Smoked Salmon (and a bonus recipe!)

Back when I got my first bullet smoker in the late 1990s in Connecticut, the first food I ever tried was salmon.

Why? Heritage, of course. 

I’m Jewish and grew up in New York with lox (a cold-smoked, cured salmon) and bagels most Sunday mornings, a little weekly splurge in the Gura household. On rare occasions of extended family gatherings, someone may have picked up smoked salmon salad, which we all salivated over, probably based on the fact that our parents had splurged even more for this delicacy (more expensive than lox). We spread it over cream cheese on a bagel or bialy in place of lox, or sometimes with lox on top for a double-salmon shot.

Now that I’ve had years of experience smoking salmon myself, I can definitely say that the “delicacy” salmon spread of my youth was meh, a mayonnaise-laden, salmon-light blend that, compared to the dish I’m about to share, may well have been created in a blender. Mine is fresh and flavorful, with bits of fresh vegetables and only enough mayo to serve a purpose. It’s always a hit when we serve it at summer parties or holiday gatherings, and it’s easy to make.


It’s all about the salmon

But let’s start with the basics. Smoking salmon is remarkably easy and the process brings out salmon’s textured, salty flavor in a smooth, delicious bite, more nuanced than grilled or baked salmon.

So how does one smoke a salmon? It starts with a nice fillet of salmon; although we typically buy wild caught fish, farm-raised salmon works fine when smoking. We purchase ours from a local seafood shop that emphasizes sustainability, and it is well worth the extra cost. The salmon should be brined overnight in saltwater; I use about 1/3 cup of kosher salt in two quarts water, warm enough to dissolve the salt. I add a little ice to cool the water before placing it in a large glass or plastic container so that the fish is completely covered. Give it an overnight if possible, or at least eight hours refrigerated in the brine.


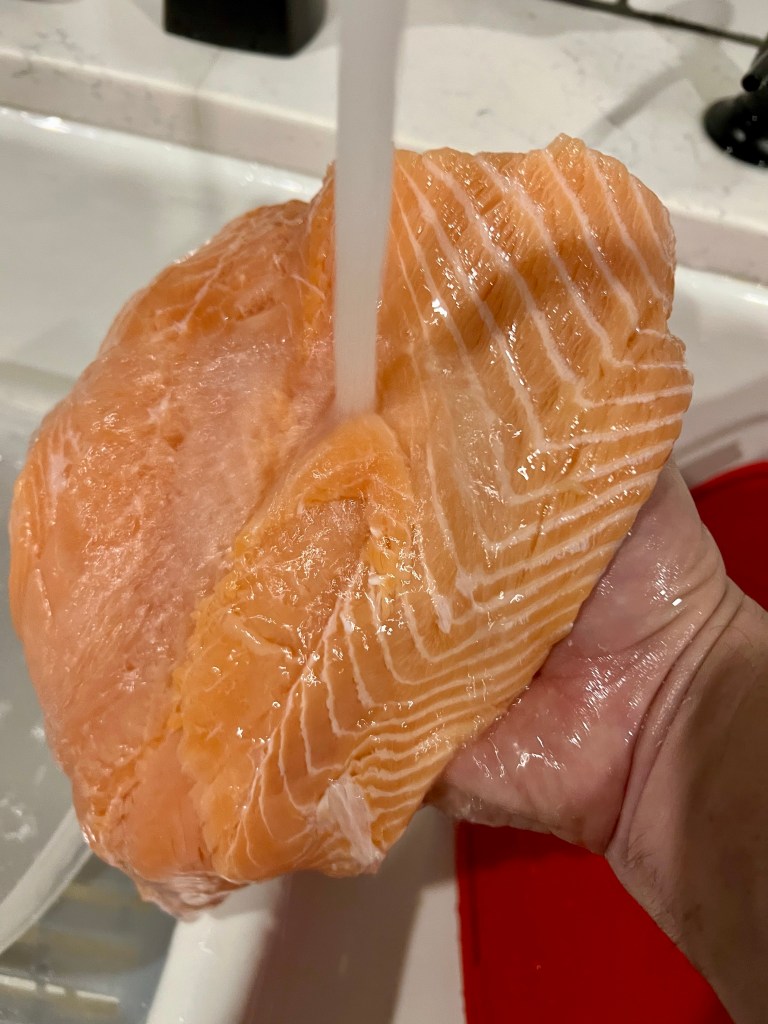
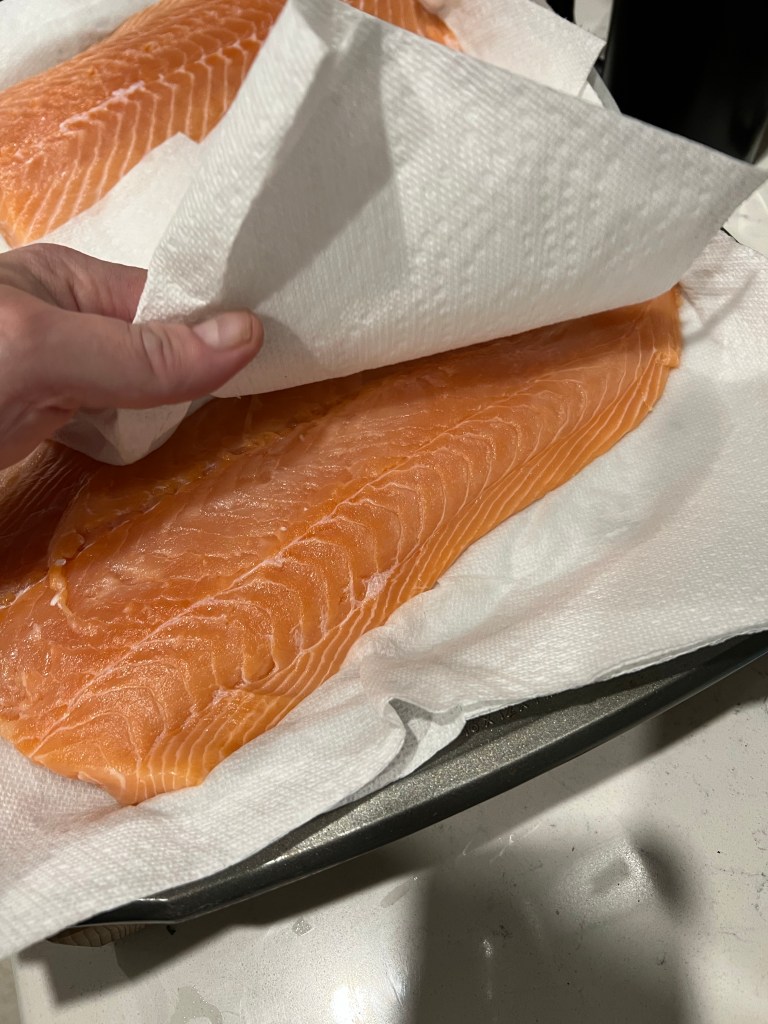
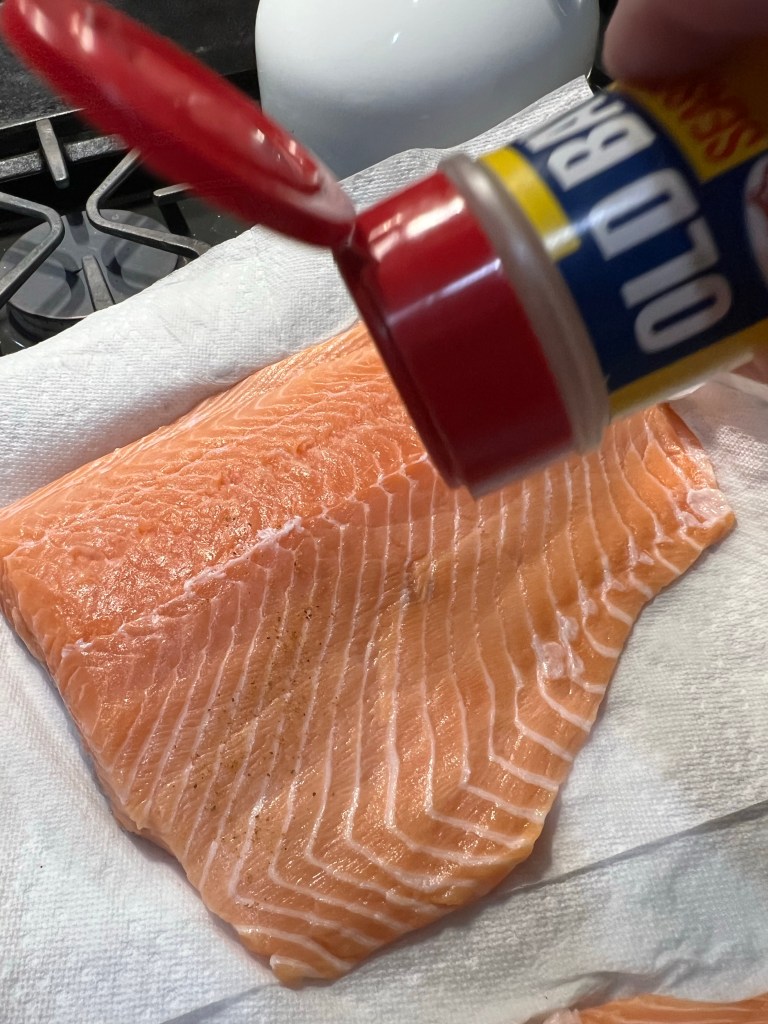
The next morning, remove the fish and rinse it thoroughly under cold water, gently massaging it for as long as five minutes to remove the bulk of the salt. Pat the fish dry with paper towels, then season to your taste. Because the brining inevitably leaves a good salt within, even after rinsing, I don’t use a heavy season. I give it just a light sprinkle of Old Bay.


Fire up the smoker

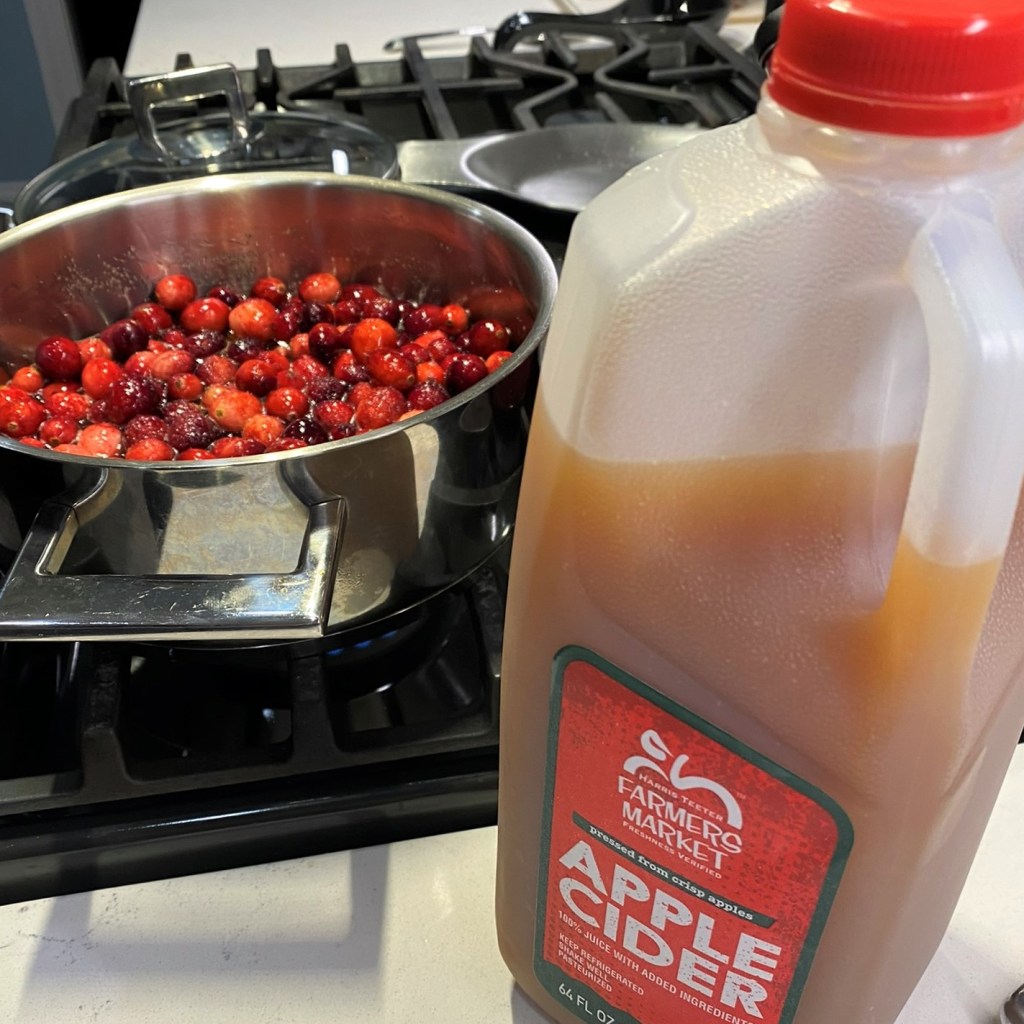
Smokers can be gas, electric or charcoal; I’ve always had charcoal smokers. I thoroughly spray the cooking grates with oil. The night before, I soak wood chips in water; this time it was apple wood, but other varieties work well, too. The wetness, I believe, helps to create more “flavored” steam in the cylinder. Though there is quite a bit of internet debate about the need to soak the chips.

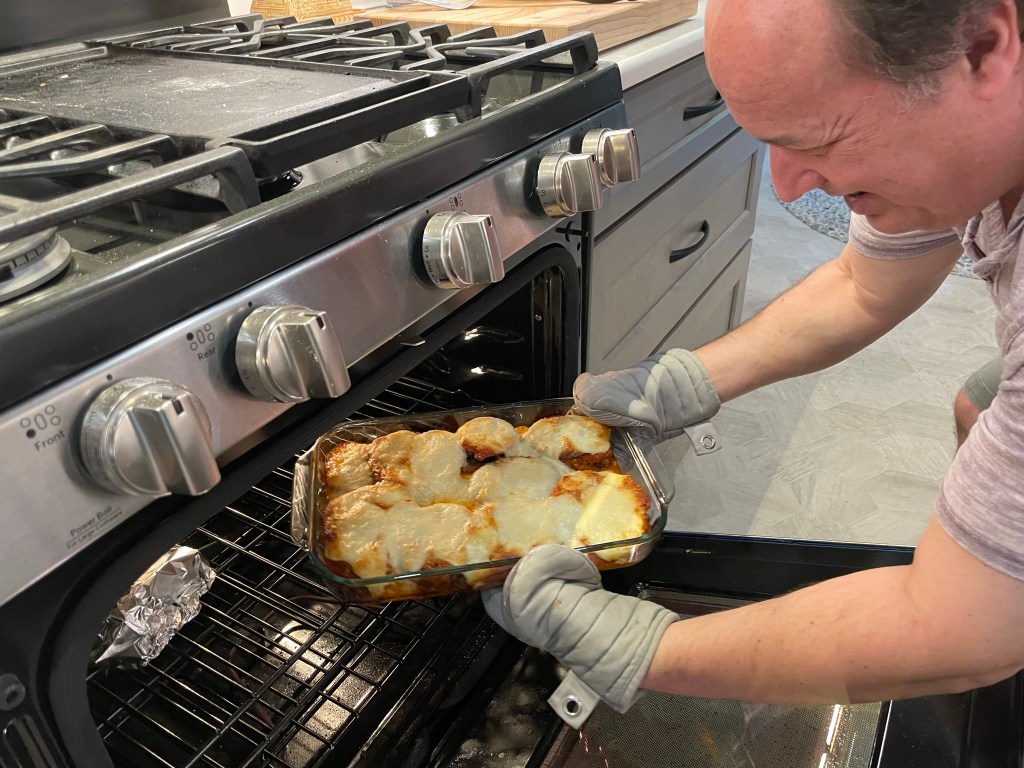
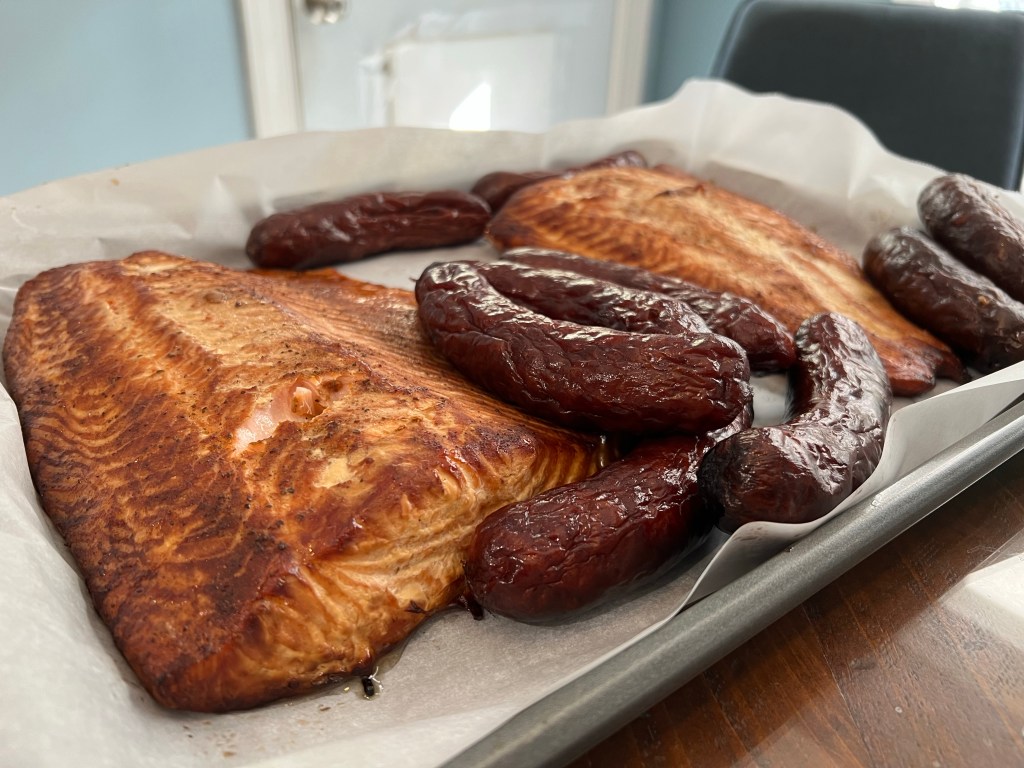
I fill my Weber smoker with enough lump charcoal to last for hours, not so much for the salmon, which can take as little as 90 minutes to 2½ hours depending on the thickness of the fillet, but for the additional food I put on the lower of the two cooking grates. Typically, I will smoke a pork shoulder, though I’ve done turkey, brisket, or pastrami in previous smokes. Next to the salmon on the top grate, we usually smoke sausages to serve as appetizers. Yes, this is one big smoker Terrie bought me for my birthday three years ago.

My new smoker is almost three times the size of my old one!

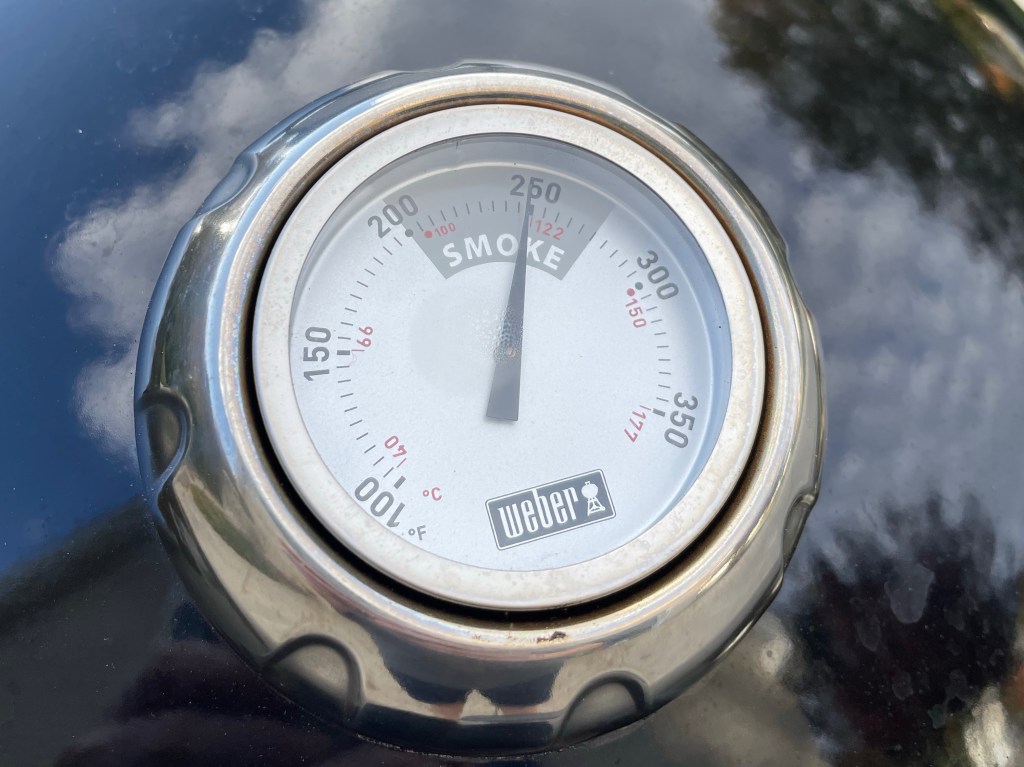
When the charcoal lumps have turned ash gray, I work quickly by adding the soaked wood chips on top, and then pouring a gallon of water into the pan below that, in effect, steams the foods as they smoke. For interesting flavor, I also add a half gallon of some other liquid— beer is my go-to, but this time, it was fresh-pressed apple cider. I put the pork shoulder on the lower grate, add the top grate and the salmon and sausages, and cover it. The smoker has a temperature gauge and several vents to control air flow and temperature. My smoker has a “smoke range” of 200° to 275° F, and the ideal is smack in the middle. I’ve learned to work the vents regularly through the cooking, and can typically now keep the smoker “in the range” for six hours, enough to cook most things through.

The sweet spot.

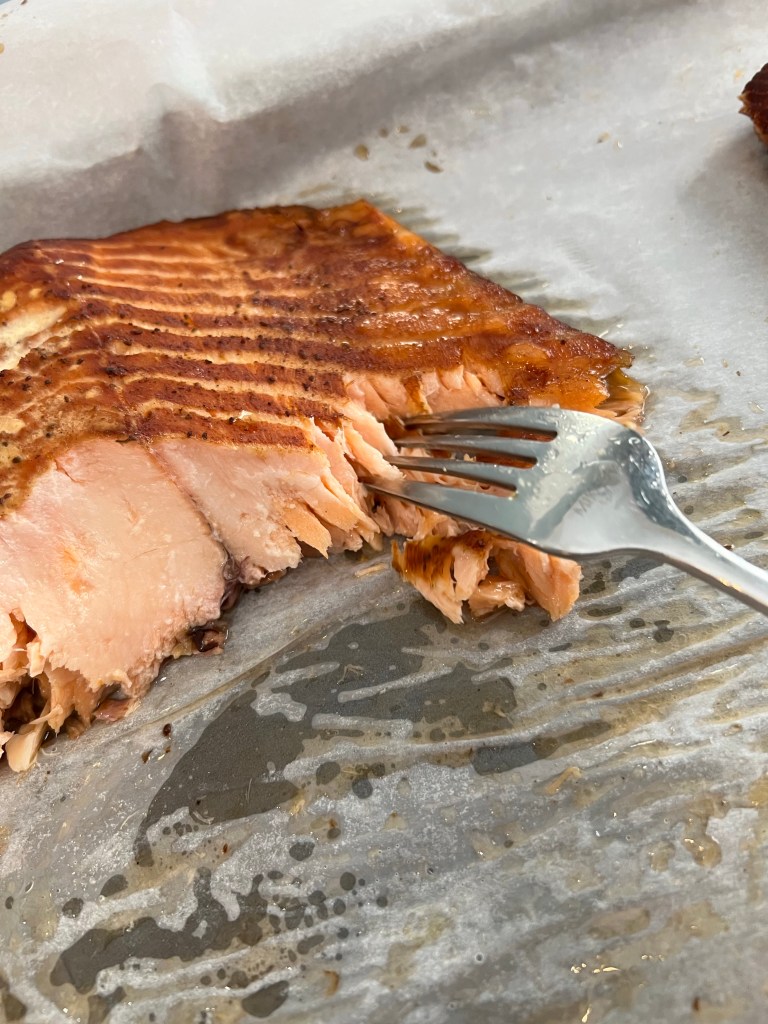
Occasionally, if I lose temperature before a pork shoulder or brisket are finished, we finish it in the oven at 300° F, wrapped tightly in heavy duty foil and roasted to desired tenderness. Salmon (and sausages) fortunately don’t take anywhere near that long. You know the fish and sausages are done just by sight. After an hour and 45 minutes with this cook, they were both ready.

Who’s hungry?

So many options for smoked salmon

When it’s freshly cooked, Terrie and I could eat a whole salmon between us, it’s so delicious. But we refrain to a few nibbles because we usually have other good things in store for it. The smoked salmon is great on top of a mixed greens salad, and sometimes Terrie will incorporate it into a pasta dish with sautéed spinach and sun-dried tomatoes. But my personal favorite use for smoked salmon is right here in this bowl.

This salmon spread is so addictive.

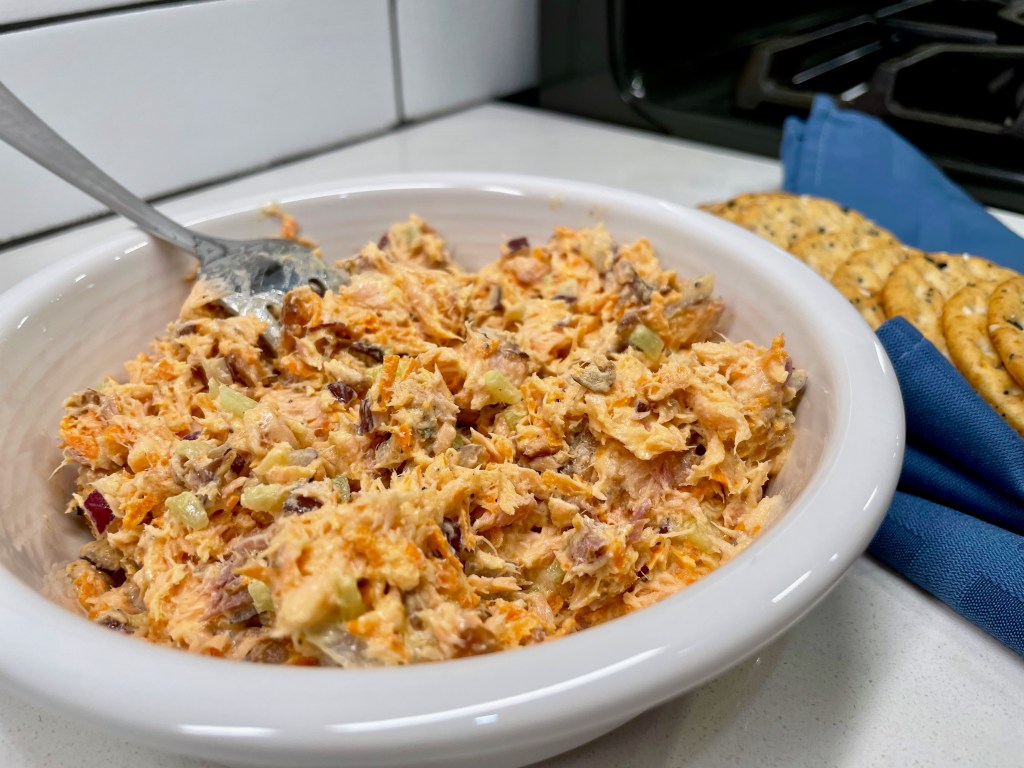
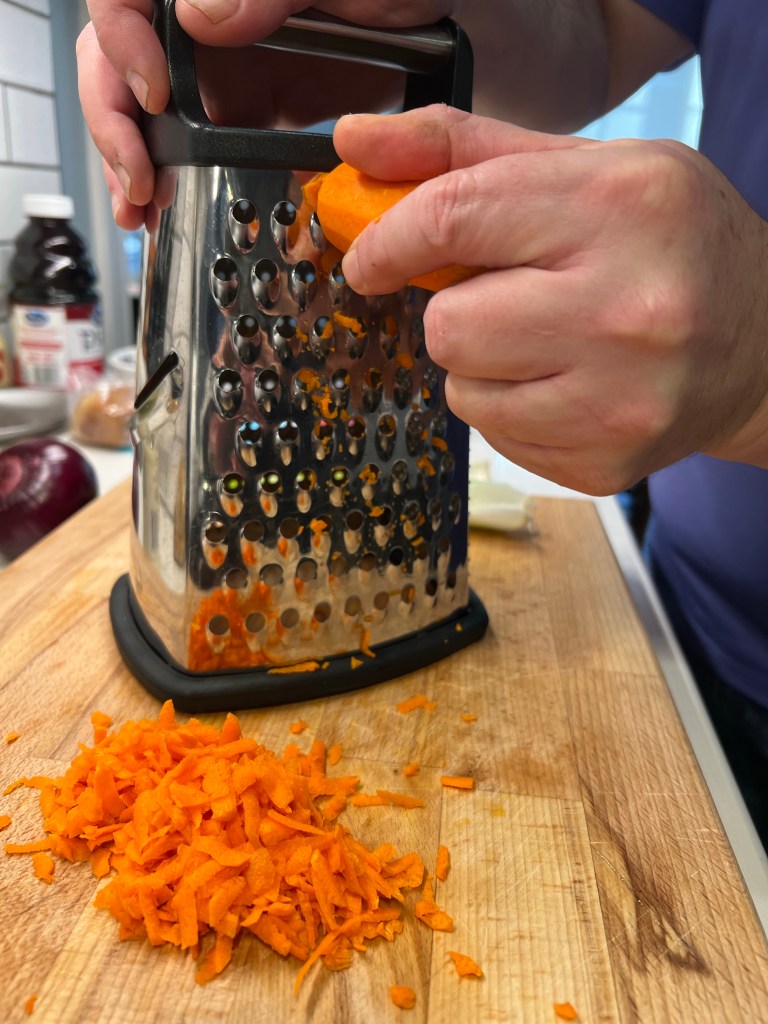
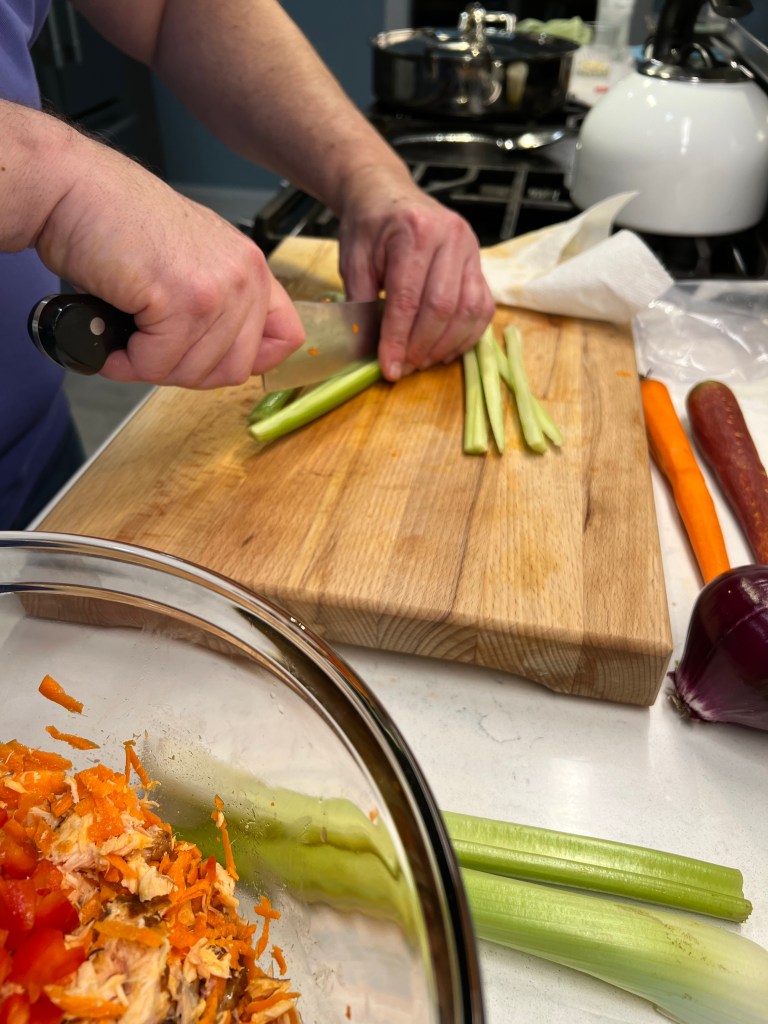
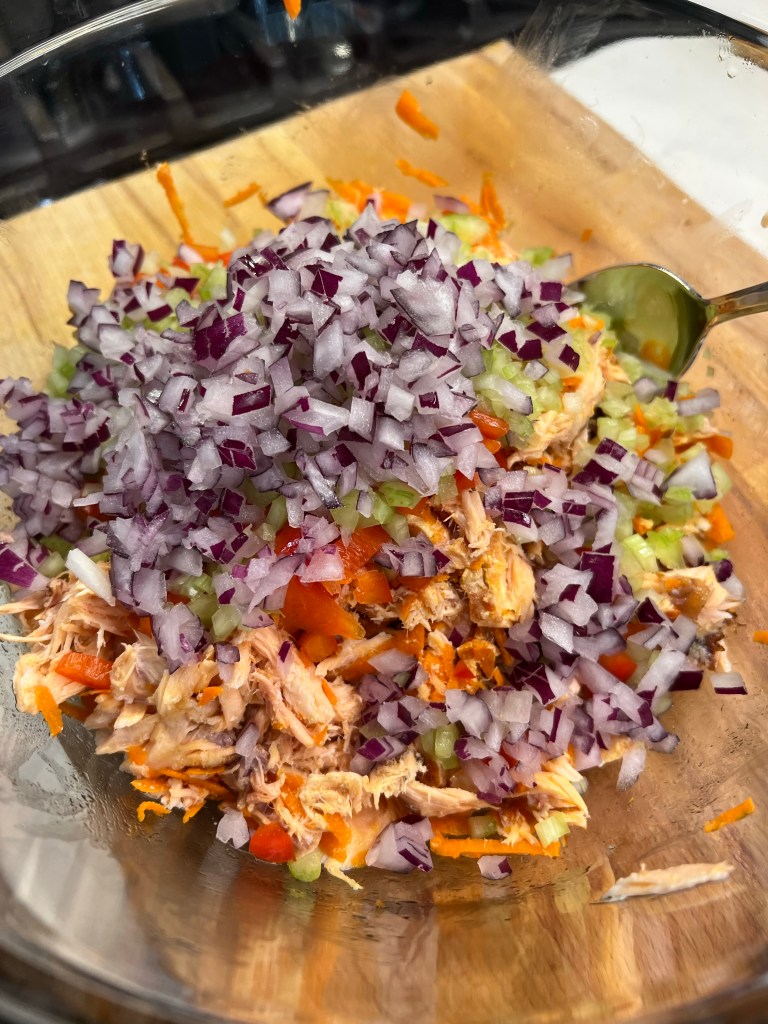
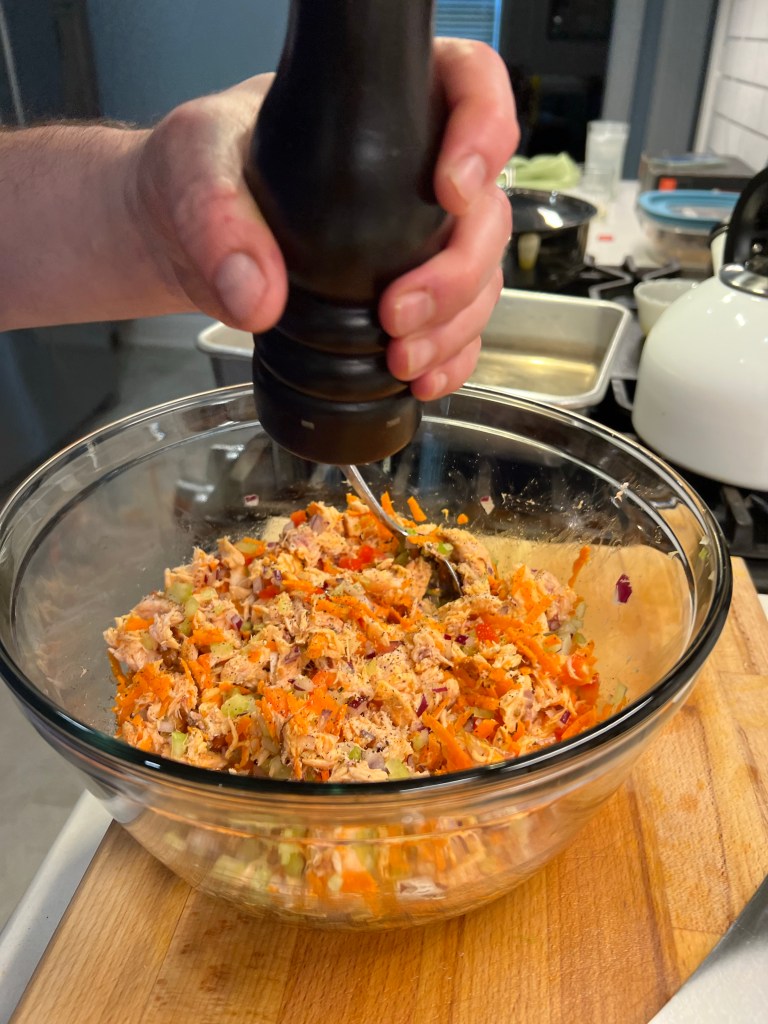
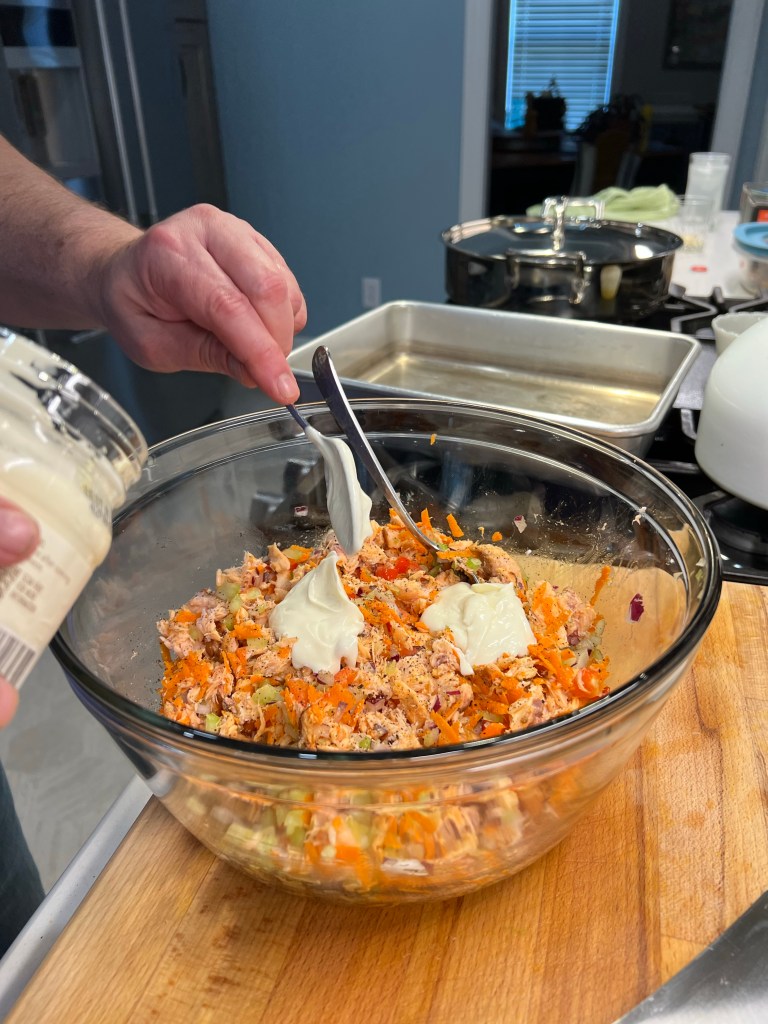
It starts with a nice chunk of the freshly smoked salmon, about a pound. Then, I dice up some red pepper, red onion and celery, and grate some carrot. Pepper to taste (salt usually isn’t necessary) and fold in just enough mayonnaise to moisten it. Mix it all together and refrigerate until ready to serve. We love it as a spread on crackers or pita chips, and it is fantastic (of course) on a bagel.


This salmon salad puts the store-bought variety of my youth to shame because it is chunky and not too laden with mayonnaise. Mainly, though, the difference is being able to smoke a fresh salmon rather than consuming a processed version. Of course, growing up in a New York City apartment building, I have to remind myself, it wasn’t like you could “fire up the smoker.” So if you have the space, the inclination and the smoker, have at it, friends.


Smoked Salmon Spread

  • Servings: About 12
  • Difficulty: Easy
  • Print

This salmon spread is a real crowd pleaser! It is very easy to make, and especially delicious when made from your own smoked salmon.


Ingredients


About 1 pound freshly smoked salmon (see note below)
1/2 red bell pepper, diced
1/2 medium red onion, diced
1 good sized carrot, peeled and grated
2 stalks celery heart, strings removed and diced
About 1/3 cup mayonnaise, just enough to moisten the mixture
A few twists of freshly ground black pepper

Note: This spread is made with “hot” smoked salmon that is cooked, not the lox-style cured salmon. If you do not smoke your own, consider purchasing this from a good delicatessen or check the packaging to be sure the salmon is fully cooked.

Directions

  1. Flake the salmon into a medium size mixing bowl. Add vegetables and toss gently.
  2. Fold in mayonnaise, a little at a time, until the mixture is moistened enough to hold together. Season to taste.


The Big Kahuna

Retailers thrive on the impulse purchase. Heck, whole displays are set up with the purpose of getting folks to buy things they hadn’t had on their shopping list. Come to think of it, who even still uses a shopping list? My rule as I approach 64 is this: three items or less commit to memory, four or more write on the iPhone notes app, 10 or more make a printout. But I digress.

On a recent Saturday afternoon, while Terrie was doing some pre-cooking, pre-prep for the amazing strawberry daiquiri cake to come the next day, she realized she really didn’t have enough granulated sugar. I was dispatched to the local Food Lion—a hop, skip and jump from our house—to fetch some, and, because Terrie also had a fresh loaf of bread in the works, some of this new cracked pepper turkey we’ve discovered at “The Lion,” a market we’ve been hearing good things about. Which is an inside joke about something my late mother used to say that is a much longer story. Oops, I digress again.

Now, getting a bag of sugar for Terrie isn’t easy. It’s not going to be Domino’s or Dixie Crystals or even the Food Lion brand, no matter how many good things we’ve been hearing. Got to be fair trade and organic, third-party labels and all. I eventually found a container of her preferred sugar squirreled away on the top shelf, hidden from the big 5-pound bags. As for the cold cuts, the man at the deli found the cracked pepper turkey. He couldn’t find the cracked pepper ham I wanted, so I switched gears after seeing a nice looking hunk of roast beef in the drawer. Now, this was, no doubt, a nitrite-injected slab of roast beef, but every once in a while, I try to sneak one past the queen of Comfort du Jour. More important, in the part of the deli where they pre-package their own stuff, I saw some sliced American cheese, another product we rarely get unless we are planning some melty cheese thing, say, queso fundido.

If you’d been watching me that afternoon as I waited for the deli dude to figure out how to bag the roast beef (it truly took him an inordinate amount of time to do this seemingly simple task), you might have seen an old-school incandescent light bulb (40 watts, it was only a dim bulb idea, not one of those brilliant, three-way 150-watters) going off over my head.

Terrie is always trying to reproduce some of the favorite things we discover in restaurants. And, of course, her versions inevitably turn out way better than the original. I’m talking spinach Maria from Ke’e Grille, I’m talking PF Chang-style lettuce wraps, I’m talking hot Italian sausage and cherry pepper pizza from Modern Apizza (OK, this one isn’t way better, but it’s just as good!).

So what did I want to do for my first “copycat” meal to be posted on Terrie’s blog? Why, the Big Kahuna from Jersey Mike’s. Because, well, why not? Terrie made a deep-dish pizza inspired by the Big Kahuna, but never the sandwich itself. The Big Kahuna has long been one of our two or three “go to” options when we just can’t figure out or don’t have time to make dinner. It’s unusual because we really aren’t fast-food people. But something about the combination of Philly cheesesteak topped with mushrooms, onions, peppers and jalapenos (and we usually ask for extra jalapenos) hits us both just right. That afternoon in Food Lion, I could envision the sandwich to come. I didn’t get the chance right away and I didn’t tell Terrie about my semi-brilliant idea. But a few days later, when I called to check in on my ride home, I pounced when there was not a firm dinner plan. “I’ll take care of it. I just have to pick one thing up from the Lion.”

It all came together very quickly. And you know what? It’s better than Jersey Mike’s. If I do say so myself.

Behold the Big Kahuna!

Now that’s a spicy bite!

I started by sautéing onions and bells peppers, just til they were soft, and then I pushed them aside and added mushrooms to the skillet. When they started to brown, I pushed the mixture aside again and tossed the hot peppers in to heat them through.


While that was working, I spread a thin layer of mayo on each cut side of the bread and laid them on our stove-top griddle. When the inside was nicely browned, I flipped it onto the back side to give it some crisp.


The roast beef slices didn’t take long to brown and heat through. I arranged them in a long, narrow oval to match the bread shape, then laid the American cheese in strips across the top to melt it.


I used a long spatula to move the roast beef and cheese together onto one half of the bread, then laid the  vegetables on the other half so they were fairly evenly dispersed, then cut that baby in half and called Terrie to the table.


The Big Kahuna

  • Servings: 1 giant sandwich
  • Difficulty: Average
  • Print

My jalapeño-loving husband has taken over the kitchen, recreating one of our favorite take-out foods at home! His version of this Jersey Mike's standard was fresher, hotter and better than the ones we can buy!


Ingredients

  • 1/2 medium onion, sliced
  • 4-5 good size mushrooms, washed and sliced
  • 1/2 bell pepper, sliced into strips (I used green, but red works, too)
  • 1/4 to 1/2 cup of jalapeño or cherry peppers (or if you like it spicy, as we do, both)
  • 4 slices white American cheese
  • 1/2 pound of sliced deli roast beef, cut into smaller pieces
  • 1 French bread loaf (I used something called a “twin French loaf bread,” which was narrower than typical loaf and more like Jersey Mike’s style), sliced in half but not all the way through
  • Mayonnaise
  • Salt and pepper
  • Olive oil


Directions

  1. Heat a medium skillet with about a tablespoon of olive oil. Sauté onions and pepper until translucent. Push aside and add mushrooms until they begin to brown. Add jalapeños/cherry peppers and cook until all are softened and heated through. Set aside.
  2. Slice the bread in half but not all the way through. Spread a thin layer of mayo on each half of the bread and lay in another skillet or stovetop griddle if you have one, lay the bread flat until it is nicely browned, then flip over to lightly crisp the top. Set aside.
  3. Brown the roast beef slices (it won’t take long), then arrange them in a long, narrow oval to match the bread shape. Lay the American cheese in strips across the top. Cook until the cheese begins to melt.
  4. With the bread on a flat surface, use a wide spatula to lay half of the roast beef onto the bread, then fetch the other half and do it again. Add your vegetables on the other side so they are fairly evenly dispersed, then do your best to hold the sandwich together and cut in half.


Les’s Nachos for Dinner

One of the things I like about my marriage is how Terrie and I respect each other’s kitchen capabilities. I certainly know and trust in her judgment, but she also respects the way I can surprise her once in a while with a “guy” food. Like, say, nachos.

As with many guys, I like nachos from days in the sports bars. Great eats while grabbing a beer and watching a game. Somewhere along in my adulting—and I believe it began with thinking of new uses for leftover chili, but I can’t say for sure—I decided I could do nachos every bit as good as a sports bar, whose chips were typically stale and plentiful, while toppings were bland and sparse.

Over the years, I refined my approach to use a block of cheddar or Monterey jack or something similar (a suggestion from Terrie, who, as regular readers of this blog know, abhors shredded cheese in a bag), a fun protein and any of a number of complementary items before the oven or after: fire-roasted corn, onions, black beans, refried beans, pickled jalapenos (or fresh if you slice them thinly), scallions, avocados, guacamole, sour cream, salsa.

Lots of flavor and texture here.

The nachos I’m sharing here feature Terrie’s homemade chorizo, which I fried in a cast-iron pan along with some diced onions and then set aside. We prepped (Terrie contributed here, serving as my sous chef, a definite change of pace for us!) by chopping up some pickled jalapeno peppers (dry them first), avocado and scallions, while I shredded a little better than a cup combined of sharp cheddar and habanero cheddar. The fun part is putting this bad boy together. OK, I kid you all. It’s incredibly simple.


Preheat your oven to 350 F. Put a piece of parchment over a cookie sheet and then lay your favorite tortilla chips on to cover the surface. We used a blue corn chip put out by a company called Xochitl. They were very good, but if you can find a local restaurant with an awesome, homemade fresh chip, so much the better. A moment here to lament the loss of Tijuana Flats, a small national chain that was our “go-to” place for chips, which were freshly made, thin and perfectly seasoned. We used to buy bags of them for just $1.25 to complement any Southwestern or Mexican dish we made; these chips were the flagship of our annual Super Bowl party. Alas, the local restaurant closed at the start of the pandemic and we still miss it. The Xochitl brand is as close as we’ve found.


Anyway, with your chips nicely arranged (you shouldn’t see any big parchment peeking through), top first with your protein, which today was the chorizo-onion mix. I then sprinkled on a generous amount of chopped jalapenos and fire-roasted corn, and then the cheese. Off to the oven it went for 10 minutes. The nachos are done when the cheese is nice and melted. A side note here: We had believed a pre-made queso would work great rather than grated cheese, but it doesn’t. The heat of the oven breaks up the queso, and it runs underneath the chips, which makes them soggy. Freshly grated cheese is the way to go.


I topped this batch of nachos with scallions and diced avocado, and we served salsa and sour cream on the table. Probably a dozen or more years ago, I found this very wide spatula for handling fish and, wouldn’t you know, it works great for portioning out a generous mound of hot nachos.

Just call me Nacho Daddy!

Les's Nachos for Dinner

  • Servings: About 4
  • Difficulty: Easy
  • Print

Somewhere along in my adulting, I decided I could do nachos every bit as good as a sports bar. Here is my latest iteration of this 'guy food' served up as a meal at home.


Ingredients

  • About 1/2 pound bulk chorizo sausage (or other protein)
  • 1/2 medium sweet or yellow onion, chopped
  • Salt and pepper as needed (use your judgment, based on the flavor of your protein)
  • Enough corn tortilla chips to evenly cover a baking pan (about 1/2 standard bag)
  • 1/4 cup sliced pickled jalapenos, blotted on paper towels
  • 1/2 cup fire-roasted corn kernels (frozen is fine)
  • 1 cup grated cheddar cheese (or other variety, such as Monterey Jack or colby; preferably not pre-shredded from a bag)
  • 2 scallions, white and green parts thinly sliced
  • 1/2 large avocado, cubed
  • Sour cream and salsa, for serving

Feel free to substitute any favorite protein you have on hand. I’ve used cut-up chicken, ground turkey, ground beef and even black beans; it all works! If your chosen protein is unseasoned, consider adding some chili powder or other Southwest seasoning to the meat as it cooks. If you prefer less heat, swap in bell pepper for the jalapenos and saute them with the meat and onions.

Directions

  1. Preheat oven to 350 F, with rack in center position. Line a rimmed baking sheet with parchment paper.
  2. Heat a cast iron skillet over medium heat and cook sausage with onions until the meat is browned and onions are softened.
  3. Arrange tortilla chips over parchment paper. It’s OK for the chips to overlap, but aim for a single layer so that each chip gets some toppings. Scatter the cooked sausage-onion mixture evenly over the chips, followed by the jalapenos, roasted corn and grated cheese.
  4. Bake at 350 F for about 10 minutes, until cheese is melted all over. Immediately top nachos with scallions and avocado. Serve with sour cream and salsa at the table.


Les’s Veal & Eggplant Parm

When Terrie asked me a couple of months ago what I wanted for my birthday meal this year, I initially asked her for some kind of lobster, a dish she’s made before that I devoured. But the more I thought about it, the more a different idea bubbled in my head.

Five years ago, on Aug. 27, 2017, my mother died at age 91. It was two days before my birthday, and we chose to have her funeral on Aug. 29, largely at my request because it could be a sort of celebration for relatives who had arrived when she took ill.

With my mom on my mind, I told Terrie I wanted to play chef on my birthday weekend as a tribute to one of the few meals Mom made that I actually loved.

Once or twice a year, Mom would make veal parmigiana in an electric skillet (you know the one, square cast aluminum with the little pinwheel vent thing on top of the lid), and from the moment you walked into the apartment after school, the aroma was so distinct you instantly knew what was happening—a respite from the usual overcooked meat, baked potato and canned vegetables. What we smelled was veal parm, which she served with spaghetti with marinara (Ragu) and Parmesan cheese (Kraft, the familiar green container). Still, for me and my sisters, it was sublime.

When I first began cooking, veal parm seemed like a giant challenge, and I stuck to ordering it in restaurants. Around the same time, as an adult, I discovered the joy of eggplant. Then, one night in an Italian restaurant, I chose a dish called “Veal Sorrentino,” which added a slice of prosciutto between a veal cutlet and eggplant slices, and it was cooked in a pan with white wine sauce and a touch of tomato. Henceforth and forevermore, I knew what I was gastronomically bound to do whenever I wanted veal parm. Combine veal and eggplant.

Now as much as I enjoy veal Sorrentino, I don’t make that at home. Rather, I prefer veal and eggplant as a red sauce parmigiana meal, and, being as we still had lots of fresh tomatoes from our first successful garden in years, I spent a few hours cooking up a marinara on Saturday to go with Sunday dinner. This sauce was similar to the Not Quite Pizza Sauce I shared here a few weeks ago, but without the red bell pepper, and with the onions sautéed and blended right into the sauce. I married this sauce with veal and eggplant, and it was excellent.

Layer upon layer of Italian comfort food.

It helps to have the meal and kitchen counter space planned for this dish, because you need room for all the breading and frying. The first step is slicing a good Italian eggplant into 1/2-inch rounds, salting them on paper towels and letting them sweat for 30 minutes or more. Arrange the plates or containers to be used for preparing the eggplant and veal. My first plate held seasoned flour for dredging the eggplant and cutlets; salt and pepper the latter on both sides. The eggplant, of course, after its salting, won’t need more seasoning.


I used a rectangular Pyrex dish to hold four eggs, beaten. A second Pyrex contained a mix of Italian-seasoned bread crumbs (we actually used seasoned panko crumbs, then used an attachment on our immersion blender to grind them finely) and if you’re bold like we are, add some cheese to it; I used our Parm-Romano blend.

After consulting with Terrie, I decided to use our electric skillet (another nod to Mom, though this stainless All-Clad skillet is nothing like Mom’s old cast aluminum), and got that filled with about 1/2-inch deep canola oil, set to 375° F; the temperature may vary, depending on the vessel you use for frying, but whatever you put into the oil should sizzle and bubble as soon as it makes contact. Keep a roll of paper towels nearby; we used a ton of them catching the cutlets and eggplant as they came out.


During the frying phase, I put the marinara on a back burner at low to warm it and preheated the oven to 350° F. We bought fresh, pre-sliced mozzarella (the kind you’d use for Caprese), so I didn’t need to worry about prepping the cheese.

Once the eggplant and cutlets were fried, it was time to assemble. In a 9-by-13 Pyrex, I ladled healthy spoonfuls of marinara on the bottom, then lay down the cutlets. On top of that went marinara, followed by eggplant, followed by more marinara, followed by mozzarella, with a healthy sprinkling of our Parm-Romano Blend as a final touch.


It baked (under foil for half the time) for about 45 minutes (ovens may vary by a few minutes) and what came out was pretty awesome. Homemade sauce on tender veal and fresh eggplant with a crunch of breading and those savory cheeses—oh yes, the cheeses are my favorite part!

This dish is the ultimate comfort to me.

For hours during and after this birthday meal, the kitchen smelled like my old apartment on 80th Street in Jackson Heights, N.Y., on those rare, but wonderful nights when Mom was making veal parm. The leftovers were pretty damn good, too.

Veal & Eggplant Parm

  • Servings: About 8
  • Difficulty: average
  • Print

When it came to dinner growing up, my sisters and I got a lot of the basics: meat, baked potato, canned vegetable. But oh for the once or twice a year when Mom decided to cook one of her specialty dishes—veal parmigiana. That’s the aroma I tried to re-create with my kicked-up version of it, with eggplant and garden-fresh, homemade marinara.


Ingredients

  • 1 medium Italian eggplant. cut into 1/2-inch rounds
  • Kosher salt, for sweating the eggplant slices
  • 1 1/2 lbs. veal cutlets
  • 4 large eggs, beaten (for breading)
  • About 1 cup all-purpose flour, seasoned with salt and pepper (for dredging)
  • 1 cup Italian seasoned bread crumbs (for breading)
  • 1/2 cup Parm-Romano blend or Parmesan (for breading)
  • Vegetable or canola oil, for frying (enough to measure 1/2-inch deep in frying skillet)
  • About 4 cups favorite marinara sauce (see ingredient notes, below)
  • 1 pound fresh mozzarella, sliced

Use any marinara sauce you like for this recipe. I made one very similar to this one, omitting the roasted red pepper and blending the onions right into the sauce. https://comfortdujour.com/2022/08/26/not-quite-pizza-sauce/

Directions

  1. Arrange the eggplant slices in a single layer on paper towels sprinkled with kosher salt. Sprinkle salt over the top of the slices as well, and let them stand for 30 minutes to remove excess moisture from the eggplant. Wipe them dry with clean paper towels and set aside for breading.
  2. Heat oil in an electric skillet or over medium heat to approximately 375° F.
  3. While the oil comes up to temperature, set up a breading station with three dishes: one containing seasoned flour, a second containing beaten eggs and a third with a mixture of the Italian breadcrumbs and Parm-Romano blend.
  4. Dredge the veal cutlets lightly in flour, shaking off the excess. Dip in the beaten egg, allowing excess to drip off. Coat both sides in the breadcrumb-cheese mixture. Arrange breaded cutlets on a parchment-lined plate.
  5. Repeat the same dredging steps with the sweated eggplant slices.
  6. Fry the cutlets and eggplant until golden on both sides, and set aside on paper towel-lined baking sheet until all are finished. The paper towels will absorb excess oil.
  7. Preheat oven to 350° F, with rack in center position.
  8. Spoon about one cup of the marinara sauce into a 9 by 13-inch glass baking dish, and spread it evenly across the bottom. Arrange a single layer of fried veal cutlets over the sauce, and then ladle a generous spoonful of sauce over each cutlet. Arrange the fried eggplant slices over the sauced cutlets, and repeat with another layer of sauce. You should still be able to see the veal and eggplant; don’t try to bury it in sauce. If you have extra marinara, use it to dress some spaghetti or linguine to serve on the side.
  9. Arrange the fresh mozzarella slices evenly over the top of the sauced eggplant. Cover loosely with foil and bake 20 minutes. Remove foil and bake 20 more minutes, until cheese is golden, bubbly and oozing.


Not Quite Pizza Sauce

Now that we’re fortunate enough to have a garden again, thanks to Terrie’s persistence, we have a bounty of summer tomatoes to deal with.

And recently I had the chance to create a pizza sauce. I used to always make my own sauce when I made pizza (pre-Terrie, pre-sourdough) with store-bought dough. But we’ve been using sauce we buy at a market because there’s quite a variety now and they’re way more flavorful than even just a few years ago. But homemade sauce, that’s the good stuff. And we have fresh Roma tomatoes, so why not?

Every day, we’ve come in from the garden with another haul.

As an aside, I should note that I’ve been gardening and canning off-and-on for 25 years, but several years ago conceded gardening to Terrie for two reasons—the persistence of the deer wore me out, and in 2013, I had an allergic reaction to yellow jacket stings and was advised by my doctor that activity in the grass where yellow jackets hung out could be dicey for me. And our raised-bed garden is right in the middle of a lot of grass. Every time I go near it, I always see bees buzzing and I’m on high-alert mode.

I know you mean well, Buddy.

But back to the story. Sauces are a big thing for me. Before Terrie, I would concoct all kinds of sauces for things I grilled. My go-to sauce for grilled chicken, for example, was a combination of five ingredients that I can still name from memory even though I’ve not made it that way for years: a base barbecue sauce such as Sweet Baby Ray’s, Italian dressing, Kraft Catalina dressing, duck sauce (most often Saucy Susan brand), and some splashes of either soy, teriyaki or hot sauce depending on my mood.

Under Terrie’s watch, however, we have eliminated anything containing ingredients such as high-fructose corn syrup (bye-bye Sweet Baby Ray’s) and soybean oil (see ya, Kraft Catalina). The result is that we’ve eliminated a lot of my go-to’s, and to be honest, I don’t mind that. When I create a sauce now, it’s with more natural ingredients and usually means I’m investing my own labor, starting with sautéing vegetables and ending by blending. That’s how it was to be when I told Terrie I wanted to make a pizza sauce.

To increase my knowledge, I searched the inter-webs for pizza sauce recipes. I know how to create “Sunday gravy,” but a homemade pizza sauce from scratch is a different animal. Do you know that almost every recipe out there, including in the cookbooks we have at home, all start with one can (28 ounces) of plum tomatoes? So I changed the search to include “pizza sauce using homegrown tomatoes.”

We’ve had so many fresh, meaty Romas. I’ll use canned tomatoes in January.

The problem is I was mostly interested in a recipe by one of Terrie’s favorite chefs, J. Kenji Lopez-Alt. And he also used canned tomatoes. I remembered another bit of Terrie’s constant advice—don’t be married to a recipe; use your instinct. As a result, I used the Lopez-Alt recipe as a baseline but was able to embellish it with my own touches, like fresh tomatoes.

This included blanching (and then ice bathing) the tomatoes, sautéing garlic and some seasonings in a combination of olive oil and butter, roasting and dicing a sweet red bell pepper, and then adding an onion cut in half for the cooking (but removing at the end), then whizzing it up smooth with an immersion blender. The end result was amazing!

Use an immersion blender to puree it nice and smooth.

There was just one teeny problem. It’s not quite pizza sauce.

Rather, the sweetness of the red bell pepper and spice of the red pepper flakes meant it read uniquely, a cross between roasted red pepper sauce (like the one linked here that I made last summer) and something akin to vodka sauce (but without vodka, go figure). It was more complex than I wanted for pizza, which to me is a more tomato-forward and simple taste. We wound up using this sauce instead for turkey meatball subs. The subs had a tangy, bright pop thanks to our garden ingredients, and Terrie promises to share her recipe for the meatballs soon. The rest of the sauce (and meatballs) found its way into a stuffed zucchini boat, thanks to inspiration from a recent post on Dorothy’s New Vintage Kitchen.


As for my desire to make pizza sauce, well, we still have plenty of Roma tomatoes coming in. Stay tuned.


Not Quite Pizza Sauce

  • Servings: 6 to 8, depending on use
  • Difficulty: average
  • Print

My intention for pizza sauce turned into something more interesting and complex, perfect for topping pasta, Italian meatball subs or even lasagna. I used fresh Roma tomatoes from our garden, rather than canned tomatoes. If you use canned tomatoes, choose a 28 oz. can of Italian plum tomatoes and reduce the simmering time by half.

Ingredients

  • 3 pounds fresh Roma tomatoes, cleaned
  • 2 Tbsp. extra virgin olive oil
  • 2 Tbsp. unsalted butter
  • 1 small red bell pepper, roasted (instructions below)
  • 3 cloves garlic, smashed and minced
  • 1 1/2 tsp. dried oregano flakes
  • 1 1/2 tsp. dried basil leaves (or 2 good-sized sprigs fresh basil)
  • Kosher salt and black pepper to taste
  • 2 generous pinches red pepper flakes
  • 1 large sweet or yellow onion, peeled and cut in half from stem to root end
  • 3 Tbsp. grated Parmesan cheese (or the Parm-Romano blend that we are so fond of at our house)
  • 1 or 2 tsp. sugar, to taste

Directions

  1. Bring a large stock pot of water to a boil for blanching the tomatoes. Score the blossom end of the tomatoes to make it easy to peel them. Plunge the tomatoes into the water and let sit until you can see clear signs of the skin splitting. Have a good-size pot or bowl filled with ice water to chill the hot tomatoes and keep them from cooking once they are blanched. Then peel the tomatoes, give them a rough chop and set aside.
  2. Quarter the bell pepper and press the pieces to flatten them, skin side up, on a foil-lined baking sheet. Set the oven to broil setting and roast peppers for about 10 minutes, until charred but not burned. Transfer the pepper pieces to a bowl and cover to steam, which will allow easier peeling. Dice the pepper.
  3. In a large non-reactive pot on a low flame, heat the oil and butter until the butter melts. Add the garlic, oregano and pepper flakes. If using dry basil, add it now, too. Continue cooking on low for 2 to 3 minutes, then add the tomatoes, and salt generously. Add the onion halves, Parmesan cheese, fresh sprigs of basil (if using that) and roasted red pepper. Bring to a low boil, then reduce heat and cook on low until volume is reduced by up to half (about two hours).
  4. Remove the onions (and basil sprigs if you used fresh), and then process the sauce with an immersion blender until smooth. Continue to simmer on low, and taste and season it from that point to suit your palate.
  5. Serve immediately over pasta or whatever dish needs a bright Italian sauce. This also can be refrigerated (the flavors really shine after a couple days in the fridge), but probably should be used within a couple of weeks. Or you can freeze it.


“It Takes Two” Spaghetti & Meatballs with Sausage

Terrie asked me to write about our adventures in cooking in the new kitchen, what it’s like to share space with her now that our renovation makes that less difficult, and specifically this fabulous Italian meal that we made together on a recent Sunday.


But as a starting point, I want to share a little about how this came to be our house. I actually moved into this house on Sept. 30, 2006. It was amid divorce—and I’d found the house, a three-bed, two-bath ranch with a bonus “loft” room—while searching with my daughter as we looked for a place zoned for the high school she wanted to attend two years hence. This was my fifth house as an adult. I’d lived in each of the others for about five years. When I moved into this one, I was thinking it would be the shortest of all, two or three years before I figured out what I wanted to do long term and would be on the move again.

Yet here I stayed, largely because I liked Winston-Salem and when my newspaper job went away in early 2011, I didn’t feel like chasing journalism anymore. I guess I felt I had accomplished what I wanted to, and I didn’t need the disruption of uprooting to find a job in a profession that was constantly shedding jobs, especially of veteran editors like myself who were paid more. So I left journalism and wound up taking communications/marketing jobs, and through two of those, as well as graduate school for my new chosen profession (clinical mental health counseling), I stayed.

Through the growing relationship with Terrie, who moved in Thanksgiving 2016, I stayed.

We began to look for an “our house,” but everything we looked at was either too expensive or didn’t have the yard or neighborhood that would allow our pets the freedom to be outside. Once we decided this is the home where we would make our stand, the decision to fix the major things was easy. First, last spring, was a new roof. Next up was the kitchen, and, having built a house and having remodeled another house (including, principally, the kitchen), I felt confident that we would get what we both desired—more confident, perhaps, than Terrie was at first.

So now it’s done. And it is, indeed, beautiful, as you have seen in some of Terrie’s posts to date. If you missed it, you’ll want to circle back and check out the big reveal of our new kitchen. Although we have frequently been in the kitchen together (that was the point, after all, behind much of the work), this meal was the first collaborative dish we’ve made in the new kitchen. And I had the “lead” role for this meal, doing something I love to do—cook Italian food. I suggested this meal to Terrie because I knew we had a good amount of leftover Italian sausage in the refrigerator from the Sausage and Cherry Pepper Pizza we’d recently made (it has been in hot rotation since our trip to New Haven).

One of the things I’ve learned to do during my seven years total with Terrie is pick up techniques that make a meal better. I love how she can elevate a meal, and though I am sometimes timid to try some of the more advanced techniques, I don’t mind an occasional foray into the unknown (for me). So the main thing I did differently this time was to use Terrie’s immersion blender (I guess by now I should call that “our” immersion blender) to smooth the sauce. But you can get all the details below in the recipe portion. My big share is about how the new kitchen works as a shared space during a meal we prepare together. My point of view is that the day went swimmingly.

I had the primary two stations on either side of the stove as I went from prepping vegetables and sauté work on the right of the stove to prepping and cooking the sausages and meatballs on the left. All the while I was working, and it was about 90 minutes, Terrie was at her new baking station in the bistro section of the room, preparing the homemade pasta, using tools of her trade that worked better in the new space (especially a larger overhanging ledge to clamp her pasta machine, as well as the maple surface).


We didn’t get in each other’s way once! Now, I will say that as we keep working, we’ll be closer together, but the new kitchen takes care of that, too. If Terrie works the two stations on either side of the stove, I have a nice new long station on the left side of our kitchen sink, available thanks to some minor re-arranging of space in the room. With taller, roomier cabinets, we’ve been able to de-clutter the countertops, thus creating the three clearly defined workspaces, which doesn’t even include the baking station, in effect a fourth workspace.

I’m looking forward to many other dual-prepared meals, as well as my typical role of sous chef, aide and kibitzer-in-chief; I now fulfill the latter role from my perch at our new bistro table next to the baking station.

Next up in transforming this house I’ve lived in since 2006 into “our house?” The master bath remodel, on tap for a March start. Don’t hold your breath waiting for the post about us cooking together there. But trust me, we will.

We’re staying.


Les’s Italian Sauce with Sausage and Meatballs

The ingredients and steps are all listed in the PDF Terrie has attached at the end of the post, but we hope you enjoy seeing our adventure.

I’ve seen Terrie use an immersion blender on everything from soups to mac and cheese sauces. I decided to try it here, and processed my Italian sauce until smooth. I had vegetable stock on hand to help with blending the thick sauce. Then, I added the cooked meatballs and sausage to the pot and simmered until the pasta was ready.

Any kind of long pasta would be great with this sauce, but we enjoyed it on Terrie’s handmade pasta. This was her first experience with making pasta in the new baking station. The rest of this story is hers.


Terrie’s Roasted Garlic Pasta Dough

Welcome to my happy place. ❤

Of all the foods I make from scratch, handmade pasta is one of the most rewarding. As with so many things that once seemed intimidating to me, this is all about practice and repetition, and once you develop a feel for it, store-bought pasta loses its appeal. Besides the cool factor of DIY-ing this versatile food, I find it deeply therapeutic to transform flour, water and egg into a dough that can be stretched so thin and turned into noodles, all under my own hand. It’s awesome, and having a dedicated space in our new kitchen makes it even better.

I like to add fun flavors to my standard pasta dough, and this time I went for roasted garlic, blended right into the dough to complement Les’s rich Italian sauce. If you are already making your own pasta, I hope you find the roasted garlic a tasty addition. If you aren’t, or if you’re new to the process of pasta making, I encourage you to check out my posts for lemon-herb pasta or spinach-ricotta ravioli, as I offer more in-depth instruction there for making and working the dough. This time, I’m focusing mainly on the flavor and formula.

To infuse the roasted garlic into the dough, I pureed it together with egg and water, then pressed it through a small mesh strainer to keep the chunky solids from messing up the dough. I strengthened the dough by rolling it through my pasta machine, as usual, but used a chitarra for the first time to cut the dough into strands. Here’s how it went!


Putting it all together

Time for dinner! The sauce was quietly simmering on the stove, so the timing was dependent on the pasta. Fresh, handmade pasta cooks much more quickly than dried, store-bought, so it’s best to have everything you need for serving lined up and ready to go before you begin.


It takes two, Baby, me and you! ❤


Les’s Atomic Buffalo Turds

The name alone demanded that I make this appetizer when I ran across the recipe sometime while preparing for my 2015 Super Bowl party. The fact that it was a heat-fueled bite made it even better. Not only did it pair well with my favorite chili, but it also helped get the guests to leave on time.

For some reason, I didn’t make these spicy bites for the 2020 Super Bowl bash at our house (the last time we actually had people over). And last year, when it was just me and Terrie for the Pandemic Bowl, no turds.

With this year’s Super Bowl coming up, Terrie asked me to make these and share the recipe, so here goes. I wish I could credit a specific source for these, but I cannot remember where I found the recipe. It’s just an awfully good one, and very conducive to substitutions of spices and topping sauce. So many different things can work. The key is the mix of sweet to offset the intense heat. The original recipe suggested cooking these on an outdoor smoker, but this adaptation is adjusted for baking in a home oven.

Behold, atomic buffalo turds!

My 2016 batch, enough for a houseful of hungry Super Bowl guests.

Ingredients (makes 12 pieces)

6 medium size jalapeno peppers, halved and trimmed*

12 li’l smoky sausages*

3/4 brick of cream cheese

1¼ tsp. smoked paprika*

3/4 tsp. cayenne pepper (or less, if you’re scared)

6 slices of bacon, cut in half crosswise*

12 toothpicks

2 Tbsp. sweet rub seasoning*

Sweet finishing sauce*


Notes

  • Scoop out the innards of the jalapenos, removing most of the membrane and the seeds. However, if you really want heat, feel free to leave some of that membrane intact.
  • There are different brands of li’l smokies. Ideally, we’d love to find some without nitrites, but if they are made, we can’t find them. You can, however, probably substitute other kinds of normal size sausage and simply cut them down to the bite-size smoky portion.
  • There are many different types of paprika. For this batch, we used a bourbon smoked paprika we’d found online at Bourbon Barrel Foods.
  • I usually wrap the bacon raw around the jalapenos, but there is something to be said for lightly starting to cook the bacon in a skillet to render some of the fat and help it be more crispy later. But don’t cook it too long, or it will either burn or crack and fall off in the oven. Thin slices of bacon work better than thick.
  • The sweet rub seasoning can be anything you find that suits the bill; it is used to offset the heat. You can also make some your own, as we did in this case, using 3 parts of brown sugar to one part of Flatiron Pepper Co.’s dark and smoky BBQ rub. Flatiron is a very good specialty pepper company and we have enjoyed many of their products, which tend to bring the heat!
  • The finishing sauce is usually a sweet/tart, often fruit-flavored BBQ-oriented sauce. It goes on after the turds have cooked and provide a beautiful cooling note. Or, if you’re like us, you can look for a fruit-flavored-but-still-has-a-kick sauce. One year, I used a cherry-ancho BBQ sauce. For this batch, we had a raspberry-habanero sauce I’d bought from a friend who sells Pampered Chef products.

Instructions

Preheat oven to 300° F.

The first thing to do is prep the jalapenos, which involves cutting off the stems, splitting them lengthwise and then taking out the seeds and membrane. The more of either you leave inside, the more the heat your turds will pack. Wash your hands thoroughly (unless you have kitchen gloves to work with, which I don’t) when you’re done. And don’t even think of getting that itch near your eye, even after you’ve washed your hands. Trust me. Been there, done that.

Prepare the cream cheese mix by adding the paprika and cayenne. The cream cheese will turn orange. Don’t be alarmed. It helps, by the way, to let the cream cheese get room temp for easier mixing. Scoop the cream cheese to fill the half jalapenos and be relatively generous. Then place one smoky right on top of the cream cheese, lining up your jalapenos on a parchment-lined cookie sheet.

Take one of the half slices of bacon and wrap around the jalapeno, covering the smoky and cream cheese mix and securing with a toothpick on top through the bacon. Push down through the smoky and keep going until you feel resistance from the bottom of the jalapeno. Do not pierce the jalapeno if you can avoid it, as that will cause the cream cheese mix to seep out.

Sprinkle a generous portion of whatever your sweet rub mix of choice is on each smoky and place the cookie sheet in the oven. Allow about 90 minutes. The long, slow baking time simulates the process of smoking them.

When the bacon looks done, remove the turds and brush or drip your finishing sauce on top of the turds. Then, enjoy the burn!

Good to the last scorching bite.


Les’s 3-Variety Overnight Applesauce

When Terrie asks me to share a recipe for her blog, my immediate thought about the specific post is where my recipe came from. In the case of applesauce, which I make at various times throughout the year, I have no answer.

I simply cannot recall the origin of my homemade applesauce. I suspect it came about originally because of my son’s absolute love of apples; he started eating apples before he was 2, and had one daily into his high school years.

I do know my recipe took a turn when two things happened. First, somewhere along the way, I decided to do with the applesauce what I have done with mashed potatoes, which is mix varieties to increase the flavor and texture. Rather than two varieties (russet and Yukon gold), as I do with my roasted garlic mashed potatoes, I decided three was the perfect mix for apples in applesauce. Second, back about 2013, for my annual gift to self for Thanksgiving (a story unto its own), I bought a Cuisinart multi-cooker, a juiced-up version of a slow cooker. This is the same slow cooker that saved many a day for us during our recent kitchen remodel.

For applesauce, the slow cooker suffices—and it is easier than tending a cast-iron pot, my old method. As for varieties, I’m quite consistent in using Honeycrisp for sweet and Granny Smith for tart; then, the third variety is whatever strikes my fancy. Unless, that is, I can find my all-time favorite, Jonagold, which happen to be extremely tough to locate in North Carolina. This year, the third variety was Kanzi, a style of apple that basic research reveals comes from Belgium. The name means “hidden treasure,” and the apple is considered a cross between a Gala and a Braeburn. It is a mix of tangy and sweet, a fine add to the first two. All three apples are in the crispy category, which I believe makes for better applesauce.

A couple of years ago, Terrie asked me to make this for Thanksgiving as an add to the usual cranberry sauces on our table. It had more to do with the proximity of the Jewish holiday Hanukkah, where applesauce is a wonderful complement to Terrie’s homemade latkes. This year it was a complete no-brainer, as Hanukkah begins the Sunday night of Thanksgiving weekend.

This recipe requires some upfront labor in peeling and dicing the apples. But after that, the slow cooker does the rest and a few hours later—voilà!—a homemade applesauce that will have your dinner table guests thinking you’re a genius in the kitchen.

This recipe could not be simpler. Combine your ingredients in the slow cooker and wait nearby with a spoon.

Ingredients

Eight to nine large apples, three varieties

One small lemon, juiced

1/2 to 3/4 cup brown sugar

Vietnamese cinnamon to taste (I use about 1/2 teaspoon)


Instructions

Peel and core the apples, then cut into bite-size chunks. Add to the slow cooker. Juice the lemon over the apples and toss to prevent browning. Add the brown sugar and cinnamon and toss to coat. Turn the slow cooker to high and let it cook for four to six hours. I usually set it up at bedtime and by morning, the cooker has cooled. Mash the softened apples by hand (I use a potato masher). If you like the applesauce chunky, use a light mashing touch. Chill and enjoy.


Les’s Cranberry Sauce with Mandarin Oranges

In the 35 years I’ve been cooking Thanksgiving dinners, one of my favorite things to make is cranberry sauce. Although I have the same fondness for the jelled cranberry of Ocean Spray fame that we all grew up with (you know, the kind you used the can opener on one end and punched two holes in the other end and secretly thrilled to the sucking sound as it plopped out onto a plate), I instinctively knew early on that there had to be a better way.

Initially I began to make fresh cranberry sauce by boiling the berries in water and adding sugar. I wanted more flavor, and in 2002, I hit the jackpot with a website recipe that adapted a version originally published in Cooking Light magazine. That means my batch for Thanksgiving 2021 will be the 20th year I’ve made this delicious concoction.

It’s about sugar and apple cider (instead of water) offsetting the tart of the cranberries, and mandarin oranges adding back a different type of tart. If you make it, I guarantee you’ll be hooked. Terrie even loves it on vanilla ice cream.


Ingredients

12-ounce bag of fresh cranberries

1 cup of white sugar* (see notes)

½ cup of brown sugar

1 cup of apple cider*

½ jar of mandarin oranges*


*Notes

The original recipe called for 1½ cups of white sugar and ½ of brown sugar. I cut down the white sugar because it is plenty sweet. Either light or dark brown sugar works well.

Although I do typically use apple cider, the recipe certainly would work with water. Better yet if you can find it, as I’ve only been able to do a couple of times over the years, apple-cherry cider is the bomb!

I used half of a 23.5 ounce jar of Dole mandarin oranges; I like jars better because I feel that canned oranges have a “tell” of can flavor (coincidentally, not unlike Ocean Spray jellied cranberry sauce).


Instructions

Combine all ingredients, except Mandarin oranges, in a medium saucepan on medium heat and bring to a simmering boil over the course of 15 to 20 minutes. Turn down heat as cranberries begin to pop and work a spoon around the outside of the pot, crushing them into a sauce. When all berries have popped, remove from heat and refrigerate for an hour. Then, add the mandarin oranges to the slightly gelled sauce and refrigerate again until ready to serve.


Crunchy Cheesy “Beefaroni” (cooking kitchenless)

I used to be a sucker for interesting cookbooks. When my kids were young (and I was always looking for fun things to make that might somehow appeal to them), I bought a collection of recipes bound in a half book, half loose-leaf from a church, featuring members’ faves.

One day, I decided, based on the name and ingredients, that one of those recipes looked safe to try for the kids. It was called “crunchy cheesy beefaroni,” and basically was a home version of hamburger helper. As I recall, the recipe included ground beef, a can of tomato soup, a can of cream of mushroom soup, elbow macaroni, and lots and lots of cheese. In fact, the recipe called for two full 8-ounce blocks of cheddar, one sharp and one medium sharp. The casserole was topped by French-fried onion rings. Hence, the crunchy.

Now my kids loved this concoction, but it had an unfortunate side effect on some in the household. And the kids, who do speak their truth, did some intentional mangling of the name when they asked for it again. They asked for “crunchy cheesy fartaroni.” It was a big laugh at the time.

Time marches on. My son now lives in Budapest. My daughter is a vegan and wouldn’t touch this stuff with a ten-foot pole.

A meaty, cheesy casserole never disappoints.

I hadn’t made it in many years, but from the time I shared the story of this legendary dish with Terrie, she wanted me to go for it. This even though Terrie typically recoils at the mention of Campbell’s condensed soups, and any of the other ingredients with decidedly “GMO” and other non-organic leanings. However, in our household, I have learned that everything has a substitute, and this dish can, indeed, be made in a “clean” fashion. More than a year ago, I made it for Terrie for the first time, using some leftover shaved steak meat from another dish, as well as incorporating previously made mac and cheese. I threw in some organic mushroom soup and some organic diced tomatoes, and the 2020s version tasted great and met Terrie’s environmental and food-quality standards.

With the kitchen renovation still rendering our kitchen in a largely “not-ready-for prime time” state, we’ve been looking for some filler meals. On a recent weekend while Terrie was under the weather, I decided to take on the cooking duties and try the beefaroni again, this time with a southwest spin.

I’m pleased to say that southwest crunchy cheesy “fartaroni” worked out great. A bowl of protein, veggies and carbs with flavor, kick and comfort.


Ingredients

1 pound ground beef, 85% lean* (see notes)

1 12-ounce box of Barilla veggie pasta rotini*

Half a medium yellow onion, diced

Half a red and half a green bell pepper, diced

1 small can of chopped green chilis

1 can of Rotel diced tomatoes*

1 6-ounce can of tomato paste

½ packet Frontera skillet sauce with chipotle and lime*

8 ounces colby-jack cheese, cubed or shredded

2 ounces habanero cheddar*

Tortilla chips

Salt

Pepper

Onion powder


Ingredients for Cheese Sauce

Terrie suggested the cheese sauce, with a thin bechamel base, as a topping for the casserole because it seemed dry after its 45 minutes in the oven. This version had no soup! And who am I to argue against more cheese? Or against anything Terrie suggests in the kitchen (OK, Terrie, I can see the look on your face already).


2 Tbsp. unsalted butter

2 Tbsp. all-purpose flour

1 cup of milk*

8 ounces of sharp cheddar, cubed or shredded*

1 ounce habanero cheddar*

3 ounces cream cheese*

3 to 4 Tbsp. salsa*


Notes

  • One of Terrie’s standards is that in our household, we eat only grass-fed beef, and that’s what I used for this. Any ground meat with similar fat content would work.
  • We like the veggie pasta for a healthier option, so I used rotini, as I couldn’t find a veggie version of elbow macaroni, which was part of the original recipe. Rotini worked great and offered plenty of texture.
  • I used Rotel’s Mexican-style version with lime juice and cilantro. If you want to seriously kick up the heat in the dish, try the hot diced tomatoes or the diced tomatoes with serrano peppers.
  • The Frontera skillet sauce was the same thing I used to flavor the ground meat in my thick and hearty chili recipe. Look for it in the grocery section where you’d find packets of seasonings.
  • The habanero cheddar is a Trader Joe’s product, and it packs some major heat. You can use other cheeses to add variety to the cheese sauce; notice I only used 10 ounces total cheese, well below what the original recipe called for. The dish is plenty cheesy, even before the cheese sauce.
  • You might use a little more or a little less milk depending on your preferred thickness of cheese sauce.
  • Terrie also noted that, especially for queso-style sauces, American cheese provides a smooth base, but I had no American on hand for this meal, so I settled for what was left in the fridge, plus a little cream cheese (another Terrie suggestion). And I supplemented with another small dose of the habanero cheddar for heat.
  • Any salsa will do, but pick what you like for your heat preference, keeping in mind everything else you’ve put in the dish.

I used our multi-function slow cooker for the heavy lifting in putting together this casserole. I browned the ground beef in it, seasoning with salt and pepper and then mixing in the Frontera skillet sauce. I removed the ground beef and sauteed the onions and peppers, then returned the beef to the slow cooker, which I set to slow cook. I then added the diced tomatoes and chopped green chiles, as well as the tomato paste, using a little less than 2 chile cans of water (10 ounces) to thin the mixture.

I’d already had salted water boiling and added the rotini, draining it when it reached al dente state. I also used this period to cube up the cheese. I added the drained rotini to the slow cooker and mixed it all up.

I pre-heated our oven (which we could finally access, though the kitchen was not completely ready) to 350° F and sprayed a 9-by-13 casserole dish. Then, I doled out about half of the pasta/beef/vegetable mixture into the casserole and topped it with about half the cheese. Repeat with the rest of the mixture and cheese. Then crush up some tortilla chips until they are small and sprinkle over the entire casserole and place into the oven for 40 to 45 minutes, depending on how your oven heats.

While the casserole is baking, prepare the cheese sauce. I did this using our induction burner by creating a roux with the butter and flour. Once the roux is yellow or golden, add the milk and keep stirring. Once it thickens and appears creamier, begin blending in the cheese, stirring until smooth and adding the onion powder to offer a little seasoning. Finally, add the salsa, which should give the mixture a more orange-reddish look.

The casserole is ready when you can see the cheese bubbling; you may need to cover the casserole with foil about halfway through cooking if it appears to be dry on top. Serve in a bowl and spoon the cheese sauce over the top.

A simple cheese sauce brings a slightly dry casserole back to life. Plus, it’s more cheese!