When the 5 o’clock bell rang at the end of my fourth and final King Arthur Baking class— and I’m speaking figuratively, because there actually was no bell— I felt an overwhelming sense of accomplishment at having baked the equivalent of 12 loaves of bread. “Equivalent,” because my classmates and I were taught shaping technique not only for loaves, but also for different kinds of rolls, and by the end of my deep-dive into the “principles and practice” of bread, my arms were filled with a brioche braid, a loaf of basic white, a whole wheat braid, a multi-grain boule, Nutella twist, cinnamon rolls, a whole wheat loaf with cinnamon-raisin swirl, two kinds of dinner rolls and three (count ’em, three) loaves of crusty French bread. Oh, and a ball of wet pizza dough in a plastic bag. Holy freakin’ moly.
I had produced enough baked goods to fill a Toyota Corolla, and I wasn’t sure what I’d do with all that bread.
Most of my classmates were headed home, so theirs was an easy decision. But I had packed up my rental car that morning for the third and final leg of my solo summer adventure, and that would lead me north, through the driving rain, farther from home rather than nearer. I would be a weekend visitor in the home of someone I’d never met in person before— what in the world was she going to think when I rolled up, looking like a drowned rat, in my rented Corolla with bread piled up to the windows?! Well, she wasn’t mad! 🙂
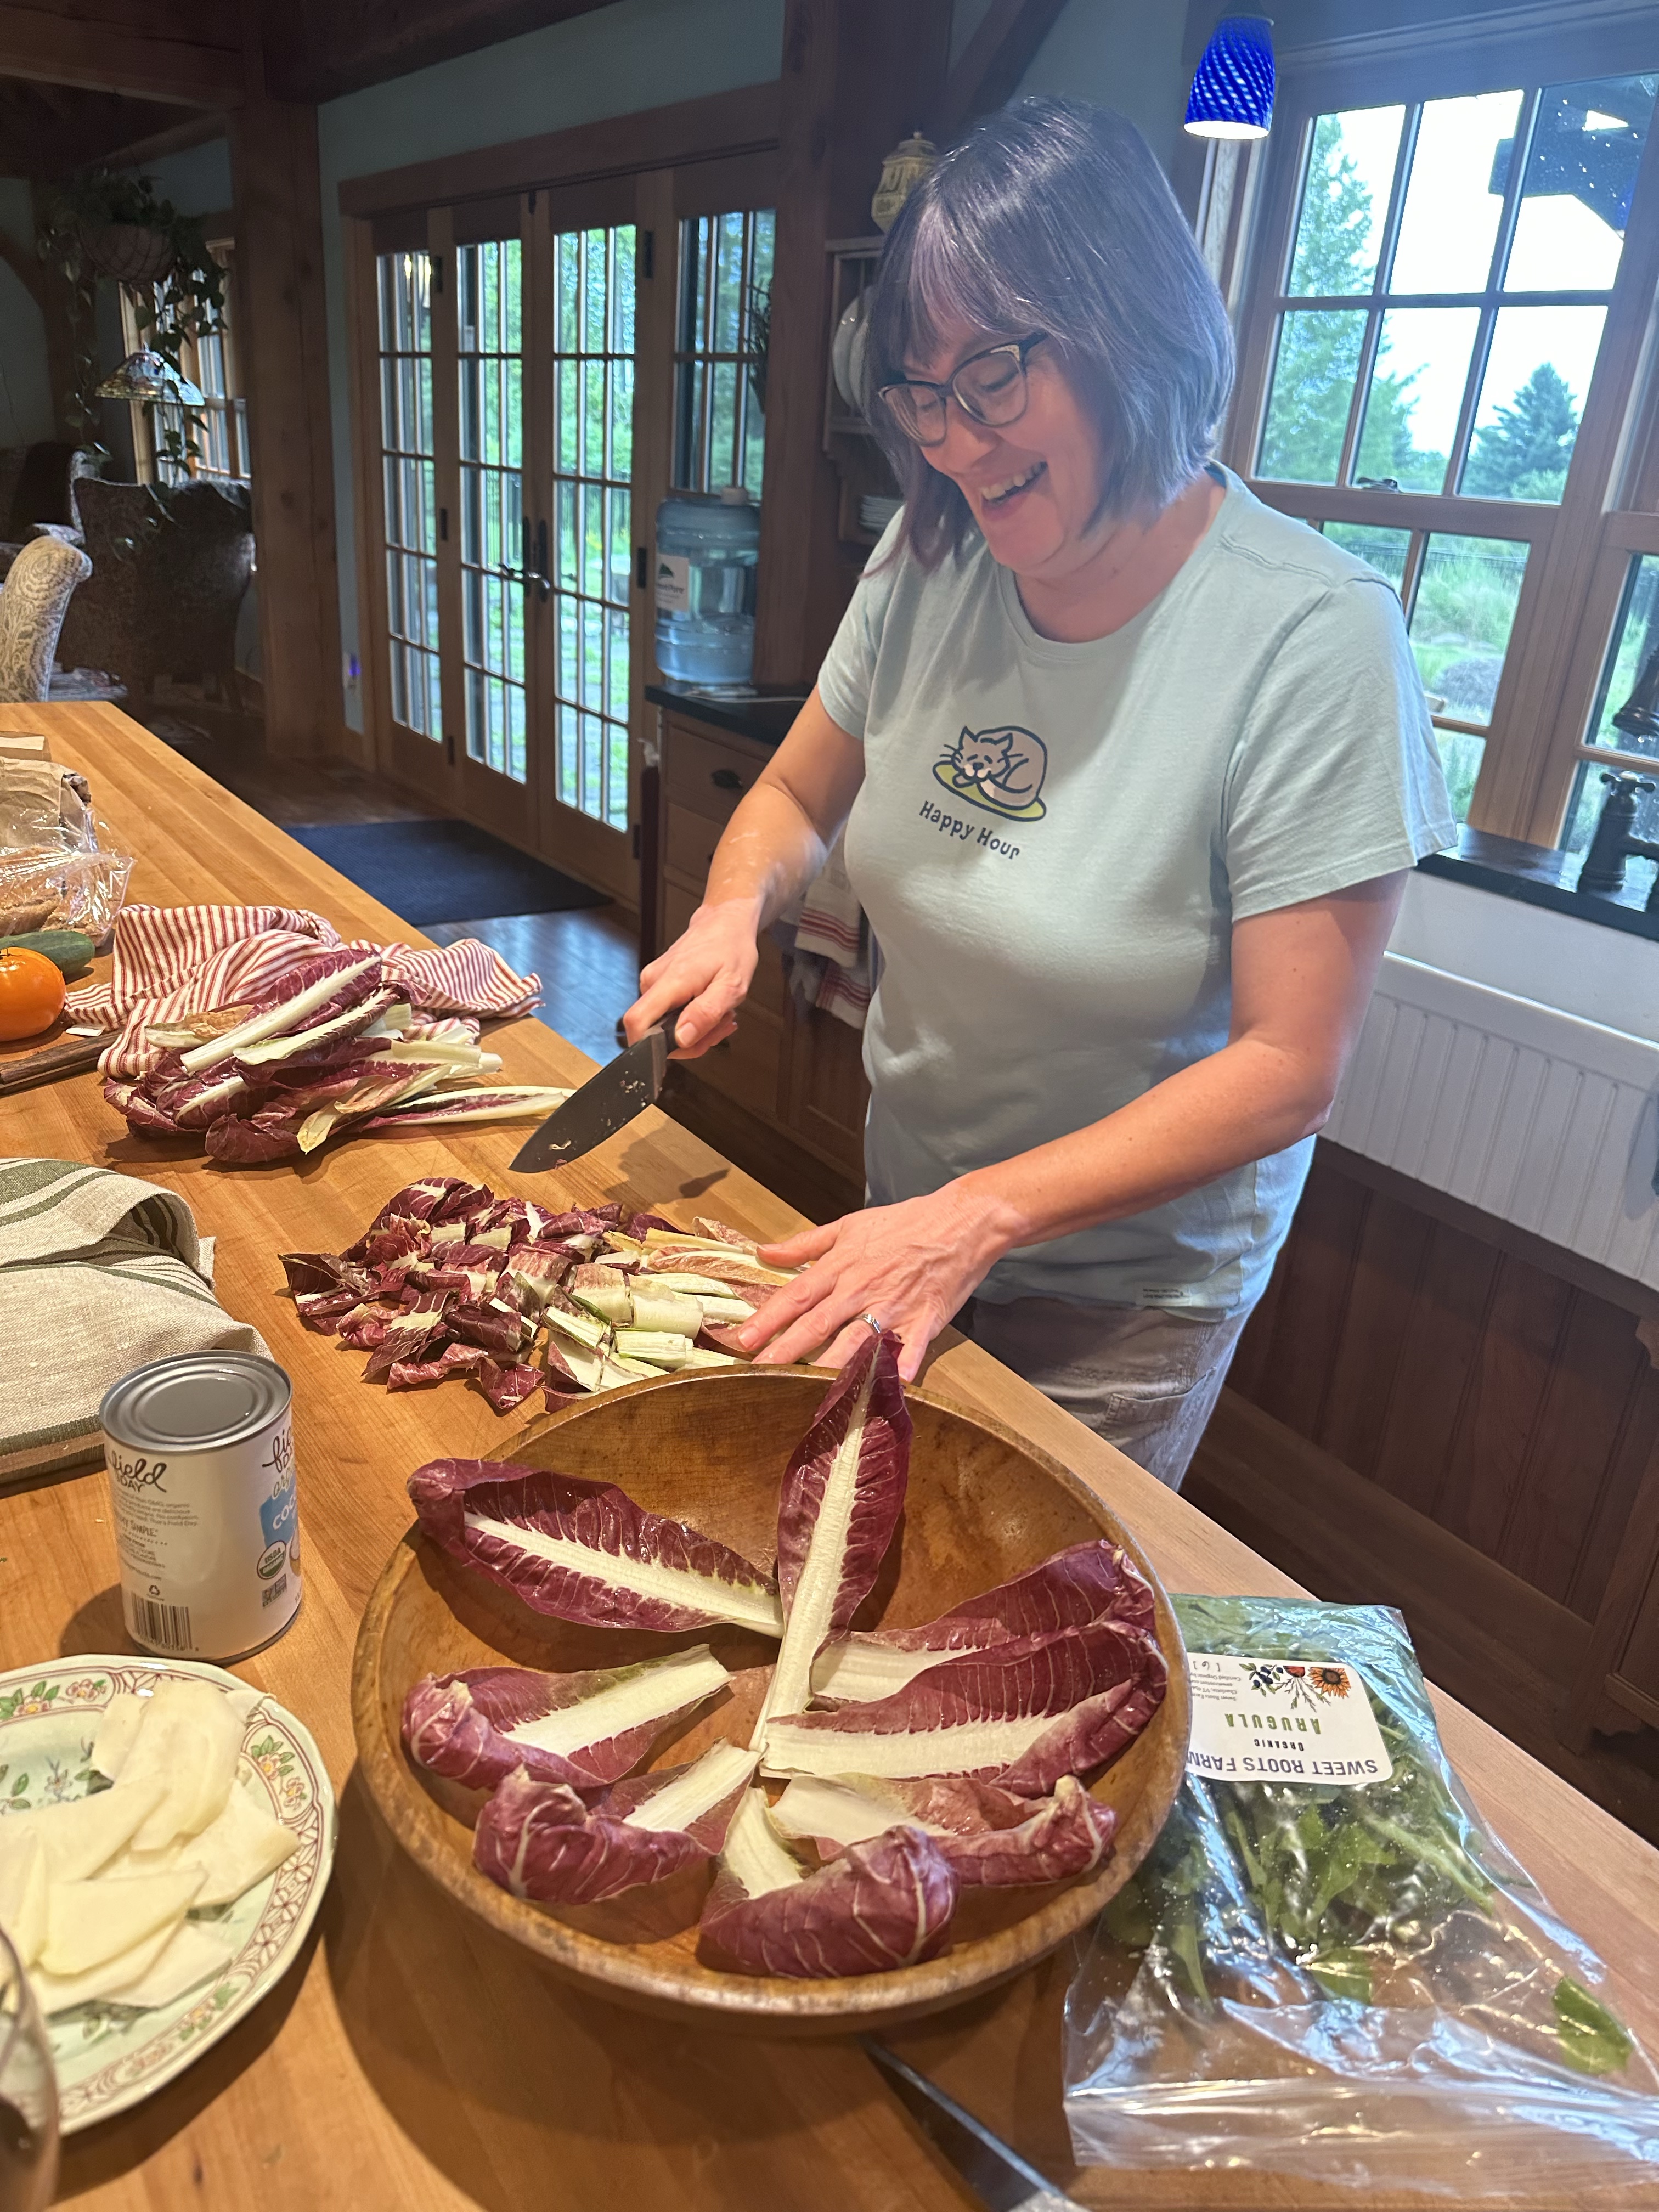
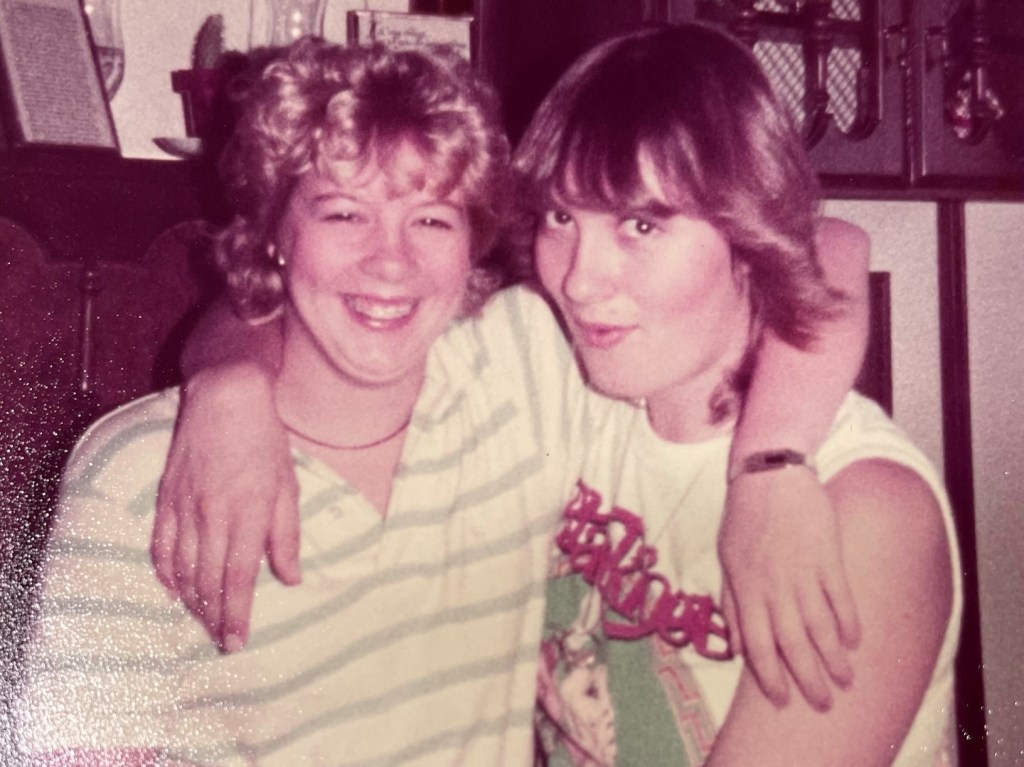
Meet Dorothy, from The New Vintage Kitchen! 🙂
Speaking from experience, if you ever need help breaking down too many loaves of bread, you want to be spending the weekend with Dorothy from The New Vintage Kitchen! Dorothy’s blog followers know that one of her mottos in the kitchen is “waste nothing,” and she showed me how she lives by it. That first evening, we enjoyed some steamer clams and a lovely nicoise salad with freshly grilled tuna. I suppose you can guess who brought the bread?
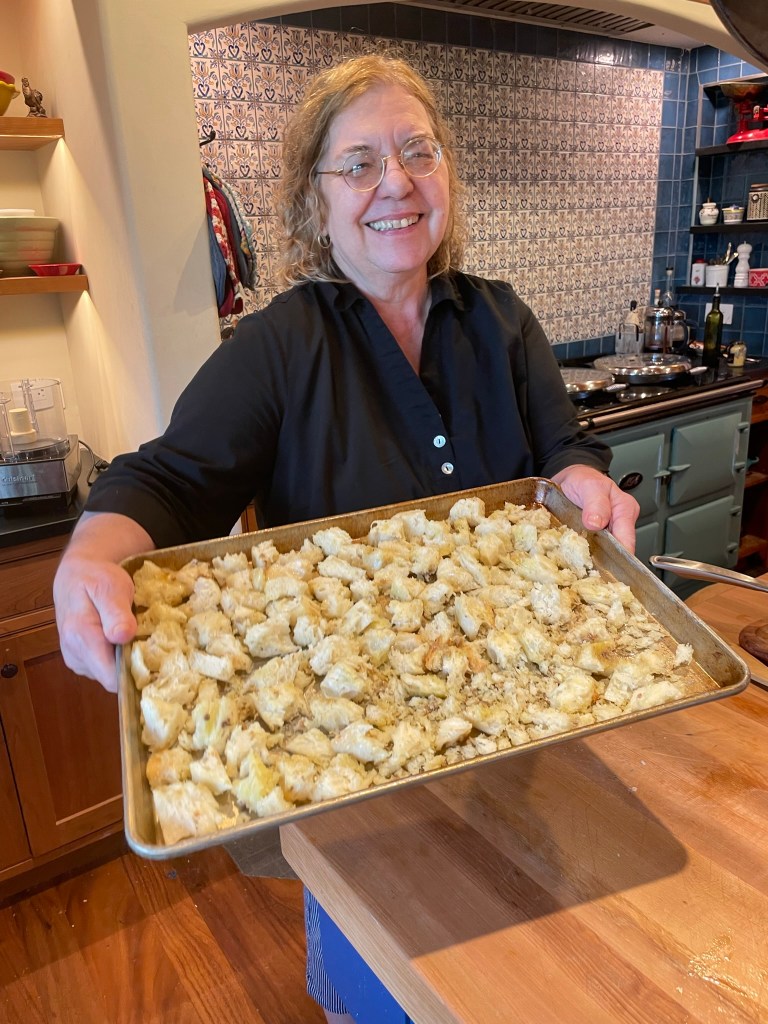
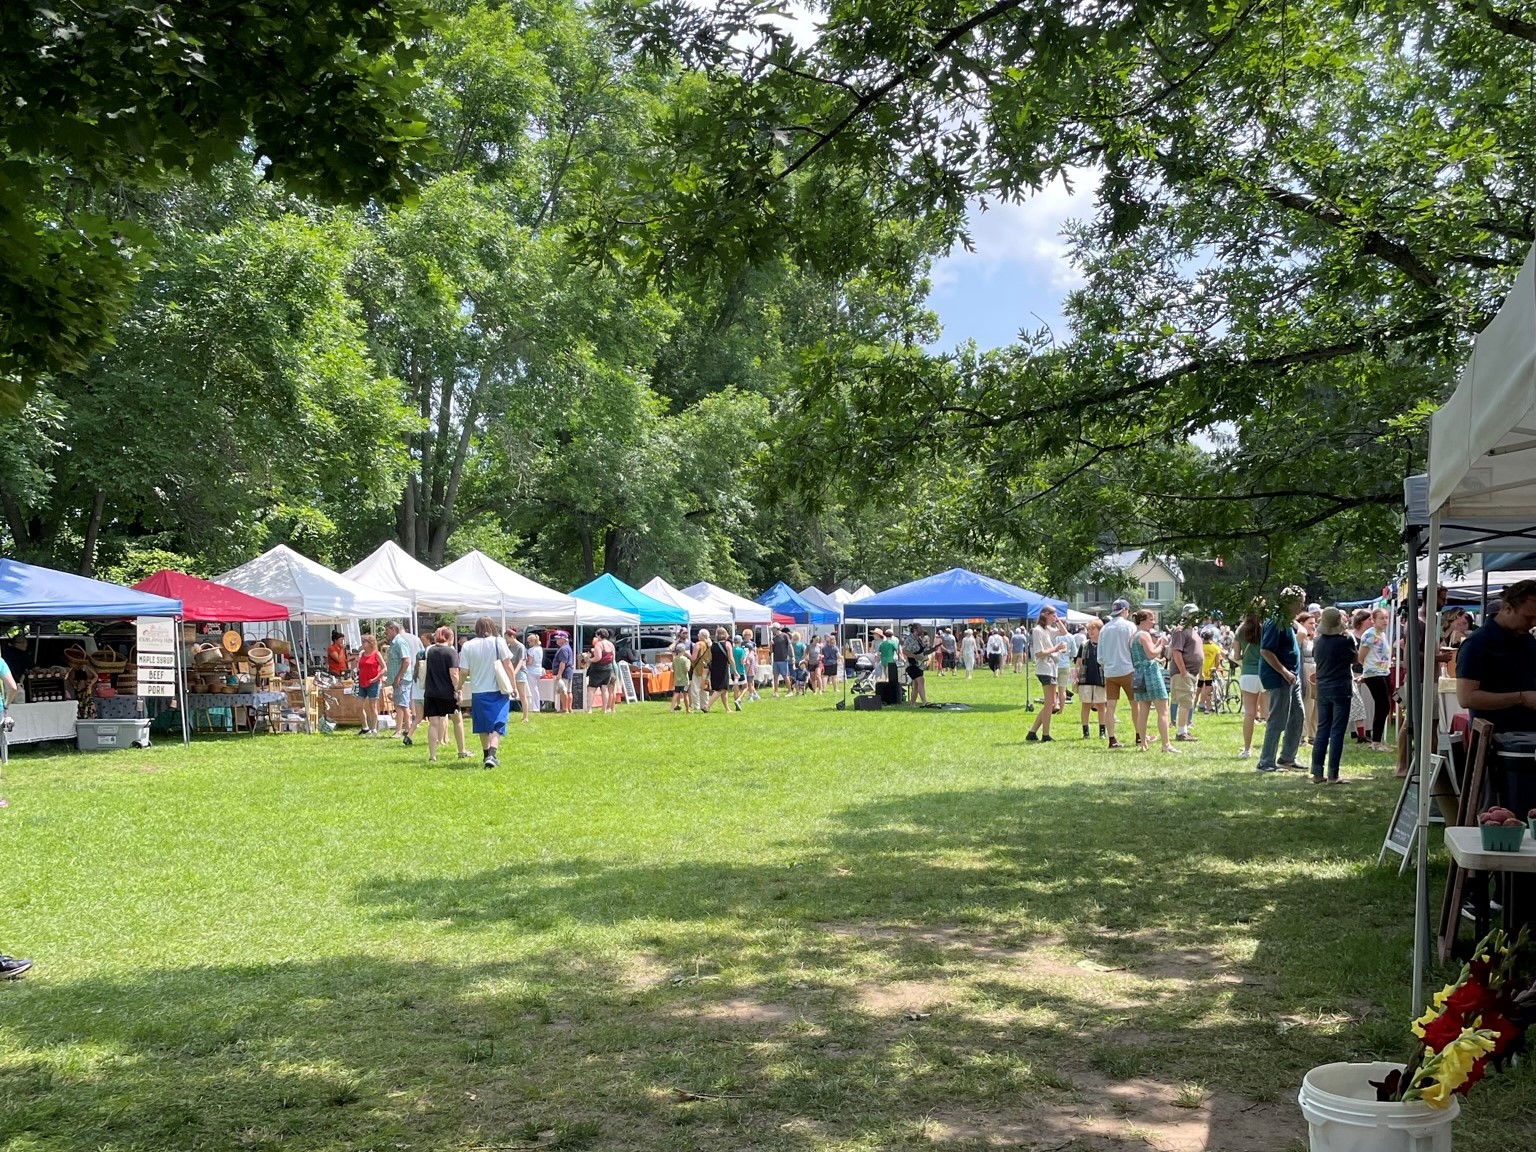
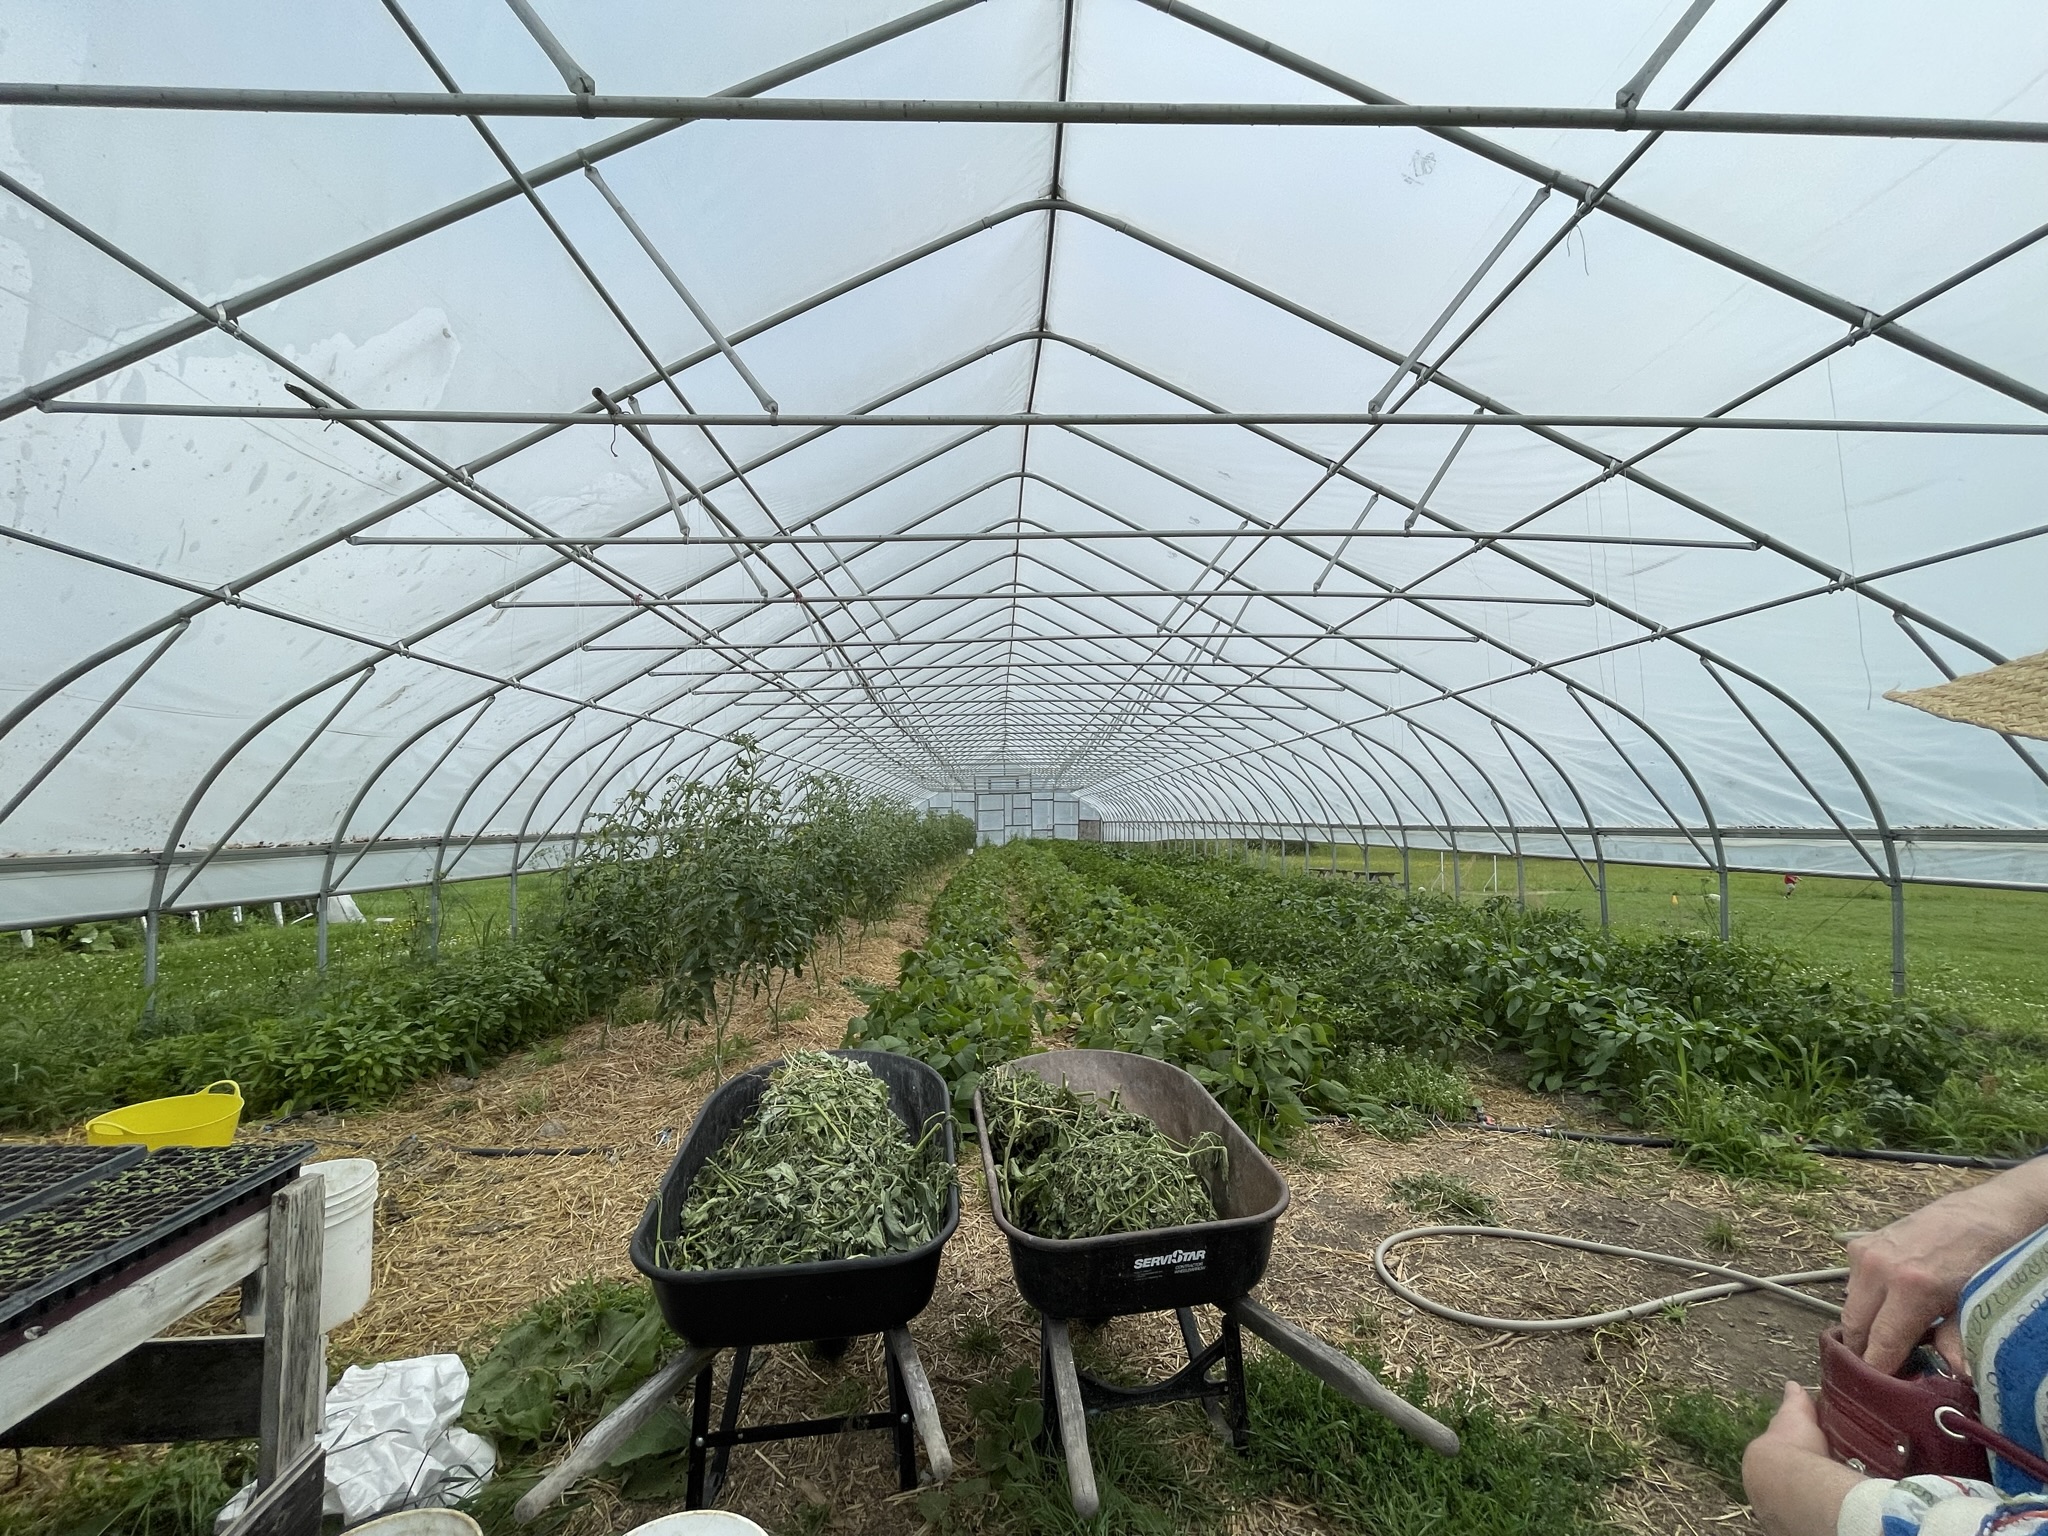
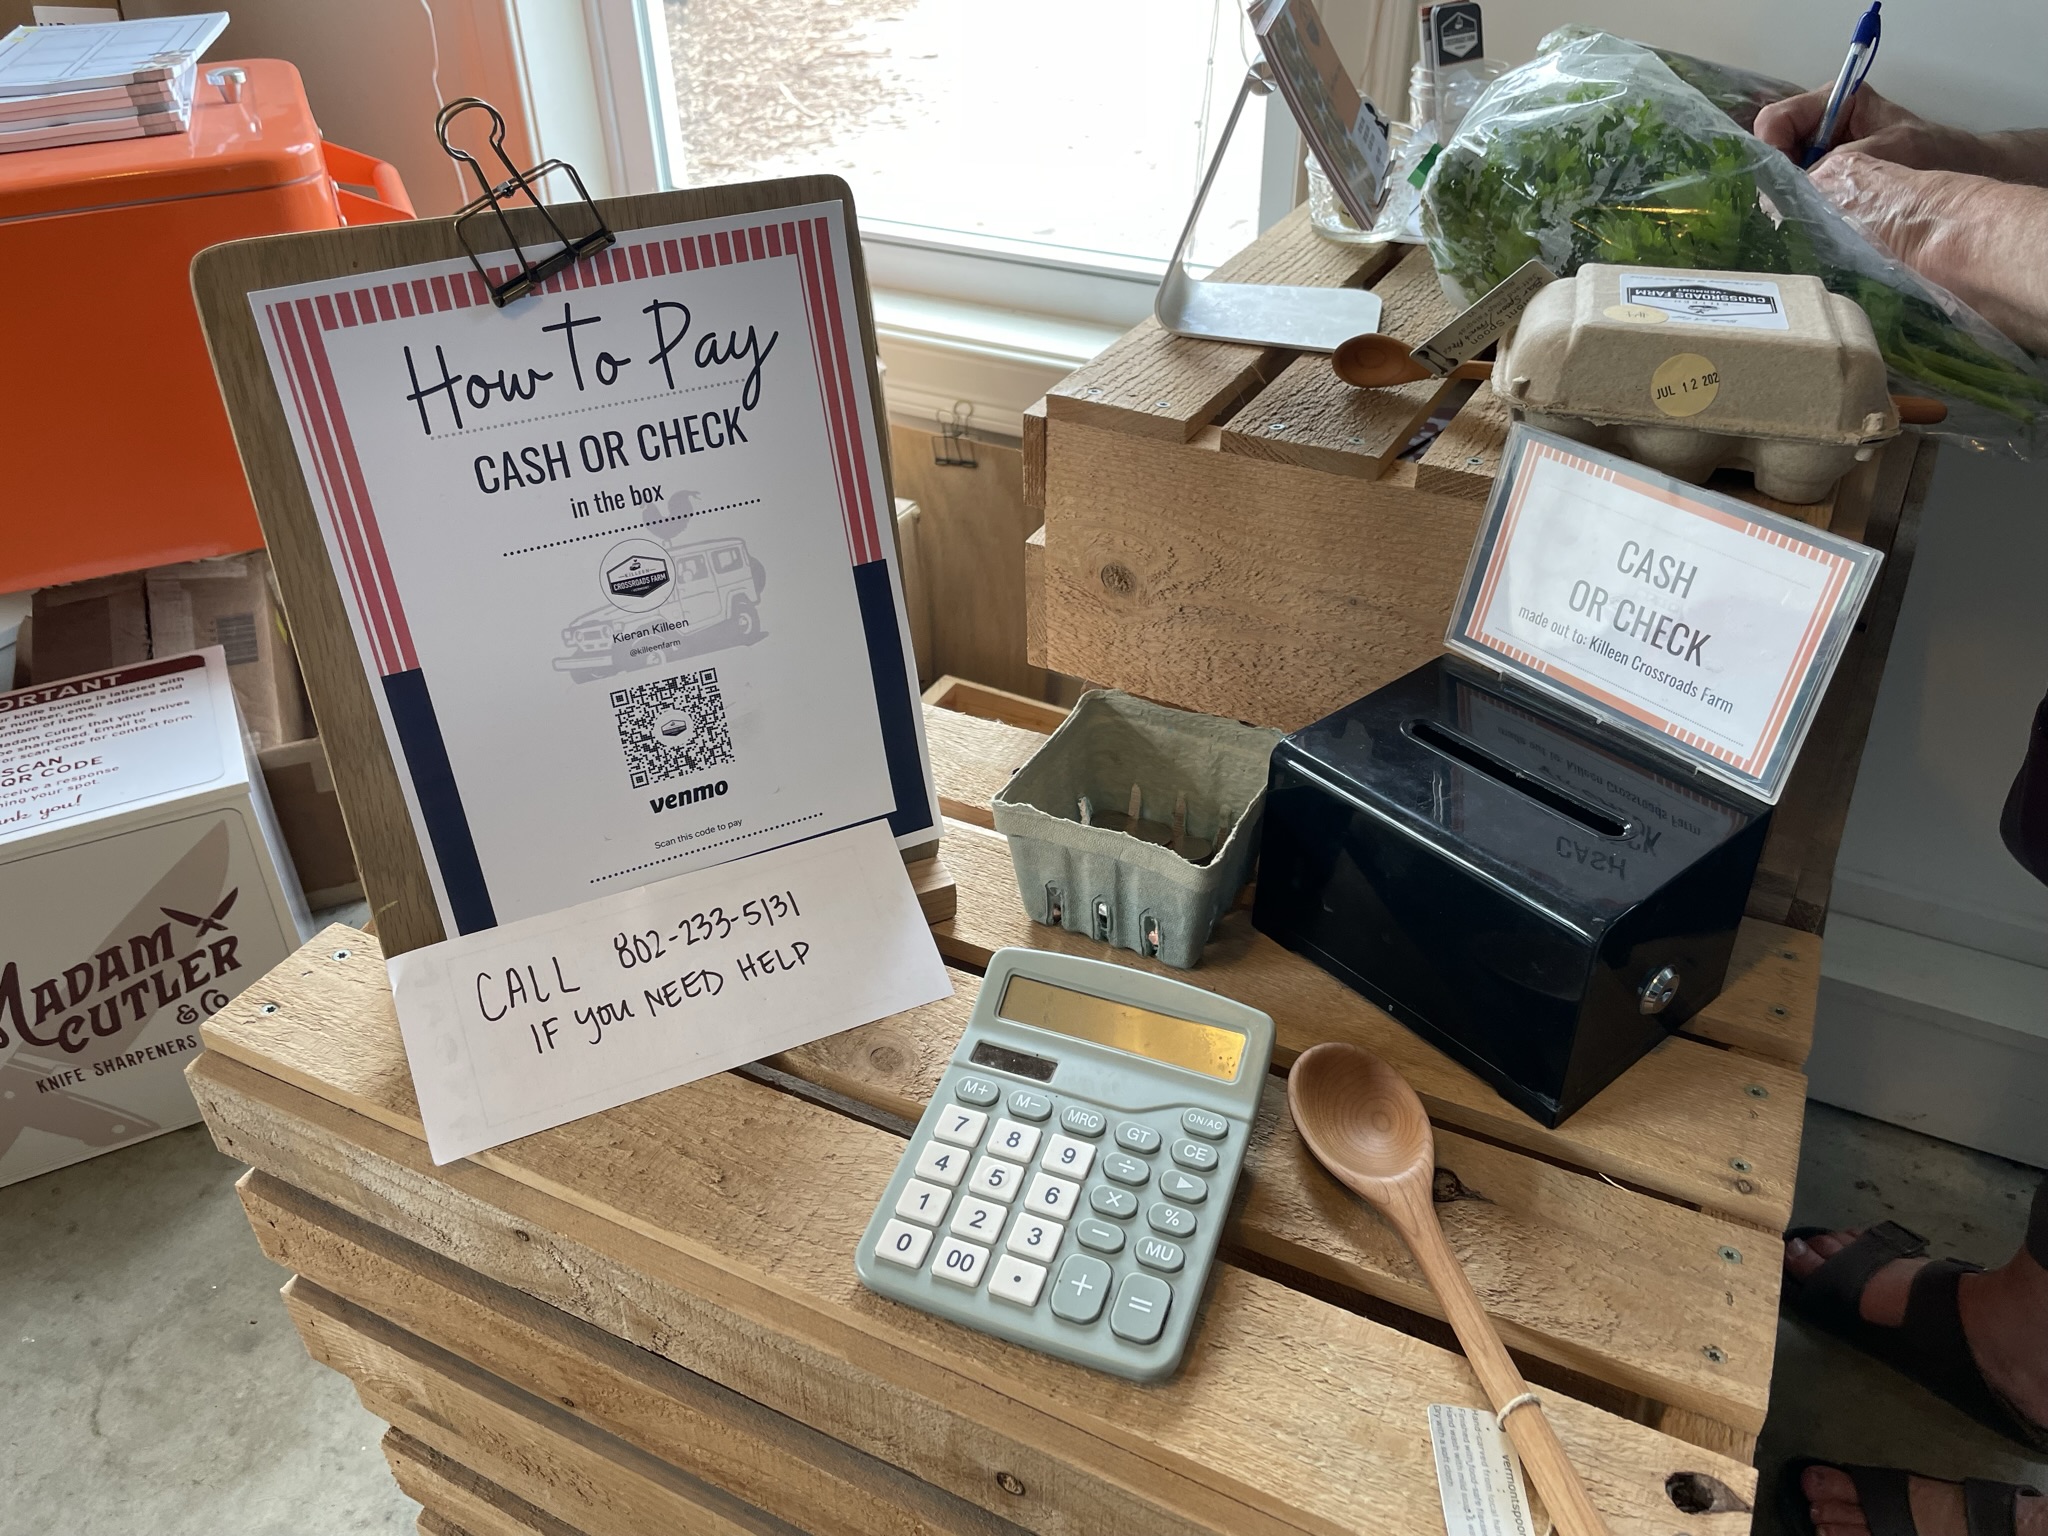
Our Friday was spent“foraging” for ingredients at some of Dorothy’s favorite farm stands, and the experience was all that I had imagined and more! We found terrific local produce, farm-fresh eggs, beautiful handcrafted items (like the wooden spoon that practically leapt into my hand) and adventure at every turn. And yes, we broke down that bread, one item at a time. Some of the loaves and rolls were stale before I even got to her house, and those ended up as bread crumbs, which are always in demand in a kitchen as busy as Dorothy’s.
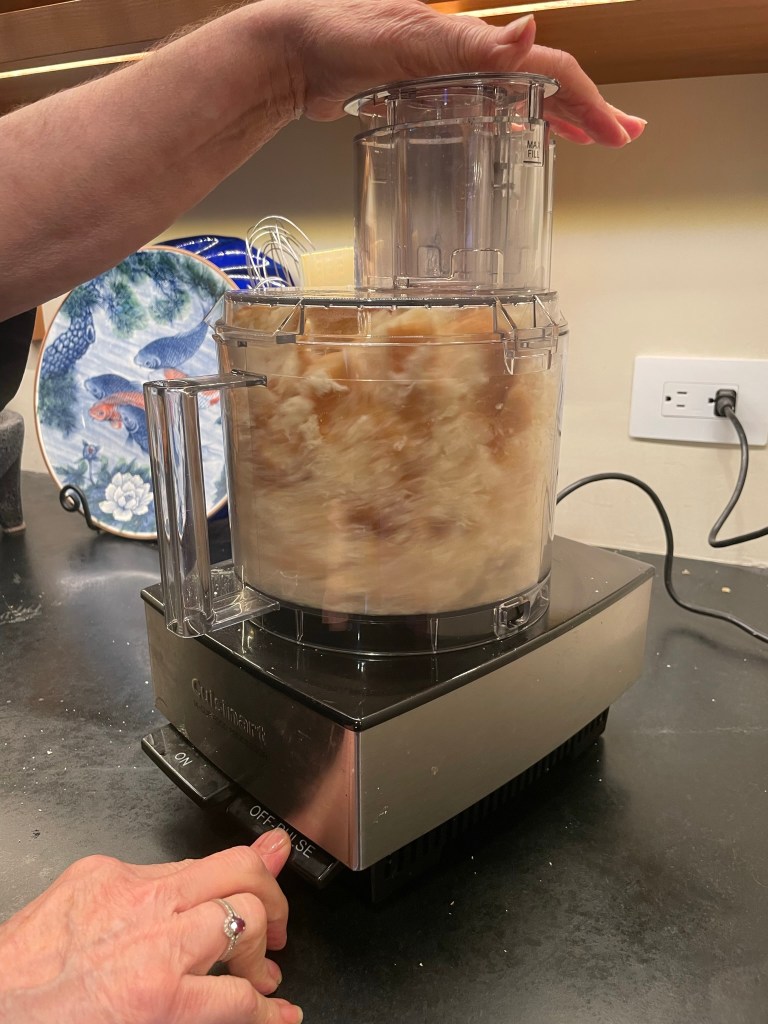
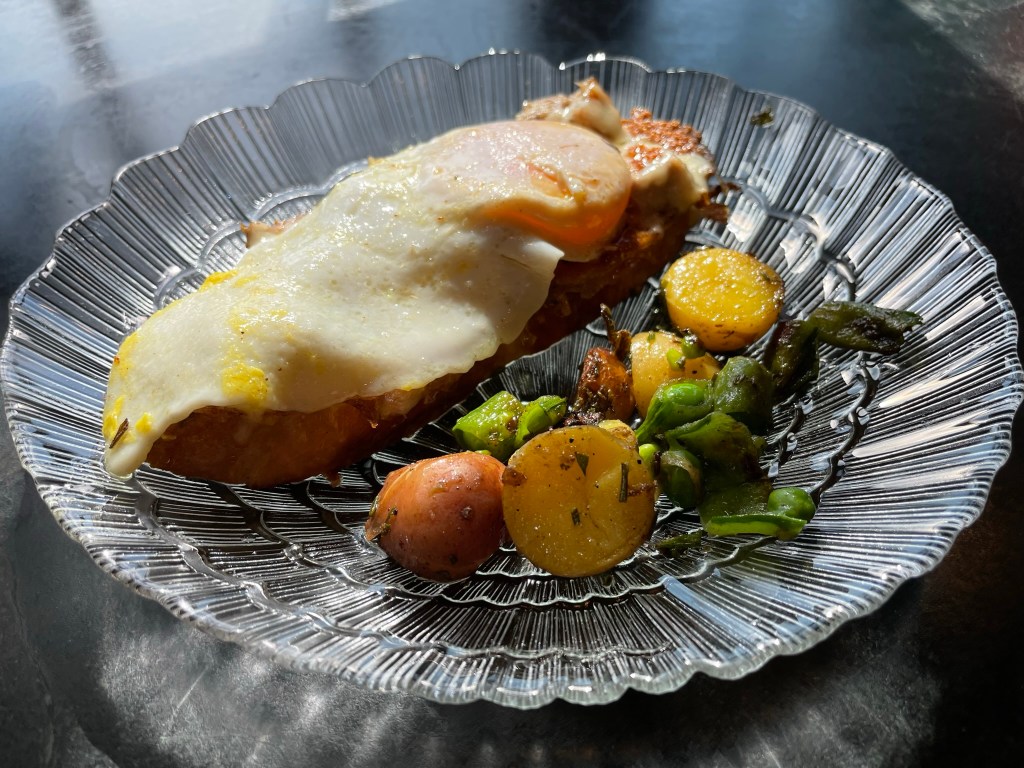
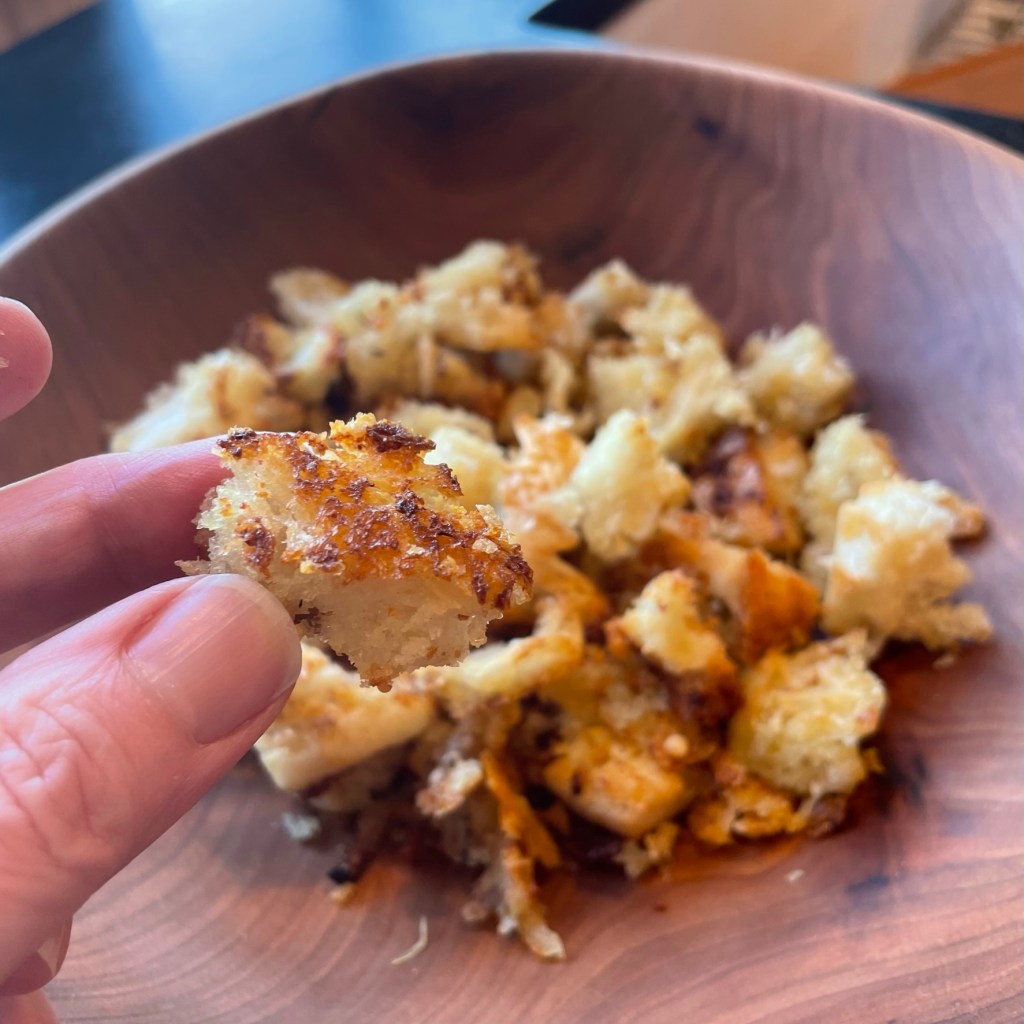
The stale basic white bread was whizzed up into crumbs.You can tell Dorothy has done this before!Friday breakfast: a delectable savory French toast with leftover tuna and a duck egg on top!The crusty French bread was transformed into croutons.Yes, I wrote down the recipe!Who needs the salad?! I’m good.
She taught me her method of making anchovy croutons, using up the rest of the French bread loaves I brought. And of course, there was the title bread pudding, which was my own contribution to Friday night dinner, where I was pleased to meet Dorothy’s daughter, son-in-law and adorable granddaughter. They received the whole wheat raisin swirl loaf as a door prize. Thank goodness!
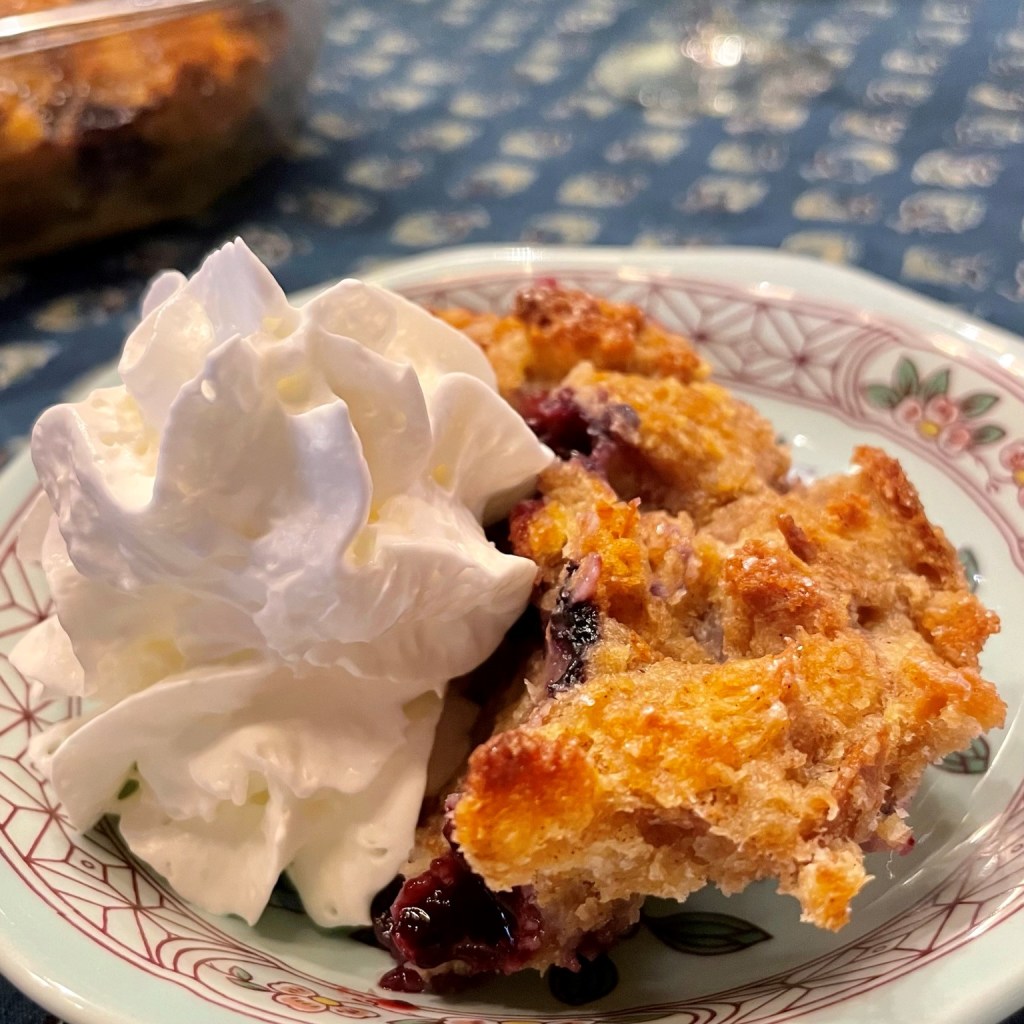
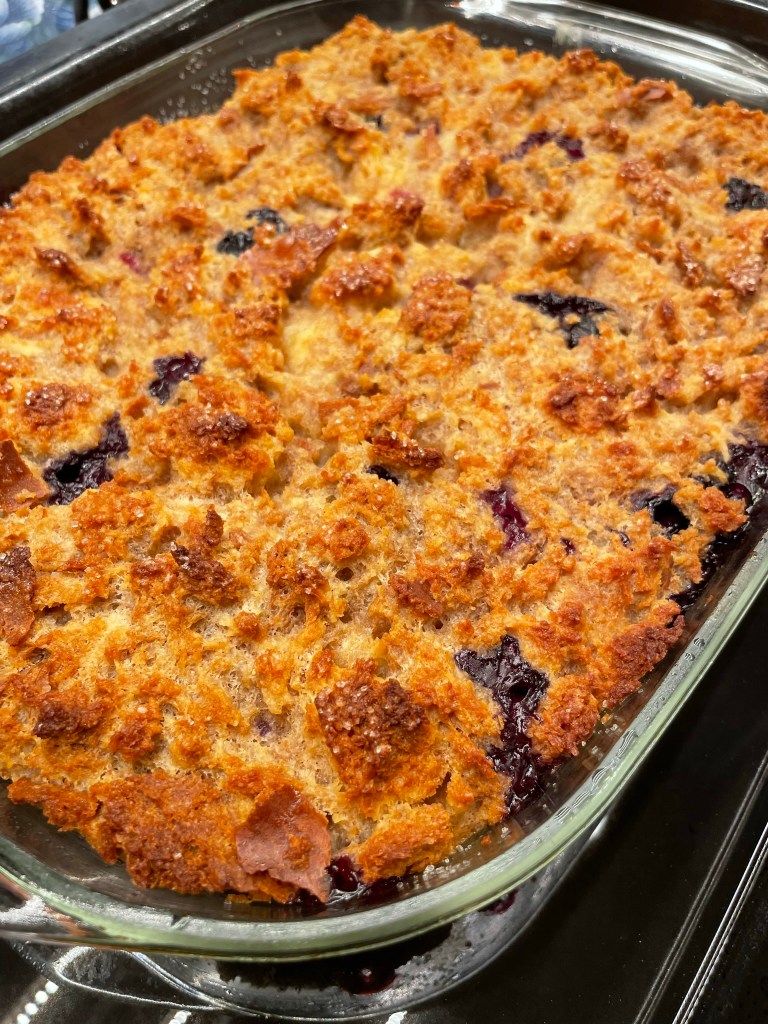
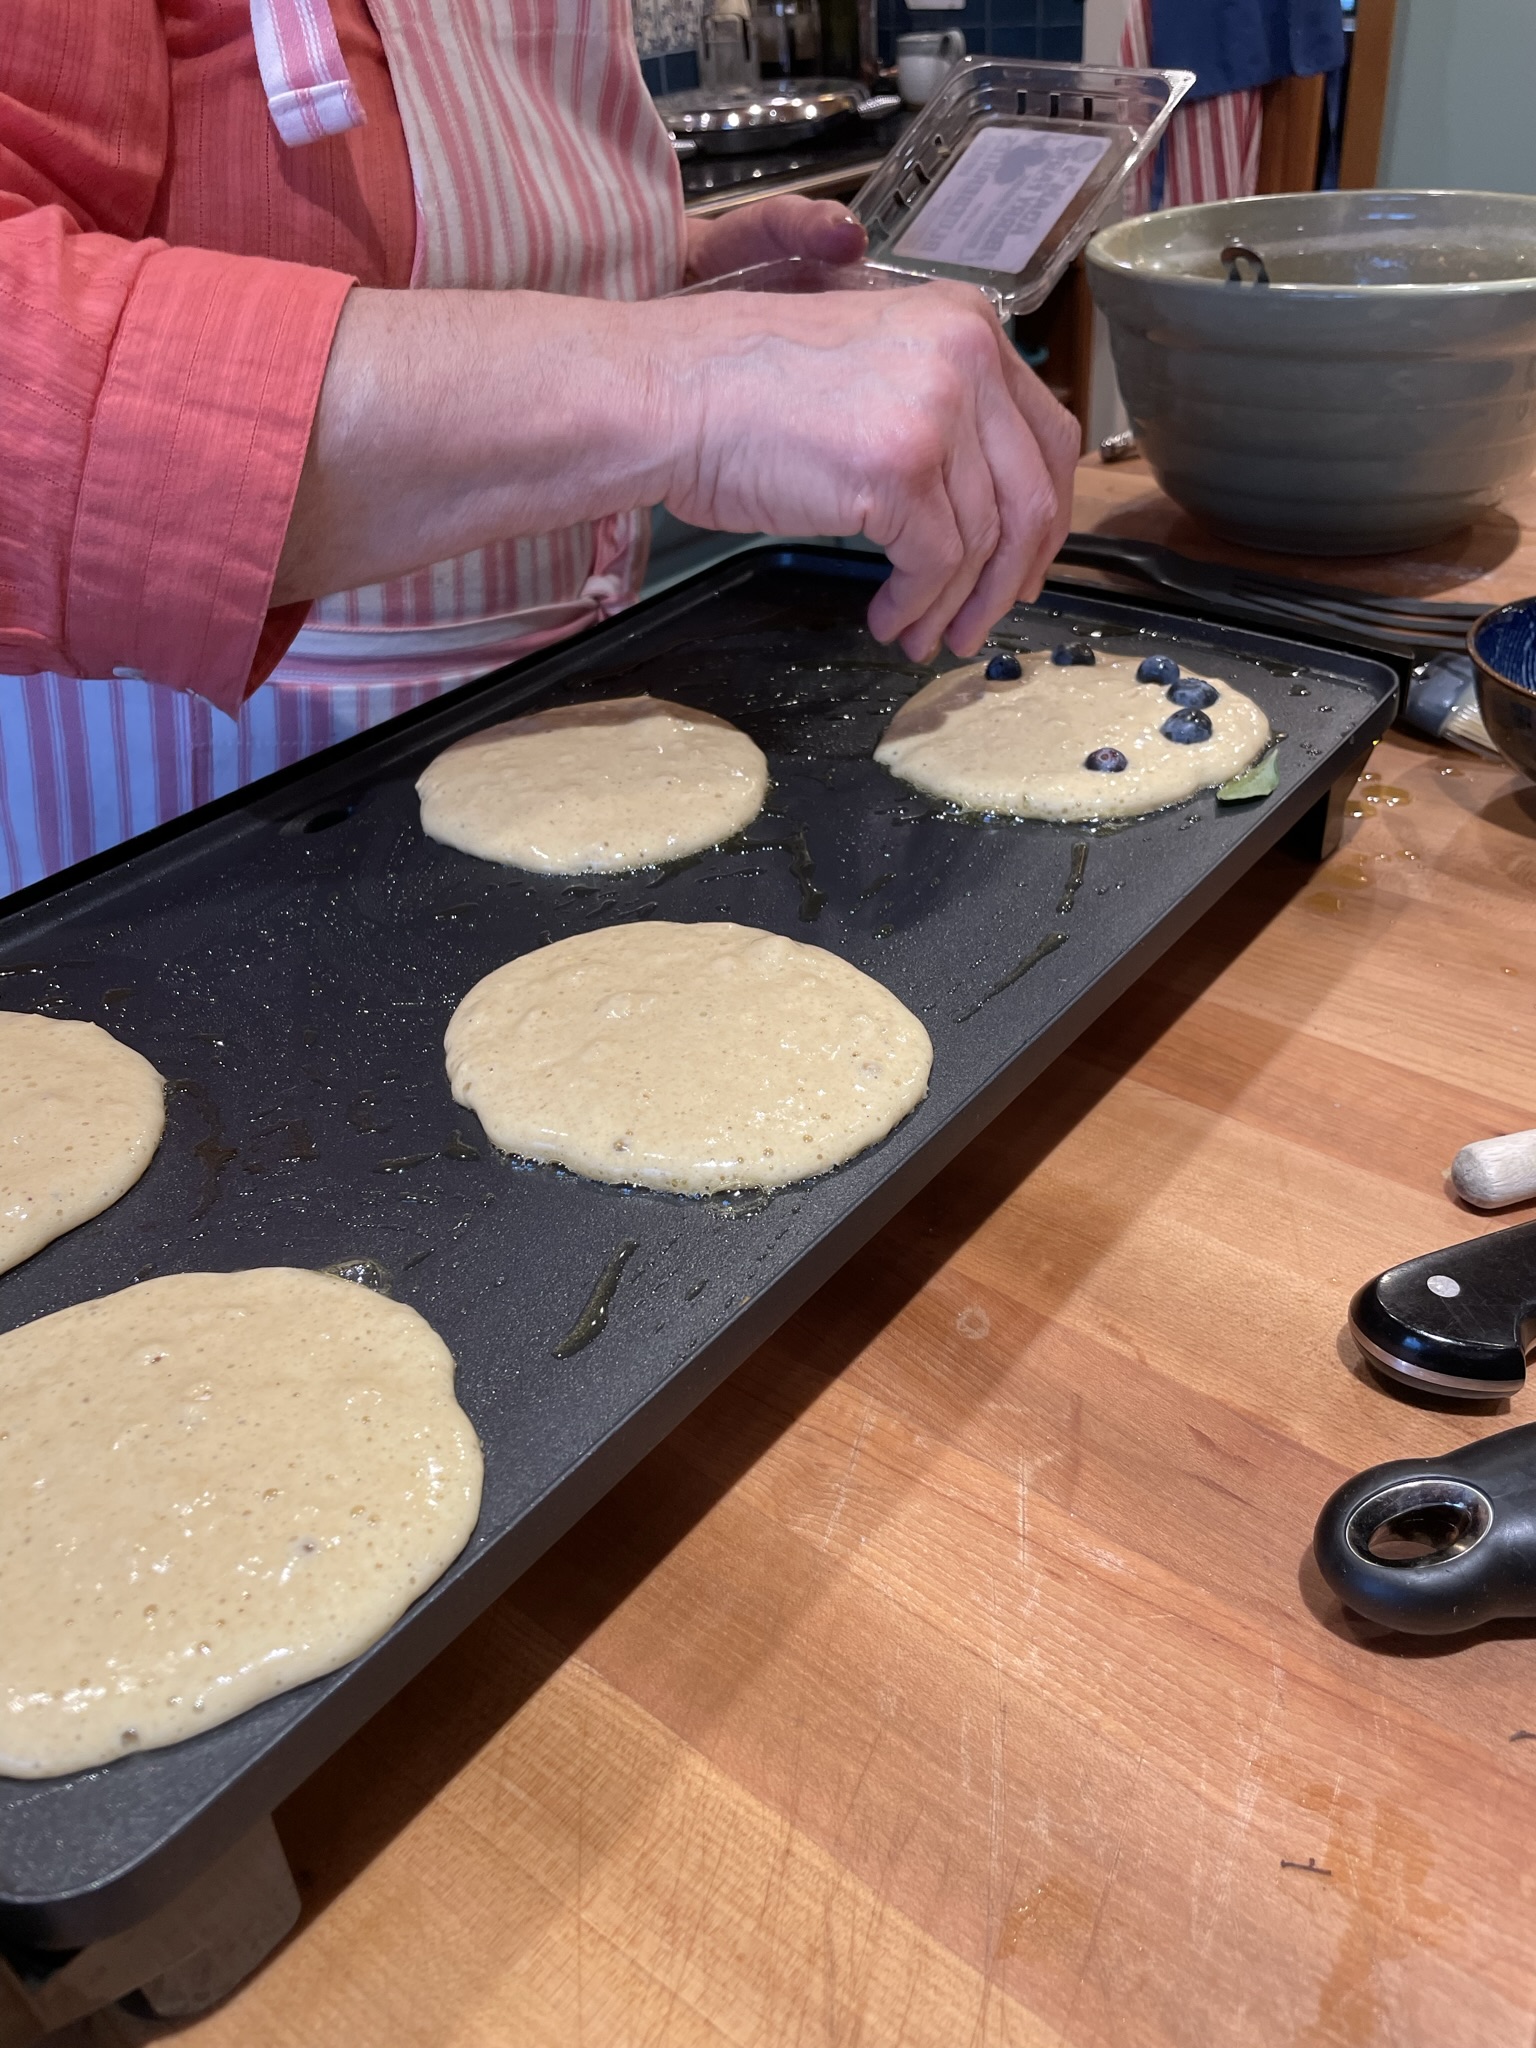
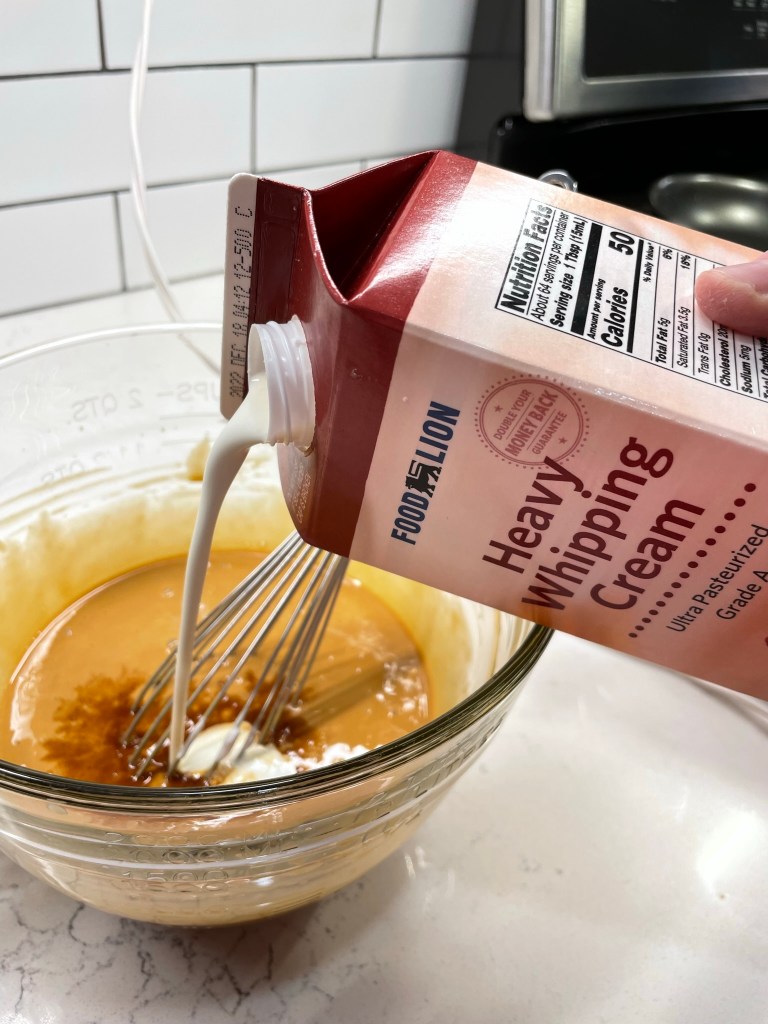
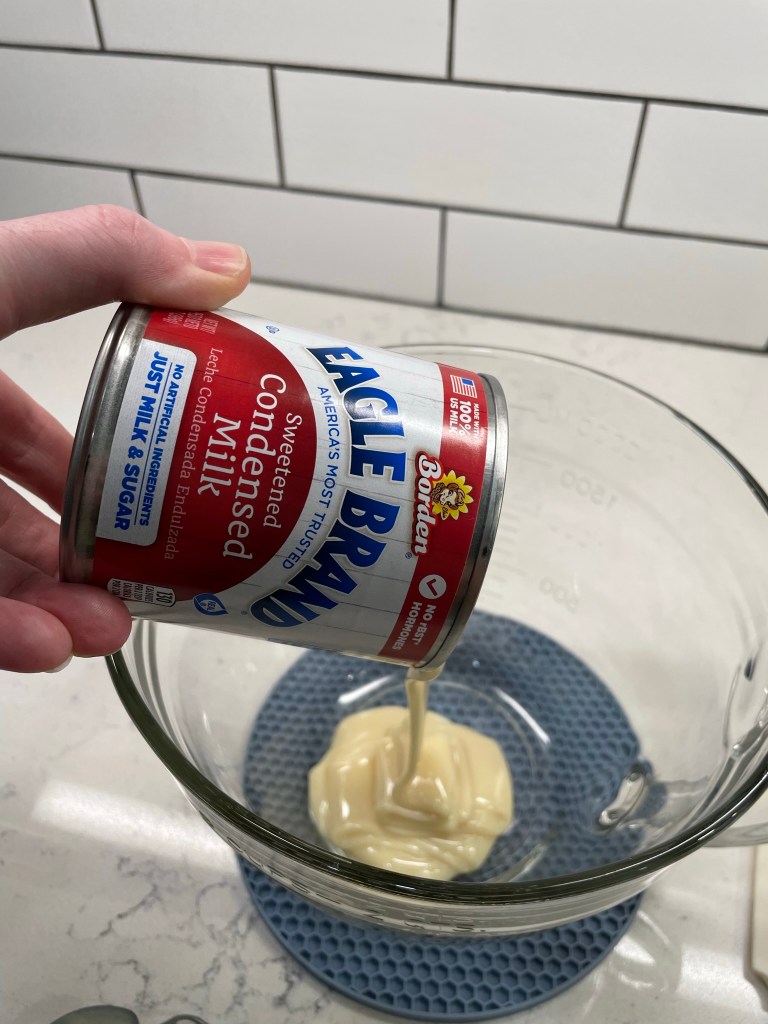
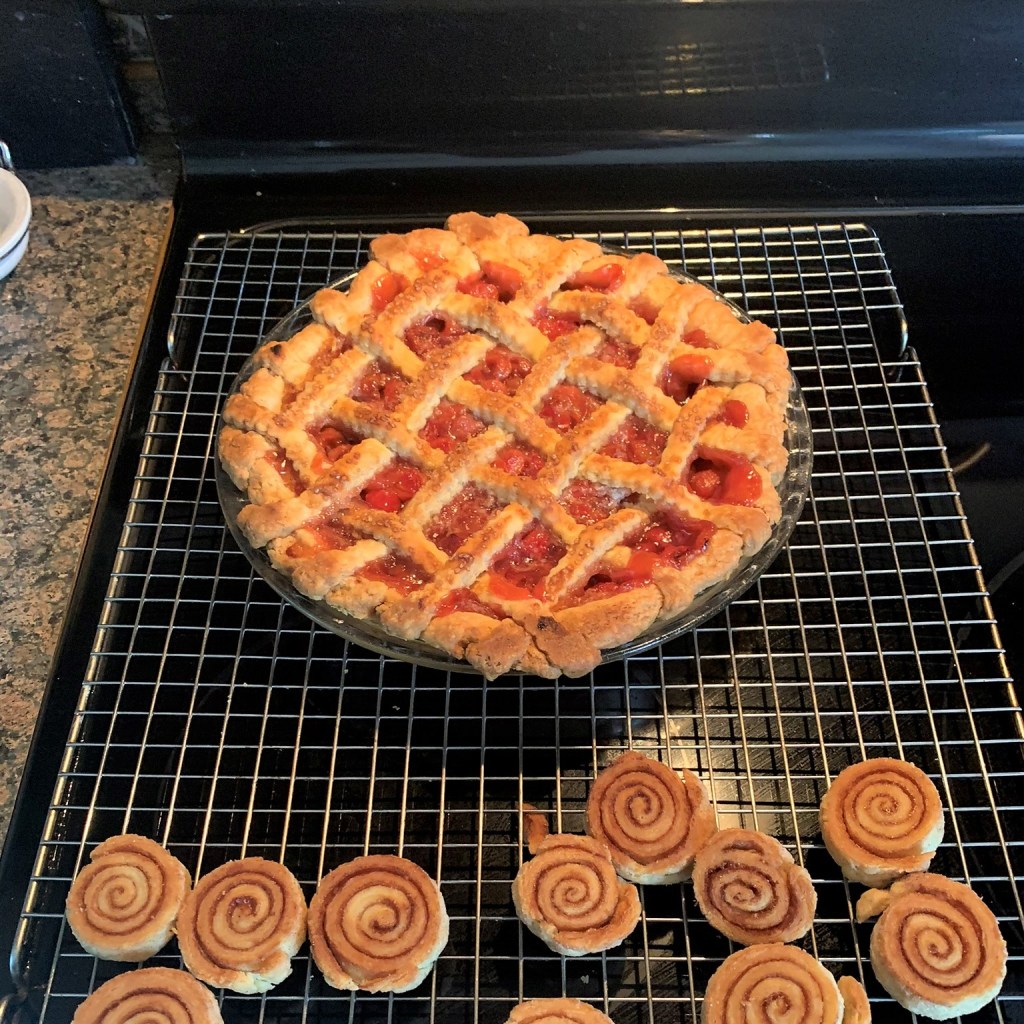
This bread pudding was exactly the right thing, because it brought me full circle from my grandmother’s kitchen, where nothing was wasted, including all the little this-and-thats of bread that she would have tucked into the freezer until she had enough to make a batch of her perfect bread pudding. As luck would have it, I had plenty of bread options and it was a very efficient (and delicious) way to finish up the braided brioche, some of the braided whole wheat and about four of the un-iced cinnamon rolls. It was roughly six cups of crumbs.
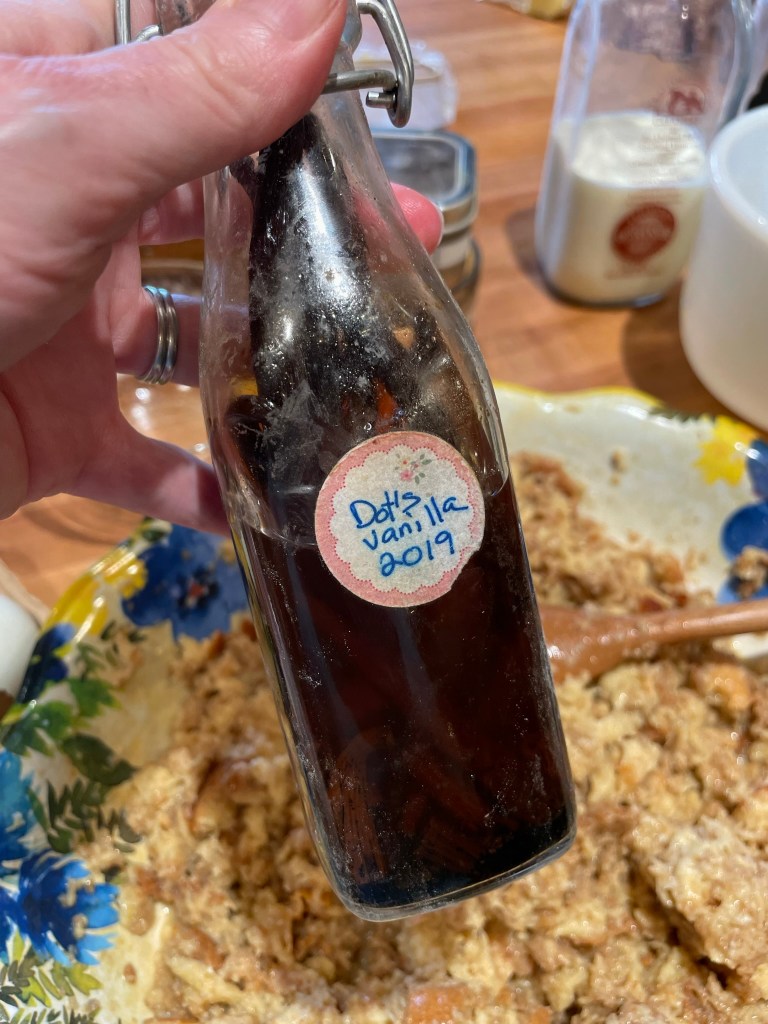
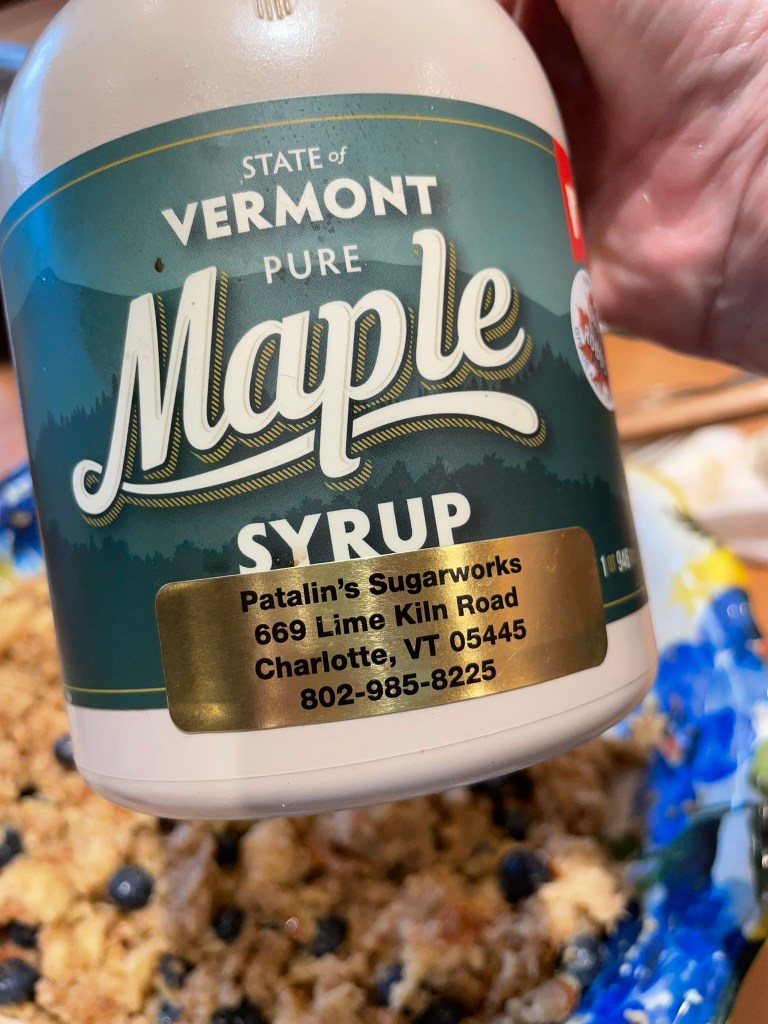
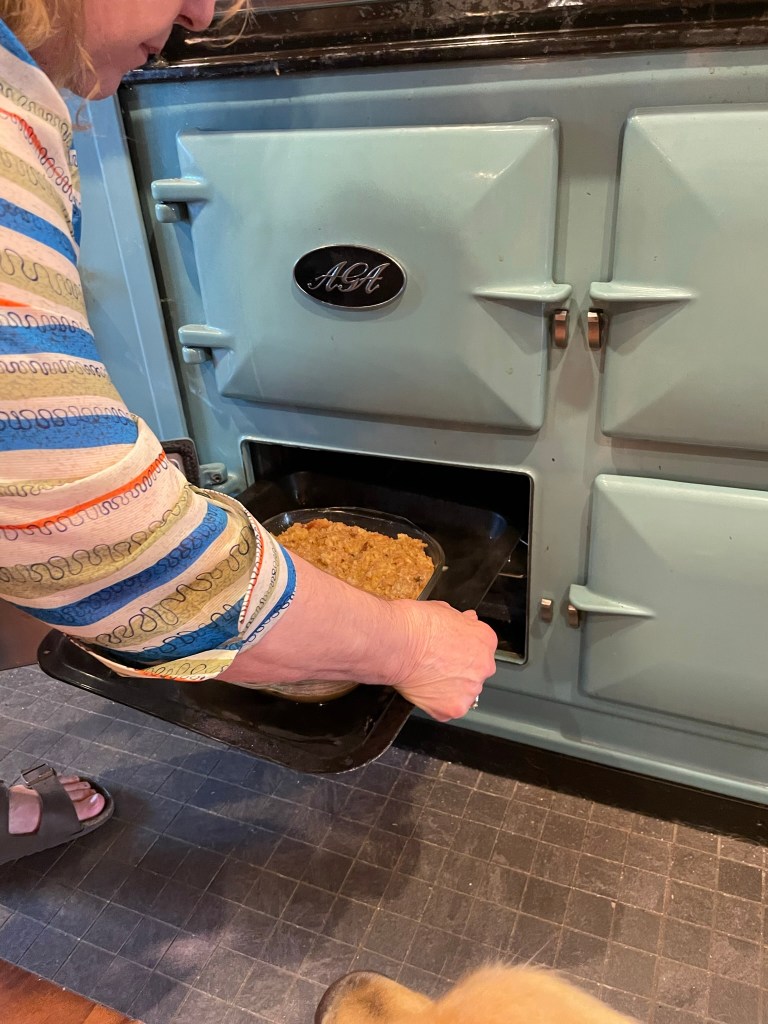
The base recipe was Gram’s, but there were a few fun twists— first of all, we used fresh, plump blueberries rather than the usual dried fruit. Real Vermont maple syrup supplemented the sugar for a warm touch of sweetness. The vanilla was homemade (of course, because this is Dorothy’s kitchen!) and we baked it up in her incredible, radiant-heat AGA range. My Gram would have loved everything about this, and she would have genuinely appreciated Dorothy’s no-nonsense, no-waste approach to cooking and entertaining. Truly, I could not have felt more welcome! Dorothy’s husband had something to do with that as well—he was always right there, topping off my French press coffee—and their two sweet dogs treated me like a member of the family, too! I got a little misty-eyed when it was time to leave, but I know I’ll be back!
After the click-to-print recipe, check out my whirlwind recap of the fun weekend we enjoyed, despite All. That. Rain!
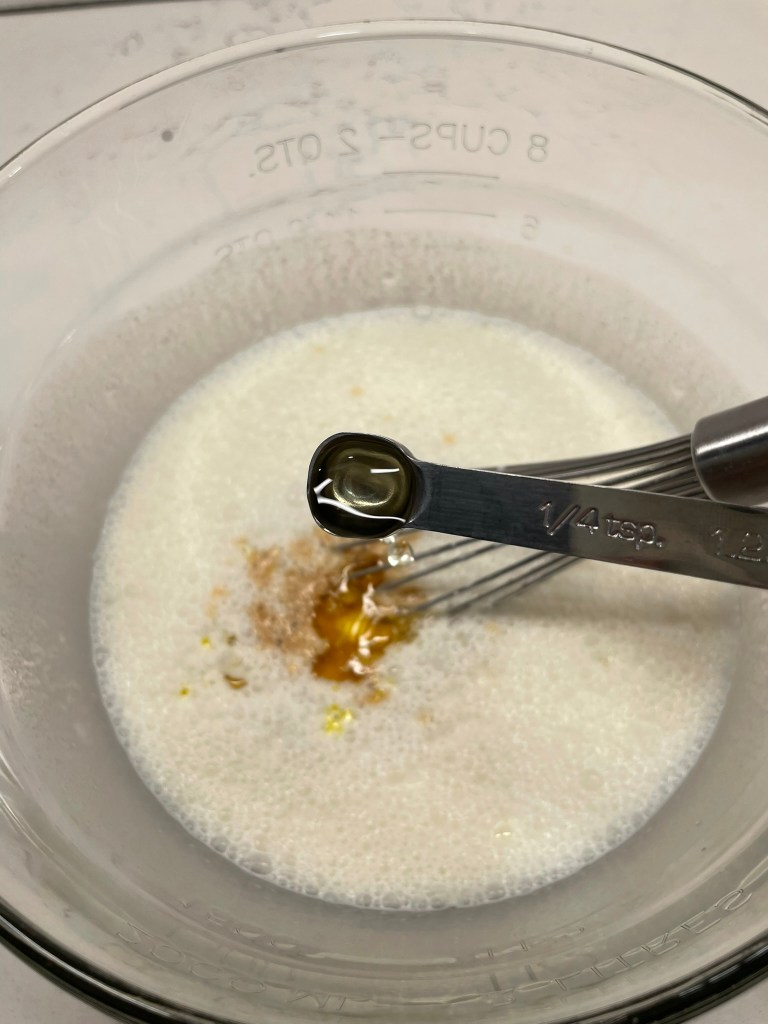
When you're in Vermont, you have to sneak a little bit of maple into everything! This version of my Gram's bread pudding also uses fresh blueberries, and it worked beautifully!
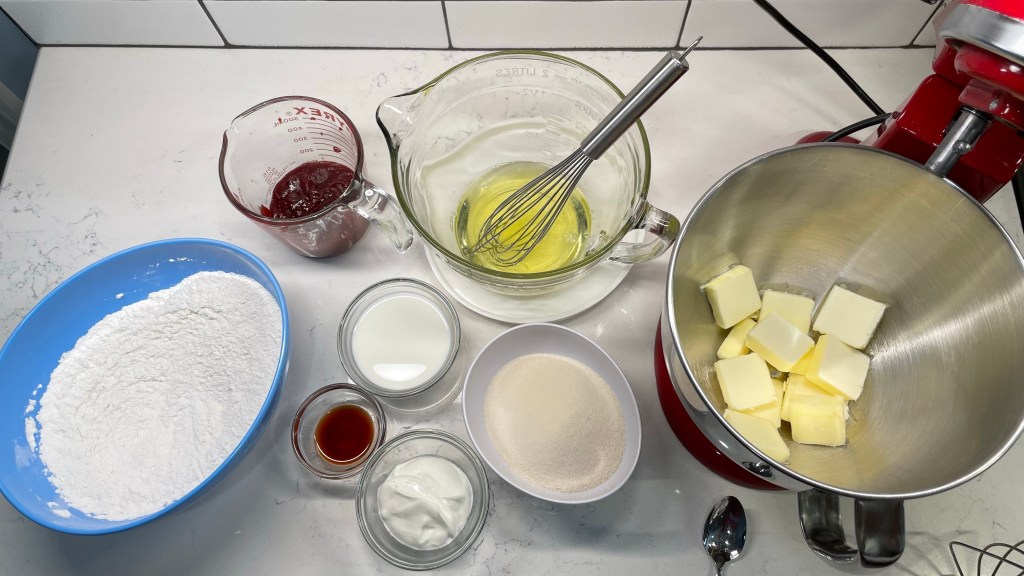
Ingredients
About 6 cups dry, stale bread pieces
2 1/2 cups milk
3 beaten eggs
1/4 cup melted butter
1/2 cup sugar (reserve a tablespoon to sprinkle over top)
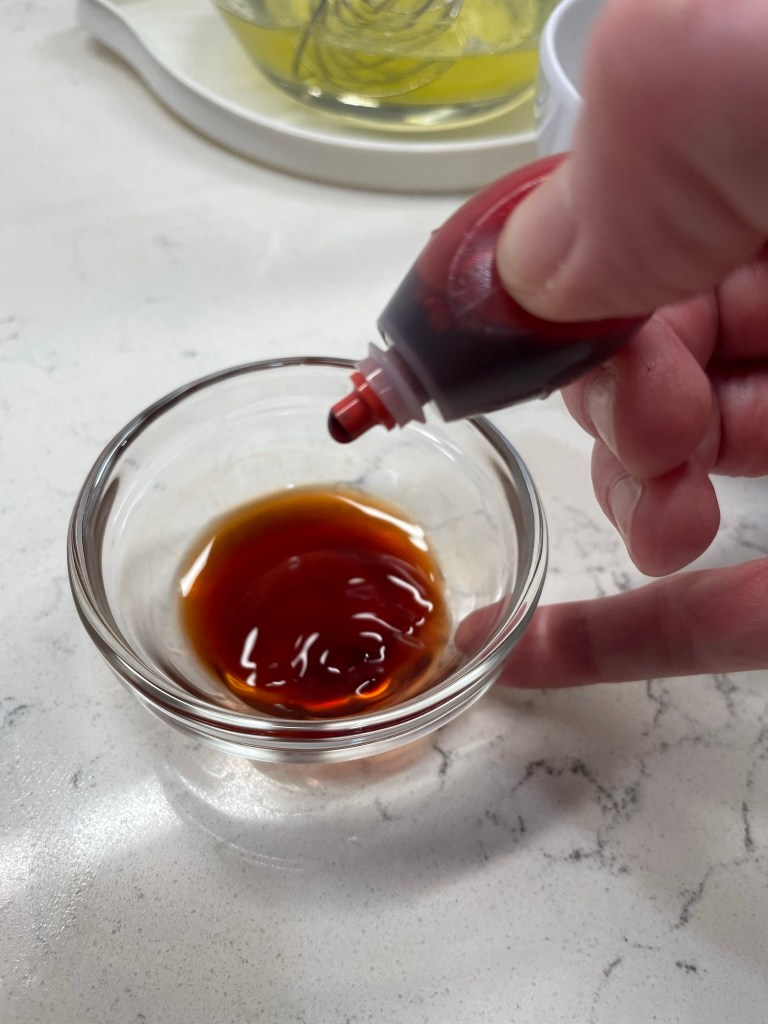
2 teaspoons vanilla extract
1 teaspoon ground cinnamon
1/4 teaspoon ground cardamom
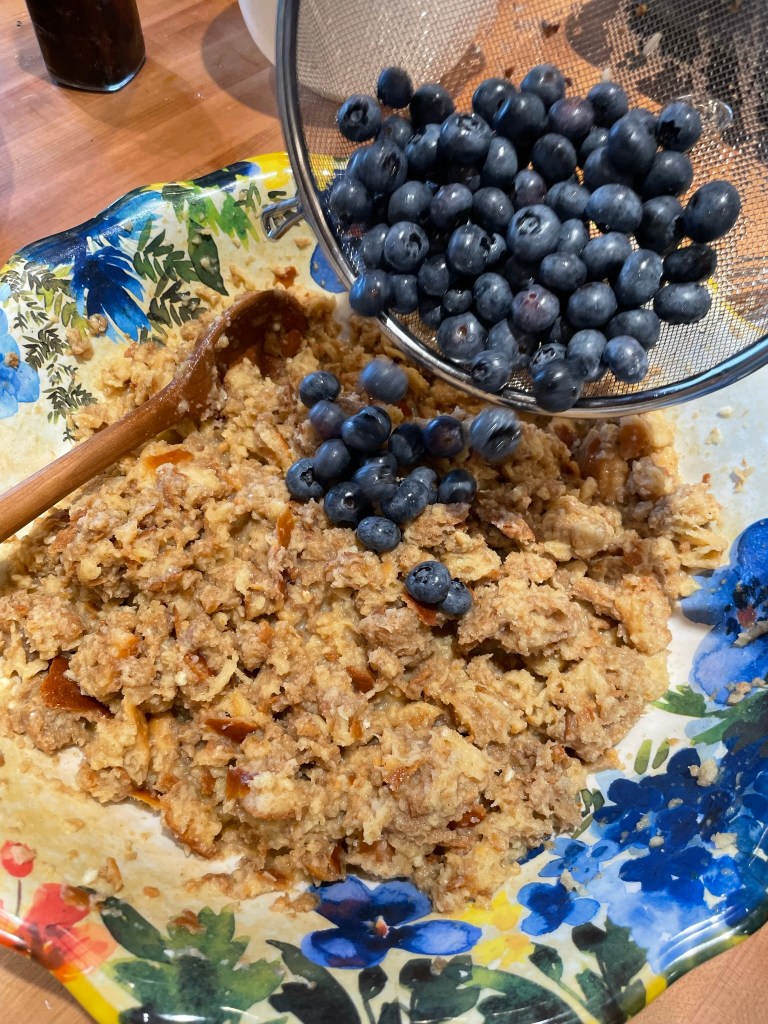
1 cup fresh blueberries
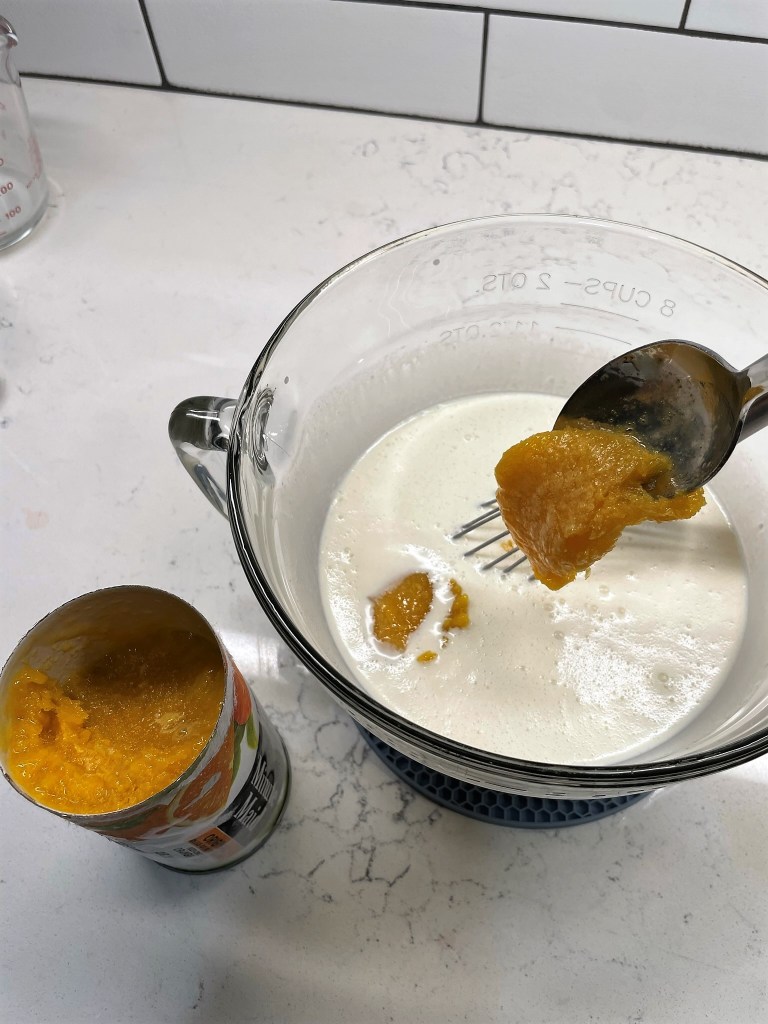
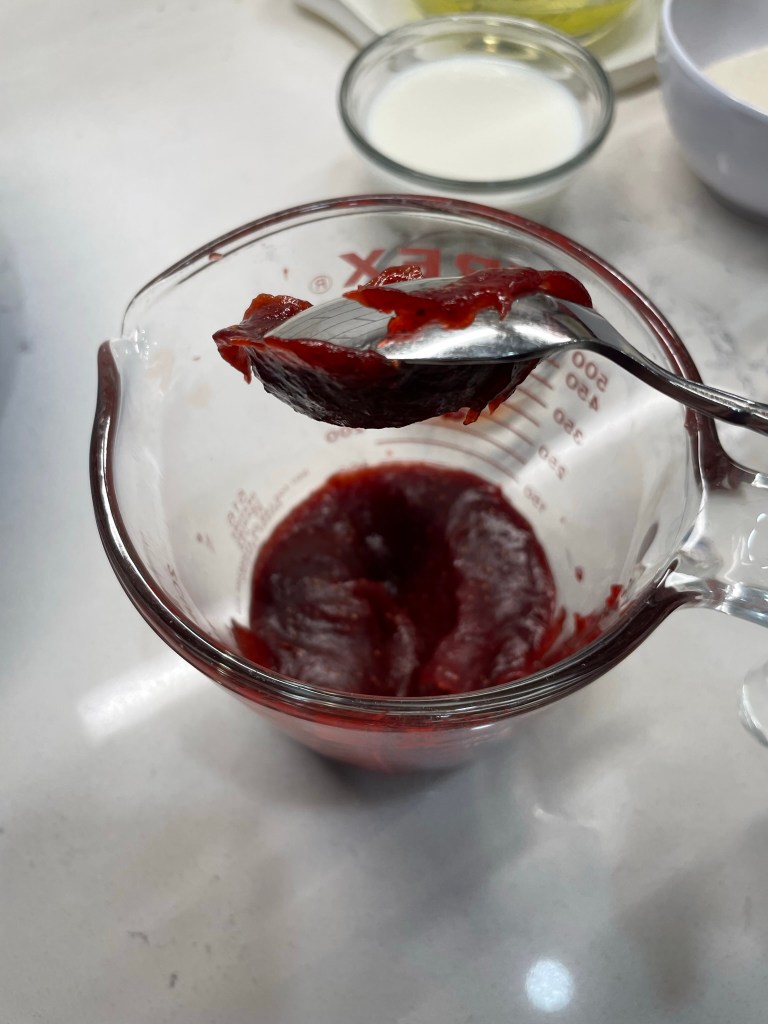
1/4 cup Vermont maple syrup
Whipped cream for serving
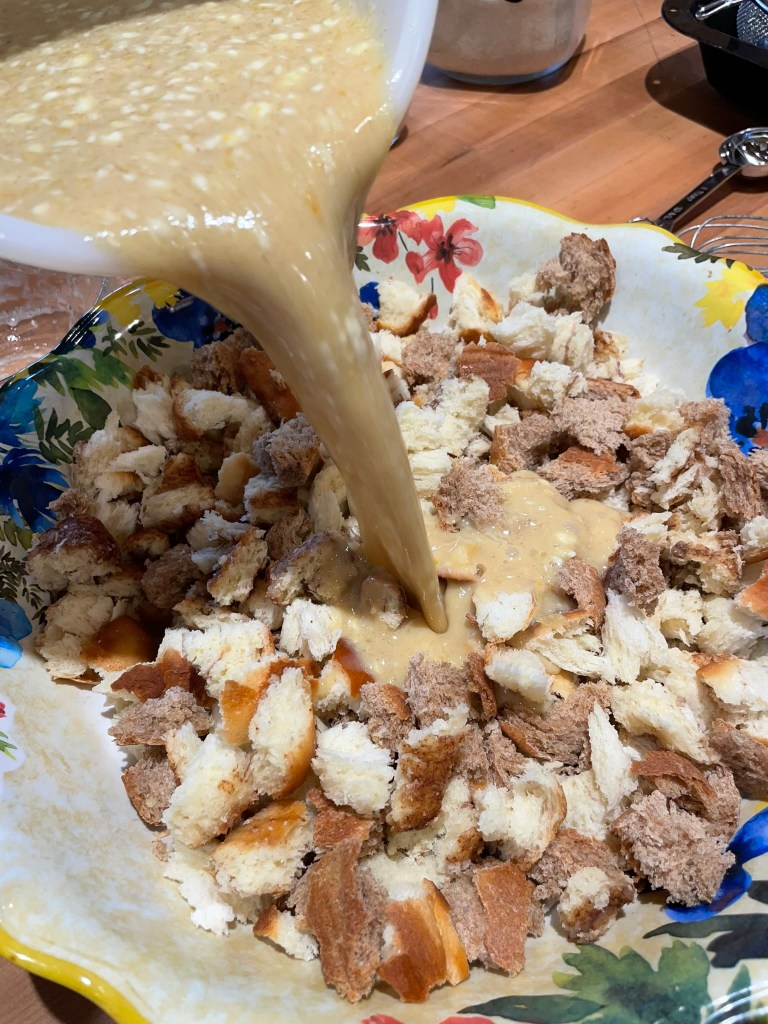
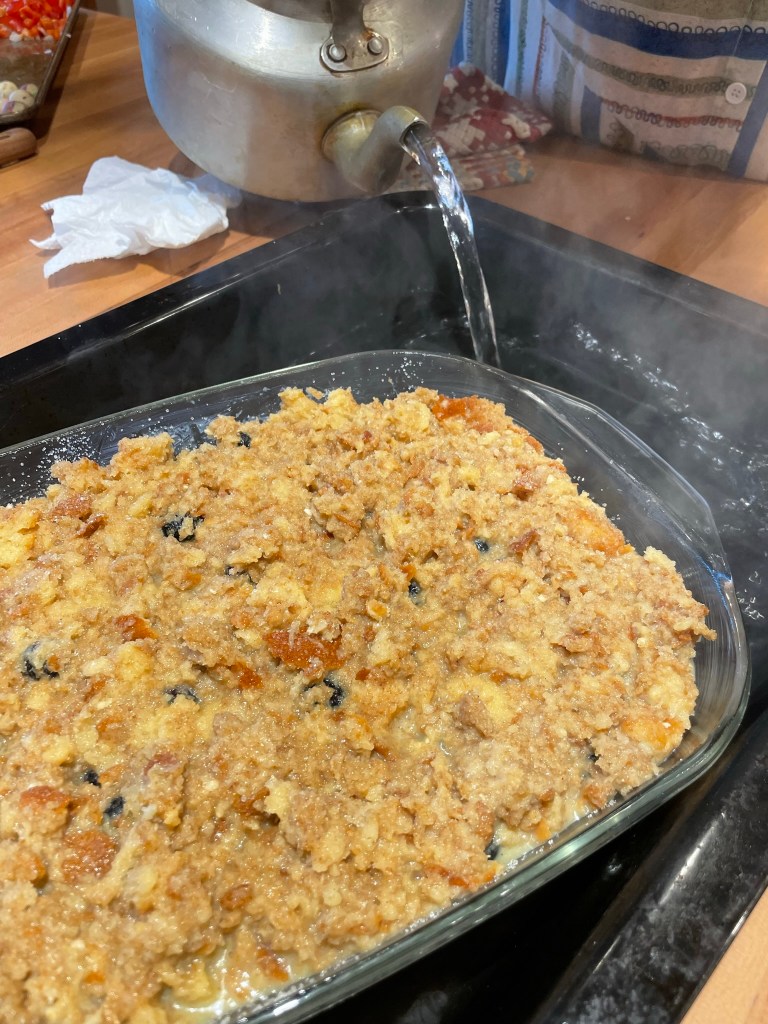
This recipe works best with bread that is stale but not bone dry. Tear up the pieces rather than cubing them, and allow them to dry out on the counter overnight (or all day, while you’re foraging for dinner’s ingredients). The bread pudding requires a water bath during baking, so put on a tea kettle to boil when you’re ready to move the pudding to the oven.
Directions
Preheat oven to 350 F, with oven rack in center position. Butter a 1 1/2 quart baking dish.
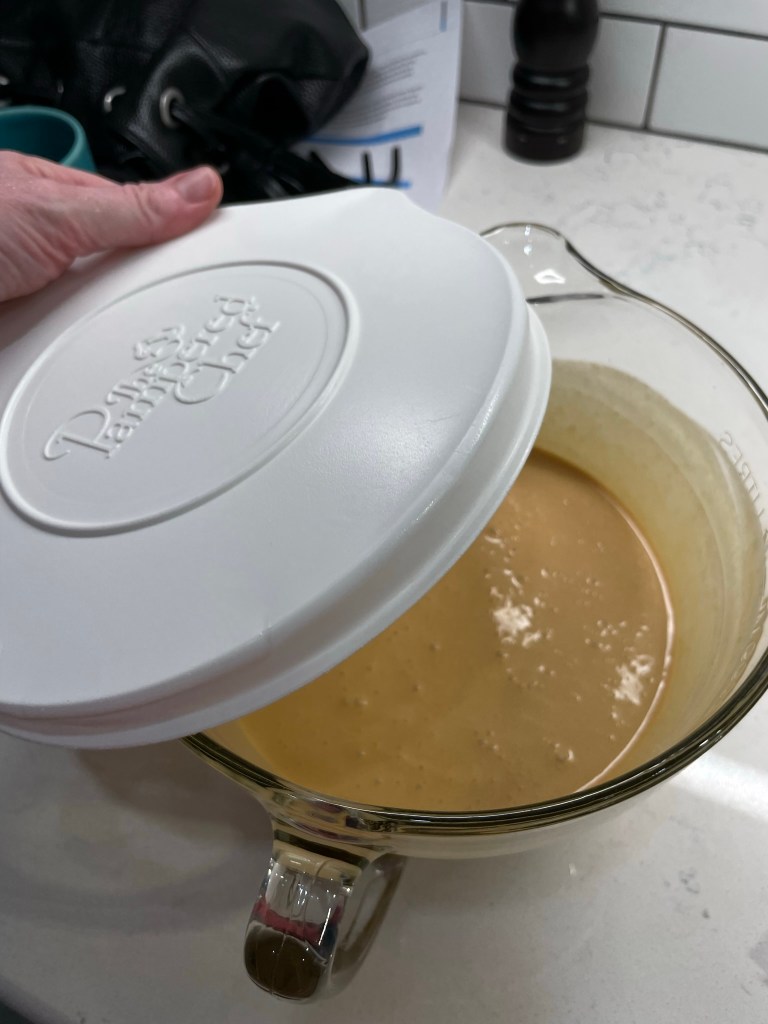
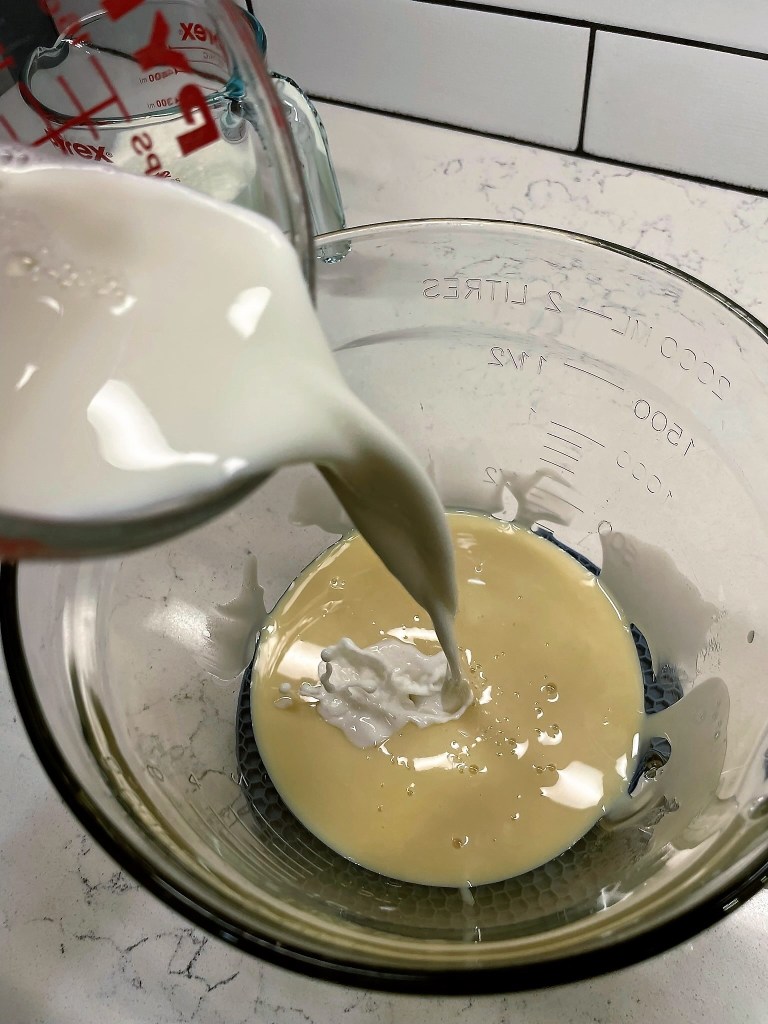
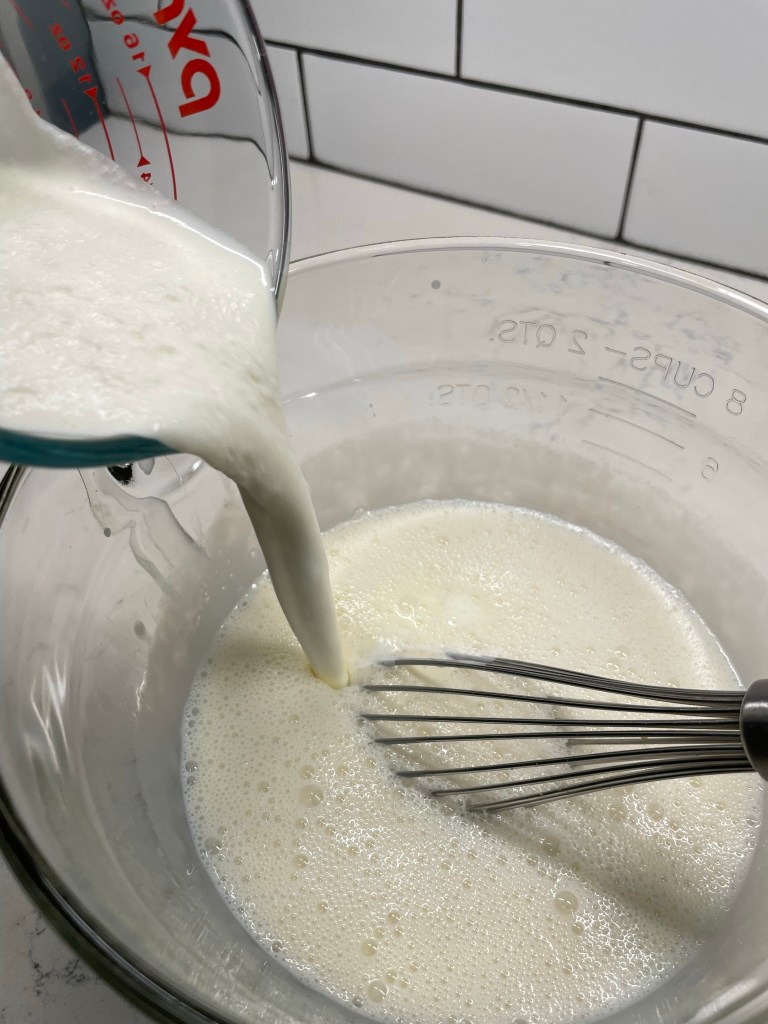
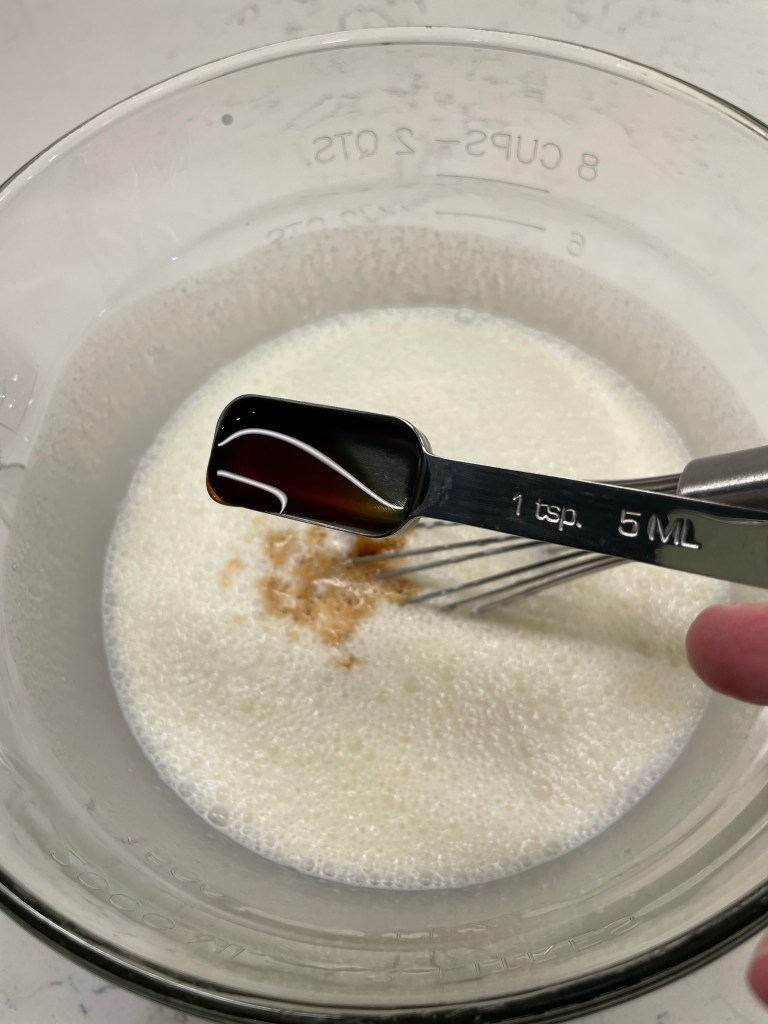
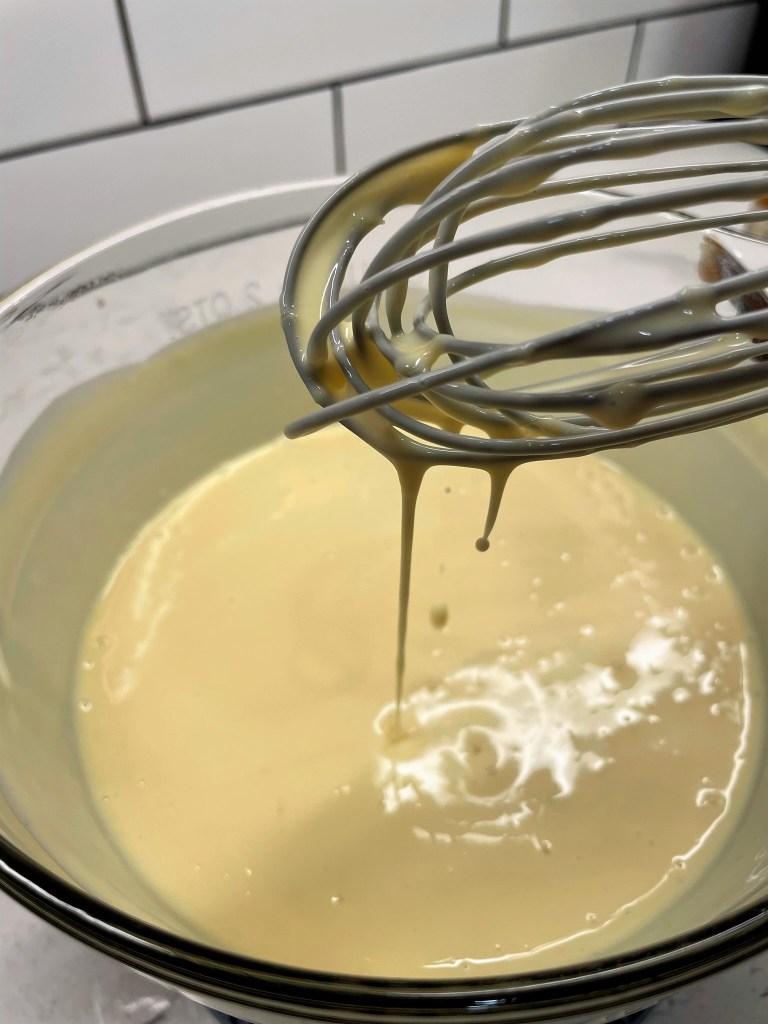
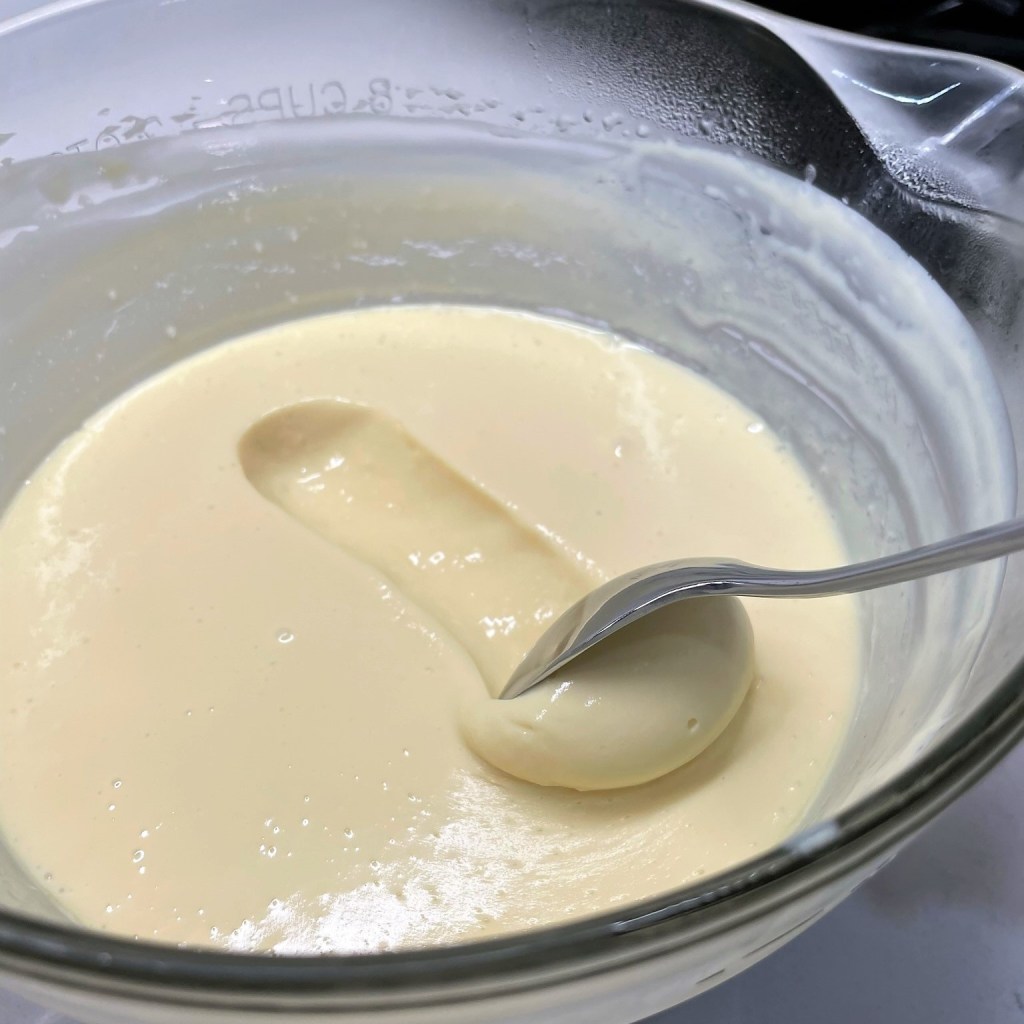
Add stale bread pieces to a mixing bowl that will be large enough to toss with liquid ingredients. Whisk together milk, eggs, sugar, melted butter, vanilla, cinnamon and cardamom. Pour milk mixture over bread and gently fold with a spatula or wooden spoon to evenly coat bread. The mixture will initially seem too wet, but the bread will continue to soak in the liquids. Allow the pudding to rest about 20 minutes to absorb the custardy liquid.
When most of the liquid has been absorbed, fold in fresh blueberries and maple syrup. Transfer mixture to buttered baking dish, and place the dish inside a larger dish with room for boiling water on all sides. Heat water to boiling in a tea kettle. Sprinkle reserved tablespoon of sugar all over the top of the pudding.
Carefully pour boiling water into larger dish, about halfway up the sides of the bread pudding dish. Bake approximately one hour, until pudding is set and top is golden browned and crispy.
I know, I know, the whole “national-whatever-day” may seem a little overboard to some, but the idea of dropping a spotlight onto a special food or drink is fun for me. Without this occasion of National Daiquiri Day, I’d be muddling through a regular old, hum-drum Wednesday. Oh yes, this is much better!
Happy daiquiri day!
If you have never made a daiquiri, I can tell you from experience that it is one of the simplest cocktails out there. Rum, sugar and lime is the essence of this drink, though you have probably also seen variations that included strawberry, and options for the drink to be served frozen, almost like a slushy. Given the brutal heat that is gripping so much of the U.S. this week, nobody would argue against a slushy cocktail right about now, right?
When people are paid fairly for producing excellent products, everyone wins!
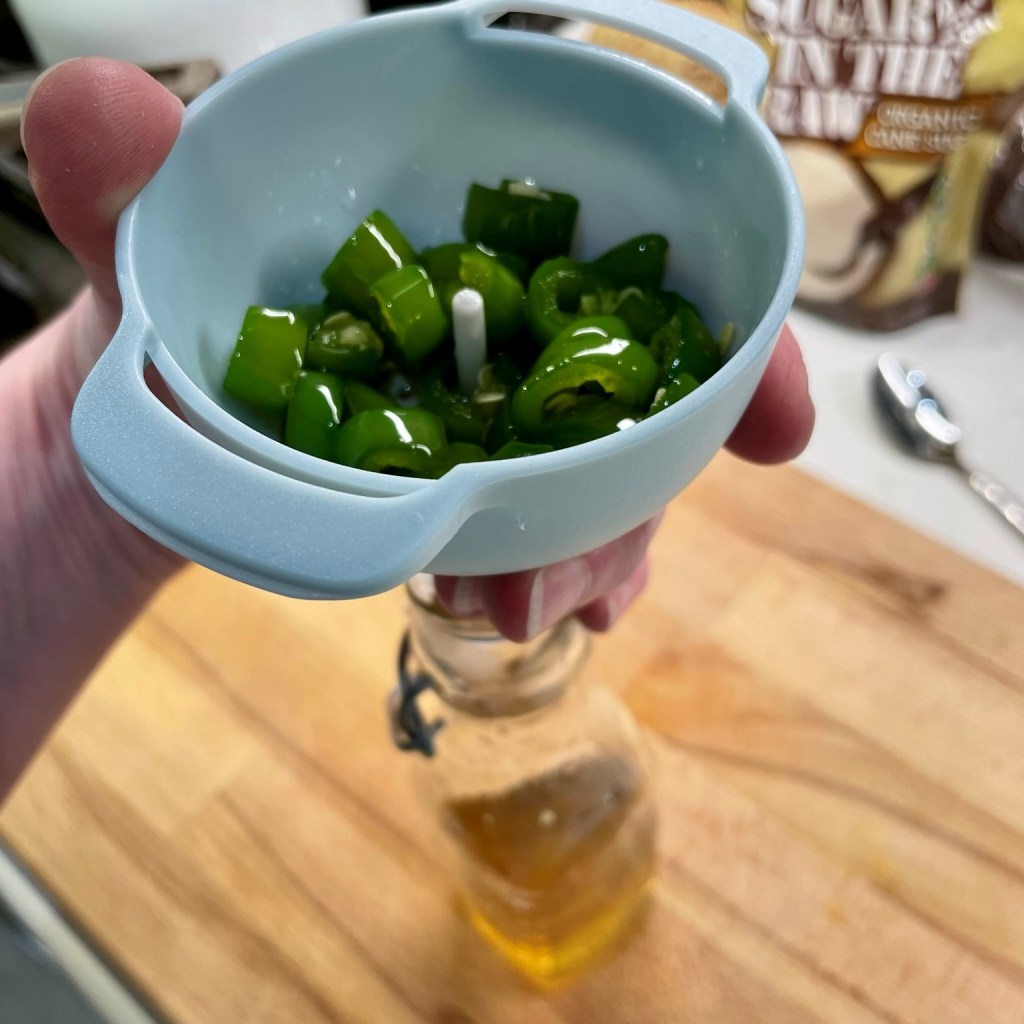
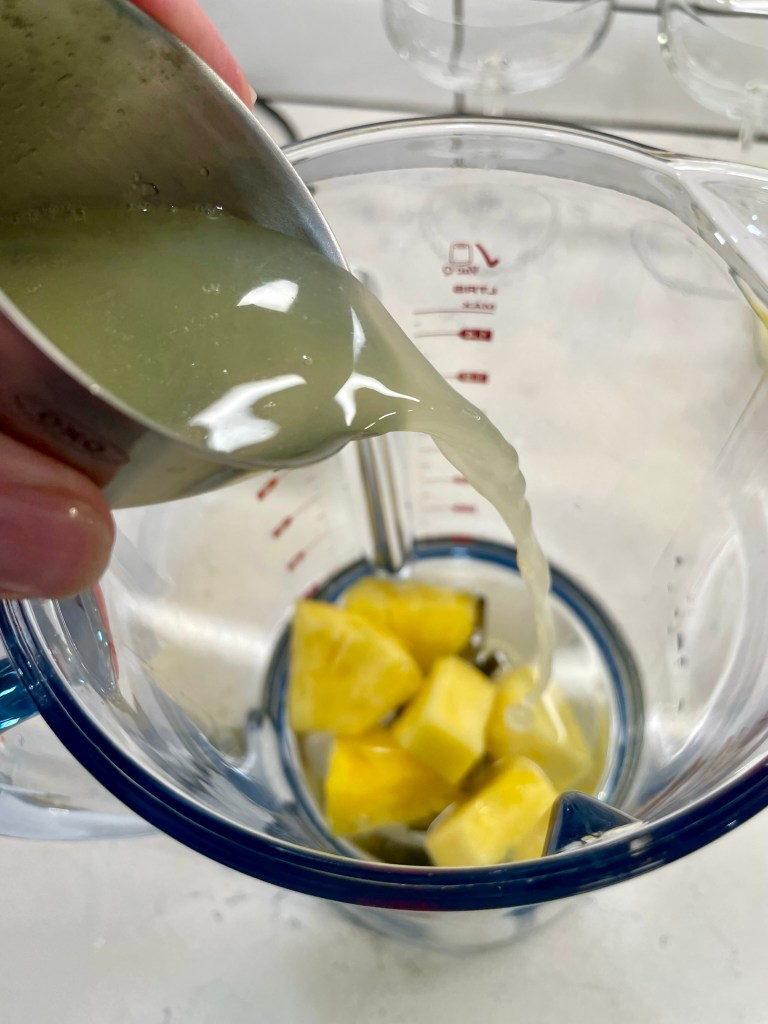
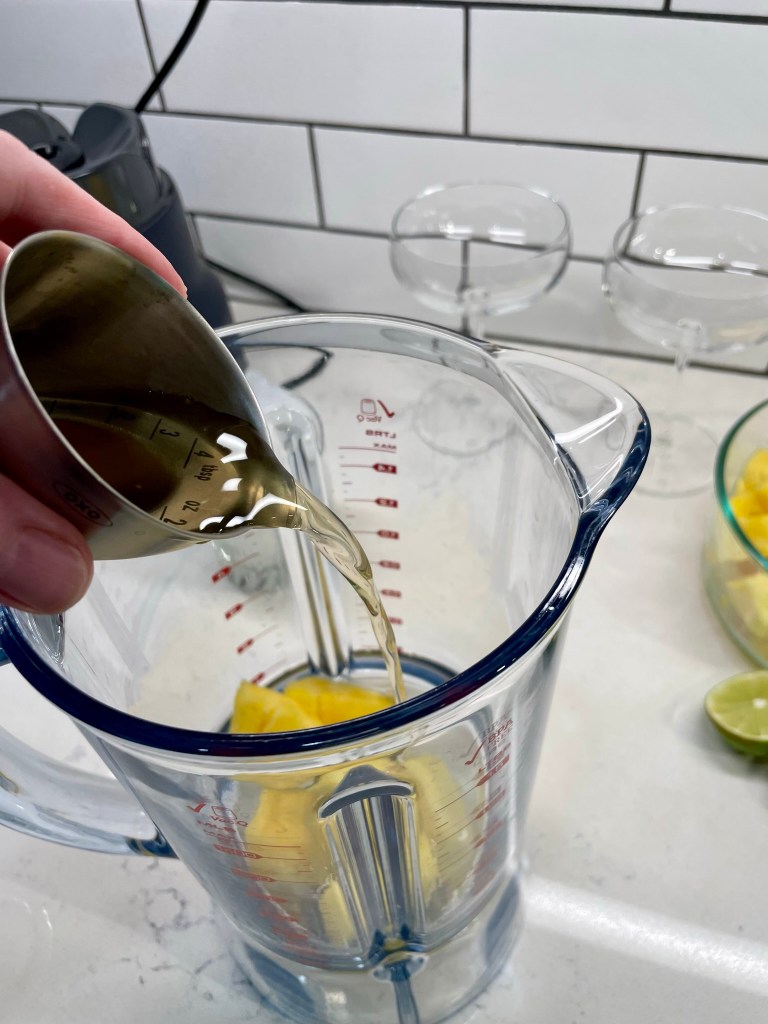
For my fun, Comfort du Jour spin, I’ve applied one of my favorite flavor combinations for a spicy-meets-tropical twist on a classic daiquiri. Fresh pineapple and a Serrano-infused simple syrup are the stars of this show. The syrup can be made ahead in a matter of minutes, and if you don’t have Serrano on hand, a jalapeño will do just fine. Any sugar can be used, but I love the richer, warmer flavor of turbinado, and we always shell out a little extra for fair trade. Equal parts water and sugar will make the simple syrup, and a cut up Serrano adds the spicy zip. Intensify the heat, if you’d like, by keeping the pepper’s seeds and membranes intact during infusion. Or scoop them out first for a milder bite. I’ll bet you can guess what we did at our house!
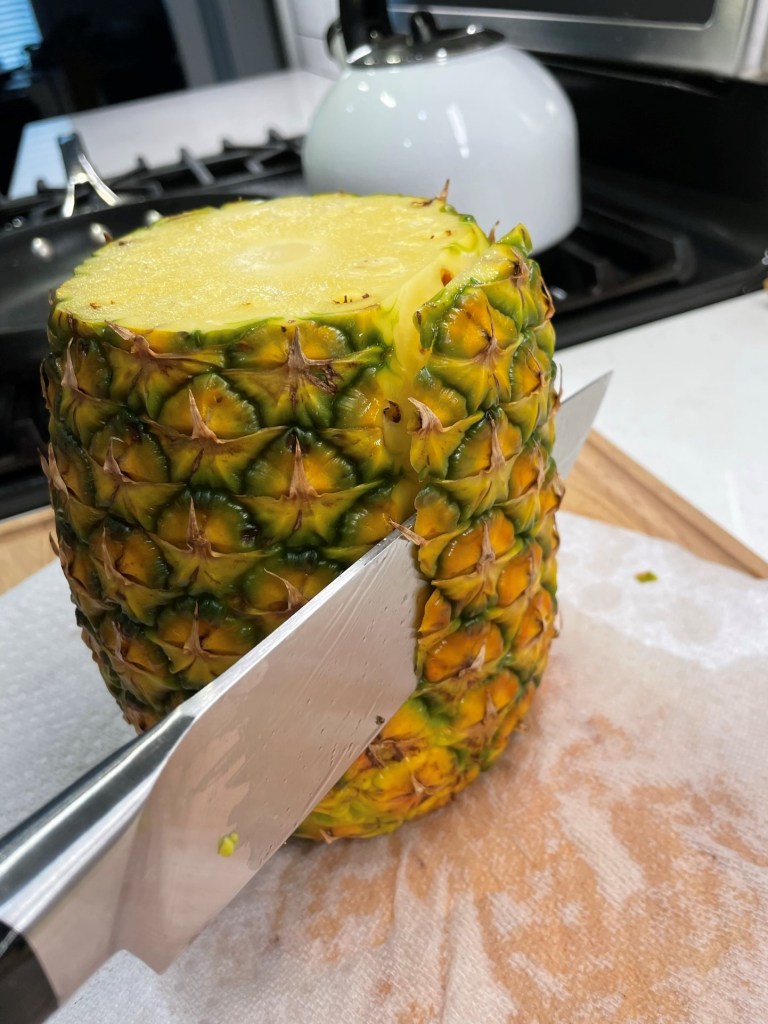
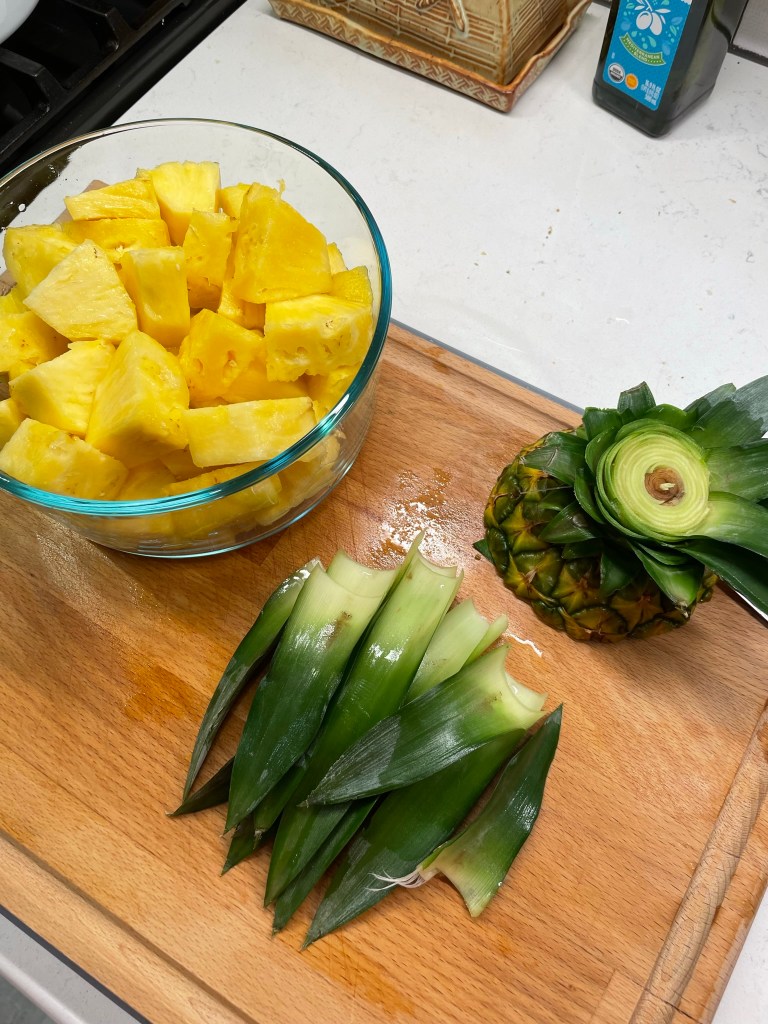
Cool it down completely, then strain out the pepper chunks and transfer it to a jar or bottle. Keep the syrup in the fridge until you’re ready to mix. Breaking down a fresh pineapple is easy to do, as you’ll see below. This one was so fresh and juicy, and the aroma was positively intoxicating!
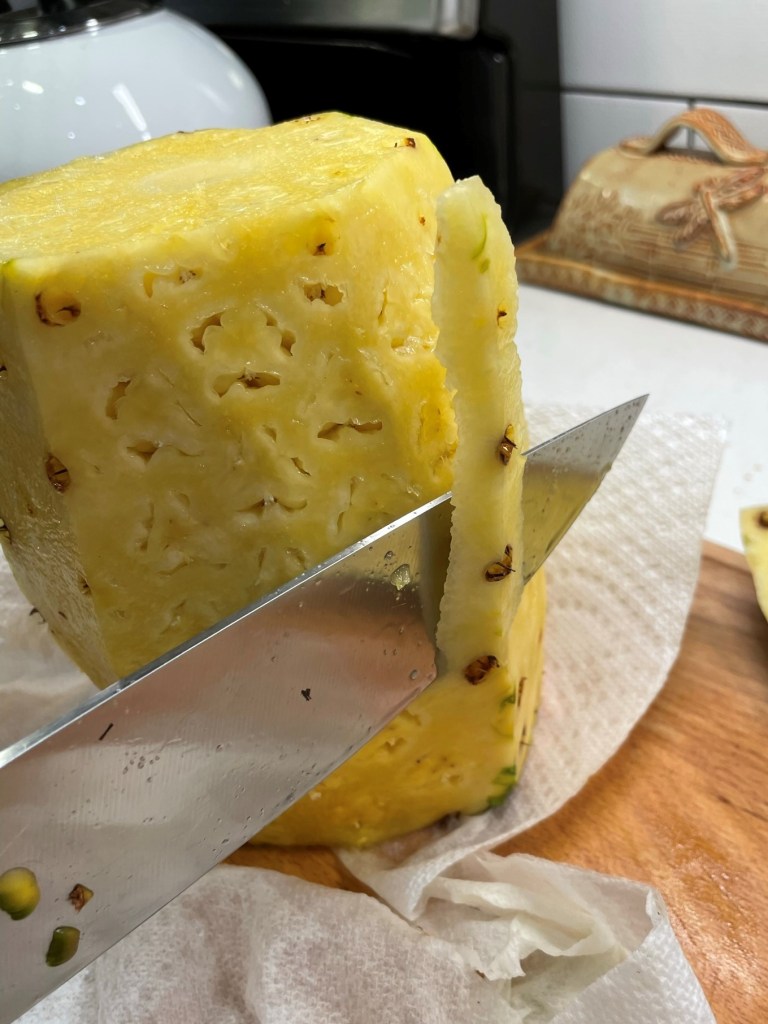
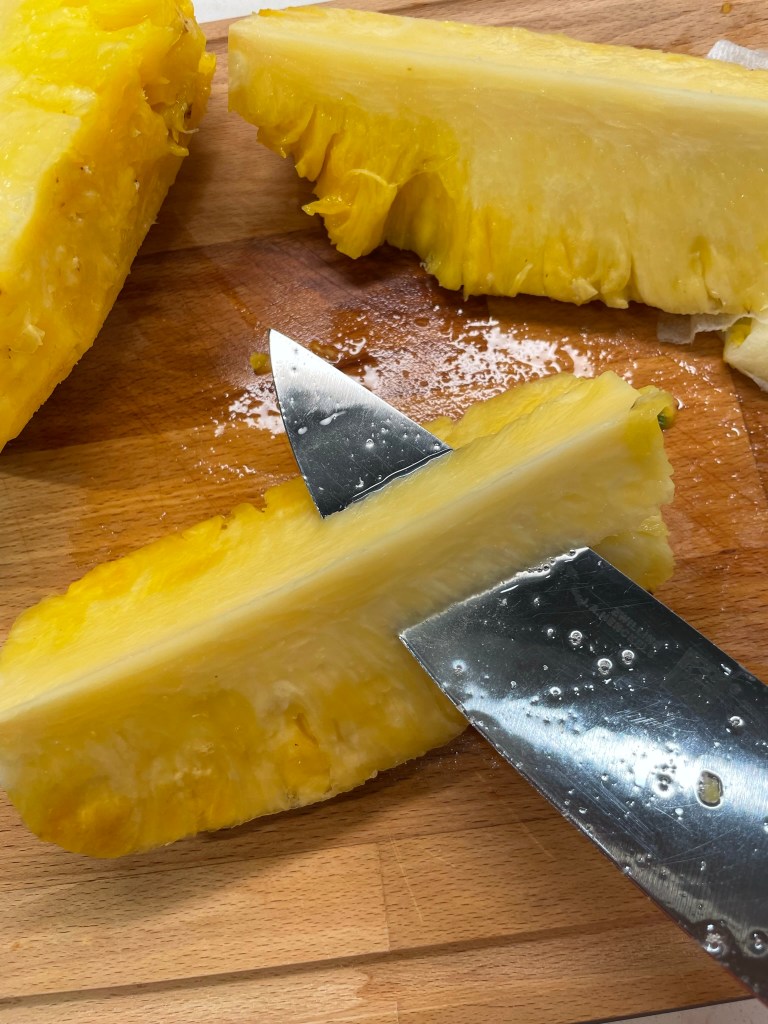
Wash the pineapple first, then cut off the top and bottom. Use a sharp knife to trim off thin slices of the peel, then go back around to catch any eyes that remain. Quarter it, then slice through the wedges to remove the core. I kept a few of the fresh leaves to use as garnish in a different kind of cocktail. 🙂
I used the sweetest, freshest pineapple, and I highly recommend that you choose one at its peak ripeness. Not sure how to tell? Check out this article for tips on selecting the best of the bunch, and if you need help finding other ways to enjoy the rest of your perfect pineapple, I’ve placed a carousel of ideas at the end of the post, just after the click-to-print recipe.
Easier than you thought, right?
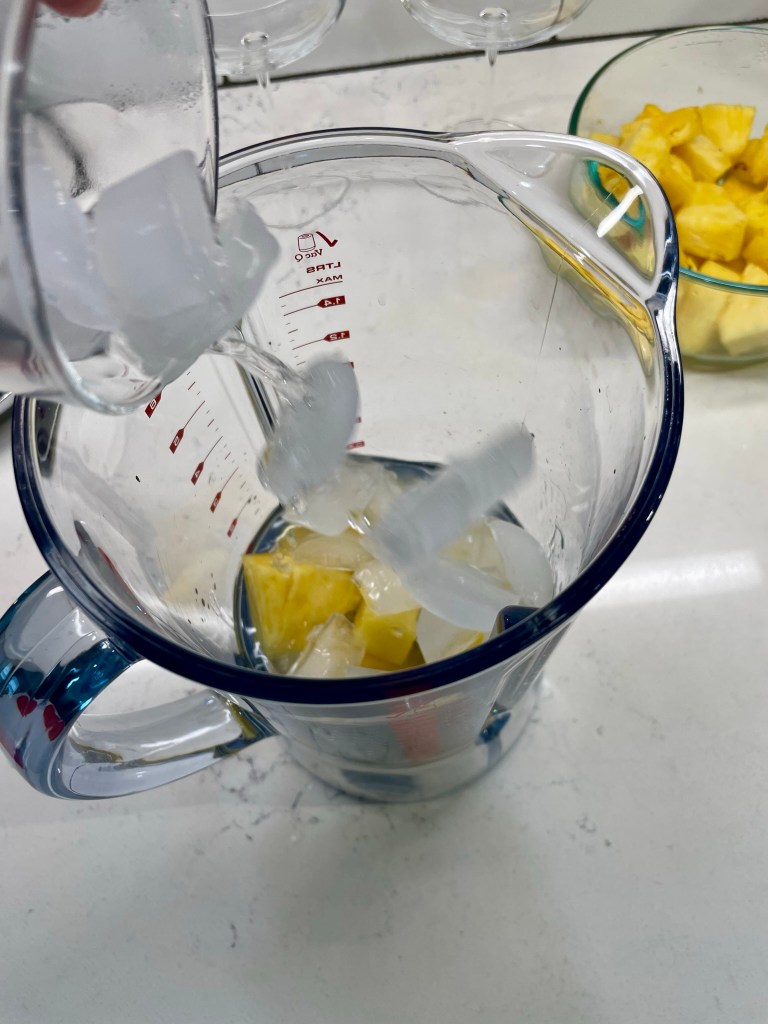
The other ingredients in my daiquiri are simple and obvious— light rum, and for this beauty, I relied on Sungrazer golden rum from Broad Branch Distillery, our favorite local spirits provider. But any light rum that isn’t “spiced” or “aged” will work great here. Fresh lime is important; please don’t ever use the green plastic squeezy bottle when making a cocktail. Your taste buds deserve the real deal! And you’ll need ice, of course, either for shaking the drink or (as I opted) blending it right in.
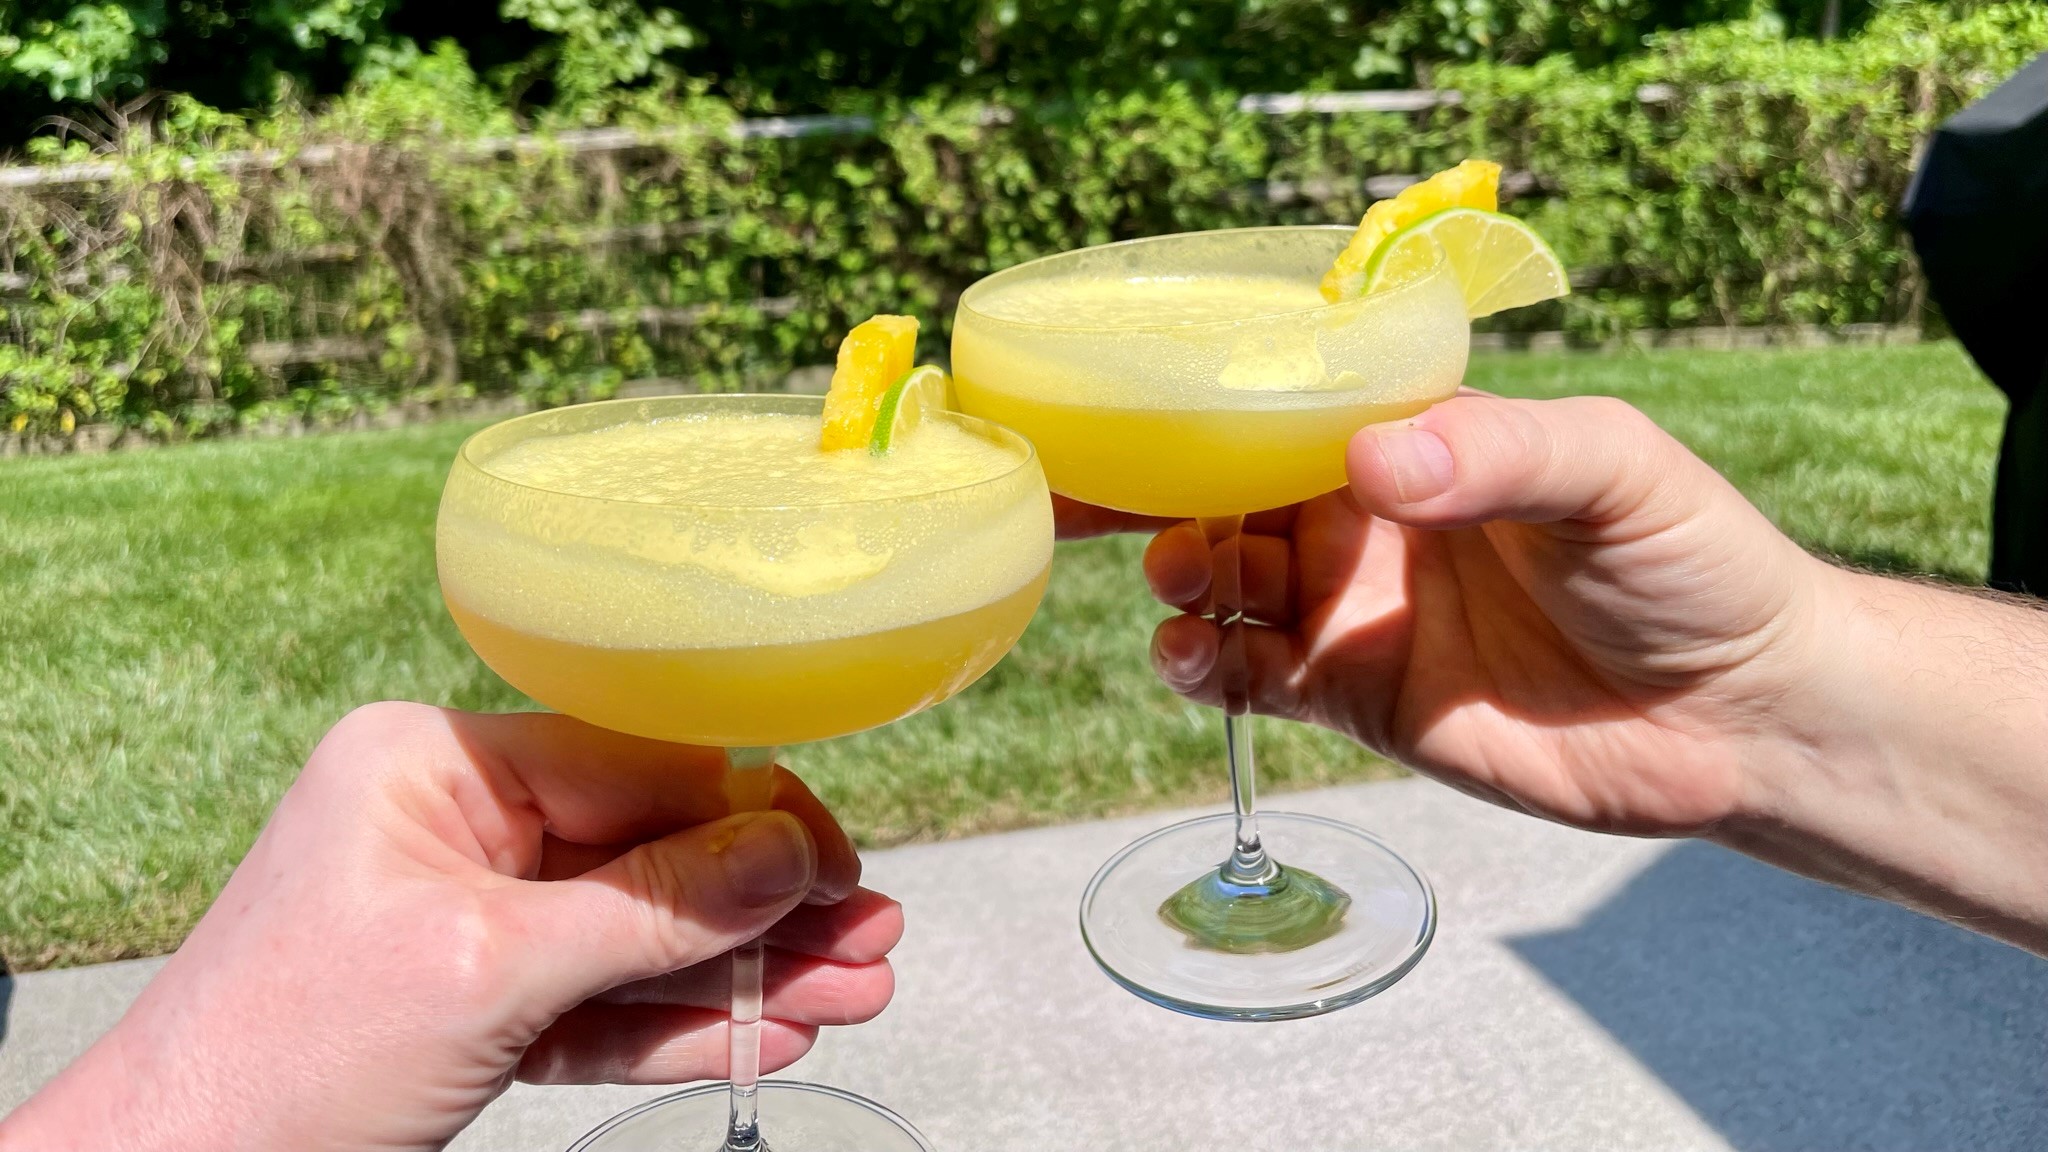
You can pour your spicy pineapple daiquiri over fresh ice or straight into a chilled coupe glass, as you wish. Doesn’t it look just like liquid sunshine?
One of my favorite heat-sweet combinations is flinging a classic daiquiri into spicy-meets-tropical territory!
Ingredients
4 oz. light or golden rum
1/2 cup fresh pineapple chunks
Juice of one large lime
1 oz. Serrano-infused simple syrup (see below)
1 cup ice (for blending)
Lime and fresh pineapple for garnish
Directions
Combine all ingredients except garnish in the pitcher of a blender and process until ice is finely blended and mixture is somewhat frothy. Divide between chilled cocktail glasses and garnish with thinly sliced lime and pineapple.
Alternatively, you may add all ingredients to a cocktail shaker and shake until the outside of the container is frosty. Strain over fresh ice into a rocks glass and garnish as desired.
Serrano-infused Simple Syrup: Combine 1/2 cup each sugar and water in a small saucepan and bring to slight boil. Stir in a chopped Serrano chile pepper. Remove from heat and steep until cool. Strain out chile pieces and transfer syrup to a jar or bottle. Refrigerate up to three weeks.
“This time, I’m gonna try something new!” I say it so many times when my husband and I visit Kilwins, a franchise candy shop and ice cream parlor that seems to always be on the way home from wherever the heck we’ve been. And if it isn’t already on the way home, we might conjure a reason that we must visit Trader Joe’s, and that makes it on the way home so we have an excuse to stop for a sweet treat.
The ice cream at Kilwins is superb— a huge variety of flavors, deliciously creamy, and big, generous scoops served up in your choice of three cones (or a bowl if you really can’t wait to just dig in). Les usually gets the one called “Kilwins Tracks,” which is a house version of Moose Tracks, a swirly mess of vanilla ice cream, chocolate-covered peanut butter truffles and trails of thick chocolate fudge. Or he might stray toward the ever-popular sea salt caramel, which is exactly as amazing as you expect it would be. There are dozens of other flavors, including mint chip, cherry, chocolate-coconut, peanut butter, rum raisin, a groovy, tie-dye colored variety called Superman, and even a few additional flavors hiding in the back.
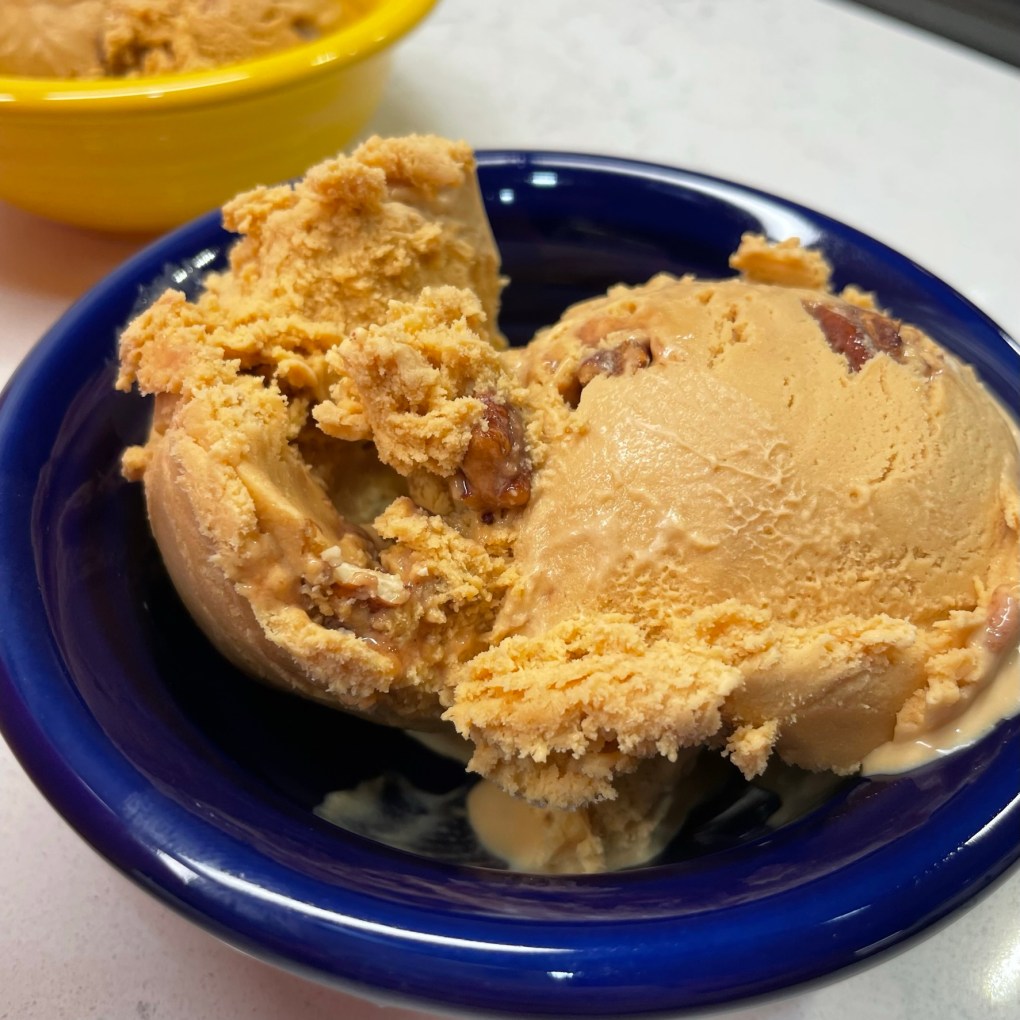
But when I stand there in front of that long glass case, trying to keep my word on choosing something different from my usual, a wave of sadness comes over me. It isn’t because there aren’t enough delicious options— it’s because I just love the New Orleans Praline Pecan that much. And, for the sake of the growing line of people behind me as much as for myself, I usually just give in and get it. So much for trying something new!
I just can’t tear myself away from my favorite!
In my defense, I stopped dating other guys when I chose my husband, so why should it matter if I get the same ice cream each and every time? It’s a perfect blend of creamy, sweet, nutty, slightly salty, caramel-y goodness. Naturally, I decided it was time for me to try to re-create this decadent treat at home, and when I found these pecan praline candies last fall at Trader Joe’s, it was exactly the nudge I needed. I have made it a few more times since, and National Ice Cream Month feels like the right time to share it!
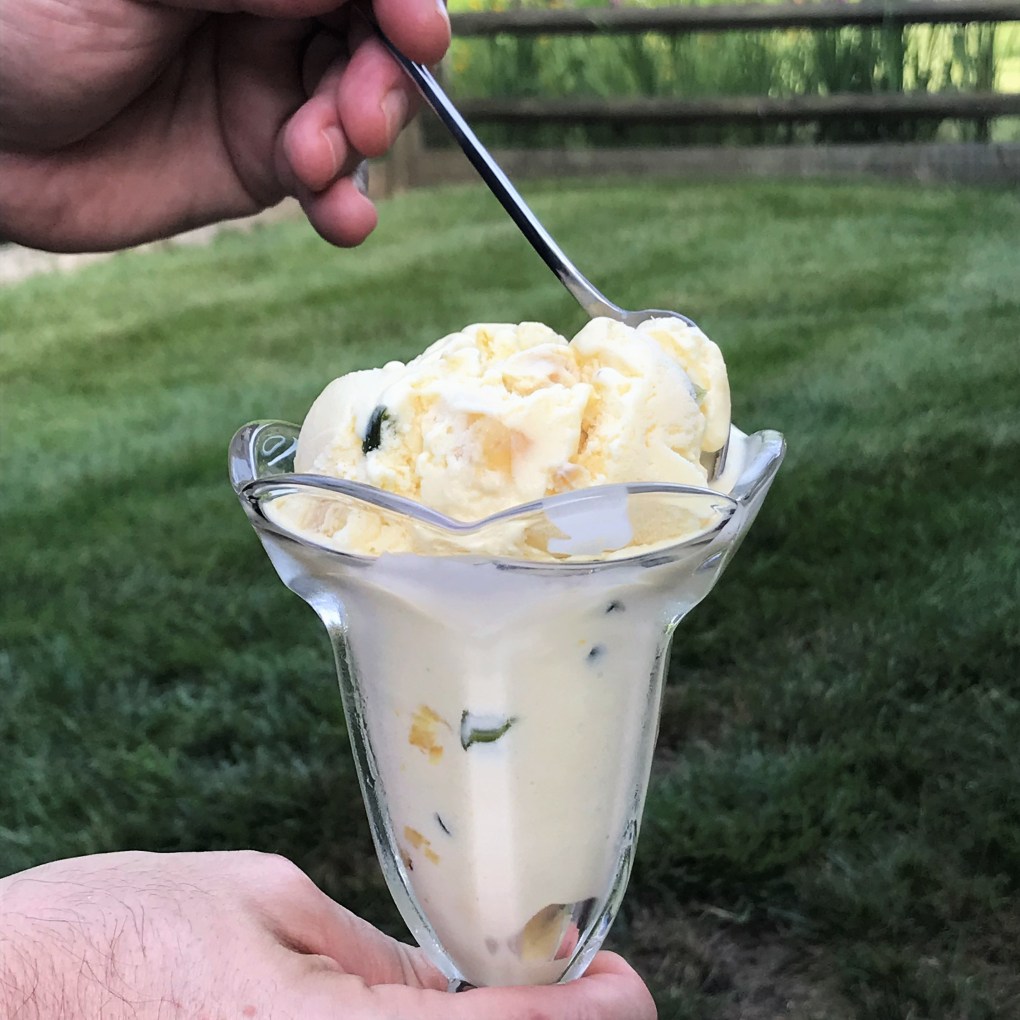
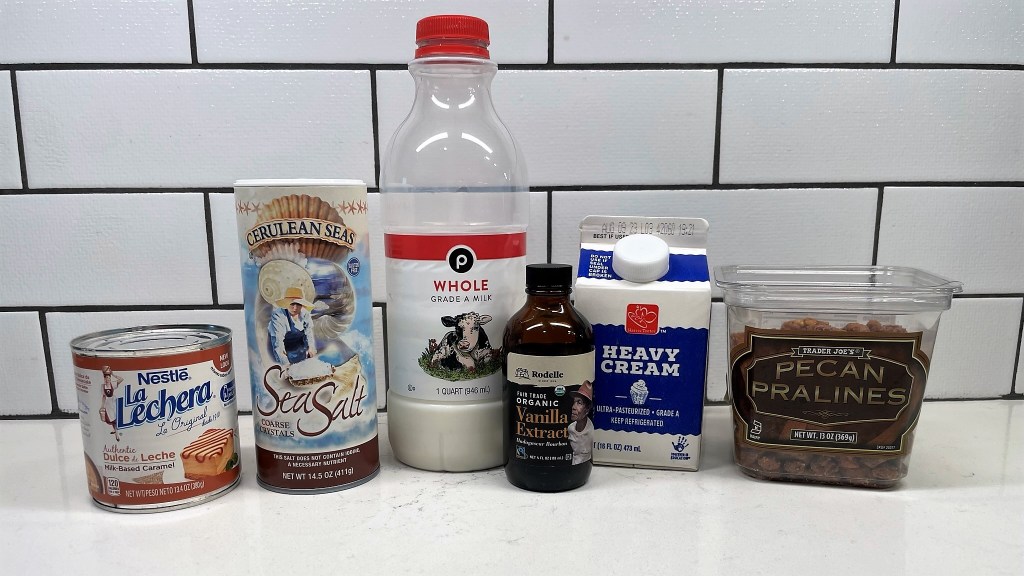
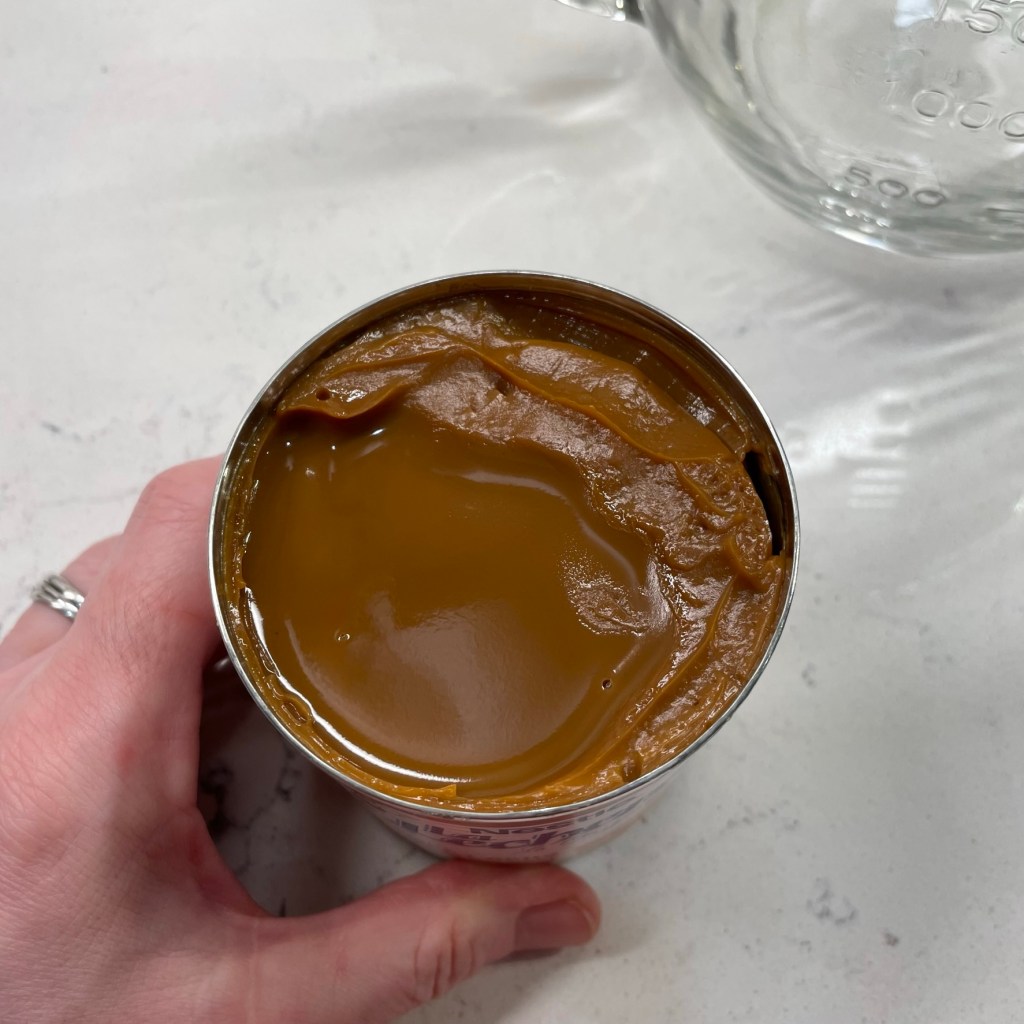
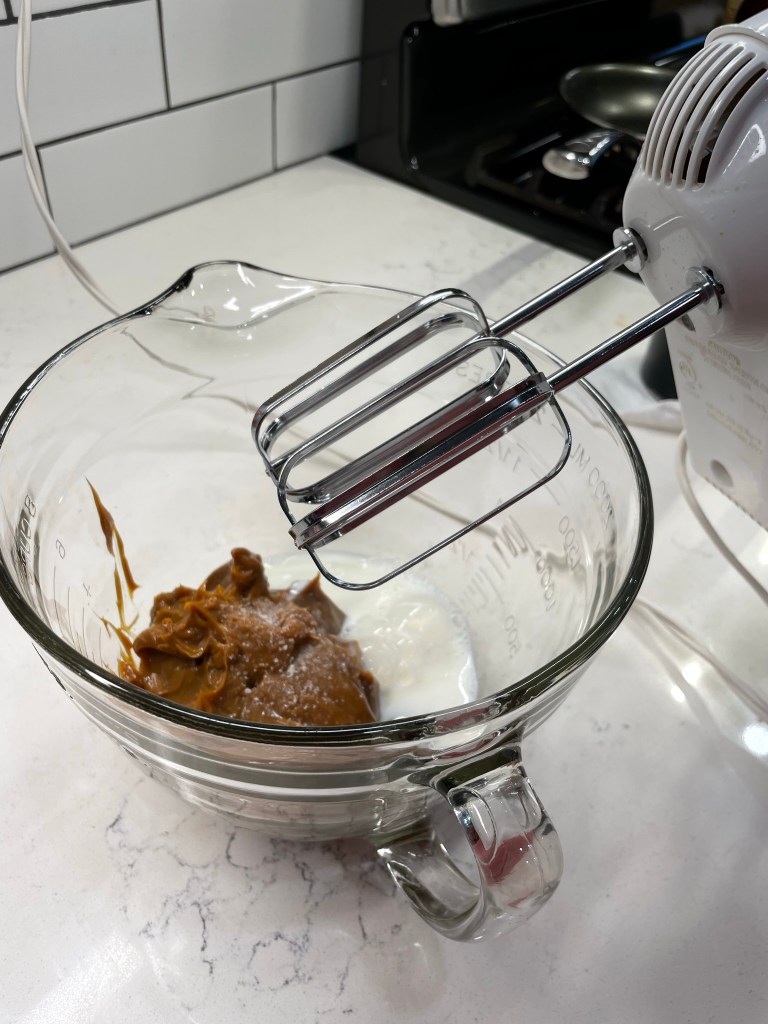
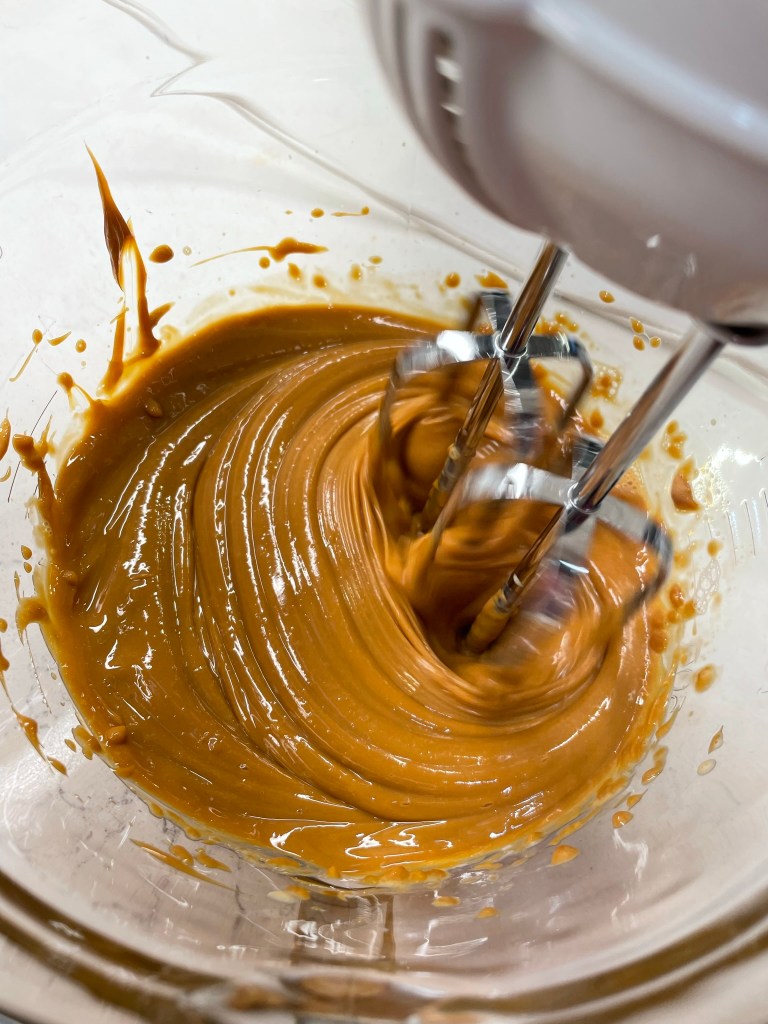
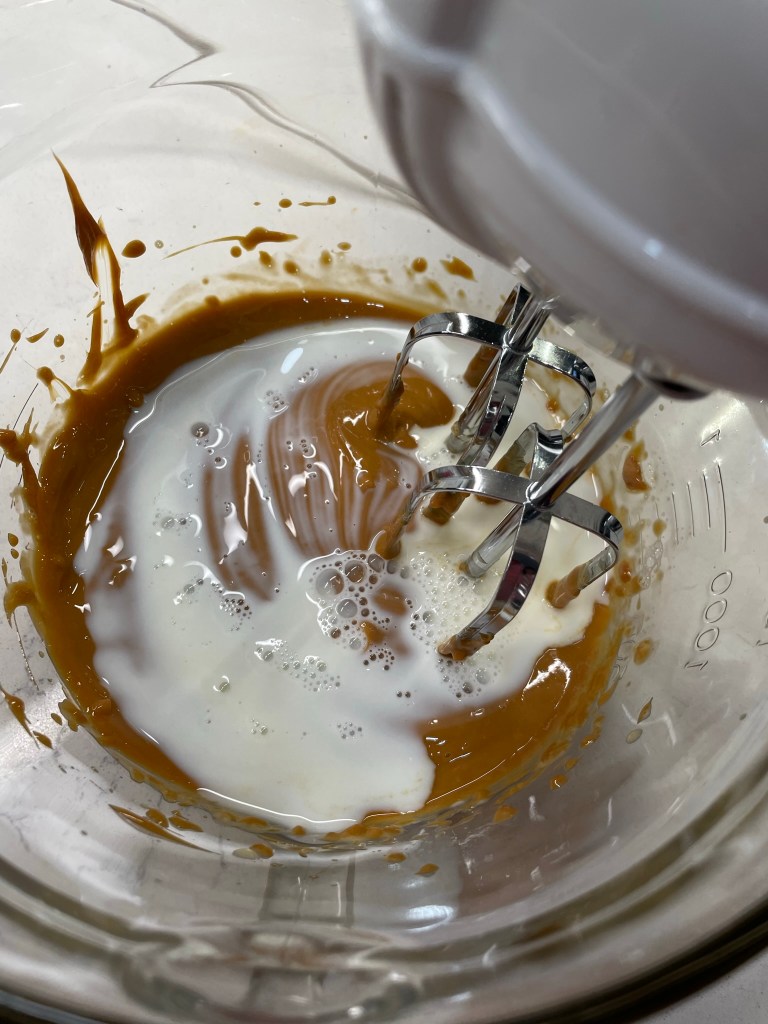
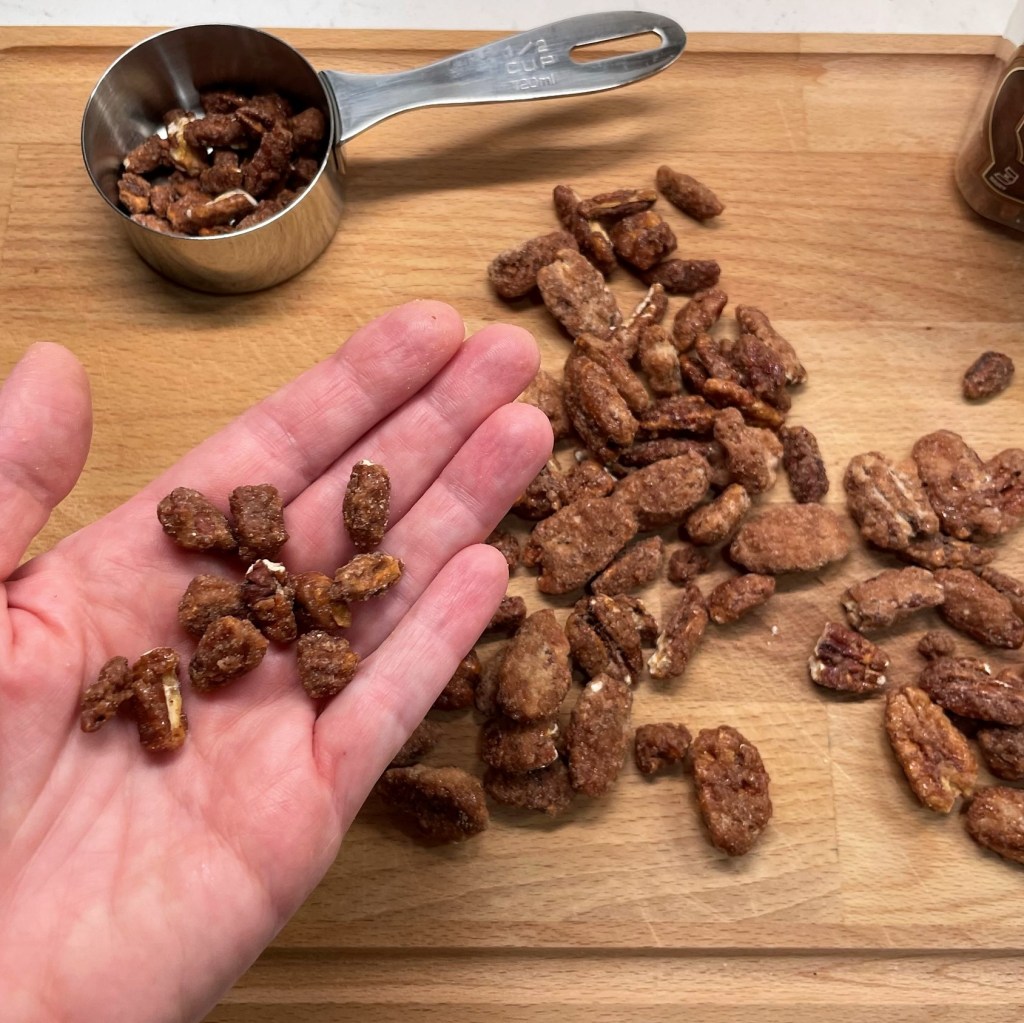
The ingredients for this ice cream are pretty simple, and if you have a recipe to make your own candied pecans, all the better! Rather than using regular sweetened condensed milk, as I have started doing in recent years, I use the dulce de leche variety, which has been cooked to a richly caramelized consistency. It is very thick, so you’ll have to use a small scraper to dig it out of the can. I sprinkle about 1/4 teaspoon sea salt over the caramel for that delicious contrast. Mixing in the milk is a little more challenging with the thick caramel, so I recommend using a handheld electric mixer over trying to whisk it. I also suggest blending in the milk a little bit at a time so you don’t spatter caramel milk all over the kitchen, as I did on my first effort!
It’s easy enough to switch to a whisk for blending in the vanilla and heavy cream, and then cover the bowl and send it to the fridge for several hours to overnight. Unless you have a fancy, professional-style ice cream maker, you always want your base to be super cold before you add it to the freezer bowl for churning.
My Cuisinart machine usually takes about 25 minutes to achieve a perfectly churned consistency. While it’s going, I take a few minutes to break up about a half cup worth of the praline pecans into small pieces. It takes a little extra effort than chopping them, but I don’t end up with all the little shards that are not the most pleasant texture. If they are at most one-quarter the size of a whole pecan, that’s just right. When the ice cream is almost finished, the only step left is adding in the pecans and transferring to an insulated container.
For best results, freeze at least eight hours before enjoying. I should also point out that if you don’t like or cannot eat pecans, you could substitute toffee bits and still enjoy the contrast of a little crunch mixed in. Or, omit them entirely and you’d have sea salt caramel ice cream. Speaking from experience, I can tell you that would be pretty awesome, too!
You only need a few fridge and pantry ingredients to create a specialty ice cream at home. I've relied on a canned dulce de leche milk and store-bought candied pecans to replicate one of my favorite ice cream parlor treats!
Ingredients
14 ounce can Nestle’s dulce de leche condensed milk (see ingredient notes below)
1/4 teaspoon coarse sea salt
1 cup whole milk
1 teaspoon real vanilla extract
1 cup heavy cream
1/2 cup candied pecan pieces
Ingredient Notes: If you cannot find the dulce de leche condensed milk, it’s fine to use regular or fat-free condensed milk in its place. The finished ice cream will not have quite the same caramel-flavored base, but the candied pecans will still provide plenty of praline flavor.
Directions
Combine Lechera condensed milk and sea salt in a large bowl or mixing pitcher. Use a handheld mixer to blend in the whole milk, about 1/4 cup at a time to avoid spattering.
When the whole milk is completely blended in, add vanilla extract and heavy cream. Switch to a whisk if you wish, or blend only briefly with a mixer to avoid whipping too much air into the cream. Cover the bowl and refrigerate the base mixture several hours to overnight.
Freeze ice cream, following manufacturer’s instructions for your model machine. During the last couple of minutes, add the candied pecan pieces to incorporate them throughout the ice cream base. Transfer ice cream to an insulated container and freeze several hours to firm it completely before serving.
Day drinking is not something I ordinarily do, but last Thursday was not an ordinary day. It was a busy travel day for me, and with two hours to kill at Charlotte-Douglas International Airport, I decided that a rum-based margarita would be a good accompaniment to my BBQ pork belly Cubano sandwich. Yep, at 10:30 in the morning.
A little stingy on the pork belly, eh?
The drink was refreshing— not quite a daiquiri and not quite a margarita— and it went down a little too easily as I counted the minutes to my 12:15 flight. The sandwich was, well, airport food. Overly processed and way too salty. There was one skimpy piece of flabby pork belly, and some ham that tasted like it was pulled straight out of a Lunchables package. The pickle was OK, at least. I thought about Kenji López-Alt, my culinary idol, and what it must be like to have half a million Instagram followers to make lunch spot recommendations for you. When Kenji traveled recently to Colombia, he posted an inquiry: “Hey, I’m at the Atlanta airport on layover, where do I eat?” And just like that, 517 suggestions rolled in— all of which were, apparently, fabulous. Me? I passed by multiple food courts and standalone eateries until I found the one closest to the gate for my next flight. It was all about proximity.
When I travel through airports, I like to watch the people and imagine where they might be going. I saw a few groups of millennial age professionals, dressed to impress and headed to a conference, I figured. There was a woman in a tee shirt that read, “pray more, worry less.” She was by herself and seemed very relaxed, so point taken. Then, a young family with the mom pulling a wheeled carry-on behind her, a bulging backpack weighing down her petite frame, baby on her hip and a husband trailing behind, carrying exactly one thing and staring at his phone. I seriously considered throwing ice on him, just to wake him up.
All these people could be going absolutely anywhere, as Charlotte is the seventh-busiest airport in the world, with about 1,400 arrivals and departures daily. I passed by one gate where the attendant was making announcements in Spanish— that flight was destined for Puerto Rico and then Costa Rica. One day, I’d like to be on that flight, but not today.
My travel plans for the week did not include stops in Colombia, Costa Rica or any other tropical destination, but I have been counting the days ’til this trip. In a couple of hours, I’d be on the ground in Providence, Rhode Island for an extended weekend with my cousin, Annie. She is not actually my cousin, but we have introduced each other this way since we were pre-teens, as it’s way easier than describing our relationship as it really was, back in the rural upstate town we came from. In truth, Annie is my ex-stepmother’s aunt and uncle’s former foster daughter. And I am her former foster parents’ niece’s ex-stepdaughter. Confused? Yeah, that’s why we’re cousins!
Cheers, Cous!
Our ties to that small town did not endure, but the friendship certainly has. We spent our long weekend laughing, catching up, chowing down and (literally) sittin’ on the dock of the bay at Annie’s cozy lake house in Connecticut. Not a bad start to an 11-day vacation, by any means.
This doesn’t suck.
The weekend went too fast (don’t they always?) and when I hugged Annie—my oldest friend—goodbye, I rented a car and high-tailed it northward to Norwich, Vermont, just barely outrunning the flood of the century.
If you have seen the news coverage of the devastation in Vermont, you might be thinking, “is she mad??” But this part of my journey has been in my plans for a long time, since my sweet husband gifted me a high-dollar gift card to King Arthur Baking Company— not for ingredients, pans or gadgets, but for a baking class. This trip ticks the box on a big bucket list item for me, and I booked it several months ago, when no one could have predicted this awful weather.
I buckled up Monday morning and, with plenty of worry in my pocket, I white-knuckled my way through the rain across Massachusetts, New Hampshire and Vermont, and arrived at King Arthur’s Norwich campus with only five minutes to spare before check-in for my first class.
New Hampshire was pretty soggy, too.Made it in the nick of time!
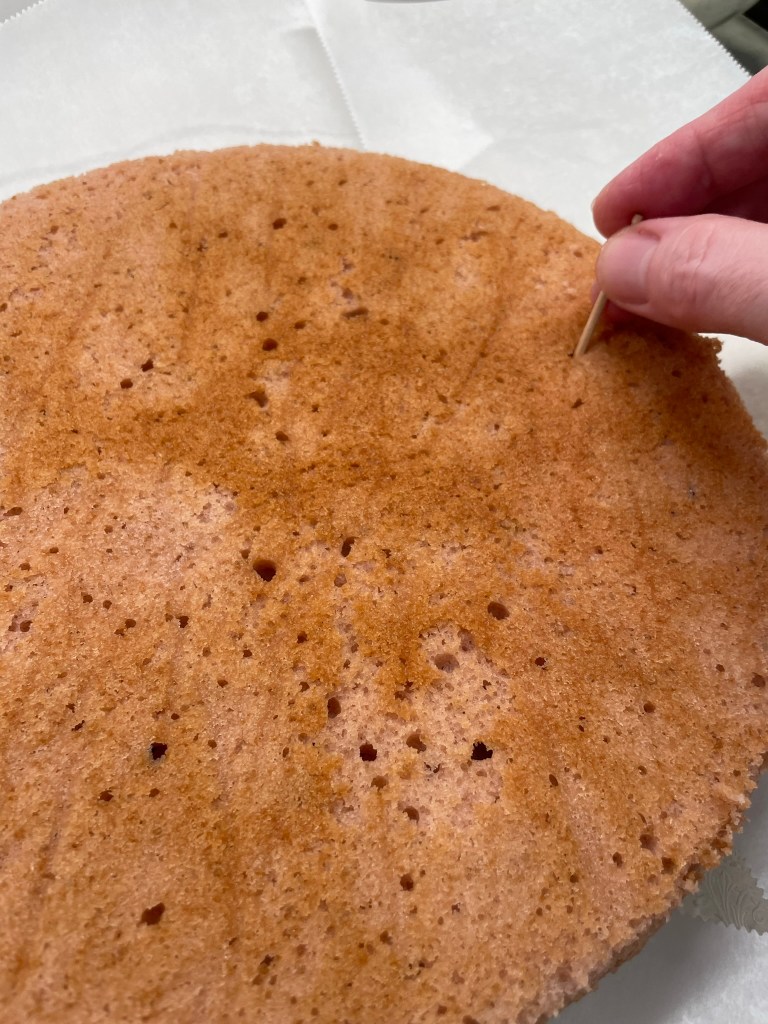
Time to make the bread!
This has been a wonderfully busy week, and there will be plenty of stories to come about the lessons I’ve learned in this class called Bread: Principles and Practice, but my adventures in New England are not over yet. When class dismisses late this afternoon, I will venture north again to debrief my experience with one of my newest friends, a fellow cook and baker who is known to some of you, if only on these pages.
Of course, more rain is coming, too. Stay tuned! 😉
As far as I’m concerned, baked beans should be right up there with baseball, hot dogs, apple pie and Chevrolet— a true American classic. And as demonstrated by my relatives at every Fourth of July gathering during my childhood, there are many, many ways to prepare them. You can make them sweet, bacon-y, onion-y, molasses-y or pretty much whatever you want. I happen to want them all, and I’m on a mission to keep pushing the flavor boundaries until I run out of ideas.
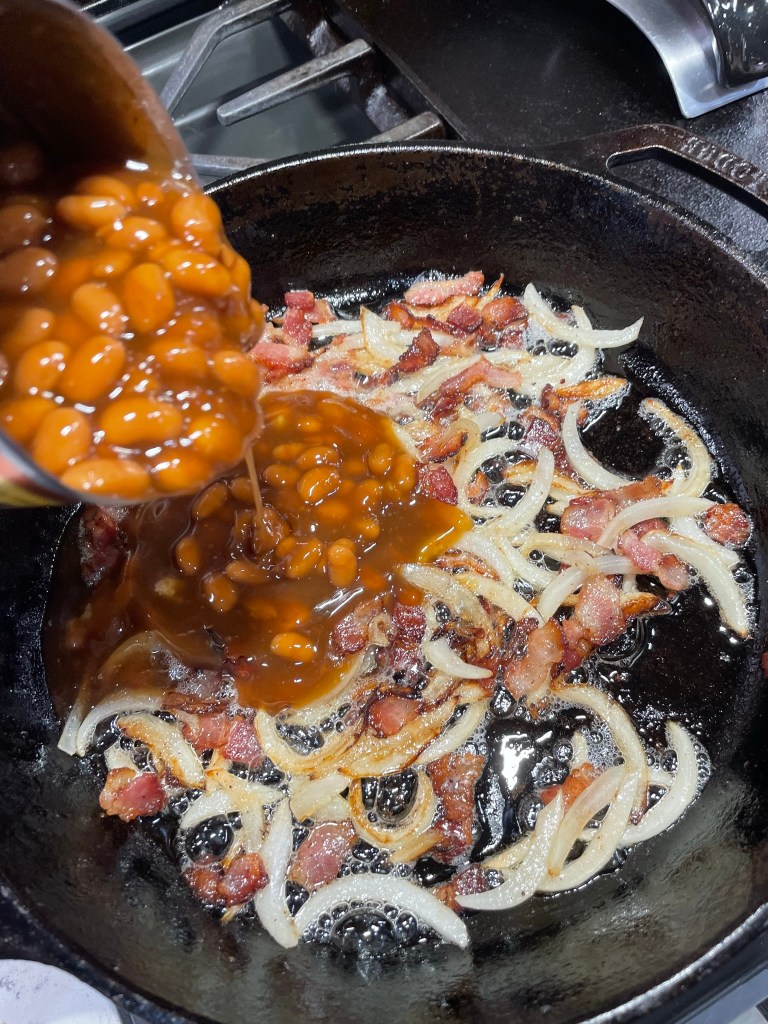
For this version, I went rogue with both sweet and spicy additions to a can of prepared baked beans that my husband’s son, Alex, had left behind following his visit here from Hungary back in March. There are only so many things one can pack in a checked bag before you reach the weight limit imposed by the airline, and Alex had to choose between the bottle of Wild Turkey 101 or this can of beans. You guessed it, he took the bourbon back to Europe! Seriously, anyone could have called that one.
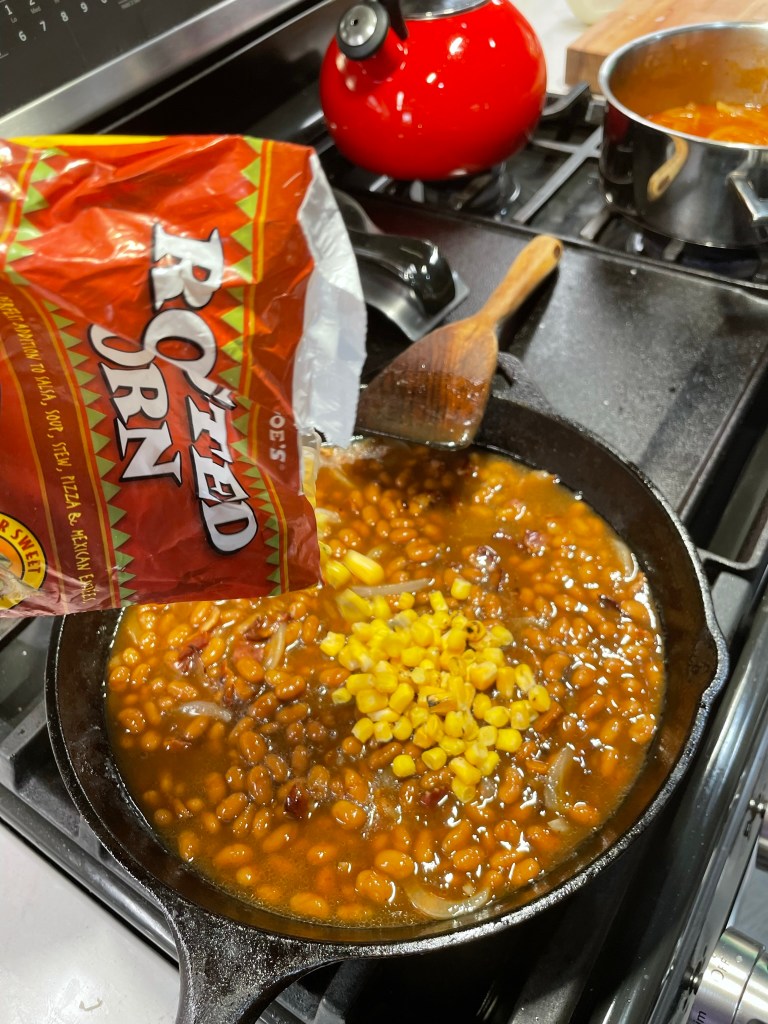
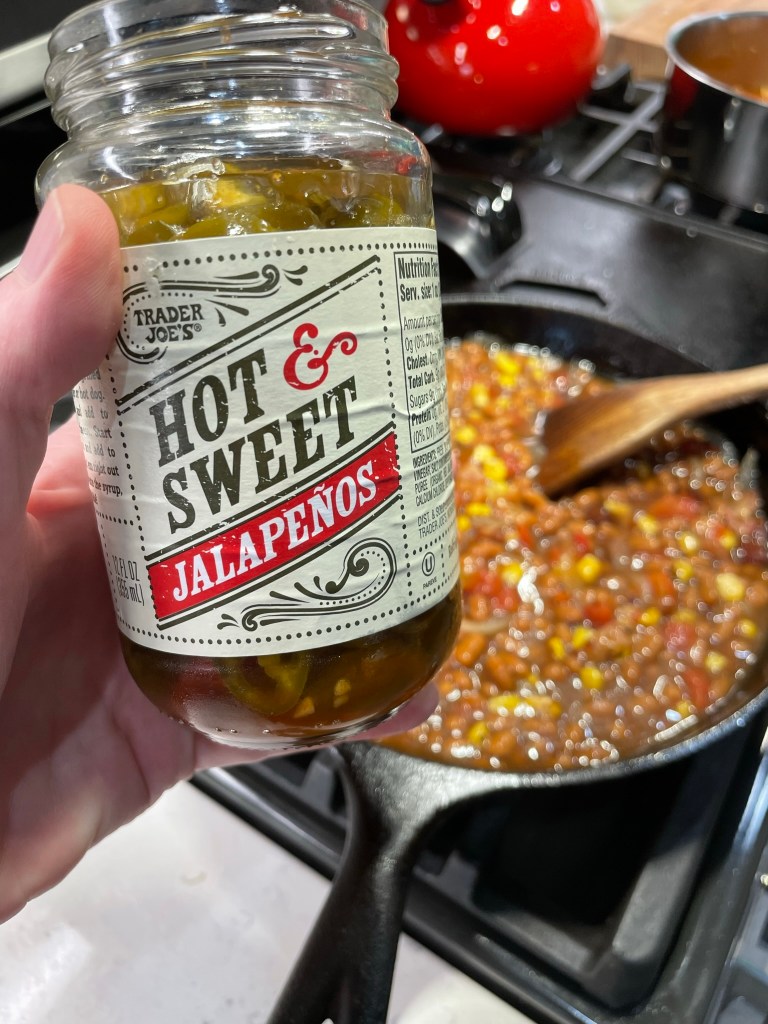
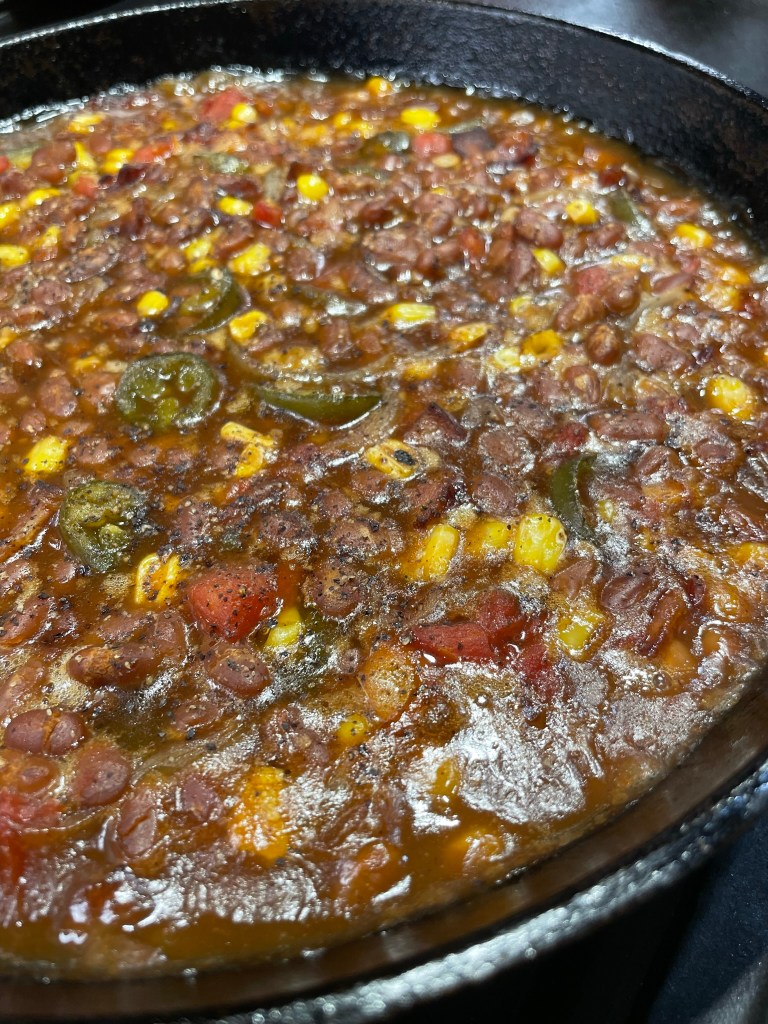
Alex’s choice left me with the enviable task of elevating the canned beans, which had a label touting “extra brown sugar.” I wanted something a little different, but not too crazy, so I started with onions and bacon— the two ingredients that always push baked beans into the savory zone. The canned beans had enough sweetness already, so I set my sights on texture and contrast. I tossed in some roasted corn (I used frozen from Trader Joe’s, but fresh would have been awesome) and about half a can of hot Rotel tomatoes, left over from a batch of Les’s amazing pimento cheese from a recent gathering of friends. For a huge kick of heat, I added a fat handful of sweet pickled jalapeño slices— also from Trader Joe’s— and I didn’t bother to drain or chop them. The only other seasoning I added was salt and pepper. Sooo easy!
This truly is an all-American dish. Beans, corn, tomatoes and peppers— all four crops are indigenous to the Americas!
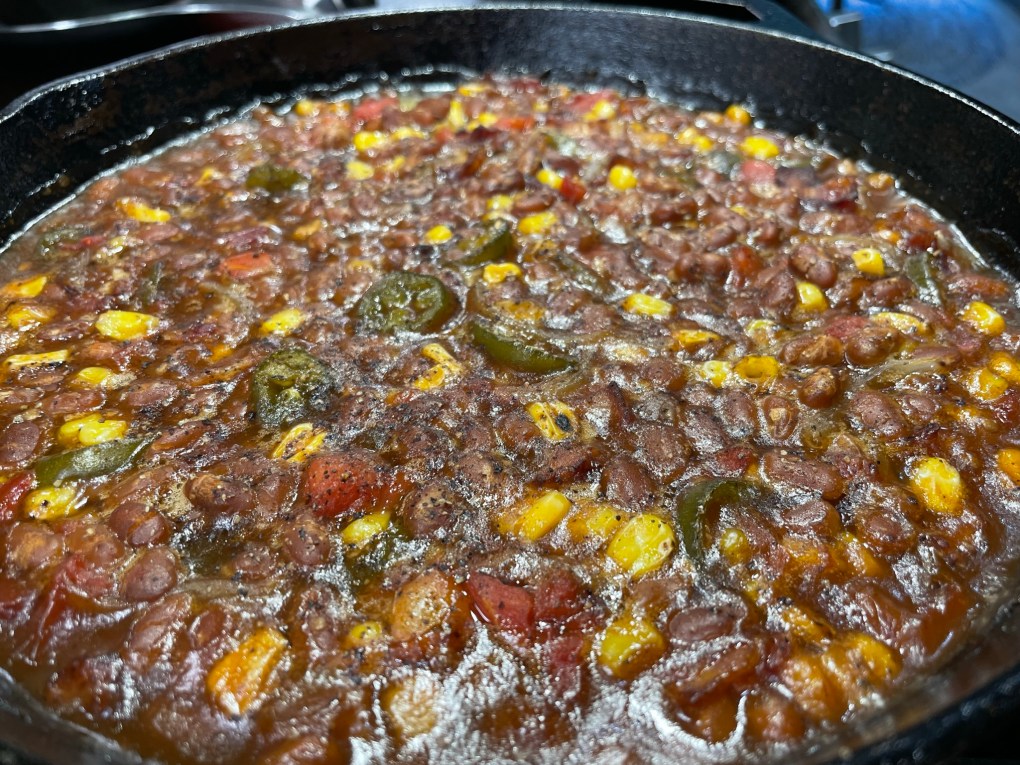
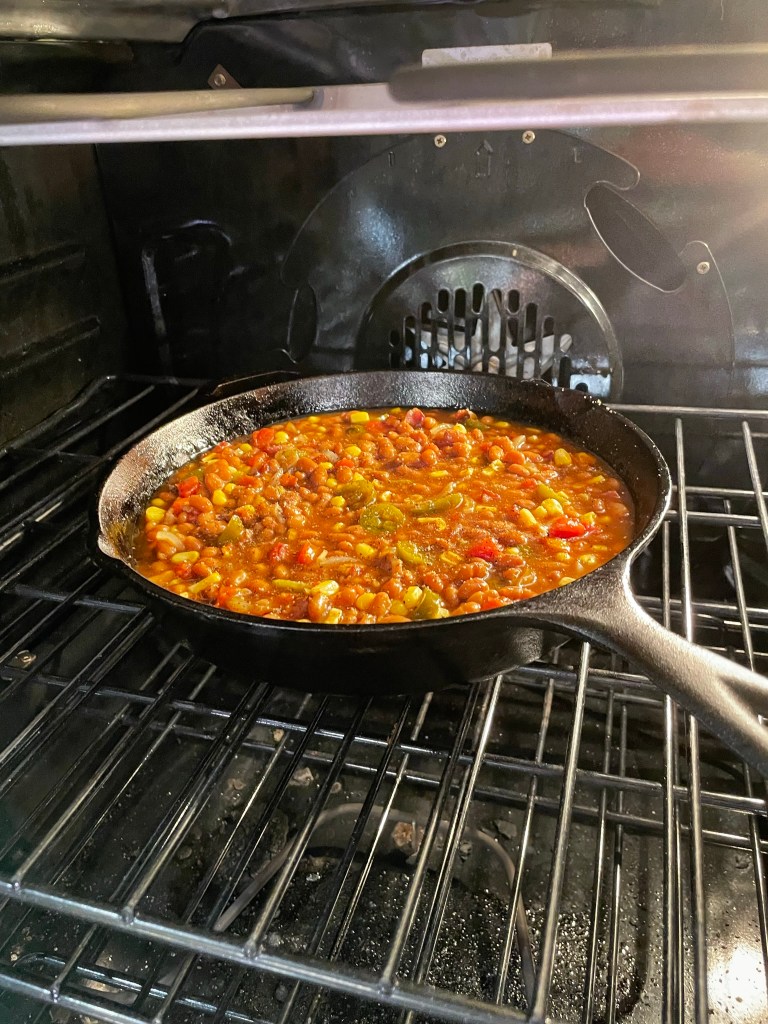
I mixed them up in the same cast-iron skillet I used to cook the bacon and onions, and then slid the skillet into a 350 F oven for about half an hour. The beans emerged hot and bubbly, but could have benefitted from a bit more oven time, so I would recommend 45 to 50 minutes if you like the sticky, candy-like sauce around the edges as much as I do.
Wow, this was one addictive batch of baked beans! There was more than enough kick, thanks to the Rotel and the jalapeños, and interesting texture from the corn and pickled jalapeños. Every bite was sweet at the start, and then the slow burn kicked in, making you desperate for another sweet bite, and so on. The leftovers were also delicious cold from the fridge. For sure, Alex would approve of what I did to his left-behind can of beans.
These baked beans are hot, sticky and sweet, with plenty of savory flavor and interesting texture. My latest homage to the Fourth of July gatherings of my childhood.
Ingredients
1 large can Bush’s baked beans with extra brown sugar
1/2 medium sweet onion, cut into slivers from top to bottom
3 slices uncured bacon, cut into 1-inch pieces
1/2 cup fire roasted corn (frozen is fine, or fresh if you have it)
1/2 can Rotel tomatoes (habanero variety)
1/4 cup hot and sweet pickled jalapeños
Salt and pepper to taste
Directions
Preheat oven to 350 F, with rack in center position.
Place a 10-inch cast-iron skillet over medium heat. Add bacon pieces and cook until some of the fat renders and bacon begins to curl. Add onions and cook until bacon is slightly crispy. Season with a little bit of salt and as much black pepper as you’d like.
Add the entire can of baked beans. Swirl the can with a couple of tablespoons of water to rinse out every drop of sauce into the skillet.
Add corn, tomatoes and jalapeños and stir until evenly blended.
Transfer skillet to preheated oven and bake 45 to 50 minutes, until beans are bubbling around all the edges of the skillet. Allow the beans to cool about 10 minutes before serving.
Do you remember your favorite frozen summertime treat? I had three, and they were pretty much neck and neck: an ice cream called “blue moon,” with an unidentified fruity flavor and bits of pineapple (one day I will figure out how to make it), the Rocket Pop in all its red, white and artificial blue glory, and of course, the Creamsicle. That combination of orange sherbet over vanilla ice cream on a stick was synonymous with summer in my youth. I loved it so much that I can’t resist sharing my scoopable version of a Creamsicle to kick off National Ice Cream Month.
I feel great about this ice cream for a few reasons. First, of course, is the nostalgia of it. The mingled flavors of vanilla and orange take me back to the summers of the 1970s, when life was so carefree. It conjures memories of splashing at the community pool with friends and walking barefoot in the freshly cut grass behind my grandmother’s house. I envision water balloon fights and the familiar sound of the ice cream truck coming down the street, drawing the kids like moths to a flame. God, I loved those days.
This is also exciting for me because my previous efforts at Creamsicle ice cream fell sorta flat, probably because I was still relying on my custard-based ice cream formula. Custard ice cream is wonderful, but it’s a lot of effort and sometimes the richness overpowers the flavors. The first time I used sweetened condensed milk for my ice cream— it was when I made S’mores Ice Cream, and I did it to keep the color nice and white— was a major “aha” moment for me. Homemade ice cream doesn’t have to be so fussy as standing over the stove tempering egg yolks and cream, crossing your fingers that you don’t scramble the eggs and have to start over. Then waiting for the mixture to cool overnight before you can churn it? It’s so extra.
Sweetened condensed milk provides an excellent, smooth texture in the base of an ice cream, it provides exactly the right level of sweetness, and it comes with a bonus advantage in that you can swap in the fat-free version with almost zero impact on the texture. Delicious ice cream and reduced guilt? Sign me up!
Who’s ready for some ice cream?
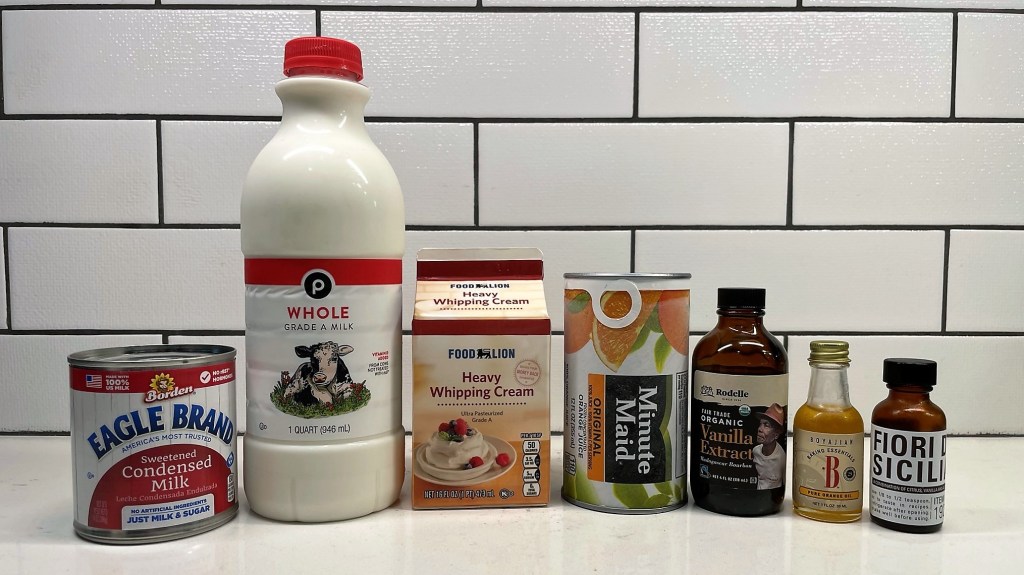
The base of this ice cream is so simple, with only four main ingredients— milk, cream, condensed milk and frozen orange juice from concentrate. The addition of vanilla extract alone would give the impression of a Creamsicle, but I’ve amped up the intensity with two secret weapons that I highly recommend.
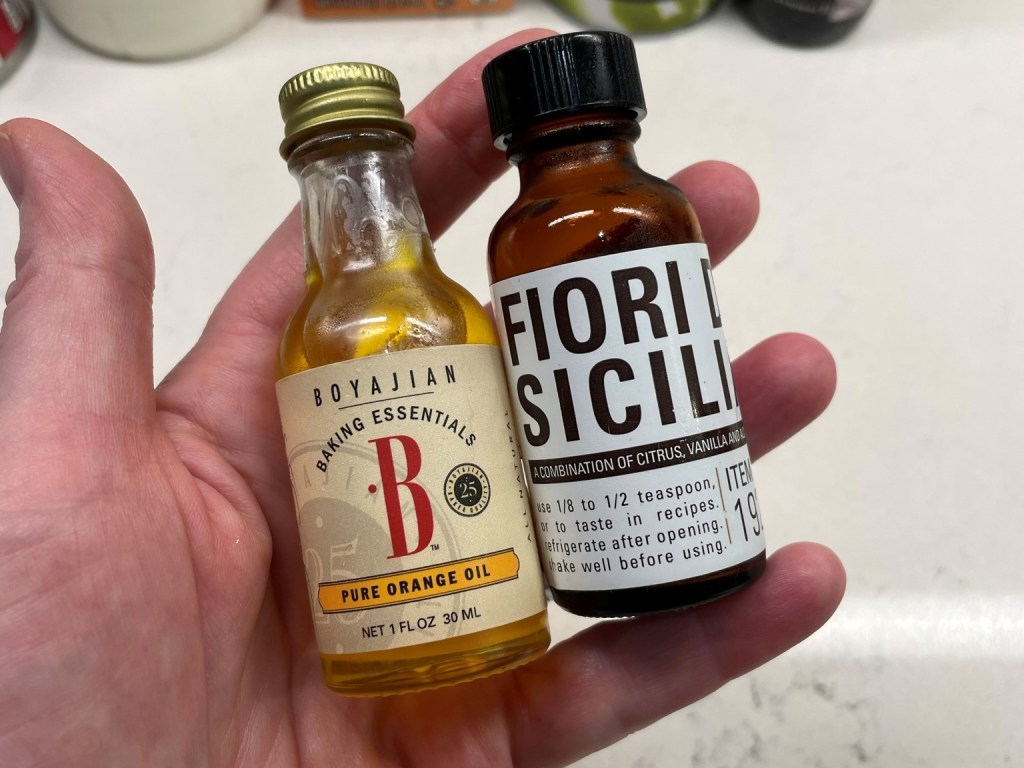
Orange oil is derived from real orange peel, and it adds a very concentrated orange flavor without adding more orange juice, which would make the ice cream too icy. Fiori di Sicilia is a citrusy-vanilla extract that is used for making panettone, and it is so potent that you only need a scant 1/4 teaspoon to get the job done in this ice cream. I purchased both of these specialty ingredients from King Arthur Baking Company, but you might also find them at a specialty store, such as Williams-Sonoma or Sur La Table, either in store or online.
Can you make the ice cream without these ingredients? Of course, but if you want more than a hint of Creamsicle in your ice cream, these will help you get there.
Here’s how it goes:
Feel free to swap in fat-free condensed milk here; on this day, I only had original in the cabinet. Whisk the whole milk into the condensed milk first, because their viscosities are very different and it requires some hefty whisking to combine them. Next, gently whisk in the heavy cream.
The flavoring agents are next: vanilla extract, orange oil and Fiori di Sicilia. Finally, half a can of orange juice concentrate, the kind your mom used to buy in the frozen section. Choose a reputable brand that lists only orange juice as an ingredient.
Whisk gently to incorporate the frozen orange juice, and then cover the bowl and refrigerate several hours or overnight. Now, something magical happens when you combine condensed milk and an acidic ingredient like citrus juice. OK, it isn’t magic, it’s science. This reaction happens with any kind of dairy milk, but the result with condensed milk is a nicer consistency. The acid changes the structure of the proteins in the milk, causing them to curdle or thicken. In the morning, you can expect it to look a little like pudding. Deliciously creamy, citrus-vanilla pudding.
Nobody would blame you if you eat a spoonful of it right on the spot.
The thickness is not a problem, and a quick whisking will bring the ice cream base to a thick but pourable consistency. Freeze as usual in an ice cream machine and then transfer to an insulated container to ripen it in the coldest spot of the freezer. Overnight is best, but if you can’t resist, you’ll still enjoy this Creamsicle ice cream in soft-serve form.
Orange and vanilla are a superb combination! With this recipe, I wanted to recreate the flavor of Creamsicles, which I loved so much in my childhood. Mission accomplished.
Ingredients
14 ounce can sweetened condensed milk (regular or fat-free)
1 cup whole milk
1 cup heavy cream
2 teaspoons real vanilla extract
1/2 teaspoon orange oil (optional, but recommended)
1/4 teaspoon Fiori di Sicilia (optional, but recommended)
Approximately 6 ounces frozen orange juice concentrate
Directions
In a large bowl or pitcher, combine condensed milk and whole milk and whisk to combine. Gently whisk in heavy cream. Stir in vanilla extract, orange oil and Fiori di Sicilia.
Add spoonfuls of frozen orange juice concentrate, gently whisking to incorporate each spoonful before adding more. Cover bowl with a lid or plastic wrap and refrigerate several hours to fully chill the mixture. The ice cream base will thicken significantly because of a chemical reaction between the dairy and citrus. Simply whisk to loosen it when you’re ready to freeze.
Freeze ice cream base, following manufacturer’s instructions for your particular machine. Transfer churned ice cream to an insulated container and freeze overnight before serving.
This ice cream is ready to scoop and serve straight from the freezer. As with any homemade ice cream, it is best enjoyed within about a week.
Once upon a time— okay, it was the early 1980s—there were two best friends. It was me and Christine, a girl who befriended me when I was an incoming sophomore to a large high school in Colorado Springs, where I spent two years living with my mother. It was a far cry from rural upstate New York, where we only had two schools— K-6, and the other one that combined junior and senior high. This school had three or four large buildings for 10-12, and I was sure I’d get lost and would never learn the names of all my classmates. Christine was new at the school, too, given that she transferred from a Catholic school. At first glance, we could not have been more different. She was raised in a nuclear family with a healthy support system and I had, well, none of that. Still, we found enough in common that we became fast friends. I’m talking, the kind of friend who gets to sign an entire page of your yearbook!
Life took us in different directions after our two years of inseparableness. I returned to my dad’s in upstate New York for my senior year and then moved south in my 20s, where I pursued my dream of being on the radio. Christine was swept off her feet by the guy who is still her husband, and they welcomed three children, moving to Texas in the process. It was before the internet and even cell phones, and staying in touch proved challenging. We had fun catching up on the occasions that we reconnected, but with little in common, the occasions were fewer and farther between.
And then out of nowhere last December, I started getting emails from the Classmates site, claiming someone I went to school with “wanted an update on my life.” Truth is, I never followed up after my initial early signup to the site, and I don’t even know my password to log in; social media has never been my thing. Anyway, there was only one friend that I could imagine might want to be in touch with me from that school, and it got me curious. A few Google clicks later, I had Christine’s phone number (only, it turned out to be her daughter’s), and after a few text exchanges and FaceTime calls, she booked a flight to visit me in North Carolina! No, she had not been messaging me, and she also had been receiving random messages from Classmates, but at least the company’s dubious marketing effort catalyzed our finding each other again.
After 40 years, everything has changed and nothing has changed!
Christine and I had a grand time reminiscing through my old yearbooks and pondering whatever happened to this classmate and that teacher. We filled in the gaps of each others’ lives during the time gone by— her move to Texas and back, some scary health situations, my rebound to happiness after divorce— and we had one very poignant moment, during a video call with her parents, when I tearfully thanked them for the positive impact they had so long ago on a lonely teenage girl who desperately needed to see what family could look like. Yes, it was a special four and a half days, and we have vowed to not lose touch again.
Somewhere amid all of that catching up was a lot of really good food. We enjoyed a meal at one of my favorite local restaurants, Les fired up the smoker with a brisket and a whole side of salmon, and we checked out the Greek Festival for authentic gyros and honey-drenched loukoumades. I whipped up some key lime pie martinis and homemade pizzas, indulged her request for fresh seafood, and we visited a local winery. And Christine indulged me, too, by sharing her tips for making a delicious sweetheart of a pie—something I’m not very good at myself.
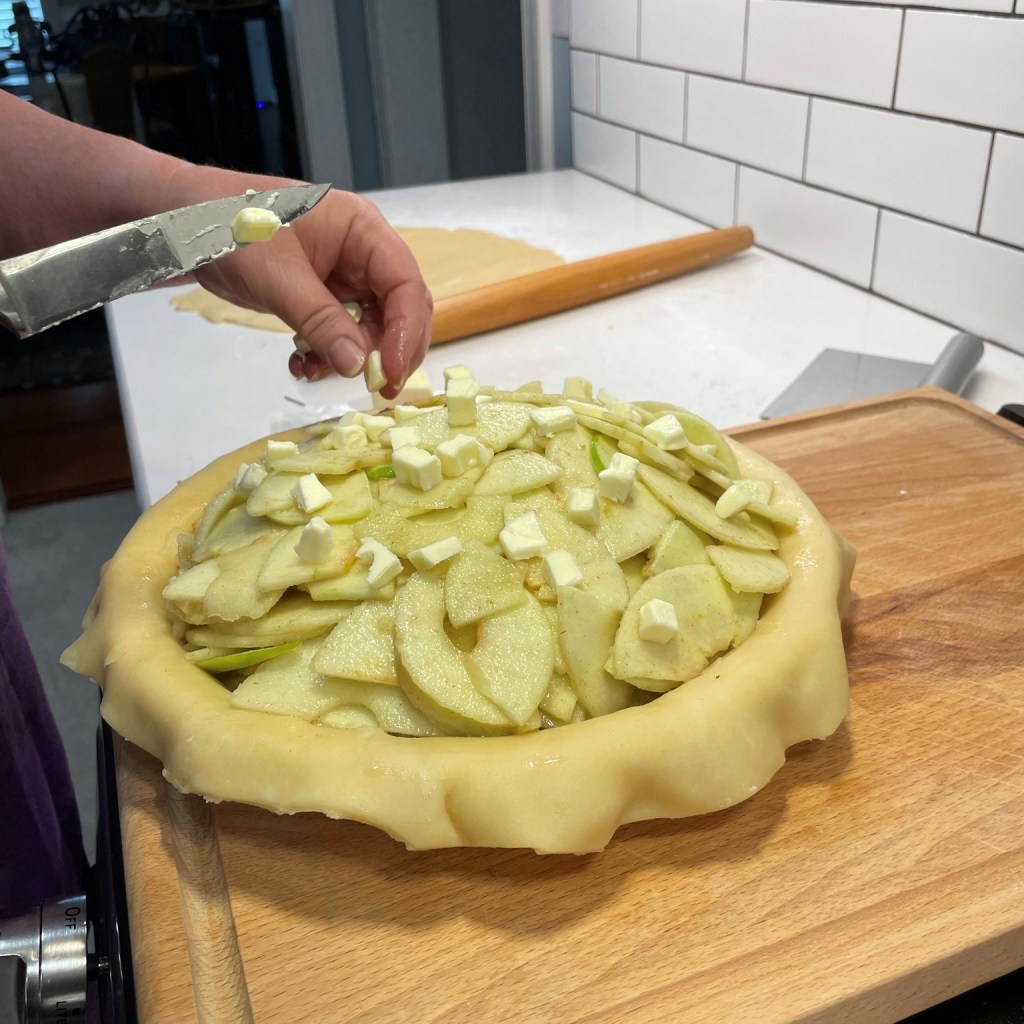
Nothing went to waste! She used the extra pie dough to decorate the edges. ❤
I’ve made no secret on Comfort du Jour of my lack of confidence in the pastry department. Yes, I can whip up a round-braided sourdough challah, no problem, but I’m still tiptoeing my way into making cakes, and the notion of mastering flaky pastry dough (or even biscuits, for that matter) has always felt just out of reach for me. Christine, on the other hand, had been texting me pictures of mouthwatering pies and pastries she makes on the regular, and well, I had plenty of questions.
YUM!
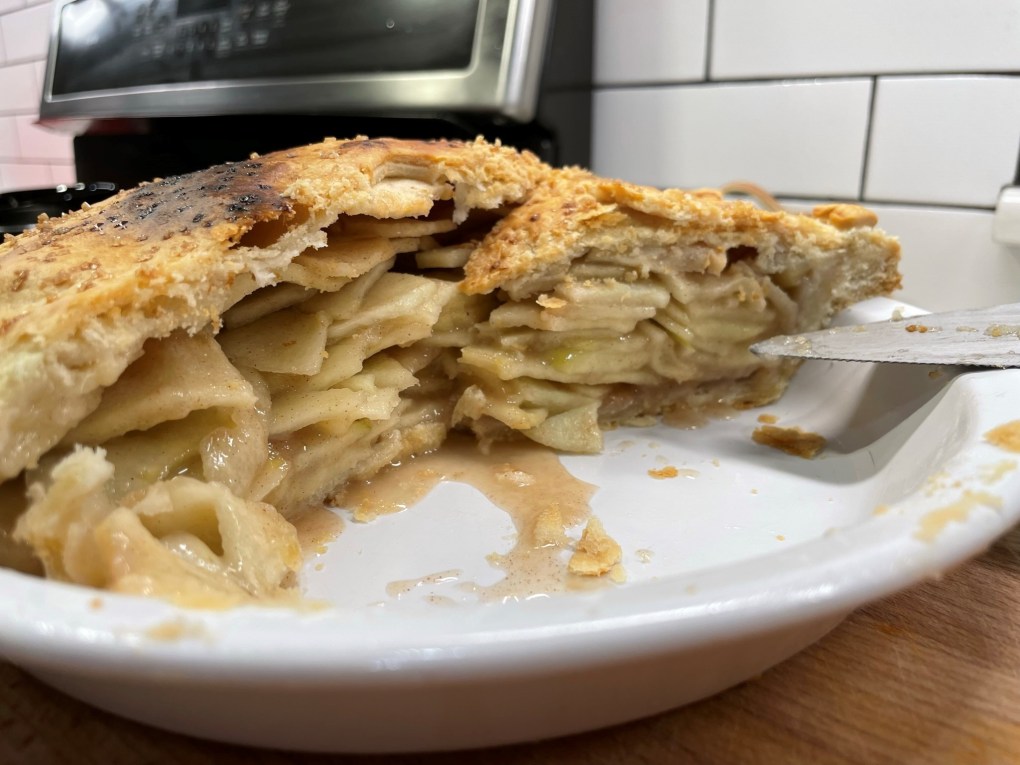
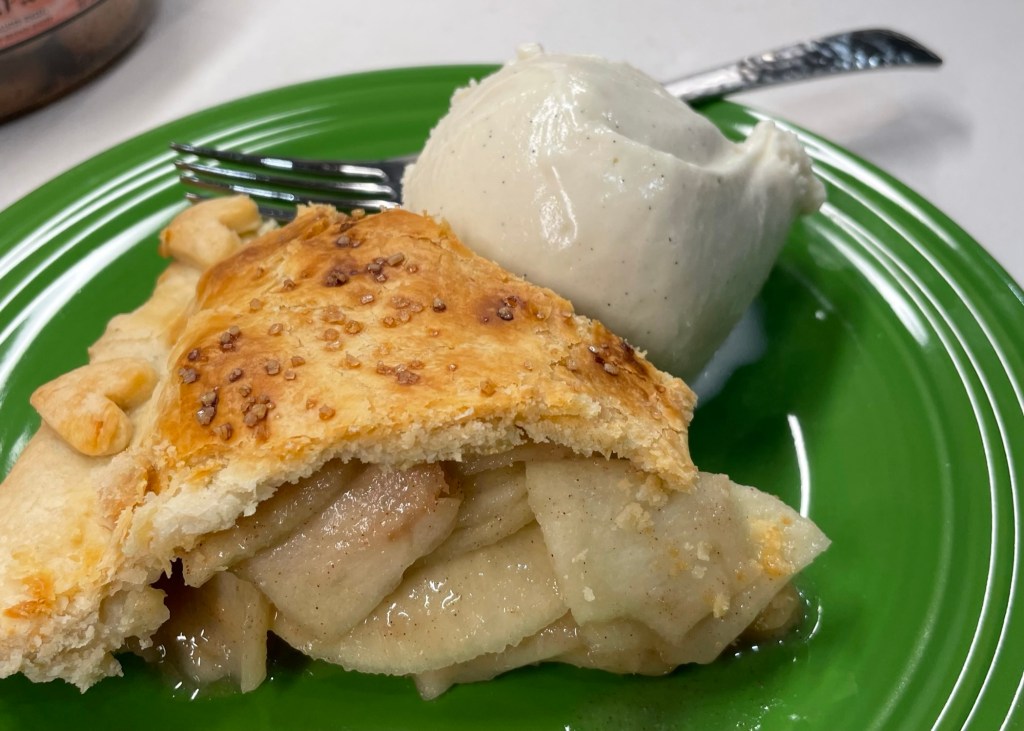
We could not make her favorite kind of pie— sour cherry is her blue ribbon best— because I don’t have a cherry tree in the backyard, as she does. But we found some shiny Granny Smith apples, and I thought it would be perfect for sharing as we head toward July 4th. We served up each mile high slice with a scoop of my reduced-guilt vanilla ice cream!
The crust is my favorite part of everything, so I really want to get good at this!
Christine did all the pie work here, and my job was to pay attention and take pictures. I took lots of mental notes as she worked on this masterpiece, but still forgot a few of the important details. Luckily, she was generous to share her exact crust recipe by text as I wrote this, and I’ve included it below in a printable format.
As for my lessons that day, I discovered three important takeaways for perfect pastry dough. First, I apparently need to start watching the Great British Baking Show, which is where Christine has honed her knowledge that led to her own baking skills. I’ve bookmarked it on Netflix for future binge watching. 🙂
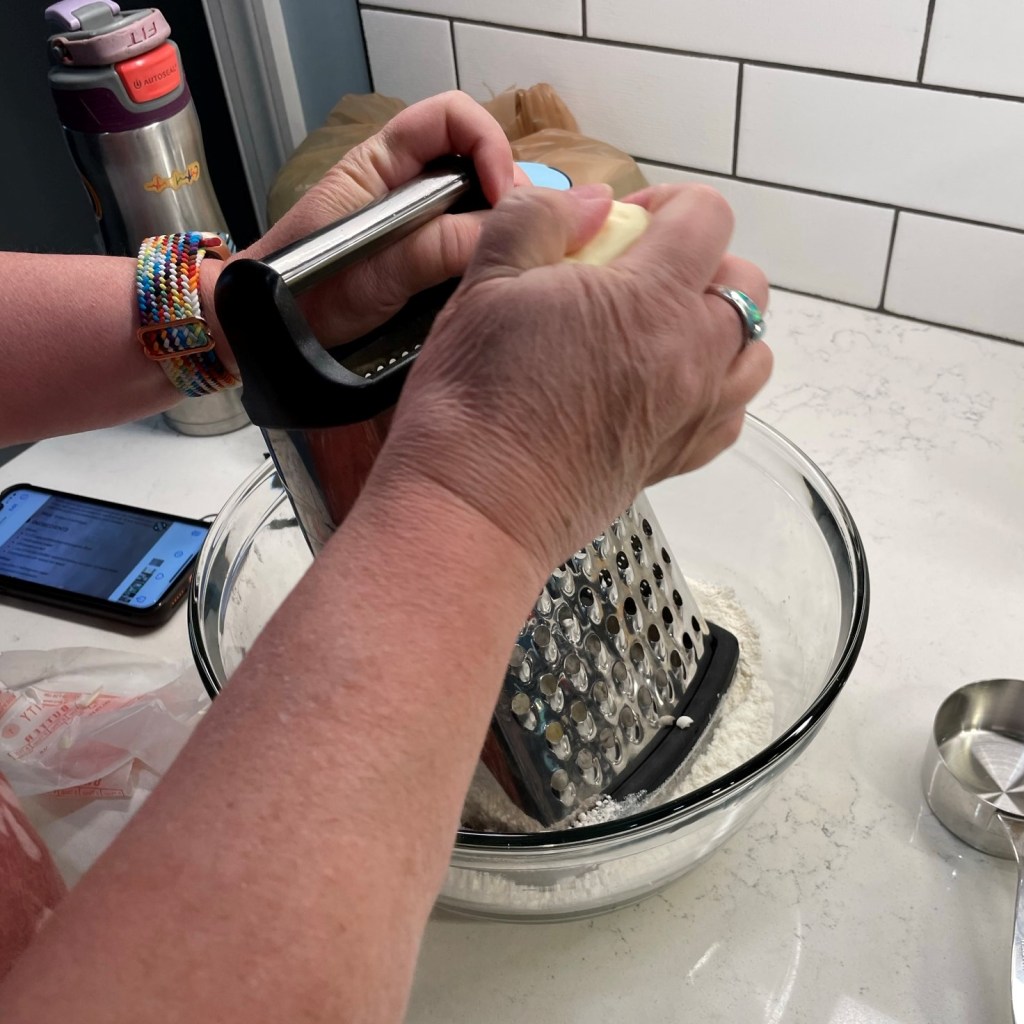
Grating frozen butter is one of Christine’s tricks for creating a flaky crust, and she blends it into the flour mixture by hand. It may also help to have a cool rainbow watch.
Second, I need to follow a simple rule of thumb for tender, flaky pie crust, and that rule is “more fat, not more water.” For real, this is probably one of the ways I’ve gone astray, as I tend to just add more water when the dough doesn’t come together easily. Christine says a little extra butter (and frozen, at that) worked into the flour is what produces the flaky, delicate layers I long to achieve. Finally, I need to not be afraid to practice, because it’s the only way I will gain confidence to make a good pie. I know she’s right, of course.
She got the filling ready first, so the rolled-out dough would not sit too long. We figured the cold quartz counter would help, too.
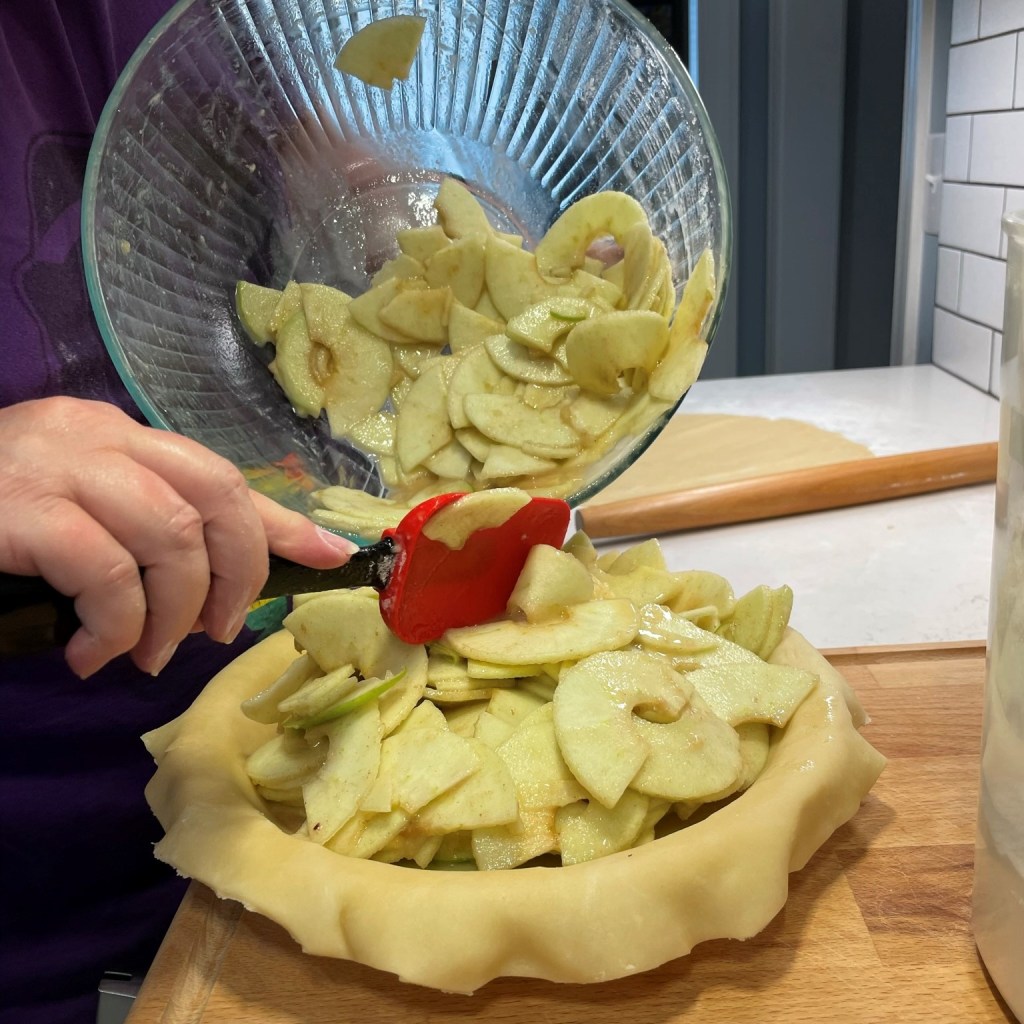
That brings me to my final lesson in successful pie making, which is don’t skimp on the filling— another mistake I now know I have made. Christine used six ginormous apples in this pie, and it wasn’t even deep dish! With so much filling, and given where our friendship began, I named it Mile High Apple Pie. Enjoy!
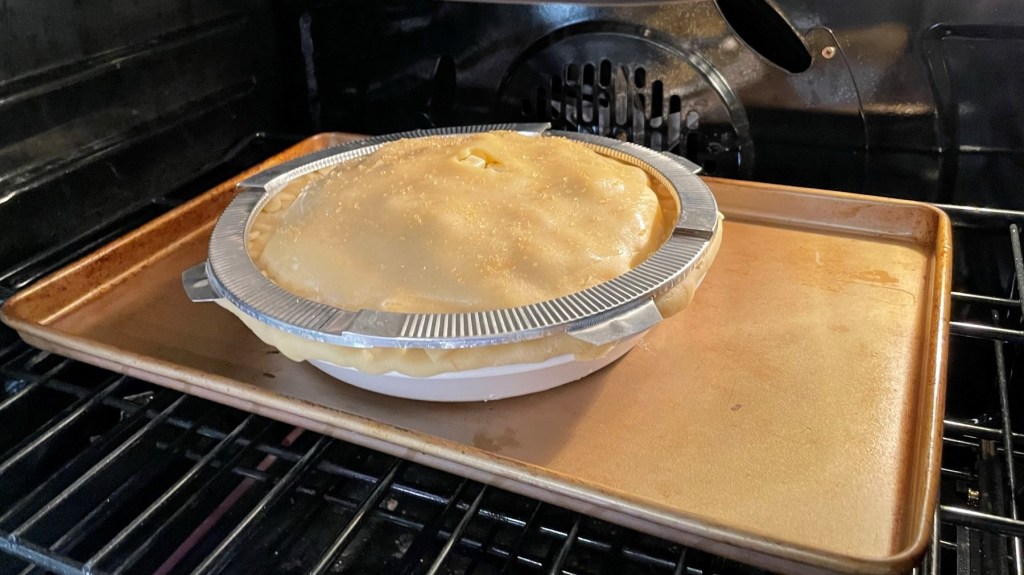
She brushed the top crust with milk and sprinkled on turbinado sugar before it went to the oven. Pie crust protectors kept the delicate edges from burning.
My bestie from high school walked me through how to make a good, flaky pie crust! Three most important lessons; use frozen butter, chill the dough and practice, practice, practice!
Ingredients
2 1/2 cups flour
1 tablespoon sugar
3/4 tsp. salt
2 1/2 sticks frozen, unsalted butter
5 Tablespoons ice water
Planning ahead is important for successful pastry dough. It should be chilled at least 30 minutes, but preferably longer, before filling and baking.
Directions
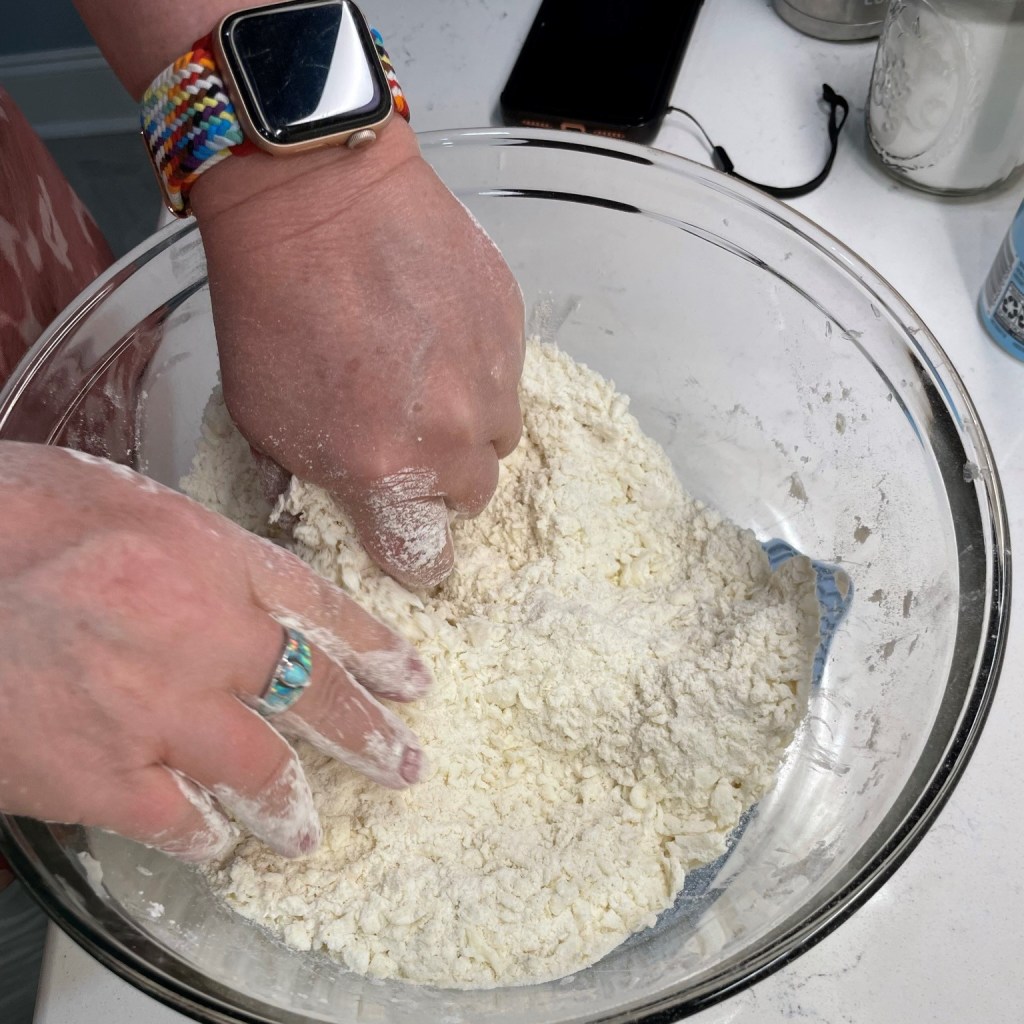
Whisk the flour, sugar and salt in a large bowl. Grate butter over flour through the large holes on a box grater. Rub in with fingertips until small pea-size clumps form. Add 5 tablespoons of water and mix lightly with fork until dough holds together when small pieces are pressed between fingertips, adding more water by teaspoonful if dough is dry.
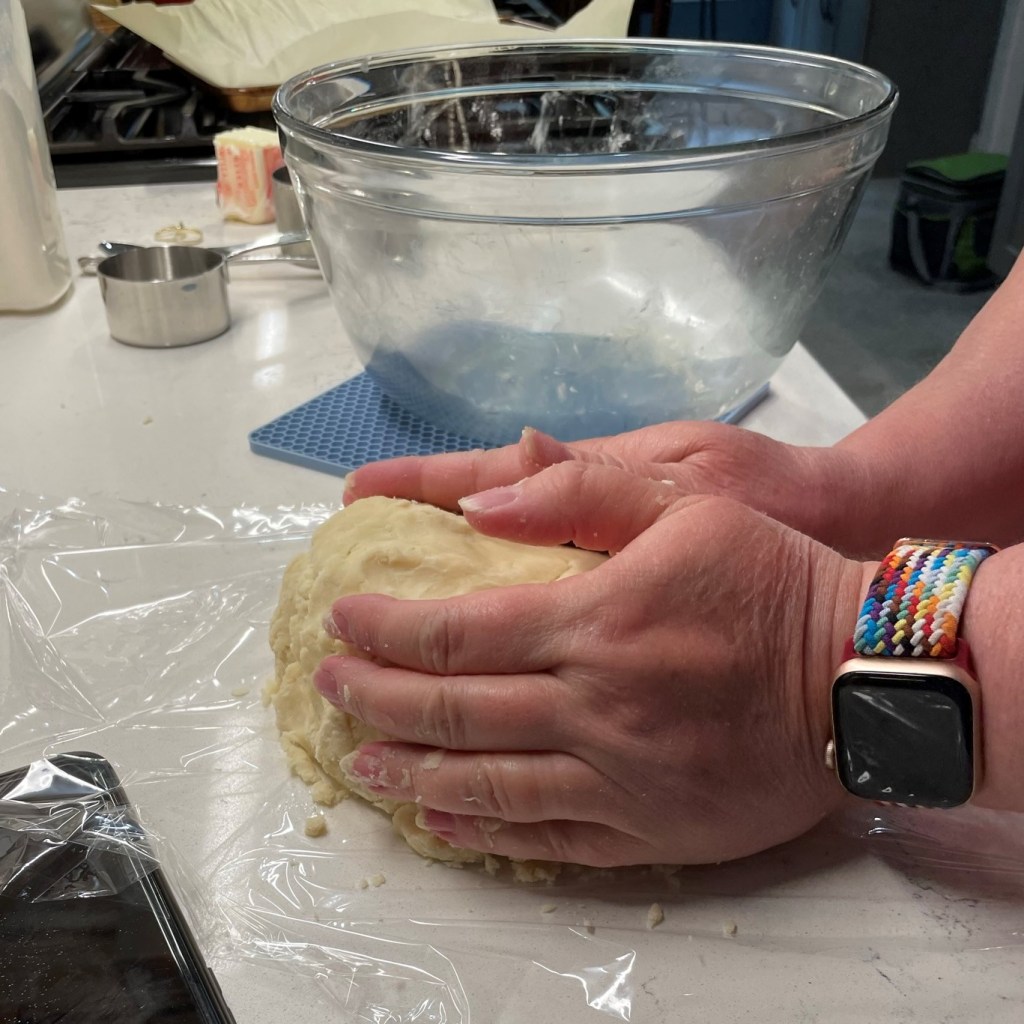
Gather dough together; divide into 2 pieces. Form each piece into ball, then flatten into disks and wrap in plastic. Refrigerate at least 30 minutes, but you can do this up to 2 days in advance.
Remove chilled dough from fridge a few minutes before rolling out. Get the filling mixed up first, then roll the dough.
Ingredients
6 large, Granny Smith apples, peeled and sliced thin
Juice of 1/2 fresh lemon
About 2/3 cup sugar (more if you like it sweet, I suppose)
2 tablespoons flour, to toss and coat the apple slices
1 teaspoon ground cinnamon
1/4 teaspoon ground cardamom (she added this at my request, because I love it with apples)
4 Tablespoons cold, unsalted butter
Directions
Preheat oven to 375 F, with rack slightly lower than center position.
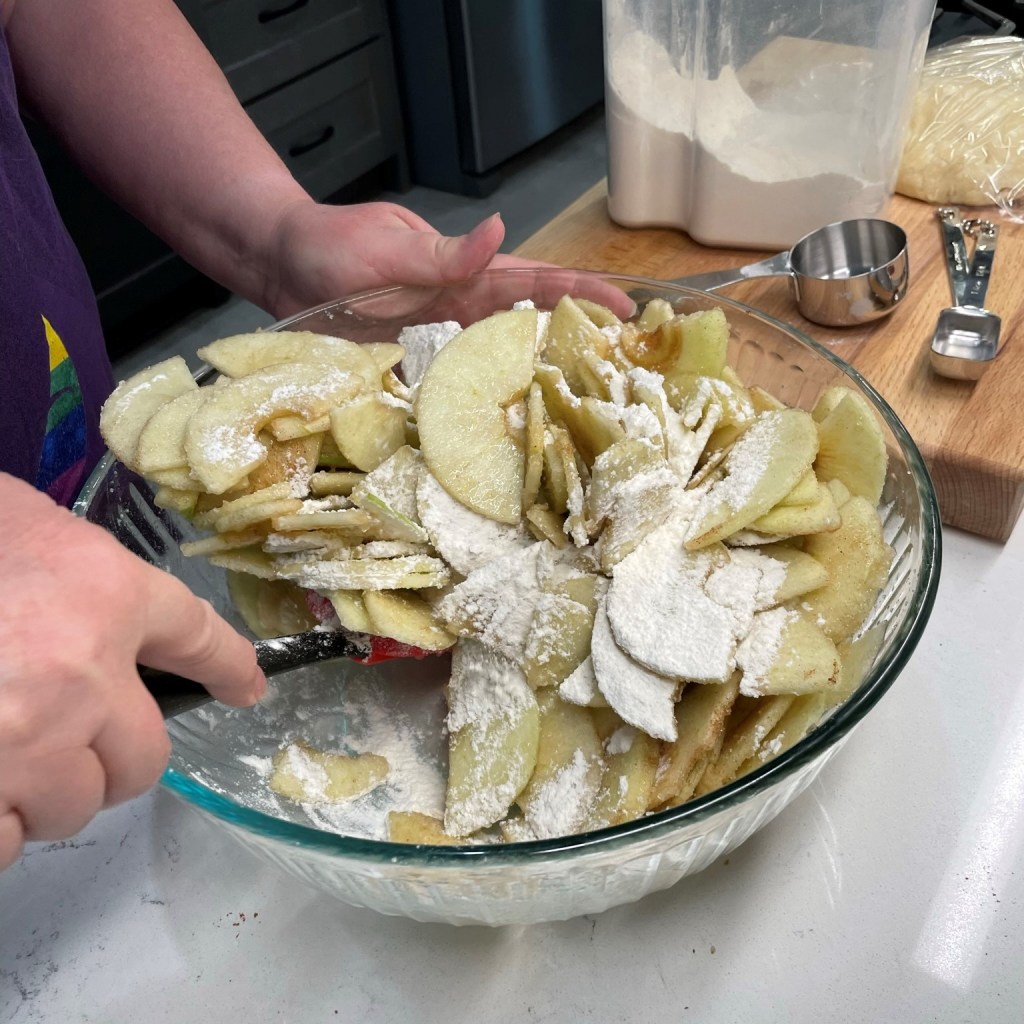
Toss apple slices with lemon juice to prevent browning. Add sugar, flour, cinnamon and cardamom to the apples and fold to coat until no visible flour remains.
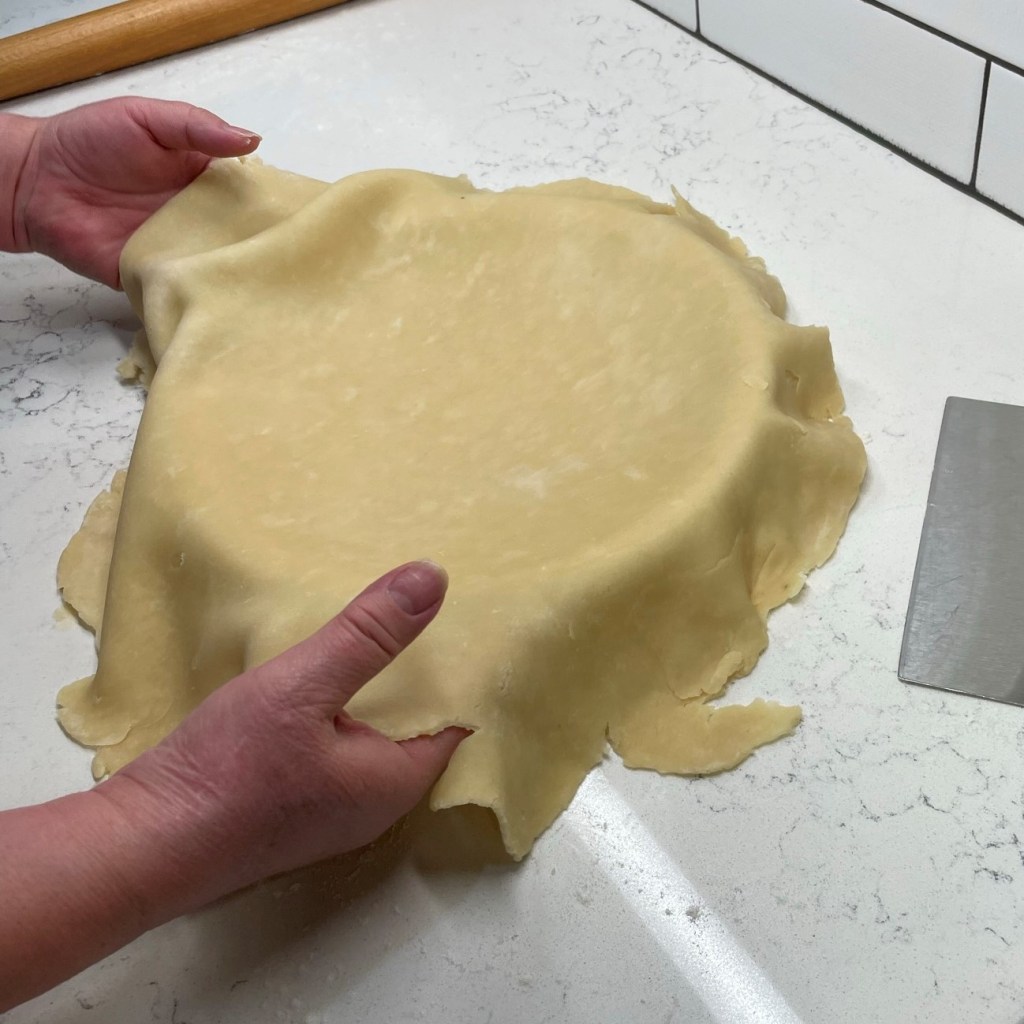
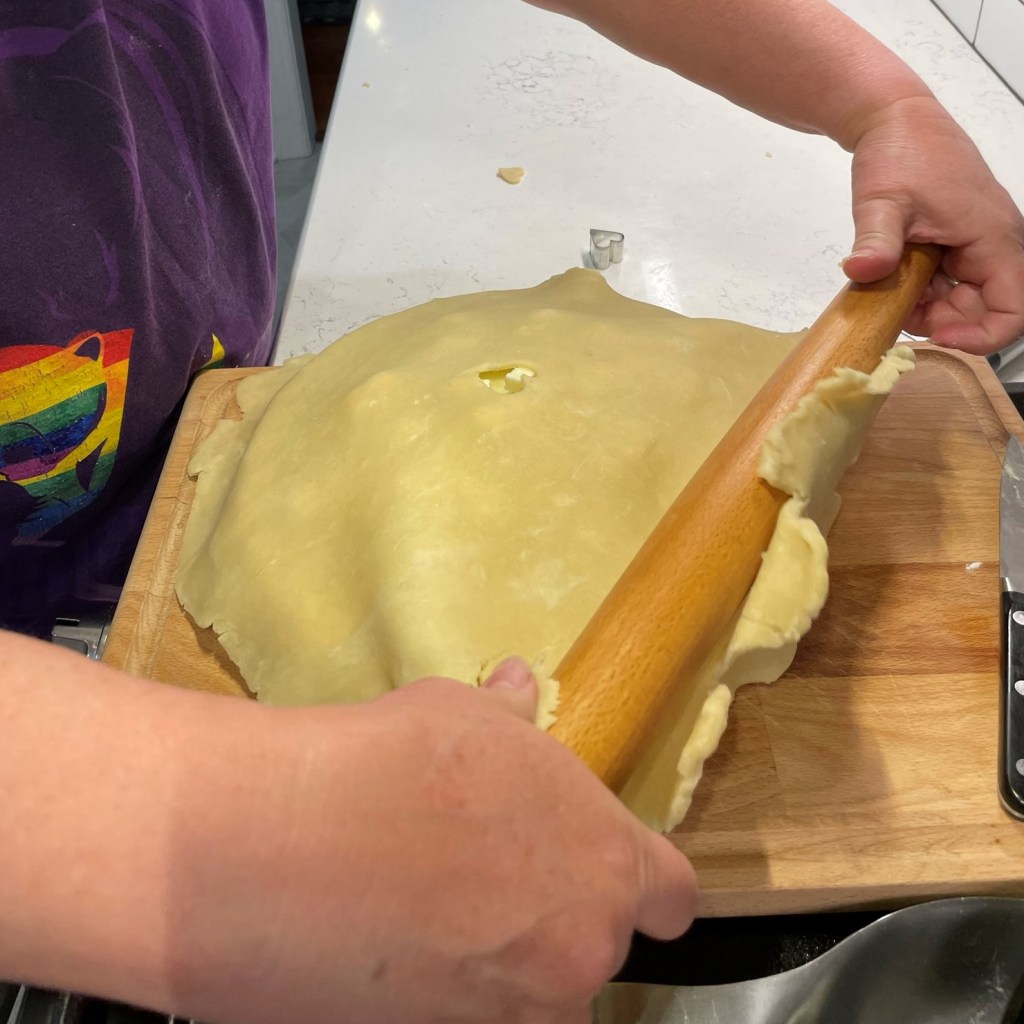
Roll out the first disk of pie dough into a large circle and place it in a 9-inch pie plate. Transfer the apple filling to the pie plate. Cut butter into cubes and arrange the cubes all over the apple filling. Roll out the second dough disk, cutting a shape in the center as a steam vent (if you happen to have a tiny heart-shaped cookie cutter, use that). Roll the top dough around the rolling pin for easy roll-on transfer to the top of the pie. Trim and crimp the top and bottom edges to seal together. If you have extra dough, cut more heart shapes and place them around the edges of the pie.
Brush the whole pie crust with milk and sprinkle with coarse sugar. Bake for about one hour, until pastry is golden brown all over and filling is visibly bubbly through the steam vent.
Here I go, answering my own question of “what other cocktails could be turned into a cake?” I asked this just a few weeks ago, when I presented the tiki cocktail skillet cake that put a fun, boozy spin on a pineapple upside-down cake. I started making a list of other drinks that could work, including some suggested by followers in the comments section.
Somehow, this one was not on the tip of my tongue when I first asked the question. It came about when I found beautifully ripe, organic strawberries on a recent shopping visit. I told Les I would make strawberry shortcake for Father’s Day, but he challenged me to come up with something more imaginative that didn’t involve sponge cake or biscuits (neither are his favorites). What about a strawberry cake, I asked? And he said, “that would be better, and do you think you could make it a little boozy?”
C’mon, could I make it a little boozy?! I mean, does he even know me?
My first step was to find a recipe that would accommodate a ton of fresh strawberries, plus booze. Even a novice baker like me knows that too much liquid will wreck a cake, so that was a major hurdle. The internet is full of strawberry cake recipes, and most of them are dressed-up versions of a boxed cake mix, which didn’t fit my goal. I don’t mean to be snobbish, and if you’re cool with a box mix, I’m not judging. But I’m super sensitive to artificial flavorings, colors, thickeners and sweeteners, so desserts tend to be a little more complicated for me.
Hello, Gorgeous!
Besides, my goal was to take advantage of these beautiful fresh berries that are at their peak, so I searched until I found a scratch recipe that satisfied both my palate and my baking comfort level. Several recipes in my search results leveraged a technique called “reverse creaming,” which I’ve never heard of, let alone tried. Too much experimentation at once gets me into trouble, so I passed on those. Finally, I found this scratch strawberry cake recipe on Sally’s Baking Addiction blog that would be a good starting point, and I made only a few adjustments to booze up the ingredients, and one to make the process more familiar to me.
Get ready for oodles of photos on this one; there were a lot of steps for this cake, and I wanted to be detailed, for my future self as much as any other reason. If it’s all too much for you, skip ahead to the end, where I’ve included a click-to-print recipe card. You know, in the event you find gorgeous strawberries at your market, too. 🙂
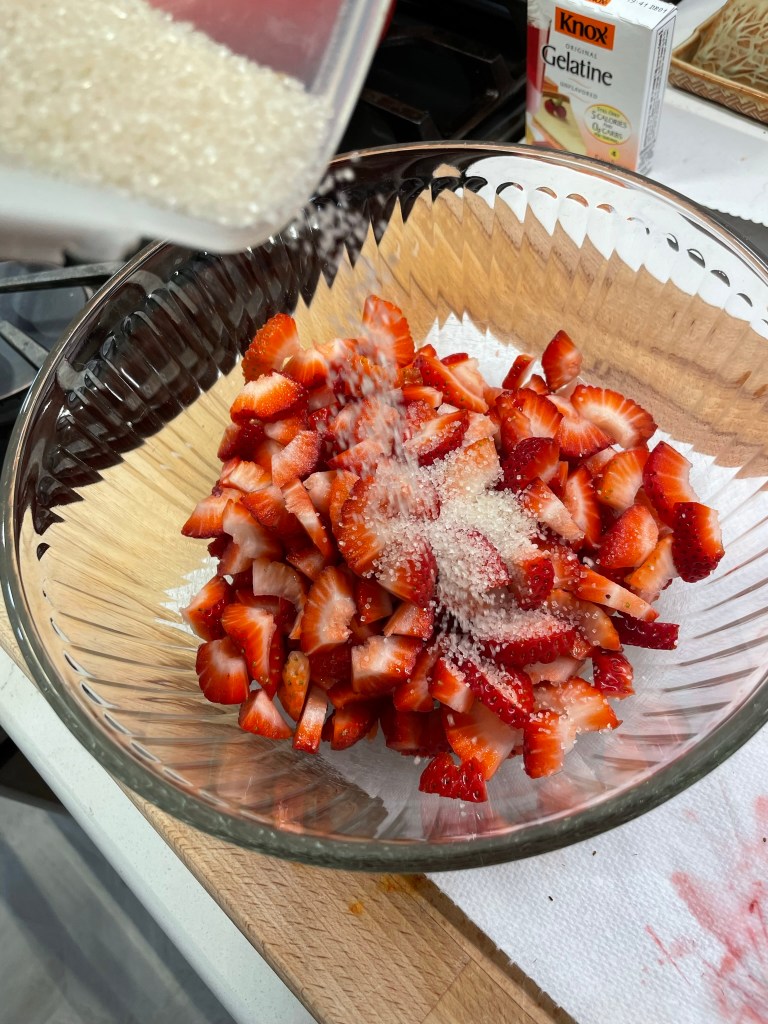
I got a little excited about the berries, and muscle memory took over when I sliced them up. Without thinking, I dumped in a bunch of sugar to macerate them before I even found the recipe I wanted to use. That turned out to be a problem because Sally’s recipe specifically said “don’t” add sugar to the berries before reducing. Oops. There was obviously no undo button for that, and I had to do some fancy math to make up for the sugar I had already used. This also meant that I had to watch the sweetened puree carefully to keep it from burning as I reduced it. If this all sounds complicated, well, what can I say? Nobody has ever accused me of doing things the easy way! It worked out just fine; next time I would just puree the strawberries naked and follow the recipe for the full amount of sugar. Don’t worry, that’s how I wrote the recipe.
This is how you turn a pound of berries into a half cup of flavor.
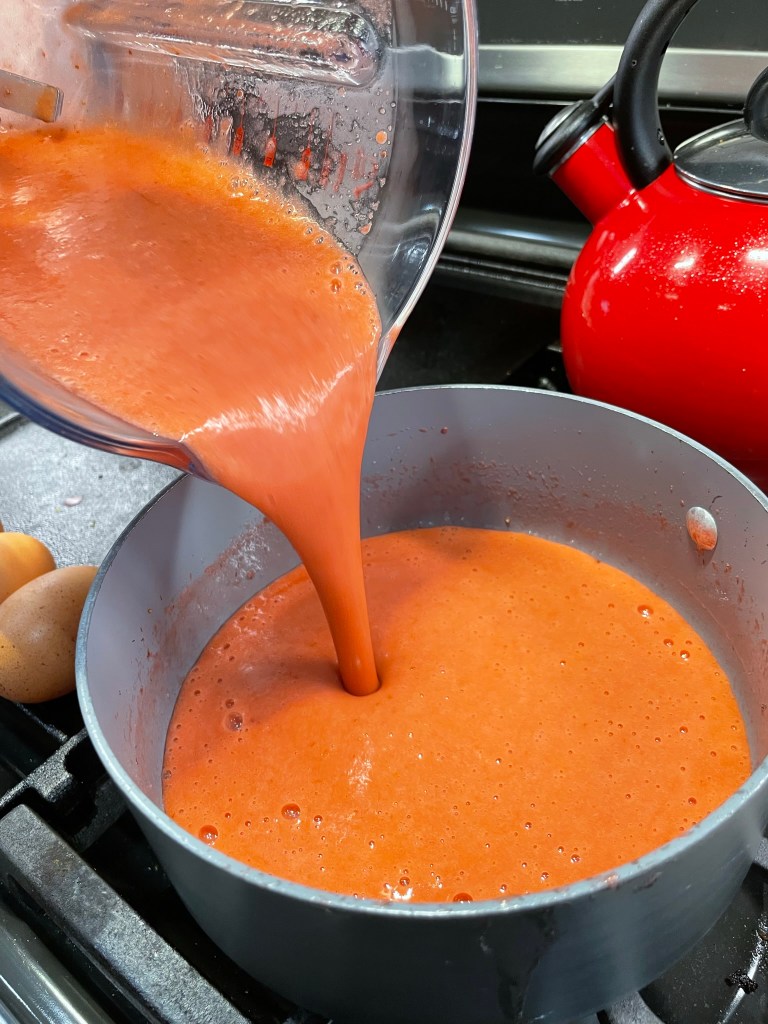
The puree needed time to cool, so I used that down time to get my other ingredients lined up and organized. This really helped me when I made my tiki skillet cake, so I’m trying to make it a habit. It still felt like too many components, so I combined a few things that made sense to me. That puree was thick as tomato paste, so I mixed the milk into it to make it pourable. I didn’t want to forget to add a few drops of natural red food coloring, so I added that to the extracts. Finally, I prepped my 9-inch cake pans and preheated the oven to 350 F.
When the butter was softened enough to blend, I started by creaming it with sugar, then whipped in the egg whites, sour cream and extracts. So far, so good!
My next adjustment was in technique. The inspiration recipe suggested adding whole amounts of some ingredients all at once, rather than alternating dry and wet additions to the batter. Perhaps this works well for a more skilled sweets baker, but I didn’t want to take any chances with unincorporated ingredients, especially when I was aiming to please my husband on Father’s Day. I did this the way my grandma would have suggested, and poured the batter into my prepped pans, one of which was fitted with a cake strip. These things are soaked in water then wrapped around the cake pan, and the intent is to help the cake bake evenly without too much “dome.” I only used it on one layer, as I didn’t mind the top layer being rounded a bit. As it turned out, neither layer had a dome.
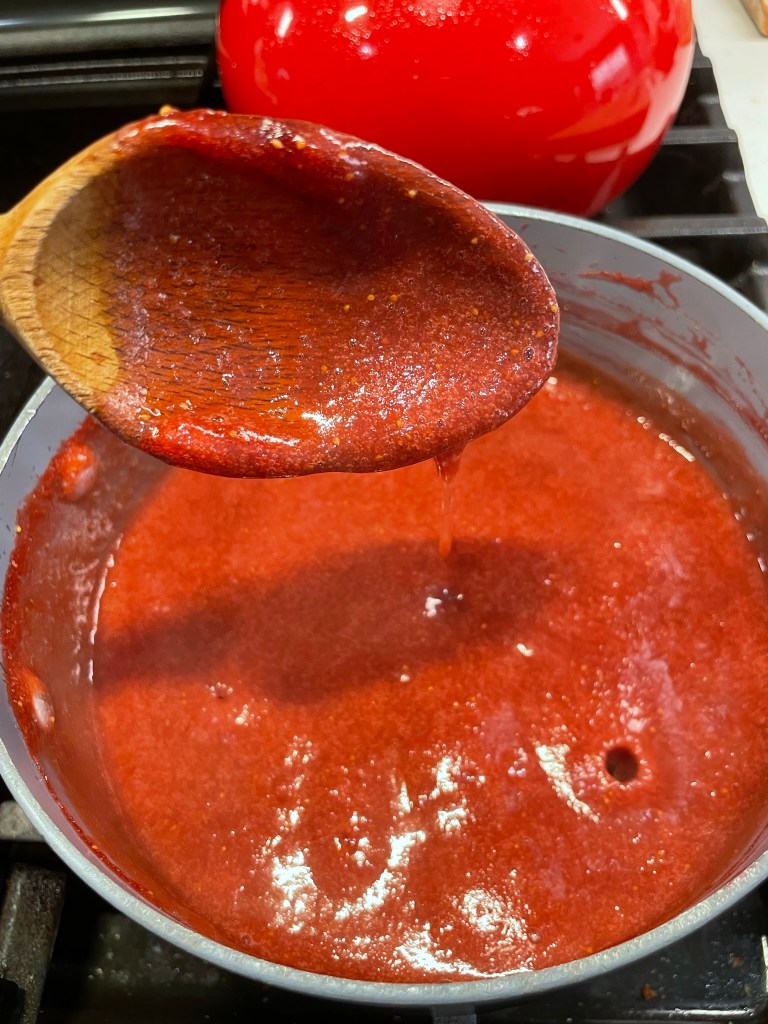
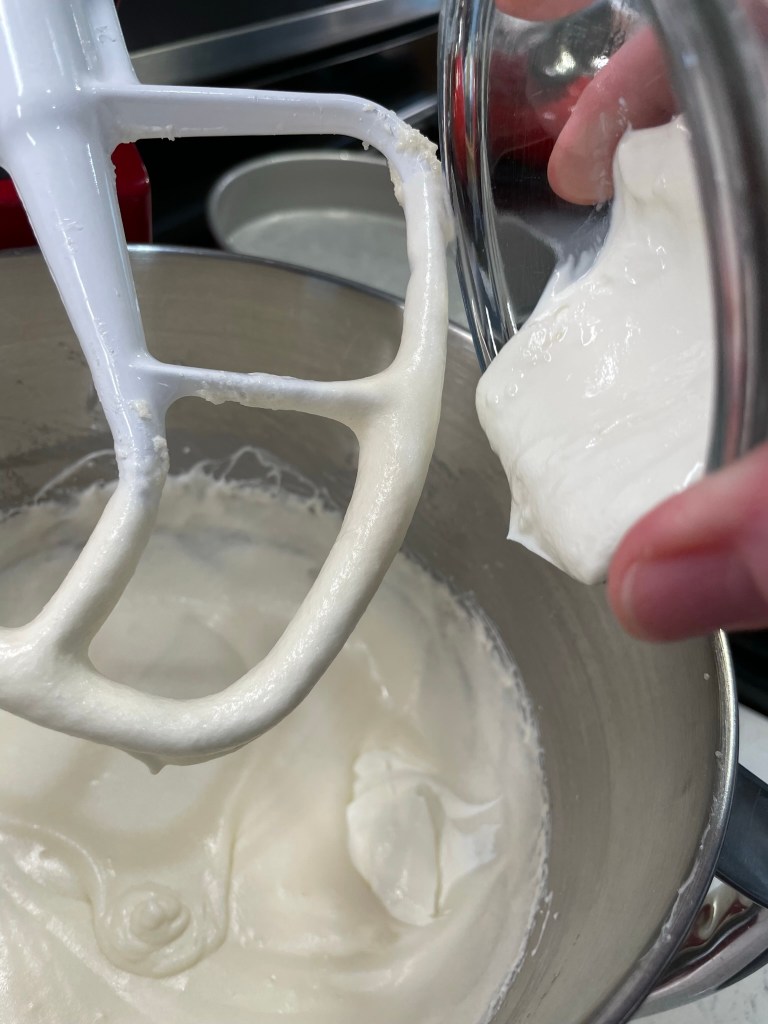
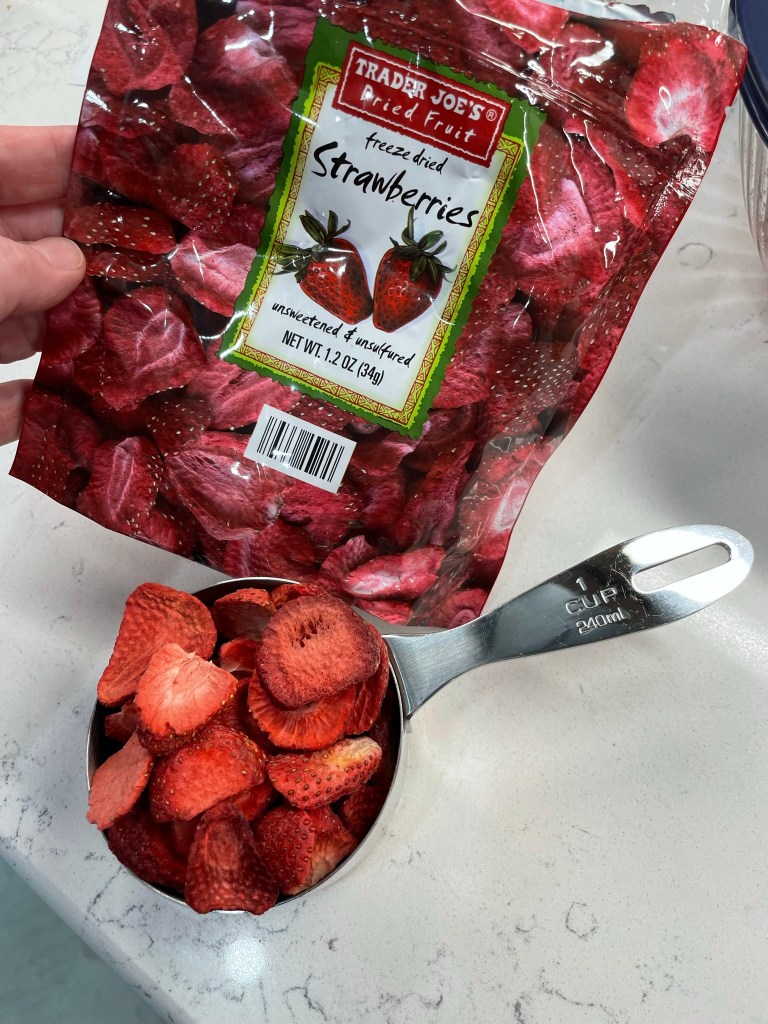
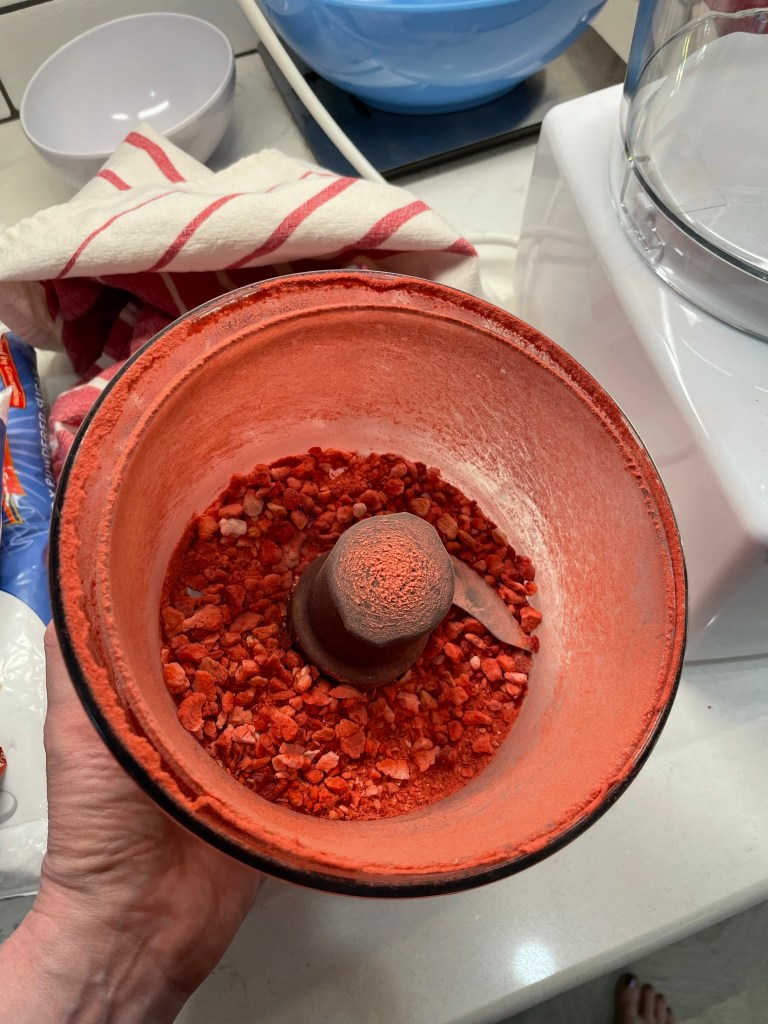
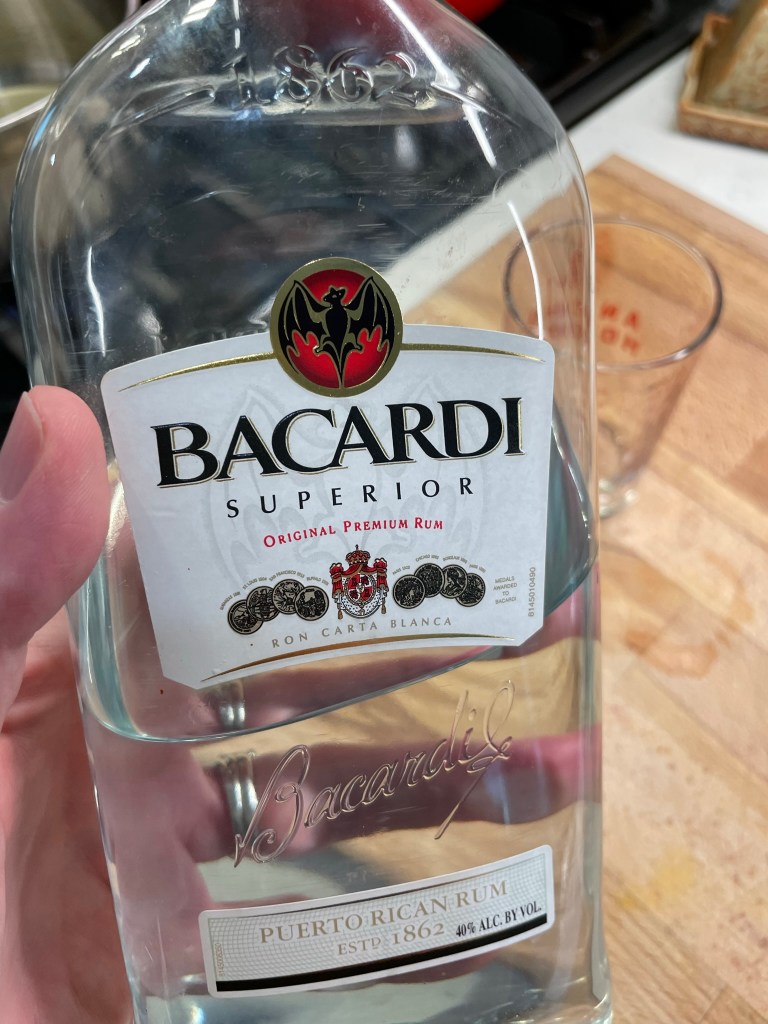
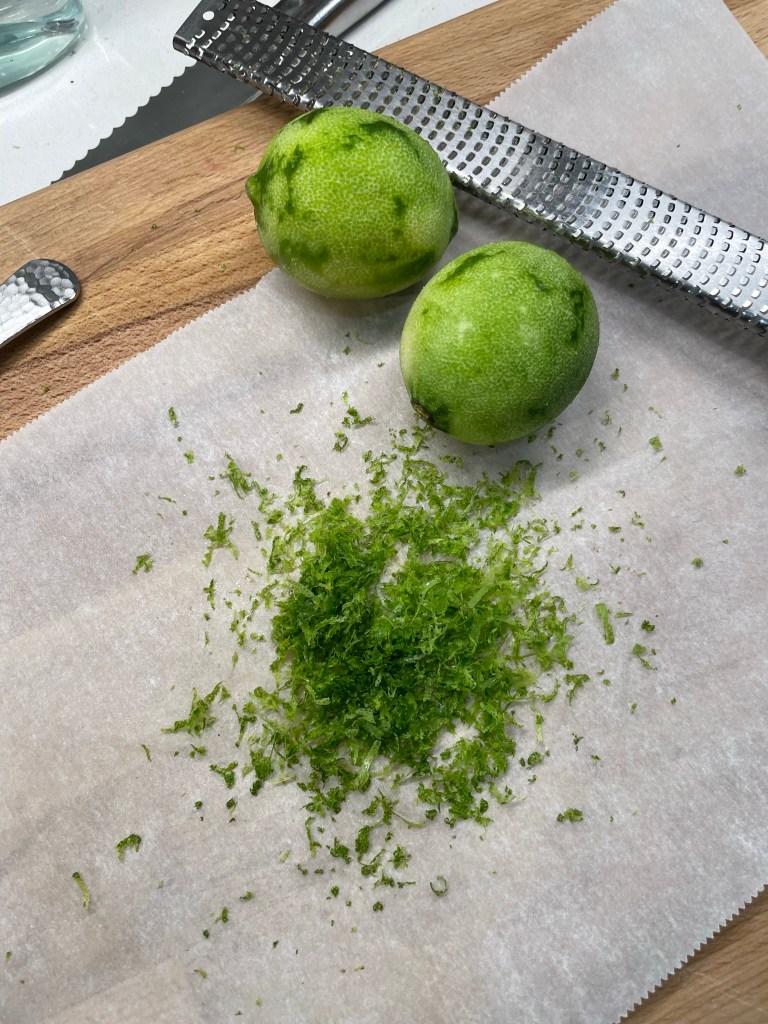
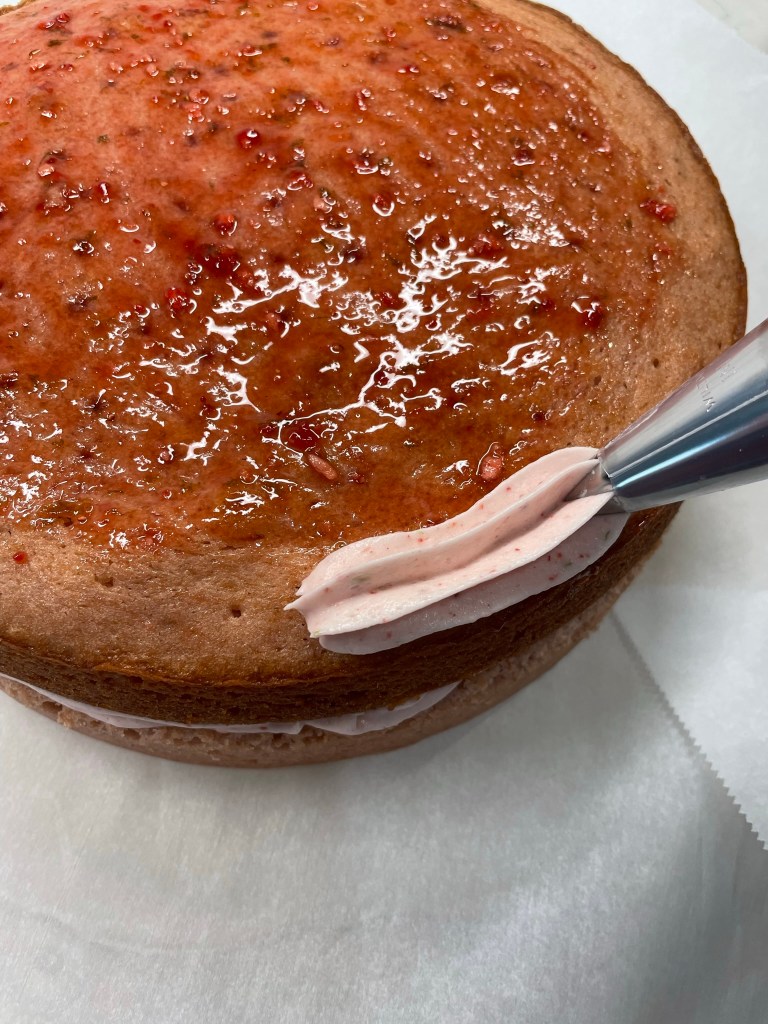
To achieve the “daiquiri” effect, I had swapped out some of the vanilla in favor of rum extract, and I cooked up a boozy strawberry daiquiri syrup for soaking the baked cake layers before icing. That alone was so good, I’ll have to think up another reason to make it again— and soon! The syrup was flavored with Bacardi white rum, fresh lime zest, and bits of freeze-dried strawberries, which I had processed into powder in the food processor. I’m pretty sure I’ll still be finding strawberry powder in random parts of the kitchen this time next strawberry season. Who has a better suggestion for turning that stuff into powder?
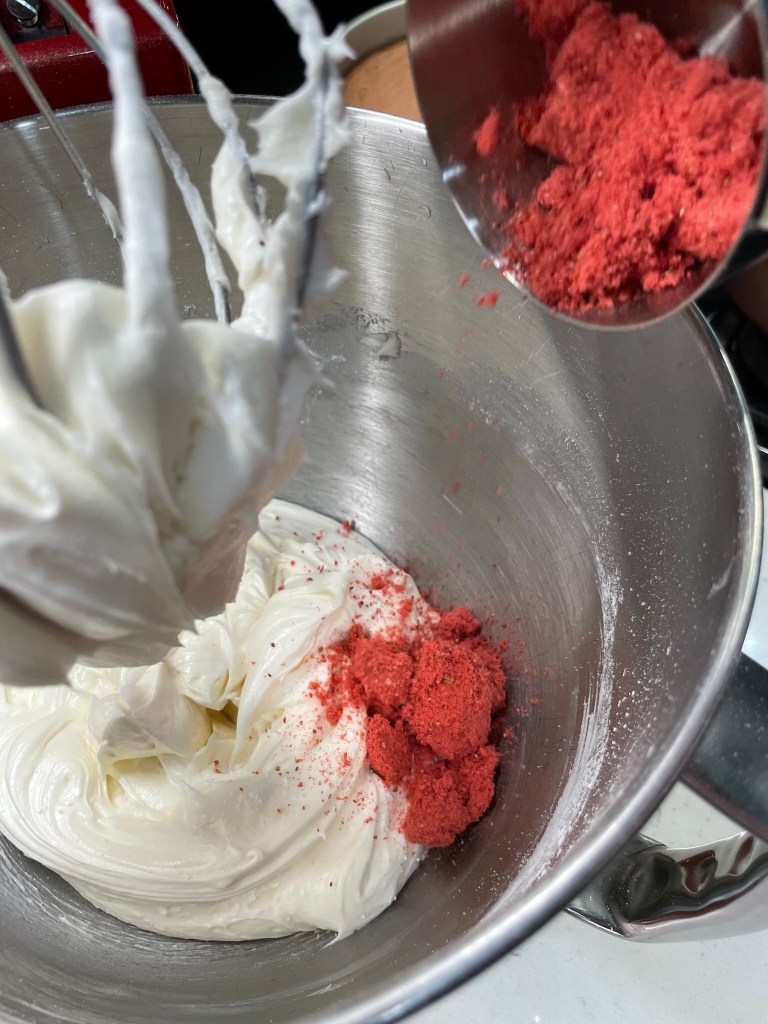
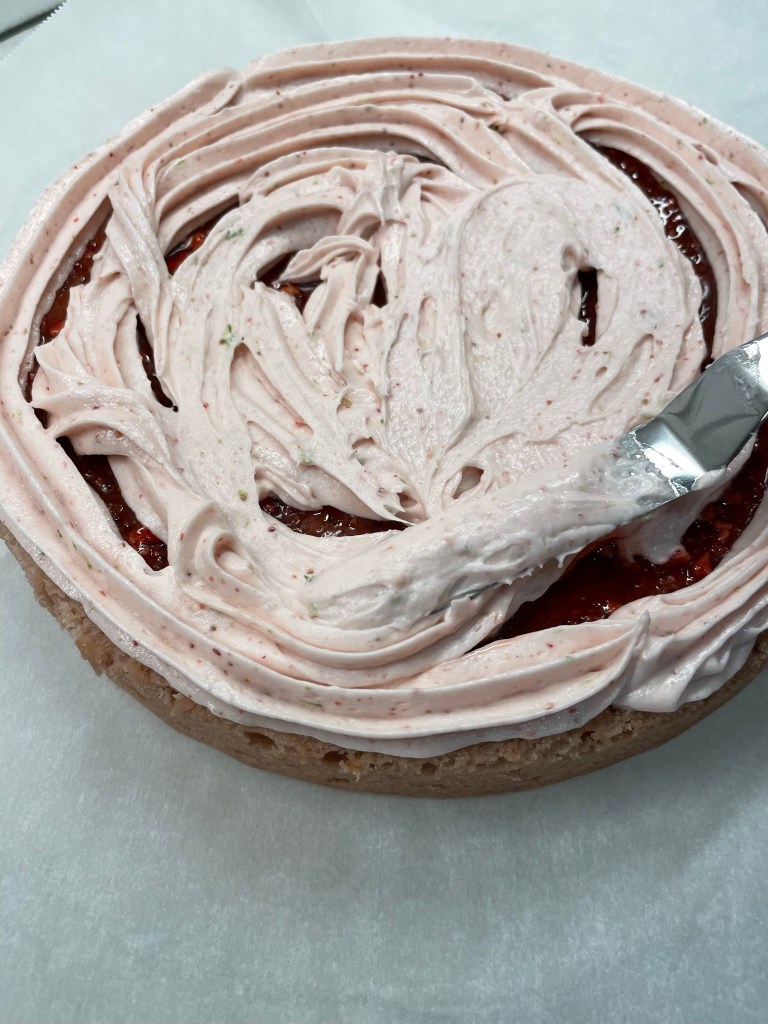
Almost finished! The cream cheese frosting got its pretty pink color from the freeze-dried strawberry powder, which put a ton of fresh berry flavor into play, without messing up the texture with too much moisture. I used an extra cup of powdered sugar from Sally’s recipe, because I wanted it to be sturdier. More lime zest and another splash of rum, and this frosting was good to go. And when I say, “good,” I mean really gooood!
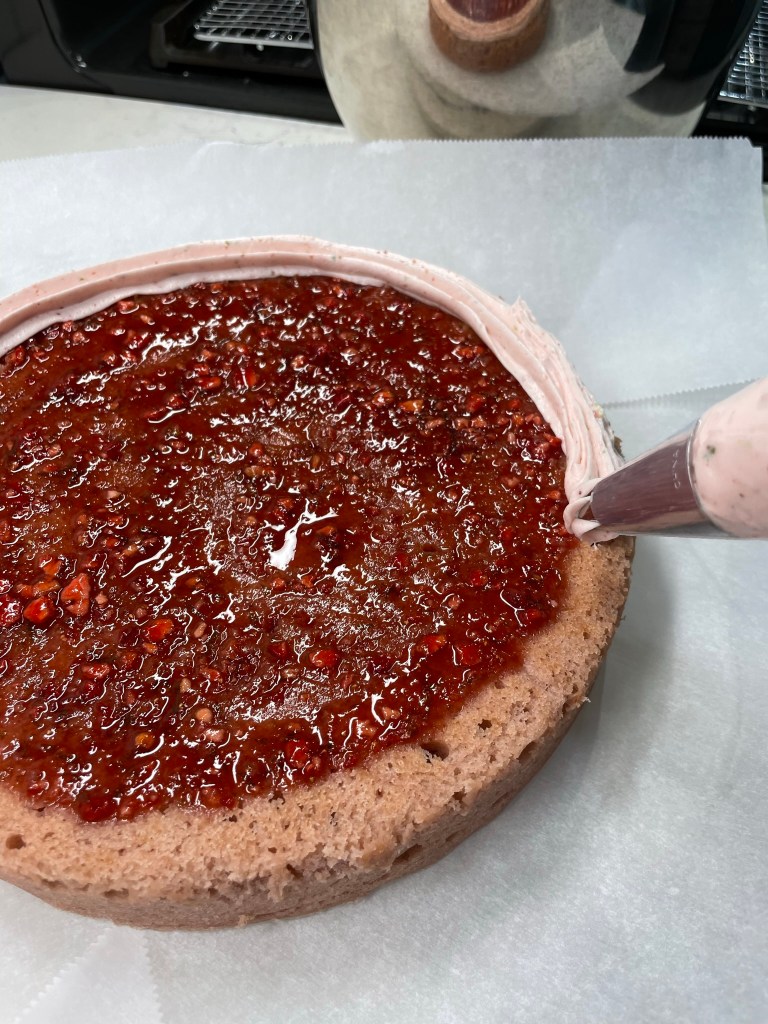
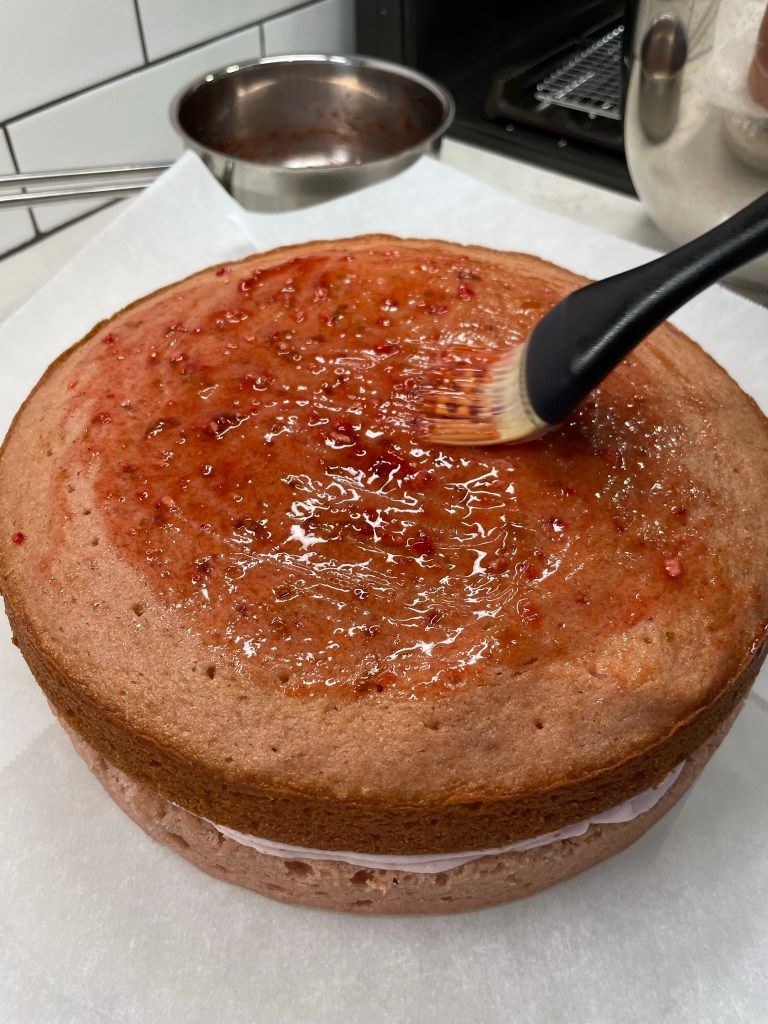
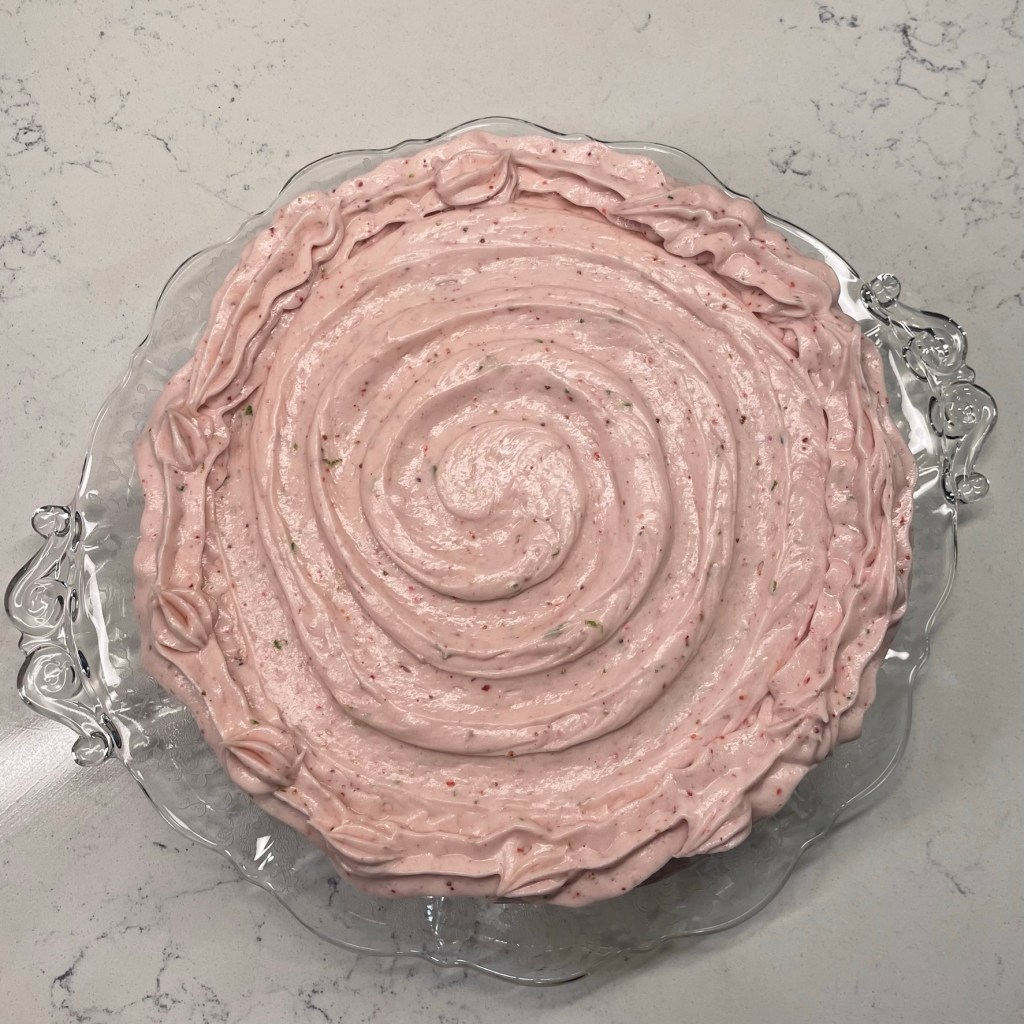
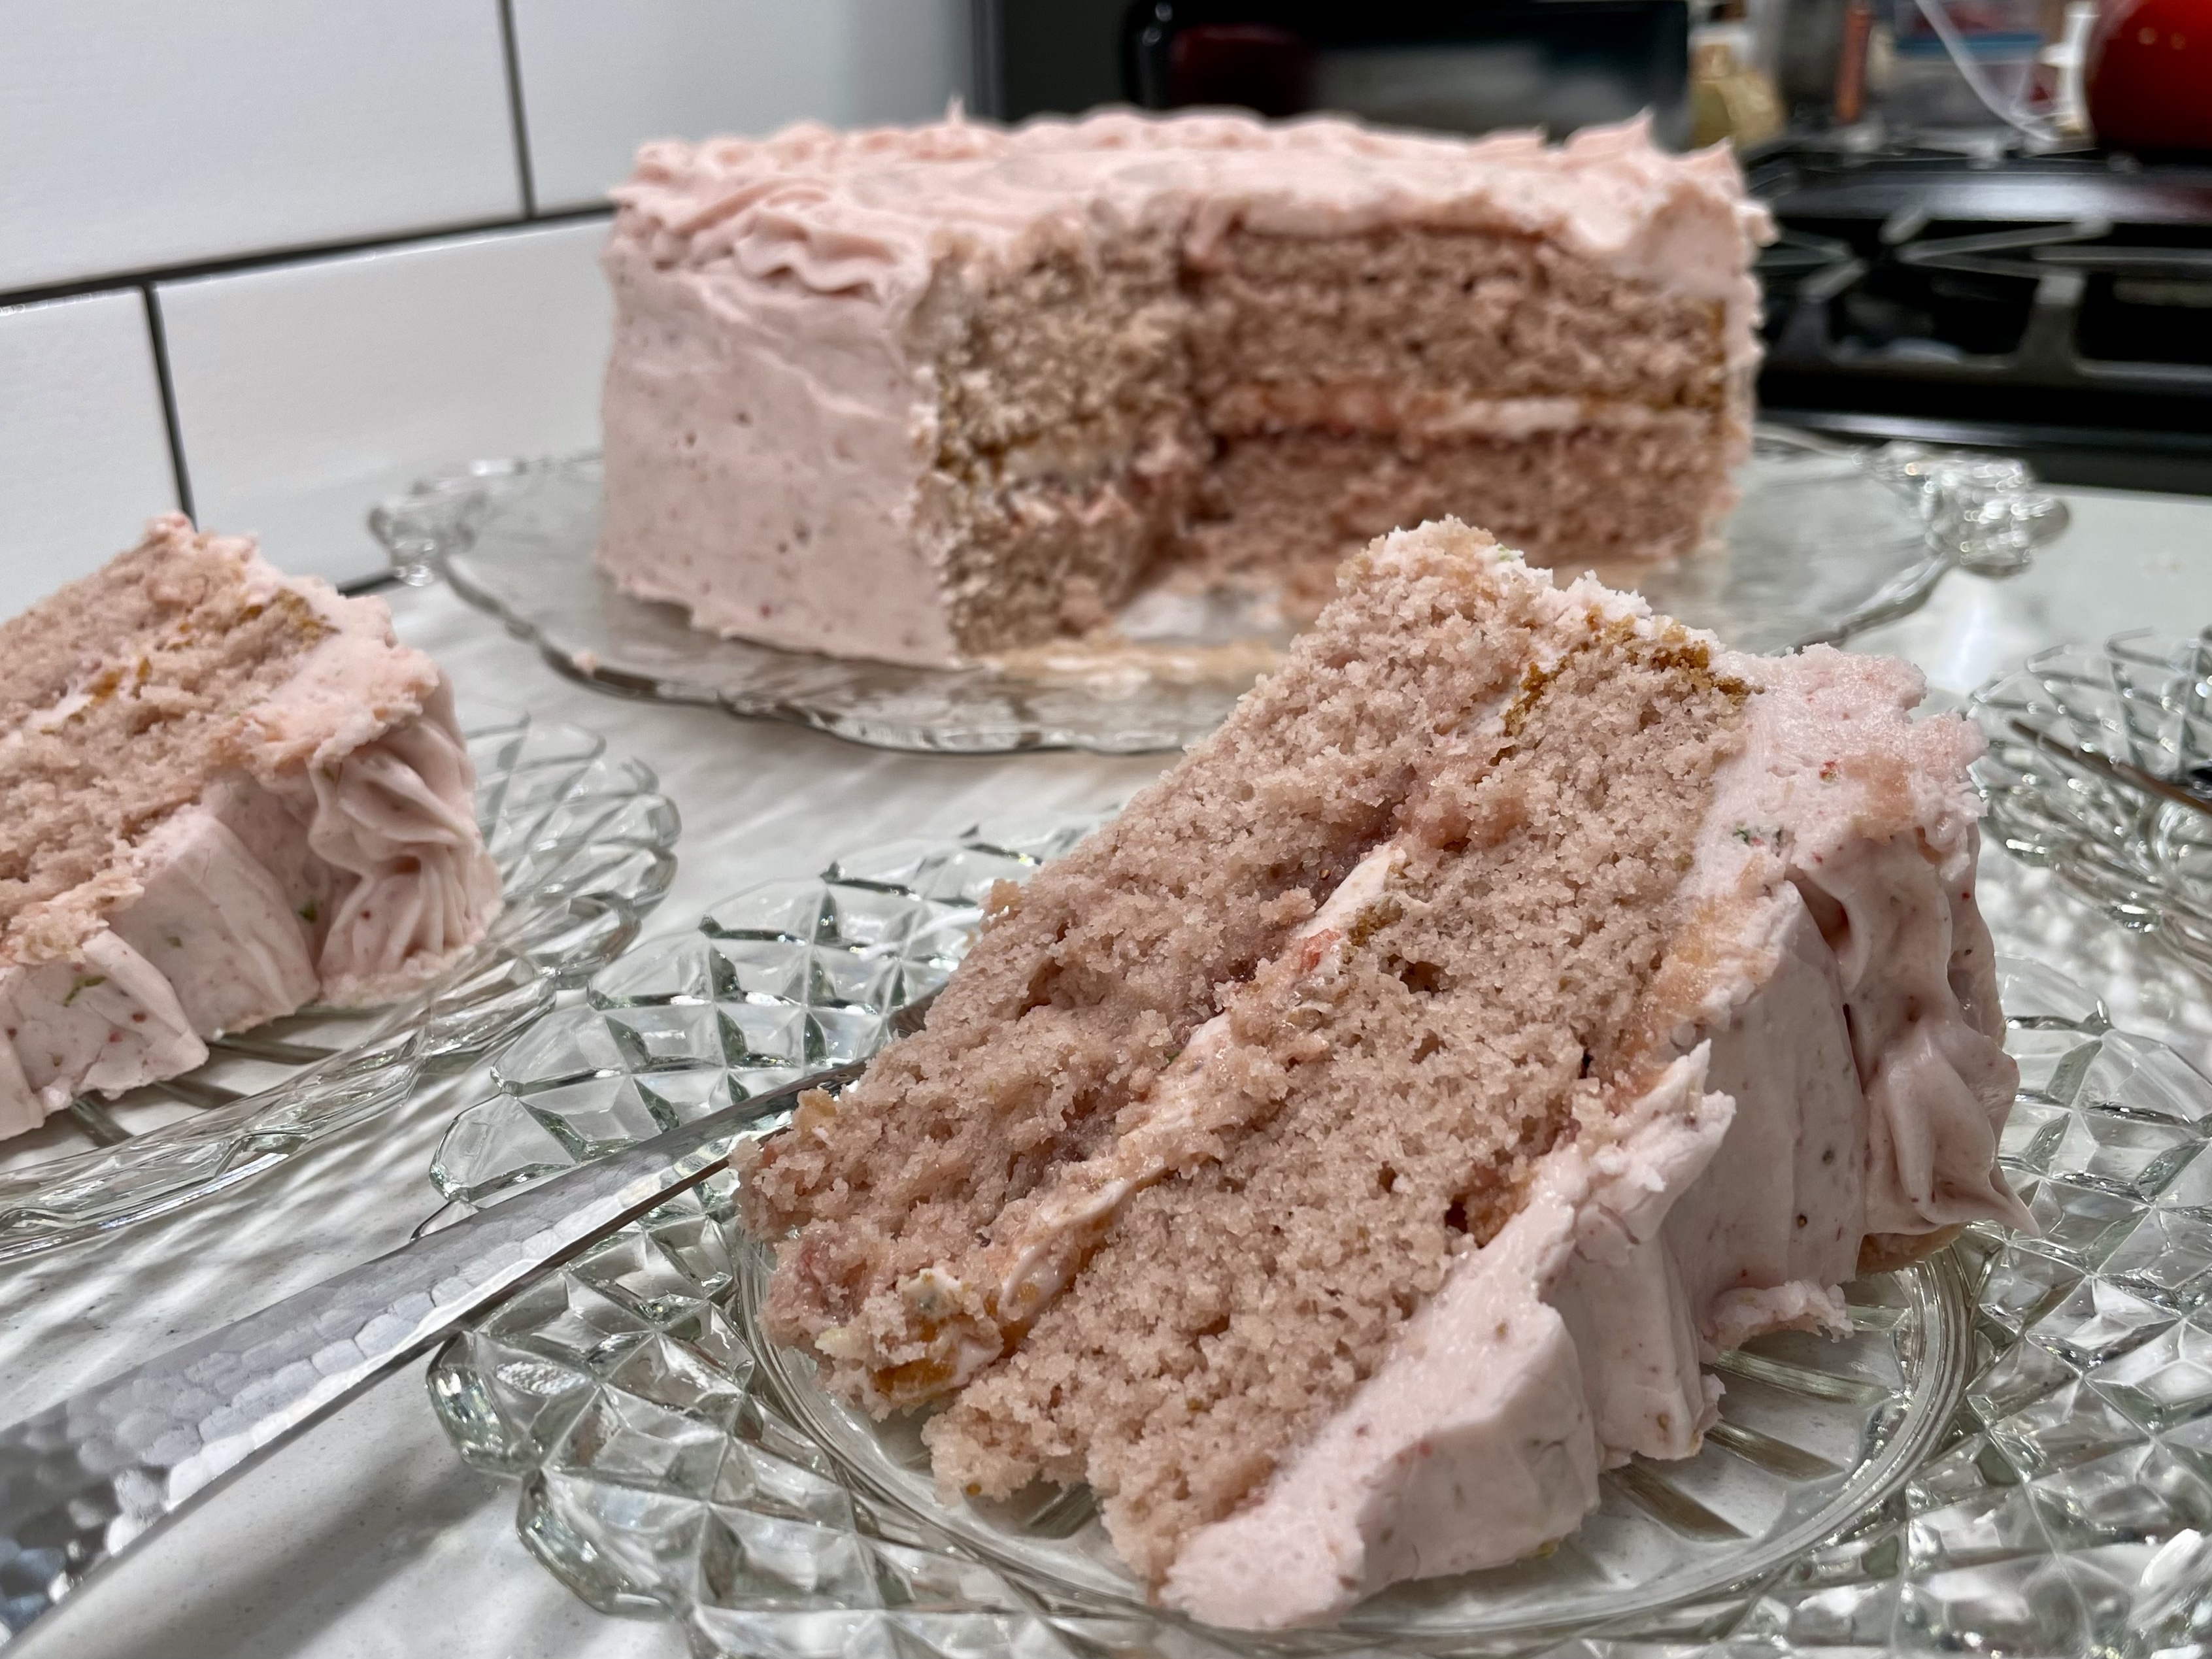
Putting the cake together was the easy part! I spooned most of that boozy daiquiri syrup over the first layer, which I poked all over with a toothpick first. A little edge of frosting kept it from soaking down the sides, and then I topped it with the second layer and frosted it up all over.
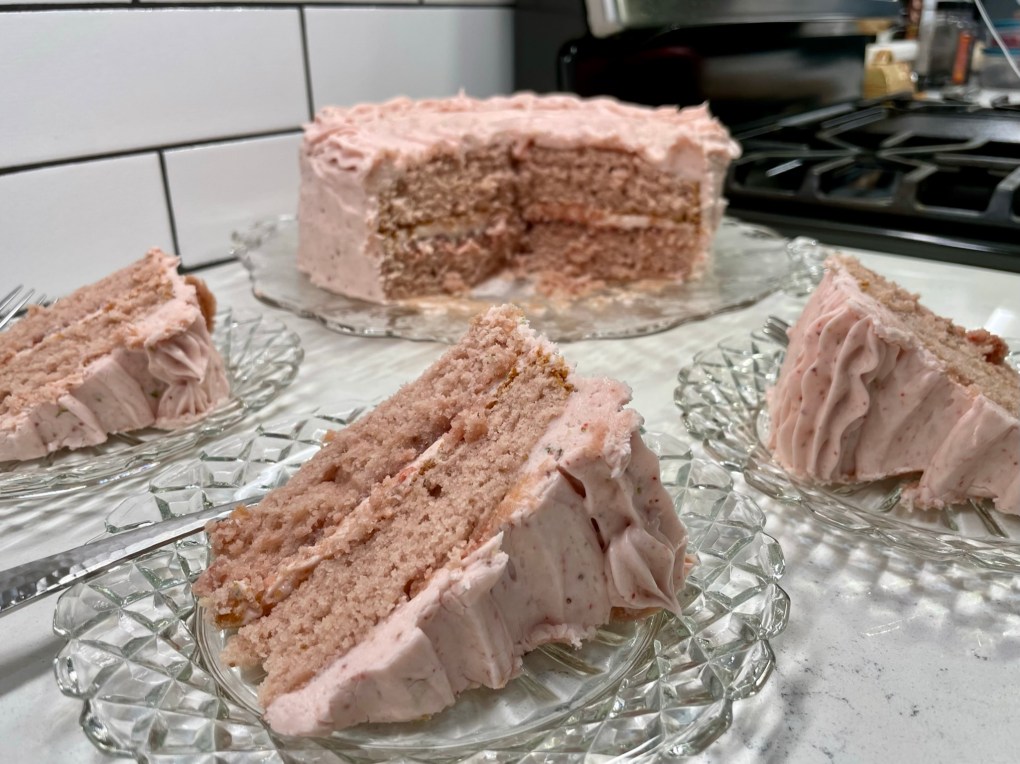
The resulting cake was beautiful and very tasty. Would I change anything next time? Not really, except for skipping the macerating of berries, which I wasn’t supposed to do in the first place. It wouldn’t be terrible to double the daiquiri syrup, and maybe it would soak in deeper if I applied it when the cake layers were still warm. I might put a little extra gel coloring into the batter to achieve more of a pink look. And I’d probably save a few of the prettiest fresh berries to garnish the cake at serving time.
But even without all of that, this was a big time winner. Les loved his Father’s Day cake, and I’m conquering my fear of baking, one recipe at a time. 🍓😉
This pretty cake is packed with fresh strawberry flavor, and I found a way to put a fun cocktail spin on it, too!
For the cake batter, plan ahead for the time needed to puree and cook the strawberries, as the reduction needs to be cooled to room temperature, along with the butter, egg whites and sour cream. For best results, measure out and line up all your ingredients before beginning this recipe. The ingredients and directions are split up into three components: the batter, the daiquiri syrup and the frosting.
Ingredients
1 pound fresh ripe strawberries, rinsed and hulled (these will be pureed and cooked)
2 1/2 cups cake flour (see notes)
2 tsp. baking powder
1/2 tsp. baking soda
1 tsp. fine salt
3/4 cup (1 1/2 sticks) unsalted butter, room temperature
1 3/4 cups cane sugar
5 large egg whites, room temperature
1/3 cup sour cream, room temperature (full fat for best results)
1 tsp. real vanilla extract
1 tsp. rum extract
4 drops red food color (optional, for extra pink color)
1/2 whole milk, room temperature
Directions
Puree the strawberries in a blender or food processor until smooth. Cook the resulting puree over medium low heat for about half an hour, until the berries have reduced down to about 1/2 cup volume. The mixture should be almost as thick and sticky as tomato paste. Set this aside to cool.
Preheat oven to 350 F, with oven rack in center position. Prepare two 9-inch cake pans by buttering the sides and bottom. Lay parchment rounds over the bottom and butter that as well for easy removal of the cake layers.
Combine flour, baking powder, baking soda and salt in a medium bowl.
Beat butter in stand mixer with paddle blade. Add sugar gradually, beating until light and fluffy. Whisk egg whites until frothy; pour into mixer bowl and beat with paddle until evenly combined, about two minutes. Add sour cream, vanilla and rum extracts and food color (if using); beat until smooth.
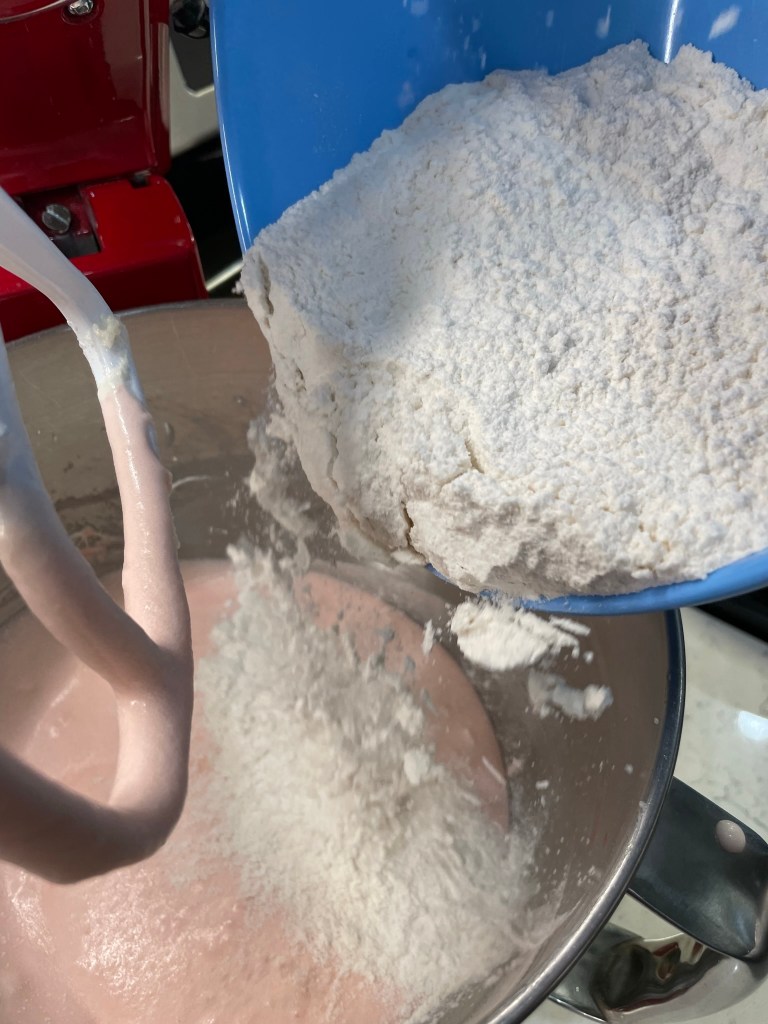
Whisk the cooled strawberry puree into the milk to create a thick liquid. Add dry and wet ingredients to the batter, alternating so that you begin with flour, then strawberry-milk, flour, milk, flour. After each addition, beat on low speed only until addition is incorporated. Scrape down the sides of the bowl a couple of times during these additions.
Divide batter between prepared cake pans. Bake 25 minutes, using the toothpick test to check for doneness. Allow cake layers to cool in the pans, set on a cooling rack for even air flow underneath. When cakes are cooled, invert onto cooling racks.
The daiquiri syrup is next, and this can be made ahead and brought to room temperature before soaking baked cake layers. The syrup uses some of the freeze-dried strawberries that are also used in the frosting. Process those into a powder during this stage, and reserve most of the powder for the frosting.
Ingredients
1/4 cup cane sugar
2 Tbsp. water
1/4 cup white rum (I used Bacardi brand)
zest of one organic lime
1 Tbsp. powdered, freeze-dried strawberries plus small bits (see frosting ingredients below)
Directions
Add the freeze-dried strawberries to a blender or the small bowl of a food processor. Pulse about 20 times to transform the berries into a powder. Sift the berry powder through a wire strainer, and measure out a tablespoon or so to be used in the simple syrup, along with some of the larger bits caught in the mesh strainer.
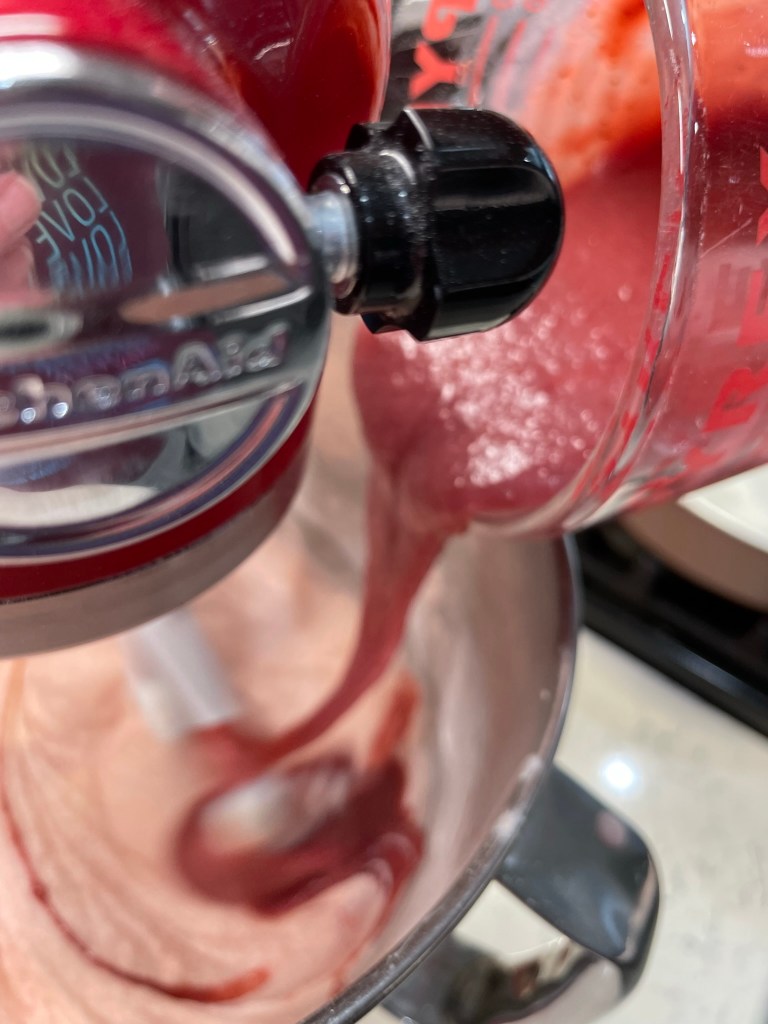
Make the daiquiri syrup by heating sugar, water and rum over medium heat until slightly bubbly. Add about a tablespoon of the strawberry powder, and a spoonful of the small bits, which will rehydrate in syrup. Stir in lime zest and set aside to cool. If you’d like, you can make this ahead and keep it in the fridge, but bring it to room temp when you’re ready to assemble the cake.
For the frosting, I like salted butter because it emphasizes the bright flavors of strawberry, rum and lime. If you prefer unsalted butter, it’s an even swap.
Ingredients
1 heaping cup freeze-dried strawberries (look for them at Trader Joe’s, Whole Foods or online)
8 ounces full-fat cream cheese, room temperature
1 stick salted butter, room temperature
4 cups confectioner’s sugar
1 Tbsp. white rum
zest of one organic lime
Directions
Make the frosting; cream together the cream cheese and butter on high speed, using the stand mixer with whisk attachment. Stop mixer and add confectioner’s sugar, one cup at a time. Whisk until smooth and scrape down sides as needed. Beat in rum, then add powdered strawberry dust and lime zest. Beat until fluffy. If the frosting seems a little soft, cover the bowl and refrigerate a half hour or so, then whip at high speed for a fluffy texture.
Smear a little bit of frosting onto serving platter, then position first cake layer upside-down on the dab of frosting to prevent it sliding around on the platter. Use a toothpick to poke small holes all over the first cake layer. This will help the daiquiri syrup soak into the bottom layer of the cake.
Fill a piping bag with frosting, and lay a thick line around the outer edge of the first layer. Spoon most of the daiquiri syrup evenly over the cake layer, spreading it up to the edge of the frosting line to encourage it into the toothpick holes. When the syrup appears mostly soaked into the cake, pipe frosting all over the top and use an offset spatula to gently smooth it over the syrup. It doesn’t have to be perfect.
Position the second layer of cake over the first. Use the toothpick to poke holes over this layer and gently brush the remaining daiquiri syrup over the top, stopping about one inch from the edges. This layer should have only a slight coating of the syrup; otherwise, the frosting might not stay put. Pipe a line of frosting around the edge of the top layer, then frost the sides and top of the cake.
Cover and refrigerate the cake a couple of hours before serving for best results.
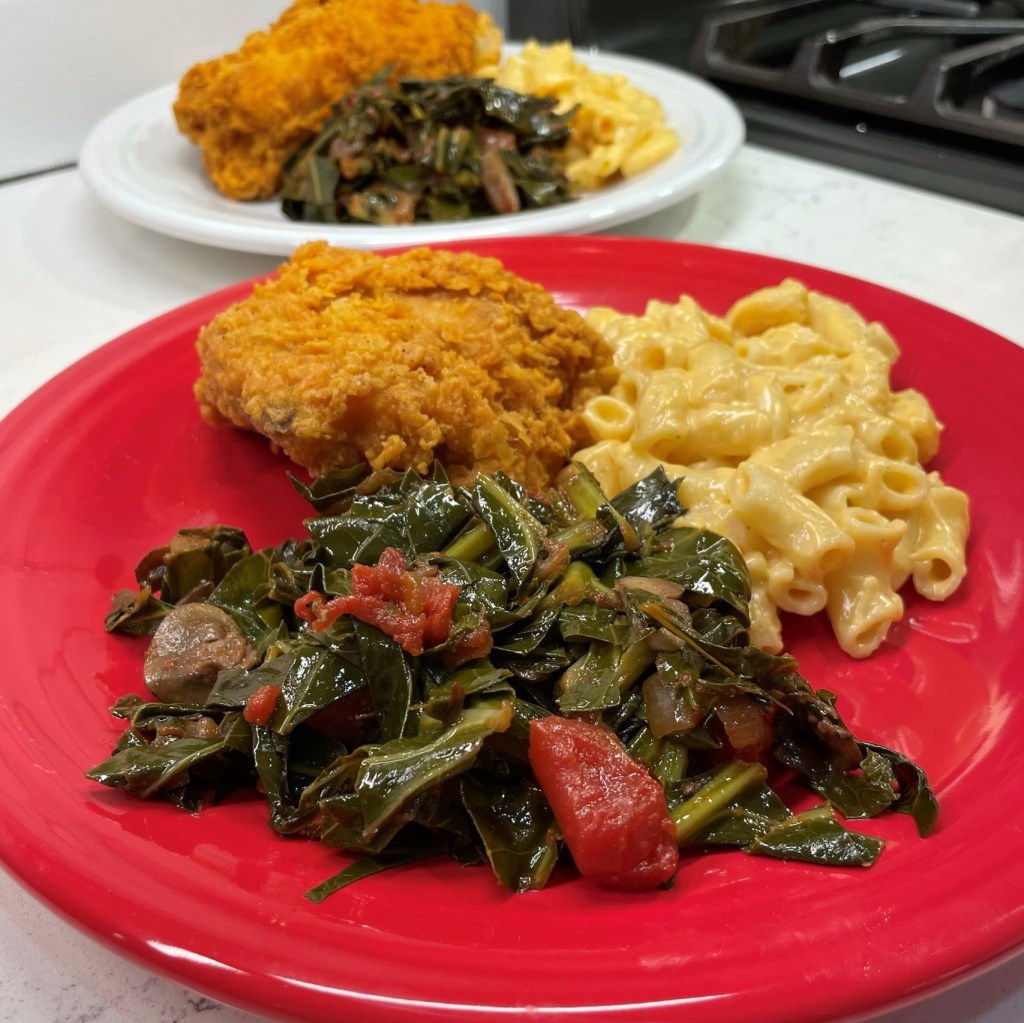
It seems funny for me to look back 35-plus years to my early days of living in North Carolina and remember how novel so many of the foods seemed at the time. It isn’t that they were all unfamiliar, of course. Fried chicken, black-eyed peas, biscuits, even banana pudding are served in other places, but they are deeply woven into the fabric of southern U.S. culture. There are a few other southern staples that I quickly learned to love, including grits, pimento cheese and okra.
Of all the foods widely considered “southern,” collard greens are the only one I had never tried or even heard of before I moved here all those years ago. And even then, it took me some time to come around to enjoying collards because the first few times I had them, they were steeped in liquid (entirely too long, if you ask me) with something called “fatback.” I recall them being greasy, dull and overly salty, and I mostly paid them no mind. A few years later, right around the time the term “superfood” began making the rounds, I had collards prepared a better way—sturdy, spicy and actually still green. And I fell in love.
Collard greens are indeed a nutritional powerhouse, and they will be a featured item on many southern tables this long weekend, as families gather to celebrate Juneteenth. In honor of the joyous occasion, I thought perhaps my Comfort du Jour community might be willing to check out another version of this ubiquitous southern side dish.
Surprisingly, this is the first time I’ve made collard greens without some kind of meat in the base. I usually start with a few slices of smoky bacon, and occasionally I’ve browned up some Neese’s hot pork sausage— it’s a local brand that’s quite popular and very good. But this time, I wanted to keep my collards meat-free, and give some other ingredients a chance to strut their stuff. I wanted heat, smoke and (most importantly) something red.
The color red is a big deal to the Black community on this occasion, as it symbolizes courage and resilience as well as blood shed by enslaved ancestors. Red drinks are common at Juneteenth celebrations, as are red desserts such as strawberry pie and red velvet cake.
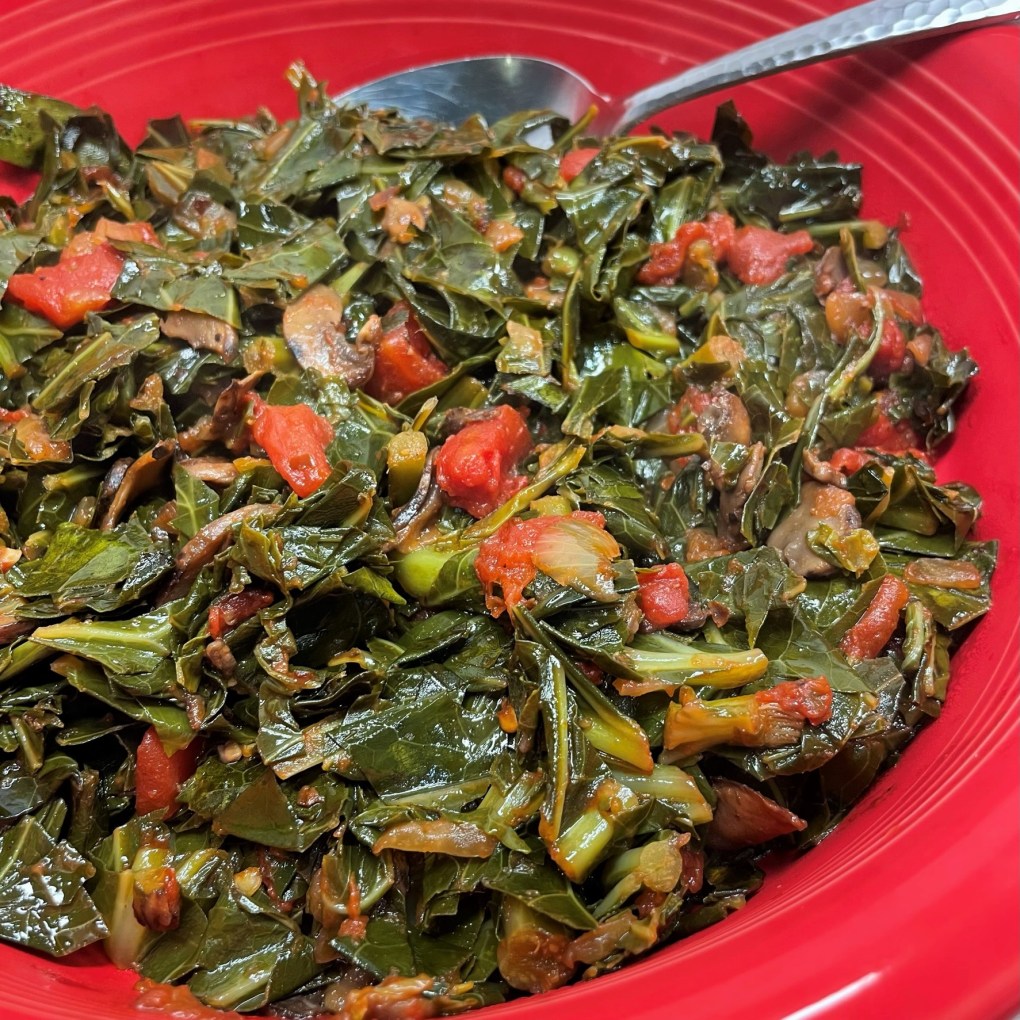
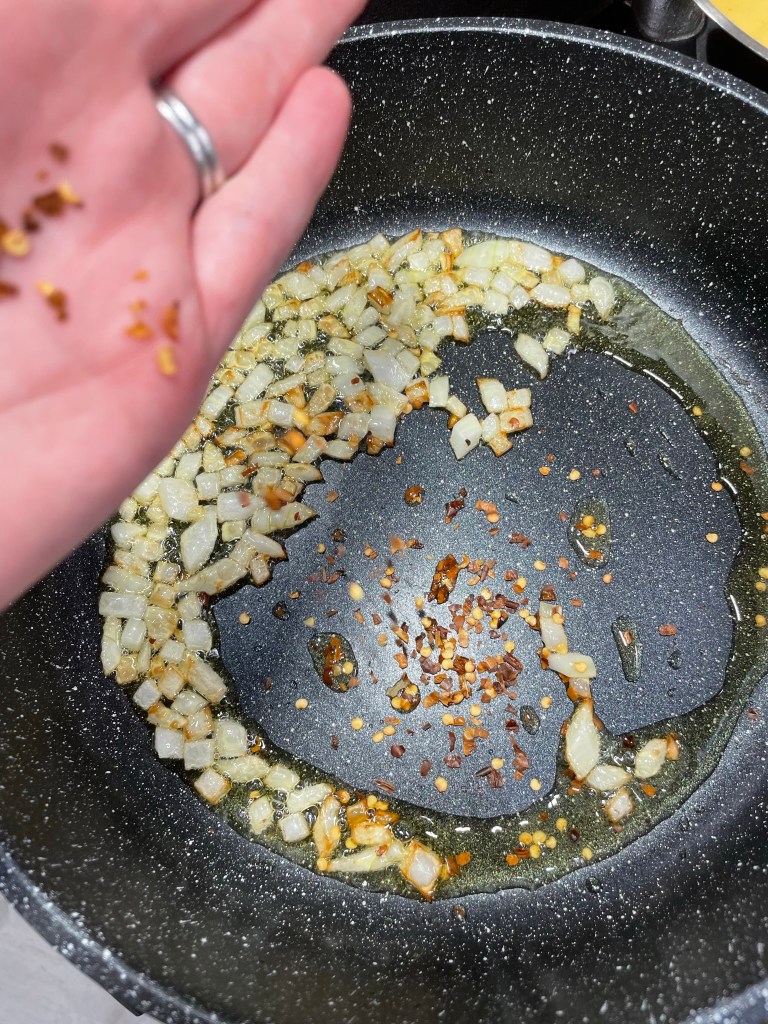
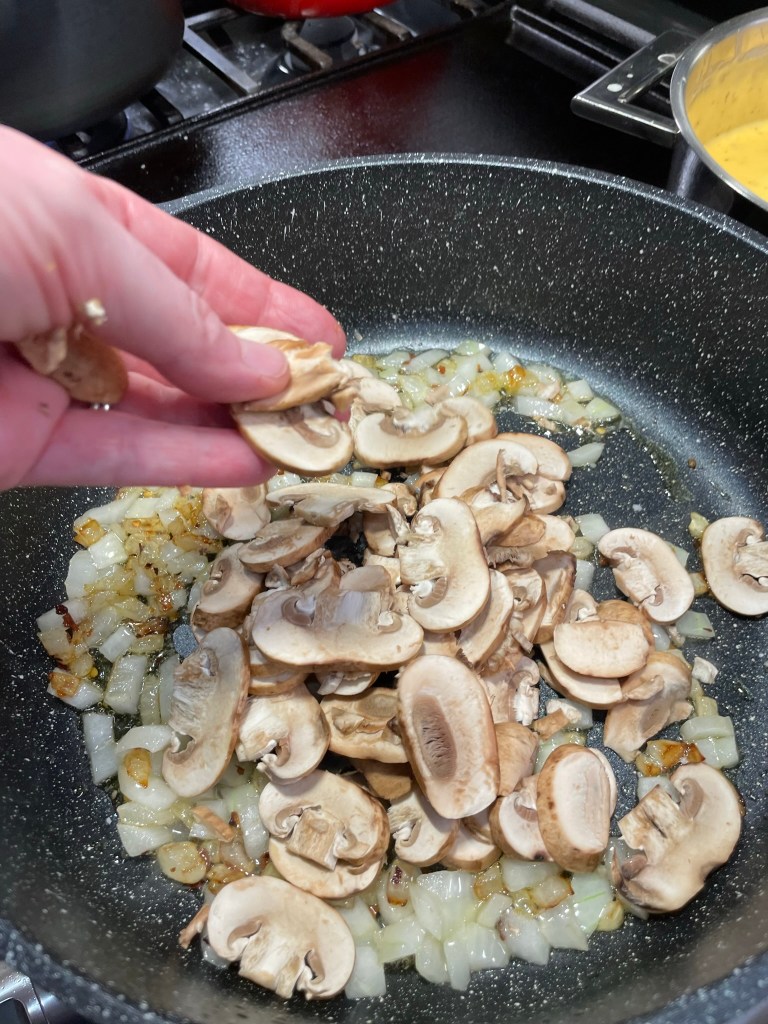
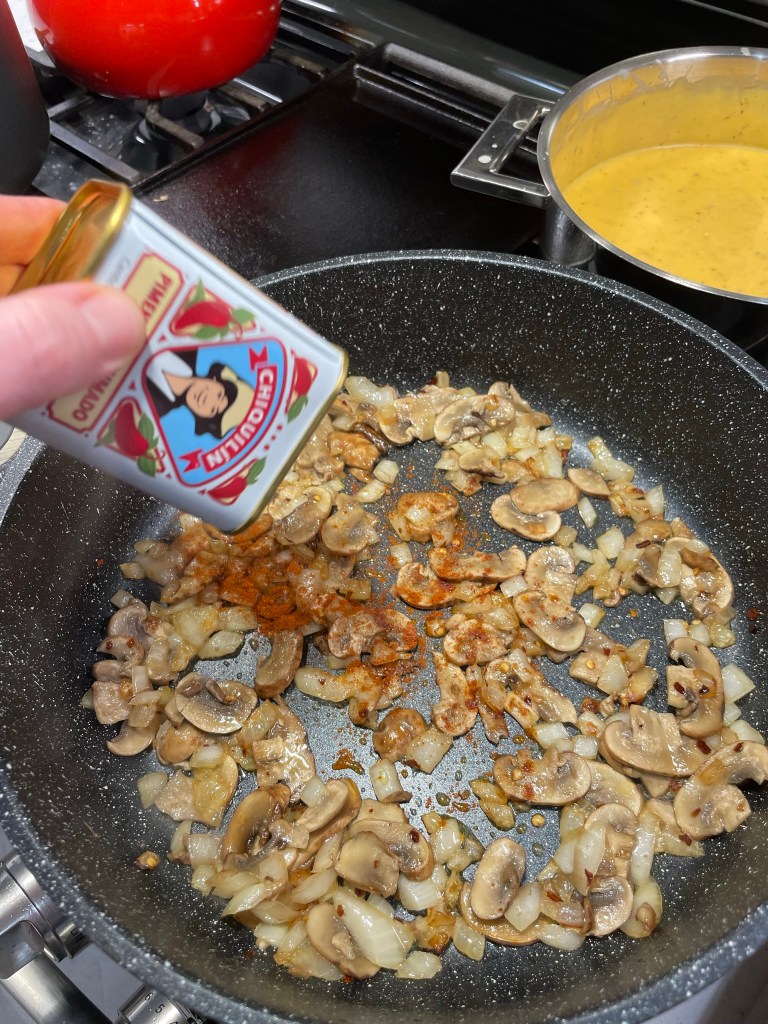
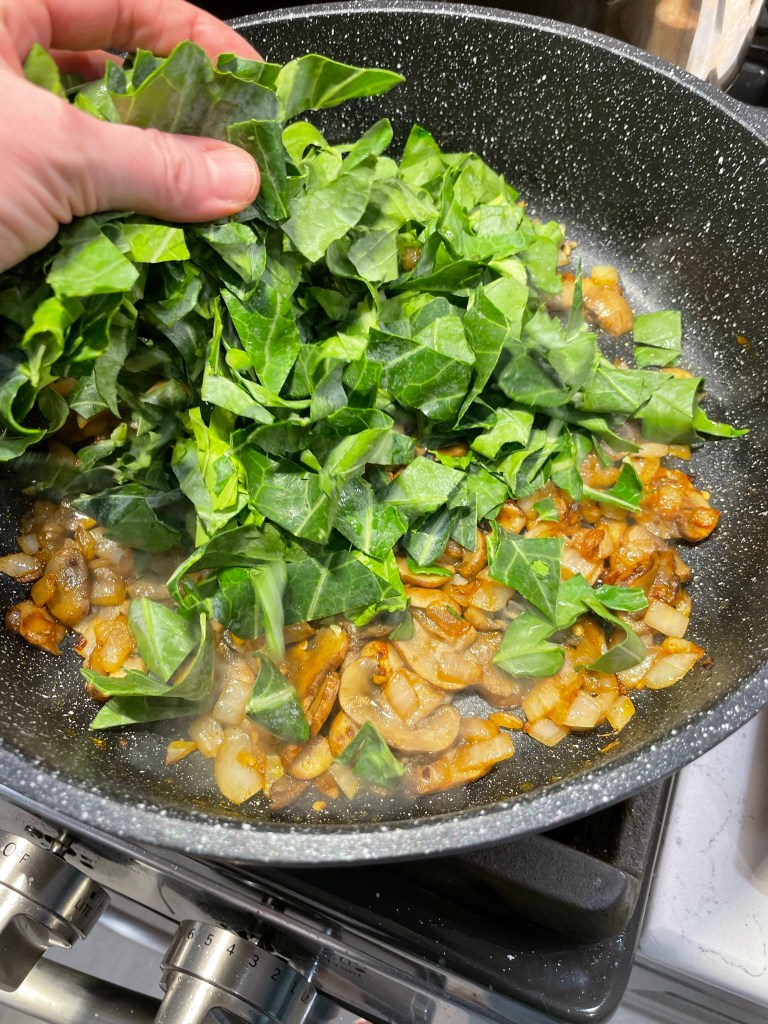
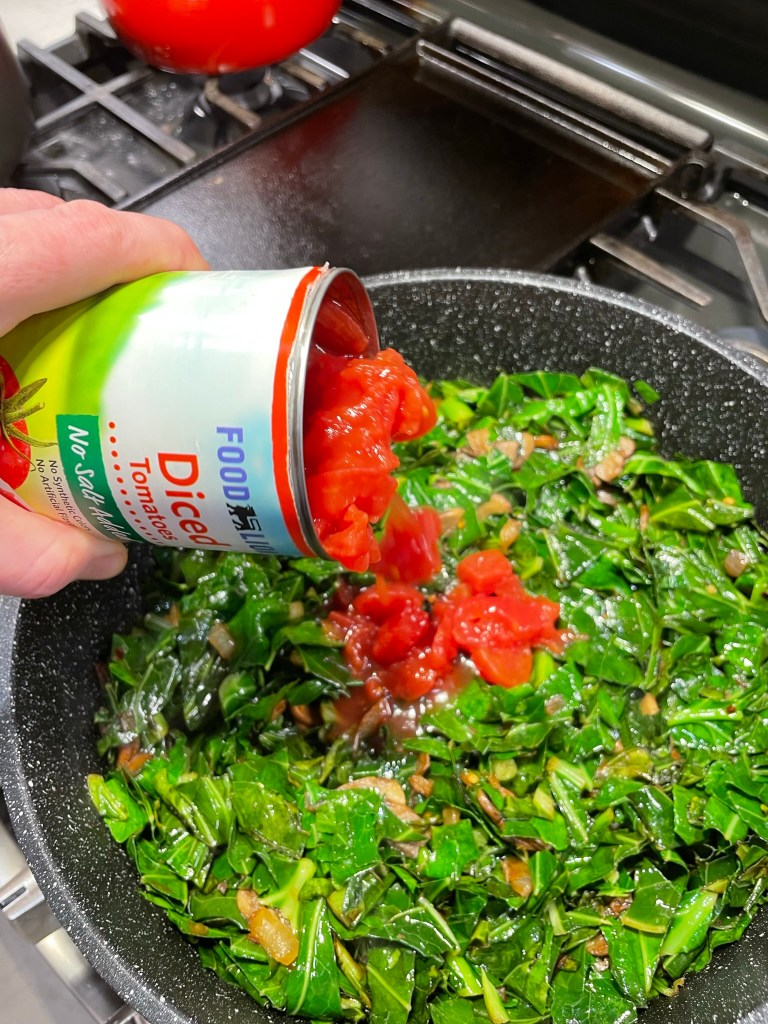
I started with onions sauteed in olive oil, then I seasoned it up with salt and pepper, a generous shake of crushed red pepper (as much as you want) for heat and sass, a fat handful of sliced cremini mushrooms for body, and about a teaspoon of smoked Spanish paprika for big earthy flavor. Next, I tossed the chopped collards into the pan in batches, adding oil as needed until the whole bagful was wilted and glossy. Finally, diced tomatoes at the end for sweetness and the pop of beautiful red color I wanted.
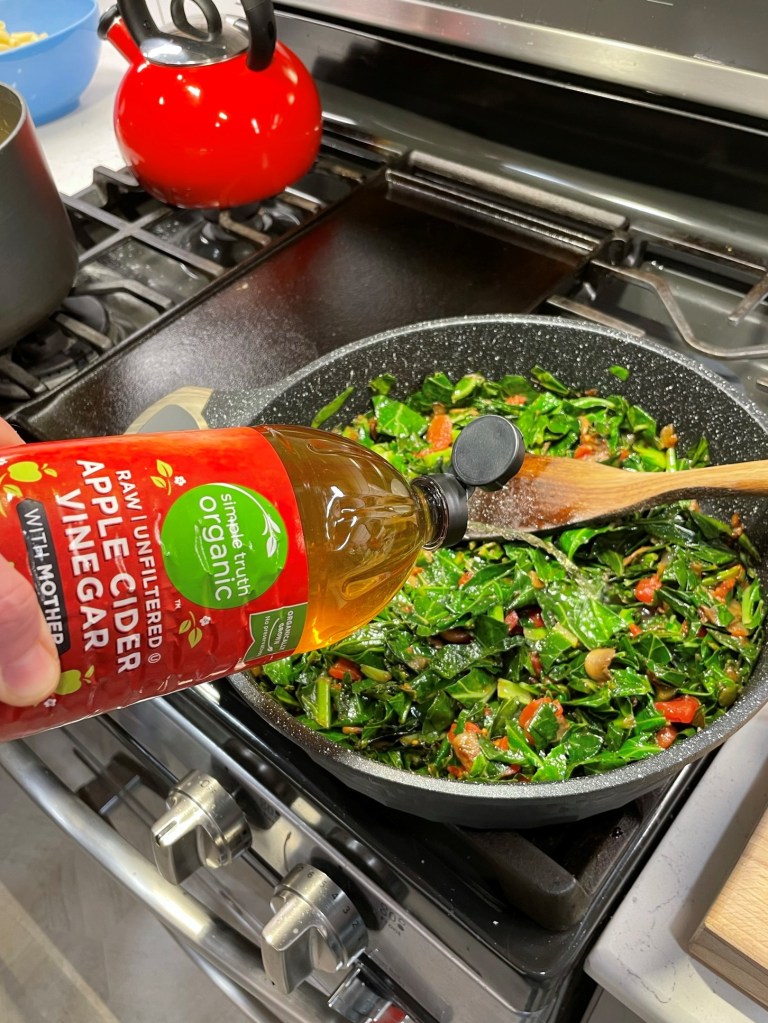
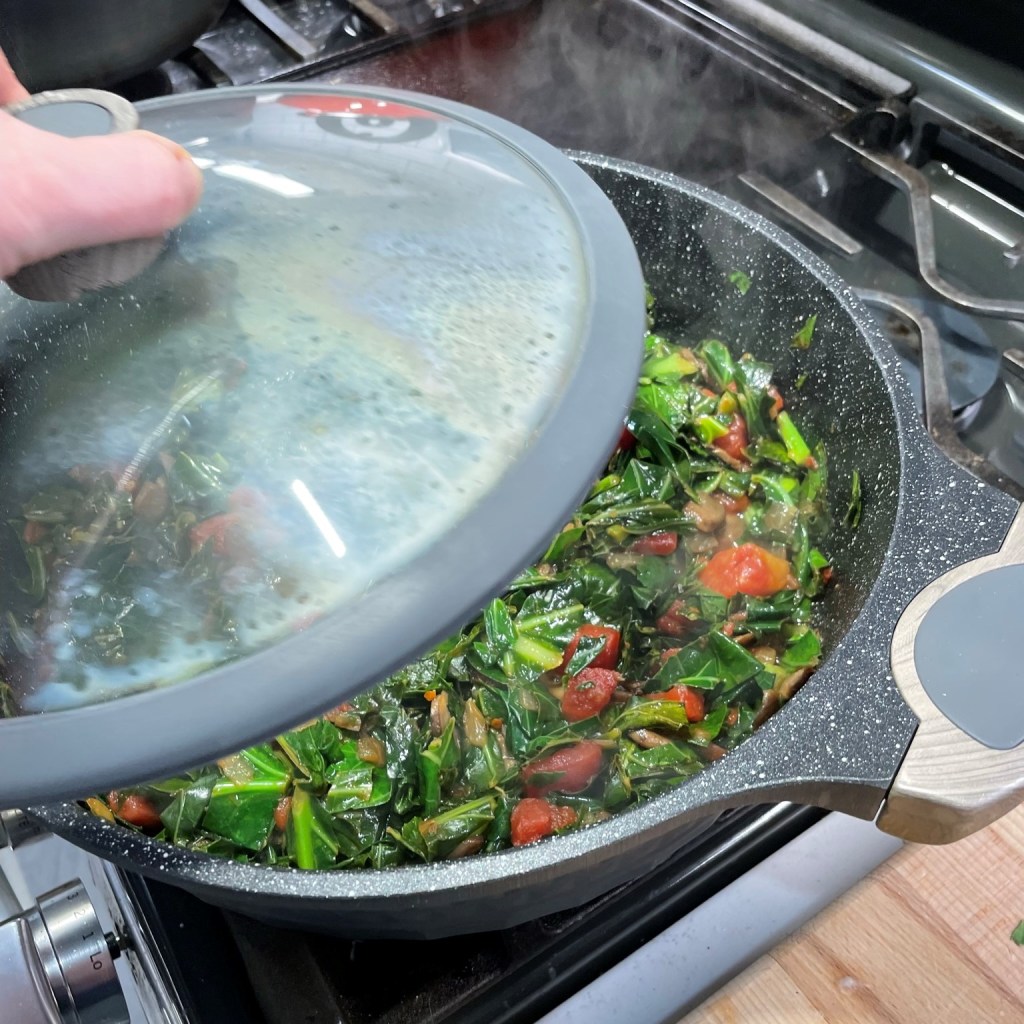
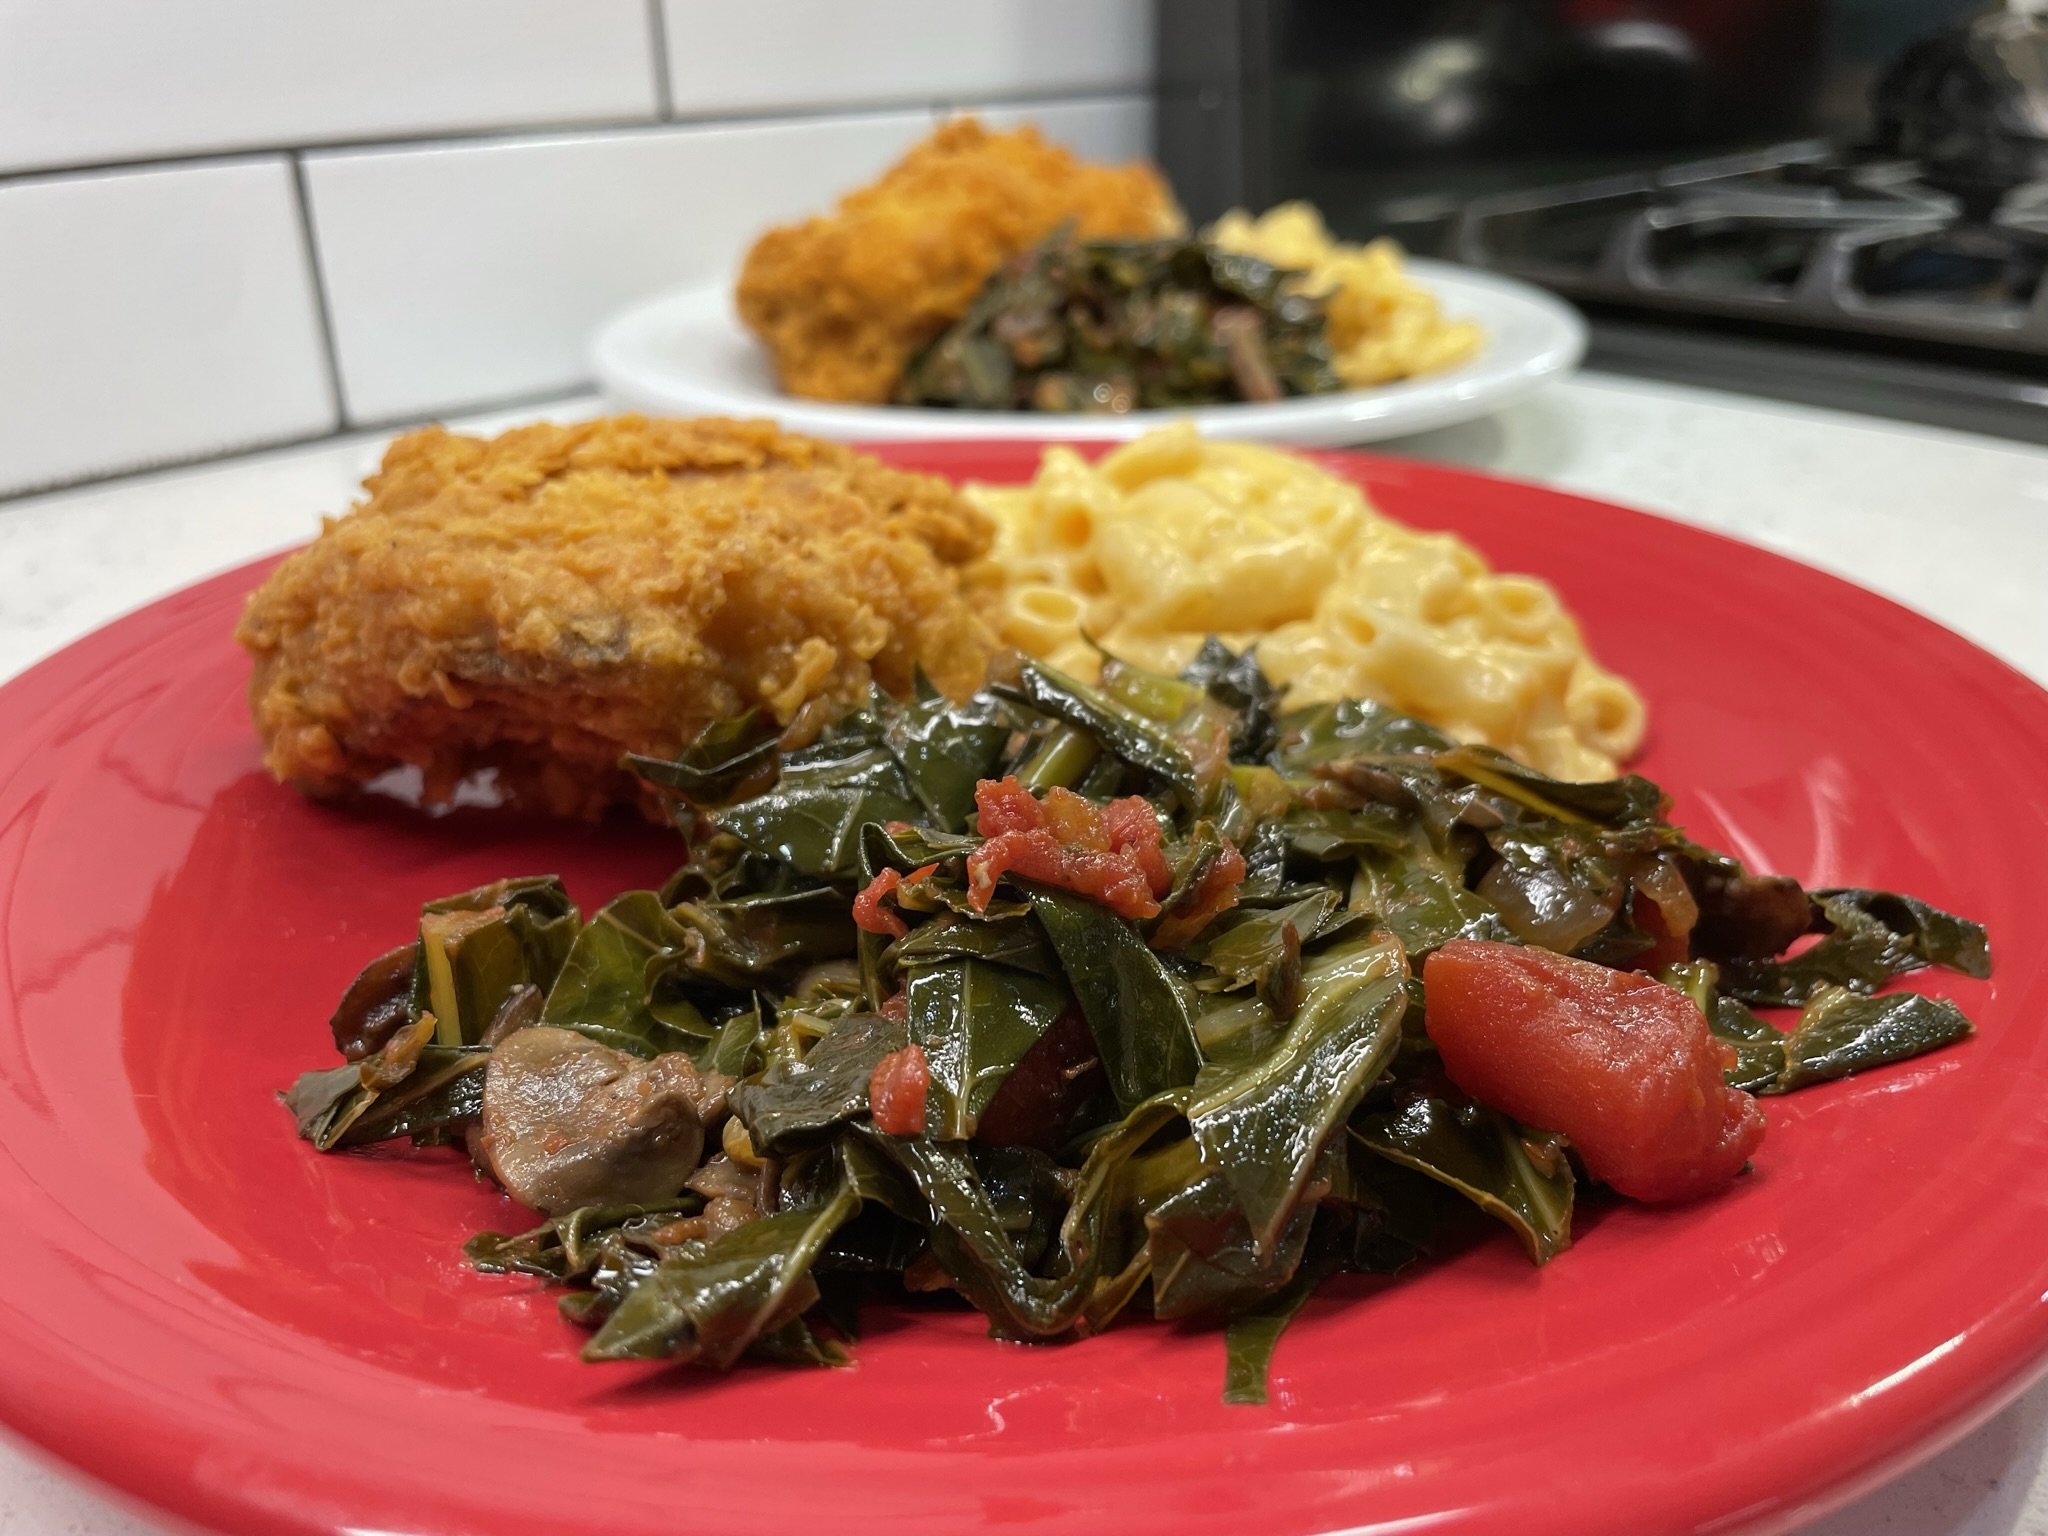
A splash of cider vinegar intensifies the flavors of the dish, which is covered and simmered for about half an hour until the collards are tender to your liking. The flavor is undeniably smoky, a perfect accompaniment to crispy southern fried chicken and easy, creamy mac and cheese. This is serious southern comfort, y’all!
Collard greens will be on many tables this weekend for Juneteenth celebrations. This version is entirely plant-based, with juicy mushrooms, smoky paprika for earthy flavor, and tomatoes for a pop of red!
Ingredients
Extra virgin olive oil
1 medium sweet onion, diced
Salt and black pepper
A few shakes crushed red pepper flakes (as hot as you want it)
About 8 large cremini mushrooms, cleaned and sliced
1 tsp. smoked Spanish paprika
1 pound fresh collard greens, cleaned, trimmed of heavy stems and chopped into bite size pieces
Half a 15 oz. can diced tomatoes, or about 1 cup fresh peeled, chopped tomato
2 to 3 Tablespoons apple cider vinegar
The trick for cooking the collards without taking all day is cooking them first in the oil. Don’t be stingy with it, and add more as needed with each handful of collards that you throw into the pot. The oil helps break down the fibrous leaves more quickly than if you simmered them in liquid alone.
Directions
Heat a large, wide pot over medium heat. Add 2 tablespoons olive oil and onions, season with salt and pepper and saute until slightly softened. Stir in crushed red pepper.
Add mushroom slices to the pot and cook until they are lightly browned on both sides. Add smoked paprika and continue to cook a minute or two to release the full flavor of the paprika. Add a handful of collard greens and toss until wilted. Season with salt. Repeat with remaining collards until all are in the pot.
Add tomatoes and cider vinegar. Stir until evenly combined and bubbling around the edges. Reduce heat to low, cover the pot with a lid and simmer until tender, about 20 minutes.
There is a running joke at our house about how everything seems to lead back to cocktails with me. And I guess it’s true. Just as food holds some of the stories of my life, my muse tends to apply my life stories to cocktails. This whiskey drink, awash with flavor and a layer of smoke, tells the story of the past week, when my husband, Les, and I spent a few days in northern New Jersey and New York City.
If you looked at the news this week, you probably saw the apocalyptic images of Manhattan, blanketed in a sepia haze that didn’t seem to move at all, even with the very breeze that dragged it south from Canada, where wildfires are still blazing. The air quality in New York, one environmental group declared on Wednesday, was the worst of all major cities in the entire world— and we, of course, were in the thick of it, but it wasn’t all bad.
Some of it was good, so good, so good, so good!
This visit to New York was planned many months ago, arranged to follow a family wedding in nearby Livingston, N.J., but we had only purchased our tickets to the The Neil Diamond Musical: A Beautiful Noise a few days earlier, before the air quality alerts started leading the news feed. I highly recommend this spectacular show about one of my all-time favorite artists, and I’m glad we resisted the urge to skip it when the smoke moved in. Carrying on amid chaos is the New York way—God knows, the city has lived through worse— and though it probably did look awful (and yellow) from a distance, the Wednesday sky seemed less ominous where Les and I stood, just a block or so from Times Square. Press play and decide for yourself.
It turned out to be a great day, despite the smoke. We saw the show, walked 20 blocks to the Empire Hotel to meet an old friend for drinks, and then enjoyed dinner at one of New York’s many authentic Italian restaurants. A day that ends with homemade tiramisu is never a bad one.
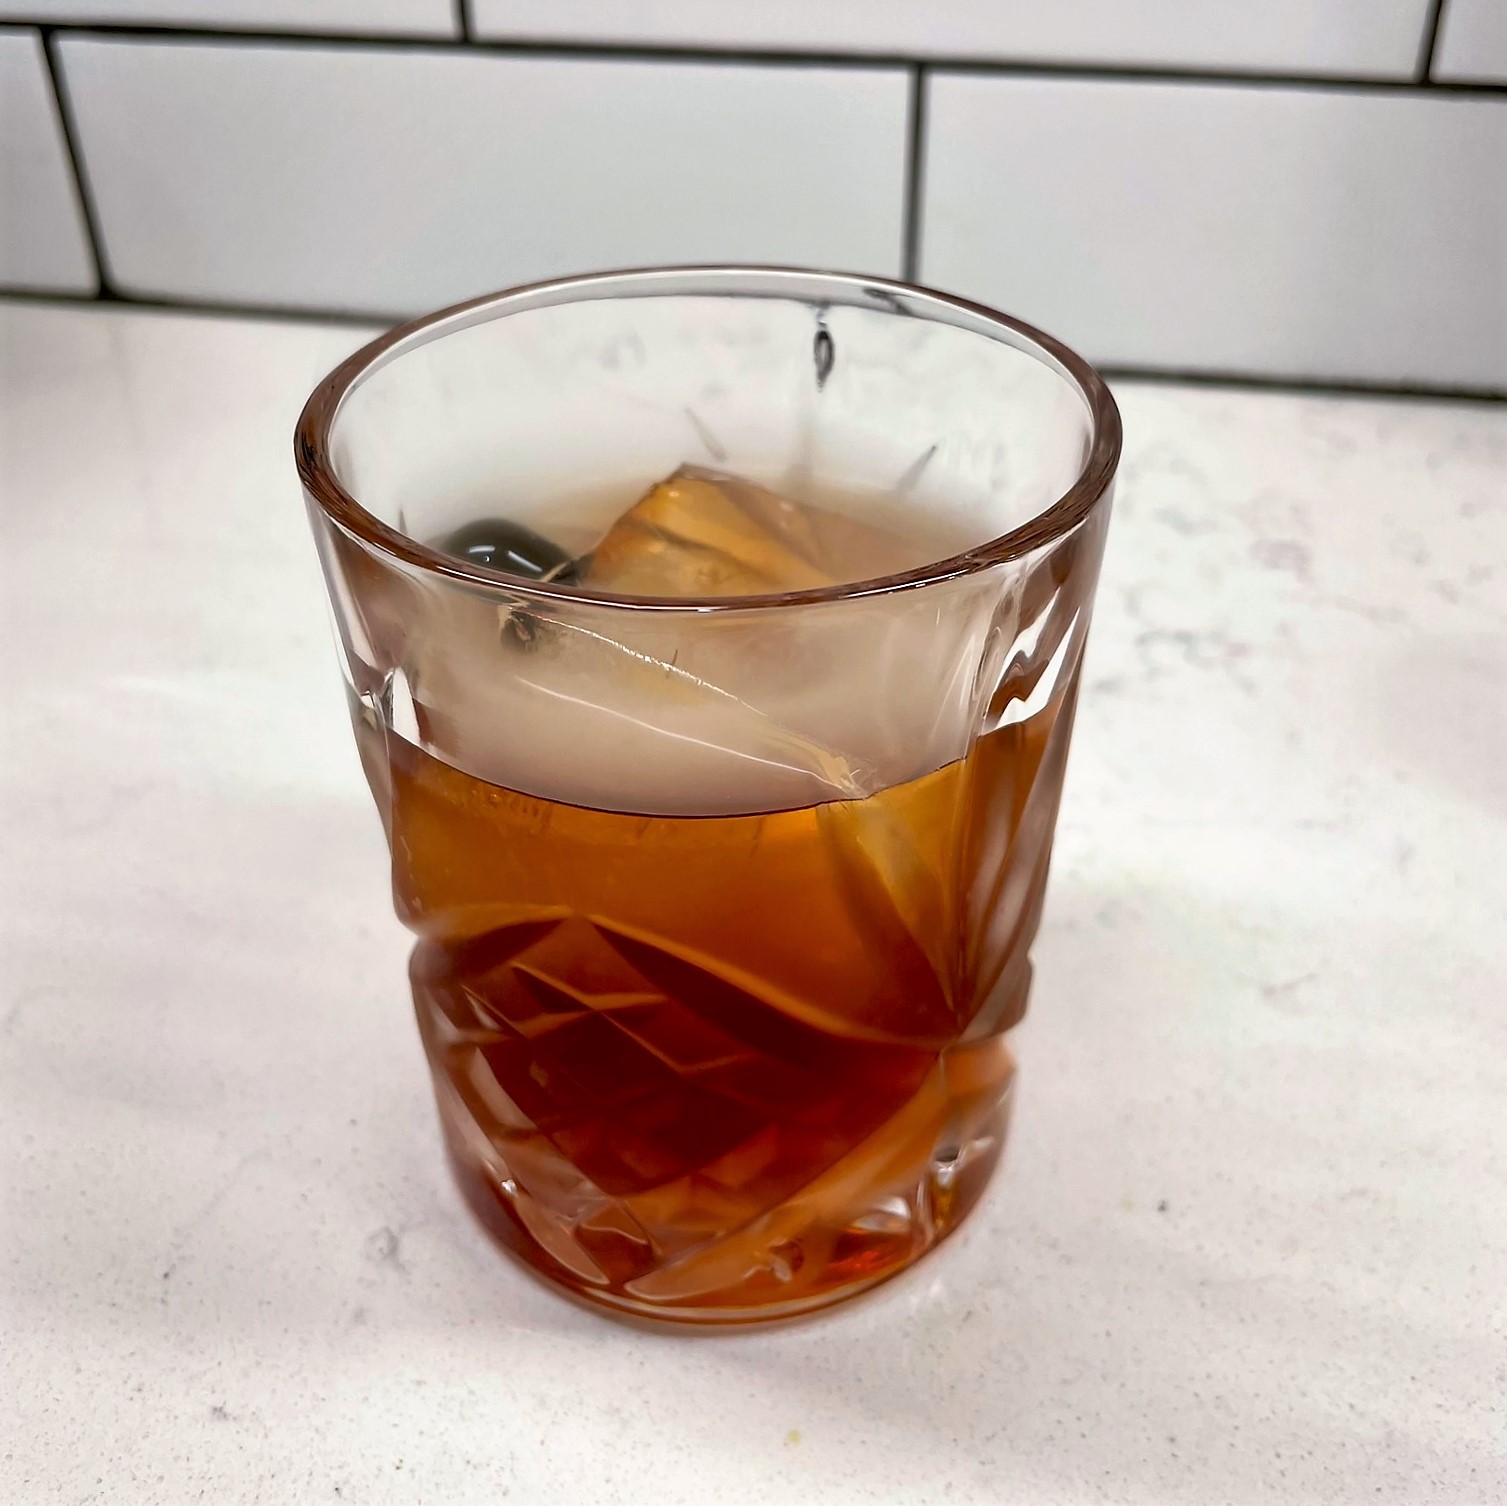
Now that we are back at home, breathing easy, sleeping in our own bed and enjoying so many snuggles from our kitty who missed us terribly, I wanted to recapture our smoky adventures the best way I know how— with a cocktail. This is essentially a riff on a classic Manhattan, but with a cherry-vanilla twist. Rather than plain old bourbon or rye, I opted for a Canadian whisky in homage to our northern neighbors. The whisky has the feel of a bourbon but focuses on the sweetness, just as we focused on the sweetness of the day in smoky Manhattan.
This cherry-vanilla vibe will be on repeat at our house, for sure.
Carpano Antica red vermouth is a classic, and amplifies the vanilla without too much extra sweetness. Strangely, this is my first ever home cocktail with real Angostura bitters (yes, really), and I won’t be looking back at my regular “aromatic” bottle anytime soon. A spoonful of syrup from the Luxardo cherries hit the mix and, of course, the dramatic smoke, courtesy of our Aged & Charred cocktail smoking kit. Here’s how it went, and if you prefer to pour it over a big rock, that’s cool, too.
This is a cherry-vanilla riff on a classic Manhattan, with Crown Royal Vanilla whisky standing in for the bourbon or rye. Here's hoping the wildfires in Canada are under control soon!
Ingredients
2 ounces Crown Royal Vanilla whisky
3/4 ounce Carpano Antica red vermouth
3 shakes Angostura bitters
1 barspoon Luxardo cherry syrup
Luxardo cherry garnish
Oak chips for smoking (optional, but wow!)
There are other ways to impart a smoky flavor to a cocktail, if you don’t have or care to use a smoking tool. Try smoky bitters or make a simple syrup infused with smoked black pepper, and substitute that for the cherry syrup.
Directions
Add ice and a bit of water to a coupe glass and give it a few minutes to chill down. OR, add a giant rock to an old fashioned glass.
Combine whisky, vermouth, bitters and syrup in a mixing glass filled halfway with ice. Stir for about 20 seconds for proper dilution and chilling. Strain cocktail into chilled glass over a Luxardo cherry.
Add a small pinch of oak chips to the smoking device and torch until chips catch fire, then cover when the flames dissipate. Let the smoke permeate the drink for about 10 seconds.
Carefully lift the smoke device and enjoy the smoke over Manhattan. Cheers!