Popcorn, like Halloween, screams nostalgia to me. I have vivid memories of enjoying popcorn as a kid, at home and on Halloween, and we even had a woman in my small hometown who handed out homemade popcorn balls to trick-or-treaters and nobody had a problem with that. Ah, yesteryear.
Trick-or-treating, like everything else, has changed over the years and though it is still (apparently) popular with the kids, we don’t see a lot of action in our cul-de-sac. Last year, we had a 50% decrease in costumed-kid turnout, and that means the doorbell only rang twice rather than the usual three times. Who knows what this year will hold (especially with rain in our evening forecast), but at least we can enjoy our memories of Halloween from our own childhood, and I’ll figure out some way to use any candy we have left over.
We will be lucky to pass out half of this candy.
Throughout my childhood, there were many ways to make popcorn, including Jiffy Pop, which was first introduced in 1958 (when my parents were kids) and the best way to make it was over a campfire. It would sputter a bit at first as the oil inside the crumpled foil pan heated up, and then it would puff up into a giant ball that you had to have an adult tear open because the steam would burn your hands. It was crazy fun, and they still make Jiffy Pop today but it has largely been replaced by the convenience of microwave popcorn. When that trend became the norm for popcorn at home, I lost interest.
But popcorn started to have a new moment in my life almost a decade ago. I was living by myself with my three fur babies in a tiny, post-divorce apartment, and there were some nights that I didn’t feel like making a meal, so I’d settle onto the loveseat with my kitties and watch a movie with real, oil-popped popcorn and a glass of wine. Hey, there was nobody else around to complain or argue about it and, in an odd way, it was kind of liberating. When Covid hit two years ago and going to movie theaters was impossible, my husband and I started making more popcorn at home as we streamed movies on Netflix or Prime. Quite frankly, I don’t care at all about movie theater popcorn anymore because it pales in comparison to what we make at home.
The greatest benefit of making popcorn on the stove top is that you miss out on the chemical aftertaste and “after-feel” that the packaged microwave stuff always offers—you know, that chalky, filmy residue that lingers? There have been many red flags raised about the chemicals used in the microwave bags, and please raise your hand if you have ever had one catch fire in the microwave, or ever had to wave a wet towel in the air to stop the shrieking of your smoke alarm when the microwave popcorn got out of hand. Yeah, it’s everyone.
Making your own microwave popcorn may not be the best idea either, as some food safety experts have raised concern about heating brown paper bags (especially those which may include recycled materials) in the oven or microwave. So, from a safety standpoint, perhaps the old-fashioned method of popping it on the stove is still the best. It is certainly the tastiest.
Hot-air poppers were popular for a spell, but the popcorn is bland without some kind of oil and, given that we only make popcorn about five times a year, one of those bulky unitaskers doesn’t make a strong enough case to earn a coveted spot in my pantry.
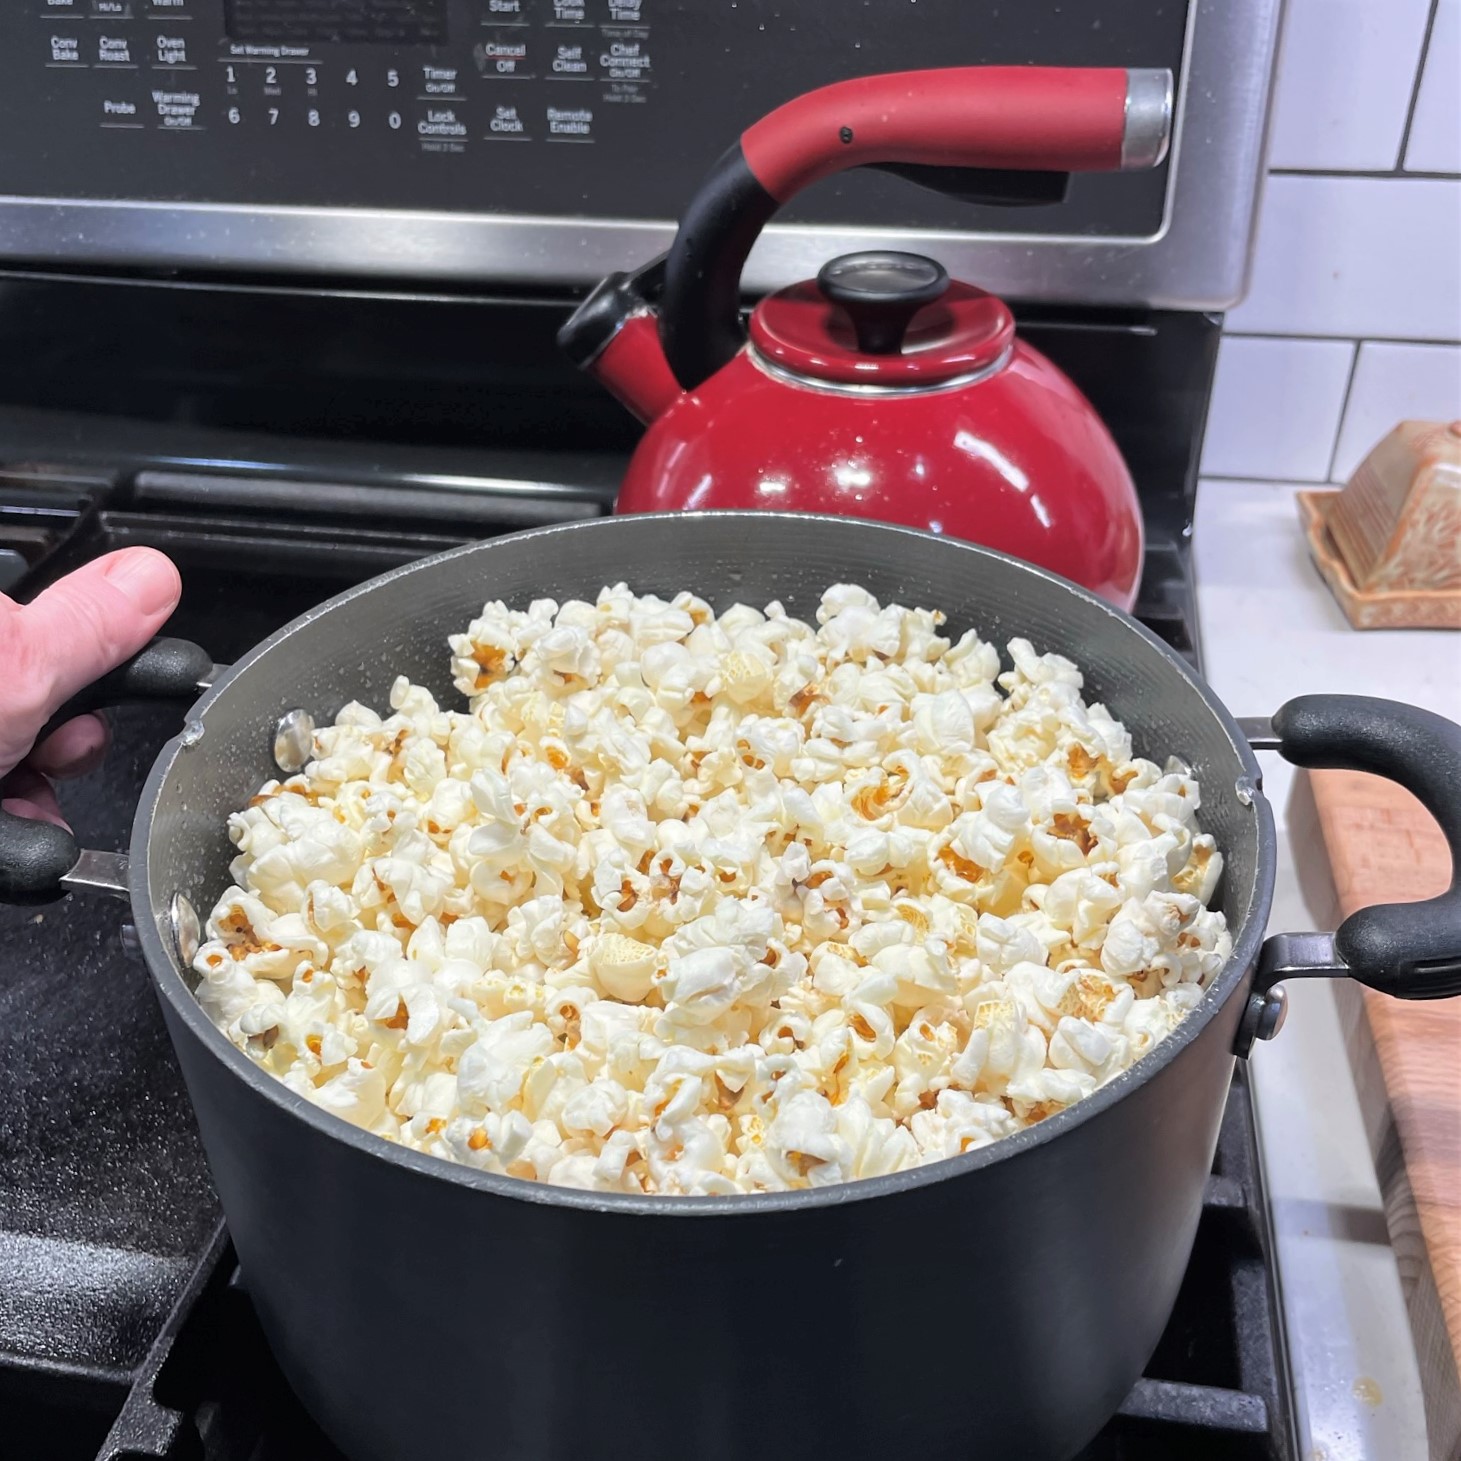
Popcorn made on the stove is easy. Grab a lidded pot, at least as tall as it is wide, and preferably one with a heavy bottom to prevent scorching. It helps to have a pot with a vented—or even perforated—lid, if you can find one. Today, I use this pot that my husband loves for easy draining of pasta and potatoes. I like it for popcorn because the steam generated by the popping kernels has an easy way out of the pan and that keeps the popcorn nice and fluffy. You might also consider using a mesh spatter screen over a tall pot, and use a slightly smaller lid to keep it in place during popping so steam can escape but the hot kernels don’t.
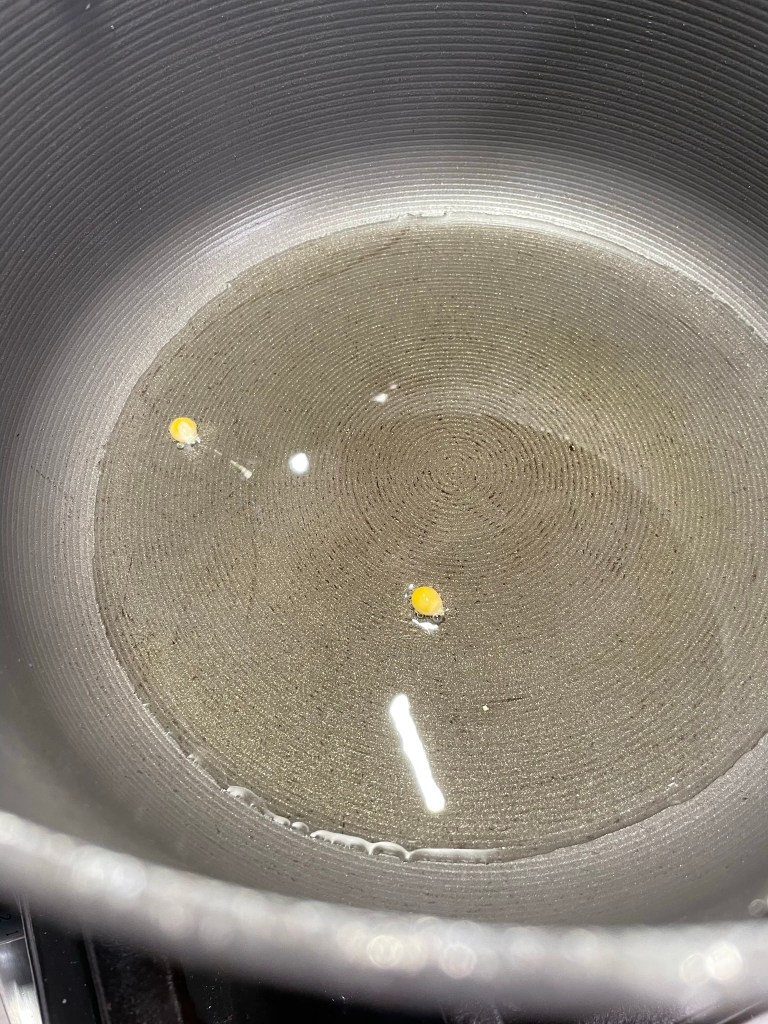
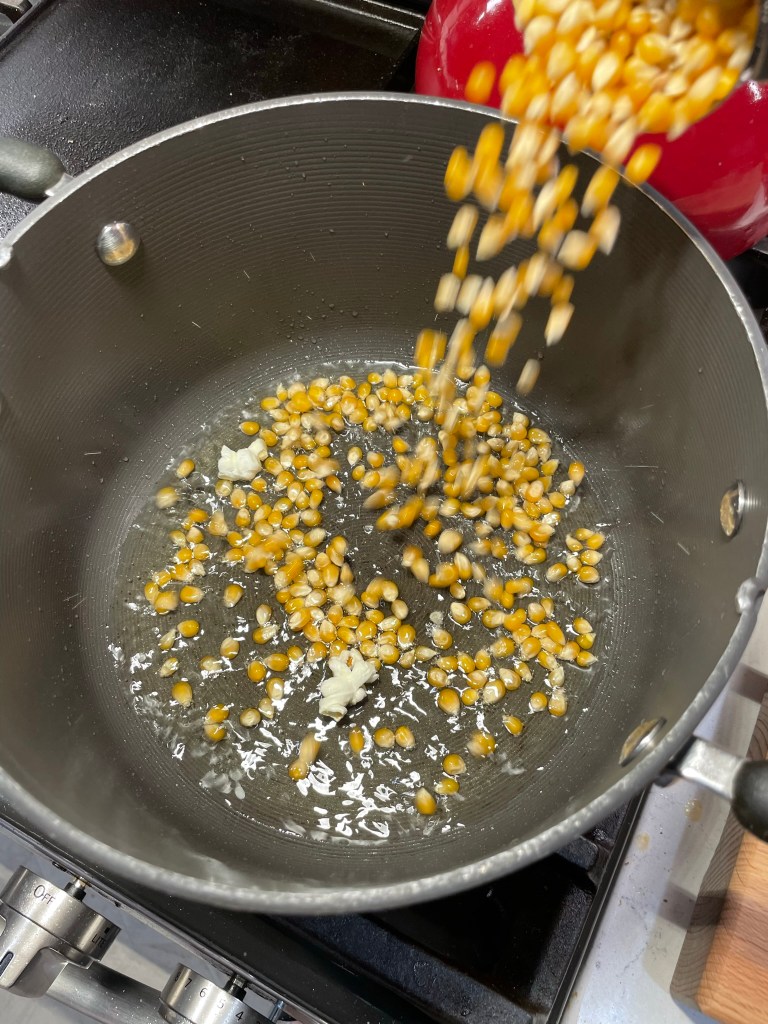
I generally use peanut oil for popping, and I sometimes mix it up with a touch of extra virgin olive oil or unfiltered coconut oil. Do not try to make popcorn using only extra virgin olive oil, because its low smoke point practically guarantees you’ll have a mess on your hands, or maybe even a kitchen fire. Stick with oils intended for frying at higher temperatures, and you’ll be good. Heat the pot over medium to medium-high heat, and start with only two kernels to help you recognize the optimal heat level. As soon as those two kernels pop, add the rest of the popcorn all at once and give the pot a little shimmy-shake to settle them into one layer, all evenly coated in the sizzling oil.
For this batch, I added a touch of dill-infused extra virgin olive oil. It was great!
Let the popping commence! When you notice that two or three seconds elapses between pops, immediately turn off the heat and transfer your popped corn into serving bowls. At our house, we dive right into one large bowl nestled between us, and it’s especially fun when we reach for it at the same time. If you like butter-topped popcorn—and let’s be honest, who doesn’t?—then you can melt a couple of tablespoons in a dish in the microwave or a separate pan while your popcorn is popping. I like to transfer only part of the popcorn at a time into my giant serving bowl and toss it with melted butter and salt or seasoning in batches.
Toss the melted butter into the hot popcorn first, so your favorite seasoning will stick better.
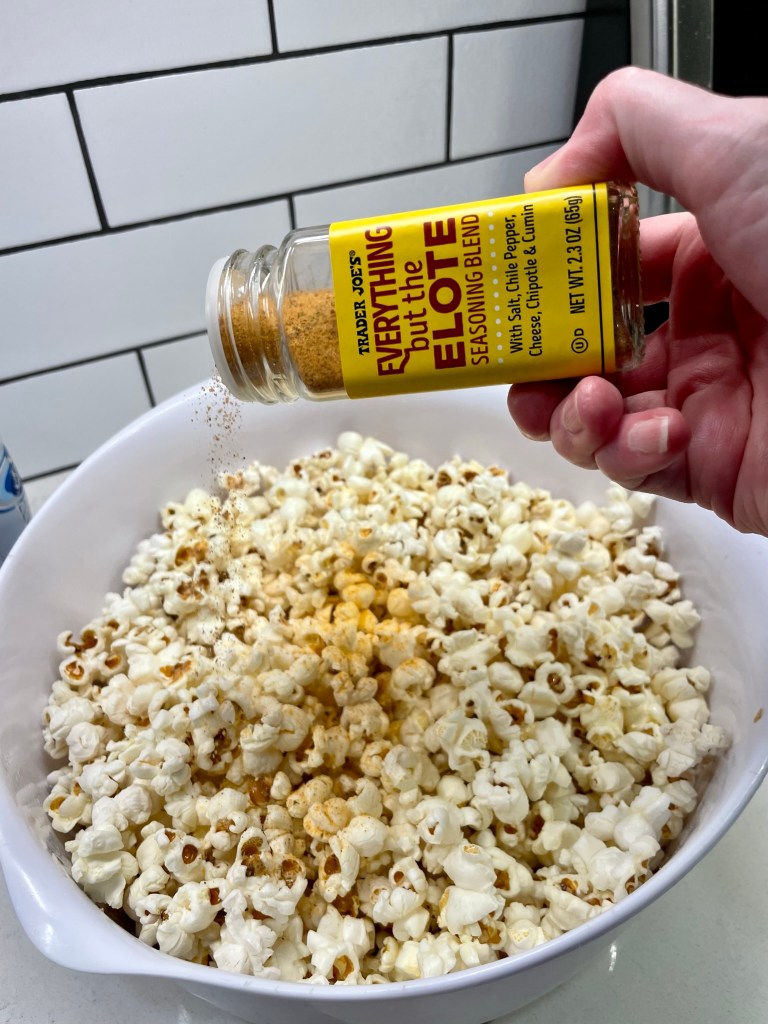
As for the seasonings, think outside the salt shaker for a moment, and consider what else is in your spice cabinet that might be tasty on popcorn. If you are sodium-averse, consider chili powder or garlic powder as a seasoning, or try one of the Mrs. Dash blends to add a little zip to your popcorn. Use your imagination, and leave a comment with your favorite!
That’s a lot of popcorn possibilities!
I promised a playlist for Halloween, and you’re welcome to borrow it for your own spooky enjoyment as you wait for the doorbell to ring. I’ve curated this list to include a little bit of everything—from classic Halloween “standards” to all genres of songs about witches, monsters, creepy-crawlies and devils. It helps to have the Spotify app, but you don’t have to be a premium member to listen. Just click the play button and enjoy!
Why subject yourself to substandard microwave popcorn, when you can make it on the stove top in minutes and get creative with the seasonings? All you need is a tall, lidded pot and a light oil for popping.The amount of each ingredient depends on the size of your pot.
Ingredients
Neutral oil, such as vegetable, peanut or canola oil
Whole kernel popcorn
Melted butter and salt or seasonings of choice
Directions
Place a heavy-bottomed, tall pot over medium heat and add enough oil to just cover the bottom. Drop two kernels of popcorn into the pot and cover it with a lid until they both pop.
When both kernels have popped, carefully add enough popcorn to completely cover the bottom of the pot in a single, dense layer. Immediately replace the cover and wait for the popcorn to pop.
Popcorn is finished when 2 to 3 seconds passes between pops. Immediately remove the pot from heat and carefully transfer it to a large serving bowl.
Toss with melted butter and sprinkle with seasonings of your choice.
Look for salt specially formulated for popcorn, as its ultra-fine texture helps it adhere quickly to your just-popped popcorn. Also, consider various types of seasoned salt to add interest, such as Old Bay, seasoned salt, chili-lime salt, or everything bagel seasoning.
There are age-old tales of hauntings on the North Carolina coast, especially in the Wilmington area and along the Outer Banks. I thought it apropos to explore the legends as we inch toward Halloween.
Folks say that Wilmington, which is nestled in a triangle between the Atlantic Ocean and the Cape Fear River, is particularly prone to hauntings because of an old superstition that says ghosts—or haints, as the Gullah people call them—cannot cross over water. The Gullah people, in case you aren’t aware, are direct descendants of formerly enslaved people brought over from West Africa, and though they once inhabited the coastline from the Outer Banks to the north coast of Florida, only a remnant of the subculture remains today in the Sea Islands near Charleston, South Carolina. The heritage of the Gullah people is largely Creole, and superstitions abound, especially in their folklore about the dead. Whether or not the water theory is true, people all across the South still paint their porch ceilings blue, presumably to keep the ghosts at bay.
But the Cape Fear region has plenty to offer for adventurous souls who come seeking those ghostly encounters. And smart marketing teams have capitalized on the legends that persist there, with everything from ticketed ghost walks to haunted pool halls. Don’t believe in it? Suit yourself.
If you venture further north of Wilmington, especially toward the inlets along the Outer Banks, you might catch a ghostly glimpse of one Edward Teach— notoriously, the pirate Blackbeard. He is said to have made his home in those parts, probably for the cover it provided him in between his plundering of unsuspecting cargo ships headed for Port Wilmington. Some modern thrill seekers claim to have witnessed a mysterious light moving around in the waters there, or experienced a spooky wailing that sounded like someone crying out, “Where’s my head?”
They say it’s Blackbeard.
Now, if the notion of pirates conjures comical images of Johnny Depp in Hollywood garb and black eyeliner, well, you can forget that. Blackbeard was no such flamboyant, clever-tongued misfit. He was a badass—a wild, fearsome figure with a long, braided black beard. Some historians say that when he was about to attack a ship, Blackbeard would weave hemp cords into his beard and torch them to make it look like his head was smoking—a tactic to further terrify his unsuspecting victims so they would give up without a fight. Indeed, he was the bulliest of all the bullies of his time.
Blackbeard’s reign of terror came to a violent end in 1718, when the governor of neighboring Virginia dispatched a military ship to take him out, and in the end, Blackbeard was shot, stabbed to death and decapitated. His gnarly head was hung from the mast of the military ship and later put on display atop a pole in Hampton Roads, Virginia—let that be a lesson to other would-be nautical thieves, I guess.
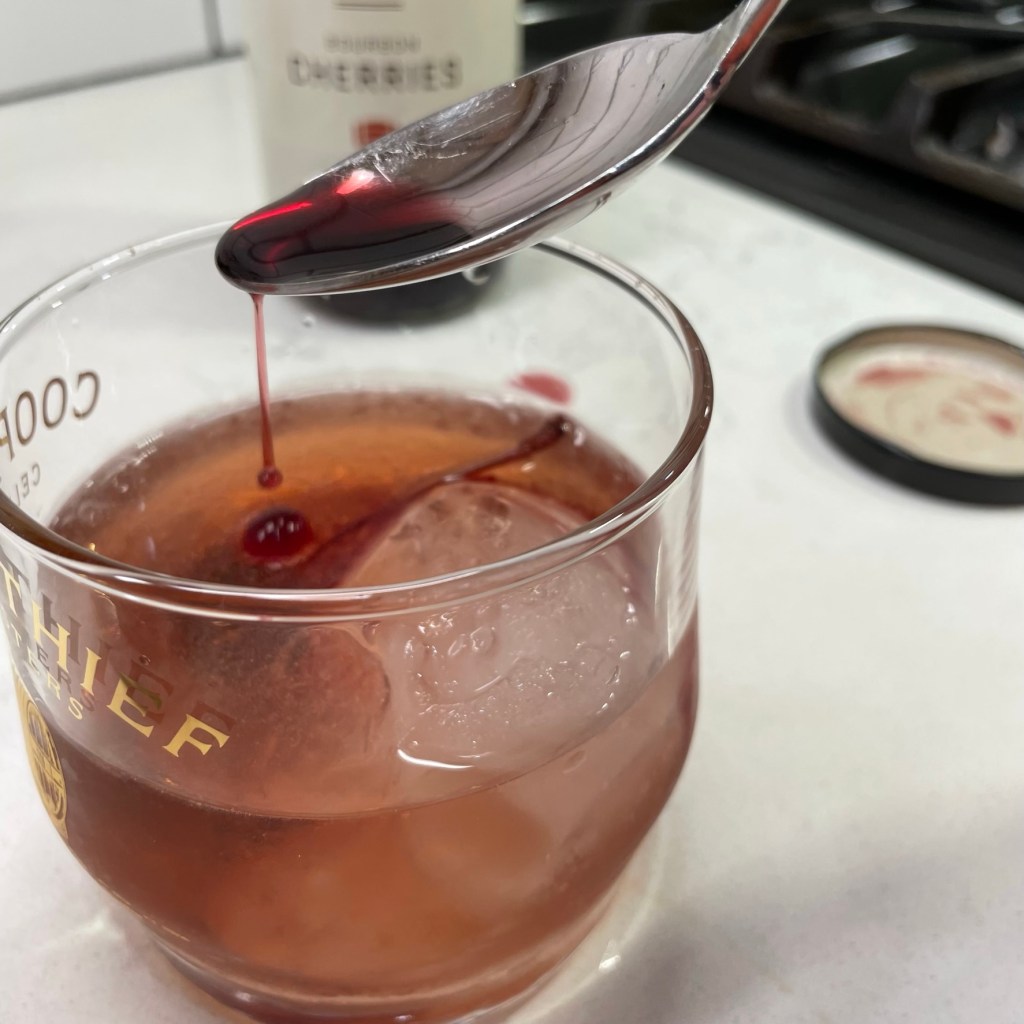
When my husband and I celebrated our wedding anniversary on the North Carolina coast earlier this year, we didn’t find Blackbeard—OK, we weren’t actually looking for him—but I did find inspiration in a cocktail we enjoyed at End of Days Distillery in Wilmington. The distillery produces vodka, gin and rum—I’m cool with all three and ordered a frilly gin drink, and Les gravitates toward sweeter, dark liquor. He ordered the rum old fashioned, which is pretty much the same as a classic old fashioned, but with rum rather than bourbon, and a splash of cherry syrup in place of the usual sugar. It was delicious!
If you look closely at the top of the large ice cube, you’ll see that they have branded their logo into it!
We bought a bottle of the End of Days “Castaway” barrel-aged rum, and I promised Les I would re-create the drink at home, but it took Halloween and a deeper dive into the history of Blackbeard to properly motivate me. This cocktail embodies a few points of the Blackbeard story—rum, because we all know it was a pirate’s drink of choice—cinnamon syrup and spicy Jamaican Jerk bitters for a little bite, and cherry juice to symbolize the bloodshed of Blackbeard’s last stand.
Cinnamon simple syrup is easy to make at home, and I highly recommend having a jar or bottle on hand for the upcoming holiday season because it works with so many spirits. Combine equal parts water and cane sugar and heat to a slight boil, then add cinnamon sticks to steep a warm, spicy flavor into the syrup. The longer it steeps, the more intense the flavor. The bitters are a specialty item, and I’ve linked to the company’s website if you’re interested in checking them out. For this cocktail, I turned to Woodford Reserve’s brand of bourbon cocktail cherries, rather than my usual Luxardo, because I wanted the color more than the sweetness. Look for the Woodford brand in the mixers section of Total Wine or Bevmo, or the Tillen brand would also work in a pinch.
I combined all of the above with ice in my cocktail shaker and then poured it over a spooky, skull-shaped ice, drizzling in a little more cherry juice for effect, and a cherry as a garnish. Tovolo makes the skull mold for ice, and I found it on Amazon.
Finally, the dramatic moment! This past summer, our friend, Bob, introduced us to a nifty cocktail smoking kit and I promised I’d be getting one to make a fun Halloween drink. Our kit included several varieties of wood chips—apple, pecan, hickory and oak—and I chose oak to echo the essence of that in the barrel-aged rum.
When the smoke cleared from the cocktail, it was far from spooky; the sweetness of the rum and cinnamon syrup were prominent, and the spicy bitters kind of sting the tongue. But just thinking of mean old Blackbeard as we sipped our cocktails made for a fun evening.
Blackbeard’s Comeuppance – a smoked cocktail for Halloween
Oak chips and cocktail smoking kit (optional, but fun!)
Directions
Measure rum, simple syrup, cherry syrup and bitters into a cocktail shaker or mixing glass. Add one cup of ice and shake or stir vigorously until outside of mixing container is frosty. Strain over new ice in a rocks glass. Add a cherry to garnish, and drizzle in another spoonful of the cherry syrup to mimic Blackbeard’s blood.
Place smoking accessory on top of glass and light the oak chips until smoke begins to appear. Cover the accessory until the smoke fills the open space in the glass. Remove the accessory and allow smoke to dissipate before enjoying.
For cinnamon simple syrup, combine 1/2 cup filtered water and 1/2 cup cane sugar in a small saucepan. Heat and stir until sugar is dissolved. Rinse 2 sticks of cinnamon (about 3-inches each) briefly under running water. Add the cinnamon sticks to the simple syrup and heat just until the syrup begins to bubble. Turn off heat and cool to room temperature. Transfer syrup to a sealed jar or bottle (it’s OK to leave cinnamon sticks in it), and refrigerate for up to 2 months.
If you’re interested in the cocktail smoking kit, Aged & Charred is the company that made ours. We didn’t receive any payment or product for my mention of them, but I wholeheartedly recommend it!
Before the kiddos head out for trick or treating on Monday night, parents hope that they have a decent, balanced meal in their little bellies. You know, so that they aren’t just chowing down on sugar from all those Snickers, Reeses and Skittles that they get in their trick-or-treat bags.
In my limited experience with children, I learned one lesson loud and clear—a simple way to get kids interested in eating good-for-them food is to make it FUN.
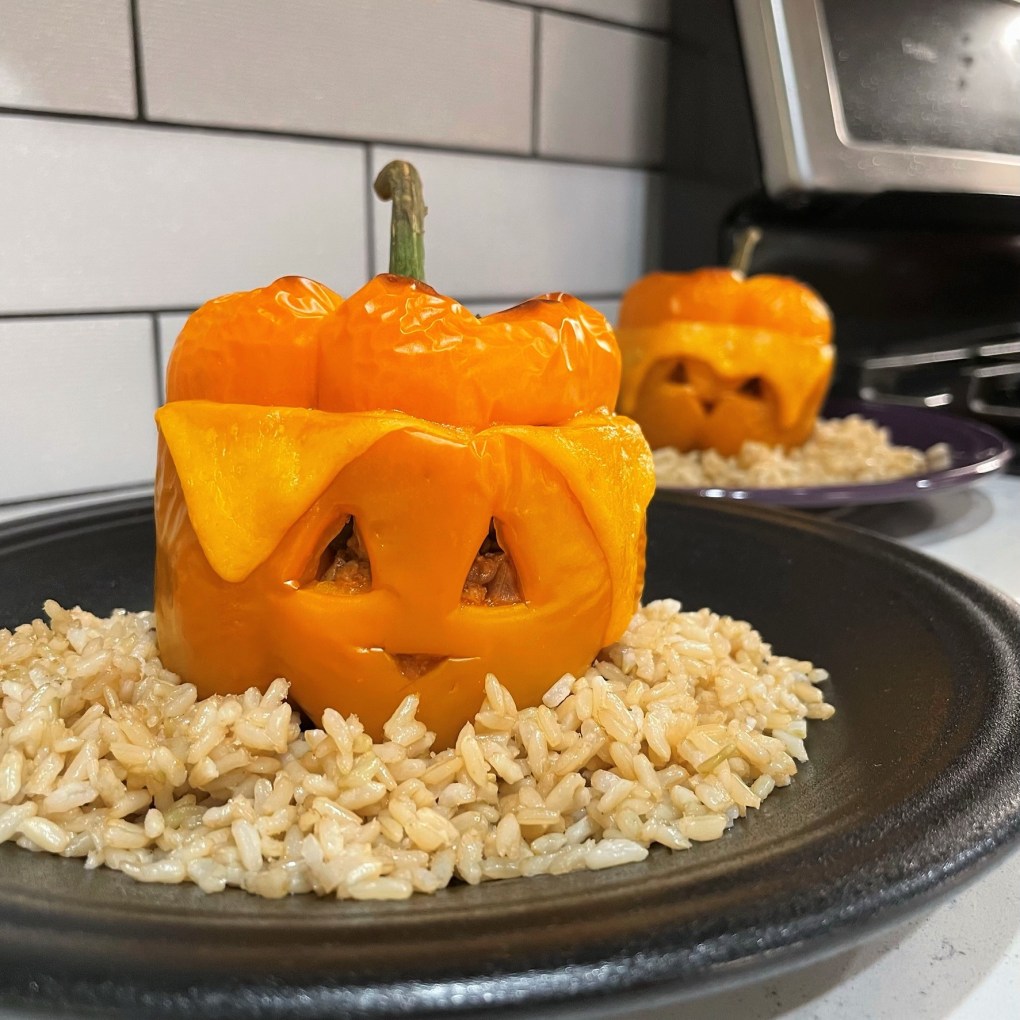
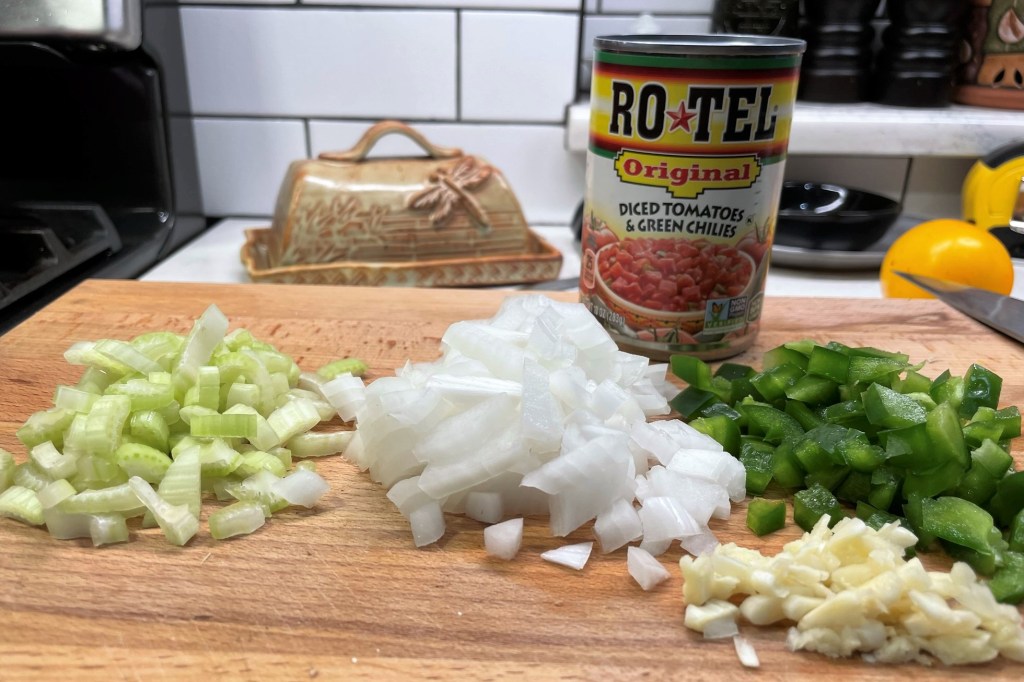
With a little imagination, you can turn an ordinary bell pepper into a fun Halloween supper, and you can fill it with whatever your kids (or grandkids, great-grandkids, neighbor kids, friends’ kids, etc.) like to eat. Mine are stuffed with cooked ground turkey in a Mexican-ish flavor profile—a combination of onions, green bell peppers, celery, garlic and Rotel tomatoes, spiffed up with chili powder and tomato paste—but there’s no reason you couldn’t change it up and make it Italian. Or Greek. Or vegan with a kale and quinoa kind of thing. Or any other combination you think the kids would like to eat. For the big kids at our house (that would be me and my husband), I went in big for veggies and lean protein.
Use any combination of vegetables that makes sense for the flavors you like.
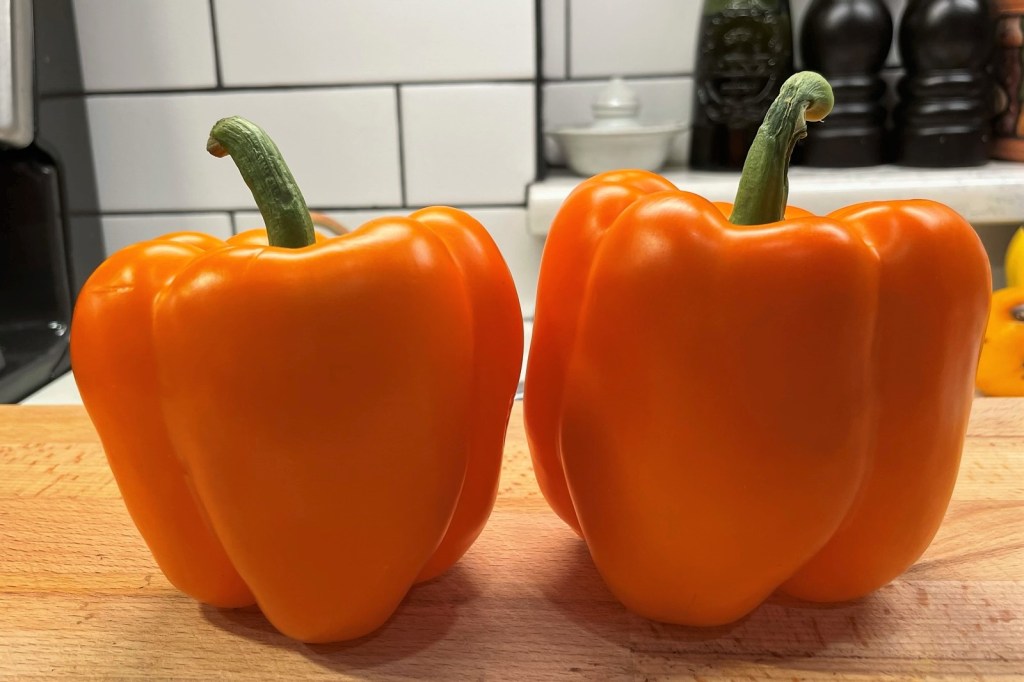
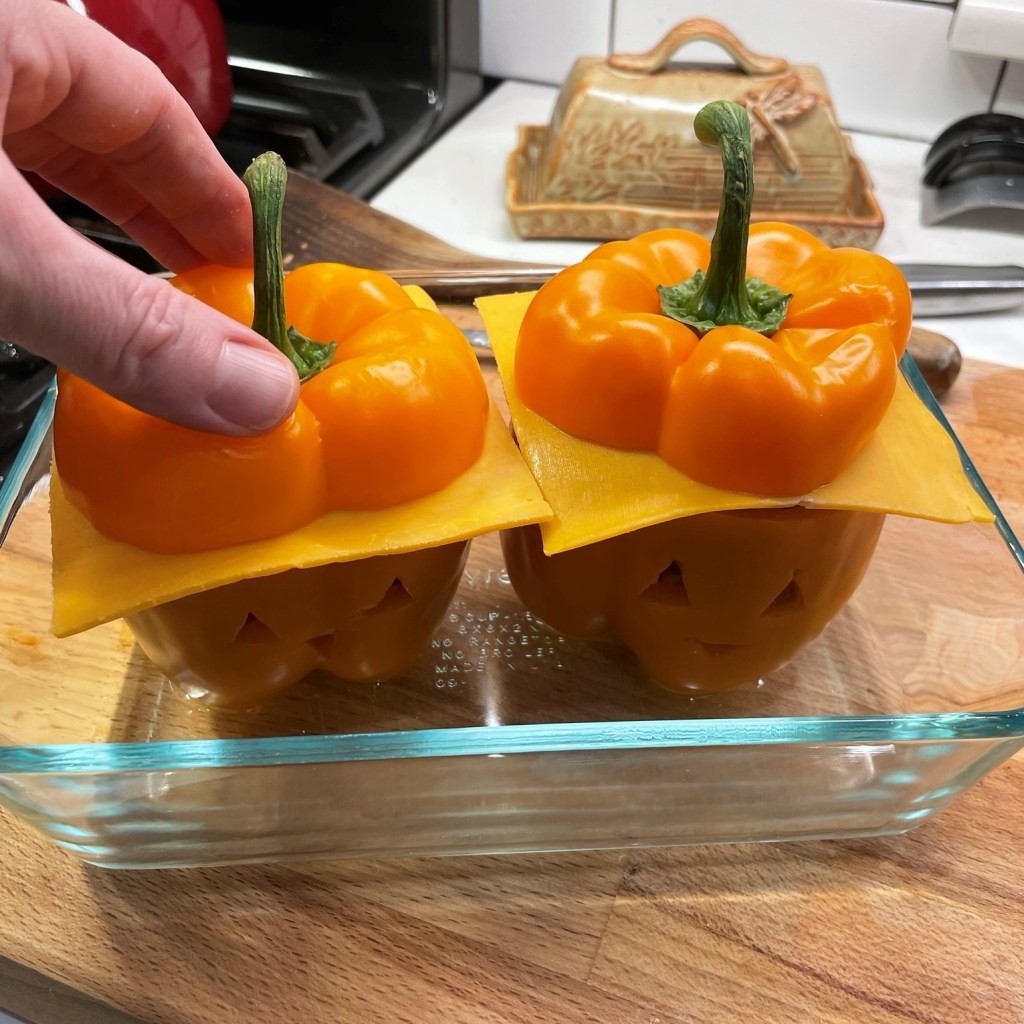
You could use another color of bell pepper if you’d like, but the orange ones are good here, not only for their impersonation of a jack o’lantern, but also because hungry trick or treaters may be more receptive to their flavor, which is sweeter than a typical green bell pepper.
Choose peppers with a good stem, and peppers that will stand up on their own.
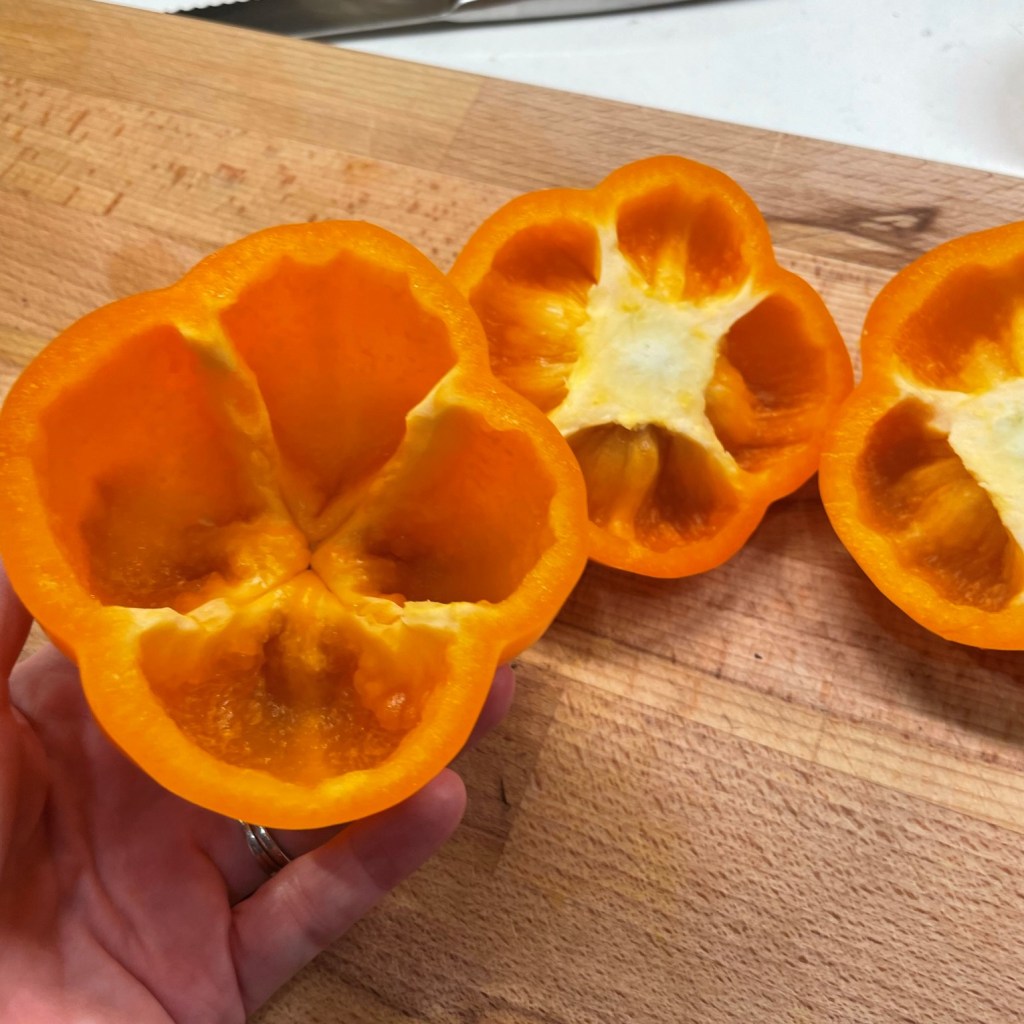
To prep the peppers, carefully slice the tops off, taking note of how far down the stem extends so that you keep the top of the pepper intact. Clean out the seeds and excess membranes, and then place the peppers, upside-down, into a glass baking dish with about one inch of water. Put the pepper tops in there, too, and microwave them on high for about five minutes. This will steam and soften the peppers so that they don’t need as much time in the oven after they are stuffed.
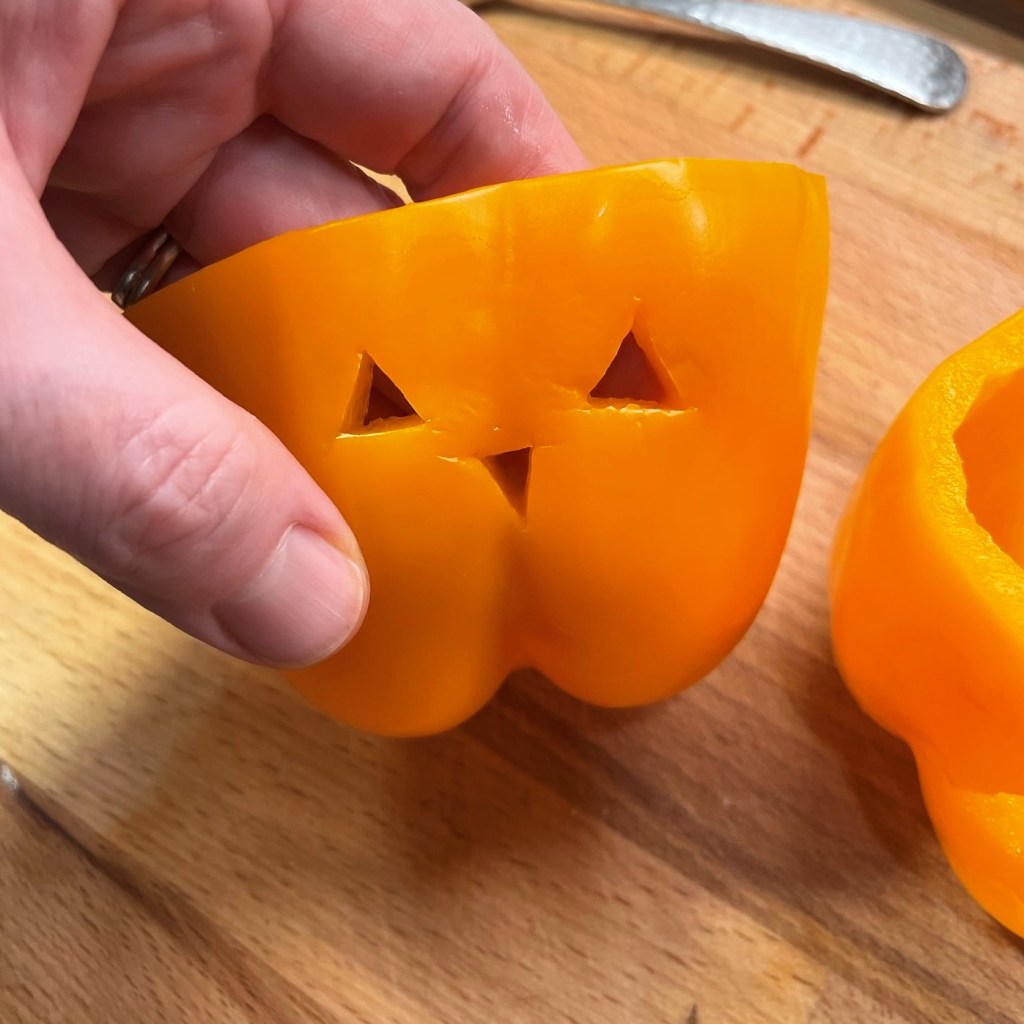
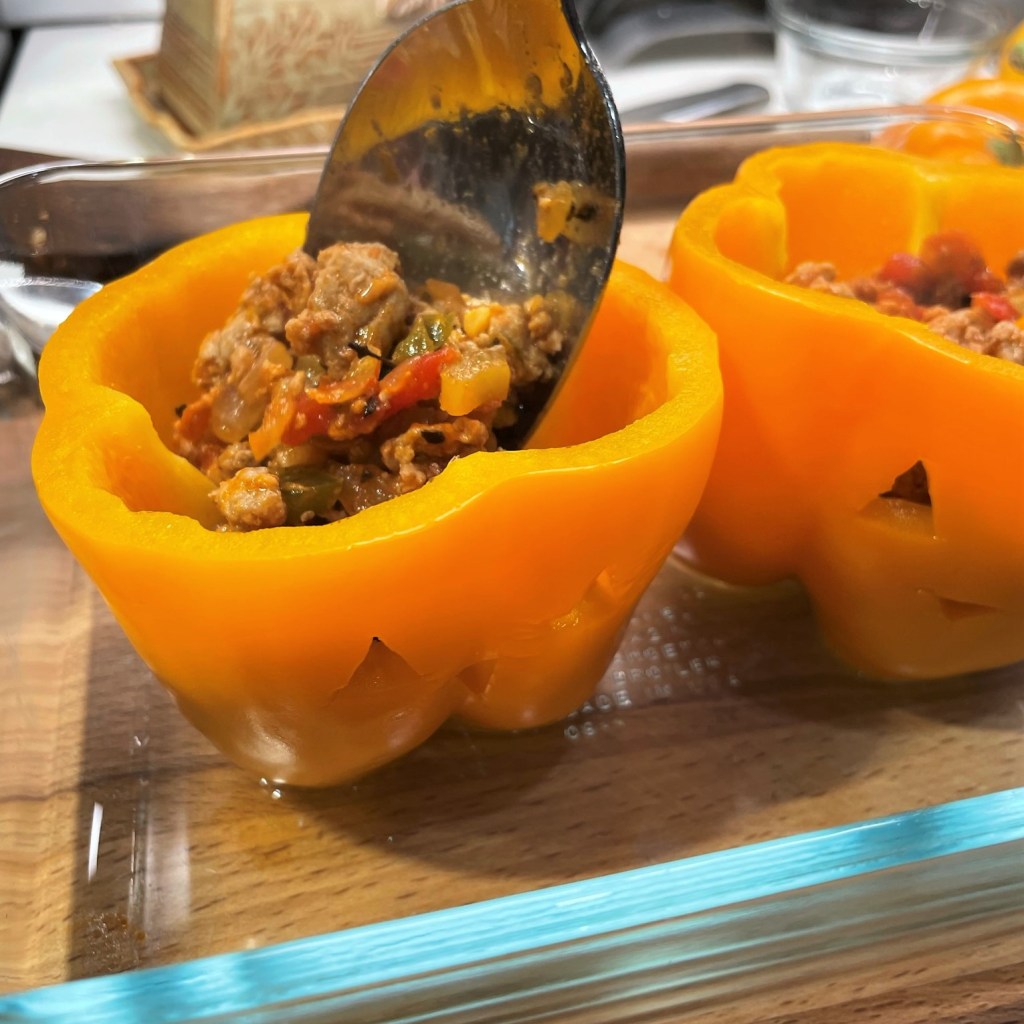
When they are cool enough to handle, use the top of a sharp paring knife to cut out triangle eyes and a nose into each bell pepper body. If you’re feeling extra creative, you could also cut a toothy smile into the peppers, too, but be careful because you don’t want the filling to seep out of its whole face.
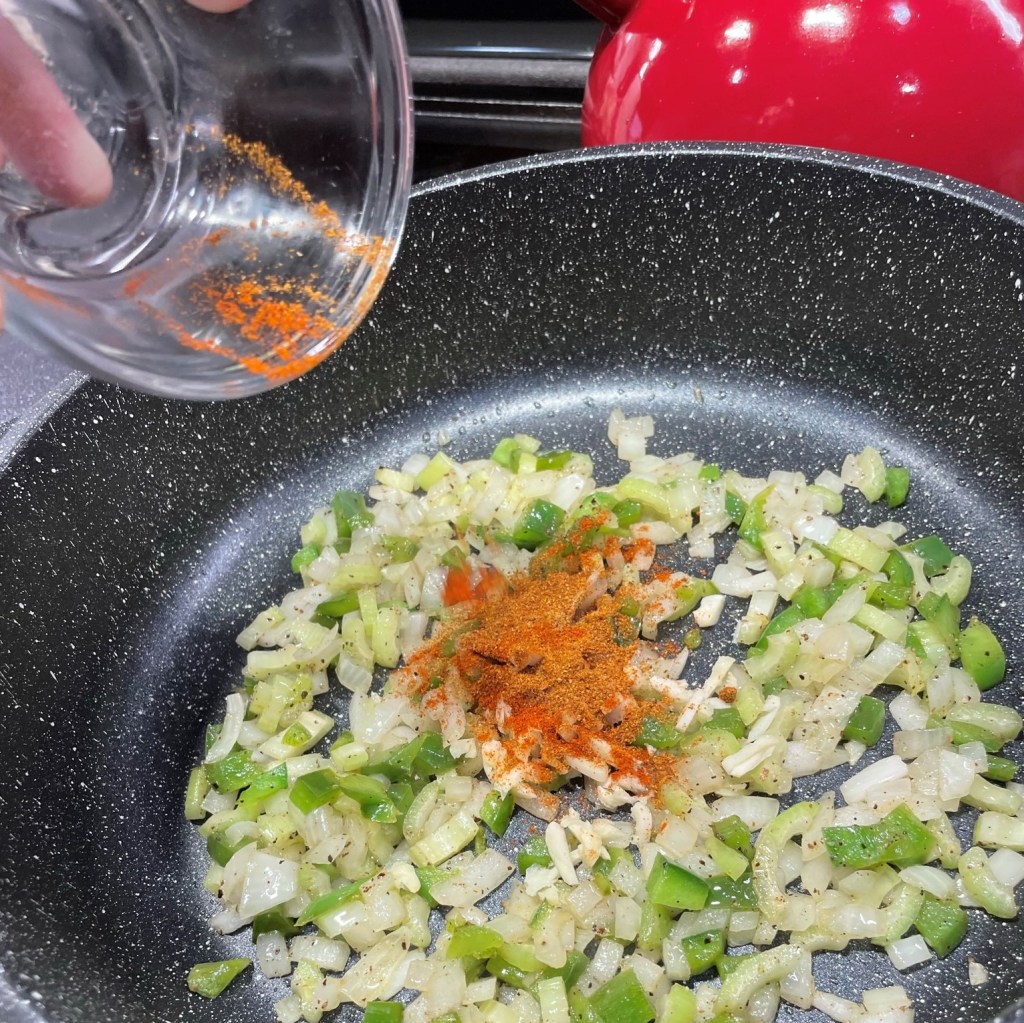
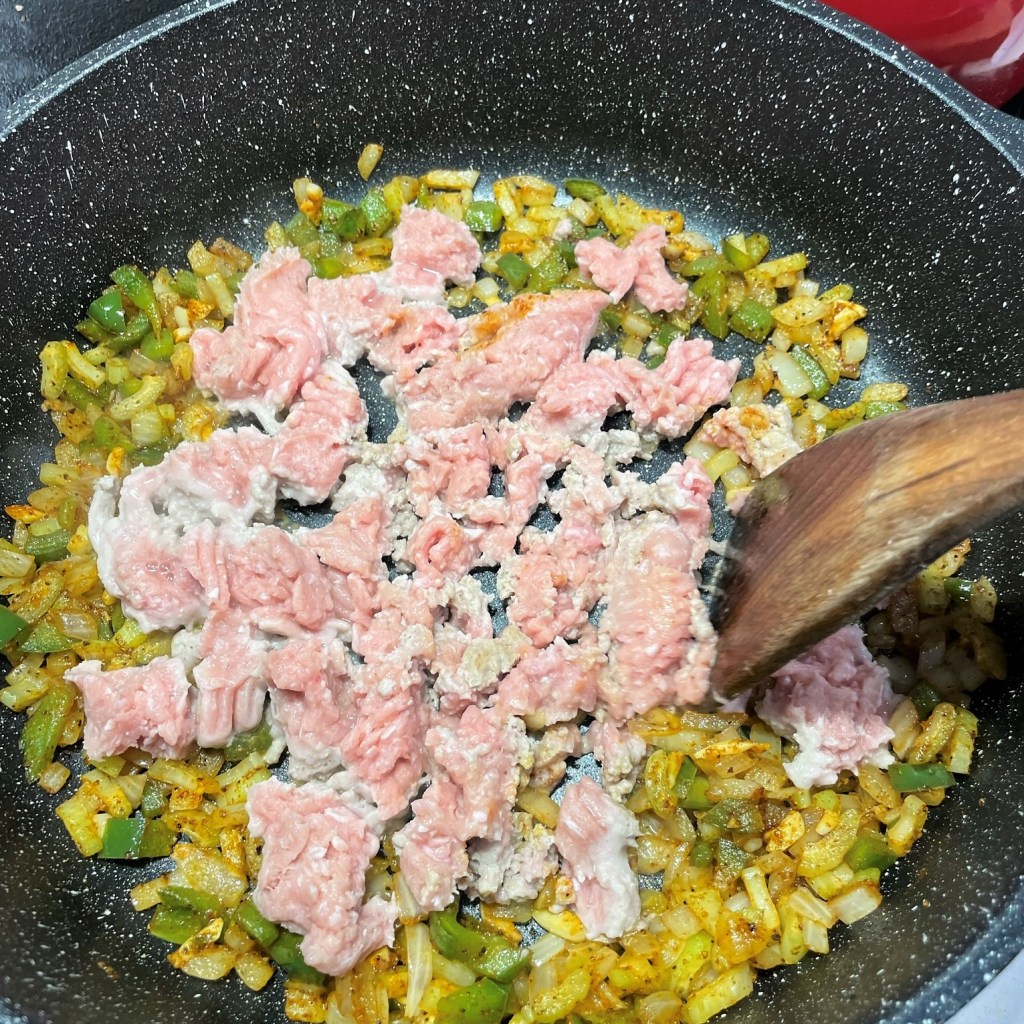
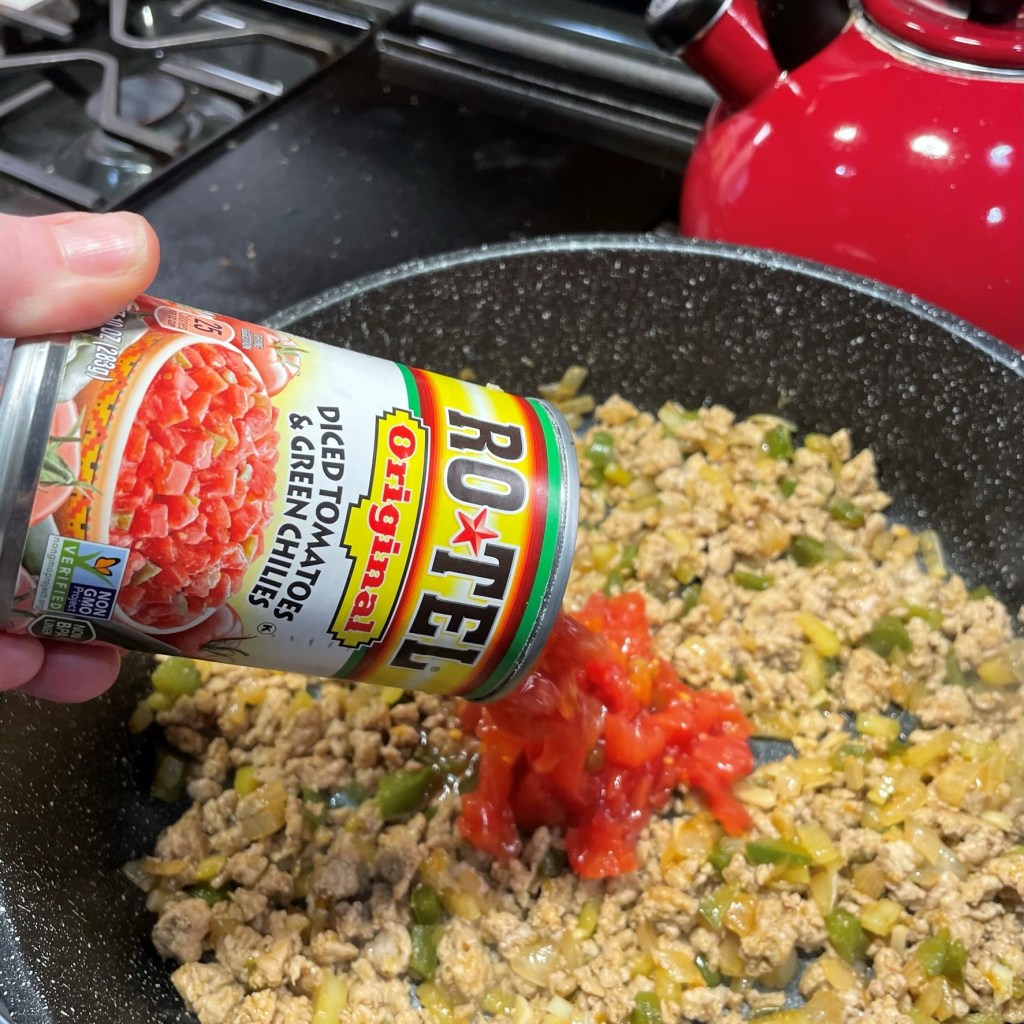
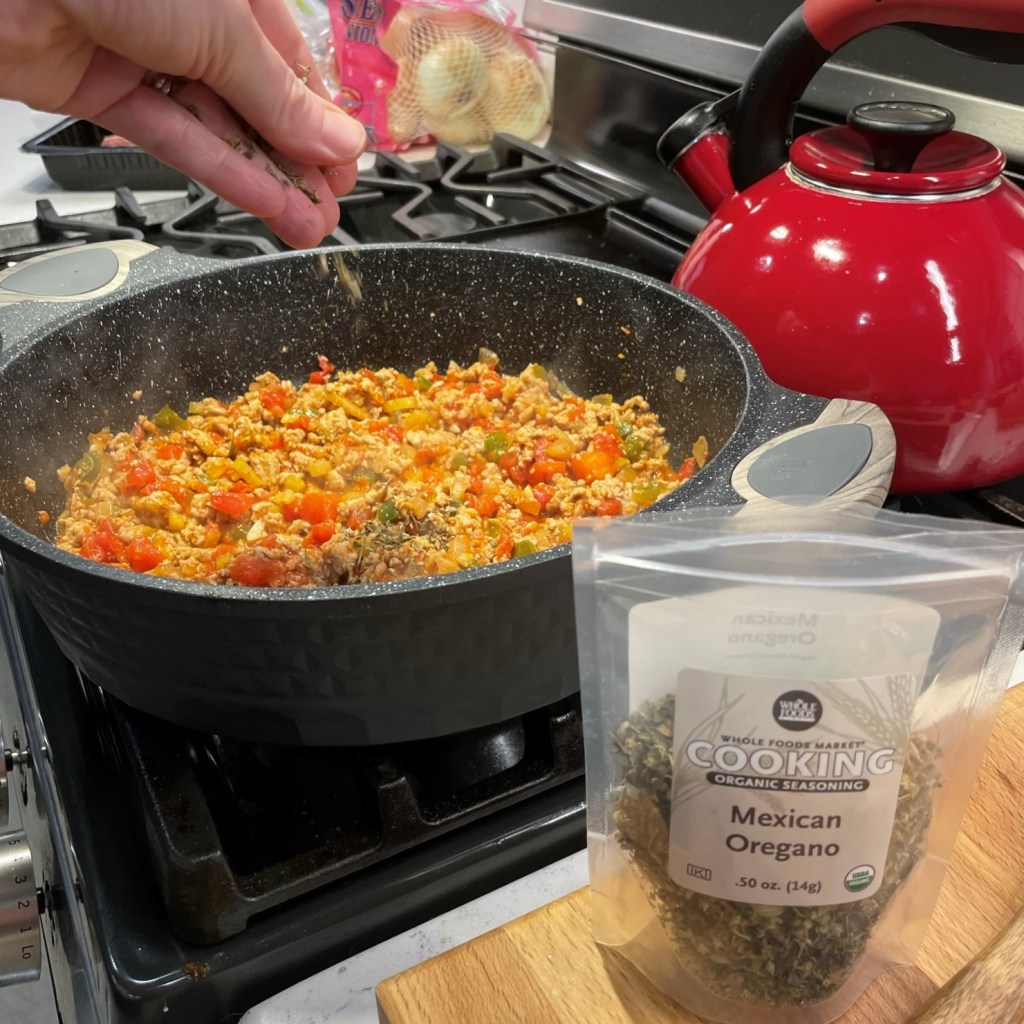
Preheat the oven, with a rack in the center position. Heat a little olive oil in a skillet and sauté the vegetables until they are just softened. Remember to season with salt and pepper, and then add the spice seasonings to bloom their flavors. Crumble in the ground turkey, a little at a time, and toss to stir until no pink color remains. Add the Rotel and a little tomato paste to intensify the tomato flavor, and a pinch of dried Mexican oregano.
I stuffed my peppers with a Mexican-themed filling, but you could take this in so many other directions!
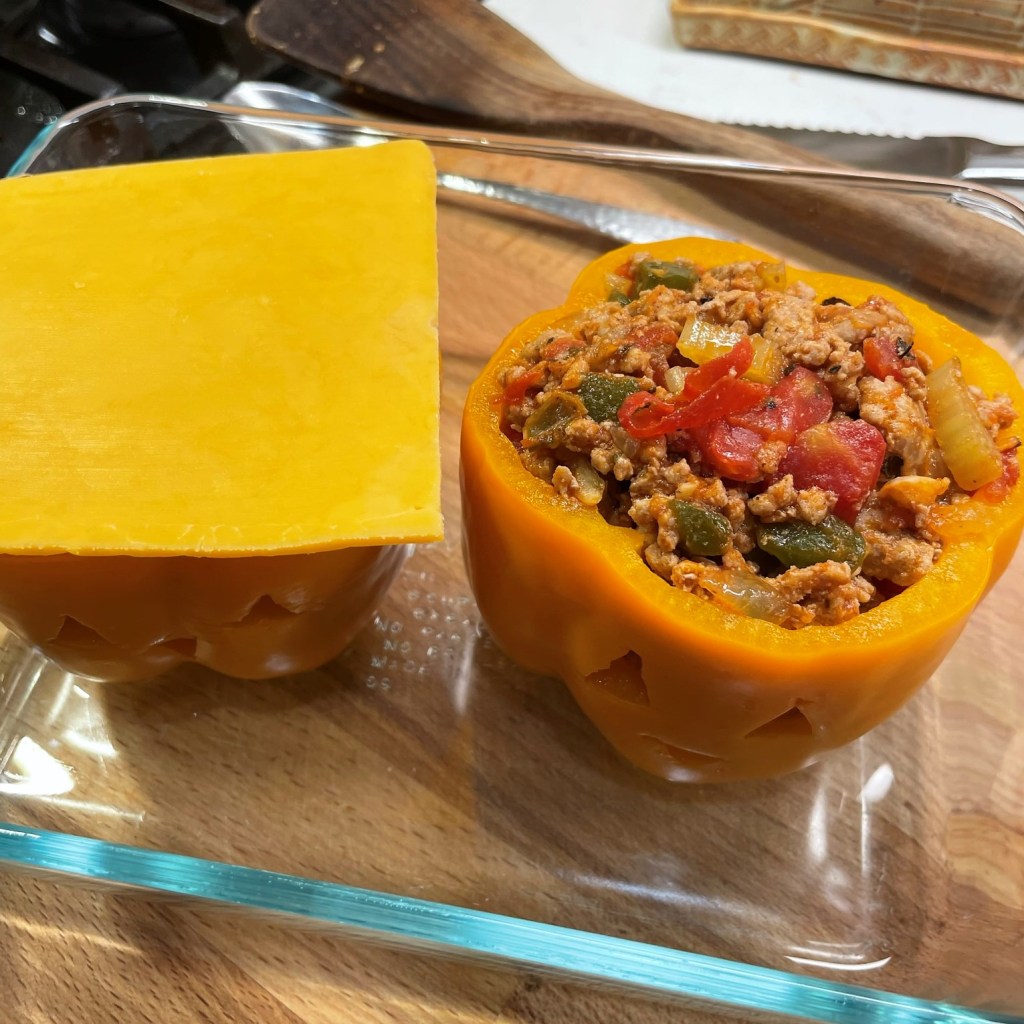
Spoon the filling into the peppers, lay a slice of sharp cheddar over the filling, and then reposition the pepper tops before sliding it into the oven. At this point, all the ingredients are fully cooked, so the peppers only need to be in the oven long enough to heat through, finish softening and melt the cheese.
Try to position the cheese so that it won’t melt into your peppers’ “eyes!”
Serve the peppers right away with a few spoonfuls of cooked rice, and get those kids costumed up for their night of fun!
This is a fun way to feed the little ones something on the healthy side before they go trick-or-treating for all that candy. Mix and match ingredients based on what the kids like.
Ingredients
4 orange bell peppers (choose them for shape and size, plus strong stems)
2 Tbsp. extra virgin olive oil
1/2 sweet onion, chopped
2 ribs celery, trimmed and chopped
1/2 green bell pepper, chopped
2 cloves garlic, smashed and minced
Salt and pepper to taste
1 tsp. salt-free seasoning (I used a combination of chili powder, cumin and paprika)
1 lb. fresh ground turkey (or other lean ground meat)
10 oz. can Rotel diced tomatoes (there are many heat levels; choose what’s right for you)
2 Tbsp. tomato paste
A pinch or two of dried oregano
4 slices sharp cheddar or other favorite melting cheese
Brown rice, for serving
Directions
Preheat oven to 350 F, with oven rack in center position.
Wash the bell peppers. Carefully cut the tops off the peppers, low enough to keep the stems intact. Remove seeds and membranes and place the peppers upside down in a microwave-safe dish. Add about an inch of water to the dish and microwave on high for 5 minutes, or longer if needed until peppers are somewhat softened. Set aside until cool enough to handle.
While the peppers are cooling, heat a large skillet over medium heat. Add oil to the pan and sauté onions, green bell pepper and celery for about 5 minutes, until softened. Add garlic, salt and pepper, plus salt-free seasoning of your choice. Cook another minute.
Crumble ground meat into the skillet, about half at a time so it doesn’t overcrowd the pan. When meat is no longer pink, add the Rotel tomatoes, tomato paste and dried oregano. Cook until mixture is bubbly, then turn off heat and cover the pan.
Use a sharp paring knife to carefully cut out triangle eyes and noses in each of the bell peppers (toss the bits into the pan with the rest of the filling).
Spoon the filling into the peppers. Arrange a slice of cheddar over each pepper, positioning the slices so that they will not melt to cover the eyes on the peppers. Replace the pepper tops and bake (uncovered) for 25 minutes, until heated through and cheese is melted. Serve immediately with brown rice.
With the cool, crispness of fall in the air, I have been giving my stove and oven a serious workout. Many of my recipes have been reruns of things I’ve already posted, but I have made a few exciting new things, too.
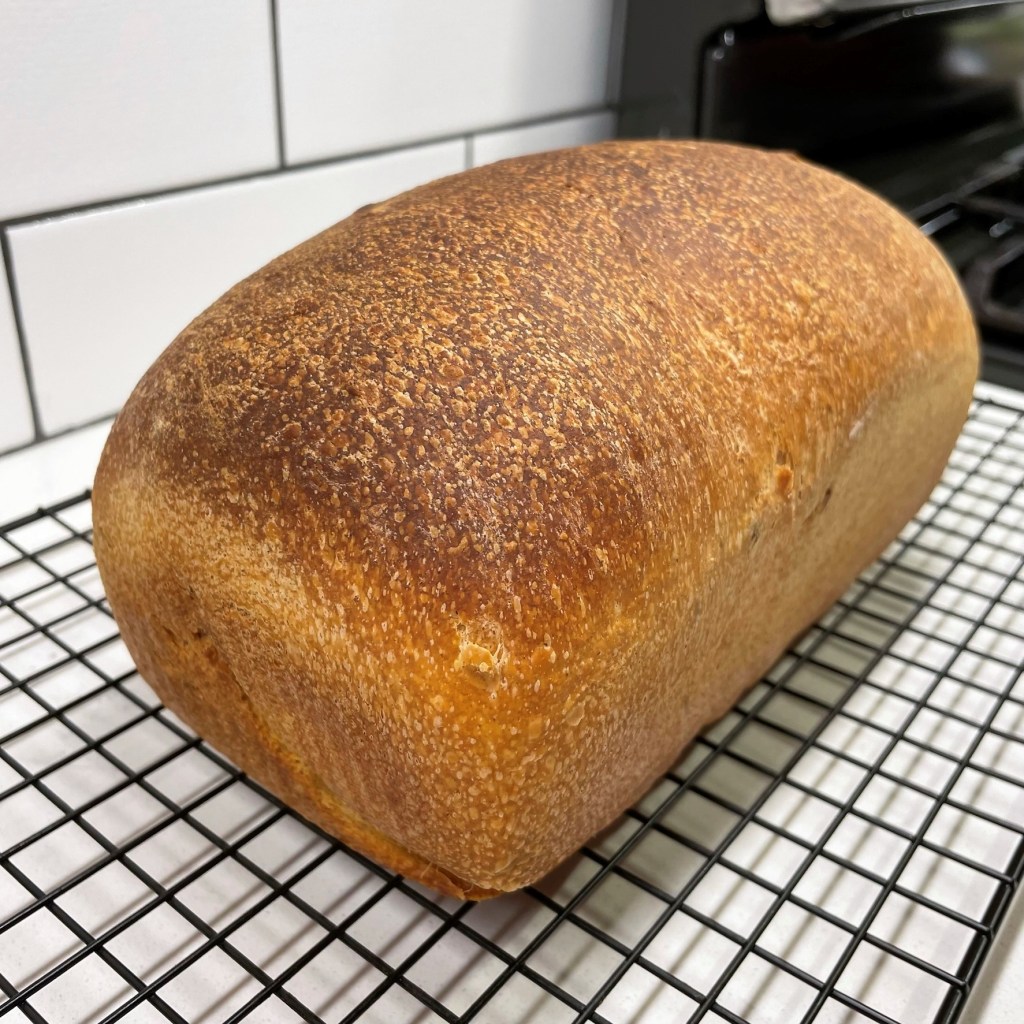
Last week, I opened a can of pureed pumpkin for another recipe (I can’t remember what), and I had just a little bit leftover—at exactly the same time I needed to feed my sourdough starter to make a new loaf of bread for my husband’s lunchtime sandwiches. Why not add the pumpkin to a bread dough? My first inclination was to make a cinnamon roll-type thing, but I remembered how delicious pumpkin is without the spice and sugar, so I took it in this savory direction instead, using my favorite sourdough sandwich bread recipe as a template.
It even looks like autumn!
The go-to recipe I modified came from Maurizio Leo, a pro baker whose passion for naturally leavened bread shines on such sites as Food 52 and King Arthur Baking Company. He understands and explains all the science of breadmaking (which I love) and though I keep saying I want to make some of the other Insta-worthy recipes on his blog, The Perfect Loaf, I keep coming back to this one. It relies on an unusual method of pre-cooking a portion of the flour—a technique which locks in much more liquid than you’d otherwise get into a sandwich loaf—and this initial step ensures a super-soft, tender bread with a perfectly chewy edge on every slice.
I’ve experimented many times with Maurizio’s original recipe, first to split it in half because we can’t finish two loaves that quickly, partly out of necessity on days that I didn’t have honey or whole milk, but also out of curiosity to see how far I could push it in the direction of more whole grain. This time, I wanted to see how the loaf would fare with a half cup of fiber-rich pumpkin puree, and as you can see, it turned out quite good.
My big test for any new loaf is toast, and this one was divine!
I love toast so much.
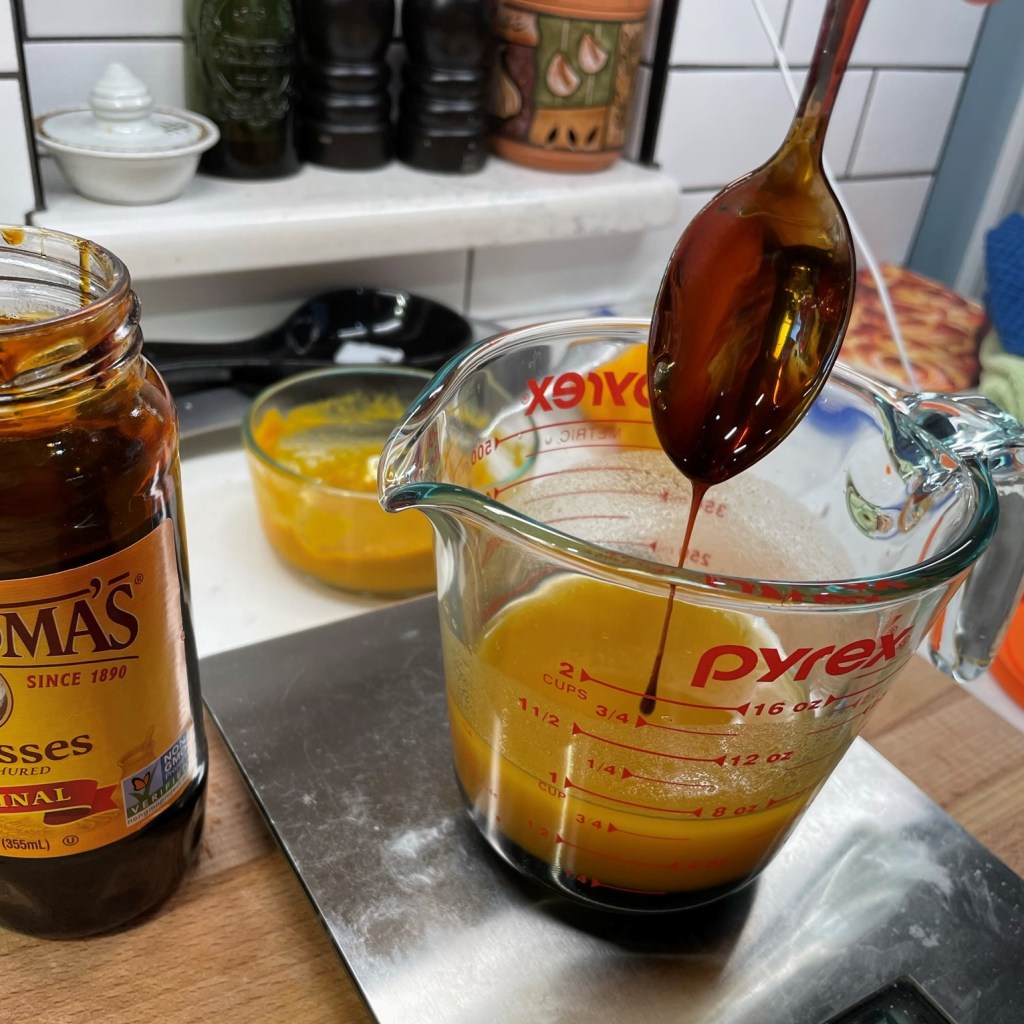
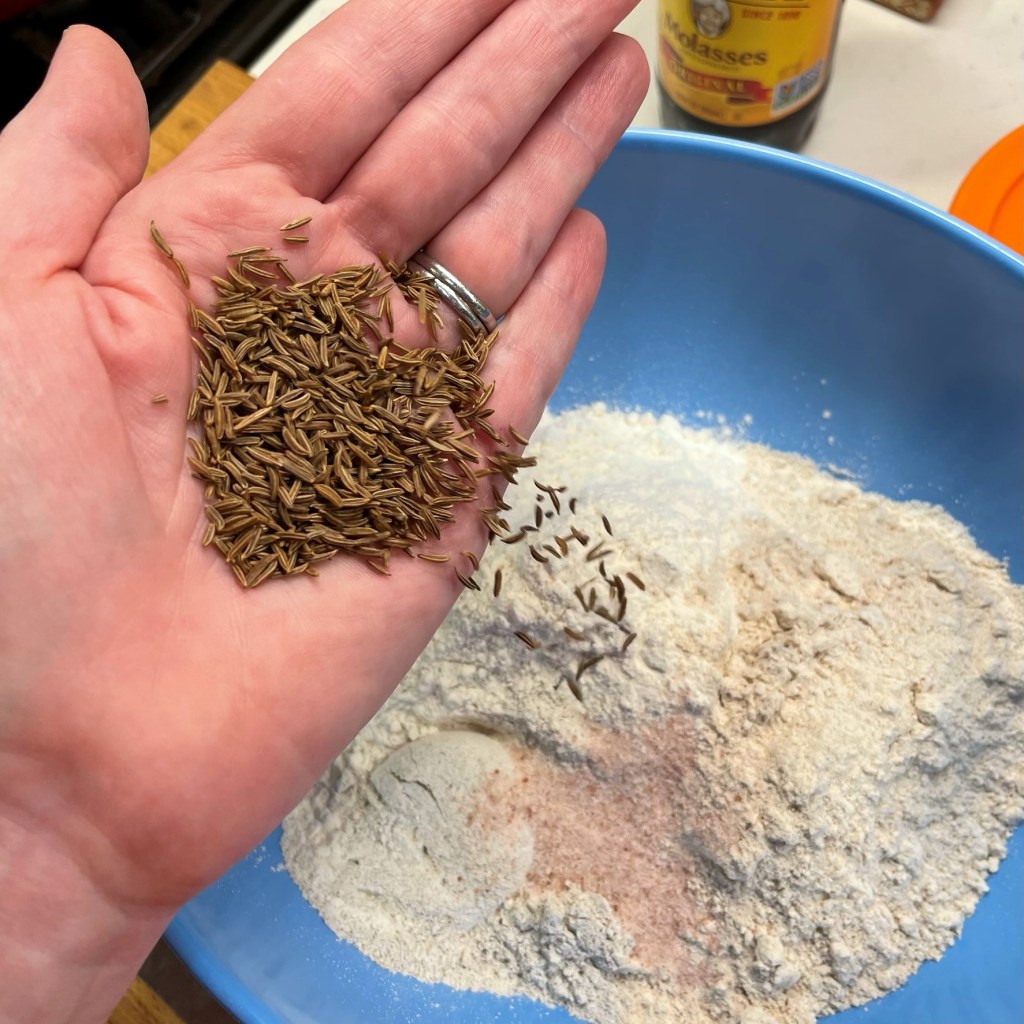
To make my pumpkin sandwich bread even more rustic and autumn-like, I swapped out a good amount of my usual white whole wheat flour in favor of whole dark rye and played up that rye infusion with a spoonful of caraway seed. I swapped in molasses for honey because I love the deep, earthy flavor of molasses with rye. It all worked beautifully, and the aroma of this loaf as it emerged from the oven was nothing short of fantastic. Sometimes it pays to experiment.
Fair warning, my recipe is written in metric measurement because that’s the way I bake. Scaling a recipe by volume measurements is a near-impossible task, and I will say honestly that my cheap digital kitchen scale is one of the items I would never go without today.
This loaf depends on a portion of ripe sourdough starter. “Ripe” means it has been refreshed within the past 8 to 12 hours, so it is fully fermented, active and ready to use. If you don’t have a sourdough starter, you could try a swap-in of canned pumpkin for about half of the water called for in your favorite yeast-based recipe, and then add about 2 tablespoons of extra water. It would be best to experiment with a recipe that you are very familiar with, so you have a better sense of when the dough looks and feels “right.”
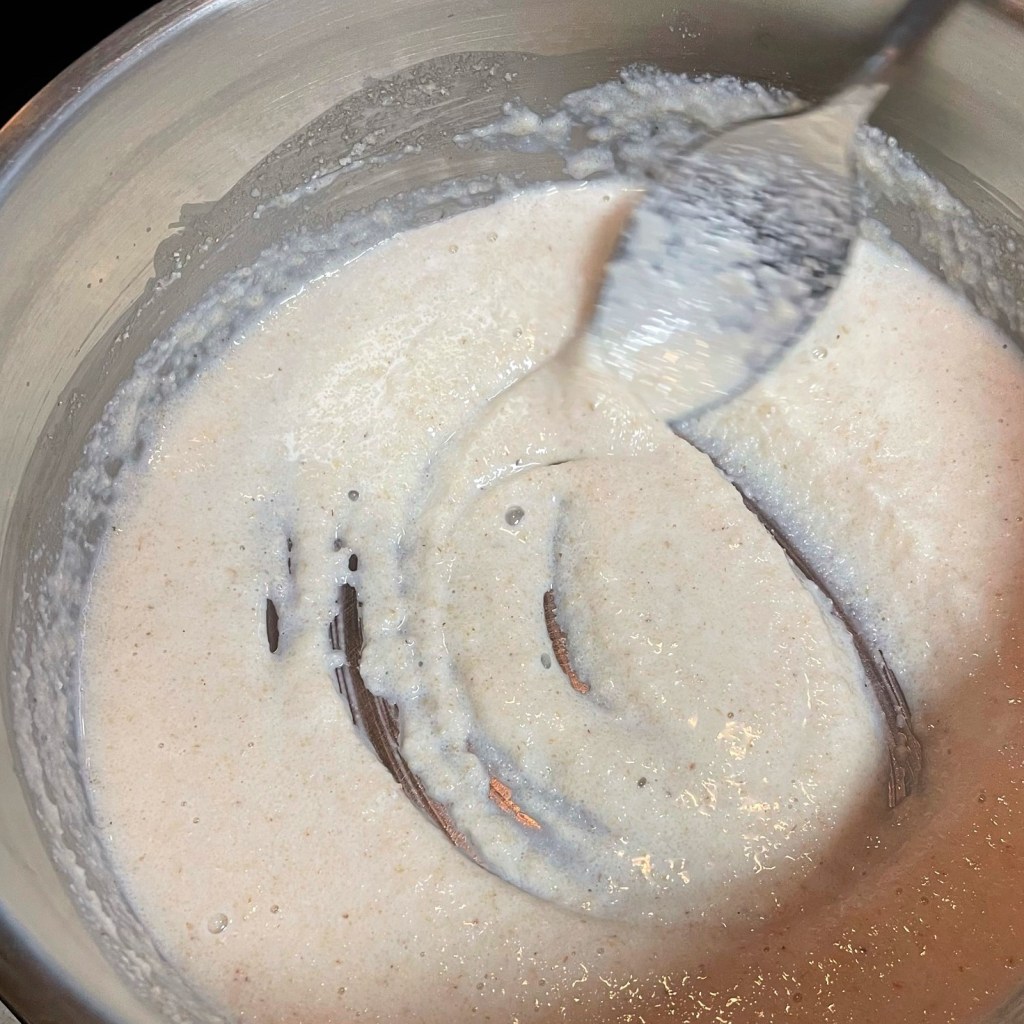
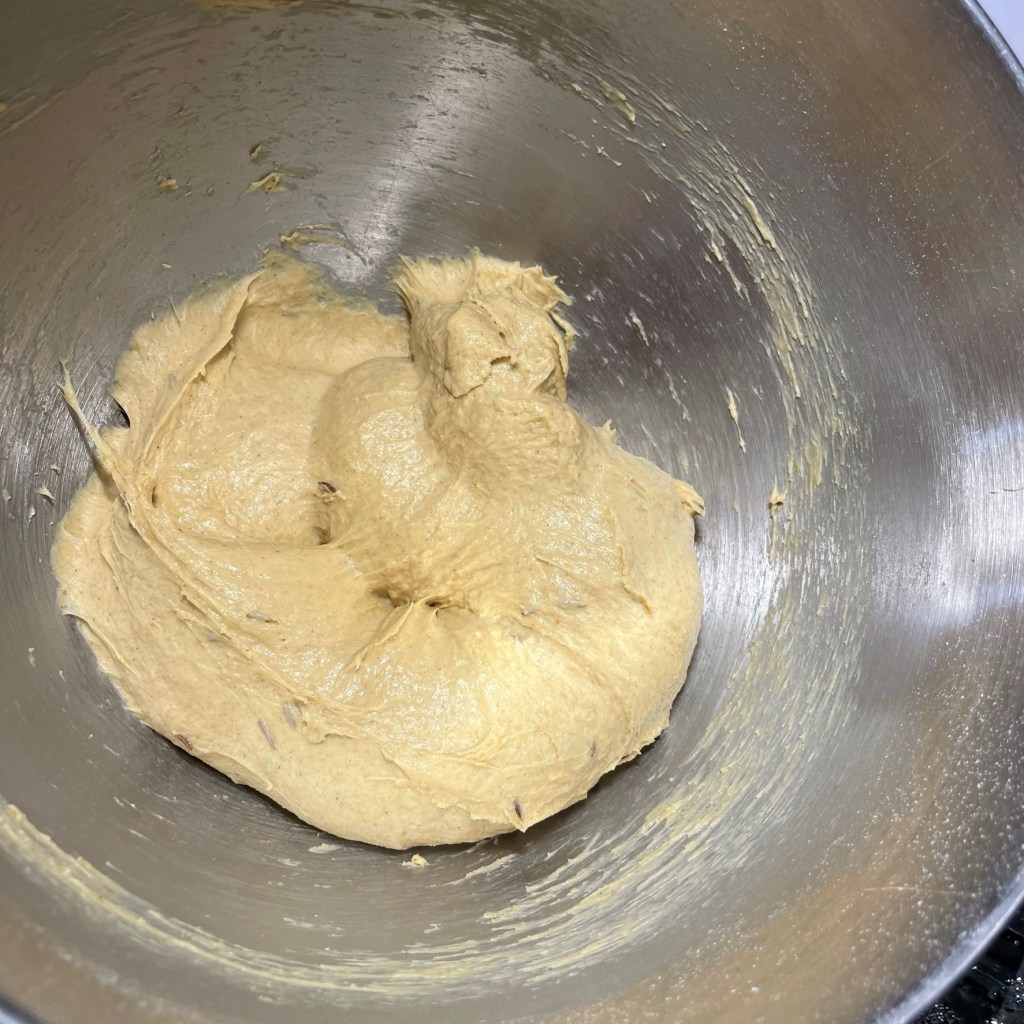
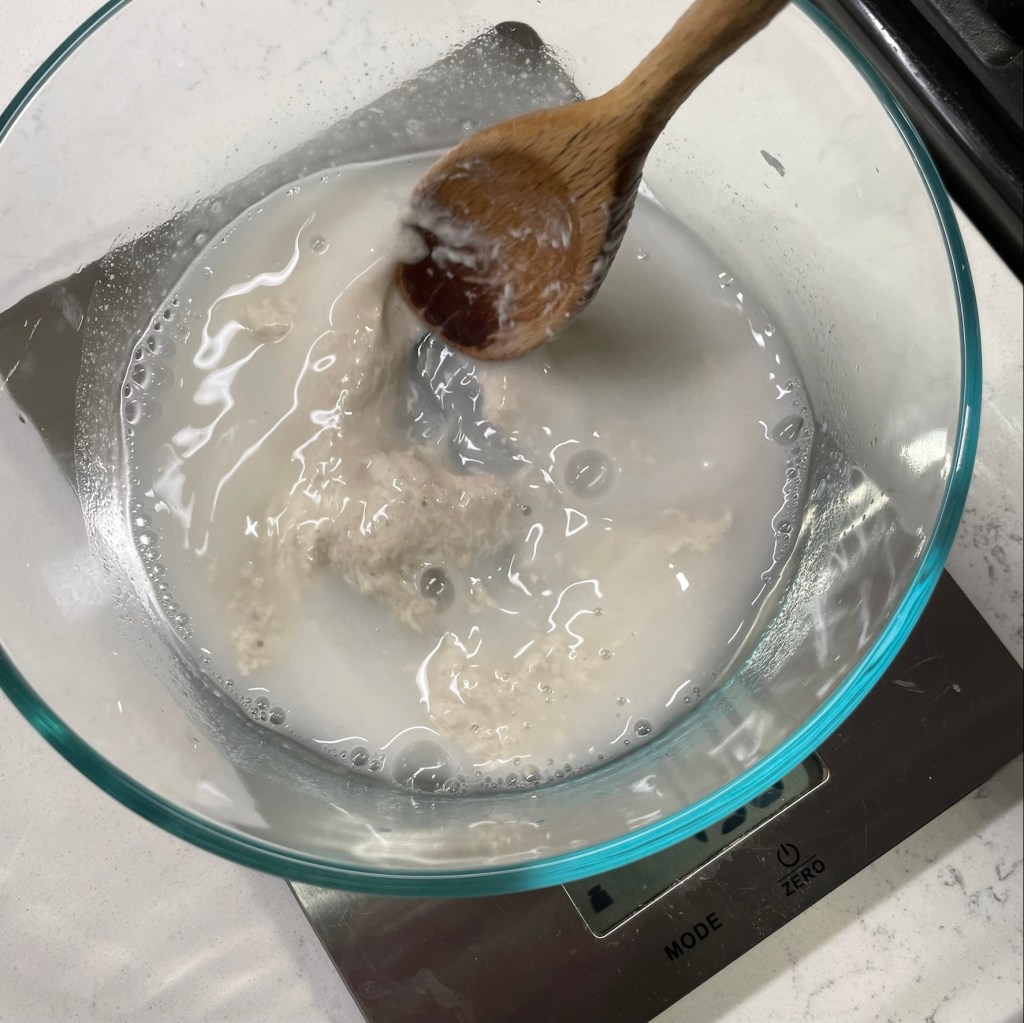
Here’s how it went down in my kitchen, beginning with the flour and milk paste, which are whisked together and cooked over medium heat until it looks like a roux. This stage needs constant attention, so don’t look away even for a moment, and be ready to switch from whisk to spoon when it starts to get thickened so you don’t get it all caught up in the whisk.
This process starts slowly, but once the flour begins to thicken it moves fast!
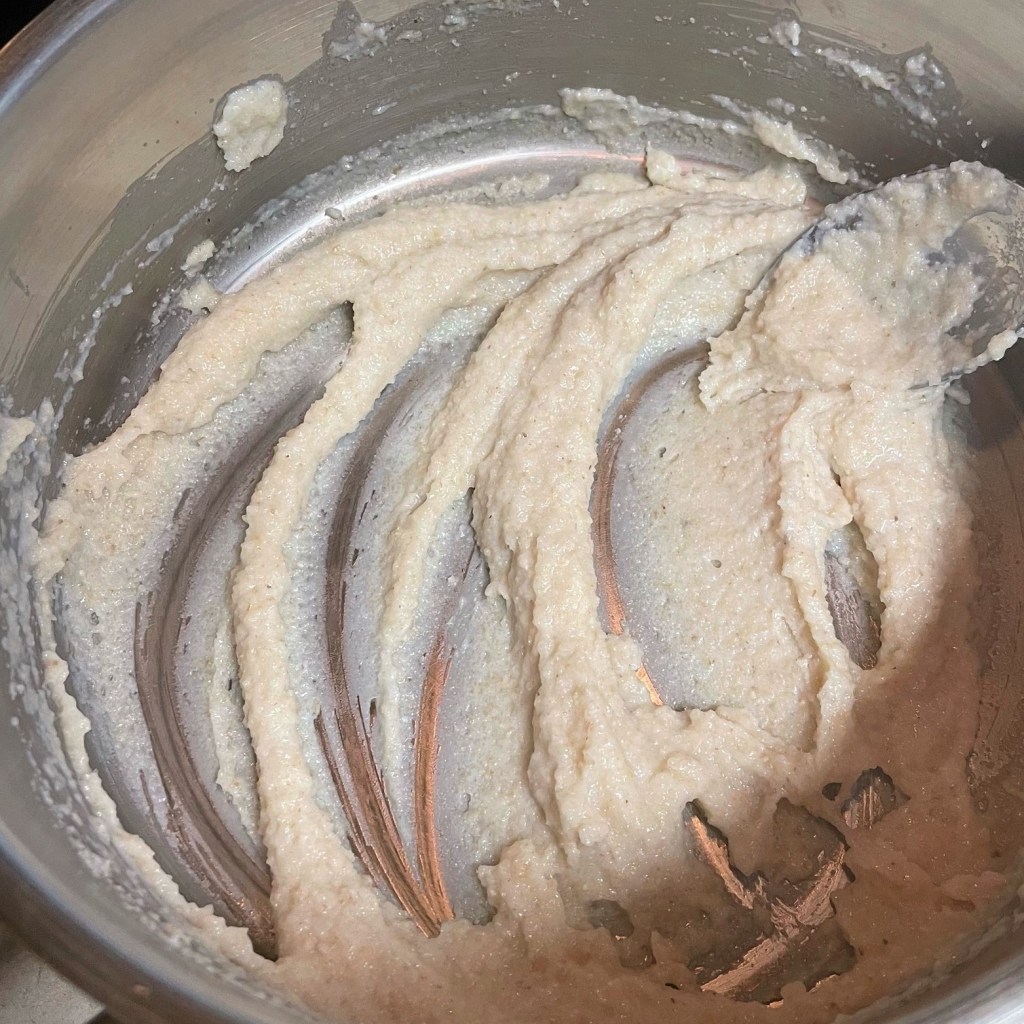
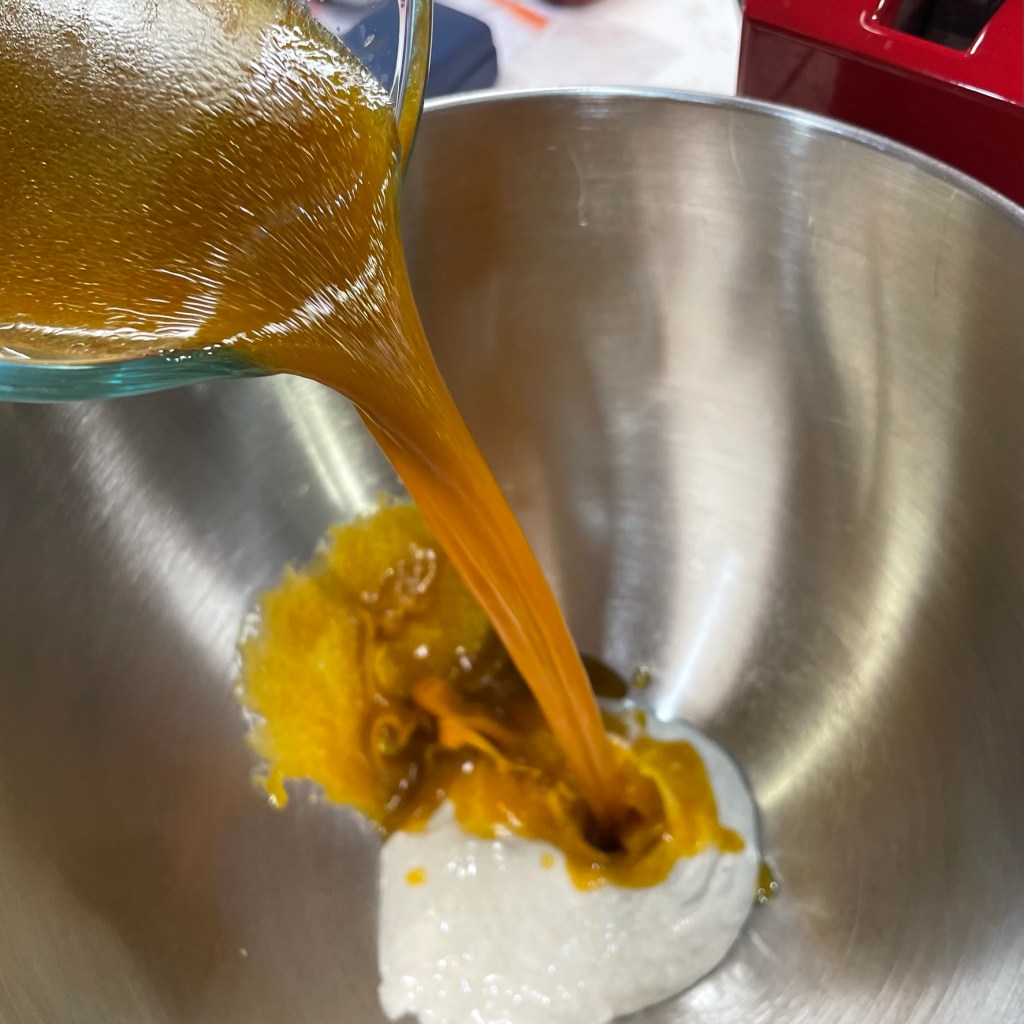
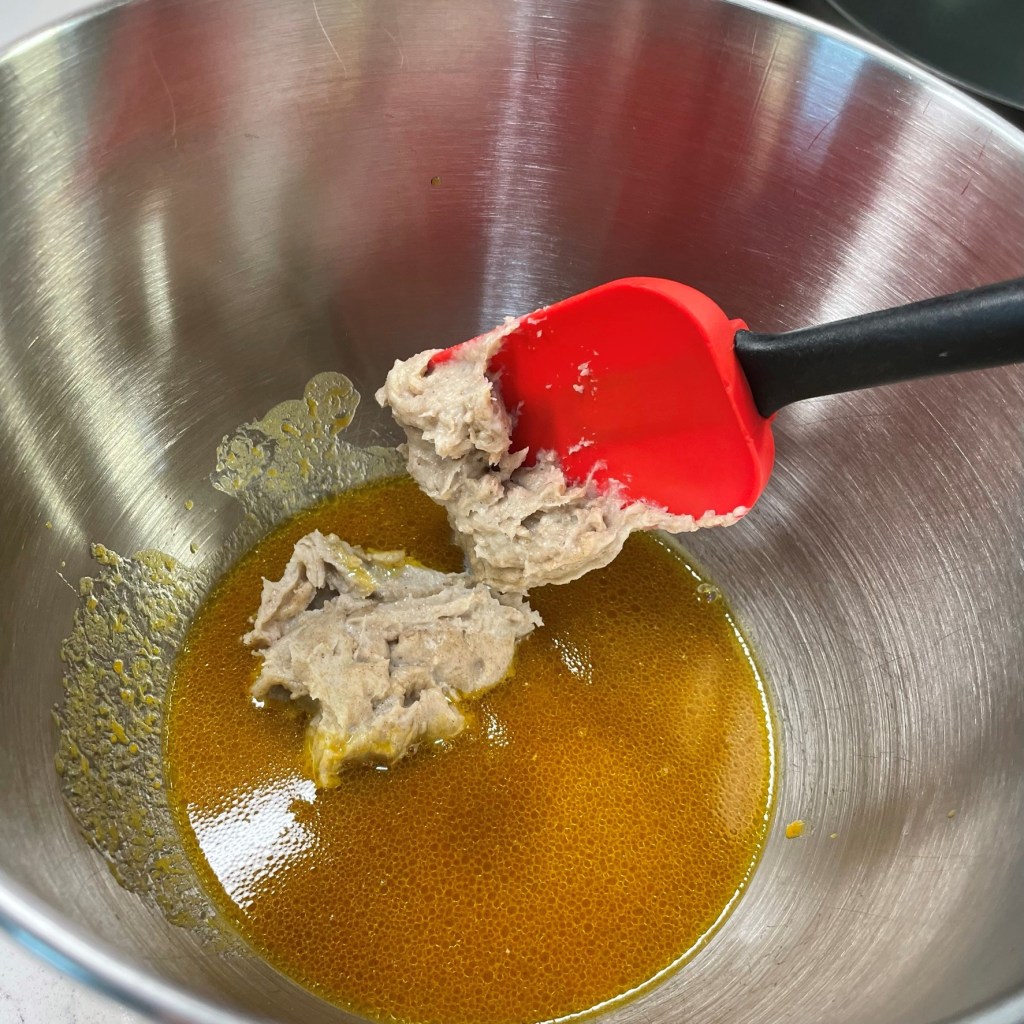
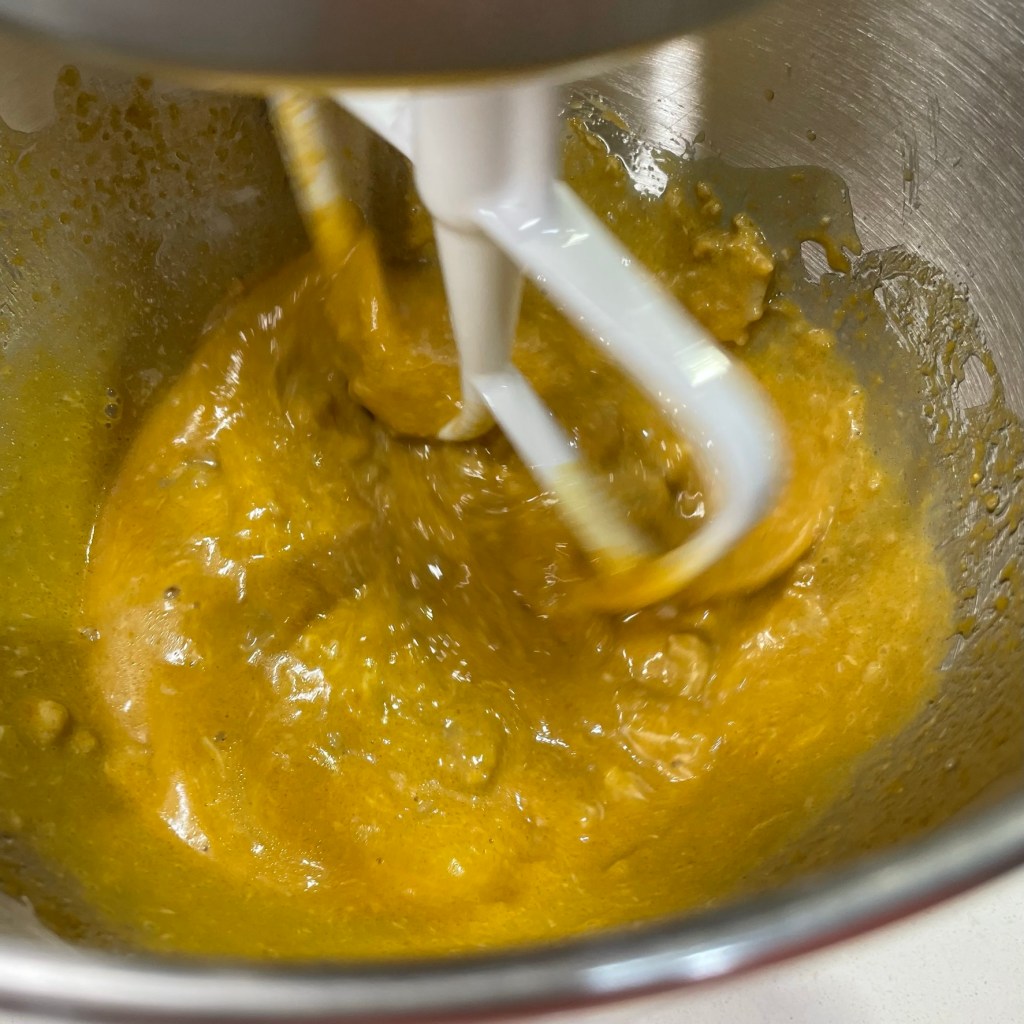
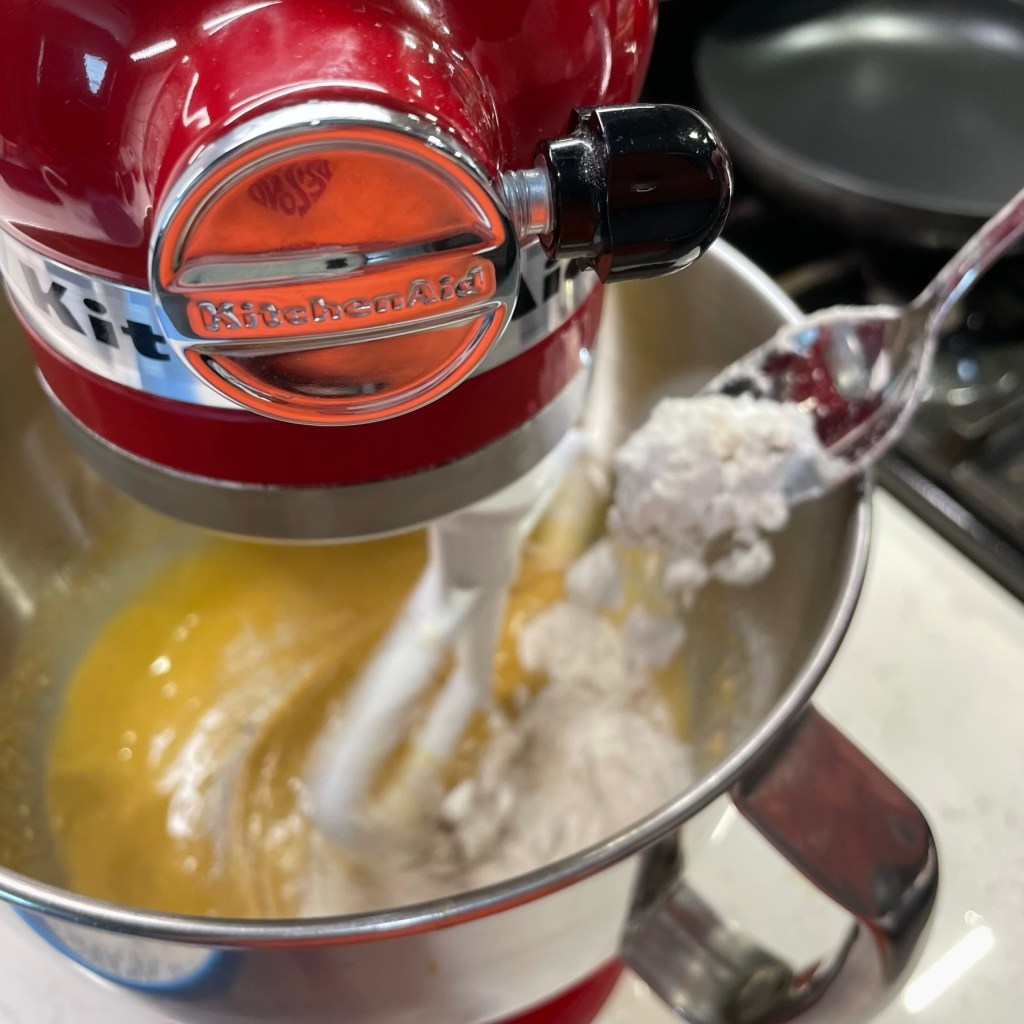
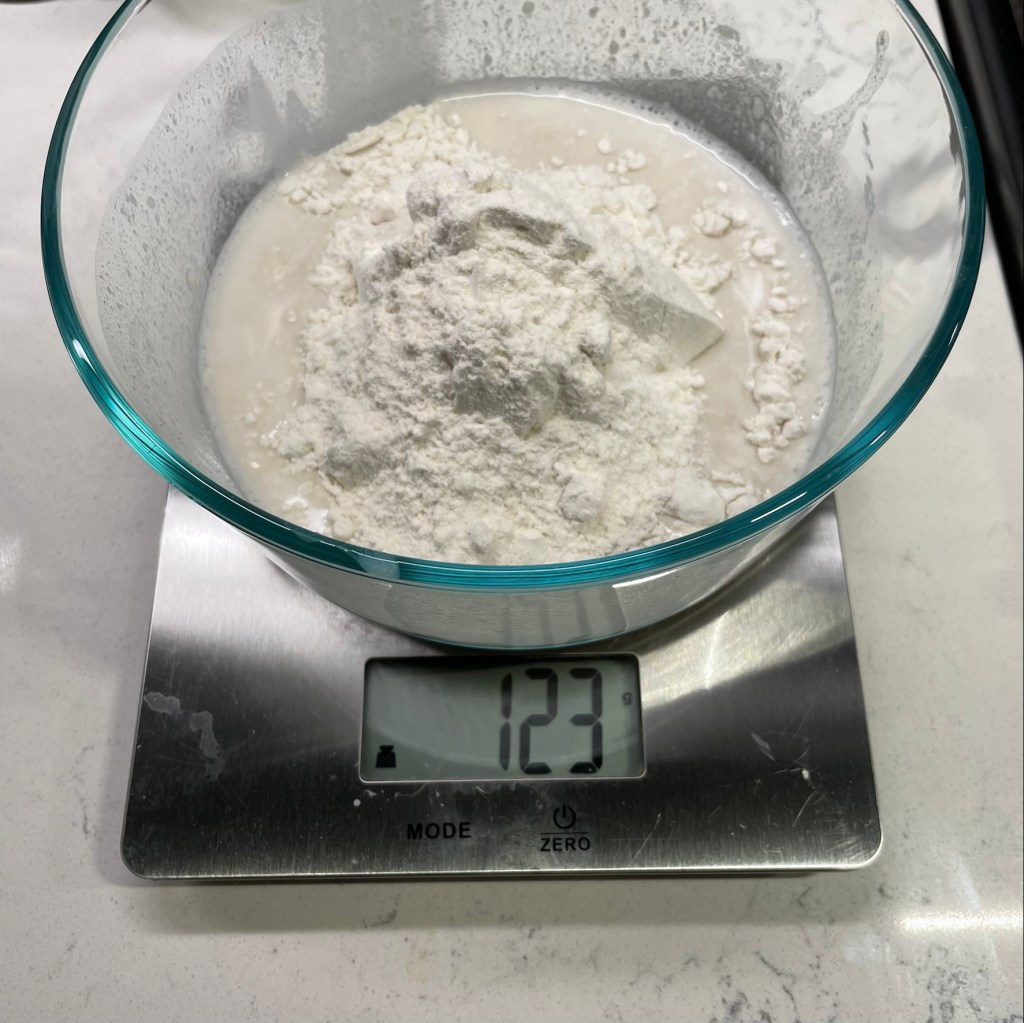
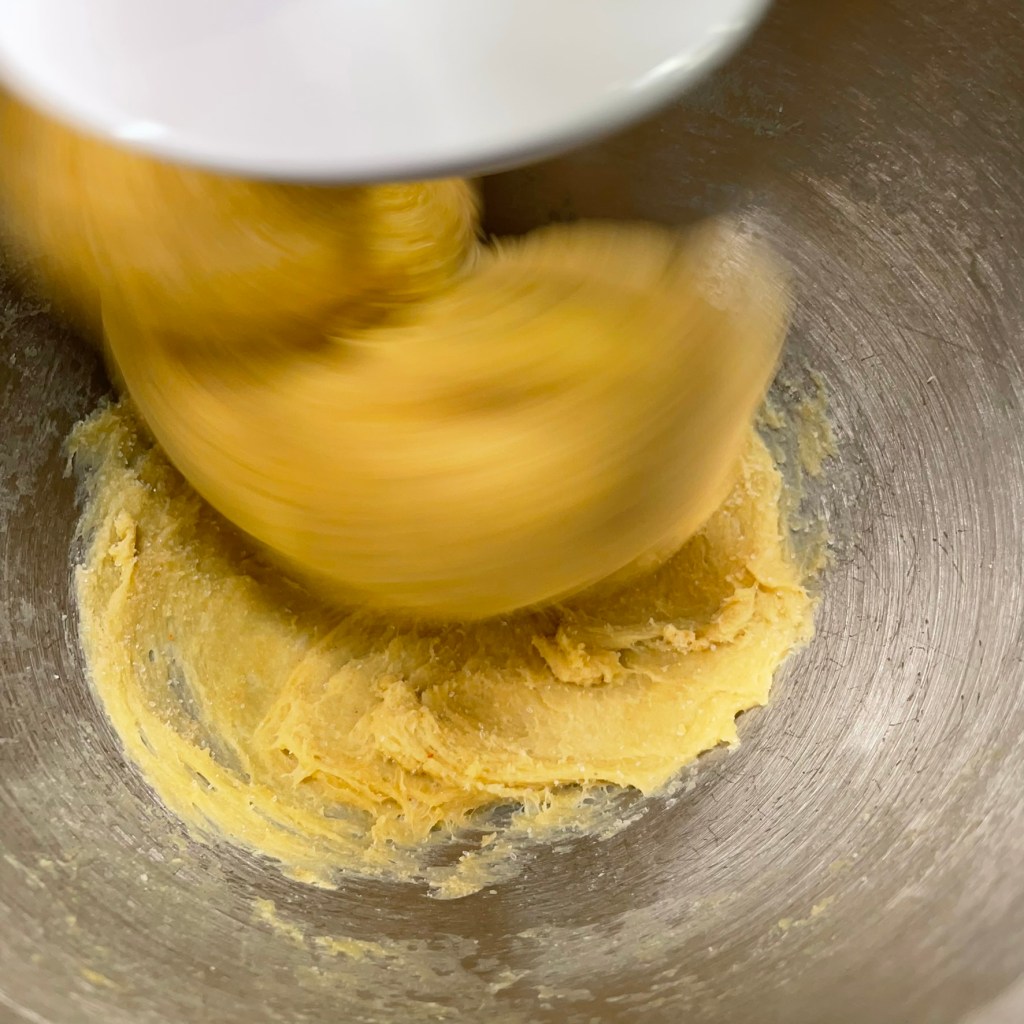
Next, combine the pumpkin and warm water, whisk in the molasses and olive oil, and then combine it with the sourdough starter and the cooled roux paste in the bowl of a stand mixer. Use the beater blade for this and blend it for several minutes, until it’s smooth and evenly mixed.
Pumpkin + molasses = beautiful autumn color!
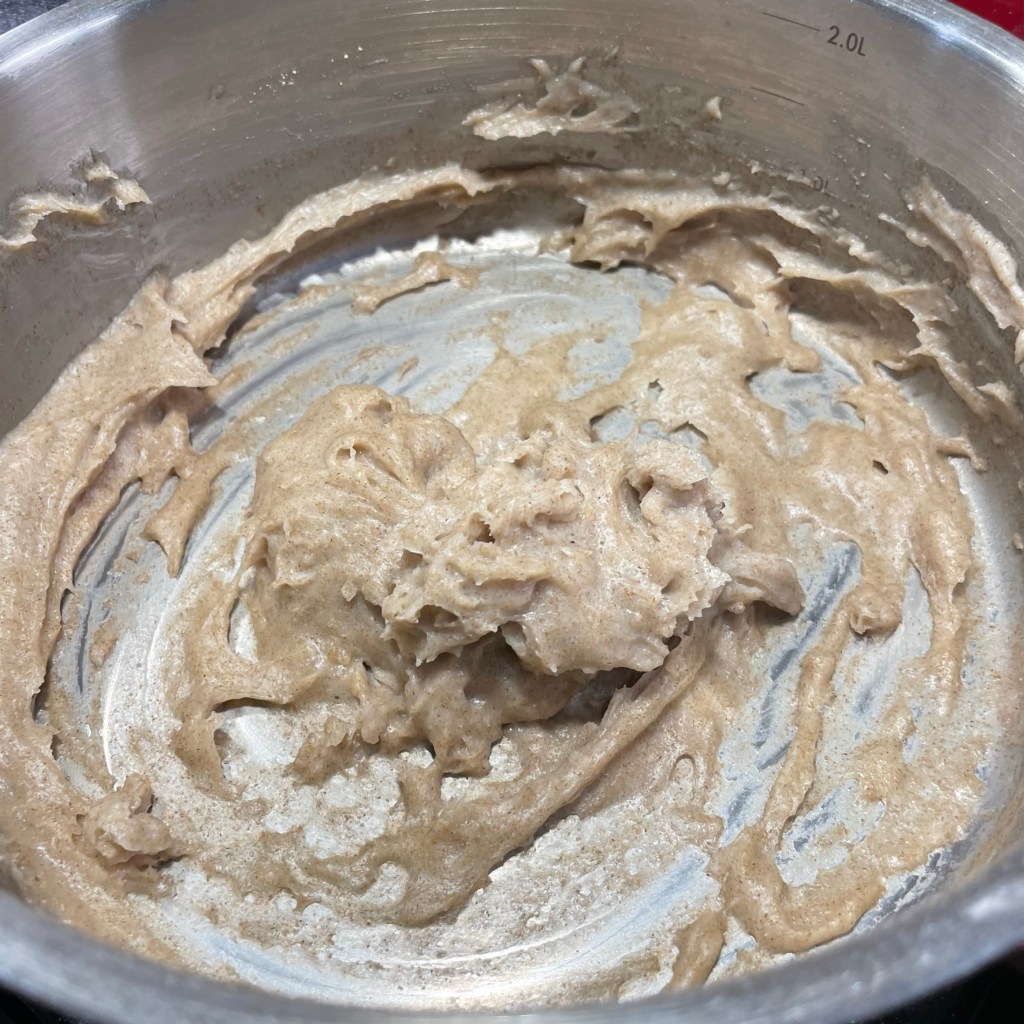
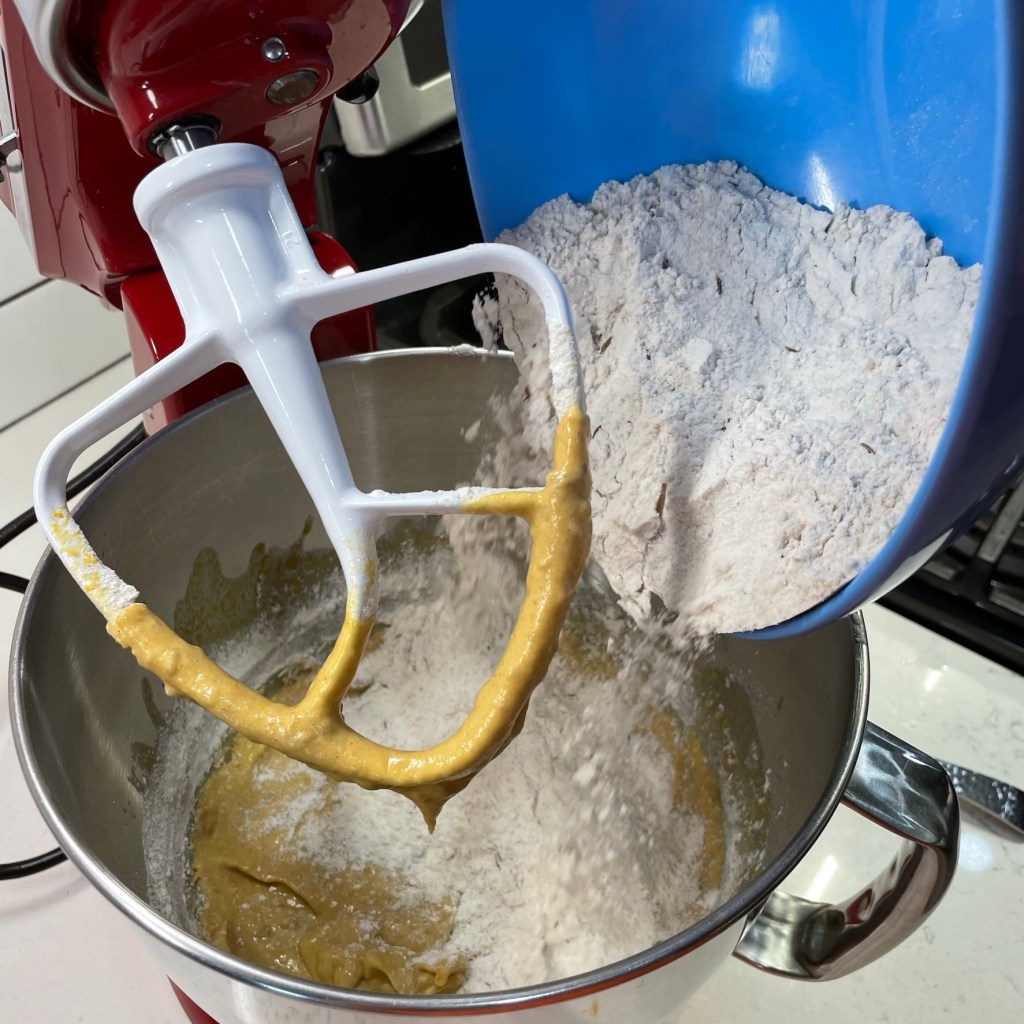
Whisk the flours together—here I used a combination of dark rye, white whole wheat and bread flour, which is high in gluten for a strong rise—and stir in the salt and caraway seed. Add a spoonful of these dry ingredients at a time to the mixing bowl while it’s running, until the dough begins to look like batter. Then turn off the mixer and add the rest of the flour ingredients all at once. This is not an essential step for the recipe, but my technique for reducing the splash that usually happens when I start my mixer with wet and dry ingredients in the bowl. I hate the mess, and this really helps!
Adding the dry ingredient mixture gradually at first prevents splashing.
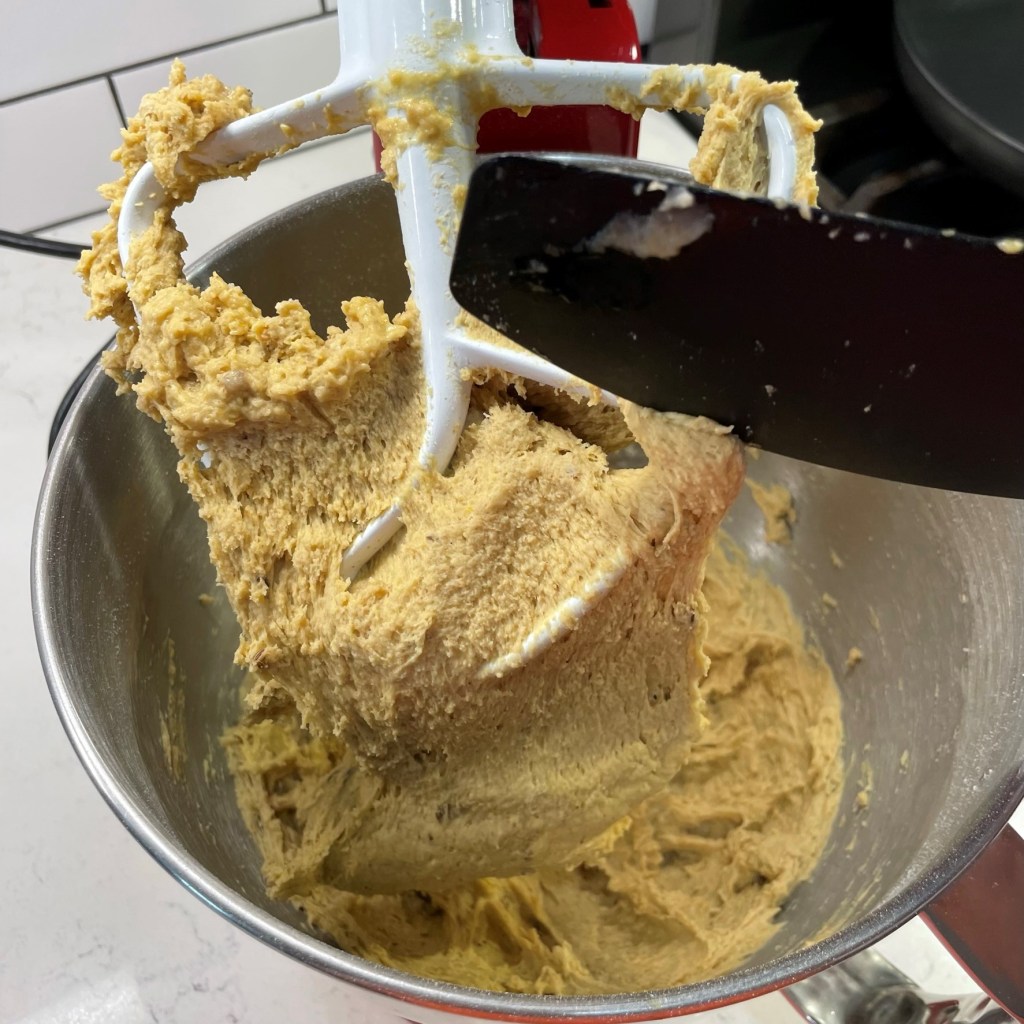
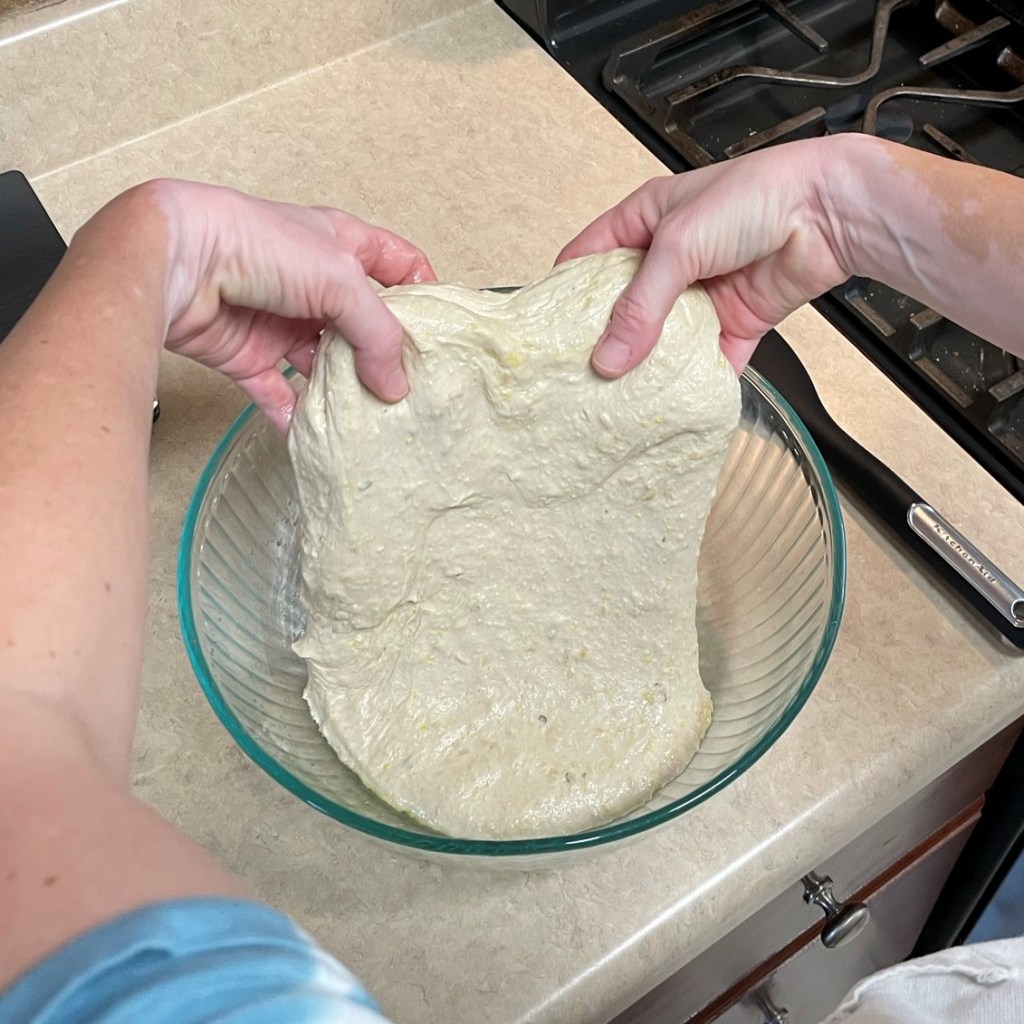
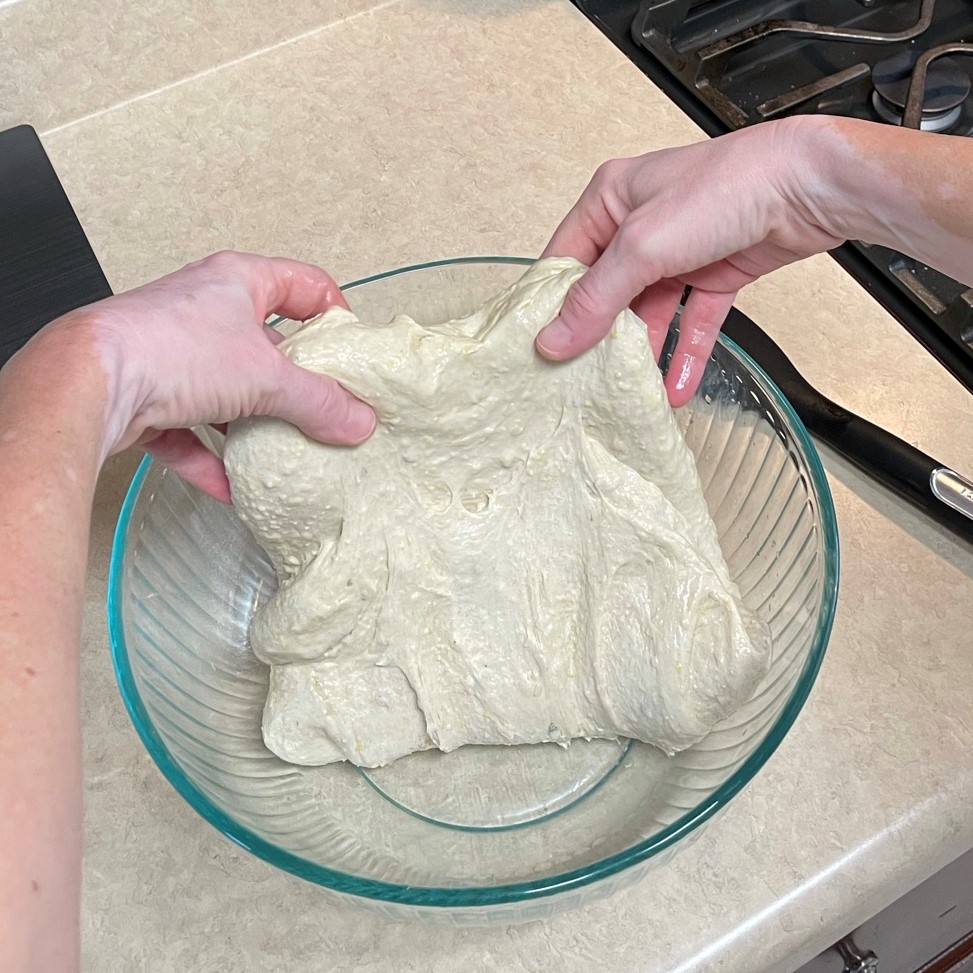
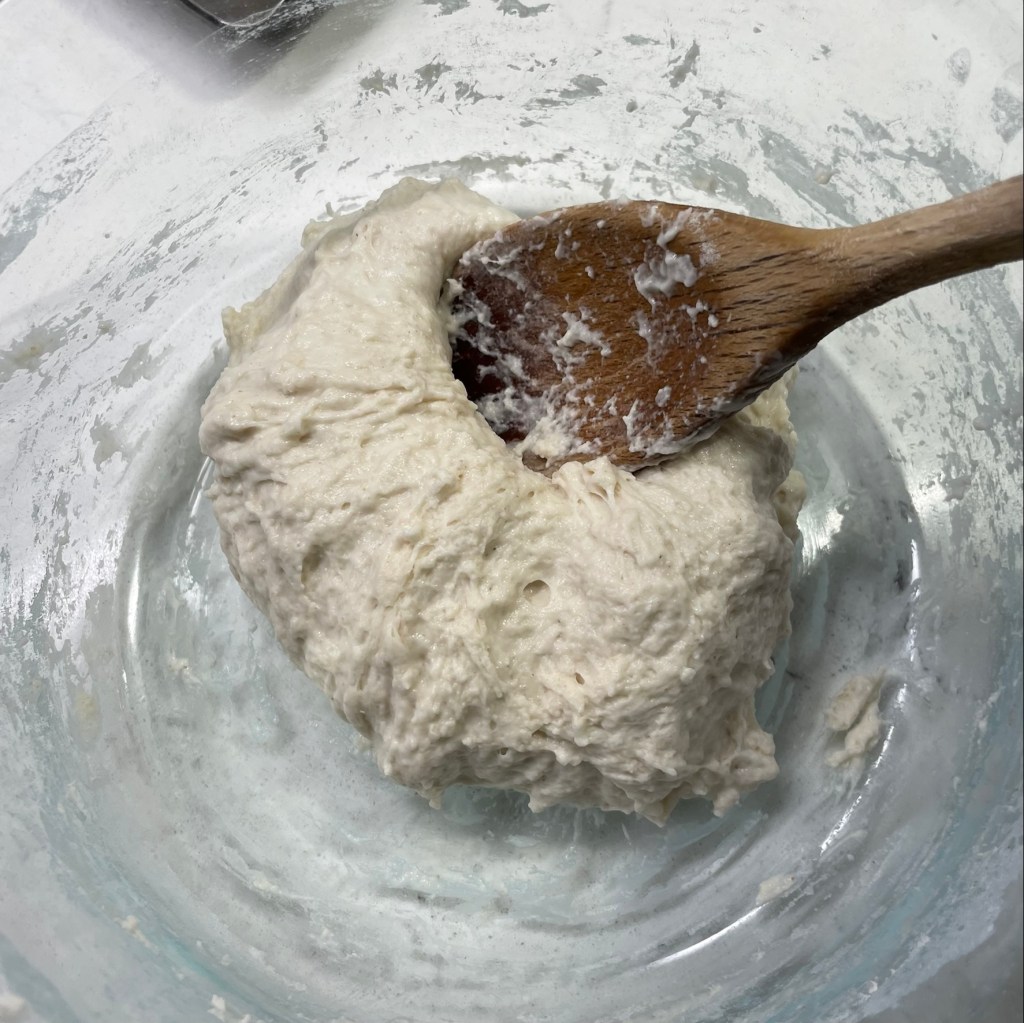
Continue mixing until all the dry ingredients are completely incorporated. Stop the mixer and scrape the dough off the beater blade into the bowl. Cover the bowl and let the dough rest for at least 20 minutes, up to an hour. This is a departure from Maurizio’s recipe; it’s my own trick for making the dough more workable, as the rest time gives the grain time to fully hydrate. Fit the mixer with the dough hook and knead the dough until it’s smooth, soft and shiny. Resist the temptation to add more flour—yes, the dough will seem too soft, but the next step of stretching and folding will increase its strength. Trust the process. Transfer the soft dough to a large, lightly oiled bowl. Cover it and stay nearby for the next step.
The rest time makes the dough easier to knead.
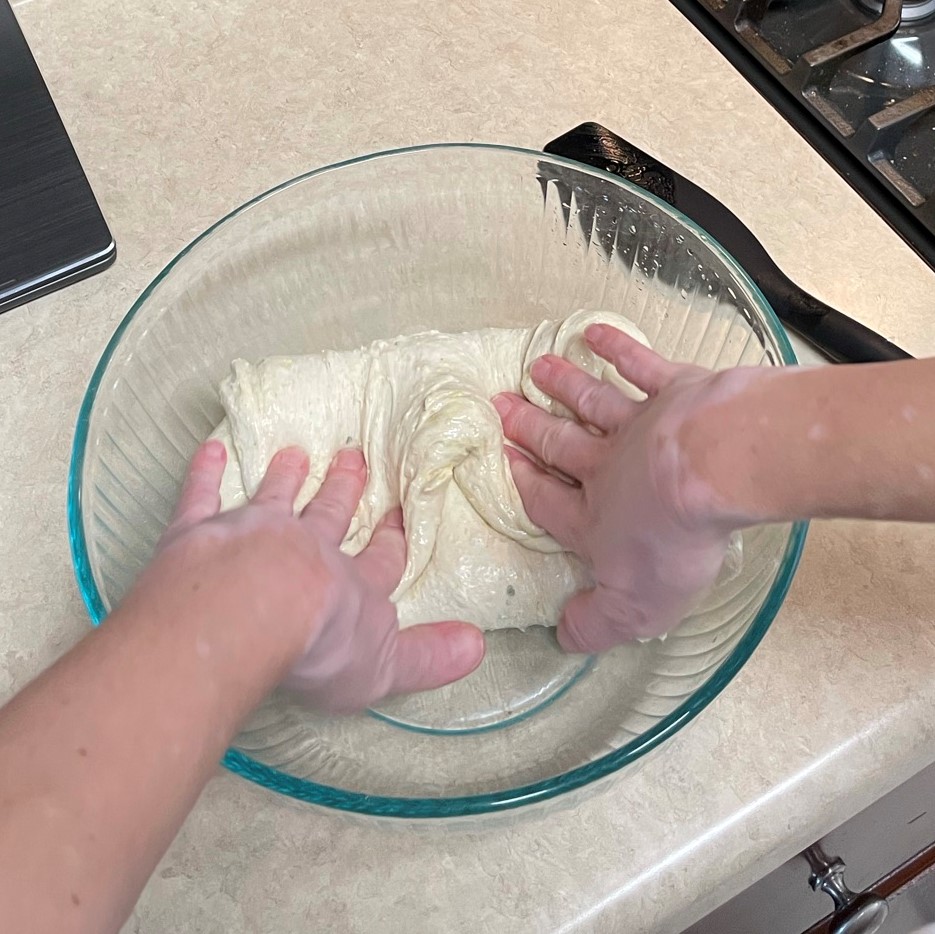
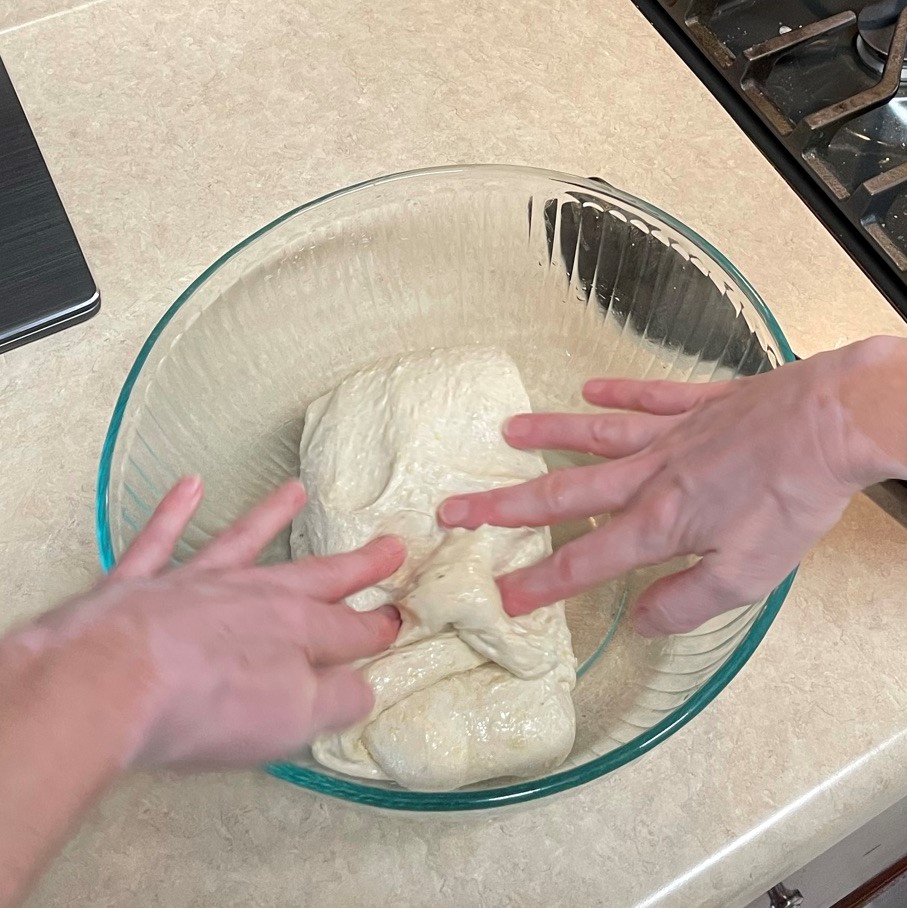
I was working alone in the kitchen on this day, so the stretch and fold pictures I’m sharing below are borrowed from an earlier post for a different bread (notice the ugly old counters?), but the process is exactly the same. Do this at least twice (three is better), about 30 minutes apart during the first part of the ferment time. This may not seem like much, but this step builds a great deal of strength in the dough so it rises big in the oven.
Once you begin the stretch-and-fold, it will make sense.
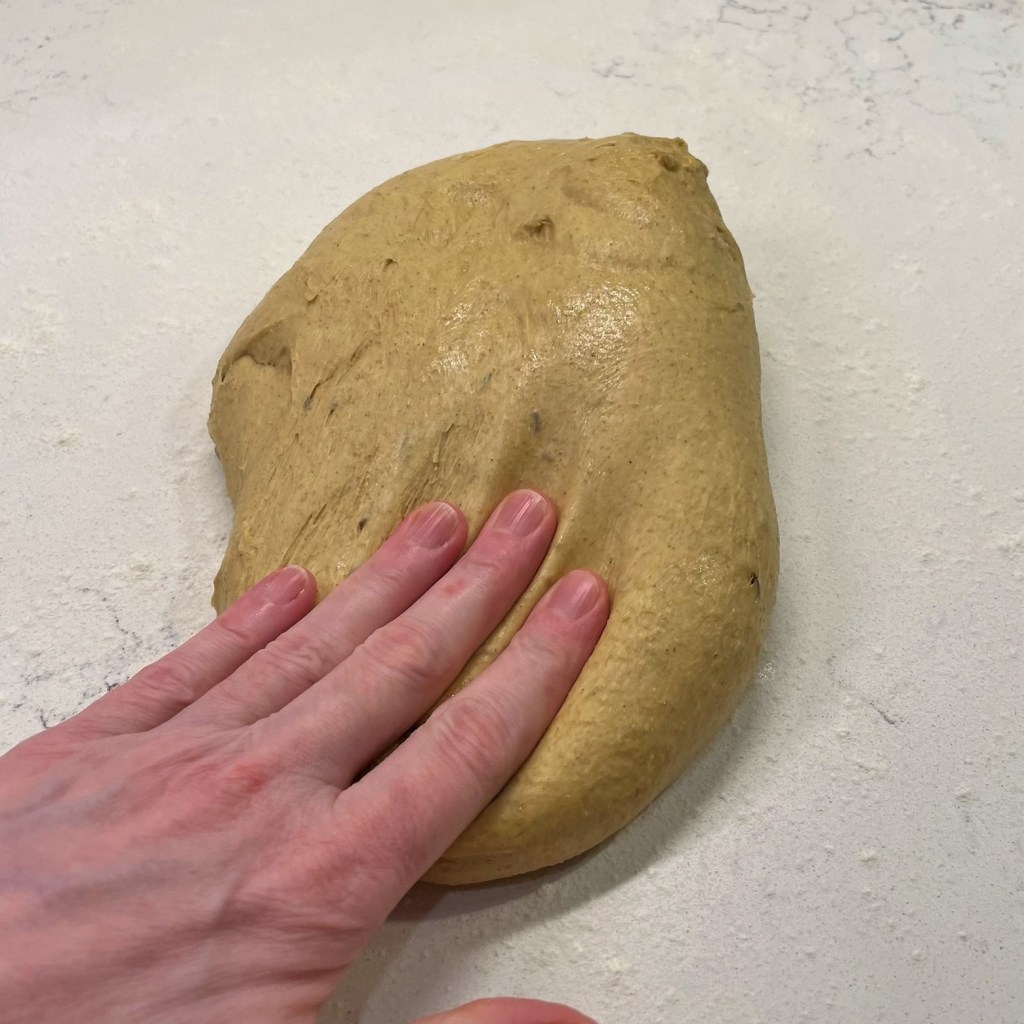
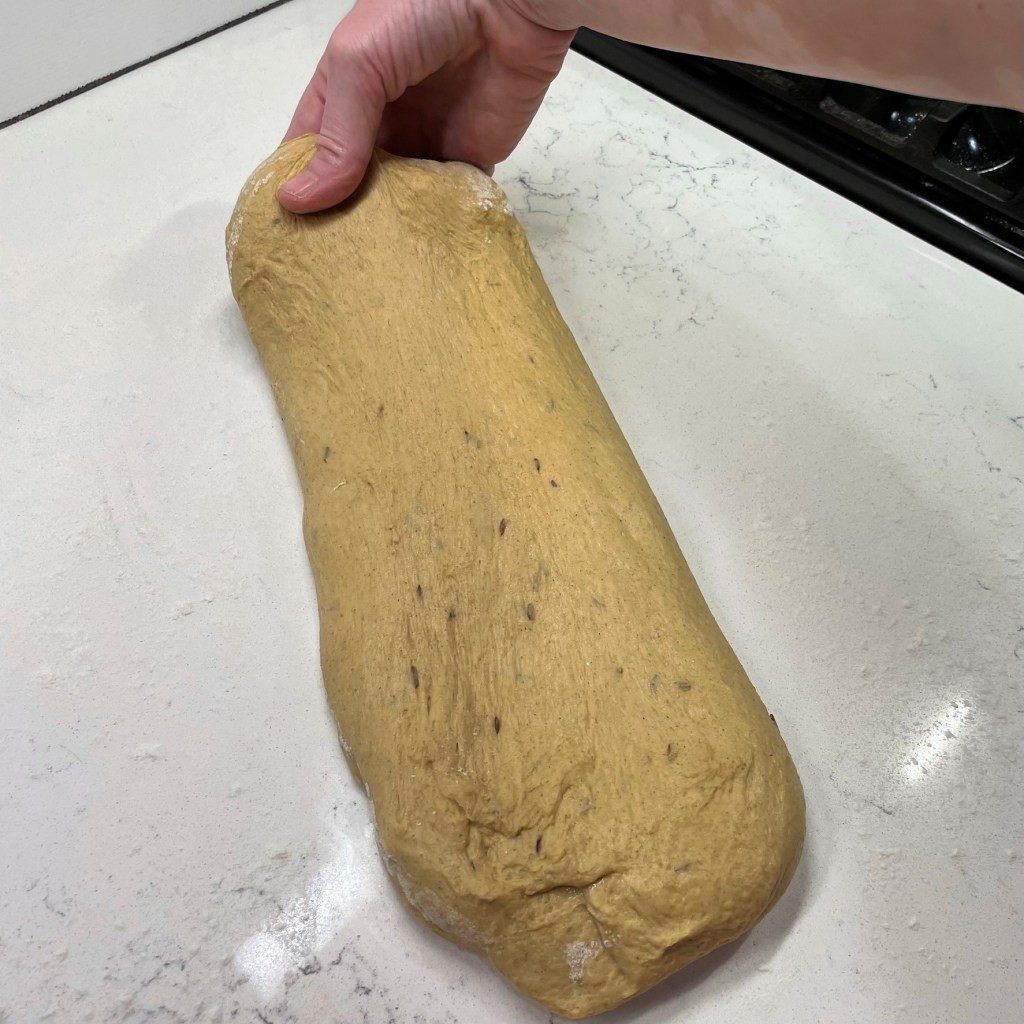
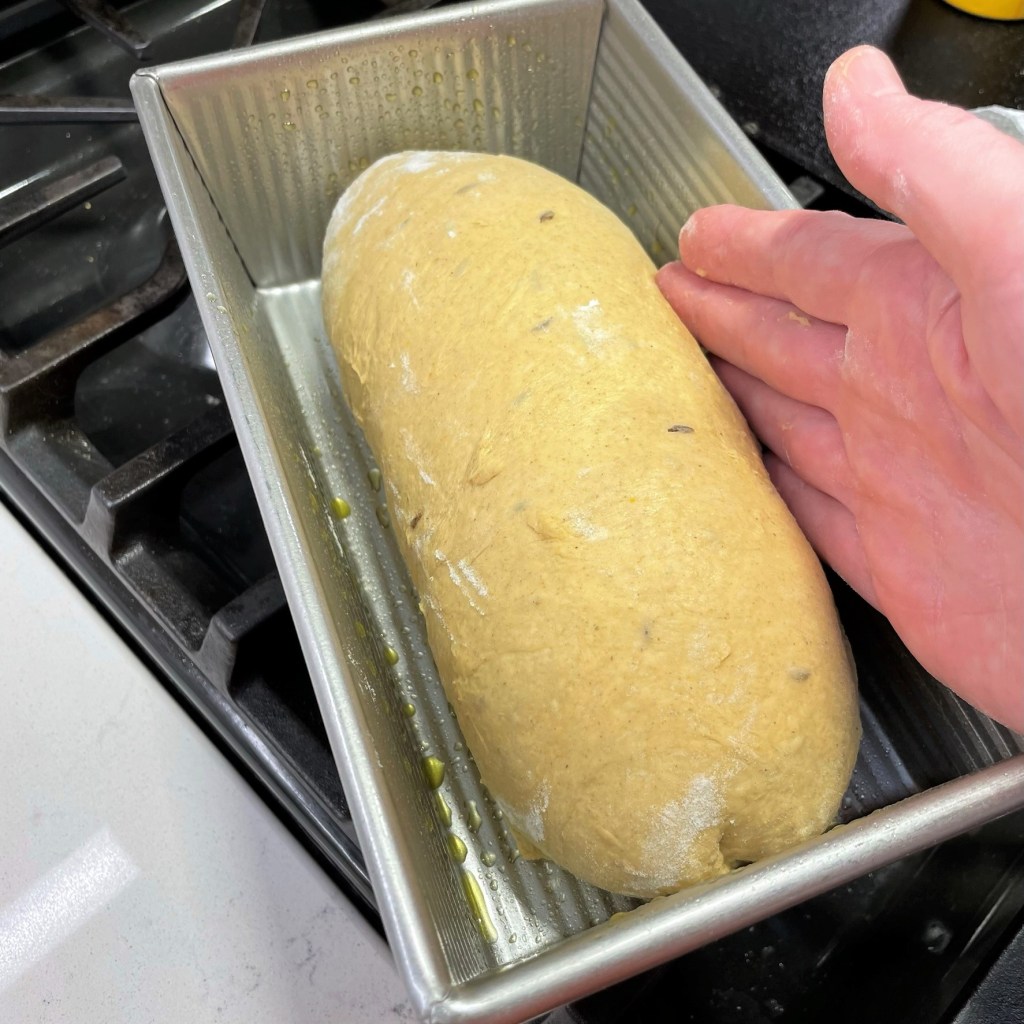
After about three hours, the dough will be puffy and stretchy. Turn it out onto a lightly floured countertop and gently press and stretch it into a long rectangle. Beginning on the short end nearest you, roll it up tightly into a cylinder shape, tucking in the sides as you go. Pinch the ends of the roll closed and seal the long edge. Place the loaf, seam side-down, into a greased (or non-stick) bread pan. Cover with plastic wrap and place the pan in a draft-free zone in your kitchen—tucked into the microwave is a good bet—until the dough rises to one inch above the rim of the pan.
The dough will be very elastic, thanks to the stretch-and-folds.
Preheat the oven to 400° F with rack in center position and another rack in the lowest part of the oven, which you’ll use for a steam pan. Fill a second, shallow baking pan with hot water and place the pan on the lowest rack while the oven preheats.
Bake 22 minutes with steam, then remove the steam pan and rotate the bread to bake more evenly. If the loaf is already brown on top, place a loose foil tent over it to prevent burning. Bake 22 minutes more, until bread is golden brown all over and internal temperature is around 205° F.
Pumpkin perfection!
Turn the finished bread out onto a cooling rack immediately and cool at least four hours—preferably longer—before cutting into it. That is, if you can stand the wait. 😊
This bread is rich with the rustic flavors of fall, and well worth the wait!
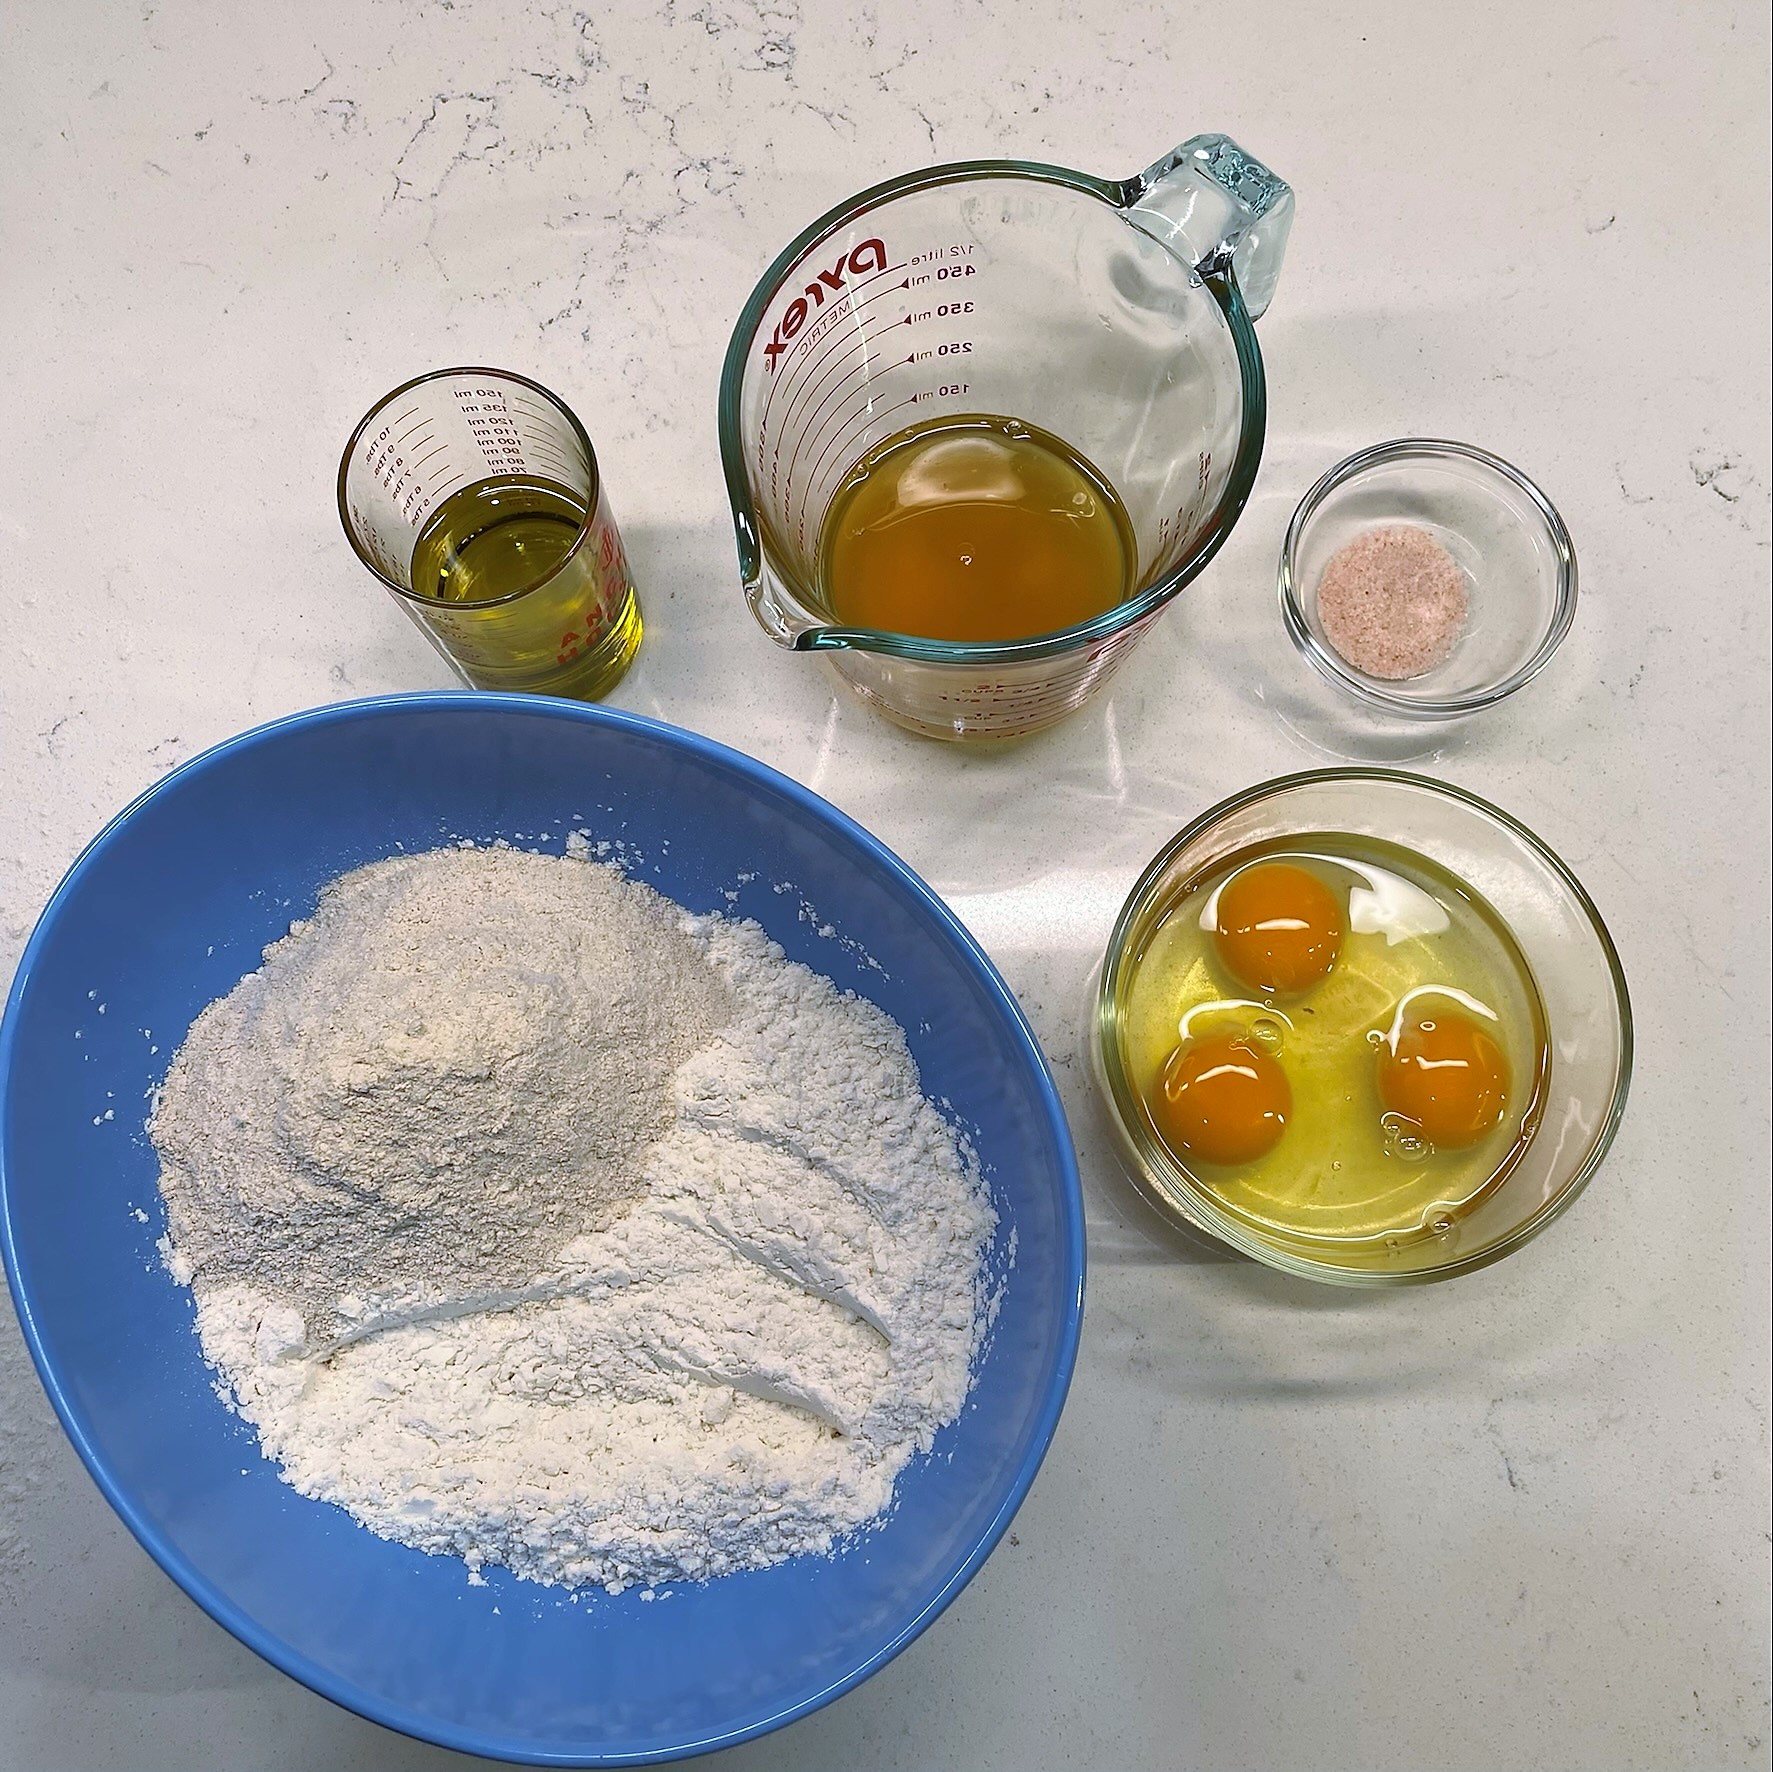
Ingredients
148 g whole milk
37 g whole dark rye flour
106 g sourdough starter, recently refreshed
100 g pureed pumpkin (NOT pie filling)
85 g filtered water, heated 30 seconds in the microwave
18 g unsulphured molasses
30 g extra virgin olive oil
285 g bread flour
60 g white whole wheat flour
28 g whole dark rye flour
2 tsp. caraway seed (optional)
1 1/4 tsp. salt
Directions
Combine milk and first amount of rye flour together in a small saucepan. Whisk them together over medium-low heat until flour is thickened into a paste-like texture. This will take about 10 minutes. Let the mixture cool to room temperature.
In a measuring cup with a pour spout, combine pumpkin, water, molasses and oil. Whisk until smooth. Combine this mixture with the sourdough starter and rye-milk paste, using the beater blade, until the mixture is evenly blended.
Whisk remaining flour ingredients together with salt and caraway seed. Add flour ingredients and continue mixing with beater blade just until the mixture comes together and pulls away from the sides of the bowl. Scrape dough from blade, cover the bowl and let it rest at least 20 minutes, up to one hour.
Attach the dough hook to the mixer and knead on medium-low speed for about 8 minutes, until dough is smooth and shiny. Transfer dough to a large, lightly oiled bowl. Cover and rest for up to three hours. Perform a few stretch-and-folds during the first hour and a half. These folds will help build strength in the dough.
When the dough has puffed considerably, shape it into a loaf and place it in a greased pan, seam side down. Cover and let rise for about two hours, until dough has risen about one inch above the rim of the pan.
During the end of the rising time, preheat oven to 400 F with rack in center position and another rack near the bottom of the oven. Prepare a shallow pan with hot water and place it on the lower shelf during preheating time. This will provide steam for the first half of baking.
Bake 22 minutes with steam, then carefully remove the steam pan. Rotate the bread pan and cover with a loose foil tent to prevent over browning. Continue to bake 22 more minutes, until bread is deep golden brown and internal temperature is in the 200-205 F range.
Turn bread out immediately onto a cooling rack and cool completely before wrapping.
It’s been a long time since we’ve talked about pizza here on Comfort du Jour, but this one deserves a mention because it is a beautiful marriage of two classic Italian foods we love in this house. Every bite had a little bit of everything we love about eggplant parm—the crispy coating, meaty eggplant and gooey cheese—and a little bit of everything we love about pizza, especially the blistery crust and tangy tomato sauce.
This mouthwatering pie also deserves a mention because its star ingredient was grown in the first genuinely successful garden we have had in several summers. I shared a lot of tomato recipes this year but didn’t get in as many raves about the beautiful Japanese eggplant we enjoyed.
Homegrown produce rarely looks perfect. This one had a funny shape because it grew against the trellis that supported the plant! 🙂
Japanese eggplant tastes virtually the same as a typical “Italian” eggplant you’d see in the supermarket or farm stands, but its long, slender shape is distinctive and makes it suitable for smaller versions of things. My husband, Les, and I nibbled on miniature eggplant parm bites as an appetizer at least twice over the summer until he finally said, “hey, why don’t we put these on a pizza?”
Well, heck, yeah!
If you saw Les’s Veal & Eggplant Parm post a couple of weeks ago, you know that we achieved the perfectly crispy, cheesy exterior on the eggplant rounds with a careful breading—first flour, then egg wash and finally a seasoned panko crumb and Parm-Romano mixture before a dunk in hot oil. We did exactly the same with these mini eggplant slices, beginning with a 20 minute salt-and-rest time.
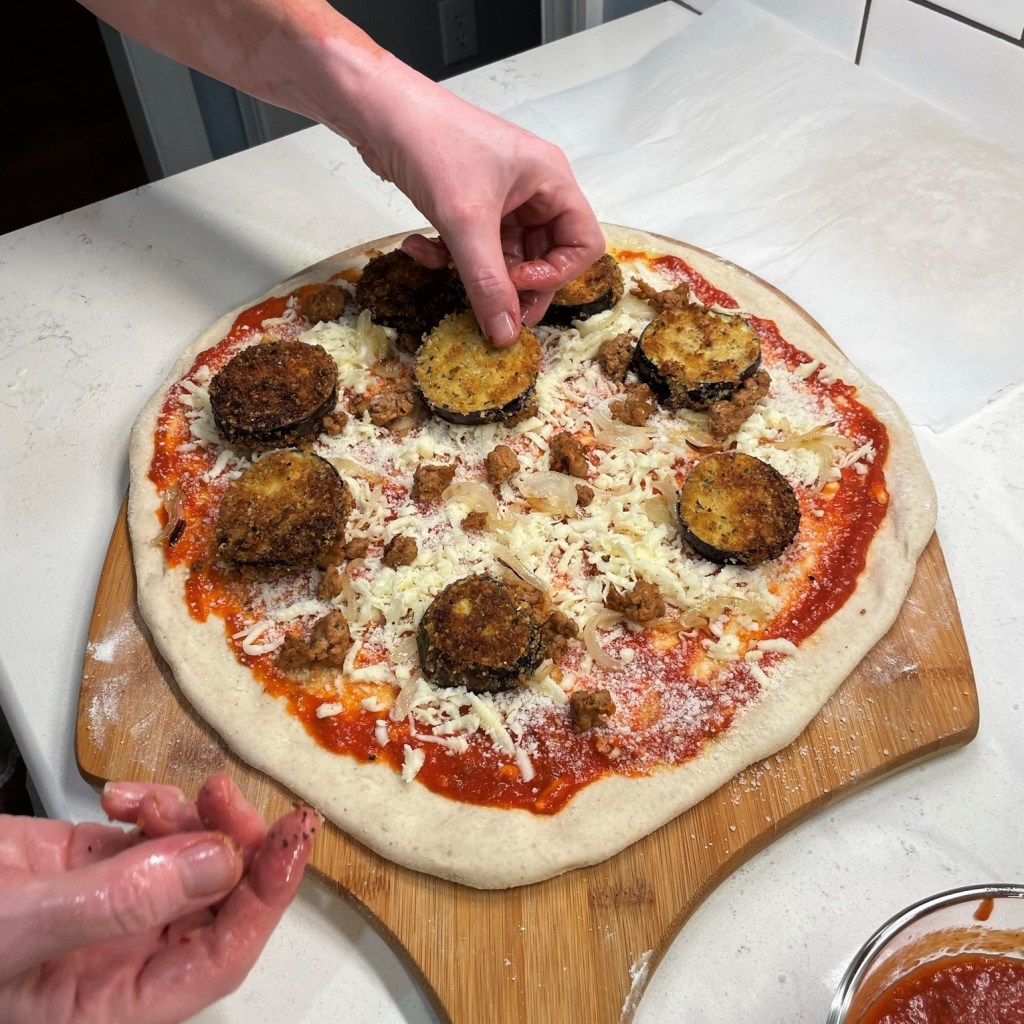
The crispy eggplant had plenty of flavor on its own, but we wanted to pair it with some complementary flavors, including soft, sauteed onions and a little bit of spicy sausage that I had left over from another recipe. I laid those down on a layer of shredded mozzarella, over our usual pizza sauce, with a few sprinkles of our Parm-Romano blend.
Then, the eggplant parm layer, and I spooned a bit more sauce right on top of each little medallion, then another good pinch of mozzarella to keep it nice and cheesy.
Into the 550° F oven on our beloved pizza steel, and six minutes later, we had this delicious Italian hybrid masterpiece!
This week, the temperatures in our area finally dipped below the frost point, and what was left of my summer garden is now history. I went out yesterday and plucked all the remaining green tomatoes (yep, we still had them coming in) and a whole bunch of jalapenos. This was a banner year for us in the garden department.
This pizza was very fun to make, and a delicious marriage of two of our favorite classic Italian comfort foods.
Ingredients
1 Japanese-style “millionaire” eggplant, sliced into 1/2-inch rounds
Kosher salt (for sweating excess moisture from the eggplant)
1/2 cup all-purpose flour, seasoned with black pepper and garlic powder
2 large eggs, beaten with a pinch of salt
1/2 cup Italian seasoned panko bread crumbs
1/4 cup Parm-Romano blend cheese (or regular, grated Parmesan)
Neutral vegetable oil, such as canola (for frying eggplant)
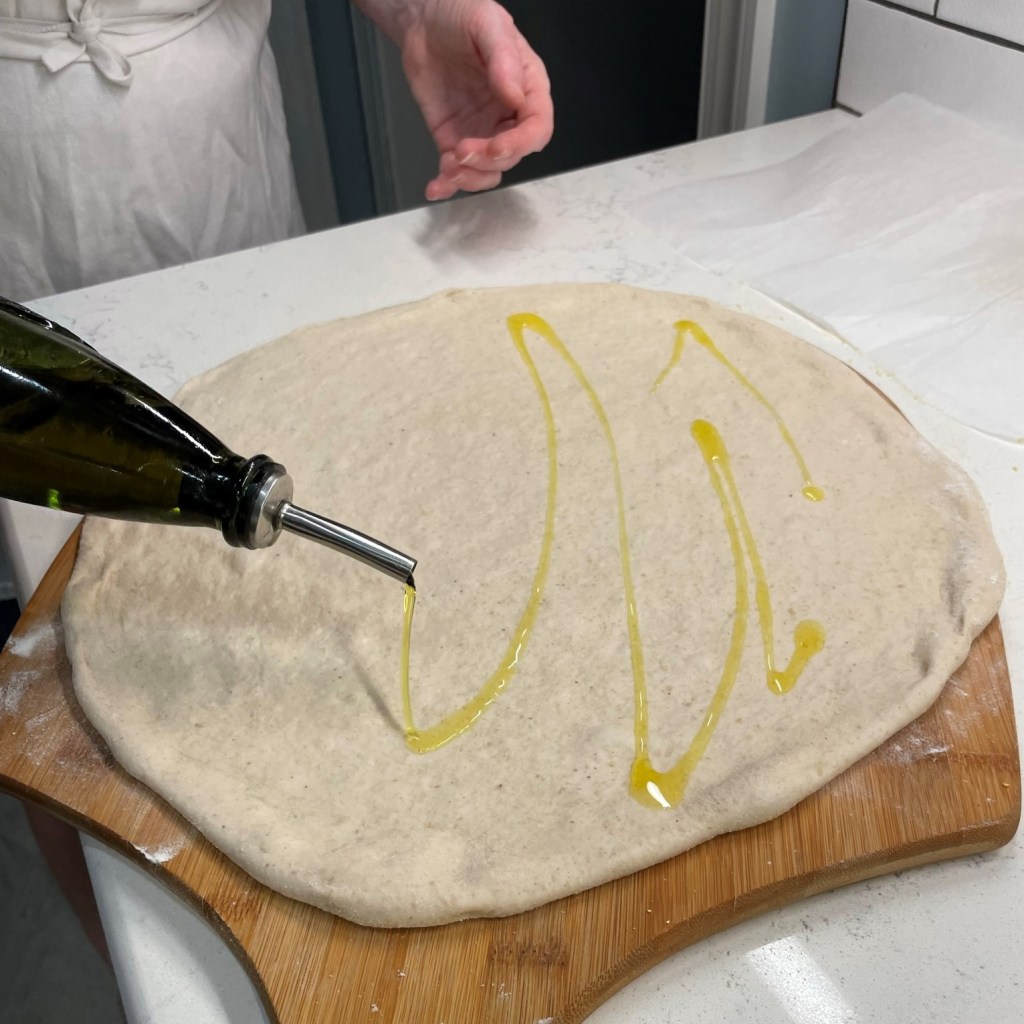
1 ball pizza dough, at room temperature
Extra virgin olive oil, for drizzling on dough
2/3 cup favorite pizza sauce, divided
1/2 small onion, sliced and sauteed until soft
1/2 cup cooked, crumbled Italian sausage
1 cup shredded mozzarella, divided
We bake all of our pizzas on a heavy pizza steel, pre-heated in a 550° F oven for one hour. If you bake on a pizza stone, use the highest temperature recommended for your stone, and adjust baking time accordingly.
Directions
Arrange the eggplant slices on layers of paper towel. Sprinkle with salt and let them rest for 20 minutes, then use clean paper towels to wipe off the salt.
Heat oil in a cast iron skillet over medium heat. Set up breading station, with one container of seasoned flour, a second with beaten eggs and a third with the panko crumbs, mixed with Parm-Romano.
Dip each eggplant slice into the flour, then shake off excess and dip into the egg. Let excess egg drip from the slices and lay them into the panko crumb mixture, pressing panko onto each side for full coverage.
Carefully place the breaded eggplant slices into the hot oil, taking care not to crowd the pan. Turn the eggplant when the first side is golden and crispy. When both sides are done, transfer the eggplant to a paper towel-lined plate to absorb excess oil.
Shape pizza dough into a 14-inch round. Drizzle with olive oil, then swirl half of the pizza sauce onto the dough. Top with 1/2 cup of the shredded mozzarella, reserving the rest for the top of the eggplant rounds. Scatter the sauteed onions and cooked sausage crumbles over the cheese layer.
Arrange the crispy eggplant rounds onto the pizza, then divide the remaining pizza sauce and mozzarella over each round.
Bake on pre-heated pizza steel for about 6 minutes, until crust edges are golden and blistered and cheese is melted and bubbling.
I know, I know—we are not exactly in “ice cream season,” but this is not an ordinary, warm weather ice cream, and I found it so interesting, I could not wait until next summer to share it!
My inspiration for this ice cream came very naturally, in the course of conversation with dear friends after a feast that concluded with one of my homemade ice cream recipes. Our friend, Charlotte, casually mentioned that she had once had a chance to try a most unusual ice cream flavor, and that she had lingering regrets over passing on that opportunity so many years earlier. It was bleu cheese ice cream, she said, and she had never stopped thinking about it.
I’ll be honest—my brain could not imagine it. Bleu cheese? In ice cream? Yikes.
But my taste buds took the wheel, reminding me that I have enjoyed many charcuterie boards with the combination of bleu cheese with fresh and dried fruits, and bleu cheese drizzled with honey, and both were fantastic! So if I’ve enjoyed bleu cheese with sweet flavors in other ways, why wouldn’t it be possible—or potentially even good—in an ice cream?
Many years ago, I made a honey and goat cheese ice cream that was fantastic, so it wasn’t out of the realm of possibility. Before long, I joined Charlotte in wondering if bleu cheese ice cream would be amazing—or just weird.
That was about two years ago, and as time rolled along, I moved on to what seemed to be more “normal” ideas for ice cream, including several that I have posted here on Comfort du Jour, but a few weeks ago, Charlotte and her partner, David, joined us for pizza night at our house and she clearly had not forgotten about this most unusual frozen treat, and she put it right out there as a challenge:
“So, what do you think about doing the bleu cheese ice cream?”
And all at once, my brain connected the dots.
The bleu cheese would need a sweet base to carry it, and I remembered the jar of specialty honey—a local one, infused with lavender—that sat mostly untouched in the back of my cabinet. Of course! That would infuse the base of my ice cream, and I would embellish it with additional dried lavender buds, steeped in the cream mixture and strained out before churning. With or without bleu cheese, I knew that would be a delightful dessert, and when I tasted the base, I let go an audible moan. It was, OMG, perfect.
Honey, lavender and more lavender!The base is sweetened condensed milk, the lavender-infused milk and heavy cream.
There could be no vanilla in this ice cream because I didn’t want a distraction from the honey or the lavender. Sweetened condensed milk would provide structure to the base, and something else would have to run through the ice cream to split the difference between the sweet, floral background and the salty, funky bits of bleu cheese. Something tart and unexpected (as if bleu cheese wasn’t unexpected enough)—yes, it would have to be balsamic vinegar!
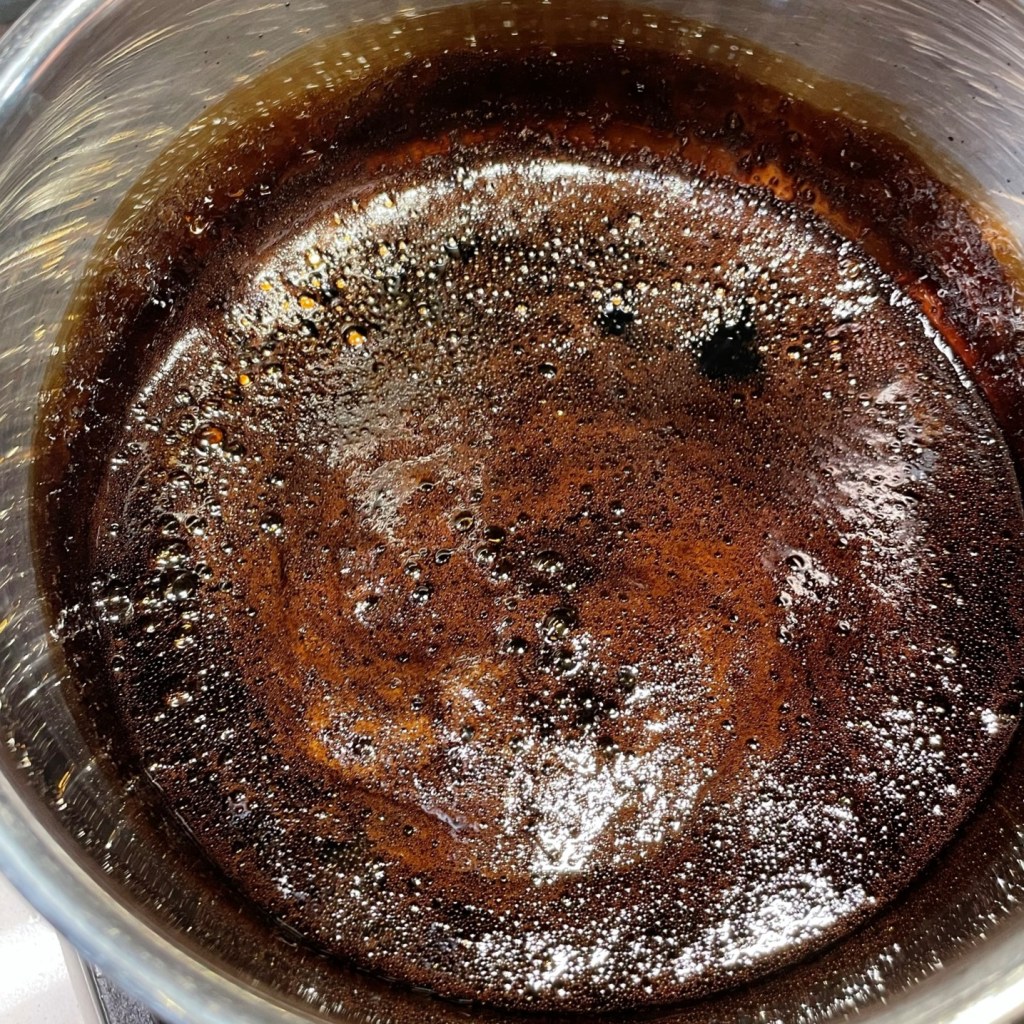
Balsamic reduction is so easy! Just vinegar, heat and time.
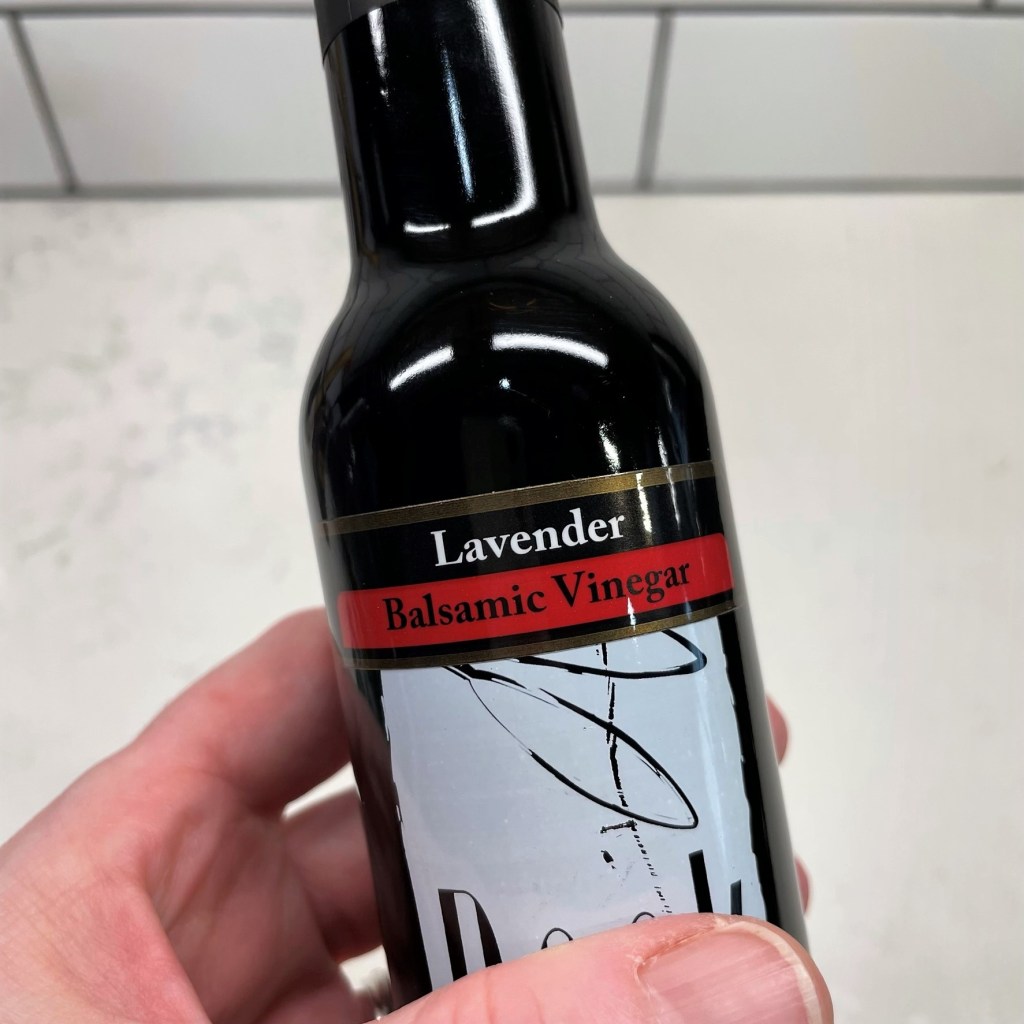
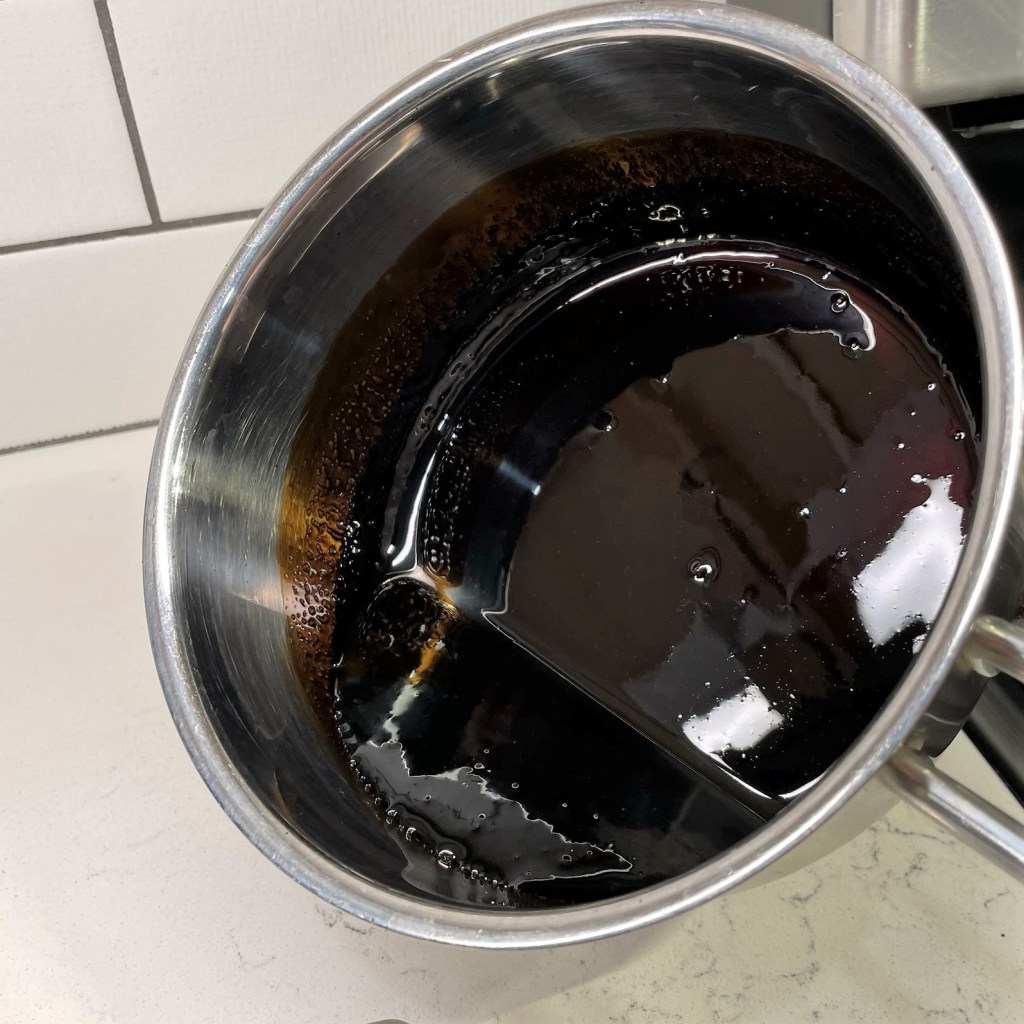
Now, if you had told me a few years ago that I would one day make ice cream with vinegar and bleu cheese, I would have decided then and there that you were completely off your rocker. But this balsamic is not ordinary vinegar—it’s a specialty product, infused with lavender. Something in my subconscious had already predicted this moment, because I found an unopened bottle of the stuff in my pantry overflow. I poured some into a pan and reduced it to a thick, syrupy consistency, which concentrated both its sweetness and its tang, and I drizzled that syrup through the churned base as a ribbon—no, more like a thread—that literally streaks through each scrumptious scoop, accentuating the positives of the warm honey, the fragrant lavender, the sweet cream and yes, the funky bleu cheese.
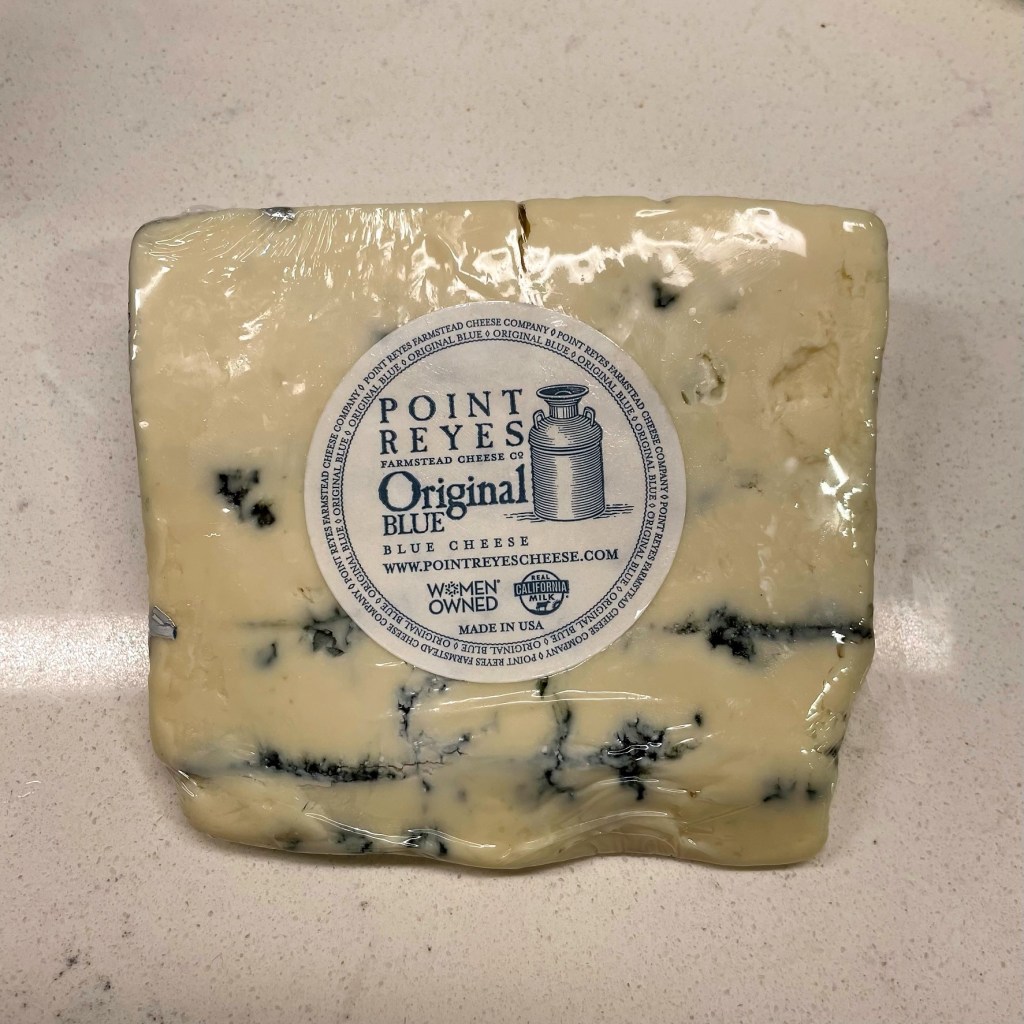
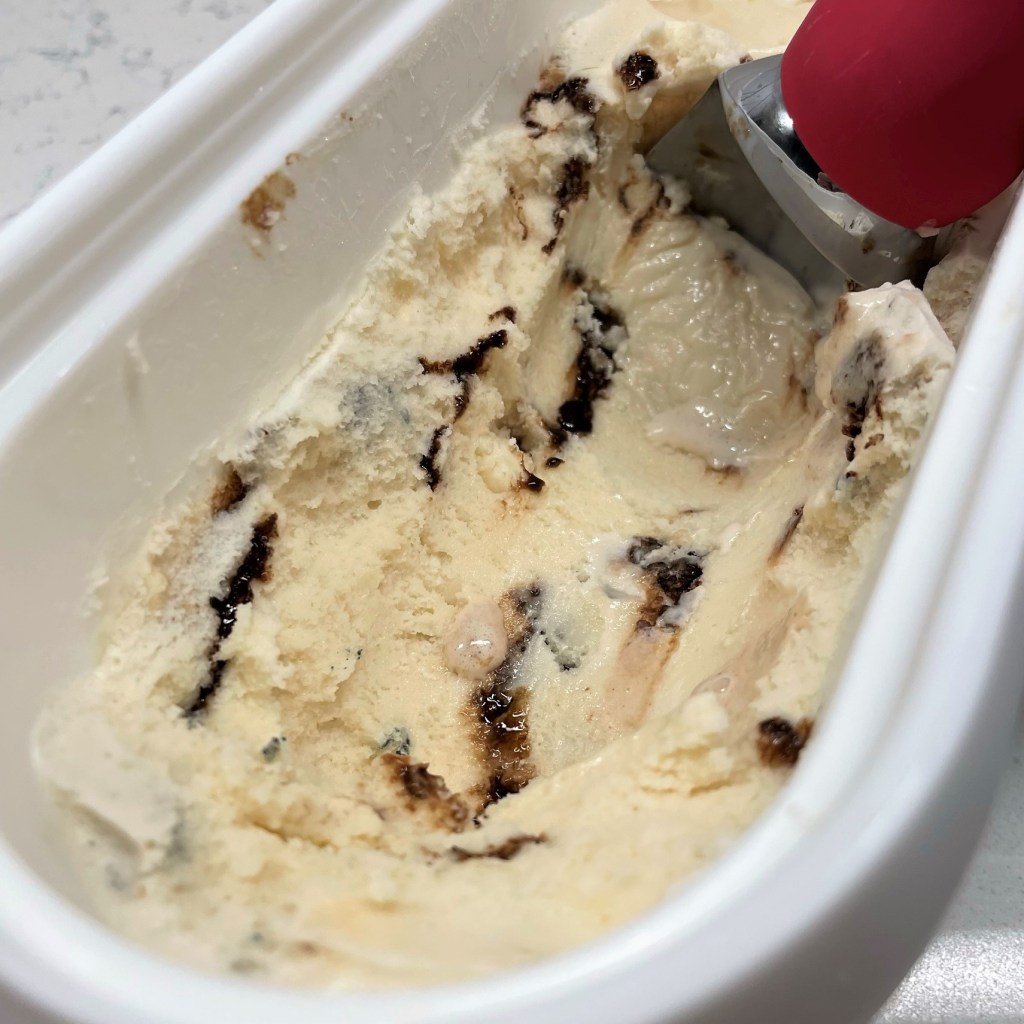
Too veiny-y, and more green than bleu.A delightful bleu cheese, but too pungent for this dessert. Just right! And women-owned, which I love!
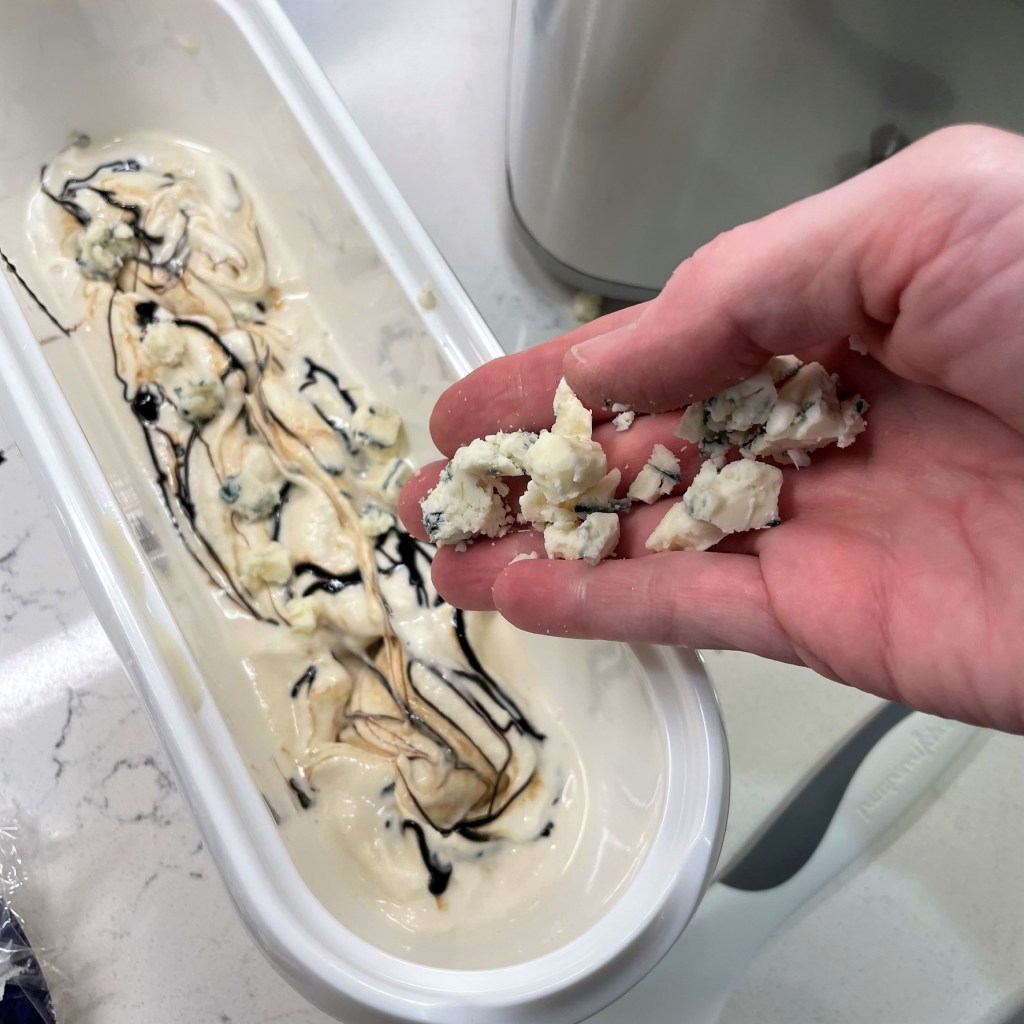
For this recipe, I recommend a bleu cheese that is not too funky or overly vein-y. I actually picked up three different bleu cheeses to determine which one was right. The first turned out to be too pungent and heavy on the funky veins— better for chunky bleu cheese dressing, and that’s exactly what I ended up making with it. The second bleu cheese had great promise, as the woman in the specialty cheese department at the market described it as being “smoked over hazelnut shells,” but in one taste, I knew that it would overwhelm the delicate lavender (It’ll be great, though, on a charcuterie tray). My third option turned out to be just right, with a classic, salty flavor and nice blue-color veins running through creamy-looking white cheese. I layered crumbles of it over the churned ice cream, which was streaked with a fine drizzle of the balsamic reduction.
I’m not so naïve to think that everyone reading this now would enjoy this ice cream because not everyone has a strong sense of adventure. Frankly, not everyone even likes bleu cheese. If you’d rather have a reduced-guilt vanilla ice cream or a homemade Cherry Garcia, I’ve got you, and you can skip over to those posts for the recipes. No judgment here. But for those of you who do have that adventurous side—you read this to the end, after all—you’re gonna be telling your friends about this one!
Charlotte was thrilled to finally have bleu cheese ice cream, and just in time for her birthday. ❤ 🙂
Not for the unadventurous, but a sophisticated combination of flavors in an elegant, indulgent ice cream.
Ingredients
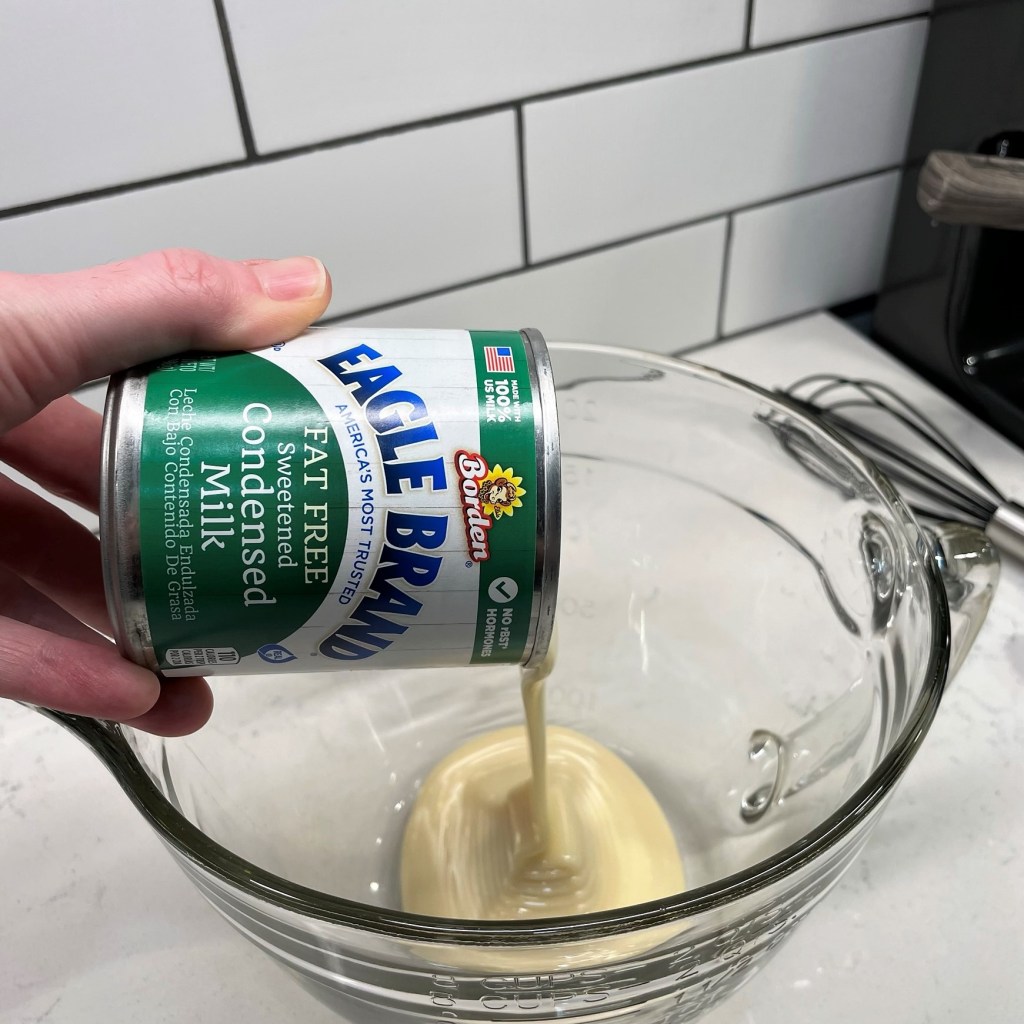
3/4 can sweetened condensed milk (about 10 ounces)
1 cup whole milk
1 1/2 cup heavy cream
1/2 cup half and half
3 Tbsp. lavender-infused honey* (see ingredient notes)
1 tsp. edible dried lavender buds*
Pinch kosher salt
1 Tbsp. vodka (optional, added at end of churning for improved texture)
1/3 cup lavender-infused balsamic vinegar*
1/3 cup mild bleu cheese crumbles*
I used Cloister brand whipped lavender honey, but there are many notable varieties available with a quick internet search. If possible, choose a honey made locally. The dried lavender buds underscored the floral essence of the honey, and I recommend them. Be sure you select lavender that is labeled as “food-grade” or “edible,” as some on the market are intended for cosmetic formulas only. The lavender-infused balsamic is another specialty ingredient that you can find at any one of the balsamic and olive oil stores that have popped up all over the U.S. If your local shop’s supplier is Veronica Foods, you’re in the right place.
Directions
Heat the milk in a small saucepan over medium-low heat. When it begins to steam around the edges, whisk in the honey to dissolve it. Add the lavender buds to the pan and turn off the heat. Allow the buds to steep until the milk has cooled to room temperature.
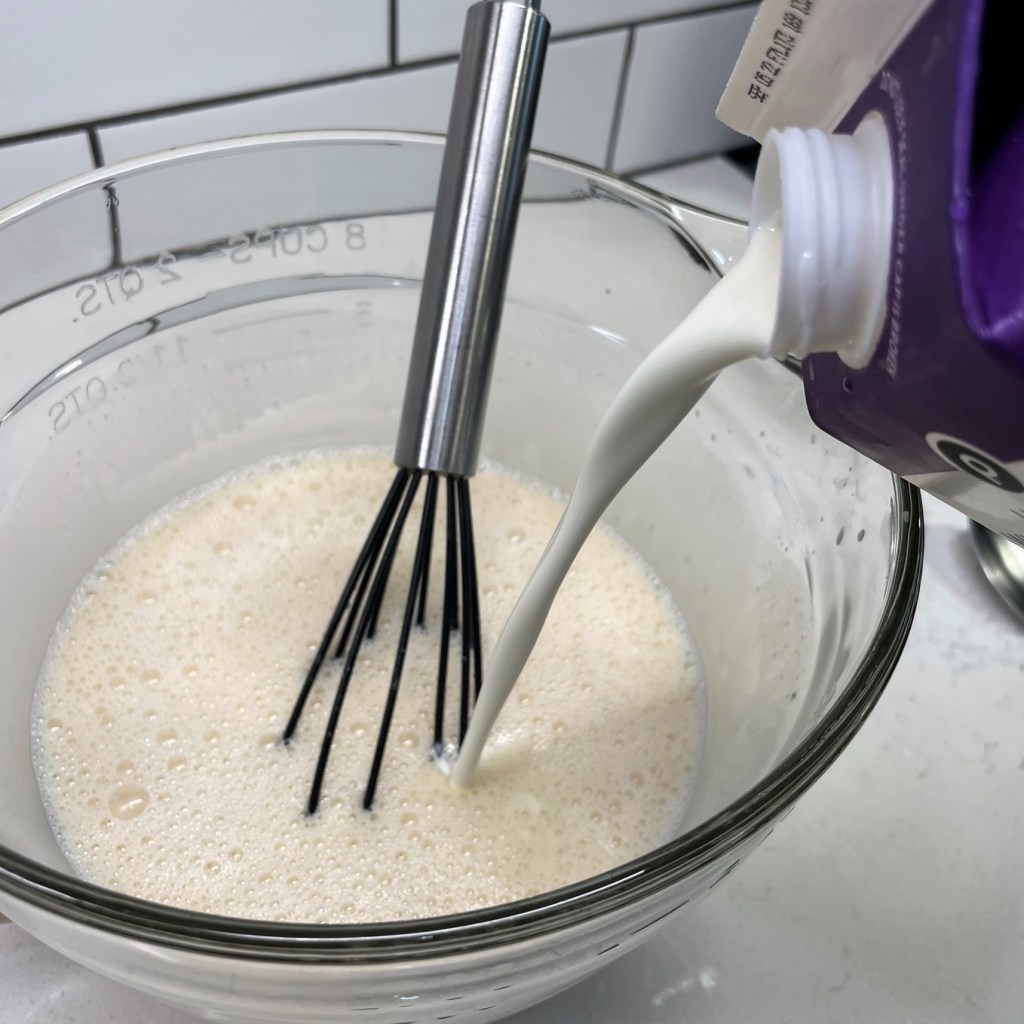
Pour 3/4 of a can of sweetened condensed milk into a pitcher bowl. Pour the lavender-infused milk through a mesh strainer into the bowl, discarding the spent lavender buds. Whisk the milks together until evenly blended. Add heavy cream and half and half, whisking to combine but taking care to not whip air bubbles into the mixture. Cover and refrigerate several hours until completely cold.
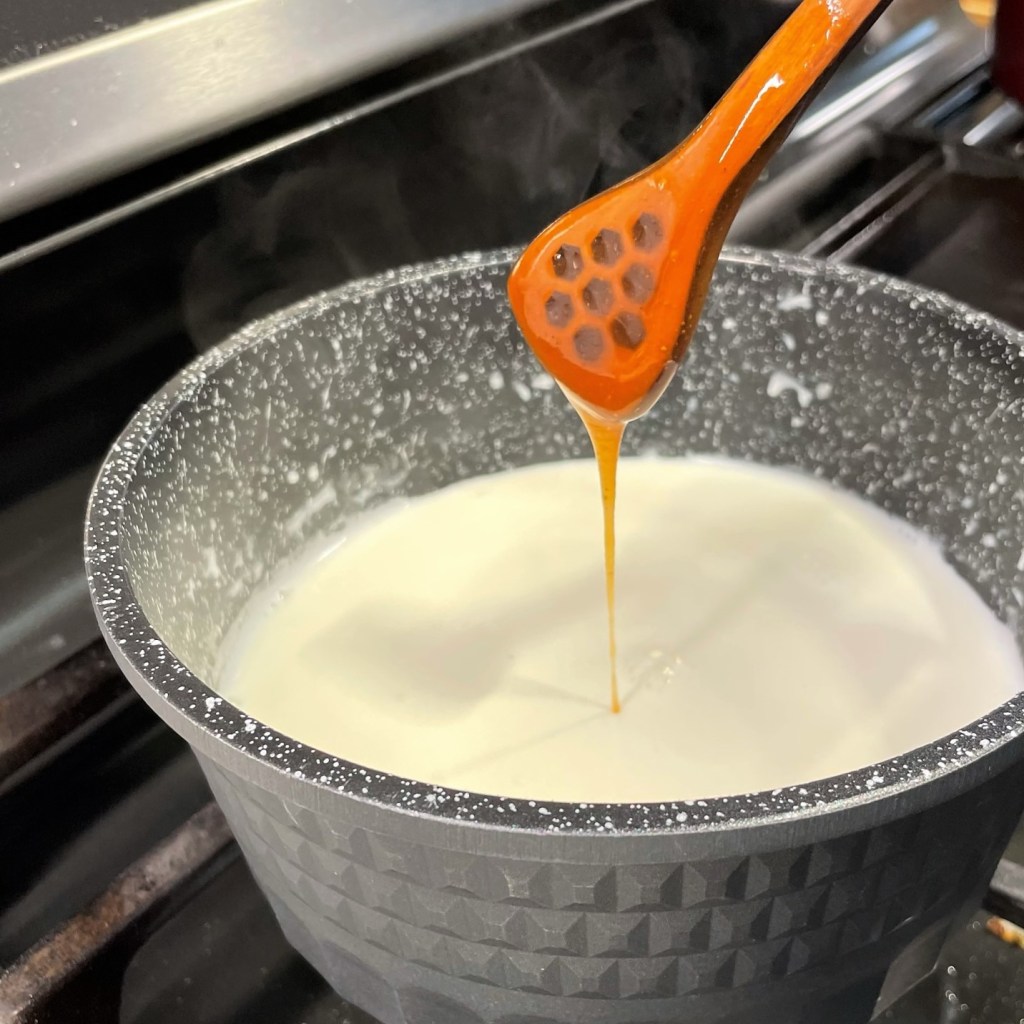
Heat the balsamic vinegar in a small saucepan over medium heat, stirring occasionally, until it reduces in volume and takes on a syrupy consistency. Cool to room temperature.
Set up ice cream machine. Gently whisk ice cream base mixture to reincorporate any ingredients that have settled. Freeze ice cream according to manufacturer’s instructions. In the final minute of churning, add vodka to ice cream and allow it the machine to churn it all the way through.
Spoon about 1/3 of frozen ice cream mixture to an insulated freezer container. Use a whisk to carefully drizzle a slight ribbon of reduced balsamic over the layer of ice cream, and use a toothpick or thin knife to gently marble the balsamic down into the ice cream, but be careful not to “muddy” it. Scatter half of the bleu cheese crumbles over the balsamic, and then repeat with another layer of ice cream, balsamic and bleu cheese. You probably won’t use all of the reduction, but you can use the rest of it to drizzle over the ice cream at serving time. Finish layer the last of the ice cream base on top. Smooth gently, cover with parchment or wax paper and freeze until firm (about 8 hours).
There is nothing earth-shattering or revelatory about beef stew in the fall, is there? The ingredients in my version are as one would expect—big chunks of vegetables, potatoes, beefy morsels and a thick, rich braising gravy—yet this is exactly the kind of comforting, satisfying, rib-sticking classic fall food I’ve been dreaming about since the temperatures first began to drop. So, even though I expect you may have your own recipe for beef stew, I’m going to share mine visually, just to make you hungry and ready to celebrate the season in comfort (you’re welcome).
Under less busy life circumstances, I might have made this one-pot stew right on the stovetop in our enamel-coated Dutch oven. But when I’m upside down with my day job, busy with home updates and wrangling our pets, I really appreciate the versatility of our slow cooker. Ours has extra options, including a setting for browning meat, so I was able to get this done without shifting ingredients from one pot to another. If your slow cooker has more simple settings, just brown the meat first in a skillet on the stove and transfer it to your slow cooker when it’s ready to braise.
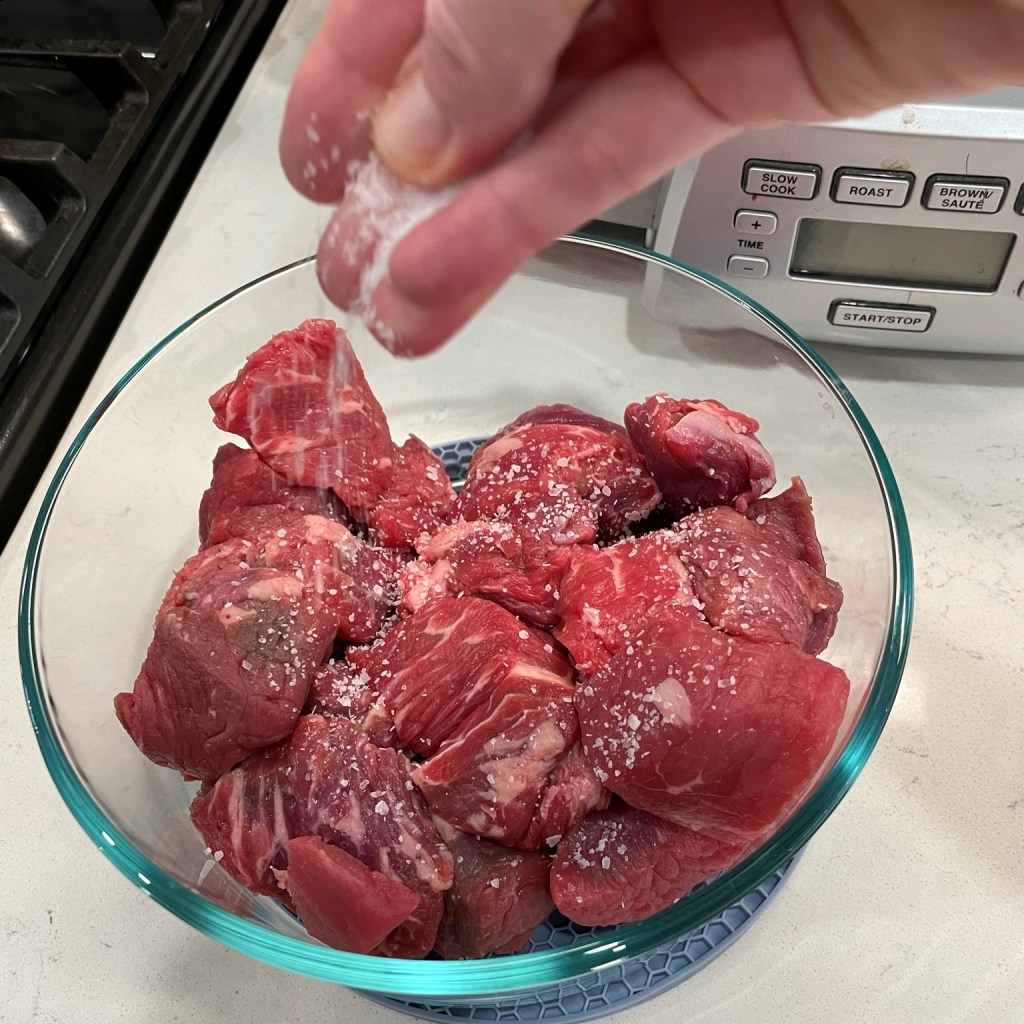
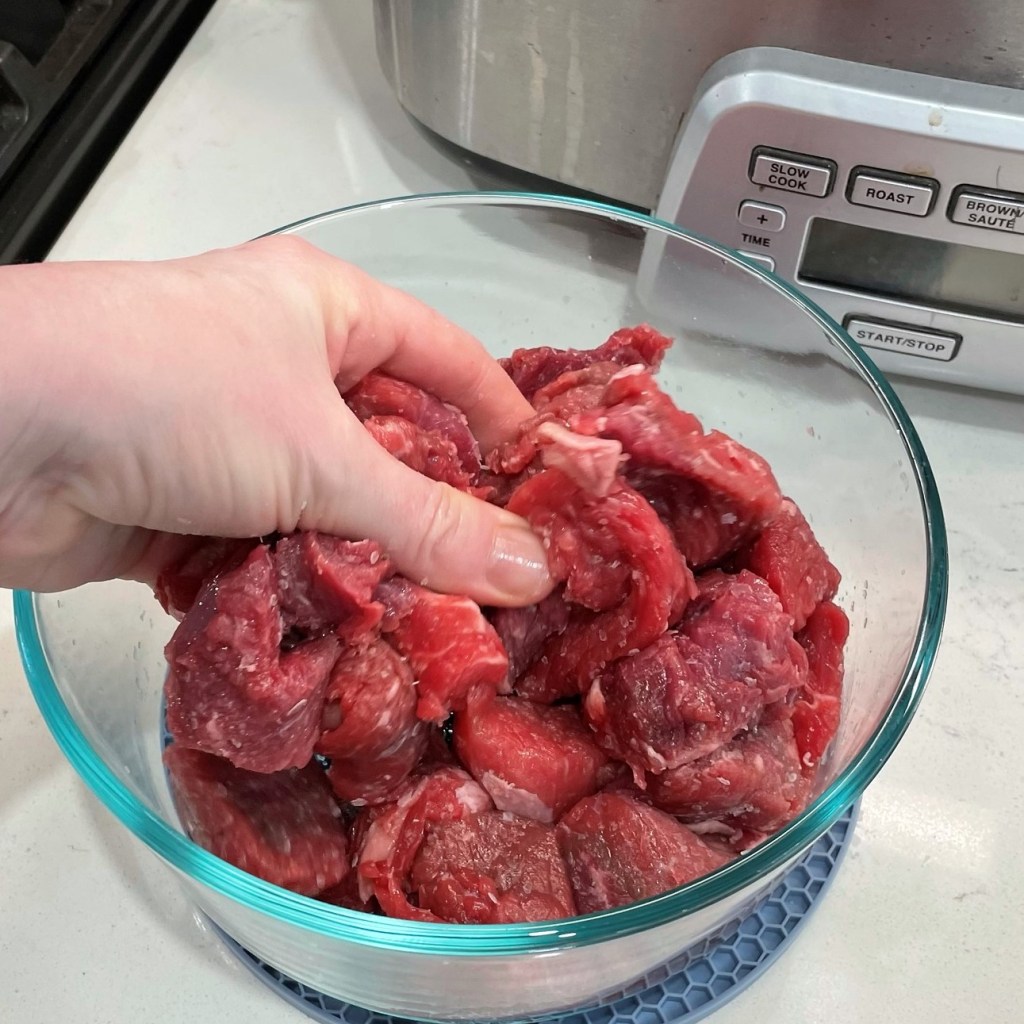
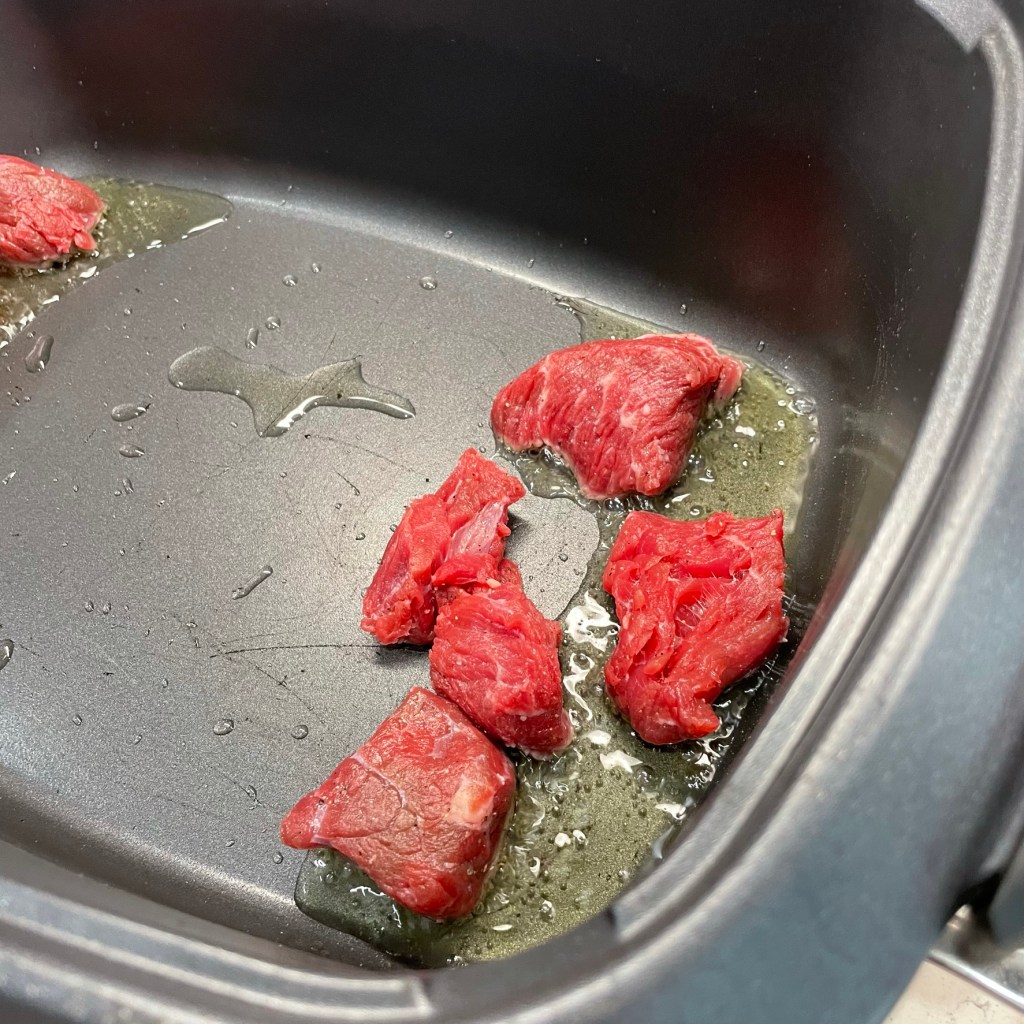
I selected grass-fed, locally raised beef for my stew. It’s easier on my digestive system than conventional beef, and we feel strongly about supporting local suppliers. Choose the best beef you can find, and a cut that is mostly lean, but with some marbling for flavor. I tossed the beef chunks with a few generous pinches of kosher salt and let them rest 15 minutes while I prepped my other ingredients and got my slow cooker up to speed.
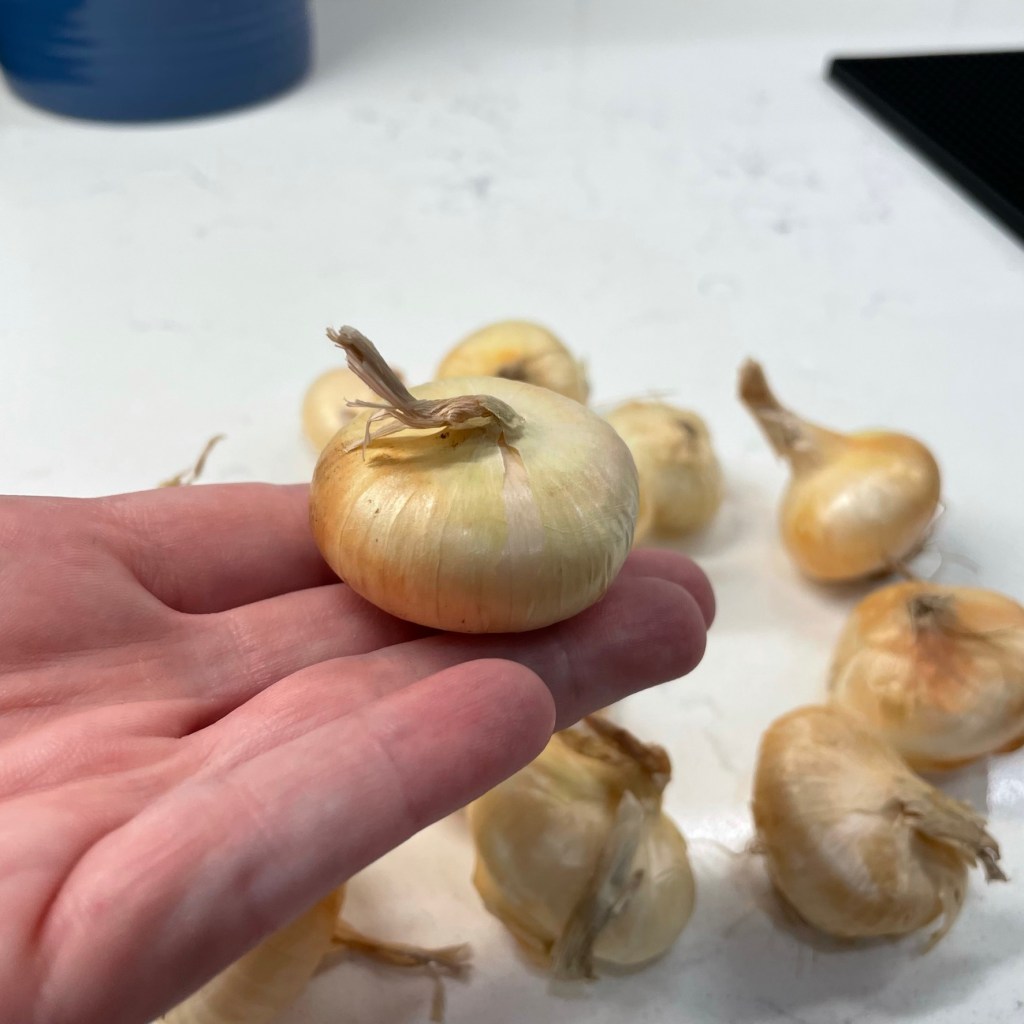
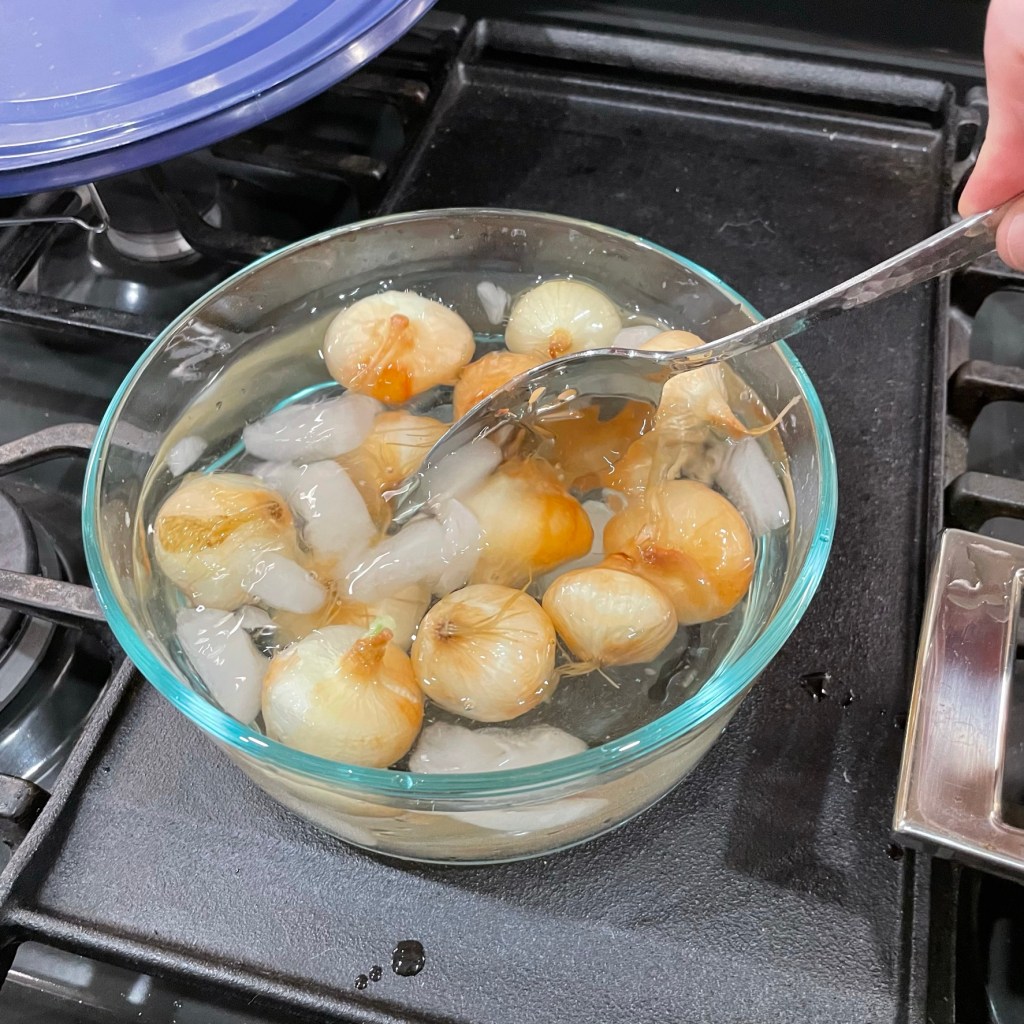
For no special reason, I decided that I would use fancy onions for my beef stew. I chose cippolini onions, which are small and squatty—kind of like miniature vidalias—and they need to be peeled before cooking. This was easy to do, with a quick bath in simmering water, then a shock in an ice bath. For the sake of uniformity, I cut my other vegetables to match the size of the cippolinis. If you wish, use a large sweet or yellow onion, cut into large chunks.
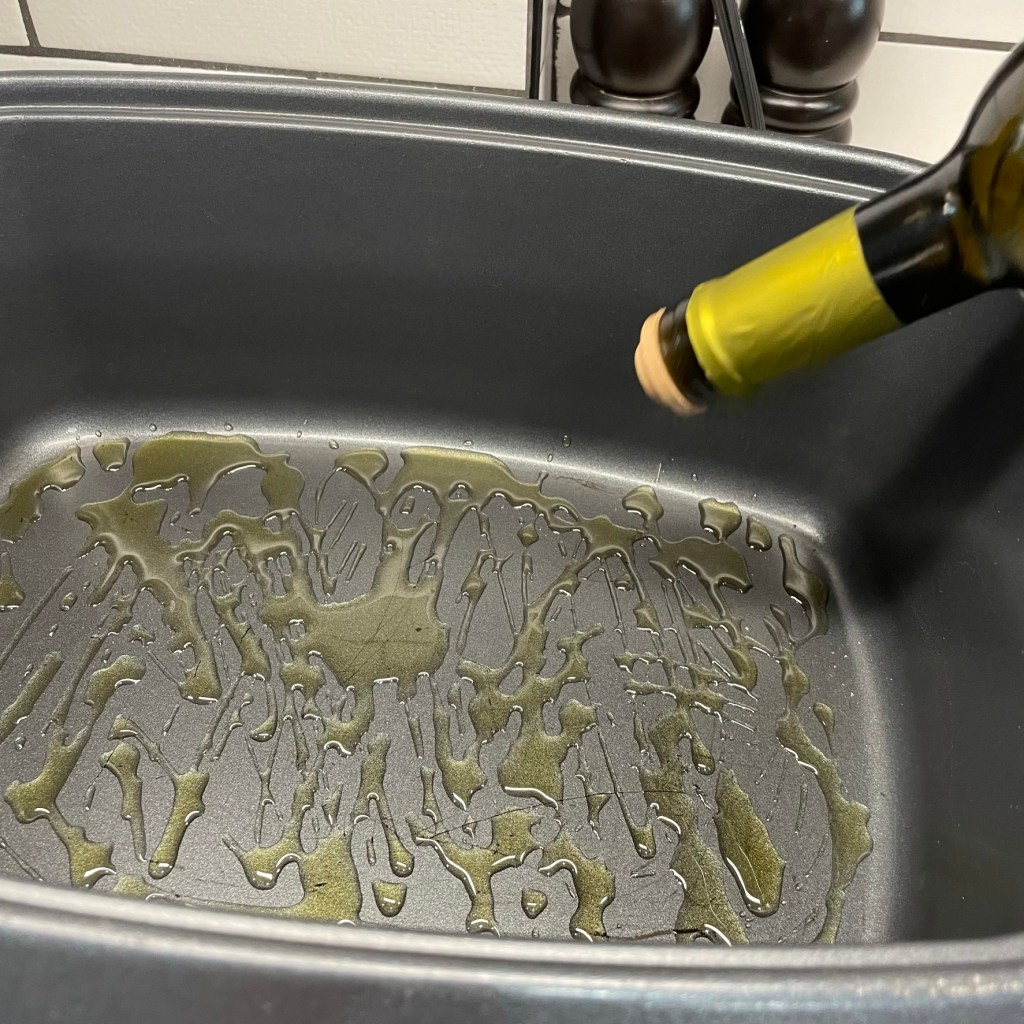
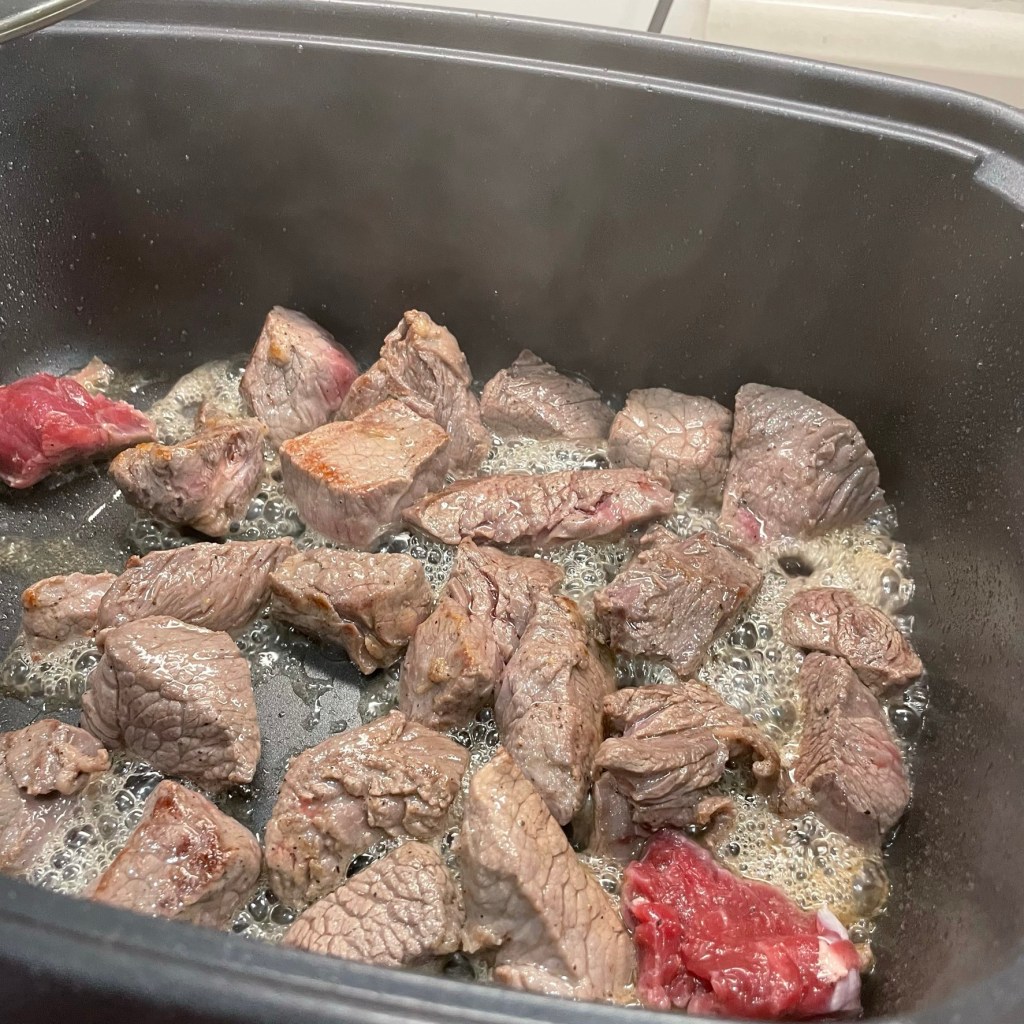
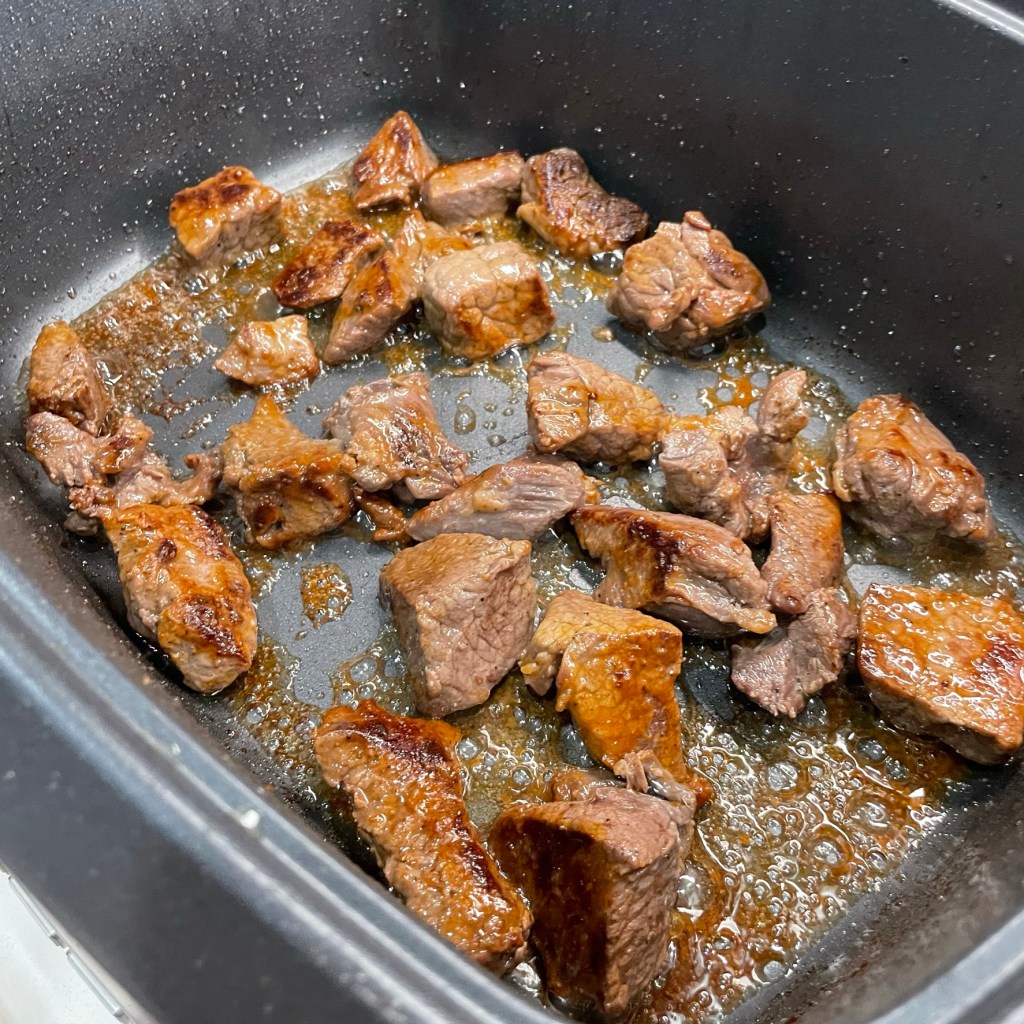
Browning the meat encourages more flavor because of something called the Maillard reaction, and if you want to geek out on food science, you could read this article to understand what that’s all about, or you could simply trust the process and brown the meat (your taste buds will thank you). When the oil in my slow cooker was ready, I added the salted meat a few pieces at a time to avoid a sudden temperature drop and turned them frequently to ensure even browning.
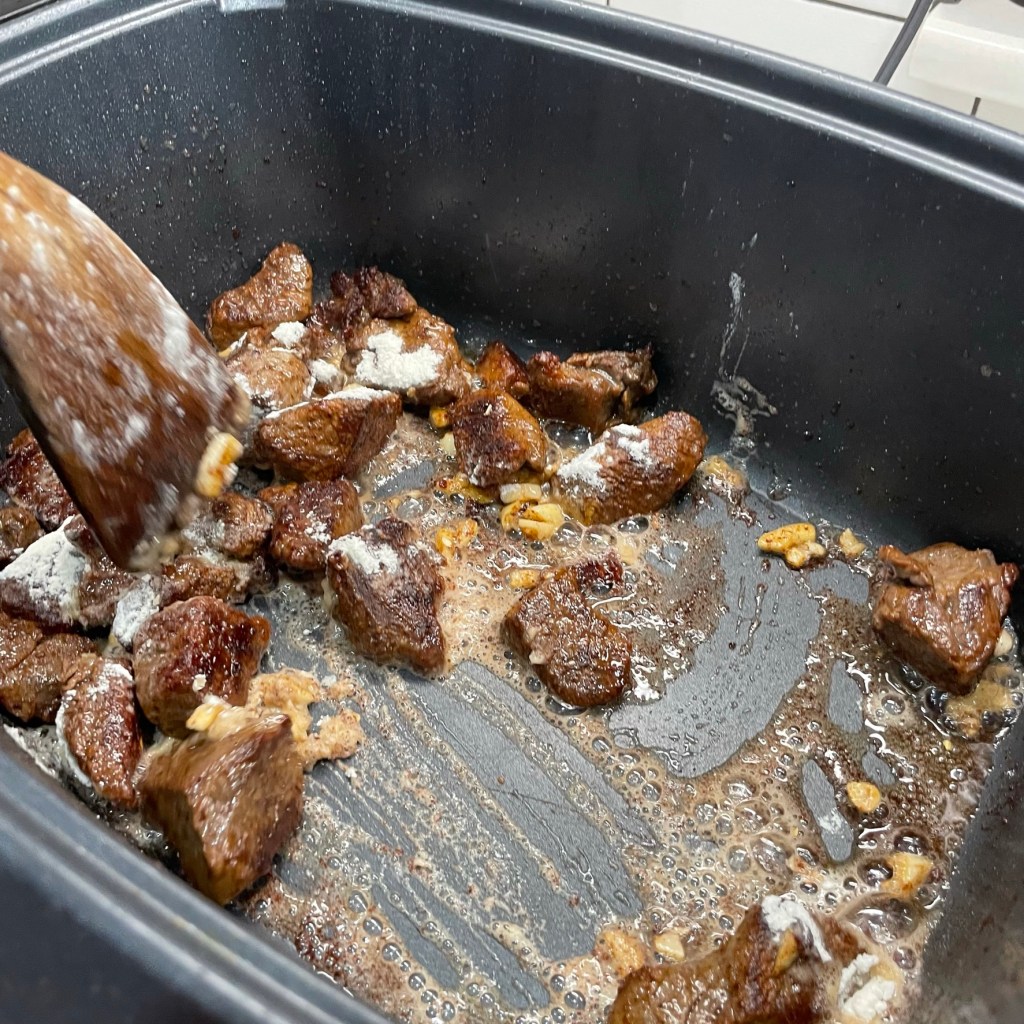
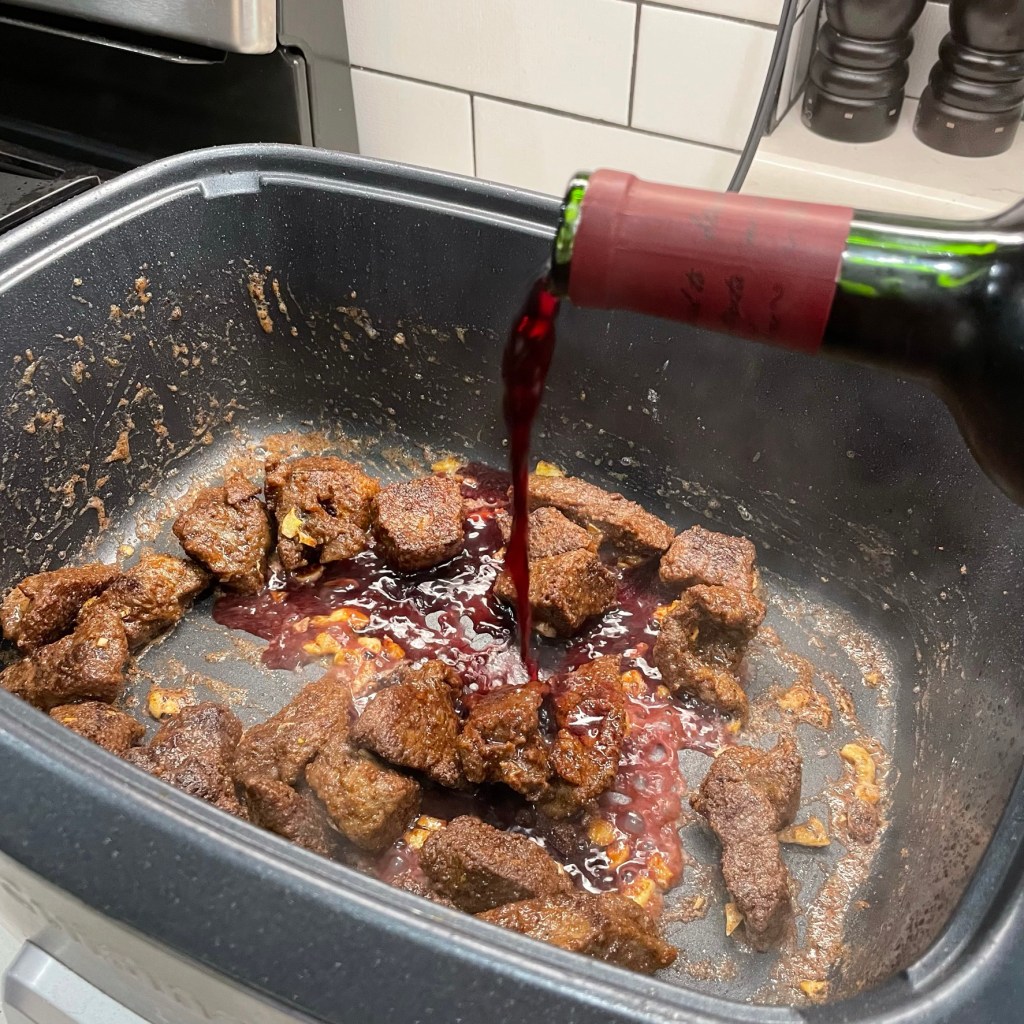
As soon as the meat was browned, I added a pat of butter and a few cloves of chopped garlic. A dusting of flour coated the meat and set the stage for gentle thickening, and then I splashed in about 1/4 cup of dry red wine. This adds depth of flavor to braising liquid, but if you don’t care for wine in food, you could substitute a splash of red wine vinegar or apple cider vinegar for a similar effect.
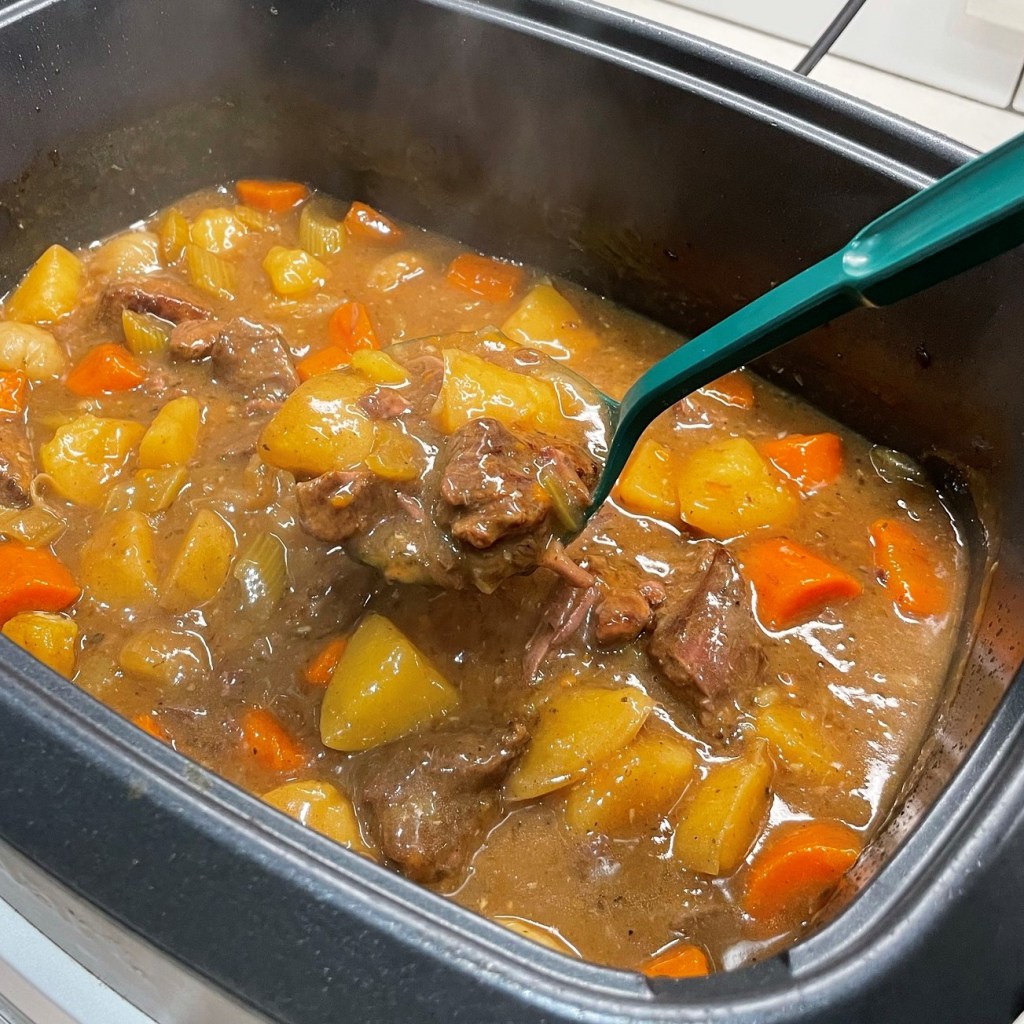
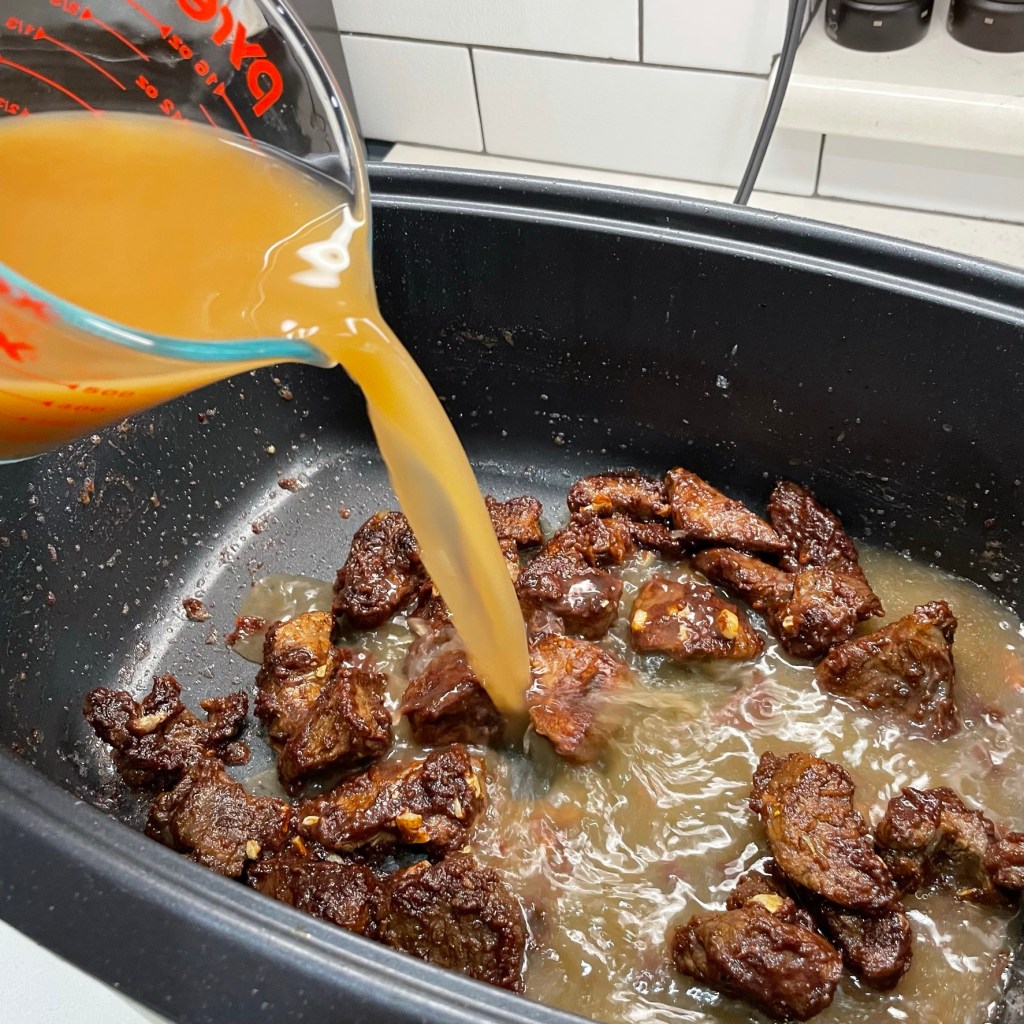
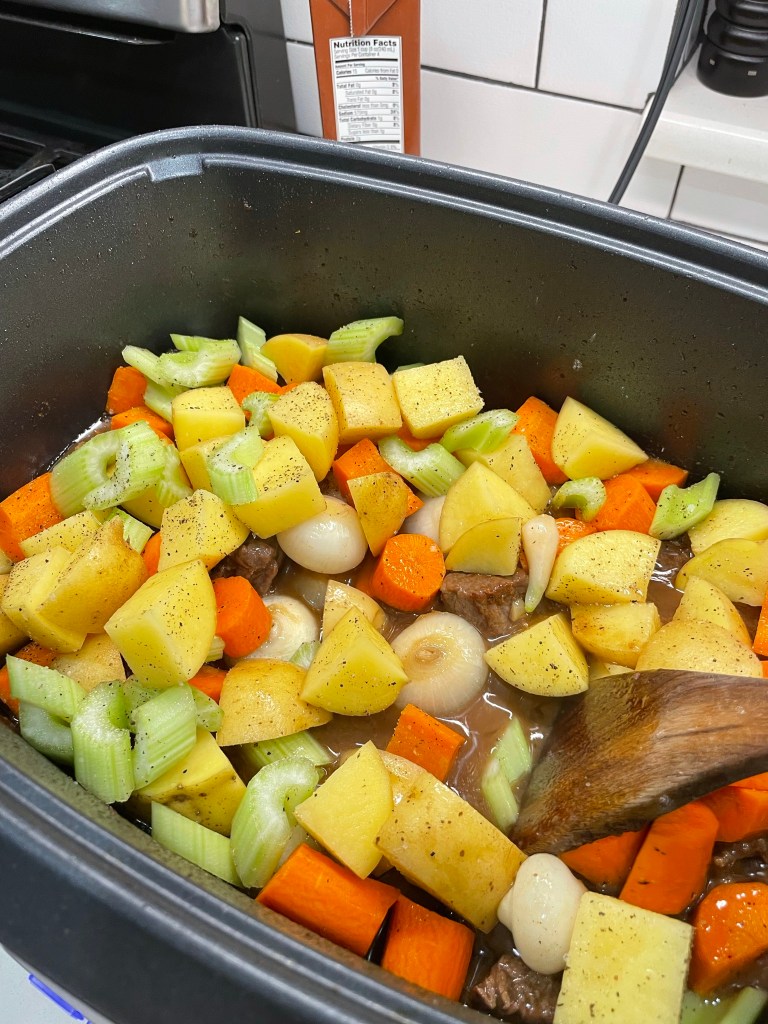
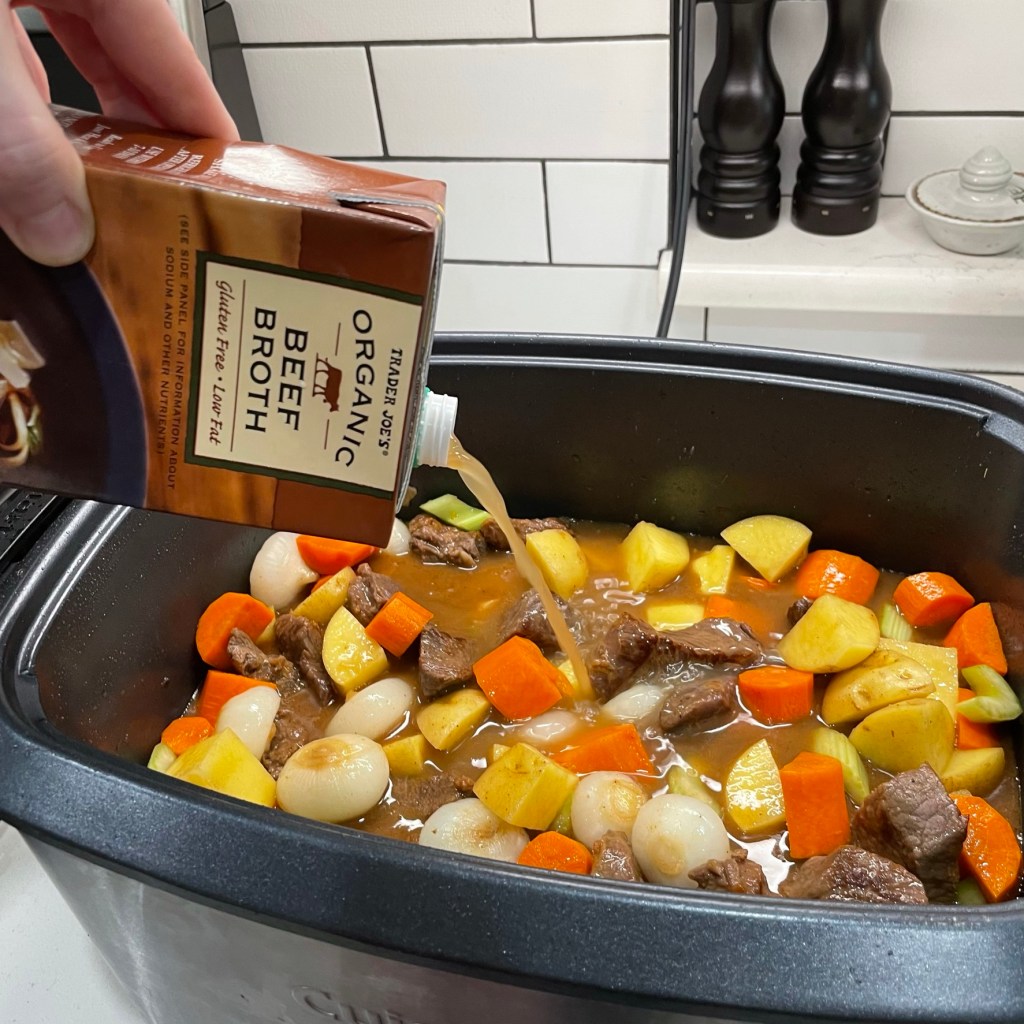
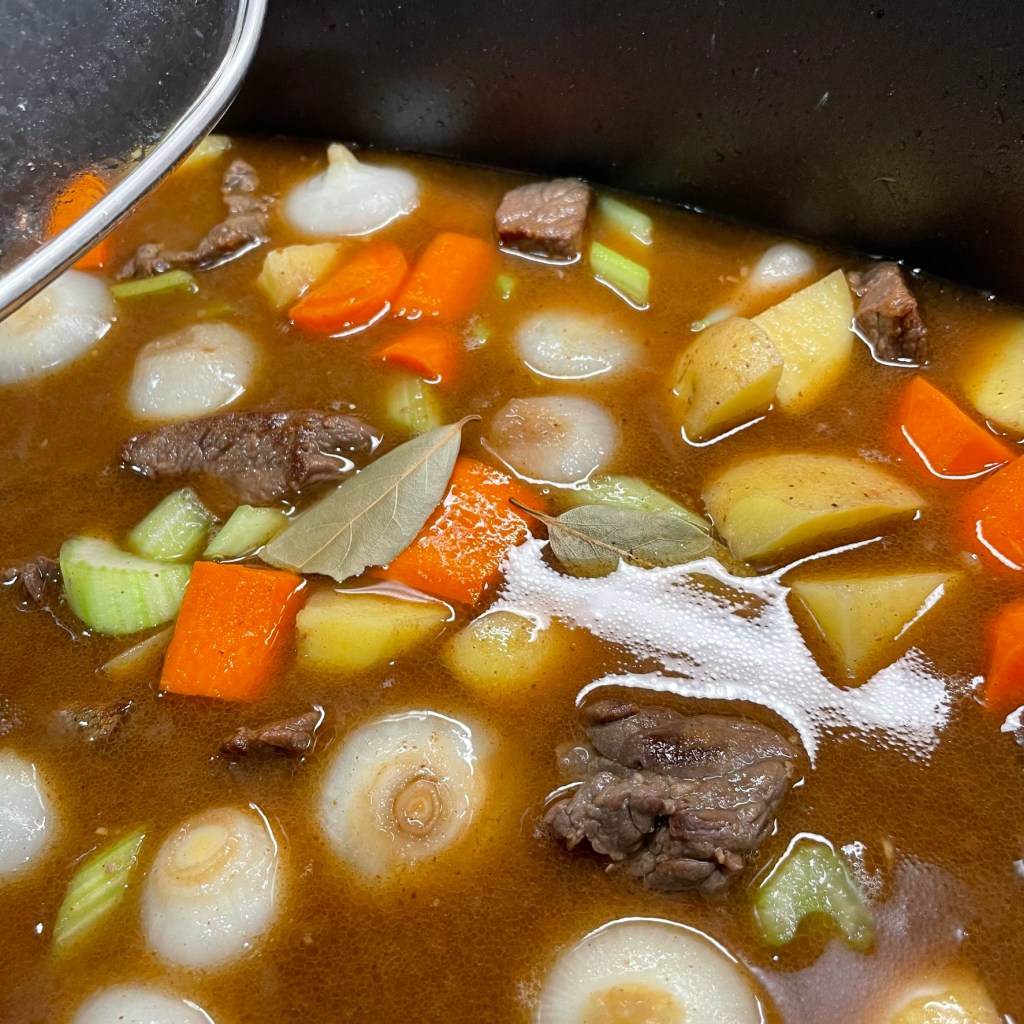
This is the time to transfer the browned meat to the slow cooker if your appliance only has heat settings, and it helps to have the cooker set on high heat setting when you do so. Add two cups of broth to the meat and stir it around until it begins to thicken slightly. Add the cut-up vegetables and cippolini onions, then add enough additional broth to just cover the cooker ingredients. Drop the temperature to low setting, add a couple of bay leaves into the stew, cover it and let it simmer for about six hours.
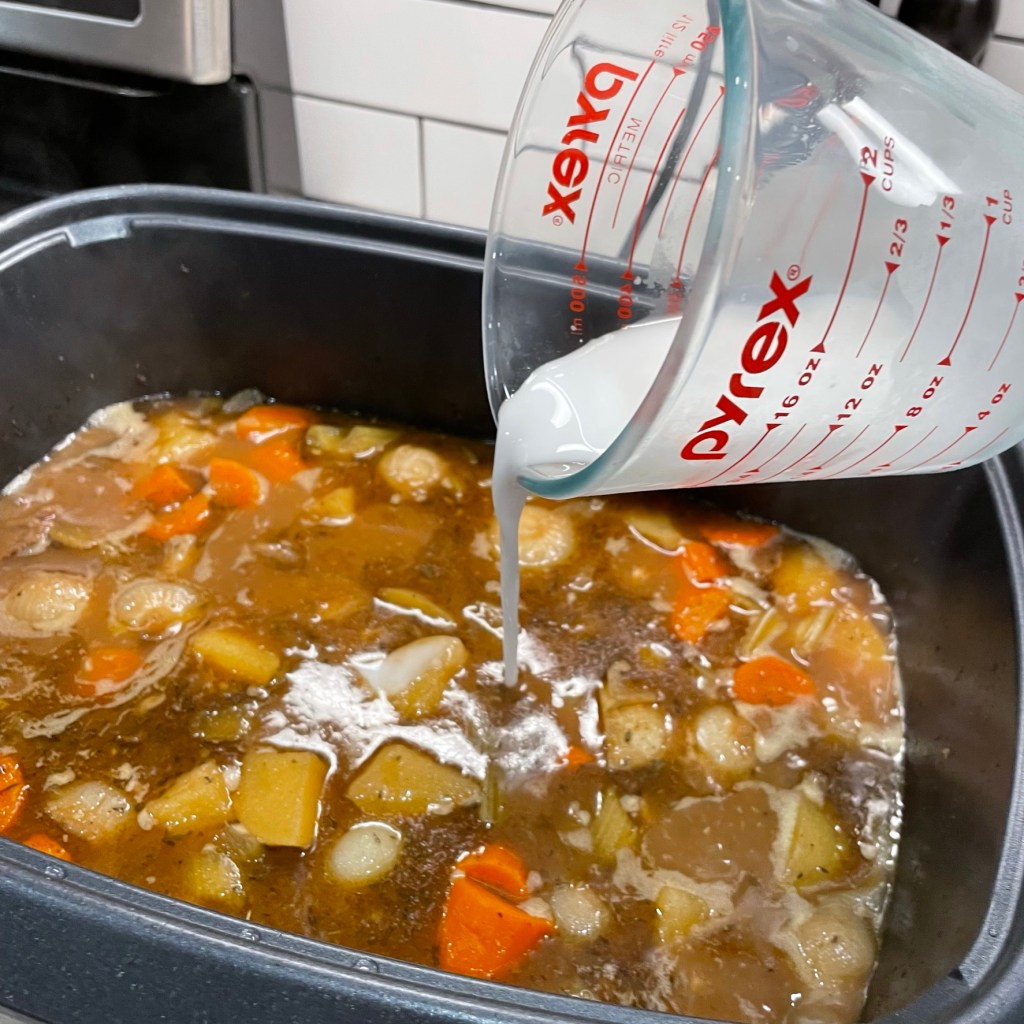
By that time, the beef will be very tender and the vegetables will be soft to the bite. If you like your stew a little thicker, a corn starch slurry will do the trick without giving an off taste. Turn the cooker heat back up to high and remove the bay leaves. Whisk together corn starch with equal amount of very cold water until smooth, and drizzle a stream of the slurry into the stew. When the braising liquid reaches a gentle boil, it will thicken to perfection.
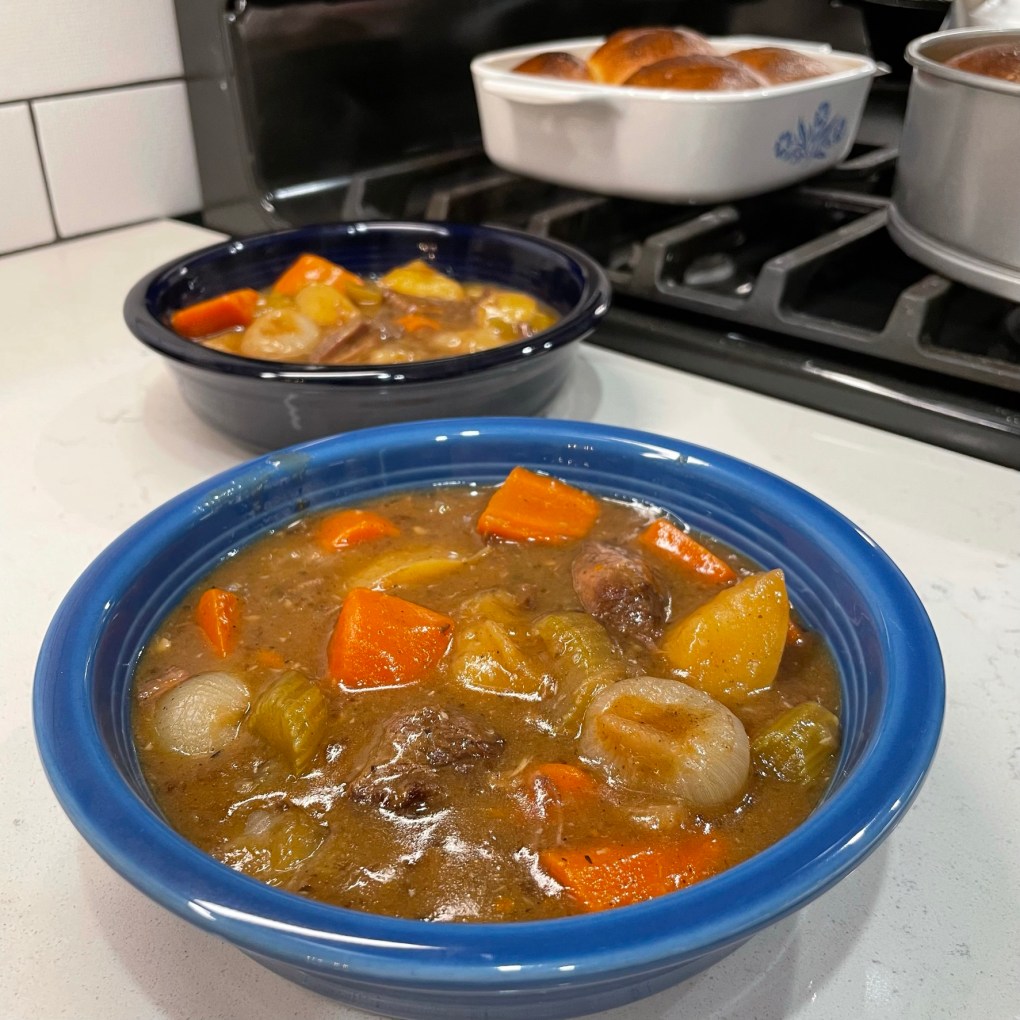
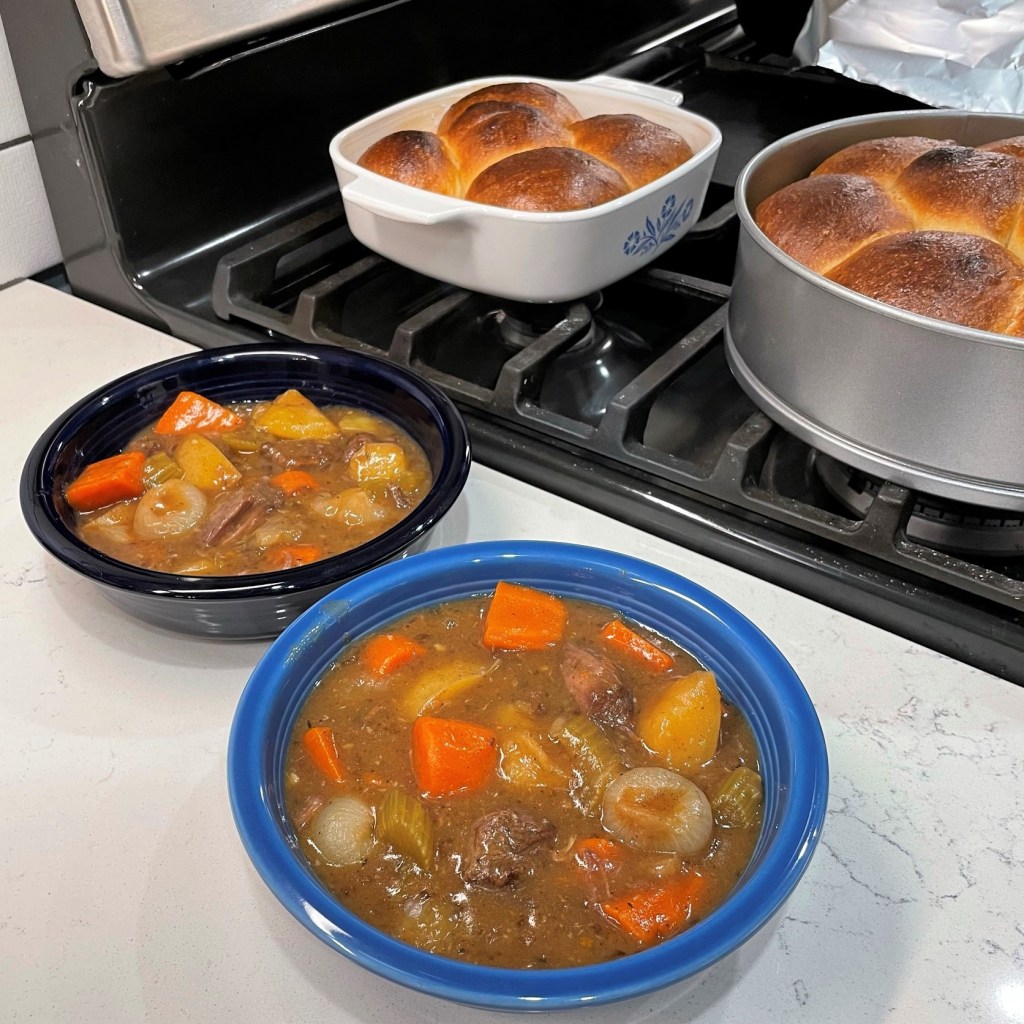
We served our beef stew with some homemade, warm-from-the-oven dinner rolls. Now, aren’t you glad it’s autumn? What comfort food have you been craving?
There's an easy way to enjoy an all-day stew without giving it all-day attention. Grab your slow cooker and let's get cooking!
Ingredients
1 1/2 pounds grass fed stewing beef, or chuck roast cut into pieces
3 Tbsp. extra virgin olive oil
4 to 5 cloves garlic, smashed and chopped
1 Tbsp. salted butter
1/4 cup all-purpose flour
1/3 cup dry red wine
4 cups low-sodium beef broth, divided
7 oz. cippolini onions, blanched for easy peeling
2 cups fresh carrot chunks
2 cups Yukon gold potato chunks (skin-on is OK)
1 cup chopped celery, ribs removed
Kosher salt and freshly ground black pepper
2 dried bay leaves
2 Tbsp. corn starch blended with 2 Tbsp. ice water (optional, for additional thickening)
Directions
Blot stewing meat (or chunks) dry with paper towels. Sprinkle with one heaping teaspoon kosher salt and black pepper to taste. Rest meat at room temperature for about 30 minutes.
Heat olive oil in a cast iron skillet, Dutch oven or slow cooker (if yours has a browning function). Brown meat on all sides over medium heat. Add garlic and cook about 2 minutes, taking care to avoid burning it. Sprinkle flour over meat and garlic, and toss until it appears absorbed onto the browned meat.
Pour wine over meat and quickly toss, scraping up any browned bits from the surface of the pot. The wine should thicken quickly, creating a sticky coating all over the meat. Transfer the meat (if using a separate pot) to the slow cooker on high setting.
Add 2 cups of the beef broth and stir meat around until the broth begins to thicken slightly. Add onions, carrots, potatoes and celery and toss to combine. Add remaining broth and stir. Place bay leaves and thyme sprigs on top of the stew mixture. Reduce slow cooker to low setting and cook for about 6 hours, until beef pieces and vegetables are tender.
If desired, stir in corn starch slurry during the last 30 minutes of cooking time (use high heat). Serve with crusty rolls to sop up all the delicious gravy!
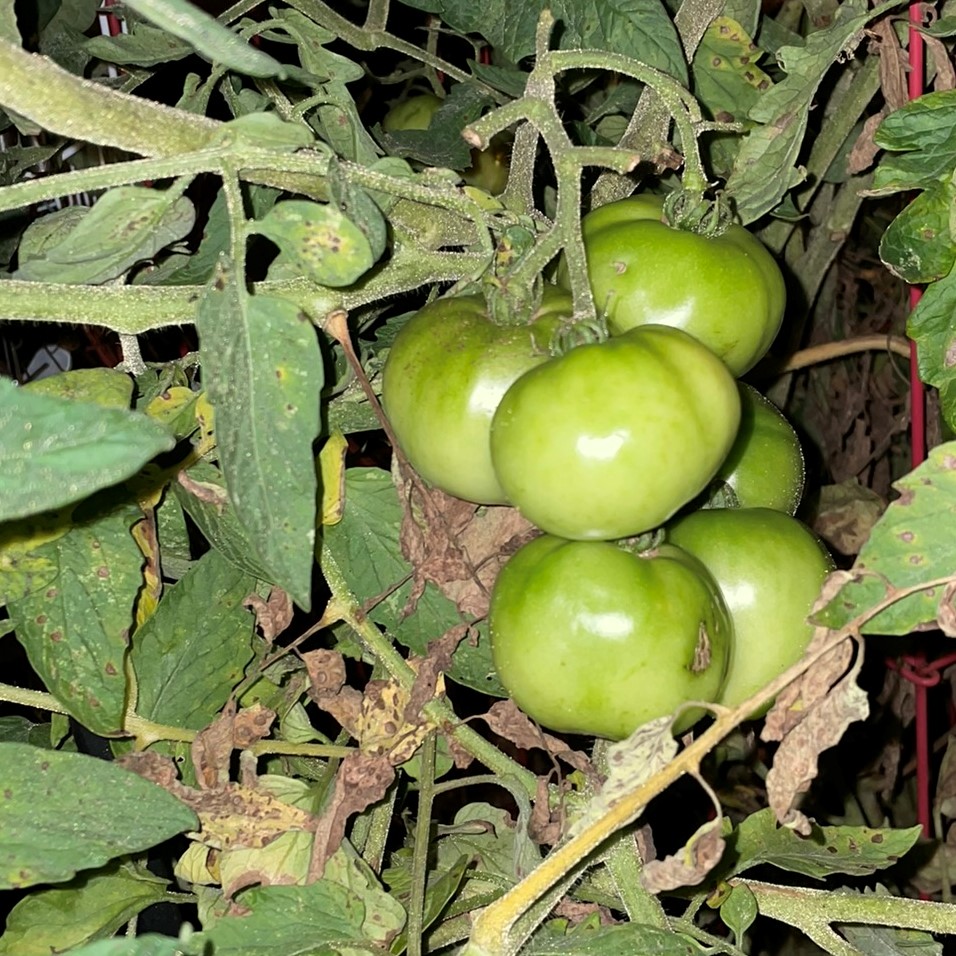
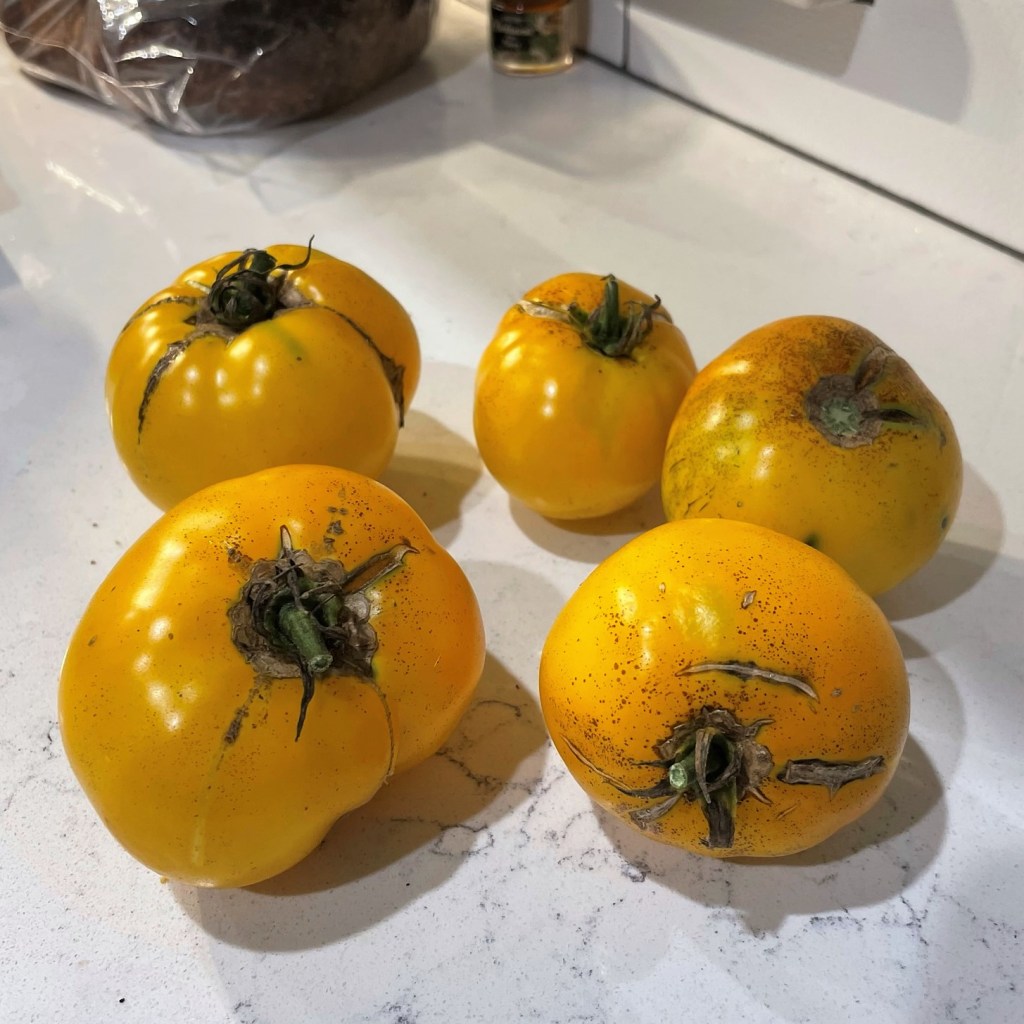
It was almost unbelievable to me, when I walked out toward our shriveled-up raised bed garden to begin breaking down the zucchini trellis and found—get this—new tomatoes!!!
It’s true that Southern summers tend to run a bit longer than some other regions, but I didn’t expect a tomato comeback, especially in the last days of September and given that our nighttime temperatures are sinking into the 40s. Mother Nature is something else though, isn’t she?
I first spotted these at night, and could hardly believe my eyes!Not as pretty as their summer predecessors, but still!I’m not worried about wrinkles or blemishes for this recipe.
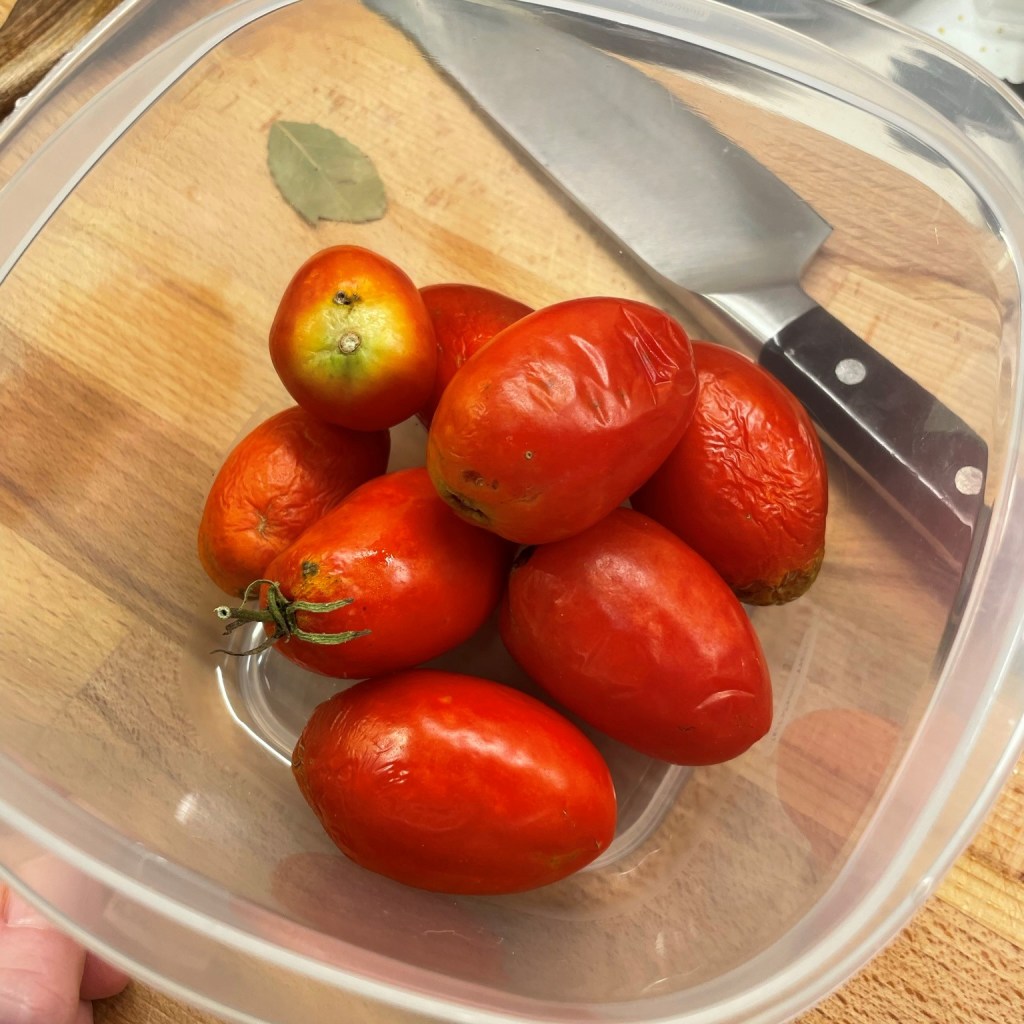
In addition to the lemon boy heirlooms (ripe and otherwise), we also had a bumper crop of a handful of Romas and though they didn’t look as pretty as the ones we enjoyed earlier in the summer, they were perfectly ripe and had a great flavor. I knew they’d be an excellent ingredient for homemade tomato bisque, which happens to be my husband’s favorite.
To be clear, you don’t literally need all day to make this bisque; I just needed something to do over the weekend, when our area was awash with the remnants of Hurricane Ian. Rather than making soup to freeze for a rainy day, I spent an entire rainy day making the soup we’d enjoy later. If you have half an hour, and don’t need to cook down fresh tomatoes, you could whip up this soup and use the simmering time to make a grilled cheese sandwich (our favorite side for this soup).
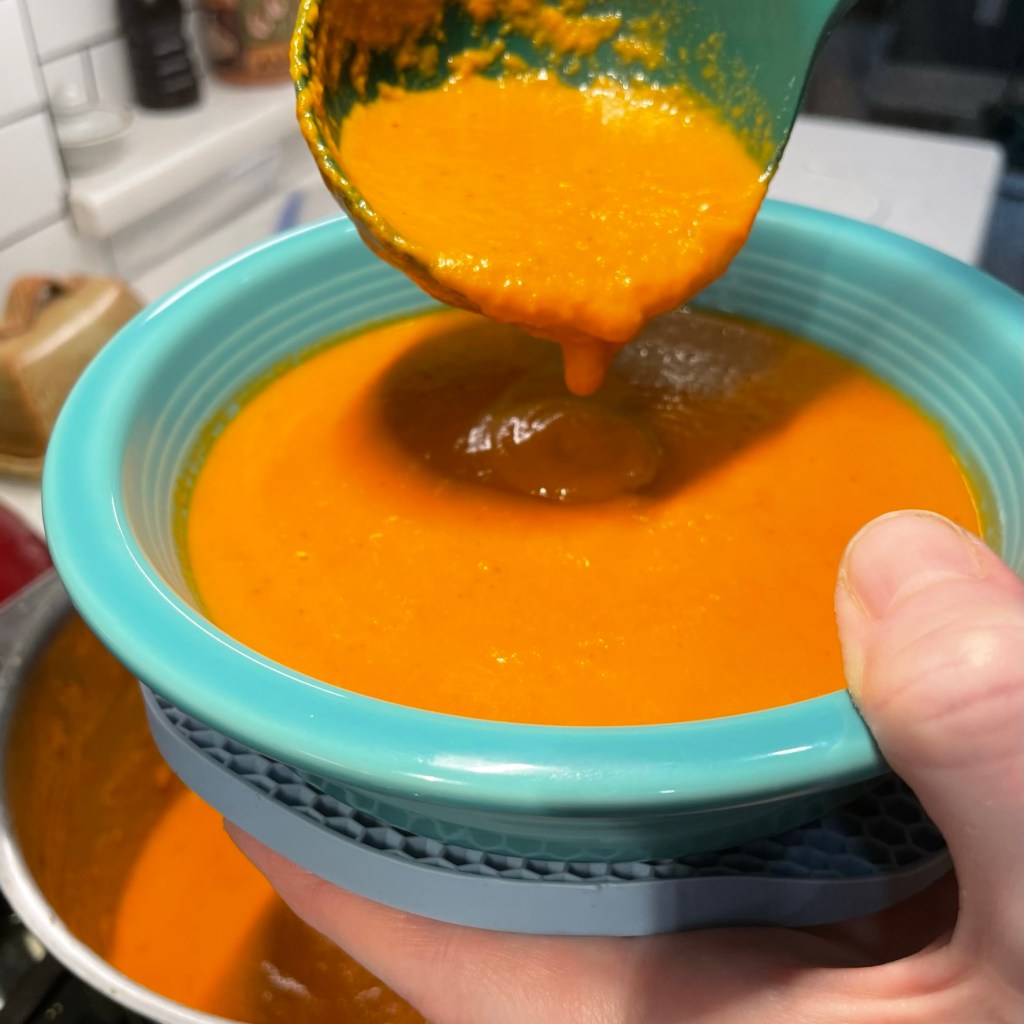
This is what a bowlful of comfort looks like.
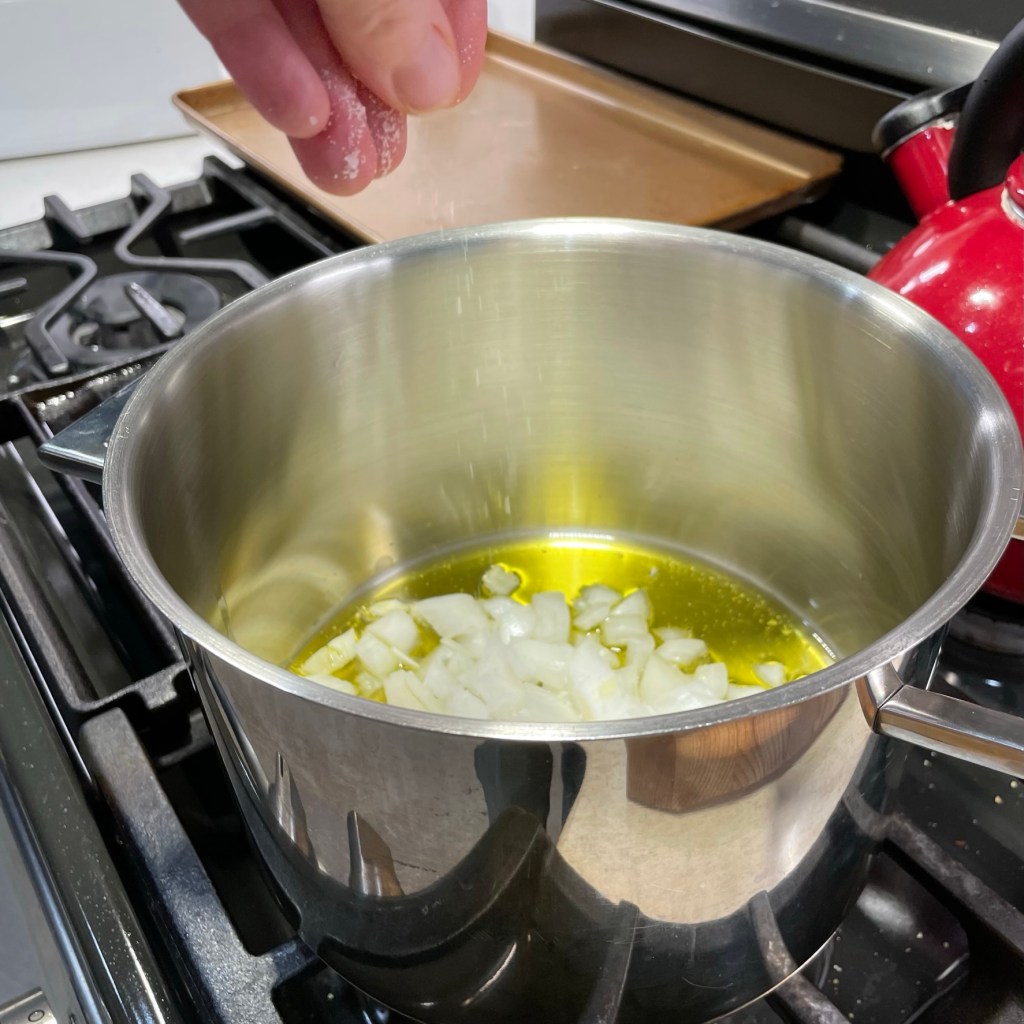
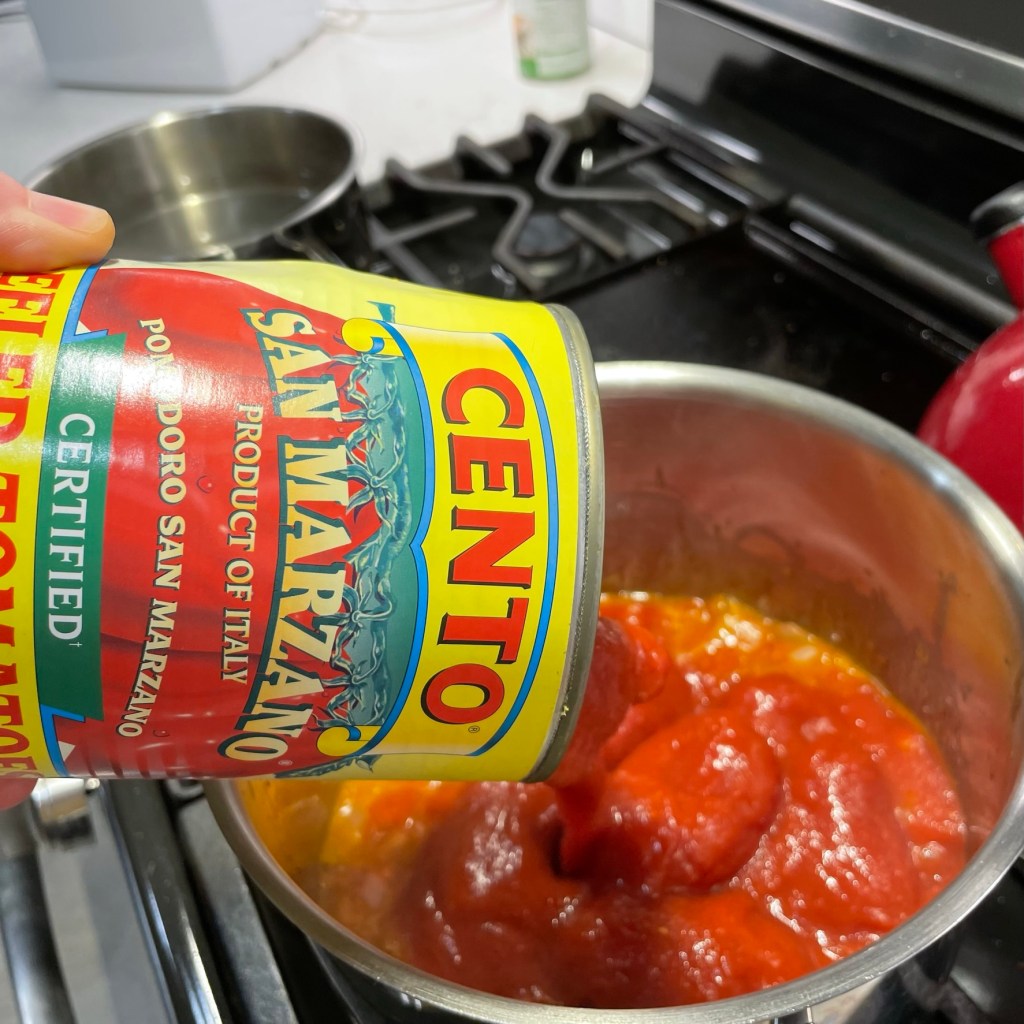
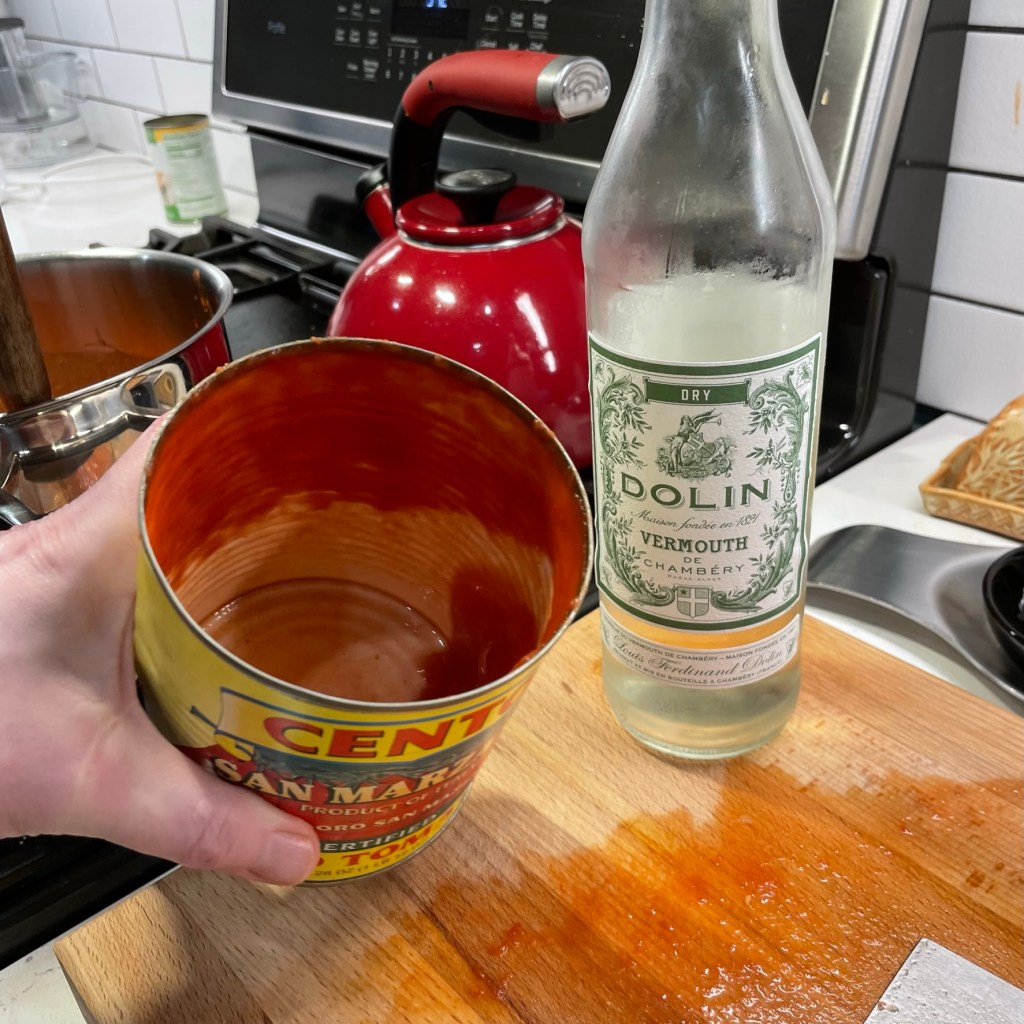
My plan for the bisque came together in seconds: I’d blanch and shock the tomatoes for easy peeling, then chop them up and add them to my soup pot along with sauteed onions and garlic, plus a large can of Italian tomatoes (San Marzano, of course) and give the mixture a nice, long simmer to marry the flavors.
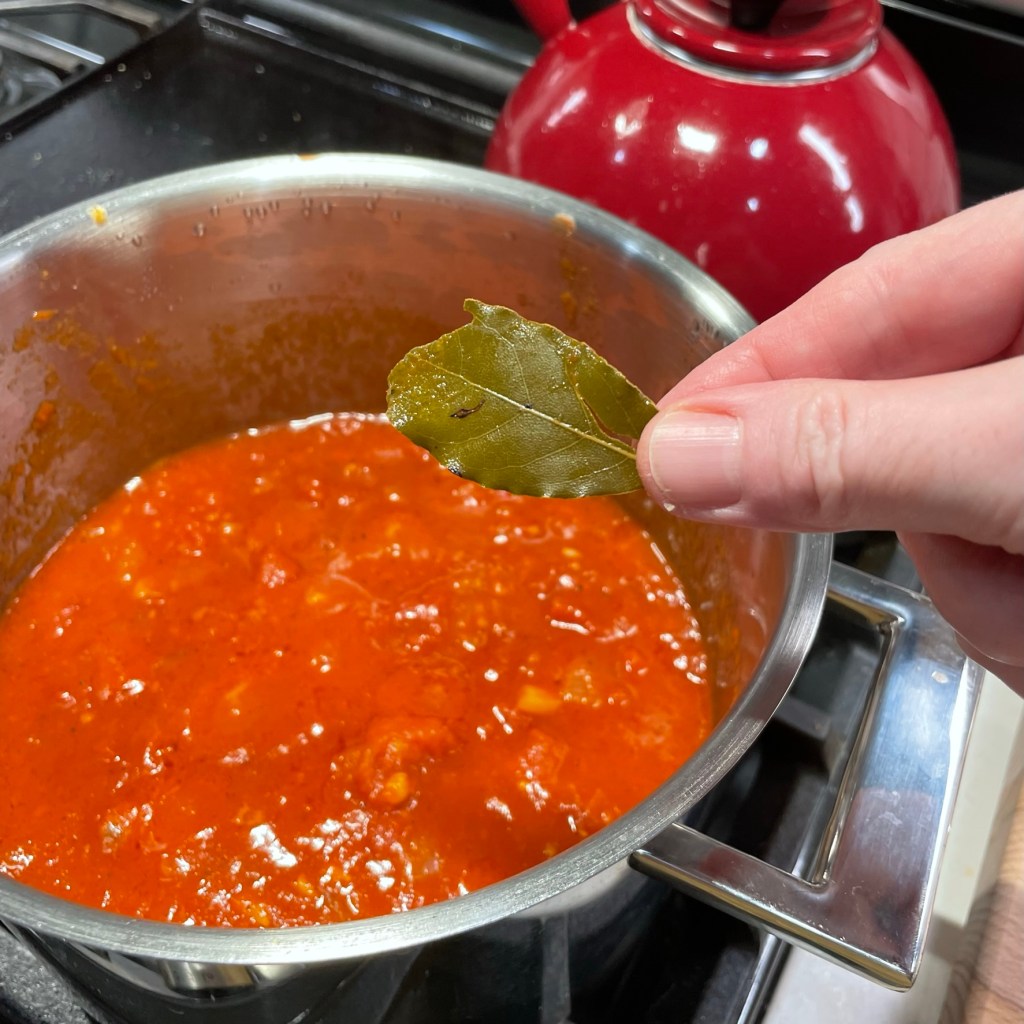
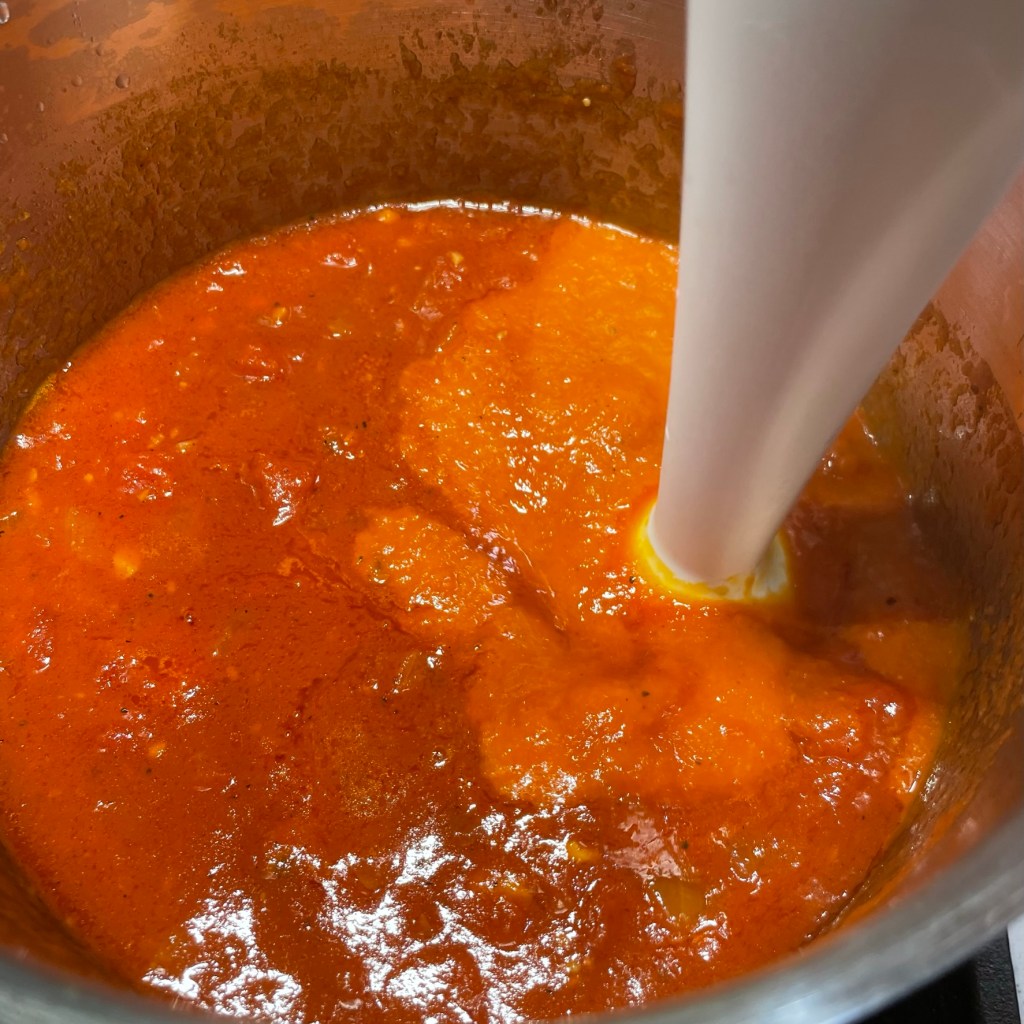
For a flavor boost, I swished out the tomato can with a few tablespoons of dry vermouth (the same spirit I put in my favorite martini) and dropped into the pot a dried bay leaf, which is always a good bet for a dish that is going in for a long simmer. Two hours later, I removed the bay leaf and brought out the immersion blender to puree the soup into the creamy texture that my hubby loves.
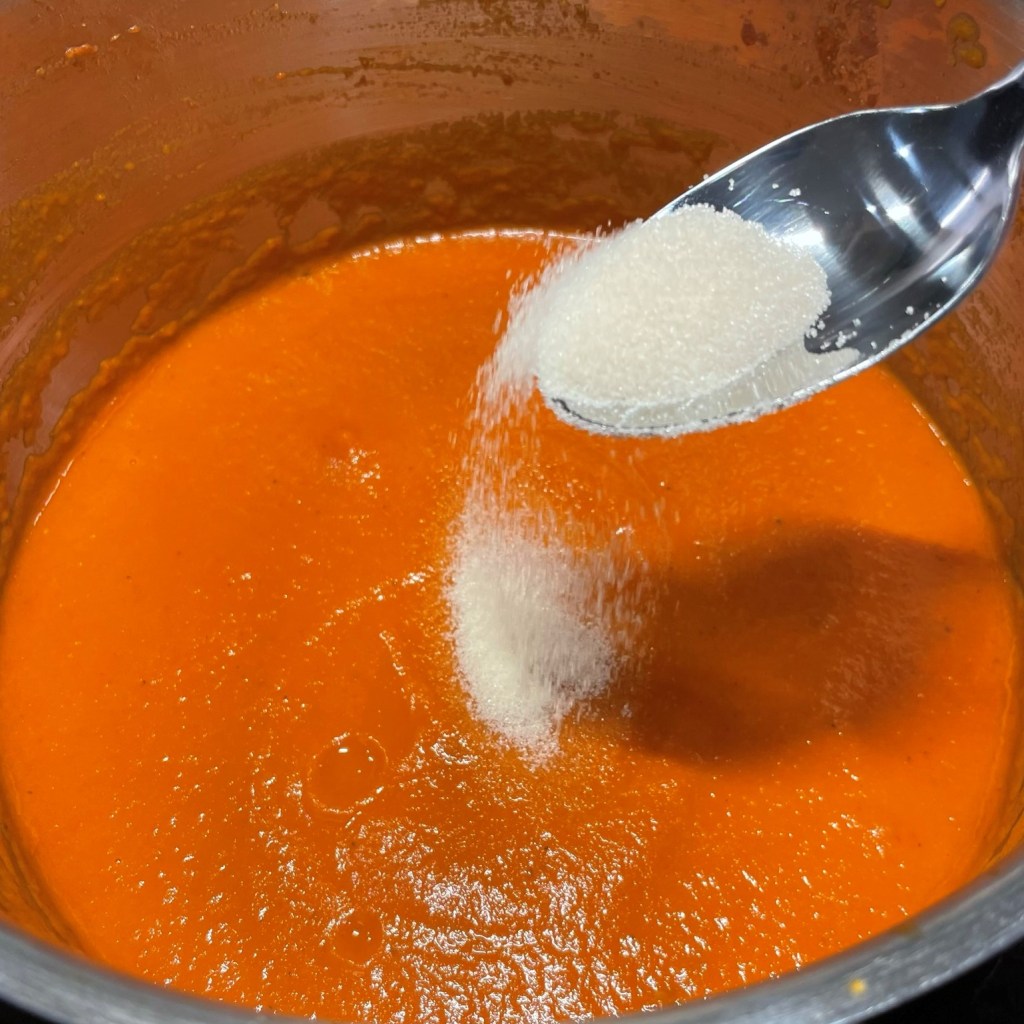
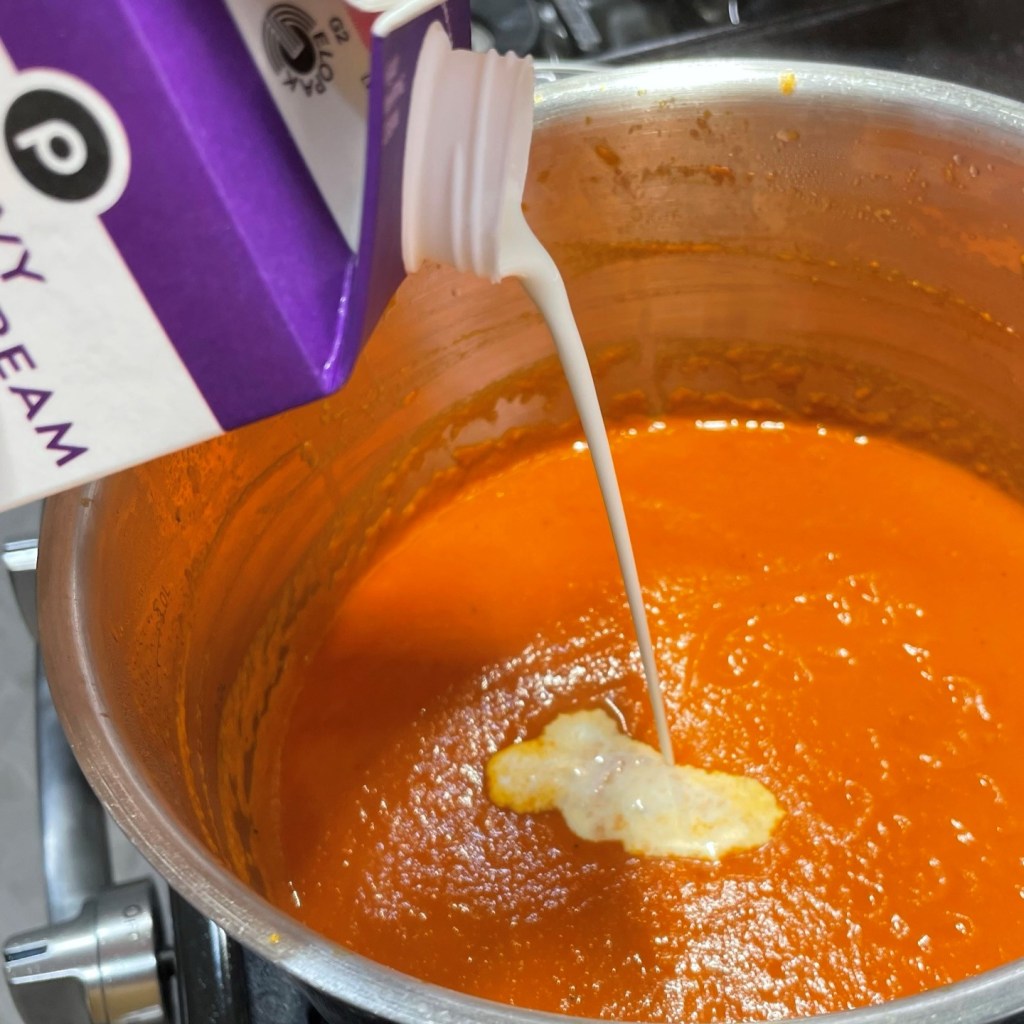
The resulting soup was really good, and I could taste the freshness that my surprise Romas contributed to the pot. It needed a little more depth, though, and definitely a little more color. Maybe you have noticed, as I have, that a homemade tomato soup or sauce tends to come out more orange than red, and it turns out there is a good (and scientific) reason for that, as I learned a few days ago in this article in my news feed. A little bit of tomato paste deepened the color and intensified the tomato flavor, a slight spoonful of sugar balanced the acidity, and a generous splash of cream made it bisque-y.
This was a great use of my encore tomatoes, though this easy homemade soup would be delicious with only canned tomatoes, which are usually packed at their peak of freshness. You might replace my fresh tomatoes with an extra, 15-ounce can, or simply reduce the other ingredients a bit for a smaller batch.
As for us, we are glad for a little extra, as a warm homemade soup will be most welcome at the end of today’s Yom Kippur service (that’s the Jewish holiday that has a 24-hour complete food-and-water fast), and we will undoubtedly devour our leftovers!
Of course, you don't really need to spend all day making this soup, but the long simmer time makes a world of difference in flavor, especially when using fresh garden tomatoes.
Ingredients
8 fresh, small plum tomatoes (or substitute a 15-ounce can of diced tomatoes)
2 to 3 Tbsp. extra virgin olive oil, depending on taste
1/2 large onion, chopped
2 cloves garlic, smashed and chopped
Kosher salt and black pepper to taste
28-ounce can whole, peeled tomatoes (San Marzano or another type that is packed in puree)
1/4 cup dry vermouth (or dry white wine, such as pinot grigio)
1 whole dried bay leaf
2 Tbsp. tomato paste
1 tsp. sugar (optional)
1/4 to 1/2 cup heavy cream (use less or substitute half and half for reduced fat)
Directions
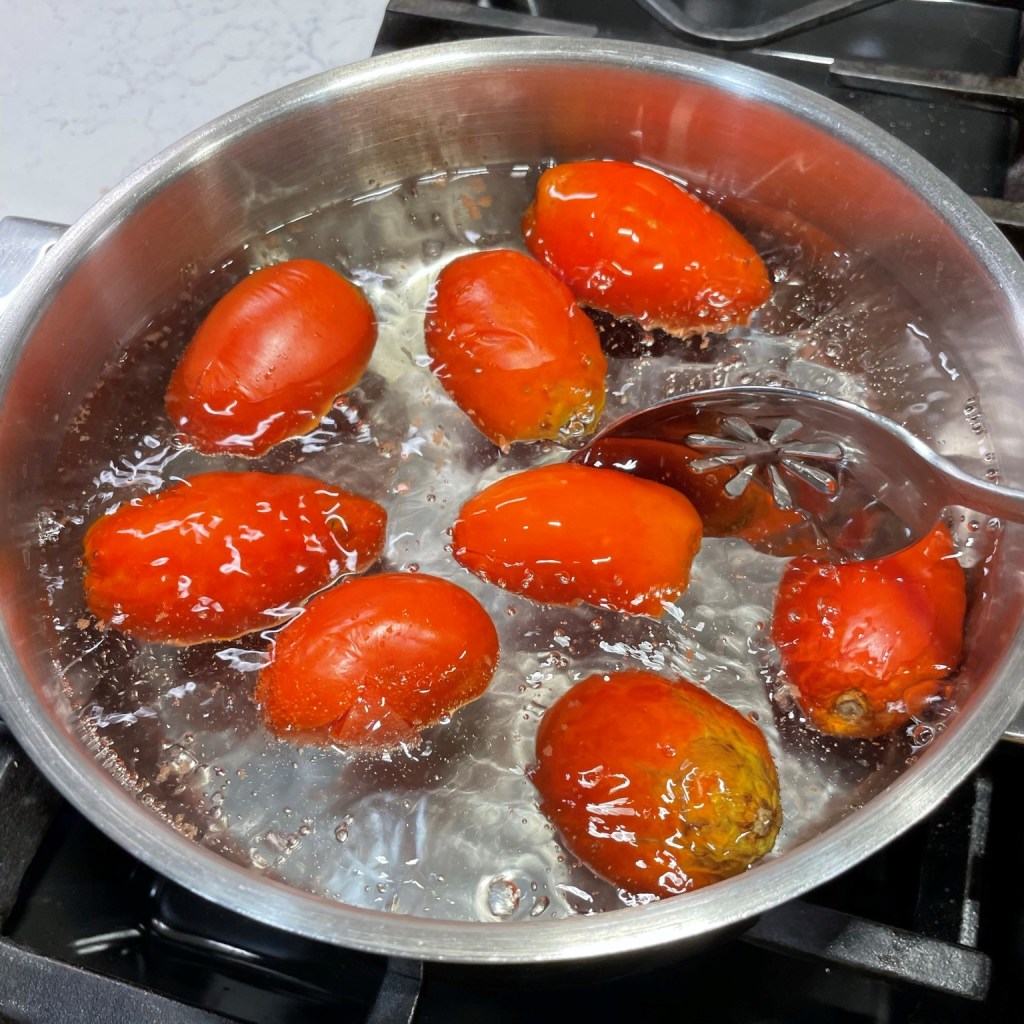
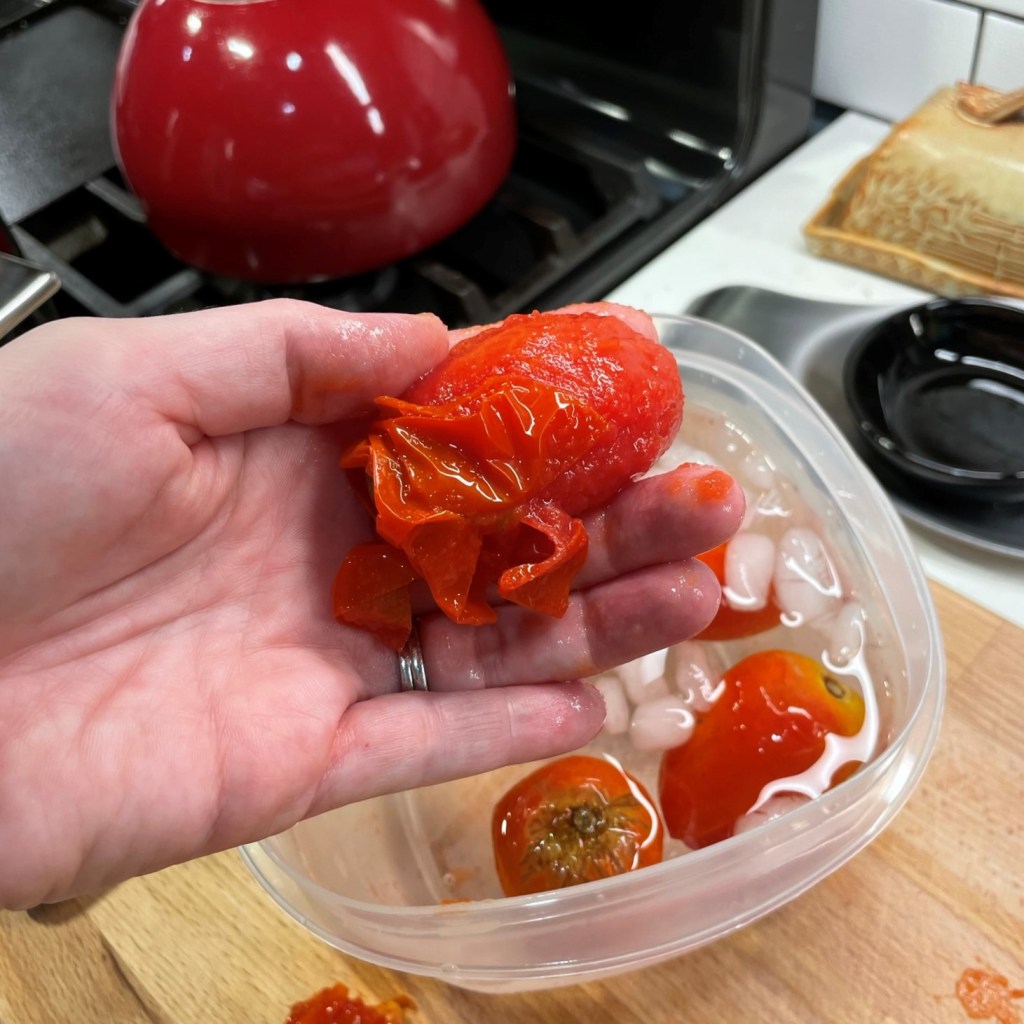
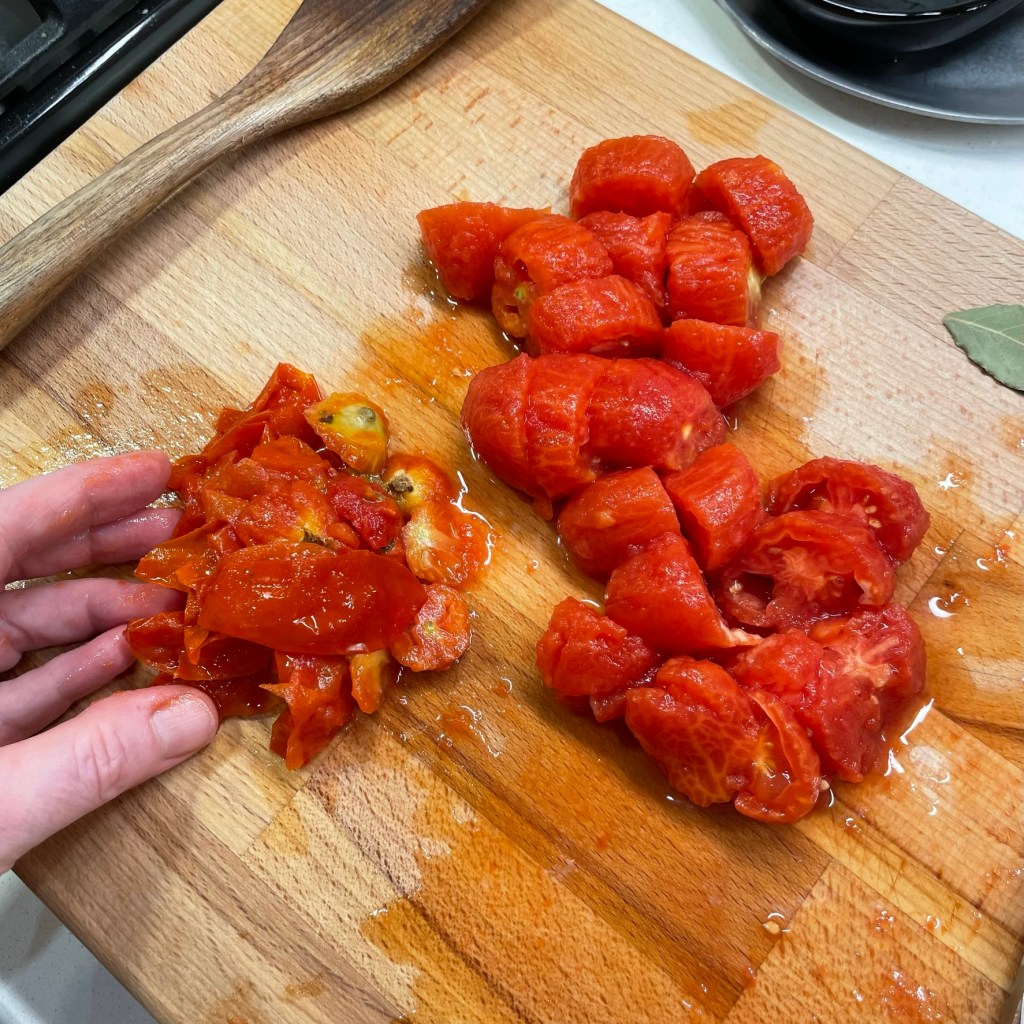
Put on a pot of water to boil for blanching the fresh tomatoes. Wash and score the bottom (blossom end) with an X for easy peeling. Carefully immerse the tomatoes into the boiling water for a minute or two, just long enough for the skins to split. Transfer immediately to a bowl of ice water, then peel and chop them.
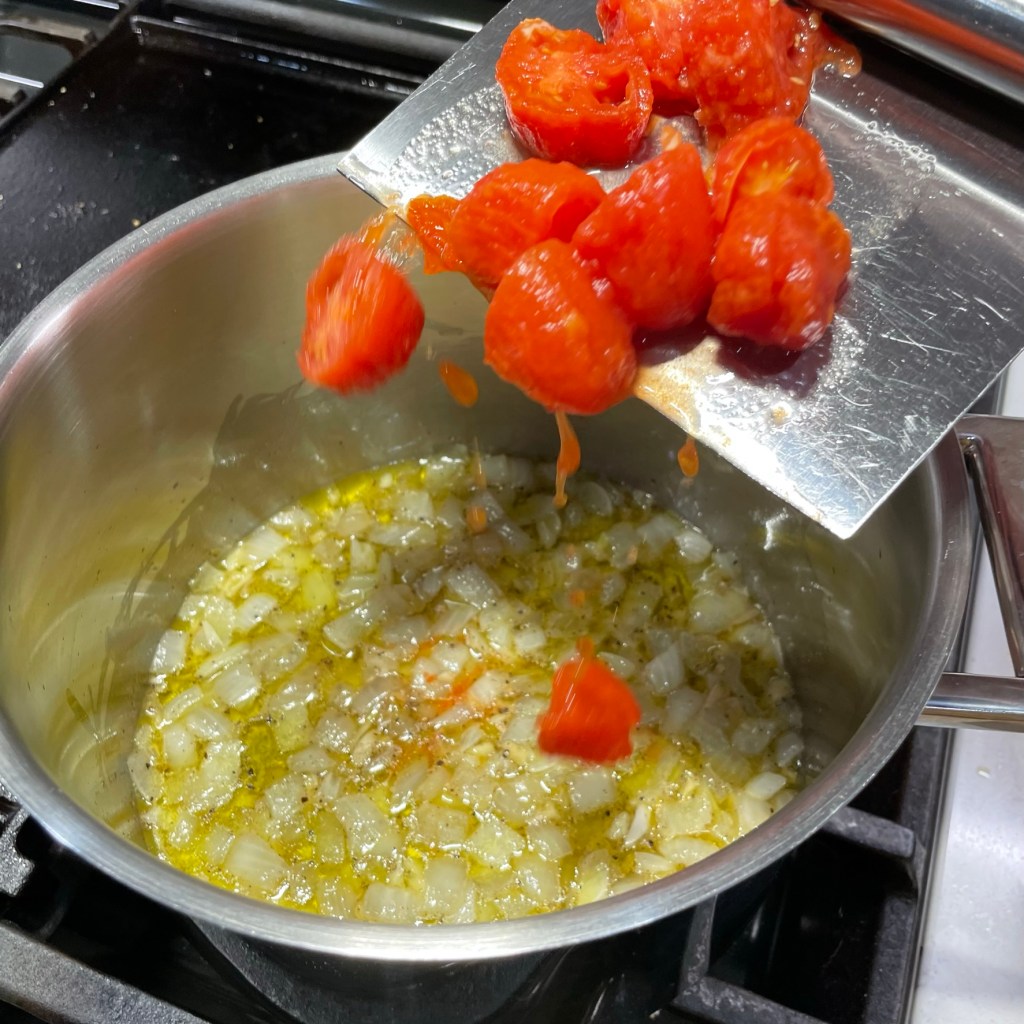
While water is boiling, heat olive oil in a heavy-bottomed soup pot over medium heat. Add onions and sprinkle with salt. Cook until softened and slightly transparent. Add the garlic and cook another minute.
Add the fresh, chopped tomatoes to the pot and stir to heat through. Add the large can of tomatoes (juice and all, but remove basil sprigs) and break them up with your cooking utensil. If you wish, you can squeeze the whole tomatoes with your hands as you add them to the pot, and I would recommend this if you’re in a hurry. For long, slow simmering, the heat will break them up just fine.
Add vermouth (or wine) to the tomato can and swirl it to rinse out the leavings. Add this to the soup and bring the pot to a slight boil, then cover and reduce heat. Add the bay leaf and simmer for at least 30 minutes or up to several hours. Check the soup occasionally and stir to keep it from burning on the bottom.
When tomatoes break easily under pressure from your utensil, use an immersion blender to puree it as smooth as you like. Be sure to remove the bay leaf first! If you don’t have an immersion blender, allow the soup to cool and puree it in batches in a regular blender. Keep the vent cap open for safety.
Stir in tomato paste and sugar (if using), and adjust salt and pepper to taste. Stir in cream just before serving.
Between my husband and me, there is exactly zero percent Hispanic heritage—yet somehow, the foods of Hispanic cultures fall squarely into the “favorites” category for both of us, and it has been this way for all of our adult lives. For me, the passion for Hispanic flavors started much earlier, during my younger childhood when I lived with my mother in southern Colorado, where at least half the kids I went to school with were of Mexican descent. Their moms made the best food.
Les, who grew up in New York, was surrounded by the foods of seemingly every culture except Mexican, though other Hispanic flavors were obviously present in the Puerto Rican-populated areas of the city. He remembers his section of Queens, famed for being among the most multicultural in the world, was the first to create “fusion” foods, but alas, he says, he never ate at “La Casa Wong.” His first experience of addictive Spanish-influenced foods didn’t come until he spent a few young adult years in southern California, but even then, he didn’t get the full effect because those restaurants were mostly chains.
Today, thanks to our collective passion for cooking and adventurous approach to food, we are enjoying more than our fair share of all the world’s flavors, including those of cultures we have yet to visit.
Over the past few months, the 2014 movie Chef, with Jon Favreau leading a tremendous all-star cast, has been in hot rotation on our streaming service. Les and I both saw this movie in the theater when it was released (a good year before we started dating), but we still can’t resist watching it every time it appears in our program lineup. We love it, not only because it’s a compelling story of a talented chef who walks away from an unfulfilling restaurant job to start a food truck, but also for the joyful Latin music, the sweet relationship that develops through teachable moments with his adorable, mop-headed son, and the fantastic food that results from his commitment to doing food right and making it from the heart. If you haven’t seen this film, we highly recommend it.
The main food that always gets us drooling when we watch Chef is the Cuban pork, and the most authentic version would be slow roasted in the oven, as sous chef Martin prepares it in the film. But this is my version of it, done the easy way in a slow cooker. The key to exceptional flavor and texture is low-and-slow cooking and (of course) the marinade. My first taste of this mouthwatering, slow-roasted meat was in Key West, and rumor has it that was most likely the origin of the dish. But let’s not go down any rabbit holes of debate about that, because there’s cooking to be done!
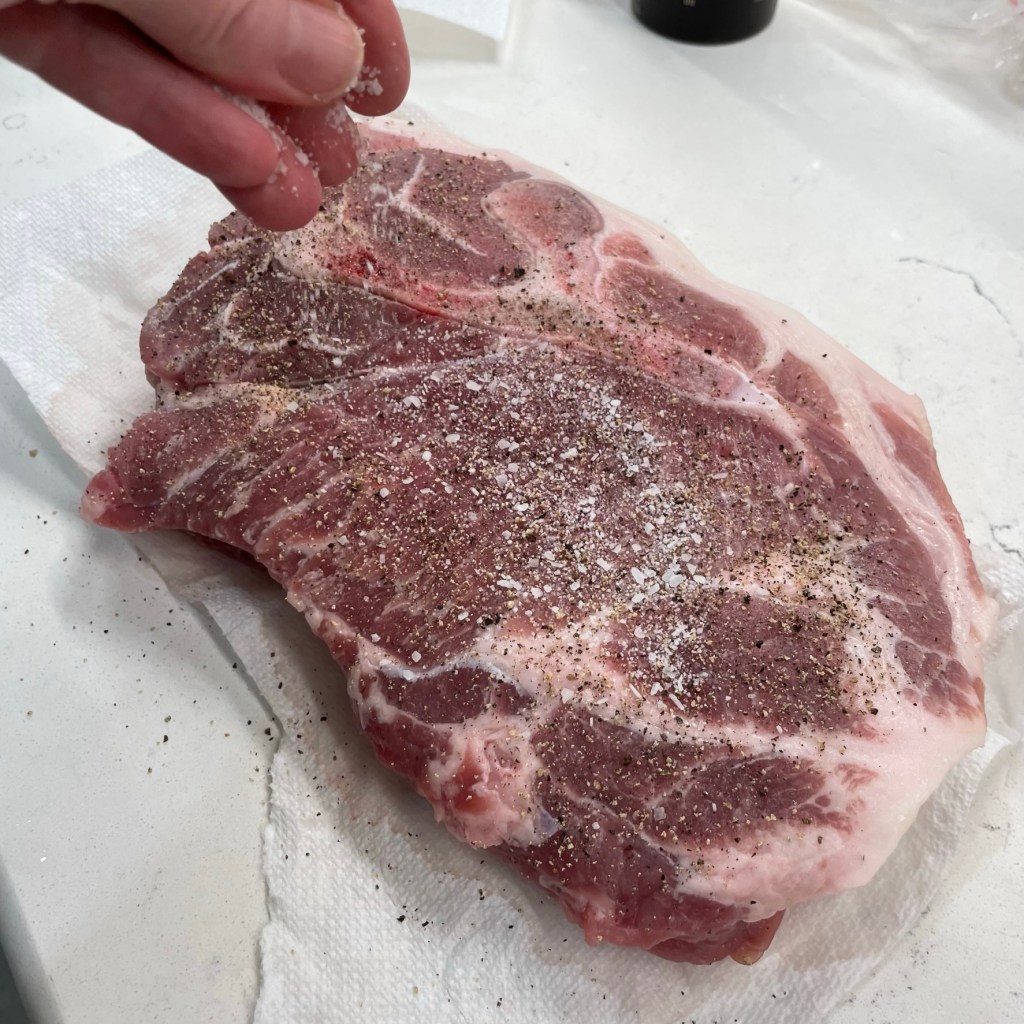
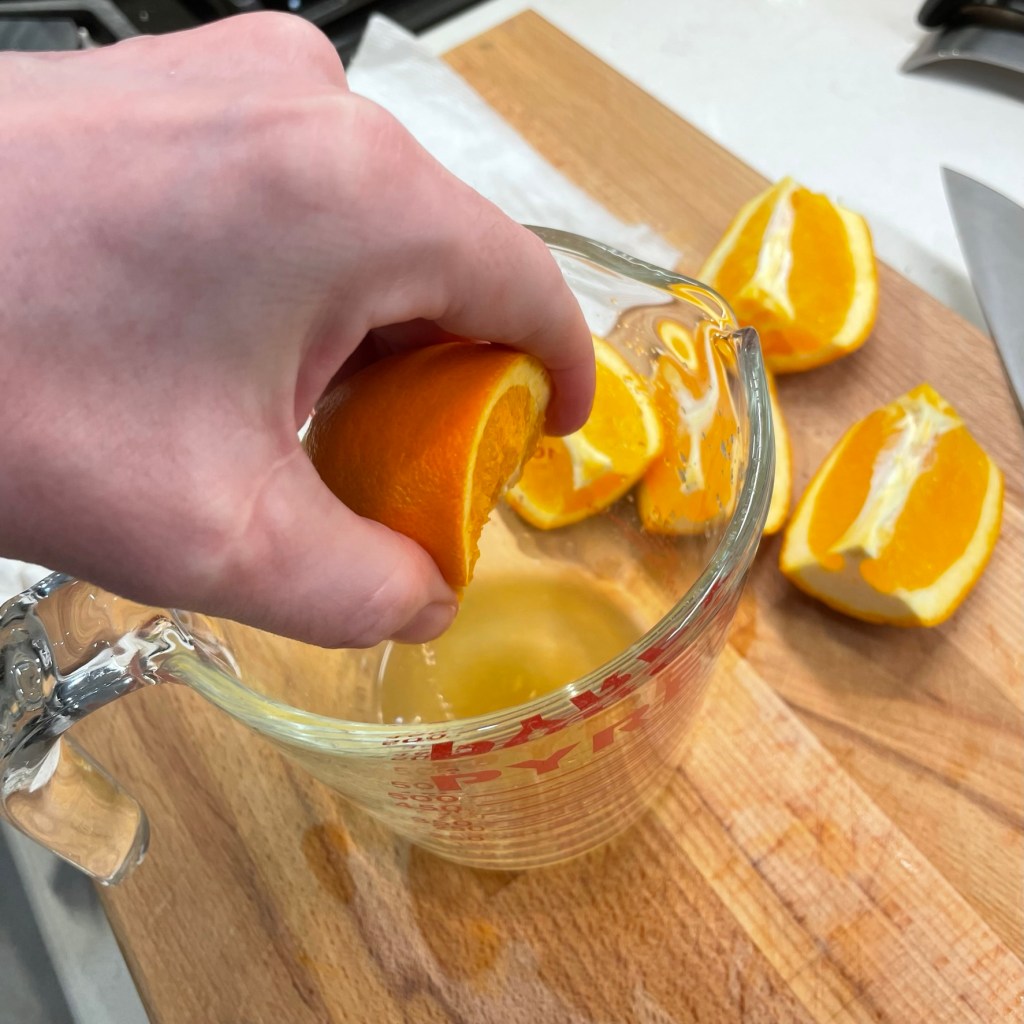
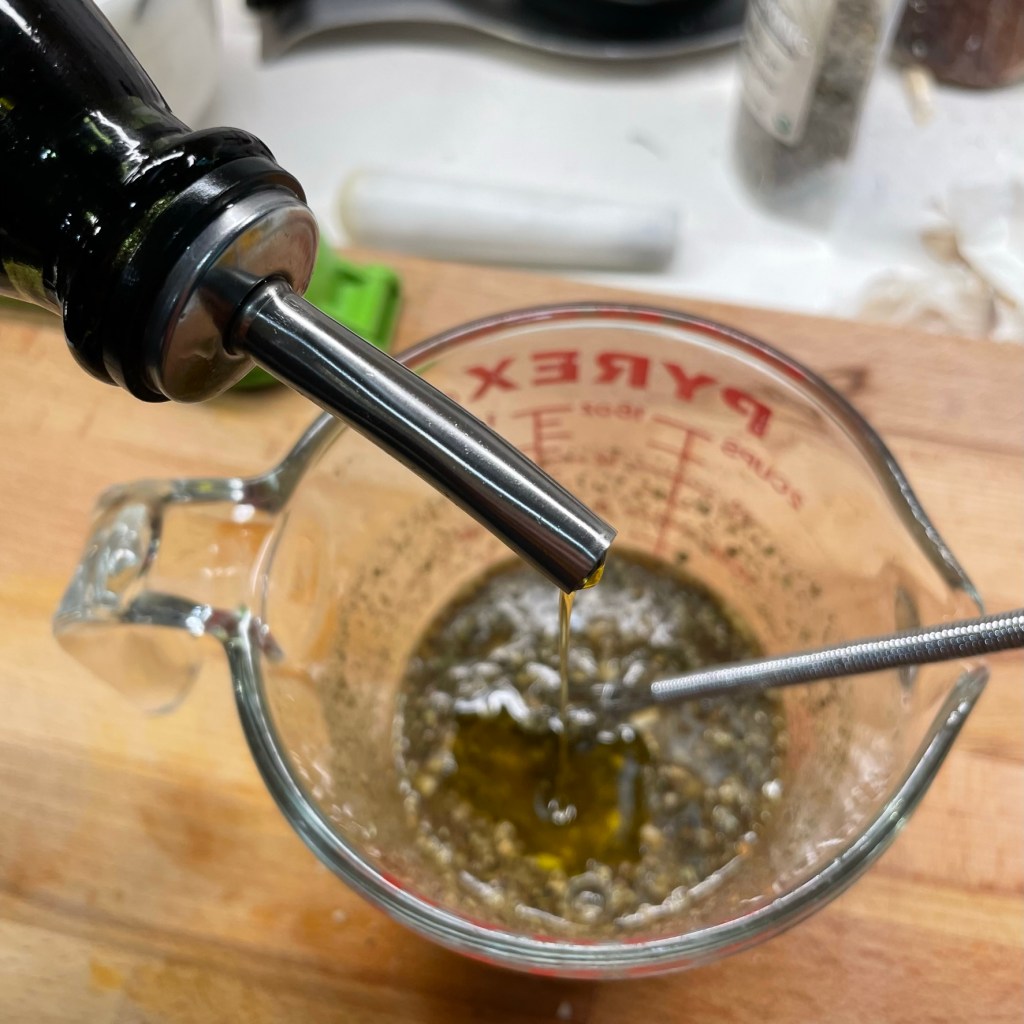
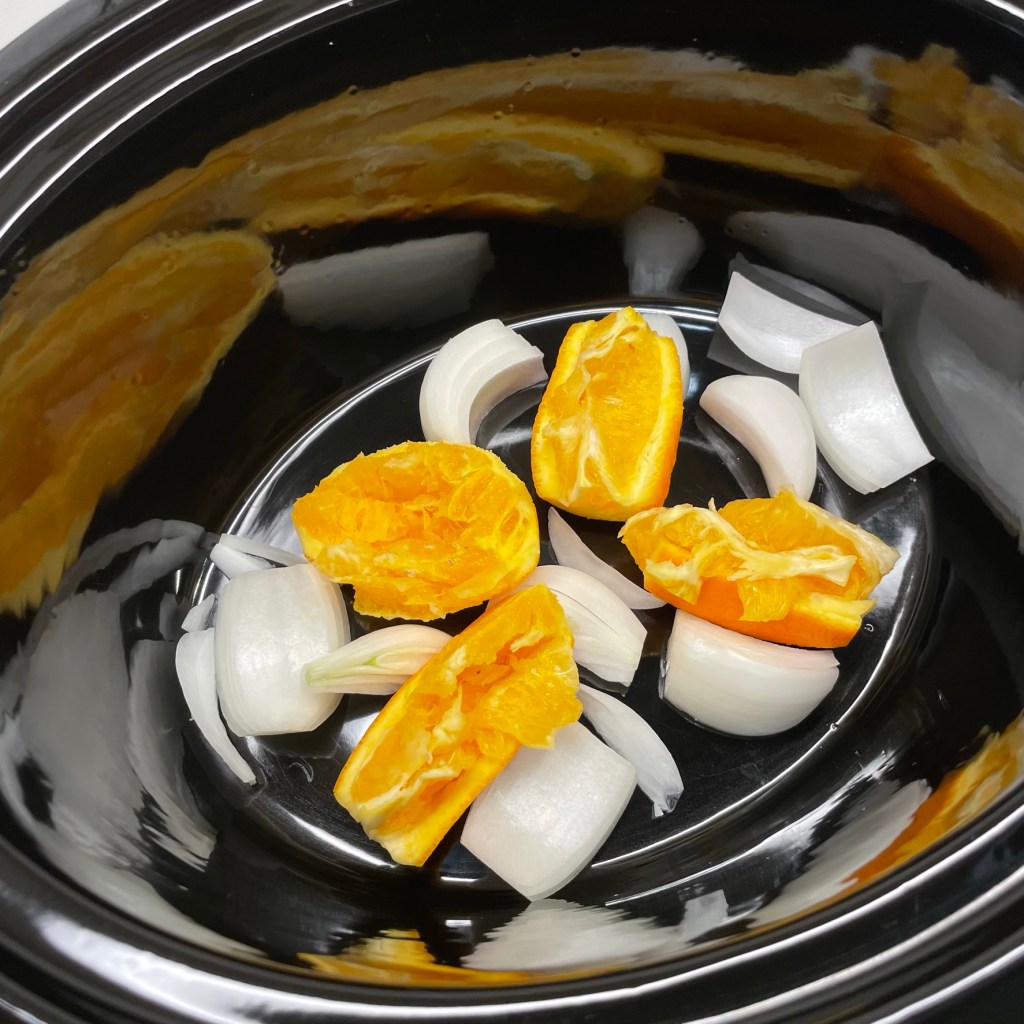
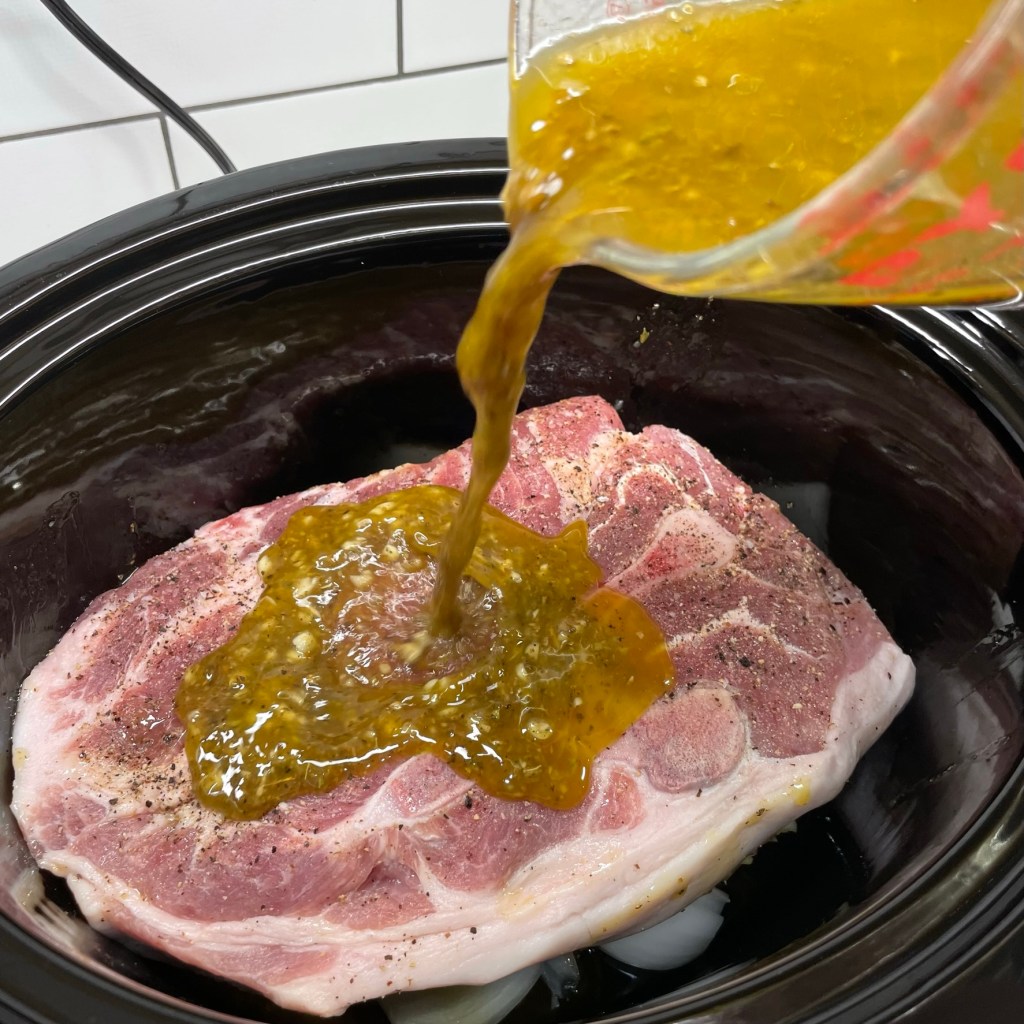
Start with a pork shoulder, and for the best flavor, get one with the bone in. Trim off some of the excess fat, but don’t take it all off because there’s a world of flavor in it, and it will help protect the meat from drying out during cooking; you can easily skim it off the braising liquid later if you so choose. Rinse the shoulder to rid it of any bone shards, pat it dry with paper towels and give it a dose of salt and pepper on all sides. If your shoulder is very large, cut several slits all over the meat and insert smashed cloves of garlic into them. Mine was only three and a half pounds, so the marinade was enough to flavor it all the way through.
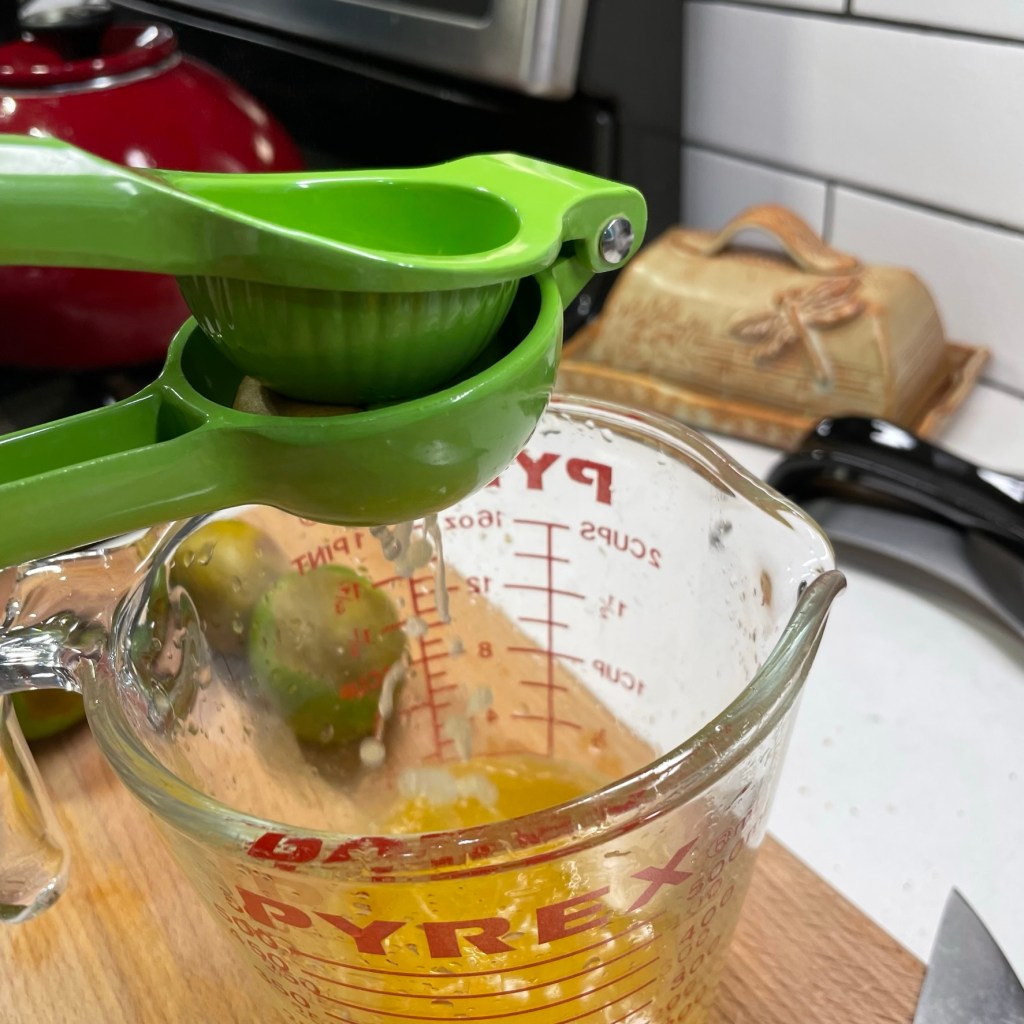
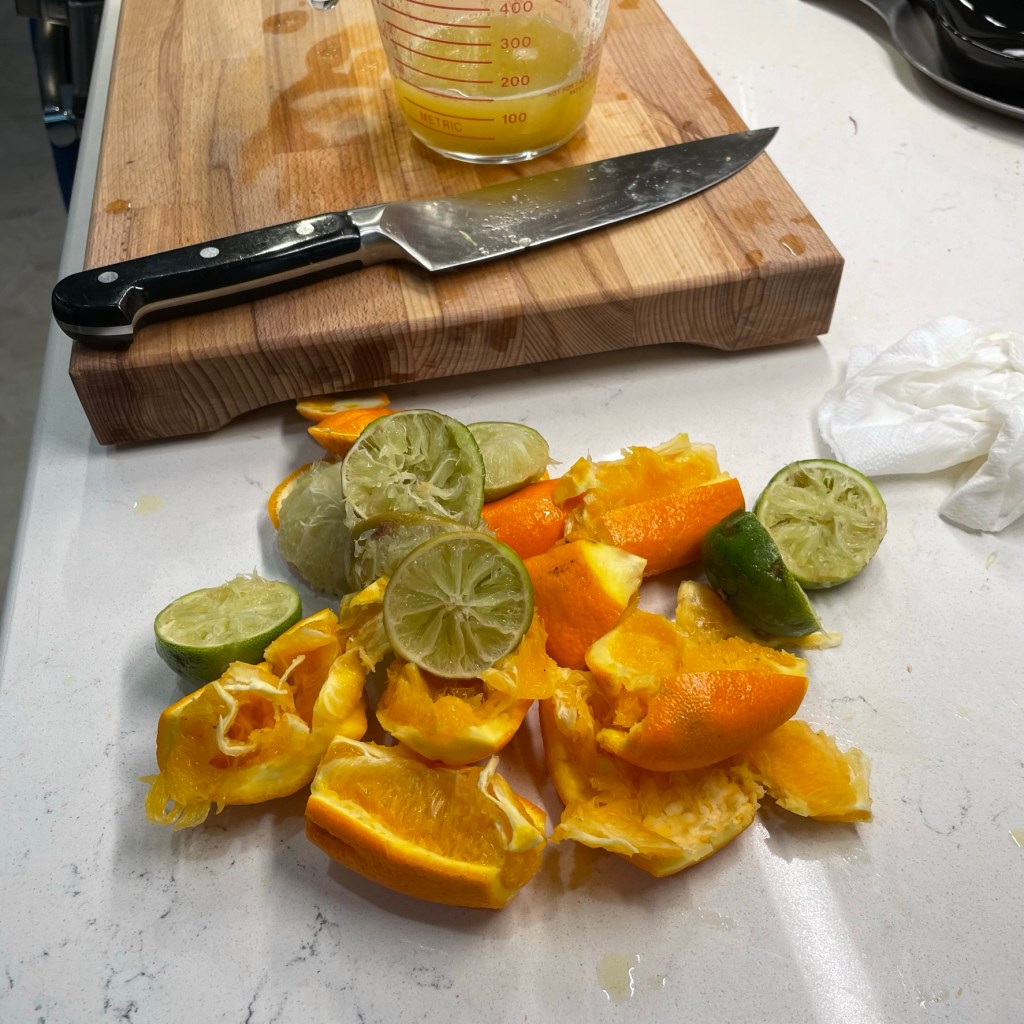
The marinade for this pork is called mojo, not like getting your mojo back or Mr. Mojo Risin’, but Spanish “j,” pronounced as an “h.” Try it with me: “mo-ho.”. The marinade begins with the juice of oranges and limes. For truly authentic mojo marinade, you’d use only Seville oranges, which are sour compared to typical navel oranges, but they aren’t easy to come by in the States, so a combination of navel oranges and limes is a common substitute. I kept a few of the spent orange wedges after juicing, and I’ll explain why in a moment.
Already smelling fine over here!
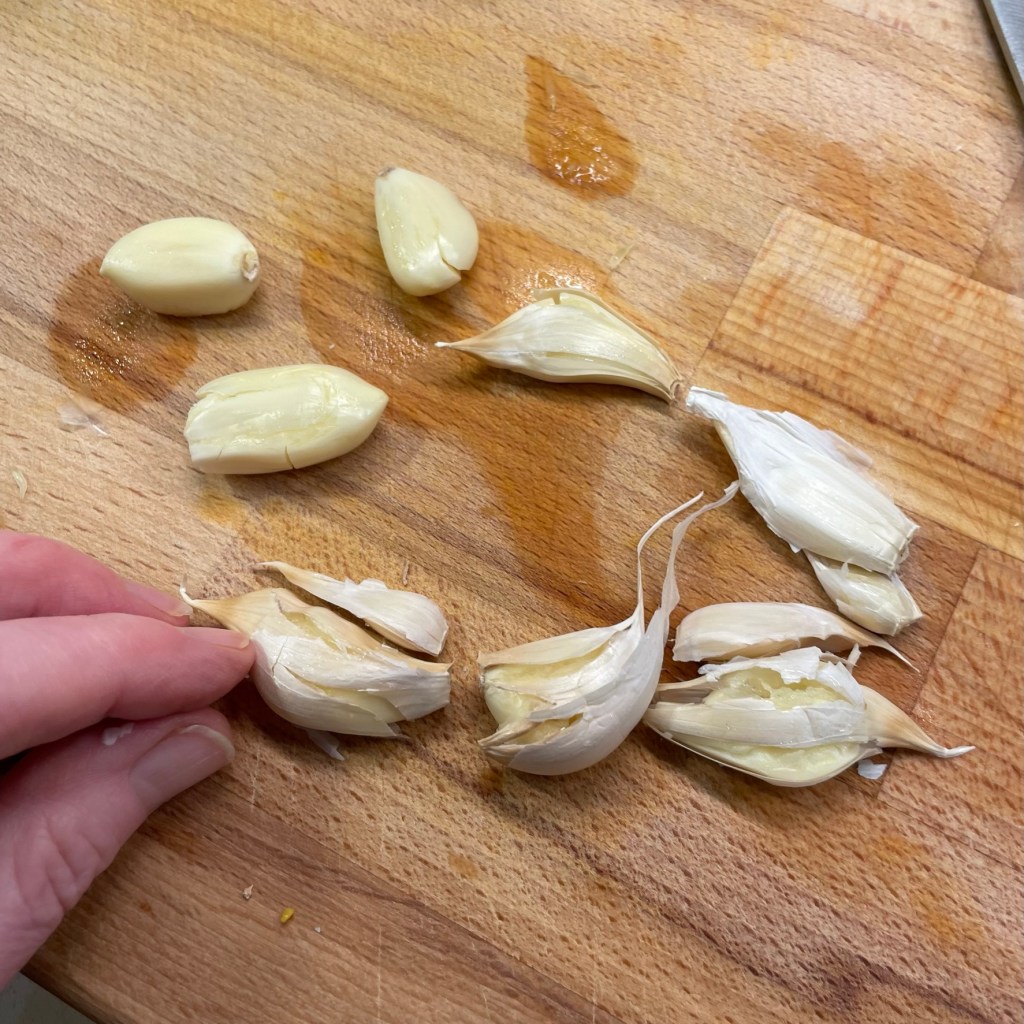
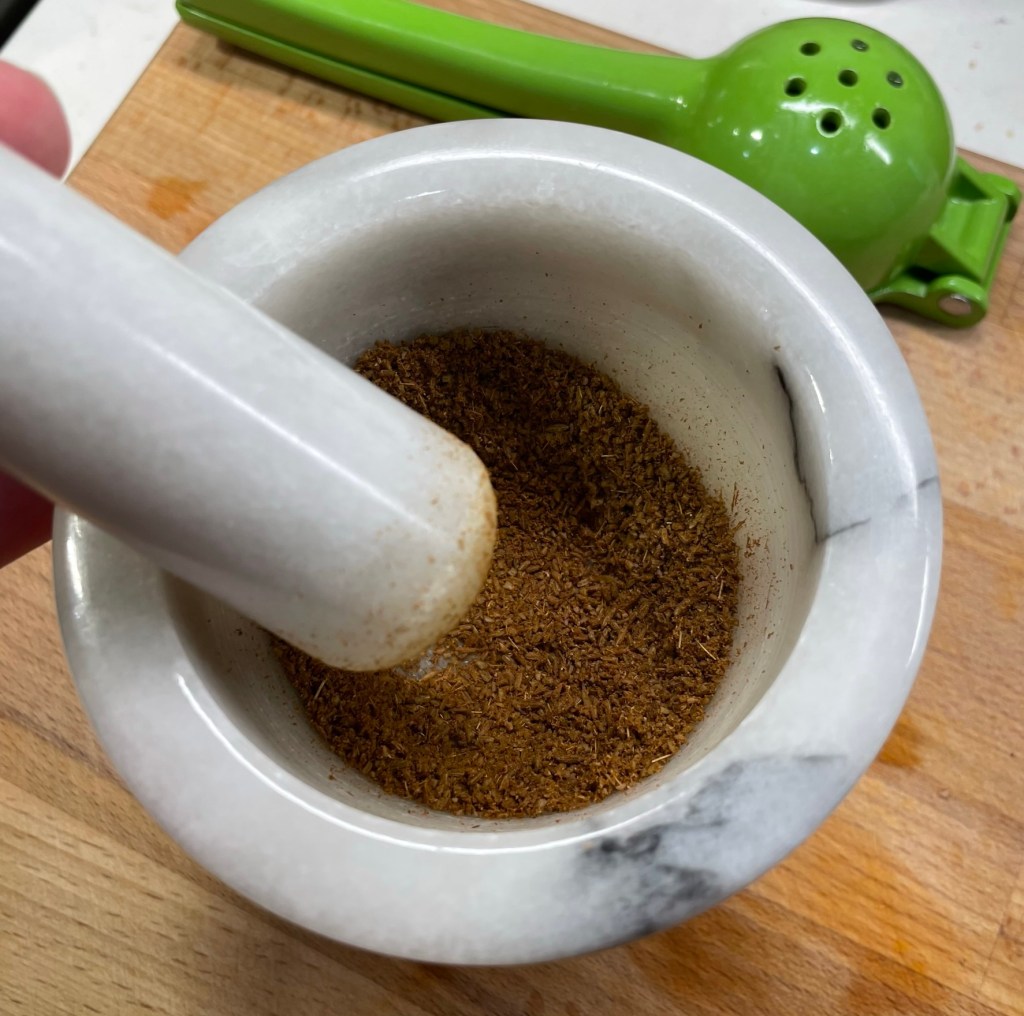
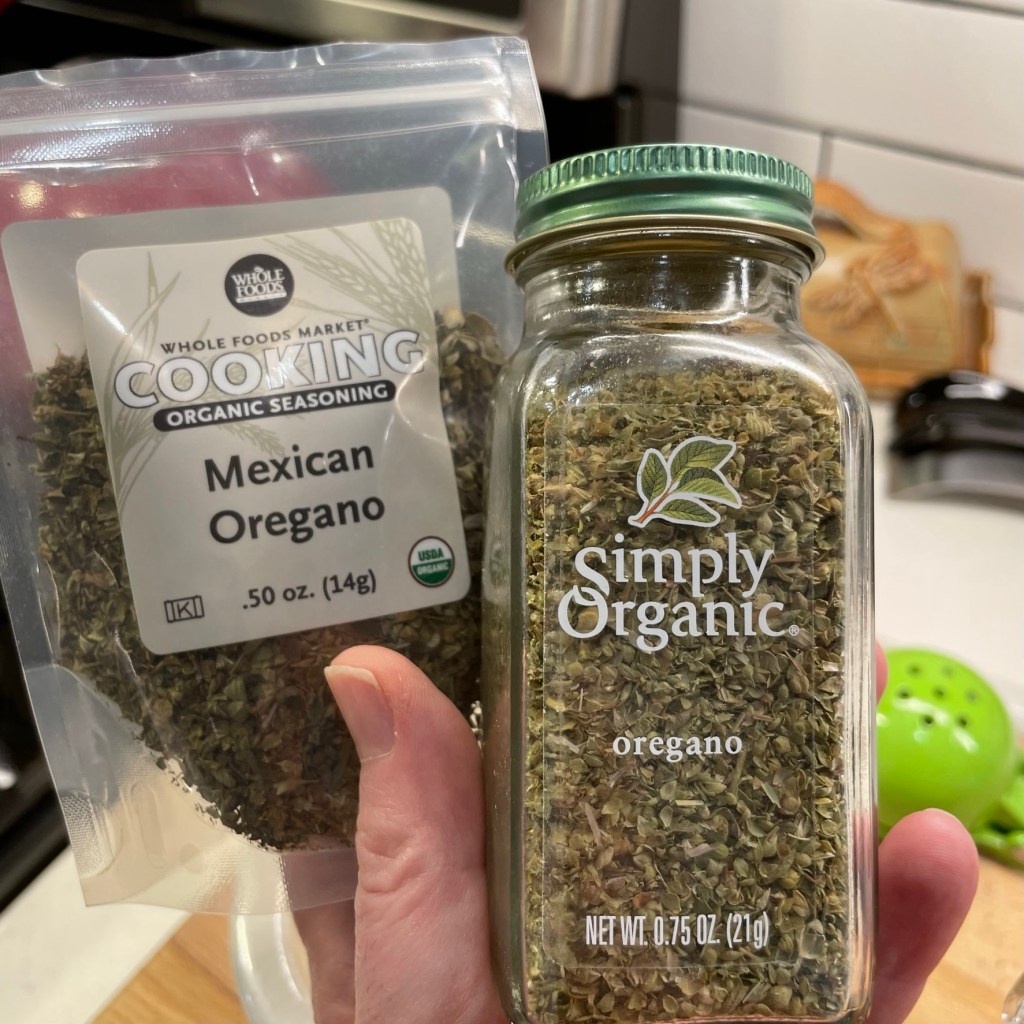
You need a lot of fresh garlic for a mojo marinade. Smash the cloves first, and then peel and mince them up so the flavor permeates every pore of the pork shoulder. That’s an important thing to know about garlic; the smaller the bits, the more pungent the flavor. Cumin is traditional, and I like to use whole seeds, slightly toasted in a dry skillet and then crushed to a powder in a mortar and pestle. This fragrance on its own puts me in a state of near-euphoria. Oregano adds an herbal note, and I couldn’t decide between regular and Mexican, which is earthier with a slight note of anise, so I used half of each.
Here’s where the marinade begins to transform.
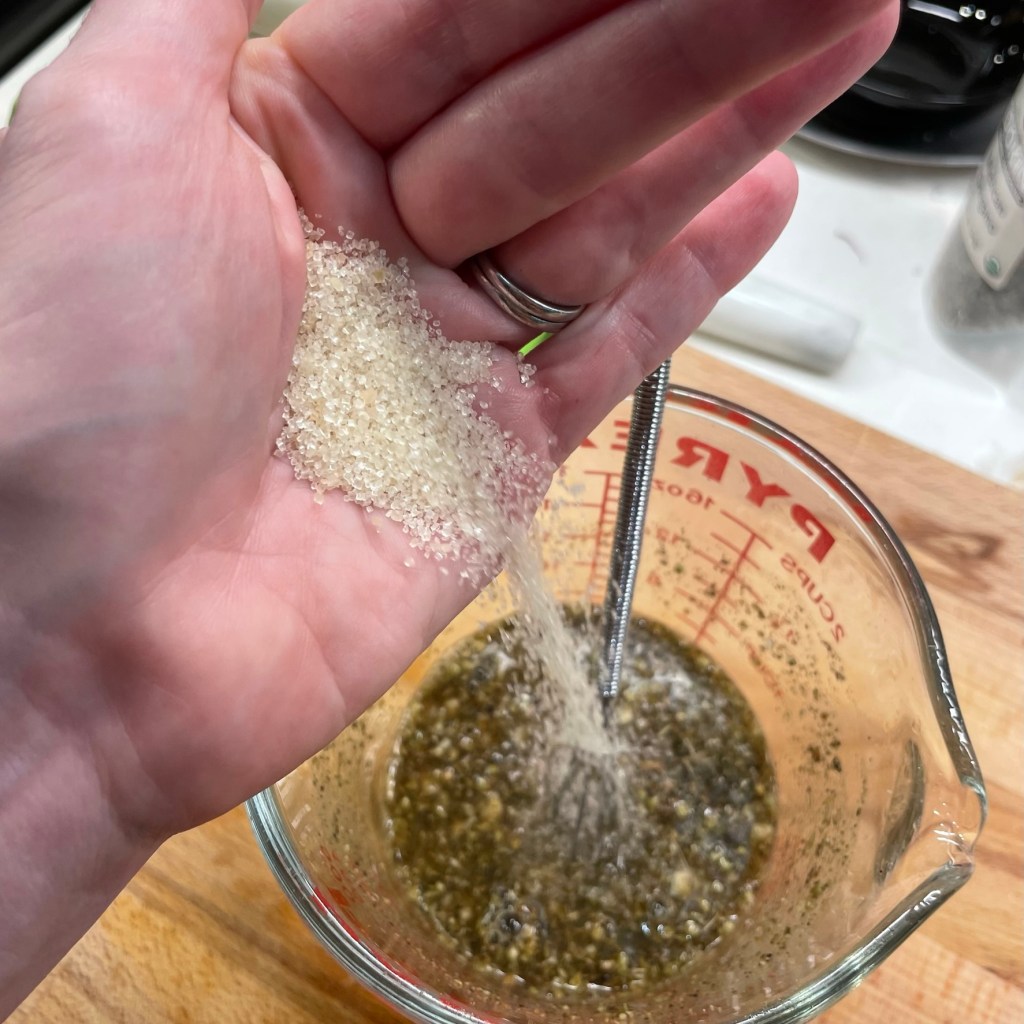
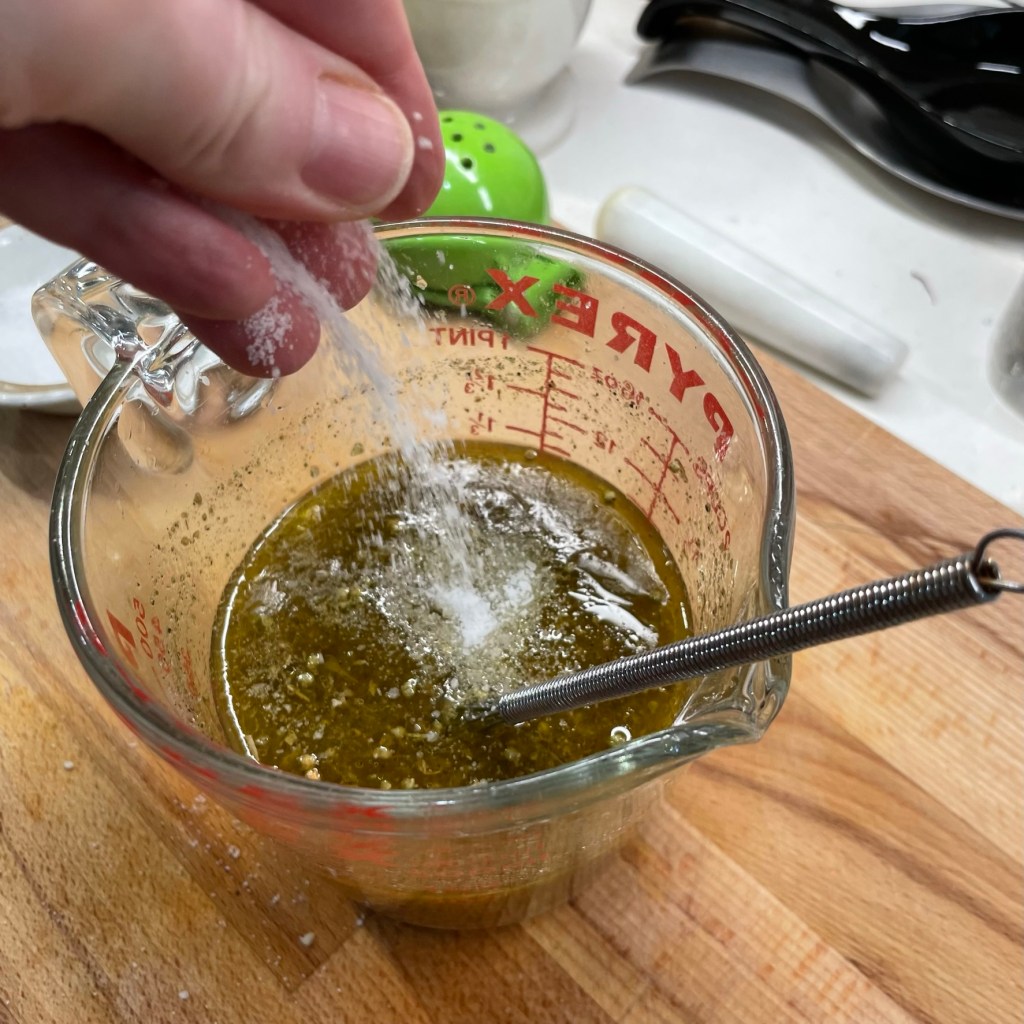
A pinch of sugar is decidedly not traditional, but we put a pinch of sugar in every damn thing here in the South. I like it for balance, but don’t go overboard. Season the mixture with salt and black pepper, of course, and whisk in a few generous glugs of extra virgin olive oil to finish the marinade. Time to cook!
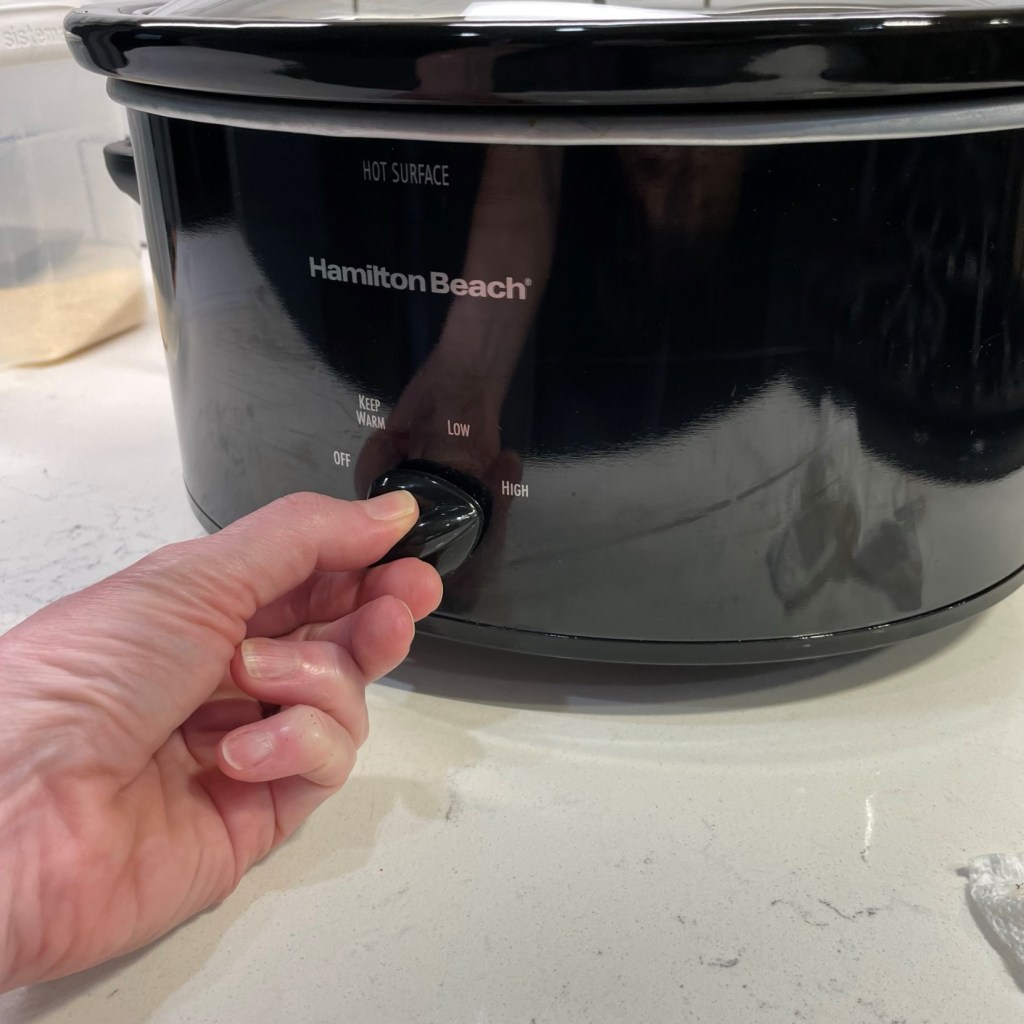
Here’s where I used the spent orange pieces, along with some onion wedges; they were a bed for the pork shoulder in my slow cooker, allowing the mojo marinade full access to the meat’s surface. I poured about a third of the marinade over the shoulder, then turned it over and poured another third, reserving the last portion of marinade mixture to pour over the roast at serving time. Set the cooker on high for 45 minutes to bring it up to cruising speed, and then knock it down to low and walk away for five hours.
Low and slow makes it a winner!
Did you get that? You don’t want to cook it on high setting for five hours, or you’ll end up with tough, overcooked shoulder. The high setting is just to bring the temperature up more quickly, and then the cooking should all happen on low setting. Very important.
I had a busy afternoon, so I wrapped up my work emails, did a load of laundry and went out for a pedicure during this time, and having the freedom to tackle my to-do list reminded me how much I still love using a slow cooker on occasion. When I came home, the house already smelled amazing. I flipped the pork shoulder over for a final hour of cooking, and went about the business of making some jalapeno-simmered black beans.
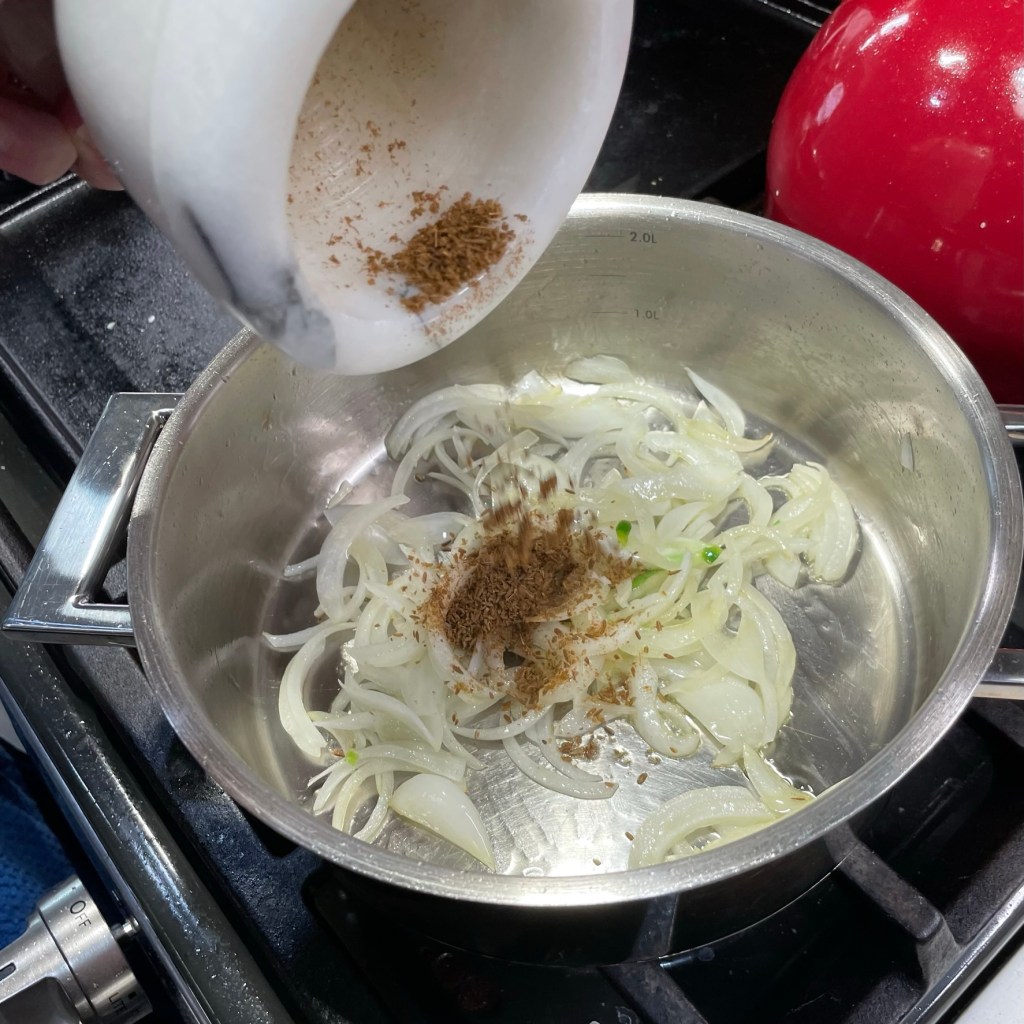
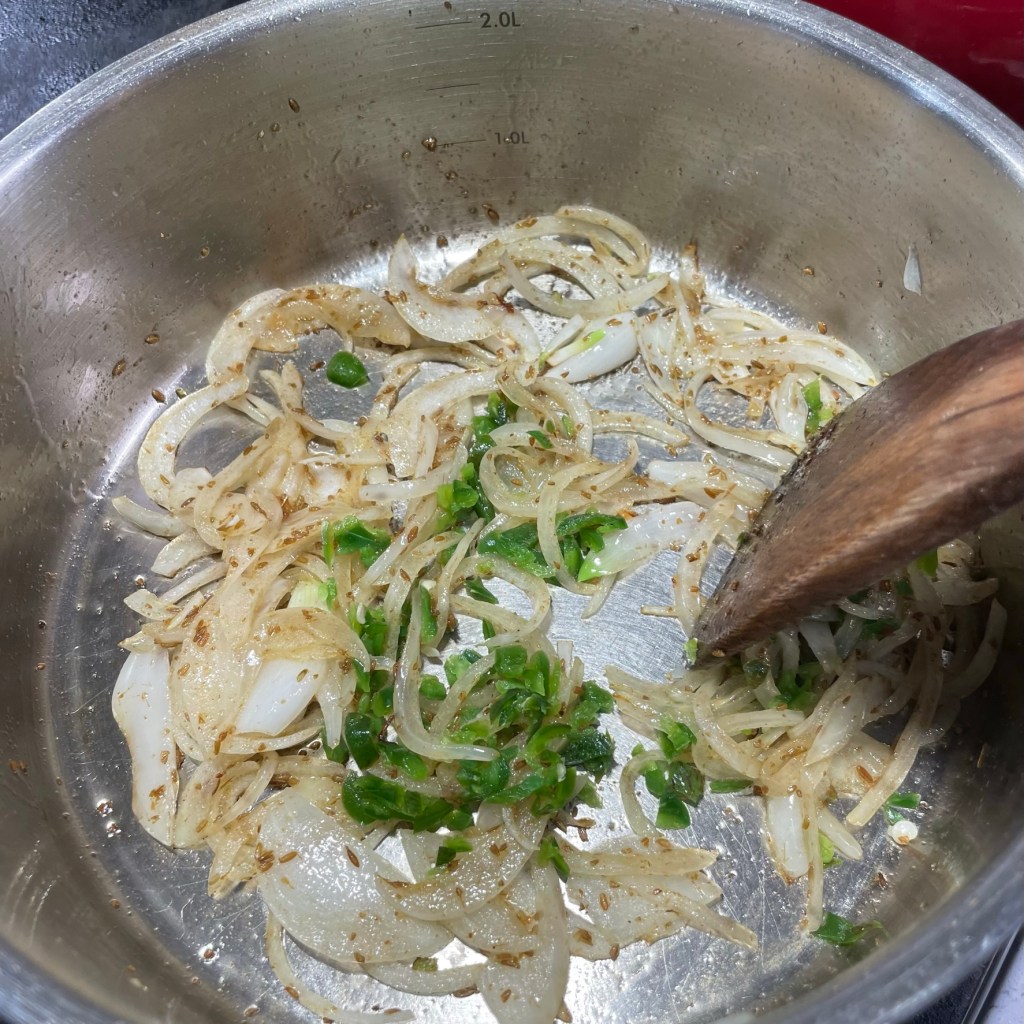
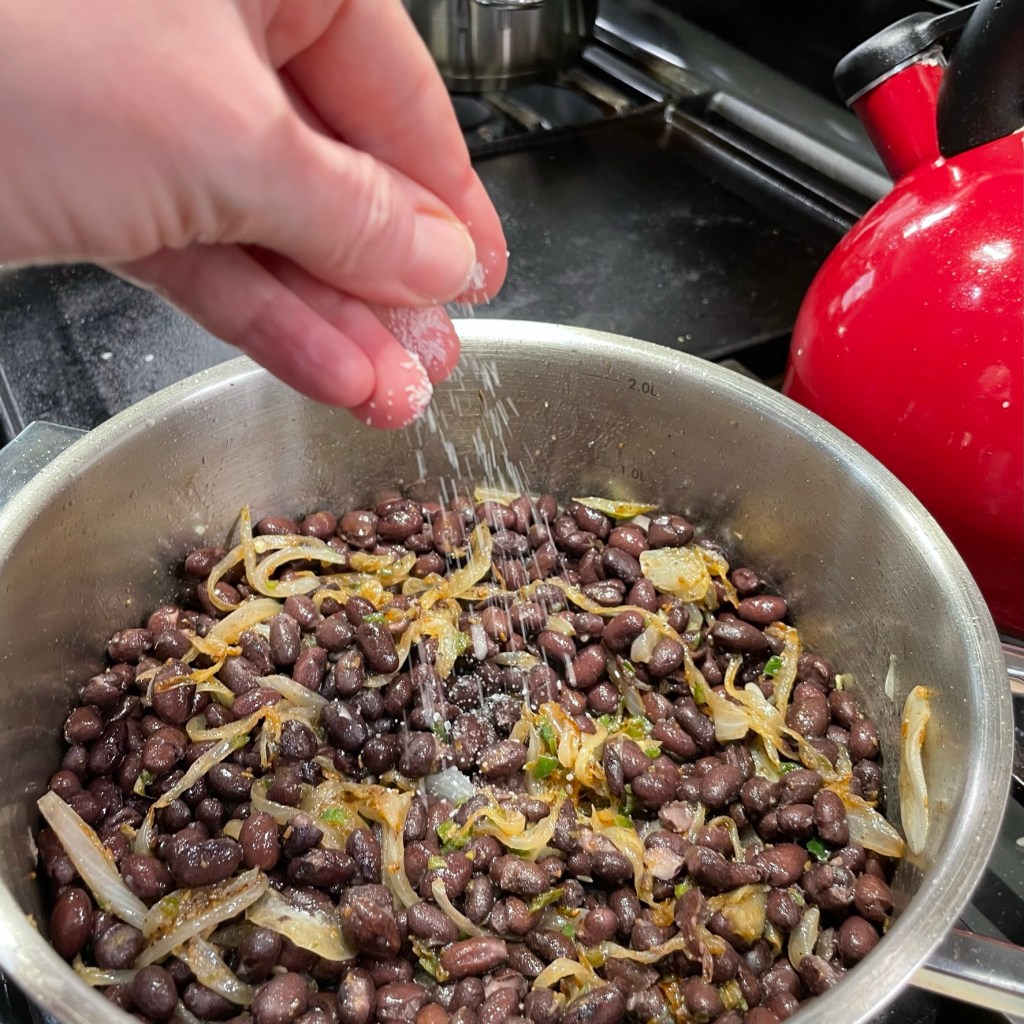
I cut half of a sweet onion into crescent slivers, and diced up a fresh jalapeno from our post-summer garden, leaving most of the seeds behind. I sautéed those in olive oil, along with a touch of ground cumin, then added two cans of rinsed black beans. Salt and pepper, and a splash or two of the Cuban-style pork braising liquid and we had a perfect, if not authentic, side dish for our delectable pork.
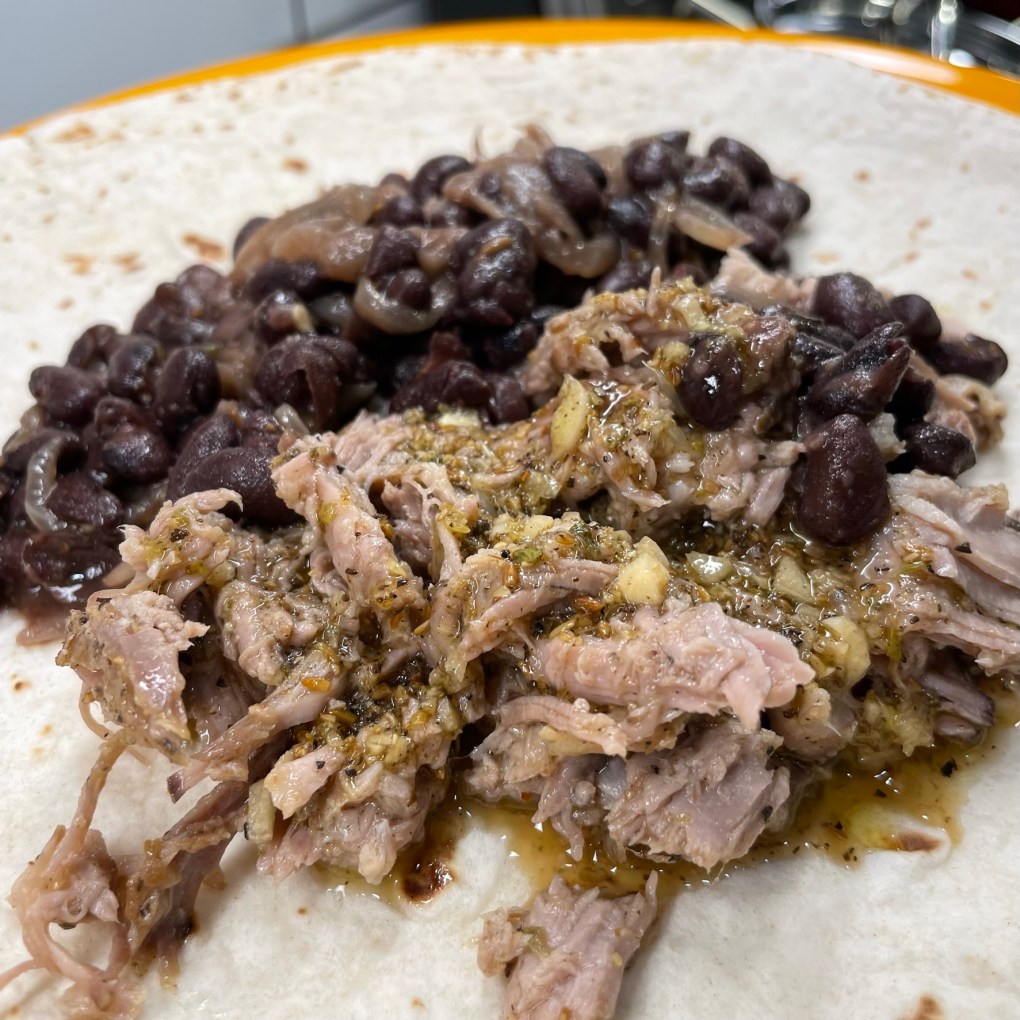
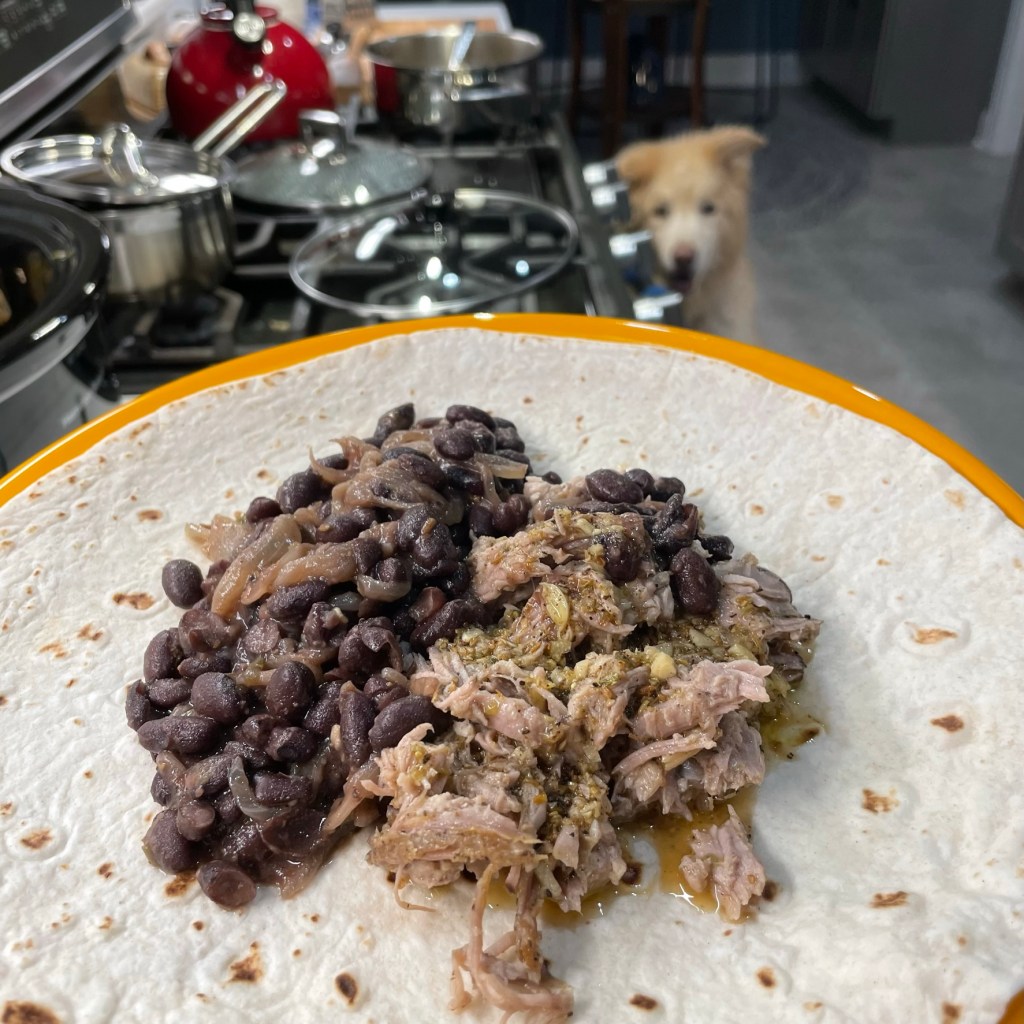
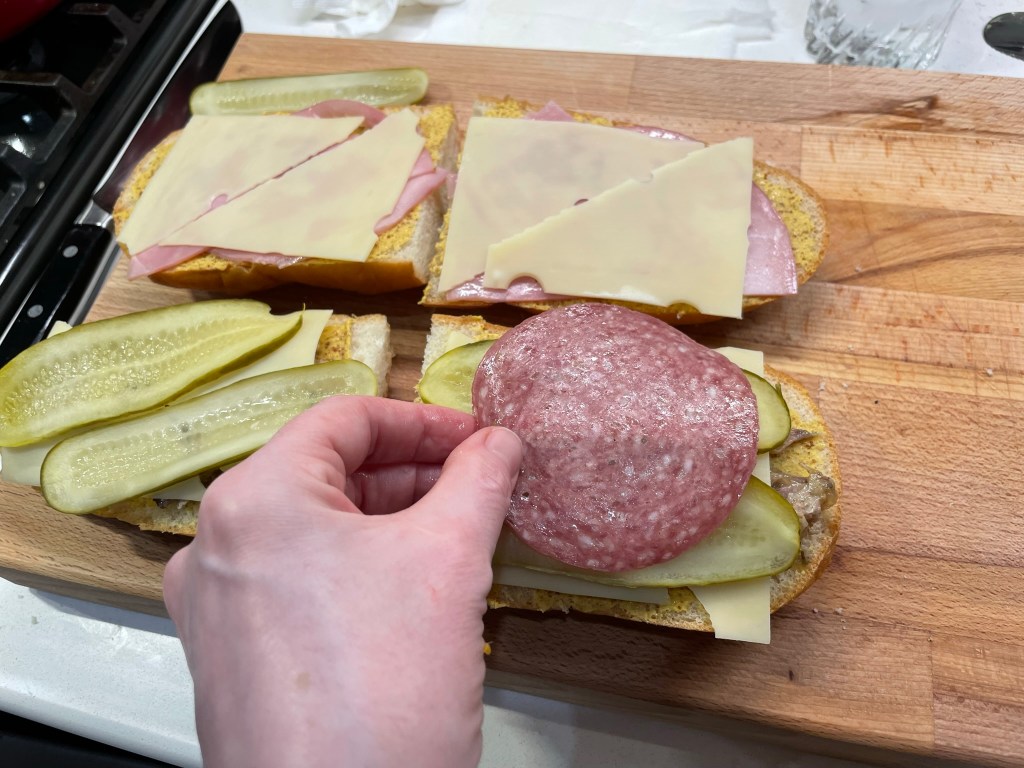
Test doneness of the pork by inserting a fork and twisting lightly. If it shreds easily, it’s ready! We enjoyed the meat on its own that first night, and tried our best a couple of nights later to make Cubano sandwiches, just like Chef Carl Casper and his crew. The bread wasn’t quite right, but it was still pretty darn delicious. 🙂
We made our Cubanos “Tampa style,” with a slice of Genoa salami. My next challenge will be learning to make the right bread!
My version of this Cuban classic has all the right flavors, and it was super easy to make in my slow cooker.
Ingredients
4 lb. bone-in pork shoulder (sometimes called Boston Butt)
2 navel oranges, wedged and juiced (reserve a few of the spent wedges)
Juice of 4 limes
About 2 Tbsp. crushed and minced garlic
2 tsp. cumin seed, toasted and ground
1 tsp. sugar (not authentic, but a touch helps balance the citrus)
2 tsp. black pepper (mine was half smoked)
1 Tbsp. dried oregano (I used half regular, half Mexican)
About 1/4 cup EVOO, whisked in
About 1 Tbsp. kosher salt
1/2 large onion, cut into wedges (used as base in slow cooker)
Directions
Rinse shoulder and wipe dry with paper towels. Salt and pepper both sides and let rest at room temp while you prep the marinade.
Combine the citrus juices, garlic, cumin, sugar, pepper and oregano in a glass measuring cup. Whisk in olive oil and season with salt according to your taste (somewhere between 2 and 3 teaspoons is good).
Place onion chunks and spent orange peels in the bottom of the slow cooker and place the shoulder on top. Pour in about 1/3 of the mojo, then turn the shoulder over and pour in another 1/3, reserving the rest for serving over the tender, shredded pork.
Use the cooker’s high setting for about 45 minutes to get the heat going, then reduce to low setting and cook for 5 hours.
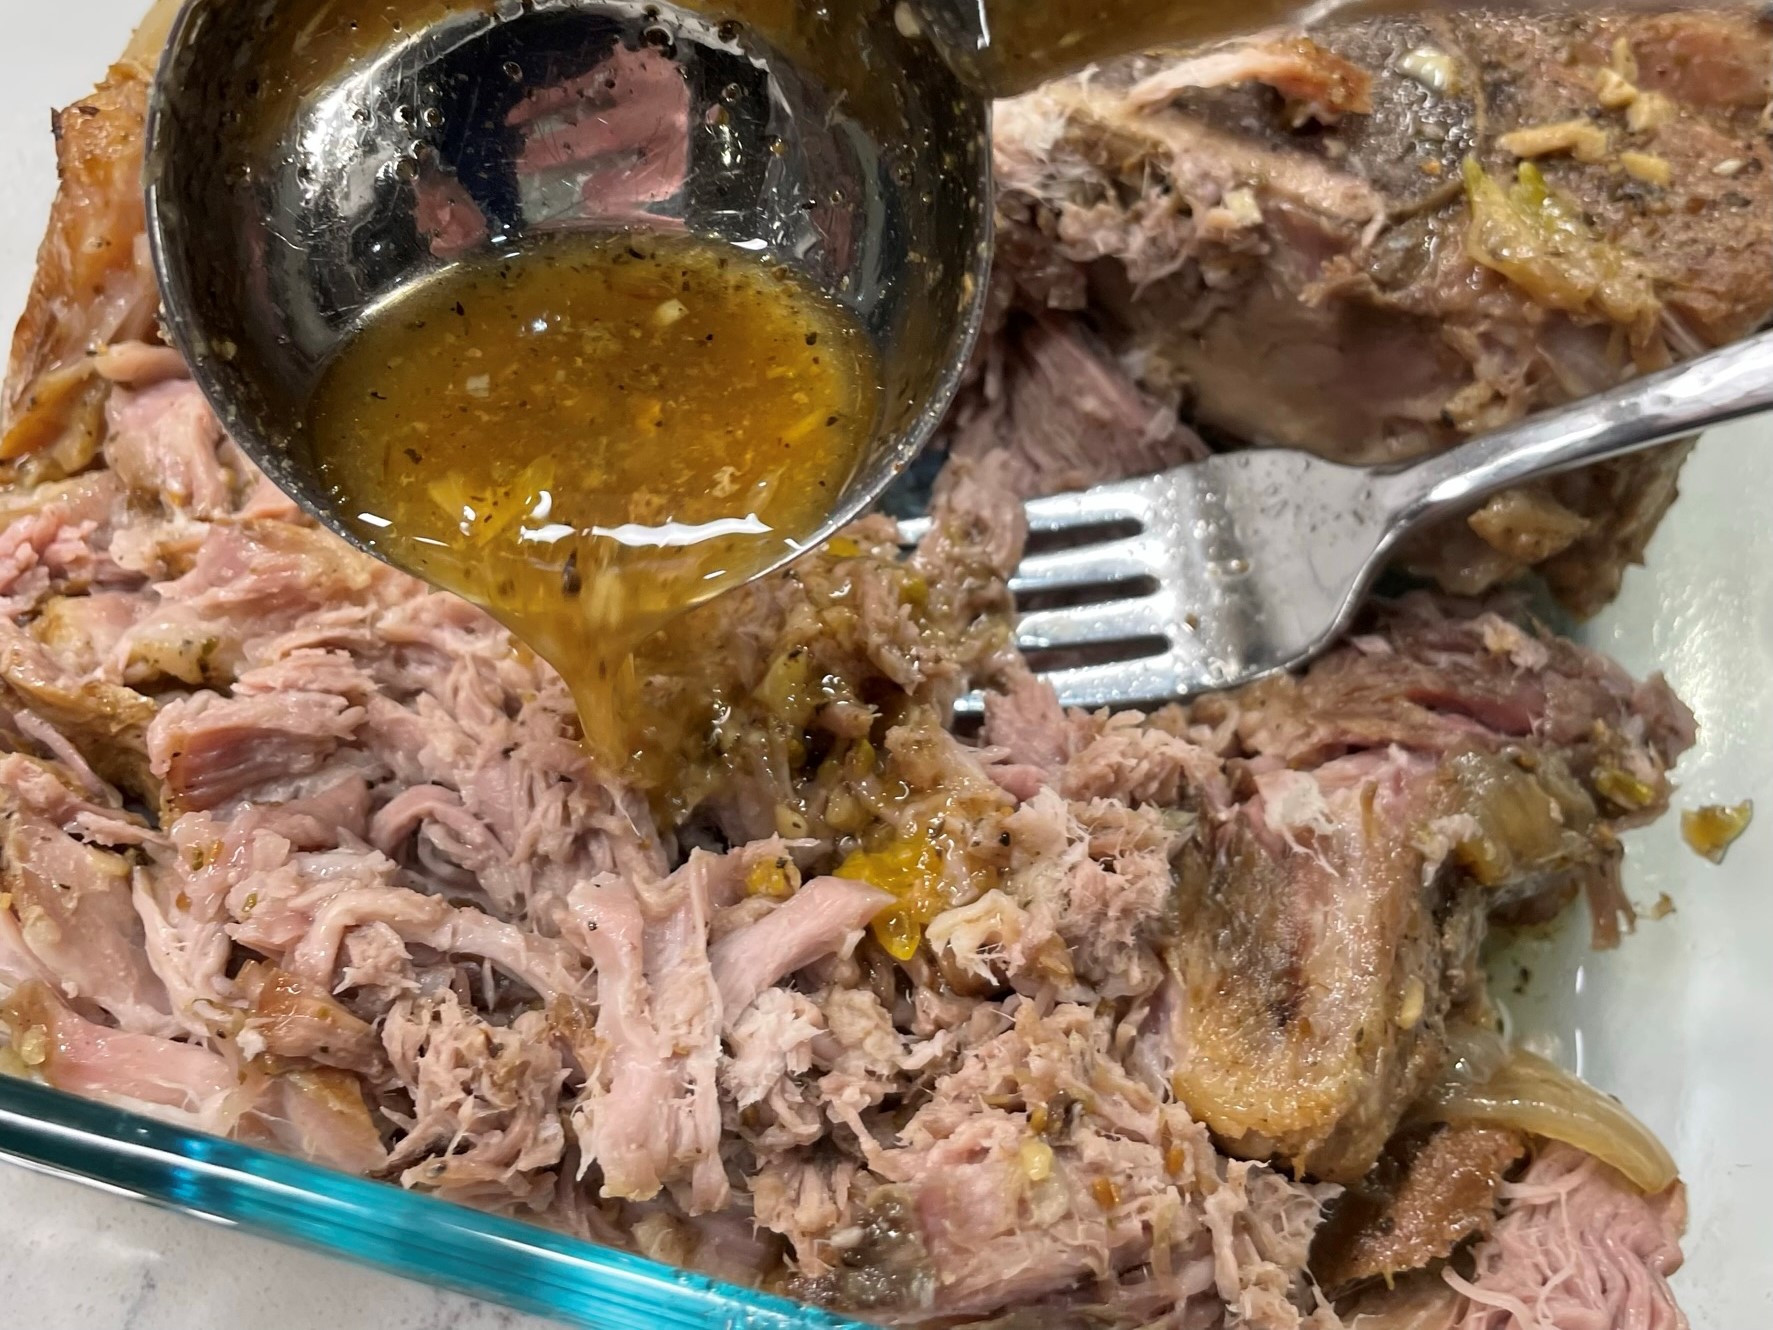
Use tongs to turn shoulder over and continue to cook on low setting for another hour. Transfer shoulder to a glass dish and use forks to shred the meat. Stir the braising liquid and ladle some of it onto the shredded pork. Pour the reserved marinade mixture onto the pork as well. The freshness of the uncooked marinade brightens up the flavors of the tender pork.
Strain the solids from the slow cooker, and keep the remaining liquid for packing the leftover meat. It will retain moisture better in the fridge this way.
Serve pork with jalapeno black beans and, if desired, white rice.
Ingredients
1/2 medium onion, sliced into crescent shapes
1 Tbsp. extra virgin olive oil
1/2 tsp. ground cumin
1 small jalapeno, seeded and minced
A few pinches kosher salt and several twists ground black pepper
2 15 oz. cans black beans, drained and rinsed
1/4 cup vegetable broth or Cuban-style pork braising liquid
Directions
Heat oil in a large saucepan over medium heat. Toss onions and cumin until fragrant, then add jalapeno and season with salt and pepper.
When onions begin to caramelize, reduce heat and add black beans. Add broth or braising liquid and cover to simmer until heated through.
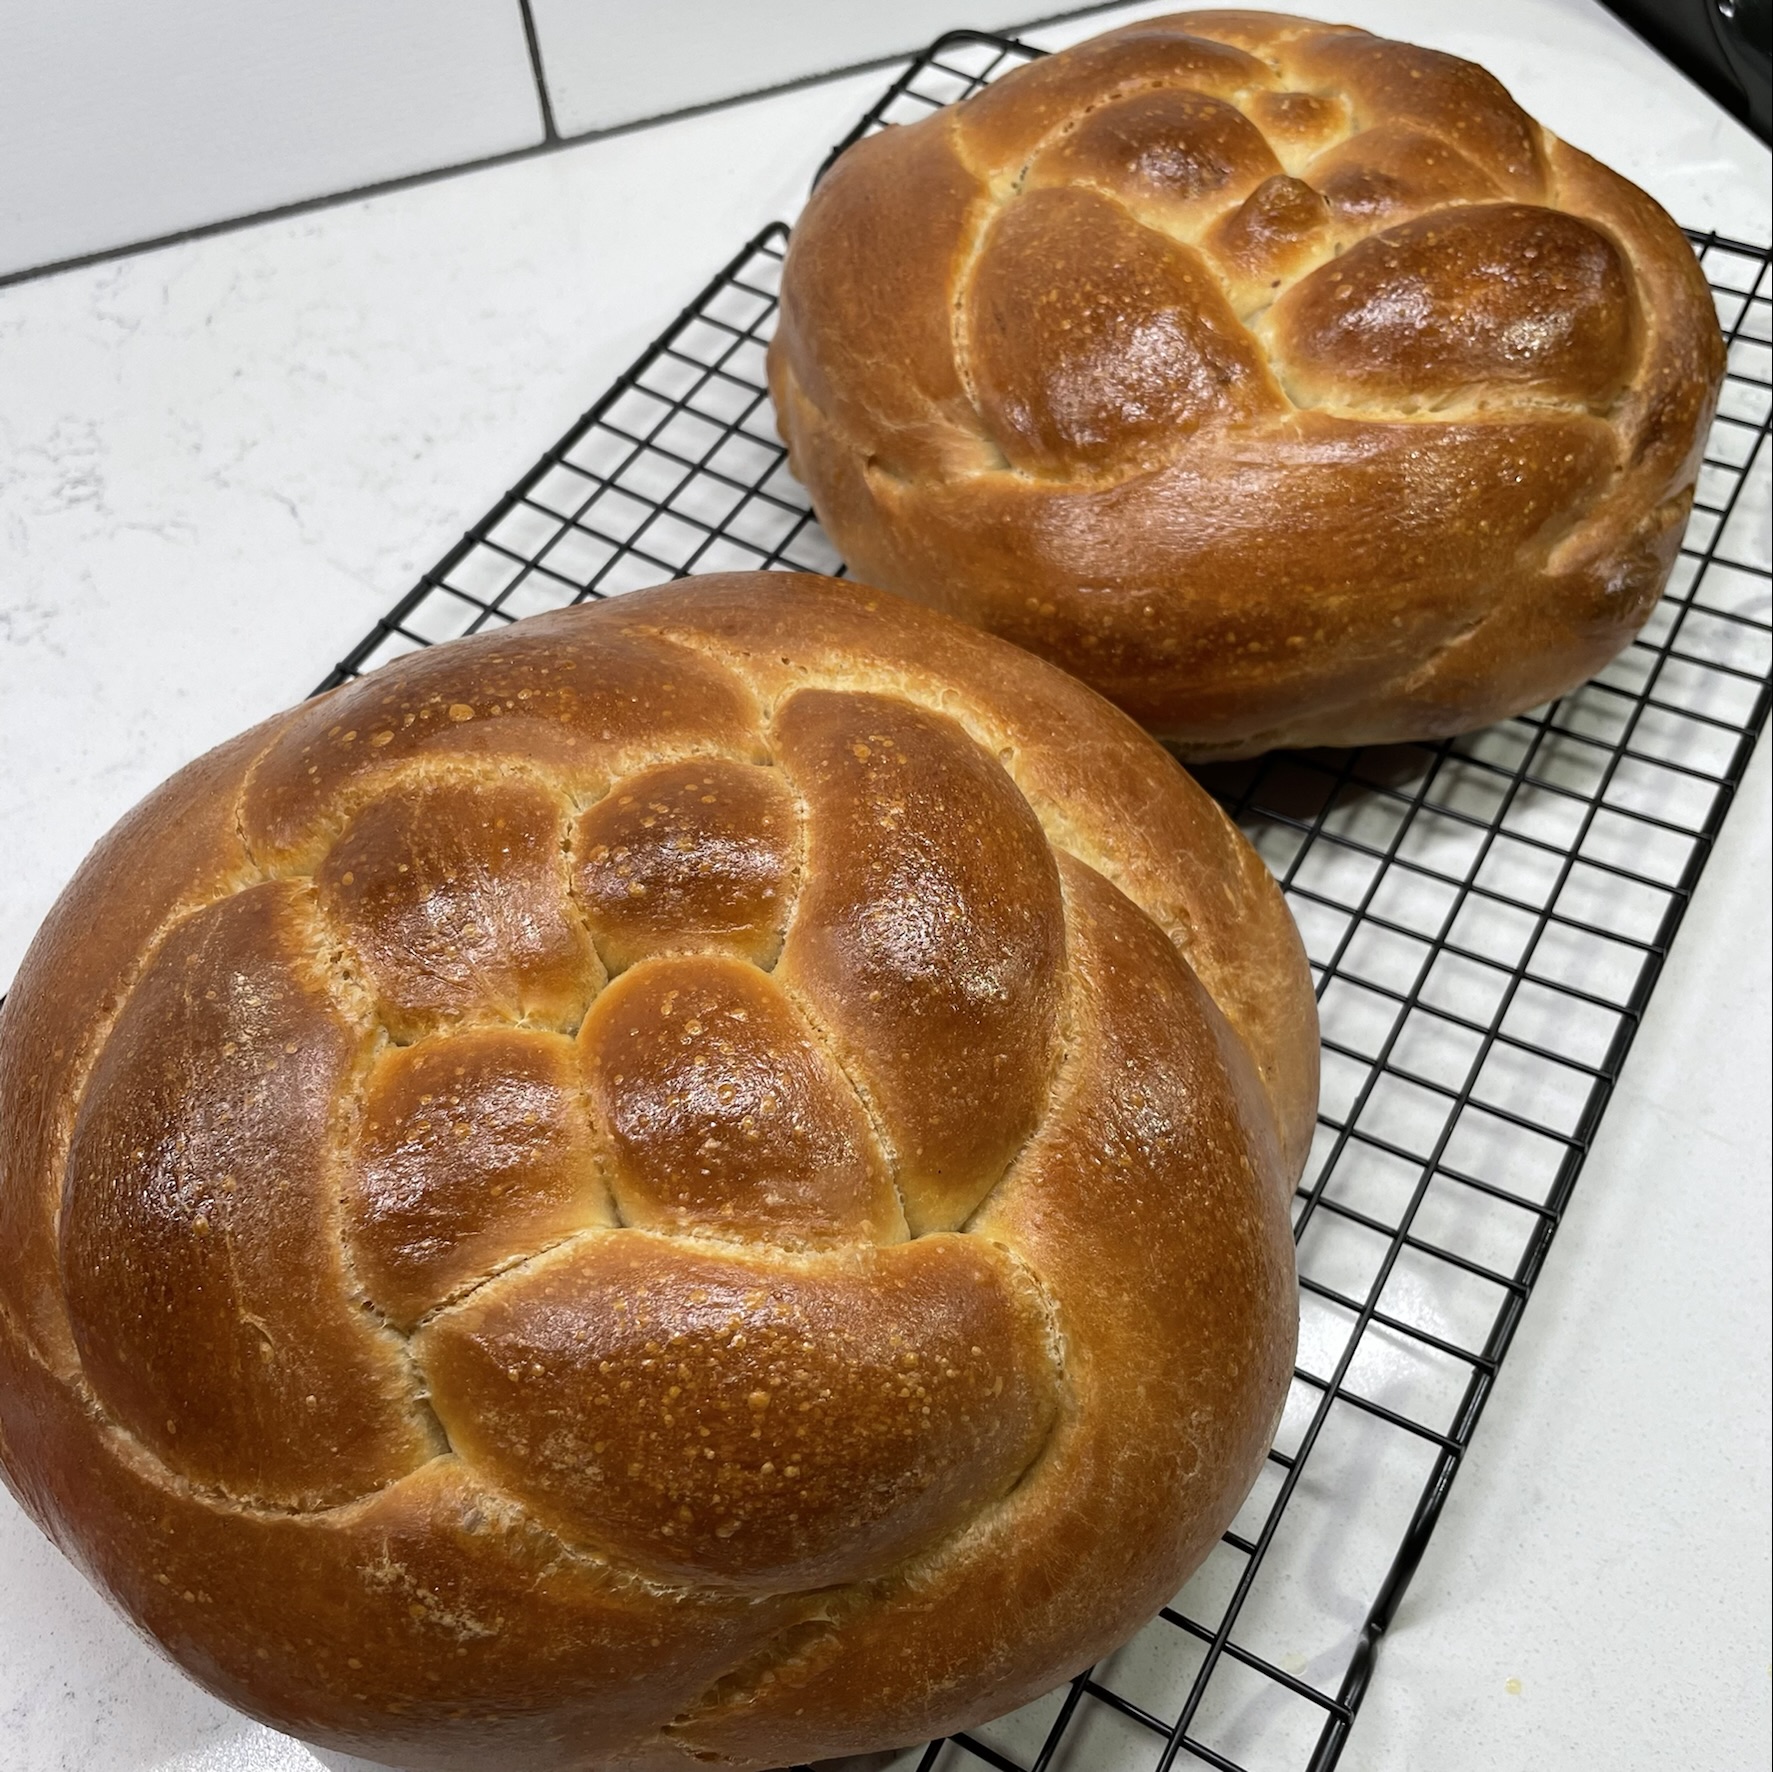
The Jewish High Holy Days are upon us, and that means it’s time for me to share one of my favorite breads. Regardless of your religious background or practices, you have probably heard of, seen or tasted this classic Jewish bread, which is rich with eggs, oil and honey. Challah is a mainstay of Jewish life, and is served weekly at Shabbat services and especially during holidays—or, at least, the ones in which leavened bread is allowed. Rosh Hashanah is a perfect time to enjoy this round version of challah, and there’s no doubt every last crumb will be gone before the fasting of Yom Kippur begins next Tuesday.
The great thing about challah, besides the fact that it is a sweet, soft and tasty bread, is that you don’t have to be Jewish to enjoy it or to make it (I’m proof of both points). From the time I became seriously involved with my husband, Les, I have been very interested in learning the foods of his Jewish heritage, and challah has become a favorite in our rotation. My sourdough version is a bit sturdier than a yeasted loaf, thanks to the higher protein bread flour that ensures a good oven rise. But the texture is still airy and it makes excellent toast, French toast and bread pudding.
There are two main challenges I’ve faced in making sourdough challah, but both can be resolved with time and practice. The first is the challenge of getting this dough to rise; any bread dough with a high volume of sugar (or honey, in this case) struggles against the yeast action, and challah is even more so because it contains so much heavy oil. The best way to win this battle is simply to give it more time. From start to finish, this bread takes almost a full day, but most of that time is spent just waiting—for the pre-ferment to be ready, for the dough to double in size (which it hardly ever does), and for it to rise for baking. Make it on a day that you have lots of other things going on at home so you aren’t tempted to stand and watch it, which I have learned the hard way doesn’t make it happen any faster.
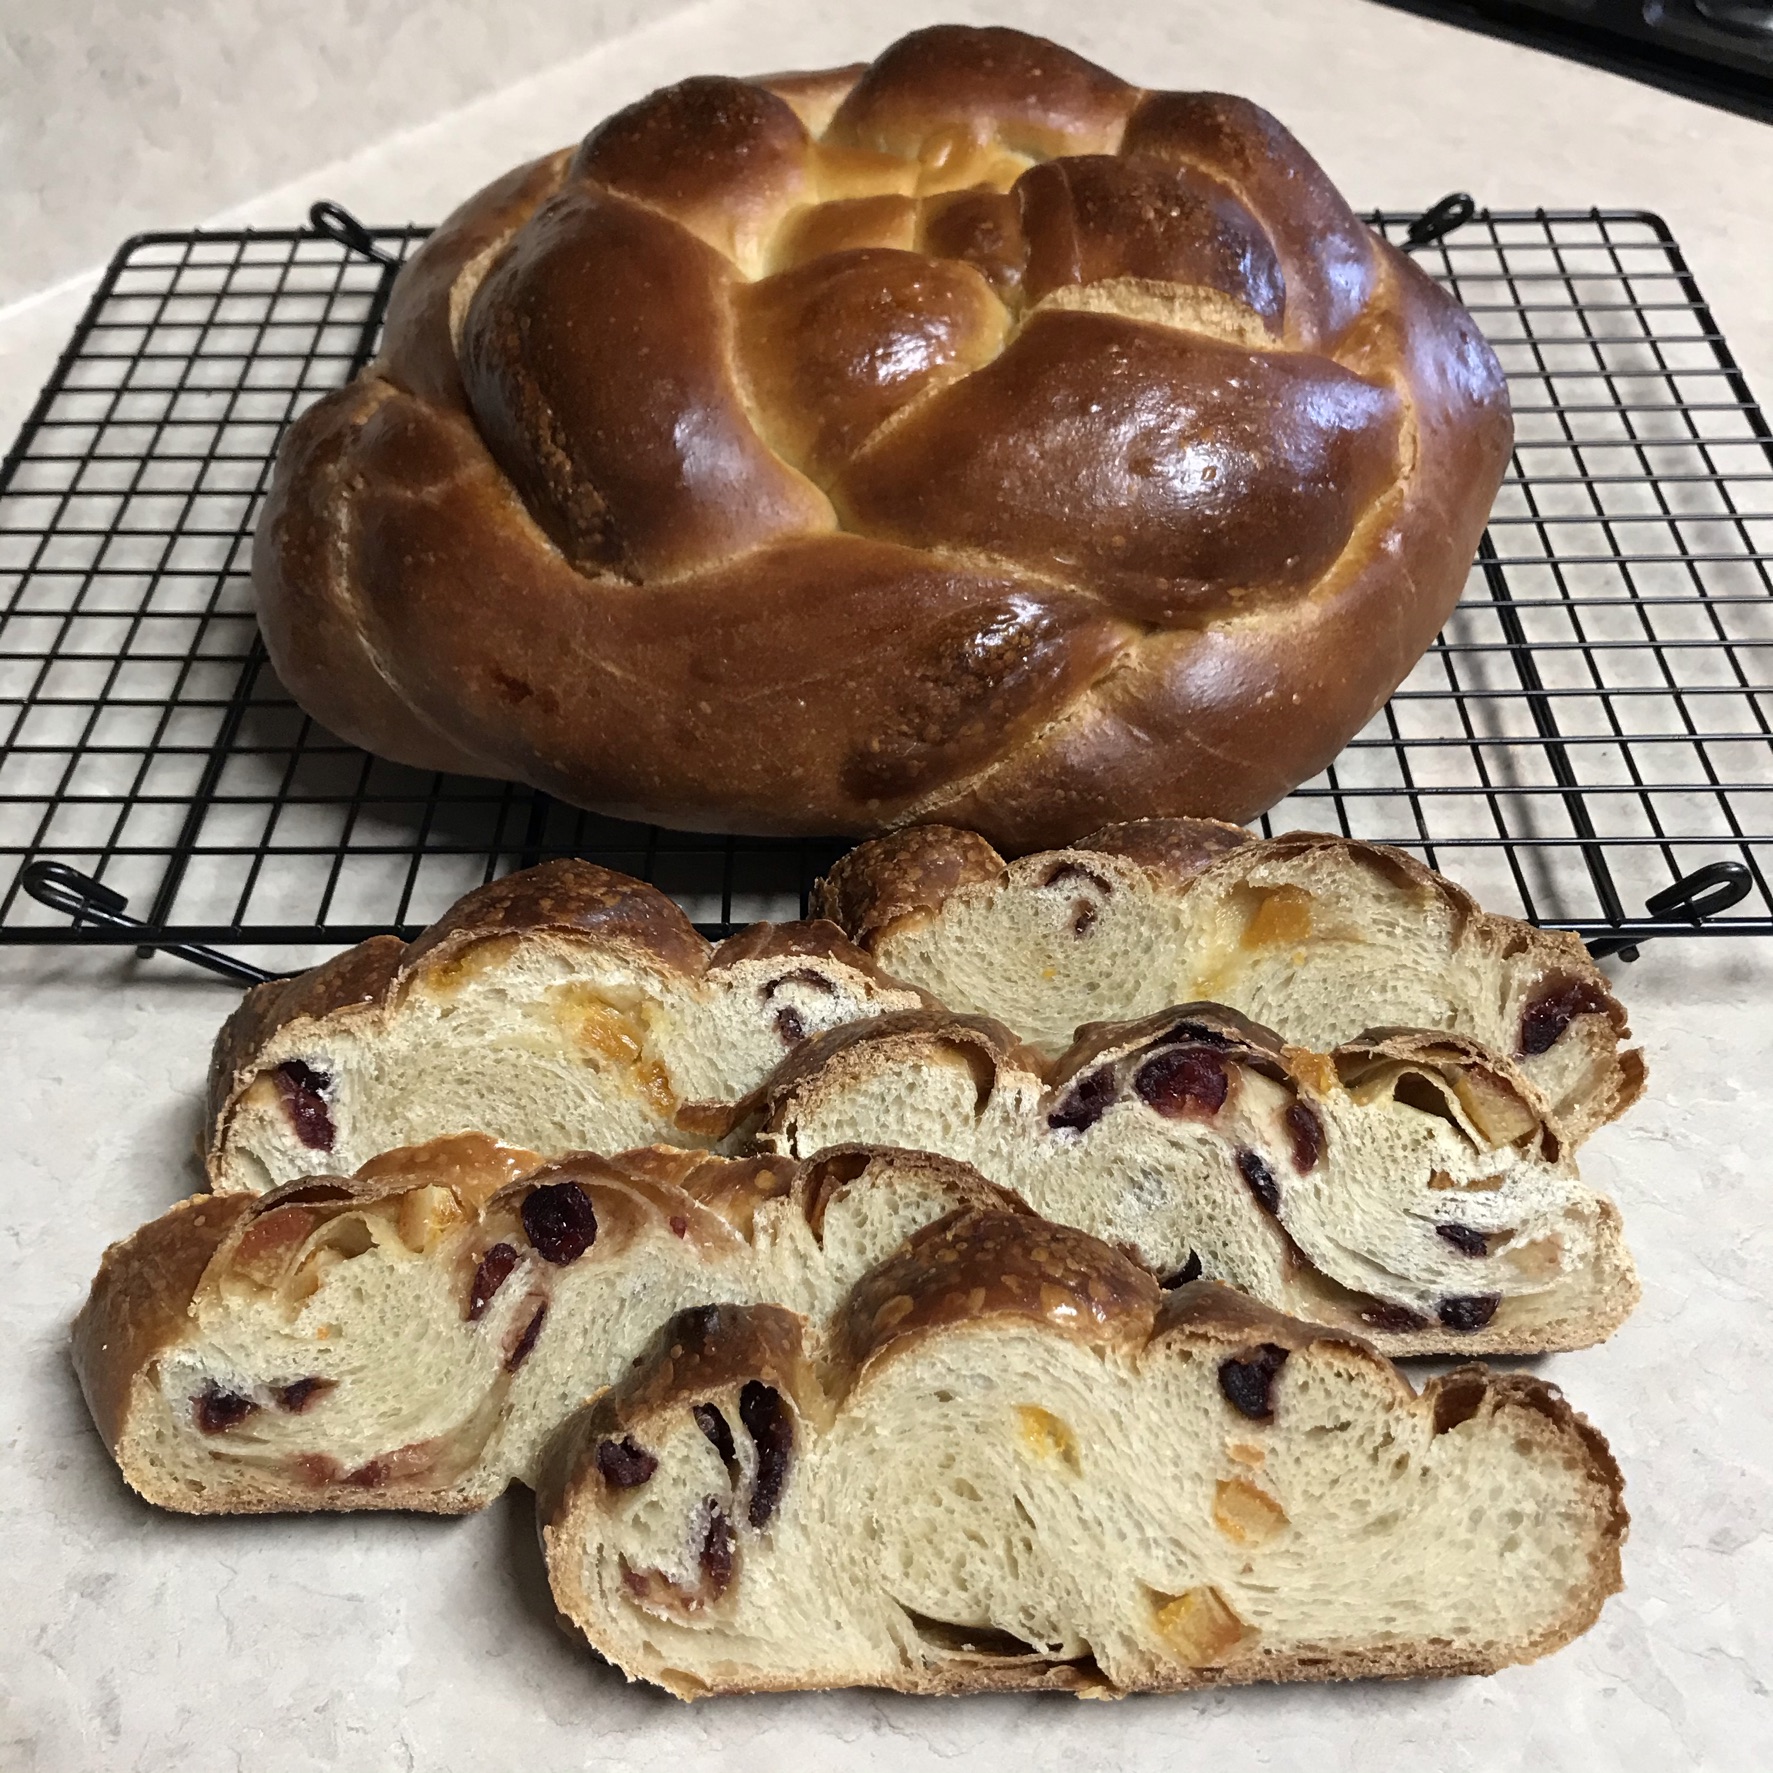
The second challenge with making challah (sourdough or otherwise) is creating the beautiful, braided shapes. This is not nearly as complicated as you might think, and I’ll share my own technique for doing this, whether you want to try making a basket-weave round (as in the featured photo) or a simpler straight braid, which is no more difficult than braiding a kid’s hair. For Rosh Hashanah, I like to make challah in a round, as its shape is a symbol for coming full circle into a new spiritual year.
For extra flair and flavor, I use orange- or lemon-infused olive oil in my dough because I love the aroma of the challah in the oven and the intoxicating citrus scent in the finished loaf. Extra virgin olive oil does impart a slightly stronger flavor to the challah, but I find it delicious. Also, I frequently add dried fruit to the dough as it is rolled up for braiding, but the photos I’ll share are mainly without it. If you do choose to add dried fruit, such as raisins or cranberries, don’t concern yourself with rehydrating it first; it bakes up beautifully straight from the package, and for your effort, you’ll be rewarded with beautifully studded slices. Did I mention that it is amazing in French toast? 🙂
This is an old photo of a loaf I made before our kitchen remodel last year. The braids are stuffed with dried cranberries and oranges.
This bread requires a ripe sourdough starter, an intermediate overnight feeding, about 3 hours to ferment on baking day, and up to 5 hours for final rise after shaping, so plan accordingly. Don’t let this lengthy process alarm you; if you make the starter the night before, you only need about an hour of hands-on time for making the dough and about half an hour to shape it for proofing. As I said, there’s a lot of waiting. All my measurements are metric, so please depend on a digital scale for getting your ingredients right.
You’ll begin the night before you plan to bake, with creation of a firm starter, which is essentially an in-between feeding that bridges the basic wet starter and the final dough. This type of starter, also called “levain,” uses less water than a wet starter, and it concentrates the rising power of the culture in your final dough. Begin with a slight amount of ripe wet starter, stirring in water to make a slurry and then flour and mixing it together until no dry flour remains. The firm starter must ferment several hours, so it’s easiest to do this the night before and leave the bowl covered at room temperature, then bake the next day. If you wish, you can make the firm starter farther ahead and then refrigerate it for up to one day.
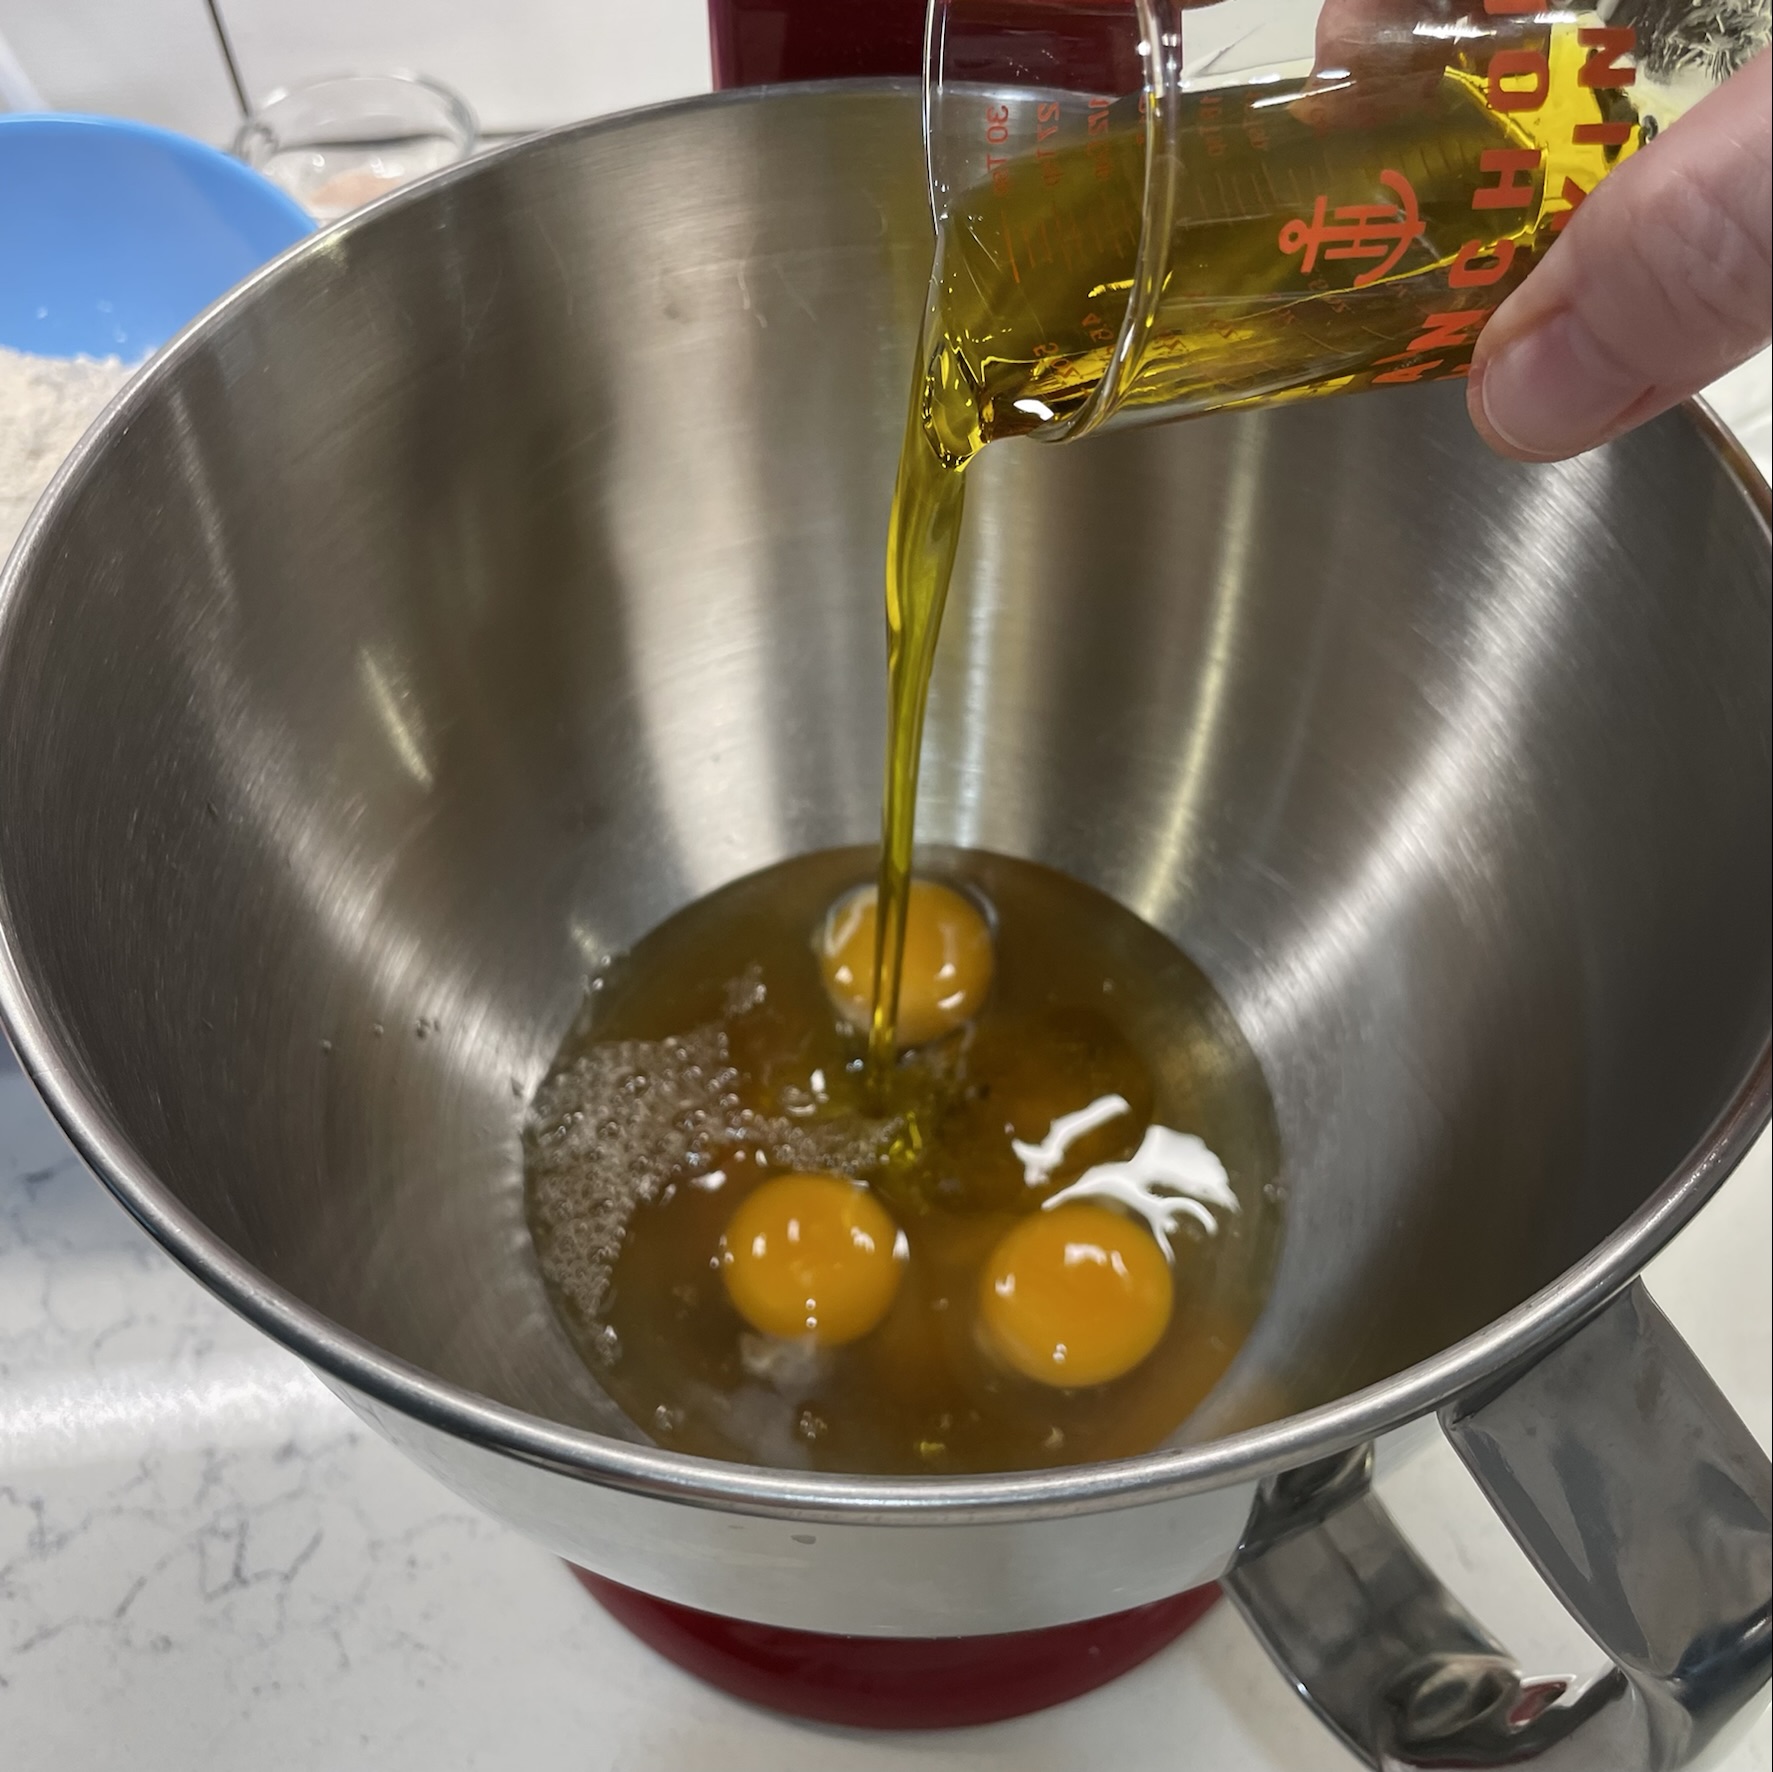
The next morning, measure out your flour and get all the other ingredients lined up, including your firm starter, which should be cut into pieces for easy introduction to the final dough. Most of the moisture in this dough comes from oil and eggs, so there is very little water to measure for the final dough. In this picture, my honey is stirred together with the small amount of water, but I usually measure the oil first and then measure the honey in the same cup—it slides right out without sticking. You’ll have an easier time mixing the eggs into the dough if they are closer to room temperature, so give them a few extra minutes on the counter before you begin.
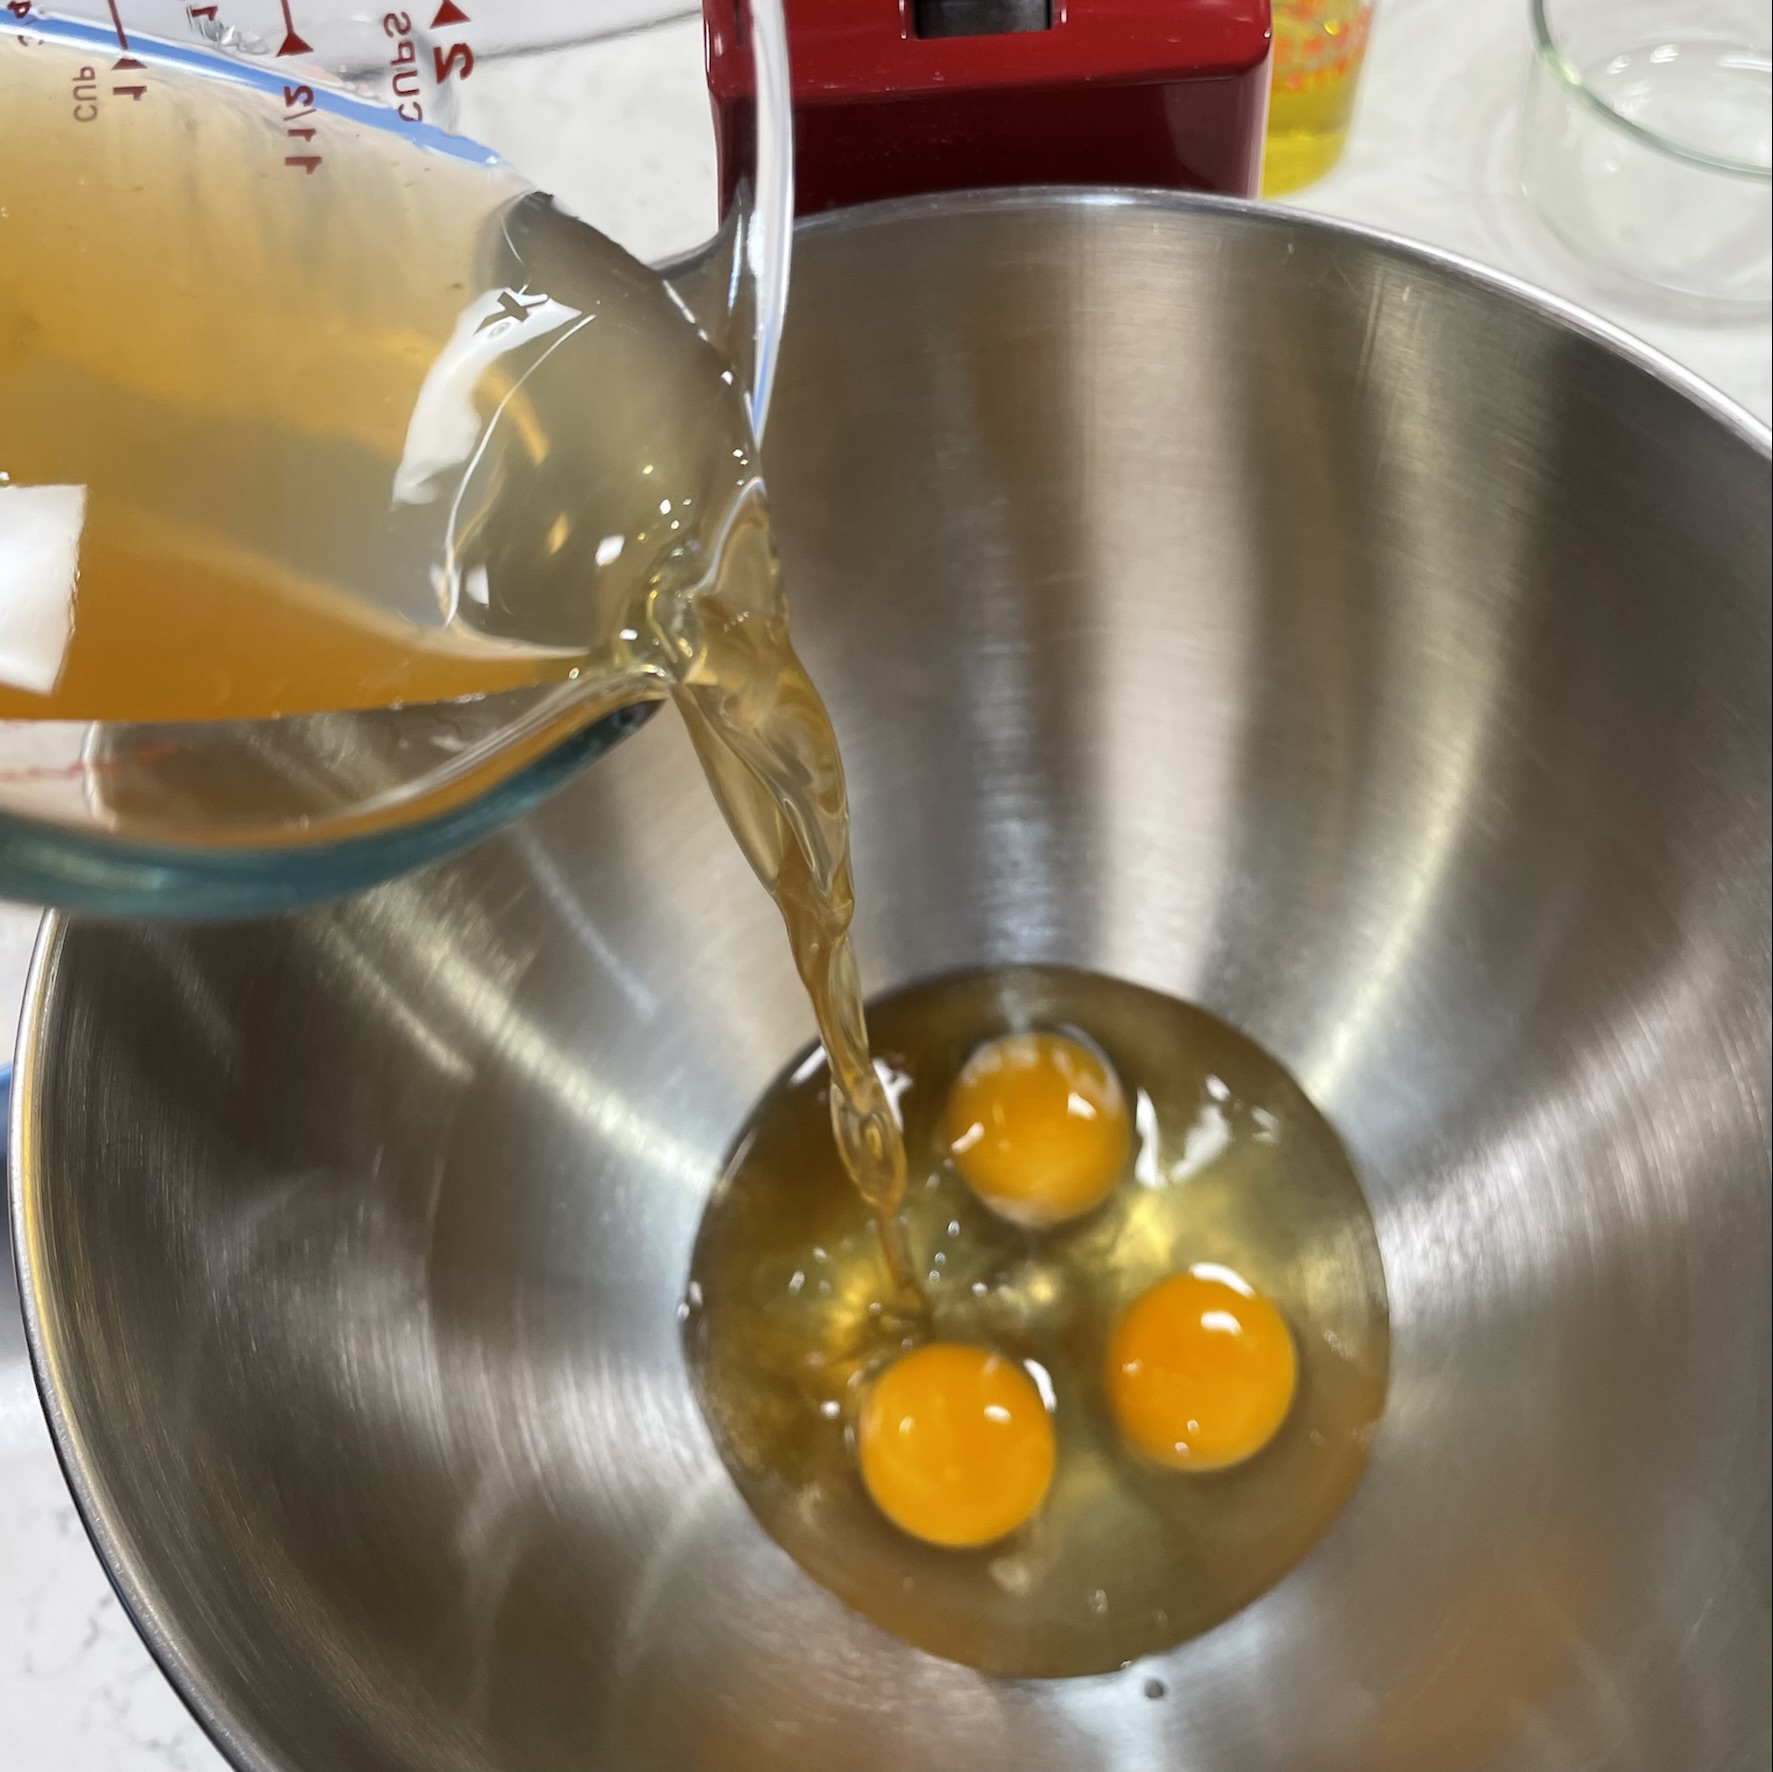
Challah ingredients, clockwise from the top: honey and water, salt (I like to use mineral-rich pink salt), whole large eggs, flour (I use a blend of high-protein bread flour and white whole wheat) and olive oil (mine is blood orange-infused extra virgin).
In the bowl of a stand mixer (or in a really large mixing bowl, if you don’t mind mixing by hand), combine the eggs, oil, honey and water and whisk until even. Add the flour all at once. Mix until all flour is completely incorporated, about two minutes in a mixer. Sprinkle the salt over the dough, cover the bowl and let it rest for about 30 minutes. This gives the flour time to absorb the moisture, and kneading is easier at that point.
Mixing the honey with the water makes it easier to pour. Add it to the eggs in the bowl of a stand mixer.
This is a rare occasion when the oil is added to the dough early on. Mix these wet ingredients until completely blended.
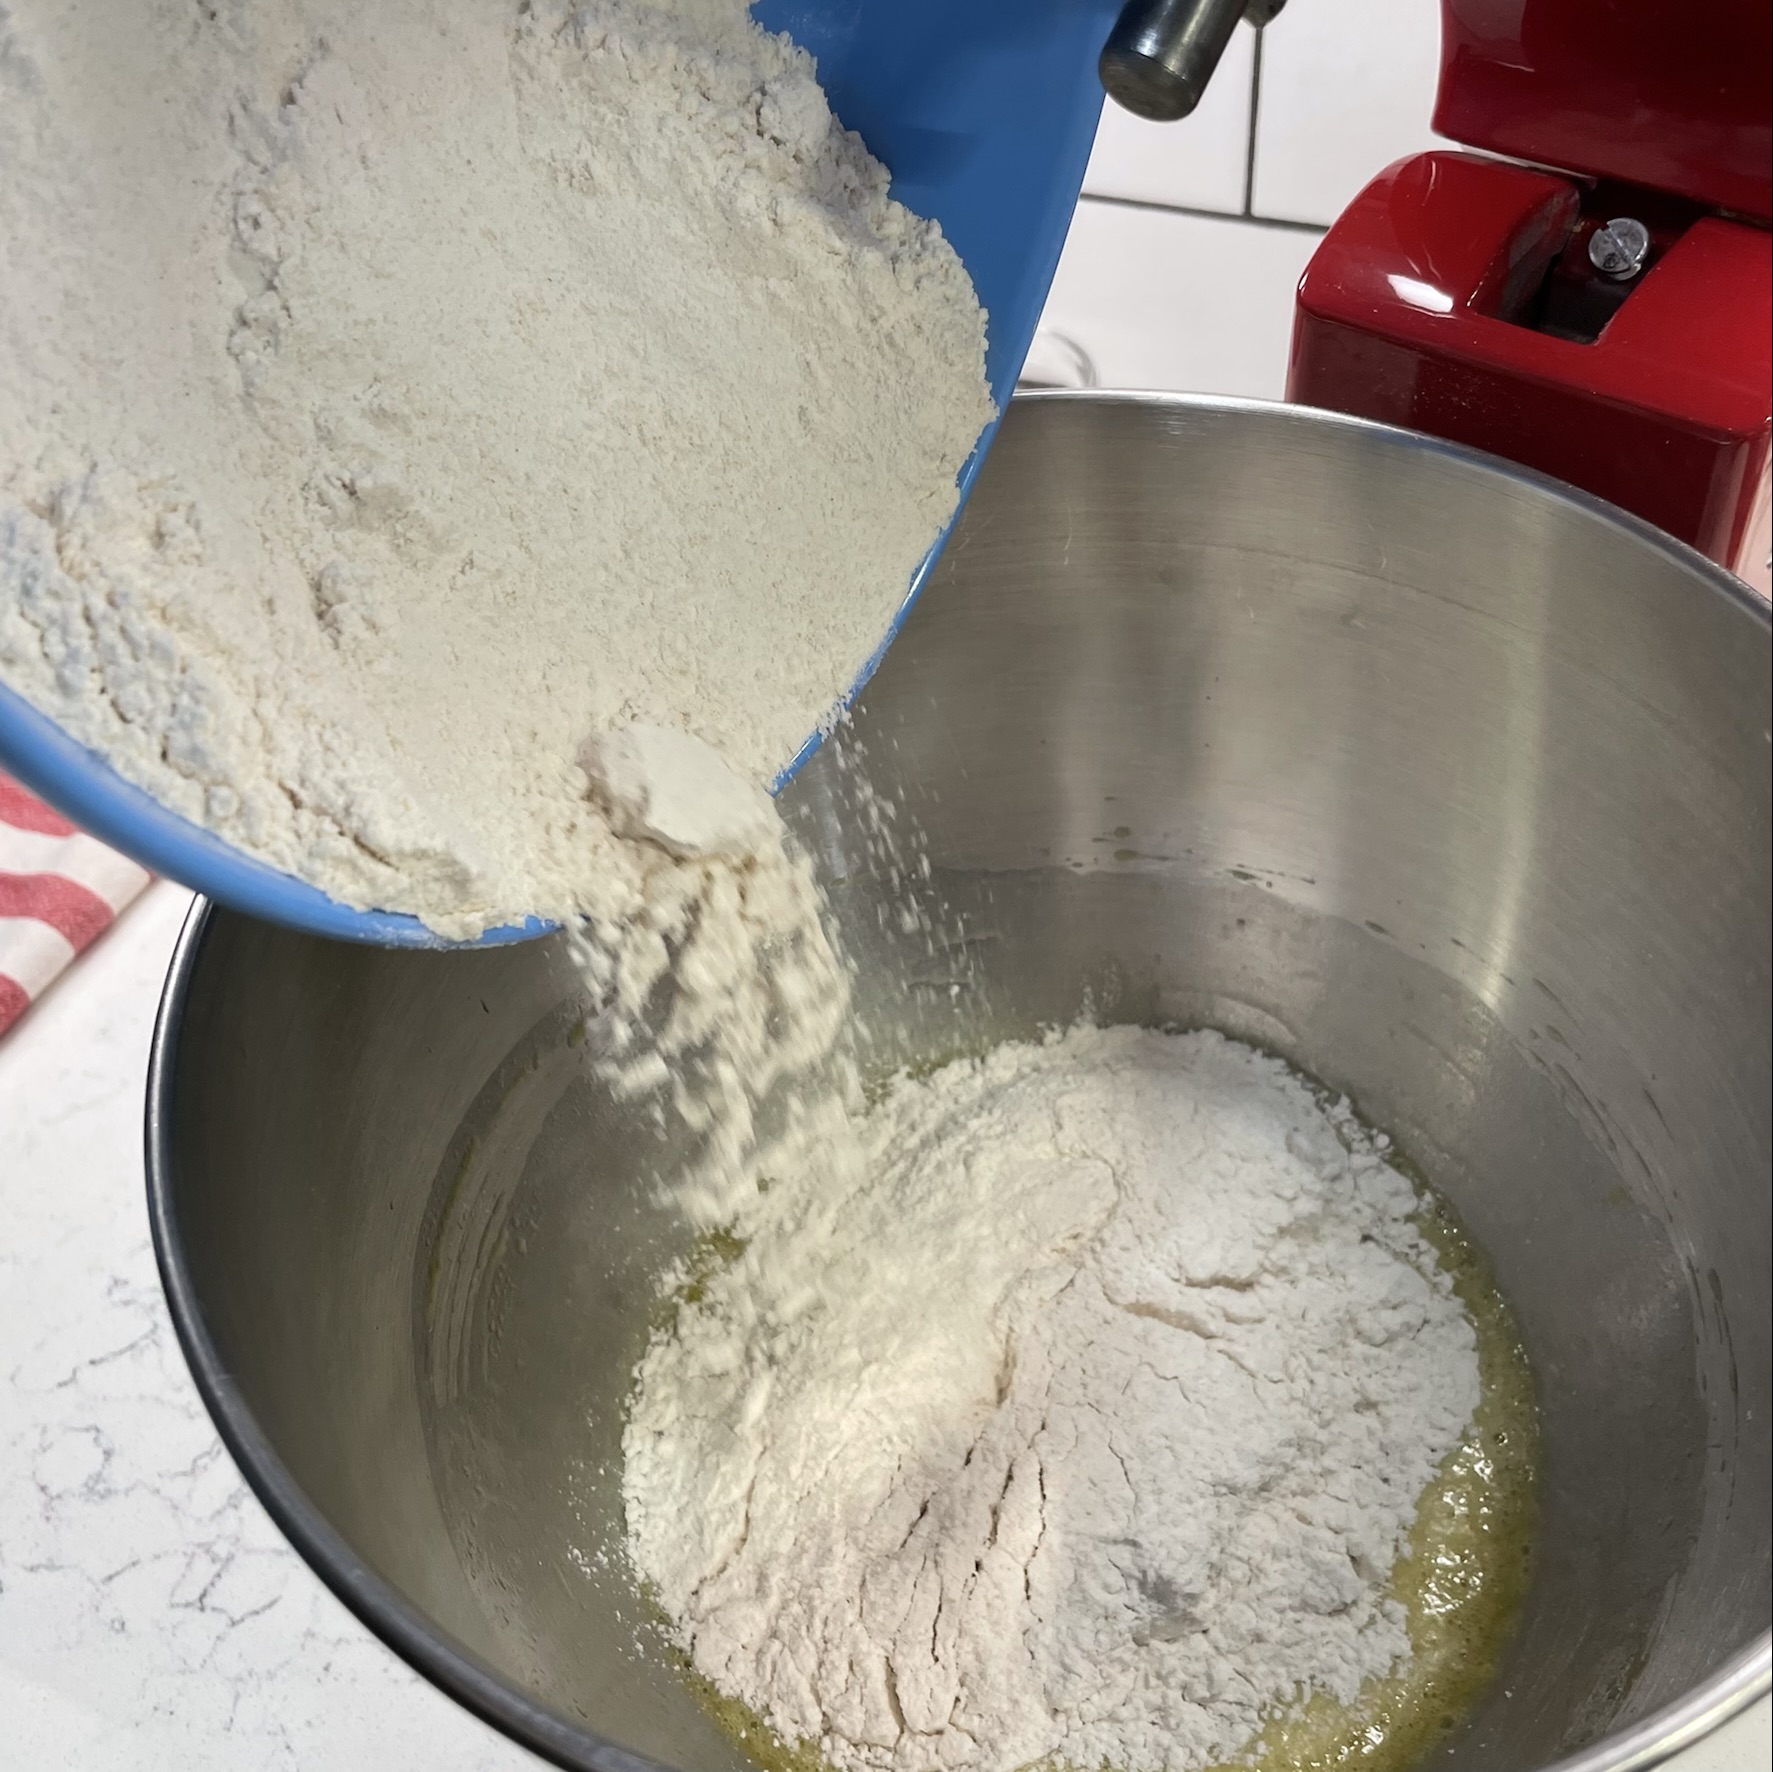
Next, add the flour all at once.
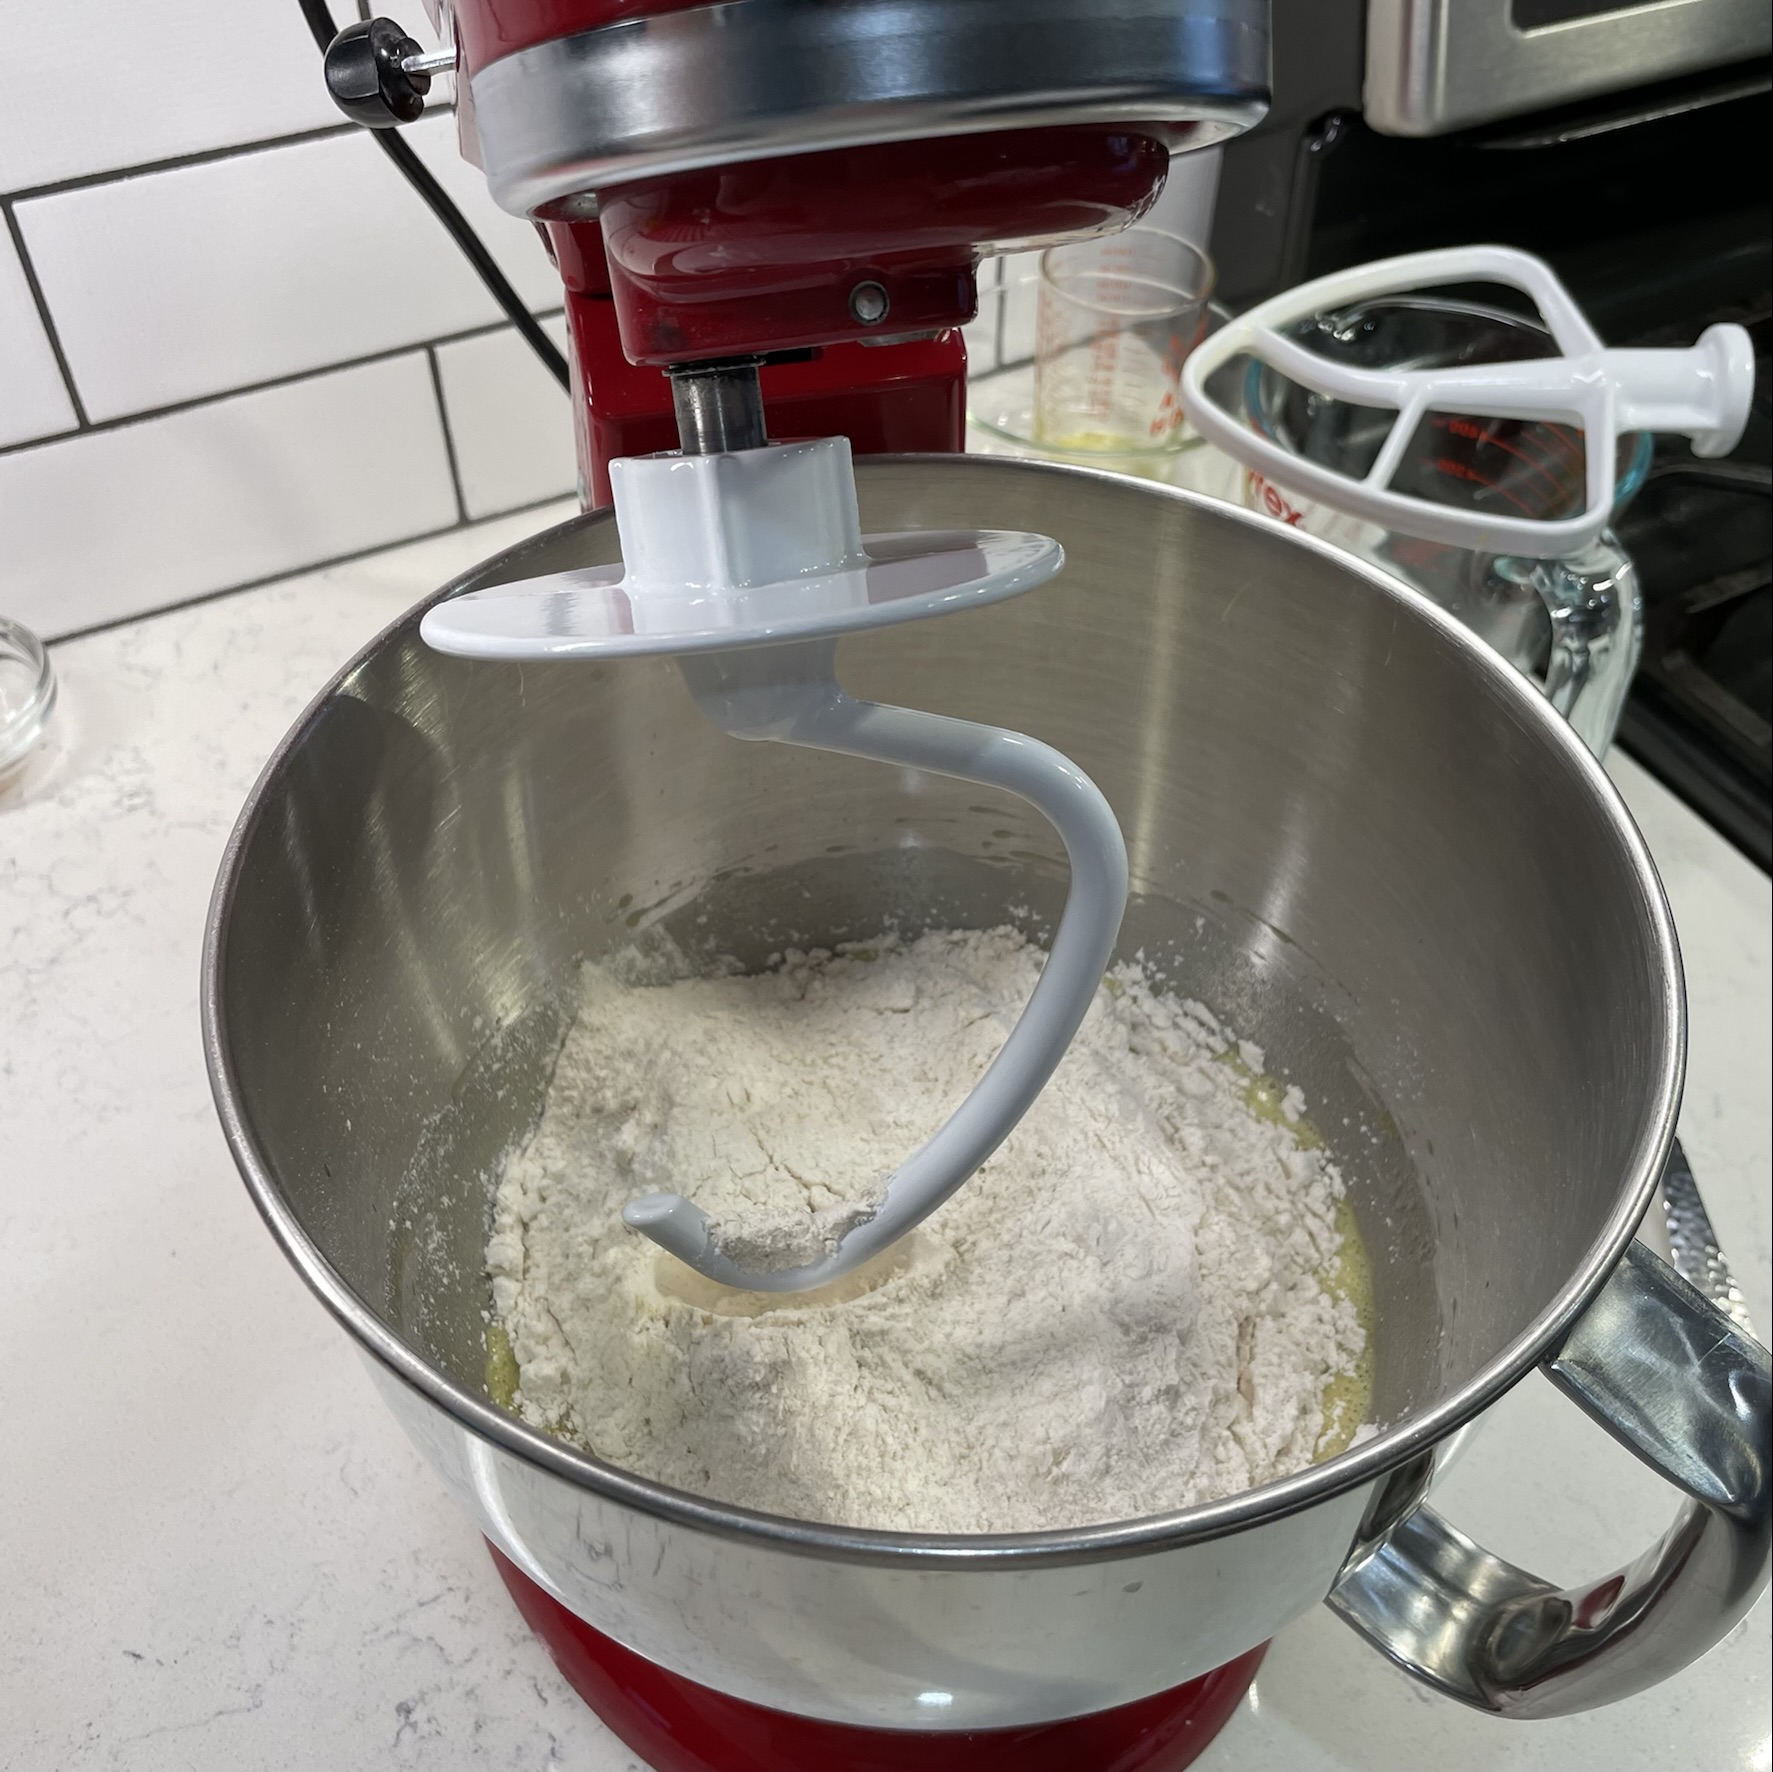
I use the dough hook for this initial mixing. It replicates the action of mixing by hand better than using the paddle, and produces less splash.
Blend just until the dough comes together on the hook, with no flour remaining on the sides of the bowl. Swipe it off the hook to rest in the bowl for about 30 minutes.
Sprinkle the salt over the dough, which will be very dense at this point. As the dough rests, the flour will absorb moisture and the salt will begin to dissolve.
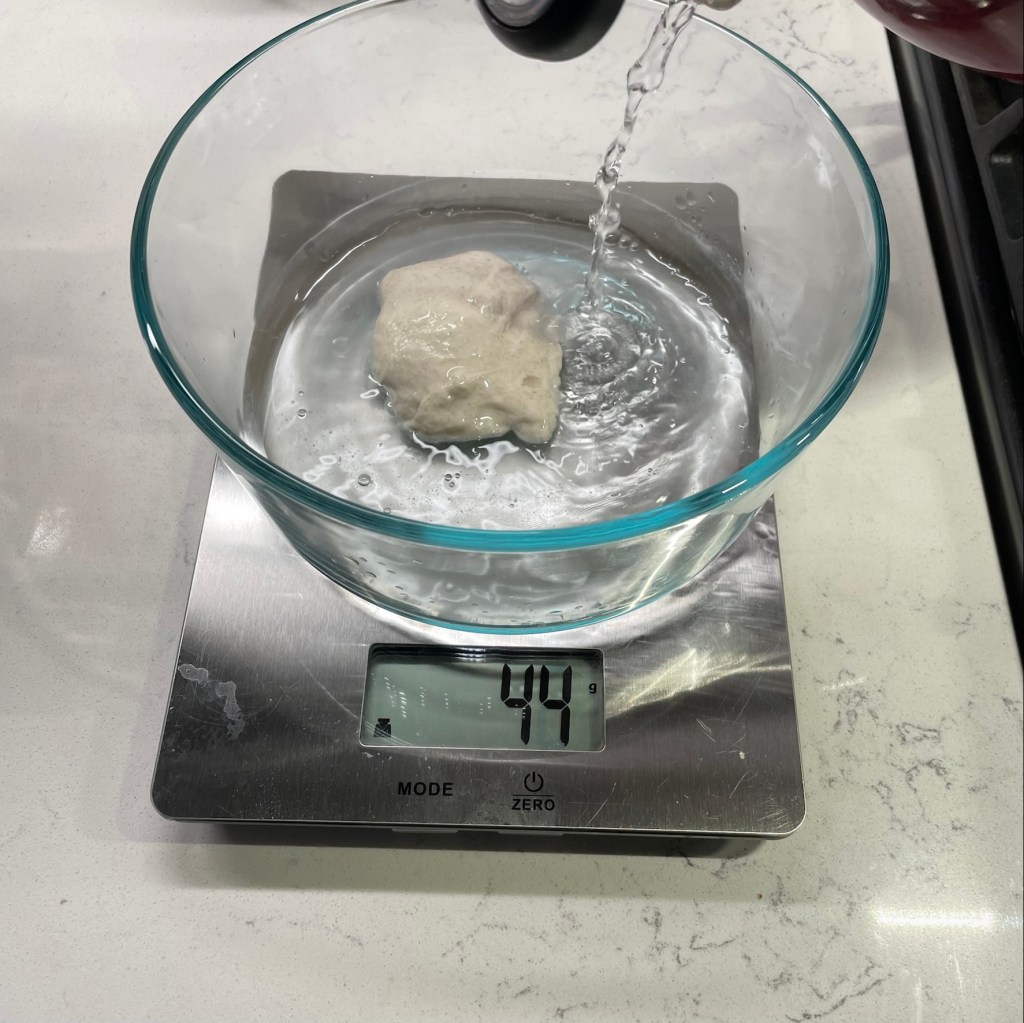
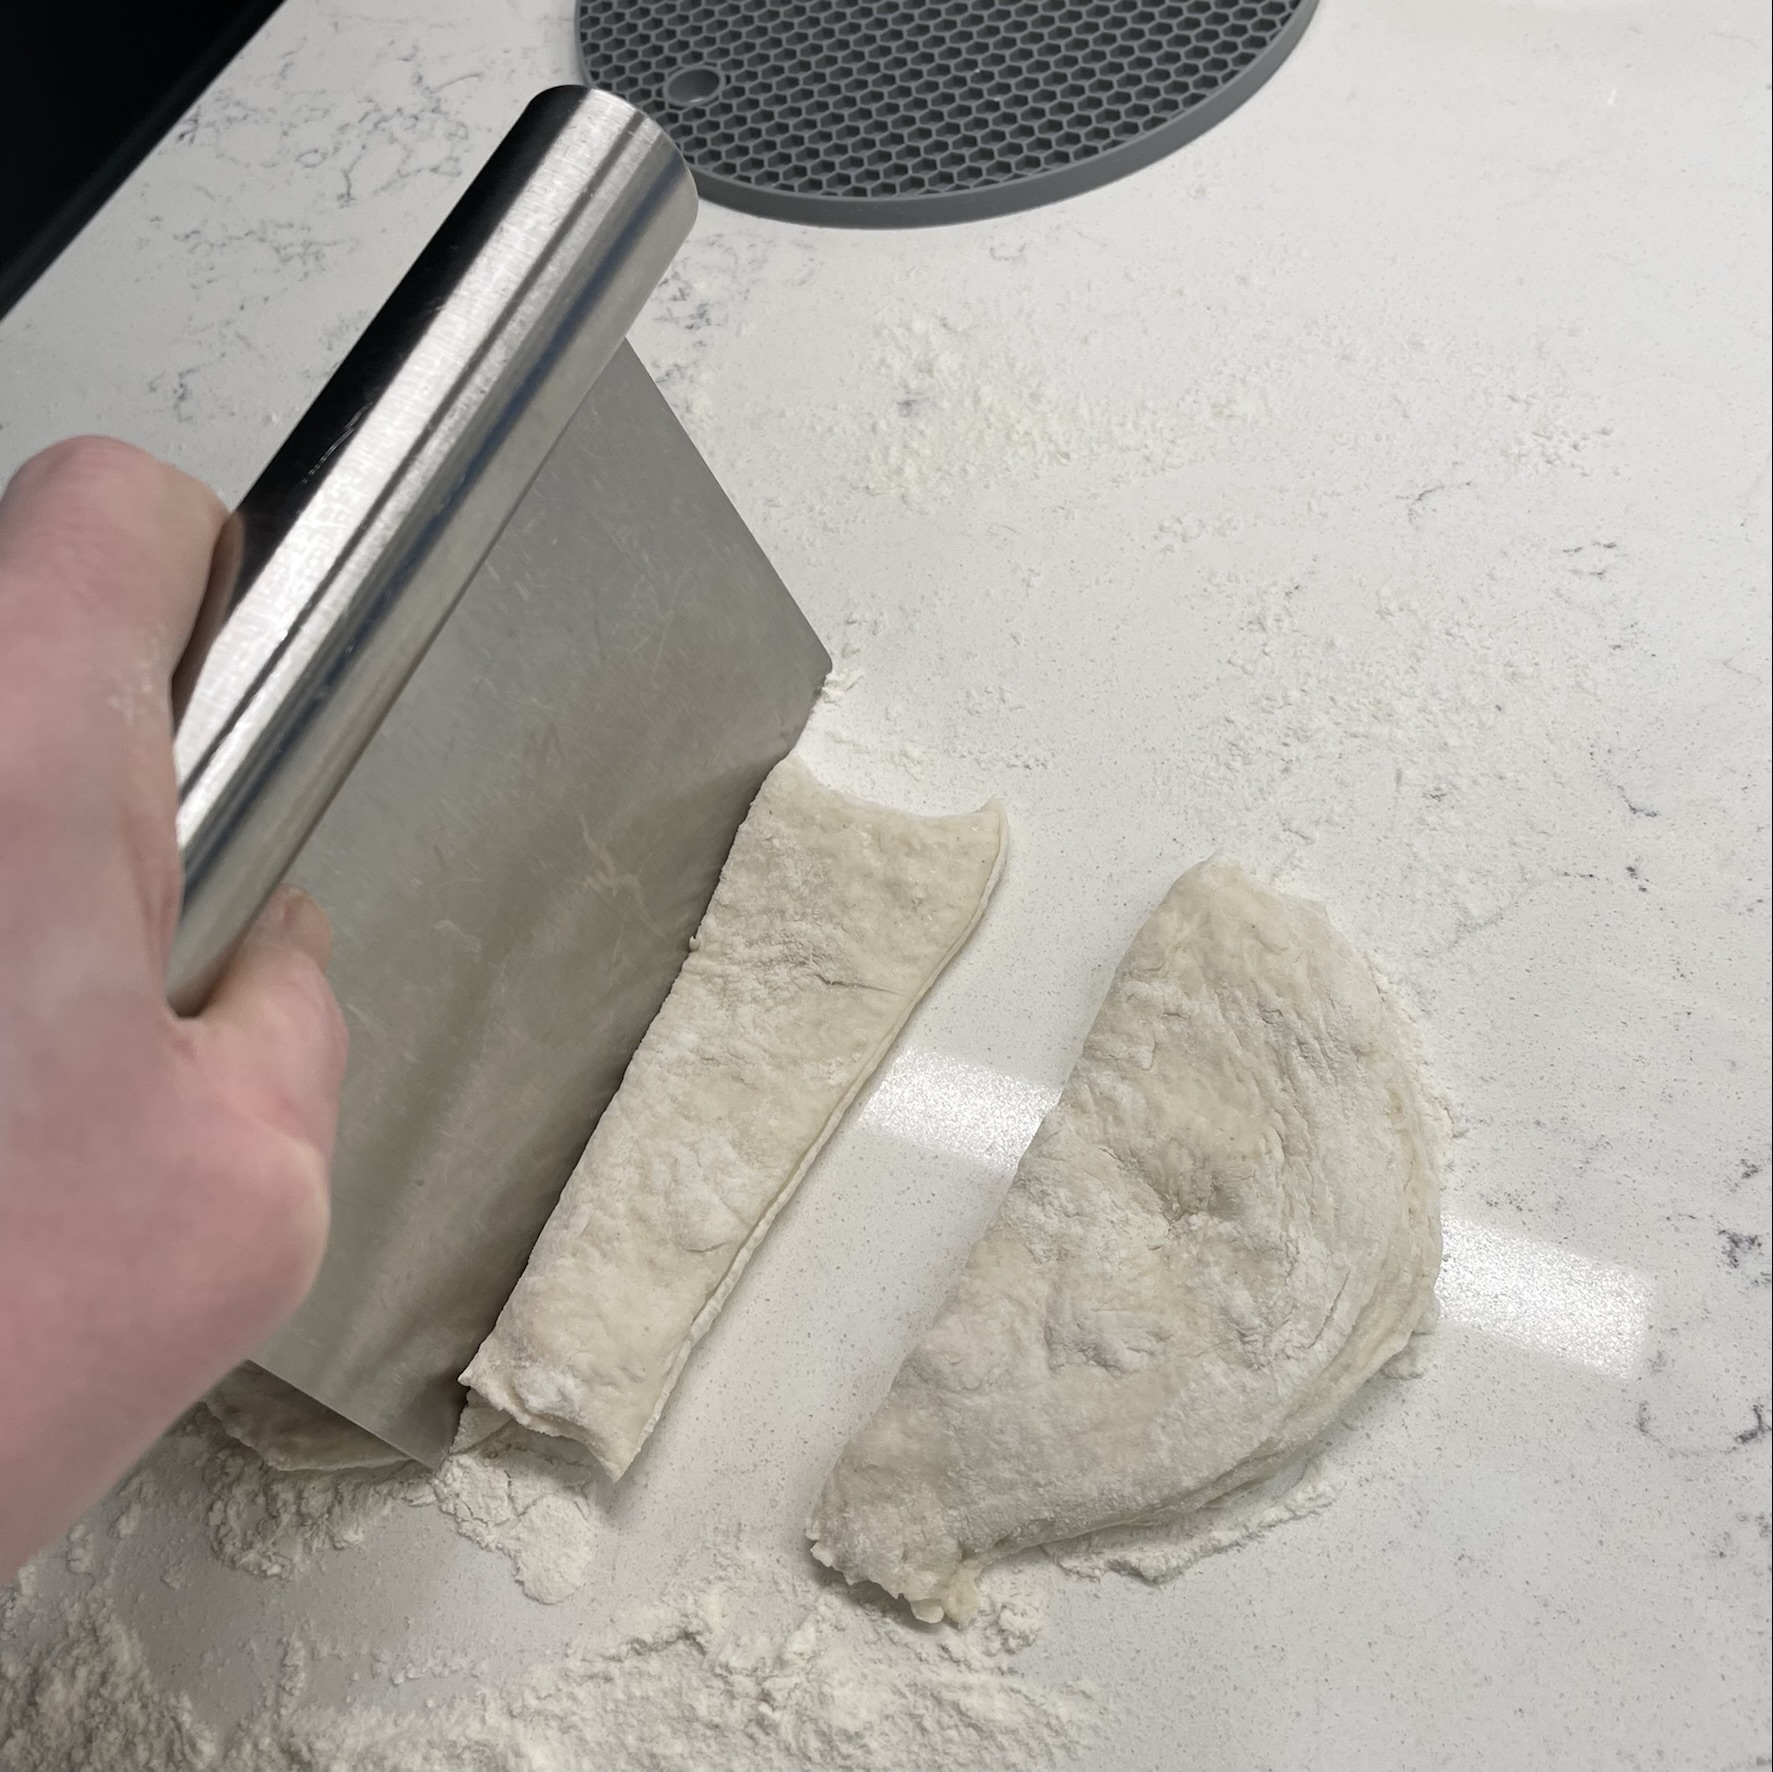
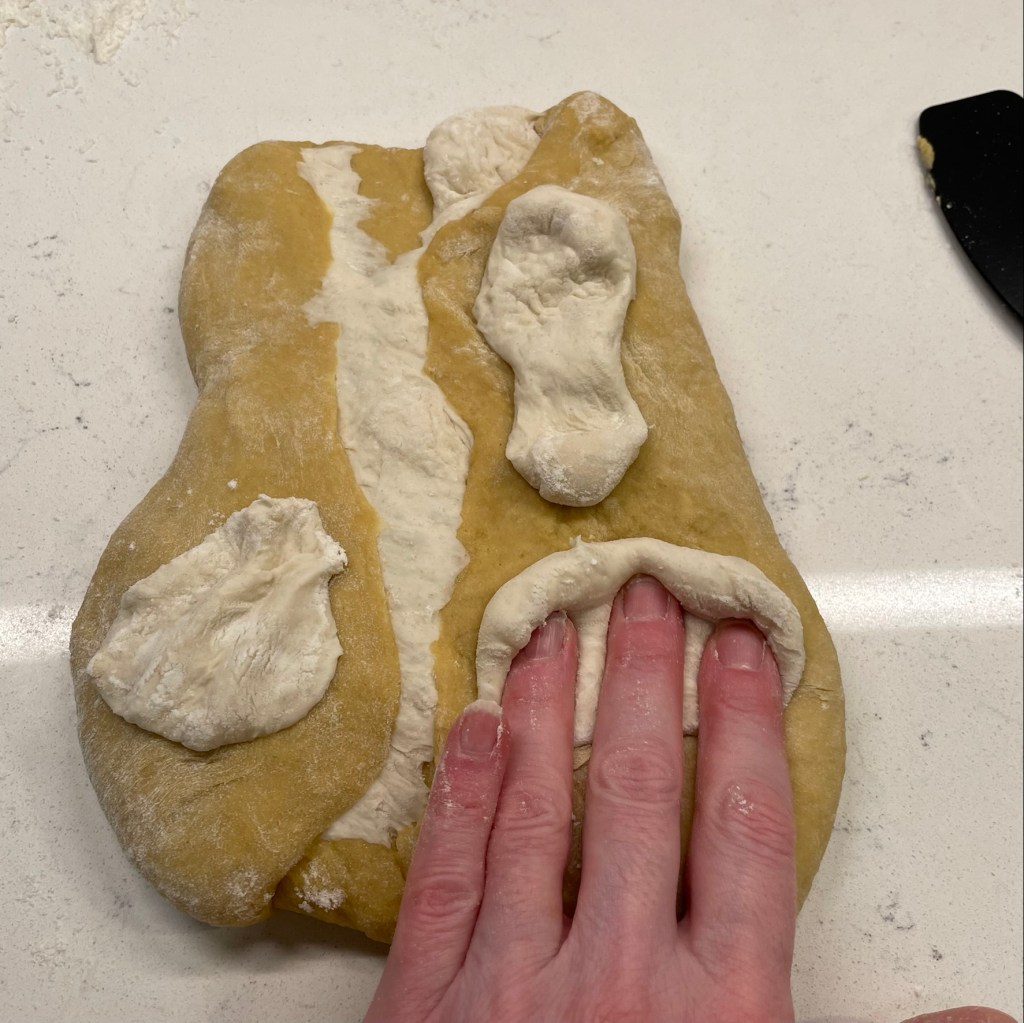
Turn the firm starter out onto a floured counter and cut it into pieces about the size of walnuts. Cover with a towel and set aside while the dough rests.
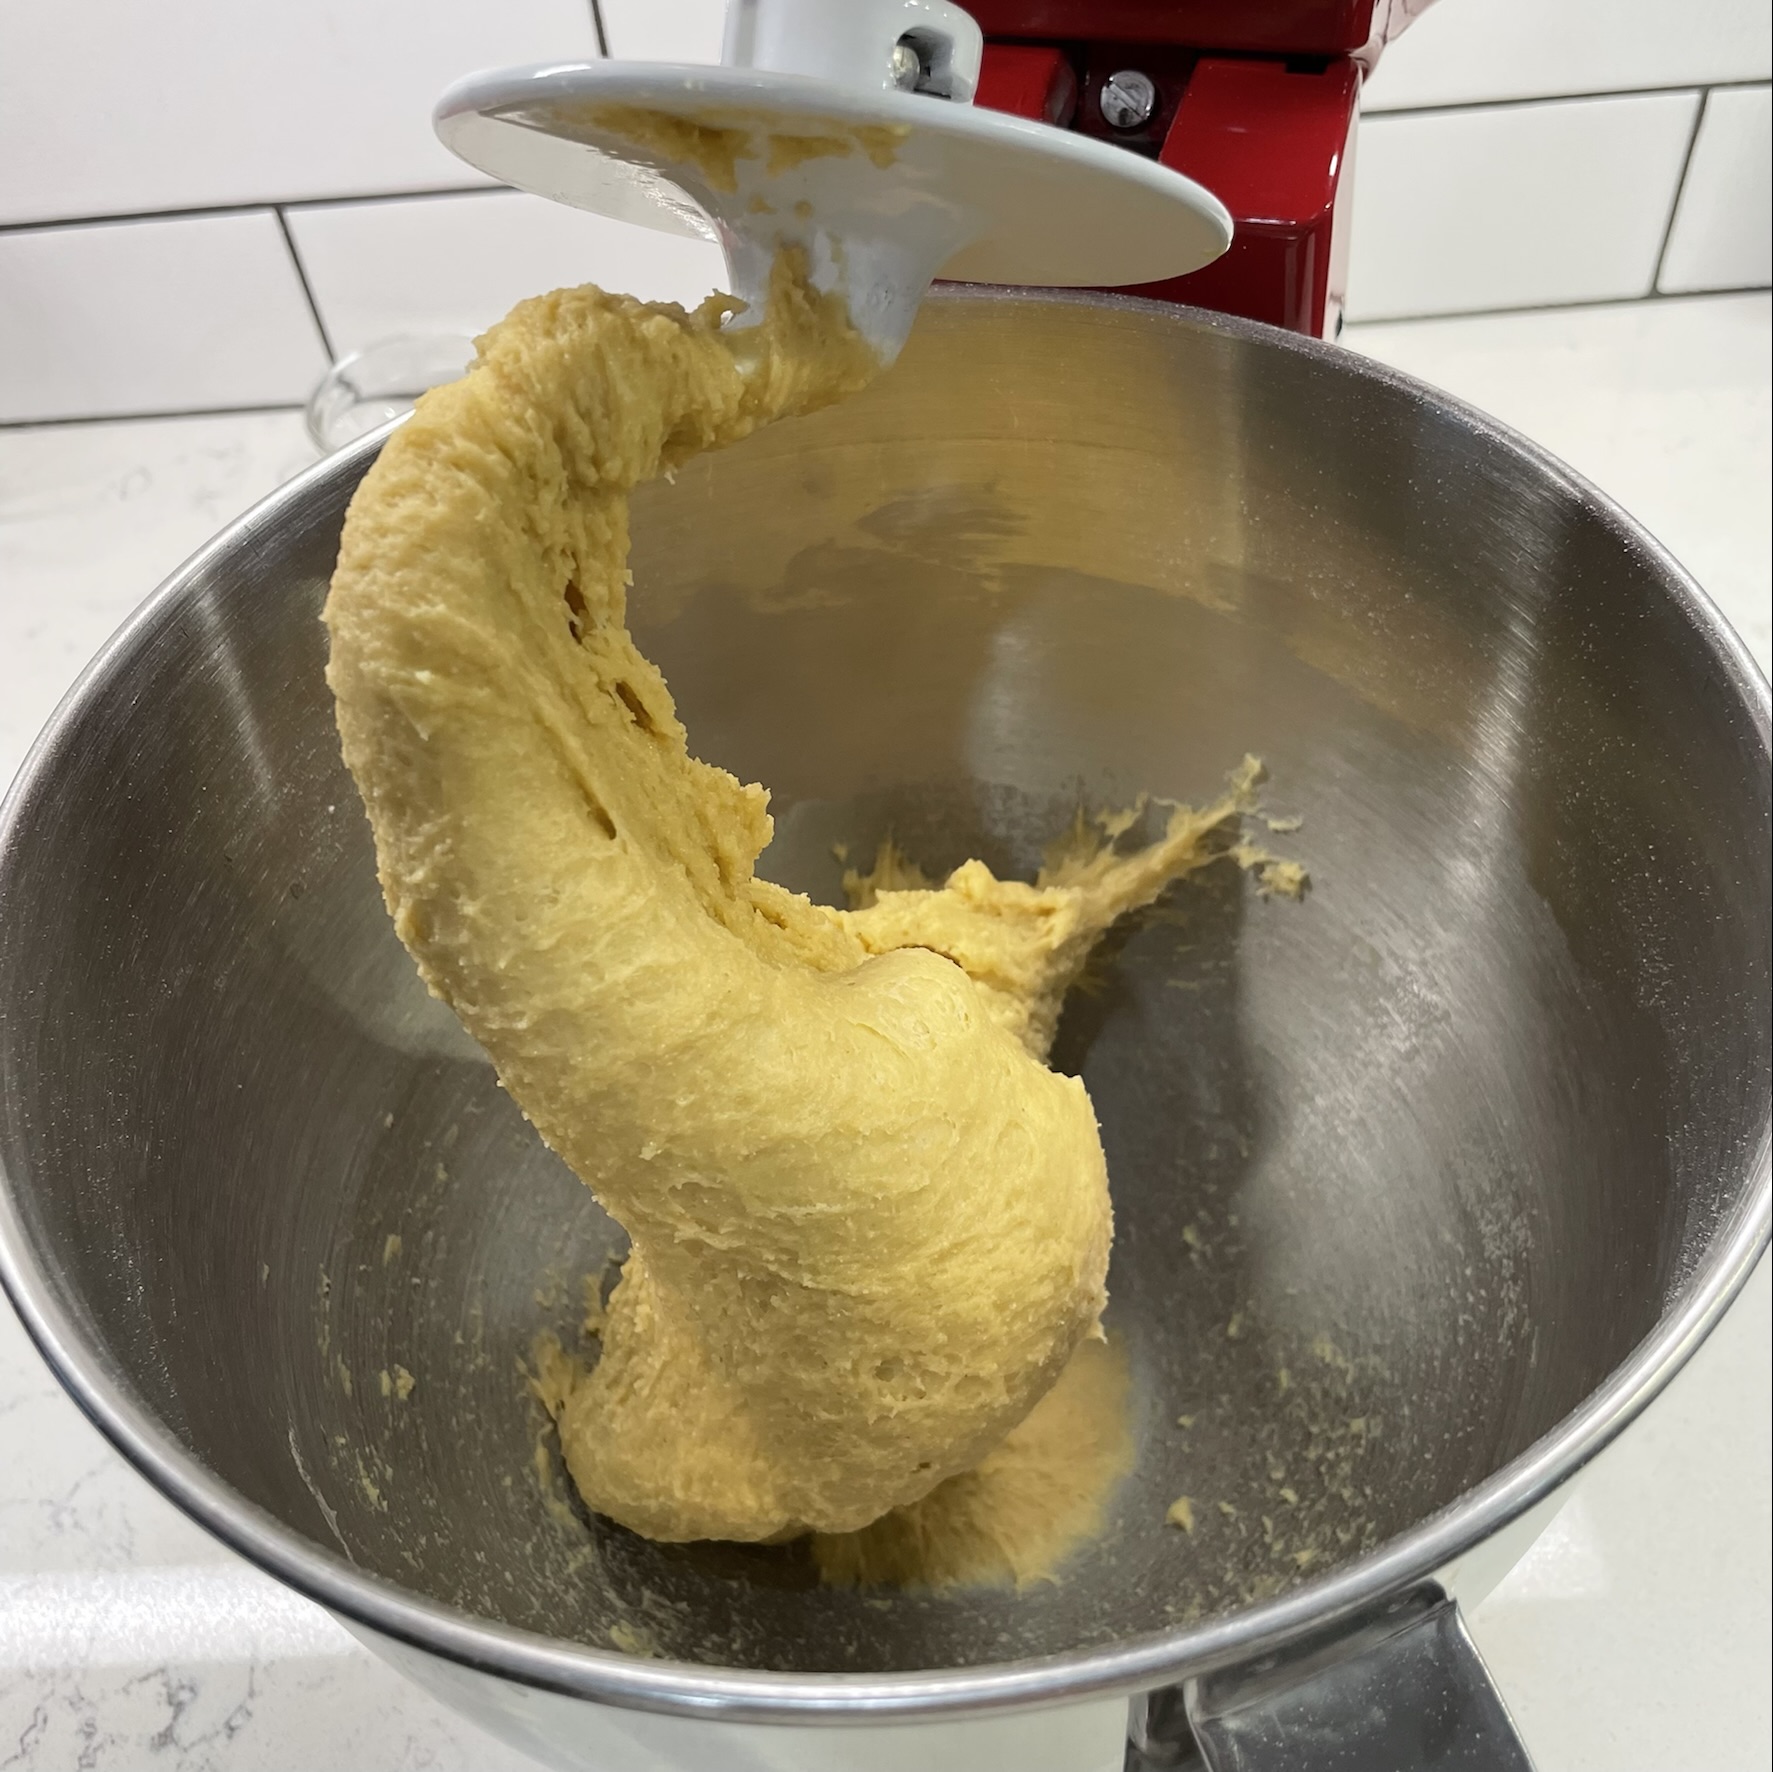
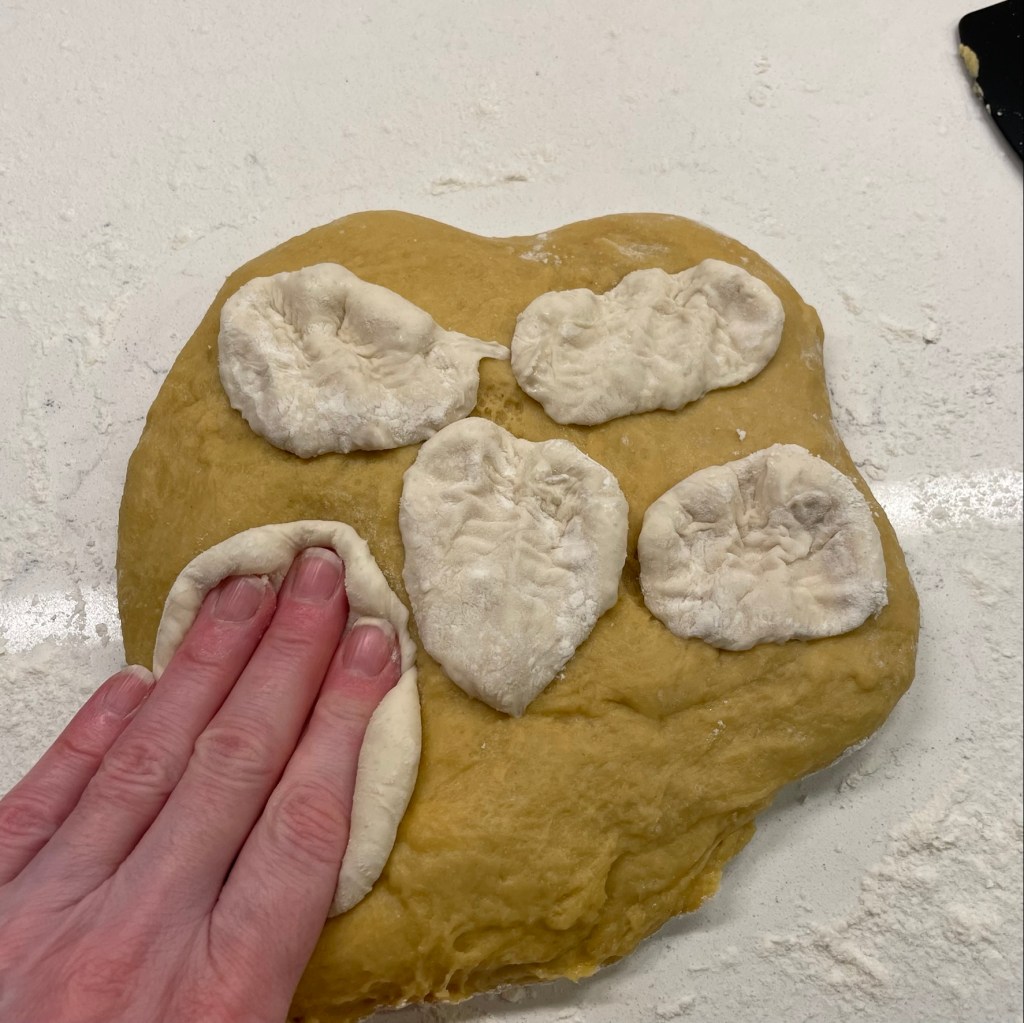
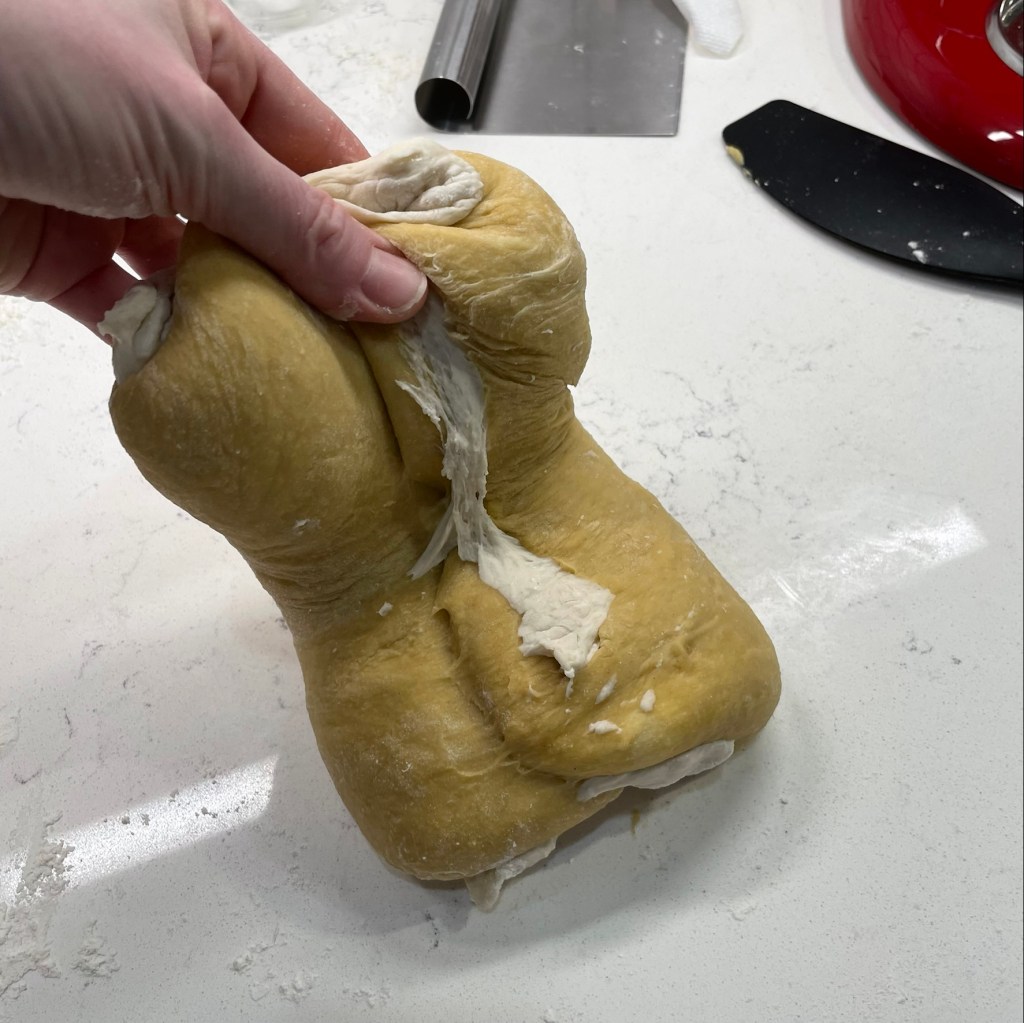
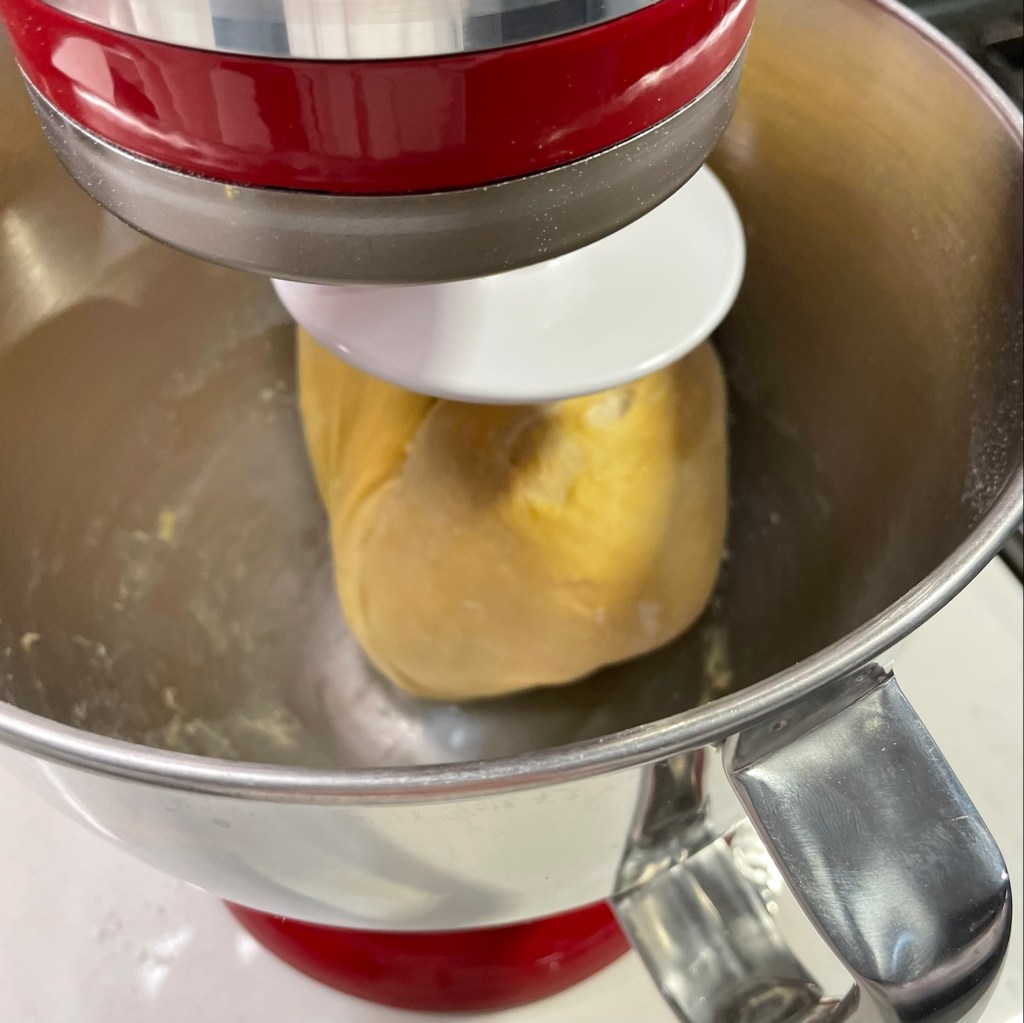
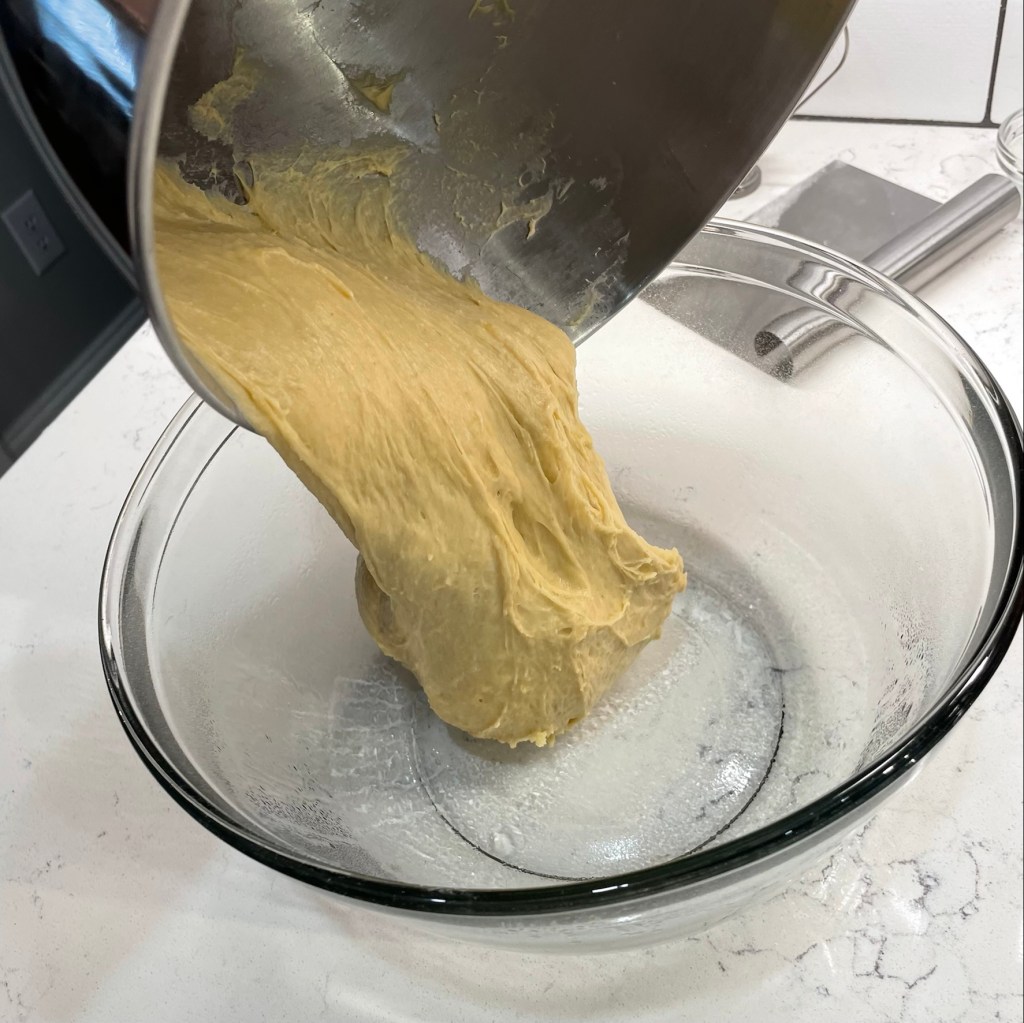
After the rest time, the salt will have begun to dissolve. Knead on medium speed to fully incorporate the salt, which should take 3 to 4 minutes. Transfer the dough to the counter or kneading board and press several pieces of the firm starter all over it. Fold the dough into thirds (like a letter) and press in the remaining pieces of firm starter. Move the dough back into the mixing bowl and knead on medium speed for 6 minutes, long enough to evenly blend the firm starter into the dough and also to get the gluten development going. Transfer the dough to a large bowl, cover and let rest at room temperature for at least 3 hours to ferment.
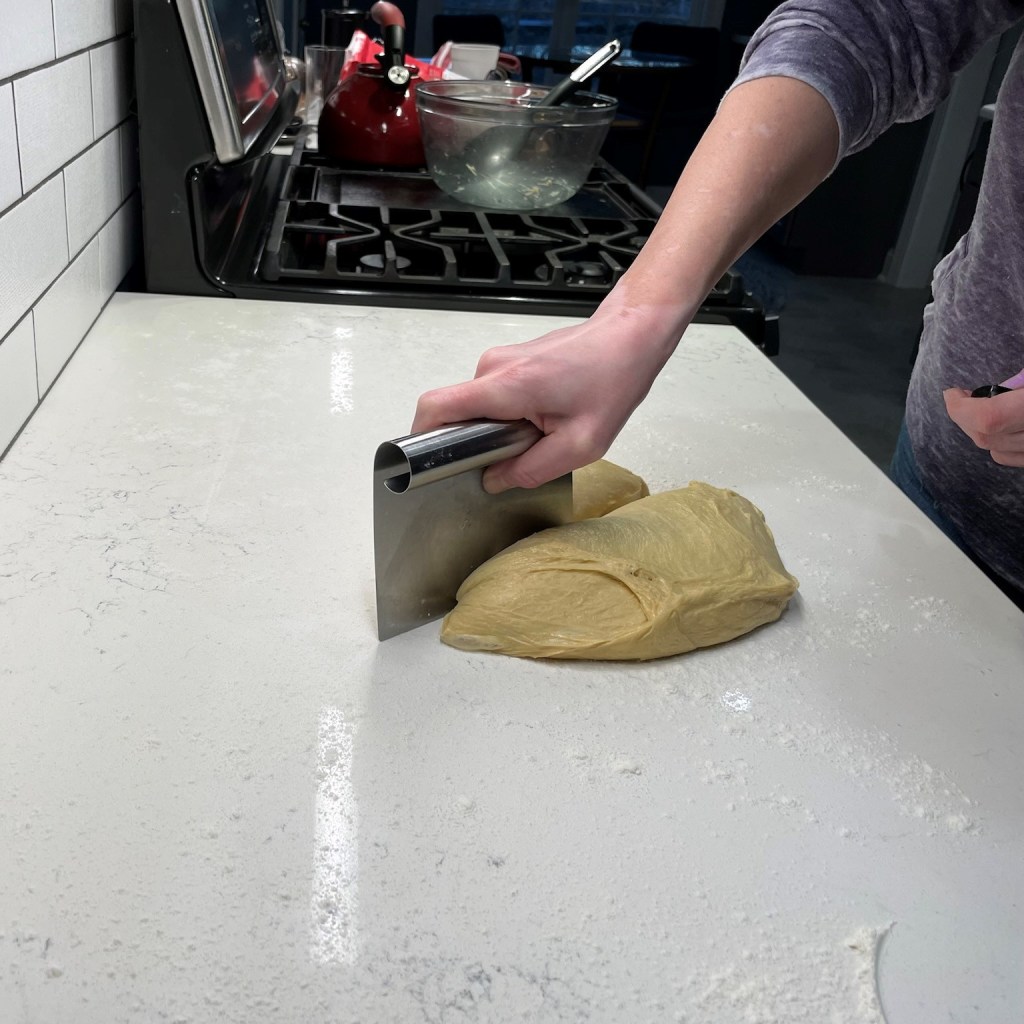
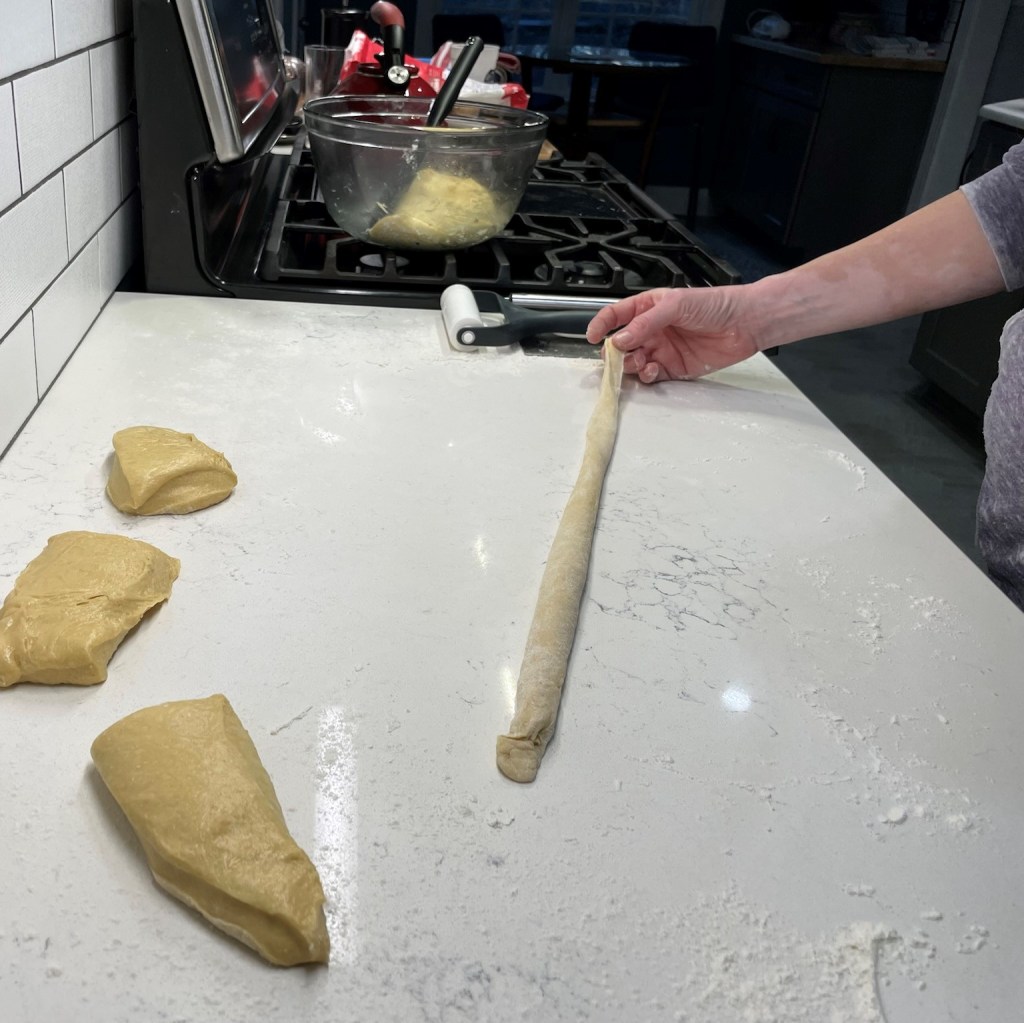
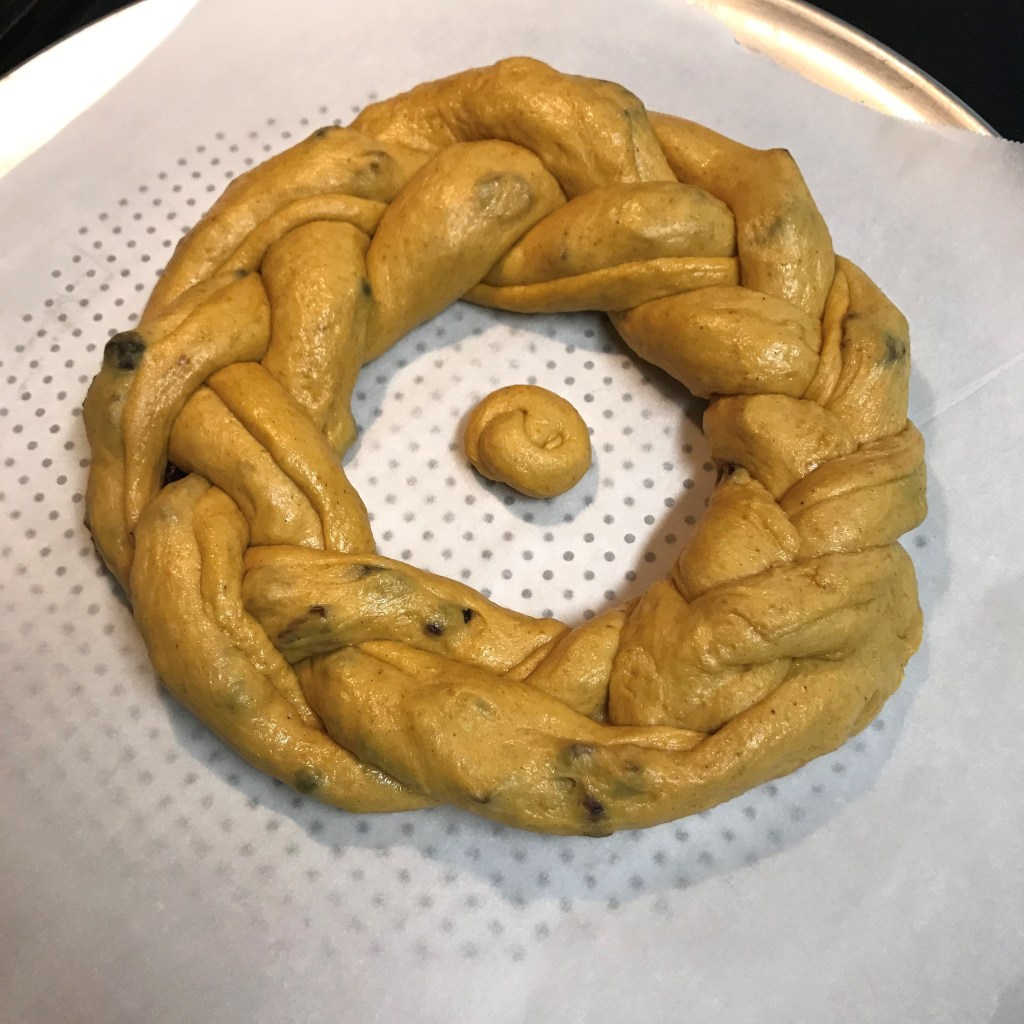
When the dough has fermented (you’ll know because it won’t spring back from a good finger poke), turn it out onto the counter and divide it into halves. This recipe makes two loaves; return one half of the dough to the bowl while you shape the first. Depending on how adventurous you want to be with braiding, divide the first dough section into either 3 or 4 equal-sized pieces. A 3-strand challah is made the easy way, as you would braid a child’s hair. To make the basket-weave round challah, you need 4 pieces.
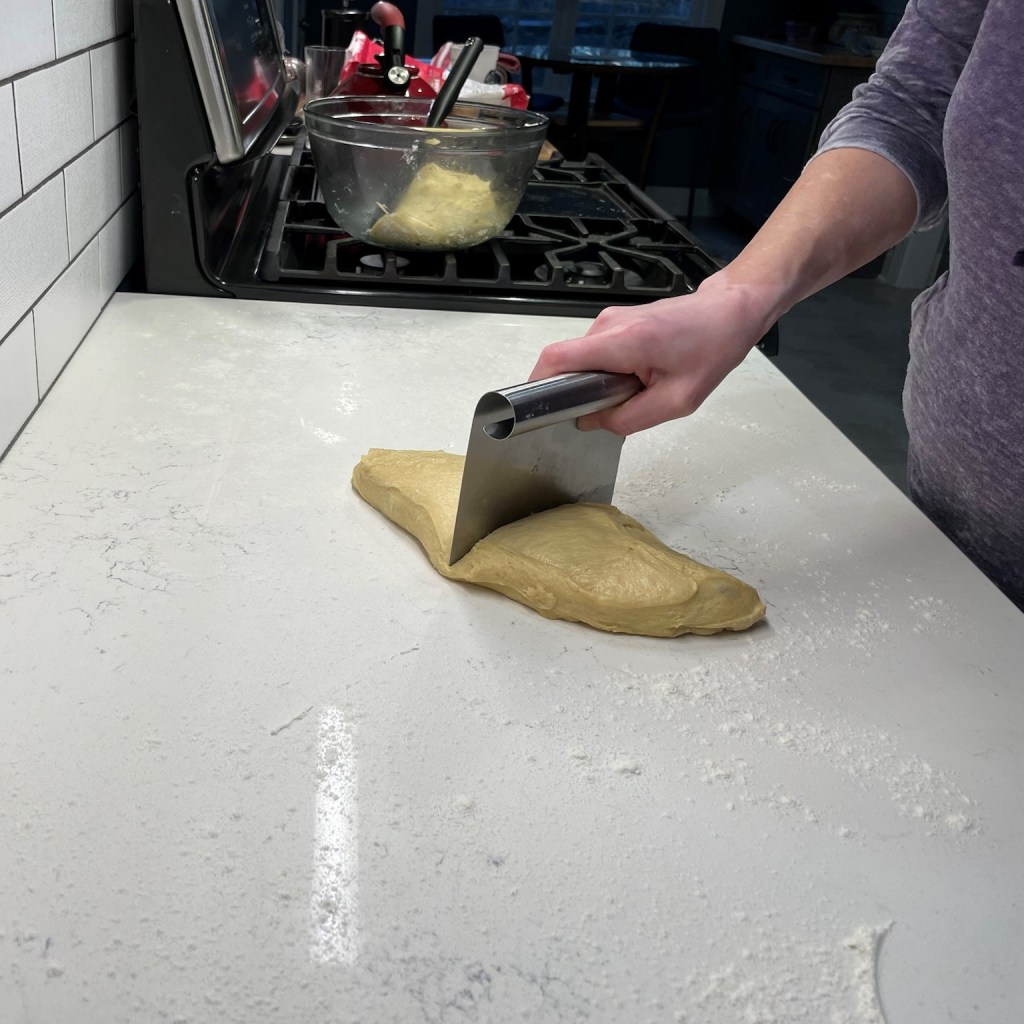
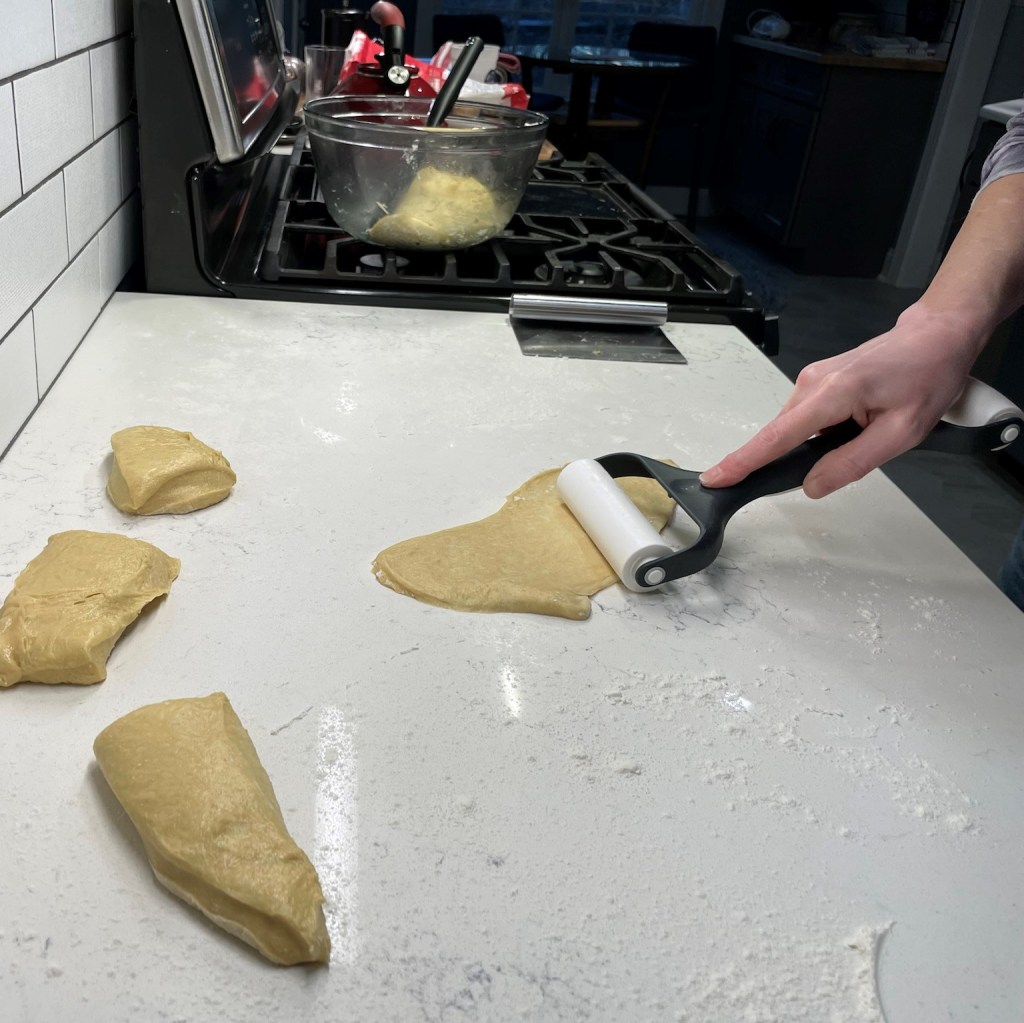
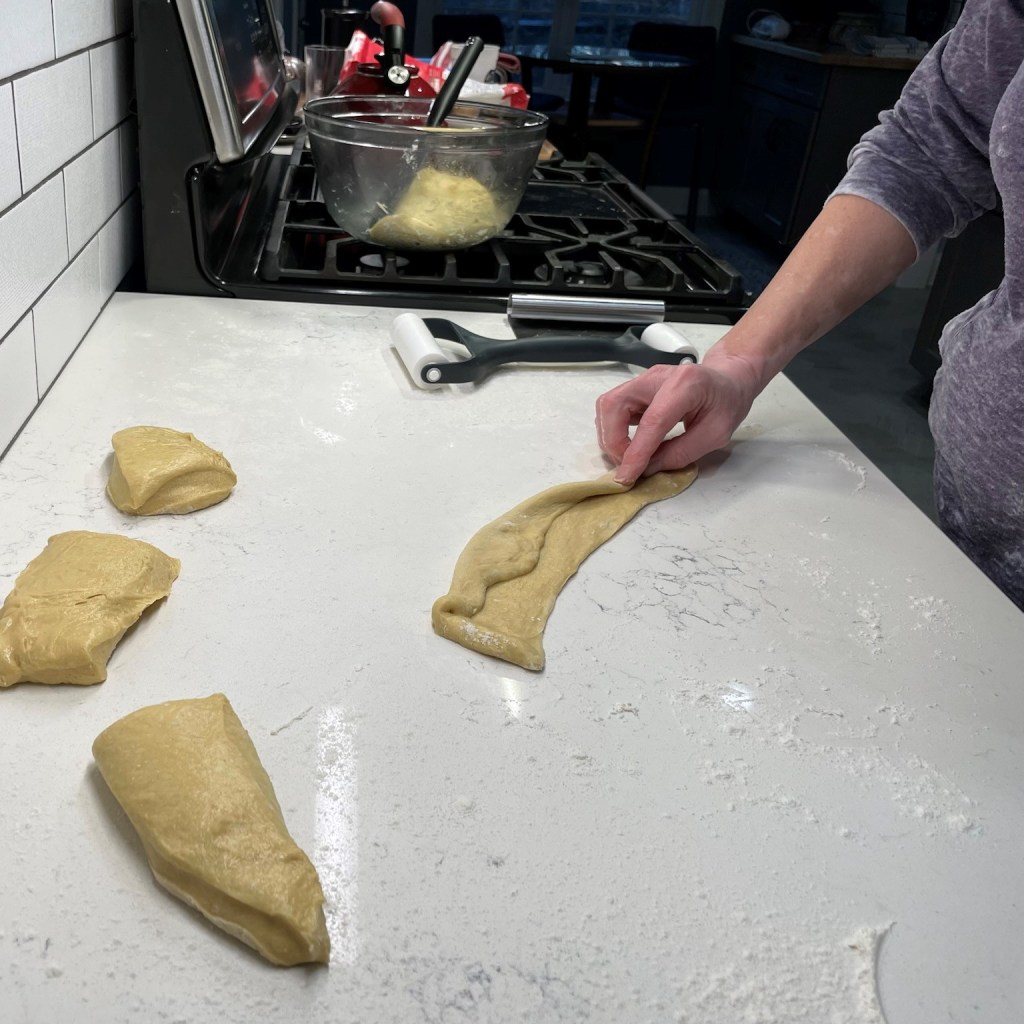
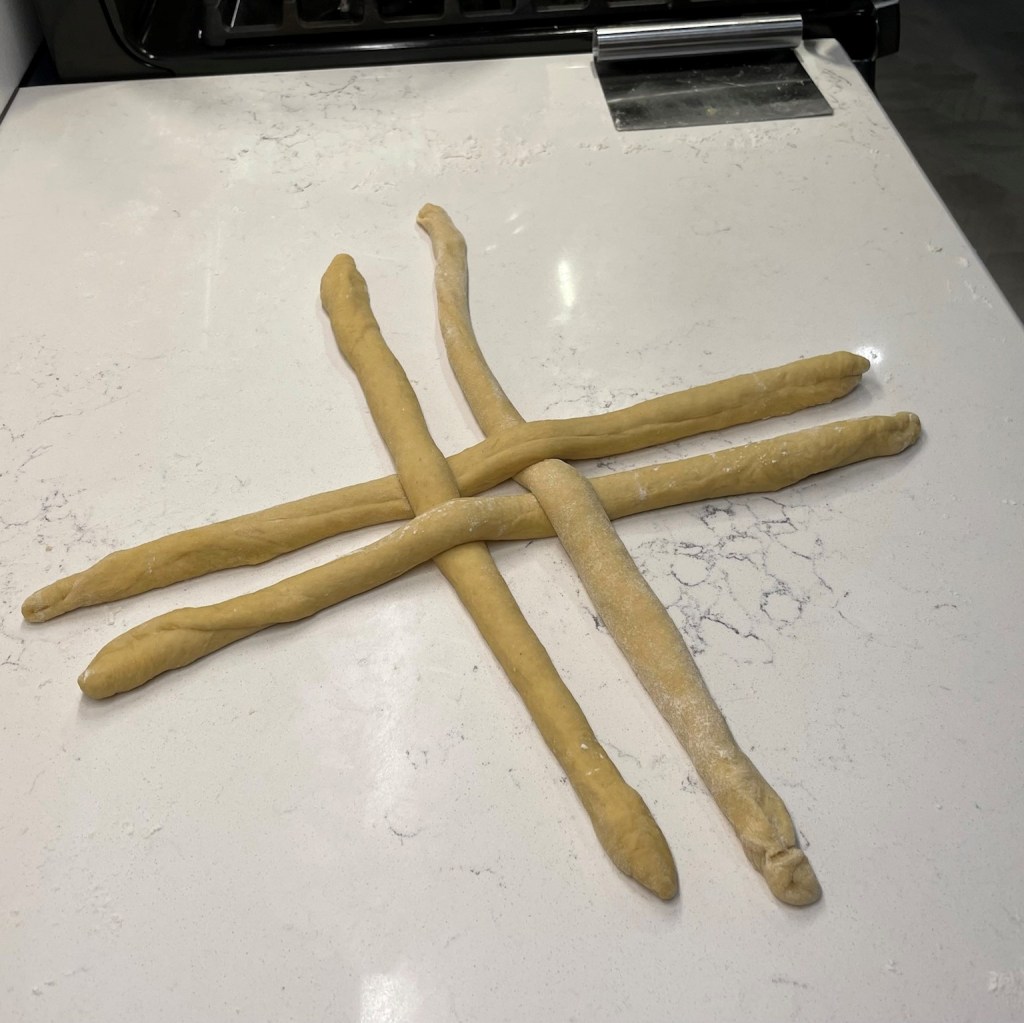
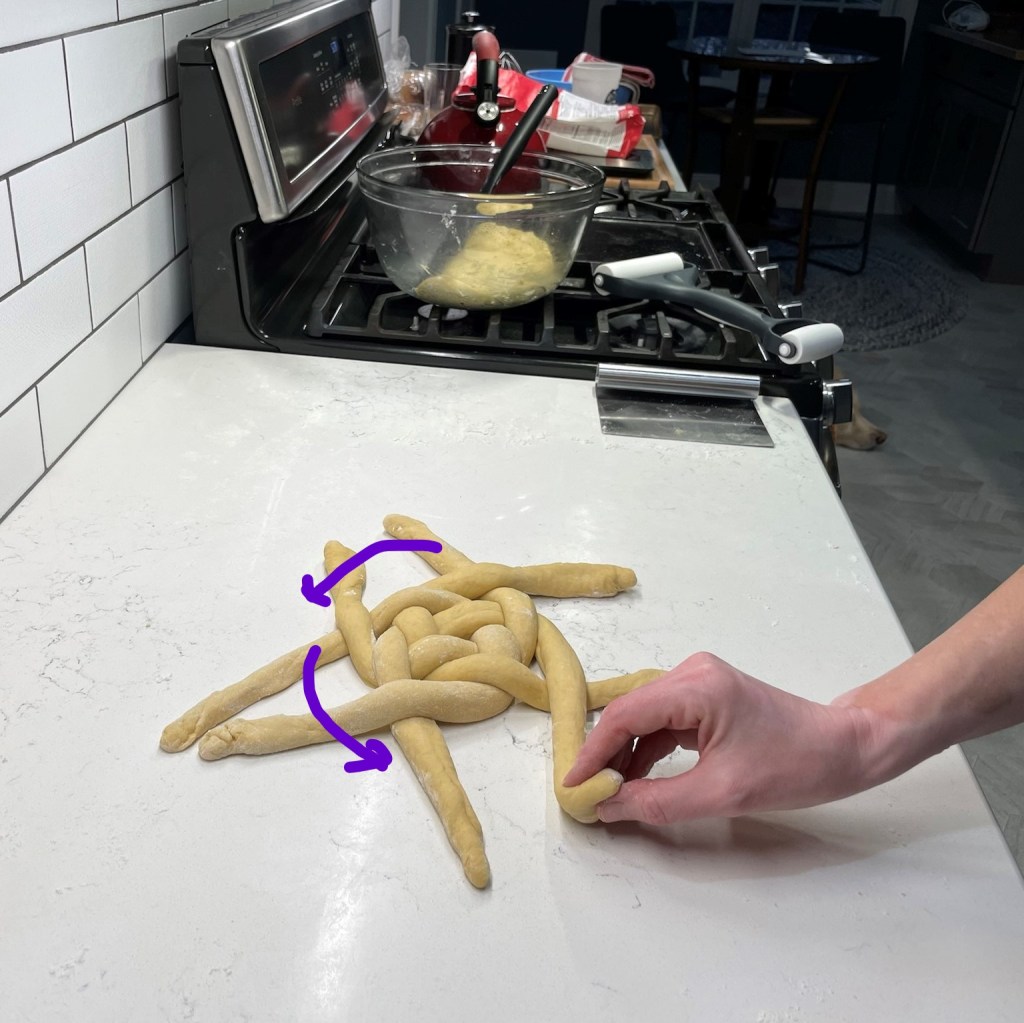
Stretch each section of dough out into an imperfect rectangle shape, and then use a rolling pin to roll it into a long, oval shape. The dough will be very thin on the counter, and that’s good. Use spray oil to keep it from sticking, or dust the counter with a very light amount of flour. Roll up the oval into a long rope shape, keeping it tight as you roll and pinching the seam to secure it. Roll it out firmly to stretch the rope into an 18″ length, with the ends somewhat tapered from the fuller, center part of the rope. Repeat with the other three pieces and arrange them in a tic-tac-toe shape, with the centers fairly close together (but not tight) and long strands extended in all four directions. Notice the over-under pattern, as this is the important starting position for braiding a round.
One important thing to note is that you do not want the dough strands to be too tightly crossed, either at the start or after braiding. You should be able to wiggle a finger between strands after braiding, and this is important because the dough needs room to expand during proofing; otherwise, it will expand into one large blob and you’ll lose the beautiful pattern.
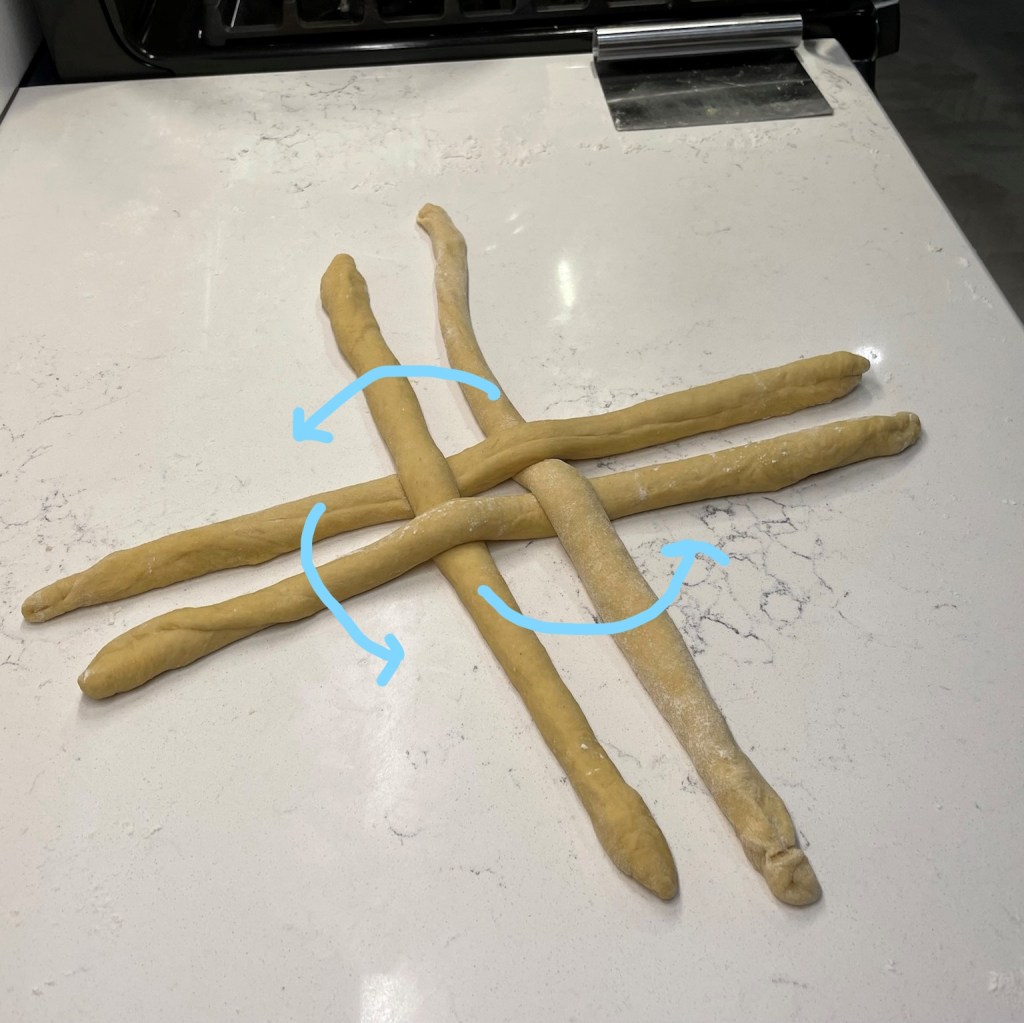
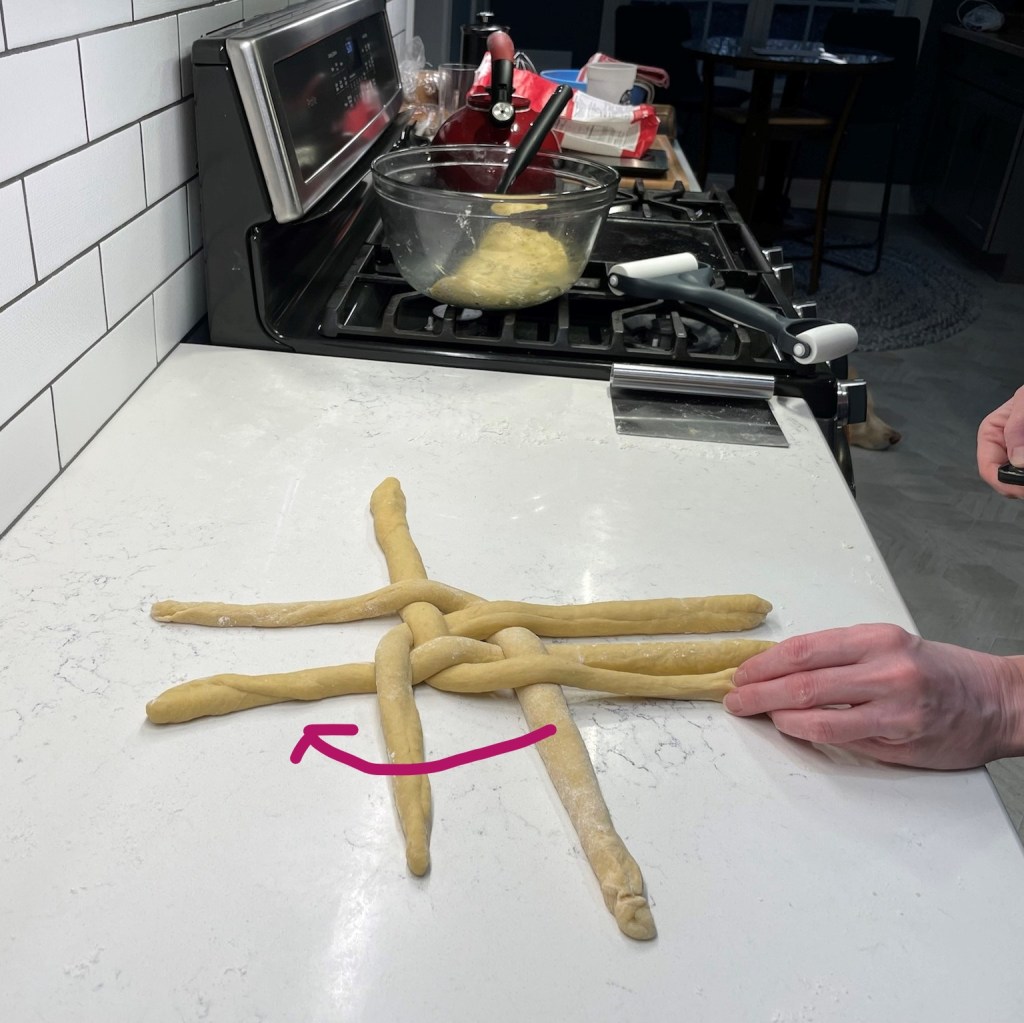
Shaping the dough is probably best learned through pictures, but I’ll try to describe it here. Take any long strand that is under the piece that crosses it, and sweep it over the piece parallel to it so that its new position is parallel to the cross piece. Repeat with the other four strands. Next, reverse direction but do the same thing, taking the underneath pieces and cross over to make them parallel to the piece next door. Repeat with the other four. Continue this pattern of reverse-crossing until the strands are too small to cross over. At that point, twist and pinch together the ends you would otherwise cross so that the dough doesn’t unravel. Tuck the twisted ends underneath and transfer the bread to a parchment-lined baking sheet.
Follow the arrows to see how the braiding goes. To begin, you’ll simply move the ropes that are underneath a cross piece over top of their parallel rope and perpendicular to their original direction.
Next, reverse the direction and do the same with the ropes that are now in underneath position.
Keep reversing and crossing until you run out of dough length.
When you can no longer cross the ropes, bring them together in a twist to seal them into place.
Tuck the twisted ends underneath. Remember that it doesn’t have to be perfect, and you can practice the technique with yarn, twine or strips of fabric to get a feel for it.
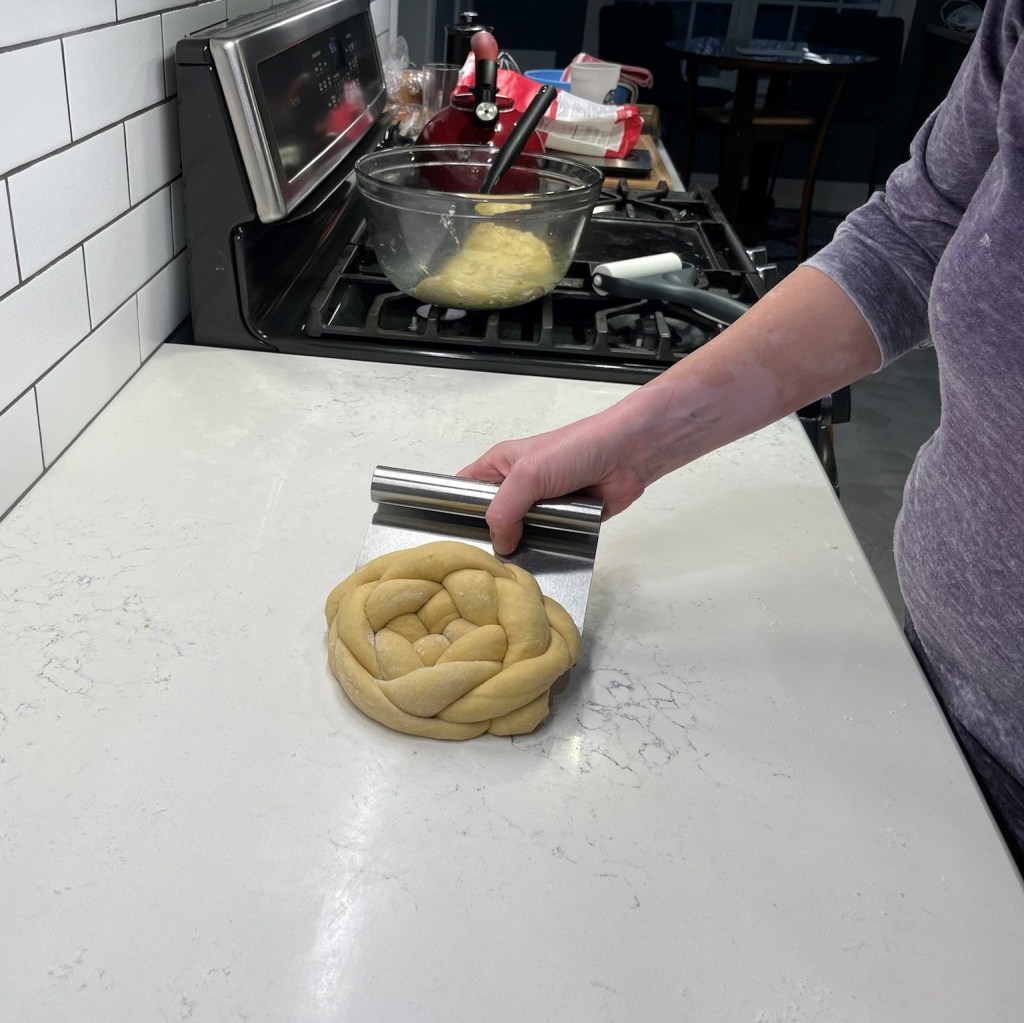
When the braiding is finished, the challah round won’t be much larger than a bread plate, but don’t worry, it’ll rise significantly during the proofing stage!
Here’s how I fill a braid with fruit. Simply scatter about two tablespoons worth of dried fruit over the section of dough before rolling it into a rope. It will feel lumpy as you stretch out the rope, but it settles down during proofing.
Repeat with the second batch of dough and lightly spray or brush the loaves with olive oil and secure a couple of layers of plastic wrap over them. Keep the plastic somewhat loose, allowing room for rising, but not so much that air can dry out your loaves.
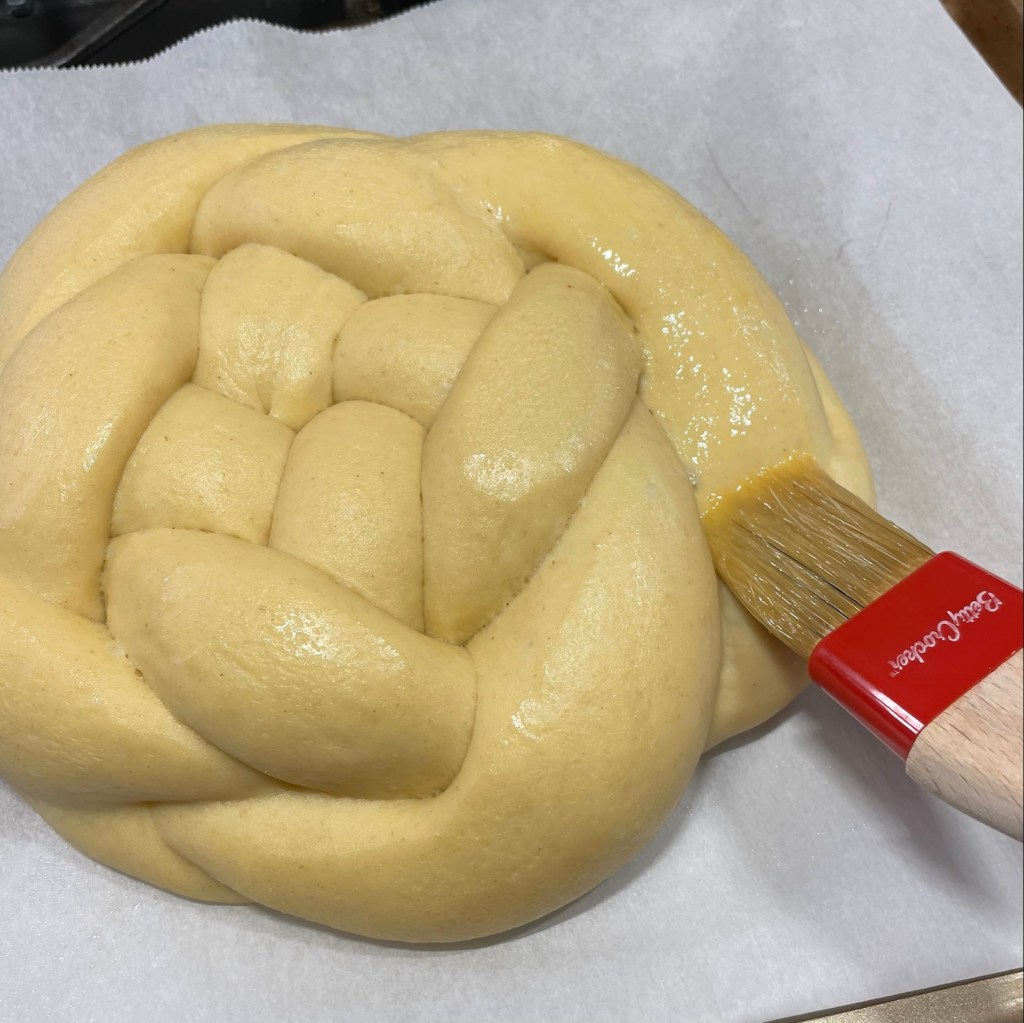
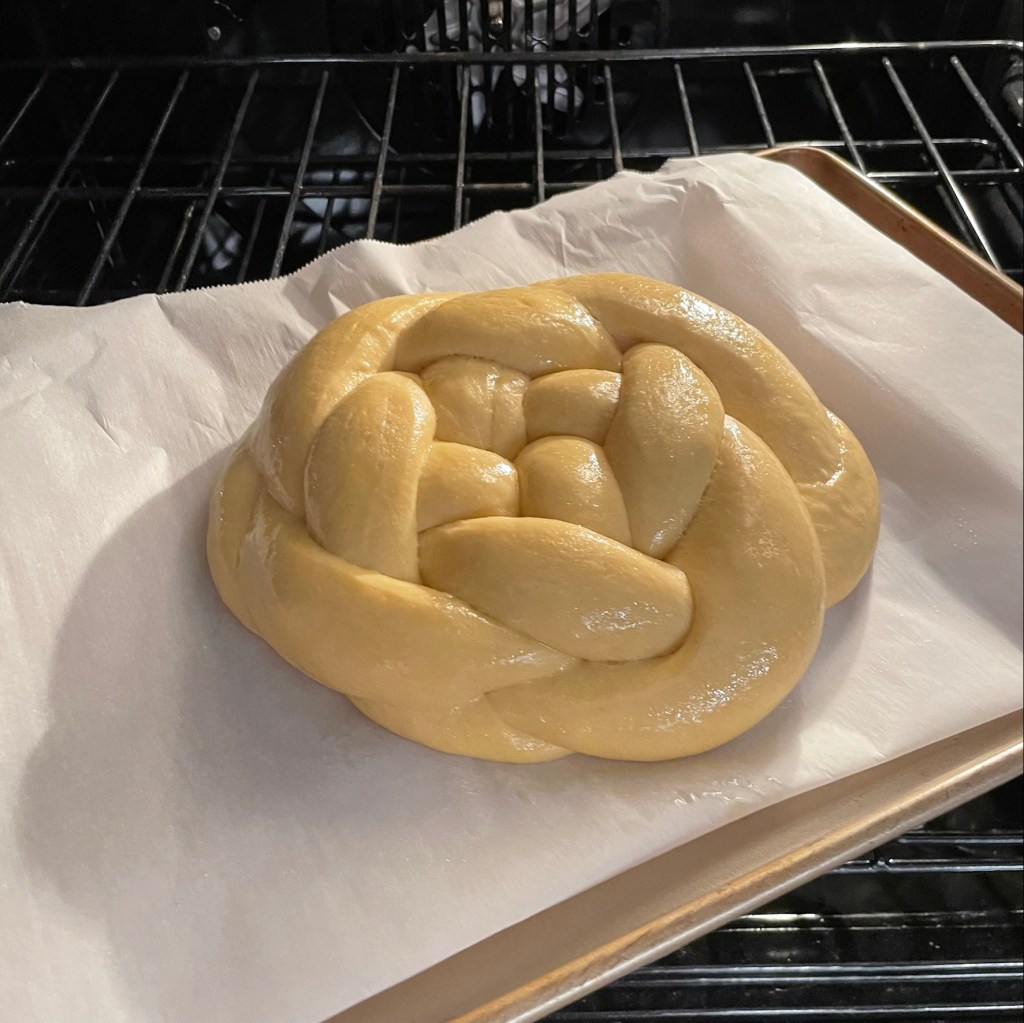
Proof the loaves at warm room temperature for up to 5 hours, until they have at least doubled in size. They will be quite “poofy” when they are ready. Preheat the oven, brush all over with egg wash (get into every nook and cranny) and bake until they are deep golden brown all over, with internal temperature at 200° F.
Transfer to cooling racks and cool completely before slicing or wrapping.
The braiding technique is the easiest thing about these loaves, which are enriched with eggs, citrus-scented olive oil and sweet honey. The recipe takes time, but the reward is as sweet as my wish for you in the Jewish New Year.
Ingredients
35g recently fed sourdough starter
80g room temperature water
130g bread flour
Mix the firm starter ingredients together, cover and let stand at room temperature overnight. Or, refrigerate after 8 hours fermentation and remove from fridge one hour before proceeding.
Ingredients
65g warm water
65g honey
3 large eggs, room temperature
55g olive oil
300g bread flour
100g white whole wheat flour
1 1/2 tsp. fine sea salt
all of the firm starter (above)
1 large egg, mixed with a tablespoon of water (for egg wash)
Directions
In the bowl of a stand mixer, combine the water, honey, eggs and oil. Whisk together until fully blended. Add flour ingredients and mix with the dough hook until all flour is incorporated.
Remove dough from hook, sprinkle with salt and cover. Rest the dough for about 30 minutes, as this will make kneading easier. Rinse all dough bits from the hook so it’s ready for the next kneading step.
Turn the fermented firm starter out onto a floured countertop. Use a bench scraper to cut the dough into several pieces, toss them in the flour to coat, and then cover with plastic wrap or a clean towel to keep it from drying out.
After resting, the salt on top of the dough will have dissolved a bit. Knead with the dough hook for a few minutes to fully incorporate the salt, then transfer the dough to a lightly floured countertop.
Spread the challah dough out to enlarge it, and then press several pieces of the firm starter into it. Fold it up in thirds, like a letter, and press the remaining pieces of firm starter into it. Return the dough to the mixing bowl and knead with the dough hook for several minutes. You should not see any streaks of starter, and the dough should be dense, smooth and shiny. Transfer it to a large, oiled bowl and cover. Let it ferment at room temperature for about 3 hours. It likely will not double in size, but it will expand somewhat.
Turn the dough out onto a clean counter and use a bench scraper to divide it in half. Return one half to the bowl and cover to prevent drying while you shape the first loaf.
Cut the first dough portion into equal parts for braiding, either 3 or 4 pieces. Flatten into rough rectangle/oval shapes and roll up tightly into ropes, pinching to seal the edges. Roll out with the flat part of your palms to stretch the ropes to 18″, with ends that are tapered a bit.
8, Arrange the dough ropes for braiding, following visual instructions in this post. Place braided loaves on parchment-lined baking sheets and cover with lightly oiled plastic wrap. Proofing time will be anywhere from 3 to 5 hours, depending on the temperature of your kitchen, humidity and moon cycle. Just kidding on that last one, but honestly, the time needed for proof can vary broadly, so my best advice is to begin checking after 3 hours. Dough will double or nearly triple in size, and it is ready to egg wash and bake when it refuses to bounce back after a finger poke.
Preheat oven to 350° F. Gently brush egg wash all over every visible surface of the challah loaves. Bake for approximately 35 minutes, until bread is deep golden brown all over. Internal temperature should be about 200° F. Transfer to a cooling rack and cool completely before slicing or wrapping.
From the CDJ archive, here’s another way you can achieve a “round” challah, if you aren’t feeling the love for the basket-weave design. Divide your dough for one of the loaves into three equal segments and braid them like a hair braid, and then curl it around, tucking and pinching to seal the ends together. It’s more of a wreath than a round, but still has the circle symbolism. This was an experimental sourdough pumpkin challah, filled with Trader Joe’s “golden berry blend” dried fruit, and it was nothing short of fabulous. 🙂
The wreath shaped loaf is filled with a blend of dried fruits: cranberries, golden raisins, blueberries and cherries.