Cole Slaw Two Ways

There’s no good reason to depend on bottled cole slaw dressing, made up mostly of ingredients we’d never find in our own pantry cabinets. Not when it’s so quick and easy to make our own dressing from the fresh things we do have in our cabinets or refrigerators.

Whether you like the slightly tangy-sweet creaminess of a mayonnaise-based cole slaw (KFC-style) or an elegant, vinaigrette-type dressing that stands up better to extended time on a picnic table, you can handle it yourself in only a few minutes. The one thing for sure is it’ll taste infinitely better than the soybean oil-xanthan gum concoction you’d otherwise pick up in the dressing aisle.

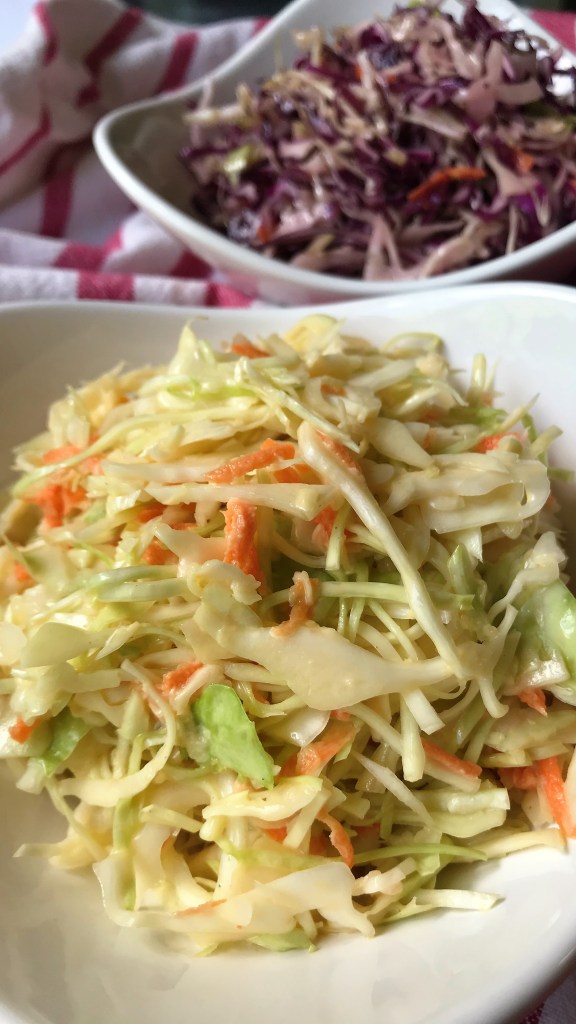
Begin with a basic combination of 4 to 5 cups shredded or chopped cabbage (red, green or both—you decide) and carrots. Use a food processor to save time or chop by hand for a more rustic texture. Then, choose your style and dress it up!

Creamy Slaw Dressing

The creamy-style dressing is on the sweet side, with a distinctive white pepper flavor that is reminiscent of the “colonel’s” cole slaw.

Ingredients

About 1 Tbsp. finely grated onion* (see notes on this)

1/4 cup mayonnaise (I used canola mayo)

2 Tbsp. whole milk

2 Tbsp. buttermilk*

1 Tbsp. white vinegar or white balsamic vinegar*

1 Tbsp. fresh lemon juice*

2 Tbsp. cane sugar*

1/2 tsp. kosher salt

A couple pinches white pepper

*Notes

Grate the onion and use a paper towel to absorb as much excess juice as possible before proceeding with the recipe.

Real cultured buttermilk works best, but you could have similar results with the same amount of plain yogurt or Greek yogurt.

I am a big fan of flavored balsamic vinegars and olive oils, and whenever I have it on hand, I substitute the “Sicilian Lemon” white balsamic for the combined amounts of vinegar and lemon juice in this recipe. If you have access to this product from a specialty store in your area, it’s worth the expense.

Reduce the sugar by half with the white balsamic substitution.

Instructions

Empty the grated onion into a glass measuring cup. Add remaining dressing ingredients and use a mini-whisk or small spoon to blend into a smooth, even mixture.

Use less dressing than you think is correct. Trust me, you won’t mind eating the extra dressing with a spoon!

Pour half of the dressing over the shredded cabbage and carrots and toss to coat, then add more dressing as desired. As the creamy dressing settles in, the cabbage will soften and shrink a good bit. It’s easier to add dressing than to take it away. Cover salad and refrigerate a couple of hours until ready to serve.

Poppy Seed and Lime Vinaigrette Slaw Dressing

The vinaigrette-style dressing is tangy and onion-y, an elegant change of pace for your backyard cookout. The poppy seeds can be left out if you aren’t a fan.

Ingredients

1/2 small onion (sweet, yellow or red—whatever you like)

2 tsp. poppy seeds* (see notes)

2 Tbsp. sugar

Juice of 1/2 fresh lime

1 Tbsp. white wine vinegar

1/2 tsp. dry mustard powder

3/4 tsp. kosher salt

1/2 tsp. freshly ground black pepper

1/4 cup canola oil (or other neutral-flavored oil)

2 Tbsp. extra virgin olive oil*

*Notes

Poppy seeds are sold by the bottle in the spice section of most grocery markets. Celery seed would be a good substitute here, or if seeds cause you trouble, you could easily skip them altogether, but you still want to begin the recipe on the stove.

Extra virgin olive oils provide the most health benefits, but some of them have a very “green” or pungent flavor. For this recipe, use the most neutral-flavored olive oil you can find, such as arbequina. Specialty oil and vinegar shops offer free tastings to help you find your favorites.

Instructions

Grate the onion into a bowl, keeping the juice. Combine sugar, lime juice, vinegar, mustard powder, salt and pepper in a glass measuring cup.

Place a small, heavy-bottomed sauce pan over medium heat and add the poppy seeds. Swirl the pan constantly and toast the seeds for 2 to 3 minutes, until lightly fragrant. All at once, add the onion (with juice) and the lime juice mixture and stir until sugar is dissolved and mixture begins to simmer at the edges of the pan. Remove from heat and transfer to the small bowl of a food processor. Turn on processor and slowly stream canola oil into the mixture, then repeat with olive oil.

When mixture is fully emulsified, pour about 1/3 cup of it over cabbage mixture. Toss to coat, add more dressing if desired, and refrigerate slaw until ready to serve. Save leftover dressing for use on other salads–perhaps a spinach salad with fresh strawberries.

Want to print these recipes?


Savory Smoky Baked Beans

Just about every baked bean recipe I’ve ever eaten has hit me a little too heavy on the sweet tooth. Do they really need to have brown sugar and honey and molasses and maple syrup? Geez, it hurts my teeth just thinking about it. My version has some sweetness, but it’s a deep, earthy kind of sweet, thanks to molasses, and balanced with only a bit of brown sugar. There’s dark-roast coffee, cumin, ancho chile, coriander and ginger, too—plenty of savory notes to keep these beans off the dessert end of the potluck table.

You could sauté the onions in olive oil and this recipe would make even a vegan happy. But don’t lament, carnivores. Your beloved bacon will feel right at home in this dish, too. Y’all go ahead and make it your own!

Ingredients

About 4 cups cooked pinto and great northern beans* (see notes)

2 Tbsp. bacon drippings (or extra virgin olive oil)

1 sweet onion, chopped

1 Tbsp. spicy coffee rub*

1 tsp. coarse kosher salt

8 oz. can tomato sauce

2 Tbsp. ketchup (Heinz organic made with sugar)

3 Tbsp. molasses

2 Tbsp. brown sugar

1 Tbsp. maple-flavored balsamic vinegar*

(Optional) chopped cooked bacon and/or browned meat*

*Notes

I cooked the beans from dry, which is easy to do after an overnight soak. For me, the texture of from-scratch beans is worth the minimal effort, and a lot cheaper. If you prefer, use two or three varieties of canned beans. You’ll need 3 cans, and you’ll want to drain and rinse them well before proceeding.

My recipe for spicy coffee rub follows, or substitute any pre-made spice blend that includes coffee, sugar and chili spices, but be mindful of the sodium content and adjust the recipe accordingly.

I’m a very devoted follower of flavored oils and vinegars, and I think the maple balsamic brings a nice maple flavor to these beans, without more “sweet.” Use any other dark balsamic you like (perhaps espresso or dark chocolate), or omit it altogether. It’s kind of like the cherry on top of a sundae—nice, but not necessary.

We had 3 slices of leftover cooked bacon from breakfast and about 1 cup cooked ground bison (a leftover from chili for hot dogs). Both found their way into the baked beans, and the dish was even more hearty and satisfying for it.

Instructions

Sauté onion in bacon drippings (or olive oil) until they’re slightly soft and translucent.

Add spicy coffee rub and salt, and cook until fragrant. Add tomato sauce, ketchup, molasses, brown sugar and maple balsamic vinegar. Cook until sugar is dissolved, and mixture is thick and syrupy.


Preheat oven to 350° F. 

Put prepared or canned beans in an oven-safe, lidded casserole. Pour sauce over beans and fold gently to combine. Bake about 45 minutes, until fully hot and bubbly. I left the lid on for most of the baking time, but removed it for the last 15 minutes. That dark, sticky crust just makes me so happy, and I can’t wait to eat the leftovers cold from the fridge.

Spicy Coffee Rub – my take on a Bobby Flay recipe

Makes about 1 cup

1/4 cup ancho chile powder

1/4 cup finely ground dark roast coffee*

2 Tbsp. sweet Spanish paprika

2 Tbsp. dark brown sugar

1 Tbsp. dry mustard

1 Tbsp. ground black pepper

1 Tbsp. ground coriander seed*

2 tsp. ground ginger

2 tsp. ground cayenne pepper (optional to taste)

1 tsp. ground cumin

1 tsp. dried thyme leaves

1 tsp. kosher salt*

*Notes

The coffee should be ground as finely as powder, not just ground for coffee. If you have a spice grinder, that’s the best way to achieve the proper grind texture.

Coriander is the seed form of cilantro, but the taste is not similar. You can find it pre-ground at the market, but I much prefer the flavor of freshly ground seeds for this rub. I use a mortar and pestle to crush the seeds, but you could also use a spice grinder, as used for the coffee.

I keep the salt to a minimum in this spice rub recipe to allow more flexibility in its use. If you want a more intense flavor when you use the rub, you don’t end up making your end dish too salty.

Instructions

Combine all ingredients and keep in a tightly covered jar for up to four months.

Use it as a dry rub on steak or ribs before grilling, add a tablespoon to your favorite chili recipe or mixed in with your meat for burgers or tacos. Obviously, use it also in this recipe for savory baked beans.

Want to print these recipes?


Spanish Onion Sauce

For just about everyone, the term “comfort food” applies specifically to the foods we learned to love during childhood. For me, that’s the made-from-scratch foods I learned in my grandma’s kitchen, including applesauce, soft molasses cookies and bread pudding. For my husband, Les, it’s pretty much all the foods you can only find in a Jewish deli and on the streets of New York. I’ve grown to love many of these foods myself—the bagels, the knishes, the in-house pastrami from Katz’s deli and of course, the pizza (am I the only one hearing angels sing right now?).

Any true New Yorker will admonish you for assuming you could just pick up a bag of Lender’s and call it “close enough.” The best bagels are apparently made with NYC water, but we are thankful to have a very good option for them in our home city. Then there’s the matter of pizza, but let’s not even start on that, though I’m proud to report we’ve finally perfected our at-home pies to nearly the level of Les’s high standards. And although hot dogs (even the Kosher, all-beef kind) are readily available in every corner of these United States, there’s no match for a good, old-fashioned New York hot dog. And for one main reason. The Spanish onion sauce.

Honestly, no other condiments are needed.

This stuff is simple enough, just sliced onions cooked in a thin, lightly spiced tomato sauce. But like any food that’s part of the very fabric of your life, it’s the memory of it that means something. You want it to taste the way you remember it. When I finished this batch of onion sauce, I cautiously asked Les to give it a taste and tell me what it needed. Last time, it was “pretty close,” so imagine my relief (and utter joy) when he licked the spoon and said, “Yep, that’s it!” Pardon me while I do the h-a-p-p-y dance. And though I’m only from “upstate” (not the same as New York, he reminds me, ad nauseum), and I don’t have my own early memories of this onion sauce, I have to say, it’s pretty darn tasty, and super easy to make. If this is all it takes to elevate his happy, I’m golden.

Ingredients

1 Tbsp. extra virgin olive oil

1 medium Spanish onion (about the size of a tennis ball)

3 Tbsp. tomato ketchup (preferably one made with real sugar)

2 pinches chili powder* (see notes)

Pinch of dried, crushed red pepper*

Pinch of ground cinnamon

1/4 tsp. kosher salt

1/4 cup water

*Chili powder is an ingredient that is wildly inconsistent, because different brands have different formulas and sometimes high amounts of salt. Use the most “neutral” chili powder you have, or substitute whatever makes you happy. For my most recent batch of onion sauce, I swapped out both noted spices for about 1 tsp. of the oil poured off a jar of Trader Joe’s “Chili Onion Crunch.” This earned an enthusiastic thumbs up from my New York-born taste tester. Don’t be shy about experimenting with the stuff in your cabinet—it’s how I’ve found all my best recipes.

Instructions

Cut the onion in half lengthwise. With flat side down, slice the onion into 1/4” crescent-shaped slices. For this recipe, I find it better to have similar-sized pieces of onion, rather than ring slices.

Heat a medium-size skillet over medium heat. Swirl in olive oil, then add onion slices and saute for about 8 minutes until softened and slightly translucent. Mix together the ketchup, spices, salt and water, and add to the onions. Stir to combine and bring to a slight boil, then reduce heat to low and simmer, uncovered, for about 30 minutes. Much of the liquid will evaporate, and you’ll be left with silky onions glistening in a light, tomato-y glaze.

Quite simply—it’s real Nu Yawk daawg sauce.

We served our Spanish onion sauce on uncured all-beef dogs and homemade potato buns. Delish!

Want to print this recipe?


Maple Bacon Bourbon Onion Marmalade

There have never been two flavors more perfectly designed for each other than bourbon and bacon. My friend Linda would give an amen, and we’d be correct. Or maybe it’s chocolate and cherry. I’d ask my husband, but it would probably prompt further discussion of all the recipes we should concoct to incorporate all four—bourbon and bacon and chocolate and cherry. Maybe brownies? Or ice cream? That sounds like a rewarding challenge for later—I’ll work on it and let you know (wink).

For now, I’m cooking up a storm in advance of Memorial Day weekend. I know, none of us are likely spending the weekend quite as we’d planned. That’s a given on just about everything this year. My husband, Les, and I have already missed a dreamy beach weekend with Linda and her husband, and my heart positively aches for everyone who has sacrificed once-in-a-lifetime plans for weddings, graduations and funerals. Just thinking about that makes me feel guilty and selfish lamenting a weekend getaway. For sure, the pandemic is revealing all that we’ve taken for granted, and given us new appreciation for the simplest things in life—like a backyard cookout. So this weekend, Les and I are following tradition and firing up the grill to usher in the summer season, even if it ends up being just the two of us. Chances are, you’ll be doing the same.

Everyone has their own favorite thing to put on the grill, and our burgers are no better than yours. But if you’re looking for something new to dress up whatever you’re putting on the grill—well, cue the bourbon and bacon!

My inspiration for this recipe is a book that literally jumped into my cart a few years ago while I was casually browsing at a discount store.

What could possibly go wrong?

It includes plenty of discussion about bourbon etiquette and whiskey history, what type of glass is correct for different types of bourbon cocktails, and what it means for a bourbon to be “bottled in bond” (if you’re wondering, it’s the result of one season, one distillation, and one distillery, and it’s bottled at a minimum of 100 proof; that’s on page 28). But there are also dozens of mouthwatering recipes—for bourbon, for bacon and for a few crossovers that include both. The latter are, without question, my favorites. Here’s my adaptation of one of them, and I’ve elevated everyone’s happy with yet another complementary flavor, maple. Oh yes, I did. The end result is a delicious smoky, savory, sweet and slightly spicy topper for your burgers, steaks, chicken and perhaps even slipped inside a grilled cheese sandwich. (You’re welcome, Linda!)

The recipe will make just about 1 cup and it’ll keep in a jar in the fridge for several weeks. But you’ll be lucky if you have any left after the three-day weekend, especially if you find yourself eating it straight from the jar at 3 am while everyone else is asleep—not that I’ve done that.

Ingredients

2 slices smoked, uncured bacon* (see notes), chopped into pieces

1 small sweet onion, cut into thin, crescent-shaped strips (not rings)

1 small red onion, roughly chopped into pieces

1/4 cup maple sugar*

2 Tbsp. apple cider vinegar

2 Tbsp. bourbon

Pinch of crushed red pepper (or as much as you like)

About 1 tsp. fresh thyme leaves

Pinch kosher salt (maybe)*

*Notes

I only purchase “uncured” bacon, which is free of the unnecessary preservative sodium nitrite. If you can find the maple kind of bacon, that’s a win-win. If you aren’t sure what “the maple kind” is, maybe you need to watch this. I literally cannot think or write about bacon without hearing this dog’s “voice.”

So, the maple bacon will be a nice extra touch, but the real flavor comes from the sugar.

Maple sugar is literally a dehydrated, granulated form of real maple syrup. I buy it online, directly from a sugar shack in upstate New York, my old stomping ground. Click here to get some from Big Tree Maple. If you can’t wait for it, substitute 1 Tbsp. light brown sugar and 2 Tbsp. real maple syrup.

You may not want additional salt in the recipe, depending on the sodium content of your bacon. Ours is house-cured by a local butcher and puts a perfectly salty kiss on this. Wait until your marmalade is finished, and add salt only if desired.

Instructions

Cook bacon in a cast-iron skillet over medium-high heat until crisp; remove bacon and drain on paper towels. Drain and discard all but about 1 Tbsp. of the bacon grease. Add sweet and red onions to the same skillet. Cook over medium heat, stirring often, until onions are soft and caramelized.

Add maple sugar, stir until dissolved. Stir in vinegar, bourbon, red pepper and thyme leaves. Cook a few minutes until liquid is the consistency of syrup.

Crumble the bacon into smaller pieces, if desired, and add to the onion mixture. Continue to cook several minutes, until mixture is thickened to a jam-like consistency. Adjust salt to taste.

Transfer to a covered jar and store in the fridge up to a month. Slather it on your favorite grilled meat. Or just eat it with a spoon—there’s no judgment here.

The finished marmalade will keep nicely in a sealed jar, or any dish with a tight lid. Keep it in the fridge, but bring to room temperature when you’re ready to use it.

Want to print this recipe?


Chili for Hot Dogs

As I was jotting down the ingredients I used in this chili, I almost felt that I should put an asterisk next to every spice ingredient. Taste is subjective, and it seems no culinary divide is greater than the one created by spicy heat. Some people love it (hear, hear), some can’t tolerate it at all and others want a little kick as long as they don’t feel too much burn.

If you make some version of this chili, use the level of heat that makes sense for you and whomever else you’re feeding. My husband and I are so much on the same page when it comes to heat, and we are quick to admit, we want a little burn. We might pay a price for it tomorrow, but that’s a consequence we will be willing to accept. Every. Single. Time. If you’re shaking your head “no,” you might find some of the spice notes helpful for adjusting the amounts to your personal taste, while still enjoying plenty of flavor.

There’s no need to spend extra for packaged “chili powder.” Mix and match spices you already have and come up with a winner.

Chipotle

Made of dried and smoked jalapeno chiles, this is a smoky-style, medium heat spice. I usually don’t even think of this spice as being “hot,” because I’m mainly captivated by the smoke. But it does bring some heat, so if you’re squeamish, skip this one and look at ancho or cumin instead.

Cumin

This spice is made from seeds, not chile peppers, and it’s common to various Latin cuisines as well as some Indian and Northern African cooking. The flavor is warm and gently smoky. “Comforting” is a good word for this spice. I adore it in fried breakfast potatoes, and it finds its way into every kind of chili I make. Cumin doesn’t have heat, but it plays so nicely with hot spices, it’s never far off in recipes with chile spices.

Cayenne

No doubt, this is a speecy-spicy one! Cayenne is a long, skinny red pepper, the variety used widely in Cajun cuisine, and the main ingredient in popular bottled hot sauces, including Tabasco and Frank’s original “red hot” sauce, as well as Texas Pete, which doesn’t hail from Texas, but Winston-Salem, NC (go figure). It’s not as hot as habanero or ghost peppers (not even close on the Scoville heat scale), but it’s fair warning to say that if you can’t stand the heat, you should get the heck out of cayenne’s kitchen.

Ancho

Made of dried and smoked poblano chiles, this one has a little heat, but is mainly smoky and fruity, especially if the seeds are removed before grinding it into powder. Ancho chiles are a favorite of celebrity chef Bobby Flay, who puts it in nearly everything. It’s a very balanced chile flavor, and though it isn’t listed as an ingredient in my chili for hot dogs, you might find it a good substitute for the chipotle if you like smokiness and peppers with a little less kick.

Paprika

This is an overly general name for a spice that varies a great deal from bottle to bottle. Some paprika is smoked, some is sweet, some is hot—it’s just all over the place. If you do an online search for “what pepper is used for paprika,” you’ll find everything from red bell pepper to cayenne, so it’s clearly a bit of a gamble. The variety I used in this recipe is specifically labeled “sweet Spanish paprika,” and I appreciate that because it helps me know what to expect. It is light and kind of fruity, with the tiniest amount of smoke (probably on the red bell pepper end of the paprika spectrum), and it adds bright color and a pleasant sweet pepper flavor without bringing heat. A bottle labeled “hot Hungarian paprika” would turn this chili into something totally different, so take notice of the differences.

Wait, what about plain old “chili powder?”

Frankly, my dear, there is no such thing. “Chili powder” is a generic term used by every spice company out there, and what’s in it is anyone’s guess. Sure, you could look at the label ingredients, but they are usually suspiciously vague—a blend of “red chile powder” (okay, but which chile?), herbs and spices (again, which ones?), plus a whole lotta salt and usually some other unnecessary ingredients with long, unpronounceable names. Personally, I don’t touch the stuff because it presumes to know what my flavor and sodium levels should be. I’ll decide what goes into my chili, thank you very much, and hopefully this quick little chili tutorial will empower you to do the same.

Ingredients

1 Tbsp. extra virgin olive oil

1/2 lb. lean ground meat*

1/2 cup yellow onion, finely chopped

2 Tbsp. apple cider vinegar or red wine vinegar

1/4 cup water*

8 oz. can tomato sauce

Kosher or sea salt to taste

Spices

1/2 tsp. each ground black pepper, ground chipotle, cumin, sweet paprika, garlic powder, onion powder

1/4 tsp. ground cayenne pepper, if you’re living on the edge

*Notes

For this batch of chili, I used 90% lean ground bison. Beef is an easy go-to, and it would also be just fine with ground turkey.

Feel free to substitute beer for the water, if you wish, as my husband does with his famous Super Bowl chili. (I hope that wasn’t a secret, Babe!)

Instructions

Heat a cast-iron skillet over medium heat. Swirl in olive oil, then add ground meat, onions, vinegar and water all together. Cooking the meat in the water rather than browning it first will result in the fine texture that’s perfect for topping a hot dog. Stir the meat mixture frequently as it cooks, until the water has completely evaporated. Season with salt and pepper, then add tomato sauce and spices. Cook and stir several more minutes, until liquid reduces and chili thickens to your liking. I like this kind of chili to be on the thicker side, so it stays on the dog without making the bun soggy.

The chili is good on its own, but I throw on more onion just because.

Want to print this recipe?


Oil-poached Tomato & Zucchini Dinner

(A “zero-waste” recipe)

It’s only been three weeks since our state went into lockdown over the COVID-19 risks, but it sure seems like I’ve been rationing fresh food items a lot longer than that. We’ve managed to only do our grocery runs about once every 10 to 14 days since the middle of March, when the walls first started to close in. And the consequences of our few-and-far-between trips became evident a few nights ago when I reached for the “brand-new” package of grape tomatoes I’d purchased, and found this:

Definitely not delicious.

If that isn’t disappointing enough, imagine my horror when I peeked into the crisper drawer to find another so-called fresh item to be way past its prime.

This is just pitiful.

I know. Kind of like those pics all over Instagram of celebrities without their makeup. Our produce drawer has been so jam-packed these past weeks, it has become a real challenge to keep up with the fresh ingredients we’re buying in greater quantity than usual. This discovery of wrinkly tomatoes and shriveled zucchini wrecked my plan for making ratatouille, one of my very favorite vegetable-centered dishes. I’m not even going to show you a picture of the eggplant. It’s rough, people.

So, a change of plans, but this need not be a disaster. I’ve been here before with the tomatoes and knew I could save them. With a little patience and the magic of slow poaching in some good quality olive oil, you can do it, too. We’re going to turn these sad little misfit vegetables into something delicious. This recipe serves two.

Let’s Get Cooking!

Ingredients:

One pint really wrinkled baby tomatoes (of course, fresh is good, also!)
1/2 cup chopped onion (I like sweet ones, but use whatever you have)
3 cloves fresh garlic, chopped
1/4 cup good quality extra virgin olive oil
1 tsp. Italian blend herb seasoning
About 1 1/2 cups leftover cooked chicken (shredded scraps from a rotisserie market chicken is perfect)
1 medium shriveled-up zucchini (or fresh, if you must)
Kosher or sea salt and freshly ground black pepper
Parm-Romano cheese for serving

Instructions:

First things first—we need to identify any tomatoes that truly shouldn’t be used. If they are wrinkled and a bit withered, they’re OK. Soft, oozing or moldy? Sorry fellas, you’ve been chopped.

Ick. At least I was able to salvage most of the tomatoes.

Rinse the tomatoes that remain and set them aside on a paper towel to absorb the excess water. Place a large, non-stick skillet over very low heat and add the full amount of olive oil. It’s going to seem like a lot, but it’s all good.

Add the onions, garlic and baby tomatoes to the olive oil and tilt the pan around to “roll” and coat the tomatoes in the oil. Add the Italian herbs, and season with sea salt and freshly cracked black pepper. Keep the heat to a bare minimum. This super-slow pace might feel a little awkward if you are accustomed to sautéing in oil. We’re doing something else—rehydrating the tomatoes should not be rushed, and I can’t emphasize enough that your heat should be at the lowest setting your burner allows. You don’t want to see or hear any sizzling at all; if you do, it’s too hot. The pictures in this slideshow are time-stamped, and the captions will help explain how this should progress:

Pretty awesome, right? And you wouldn’t believe the depth of aroma and flavor the olive oil is able to extract from those sad little tomatoes. Actually, it’s more than that; studies have shown that cooking tomatoes in oil releases more of their lycopene, an antioxidant linked to heart health and protection against certain types of cancer. And to think, we almost threw them away!

If you only had the tomatoes, you could stop right here, toss this sauce with some freshly cooked pasta and call it dinner (just add a sprinkle of parmesan and a glass of wine). But today is also the deadline for that pitiful zucchini, so I’m going to take this a step further and turn the squash into “noodles.”

One day soon, I’ll share my honest opinion about the different spiralizers I’ve tried. They definitely are not created equal, and although you’d think the expensive ones would be the best, I usually prefer this little gadget—called a “Vegetti”—that I picked up for about $6 at TJMaxx (a couple years ago—you know, when things were open).

It has two sides: one for thick spirals and one for thin. I’m using the thick side today, and as you can see, after twisting the zucchini through it, there’s very little waste. Just the butt ends and these cute little swirly buttons. Lucky for me, even these will not be wasted because our dog, Nilla, is certifiably crazy about vegetables. Sweet girl has such patience.

We’re now in the homestretch, where we will see the final transformation of too-far-gone vegetables turned into a delicious and healthful, zero-waste meal. I’m scattering my leftover chicken pieces over the top of my luscious poached tomato sauce, then the zucchini noodles, salt and pepper, and covering it with a lid to heat it through.

Turn up the heat about two notches to medium, set the table and pour the wine. By then, this one-skillet meal will be ready to be tossed and plated. Enjoy!


Egg-stravaganza!

This week, I imagine two reasons you might have a bunch of extra eggs in the fridge—you stockpiled them to get through COVID-19 self-isolation or you got creative with coloring them for Easter. Either way, here’s a list of ideas to help jazz up a classic comfort food—deviled eggs!

My husband, Les, and I have gotten pretty adventurous with deviled eggs in the years we’ve been together, and each time we make them, we ask each other, “why don’t we make these more often?” Honestly, they are a perfect light bite—packed with protein, ridiculously easy to make with basic ingredients and no special tools, and an amazingly versatile blank canvas for a wide array of other flavors. They work for breakfast, lunch and dinner, or even a late-night snack. Perhaps best of all, given that we enjoy them so much, they are relatively easy on the waistline (depending on your filling choices, of course).

If you’ve never made them yourself, now is a great time. Here’s my very basic recipe for deviled eggs, along with some creative, flavorful change-ups to help you use up some other stuff in the fridge while you’re at it. Let me know if you find a new favorite!

Ingredients

6 chilled hard-boiled eggs, peeled (obviously)

Filling

2 to 3 Tbsp. canola mayonnaise
1 tsp. Dijon or other prepared mustard
Sea salt and freshly ground black pepper
Sweet or smoked paprika

Instructions

Cut the eggs in half lengthwise, and empty the yolks into a small mixing bowl. Set the whites aside on a covered plate while you make the filling.

Add 2 Tbsp. mayo and the mustard to the egg yolks and mash with a fork or back of a spoon to combine into a soft, smooth mixture. Add more mayo if mixture seems too dry. Salt and pepper to taste. Spoon filling into a zip-top bag and squeeze out as much air as possible. Carefully snip a small bit of one corner off the bag, and pipe the filling into the egg white halves; sprinkle with paprika and enjoy!

Jazz em up! (left to right) Bloody Mary; Jalapeno pimiento cheese; Bacon, egg and cheese.

Fun Flavor Variations

Change it up with a simple swap of fillings.

Bloody Mary

Filling: egg yolks, 1 Tbsp. mayo, 2 Tbsp. tomato paste, 1 Tbsp. prepared horseradish, a dash or two of hot sauce and/or Worcestershire sauce, salt and pepper to taste. Press cut side of egg white halves onto a plate sprinkled with Old Bay seasoning so when you turn them back over the rims are nicely coated and colored. Pipe filling into egg white halves; garnish with olive half and celery leaf.

Jalapeno-pimento cheese

Filling: egg yolks, 2 to 3 Tbsp. prepared pimiento cheese, 2 tsp. chopped pickled jalapeno slices (drain them well and pat dry on paper towels). Salt and pepper to taste. Pipe filling into egg white halves; garnish with piece of pimiento and jalapeno.

Bacon, egg and cheese

Filling: egg yolks, 3 Tbsp. mayo, 2 Tbsp. very finely shredded cheddar cheese, ½ slice crispy bacon (wrap in a paper towel and use a rolling pin to crush it into very fine crumbs). Pipe filling into egg white halves (you will have extra – you’re welcome); sprinkle with sweet paprika and garnish with a small strip of crispy bacon.

Smoky guacamole

Filling: egg yolks, no mayo, 2 Tbsp. mashed avocado, ¼ tsp ground chipotle or chili powder, 2 tsp. very finely minced red onion, squeeze of fresh lime juice to preserve color. Salt and pepper to taste. Pipe filling into egg white halves just before serving; garnish with a cilantro sprig.

Lox and bagels

Filling: egg yolks, 2 Tbsp. mayo, 1 Tbsp. finely chopped smoked salmon or lox, 1 tsp. very finely minced red onion. Pipe filling into egg white halves; garnish with “everything bagel” seasoning and capers.

Sweet southern

Filling: egg yolks, 3 Tbsp. mayo, 1 tsp. each yellow mustard and sweet pickle relish (pat dry on paper towel). Salt and pepper to taste. Pipe filling into egg white halves; garnish with chopped sweet pickle and/or a slice of pickled okra.

Roasted garlic hummus

Filling: egg yolks, no mayo, 2 Tbsp. prepared hummus, 3 smashed cloves of freshly roasted garlic. Salt and pepper to taste. Pipe filling into egg white halves; garnish with paprika if desired.

Bloody Mary (center); Sweet southern and Roasted garlic hummus (alternating, outside)

What’s your favorite deviled egg combination?

Want to print these recipes?


Apple Dutch Baby with Cider Sauce

A Dutch baby (also known as a German pancake) is an elegant breakfast or brunch dish you can make from basic pantry ingredients. It’s terrific because you can swap in whatever fruit you have on hand—fresh peaches or berries make delicious toppings, with just a dusting of powdered sugar. But for this one, I’ve used a single, unpeeled apple for rustic appeal, and created a sweet apple cider sauce that takes it way over the top, almost into dessert territory.

The basic German pancake recipe was graciously offered to me by the innkeeper at a Virginia bed and breakfast I visited many years ago. It uses the simplest of ingredients, but something almost magical happens in the oven, as the batter rises up and curves inward over the filling—almost like it’s giving a hug.

There are three components to this dish, and I’ve listed the ingredients for each separately along with the steps. You may want to read all the way through before you begin. Enjoy!

Tools you’ll need:

10 1/2 inch cast-iron skillet (and potholder)
Whisk
2 medium mixing bowls
Small microwave safe bowl or measuring cup
Medium, heavy-bottomed sauce pan
Cutting board and knife
Flat wood utensil or wooden spoon

Ingredients – cider sauce:

2 cups apple cider
1 Tbsp. unsalted butter
2 Tbsp. maple syrup (I love the dark amber, formerly known as “grade B”)
1 tsp. vanilla extract
Pinch of sea salt (this simultaneously enhances and balances the sweetness of this decadent sauce)

In a heavy-bottomed sauce pan, combine all ingredients except vanilla and sea salt over medium-high heat. Bring to a boil, stir and cook about 2 minutes. Reduce heat to medium-low and simmer, stirring occasionally, until mixture is reduced by nearly half, about 30 minutes. Remove from heat and stir in vanilla and sea salt. Set aside to cool. This may be made ahead and refrigerated for up to a week; warm before serving.

Ingredients – apple filling:

1 large, firm apple (Granny Smith, Honeycrisp, Gala or Fuji would be good), cored and sliced thin
2 Tbsp. unsalted butter
1 Tbsp. brown sugar (light or dark)
1/4 tsp. ground cinnamon
1/4 tsp. ground cardamom (or extra cinnamon)
Pinch sea salt

Preheat oven to 425° F. Heat cast-iron skillet over medium heat and melt butter. Add apple slices and sprinkle with brown sugar, cinnamon, cardamom and sea salt. Toss to coat, and stir frequently for about five minutes, until apples are evenly coated and beginning to soften. Remove from heat, empty apples into a bowl and wipe the skillet clean of any bits that might burn. Place skillet into preheated oven for about 10 minutes.

Ingredients – Dutch baby:

3 Tbsp. salted butter (for the batter)
1 cup all-purpose flour
¼ tsp. ground cinnamon
1 cup whole or 2% milk
2 Tbsp. unsalted butter (for the skillet)

Melt 3 Tbsp. salted butter in a microwave safe bowl or glass measuring cup. Whisk together flour and cinnamon in a medium bowl. In another bowl, whisk eggs until uniform consistency. Make a well in the center of the flour mixture then add milk, eggs and melted butter. Whisk just until all flour is incorporated.

Carefully remove skillet from the oven and add 2 Tbsp. unsalted butter, swirling around to coat the bottom and sides of the pan. Spoon the apples into the center of the pan. Give the egg mixture another quick whisk, then pour gently over the apples. Place the skillet back into the oven, reduce heat to 400° F and bake about 25 minutes, until edges are golden brown and center is set, but still a bit soft and “eggy.”

Straight from the oven; notice those little pockets of custard and butter?

Remove from skillet, drizzle the warm cider sauce over the pancake and serve in wedges.

The fragrant apple and spices will warm you up from the inside.

Can I make a Dutch baby without a cast-iron skillet?

Alternatively, you can use an oven-safe casserole dish and get great results. Butter and flour the inside of the dish before adding the batter. Because the casserole dish won’t be preheated like the skillet, it may take a bit longer. Bake at 400° F, and check for doneness after about 30 minutes.

Can I make individual Dutch baby pancakes?

Yes! If you have individual size cast-iron skillets, simply preheat them as instructed for the large skillet, and divide the melted butter and batter into them. Check for doneness after about 15 minutes. Or butter and flour individual glass casserole dishes and check them at 20 minutes. This recipe should work for about four of them.

Can I serve a Dutch baby for dessert?

I can’t think of a reason not to, especially if you make a decadent sauce! This apple dutch baby with cider sauce would be fantastic as it is for dessert; I’d probably even add an ounce of bourbon or brandy to the cider as it reduces (I’m spontaneous like that). It would also be great with cooked cherries rather than apples, and maybe a nice dark chocolate sauce. Or what about caramelized bananas with a caramel rum sauce…like Bananas Foster? Okay, now it’s just getting crazy in here.


Creamy Tomato Bisque

There’s a reason “tomato bisque” is on so many restaurants’ menus. It’s a classic comfort food, and so simple to make from regular pantry ingredients you’ll wonder why you ever settled for the stuff in a can. My version includes a bit of red bell pepper and carrot for a touch of extra flavor and sweetness. This is perfect on a chilly day or rainy night, and we love to pair it with a tuna on homemade rye or classic grilled cheese sandwich.


Ingredients

Extra virgin olive oil, salt and pepper

1 medium onion, chopped (I like sweet onions, but yellow works well here, too)

1/2 medium red bell pepper, seeded and chopped

1 medium carrot, peeled and diced

3 cloves garlic, peeled and chopped

1 tsp. Italian herb seasoning (or some combination of oregano, basil, thyme, rosemary)

A pinch of crushed red pepper

28 oz. can peeled plum tomatoes (San Marzano, if possible)

1/2 cup vegetable broth or 3/4 cup V-8 juice

1/4 cup whole milk, half-n-half or heavy cream (omit or substitute canned coconut milk if vegan)

Freshly grated parm-romano cheese blend (omit for vegan) and chopped parsley or basil for serving

Tools

cutting board and knife, heavy-bottomed tall pot, flat wooden utensil or spoon, immersion blender*


Let’s Get Cooking!


Place a deep, heavy-bottomed pot over medium heat. Add a generous swirl of olive oil (about 2 to 3 tablespoons). When oil begins to shimmer, add onion, pepper and carrot all at once. Salt and pepper to taste, then stir and cook until all begin to soften. Add chopped garlic and seasoning blend, stir and cook another minute or two until onions seem slightly translucent.

Add the plum tomatoes, using your hand to squeeze each tomato into the pot. This helps release the juices and gives them a head start on breaking up in the pot. Squeeze slowly and gently so you don’t wear it! Add all the tomatoes plus all remaining liquid from the can, but discard any basil leaves that may be in the can. Add broth or juice, stir to mix evenly and bring just to a boil, then reduce heat and simmer uncovered on medium-low about 30 minutes. Stir occasionally to prevent burning. Adjust seasoning to taste.

When mixture appears less chunky and somewhat reduced, turn off heat and use an immersion blender to puree until mixture is as smooth as you like. Simmer on low another few minutes to allow air bubbles to disperse and soup to reduce to your preferred thickness. If it’s too thick, stir in a bit more vegetable broth. Remove from heat and swirl in milk or substitute. Ladle into bowls and swirl a drizzle of olive oil over the top of the soup and sprinkle with parm-romano cheese and fresh chopped herbs as you like.

Dinner is served. We love it with a sourdough grilled cheese, but any kind of sandwich is a good side.

Want to print this recipe?


No-Fuss Mushroom and Spinach Omelet

I like this style of omelet because it’s quick and simple, and it doesn’t require removing the extras from the pan and then stuffing them back in. Your “fillings” will be cooked into the outside of the omelet, with melty gooey cheese layered inside. This recipe is super flexible, too! You can add or substitute leftover vegetables of any kind if you don’t have spinach and mushrooms on hand—peppers, kale, broccoli, asparagus or whatever is taking up space in the fridge. If they’re already cooked, just chop into smallish pieces and toss them in the pan long enough to warm them and proceed with the recipe from there. As with most my recipes, I rely on formula and technique more than the ingredients. So, let’s talk about that:

How do you make an omelet fluffy?

Whisking cold water (not milk!) into the eggs just before cooking them gives a nice airy lift to the omelet. The scientific upshot is that the tiny water droplets evaporate quickly in the heat of the pan, creating airy pockets inside the egg mixture. If you want even more fluff, separate the eggs before you begin (this works best when they’re cold) and whip the whites into a soft foam (this works best at room temperature). Fold this into the rest of your egg mixture just before pouring into the hot pan.

Which cheese melts best for an omelet?

Good melting cheeses include Monterey jack, cheddar, Colby, Muenster, Havarti, Gouda and gruyere. Hard or crumbly cheeses such as feta, chevre and parmesan will add tons of flavor; just don’t expect gooey goodness from them, as they pretty much hold their shape when warmed. Whenever possible, grate your cheese from a block. The packaged pre-shredded cheeses are coated to prevent sticking in the bag, and this also prevents them from melting well.

Do you need a special pan for an omelet?

Years ago, my mom had one of those hinged, fold-over pans “designed for omelets,” but this is absolutely not necessary. It didn’t produce a fabulous omelet and mostly just made a mess. My go-to pan for omelets is a good non-stick skillet with curved sides. The shape and coating makes it easier to slide your spatula underneath the set egg mixture for folding and serving. If your skillet is not coated, swirl in a little extra oil just before adding the eggs, to guard against sticking.

This recipe is a delicious way to work in an extra serving of vegetables and works especially well as “breakfast for dinner.” Three eggs make just the right size for my husband and me to share, but we are not big eaters at breakfast. Feel free to throw in a fourth egg with no other adjustment needed.

Ingredients

Extra virgin olive oil, salt and pepper

1 thick slice of onion, finely chopped (we like sweet onions, but red or yellow ones are fine)

3 to 4 mushrooms, cleaned and sliced (cremini is my go-to, but white button or shiitake would also work)

Big handful of fresh baby spinach, roughly chopped and tough stems removed

3 large eggs, room temperature

About 1/2 tsp. prepared Dijon mustard (or hot sauce for a spicier twist)

Splash of cold water

1/3 cup freshly shredded cheese (or less if using more pungent cheese, such as Parmesan or feta)

Tools

Get Cooking!

Place a 10 inch non-stick skillet over medium heat and add a generous swirl of olive oil.

When you notice the oil beginning to shimmer and flowing easily around the pan, add your chopped onions. Give them a stir and cook until they are just soft but not quite browning, about 2 minutes. Add the sliced mushrooms and toss them around with your wooden utensil to be sure they get lightly sautéed on both sides. Add the chopped baby spinach leaves and stir until wilted and noticeably reduced, but still bright green. Salt and pepper to taste.

While the veggies are doing their thing, crack your eggs into a large measuring cup, add Dijon mustard (or hot sauce) and whisk briskly until lightly foamy. Add a splash of cold water – about 1 Tablespoon – and whisk again until light and foamy. You want lots of bubbles in this mixture, so whip it…whip it good!

Spread out the sautéed veggie mixture evenly in your pan. Slowly pour the eggs around the outer edge of the mixture, encircling your veggie ingredients, then pour gently to “fill in” and cover the entire mixture. Again, salt and pepper. Reduce the heat to medium-low and cook about 2 or 3 minutes, or until the egg mixture looks set about one half inch around the edges but still wet and somewhat loose in the center.

Sprinkle shredded cheese over the entire mixture, turn off the burner and place a cover over the pan, allowing trapped heat and steam to finish cooking the eggs and melting the cheese into them. This will take about 3 minutes. Using a wide silicone spatula, fold in half. Or for a slimmer omelet, fold one third toward the center, then fold the other side over the top of that, as if folding a letter. Carefully cut the omelet in half crosswise to share the other half with your other half, and enjoy!

Want to print this recipe?