It’s a question that has always piled on stress, and one that is virtually inescapable this time of year, asked by friends and strangers alike.
“Are you ready for Christmas?”
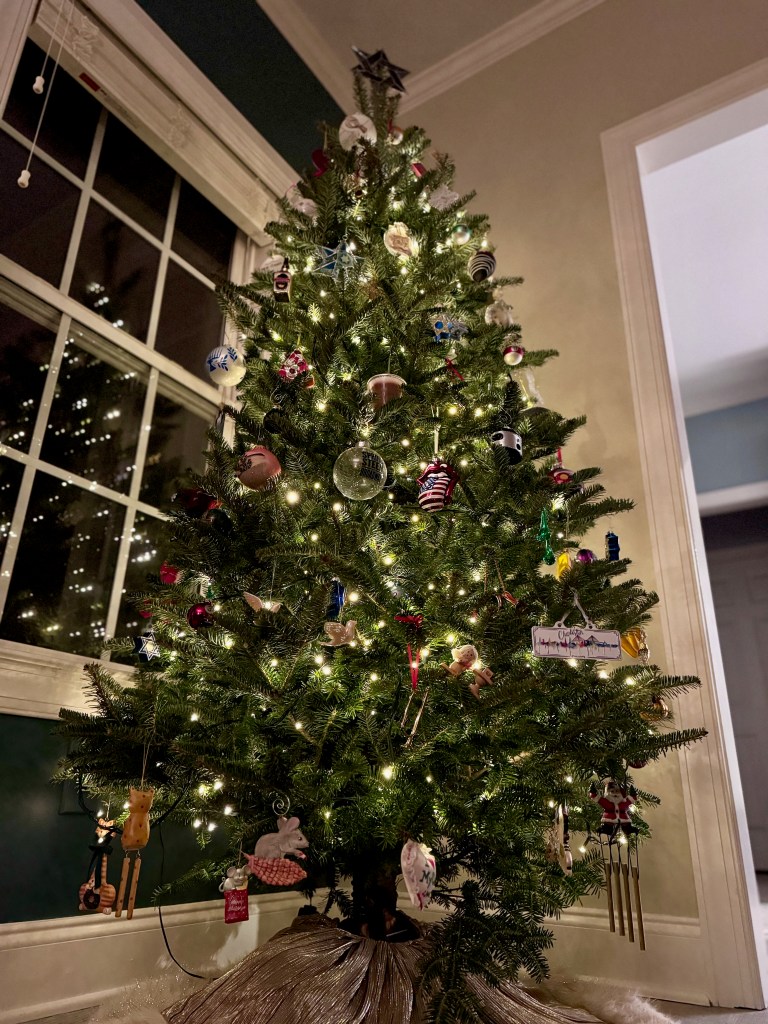
And this year, I actually am! Not for having crossed off a multitude of items on a gift list or for having my proverbial ducks in a row for holiday entertaining or gathering or what-have-you. Nope, this year I’m “ready” because my husband and I made a conscious decision to forgo most of the hubbub that is typically associated with the holiday season. You could say that we are quiet-quitting Christmas. Except for the tree!
I bought new lights this year, and they are convertible from white to multi-color. Loving this!
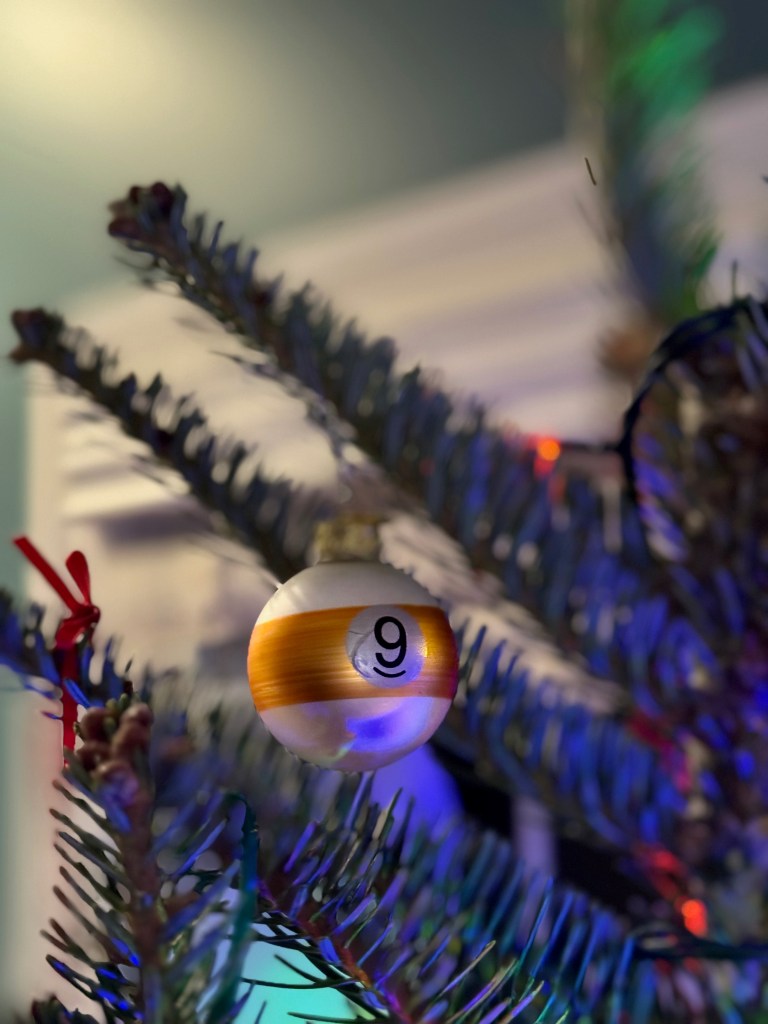
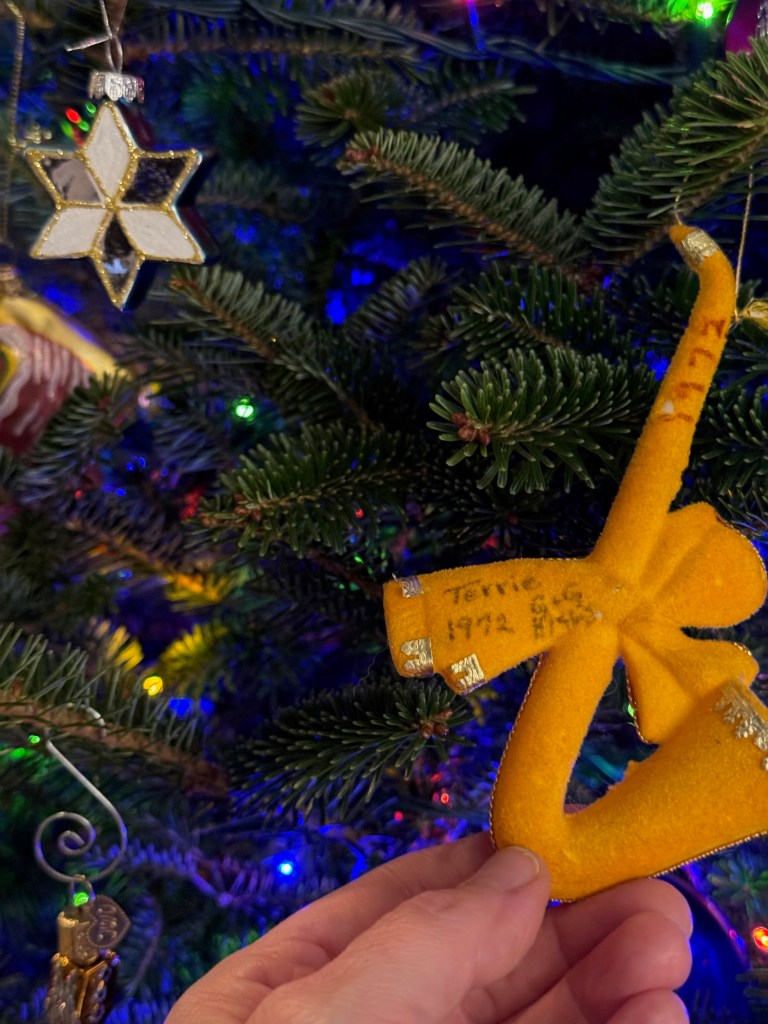
Our tree is all we’ve done so far this year, and it’s simple. We are not the family who has a perfectly color-matched tree, nor do we want to be. Our tree has a hodgepodge of trimmings, many of which symbolize memories we’ve made since we’ve been together, and others that were gifted to me by my maternal grandmother as long ago as 1972!
We will exchange small gifts, and I’ll go overboard for the pets, but there isn’t a darn thing we need. Instead of the hustle and bustle involved in “finding the perfect gifts,” we are taking time to enjoy being together, and doing fun things that improve our moods, such as watching holiday-themed films, sipping hot cocoa by our patio fire and— you knew this was coming— cooking and baking!
Nice enough for company, but easy enough for an average Tuesday!
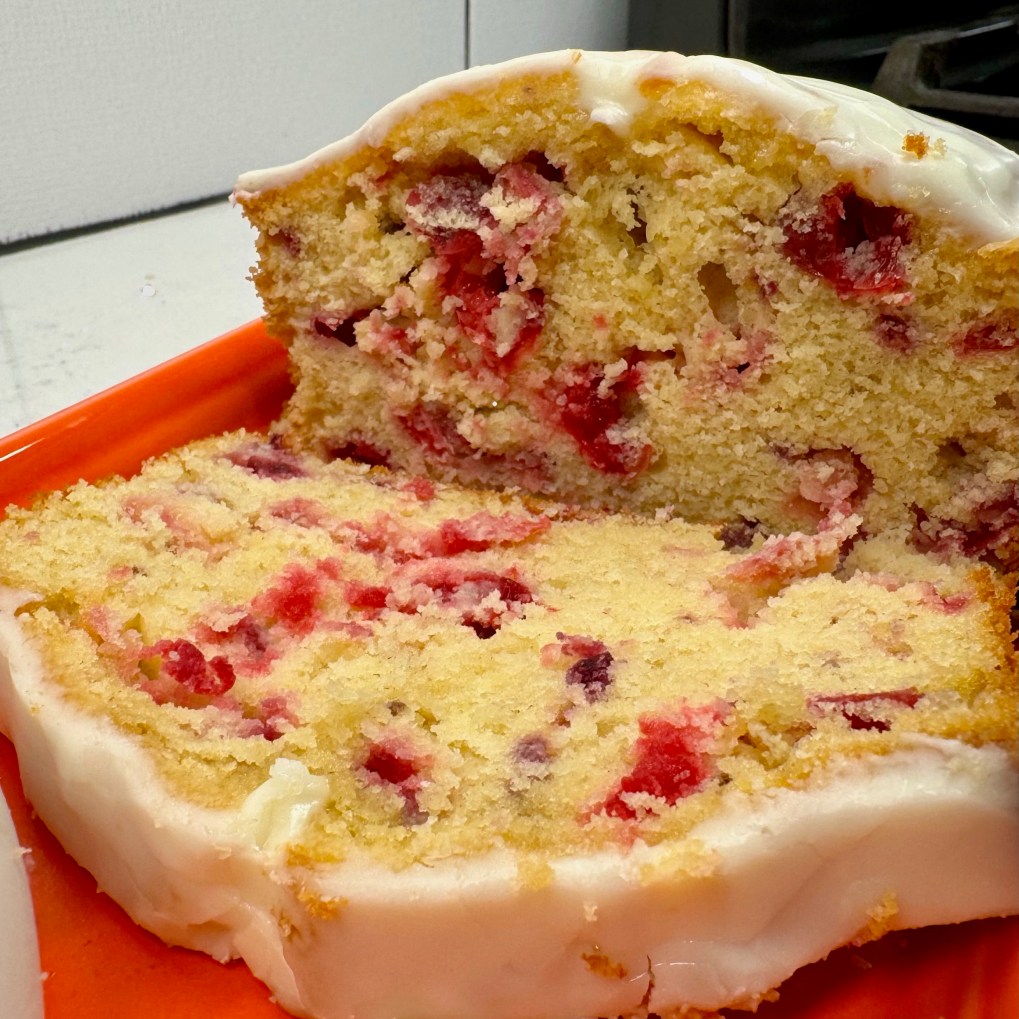
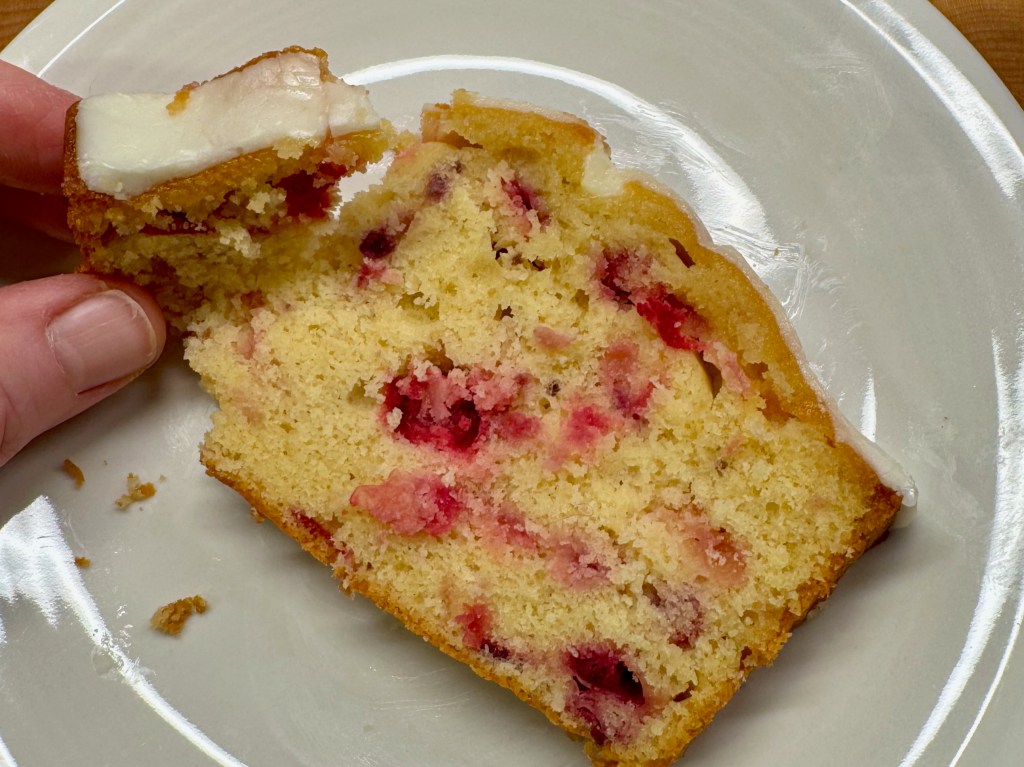
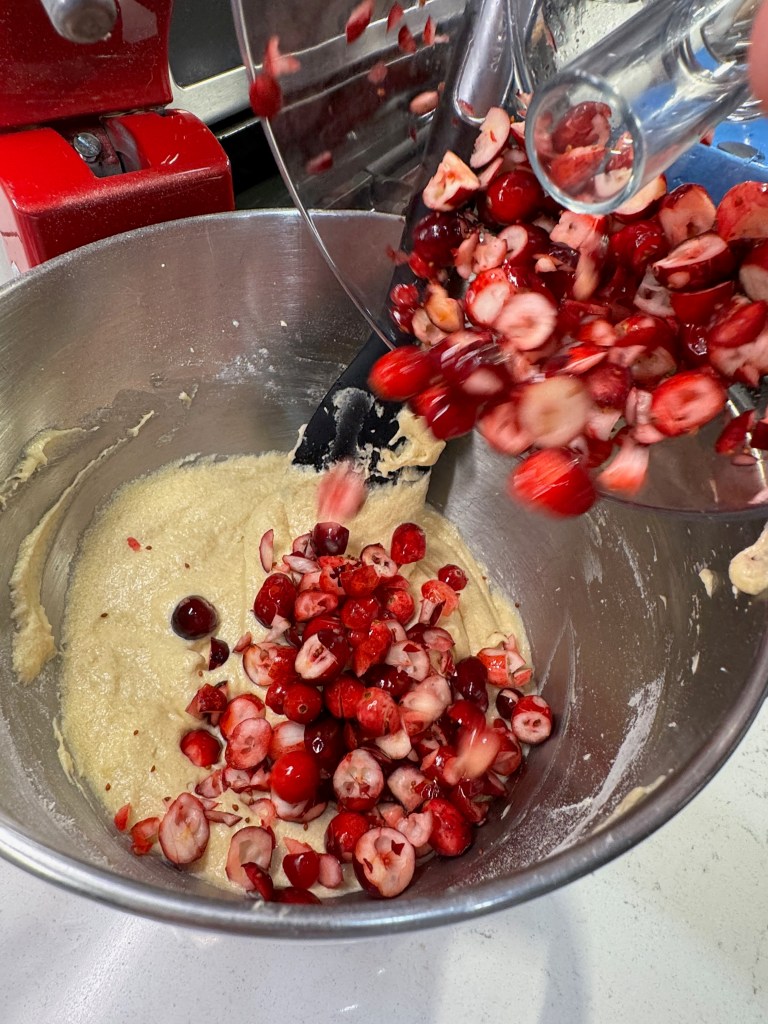
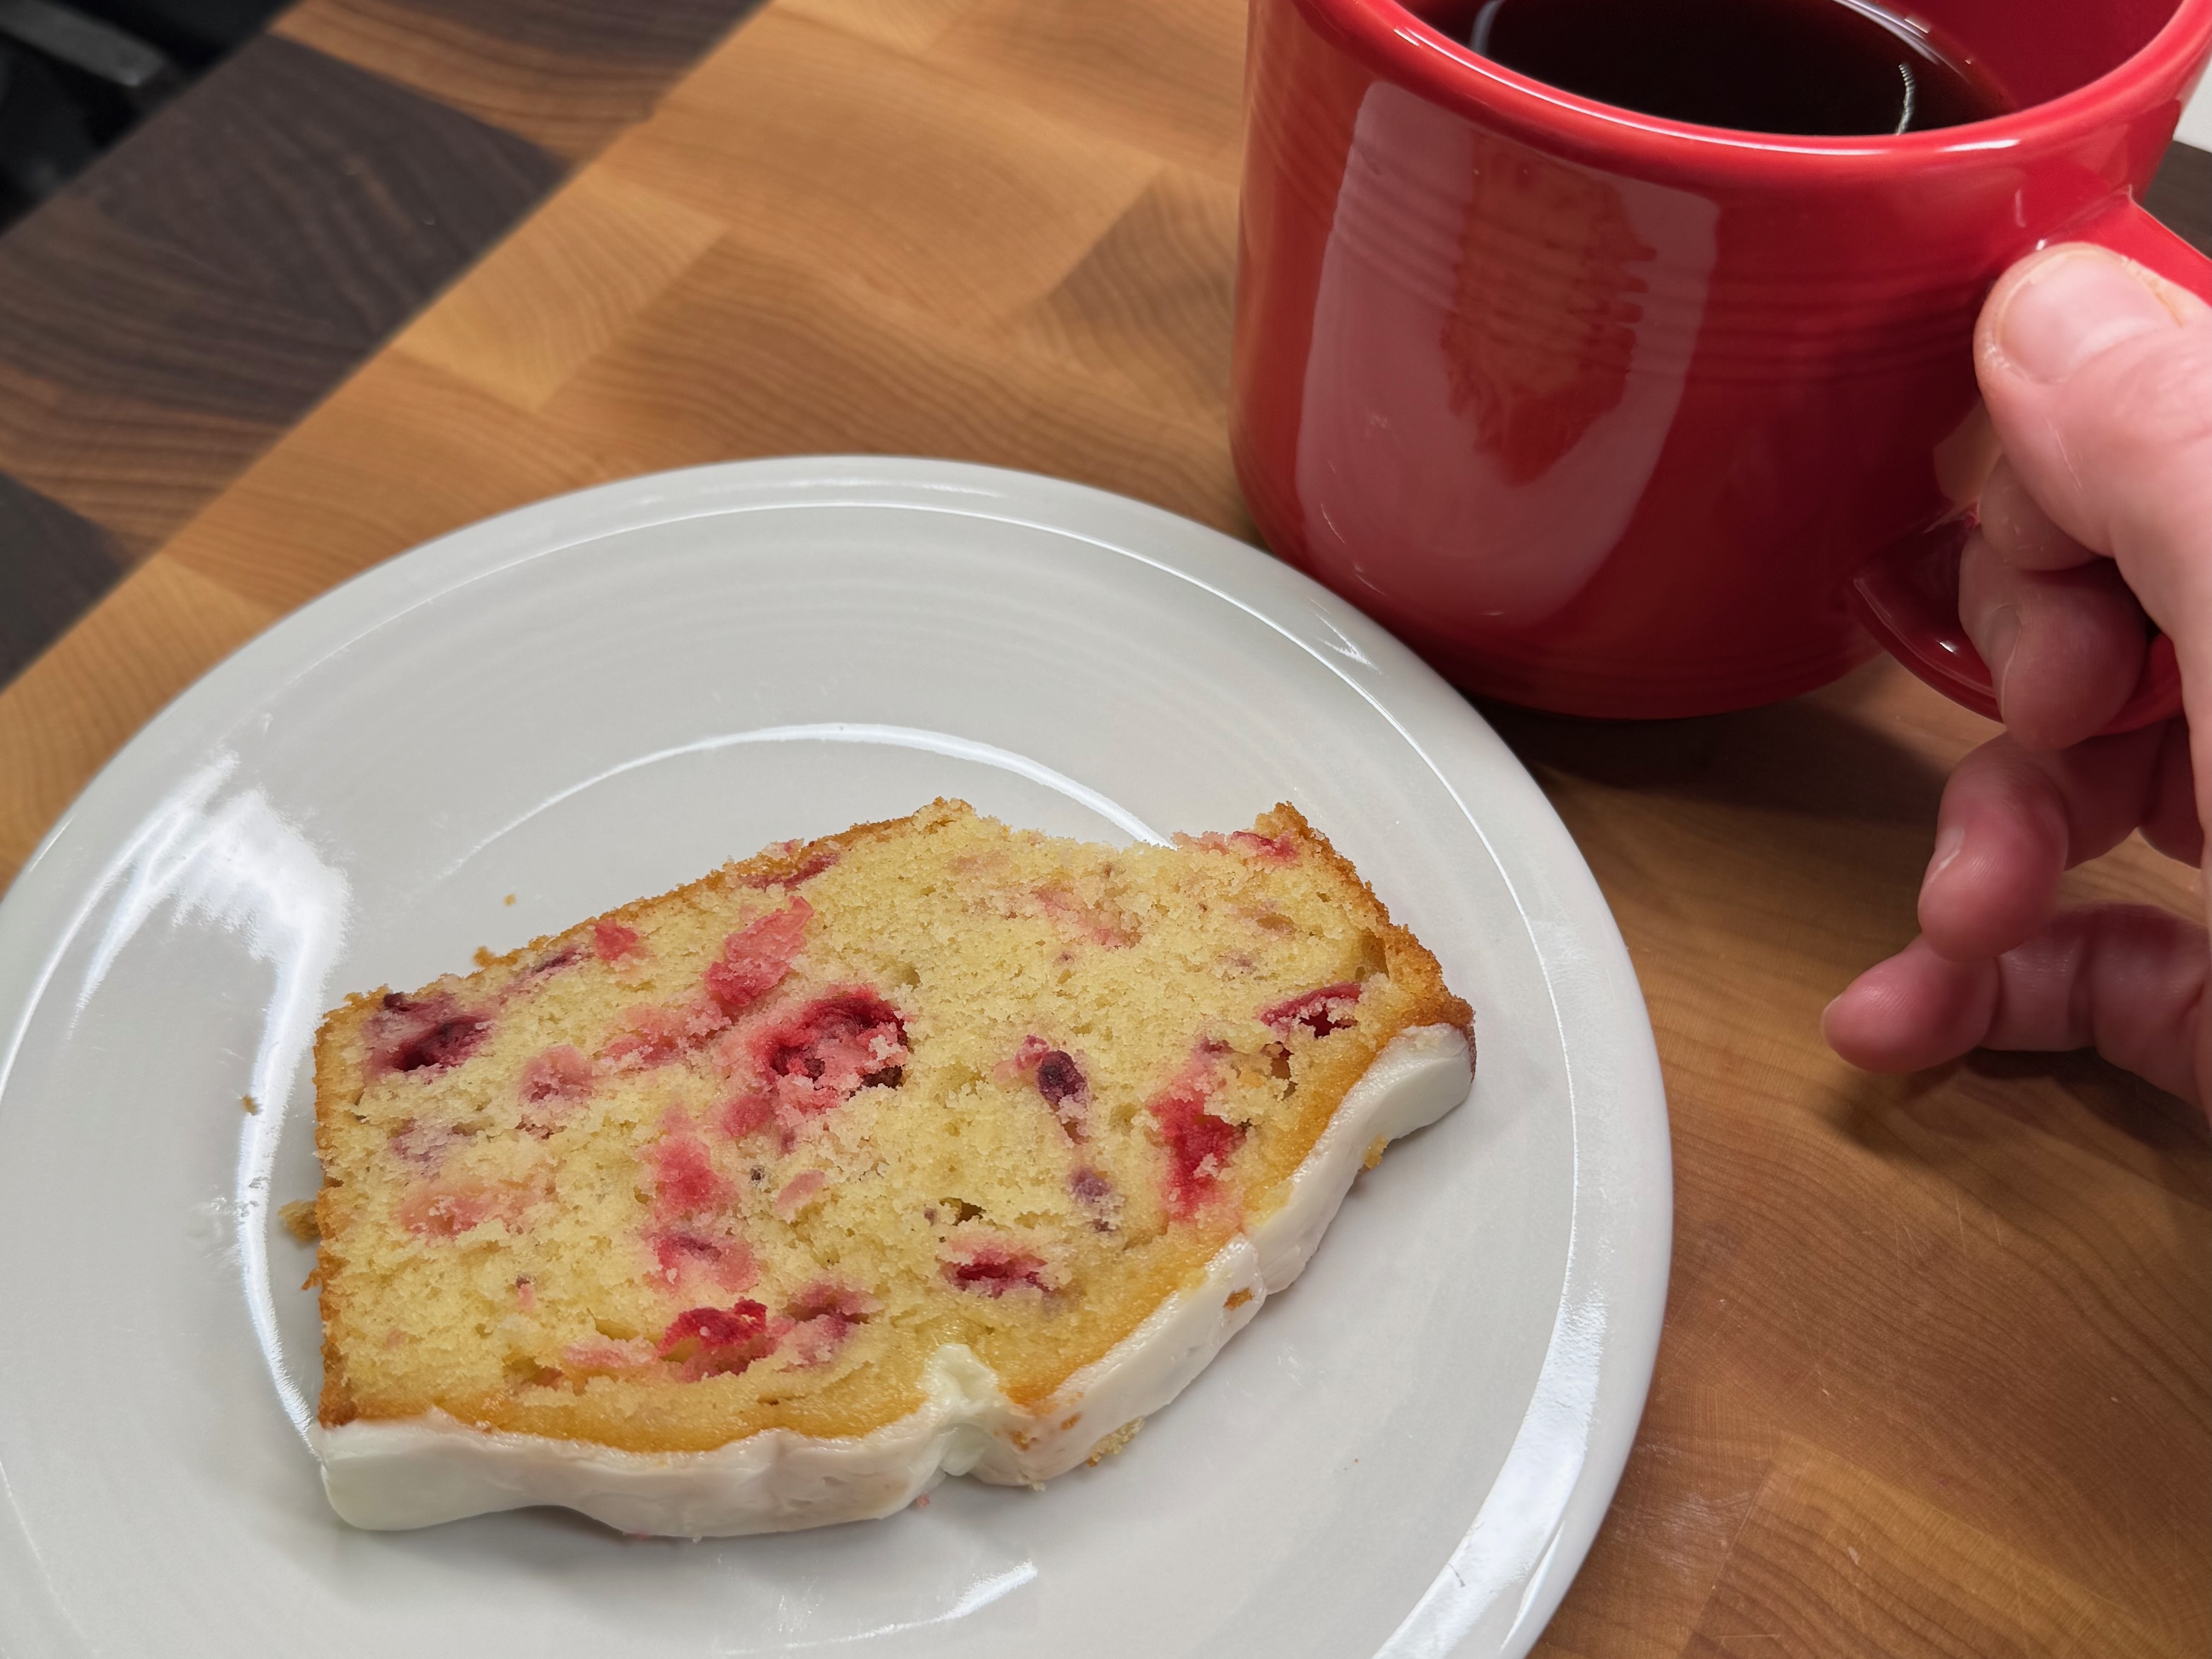
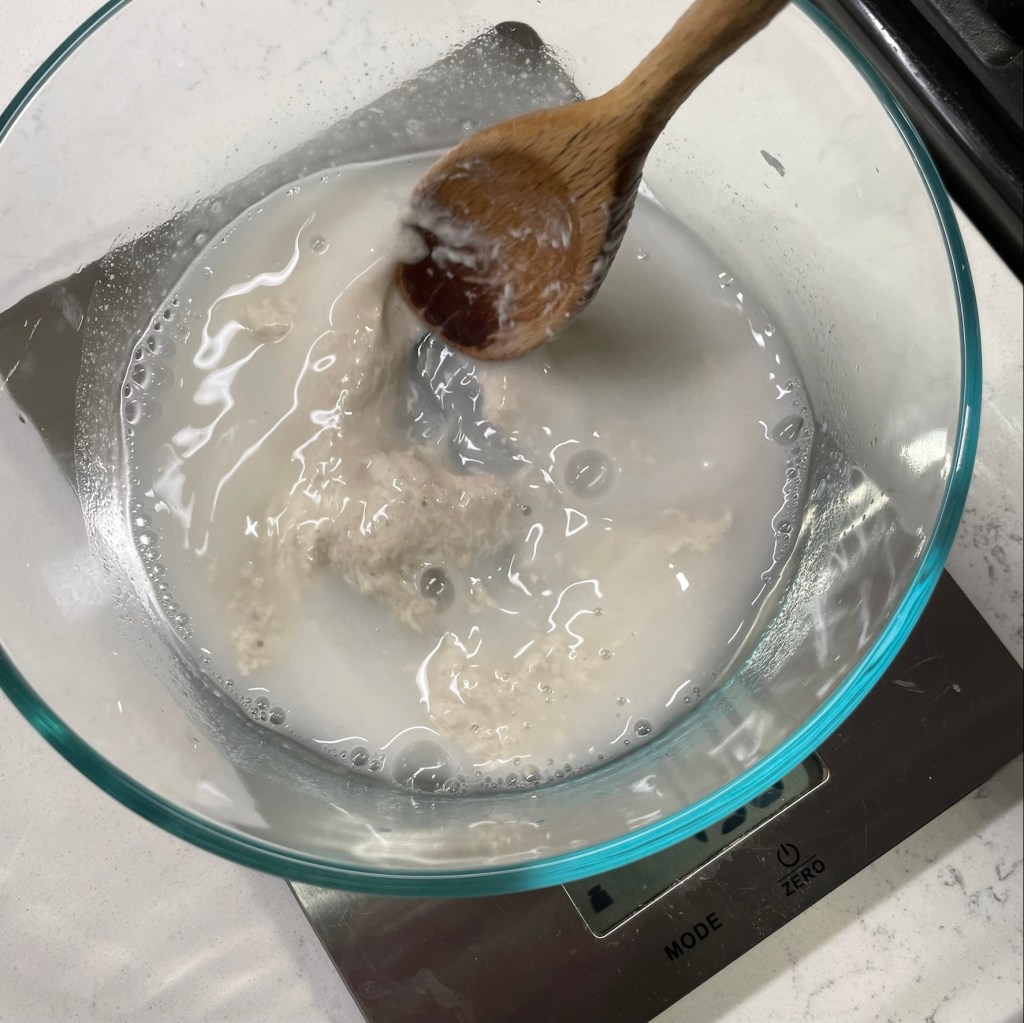
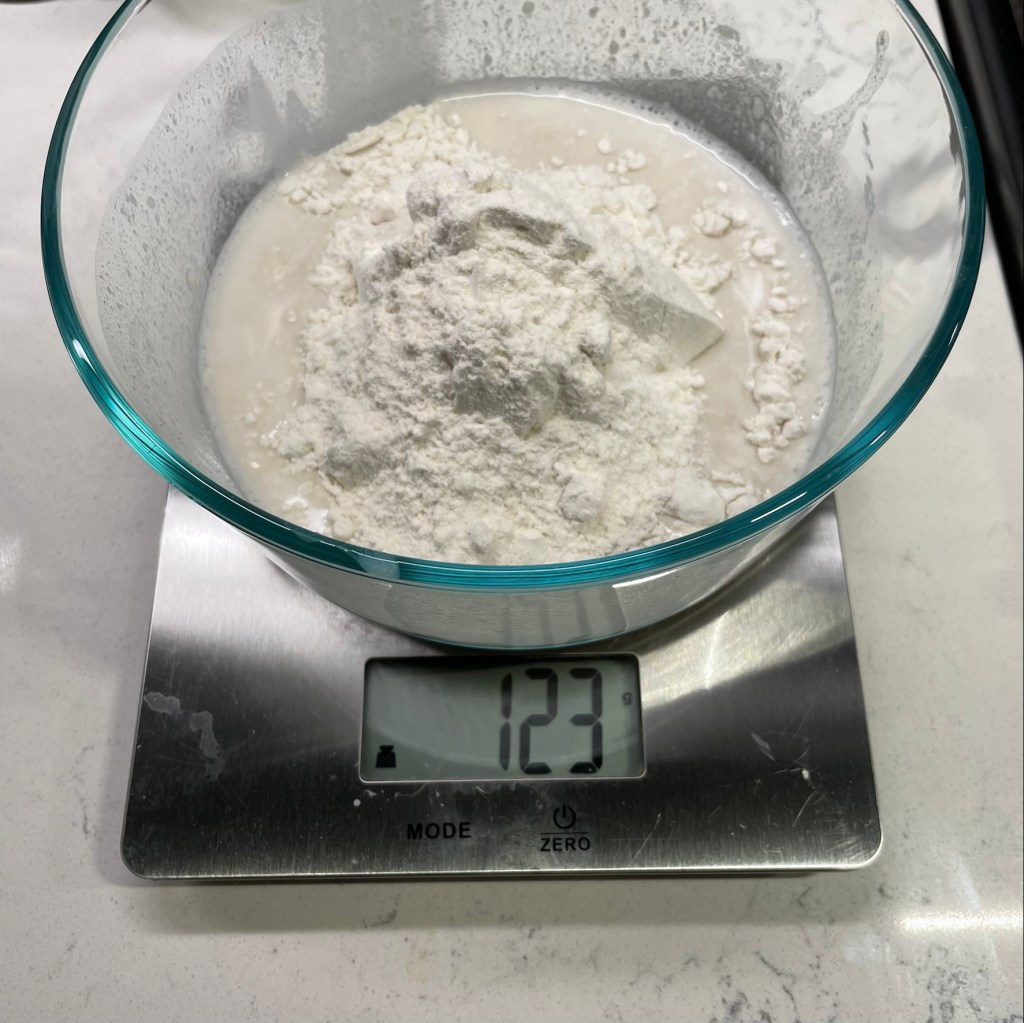
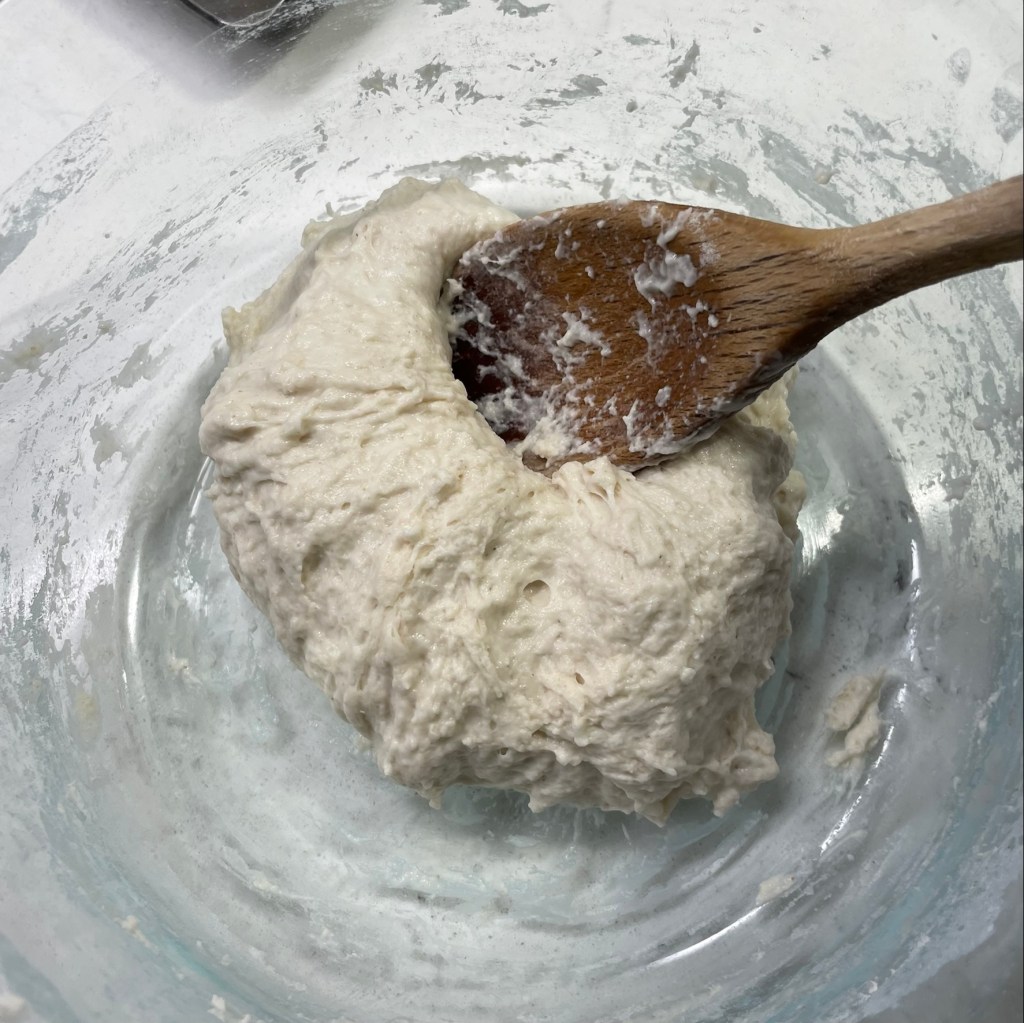
I’ll never ever say that the food of the holidays is too much trouble, and this seasonal combination of cranberry and orange is one of my all-time favorites. My first instinct was to make a challah, featuring dried cranberries and candied orange (as I shared back in 2022), but to keep things sweet and simple, I decided on a quick bread instead. It’s been forever since I made one, and the King Arthur Baking site, my go-to resource for all things baking, had a recipe that satisfied most of my intentions. I embellished their recipe, adding a touch of orange oil (because I didn’t have a fresh orange for zest) and subbing in a portion of white whole wheat (because it’s what I always do).
Fresh chopped cranberries give this bread bright, holiday flavor!
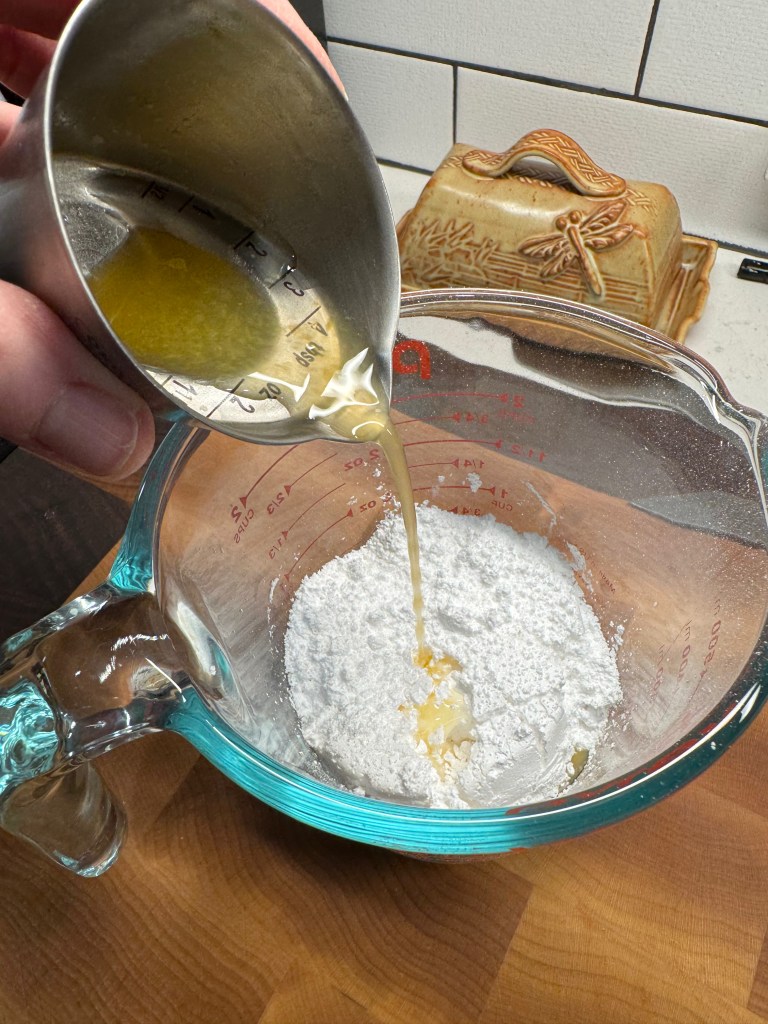
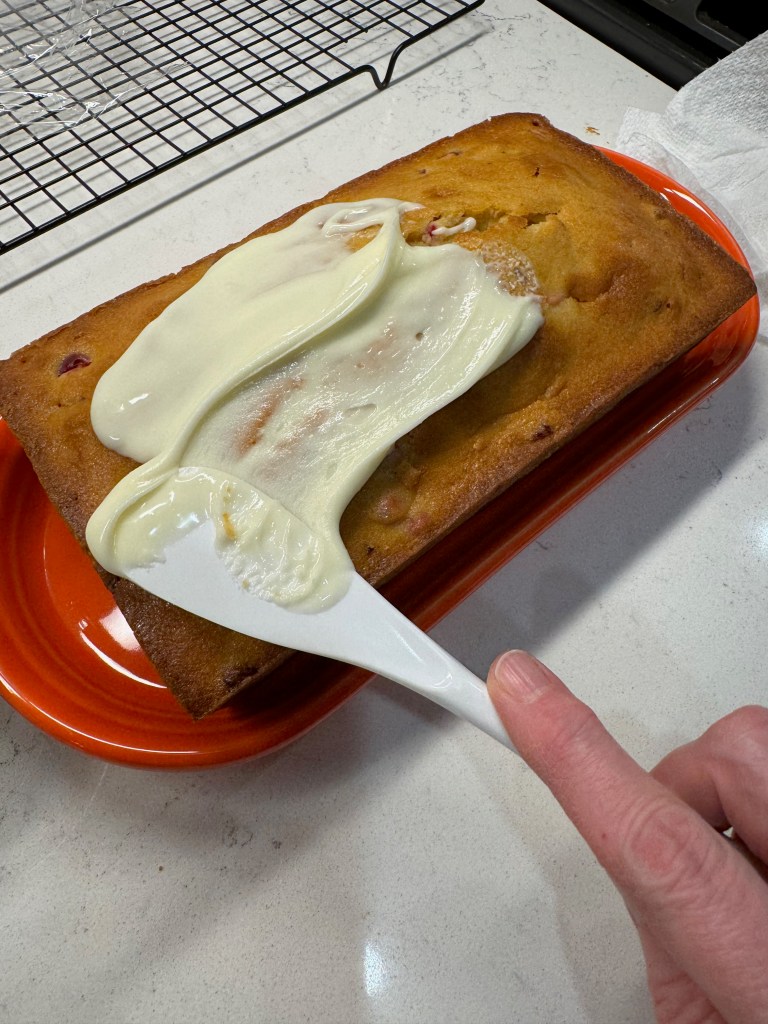
The glaze was simple, too— just powdered sugar, fresh orange juice (by that time, I had made a grocery run) and just enough Grand Marnier to make it feel extra special.
Next time, I’ll make more icing so that I can do additional taste tests. 😉
Now, if I can get through the rest of the holidays with this much ease, I’ll be golden! How about you?
This is my adaptation of a King Arthur Baking recipe. The fresh cranberries and bright citrus flavor are perfect for the holiday season, and the bread is elegant enough for company but easy enough for a weeknight.
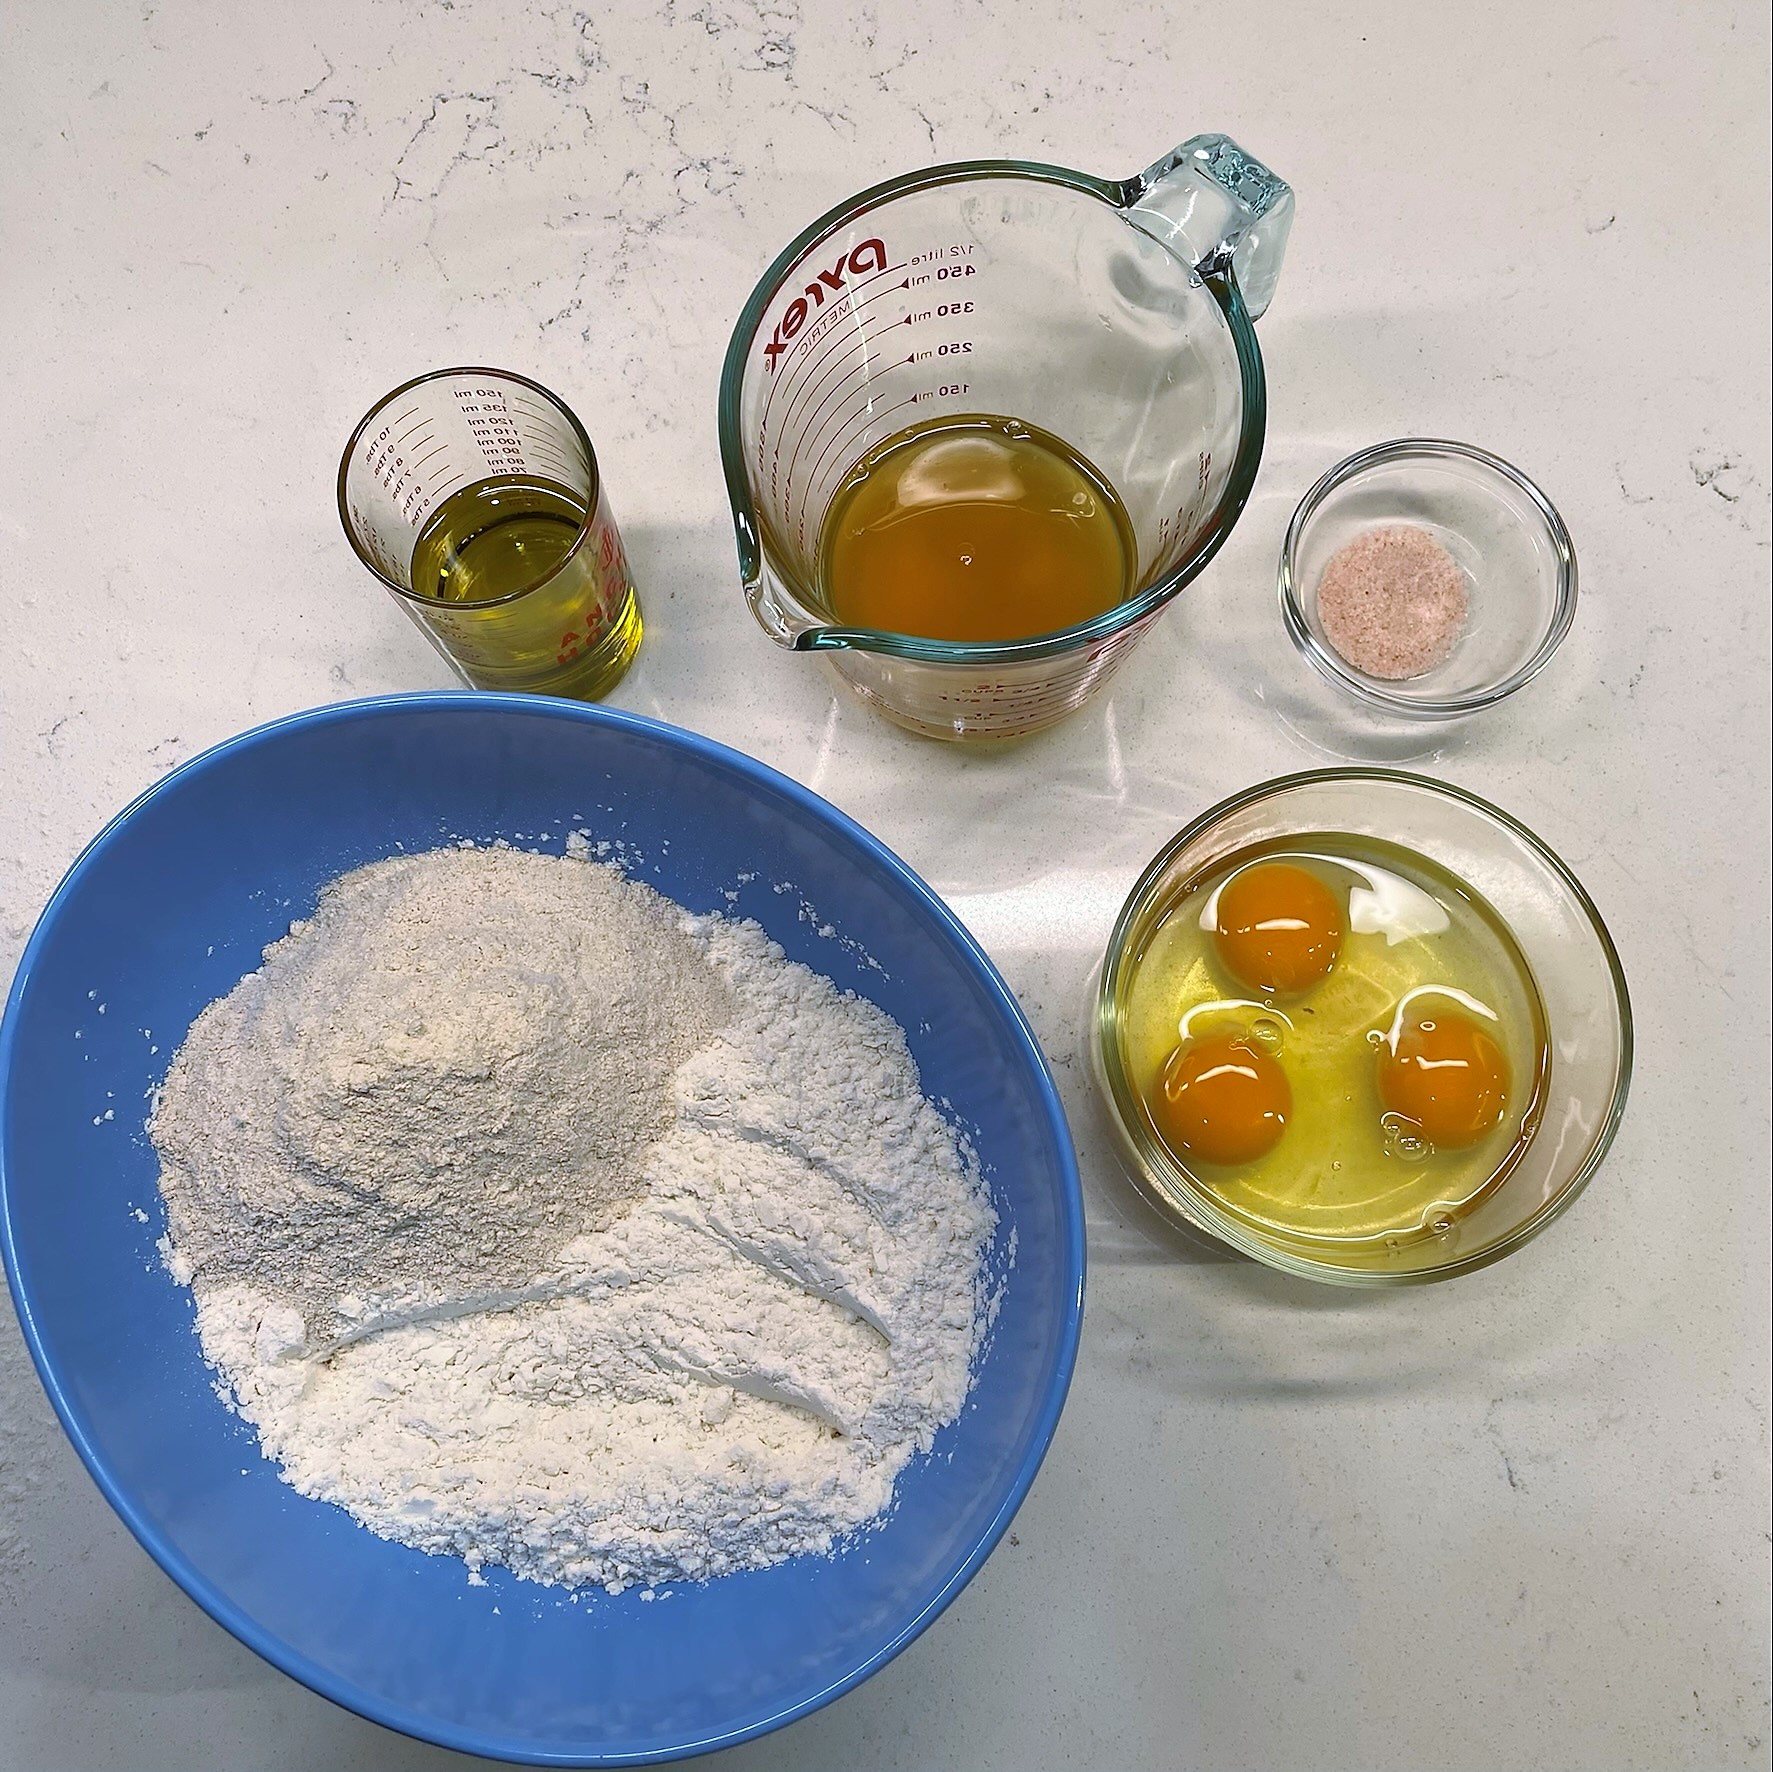
Ingredients
8 tablespoons (one stick) salted butter, at room temperature
3/4 cup (149g) granulated sugar
1/2 teaspoon table salt
1 cup (120g) King Arthur Unbleached All-Purpose Flour
3/4 cup (90g) King Arthur Golden Wheat Flour (formerly called White Whole Wheat)
1 teaspoon baking powder (see notes to test its activity)
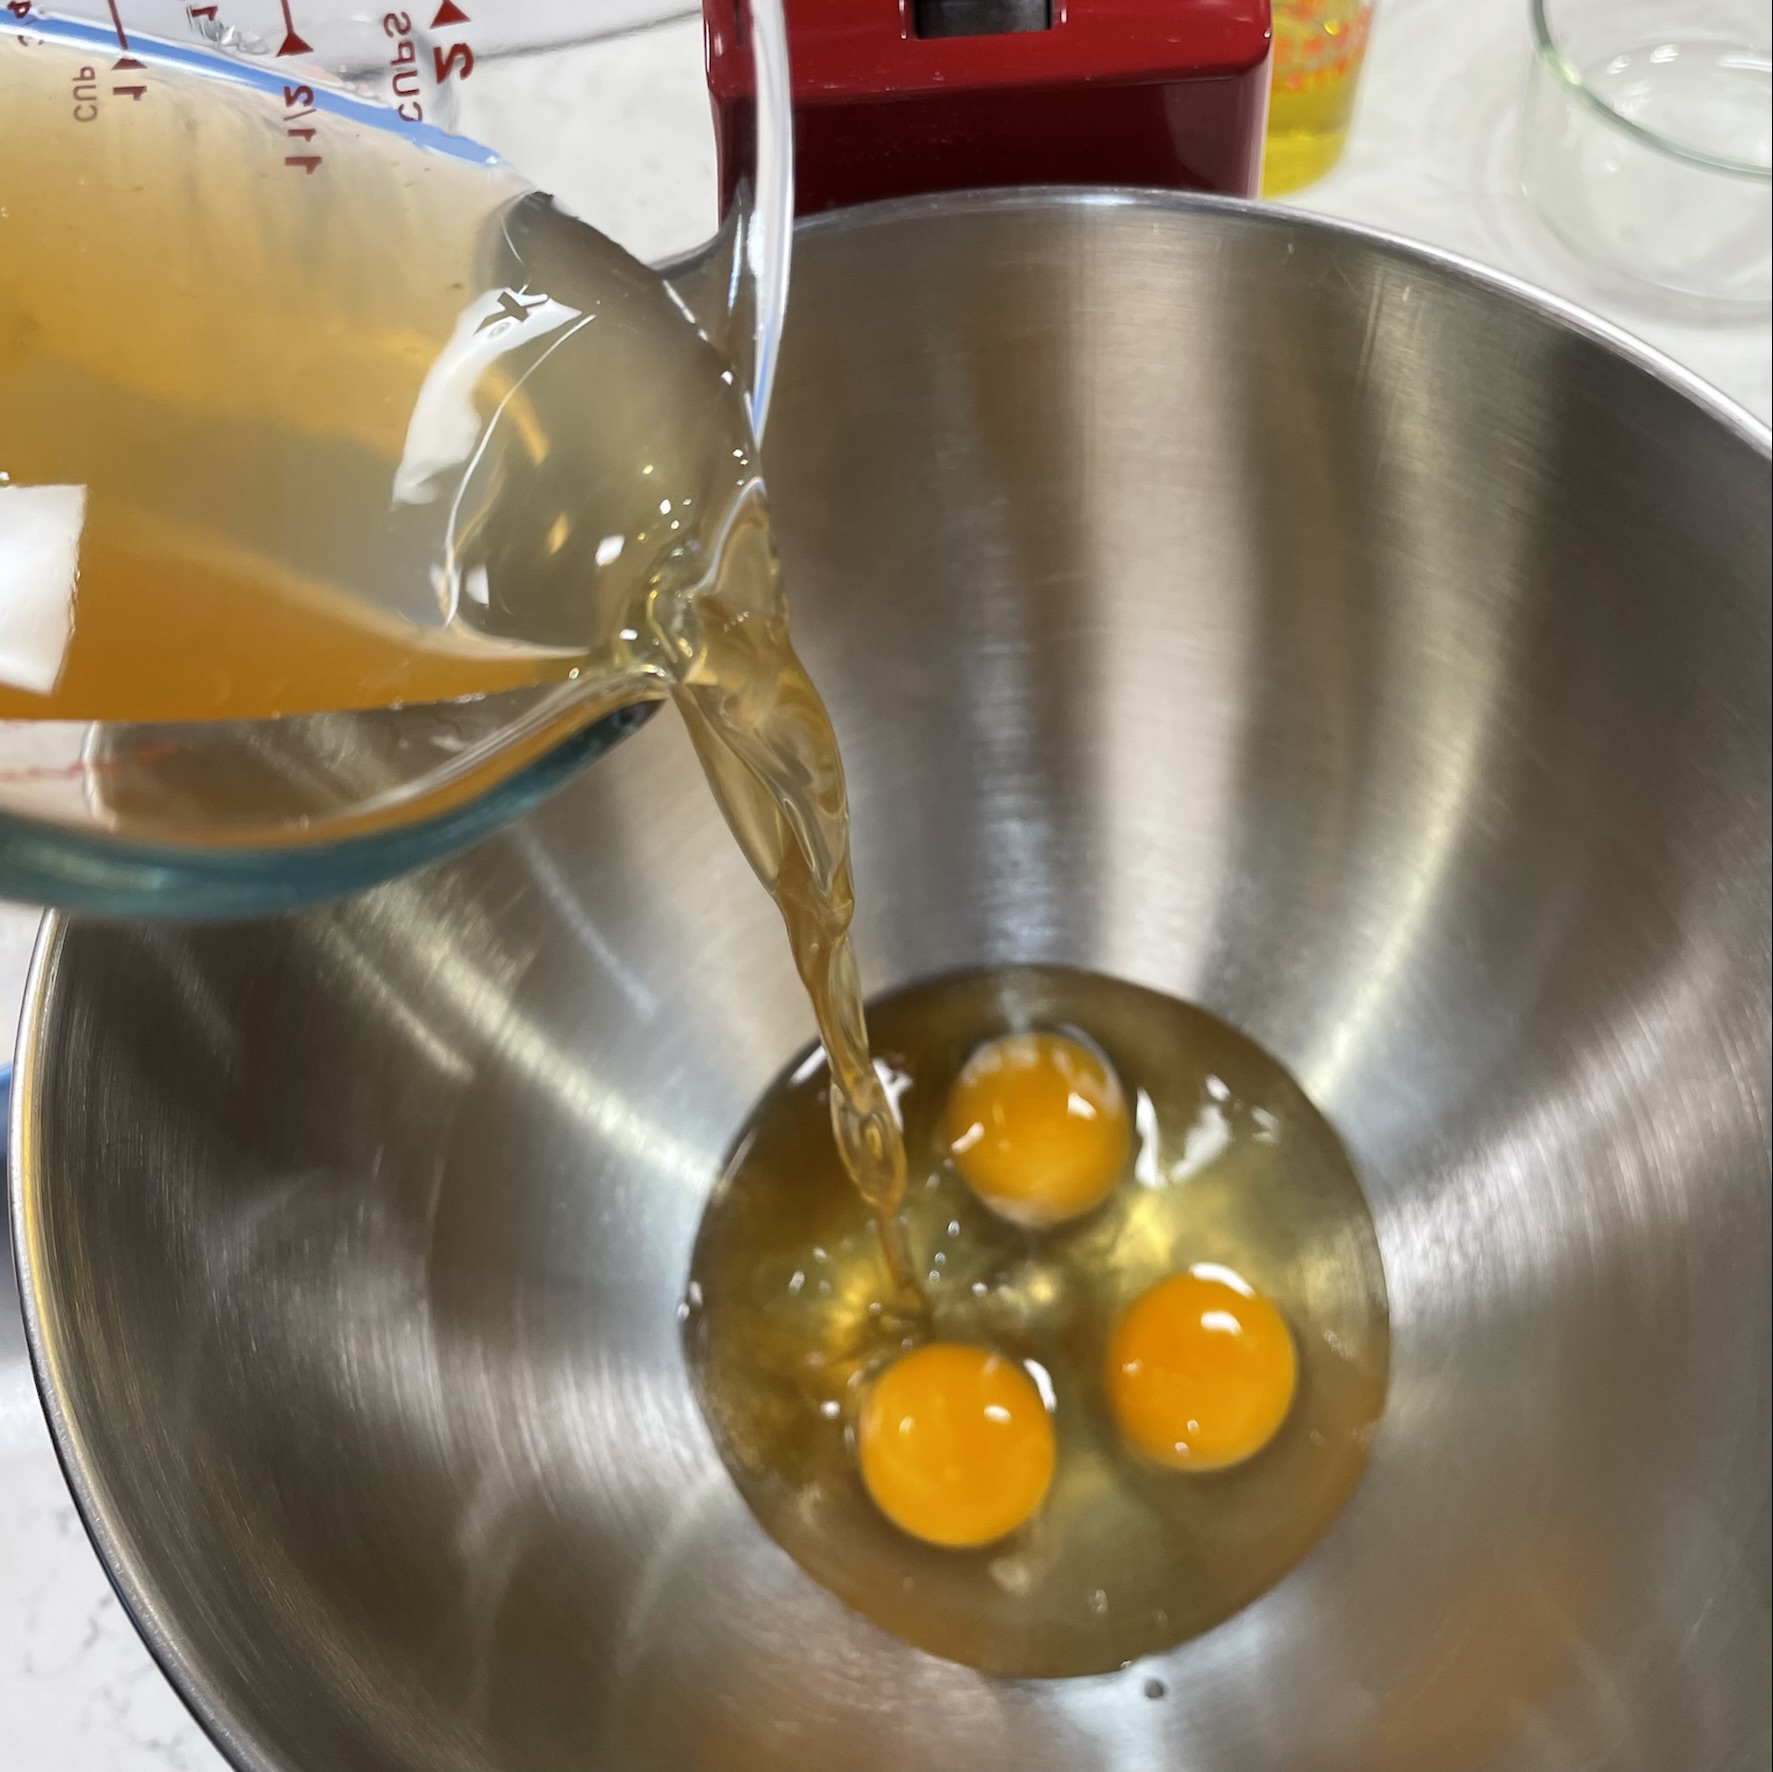
3 large eggs, at room temperature
1/2 cup (113g) milk
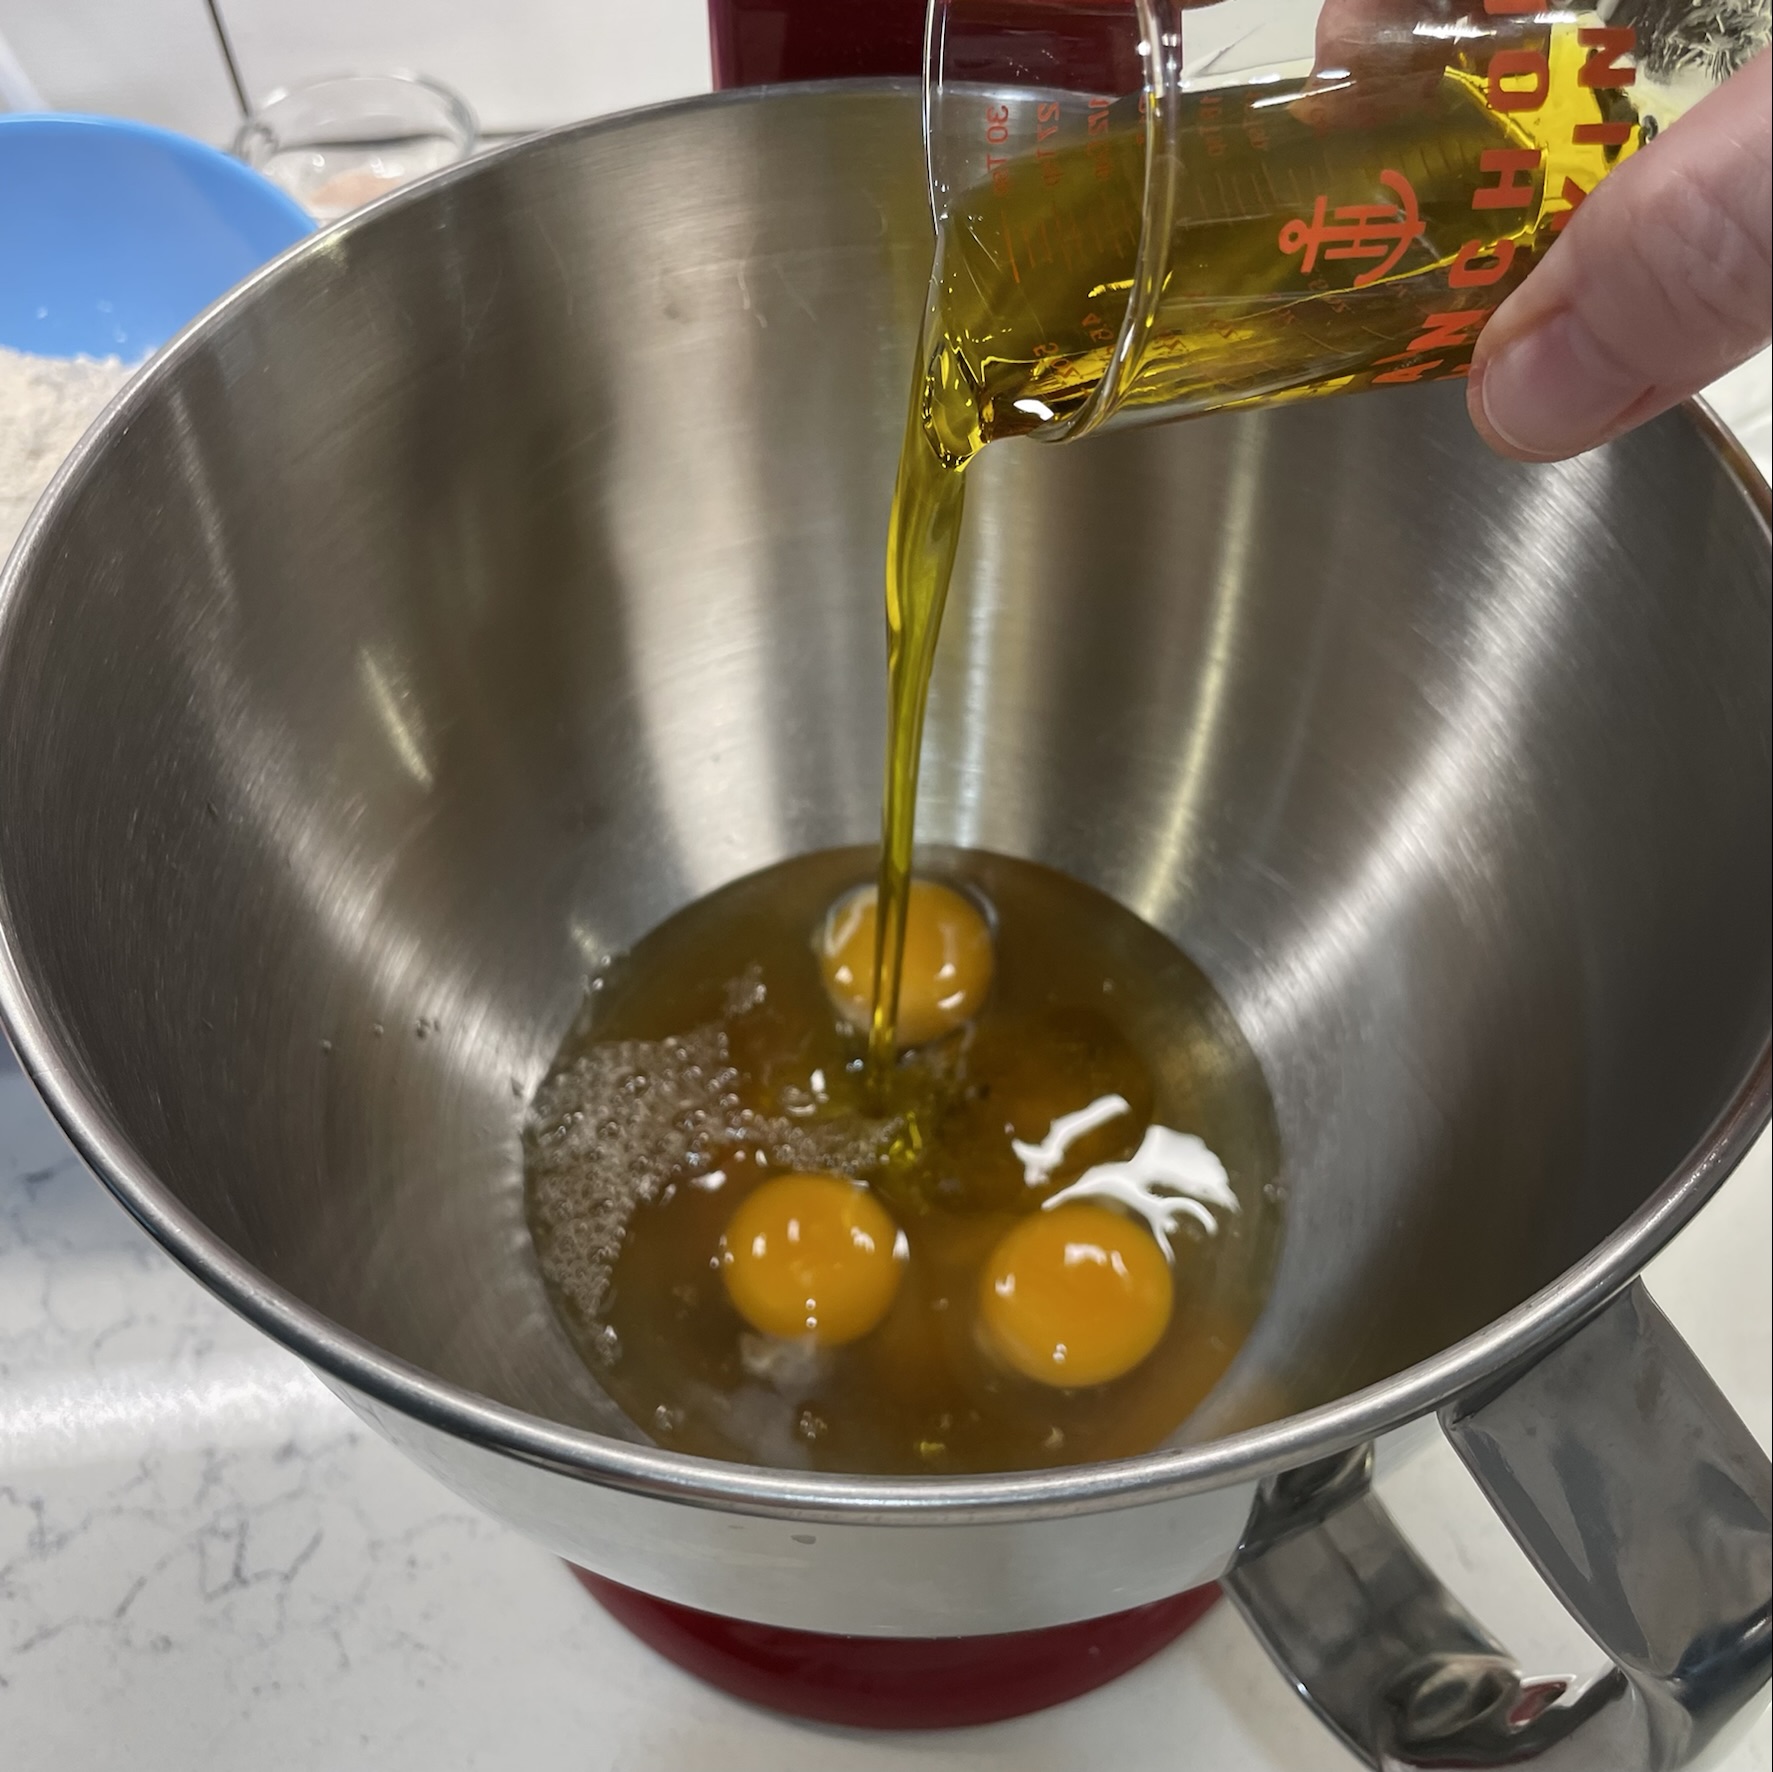
1 teaspoon King Arthur Pure Vanilla Extract
1/2 teaspoon orange oil or extract (see notes)
1 cup (most of a bag) fresh cranberries, roughly chopped
3/4 cup (85g) confectioners’ sugar
1 tablespoon (14g) fresh orange juice
2 teaspoons Grand Marnier orange liqueur (optional, or use extra juice)
Notes: Has it been a while since you used your baking powder? You can test it for freshness by measuring 1/2 teaspoon into a bowl, and then add a few tablespoons of boiling water. If it bubbles up and makes a fuss, it’s good. If not, it is past its prime and should be replaced. Better to know before you bake!
I’m the weirdo who has orange oil but not fresh oranges. If you have a fresh orange, wash it well and use a microplane or the small holes of a box grater to shave all of the bright orange zest. If you really love citrus, use both!
Directions
Preheat oven to 350° F, with oven rack in center position. Lightly grease a standard loaf pan and set aside.
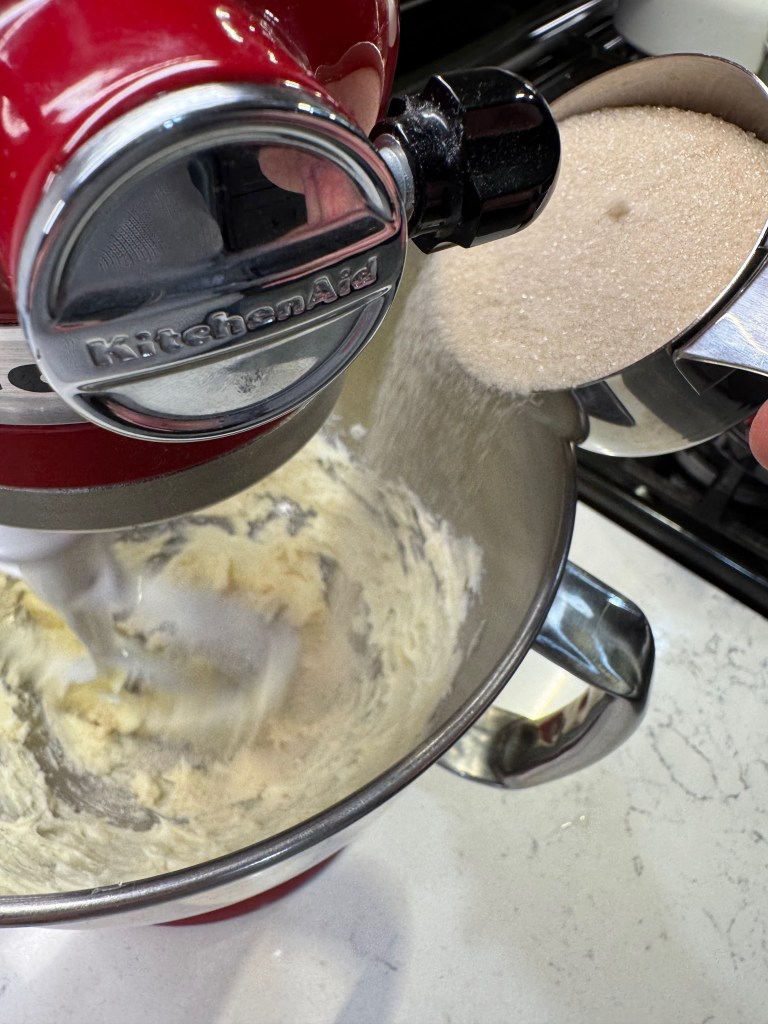
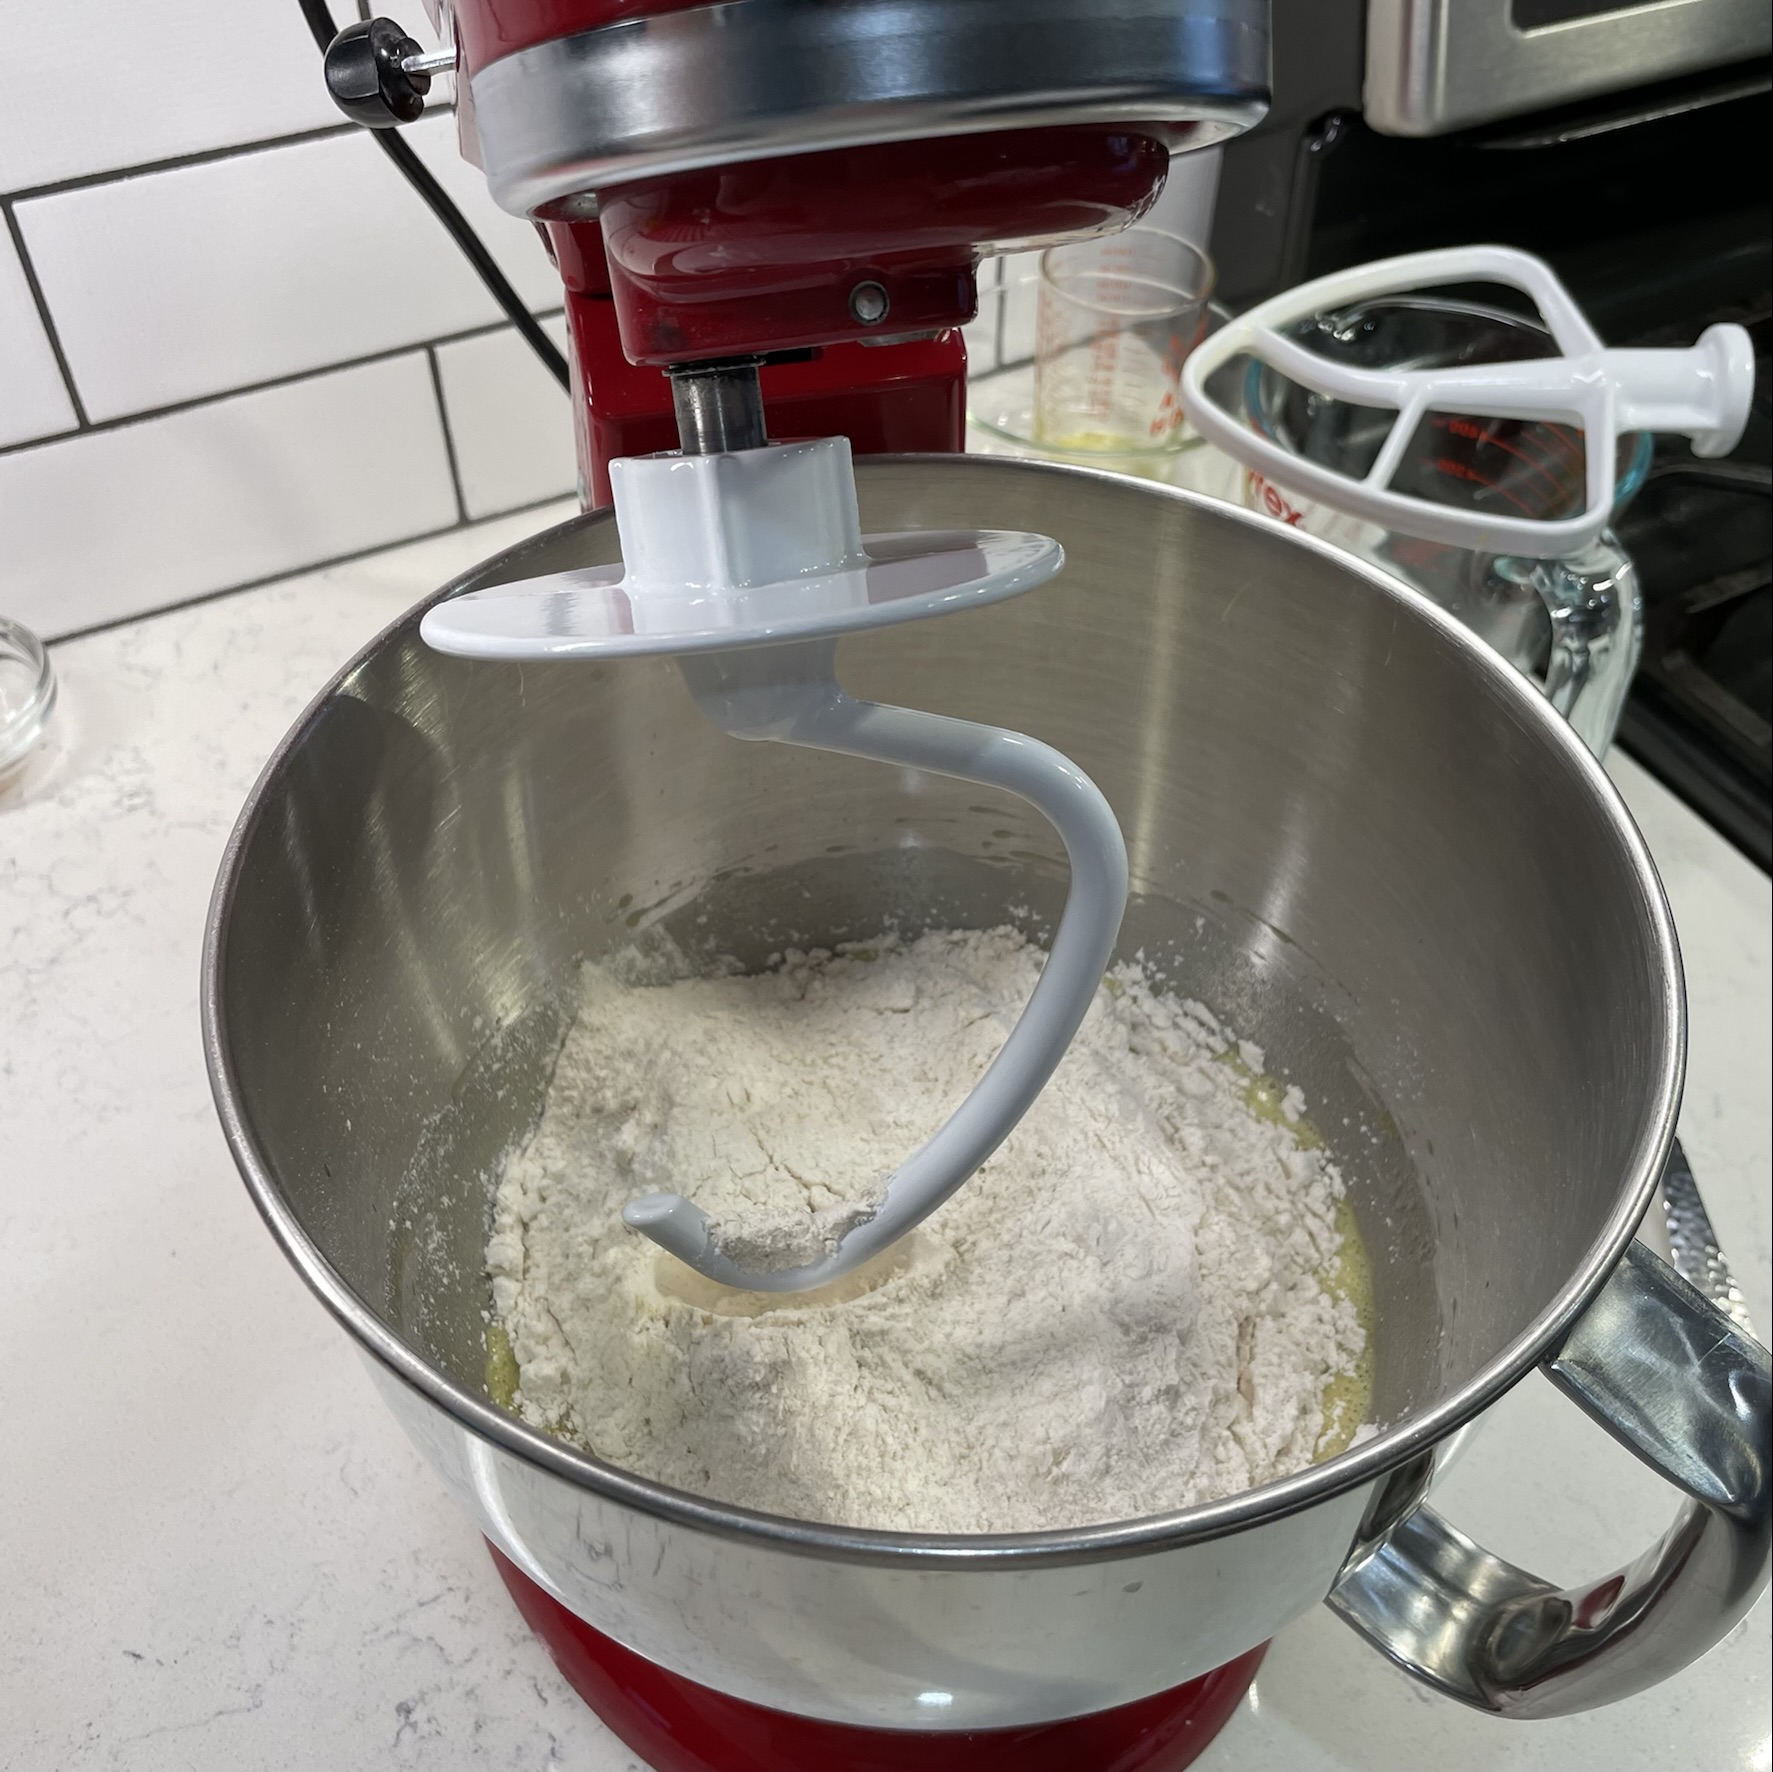
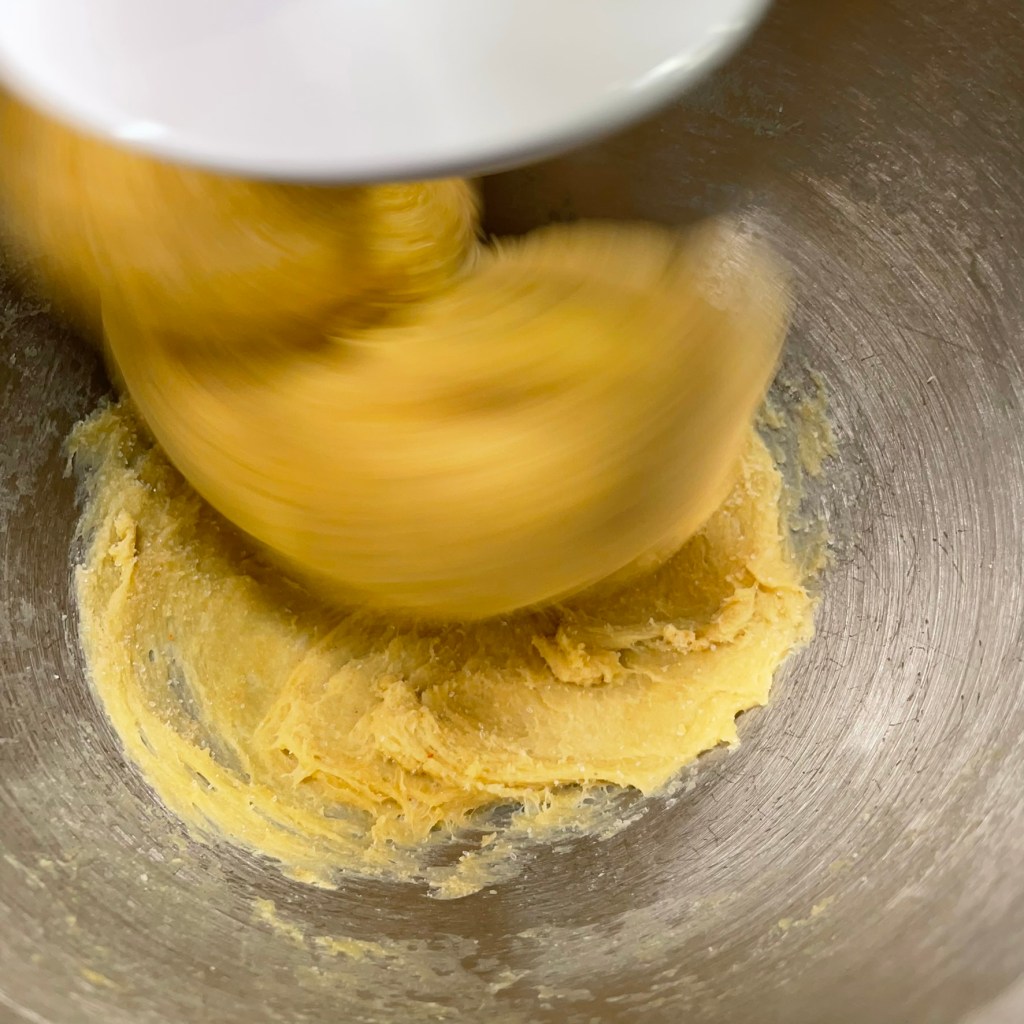
Use an electric hand mixer or stand mixer fitted with the beater blade to cream the butter and sugar together. This mixture should be soft and somewhat fluffy.
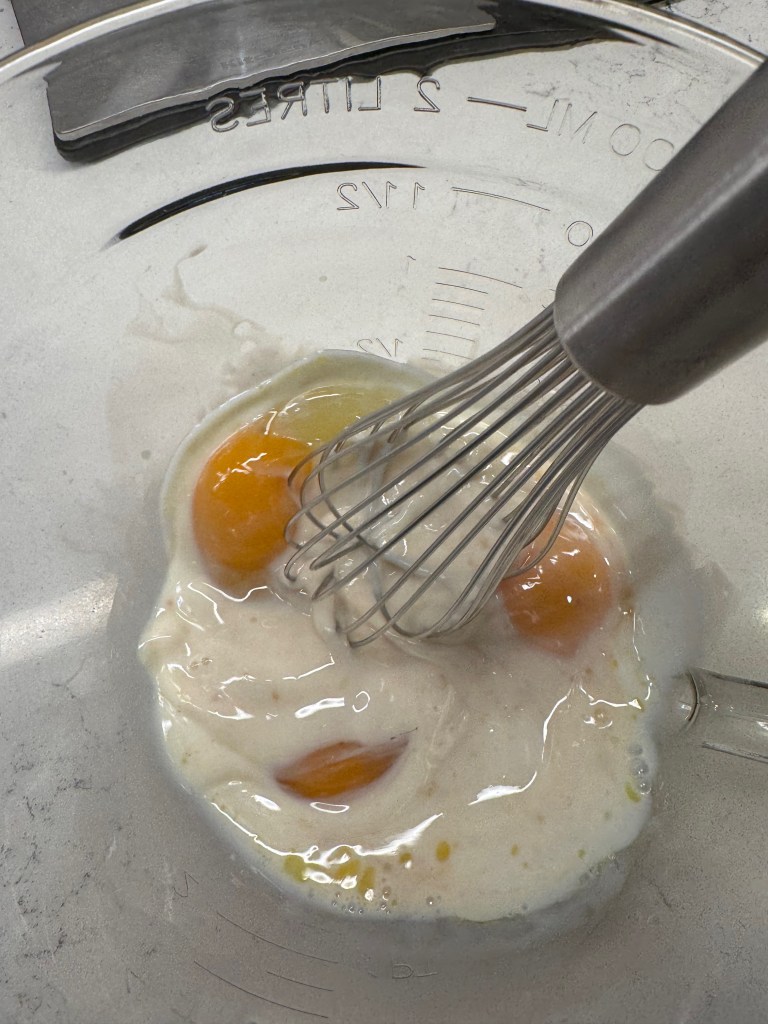
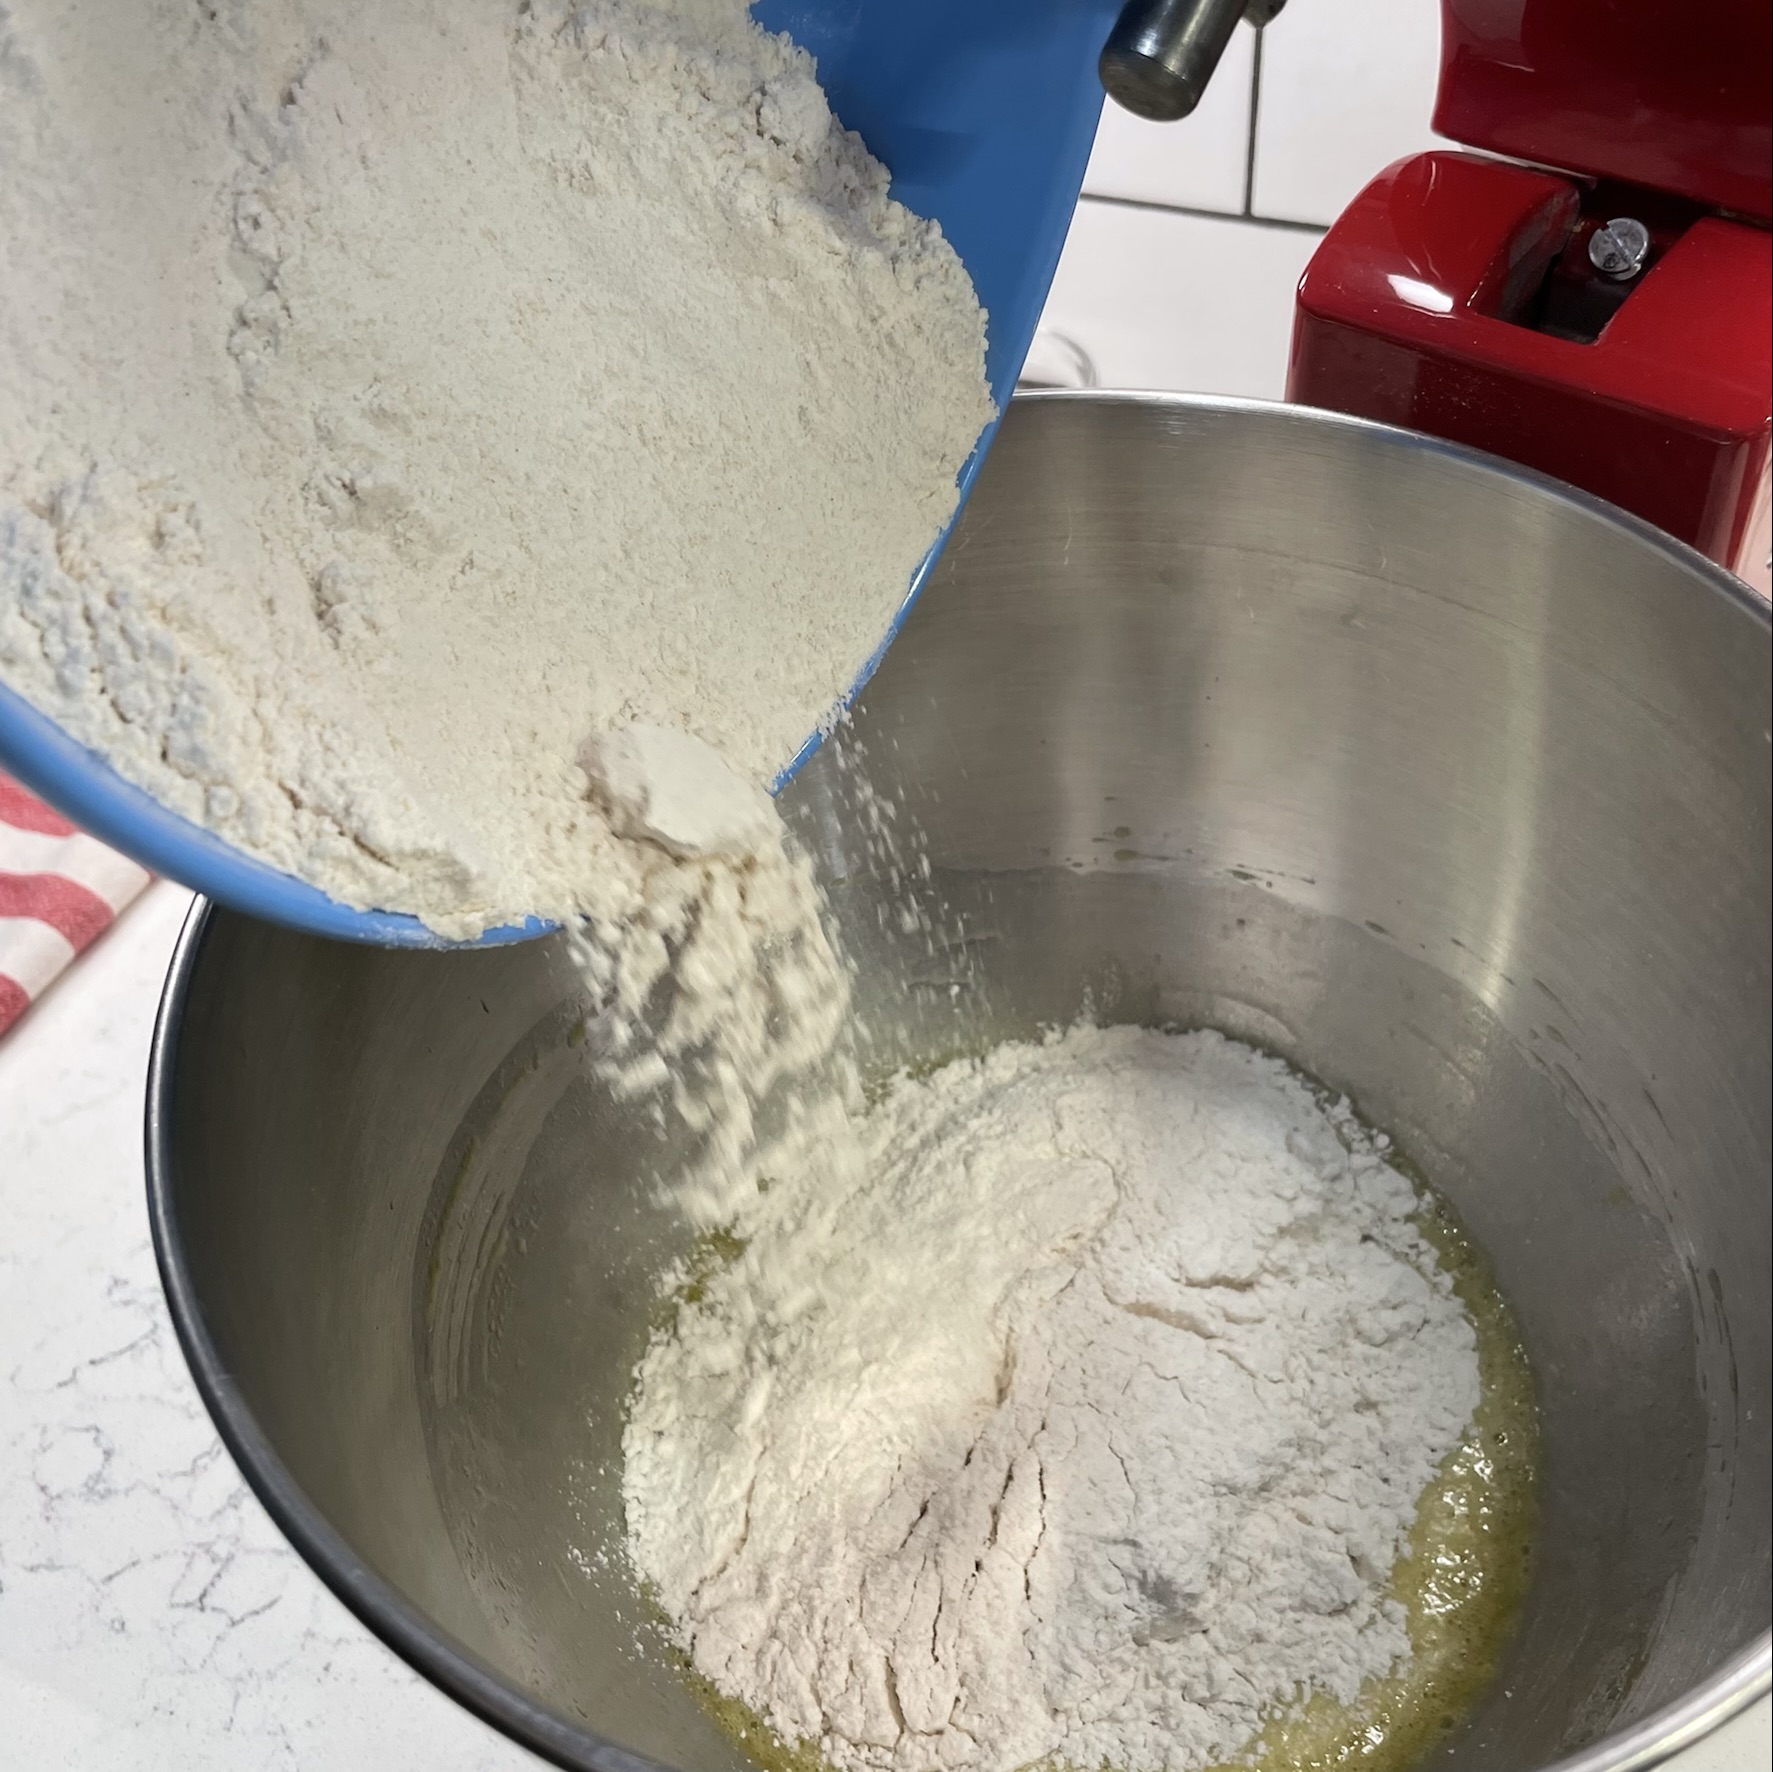
Whisk together flours, baking powder and salt in a medium bowl and set aside. Whisk together milk, eggs, vanilla and orange oil (or zest).
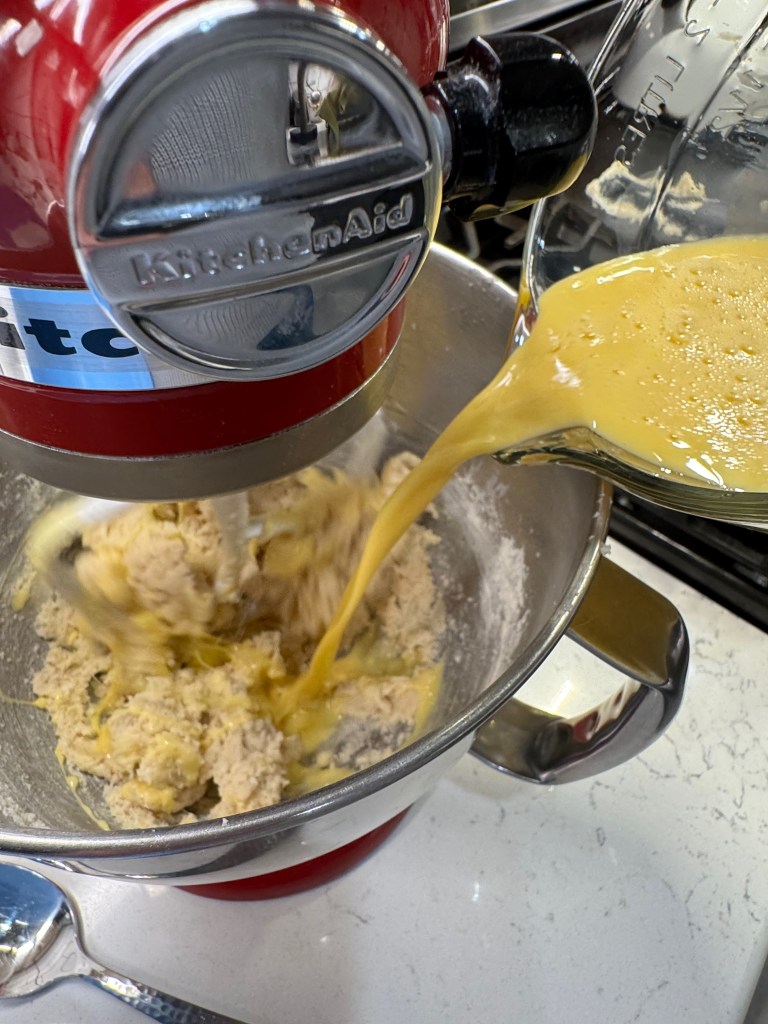
With mixer running on low speed, blend in the flour and liquid ingredients, alternating and scraping down the bowl as you go.
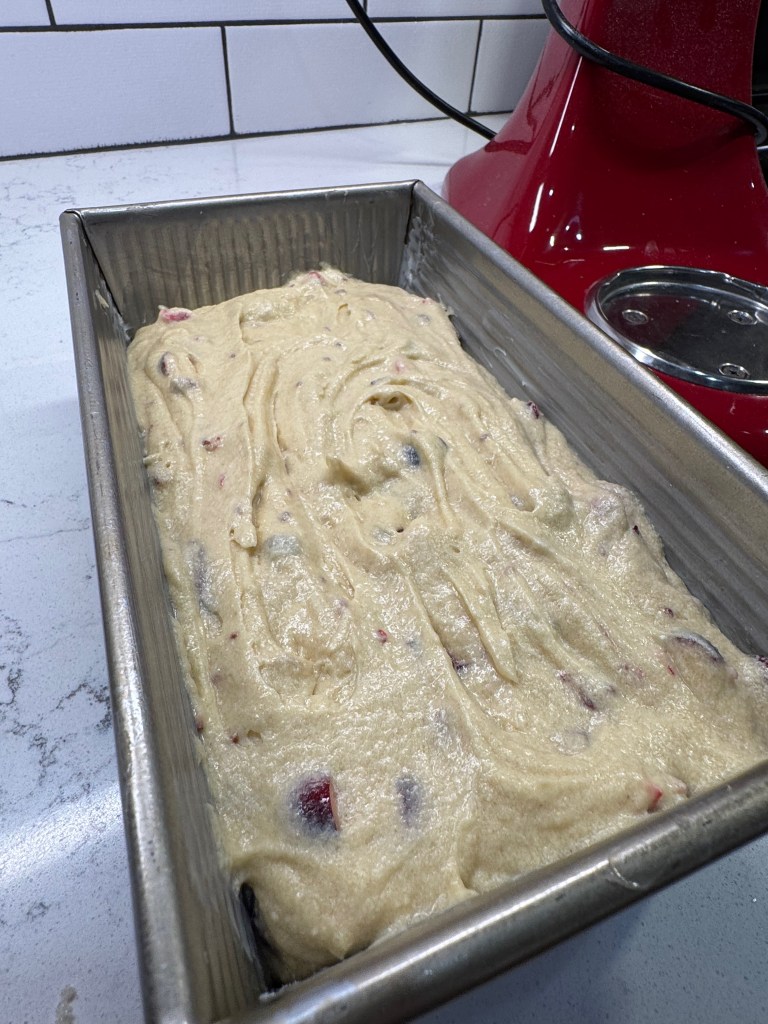
When the batter is evenly blended, gently fold in the chopped cranberries. Pour the batter into the prepared loaf pan, using a spatula to smooth the top.
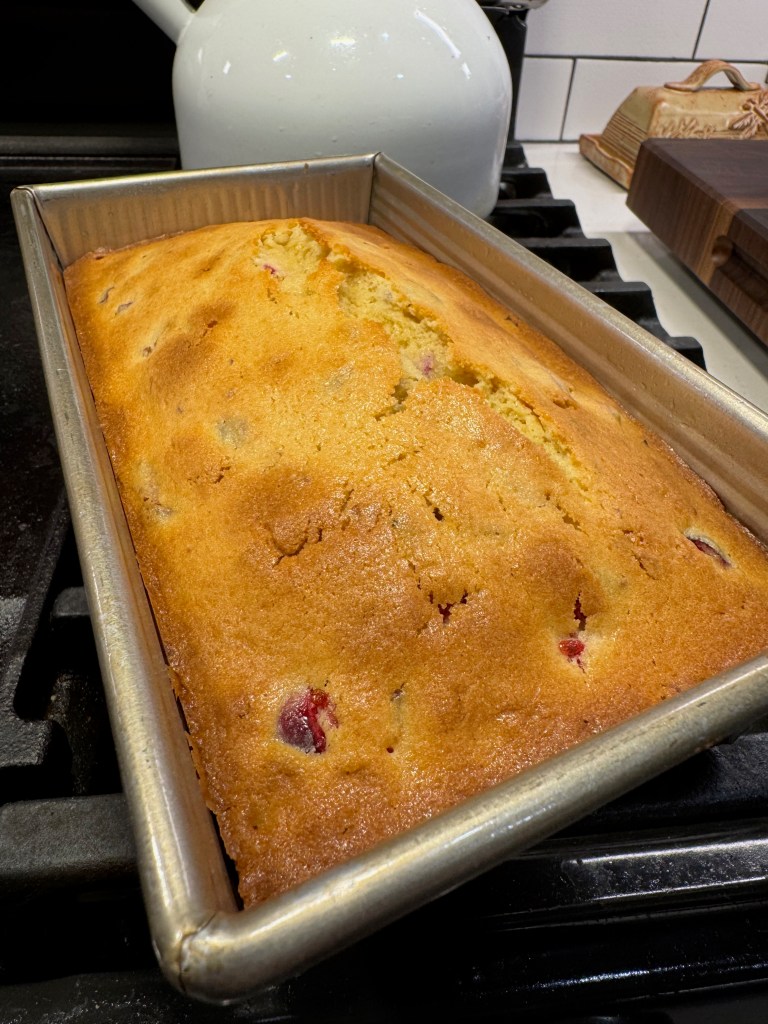
Bake 50 to 60 minutes, or until cake passes the toothpick test. Cool in the pan for a few minutes, then carefully transfer the cake to a rack to cool completely.
Mix glaze ingredients together until smooth; drizzle and spread over top of quick bread.
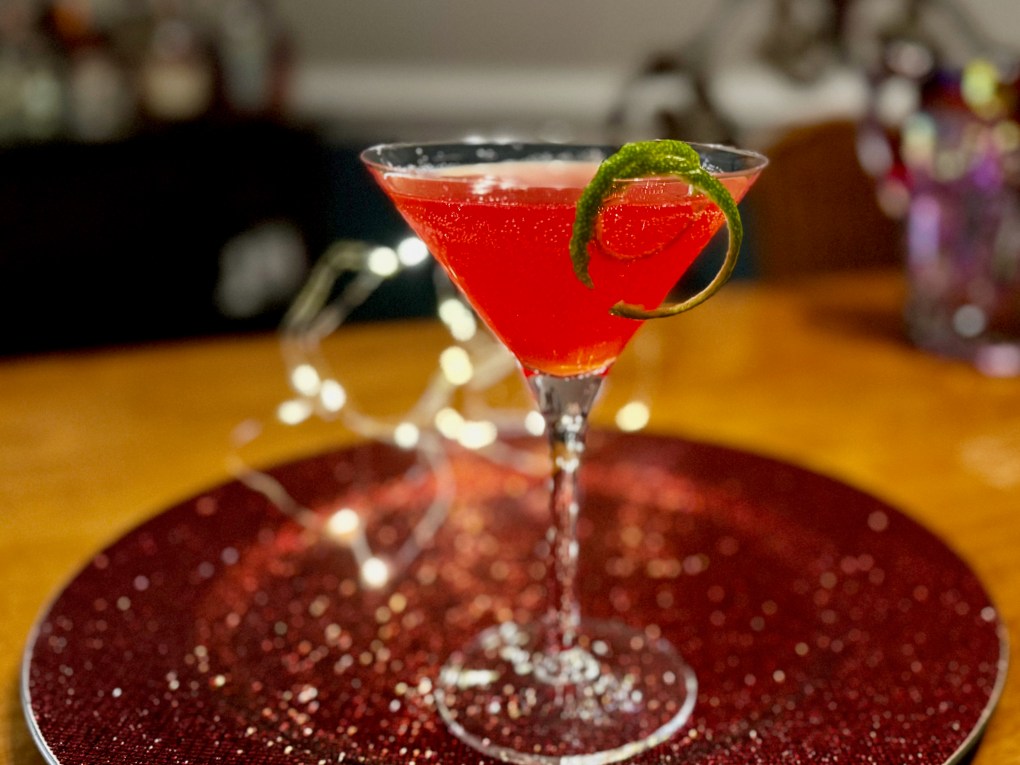
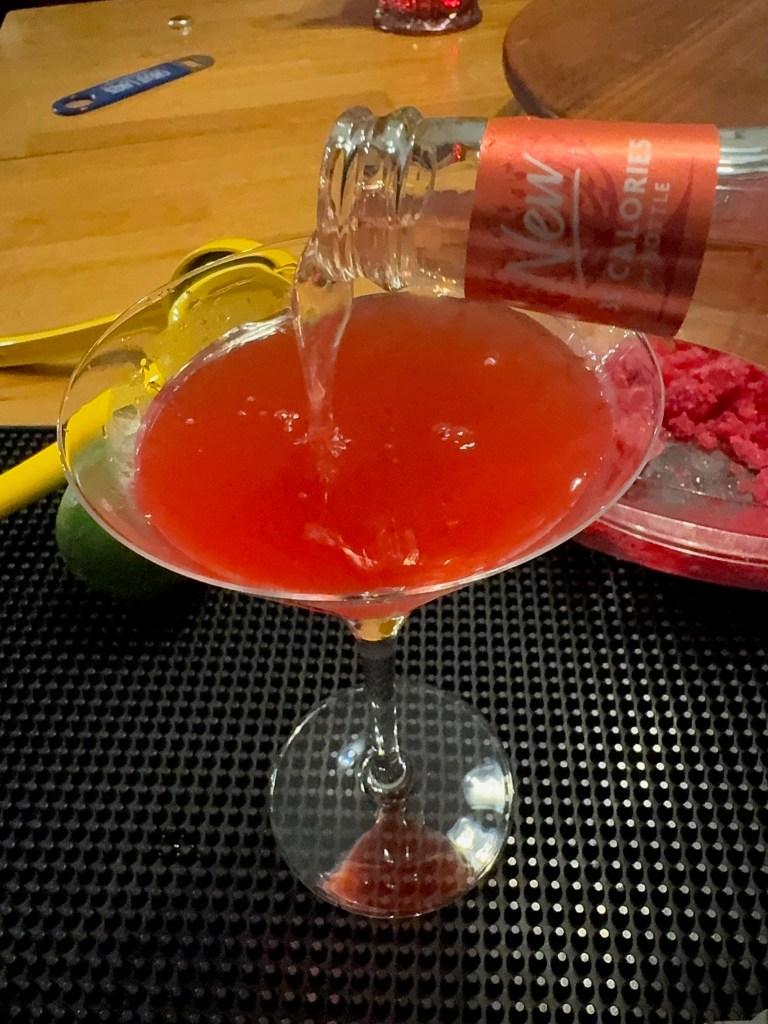
I know I promised you a cocktail before Thanksgiving, and I should know by now that late November is not the time to make promises I might not be able to keep. 🤷🏻♀️ Better late than never, and it’s all good because what I’m about to share with you could be the holiday miracle your entertaining plans have been waiting for. This drink became an accidental star at our Thanksgiving happy hour, and the great news is that its seasonal flavors and fancy presentation make it perfect for all the holidays coming up.
I found this inspiration quite unexpectedly while scrolling Instagram in the wee hours, as I am wont to do. A few days before Thanksgiving, Food Network had posted a slideshow of recipes offered by its celeb chefs. There were variations on casseroles and desserts and—oh, who am I kidding? I have no idea what else was in the photo carousel because the fresh cranberry cosmo stopped me dead in my tracks. The ingredient list was simple, the technique brilliant and the drink divine.
Cheers, Christmas!
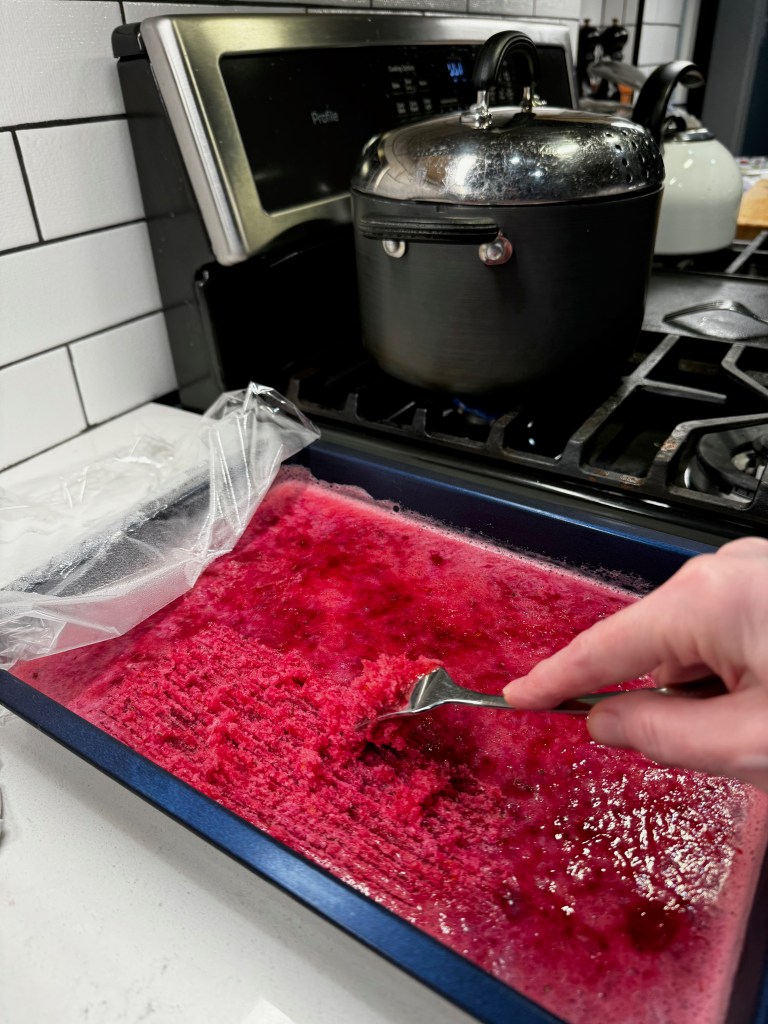
It was star chef Alton Brown who presented the formula for the cranberry granita that is the base of this stunning, neon-colored drink, and the granita itself could be served as a palate cleanser or even a light dessert after a rich holiday meal. His granita was made by simmering fresh cranberries, sugar and lime zest in a fair amount of water, and then blending, straining and freezing. Later, he used a fork to shred the icy mixture into a substance not unlike a snow-cone. That granita mixture is then shaken with vodka and fresh lime juice— no additional ice necessary— and strained into a martini glass for the brightest, freshest seasonal cocktail I’ve ever enjoyed.
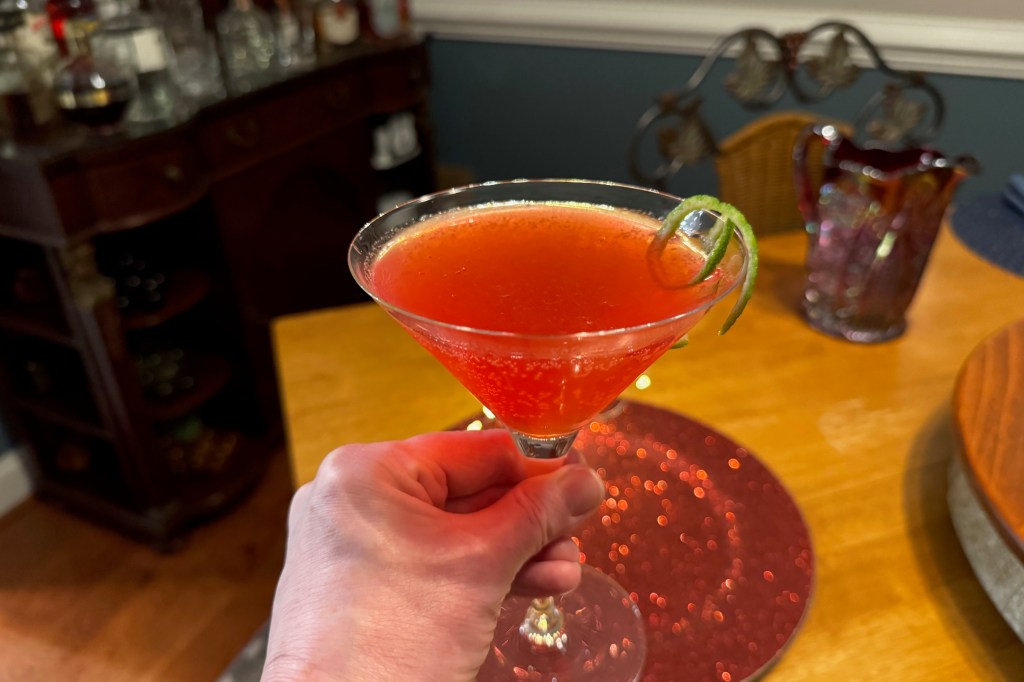
Of course, I couldn’t leave it at that (do ya know me?), and Alton himself is partly to blame for my tendency to twist a classic. During the early aughts, I hardly missed an episode of his “Good Eats” program on Food Network, and that was unquestionably when I became fascinated with the science of food and drink, inspiring me to push the culinary boundaries in my own kitchen. So, Alton, I’ll see your cranberry granita and I’ll raise you some crystallized ginger and orange zest. Because, Christmas. 🎁
Cranberry, ginger, citrus. It even smells like the holidays!
You don’t want to know how many spoons I used tasting this stuff along the way, nor how many sample cosmos I made for myself, just to be sure I wasn’t imagining how good it was. The cranberry-ginger granita is equally tart and sweet, and my mind is still racing with possibilities for drinks beyond this festive cosmo. Imagine swapping the vodka for blanco tequila— instant Christmas margarita! Or substitute white rum for a cranberry-ginger daiquiri. Seriously, can anyone give me one reason not to mix it with gin and lemon and top it with champagne for a cranberry-ginger French 75? Could this be the little black dress of the holiday cocktail season?
For that matter, I should also be able to sub something non-alcoholic for a tasty mocktail to delight non-drinkers at my party, right? I did that for one of our Thanksgiving guests, and I guarantee you can’t tell which of these glasses held the zero-proof drink. She said it was delicious.
I’ll give you a hint: it wasn’t mine. 😂
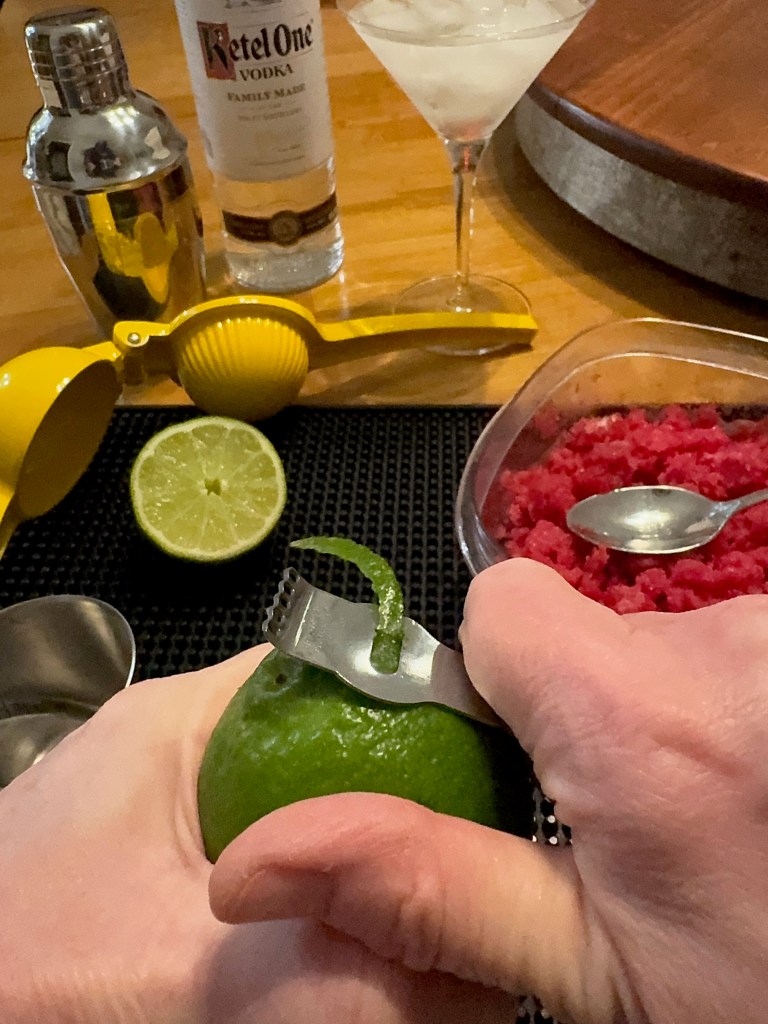
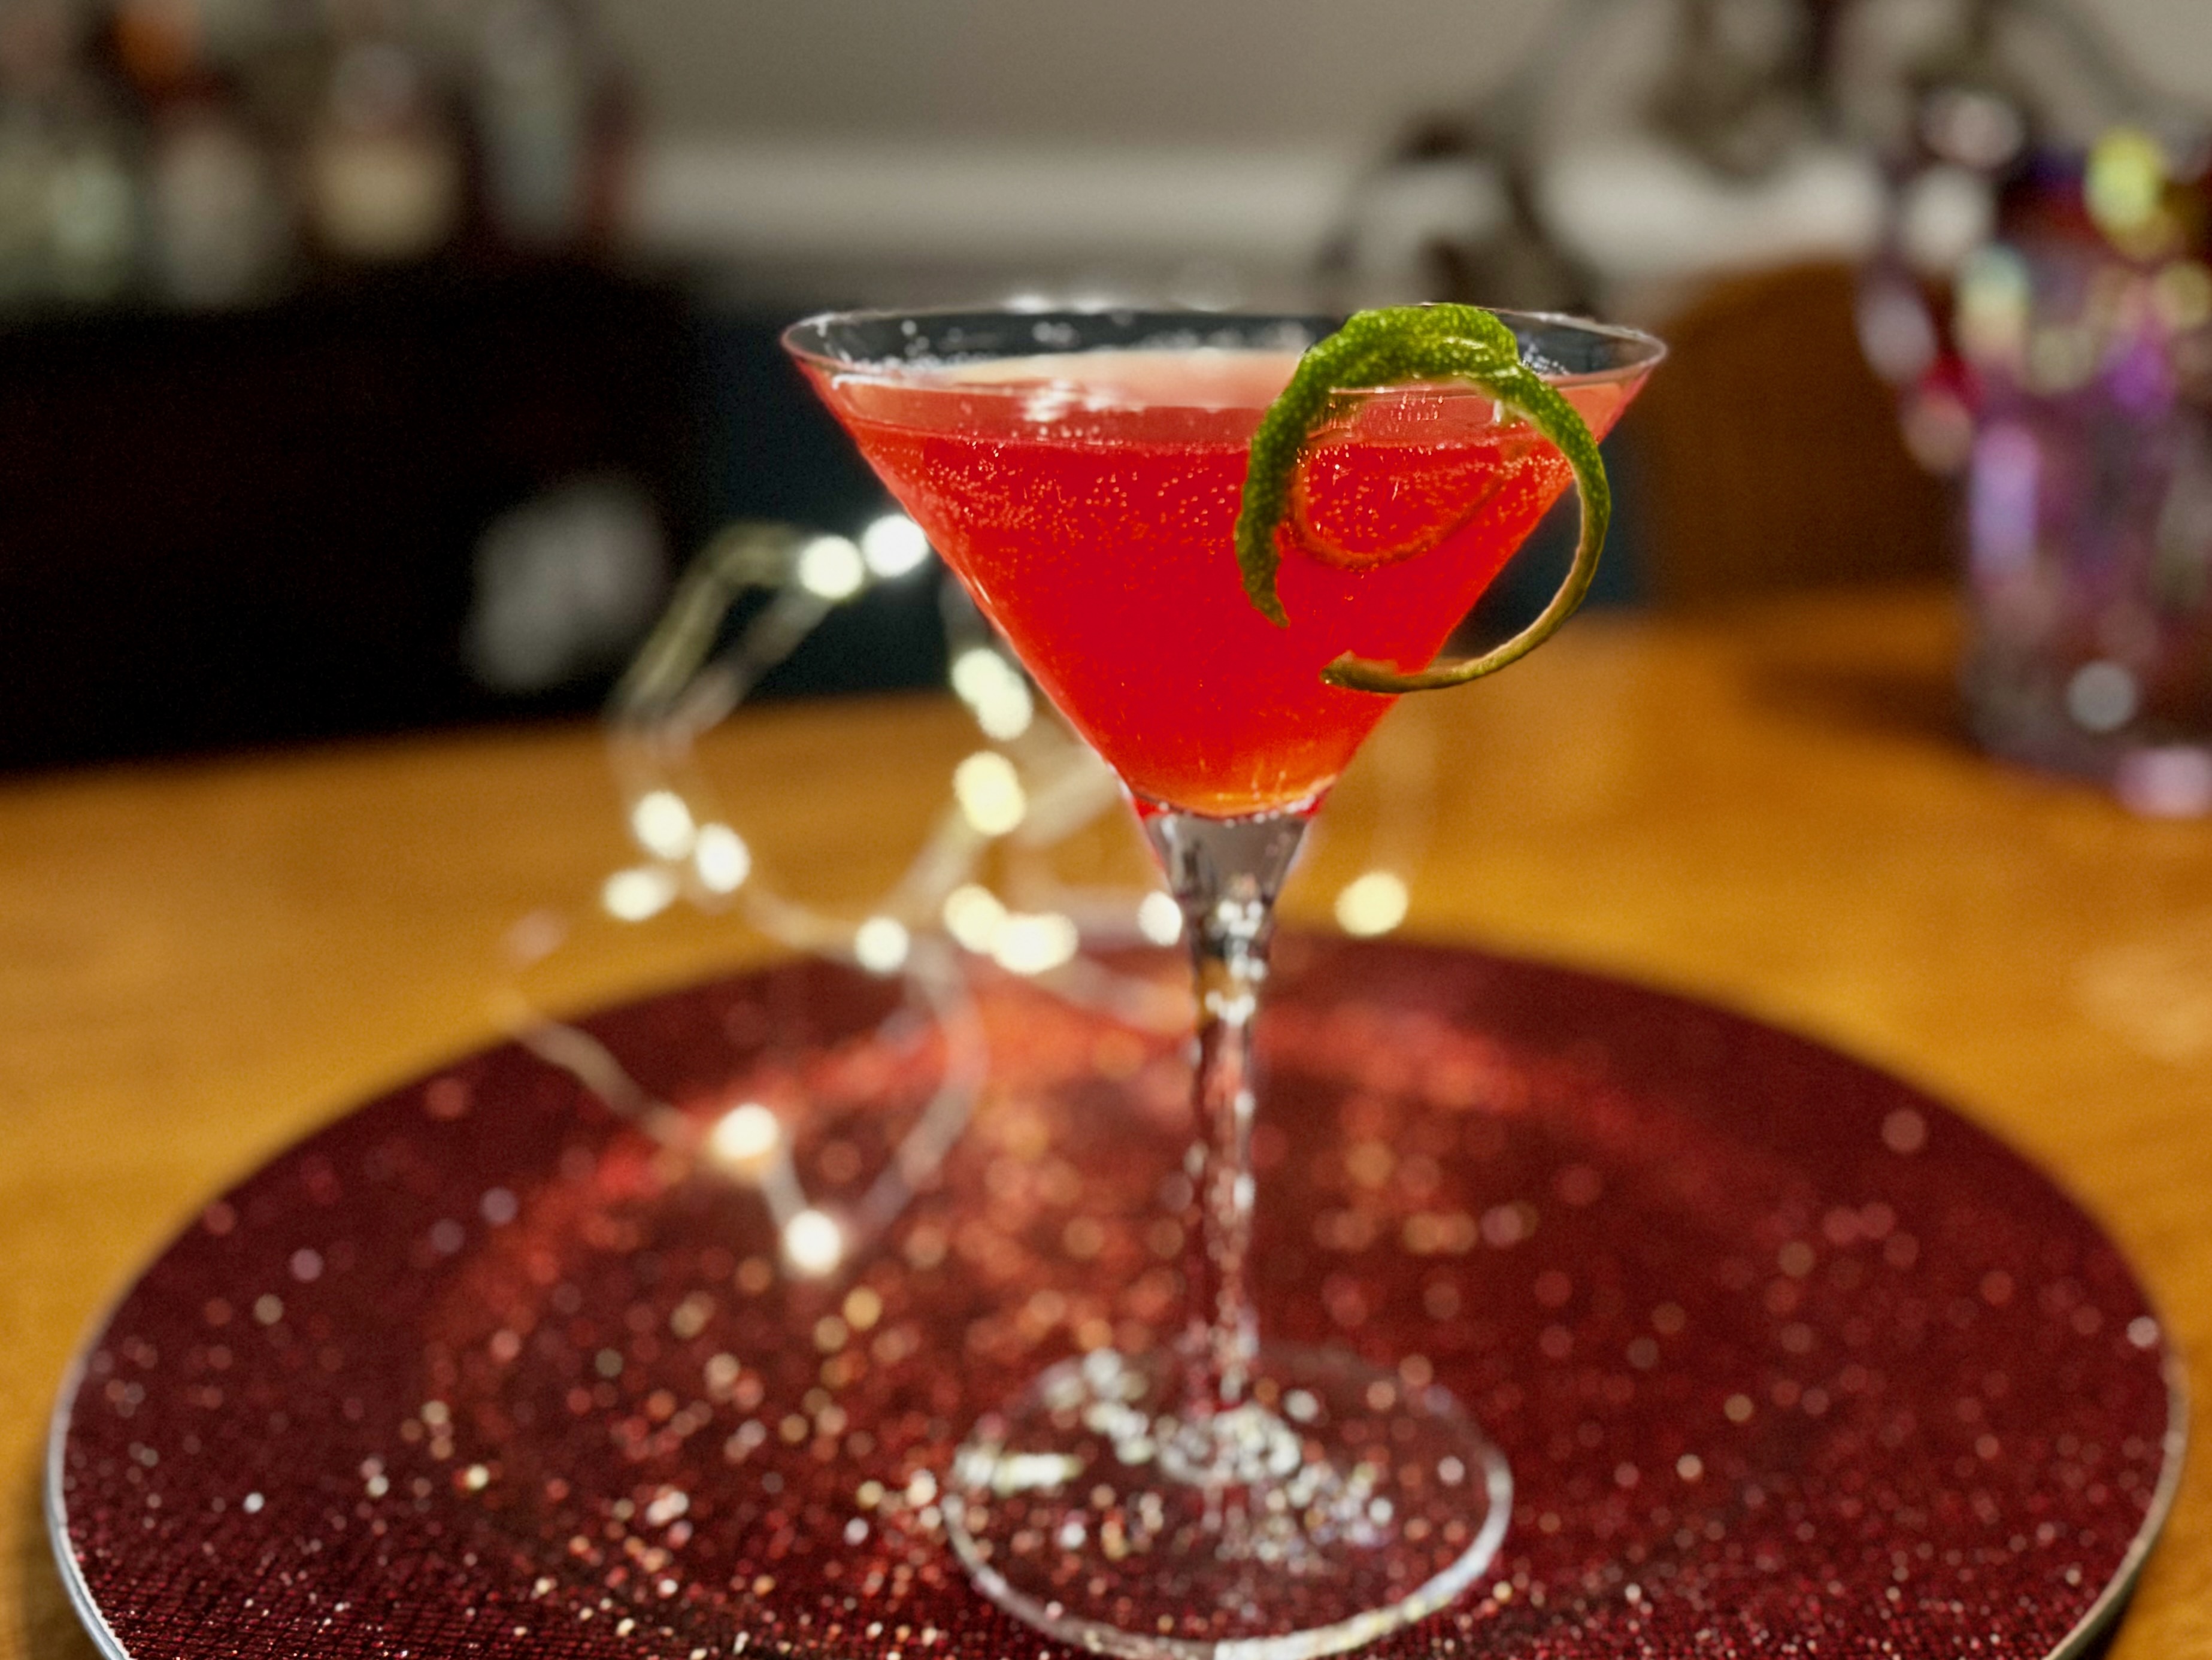
Making this sparkling fresh cranberry-ginger cosmo couldn’t be easier, and I’ll also share my tips for the mocktail in the click-to-print recipe card you’ll find at the bottom of the post. Start by making the granita a few days before you plan to entertain, and wash up several fresh limes so they are ready for happy hour. Plan on one lime for every two drinks; you’ll use the juice in the drinks and a strip of zest for garnish. And for a little extra holiday pizzazz, pick up a four-pack of blood orange ginger beer to top off your cocktails with a sparkly finish. Chill your cocktail glasses while you mix, and use a fine mesh strainer if you don’t want little bits of zest floating in your glass.
A channel knife is great for making a zest strip. Otherwise, use a potato peeler and trim with a sharp knife.
This gorgeous holiday drink uses a make-ahead cranberry-ginger granita that is so delicious, you'll want to use it in other drinks, too!
Ingredients
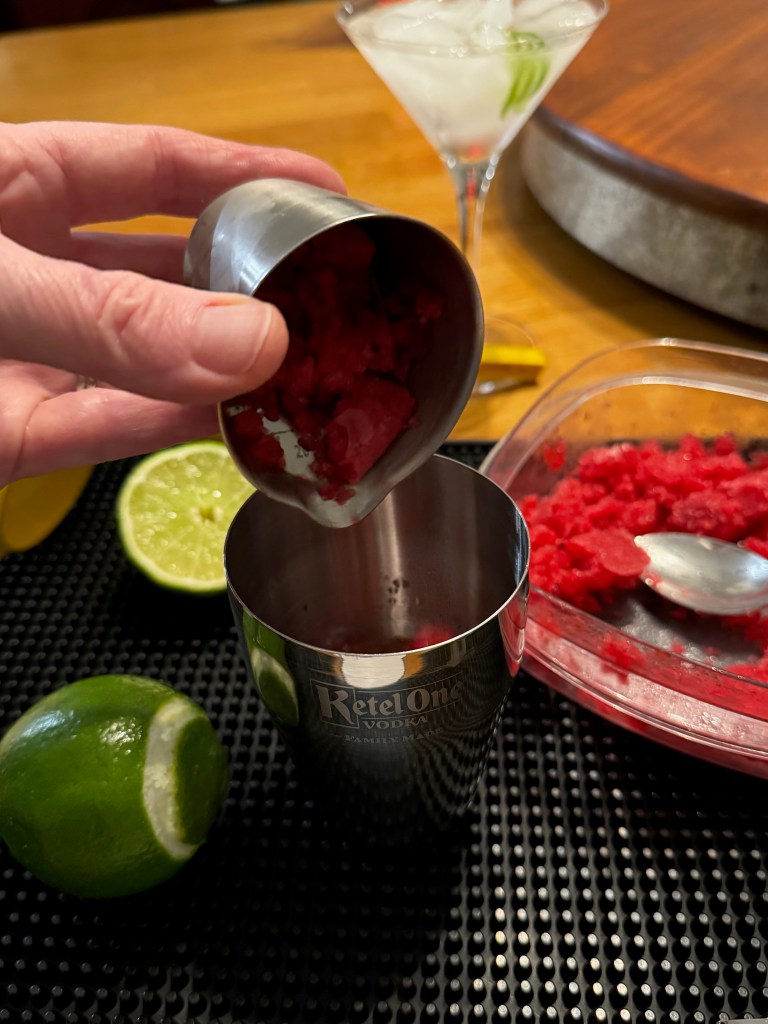
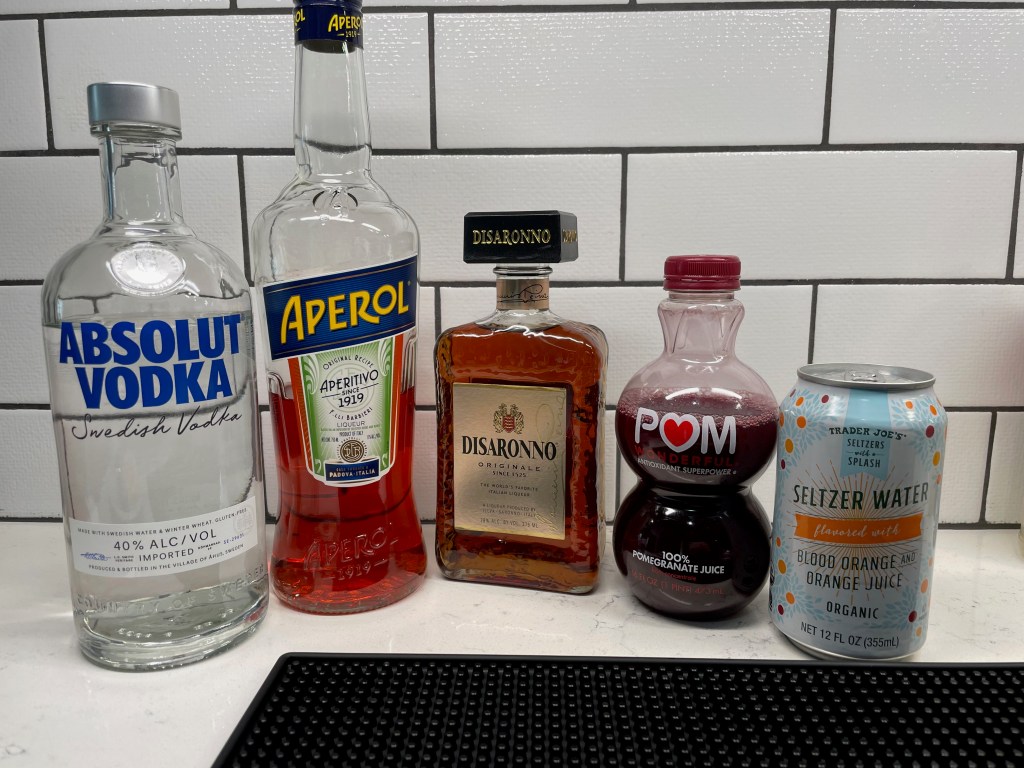
1 1/2 oz. Ketel One (or other premium) vodka
2 1/2 oz. cranberry-ginger granita (recipe follows)
1/2 oz. freshly squeezed lime juice
1 oz. Fever Tree blood orange ginger beer (or regular ginger beer, if desired)
lime zest twist to garnish
Notes: Make the cranberry-ginger granita ahead of time, and transfer to airtight containers in your freezer for safekeeping. I recommend using a fine-mesh strainer when pouring the drink into the glass, unless you’re OK with having the zest bits floating in the drink.
For an easy mocktail, swap in Simply Lemonade for the vodka, use 1/4 oz. lime juice and increase the ginger beer a bit. When making both alcohol and non-alcohol drinks for party guests, consider using two separate shakers to avoid mixups and in-between cleanings.
Directions
Chill cocktail glass with ice water, or place in freezer 20 minutes before mixing the drinks.
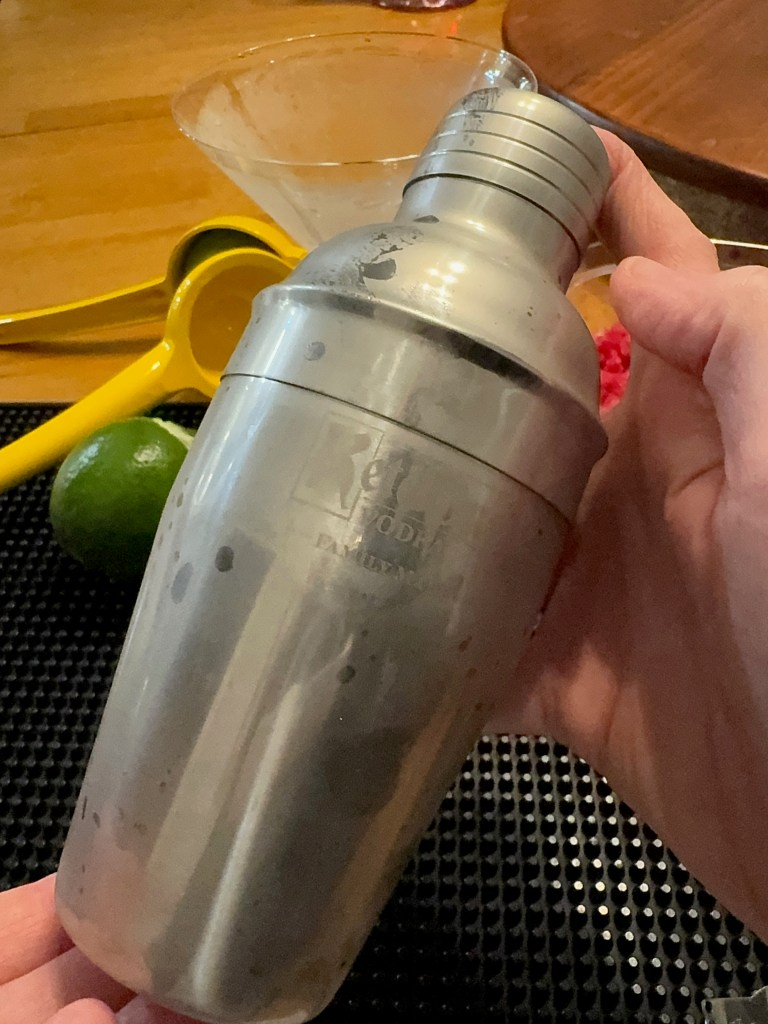
Measure vodka, granita and lime juice into a shaker. Cover and shake the shake out of it until the thing is too frosty to hold comfortably. The granita will melt with the other ingredients, so no ice is required for this step.
Strain into the glass, top off with ginger beer and garnish with the lime strip.
Notes: The cranberry-ginger granita will be enough for about 20 cocktails. Make it ahead and keep it in the freezer so it’s ready for all the holidays.
Ingredients
3 cups water
2 1/4 cups fresh whole cranberries
1 cup plus 2 tablespoons organic cane sugar
2 tablespoons minced crystallized ginger
Zest of one lime and half an orange (organic is best and washed thoroughly)
Directions
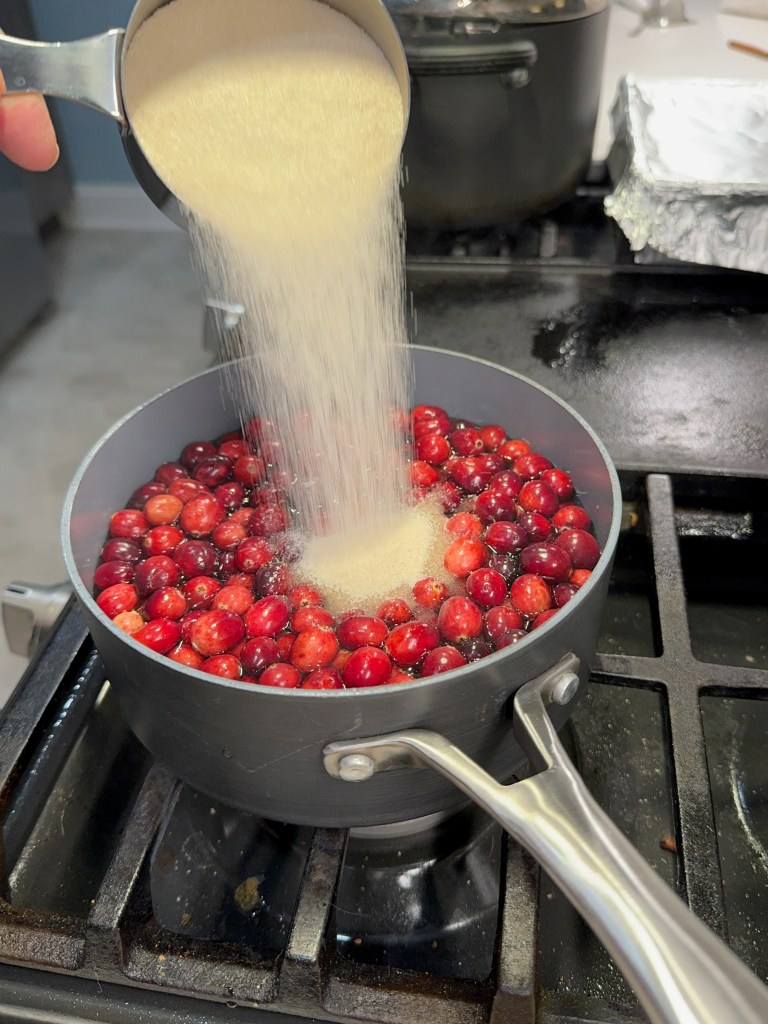
1. Combine water, cranberries, sugar and ginger in a medium saucepan over medium-high heat. Bring to a boil and then simmer for several minutes until the berries soften and split. Remove from heat and cool for a few minutes.
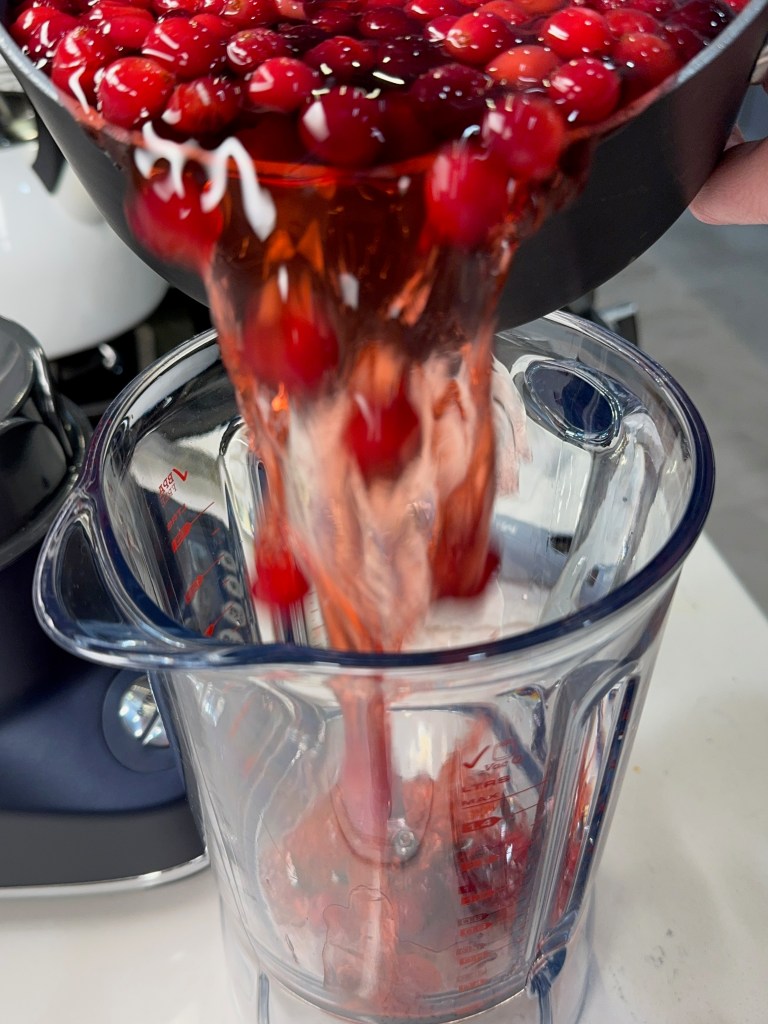
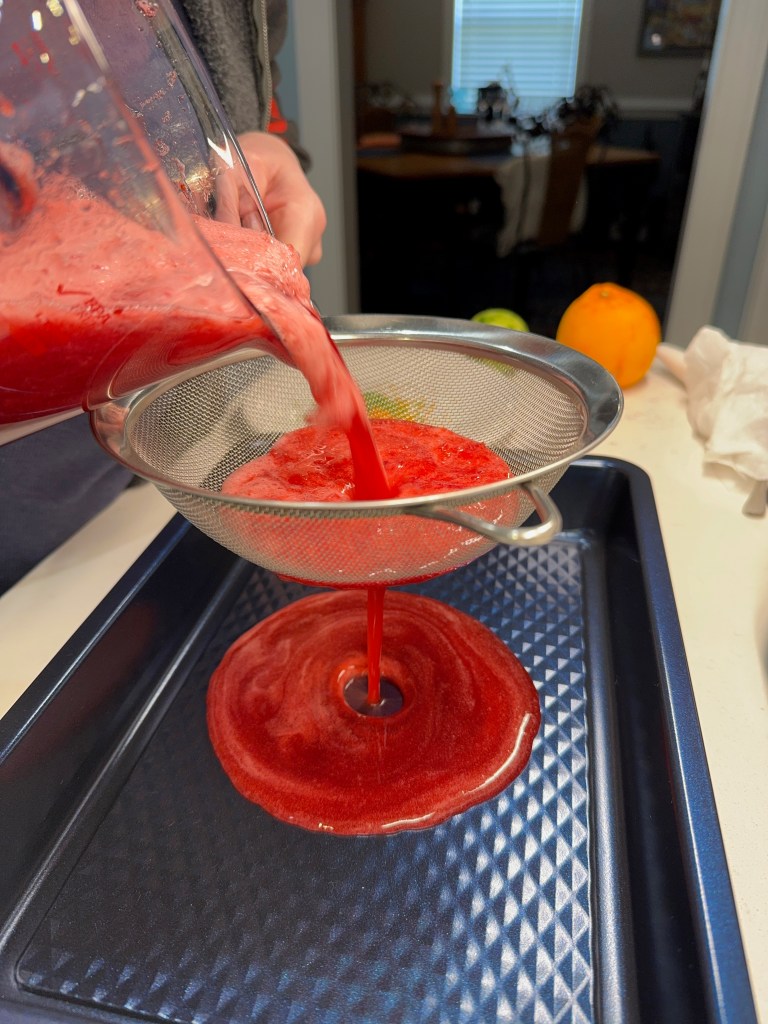
2. Transfer cranberry mixture to a blender (remove vent cover) or use an immersion blender to puree the mixture into a slurry. Pour through a mesh strainer into an oblong, shallow pan. I used a silicone scraper to gently move the puree back and forth on the strainer surface, as the pectin from the berries was quite heavy.
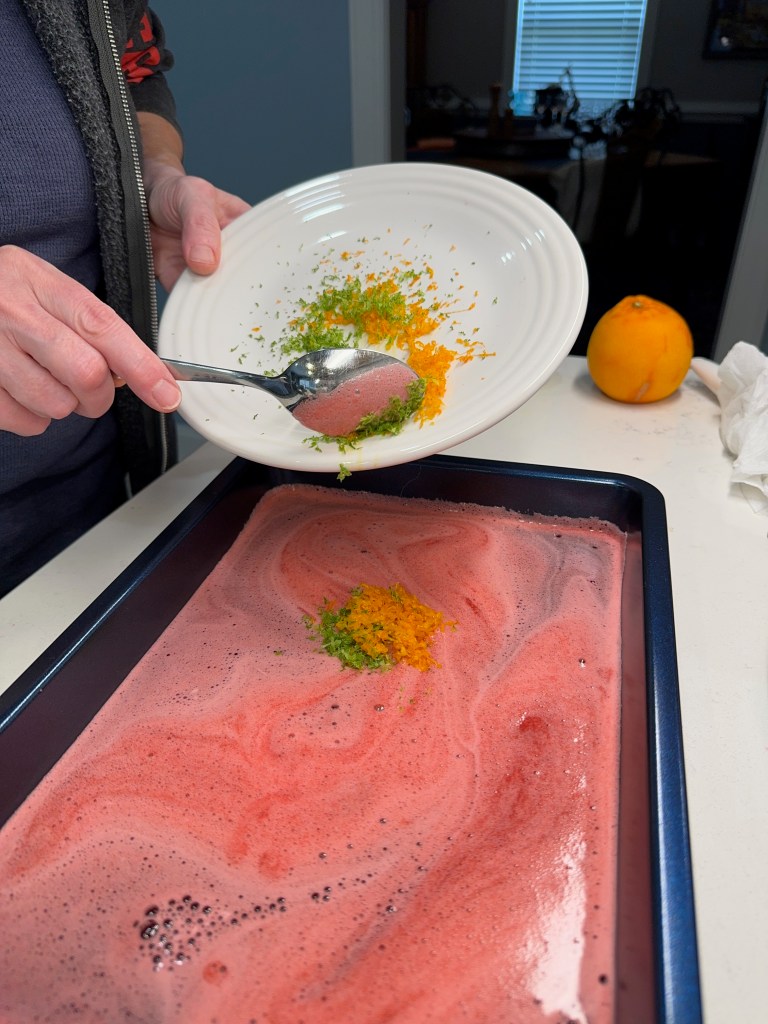
3. Stir in the citrus zest. Cover with plastic wrap and place the pan flat in the freezer for several hours until solid (overnight is fine).
4. Use a fork to scrape the surface of the mixture until you have multiple layers of icy granita. Note that the mixture will likely clump as it refreezes. If you want it to be uniform consistency for cocktail hour, transfer it to a food processor and pulse a few times.
In all my working days— even those that I spent pitching in for a catering company— I never had a work assignment that involved developing a cocktail. Until now!
The second half of this year has been a wild ride for me, as I assumed a management role of sorts in the company where I’ve been working for the past decade. I’ve been busy since July learning new processes and data systems, tackling the billing records and helping other departments in our parent company learn more about my lesser-known branch of the business. It’s been exciting, exhausting and rewarding all at once.
With these new responsibilities came introduction to new people in the company, including my new direct supervisor, John. We’ve only met online, as he is based in northern California and I’m in central North Carolina, but we connect regularly for one-on-one updates, and he perked up in one of our early, get-acquainted conversations when he learned that I do a food blog. At the end of each monthly meeting, we usually squeeze in a little banter about the most interesting thing I’ve been cooking or shaking up that month. The rest of the department has not met me, though, and I’m told that John has been subject to some teasing by the team. They call me his “imaginary friend!” 😂
That will change this afternoon when I join an online holiday-themed meeting with the whole gang. To help with introductions, John gave me an assignment— spend a few minutes describing my branch of the business, and a few more minutes instructing the team in making a holiday cocktail. So it’s true— my reputation as an amateur mixologist precedes me. I’m good with that!
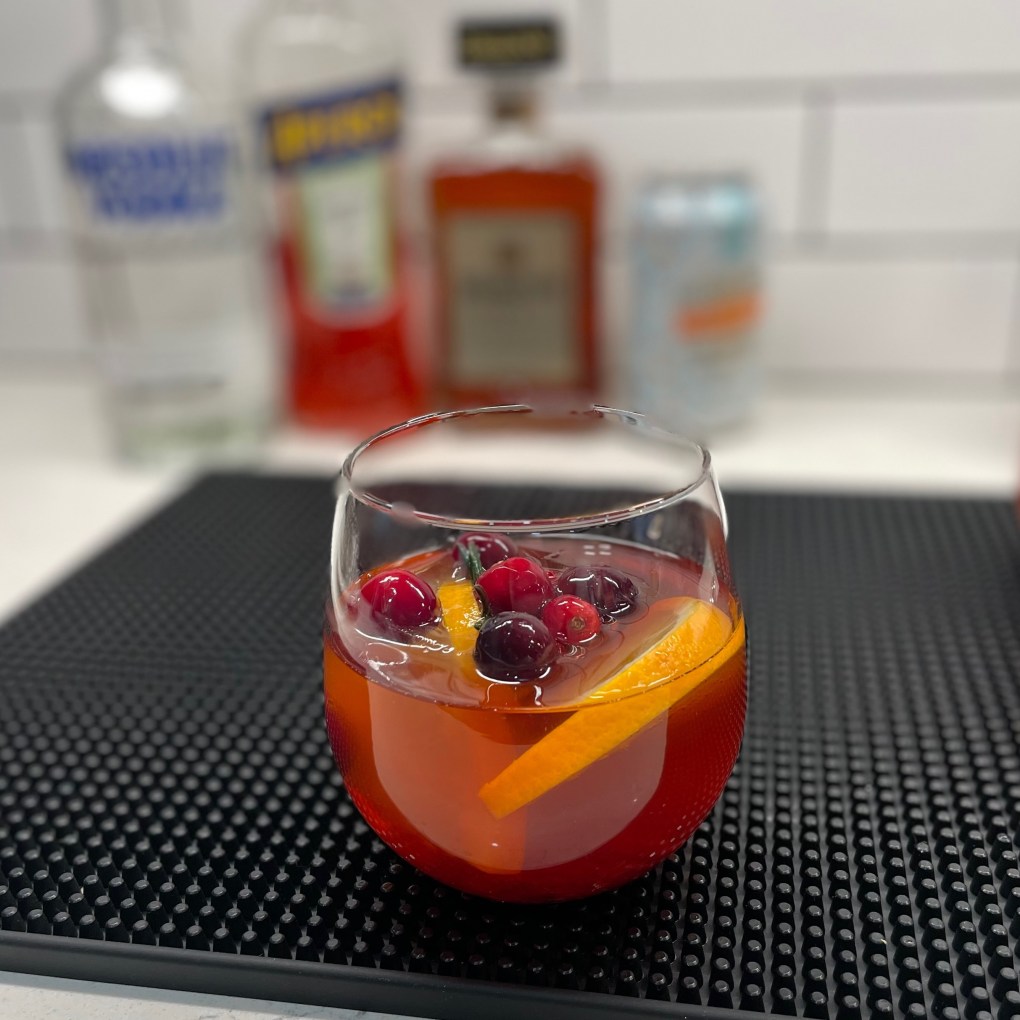
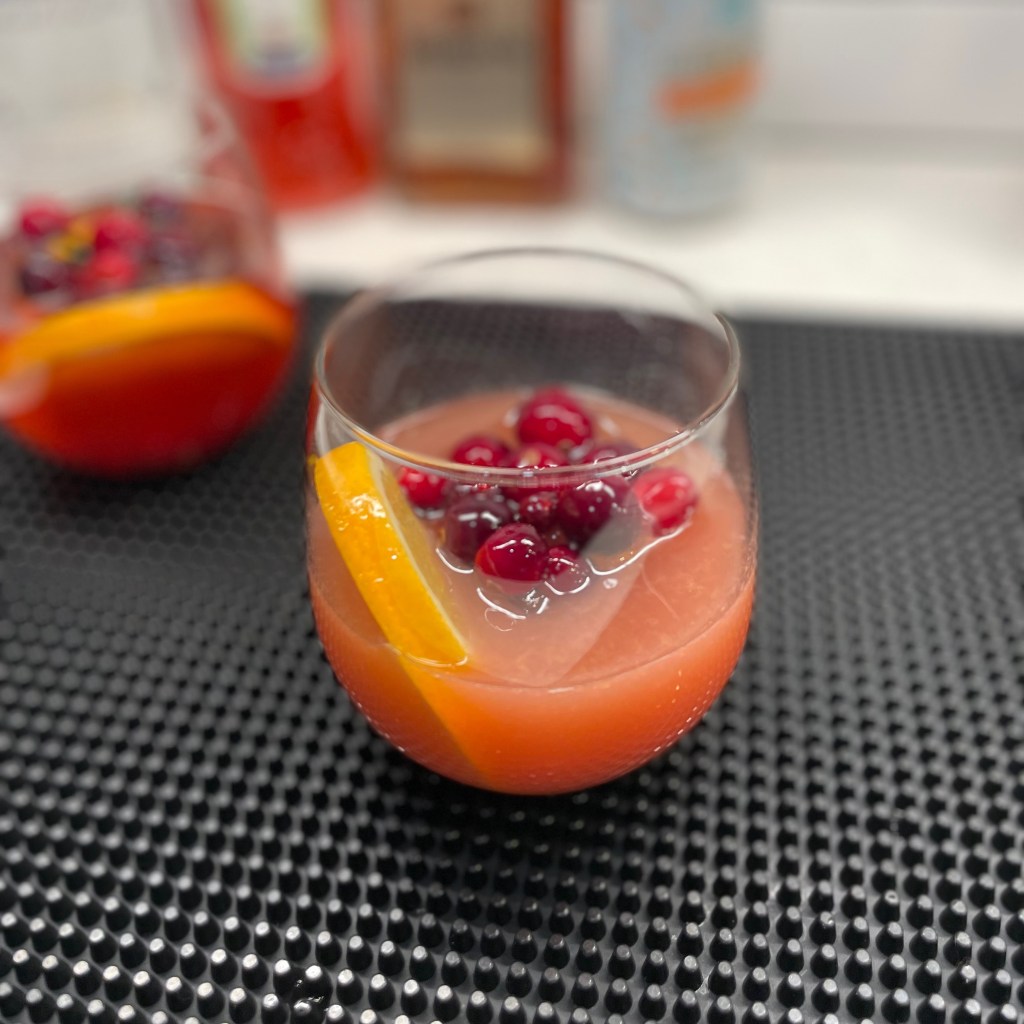
This cocktail even looks like Christmas!
The drink I’ve prepared is a fun and festive twist on a classic Italian Spritz, and I chose this approach for a few reasons:
It’s easy, made with widely available ingredients for a global audience.
It’s a good balanced drink— not too sweet or strong.
You don’t need fancy bartender tools, as this drink is built right in the glass.
It’s simple to sub in lighter ingredients for an alcohol-free version that is every bit as festive and sure to please the non-drinkers at your holiday gatherings.
So, what’s in this cocktail?
The almond and pomegranate flavors give a traditional Spritz a holiday flair.
The flavors in my Spritz are seasonal— tart pomegranate and sweet almond— paired with Aperol, the slightly bitter Italian aperitivo that hits the taste buds like a marriage of grapefruit peel and orange LifeSavers candy. If you are already a fan of Aperol, you’ll love this drink. If Aperol feels a little too bitter for you, then you’ll appreciate the way the amaretto and pomegranate calm it down. Vodka is the primary spirit of the drink, but if you want something lighter, the drink won’t suffer without it.
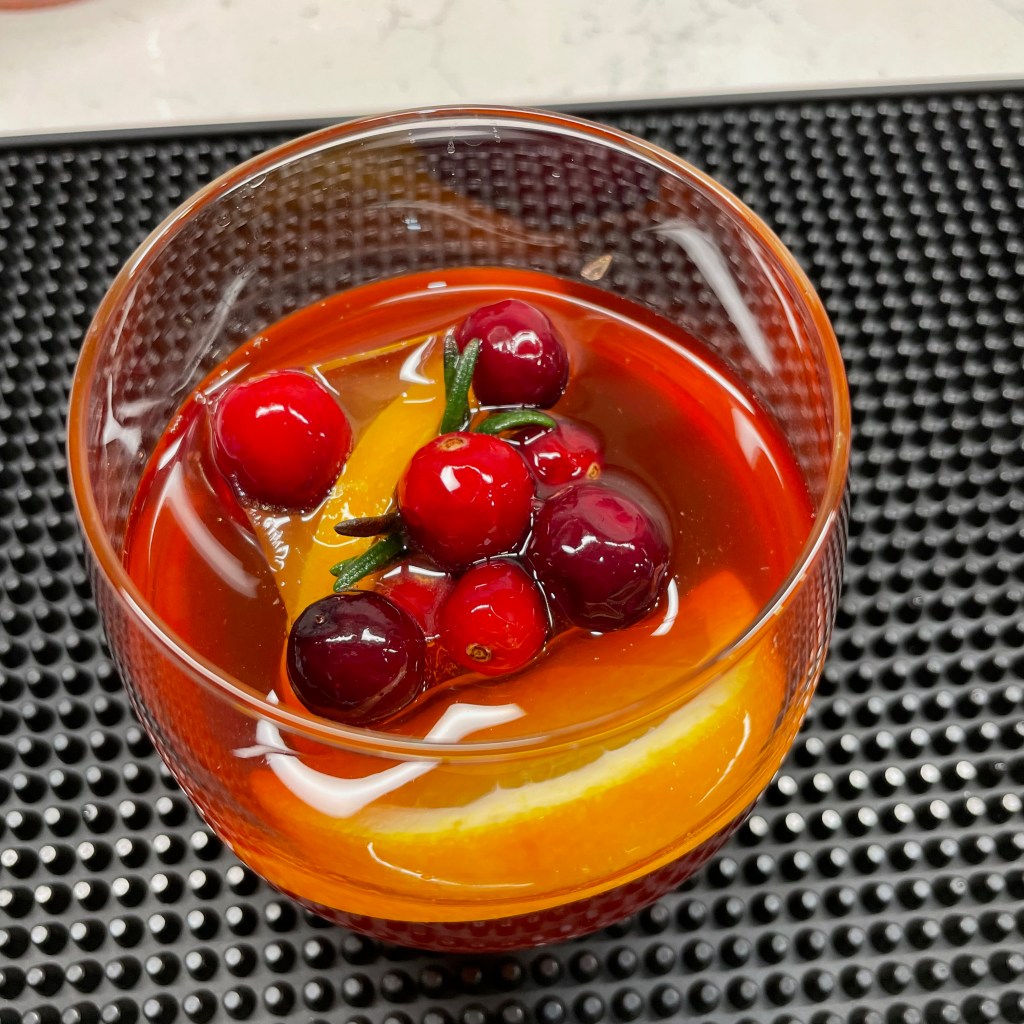
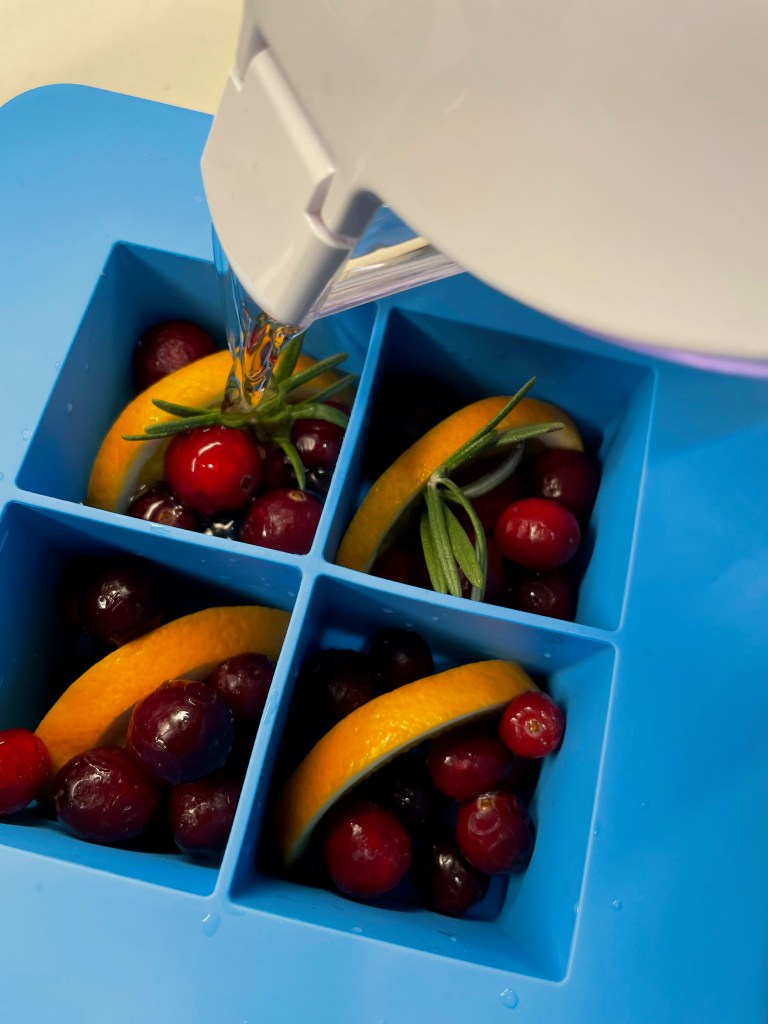
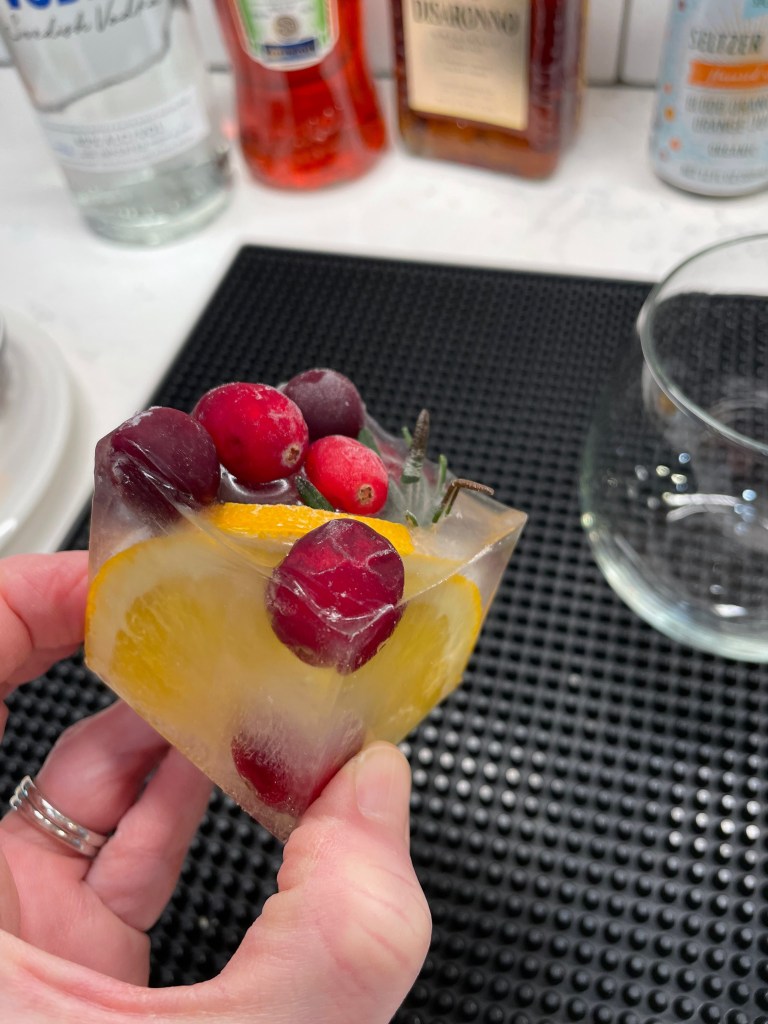
Don’t forget to garnish! A few pomegranate arils and a slice of orange in the glass will dress it up beautifully for the holidays and make a great impression! You know that I’m obsessed with fancy ice, too, and here I’ve found an easy way to make them extra festive, with orange slices, whole cranberries and a rosemary sprig frozen inside! My ice mold is made by True Cubes, but this trick should work with any silicone ice mold.
Don’t underestimate the wow factor of a thoughtful garnish!
Finally, this drink is topped off with sparkling water or seltzer because everything feels fancier with bubbles. If you’re in the mood for a stronger topper, go with Prosecco, as with the classic Spritz. I personally think it’s just right with seltzer, especially one flavored with blood orange. 😋
Can I get a no-booze version of this pretty drink?
Absolutely! The great thing about a drink made with fruit flavors is that it’s very adaptable to a no-alcohol or “zero proof” version.
This drink received rave reviews from non-drinkers at our house!
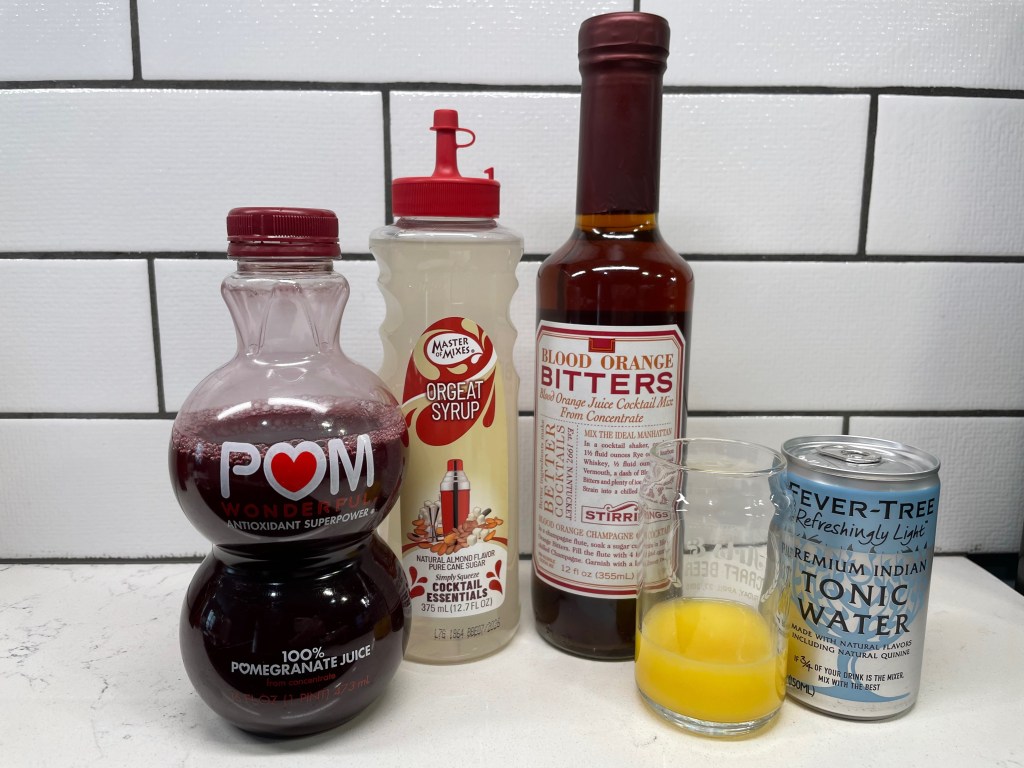
To maintain the good balance of sweet, tart and bitter, I’ll shift the ratio of ingredients slightly. Use non-alcoholic orange bitters to replace the Aperol and orgeat, an almond cordial syrup, as a stand-in for the sweetness of Amaretto. Freshly squeezed citrus is perfect here, and the pomegranate juice brings a little tartness. There’s no need to “replace” the vodka, which doesn’t have much flavor on its own. But if you’d like a little bite or tingle on the tongue, I have a trick for that, too. Tonic water!
The same flavors, but rearranged for a zero-ABV drink.
These alcohol-free ingredients are easy to find online or in the mixers section of a larger supermarket. You might also amp up the bitter orange flavor by crushing a piece of orange peel in the bottom of the glass. To give the drink a little “bite’ that you would otherwise have in a spirited cocktail, top it off with tonic water rather than seltzer.
Cheers!
For your holiday enjoyment, two click-to-print recipe cards are available below, one for each version of my holiday Spritz. For readers abroad, I’ve estimated the measure amounts in milliliters. Feel free to adjust to taste!
This cocktail is a festive, seasonal twist on a classic Aperol Spritz. The drink can be built right in the glass, and a garnish of fresh fruit is a beautiful finish!
Ingredients
1.5 oz vodka (40ml)
1 oz Aperol (25ml)
.5 oz pure pomegranate juice (15ml)
.25 oz amaretto or other nut liqueur (10ml)
2 oz. seltzer (or Prosecco, for a stronger drink)(50ml)
Pomegranate arils and fresh orange slice for garnish
Note: Hazelnut or pistachio liqueur would be an interesting substitute for the amaretto in this cocktail. If nut allergies are a concern, consider adding something with a touch of vanilla or ginger for an extra little something.
Directions
Measure vodka, Aperol, pomegranate juice and amaretto into a large cocktail or wine glass. Stir gently to mix.
Add ice and top off the drink with seltzer. Give it a quick little stir to activate the bubbles. Add garnish as desired.
The seasonal flavors of pomegranate and almond give this drink a festive feel without any of the consequences of alcohol! Look for orgeat and alcohol-free orange bitters online or in the mixers section of a larger supermarket.
Ingredients
1.5 oz. freshly squeezed orange juice (40ml)
.75 oz. pomegranate juice (20ml)
.25 oz. orgeat (almond cordial syrup)(10ml)
.25 oz. non-alcoholic blood orange bitters (10ml)
2 oz. seltzer (or tonic water, for a drink with more “bite”)(50ml)
Pomegranate arils and fresh orange slice for garnish
Note: If you cannot find the orgeat, consider using almond syrup, similar to what is used in fancy coffee shops. In a pinch, you can replicate the orange bitters by crushing a piece of fresh orange peel in the bottom of the glass before mixing the other ingredients.
Directions
Measure orange juice, pomegranate juice, orgeat and bitters into a large cocktail or wine glass. Stir gently to mix.
Add ice and top off the drink with seltzer or tonic water. Give it a quick little stir to activate the bubbles. Add garnish as desired.
While out shopping yesterday, I bumped into some friends who asked whether my husband and I would be staying close to home for Christmas. I jokingly told them that yes, our holiday would be easy and simple again this year for one good reason: Les is Jewish. 😂
Our friends know this of course, and they also know that we do celebrate Christmas, just as we celebrate and observe Hanukkah, Rosh Hashanah, Easter and Passover. Even when it is just the two of us, we enjoy making a special dinner for Christmas night— one that usually begins with a fancy appetizer and ends with a nice dessert.
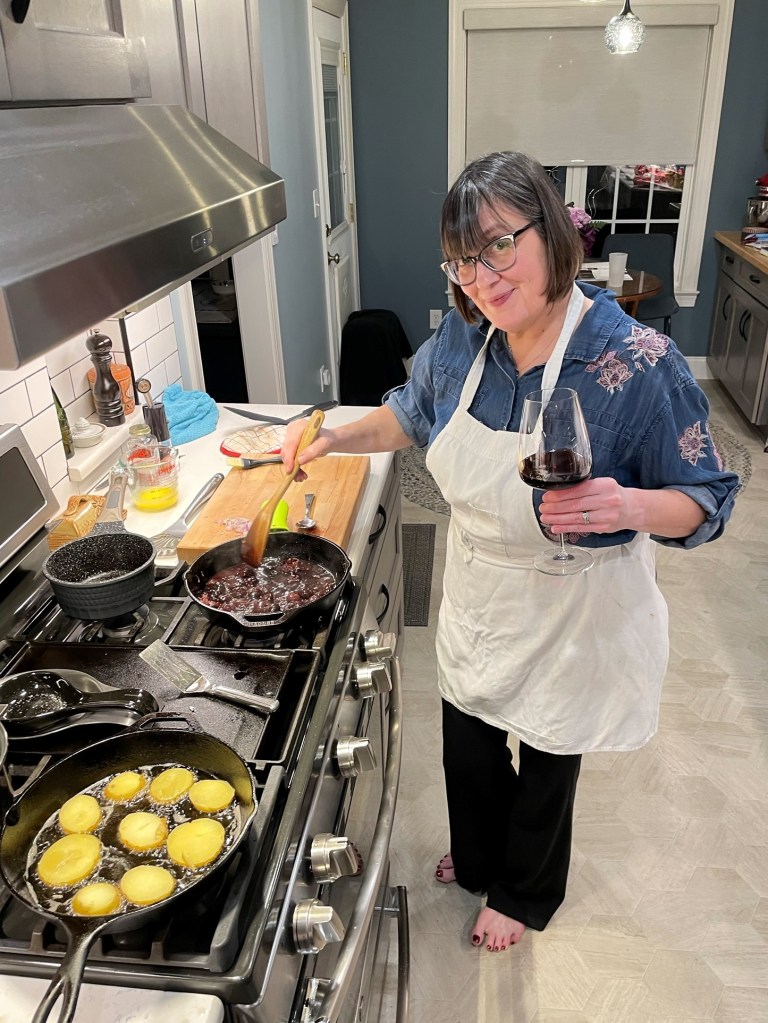
The holidays are a great time to pull out all the stops and splurge a little— calorie- and money-wise—and we relish this little bit of indulgence regardless of whether we are serving guests or just ourselves. Les informed me recently that his favorite “special” dish that I make is duck (funny that I didn’t know that!), and so I’ve decided to share my tips for making a perfectly crispy seared duck breast and a cherry-pinot noir sauce that sounds complicated but is actually so easy.
Let’s start at the beginning. At first impression, you might think that duck is similar to chicken, but in flavor and preparation, it is actually closer to red meat. There is a generous layer of fatty skin on duck, and it takes extra care to crisp it without overcooking or drying out the meat. This is the technique that works best for me, and I’m sharing it with a recipe I made for my sweetheart on Valentine’s Day this year. If you already have your Christmas meal planned, save this for February (and make something with chocolate and cherries for dessert).
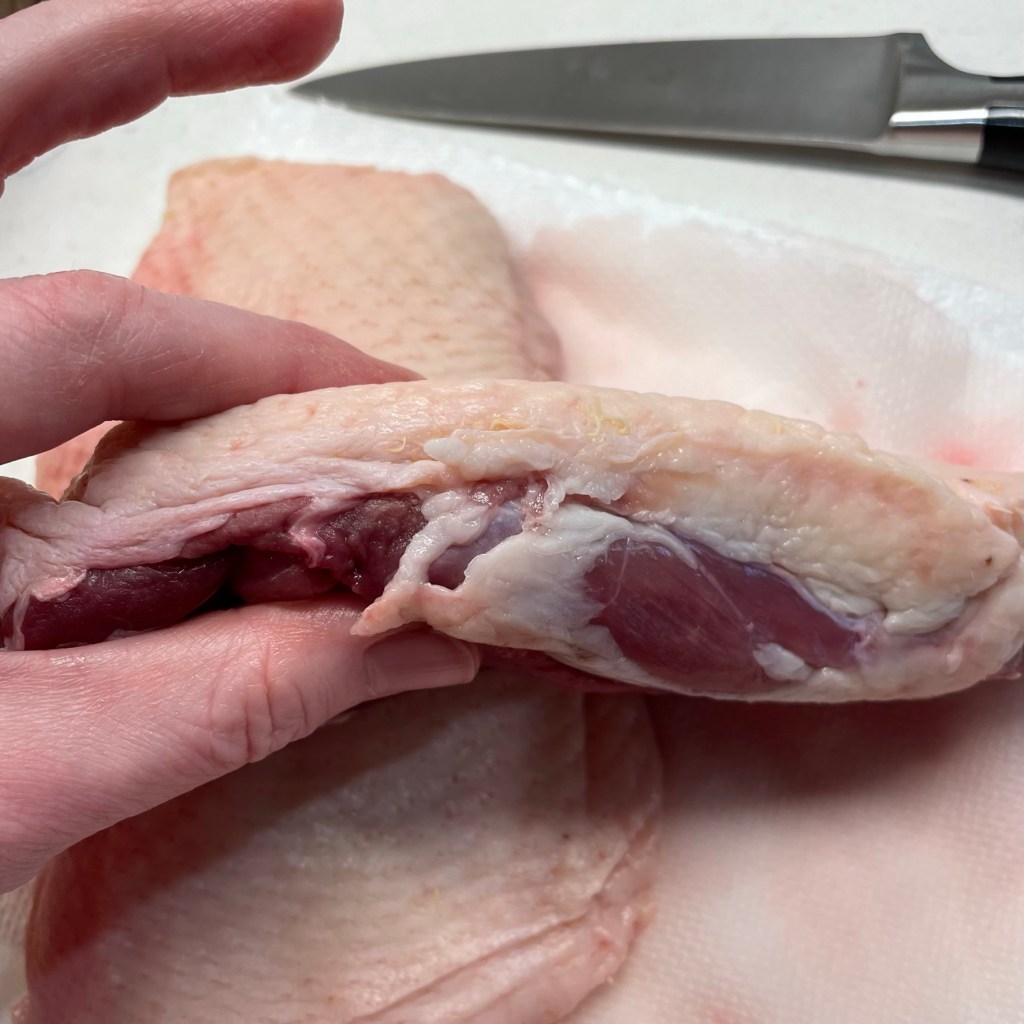
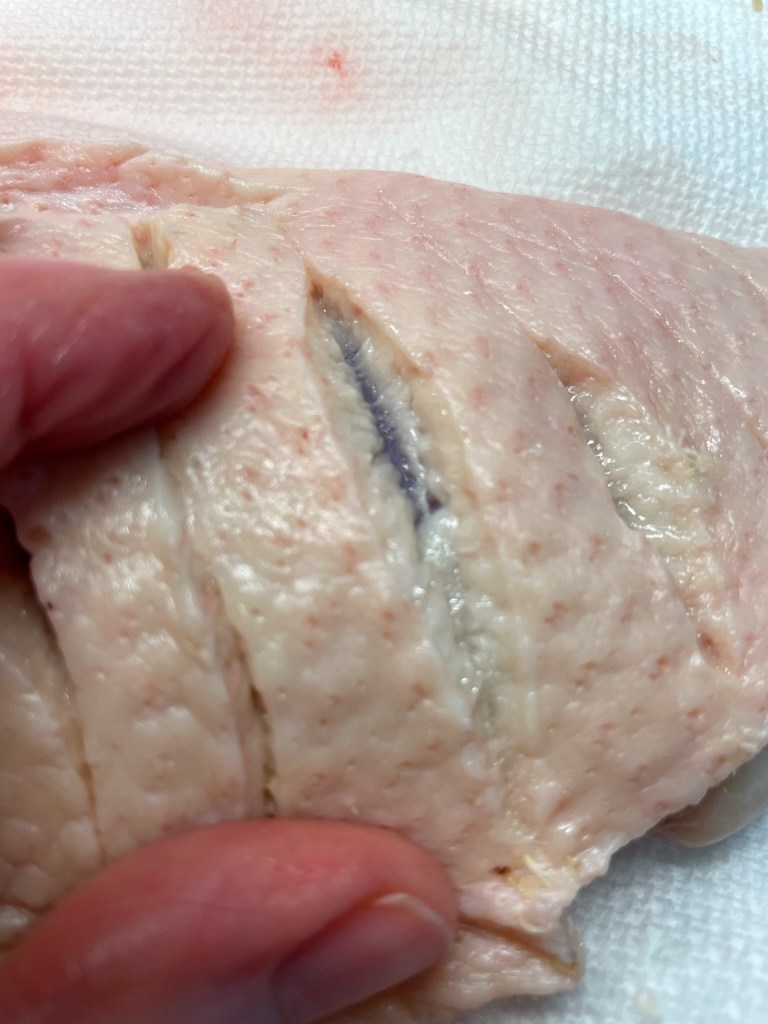
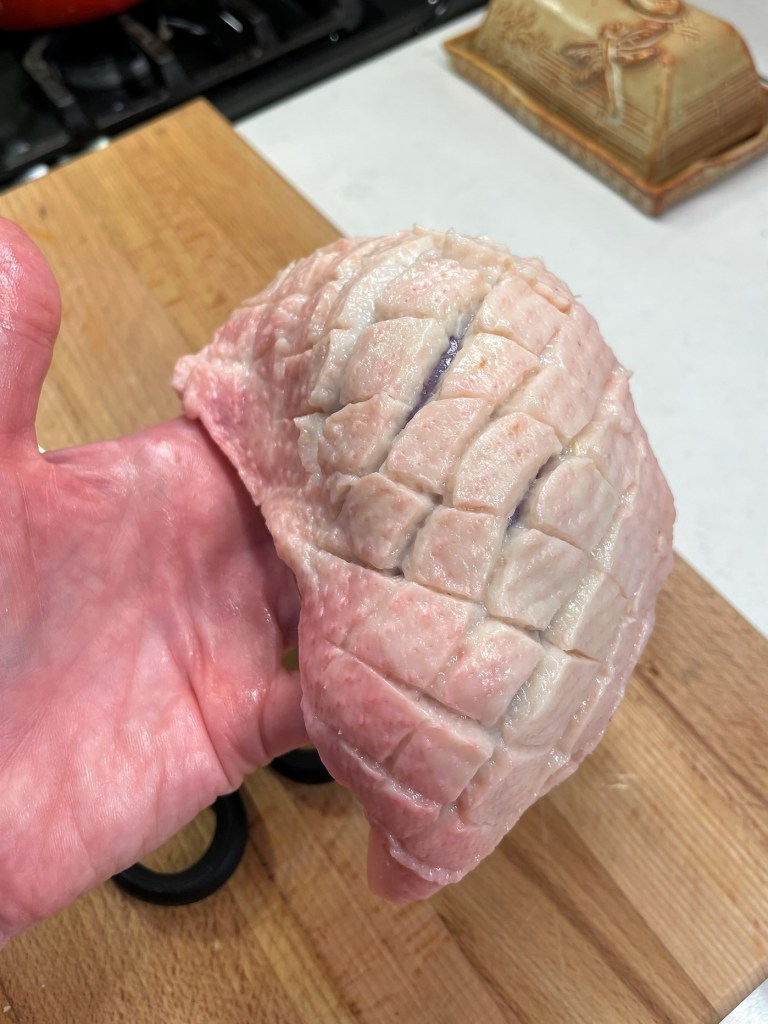
Tip #1: Score the meat for better rendering
Take care not to cut into the duck meat, as I did in the third picture above. You want your cuts to only break the fat.
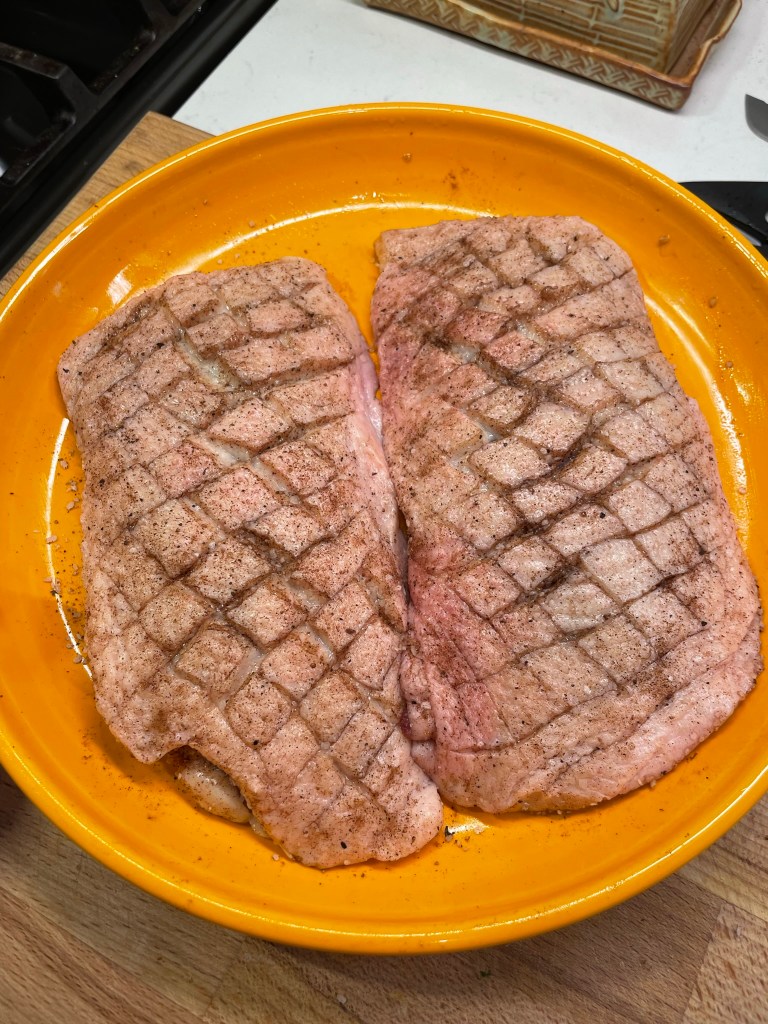
To efficiently render the thick, fatty skin on duck breast, use a very sharp knife to score it with a crosshatch design, with cuts that spread about 1/2-inch apart and only through the skin, not into the meat. This scoring allows more of the fat to render when you fry it in a skillet.
Tip #2: Dry brine the duck breast
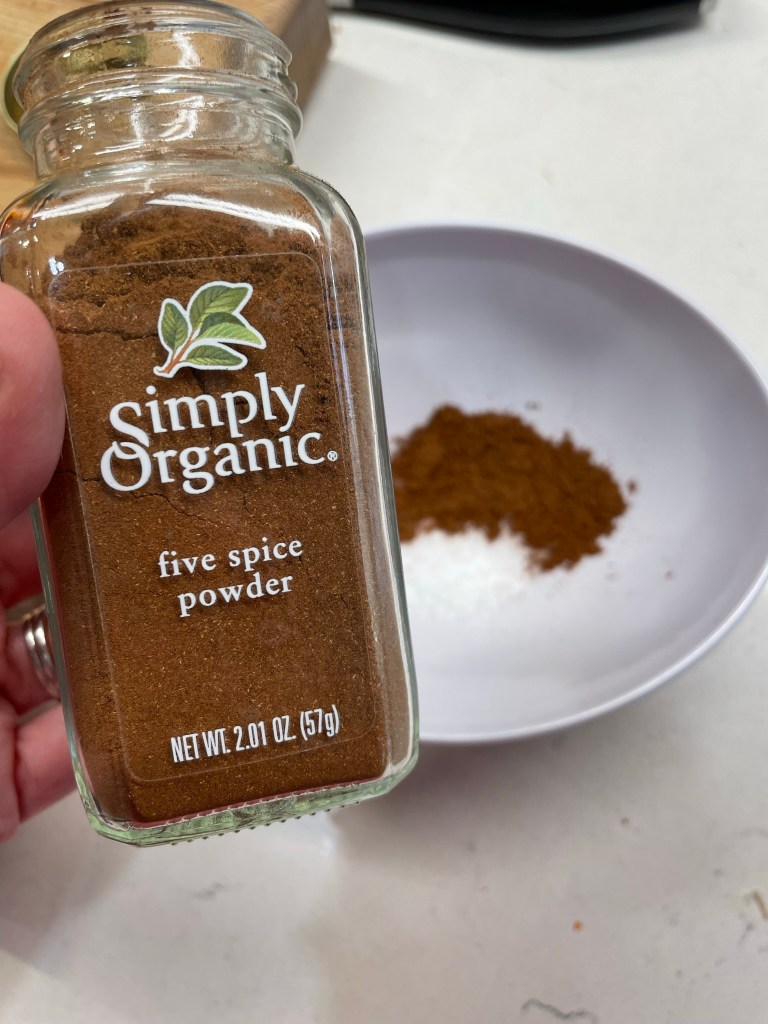
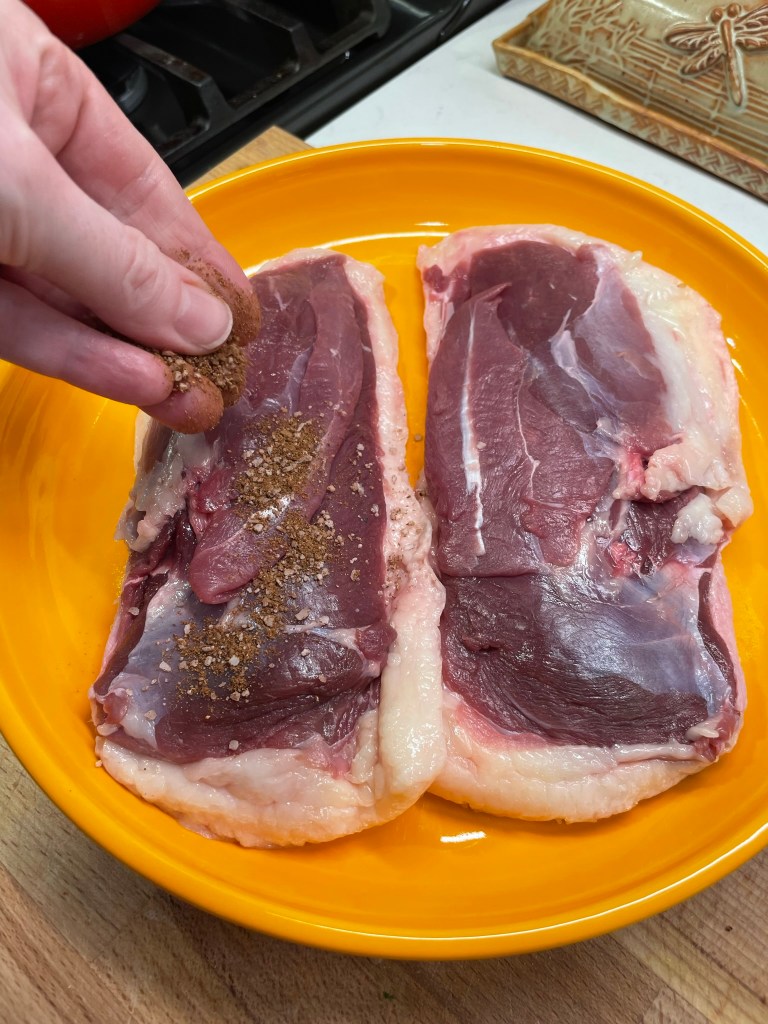
The five spice was delicious with the cherries. If you’re not a fan, simply salt the duck.
I’ve become a big fan of the dry brine, though I had to wrestle with my own sensibilities the first few times I tried it because at first glance, a dry-brined meat looks like it has dried out. Not so! There’s a whole science behind how this works— reverse osmosis of some sort, I guess— but the upshot is that salting and resting meat uncovered in the fridge allows better infusion of the seasoning into the meat and juicier results in the end. Here, I added five spice powder to the kosher salt. It was excellent with the flavors in my sauce. Another advantage of doing this step is that it does dry out the fatty skin a bit, and that greatly reduces spattering in the next step.
Tip #3: Begin with a stone-cold skillet
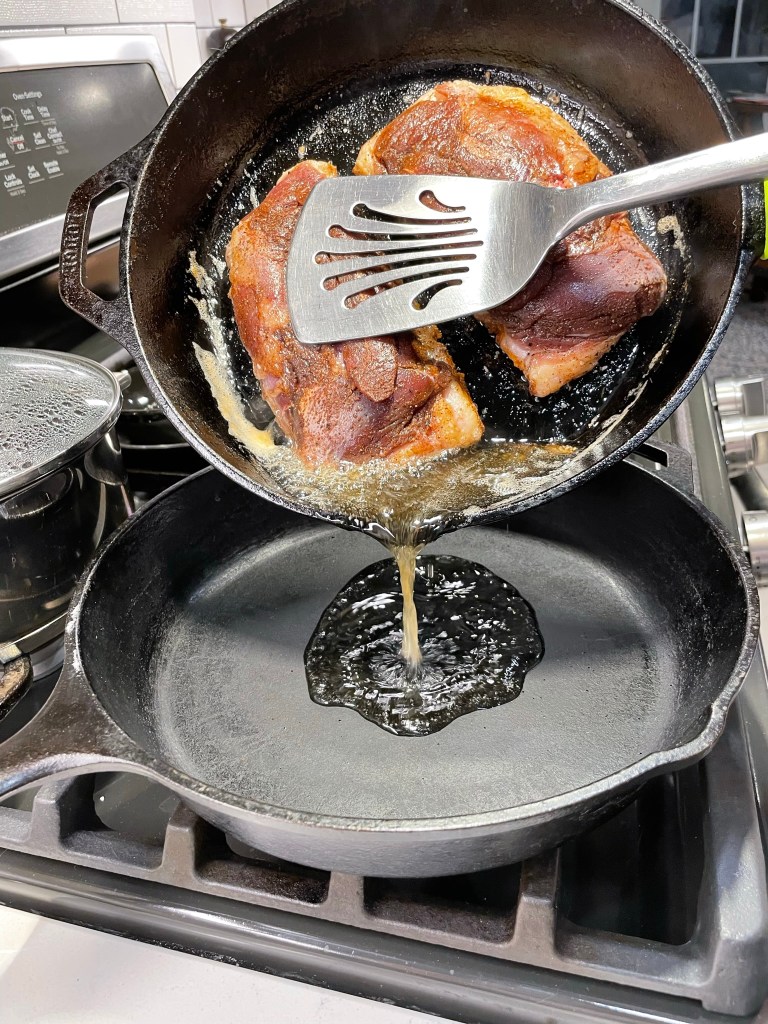
When melted fat accumulates around the duck breasts, carefully drain it off.
And preferably cast iron! If you were to place a duck breast in a hot skillet, the skin would sear, but the fat would not render very neatly. You’d likely be left with an oily mess, as I did the first couple of times I made duck. A non-stick skillet is not ideal either because the coating is a barrier to getting crispy skin. Invest in a quality cast-iron skillet and it will reward you with exceptional results for any meat you sear. Mine is a 10-inch Lodge skillet, made in the USA and built to last a lifetime. As the fat renders, carefully drain it off.
Tip #4: Do most of the cooking on the skin side
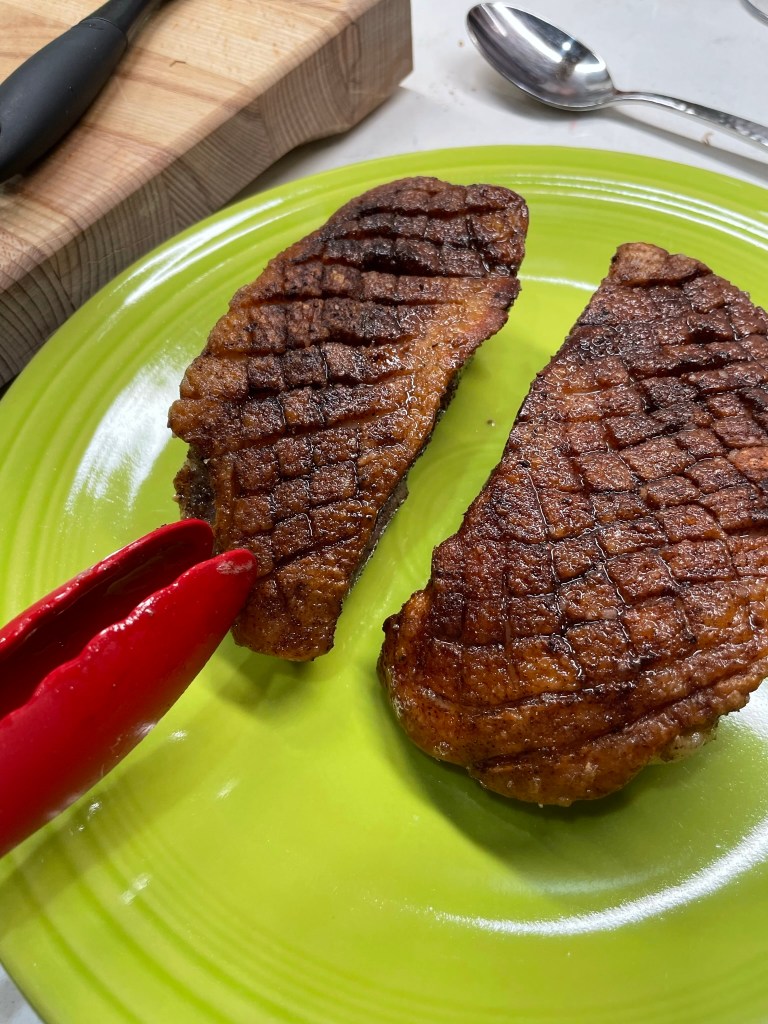
The fatty side should be completely crisp after about 11 minutes. Turn and cook the other side briefly, then transfer to a warm plate.
Duck is best served medium rare (like red meat), and the best way to achieve this together with crispy skin is to leave the breast skin-side down for most of the cooking time. Residual heat from the pan will bring it to temperature, and you only need to turn it to the flesh side for a minute or two to seal in the juices.
Tip #5: Don’t waste the extra duck fat!
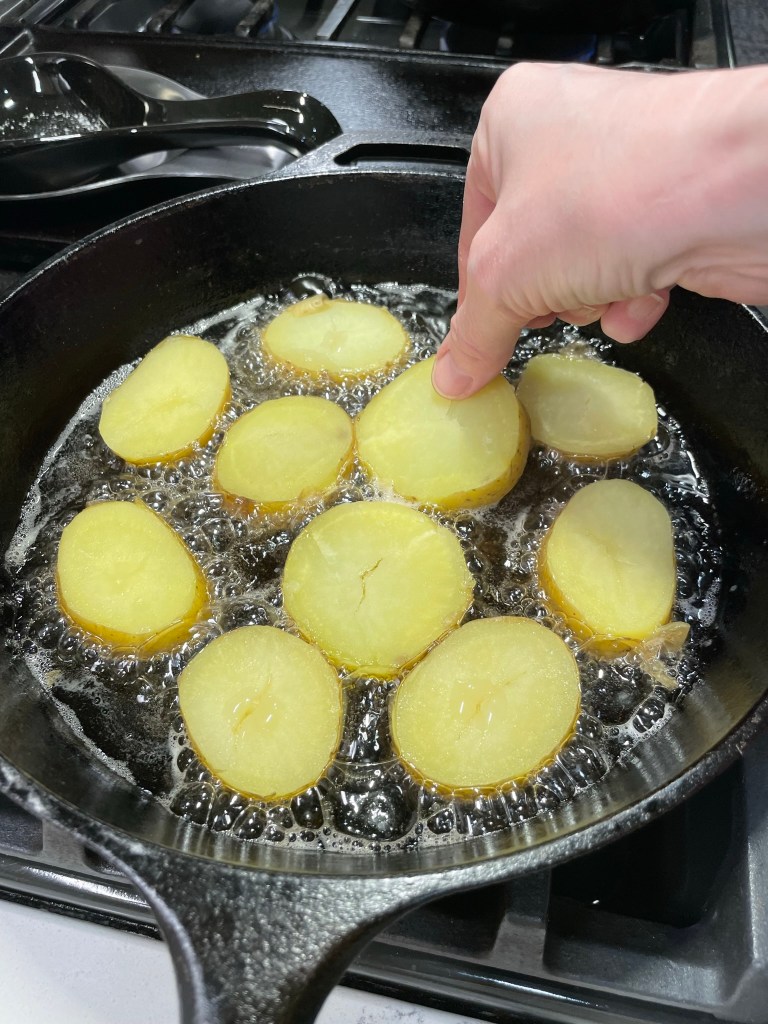
A great deal of fat will be released as you render the duck breasts, but this is decidedly not a bad thing! If you plan to make potatoes to accompany your duck, do yourself a favor and fry them in the duck fat! The flavor is incomparable and I am always thrilled to find the crispiest, non-greasy texture on the potatoes. If you don’t need the fat for this meal, drain it off into a jar, let it cool and store it in the fridge until you do make potatoes.
My tips for making these decadent, duck fat-fried potatoes are included at the end of the click-to-print recipe card below.
Yes, it’s saturated fat, and of course, you shouldn’t eat like this very often. But these are the holidays, and this meal is a worthwhile occasional indulgence. Especially with cherry-pinot noir sauce!
Let’s talk about that sauce!
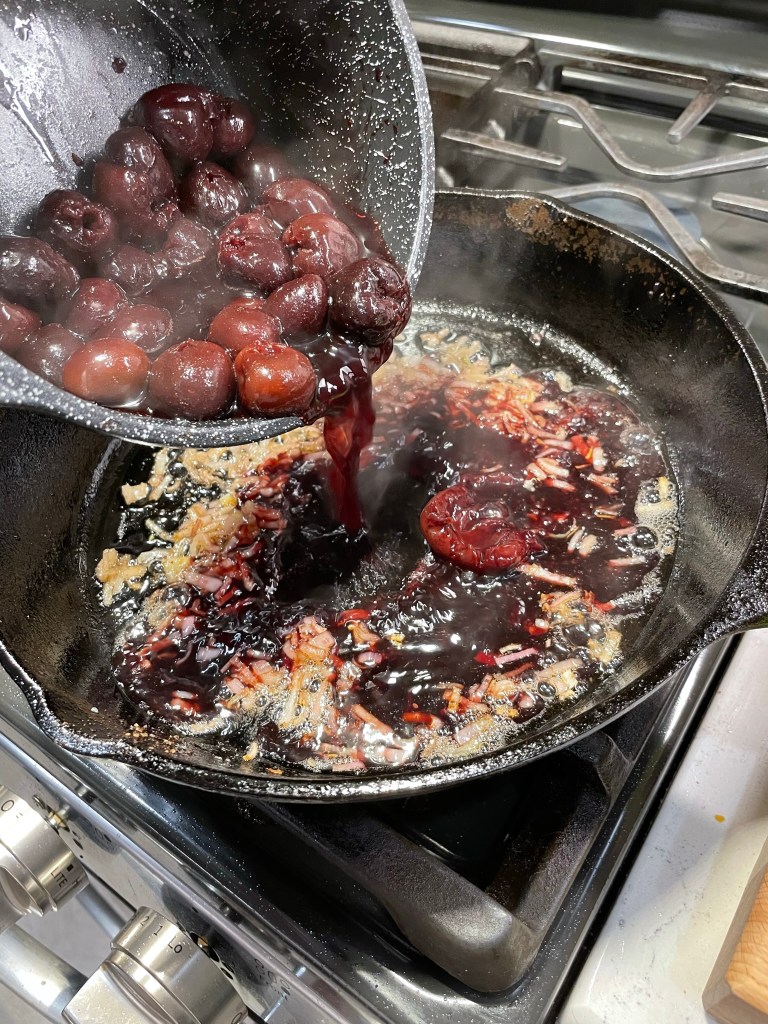
Now that you’re feeling confident about achieving the perfectly crispy duck breast skin, take a look at this flavorful, sweet and savory sauce, made from dark cherries, shallots, chicken stock and Pinot noir. Though we are definitely not in cherry season, this recipe is great because it uses frozen dark cherries. Pinot noir is the perfect complement to this, and the shallot, chicken stock and red wine vinegar provide a savory backdrop to keep this from feeling too sweet.
As you will see, this recipe makes quite a bit of sauce and each duck breast is about half a pound, so the whole thing is really suited to serving four people. Les and I got a little carried away because the flavors were so mouthwatering and we knew it would lose that perfect, crispy texture as leftovers. Get the base of the sauce started while the duck is cooking and just keep it warm on the back burner until serving time.
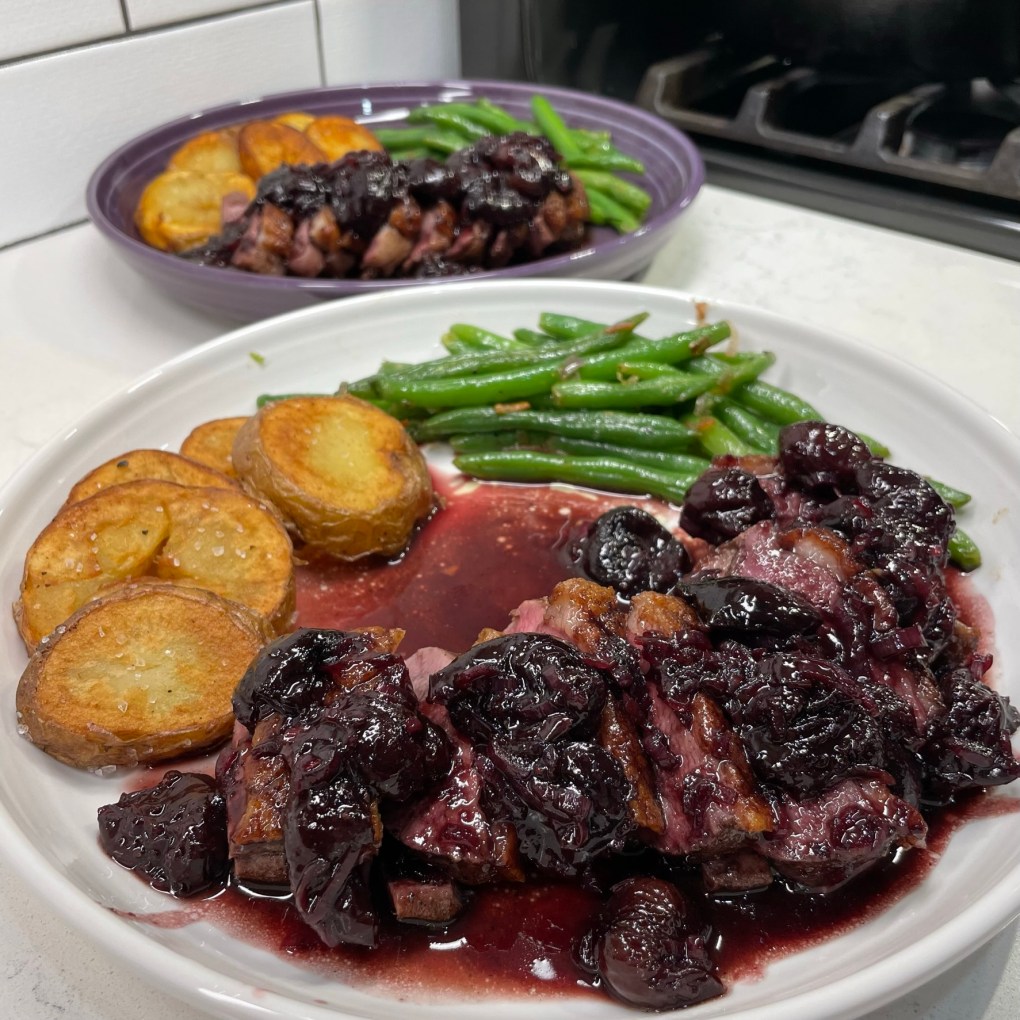
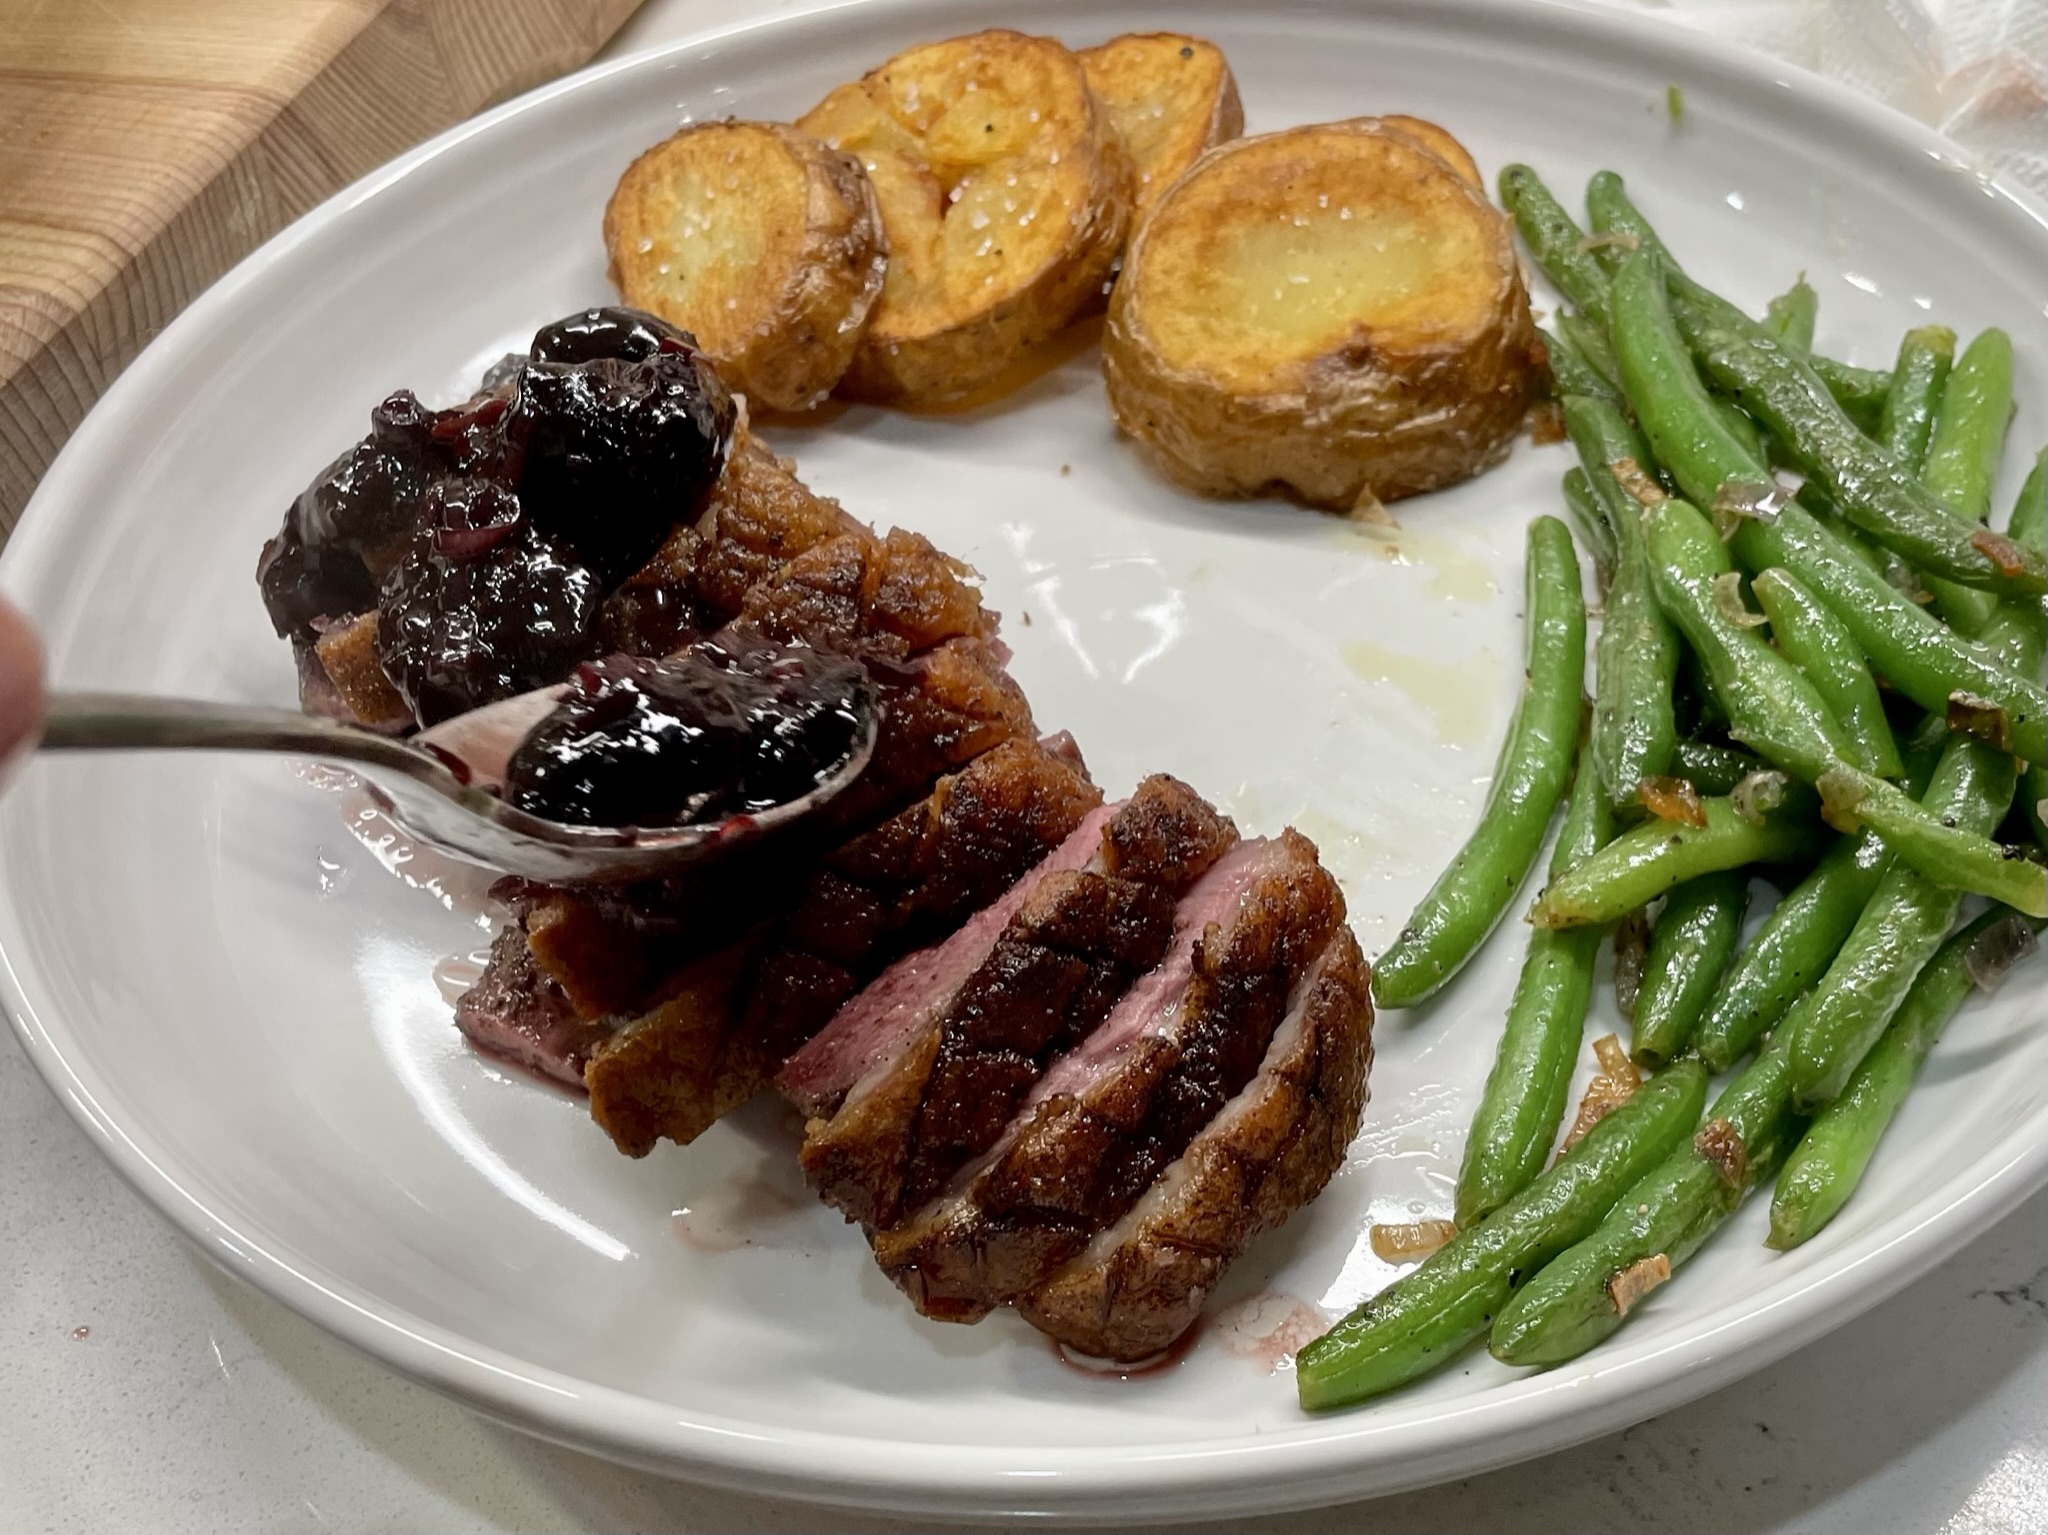
Time to plate this gorgeous meal!
The sauce finishes quickly in the same skillet used to cook the duck, and you’ll get to enjoy all the little fond bits of flavor that were left behind in the pan.
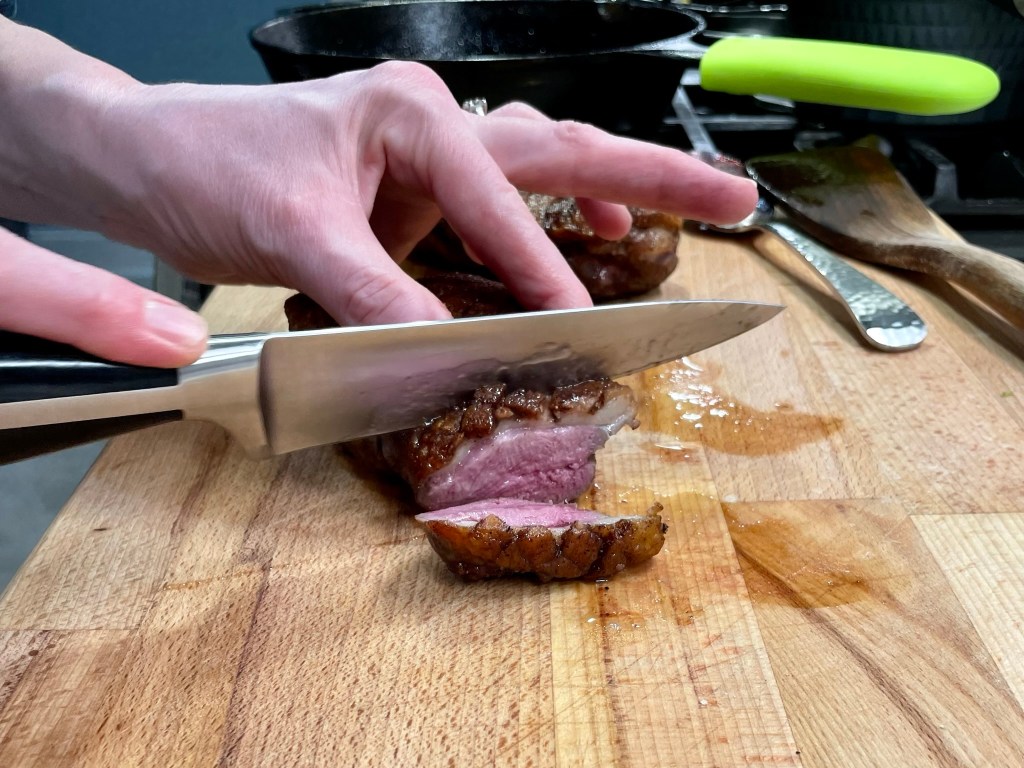
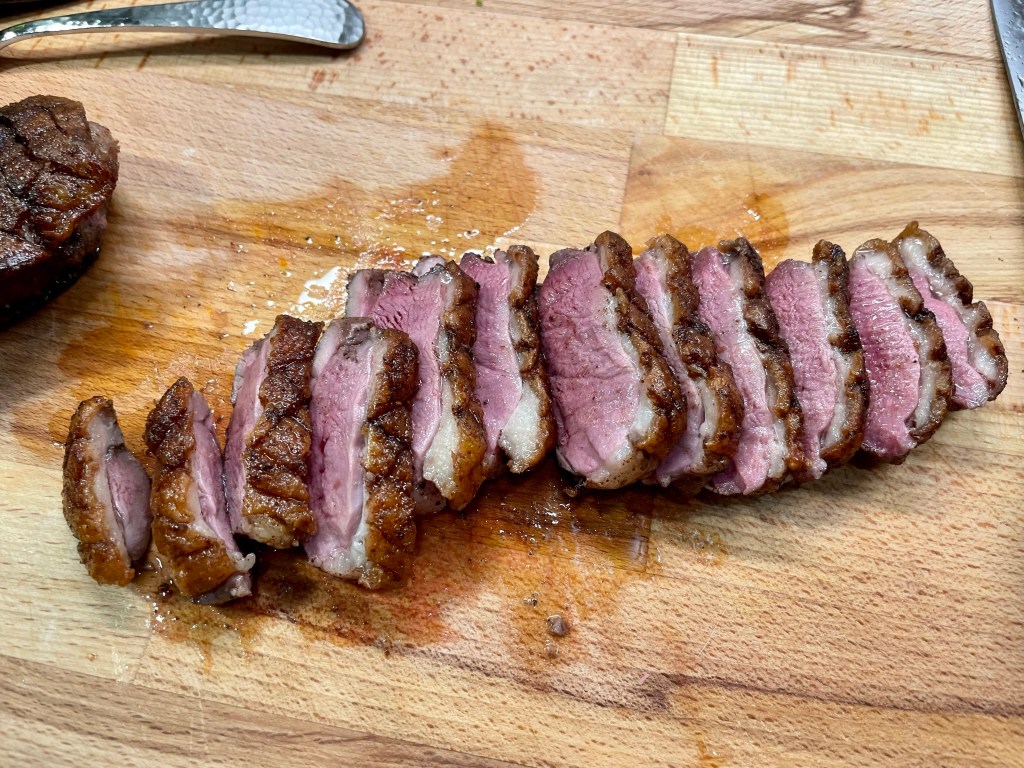
Place each breast on a cutting board and use a sharp knife to cut 1/2-inch slices. The meat should be bright pink and juicy with a thin layer of succulent fat under the crispy skin.
If I could go back in time to one step of this recipe, I’d plate the sauce before the duck breast, just to show off that incredible crispy skin. I do recommend sauce underneath the duck breast if you’re serving company, as we all know people eat with their eyes first. But we can confirm that it was just as delicious with the sauce on top, and if nothing else, it helped keep the duck warm as we savored every last delicious, cherry-kissed bite.
Crispy Five Spice Duck with Cherry-Pinot Noir Sauce
There's a lot to love about this dish, from the crispy skin to the flavorful sauce. It is definitely special occasion-worthy!
Ingredients
2 individual duck breasts, about 8 oz. each
1 tsp. kosher salt
1 tsp. five spice powder
2 Tbsp. turbinado sugar
1/4 cup good quality Pinot Noir (save the rest for dinner)
2 Tbsp. red wine vinegar
1/2 cup good chicken stock
Kosher salt and freshly ground black pepper to taste
1 heaping cup frozen dark sweet cherries
1 medium shallot, minced
The trick to getting the crispiest skin begins with a dry brine on the duck breasts and a stone-cold skillet at the start of cooking. Render the fat slowly and drain off the excess as it accumulates, saving the fat to fry up the most delicious potatoes your taste buds will ever enjoy.
If you wish to make this dish without alcohol, substitute tart cherry juice for the Pinot Noir and reduce or omit the red wine vinegar.
Directions
Pat the duck breasts dry with paper towels. Use a sharp knife to score the fatty skin only of the duck breast pieces. Make your cuts about 1/2-inch apart, in a crosshatch pattern. Take care not to cut the meat.
Combine the salt and five spice powder and sprinkle all over both sides of the duck breasts, rubbing it into the scored fat side. Place the breasts on a plate and rest, uncovered, in the fridge for about six hours.
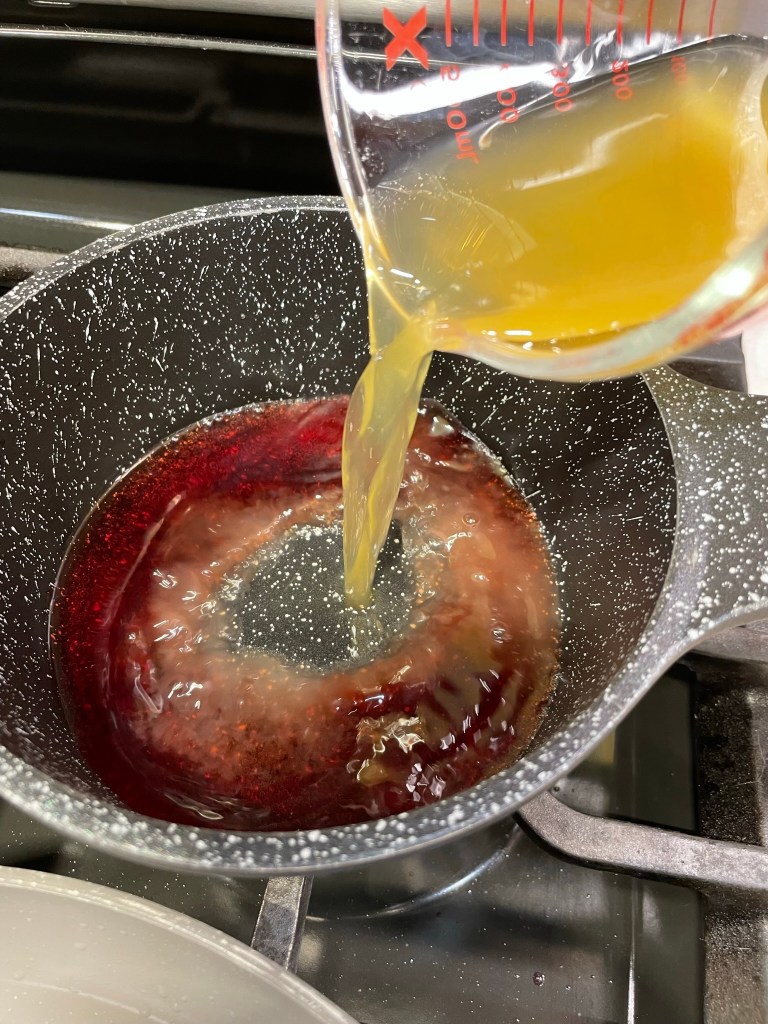
Begin the flavor base for the sauce by combining sugar, wine, vinegar and chicken stock in a small saucepan. Bring to a slight boil then add the frozen cherries and simmer until cherries are softened. Keep warm.
Place a COLD cast iron skillet onto a burner over medium heat. Immediately place the duck breasts, skin side-down, into the skillet. Don’t disturb the breasts until the fat begins to render. Carefully drain off excess fat by holding the breasts in place with a spatula or tongs and pouring off the fat into a bowl, jar or a second skillet. This helps reduce the amount of spattering. You’ll likely need to do this twice during the rendering process.
Cook the skin side of the duck breasts for about 11 minutes, or until the bottom is deep golden in color and very crispy. Gently turn the breasts to cook the second side for only about two minutes. Transfer the breasts to a warm plate while you finish the sauce.
Drain off all but a tablespoon of the duck fat and add the minced shallots to the skillet, tossing until slightly tender. Pour in the reserved Pinot Noir-cherry mixture and bring to a boil, scraping up any bits that are stuck to the pan. Allow this to simmer for a few minutes until some of the liquid evaporates and the sauce is slightly thickened.
Slice the crispy duck breasts into 1/2-inch thick slices and serve immediately with the sauce.
If you’ll be frying up the potatoes, boil Yukon golds in advance (skin-on) until they are about half-cooked. Cool them to room temperature and slice into 1/2-inch rounds. Fry in hot duck fat until both sides are crispy, and season with salt immediately.
Just for fun…
Les and I had some flashbacks during the making of this recipe, because I had first prepared it on Valentine’s Day three years earlier, just one month before Covid disrupted everything known to mankind. He had snapped a picture of me at the stove, wine glass in-hand, stirring the sauce. I was oblivious to what he was doing at the time, but he recognized my passion for cooking and has been my biggest supporter since I started my food blog two months later. When I made the dish again this year, we tried to replicate that photo, but with our beautiful new kitchen and a perfected crispy duck technique. Cheers!
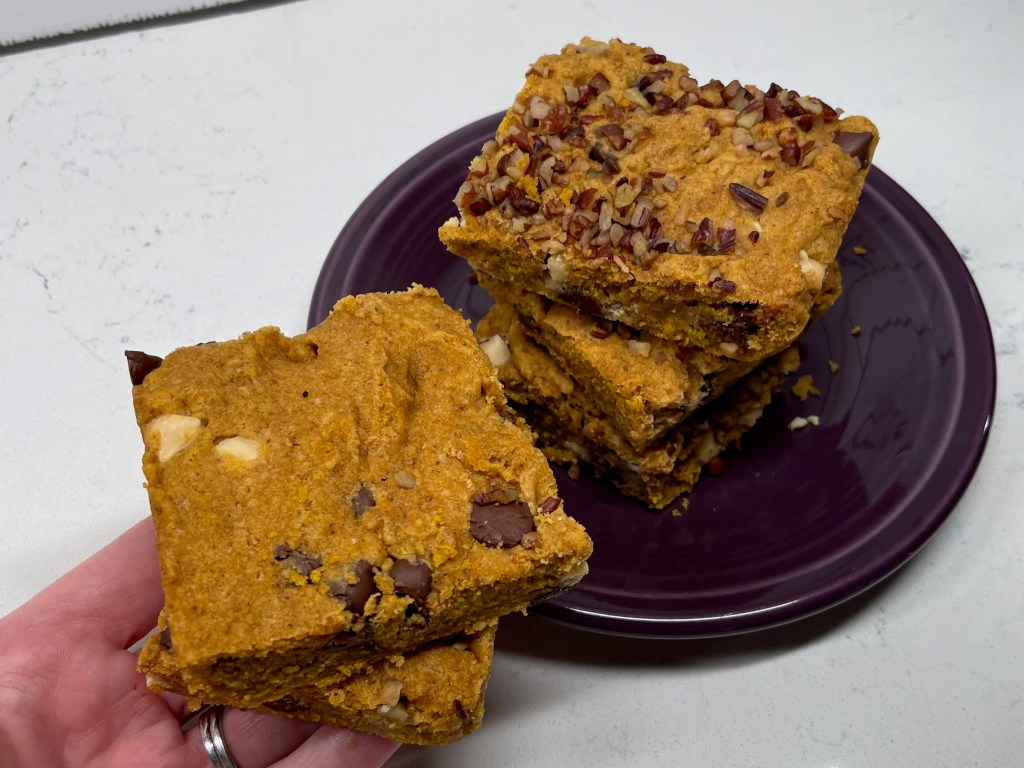
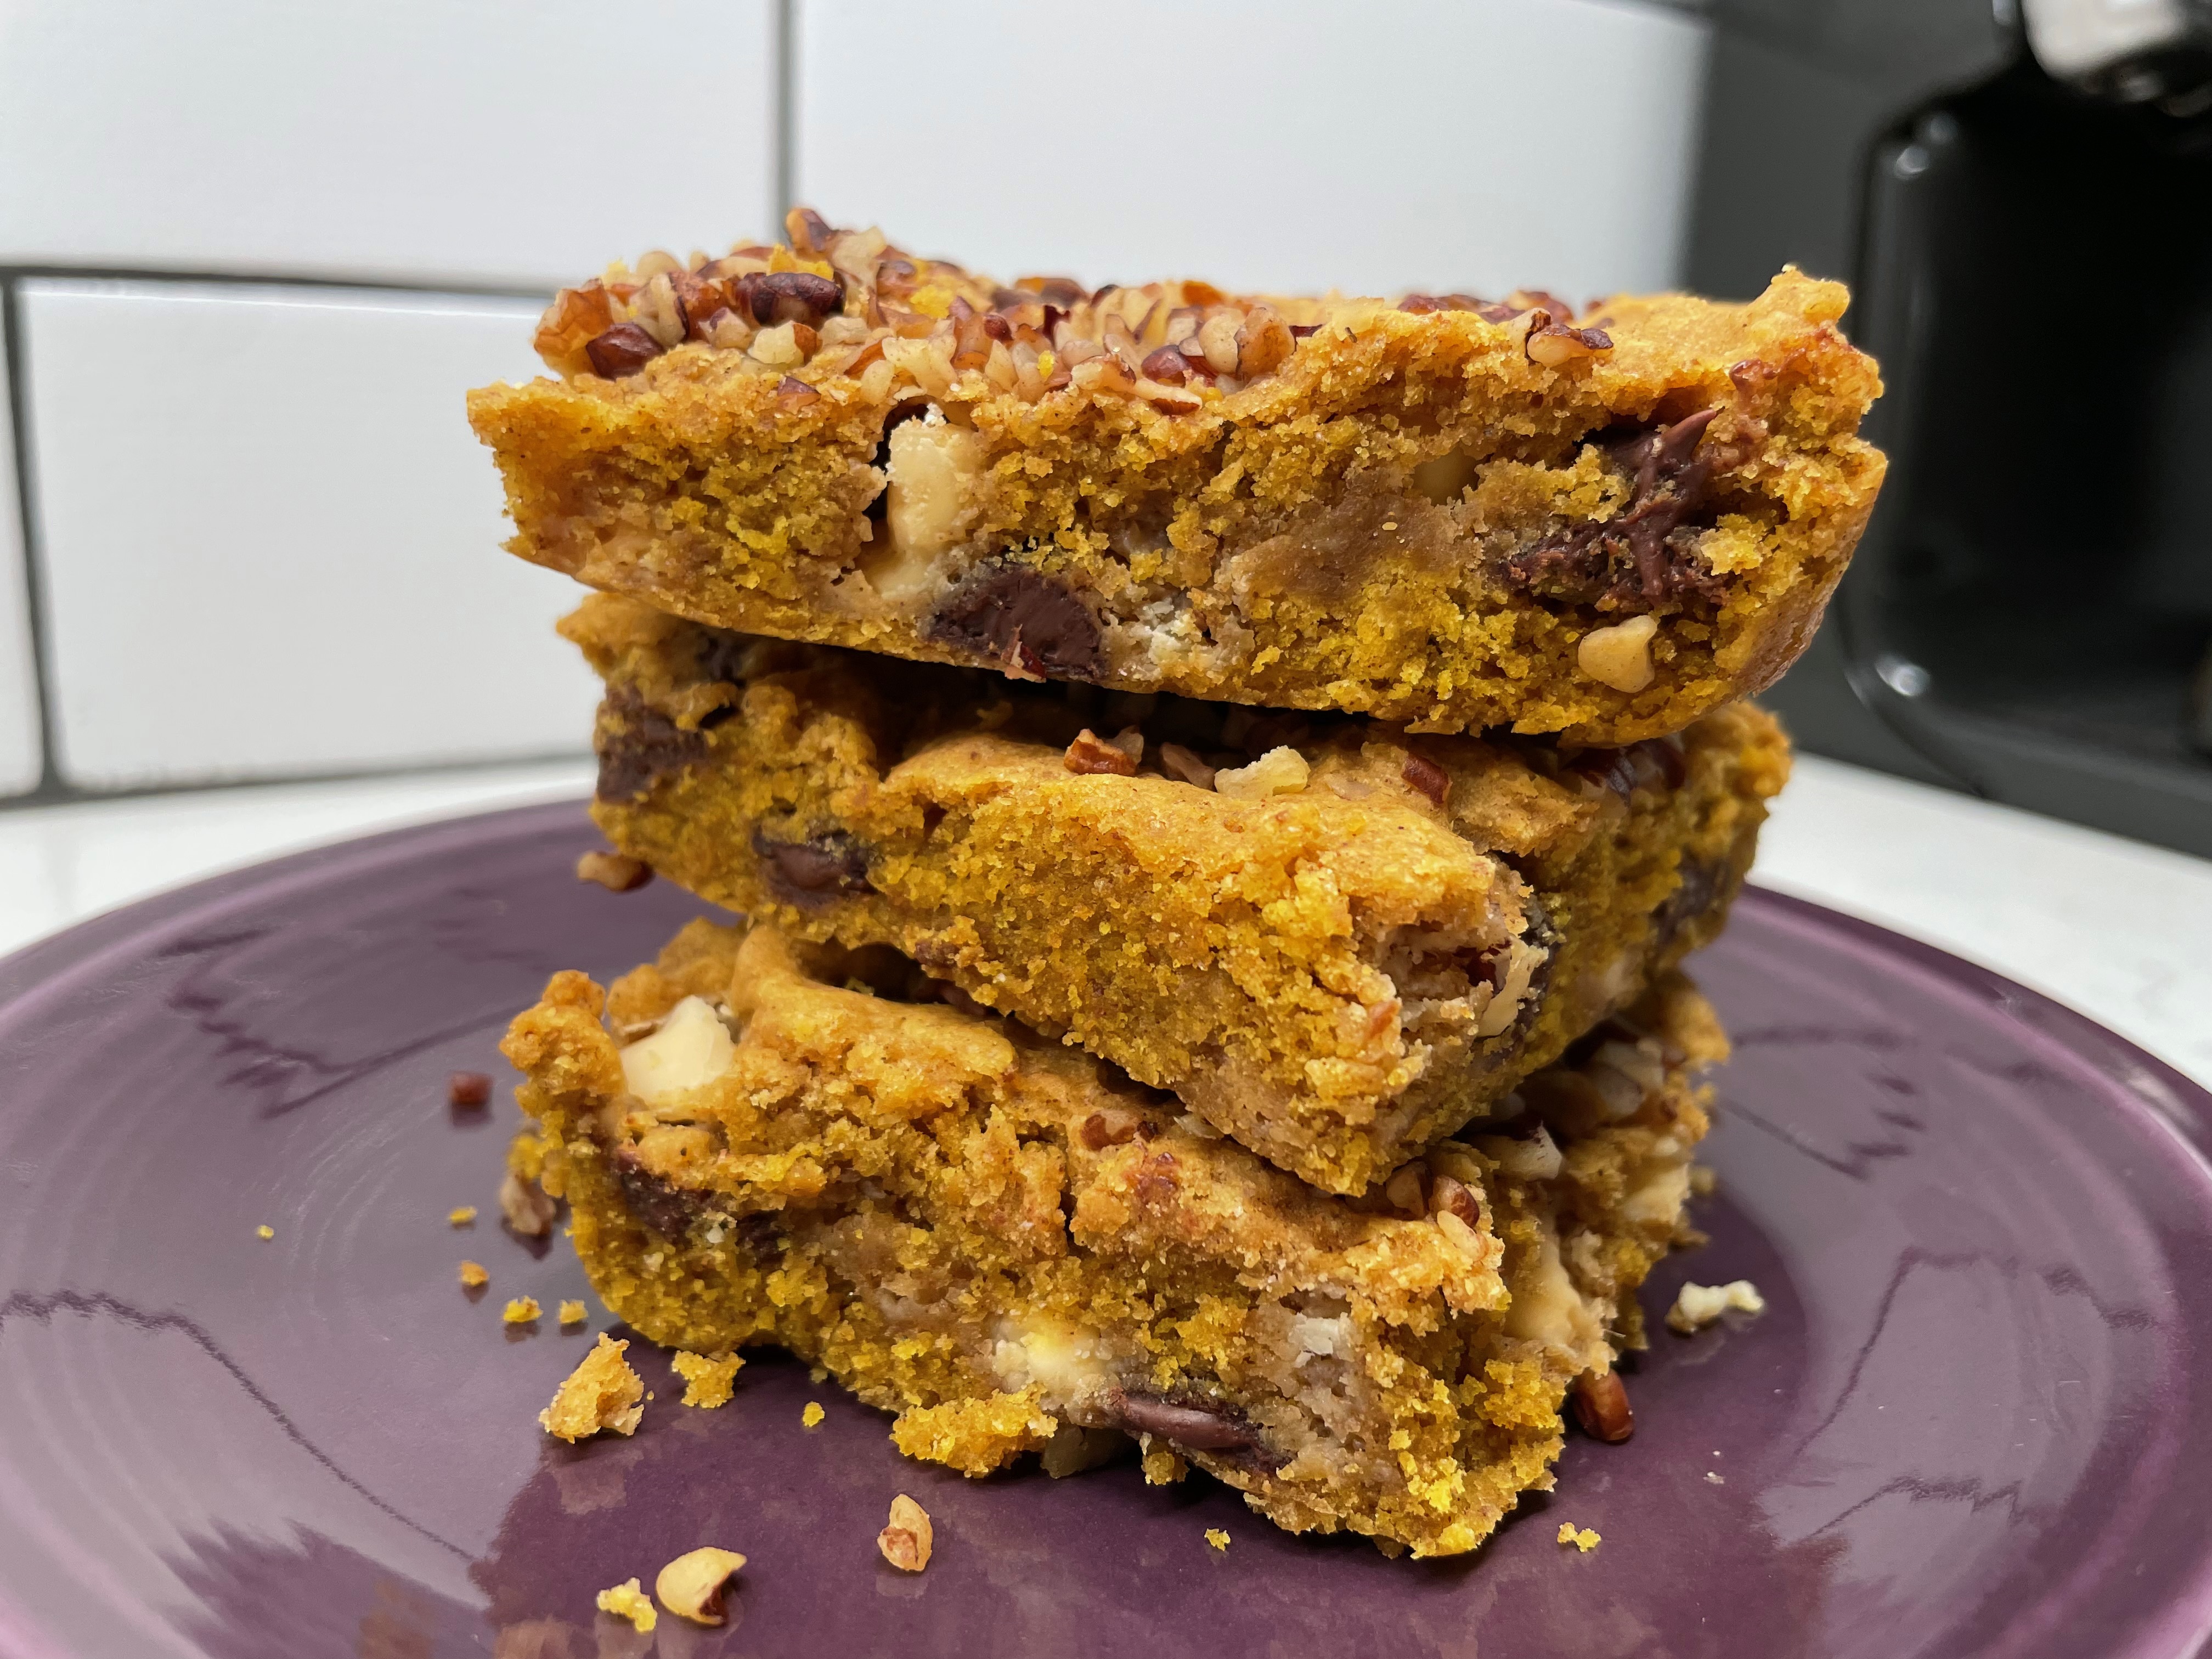
Is it fair to call these autumn-hued bar cookies “blondies?” Unlike classic blondies, which have a light golden color and are basically just chocolate chip bar cookies, these stunningly brilliant treats practically scream fall, with a deep orange color born from half a can of pumpkin puree. What else shall we call them— russets? Auburns?
They are still in essence a “blondie,” which is meant to have all the delightfully chewy texture of brownies, just without the cocoa. But these have a lot more going on, with add-ins of white and dark chocolate chips and crunchy pecan bits on top (well, half of it, anyway). There’s a lot to love here, and I have no doubt there are many other add-ins that would be great.
What do you think— maybe dried cranberries or butterscotch chips?
Let’s start with the fact that they satisfy any craving for pumpkin and spice— though this recipe does incorporate a more assertive spice blend than most “pumpkin spice” foods. To kick these up a few notches, I used equal parts Vietnamese cinnamon and chai spice, an Indian-inspired blend of cinnamon, ginger, cardamom, anise and black pepper (yes, really). The bold spices gave these blondies an edge over some of the too-sweet, ordinary desserts you find in a supermarket bakery, and the flavor is still familiar but with a little special something.
I’ve been looking for ways to sneak pumpkin into so many things.
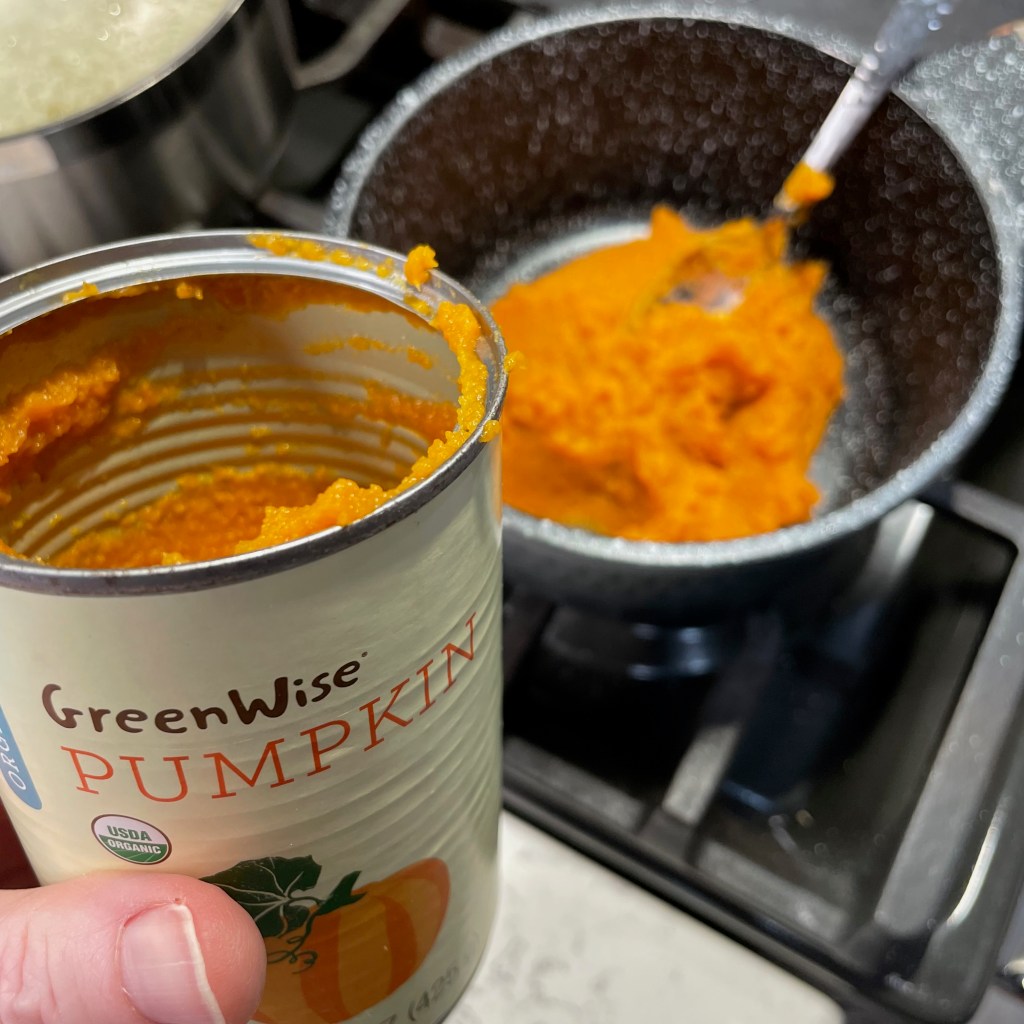
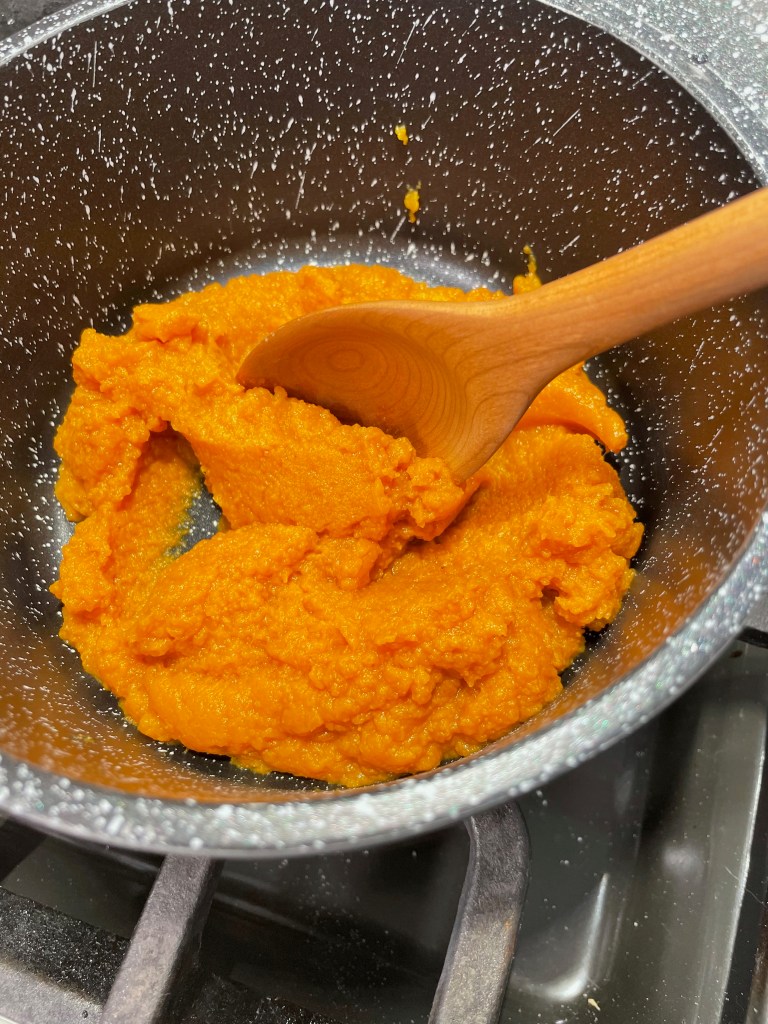
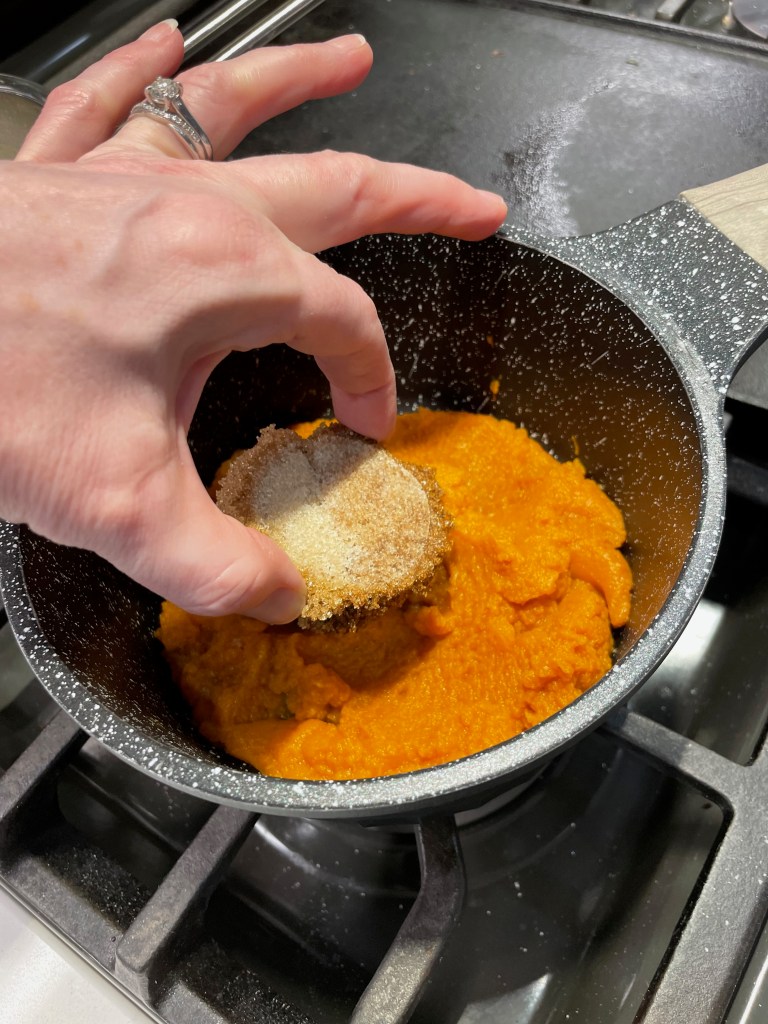
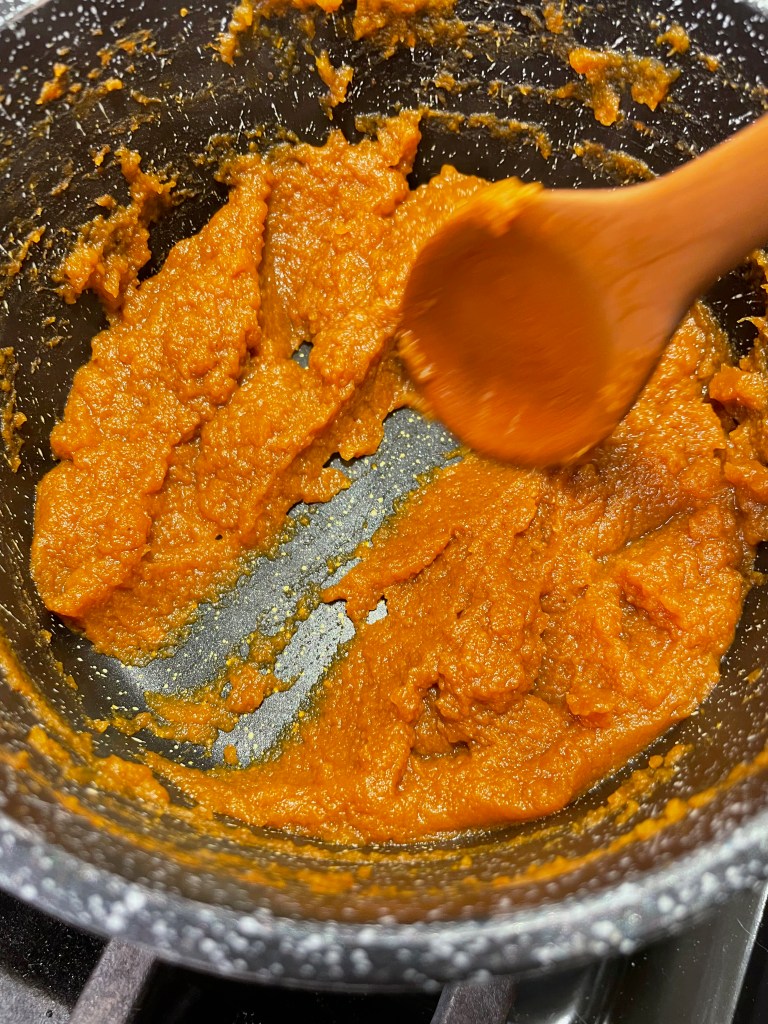
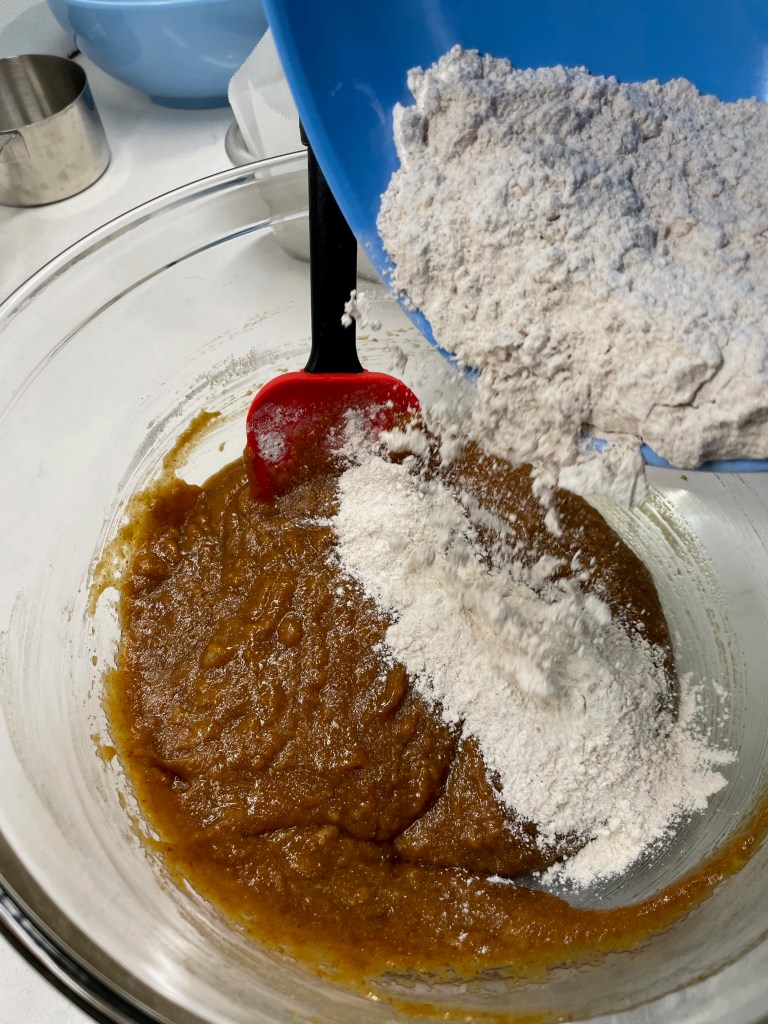
The downside of baking with pumpkin puree is that most recipes I’ve tried tend to be more cake-like than chewy— which is great when you want a cupcake, but not so much if you crave a cookie or blondie— and this is because of the high moisture content of the canned pumpkin. To counter this, I pulled a trick from the King Arthur Baking playbook, which is to cook the pumpkin puree until it is somewhat caramelized. The result is a thicker, more concentrated pumpkin flavor and a denser, more fudge-like texture of the finished auburns— er, blondies. I cooked mine with a bit of the brown sugar from the recipe, and the result was almost like pumpkin butter. So good!
I had a weird clump in my brown sugar container, so I dissolved it by cooking it with the pumpkin.
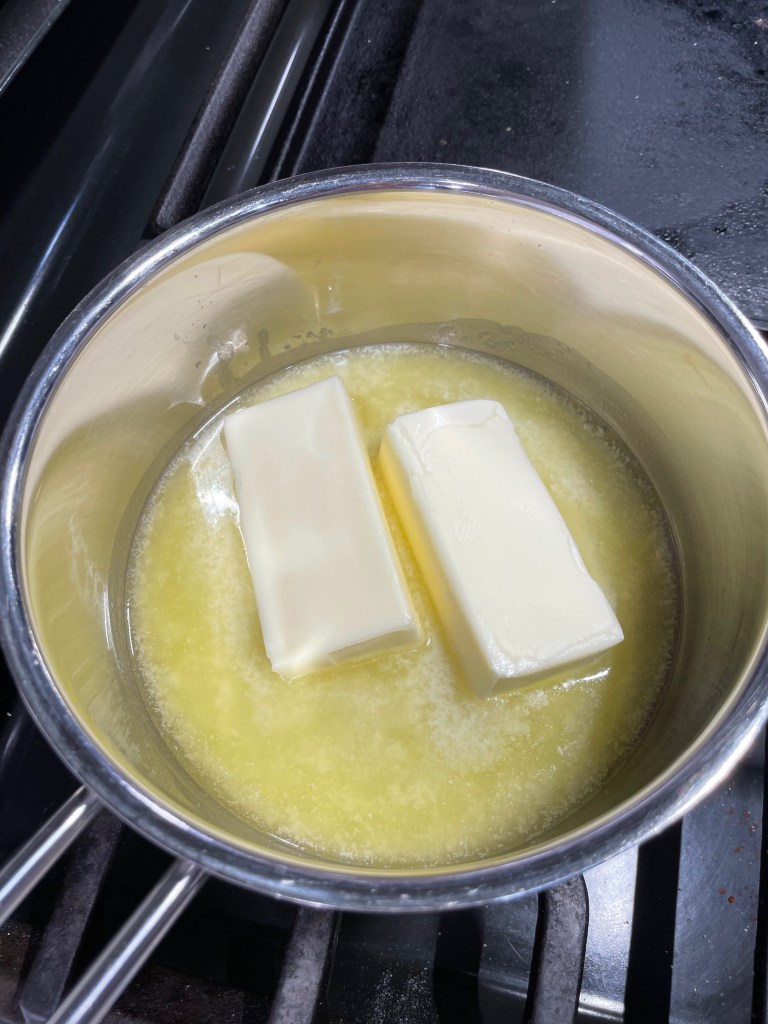
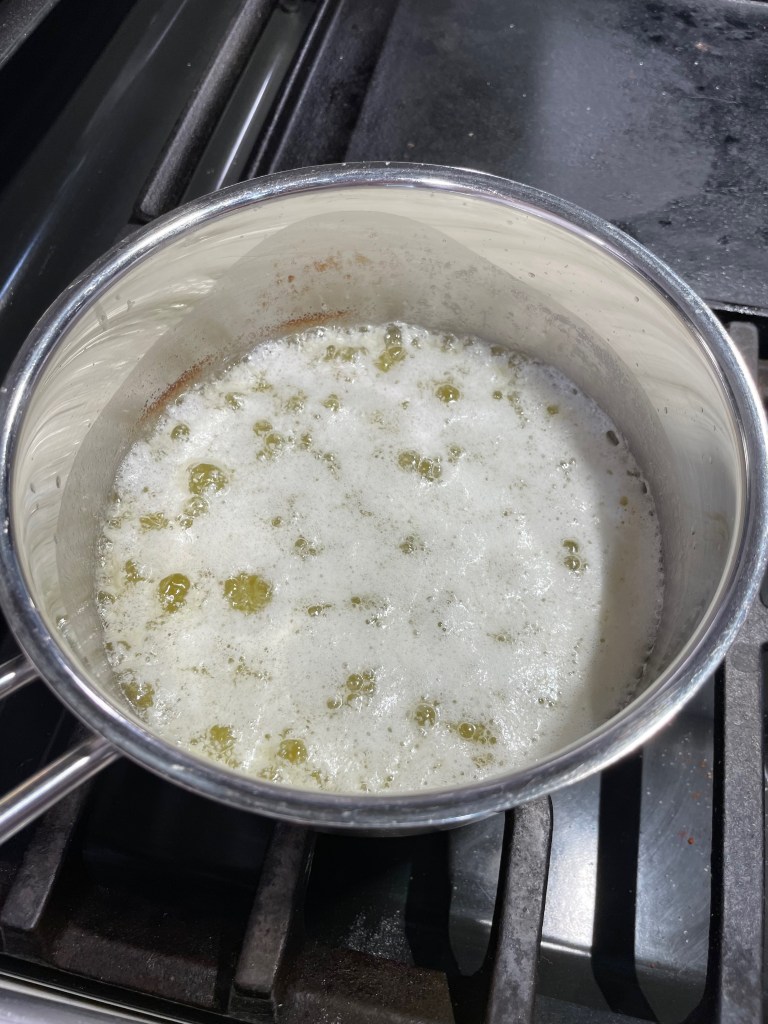
For additional autumn-inspired flavor, this recipe leans on browned butter, which is very easy to make though I don’t recommend trying to do it while multitasking the other components of the recipe. Browning butter takes very little effort but quite a bit of attention. Look away long enough to measure out your flour or caramelize your pumpkin, for example, and you may just find that the butter has turned to a charred, blackish liquid. I guess you can tell that I’m speaking from experience! 🤷🏻♀️
My butter was off to a good start, but it went too far. Oops!
My second attempt went much better!
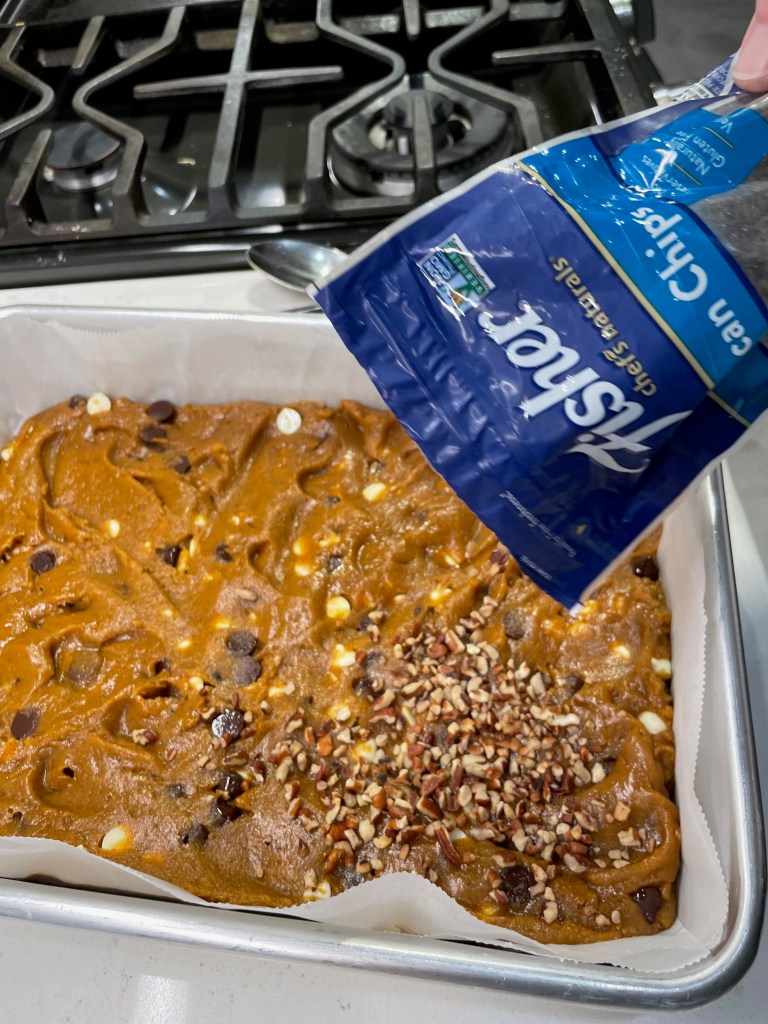
Other than that, it’s a typical dessert recipe— flour (I used part whole wheat), baking powder, egg, sugar (light brown, in this case), splash of vanilla and some white and dark chocolate chips just for fun. For a little extra something, I also scattered pecan bits over half of the blondies after spreading it out into the baking pan. This is optional, and if you have any guests who cannot digest nuts, follow my lead and sprinkle the nuts on half. Everyone wins!
These came together really easily.
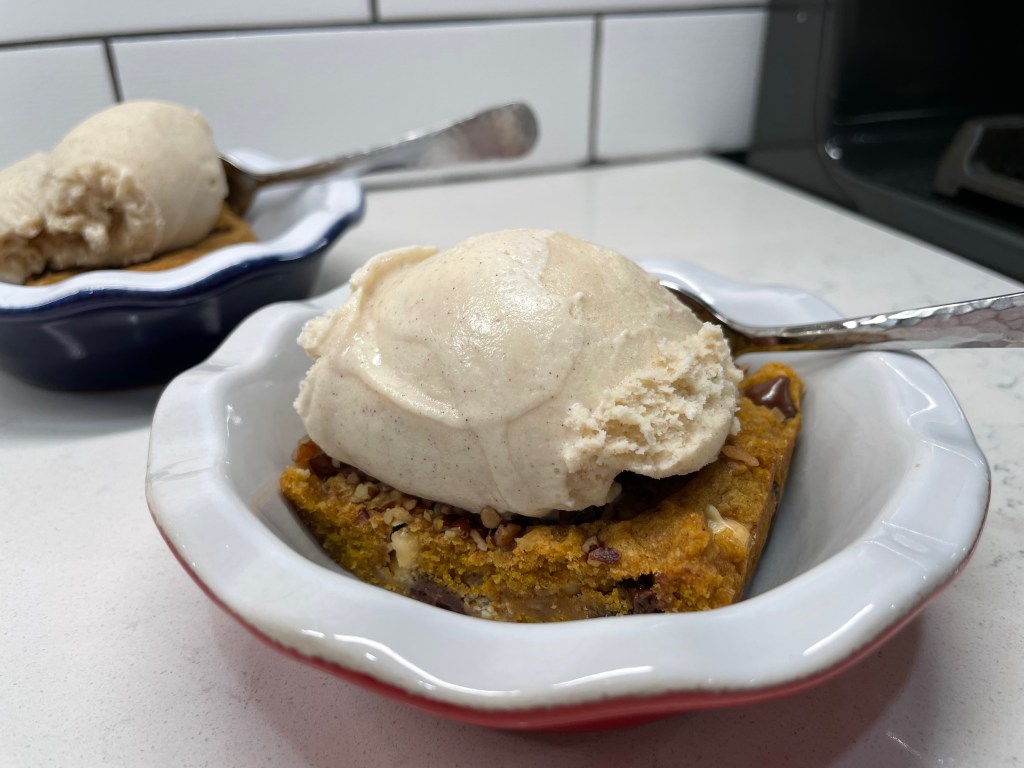
This was a fun fall dessert that would be nice for a casual Thanksgiving meal, the kids’ table, a brunch with friends, a treat for a special teacher or perhaps a snack for visiting grandkids that’s a bit healthier without them knowing it! As for us, we enjoyed it warmed 30 seconds in the microwave with a small scoop of ice cream. Delish!
Cooking the pumpkin puree before mixing the batter keeps this autumn-hued blondies nice and chewy, and the flavor will make you wish for fall to linger a little longer.
Ingredients
2 sticks unsalted butter
1 cup pumpkin puree
1 cup light brown sugar, packed
1 large egg, room temperature
2 teaspoons vanilla extract
1 1/4 cup all-purpose flour
1 cup white whole wheat flour
1 tsp. ground cinnamon
1 tsp. ground chai spice blend
1 tsp. kosher salt (I used Diamond crystals)
3/4 tsp. baking powder
1 cup white chocolate chips
1 cup dark chocolate chips
1/2 cup pecan bits (optional, or 1/4 cup for half the blondies)
Directions
Melt the butter in a saucepan, swirling frequently and watching carefully to prevent burning. Cook melted butter until it takes on a deep golden color and has a nutty aroma. Allow it to cool for about half an hour.
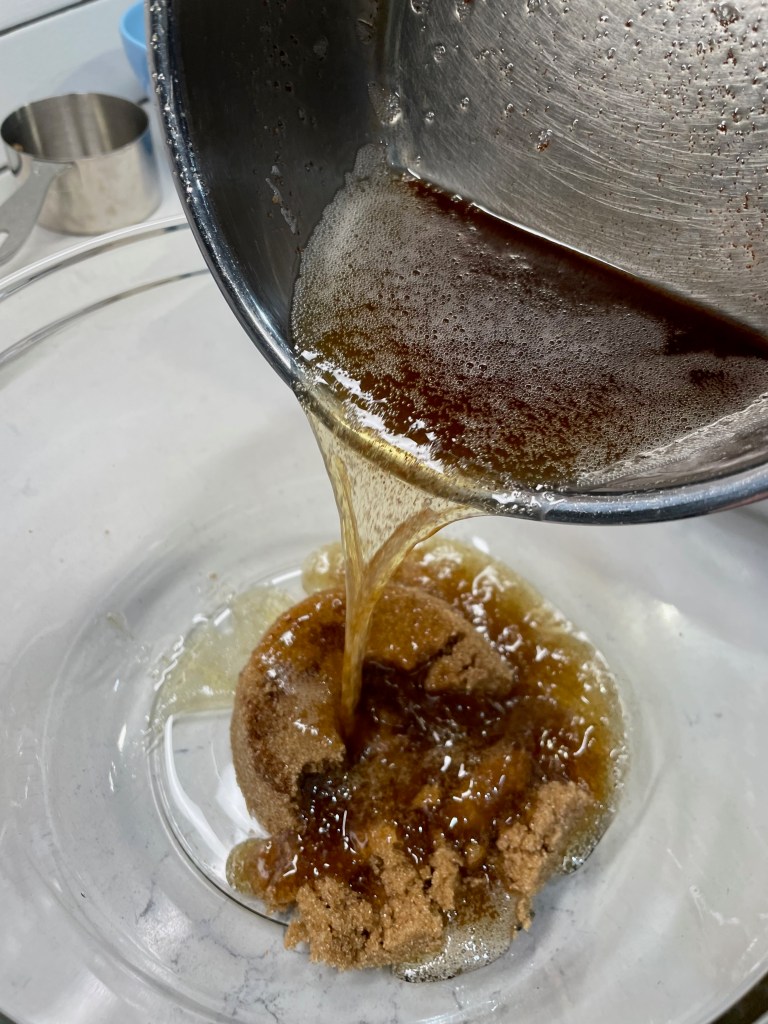
Meanwhile, add pumpkin puree and a few tablespoons of the brown sugar to a second saucepan. Cook over medium heat, stirring almost constantly, until sugar is dissolved and pumpkin puree has reduced slightly. Cool completely before proceeding.
Preheat oven to 350° F, with oven rack in center position. Line a 9 x 13 baking pan with parchment paper, keeping a little extra to overhang for easy lifting of the blondies from the pan after baking.
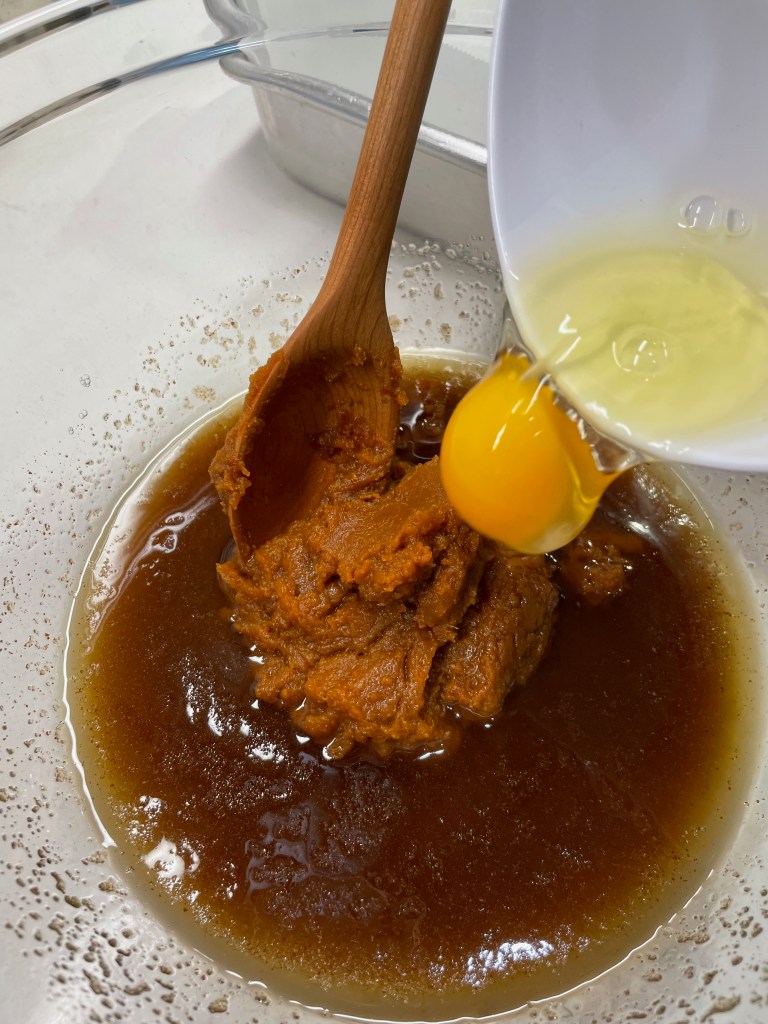
In a large mixing bowl (or the bowl of a stand mixer fitted with paddle), stir together browned butter and remaining brown sugar until evenly combined. Add reduced pumpkin puree and egg. Beat until combined.
In a medium bowl, whisk together flours with spices, baking powder and salt. Add half the flour mixture to the butter mixture, folding just until all the dry ingredients are incorporated. Repeat with remaining flour blend. Gently fold in chocolate chips. The batter will be very thick and dense.
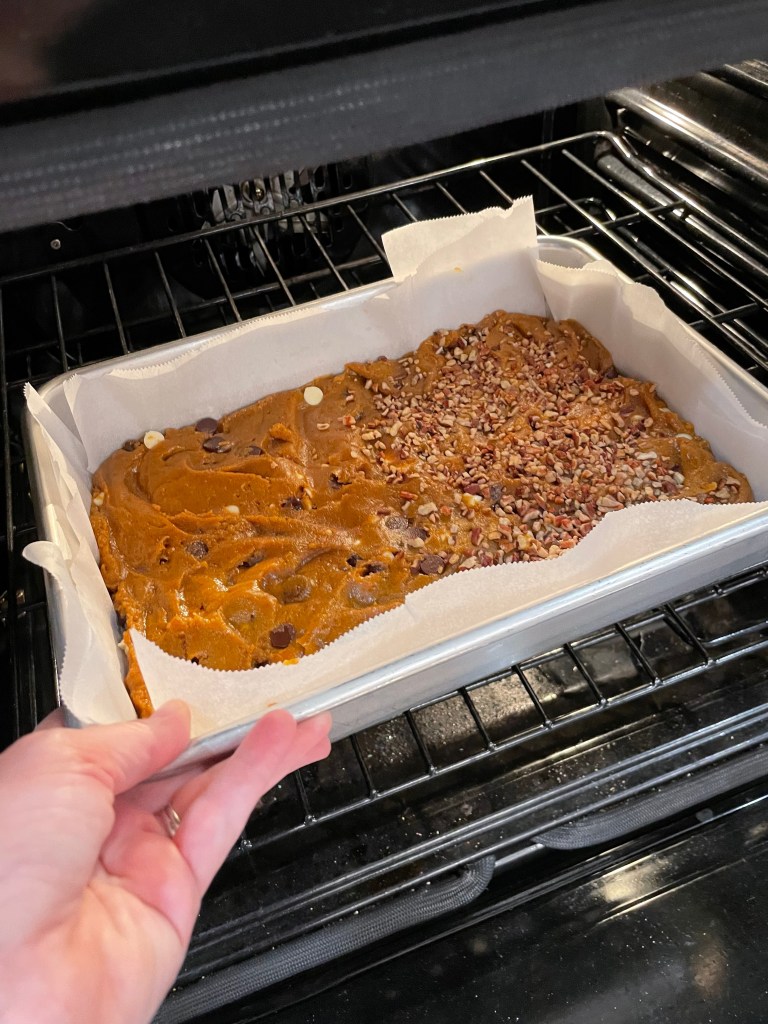
Spread batter evenly over parchment-lined baking pan. Sprinkle pecan chips over all or half the blondies, if desired. Bake for 30 minutes, or until blondies are set but not overly dry. Remember that they will continue to cook for a few minutes after removal. As with brownies, the type of pan may affect the outcome. For a glass pan, add a few extra minutes to the baking time.
Cool for about 30 minutes before using parchment to lift blondies from the pan. Cut into squares for serving. Keep leftover blondies wrapped or in a sealed container, at room temperature for up to three days.
These warm up beautifully in the microwave (give them 30 to 45 seconds on high), and they are delicious served with a scoop of ice cream.
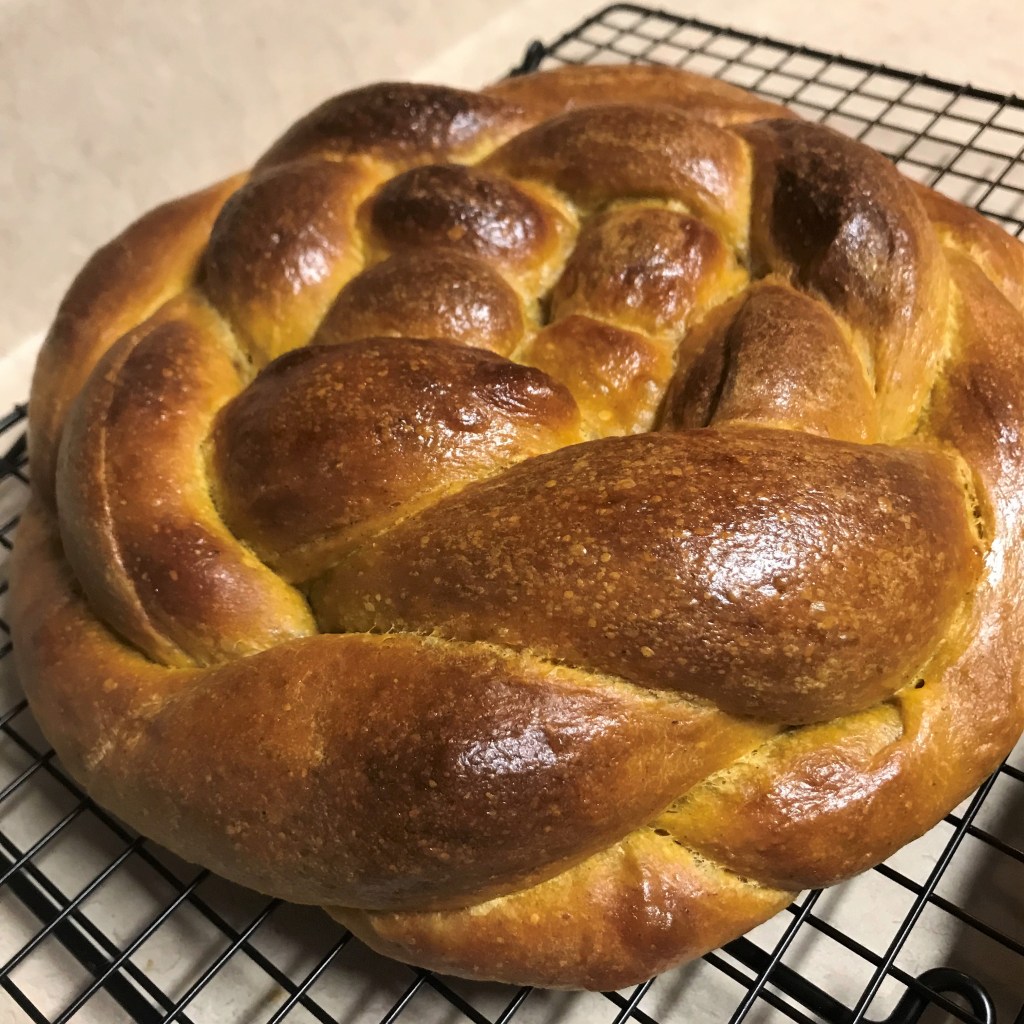
Each fall since I began dating my husband, I’ve made a concerted effort to celebrate the season of Rosh Hashanah— the Jewish New Year— by baking a special bread. That first year, Les had visited a local apple festival and brought back a bagful of gorgeous Jonagold apples, which were lovely in a coiled-into-a-round challah. I was so proud of my bread that I took a picture of it— way before I began blogging— and I even took time to leave a review on the King Arthur website to report my great results.
Not a bad effort in 2015! But my iPhone 5 camera…
The round shape is significant to Rosh Hashanah because it represents the idea of coming full circle into a new year. The apples were a nice touch, because apples and honey make an appearance on everyone’s holiday table— symbolizing the wishes for a sweet year ahead. Most years since that first one, I’ve worked on my challah braiding skills, specifically the four-strand loaf that is woven like a basket. Here are a few examples of those breads, using my sourdough starter.
L to R: pumpkin challah, fruit-studded challah, over proofed challah!
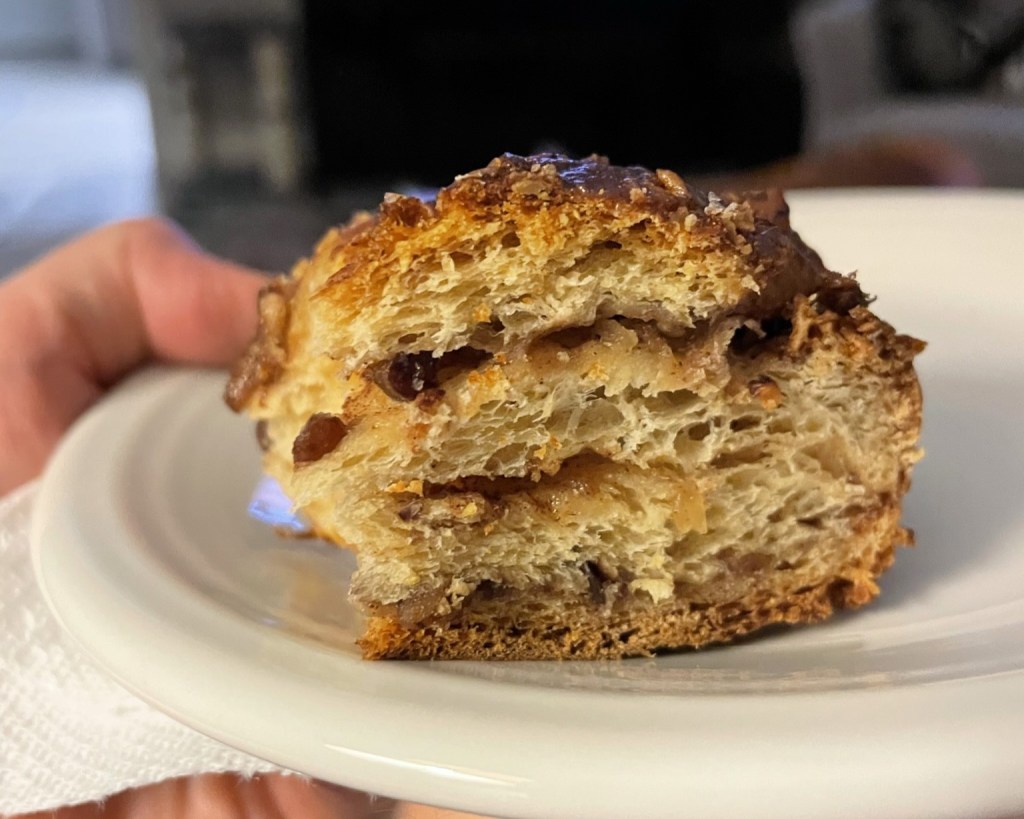
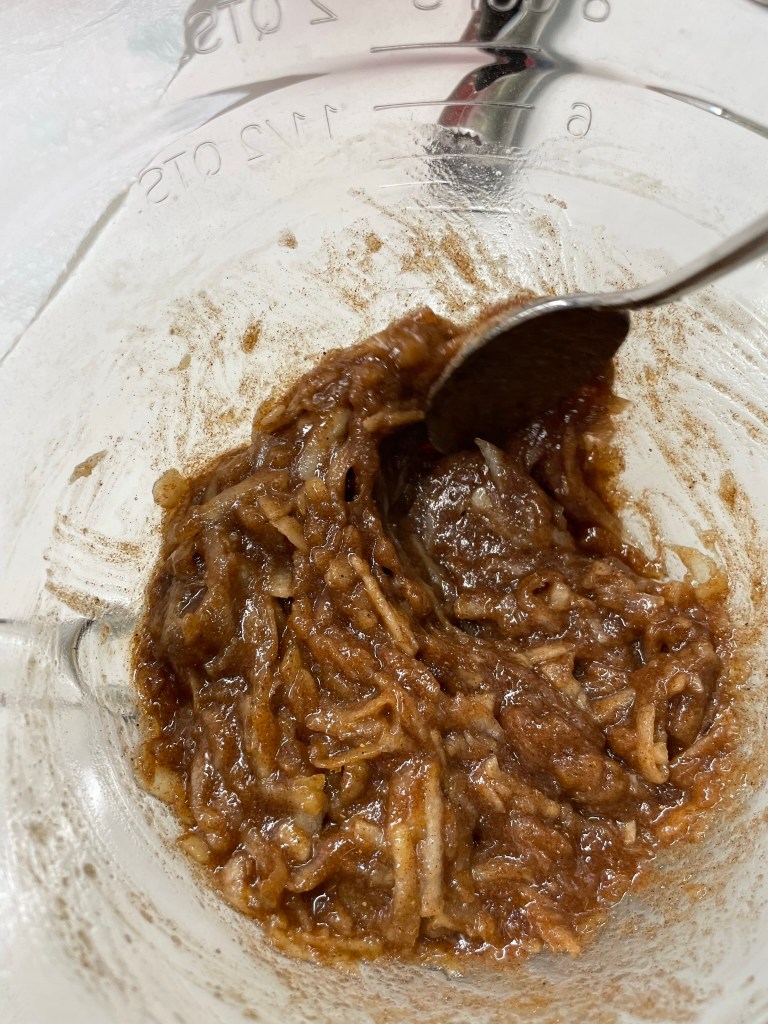
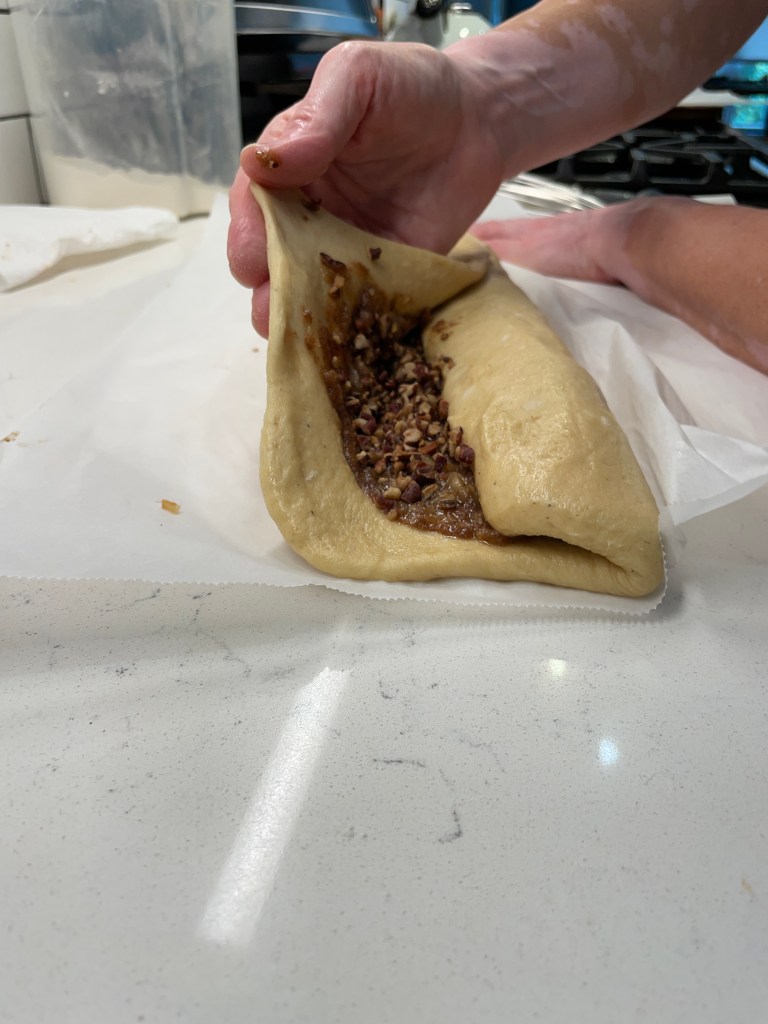
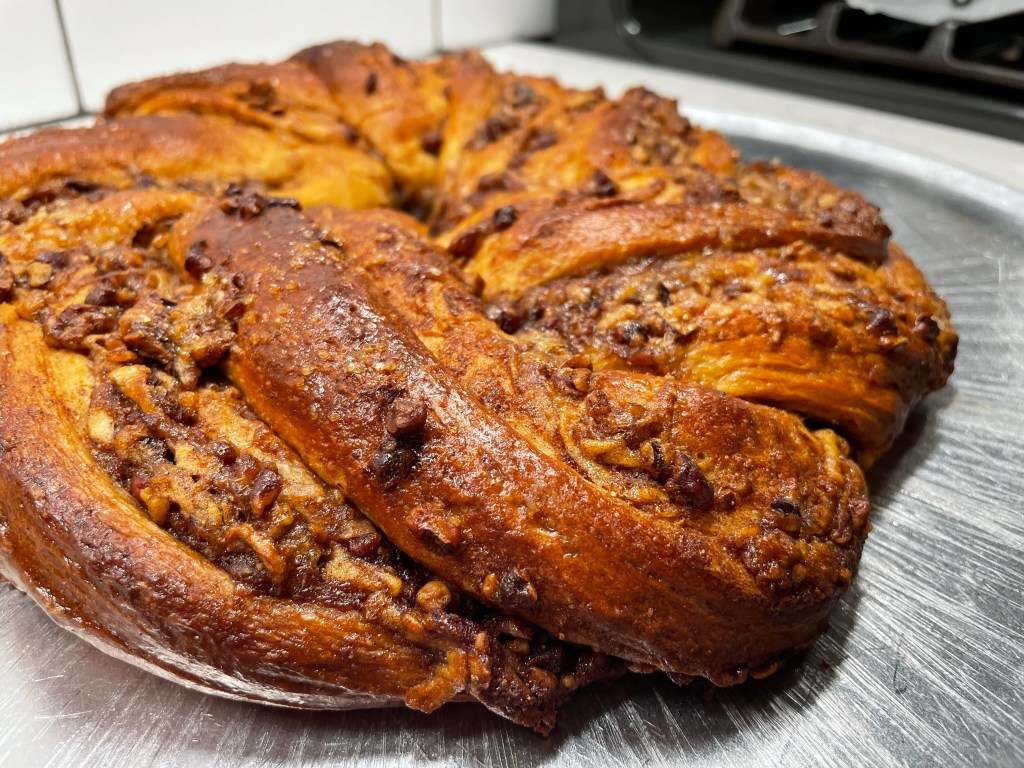
This year, however, I decided to tackle another item on my culinary bucket list, and I’ve made a babka! This is another traditional Jewish bread, and I’ve wanted to make one for years but never got around to it until now. Most babka recipes I have seen involve a chocolate filling, which is most dramatic looking in the typical swirly pattern. I pondered, what about a babka that had apples and honey? That would be perfect for Rosh Hashanah, and a double win in that it finally moves babka to the “done” column.
I didn’t have to look very far for an inspiration recipe, because the first place I looked was King Arthur Baking. Of course!
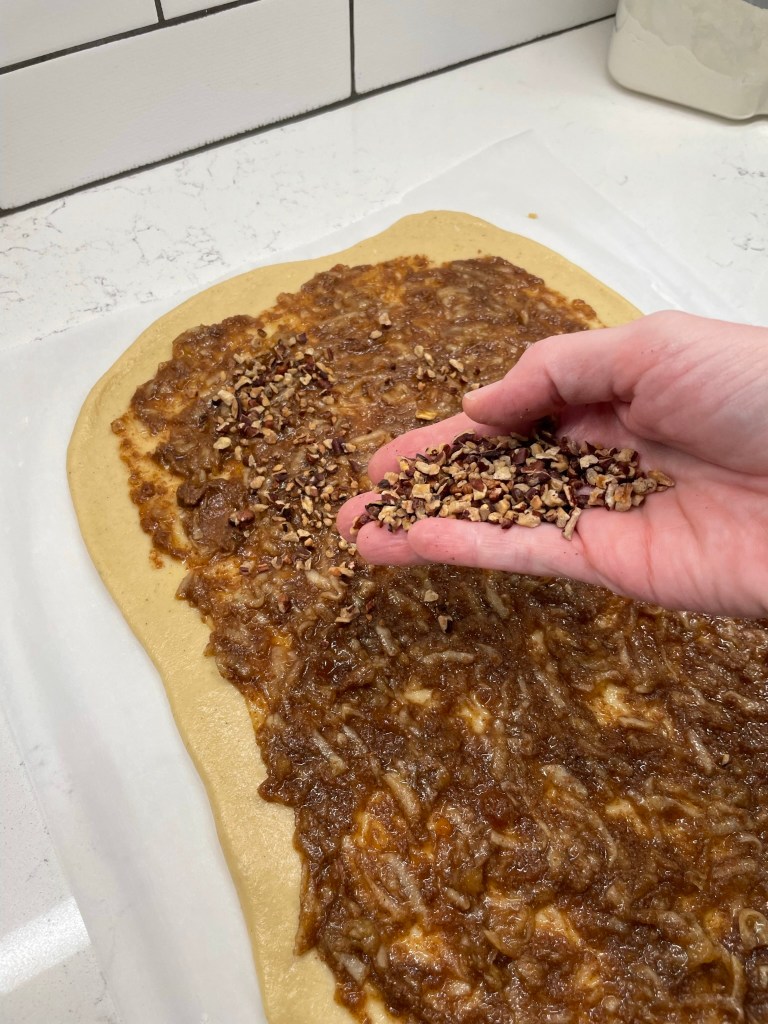
The layers of apple, spices and pecan make this extra special!
I’ve been a big fan of King Arthur products for years (and no, they never have paid me to say so), and my devotion to them is stronger than ever since my trip to their Vermont baking school, where I am proud to have completed their four-day “Principles & Practice” baking course. I learned a good many things during my time there, and made friends with several of my classmates. Among the takeaway lessons was the importance of using high-quality ingredients (i.e., theirs) and having them organized and properly measured before you begin mixing. That’s how I set up for this recipe, and I swapped in honey for the sugar, following the same helpful tips I used last month when I made my s’mores cupcakes.
Baking is much easier when I’m organized!
My main dry ingredients were measured by weight, which is something I was already doing before my King Arthur class, and all of our instructors during the four days emphasized the benefit of this. I cannot remember the last time I measured by volume, but there is a sensible way to do it for consistent results. They call it the fluff, sprinkle, level method, and it helps ensure that you don’t have dense results in your baked goods. If you are reluctant to get a kitchen scale, I highly recommend following that three-step method; otherwise, you may find your baked goods dense from being flour-heavy.
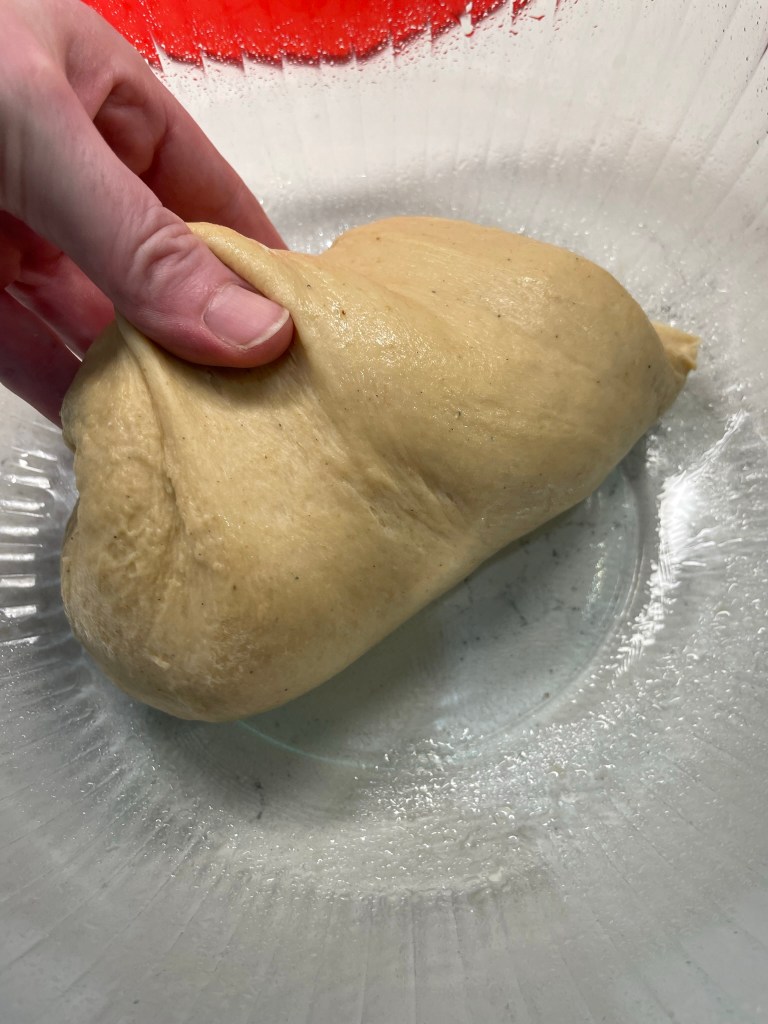
The process of the apple babka recipe was straightforward. I introduced the wet ingredients to the dry ones, then switched to the kneading hook and worked in the softened butter. This recipe would not be suitable for a meal that also includes meat— kosher rules require that meat and dairy not be served together— but it would be wonderful served with breakfast or dessert on another occasion. The dough rested about two hours until it was doubled and puffy.
With 6 tablespoons of butter, this dough was very silky.Did I sample the filling on its own? Of course!
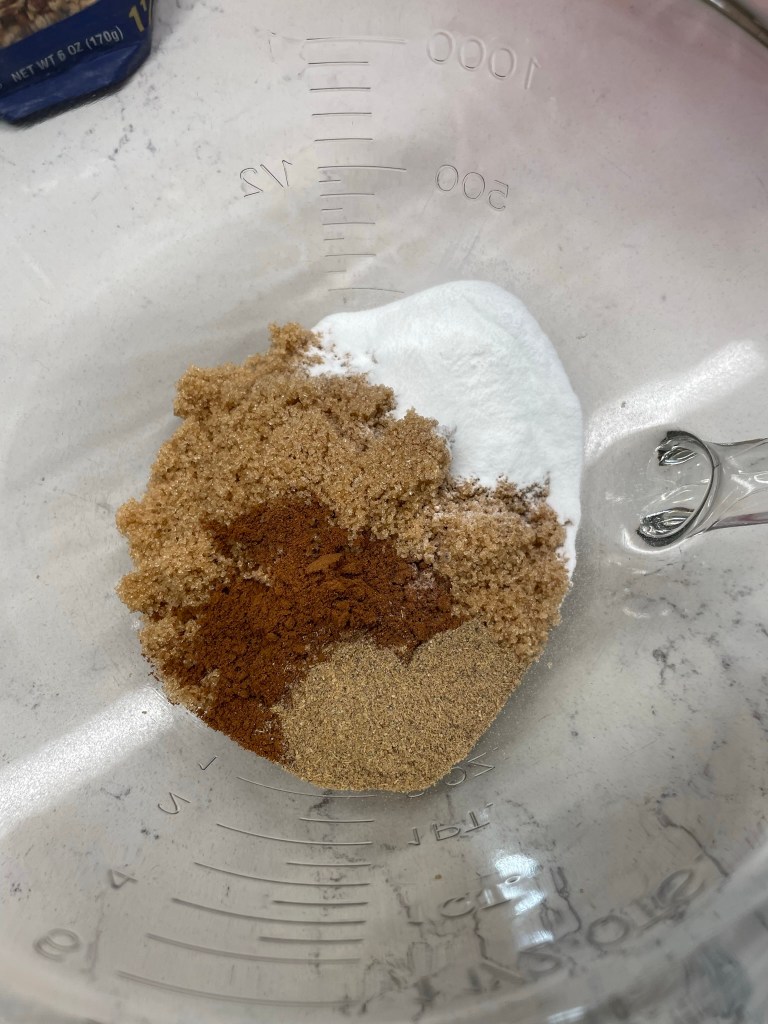
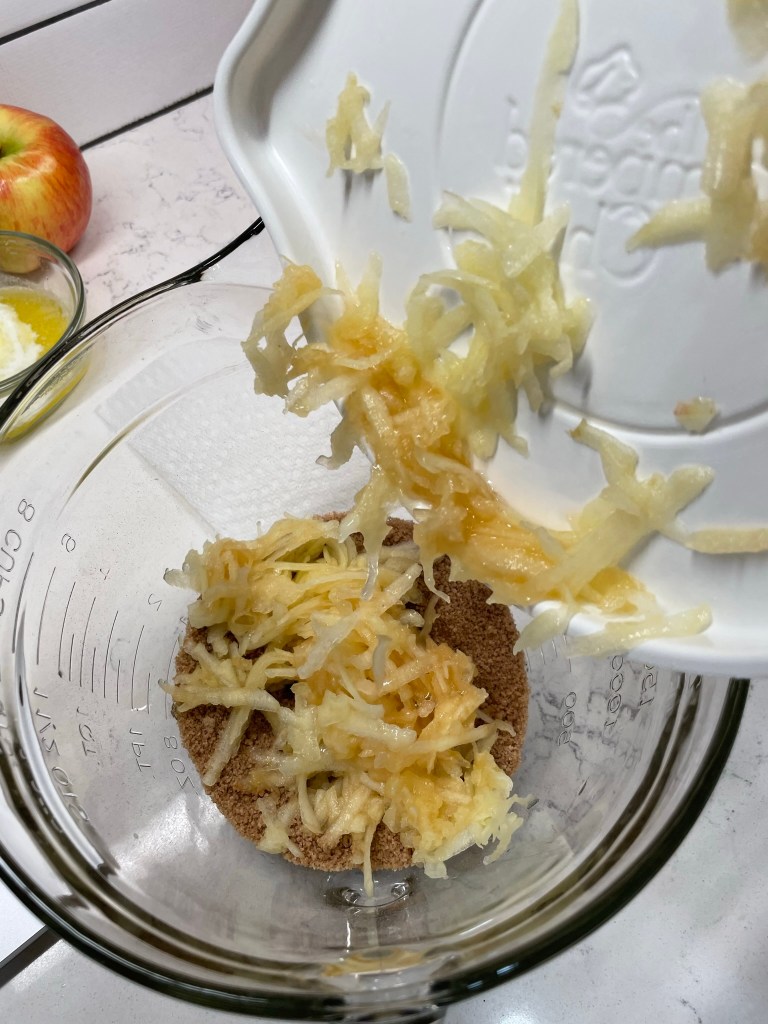
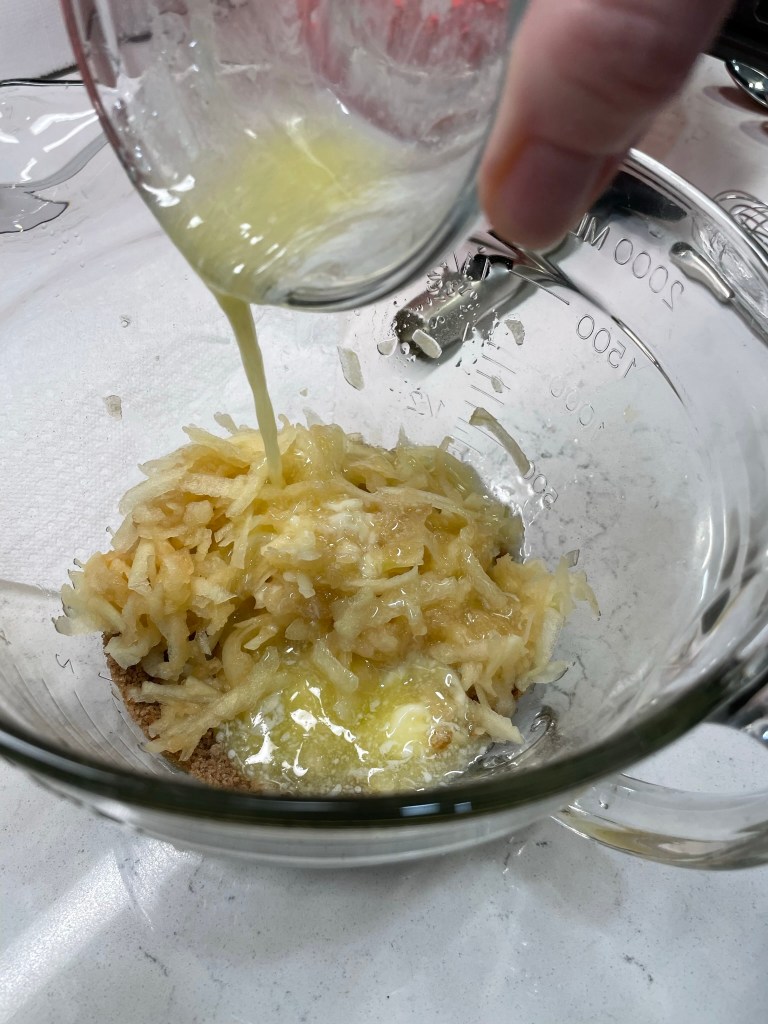
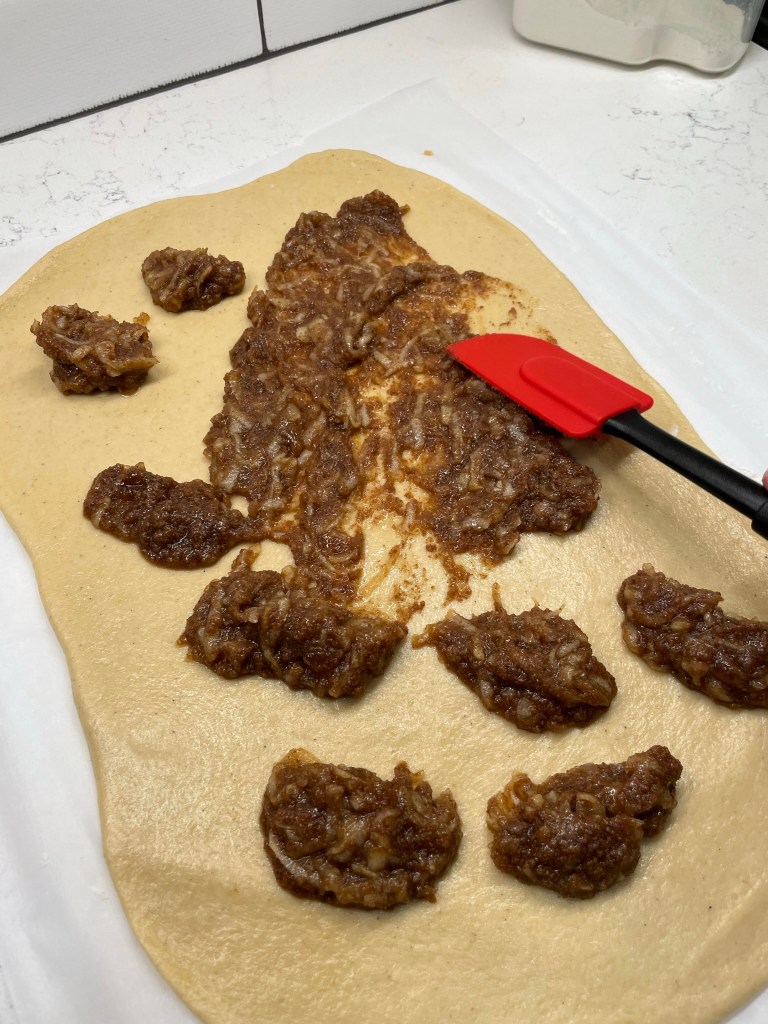
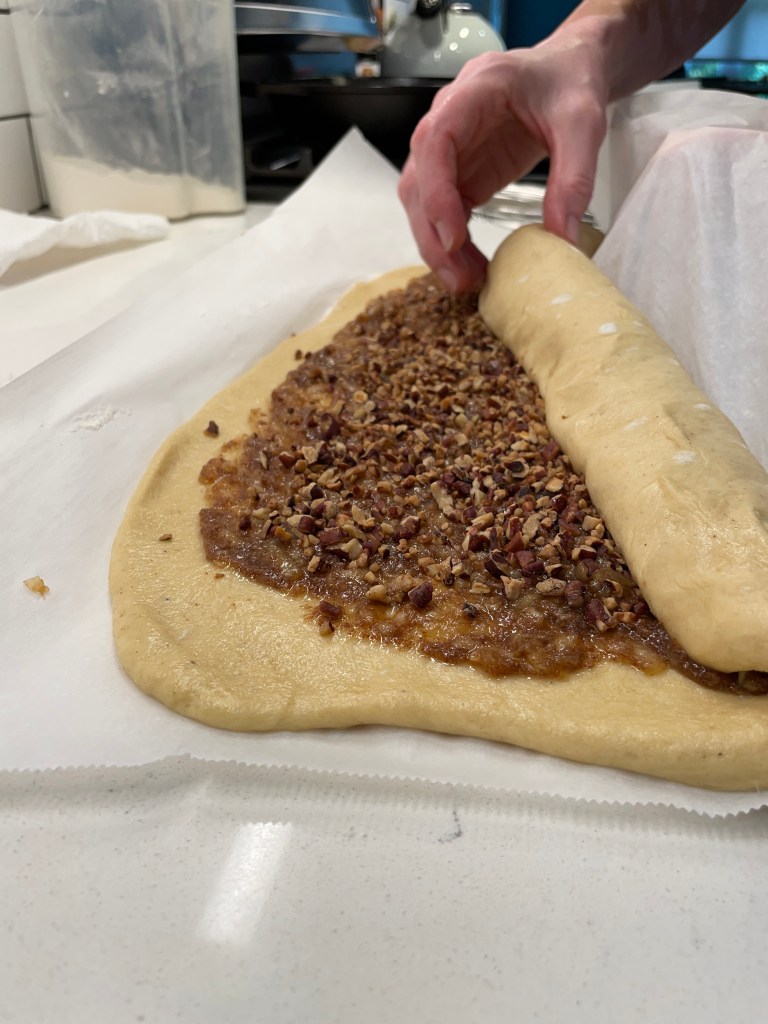
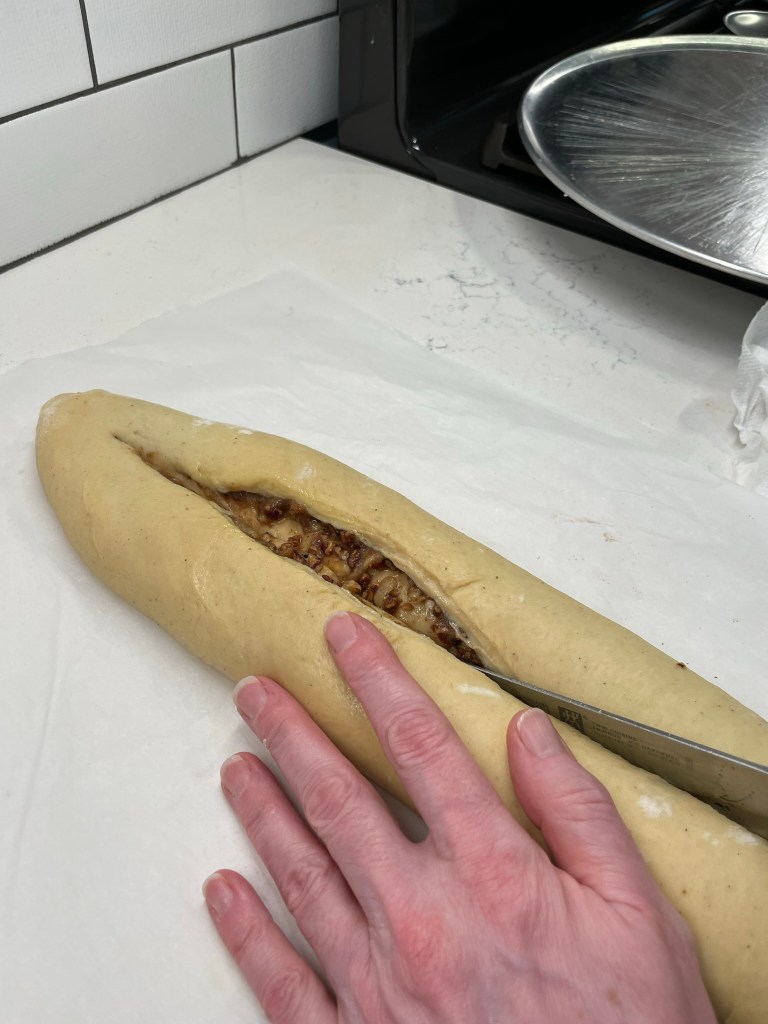
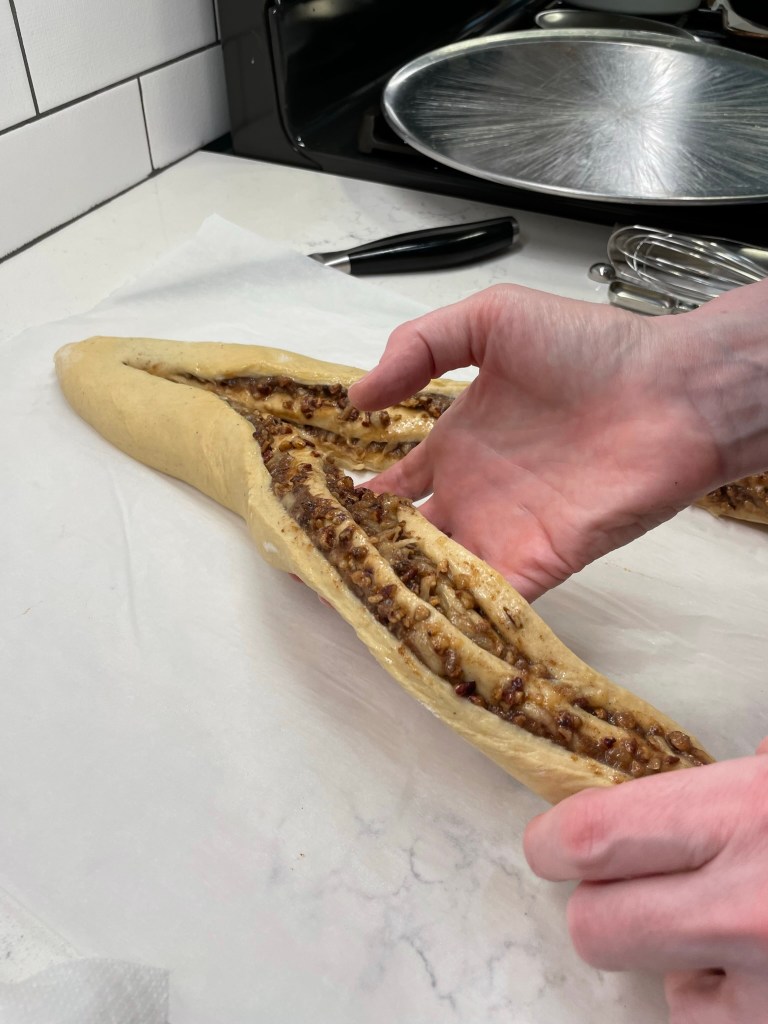
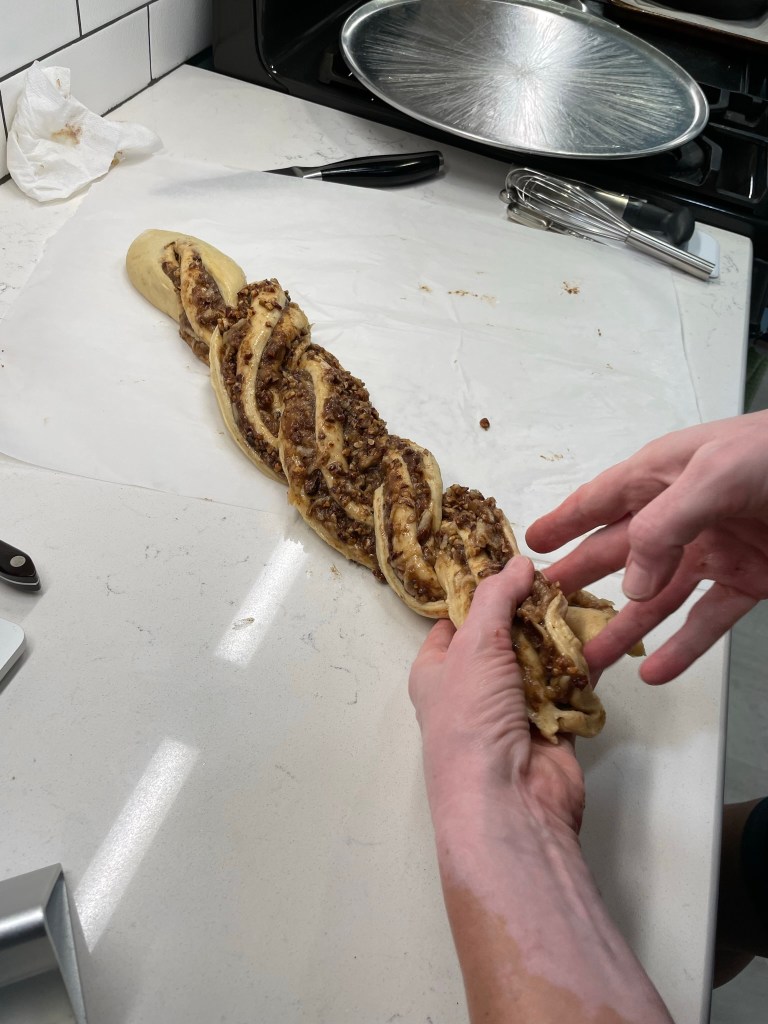
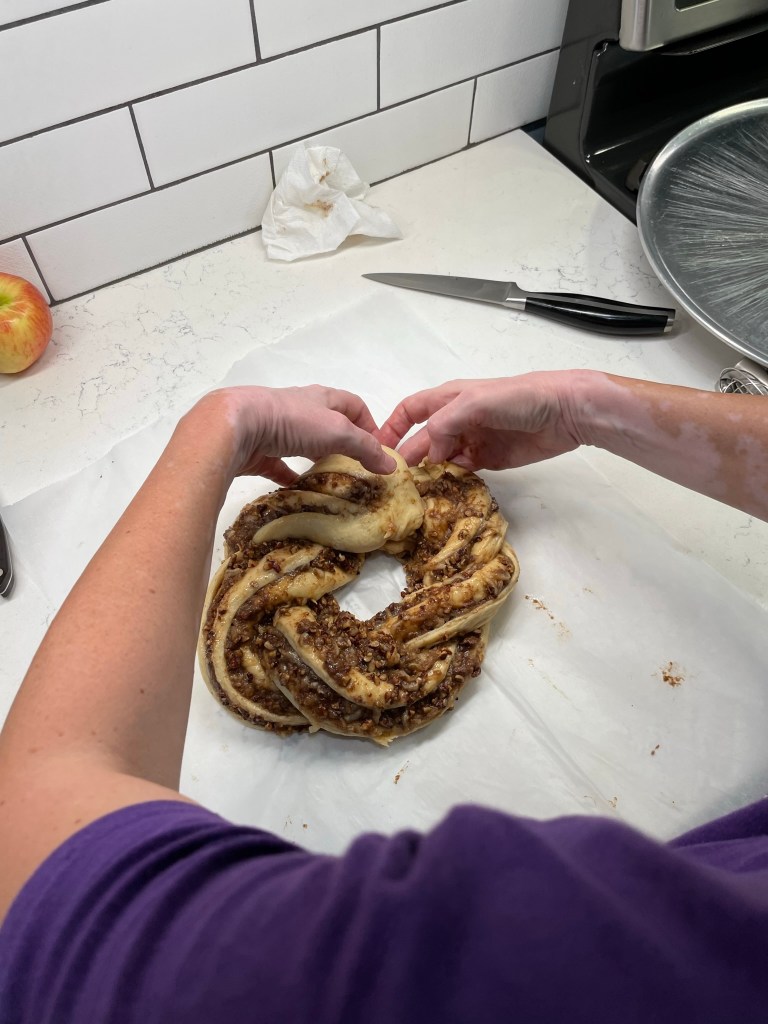
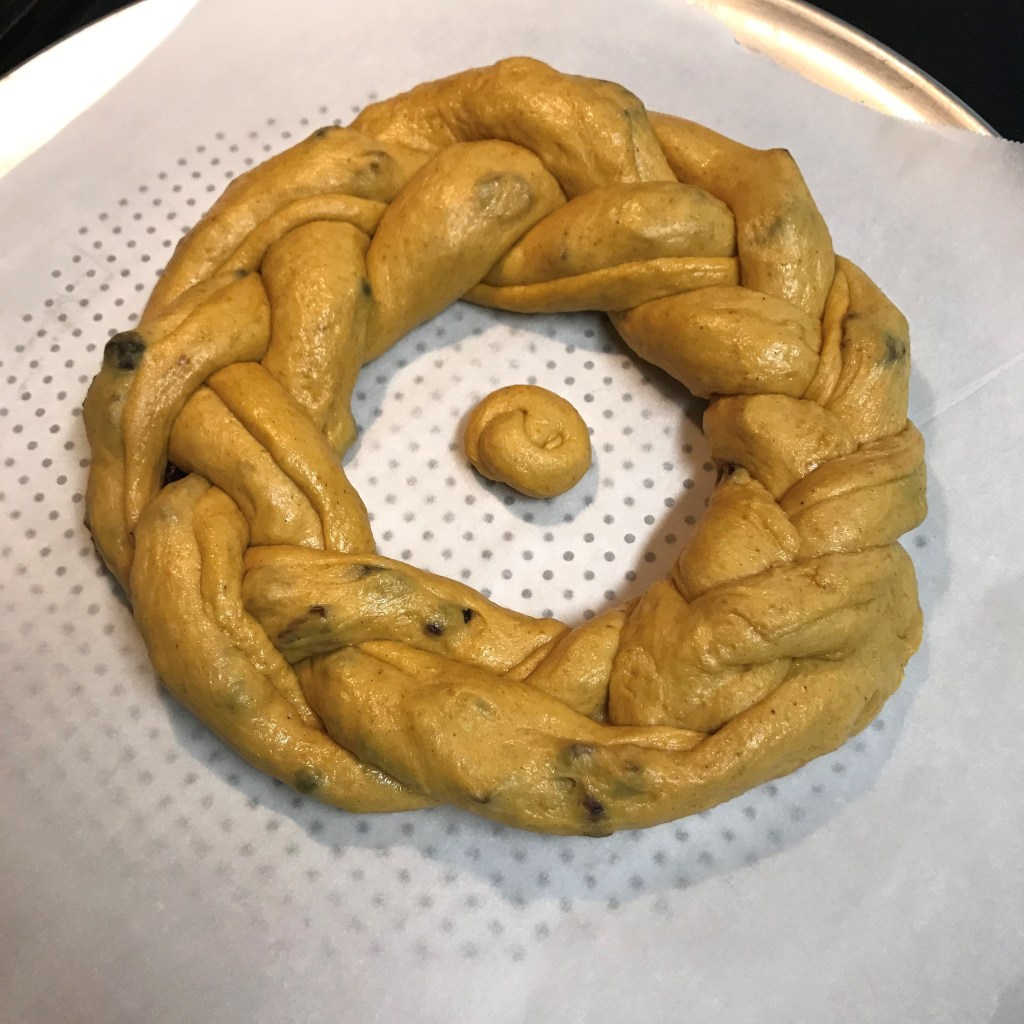
The filling was easy as well— brown sugar, cinnamon, cardamom and grated apple. Honeycrisp seemed appropriate for the occasion of Rosh Hashanah. Next came the rolling up and cutting, and I think this part would have been easier if this dough had been chilled, as the filling was very wet and loose. It was not difficult, but very messy, and not as pretty as I wanted it to be. I shaped the braided babka into a round, like a wreath, and covered it to proof for baking.
Next time, I will refrigerate the roll before cutting and shaping.
One of the other lessons in the King Arthur class was the simple way to determine whether your dough has proofed sufficiently for baking. If you poke the dough with a floured fingertip and the indent remains, it’s ready. If it bounces back, it needs more time. This one was ready!
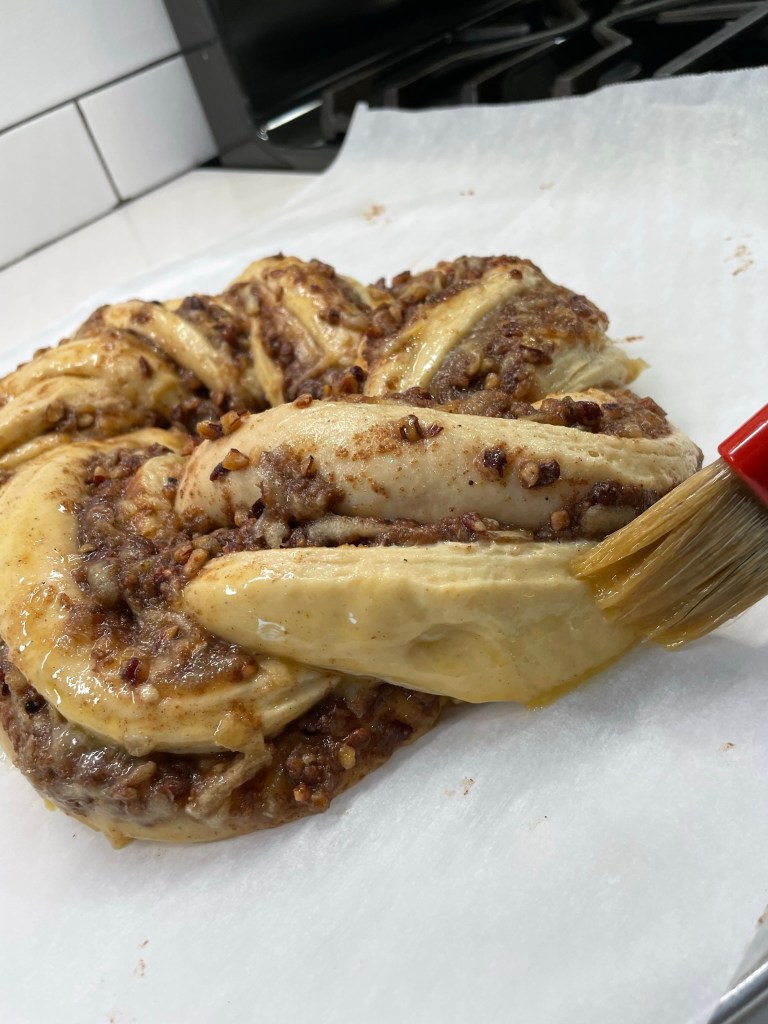
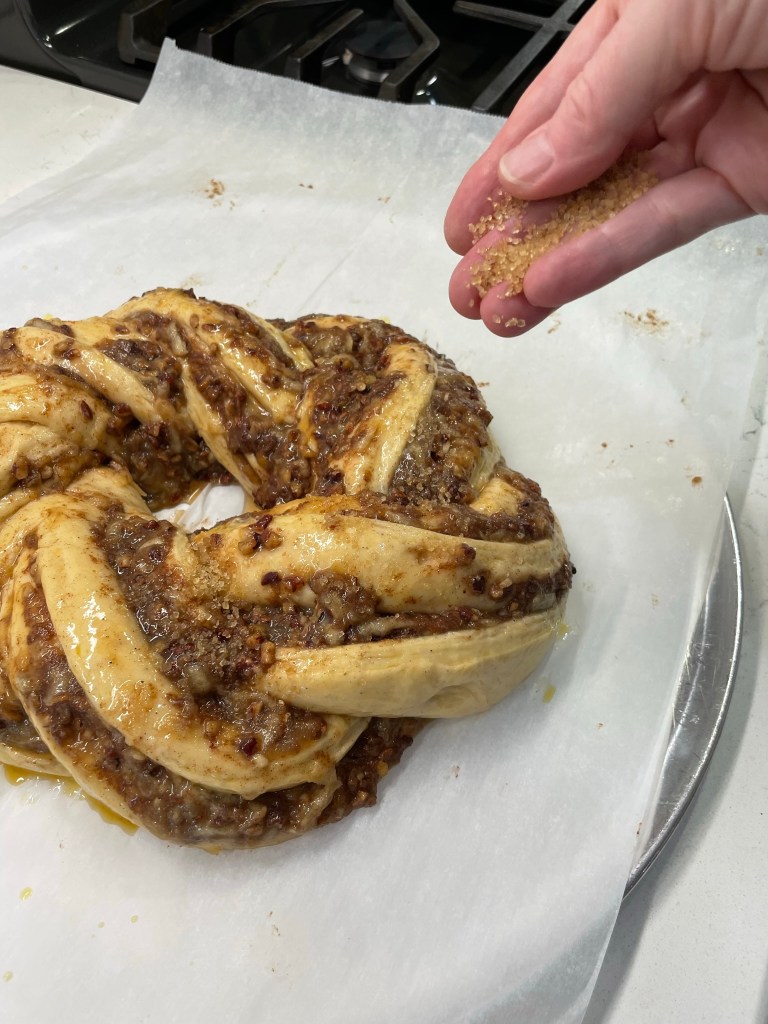
The egg wash and sprinkles of turbinado sugar made this beautiful!
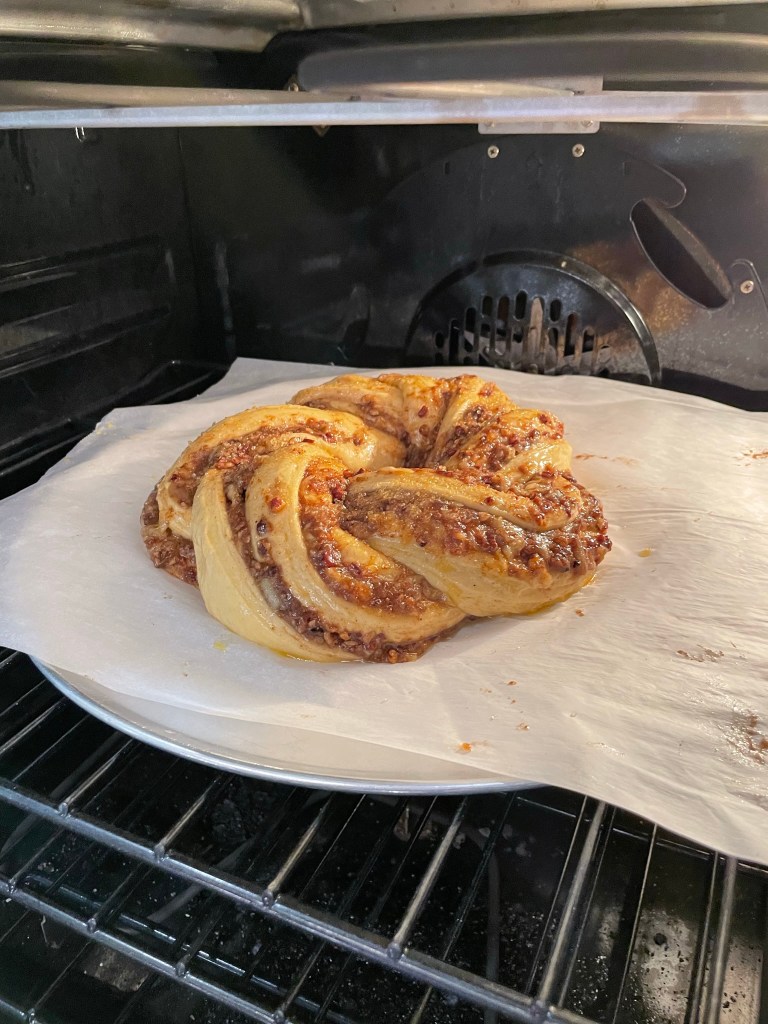
Time for an egg wash and bake, and we are ready for Rosh Hashanah! Of course, you don’t have to be Jewish to enjoy the lovely flavors. The apple, honey and spices make it perfectly appropriate through the rest of the year.
It’s been ages since I last bought cranberry sauce in a can. That high-fructose corn syrup-laden jellied stuff that goes schhhluuuup onto the plate, retaining the shape of the can, right down to the rings that I once thought were meant to help you slice it into portions. What in the world was I thinking?
Sure, I know the canned stuff is kind of a standard and it’s certainly convenient. But real, fresh cranberry sauce is so simple to make at home, and I love jazzing it up with unexpected ingredients for a different take on the classic. I have made it relish-style with chopped raw cranberries and pecans. I’ve flavored it with citrus and pomegranate. Heck, I’ve even made cranberry sauce with jalapeno and orange (that was 2020, and it was awesome).
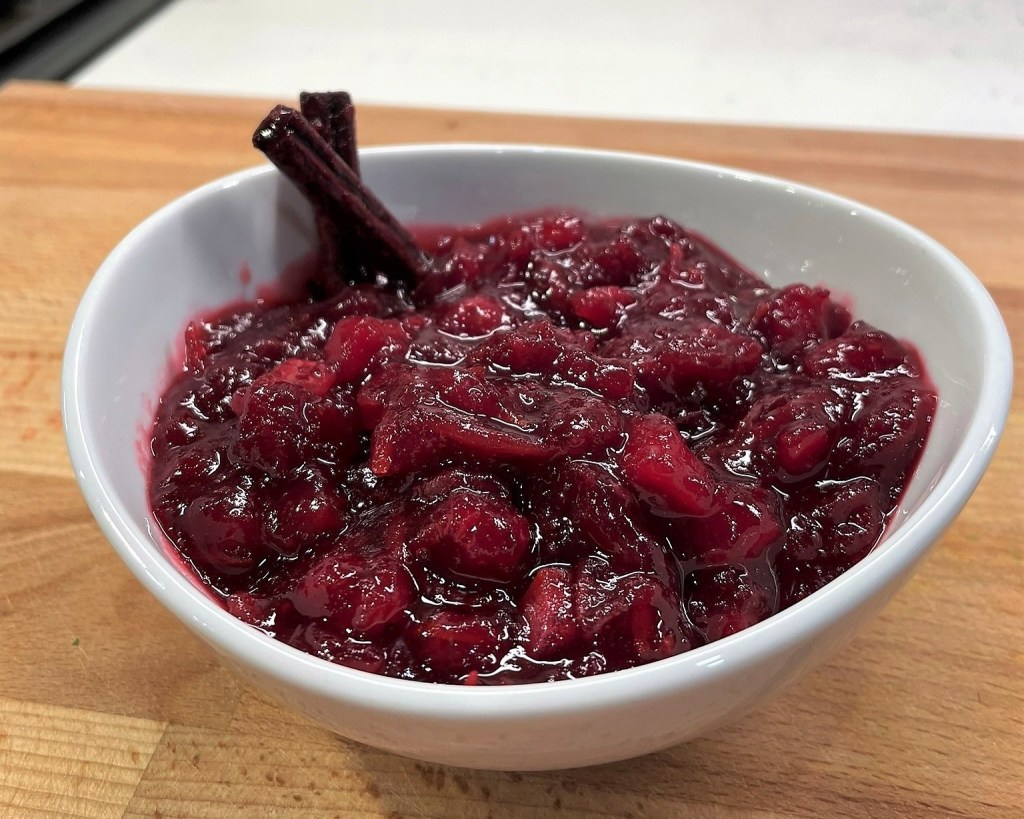
This year, I’m sharing a version that is just for the grown-up table, marrying the tangy flavors of traditional cranberry sauce with the spicy, fruity notes of red wine sangria. It’s a little bit boozy, a touch cinnamon-y and altogether yummy.
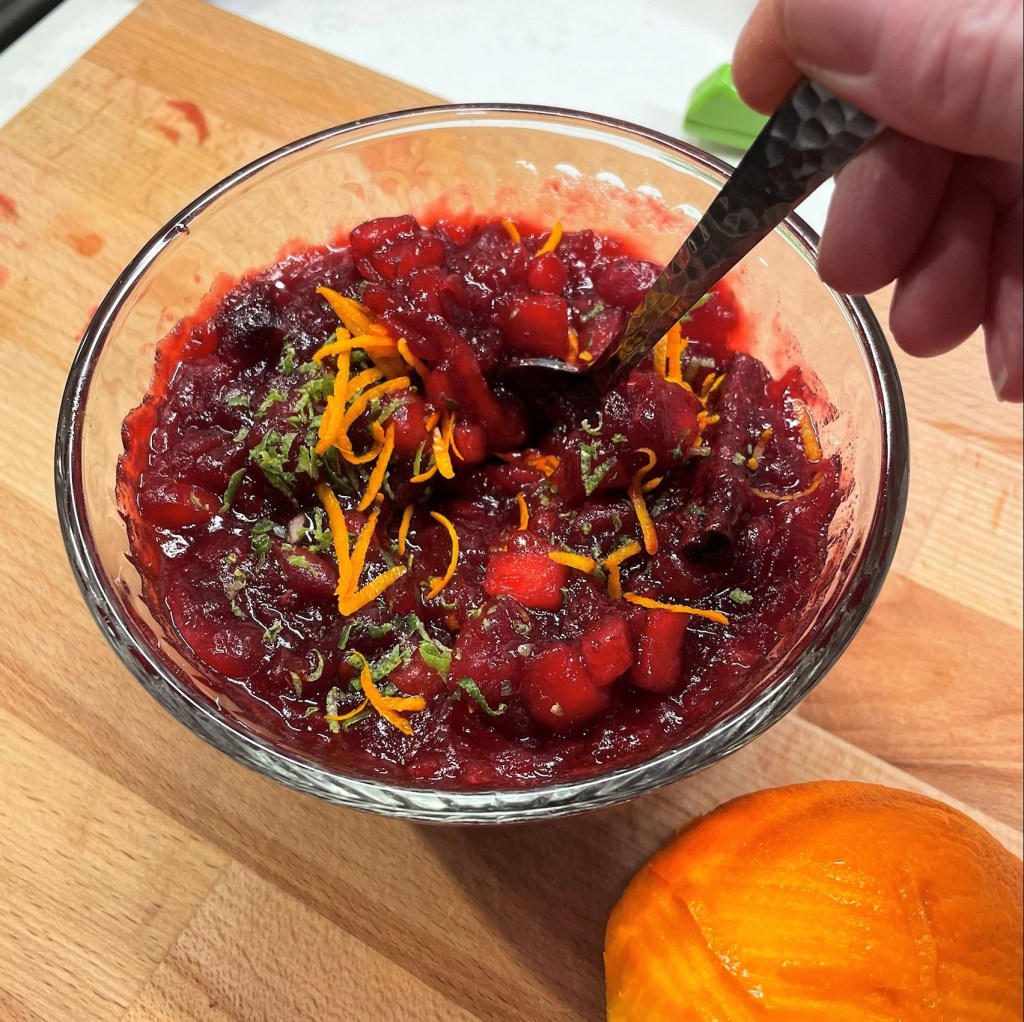
This smells exactly like sangria!
Any red wine will work for this recipe (and it doesn’t have to be expensive), but I would recommend choosing a pinot noir or other dry wine that is described with flavors of red berries and cherries. Steer clear of heavier wines such as cabernet sauvignon, which will overpower the brightness of the cranberry. Here’s a good rule of thumb—if the wine would make a good base for sangria, it’s perfect for this cranberry sauce.
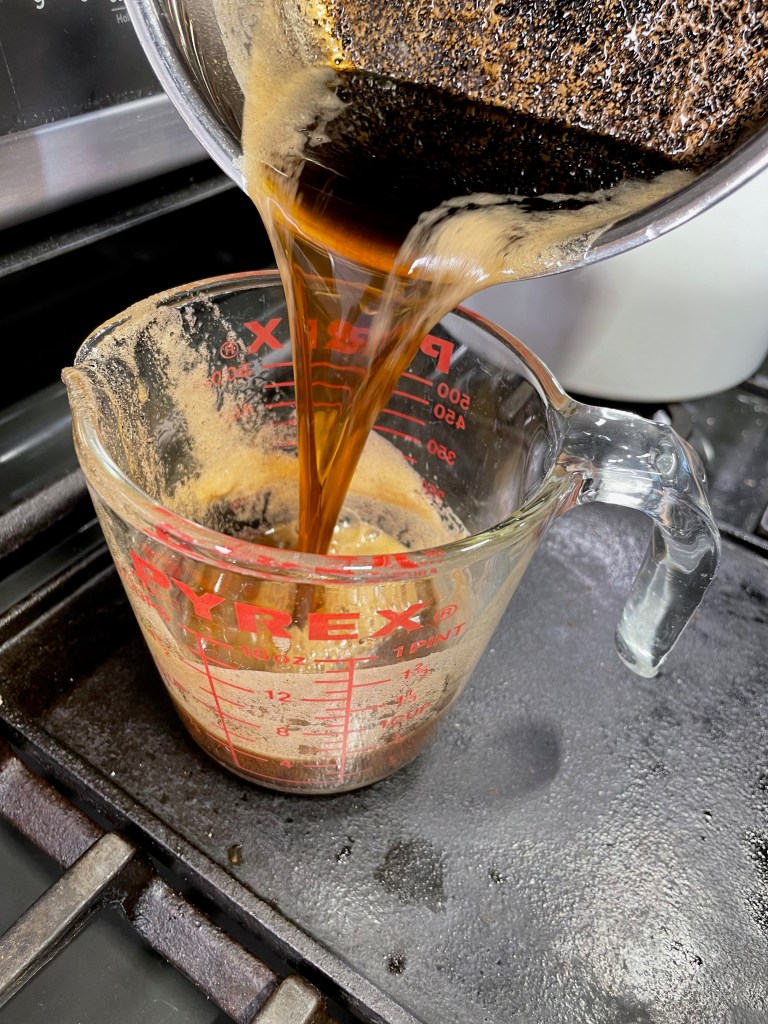
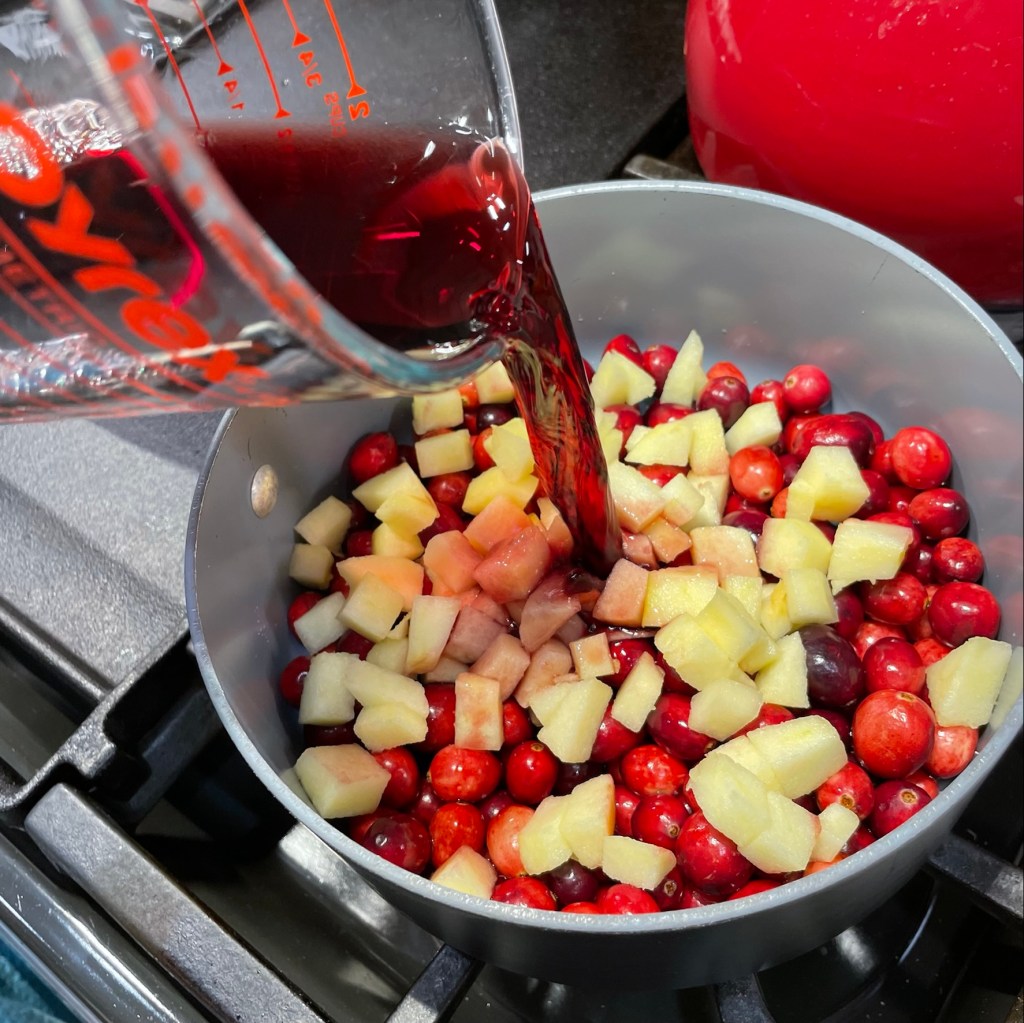
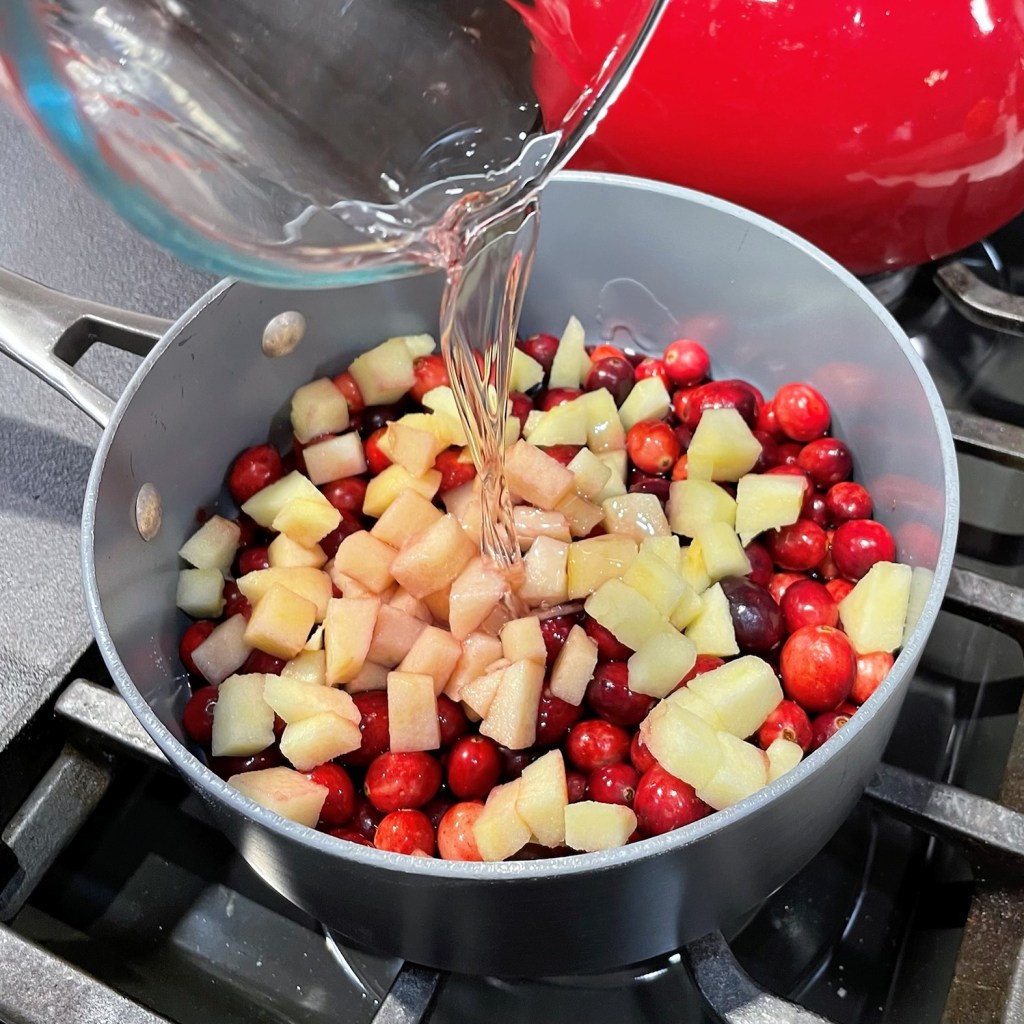
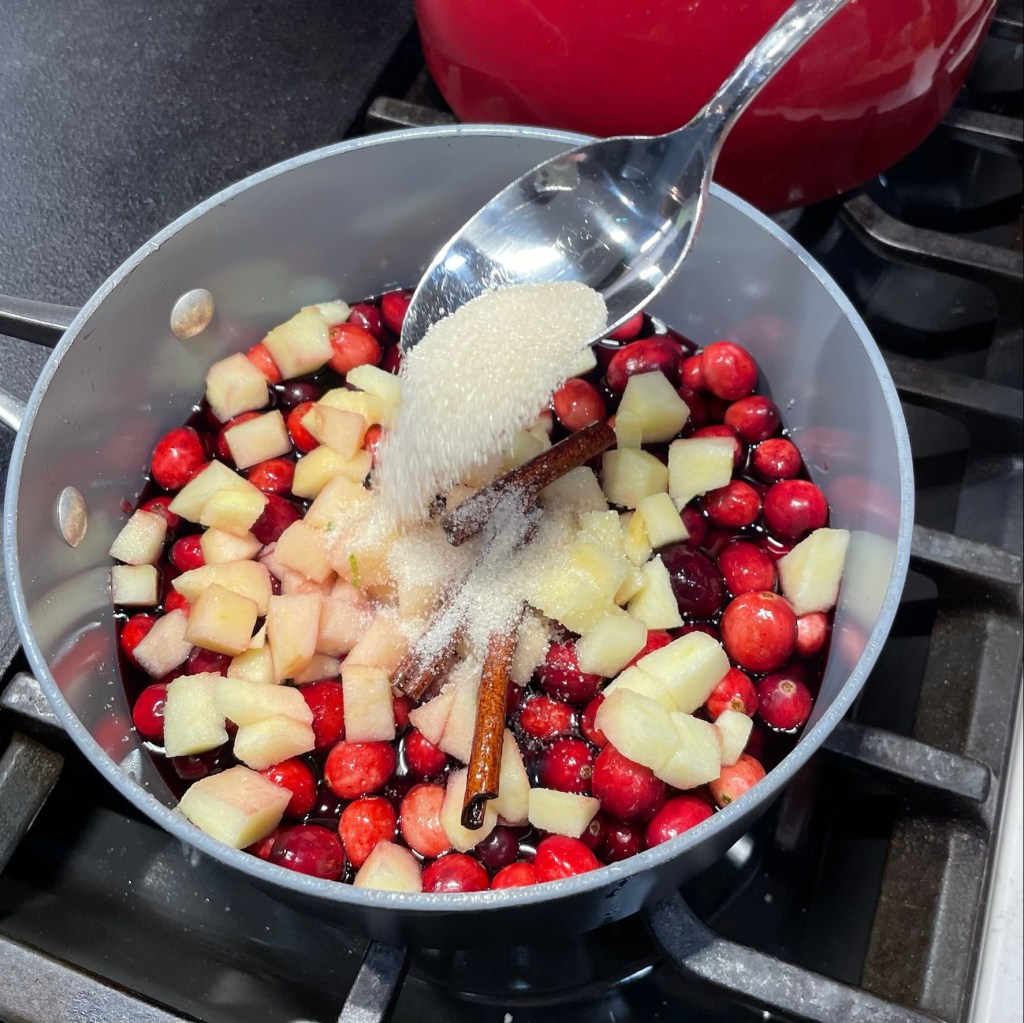
Begin by rinsing the cranberries and plucking out any bad ones. Combine them with chopped apple in a medium saucepan. Add wine, orange liqueur, cinnamon sticks and cane sugar, and cook over medium heat until the mixture begins to bubble.
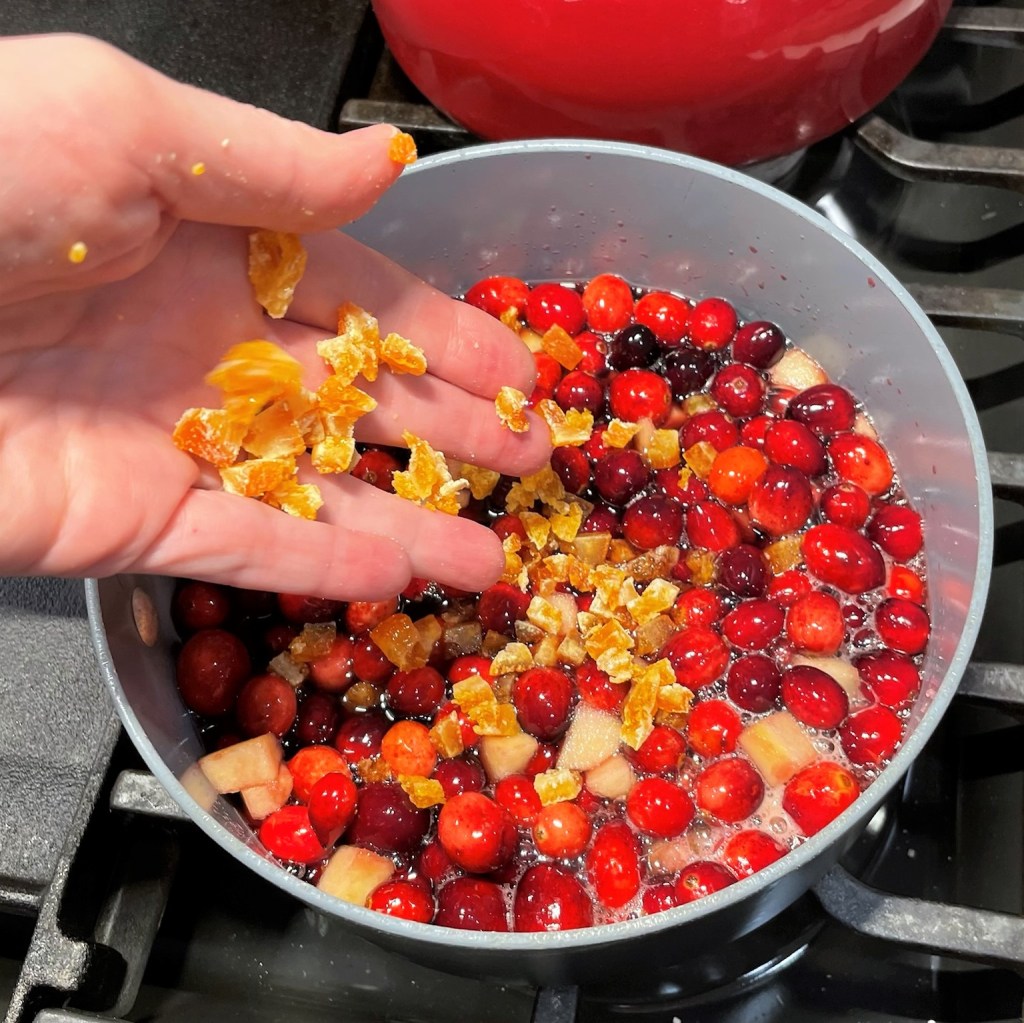
When the mixture reaches a light boil, add minced sweetened orange and stir to combine. Reduce the heat and simmer for about a half hour, until berries are easily mashed and mixture is bright red. Remove it from the heat and transfer it to a bowl to cool. As the cranberry sauce cools, the natural pectins in the berries will cause it to thicken. Stir the zest of an orange and a lime into the cranberry sauce. As the cranberry sauce rests in the fridge, the red wine will stain everything deep red, but that isn’t exactly a problem for me. 😉
If your Thanksgiving day isn’t too hectic, hold the zest until serving time for a bright pop of color.
Decked out with red wine, orange liqueur and warm, festive spices, this one should be served strictly on the grownup table!
Ingredients
12 oz. package organic cranberries, sorted and rinsed
3/4 cup turbinado sugar
1 crisp apple, such as Granny Smith, Fuji or Gala
1/2 cup dry red wine
1/4 cup orange liqueur (I used Cointreau)
2 pieces stick cinnamon, about 3 inches each
1/4 cup minced sweetened, dried oranges (such as Trader Joe’s)
Zest of one orange (organic is best when the zest is eaten)
Zest of one lime (organic)
If you wish, sprinkle additional orange and lime zests on top of the cranberry sauce at serving time for a bright pop of color.
Directions
Combine the cranberries and apples with the red wine, orange liqueur, sugar and cinnamon sticks in a medium saucepan.
Stir and cook over medium heat until the mixture begins to bubble. Add dried orange bits. Reduce heat and simmer until berries pop easily and sauce is reduced to a syrup-like consistency (anywhere from 20-30 minutes).
Remove from heat. Stir in orange and lime zests and allow the mixture to cool to room temperature. The natural pectin in the cranberries will cause the mixture to thicken more as it cools.
Refrigerate at least overnight, and up to two weeks. Remove cinnamon stick before serving.
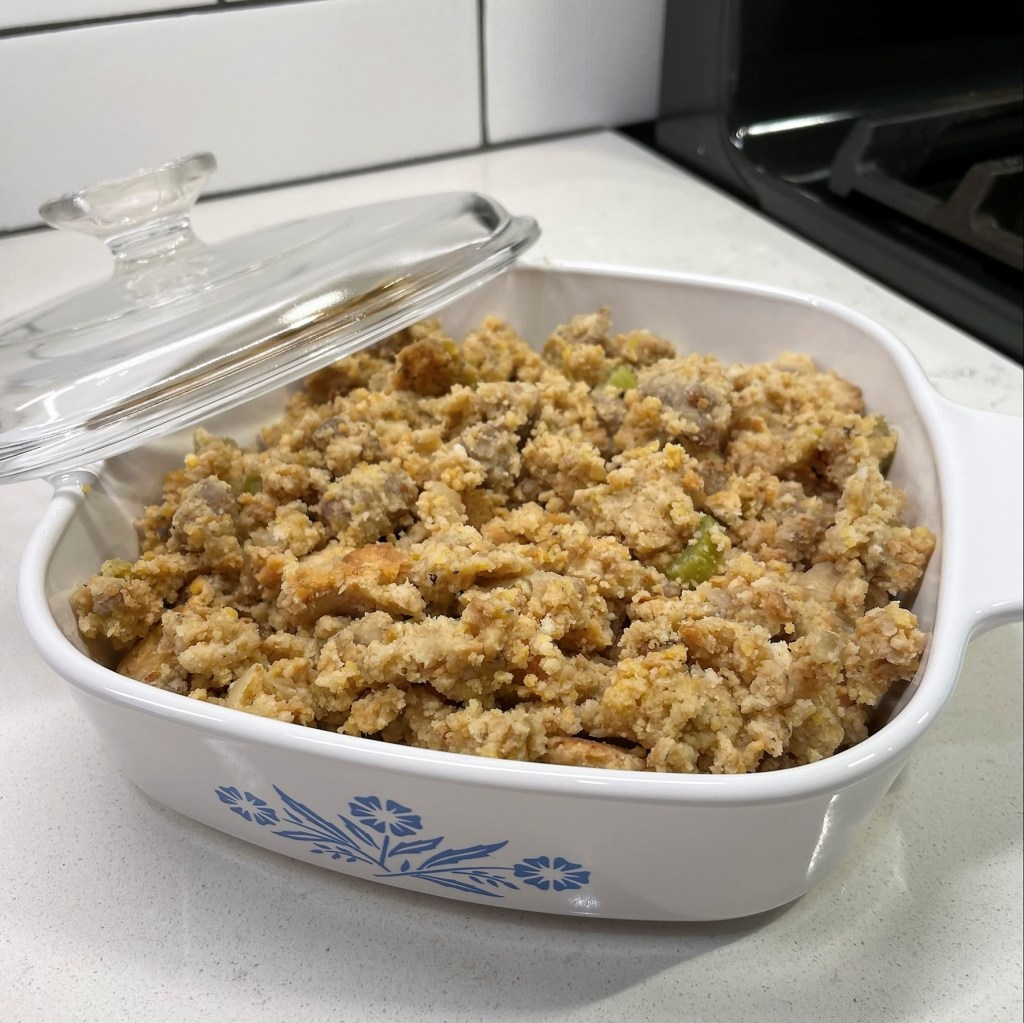
There is no recipe that reminds me more of my time at A Pinch of Thyme catering in Greensboro, N.C. than this Thanksgiving standard. I look forward to the aromas of each stage of this dish to this day, and about the time I start chopping celery, the memories come flooding back.
It was November 1994 and I was in the Pinch kitchen, elbow-deep in a humongous Cambro, mixing up the familiar flavors of Thanksgiving dressing — sausage, sage, onions, celery and fresh herbs. (You have probably seen a Cambro; it’s a plastic food pan about the size of a carry-on suitcase, used widely in restaurant and catering kitchens. Sometimes, when I’m in the throes of holiday food prep, I wish I had a stack of ‘em.) Chef Rodney had scribbled out some notes to remind me how to put this dressing together, but after making so much of it for the umpteen in-home holiday parties we catered, I didn’t need them anymore. Nope, I knew that recipe like the back of my hand:
Crumble up the flaky buttermilk biscuits and honey-sweetened cornbread that Kathleen, the pastry chef, had made the day before. They needed to be stale, but not dry. Pull the strings off the celery, then chop it with the onions and cook them in the drippings left in the pan after browning the crumbled sausage. Add fresh herbs, including the signature pinch of thyme and toss it all together in the Cambro. Beat the eggs in one of the large stainless mixing bowls from the side shelf and add it to the dressing mix with enough chicken stock to moisten it all the way through. Pour it into a couple of greased, stainless steel hotel pans and over-wrap them with plastic film and then foil. Label the order with the client’s name and date of their event and move it to the walk-in. The service team would handle it from there, baking it and serving it up for the happy holiday hosts.
Then, wash up and repeat the whole thing for another party.
Today, wearing the very same apron (which I wore home one night and never returned), I make a scaled-down version of this dressing for my own Thanksgiving meals and it is my all-time favorite. I still don’t need a recipe to make it, but I had to write it down several years ago because everyone I ever made it for wanted the recipe. Even my ex-husband asked me to leave a copy for him when we parted ways (and yes, I did). What makes it so addictively good?
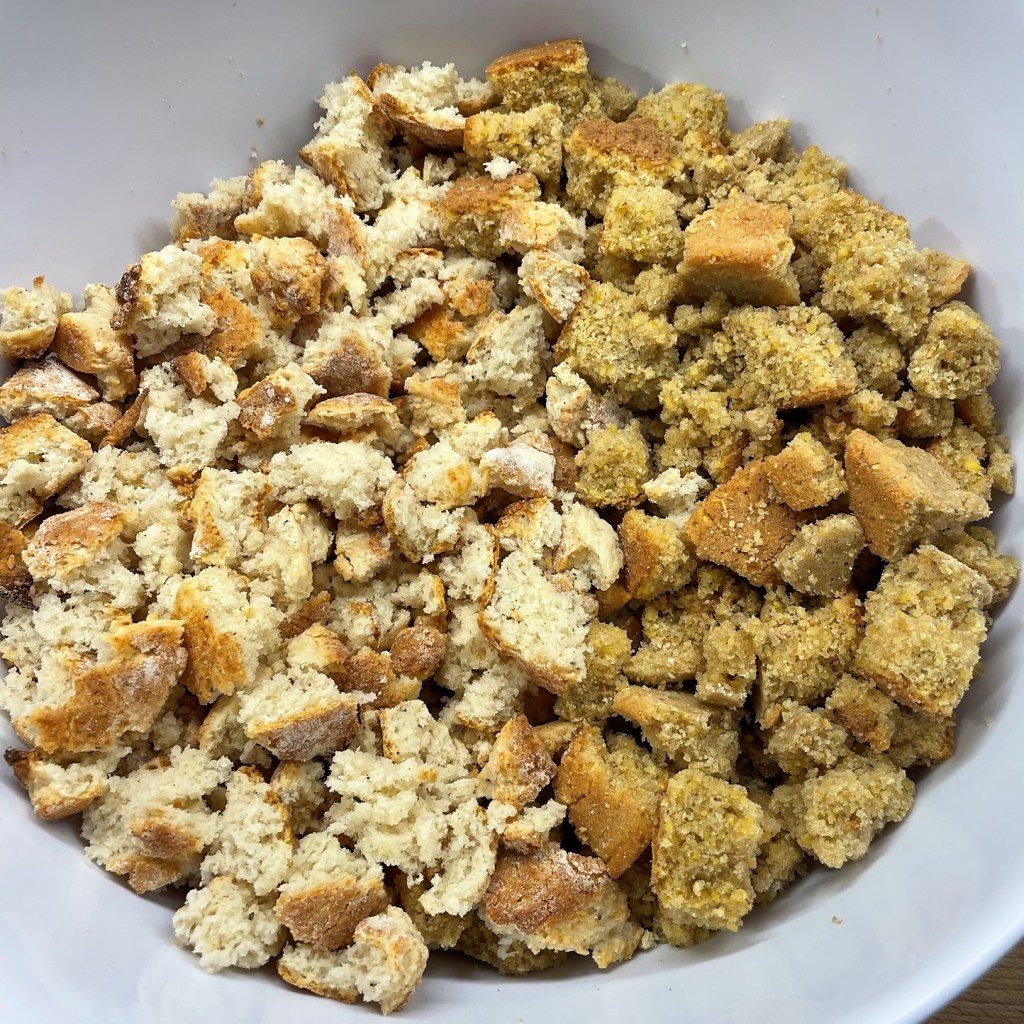
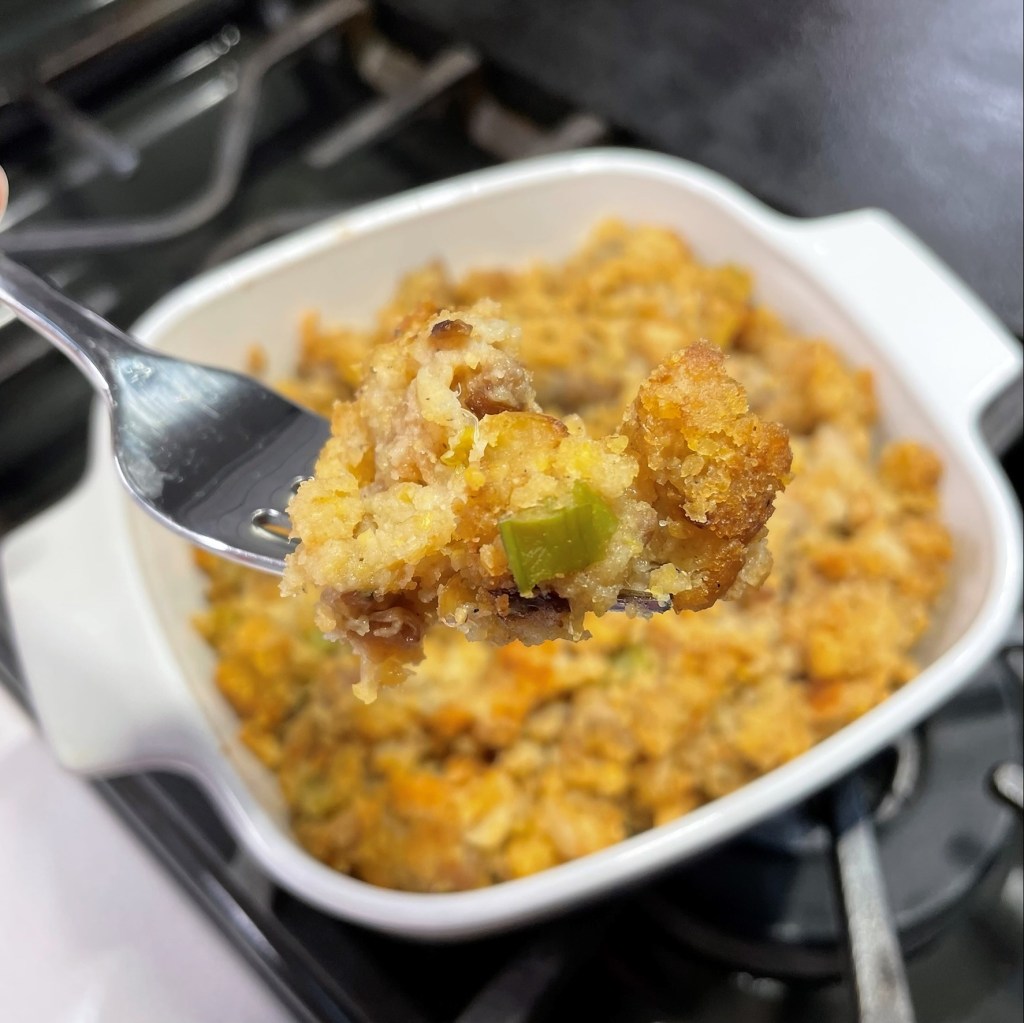
Biscuits and cornbread.
The official breads of the South!
Though the flavors of the dressing are all familiar, the texture of the flaky biscuits and grainy cornbread—the two most popular breads of the American South—make it different from a typical dressing made with seasoned yeast bread cubes. And it doesn’t really matter what recipe you use for the biscuits and cornbread. It only comes down to how much time and baking skill you have, and whether you have a sweet tooth.
The cornbread can be more or less sweet, depending on your taste.
For this version, which I made last year when it was my year for the turkey — my husband, Les, and I alternate years, just as we declared in our wedding vows — I used Bob’s Red Mill whole grain cornbread mix (which is less sweet) and I made my own biscuits, using a partial amount of whole wheat flour.
Over the years, I’ve made it with everything from supermarket bakery cornbread to Jiffy mix (the sweetest option). My only suggestion is to stick with a cornbread that has some amount of flour in it; the kind made with only cornmeal will be too grainy for this dressing. I’ve used frozen biscuits, bakery biscuits and even biscuits from a fast food drive-thru. Other than the twist-can variety (which don’t have quite the right texture), any biscuit will work as long as you pay attention to the sodium factor. The best sausage is a bulk breakfast-style pork sausage (such as Jimmy Dean’s), and I like vegetable broth but chicken broth is also great. For the most authentic Southern version, put your hands on a Vidalia onion from Georgia; otherwise, any sweet onion will do (or you can even use leeks, as I did for this version). The fresh herbs are up to you; in the Pinch kitchen, we added fresh sage and thyme, but you know what your people like so go with that.
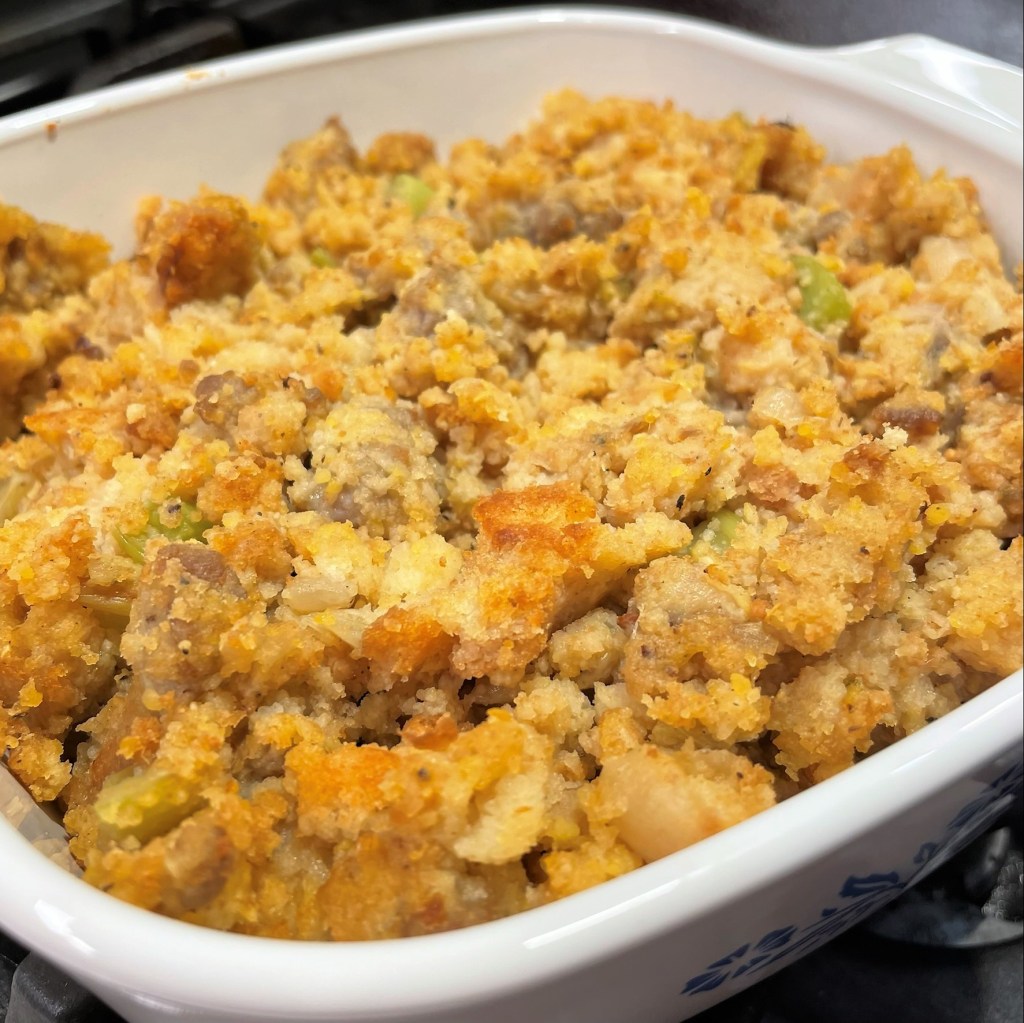
Now, I suppose you could technically use this mixture to stuff your turkey, if you do that sort of thing. As in most commercial kitchens, the policy at Pinch was to never stuff the bird because of the risk of food borne illness, and that’s a battle that I still face every other year when my hubby takes his turn with the turkey (yep, he stuffs it). My at-home version relies on the same clean and easy method we used back in the day— only, at home I’m baking it in a buttered casserole dish rather than a greased hotel pan. Sometimes I even “accidentally” make more dressing than my baking dish can accommodate and I wind up with a second dish that gets baked the day after Thanksgiving. That way, I can savor it twice for its lightly crunchy topping and the warm and fluffy insides.
Happy Thanksgiving, y’all!
Just as we did back in the day, you can easily prep this dressing the day before and bake it on Thanksgiving morning, then just warm it when it’s time for dinner. It travels well, too, if you happen to be going to someone else’s house for the big feast. However you go about it, please take my advice and make a large batch. You’ll be thankful for the leftovers!
I used to make this dressing by the busload when I worked holiday season at a catering company. This scaled-for-home version brings together two beloved breads of the American South into a perfect dressing for Thanksgiving.
Ingredients
1 batch cornbread (see recipe notes for suggestions)*
8 buttermilk biscuits (see recipe notes)*
1 pound bulk breakfast sausage
1 medium sweet onion, chopped (or 1 leek, white and light green parts)
3 ribs celery heart, strings removed and chopped
Kosher salt and freshly ground black pepper
Leaves from two sprigs of fresh thyme
A few leaves of fresh sage, finely minced (optional, depending on how sage-y the sausage is)
2 cups chicken stock (or more, if breads are very dry)
1 large egg
Batch size for the cornbread should be for an 8 by 8-inch pan. A Jiffy mix works great, but it’s a little on the sweet side. Try pre-made cornbread from your favorite bakery or use your own recipe. My favorite is Bob’s Red Mill whole grain cornbread mix. The only cornbread I do not recommend is a recipe that uses only cornmeal without flour; it would be too gritty for this dressing recipe.
Almost any biscuits will work here, and they certainly don’t have to be perfect. If you make a good drop biscuit, go with that. Rolled-out biscuits are great, and you don’t have to fuss over cutting them into rounds. Frozen biscuits work well (baked, obviously), but the twist-can biscuits don’t have quite the right texture. I have even used biscuits from a fast-food joint, but be mindful of the extra salt they contain.
Directions
Cube or tear cornbread and biscuits into a large, open bowl or onto a parchment-lined cookie sheet. The pieces should be about 1-inch square; don’t make them too small or the dressing will be more like mush. Let the bread pieces sit out overnight to stale. Alternatively, you may choose to toast them lightly in the oven, but only long enough to stale them.
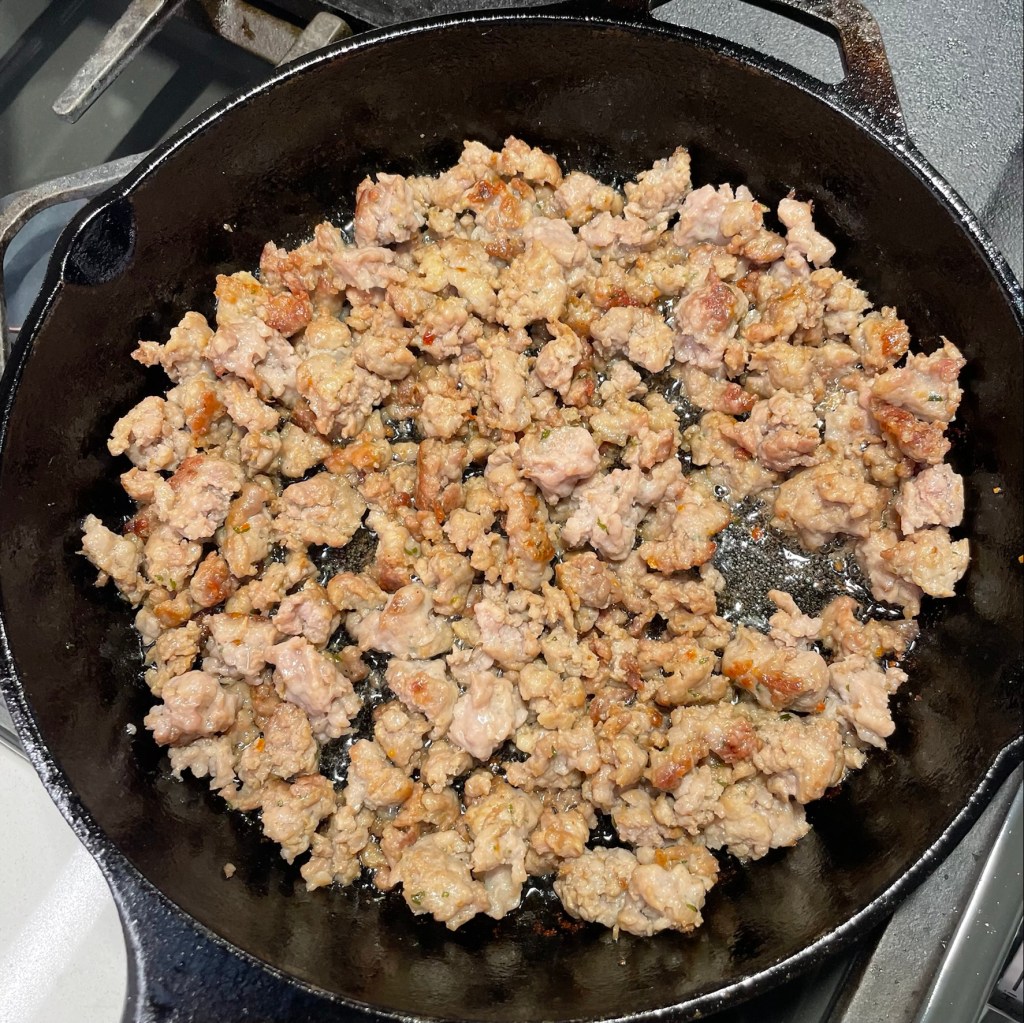
Place a cast iron skillet over medium heat and cook the sausage until most of the fat has rendered and sausage is lightly browned, but not crusted. Transfer sausage to a large bowl and keep the drippings in the skillet.
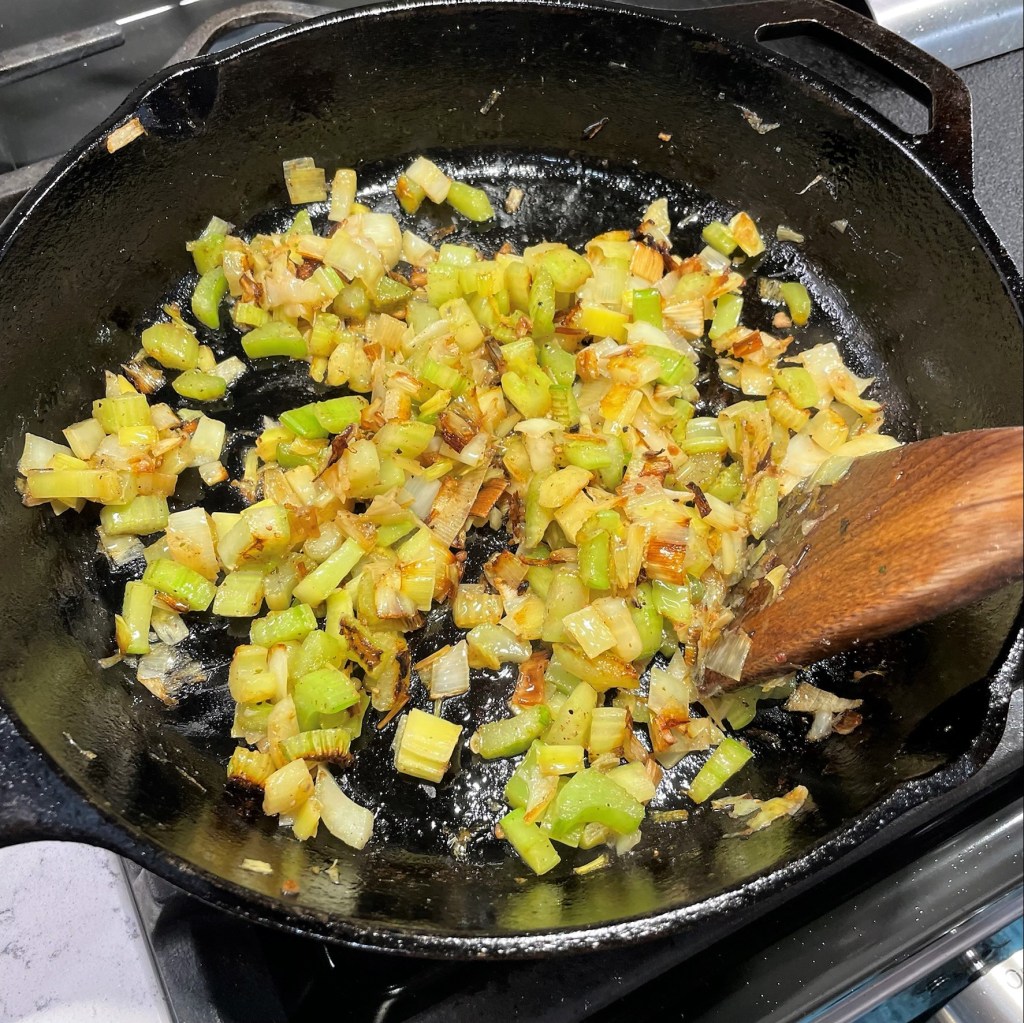
Saute the onions and celery bits in the sausage drippings until they are soft and slightly caramelized. If the drippings are skimpy, add a tablespoon or so of butter. Season this mixture with salt and pepper to taste. Transfer entire skillet contents to the sausage bowl. Sprinkle thyme leaves (and minced sage, if using) over the mixture and toss to blend.
While the sausage mixture is still warm, gently fold in the cornbread and biscuit pieces so that the lingering sausage grease will be evenly dispersed. Set this aside to cool slightly.
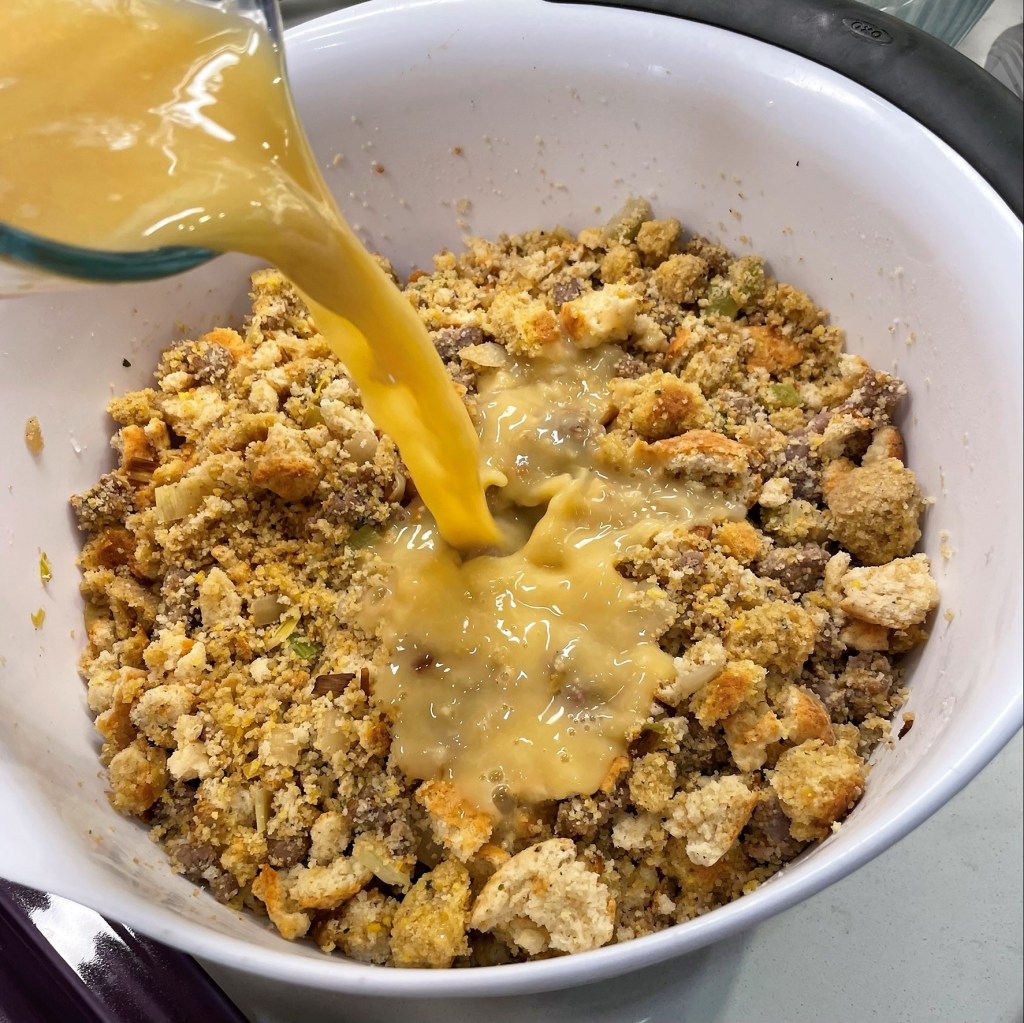
Whisk egg and broth together in a large glass measuring cup. Pour half of it evenly over the dressing mixture and fold to combine, and then pour in the remaining broth-egg mixture. The dressing should be wet but not dripping. After the breads soak up the liquid, feel free to add a little more broth if the mixture seems too dry.
Bake at 350° F for 35 to 40 minutes. If you want a very moist, soft dressing, bake it with a foil covering. For a firmer dressing with slightly crunchy top, bake uncovered. I usually split the difference, covering it with foil for the first 15 minutes then removing foil to finish it.
The Jewish High Holy Days are upon us, and that means it’s time for me to share one of my favorite breads. Regardless of your religious background or practices, you have probably heard of, seen or tasted this classic Jewish bread, which is rich with eggs, oil and honey. Challah is a mainstay of Jewish life, and is served weekly at Shabbat services and especially during holidays—or, at least, the ones in which leavened bread is allowed. Rosh Hashanah is a perfect time to enjoy this round version of challah, and there’s no doubt every last crumb will be gone before the fasting of Yom Kippur begins next Tuesday.
The great thing about challah, besides the fact that it is a sweet, soft and tasty bread, is that you don’t have to be Jewish to enjoy it or to make it (I’m proof of both points). From the time I became seriously involved with my husband, Les, I have been very interested in learning the foods of his Jewish heritage, and challah has become a favorite in our rotation. My sourdough version is a bit sturdier than a yeasted loaf, thanks to the higher protein bread flour that ensures a good oven rise. But the texture is still airy and it makes excellent toast, French toast and bread pudding.
There are two main challenges I’ve faced in making sourdough challah, but both can be resolved with time and practice. The first is the challenge of getting this dough to rise; any bread dough with a high volume of sugar (or honey, in this case) struggles against the yeast action, and challah is even more so because it contains so much heavy oil. The best way to win this battle is simply to give it more time. From start to finish, this bread takes almost a full day, but most of that time is spent just waiting—for the pre-ferment to be ready, for the dough to double in size (which it hardly ever does), and for it to rise for baking. Make it on a day that you have lots of other things going on at home so you aren’t tempted to stand and watch it, which I have learned the hard way doesn’t make it happen any faster.
The second challenge with making challah (sourdough or otherwise) is creating the beautiful, braided shapes. This is not nearly as complicated as you might think, and I’ll share my own technique for doing this, whether you want to try making a basket-weave round (as in the featured photo) or a simpler straight braid, which is no more difficult than braiding a kid’s hair. For Rosh Hashanah, I like to make challah in a round, as its shape is a symbol for coming full circle into a new spiritual year.
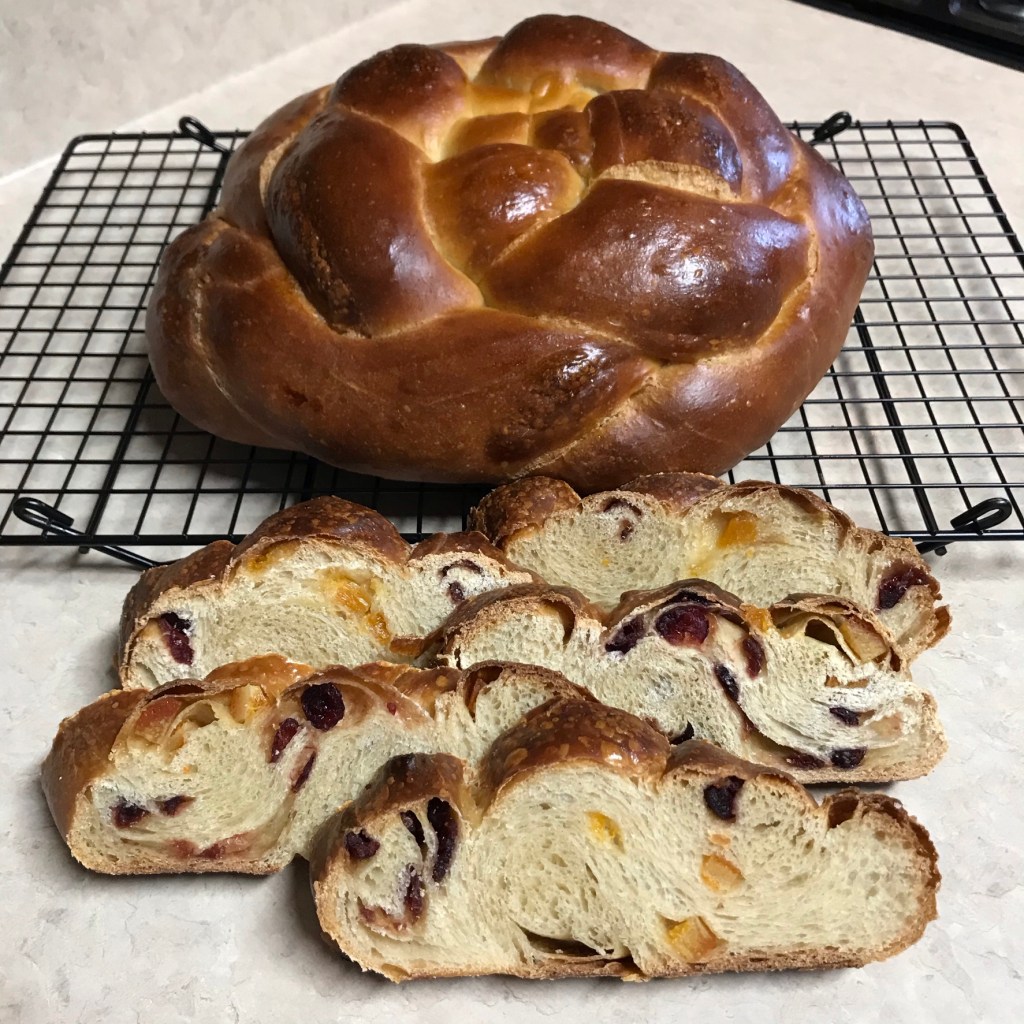
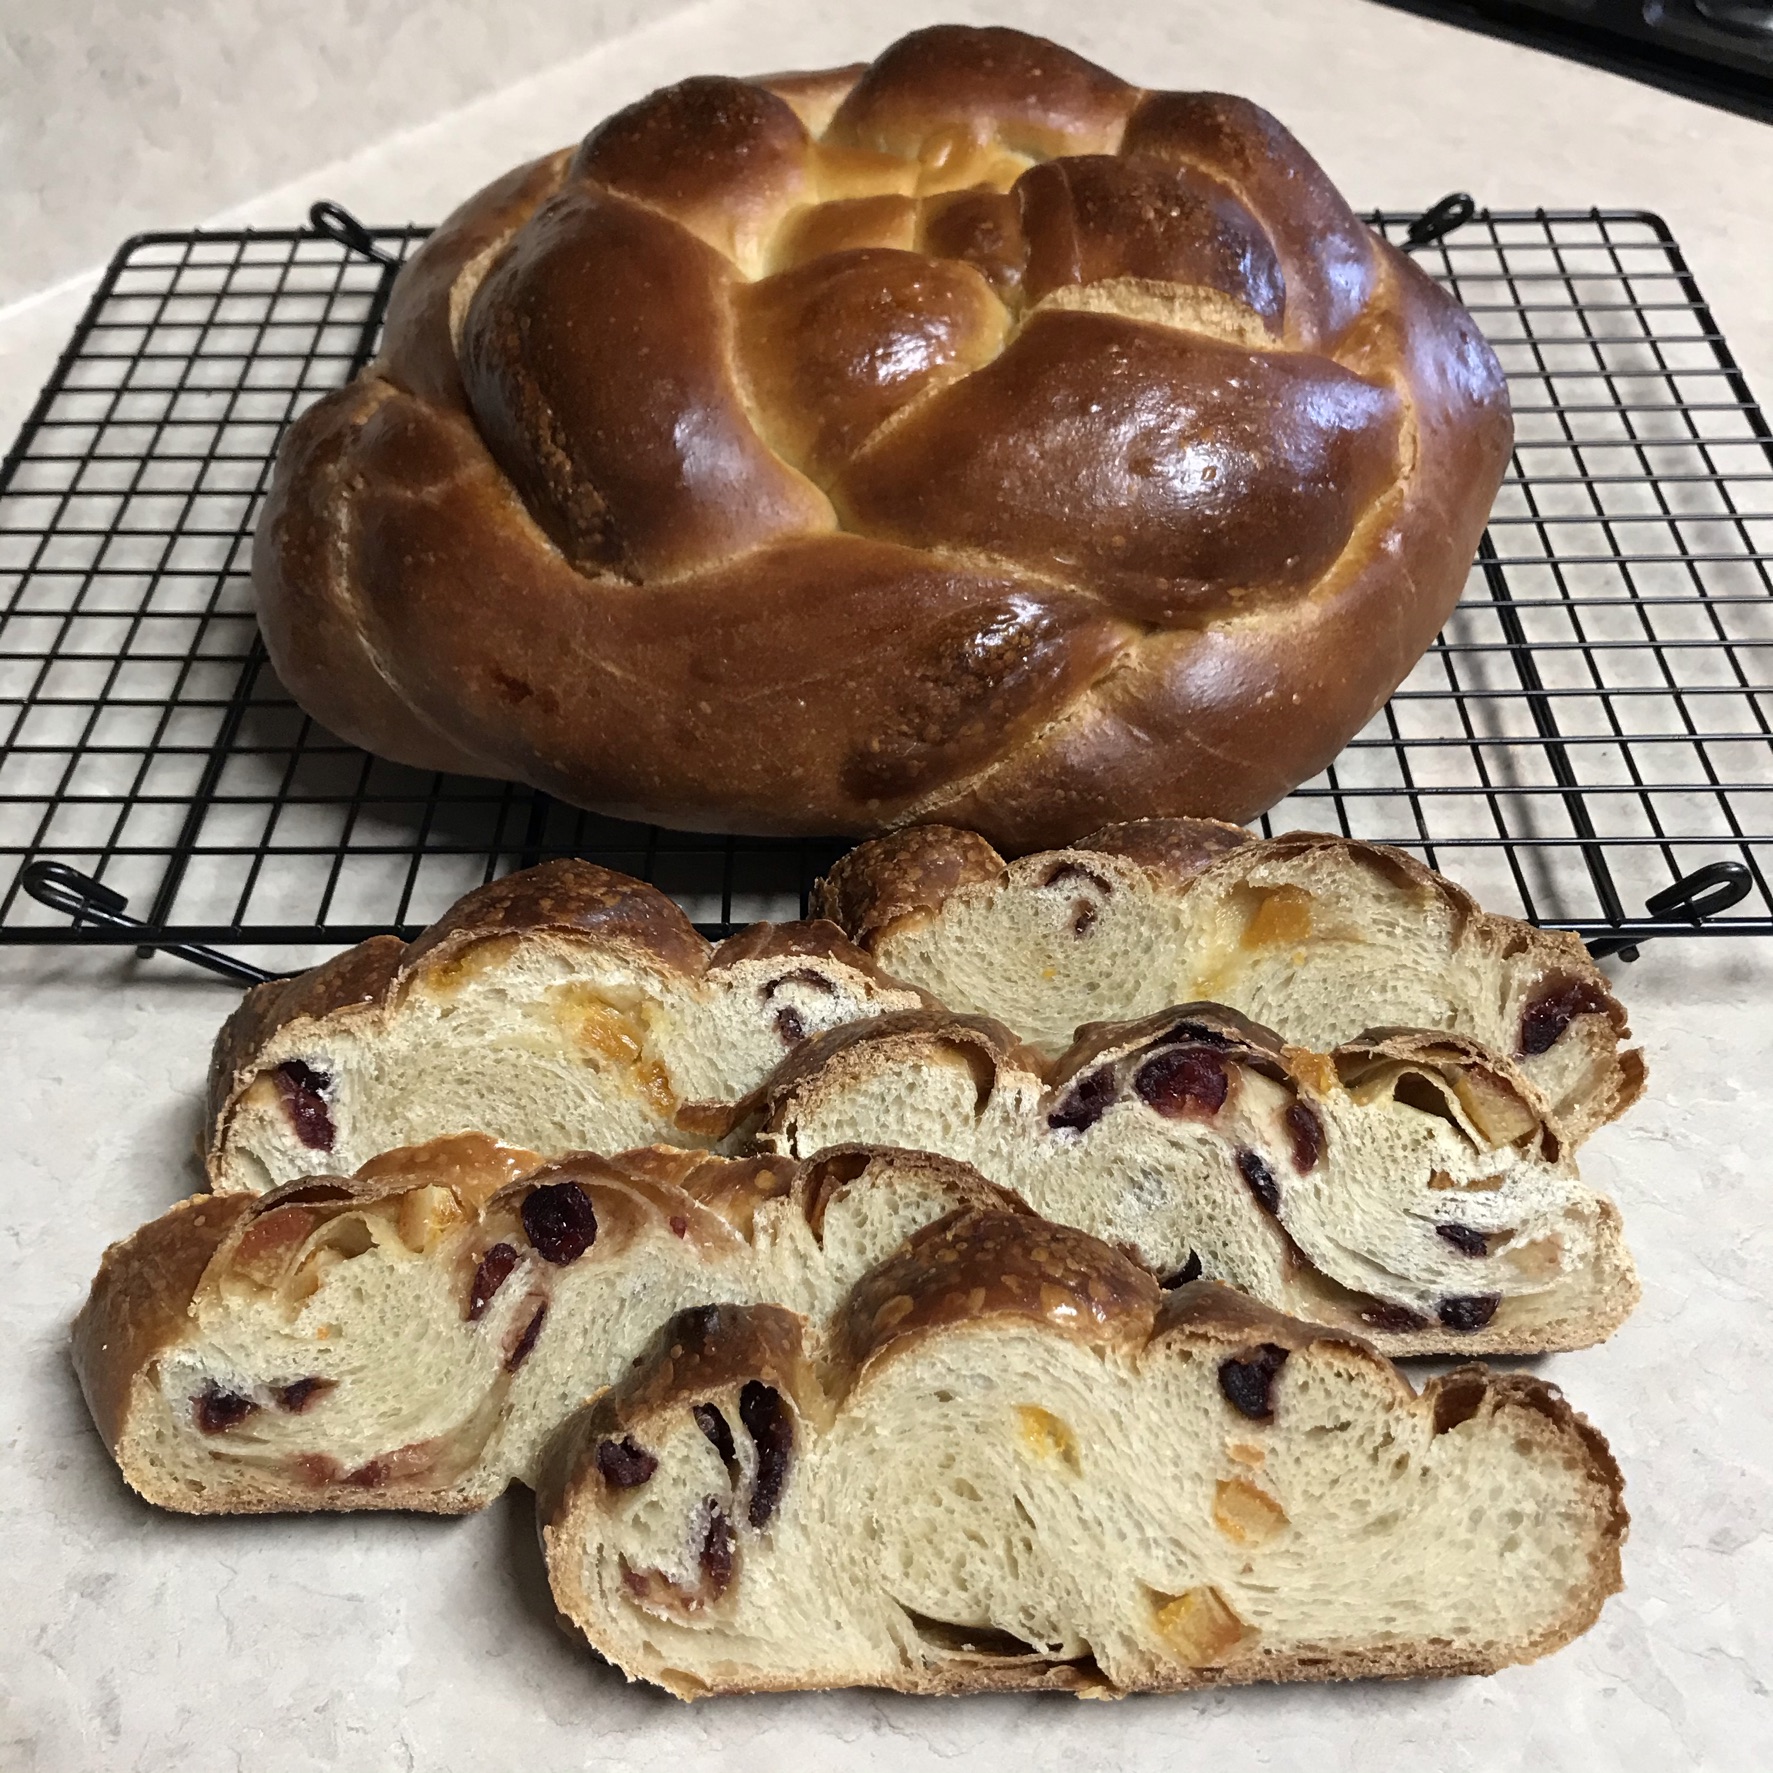
For extra flair and flavor, I use orange- or lemon-infused olive oil in my dough because I love the aroma of the challah in the oven and the intoxicating citrus scent in the finished loaf. Extra virgin olive oil does impart a slightly stronger flavor to the challah, but I find it delicious. Also, I frequently add dried fruit to the dough as it is rolled up for braiding, but the photos I’ll share are mainly without it. If you do choose to add dried fruit, such as raisins or cranberries, don’t concern yourself with rehydrating it first; it bakes up beautifully straight from the package, and for your effort, you’ll be rewarded with beautifully studded slices. Did I mention that it is amazing in French toast? 🙂
This is an old photo of a loaf I made before our kitchen remodel last year. The braids are stuffed with dried cranberries and oranges.
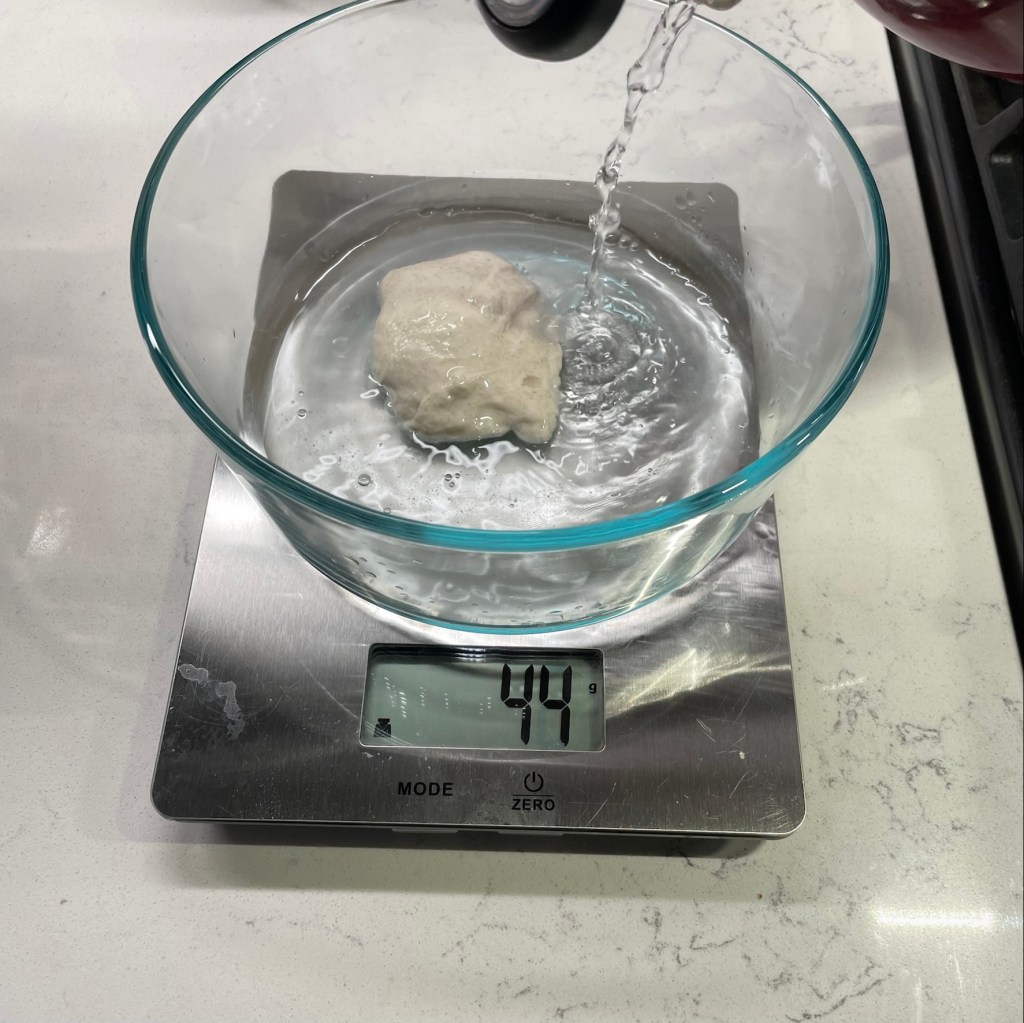
This bread requires a ripe sourdough starter, an intermediate overnight feeding, about 3 hours to ferment on baking day, and up to 5 hours for final rise after shaping, so plan accordingly. Don’t let this lengthy process alarm you; if you make the starter the night before, you only need about an hour of hands-on time for making the dough and about half an hour to shape it for proofing. As I said, there’s a lot of waiting. All my measurements are metric, so please depend on a digital scale for getting your ingredients right.
You’ll begin the night before you plan to bake, with creation of a firm starter, which is essentially an in-between feeding that bridges the basic wet starter and the final dough. This type of starter, also called “levain,” uses less water than a wet starter, and it concentrates the rising power of the culture in your final dough. Begin with a slight amount of ripe wet starter, stirring in water to make a slurry and then flour and mixing it together until no dry flour remains. The firm starter must ferment several hours, so it’s easiest to do this the night before and leave the bowl covered at room temperature, then bake the next day. If you wish, you can make the firm starter farther ahead and then refrigerate it for up to one day.
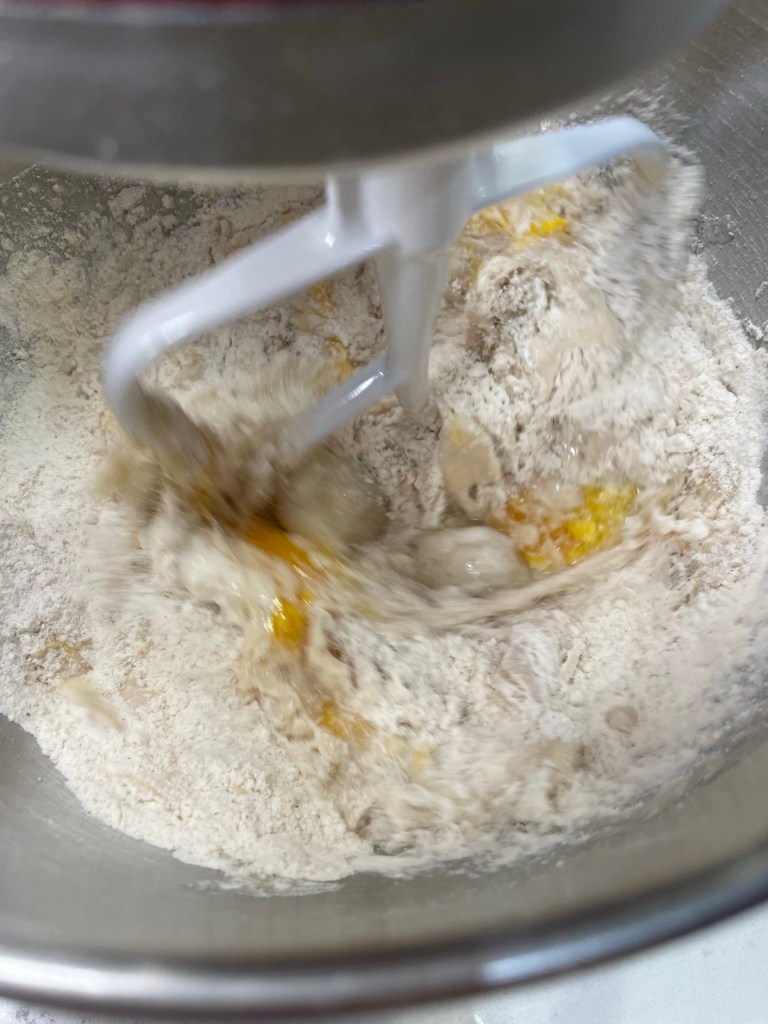
The next morning, measure out your flour and get all the other ingredients lined up, including your firm starter, which should be cut into pieces for easy introduction to the final dough. Most of the moisture in this dough comes from oil and eggs, so there is very little water to measure for the final dough. In this picture, my honey is stirred together with the small amount of water, but I usually measure the oil first and then measure the honey in the same cup—it slides right out without sticking. You’ll have an easier time mixing the eggs into the dough if they are closer to room temperature, so give them a few extra minutes on the counter before you begin.
Challah ingredients, clockwise from the top: honey and water, salt (I like to use mineral-rich pink salt), whole large eggs, flour (I use a blend of high-protein bread flour and white whole wheat) and olive oil (mine is blood orange-infused extra virgin).
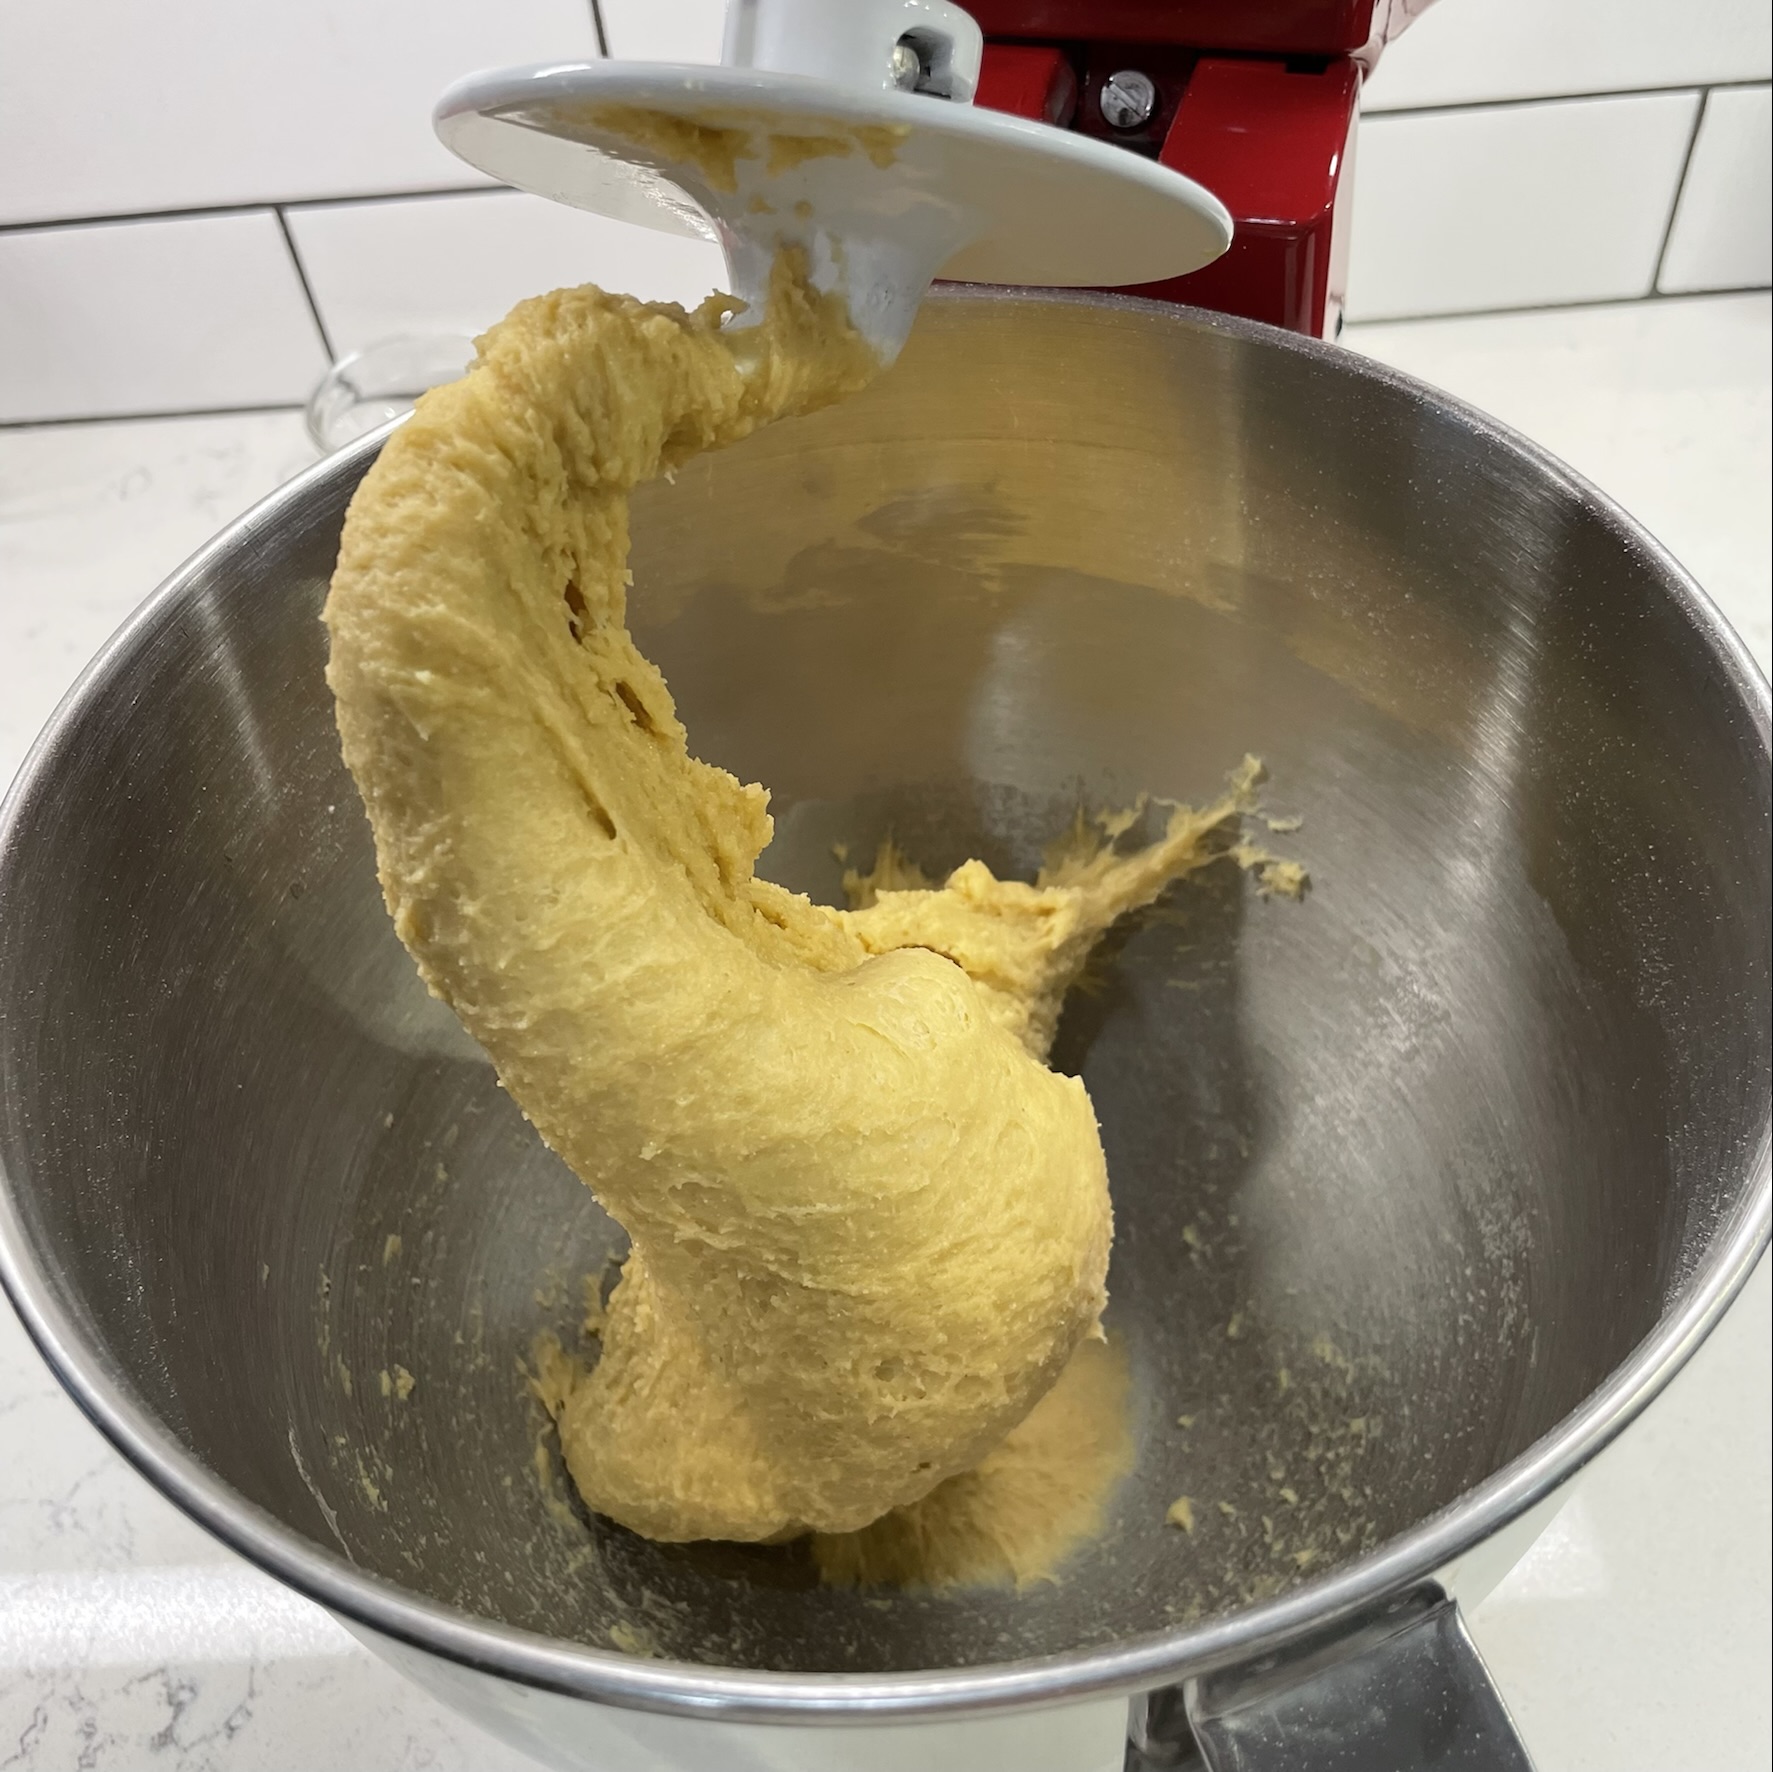
In the bowl of a stand mixer (or in a really large mixing bowl, if you don’t mind mixing by hand), combine the eggs, oil, honey and water and whisk until even. Add the flour all at once. Mix until all flour is completely incorporated, about two minutes in a mixer. Sprinkle the salt over the dough, cover the bowl and let it rest for about 30 minutes. This gives the flour time to absorb the moisture, and kneading is easier at that point.
Mixing the honey with the water makes it easier to pour. Add it to the eggs in the bowl of a stand mixer.
This is a rare occasion when the oil is added to the dough early on. Mix these wet ingredients until completely blended.
Next, add the flour all at once.
I use the dough hook for this initial mixing. It replicates the action of mixing by hand better than using the paddle, and produces less splash.
Blend just until the dough comes together on the hook, with no flour remaining on the sides of the bowl. Swipe it off the hook to rest in the bowl for about 30 minutes.
Sprinkle the salt over the dough, which will be very dense at this point. As the dough rests, the flour will absorb moisture and the salt will begin to dissolve.
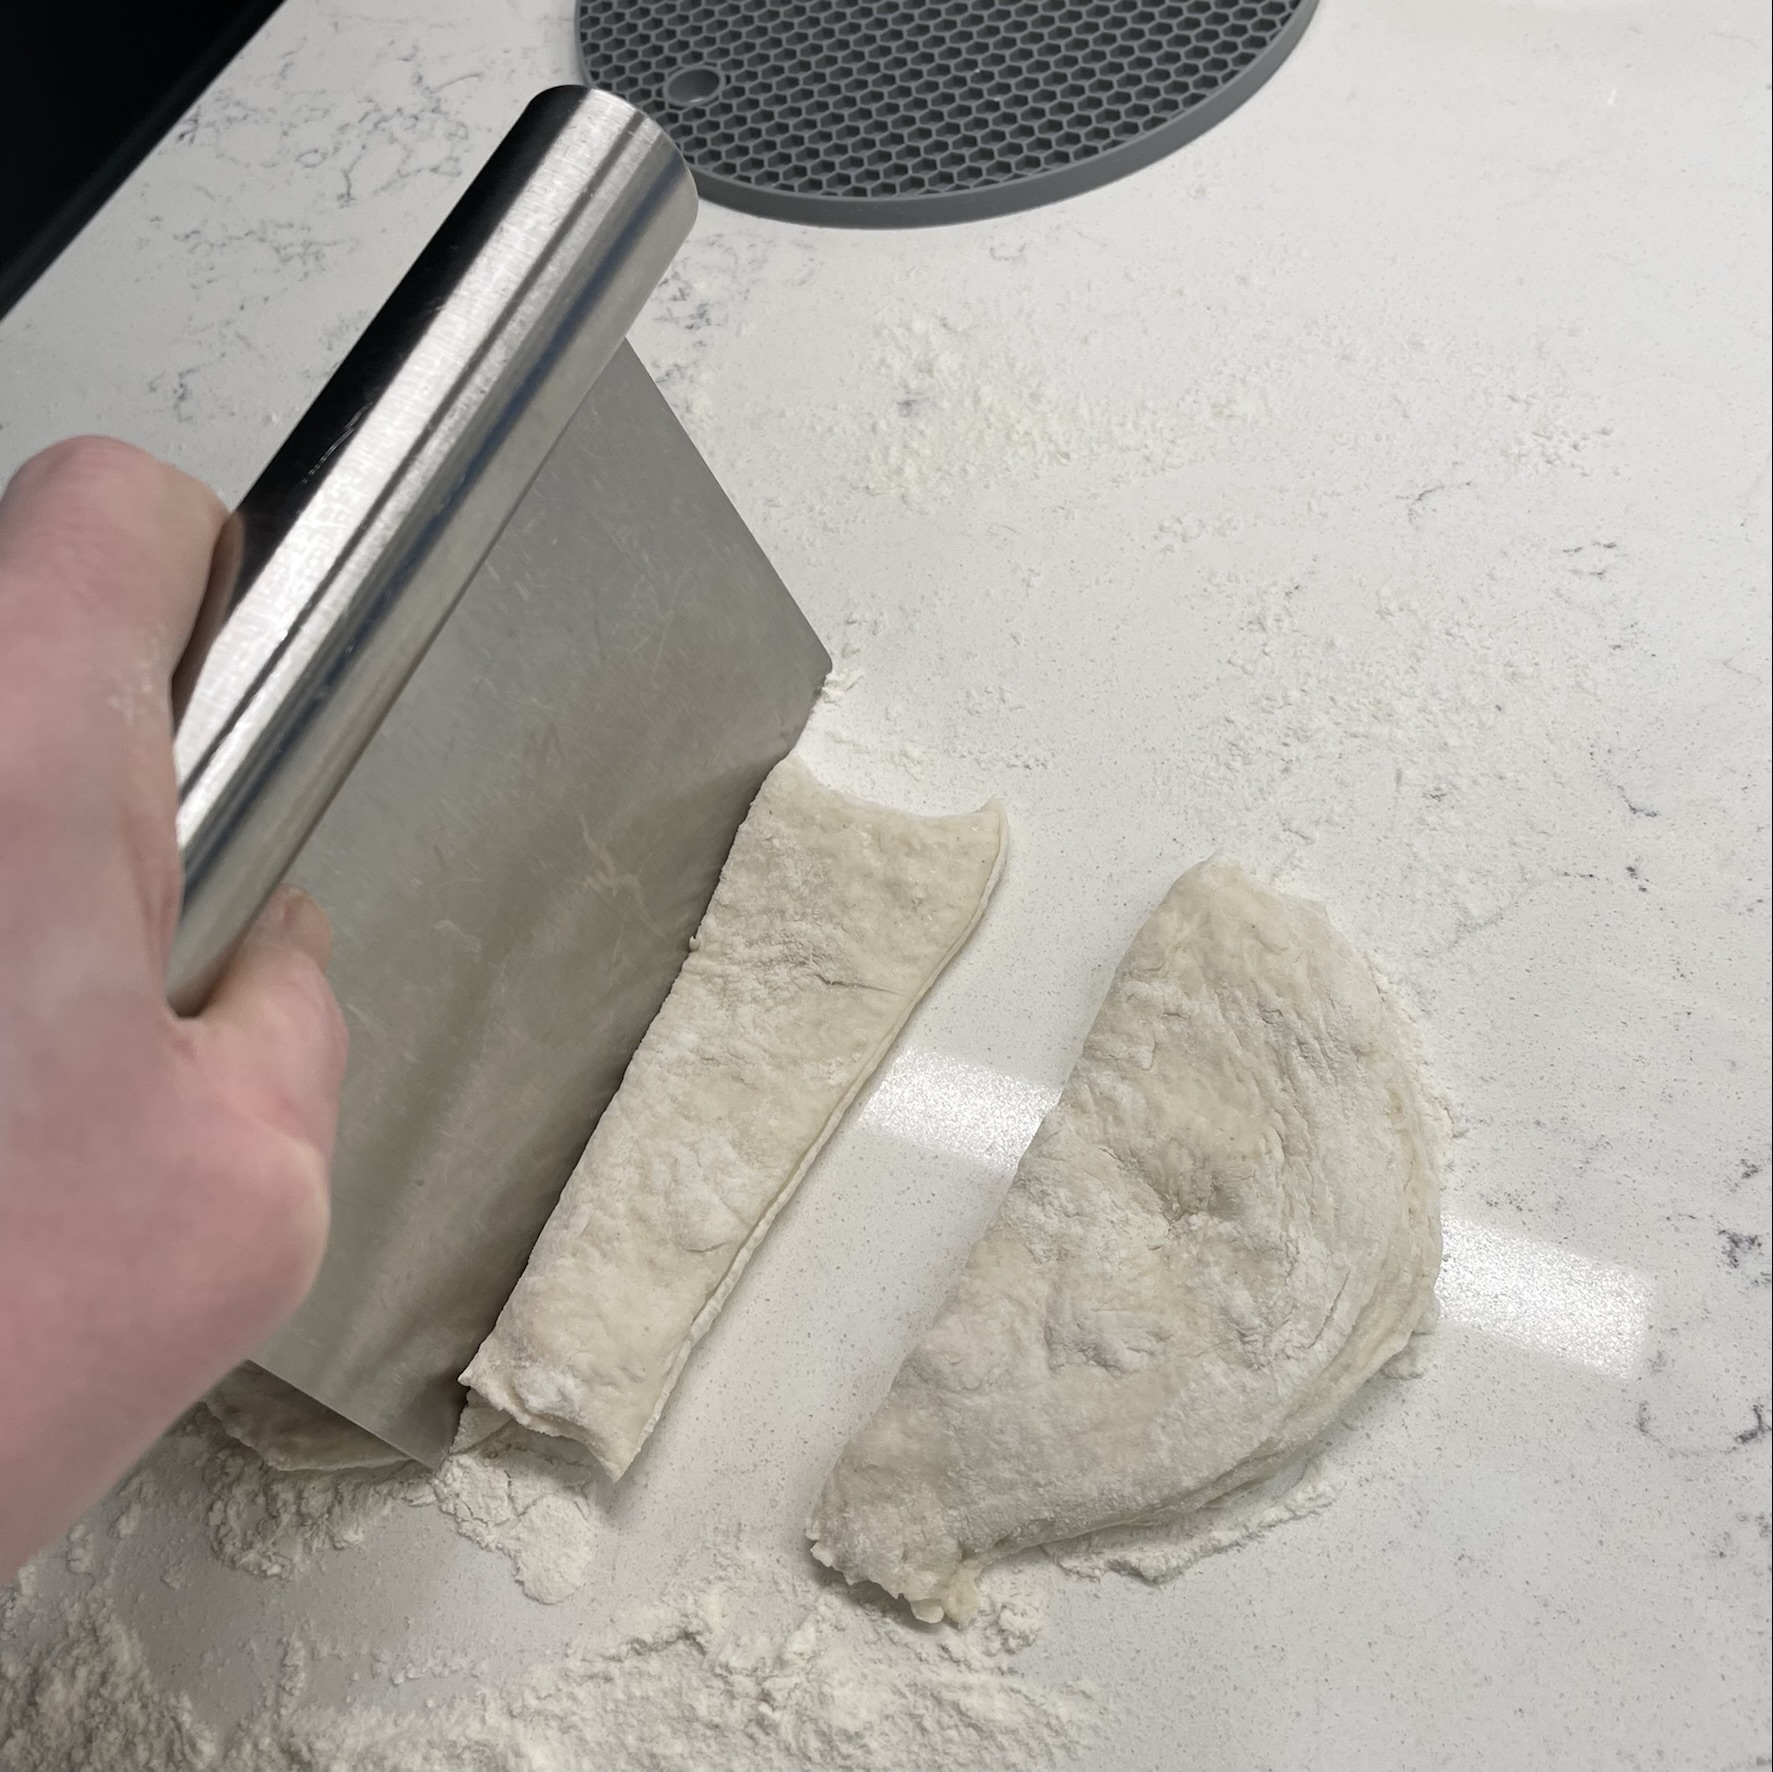
Turn the firm starter out onto a floured counter and cut it into pieces about the size of walnuts. Cover with a towel and set aside while the dough rests.
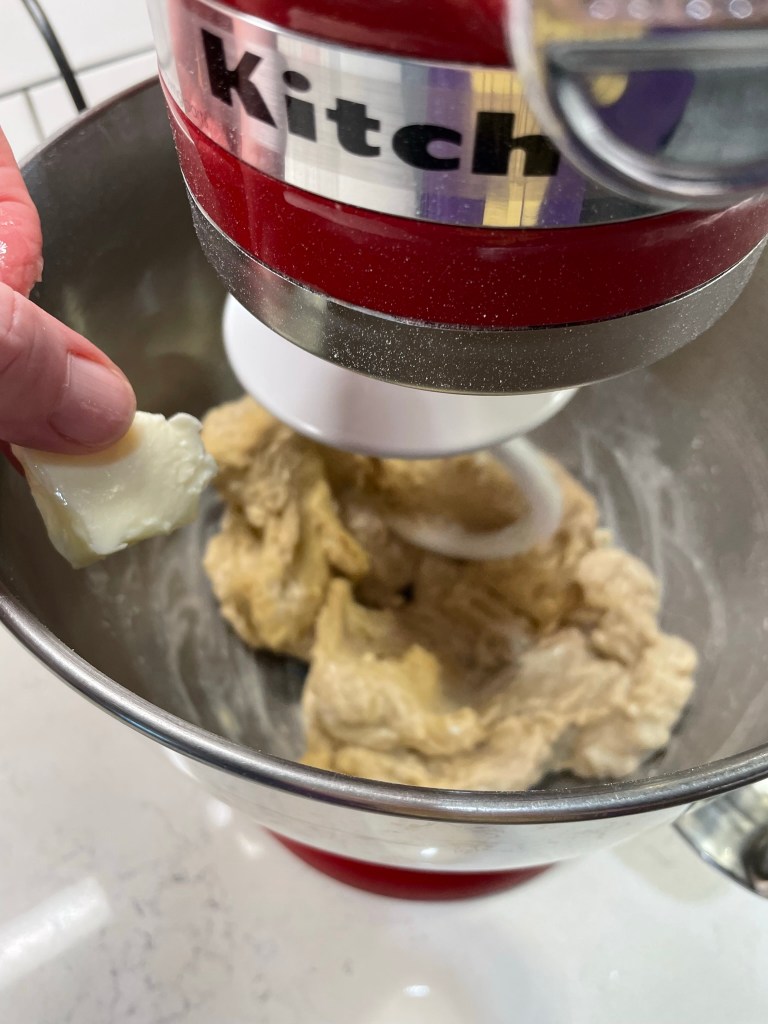
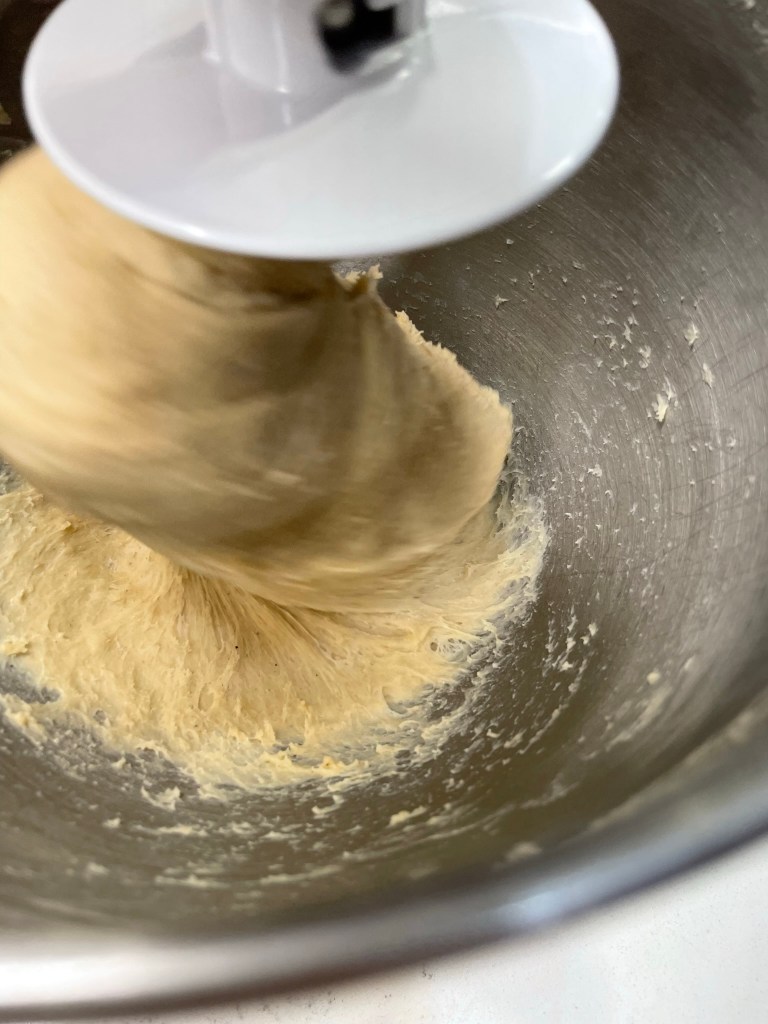
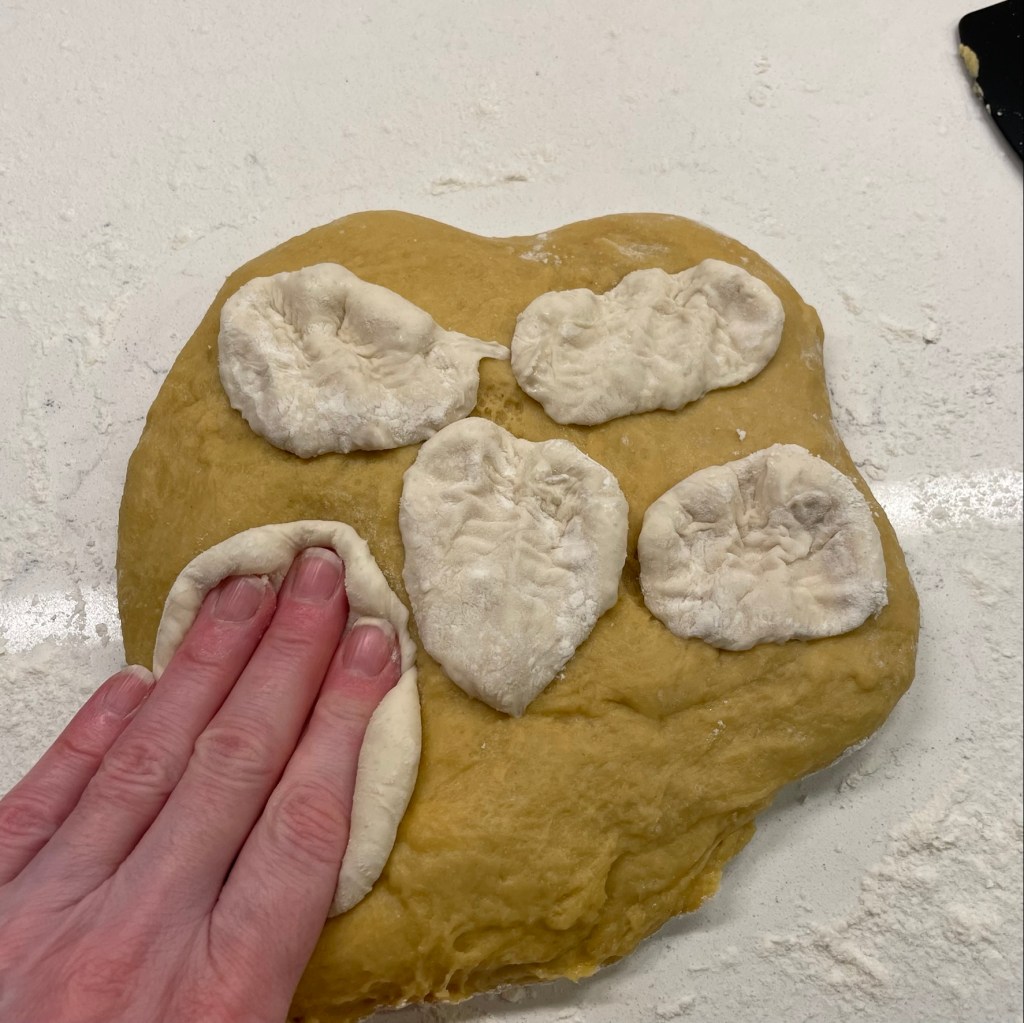
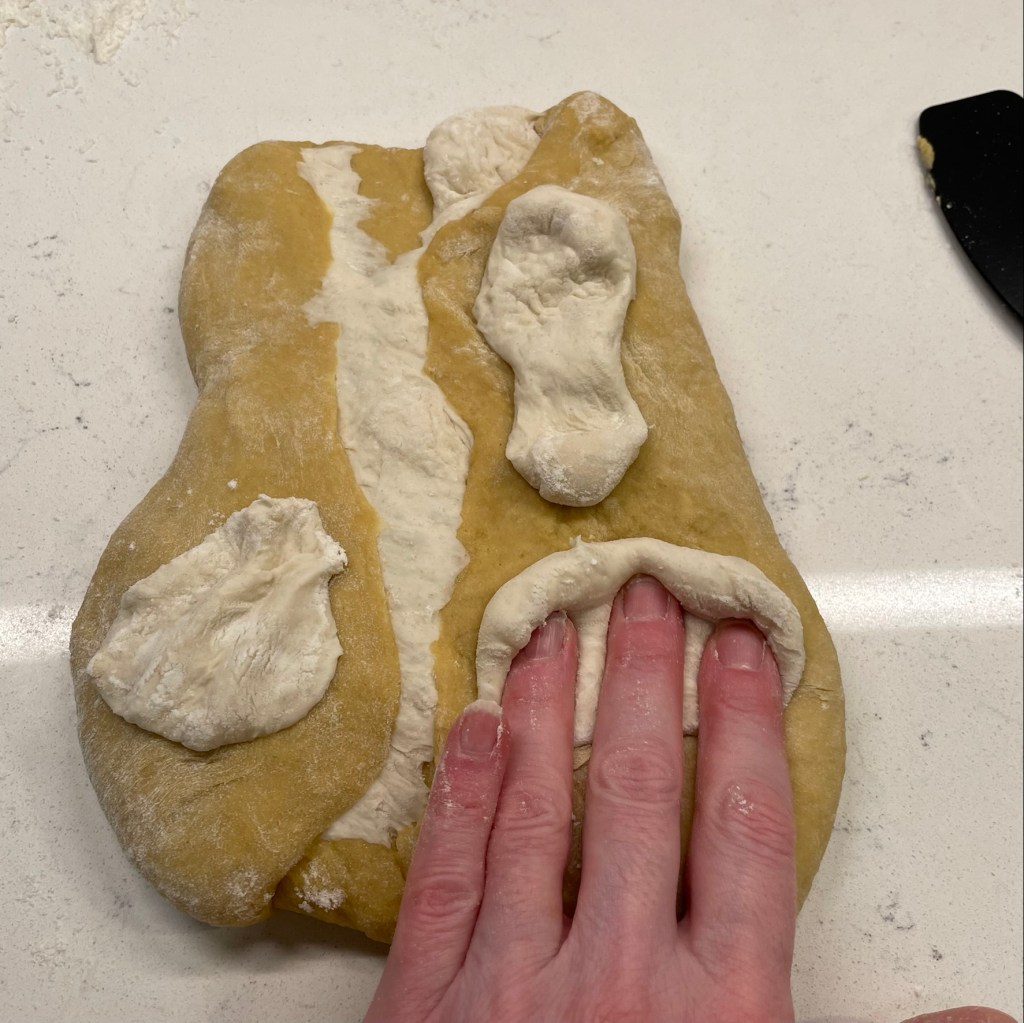
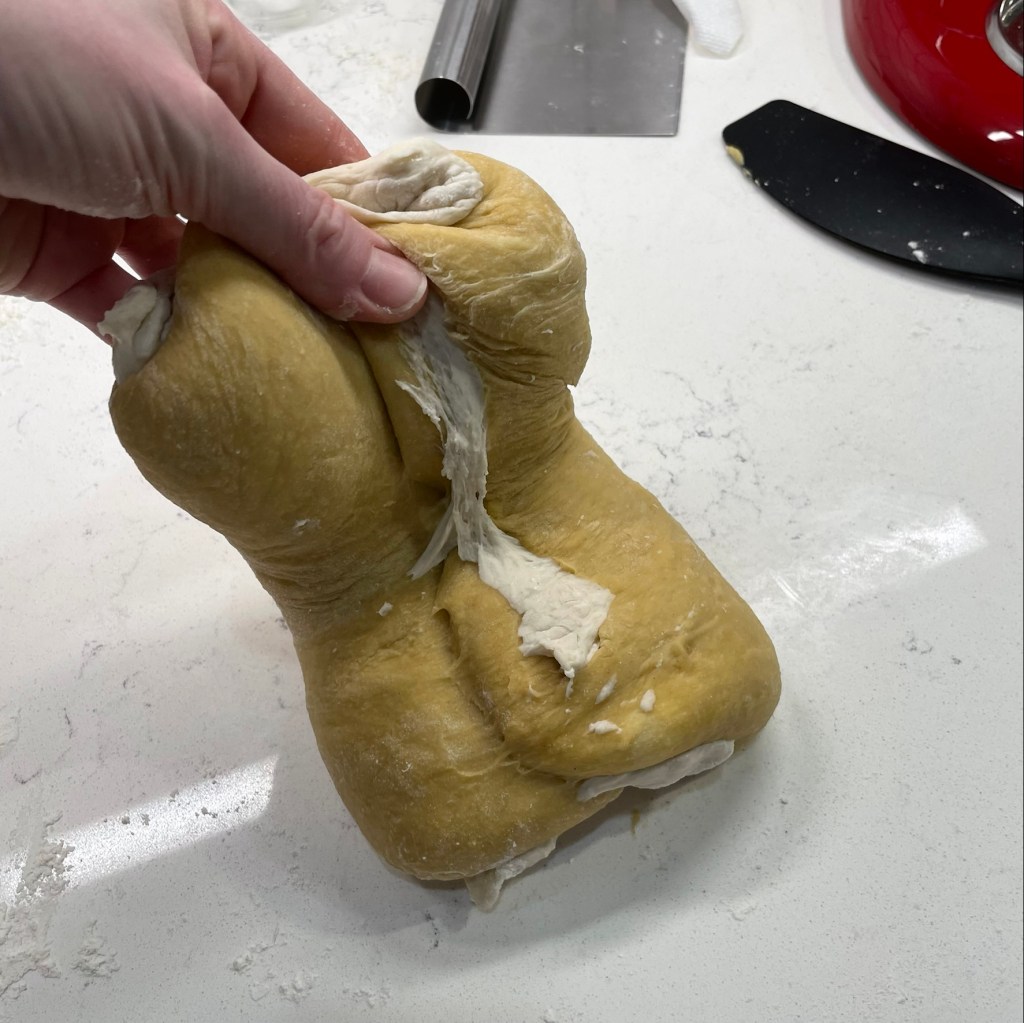
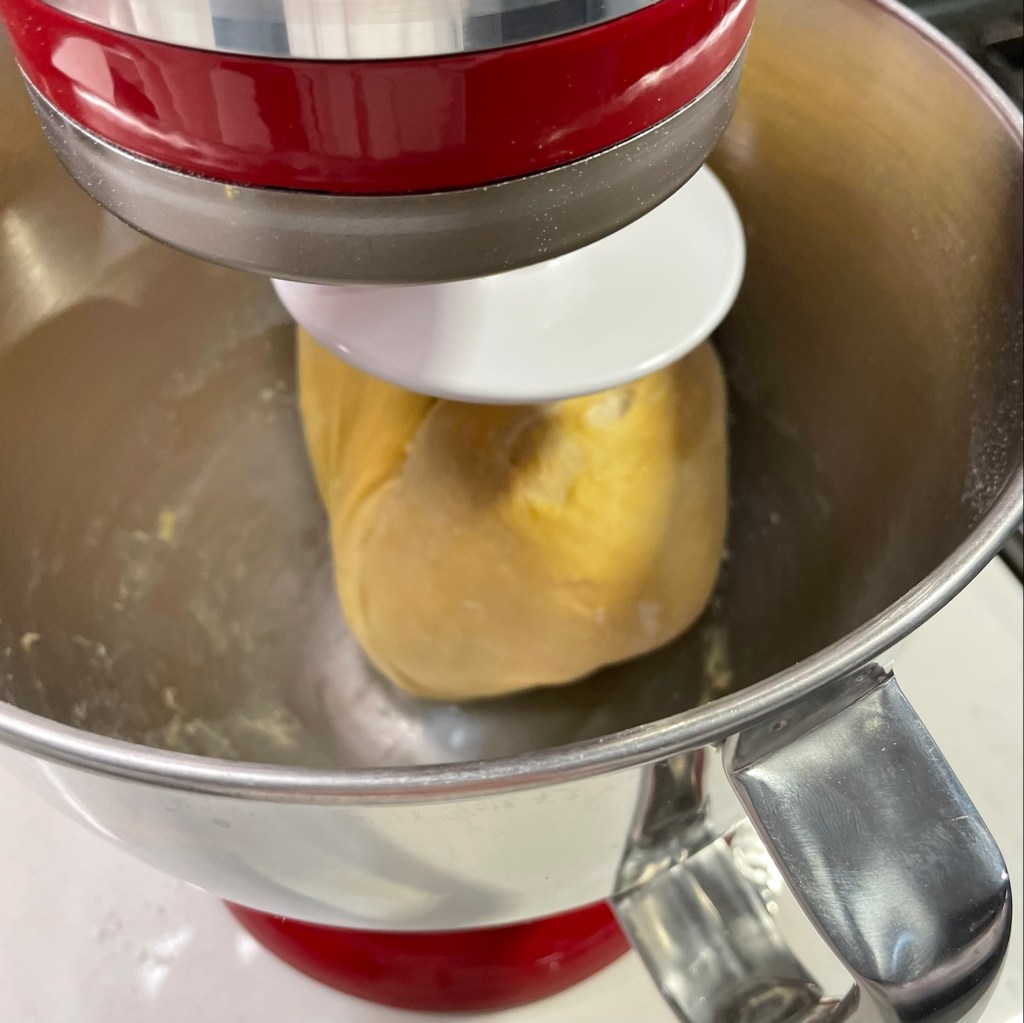
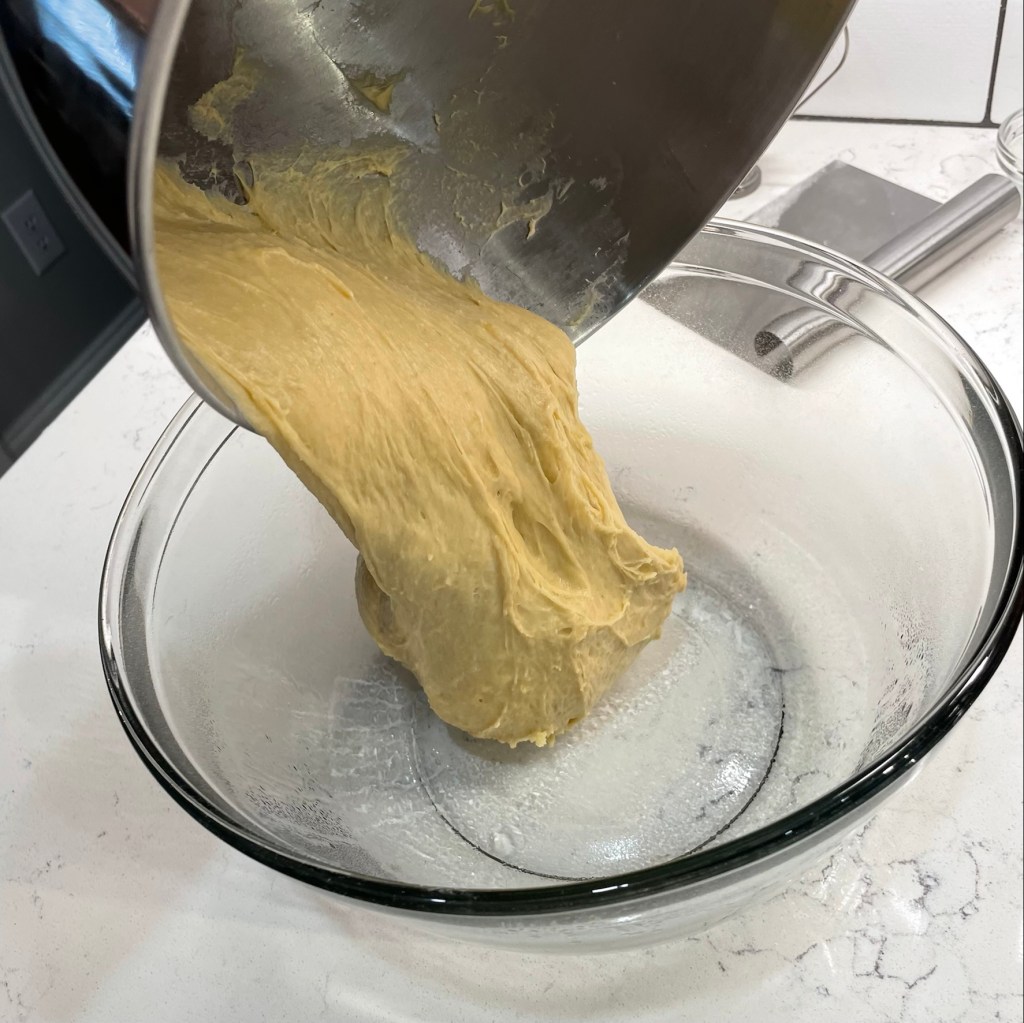
After the rest time, the salt will have begun to dissolve. Knead on medium speed to fully incorporate the salt, which should take 3 to 4 minutes. Transfer the dough to the counter or kneading board and press several pieces of the firm starter all over it. Fold the dough into thirds (like a letter) and press in the remaining pieces of firm starter. Move the dough back into the mixing bowl and knead on medium speed for 6 minutes, long enough to evenly blend the firm starter into the dough and also to get the gluten development going. Transfer the dough to a large bowl, cover and let rest at room temperature for at least 3 hours to ferment.
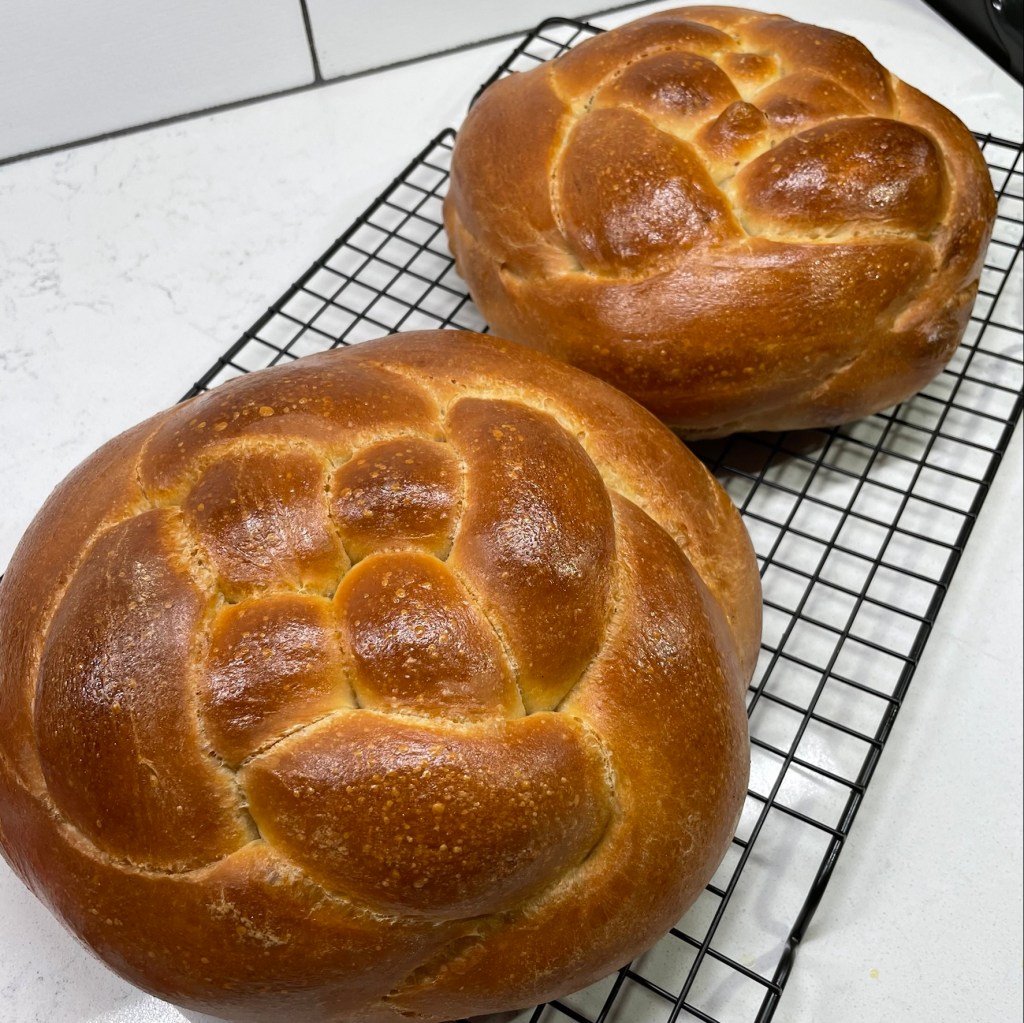
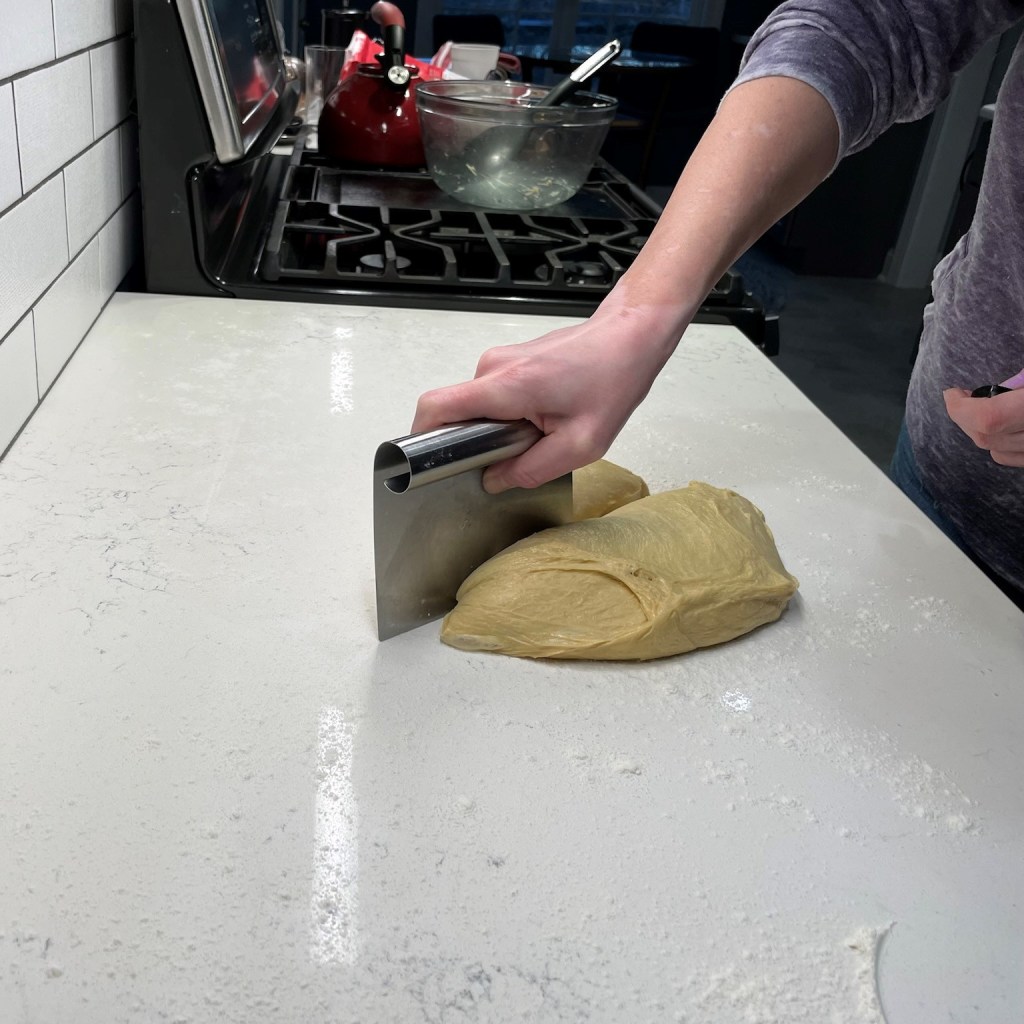
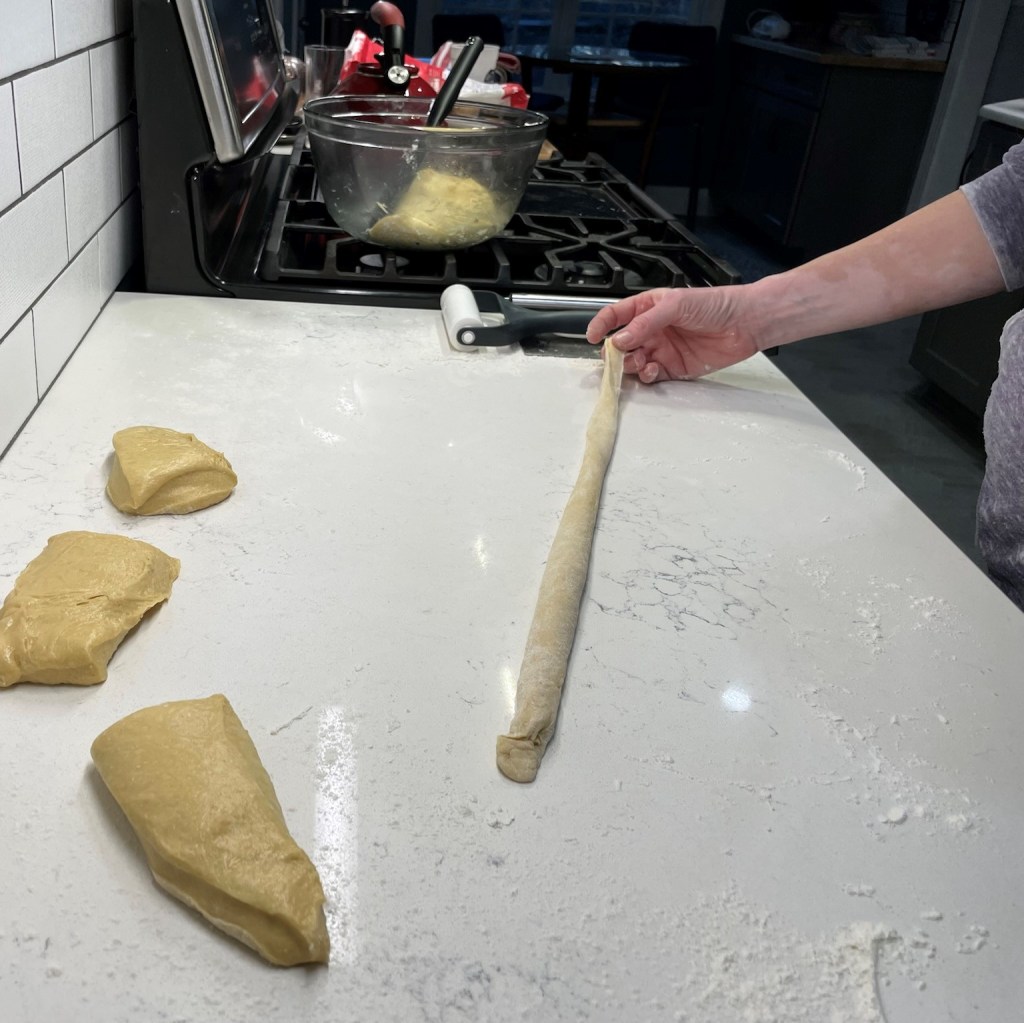
When the dough has fermented (you’ll know because it won’t spring back from a good finger poke), turn it out onto the counter and divide it into halves. This recipe makes two loaves; return one half of the dough to the bowl while you shape the first. Depending on how adventurous you want to be with braiding, divide the first dough section into either 3 or 4 equal-sized pieces. A 3-strand challah is made the easy way, as you would braid a child’s hair. To make the basket-weave round challah, you need 4 pieces.
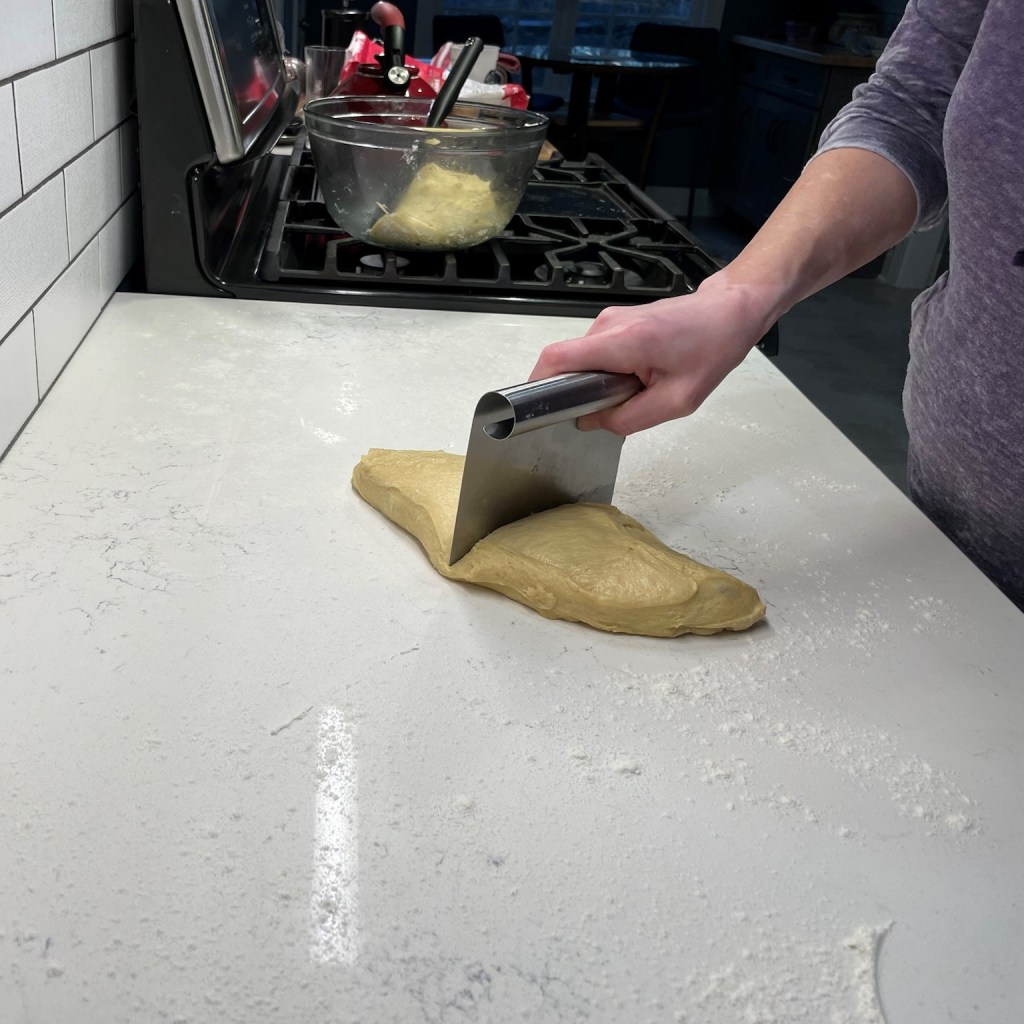
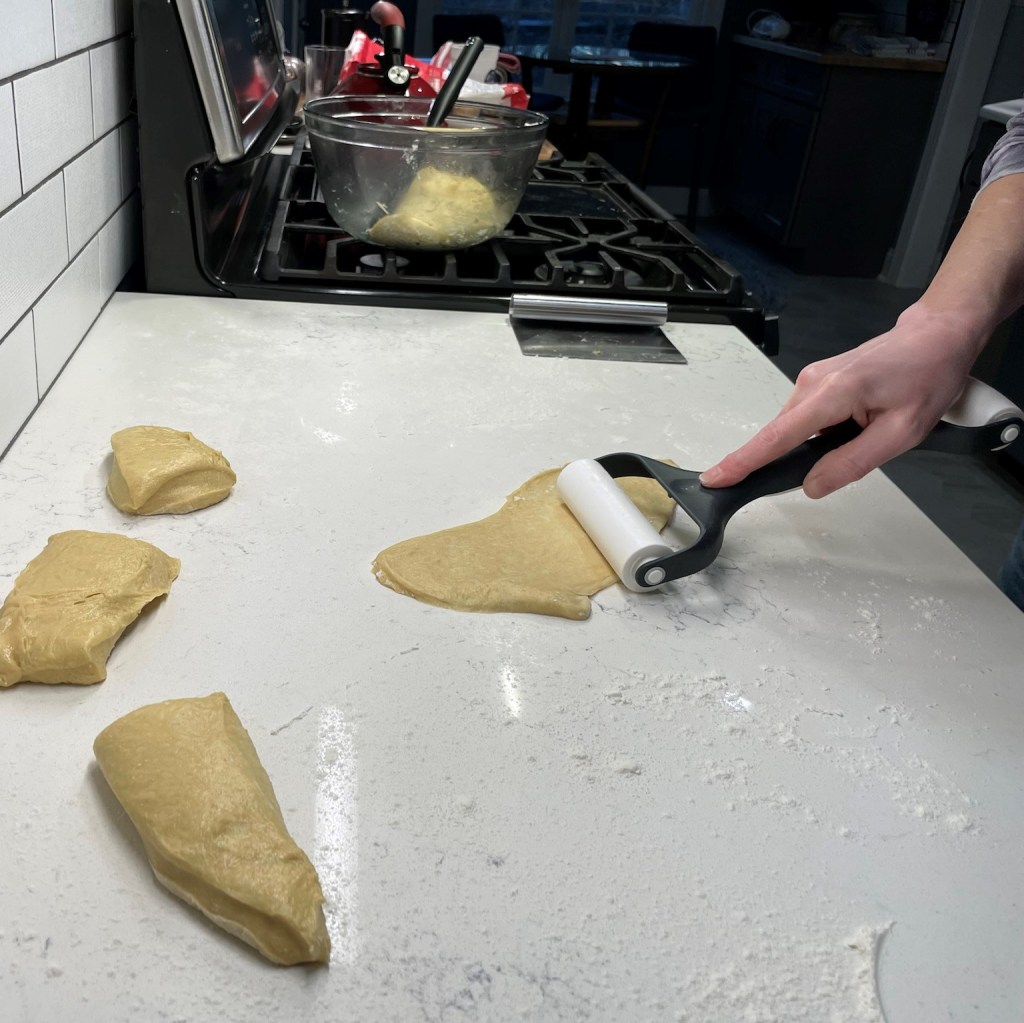
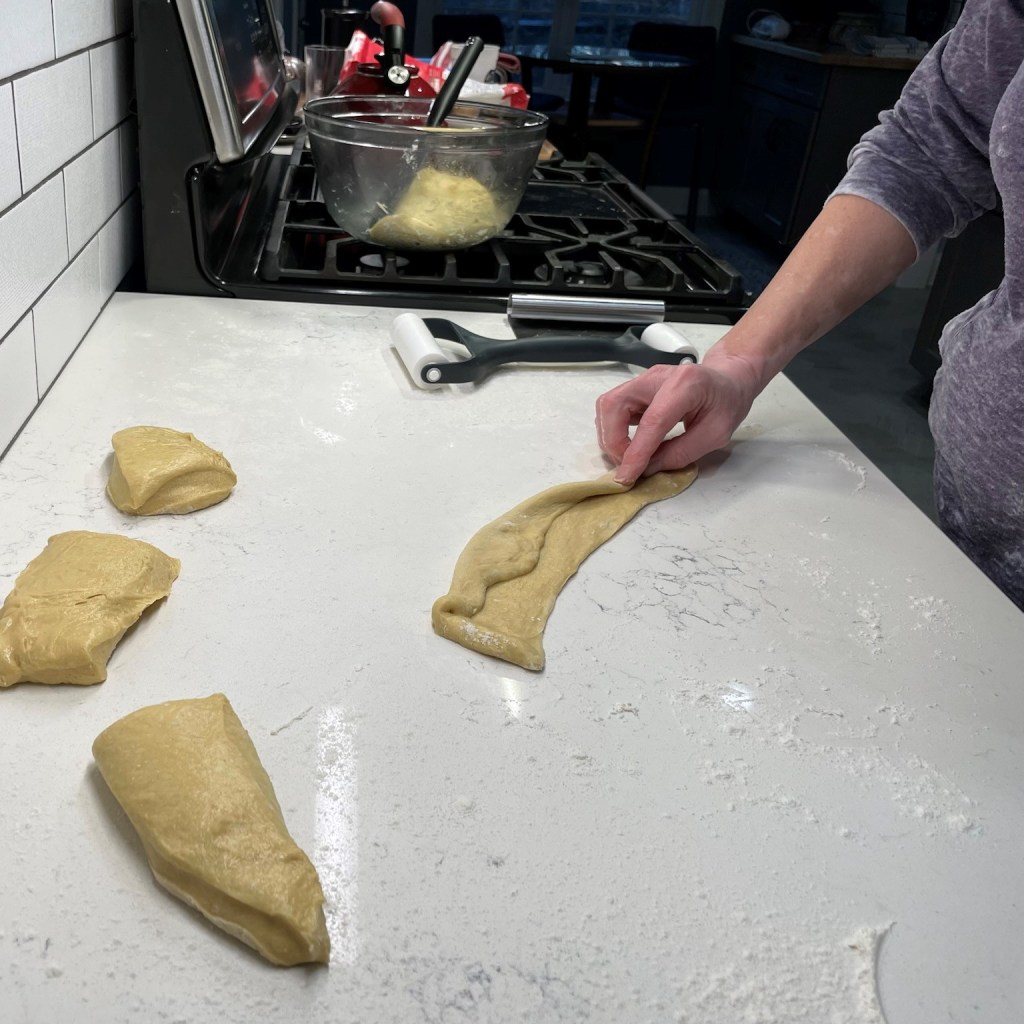
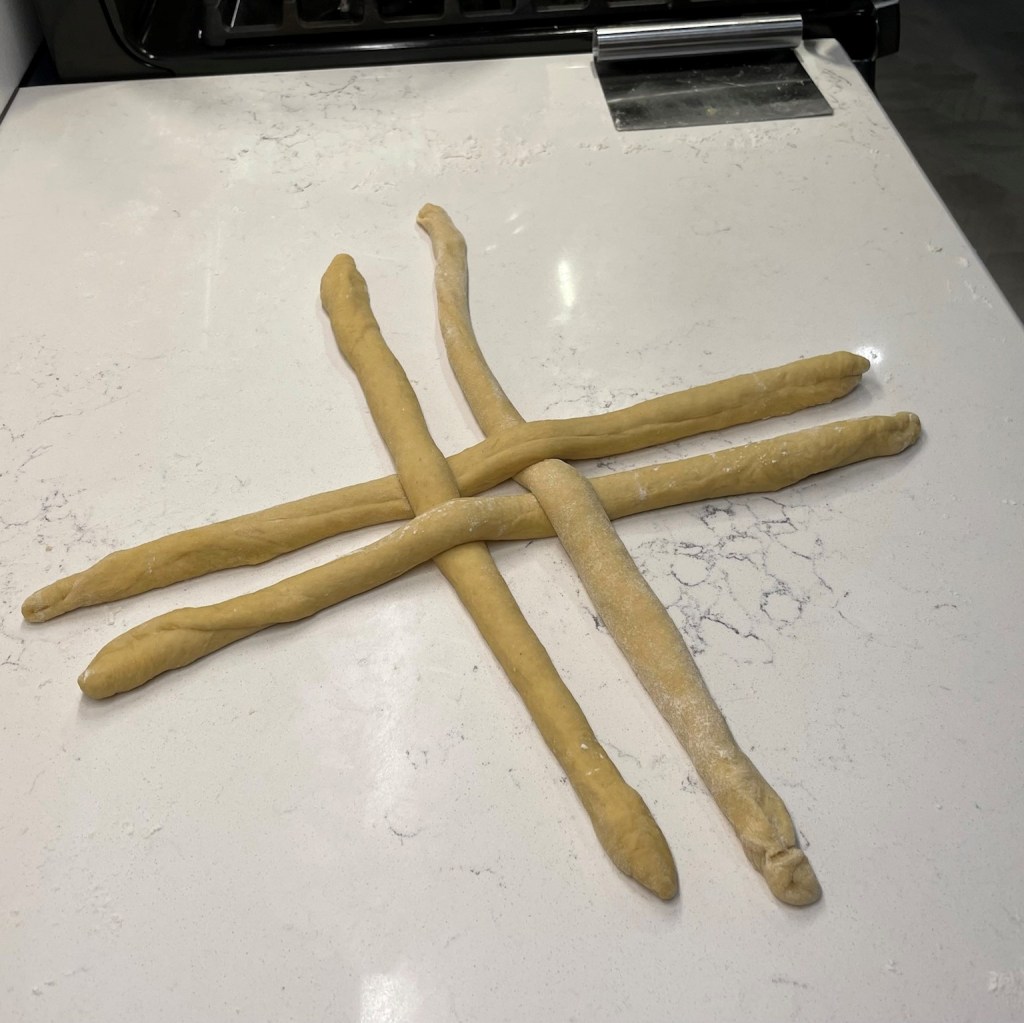
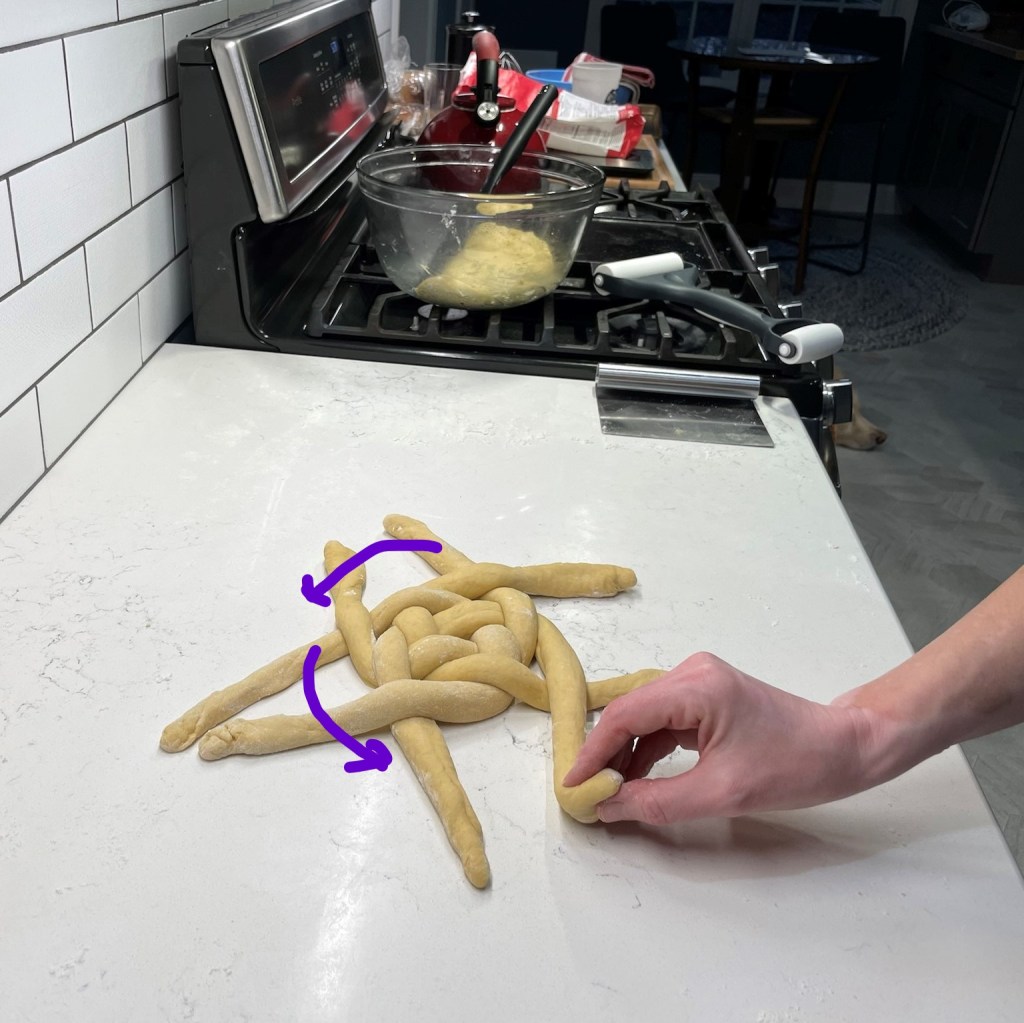
Stretch each section of dough out into an imperfect rectangle shape, and then use a rolling pin to roll it into a long, oval shape. The dough will be very thin on the counter, and that’s good. Use spray oil to keep it from sticking, or dust the counter with a very light amount of flour. Roll up the oval into a long rope shape, keeping it tight as you roll and pinching the seam to secure it. Roll it out firmly to stretch the rope into an 18″ length, with the ends somewhat tapered from the fuller, center part of the rope. Repeat with the other three pieces and arrange them in a tic-tac-toe shape, with the centers fairly close together (but not tight) and long strands extended in all four directions. Notice the over-under pattern, as this is the important starting position for braiding a round.
One important thing to note is that you do not want the dough strands to be too tightly crossed, either at the start or after braiding. You should be able to wiggle a finger between strands after braiding, and this is important because the dough needs room to expand during proofing; otherwise, it will expand into one large blob and you’ll lose the beautiful pattern.
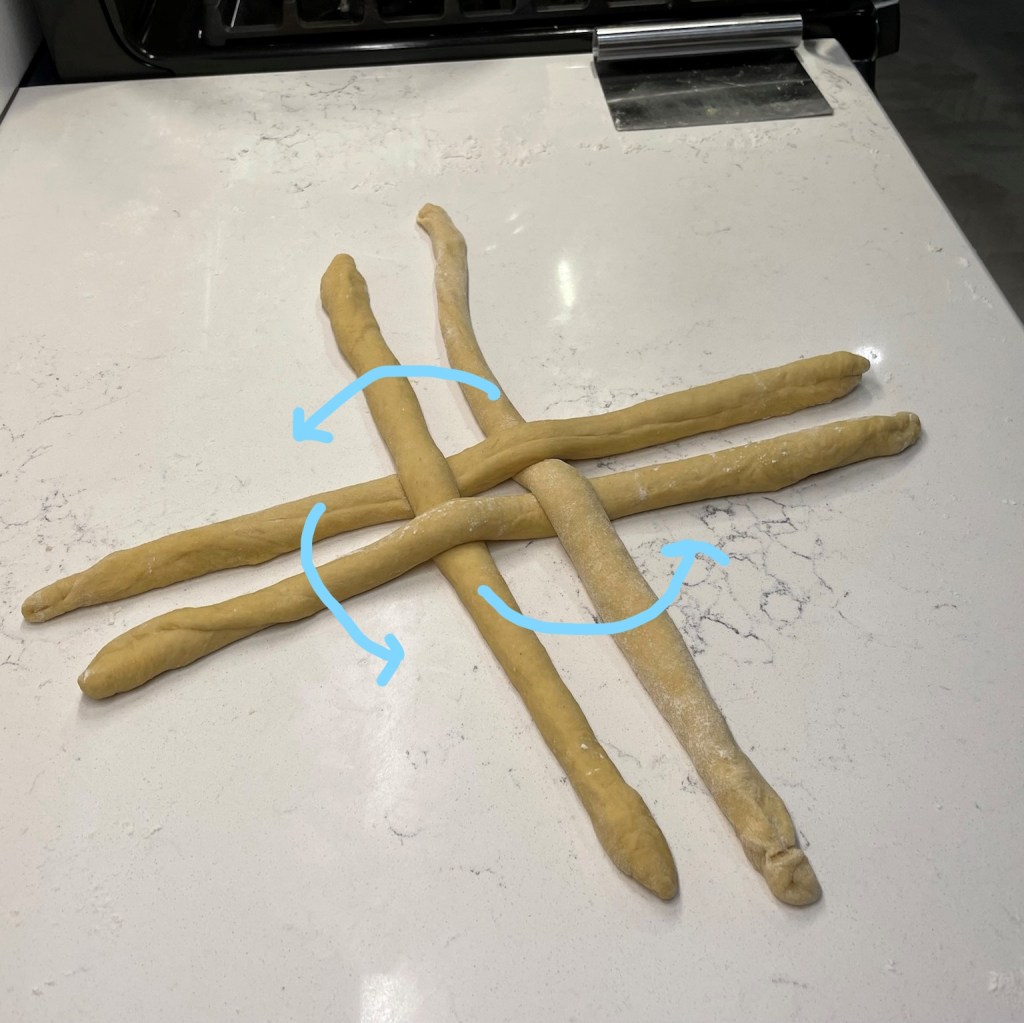
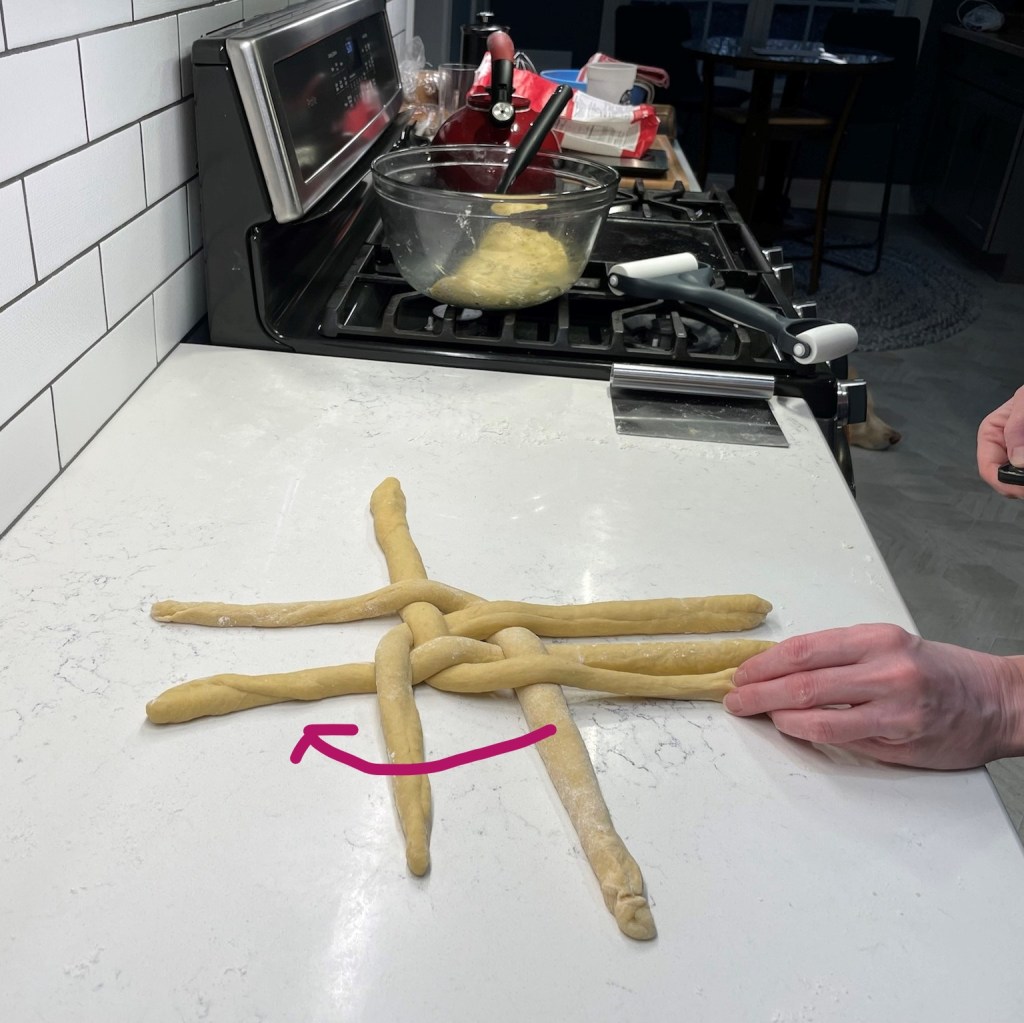
Shaping the dough is probably best learned through pictures, but I’ll try to describe it here. Take any long strand that is under the piece that crosses it, and sweep it over the piece parallel to it so that its new position is parallel to the cross piece. Repeat with the other four strands. Next, reverse direction but do the same thing, taking the underneath pieces and cross over to make them parallel to the piece next door. Repeat with the other four. Continue this pattern of reverse-crossing until the strands are too small to cross over. At that point, twist and pinch together the ends you would otherwise cross so that the dough doesn’t unravel. Tuck the twisted ends underneath and transfer the bread to a parchment-lined baking sheet.
Follow the arrows to see how the braiding goes. To begin, you’ll simply move the ropes that are underneath a cross piece over top of their parallel rope and perpendicular to their original direction.
Next, reverse the direction and do the same with the ropes that are now in underneath position.
Keep reversing and crossing until you run out of dough length.
When you can no longer cross the ropes, bring them together in a twist to seal them into place.
Tuck the twisted ends underneath. Remember that it doesn’t have to be perfect, and you can practice the technique with yarn, twine or strips of fabric to get a feel for it.
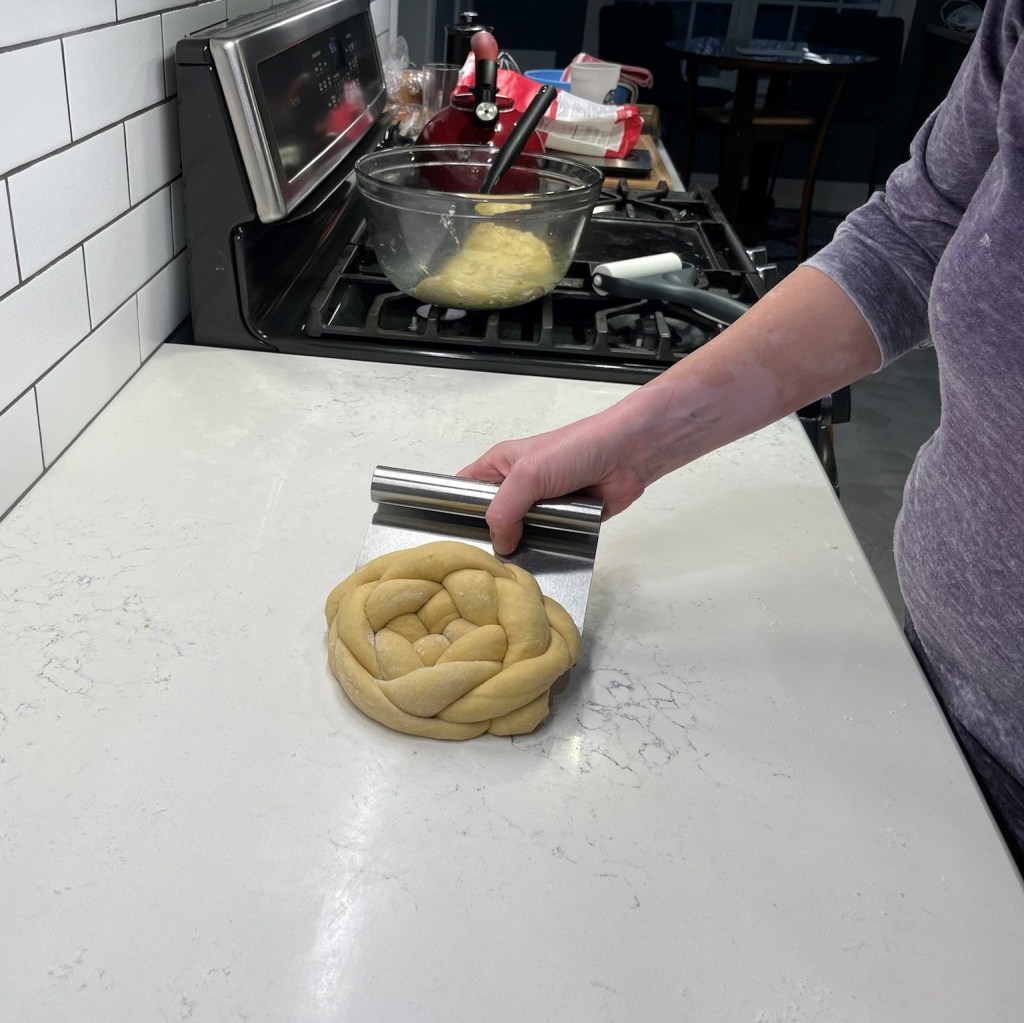
When the braiding is finished, the challah round won’t be much larger than a bread plate, but don’t worry, it’ll rise significantly during the proofing stage!
Here’s how I fill a braid with fruit. Simply scatter about two tablespoons worth of dried fruit over the section of dough before rolling it into a rope. It will feel lumpy as you stretch out the rope, but it settles down during proofing.
Repeat with the second batch of dough and lightly spray or brush the loaves with olive oil and secure a couple of layers of plastic wrap over them. Keep the plastic somewhat loose, allowing room for rising, but not so much that air can dry out your loaves.
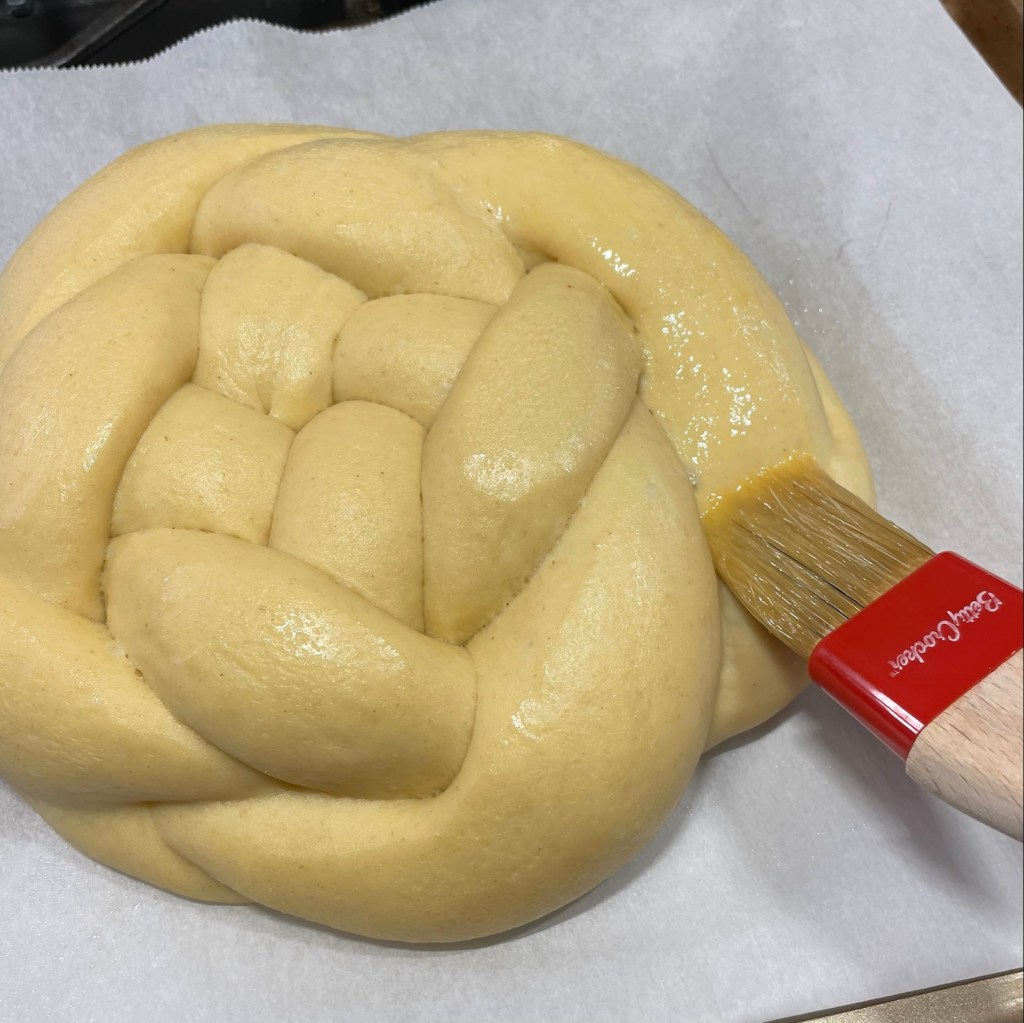
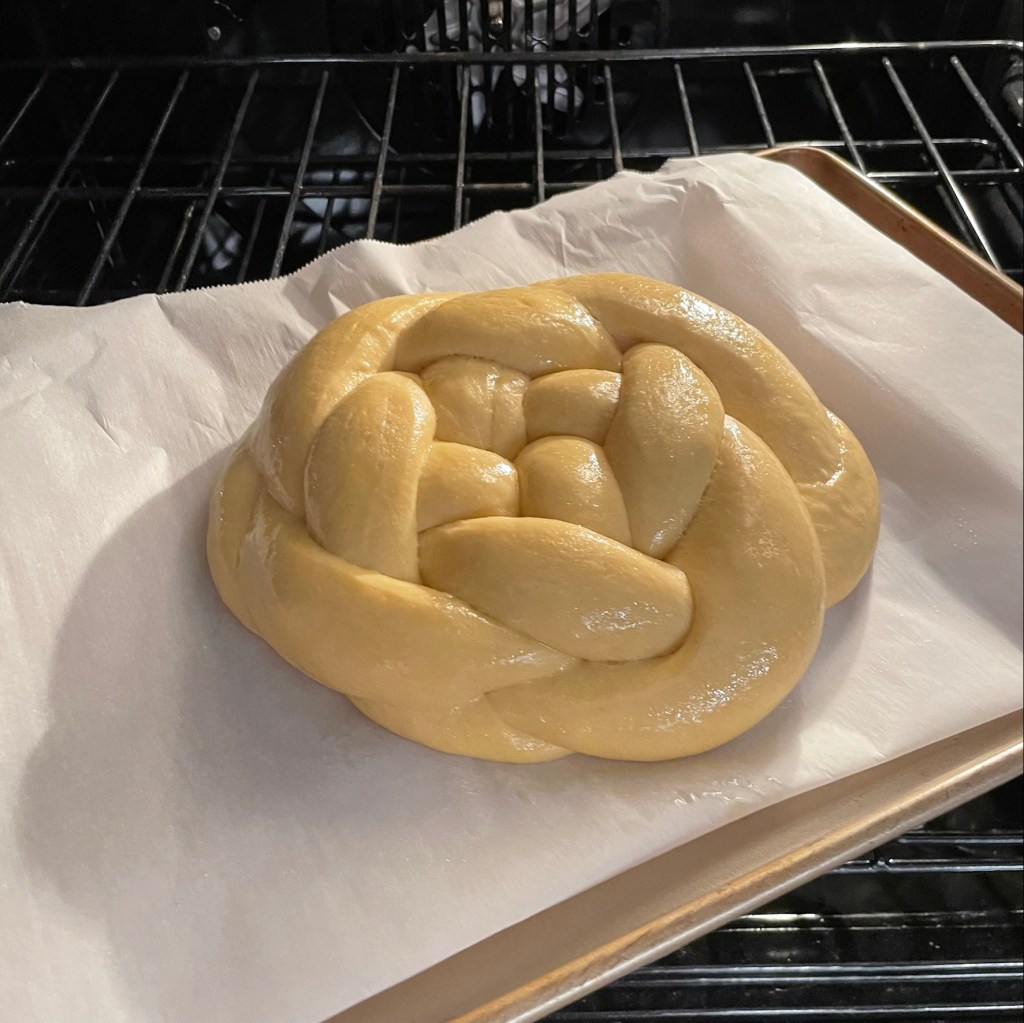
Proof the loaves at warm room temperature for up to 5 hours, until they have at least doubled in size. They will be quite “poofy” when they are ready. Preheat the oven, brush all over with egg wash (get into every nook and cranny) and bake until they are deep golden brown all over, with internal temperature at 200° F.
Transfer to cooling racks and cool completely before slicing or wrapping.
The braiding technique is the easiest thing about these loaves, which are enriched with eggs, citrus-scented olive oil and sweet honey. The recipe takes time, but the reward is as sweet as my wish for you in the Jewish New Year.
Ingredients
35g recently fed sourdough starter
80g room temperature water
130g bread flour
Mix the firm starter ingredients together, cover and let stand at room temperature overnight. Or, refrigerate after 8 hours fermentation and remove from fridge one hour before proceeding.
Ingredients
65g warm water
65g honey
3 large eggs, room temperature
55g olive oil
300g bread flour
100g white whole wheat flour
1 1/2 tsp. fine sea salt
all of the firm starter (above)
1 large egg, mixed with a tablespoon of water (for egg wash)
Directions
In the bowl of a stand mixer, combine the water, honey, eggs and oil. Whisk together until fully blended. Add flour ingredients and mix with the dough hook until all flour is incorporated.
Remove dough from hook, sprinkle with salt and cover. Rest the dough for about 30 minutes, as this will make kneading easier. Rinse all dough bits from the hook so it’s ready for the next kneading step.
Turn the fermented firm starter out onto a floured countertop. Use a bench scraper to cut the dough into several pieces, toss them in the flour to coat, and then cover with plastic wrap or a clean towel to keep it from drying out.
After resting, the salt on top of the dough will have dissolved a bit. Knead with the dough hook for a few minutes to fully incorporate the salt, then transfer the dough to a lightly floured countertop.
Spread the challah dough out to enlarge it, and then press several pieces of the firm starter into it. Fold it up in thirds, like a letter, and press the remaining pieces of firm starter into it. Return the dough to the mixing bowl and knead with the dough hook for several minutes. You should not see any streaks of starter, and the dough should be dense, smooth and shiny. Transfer it to a large, oiled bowl and cover. Let it ferment at room temperature for about 3 hours. It likely will not double in size, but it will expand somewhat.
Turn the dough out onto a clean counter and use a bench scraper to divide it in half. Return one half to the bowl and cover to prevent drying while you shape the first loaf.
Cut the first dough portion into equal parts for braiding, either 3 or 4 pieces. Flatten into rough rectangle/oval shapes and roll up tightly into ropes, pinching to seal the edges. Roll out with the flat part of your palms to stretch the ropes to 18″, with ends that are tapered a bit.
8, Arrange the dough ropes for braiding, following visual instructions in this post. Place braided loaves on parchment-lined baking sheets and cover with lightly oiled plastic wrap. Proofing time will be anywhere from 3 to 5 hours, depending on the temperature of your kitchen, humidity and moon cycle. Just kidding on that last one, but honestly, the time needed for proof can vary broadly, so my best advice is to begin checking after 3 hours. Dough will double or nearly triple in size, and it is ready to egg wash and bake when it refuses to bounce back after a finger poke.
Preheat oven to 350° F. Gently brush egg wash all over every visible surface of the challah loaves. Bake for approximately 35 minutes, until bread is deep golden brown all over. Internal temperature should be about 200° F. Transfer to a cooling rack and cool completely before slicing or wrapping.
From the CDJ archive, here’s another way you can achieve a “round” challah, if you aren’t feeling the love for the basket-weave design. Divide your dough for one of the loaves into three equal segments and braid them like a hair braid, and then curl it around, tucking and pinching to seal the ends together. It’s more of a wreath than a round, but still has the circle symbolism. This was an experimental sourdough pumpkin challah, filled with Trader Joe’s “golden berry blend” dried fruit, and it was nothing short of fabulous. 🙂
The wreath shaped loaf is filled with a blend of dried fruits: cranberries, golden raisins, blueberries and cherries.
Ice cream is one of my favorite desserts to make. It’s usually just me and my husband at the table, so I rarely make cakes, pies or other large-scale desserts because we don’t want all those leftovers in the house. But ice cream. Now that’s a treat that we can enjoy over a week or two, and for the holidays this year, I wanted to do a Christmas-y flavor. I had considered doing an ice cream with My Dad’s Irish Creme, which I made last week for sipping by the chiminea, though it has been unseasonably warm in North Carolina so we have only done that once. I’ll need to give that one some thought, because so much of the flavor comes from a hefty amount of Irish whiskey and that will hinder the freezing. I also considered eggnog ice cream, which can be made with less alcohol, but I could not find a commercial eggnog that wasn’t made with high fructose corn syrup (bleh). Maybe next year, with more careful planning.
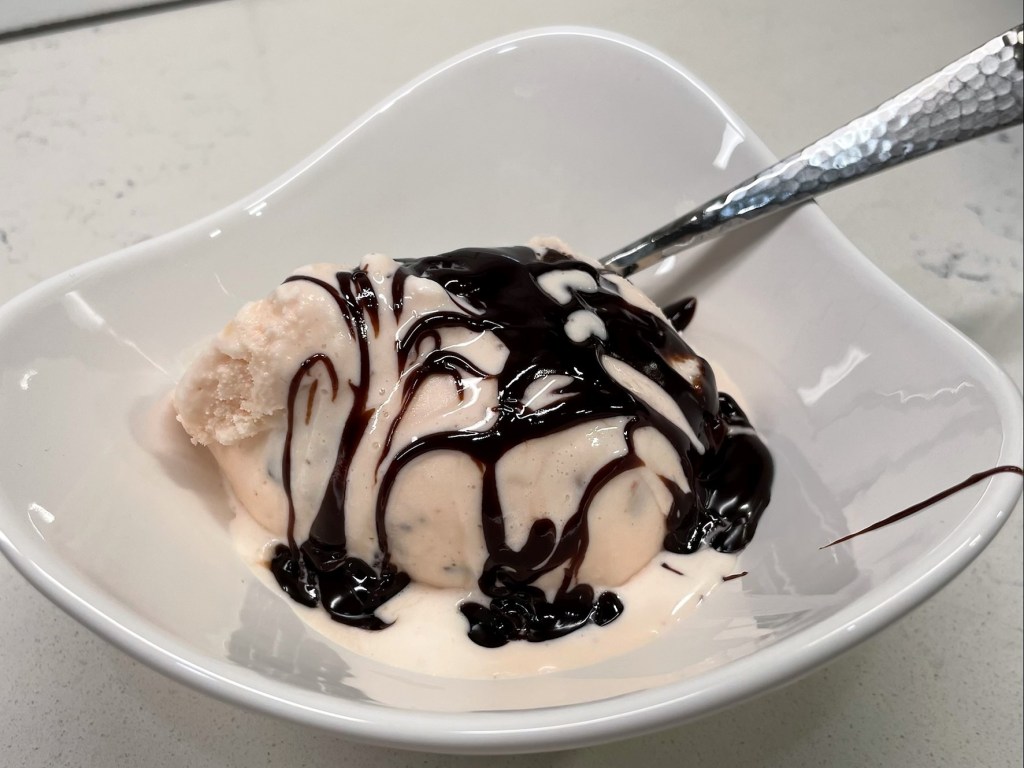
You can only find this flavor during the holidays, and this week, it will probably be on sale!
This peppermint-and-chocolate combination won me over after my husband tasted one of these little peppermint bark candies. Mint is not a favorite of his, but combined with the chocolate, he declared it a winner. I wanted to include these candies in the finished ice cream, and I also wanted the ice cream base to have a minty flavor.
My inspiration for that part came from a post shared recently by one of my blog pals, Chef Mimi, who presented a gorgeous peppermint chocolate cocktail made with vodka that had been infused with candy canes. I thought, “well, why wouldn’t that kind of infusion also work in a base for ice cream?” And, as you can see, it does!
Unlike most of my ice creams, which begin with a cooked egg custard base, this one gets its rich texture from sweetened condensed milk. The base peppermint flavor and pretty pink color are the result of having dissolved a couple of candy canes into the milk portion of the ice cream, and I added chopped up chocolate peppermint bark squares at the end for a fun candy surprise.
An ice cream machine is recommended for this recipe, which will yield 1 1/2 quarts.
This was a fun way to capture the flavors of the season in an ice cream!
Ingredients
1 cup whole milk
2 regular size candy canes (if you have mini candy canes, I recommend using about 4 of them)
14 oz. can sweetened condensed milk* (see notes)
1 1/2 cups heavy cream
1/2 tsp. peppermint extract oil
1/2 tsp. real vanilla extract
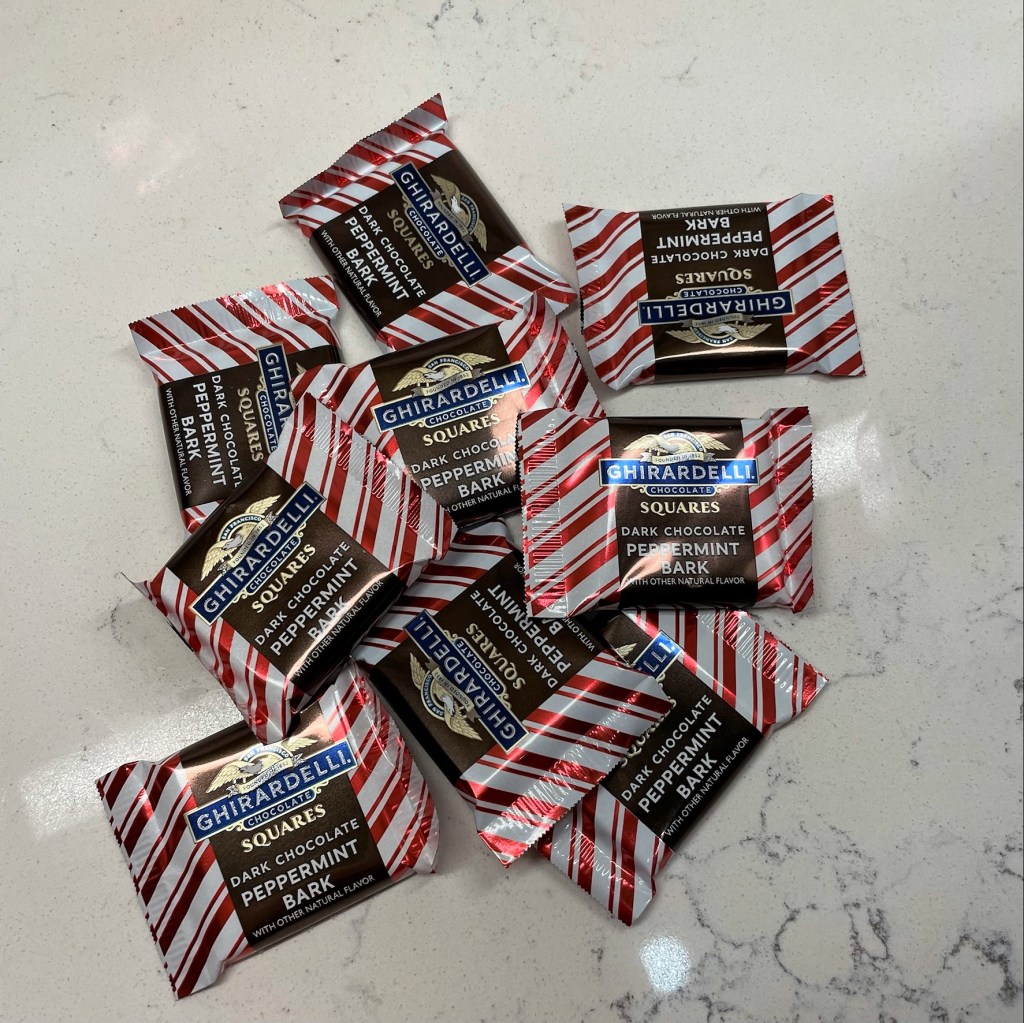
9 Ghirardelli dark chocolate peppermint bark squares, chopped
1 oz. good vodka*
Your favorite hot fudge sauce (optional, but yum!) for serving
*Notes
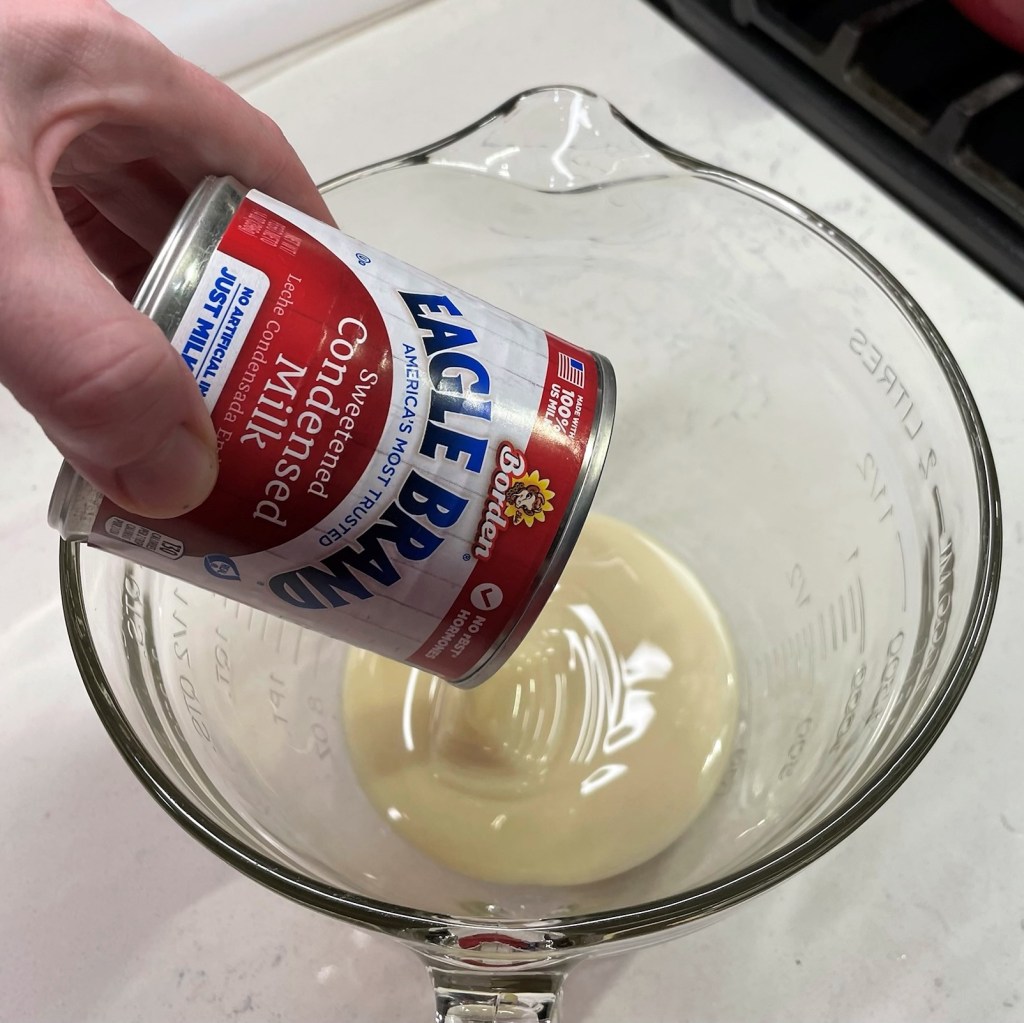
Sweetened condensed milk is great for ice creams that do not have a custard base, especially when you want to have a brighter “white” base color. I used the whole milk version of Eagle brand, but I expect you could also use a reduced-fat or even fat-free version of condensed milk; if you choose a lower fat option, expect a slightly “icier” texture in the finished ice cream.
A small glug of vodka, mixed in for the final minute of freezing, ensures that the ice cream will scoop easily straight from the freezer. If you prefer not to add alcohol (or, certainly, if you intend to share the ice cream with children or non-drinkers), you can skip this ingredient. Simply take the ice cream from the freezer about 10 minutes before scooping.
Instructions
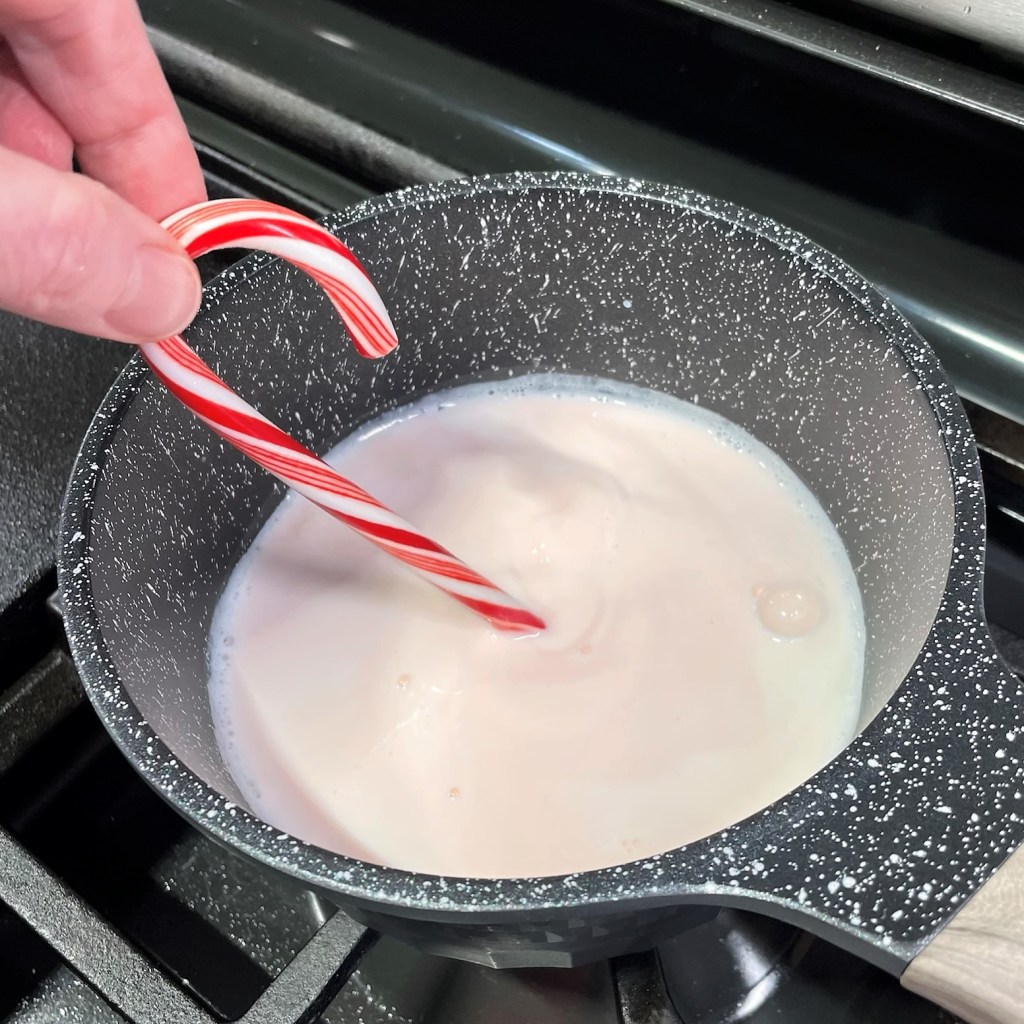
Warm the milk over medium-low heat, and let the candy canes dissolve in it.
The fully dissolved candy canes will turn the milk a pretty pink color!
Condensed milk is very sweet, so there is no need for additional sugar in this ice cream recipe.
Whisk the heavy cream into the condensed milk.
Bring on the minty pink milk!
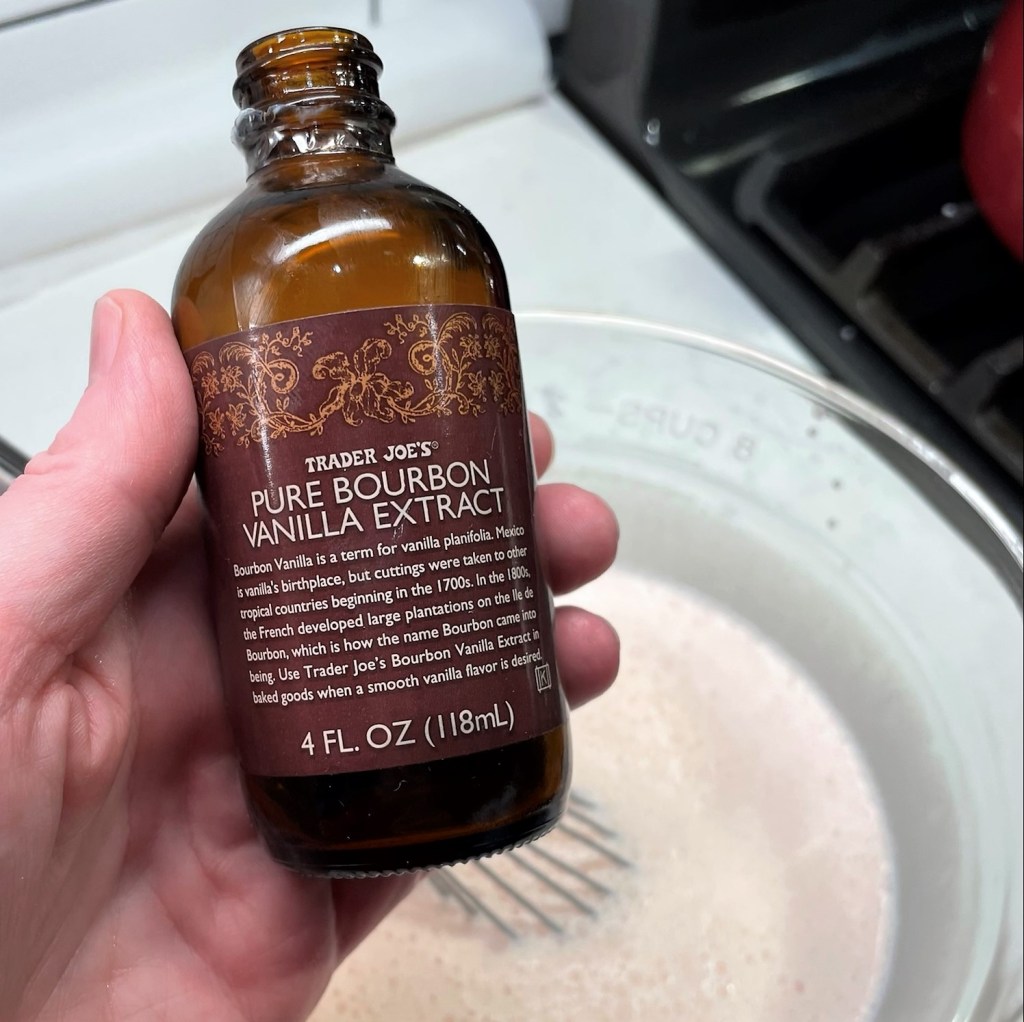
I added a touch of peppermint oil to boost the minty flavor.
And a small bit of real vanilla to soften the sharp peppermint flavor.
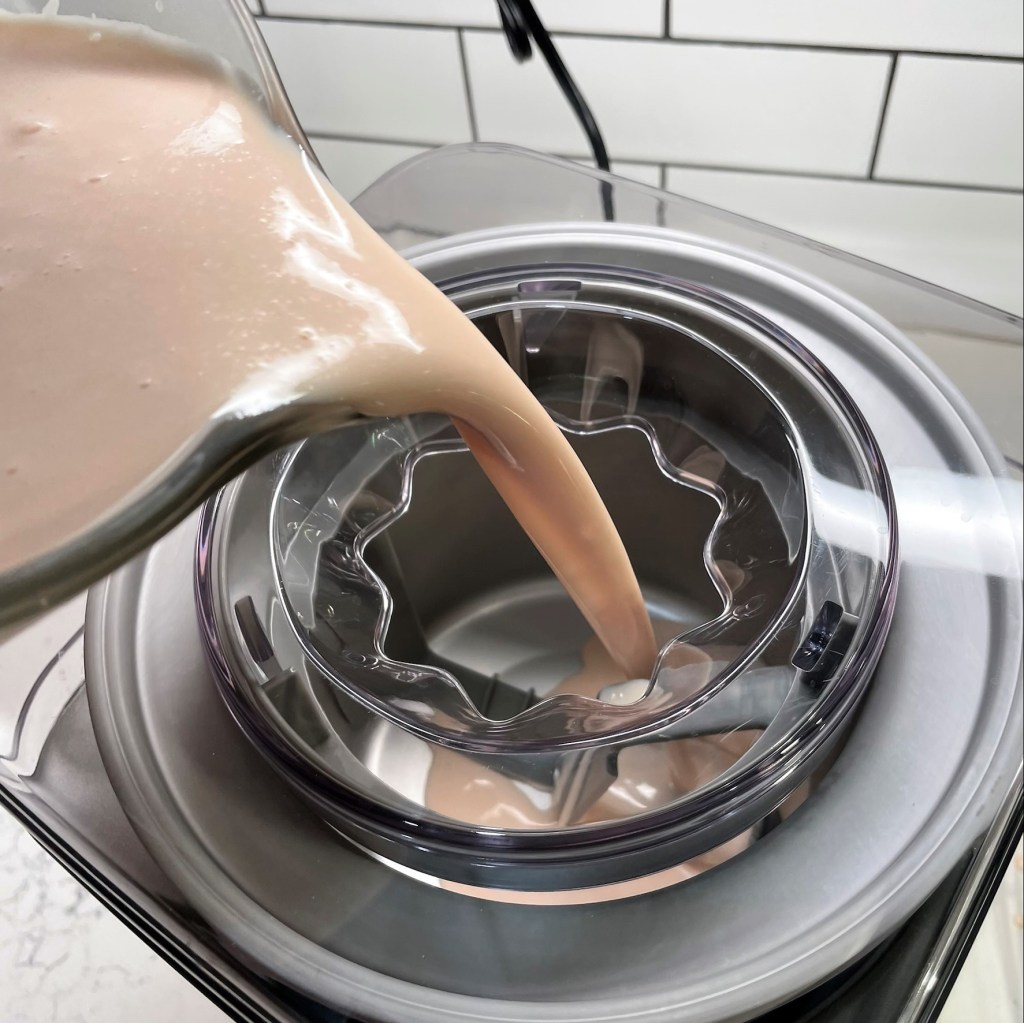
After chilling the ice cream base completely, freeze according to manufacturer’s instructions in your ice cream machine.
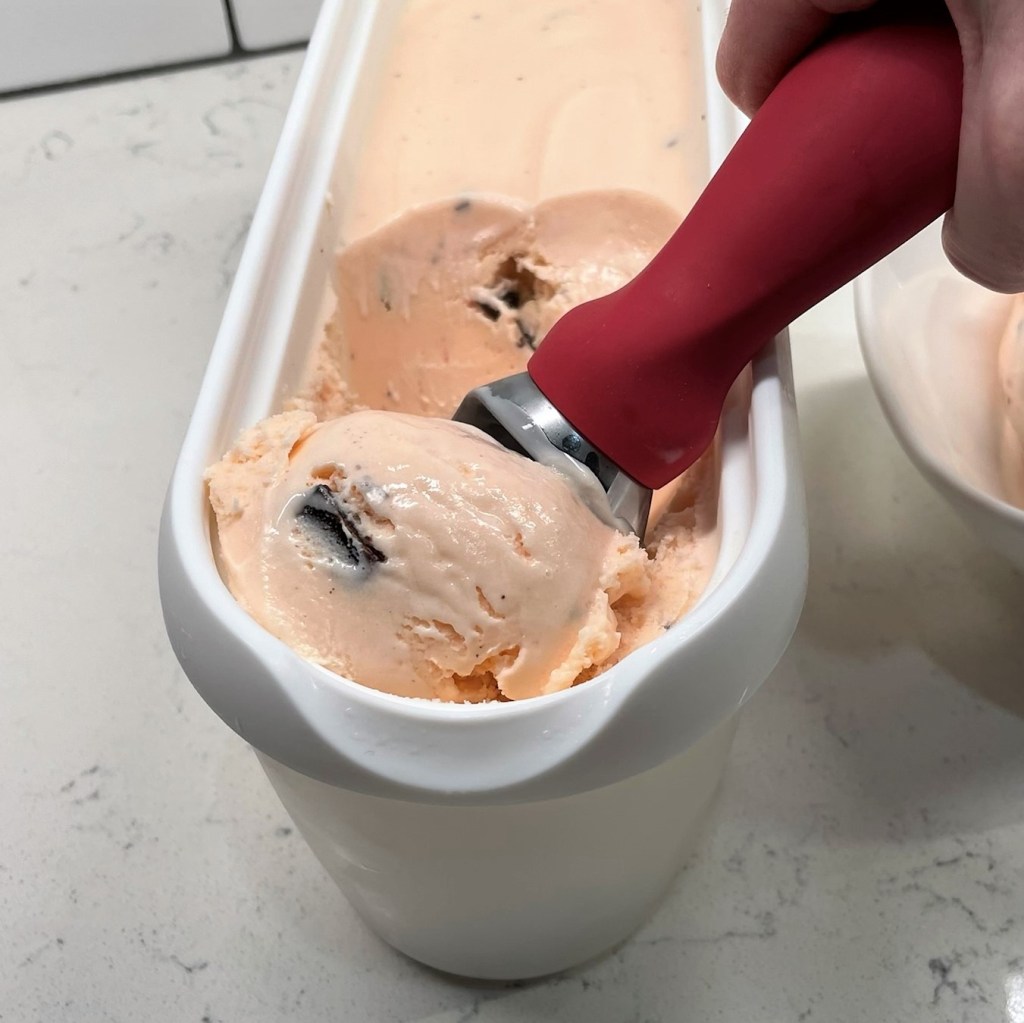
I used nine of the peppermint bark squares in the ice cream.
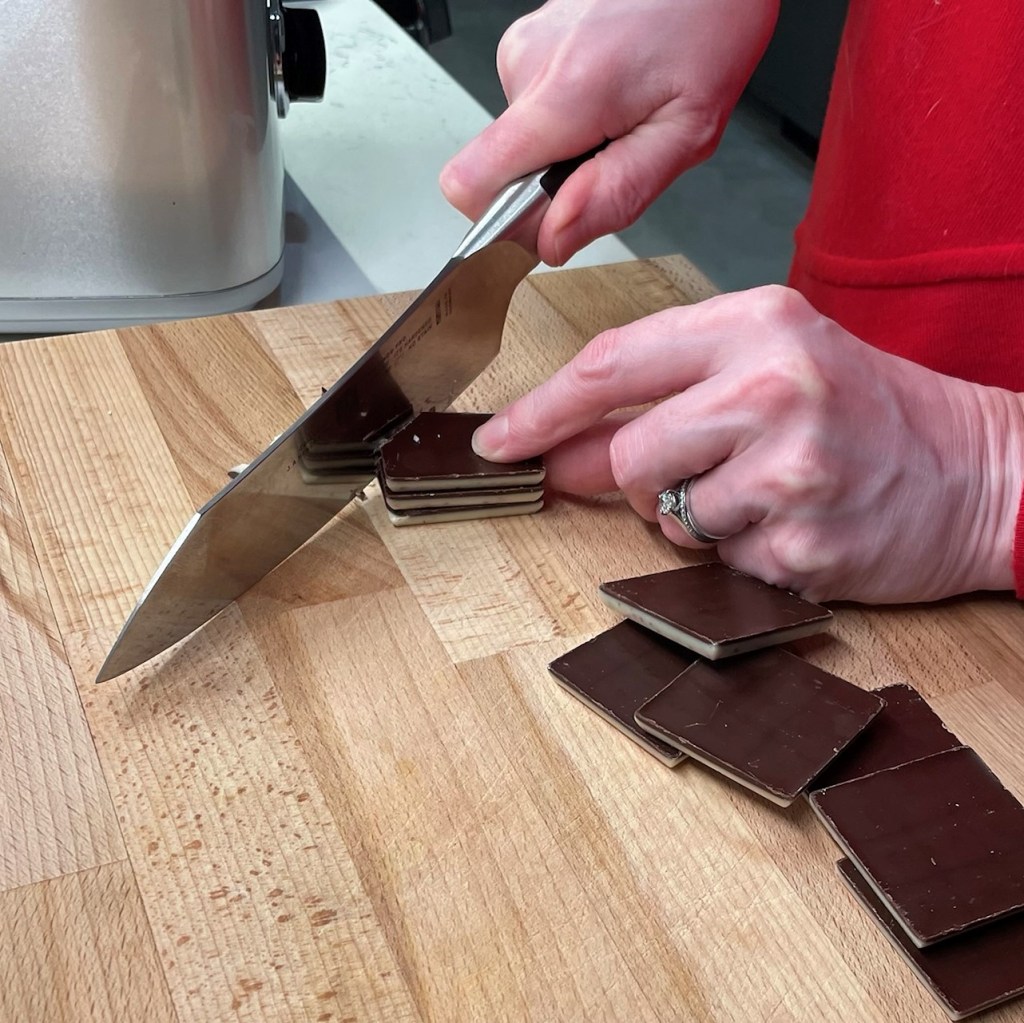
Cut the peppermint bark squares into smaller bits and put them in the freezer to get them nice and cold.
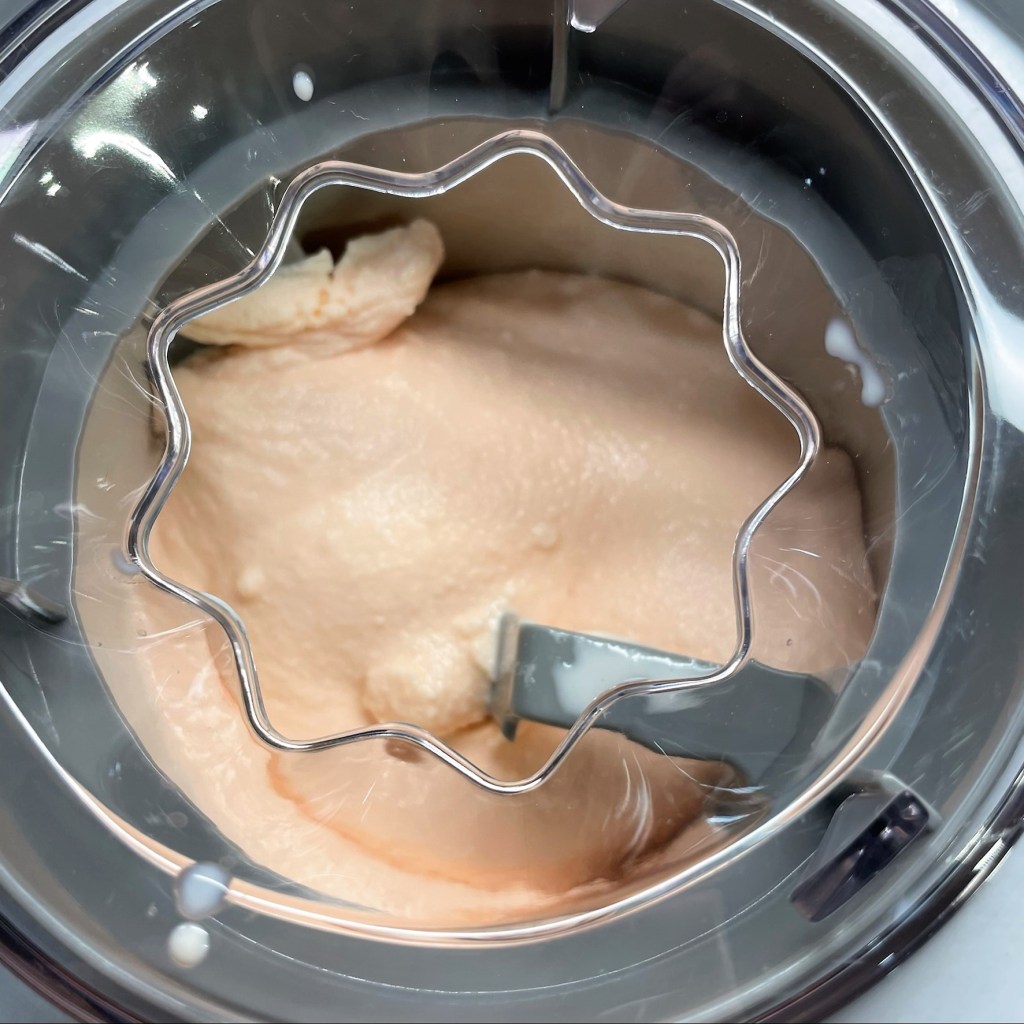
My ice cream machine churns the mixture in about 25 minutes.
Add in the peppermint bark bits and churn a couple more minutes to thoroughly incorporate them.
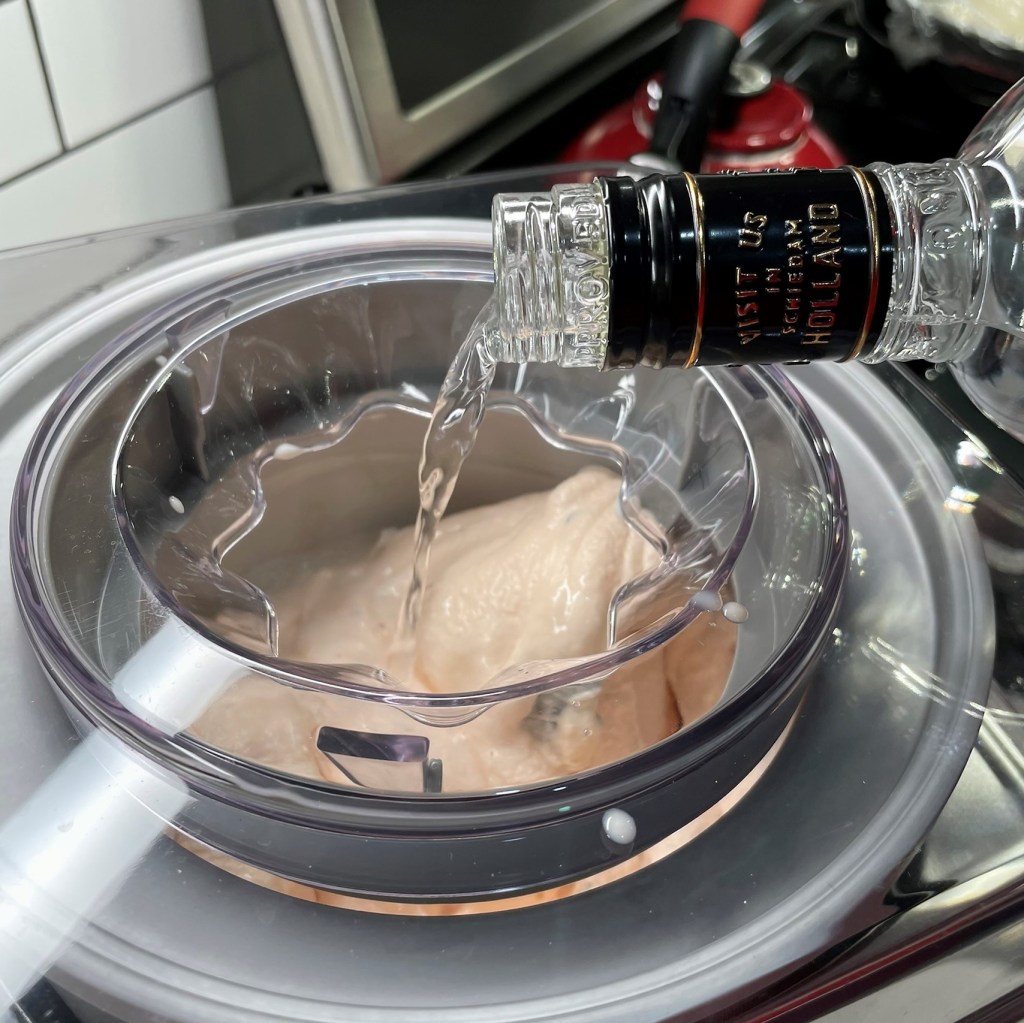
A splash of vodka at the very end gives the ice cream a very scoopable texture, straight from the freezer.
Transfer the ice cream to an insulated container and freeze overnight.
Time to serve, and the splash of vodka has done its job. It’s OK to leave it out; just give the ice cream a few minutes on the counter before scooping.
Each scoop has a luscious peppermint flavor throughout the whole ice cream, and the bits of peppermint bark are a fun touch!
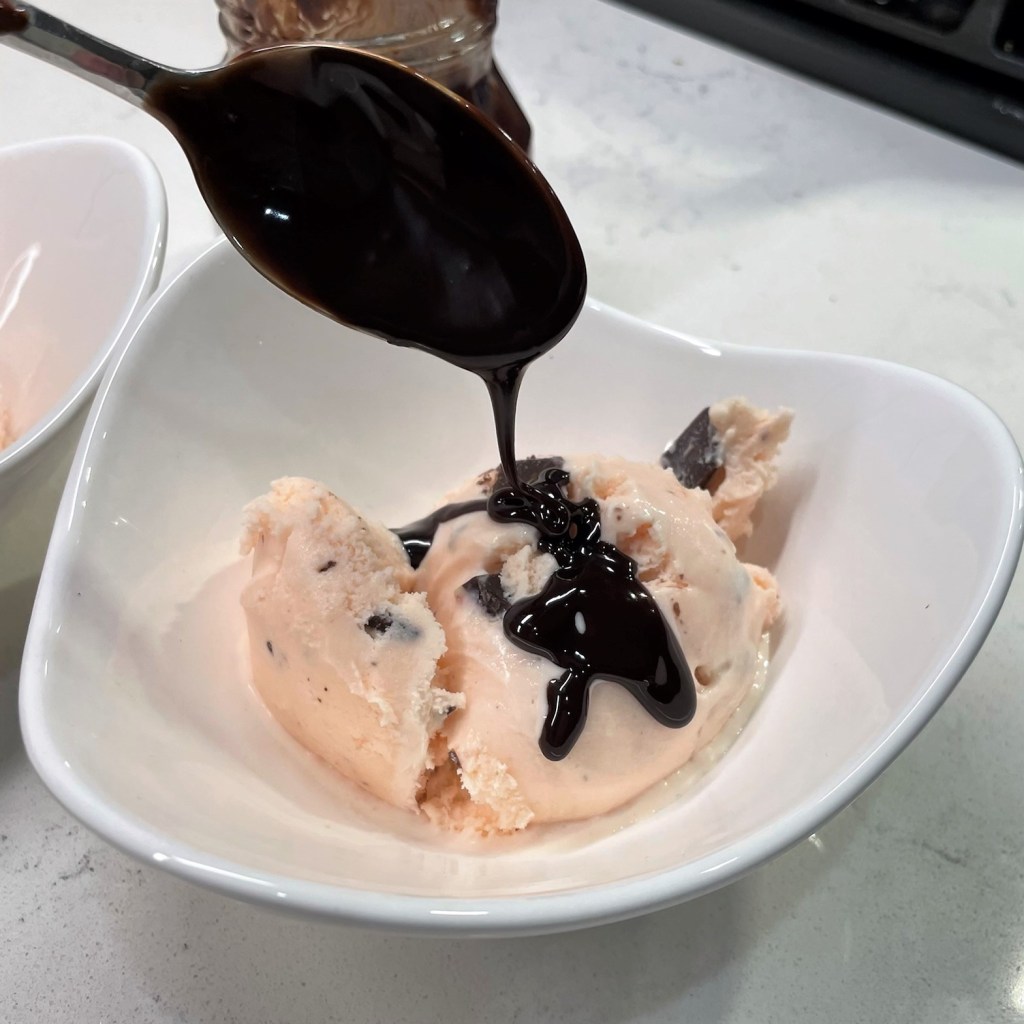
For a little extra yumminess, we served it with a drizzle of hot fudge sauce.
Heat whole milk and candy canes in a small saucepan, over medium-low heat. As the milk warms, the candy canes will melt into it, creating a pretty color and a delicately sweet minty base. As I think of it, I imagine that this milk could also be used to make a minty version of hot cocoa. Maybe next Christmas!
When candy canes are fully dissolved, remove milk from heat and cool then chill in the refrigerator.
In a large bowl or mixing pitcher, blend together the sweetened condensed milk and heavy cream. Whisk in the peppermint milk. Stir in the peppermint and vanilla extracts. Cover and chill for several hours (maybe even overnight) until the mixture is very cold.
Put the chopped chocolate-peppermint bark in the freezer while you freeze the ice cream mixture.
Prepare your ice cream machine, following manufacturer’s recommendations for freezing the ice cream mixture. When the ice cream reaches the fully churned stage, add in the chopped peppermint bark pieces and churn an additional two minutes to evenly incorporate the candy pieces.
Finally, add the vodka and churn until the liquid has disappeared. This trick will improve the texture of the ice cream for very easy scooping straight from the freezer. The vodka is indiscernible in the ice cream, but if you (or someone you are feeding) avoids alcohol, it can easily be omitted.
Transfer the finished ice cream to an insulated freezer container and place it in the freezer for several hours, or preferably overnight. Serve it with warmed hot fudge topping for an extra special holiday treat!