Who says you can’t have a satisfying meal without meat? Learn new ways to shine a spotlight on plant-based foods and open up a whole new culinary experience (at least one day a week)!
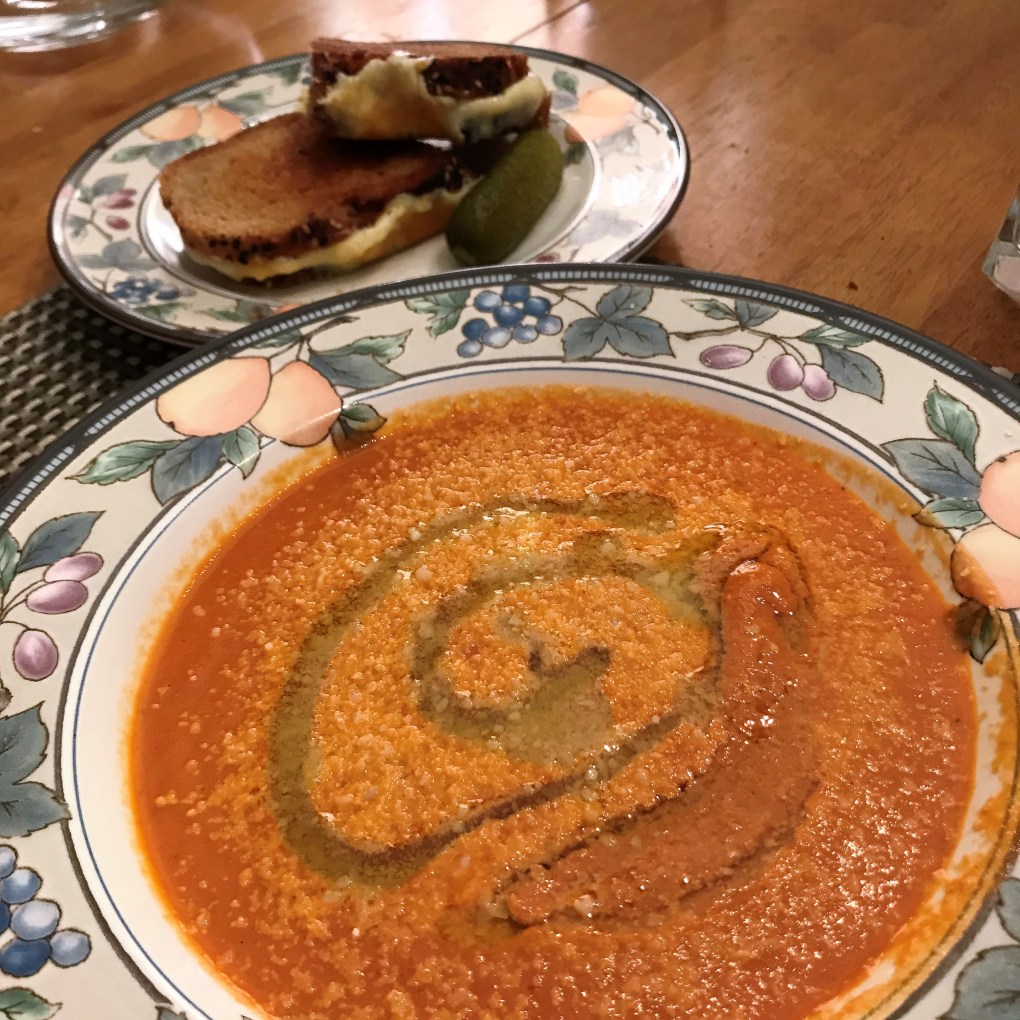
There’s a reason “tomato bisque” is on so many restaurants’ menus. It’s a classic comfort food, and so simple to make from regular pantry ingredients you’ll wonder why you ever settled for the stuff in a can. My version includes a bit of red bell pepper and carrot for a touch of extra flavor and sweetness. This is perfect on a chilly day or rainy night, and we love to pair it with a tuna on homemade rye or classic grilled cheese sandwich.
Ingredients
Extra virgin olive oil, salt and pepper
1 medium onion, chopped (I like sweet onions, but yellow works well here, too)
1/2 medium red bell pepper, seeded and chopped
1 medium carrot, peeled and diced
3 cloves garlic, peeled and chopped
1 tsp. Italian herb seasoning (or some combination of oregano, basil, thyme, rosemary)
A pinch of crushed red pepper
28 oz. can peeled plum tomatoes (San Marzano, if possible)
1/2 cup vegetable broth or 3/4 cup V-8 juice
1/4 cup whole milk, half-n-half or heavy cream (omit or substitute canned coconut milk if vegan)
Freshly grated parm-romano cheese blend (omit for vegan) and chopped parsley or basil for serving
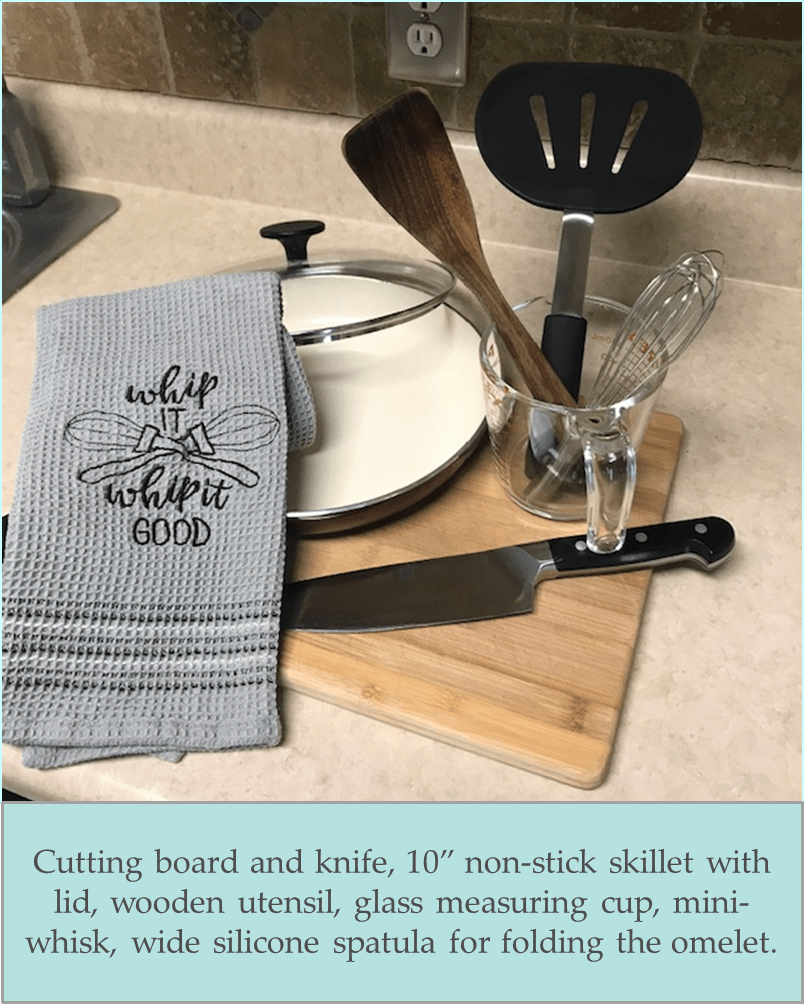
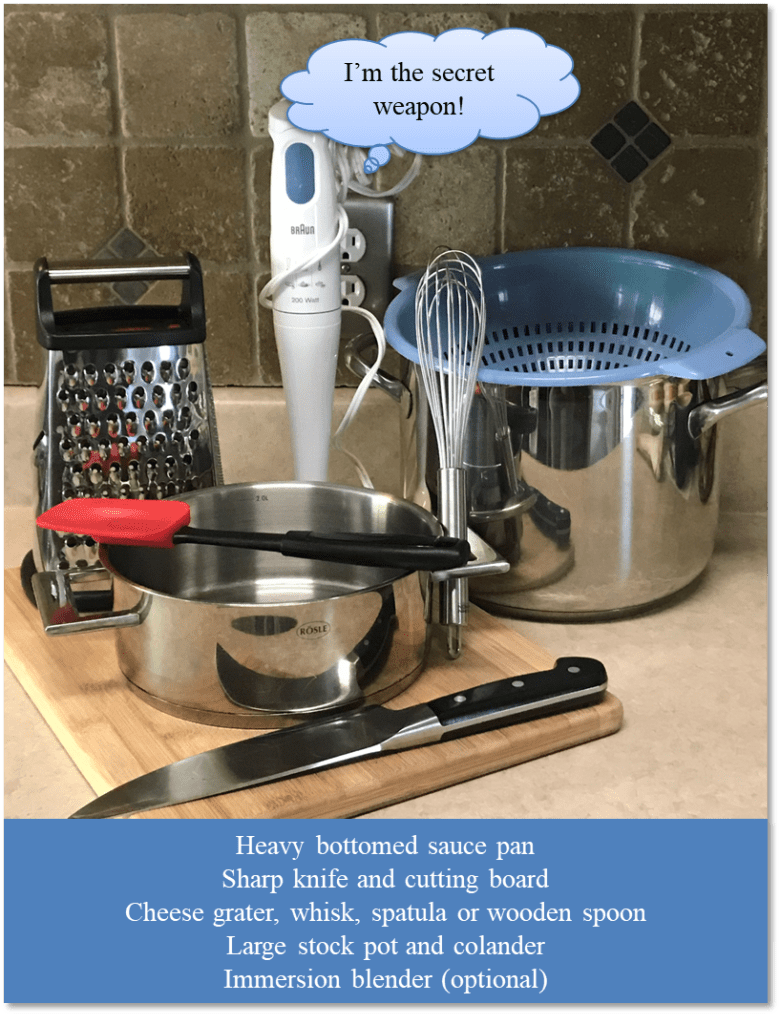
Tools
cutting board and knife, heavy-bottomed tall pot, flat wooden utensil or spoon, immersion blender*
Let’s Get Cooking!
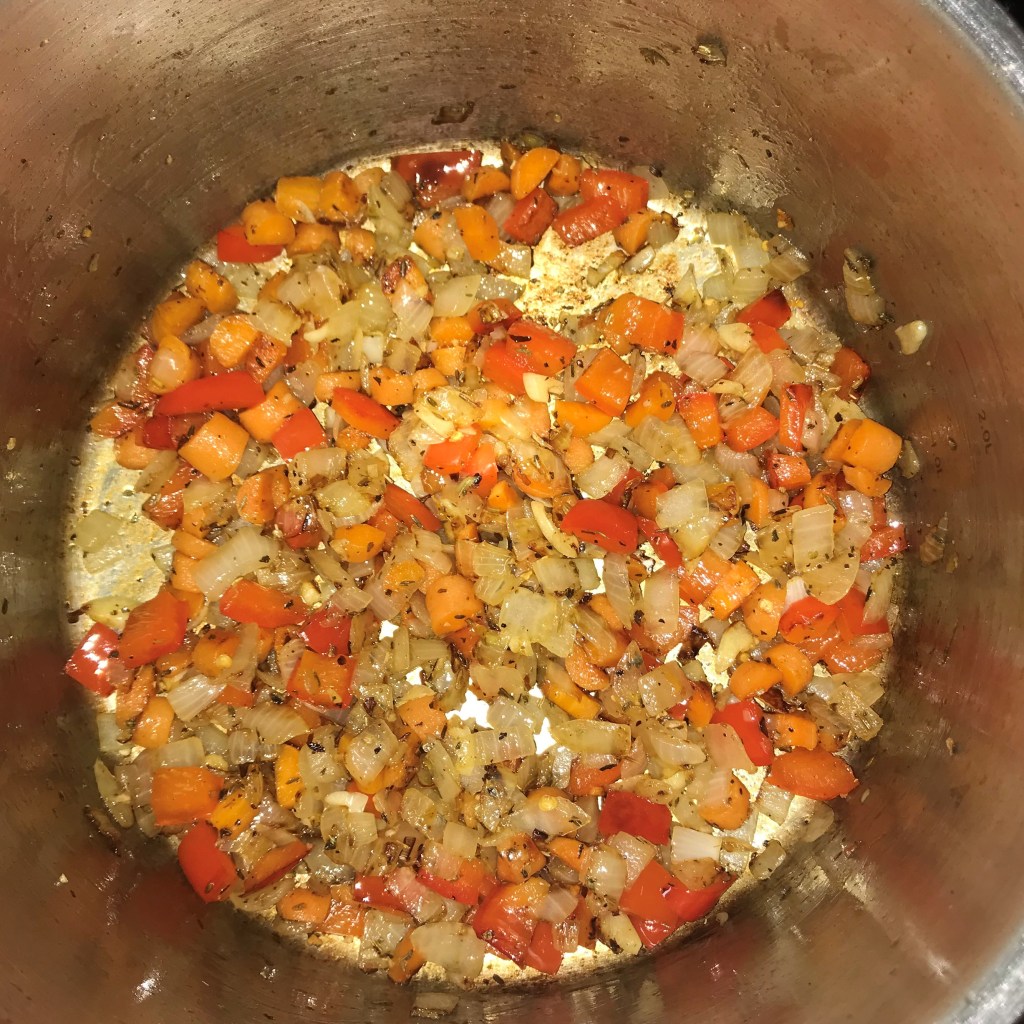
Not quite “trinity,” and not quite “mirepoix,” but the onions, red bell peppers and carrots create a warm, sweet base for the soup.
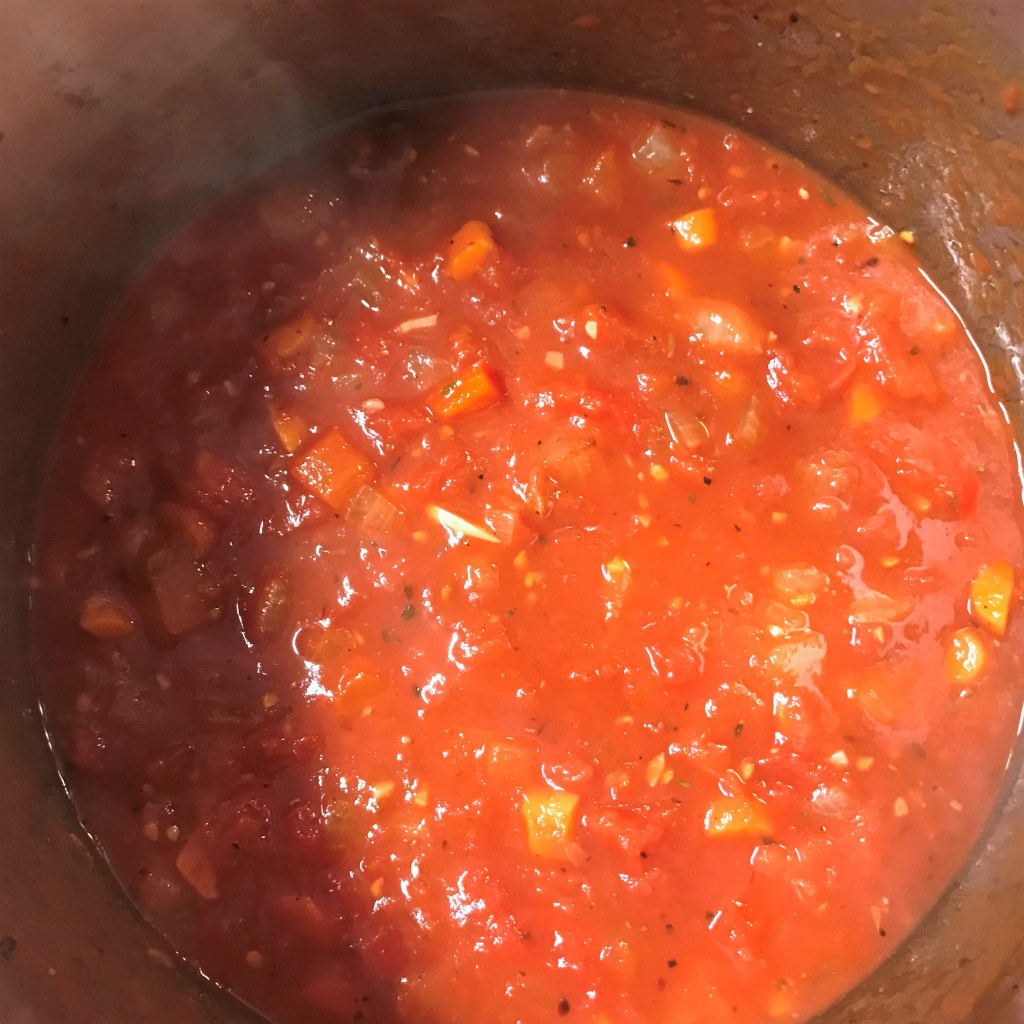
I choose a deep pot for this soup, so I don’t spatter tomato all over myself at this stage! If you don’t like this “hands-on” approach, you could also pulse the tomatoes briefly in a food processor before adding them to the pot.
Authentic San Marzano tomatoes are completely worth the extra cost.
With the tomatoes and vegetable broth mixed in, all it needs now is some time to simmer.
The immersion blender is such an essential tool in my kitchen. If you don’t have one, cool the soup a bit and puree in batches in a regular blender, then reheat.
A generous swirl of extra virgin olive oil gives this a healthy fat boost, plus extra richness of flavor.
Place a deep, heavy-bottomed pot over medium heat. Add a generous swirl of olive oil (about 2 to 3 tablespoons). When oil begins to shimmer, add onion, pepper and carrot all at once. Salt and pepper to taste, then stir and cook until all begin to soften. Add chopped garlic and seasoning blend, stir and cook another minute or two until onions seem slightly translucent.
Add the plum tomatoes, using your hand to squeeze each tomato into the pot. This helps release the juices and gives them a head start on breaking up in the pot. Squeeze slowly and gently so you don’t wear it! Add all the tomatoes plus all remaining liquid from the can, but discard any basil leaves that may be in the can. Add broth or juice, stir to mix evenly and bring just to a boil, then reduce heat and simmer uncovered on medium-low about 30 minutes. Stir occasionally to prevent burning. Adjust seasoning to taste.
When mixture appears less chunky and somewhat reduced, turn off heat and use an immersion blender to puree until mixture is as smooth as you like. Simmer on low another few minutes to allow air bubbles to disperse and soup to reduce to your preferred thickness. If it’s too thick, stir in a bit more vegetable broth. Remove from heat and swirl in milk or substitute. Ladle into bowls and swirl a drizzle of olive oil over the top of the soup and sprinkle with parm-romano cheese and fresh chopped herbs as you like.
Dinner is served. We love it with a sourdough grilled cheese, but any kind of sandwich is a good side.
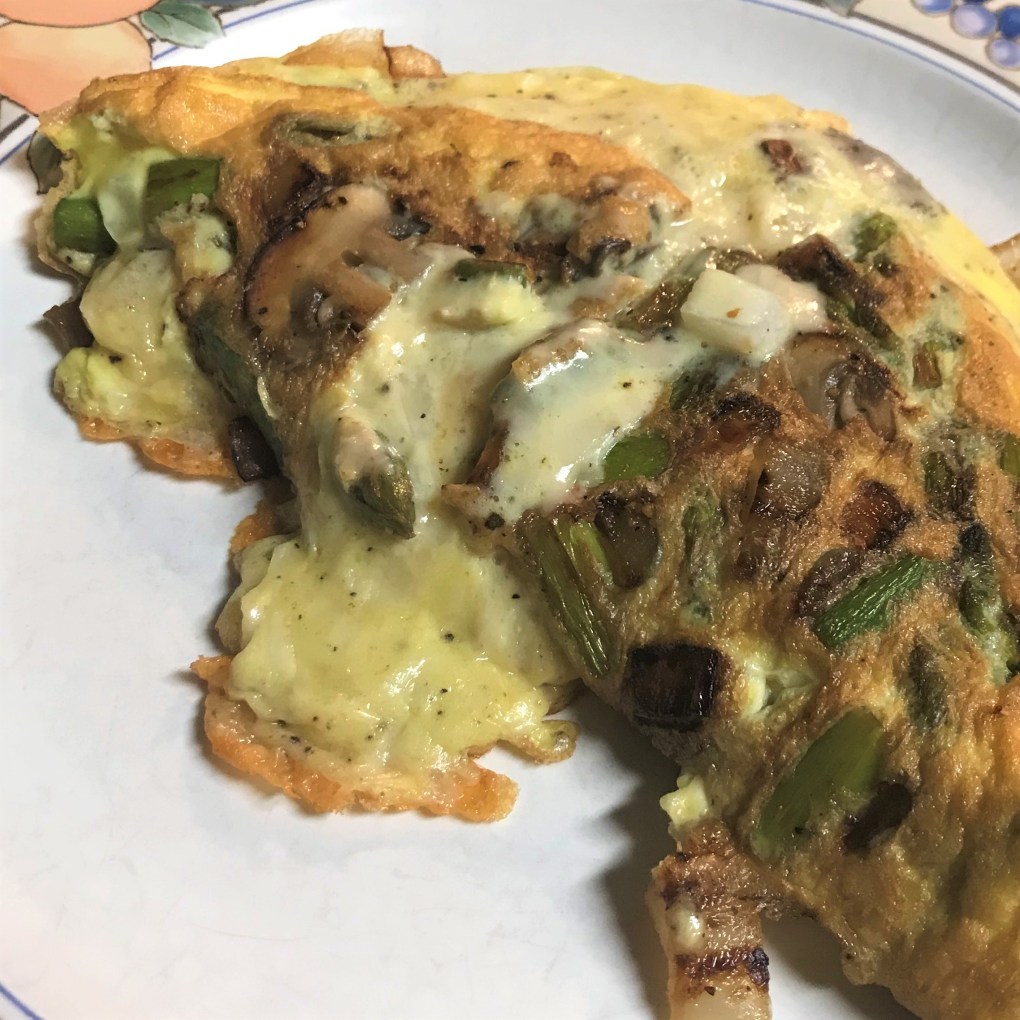
I like this style of omelet because it’s quick and simple, and it doesn’t require removing the extras from the pan and then stuffing them back in. Your “fillings” will be cooked into the outside of the omelet, with melty gooey cheese layered inside. This recipe is super flexible, too! You can add or substitute leftover vegetables of any kind if you don’t have spinach and mushrooms on hand—peppers, kale, broccoli, asparagus or whatever is taking up space in the fridge. If they’re already cooked, just chop into smallish pieces and toss them in the pan long enough to warm them and proceed with the recipe from there. As with most my recipes, I rely on formula and technique more than the ingredients. So, let’s talk about that:
How do you make an omelet fluffy?
Whisking cold water (not milk!) into the eggs just before cooking them gives a nice airy lift to the omelet. The scientific upshot is that the tiny water droplets evaporate quickly in the heat of the pan, creating airy pockets inside the egg mixture. If you want even more fluff, separate the eggs before you begin (this works best when they’re cold) and whip the whites into a soft foam (this works best at room temperature). Fold this into the rest of your egg mixture just before pouring into the hot pan.
Which cheese melts best for an omelet?
Good melting cheeses include Monterey jack, cheddar, Colby, Muenster, Havarti, Gouda and gruyere. Hard or crumbly cheeses such as feta, chevre and parmesan will add tons of flavor; just don’t expect gooey goodness from them, as they pretty much hold their shape when warmed. Whenever possible, grate your cheese from a block. The packaged pre-shredded cheeses are coated to prevent sticking in the bag, and this also prevents them from melting well.
Do you need a special pan for an omelet?
Years ago, my mom had one of those hinged, fold-over pans “designed for omelets,” but this is absolutely not necessary. It didn’t produce a fabulous omelet and mostly just made a mess. My go-to pan for omelets is a good non-stick skillet with curved sides. The shape and coating makes it easier to slide your spatula underneath the set egg mixture for folding and serving. If your skillet is not coated, swirl in a little extra oil just before adding the eggs, to guard against sticking.
This recipe is a delicious way to work in an extra serving of vegetables and works especially well as “breakfast for dinner.” Three eggs make just the right size for my husband and me to share, but we are not big eaters at breakfast. Feel free to throw in a fourth egg with no other adjustment needed.
Ingredients
Extra virgin olive oil, salt and pepper
1 thick slice of onion, finely chopped (we like sweet onions, but red or yellow ones are fine)
3 to 4 mushrooms, cleaned and sliced (cremini is my go-to, but white button or shiitake would also work)
Big handful of fresh baby spinach, roughly chopped and tough stems removed
3 large eggs, room temperature
About 1/2 tsp. prepared Dijon mustard (or hot sauce for a spicier twist)
Splash of cold water
1/3 cup freshly shredded cheese (or less if using more pungent cheese, such as Parmesan or feta)
Tools
Get Cooking!
Place a 10 inch non-stick skillet over medium heat and add a generous swirl of olive oil.
When you notice the oil beginning to shimmer and flowing easily around the pan, add your chopped onions. Give them a stir and cook until they are just soft but not quite browning, about 2 minutes. Add the sliced mushrooms and toss them around with your wooden utensil to be sure they get lightly sautéed on both sides. Add the chopped baby spinach leaves and stir until wilted and noticeably reduced, but still bright green. Salt and pepper to taste.
While the veggies are doing their thing, crack your eggs into a large measuring cup, add Dijon mustard (or hot sauce) and whisk briskly until lightly foamy. Add a splash of cold water – about 1 Tablespoon – and whisk again until light and foamy. You want lots of bubbles in this mixture, so whip it…whip it good!
Spread out the sautéed veggie mixture evenly in your pan. Slowly pour the eggs around the outer edge of the mixture, encircling your veggie ingredients, then pour gently to “fill in” and cover the entire mixture. Again, salt and pepper. Reduce the heat to medium-low and cook about 2 or 3 minutes, or until the egg mixture looks set about one half inch around the edges but still wet and somewhat loose in the center.
Sprinkle shredded cheese over the entire mixture, turn off the burner and place a cover over the pan, allowing trapped heat and steam to finish cooking the eggs and melting the cheese into them. This will take about 3 minutes. Using a wide silicone spatula, fold in half. Or for a slimmer omelet, fold one third toward the center, then fold the other side over the top of that, as if folding a letter. Carefully cut the omelet in half crosswise to share the other half with your other half, and enjoy!
It’s one of the world’s most beloved comfort foods. From the blue box variety with the envelope of “cheese” powder to the saltine crumb-topped church potluck kind, macaroni and cheese isn’t particularly sophisticated—it’s just a dish full of noodles, cheese and milk. I have a few ideas why it endures as a favorite:
Everyone likes it Okay, maybe not everyone. Folks with celiac disease or dairy allergies don’t. Nor would a vegan. But bring it to a dinner party and you’re pretty much guaranteed to have a home run.
It satisfies all our primal cravings If science is correct—that humans are hard-wired to crave fats, carbs and salt—well, this food ticks all the boxes.
It’s versatile and adaptable Like an essential “little black dress,” you can modify a good mac and cheese recipe up or down to suit the occasion. A stove-top version is great for a quick weeknight dinner and an embellished baked casserole version rocks for a family reunion. Many upscale restaurants have taken it even further by addition of fancy-pants ingredients such as lobster and truffles.
It’s easy to make with ingredients you probably already have This has never been more important, as we are all looking for ways to make satisfying meals without one more run to the grocery store.
It reheats well In the oven, on the stove top or even in the microwave. That is, if you actually have leftovers.
There are a million “best ever” mac and cheese recipes out there, but taste is subjective so I’m not going to make that claim here. This really is about the cheese sauce, and your technique can make or break your dish. I’ll admit that I hardly ever make this dish the same way twice. I change up the type of pasta depending on what’s in the pantry, and I use whatever leftover bits and pieces of cheese we have in the deli drawer at the time. But the main formula is the same and each step has a purpose. In case you’re wondering:
What is the best cheese for macaroni and cheese?
I like to start with American cheese, which is processed with salts and enzymes for super melting ability. If you are averse to the idea of American cheese (first of all, why? And read this), or if you just don’t have any, you may substitute a lesser amount of real cream cheese, which also has some stabilizers for a creamier sauce, but it’s bland so you’ll need to season it more. The rest of the cheese is your choice, but go with something that melts well: medium to sharp cheddar, Monterey jack, Havarti, Gouda, fontina, gruyere or even a bit of brie (without the rind) are delicious. Avoid super-stretchy cheeses such as mozzarella or Swiss and hard or crumbly cheeses such as feta, parmesan and manchego. Also, freshly shredded cheese is best. Pre-packaged shreds are coated with modified starch substance that keeps the cheese from clumping in the bag. Guess what else it does? It prevents even melting.
What kind of pasta is best for macaroni and cheese?
Consider mainly shape and texture, but if you’re looking to step up your game, also peek at the ingredients. Pasta made with “durum” or “semolina” flour (same thing, two names) provides a richer, deeper flavor than “enriched wheat” flour. If you like whole grain, that’s fine, too. Look for shapes with curves, nooks and crannies to grab onto your creamy cheese sauce. Elbows are classic, but rotini, fusilli, orecchiette, ditalini, and shells are all going to work well. Look for pasta labeled as “bronze cut,” which has a rougher texture, ensuring even greater hold on the cheese sauce.
What is the best way to cook pasta?
No matter how much pasta you’re cooking, use a large pot, at least 6 quarts. There’s a very scientific reason for this, but suffice to say it gives the pasta room to move so it doesn’t stick and clump together. Add kosher salt once the water is boiling. Adding it too early could damage the surface of the pot. Don’t be stingy with the salt; use about a tablespoon, and don’t worry—most of that salt will end up going down the drain. Regardless of what you’ve “always been told,” do not add oil to the water. It doesn’t prevent a boil-over and it does not prevent the pasta from sticking. On the contrary, it hinders your sauce from clinging to the cooked pasta. For the same reason, don’t rinse your cooked pasta.
Ready to get cooking?
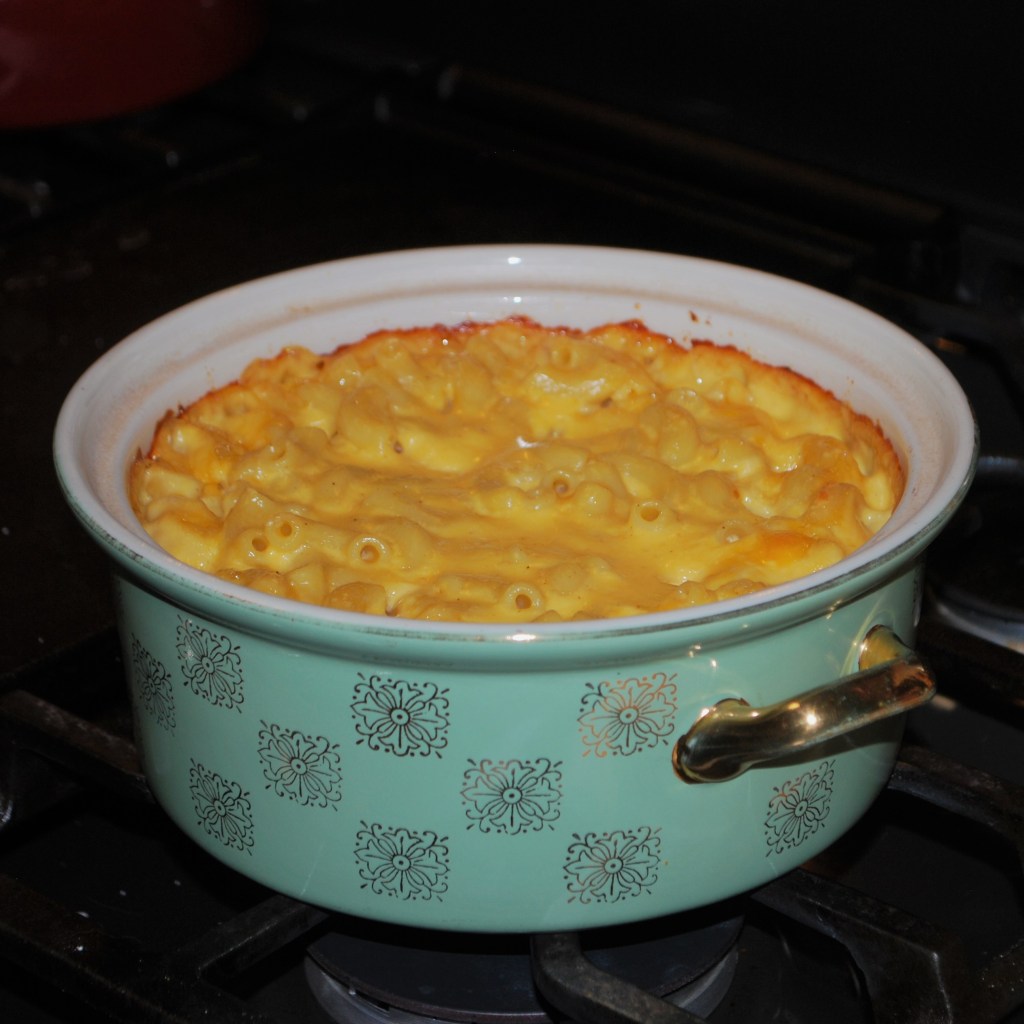
Still as creamy as can be, and ready to serve.
Follow along, but by all means flex my basic recipe to suit your taste and your inventory. The best part of cooking is making it your own.
Ingredients & Tools
3 Tbsp. butter (salted or unsalted)
½ cup finely chopped onion (I like sweet, but use Spanish, shallots, white, red or whatever)
3 Tbsp. all-purpose flour
2 cups whole milk (see sidebar notes)
About 8 oz. real American cheese (the kind sold by the pound in the deli, not the pre-wrapped slices)
2 packed cups good melting cheese, freshly shredded (see sidebar notes)
Kosher salt and freshly ground black pepper to taste
¼ tsp. white pepper
¼ tsp. dry mustard powder
12 oz. box good quality pasta (see sidebar notes)
One more tool you’ll need…
A 2-quart covered casserole dish, if you should decide to go one step further (better) and finish your mac and cheese in the oven. In memory of my maternal grandmother, who taught me all the basics of cooking, I’m using this beautiful vintage casserole. Gram gave this to me many years ago, when I moved into my first apartment. I simply LOVE this dish!
Instructions – the Béchamel (fancy French word for “cream sauce”)
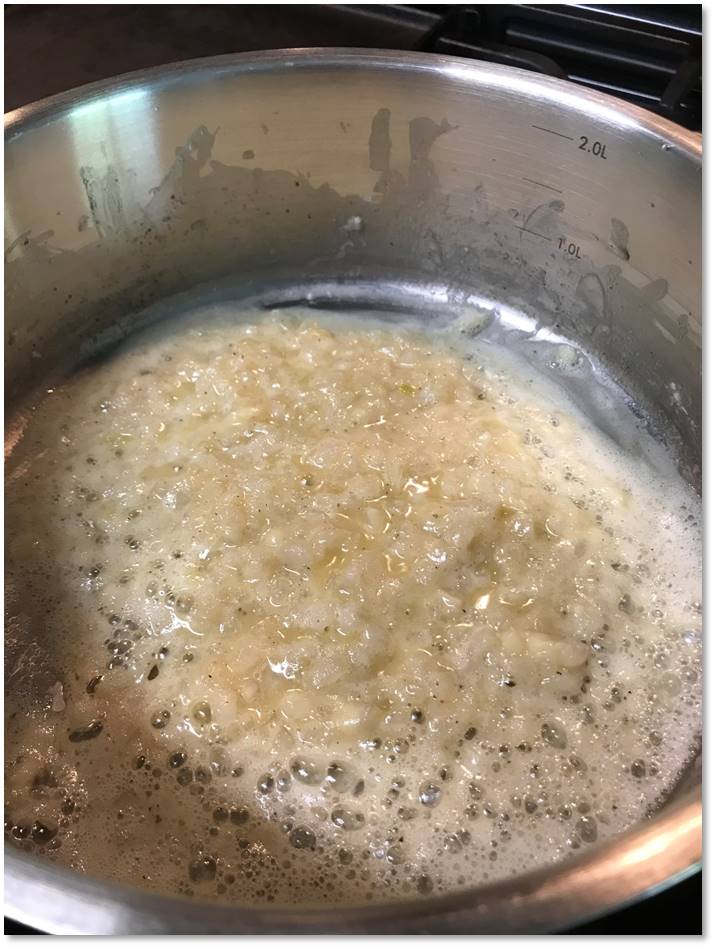
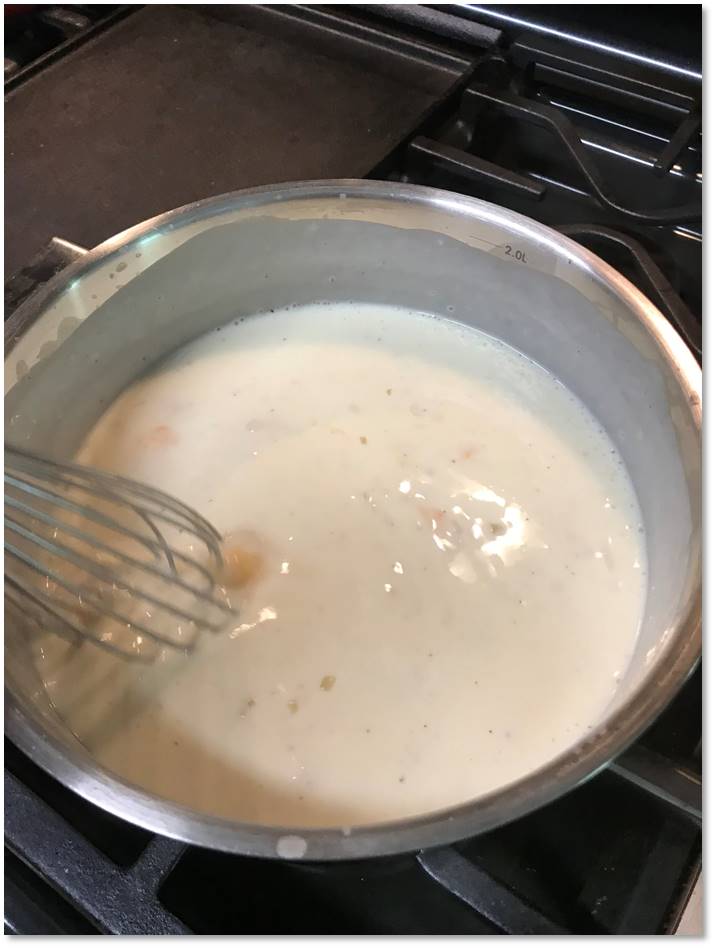
Over medium low heat, melt butter in your heavy-bottomed saucepan and add onions, simmering very slowly until they are soft and translucent. Do not rush this step. You don’t want the onions to brown, only to soften. This step should take about 6 to 8 minutes. Get the rest of your ingredients lined up, because it will go quickly from here.
When onions are soft, season with salt and pepper then sprinkle flour over them and stir to coat well. Increase the heat to medium and cook until bubbly and just turning golden.
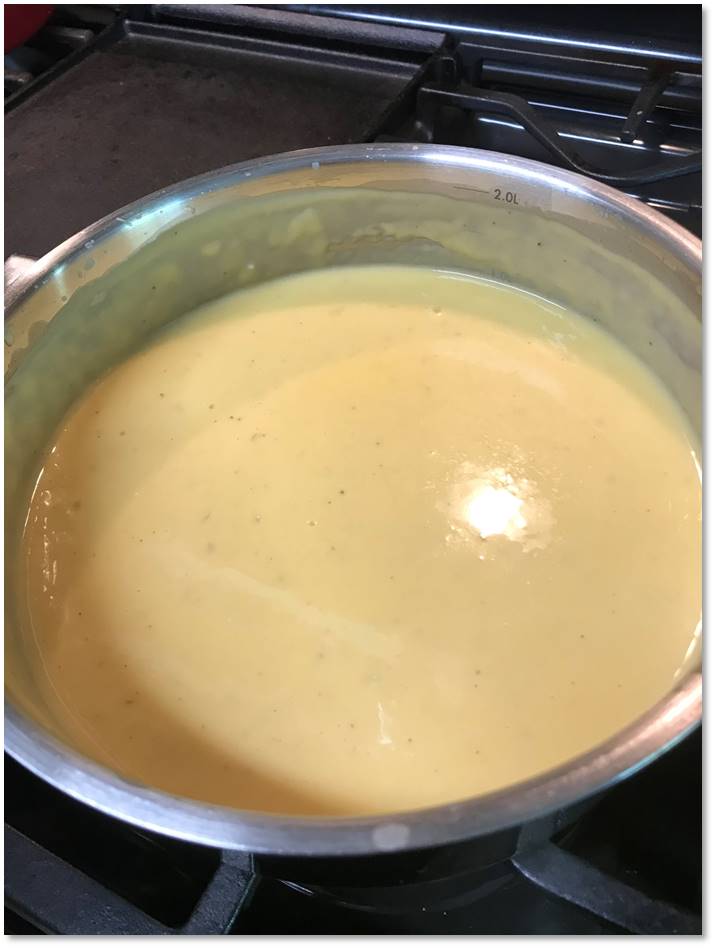
Add milk slowly but all at once, whisking constantly to create a smooth mixture. Add dry mustard and white pepper and continue to cook over medium heat until mixture is just simmering and slightly thickened. Add cubes of American cheese and whisk until melted and uniform consistency.
Add shredded cheese, one cup at a time, and whisk after each addition until smooth. Adjust salt and pepper to taste, remove from heat. At this point, you have a lovely creamy cheese sauce.
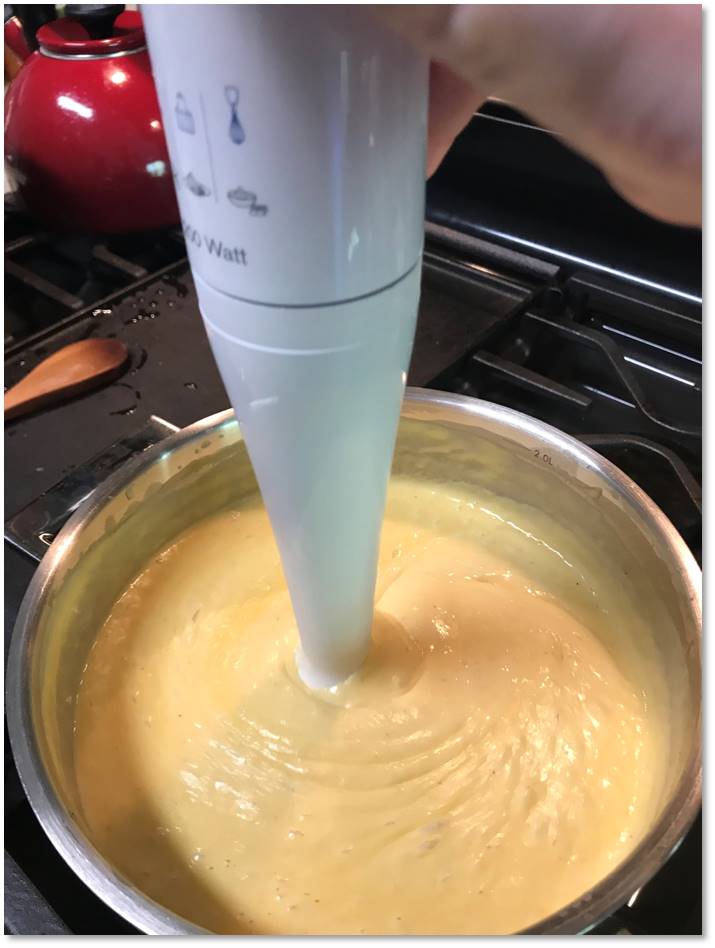
Want to take it up a notch to pure decadence? Use an immersion blender to whip the sauce into a completely smooth and silky consistency. Either way is fine, but if you have the stick blender, I highly recommend it.
I like to cook the onions right in the butter, then add flour and cook until it’s bubbly and smells “nutty.”
Add the milk and whisk until it’s smooth and thick. The American cheese will melt in very easily, and this provides the perfect base for a silky sauce.
It looks good, right! Nice and cheesy, smooth and creamy. But wait…
NOW we’re getting down to business. If you have an immersion blender, hit the sauce with it for about 60 seconds. Friends, this will absolutely change the game on every cheese sauce you make going forward.
You want it to be overly cheesy, because some of the sauce will find its way inside the elbows during baking.
Instructions – the Pasta
Fill your stockpot with cold tap water and place over medium-high heat until water comes to a boil. Add a generous spoonful (about a tablespoon) of kosher salt and stir to dissolve. You have one shot at seasoning your macaroni; don’t miss it. Do not add oil to the cooking water.
Add the pasta to the pot all at once and stir immediately to prevent sticking. Cook according to package instructions for “al dente” or “firm” texture. You don’t want the pasta to be too soft or it will become mushy later when you bake it with the cheese sauce. Drain pasta in a colander, shaking to rid all excess water, but do not rinse it.
Instructions – Assembling for Baking
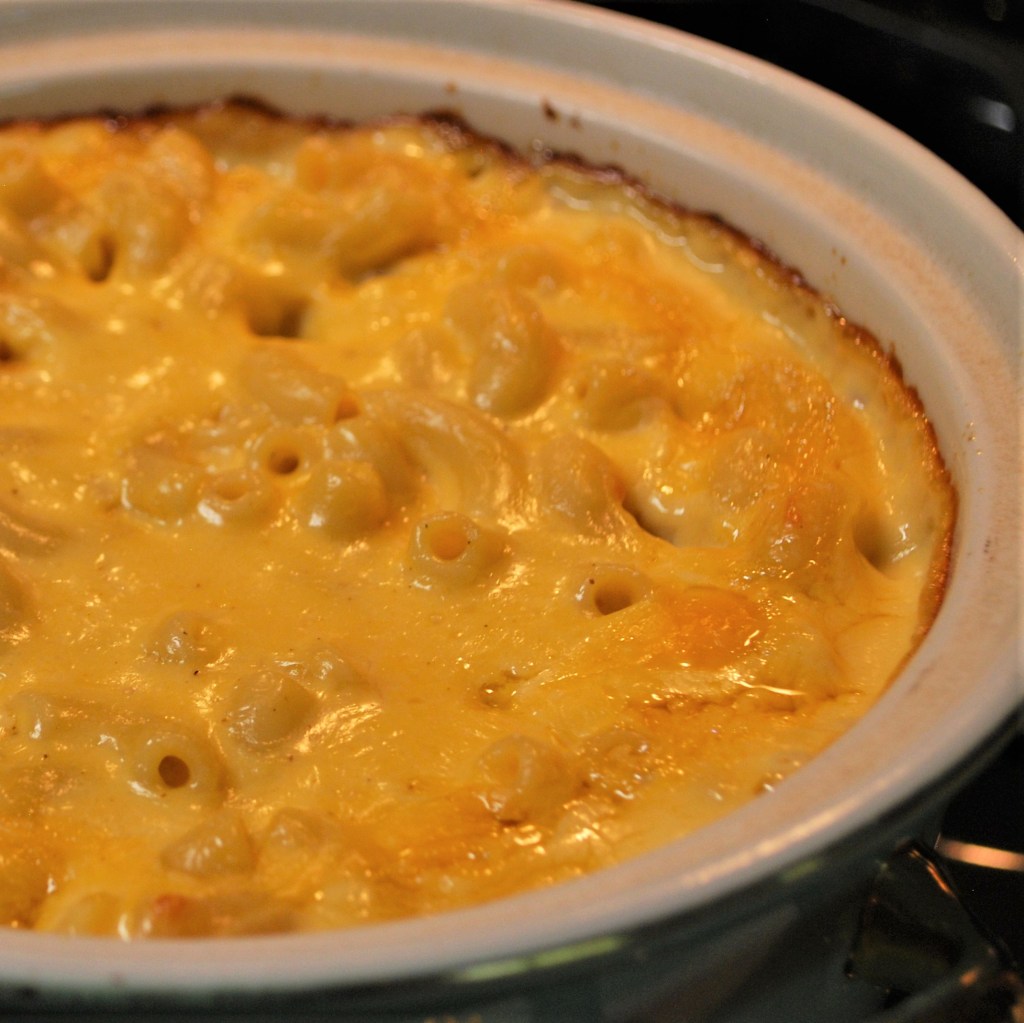
Combine sauce and pasta together in the cooking pot, folding gently to incorporate everything into a nice even mixture. This may seem overly cheesy, but please use all the cheese sauce. Remember that during the baking time, a lot of the sauce will be wiggling its way to the inside of your pasta shapes. More is better! Spoon into a buttered casserole dish and let cool slightly while you preheat the oven to 350° F. Cover and bake about 40 minutes then remove cover and bake 20 minutes more. Enjoy!
I love the baked-on cheesy crust that forms on oven mac and cheese.
You can hear and feel how gooey and creamy the sauce is, from the first spoonful!