Each fall since I began dating my husband, I’ve made a concerted effort to celebrate the season of Rosh Hashanah— the Jewish New Year— by baking a special bread. That first year, Les had visited a local apple festival and brought back a bagful of gorgeous Jonagold apples, which were lovely in a coiled-into-a-round challah. I was so proud of my bread that I took a picture of it— way before I began blogging— and I even took time to leave a review on the King Arthur website to report my great results.
Not a bad effort in 2015! But my iPhone 5 camera…
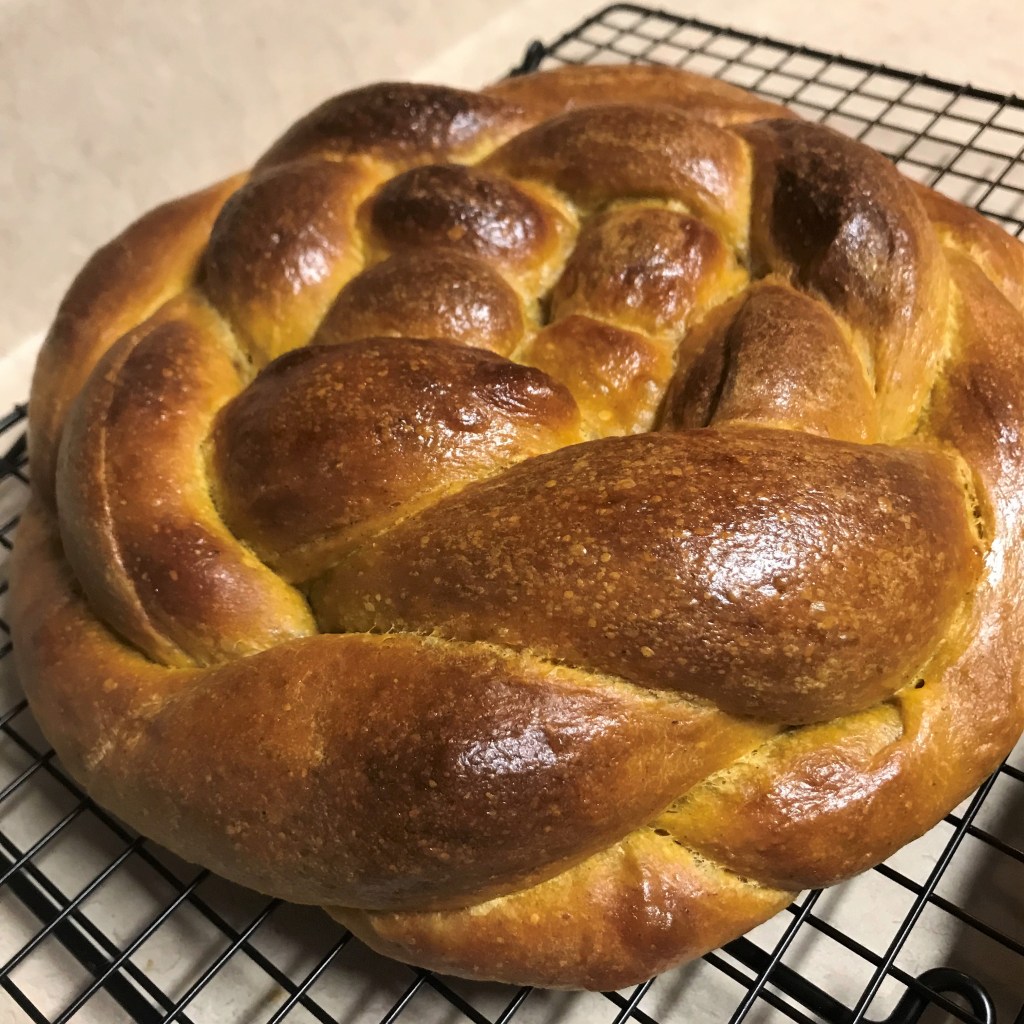
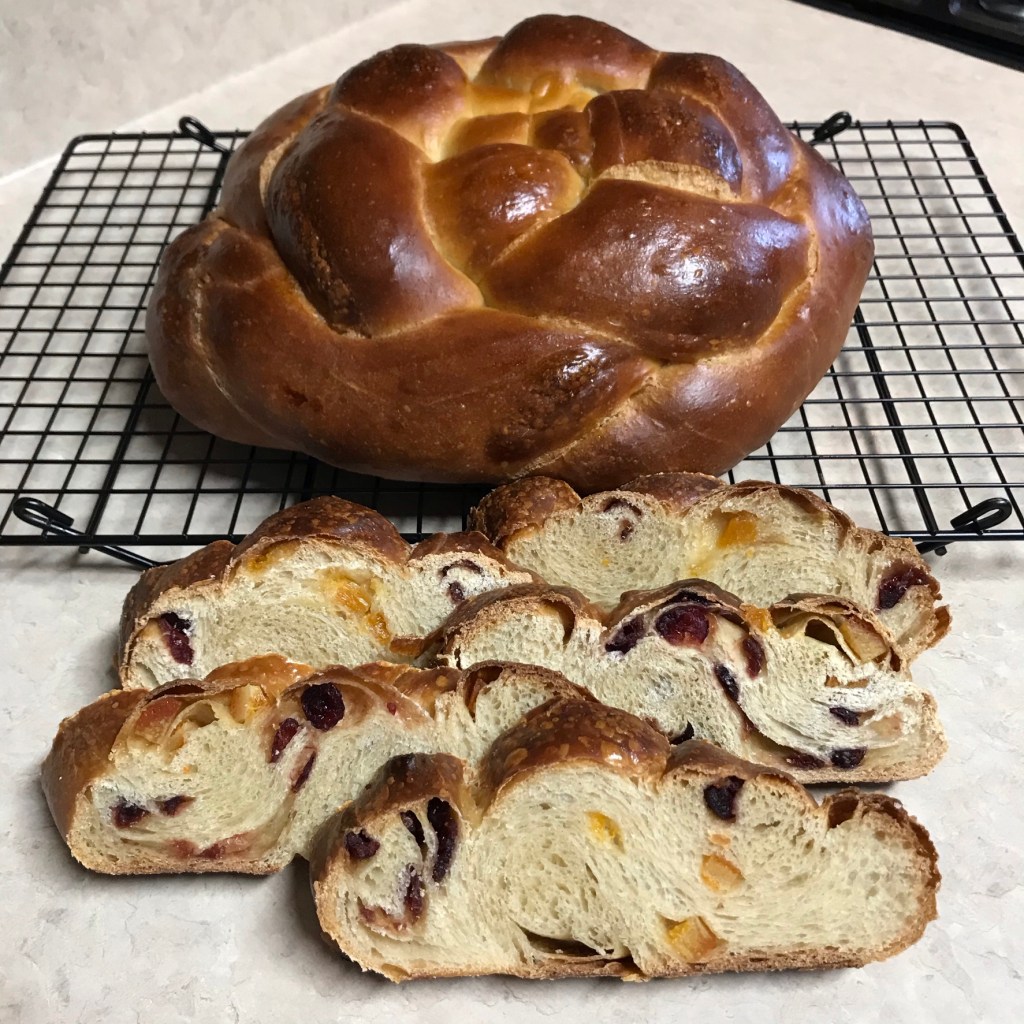
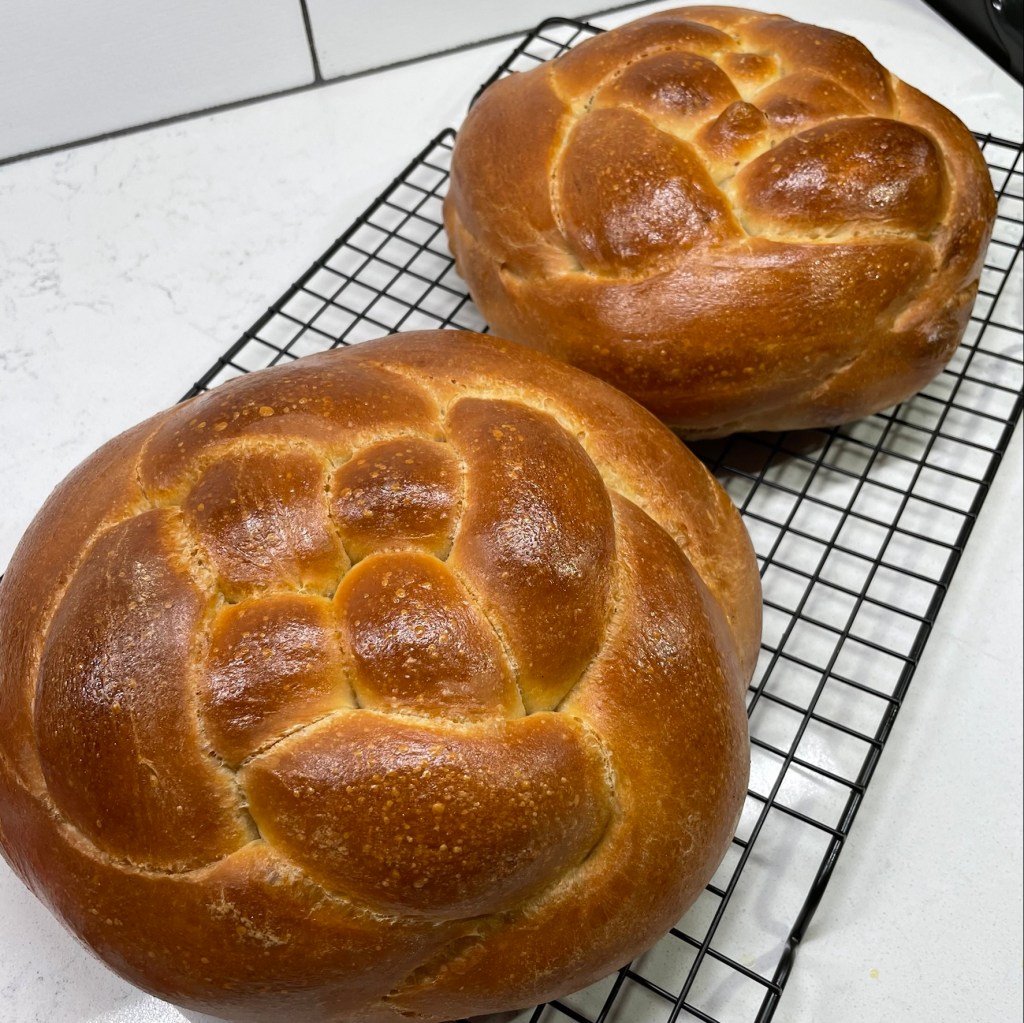
The round shape is significant to Rosh Hashanah because it represents the idea of coming full circle into a new year. The apples were a nice touch, because apples and honey make an appearance on everyone’s holiday table— symbolizing the wishes for a sweet year ahead. Most years since that first one, I’ve worked on my challah braiding skills, specifically the four-strand loaf that is woven like a basket. Here are a few examples of those breads, using my sourdough starter.
L to R: pumpkin challah, fruit-studded challah, over proofed challah!
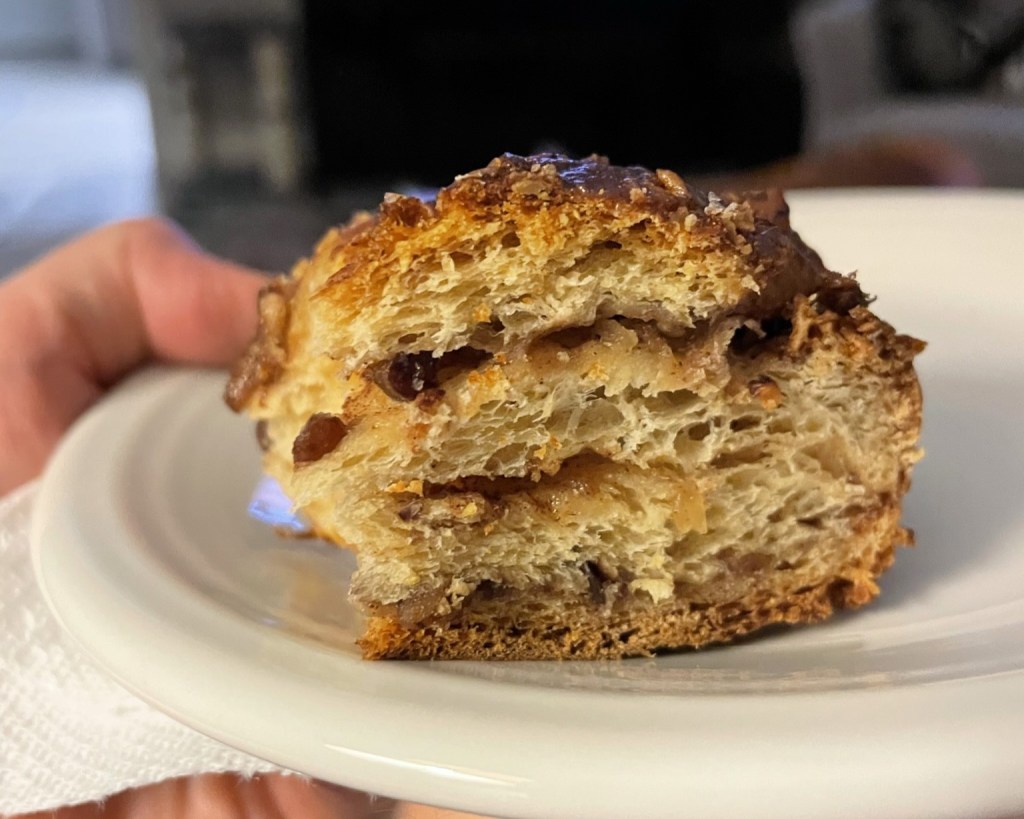
This year, however, I decided to tackle another item on my culinary bucket list, and I’ve made a babka! This is another traditional Jewish bread, and I’ve wanted to make one for years but never got around to it until now. Most babka recipes I have seen involve a chocolate filling, which is most dramatic looking in the typical swirly pattern. I pondered, what about a babka that had apples and honey? That would be perfect for Rosh Hashanah, and a double win in that it finally moves babka to the “done” column.
I didn’t have to look very far for an inspiration recipe, because the first place I looked was King Arthur Baking. Of course!
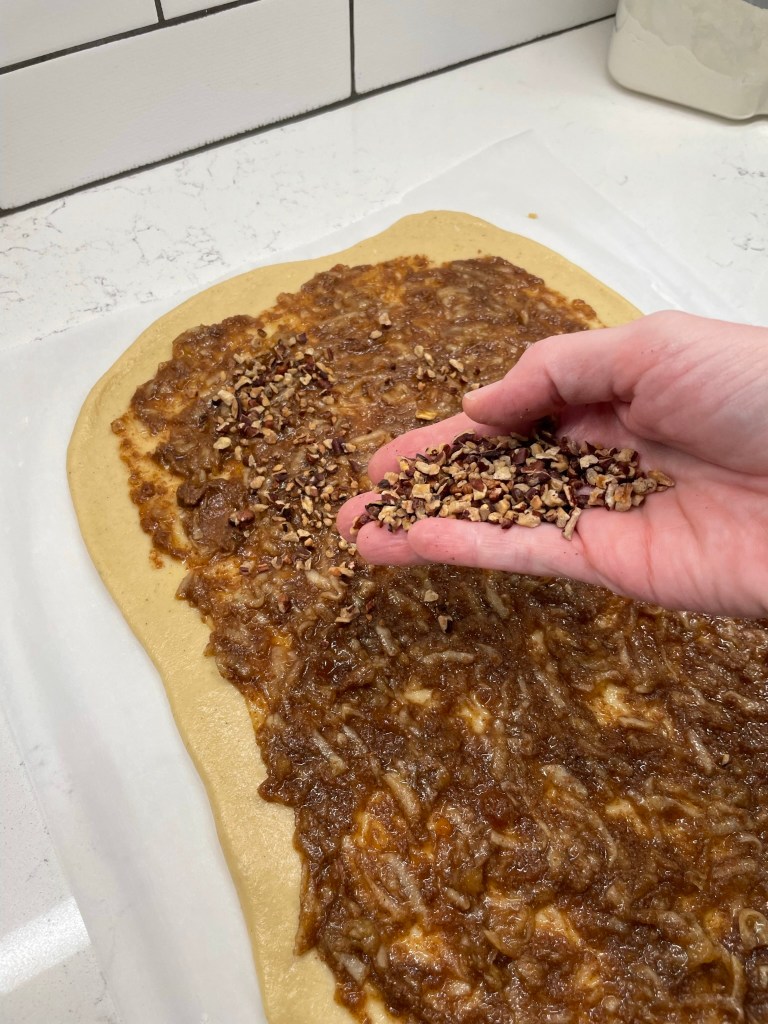
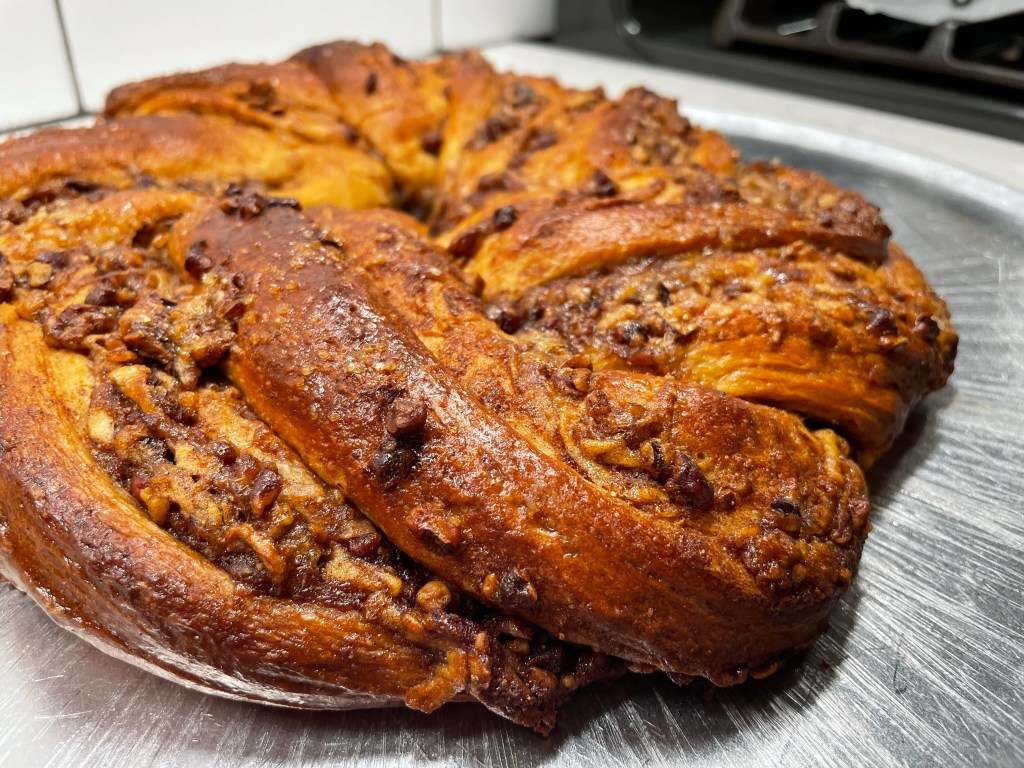
The layers of apple, spices and pecan make this extra special!
I’ve been a big fan of King Arthur products for years (and no, they never have paid me to say so), and my devotion to them is stronger than ever since my trip to their Vermont baking school, where I am proud to have completed their four-day “Principles & Practice” baking course. I learned a good many things during my time there, and made friends with several of my classmates. Among the takeaway lessons was the importance of using high-quality ingredients (i.e., theirs) and having them organized and properly measured before you begin mixing. That’s how I set up for this recipe, and I swapped in honey for the sugar, following the same helpful tips I used last month when I made my s’mores cupcakes.
Baking is much easier when I’m organized!
My main dry ingredients were measured by weight, which is something I was already doing before my King Arthur class, and all of our instructors during the four days emphasized the benefit of this. I cannot remember the last time I measured by volume, but there is a sensible way to do it for consistent results. They call it the fluff, sprinkle, level method, and it helps ensure that you don’t have dense results in your baked goods. If you are reluctant to get a kitchen scale, I highly recommend following that three-step method; otherwise, you may find your baked goods dense from being flour-heavy.
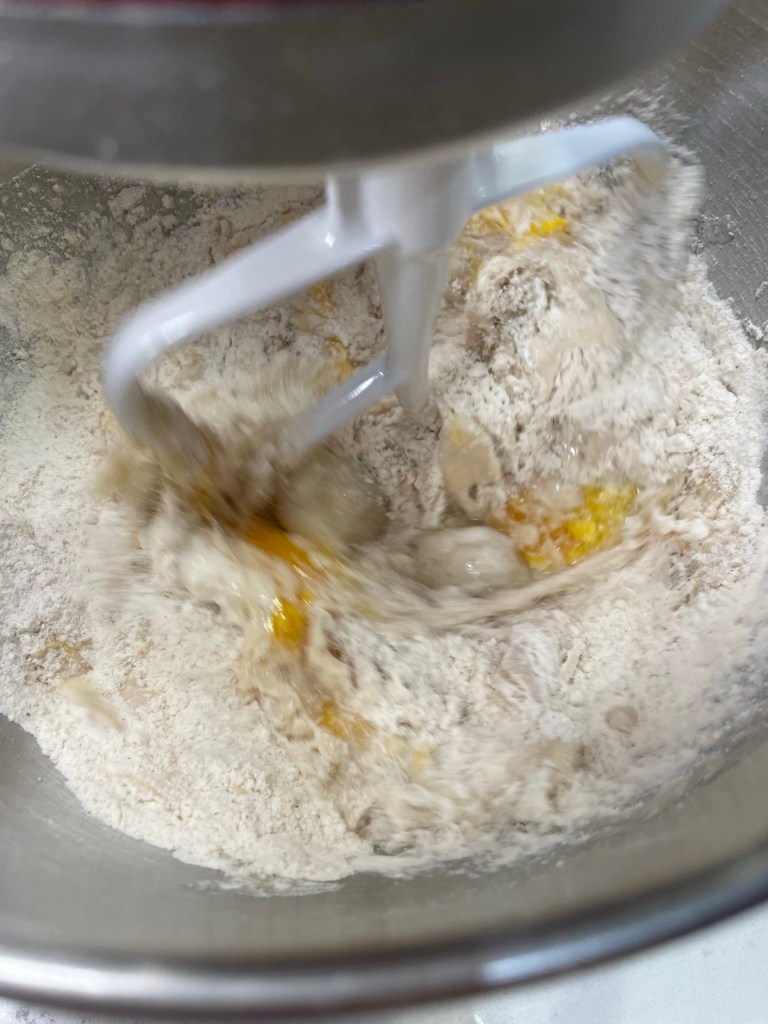
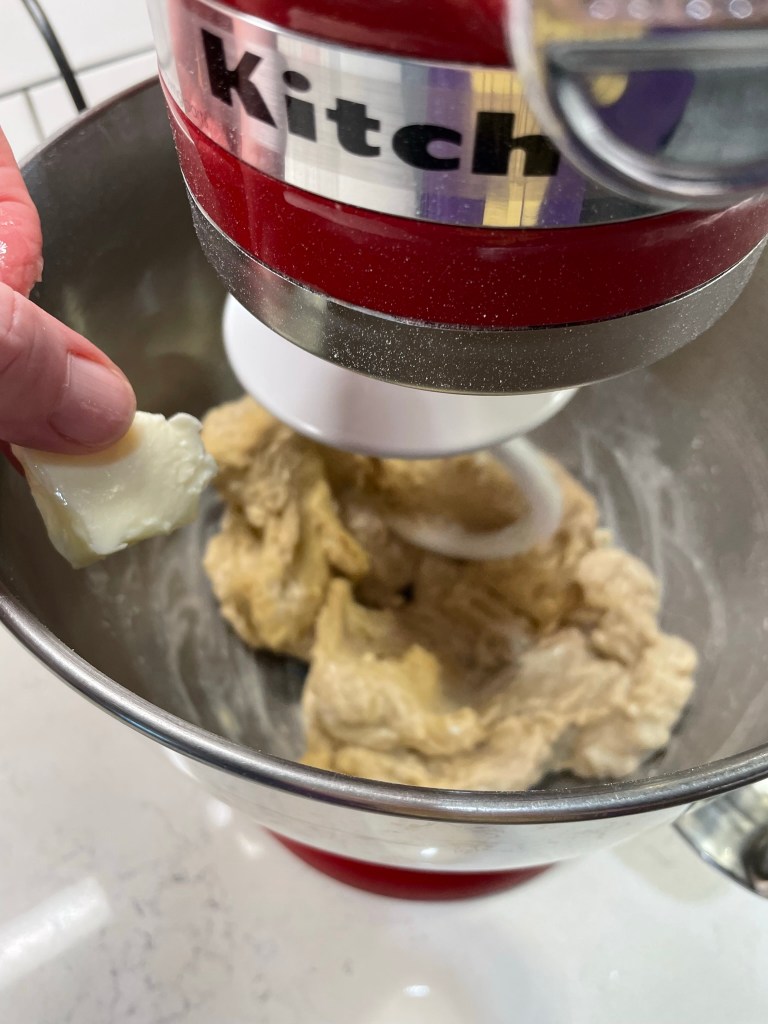
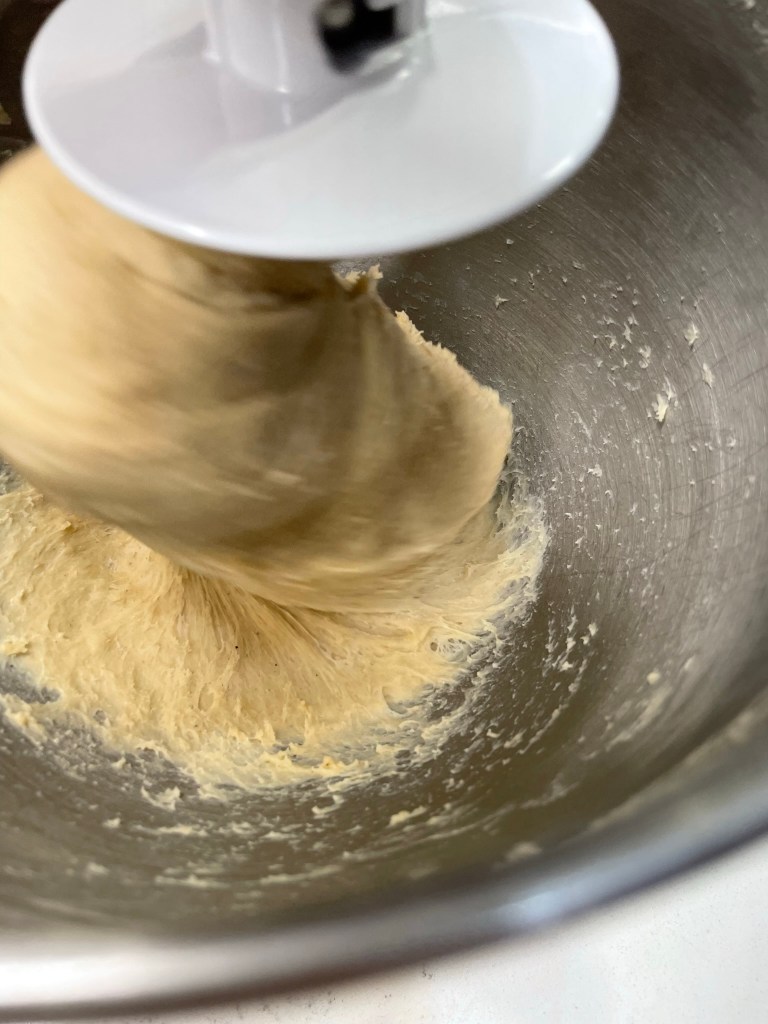
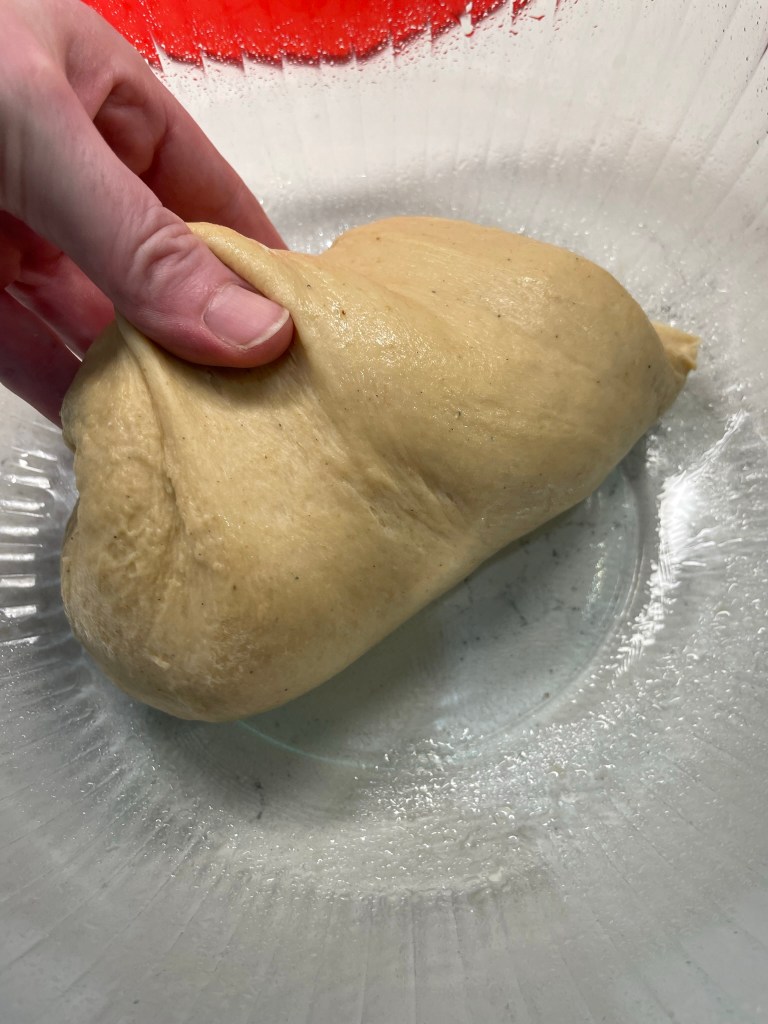
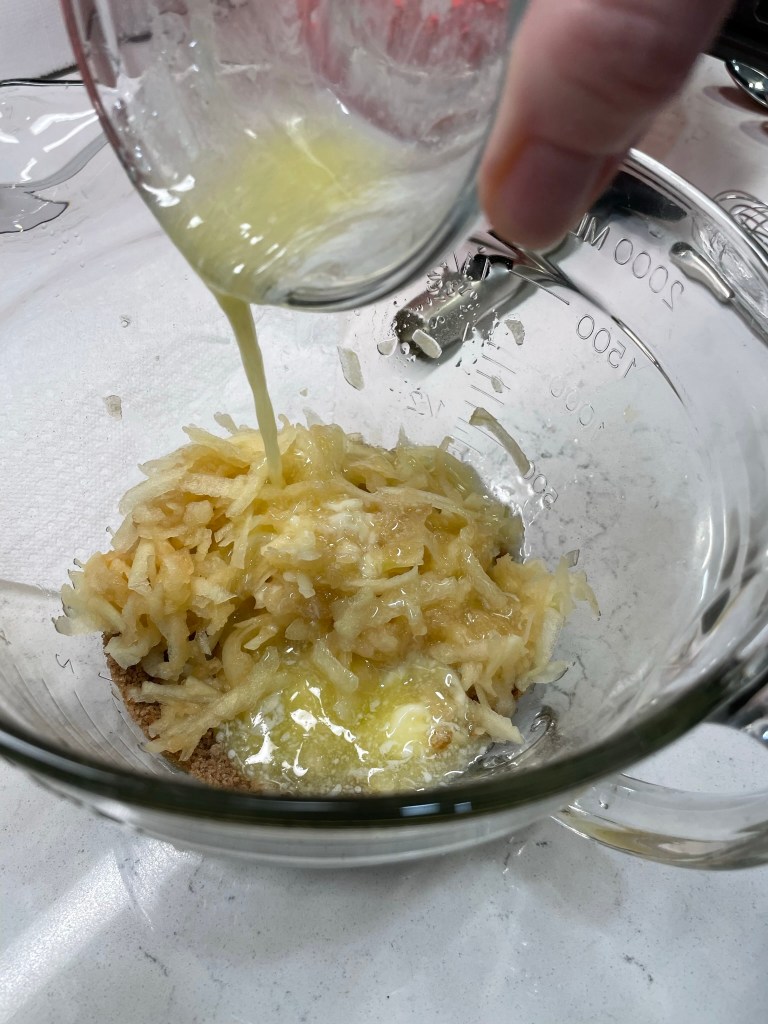
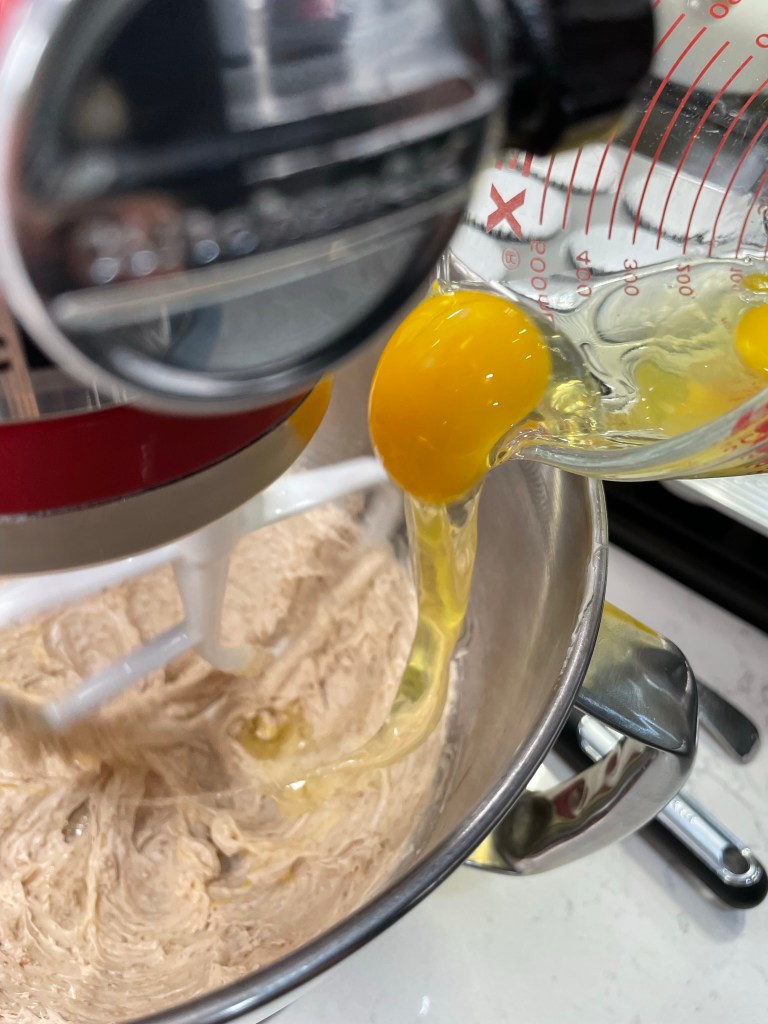
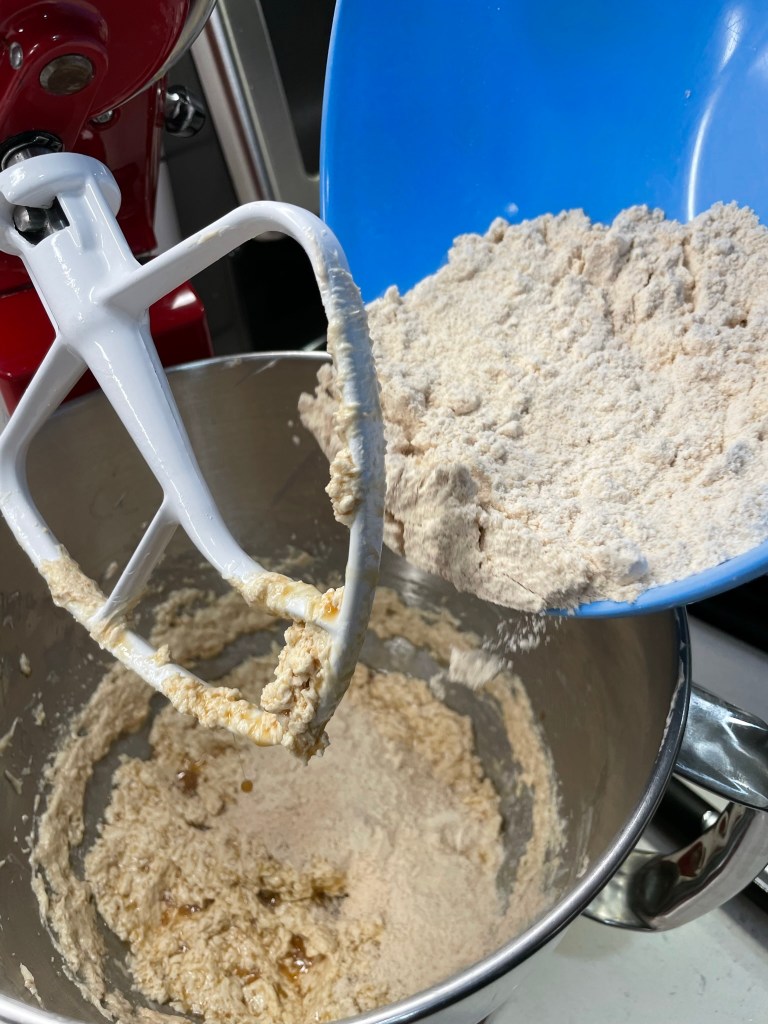
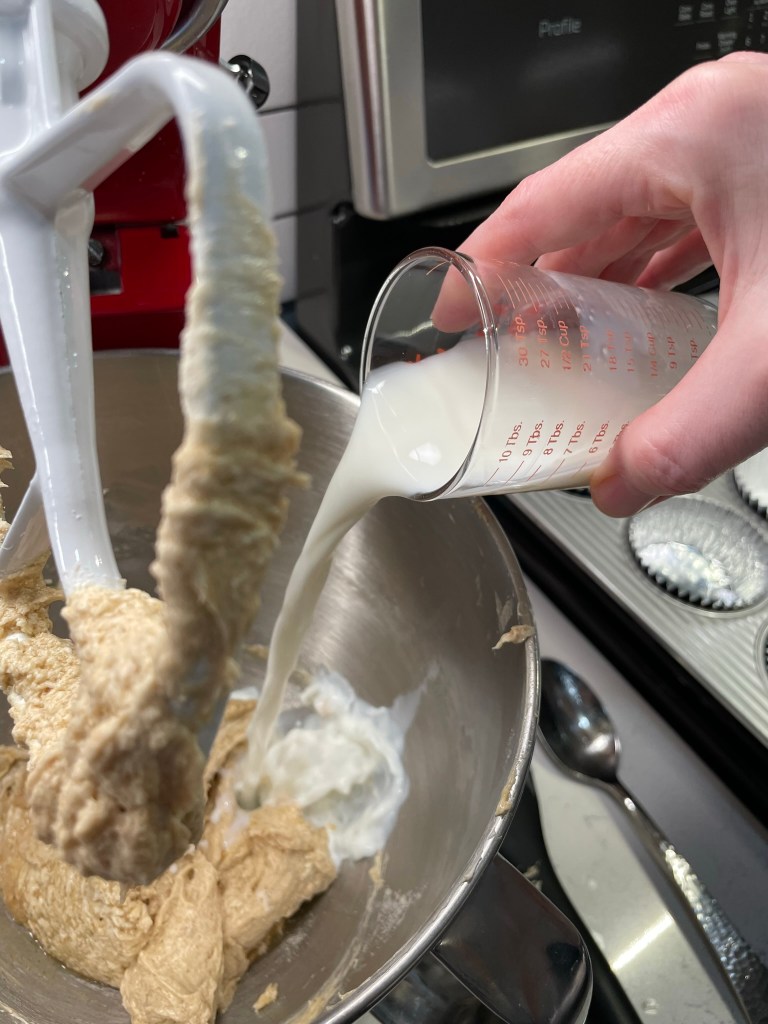
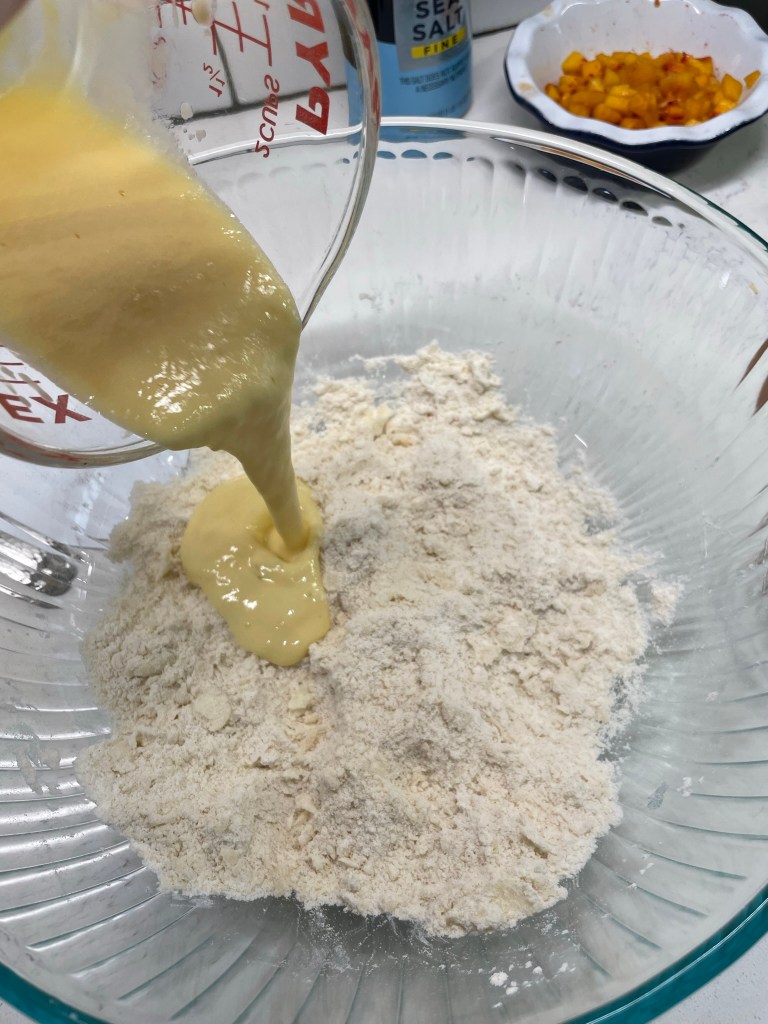
The process of the apple babka recipe was straightforward. I introduced the wet ingredients to the dry ones, then switched to the kneading hook and worked in the softened butter. This recipe would not be suitable for a meal that also includes meat— kosher rules require that meat and dairy not be served together— but it would be wonderful served with breakfast or dessert on another occasion. The dough rested about two hours until it was doubled and puffy.
With 6 tablespoons of butter, this dough was very silky.Did I sample the filling on its own? Of course!
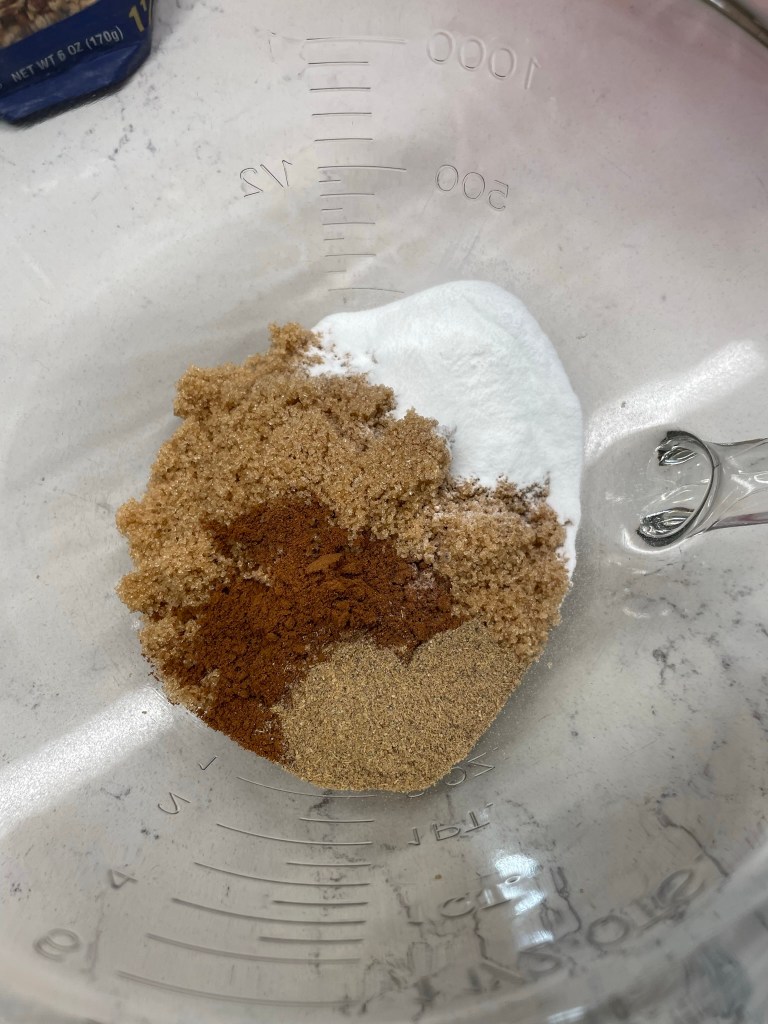
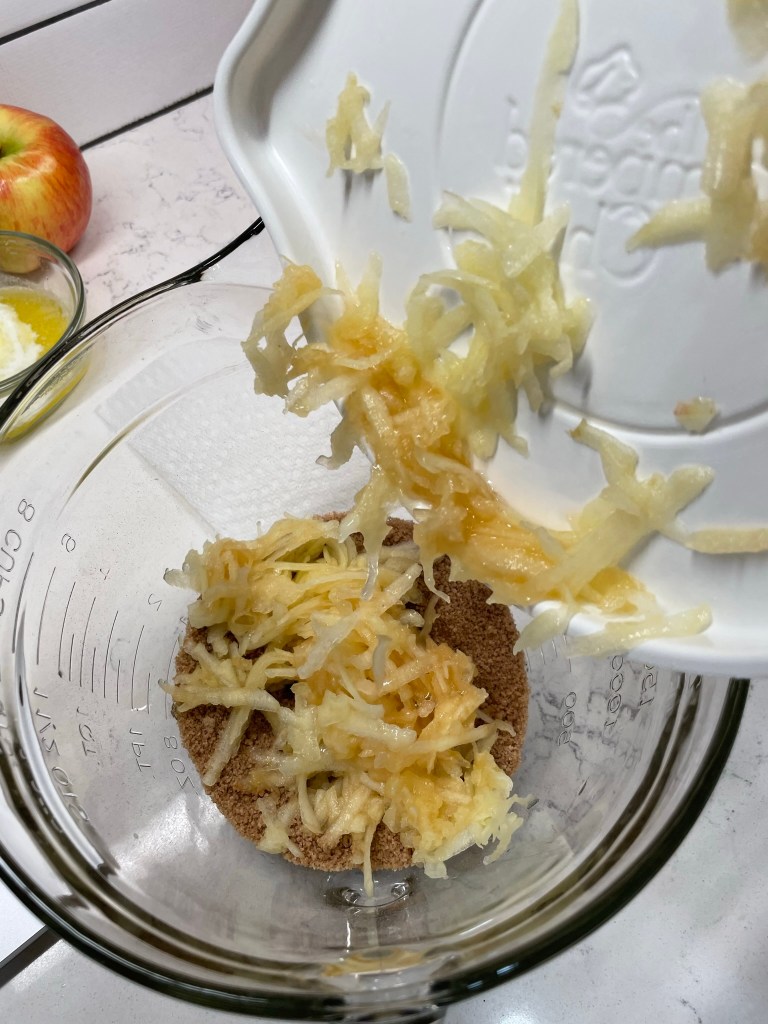
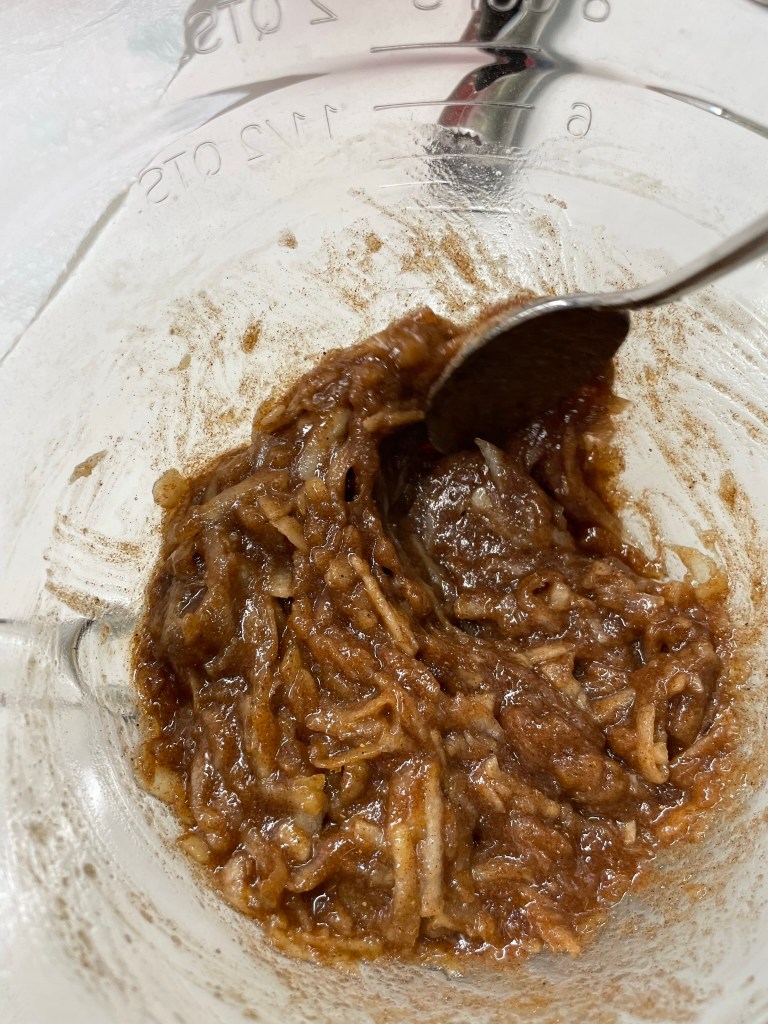
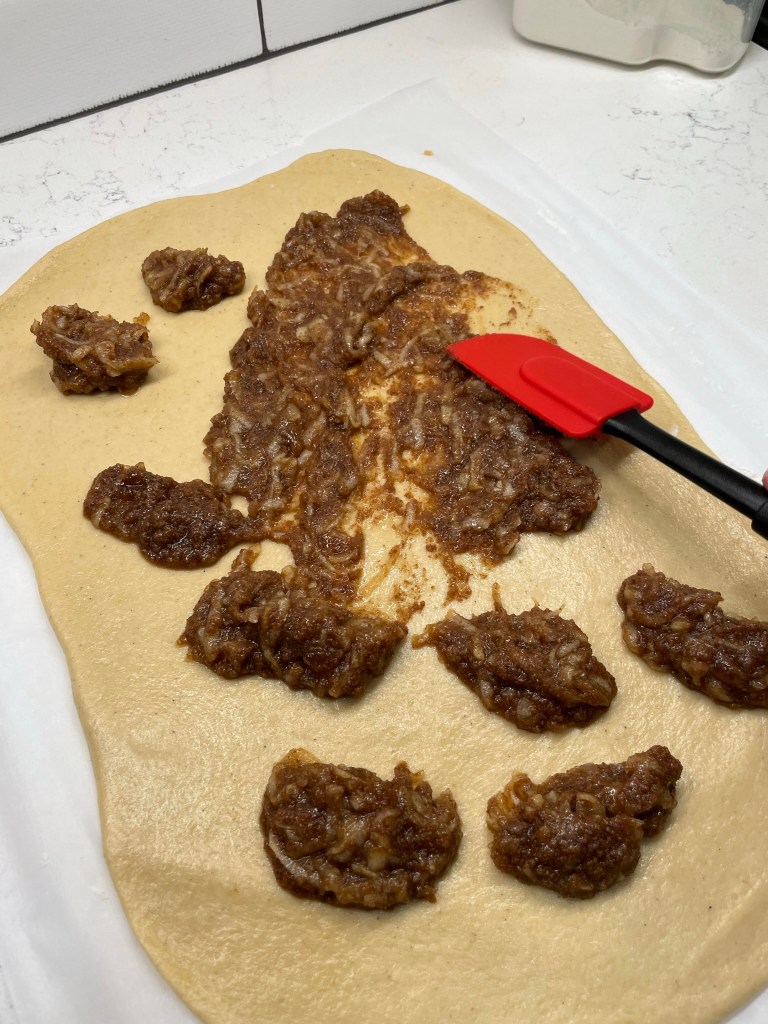
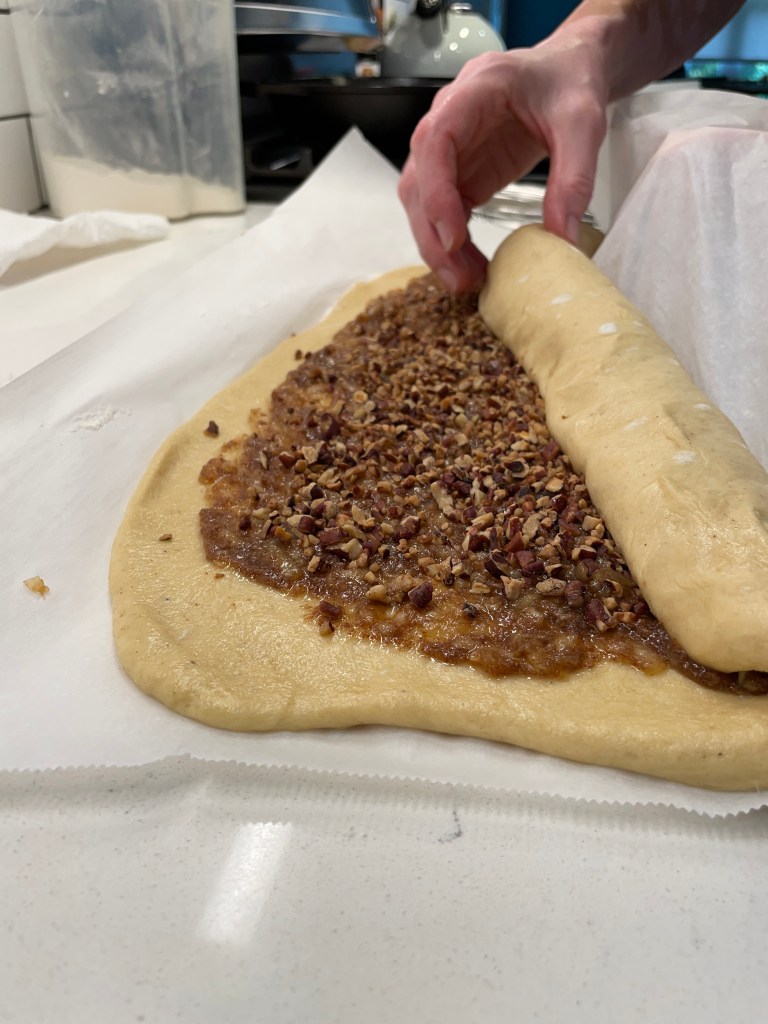
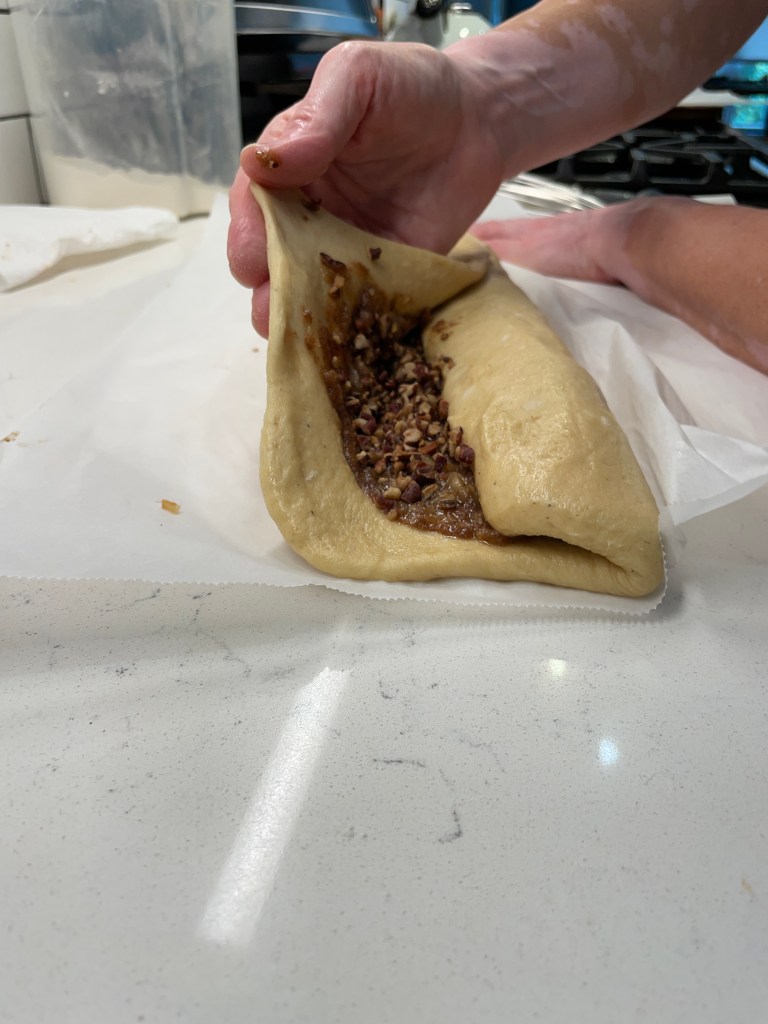
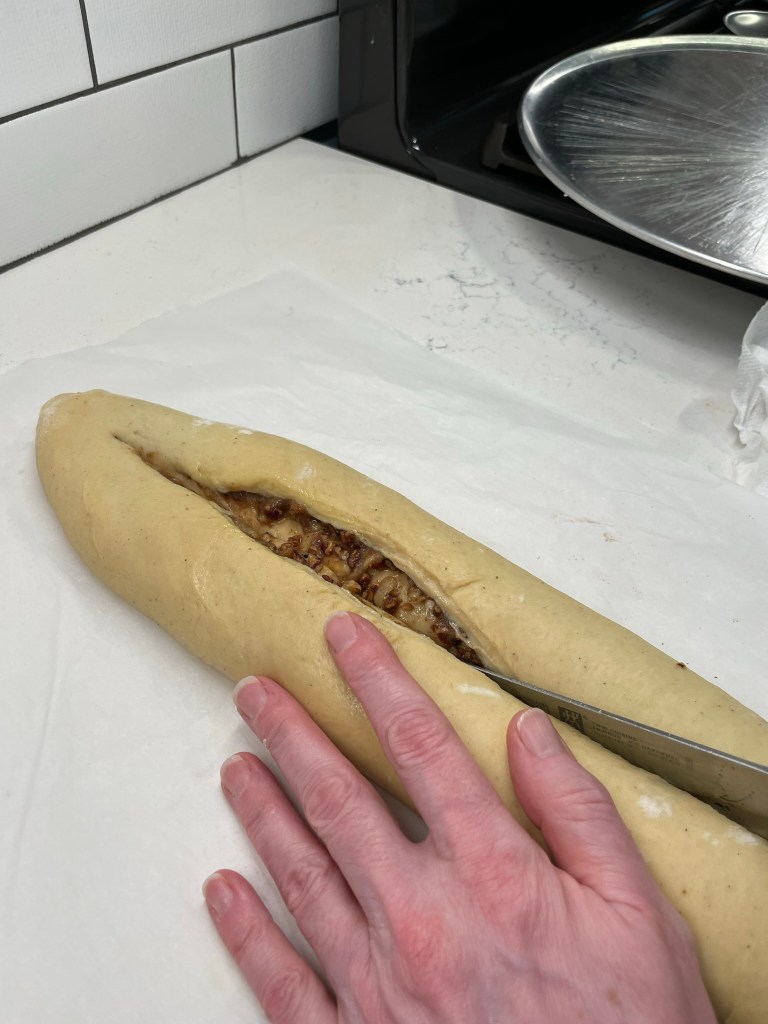
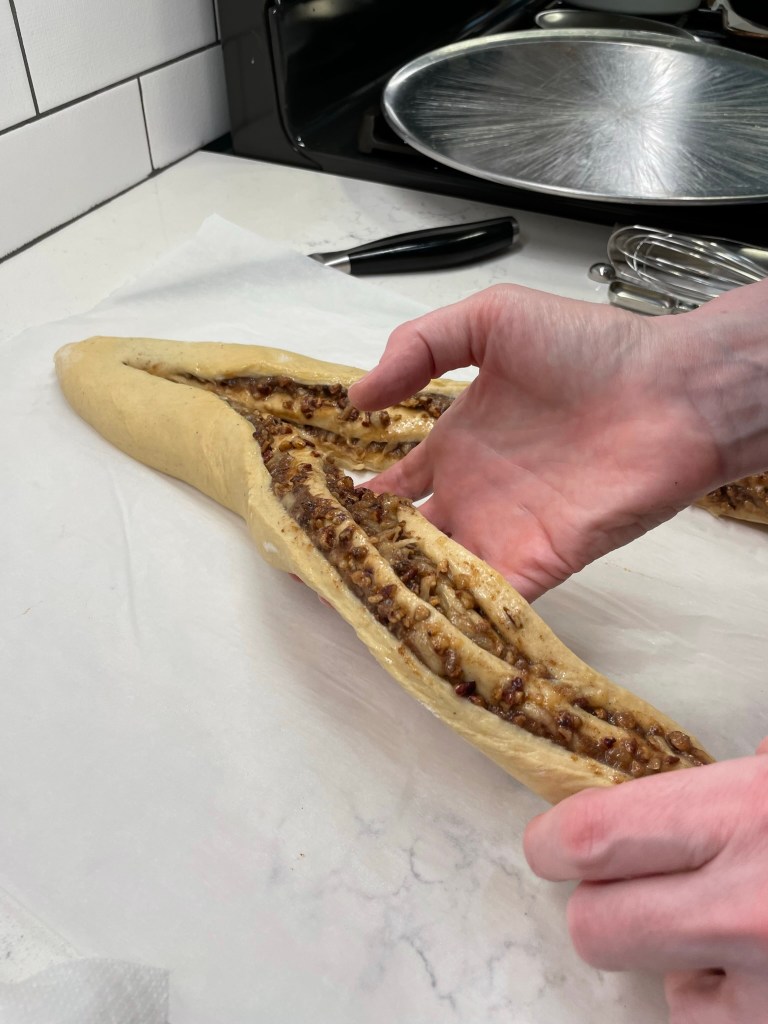
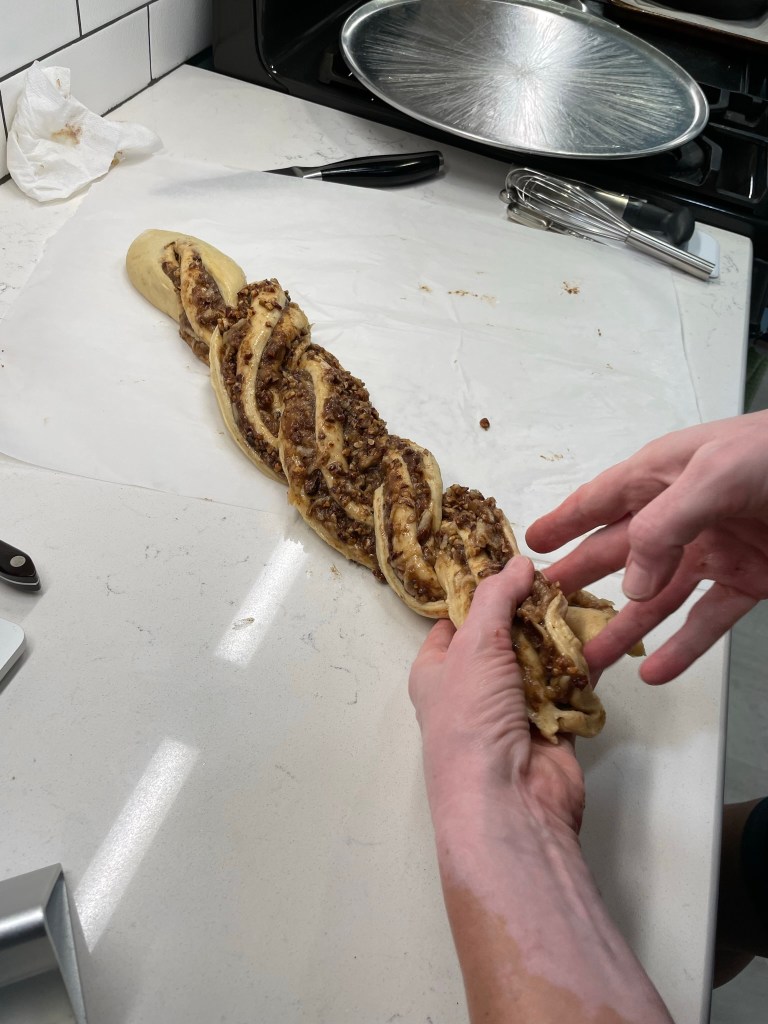
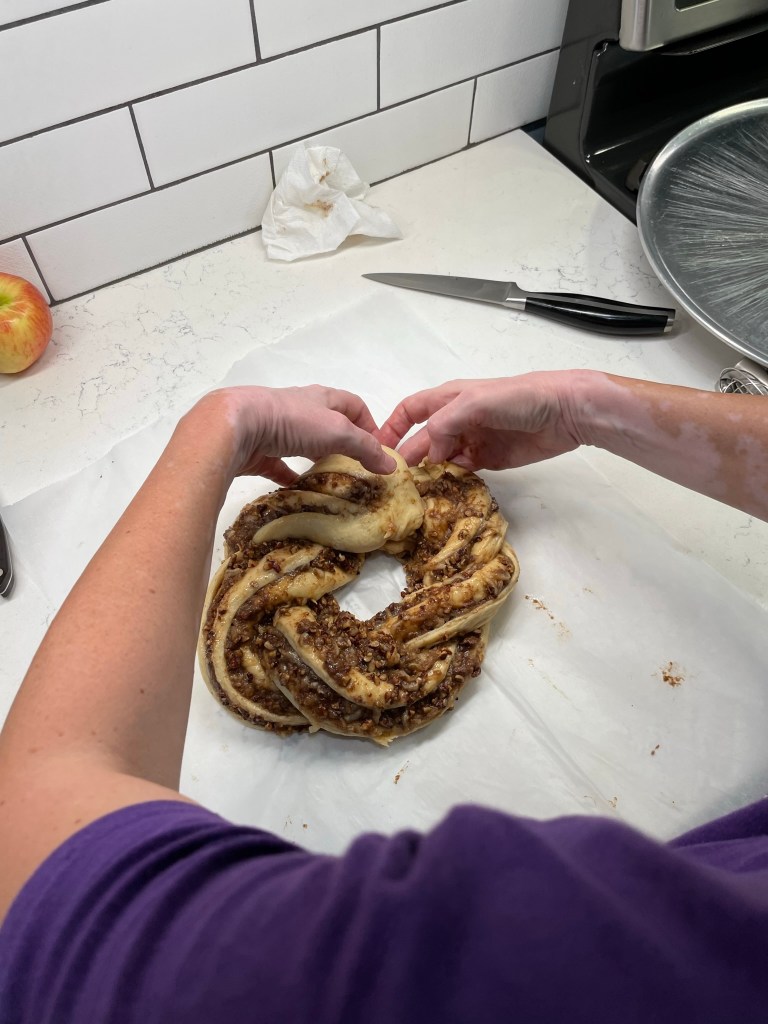
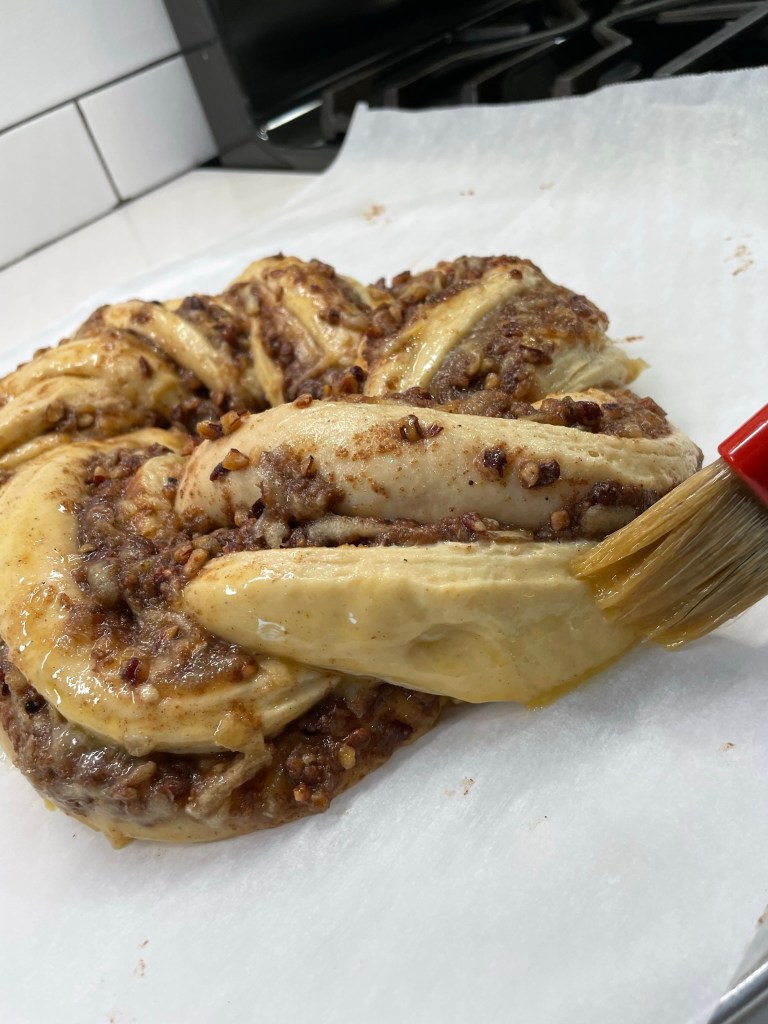
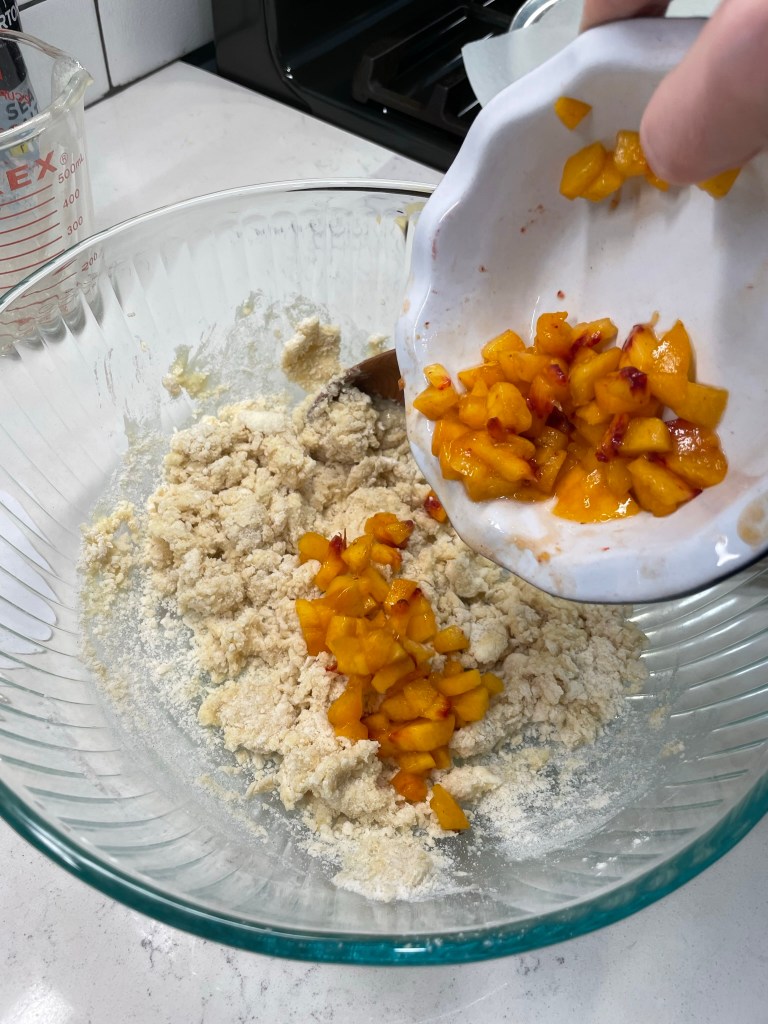
The filling was easy as well— brown sugar, cinnamon, cardamom and grated apple. Honeycrisp seemed appropriate for the occasion of Rosh Hashanah. Next came the rolling up and cutting, and I think this part would have been easier if this dough had been chilled, as the filling was very wet and loose. It was not difficult, but very messy, and not as pretty as I wanted it to be. I shaped the braided babka into a round, like a wreath, and covered it to proof for baking.
Next time, I will refrigerate the roll before cutting and shaping.
One of the other lessons in the King Arthur class was the simple way to determine whether your dough has proofed sufficiently for baking. If you poke the dough with a floured fingertip and the indent remains, it’s ready. If it bounces back, it needs more time. This one was ready!
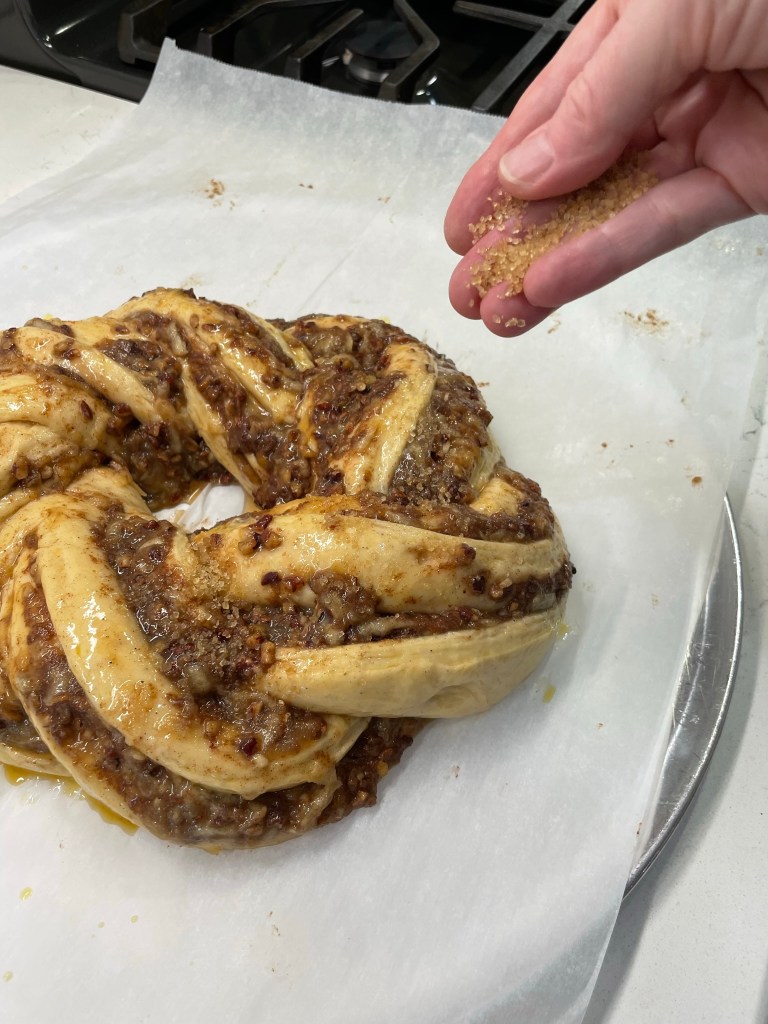
The egg wash and sprinkles of turbinado sugar made this beautiful!
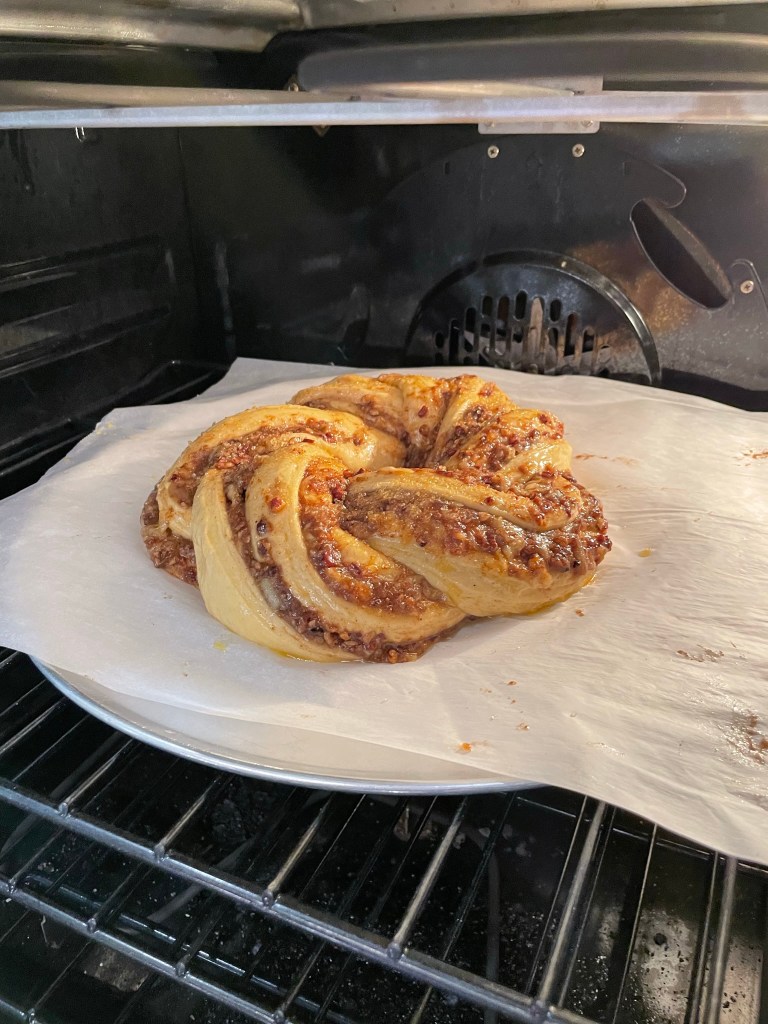
Time for an egg wash and bake, and we are ready for Rosh Hashanah! Of course, you don’t have to be Jewish to enjoy the lovely flavors. The apple, honey and spices make it perfectly appropriate through the rest of the year.
The first time I heard the term “reverse sear” was about five years ago, on Food Network, but that was already more than a decade after a young, rock-star chef and culinary consultant named J. Kenji López-Alt started talking about his discovery of a new method for cooking thick steak to perfection.
Rather than searing the meat first— you know, “to lock in the juices,” as we’ve all been advised since forever— Kenji tested this method of bringing the steak to ideal temperature in the oven first, and then throwing it onto the hot grill or skillet to sear it. The food world took notice of this brilliant discovery, but I’d been reluctant to try it, for reasons I can only explain as sentiment and tradition.
We’ve all seen the drawings on cave walls, with a man cooking animal parts over fire. This is the way we’ve always done it, and here I was, questioning what was already working. Still, I had to ask myself, are some of my mindsets about cooking set in stone because they date back to the actual Stone Age?
But Kenji hasn’t steered me wrong yet, as evidenced when I tried his brilliant baking soda technique that I like to call the miraculous mayo marinade. I use that one all the time now. Or last summer when he posted a recipe in NY Times Cooking, describing how to use salt to draw out the flavors of ingredients in this Mexican street corn guacamole, which Kenji says is his favorite and understandably so. And of course, the tremendous a-ha moment I had when I realized how positively simple it is to make my own sausage, following his salt-wait-grind-mix instructions.
So this summer, I finally decided to try the much-lauded reverse sear, and I’m here to report my experience. First things first, I had to pick up some steaks.
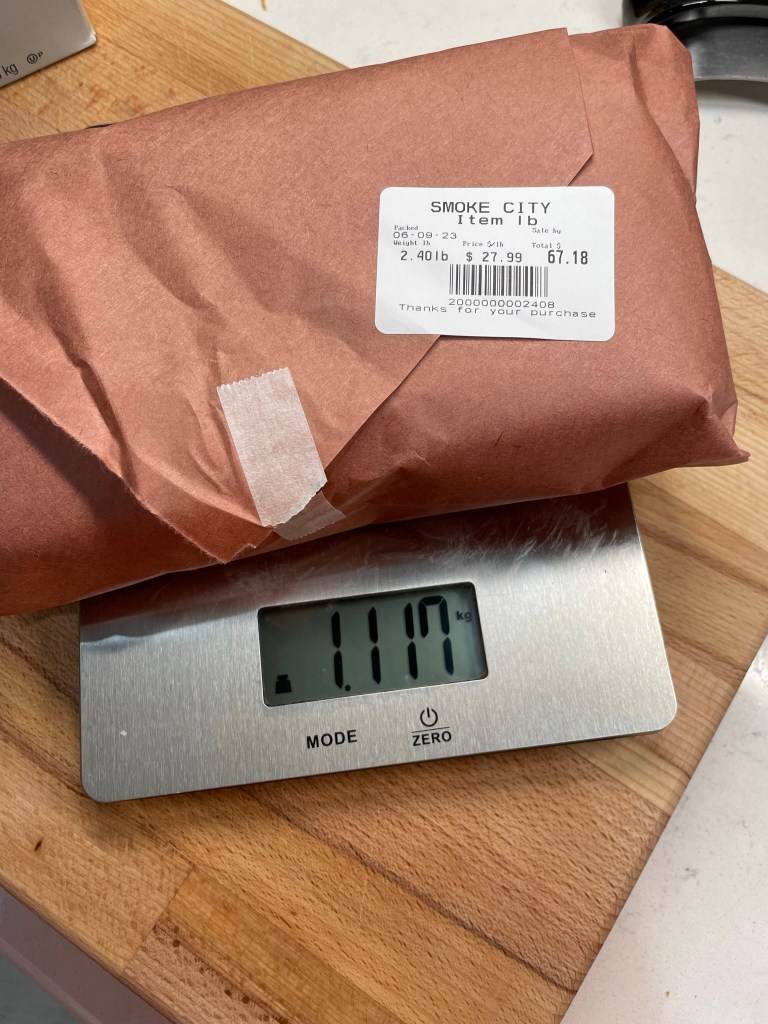
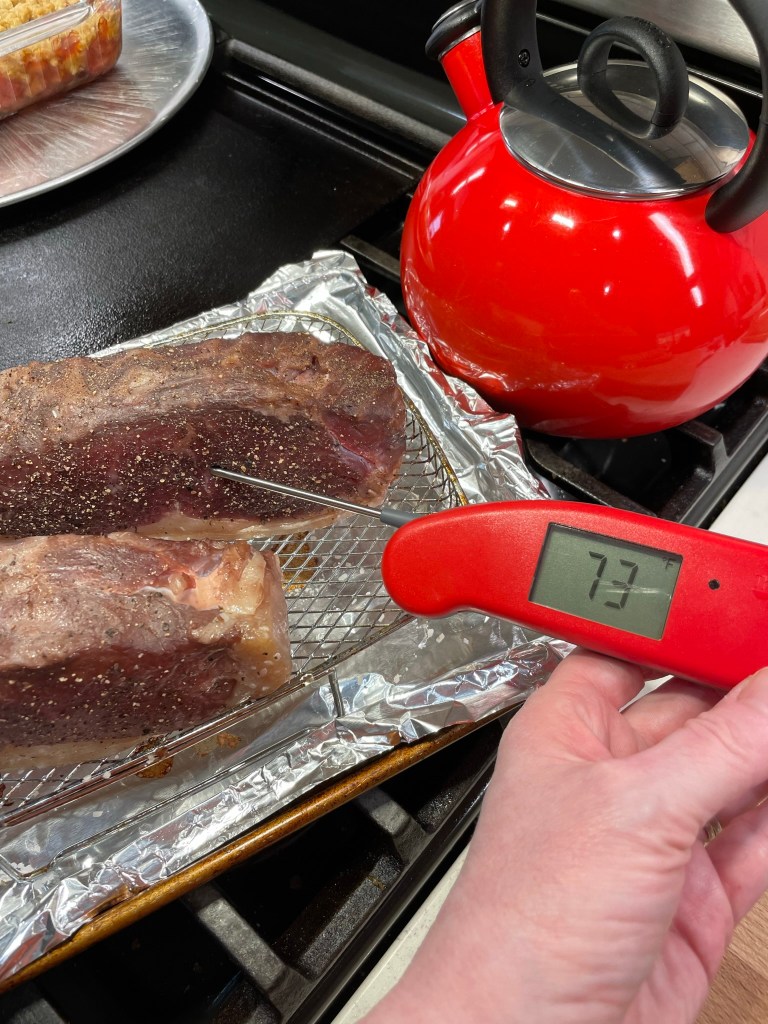
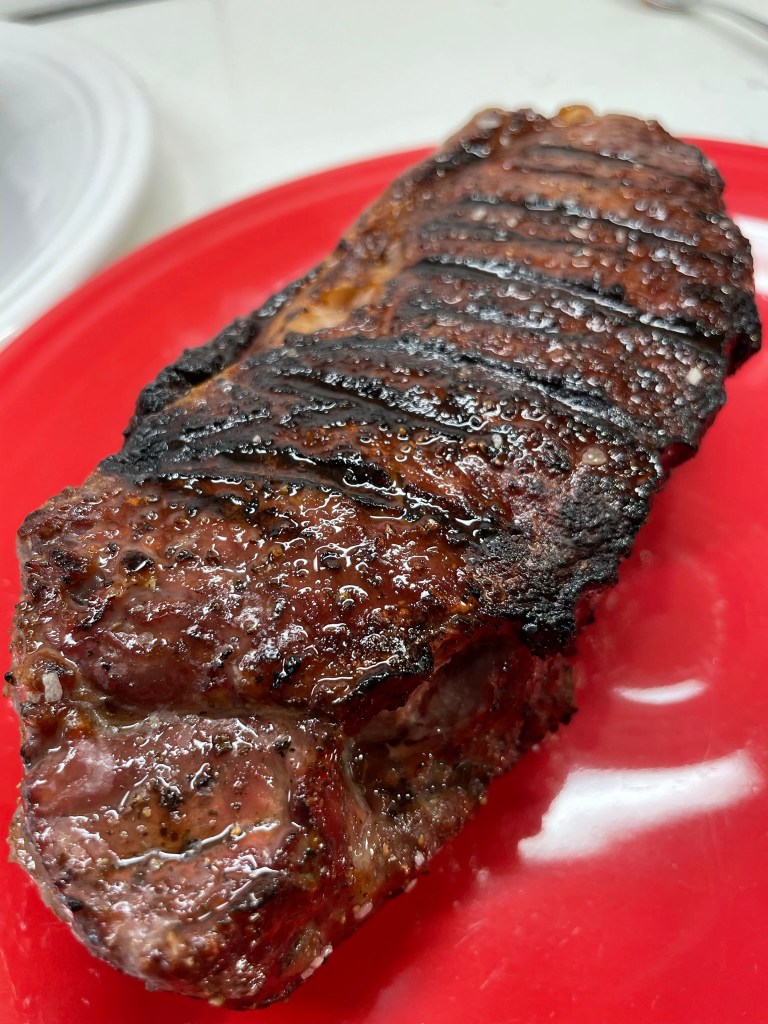
And not just any steaks. According to this article on Serious Eats, I needed to have steak that was close to 2 inches thick, and that usually means a custom order. When I explained to my local butcher what I had in mind, he pulled a huge slab of bone-in meat from the cooler in the back and went to work— slicing it nice and thick and trimming off the excess fat and bone. I’ll pause right here and acknowledge how much I appreciate having an actual butcher in town, one that sells locally produced meats with sustainability in mind, rather than a forced selection of meats from God-knows-where, shrink-wrapped over styrofoam trays. If you have a community butcher shop, please support it.
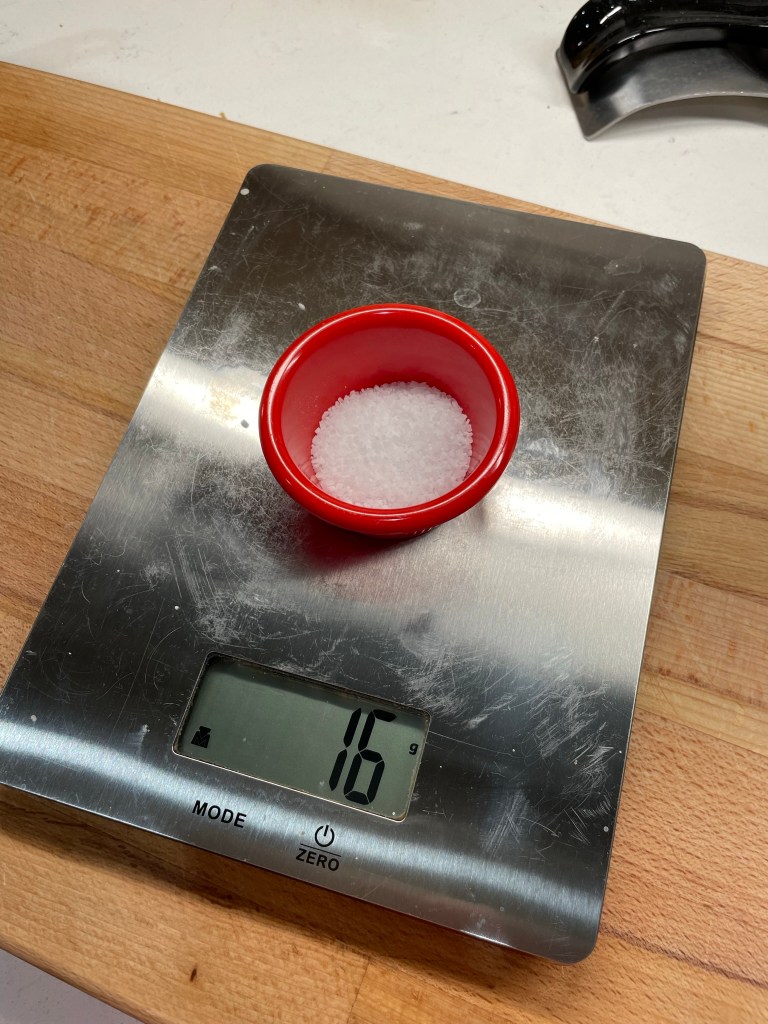
First, I weighed the meat in grams.Then weighed out kosher salt at 1.5% of the meat weight (close enough).Finally, added black pepper and rubbed the steak on all sides.
We ended up with two locally raised, grass-fed N.Y. strips that weighed roughly 2 and 1/2 pounds total— whew, that’s a lotta meat. At nearly 28 bucks a pound, this was not going to be a cheap experiment. My husband (and resident grill master), Les, was a great sport about the whole thing, even though the method defied his sensibilities, too, and even though it meant a longer wait for dinner.
Here’s how it was supposed to go.
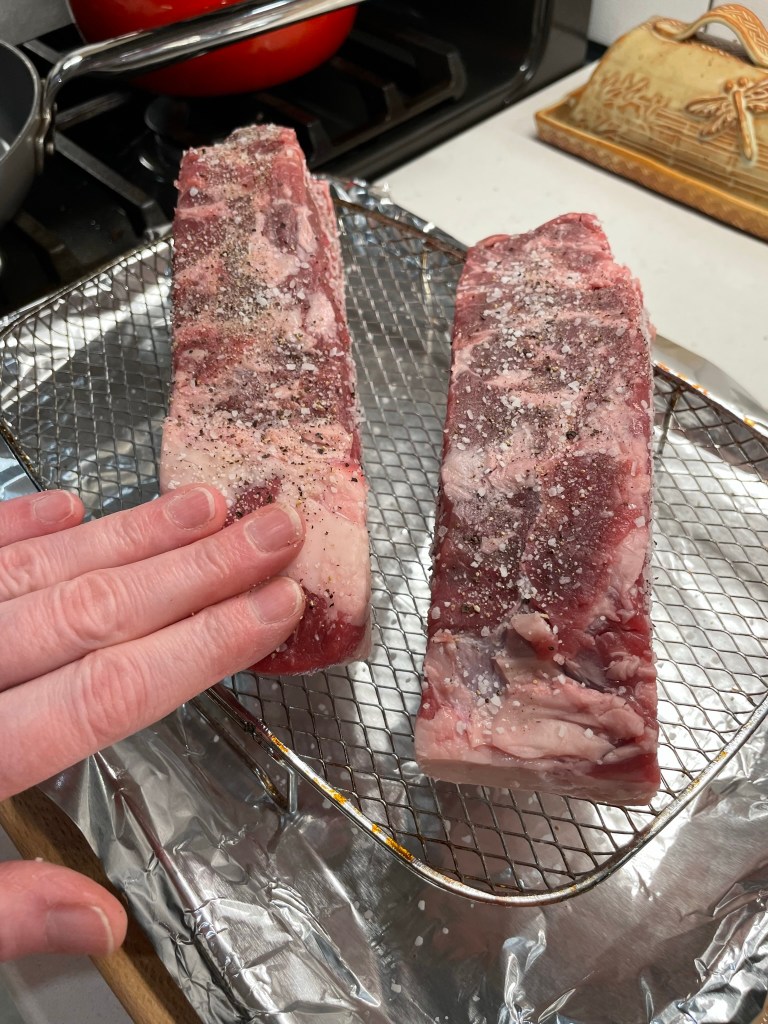
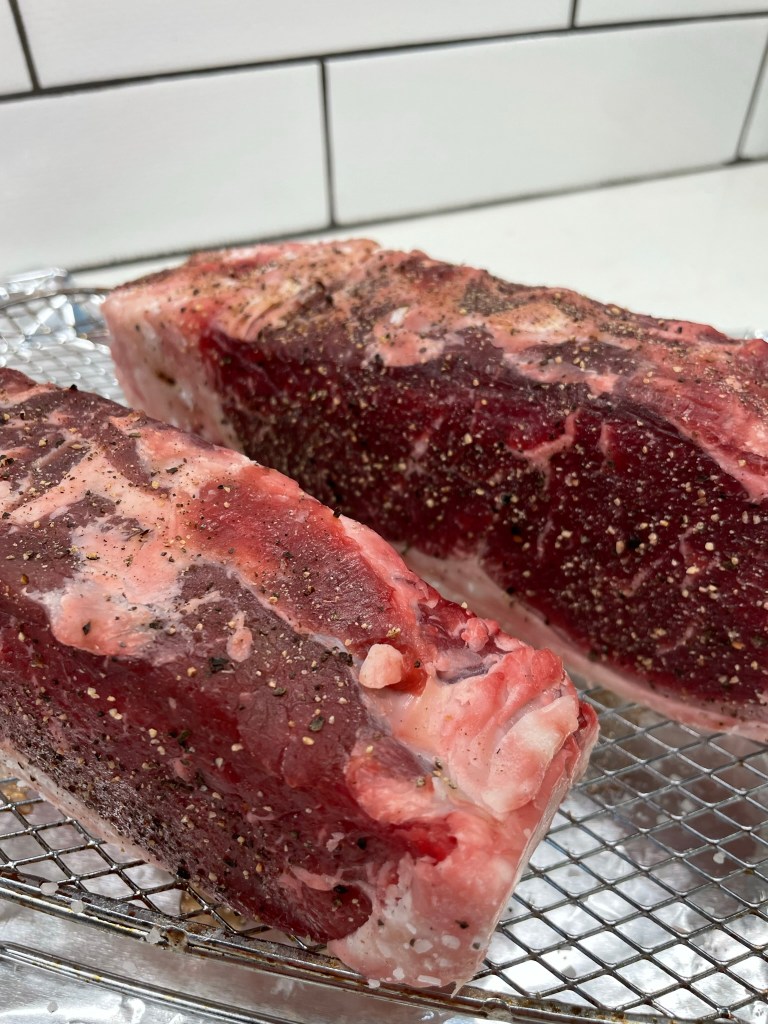
Dry rub the steaks the night before — I used just kosher salt and black pepper, and they rested uncovered in the fridge.
Slow bake the steaks at low temperature (250° F) to just-shy of done — 25 to 30 minutes (we’ll just see about that).
Sear the steaks to perfection — we had the grill fired up and ready to go!
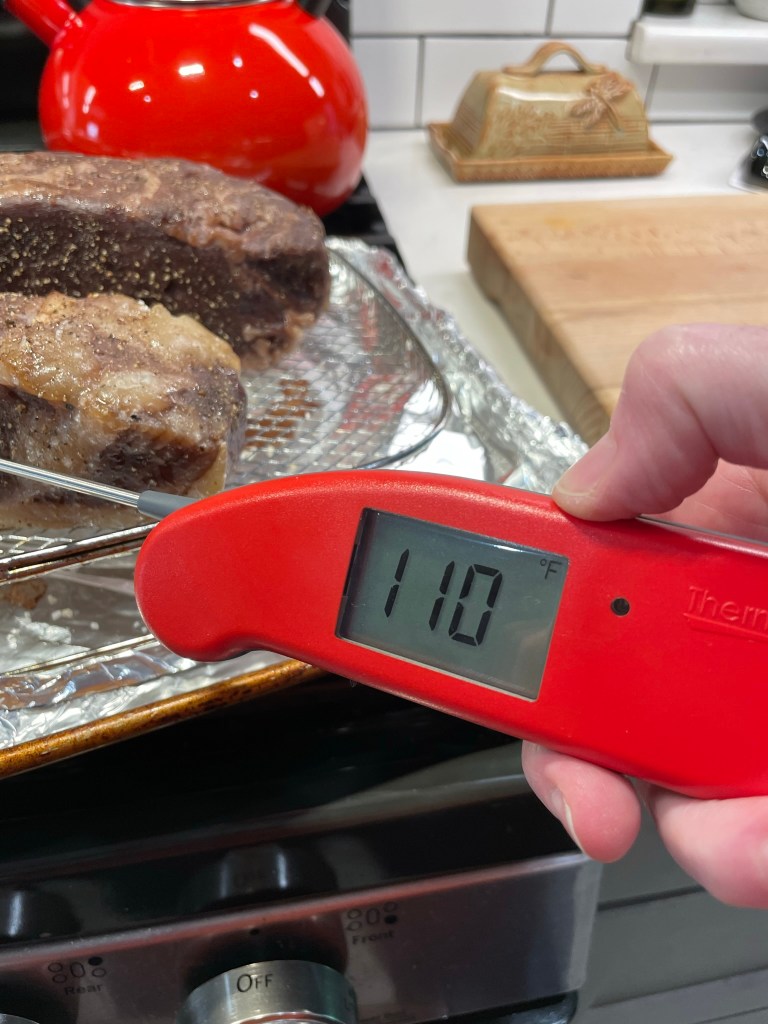
They don’t look juicy, and that’s the point.Into the oven for a slow roast.
Are we there yet??
First, the process that was supposed to take 25 to 30 minutes ended up taking much longer. Were my steaks too thick? Was 40 minutes out of the fridge long enough to knock the chill off? Whatever the case, the steaks looked awful during this slow oven time. It’s a little upsetting to see expensive cuts of meat looking so— what’s the word? Grayish. 🫤
I started checking at the 30-minute mark, and we weren’t even close to the 115° F internal temperature we needed for a medium rare finish. This project was running slower than molasses in January. We resisted the urge to turn up the oven temp, but the clock was ticking, and we were getting damn hungry by this point.
After 30 minutes.After 49 minutes.After 58 minutes.
C’mon, I’m starving!
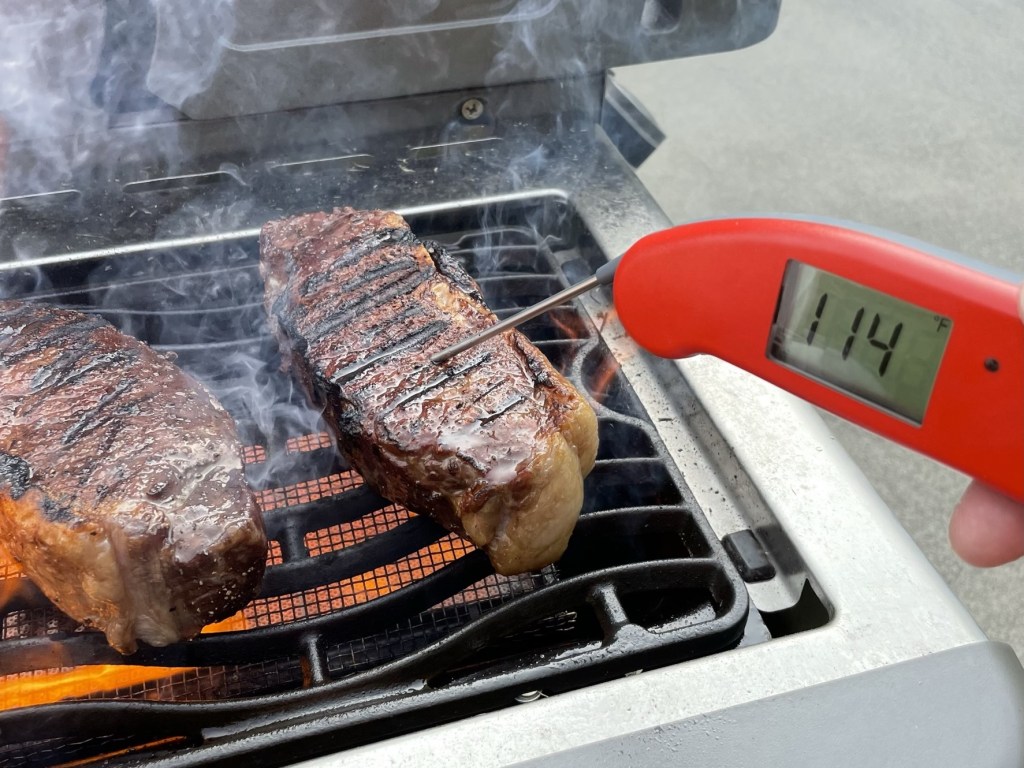
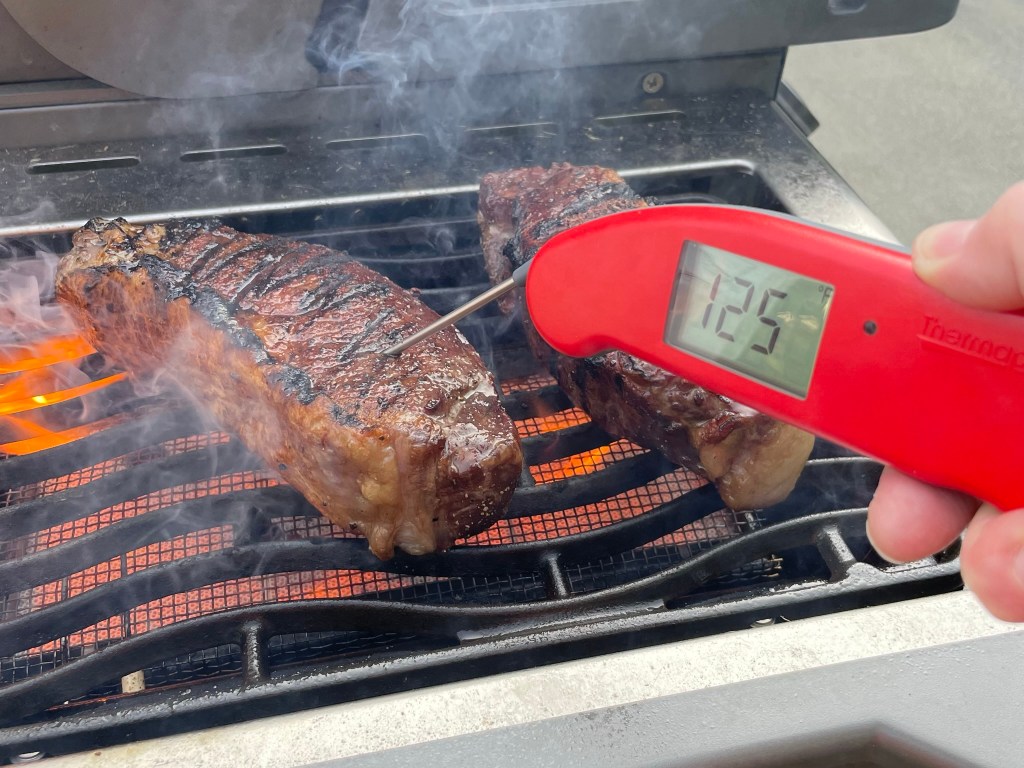
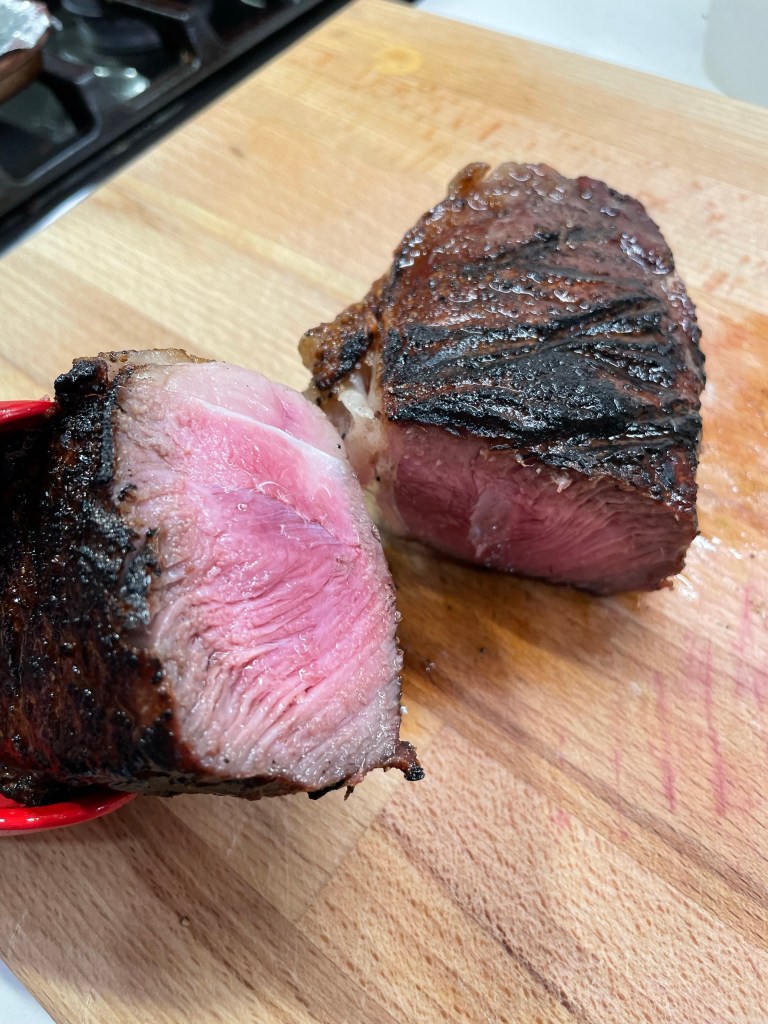
Finally, we decided that 110° was close enough, and when those steaks hit the infrared side burner of our Napoleon grill, it was quite dramatic! The sear was spectacular, and from that point, it took a mere four minutes to plating. We were grateful that Kenji’s instructions said there was no need to rest the steaks before serving. All that business of letting the juices redistribute was covered during the slow roast. Just slice and enjoy! I barely slowed down to take pictures.
This part of the process moved very quickly!
Finally, the taste test!
Perfect outside, perfect inside!
The texture of the reverse-seared steak really was perfect— crusted and flavorful on the outside, juicy and tender inside— and it was delicious. But was it superior to a seared-first steak— the kind we usually grill? I can’t say for sure, and I also can’t confirm that it was the cooking method alone that caused this perfection, as I also followed Kenji’s instruction for salting and seasoning the steak the night before. The overnight “dry-brining” technique used to make me uncomfortable, too, but I’ve done it with turkey, chicken, pork and duck, and had fabulous results. Maybe the dry brine on its own would have given us the same end result.
Would I do the reverse sear again? Possibly, but only on rare occasion and under the right circumstances. Les already does a terrific steak on the grill, following the old cave man method, and I do a darn good job with them in a cast-iron skillet. It is unlikely that we would ever choose such large steaks to begin with; nutritional guidelines say that 4 to 5 ounces is appropriate for a serving, and we usually push that into the 8-ounce range, but these were over a pound apiece! We should have shared one, I think, but I wanted leftovers.
The reverse sear technique could be useful if we had a large gathering for a grilled meal (probably why top-notch restaurants are doing it). Things can get a little dicey when you’re trying to get a bunch of steaks grilled at once, and the low-and-slow process would allow extra flexibility for accurate temperature and quick finish, and more time for cocktails and chit chat while we wait—nothing wrong with that.
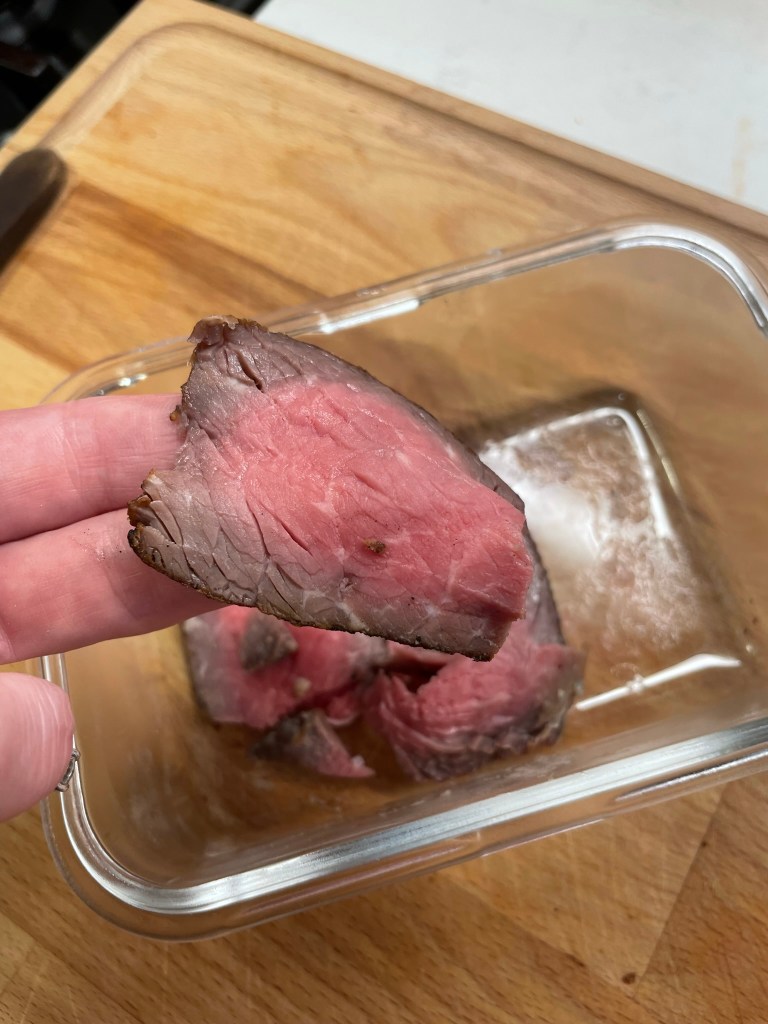
One final observation about reverse searing, and this one didn’t hit me until the next day when I sliced up some of the leftovers of our enormous steaks to top a salad. I can truly say that never-have-I-ever had leftover steak with such flavor and texture. The meat was still juicy and tender, much more so than I expected for round two, so there’s that.
I’m curious to know others’ experiences with reverse searing; if you have tried it, please let me know in the comments section below how things went for you. If you haven’t tried it, will you be firing up the grill (and oven) to give it a go this weekend?
Well, here we are, staring down the unofficial end of summer. Labor Day weekend is upon us in the U.S., and though it signifies the waning days of summer, we are hardly ready to trade in our shorts and flip flops for boots and cozy sweaters. It’s still plenty hot, and we still have weeks— if not months— of good grilling weather remaining.
If you’ll be grilling out this weekend, and perhaps looking for a different take on potato salad, I have a fun one for you. This salad was the result of wracking my brain for another mayo-free potato side, not unlike the potato salad with chive and parsley pesto that I shared at the start of summer. That was a NY Times Cooking Recipe, and this one happens to be inspired by another recipe from the same site.
It had already occurred to me that romesco sauce would be a delicious flavor to apply to potato salad, when lo and behold, a recipe appeared in my inbox for a “romesco egg salad.” There was confirmation for my inspiration, and I was off and running.
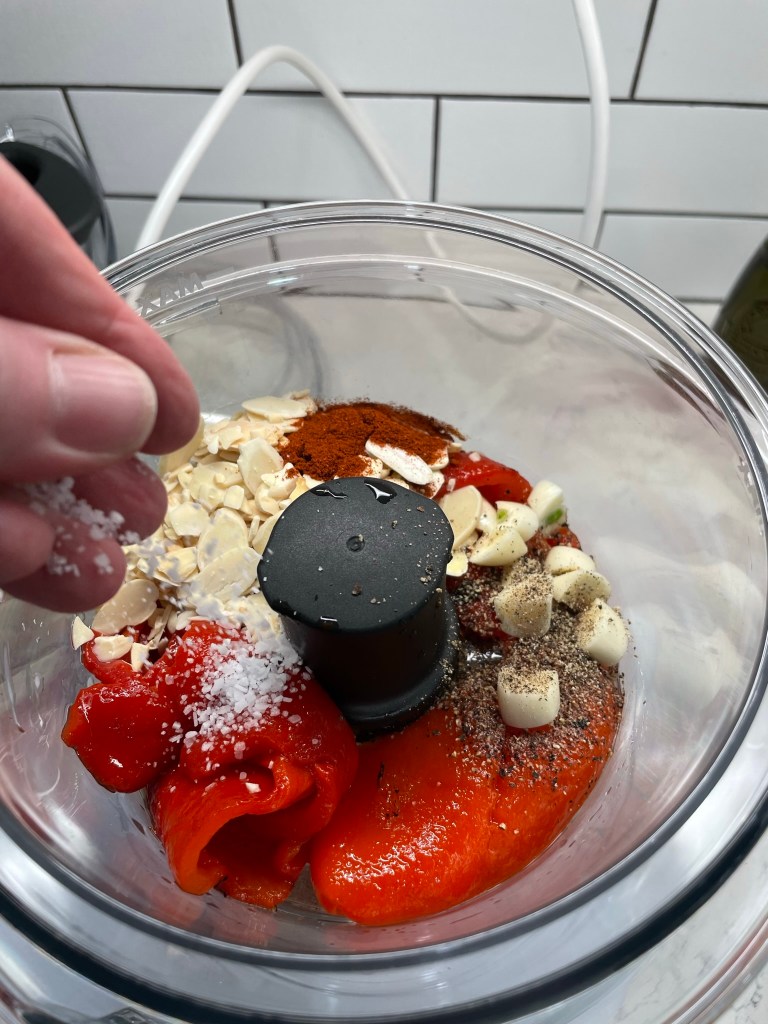
Romesco, in case you are not familiar, is a Spanish-inspired sauce made of pureed roasted red pepper, almonds and paprika. Typically, it would include roasted tomatoes, but I omitted those to keep my sauce thicker. It is sometimes also blended with stale bread to give the sauce more body, but I didn’t want carbs on carbs, so I skipped that, too, which also kept it gluten free. My romesco is spiked with garlic, vinegar, sherry and capers for extra bright flavor, and a peppery extra virgin olive oil holds the whole thing together. The sauce was delicious and substantial for dressing a potato salad.
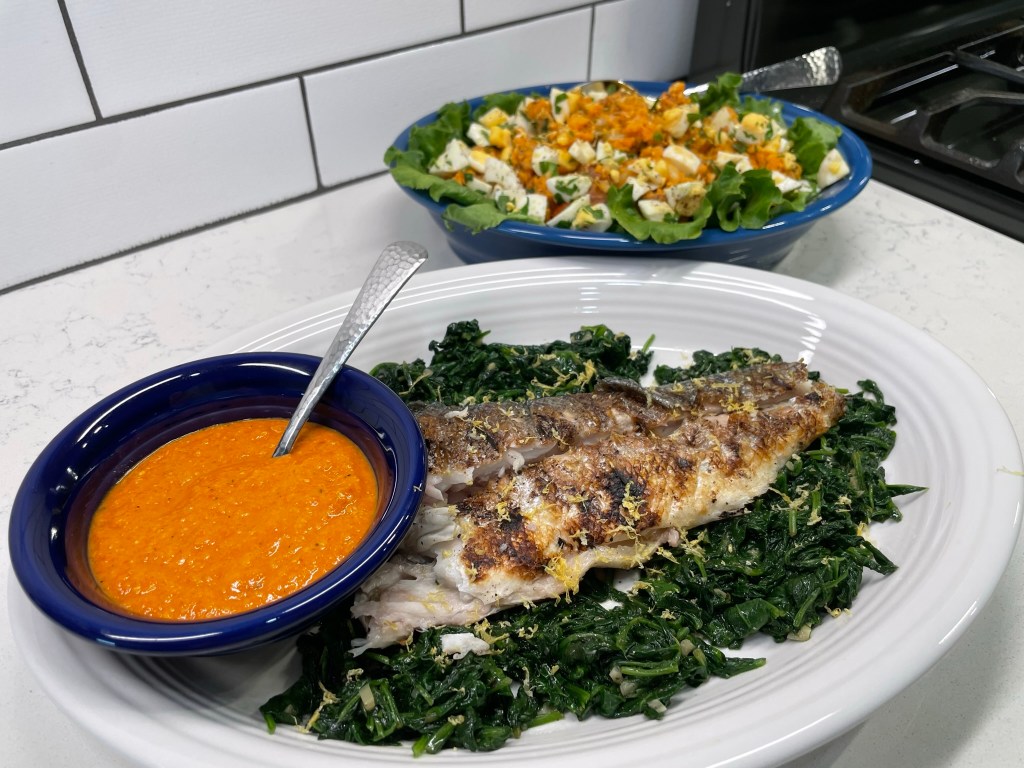
What I like about this salad, besides it being free of greasy mayonnaise that separates at the first hint of heat, is that it packs a ton of flavor that you might not expect on a potato salad. The roasted red pepper lends more than enough moisture to keep the tender boiled potatoes from feeling sticky or dry, and the smoked paprika, capers and hard boiled egg give it an unmistakable flair of Spanish cuisine.
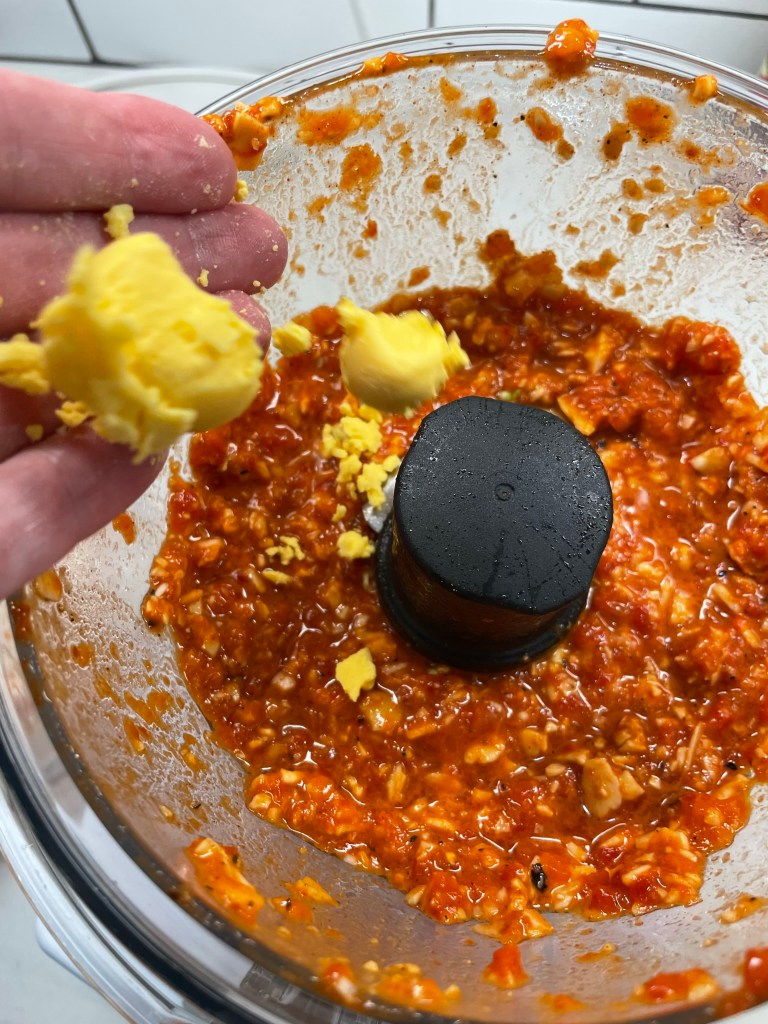
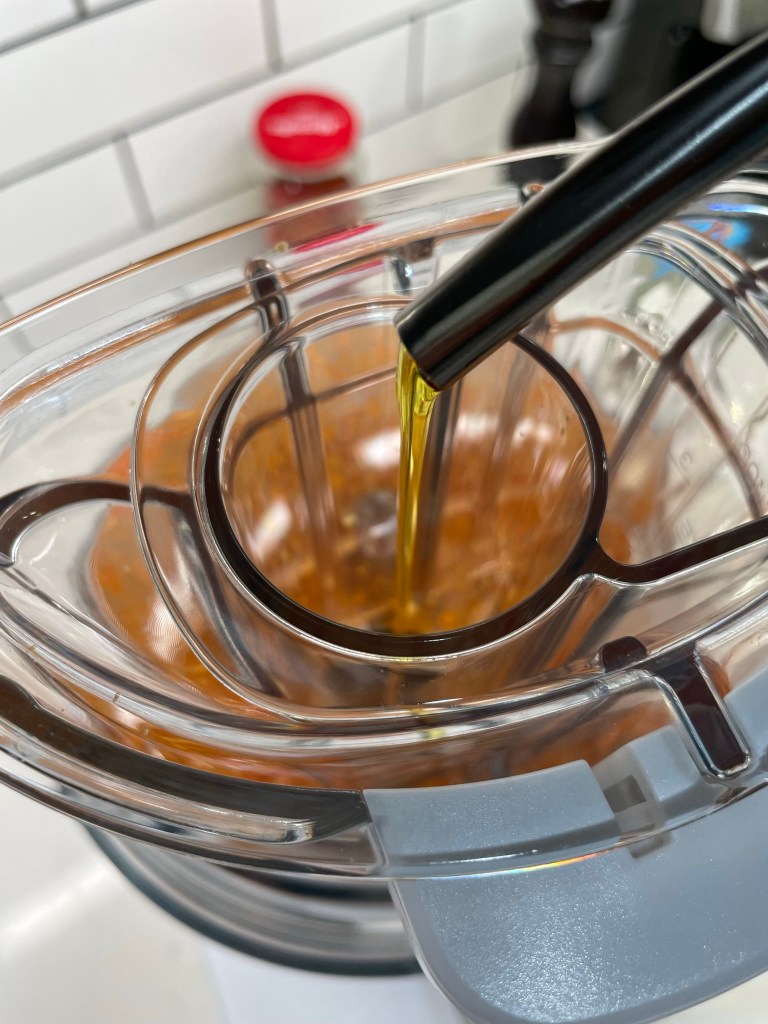
No food processor? Use a bullet blender or mortar and pestle.I added one of the cooked yolks to give my sauce more body.Add the oil while the processor is running.Lightly smash the potatoes, to better receive the sauce.This romesco sauce smelled sooo good!Add toppings and drizzle with more olive oil to serve!
It comes together easily, especially if you use jarred roasted red peppers, as I did for this one. Simply process together the romesco ingredients, seasoning as you go, and then fold it into tender cooked baby potatoes. A few hours to chill it down is all you need, then top it with chopped eggs, onions, capers and parsley, and this is potluck-ready!
We enjoyed this romesco potato salad at our house on Fourth of July weekend, but it would be a perfect way to celebrate the end of summer while also welcoming in some of the bolder flavors of fall. It would be excellent alongside a grilled skirt steak or zesty marinated chicken breasts, or keep it light and healthy— as we did, by serving it alongside a grilled whole branzino.
This recipe made enough romesco to dress the salad plus a little extra to serve on the side with the grilled fish. If you don’t want the extra, simply prepare an extra half-pound of potatoes. But trust me on this, you’re going to want the extra. 😁
The Spanish-inspired flavors of roasted red pepper, paprika, sherry and almond lend a zesty flair to this mayo-free potato salad!
Ingredients
1 pound itty bitty red potatoes
3 eggs, hard boiled, cooled and peeled
1/2 cup roasted red peppers
1/3 cup almonds
1 Tbsp red wine vinegar
1 Tbsp sherry (see recipe notes)
3/4 tsp smoked paprika
2 cloves garlic
1/3 cup evoo; add 2 Tbsp at first, drizzle remaining in while processor runs
Kosher salt and freshly ground black pepper, to taste
Additional roasted red bell pepper, chopped
1/4 cup parsley leaves and stems, chopped
1 Tbsp capers, rough chopped
1/4 cup diced Spanish onion
Recipe Notes: Sherry vinegar is traditional for romesco, but I substituted a 50/50 mix of red wine vinegar and good quality drinking sherry. Odd, isn’t it, that I had sherry but not the vinegar?
You will likely only need about 2/3 of the romesco to dress the potato salad. Save the rest for another purpose (it’s great on sandwiches or with grilled fish), or do an extra 1/2 pound of potatoes.
Directions
Add baby potatoes and water to a medium pot. Bring to a gentle boil, then reduce slightly to simmer until potatoes are tender. Drain immediately and let them relax in the colander to dissipate the steam. Lightly smash the potatoes, not to the point of mashing them, but enough to break them open just a bit.
In the bowl of a food processor, combine roasted red pepper, garlic, almonds, vinegar, sherry and paprika. Season with salt and pepper. Pulse a few quick times to roughly blend the sauce. Add one yolk of hard boiled egg if desired. Add two tablespoons of the olive oil and pulse again, then run the machine continuously while you slowly drizzle in the remaining oil.
When potatoes are warm but no longer hot, gently fold in the romesco sauce. You’ll probably want to use a little more sauce than you initially think it needs, as the warm potatoes will absorb some of the moisture in the sauce.
At serving time, top with additional red pepper, onion, chopped hard-boiled egg, capers and parsley. Add one last drizzle of olive oil, if desired.
How in the world can an ice cream stir up such a mixed bag of emotions? That’s what I have been asking myself for the past week as I wrestled with the decision to share this post. I almost didn’t even bother, but it seems so appropriately timed to tonight’s “blue supermoon,” an astronomical phenomenon that we haven’t seen since 2009 and won’t see again until 2037. So, I reasoned, it was now or never.
But oh, the drama! Allow me to explain.
For me personally, a very specific childhood event involving this ice cream dredges up difficult feelings about being gaslighted into becoming a timid kid. I’ll spare you the dreadful details, but in some weird, wishful-thinking way, I thought that revisiting the event by making this ice cream would redeem those feelings. It didn’t, but that is not the ice cream’s fault.
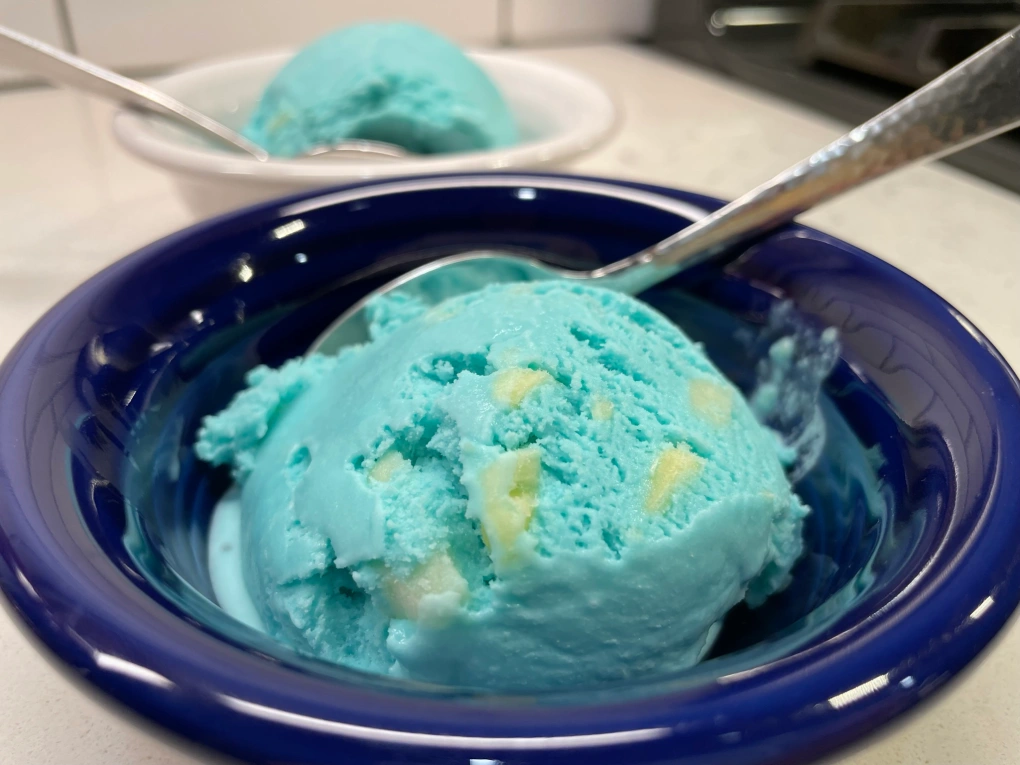
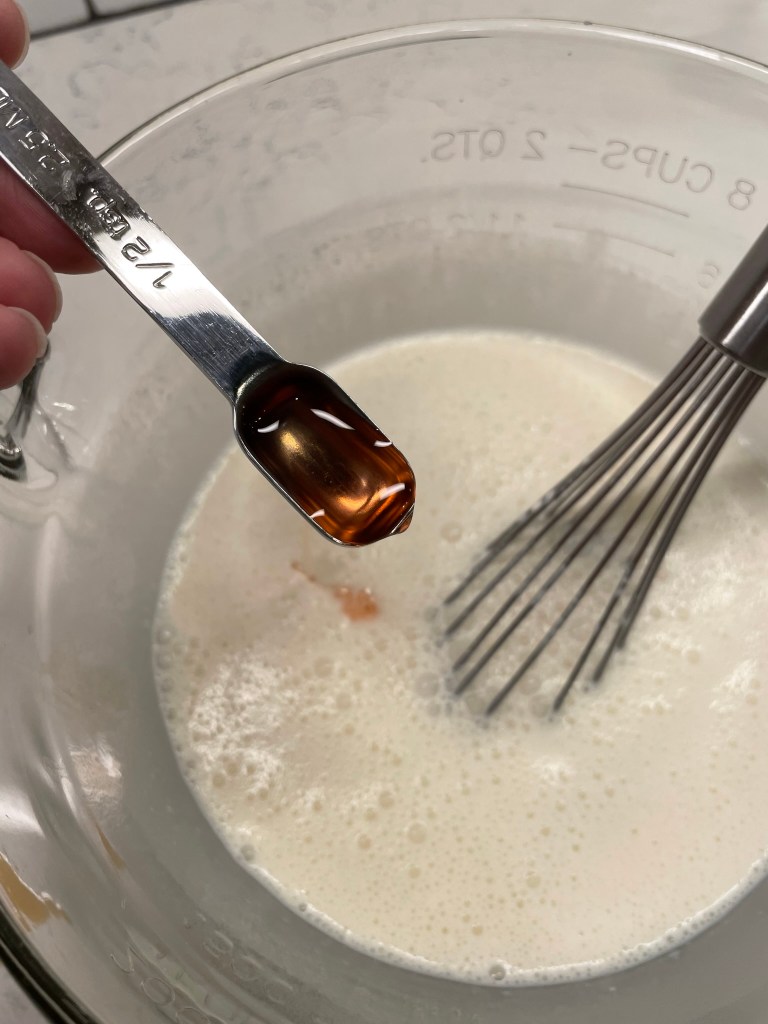
The recipe itself is a bit of an enigma, given that nobody really seems to know for sure what flavors go into blue moon ice cream, and I struggled with my own memory to describe the flavor of it, which is “fruity,” but not specific to a single fruit. Is it raspberry or lemon? Almond or vanilla? In my memory, it tasted like some mashup of bubble gum, cotton candy and tropical fruit punch. Oh, and with pineapple bits. And that’s where this adventure began to go off the rails.
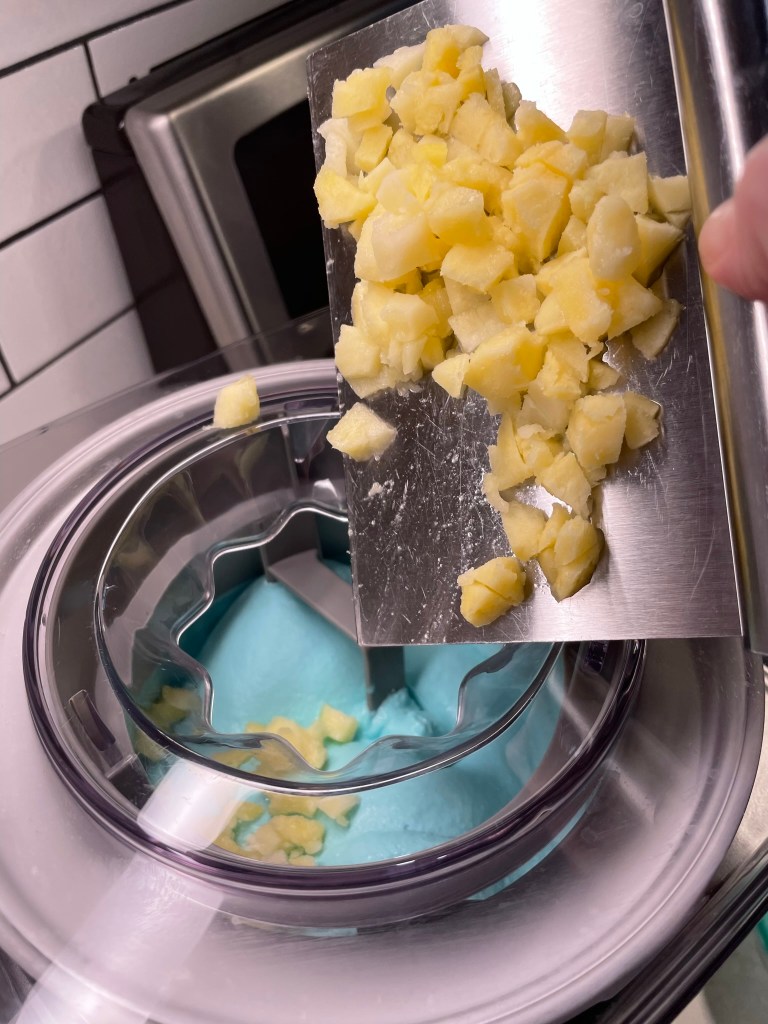
I pulled several extracts from my pantry for this experiment.
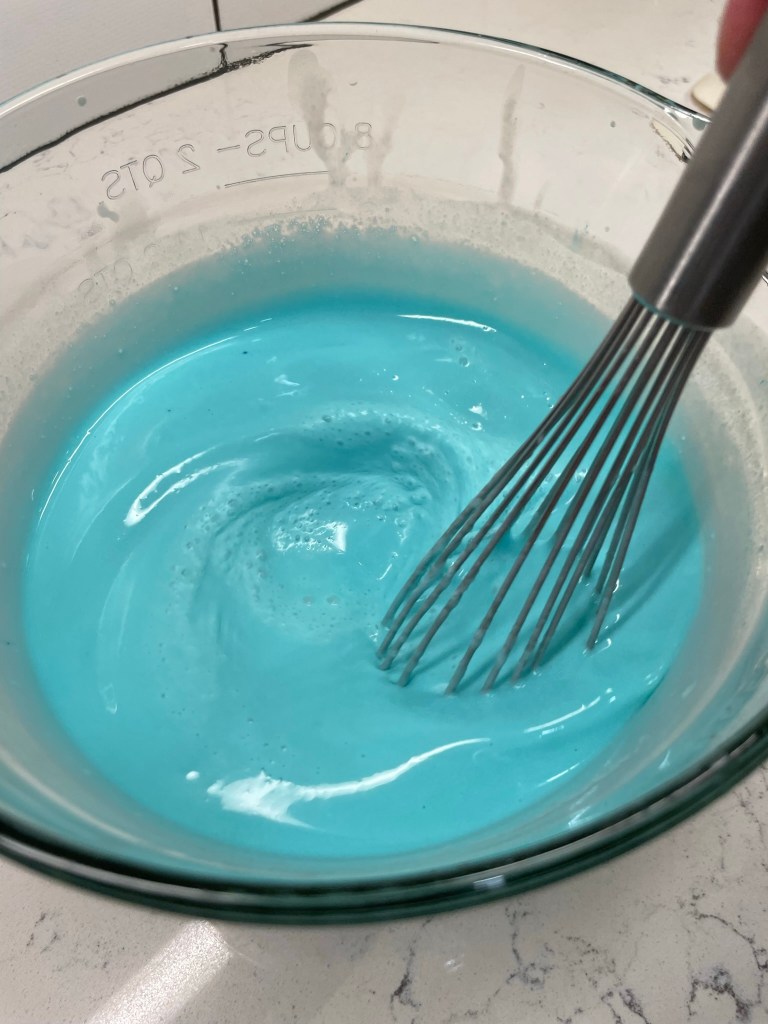
My search for an inspiration recipe for blue moon ice cream turned up massive volumes of denials of my own memory of it. Nearly every recipe on the internet emphatically declares (often in all caps) that “blue moon DOES NOT contain pineapple!” But here’s the problem— I was there during my childhood and the blue moon ice cream I had most certainly did contain pineapple; in fact, it was the pineapple that I remember most. Lovely little bits of crushed pineapple amid all that artificially teal ice cream base. Another thing that struck me odd about the online recipes I found was that most of them included a package of instant vanilla pudding, which sounds so wrong to me. What would instant pudding add to an ice cream, I wondered, besides more artificial flavoring? Wasn’t the teal blue color artificial enough? My iPhone camera certainly thought so!
The discrepancy of opinion on the flavor of this ice cream, and especially the pineapple, apparently results from the fact that blue moon originated in the Midwest— Michigan to be specific— and my experiences of it were in upstate New York. What I enjoyed as a kid was obviously an adaptation of the original recipe, but it was still sold as “blue moon.” Was I wrong to enjoy it that way? I can not bear this level of gaslighting.
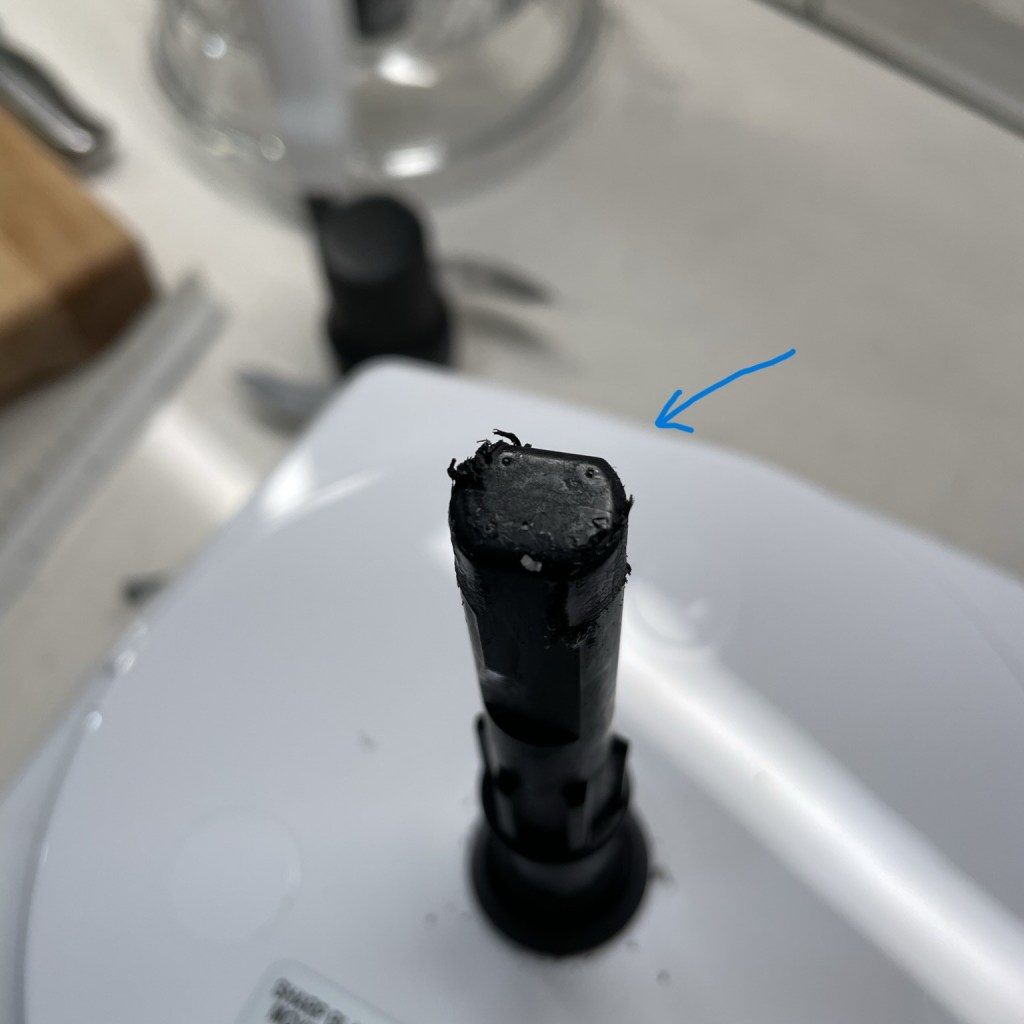
If the argument around this was not turbulent enough, I also had the unfortunate experience of damaging my fancy new French-made food processor in the making of my blue moon ice cream. As I have done many times before, I used my processor to pulse partially frozen pineapple into smaller chunks, and this was to be mixed into the blue base at the end of churning in my ice cream freezer. But something went terribly wrong, and my processor is currently on a UPS truck, headed to the service center for a warranty repair. Was this the universe’s way of confirming that pineapple is NOT meant to be in blue moon ice cream? Good golly, what chaos!
The stem of my food processor was stripped in the process of this misadventure.
After all my tinkering with the raspberry, vanilla, lemon and almond, plus the addition of the pineapple, I’m still not sure I got it right (Les disliked it so much, he didn’t even finish a serving of it). Perhaps the proof is in the pudding, but I have neither the time nor the motivation to make blue moon ice cream again right away. At the end of this ridiculous string of events, I decided that it was at least worth sharing because it does move an item to the done column of my culinary bucket list, and just in time for tonight’s blue supermoon. Blue moon ice cream is now completed, and even though I didn’t particularly appreciate the resulting flavor, I did learn an important lesson, which can be summed up in a line from a Don Henley tune:
Out on the road today, I saw a Deadhead sticker on a Cadillac. A little voice inside my head said, “don’t look back, you can never look back.
Don Henley ~ “The Boys of Summer”
I wish I had left blue moon ice cream in my memories, where it still held mystery and intrigue. It could be that 11-year old Terrie enjoyed it just because it was different from the mint chocolate chip ice cream that everyone else my age was screaming for that summer. I probably should have followed my own advice about recipes and disregarded the “alternate facts” presented by so many others on the internet regarding the pineapple. Finally, if I hadn’t pushed so hard to make sense of the whole thing, I could be making hummus or spiralizing zucchini or pureeing fresh tomatoes into gazpacho today. Instead, I’m checking the UPS tracking to be sure my food processor arrives at the warranty service center in one piece. I hope it get it back in time for Thanksgiving.
As for the blue supermoon, I wanted to be excited about it as well. Supermoons are fairly common during the summer, but the odds of a blue moon (second full moon during a single month) also being a supermoon (appearing closer and larger than usual) are extraordinary. The blue supermoon will be a spectacle to behold, beginning after 9pm ET tonight. But I learned today that this supermoon— which is expected to exaggerate high tide— will likely wreak additional havoc on the gulf coast of Florida, where folks are already underwater from Hurricane Idalia.
At least I know my ice cream didn’t cause that.
For those of you wishing to recreate this astronomical mishap, here’s an easy, click-to-print recipe for you. Pineapple, of course, is optional. 😉
This recipe is my best effort at recreating a childhood favorite. Adjust the flavors to your liking, and decide for yourself whether to add the pineapple.
Ingredients
14 oz. can sweetened condensed milk (regular or fat free is fine)
1 cup whole milk
1 cup heavy cream
1 1/2 tsp. almond extract
1 1/2 tsp. raspberry extract
1 tsp. vanilla extract
1/4 tsp. pure lemon oil
1/8 tsp. Fiori di Sicilia extract (optional, and probably redundant to the lemon and vanilla)
2 Tbsp. cream of coconut (for extra sweetness)
1/2 tsp. blue food coloring gel (this is more concentrated than liquid colorant)
1/2 cup pineapple tidbits (added during final few minutes of churning)
Most recipes for the “Midwest” version of blue moon ice cream do not include the pineapple, so adding them is entirely up to you. The ice cream I knew and loved from my childhood in Western N.Y. included pineapple, so my nostalgia required it. 😉
Directions
Combine condensed milk, whole milk and heavy cream in a large mixing bowl or pitcher.
Stir in extracts, a little at a time if you wish, and adjust flavors to taste. Stir in food coloring gel. Refrigerate until base is completely chilled.
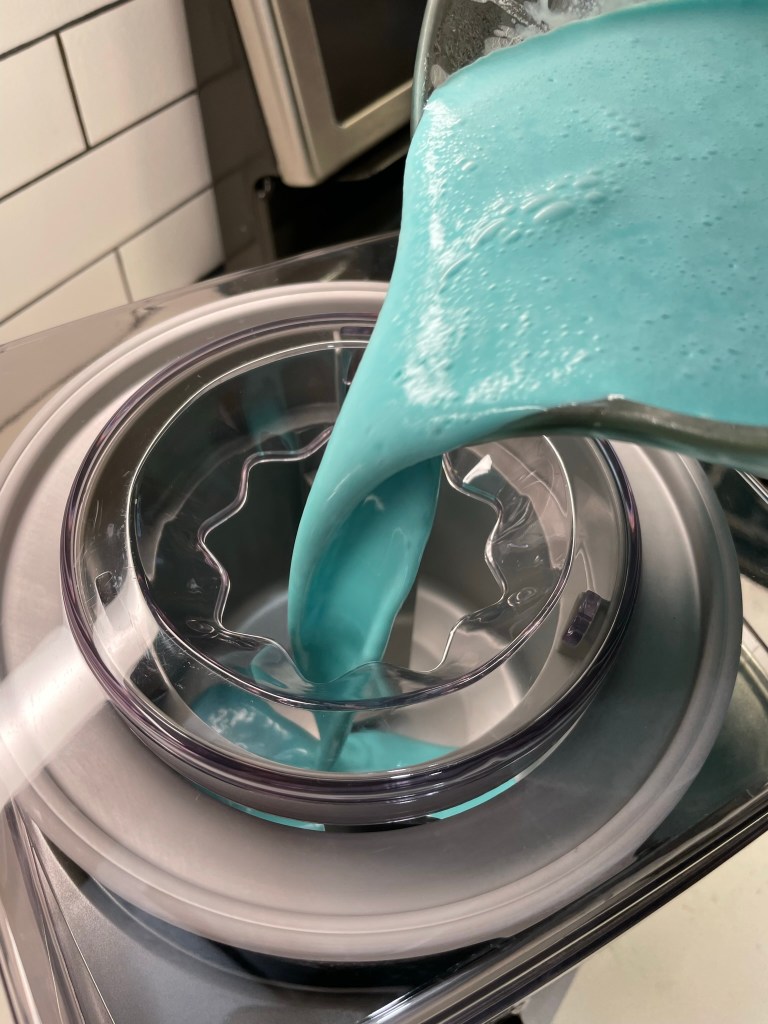
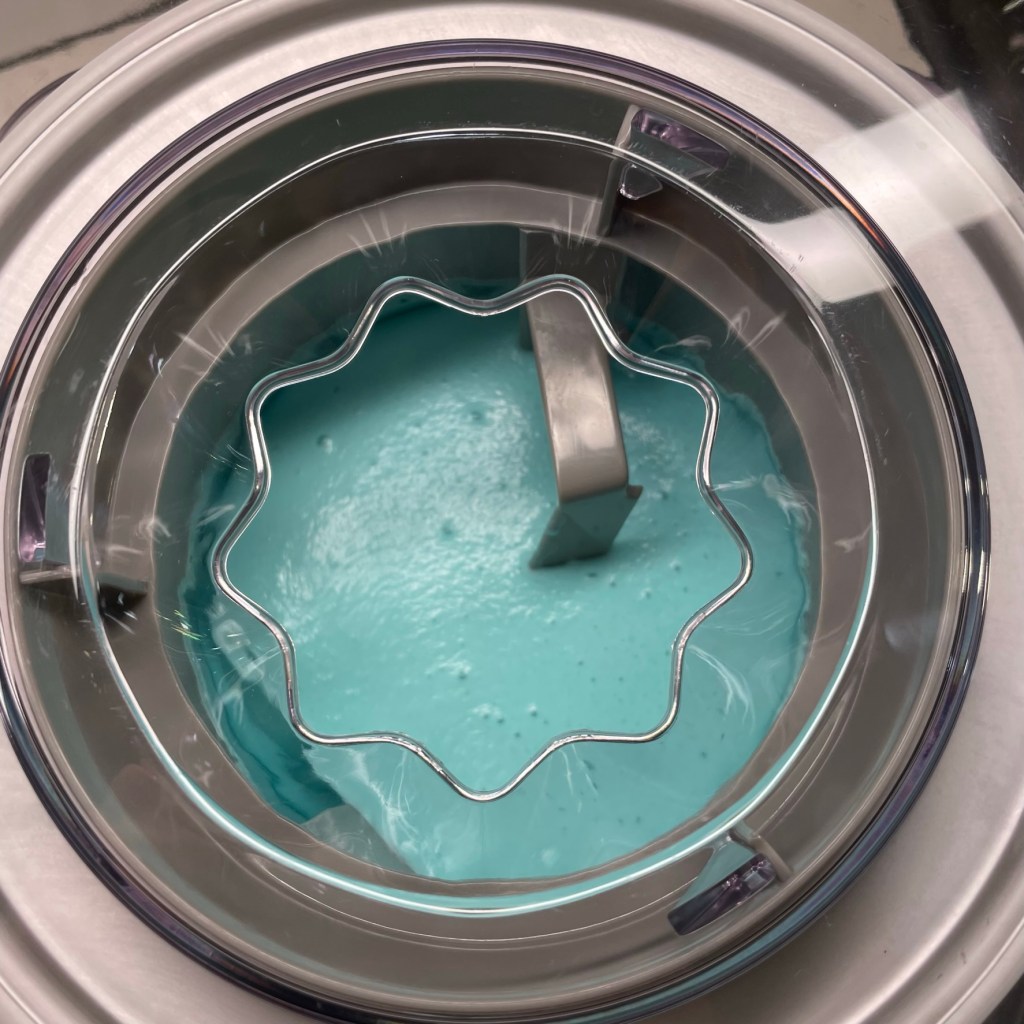
Freeze according to manufacturer’s instructions, adding partially frozen pineapple bits during the final few minutes.
Transfer to an insulated ice cream container and freeze several hours to overnight, until firm.
Before I explain how I made this small batch version of sriracha, I have a confession. I made it last summer— you know, the first time the grocery stores ran out of it. It seemed like a smart thing to do, given the enormous popularity of sriracha (the one with the green cap and the rooster) and the panic that ensued when the word got out it was depleted. But time got the better of me, and when I circled back months later to share my experience on my blog, the crisis was over and sriracha was restocked in the stores. I crossed it off my blog schedule and even deleted the photos from my iPhone. Why bother, I figured, when sriracha was easy to buy again?
What I didn’t expect was that this condiment crisis would repeat itself. Yet, earlier this week, I found my news feed riddled with articles about this year’s shortage, and I thought, here we go again. It must be related to the scorching temperatures and the fact that absolutely nothing wants to grow in this God-awful heat. That seemed to be the gist of the problem last year, anyway, but how true was it?
One of the articles I read, in The New York Times, throws shade on the notion that the sriracha shortage is entirely related to our changing climate. The Times piece is a good read for anyone who enjoys falling down rabbit holes of journalistic information (guilty over here). For the rest of you, I’ll summarize what I learned.
First, sriracha is not a pepper, but a concoction based on a traditional Vietnamese recipe, and Huy Fong, the California company that makes the most popular version of sriracha, a.k.a. “rooster” sauce, has been blaming its snowballing supply chain issues on environmental decline. Interestingly, other hot pepper sauce-making companies are shrugging it off; they haven’t experienced the same disruptions, and they aren’t hearing sob stories from their suppliers, either. In short, this sounds like it could be more a business problem than a climate problem. Either way, it’s bad news for sriracha lovers because the shelves are bare— again. And if that doesn’t sit right with your craving for a little shot of spicy, then you might want to have a backup plan. I’m talking, of course, about making your own.
It’s not as difficult as you might imagine. And, as luck would have it, I discovered that the pictures I had taken last year were waiting patiently in a folder on my desktop computer— I had edited, titled and saved them before deleting them from my phone— it’s like they knew they’d have their moment. Let’s do this!
What do we do when the stores run out of something we love? We make our own!
The Ingredients
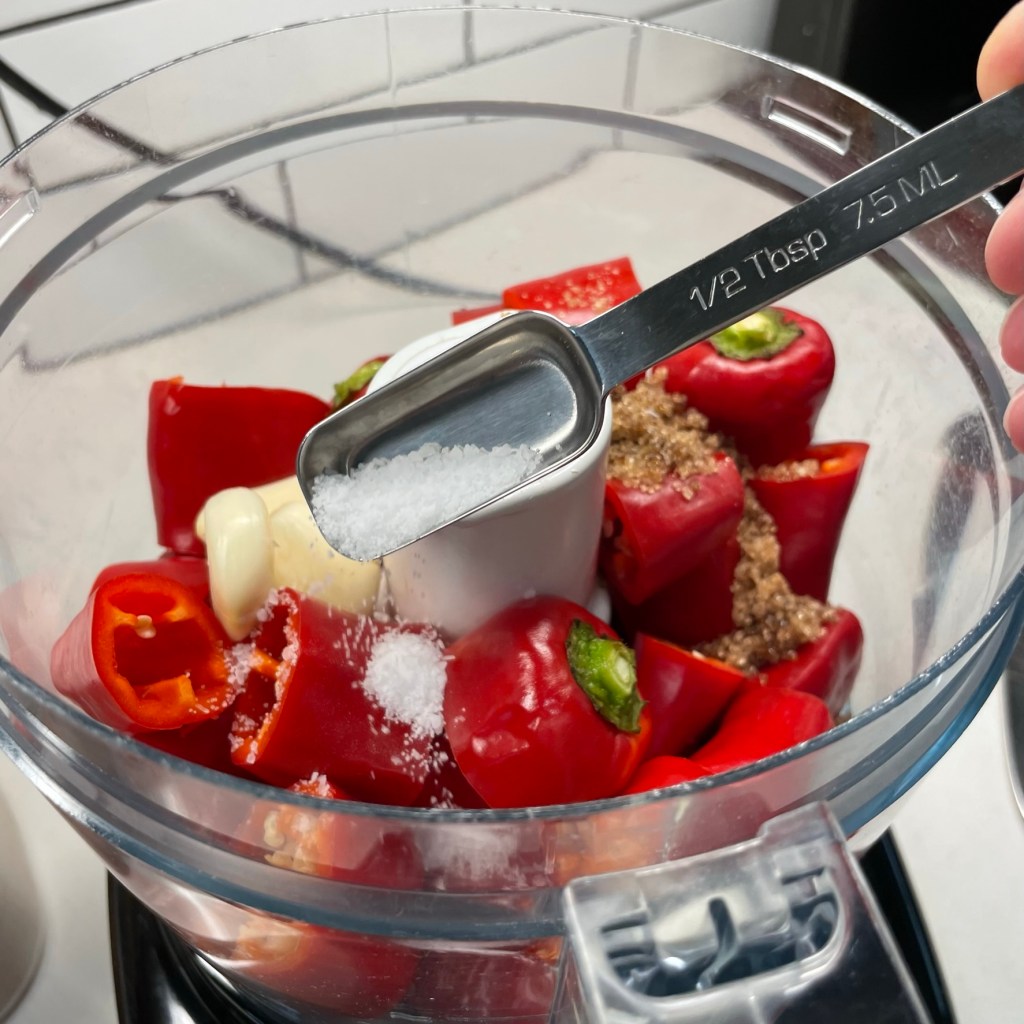
I’ll begin with the simple list of ingredients. On the back of a bottle of the “rooster sauce,” we find chili (don’t ding me, that’s how it’s spelled on the bottle), sugar, salt and garlic, plus a whole bunch of preservatives that allow you to keep it at room temperature after opening, something I never do— condiments other than vinegar belong in the fridge, as far as I’m concerned. I’ll share more of what I learned about the preservatives in a bit, but let’s skip ahead to the pictures and the fun part.
Look at that gorgeous pop of color!
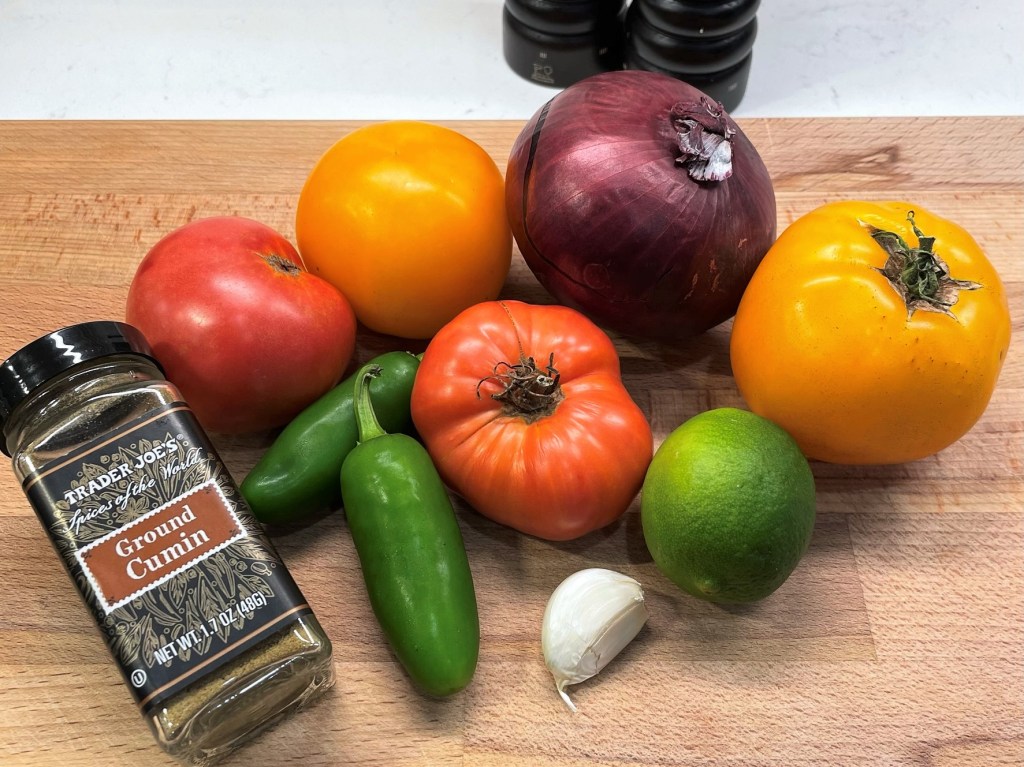
You can use either red jalapeños or Fresno chiles, depending on availability and flavor preference. I used a combination, but mostly Fresno, which offers a slightly more feisty flavor and happened to be plentiful at my supermarket that day. We love spicy foods at our house, so the extra heat was not a concern for us. If you happen to be growing jalapeños in your home garden, leaving them on the vine an extra couple of weeks will turn them red and intensify the heat.
Keep the seeds and, yes, the green caps.
I used light brown sugar, kosher salt and fresh garlic, peeled and smashed. Though the ingredients are simple, the sriracha label doesn’t describe how to transform them into an addictive, put-it-on-anything sauce. For that, I found this article on Serious Eats which gave me helpful insight, plus a road map to launch my own sriracha journey.
The Process
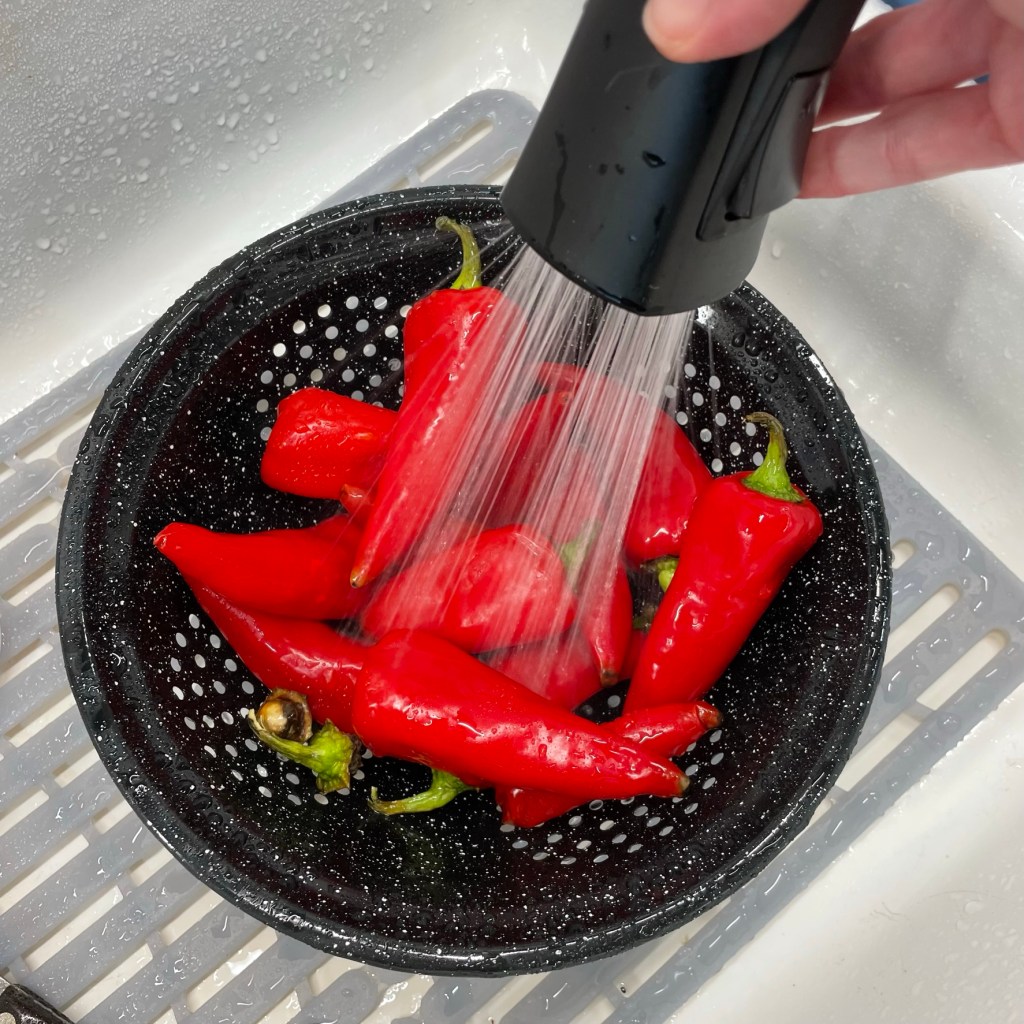
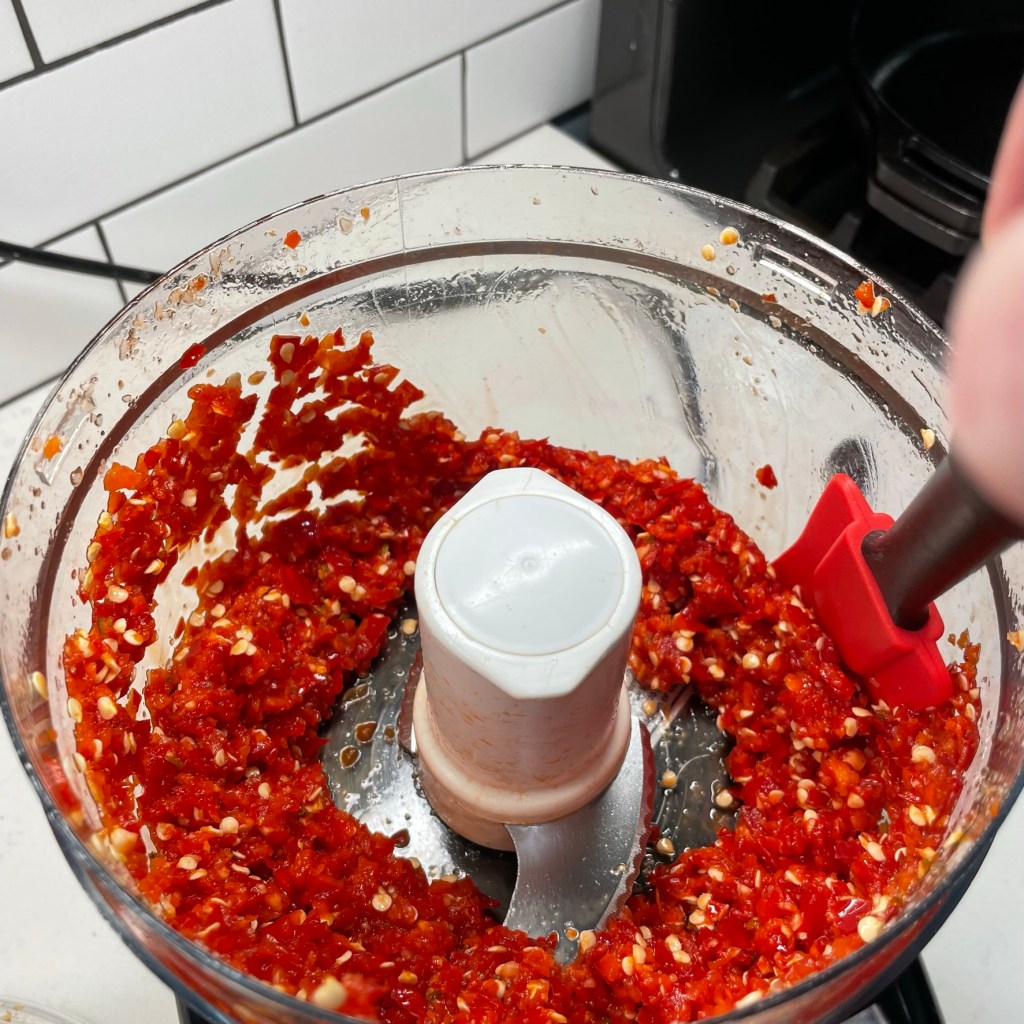
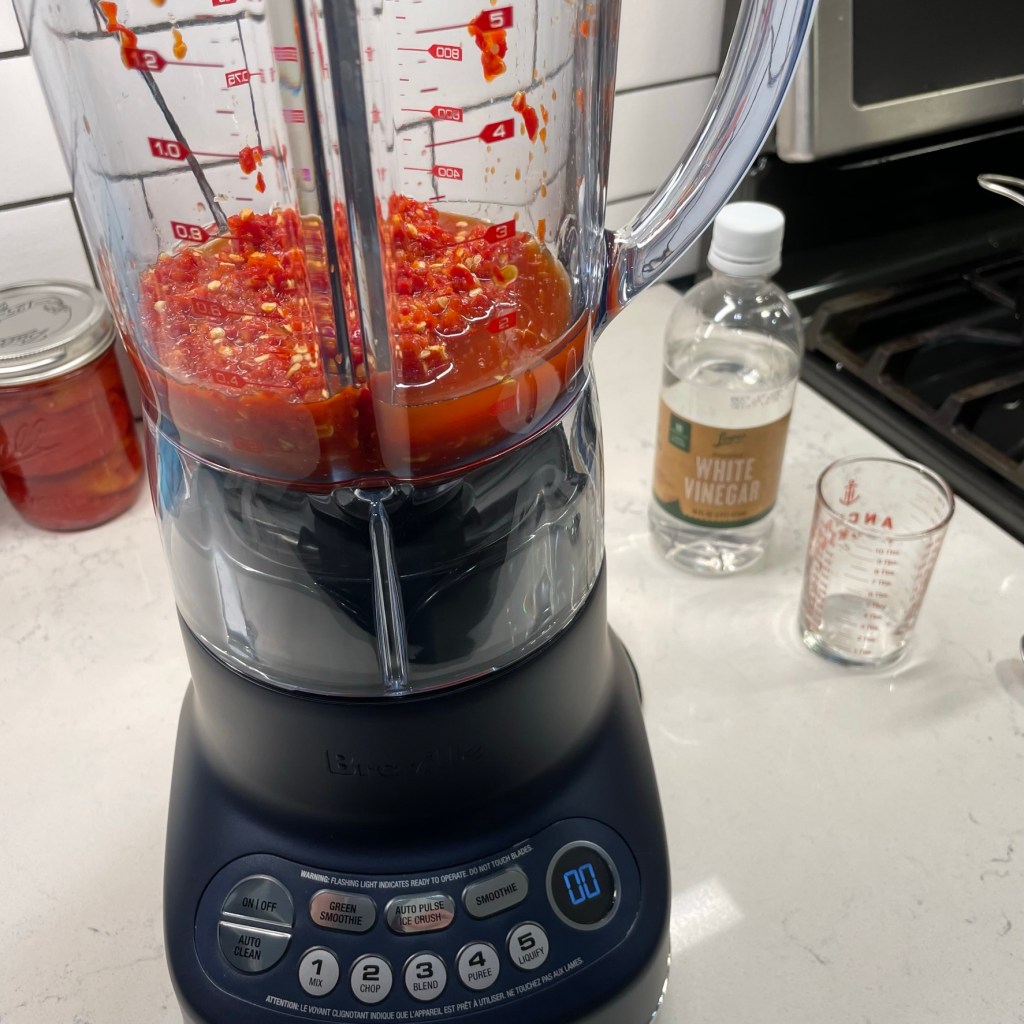
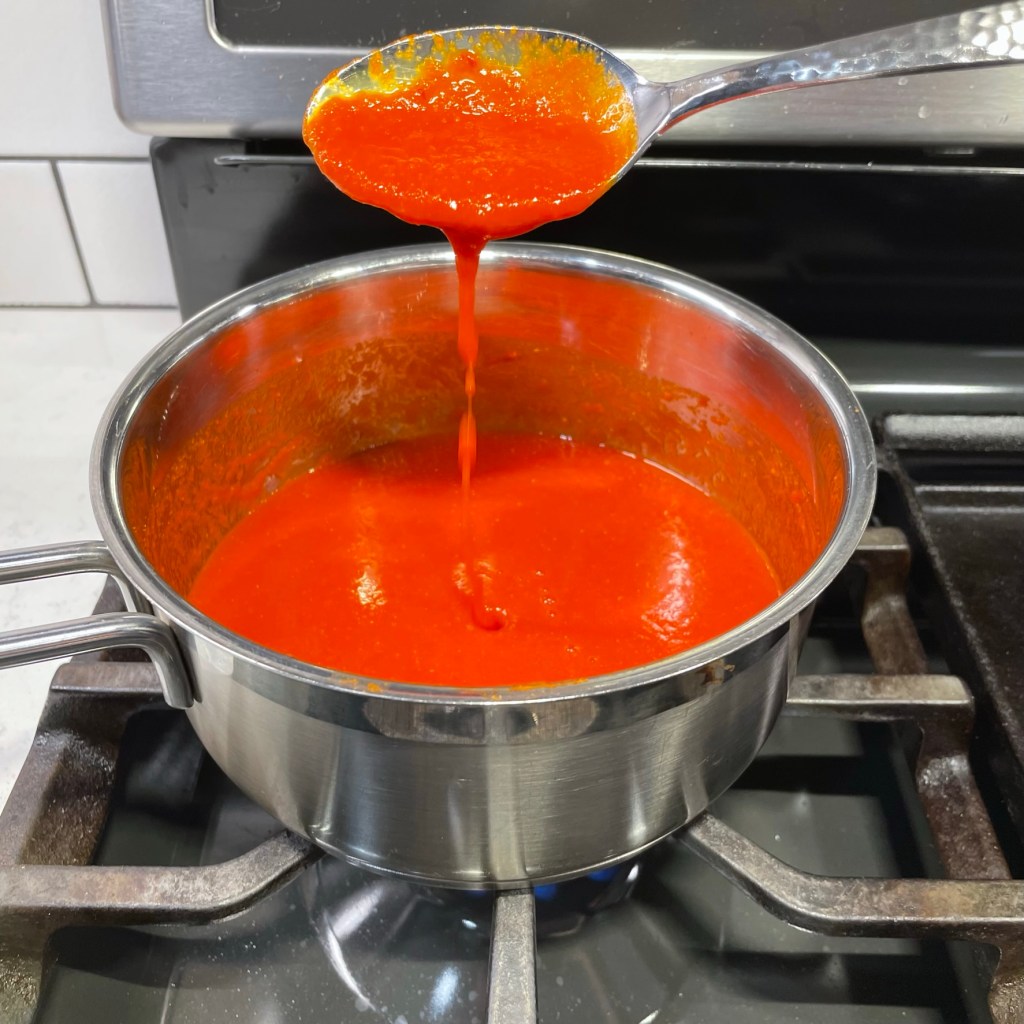
The first step is fermentation, a roughly week-long process that builds the deep, funky, earthy flavor that we know and love in sriracha. Clean the peppers well, and cut off the stems but keep the dark green “caps” that connect to the top of the pepper. Give the peppers a rough chop and add them (seeds and all) to the bowl of a food processor with brown sugar, fresh garlic and kosher salt. Pulse several times until the mixture is coarse and chunky but well blended. Transfer it to a mason jar, cover it and set it aside on the counter for 5 to 7 days. The Serious Eats article suggested stirring the pulp every day, but I’ll admit that I missed this when I was in the thick of things, and mine managed to ferment without assistance.
The green caps are not visible after the peppers are chopped up, and they are responsible for some of the earthy notes in sriracha.
The Additives (for better or worse)
While the sriracha mixture ferments, let’s chat about the “other” ingredients listed on the store-bought bottle. One big advantage of making your own sriracha— besides the obvious one of overcoming the shortage— is avoiding chemicals such as sodium benzoate, an all-too common food additive that serves as a preservative. You might read that there is no harm in sodium benzoate, and that may be true. But apparently, if it’s combined with ascorbic acid (better known as Vitamin C), then studies show sodium benzoate morphs into a known carcinogen called benzene. This information alarmed me quite a bit because I know that red bell peppers are higher in Vitamin C than even citrus fruit. Aren’t red jalapeños related? It makes me uneasy just reading about it.
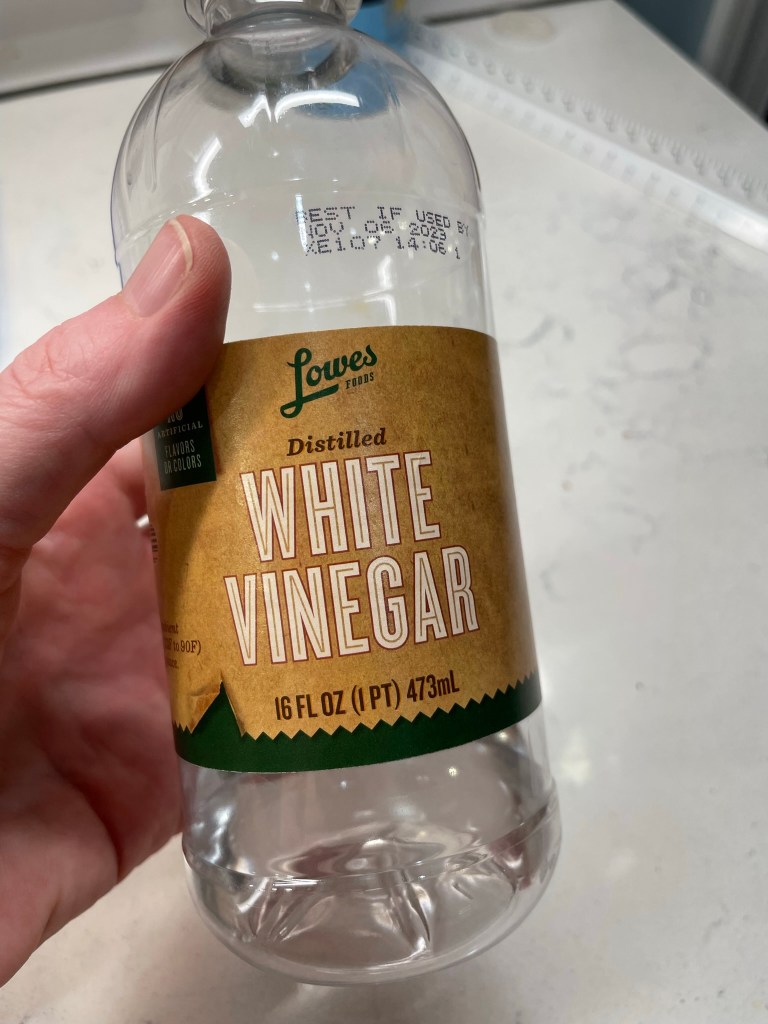
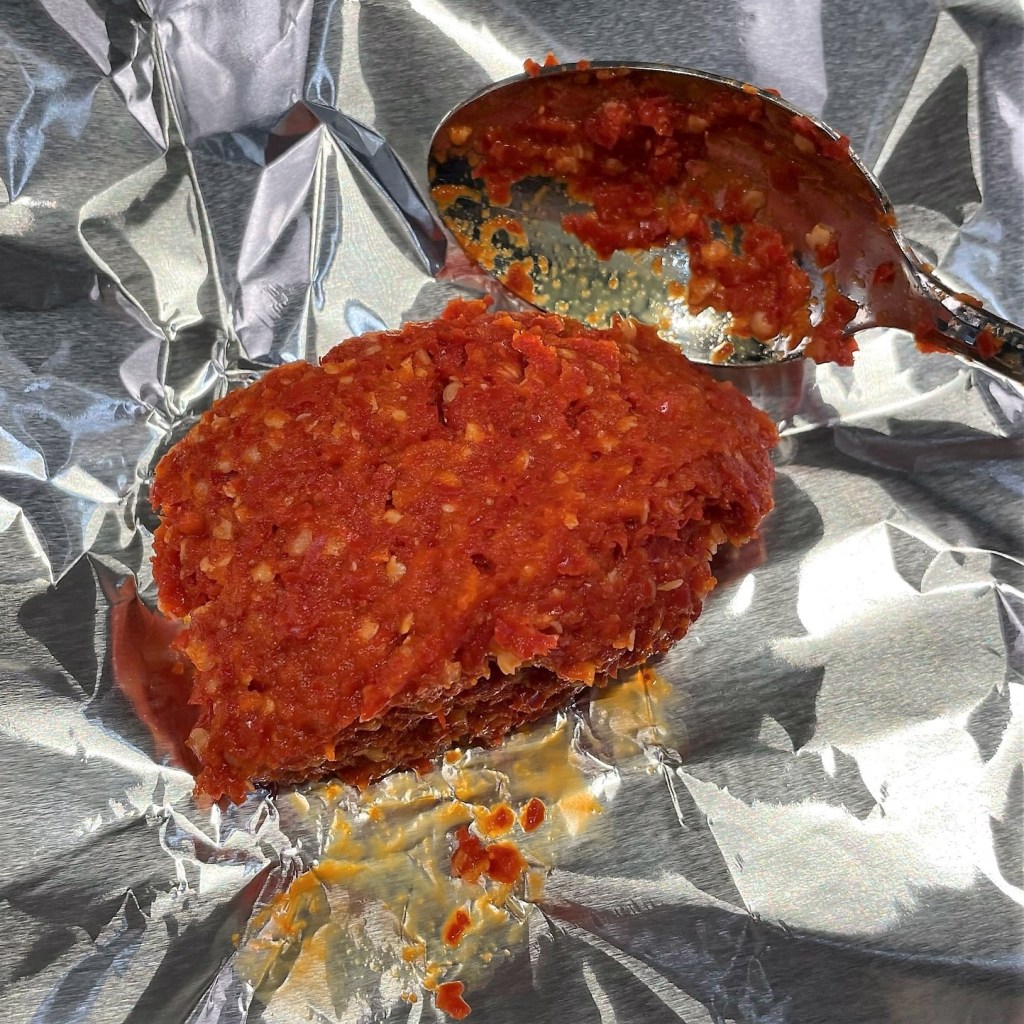
The disadvantage of making your own sriracha is, well, the same. Without heavy preservatives, homemade sriracha must be stored in the fridge and even then, it will not keep as long as store-bought. This recipe only yields about a cup, so that shouldn’t be a problem if you love sriracha because you’ll likely use it up pretty quickly. There is one preservative ingredient, however, that will be making its way into my homemade version of sriracha, and that is acetic acid. I just happen to have some in my pantry cabinet— and you likely do as well. Take a look:
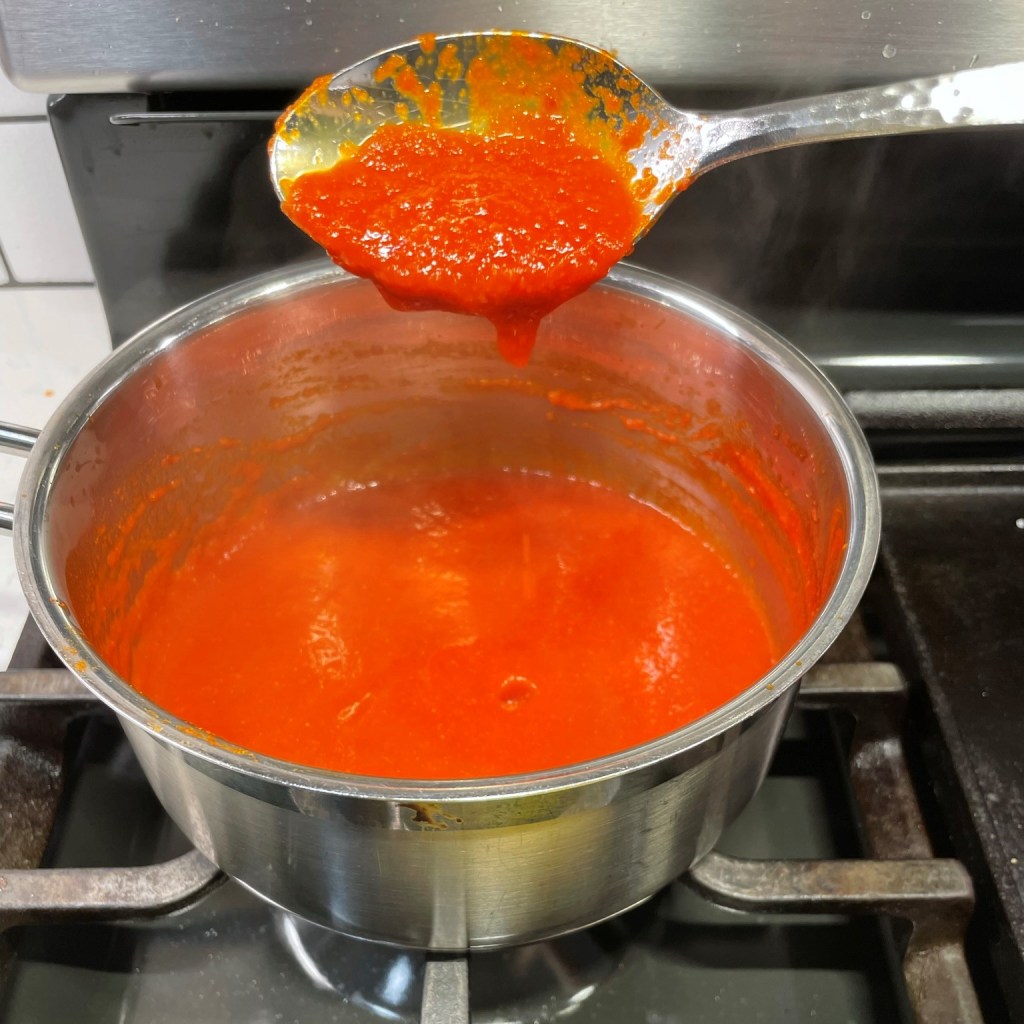
All vinegars have some level of acetic acid, but white distilled vinegar checks in with about 5%, higher than other culinary vinegars. It will help preserve both the color and freshness of my homemade sriracha, while also brightening up the flavor notes, and it comes into play in the next step— pureeing the fermented Fresno paste. Ready to finish this?
The Home Stretch
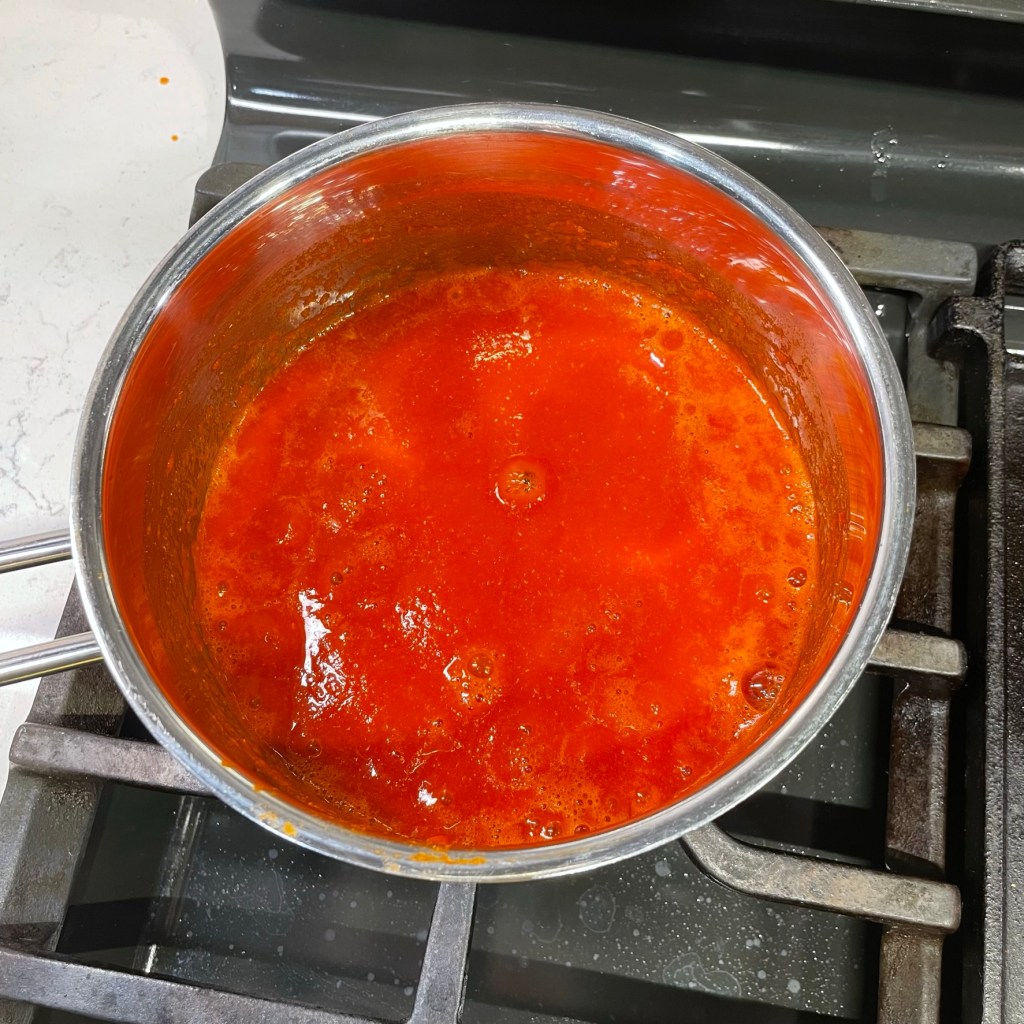
According to the roadmap article in Serious Eats, the pepper pulp is ready when large bubbles are visible in the jar, and mine definitely was. It also had a pleasantly funky, fruity-meets-spicy aroma. It smelled like, well, sriracha!
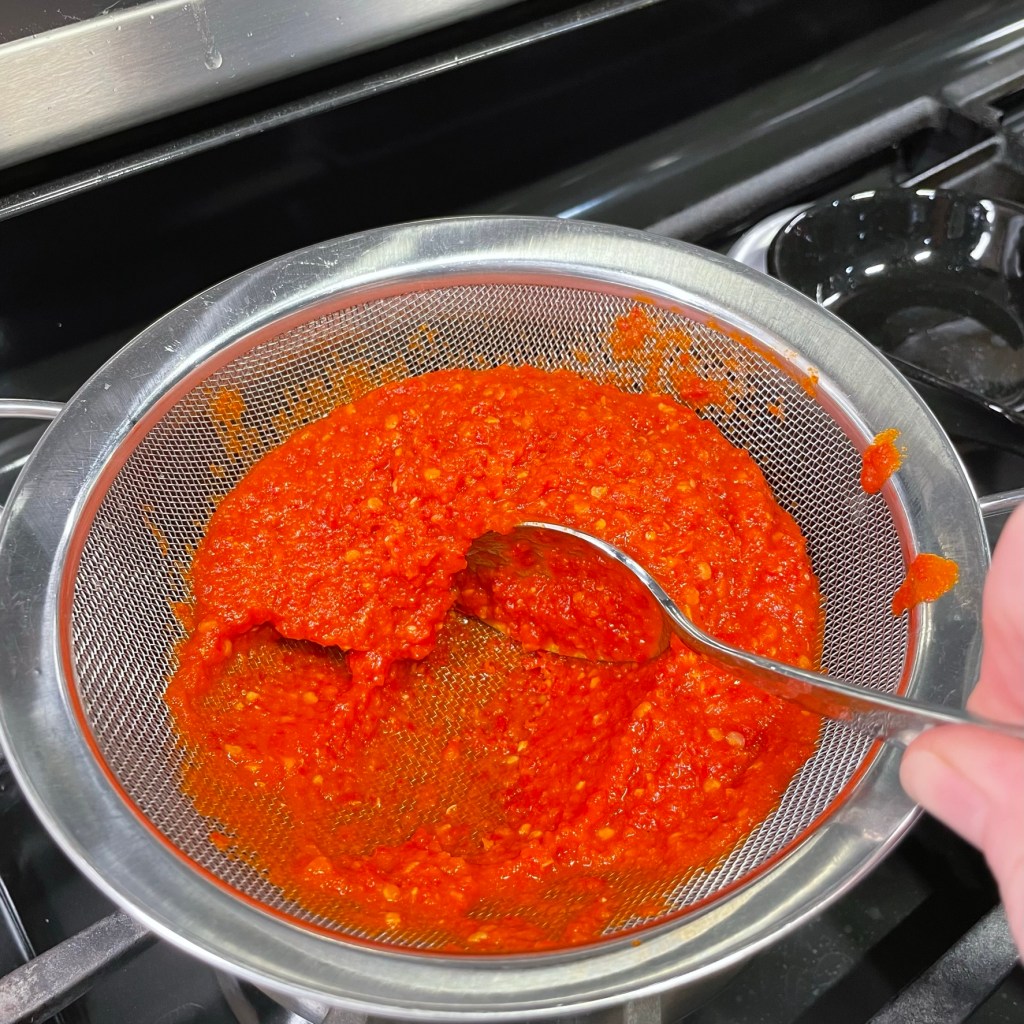
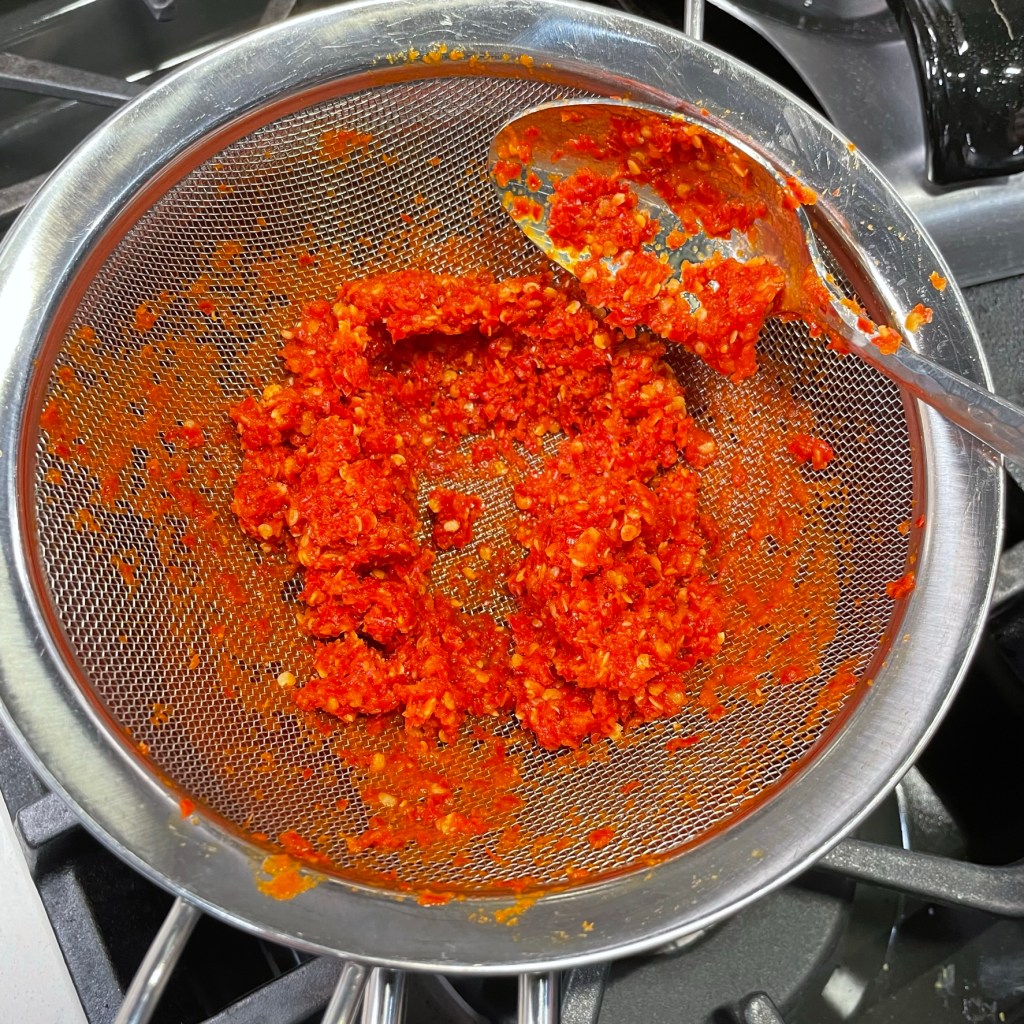
The whole jar’s worth of pulp goes into the blender with a splash of white vinegar, and this time, you’ll puree it until the mixture is as smooth as you can get it. Then, press it through a mesh strainer to separate the solids. Last year when I made this, I spread that nasty lump of hot pepper solids on the ground around the tomatoes in my garden. Probably another reason that I had a decent harvest for the first time in ages, as I can’t imagine any critter wanted to be near that stuff!
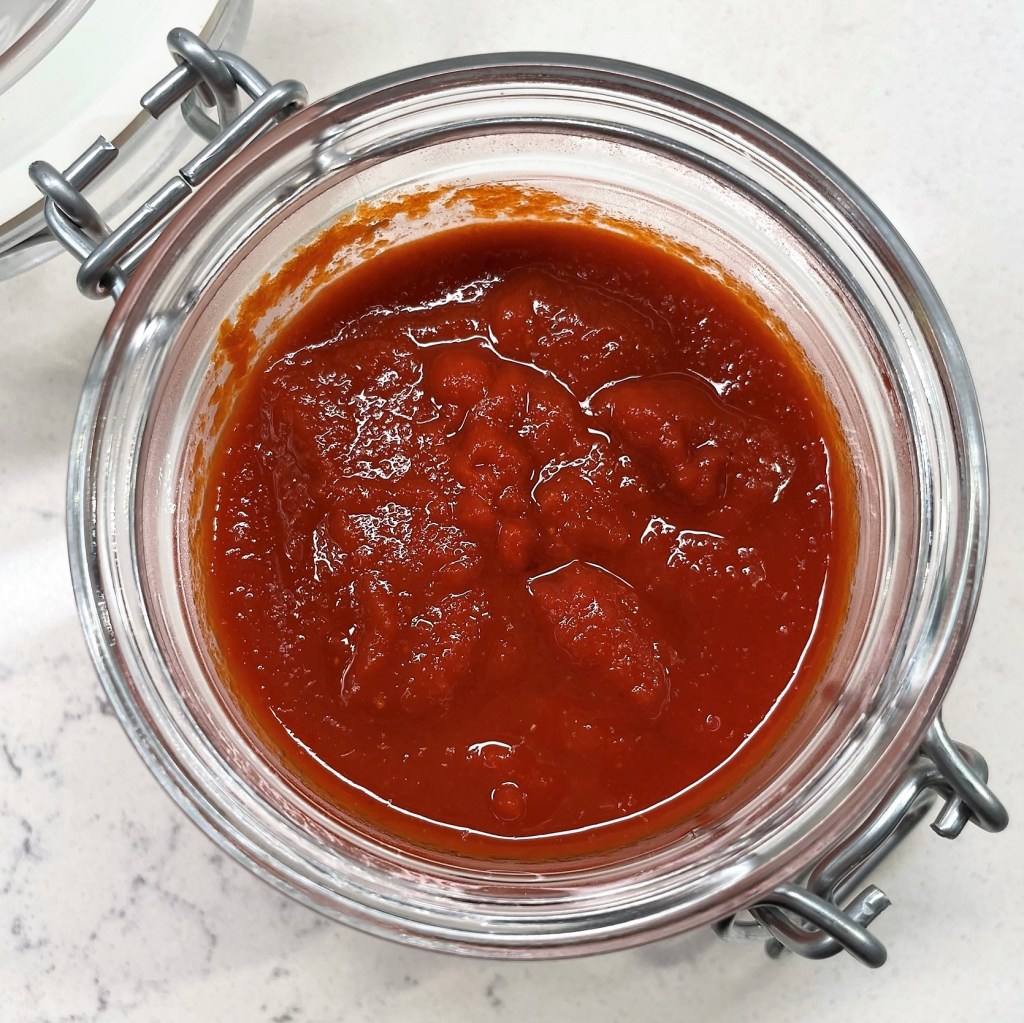
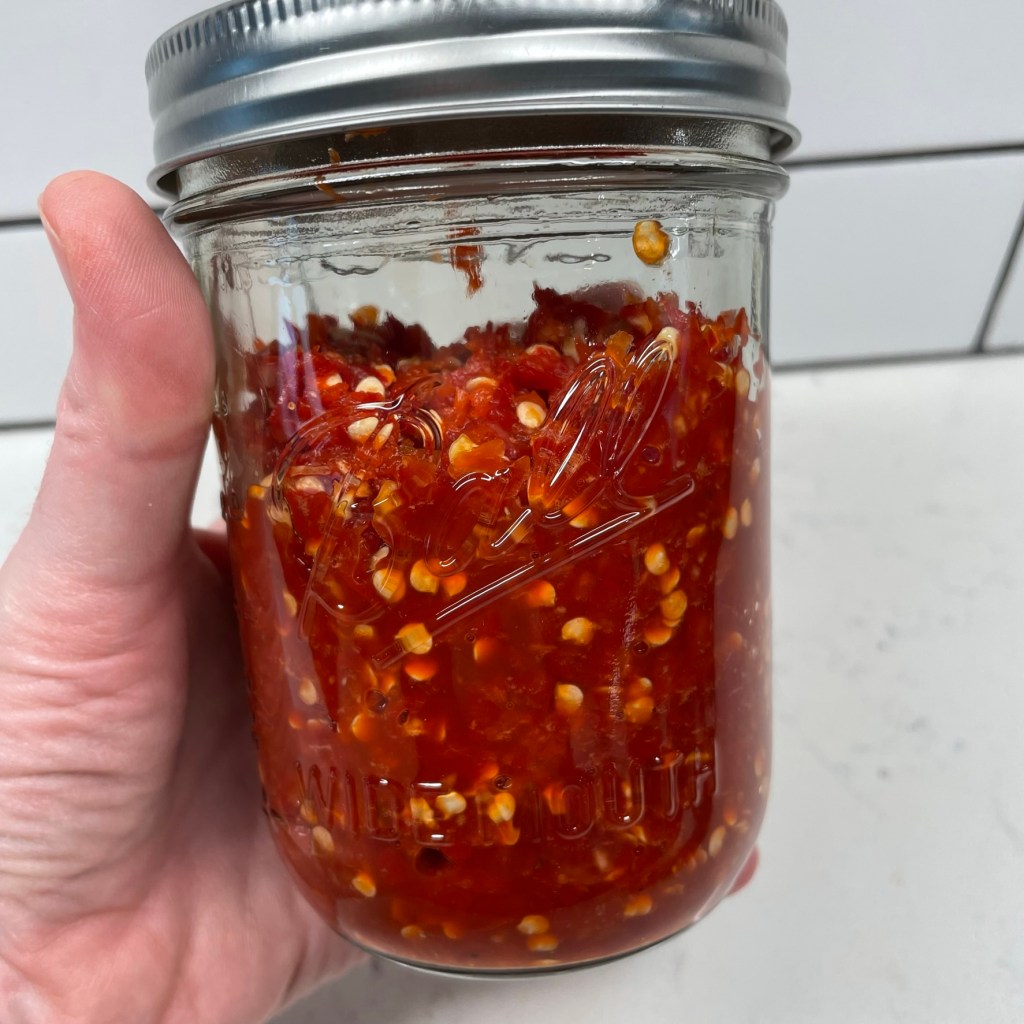
The strained puree simmered for about 30 minutes until it reached the consistency one would expect for sriracha, and then I transferred it to a jar for longer storage—in the fridge!
The Verdict
This adventure surprised me! I’ve always imagined that condiments are not DIY projects because of their complexity, but there was nothing difficult about making my own sriracha, and it was really very good. As the Serious Eats author noted, the flavor registered brighter and more fresh than the bottled stuff, but that shouldn’t come as a shocker. I’m already eyeing my jalapeño plants, and thinking I may try something similar when they start going gangbusters. And though I will admit that I currently have a bottle of the Huy Fong sriracha in my refrigerator door at this moment, I feel empowered just knowing that if the manufacturer doesn’t get its act together next year, I’ll be just fine. 🌶️
When life gives you lemons, make lemonade. But when life takes away your beloved sriracha, don't despair. Just make your own!
Ingredients
About 3/4 pound fresh red hot peppers (jalapenos or Fresno work great)
2 Tbsp. light brown sugar (white sugar would likely be fine, too)
1 1/2 tsp. kosher salt
3 cloves garlic, peeled and smashed
1/4 cup distilled white vinegar (added during step 3)
My recipe is based on this one from Serious Eats: https://www.seriouseats.com/sriracha-recipe-from-scratch. Note that this homemade sauce must be refrigerated, and it should be used up within a few weeks. Without the excessive preservatives that are included in the store-bought variety, you should expect a much shorter shelf life.
Directions
Thoroughly rinse peppers, wiping away any debris, and then dry them. Give the peppers a rough chop, discarding stems but keeping the green caps.
Add pepper chunks (seeds and all) to the small bowl of a food processor. Add sugar, salt and garlic. Pulse several times to break up the pepper into smaller chunks, then run the processor continually for about 10 seconds. Transfer pepper pulp to a clean mason jar. Cover with a lid and set the jar aside to ferment at room temperature for 5 to 7 days.
When the pepper pulp has a significant amount of bubbles throughout, and a slightly funky aroma, it’s ready. Transfer it to a blender container. Add white vinegar and puree for a solid couple of minutes until the mixture is nearly liquified. Stop and scrape down the container as needed.
Pour pepper puree through a large mesh strainer into a saucepan. Use a spatula to gently press and scrape the puree through the strainer. Discard the solids.
Heat puree to a boil, then reduce heat and simmer until it reduces to desired thickness; for me, this was almost 20 minutes. Allow sauce to cool to room temperature, then transfer to a clean jar and store in the refrigerator.
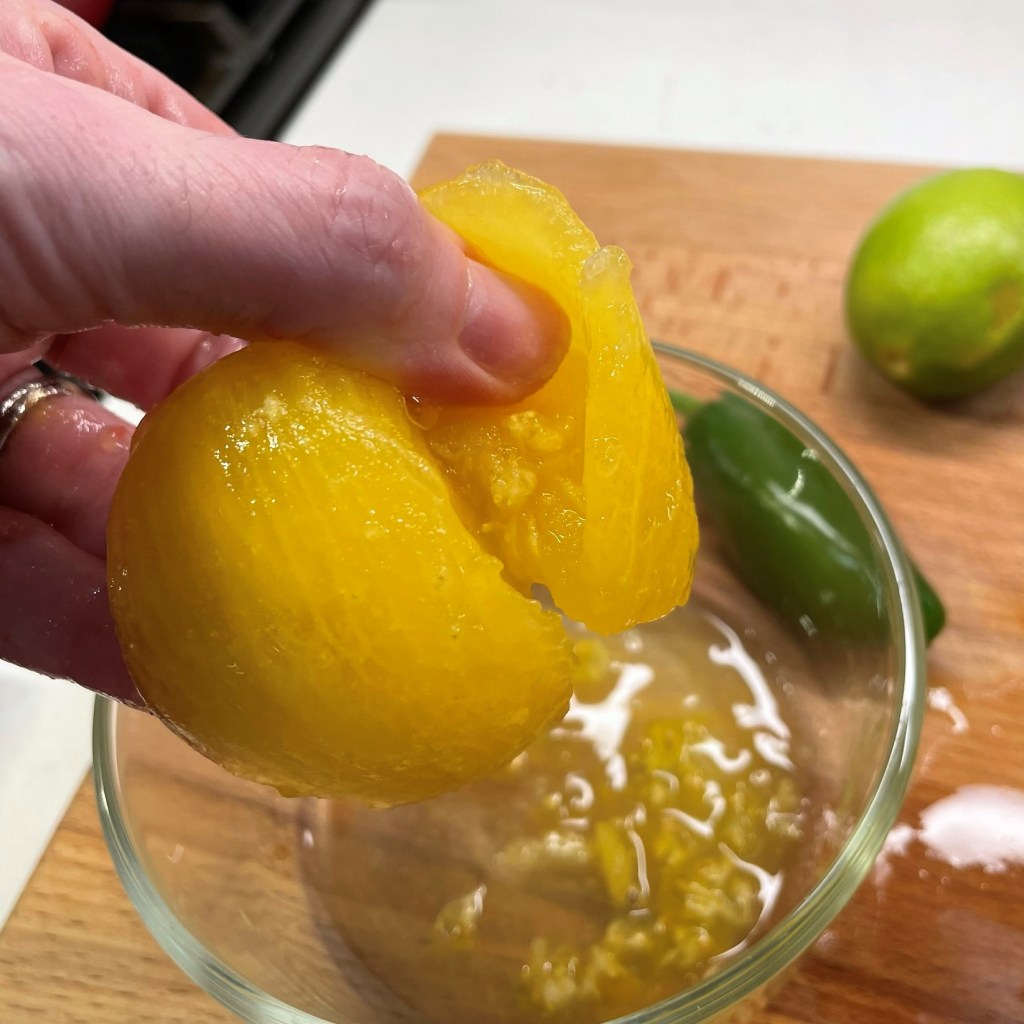
Sometimes the best way to cheer yourself up when things aren’t going well is to remember happier times. That’s what I’ve decided to do in the wake of my decision to call it quits on our home garden, which seems to have been doomed from the get-go this year. In some ways, it may seem like a fluke that we couldn’t get it going after the success we saw last summer, but to me, it feels more like we are back to normal with the struggling. Last year was the exception, not the rule, and I’m finding solace in the glorious haul of fresh garden vegetables we enjoyed a year ago.
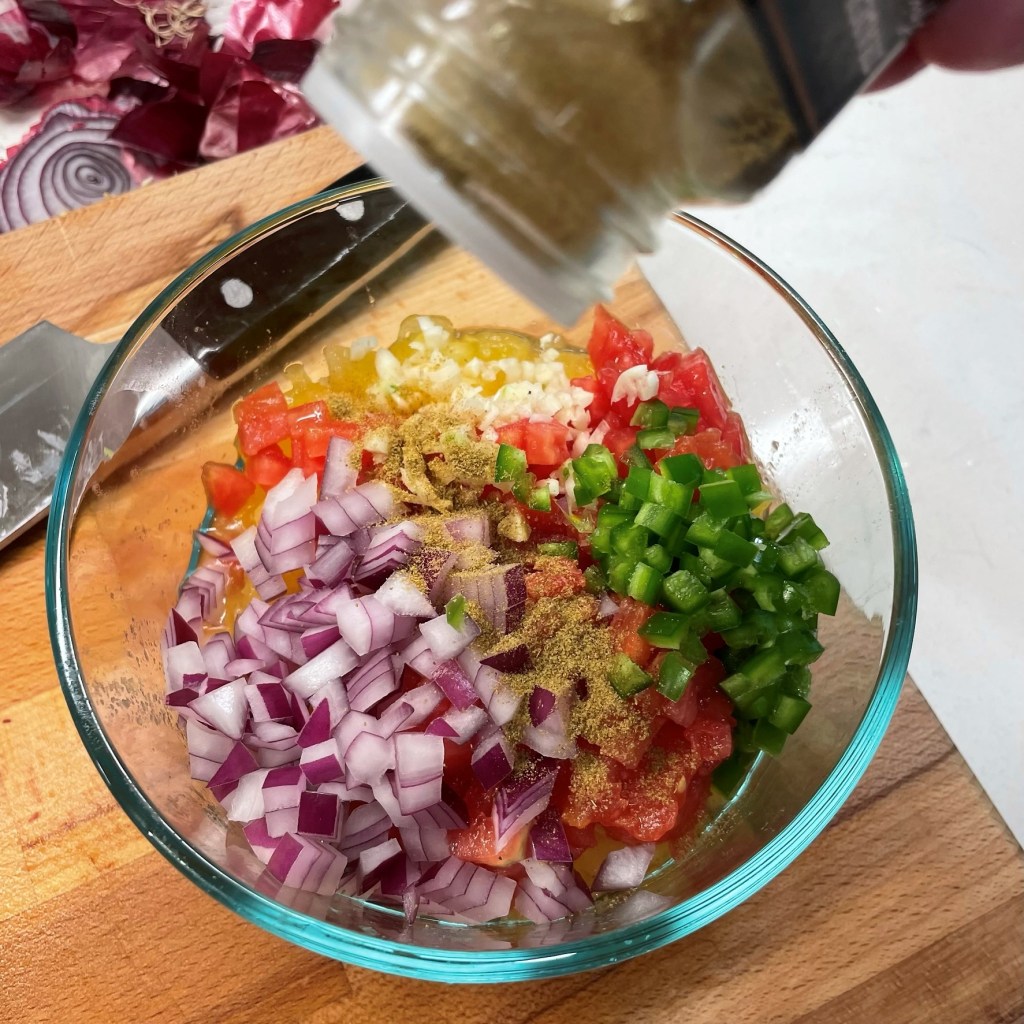
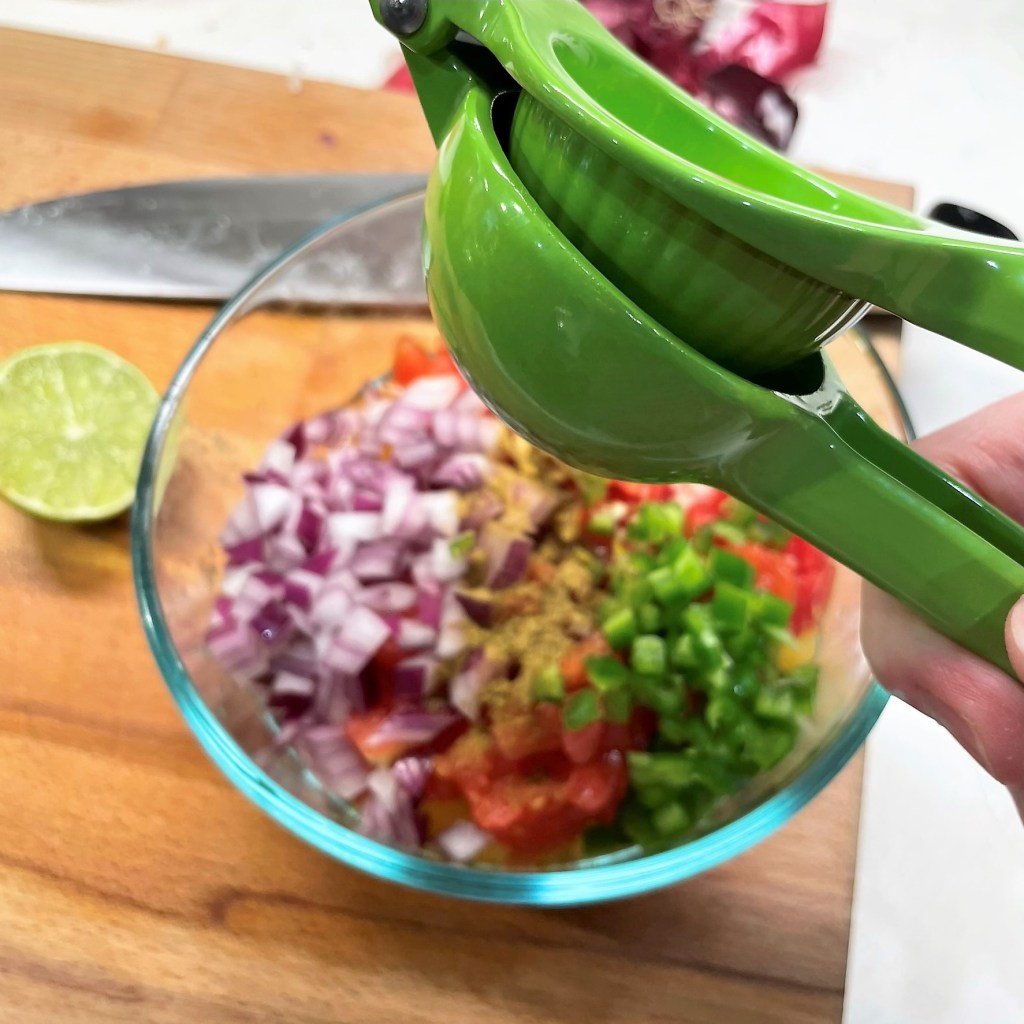
The tomato harvest in particular was fast and furious last summer, and in addition to so many yellow, heirloom and Roma tomatoes, we had jalapeño peppers just about coming out our ears. I found the simplest and most flavorful way to enjoy them all was with a weekly batch of pico de gallo, a.k.a. “salsa fresca.” Those shiny green jalapeños found themselves right at home with the sweet tomatoes. Add to that some chopped red onion, a little minced garlic and the juice of a lime, and you are pretty much looking at a late-summer fiesta in a bowl.
Yellow tomatoes are less acidic than red, and I just love the color they add to salsa fresca!
These bright flavors (and colors) make me so happy, and the great thing about making your own salsa fresca is that you control the heat factor. If you love it spicy (as we do), you might leave in some of the jalapeño seeds, or maybe use two of them. If sodium is an issue for you, simply cut back a bit or use a salt substitute. For a subtle smokiness, I’ve been adding a few shakes of ground cumin, and it’s delicious that way. I’ve peeled the tomatoes in some batches, and skipped that step in others, so follow your own instinct (either way works fine).
The freshest, ripest tomatoes will serve you best here, so stick with homegrown or farmers’ market varieties. Obviously, different types of tomato will result in varying amounts of juicy liquid. Our vine-ripened heirloom and yellow tomatoes were super juicy and that worked out great for me, as you’ll see in a moment. At the bottom of today’s post, you’ll find a click-to-print recipe for salsa fresca, but first, a glimpse at four ways we enjoyed it all last summer at our house.
Shrimp Tacos
If the mention of Mexican cuisine conjures memories of feeling bloated and uncomfortable, let this one reboot your thinking. For this simple summer meal, I made a batch of handmade corn tortillas (it’s easier than you might think and they are so much better than store bought), tossed shredded cabbage with a slight amount of poblano ranch dressing we found at the grocery store (any ranch dressing would work just fine), and grilled up some wild-caught shrimp. We divvied those ingredients up onto our tortillas with fresh cubes of avocado and a few cilantro leaves, plus the salsa fresca. The meal was light, flavorful and very satisfying on hot summer evenings.
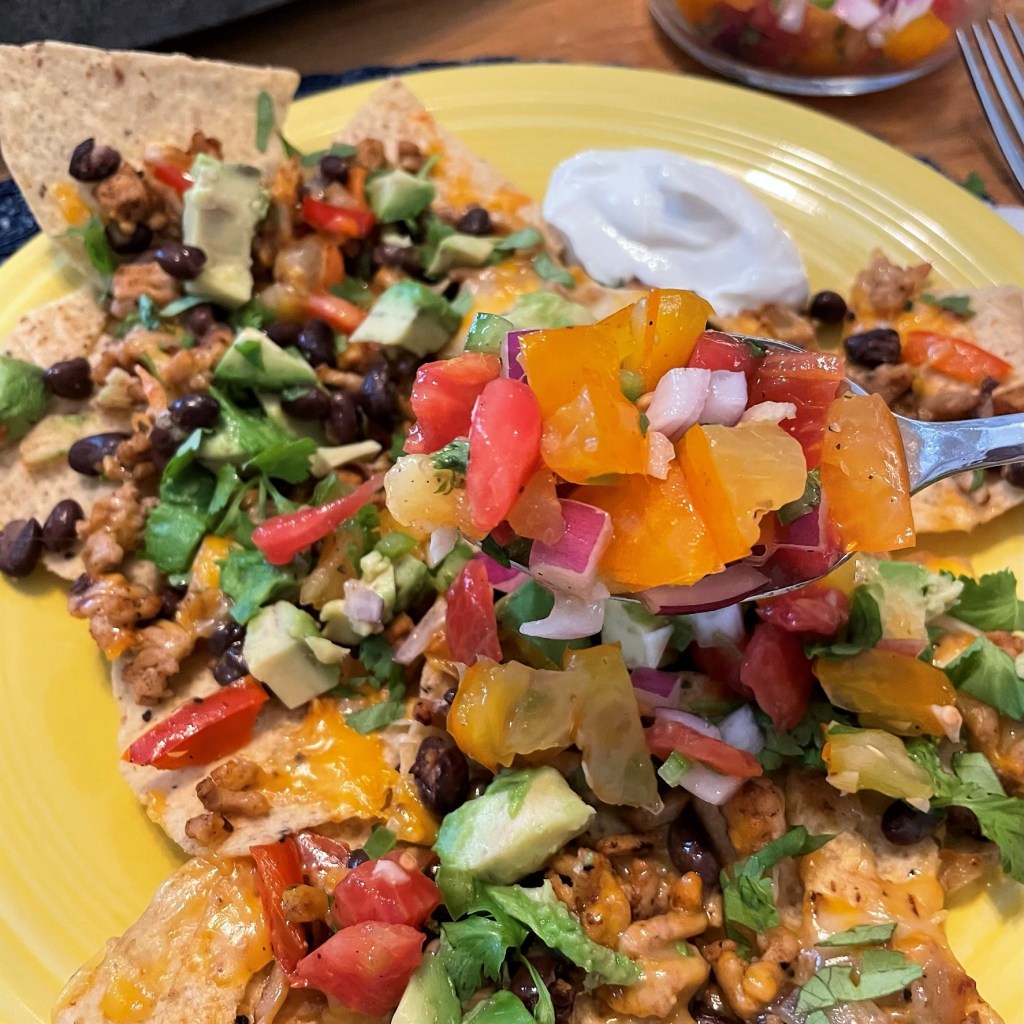
Lightened-up Nachos for Dinner
Nachos is one of my husband’s favorite go-to weeknight dinners, and he has taught me to love them, too. This is a dish that has been unfairly maligned because of many over-the-top, outrageously calorie-heavy, so-called appetizers found on chain restaurant menus. But it doesn’t have to be that way. There are many protein options for nachos, and this time around, I browned up a half-pound of lean ground chicken with chopped onions, seasoned it with chili powder, salt and pepper, and layered it onto store-bought tortilla chips with drained black beans and a reasonable amount of grated, reduced-fat Monterey Jack-cheddar blend cheese. Nachos only take a few quick minutes in the oven, and with a scatter of cilantro, avocado cubes and salsa fresca on top, they were just right.
Grilled Swordfish with Salsa Fresca
We love seafood on the grill, and swordfish is well-suited for this method of cooking because it is firm enough to place directly on the grill grates without worry that it will fall apart. My seasoning was very simple for this one—I blotted the fish dry with a paper towel, spritzed it with olive oil spray and kissed it with sea salt and a few twists of black pepper. Just for fun, I sprinkled some Trader Joe’s “Everything But the Elote” seasoning onto it before my husband took it to the grill. I used the same seasoning on the fresh, local corn we served that night, and a scoop of salsa fresca brightened up every bite.
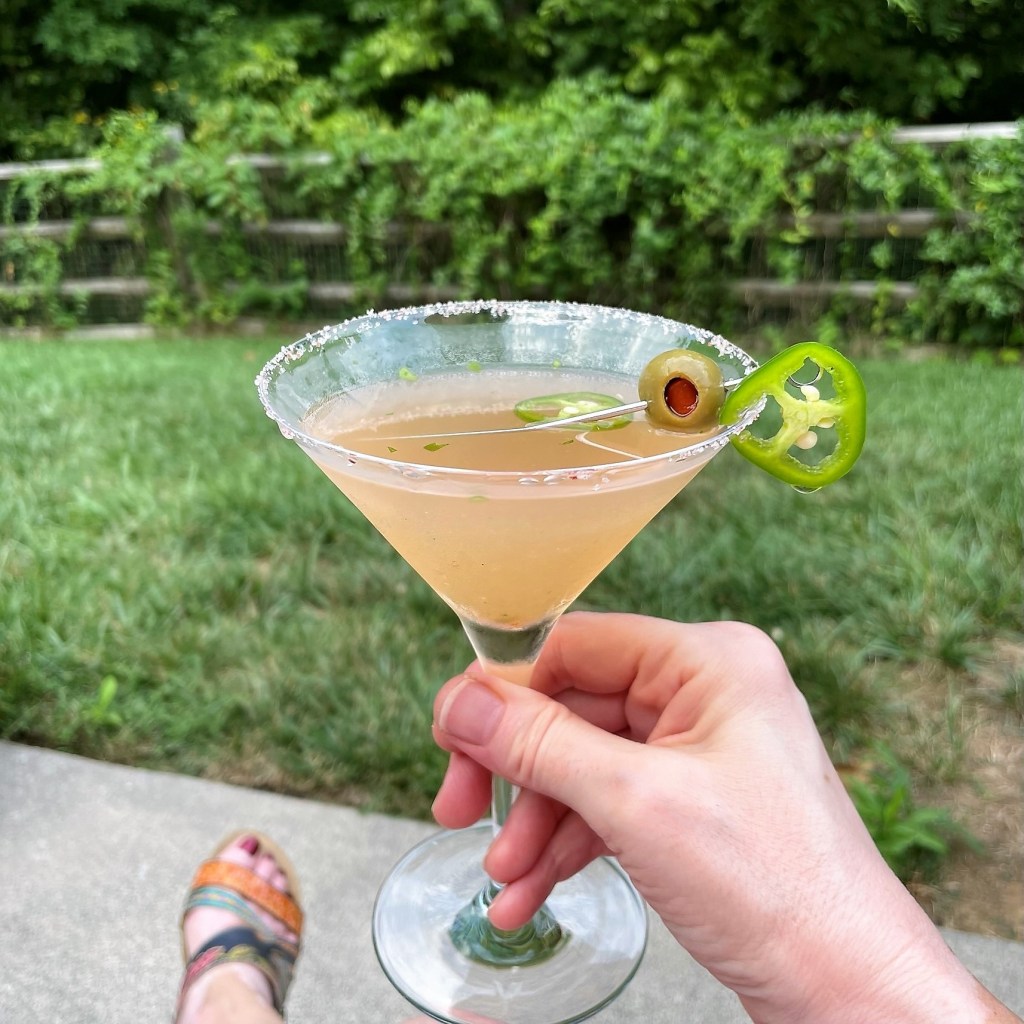
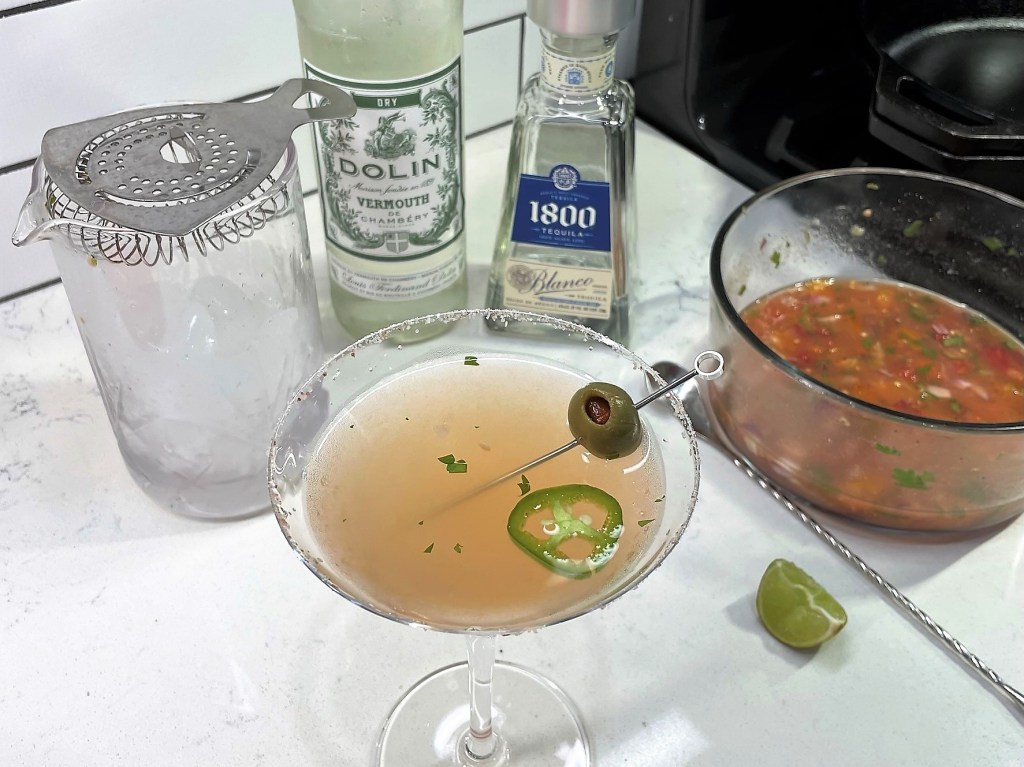
Salsa Fresca “Mexican Martini”
You knew I would go there, right? After the delightful surprise I experienced with last summer’s tomato water martini, there was no doubt in my mind that the juice lingering in the bowl after we depleted a batch of salsa fresca was destined for a chilled cocktail glass. Think of it as a mashup of a martini and a Bloody Mary, but with blanco tequila. It’s so cool and so hot at the same time. Perfect!
Here’s the ratio I like best for the cocktail, and I served it in a chilled martini glass, rimmed with a touch of pink sea salt.
2 oz. blanco tequila (I used 1800), 1/2 oz. dry vermouth (Dolin brand is my fave), 1/2 oz. salsa fresca juice (or more for a big, savory punch), squeeze of lime wedge. Stir with ice, then strain into chilled glass. Garnish with a jalapeño slice and pimento-stuffed Spanish olive.
This is a terrific way to use some of the bounty of a late-summer garden. Use the freshest, ripest tomatoes possible and enjoy your salsa with everything from grilled seafood to cocktails to tortilla chips!
Ingredients
4 medium garden-ripe tomatoes, peeled or not
1 or 2 fresh jalapeños, seeds or not
1/2 large red onion
1 medium clove garlic
Juice of 1 small lime
Kosher salt and black pepper
A few shakes of ground cumin
Small handful of cleaned cilantro, optional (I usually add this just before serving)
The instructions offered here are purely subjective; use as much or as little heat, salt and spice as you desire. Remember that chopping fresh jalapeños is risky business. Wear a disposable kitchen glove when touching the peppers, or rub Dawn dish liquid onto your hands for a couple of minutes just before washing them. The Dawn helps break down and remove the oils from your skin.
Directions
Chop the tomatoes into small dice. If they are especially juicy, you may opt to drain the seeds. Mince the jalapenos. Dice the onion. Mince the garlic.
Combine all of the above in a medium bowl. Season with salt, pepper and cumin. Squeeze in lime juice and stir to combine.
If serving right away, add chopped cilantro. Otherwise, refrigerate to meld flavors and add the cilantro just before serving.
My cousin, Annie, has a wicked sense of humor. Wicked, meaning funny, but also just a little bit wicked. During my visit last month at her lake house in Connecticut, Annie caught me off guard with what seemed like would be important, somber information.
“OK, listen” she began, cracking open a tall pantry door next to the kitchen of her sweet, cozy cottage. “If something happens to me, and you guys have to come here to the lake after I’m gone…”
“Yes,” I said, swallowing hard at that awful thought, as she pointed to a lower shelf inside the cabinet.
“Here’s where you’ll find the stuff for s’mores.”
Honest to God, I don’t know how she keeps a straight face when she delivers a punchline like that. But one thing is for sure, if there is an opportunity to bring joy to any situation or gathering, she has it covered— including s’mores, which we enjoyed as we relaxed in front of her patio fireplace, with the backdrop of gentle lapping sounds of the lake and an occasional bullfrog bellowing somewhere off in the distant darkness.
Who doesn’t have fun s’mores memories? The sweet little campfire sandwich of graham crackers, chocolate bar and toasted marshmallow has been a favorite of mine since I was a kid, and I was thrilled a few years ago to learn that the sugary treat has been awarded its very own day of celebration— National S’mores Day! Each August 10th since I started Comfort du Jour, I have presented a fun interpretation of s’mores. In 2020, it was a duo of treats with a s’mores cocktail and dessert pizza. In 2021, I gave you s’mores ice cream. Last year, those ooey-gooey s’mores brownies. And this year, well, it isn’t really a surprise, is it?
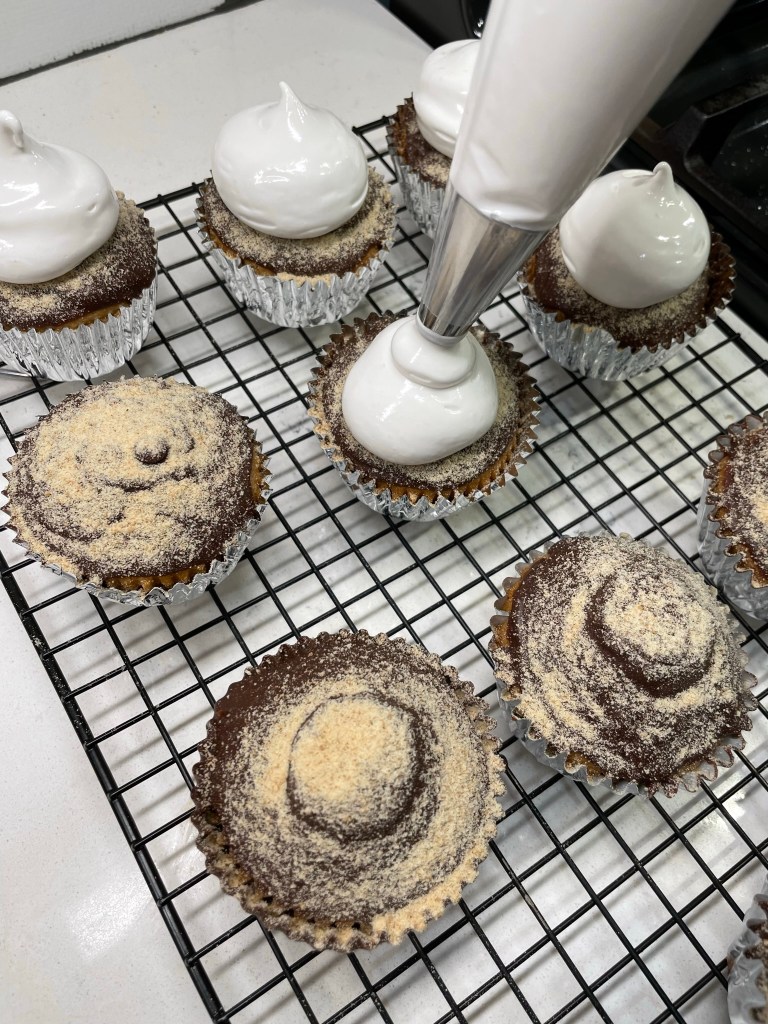
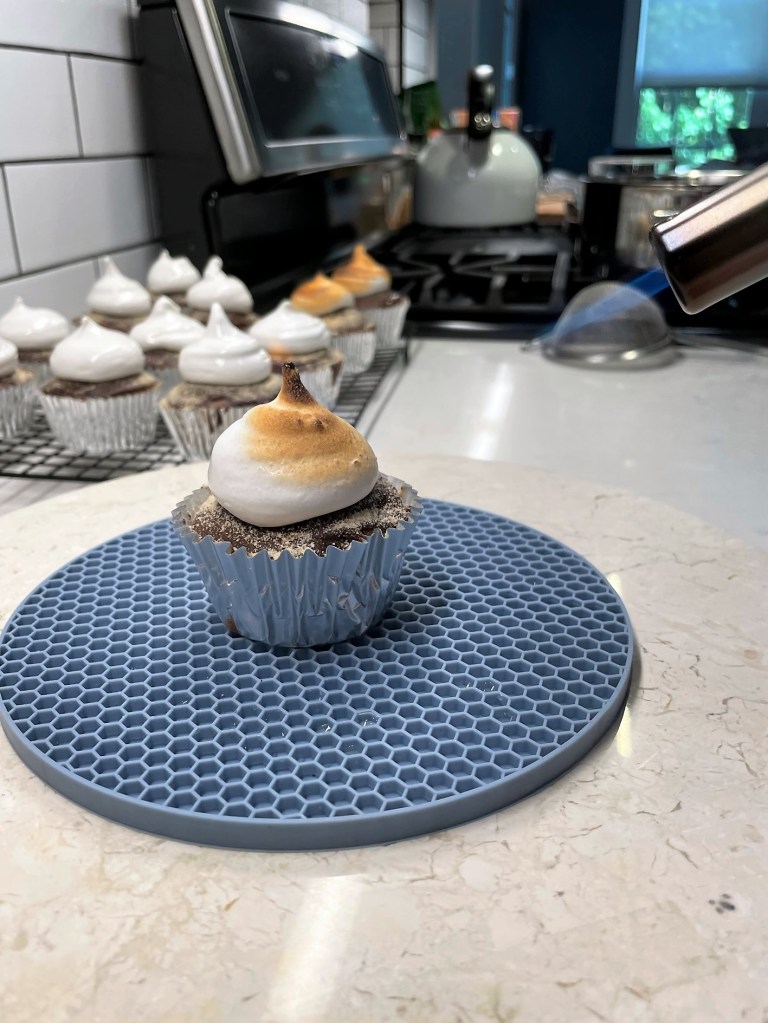
Behold, s’mores cupcakes!
These turned out to be everything I wanted!
With a sweet honey-graham cake base, hollowed out for a dark-and-milk chocolate ganache filling, and topped with a homemade marshmallow frosting (toasted, of course), this may be my favorite s’mores treat to date.
I’d been scouting out component recipes for these for several months, and finally nailed it down after flipping through a special edition Food Network Magazine, called “The Cupcake Cookbook.” The pages held all kinds of cupcake creations, from fruit to spice to chocolate and vanilla, plus numerous flavors and types of frosting, icing and glaze. It was their recipe for “honey-graham cupcakes” that sealed the deal for my s’mores recipe, but I did (of course) put my own spin on them, using honey in place of sugar for an extra-sweet, extra-“graham-y” impression.
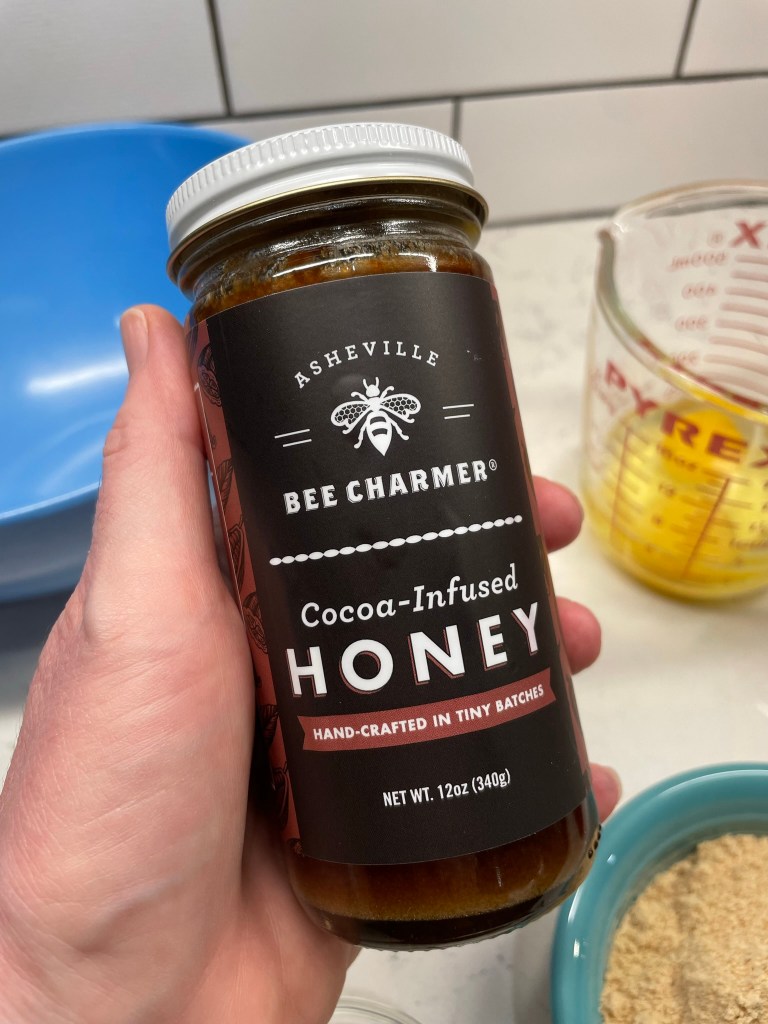
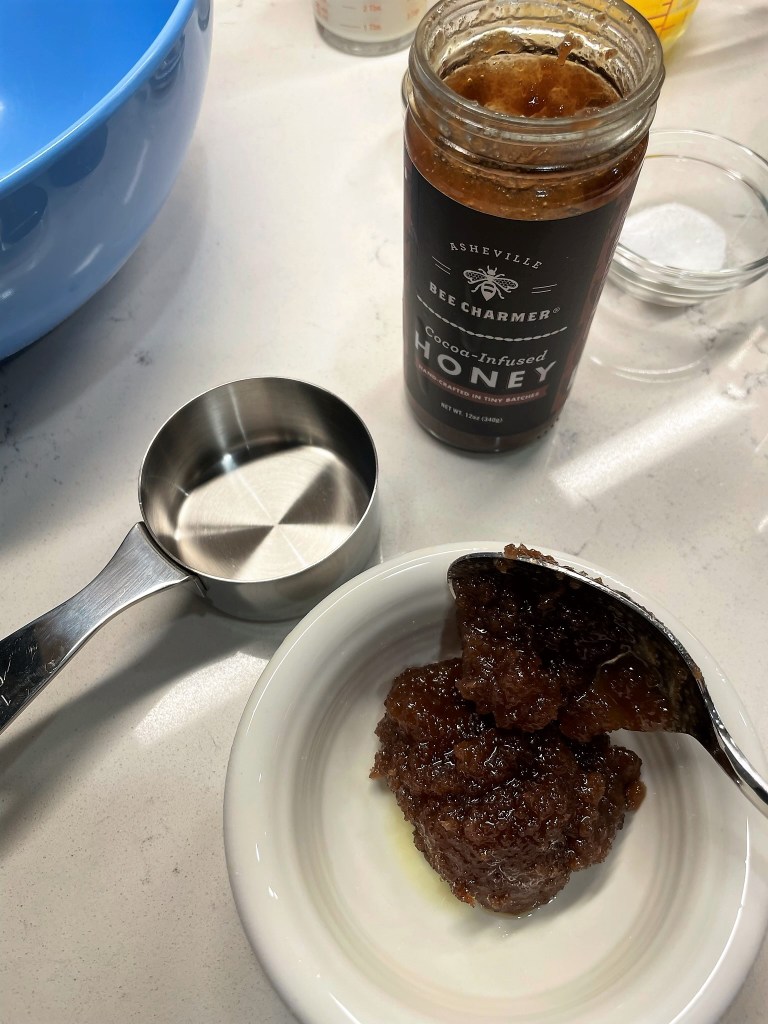
I had this cocoa-infused honey that I had picked up on an earlier trip to Asheville, N.C., where we go occasionally to visit my husband’s adult daughter. I suspected that the cocoa infusion would lend itself nicely to the s’mores vibe, and I was correct. The honey has been in my cabinet for about a year, so it was fairly crystallized, but the texture was no problem for my baked recipe.
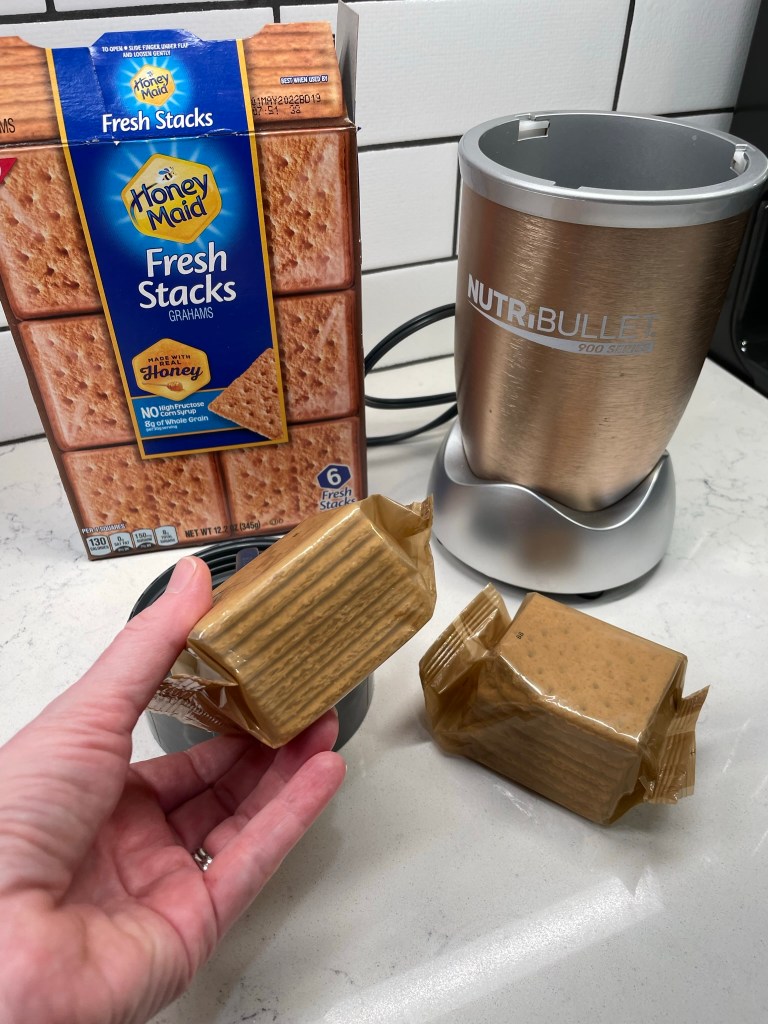
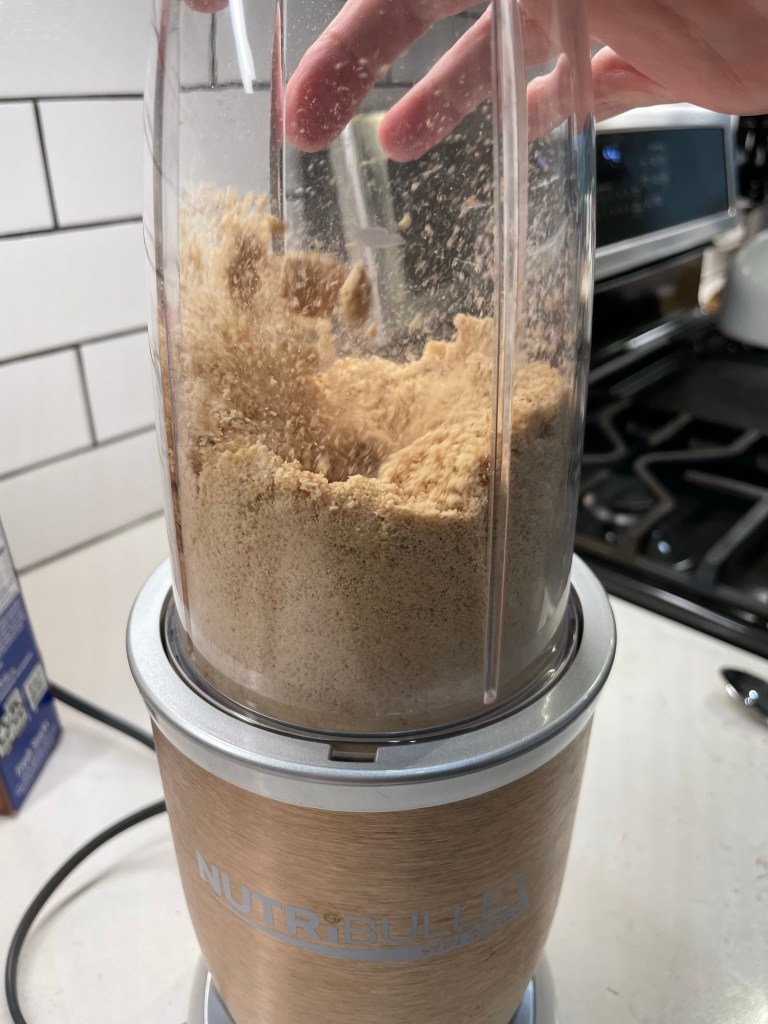
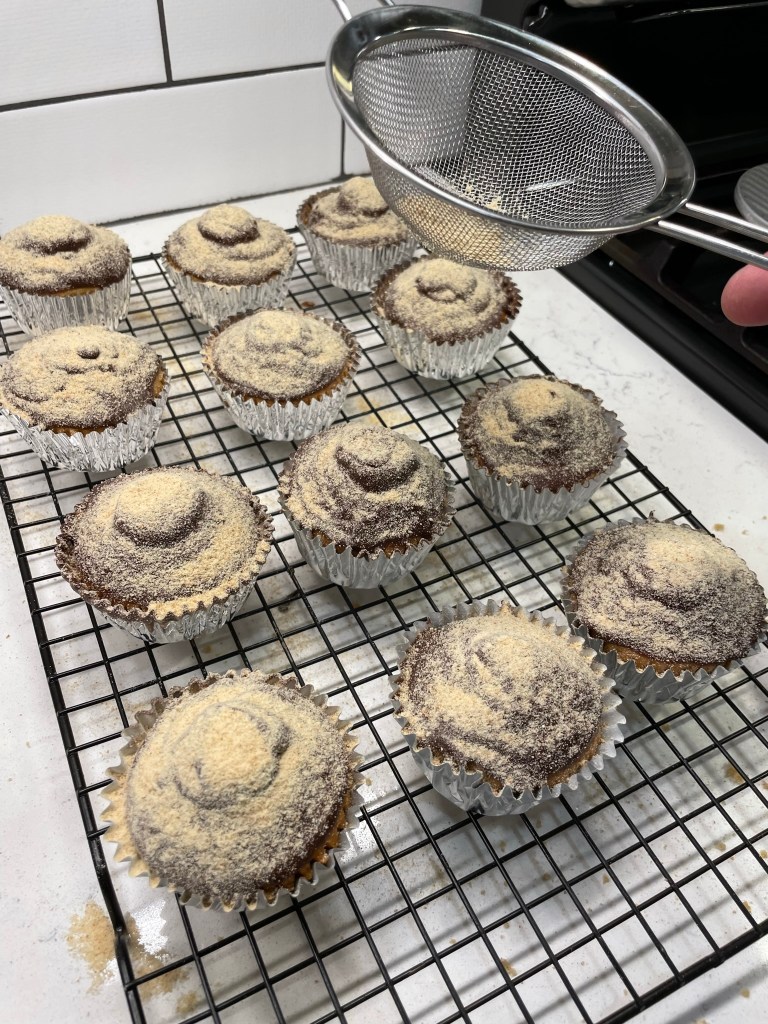
One of the things that appealed to me about the Food Network cupcake recipe is that it included actual crushed graham crackers. I was guaranteed to have the flavor I wanted, along with a slightly grainy feel from the already baked crumbs mixed into the cupcake batter. To crush the graham crackers, I piled a couple sleeves of them into my bullet-style blender and pulsed them for about 20 seconds, until they were reduced to a fine powder. I had the 3/4 cup of crumbs that I needed, plus 1/4 cup left over that I figured I’d use in the topping.
With all my ingredients lined up and measured, I was finally ready to bake!
Generally speaking, you can swap honey for sugar in a baking recipe, but you must take a few things into consideration, which I learned thanks to this article from an online honey supplier. Following those tips, I made the following adjustments:
used less honey than the sugar amount called for (because honey is sweeter)
reduced the milk amount slightly (because honey is also somewhat liquid)
added a touch of baking soda to balance the acidic effect of the honey
reduced the baking temperature a bit (because honey burns more easily than sugar), and slightly increased the baking time to compensate
I have accounted for all of those adjustments in my instructions, but the click-to-print recipe below also describes how the recipe should look if you’re using sugar to sweeten the cupcakes.
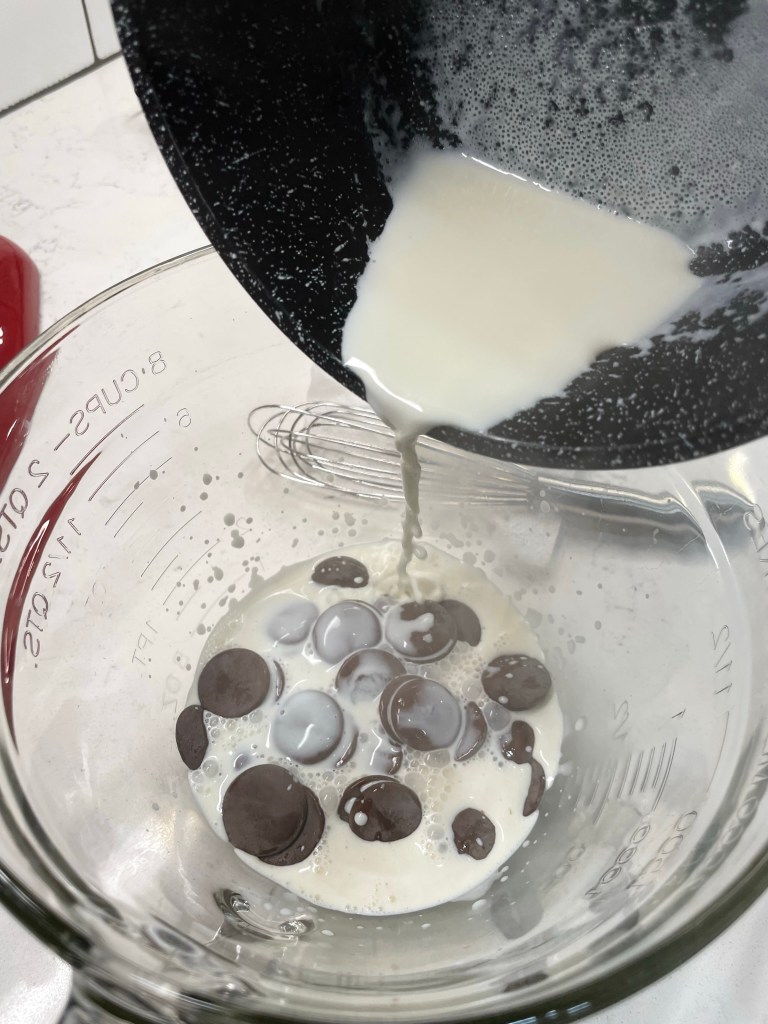
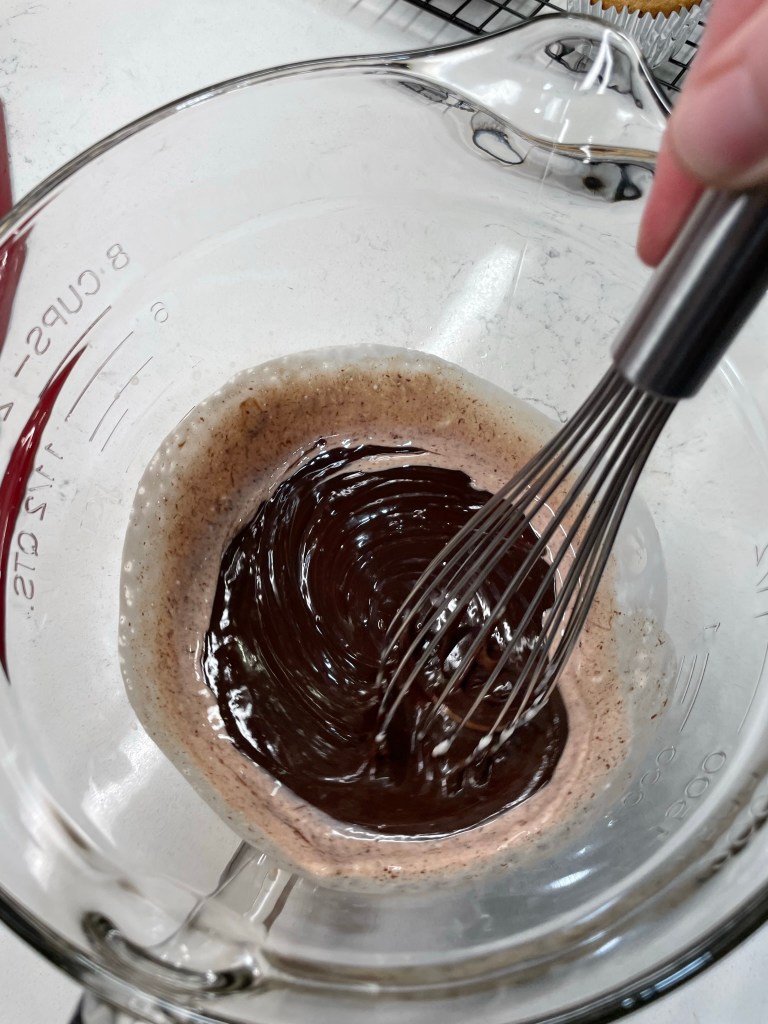
The ganache filling was the simplest component of this recipe; nearly equal parts chocolate— I used a combination of dark and milk chocolate for this— and heavy cream heated to just-shy of boiling. If you’ve never made ganache, you might be surprised how simple it is. Just heat the cream, pour it over the chocolate so it’s complete covered, wait 10 minutes, and stir to blend. Don’t be alarmed if the mixture seems very runny at first— it will thicken and firm up a bit as it cools. I wanted the ganache to be soft but not too messy, so I used slightly more chocolate than cream. In hindsight, equal parts would have been fine.
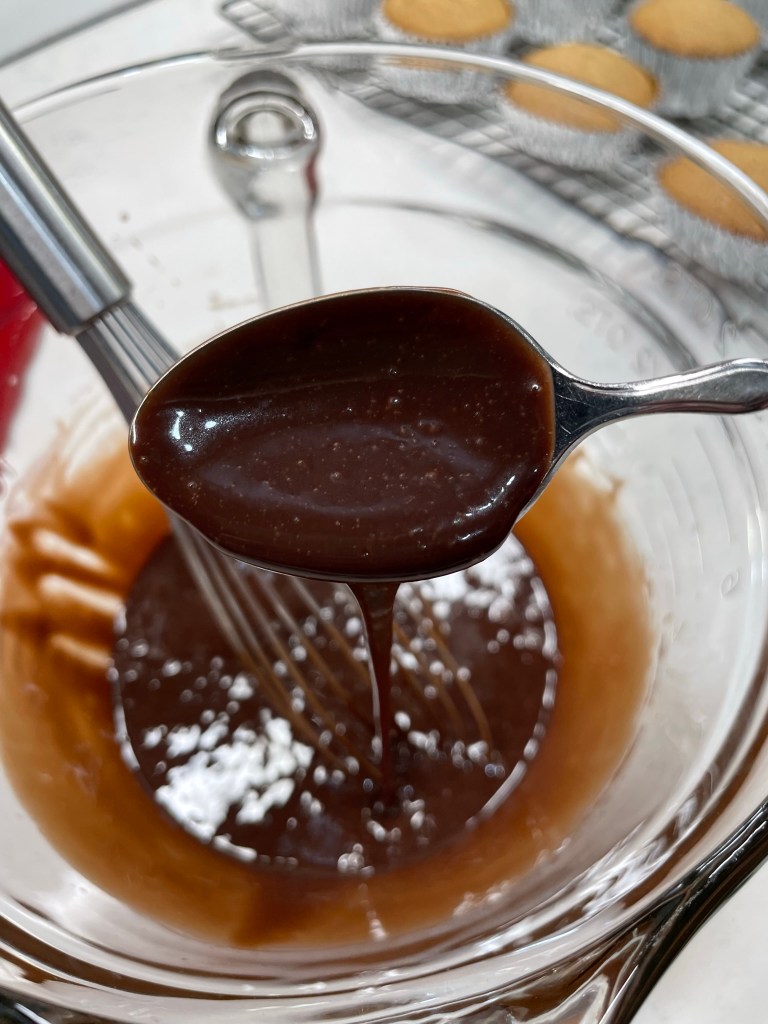
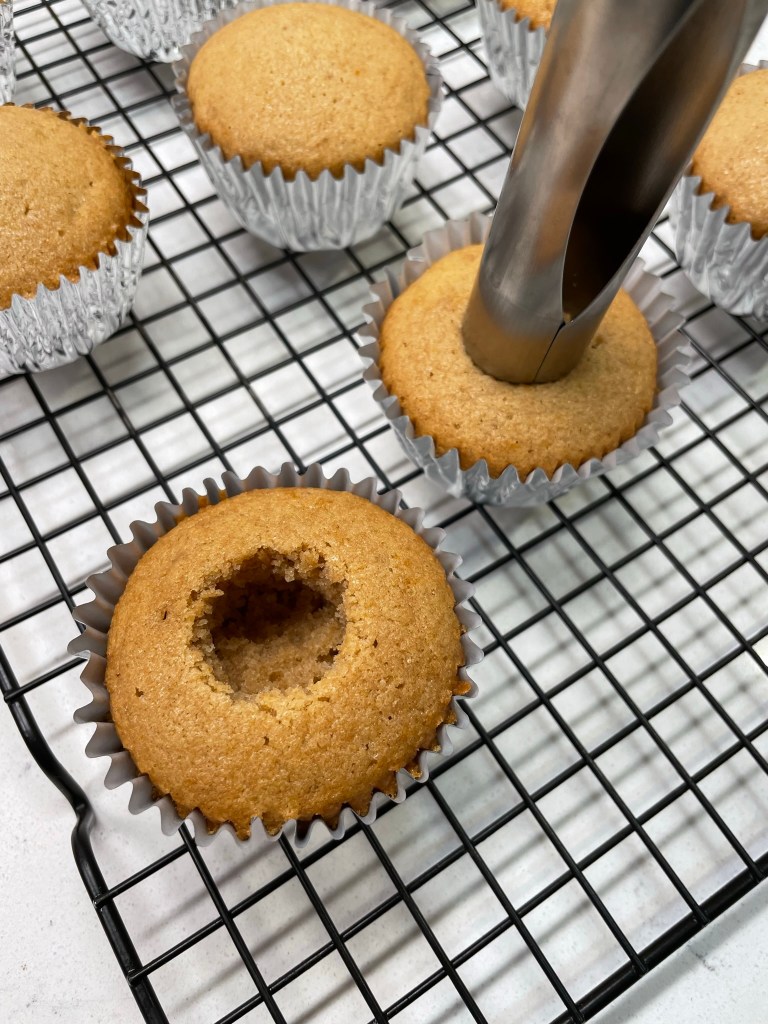
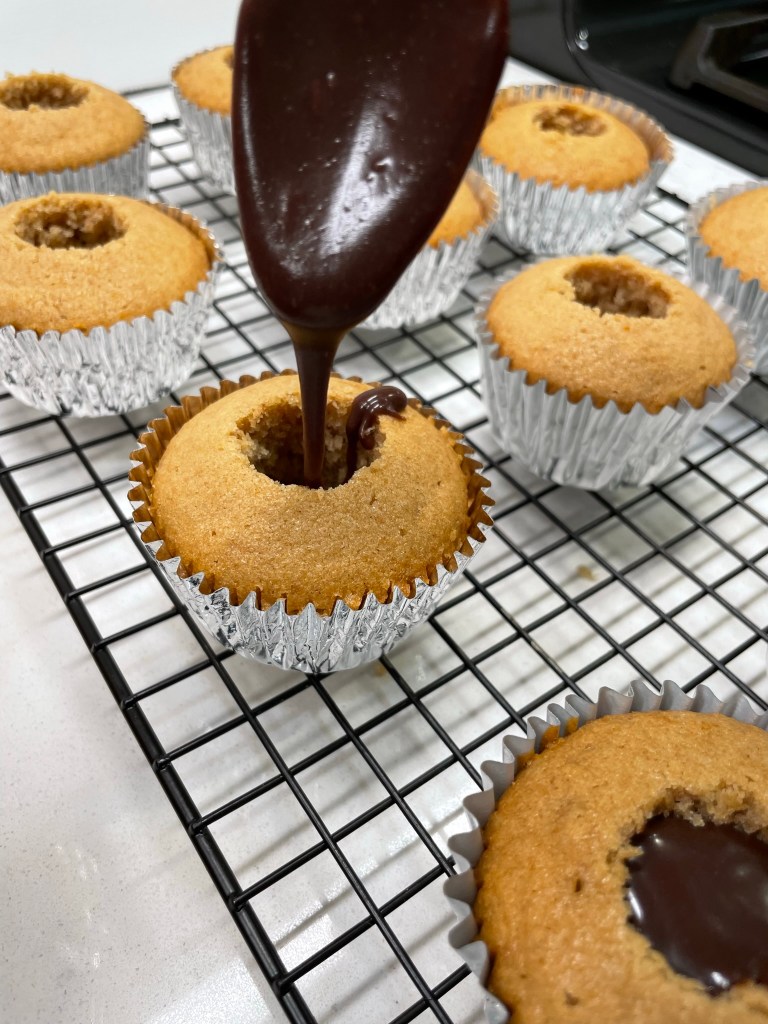
When the cupcakes were cooled, I used my apple corer tool to carefully cut out a plug shape bit of cake, keeping those pieces intact, to place back on top of the ganache, which I spooned inside the cupcake cavity. I didn’t mind that the tops didn’t sit flush with the cakes, because the whole thing would soon be buried in marshmallow frosting anyway. I had some ganache left over after filling the cupcakes, so I warmed it over hot water back to a spreadable consistency, and glazed the top of each cupcake, and then sifted some of the remaining graham crumbs on top as a bed for the marshmallow frosting.
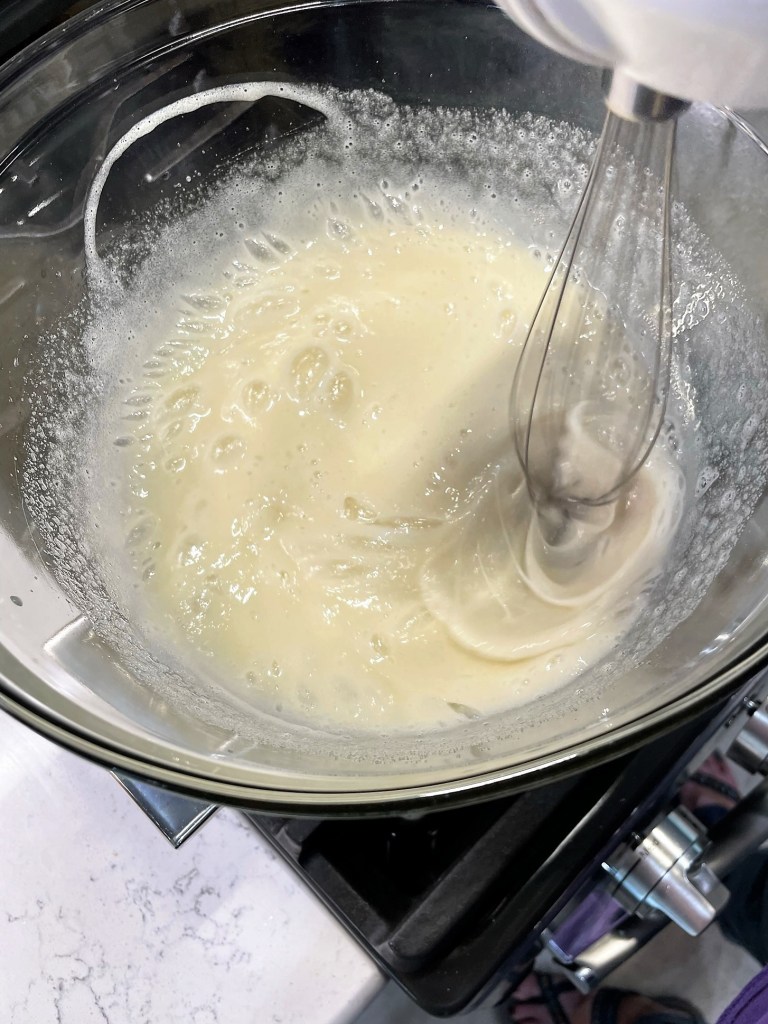
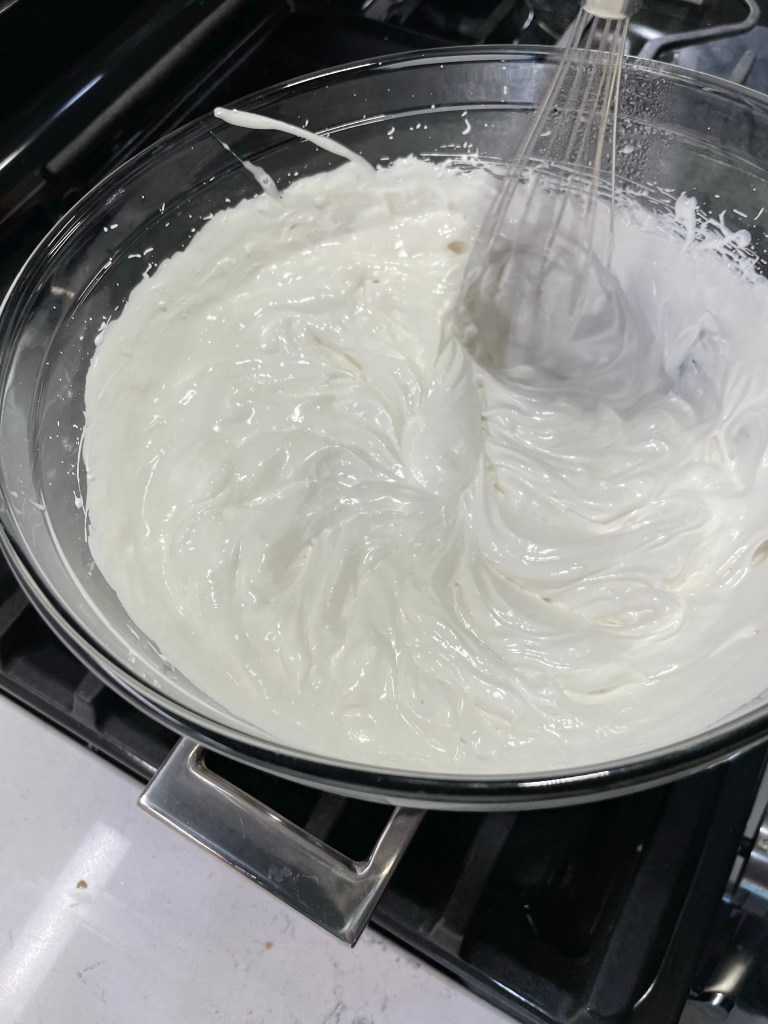
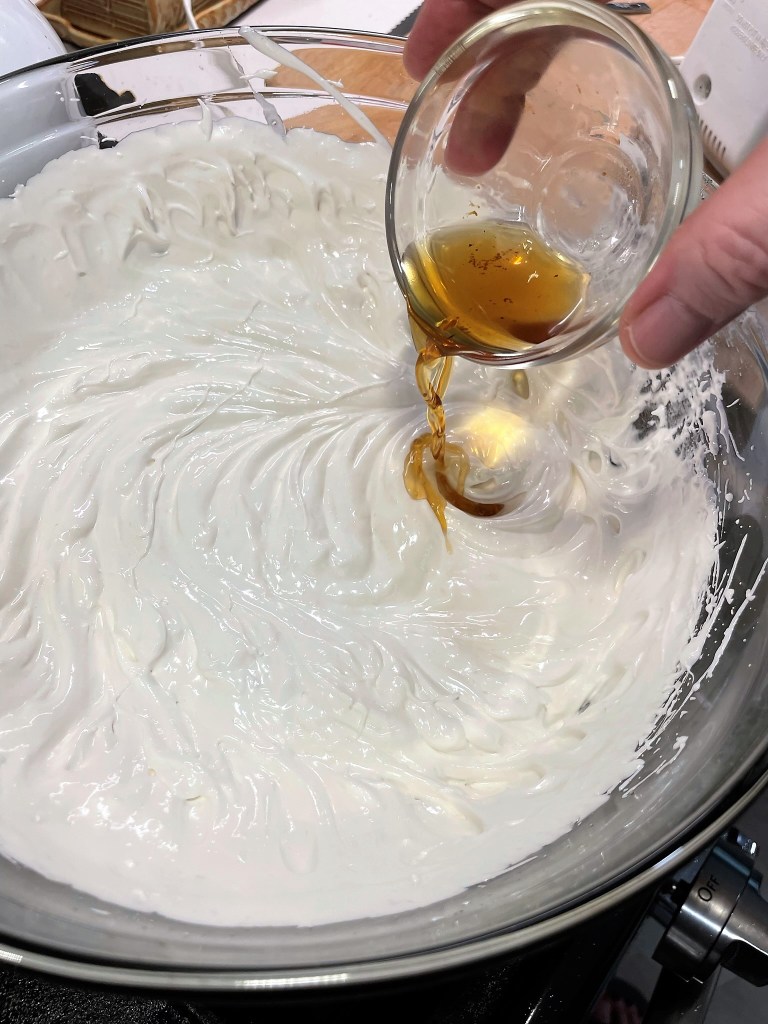
Almost done! I agonized a bit over which frosting recipe to use, and considered one in the Food Network Cupcake magazine, but it sounded more like meringue than frosting, and I wanted mine to be stable enough to keep its shape without getting watery. I finally found a “marshmallow frosting” recipe online that sounded more hefty, and about the time I got to the step to “whip it with a mixer for seven minutes over simmering water,” it occurred to me that this was exactly the same as a topping that my grandmother frequently made during her having-company-over days.
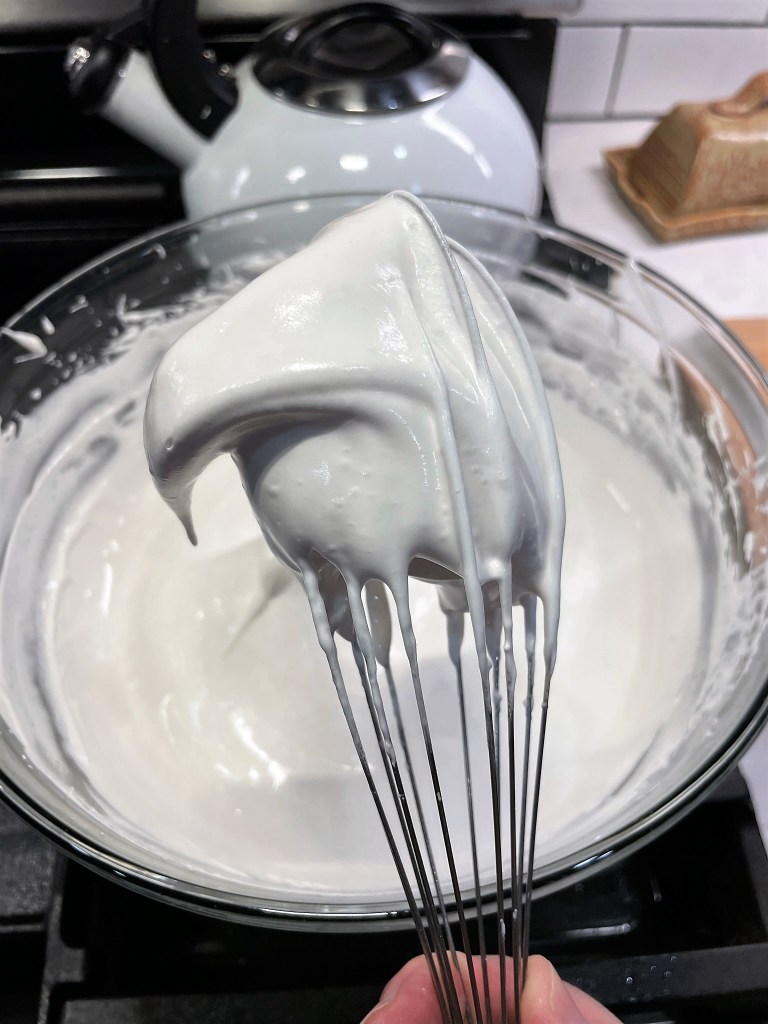
Corn syrup prevents crystallization.Start the frosting off the heat.Place over steaming water and continue beating.After 7 minutes, the eggs are cooked and soft peaks form.Vanilla goes in at the end.Marshmallow frosting!
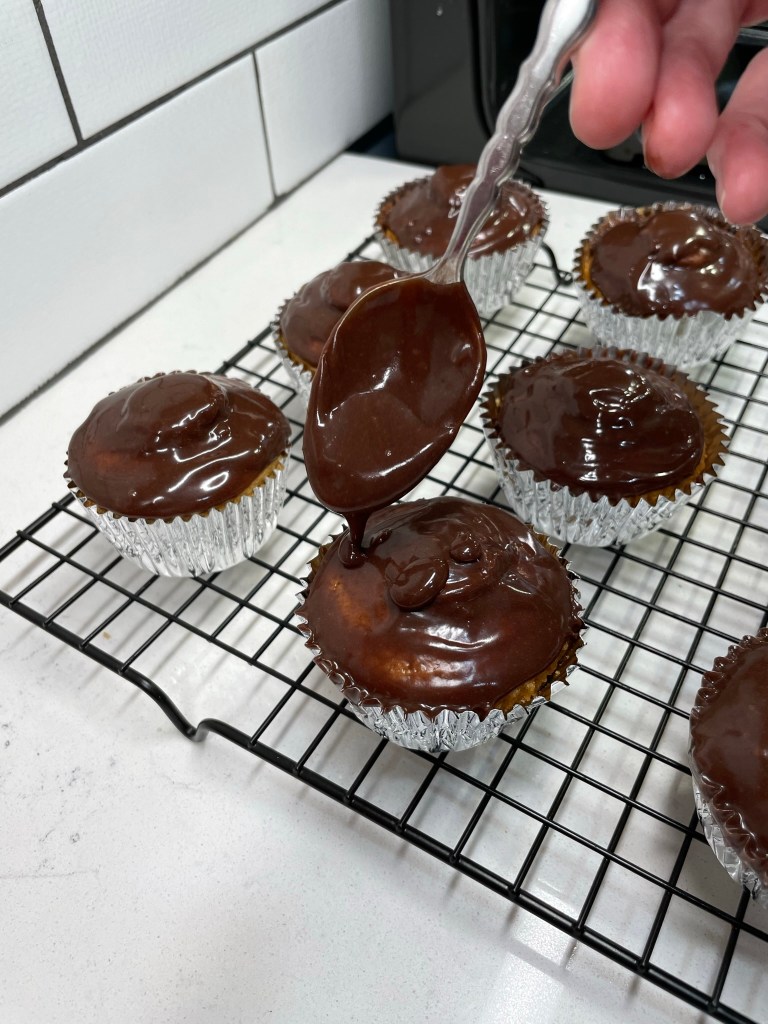
Turns out, seven-minute frosting is essentially marshmallow creme. I suppose you could probably just top the cupcakes with store-bought marshmallow creme, but by this time, my frosting was already done and I did enjoy piping the stuff onto the cupcakes— it made me feel like a real baker!
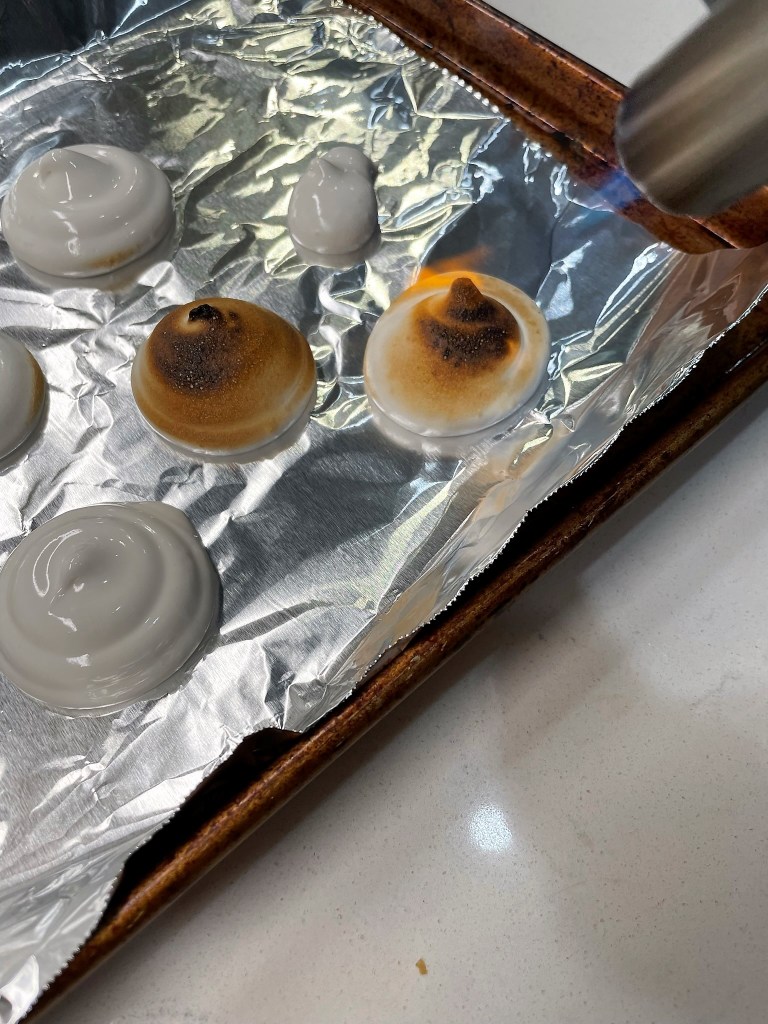
The only thing left to do was was toast the marshmallow topping. Having never done this before, and not wanting to ruin my pretty little s’mores cupcakes, I piped out some of the leftover marshmallow frosting onto a sheet of foil, and hit the dollops with my culinary torch to practice. Would you believe, this turned out to be the simplest part of the recipe?! The frosting toasted beautifully, and it stayed pretty for a few days after I made the cupcakes.
Incidentally, I had enough marshmallow frosting left over to cover at least two more batches of cupcakes, and most of the extra went to waste because I didn’t have a plan ready for using it. Perhaps I could have whipped up a quick batch of Krispie treats— and that of course, gives me an idea for National S’mores Day next year. 😉
With a sweet honey-graham cake base, hollowed out for a dark-and-milk chocolate ganache filling, and topped with a homemade marshmallow frosting (toasted, of course), this may be my favorite s’mores treat to date. There are three components of this treat, and I've described each separately below.
Ingredients
3/4 cup honey graham crackers, crushed fine (see notes)
3/4 cup all-purpose flour
1 tsp. baking powder
1/8 tsp. baking soda (omit if using sugar in place of honey)
1/2 tsp. salt
1 stick unsalted butter
1/2 cup honey (or 1 cup granulated sugar)
2 eggs
2 tsp. real vanilla extract
1/2 cup milk (minus 2 tablespoons if using honey)
Notes: Butter, eggs and milk should be at cool room temperature. Remove them from refrigerator about one hour before you plan to start the recipe.
To get a fine crush on the graham crackers, I broke them up into my bullet-style blender and processed them for about 15 seconds. Sift through them with your fingers to remove any remaining chunks. I used two wrapped packs of “Fresh Stacks” crackers, and had about 1/4 cup of crumbs left over, which I sprinkled on top of the ganache before frosting.
Directions
Preheat oven to 330° F (or 350° F if using sugar), and line cupcake pan with foil liners.
Combine crumbs, flour, baking powder, soda and salt in a medium bowl and set aside.
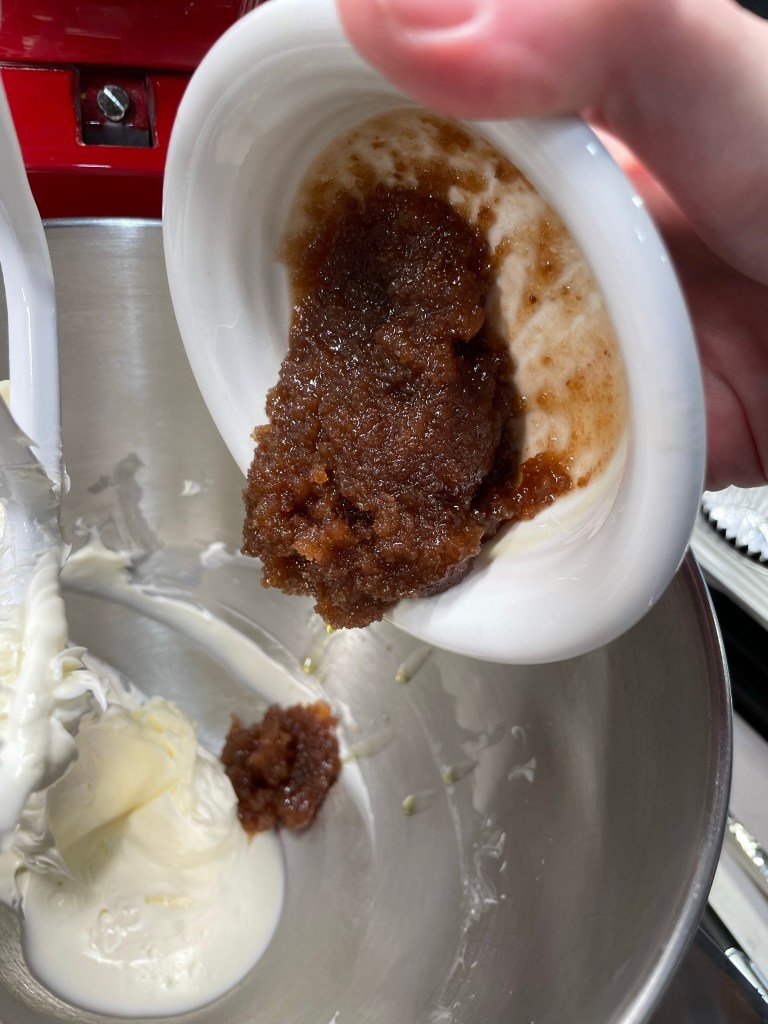
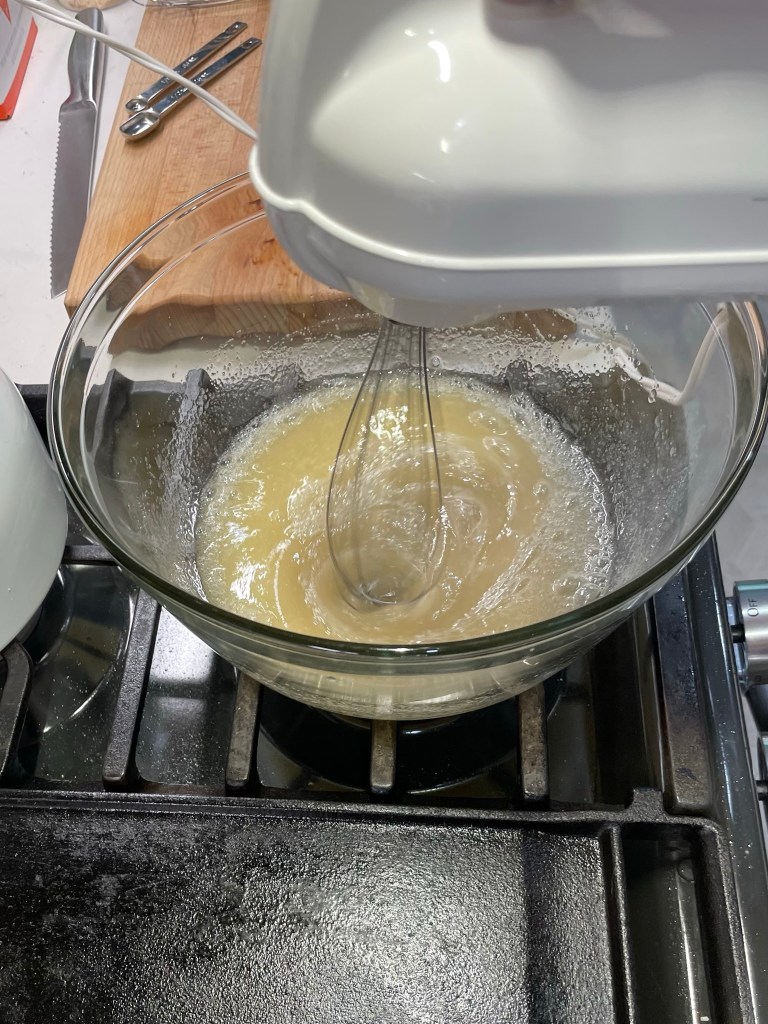
In a stand mixer, cream butter on medium speed until light and airy, about one minute. Add honey and beat on medium speed until fluffy and evenly blended, about four more minutes. Scrape down sides of the bowl.
Add one egg at a time, beating to blend after each. Scrape down sides of the bowl. On low speed, beat in one-third of the flour mixture just until no visible dry ingredients remain. Beat in half of the milk. Repeat with dry ingredients, then milk, then final dry ingredients. Scrape down sides.
Scoop cupcake batter into lined cupcake pan. Each cup should be about 2/3 filled.
Bake 25 to 30 minutes (less if using sugar), until cupcakes are golden and spring back easily when touched in the center.
Cool cupcakes in pan 5 minutes, then transfer to a wire rack to cool completely.
While the cupcakes are baking, prepare the ganache filling. It’s best to fill the cupcakes while the ganache is still somewhat warm and easily drizzled.
Ingredients
2/3 cup quality chocolate, wafers or bars preferred over chips
1/2 cup heavy cream
Directions
Add chocolate pieces to a medium bowl. Heat cream to just-shy of boiling point. Pour cream over chocolate and let sit 10 minutes.
Gently whisk or stir cream and chocolate together until evenly blended. This will seem impossible at first, but within one minute, it should be glossy and silky.
When cupcakes are completely cool, used an apple corer tool or paring knife to carefully cut a one-inch plug from the center of each cupcake. Set these aside.
Use a spoon to drizzle the warm ganache into each cupcake hole, then press the plugs back onto the cupcake. Carefully glaze the filled cupcakes with any remaining ganache. Scatter some of the remaining graham crumbs over the top and cool completely while you make the marshmallow frosting.
To prepare the frosting, you will need an electric hand mixer and a double boiler or a large, heatproof bowl that will fit over, but not inside, a medium saucepan. Be sure the mixing bowl and beater blades are completely clean, as any amount of oil or fat on them will prevent the egg whites from forming peaks.
Ingredients
2 egg whites, at room temperature
1 1/2 cups granulated sugar (I used a 50/50 mix of cane sugar and superfine caster sugar)
Bring a medium saucepan of water to a slight boil over medium heat. The water should not be high enough to touch the bottom of the bowl used in the next step.
In the heatproof bowl, combine all ingredients except vanilla. Do not place the bowl over the hot water yet.
Use a hand mixer to whip the frosting ingredients together. Start on low speed and increase slightly when the mixture starts to get frothy. After a minute or two, place the bowl over the simmering water.
Continue to whip with the mixer for 7 minutes, until all the sugar has dissolved and soft peaks form in the frosting. Remove from heat.
Add vanilla and beat again just until incorporated. Cool a few minutes before frosting cupcakes.
Load frosting into a piping bag with a wide, round tip. Pipe frosting onto cupcakes.
Use a culinary torch to carefully toast the marshmallow topping. Cool before enjoying.
The inspiration for this scrumptious chicken highlighting the flavors of peach and bourbon came from Instagram, but it was salmon rather than chicken. And it was baked rather than grilled (I think). I don’t remember the details, and anyone who is on Instagram knows that’s the nature of the social media beast— either follow it or lose it. And I don’t want to follow every single thing that interests me because I’m scatterbrained enough, and I don’t always think to “save” a recipe post to my favorites collection. I need that sacred space for videos of hero dogs making their final flight home, hungry raccoons snatching a donut at the Dunkin’ drive-thru, and onesie-wearing dachshunds munching on carrots by a cozy fireplace. Yep, I use social media for mindless entertainment. When it comes to food posts, I’m only looking for inspiration.
That mention of a peaches and bourbon combo was enough to get me going, though, and it stuck with me for days after I saw it, so when Les and I were asking each other what we’d do for dinner last weekend, I remembered the package of chicken thighs I had just bought that day and I blurted without even thinking, “peach-bourbon glazed chicken.” And there was no arm-twisting involved, because anytime we are pairing anything and bourbon, we’re good. All I needed was a recipe, right?
Not so fast.
If I had time only to share one message for people who think they don’t know how to cook, it would be this: trust yourself! Recipes only get you so far; you still have to understand some things about cooking, and that boils down to pairing flavors and mastering a few techniques. You already know what flavors you like together, so learn the methods that will help you be successful and the rest will fall into place. I didn’t write down anything about the recipe from that fleeting Instagram post— but I am going to connect the dots from what struck me about it: peaches, bourbon, meat and the grill.
The Flavor Pairings
Peaches are sweet, juicy and summery. What complements sweet? Tart, spice or smoke. That helps narrow down my next move toward pairing flavors. Bourbon is strong, with a boozy bite and a light smokiness from oak barrel aging, so I already have a complementary flavor profile (smoke) taking shape. I can inch it further toward smoke with introduction of a spice, but which ones are smoky? Off the top of my head, I know I have cumin, but that starts heading off into more specific ethnic cuisines (Mexican or Indian), which is not where I’m going. I wanted this to taste like an all-American summer. Paprika is also smoky and brings the benefit of adding vibrant brick-red color. That’s my choice for this dish, and I happen to have a bourbon-smoked paprika, which is a no-brainer here. Finally, I want to take the edge off the bourbon without losing its flavor, and a bit of brown sugar will do that while also supporting the sweetness of the peach. See how easy that was?
Lest you think that I analyze every recipe I make this way, I can assure that most of this mental processing happens unconsciously, much the same as getting dressed in the morning and instantly knowing which colors, styles and patterns will work or clash. The more time you spend in the kitchen, the more natural these decisions become.
Salt and pepper: the simplest seasonings are usually enough when you’re grilling, and it’s the way to go when you want the flavor of the meat to take center stage.
Smoked paprika: this lends a light smoky flavor, which is always a winner for the grill. This spice might not have been right for berries or citrus, but it worked great with peaches.
Brown sugar: this will underscore the sweetness of the peaches, soften the bourbon and also encourage even caramelization of the meat during grilling and glazing.
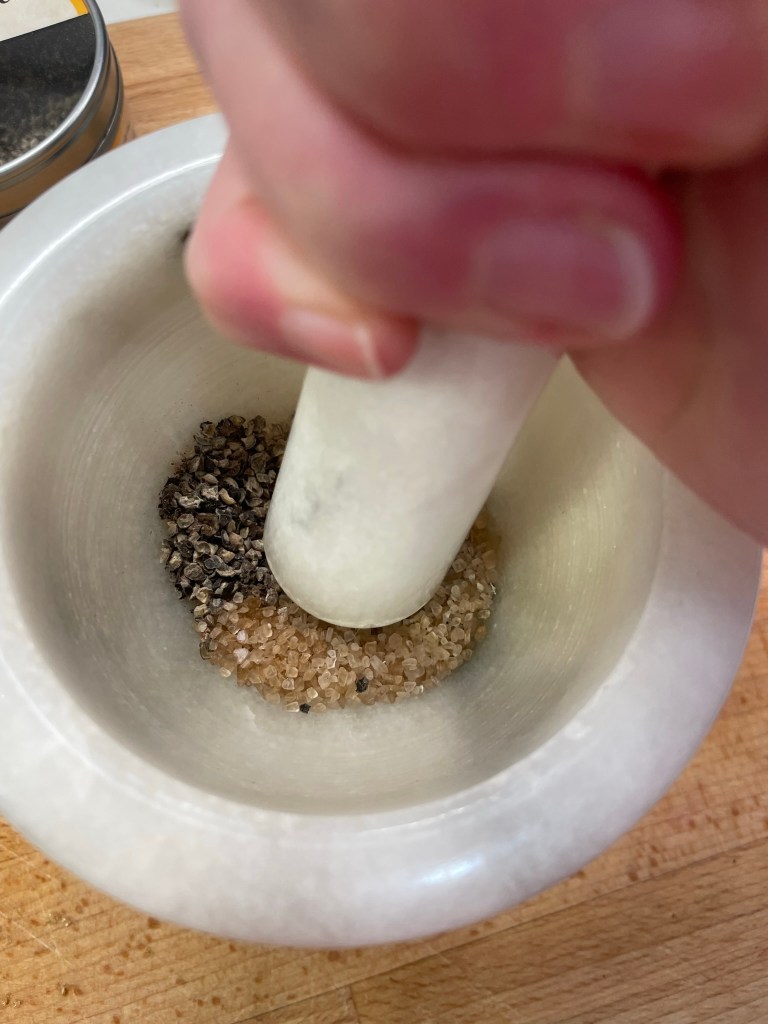
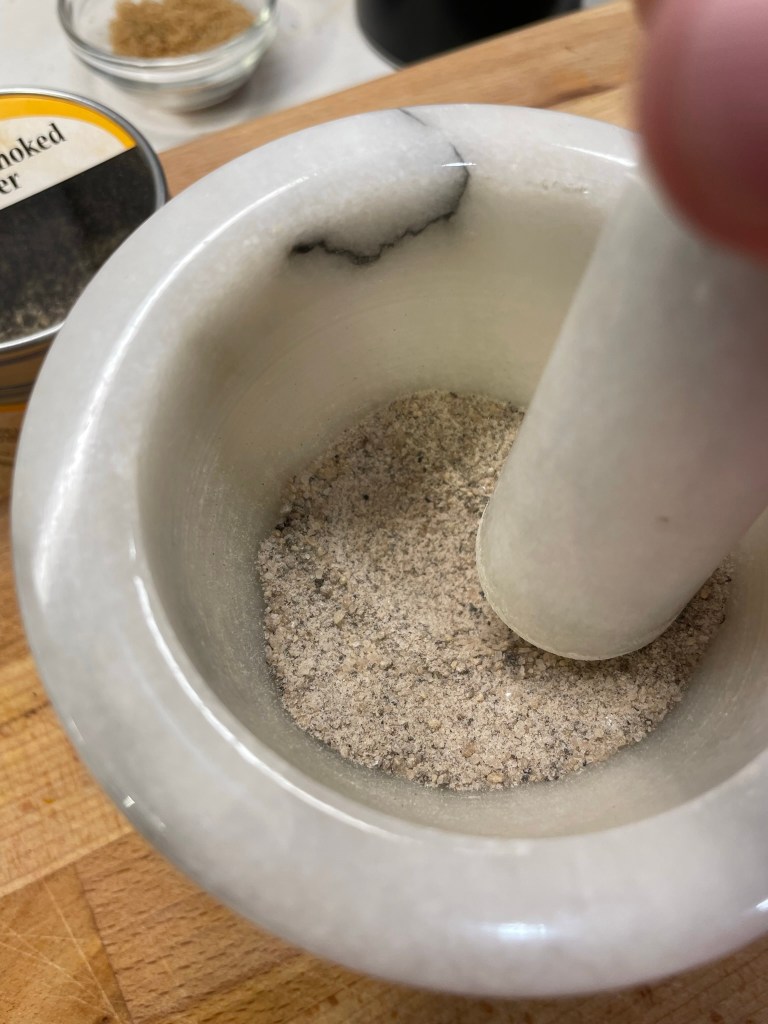
My bourbon smoked salt and pepper were very chunky, so I crushed them fine, then added the mixture to the paprika and brown sugar.
The Technique
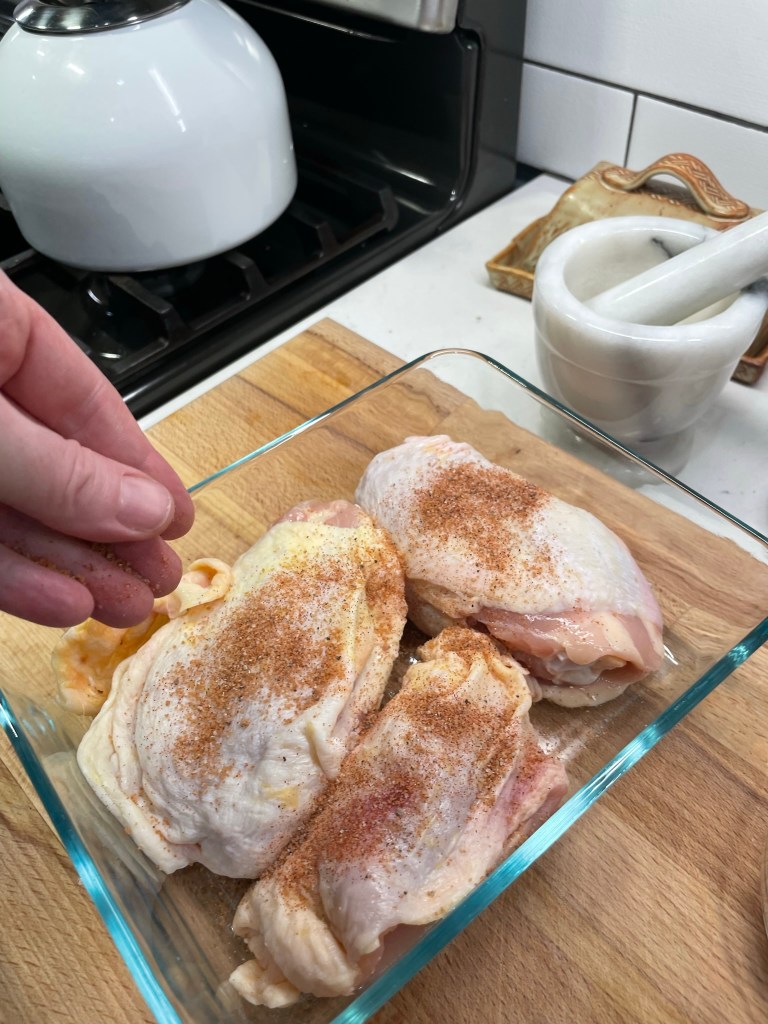
Les and I have both grilled food for years, but we always have something new to learn. I’ve been leaning heavily lately on the teachings of Kenji López-Alt, whose book The Food Lab describes in detail the benefits of dry-brining meat before roasting or grilling. It’s a whole science-y thing that involves reverse osmosis or something, and it works every time, producing both a great crispy skin and a juicy, tender interior. So for these chicken thighs, I did a quick dry brine with the seasoning blend above, and I held back a spoonful to use in the peach-bourbon glaze (more on that in a moment).
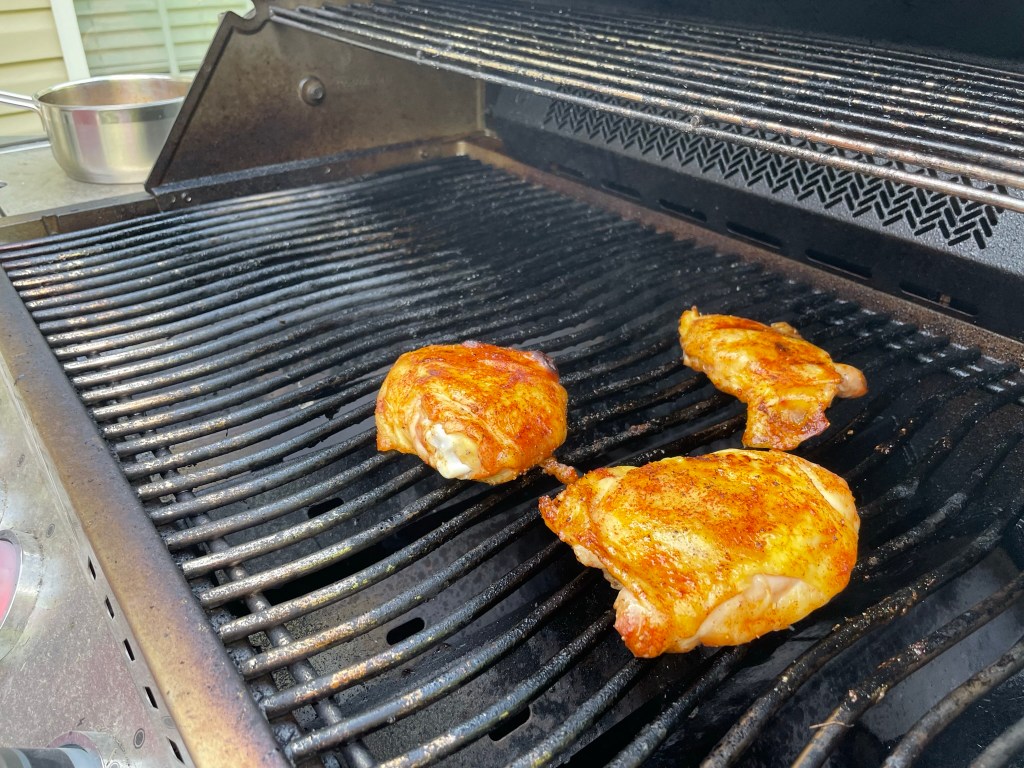
Pat the chicken fully dry before seasoning both sides with the spice rub, then send it to the fridge WITHOUT a cover.
With better planning, I would have done this seasoning step the night before we cooked, to give the chicken skin more than five hours of dry brining time. But sometimes these ideas hit me on the same day I want to cook, and five hours turned out to be plenty to give the chicken a locked-in delicious flavor. An extra few hours would likely have dried out the skin more for an even crispier exterior, so maybe next time. 😉
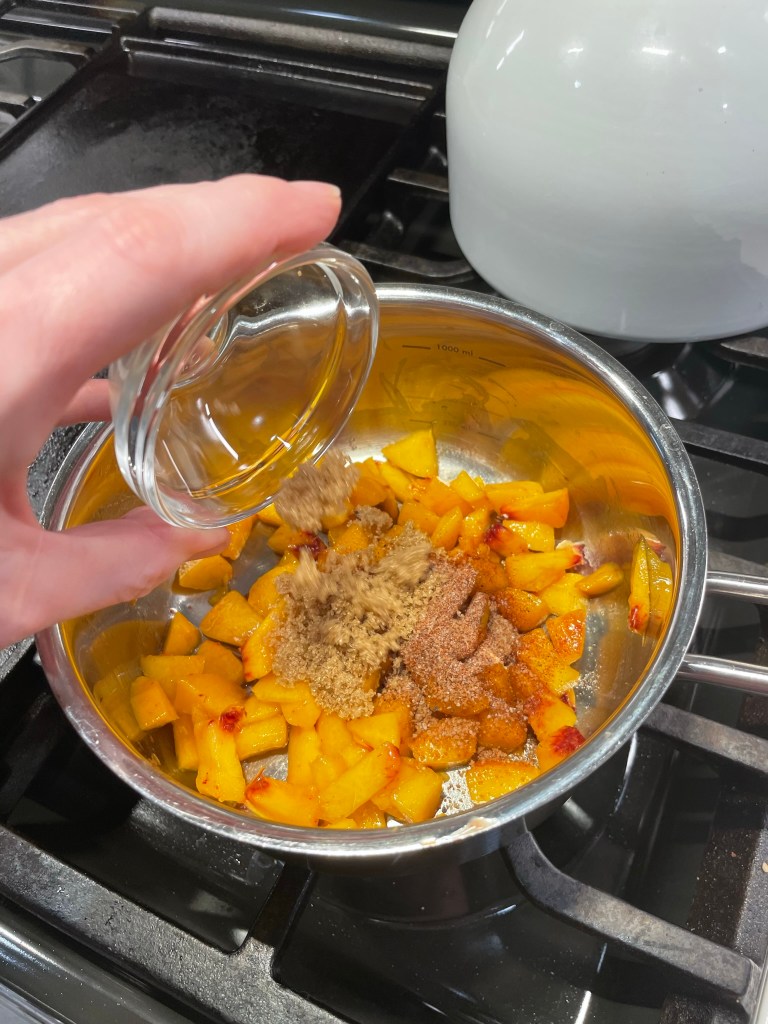
The Peach-Bourbon Glaze
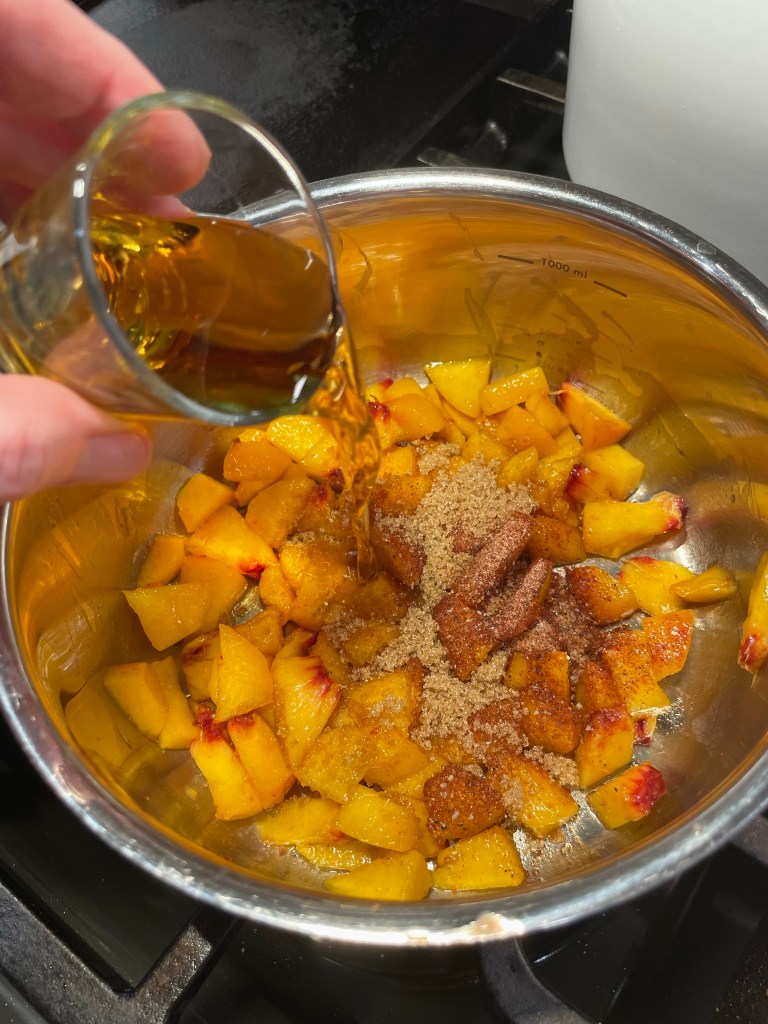
The peach-bourbon flavor combination that started it all was the last thing I prepared, but you can see by now that it was the basis for everything else I did. This is usually how I develop a recipe, whether it’s for a cocktail, a dessert or a main dish. The same spice blend I rubbed on the chicken also seasoned the peaches I cooked down for the glaze. An extra spoonful of brown sugar made the glaze syrupy, but too much would have made it cloyingly sweet. For the bourbon, I scanned my bar for ideas. Would regular bourbon have worked? Of course. Black-cherry infused bourbon? Not so much. The smoked maple was next-level, the winner!
Notice that I added the smoked maple bourbon twice? Half a shot at the beginning of cooking, and half a shot at the very end.
More Technique
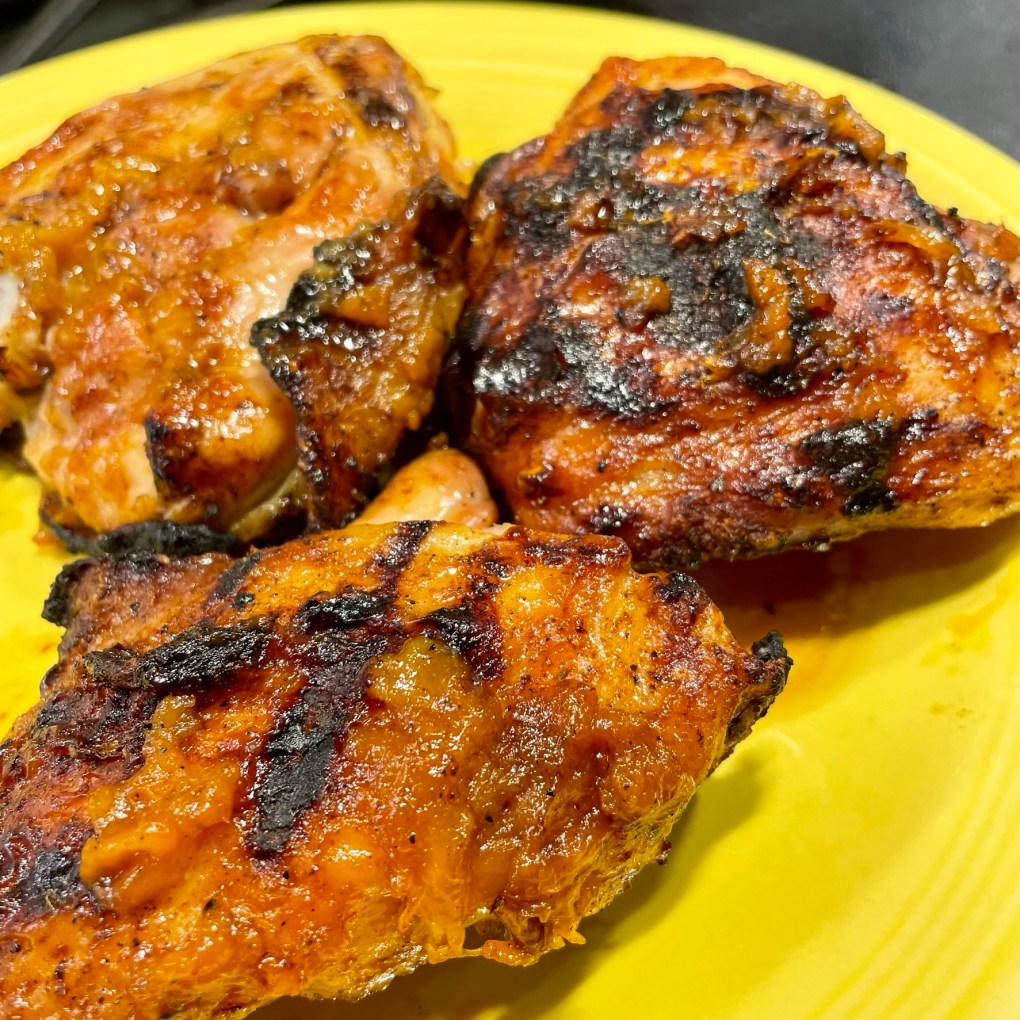
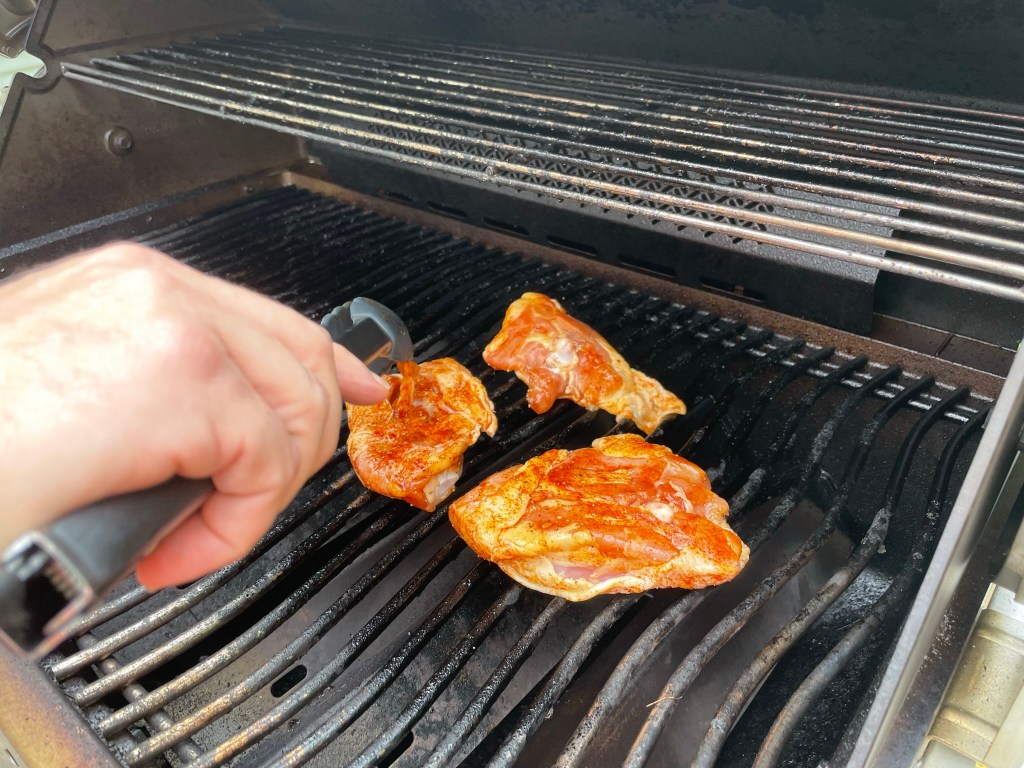
The rest of the process belonged to my husband, also known here as “Master of the Grill.” He has been relentless in learning the nuances of our new Napoleon gas grill with its numerous bells and whistles, including infrared searing zones, and some of those features come with a steep learning curve. For chicken thighs, Napoleon recommends a “reverse-sear” technique—Kenji would approve— and so Les preheated the grill to 350° F, with indirect heat on one side. The goal with this kind of cooking is to slow-cook the meat to achieve proper temperature before sealing the deal with crispy skin and glaze.
This reverse sear technique seemed backward from our usual way of grilling, but it paid off.
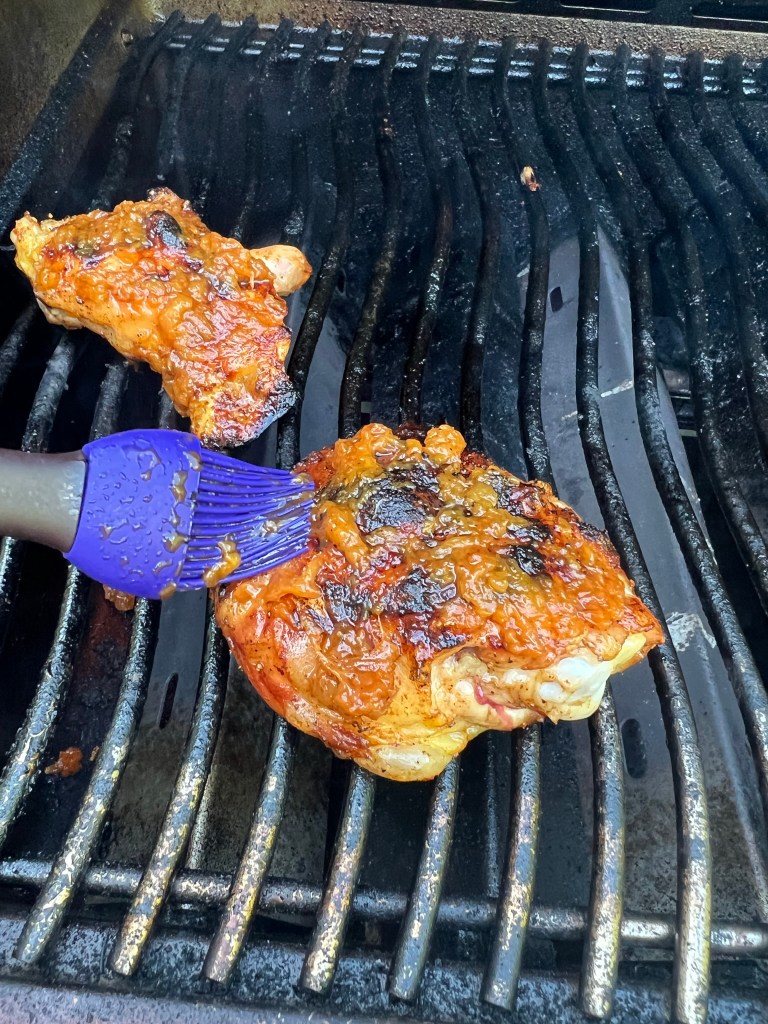
Les placed the thighs skin side-down on that indirect side and closed the grill cover, turning them only once during a whole 25 minutes, and checking the internal temperature periodically until it reached the recommended 145° F. Finally, the chicken was ready to move to the direct heat side of the grill, where it was licked by the flames for about four minutes, until the skin was crispy and the final meat temperature was 165° F. Only then did Les brush the peach-bourbon glaze onto the thighs for a final grilling, and gave them another quick sear to lock in the glaze.
If he had done the glazing too early, two things could have gone wrong— the glaze (with all its sugars) would probably have burned, and the wetness of it would have kept the skin from reaching and keeping its ideal, crispy texture. Patience, Grasshopper.
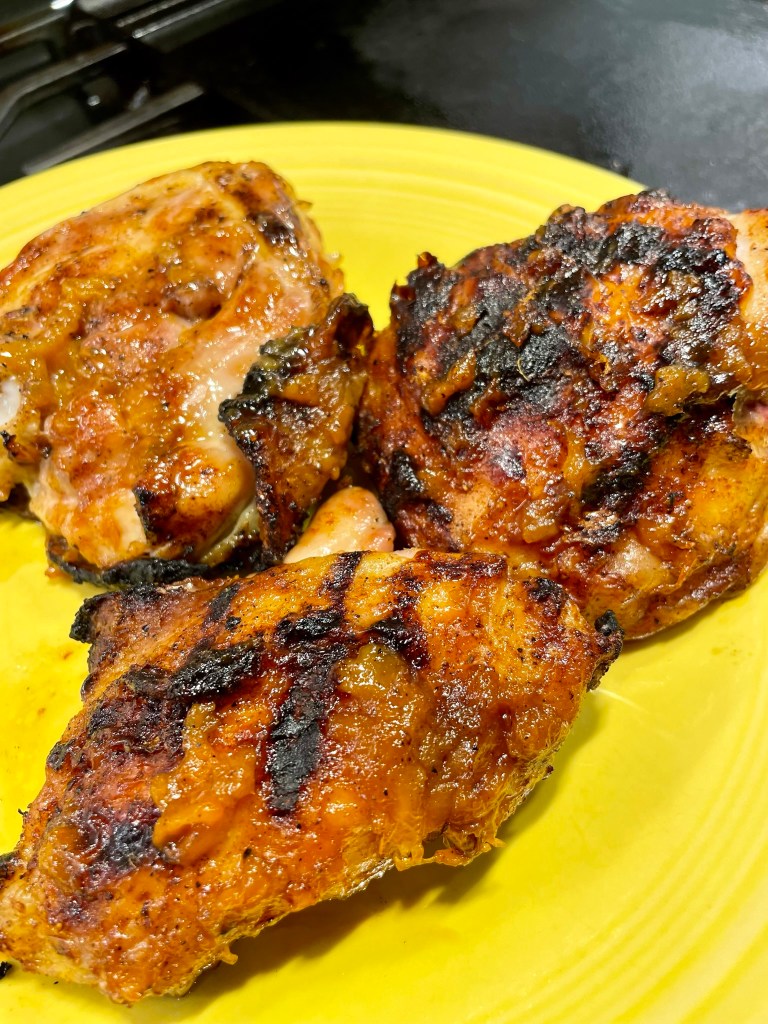
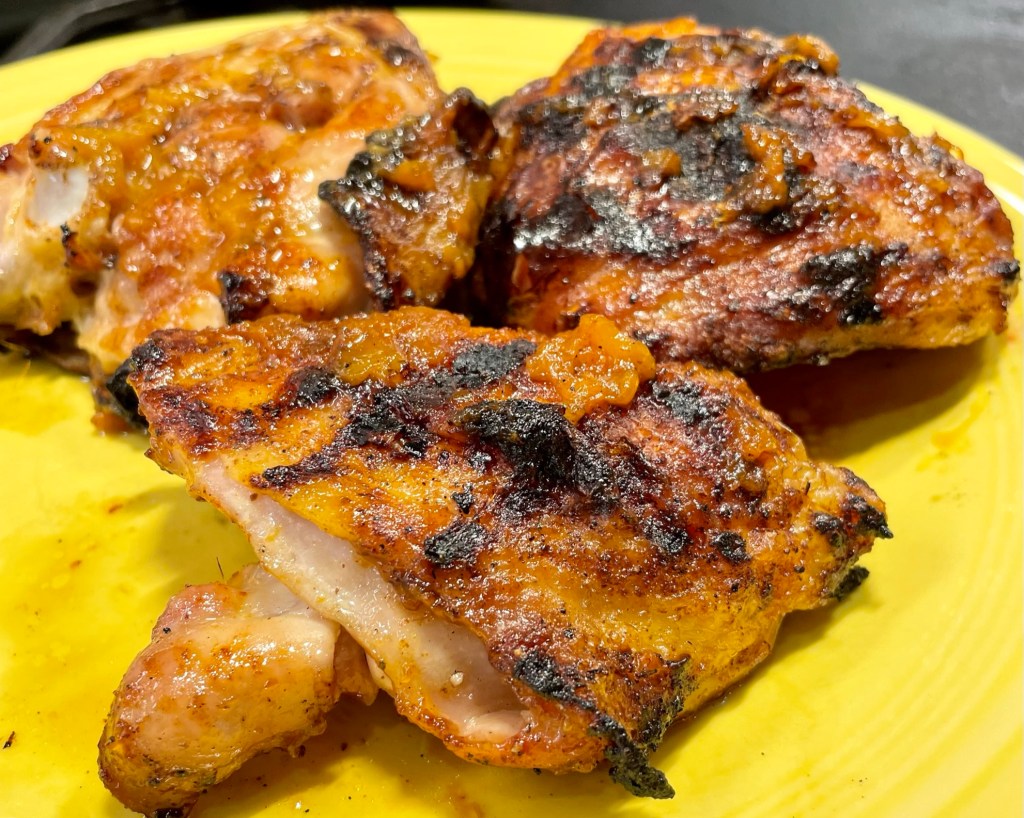
The Result
So there we have it: peach-bourbon inspiration + simple, complementary seasonings + unconventional technique + teamwork = one winner of a dish! The chicken thighs were juicy and tender inside, with a nice, crispy skin and a flavorful coating that combined one of summer’s greatest gifts and one of our favorite spirits.
A smoky spice is a wonderful complement to the sweetness of fresh, summer peaches in this flavorful grilled chicken recipe.
Ingredients
1 pound chicken thighs
1 tsp. smoked paprika (Spanish-style, not “hot” or Hungarian)
1 tsp. kosher salt
1/2 tsp. black pepper
3 tsp. brown sugar (use 2 for the rub and 1 in the glaze)
1 large peach, peeled and diced
1 1/2 oz. bourbon (I used smoked maple, and it was great!)
A splash of water, as needed, to cook down the peaches
This recipe relies on two specific techniques: dry-brining and indirect grilling. Both are outlined below, and they take longer than a conventional recipe, so plan ahead. I promise, the extra wait time is well worth it in the end! You’ll need to check the internal temperature of the chicken, so it’s beneficial to have a meat thermometer handy when you begin.
Directions
Do not rinse the chicken. Pat the pieces dry on all sides with paper towels. Arrange on a plate or in a glass dish.
Combine paprika, salt and pepper in a small bowl. Add two teaspoons of the brown sugar and mix until evenly blended. Sprinkle all over both sides of the chicken, reserving about one teaspoon of the spice mix for the glaze. Place the chicken, uncovered and skin side exposed, into the fridge and let it rest for several hours.
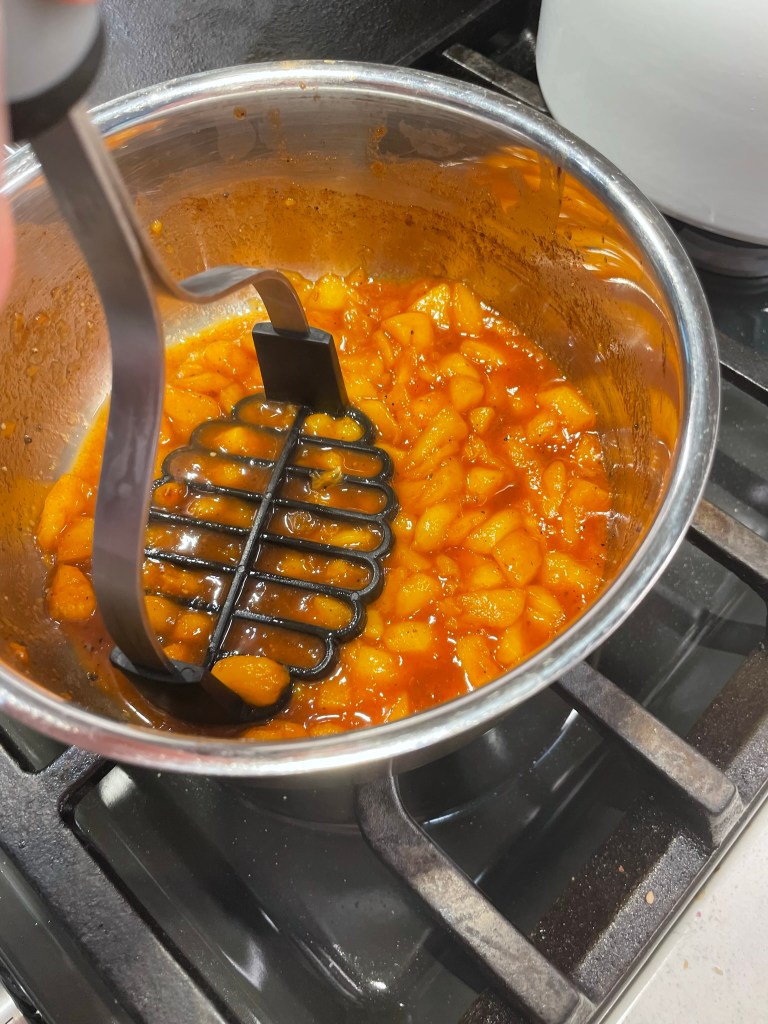
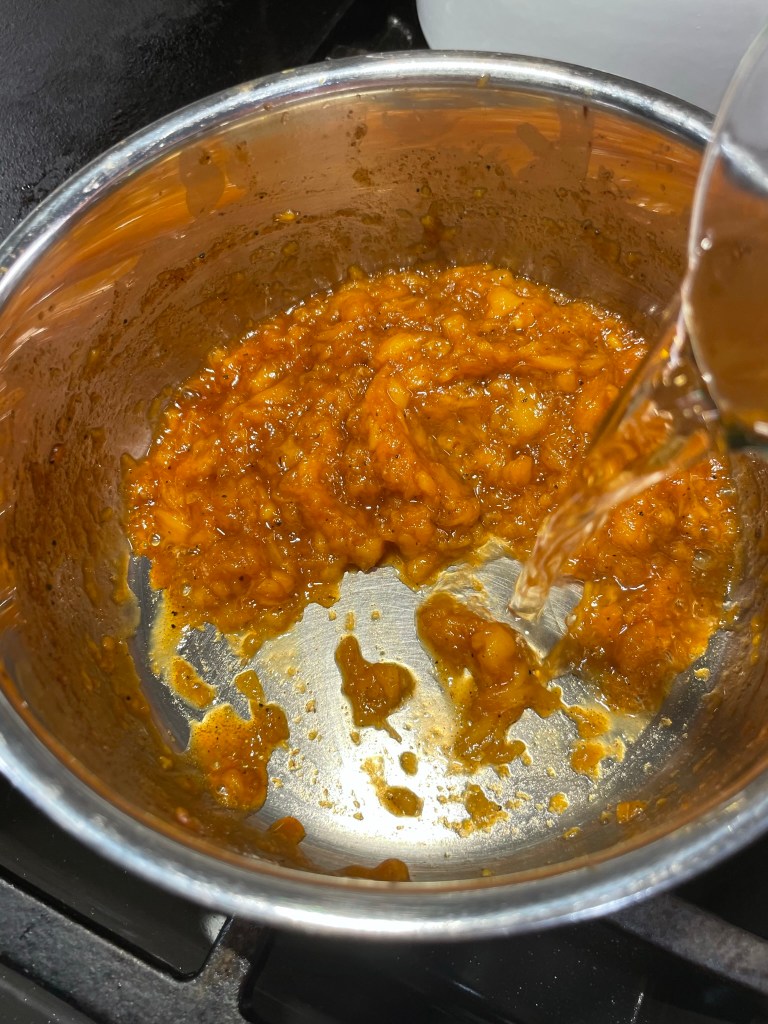
Add diced peaches to a small saucepan with remaining spice blend and another teaspoon of brown sugar. Pour in half of the bourbon and cook over medium low heat until peaches break down and mixture is slightly syrupy. If needed, add a splash or two of water to achieve this consistency.
After about 15 minutes, mash the peaches slightly into a chunky puree. When all the moisture has evaporated, stir in the remaining half shot of bourbon and remove from heat. If you make and chill this ahead, bring it to room temp before grilling.
Remove chicken from fridge about 30 minutes before grilling. Heat grill to 350° F, with burners or coals only one one side of the grill for indirect cooking.
Arrange chicken pieces, skin side-down, on indirect side of the grill. Cook for about 25 minutes, turning once or twice, until internal temperature is 145° F. Move chicken to direct heat side to finish cooking and crisp the skin.
When chicken internal temp reaches 165° F, brush on peach-bourbon glaze, and continue to cook on direct heat side briefly, until glaze has a “baked-on” appearance. Watch it closely so the sugars don’t burn.
Serve chicken immediately. When cooking by reverse-sear, post-cooking rest is not necessary.
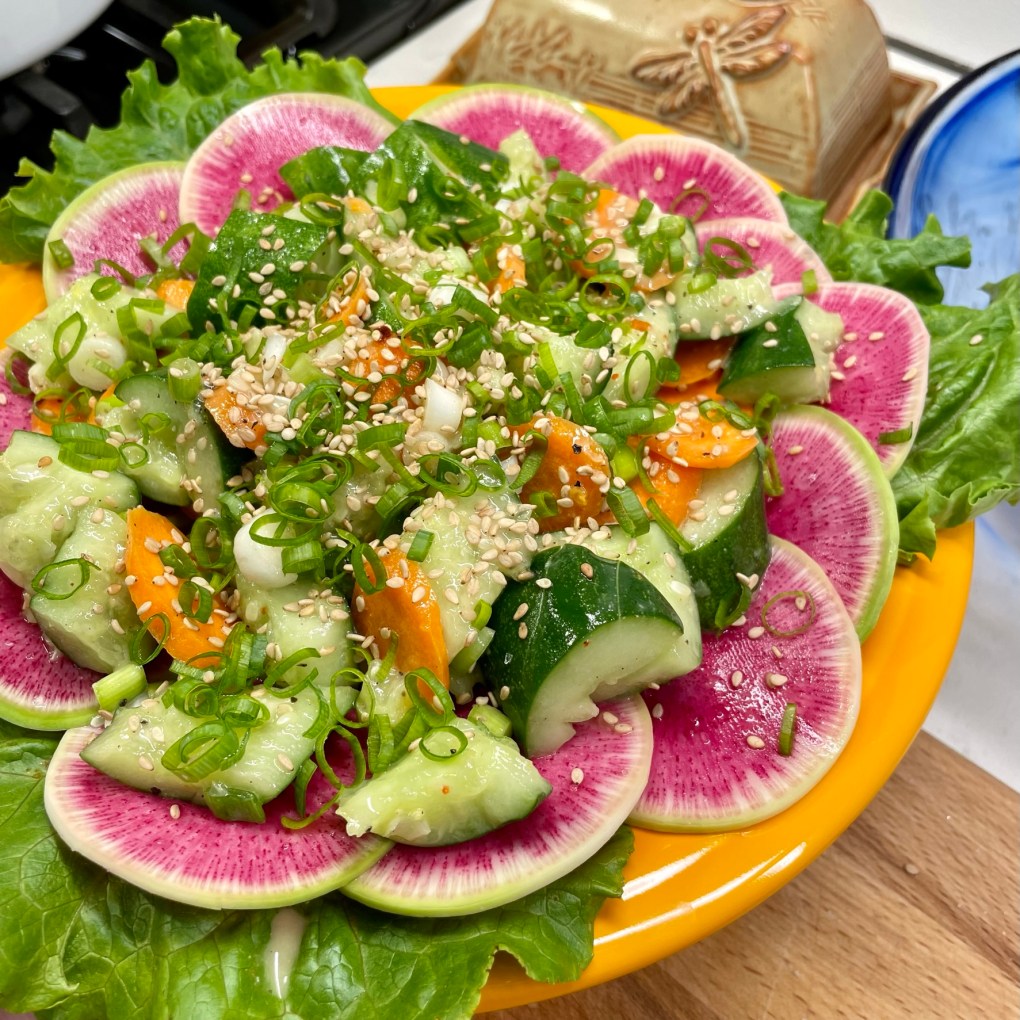
Over the past few months, I’ve seen numerous recipes for something called smashed cucumber salad and wondered, what’s so special about that? Sure, I love cucumbers and the way they freshen up a salad with an extra level of cool and crunch. But why not just, you know, slice them? Of course, that was before I tried one, and I may never be the same.
I enjoyed my first-ever smashed cucumber salad last month, when I joined my blog buddy, Dorothy, and her husband at one of their favorite restaurants, Starry Night Cafe in Ferrisburgh, Vermont. That salad had a rustic Italian flair with Calabrian chili flakes, anchovy, parmesan and ripe heirloom tomatoes. It was a masterful arrangement of fresh, seasonal food just doing its thing.
Every flavor complemented the next, but what struck me most about “smashed” cucumber salad was the texture— the open, craggy edges held onto the dressing, and the big chunks made it sooo crunchy and satisfying. And that was only the opener of our incredible meal.
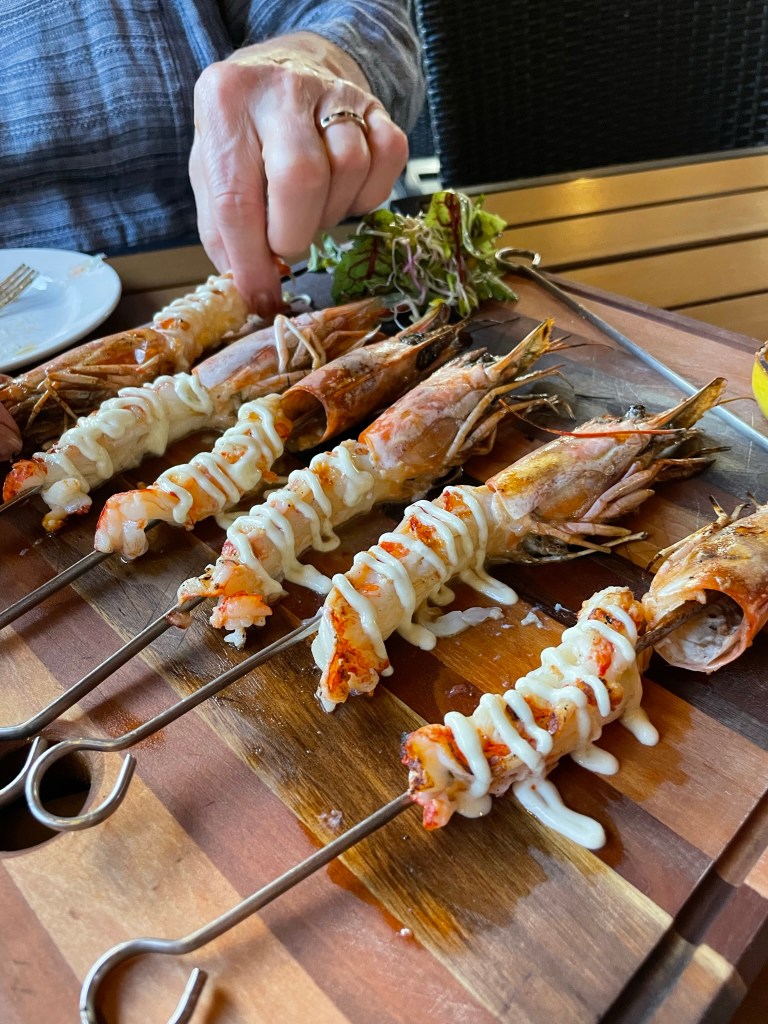
Starry Night Cafe demonstrated its commitment to partnering with local farmers and producers in every single thing brought to our table. From the specialty cocktail (don’t you worry, I’ll share it soon) to the coal-roasted oysters and grilled shrimp spiedini all the way to the stunning main course of wild halibut, I found myself wishing we lived closer!
Food really does taste better when it’s fresh and seasonal, grown without pesticides or chemical fertilizers and picked at peak ripeness. My entire visit through Vermont reignited my excitement for local food, and our Starry Night experience was the icing on the cake— er, salad. I started imagining what other flavors would play nice with the versatile cucumber, and I think I came up with a winner in this pretty plate.
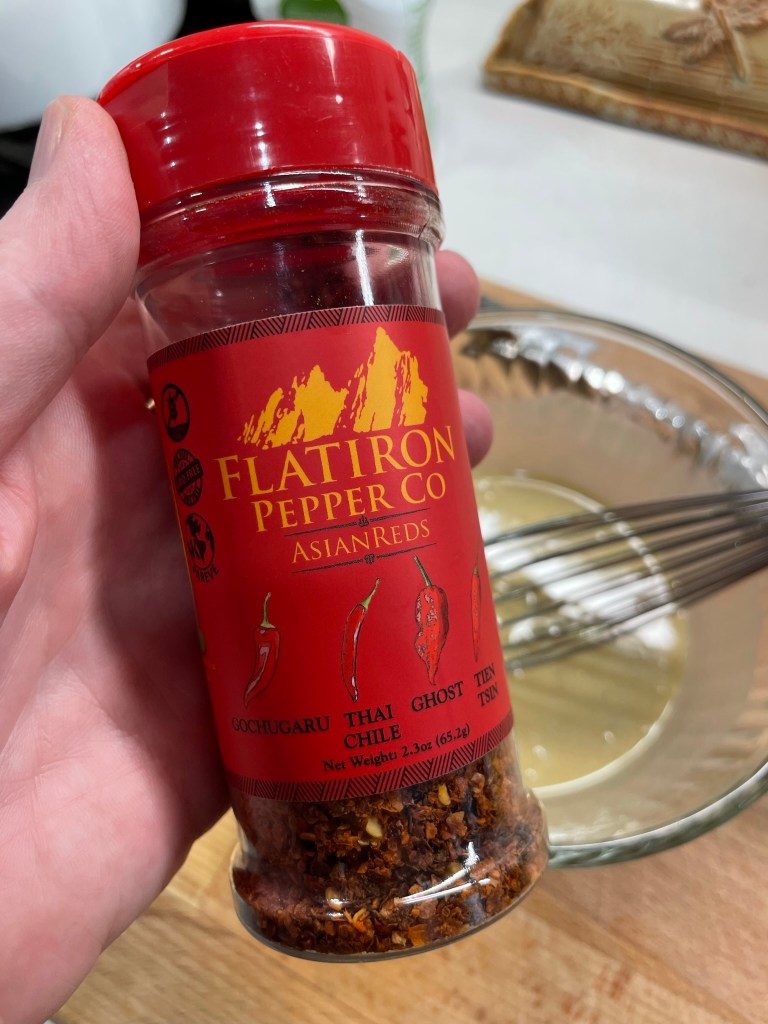
My smashed cucumber salad is not a remake of the Italian-ish salad we shared at Starry Night Cafe, but an Asian-inspired interpretation, built on some fun ingredients I found when Les and I visited our own farmers’ market here in Winston-Salem. I wanted a dressing that was savory, sweet and tangy. Creamy but without cream. And with a touch of heat to accent all of the above. So I poked around on the internet for a bit and found a lemon-miso dressing on a blog calledA Nourishing Plate.
The author’s recipe satisfied most of my wish list, and I followed it mostly as written, subbing tahini in place of cashew butter because I always have a jar of tahini in the fridge. I used slightly less sugar and oil, and for a pop of heat, I added a few shakes of Asian Reds hot chile flakes from Flatiron Pepper Company. This is different from generic “red pepper flake,” as the chiles are specific to various parts of Asia. The dressing is so good, and easily adjusted for sweet and heat. I love the contrast it provided this cooling cucumber salad, and I can imagine it would also be good as a roast vegetable topper. The dressing thickens up a bit in the fridge, so I’d recommend making it ahead.
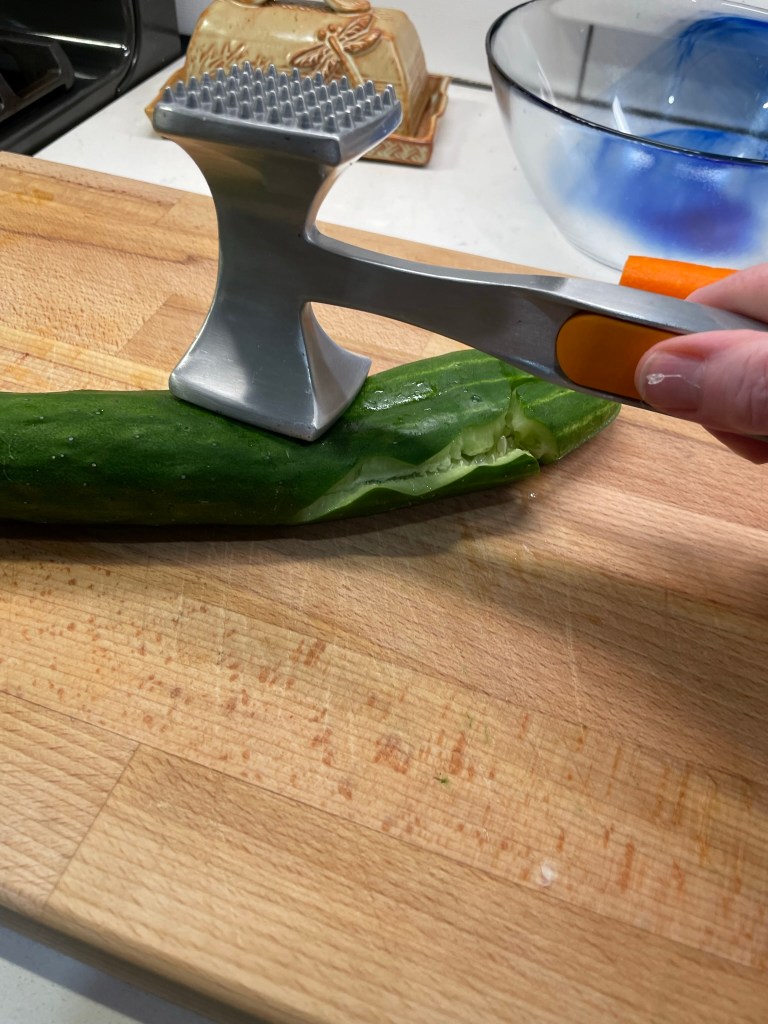
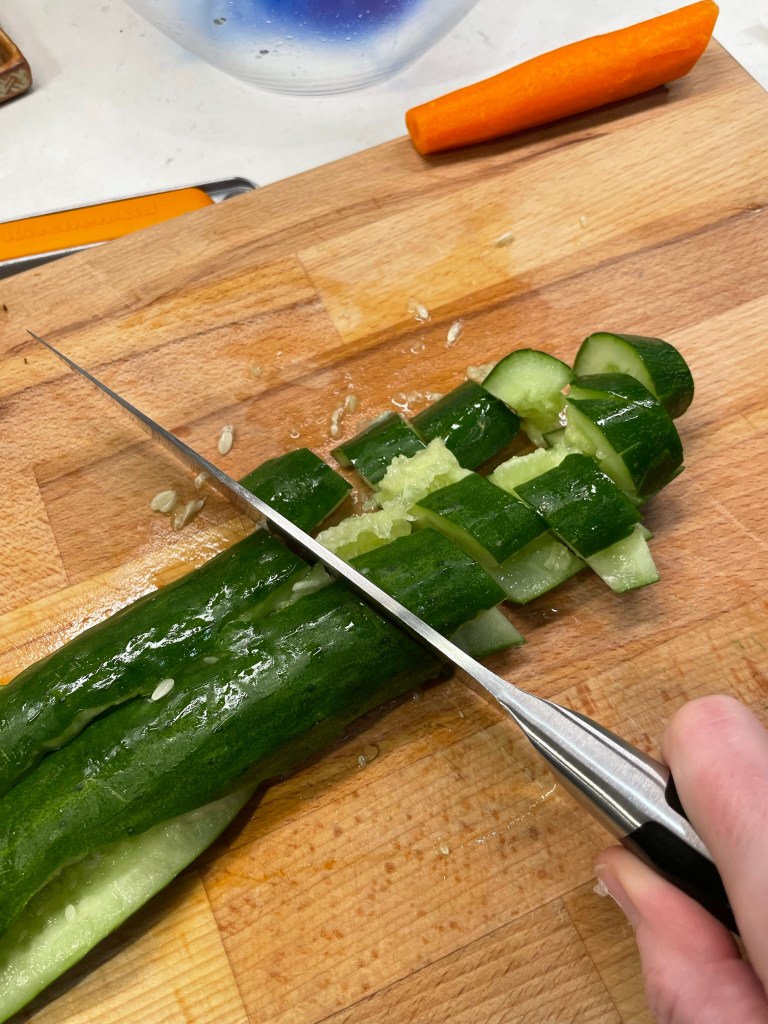
English cucumber is ideal for this type of salad, for its smaller seeds and thinner skin. My grocery stores all sell this type of cucumber, but usually they have a waxy coating to keep them fresh during transport from God-knows-where (yet another reason to choose local). You can use anything you have on hand for smashing it— the flat side of a chef’s knife, bottom of a skillet, whatever— but don’t use a heavy hand unless you want cucumber juice all over yourself and the kitchen. Just enough to crack it open is good, and then use a knife to cut the smashed cucumber into generous chunks. Season it, and toss with the other ingredients. Could it be more simple?
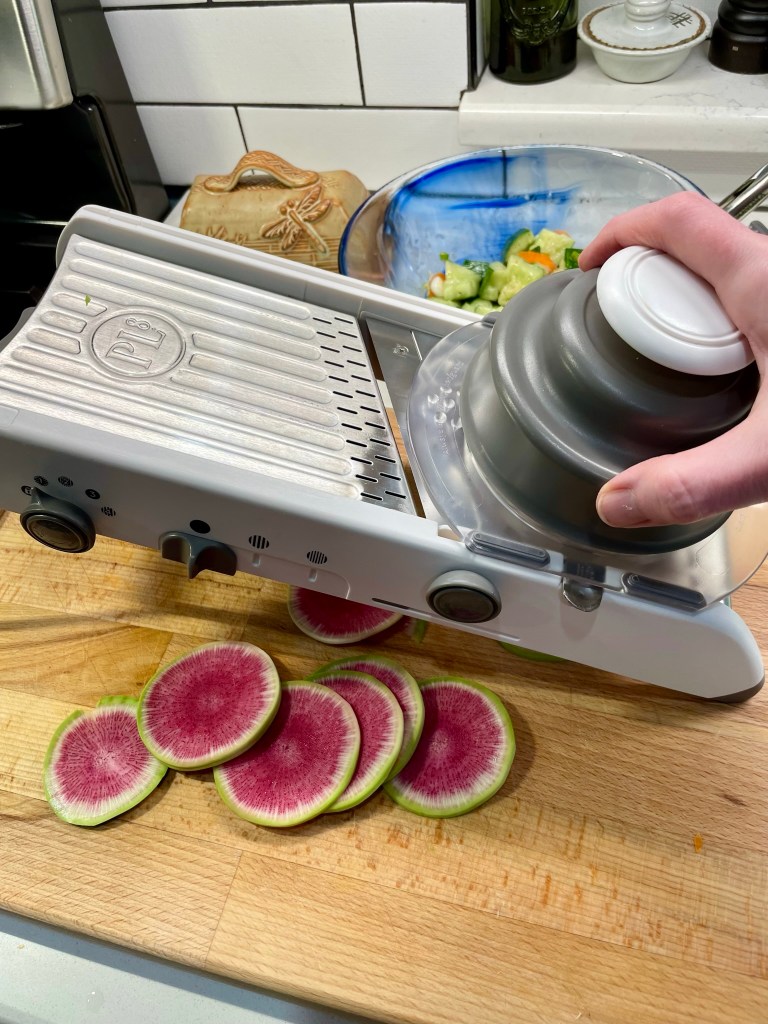
The most brilliant element of this dish— and I mean brilliant in the sense of “wow, look at that shocking pink color!”— is the watermelon radish. That neon pink color seems to be everywhere right now, thanks to the Barbie movie, and though I’ve seen these radishes in food magazines and cooking shows, I have never run across one in the supermarket.
Just gorgeous!
Turns out the farmers’ market is also the place to score Barbie-colored vegetables, and I couldn’t resist slicing one up to complement my smashed cucumber salad. It made a lovely border, don’t you think? And it carries the same pungent, spicy flavor as a typical radish— just larger and way prettier. I’m still deciding what to do with the other watermelon radish (stay tuned).
I love trying new foods! What ingredients are you curious to try, and will you scout them out this weekend at the farmers’ market in your neck of the woods? I hope so!
An Asian-inspired dressing puts a flavorful jacket on this super-refreshing and oh-so-fresh cucumber salad. Don't skip the smashing part, as it contributes to the amazing texture of this new summer favorite.
Ingredients
1 large organic English cucumber, cleaned and dried
1 large carrot, peeled and sliced thin
3 scallions, washed and sliced thin (green parts reserved for garnish)
1 medium watermelon radish, peeled and sliced thin
Spicy lemon-miso dressing (see below)
Lettuce leaves for plating, optional
A few shakes toasted sesame seeds (for garnish)
Directions
Prepare the spicy lemon-miso dressing and refrigerate until you’re ready to make and serve the salad. If using the red pepper flake, remember that the flavor will become more intense after the flakes rehydrate.
Lightly smash the cucumber, just enough to split it open. Cut into chunks and add them to a large bowl with the carrots and the white parts of the scallions. Sprinkle with kosher salt and gently toss to distribute the seasoning.
Spoon about half of the dressing over the salad and toss to coat.
Arrange lettuce leaves and watermelon radish on a serving platter. Spoon the smashed cucumber salad onto the plate and garnish with reserved scallion tops and sesame seeds.
Notes: Make the lemon-miso dressing ahead; the flavors mingle nicely in the refrigerator, and the red pepper flakes will rehydrate for maximum punch. You will only need about half of the dressing recipe for this smashed cucumber salad. Save the rest for another salad or to drizzle on grilled vegetables.
Ingredients
2 Tablespoons white miso paste
1 Tablespoon rice vinegar
1 Tablespoon tahini paste
2 teaspoons organic cane sugar
Juice and zest of one large lemon
Kosher salt and black pepper
A few shakes of red pepper flake, optional but wow!
3 Tablespoons extra virgin olive oil
Directions
In a small bowl, combine miso, vinegar, tahini, sugar and lemon juice plus zest. Season to taste with salt and pepper. Add a few shakes of red pepper flake if you want a bit of heat. I like Flatiron Pepper Company’s Asian Reds here.
Slowly drizzle oil into the dressing, whisking constantly to create an emulsion. Adjust seasoning to taste and refrigerate. Dressing will thicken slightly in the fridge.
It’s interesting to me that some foods have their own variations in different parts of the country. Take barbecue, for example. Depending on where you go— Texas, Kansas City or the Carolinas— you might be presented with dry-rubbed beef brisket, saucy ribs or burnt ends, or slow-braised, pork shoulder with vinegar sauce. And for sure, natives of each area will proclaim theirs to be the “true” barbecue, the best or most authentic. It is, of course, a matter of opinion and upbringing.
The same can be said for peach cobbler. Here in the South, most cobblers I’ve had at church potlucks, diners or restaurants resemble another popular dessert here, the dump cake. Everything gets slopped into a pan, usually with the batter on the bottom and the fruit on top, and somehow during the baking process, the dough finds its way to rise up through the peaches. It’s tasty, but a bit soupy and mostly a mushy texture— definitely not the peach cobbler of my childhood, and we all know that comfort food is what you remember from those early days. So I’m about to say something that irritates Southerners more than anything else, ever:
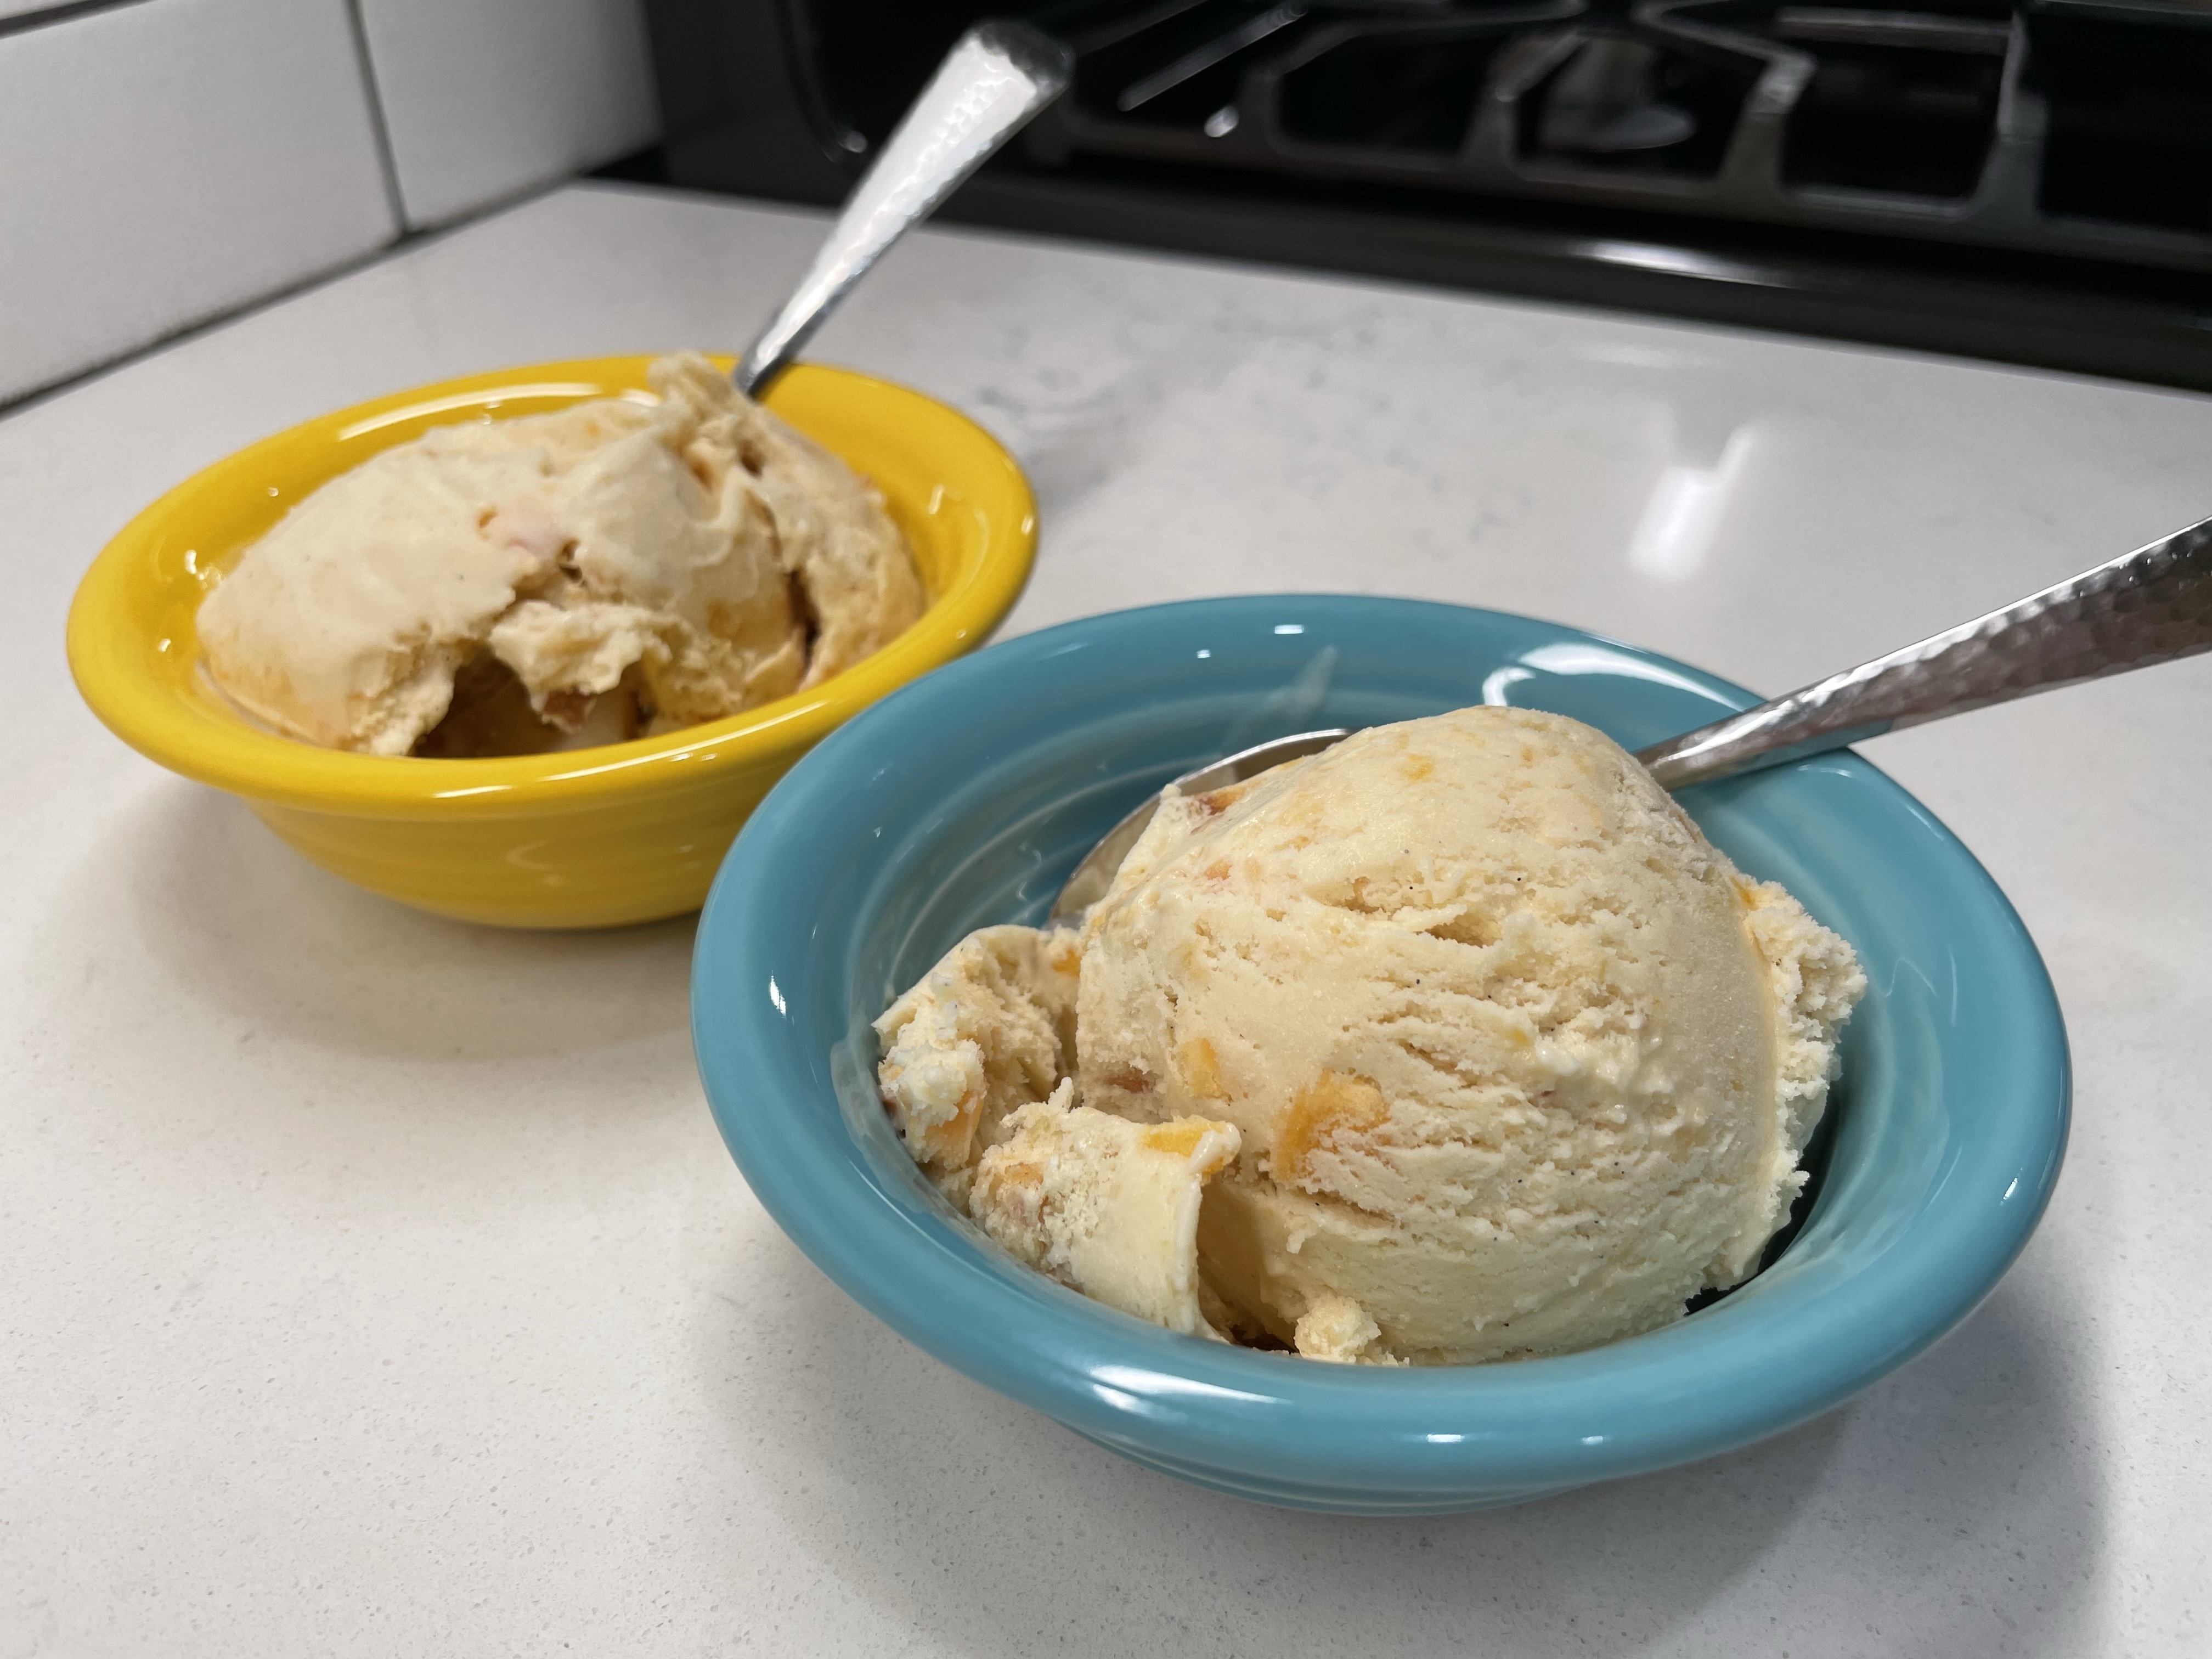
Sweet juicy peaches, tossed with sugar, corn starch and a touch of cinnamon, cooked until tender and saucy under a crown of tender biscuits that have just a touch of crunch on the edges. Crystals of sugar on top that add a little extra something with each bite. Served warm with a scoop of vanilla ice cream. That, to me, is a real deal peach cobbler. As the sun sets on National Ice Cream month this year, I’ve transformed that favorite summer dessert into a single, glorious scoop of peach cobbler ice cream.
This recipe is my own, developed out of my experience with several other past recipes, with and without peaches. To explain how I got here, it makes sense to share what I’ve learned from past efforts and mistakes.
What’s the best way to make ice cream with fruit?
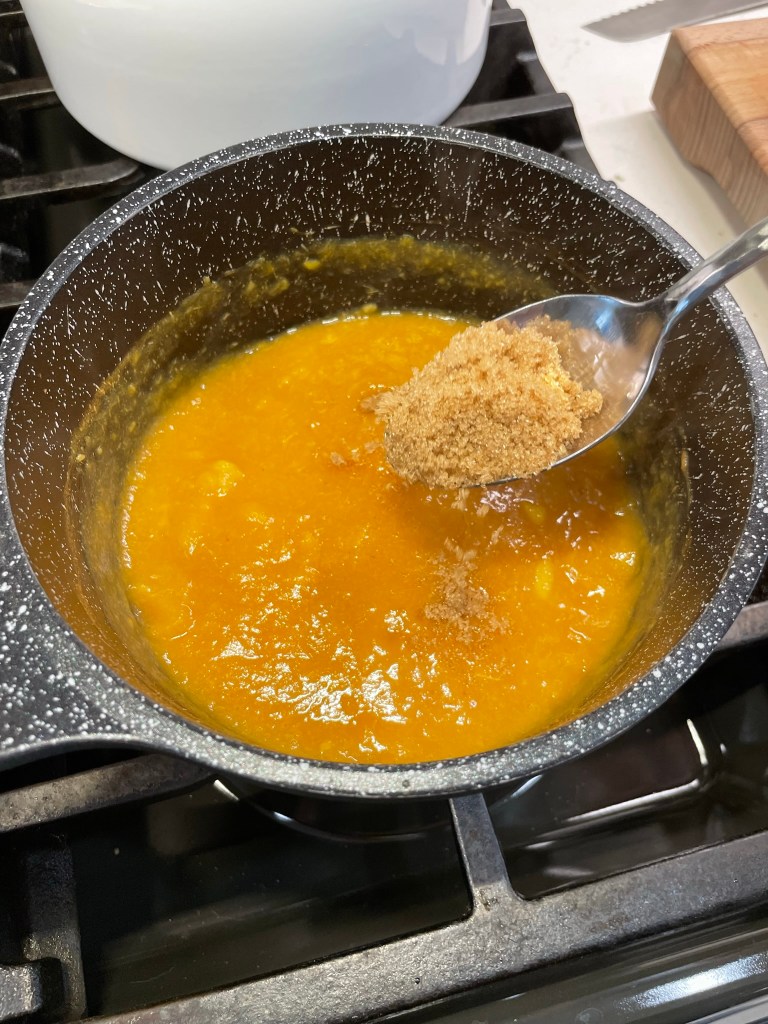
Too many fresh fruit bits can make the finished ice cream feel too icy. I learned this especially when I made a strawberry-mascarpone ice cream a few years ago. Fruit, especially fresh fruit, contains a great deal of moisture, and when you freeze it, ice crystals form inside, making for an unpleasant bite that hurts my teeth. One day, I will re-work that recipe to improve the texture. But to counter the icy effect in this peach cobbler ice cream, I cooked the peaches, borrowing a technique I learned recently when I made that heavenly, boozy strawberry daiquiri cake. Cooked fruit loses volume as the moisture evaporates, but all the flavor remains, so I peeled and pureed a couple of peaches, then cooked them down into a sticky, concentrated peach paste. I still embellished the ice cream with a few bits of fresh peach for pops of color and flavor, but the ice cream gets most of its peachy keen flavor from the puree.
A touch of brown sugar in the puree made this extra delicious!
How do you incorporate other foods into an ice cream?
I’ve had to get a little creative with some ingredients, because adding the ingredient directly would have resulted in a weird texture. For my s’mores ice cream, I wanted every element of a s’more— the melty chocolate, toasty marshmallow, the sweet graham cracker— but can you imagine what would happen if I tried to swirl actual melted chocolate into an ice cream base? Yep, a big mess. Same with toasted marshmallows, which just get hard and sticky in the refrigerator, let alone the freezer. My solution for that ice cream was to use a dark chocolate syrup to play the role of the Hershey square, and a marshmallow fluff-cream cheese mixture to stand in for the toasted marshmallow element. It was delicious, but I’ve been hankering for a re-do on that one as well, so stay tuned! For this peach cobbler ice cream, I wanted the “biscuit” texture that I loved in my up-north cobblers, but a plain old biscuit would have been dry and crumbly. That’s when I remembered one of my baking class experiences at King Arthur earlier this month— we made scones!
Thanks to Michelle, my baking partner, for taking this picture! It was such a hectic day, I forgot! 🙂
What’s the difference between a biscuit and a scone?
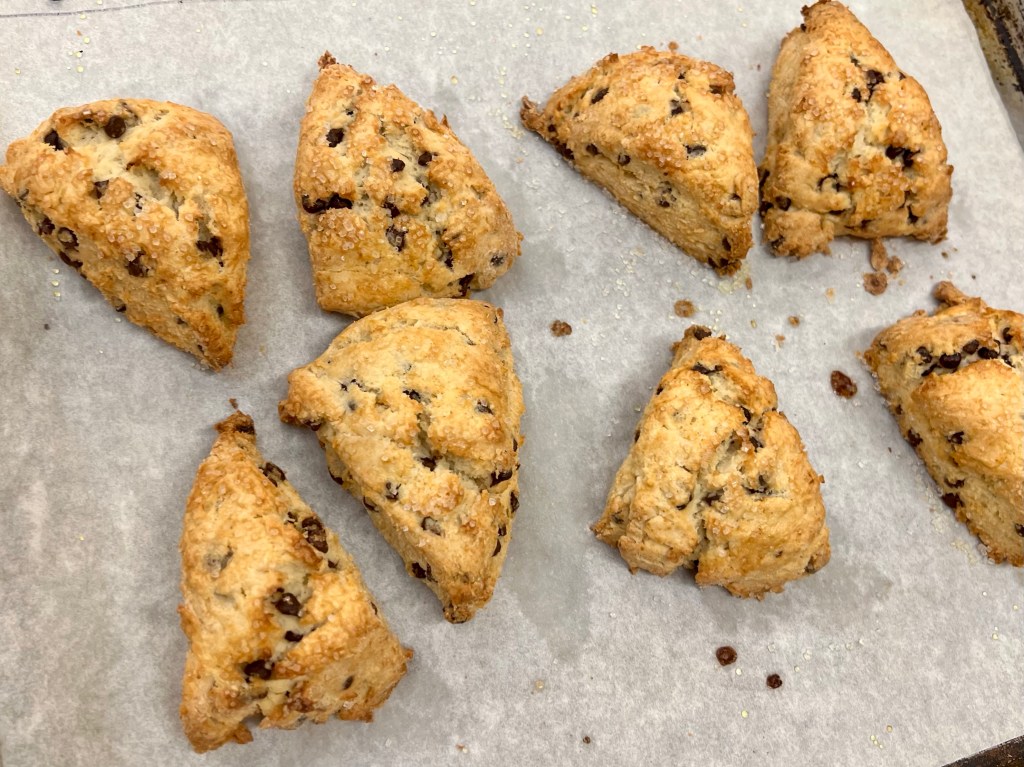
Scones are similar to biscuits in that they use a chemical leavening— baking powder, in this instance— but different because the dough usually incorporates more sweetness and an egg for richness and texture. At the tail end of my Bread: Principles & Practice class, we whipped up a batch of scones as we waited for another bread recipe to do its thing. The scones were delightfully tender, like a biscuit, but sweeter, softer and almost cookie-like. That, I decided, would be a perfect solution for the “cobbler” element of my ice cream, and would you believe it? King Arthur Baking has a recipe for tender peach scones! I whipped up half a batch (exactly as written, if you can imagine), and crumbled two of them to layer in my ice cream.
These drop scones were deliciously peachy, with a tender, almost spongy texture.
I hope I always find something new to learn in the kitchen. This is my blue ribbon-hopeful peach cobbler ice cream, my final bow for this year’s National Ice Cream Month. Enjoy!
A cooked puree of peaches adds a concentrated fruit flavor to the base of this ice cream, and tender peach scones provide the 'cobbler' element.
Ingredients
3 fresh, ripe peaches (you’ll puree two and dice the third)
2 teaspoons fresh lemon juice (divided between peaches above)
1 Tbsp. light brown sugar
14 oz. sweetened condensed milk (regular or fat free)
1 cup whole milk
1 cup heavy cream
1 Tablespoon vanilla bean paste
1 Tablespoon vodka (optional, added at end for improved scooping texture)
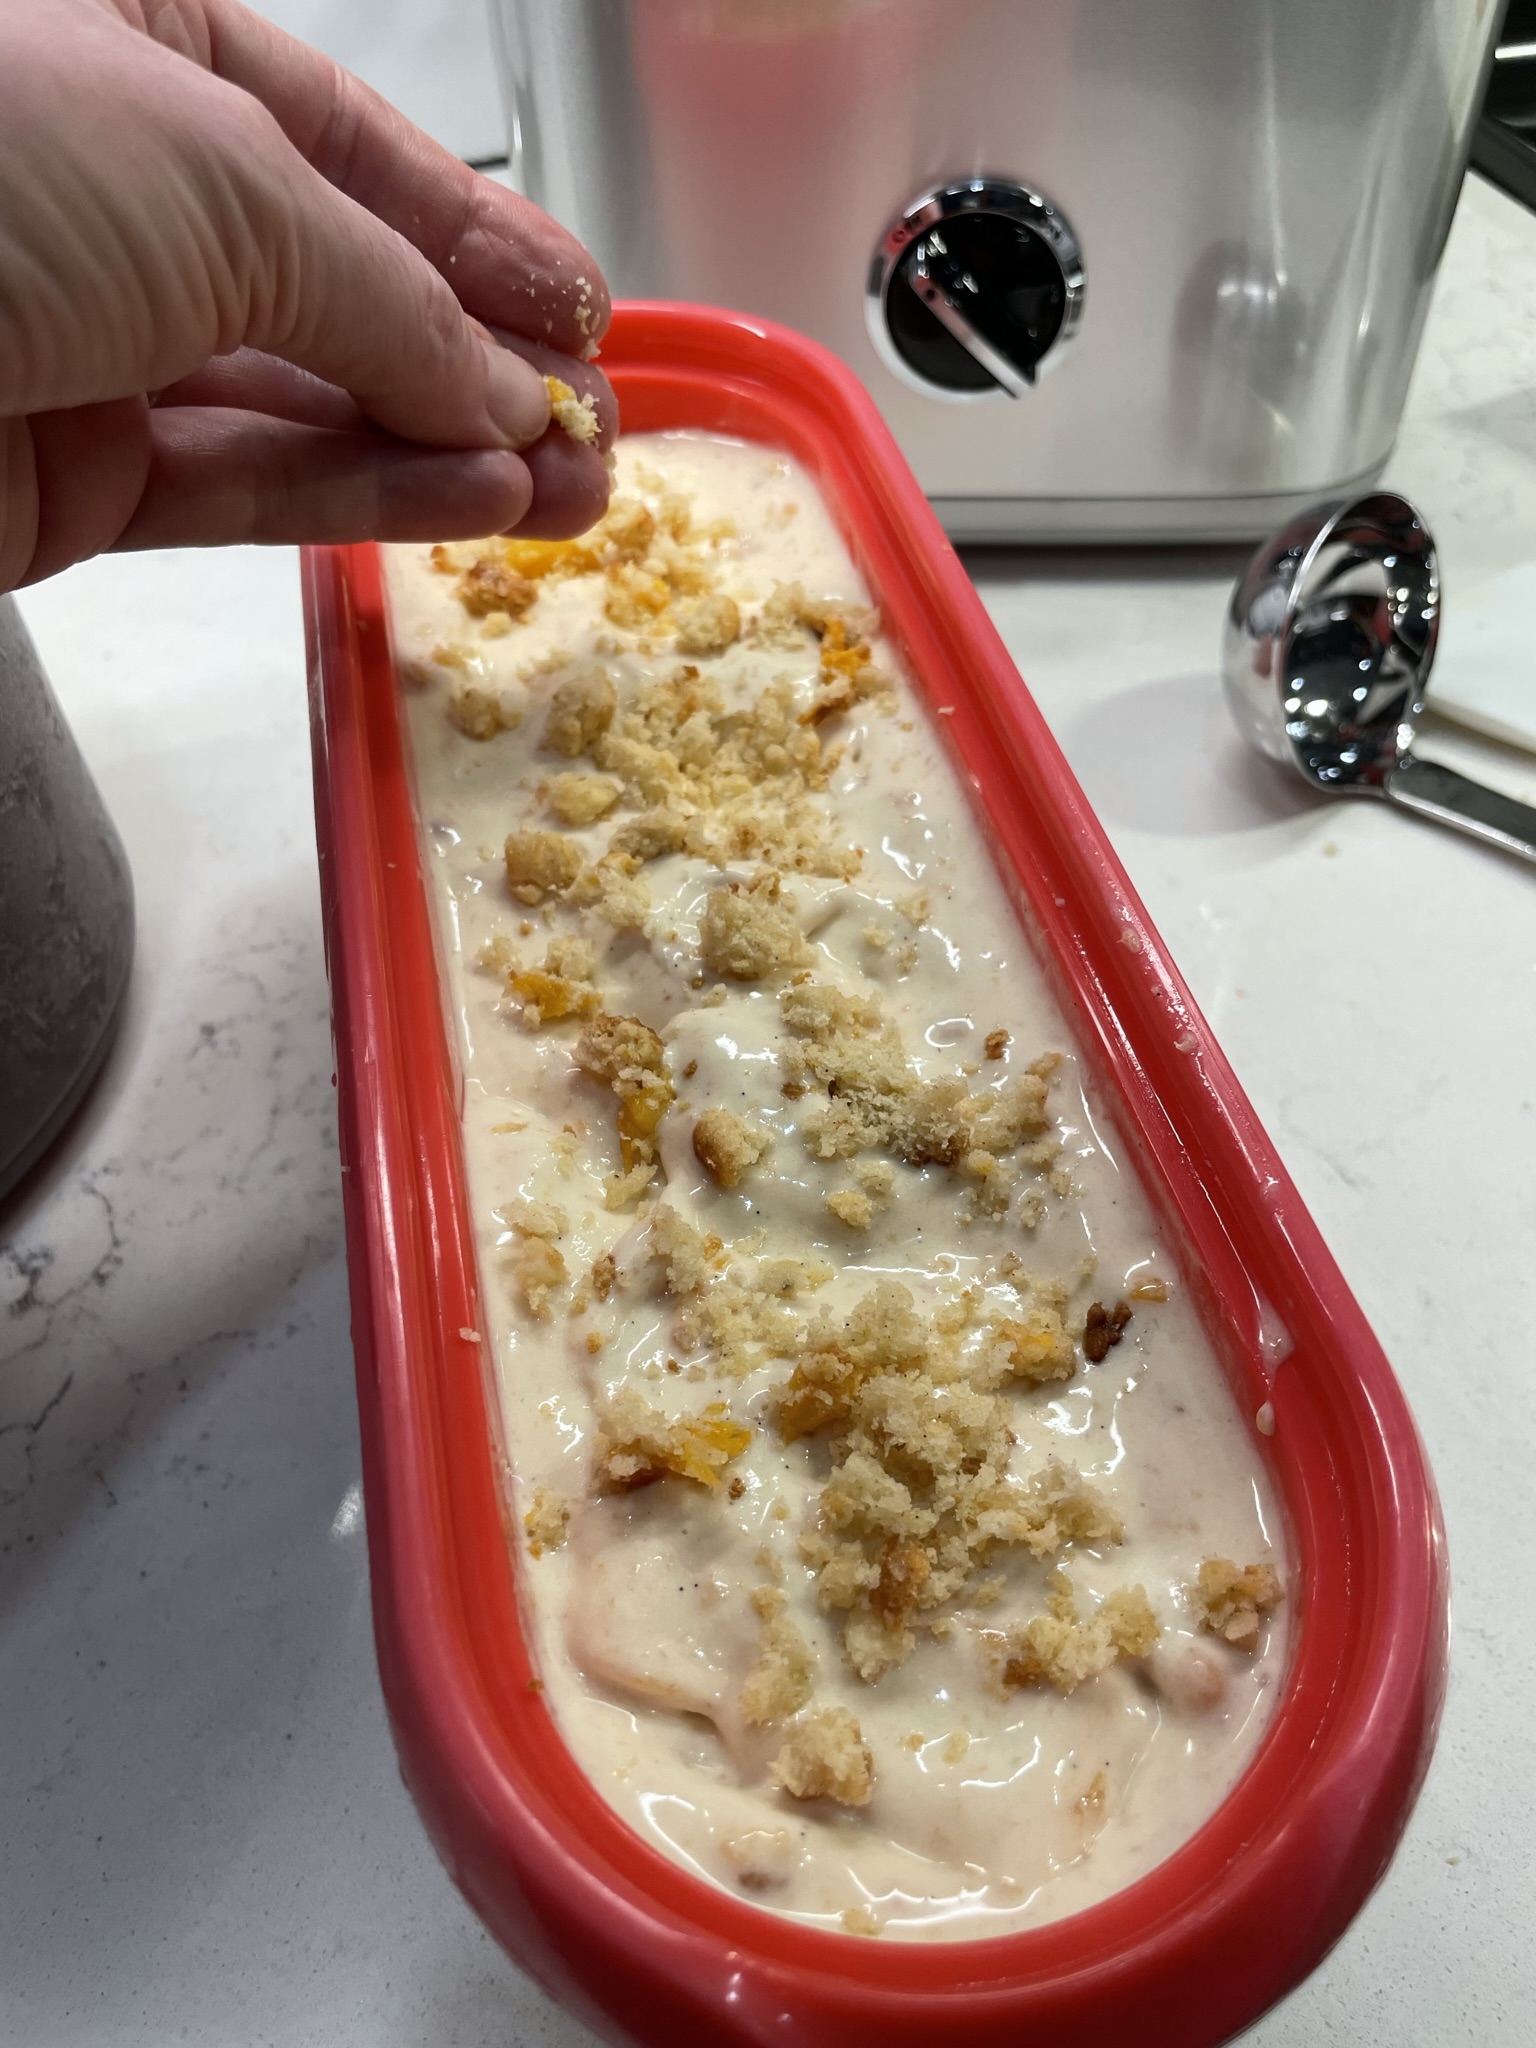
1 cup crumbled peach scones (recipe linked in story), or substitute as noted below.
To mimic the texture and sweetness of cobbler batter, I baked a half batch of tender peach scones, found on King Arthur Baking website, and crumbled two of them to layer in this ice cream. Other great options would be buttery sweet drop biscuits, a yellow cupcake or even a few snickerdoodle cookies! If you want to skip the cobbler portion, the peach ice cream on its own will still be sweet and summery.
Directions
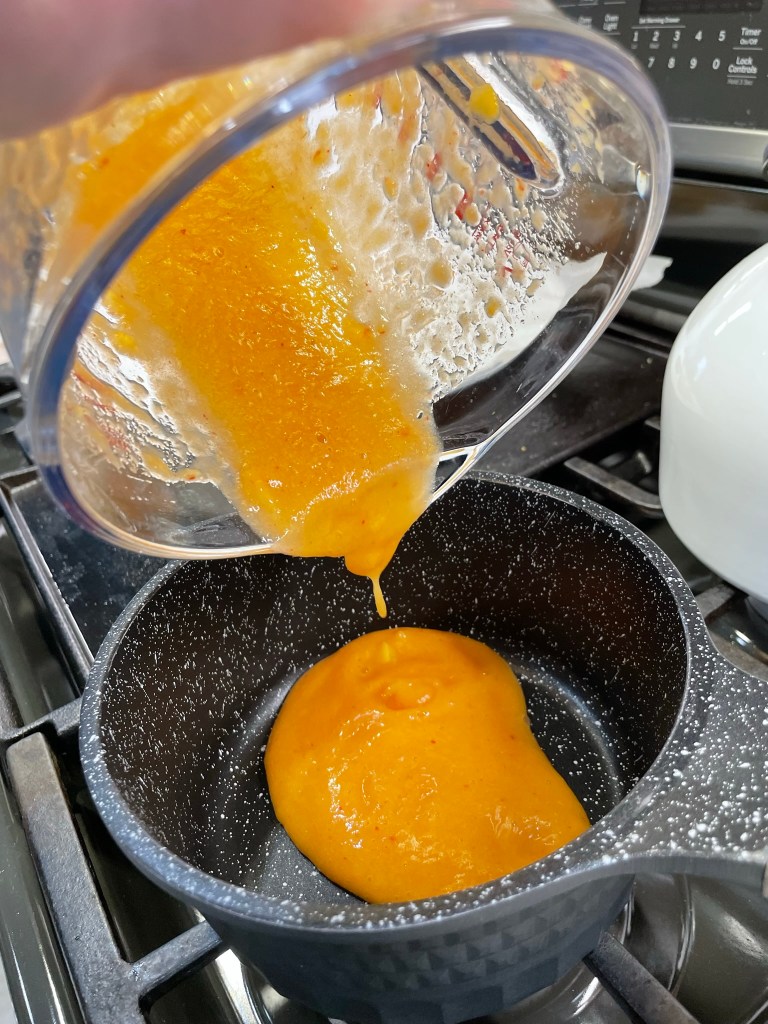
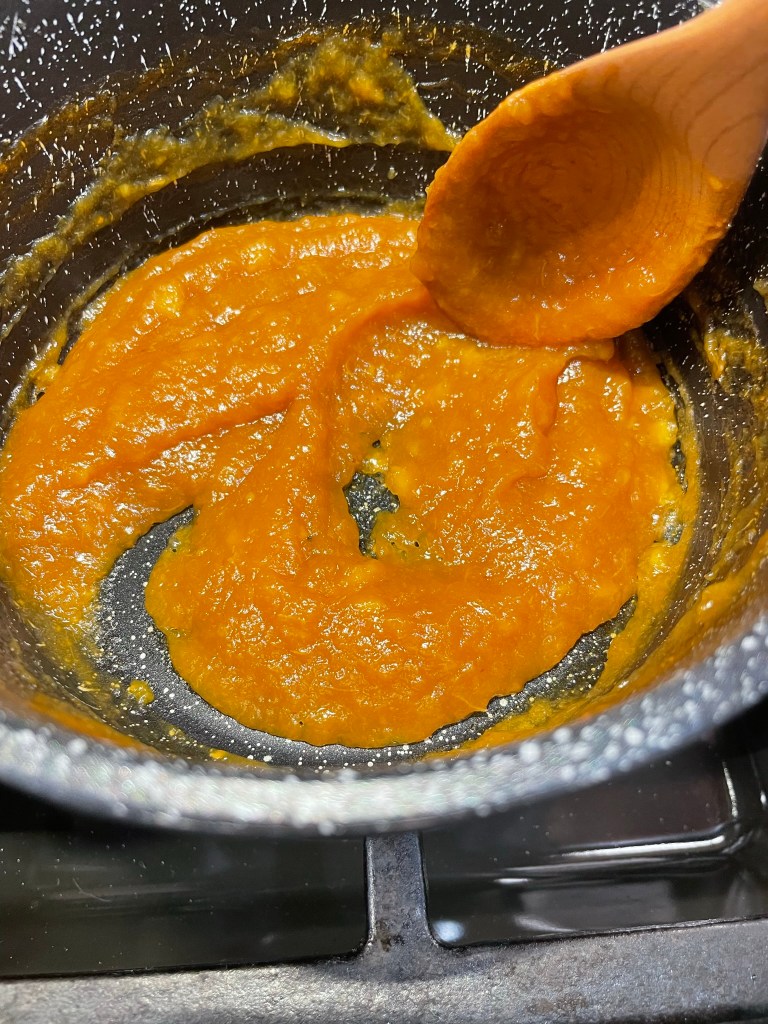
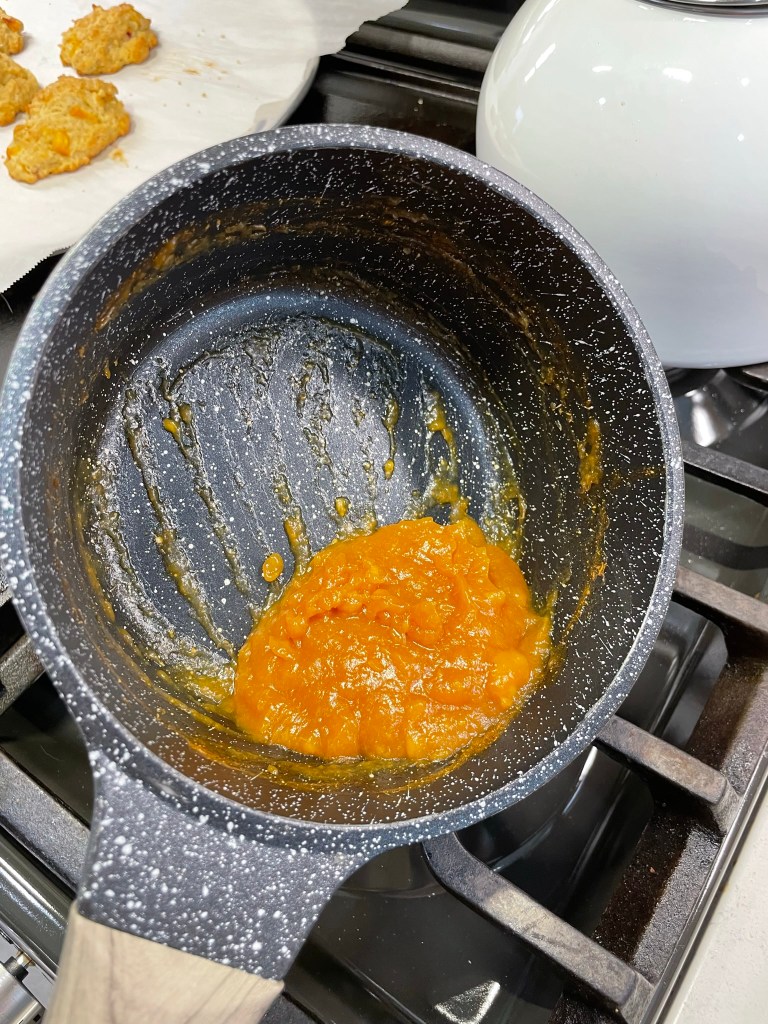
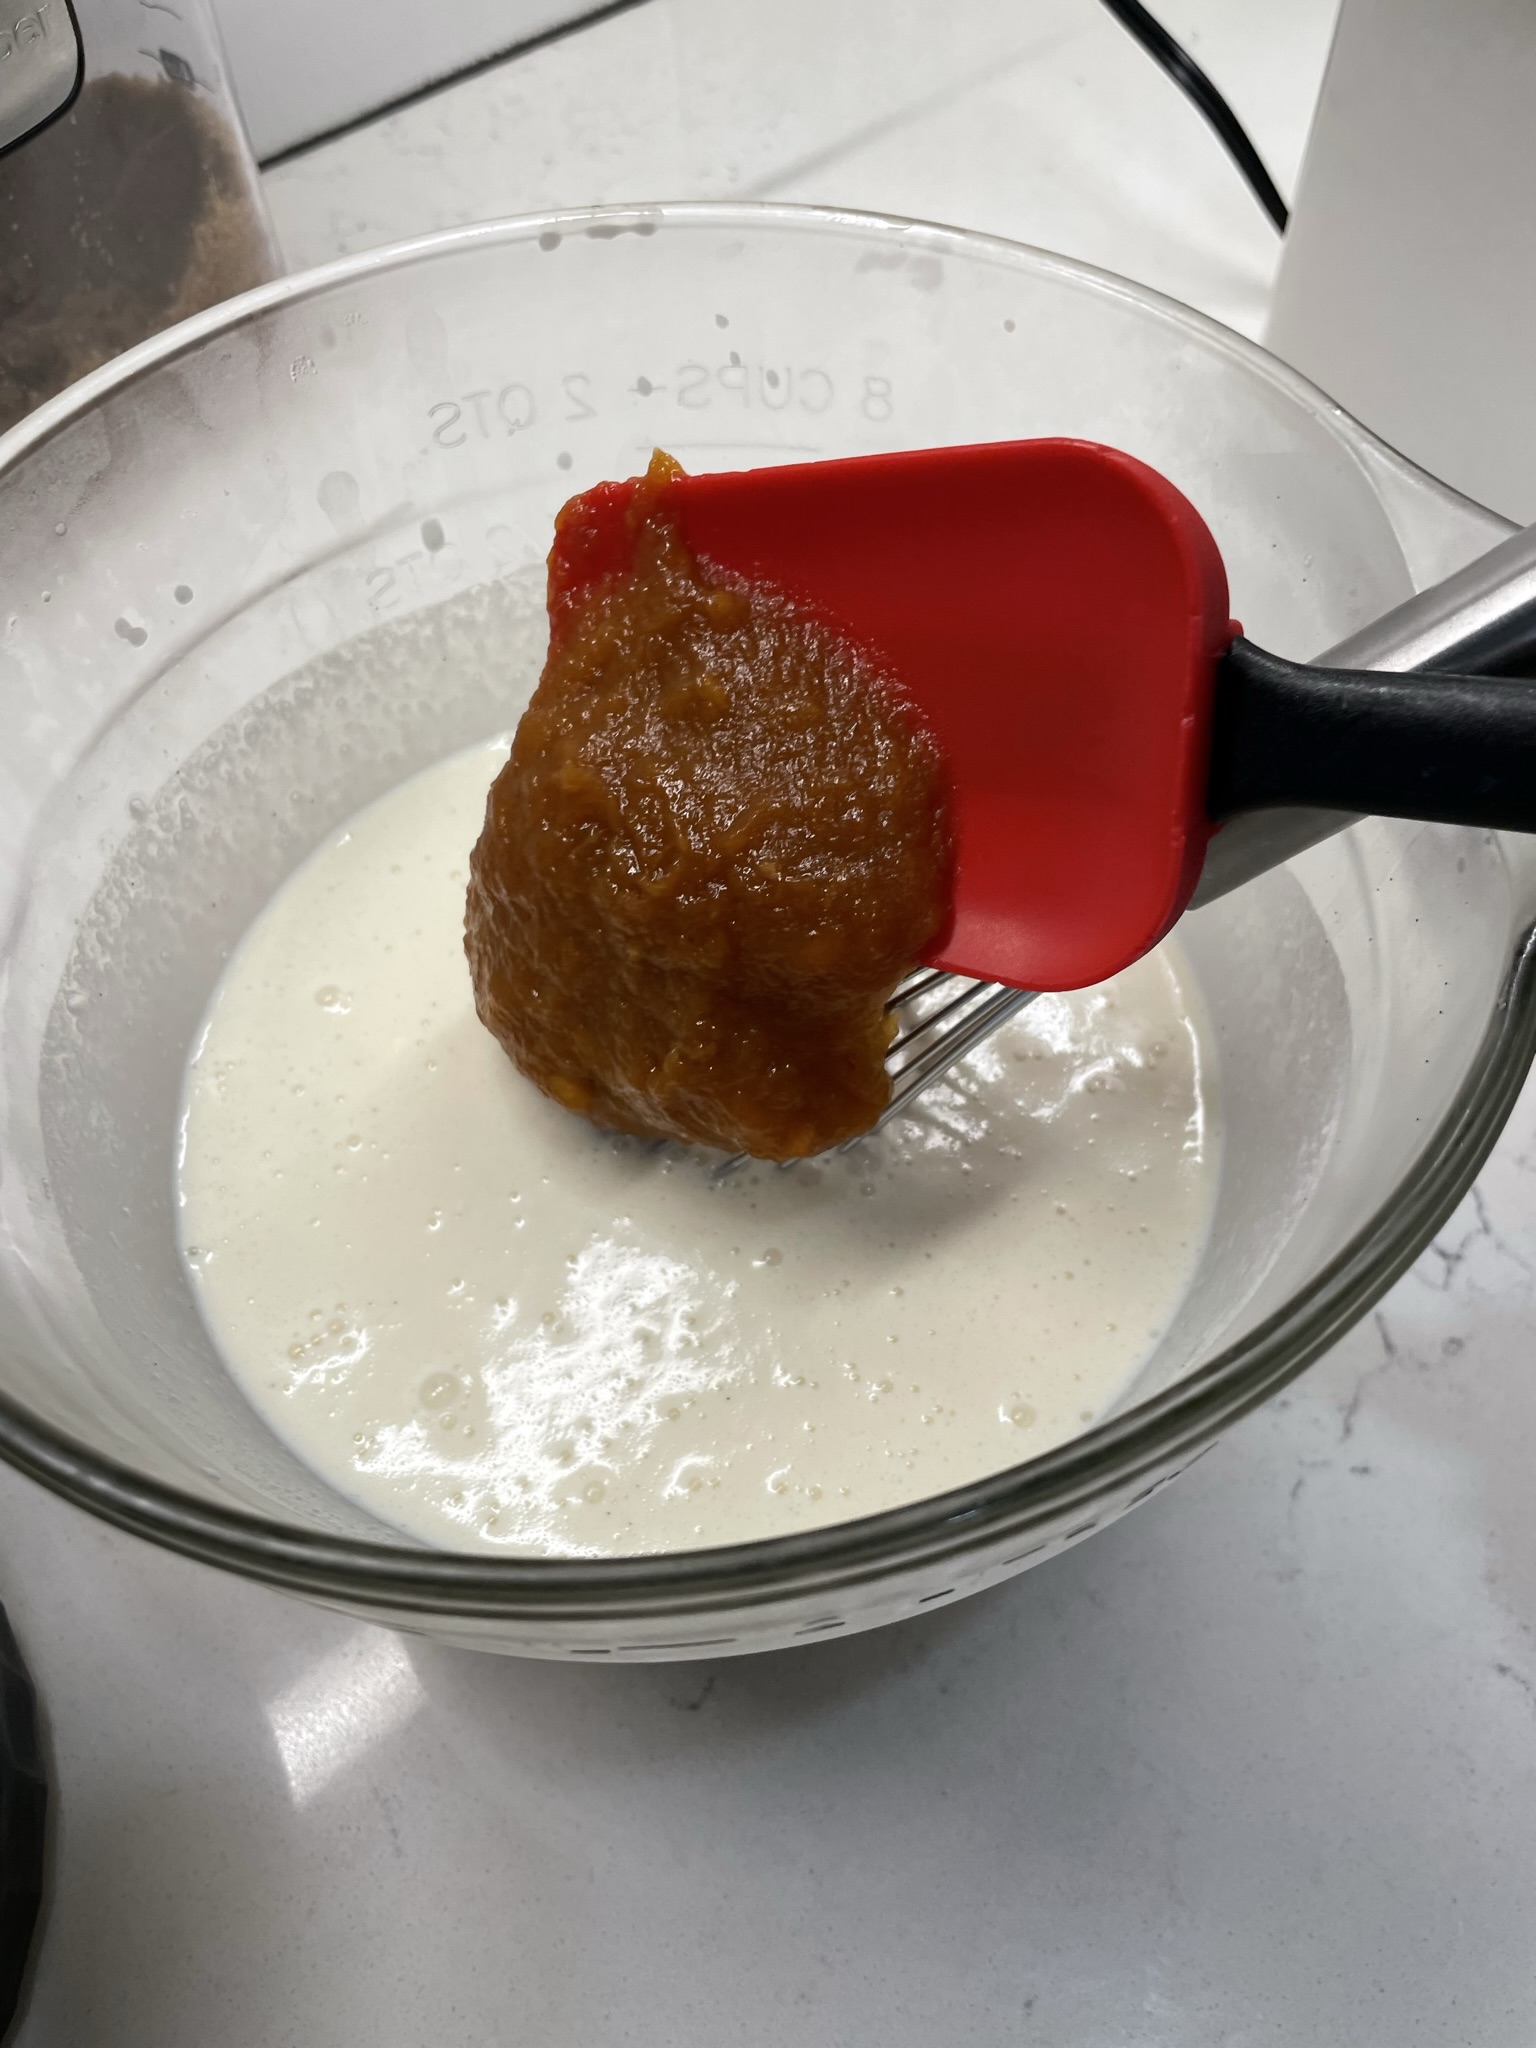
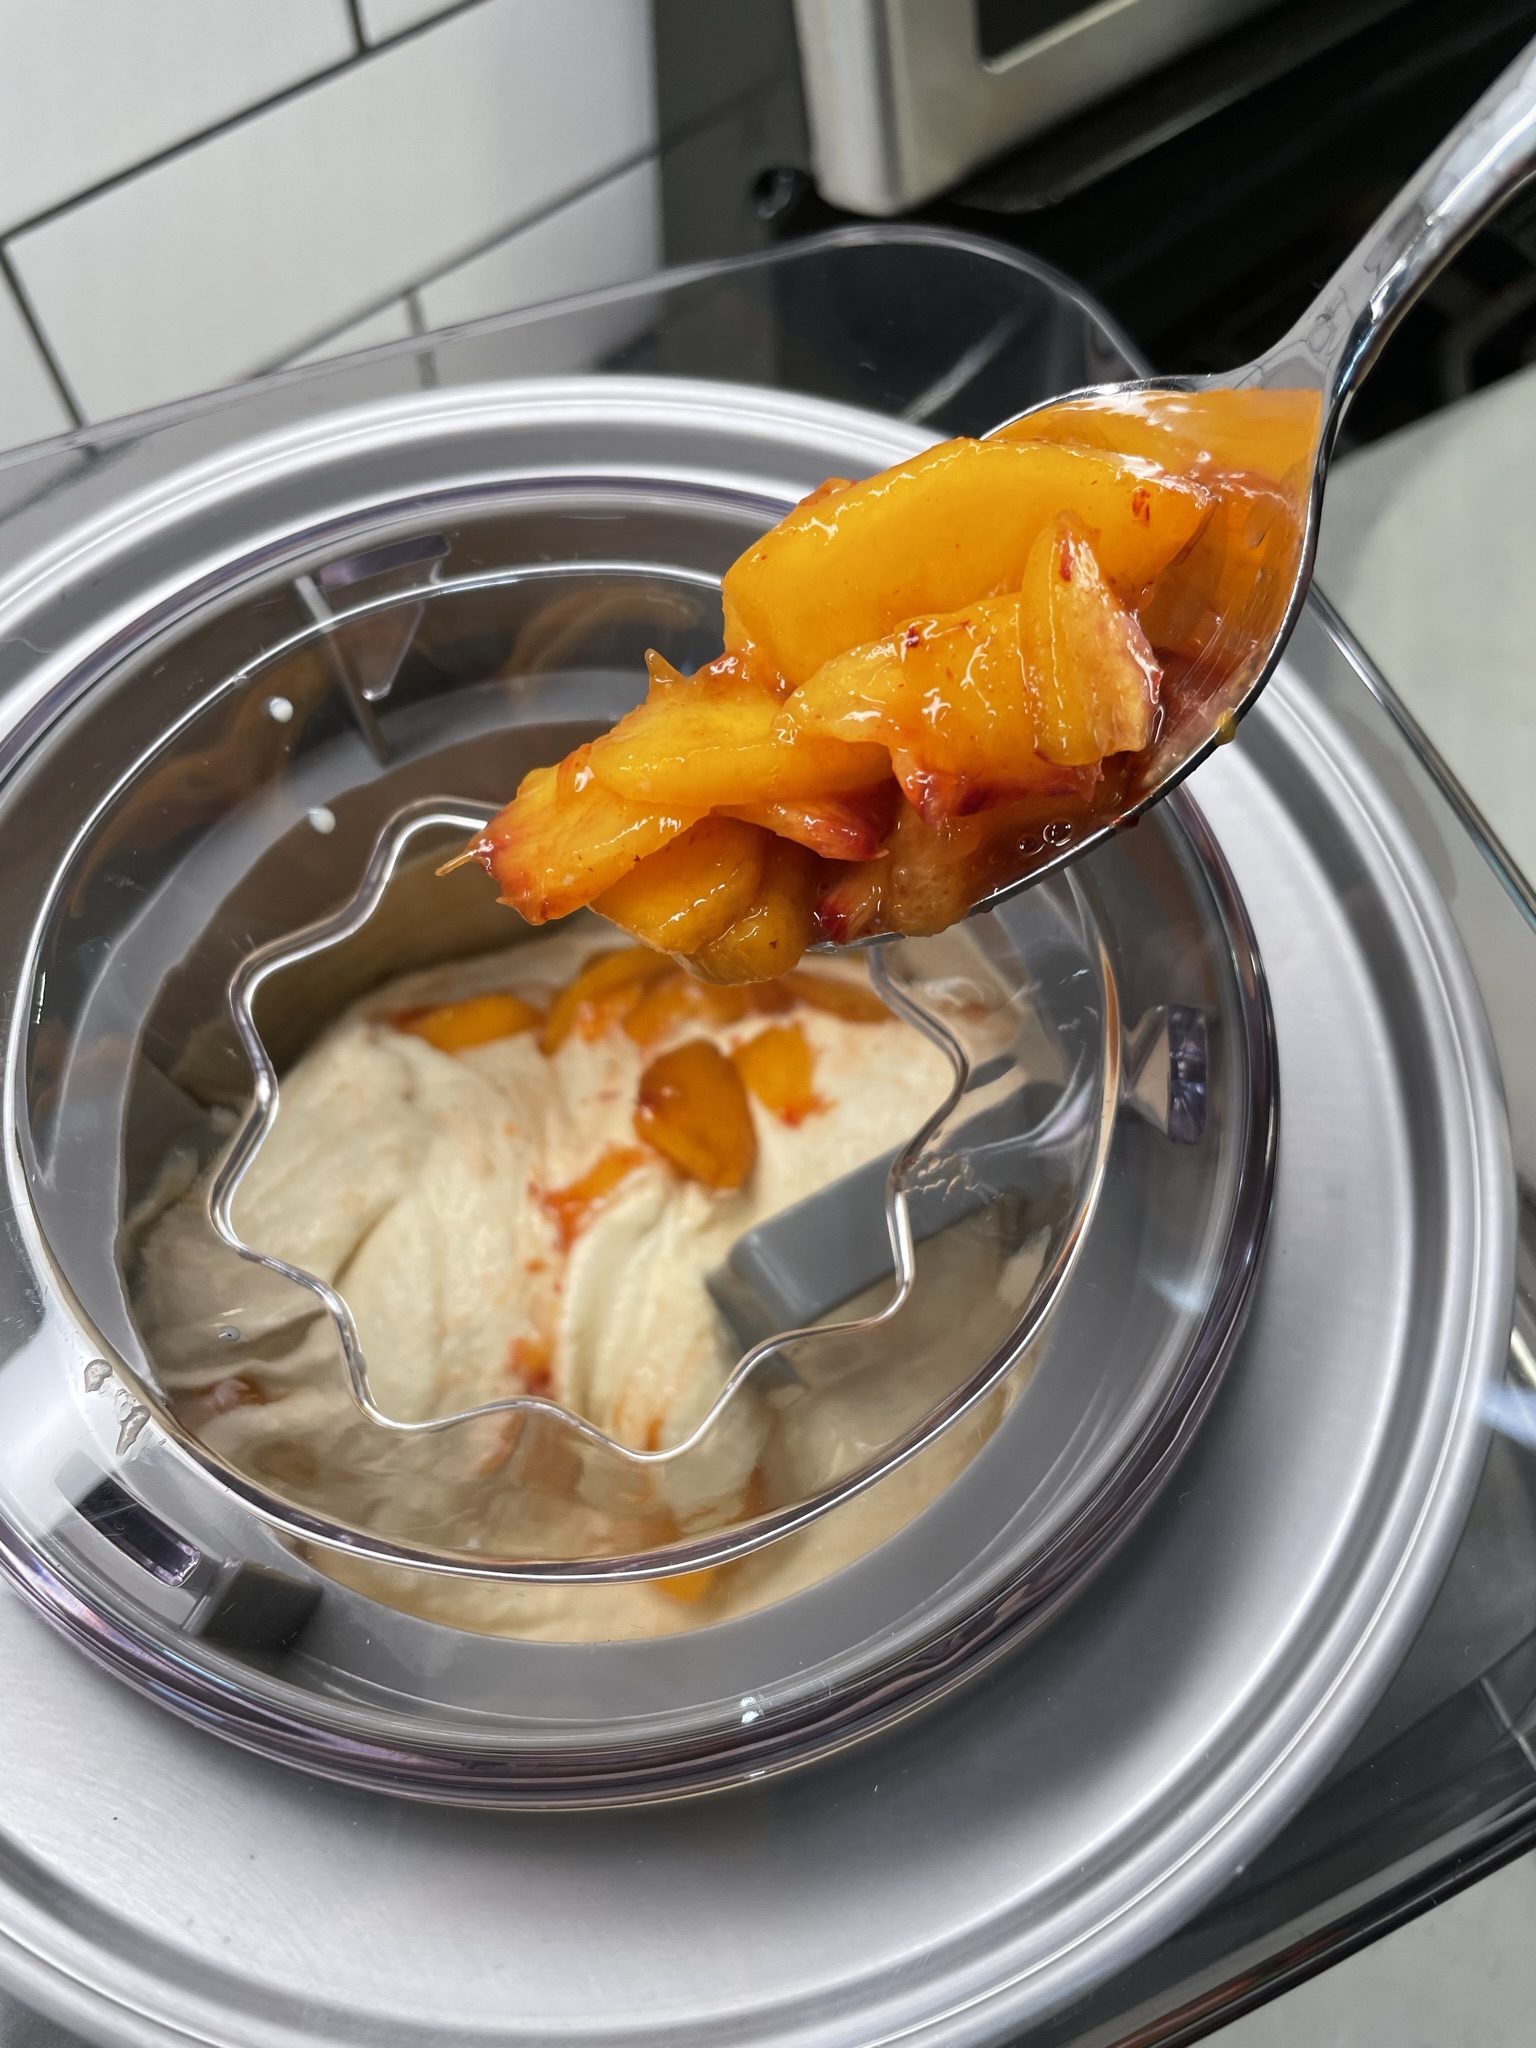
Peel two of the peaches and add to a blender or food processor bowl. Add one teaspoon of lemon juice. Puree for 20 seconds, keeping a few bits if you wish. Cook the puree and brown sugar over medium heat, stirring constantly, until reduced to about 1/2 cup volume (about 20 minutes). Cool to room temperature, then press a piece of plastic wrap directly onto puree. Refrigerate until thoroughly chilled. Peel and dice the third peach and toss bits with lemon juice to prevent browning. Cover with plastic wrap and keep chilled until ready to freeze.
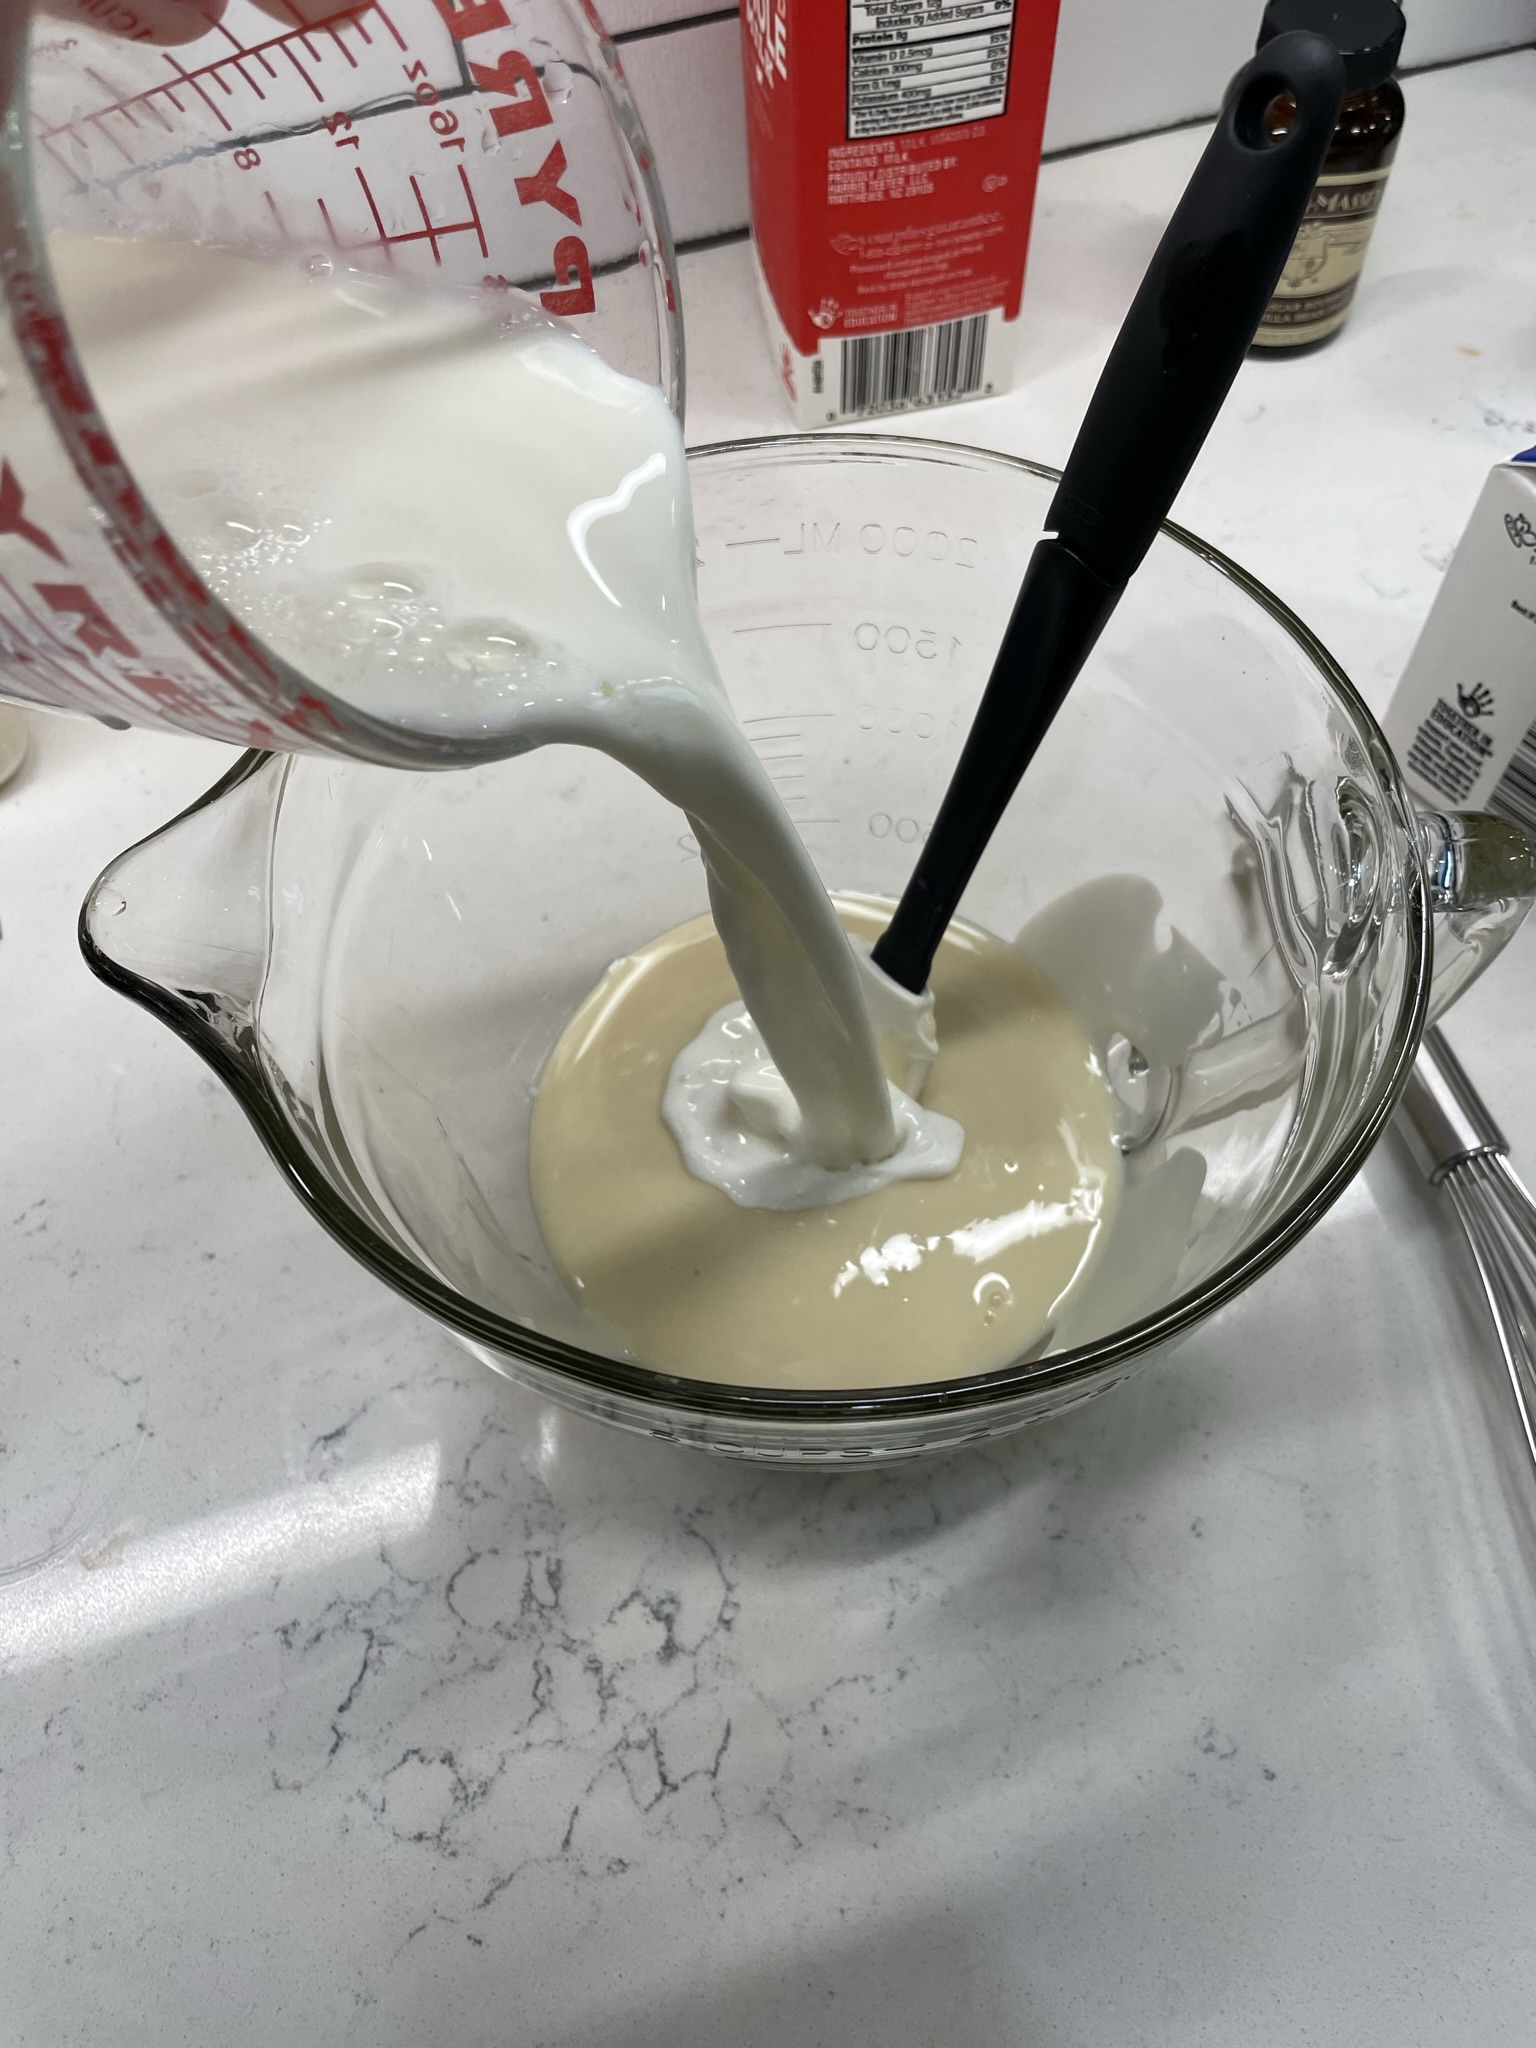
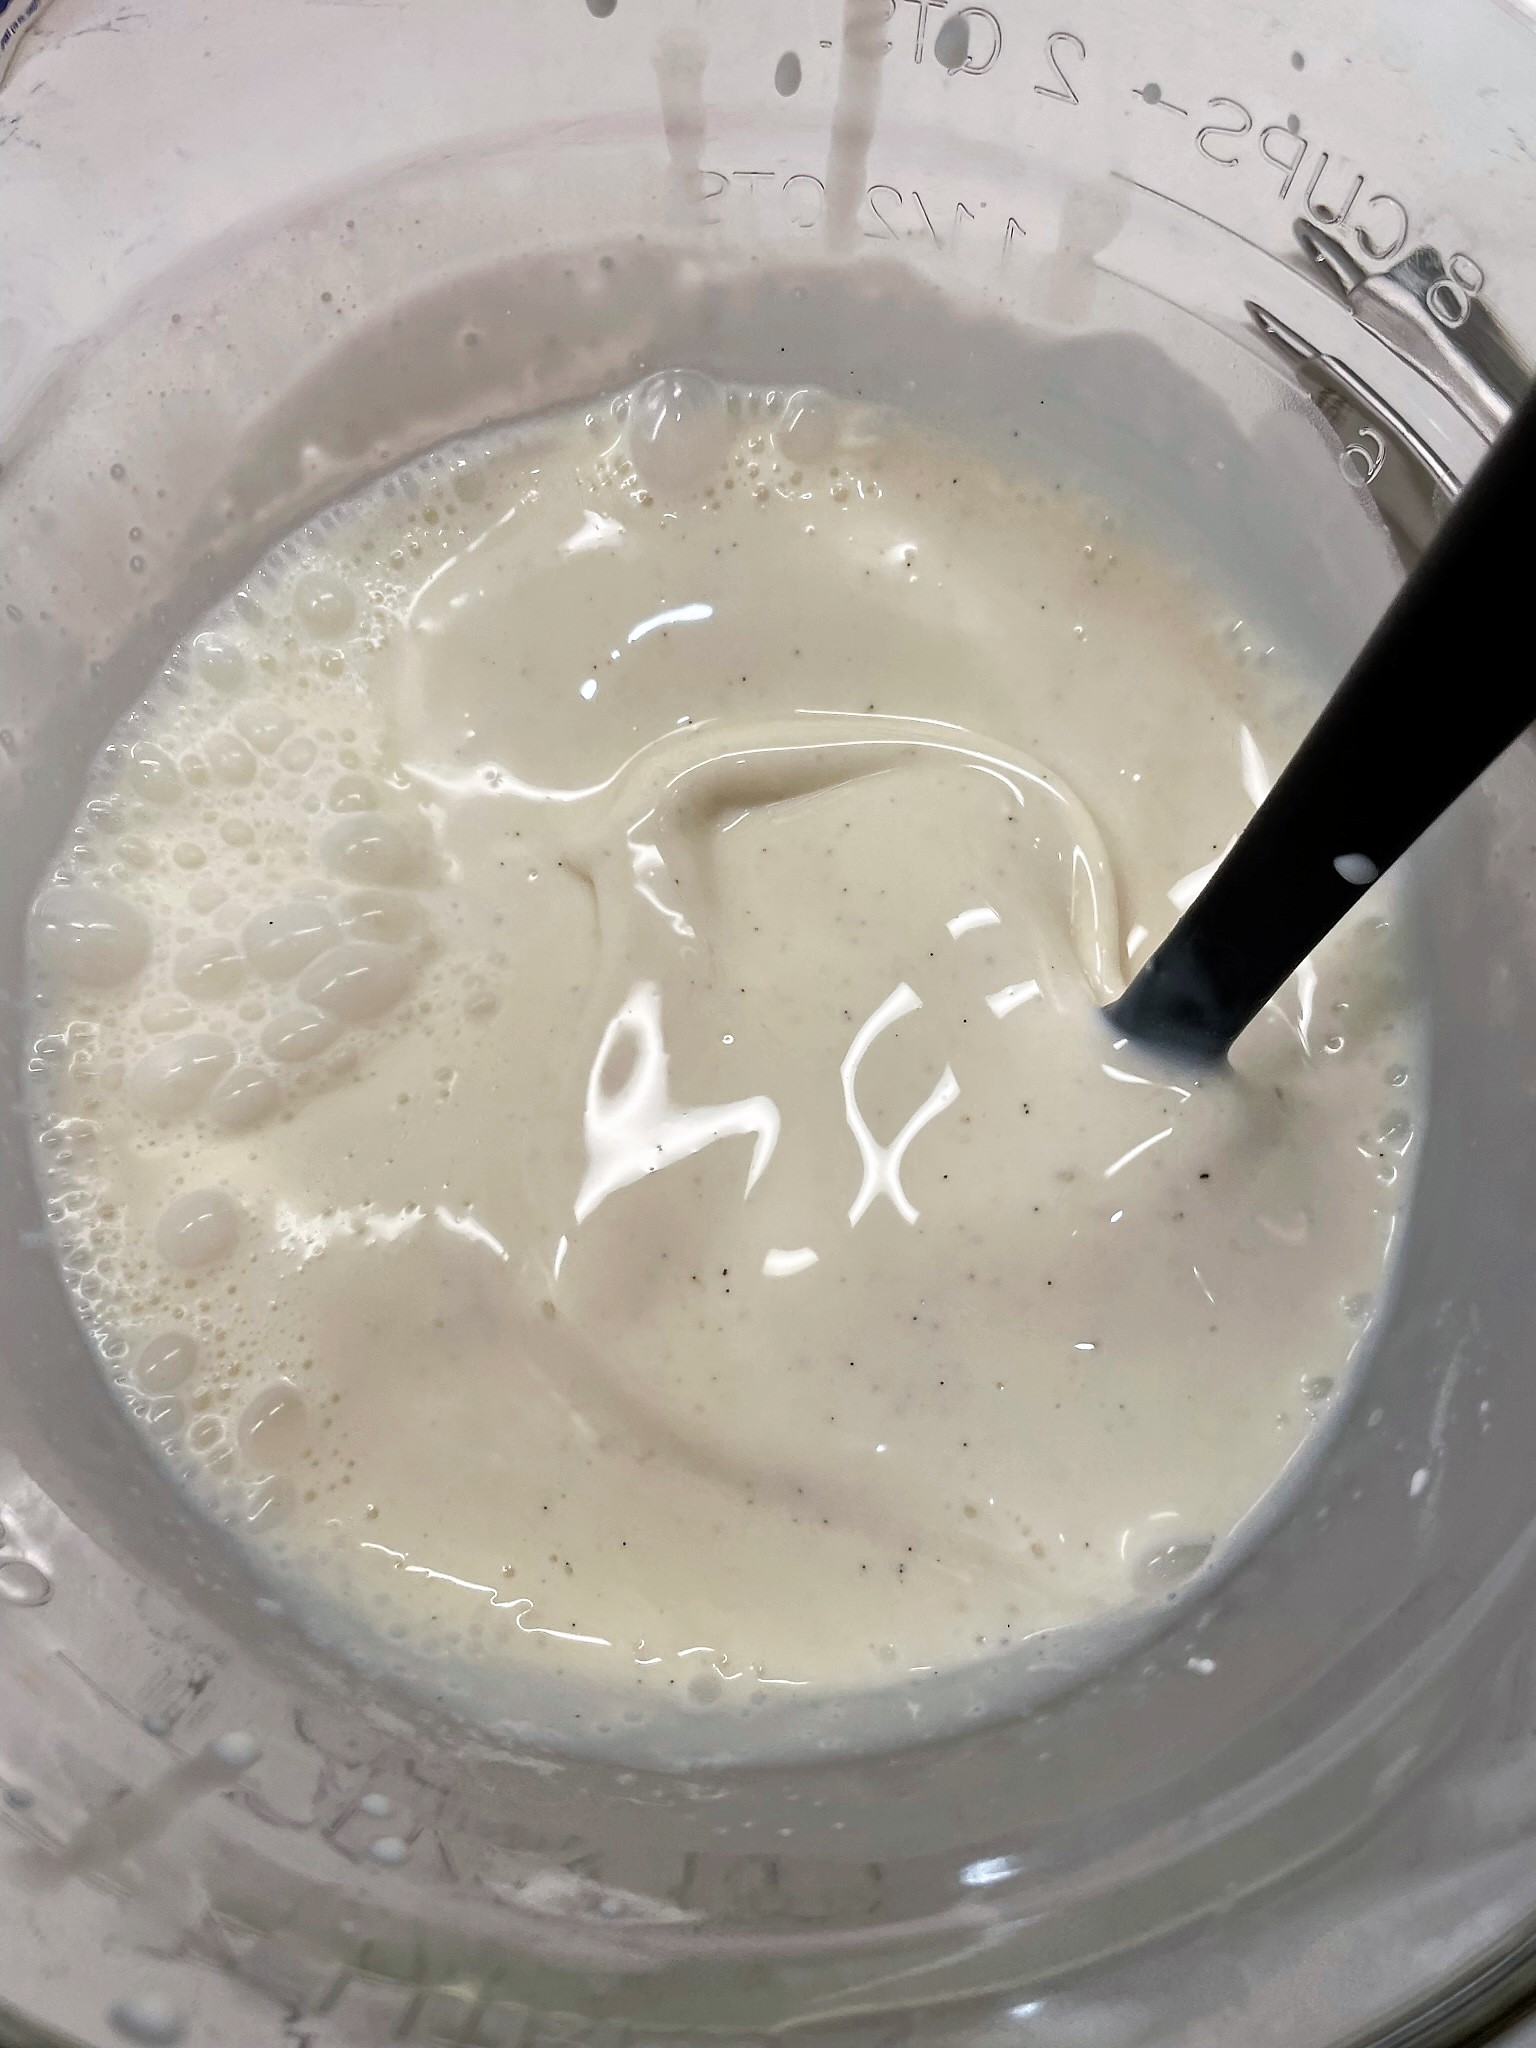
In a large bowl or pitcher, combine condensed milk, milk and heavy cream until evenly blended. Stir in vanilla bean paste. Refrigerate at least 3 hours until thoroughly chilled.
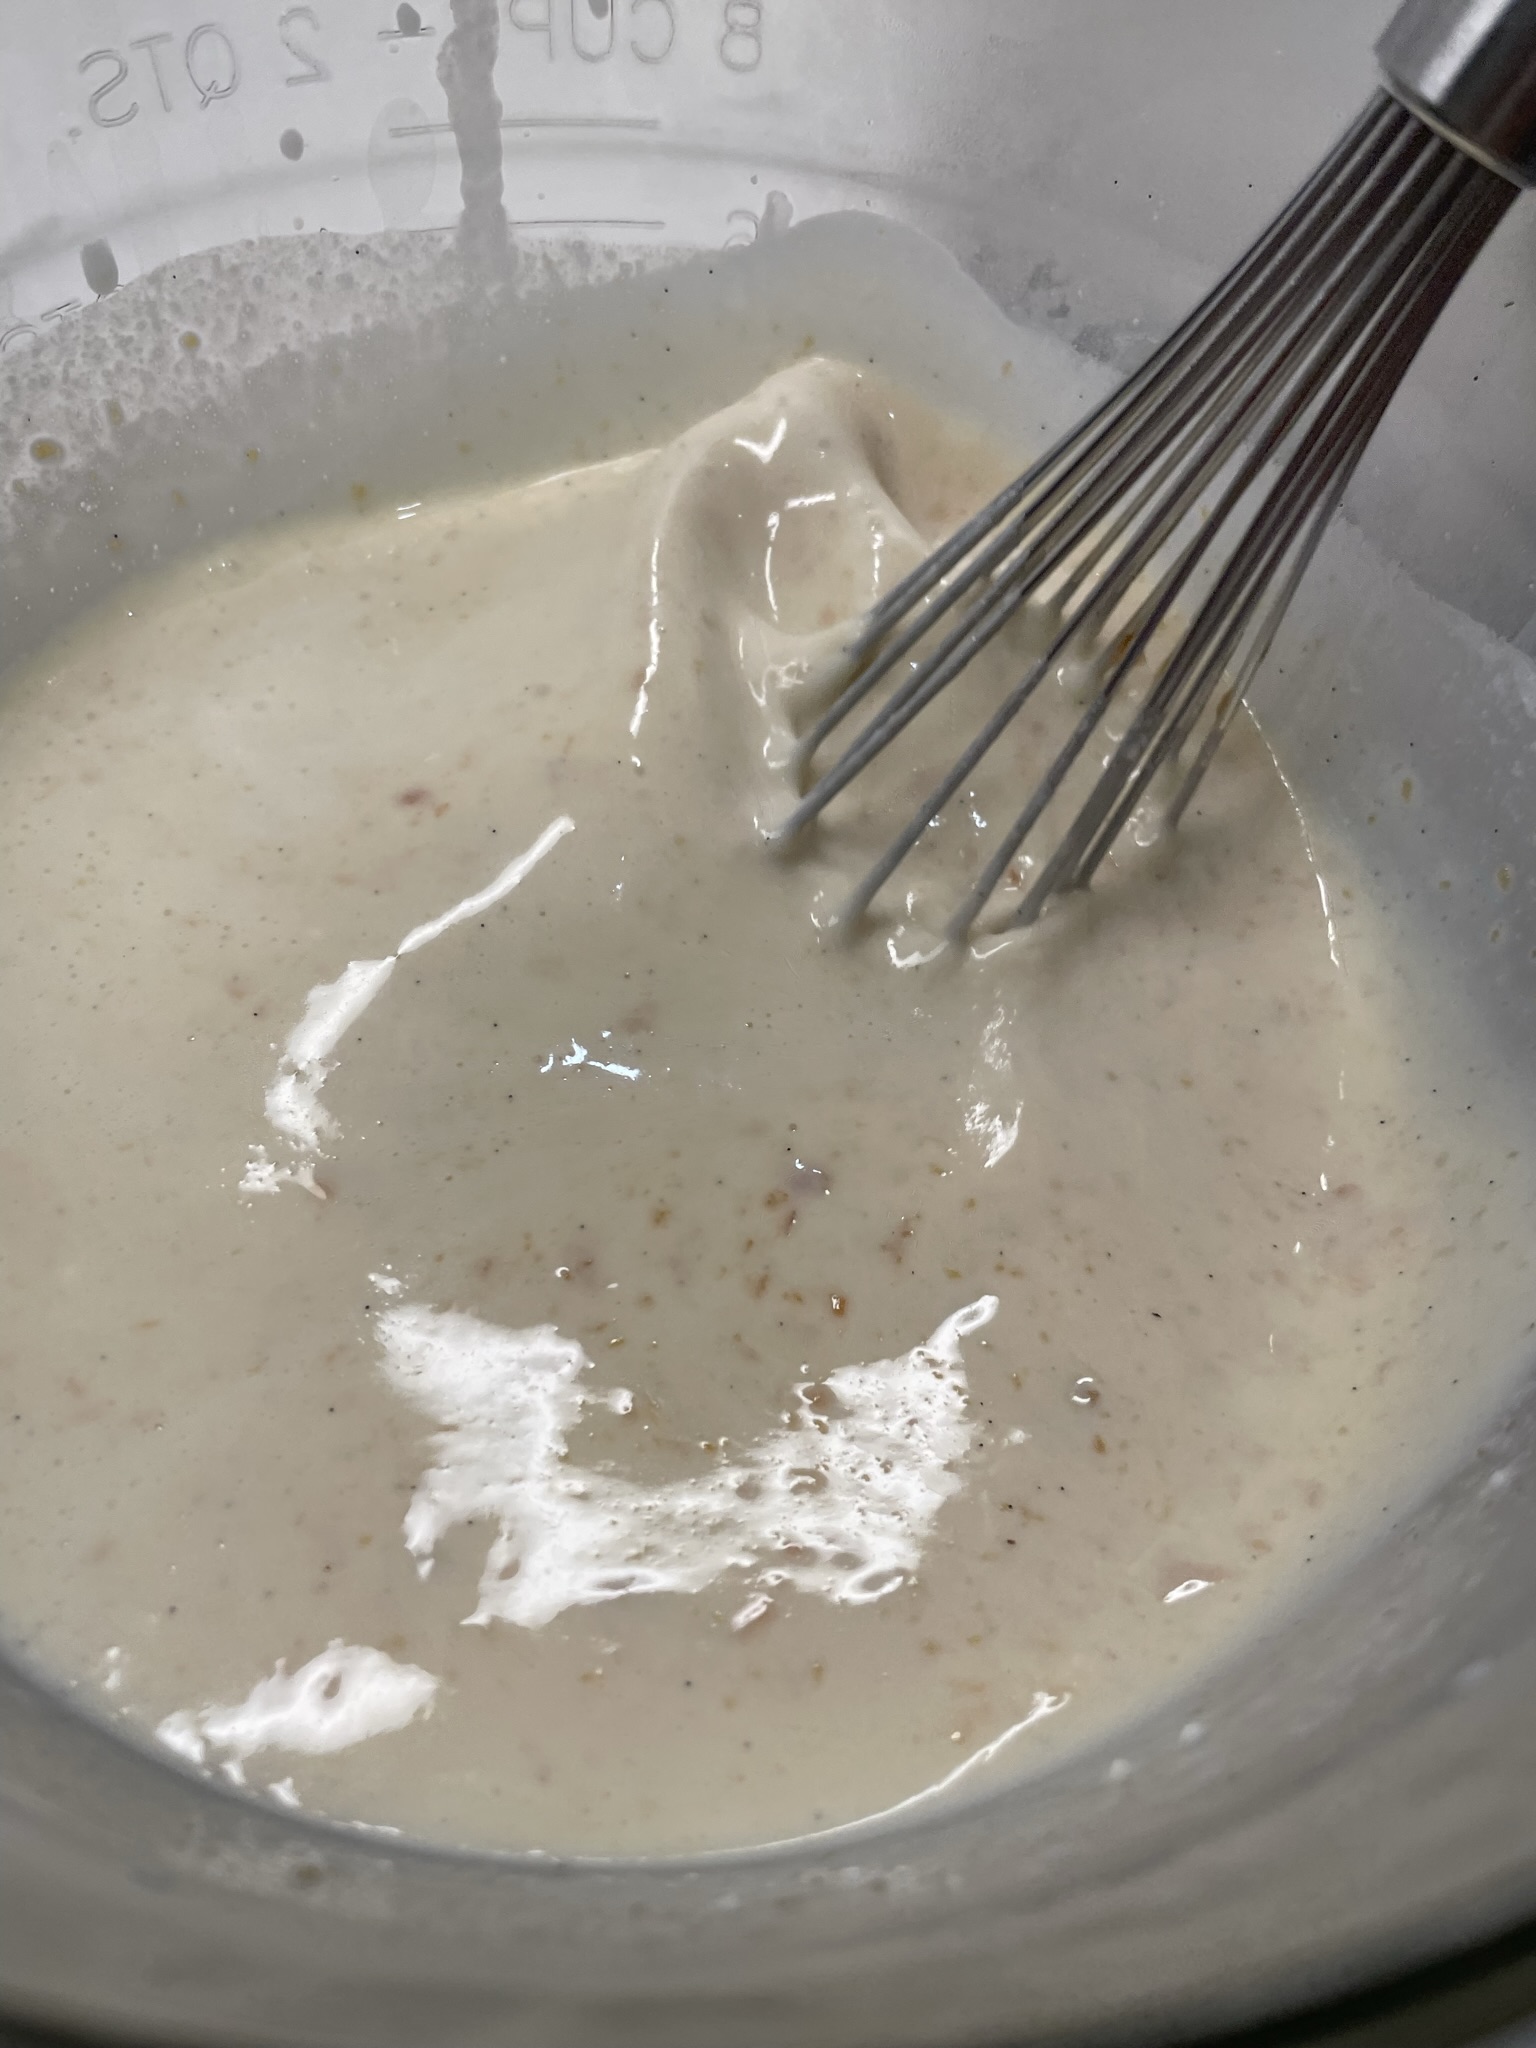
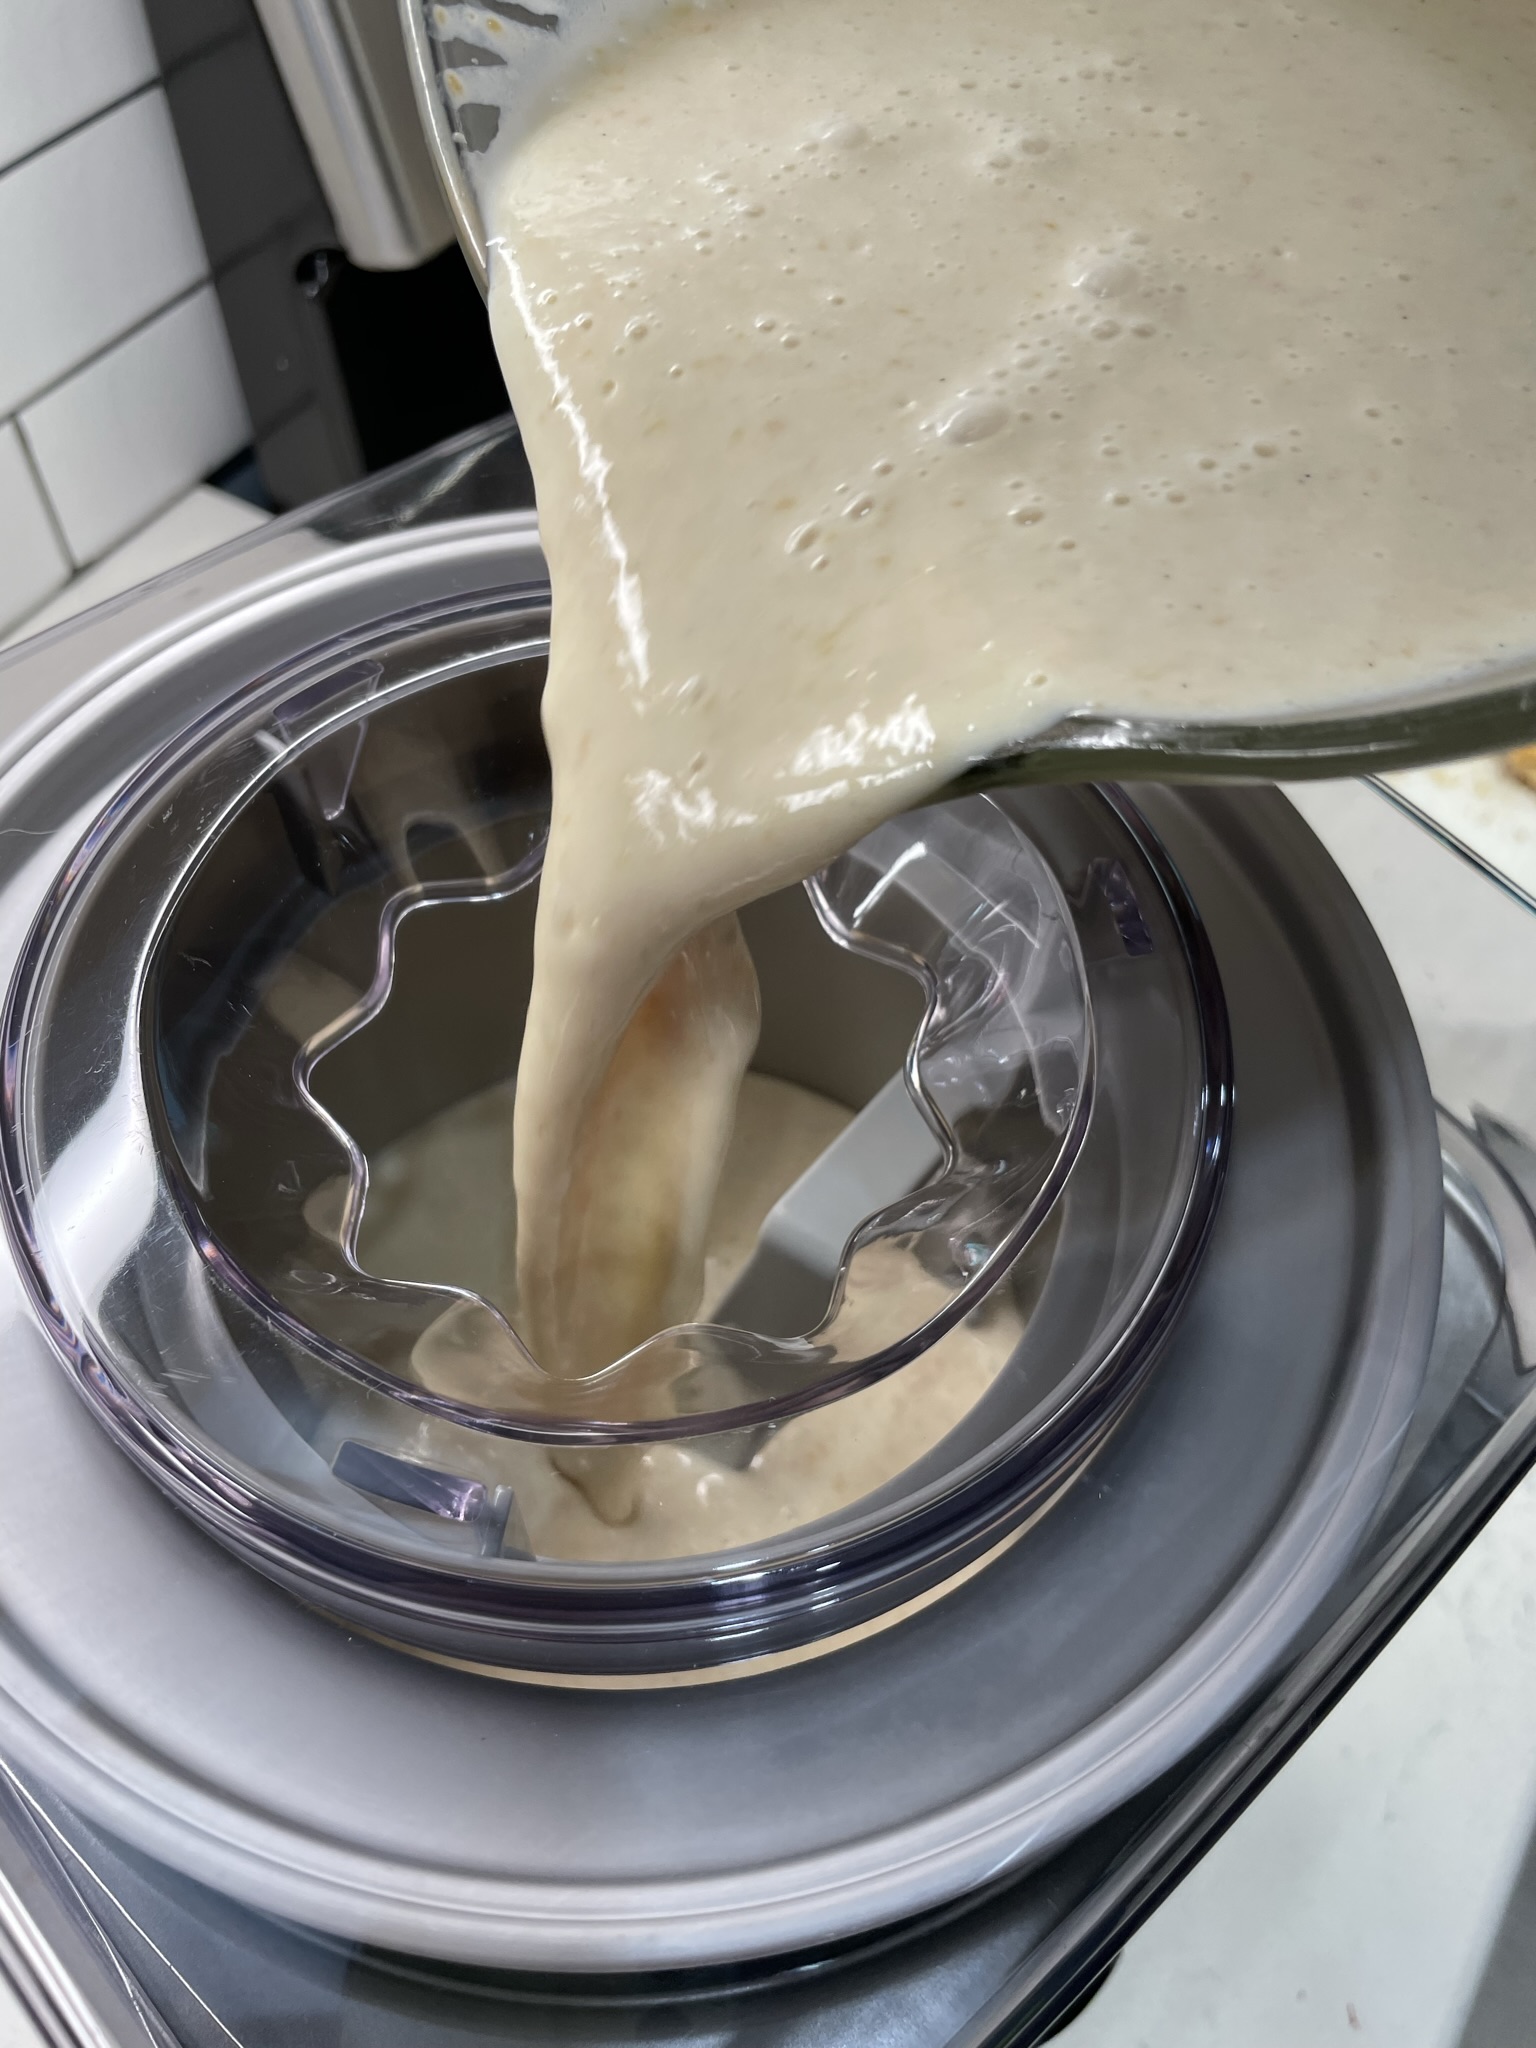
Gently whisk cold peach puree into ice cream base. Freeze in ice cream machine according to manufacturer’s instructions. In the final two minutes of churning, spoon the reserved diced peaches into the machine and pour in vodka (if using). Churn until fully blended.
Transfer ice cream to an insulated freezer container, layered with scone crumbles. Cover and place container in freezer several hours or overnight for best texture.