There are only a few days left of Hispanic Heritage Month, which runs from Sept. 15 to Oct. 15. Recognizing and celebrating cultures other than my own is important to me, especially with the recent happenings in this U.S., and the government trying to wipe out diversity of any kind. I feel helpless in the face of it, but know I can still shine a light on the other cultures. And the best way I know how to do that is to explore and share their cuisine.
At our house, we observe the heritage of Hispanic cultures regularly— not only on months that “officially” mark the occasion— and that usually happens through food, and typically Mexican food. A few of my formative years were spent with my mother in Southern Colorado and New Mexico, so those flavors taste like home to me. But Mexico isn’t the only country with Hispanic culture; there are 21 countries and territories to celebrate, with most of them being in the Americas, some in the Caribbean (such as Cuba and the D.R.) and even an itty bitty country in Africa. What puts them in the “Hispanic” category is that Spanish is the predominant language and their cultures have been significantly influenced by Spain (which is, itself, an Hispanic nation).
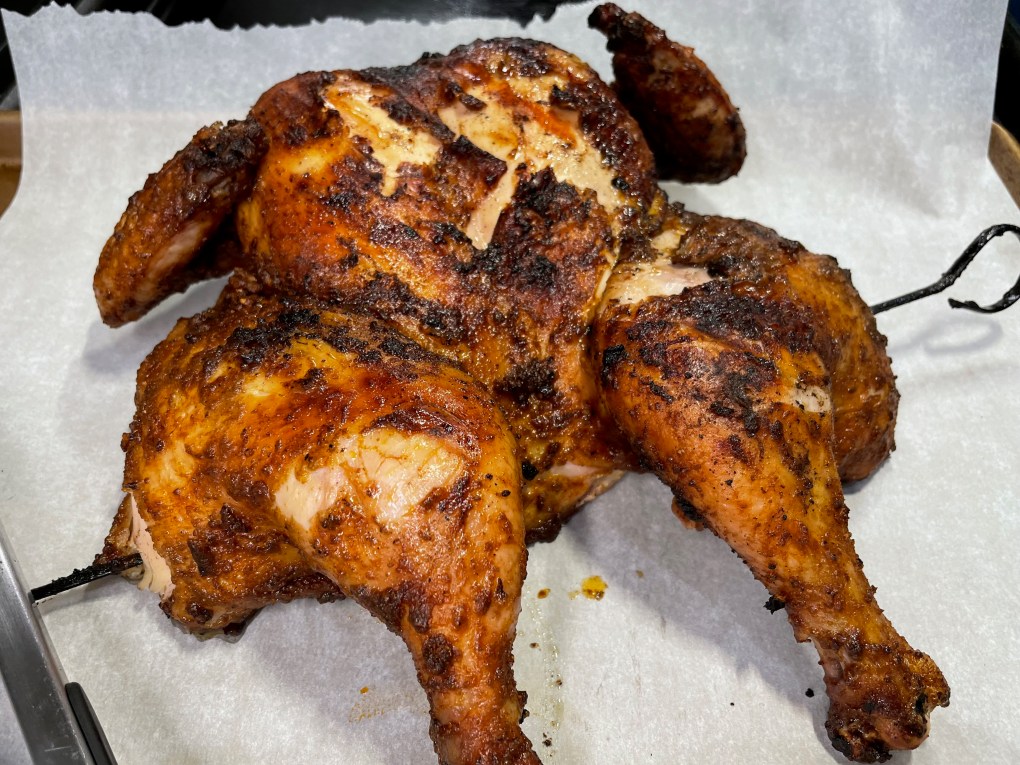
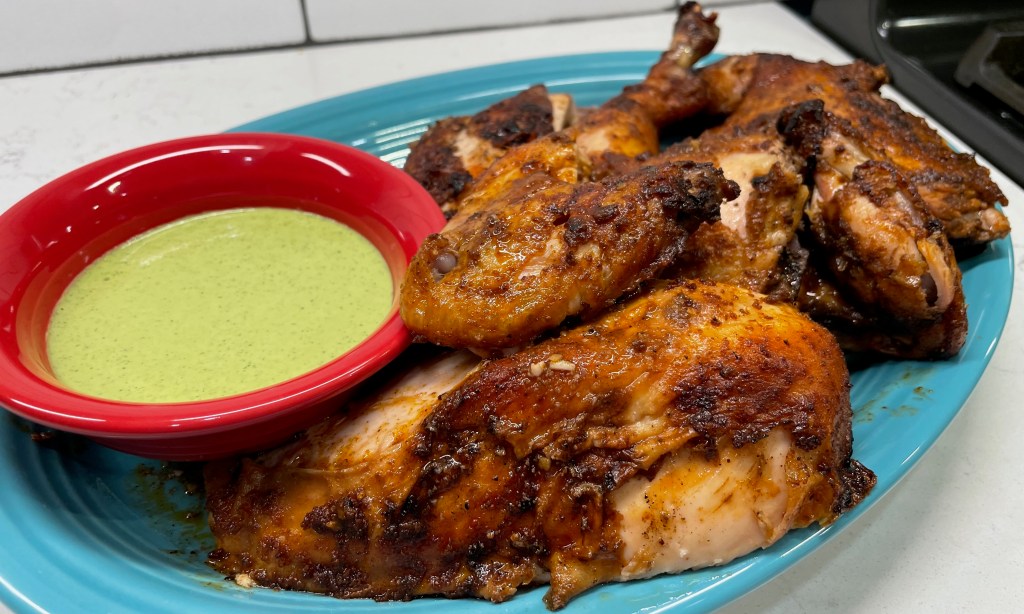
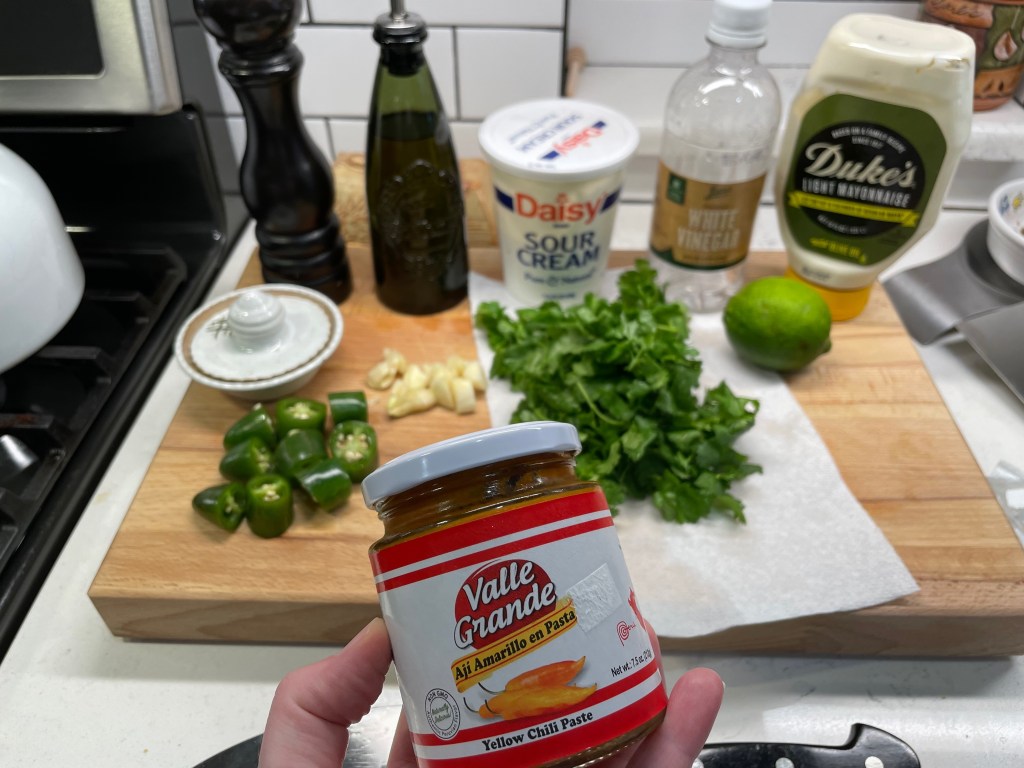
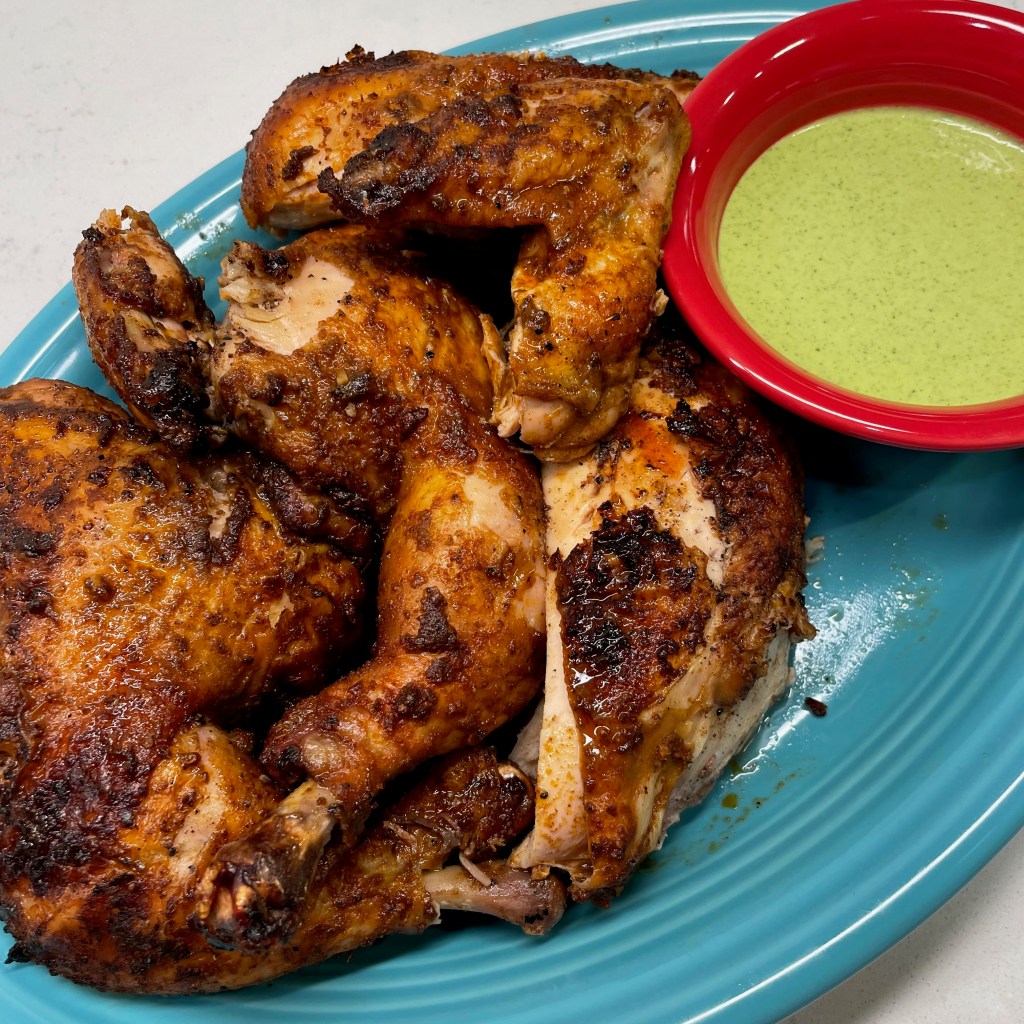
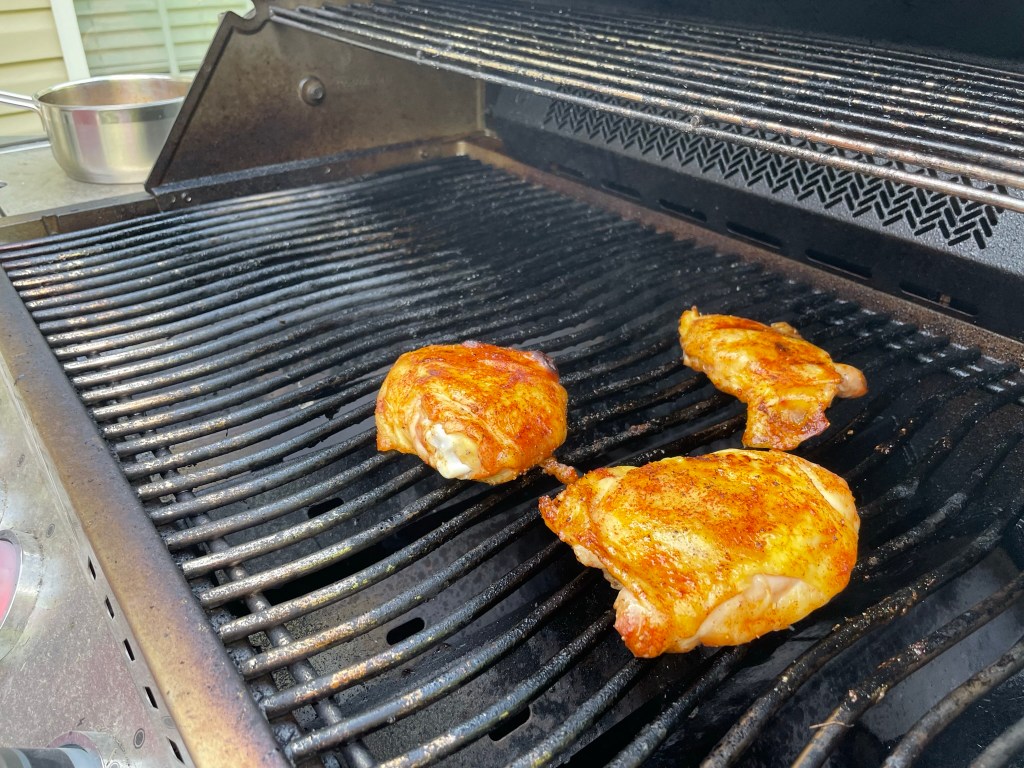
Today, my attention is on Peru, for no other reason than I freaking love this chicken! My first-ever experience of Peruvian roast chicken was underwhelming— it was a rotisserie bird from Whole Foods that barely tasted different from a plain one. But when I first had pollo a la brasa for real—fire-roasted chicken with paprika, cumin, vinegar and garlic—I was blown away by the intensely warm and smoky spices and the flavor explosion at the first bite. And it’s not just the spices on the chicken— it’s this insanely good jalapeño-based sauce that I would happily devour with a spoon.
I’ll bet you can smell it through the screen.
We’ve made this a few times at home now— first, with the rotisserie spit accessory on our Napoleon gas grill and later by spatchcocking the bird and grilling it flat— and I have a few thoughts to share for the best success.
Thought #1: Trust Kenji’s recipe!
It didn’t take long to find the recipe I would trust when I decided to make this at home. If you know me at all, you know that Kenji López-Alt has my utmost respect for his culinary approach and techniques. He’s the reason I dry-brine my turkey at Thanksgiving and salt steaks overnight before grilling. If anyone knows the right way to cook Peruvian-style chicken, it’s Kenji. The only deviation I made from Kenji’s recipe on the Serious Eats website is that we used our gas grill (we don’t have a charcoal one, darn it). Literally everything else about my method is the same. For this reason, I’m tagging his recipe below so that I don’t have to type it out myself. Be sure to read through Kenji’s narrative, too, for more tips and expert insight.
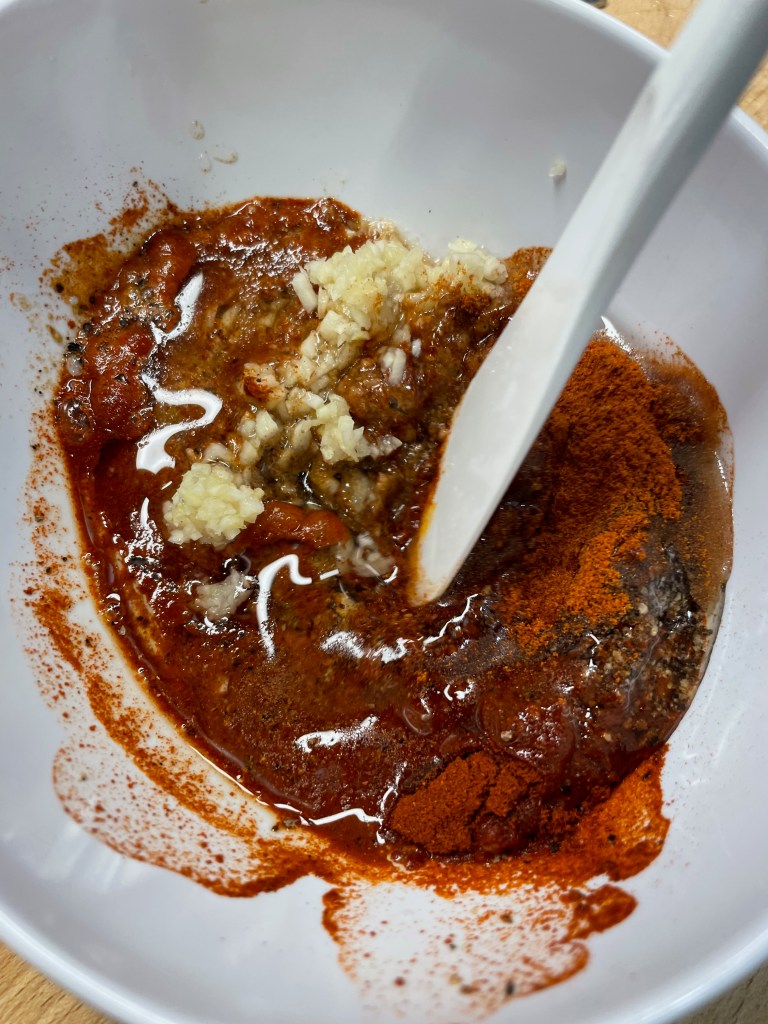
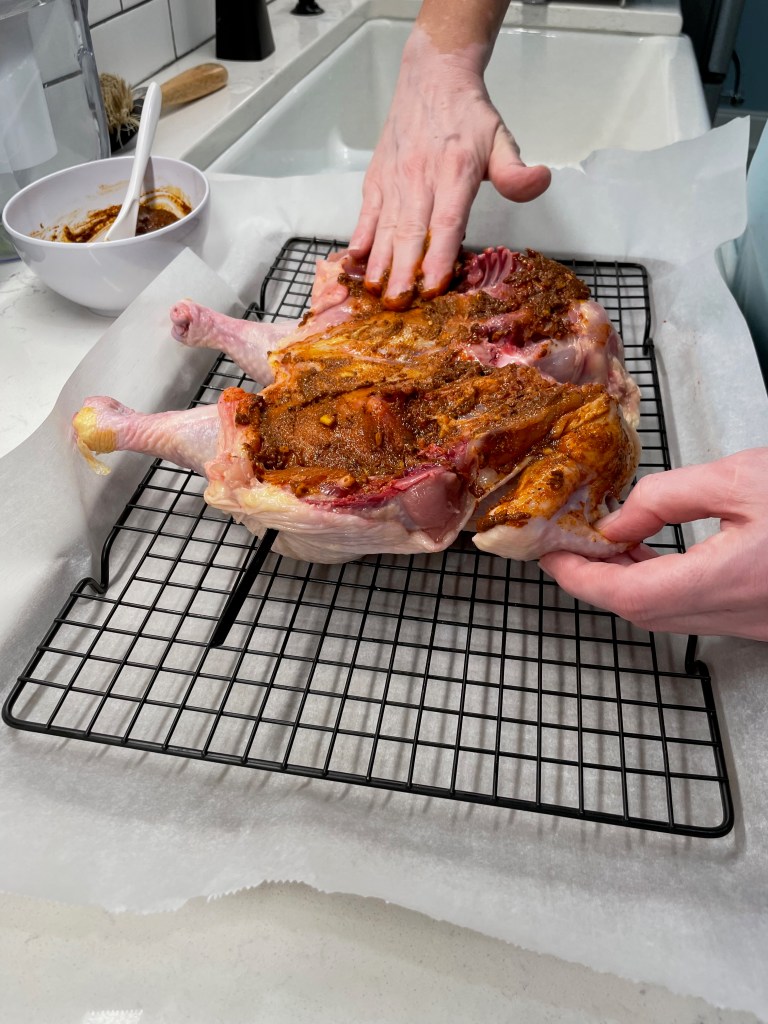
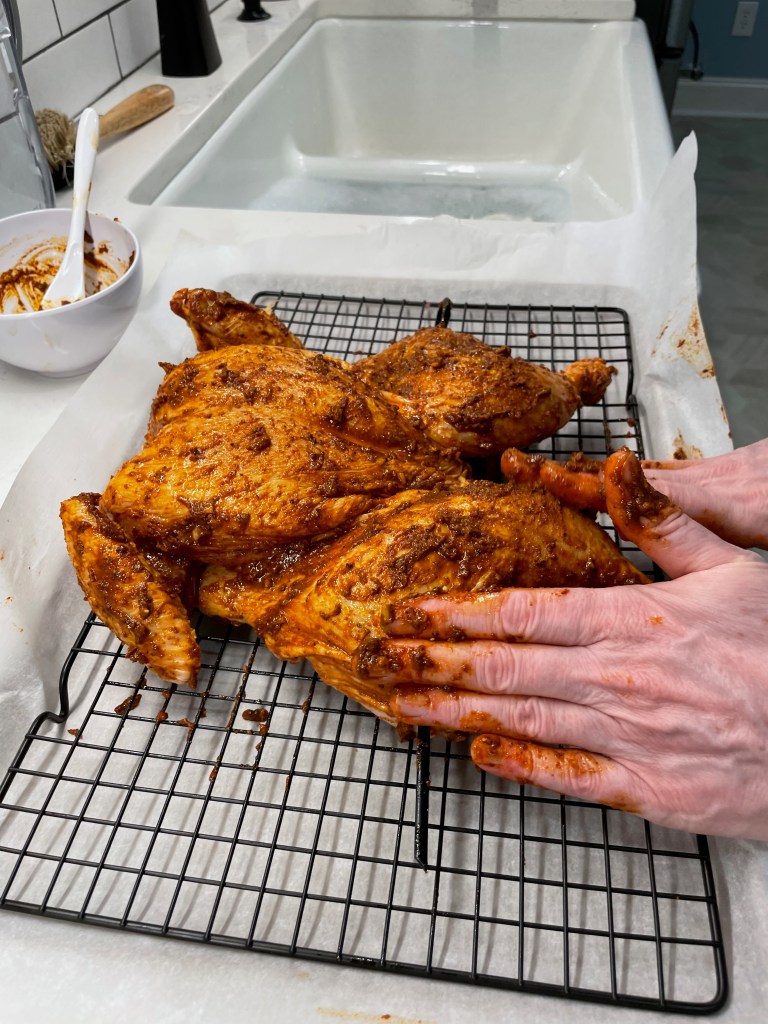
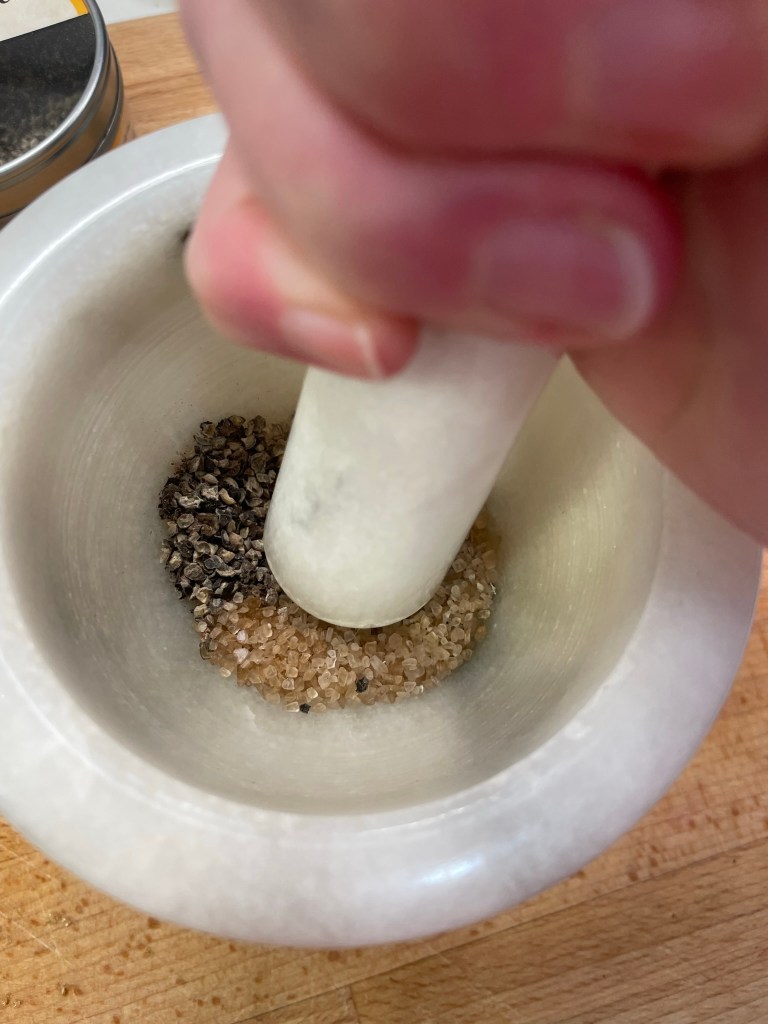
The rub includes spices, garlic, oil and white vinegar. I did this part in the late morning and let the chicken hang out in the fridge all day.
Thought #2: Consider roasting parts rather than a whole chicken
Our rotisserie effort felt authentic and fancy, but the whole, flat-roasted chicken was just as good. Next time we make this recipe, I’ll probably buy packages of the chicken parts we like best— the thighs! It can be tricky to get the thighs and breast of a whole chicken done at the same time, especially on the grill, so why not buy the parts separately and give each the attention they need? Bone-in, skin-on is the way to go for maximum flavor.
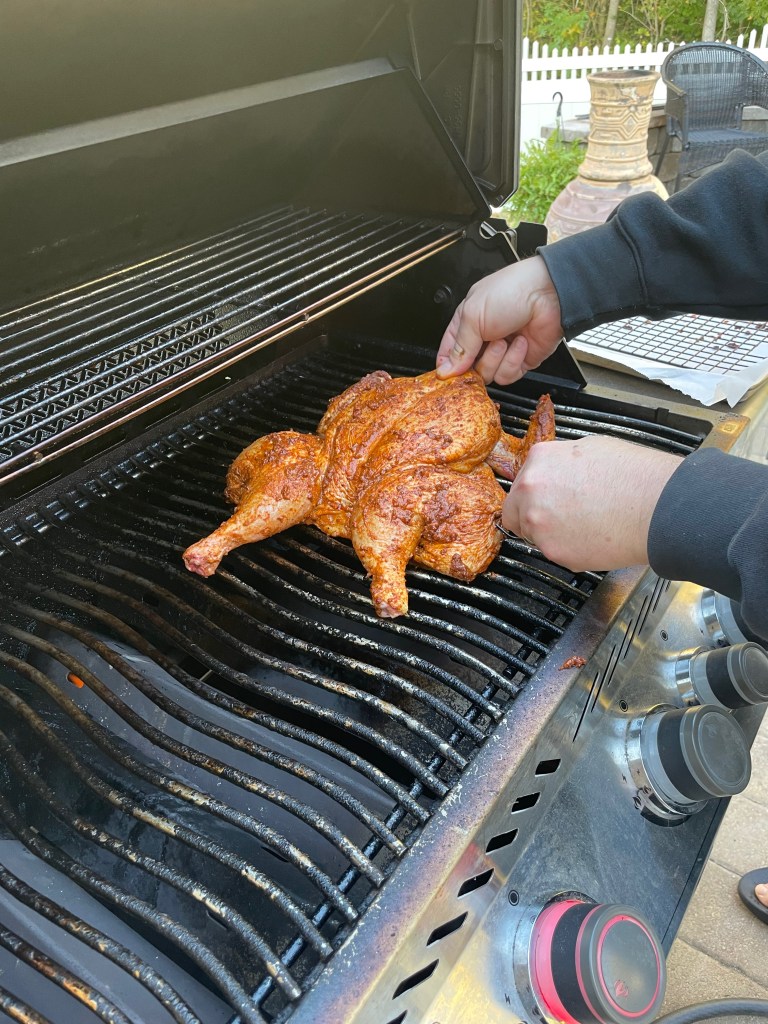
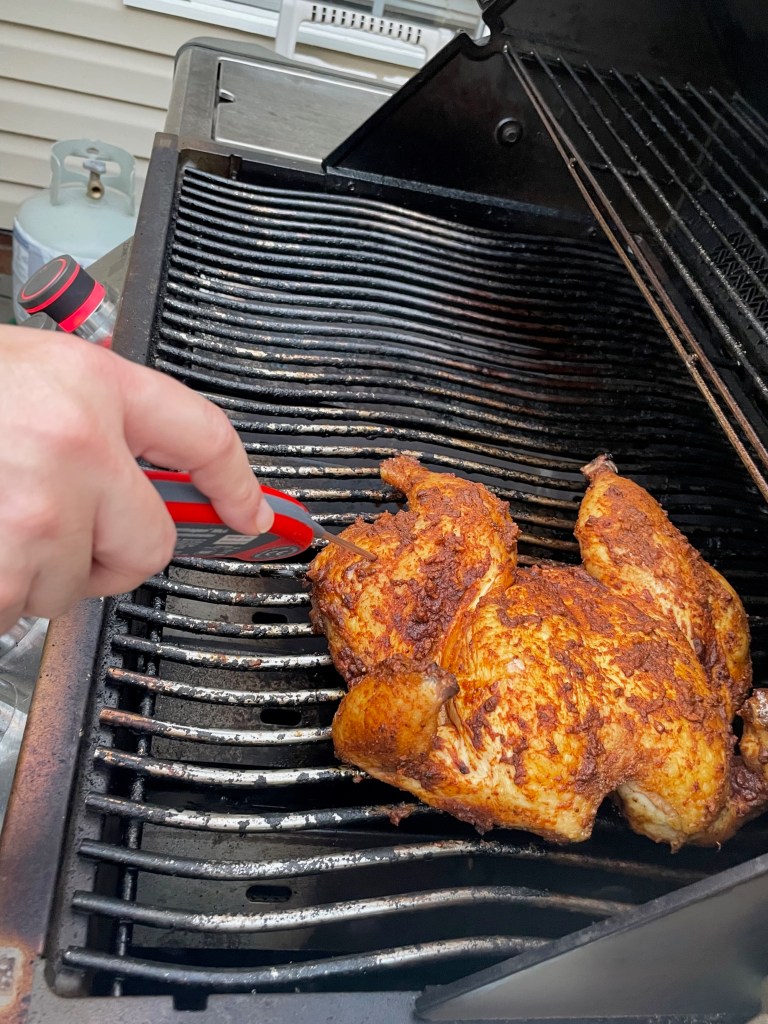
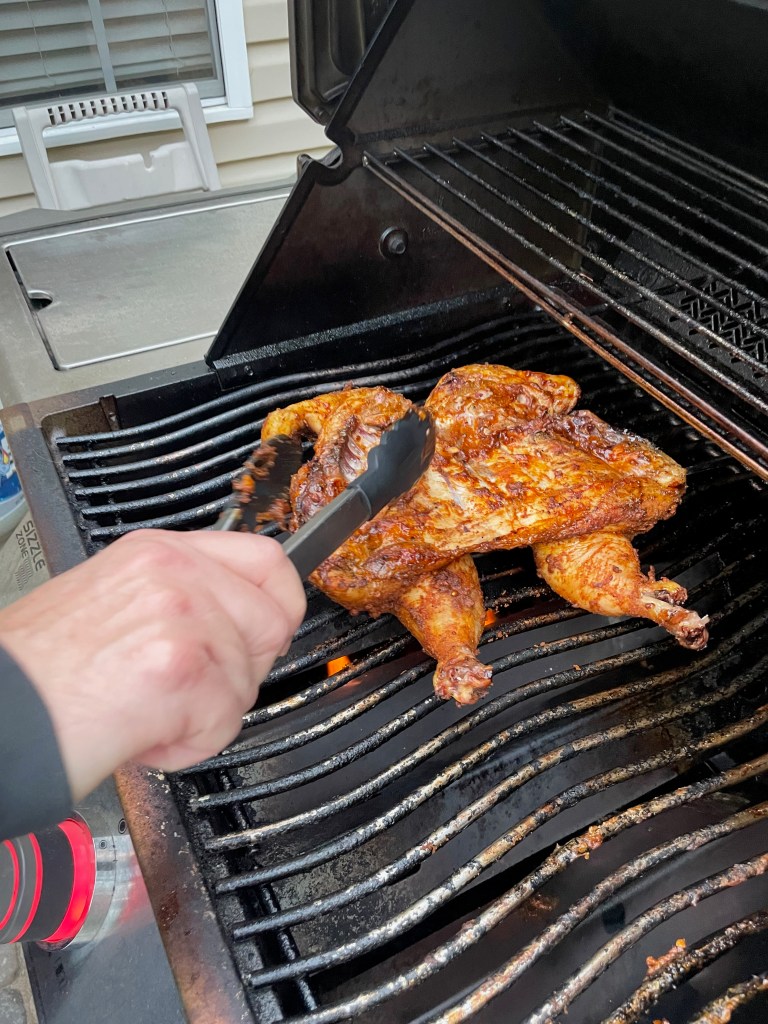
The chicken starts on the cool side of the grill, and finishes directly on the heat. It was on the grill for about an hour.
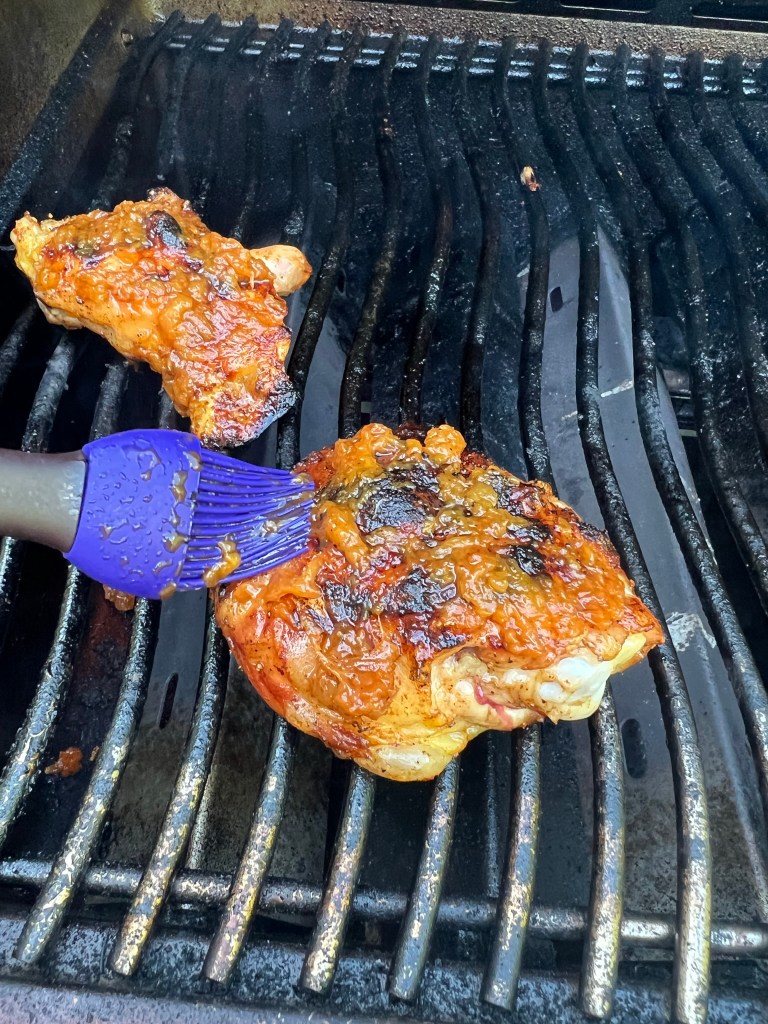
Thought #3: Make extra green sauce (trust me!)
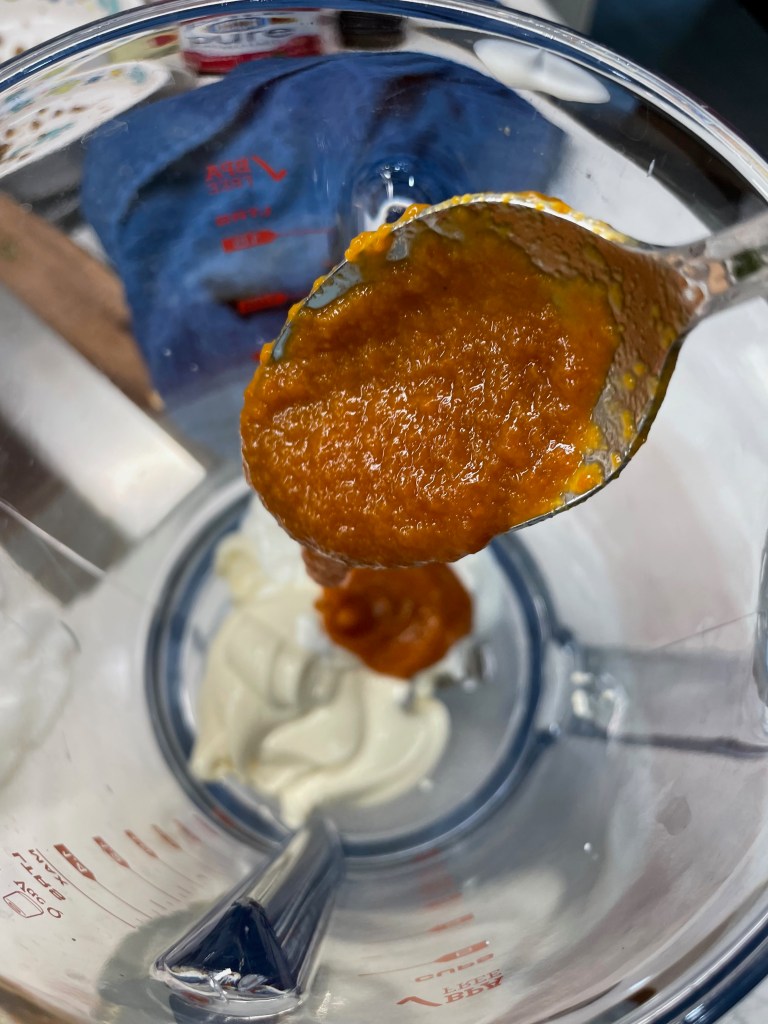
I don’t know how such simple ingredients can become so delicious. It’s kind of ridiculous how good this sauce is, and the secret ingredient is a product called aji amarillo chile paste. Look for it in a Hispanic specialty market or online if your supermarket doesn’t carry it.
The aji amarillo paste is the star of this sauce show!
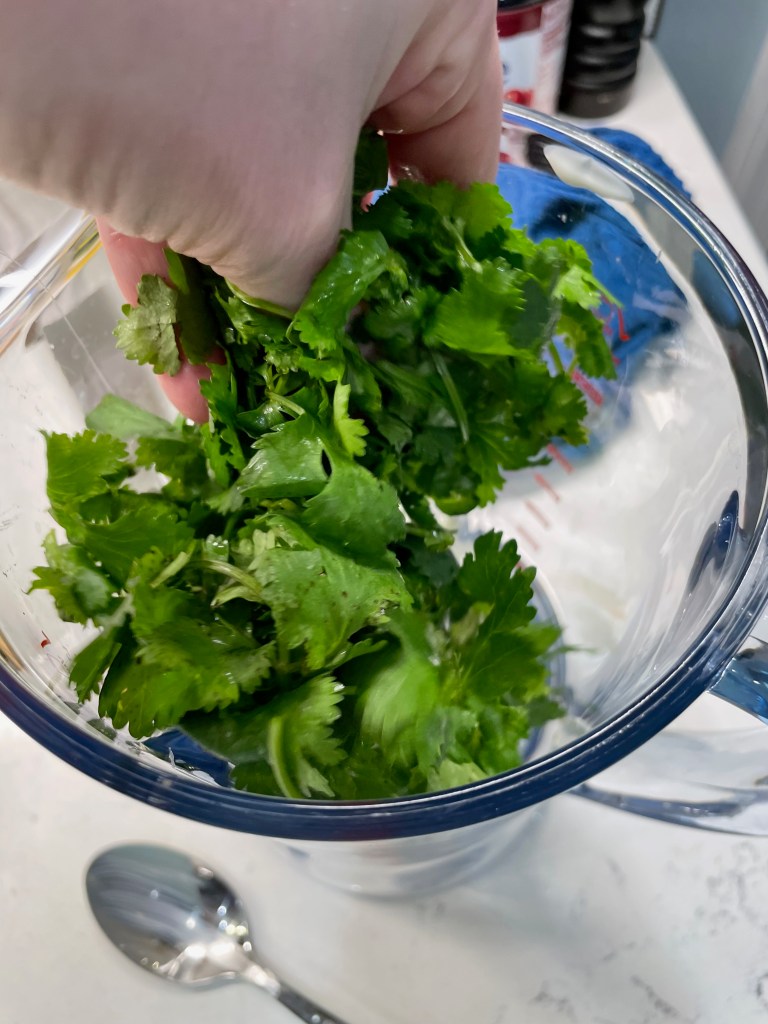
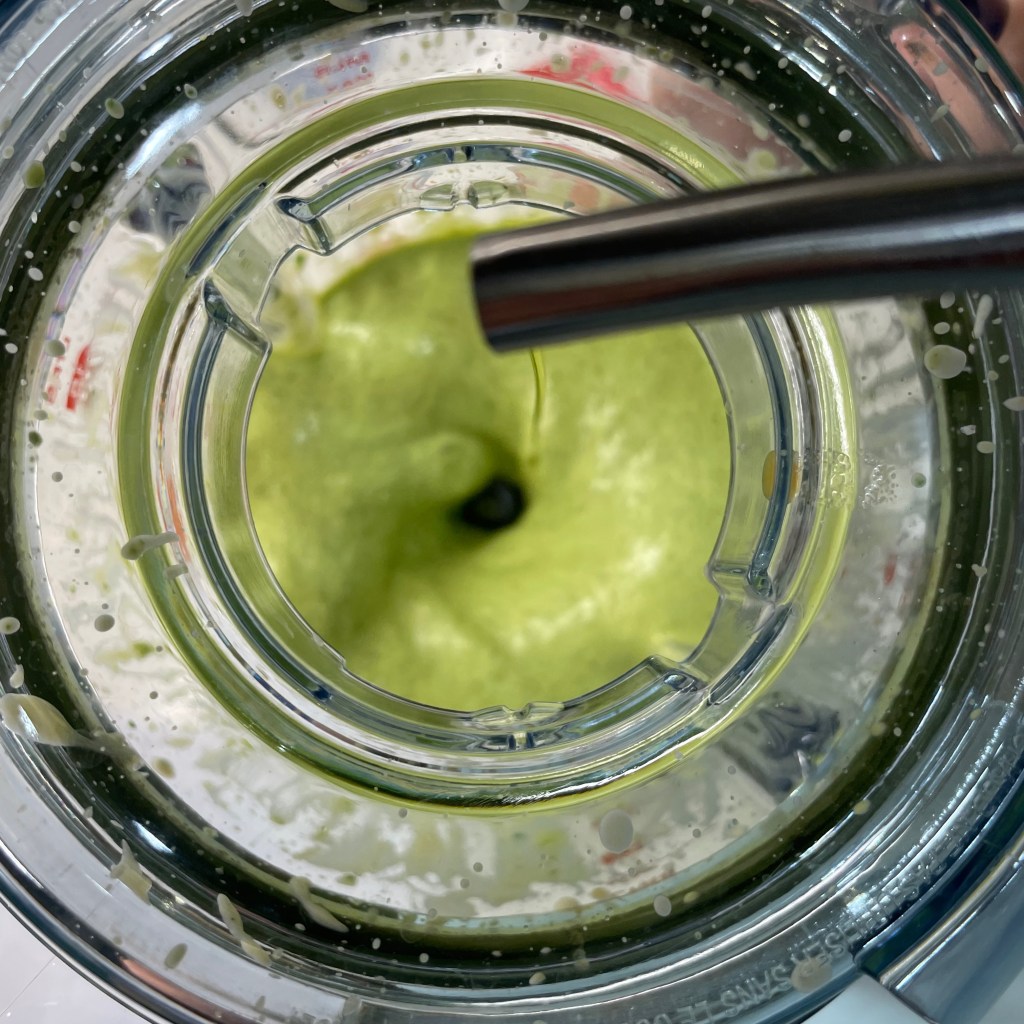
Aji amarillo has a uniquely earthy yet tropical, almost sweet flavor, and when combined with jalapeños, cilantro, garlic, lime and mayonnaise— well, it’s almost magical, with an addictive quality that will make you wish you had grilled a second chicken. But don’t worry, you’ll find plenty of other things to dunk into this sauce. It’s that good!
This sauce! 🤩 OMG
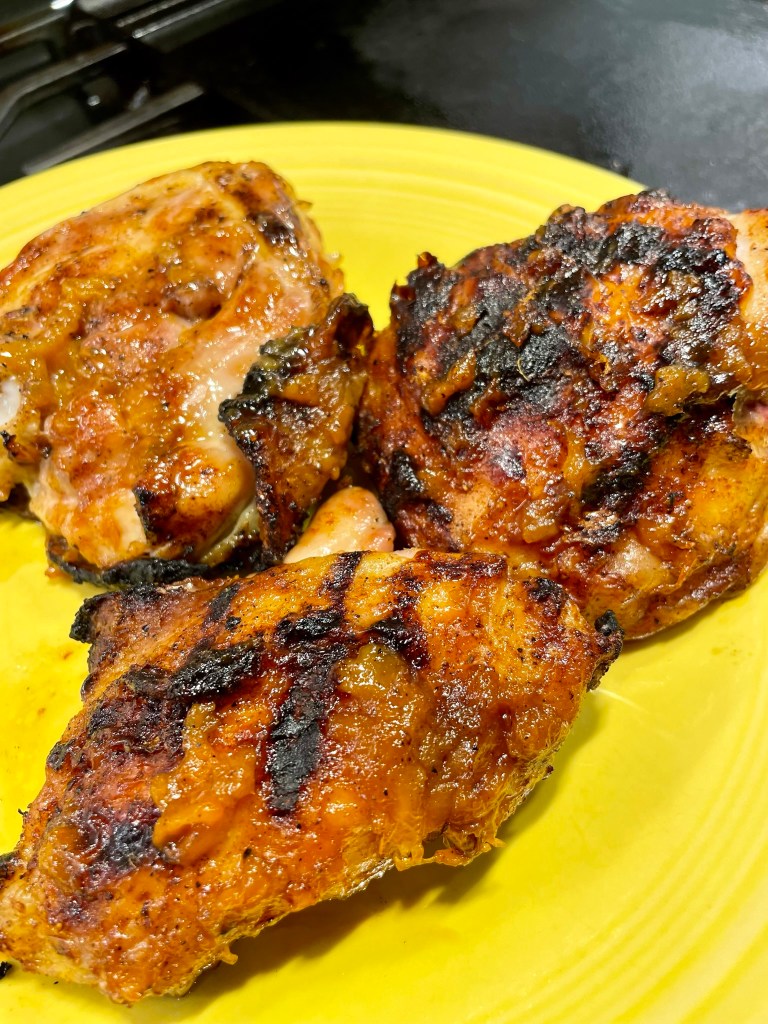
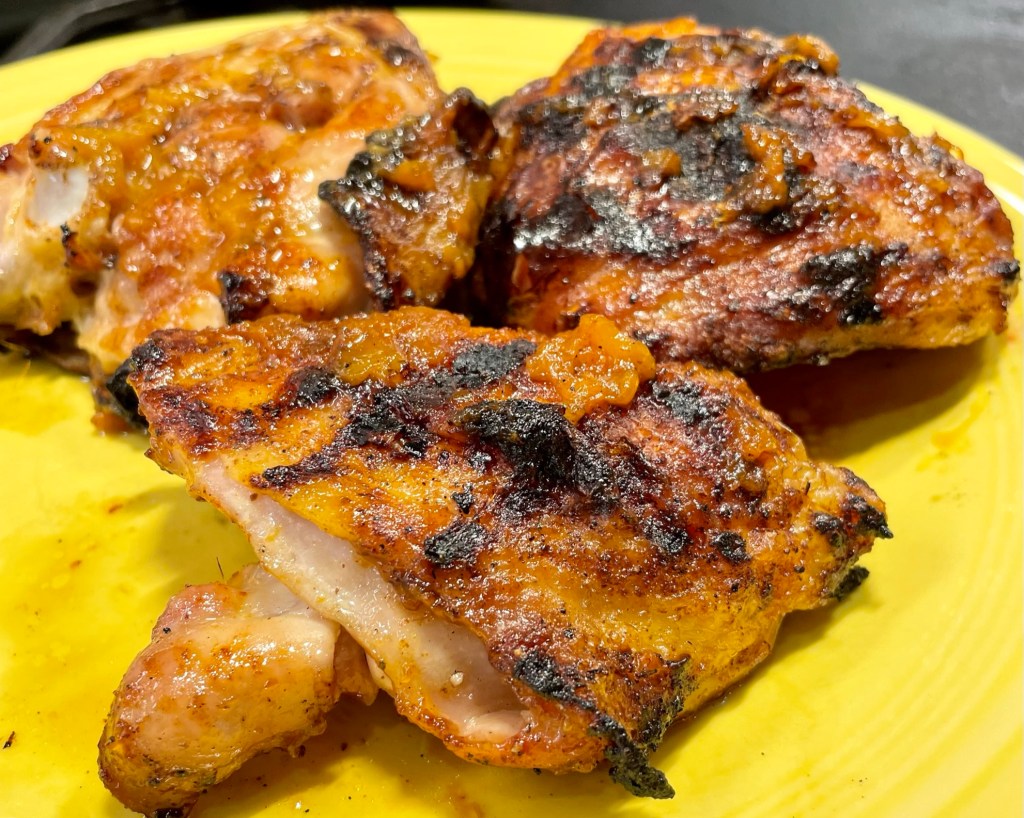
Make the sauce ahead of time, if you wish, so the flavors have plenty of time to meld in the fridge. If you have a charcoal grill, use it! But we had zero complaints with the outcome of our grilled Peruvian chicken. My mouth is watering again just looking at it!
Special occasion food doesn’t have to be complicated. Sometimes, it’s the simplest flavors that have the most impact, and this is one of many lessons I learned during the few years that I pitched in at a catering kitchen back in the ’90s. But when an occasion calls for something “fancy,” there are a few tricks you can use to elevate your presentation of simple ingredients. Roulades are a great example of this concept, and it’s only a little bit of extra effort, but the impact is always great!
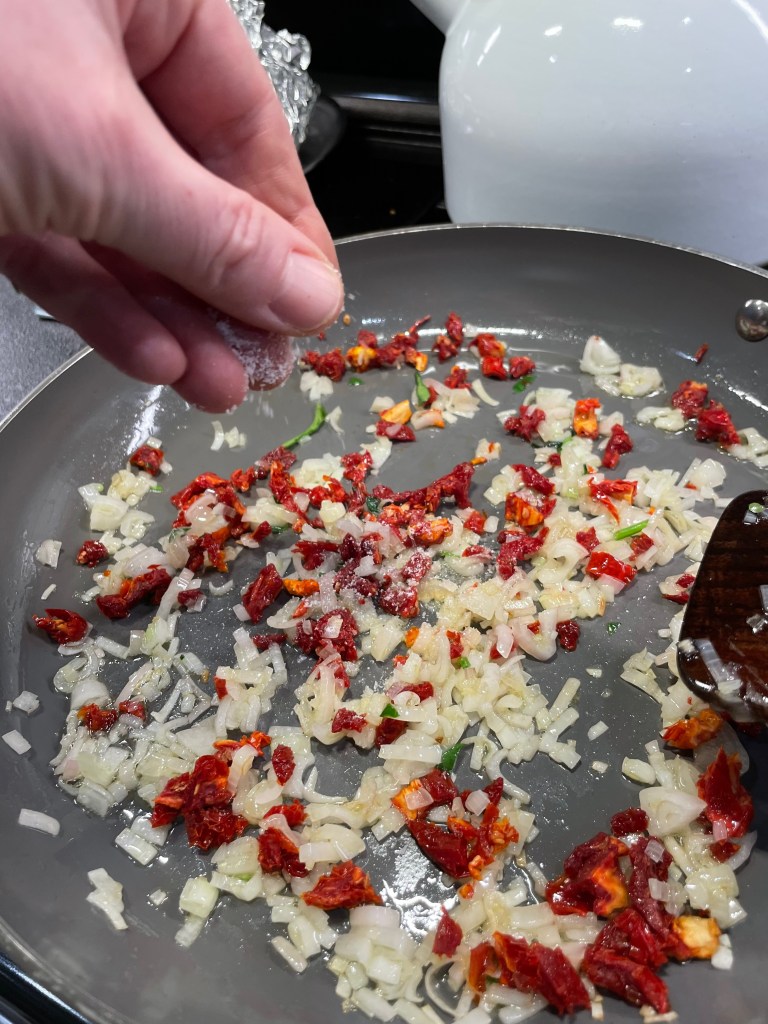
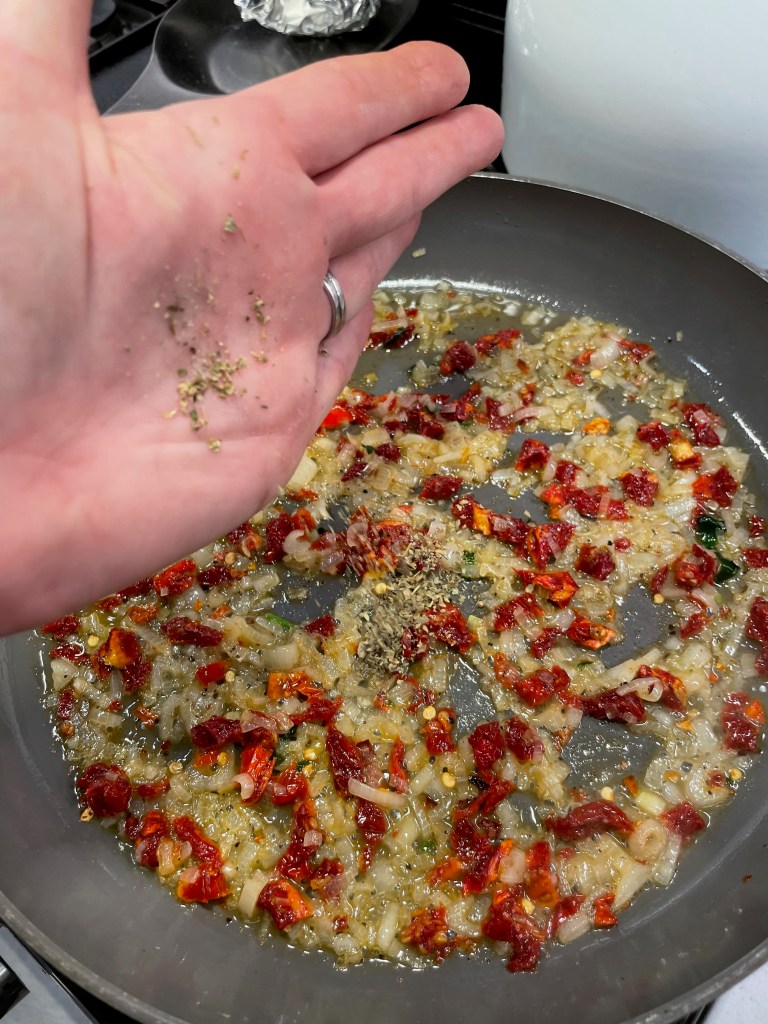
Despite the special appearance of roulades, they’re actually quite easy to make, using whatever fillings sound good to you. This time, mine are bearing festive hues of green and red (just like Christmas), with crowd-pleasing flavors of spinach, feta and sun-dried tomato. The filling is accented with sautéed shallots, garlic and Italian herb blend, and these pretty pinwheels are delicious alongside some roasted garlic mashed potatoes.
Are you ready to get cookin’?
My flavors are Mediterranean, but there are so many possibilities!
Special tools
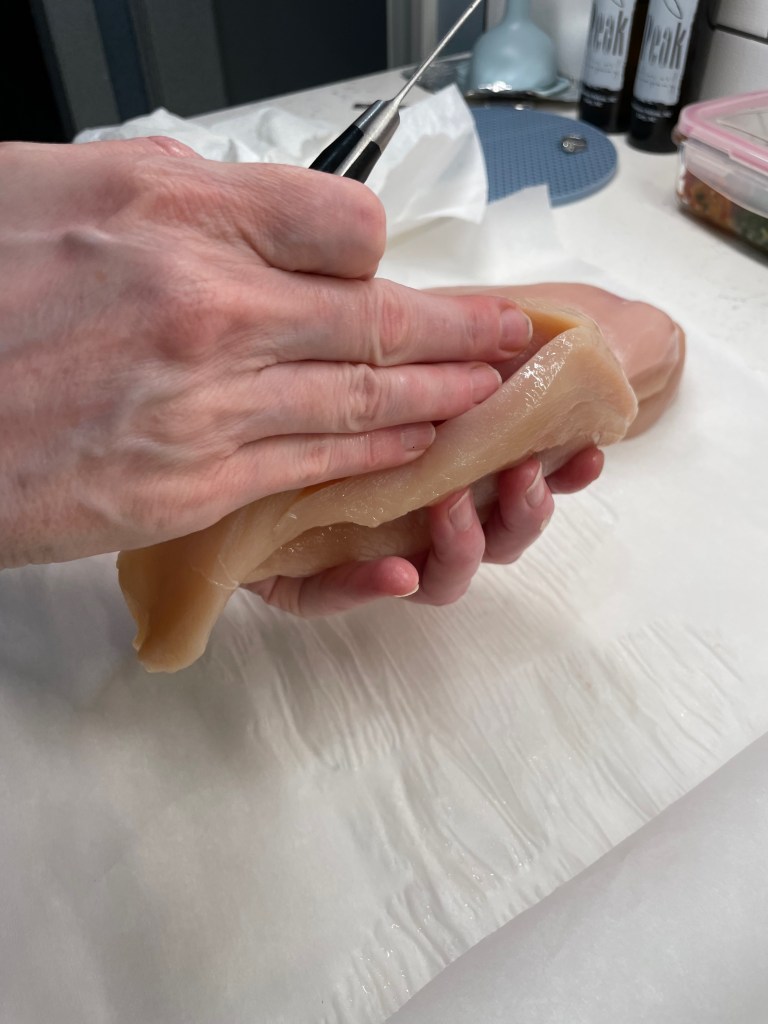
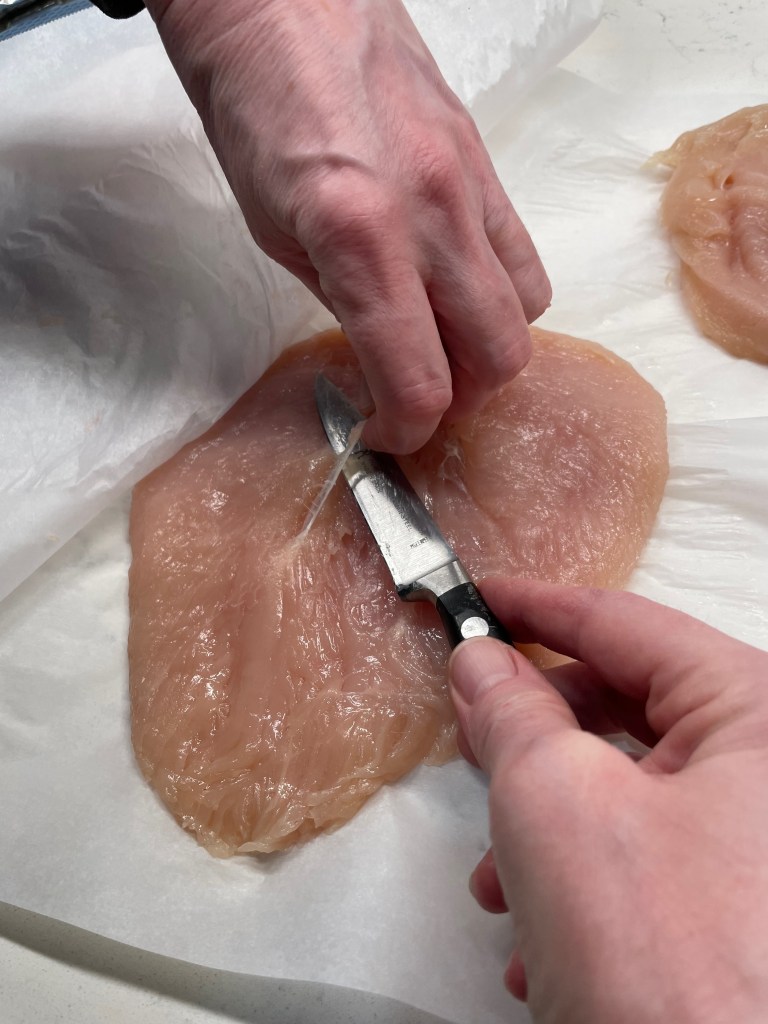
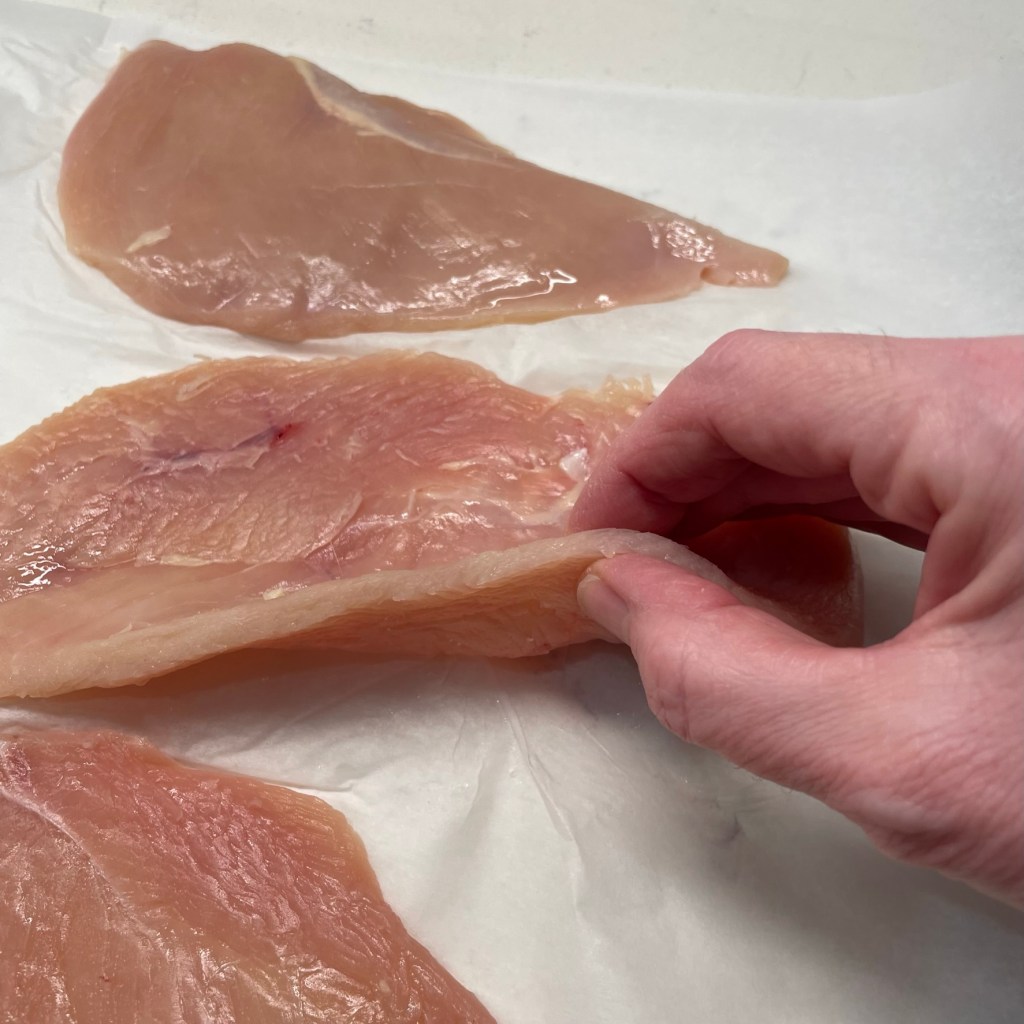
You’ll want to have a few items handy to successfully prep the chicken breasts, and the most important is a sharp, sturdy paring knife that you can use to open up a plump breast into a wider piece that can be pounded flat. A large chef’s knife is not recommended for safety reasons; using a smaller knife allows you to cut with more precision. Begin by holding the thick side of the breast toward you, and make several shallow slits lengthwise, opening the breast as you go, until it lays flat on the parchment. Take your time, and don’t use heavy pressure on the knife. Nobody wants to be at urgent care the week before Christmas.
Make a shallow slit along the thicker side.Open up the breast and continue making shallow cuts, a little at a time.Stop cutting when the breast will lay flat.
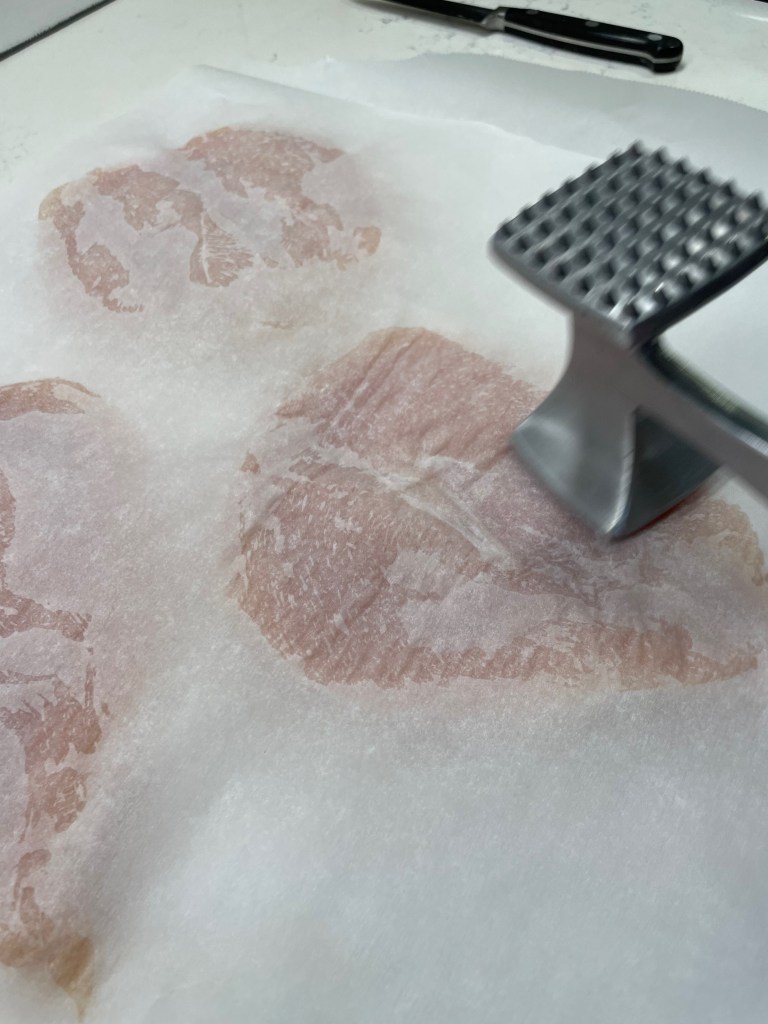
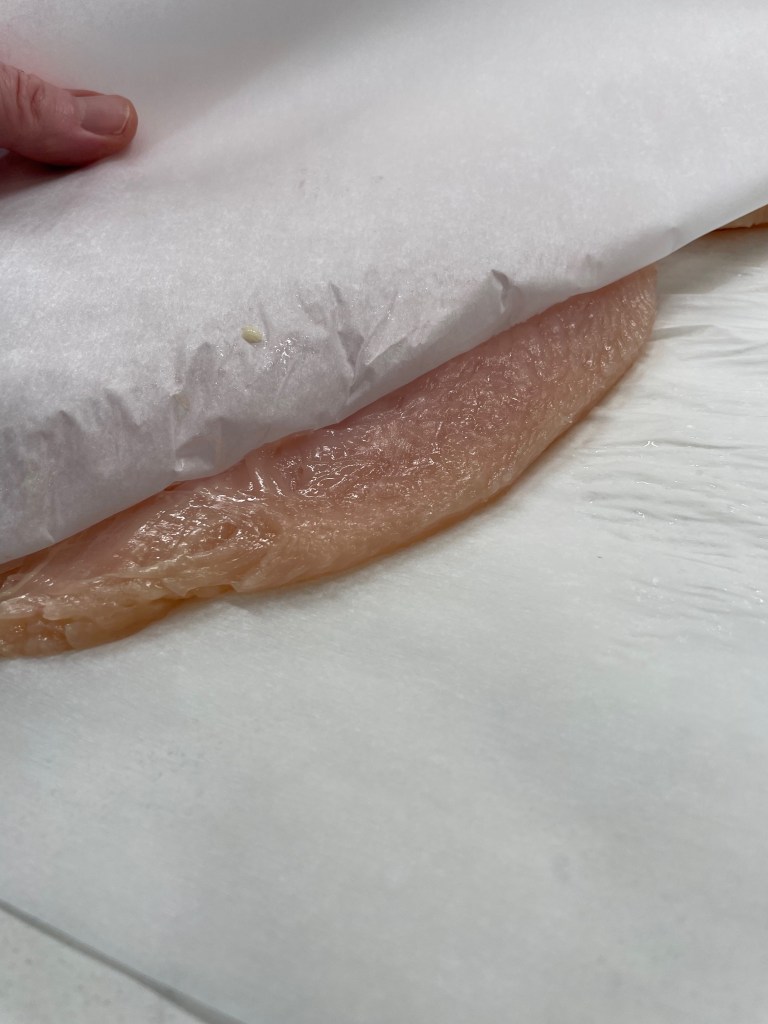
Next, you’ll need parchment or waxed paper and a smooth meat mallet for pounding the chicken. Don’t rush this, and don’t use the textured side of the mallet or you may accidentally split the fibers of the meat. The goal is to gently pound out the breast between layers of paper until it is an even 1/4-inch thickness (or as close to it as you can get). This makes the chicken more flexible for rolling up around your chosen filling ingredients, but don’t go thinner than 1/4-inch, or your chicken will tear apart.
Make a gentle swiping motion from center to edges.Ideal thickness is 1/4 inch.Use the tip of your knife to cut out the tendon.
Filling for the roulades
Just about any ingredients you like can be layered into chicken roulades, though I don’t recommend “melty” cheeses because they will always ooze out and make a mess in the oven. If you want a cheesy accent, stick with small amounts of firm cheeses, such as feta, bleu or Parmesan. Whatever vegetables you choose, chop everything small so that the filling rolls up easily and doesn’t fall out of the roulades when you bake them.
Use olive oil or butter to sauté, and remember to season every layer!
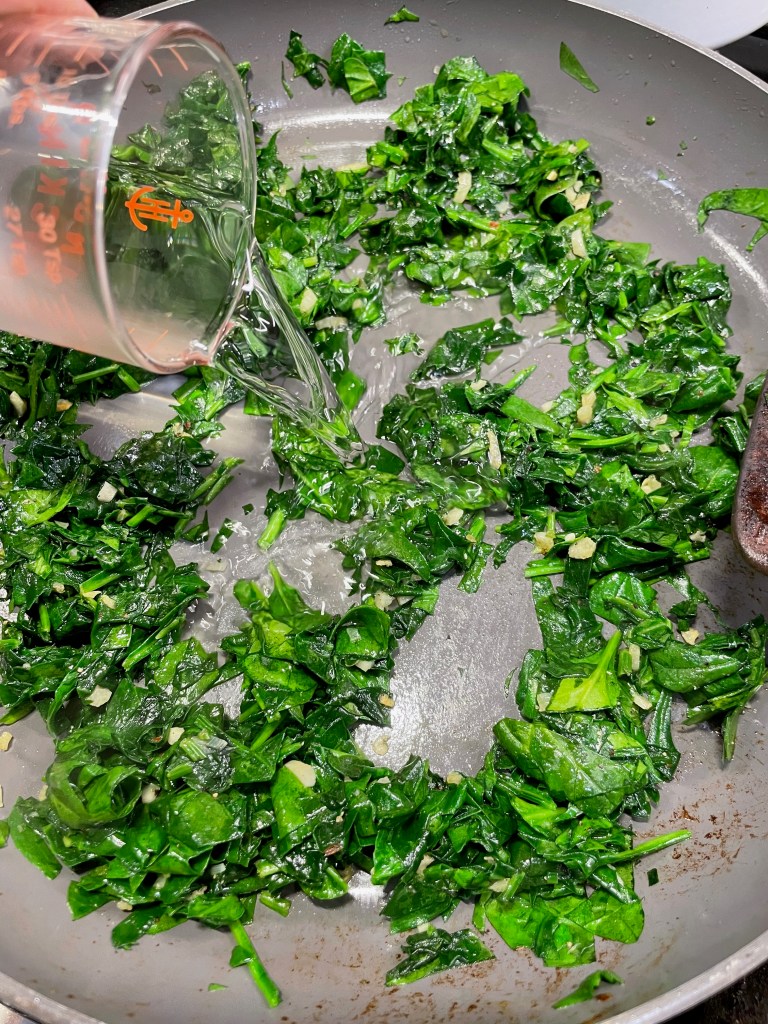
Second, cook any vegetable fillings until they are soft and tender. Raw ingredients rolled up inside the chicken will give off extra moisture and throw off the cooking time, and you’re also likely to have some unpleasant textures. To make the colors of my filling stand out, so I cooked the sun-dried tomatoes and spinach separately, but there would be no harm in cooking it all together to save a little time.
Don’t miss a chance to add flavor!
A little Italian herb seasoning and a pinch of Calabrian chile flakes gave my sun-dried tomato mixture some pizazz, and then I simmered with a splash of chicken stock until all the liquid was cooked off. To add depth to the spinach and garlic filling, I braised it in a shot of dry vermouth, again cooking until the excess moisture was evaporated. Dry white wine would be fine here; I just never have one open anymore and the vermouth is more interesting.
Cook off all excess moisture so that your roulades hold their shape in the oven.
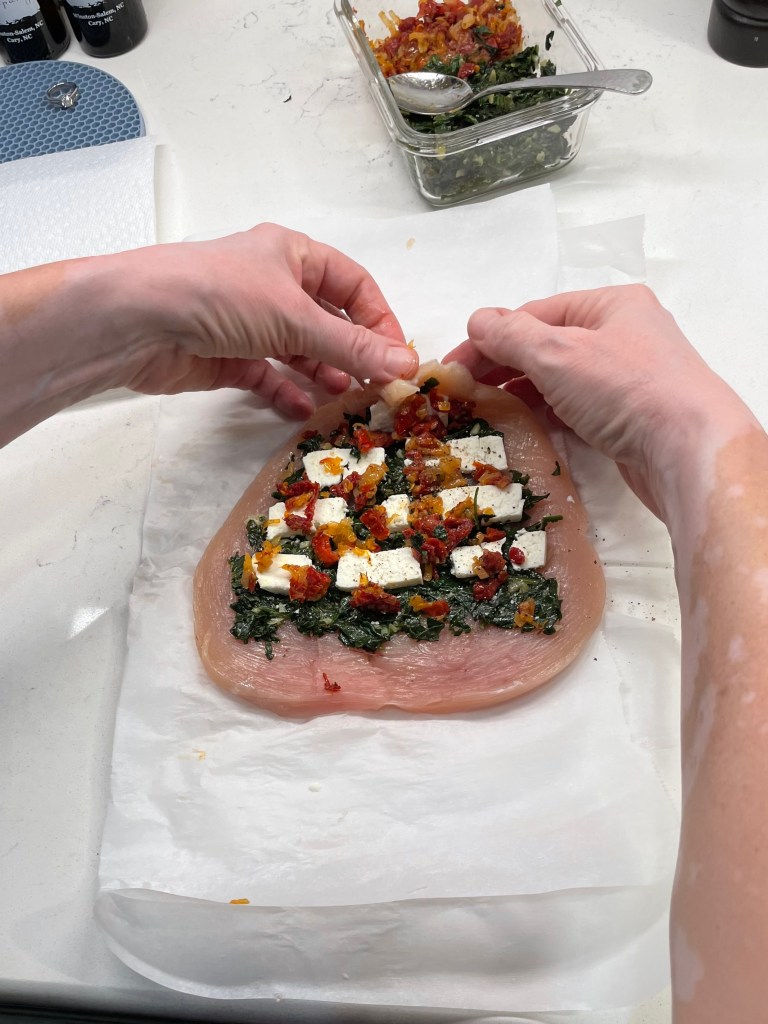
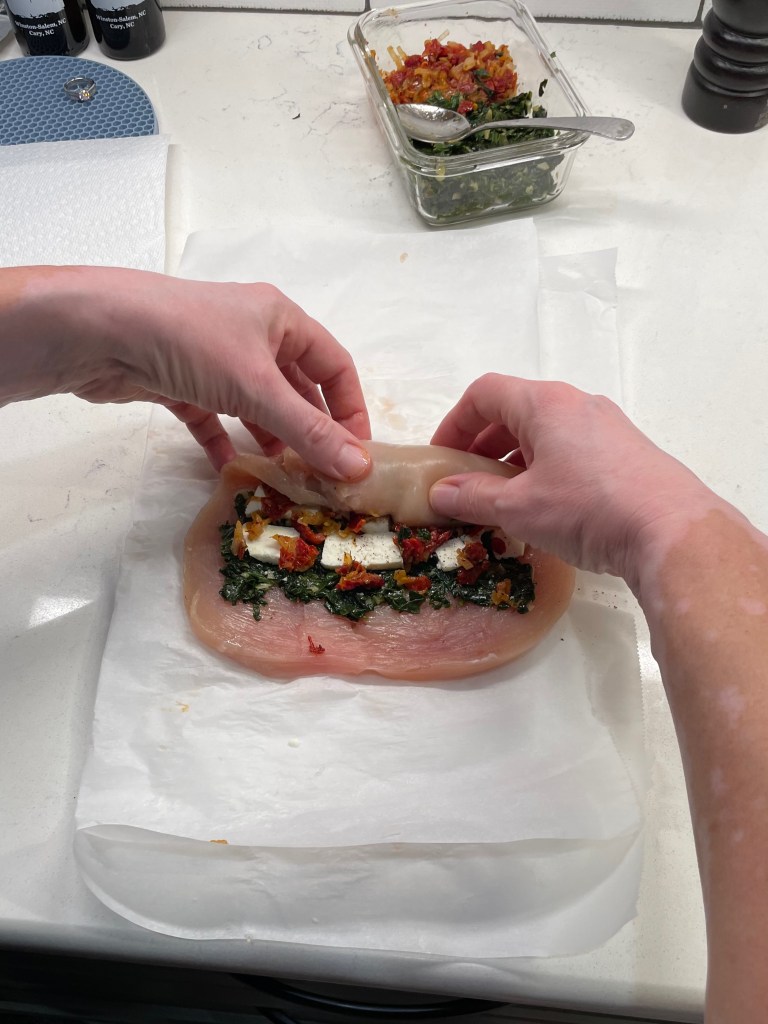
My chicken was layered with the spinach mixture, then thin slices of salty feta, and finally the sun-dried tomato mixture. Begin rolling from the pointed end of each butterflied breast, so that the fillings stay secure inside. The great thing about roulades is that any part of this could be done in advance to save precious time when you’re ready to entertain. You could even roll and refrigerate them in advance and just pull the whole baking sheet out of the fridge an hour before you bake.
My filling arrangement even looks a little bit like a Christmas tree! 😉
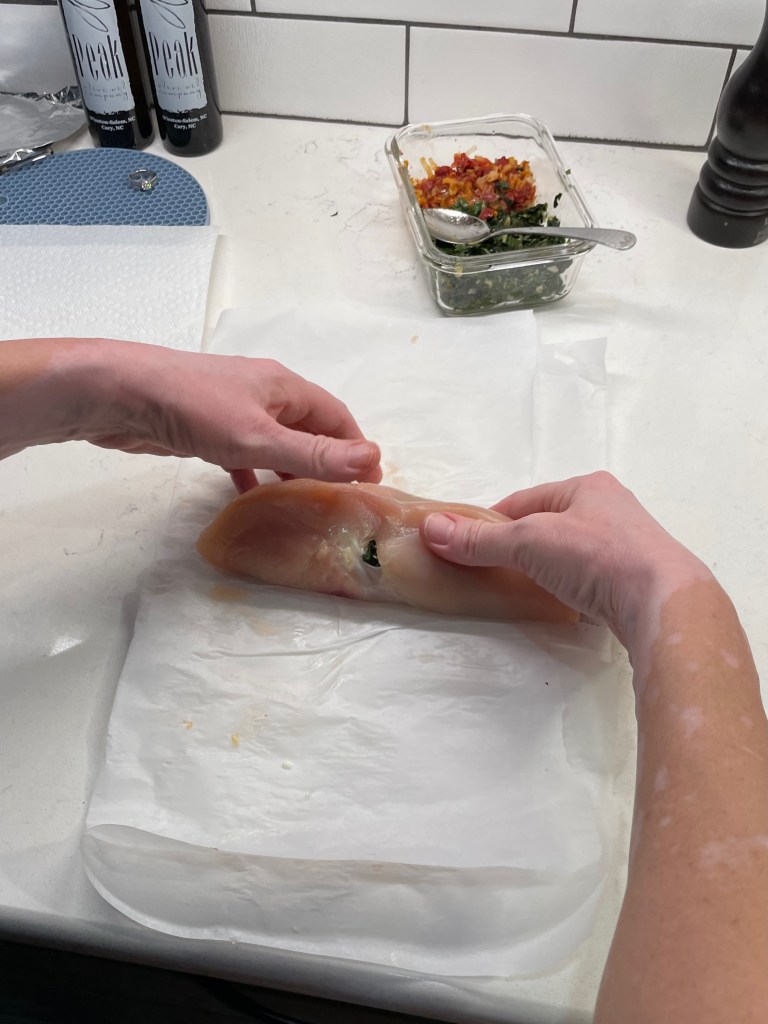
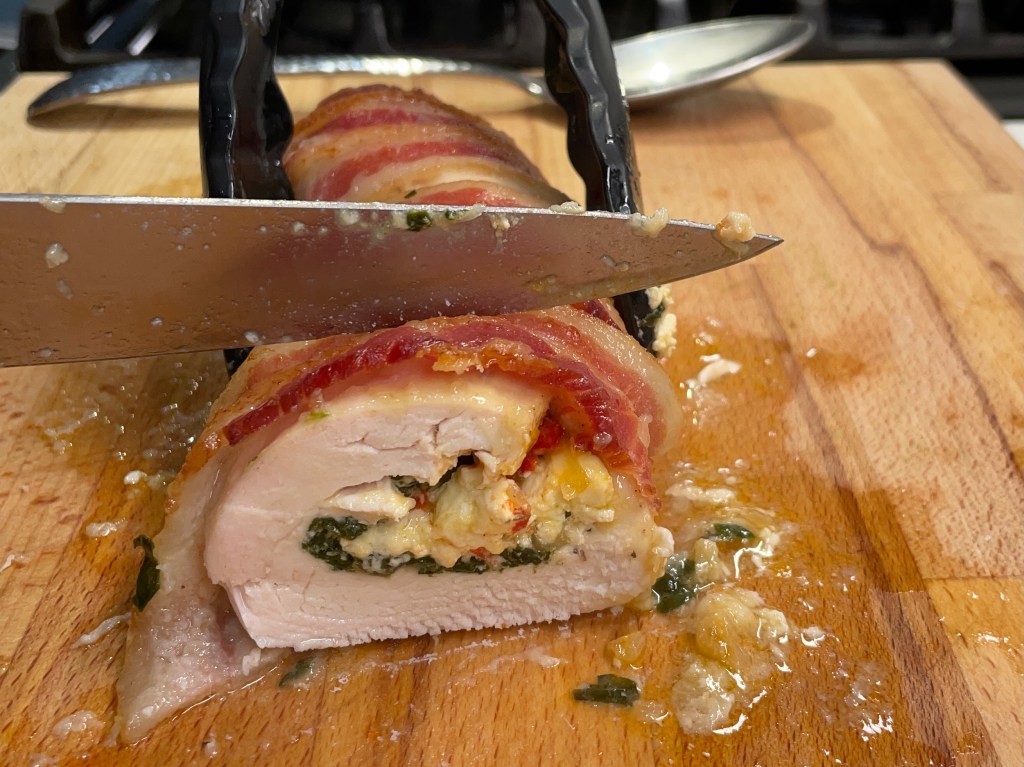
Secure the roulades with toothpicks, or stretch and wrap thin bacon slices all around before placing them (seams or bacon ends down) on a parchment-lined baking sheet. These go straight into the oven— no browning or searing is needed— and they’ll need about 40 minutes at 350° F. Let them cool a few minutes before slicing into one-inch thick rounds. Serve immediately.
The bacon adds flavor, and also works to hold the roulades together.
These festive chicken roulades were moist, tender and so flavorful. It made a delicious entree with Les’s amazing roasted garlic mashed potatoes, but I could also imagine them with polenta or risotto with these Italian-themed ingredients. But there are lots of other flavorful possibilities. Now that you know how to make roulades, drop a note in the comments to let me know what filling flavors you would like to try!
With favorite flavors and a few easy techniques, you can transform simple ingredients into something special for holiday entertaining. These roulades are filled with spinach and sun-dried tomato, but as long as your filling ingredients are chopped small and pre-cooked, the possibilities are endless!
Ingredients
1 1/2 pound package skinless, boneless chicken breasts (see notes)
2 Tbsp. extra virgin olive oil, divided (you’ll use half each for sautéing the spinach and tomato mixtures)
2 fat handfuls baby spinach leaves, chopped
2 cloves garlic, finely minced
2 Tbsp. dry white wine (or vermouth, which is my go-to)
1/4 cup chopped sun-dried tomatoes (see notes)
1 medium shallot, finely diced
1/2 tsp. dried Italian herb blend
A pinch of red pepper flakes
1/4 cup chicken broth or stock
Kosher salt and freshly ground black pepper
4 oz. dry feta, cut into thin slices or crumbled
2 slices thin-cut bacon for each chicken breast used
Notes: The chicken breasts can be any size, and you don’t need to have one breast for each person you’re serving. They will be sliced into rounds, so as long as you have the appropriate weight package, you’ll have enough.
The sun-dried tomatoes I use are soft and pliable, ready straight from the package. If using very dry ones, rehydrate them briefly in hot water or chicken broth and then pat them dry. If using sun-dried tomatoes packed in oil, there’s no need for additional oil for sautéing them with the shallots.
Directions
Preheat oven to 350° F, with rack in center position. Line a baking sheet with parchment paper.
Butterfly the chicken breasts; use a sharp paring knife to cut shallow slits along the fat edge of the breasts, opening as you go until the breasts lay flat on the counter. Place between layers of parchment or waxed paper and pound gently with the smooth side of a meat mallet until they are a uniform, 1/4-inch thickness. Season with salt and pepper and set aside.
Heat one tablespoon of the oil over medium heat. Add the sun-dried tomatoes and shallots and sauté until tender. Season to taste with salt and pepper, plus Italian herb blend and red pepper flakes. Add chicken stock or broth, simmering until the liquid evaporates. Cool completely.
Heat remaining olive oil over medium heat. Add the chopped spinach and garlic and sauté until spinach is fully wilted. Season with salt and pepper, and stir in dry white wine; continue cooking just until the liquid evaporates. Cool completely.
Place the butterflied chicken breasts in front of you, with the pointed ends at the top. Divide spinach mixture evenly over the breasts, then arrange the feta and sun-dried tomato mixture. Roll each chicken breast tightly, starting at the narrow top so that you finish with a long edge. Use toothpicks to secure the edges of the chicken to the roulades, or gently stretch two slices of bacon to wrap around each breast, covering as much as possible.
Bake the roulades (uncovered) 35 to 45 minutes, or until bacon is fully cooked and chicken is opaque but not dry. Internal temp should be ~165° F. Let roulades rest at least five minutes, then slice into one-inch thick rounds and serve immediately.
The best thing about Thanksgiving leftovers— for me, anyway— is when they are gone. For all the excitement leading up to the biggest food holiday of the year, I’m usually over it after two rounds of leftovers. Yes, I look forward to a good turkey sandwich, usually with a thin layer of leftover dressing and a smear of tangy cranberry sauce, plus a dab of mayo and perhaps a piece of lettuce in a ridiculous effort to offset all those carbs. And obviously, I enjoy transforming the turkey bits into spicy dishes, such as my turkey and black bean enchiladas or a delicious, comforting bowl of leftover turkey gumbo.
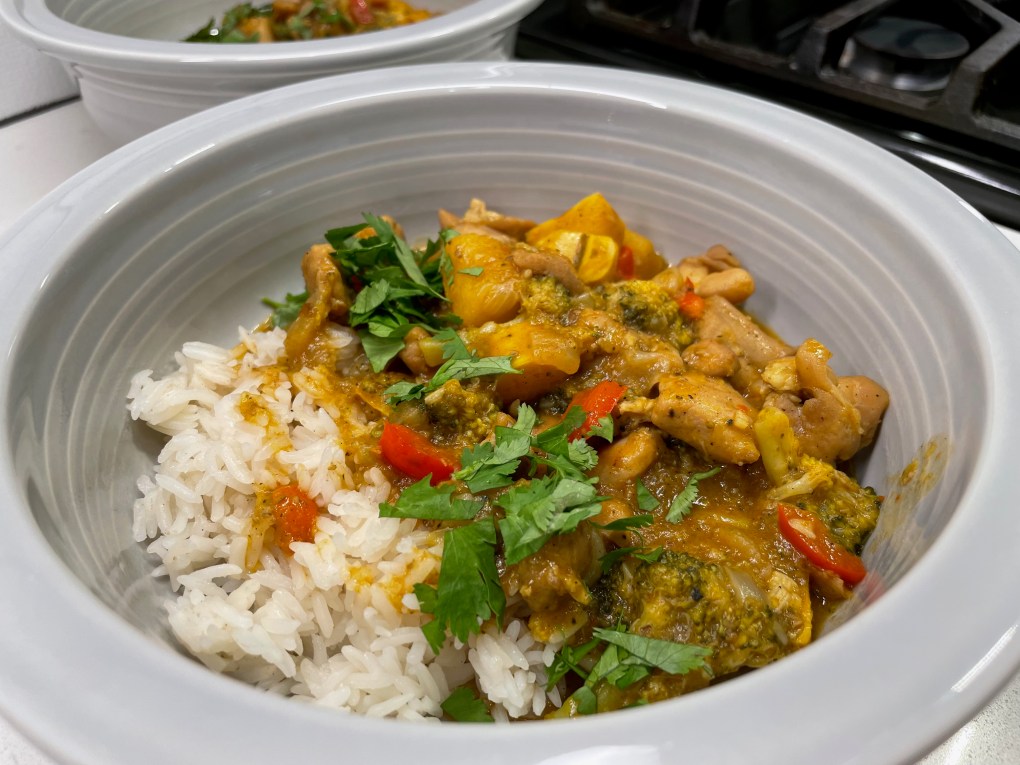
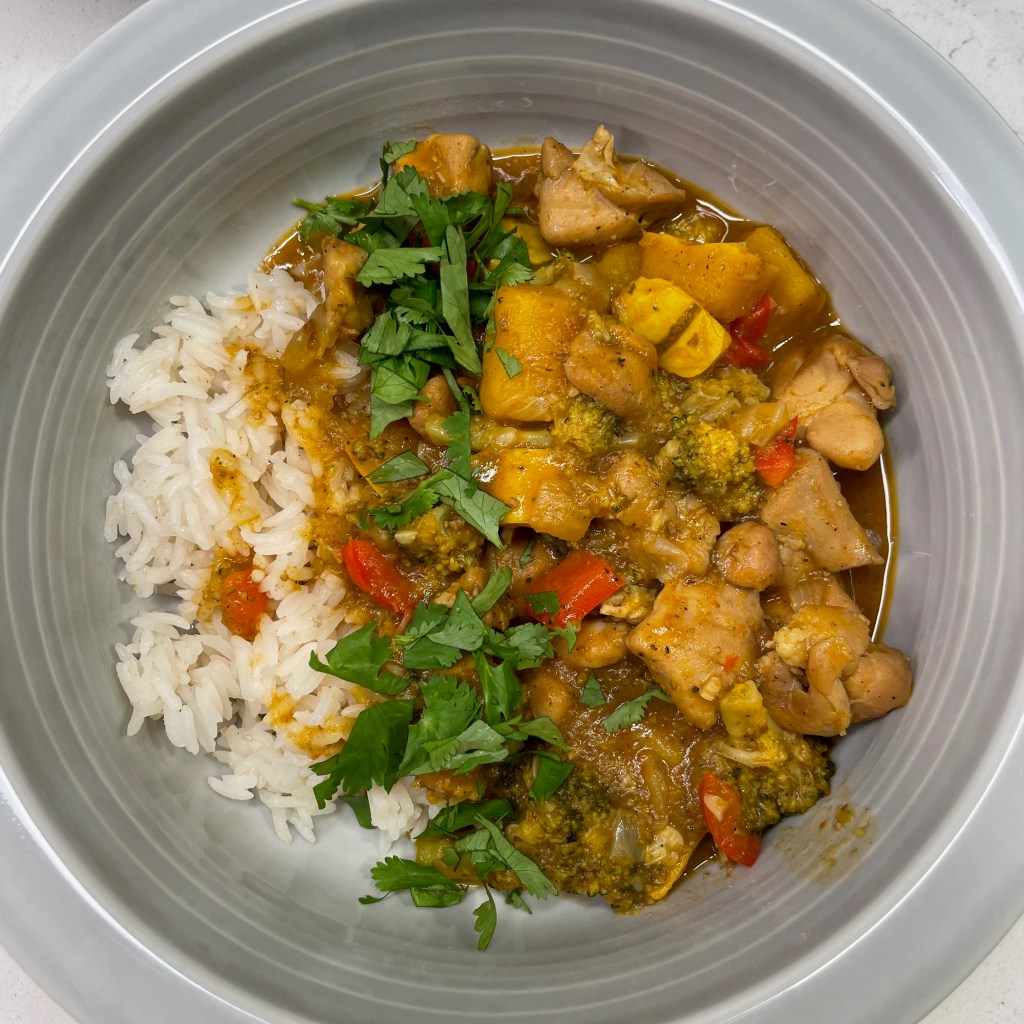
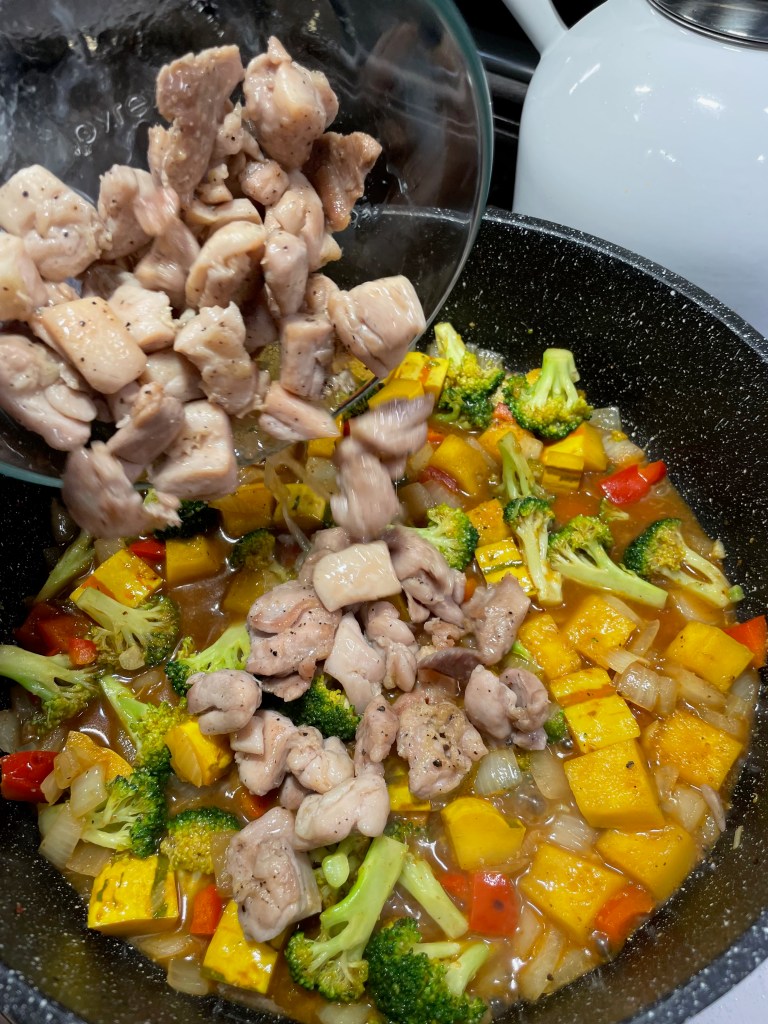
But my taste buds get weary after all that butter and gravy, and I start craving something with more pizzazz, and (for reasons I cannot explain) preferably from a culture other than my own. This impromptu Indian-inspired meal gave me not only delicious, warm spicy flavors, but also a generous dose of comfort on a dreary November night. My chicken curry came together more quickly than you might imagine, and it was a great way to incorporate some nutritious autumn vegetables and use up a package of skinless chicken thighs that I had stashed in the freezer.
There’s flavor, color and loads of nutrients. What more could I ask?
Curry is not a cuisine of my youth; I first learned to enjoy it about 15 years ago in a local Thai restaurant, and I finally got brave enough to try making it at home within the past few years. There are many varieties and styles (or colors, if you will) of curry, and it has taken me some time to learn which ones I like best. In Thailand, a green curry might include lemongrass, garlic, kaffir lime and hot chile spices, and those flavors are spectacular with seafood in a broth softened with coconut milk. In nearby India, a curry looks altogether different and usually gets its flavor from a blend of dry spices, including cardamom, coriander, ginger, cumin and turmeric. If you purchase a jar or can of “curry powder,” it may contain any combination of those pre-ground ingredients, but it’s easy enough to mix and match your own flavors if you already have the individual spices.
A pre-made curry blend would work great, but I make my own for better control of our favorite flavors.
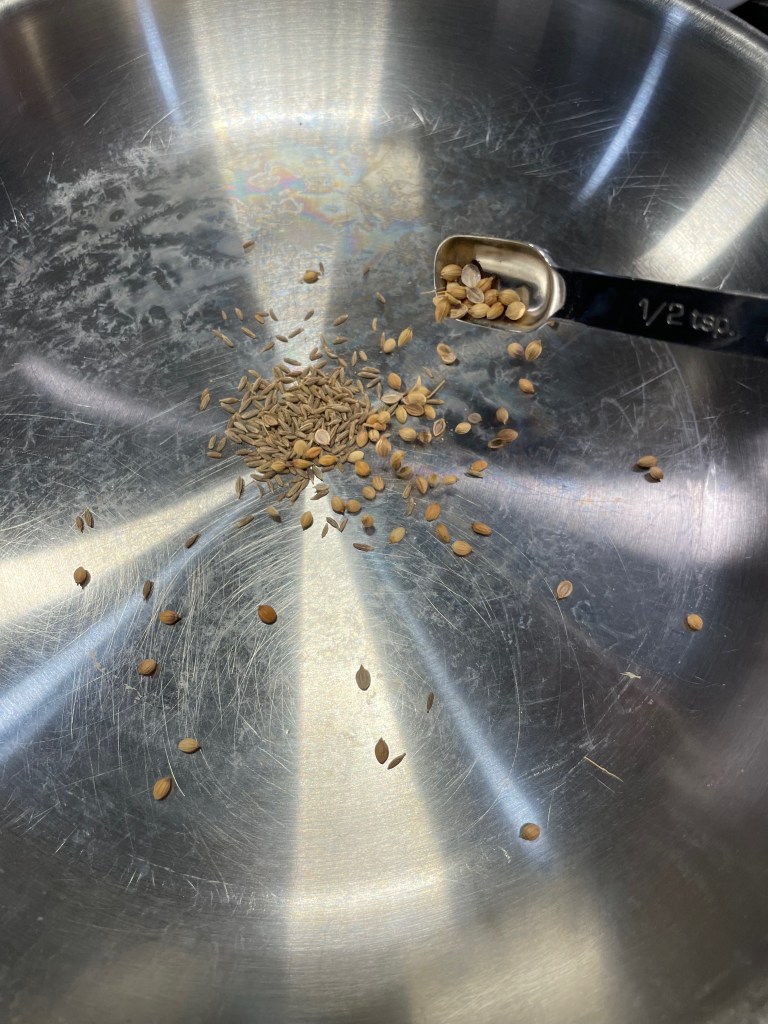
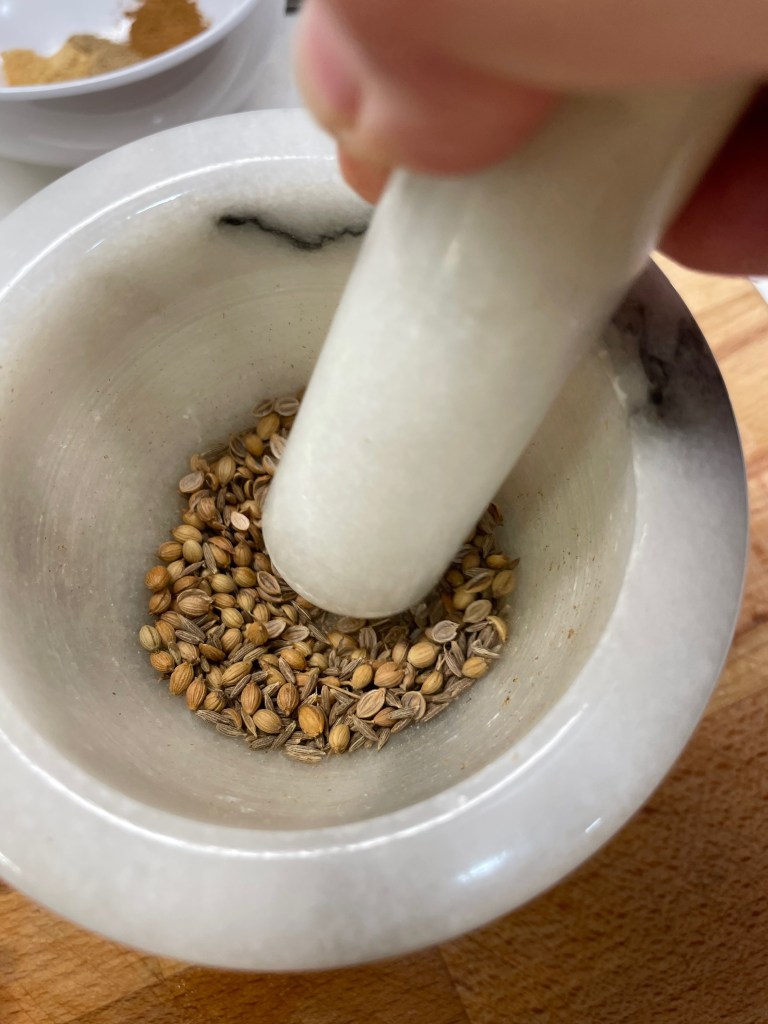
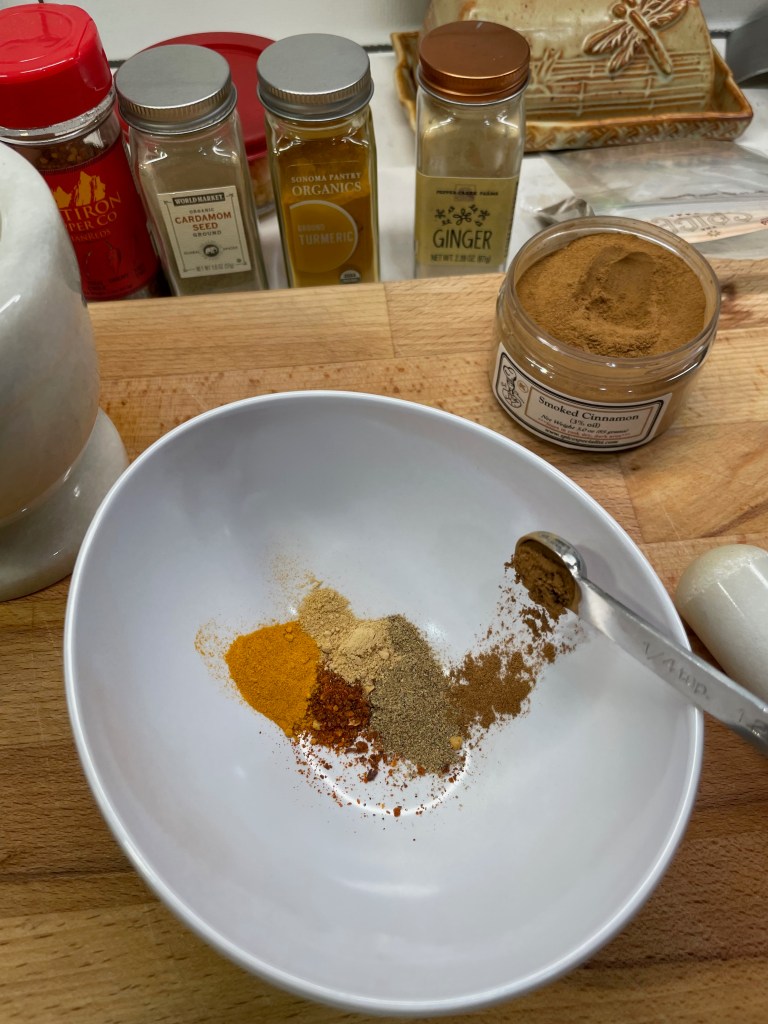
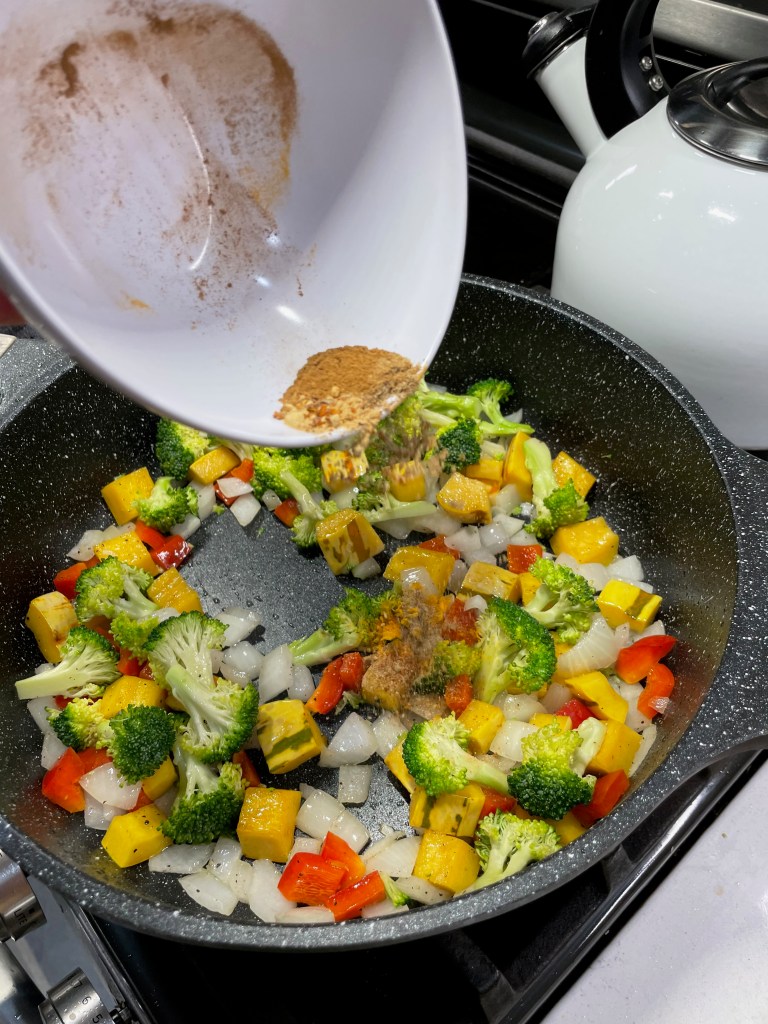
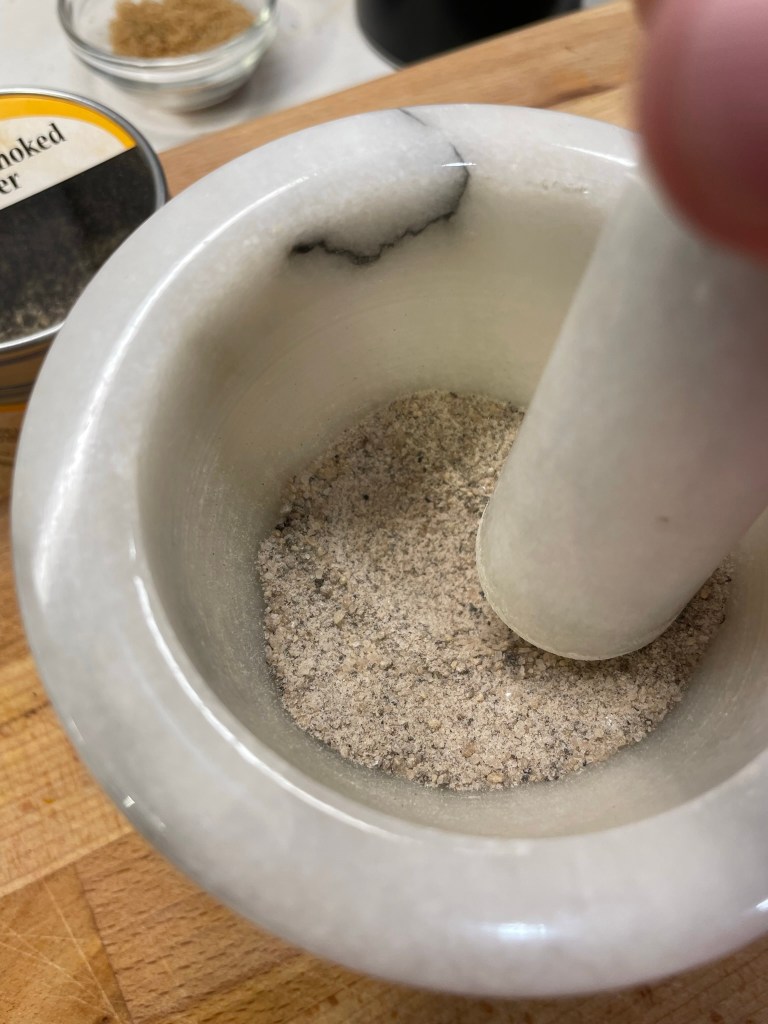
My chicken and autumn veggies dish is more similar to an Indian curry, and I started my blend with a quick toasting of whole cumin and coriander seeds. Heat brings forth the intense flavors, whether by toasting whole spices or by adding ground spices to hot oil in the pan. The technical term for this is “blooming,” and you don’t want to miss this easy step for the extra flavor it imparts to your final dish. I toasted the seeds in a hot, dry skillet— swirling the whole time for about 45 seconds until they were intensely fragrant— and then let them cool before crushing them in a mortar and pestle. Next up, I assembled my other dry, pre-ground spices, including ginger, cardamom, turmeric, cinnamon and hot chile flakes.
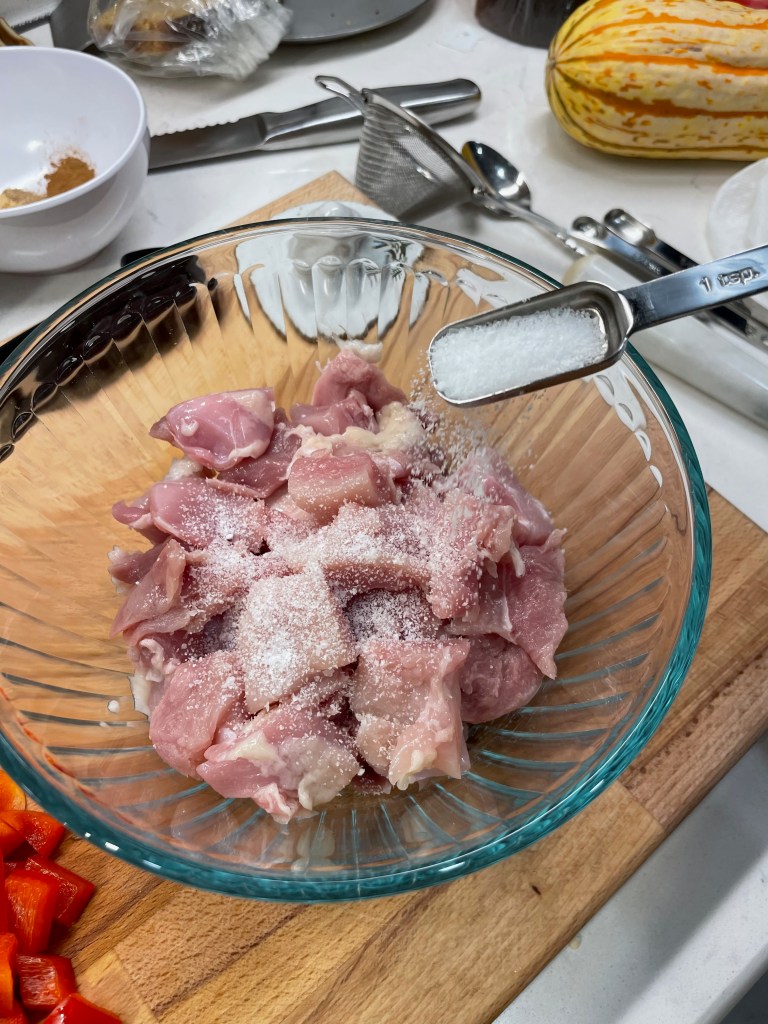
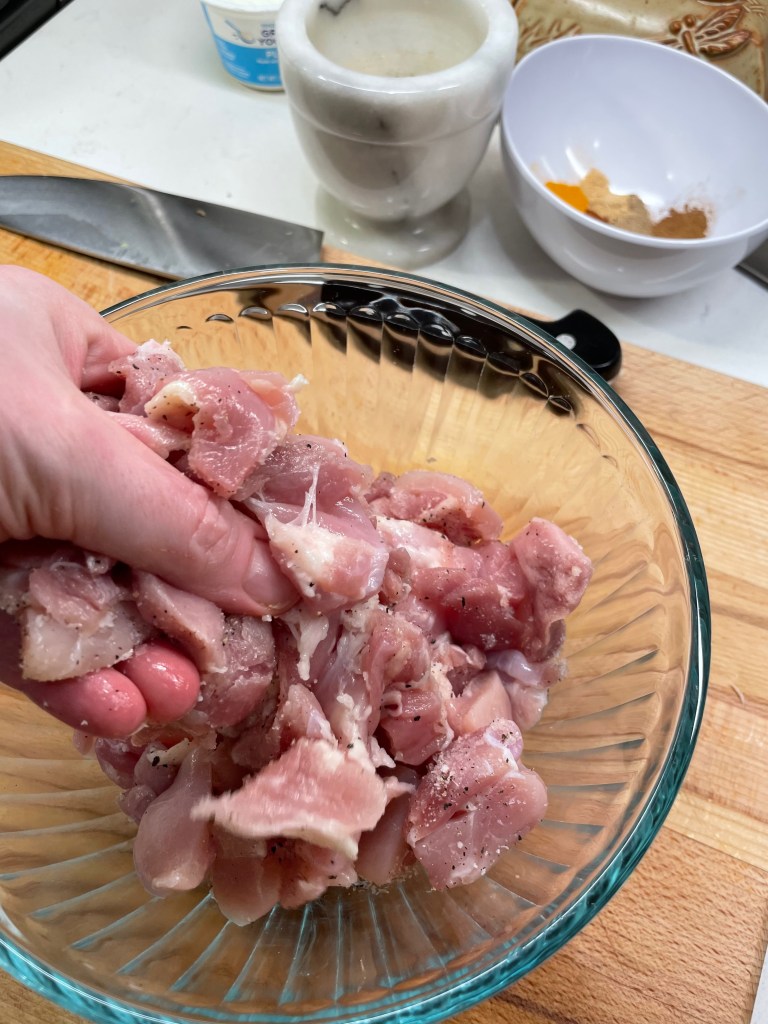
Toss the chicken chunks with salt and pepper and let it rest while you prep the veggies.
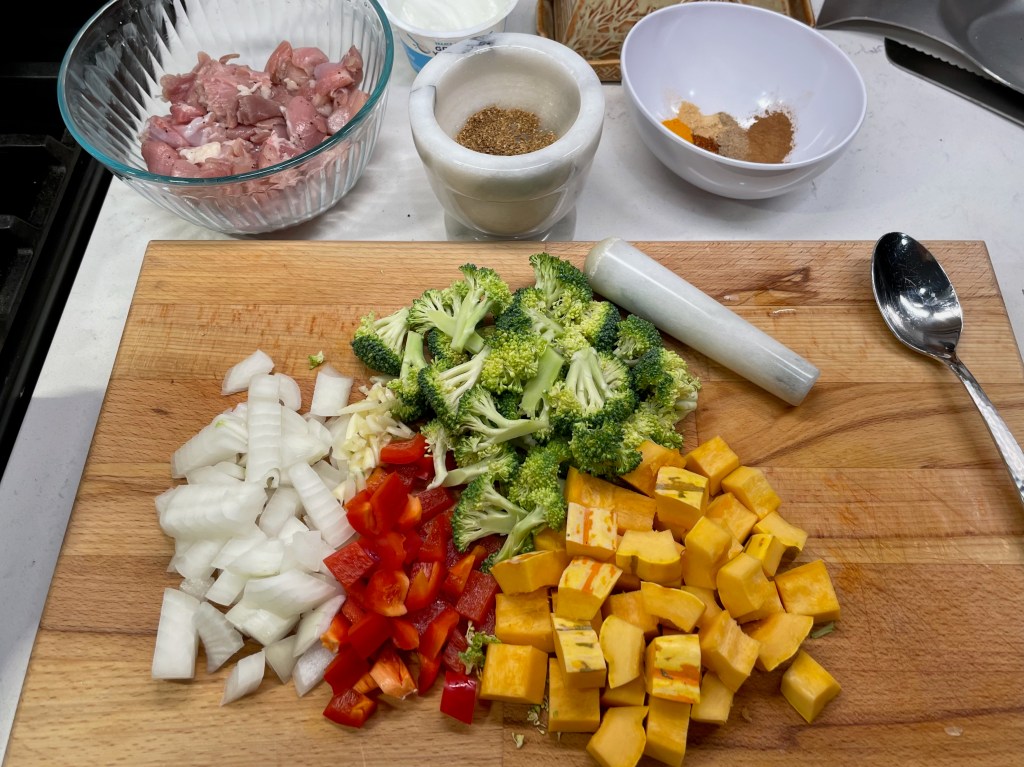
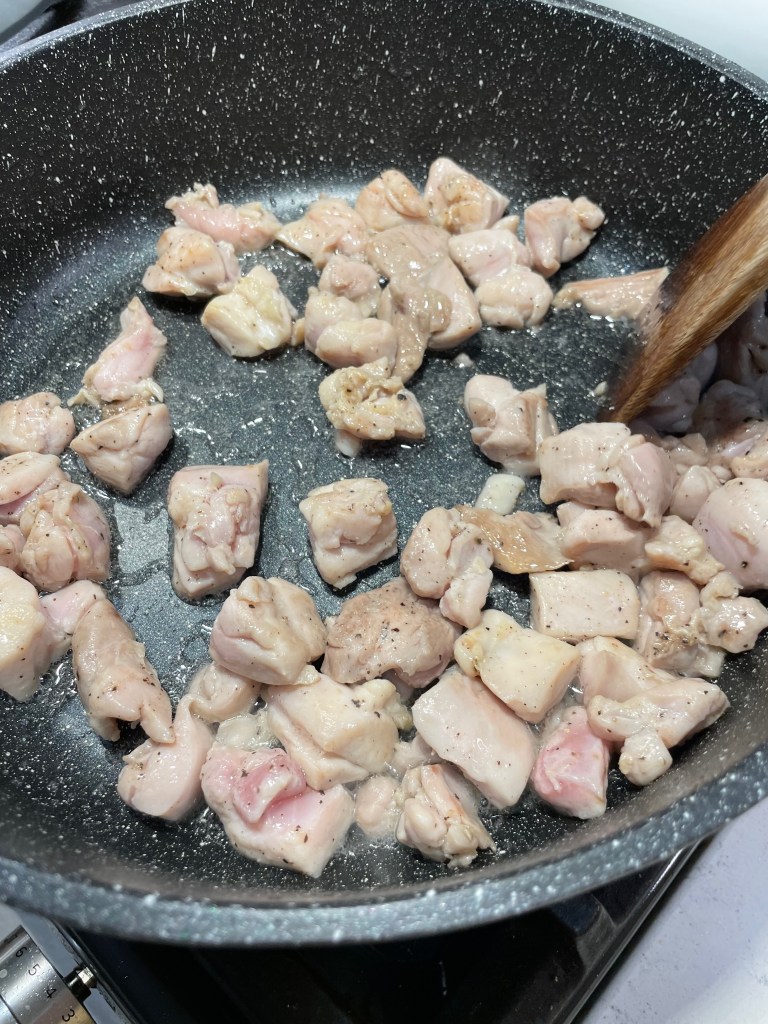
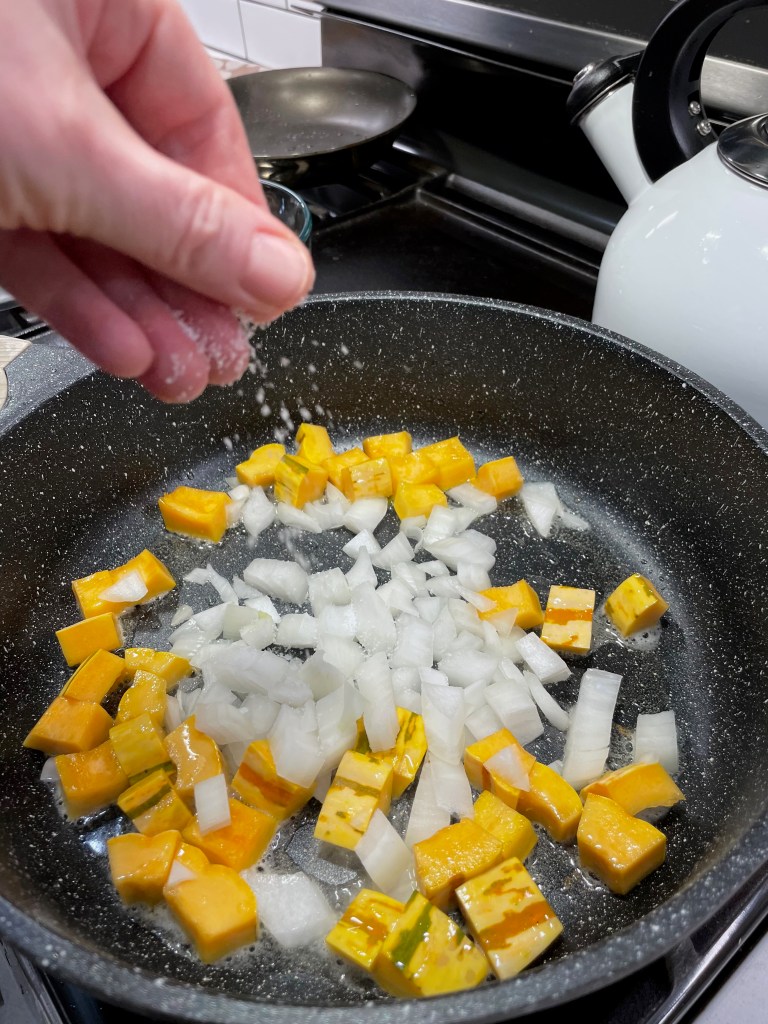
I chose boneless chicken thighs for their texture and flavor, but chicken breast or tenderloins would also be delicious here. I cut them into one-inch chunks, seasoned them with salt and pepper and let them rest while I cut up onions, red bell peppers, fresh broccoli and delicata squash. For this dish, I highly recommend getting all your components lined up and ready, as the cooking goes quickly once it begins.
Behold all the vitamins and fiber on that cutting board!
You’ll also need a bit of oil to get things started. Choose an oil that performs well over high heat, such as canola, peanut or coconut oil. I cooked the chicken first, just until the bits were no longer pink, and then transferred them to a separate bowl while I sautéed the vegetables. When I’m cooking veggies of varying textures, I usually begin with the firmer ones, adding the rest in descending order of necessary cooking time. The best time to add the spices is just before adding more vegetables— this allows them to bloom in the hot oil that coats the veggies. Season along the way, of course, with salt and pepper as well. This does more than add salty flavor; salting during cooking helps to draw moisture out of the ingredients for better texture.
With every ingredient addition, my kitchen smelled more and more amazing!
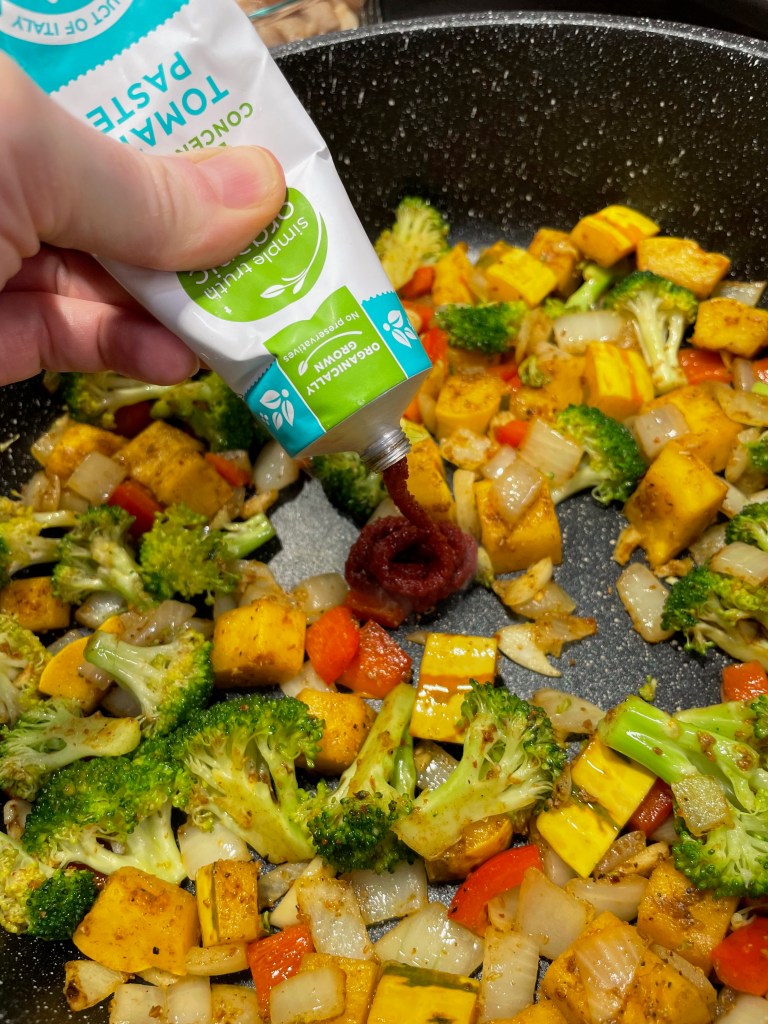
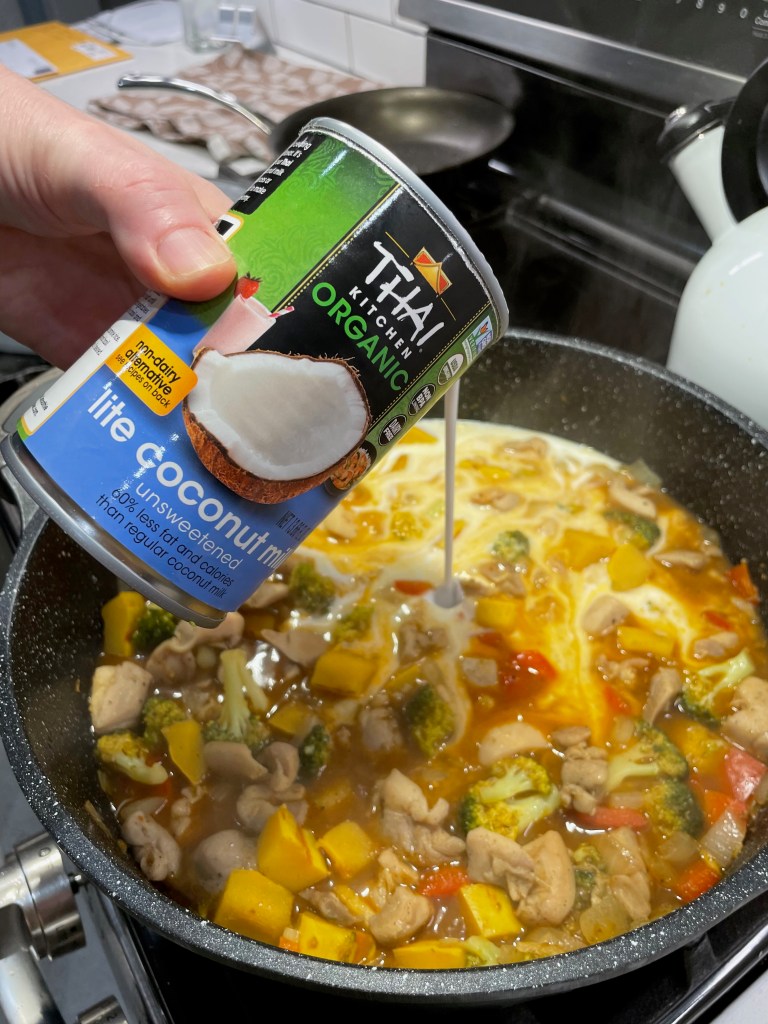
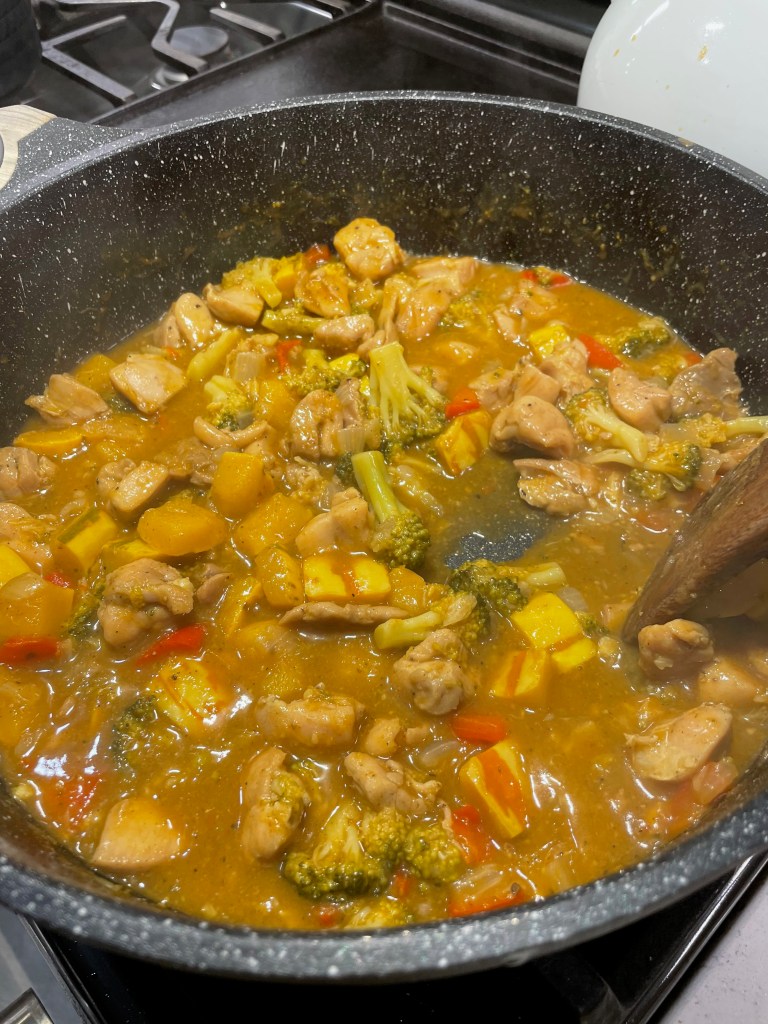
A dab of tomato paste in the center of the pot adds a rich, warm color and also a burst of umami flavor from the concentrated glutamates in the tomatoes. A little broth to thin it out, and then the chicken goes back into the pan with half a can of light coconut milk to simmer until everything is nice and tender. This took about 30 minutes, long enough to cook up a pan of basmati rice, perfect for soaking up the flavorful curry.
The coconut milk is a perfect complement to the warm Indian spices, and it helps all the flavors meld during the simmer.
This kind of meal hits the spot after so much gravy, dressing and mashed potatoes, and the heavy load of vegetables does the body good, too!
This dish ticks all the boxes with big flavor, warming comfort and exceptional nutrition. It's easy enough for a busy weeknight and rich with autumn comfort.
Ingredients
1 pound boneless, skinless chicken thighs, patted dry and cut into 1-inch chunks
Kosher salt and black pepper
1/2 tsp. whole cumin seeds
1/2 tsp. whole coriander seeds
1/4 tsp. EACH cardamom, cinnamon, red pepper flakes, ginger, turmeric (see recipe note below)
1/2 sweet or yellow onion, chopped
1 small delicata squash, cleaned and cut into 1-inch chunks
1/2 bunch fresh broccoli, cut into small florets
1/2 red bell pepper, chopped
2 Tbsp. high-heat cooking oil (I used coconut, but canola or peanut would be good)
1 to 2 Tbsp. tomato paste
1/2 cup low sodium broth (chicken or vegetable)
1/2 can light coconut milk
Basmati or brown rice for serving
Fresh cilantro for serving (optional)
Recipe Notes: I created my own curry spice blend because I have the individual ingredients, and 1/4 teaspoon each was a good starting point for my adjustments. This is a good way to control the heat and balance the blend with the spices you like best, but there’s no harm in buying a pre-made curry powder. Use 1 to 2 teaspoons, depending on how intense you’d like the flavors to be.
Because this dish moves quickly once cooking begins, I recommend having all ingredients prepped and on standby before you turn on the burner.
Directions
Season the chicken chunks with about 3/4 teaspoon salt and a few twists of black pepper. Toss to coat, and allow it to rest at room temperature while you prep the spices and vegetables.
Heat a small dry skillet over medium-high heat. Add seed spices and toast, swirling the pan constantly until the spices are very fragrant. Transfer to a bowl to cool, and then grind in a mortar and pestle or electric spice grinder.
Measure remaining spices into a bowl and set aside.
Place a wide, heavy-bottomed pot over medium-high heat. Add oil and heat until shimmering, then toss the chicken pieces just until all sides are no longer pink. Transfer chicken to a bowl and keep warm.
Add vegetables to the pot, beginning with the firmest and adding the others in descending order of time needed to soften. Season with a pinch or two of salt to help draw out the moisture. Add spice blend and ground seed spices to the hot vegetables and toss to coat.
Stir in tomato paste for rich color and burst of umami flavor. Add broth and cook until the liquid begins to simmer.
Return chicken to pan. Stir in coconut milk. Cover pan and reduce heat to simmer the curry for about 25 minutes. Serve with basmati rice and sprinkle with chopped cilantro, if desired.
The inspiration for this scrumptious chicken highlighting the flavors of peach and bourbon came from Instagram, but it was salmon rather than chicken. And it was baked rather than grilled (I think). I don’t remember the details, and anyone who is on Instagram knows that’s the nature of the social media beast— either follow it or lose it. And I don’t want to follow every single thing that interests me because I’m scatterbrained enough, and I don’t always think to “save” a recipe post to my favorites collection. I need that sacred space for videos of hero dogs making their final flight home, hungry raccoons snatching a donut at the Dunkin’ drive-thru, and onesie-wearing dachshunds munching on carrots by a cozy fireplace. Yep, I use social media for mindless entertainment. When it comes to food posts, I’m only looking for inspiration.
That mention of a peaches and bourbon combo was enough to get me going, though, and it stuck with me for days after I saw it, so when Les and I were asking each other what we’d do for dinner last weekend, I remembered the package of chicken thighs I had just bought that day and I blurted without even thinking, “peach-bourbon glazed chicken.” And there was no arm-twisting involved, because anytime we are pairing anything and bourbon, we’re good. All I needed was a recipe, right?
Not so fast.
If I had time only to share one message for people who think they don’t know how to cook, it would be this: trust yourself! Recipes only get you so far; you still have to understand some things about cooking, and that boils down to pairing flavors and mastering a few techniques. You already know what flavors you like together, so learn the methods that will help you be successful and the rest will fall into place. I didn’t write down anything about the recipe from that fleeting Instagram post— but I am going to connect the dots from what struck me about it: peaches, bourbon, meat and the grill.
The Flavor Pairings
Peaches are sweet, juicy and summery. What complements sweet? Tart, spice or smoke. That helps narrow down my next move toward pairing flavors. Bourbon is strong, with a boozy bite and a light smokiness from oak barrel aging, so I already have a complementary flavor profile (smoke) taking shape. I can inch it further toward smoke with introduction of a spice, but which ones are smoky? Off the top of my head, I know I have cumin, but that starts heading off into more specific ethnic cuisines (Mexican or Indian), which is not where I’m going. I wanted this to taste like an all-American summer. Paprika is also smoky and brings the benefit of adding vibrant brick-red color. That’s my choice for this dish, and I happen to have a bourbon-smoked paprika, which is a no-brainer here. Finally, I want to take the edge off the bourbon without losing its flavor, and a bit of brown sugar will do that while also supporting the sweetness of the peach. See how easy that was?
Lest you think that I analyze every recipe I make this way, I can assure that most of this mental processing happens unconsciously, much the same as getting dressed in the morning and instantly knowing which colors, styles and patterns will work or clash. The more time you spend in the kitchen, the more natural these decisions become.
Salt and pepper: the simplest seasonings are usually enough when you’re grilling, and it’s the way to go when you want the flavor of the meat to take center stage.
Smoked paprika: this lends a light smoky flavor, which is always a winner for the grill. This spice might not have been right for berries or citrus, but it worked great with peaches.
Brown sugar: this will underscore the sweetness of the peaches, soften the bourbon and also encourage even caramelization of the meat during grilling and glazing.
My bourbon smoked salt and pepper were very chunky, so I crushed them fine, then added the mixture to the paprika and brown sugar.
The Technique
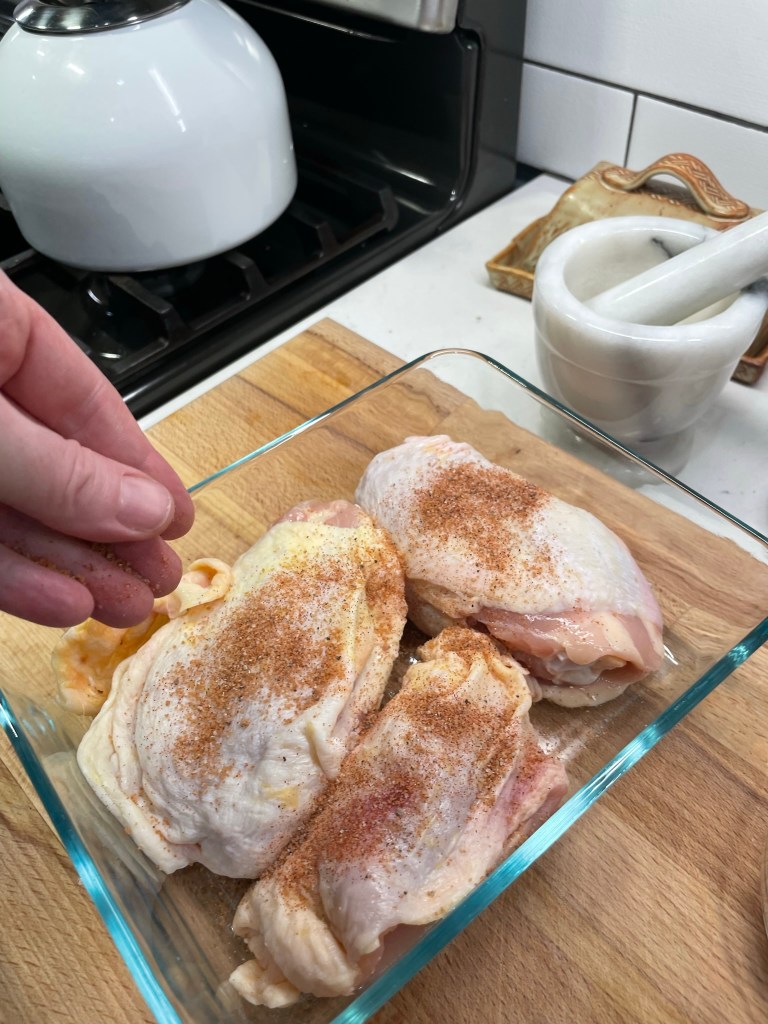
Les and I have both grilled food for years, but we always have something new to learn. I’ve been leaning heavily lately on the teachings of Kenji López-Alt, whose book The Food Lab describes in detail the benefits of dry-brining meat before roasting or grilling. It’s a whole science-y thing that involves reverse osmosis or something, and it works every time, producing both a great crispy skin and a juicy, tender interior. So for these chicken thighs, I did a quick dry brine with the seasoning blend above, and I held back a spoonful to use in the peach-bourbon glaze (more on that in a moment).
Pat the chicken fully dry before seasoning both sides with the spice rub, then send it to the fridge WITHOUT a cover.
With better planning, I would have done this seasoning step the night before we cooked, to give the chicken skin more than five hours of dry brining time. But sometimes these ideas hit me on the same day I want to cook, and five hours turned out to be plenty to give the chicken a locked-in delicious flavor. An extra few hours would likely have dried out the skin more for an even crispier exterior, so maybe next time. 😉
The Peach-Bourbon Glaze
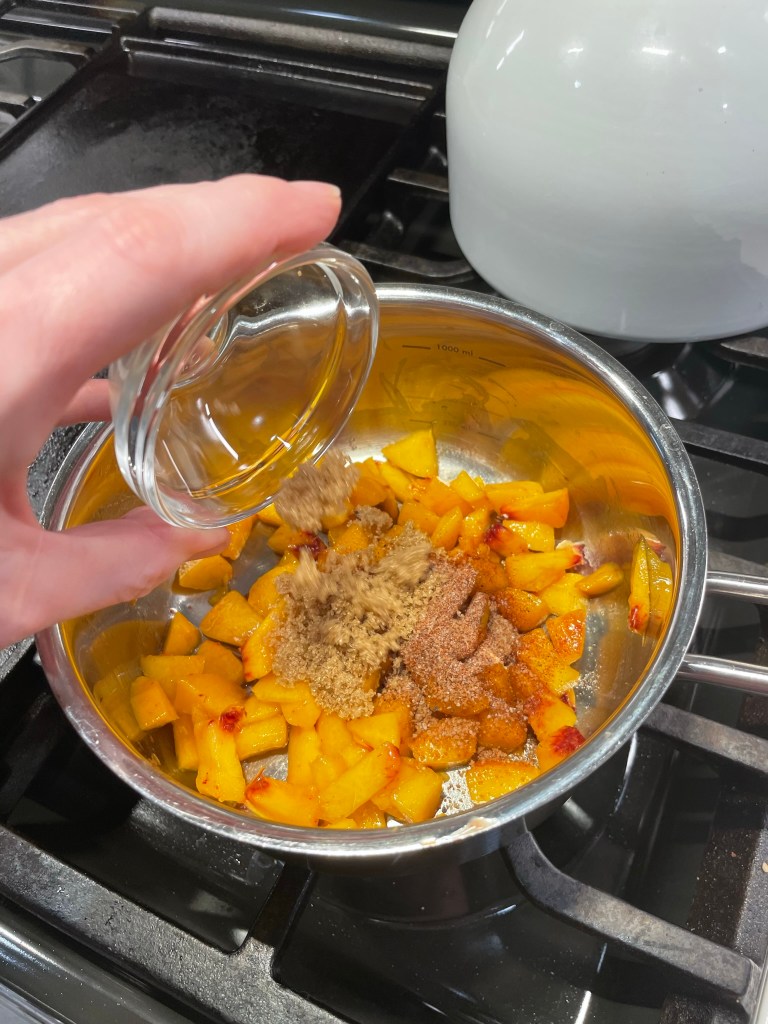
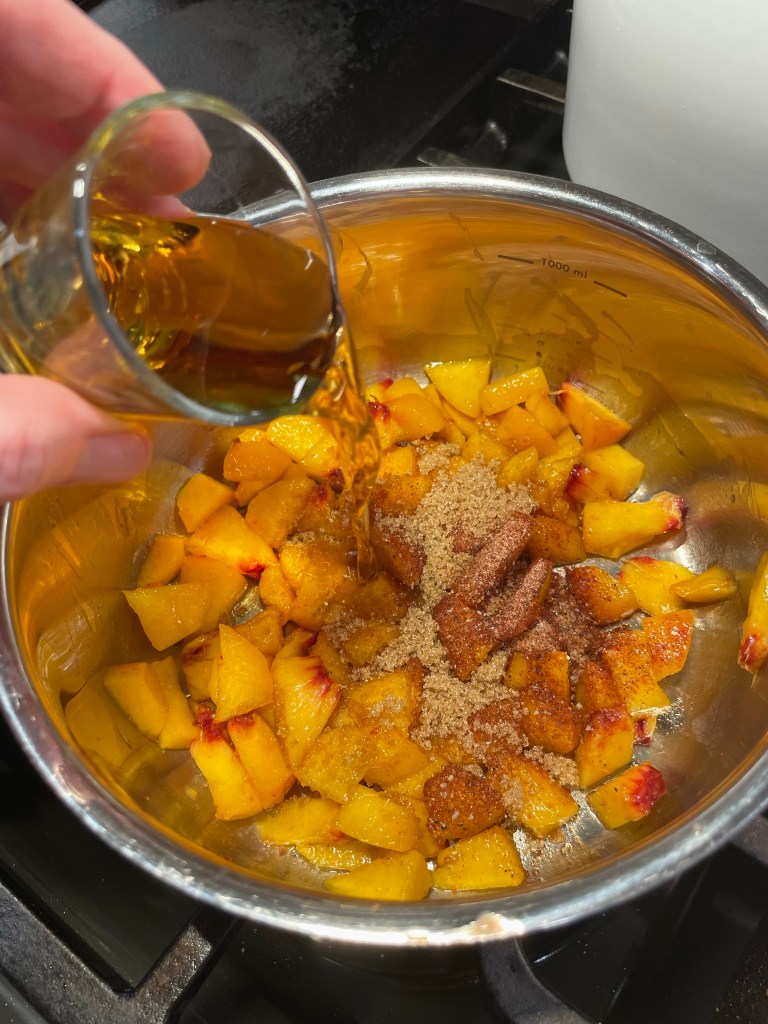
The peach-bourbon flavor combination that started it all was the last thing I prepared, but you can see by now that it was the basis for everything else I did. This is usually how I develop a recipe, whether it’s for a cocktail, a dessert or a main dish. The same spice blend I rubbed on the chicken also seasoned the peaches I cooked down for the glaze. An extra spoonful of brown sugar made the glaze syrupy, but too much would have made it cloyingly sweet. For the bourbon, I scanned my bar for ideas. Would regular bourbon have worked? Of course. Black-cherry infused bourbon? Not so much. The smoked maple was next-level, the winner!
Notice that I added the smoked maple bourbon twice? Half a shot at the beginning of cooking, and half a shot at the very end.
More Technique
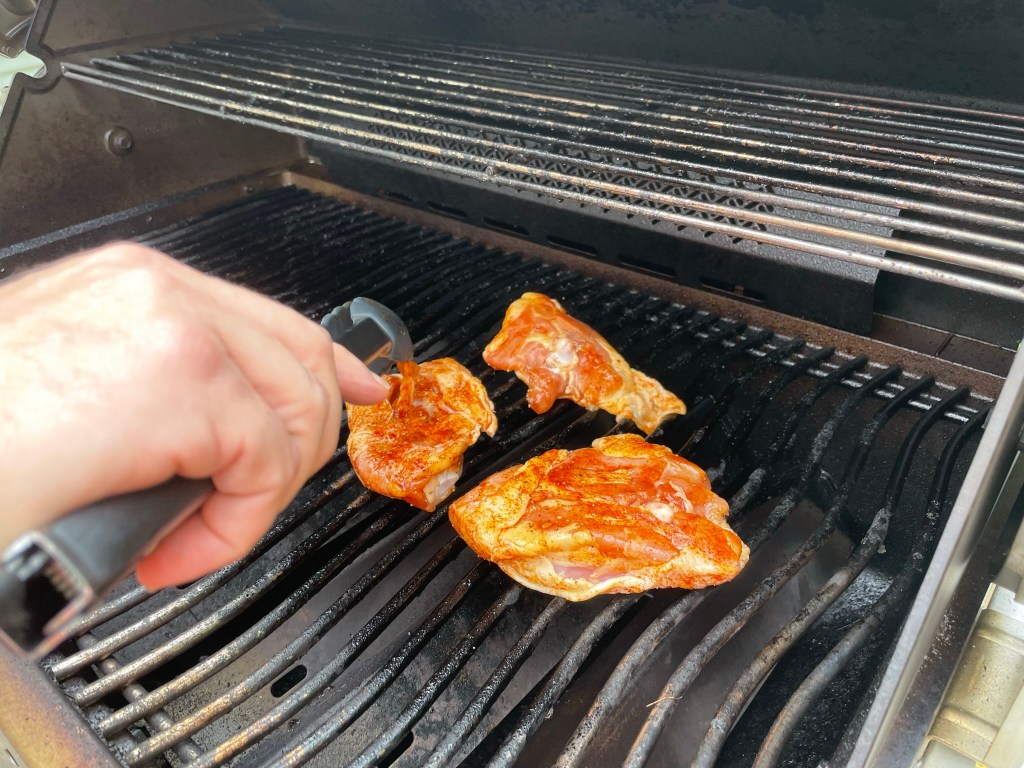
The rest of the process belonged to my husband, also known here as “Master of the Grill.” He has been relentless in learning the nuances of our new Napoleon gas grill with its numerous bells and whistles, including infrared searing zones, and some of those features come with a steep learning curve. For chicken thighs, Napoleon recommends a “reverse-sear” technique—Kenji would approve— and so Les preheated the grill to 350° F, with indirect heat on one side. The goal with this kind of cooking is to slow-cook the meat to achieve proper temperature before sealing the deal with crispy skin and glaze.
This reverse sear technique seemed backward from our usual way of grilling, but it paid off.
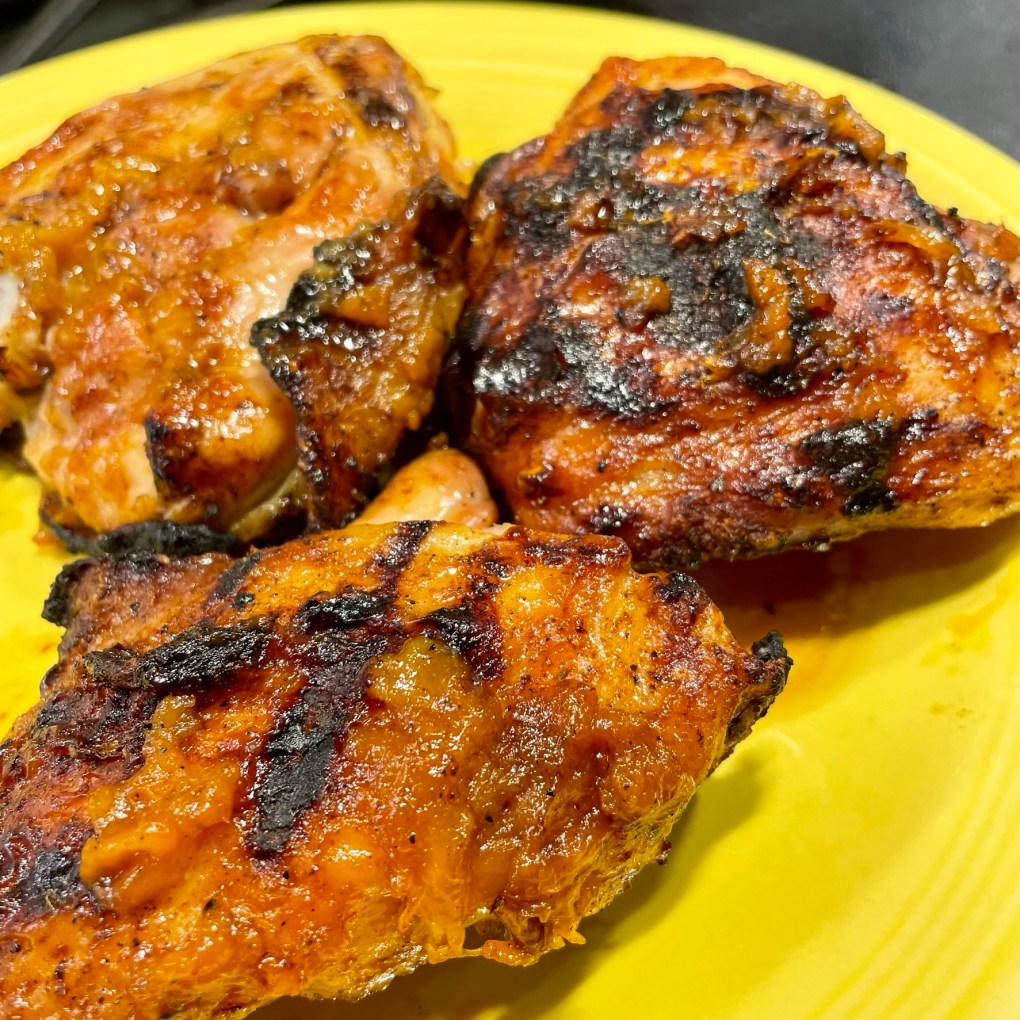
Les placed the thighs skin side-down on that indirect side and closed the grill cover, turning them only once during a whole 25 minutes, and checking the internal temperature periodically until it reached the recommended 145° F. Finally, the chicken was ready to move to the direct heat side of the grill, where it was licked by the flames for about four minutes, until the skin was crispy and the final meat temperature was 165° F. Only then did Les brush the peach-bourbon glaze onto the thighs for a final grilling, and gave them another quick sear to lock in the glaze.
If he had done the glazing too early, two things could have gone wrong— the glaze (with all its sugars) would probably have burned, and the wetness of it would have kept the skin from reaching and keeping its ideal, crispy texture. Patience, Grasshopper.
The Result
So there we have it: peach-bourbon inspiration + simple, complementary seasonings + unconventional technique + teamwork = one winner of a dish! The chicken thighs were juicy and tender inside, with a nice, crispy skin and a flavorful coating that combined one of summer’s greatest gifts and one of our favorite spirits.
A smoky spice is a wonderful complement to the sweetness of fresh, summer peaches in this flavorful grilled chicken recipe.
Ingredients
1 pound chicken thighs
1 tsp. smoked paprika (Spanish-style, not “hot” or Hungarian)
1 tsp. kosher salt
1/2 tsp. black pepper
3 tsp. brown sugar (use 2 for the rub and 1 in the glaze)
1 large peach, peeled and diced
1 1/2 oz. bourbon (I used smoked maple, and it was great!)
A splash of water, as needed, to cook down the peaches
This recipe relies on two specific techniques: dry-brining and indirect grilling. Both are outlined below, and they take longer than a conventional recipe, so plan ahead. I promise, the extra wait time is well worth it in the end! You’ll need to check the internal temperature of the chicken, so it’s beneficial to have a meat thermometer handy when you begin.
Directions
Do not rinse the chicken. Pat the pieces dry on all sides with paper towels. Arrange on a plate or in a glass dish.
Combine paprika, salt and pepper in a small bowl. Add two teaspoons of the brown sugar and mix until evenly blended. Sprinkle all over both sides of the chicken, reserving about one teaspoon of the spice mix for the glaze. Place the chicken, uncovered and skin side exposed, into the fridge and let it rest for several hours.
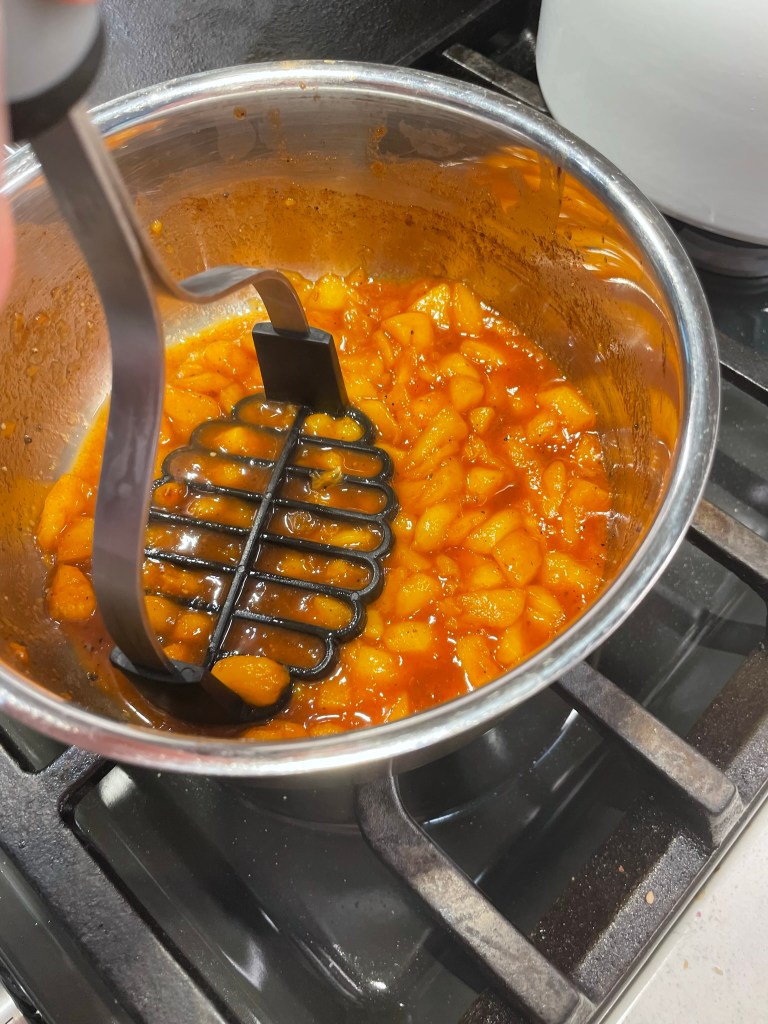
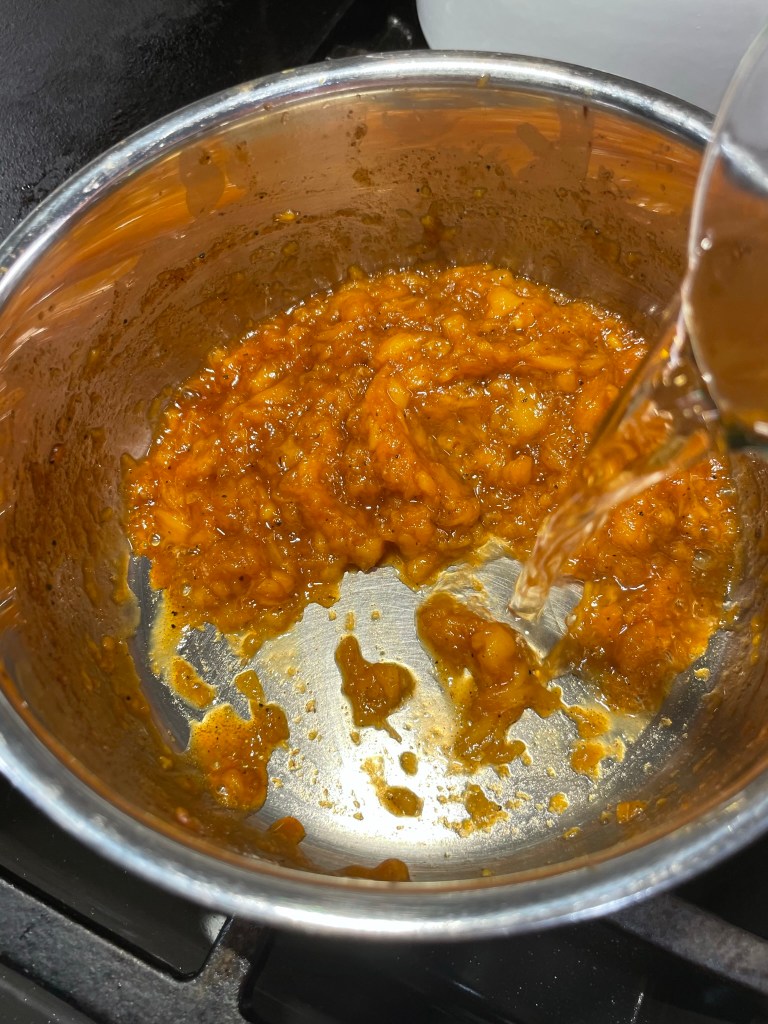
Add diced peaches to a small saucepan with remaining spice blend and another teaspoon of brown sugar. Pour in half of the bourbon and cook over medium low heat until peaches break down and mixture is slightly syrupy. If needed, add a splash or two of water to achieve this consistency.
After about 15 minutes, mash the peaches slightly into a chunky puree. When all the moisture has evaporated, stir in the remaining half shot of bourbon and remove from heat. If you make and chill this ahead, bring it to room temp before grilling.
Remove chicken from fridge about 30 minutes before grilling. Heat grill to 350° F, with burners or coals only one one side of the grill for indirect cooking.
Arrange chicken pieces, skin side-down, on indirect side of the grill. Cook for about 25 minutes, turning once or twice, until internal temperature is 145° F. Move chicken to direct heat side to finish cooking and crisp the skin.
When chicken internal temp reaches 165° F, brush on peach-bourbon glaze, and continue to cook on direct heat side briefly, until glaze has a “baked-on” appearance. Watch it closely so the sugars don’t burn.
Serve chicken immediately. When cooking by reverse-sear, post-cooking rest is not necessary.
My husband doesn’t ask for much. We have a terrific give-and-take kind of relationship, and I love that when I’ve had a hectic day, or don’t feel in the mood to prep a meal, he happily steps up to the plate, either by grabbing some takeout on his way home, dragging me out to a restaurant, or sometimes taking a turn at the stove himself. And he’s a really good cook, too—one of many things that kept me around in our earliest days together. I couldn’t be with someone who doesn’t enjoy the simple pleasures of food.
So when Les asked me recently to put chicken Marsala back into the meal rotation, I took it to heart. The “rotation” is a running joke at our house—it takes a while for most dishes to cycle back around. I attribute this in part to my having worked 15 years as a deejay at a Top 40 radio station, where every single day was a rearrangement of the same songs I played the day before. We referred to our playlist as a “rotation,” and that’s exactly what it was—‘round and ‘round, over and over. If you think it gets old to hear the same songs every day, well, imagine having to play them! I crave variety, and most of the time, my cooking style is more like a big stack of one-hit wonders than a greatest hits album. Some dishes never get another play in my kitchen, and when they do, they often appear with changes or twists, almost like a “cover” of the original.
I couldn’t distinctly remember the last time I had made chicken Marsala for Les, so I was happy to revisit this dish. It deserves a spot in the Sunday Supper category, not because it requires extra time or a ton of effort (it doesn’t), but because there is a specialness about it that comes from the gentle mushroom gravy that envelops the tender, pan-fried chicken cutlets.
I’m happy to play my hubby’s request!
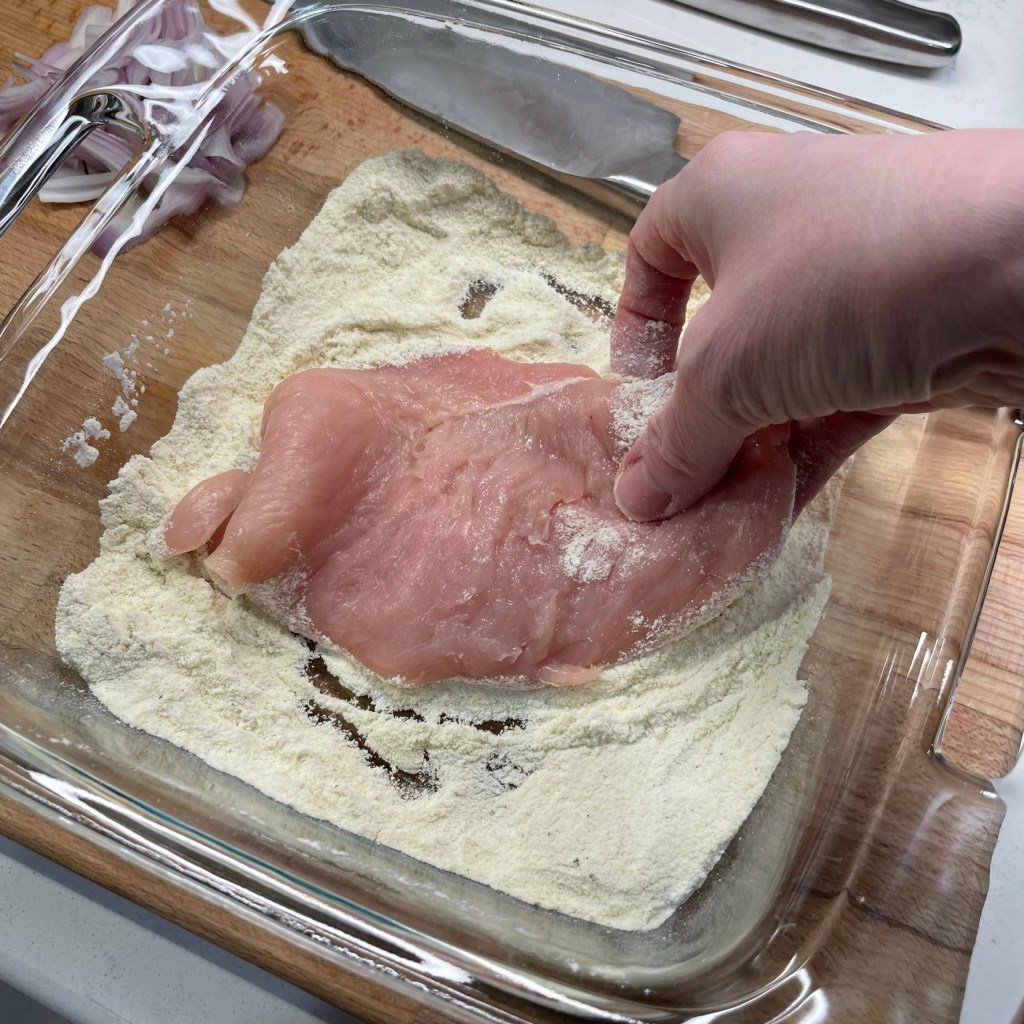
I went off-script a bit with this Italian classic, beginning with the flour coating. Rather than using plain all-purpose flour to dredge the cutlets, I mixed it half and half with semolina flour—the same kind I use when I shape my pizza dough. My reason for this is that all-purpose flour on its own tends to get soaked by the natural moisture in fresh meat, and that can give it a somewhat gummy texture after frying. Semolina remains drier and creates more of a natural barrier to the hot oil in the pan. I was pleased with the result of this substitution and will likely use all semolina next time this golden oldie comes up in “the rotation.”
Purchase thin cutlets or pound between sheets of parchment to 1/4 inch thickness.I seasoned my 50/50 flour mixture with salt, pepper and onion powder.The semolina felt drier than regular flour alone, and created a better barrier to the moisture.Rest the dredged cutlets on a plate while you heat the oil.
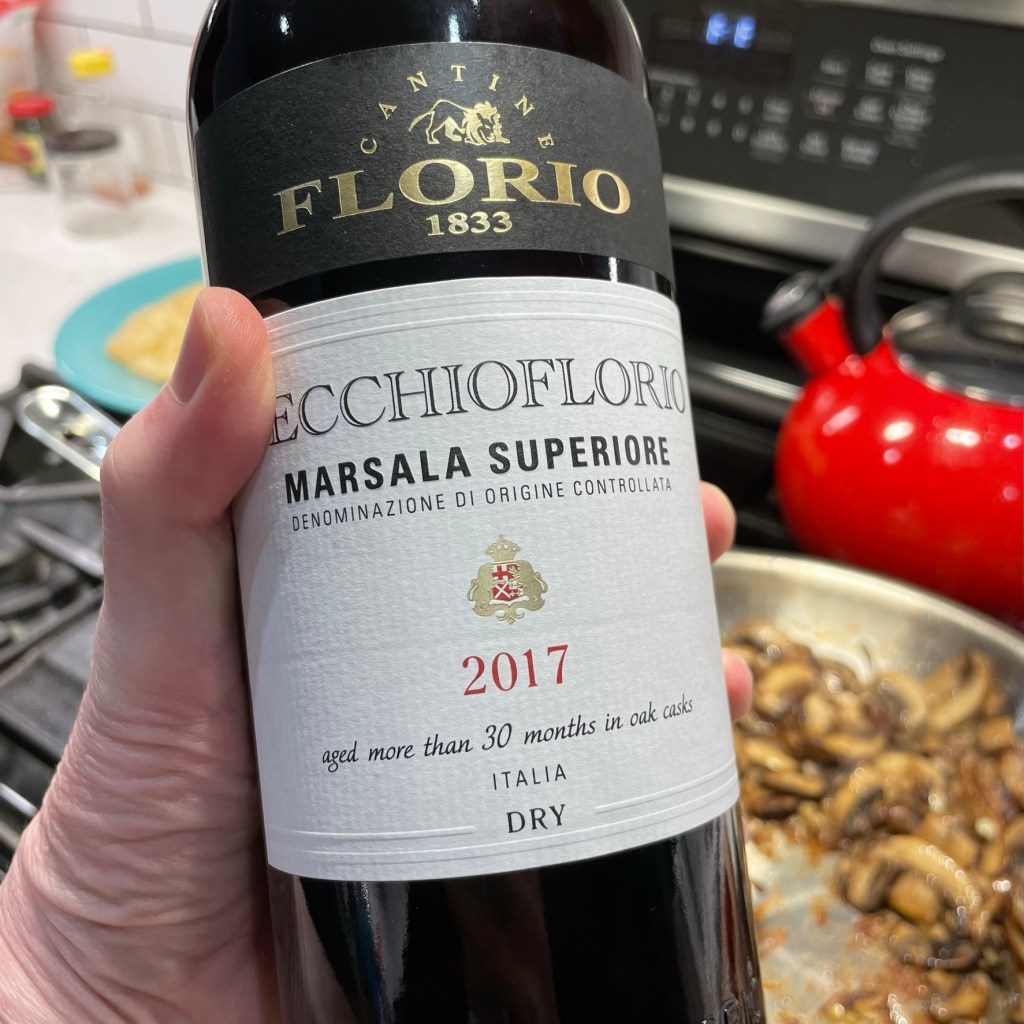
Which kind of Marsala is correct for this dish? Depends on who you ask, as some cooks like the sweet version. Marsala is a fortified Italian wine with warm, gentle flavors of dried fruit and it is frequently paired with chicken and veal. Even the dry version has subtle sweetness, almost like a touch of honey. “Sweet” is not my favorite genre in an entrée course, unless it is balanced with hot, salty or sour—say, Asian food or barbecue sauce. So I found a lovely, dry Marsala in a wine shop rather than the grocery store (which only carries the cheapest bottles). This was an excellent choice and it’s a good quality Marsala that I plan to use again soon—maybe as a sipper with a plate of cured meats, dried figs and salted almonds. Am I teasing an upcoming record in my next quarter hour? 😉
I’m looking forward to enjoying this again!
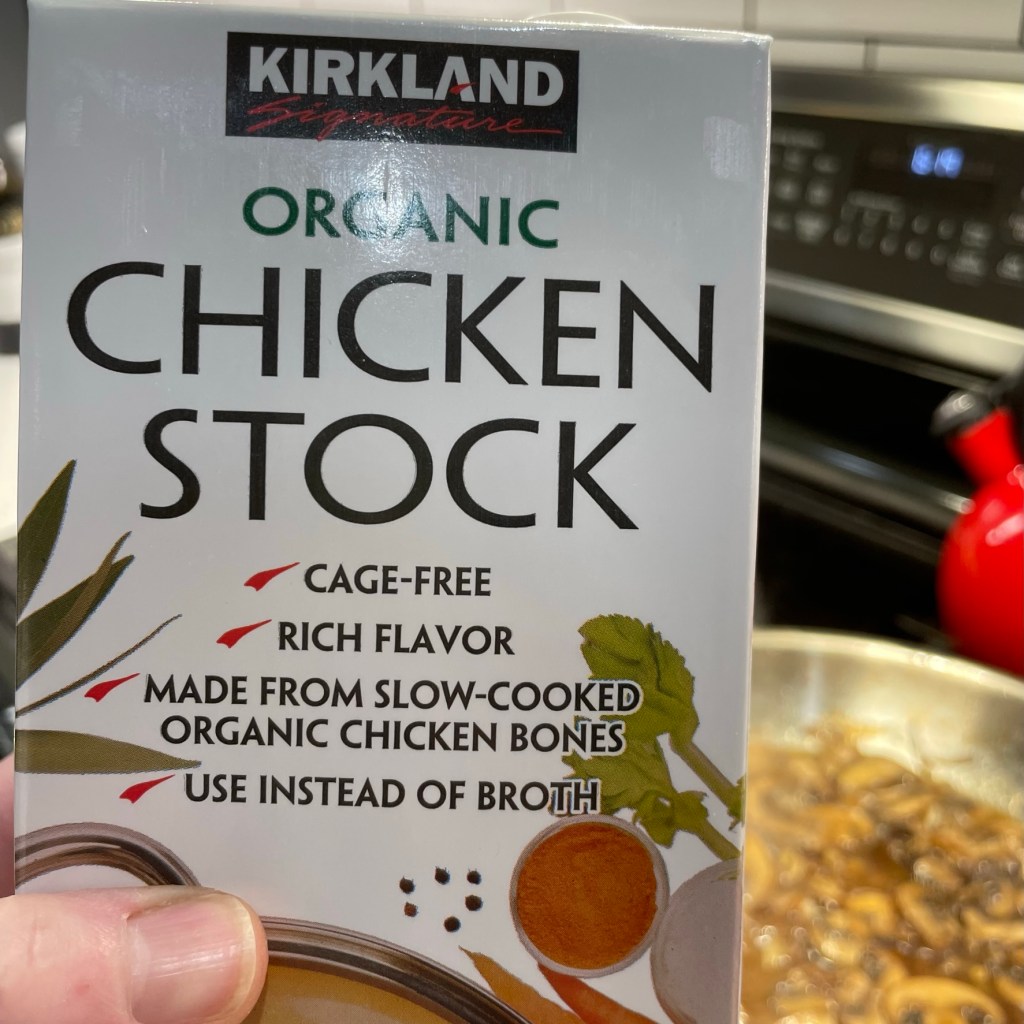
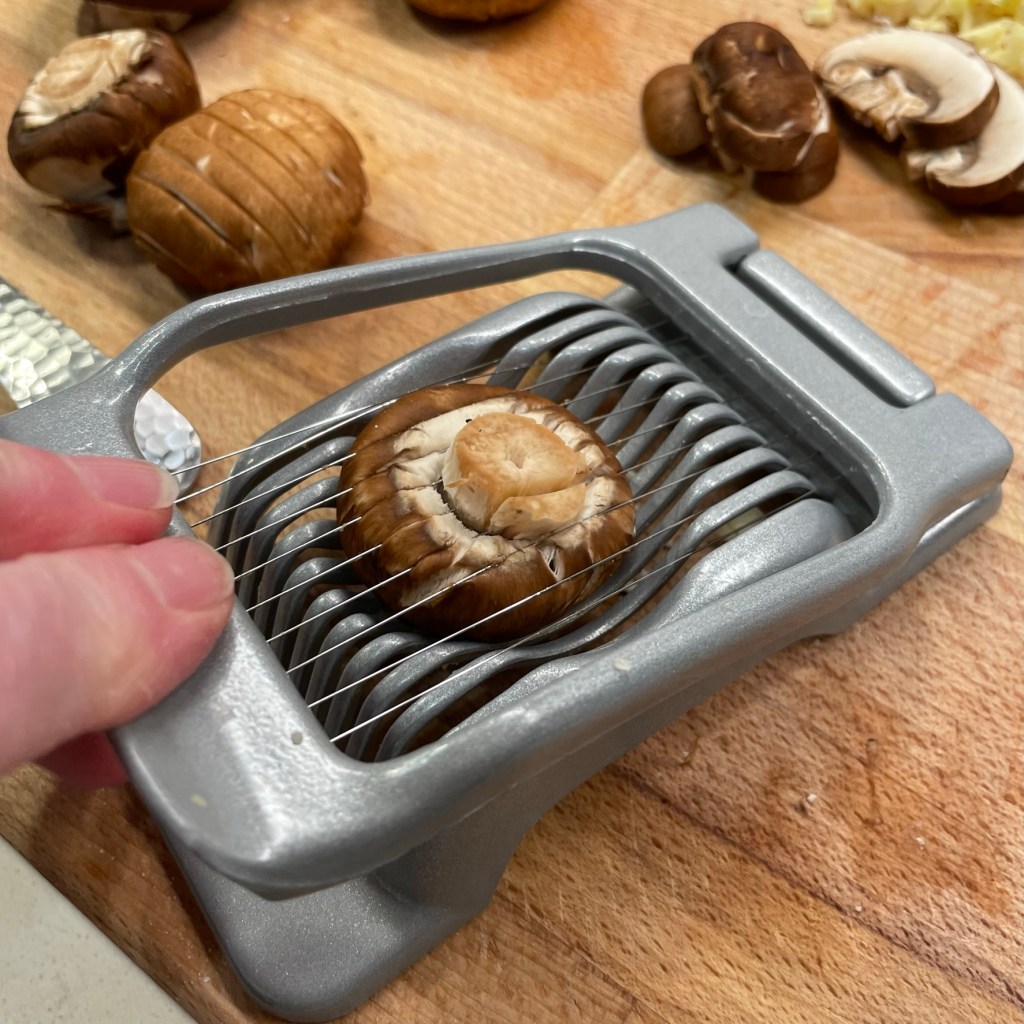
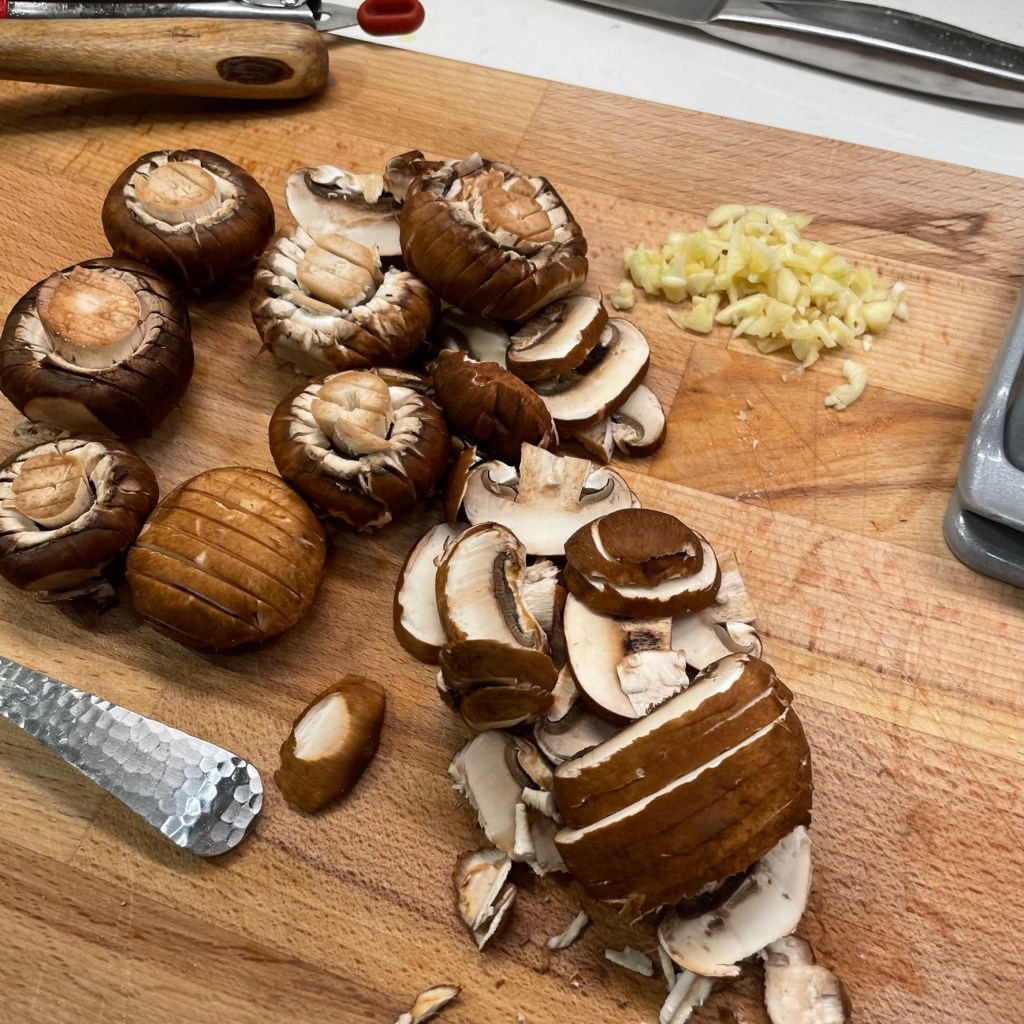
My other twists on the classic preparation were shortcuts—If time had not been an issue, I would have slow-simmered some chicken parts to make my own rich stock, but I was a bit rushed, so I used a store-bought stock. I definitely recommend stock over broth, because the result is richer and more flavorful. My other shortcut helped me save time on slicing all those plump mushrooms. I needed a whole carton of mushrooms sliced into perfect, ¼-inch slices, so I dug out my trusty egg slicer. It’s the simplest way to make quick work of this part of my recipe.
I’m not partial to this brand, but stock is definitely the way to go.My sturdy, metal egg slicer is also great for strawberries!I had my entire carton sliced in under a minute!
Ready to get cooking?
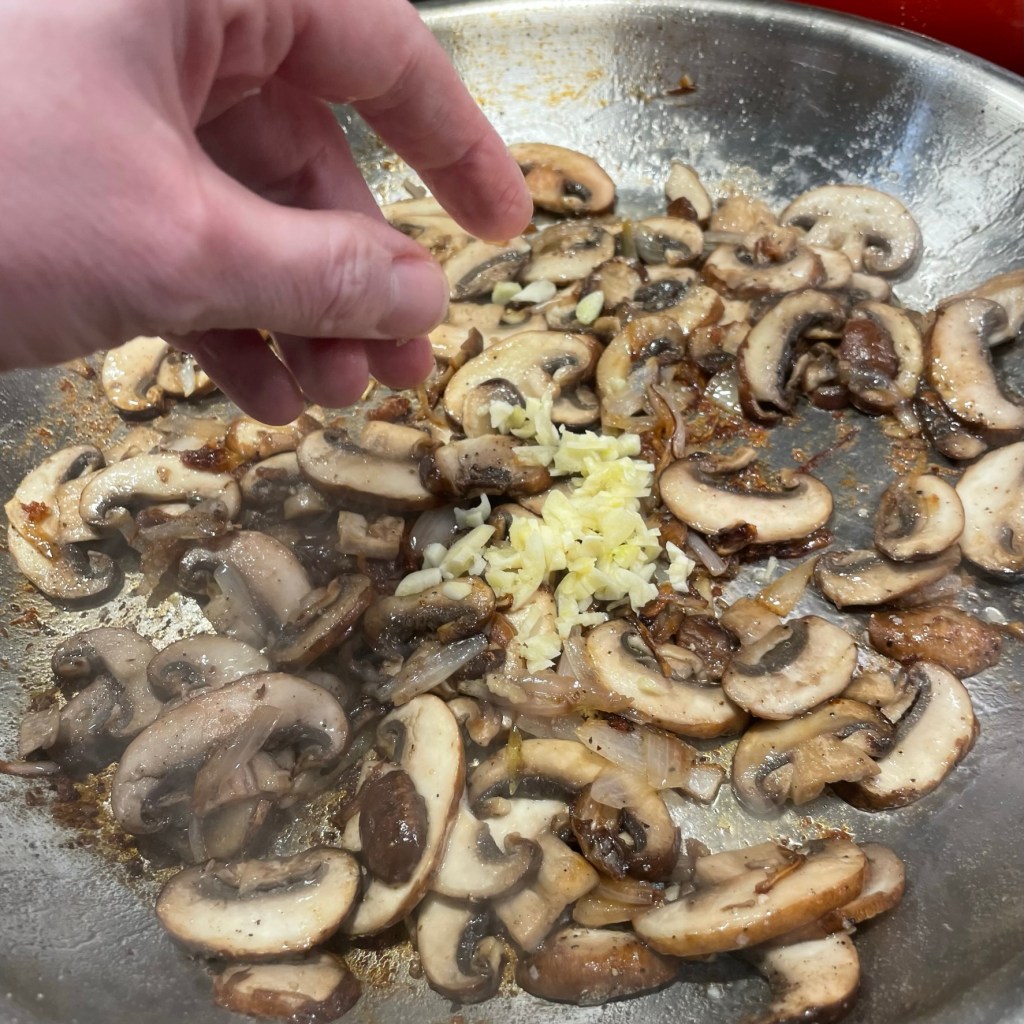
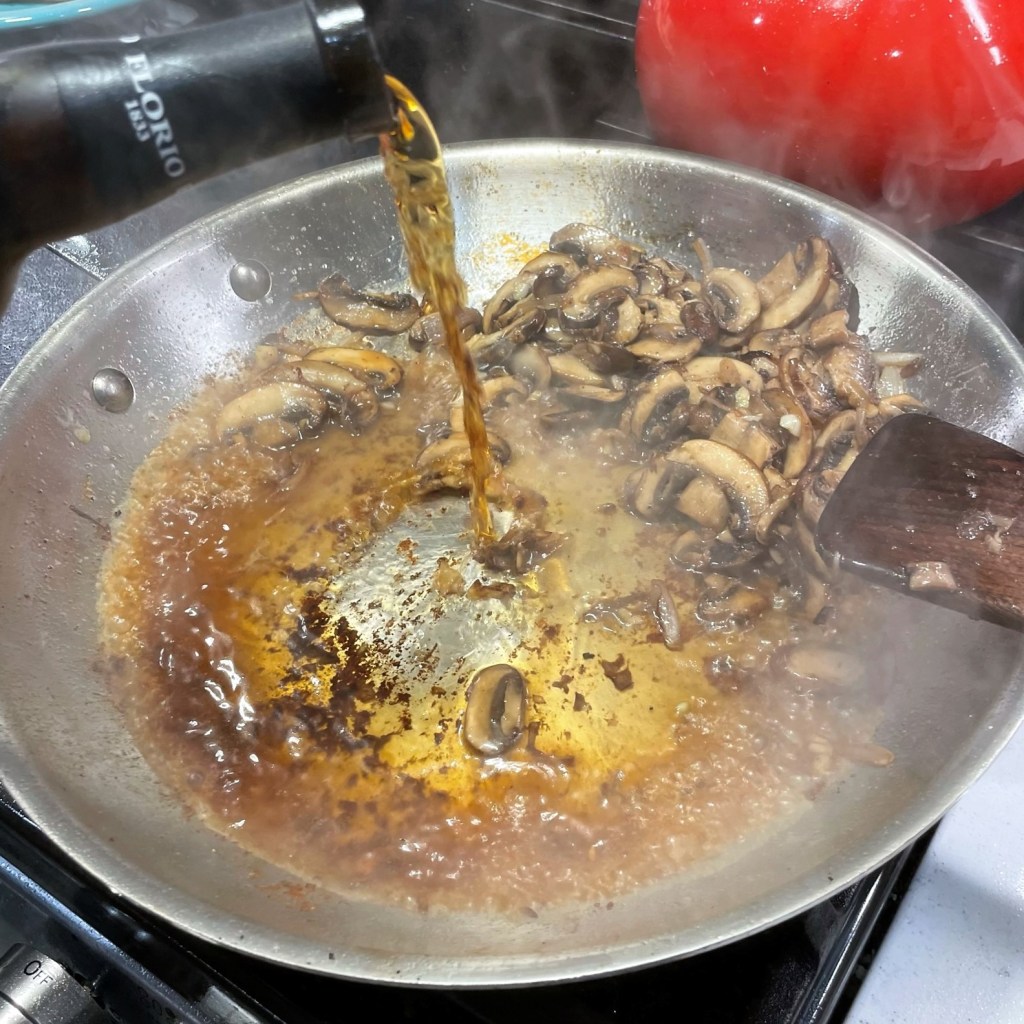
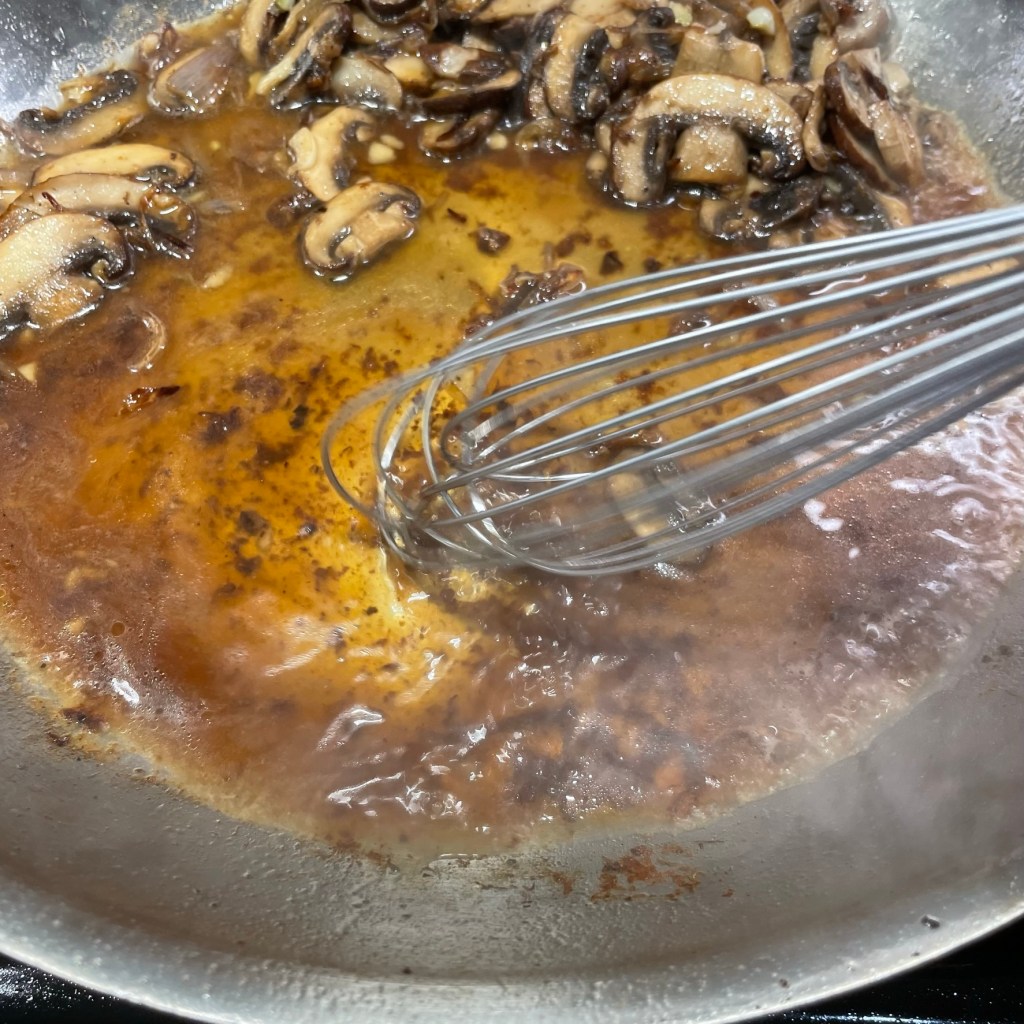
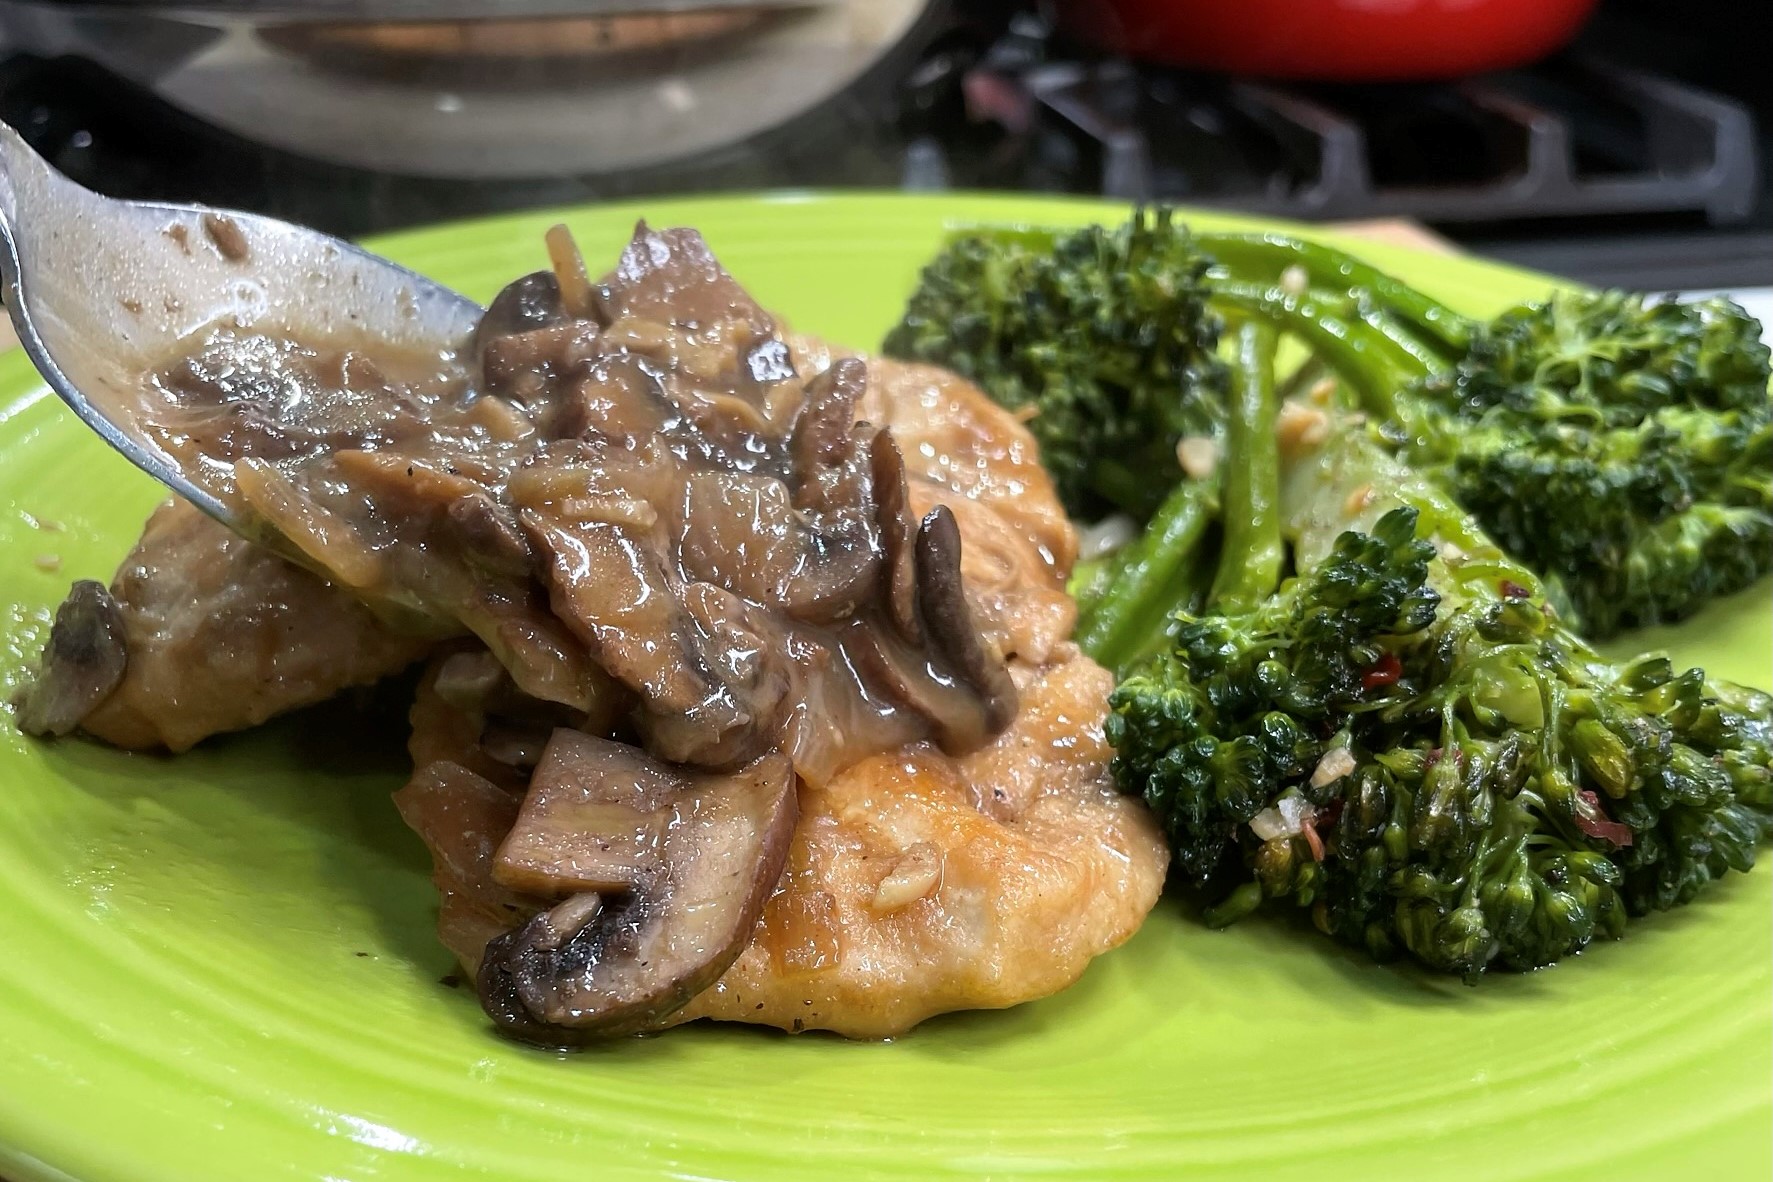
Pan fry the floured cutlets in a little olive oil, just until golden on both sides, then transfer them to a plate. Brown the mushrooms in a touch more oil, then add garlic and splash in the Marsala—watch out for the steam! Whisk the pan to release the stuck-on bits, then add stock and let it come back up to a gentle boil.
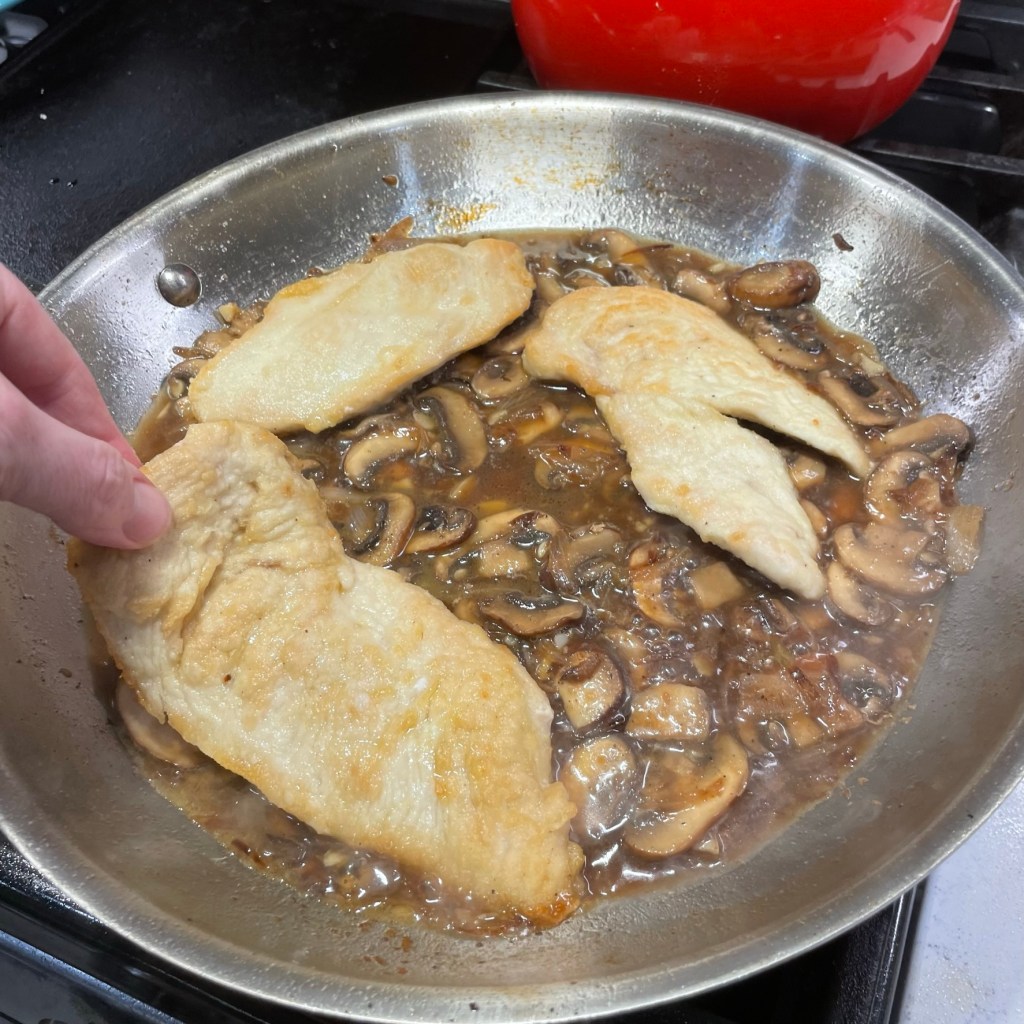
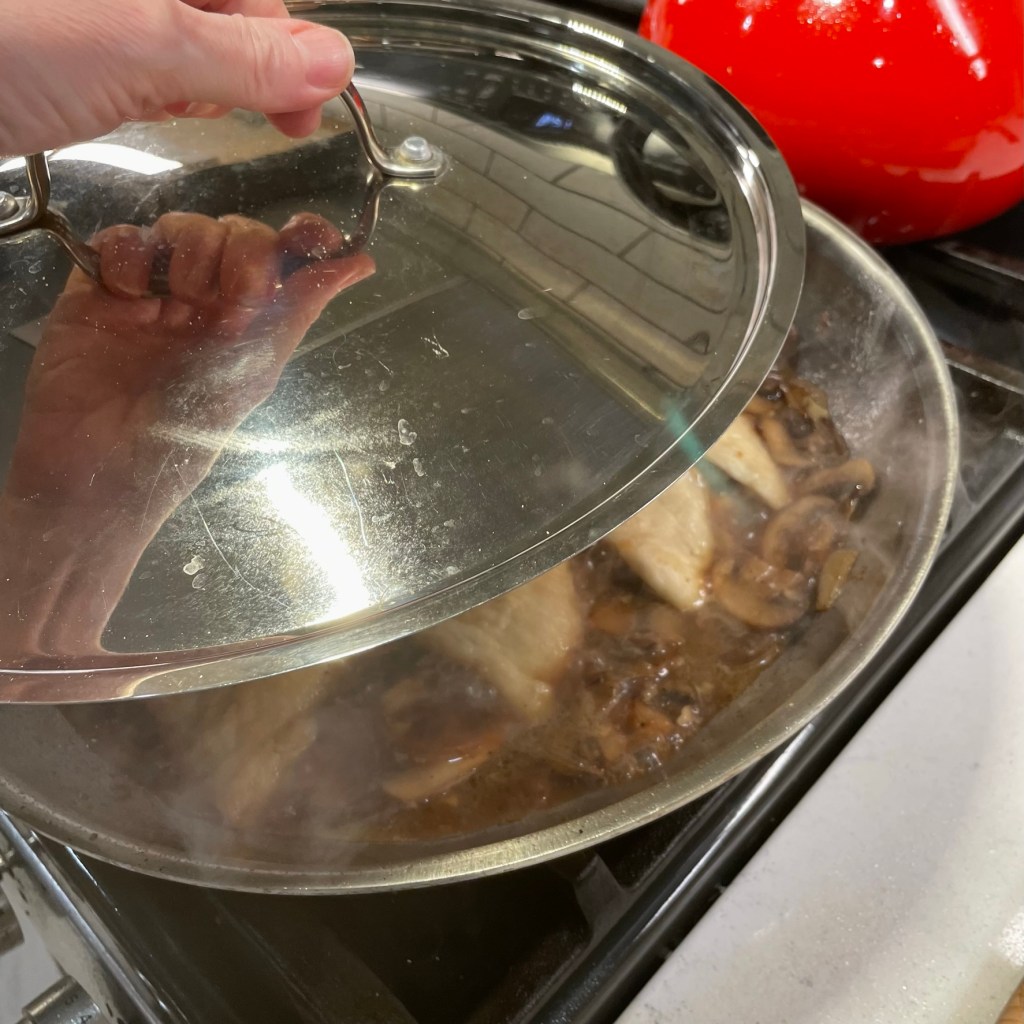
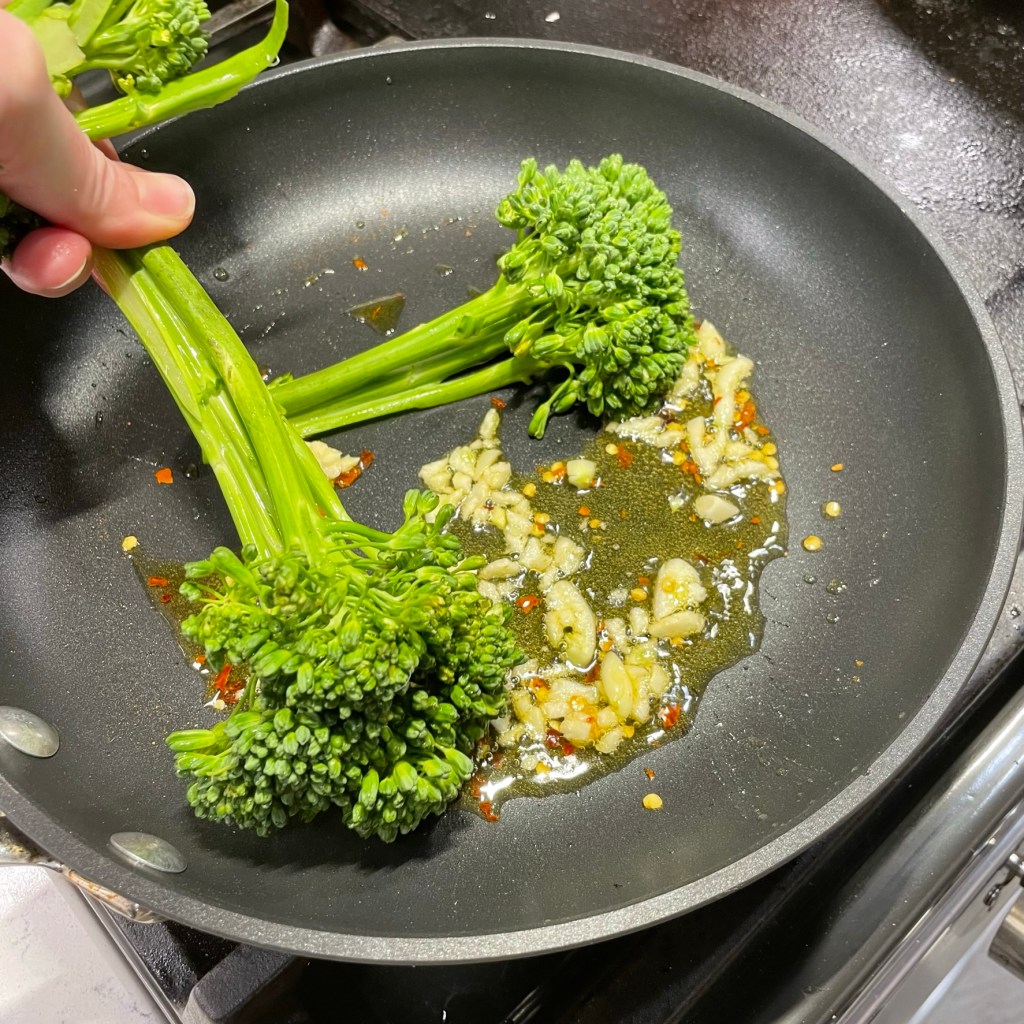
Return the chicken cutlets to the skillet, turning to coat them lightly in the Marsala sauce. Cover the pan and turn it down to low heat to simmer. I used this 25-minute simmering time to prep my side veggies—a quick, pan-fried and then steamed broccolini with garlic and red pepper flakes. This vegetable can be hard to find (or easy to miss) in the supermarket, but it’s worth a look as a great alternative for people who don’t enjoy the bitterness of broccoli. Count my hubby among them!
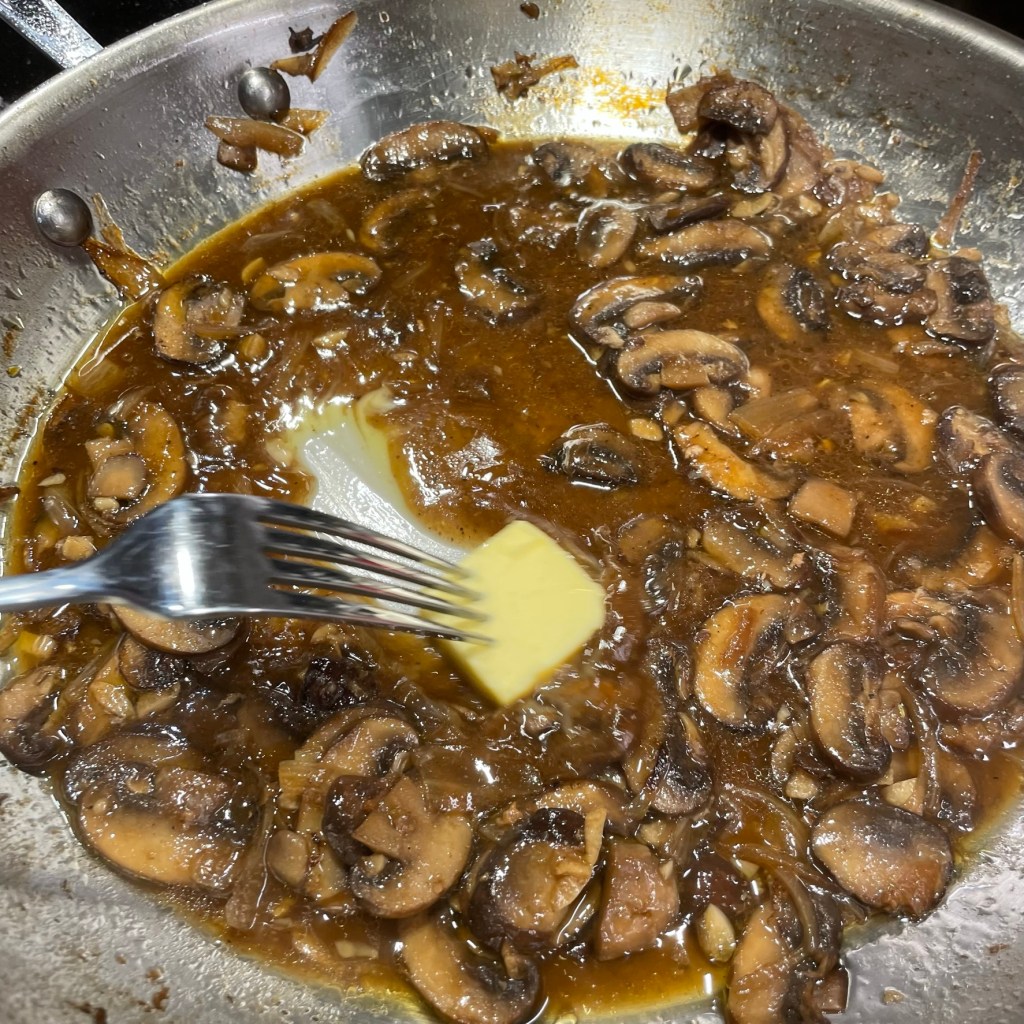
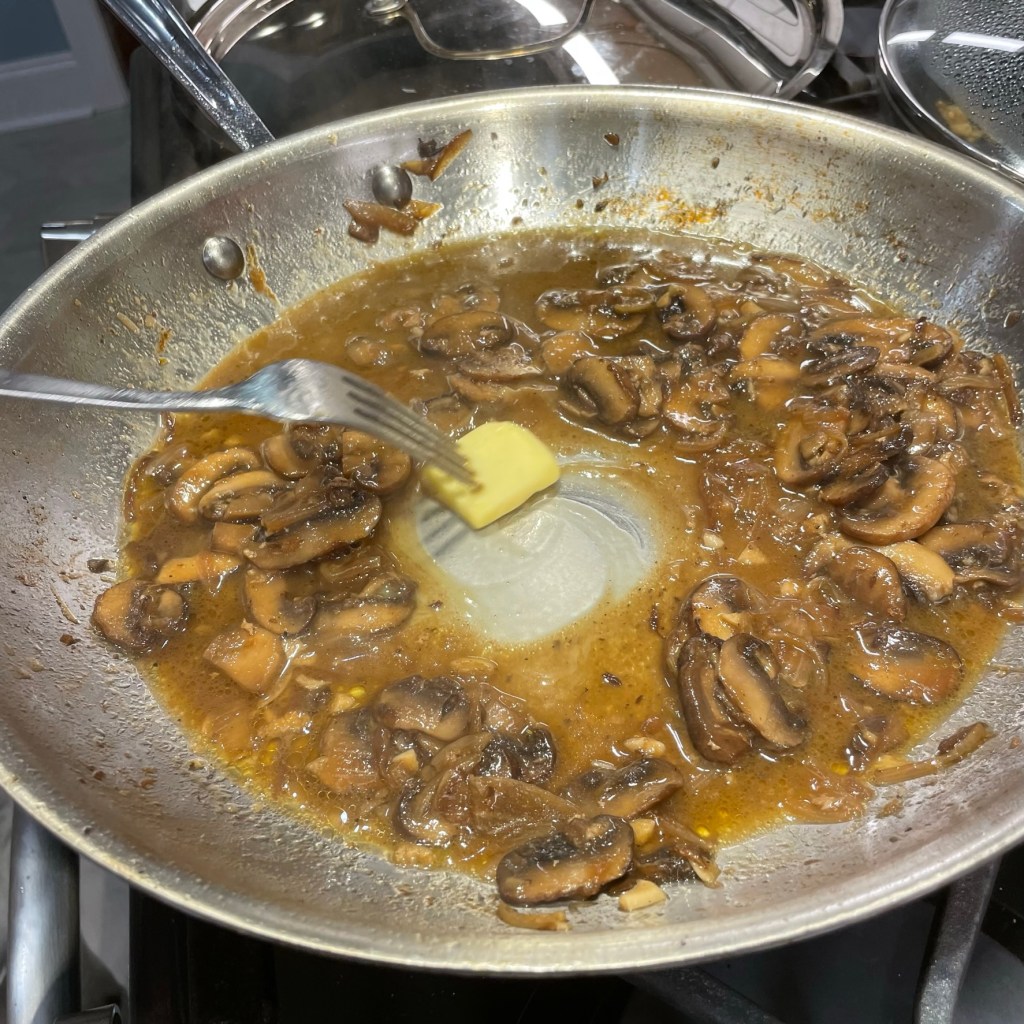
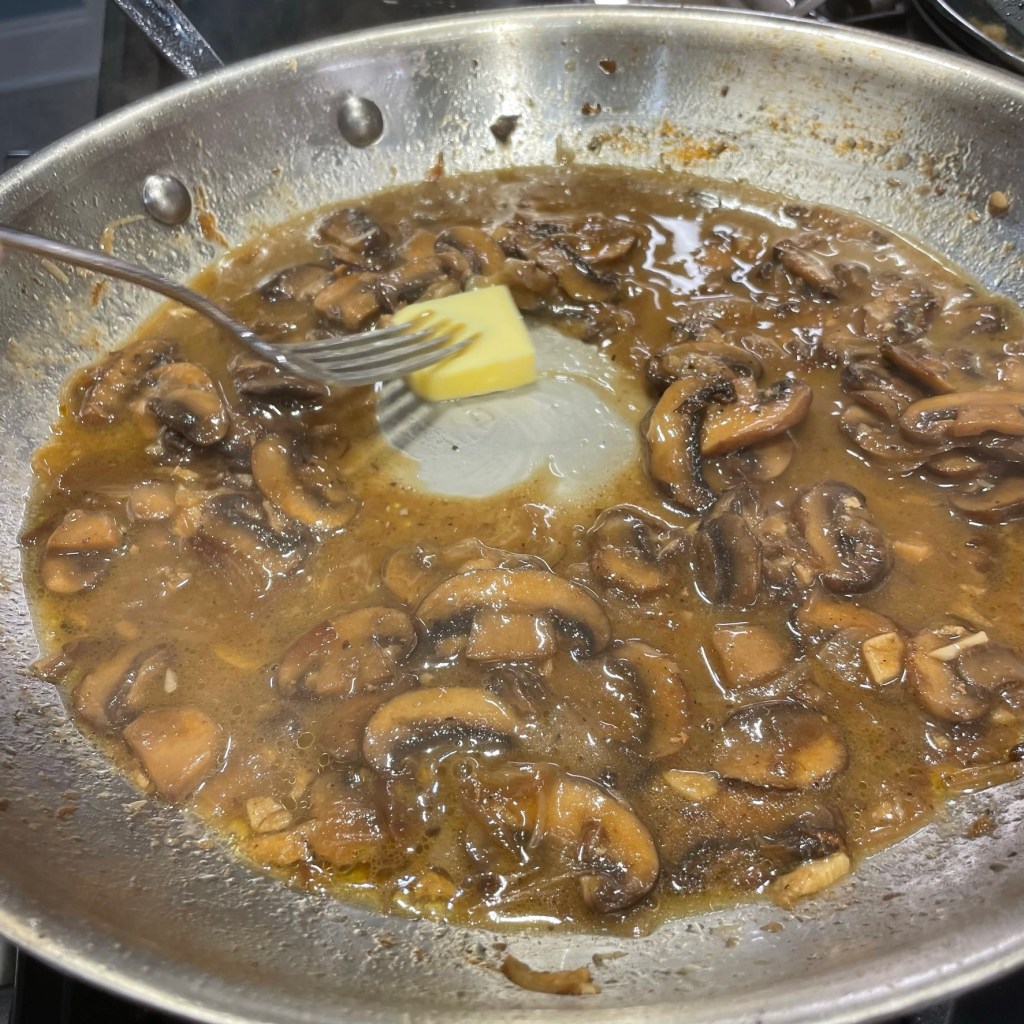
When you’re ready to serve, plate the chicken cutlets and veggies and then, off the heat, quickly whisk in cold butter—one teaspoon pat at a time—into the mushroom sauce. This method creates a silky, emulsified sauce. Spoon the mushroom sauce over the cutlets, sprinkle with chopped parsley, and this dinner is a certified hit!
You can see the sauce getting richer with each teaspoon of butter. A sprinkle of parsley is a nice finishing touch.
I have taken a few liberties with this Italian classic, which is both elegant and easy. If you are feeling extra fancy, swap the chicken for veal cutlets.
Ingredients
2 large boneless chicken breasts, split into cutlets and pounded thin
1/4 cup all-purpose flour
1/4 cup semolina flour
Salt and pepper (to season the flour mixture)
4 Tbsp. extra virgin olive oil (most for chicken, remaining for mushrooms)
1 shallot, chopped
10 oz. cremini mushrooms, cleaned and sliced
2 cloves garlic, minced
Salt and pepper to taste
1/2 cup dry Marsala (preferably not “cooking wine”)
1/2 cup rich chicken stock
1 Tbsp. cold salted butter, cut into three pats (keep cold until the end)
Chopped Italian parsley, to garnish
Directions
Combine flours, salt and pepper in a shallow dish. Dredge cutlets in the dry mixture and set aside on a plate.
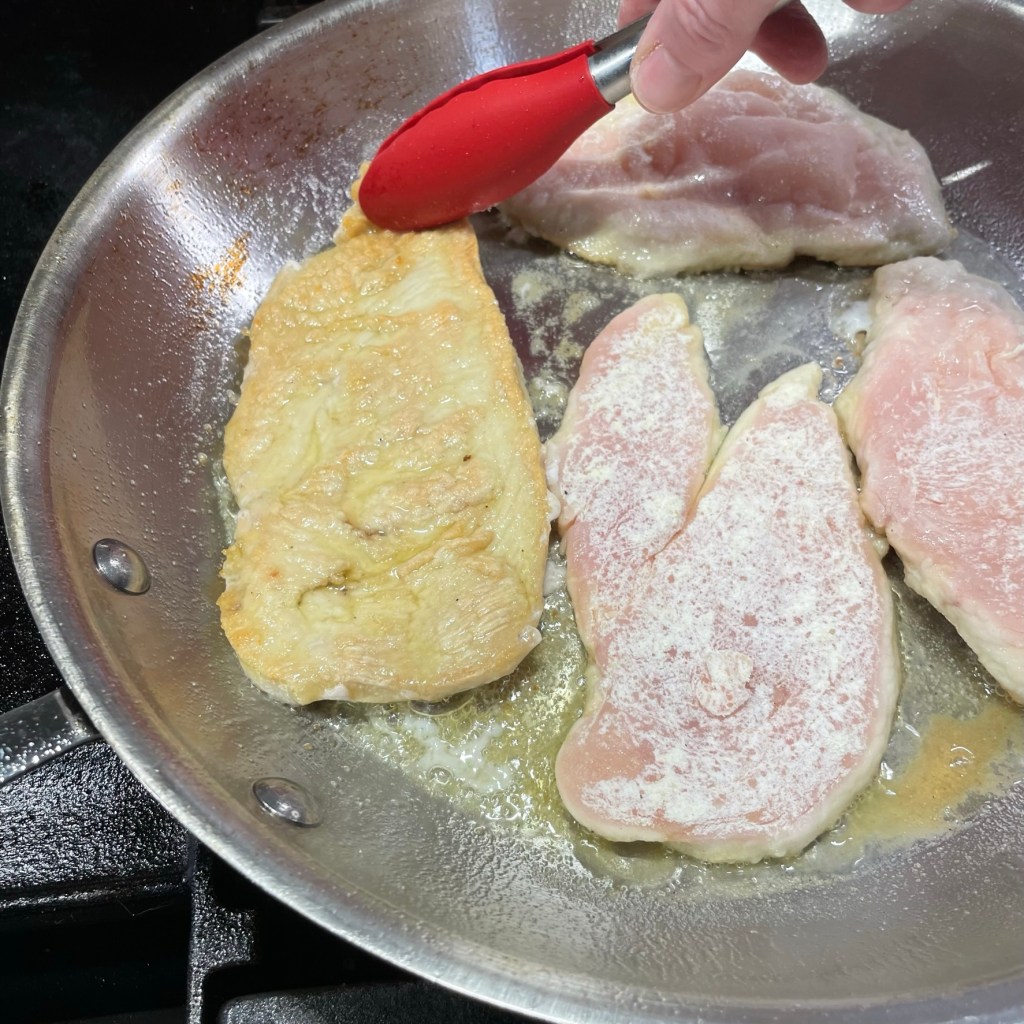
Heat 3 tablespoons of the olive oil in a skillet (if you have one that is not non-stick, that’s best) over medium heat. When the oil is shimmering, arrange the cutlets in the pan and cook just until golden on each side, about three minutes each side. Transfer cutlets to a plate and cover with foil to keep warm.
Add remaining oil to the skillet and saute the shallots until softened. Add the mushrooms, half at first then the rest. Avoid overloading the skillet as this will cause the mushrooms to steam in their own moisture. When the mushrooms are sufficiently browned and excess moisture has cooked off the pan, stir in the garlic.
Add the Marsala wine all at once. This will probably create a big cloud of steam! Use a whisk or utensil to loosen any browned bits in the skillet. Stir in the chicken stock and bring the mixture back up to a slight boil.
Return cutlets to the skillet, reduce heat and cover. Allow the chicken to simmer for 25-40 minutes, depending on what else you have going on. The longer it simmers, the more moisture will reduce, so check on it periodically and add a splash of stock if needed. Turn the cutlets once during simmering as well.
Transfer the tender cutlets to serving plates. Swirl in cold butter, one teaspoon pat at a time. This will blend with the pan juices to create a thickened, luxurious sauce. Immediately spoon over cutlets. Sprinkle with fresh parsley, if desired, and serve at once.
This dish is terrific on its own with a vegetable or salad, or you can place the cutlets on top of polenta, risotto, mashed potatoes, rice or buttered pasta.
There’s never a wrong time for chicken soup, and winter seems especially appropriate, given that it is also cold and flu season. In the middle of January, my husband and I both found ourselves stuck at home with Covid. I had started experiencing symptoms on a Thursday night, and I was quick to blame the just-completed replacement of our entire HVAC system as the culprit for the sore throat and sneezing that had suddenly walloped me. Dust and bits of insulation had been falling out of all the vents in the house for two days, so of course I felt lousy. At least, with the new system, I’d be warm.
But two nights later, as I sat shivering on the sofa, despite wearing a bulky sweatshirt, fuzzy jammie pants, two pairs of socks, my Land’s End shearling-lined slippers and curling up under a big ass blanket, I knew I was in trouble. The lines on my at-home rapid Covid test were not only pink— they were bright magenta! Les tested positive the next day, and we settled in for a week of being bored out of our ever-loving minds. Thank God we have every TV streaming service known to man, and some of the kindest neighbors around who did front porch drop-offs of soup, orange juice and other sick-at-home necessities. We are grateful.
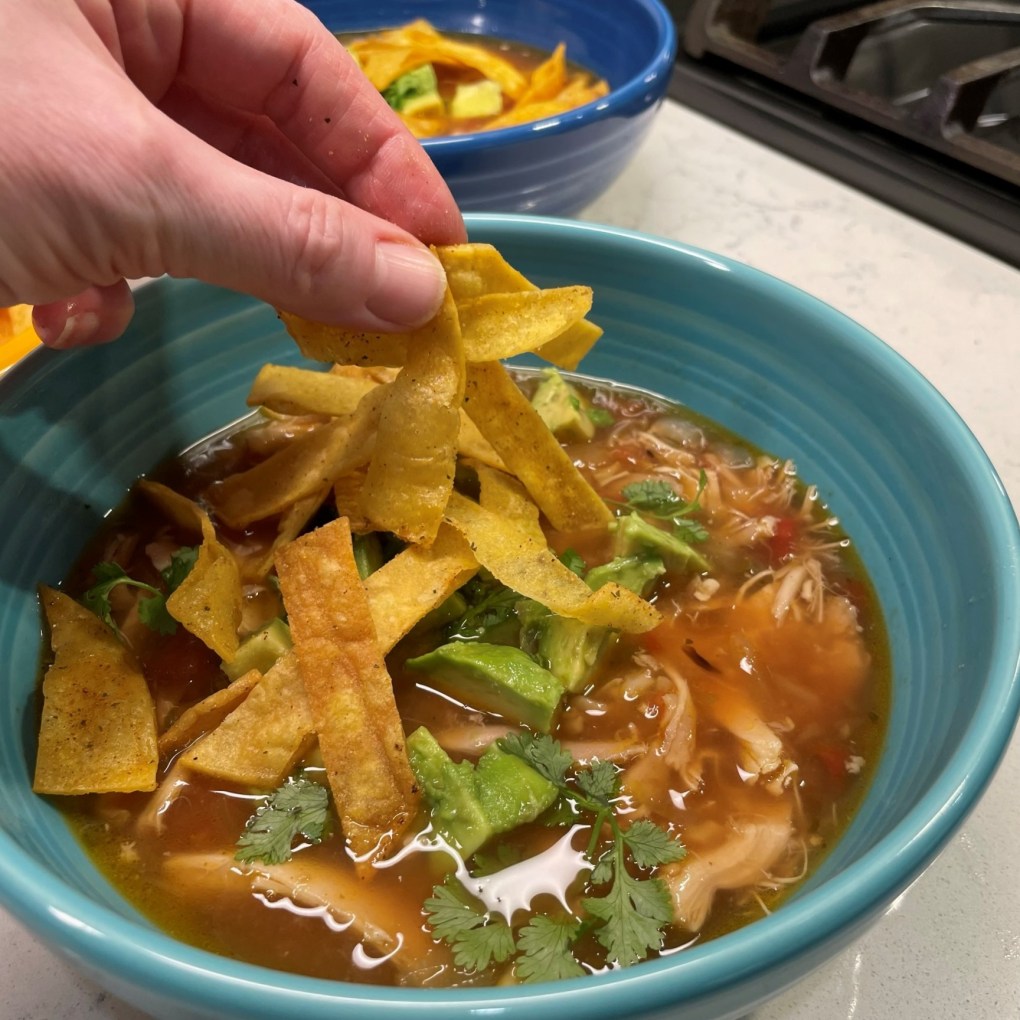
That first night of symptoms, I had made this southwest-themed chicken soup, and it was exactly what I needed, though I wish I had made a double batch. Next time, I will do exactly that and I’ll stash some in the freezer— just in case!
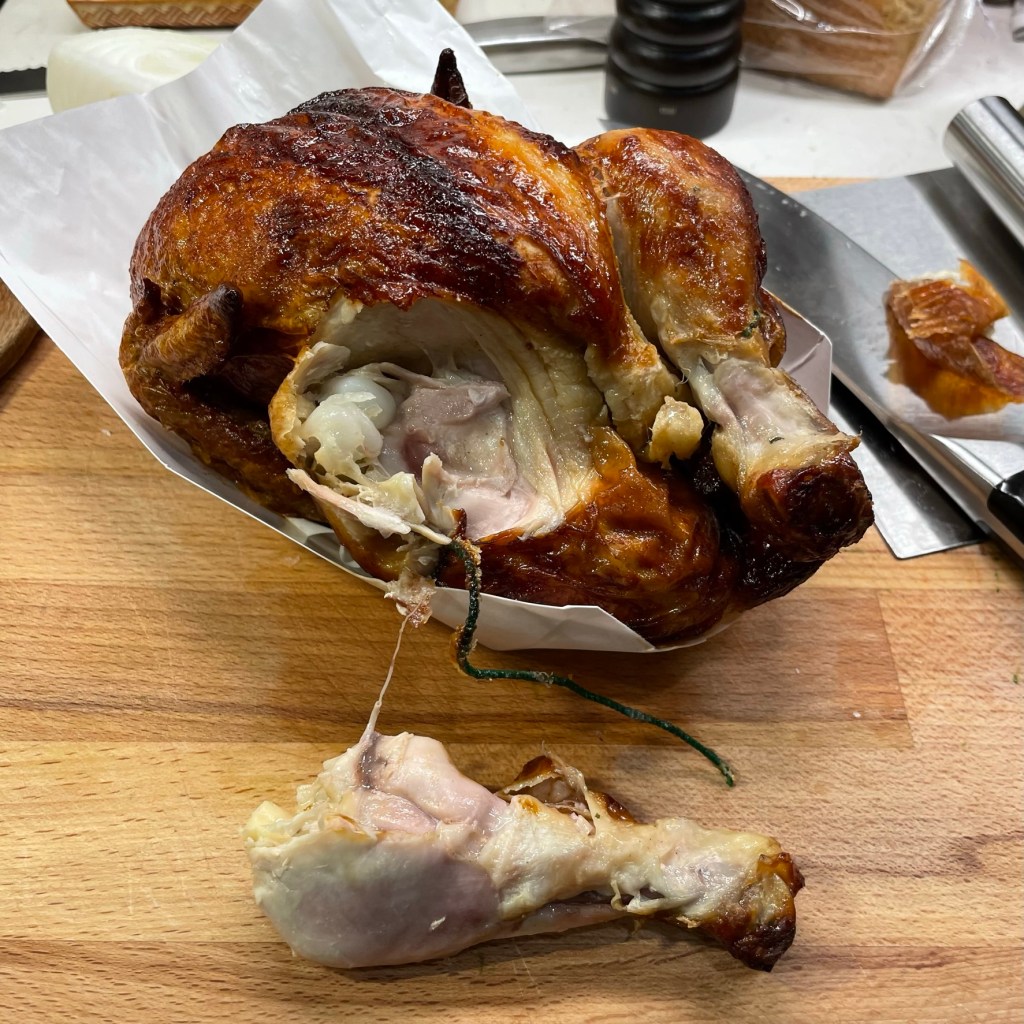
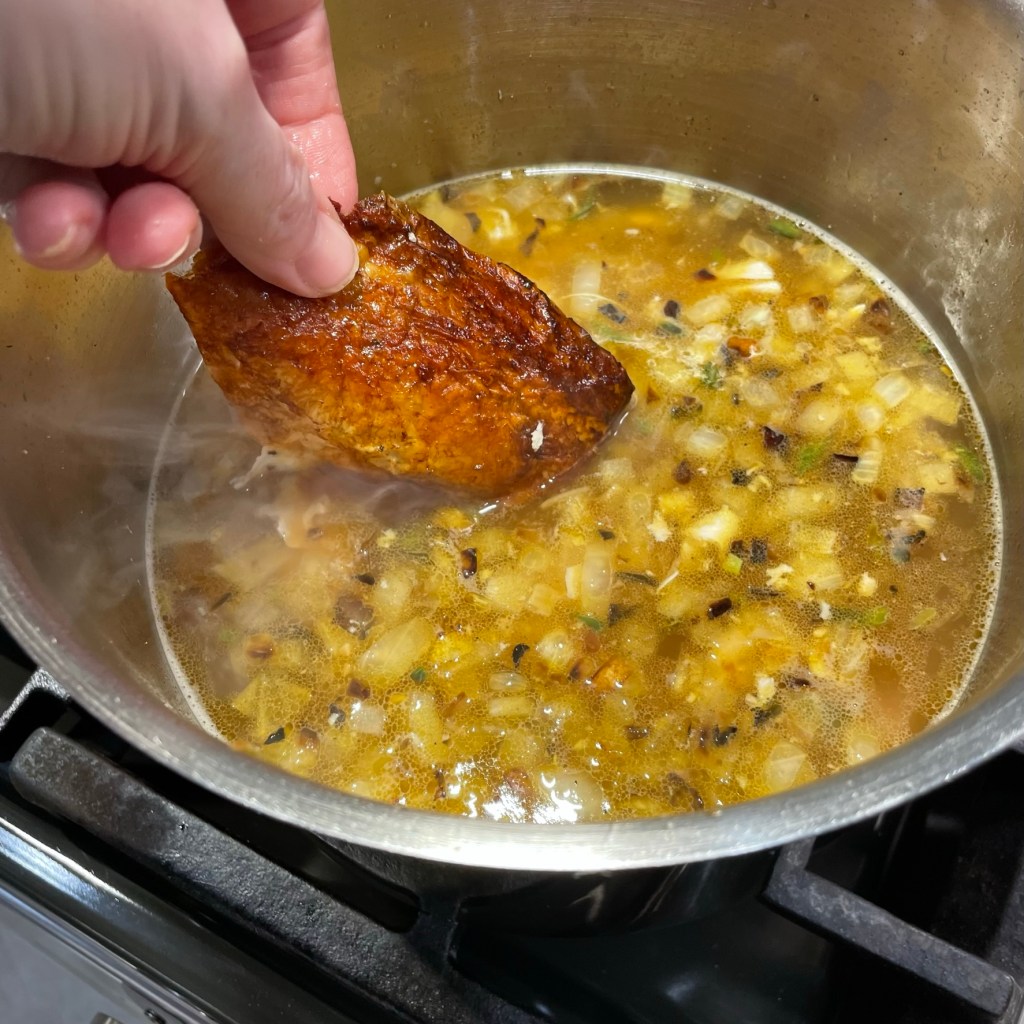
The soup is quick to make because it relies on a supermarket deli roast chicken and a few easy pantry ingredients. The chicken I selected was labeled “Peruvian,” which includes seasonings like paprika, cumin and oregano— all perfectly compatible for a southwest-themed soup. I used almost exactly half of the chicken, including the shredded meat from a thigh, breast and drumstick, plus the skin (I’ll explain in a moment). The remaining chicken meat went into a very tasty chicken salad that Les made, using some of his fabulous pimiento cheese. It was so good on sandwiches, and I’ll try to sweet talk him into making that again to share on the blog.
Once in a while, these deli roast chickens come in really handy!
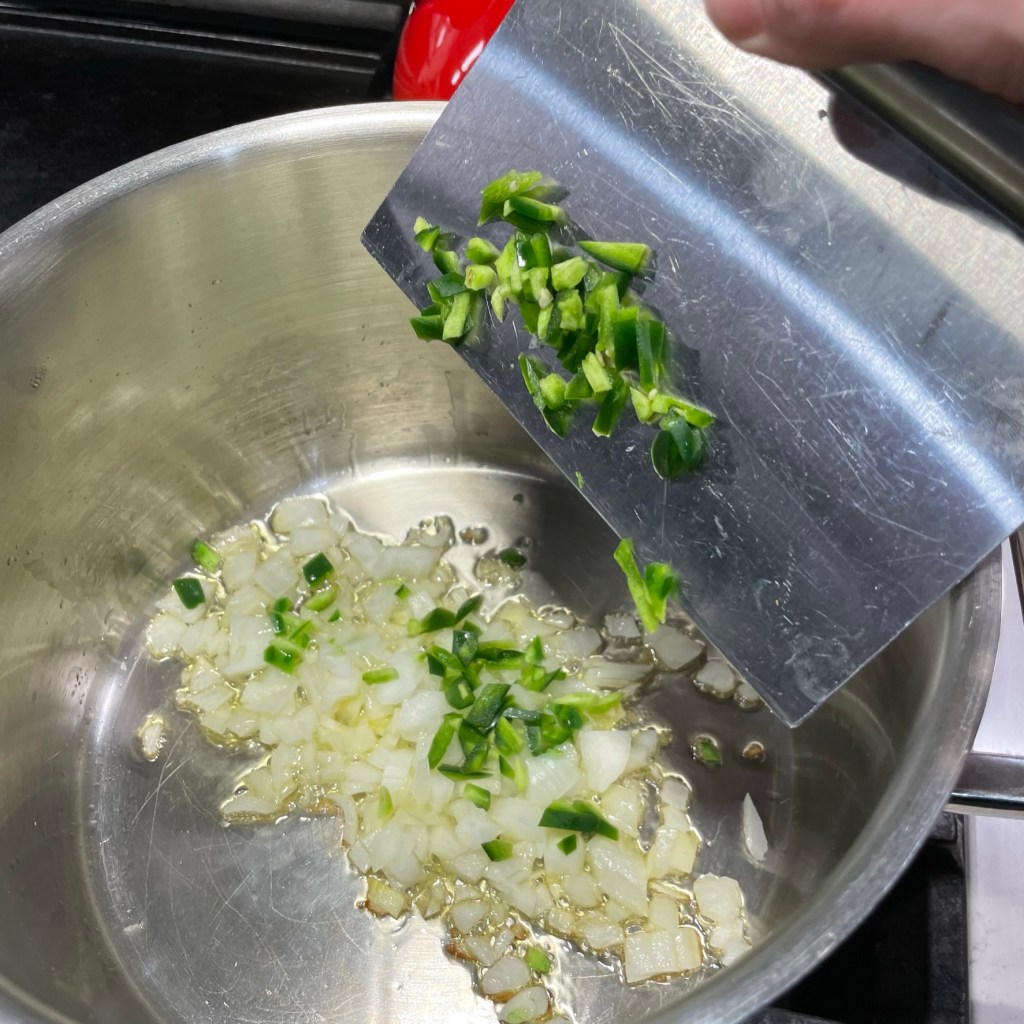
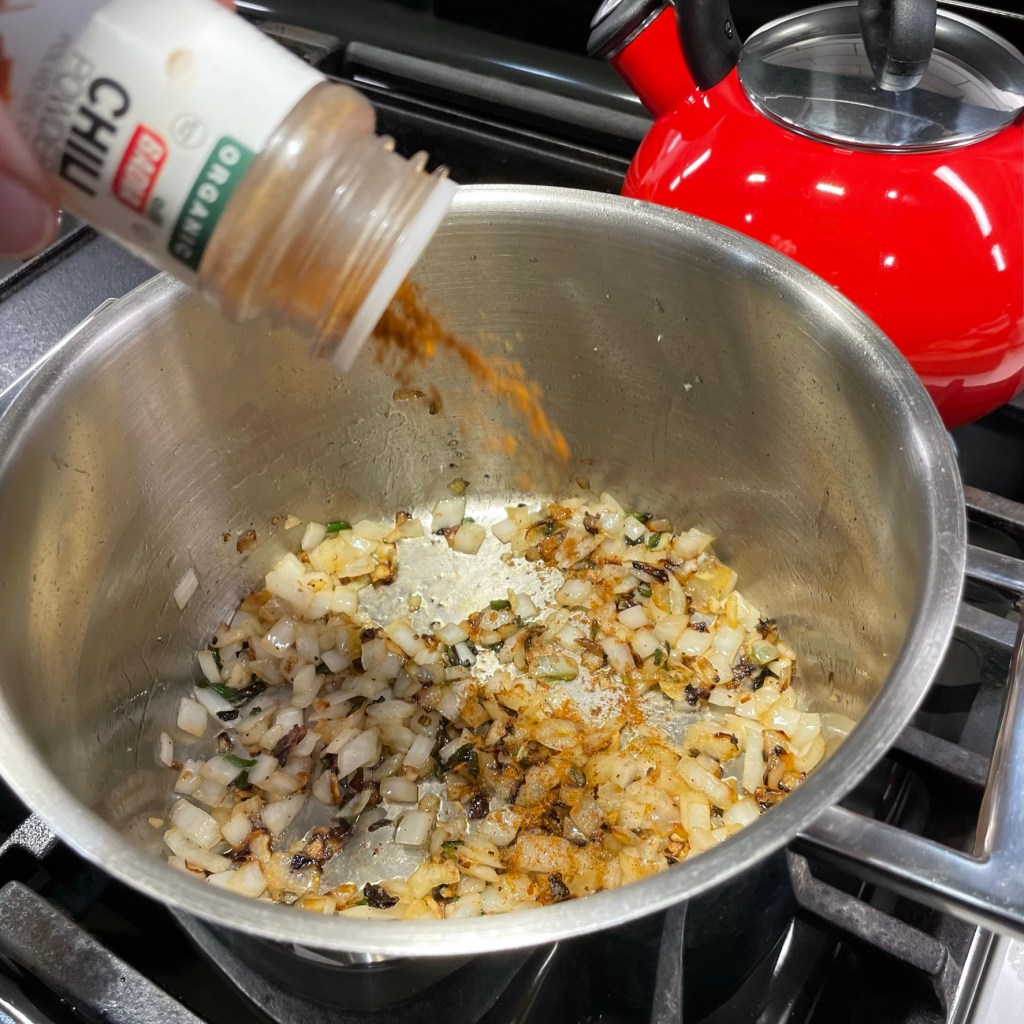
I started the soup with a quick saute of chopped onions and diced jalapeno— just long enough to soften them up. A few shakes of chili powder added a layer of flavor, and then I poured in a whole carton (4 cups) of chicken stock, the shredded chicken and several pieces of skin from the chicken, and I heated it to the point of a low boil before dropping it to a simmer. The skin released extra flavor into the soup, and I pulled them out before serving the soup.
The flavors in this soup come in layers.
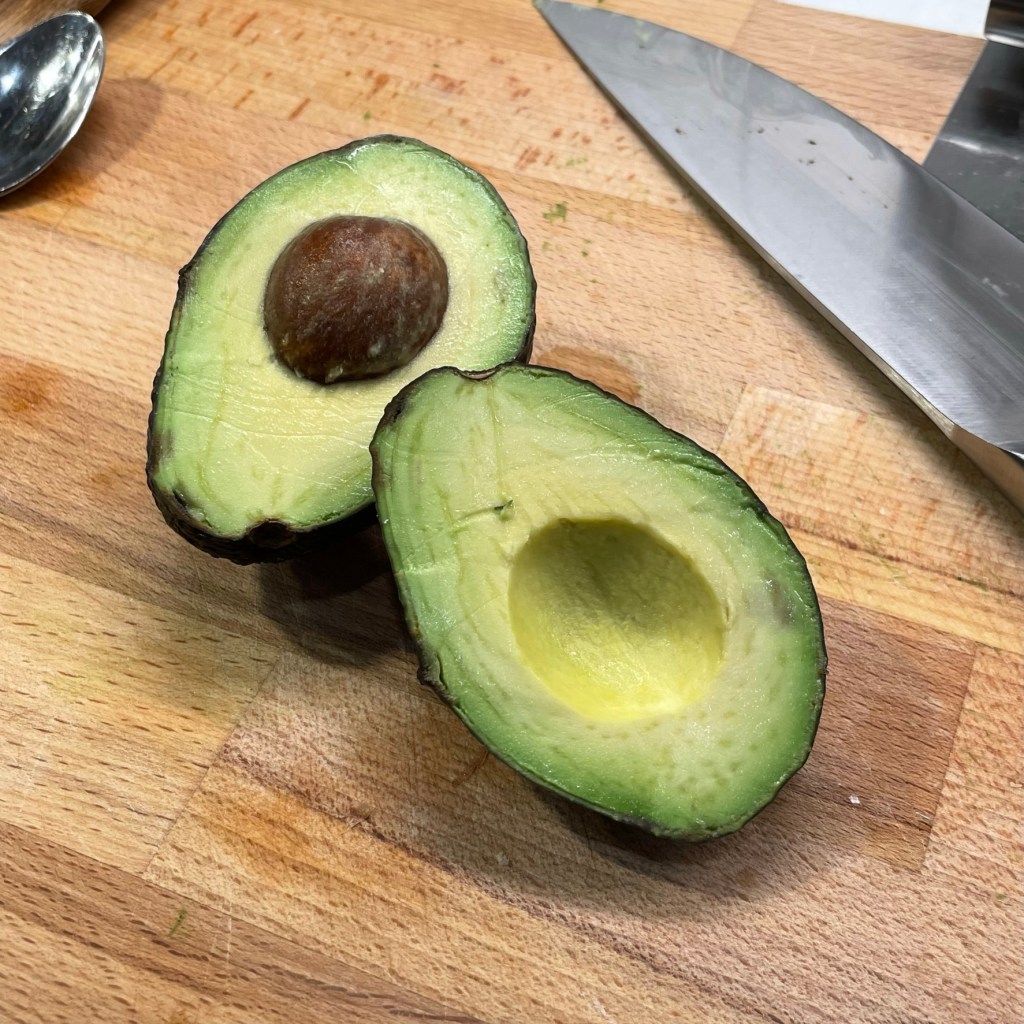
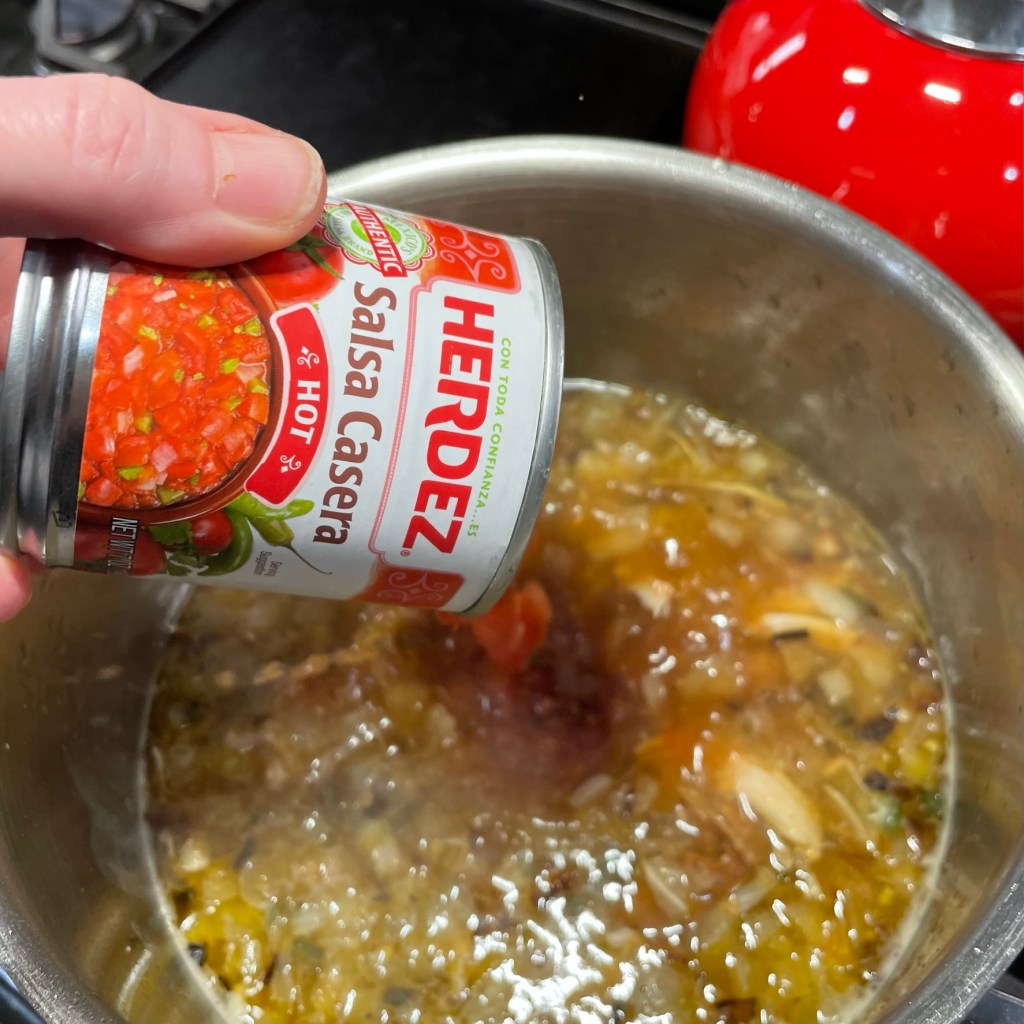
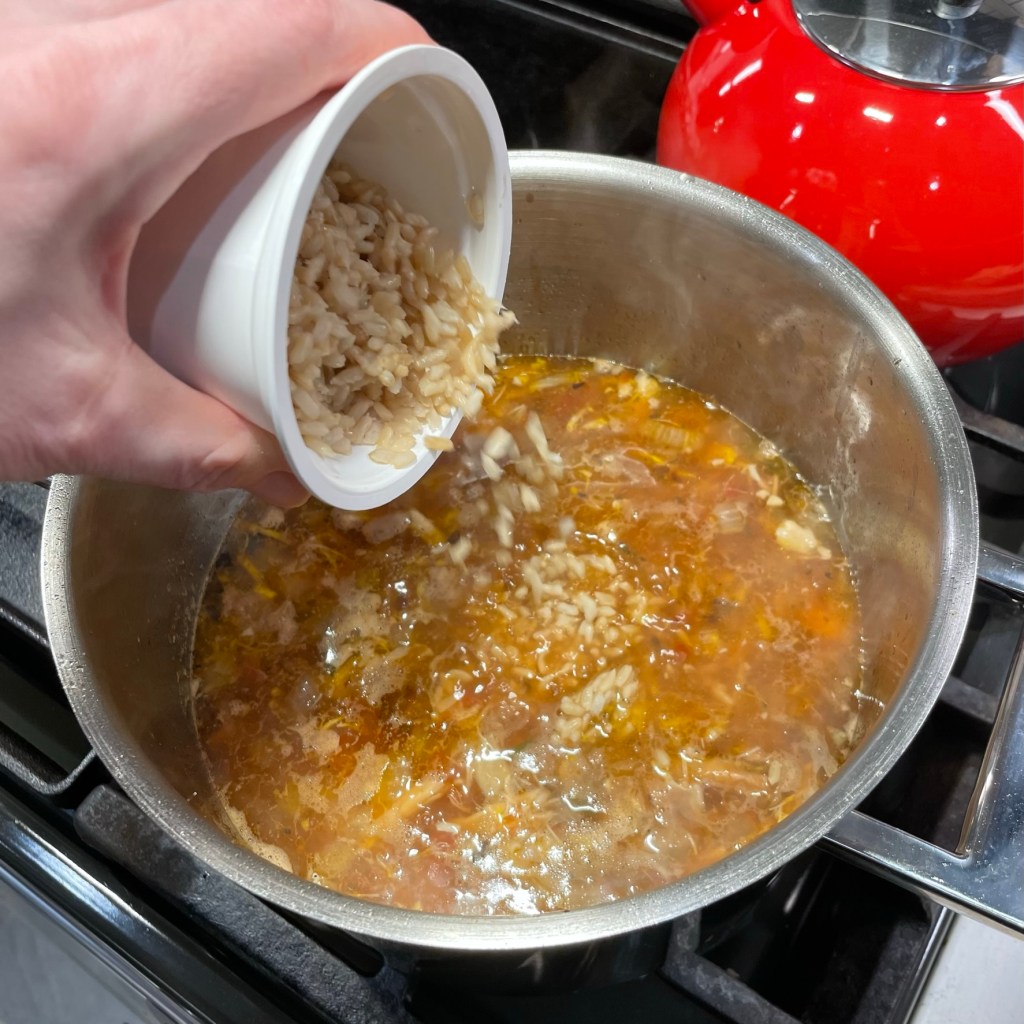
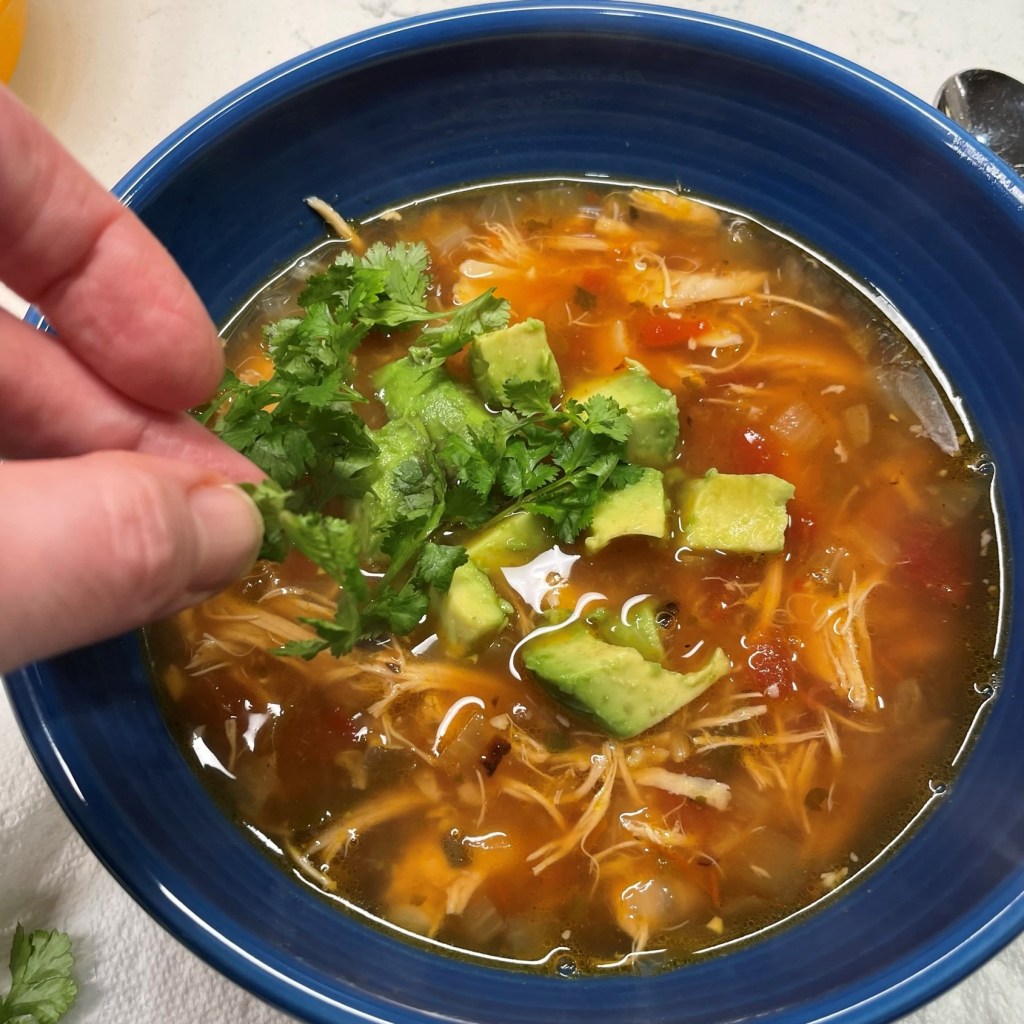
While the soup simmered, I prepped the fresh toppings which included diced avocado and torn cilantro leaves, plus wedges of fresh lime to squeeze over at serving. A small can of hot salsa added a big punch of flavor. Pre-cooked brown rice saved precious minutes and added a little whole grain to the soup.
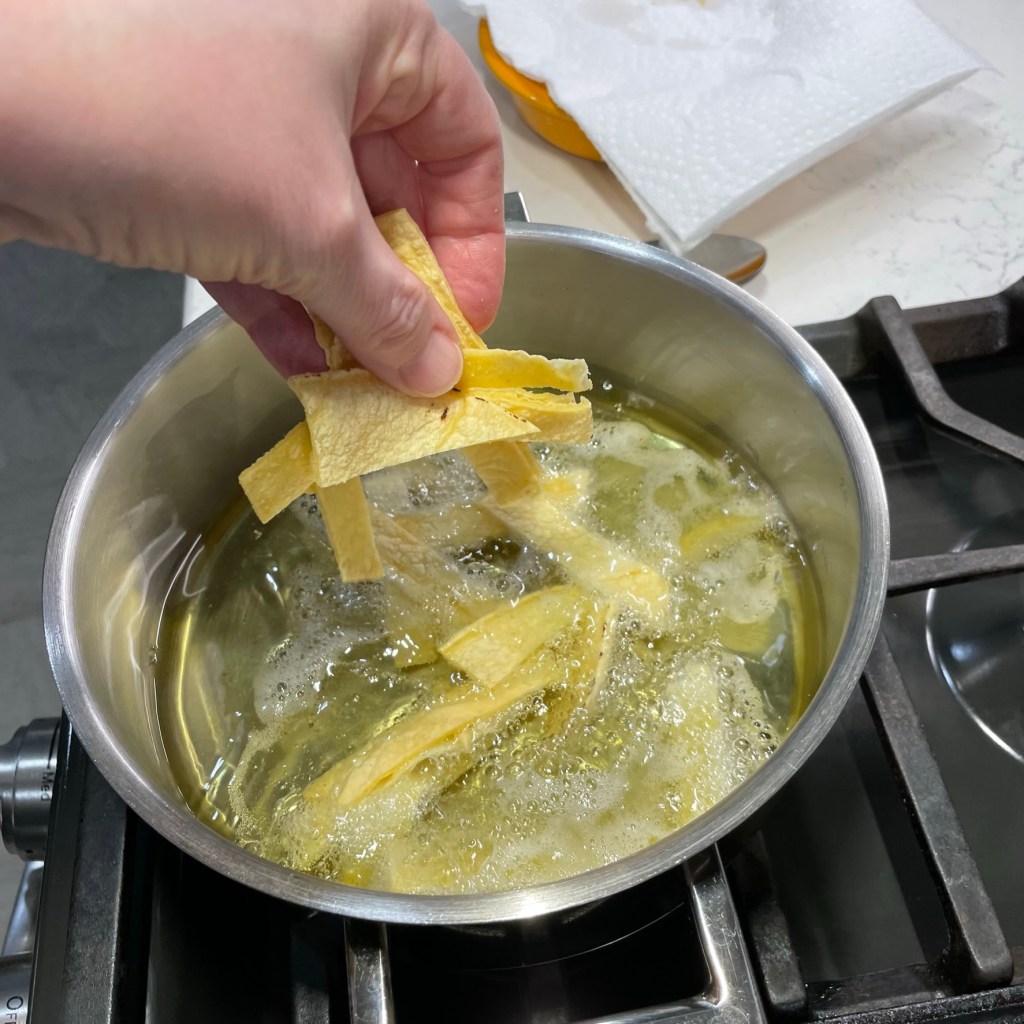
With all the shortcuts I took making this soup, it’s ironic that I made the tortilla strips from scratch!
The only thing my soup still needed was a little bit of crunch on top. Any other day, I would have just served it with a few tortilla chips on the side. But on that day, when I was already feeling crummy and didn’t want to run to the store, I found instead a package of corn tortillas shoved into the back of our deli drawer. So I heated some peanut oil, cut up the corn tortillas into small strips and fried them crispy. It took only about 4 minutes, and it was the perfect finishing touch!
Serve up the soup and add your fresh toppings and crispy strips. Delicious!
A deli roast chicken and a few easy pantry ingredients make this flavorful twist on a classic comfort food perfect for chasing away the mid-winter blahs!
Ingredients
1 small onion, chopped
1/2 jalapeño, seeded and minced
Kosher salt and freshly ground black pepper
2 Tbsp. extra virgin olive oil
A few shakes of prepared chili powder
4 cups chicken stock or broth
About 2 cups shredded or chopped roast chicken (and skin, optional)
10 oz. can spicy salsa (I used Herdez brand)
About 1/2 cup cooked brown rice (I used pre-cooked Minute Rice)
1 ripe avocado, peeled and cubed
1/2 fresh lime, cut into wedges for serving
Small handful of fresh cilantro leaves
Crispy tortilla strips (store bought or homemade, for serving; my recipe is below)
Directions
Heat olive oil in a medium sized soup pot, over medium heat. Add onions and jalapeños, season with salt and pepper and sauté until softened. Sprinkle with a few shakes (about 1/2 tsp) chili powder.
Add chicken stock and shredded chicken. Drop any crispy roasted chicken skin into the soup pot to extract the extra flavor.
Stir salsa into the soup and heat until it comes to a low boil. Reduce heat and simmer for about 30 minutes.
Prepare crispy tortilla strips while soup simmers, or skip this step if you’re using pre-made chips.
Add brown rice and heat through. Serve soup in shallow bowls, topped with chopped avocado and torn cilantro.
Top each bowl with a few crispy tortilla strips and serve immediately.
If you have a few extra minutes, it’s worth the little bit of trouble to make the crispy tortilla strips from scratch. Be sure to season them immediately upon removal from the hot oil. I used Trader Joe’s “Everything But the Elote” seasoning, but chili powder, season salt or simple salt and pepper would also be delicious.
Ingredients
4 to 6 corn tortillas, cut in half, then stacked and cut into strips about 1/2-inch wide
1 cup neutral cooking oil, such as grapeseed, canola or peanut oil
Salty seasoning of your choice
Directions
Heat oil in a shallow pot over medium-high heat; it should measure about 1-inch deep in the pot.
Add a few test strips of tortilla to the oil to test the temperature. They should immediately bubble all over.
Fry tortilla strips for about 4 minutes, until light and crispy. Use a slotted spoon to remove the strips. Drain them on layers of paper towel, and sprinkle right away with salt or seasonings.
Ahead of Thanksgiving, I like to make a few “Sunday Supper” meals—the kind of menu that takes a little extra time or effort—because it gives me something to focus on besides worrying about Thanksgiving, and it also gives me a chance to do a trial run on potential new side dishes before the big day. You know what they say about experimenting on Thanksgiving, right?
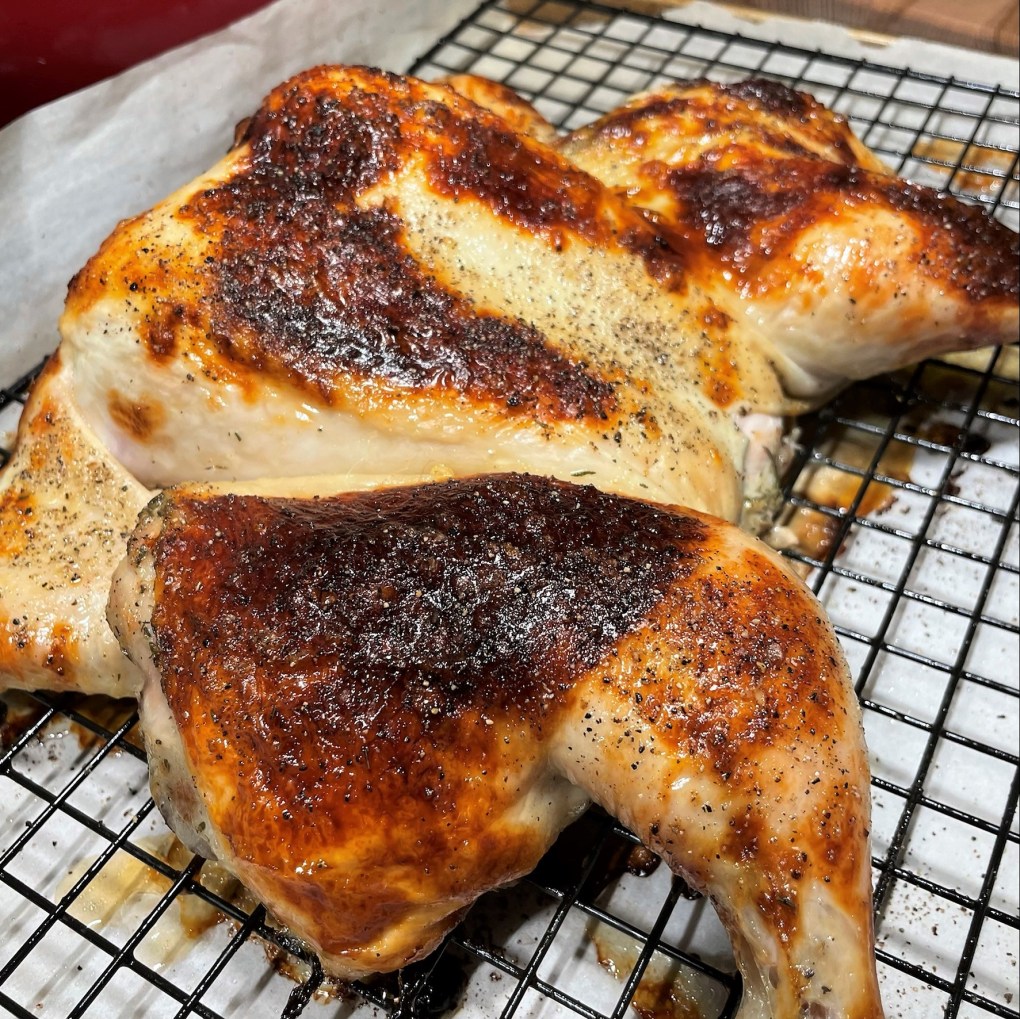
This spatchcocked and roasted chicken can hold its own next to even the most elegant of side dishes you might be auditioning, and the best thing about it is that its lovely presentation takes minimal effort. I wouldn’t have believed it several years ago when I first saw a magazine cover with an image of a roasted chicken laid-out flat on a platter, and I remember thinking, maybe one day I’ll be able to cook like that. Little did I know how easy it is, and after my first attempt at it for a Passover meal a few years ago, I’ve been hooked.
From a technical standpoint, the spatchcocking (or, butterflying, if you wish) of the bird serves an important purpose by putting the whole chicken on the same level for roasting. After 45 minutes in the oven, you won’t have the concern about the breast meat being overdone before the thighs are cooked through because the cavity of the bird is essentially eliminated. The breast of the bird is not sitting several inches higher than the rest of the body, and that means the heat is applied more evenly. Thus, the chicken cooks more evenly.
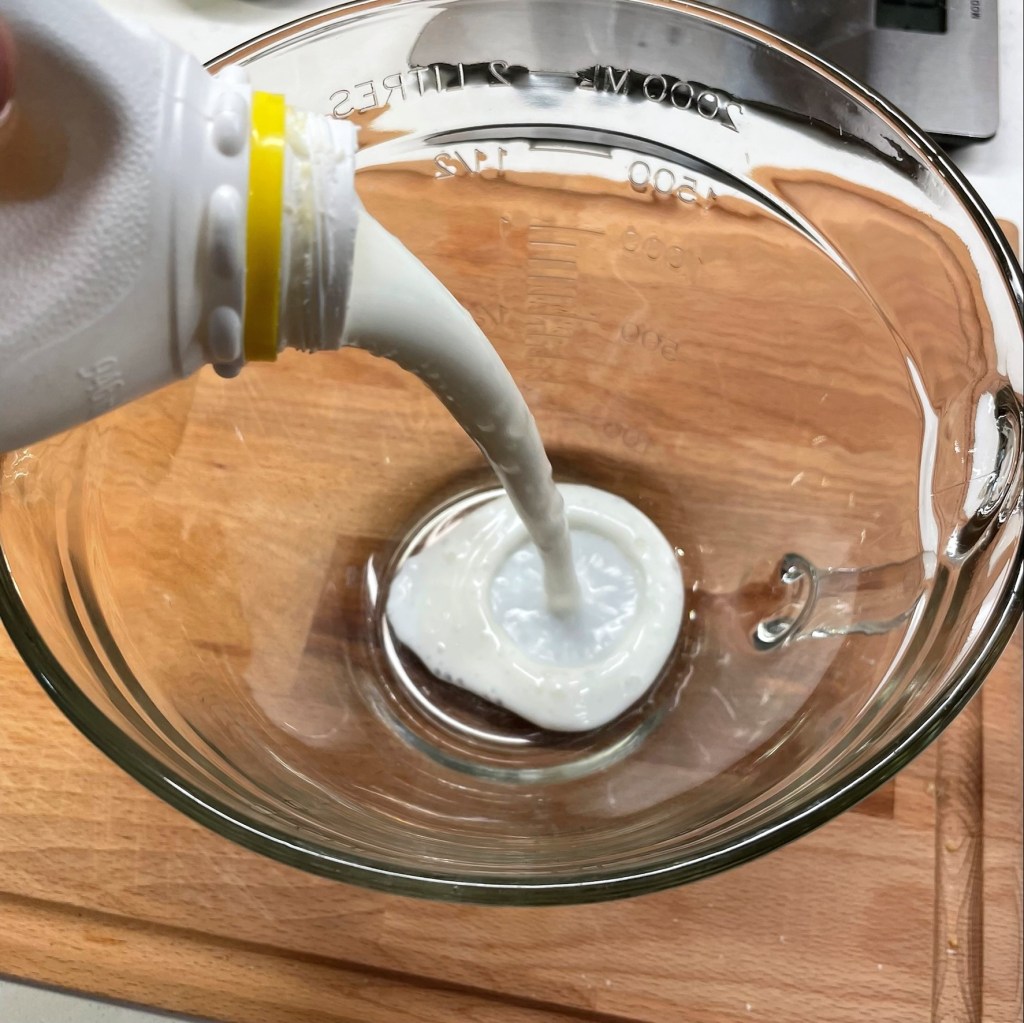
And the flavor comes easy for this chicken, too, because the buttermilk does all the work. Most often, when you hear the words chicken and buttermilk in the same sentence, it’s probably in context of a recipe that involves frying. At least, that’s how it usually works here in the South. But this oven-roasted recipe is lighter, easier to prep and cook, and so, so flavorful. Buttermilk, which is acidic to begin with, has special enzymes that help break down the proteins of meat. When that breakdown occurs, it opens the door for flavors to go into the meat.
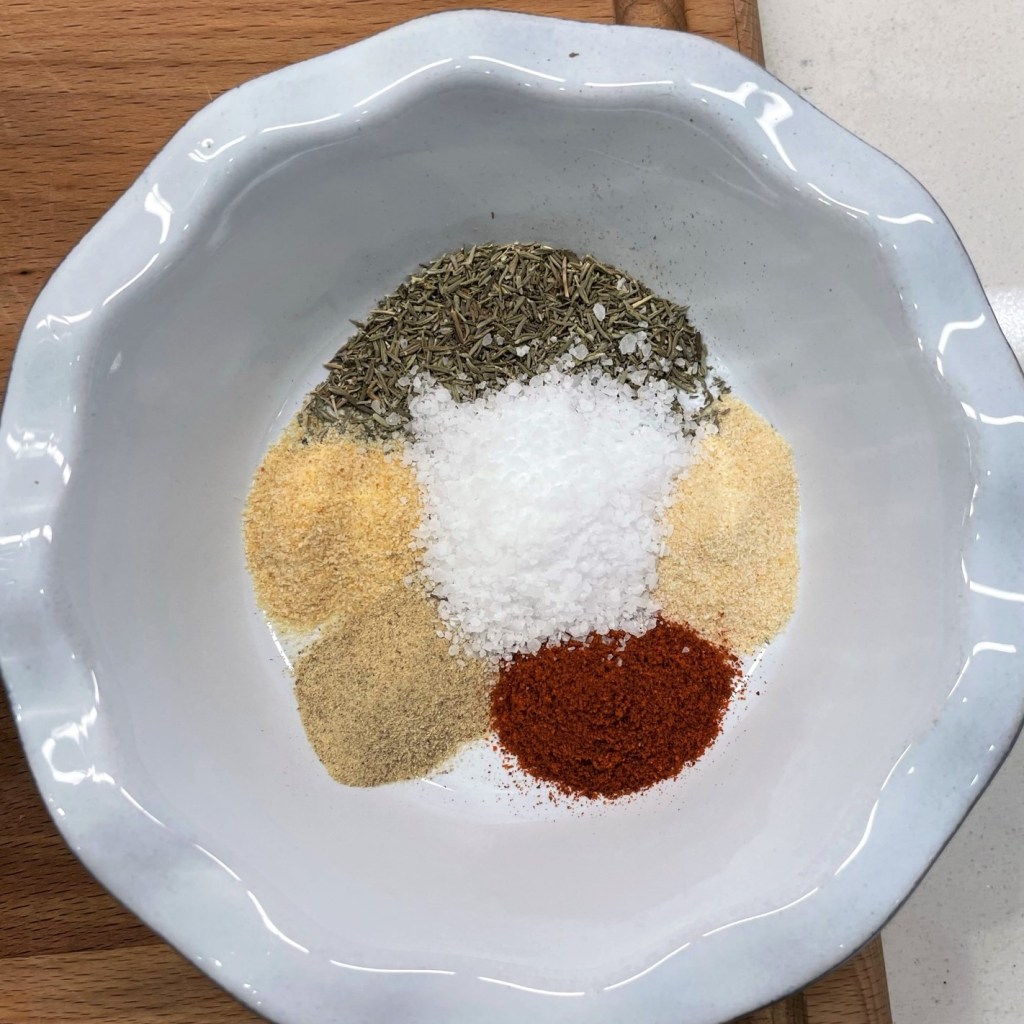
During six hours of marinating, the chicken soaks up the flavors of the herbs and seasonings I add to the buttermilk, including kosher salt, white pepper, garlic and onion powders, paprika and dried thyme.
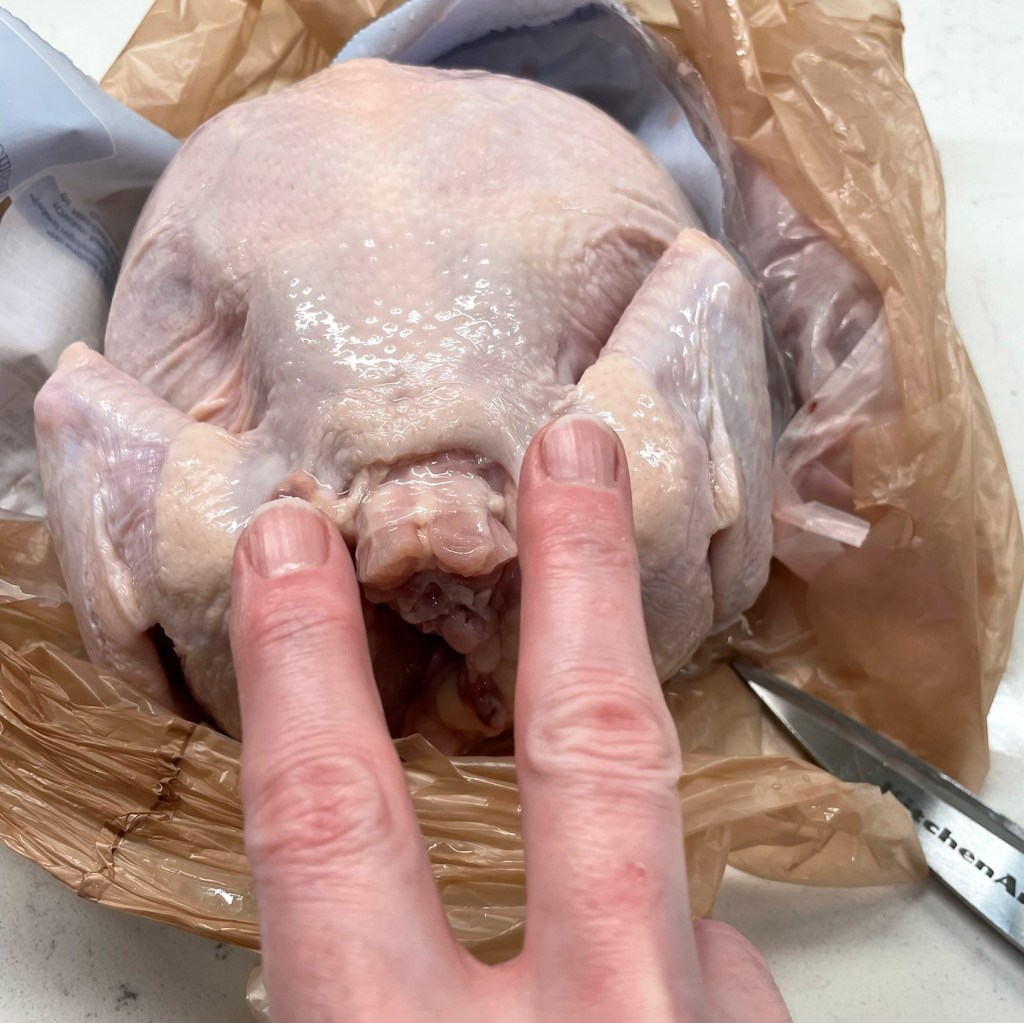
When I shared my plans last week for making homemade stock for Thanksgiving gravy, I mentioned a tip for adding some chicken parts to the simmering broth, most notably the backbone, which I removed from a whole chicken with a technique called “spatchcocking.” This step is not necessary for roasting the bird, but I like it for the evenness of roasting that results. And as I explained in the stock post, I needed some more poultry parts for my stock. Because we don’t eat it, the backbone doesn’t add much value when it’s left on the chicken, but there’s a world of flavor in those bones when you simmer them down in a stock, so this is a smart way to “waste nothing.”
Removing the backbone is easy. You need a good set of kitchen scissors, and a little bit of gumption to crack through the ribs that are attached to the bone along both sides. Start on the neck end of the chicken, where the backbone is easy to recognize. Cut all the way down one side, then the other, and then lift the bone away from the body and cut it off at the tailbone.
I didn’t want to risk cutting myself for a picture, but put kitchen scissors to work where my fingers are and you’ll have it.
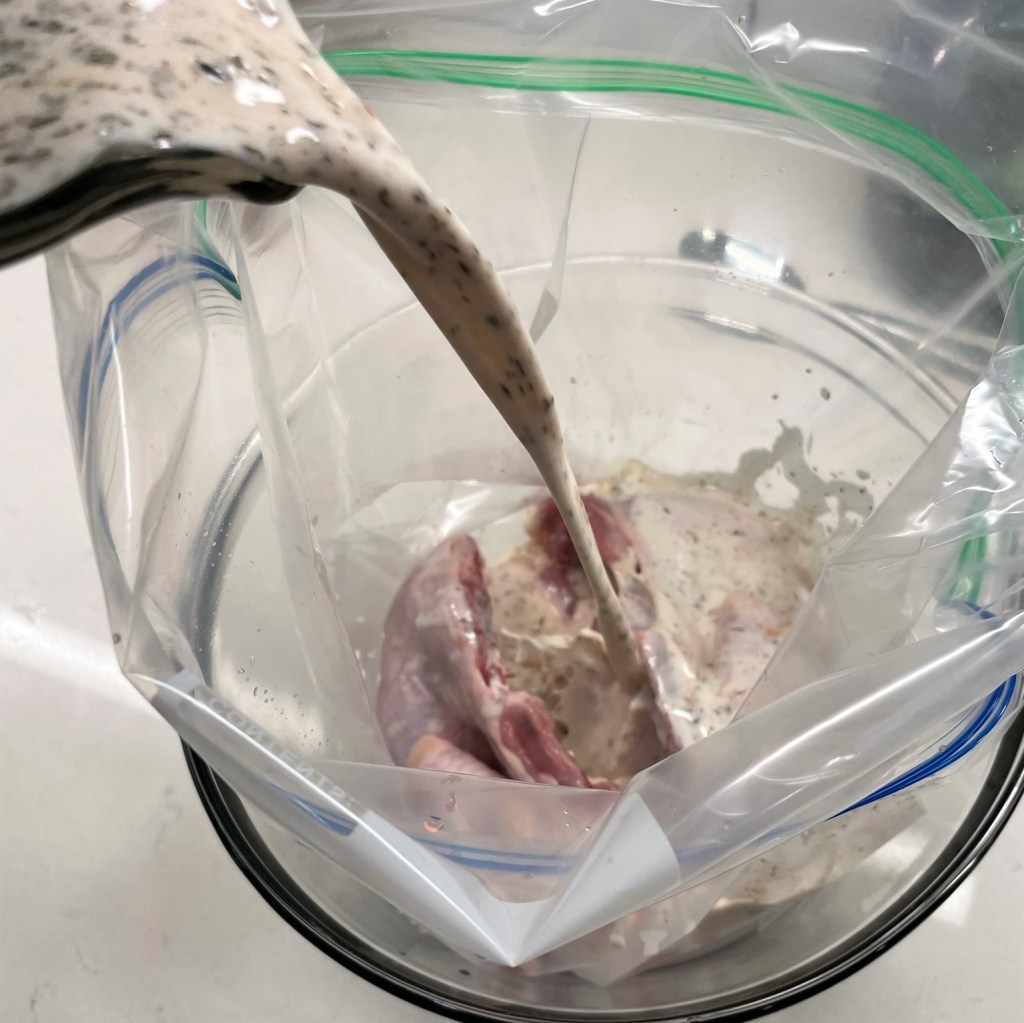
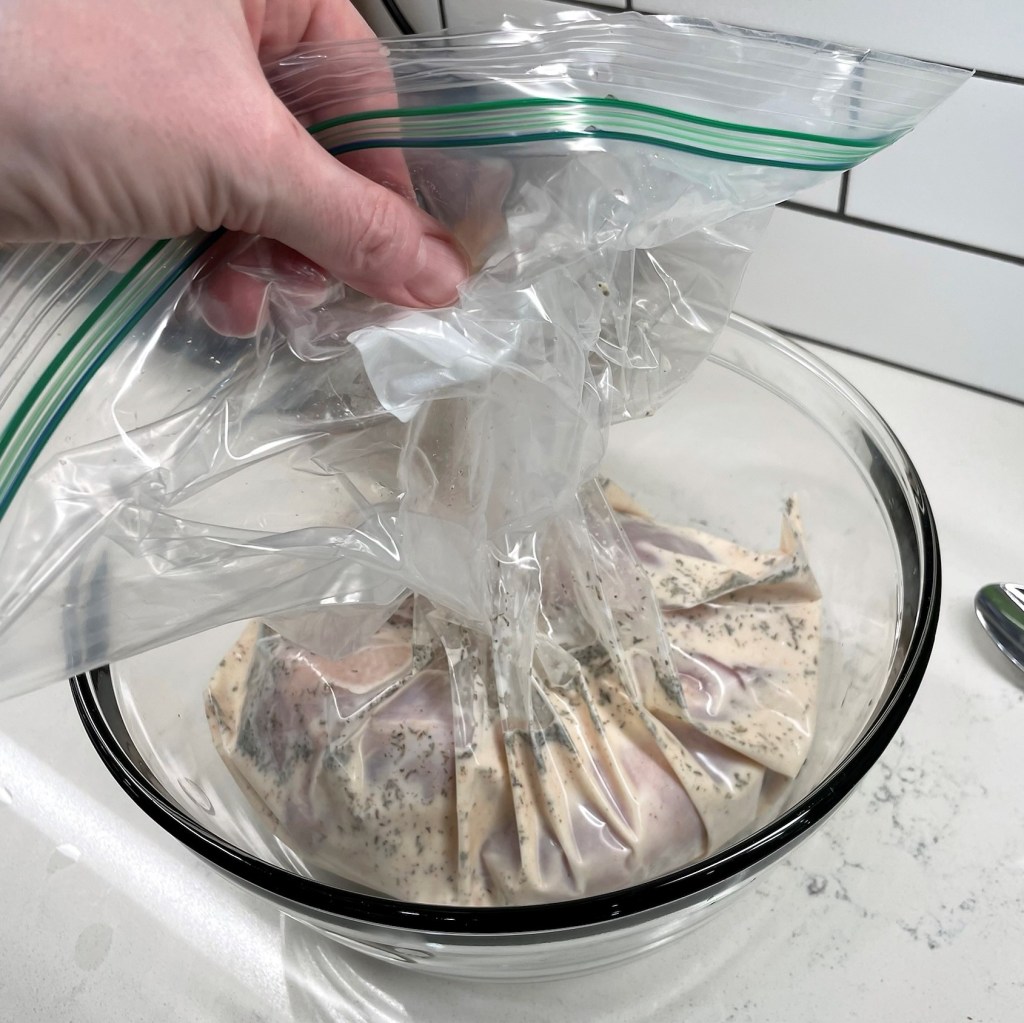
If you don’t need the backbone, you can discard it; otherwise, follow my lead and add it to the pot for your next batch of stock. All that collagen in the bone will really amp up the flavor and richness of any soup or gravy you make with it. You can even freeze it for later, if you aren’t ready to make stock just yet. Pat the bird dry with paper towels and place it in a heavy-duty plastic freezer bag with a zipper top. Pour in the seasoned buttermilk mixture and seal up the bag, squeezing out as much air as possible to force the brine up around every part of the chicken. Stash it in the refrigerator for about six hours, and let the buttermilk work its magic.
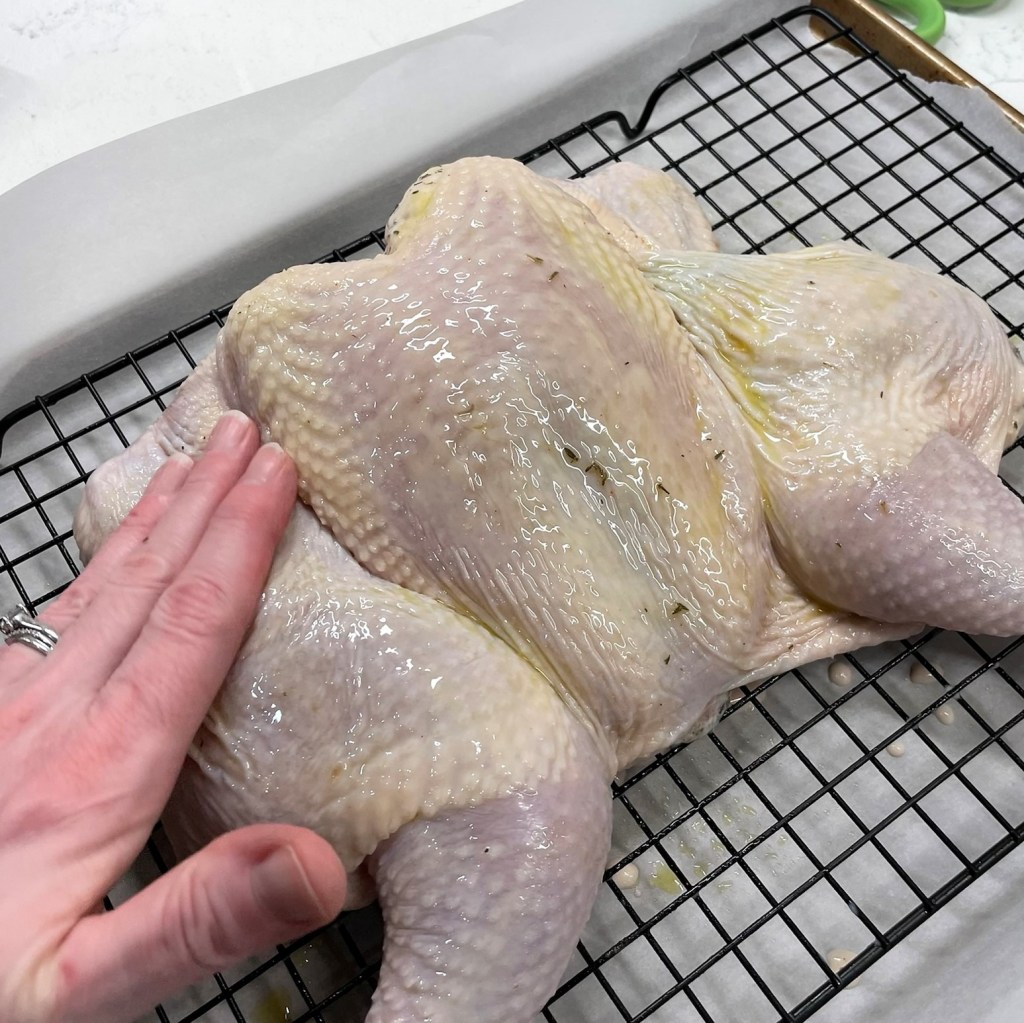
Don’t rinse the marinade off the bird; just pat it dry and then rub on some oil before roasting.
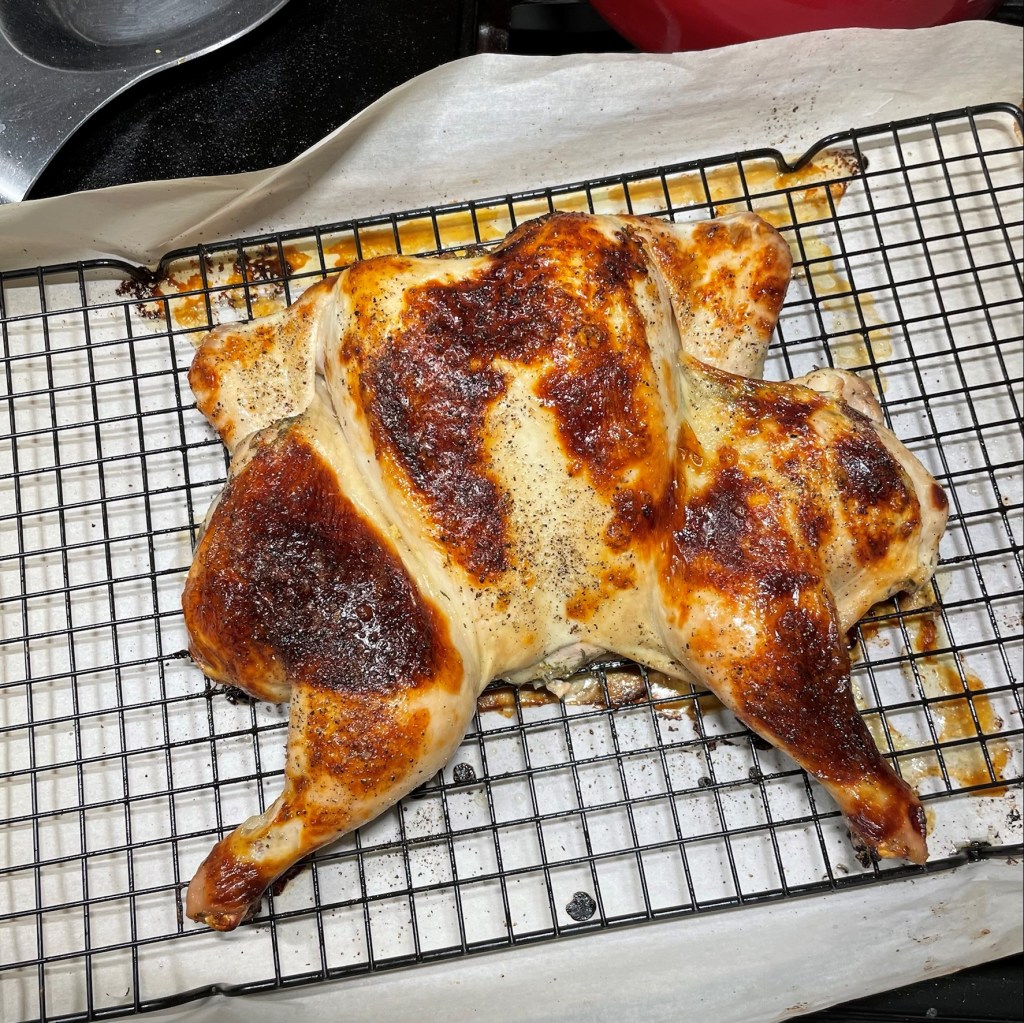
After marinating, dry the chicken with paper towels and rub a small amount of olive oil all over the skin of the bird to protect it from drying out. Let it rest while the oven preheats to 400° F, and roast it for about 45 minutes, until the skin is golden brown all over and the internal temperature is 160° F. It looks beautiful and the buttermilk keeps it nice and juicy on the inside.
I’ve put this buttermilk roasted chicken in the Sunday Supper category, not for any difficulty but for the marinating time that’s required for tenderizing and flavoring. Let me know in the comments what side dishes you’d like to see with this yummy chicken.
You don't need any special skills to spatchcock a chicken, as long as you have a good pair of kitchen scissors. And this buttermilk brine brings a world of flavor into the chicken with almost no effort.
Ingredients
3.5-pound chicken, preferably free-range
2 cups real, cultured buttermilk
1 heaping tsp. kosher salt
1/2 tsp. garlic powder
1/2 tsp. onion powder
1/2 tsp. white pepper
1/2 tsp. sweet Spanish paprika
1 tsp. dried thyme leaves
1 Tbsp. extra virgin olive oil
Directions
Remove the giblet package and neck parts from the inside of the chicken. Use kitchen scissors to cut down both sides of the backbone and set it aside with the innards to be simmered into a stock.
Open up the chicken, essentially “unfolding” it, and lay it breast side-up on a sheet pan. Use the heel of your hand to press firmly onto the breast of the bird until it cracks. This will help the chicken lay flatter when it is time to roast it.
Add buttermilk to a 2-quart bowl. Combine the salt and other dry seasonings in a small bowl, and then stir the spice blend into the buttermilk until the salt is dissolved.
Place the chicken in a gallon-size freezer bag with a zip top. Pour the buttermilk into the bag and seal it, gently squeezing the air out of the bag as you go. This will ensure the brine covers every surface of the chicken. Wash and dry the bowl and place the bagged chicken into it (just in case the bag leaks) and refrigerate it for about six hours.
Remove the chicken from the buttermilk brine, allowing the excess to drip off. Do not rinse the bird, but pat it dry with paper towels and lay it, breast side-up, on a baking rack placed over a rimmed sheet pan. Rub the olive oil all over the skin of the chicken and sprinkle it with kosher salt and black pepper. Let the chicken rest at room temperature for an hour before roasting.
Preheat oven to 400° F, with rack in the center position. Roast the chicken without convection for 45 minutes, until the skin is golden brown all over and a thermometer inserted into the thickest part of the thigh reaches 160° F. Rest chicken for 15 minutes before carving and serving.
Something about the change of seasons makes me happy, and this is especially true when we can see Labor Day just up ahead. This time last year, my husband, Les, and I were gallivanting all over New Jersey, Connecticut and New York, visiting old friends, meeting new ones and satisfying our culinary curiosity with so many delicious foods. Our plans this year have kept us mostly at home, and so the transition to fall doesn’t feel nearly as dramatic, but we have at least fulfilled the delicious food requirement. The big food news of our week occurred when we celebrated my hubby’s birthday with a fantastic veal and eggplant Parmesan dish, which he will be proud to share on Comfort du Jour soon (it will be an excellent way to re-welcome the Sunday Supper category).
Yes, the countdown to autumn has begun, and I’ll be at the front of the line to greet it. For now, I’d like to share this colorful, late-summer dish that I whipped up last month, just before our garden tomatoes started coming in. It’s a “healthy-ish” play on chicken and waffles, and a great way to hang onto the lingering days of summer as we prepare to roll out the welcome mat for the glorious comfort foods of autumn.
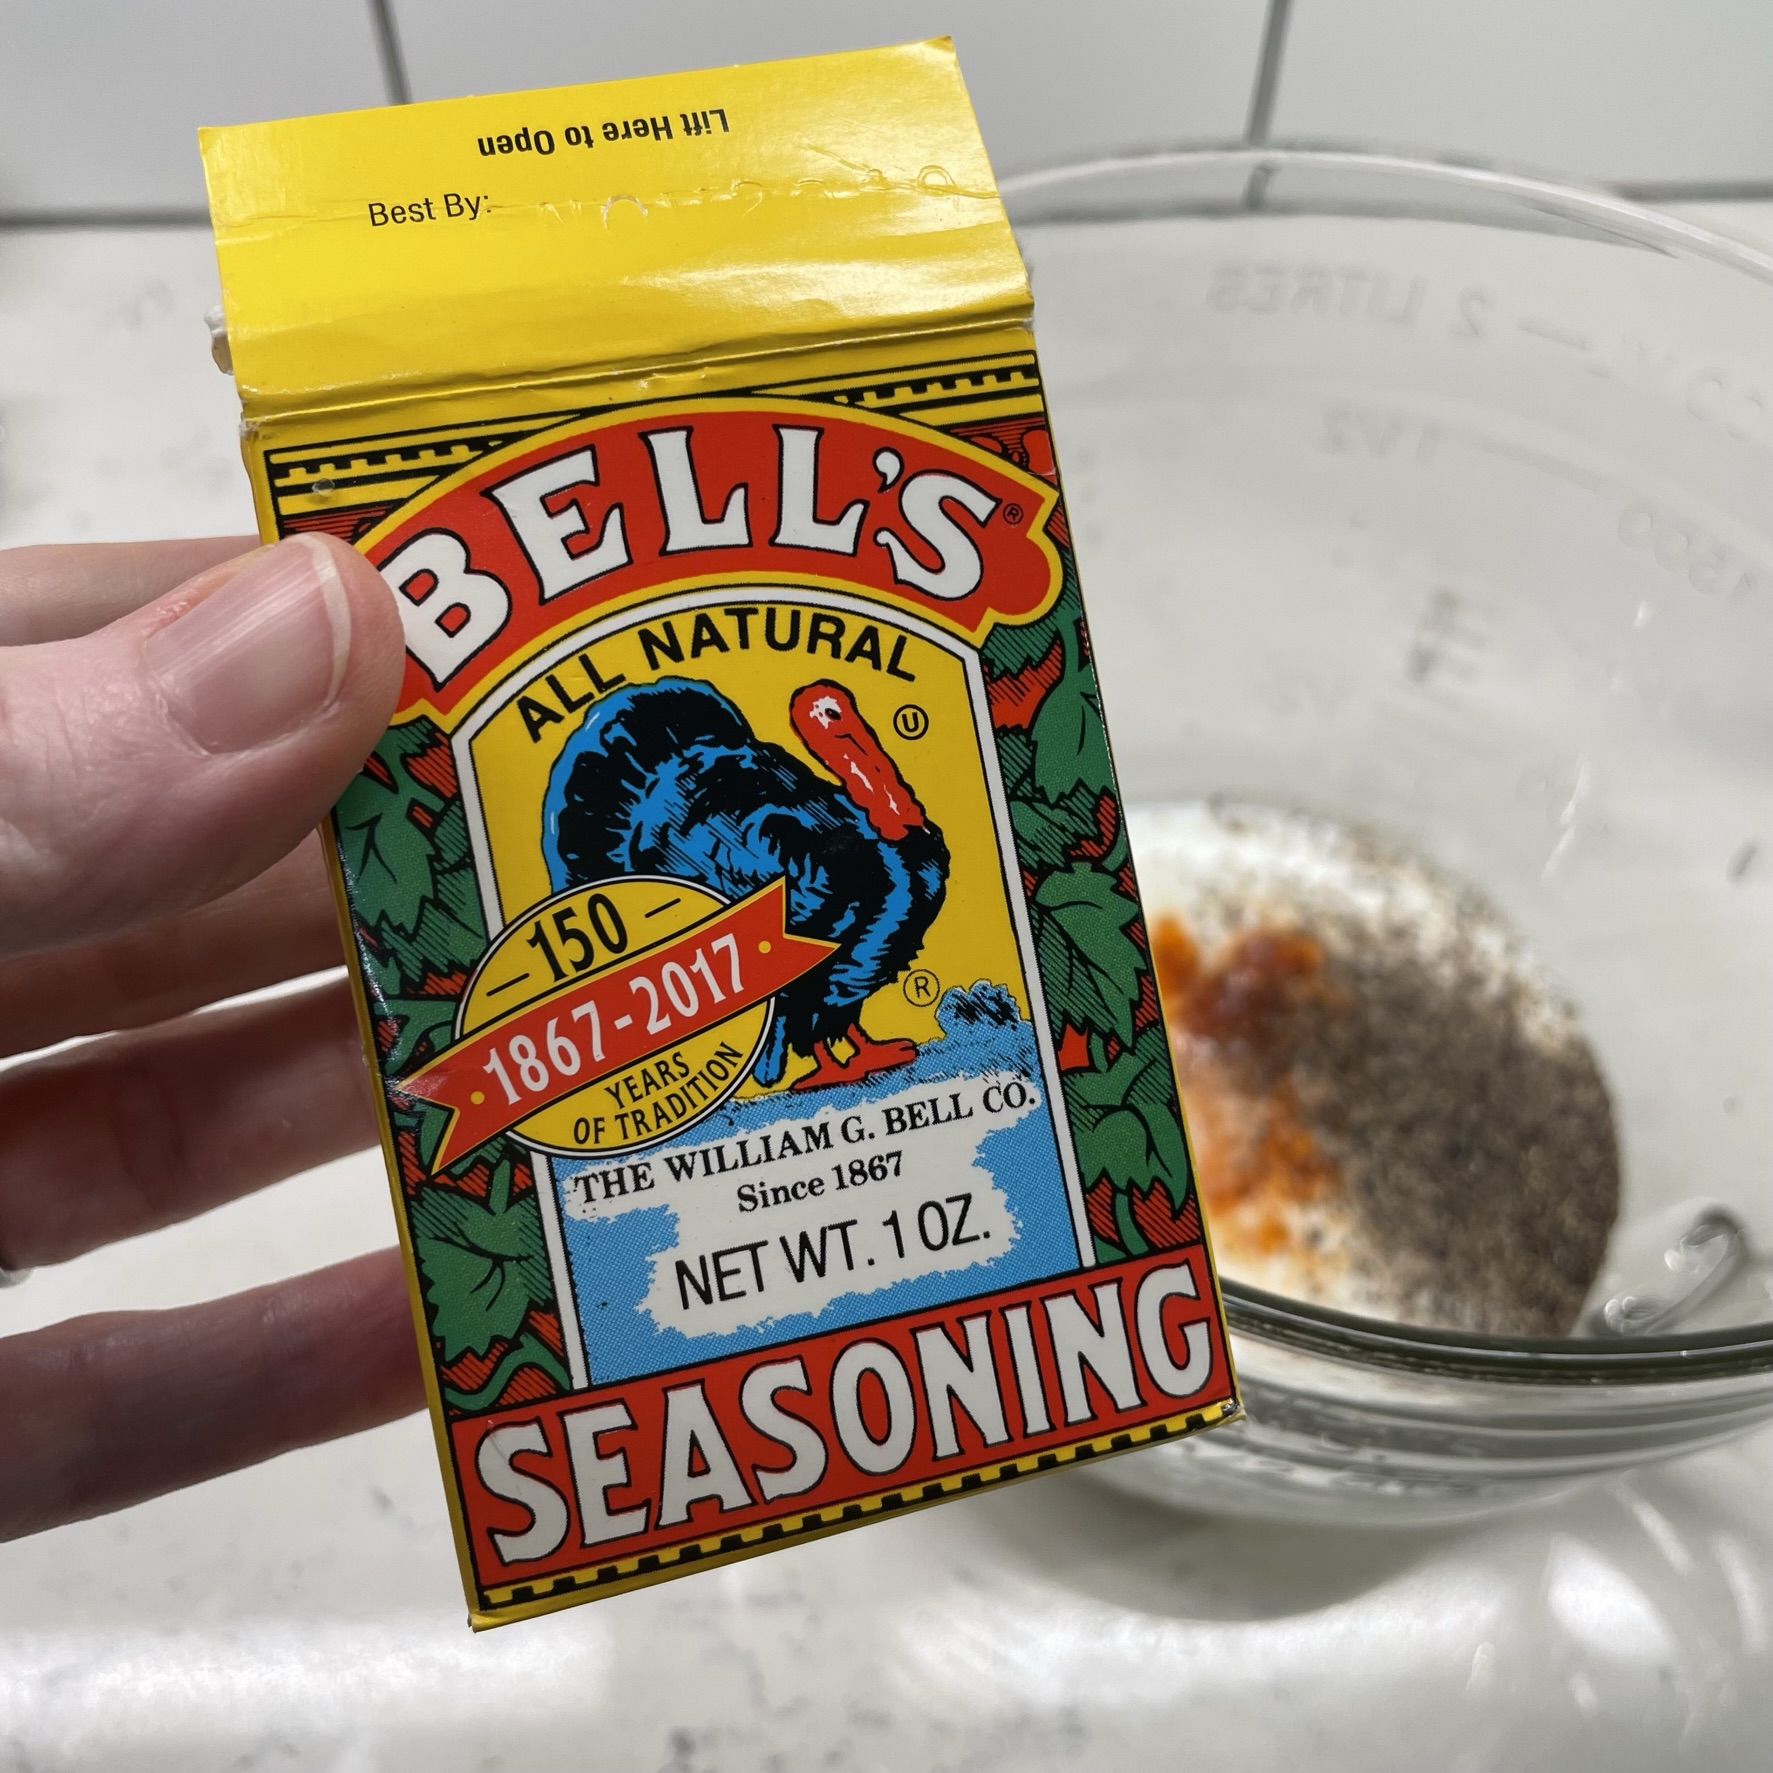
It may seem that “chicken and waffles” could not qualify as healthy-ish, but I did lighten this up in a number of ways. First, I used skinless chicken tenders (rather than skin-on, bone-in pieces), which were drenched in flavor after a two-hour bath in buttermilk, seasoned with plenty of hot sauce and a bit of Bell’s poultry seasoning. Never miss an opportunity to add flavor—that’s one of my key approaches to cooking. Rather than deep frying the tenders, I dipped them in seasoned flour and crisped them up lightly in a cast-iron skillet. And with a high volume of vegetables in the succotash, each serving only included two of the fried tenders. Portion control is one of the simplest ways to reduce calorie intake. 🙂
Can you stand a little heat?
In my opinion, this is the best poultry seasoning ever.
The spiked buttermilk makes my tenders more tender. 🙂
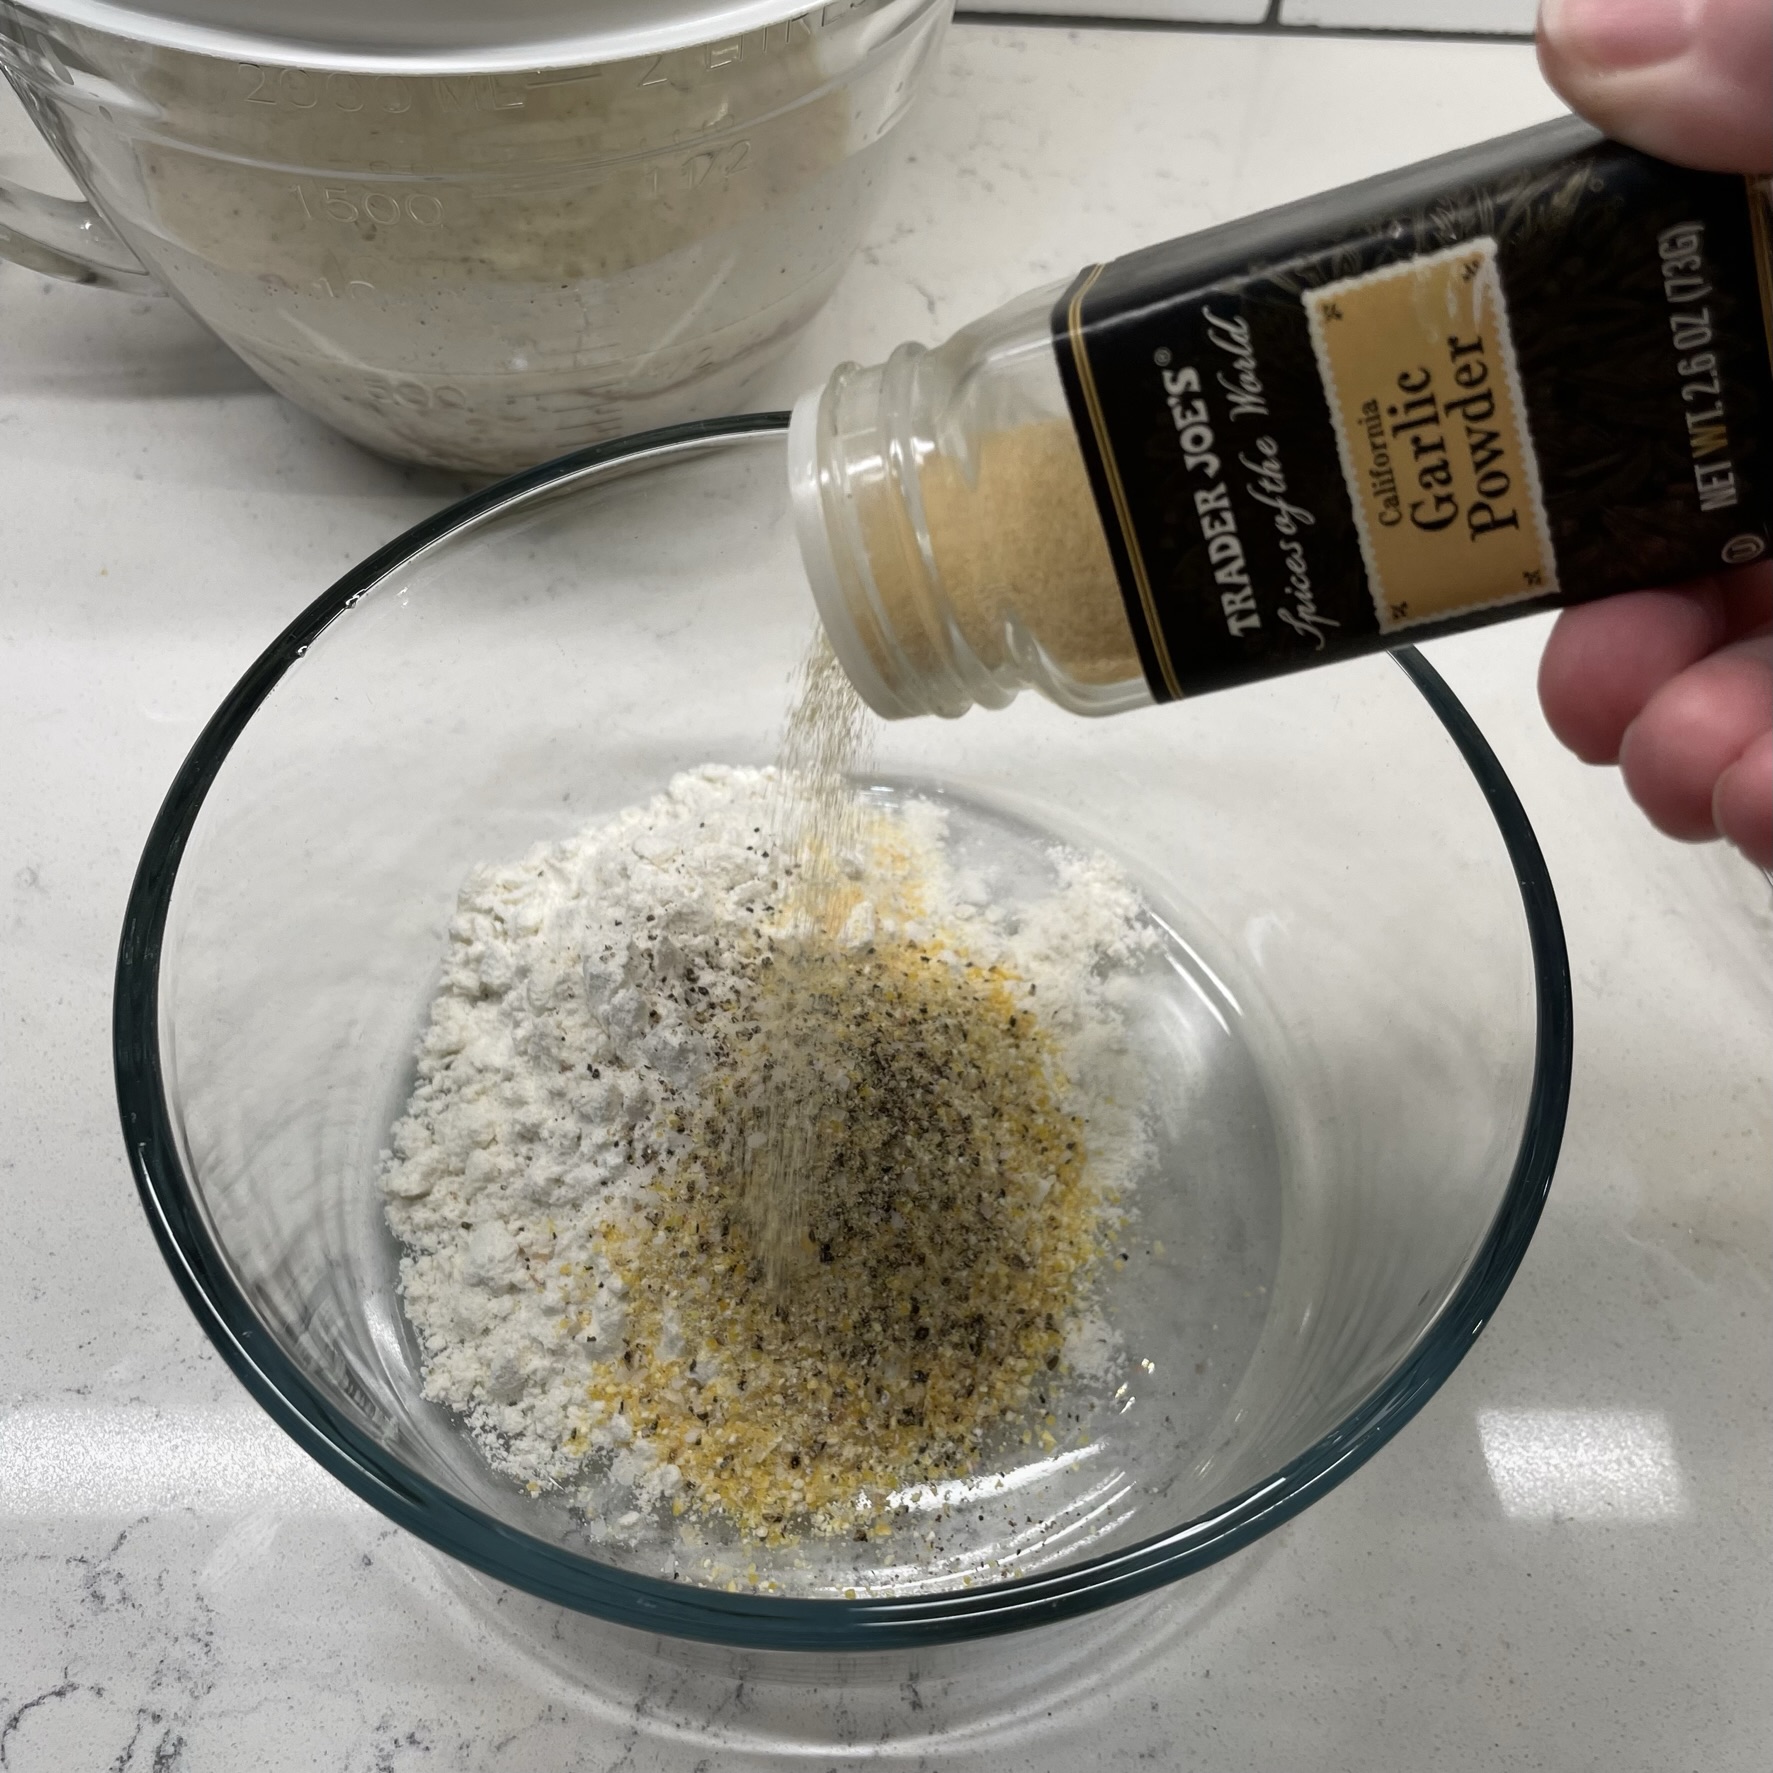
A wee bit of garlic in the flour and cornmeal breading.
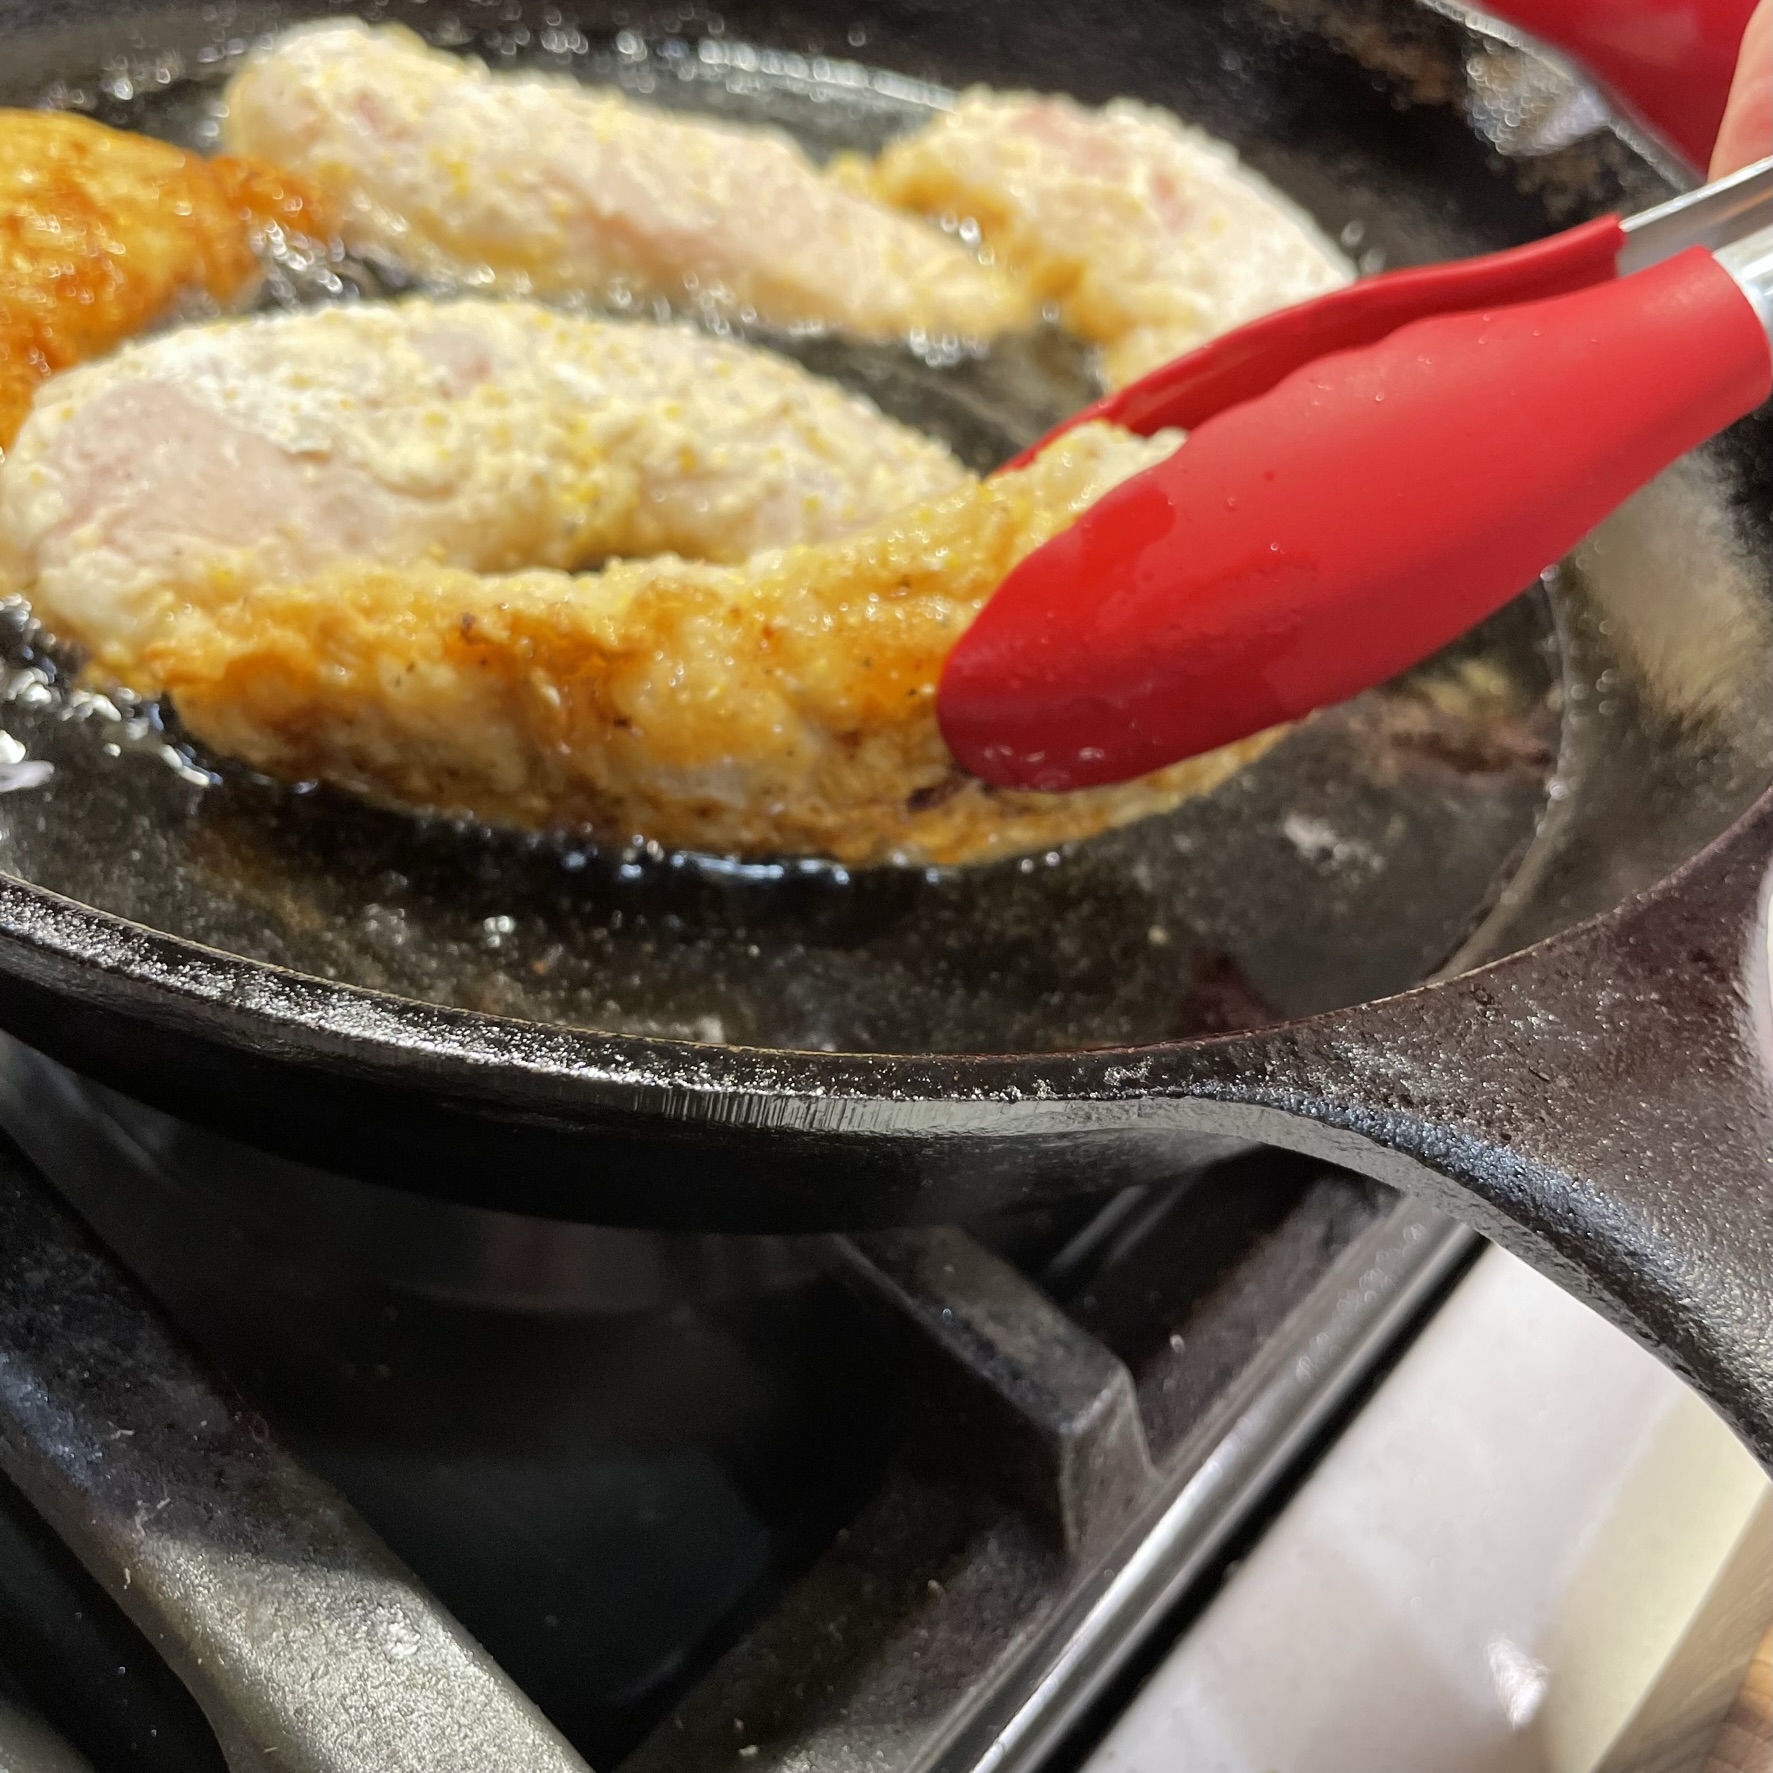
Bread the tenders lightly so they don’t take up too much oil.
Fry the tenders when the oil is hot, and don’t crowd the pan.
Give them a gentle turn when they are golden brown.
Season the tenders while they are still hot.
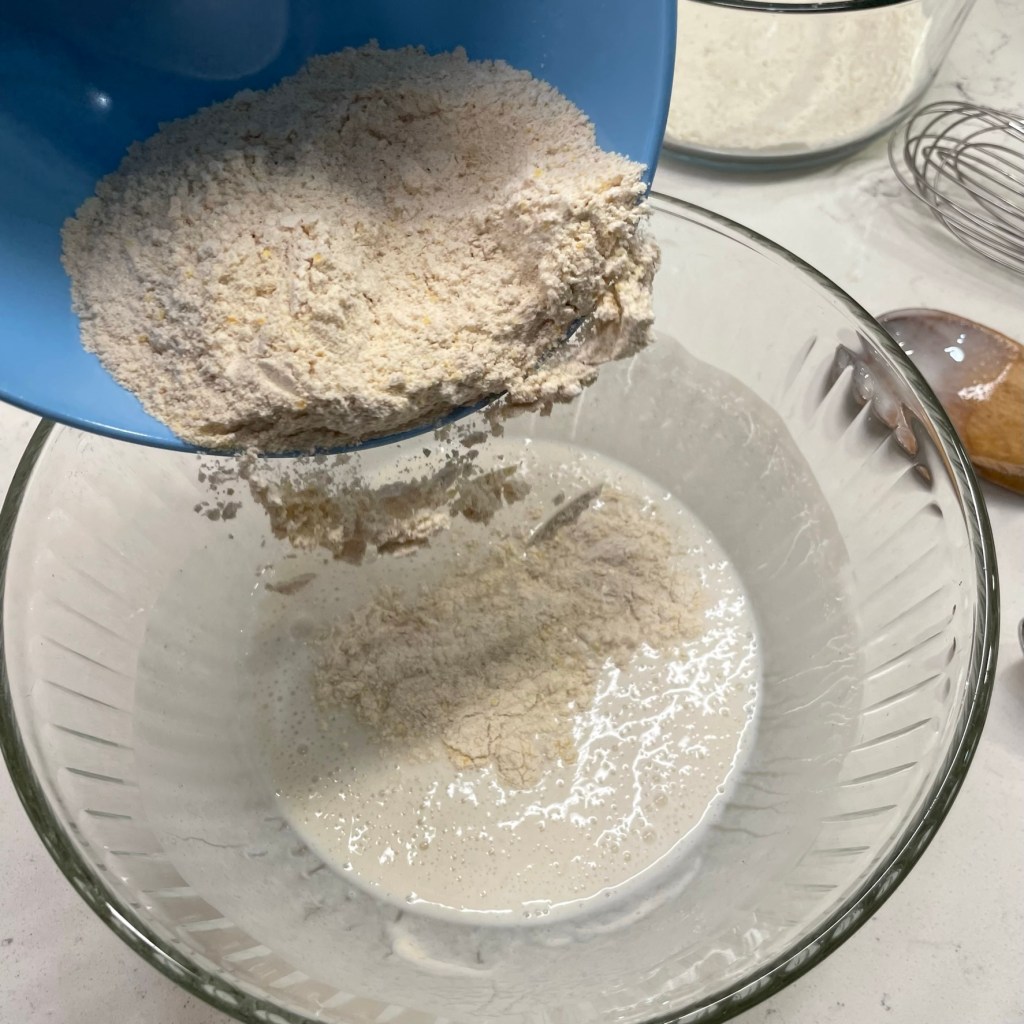
The waffles for this dish were on the healthy side of things, too, and based on a sourdough pancake recipe from my favorite baking site, King Arthur Baking Company.
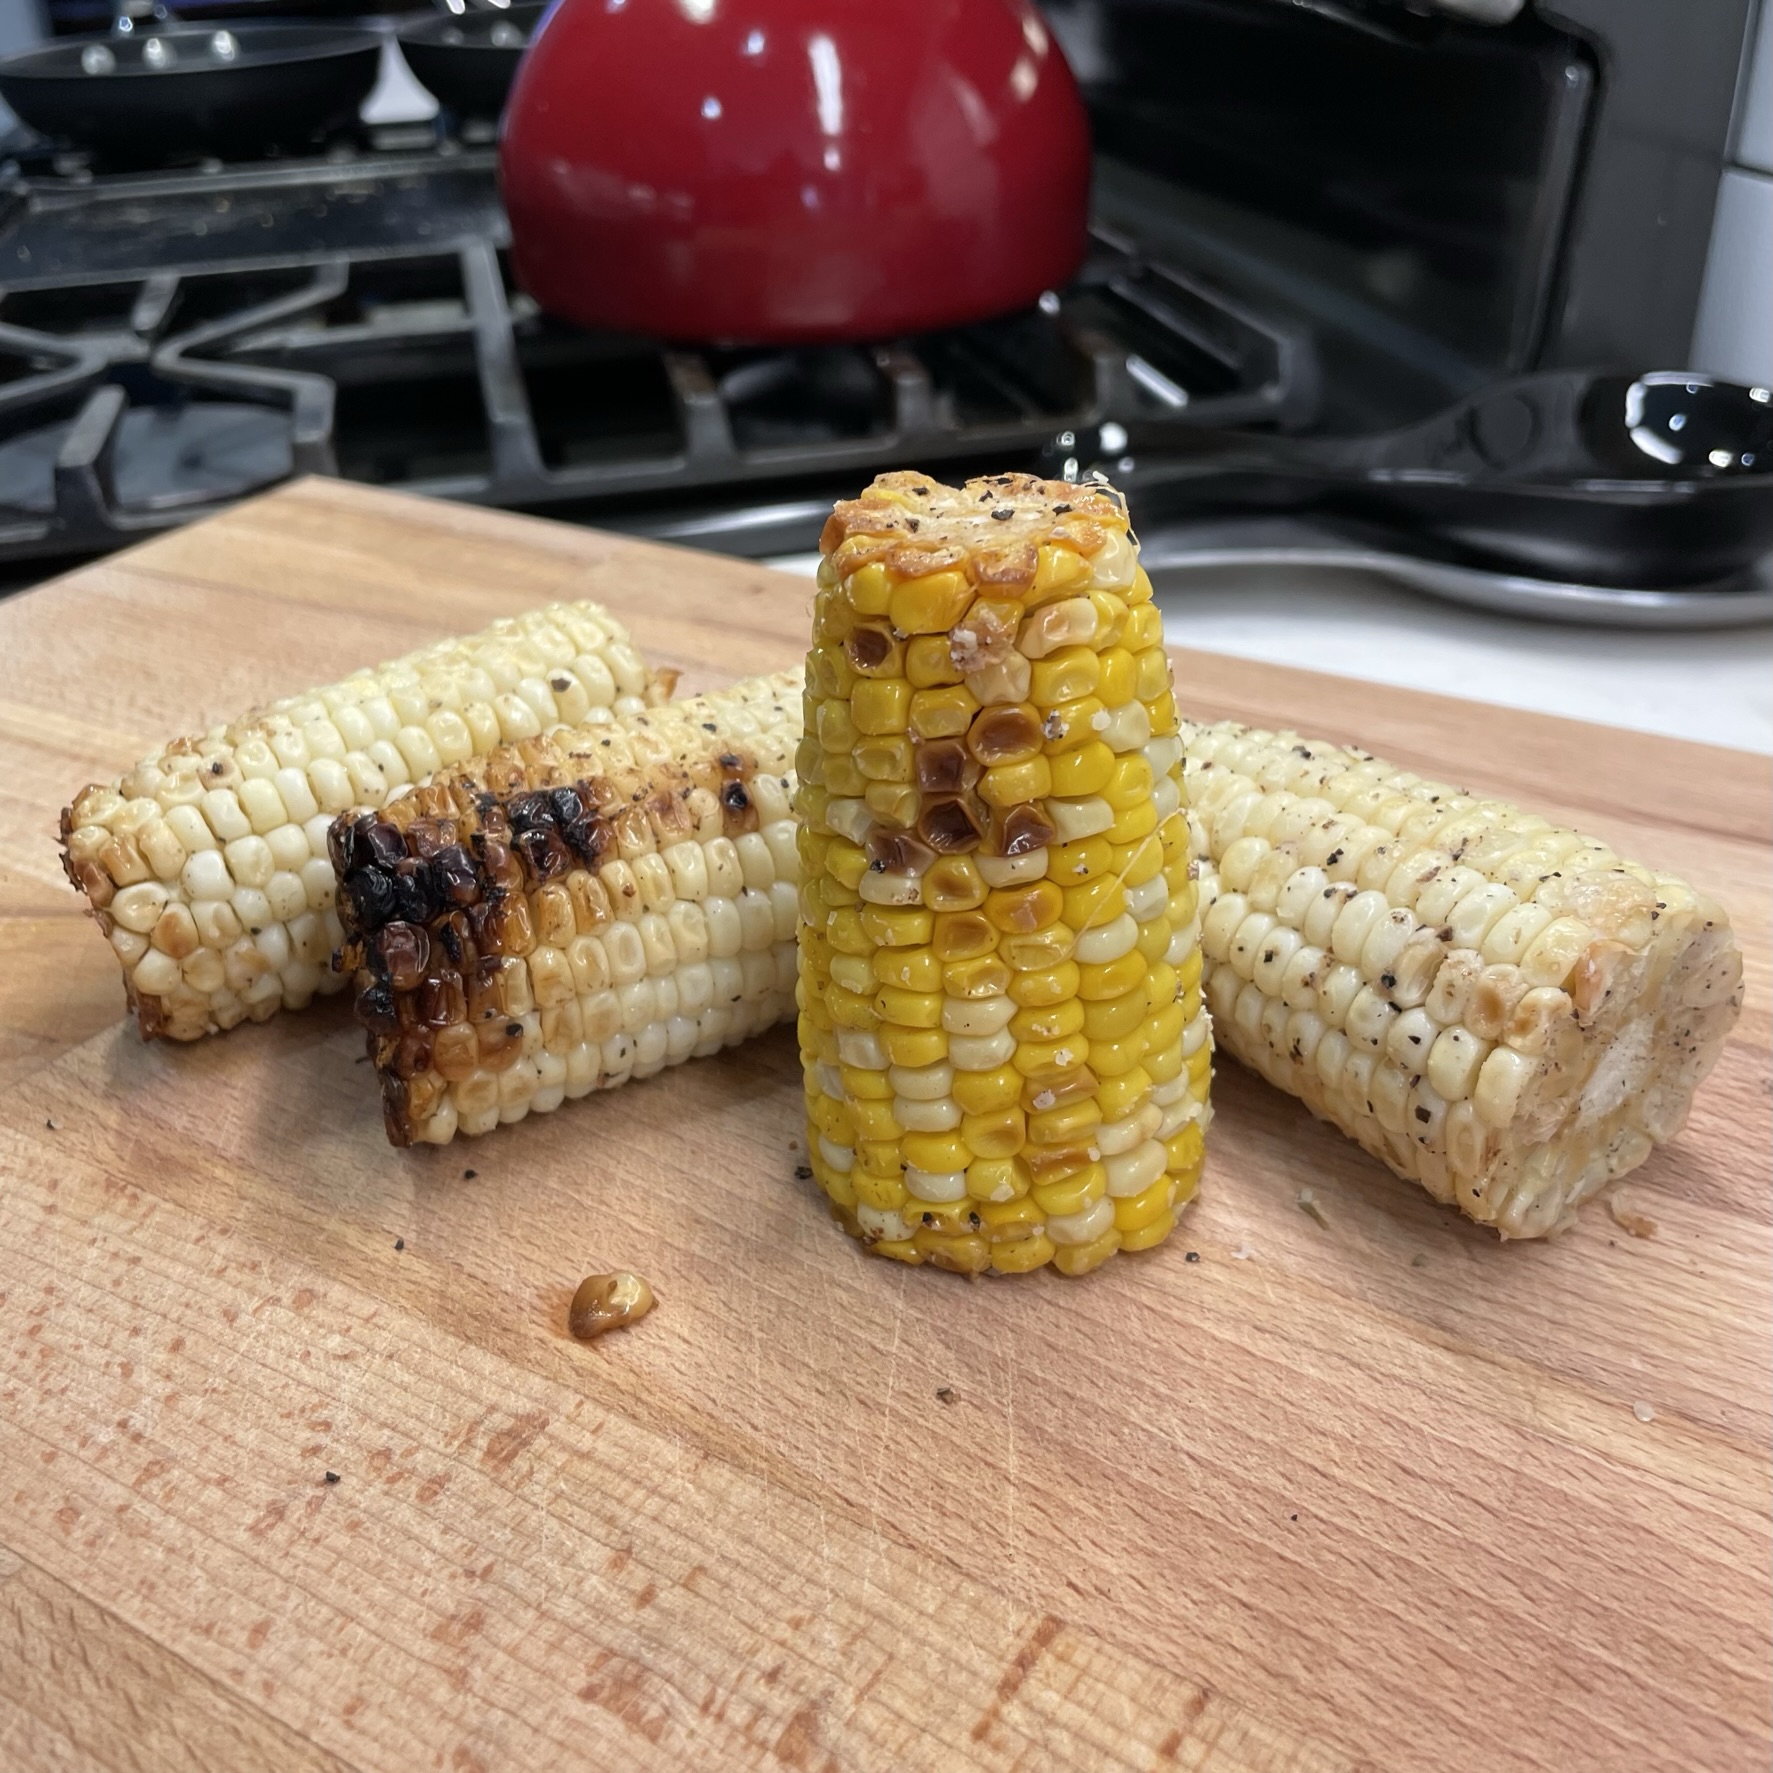
I followed the King Arthur recipe as written, except that I halved it, swapped in white whole wheat flour with a little cornmeal, and bumped up the oil just enough to prevent them from sticking to the waffle iron. The scallions and leftover grilled corn folded into the batter made the waffles extra hearty, and sourdough can’t be beat for this application because of the amazing crispy texture it puts on the waffle exterior. If you aren’t riding the sourdough train, there’s no reason in the world you couldn’t substitute another waffle recipe you like and add the corn and scallions to it.
Whole wheat and cornmeal makes my waffles a little better for us.Corn and scallions make my batter better.I made these waffles in my Belgian maker, but regular square waffles would be just fine.Perfect crispy outside!
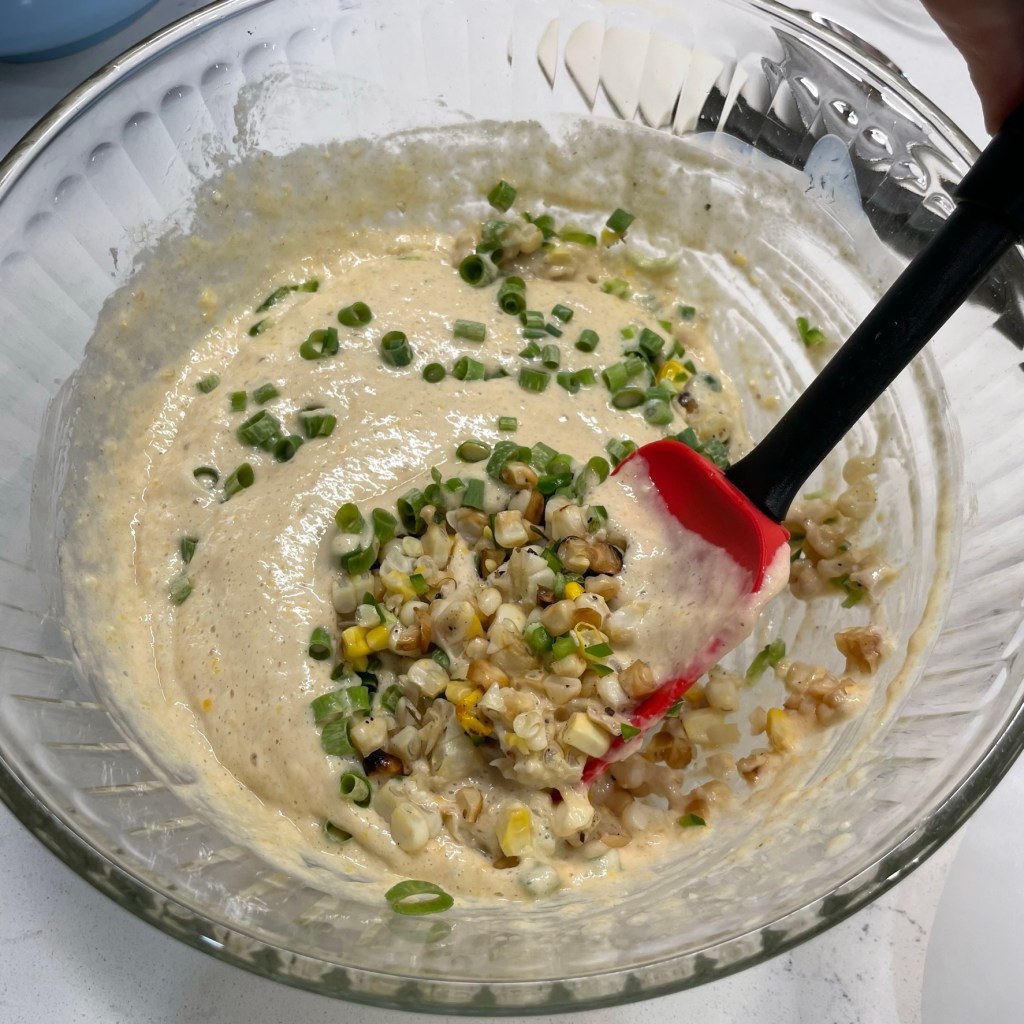
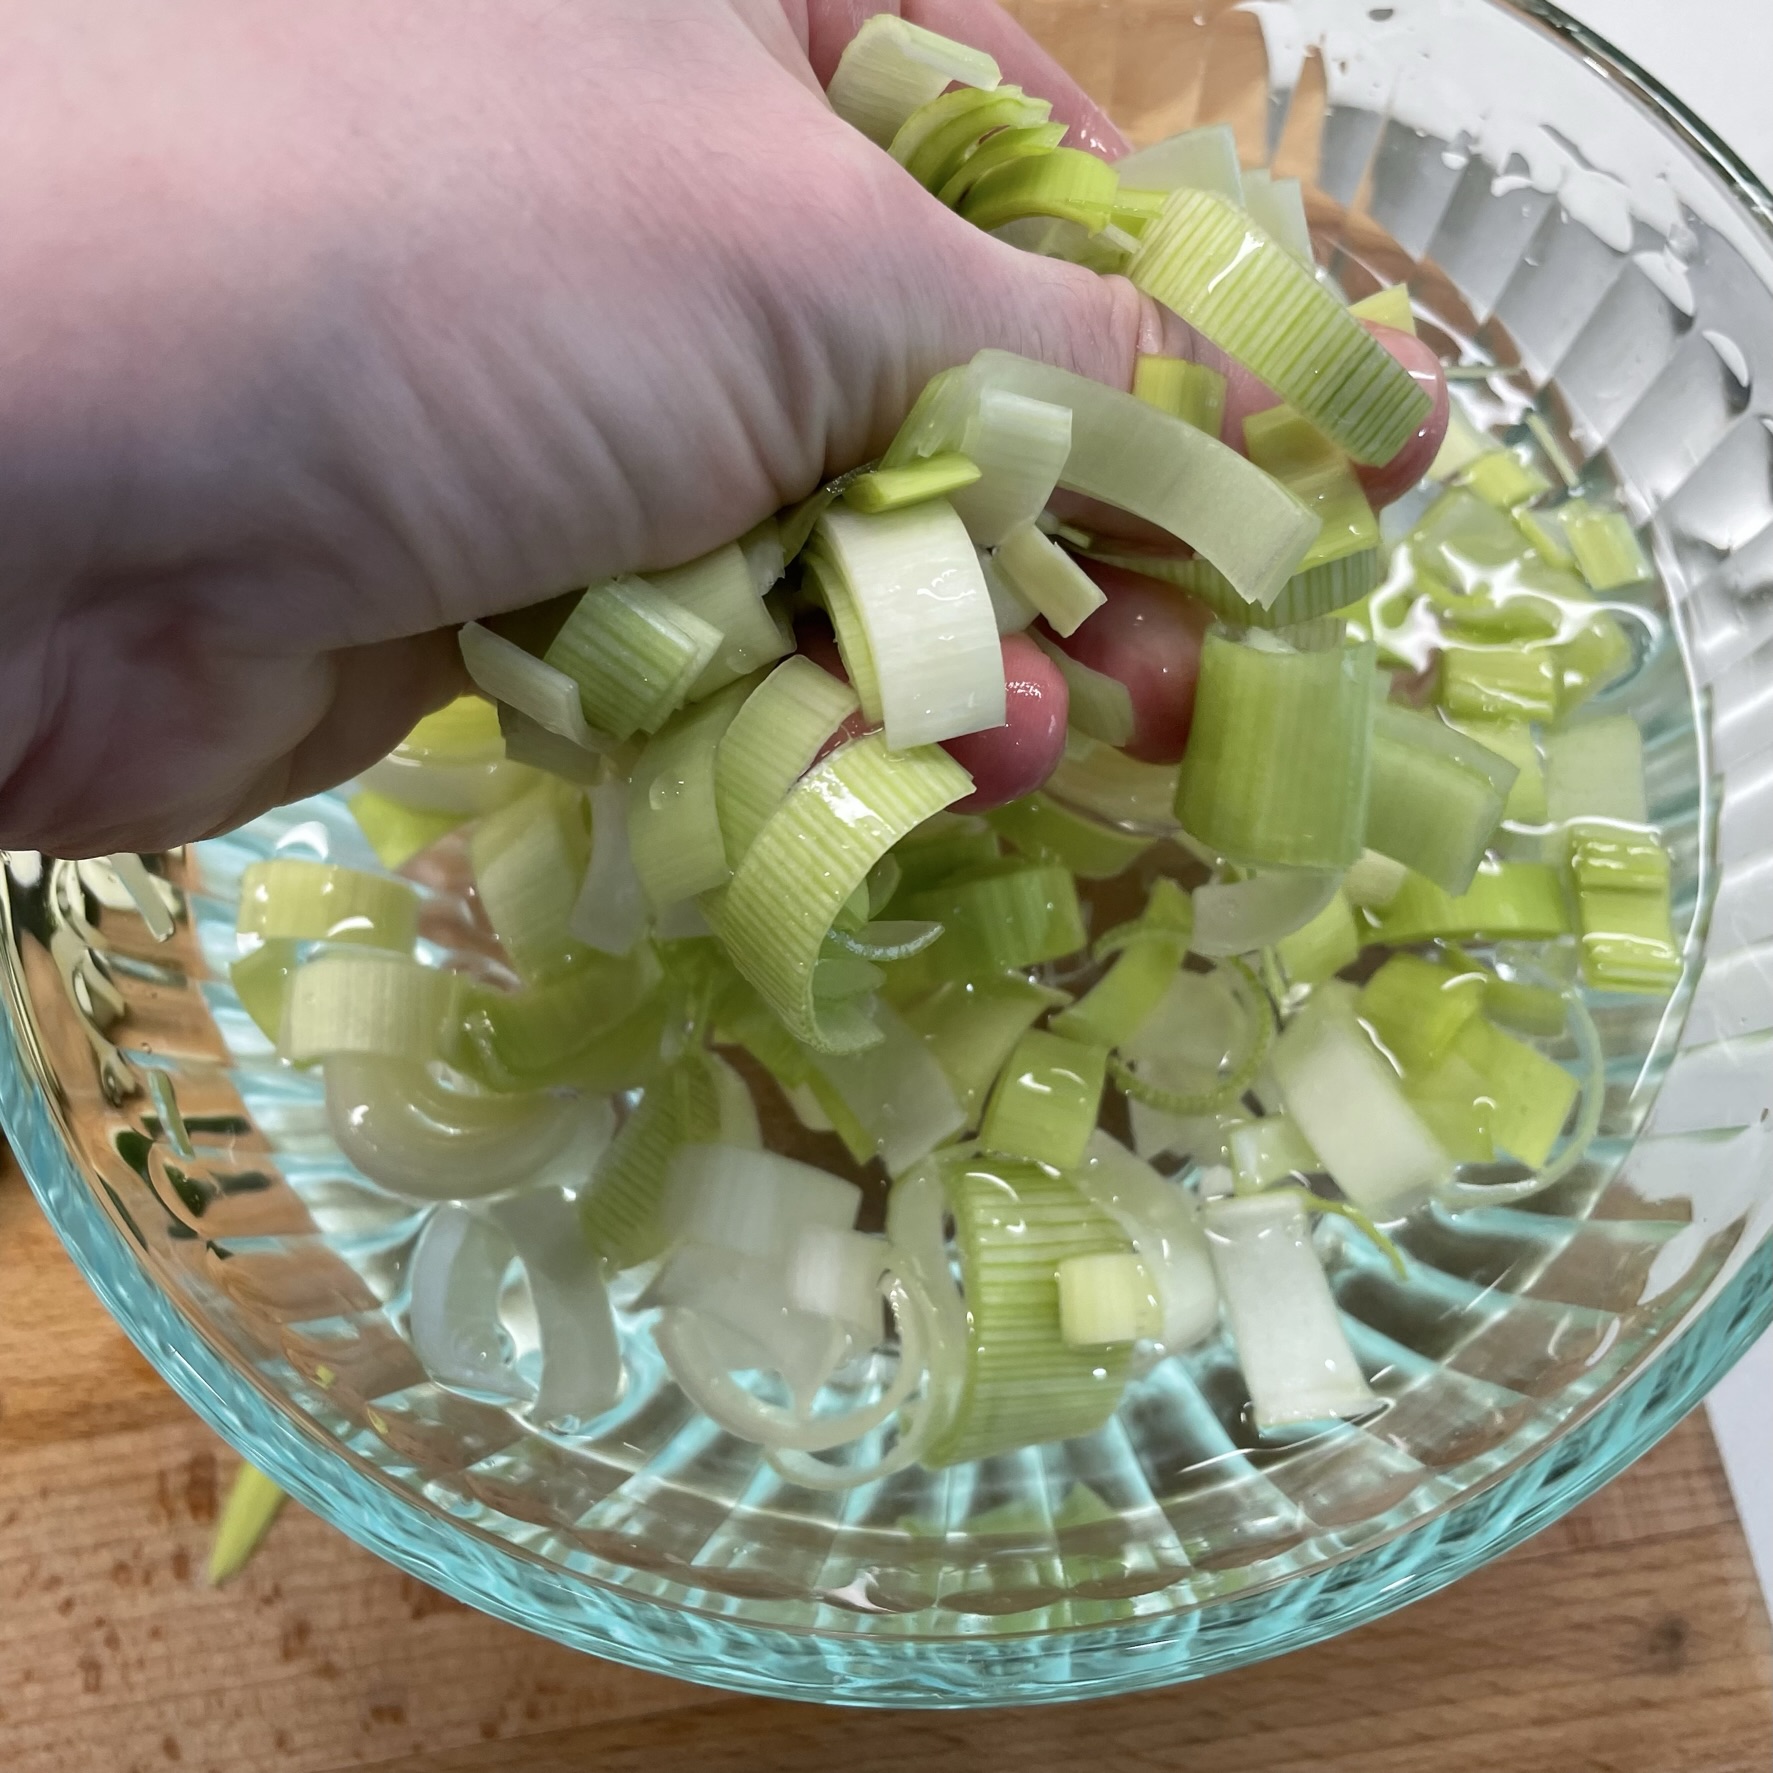
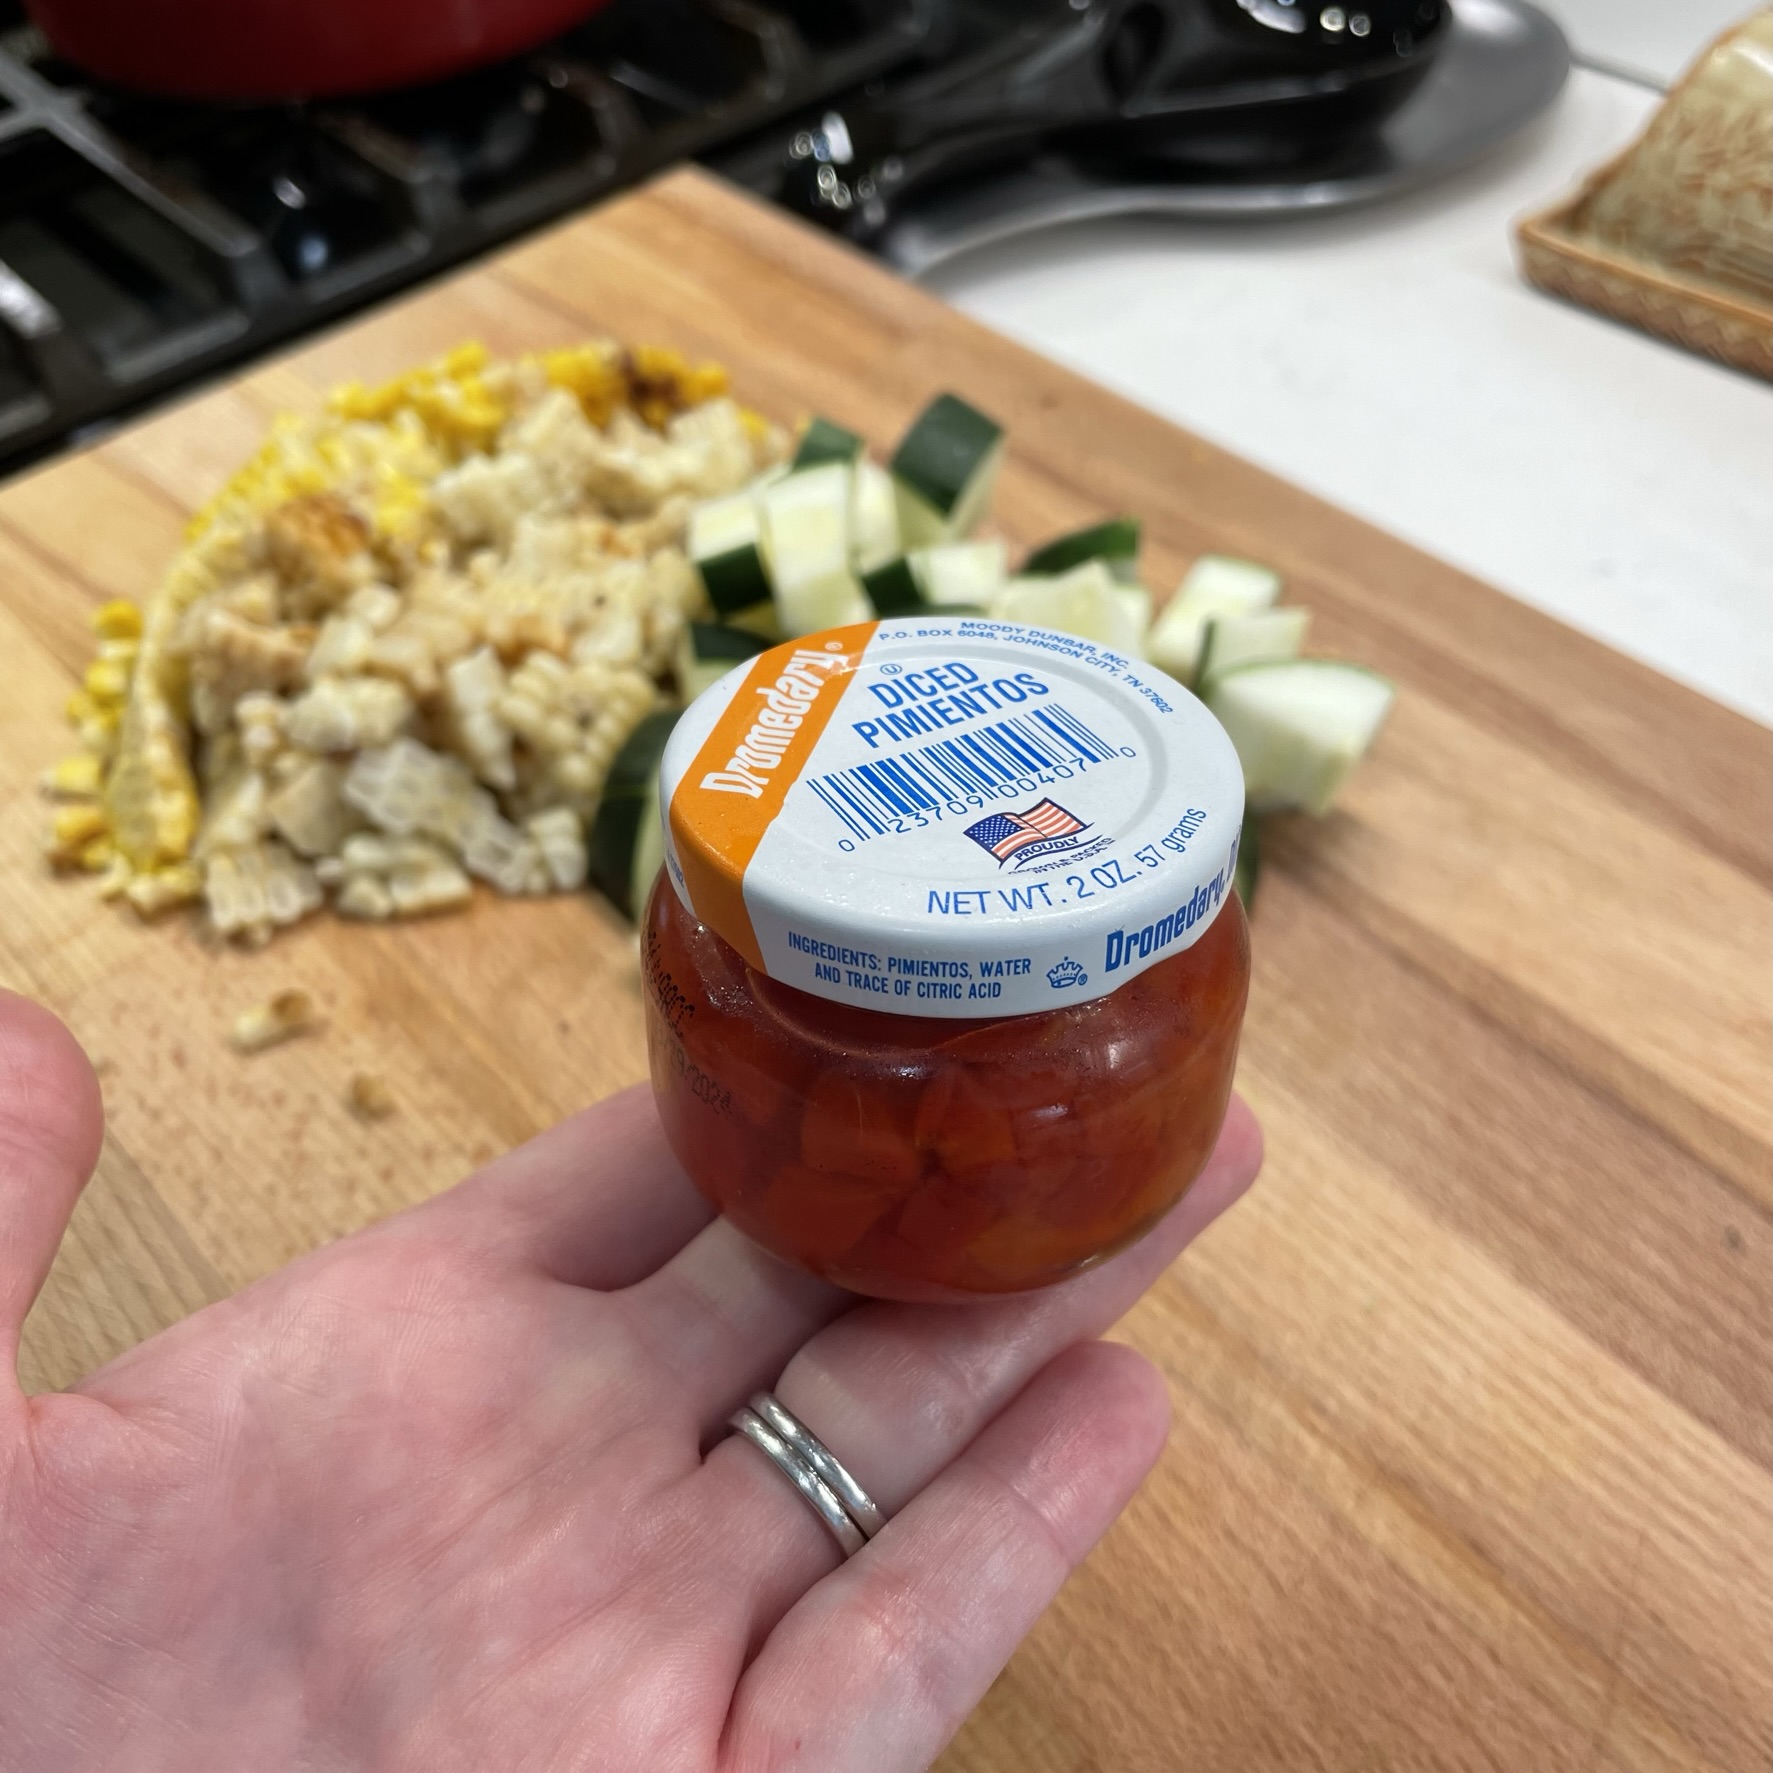
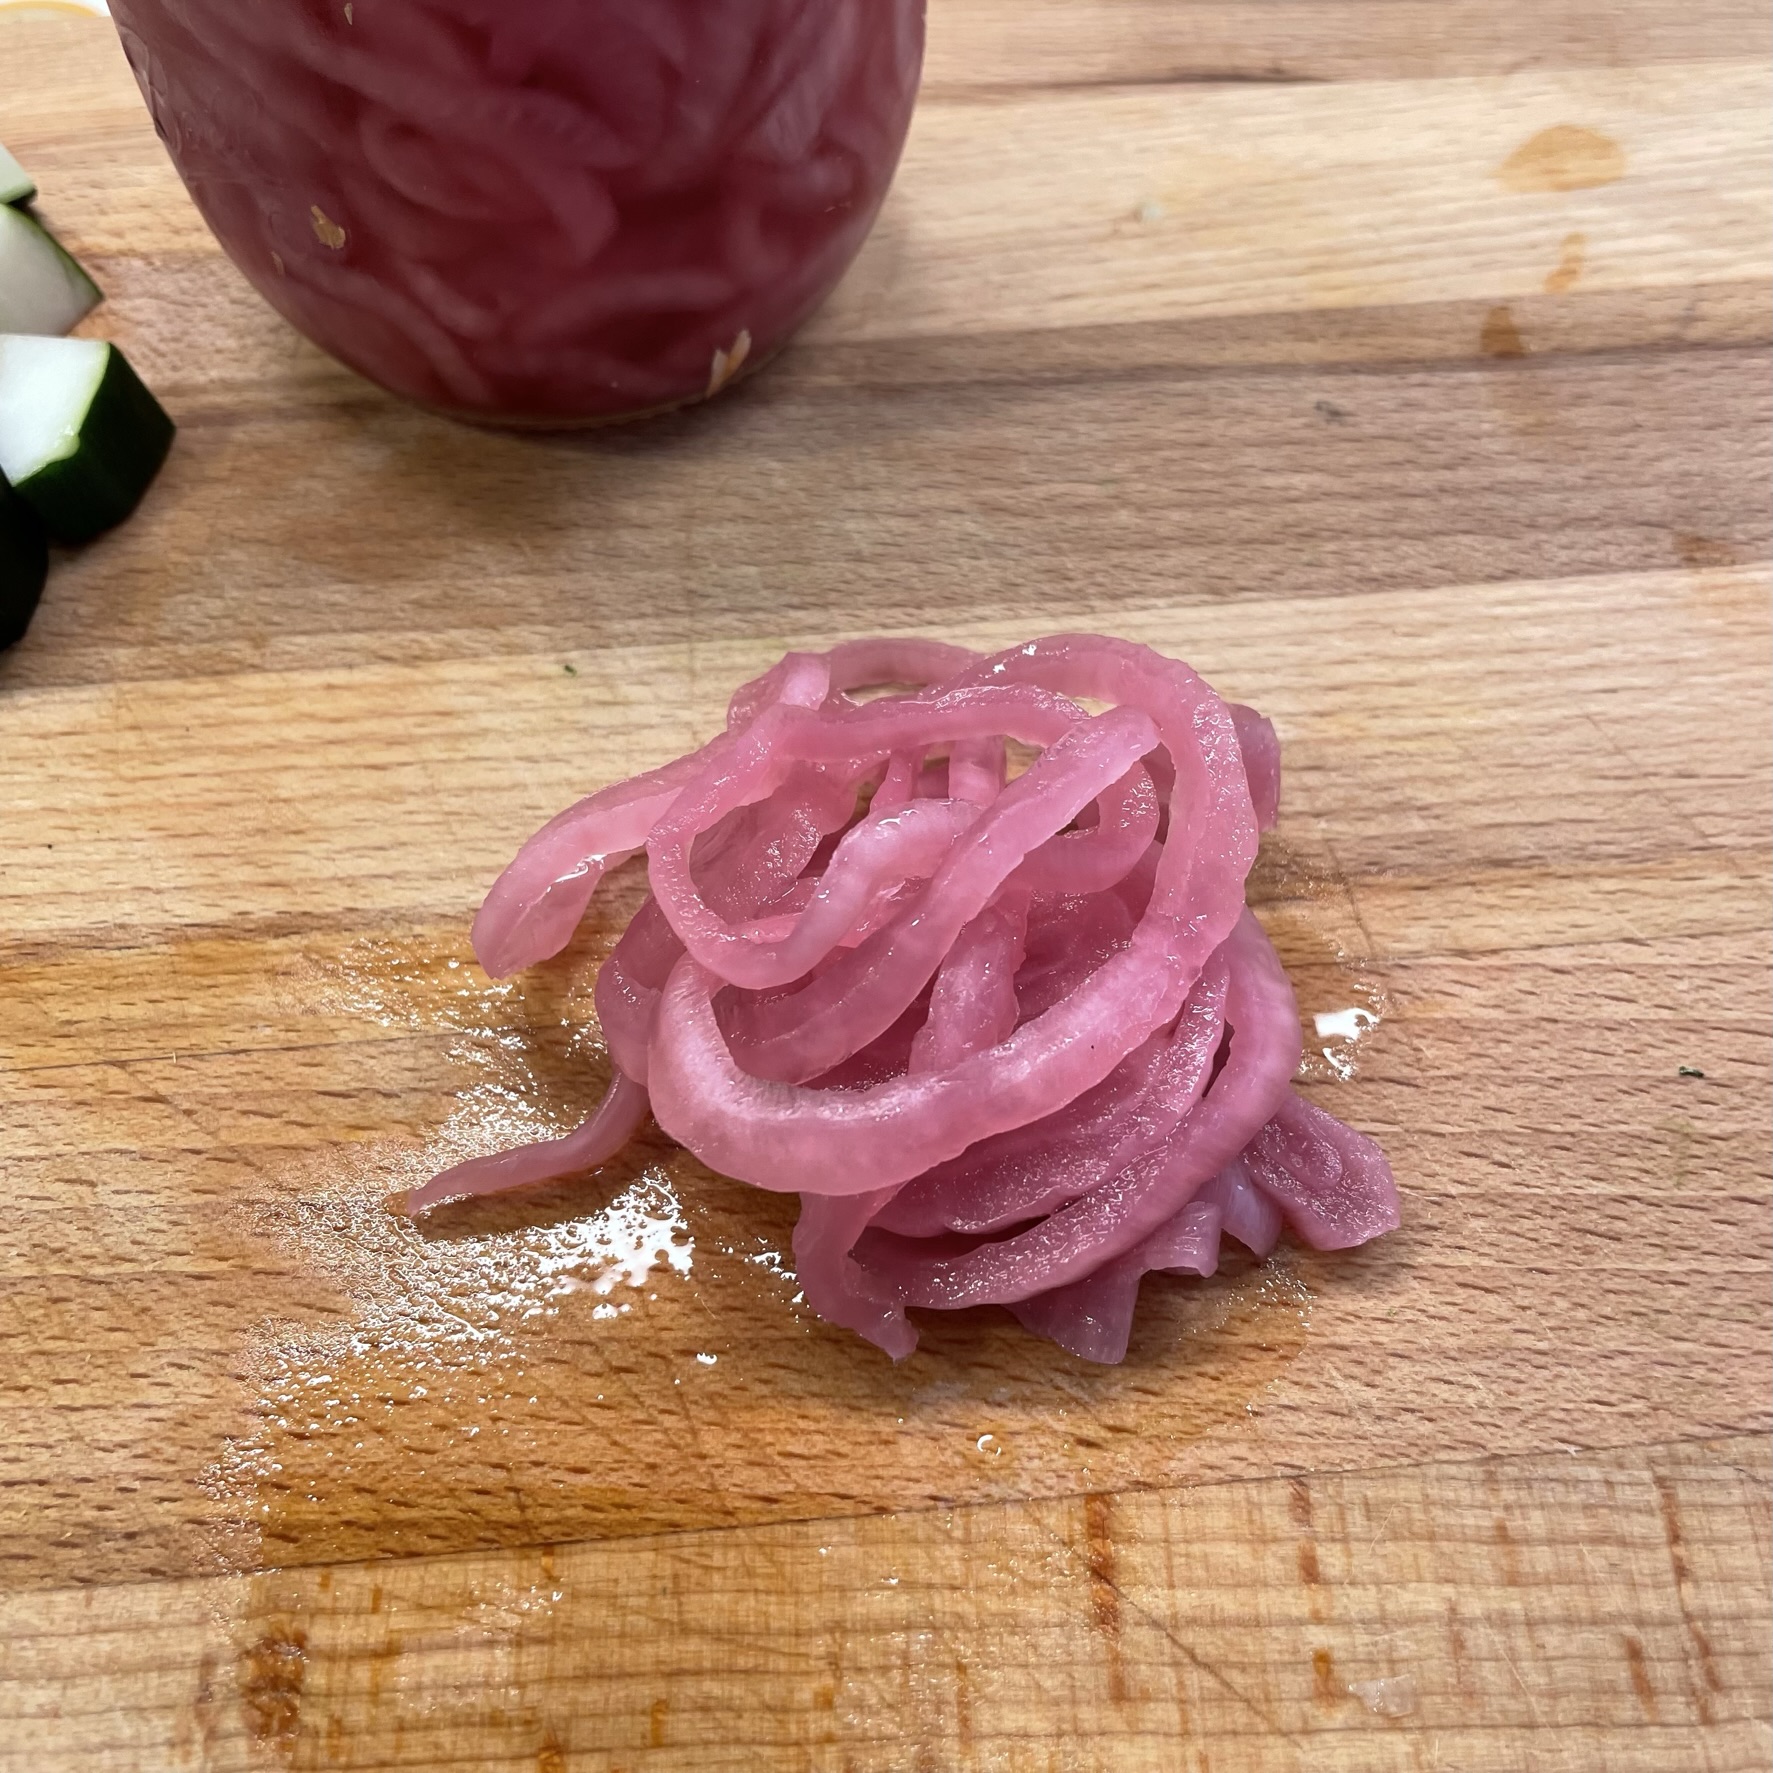
The succotash (technically this isn’t one because it doesn’t have beans) has everything that I love—zucchini (still plenty of it at the farmers’ market), grilled corn, leeks, ripe baby tomatoes, pickled onions and half of a tiny jar of pimentos we had in the fridge. I used one of my favorite prep-ahead techniques for this meal, which is layering the cut-up ingredients in reverse order in a single prep bowl that I can tuck into the fridge until I’m ready to start cooking.
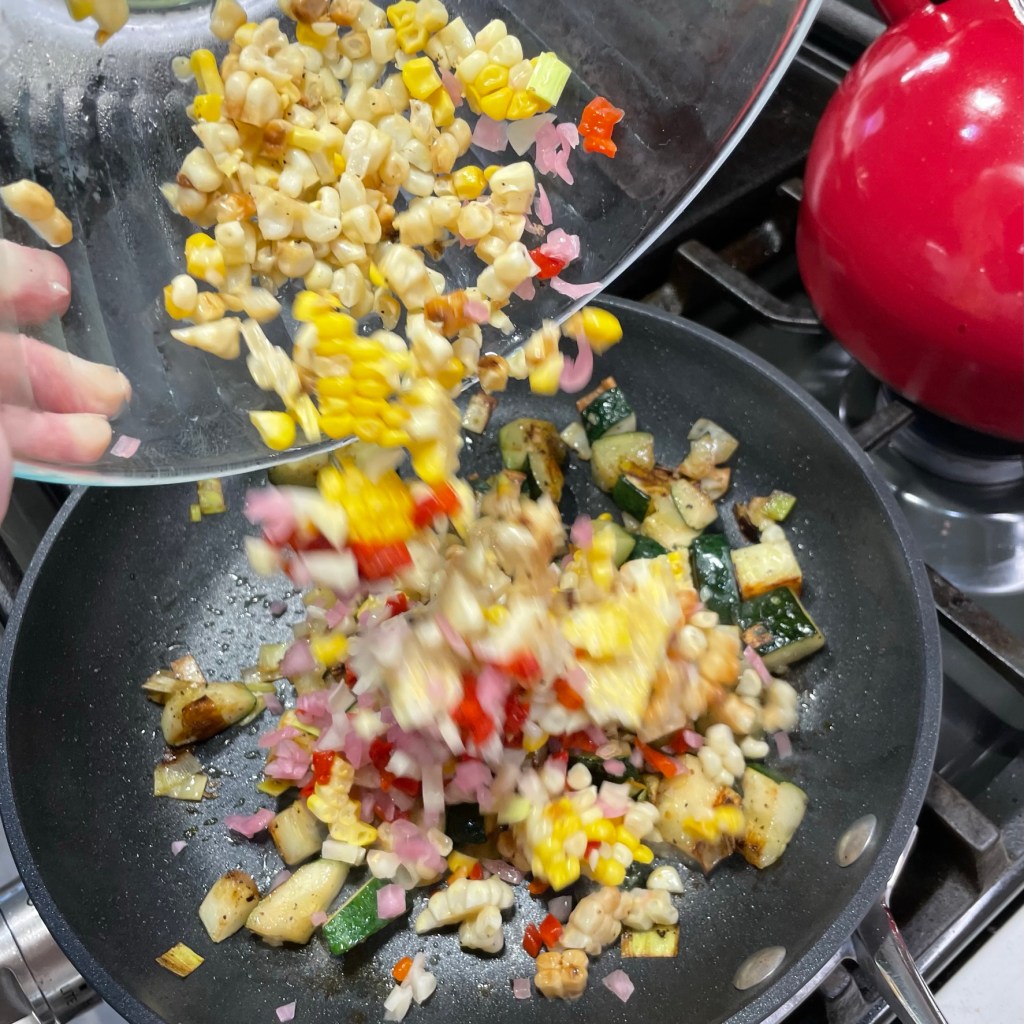
I used some of the leftover corn in the succotash and the rest in the waffles.
Leeks are a nice change of pace from typical onions.
I had just enough pimentos to add a pop of rosy color to the succotash.
A vendor at the farmers’ market turned me onto pickled onions, and I’m hooked!
Everything I need for the succotash is layered, in reverse order from how I plan to cook it.
This recipe gave me a first chance to use the new non-stick skillets we bought this summer; Les and I had looked high and low for replacements that didn’t feel chintzy and weren’t made in some factory overseas. Les learned via online research that the only pair of American-made non-stick skillets were a specific set of Calphalon pans that were sold by Williams-Sonoma (most of Calphalon’s products are made in China, but this set is made in Ohio). They are available online if you don’t have a store near you.
The non-stick coating is great, and I love the sturdiness of our new pans, but for me the real test of a new skillet is “how easily can I flip my ingredients?” Sometimes when I have a lot going on at once, I don’t want to take time to pick up a utensil so I’ll employ the flipping technique I learned during my catering days. It worked fine, though the pan was a bit heavy, so I’m counting it as upper-body exercise (and I only lost a few pieces of onion to the floor).
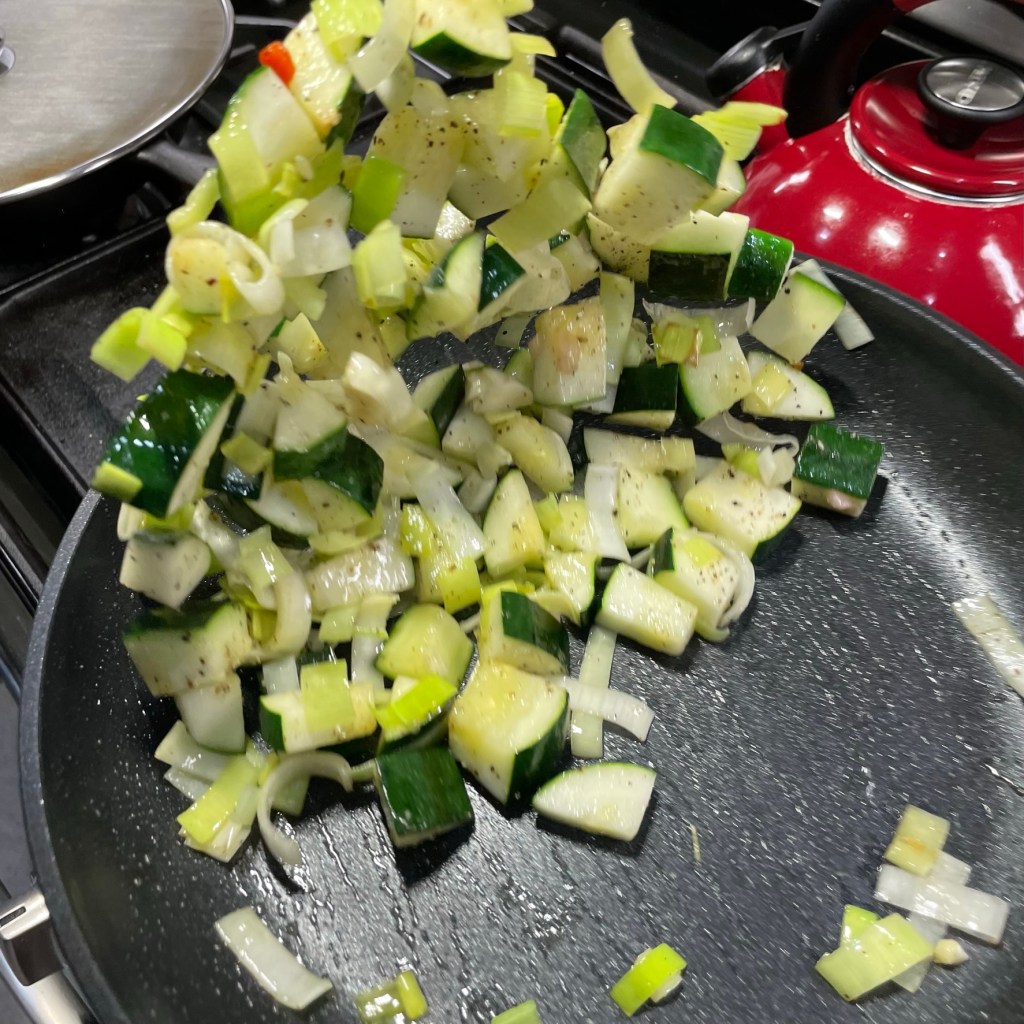
How about that?! Three cheers for Ohio!The zukes and leeks get a head start in the saute pan.Not a bad flip for a first try!
Having one prep bowl filled with vegetables makes cooking a snap, as I simply empty them into the skillet as I need them, and there’s no jumbling around in the fridge to find what I need or washing extra prep dishes. When the zucchini started to become tender, I moved deeper into the bowl for the other ingredients until I had everything in the pan.
When the zukes are tender, in goes the rest!This can simmer on the stove while I get the chicken and waffles ready.At the end, bright ripe baby tomatoes add a pop of freshness. Season to taste.
All three components of this dish—the waffles, the chicken and the succotash—happen simultaneously, but you could certainly make the succotash ahead and simply rewarm it when you’re ready to serve. Keep the waffles warm on your oven’s low setting if needed, and aim to make the chicken the last thing you prepare. Remember to season it with a light touch of salt from the skillet!
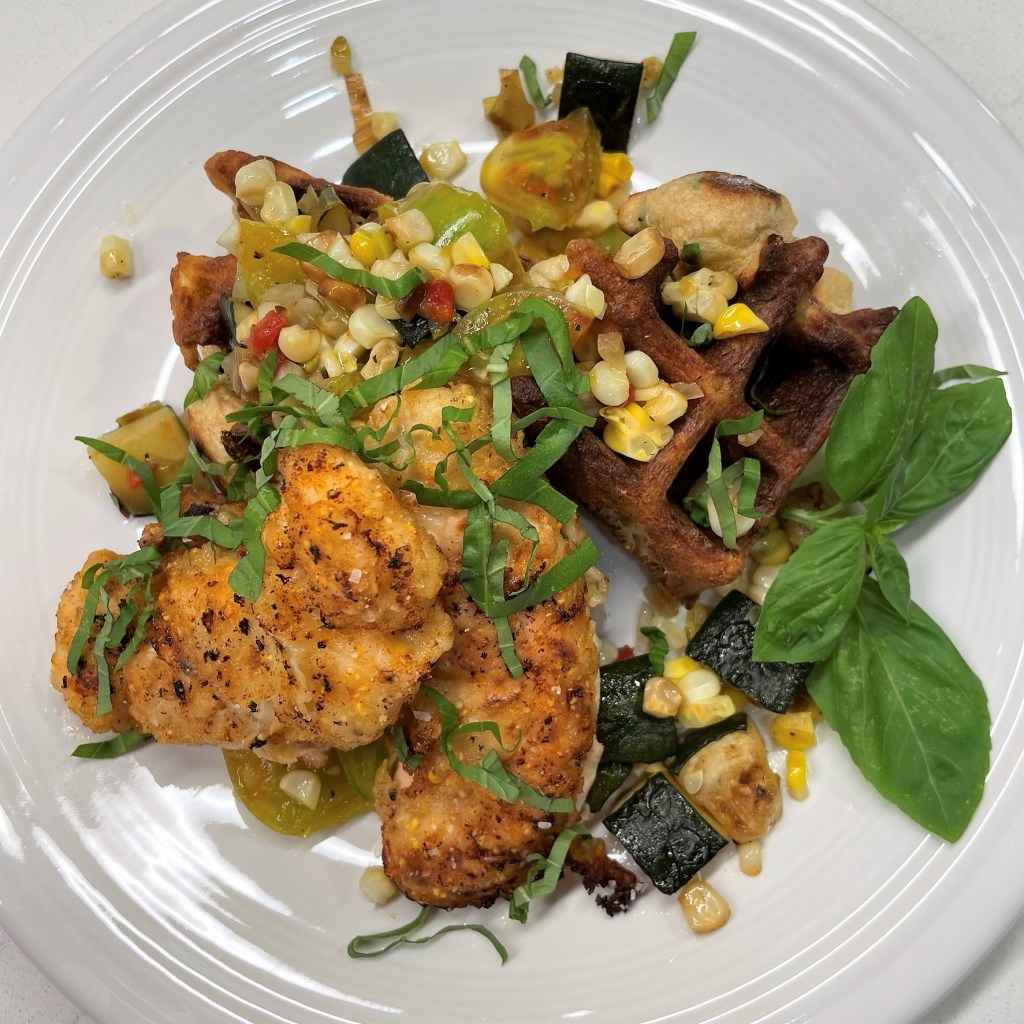
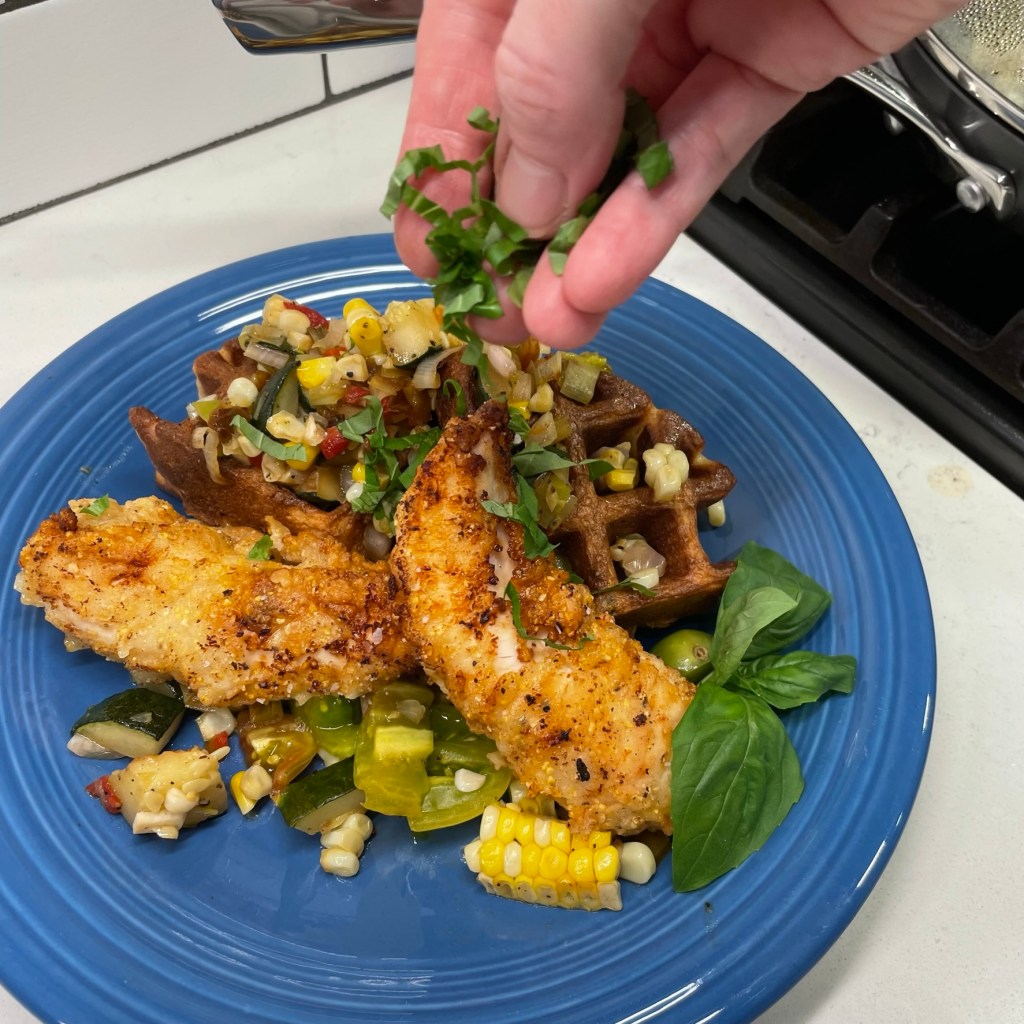
Pile it onto a plate, with the succotash underneath and over top of the crispy waffles, and the chicken tenders leaned against it. Finish the dish with a scattering of fresh chopped basil leaves, and dinner is served!
How about a little fresh basil to brighten this plate?The whole grain and add-ins make these waffles substantial and nutritious.Tender to the end. 🙂
Not only does this presentation look beautiful, it serves the purpose of keeping everything warm until you make it to the last delicious bite!
This meal takes some time to prepare, but the combination of sauteed summer ingredients and lightened-up chicken & waffles is well worth the effort! Prepare the three components of this dish at your own pace; if time is limited, the succotash can be made ahead and warmed at serving time. If you plan to make everything concurrently, consider setting the oven to warm and tuck away the waffles or chicken tenders on a rack placed over a baking sheet.
In a medium bowl, combine buttermilk, hot sauce, poultry seasoning, salt and pepper. Add chicken tenders to the bowl, tossing to coat. Allow this to rest at room temperature at least 30 minutes, or refrigerate up to a few hours if working ahead. Take them from the fridge 30 minutes before pan-frying them.
In a small bowl, combine flour, corn meal and garlic powder, plus a few shakes each salt and pepper. Set this aside for breading the chicken tenders.
Heat a cast iron skillet over medium heat, with 1/2-inch oil.
When oil is hot, remove tenders from buttermilk mixture, allowing all liquid to run off. Dip the tenders into the breading mixture; coat evenly without dredging too heavily. Carefully place each tender into the hot oil, taking care to not crowd the pan too quickly, as this will drop the temperature of the oil and result in greasy chicken. Turn tenders when the first side is golden brown; transfer them to a paper towel-lined plate when done. Season immediately with a light sprinkle of salt.
Ingredients
1/4 cup fed sourdough starter
1/2 cup cultured buttermilk
1/2 cup white whole wheat flour
3 Tbsp. medium-grind cornmeal
1/2 tsp. baking soda
1/4 tsp. salt
1 large egg
1 Tbsp. extra virgin olive oil
1/2 cup leftover grilled corn kernels
3 chopped green onions (scallions), white and green parts
Directions
In a medium batter bowl, combine sourdough starter and buttermilk. Add flour and cornmeal. Stir until smooth; cover and leave at room temperature at least 30 minutes, up to about 2 hours.
In a small bowl, combine flour, cornmeal, baking soda and salt. Set aside.
Set waffle iron to medium heat. While it preheats, add egg, oil, soda and salt to the sourdough batter. Stir until smooth. Fold in corn and scallions.
Brush waffle iron with oil. Add a scoop of batter and bake until crispy, following manufacturer’s instructions. As a visual cue, watch for steam to dissipate from the iron. Generally, if the waffles are sticking, they aren’t finished baking. If working ahead, place finished waffles on a rack over a cookie sheet and keep them in a warm (250° F) oven.
Ingredients
1 medium zucchini, chopped into chunks
1 small leek or onion, chopped
1 cup leftover grilled corn kernels
1/4 cup pickled onions, chopped (I like the “pickled” flavor here; substitute anything pickled, such as okra, green beans, cucumber)
2 Tbsp. jarred pimento, drained
2 Tbsp. extra virgin olive oil
1 cup ripe baby tomatoes, halved
Salt and pepper
Fresh basil or parsley, to garnish
Directions
Heat a large, non-stick skillet over medium flame. Add olive oil and saute zucchini with leeks or onions until slightly tender.
Add remaining vegetables, except tomatoes, and toss until evenly combined. Reduce heat to low and cover skillet with a lid so that the pan ingredients can heat through without much more cooking.
Add tomatoes at the end, tossing just to combine.
To assemble the dish, spoon out some of the succotash, and then place a waffle section, topped with additional succotash. Arrange the chicken tenders by leaning them up against the waffles. Sprinkle with chopped, fresh basil or parsley.
One of things I love about food blogging is participating in the “National Days” that are related to popular comfort foods. I’m not sure who is responsible for deciding what day is right for celebrating chocolate chip cookies or fried chicken or pepperoni pizza, but I know it’s fun! Here on Comfort du Jour, I have paid particular attention to National S’mores Day, and this year will be no exception (watch for that on August 10th).
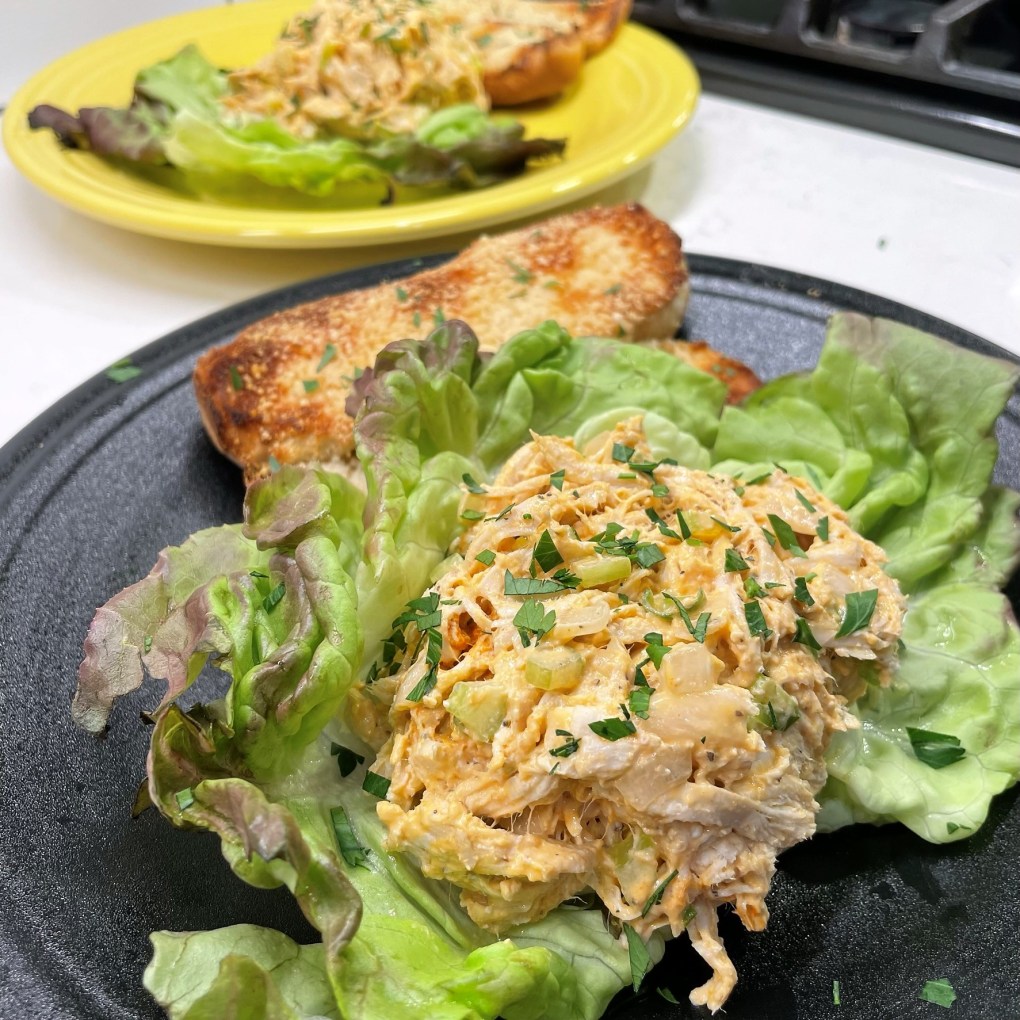
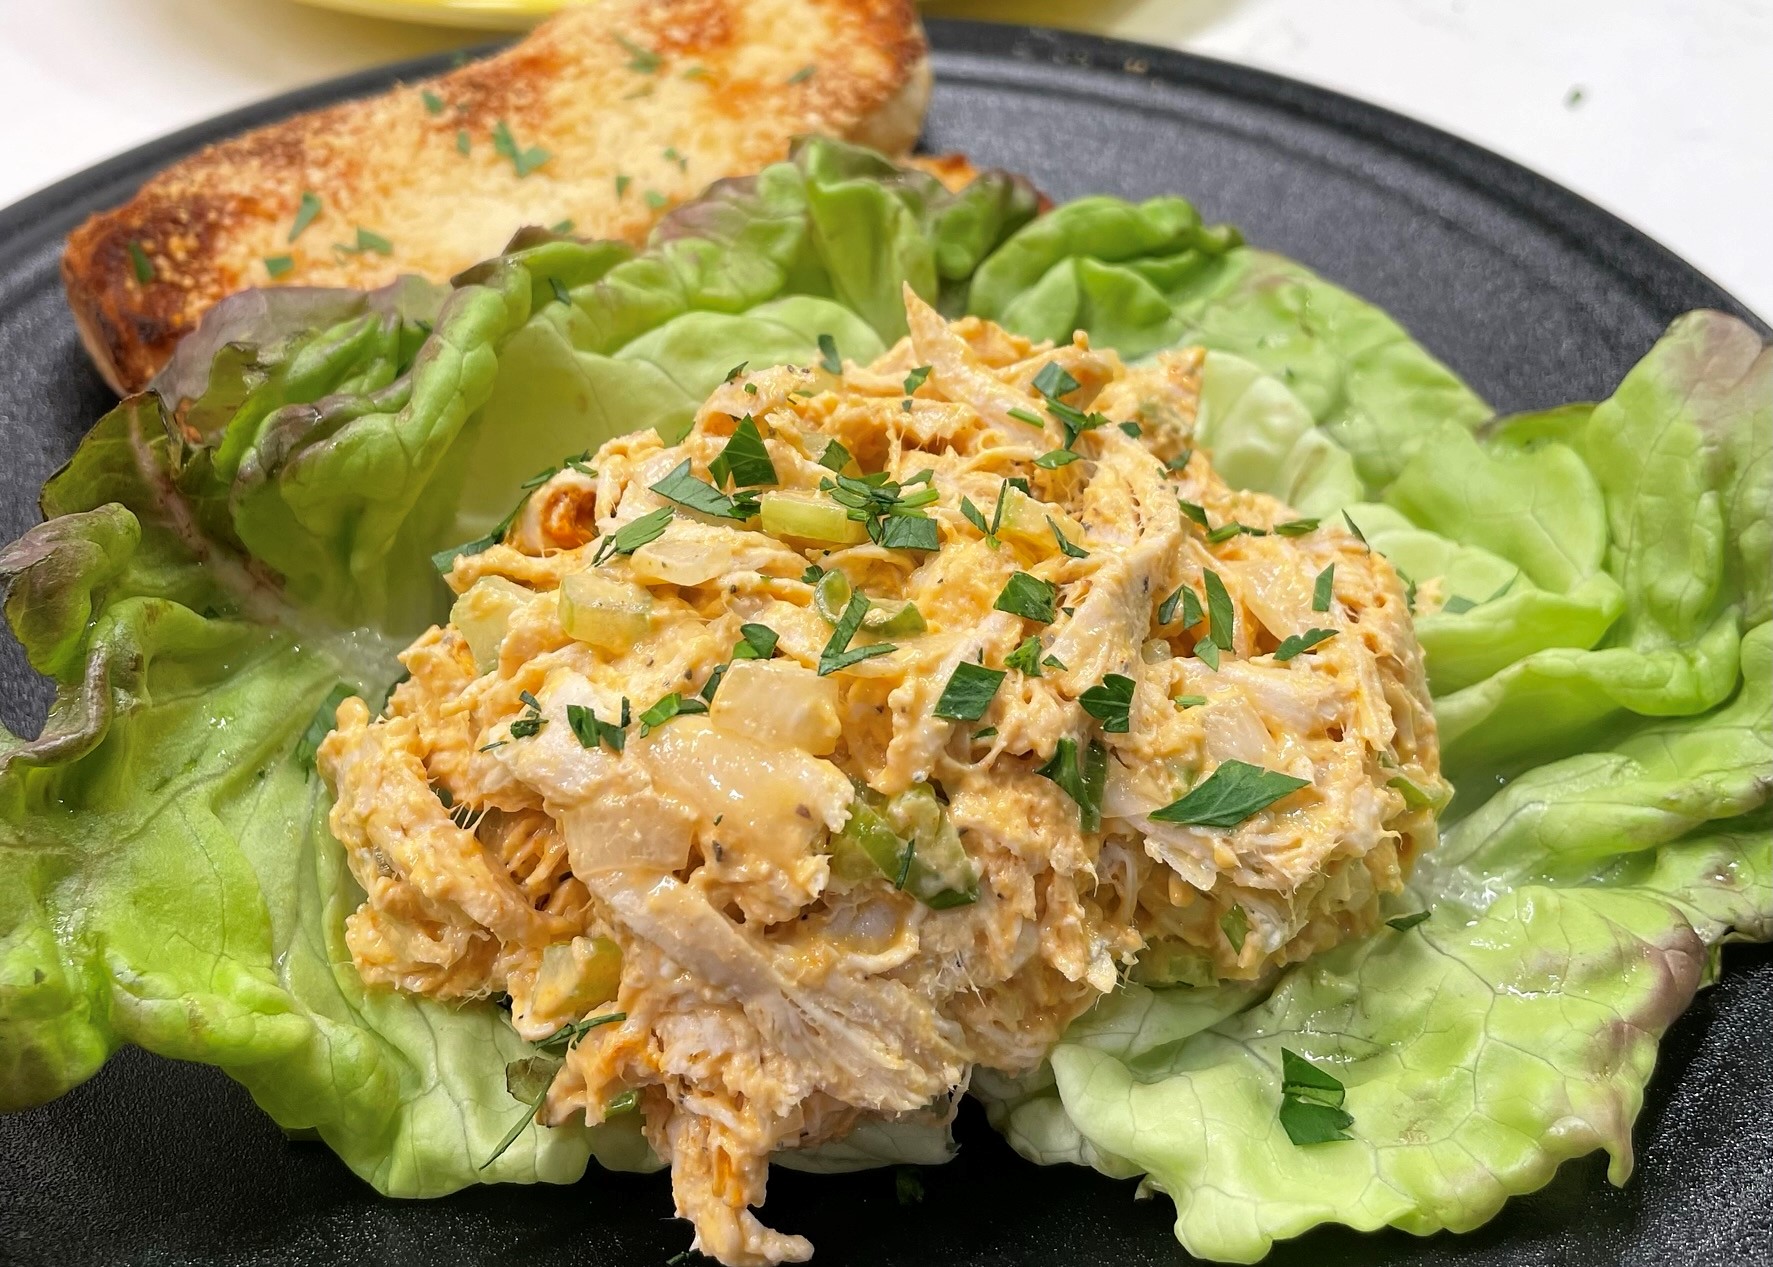
This Friday is National Chicken Wing Day, proclaimed as such in 1977 by then-mayor of Buffalo, N.Y., Stan Makowski—and for this gal, who was born and raised just south of Buffalo, that’s a big deal! But I’m torn, because I have really been trying to dial it back on the heavy foods to get my health back on the right track. As much I love Buffalo wings (oh, how I do), I can’t justify deep frying tiny, skin-on chicken pieces, drenching them in sauce and then dragging them through bleu cheese dressing, just because it’s a “National Day.” Talk about a calorie explosion! I wanted to see if I could find a lighter way to enjoy the flavors associated with this “taste of home.” Here it is—Buffalo chicken salad.
This has all the flavors of Buffalo wings, without the deep-fried calories!
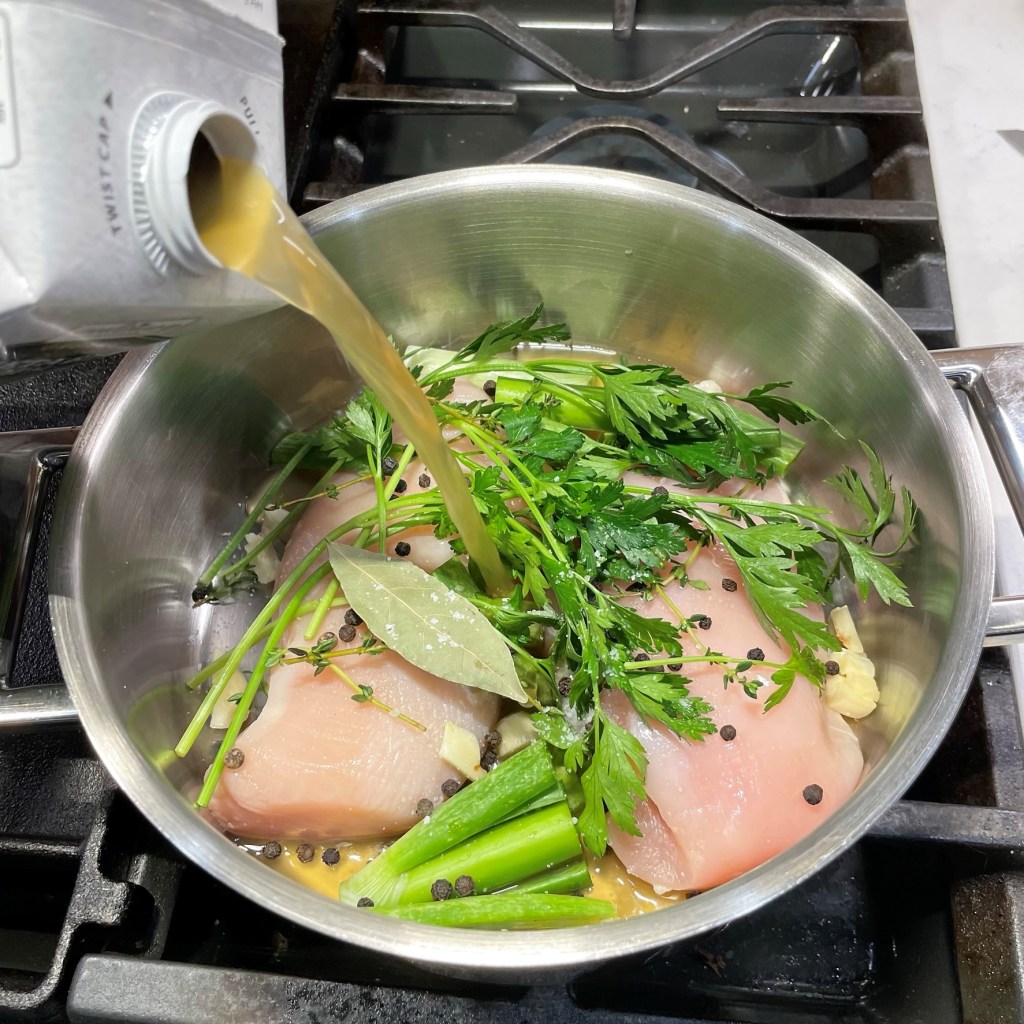
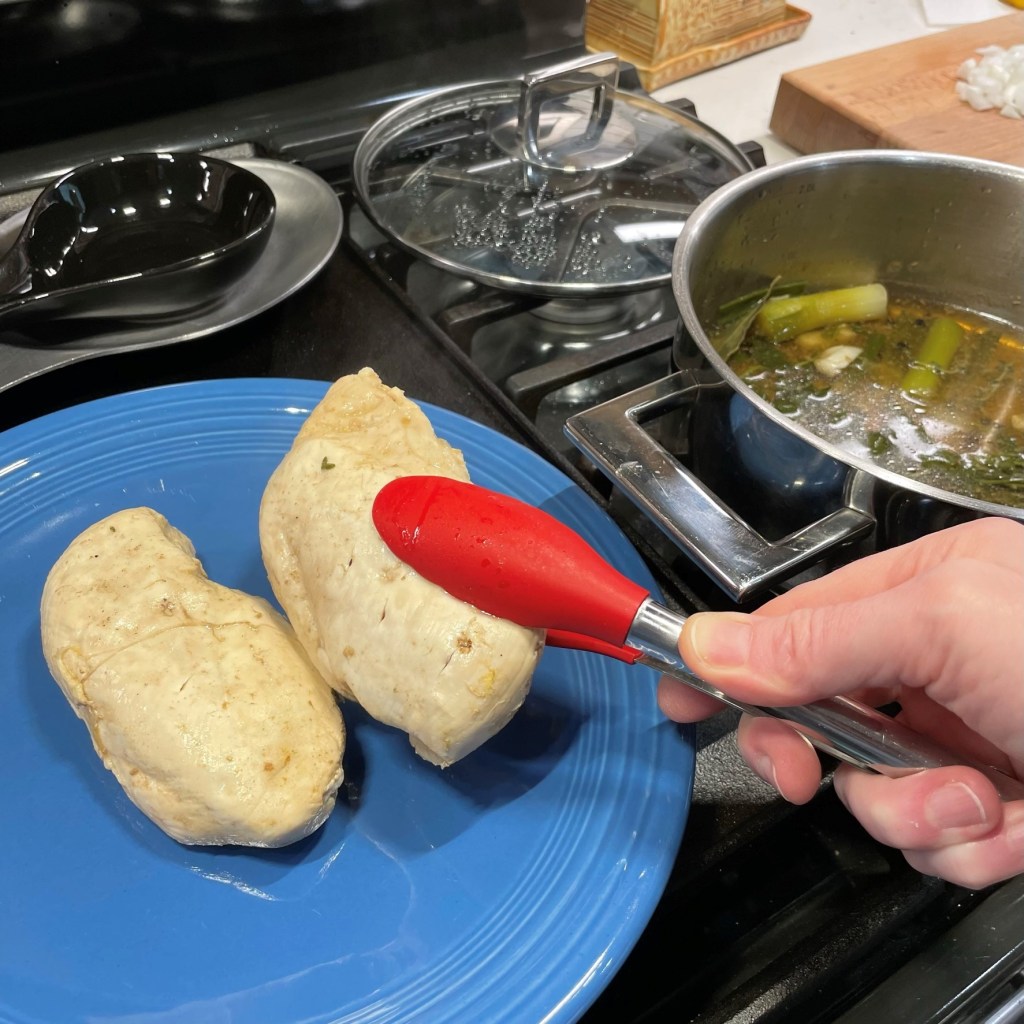
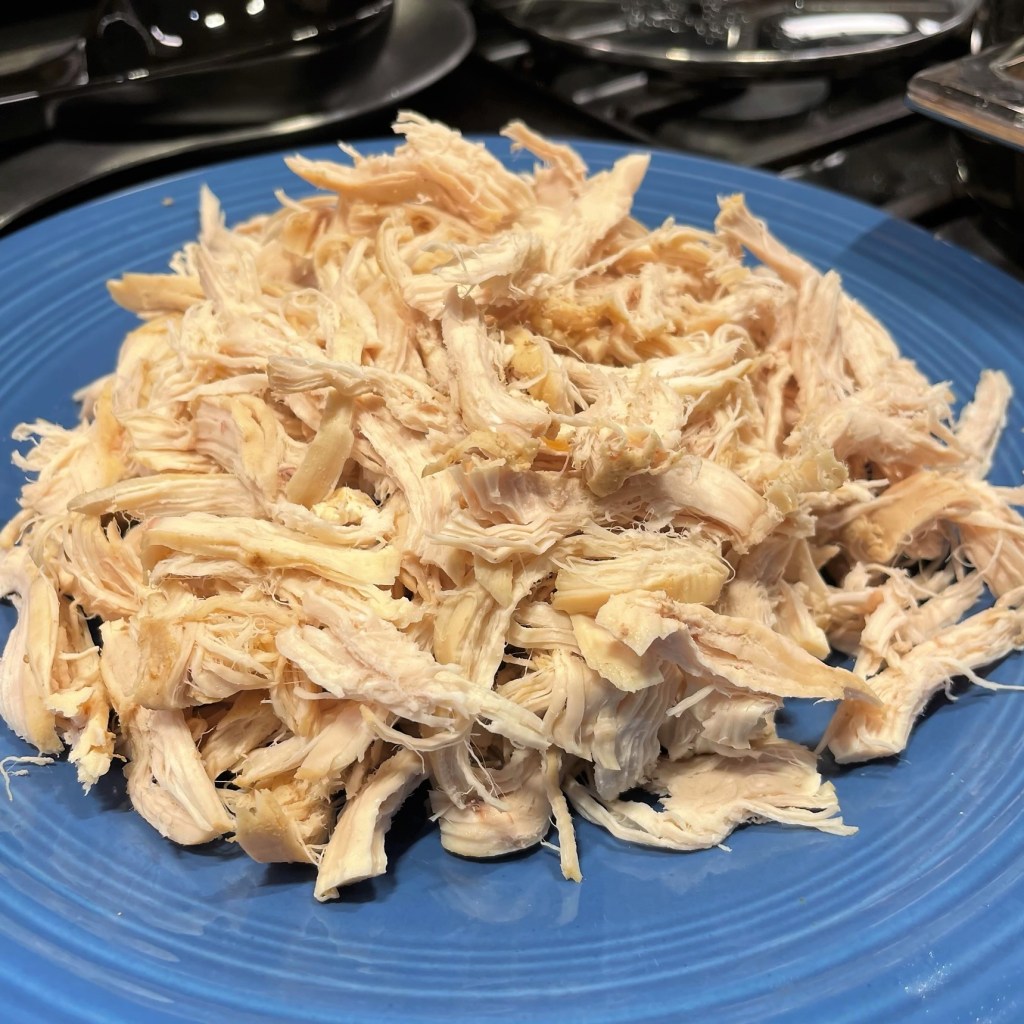
All the flavors are represented: tender chicken (obviously), spicy Buffalo wing sauce, bleu cheese, even celery—but at a fraction of the fat and calories of the usual preparation. The chicken here is lean, skinless breast meat, and you can make that part super easy by picking up a deli-roasted chicken (you can use the rest for another meal), or you can poach them at home with a few aromatics and some chicken or veggie broth, as I did:
My recipe card describes how I poached the chicken breasts, or make this even easier by picking up a deli-roasted chicken.
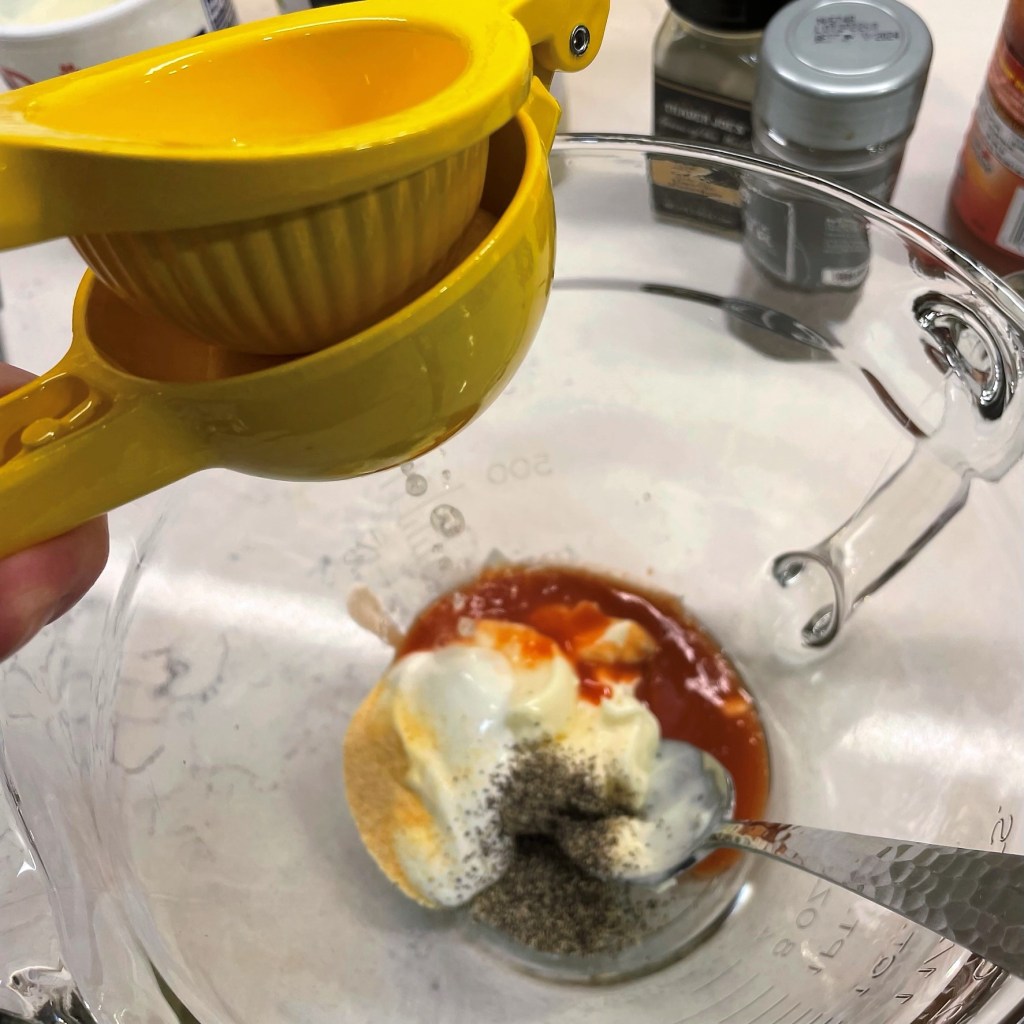
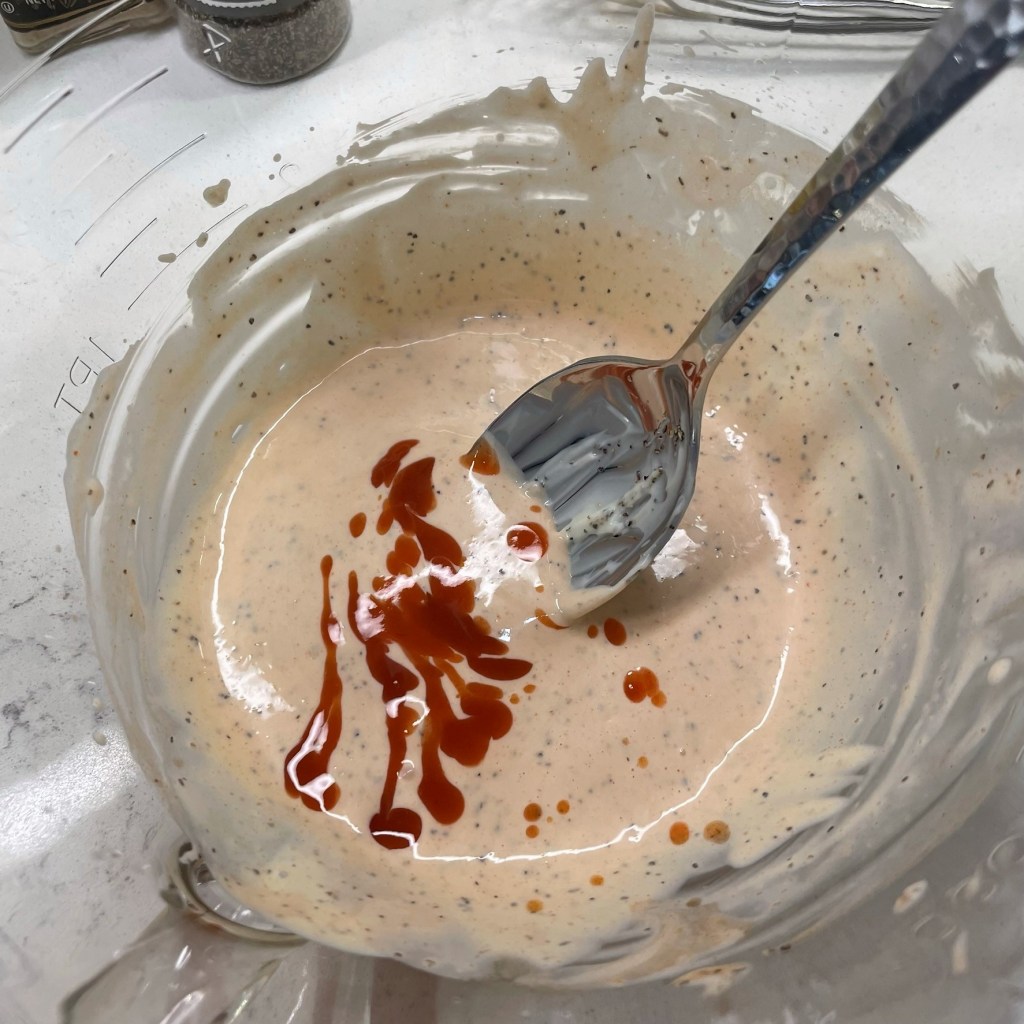
The dressing that wraps around the chicken shreds carries all the other flavors, beginning with mayonnaise and sour cream—just enough to hold it all together—and ending with however much Franks RedHot sauce tickles your fancy. To give it a really good kick, add a few pinches of cayenne pepper or keep it colorful with less heat by adding a spoonful of sweet paprika. This recipe is totally flexible to match your heat tolerance.
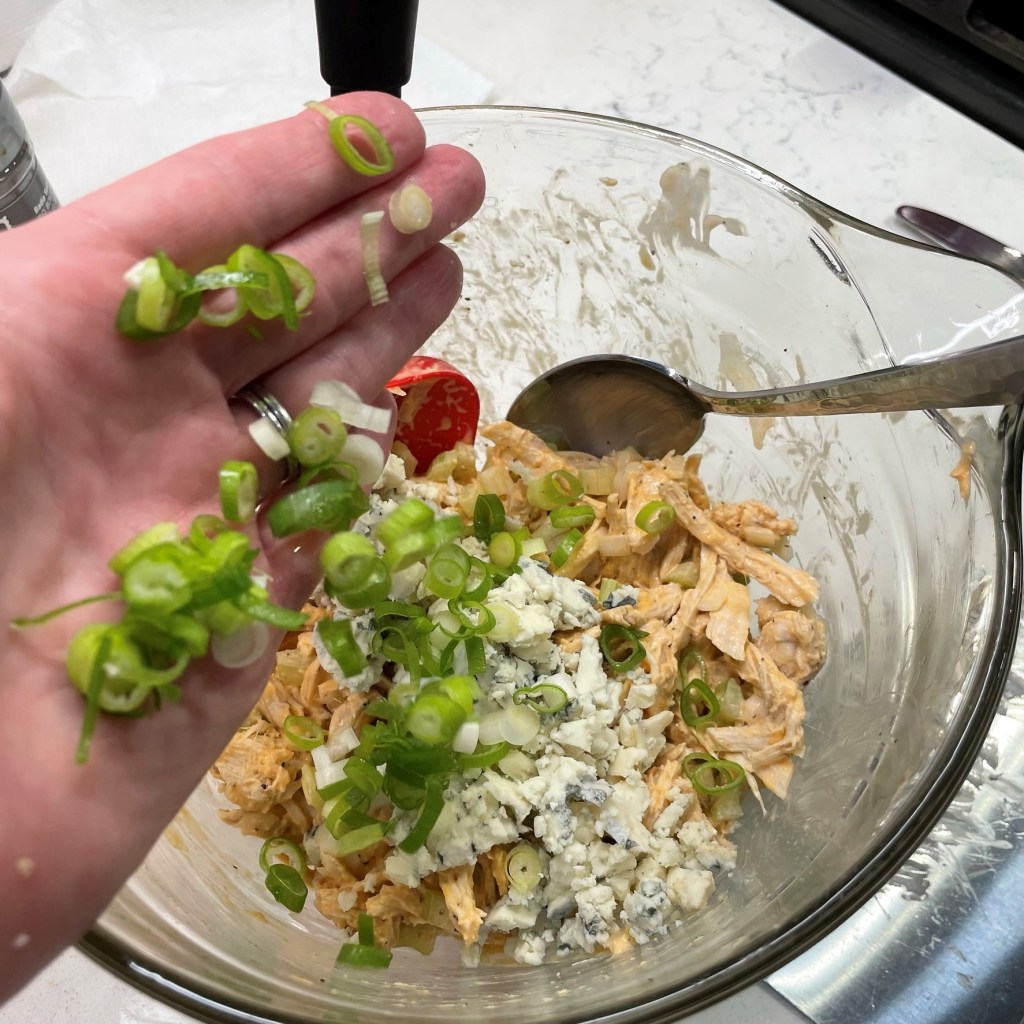
A squeeze of lemon wakes up all the other flavors.Adjust to taste; more heat, please.Add the tender shreds to the dressing.Here come the onions and celery for texture.I can always stand it just a little bit hotter!Bleu cheese for funk and a handful of scallions for bite.
This recipe made four generous servings of chicken salad. I served it on leaves of soft butter lettuce as dinner, alongside an impromptu slab of garlic toast; the latter was my husband’s genius creation made from leftover hot dog buns and a few sprinkles of our favorite parm-romano blend cheese. It was a great meal, both for the flavor and the satisfaction of throwing a low-calorie twist on a classic comfort food.
This is an easy way to enjoy the flavors of Buffalo wings, but without the high fat and calories. Adjust the amount of Frank’s RedHot sauce to match your desire for heat.
Ingredients
2 cooked chicken breasts, shredded
1/4 cup mayonnaise
2 Tbsp. sour cream
3 Tbsp. Frank’s RedHot sauce (give or take, depending on your heat preference)
Juice of 1/2 lemon
3/4 tsp. ground black pepper
1/2 tsp. garlic powder
1/3 cup bleu cheese crumbles
2 ribs celery, finely chopped
1/2 cup finely chopped onion
1 scallion, thinly sliced (white and green parts)
1/2 tsp. sweet Spanish paprika, optional for color
A sprinkle of fresh, chopped parsley for garnish, if you’re feeling fancy
Directions
In a medium bowl, combine mayonnaise, sour cream, RedHot sauce, lemon juice, pepper and garlic powder. Whisk until evenly combined. Adjust hot sauce to taste.
Add shredded chicken, onions and celery to the dressing bowl. Fold gently to combine ingredients. Taste the mixture and adjust seasonings to taste.
Fold in bleu cheese crumbles and sliced scallions, plus paprika if desired for extra color.
Cover and refrigerate Buffalo chicken salad until ready to serve.
If you prefer, you can poach the chicken breasts yourself. Simply place them in a shallow pot with aromatics, such as celery, onion, fresh herbs and black peppercorns. Pour in enough chicken or vegetable broth to cover the chicken about halfway. Bring to a slight boil, then cover and simmer about 20-30 minutes until chicken is cooked through and tender.
When I got to the bottom of the bowl of Buffalo chicken salad, I lost my way a little bit on the whole “light and healthy” thing. I couldn’t resist putting an over-the-top spin on it. I know, but it sure was delicious, and still not as heavy as chicken wings! 🙂
With muenster cheese and homemade, whole-grain sourdough, this was a wicked good grilled cheese!
To say that I’ve been under stress lately would be a gross understatement. I know that many of you feel the same angst related to the stories that plague our newsfeeds, and that alone is enough to make anyone shaky. On top of the stressors of life, things at home have been a little, um, hectic.
Besides the uncharacteristically high pressure of late in my day job (which is usually quiet in June), and beyond the fact that we are now past the 90-day mark since the start of our master bath remodel (with issues still happening every day), I had an unwelcome bit of news this week at my first primary care visit in nearly a decade. It’s nothing serious—at least, not yet—but I am considering the results of my blood workup to be an important wake-up call.
At the risk of TMI, I’ll summarize to say that several key markers are out of whack, and I need to get my act together quickly as it relates to my diet and my overall health. As luck would have it, going through menopause, starting a food blog, and signing up for not one, but two major home renovations during a world pandemic did not have positive effect on my body. I should have seen it coming.
For the first time in my life, a doctor told me that I must make changes, and that was a little scary. There’s plenty of time to turn things around, and I am truly thankful for that, but it means healthier options will be my first choice and decadence is on the bench for a while. I need to embrace regular exercise, too, but that’s another post entirely. Today, I’m focusing on healthier eating. It does not mean that we can’t have pizza or ice cream or some of the other fun things my husband and I love; rather, it only means that I must be more mindful of what goes into those dishes in the first place. Luckily, I do love experimenting!
For me, what makes a meal truly satisfying is variety of texture, big flavor and interesting spices. I’m not suddenly turning vegan or entirely giving up any food groups—I have never been one for a total elimination diet. I can move toward better health with a few lightened-up favorites, more meatless dishes and plenty of vegetables, and that’s what I intend to do. Truth be told, part of the reason I’m telling y’all this is that it builds in an extra level of accountability. Now that you know, I’ve painted myself into a bit of a corner. So here comes the first of several fresh and healthy meals served up at our house recently.
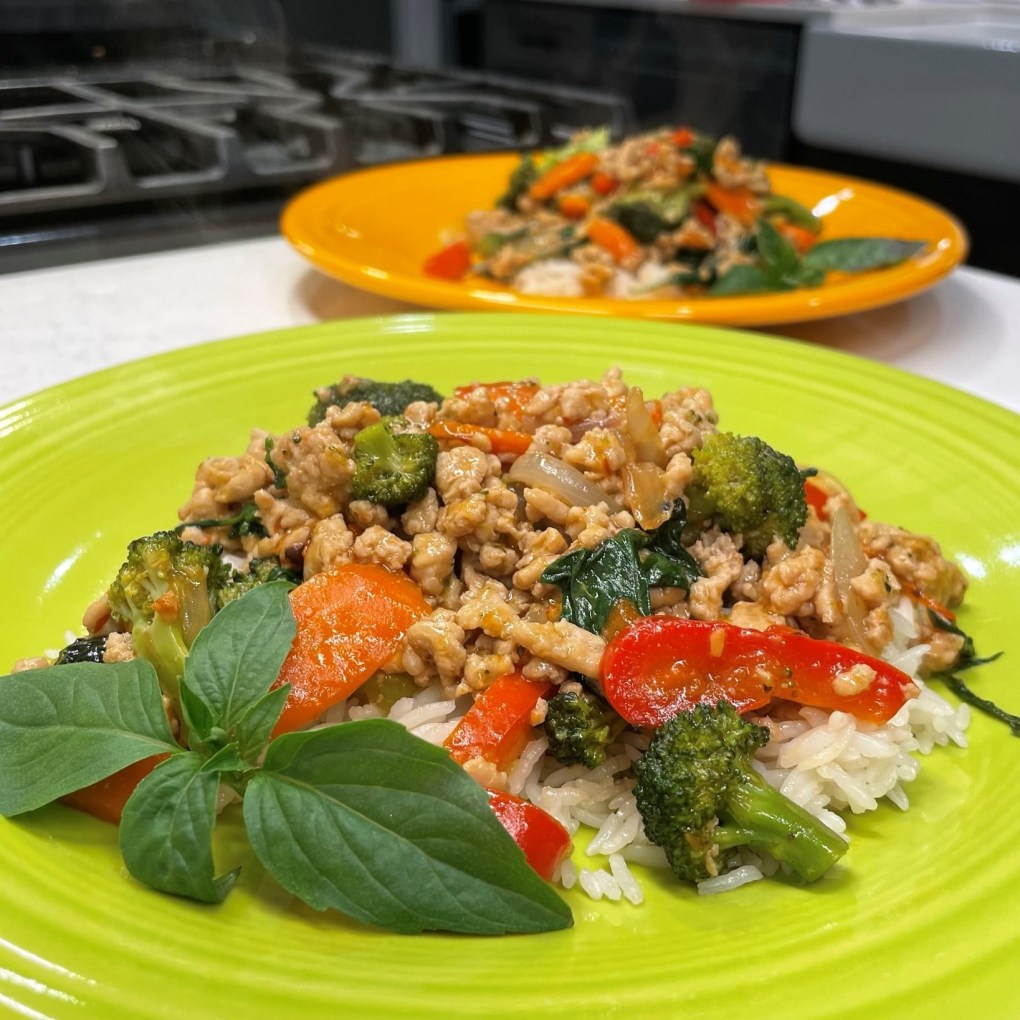
It smells even more delicious than it looks!
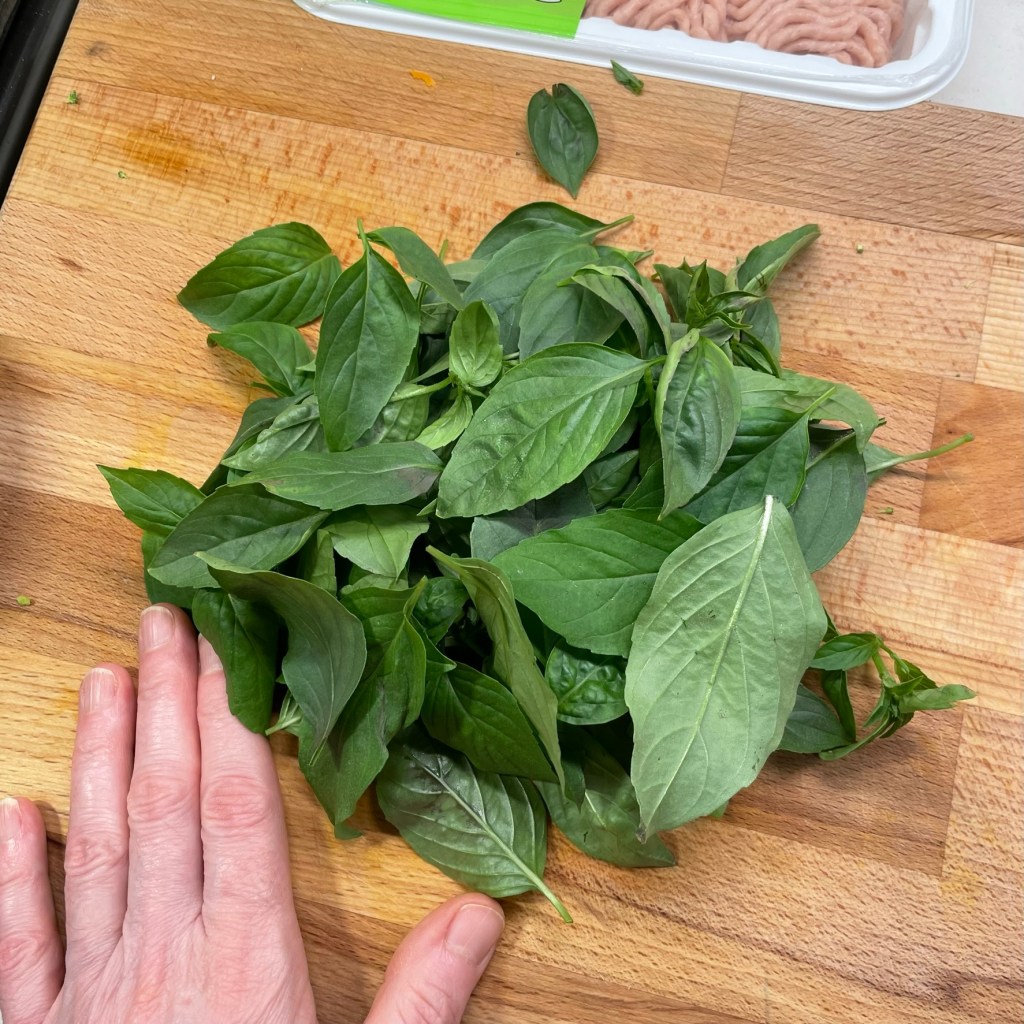
Thai basil chicken meets all the criteria I mentioned for a satisfying meal. The texture is amazing and packed with crunchy vegetables, including carrots, broccoli and red bell pepper. The flavor is phenomenal, with a complex blend of spicy ingredients in the Thai-inspired sauce that gently coats the vegetables and lean ground chicken. The signature flavor that gives this dish a little extra “zhuzh” is Thai basil, a fresh herb in the mint family that is similar to the Genovese basil you’d recognize in Italian food, but with a spicy undernote and a hint of anise or licorice. I’ve had an abundance of this ingredient lately, since my husband and I reinstated the Aerogarden that he gave me for Christmas a couple of years ago. This gorgeous herb has taken over the whole dining room, even visible from outside the window because it’s growing through the blinds (which, I suspect, is causing the neighbors to whisper). I prune the plants every couple of days, which only makes them grow faster, and so I needed a dish that uses a lot of Thai basil at once. This recipe is perfect for it!
I wish I had snatched the Thai basil out of the Aerogarden in time to plant it outdoors. I can’t keep up with the harvest!
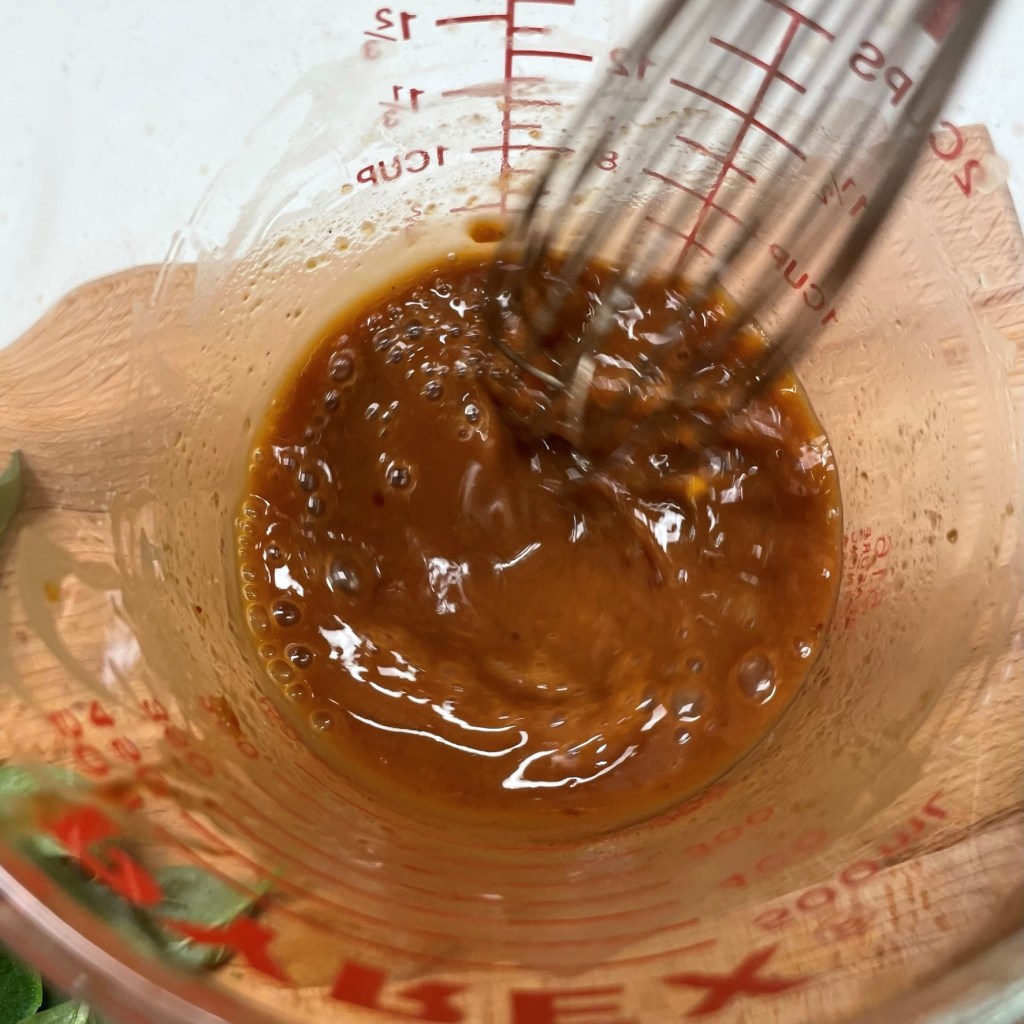
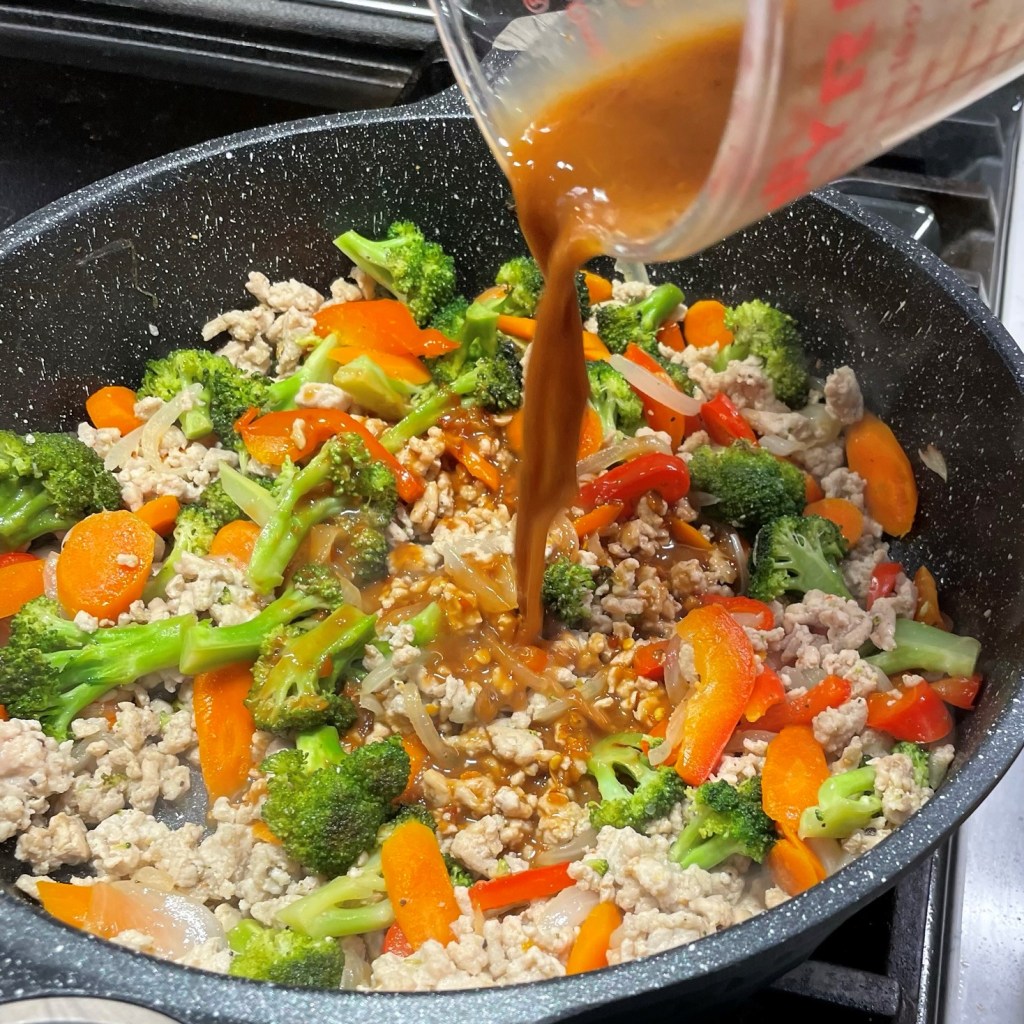
The prep for Thai basil chicken is easy; it’s just a bit of chopping and slicing of fresh vegetables that have plenty of texture, color and nutrition. The other essential prep is making the sauce. My recipe includes chili-garlic paste for heat, soy sauce and coconut aminos for an umami burst, oyster and fish sauces for a little funky depth, rice vinegar for a slight acidity and a touch of coconut sugar to round it all out. There’s also a bit of corn starch in the mix to keep it silky. If you like Asian flavors even a little bit, you won’t regret having these ingredients in the door of your fridge, and in no time at all, you’ll be mixing and matching them to come up with your own amazing recipes. One final note on the point of these Asian sauces, and this is not a joke. There is an imminent shortage of both sriracha sauce and chili-garlic paste, so you may want to grab a jar of each now to avoid the drought that’s coming on these ingredients. Now, let’s get cooking on this dish!
It’s important to mix up the sauce before you begin cooking, because this recipe moves quickly. Look at that pile of fresh veggies!
I used carrots, red bell pepper, onions and broccoli in my recipe, but there are other veggies that would feel right at home here, including scallions, cauliflower, celery, crunchy green beans or snow peas. Sliced fennel would also be terrific, and if you can only find Genovese basil, having fresh fennel in the mix would help fill the gap of the licorice flavor that Thai basil offers. Basically, aim for lots of color and texture and you’ll have a winning dish. The only vegetable I wouldn’t recommend is tomato, which is too soft, and hardly ever used in Asian cuisine.
Cooking the dish is simple, beginning with a little bit of oil in a large, fairly deep skillet or wok. Because this recipe is cooked over medium-high heat, you need an oil with a high smoke point, such as peanut, coconut or canola oil, but you won’t need more than a few tablespoons. Extra-virgin olive oil is not best for this kind of cooking because it overheats easily and turns bitter.
I always say “season every layer,” but you want to go easy on salt for this recipe. The sauce ingredients have that covered.
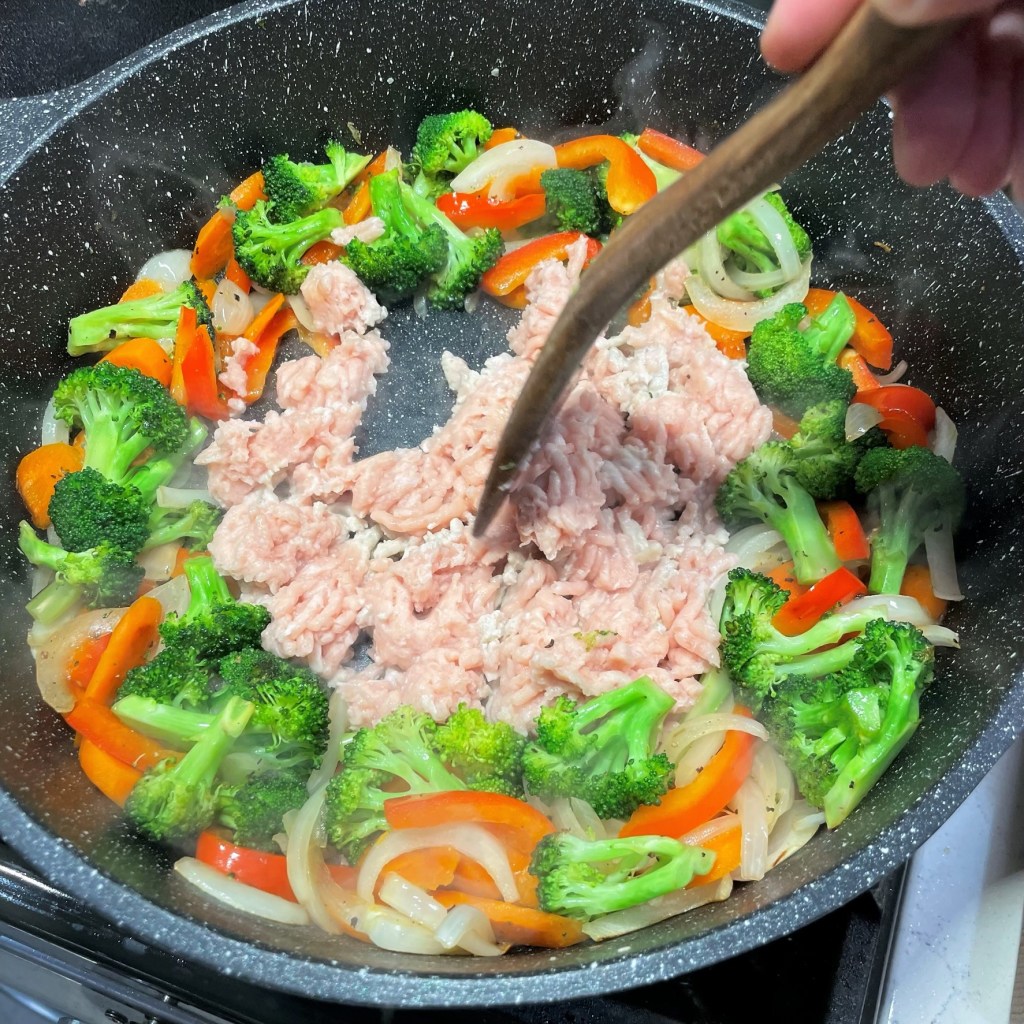
You’ll cook the veggies first, only a few minutes until they begin to soften, then move them to the outside edges of the pan and cook the ground chicken, half at a time. You could use cut-up pieces of chicken breast, also, but I find that ground chicken cooks more quickly and evenly. I normally use a wok when I make this dish, but that is one of the few tools that didn’t earn prime kitchen real estate after our remodel, and the overflow of stuff in the garage is a bit of a nightmare right now. If you have a wok, of course it would be the best vessel for cooking, but any large, sturdy skillet or pan with deep sides will work fine.
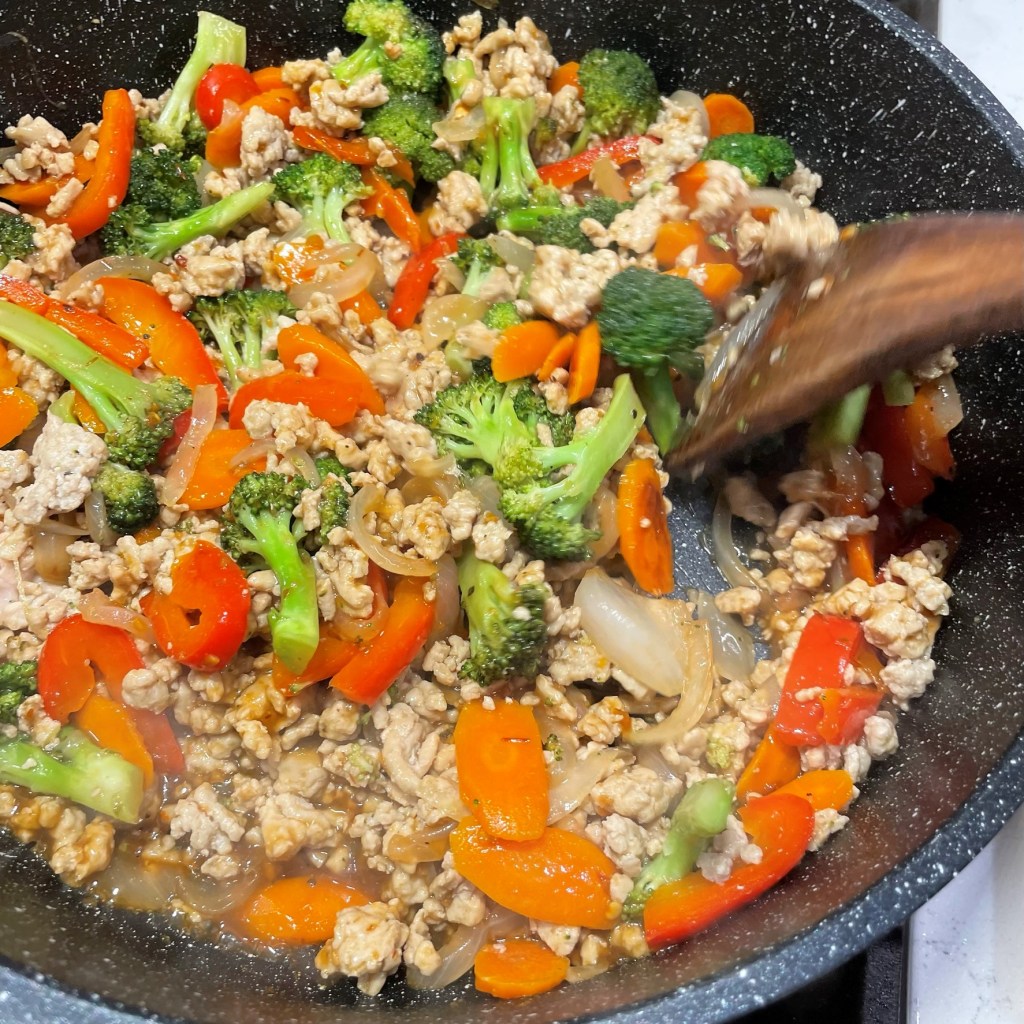
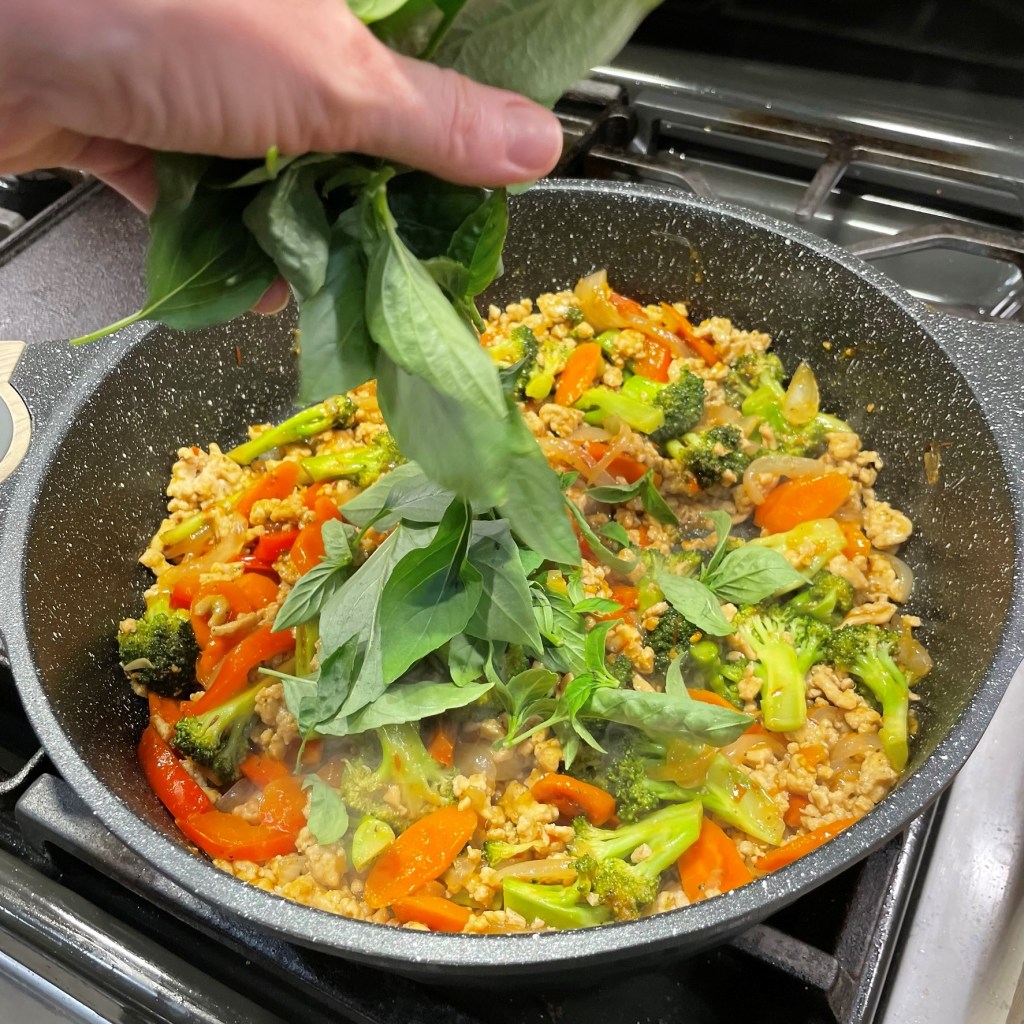
After the chicken has lost its pink color, whisk the sauce to mix it up again, and pour it all at once over the pan ingredients. Toss a few times to coat, and you should see the sauce thicken quickly, thanks to the cornstarch in the mix. Add the Thai basil at the very end, and when it wilts down and turns darker green (which takes no more than 30 seconds), this meal is ready to serve!
I’ll be looking for other fun ways to use my Thai basil, and I’m already planning to do something with the shrimp we have in the freezer—maybe a drunken noodle kind of thing? Oh, aaand, I don’t think I have mentioned that I planted a vegetable garden this year, and we have found a new weapon against deer invasion. More on that next time. 🙂
June 8thJune 16th
Fingers crossed, we will have fresh zucchini, tomatoes, peppers and eggplant soon. Stay tuned!
This recipe moves quickly, so it’s best to have your fresh ingredients and sauce ready before you begin. If you have a favorite store-bought, spicy Thai sauce, you could substitute that, using about 2/3 cup. If you cannot find fresh Thai basil, a regular Italian basil can be substituted but the flavor will not be quite as authentic. As long as we are talking substitutions, the chicken could also be swapped out for shrimp or even extra firm tofu cubes. Go on, make it yours!
Ingredients
1 pound ground chicken
1 small onion, halved and cut into slivers
1 large broccoli crown, trimmed and cut into florets
1/2 large red bell pepper, cut into strips
3 small carrots, peeled and cut on bias into thin slices
a fat handful fresh Thai basil leaves
3-4 Tbsp. high-heat oil, such as coconut, peanut or canola (you will divide this to cook the vegetables and the chicken)
Spicy Thai basil sauce (ingredients listed below)
Cooked jasmine rice, for serving
Whisk the sauce ingredients together in a glass measuring cup or other bowl that is suitable for pouring. Have it ready before you begin cooking.
Ingredients
2 Tbsp. garlic chili paste
1 Tbsp. oyster sauce
1 Tbsp. low-sodium soy sauce
1 Tbsp. coconut aminos
2 Tbsp. rice vinegar (not seasoned)
1 Tbsp. coconut sugar
1 tsp. fish sauce
1 Tbsp. corn starch
2 Tbsp. COLD water
Directions
Place a large, high-side pan over medium-high heat. Add half of the oil, and when it shimmers, add all vegetables to the pan. Sprinkle with a slight pinch of salt (not too much, because the sauce has plenty), and toss in the pan until they begin to soften, or about 7 minutes.
Push the vegetables toward the outside edge of the pan. Add half of the remaining oil in the center of the pan, and add half the ground chicken, tossing to cook just until it’s no longer pink. Repeat with the remaining chicken.
Whisk the sauce to reincorporate ingredients that have settled. Pour the sauce all over the pan mixture and stir or toss to coat. The sauce should begin to thicken very quickly.
Add the Thai basil to the skillet all at once and toss to wilt it into the recipe. This will happen very quickly.
Spoon the Thai basil chicken over portions of hot cooked rice, and enjoy it while it’s hot!