Most of the times that I ask my husband, Les, what kind of cocktail he wants for our at-home happy hours, I get the same answer:
“Something with bourbon, surprise me.” And then I’m off to figure out what kind of old fashioned or whatever he would enjoy.
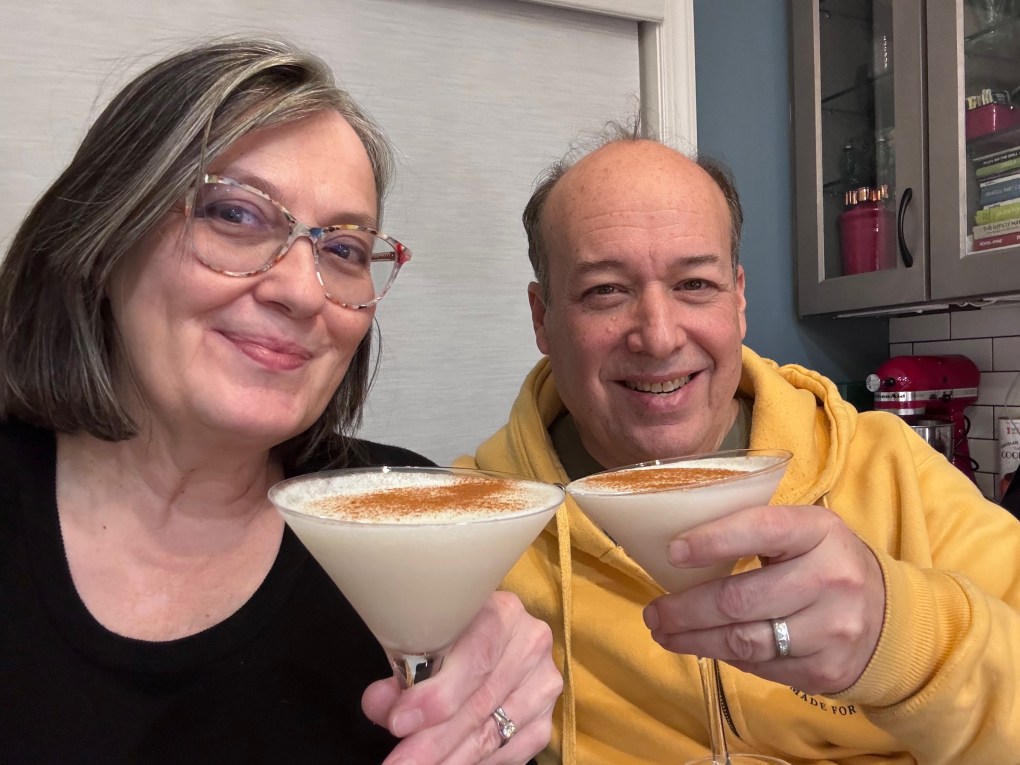
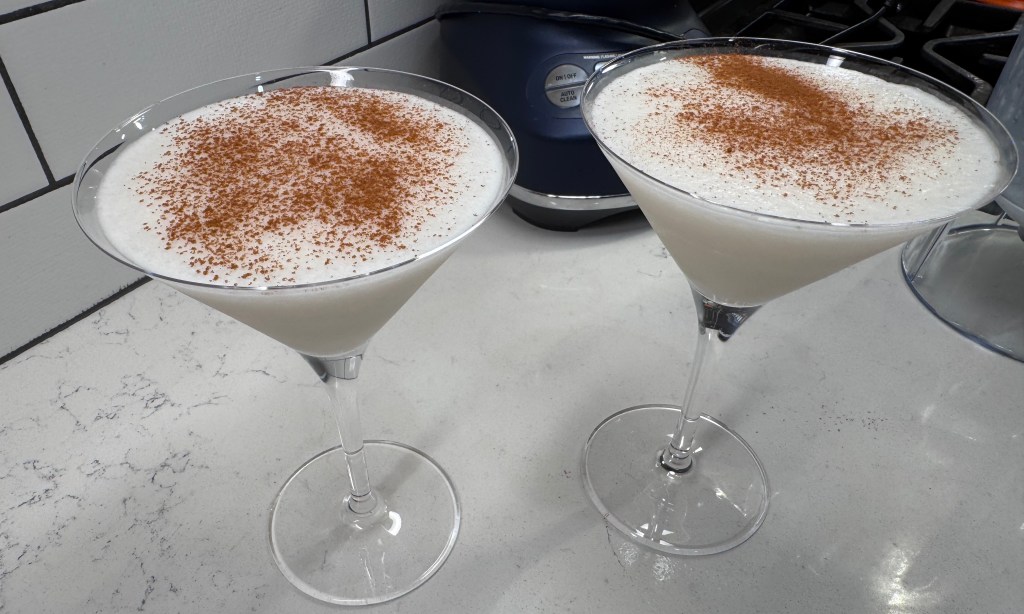
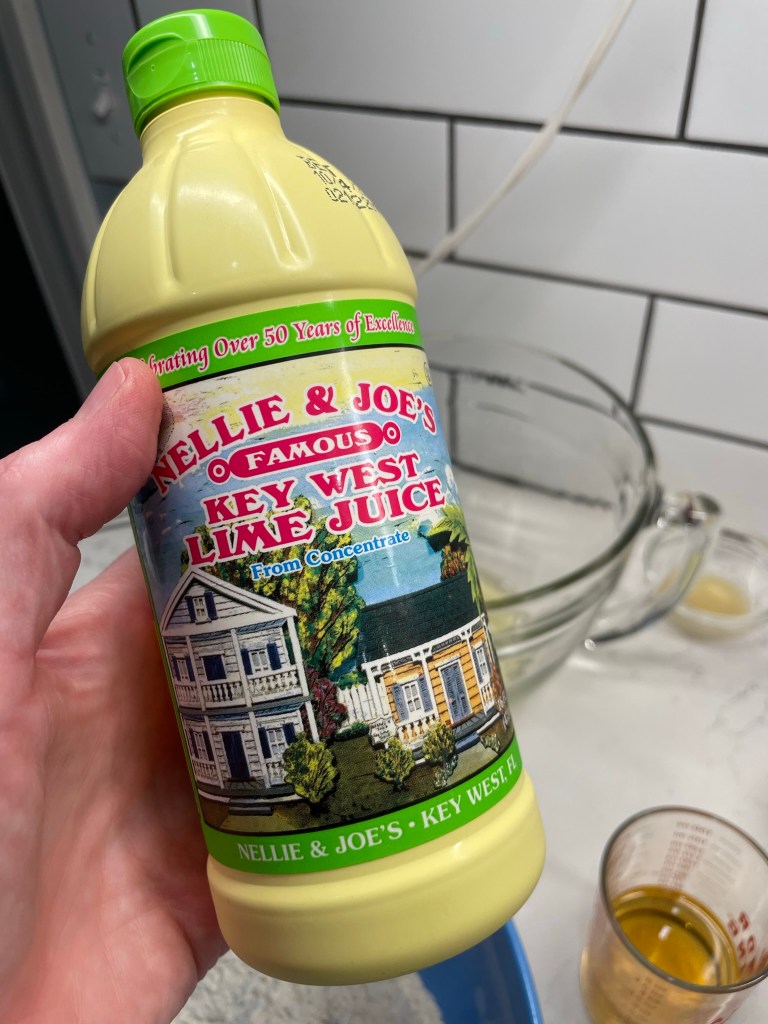
But every once in a while, Les asks me to try to re-create Will’s coconut martini. It’s frosty, coconut-y, and with just a hint of almond and a light dusting of cinnamon. The first time I tasted this drink, I thought it tasted a little bit like Christmas. I still think so!
I may have gone a little crazy with the cinnamon.
Will is part of my extended family— my husband’s cousin’s husband— and we made an instant connection on our first meeting at my (almost) mother-in-law’s 90th birthday party back in 2016. Will is charming and fashion-forward, always has a witty comeback for every situation, and makes even last-minute entertaining seem effortless. When we visited him and Cousin Evan on our tour of the Tri-State area a few years ago, Will pulled out the blender and whipped up these drinks like it was nothing. And Les went bonkers for it!
I asked for the recipe on the spot, but it was clear that Will had made them so many times, it was pure muscle memory for him. He said it was vodka, cream of coconut, a splash of Amaretto and ice. How much of each? Well, until it “tastes right.” 😂
Just a few ingredients keeps this drink simple.
Les has asked for this drink at home enough times now that I’ve finally managed to get the ratios pretty darn close to Will’s version. With today being Will’s birthday, I thought it would be fun to share this frozen concoction, and just in time for Winter Solstice and Christmas. It’s an easy drink to make as a batch, so increase your measurements for the number of people who’ll be enjoying it. And, of course, if it needs a little more of something or another for your taste, just fiddle with it until it tastes right. 😉
Cheers!
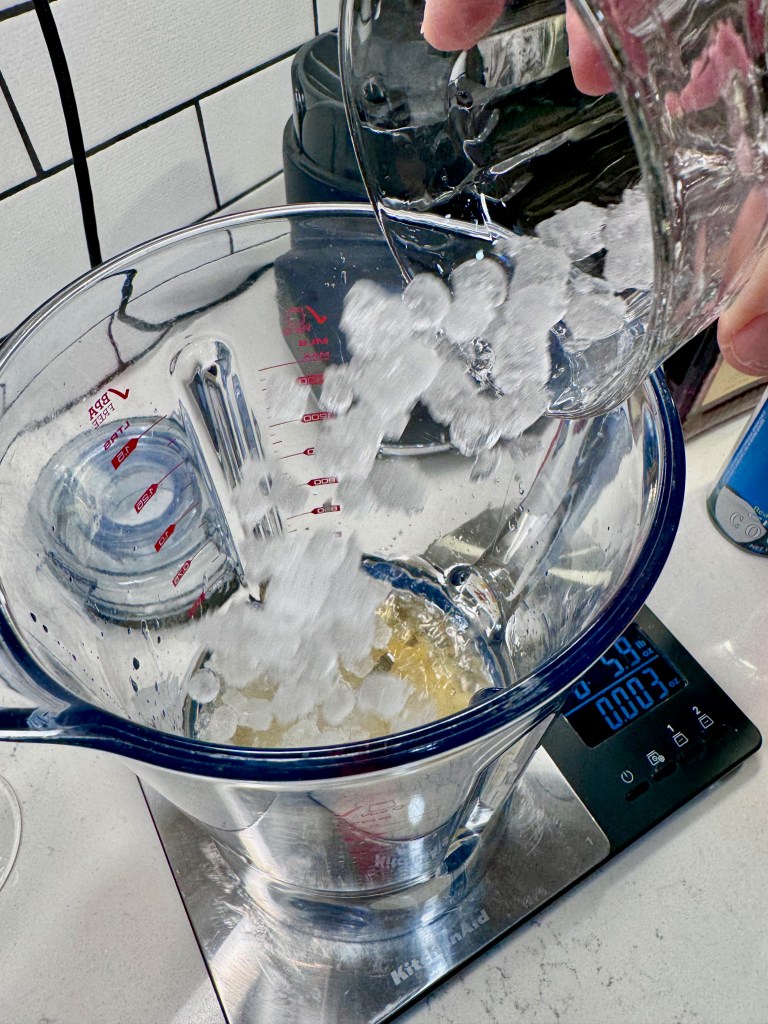
Pellet ice makes this even easier. See if your nearby fast food joint will sell you a bag or a large cup of it.
This is a really simple cocktail that is easy to batch for a group, and the subtle touches of almond and cinnamon make it taste like Christmas.
Ingredients
4 oz. (1/2 cup) vodka
2 oz. (4 tablespoons) Coco Lopez or Reàl Coconut (see note below)
1/2 oz. (1 tablespoon) amaretto
Ground cinnamon to sprinkle on as garnish
Note: Coco Lopez is canned cream of coconut, and it is sweetened. Do not confuse with culinary coconut cream, which has no added sugar. If you are making only a couple of drinks, or if you prefer to use a squeeze bottle, Reàl Coconut would be a good alternative. You can find both of these products in the cocktail mixer aisle of a grocery store.
Directions
Measure vodka, Coco Lopez and amaretto into a blender container.
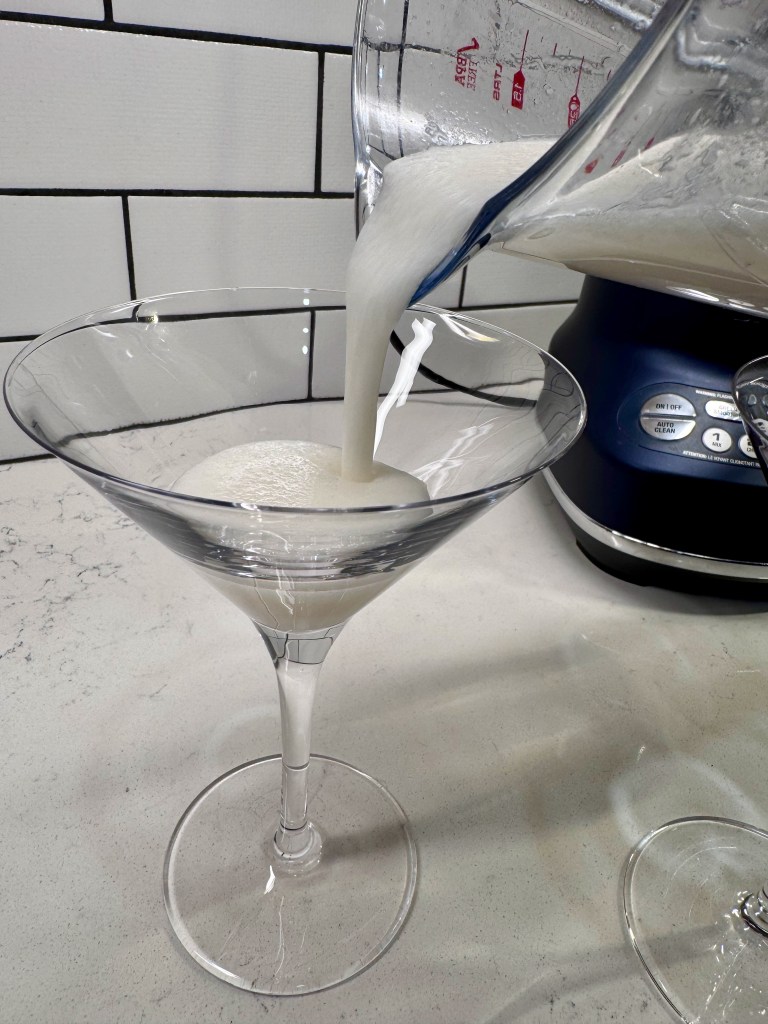
Add one cup of ice for each drink. Pulse the blender to break ice into smaller pieces, then run the blender continuously until the mixture is smooth and frosty.
Divide the blended cocktail into two chilled martini glasses. Sprinkle the top of the drinks with cinnamon and serve immediately.
Does it seem odd that the first recipe I post after the announcement of my husband’s “get healthier” initiative is a cocktail? Yes, of course it does. This is one of those awkward food blogging moments where things seem out of order. But Thursday is National Margarita Day, and I’ve been planning this post since before Les saw the light. With tequila being one of the lowest calorie spirits, I figure that a margarita is a reasonable, if only occasional, splurge. Besides, if you’re cutting back on cocktails while implementing a new eating plan, it’s best to make that once-in-a-while drink a good one, and make it at home for Margarita Day or any other day you’re craving refreshment.
I think I can see warmer weather just ahead!
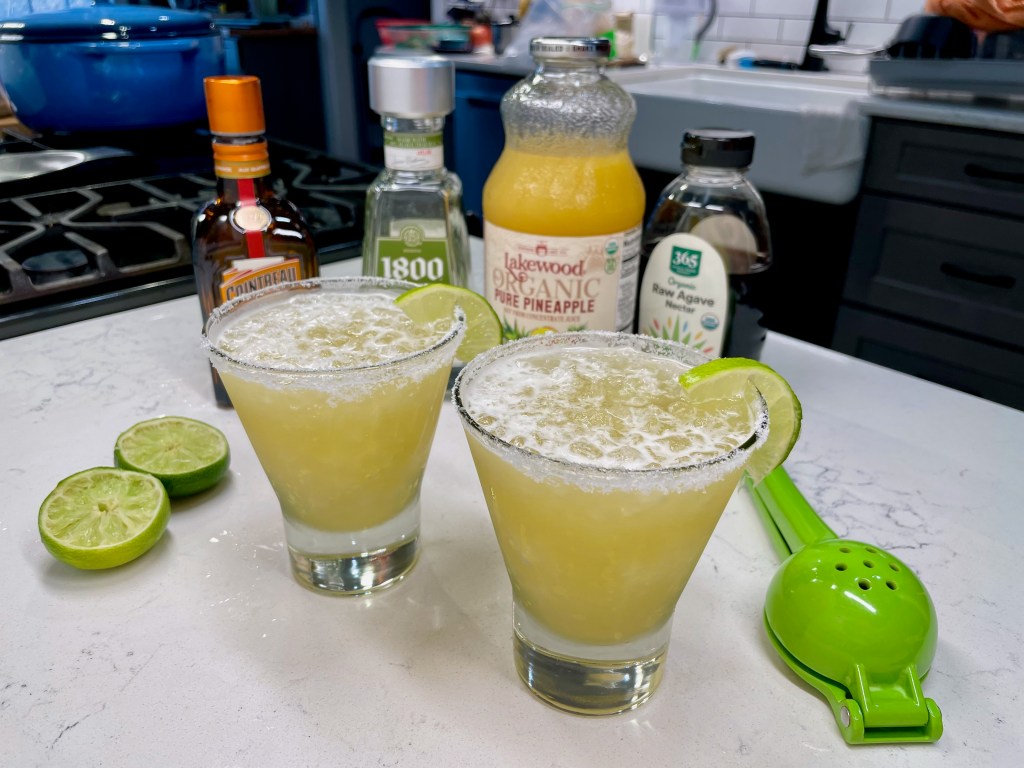
The margarita is one of the easiest drinks to modify with fun, flavorful twists, and this one is working a tropical vibe with pineapple and coconut, without being overly sweet. What makes it a “margarita” (which translates to “daisy” in Spanish) is tequila, orange liqueur, fresh lime and a touch of sweetener. The rest is up for grabs; just don’t go too crazy mixing in other flavors or you’ll have yourself a boozy mess and probably feel terrible in the morning (especially if the add-ins are sweet). If you generally associate margaritas with hangovers, here’s my theory: you probably had too many, made with cheap tequila (it didn’t have a worm, did it?) and a crappy mixer, and possibly in a chain restaurant.
My personal rules for margaritas are simple— use good quality tequila, freshly squeezed citrus (never a bottled mix!) and give it a fresh garnish. We eat and drink with our eyes, and when my husband and I entertain, it seems that the garnish is what always makes guests ooh and aah, so I consider it as crucial as the other ingredients. For this drink, I’m keeping it simple with a lime slice on the edge of the glass.
This is the beginning of a beautiful relationship.
I love this 1800 Coconut, a blanco tequila first recommended to me by my cousin-in-law, Will. The differences between this and some other “flavored” spirits are that the coconut is subtle and natural, it has no added sugars, and— at 70 proof— it still has a nice little kick. It’s mellow enough to sip with just an ice rock (as Will does), but it is also terrific paired with another tropical flavor, especially pineapple.
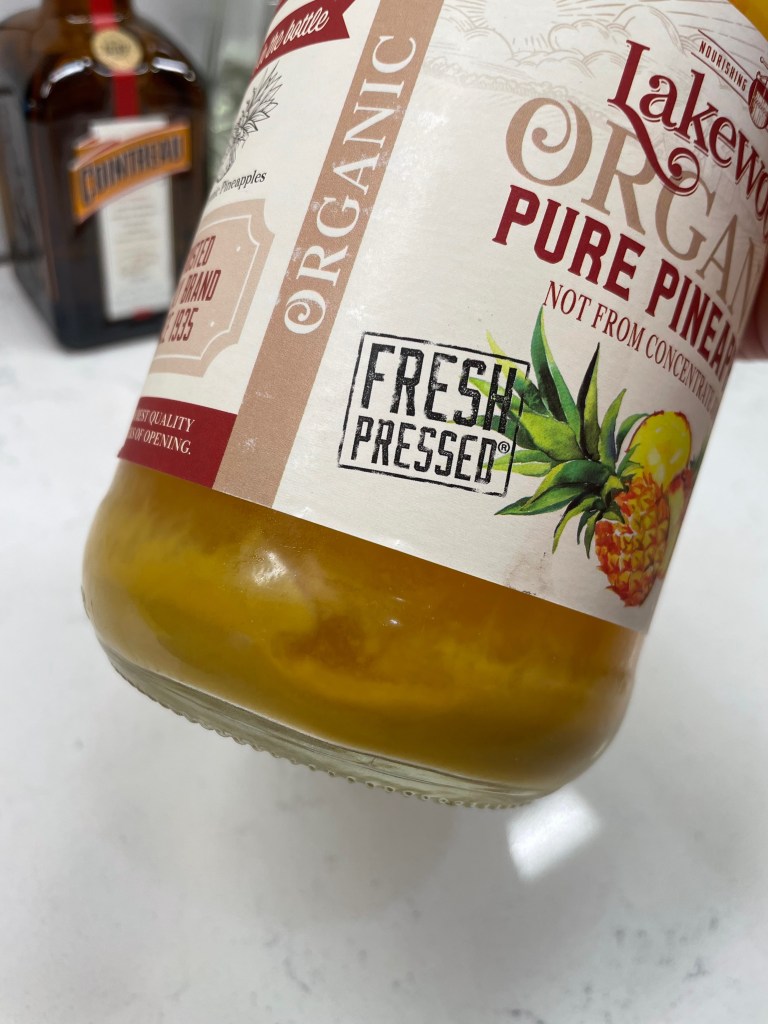
This time of year, bottled pineapple juice is likely to be tastier than any fresh pineapple you’d pick up at the supermarket, and I typically choose a large bottle over the individual cans because my sensitive tastebuds pick up that tinny flavor. Choose a juice with minimal ingredients, and preferably one that is made from fresh-pressed pineapple rather than concentrate. Be sure to give it a good shake, as the heavier pulp of the juice settles to the bottom, and that’s where most of the flavor is.
The pulp solids have settled to the bottom.A quick shake fixes that!
Triple sec is a standard ingredient in a margarita, but I prefer the higher end, more intense orange flavor of Cointreau. Fresh lime is a must (please don’t use the bottled stuff) and to keep the drink lightly sweet, just a quick squeeze of agave syrup— paying respect to the plant that gave us tequila in the first place.
Use equal amounts of these three ingredients.
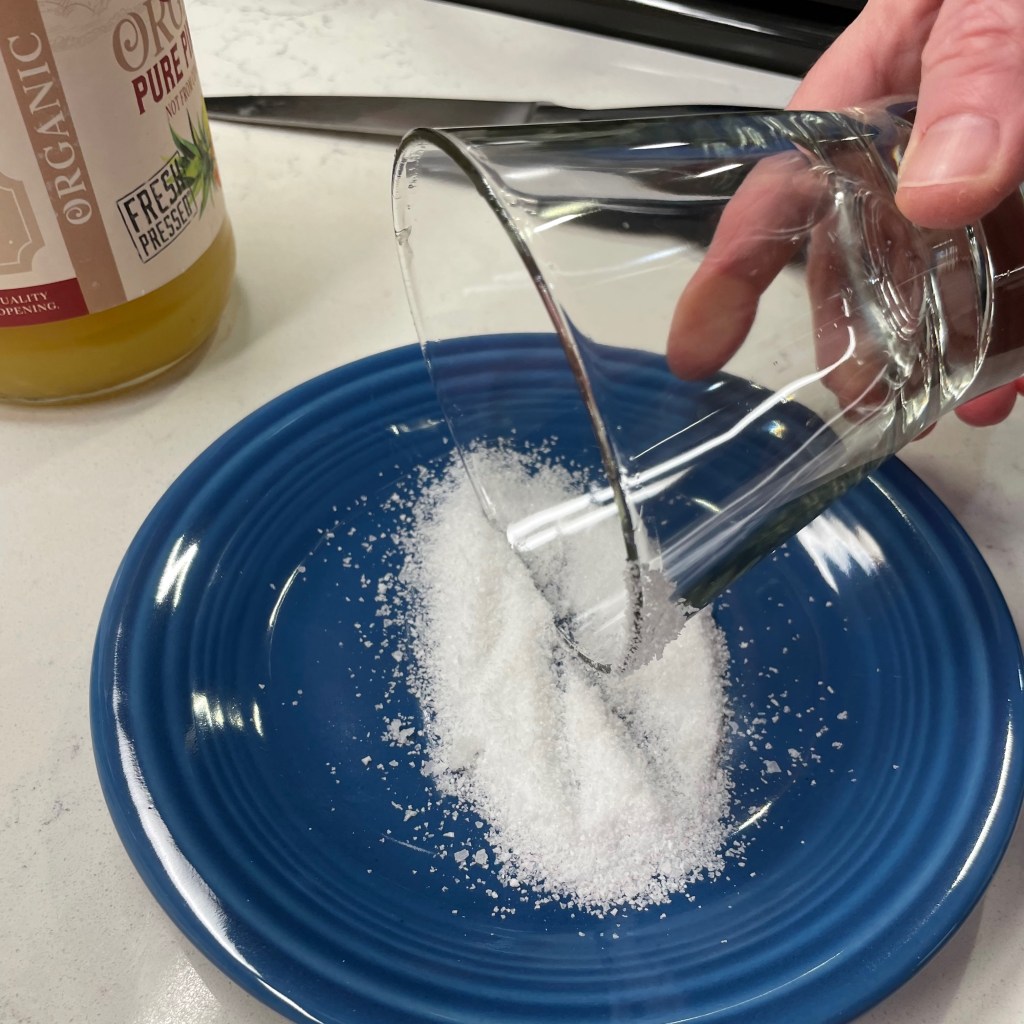
I know that some people have strong feelings about the salt rim, and I’m here to represent those who love it. But I don’t care for the commercial stuff that is “made” for margaritas, because it tends to have a slight chemical flavor and I truly hate when those gigantic chunks of salt fall into my drink. My preference is for a delicate rim of fine sea salt, which is easily adhered only to the outside of the rim after a quick swipe of fresh lime.
It’s great if you have time to do this ahead so the salt has time to set.
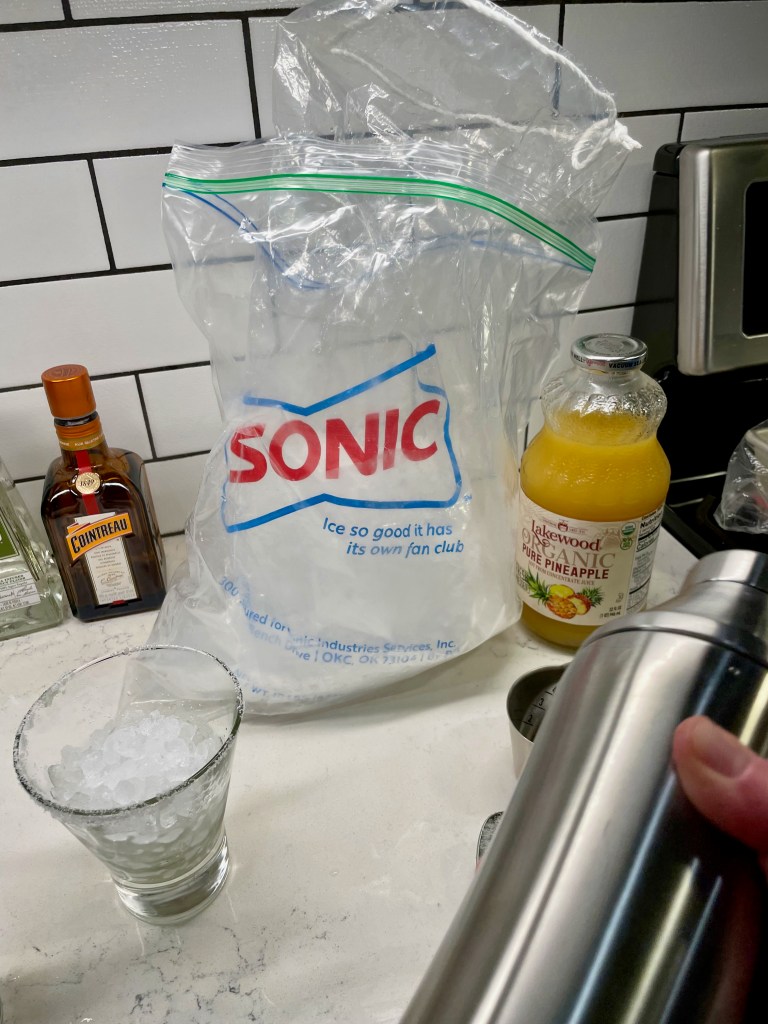
Finally, the ice! If you don’t already know that you can purchase a large bag of perfect pellet ice from Sonic, the drive-in fast food joint— well, now you do! This is a far cry from the crushed ice your refrigerator door will give you. Each pellet is a crystal clear chunk of flaky ice, and a scoop of this ice keeps a cocktail cold much longer than you might expect. If you’re only making a couple of drinks, a large cup of Sonic ice will probably cover it; I’ve been buying the 10-pound bags for just $3.50 and have found that it will keep in the freezer (double-bagged) for a few weeks.
The sonic ice will elevate all your tropical cocktails.
So there you have it— a tropical twist for National Margarita Day! Shake it up with plenty of ice, pour it into the icy glass, add more ice to top off the glass, garnish and enjoy. For those on a calorie budget, this tasty cocktail checks in at 211 calories, made exactly as written.
Here's a fun tropical twist on a classic margarita! Use the best ingredients you can find for a memorable cocktail at home.
Ingredients
1 1/2 oz. 1800 Coconut tequila
1 1/2 oz. fresh pineapple juice
1/2 oz. Cointreau
1/2 oz. freshly squeezed lime juice
1/2 oz. agave or simple syrup
Sea salt to rim the glass and a lime slice to garnish
Note: To salt the rim of the glass, swipe a fresh lime slice around the outer edge of the glass, and then roll it on salt poured out onto a plate or paper towel. Do this in advance, if possible, so that the salt has time to set as the lime juice dries.
Directions
Combine tequila, pineapple juice, Cointreau, lime juice and agave in a cocktail shaker. Add plenty of ice and shake for about 20 seconds.
Strain into a prepared cocktail glass. Top off with additional ice, if necessary, and garnish with a lime.
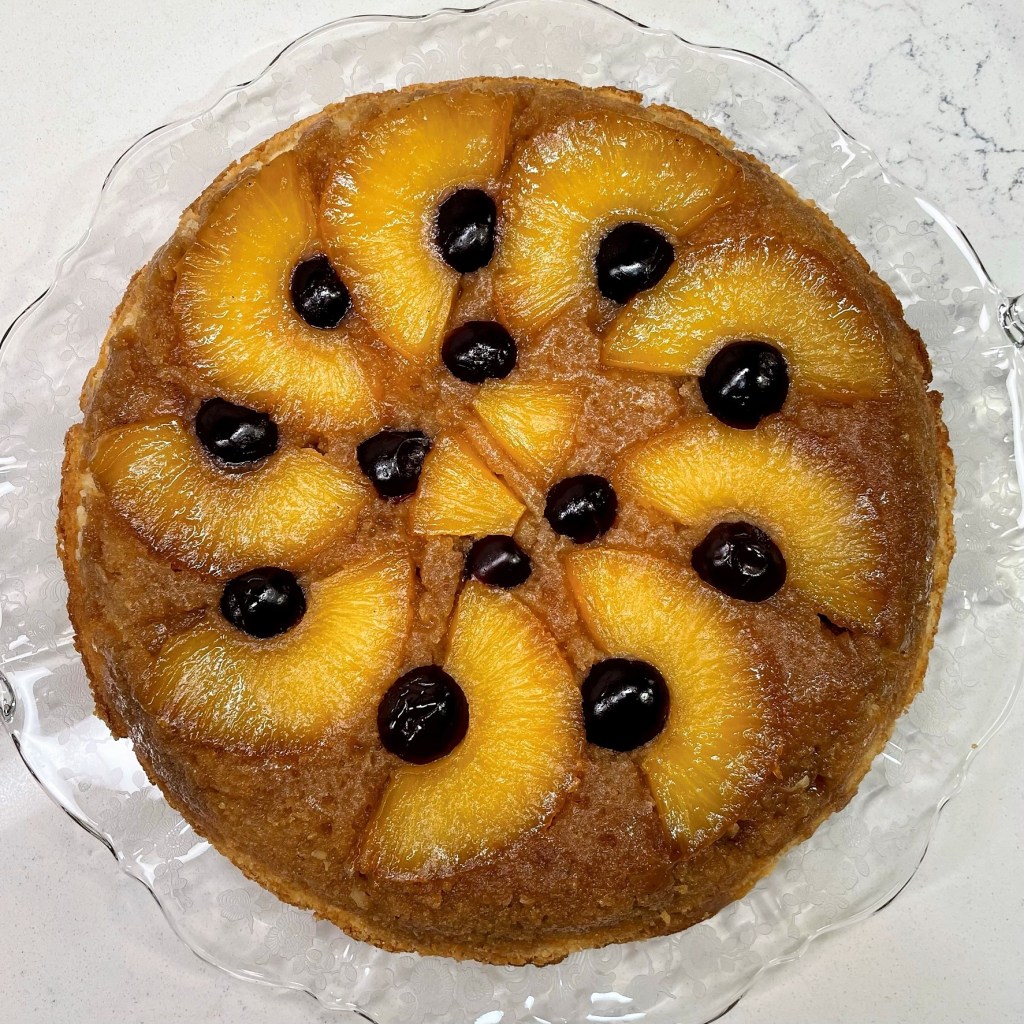
On a recent grocery run, I was stopped in my tracks in the produce section by a stunning display of fresh pineapple. Their luscious fragrance caught me first, and those golden beauties were staring me in the face, just begging to go home with me. All the way home, I imagined whipping up some fun tiki drinks, one of my hubby’s favorites. I also considered making a classic pineapple upside-down cake, though I don’t have a great track record with dessert baking. It isn’t for lack of trying; rather, it’s a matter of getting into my own head in a way that messes me up. Still, I’d try it. And then, as I was putting away groceries, a crazy thought hit me.
Could it be a terrible idea to combine the two? Throw a little Comfort du Jour curveball on a pineapple upside-down cake by applying all the tropical flavors of a tiki drink? The magical combination of rum, pineapple, coconut and lime is the flavor equivalent to summer sunshine, and once the idea hit me to include them in a cake— with my good cocktail cherries, of course— well, there was no turning back!
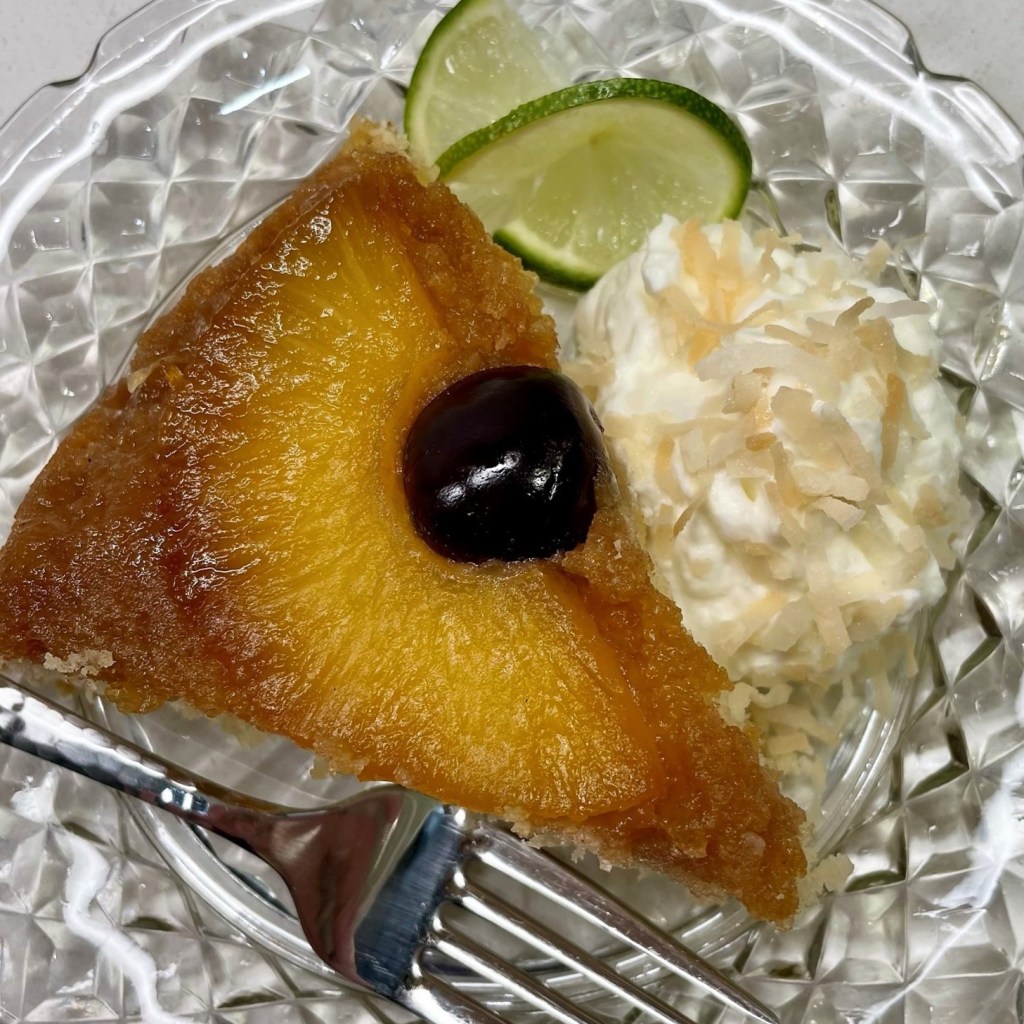
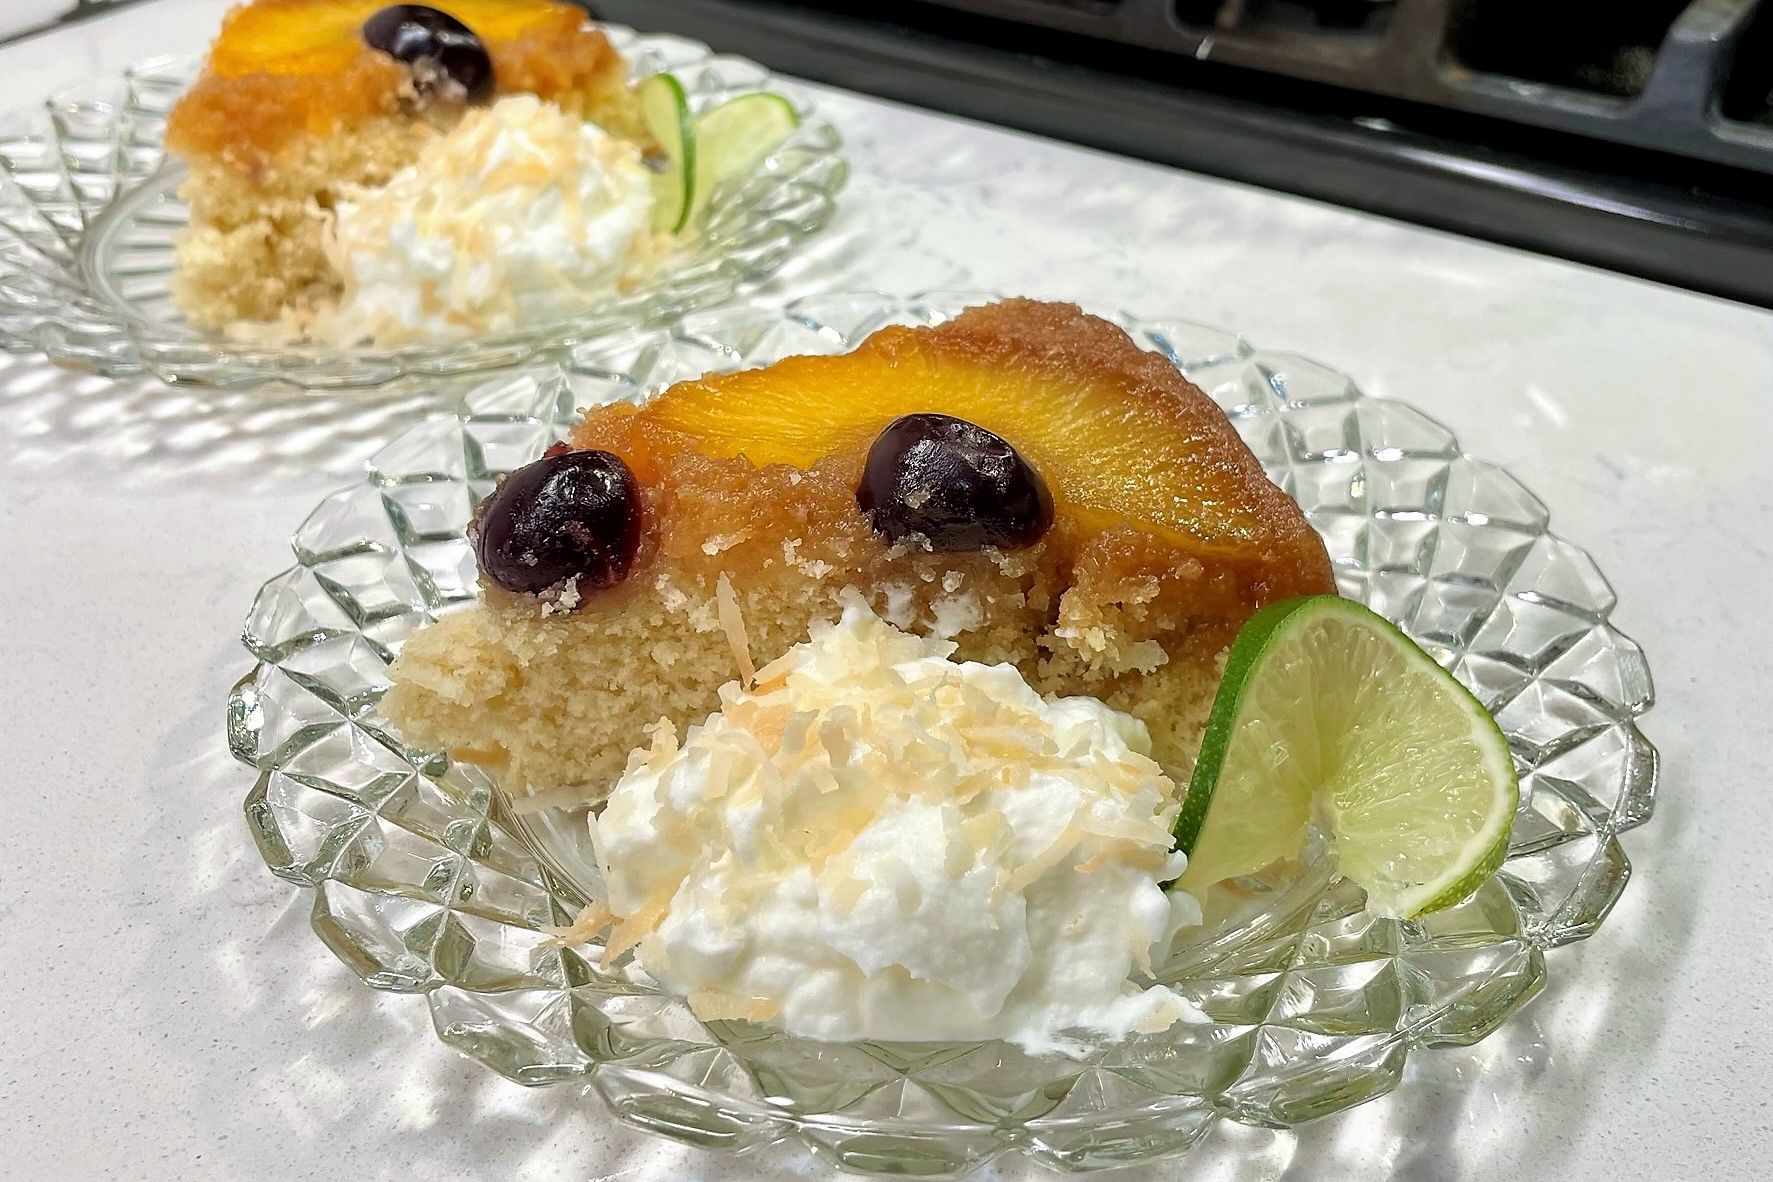
It was every bit as delicious as it looked!
As I gathered up my ingredients to get started, I realized all at once the source of my frustrations with baking sweet treats. It’s me. Yep, it’s my own fault I’m a lousy sweets baker.
But this recipe proved I can break free of that negative self-talk. I just needed to be diligent.
My muse is frequently five or more steps ahead of my mind and my hands, and the exuberance that kicks in when I start making on-the-fly adjustments to a perfectly good recipe is exactly what gets me into trouble. I confuse myself with too many ideas for substitutions, throwing off the ratios that are so necessary for good baking results. It makes me crazy after hours spent in the kitchen on a recipe that seemed so promising at the start.
When I have a crappy result, I inevitably swear off baking— and I am using the word swear quite intentionally. Then, when my persistent muse comes around again, I repeat the whole scenario, sometimes verbatim. But for this cake, I pledged to slow down, chart my substitution ideas more thoughtfully, read the recipe (twice), and truly organize my ingredients into pre-measured amounts (not just put their pantry containers on the counter) to reduce the chances of disaster. And what do you know?— it worked!
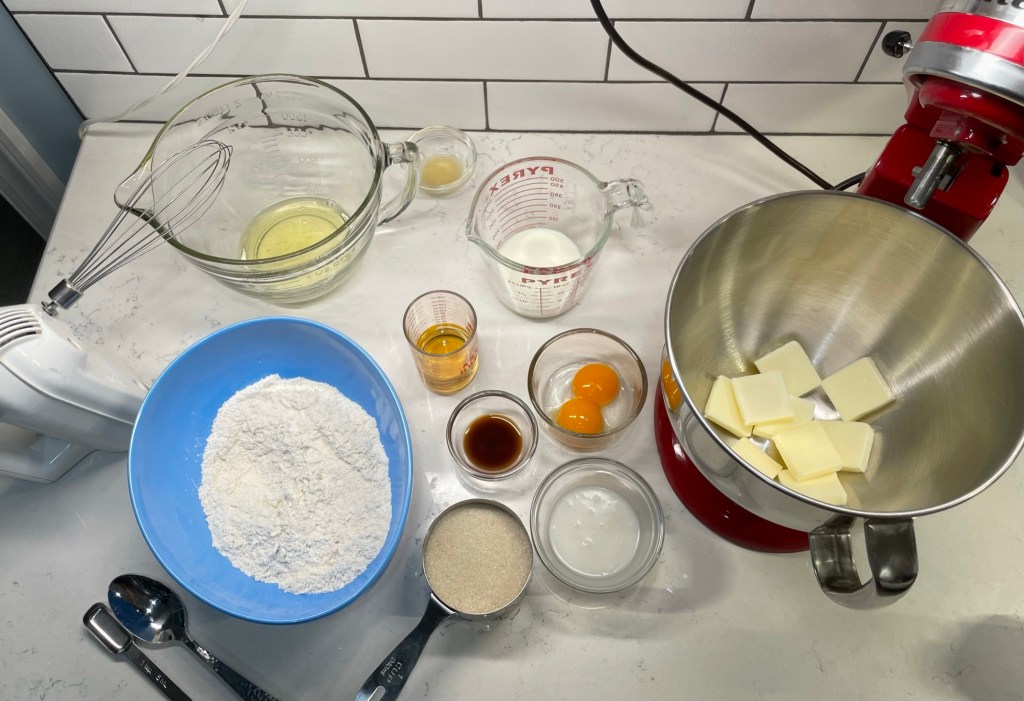
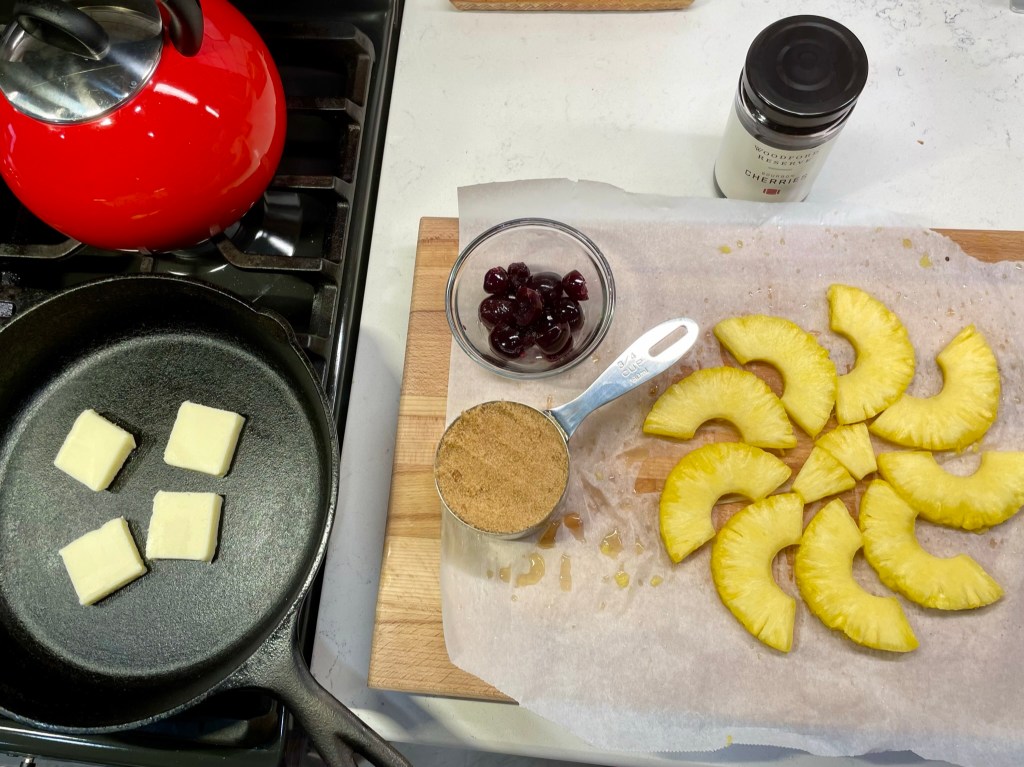
I could not have been more organized for this project, right down to pre-arranging the pineapple!
My baseline recipe was a skillet version of pineapple upside-down cake that I found on the King Arthur Baking website, my go-to for all things baking. I imagined the wonderful flavors of a tiki cocktail and started rounding up my substitutions.
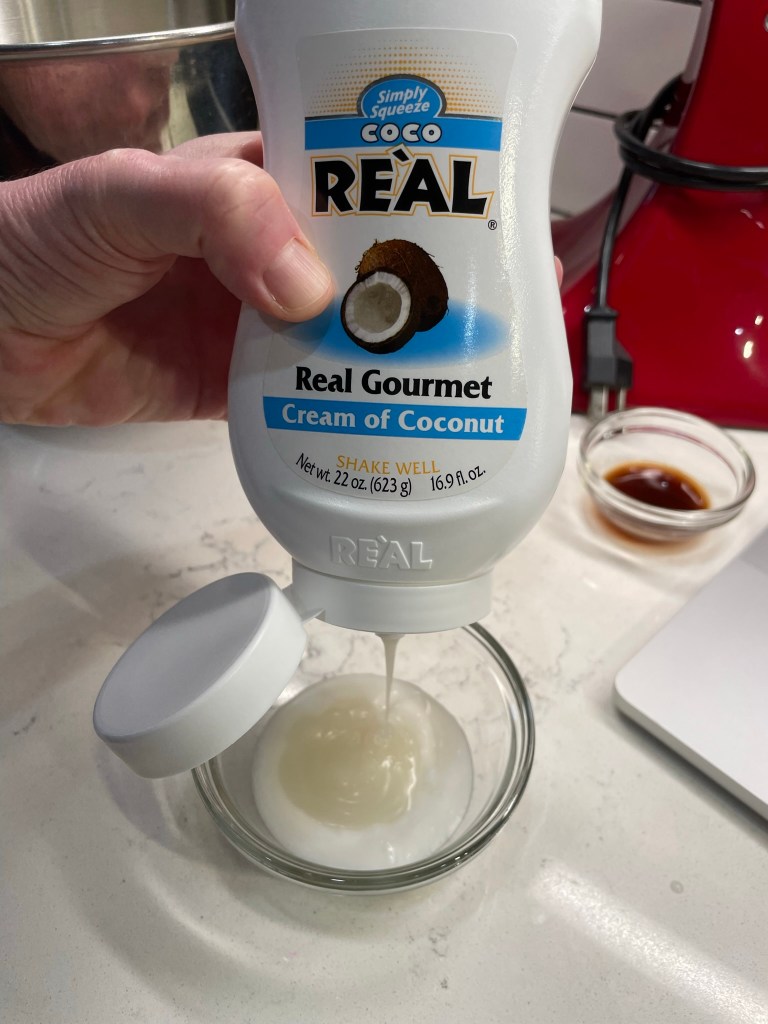
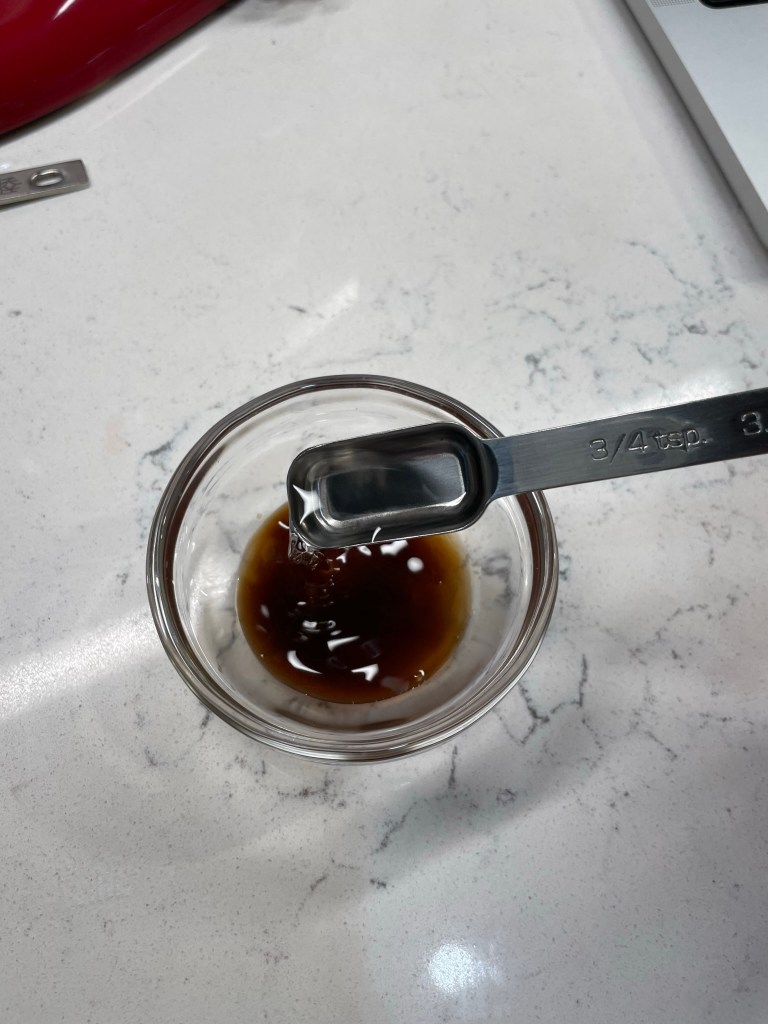
I wanted rum in the brown sugar topping, and in the cake batter itself. Sweetened flaked coconut would be great in the batter, but that wouldn’t be enough flavor so I’d swap out some of the sugar in favor of this sweet cream of coconut— the same stuff I use in a real tiki cocktail. Key lime juice would spike it with a touch of citrus, but just a touch. Almond extract would play the role of orgeat, the nutty-sweet syrup ingredient that is so distinctively tiki-ish. Our bourbon-drenched cocktail cherries felt more appropriate than the artificially colored bright red maraschinos, and it would be another touch of boozy, grownup candy goodness. And then, of course, my lovely fresh pineapple would be the centerpiece.
The cream of coconut made a big flavor difference, and I put lime juice in the rum and almond extract into the vanilla.
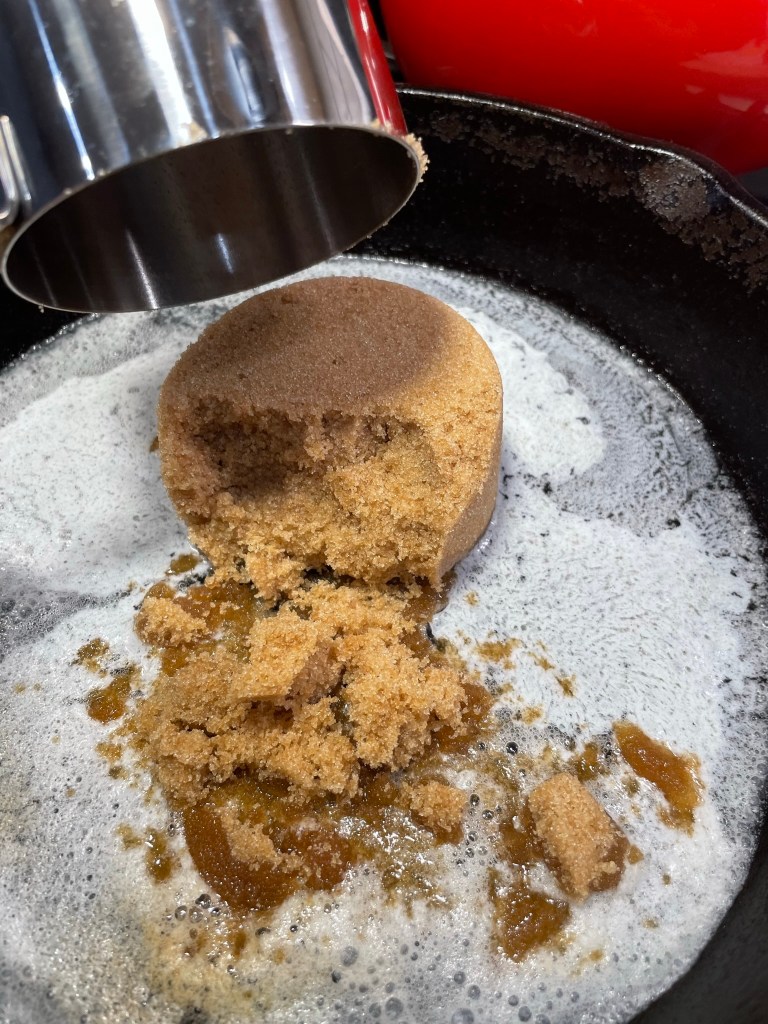
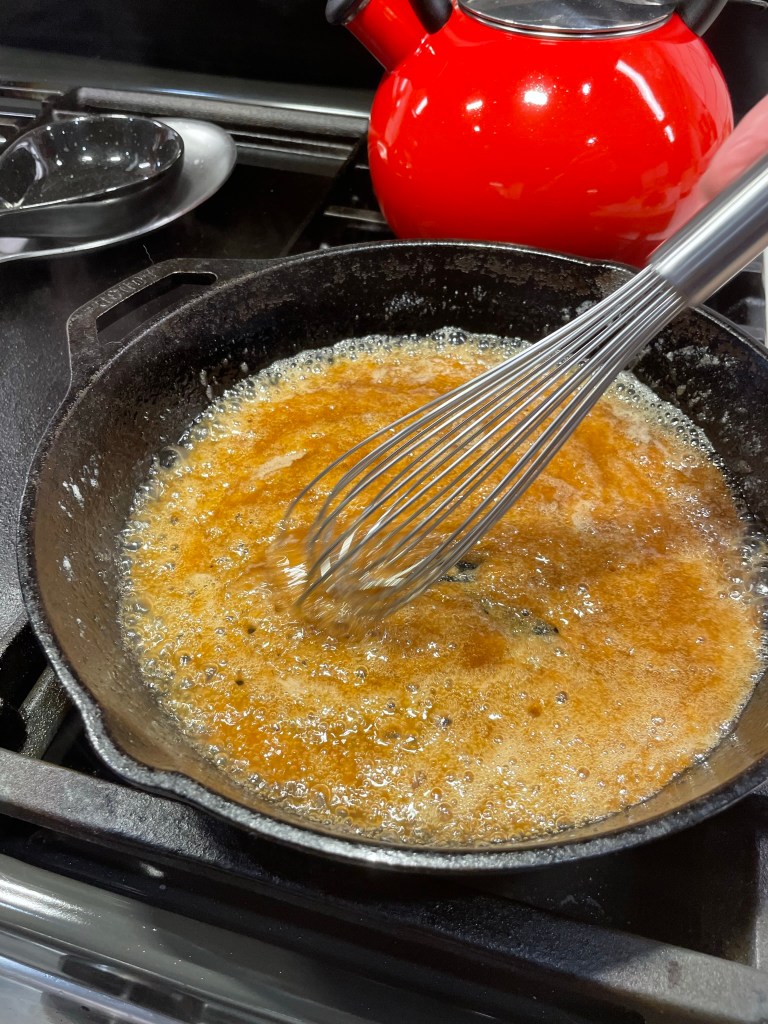
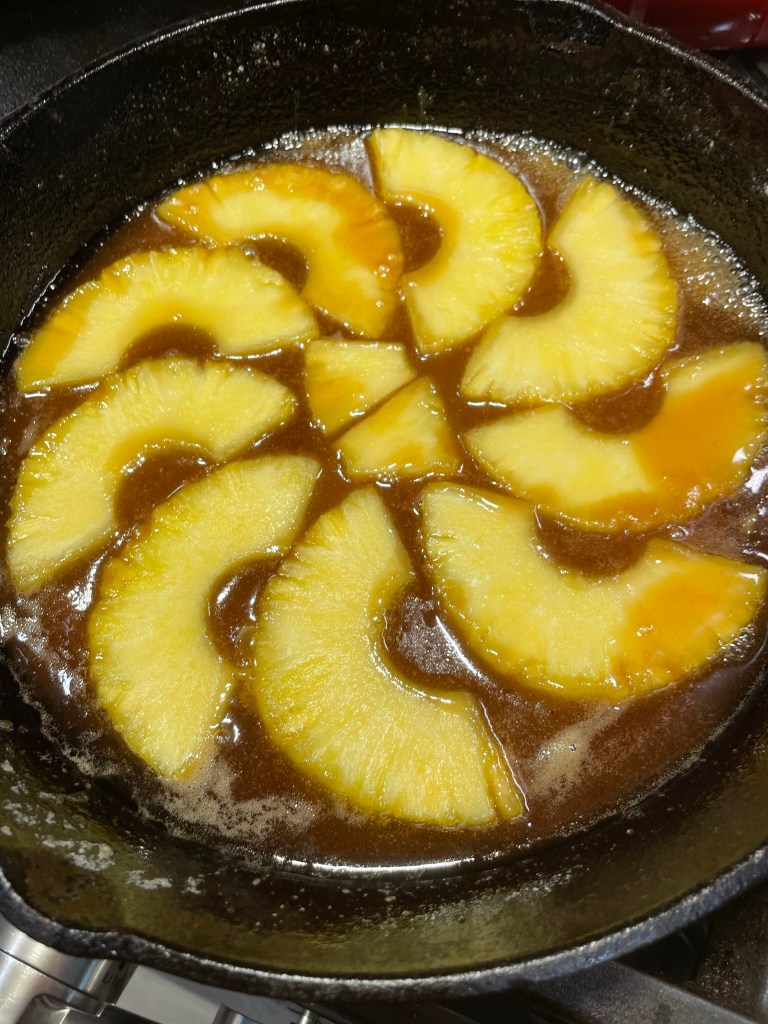
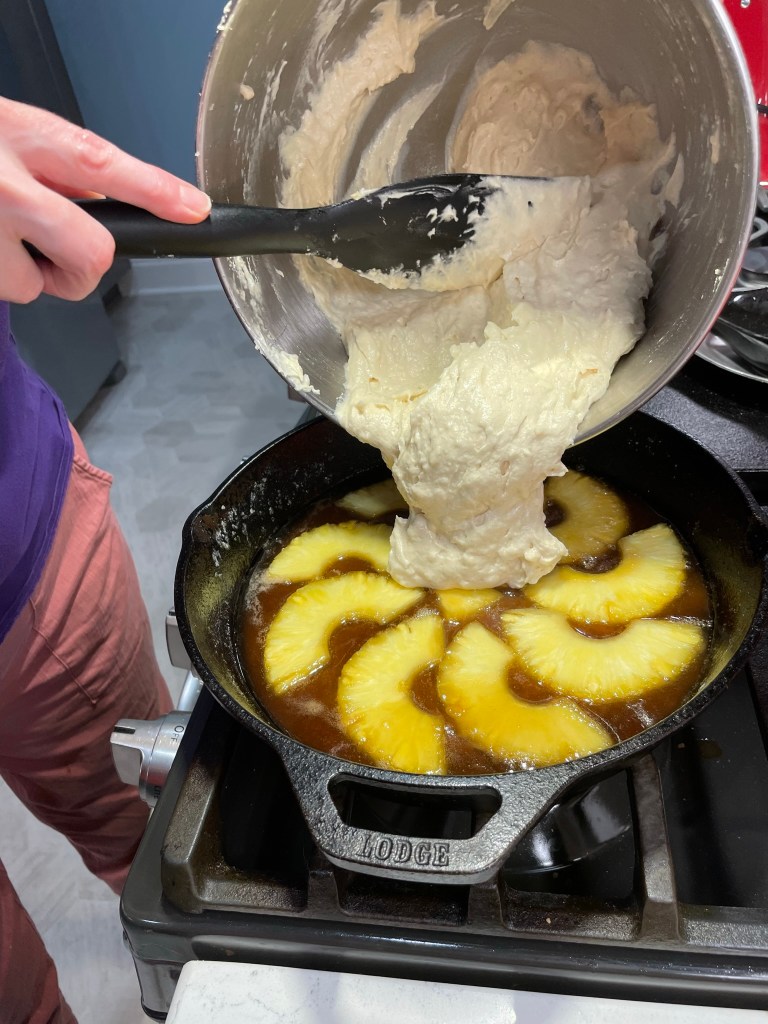
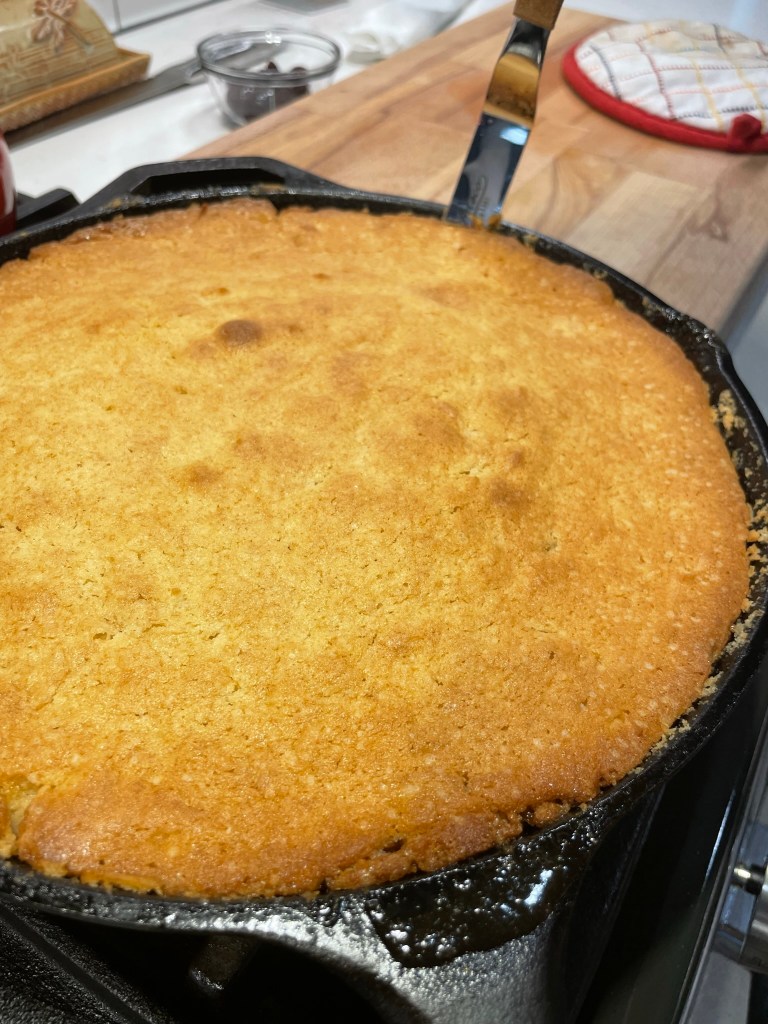
With my ingredients measured and in order, following the recipe roadmap was a cinch. The topping was easy, just melting together brown sugar and butter, and then boosting it with a shot of Jamaican rum. I let it get nice and bubbly, then turned off the heat and arranged the pineapple slices. The cherry halves would come later.
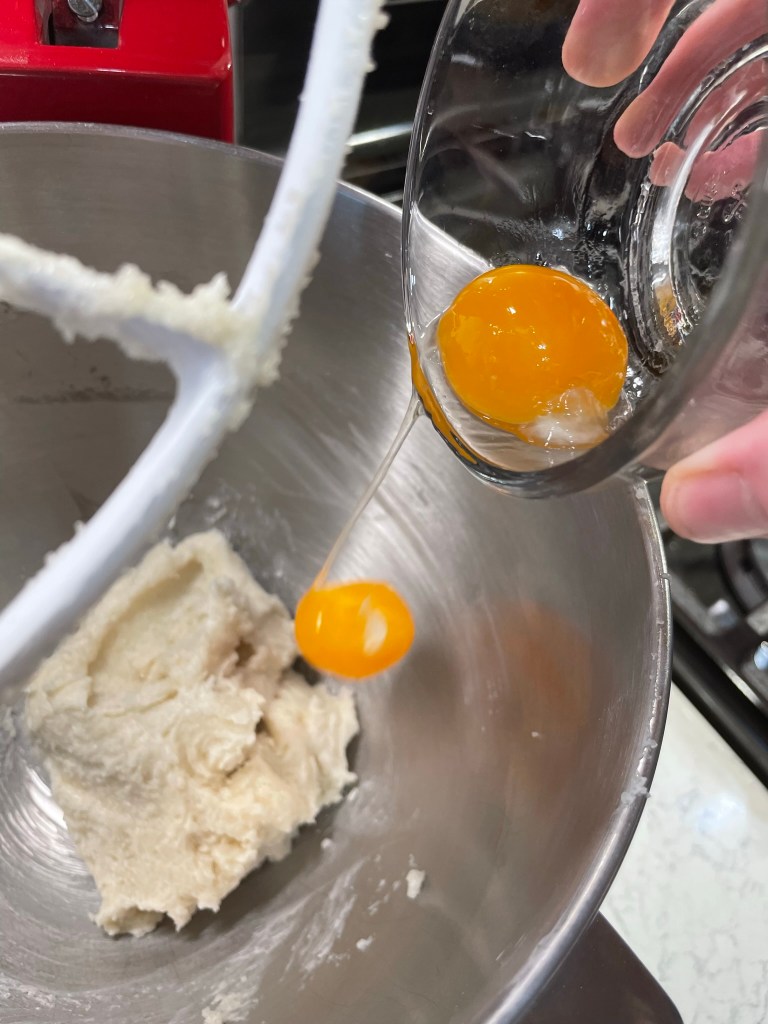
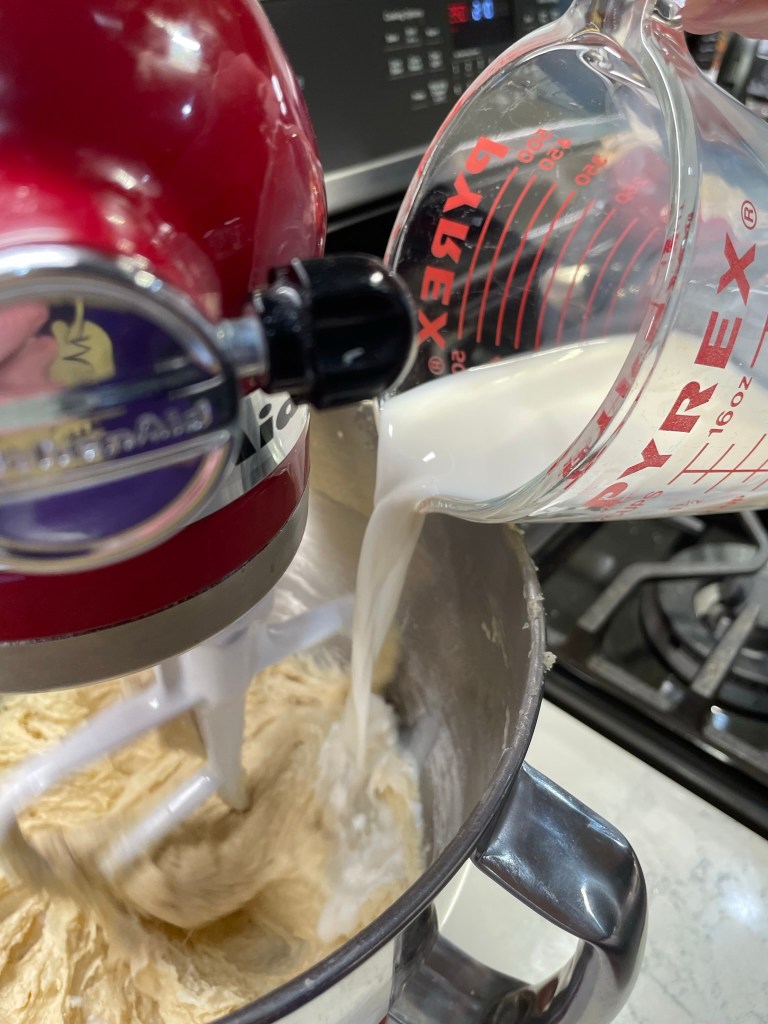
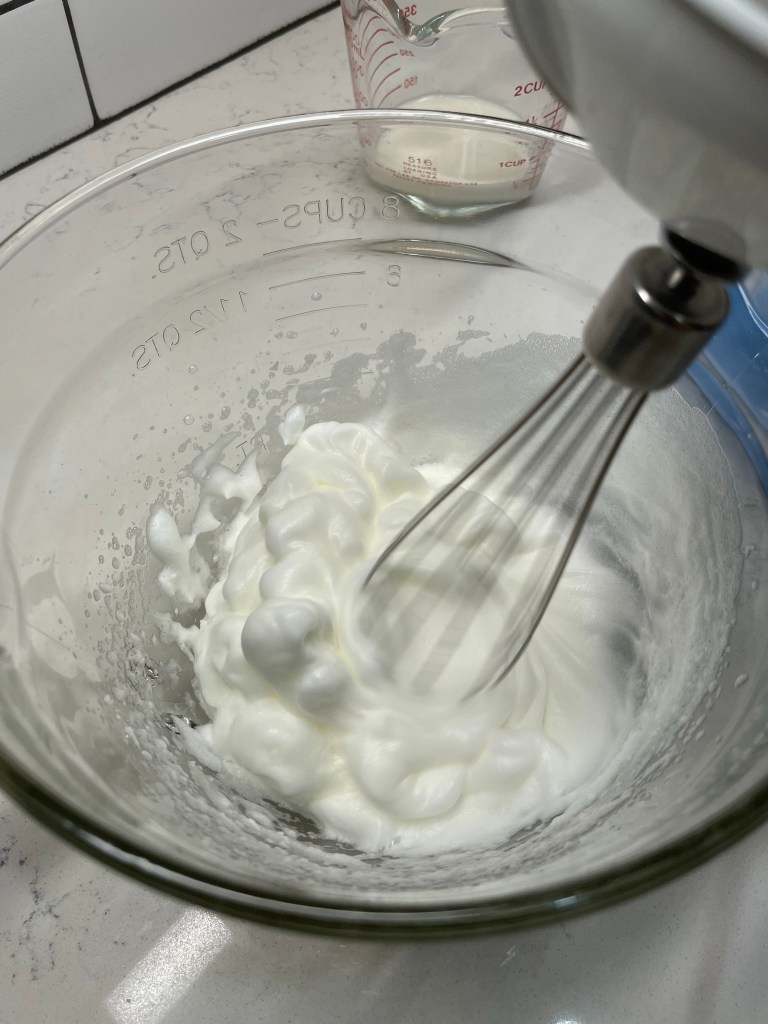
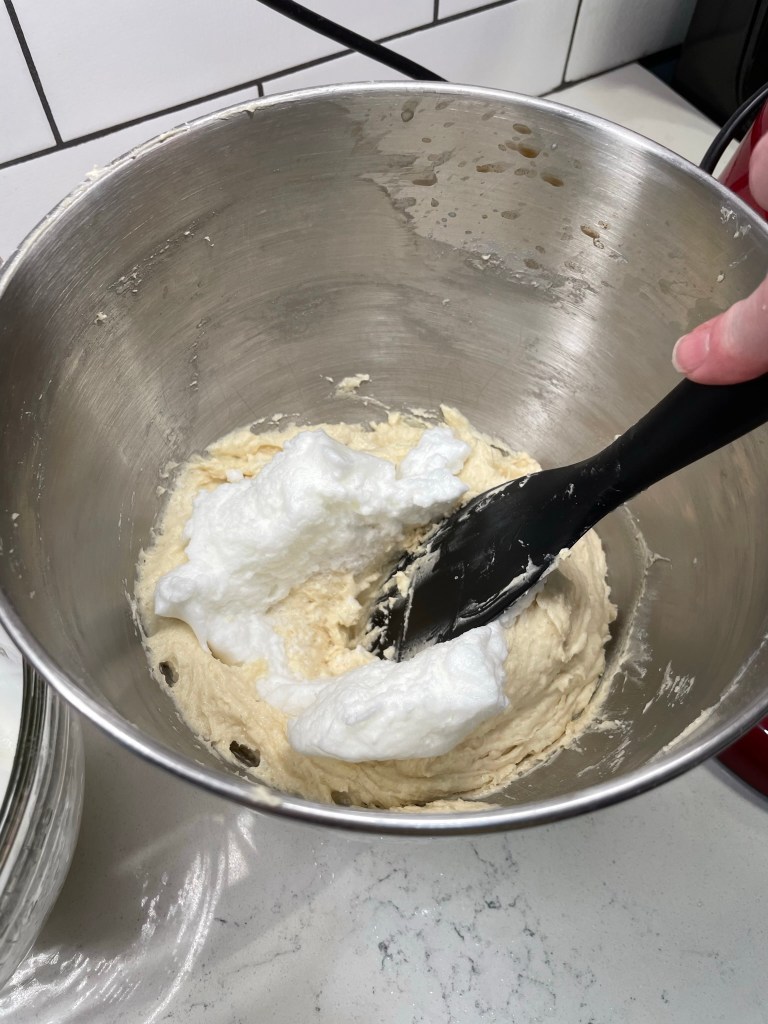
I creamed together the butter and cream of coconut, then gradually beat in the sugar. Next came the egg yolks, the flavorings and the flour-milk-flour-milk-flour additions. Alternating those ensures more even blending without overmixing. The egg whites, which were whipped separately, were folded in at the end and I spooned the batter over the brown sugar butter mixture that held the pineapple slices in the skillet.
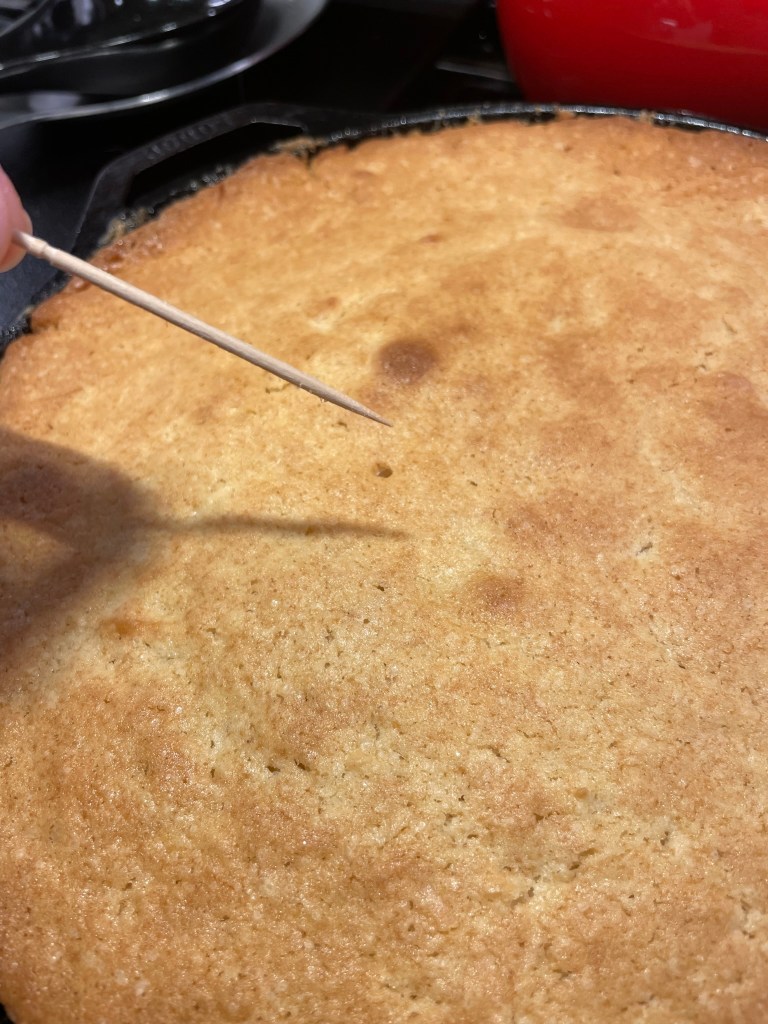
What a world of difference it made to have my ingredients measured and ready!
The baking time was true to the recipe (my toothpick said so), and I inverted the cake onto a serving platter to cool. There’s a sweet spot in timing the inversion from a hot skillet; too soon and the cake may fall apart, too long and the toppings will stick and you’ll be patching them into place. Aim for 15 to 20 minutes for best results, then immediately press the cocktail cherry halves into place while the topping is still warm and gooey. Cool it completely before serving. Waiting to enjoy it was the hard part!
Dont’ rush this step, or the cake may fall apart.
I served my tiki cocktail cake with a dollop of sweetened whipped cream, spiked with more booze of course, as well as a lime twist and a sprinkling of toasted coconut.
Having my cake and drinking it, too!
So was it worth the trouble? Mostly, yes. The cake was really delicious— definitely boozy, as intended— and the coconut and pineapple were solid co-stars. It had the perfect hint of almond, but the key lime was barely detectable, and next time I would probably just grate a little lime zest over the cake at serving time. The boozy cherries, as much as I love them, got lost a little bit with all the tropical flavors swirling around them, but they were still a nice little nod to a traditional upside-down cake.
The biggest victory for me was seeing the success that resulted from my planning and, for once, I didn’t swear off baking when this was finished. To the contrary, I’m already imagining my next cocktail-to-cake creation. Any suggestions? 😄
A few thoughtful ingredient swaps turned a classic cake into tropical tiki territory. You might say that I'm having my cake and drinking it, too!
Ingredients
1/2 stick (4 Tbsp.) salted butter, softened
3/4 cup light brown sugar
2 Tbsp. rum (I used Jamaican dark rum)
Fresh or canned pineapple rings, drained
1 cup all-purpose flour
2/3 cup whole wheat pastry flour (or additional all-purpose)
1/4 cup sweetened flaked coconut
2 tsp. baking powder
3/4 tsp. fine salt
1 stick (8 Tbsp.) unsalted butter, room temp
1/4 cup cream of coconut
3/4 cup cane sugar
2 large eggs, separated
1/2 cup, minus 2 Tbsp. milk (see recipe notes)
2 Tbsp. rum (Jamaican again)
1 1/2 tsp. vanilla extract
3/4 tsp. almond extract
1 tsp. key lime juice
Cocktail cherries, halved (use as many as you have pineapple rings)
Having all my ingredients measured and lined up before beginning made all the difference in the world for my successful outcome. Separate the eggs while they are cold, but let them come to room temperature before you start the recipe.
Directions
Preheat oven to 350 F, with rack in center position.
In a medium bowl, whisk together flours, coconut, baking powder and salt. Set bowl aside.
Cut unsalted butter into chunks to quicken softening. Separate the eggs, keeping the whites in a large bowl to be whipped. This will be added to the batter just before baking. Combine milk and 2 Tbsp rum in a measuring glass and set aside.
While all the ingredients are coming to room temperature, prepare the pineapple topping. Melt salted butter in a cast-iron skillet over medium heat. Add brown sugar and whisk until combined and just beginning to bubble. Turn off heat and stir in 2 Tbsp of the rum. Give the skillet a few gentle shakes to settle the mixture evenly in the skillet. Arrange the pineapple slices as desired.
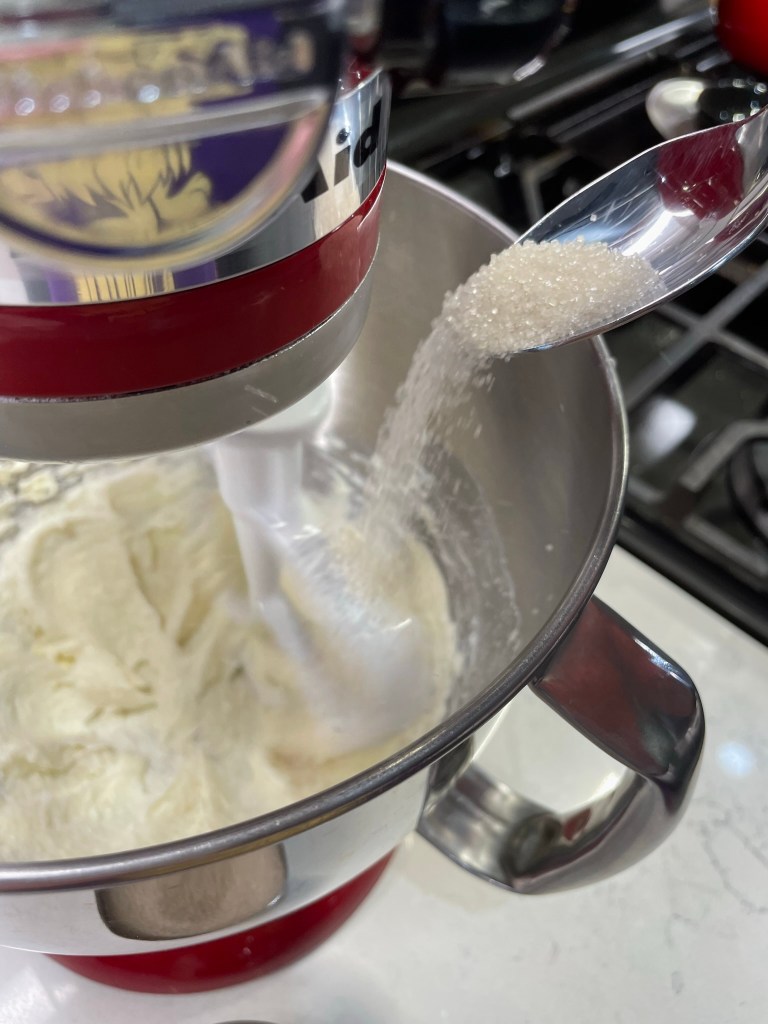
Cream butter and cream of coconut together in the bowl of a stand mixer, stopping occasionally to scrape down the sides. When mixture is lighter and somewhat fluffy, gradually add sugar, beating and scraping down sides as needed.
Use an electric hand mixer to whip the egg whites until light and airy but not broken. Set aside.
Add one egg at a time to the batter, beating until well combined after each. Beat in vanilla, almond and lime juice.
Alternate addition of the flour mixture and milk as follows: 1/3 flour mixture stirred in until smooth. Next, 1/2 milk mixture. Then 1/3 flour mixture, remaining milk, remaining flour mixture. Scrape down sides and blend as evenly as possible without overworking the batter.
Give the egg whites a quick whisk again, then gently fold them into the batter, taking care to mix only until the whites are not distinguishable in the batter. Gently spoon the batter over top of the pineapple topping. Use a spatula to smooth out the top.
Bake for 35 to 40 minutes, until a toothpick inserted in the center comes out clean. Cool for about 15 minutes.
Run a knife or offset spatula around edges of the skillet to loosen the outer edge of the cake. Invert onto a plate or serving platter. Immediately place the cocktail cherries into the topping, pressing gently to set them into caramelized sugar.
Cool cake completely. Cut into wedges and serve with a dollop of whipped cream, spiked with cointreau or coconut rum. Sprinkled with toasted coconut.
Most bloggers post their yummy cookie recipes before Christmas, because that’s when everyone is getting ready for Santa’s visit. But I’ve intentionally saved mine for this week for a specific reason, and it has everything to do with my family’s unusual relationship with Santa Claus. So I will get to the cookie recipe, but I beg your indulgence because the family connection is, well, compelling, don’t you think?
And yes, you read that right. My family knows Santa personally, and he’s more like the rest of us than you may have imagined.
When I was a little girl, I was fortunate to live near enough my maternal great-grandparents that I visited them regularly in our small town. When I was a teenager, my visits remained frequent, as their house was within easy walking distance of the high school and I could visit during senior free time. I think it’s possible that my Grandma J actually invented the “grandma pizza,” as that was a regular lunch treat she made for my school day visits.
On occasion, I would also catch the lingering aroma of Grandpa J’s homemade cake donuts, and that was a sure giveaway that Santa had been to their house that morning. Apparently, cake donuts were Santa’s favorite, and he made a point to stop and sit a spell whenever he pulled his 18-wheeler into the parking lot of the grocery store across the street from my relatives’ humble home. You didn’t think a sleigh was his only mode of transport, did you? Santa also has a motorcycle, and he sometimes rolled into town on that, especially in the summer.
Santa visited my great-grandpa quite often, and my one regret is that I always arrived at their home just moments after Santa had left. My timing was terrible, but Grandpa told me the stories, and I remember them all as if I had met Santa myself.
The history of the friendship
It’s hard to say exactly how or when this personal friendship between my great grandpa and Santa began, but it could go back a few generations. Grandpa’s people came from Norway, which is basically a stone’s throw from the North Pole, and because Santa is multilingual, he and Grandpa J usually conversed in Norwegian. Their discussions didn’t focus on Christmas unless it was on the calendar that month, but those visits were rare because Santa was so busy. The rest of the year, Santa’s life is quite different and, well, normal, so they talked about ordinary things like the weather and family and how things were going up at Santa’s place, which is much more than just a toy shop.
Santa has more going on than toys
There is a small working farm at the North Pole, so Santa stays busy keeping things in order there, but with plenty of help. There are farm hands to tend the livestock and the crops, and Santa always had children staying with him, too. It was never clear to me whether they were his own kids or perhaps adopted or even fostered— and it doesn’t really matter because Santa loves all children the same. I most remember the stories about the two teenage boys and the girl, and how they spent a lot of time outdoors, especially around Buttermilk Lake (which isn’t actually filled with buttermilk, despite its name) and reporting to Santa the chaotic incidents perpetrated by two particular animals.
The monkey and the billy goat
My great-grandpa relayed many stories of Santa’s life at the North Pole, but the most memorable ones were about a billy goat, which doesn’t initially seem unusual on the grounds of a working farm. But this was a rambunctious billy goat who was less part of the farm and more part of the family. He minded his own business for the most part, but regularly found himself the target of pranks by a mischievous monkey. The monkey was a real terror, and he’d often use a long wheat straw to tickle the billy goat’s ear as he napped. Sometimes he’d annoy the goat so badly that a chase would ensue around the outside of the house. Santa’s wife (her name is Mary Christmas, in case you’re wondering) would be interrupted from her work in the kitchen as the pair whipped past the window again and again, until finally she only saw one figure. That darn monkey was so clever, he’d jump up and land on the billy goat’s back, just riding along as the billy goat basically chased himself. It must have been a sight!
Santa’s wife
And lest anyone assume that the relationship between Santa and Mary Christmas is misogynistic, I can assure that it isn’t. Mary Christmas was not just washing dishes or making supper in those stories; she is a very resourceful woman who also helps on the farm, especially planting and tending the garden. She does a lot of canning and pickling to ensure that the family and farm hands have ample supplies throughout the year. Some of Santa’s visits to my great-grandpa were the result of him being in town to purchase canning supplies and other things that Mary Christmas had put on his “honey-do” list.
The night everyone talks about
So what about all the magical effort that goes into delivering presents on Christmas Eve? Well, it’s not a big deal for Santa because he’s been doing it so long and he also has his own logistics team. He doesn’t depend on airlines or commercial freight carriers; he handles the details himself and gets the job done well every time. As for the ability to visit all the world’s children in a single night, there is a very simple explanation. Time stands still at the North Pole and most of the travel happens at very high altitude so everything goes faster than it does down here at ground level. You know how it is when you’re in an airplane, moving at approximately 550 mph, but not feeling plastered against your seat? Same principle.
The other 364
During the rest of the year, and especially after Christmas, Santa lives a lot like the rest of us— keeping his business and home in order, taking care of his family and workers and catching up with old friends, like my late great-grandfather. Because time stands still at the North Pole, though, Santa doesn’t age at the same rate as the rest of us. Keeping fit is an ongoing effort and Santa knows that children love to prepare cookies for him, so he never complains about the sugary treats he finds while delivering gifts. But he also eats other foods, and he appreciates finding cheese and crackers, sandwiches, a veggie tray or even a little nip of whiskey (the reindeer are the ones driving, after all). Santa is good with all of that, so don’t stress yourself next Christmas to get the cookies ready. And if you feel like putting out cake donuts, well, he’d be pleased as punch (especially if they’re rolled in cinnamon sugar).
About these cookies
As much as I love the idea of Christmas cookies, I rarely make them and I don’t get too excited about the sugary toppings and decorations. I was always the weird kid who chose homemade oatmeal raisin over iced with sprinkles. This is the kind of cookie I would make for a last minute, mid-year visit from Santa. Without weeks to plan, I’d go to the pantry and clear out every this-and-that ingredient I could find—oats, puffed rice cereal, nuts, dried cherries, coconut flakes and dark chocolate— and turn them into a cookie that satisfies with all its contrasting textures.
I made a batch of these “clear out the pantry” cookies recently, and I’m happy to share how it went!
These ingredients bring in great texture, and some of them are even good for you!
The cookie dough itself is akin to a chocolate chip cookie dough, but with a swap-in of some whole wheat flour for extra flavor and nutrition. I used a combination of brown and cane sugars, wholesome egg, creamy butter and real vanilla extract. The dough begins as most, by creaming together the butter and sugars, then blending in the egg and vanilla.
Creaming the butter and sugars together builds a good base for soft cookies.Add egg and vanilla to the creamed butter-sugar mix.Beat again until dough is smooth.
I mixed in the old fashioned oats first, because I can beat them vigorously without worry of gluten development. Next, the whole wheat flour mixed with the baking soda, salt and cream of tartar. Then, the rest of the flour, mixing just enough to work it into the creamed mixture.
Blend in the oats first; they don’t have gluten so you can’t overmix.Mix in wheat flour with the leavening agents, while dough is soft and easy to mix.The all-purpose flour goes in next.Mix only as long as needed to incorporate, so the dough stays tender.
When you’re mixing any cookie dough, you want to avoid stirring too much after you add the flour, or the dough may get tough rather than soft. So for the mix-ins, I began with the really firm ones— chocolate chips, dried cherries and chopped pecans— and I used a hard spatula to essentially “press” them through the dough. Finally, I did the same with the toasted coconut and crispy brown rice cereal.
Add the hard mix-ins , including the chips, fruit and nuts.Use a firm spatula to “press” those add-ins through the mixed dough. The less stirring, the better.Finally, press in the coconut and crispy rice cereal.
I used a small cookie scoop to divvy out the dough, pressing a really full scoop against the inside of the bowl to ensure that every cookie is full and round, and spacing them two inches apart onto a parchment-lined baking sheet. If you don’t have a scoop, use a teaspoon to measure out the dough into pecan size mounds. Try to avoid rolling the dough with your hands, as the warmth will change the nature of the cookie.
Drag a small scoop through the dough to collect a little of everything.Press the scoopful of dough against the inside of the bowl for a round, compact cookie.Arrange the cookie scoops onto parchment, with two inches between.Bake for about 10 minutes, until edges are golden.
Into the preheated oven for 10 minutes, and these cookies emerge perfectly soft, with crispy edges and all that lovely texture. The pantry is a bit lighter after making these, and if Santa should happen to stop in for coffee (or sweet tea, or whiskey) on his way to pick up supplies, I’ll be ready!
These cookies have crispy edges, chewy dried fruit, crunchy nuts and flaky coconut. In other words, ALL the texture I crave!
Ingredients
2 sticks (1 cup) unsalted butter, slightly softened from refrigerator
1/2 cup light brown sugar
1/3 cup granulated cane sugar
1 large egg
1 tsp. real vanilla extract
1/2 cup old fashioned oats
3/4 cup white whole wheat flour
3/4 tsp. salt
1/2 tsp. baking soda
1/2 tsp. cream of tartar
1 cup all-purpose flour
6 oz. semi-sweet or dark chocolate chips
1/2 cup candied (or plain) pecans, broken into small pieces
1/2 cup crispy rice cereal, lightly toasted
1/2 cup dried cranberries, cherries or raisins
1/2 cup sweetened coconut flakes, lightly toasted
Directions
Preheat oven to 350 F, with rack in center position. Line two baking sheets with parchment paper.
Using the paddle attachment of a stand mixer, or the double blades of an electric handheld mixer, beat butter until creamed and airy. Add cane sugar, a few tablespoons at a time, until fluffy. Add brown sugar the same way.
Add egg and vanilla to bowl and beat until mixture is smooth.
Add oats and mix until evenly blended. In a small bowl, combine whole wheat flour with the salt, soda and cream of tartar. Add this flour mixture to the creamed butter mixture and beat only long enough to incorporate the dry ingredients. Next, add the all-purpose flour to the bowl and mix just to incorporate. Avoid overmixing so that your cookies will remain soft.
Remove bowl from stand mixer. All remaining ingredients should be folded in by hand to avoid overheating. An easy way to incorporate the add-ins is to use a firm spatula or wooden spoon to try to “press” them down through the dough, beginning with the firmer ingredients (chips, dried fruit and pecans) and ending with the delicate ones (coconut and rice cereal).
Place by rounded teaspoonfuls (or use a small size dough scoop), 2 inches apart on the parchment-lined sheets.
Bake 9 to 11 minutes (depending on oven), until dough is set and edges are lightly golden brown.
Cool on sheet a couple of minutes, then transfer to a cooling rack to cool completely.
My taste for chocolate has evolved exponentially since childhood. The candy bars I loved back then—Kit Kat, Snickers, Mounds and Almond Joy were some of my favorites—all fall a little flat now that I have experienced fine, artisan chocolates. After you develop a palate for high quality, single-origin chocolate, it’s tough to go back. But occasionally, nostalgia sneaks in and makes me crave a taste of yesteryear, and that’s what happened when I had to reach past a jar of unsweetened coconut to get to my go-to brownie mix.
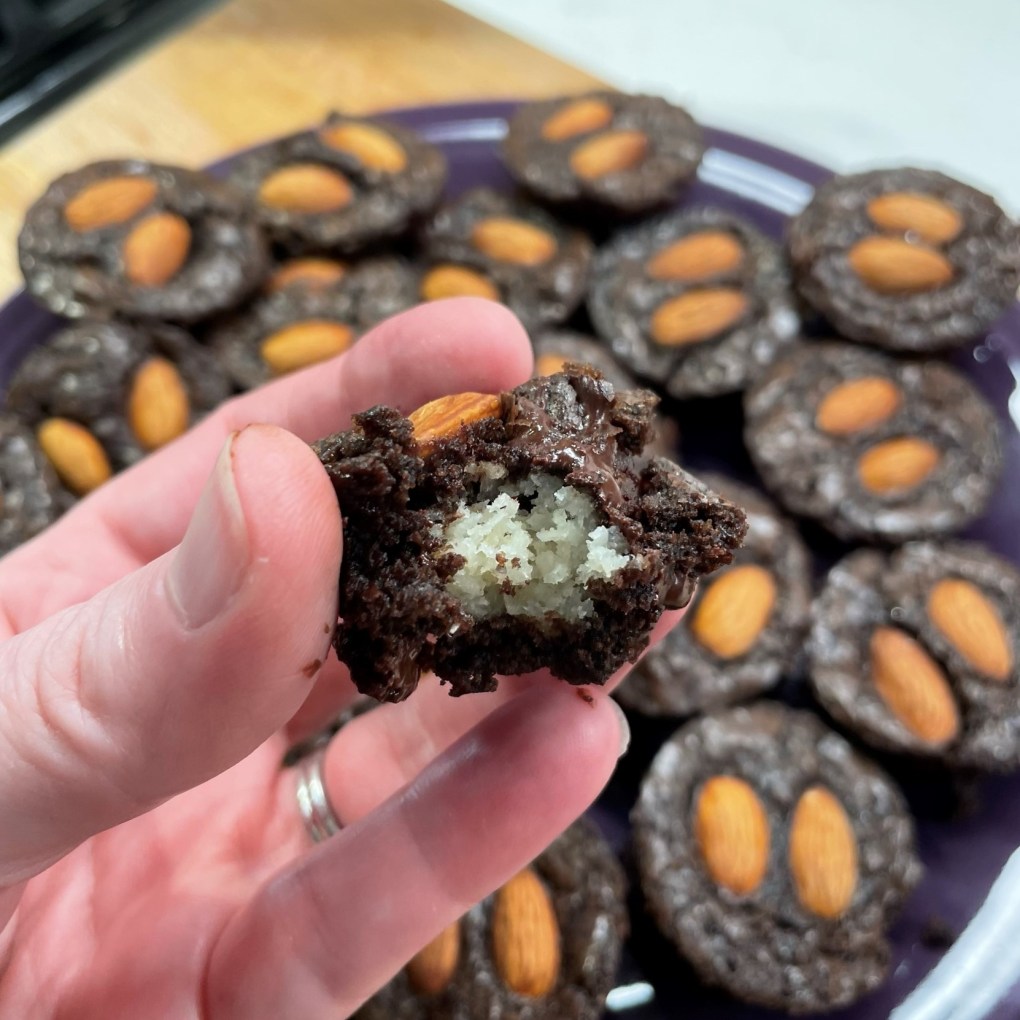
Why couldn’t I turn my brownies into a play on an Almond Joy candy bar, I thought, but with an elevated presentation and more texture? I reached for almonds, too, and had only one dilemma—how to incorporate the coconut so that it didn’t get lost into the brownies. I didn’t just want the flavors of an Almond Joy to be present, I wanted it to look kind of like an Almond Joy candy bar, too, and that meant I could not just add coconut to the brownie mix. No, I needed to create a filling that would be enveloped inside the brownie, and I wanted it to be bite size with two almonds, just like the candy bar.
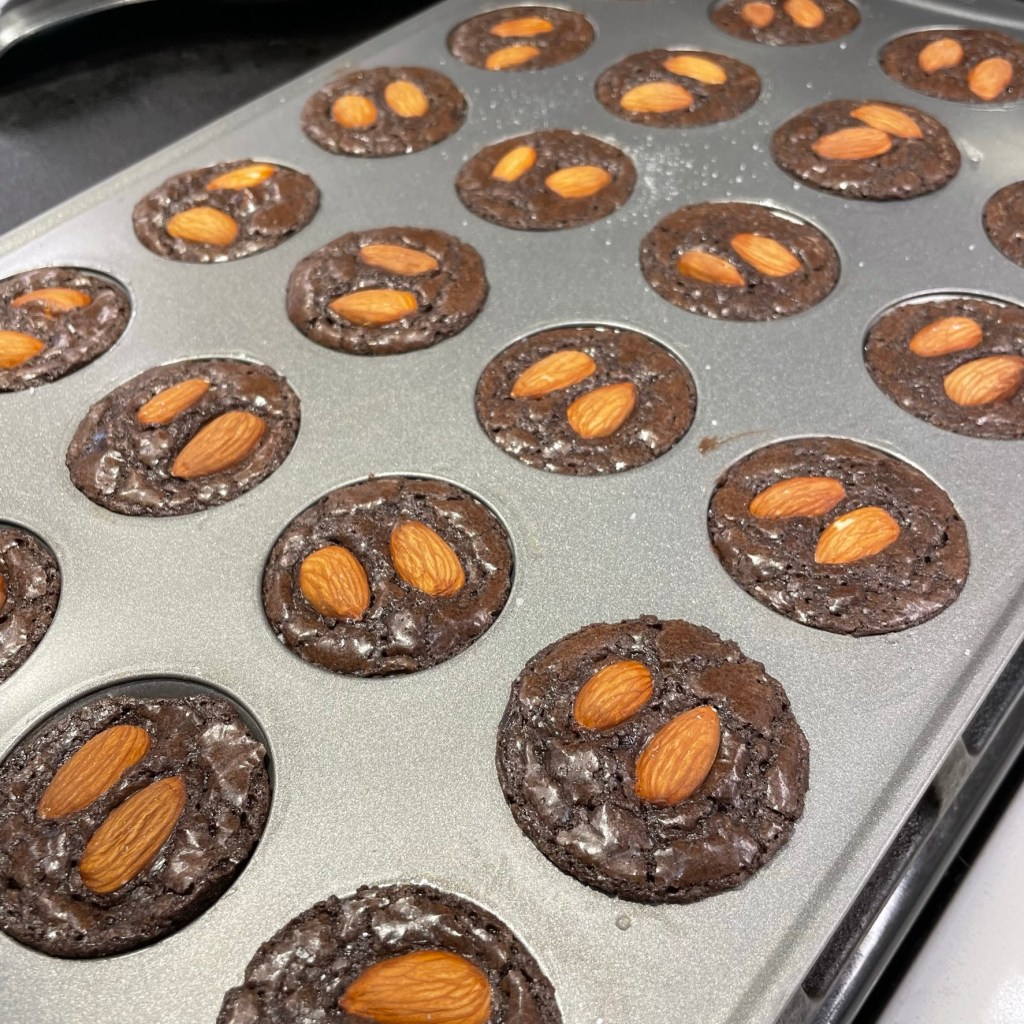
These miniature, two-bite brownies were a home run!
I found a recipe on Pinterest for a coconut filling intended for layer cakes, and as I considered the steps of cooking the milk and sugar together until it was dissolved and thickened, it occurred to me: isn’t that basically sweetened condensed milk, and why not just use that? It was perfect for transforming plain, shredded coconut into a thick, sticky, coconutty filling.
I love this new Eagle brand condensed milk in a pouch. It’s perfect when you only need a small amount. Use enough to hold the coconut together. If your spoon stands upright, it’s good!
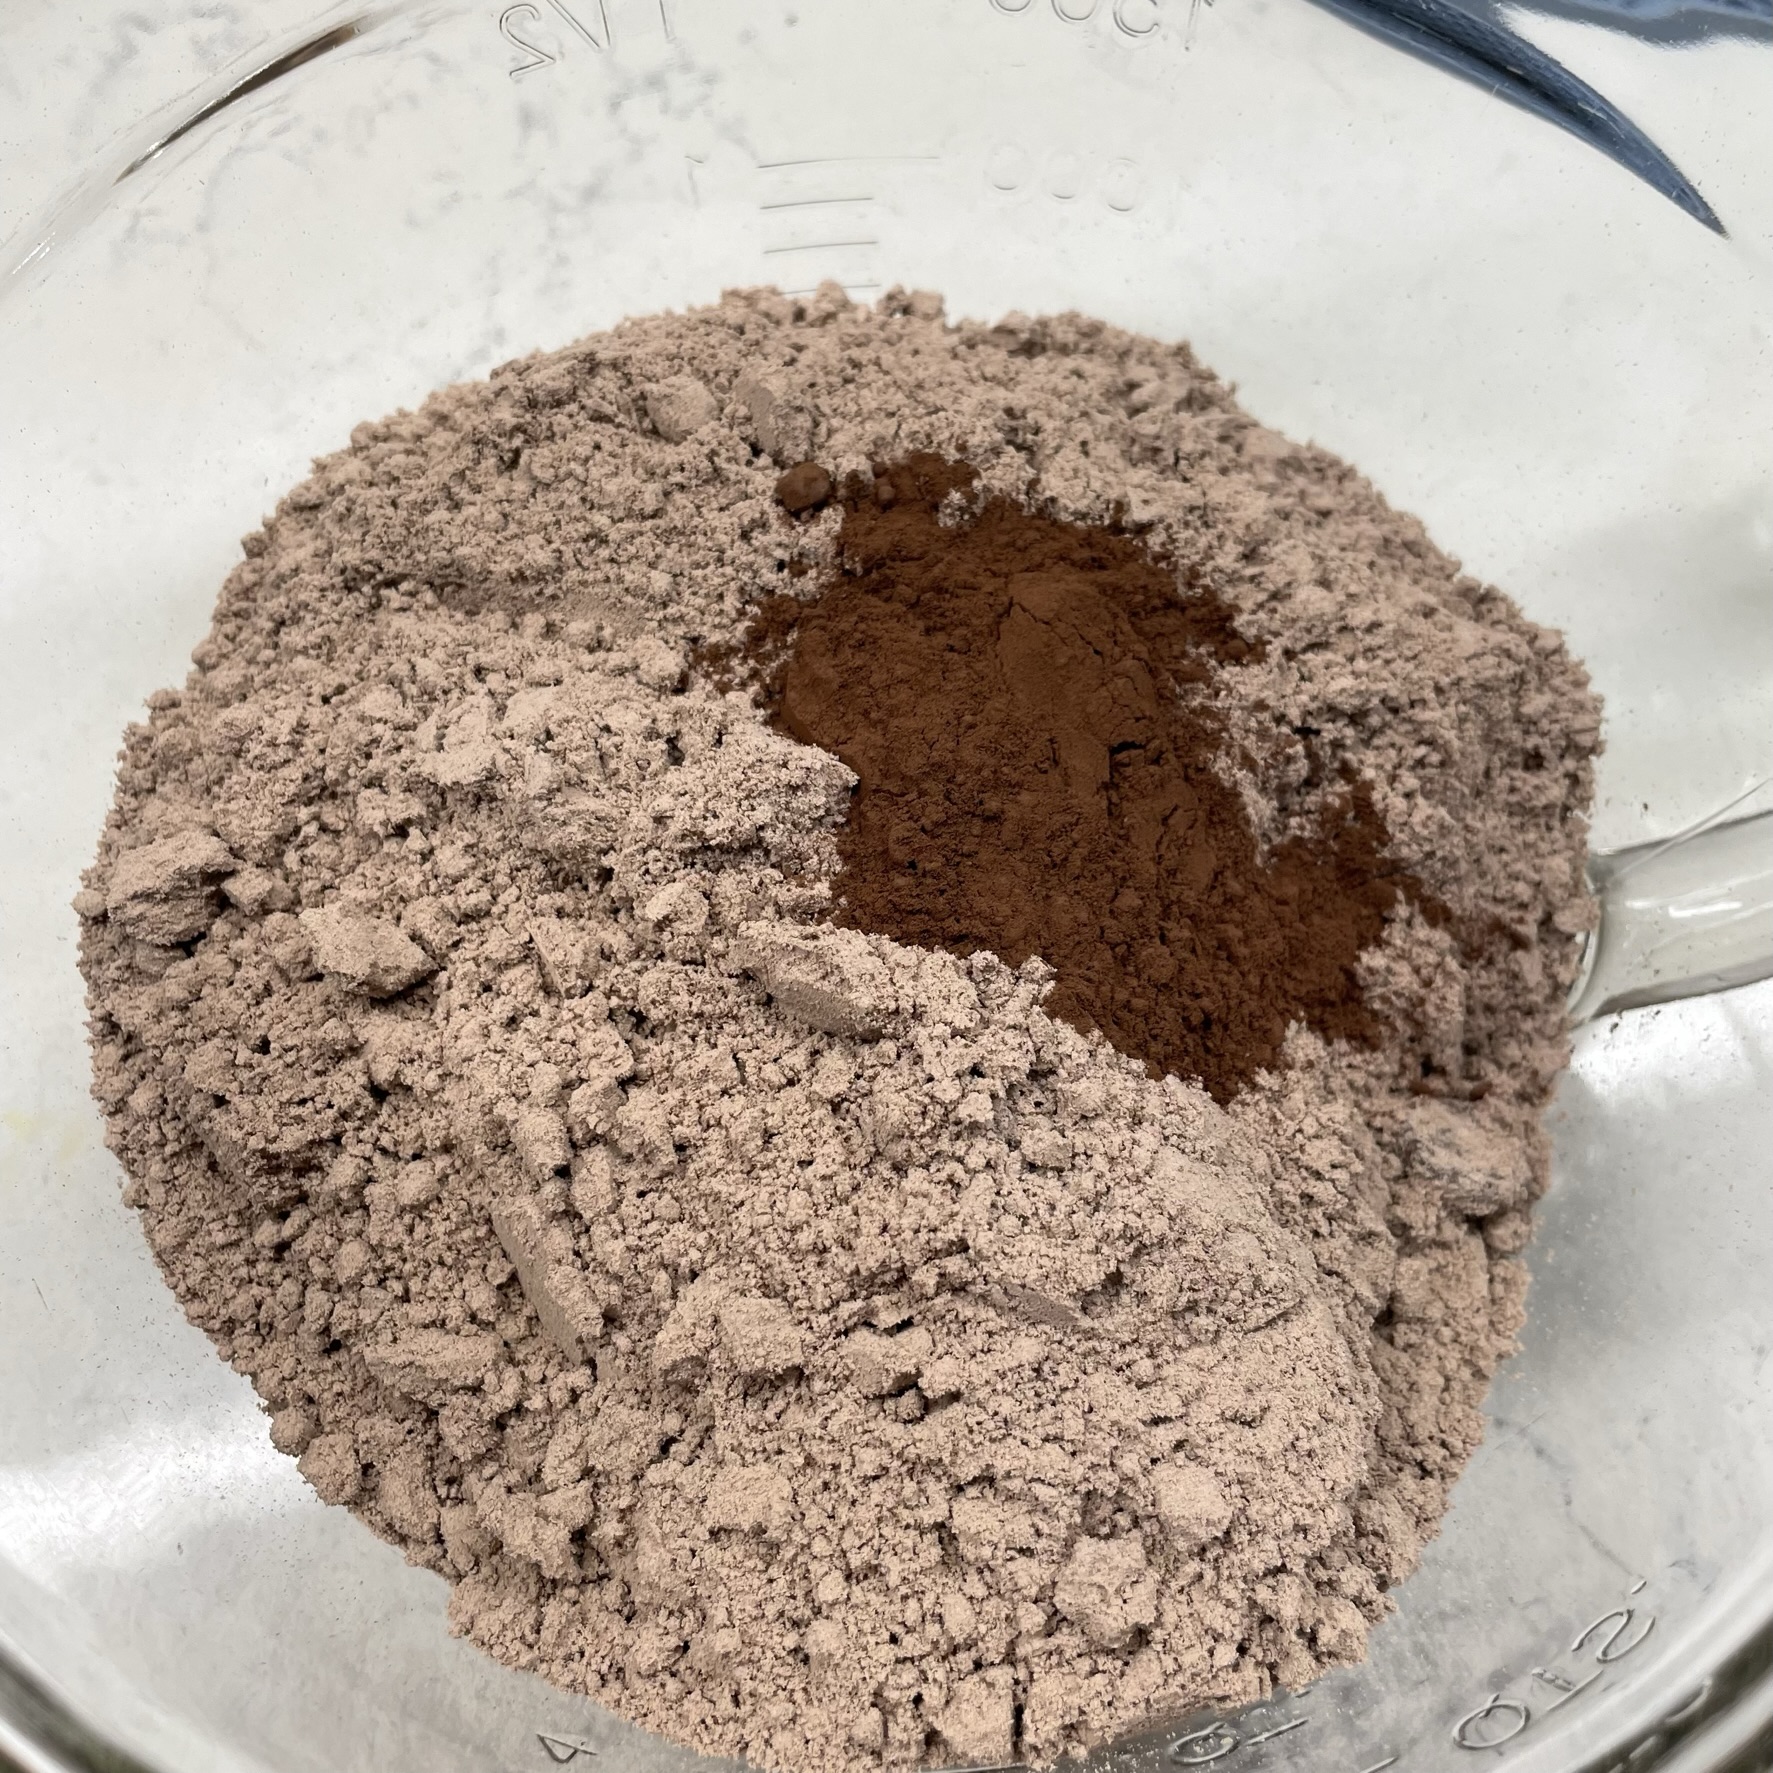
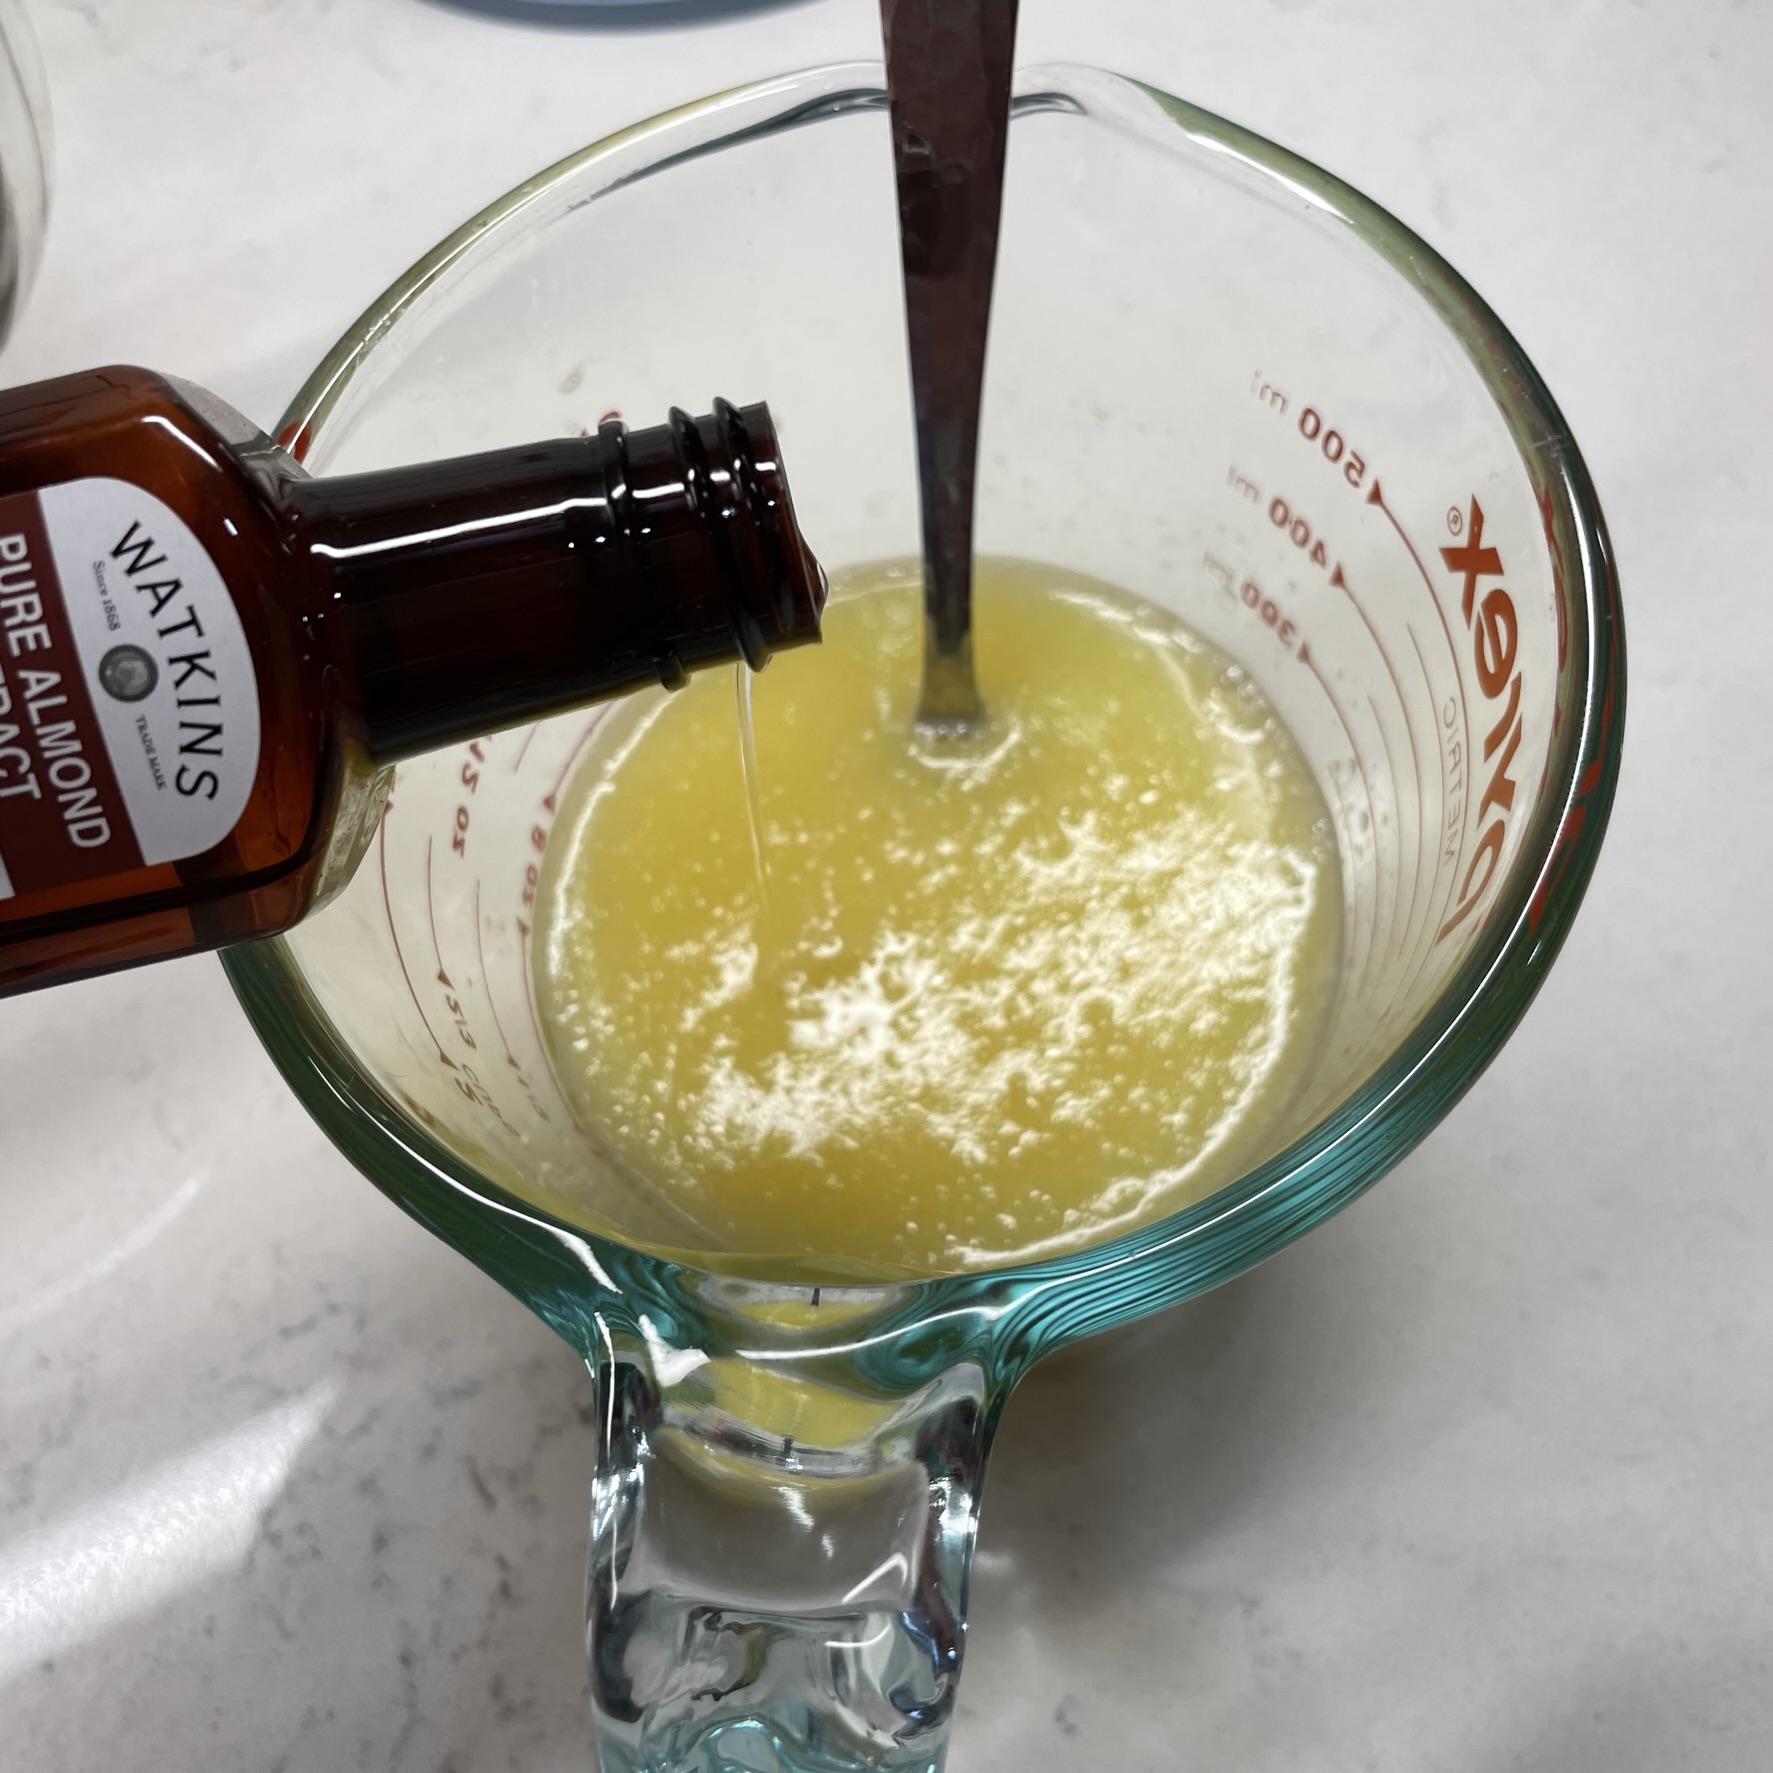
My brownie mix got an extra boost of dark chocolate from a spoonful of dark cocoa powder. I did this because I always wished that the candy company had made a dark chocolate version of the Almond Joy—sort of a Mounds-Almond Joy combination thing. I also gave the almond flavor a boost with a touch of almond extract added to the liquid ingredients used to make the brownie batter.
A few more notes worth mentioning before I dive into a visual walk-through of how I put these fun little treats together:
To keep this from being too sweet, I combined equal amounts of sweetened and unsweetened shredded coconut. The latter is sometimes labeled “dessicated” coconut, and you can find it in the baking aisle of a well-stocked supermarket or online from Bob’s Red Mill (where I get it). This is my preferred coconut for most recipes—cookies, smoothies, muffins, etc.—and I chose to use some of it here because I knew the filling would be sweet enough with the addition of the condensed milk and the amount of sweetened coconut. I pulsed the coconut in the food processor, too, to knock down some of the shaggy texture.
My go-to brownie mix is Ghirardelli Dark Chocolate, but (I can’t believe I’m about to say this) the chocolate chunks included in the mix may not be right for this recipe. If you are making this as mini muffins, as I did, you will find that the melted chocolate bits hinder the work of loosening and removing the brownie bites from the pan. The dark chocolate flavor is great but consider using a brownie mix that doesn’t have chips or pieces of chocolate in it; you’ll have an easier time removing the brownie bites without breaking them.
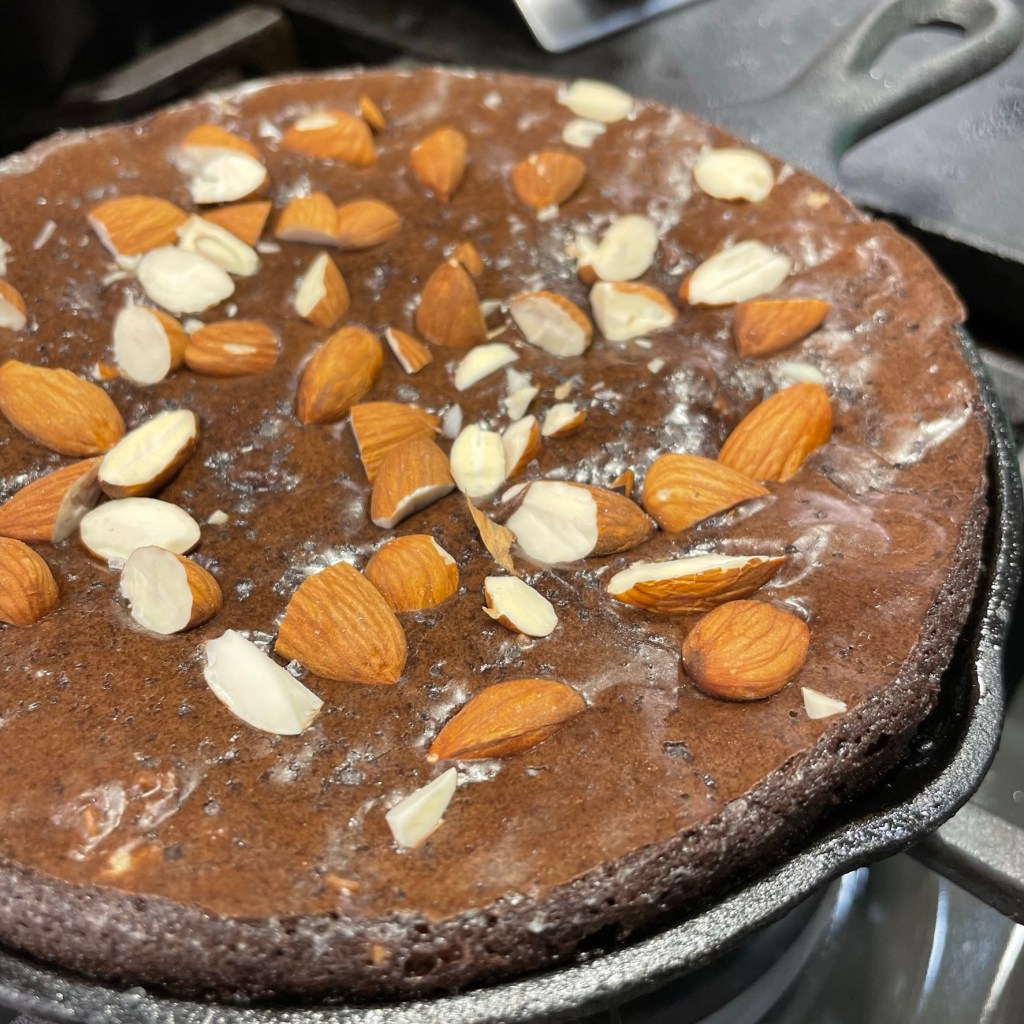
Finally, and this is important, the amounts of brownie batter and coconut filling exceed what is needed in the 24-count mini muffin pan. I had enough of both left over to make a small skillet brownie, and trust me when I tell you, that was not a bad decision either. If you decide to do this, I’d like to suggest that you eat it warm. Mmm…
Yes, really.
OK, preheat the oven to the temperature suggested on your brownie mix, and let’s get this started!
Use a spoon to fill each buttered mini muffin cup about halfway, leaving room for the coconut filling.
Roll a teaspoon of coconut filling into a ball about the size of a marble, and press it down into the batter.
Top with enough additional batter to cover the coconut ball.
Nothing makes dark chocolate better than a tiny touch of flaky sea salt!
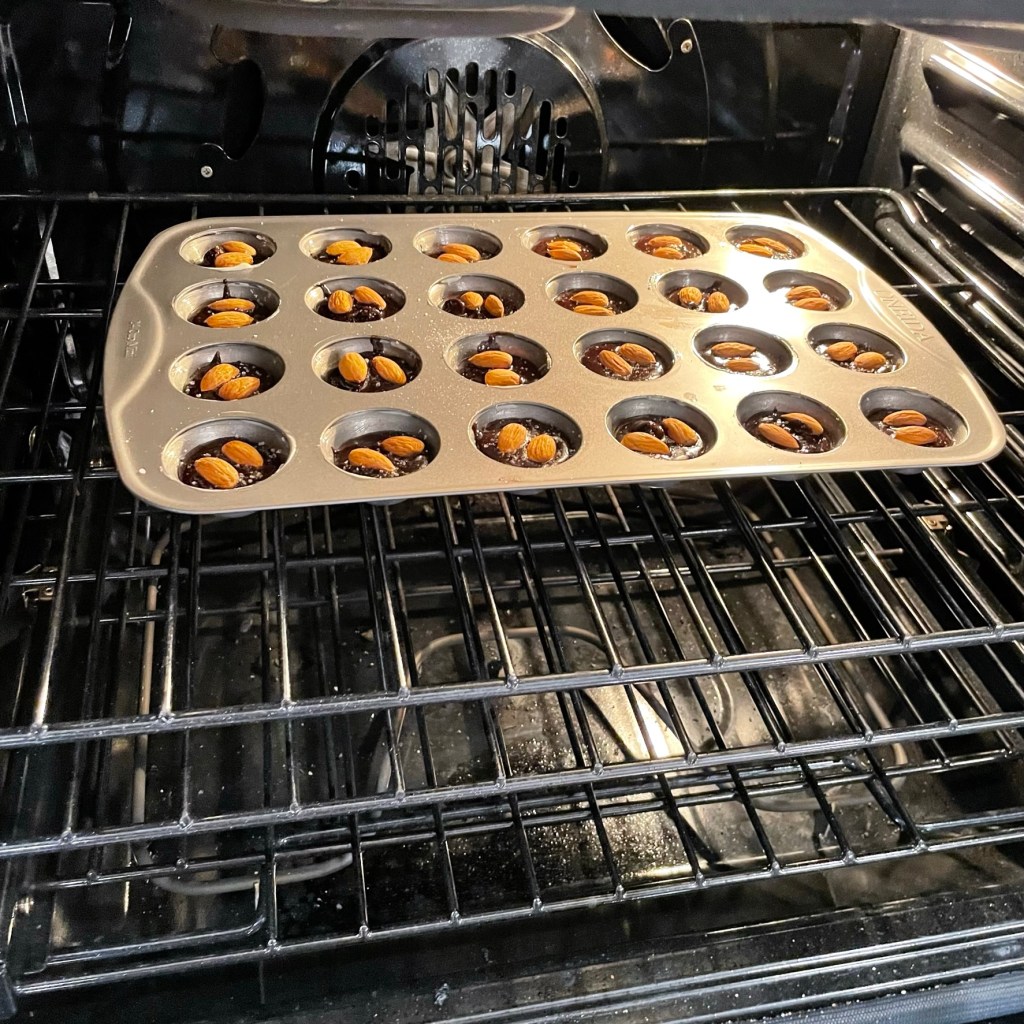
Bake at 325 F. Check your brownies at 15 minutes. They should be plump and shiny on top.
Allow them to cool in the mini muffin tin until they are easy to handle. Use a thin knife or offset icing spatula to loosen them.
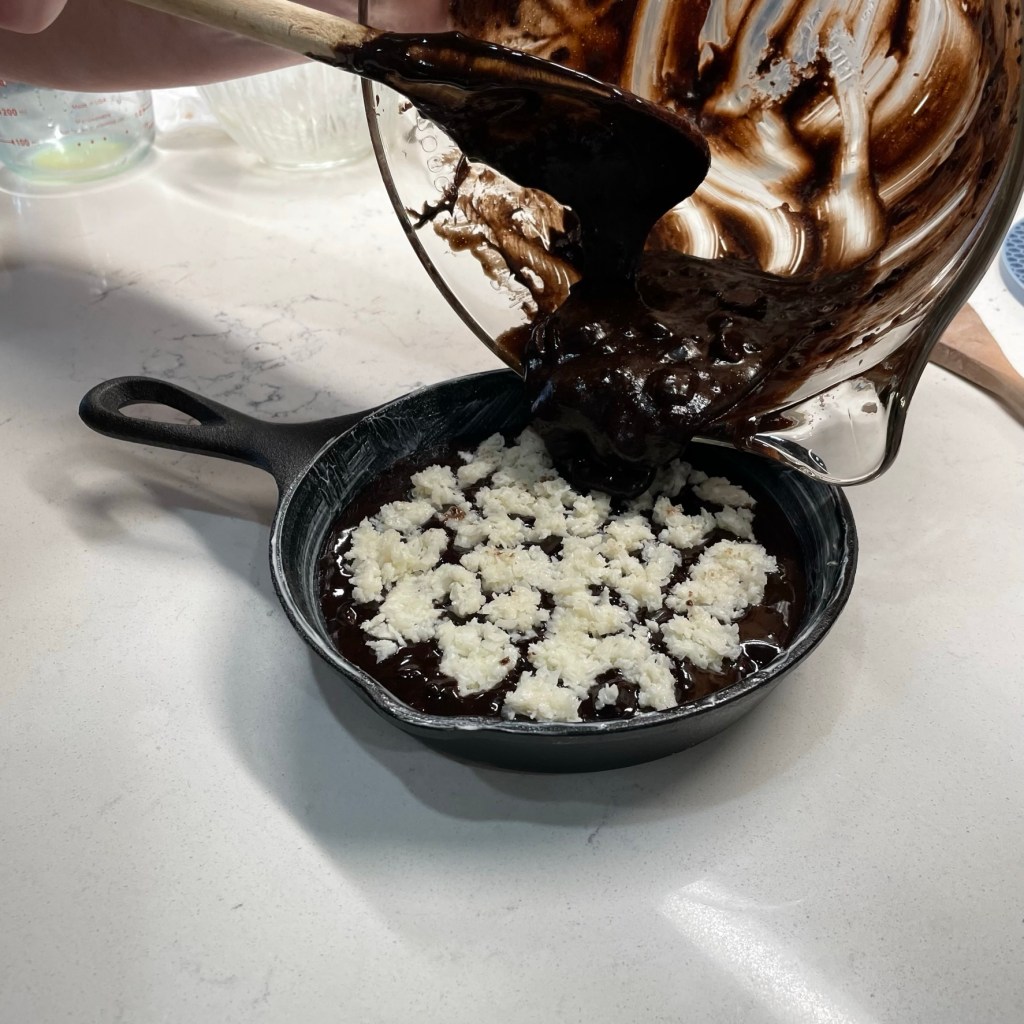
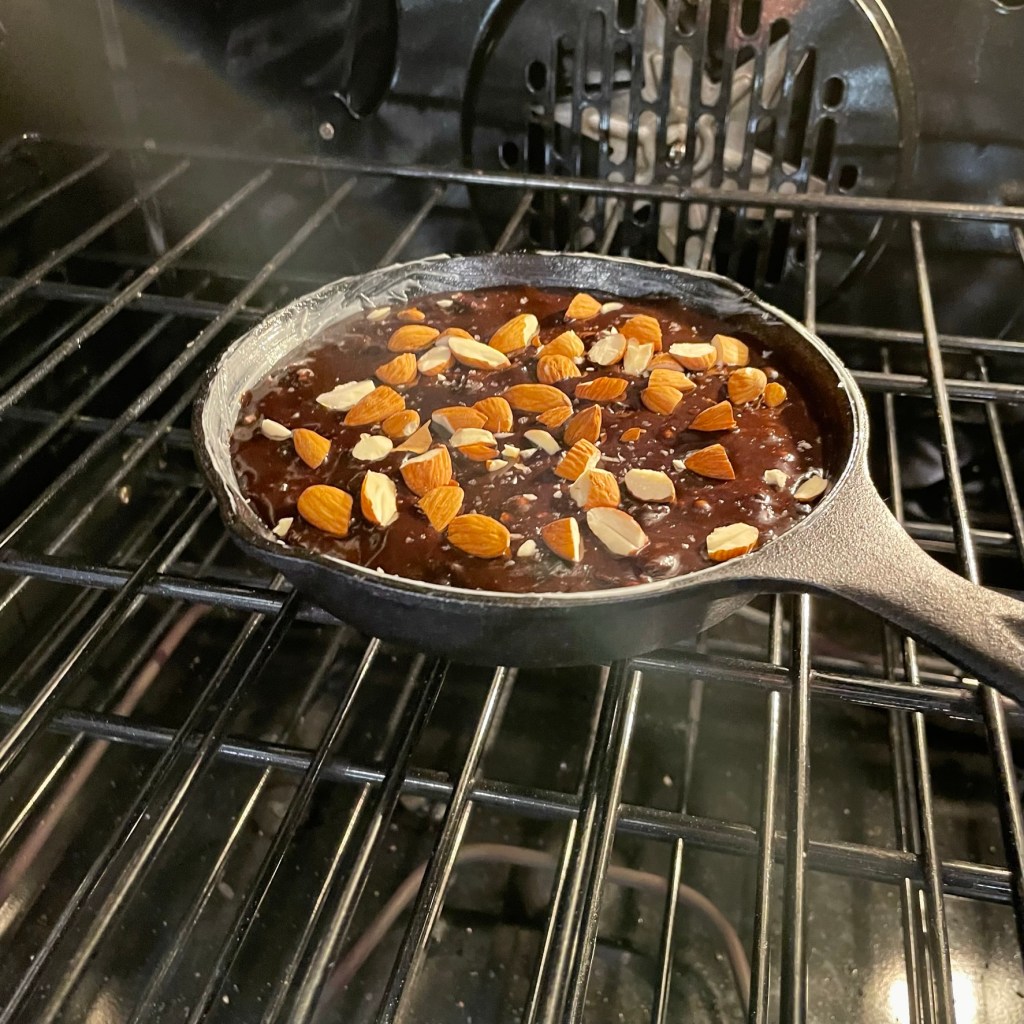
For the extra batter and filling, layer them in a mini cast iron skillet or small glass baking dish.
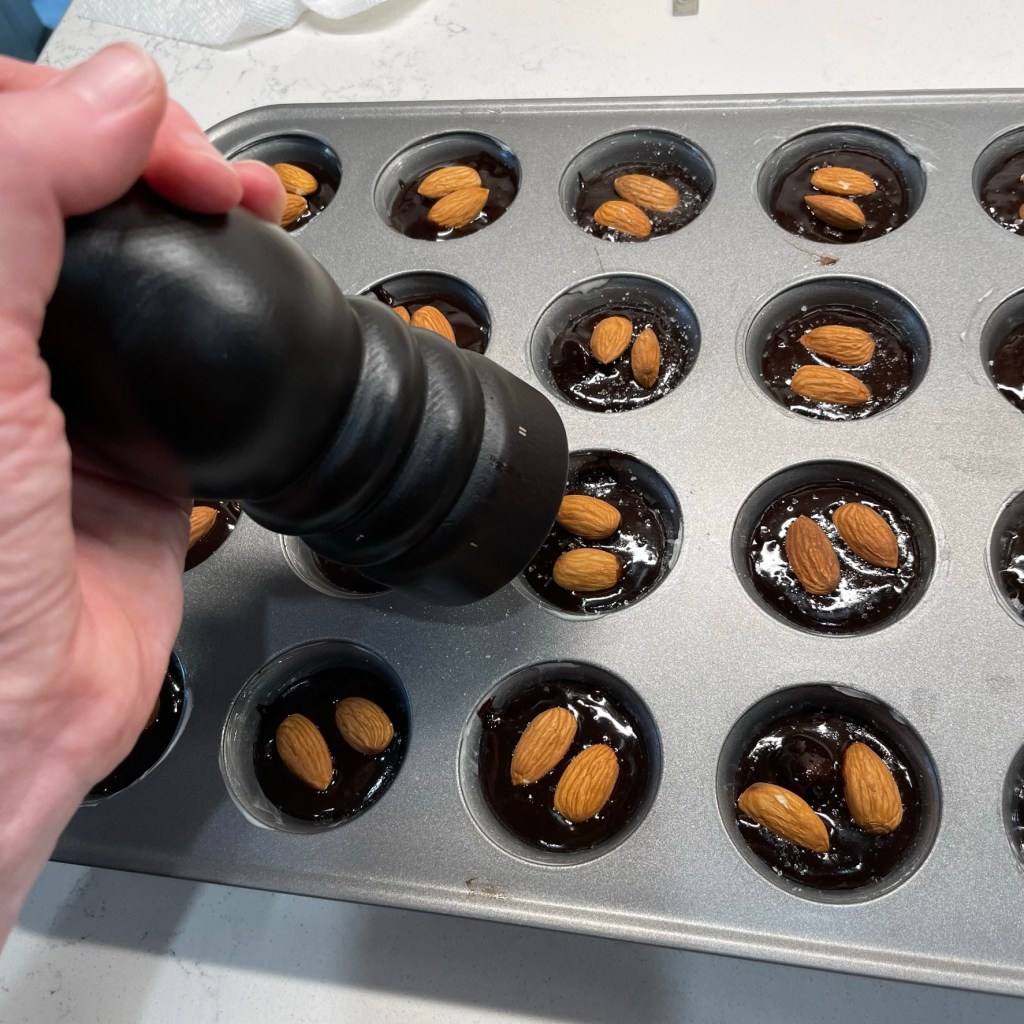
Top with chopped almonds and a slight sprinkle of flaky sea salt.
For this one, give it about 30 minutes in the oven. Watch for visual cues of doneness: shiny top with no jiggling.
Oh, my. 😉
So, was all this necessary? Couldn’t I have just chopped up some Almond Joy candies and added them to the brownies, the way I did with the Leftover Snickers Brownies I made at Halloween a few years ago? Sure, and that would have been tasty, too, but this was a lot more fun. 😊
This is a fun way to dress up a box mix, bringing together the flavors of a classic candy bar with fudgy, soft and chewy brownies.
Ingredients
1/2 cup sweetened shredded coconut
1/2 cup unsweetened shredded coconut
1/4 cup sweetened condensed milk
1 box brownie mix plus ingredients on package to make them
1 Tbsp. dark cocoa powder, optional
1/2 tsp. almond extract, optional
24 whole raw almonds
a few pinches flaky sea salt, optional
Note that this recipe will yield more batter and coconut filling than you will need for a single pan of mini muffin-size brownie bites. Plan ahead to use up the rest in a small baking dish or extra mini muffin pan.
Directions
Preheat oven to 325 F, or whatever temperature is recommended for the brownie mix. Generously butter the inside of every cup on a mini muffin pan.
Combine sweetened and unsweetened coconuts in the bowl of a food processor and pulse several times to make a finer texture. Transfer the coconut to a bowl. Add the sweetened condensed milk and stir until evenly blended. This will be a thick, sticky mixture.
Prepare brownie batter, adding the dark cocoa to the dry mix and the almond extract to the liquids. Fill the mini muffin cups about halfway. Scoop out a small amount of coconut filling and roll it between your hands into a ball about the size of a marble. Press the coconut ball into a muffin cup, letting the batter come up the sides around it. Repeat with the remaining muffin cups, then drop a slight spoonful of batter on top to fully enclose the coconut ball. You will have a significant amount of batter left over. See Step 5 for suggestions.
Place two almonds on each brownie bite and scatter a few small pinches of flaky sea salt over the pan. Bake at 325 for 15 minutes. Allow brownie bites to cool in the pan until they are easy to handle. Run a thin rounded knife around the edges of the brownie bites to aid in releasing them. Let them cool completely on a plate or tray.
With the remaining batter and filling, we made a warm miniature skillet brownie for two. This could also be baked up in a small glass baking dish, or make a second batch of mini brownie bites when the pan is fully cooled. Use the same method of layering coconut filling over about half of the batter, then pour the last of the batter over to cover it. Sprinkle with chopped almonds and bake for 30 minutes. Enjoy warm!
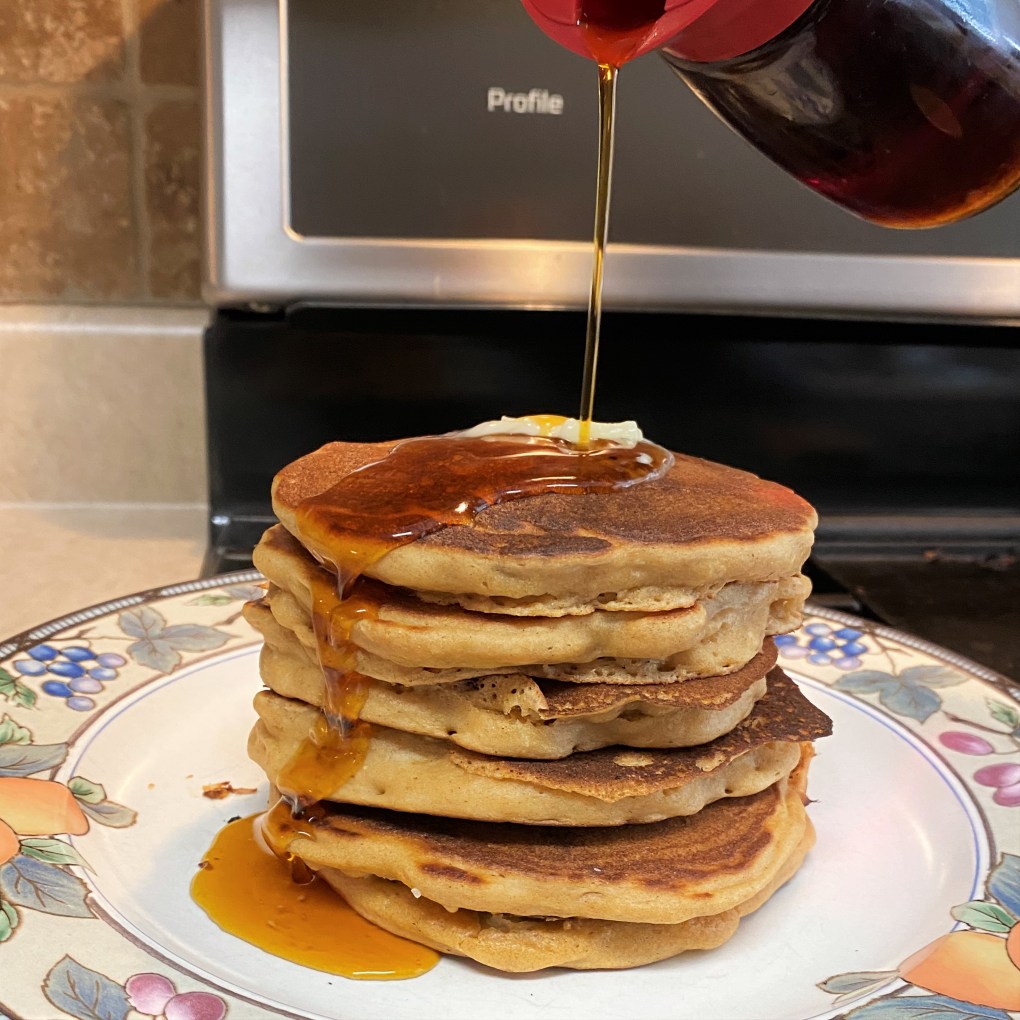
Your weekend deserves these soft, sweet pancakes. They are packed with whole grain goodness, a serving of fresh fruit and real cultured buttermilk for richness without extra fat. We are making breakfast better this month, and these sweet stacks are bringing all the comfort without so much guilt.
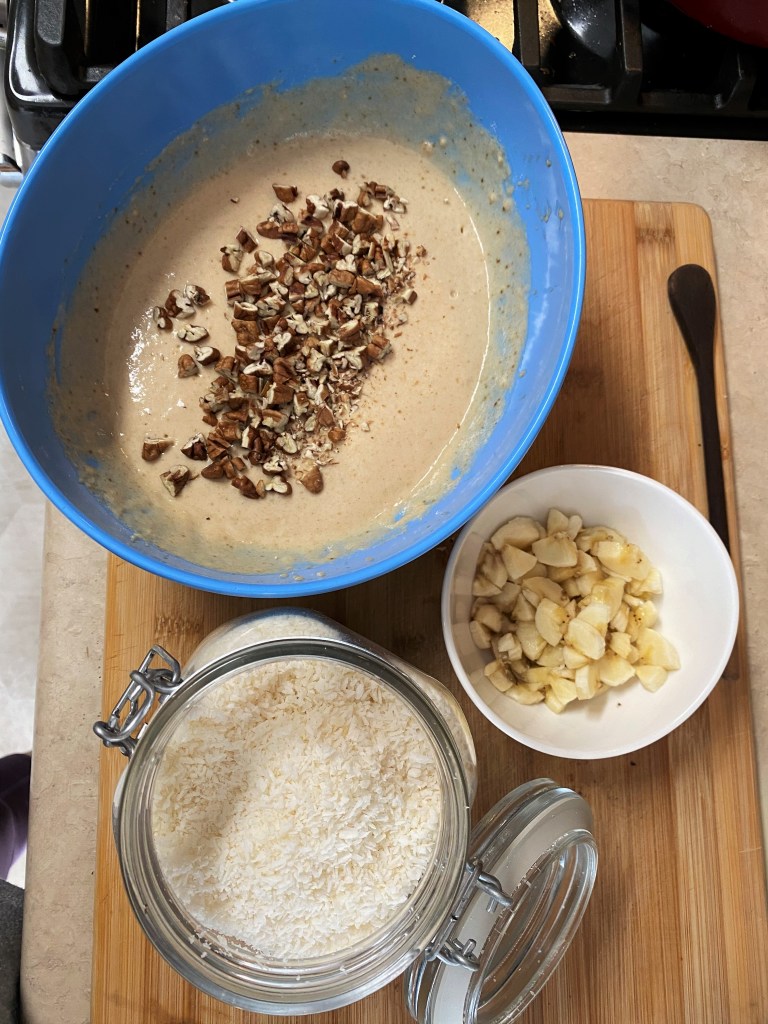
My pancake recipe is inspired by King Arthur Baking Company’s buttermilk pancakes, and they are terrific as written, but I’ve dressed them up with fresh banana, and made a few ingredient swaps to pull it further into the “healthy” column—whole wheat pastry flour delivers fiber and complex carbs, coconut sugar lends rich flavor and easier impact on blood sugar, and an addition of unsweetened coconut and toasted pecans for texture and crunch that makes these so satisfying.
Small bits of banana and pecan in every delicious, mouthwatering bite!
Last weekend, my husband, Les, and I enjoyed these whole grain banana pancakes with crisp butcher shop bacon and real maple syrup from Western New York, where the autumn colors are more beautiful than any other place I’ve been. Sure, I can go anyplace (even Walmart) to purchase maple syrup, but I grew up beneath the brilliance of the maple trees of Upstate New York, and I am especially comforted to dress my pancakes in syrup made near my childhood home. As we head into fall, I expect maple will pop up many times in the recipes I will share with you.
Some of the ingredients listed may be new or intimidating to you, but not to worry—the original King Arthur recipe is excellent, or use any pancake mix you like and add the banana and other flavors to customize them. All the same, I’ll share some background notes about the special ingredients in case you want to try these items.
What is pastry flour and how is it different from regular flour?
Flour that is labeled as “pastry flour” is lower in protein content than all-purpose flour. In simple terms, it means that the flour is not as strong as you would want for making yeast-risen bread. Pastry flour is softer, which makes it ideal for making cookies, quick breads, pancakes and muffins. For this pancake recipe, I’ve recommended whole wheat pastry flour, available in larger supermarkets or online from Bob’s Red Mill. The softness makes it a good bet for pancakes and the whole grain gives a big nutrition boost.
What is coconut sugar?
Coconut sugar is produced when the moisture is evaporated off the sap of a coconut palm tree. You can substitute it 1:1 for regular sugar in nearly any recipe. It looks similar to brown sugar, but it has a drier, less sticky texture. Coconut sugar still has a fair amount of calories, but it also has iron, zinc and potassium—though for the small amount of sugar used in a baking recipe, the health benefits are negligible. There is some evidence that coconut sugar doesn’t spike your blood sugar as intensely as refined cane sugar. Beyond the potential “good for you” notes, I like it for the richness of flavor, especially in baked goods, and I’ve chosen it for these pancakes because it tastes great with banana.
What is dessicated coconut?
I wish they had a better word because “dessicated” sounds so harsh, doesn’t it? The main difference with this kind of coconut is that it is a drier and finer shred than typical “baker’s” coconut, and the brand I buy (Bob’s Red Mill) is also unsweetened. If you dislike the texture or cloying sweetness of typical coconut, but enjoy the flavor, this would be a good option. In these banana pancakes, I love the delicately flaky texture it adds to the tender pancakes, as well as the pairing of tropical flavor to the bananas.
Can I swap another milk for buttermilk?
In some recipes, regular or dairy-free milk may be substituted 1:1 for buttermilk. But in this instance, the acidity of the buttermilk is meant to balance the alkaline nature of the baking soda, to create a lighter, fluffier pancake. If you don’t have buttermilk on hand, or if you have issues with dairy in general, substitute another type of milk (2%, almond, etc.) and add a tablespoon of lemon juice or white vinegar. Allow the mixture to rest 15 minutes before using, and you will get similar results.
What can I use in place of bananas in these pancakes?
If you are not bananas for bananas, you can still enjoy the benefit of whole fruit by substituting berries or another fruit with similar moisture makeup. I would not recommend very wet fruit such as melon, citrus or kiwi in pancakes, but any kind of fresh berry can be added to pancake batter. I have also had great success making apple cinnamon pancakes, using small cut up bits of fresh firm apples. If you try this, I’d recommend increasing the cinnamon in the dry ingredient mix, and sprinkle the apple bits atop the pancake before turning it, rather than adding the apple to the batter.
Ready to make them?
This recipe made six 4 1/2″ pancakes, plus two miniature pancakes for my taste tester. Feel free to put on Jack Johnson as you make them. 🙂
This song is perfect for a laid-back, “hanging out with your baby and making banana pancakes” weekend.
Ingredients
3/4 cup whole wheat pastry flour* (see notes above)
1/4 cup all-purpose flour
2 Tbsp. coconut sugar*
1/2 tsp. baking powder
1/2 tsp. baking soda
1/4 tsp. salt
1/4 tsp. ground cinnamon
1 egg, lightly beaten
1 cup low-fat cultured buttermilk*
1 Tbsp. canola oil
1 tsp. vanilla extract
1 medium firm, ripe banana, cut into bite-sized pieces
1/4 cup chopped toasted pecans, optional
2 Tbsp. unsweetened dessicated coconut, optional*
Butter and maple syrup for serving
Instructions
First, the visual, and written instructions listed after, along with a downloadable PDF copy for your recipe book!
After a 15 minute rest, I folded all the mix-ins into the batter.
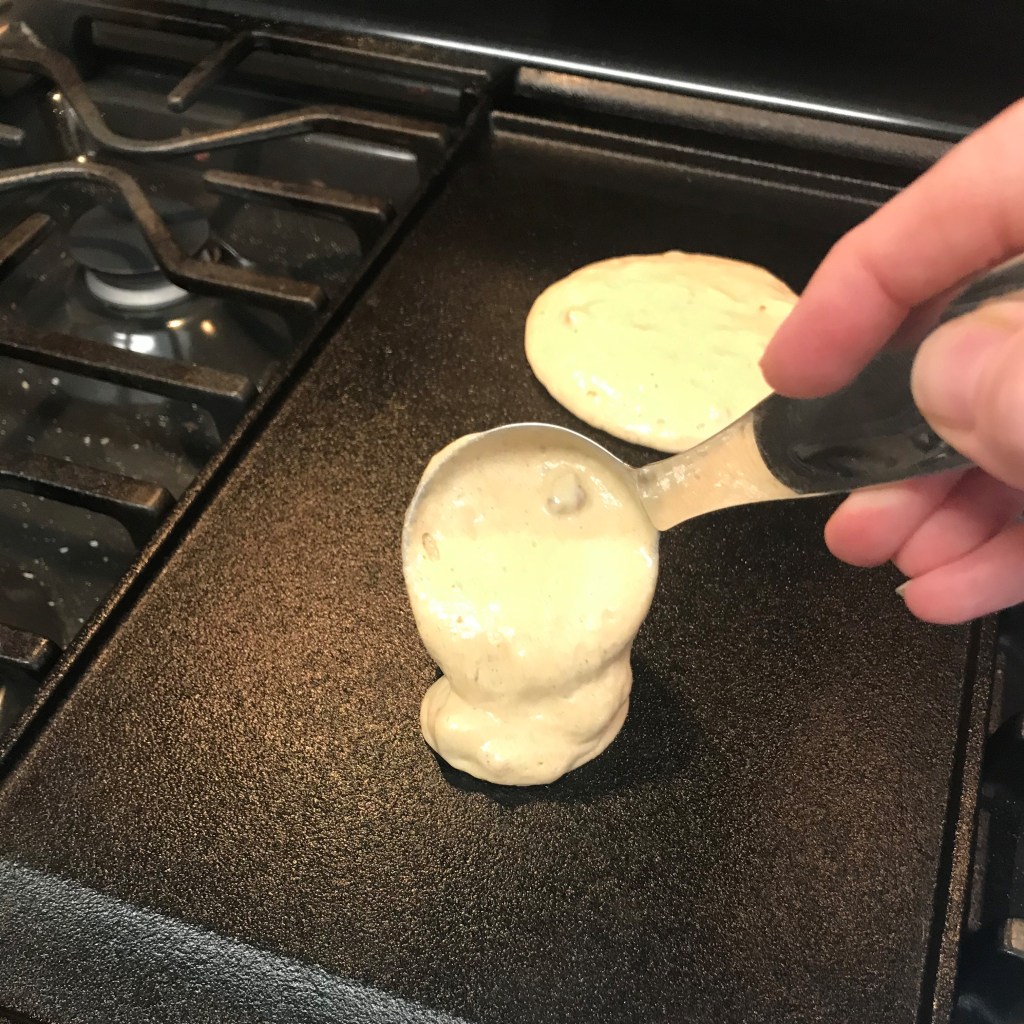
The batter is thick and chunky. Make each pancake with about 1/4 cup batter.
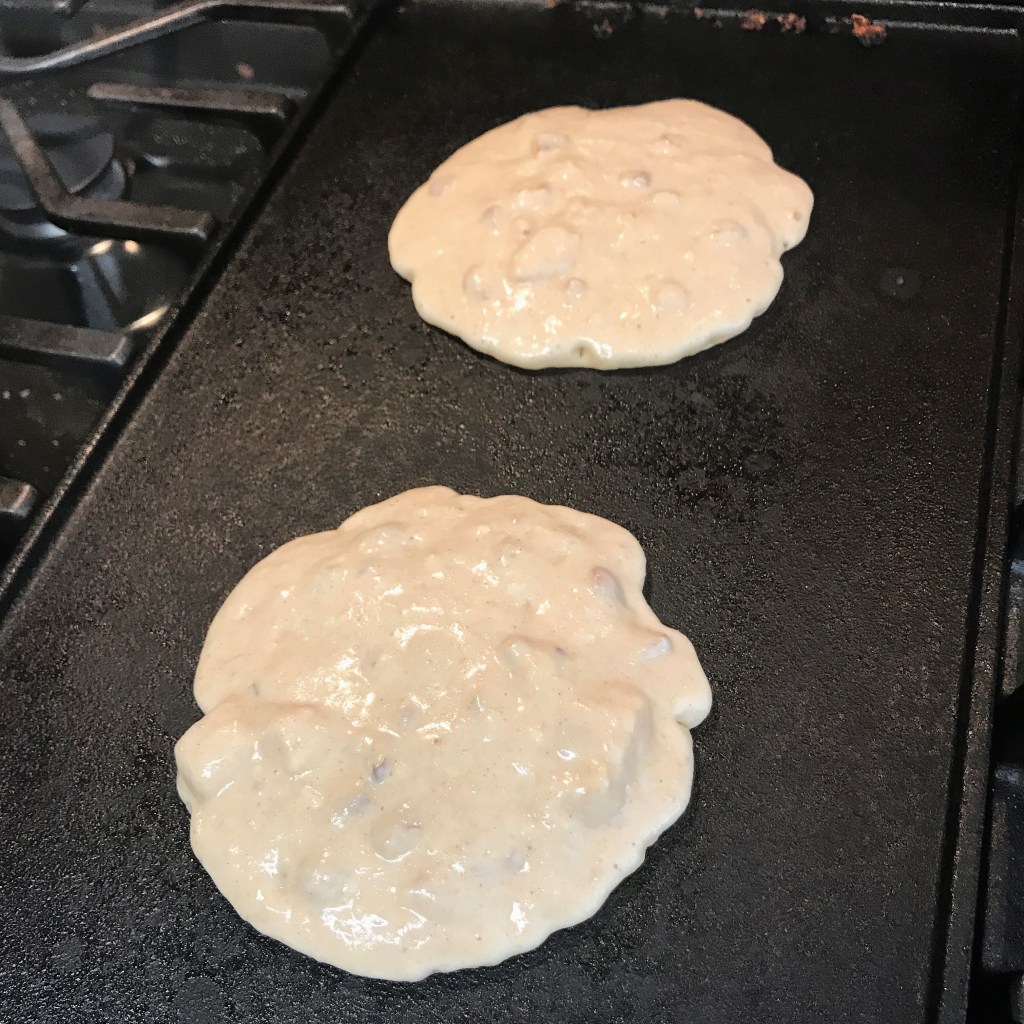
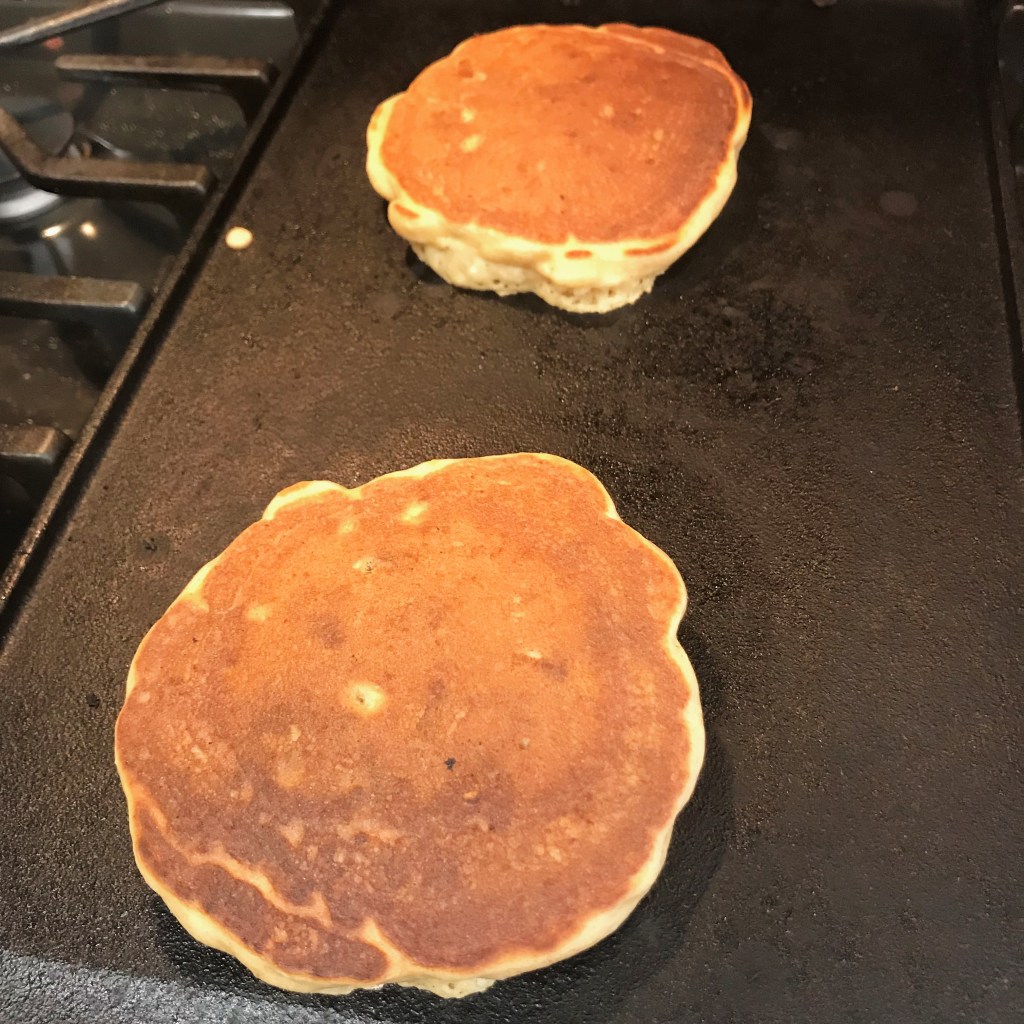
It takes only about two minutes for each side of the pancakes. Turn them when the edges seem set and the underside is golden brown.
They are perfectly browned, and I love watching them rise slightly after turning.
This is a fluffy stack! The pancakes are nice and soft, and so delicious with the bananas, pecans and coconut.
Whisk together dry ingredients in a large mixing bowl and set aside.
Combine egg, buttermilk, oil and vanilla, and whisk until evenly blended.
Pour wet mixture into the bowl of dry ingredients and stir only until flour is completely mixed in. It’s OK to see a few small lumps. Set this aside to rest for 15 minutes while you preheat the griddle or pan to 350° F (medium setting on stovetop).
After rest time, fold pecans, banana bits and coconut (if using) into the batter mixture. Be as gentle as you can, to keep an “airy” texture to the batter.
When skillet is pre-heated (water beads will “dance” on it), spoon or ladle out the batter in 1/4 cup amounts. Cook until large bubbles appear on top and edges of pancake appear set. Turn gently to cook the other side.
Keep pancakes warm on a platter until all are cooked. Serve with butter and maple syrup.
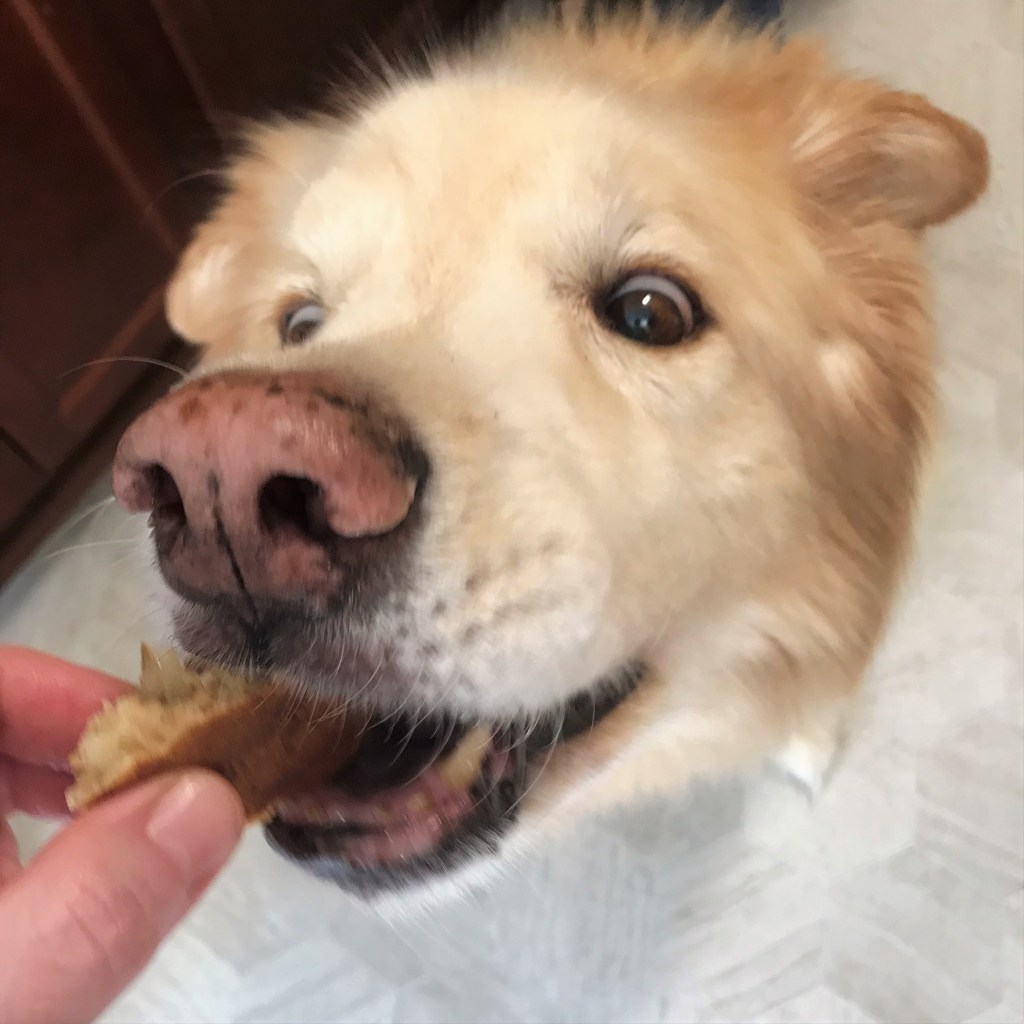
Spoil the dog. ❤
Nilla coached me all the way through these pancakes, so I promised I’d make one for her.
Our good girl loves her whole grains and bananas! 🙂