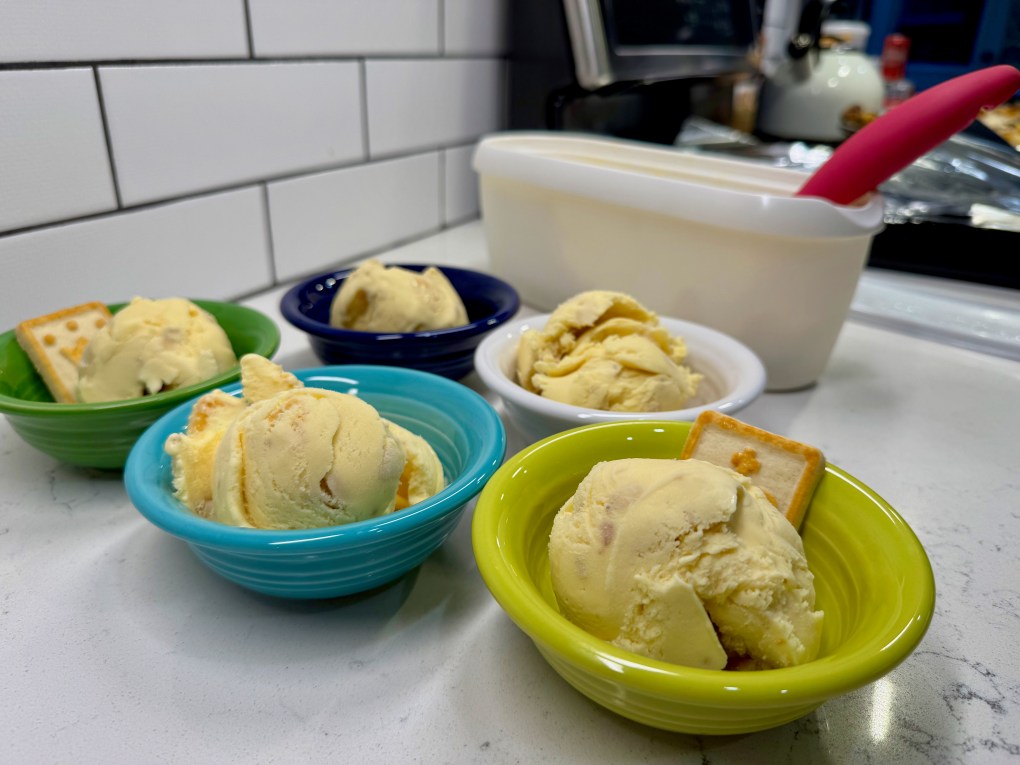
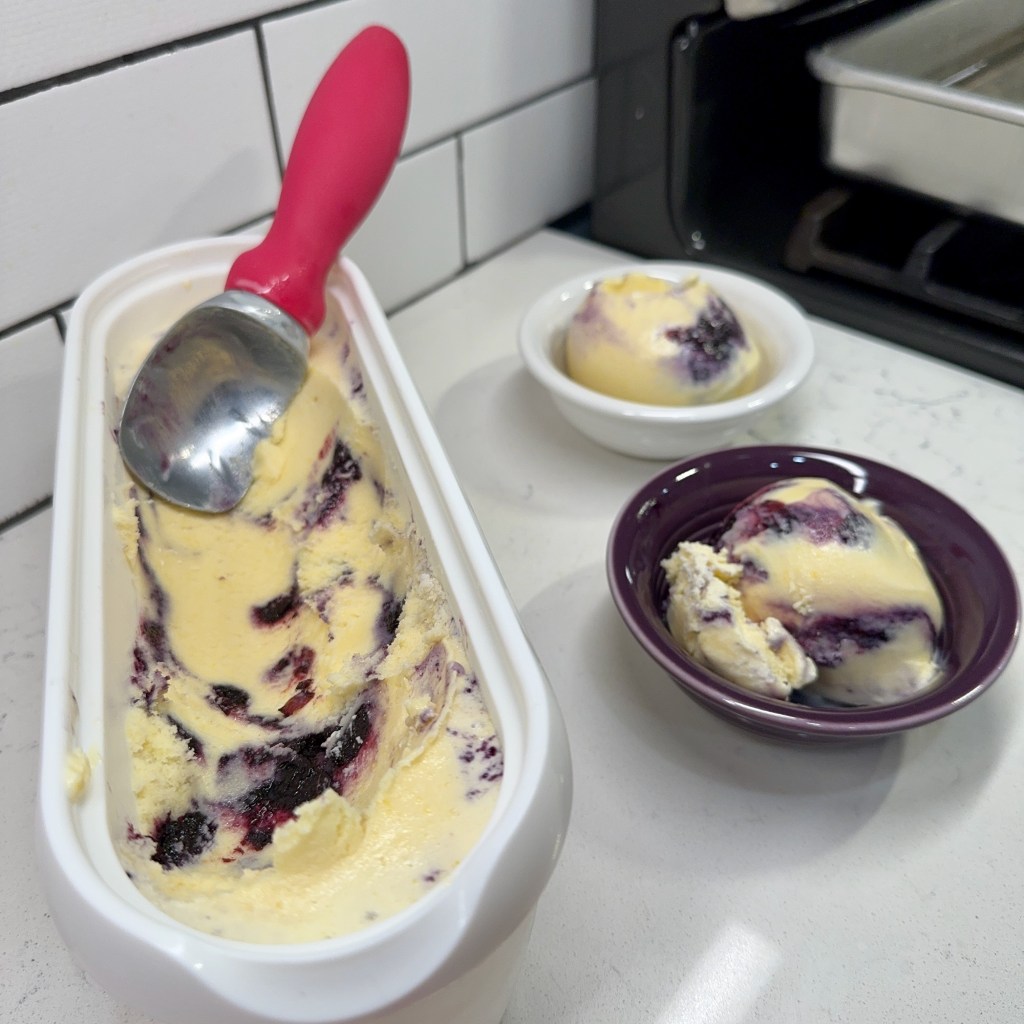
My muse has been after me for at least four years to turn banana pudding, a classic North Carolina dessert, into an ice cream. Imagine the creamy, comforting texture of pudding, wrapped around bits of fresh banana and complemented with delicate, vanilla-scented cookies. But frozen! And just in time for the ridiculous heat wave that has gripped our state. This turned out to be a very good thing.
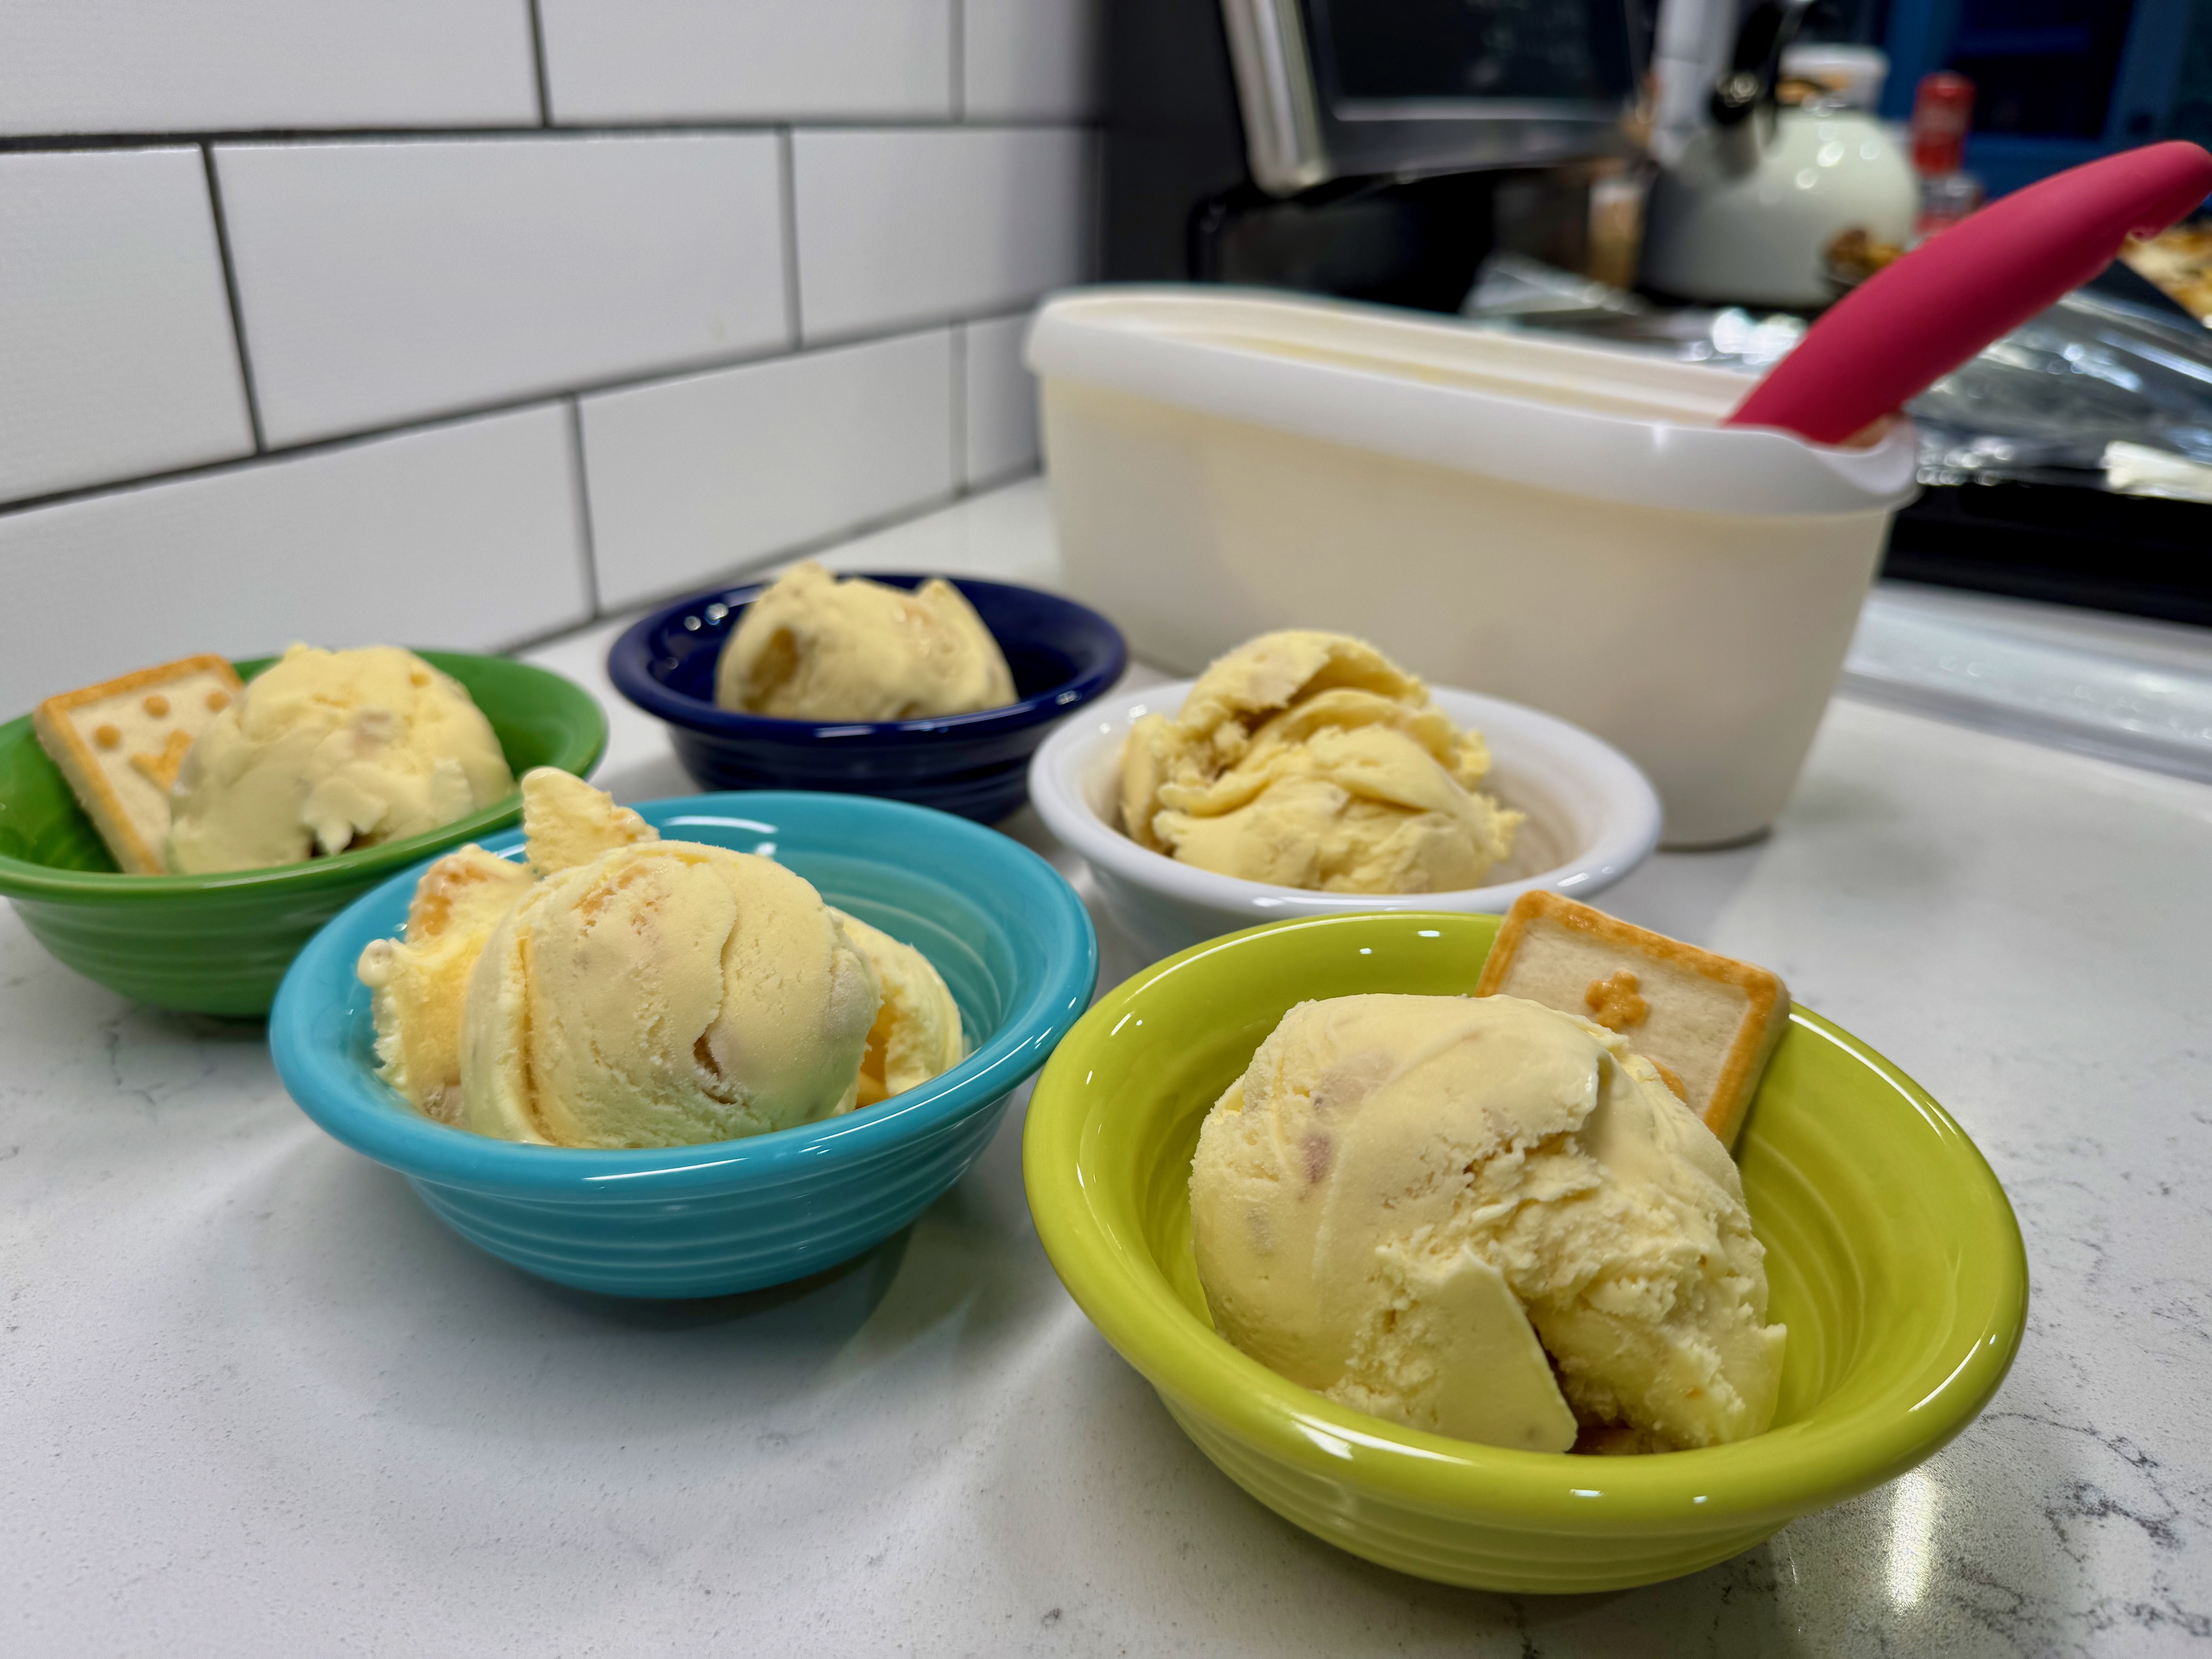
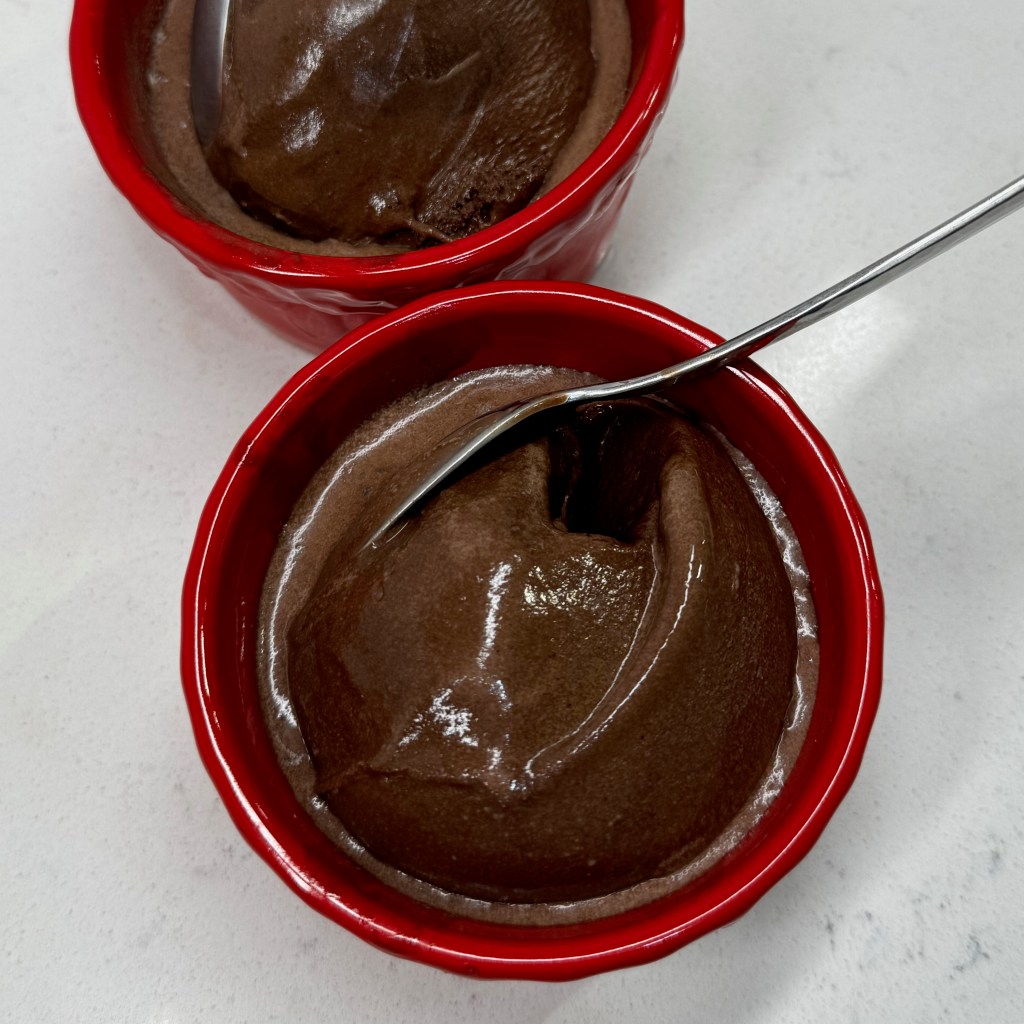
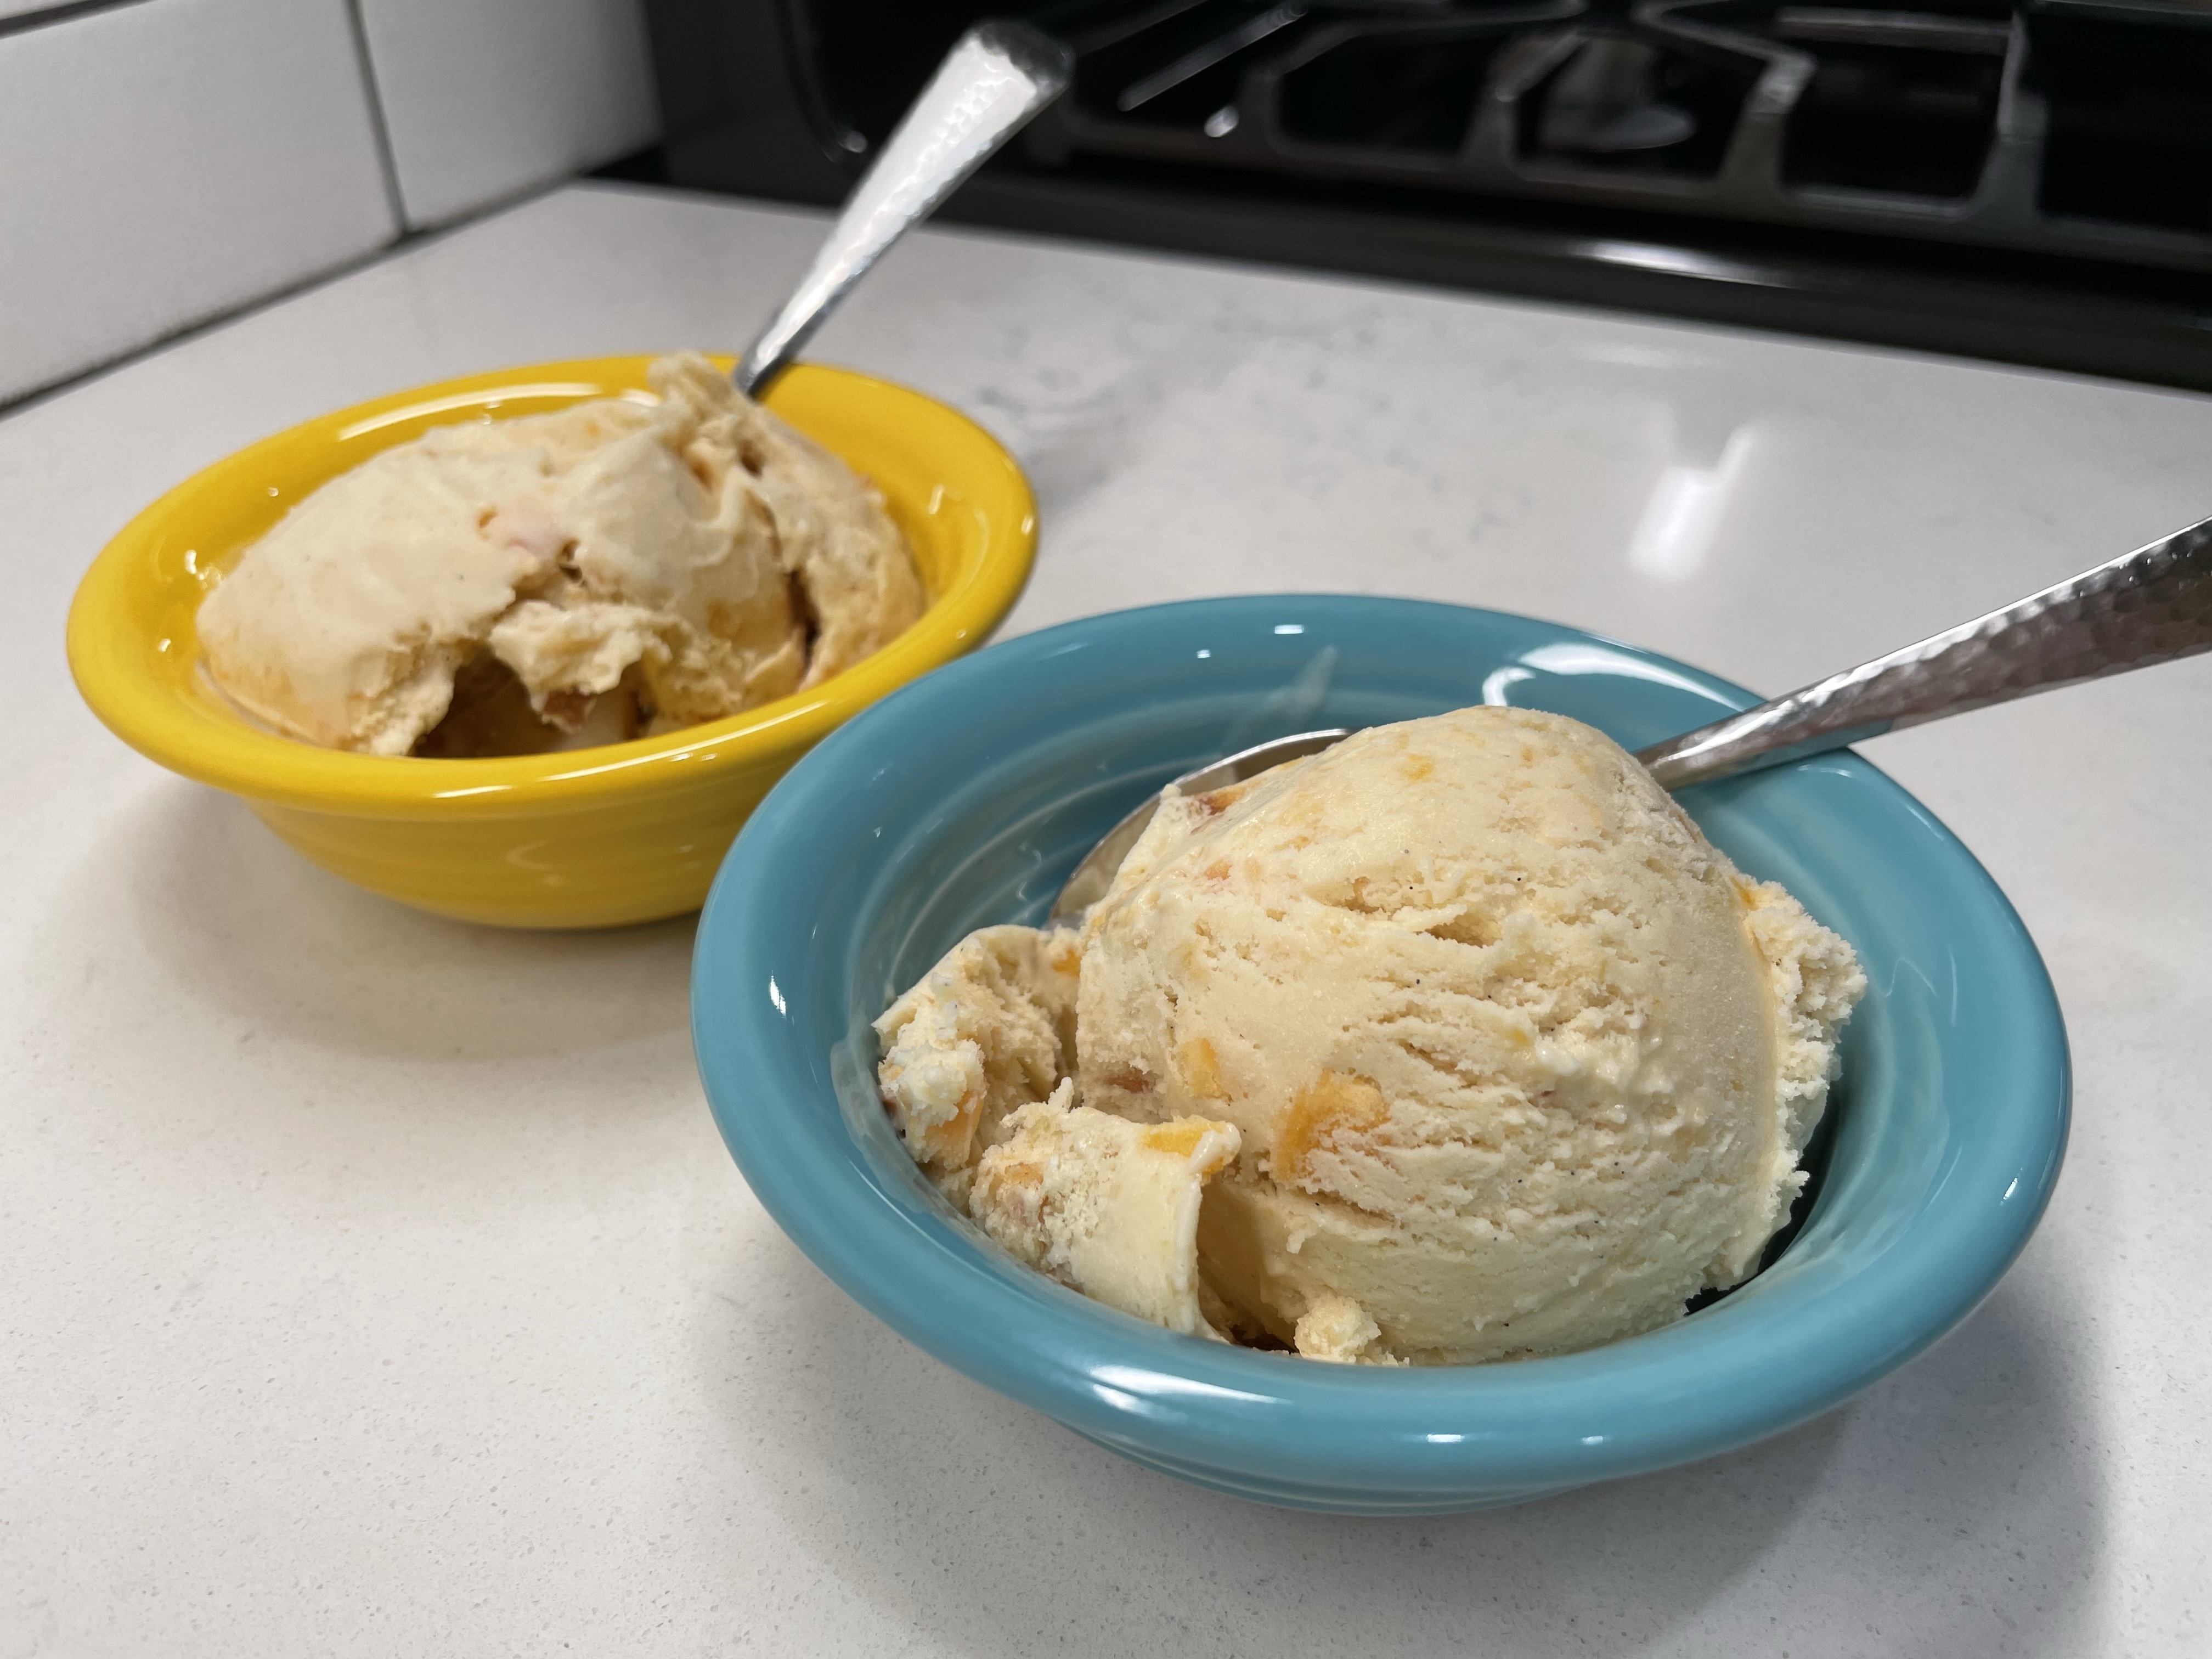
Even a non-pudding fan would like this ice cream.
So what took me so long? My husband, Les, doesn’t care for banana pudding, and I didn’t want to make a big dessert that I’d have to eat by myself. I will admit that I’ve also considered banana pudding to be generally overrated since I moved to the American South some 38 years ago. The pudding part isn’t even banana flavored, but vanilla (did you know this?), and everyone knows how visually unappealing bananas get when they’ve been exposed to air. Don’t even get me started on vanilla wafers because they are just so boring. 🥱
But if I elevated the ingredients, and if it was frozen— well, let’s just say that I haven’t met many ice creams that I didn’t love. Fortunately, we had company for dinner on a recent weekend, giving me the perfect excuse to finally put this one in the “done” column of my culinary bucket list. And guess what? Even Les liked it!
Delicious from the first scoop to the last!
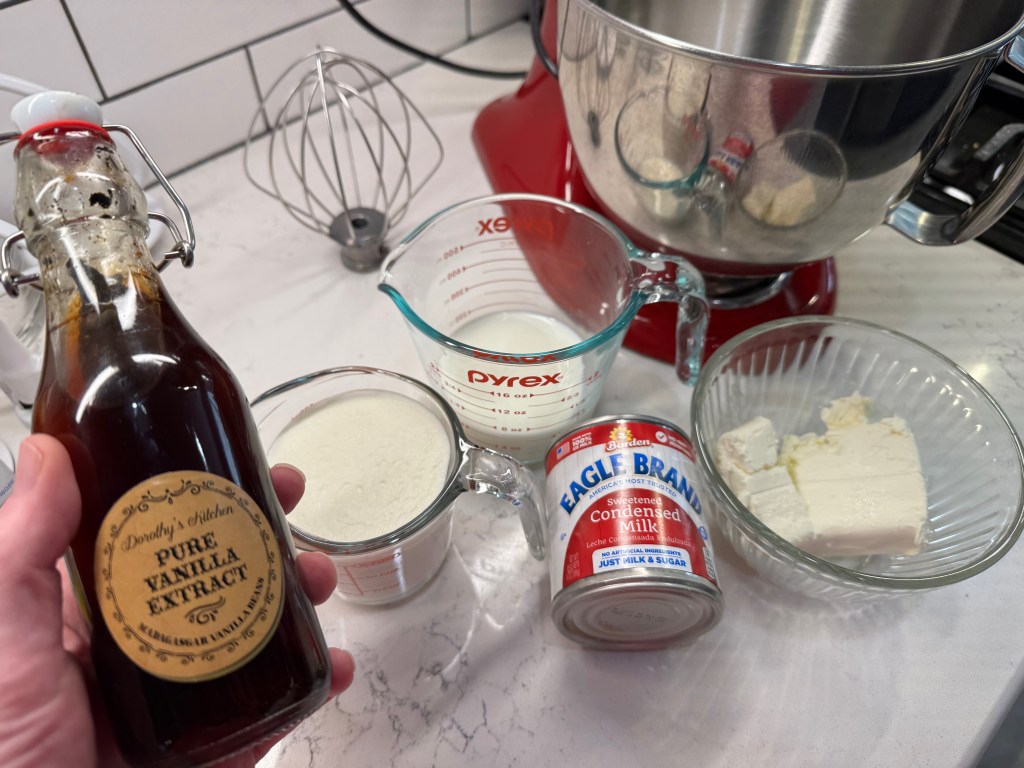
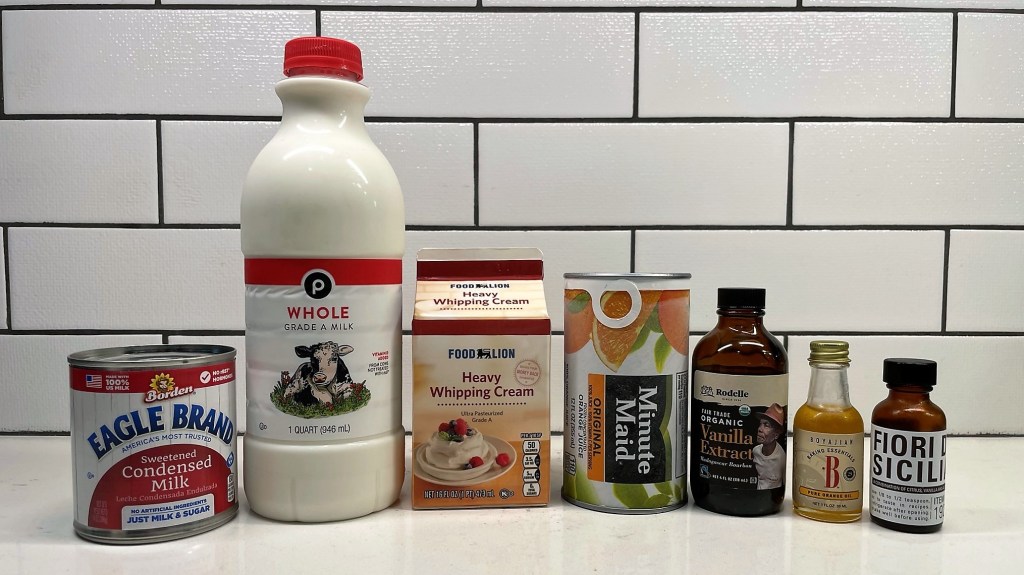
Ingredients for banana pudding ice cream
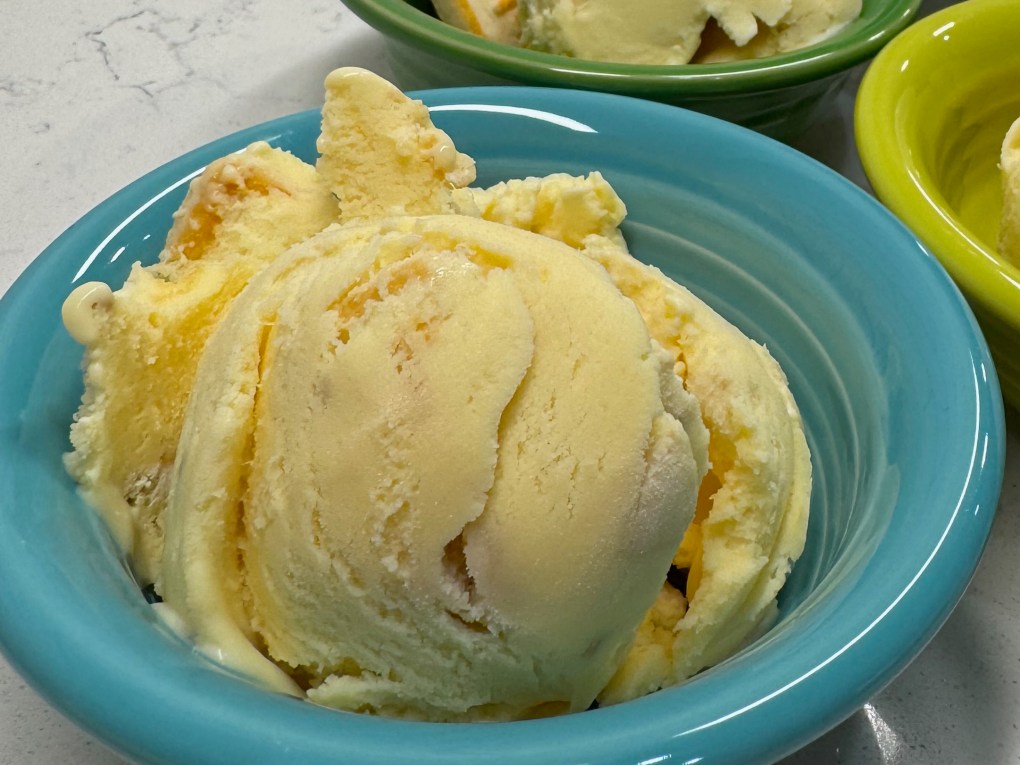
All of our guests enjoyed this creamy treat, and one asked, “what makes this banana pudding ice cream rather than just banana ice cream?” The answer is exactly what you might expect—there is actual pudding mix in the ice cream, and I’m shocked by how good it is.
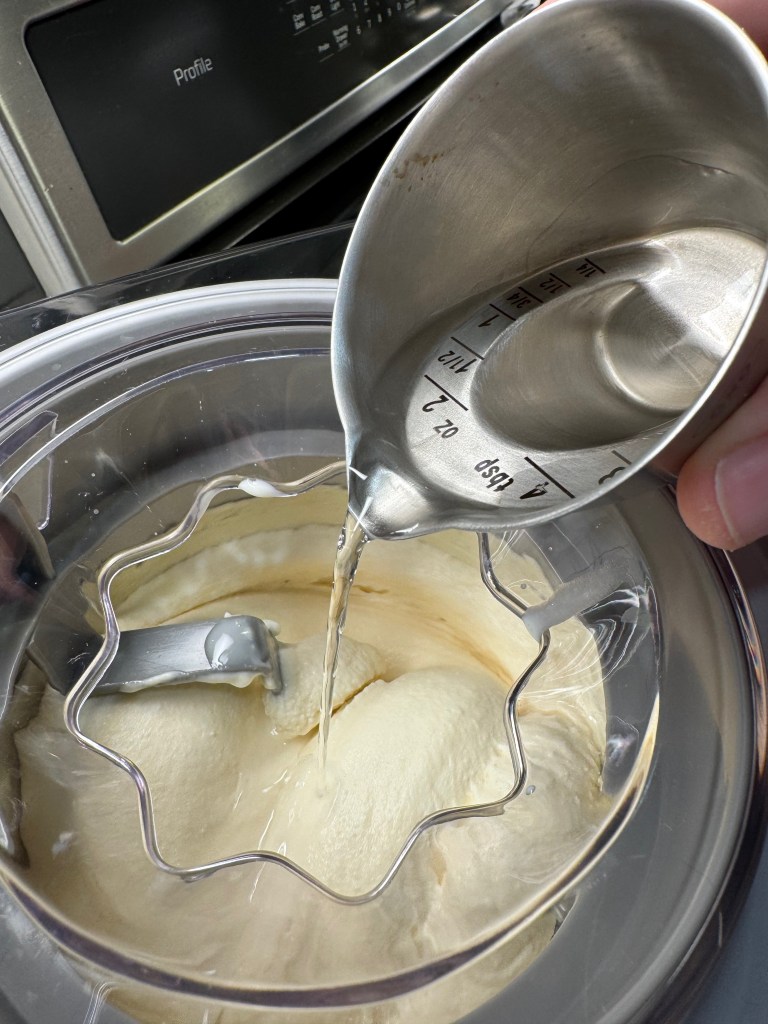
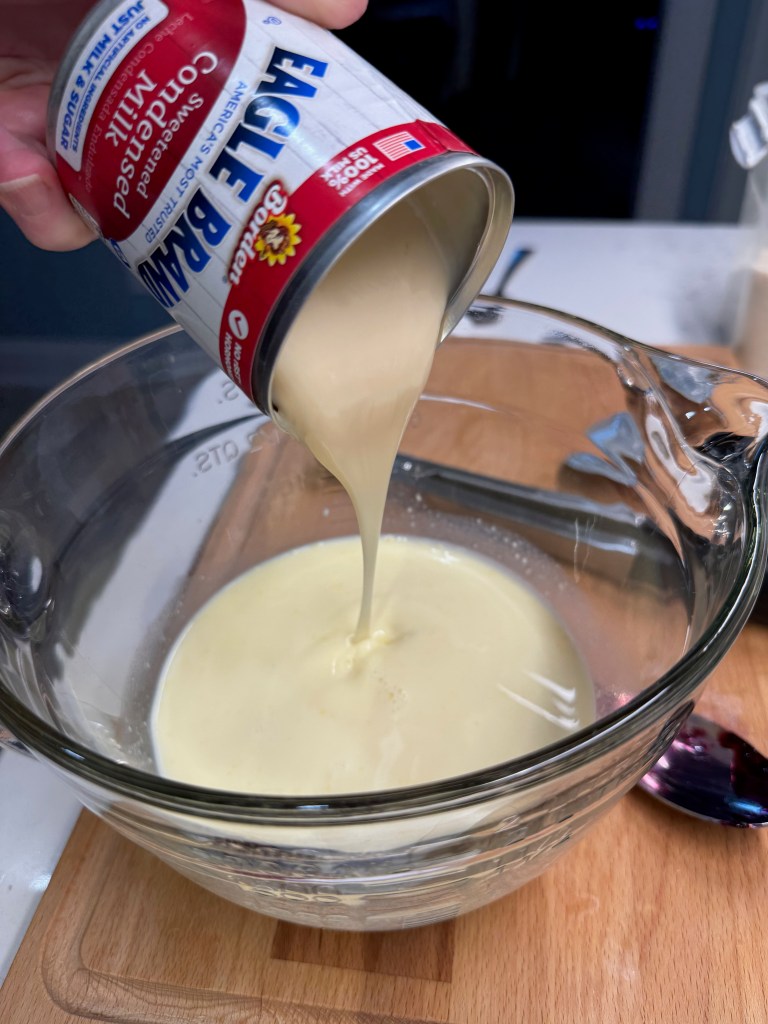
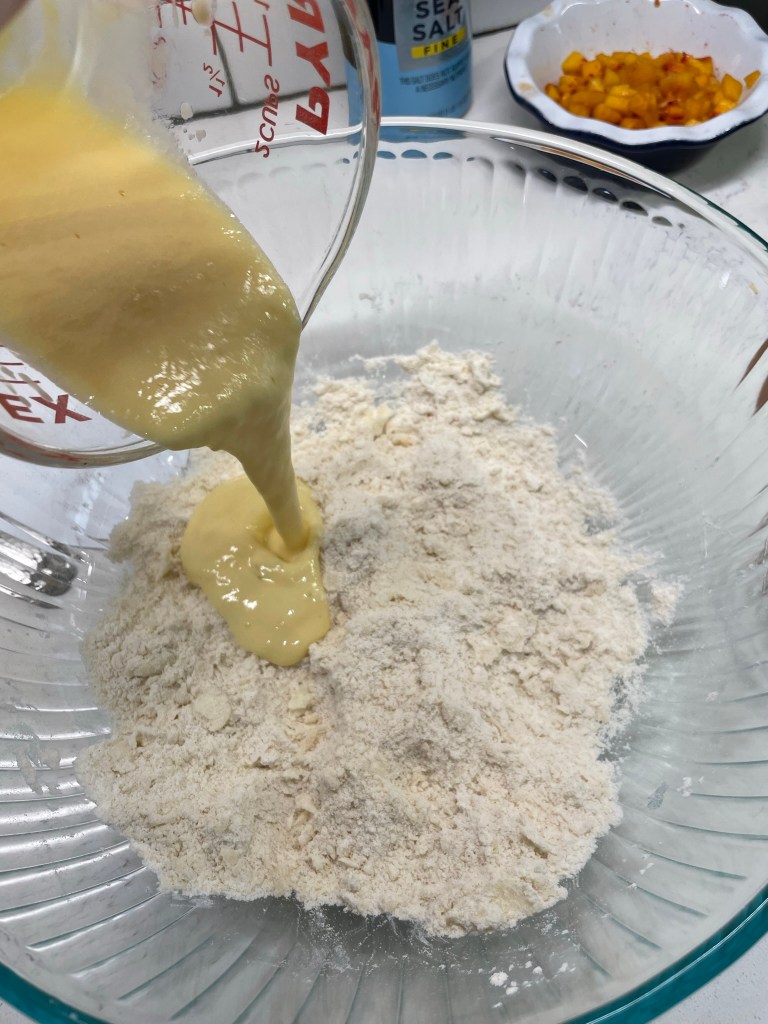
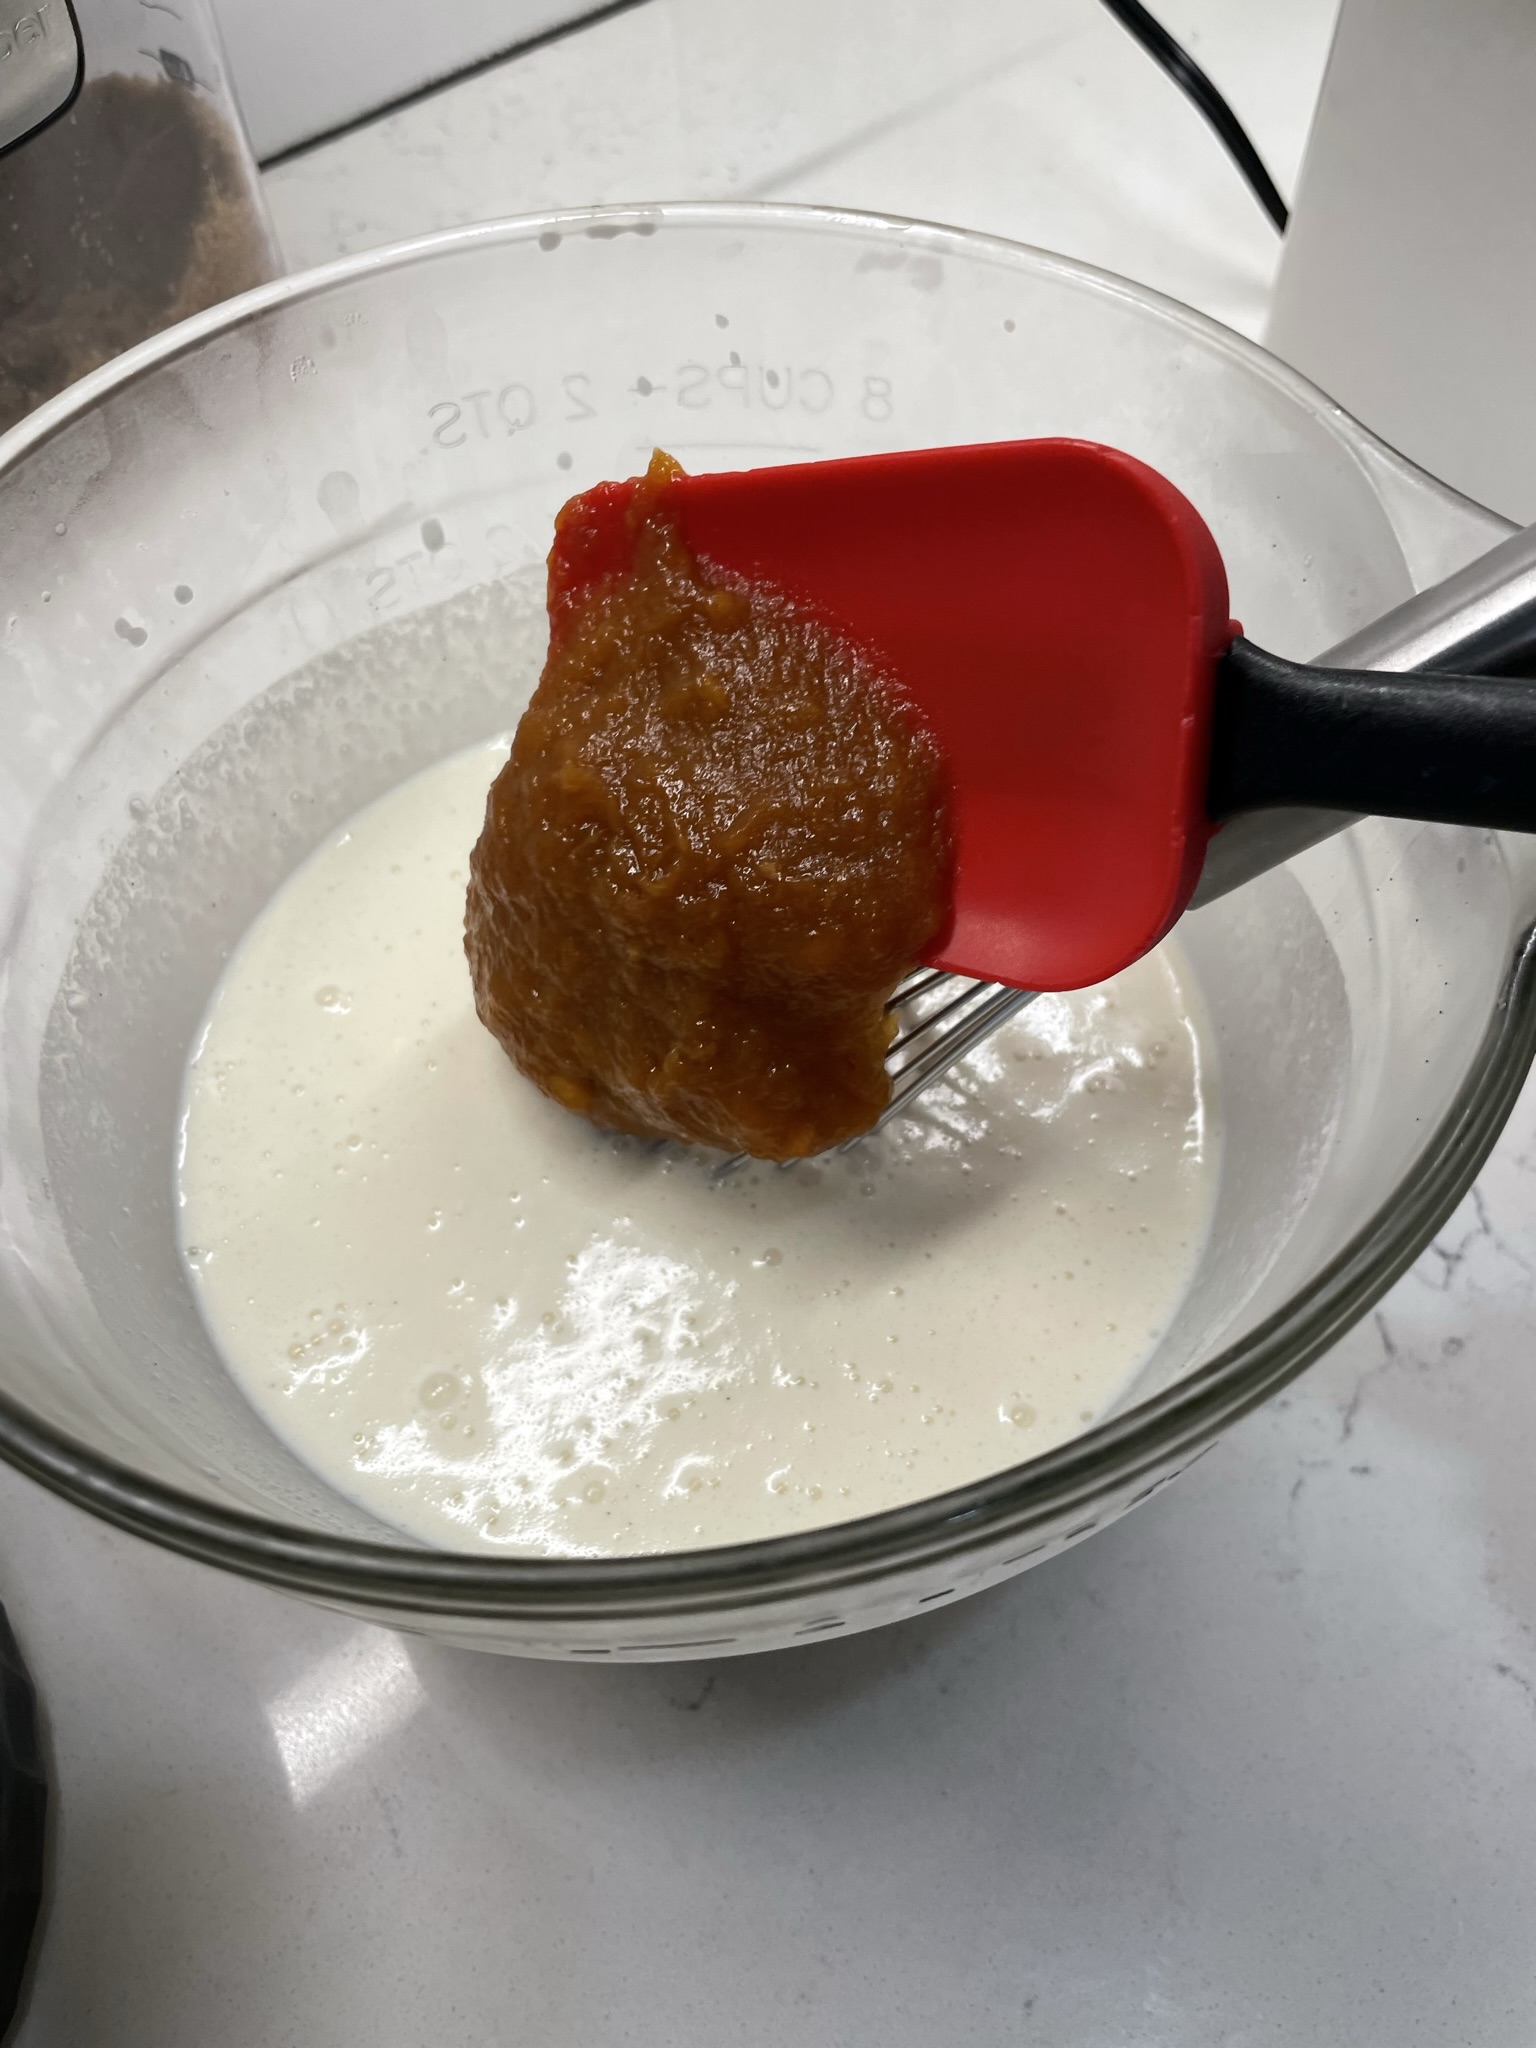
Condensed milk lends additional sweetness, so I only used half the can.
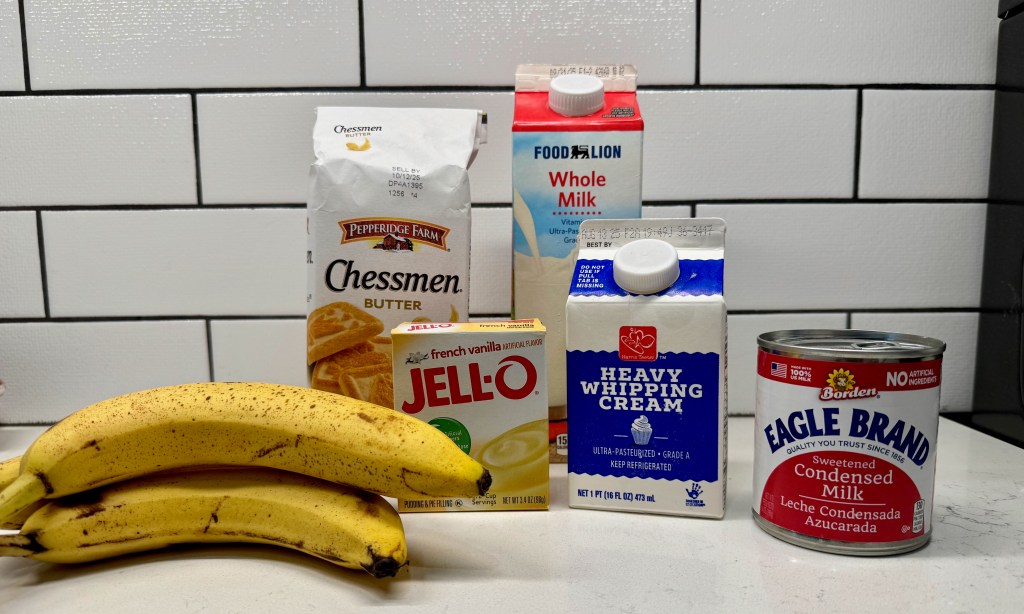
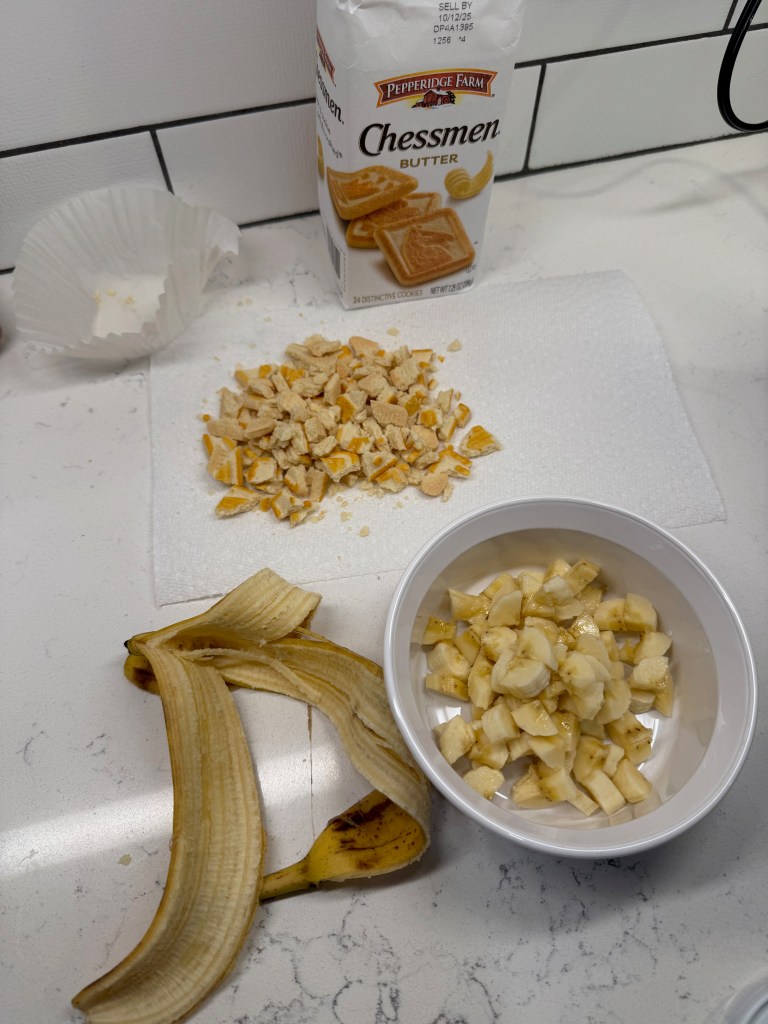
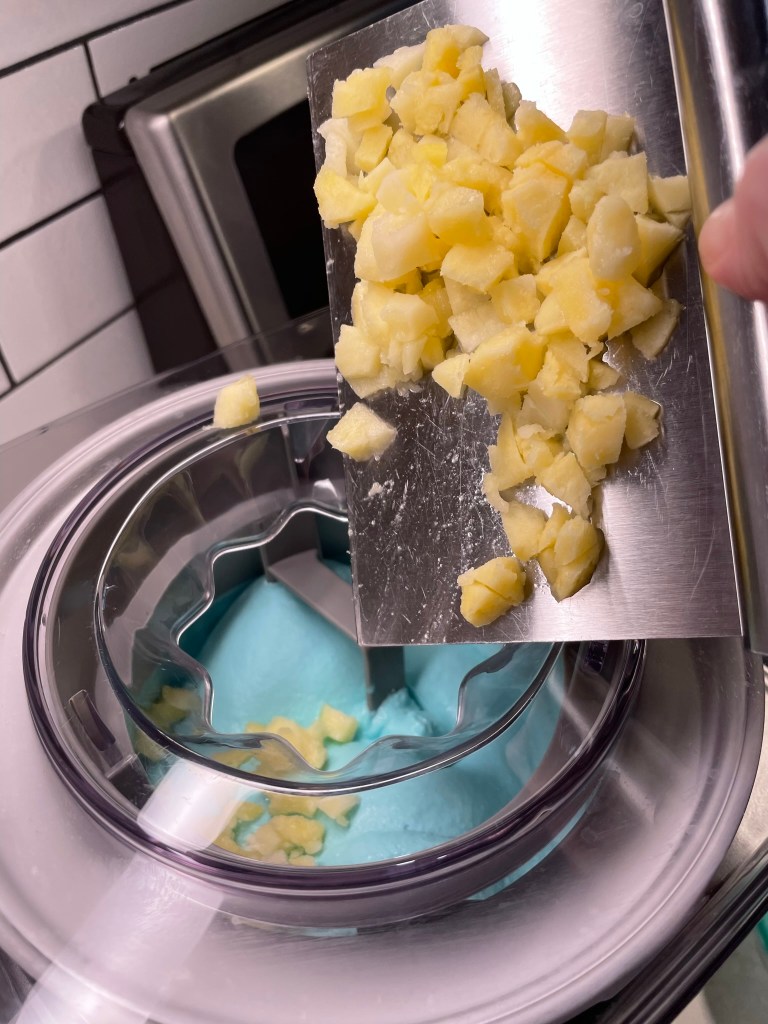
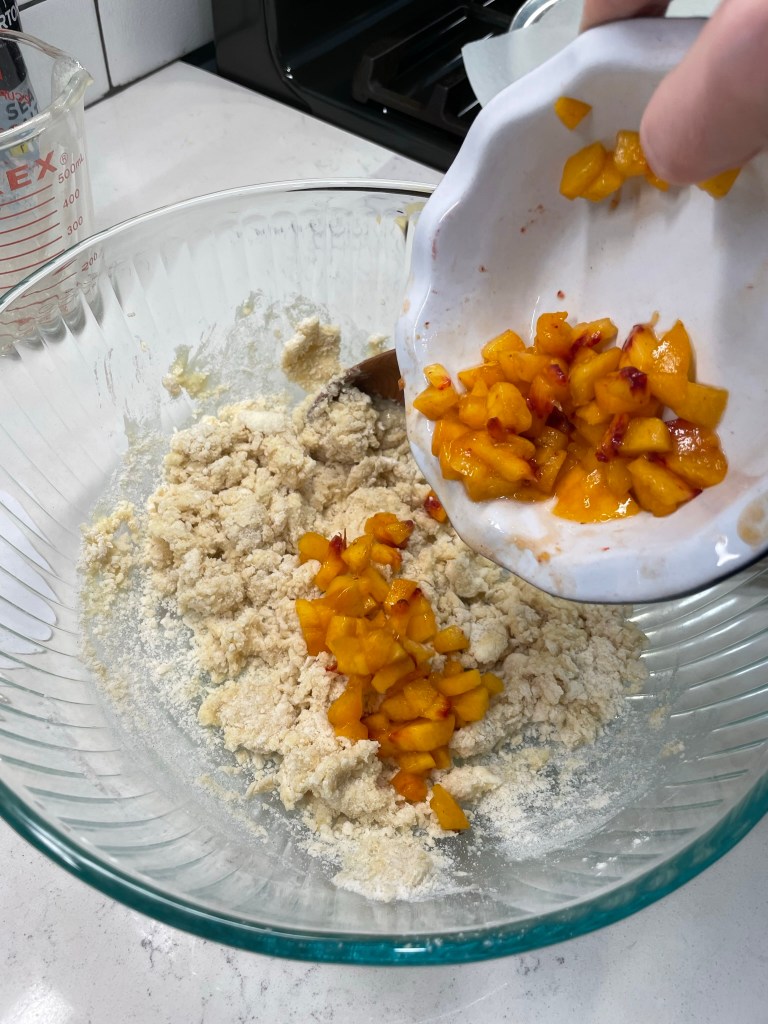
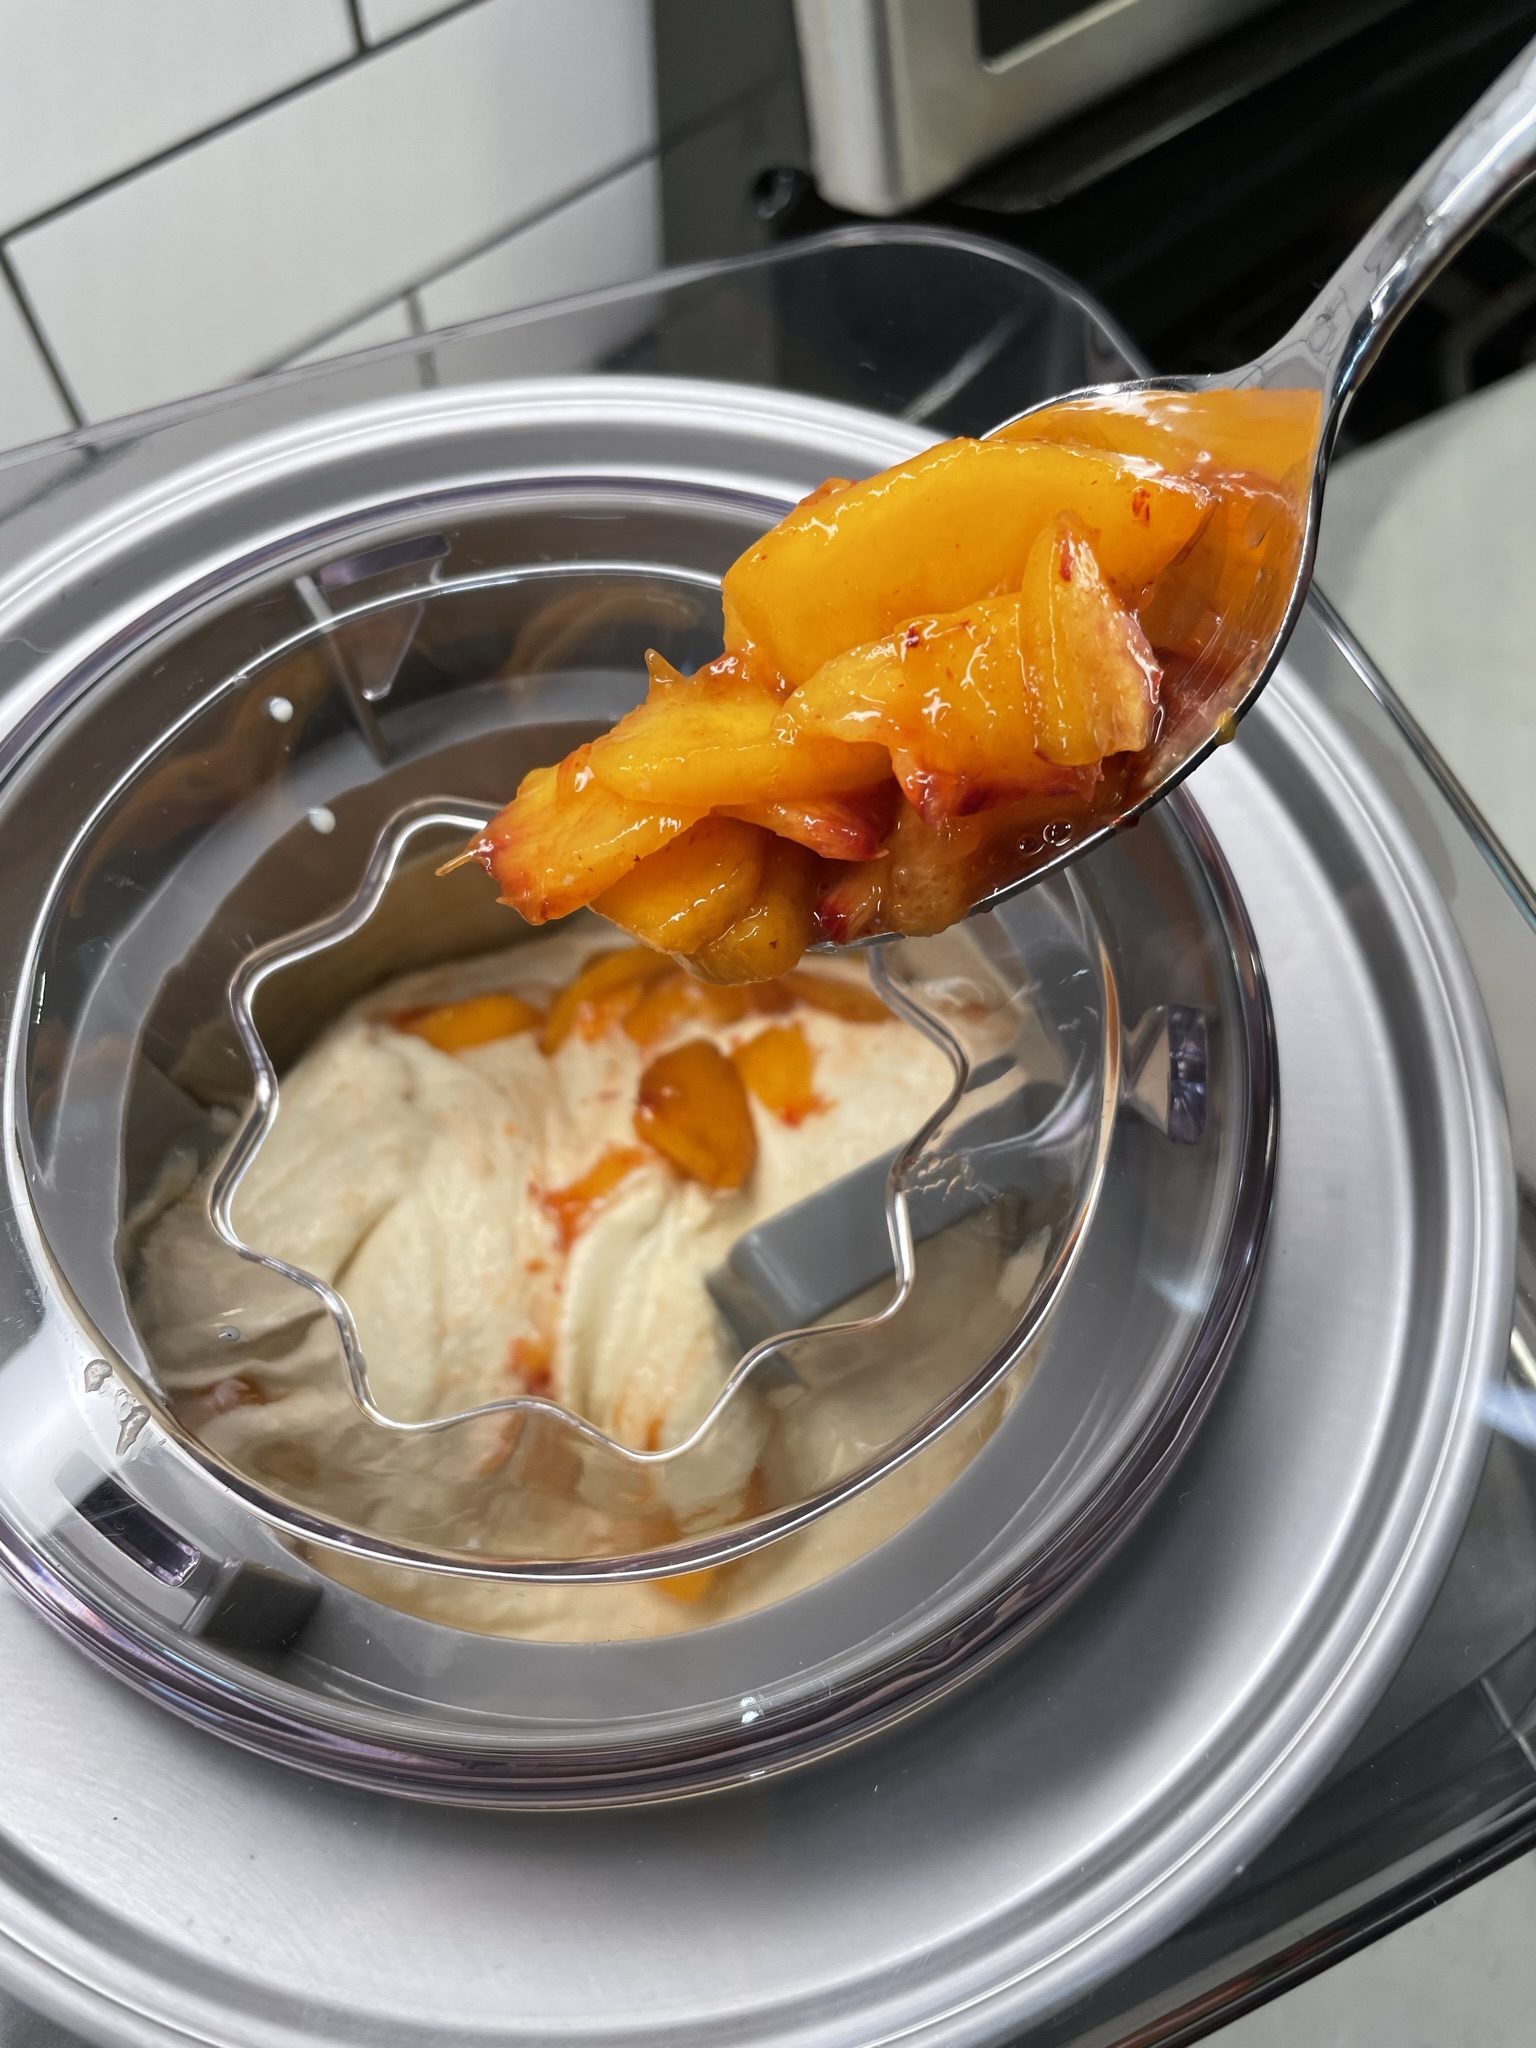
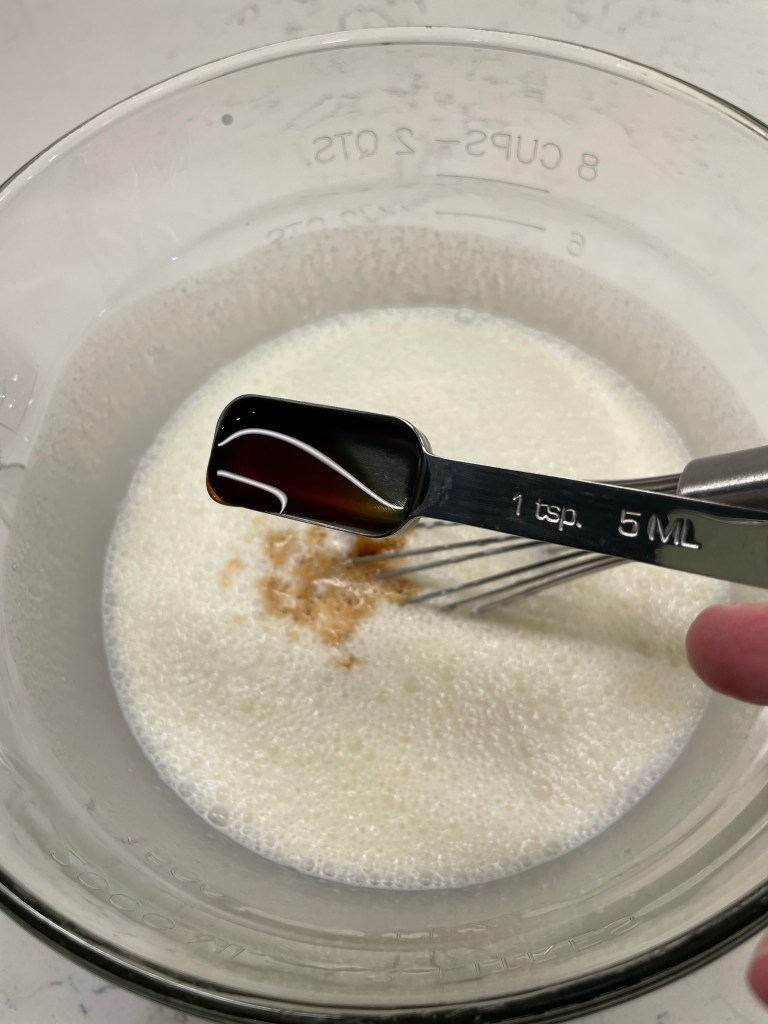
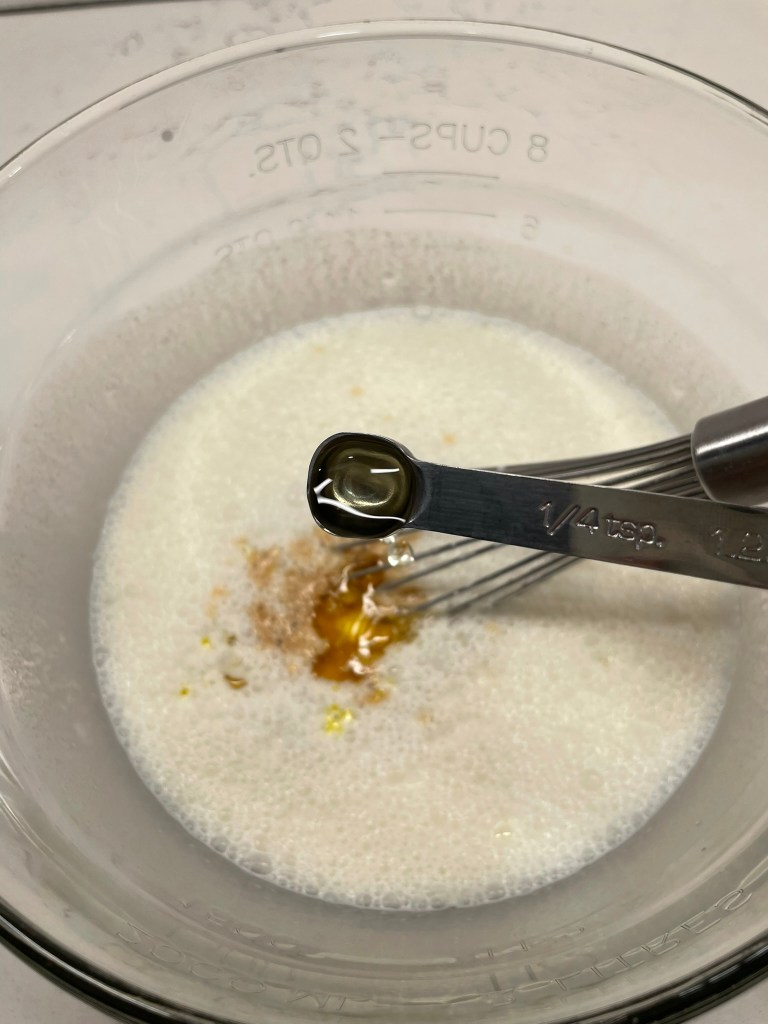
Perhaps one day, I will have all the time in the world to make my own pudding from scratch, but I’ve been giving myself permission lately to take shortcuts, and here I used a boxed instant pudding mix. French vanilla has a richer color than regular vanilla, so that’s what I chose. A fresh, perfectly ripe banana was chilled, cubed and folded into the mix, and I passed over bland vanilla wafers in favor of buttery Chessman cookies.
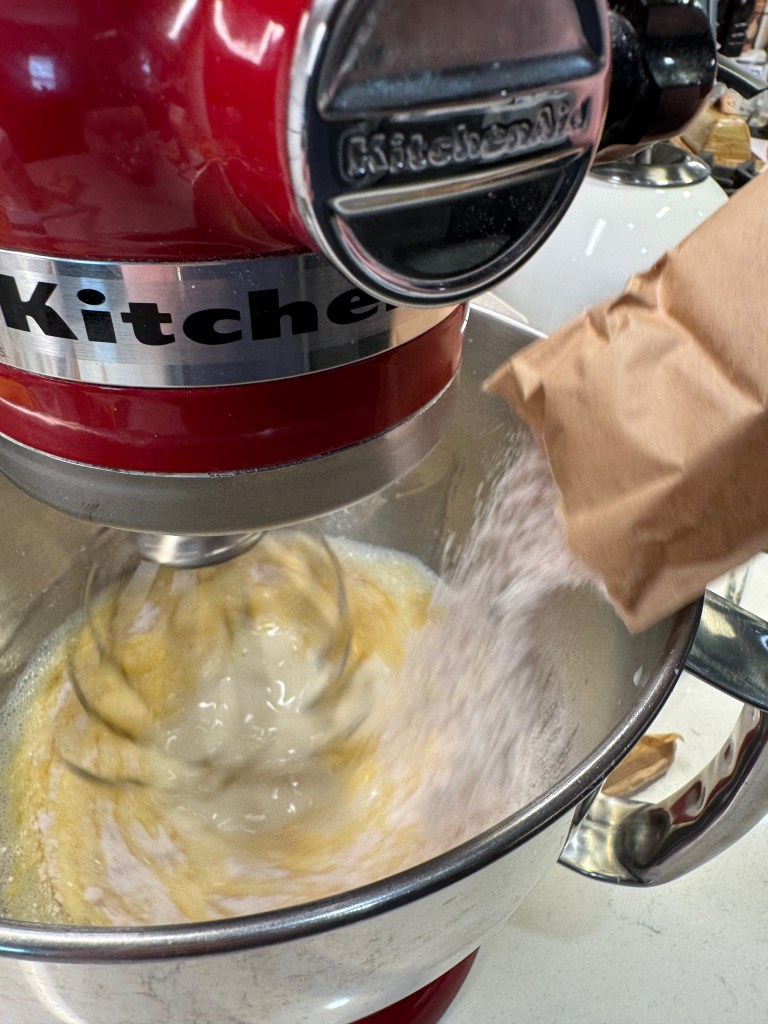
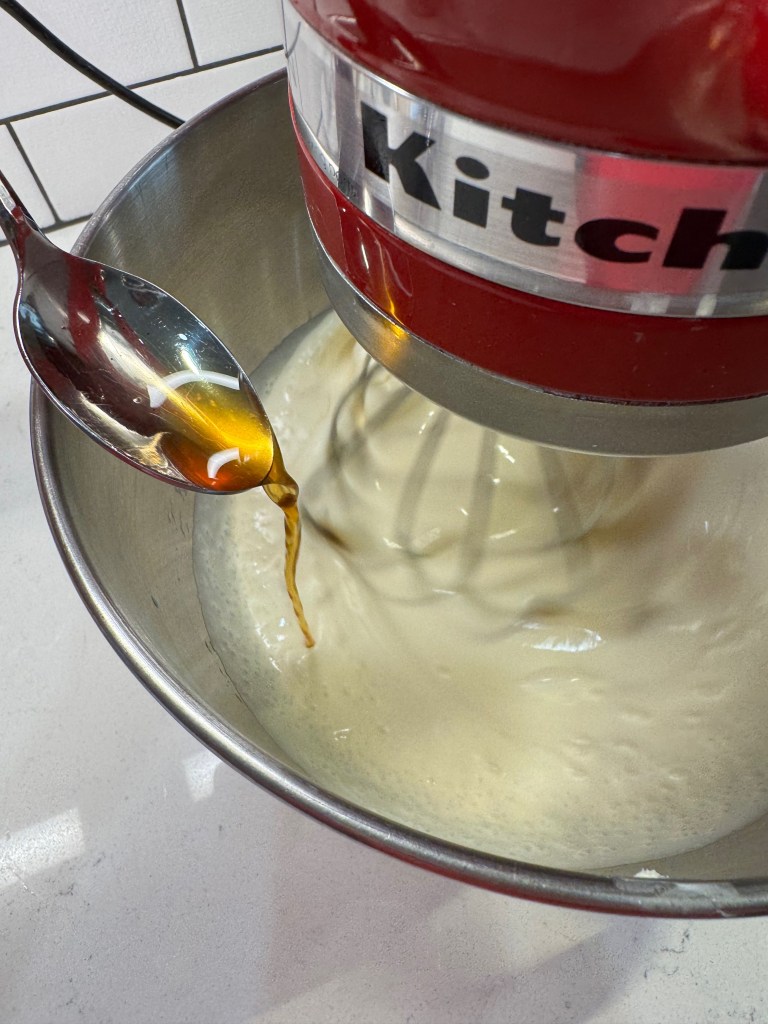
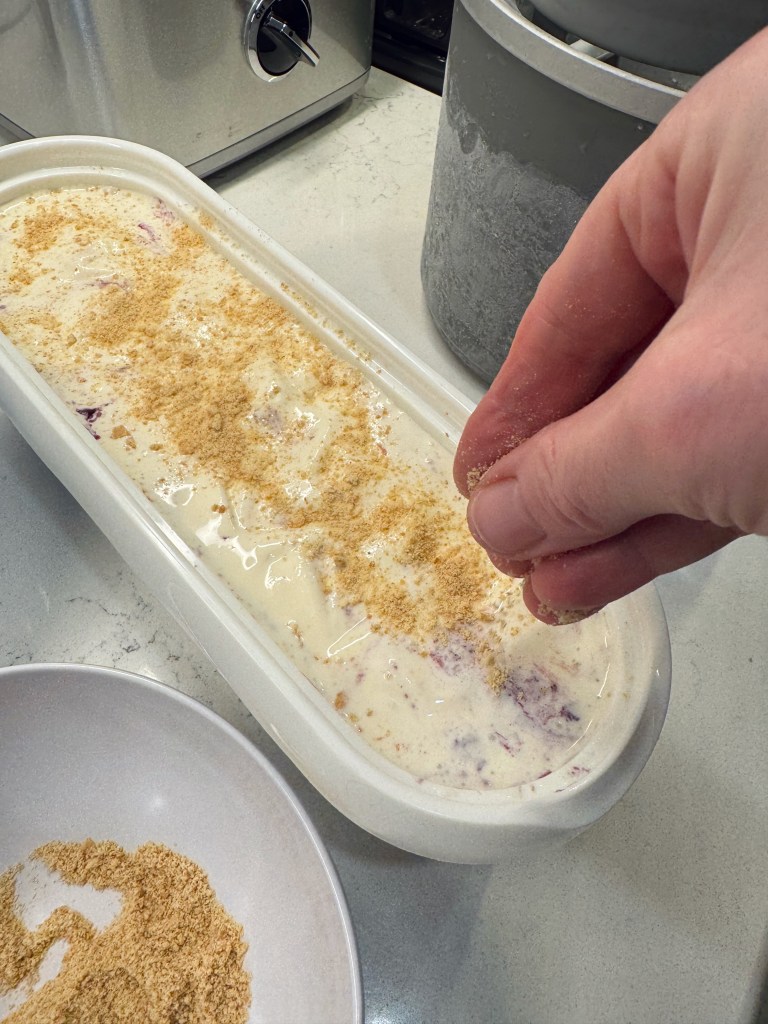
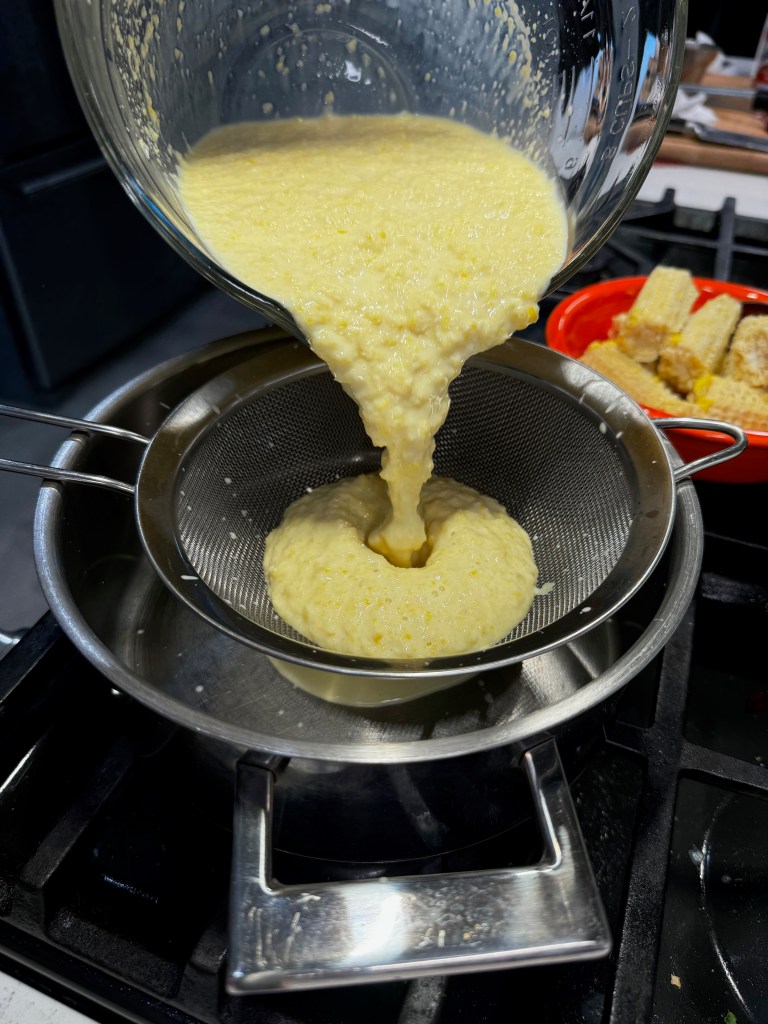
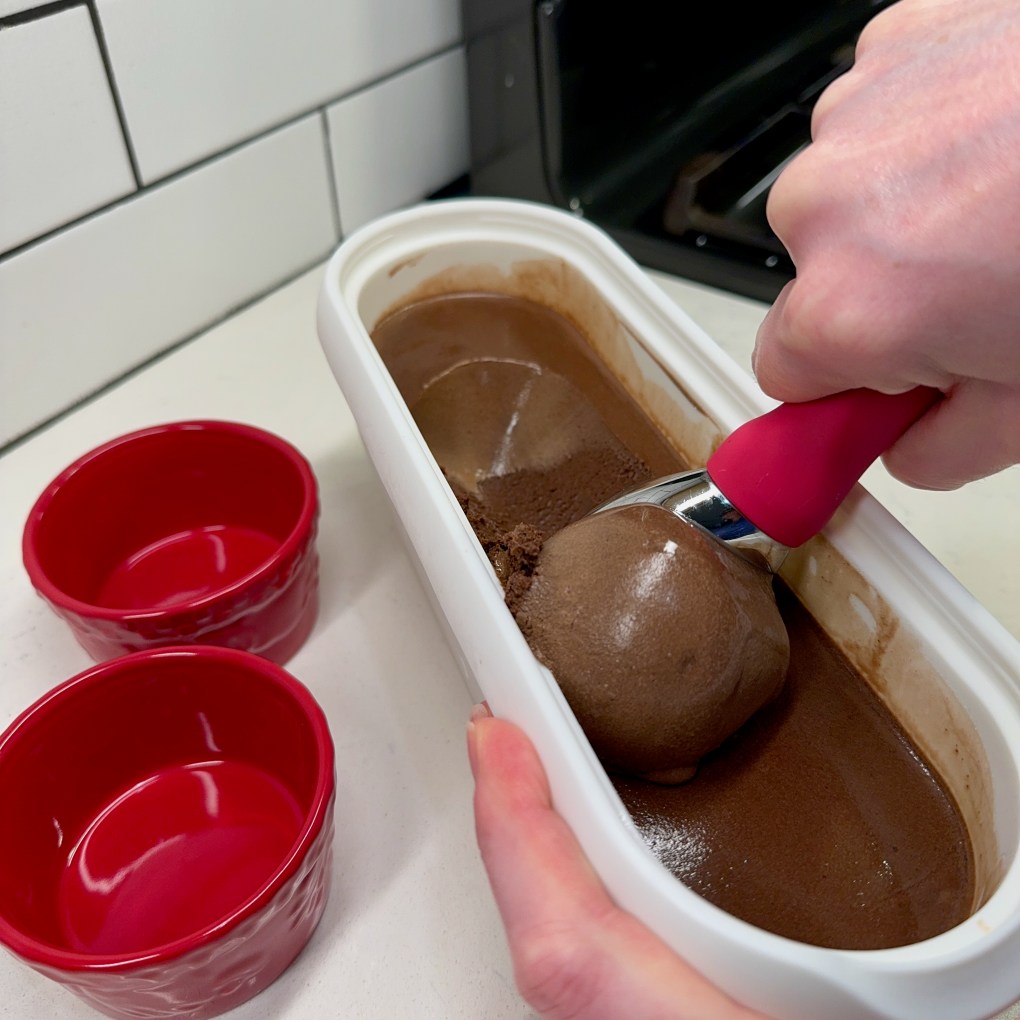
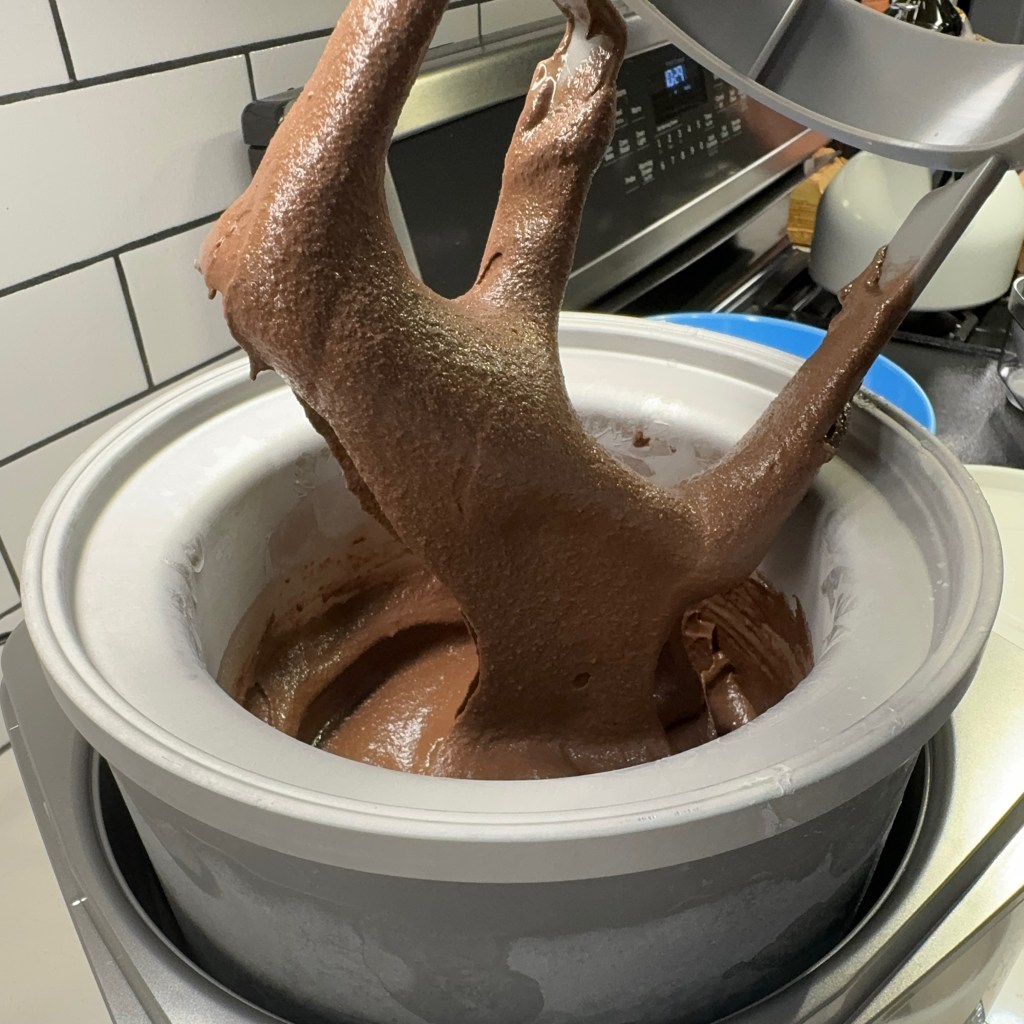
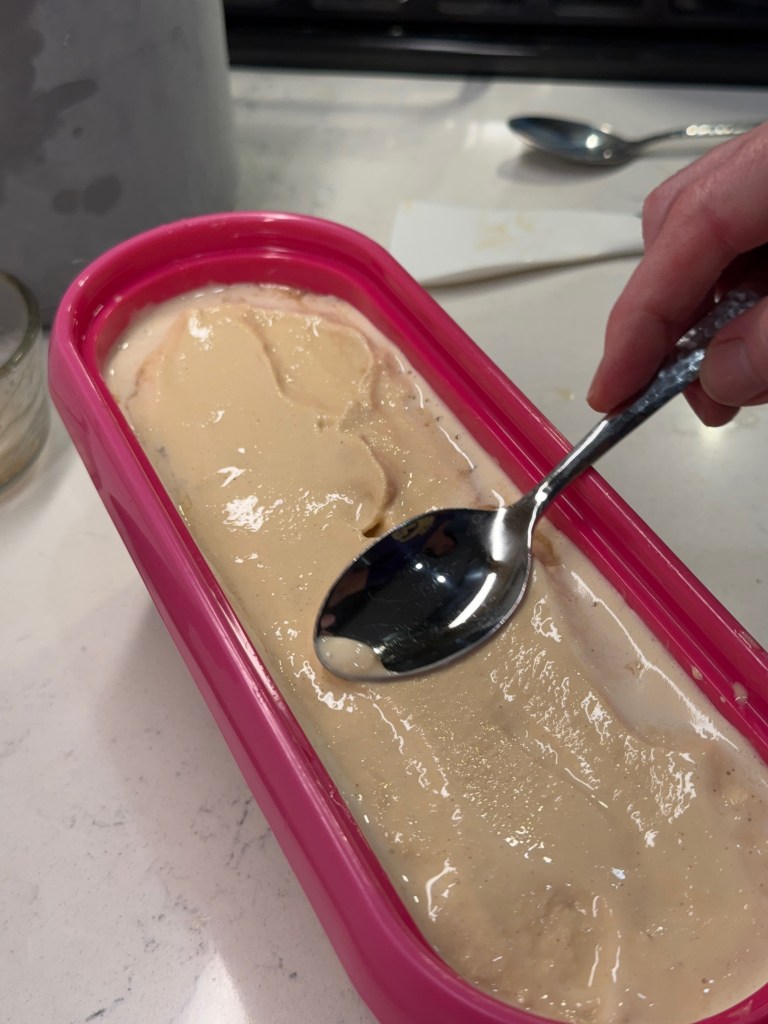
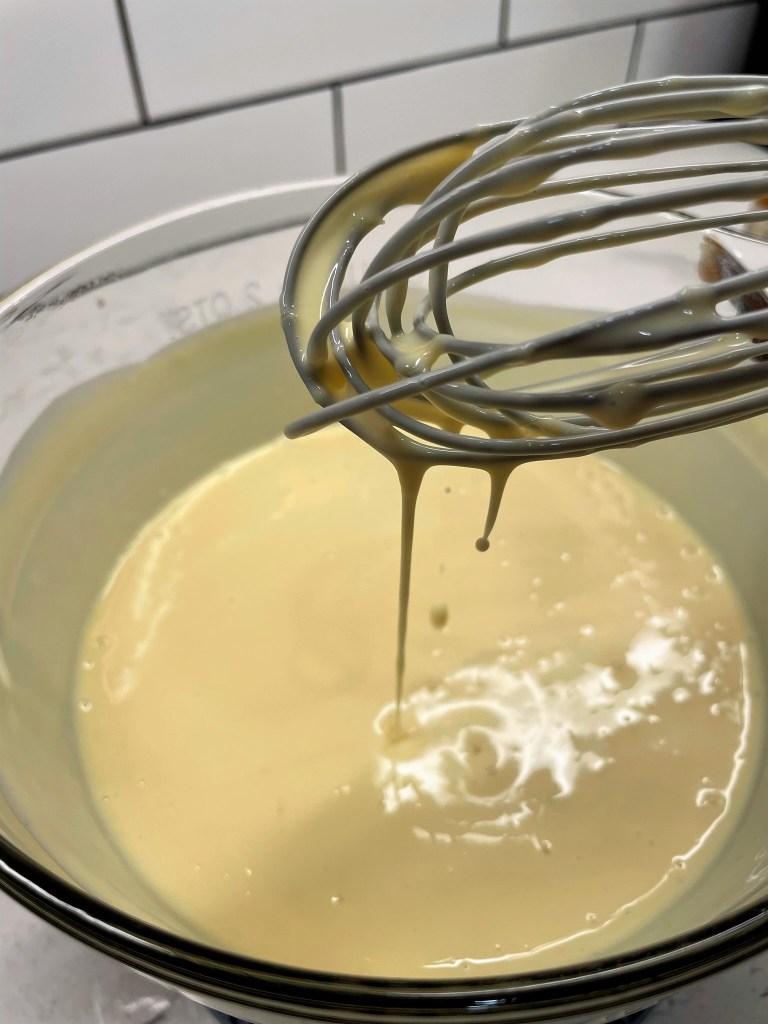
Stop the mixer to scrape down the sides a couple of times.
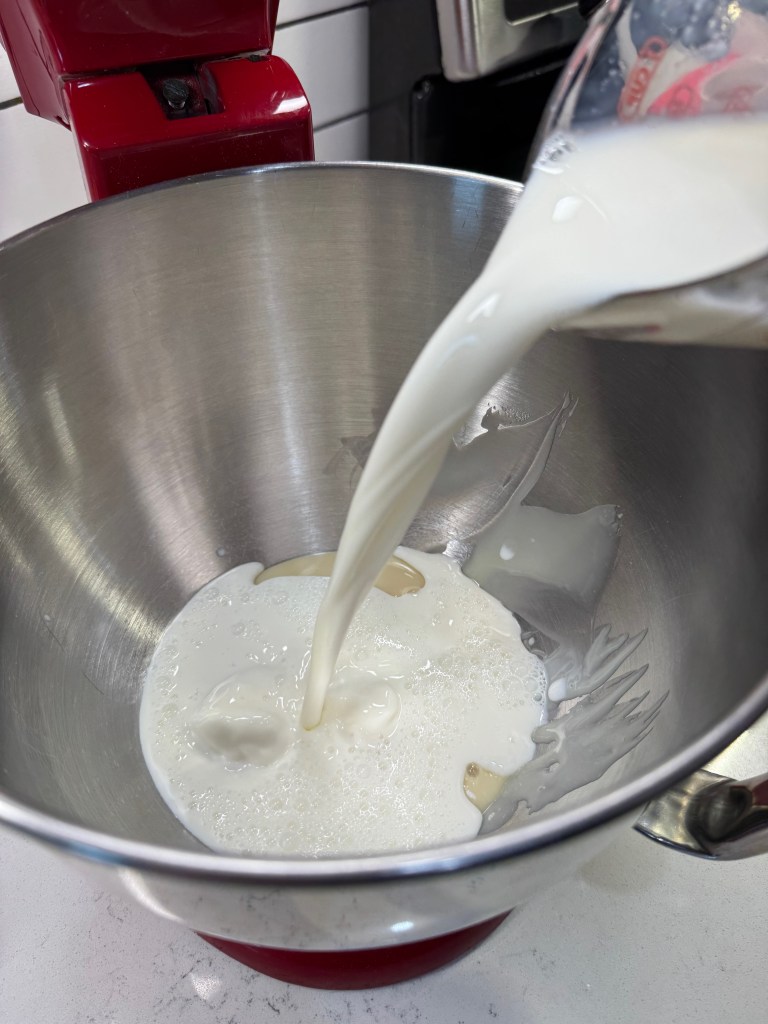
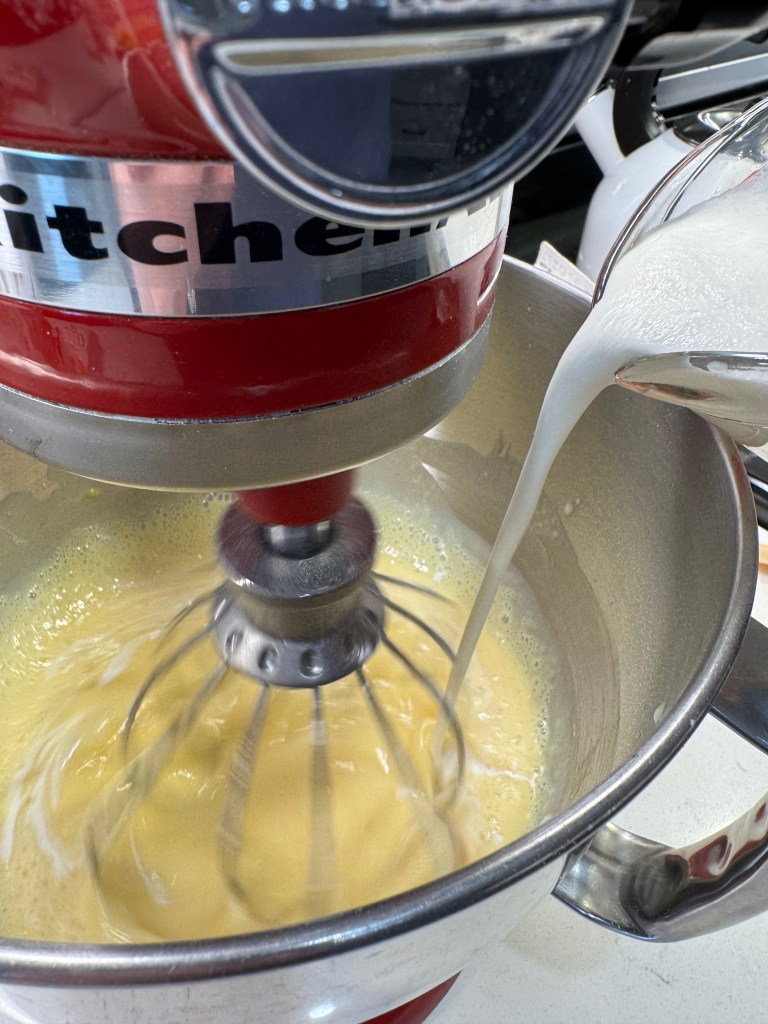
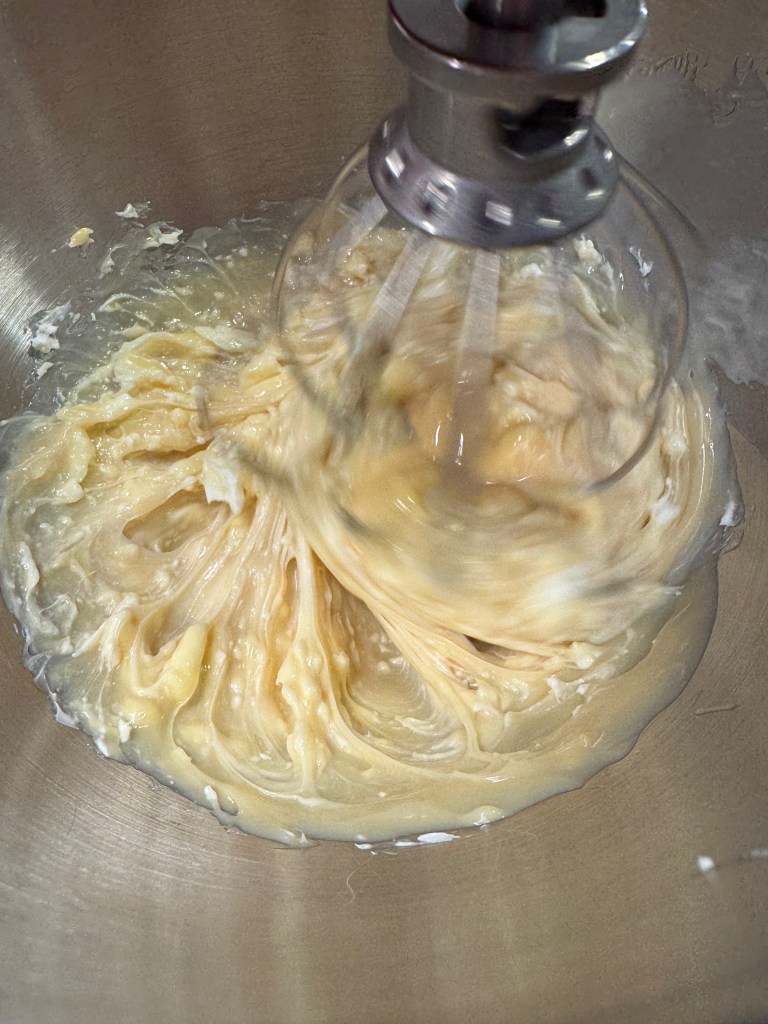
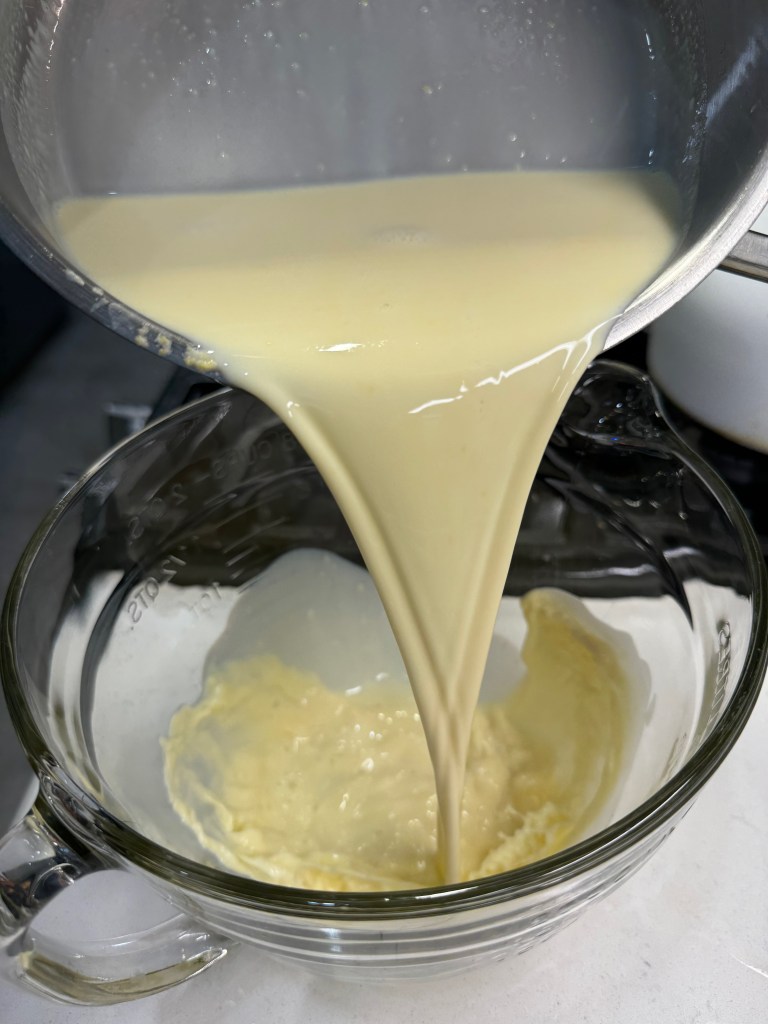
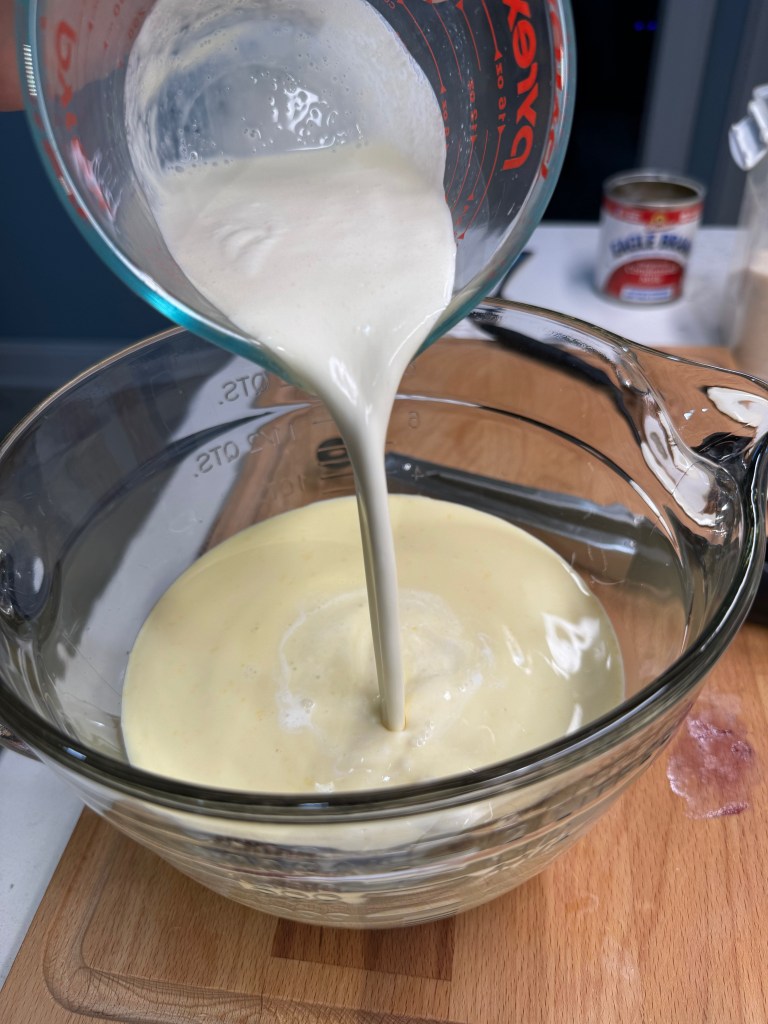
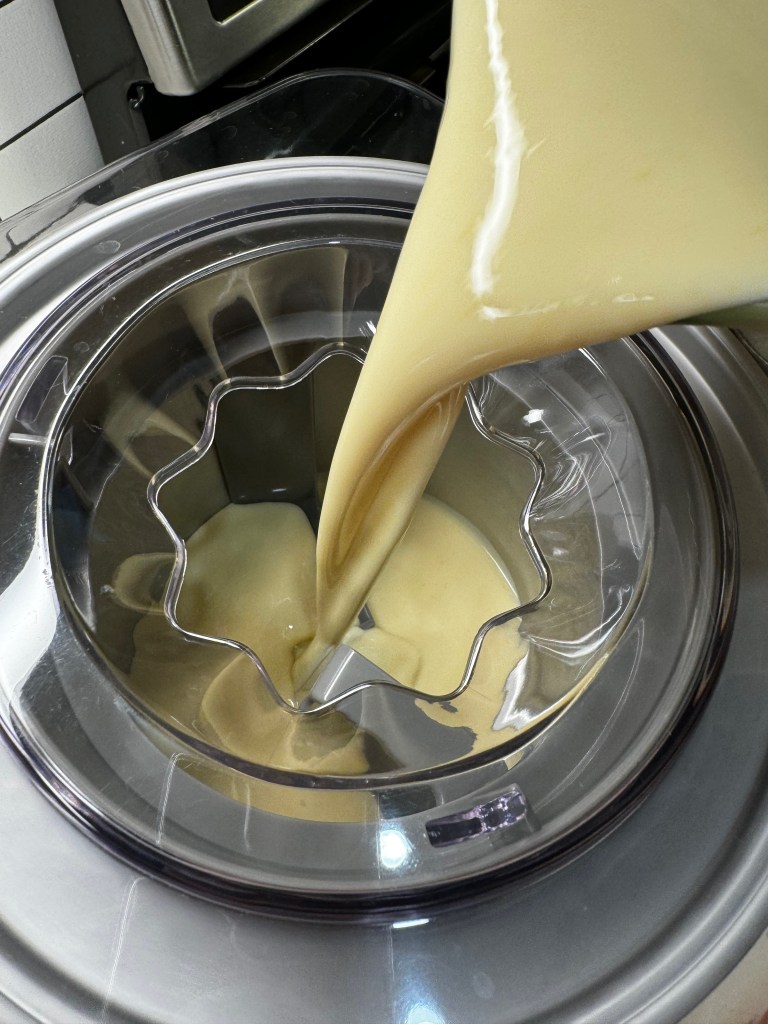
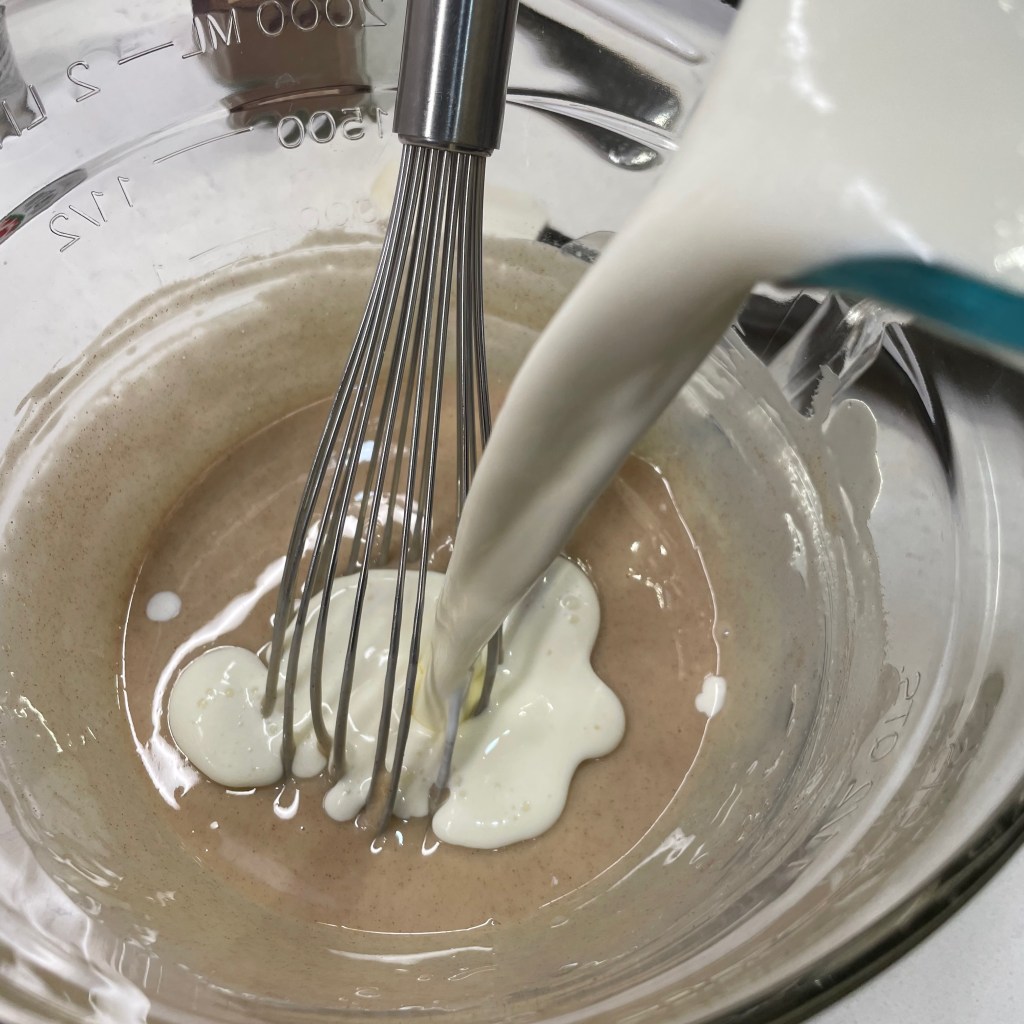
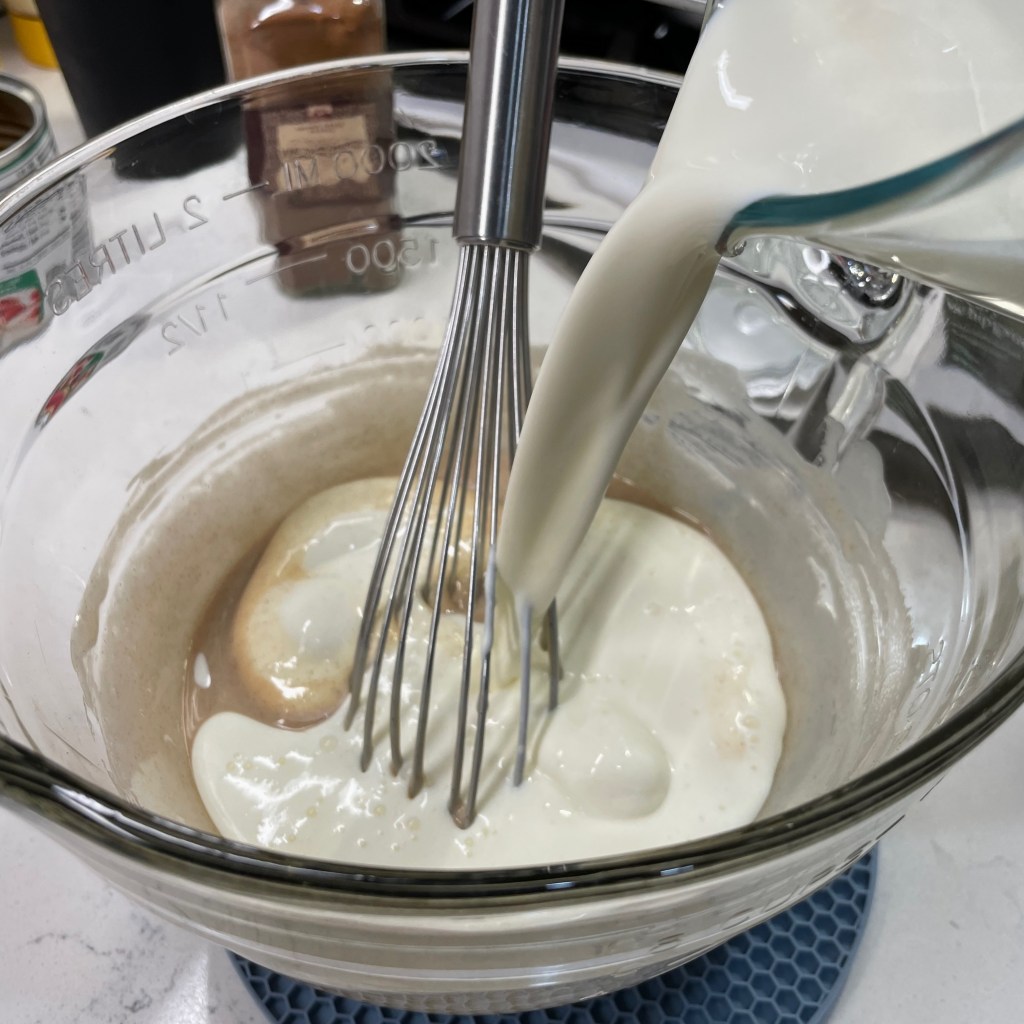
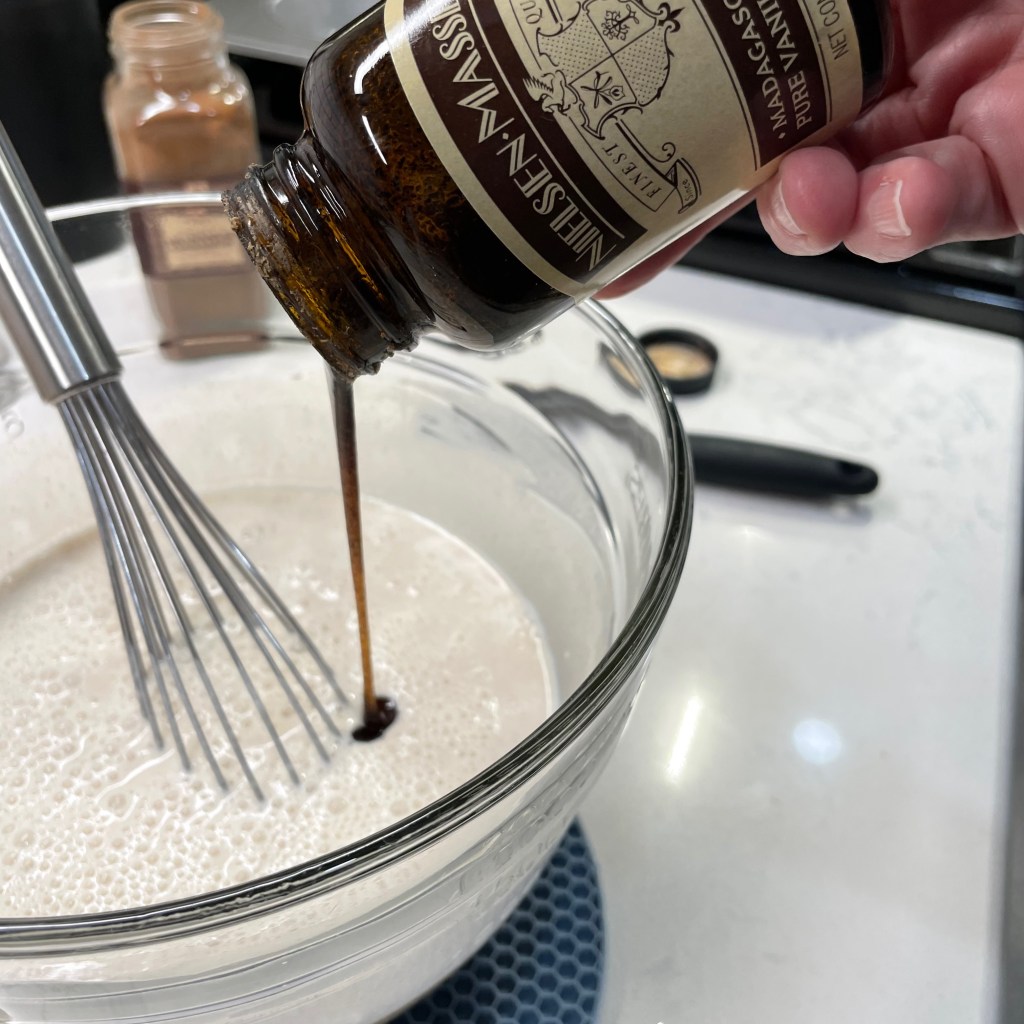
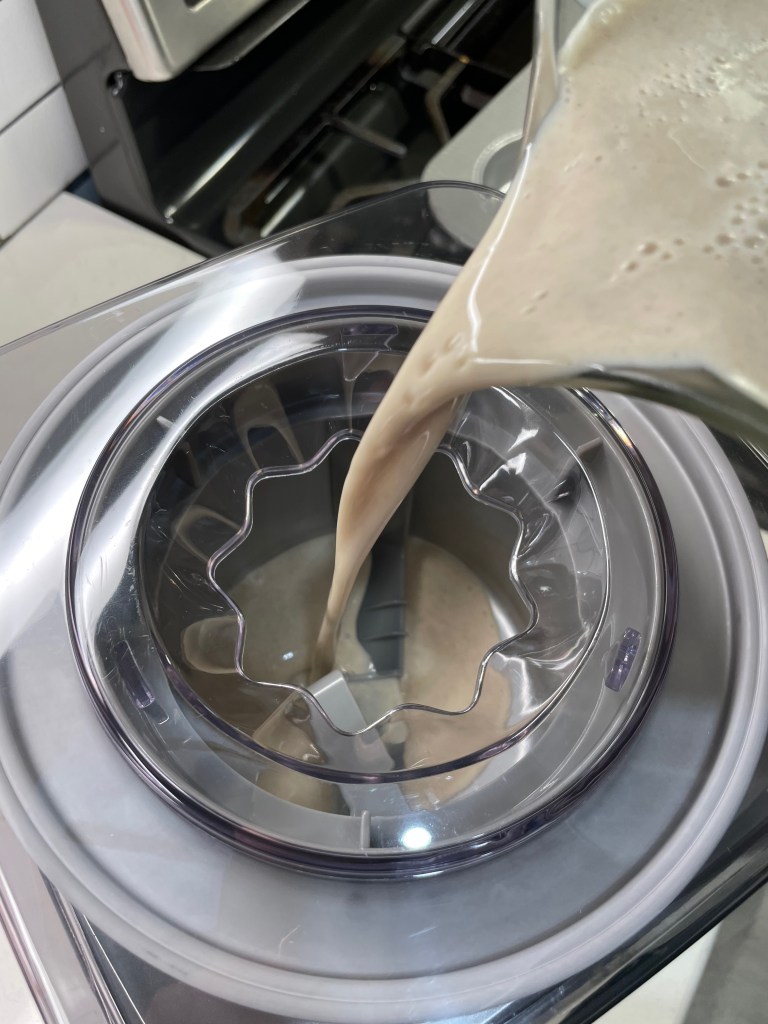
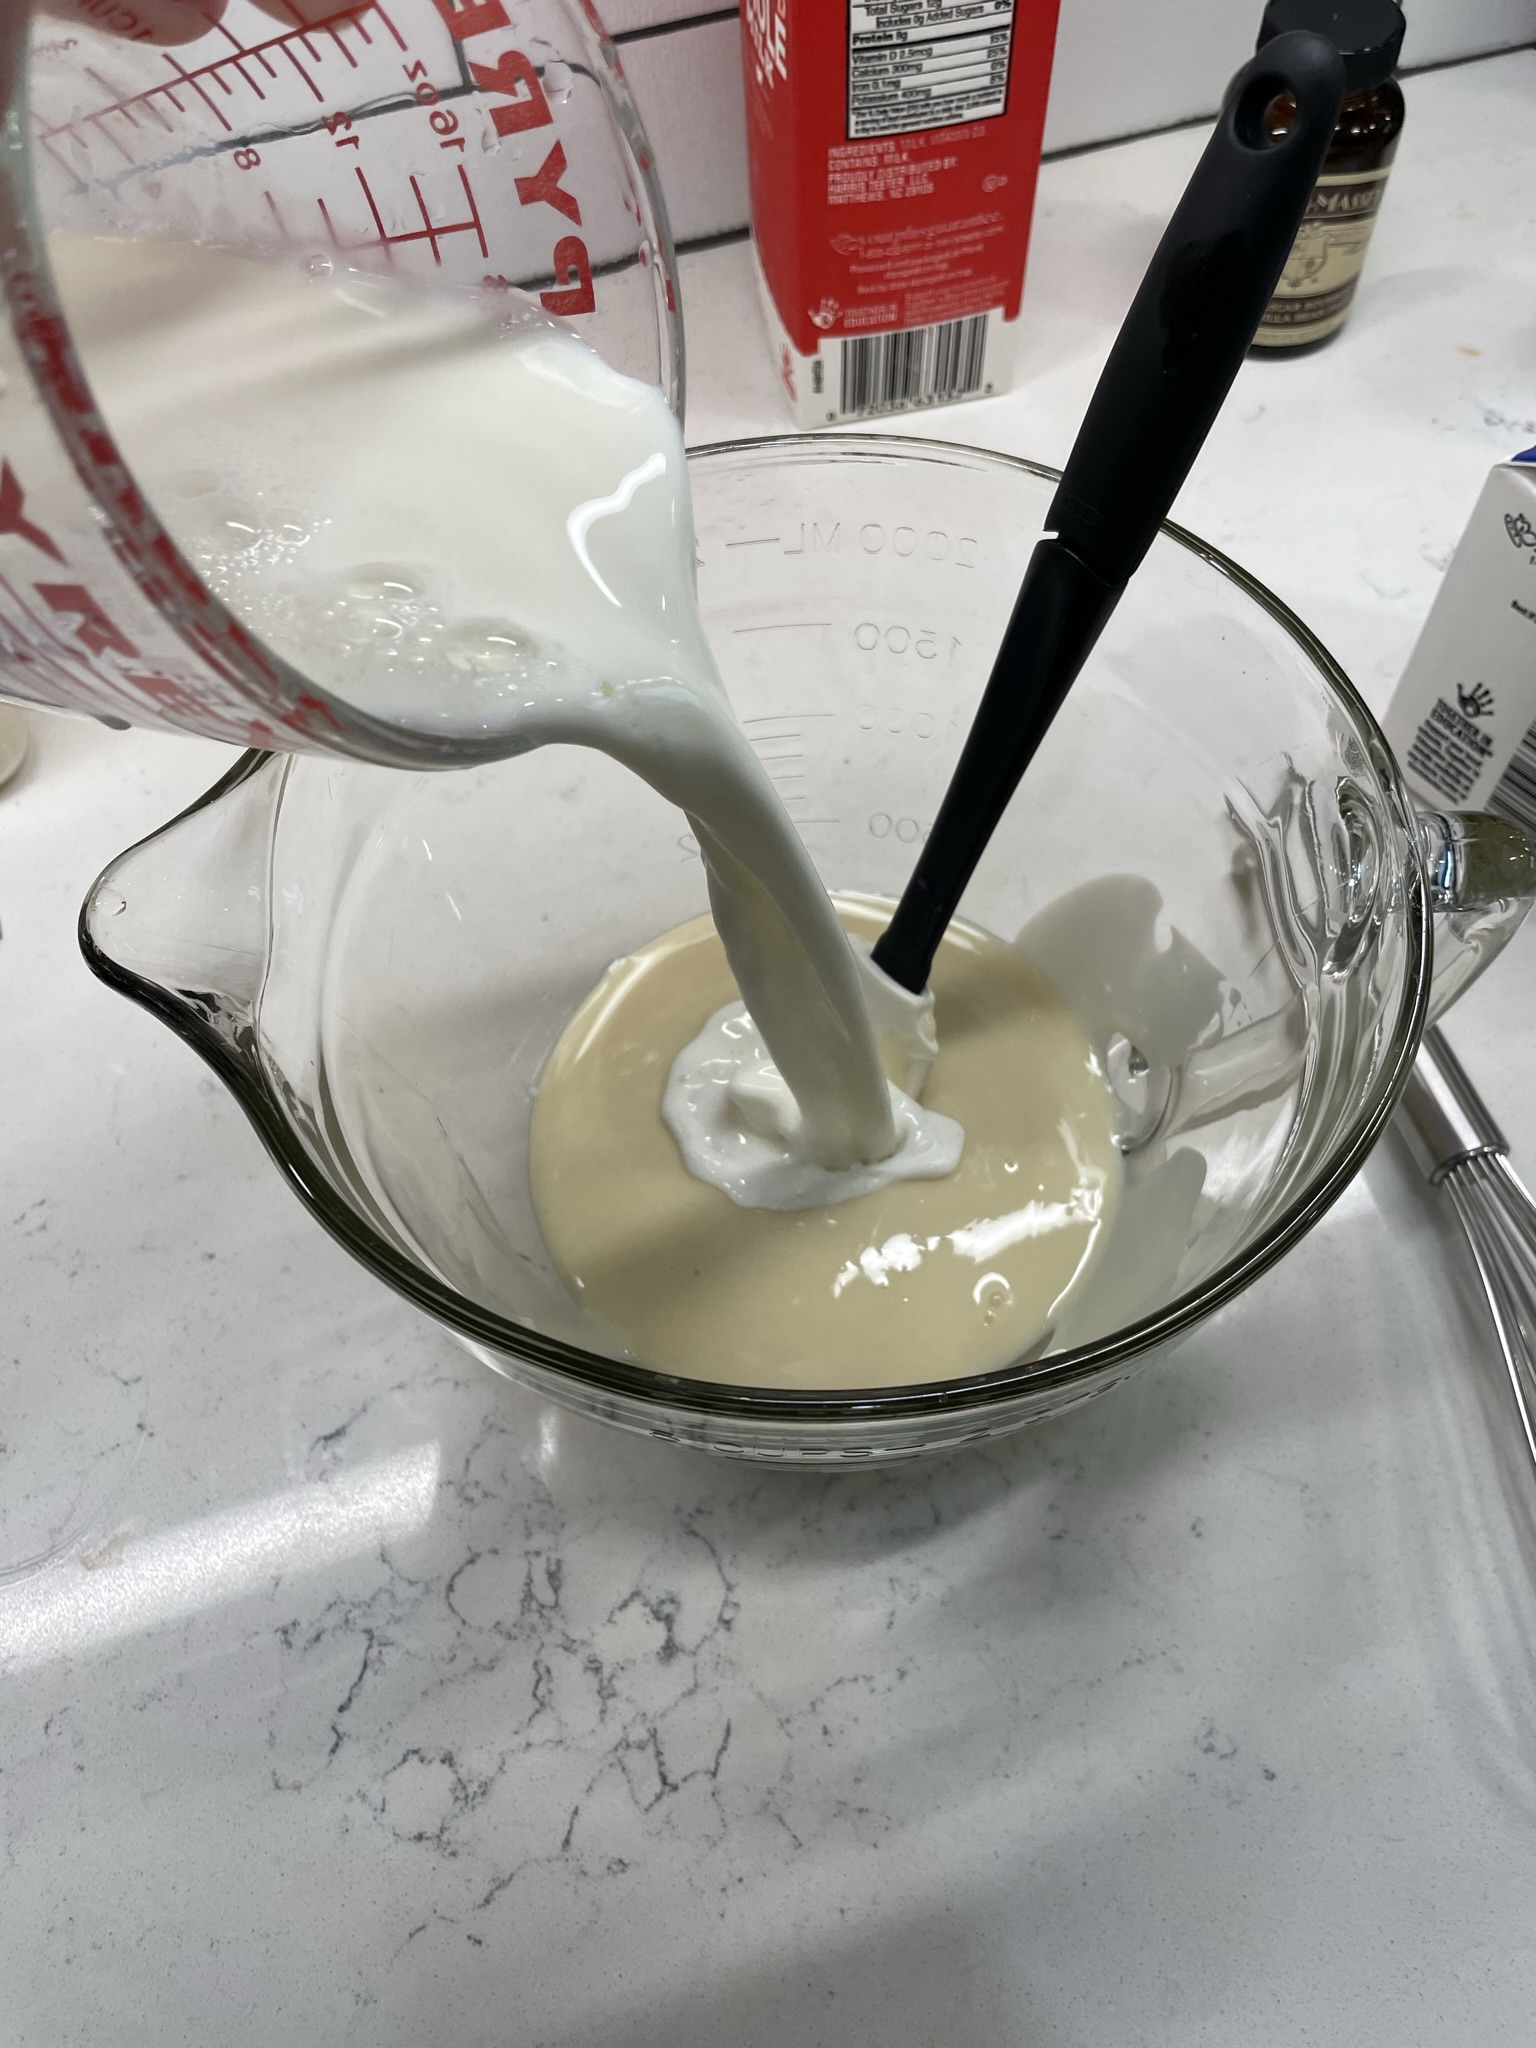
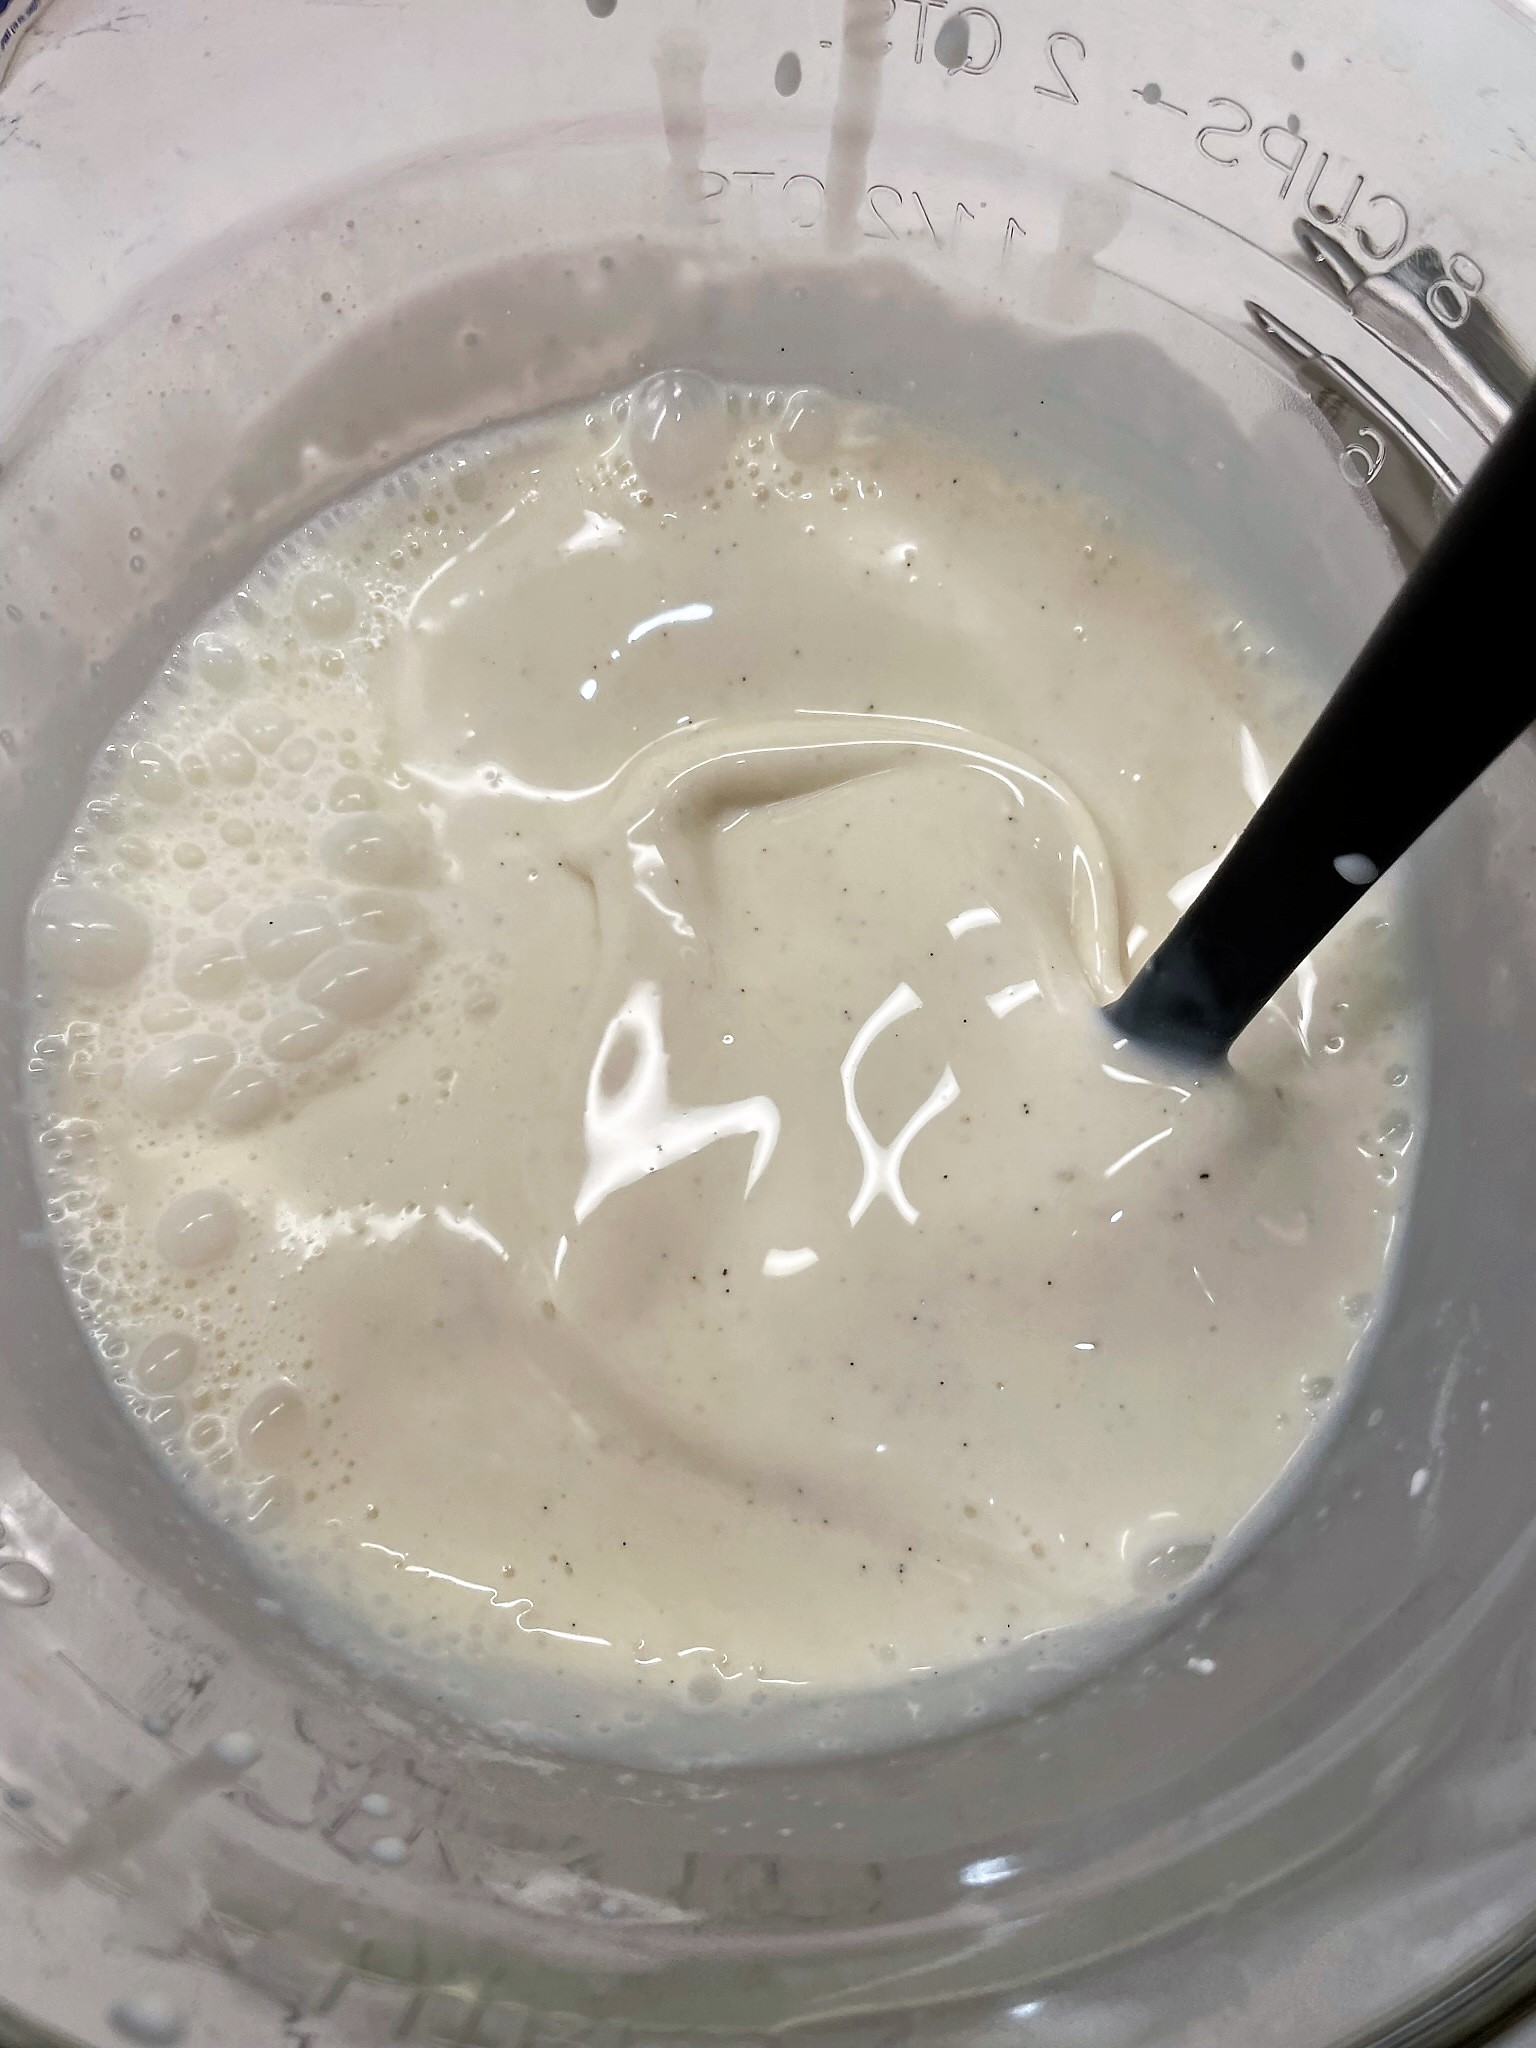
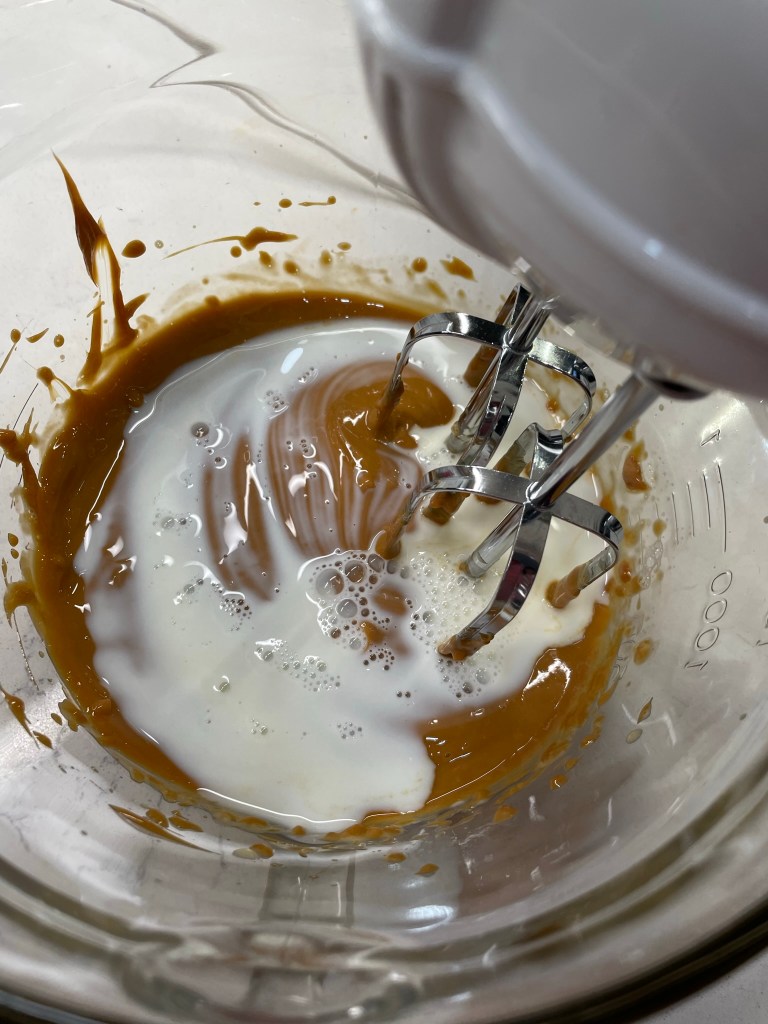
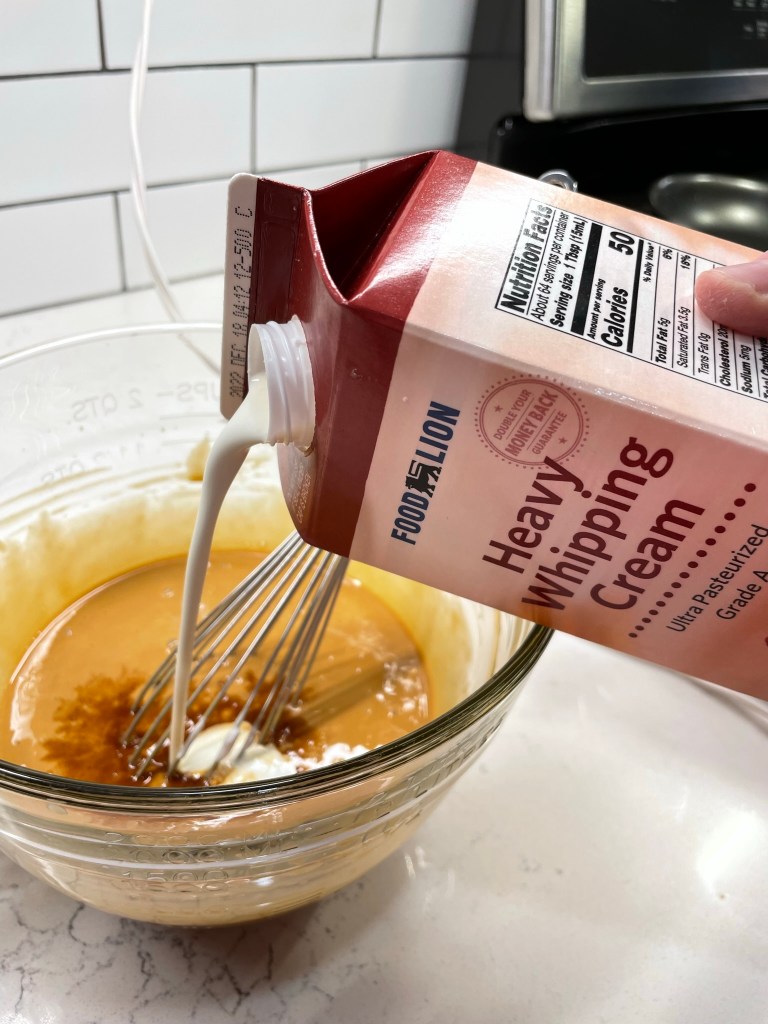
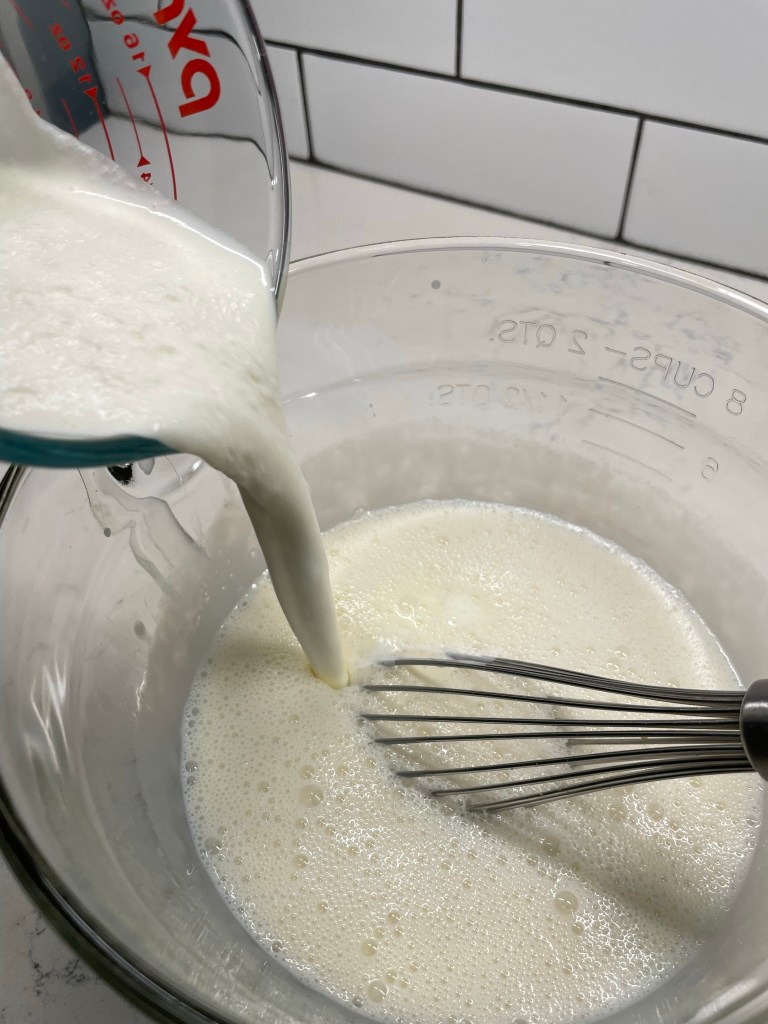
First into the mixer was the sweetened condensed milk and the regular whole milk. These two ingredients are very different in consistency, so getting them blended first felt important. Next came the pudding mix, which I whisked and whipped until it was a soft, airy consistency. I stirred in the heavy cream, and I was trying to act quickly before the pudding thickeners took over, and then this base mixture went into the fridge for a few hours to chill through before churning in my electric ice cream maker.
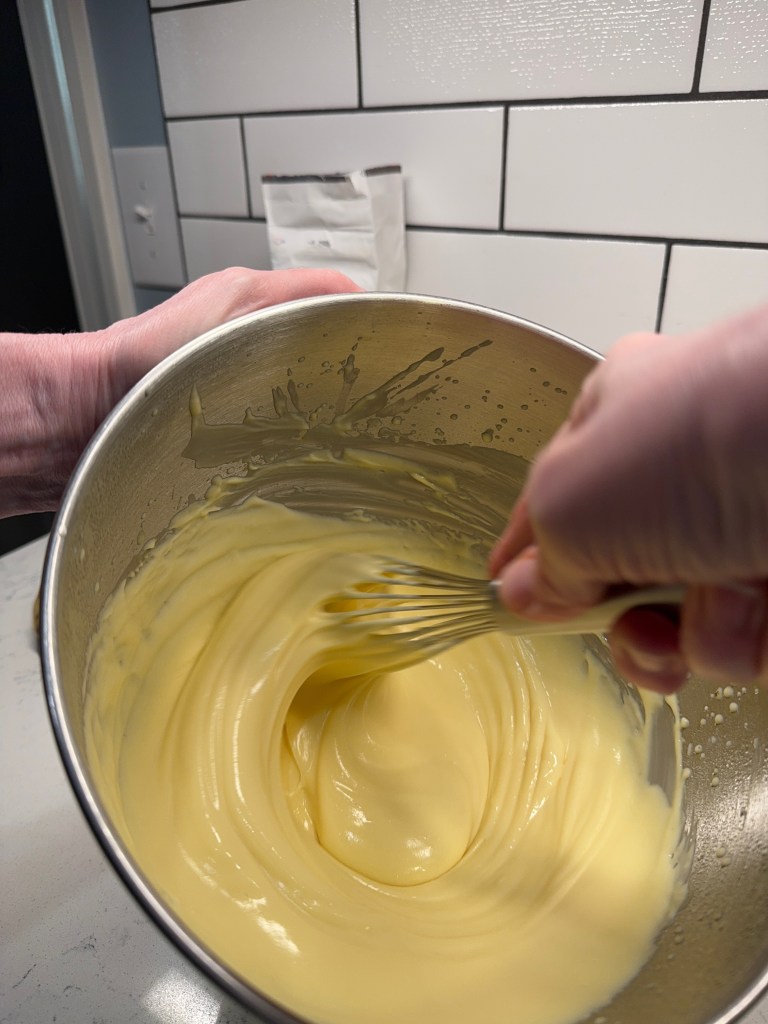
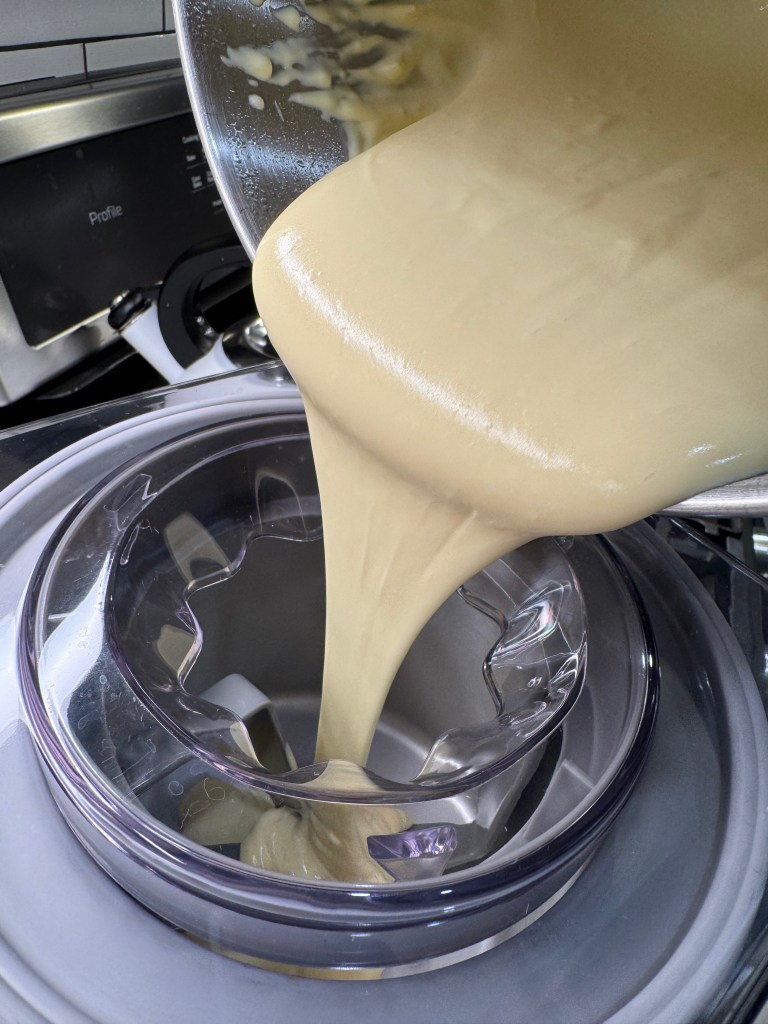
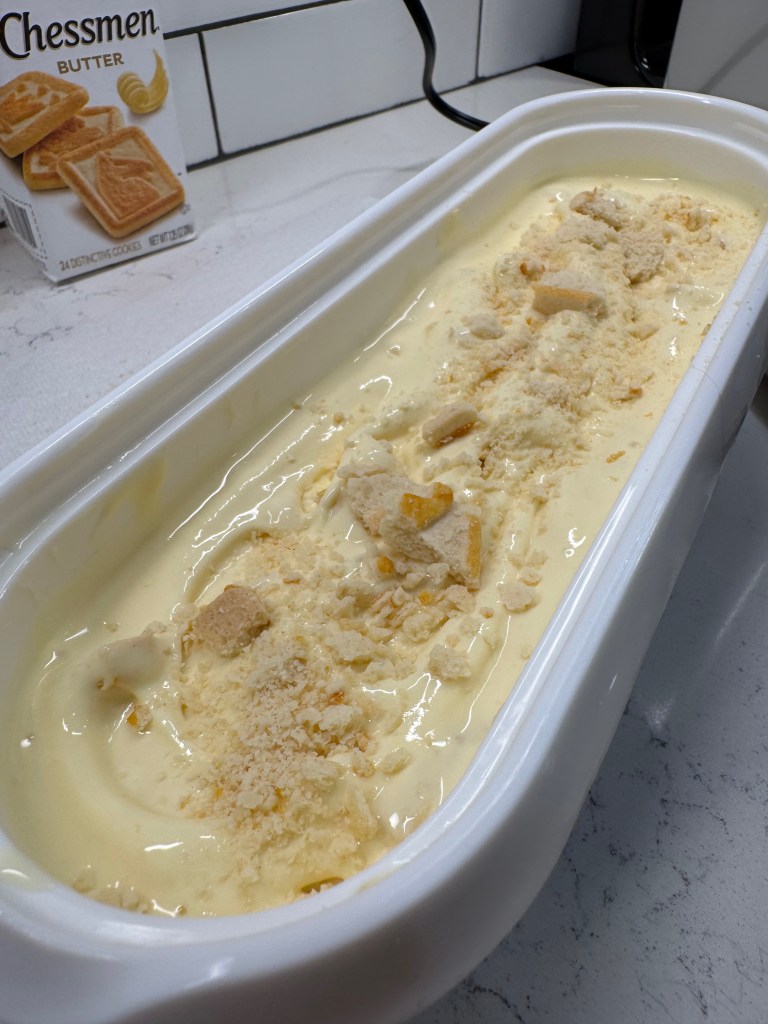
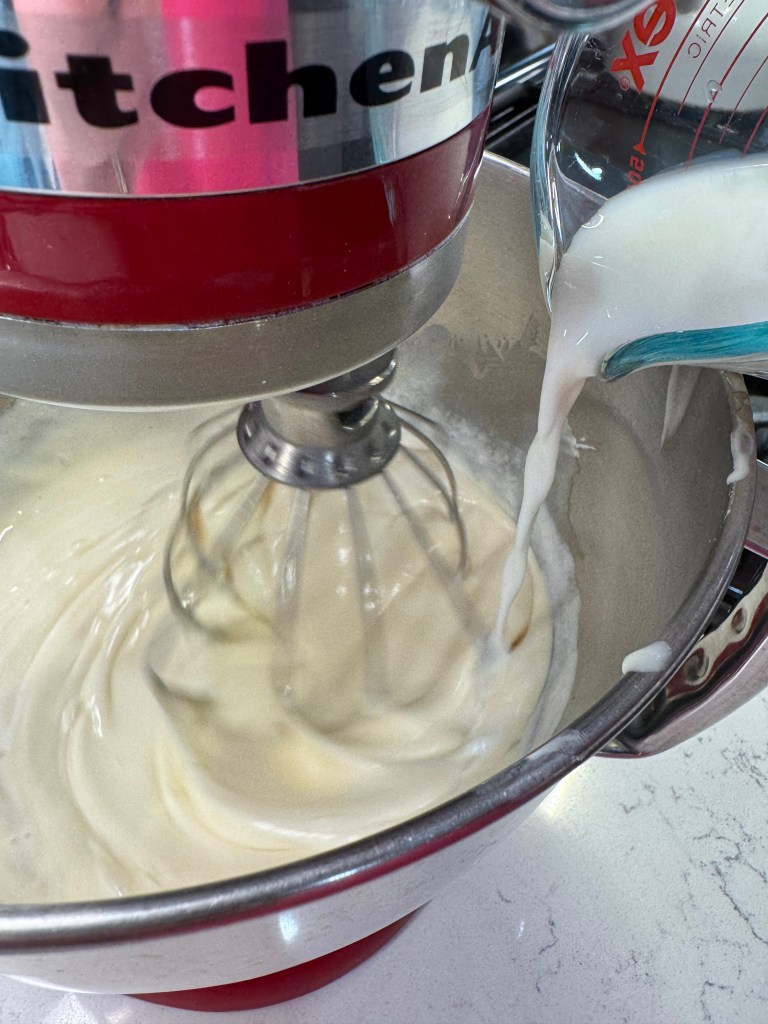
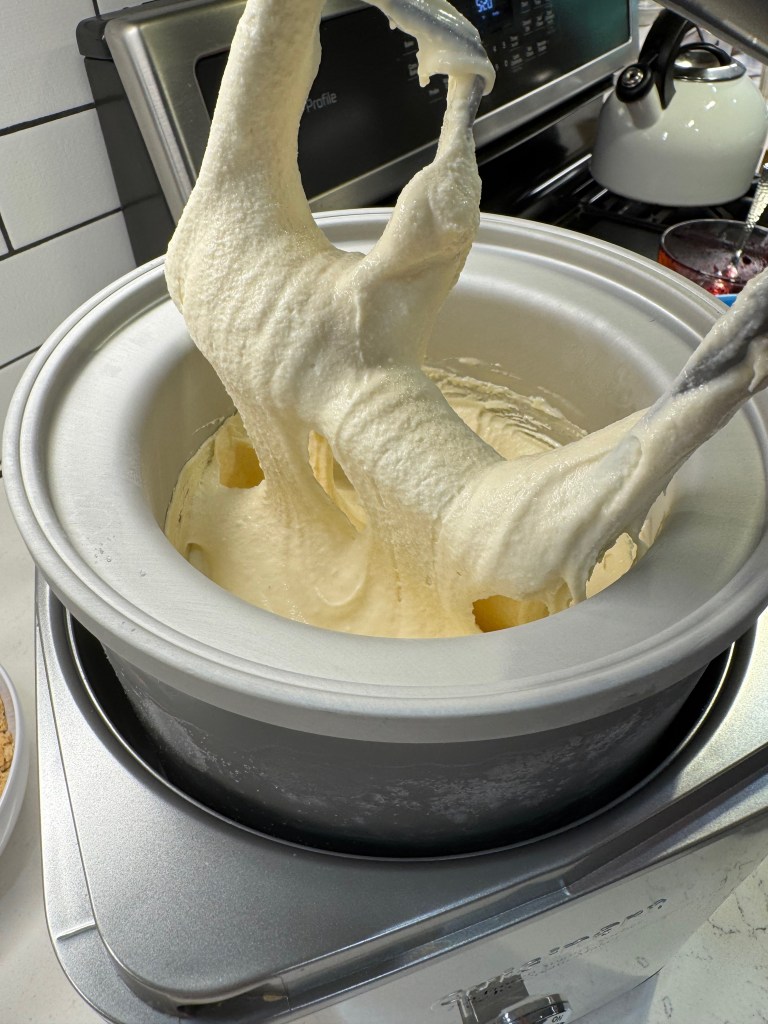
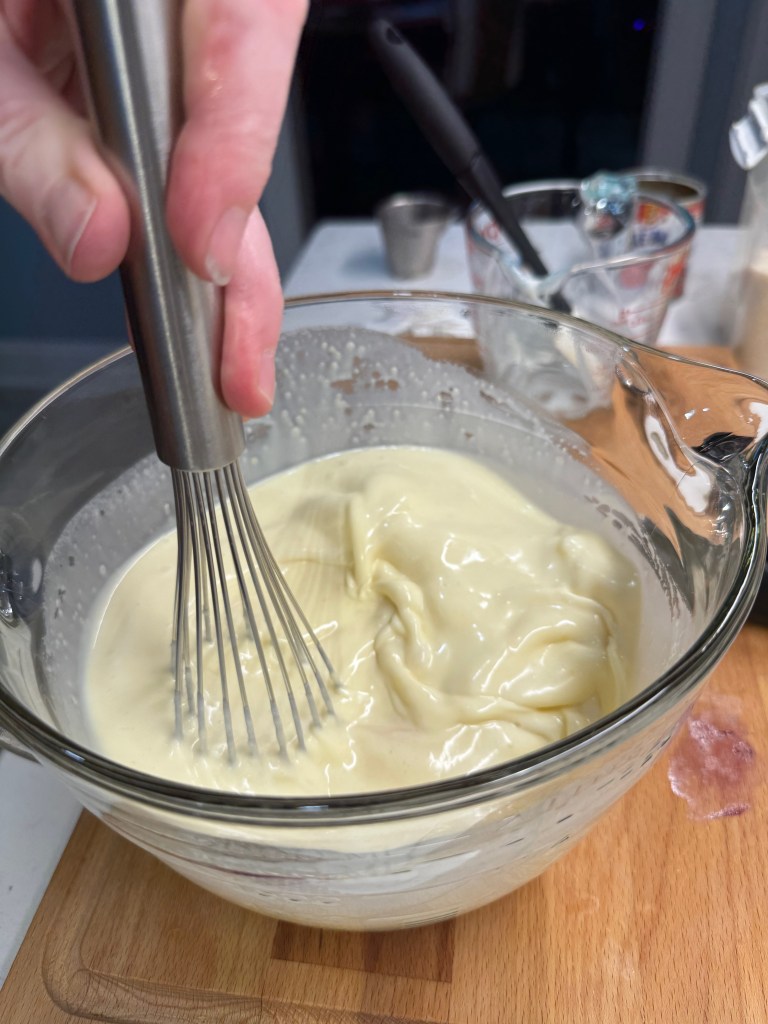
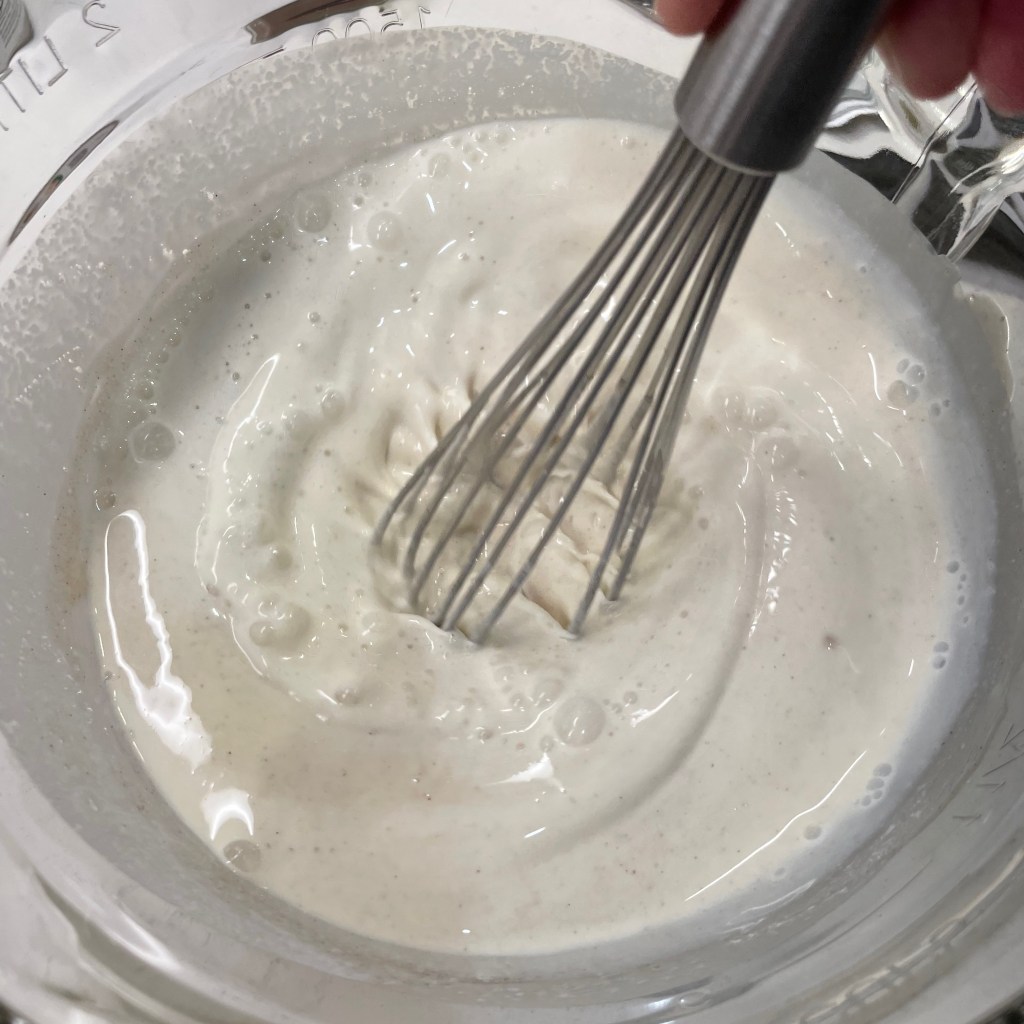
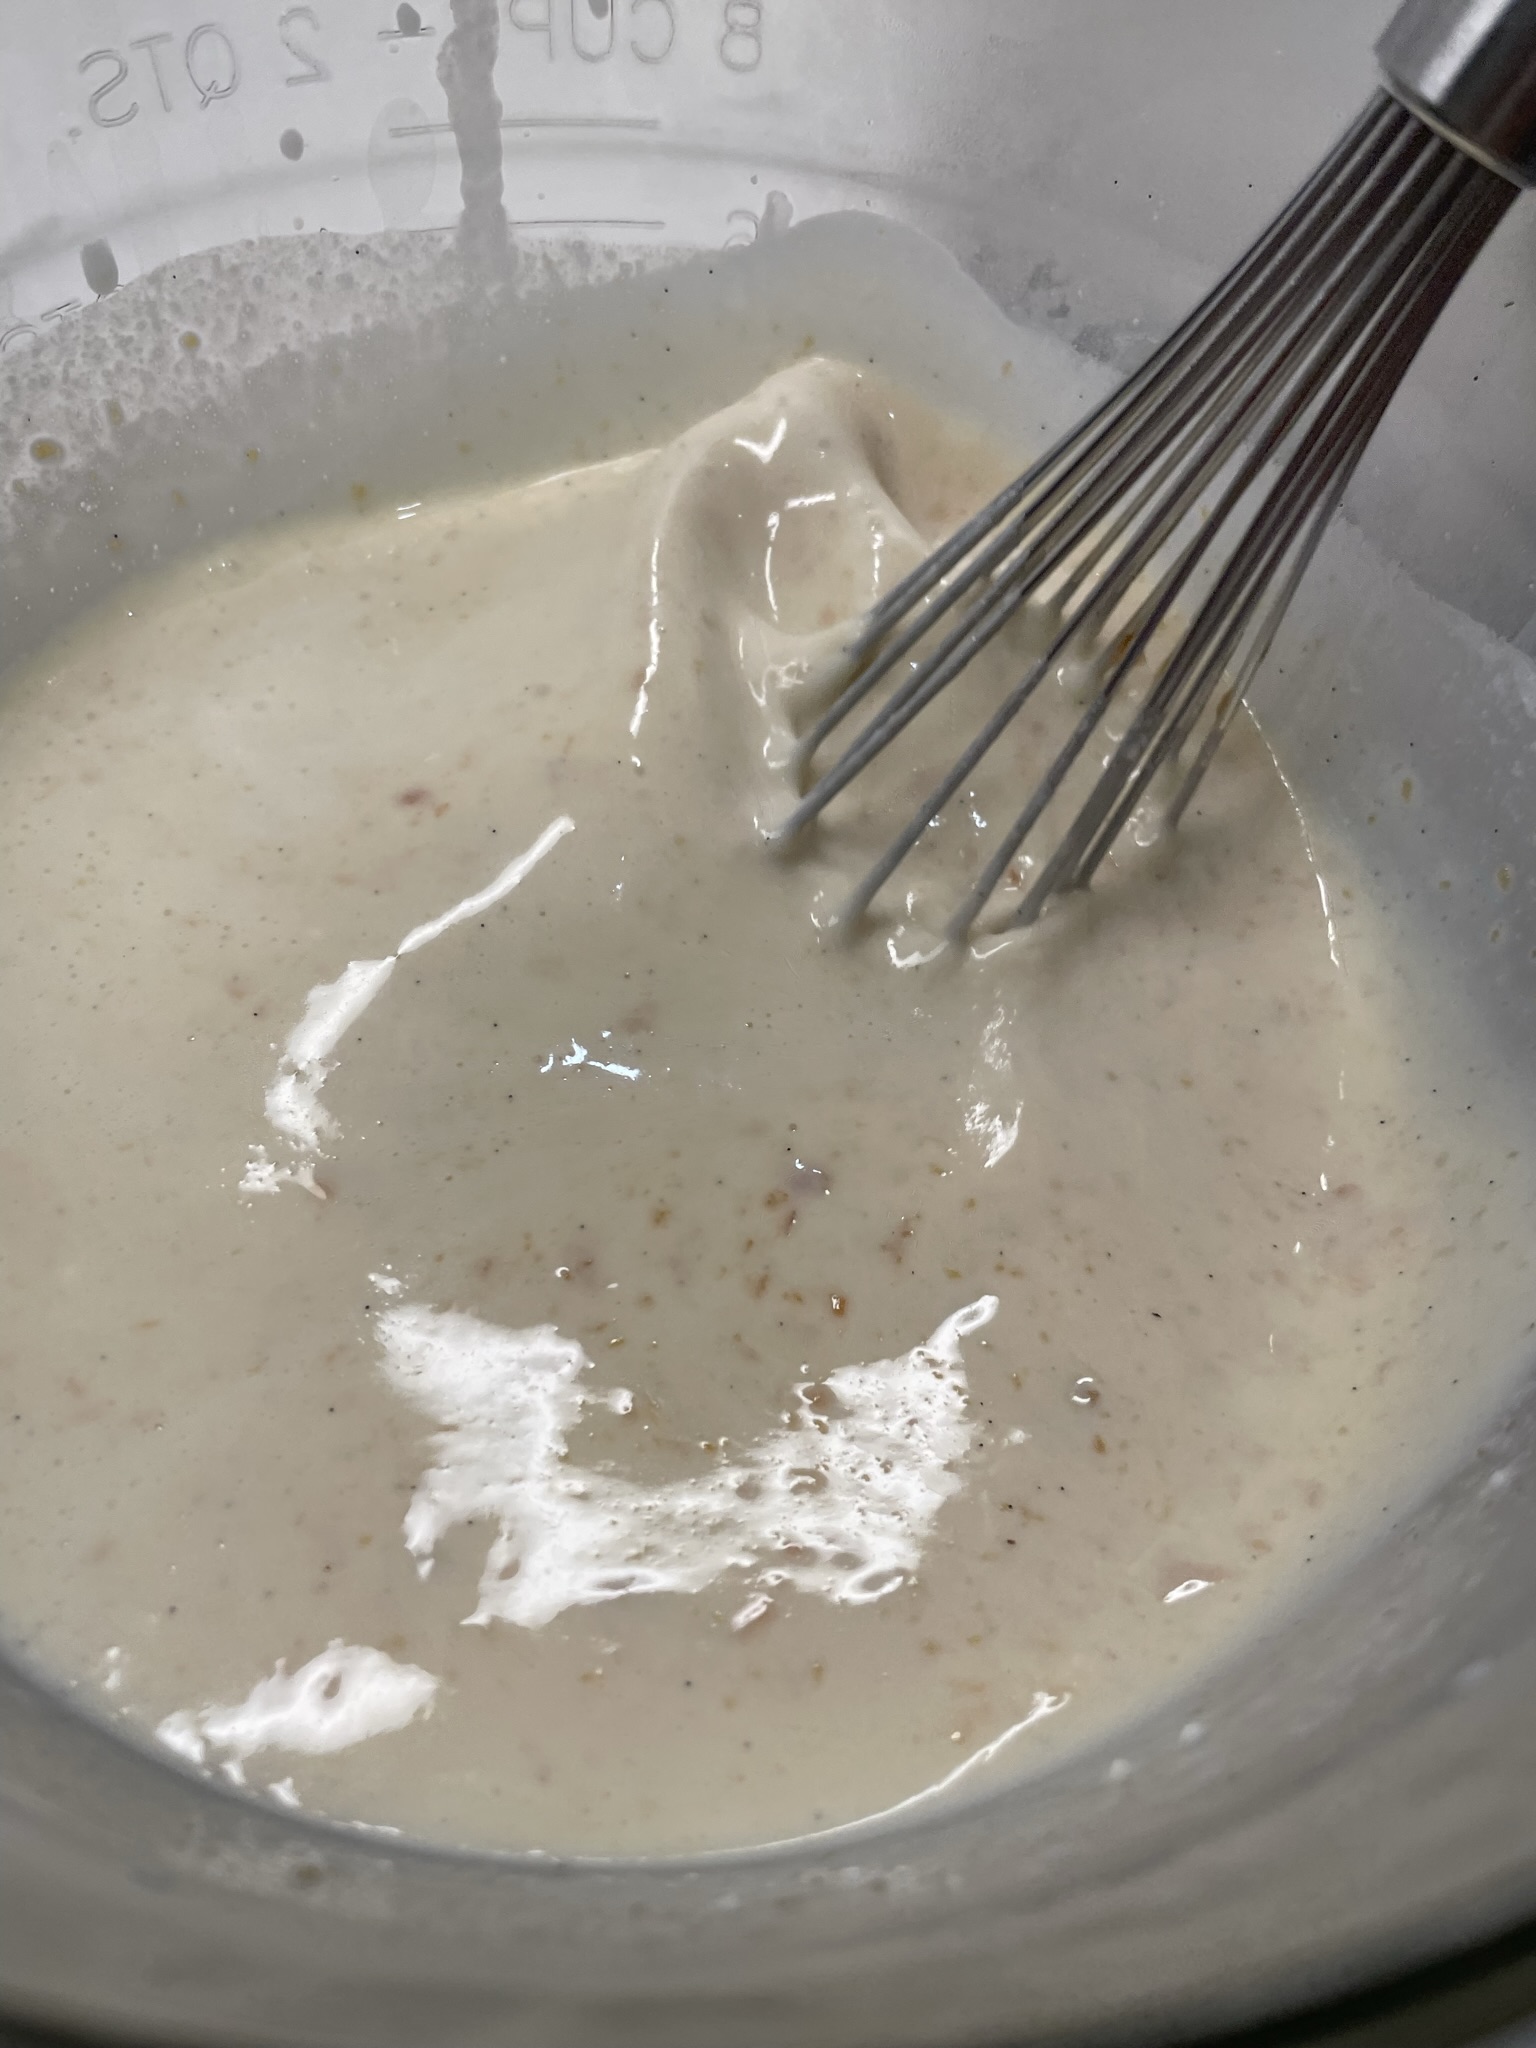
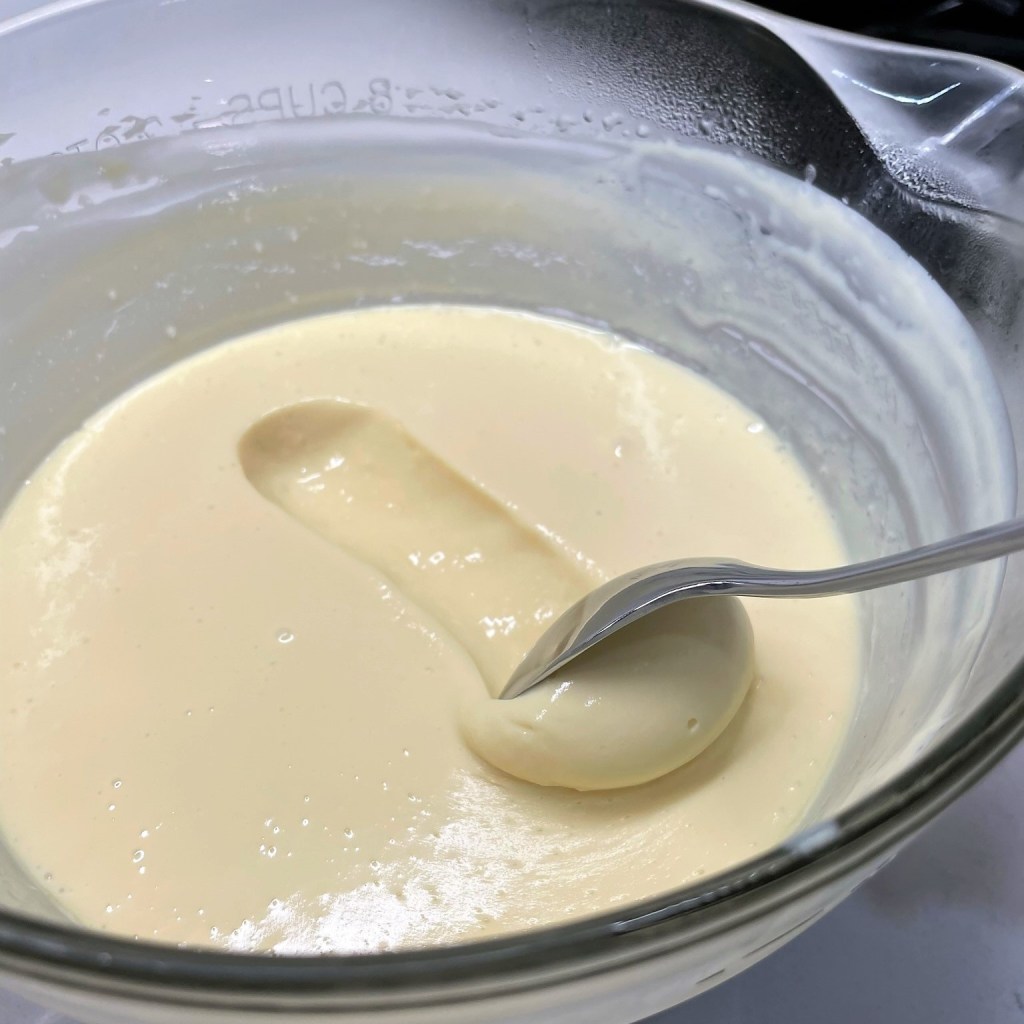
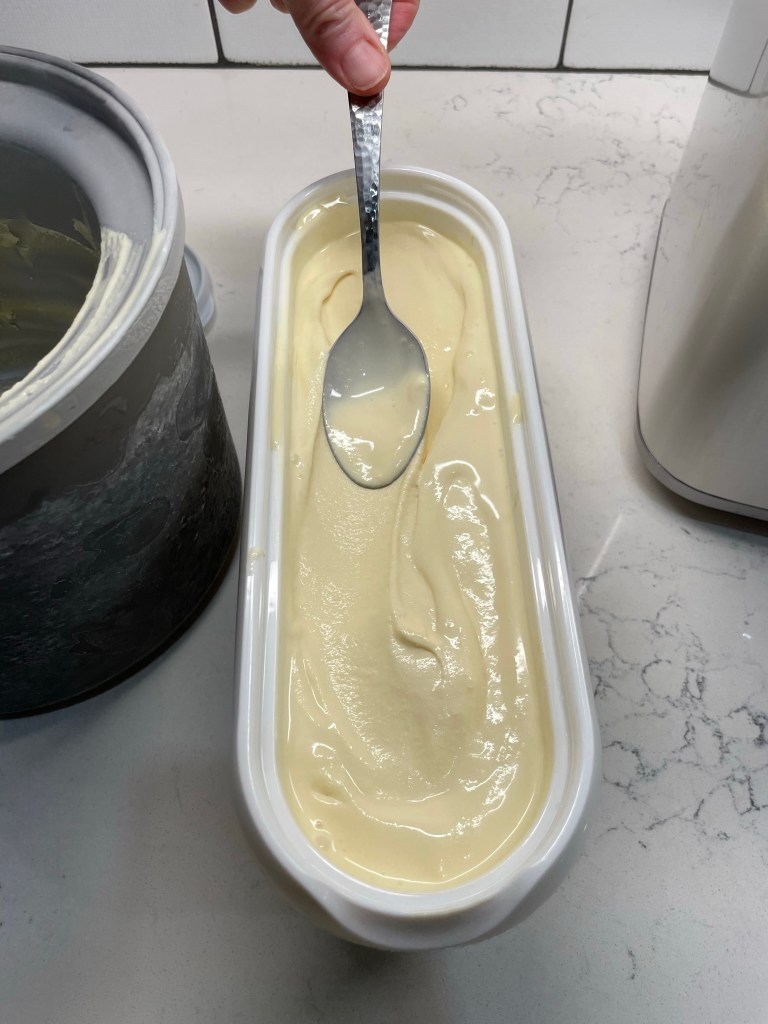
A good whisking brought this “pudding” mixture back to a pourable consistency.
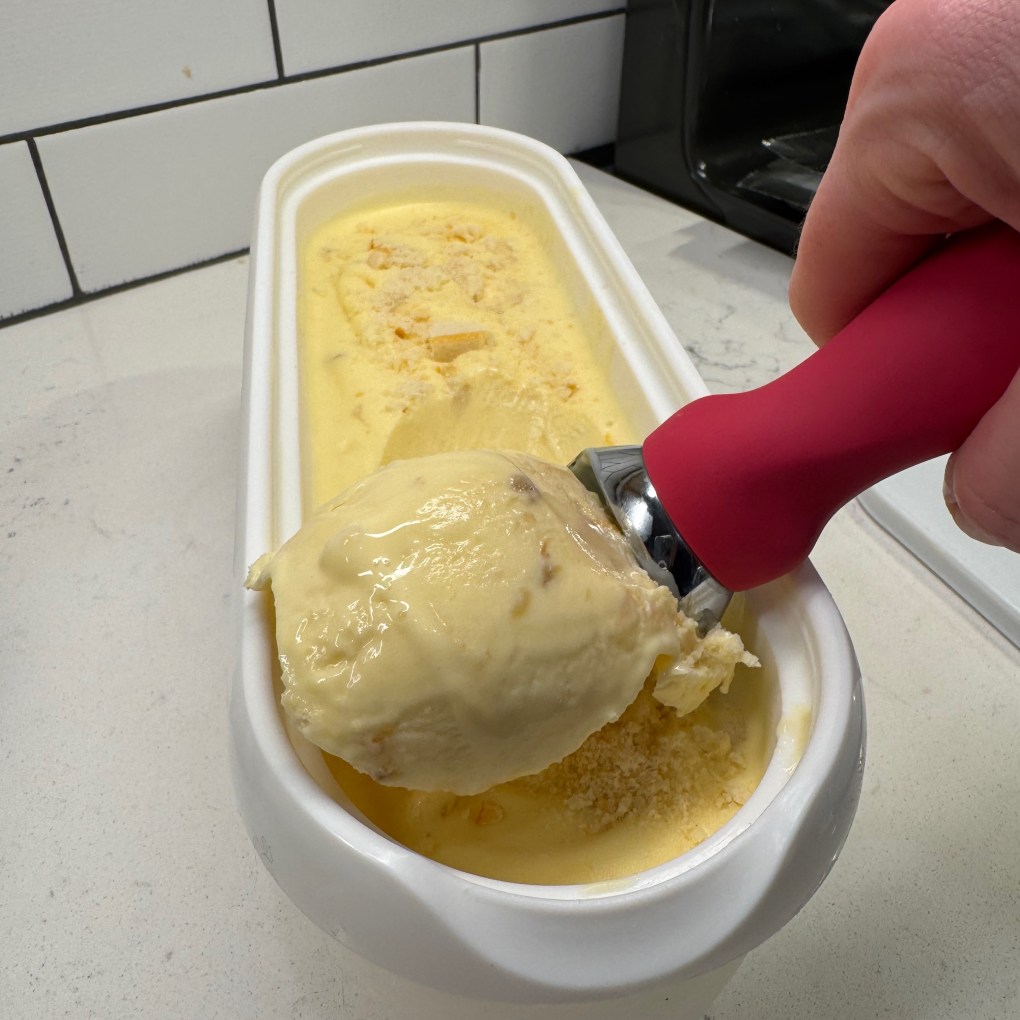
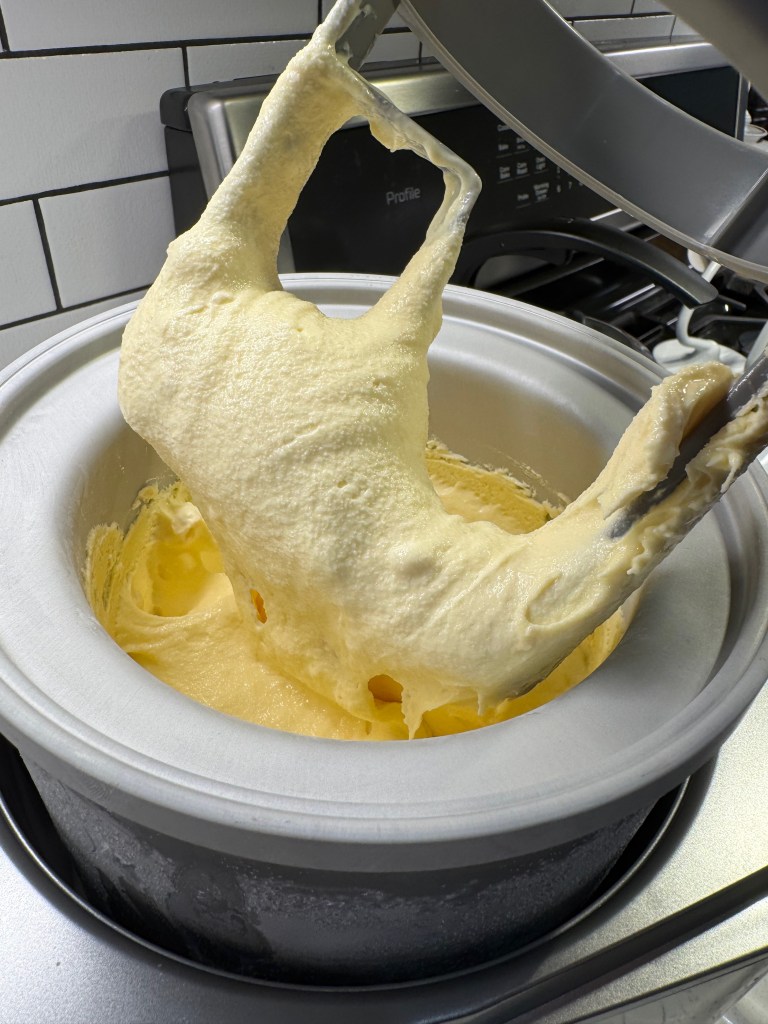
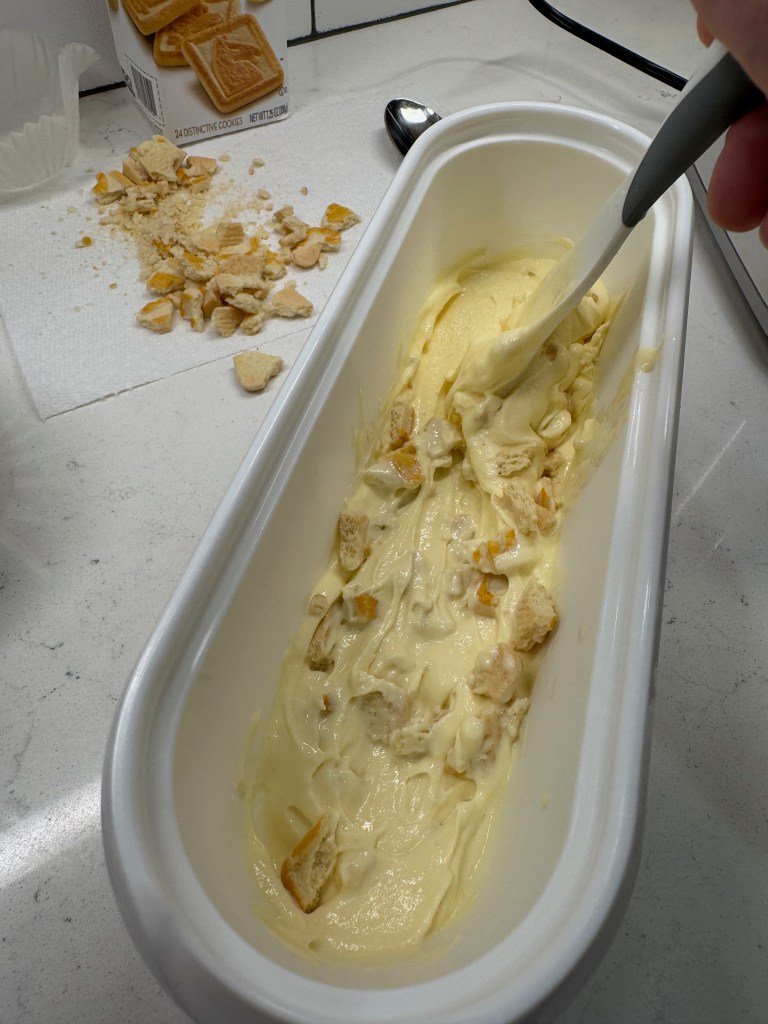
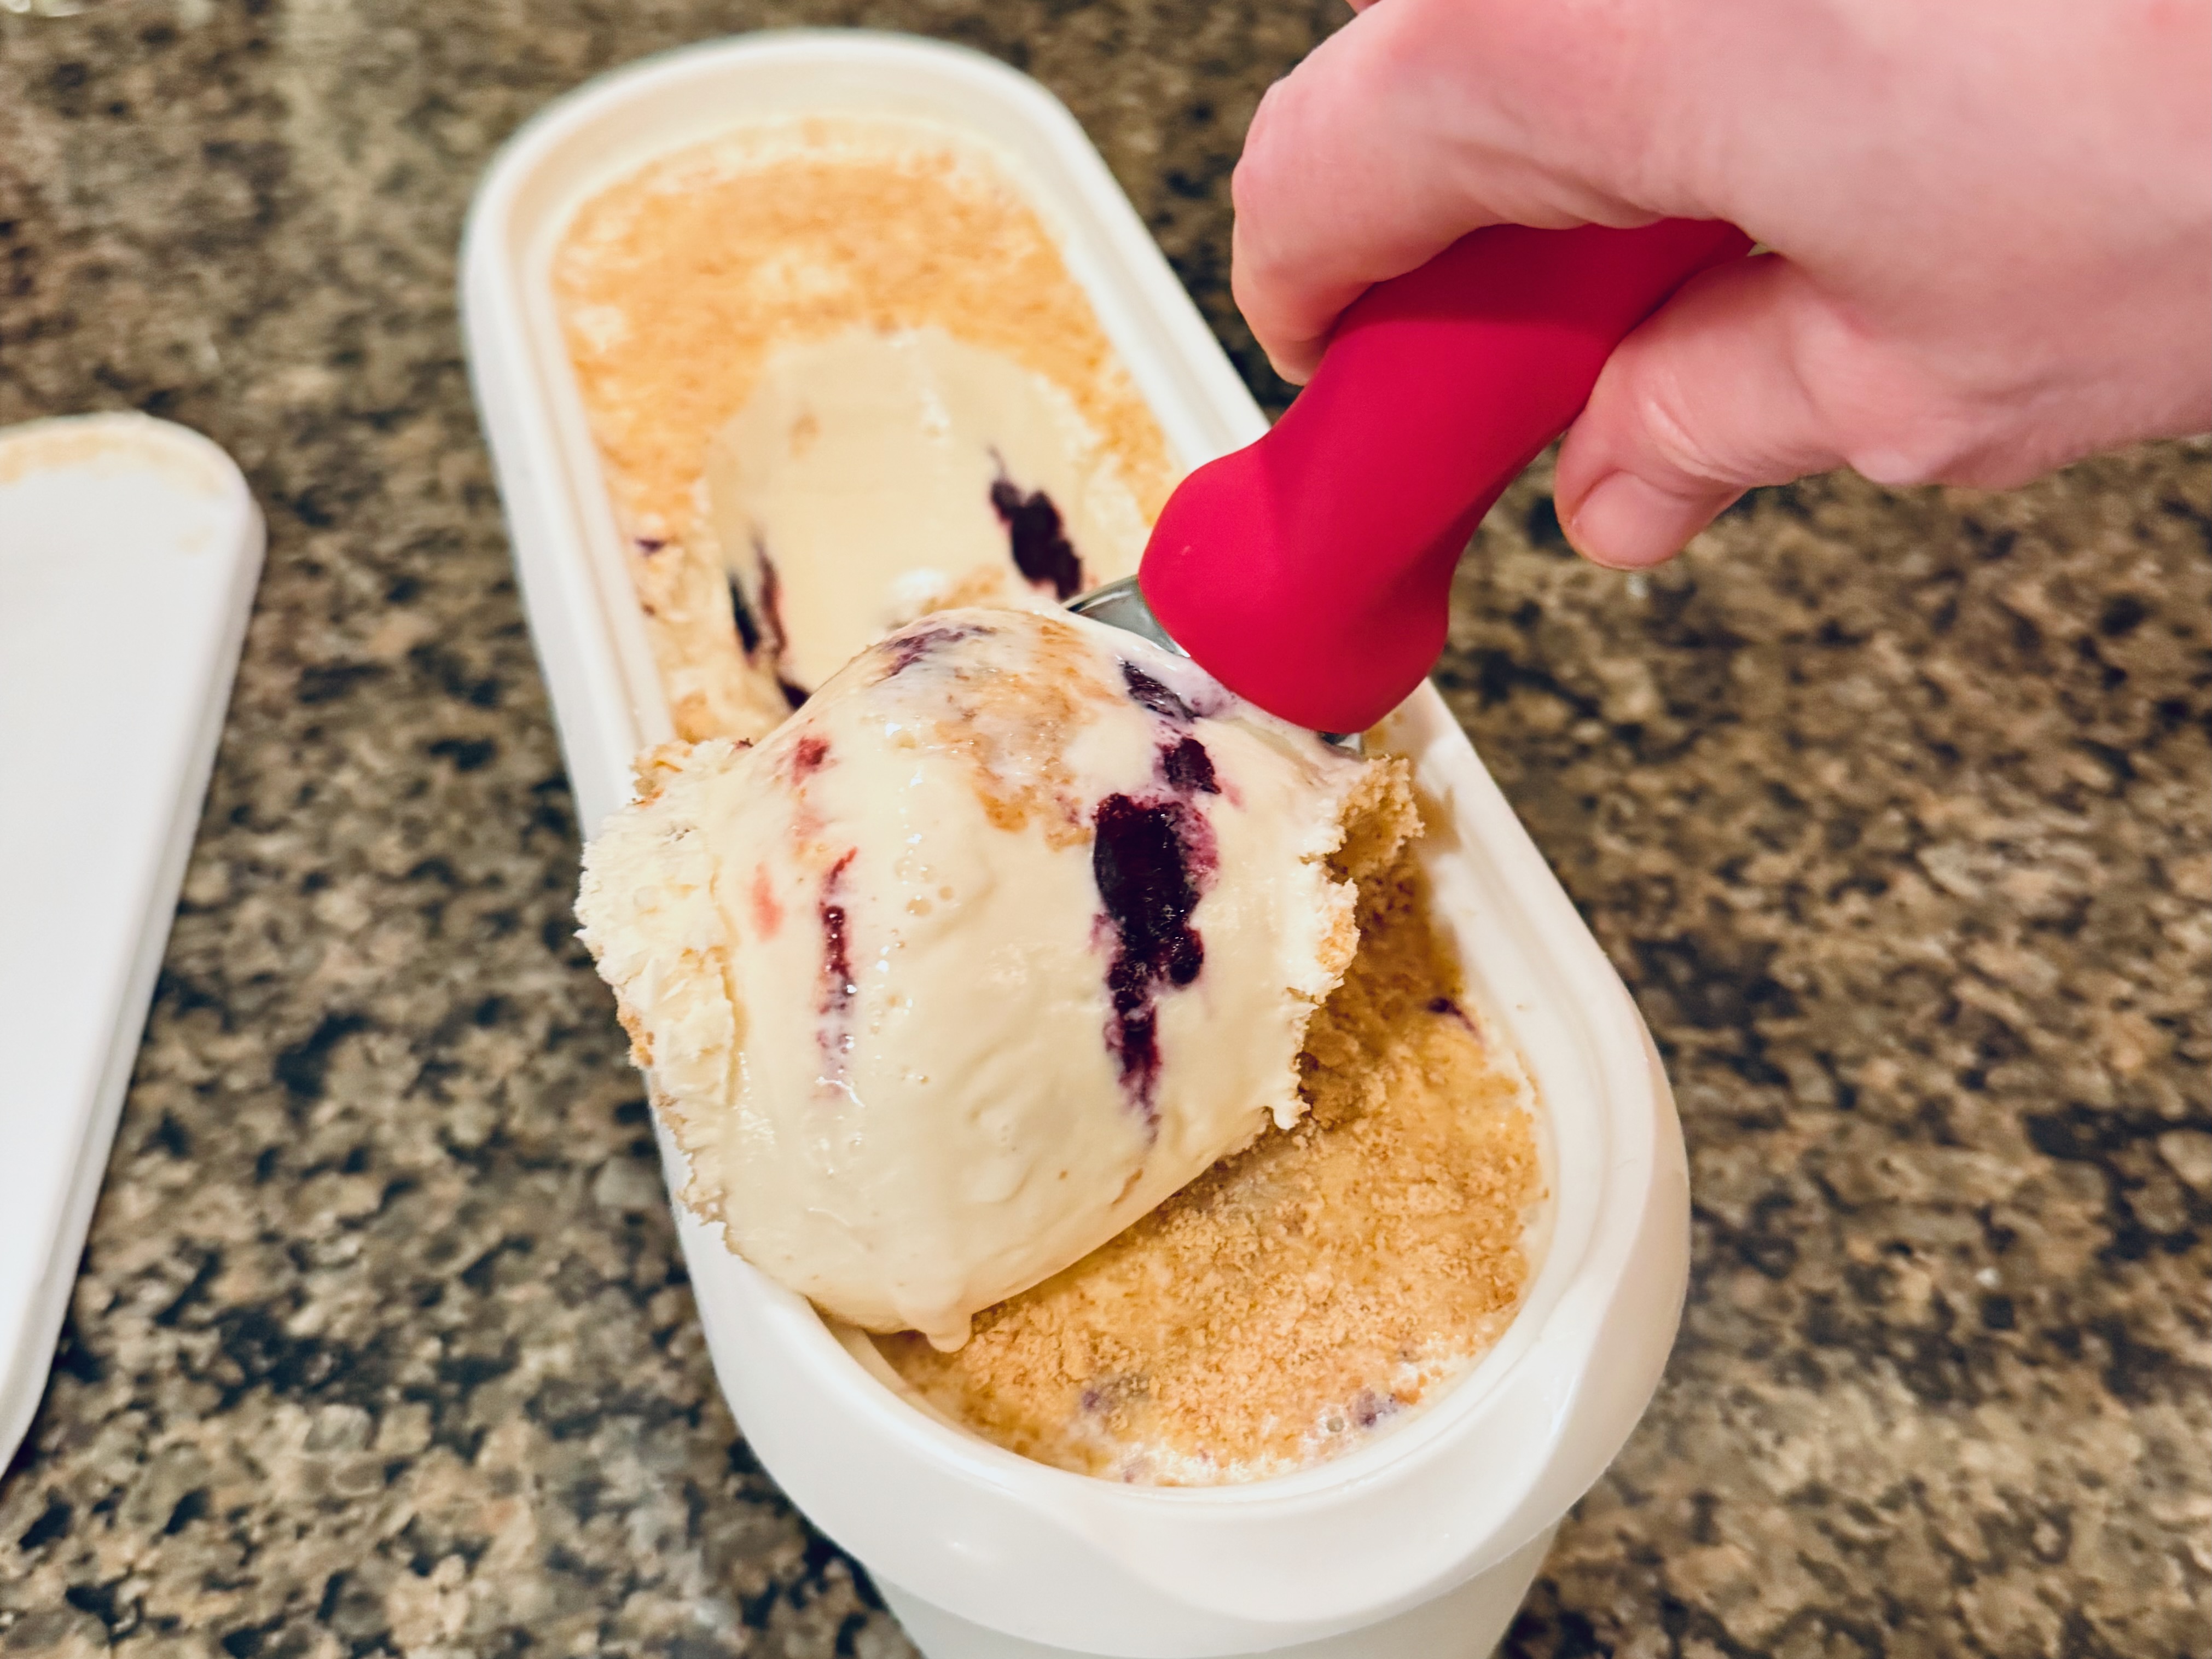
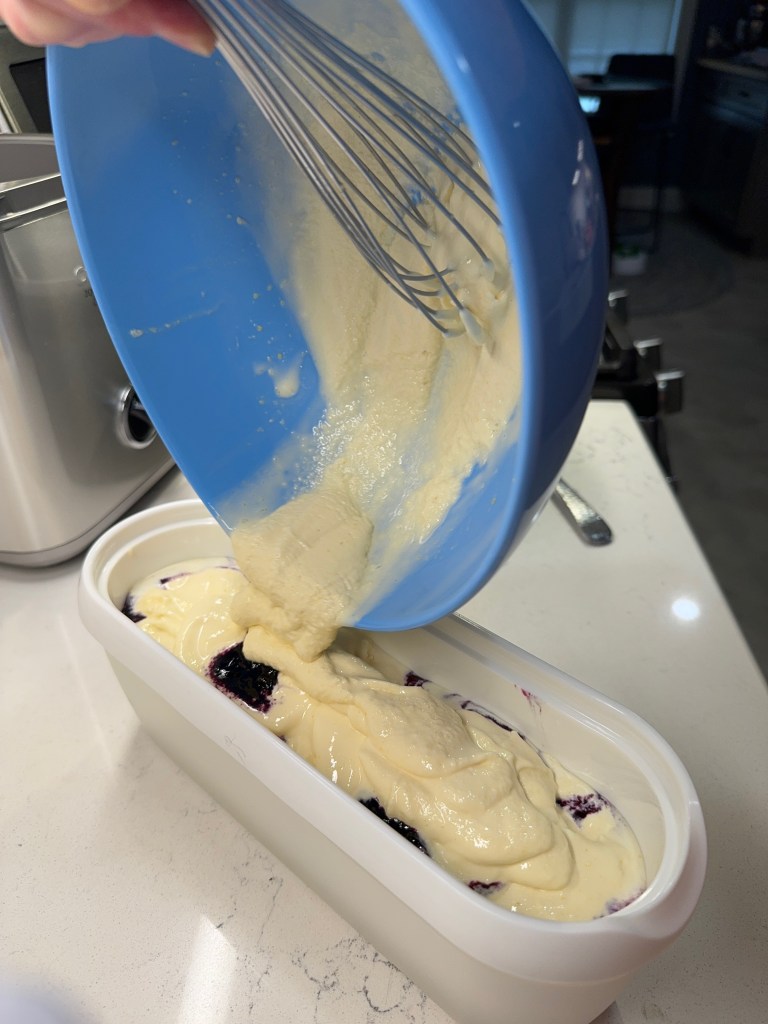
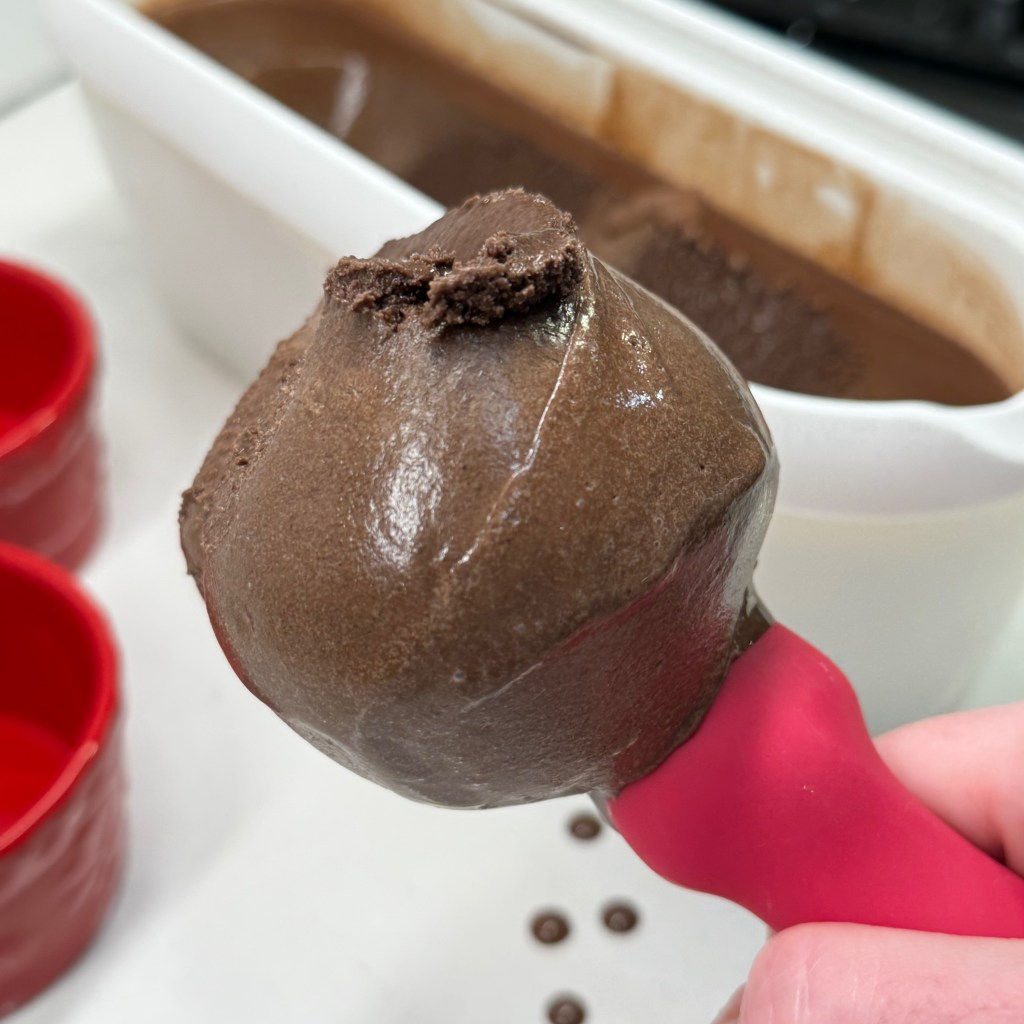
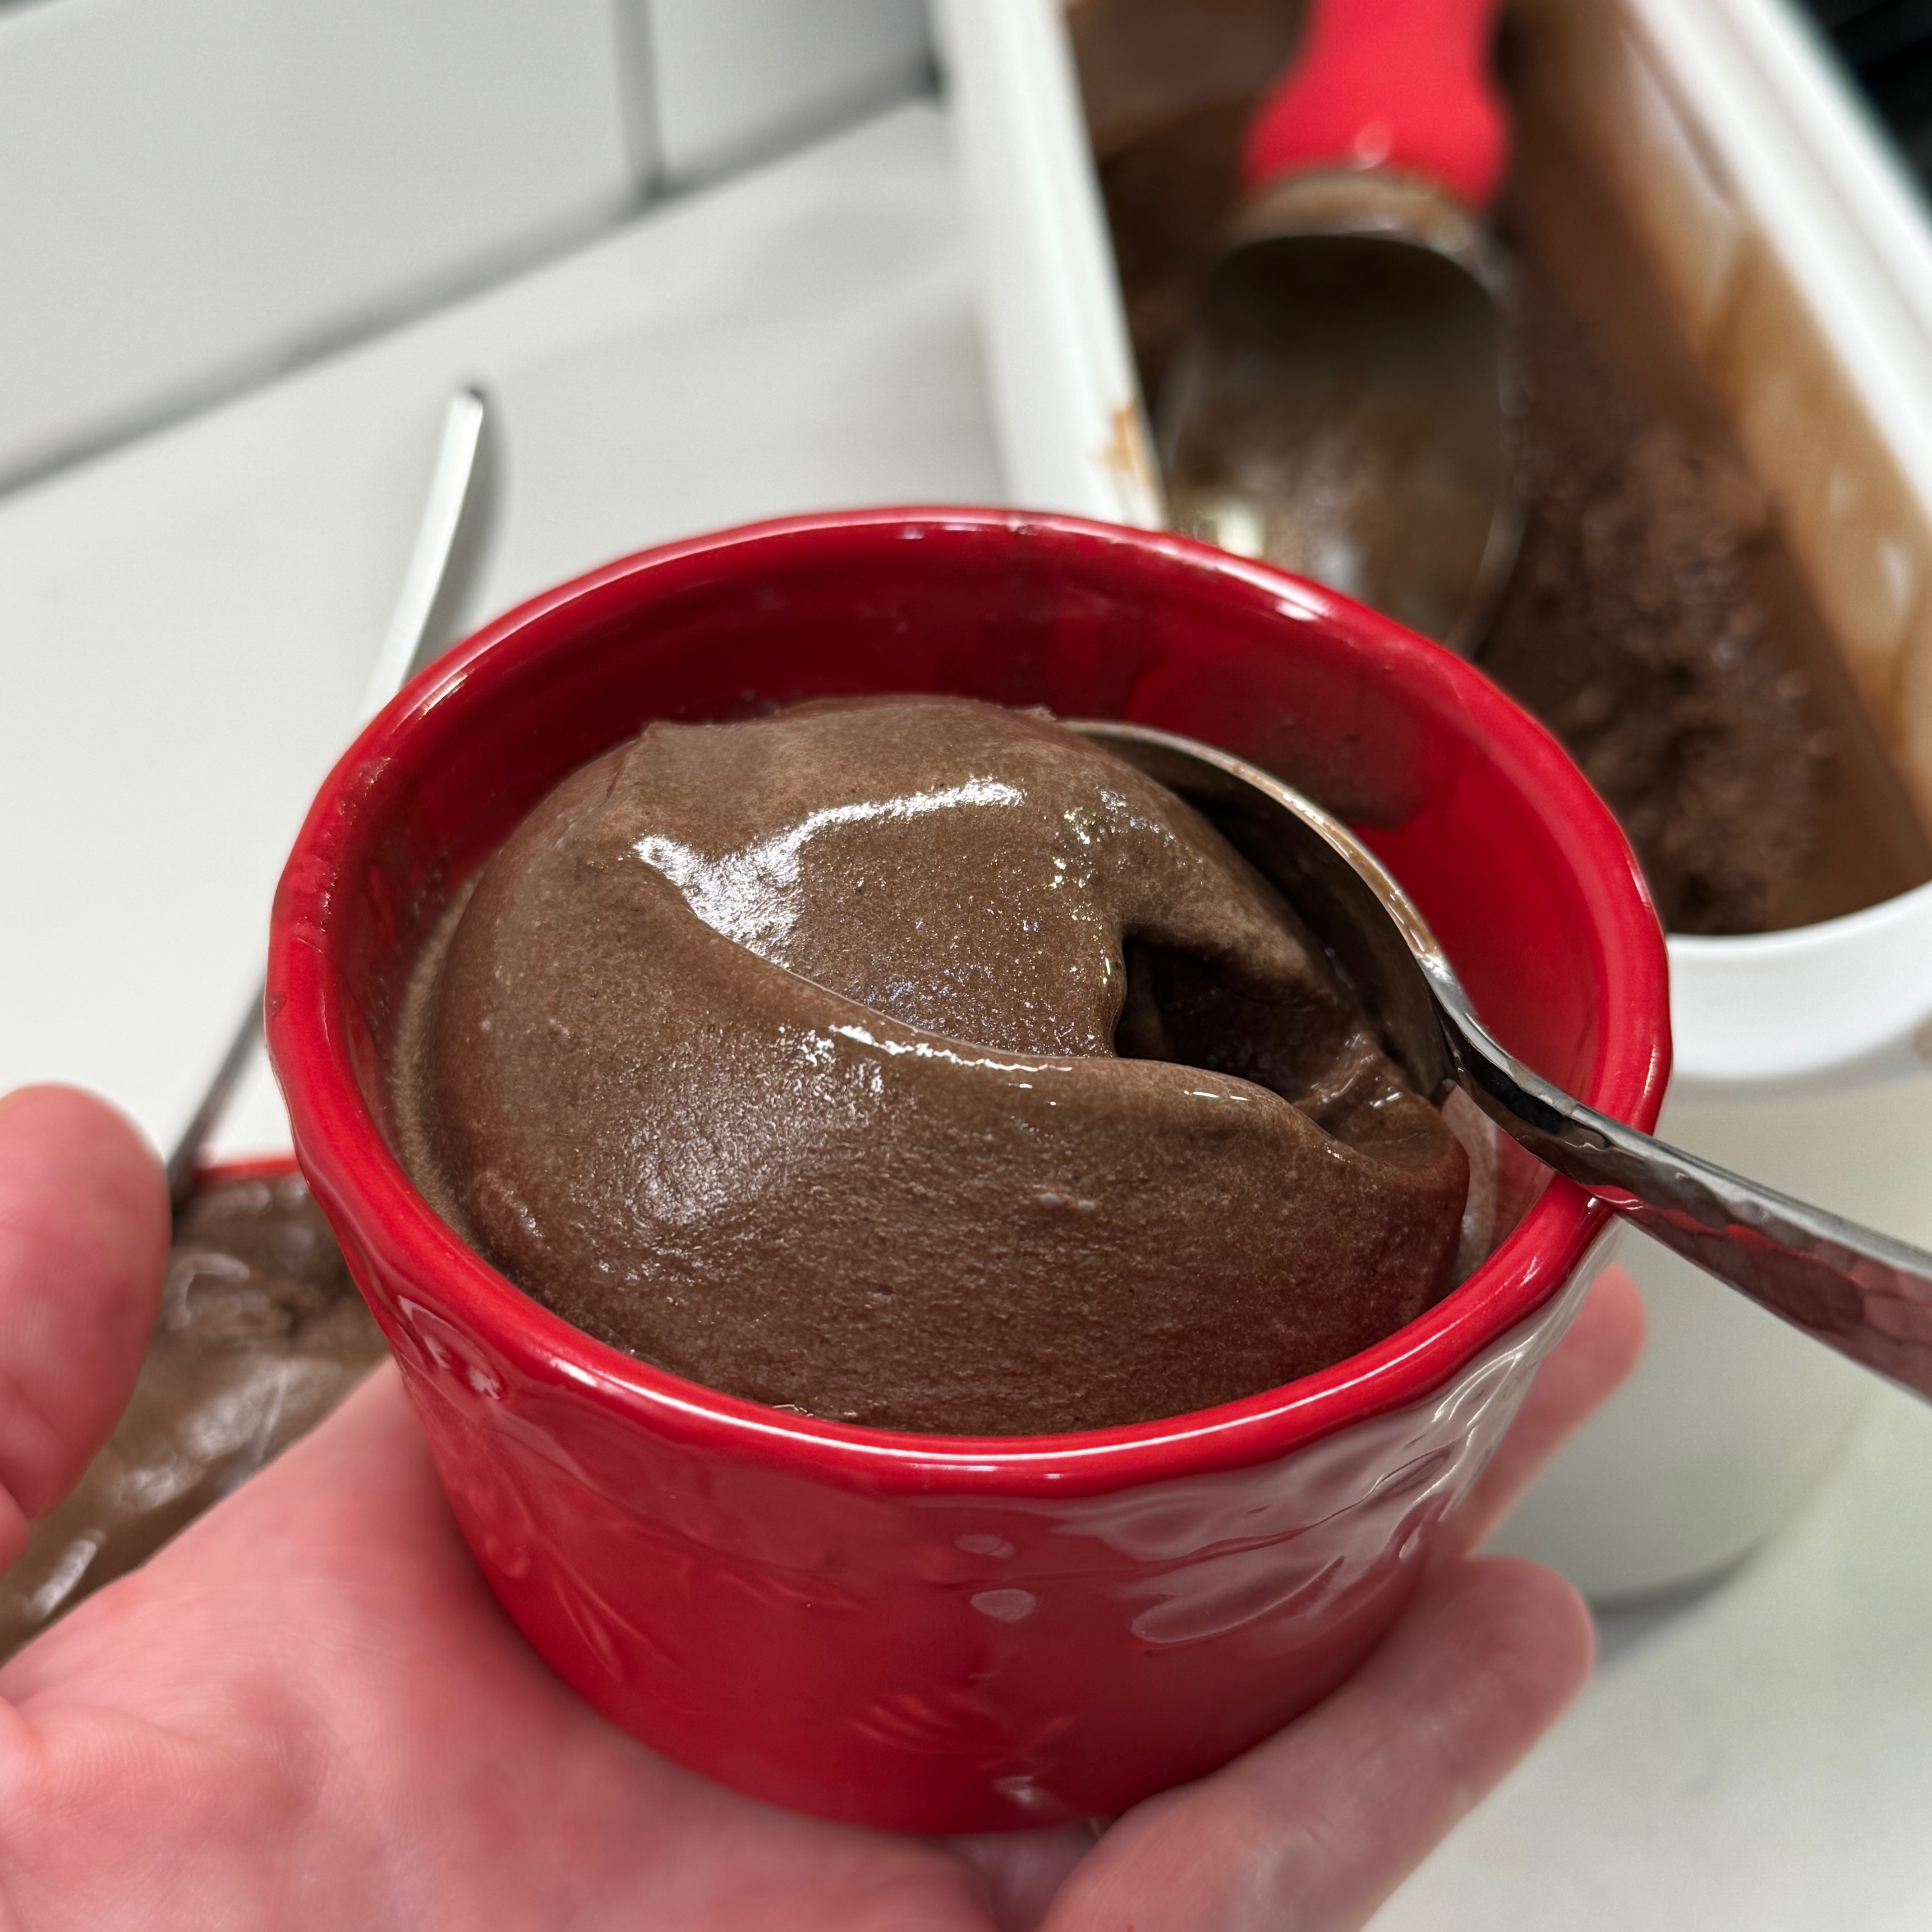
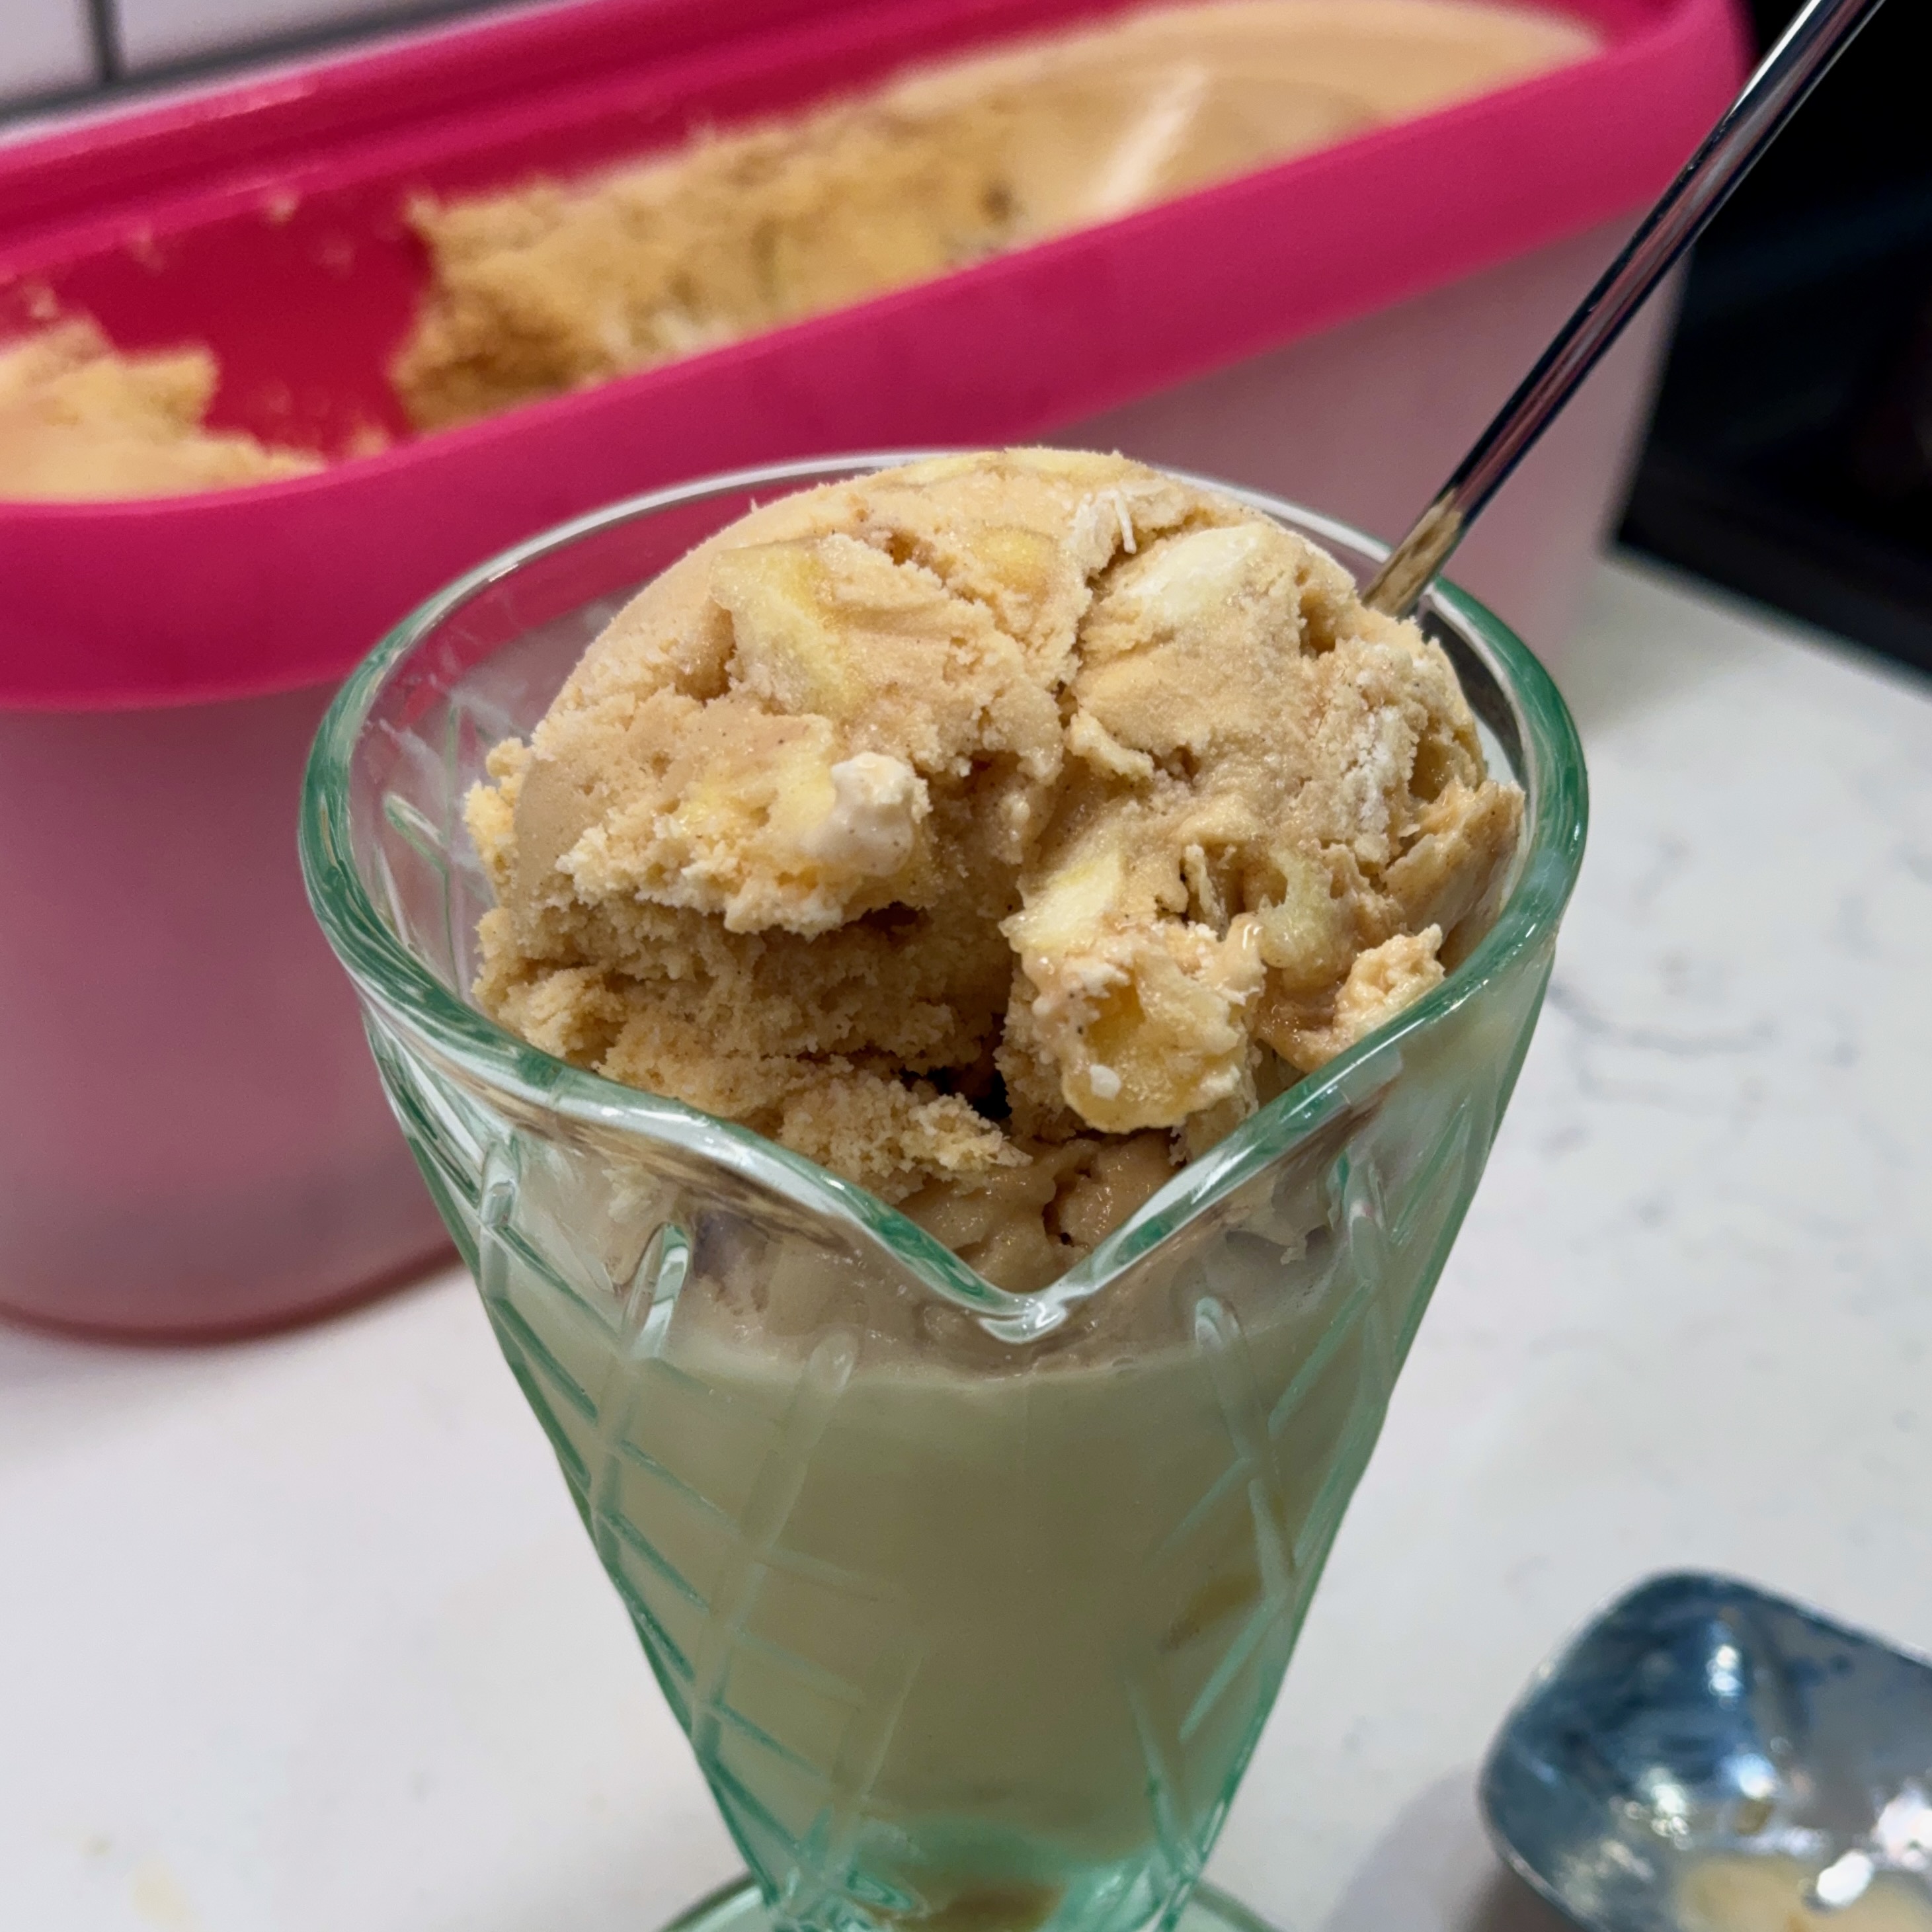
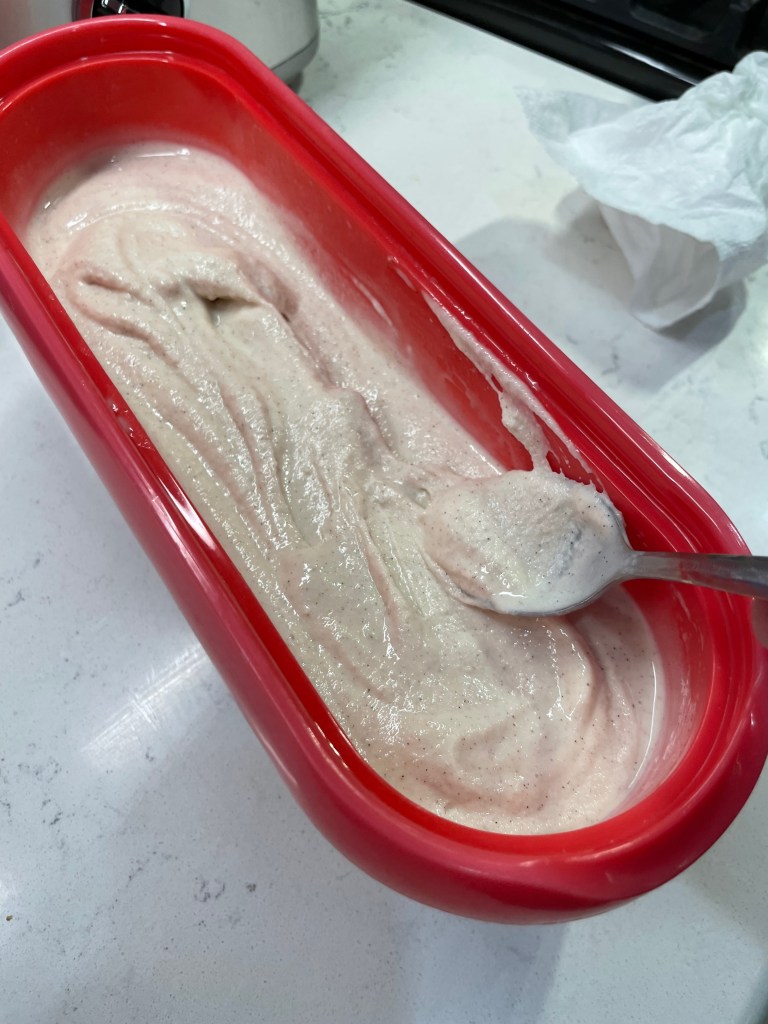
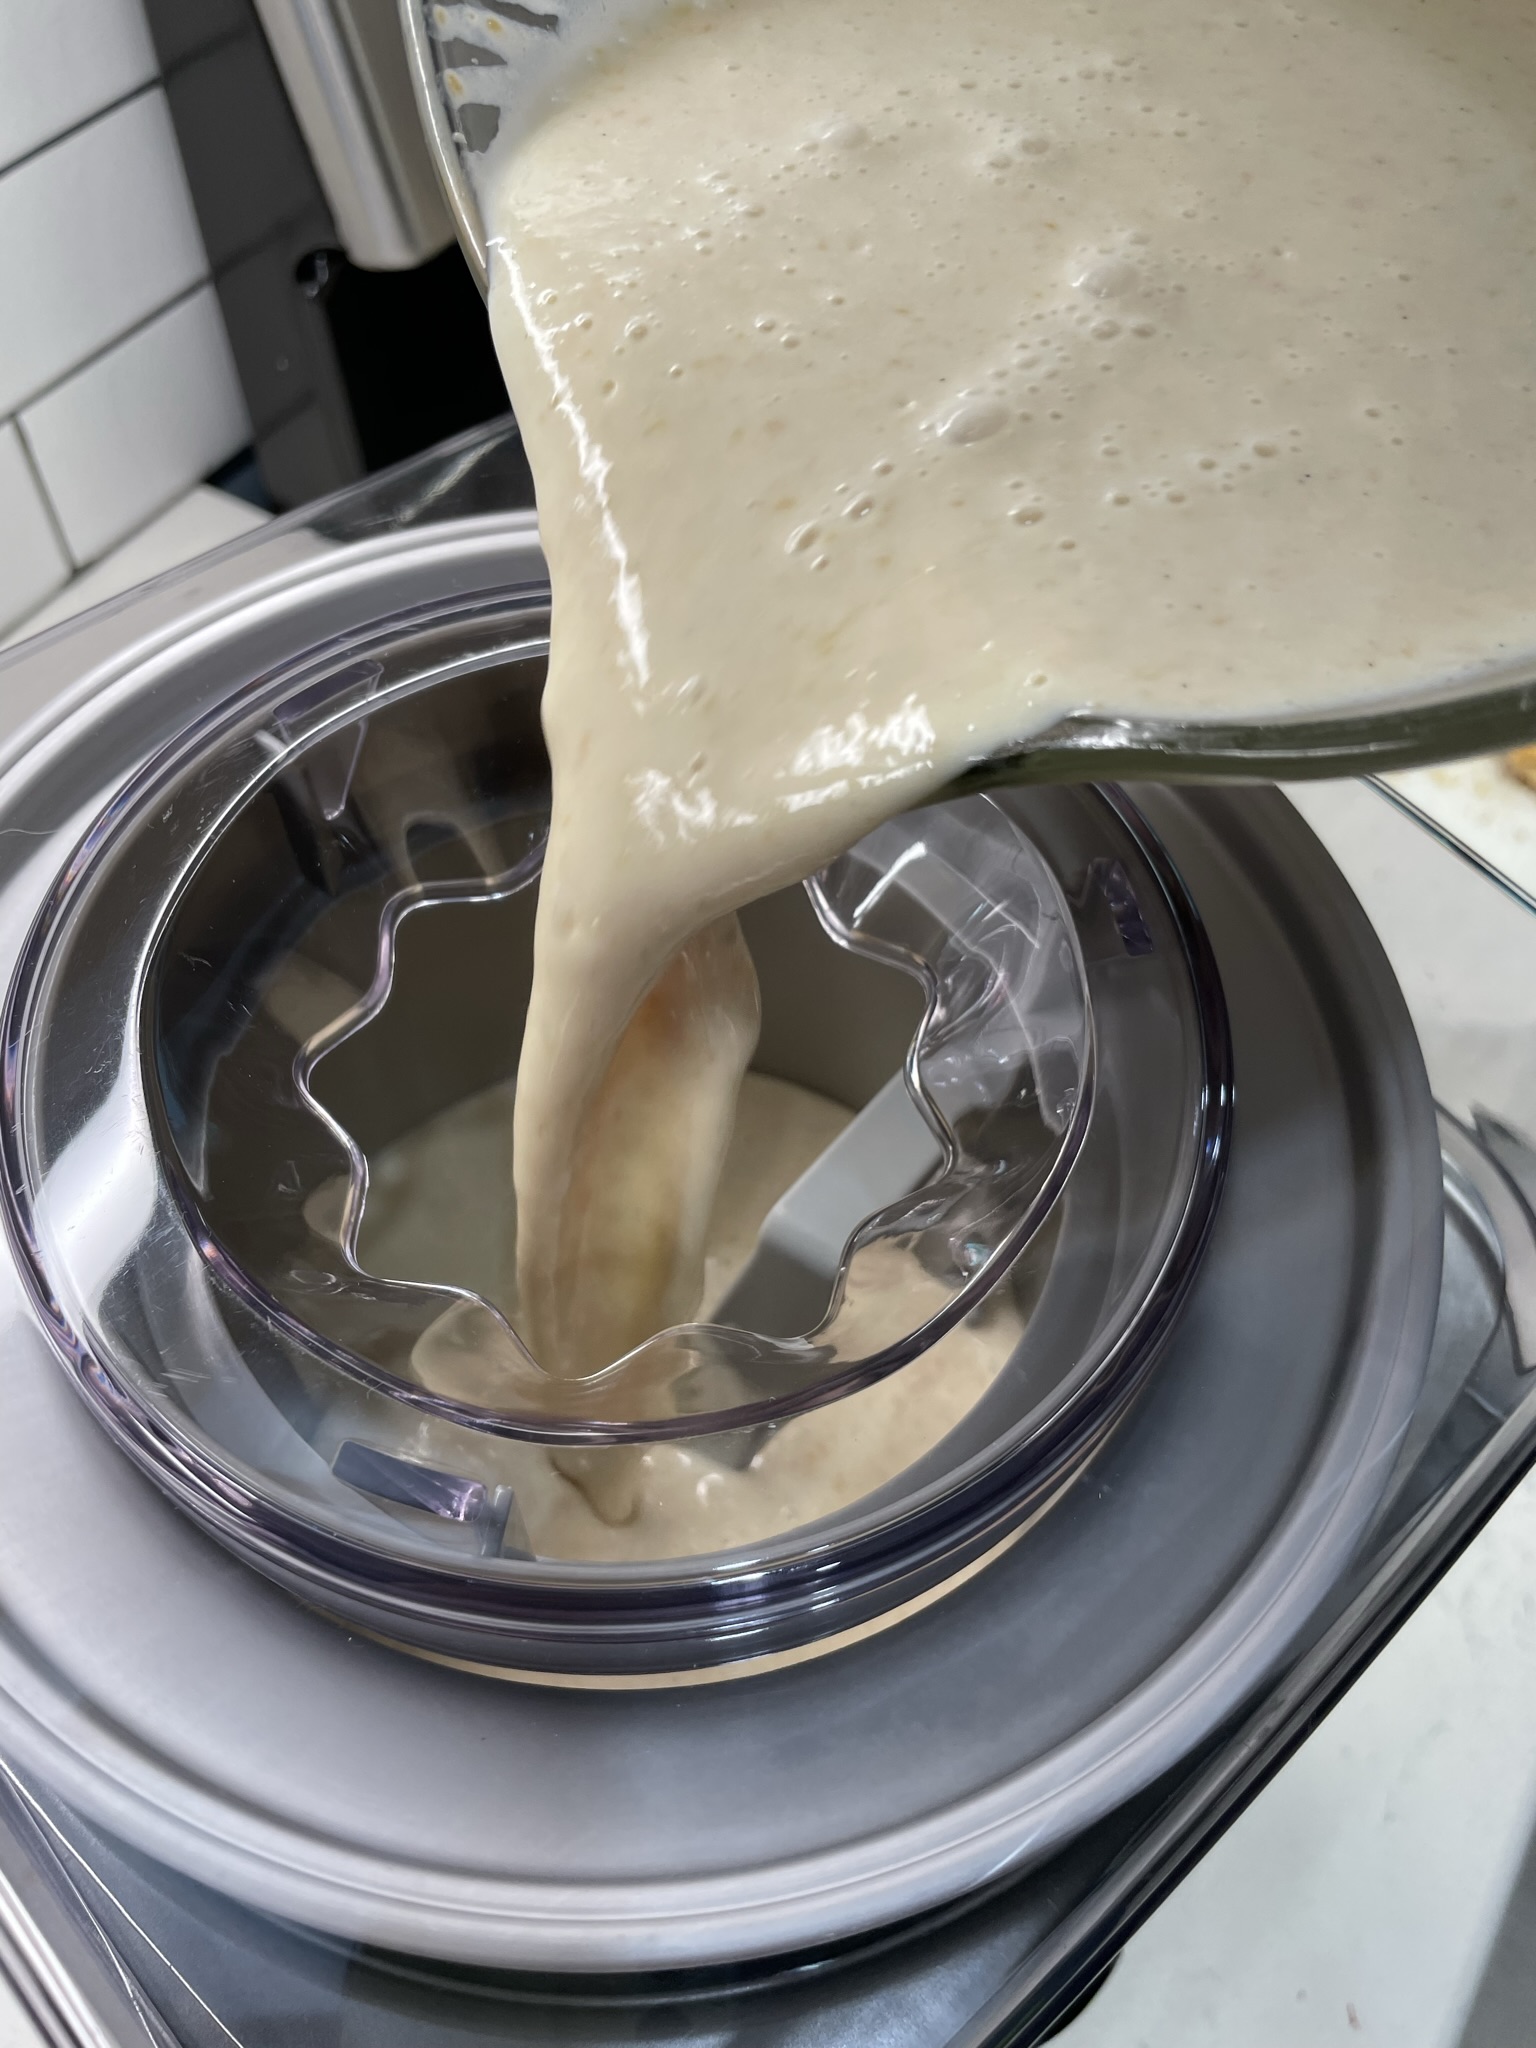
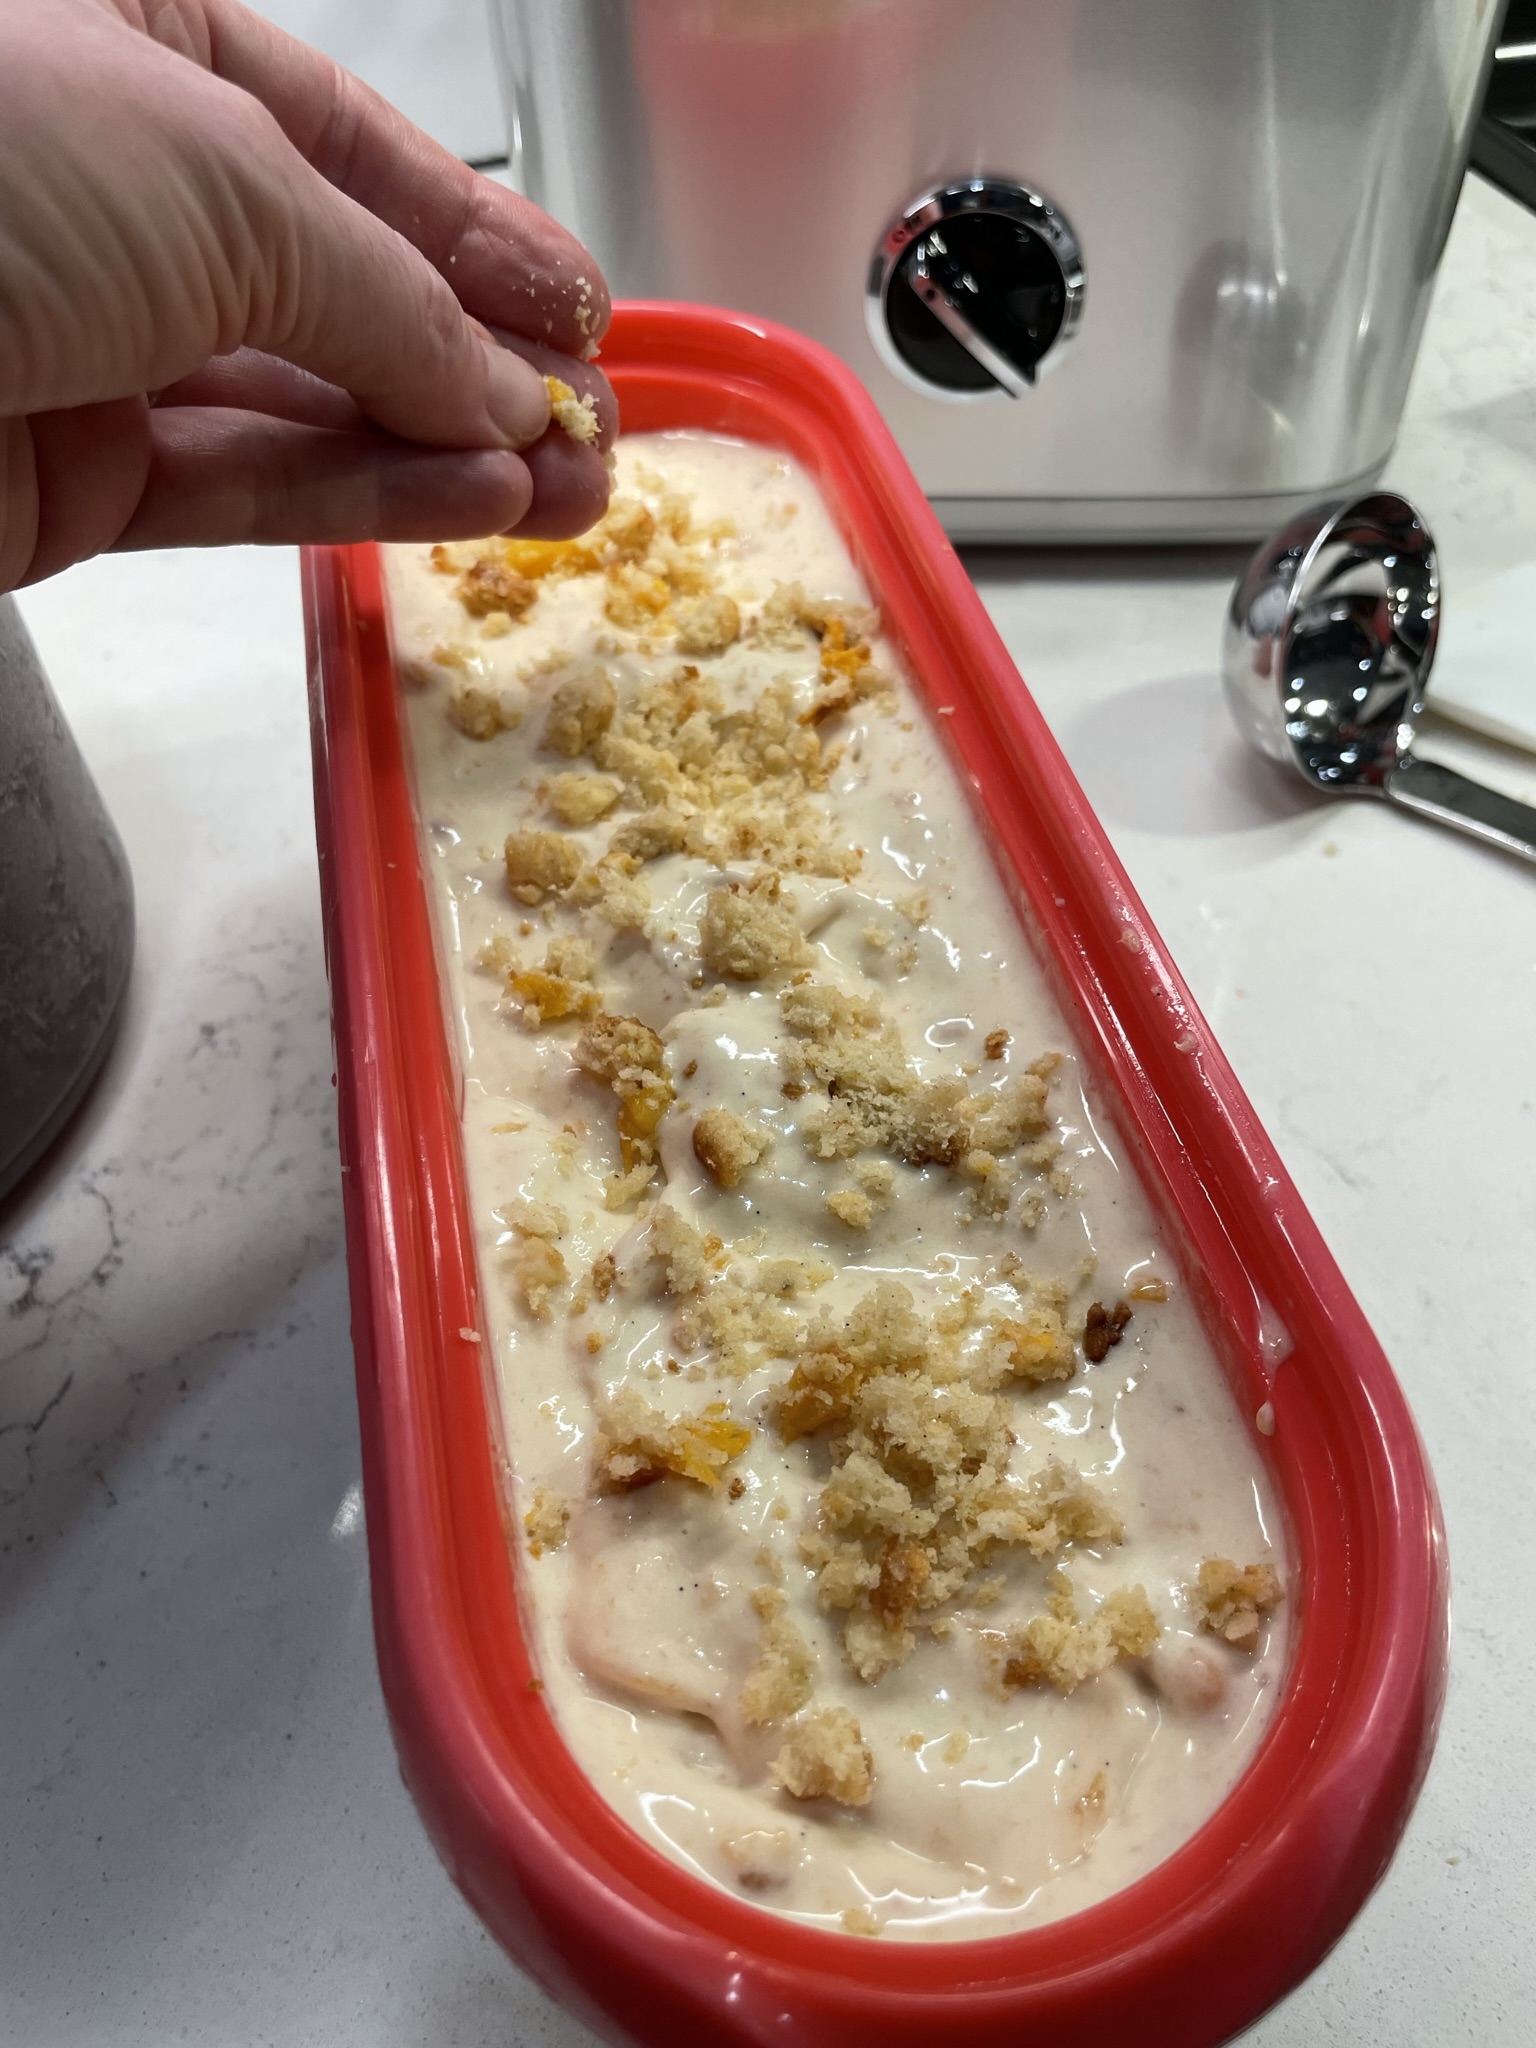
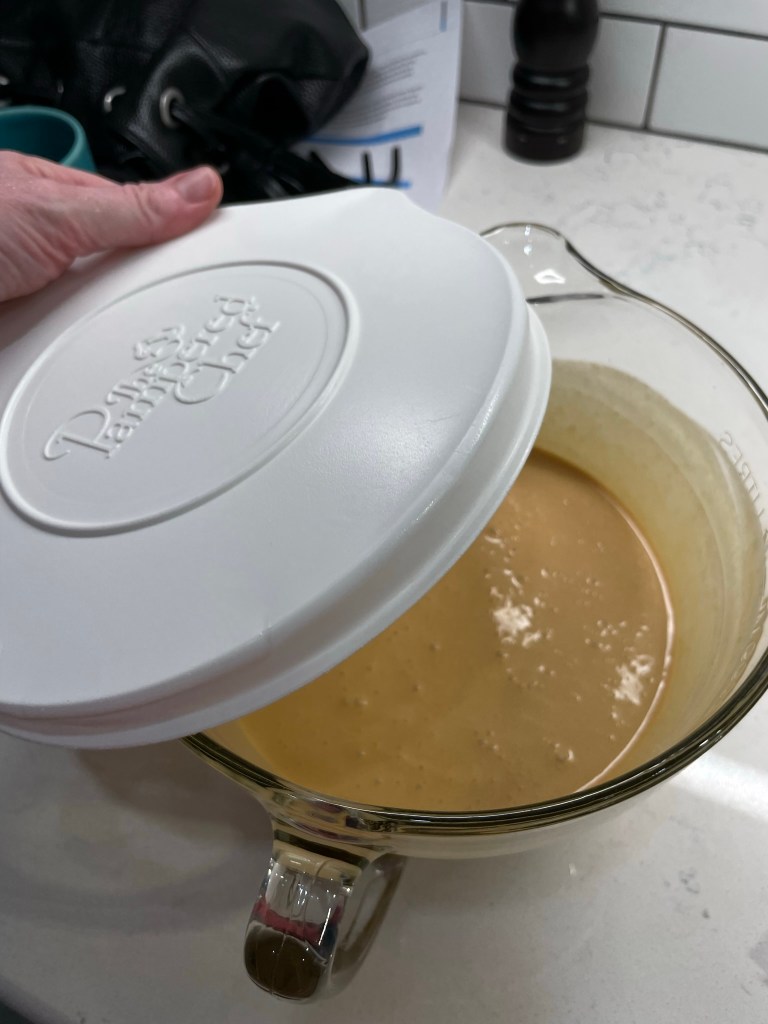
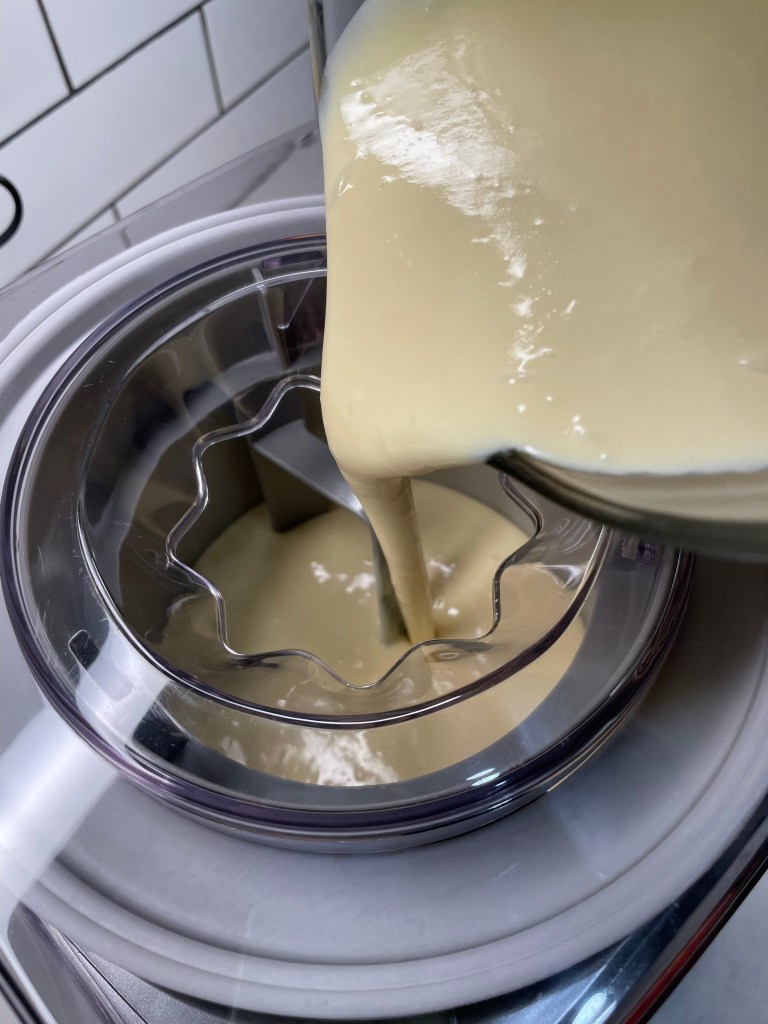
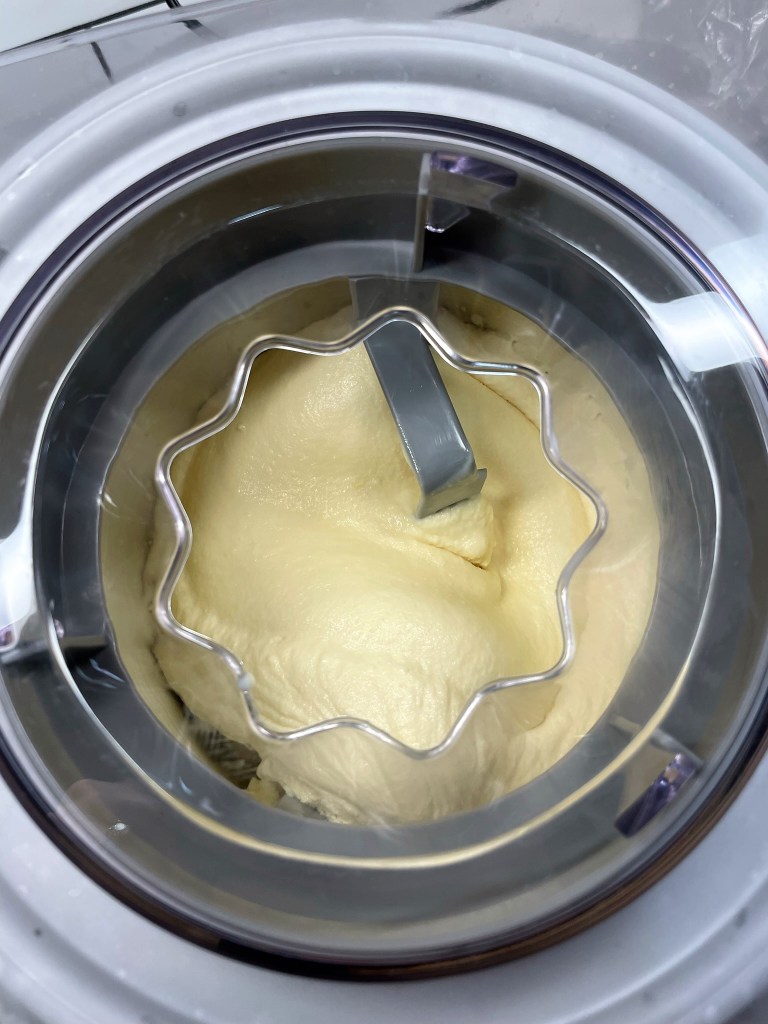
You can see how thick and rich the mixture is after that chill-down time, but a good whisking made it pourable, and then it just needed time to freeze into soft-serve texture. This usually takes about 25 minutes In my Cuisinart, long enough to cut up my banana and break a few of the Chessman cookies to be mixed in with the finished ice cream. Assembling the final product was so easy because the bananas were already mixed in. It was just a matter of layering and swirling in the cookie bits, and then it was off to the freezer for the “ripening” stage.
This ice cream is delicious in soft-serve texture, too!
National Ice Cream month is winding down, but there’s still plenty of hot summer weather, especially in North Carolina, which has experienced some brutal upper 90s temperatures this past week. Don’t be surprised if I toss one more ice cream your way before we get to Labor Day!
What if we took all the ingredients for banana pudding and turned them into an ice cream? This is a really fun surprise for National Ice Cream Month!
Ingredients
1/2 can sweetened condensed milk
1 1/2 cups cold whole milk
1 package French vanilla instant pudding mix
1 cup cold heavy cream
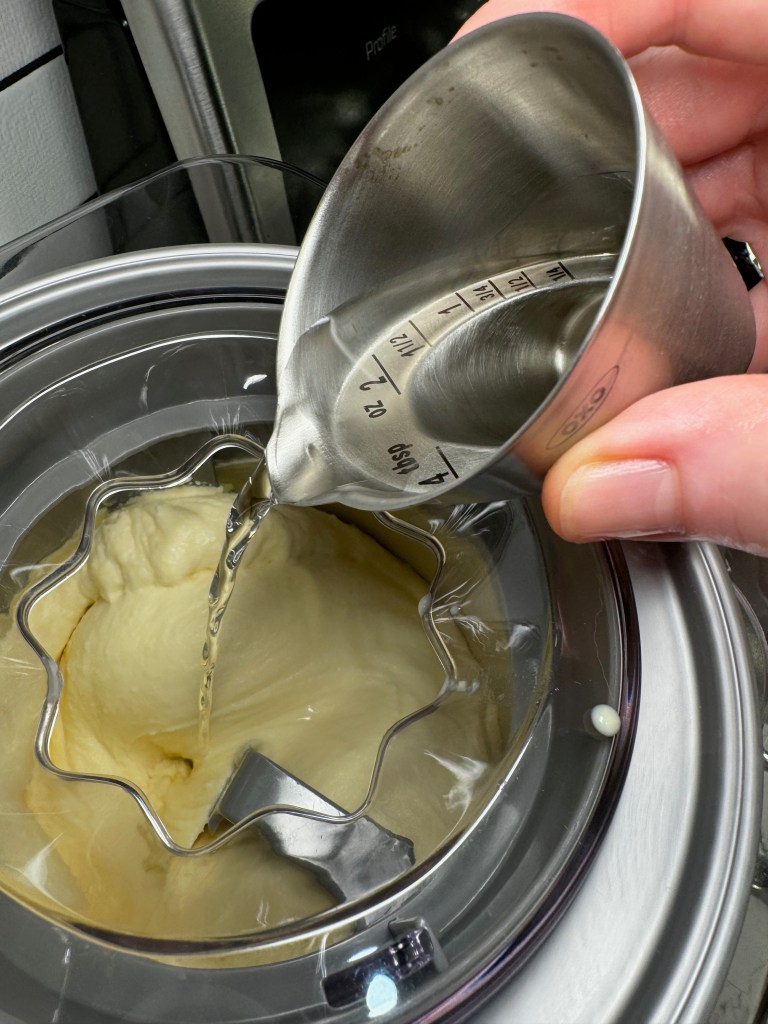
1 Tbsp. vodka (optional, added in final minute of freezing for improved texture)
1 large ripe banana, chilled and cut up into cubes (this measured approximately one cup)
6 Pepperidge Farm Chessman butter cookies, broken into bits (this measured approximately 2/3 cup)
Note: Classic Southern banana pudding is made with vanilla wafers rather than Chessman cookies. Feel free to substitute as you wish.
Directions
In the bowl of a stand mixer, fitted with the whisk, blend condensed milk and whole milk until evenly combined. Add instant pudding mix and blend with the whisk on medium speed, stopping twice to scrape down the sides.
Using low speed, gently blend in the heavy cream. Cover and refrigerate the ice cream base for several hours until fully chilled.
Whisk chilled ice cream base vigorously until it’s smooth again, and then pour it into the ice cream machine. Churn until mixture is nearly finished, and then add the cut-up banana bits, churning again for a few minutes to incorporate. During the final minute of freezing, pour in vodka (if using) and allow it to disperse throughout the ice cream.
Transfer finished ice cream to an insulated freezer container, a third at a time, layering and mixing in Chessman cookie bits as you go. Sprinkle fine cookie crumbs over the top of the ice cream and freeze overnight for best results.
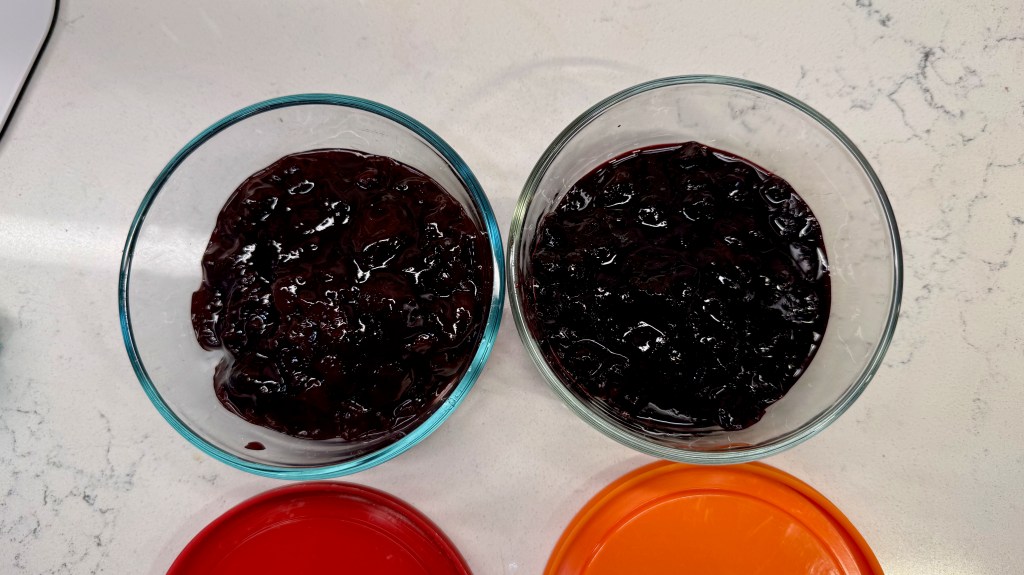
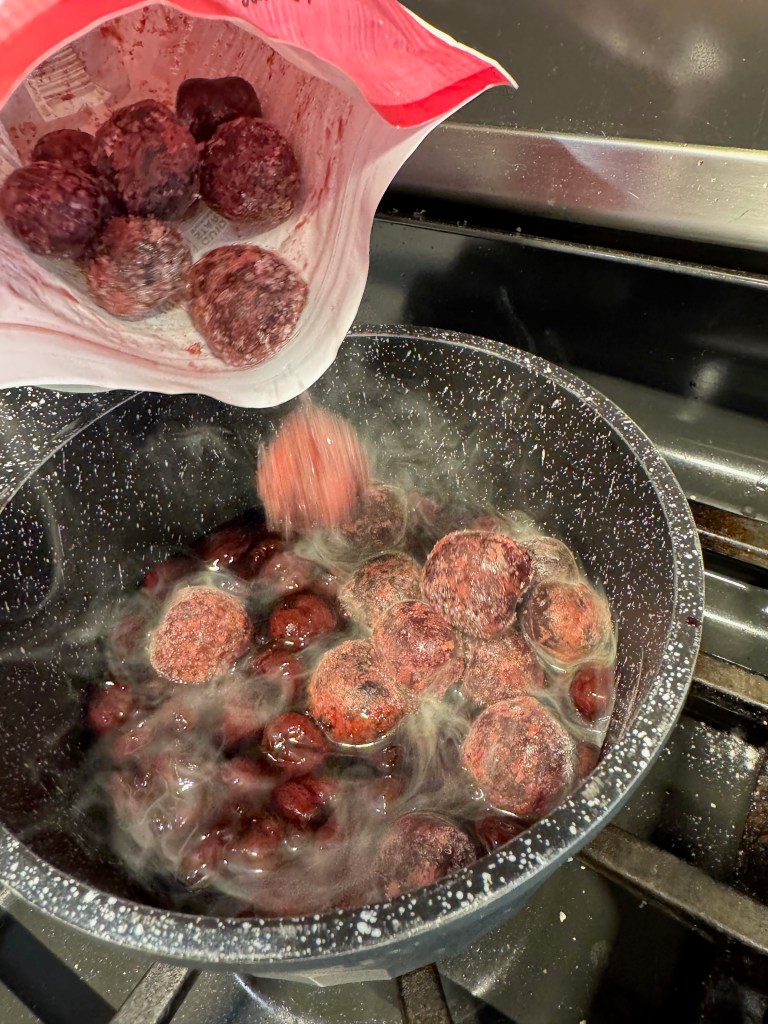
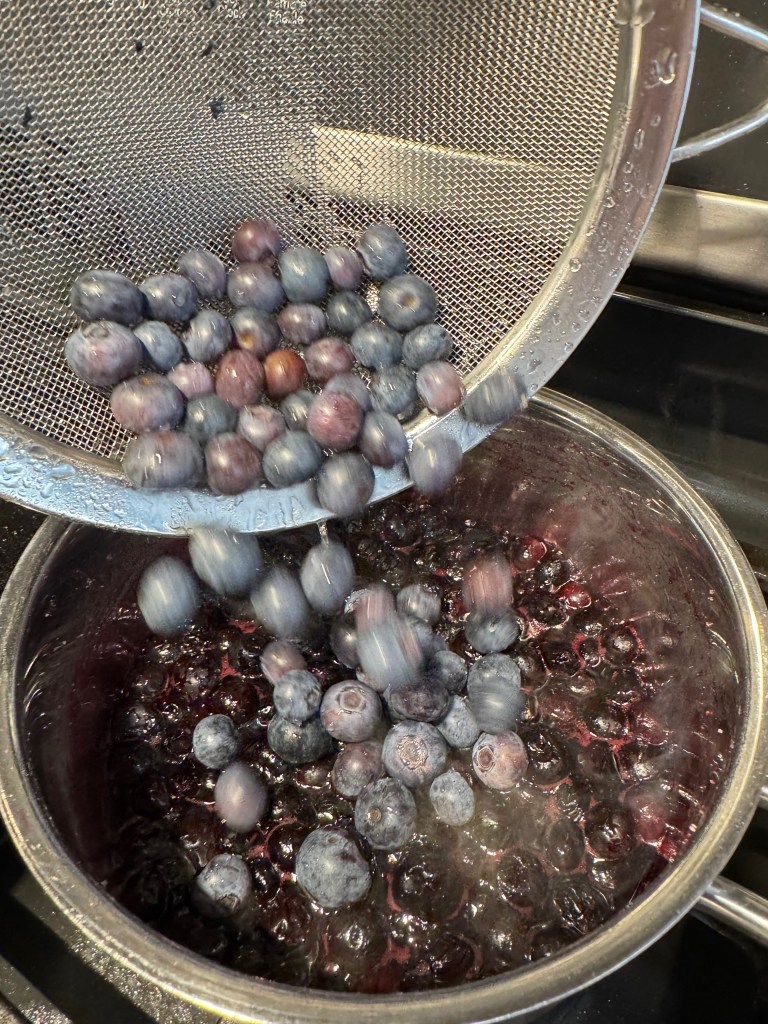
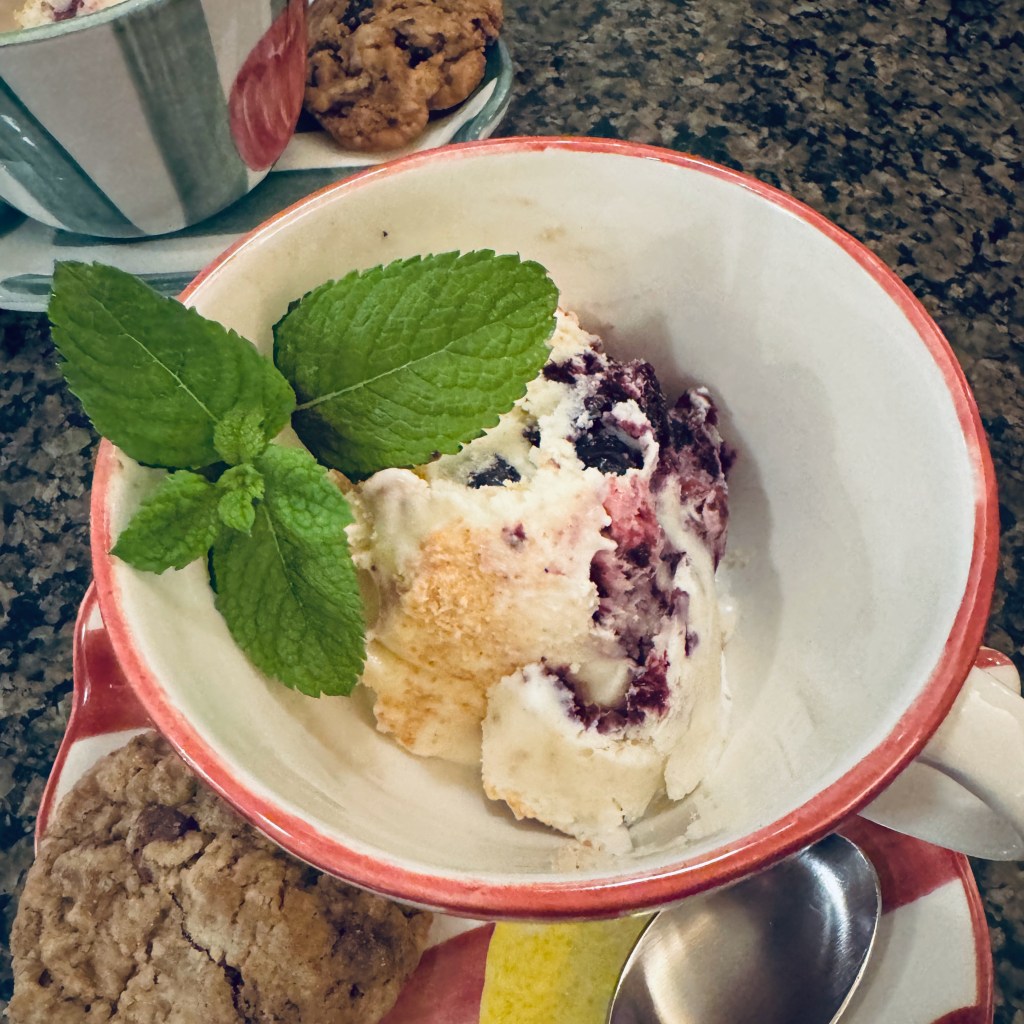
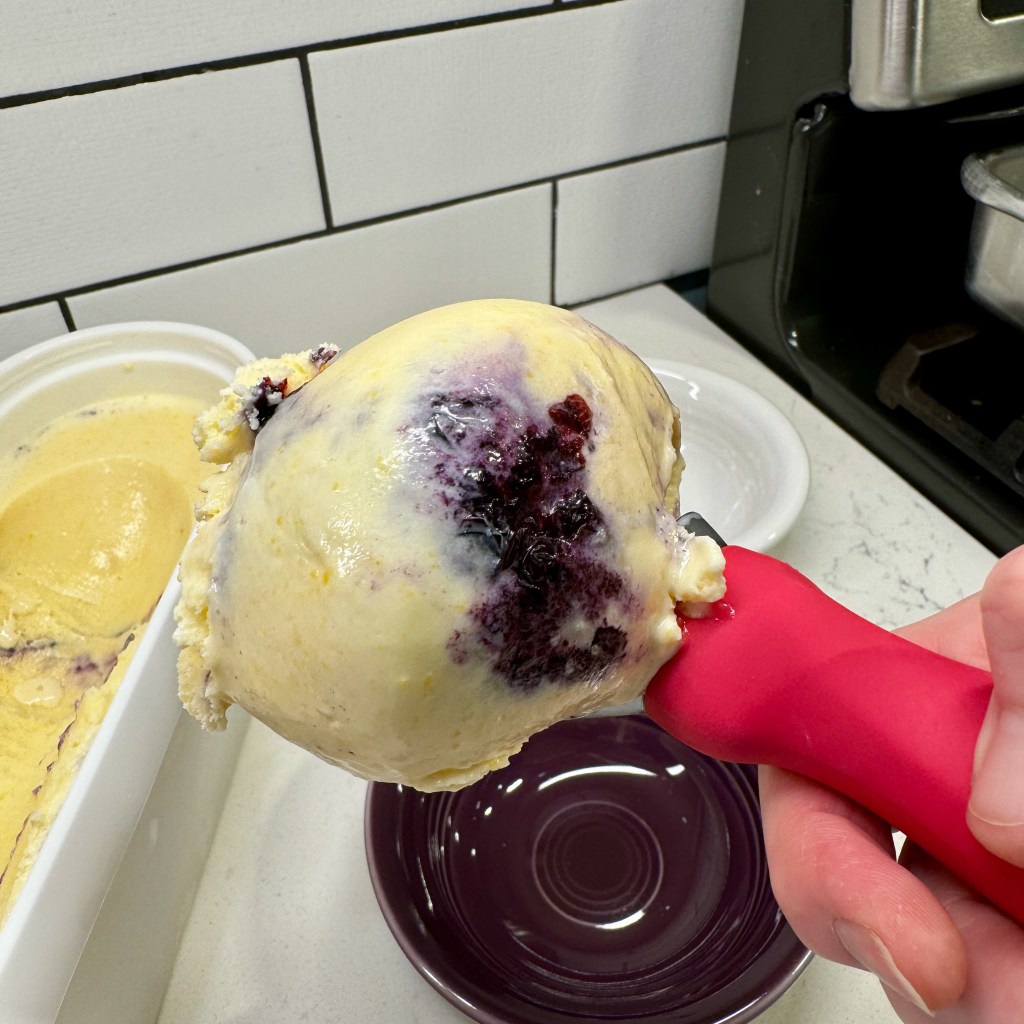
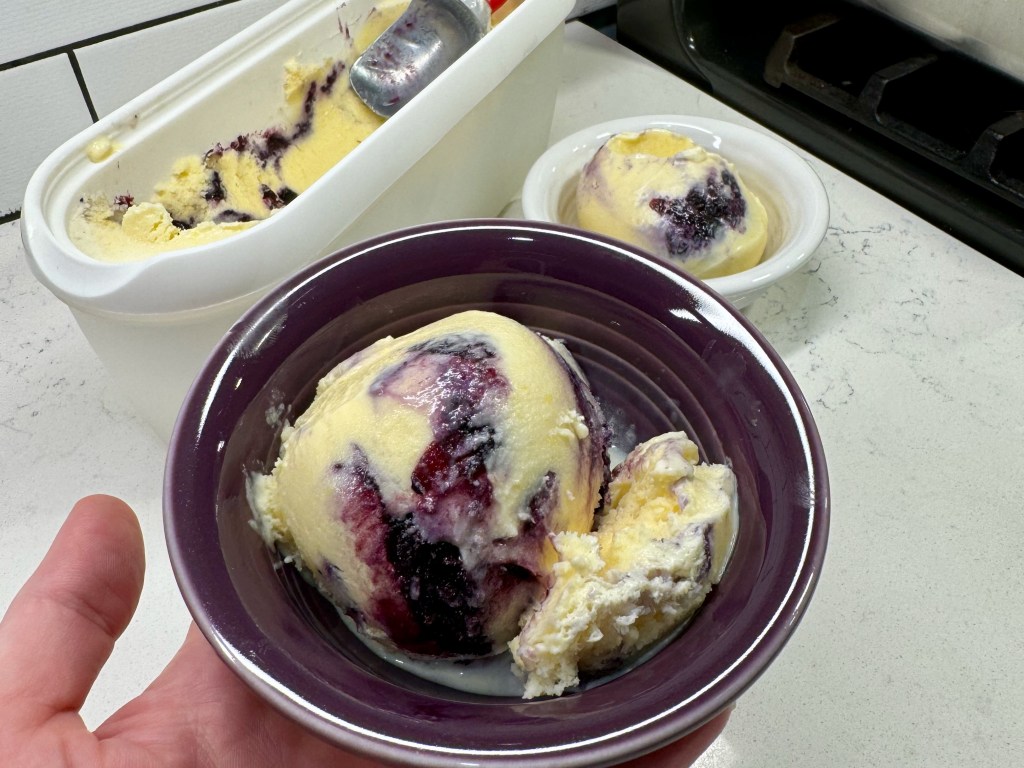
Three cheers for the purple, white and purple?! Yes, I know that isn’t exactly how the patriotic verse goes, and I had every intention and imagination for this ice cream to represent the colors of the American flag, just in time for the 4th of July. But something interesting happened when I cooked the cherry and blueberry compotes that were destined to be the “red and blue swirls” in my easy, no-egg cheesecake ice cream. They both turned to lovely shades of purple!
Can you tell which is which? Put your guess in the comments section!
Well, dang! My vision was burst for this year’s first National Ice Cream Month offering, and I was bummed. I expected the blueberries would shift to a purplish color, just as they do in pancakes, muffins and even in the mouthwatering Vermont maple blueberry bread pudding that I made a couple of summers ago. But the cherries turning purple surprised me. I had fair warning when I opened the jar of tart cherries, which at first glance were as dull as Kalamata olives! The color perked up slightly when I added frozen dark sweet cherries, but not enough to bring them fully back to red.
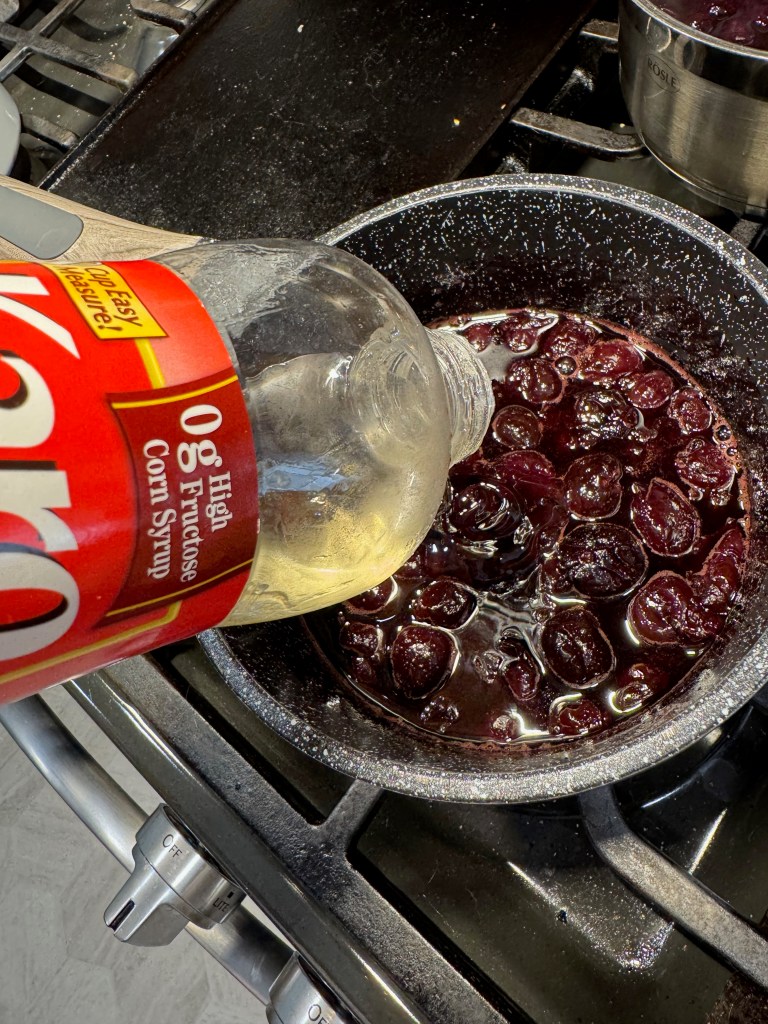
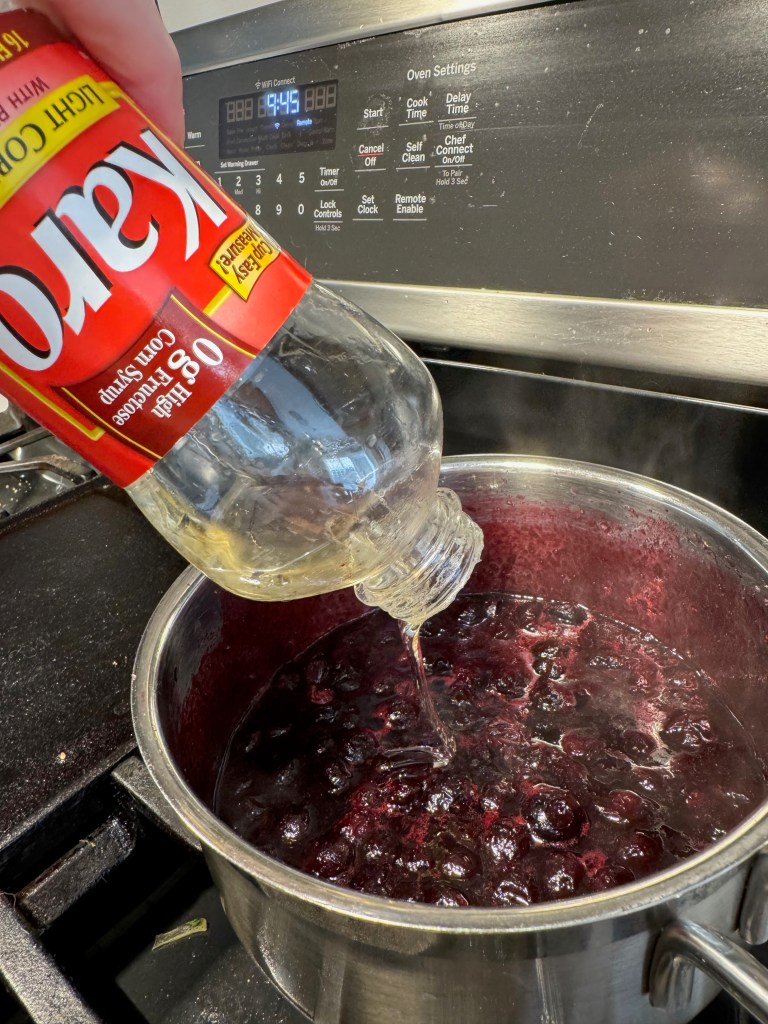
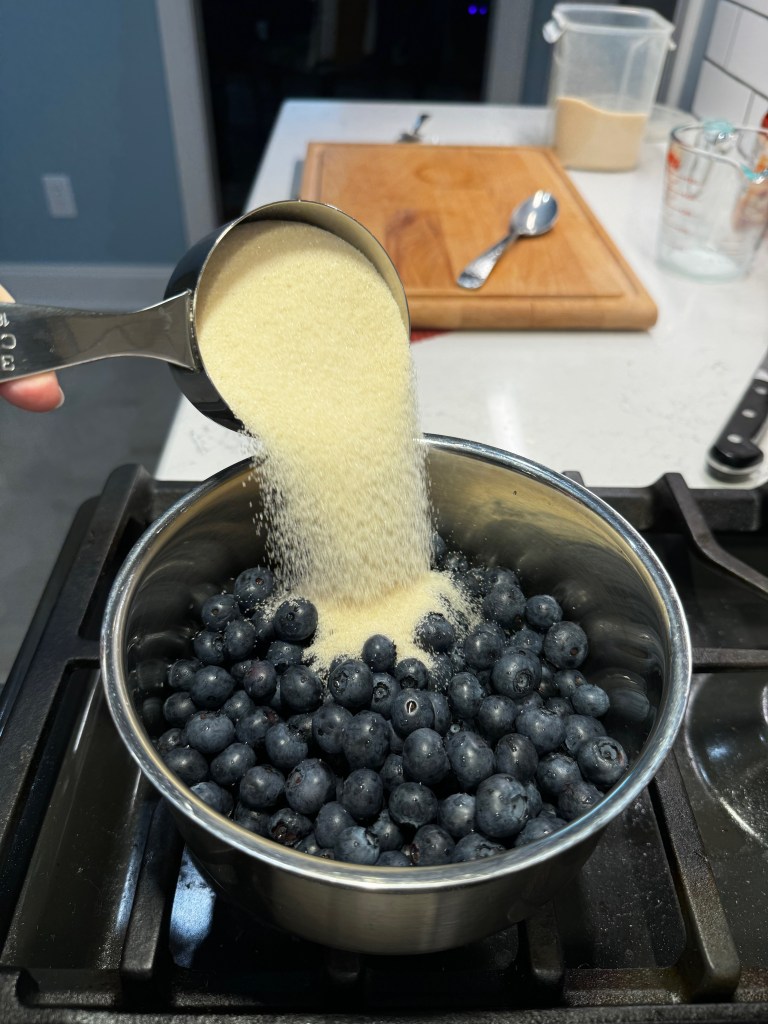
Both compotes included frozen fruit, sugar and a touch of corn syrup to prevent crystallization in the freezer. In the end, both purple. 🤷🏻♀️
Power to the purple!
I won’t pretend that I wasn’t disappointed and a little frustrated at the outcome of my “red and blue” ribbons, but there was a valuable meaning in this for me, and it has nothing to do with ice cream. As a nation, we have been self-segregating into red and blue buckets for generations, and how is that working out for us? Anyone who doubts the extent of social division in our land should check the comments section of literally any social media post, political or not. We are losing common ground, losing heart, and losing hope, and that is by design. For as long as rulers have coveted power, they have found ways to pit the people against each other to distract from the real damage they are inflicting on the masses. If they can get us to blame and hate each other, they win and we all lose. We need less revisionist history and fake patriotism that celebrates only “our own kind,” whatever that means, and more of the sentiment that focuses on the bigger picture of a nation that started out as, and still has the potential to be, a melting pot with room and respect for everyone. Power to the purple!
Press play: Little Steven doesn’t mince words in his message about patriotism. It is as relevant today as when he performed this in 1984.
Give that some thought, and then let’s talk about the delicious cheesecake ice cream base that held my purple and purpler fruit ribbons together.
Cheesecake ice cream
Only a few slight adjustments to my usual base recipe.
It’s been years since I made a cheesecake version of ice cream, and this time, I focused on bringing a tart, slightly lemon flavor to the base to counter all the sweetness of the fruit ribbons. My ice cream began with most of a block of cream cheese, sweetened condensed milk, whole milk and heavy cream, plus a shot of vanilla and a few drops of lemon oil. The latter is a specialty product I ordered from King Arthur Baking Company, but you could easily substitute the zest of a fresh lemon in its place. I don’t recommend lemon juice, which could potentially curdle the dairy ingredients.
Mixing the thicker ingredients first ensures more even blending. The lemon oil emphasized the tang of the cream cheese.
I chilled the base for six hours, then churned it in my Cuisinart ice cream machine until it was silky smooth. This took about 25 minutes, and during the last minute of churning, I did my usual trick of blending in a tablespoon of vodka, which improves the texture of my ice cream so that I can scoop it straight from the freezer later. It’s a minimal amount of alcohol and you never taste it in the ice cream, but feel free to skip this step if you’re avoiding alcohol or serving to children.
The best and most fun part of making an ice cream with any kind of swirl add-in is layering it in the freezer container. Don’t worry about creating the swirls at this stage; doing so tends to create a “muddy” appearance. Just layer away, and trust that the swirls will happen on their own when you scoop the finished product.
There’s magic in the layers!
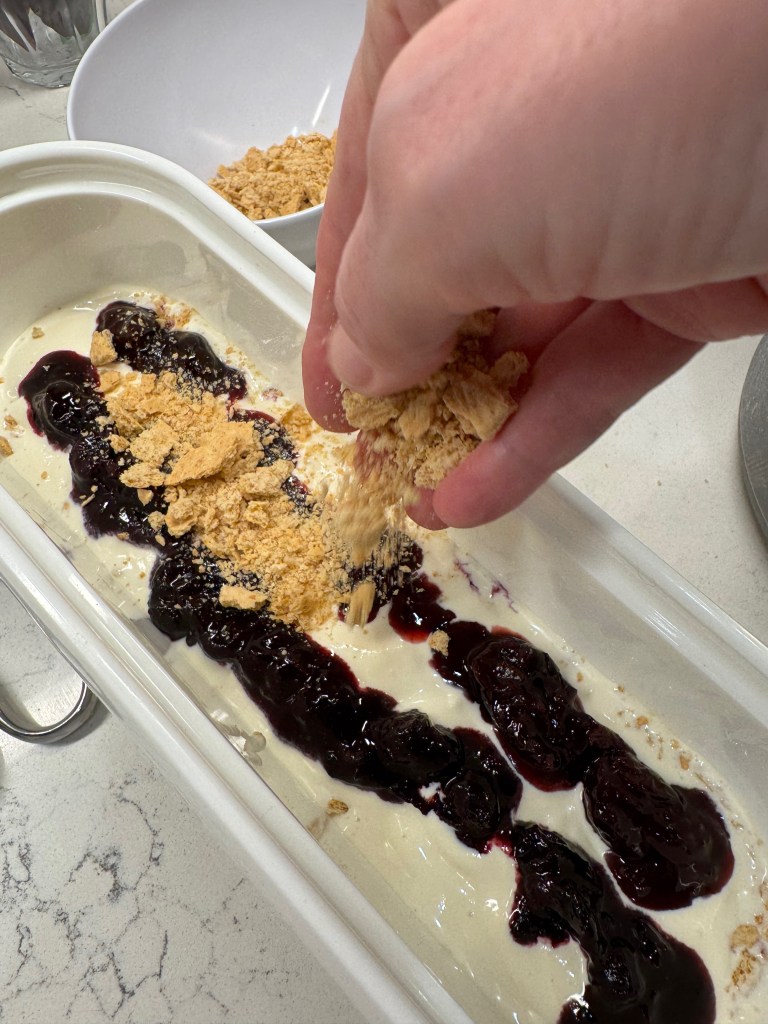
I had transferred part of my cherry and berry compotes to small zip-top bags, and had crushed several graham crackers into pieces to scatter between layers. Having these components lined up when the ice cream is finished churning makes things come together smoothly.
Layer ice cream, compotes, graham cracker crumbs. Repeat two more times and then freeze.
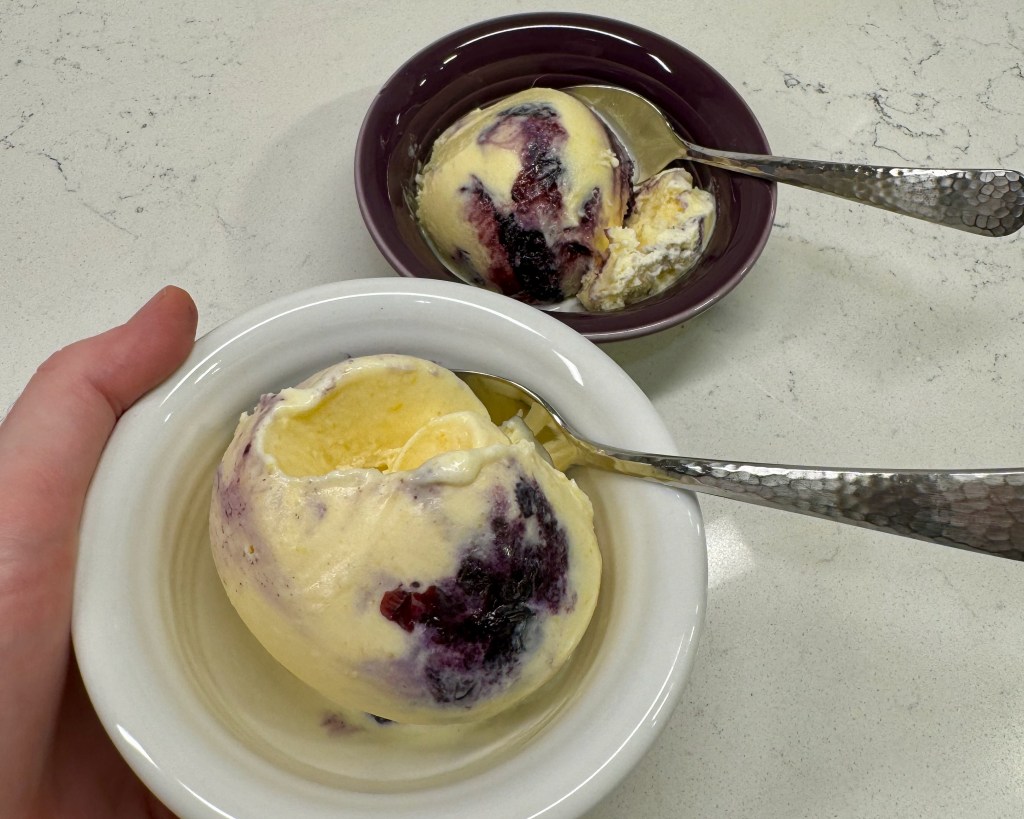
As always, homemade ice cream is best served fully “ripened,” which just means you put it in the freezer overnight. We shared this purple, white and purple ice cream with friends over Memorial Day weekend and it was fabulous! The cheesecake flavor was prominent, and the cherry and blueberry ribbons tasted exactly like summer.
To my delight, by the way, the purple ribbons did reveal a bit more of their intended blue and red tones when scooped out with the white ice cream. I hope we can look forward together and commit to a positive outcome for our great nation as well. Oh, how I hope.
Use your imagination a bit to see this as 'red, white and blue' ice cream, as the blueberries and cherries both turn purplish when you cook them into compotes. The slight lemon flavor in the cheesecake ice cream base is a nice tart balance to all the fruit sweetness, making this ice cream ideal for a July 4th party or any other special occasion this summer!
The cherry compote and blueberry compote are virtually identical in preparation. See the directions below the blueberry compote ingredients list. Of course, make the compotes in separate saucepans so that you may layer them side-by-side in the ice cream.
Combine fruit, sugar, lemon juice and cornstarch in a small saucepan over medium heat.
Cook and stir until sugar is dissolved, and then reduced heat to low and cook until liquid is reduced and mixture is syrupy.
Stir in light corn syrup, remove from heat and cool to room temperature. Transfer to a bowl and refrigerate. Before layering in ice cream, transfer part of the compote to a small zip-top bag. You will have extra of both compotes left over; enjoy them on top of the ice cream!
Make the ice cream base far enough ahead to chill for a few hours before churning in your ice cream maker.
Ingredients
6 oz. full-fat cream cheese, at room temperature (this is 3/4 of a standard package)
14 oz. can sweetened condensed milk
3/4 cup whole milk
1 cup heavy cream
1 tsp. vanilla
1/4 tsp. lemon oil (optional)
1 Tbsp. vodka (optional for texture, added during final minute of churning)
Cherry and blueberry compotes (recipes above)
1/2 cup crushed graham crackers, for layering (this was one “stacker” package)
Directions
Add cream cheese and sweetened condensed milk to the bowl of a stand mixer, fitted with the whisk blade. Mix on one of the low speeds until evenly combined.
Add cream and milk to the mixture and whisk on low speed until the mixture is smooth and even. Gently whisk in vanilla and lemon oil.
Transfer ice cream base to a covered bowl or pitcher and refrigerate at least six hours, or up to 24 hours.
Freeze in ice cream machine, following manufacturer’s instructions. Drizzle in vodka (if using) during the final minute of mixing.
Layer churned ice cream into an insulated freezer container, about one third at a time. Follow the layer with one stripe each of the fruit compotes, then scatter crushed graham cracker crumbs over the fruit stripes. Repeat twice with more ice cream, more fruit compote and more graham cracker crumbs. Save the finest crumbs for the final layer. Cover and freeze at least overnight.
It was only a matter of time before I would begin revisiting recipes that I’ve already shared here on Comfort du Jour. And it’s not because I’m out of ideas. Rather, it’s because I cannot leave well enough alone, and I am always fiddling with successful recipes— even my own. When I first gave you the scoop on this sweet corn ice cream with a blueberry whiskey ribbon (it was July 2020 if you missed it), I was stuck in a rut of making a custard base that required whipping egg yolks with sugar and then tempering them with hot milk and cooking until thick. Those days, however, are gone. More gone than National Ice Cream month (July) and more gone than the so-called dog days of summer (which ended last week).
My discovery of the sweetened condensed milk variety of ice cream has changed everything, and as most of the United States enters peak sweet corn harvest season, I can’t find any reason to postpone sharing my 2.0 experience with this delightful, unexpected flavor combination. That’s right, I’m not going to make you wait until next July (you’re welcome)!
Ice cream month is over, but this flavor is still worth celebrating!
Like my custard-based version, this ice cream gets its flavor from real corn, simmered in milk and then pulsed and strained to coax every bit of flavor from the plump kernels. But replacing the rich, eggy custard with a flip-top can of sweetened condensed milk is not only easier and quicker, it’s a better outcome, texture-wise. Why bother with custard when this turns out so good? The ice cream base gets layered (after freezing, of course) with a sweet and boozy fresh blueberry compote, and I am officially going on record to say this is my favorite summer flavor combination. Come along, let’s make some!
It’s easier than it looks!
What are the ingredients for sweet corn ice cream?
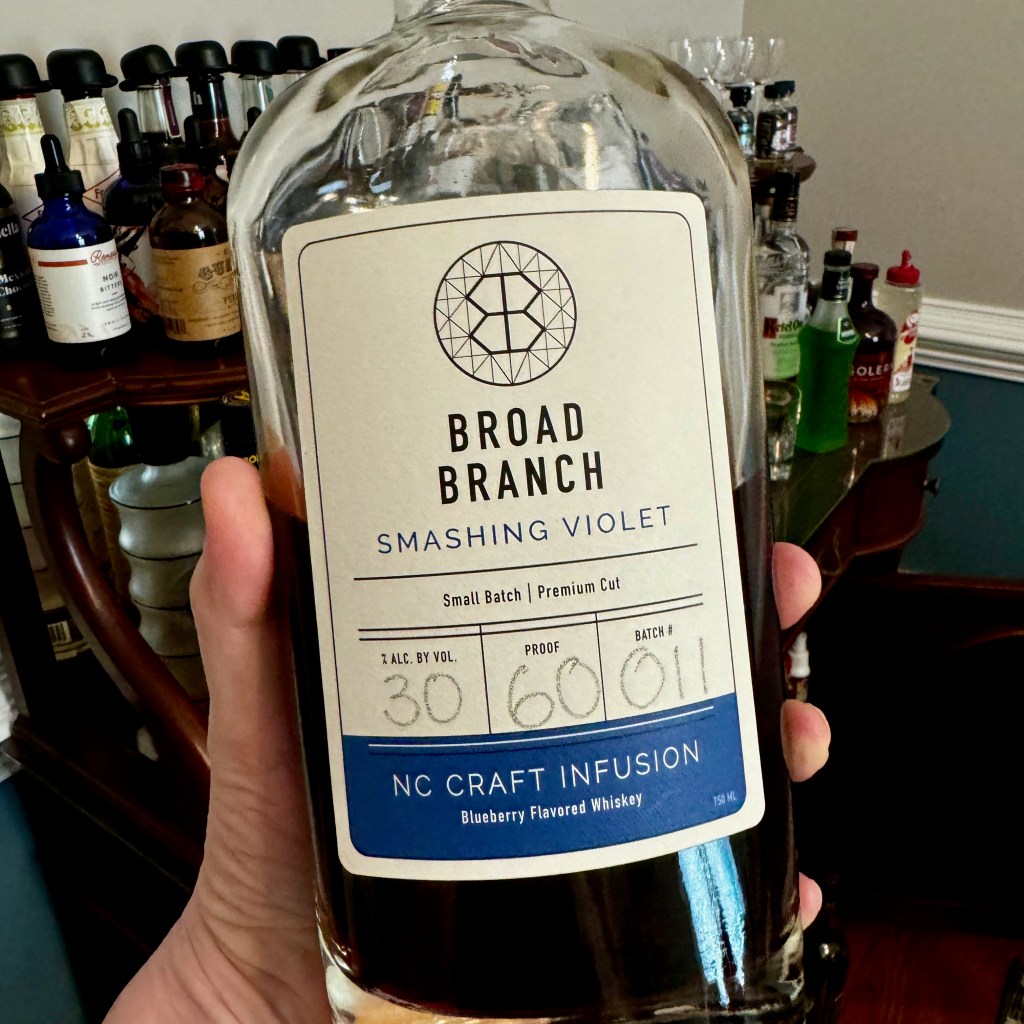
The ingredient list for this ice cream is almost too simple. My usual base formula is one can sweetened condensed milk, one cup whole milk and one cup heavy cream (keep it simple, sweetheart). But on the day I made this, I messed up. I had only a splash each of milk and heavy cream, so I made a quick pivot and subbed half and half for most of the dairy. The fat content ended up being about the same as my go-to, and guess what? This was not a dealbreaker. Sometimes you just have to go with what you’ve got. The rest of the ingredients are fresh sweet corn, cane sugar and the blueberry compote, which is also a short list: fresh berries, sugar, corn syrup and this blueberry-infused whiskey.
This is excellent for sipping, too!
My recommendation for readers outside of North Carolina, where this “Smashing Violet” whiskey is available in ABC stores, would be to seek out a distiller near you that might offer a similar whiskey with blueberry infusion. Or, if that is a no-go, choose a lower proof sweet-variety bourbon and supplement with pure blueberry juice. Or skip the booze altogether (if you must), and add pure blueberry juice and a squeeze of lemon for a bit of acidity.
Let me pause for a quick sec to call out what I didn’t add to this recipe. Did you notice? As much as I adore vanilla, and especially after I was recently gifted a gorgeous bottle of homemade vanilla extract from a sweet foodie friend (thank you, Dorothy!), I didn’t want anything competing with the flavor of the corn. Not even vanilla. So it is a rare but intentional omission for this batch of ice cream.
Do I need any special tools to make sweet corn ice cream?
There are a few things you’ll need for best results— first, an ice cream machine, which I highly recommend for anyone interested in making ice cream at home. Sure, there are a million “no churn” recipes on the internet, but to me, this is equal to trying to make toast without a toaster. It can be done, but why would you want to MacGyver it? The second item you’ll need is some kind of tool to process the corn after it simmers in the slightly sweetened milk. This might be an immersion blender, or perhaps a regular blender, but definitely one that you can “pulse” rather than just puree. Finally, have a stainless mesh strainer for separating the processed corn solids out of the milk mixture, and it should be large enough to hold about three cups of mixture. A smaller one will work if you’re willing to do it in batches. I don’t have that kind of patience. I just want to get to eating this ice cream!
The first scoop always tastes the best!
Tips for success
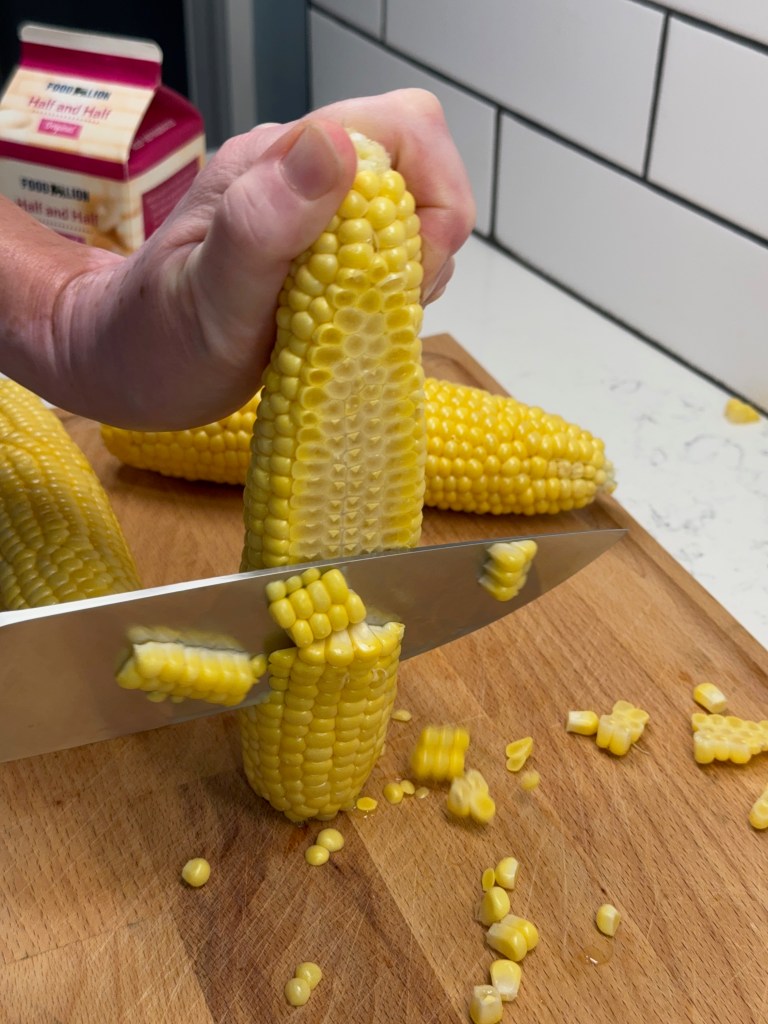
Use the sweetest, freshest corn you can find. Farmers’ market or homegrown is ideal; pre-husked and shrink-wrapped at the grocery store, not so much. I can’t say for sure how many ears you’ll need because corn varies in size. After cutting the kernels off the three large ears I used, I had roughly two and a half cups of corn, so let that be your guideline.
I especially like the yellow sweet corn for its beautiful color.
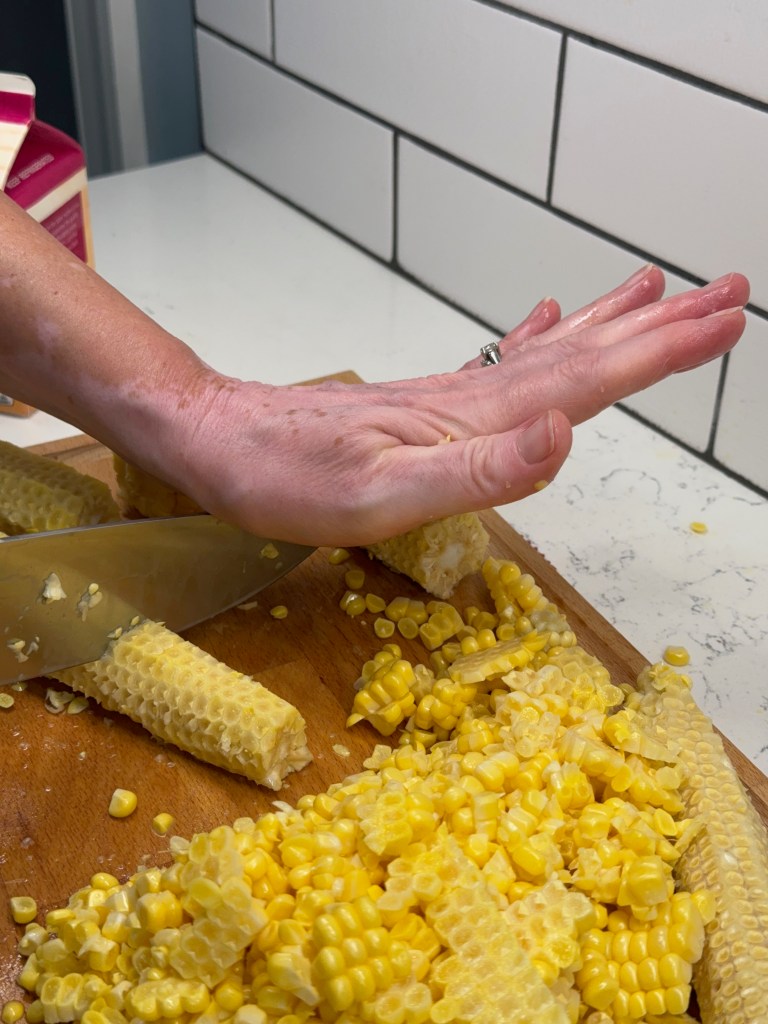
Also, don’t toss the cobs! Trim the ends and cut them into chunks that will fit in your pot. It can be difficult to cut through uncooked corn, so here’s another tip: Cut down about a half-inch into the cob, and then use your hands to snap the cob where you’ve scored it. No sense chopping off a finger.
Use a heavy-bottomed pot to prevent scorching while you simmer the corn in the half and half. Use a medium-low temperature at first, and then when you begin to see a few bubbles around the edges, turn it down to low. Do not let the mixture boil, as this will curdle the proteins and burn the sugars. This will simmer— or steep, really— for almost an hour. Cool it to room temp before blending.
Use an immersion blender right in the pot, or transfer in batches to a regular blender, and only pulse to chop up the tender kernels so that they release the flavor inside. Do not puree it, as this will leave you with a weird texture that will be impossible to strain. Don’t use a food processor unless you have plenty of time to clean up the mess it will make. You know what would be great here, and probably what my grandmother would have used? An old-school food mill. Oh, how I wish I had hers! 🥹
Process gently, don’t puree!
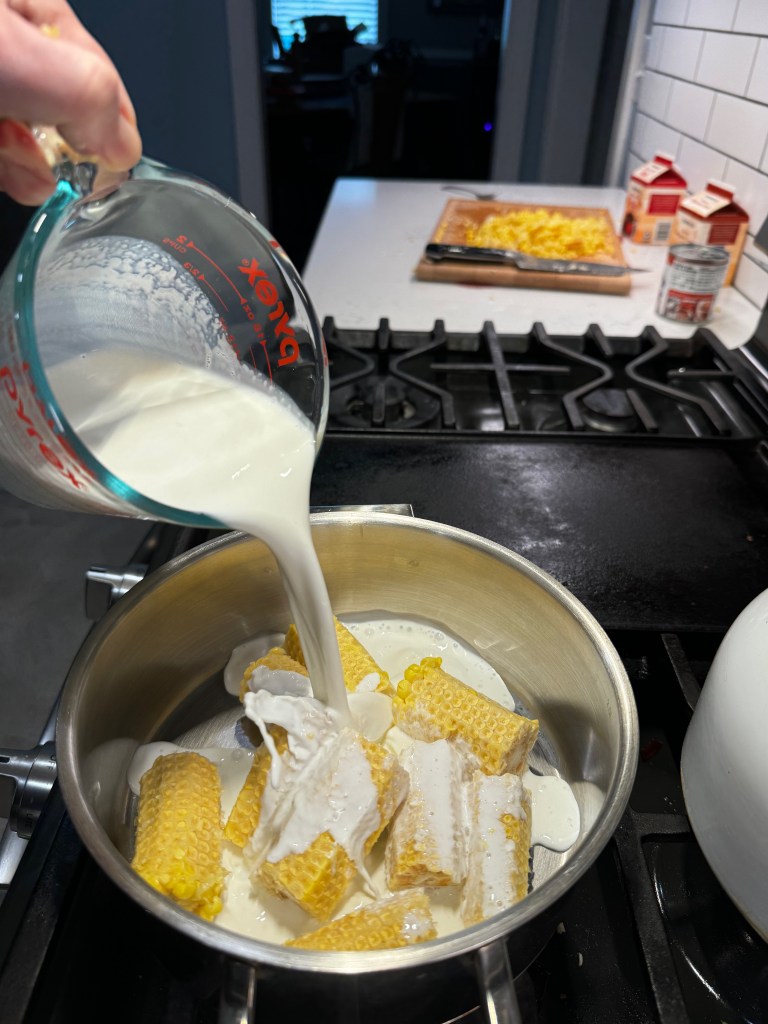
Don’t discard the solids after straining! Even though they’ve given up the ghost for this ice cream, they still have quite a bit of flavor themselves. Add half of them to a batch of corn muffins or pancakes (I love this recipe from King Arthur Baking, if you happen to also be a sourdough baker), and throw the rest into a chowder. Blend in the condensed milk and heavy cream to the corn-infused half and half and chill it at least several hours, preferably overnight.
Add the other base ingredients after the corn has infused into the half and half.
No fresh blueberries? No problem! I have made this ice cream several times with frozen blueberries— I’m especially fond of the “wild” ones— and it works absolutely fine.
For the most intense blueberry flavor in your compote, especially if you don’t have the blueberry whiskey, add some bottled blueberry juice to the fresh or frozen berries as they simmer with the sugar. Find it in the juice aisle, and verify the ingredient list to ensure that it is only blueberry juice. Don’t be misled by claims of “100%” juice, which might just mean that it has an apple or pear juice base with enough blueberry to color it. Also, the juice should not have added sugar (or if it does, reduce what you add to the compote).
On the subject of the compote, for goodness sake, don’t rush it. The berries need to be softened to the point of being mushy, and the liquid must evaporate so that the added sugar creates a syrup. Add a bit of light corn syrup to prevent the sugar from crystallizing when it cools. Cook this over medium-low heat until it is very bubbly all over. Add the whiskey and simmer again until it reaches the same stage. Then, turn it off and cool to room temp before transferring it to a bowl. Expect this to take at least 30 minutes from start to whiskey.
I made a double batch of the beautiful blueberry compote because I love it so much.
Be sure the ice cream bowl for your machine has been in the deep freeze for a minimum of 24 hours before churning. When it finishes in the churn cycle, consider adding a tablespoon or two of vodka during the final minute. This is not essential, but it improves the texture of the ice cream so that you can scoop it out straight from the freezer without waiting. If you choose to skip this, plan to remove the ice cream 10 to 15 minutes before serving time.
Would you like to guess how many times I tasted it, just to be sure? 🤭
Layering the ice cream with compote is as easy as it sounds, and I discourage any attempt to “swirl’ it during this stage, as you may end up with a muddy look when you scoop it. Trust the process. The swirl will happen like magic later when it’s ready to scoop and serve.
Finally— and this is so important— put this ice cream in the freezer and do your best to forget about it for a full day. You’ll be tempted to dig right in, especially if you have tasted things along the way as I always do. But homemade ice cream needs time to “ripen” in the deep freeze, and with the layer of sticky compote, scooping this one too soon would be nothing short of disaster. Go read a book, shampoo the carpets, binge-watch another bad HBO series. Do anything, but give this ice cream 24 hours to set up properly before you scoop and enjoy. You won’t be disappointed!
Best ice cream of the summer!
Sweet Corn Ice Cream with Blueberry Whiskey Ribbon
This is my custard-free version of one of my favorite summer ice creams, using sweetened condensed milk for the silkiest, creamiest texture you can imagine. Take your time with this one; I promise it's worth the trouble and the wait!
Ingredients
3 large ears ripe sweet corn, husked and cleaned
1 1/2 cups half n half
1/4 cup organic cane sugar
pinch of salt
14 oz. can sweetened condensed milk
1/2 cup heavy cream
1 Tbsp. vodka (optional, added during final minute of churning for improved texture)
Note: Use a heavy-bottomed pot for simmering the corn and cobs, to prevent scorching. Take care not to boil the milk mixture, and wait until after the corn is processed and strained to add the sweetened condensed milk and cream. You will need an immersion blender, regular blender or food mill to process the corn-milk mixture and a stainless mesh strainer to filter out the solids.
Directions
Using a sharp knife, stand each ear of corn on end and cut off all the kernels. Cut the cobs into pieces that will fit in your cooking pot.
Combine corn, half and half, sugar and salt in the pot over medium heat. Watch it closely, and reduce the heat to very low once it begins to barely bubble around the sides of the pot. Steep without allowing it to boil for almost one hour, until the kernels are very soft. Remove from heat and set aside for a few minutes.
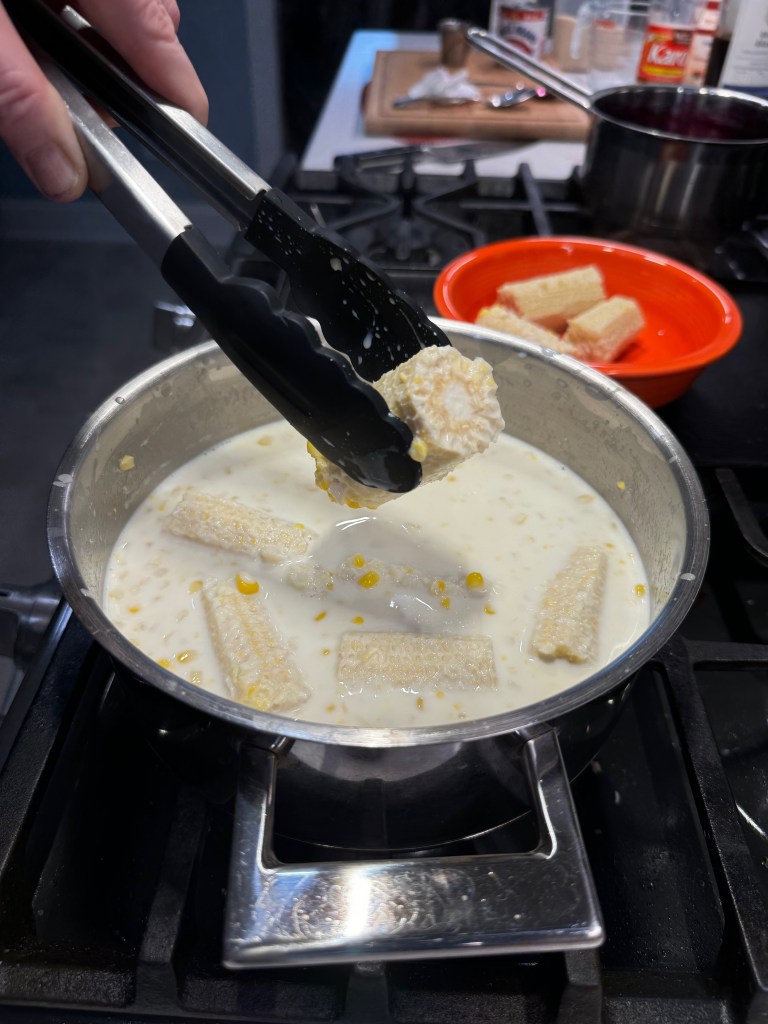
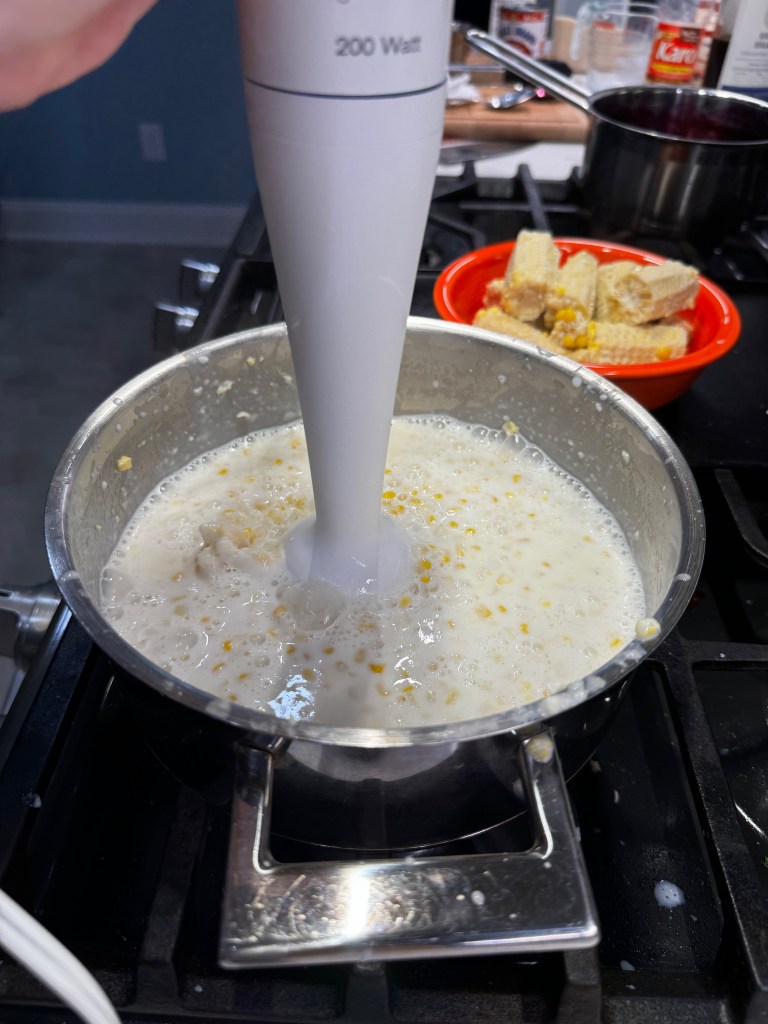
Use tongs to remove the spent corn cobs, allowing excess milk to drip into the pot. Pulse the mixture with an immersion blender to break up the softened kernels, but do not try to process smooth. There should be plenty of shredded bits of corn visible in the mixture.
Strain through a mesh strainer into a clean pitcher bowl. Gently stir in sweetened condensed milk and heavy cream. Cover and refrigerate several hours to thoroughly chill before freezing.
Make the blueberry compote while the ice cream base is chilling.
Ingredients
1 cup fresh (or frozen) blueberries
scant 1/2 cup organic cane sugar
2 Tbsp. water
1 Tbsp. corn syrup (to prevent crystallization)
3 Tbsp. Broad Branch Distillery Smashing Violet blueberry-infused whiskey (see notes for substitute)
Note: If you cannot find this whiskey (or a similar local product), substitute with two tablespoons of a low-proof bourbon, and swap in pure blueberry juice for the water used for simmering the berries. If you prefer a no-alcohol recipe, omit the whiskey entirely and swap in double amount of blueberry juice for water, plus a squeeze of fresh lemon. You may need to slightly increase the cooking time of the compote to get a proper reduction.
Directions
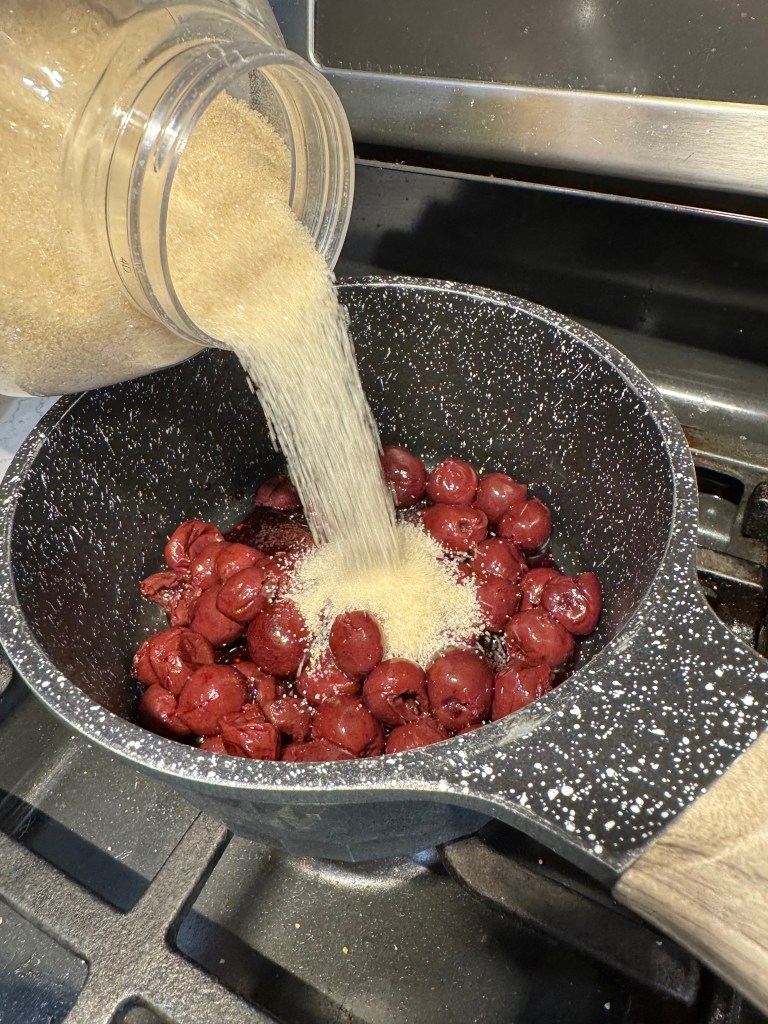
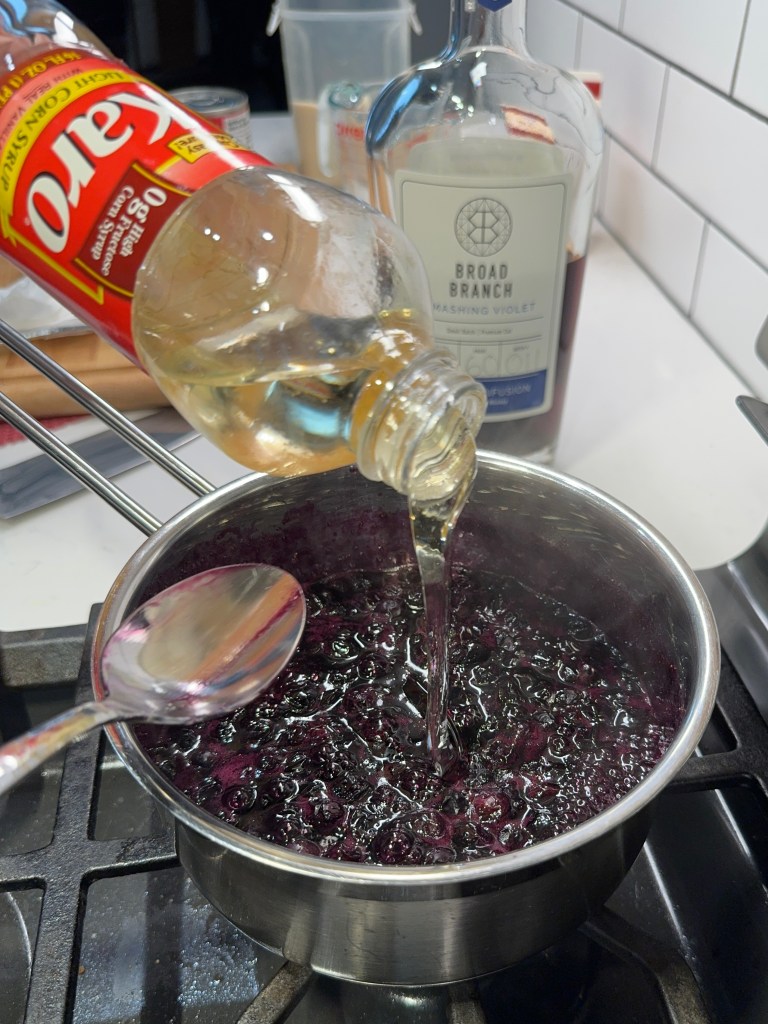
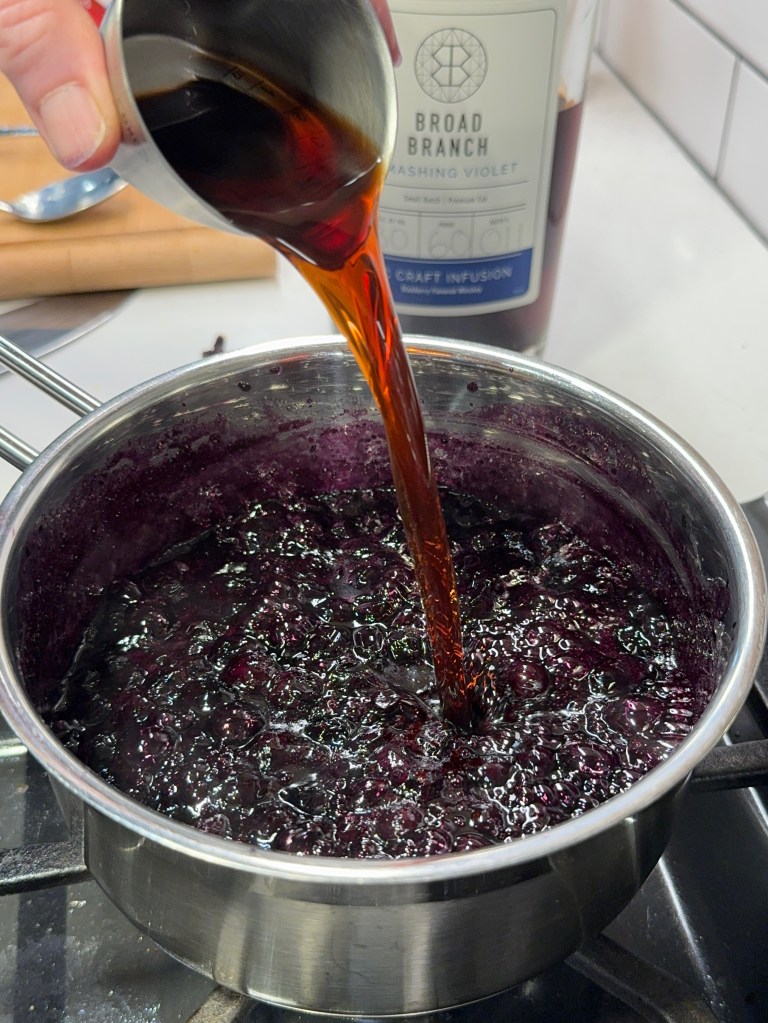
Combine berries, sugar and water in a heavy-bottomed pot over medium-low heat. Stir frequently to ensure that the mixture doesn’t scorch. After sugar dissolves, stir in the corn syrup to prevent crystallization of the sugar when the mixture cools later.
When the mixture is syrupy and reduced by about half, it should be bubbly all over even when stirred. Add the whiskey and allow it to boil again, but only for about 30 seconds. Remove from heat and cool to room temperature before transferring to a bowl to be chilled in the fridge.
Note: Be sure your ice cream maker’s freezer bowl has been frozen for at least 24 hours for best results.
Directions
1. Gently stir the ice cream base just before churning to reincorporate any ingredients that may have settled. Pour into the ice cream machine and freeze according to manufacturer’s instructions. During the final minute of churning, add optional vodka.
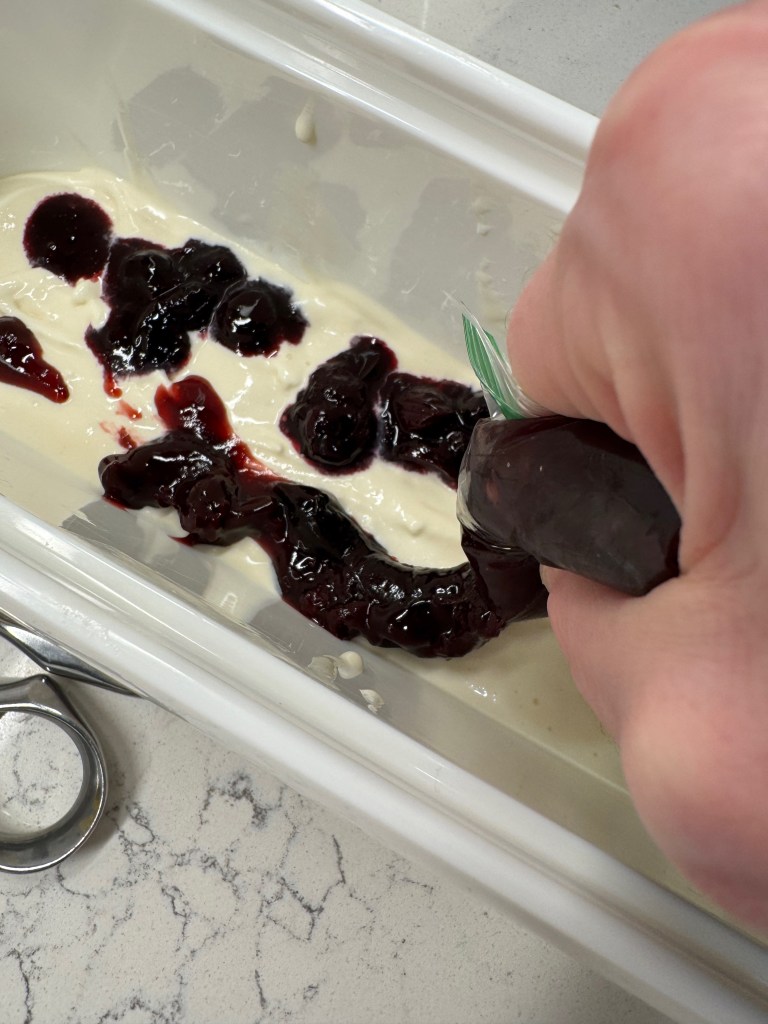
2. When ice cream base has finished freezing, spread one-third of it into an insulated ice cream container. Carefully spoon on a zigzag of the blueberry compote, about a quarter cup worth. Do not attempt to swirl it into the ice cream as this will lead to a muddy appearance (the swirls happen naturally during scooping).
3. Repeat with another layer of ice cream and another zigzag of compote, and then finish with the remaining ice cream. Smooth the top, cover it and place it in the freezer for 24 hours before enjoying.
It’s funny how things change after marriage. When we were dating, my husband, Les, and I spent weekends going to shows, visiting antique stores, shooting pool or walking the trails at nearby parks. Now, our Saturdays are more likely to involve cleaning out the garage and hitting up the sample tables at Costco. Who said romance is dead?
Last weekend, we loaded all our goodies into the trunk of the car after a Costco run— the bulk package of paper towels, a two-liter bottle of extra virgin olive oil, tower of canned tuna— everything except some irresistible dark chocolate peanut butter cups that caught my eye at checkout. That item rode shotgun with me in the front seat because we didn’t get to sample them inside and we are always starving when we finish shopping. By the time we got home, I said, “you know, these peanut butter cups would be great in a dark chocolate ice cream. I guess it’s time I made some.”
It’s possibly the creamiest ice cream I’ve ever made.
So, where are the peanut butter cups?
Your eyes don’t deceive; the peanut butter cups aren’t in there and I can explain. Our impression of the peanut butter cups changed after we got home, as we found them to be oddly gritty, especially after I chilled them. This is one of the hazards of Costco, as we now have a humongous bag of an impulse item that lost its shine on the way home. I didn’t want to risk sabotaging the perfect texture of the ice cream before me, so I changed my plan. The candy inspired me, and for that, I give thanks.
Without ice cream, there would be darkness and chaos.
Don Kardong (1976 Olympic runner, serious ice cream lover)
Let’s be honest, the world is full of darkness and chaos, even with ice cream. But summer’s favorite treat at least provides a most pleasant distraction, and this one deserves to be shared for its deep, dark chocolate flavor and silky smooth consistency. Here’s a fun fact: I’m not even particularly fond of chocolate ice cream, but this one? This one is awesome.
Most of my homemade ice creams these days begin, as this one does, with a can of sweetened condensed milk. I used to rely on custard as a base, and I still think it’s delicious and luxurious. But it gives me a headache trying to whip the egg yolks and sugar just right, then tempering with hot milk and especially cooking the custard to the proper thickness without crossing the line into scrambled egg territory. You can probably tell that I’ve had my share of issues here. 😏
The first time I made sweetened condensed milk ice cream, the clouds parted and I heard angels singing. I’m pretty sure it was the s’mores ice cream that I made for National S’mores Day three years ago, and I’ve hardly looked back. Condensed milk is thick, rich and exactly the right amount of sweetness for ice cream. It is an amazing substitute for custard, without the fuss or the saturated fat of several egg yolks. I learned later that the fat-free version of condensed milk works just as well as the regular kind (as long as you eat the ice cream within a few days), and isn’t this just the greatest news?
The ingredient list is surprisingly simple.
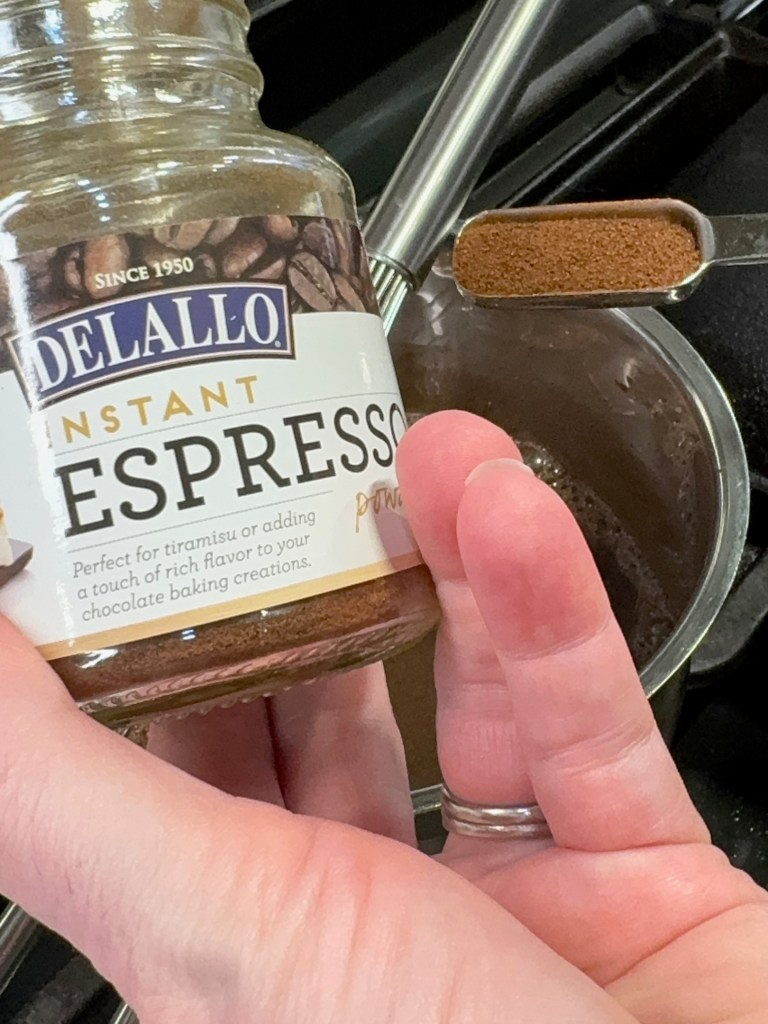
So, I decided that sweetened condensed milk was the way to go, along with a few other things— whole milk, cream, dark cocoa powder and vanilla. As my recipe progressed, I also stirred in a bit of brown sugar to offset the sharpness of the cocoa and a teaspoon of espresso powder to accentuate the deep chocolate flavor. We are already more than halfway through National Ice Cream Month— let’s get this done!
Chocolate lovers, pay serious attention
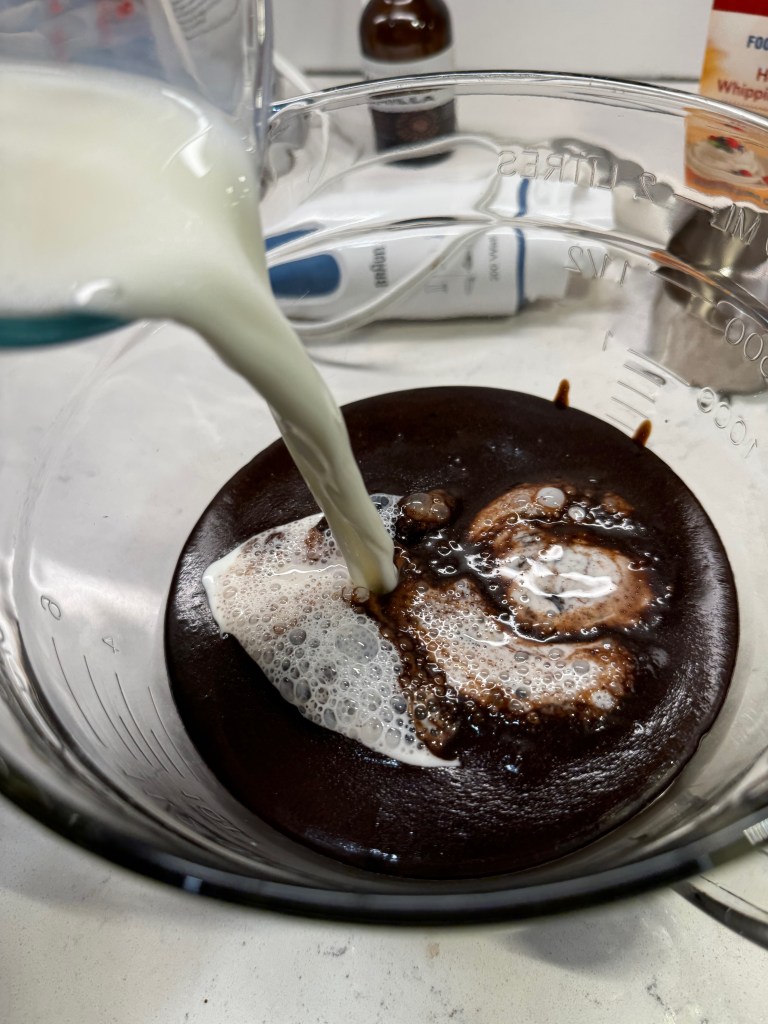
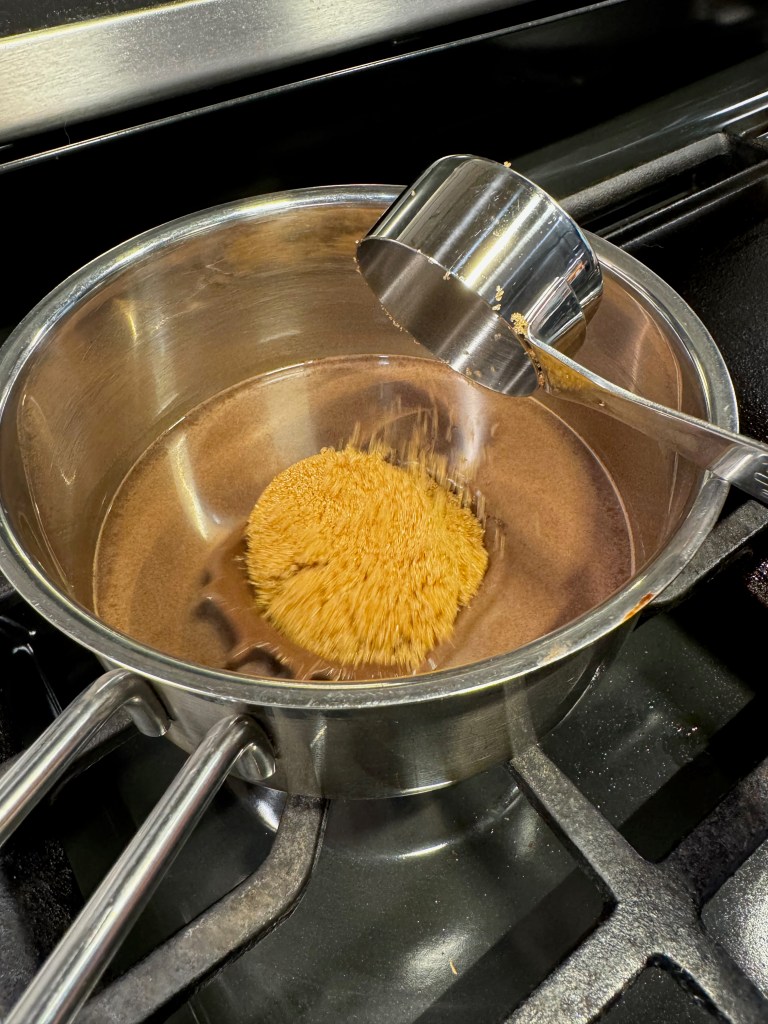
Do you remember, as a kid, stirring Nestlé Quik into a glass of ice cold milk, and how you could never quite get all the chocolatey powder to dissolve, no matter how long you stirred? It’s tough to mix a powder into a liquid, and even more so when the powder is cocoa. For starters, the density of cocoa powder is greater than the density of milk— it’s mostly fat and fiber, so it’s kind of like me expecting my middle-aged body to squeeze into my favorite old jeans shorts. It ain’t happening (especially after so much ice cream)! But there is a way to force the cocoa to dissolve, with a side effect of also releasing its full flavor potential. You have to cook it.
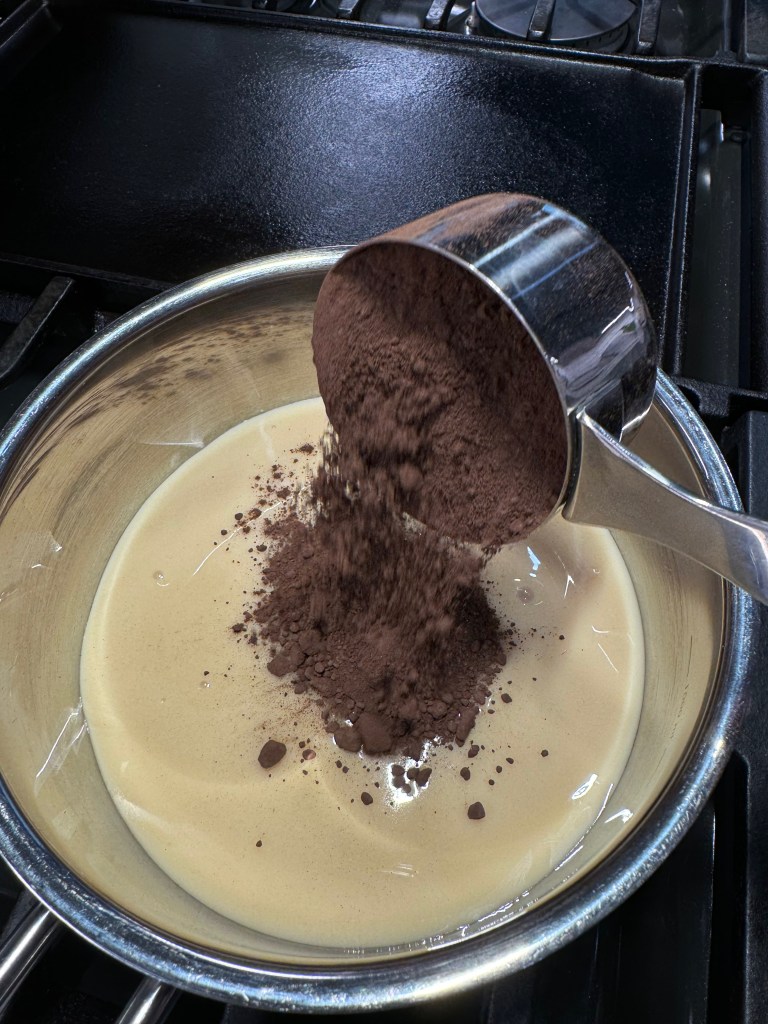
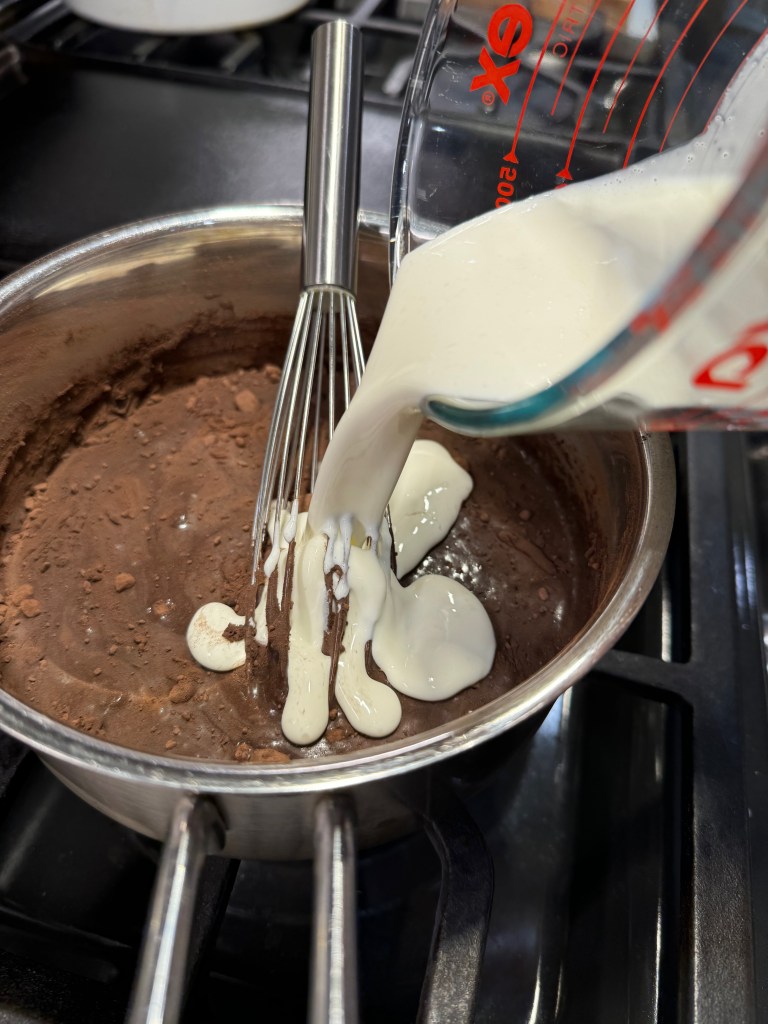
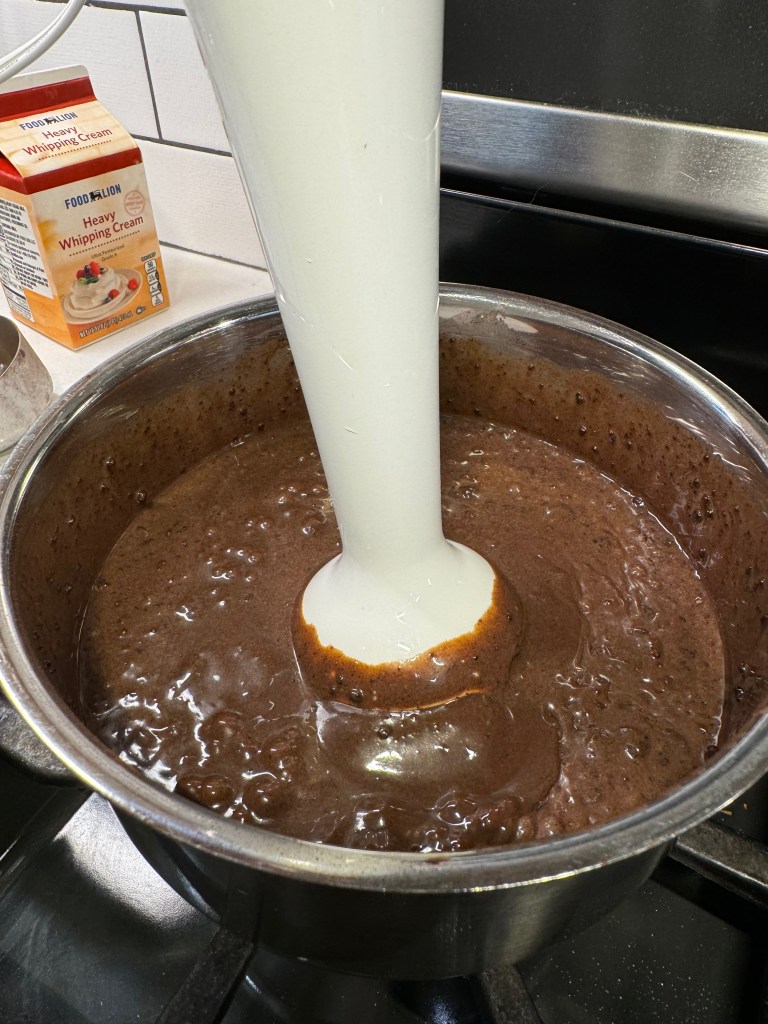
Sorry, but even with a non-custard base ice cream, we must turn on the stove for this one, at least long enough to coax the cocoa into dissolving. As I began whisking my cocoa into the condensed milk, I remembered that my condensed milk was fat-free, and I needed a little fat content to help this along. So I whisked in a half cup of the cream from my recipe and realized that I had another problem. My cocoa was lumpy, and it hadn’t occurred to me to sift it first (I was too excited, I guess). This, my friends, is exactly why my immersion blender lives in the cabinet above the range hood. I was back in business!
My iPhone camera had trouble with the color of my ice cream base! It was soooo dark and rich.
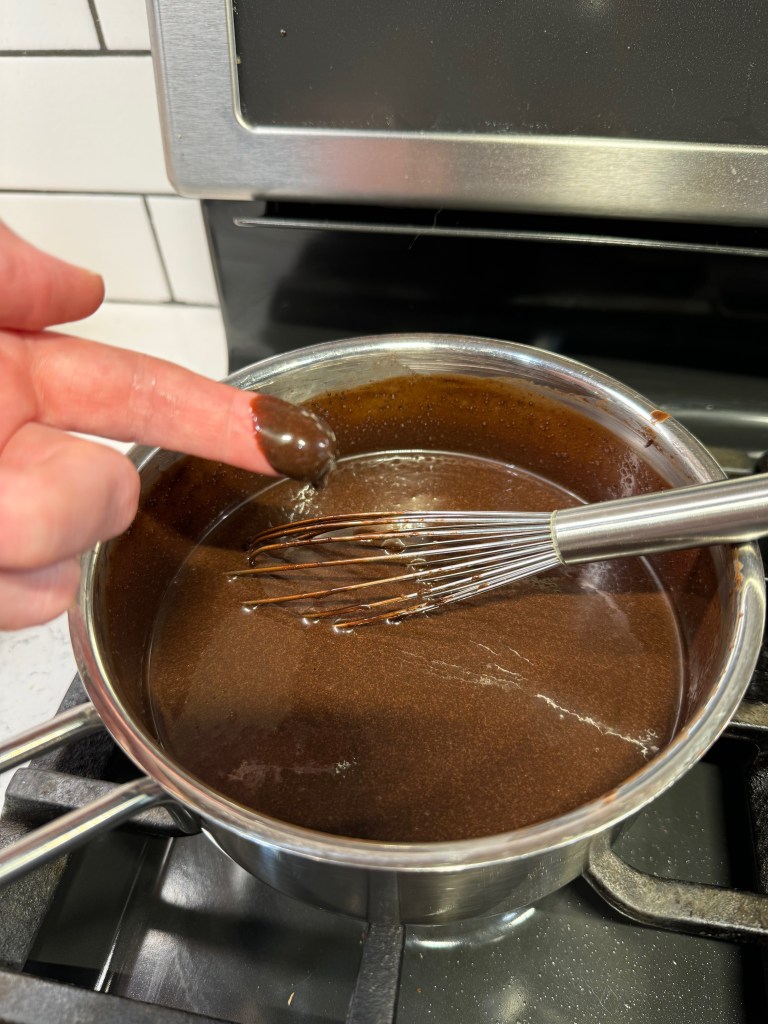
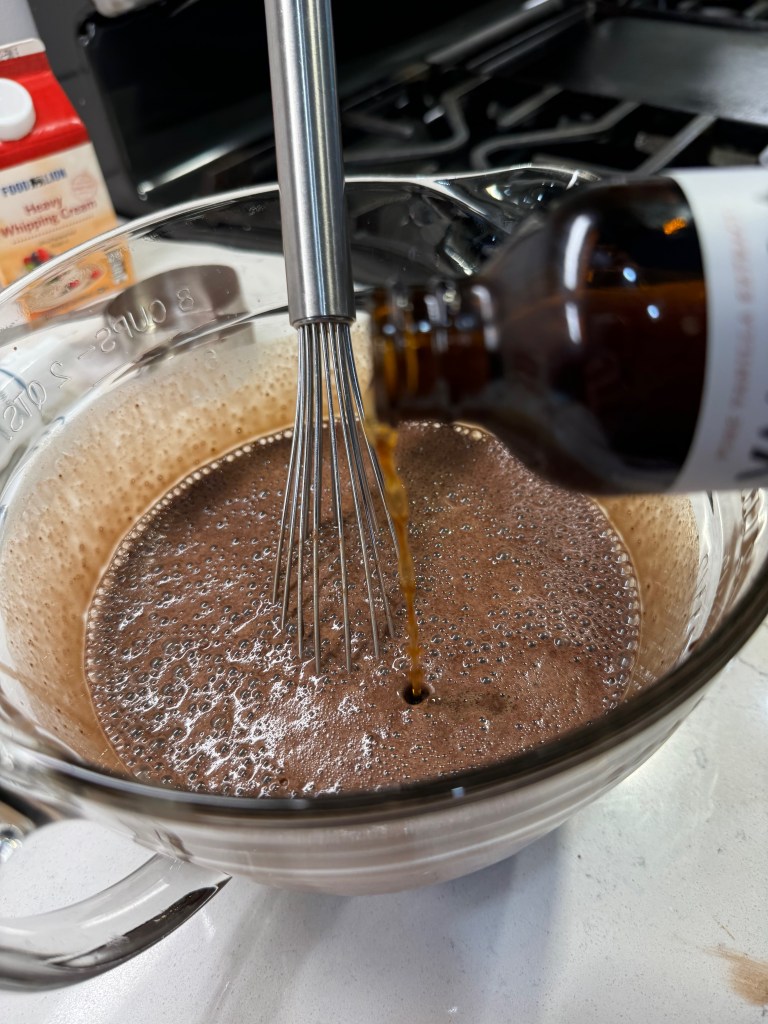
The condensed milk base was so deep and rich, I worried that the cream and milk would flatten the flavor, but that definitely was not the case. Vanilla did its part as well, accenting the depth of the cocoa. It was smooth, creamy and exploding with chocolate flavor.
But what does the resident chocolate lover think?
As much as possible, I include Les in my process of making new recipes, especially when it comes to sweets because my own sweet tooth is underdeveloped. He licked the tasting spoon and declared it “very chocolatey, but not sweet enough.” The double dark cocoa blend from King Arthur Baking is a fantastic blend of Dutch-processed and black cocoas. It’s more intense even than Hershey’s dark cocoa, and that intensity registers as a touch bitter. So one cup of the ice cream base went back into the pan so that I could melt in a quarter cup of brown sugar to soften that sharpness, and this is when I decided to also add a touch of espresso powder to enhance the chocolate flavor without more cocoa. It was a bold move because Les despises coffee flavor, but trust me, he would never know it’s in there.
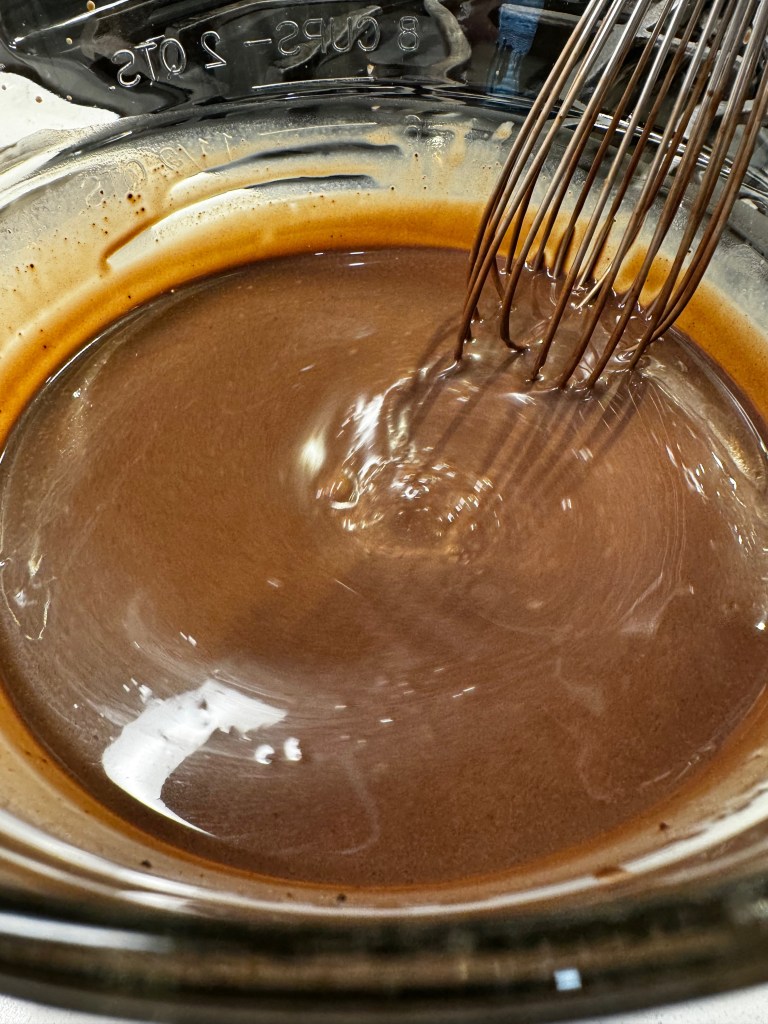
Don’t worry about keeping up with all these adjustments; I’ve written the recipe to include it all!
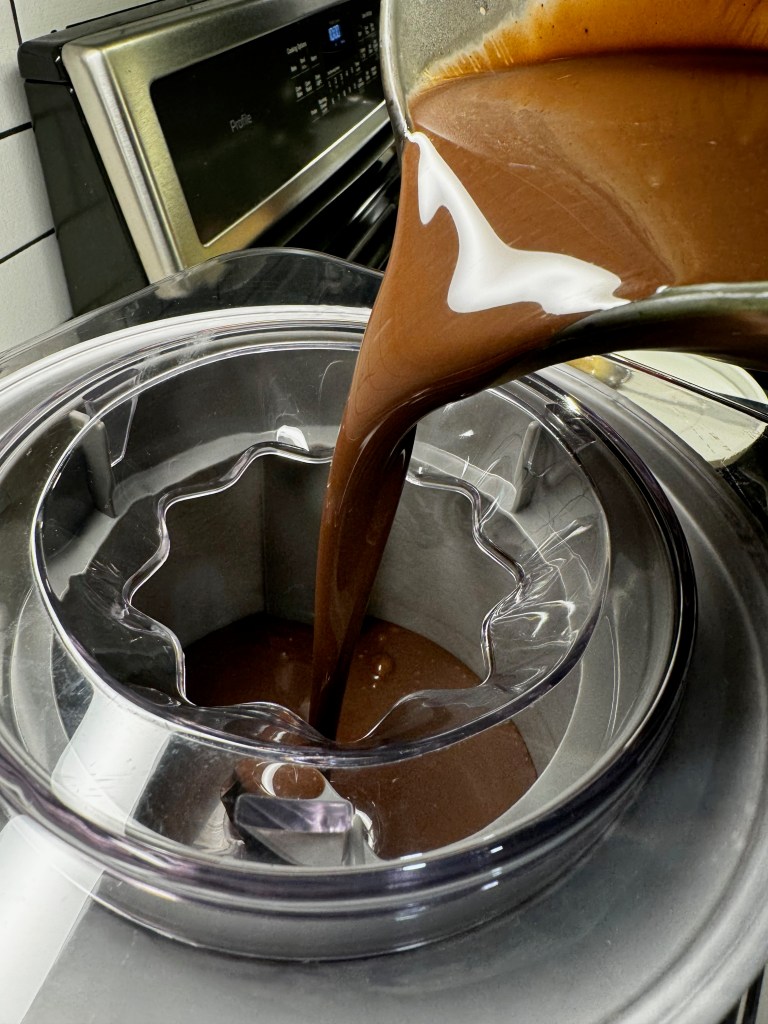
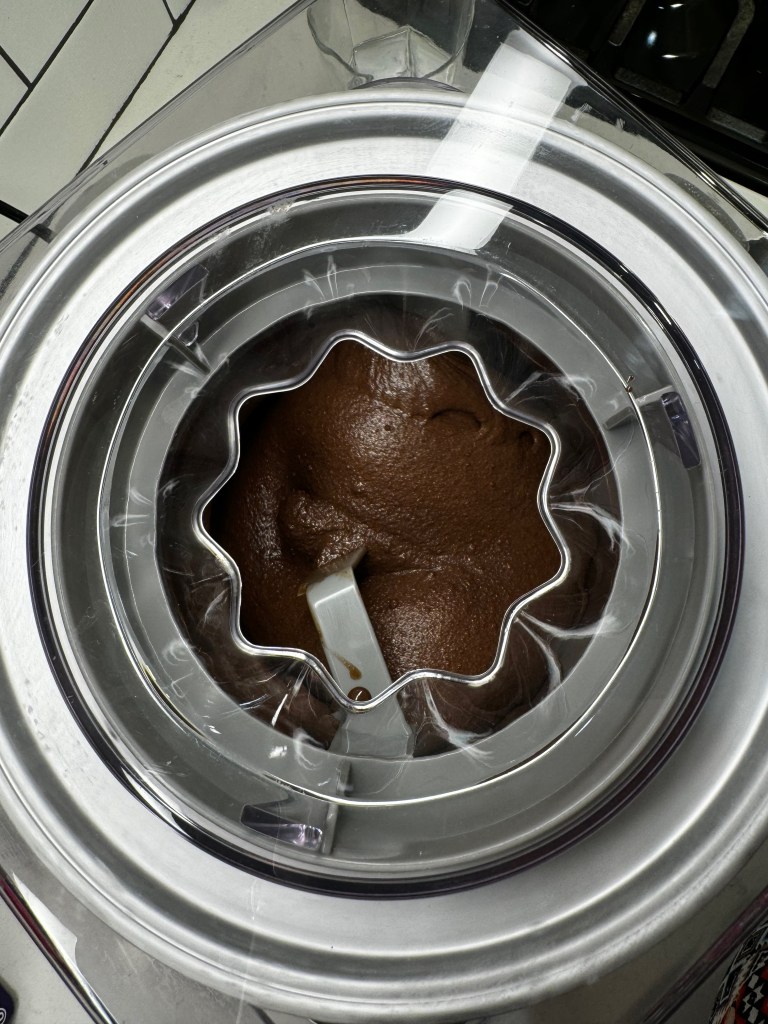
Second taste test was a winner, and I chilled and churned as usual, trusting my Cuisinart 2-quart ice maker that is going strong after 15 years. I know that the internet is full of “no churn” recipes, but if you enjoy homemade ice cream, I wholeheartedly recommend that you purchase a good quality machine. Mine has paid for itself many times over.
Churning ice cream incorporates air while it freezes, contributing to irresistible texture.
One could certainly make an argument for adding any variety of candies or other goodies to this dark chocolate ice cream. It would be a terrific base for a rocky road, a mint chip—or yes, a peanut butter cup blend. But I don’t regret enjoying it just as it is, in all its deep, dark chocolatey goodness.
Still twelve days left of National Ice Cream Month. What flavor do you want next?
If you love chocolate ice cream, do yourself a favor and make this no-egg recipe. It would be a terrific base for any number of add-ins, but its creamy, indulgent texture makes it perfect on its own!
Ingredients
1 can sweetened condensed milk (fat-free works great)
1/2 cup dark cocoa powder
1 1/4 cups heavy cream, divided
1/4 cup brown sugar
1 tsp. espresso powder (optional, to accentuate the chocolate flavor)
1 cup whole milk
2 tsp. real vanilla extract
1 Tbsp. vodka (optional, added in the final minute of churning)
Note: The vodka addition is optional, and I recommend omitting it if you will be serving children or others who avoid alcohol. It’s a very small amount, and if you choose to add it during the final minute of churning in the ice cream maker, you’ll find that the ice cream is easy to scoop straight out of the freezer. If you do not use the vodka, simply take the ice cream out five minutes before serving.
Directions
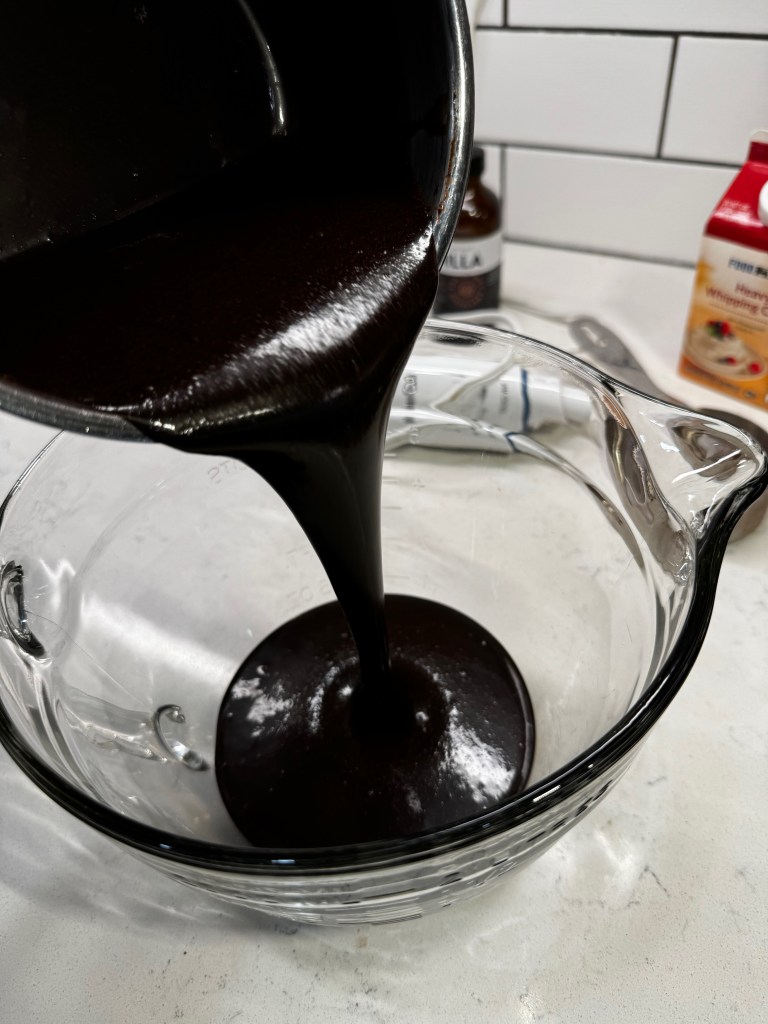
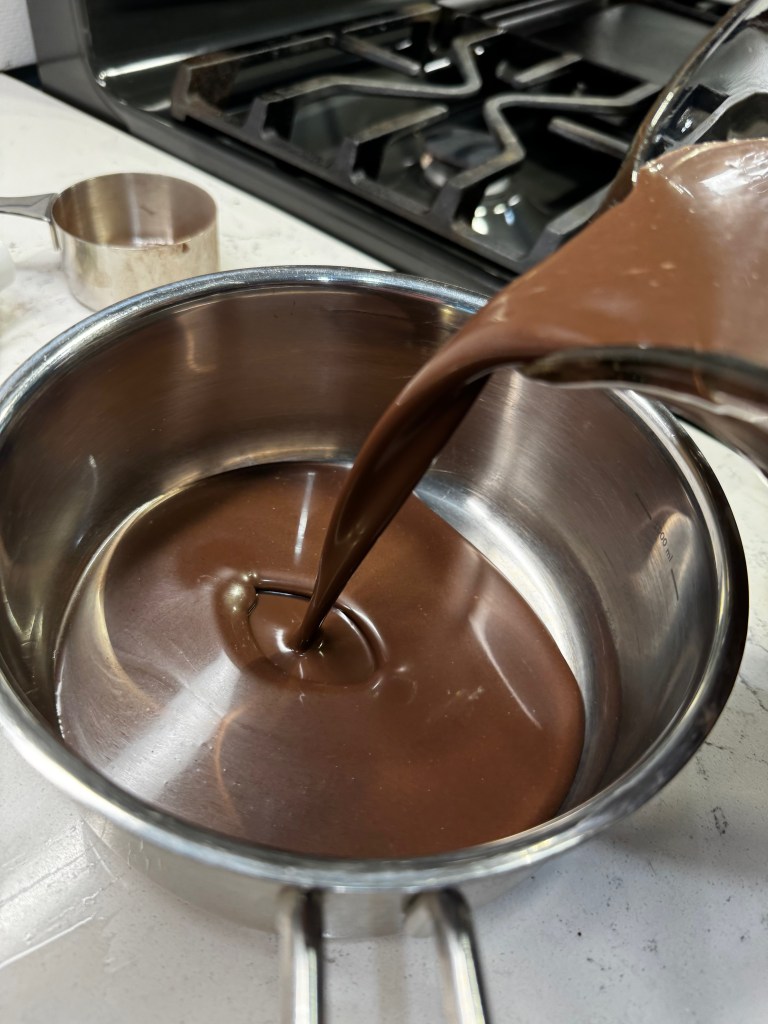
Combine condensed milk, cocoa, brown sugar, espresso powder and 1/2 cup of the heavy cream in a small, heavy-bottomed sauce pan. Whisk over medium low heat for 6 to 7 minutes, until sugar is completely dissolved and the mixture is very hot to the touch. Remove from heat and continue whisking for one minute.
Transfer hot cocoa mixture to a large, heatproof bowl. Whisk in whole milk, vanilla and remaining heavy cream. Cover with a tight-fitting lid and refrigerate several hours until thoroughly chilled.
Prepare ice cream machine and churn mixture according to manufacturer’s instructions. Add vodka during the final minute of churning, if desired.
Transfer to an insulated ice cream container. Freeze several hours or overnight until firm.
The kid in me comes out to play in July. It’s my birthday month, and so my memories call me back to childhood more than in other months. But I also think it’s because I learned a few years ago that July is National Ice Cream month. And what kid (even a grownup one) doesn’t love ice cream in the summer?
There’s a saying out there, attributed to President Harry Truman, that “there is nothing new in the world except the history that you do not know,” and though most U.S. citizens grew up believing that apple pie is an all-American dish— right alongside baseball, hot dogs and Chevrolet, remember?— the backstory of apple pie is much older. I found this article in Southern Living interesting; if you like rabbit holes (as I do), then dig into this after we finish this ice cream.
We may not have invented it, but we do indeed love apple pie in this country, and I have many fond childhood memories of my grandmother making pies and applesauce from the tart green apples produced by a tree next to the side of her house in Western New York. My cousins and I would go out there to pick them (sometimes off the ground), and Gram would spin a few other ingredients around like magic, and just like that, a pie would appear. A slice of that pie, alongside a scoop of vanilla ice cream and a wedge of sharp New York cheddar— oh, it was like heaven.
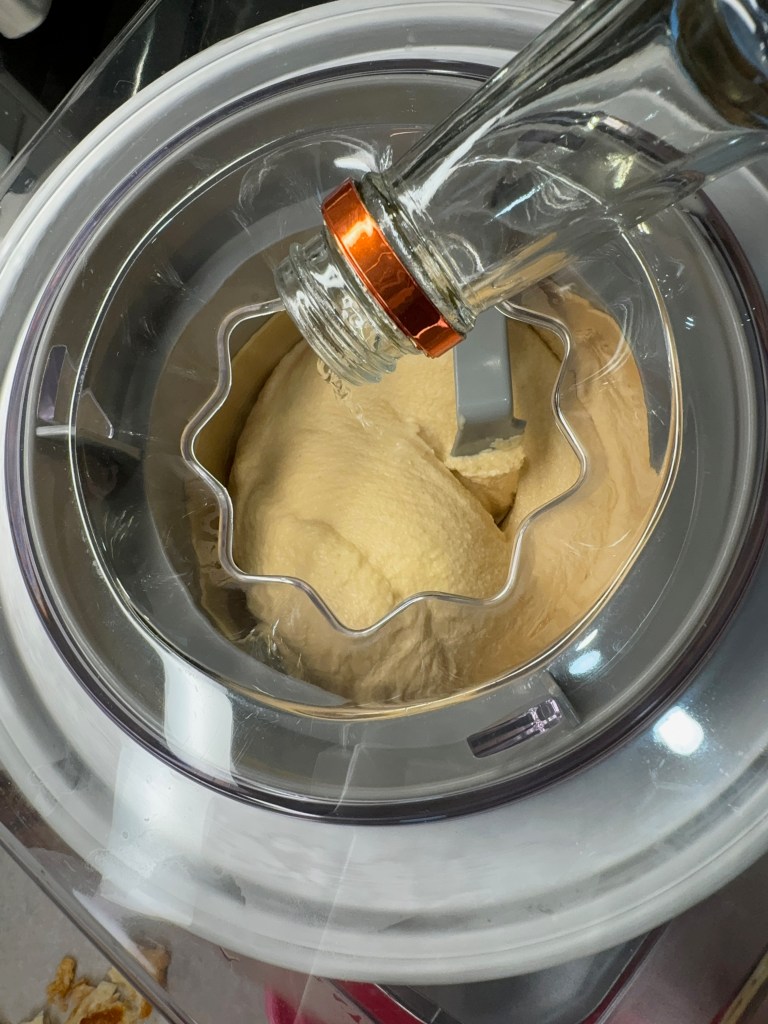
This year, the kid in me was craving something a little simpler, and so for our July Fourth celebration this year, it’ll be this apple pie ice cream. Two summer favorites in one scrumptious scoop!
It’s apple pie and à la mode, all in one!
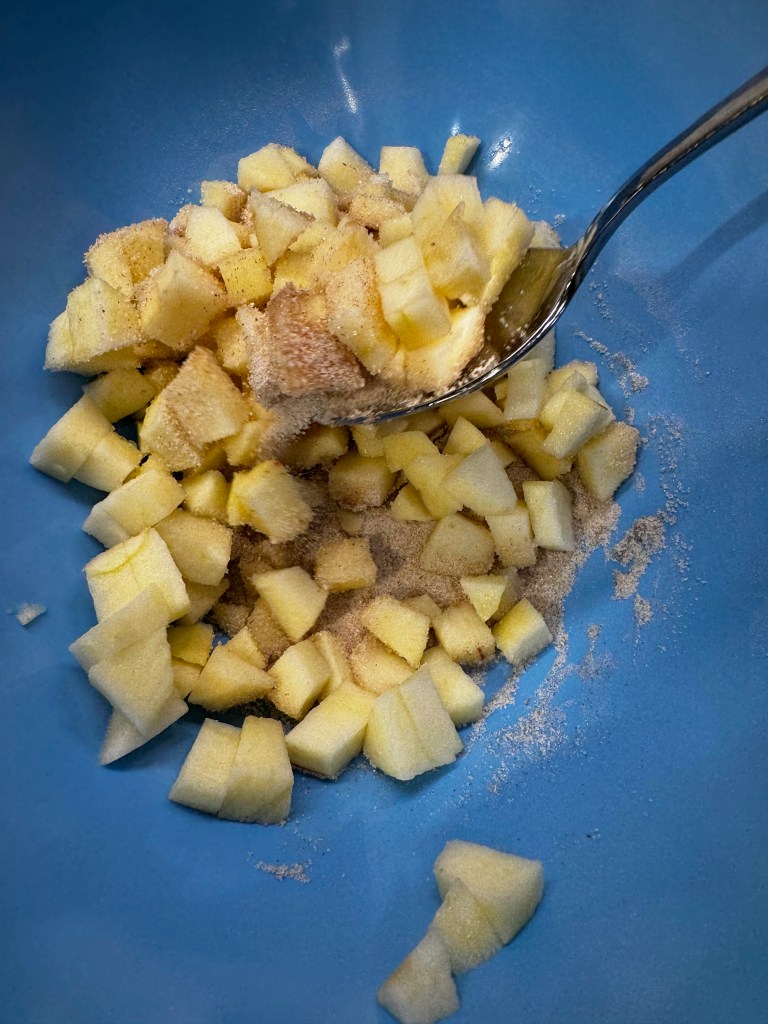
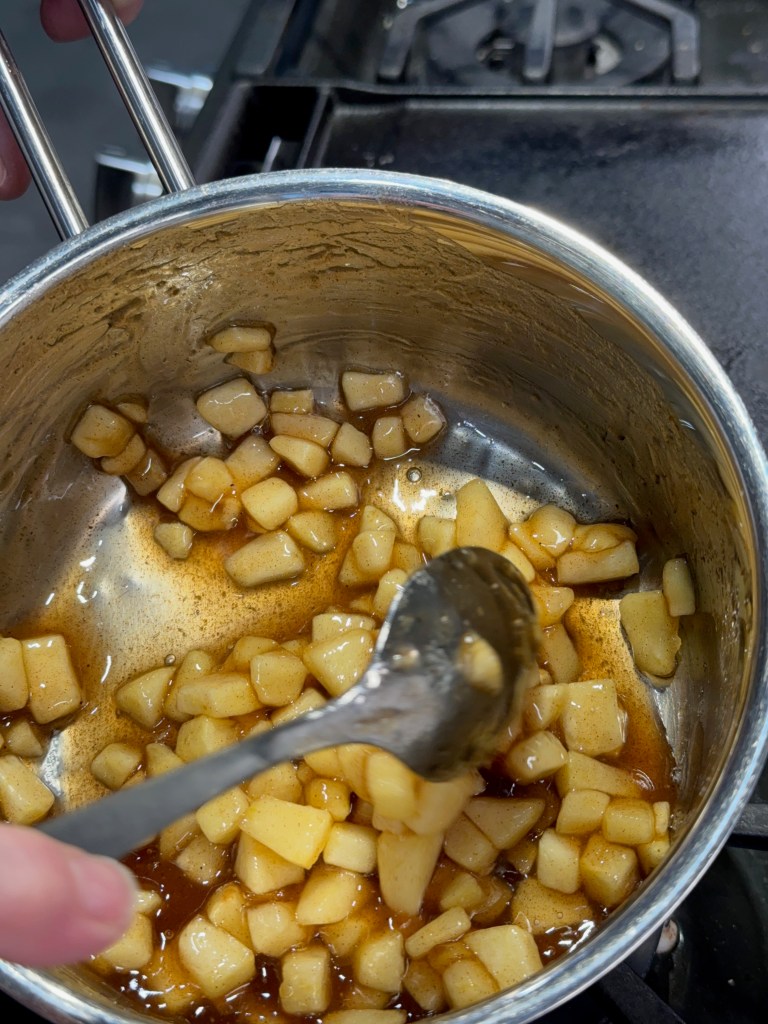
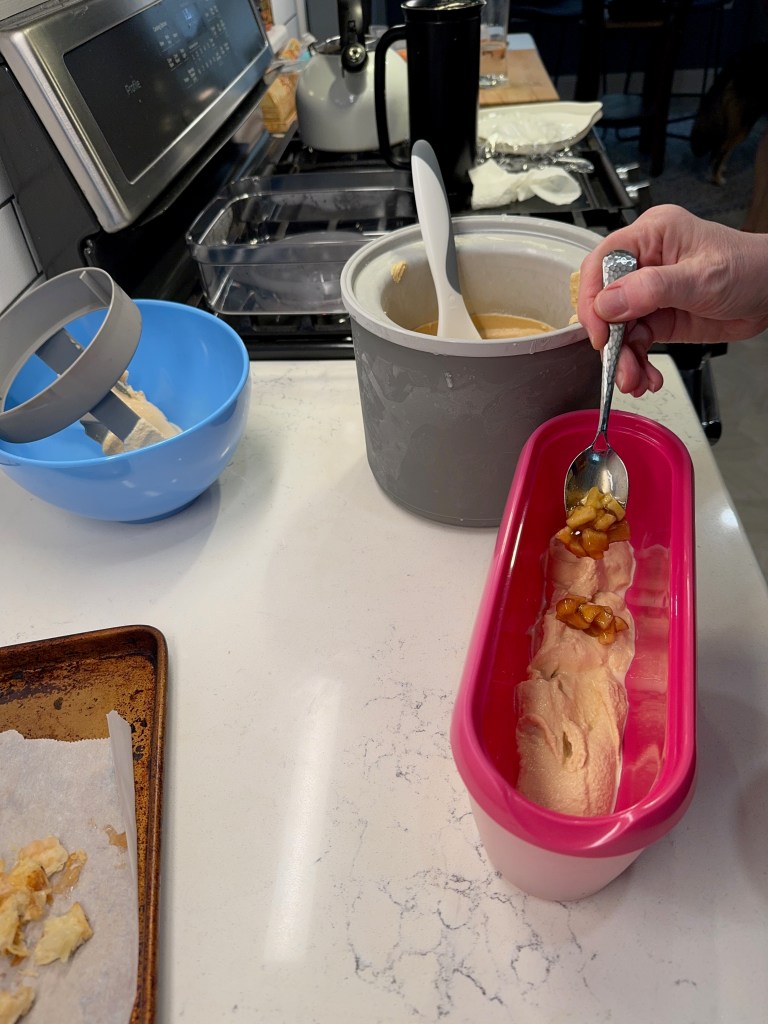
There’s no magic to it, and only a little bit of cooking to get the chopped apples softened and syrupy with cinnamon, sugar and cardamom flavors. I used two small Gala apples, which cooked down to approximately one half cup of syrupy deliciousness. I was on the fence whether to blend those bits into the ice cream base itself or merely layer with the base at the end. Ultimately, I layered them because I love the visual appeal of all the tasty flavors swirled into each scoop.
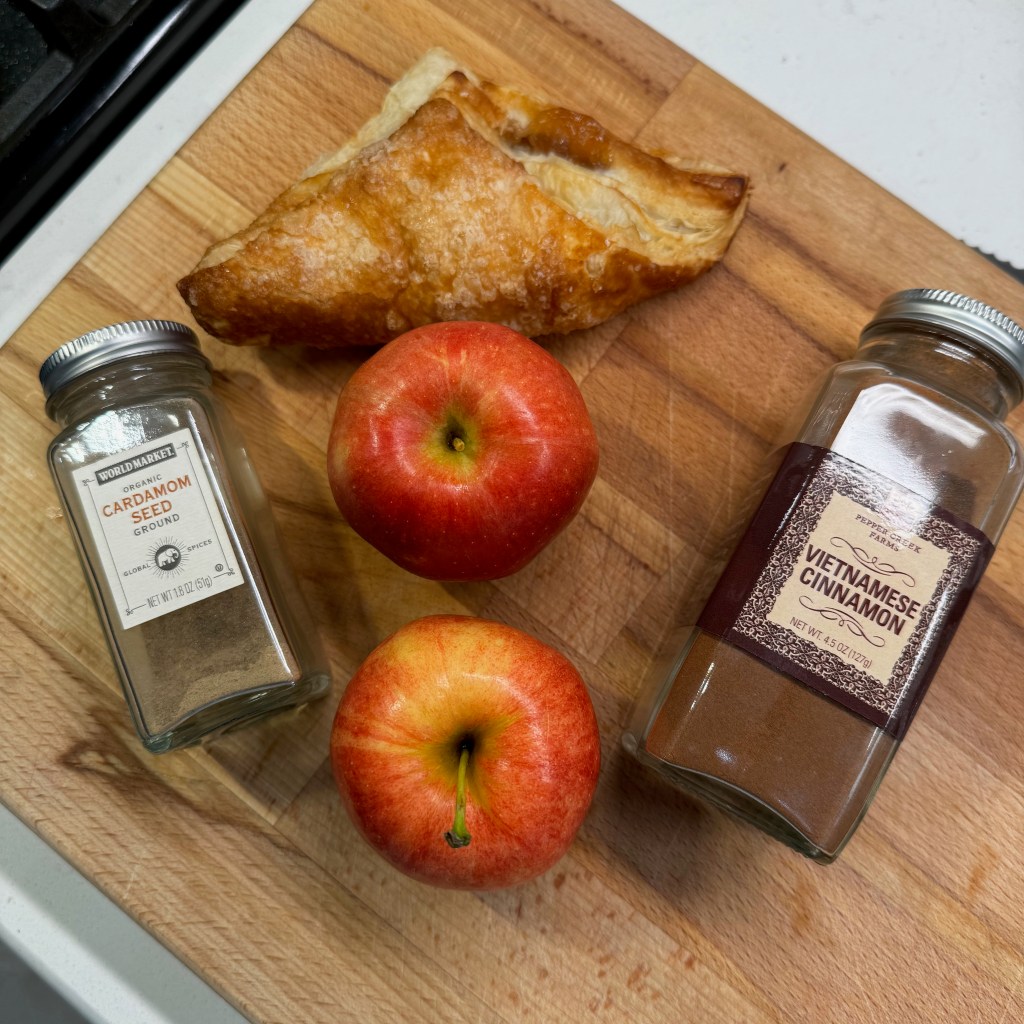
These flavors were begging to be worked into an ice cream!
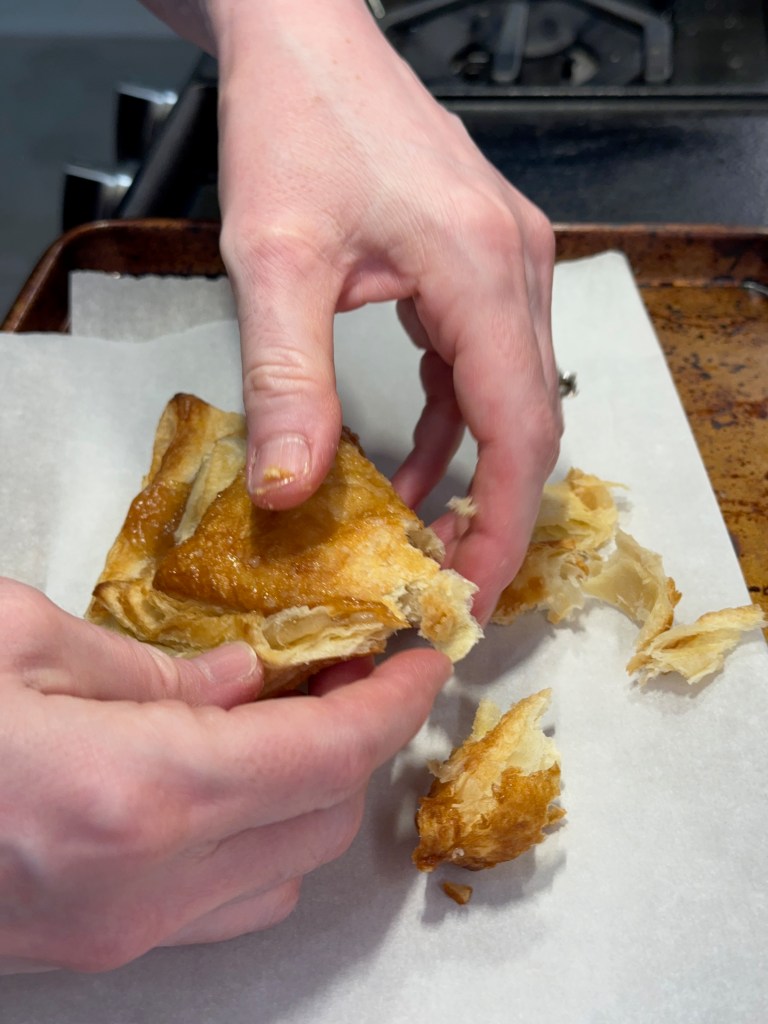
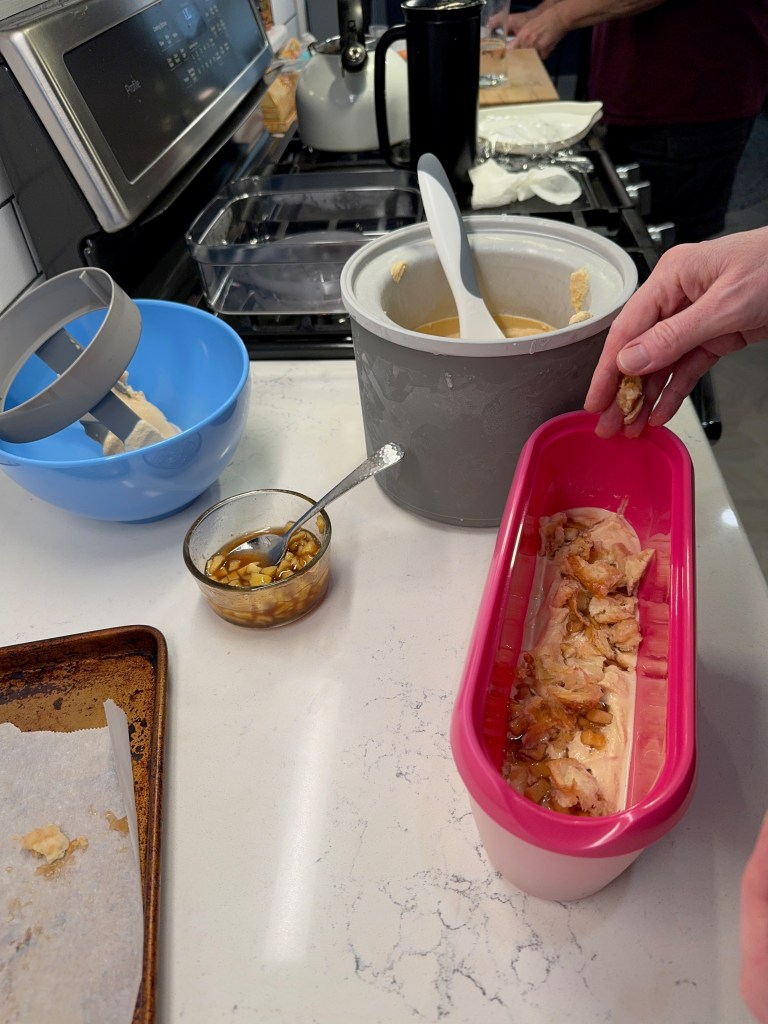
The “pie” part of my recipe comes not from pie crust, but from buttery, flaky apple turnovers. I took a shortcut by using store-bought pastries, but it was a relief to not turn on the oven. If you make the turnovers yourself, you are officially the apple of my eye! 🤩
The only difficult part of making this ice cream was the waiting!
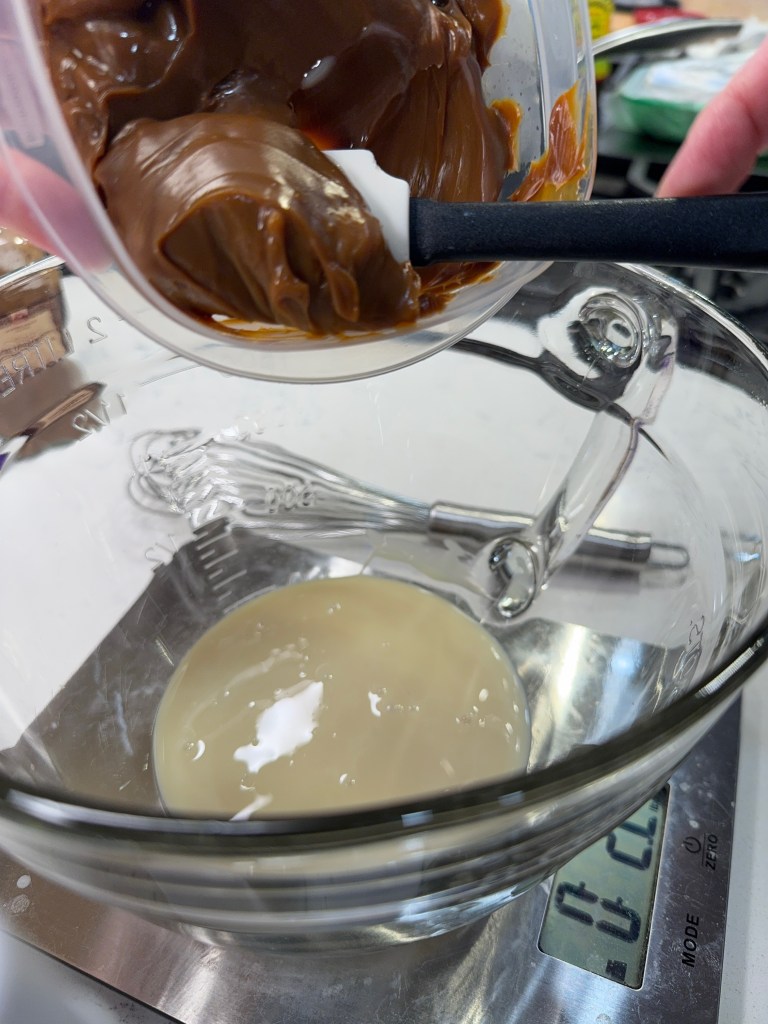
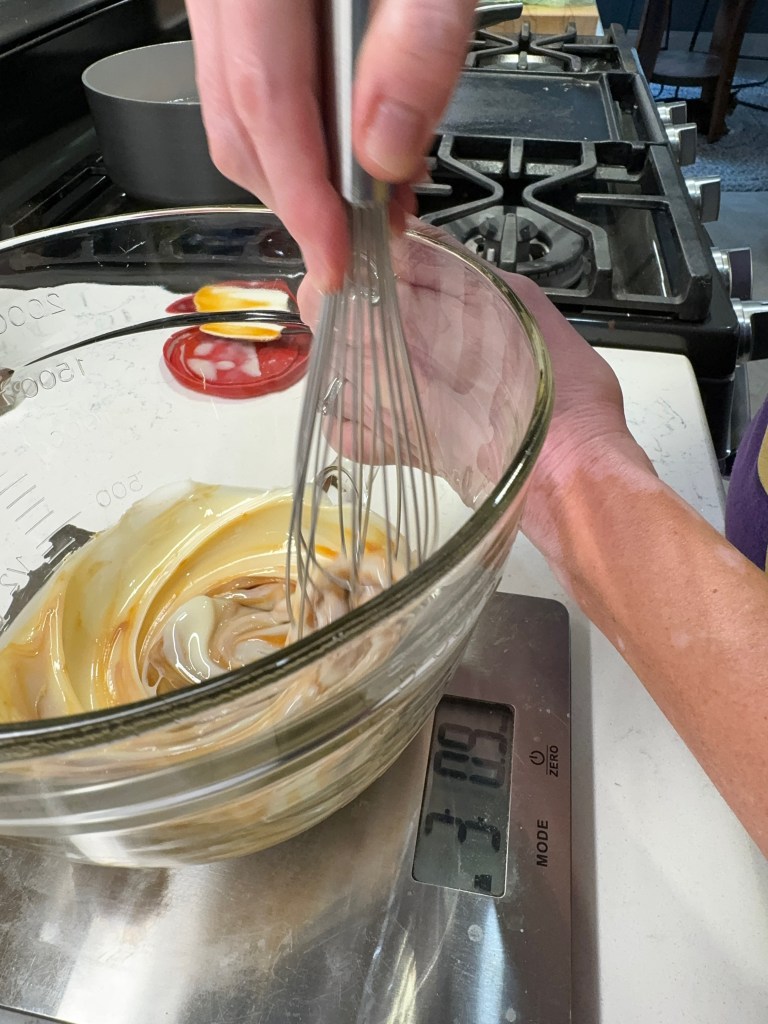
The ice cream base I used is my go-to, with sweetened condensed milk, cream, whole milk and a touch more cinnamon. This time, though, I got a notion to swap in a portion of dulce de leche sweetened condensed milk. It’s a thicker, caramelized version of condensed milk, and its rich, caramel-y flavor gave my ice cream even more of an apple pie vibe. Notice that I did not include vanilla? I wanted no distraction from the apples, caramel and spices.
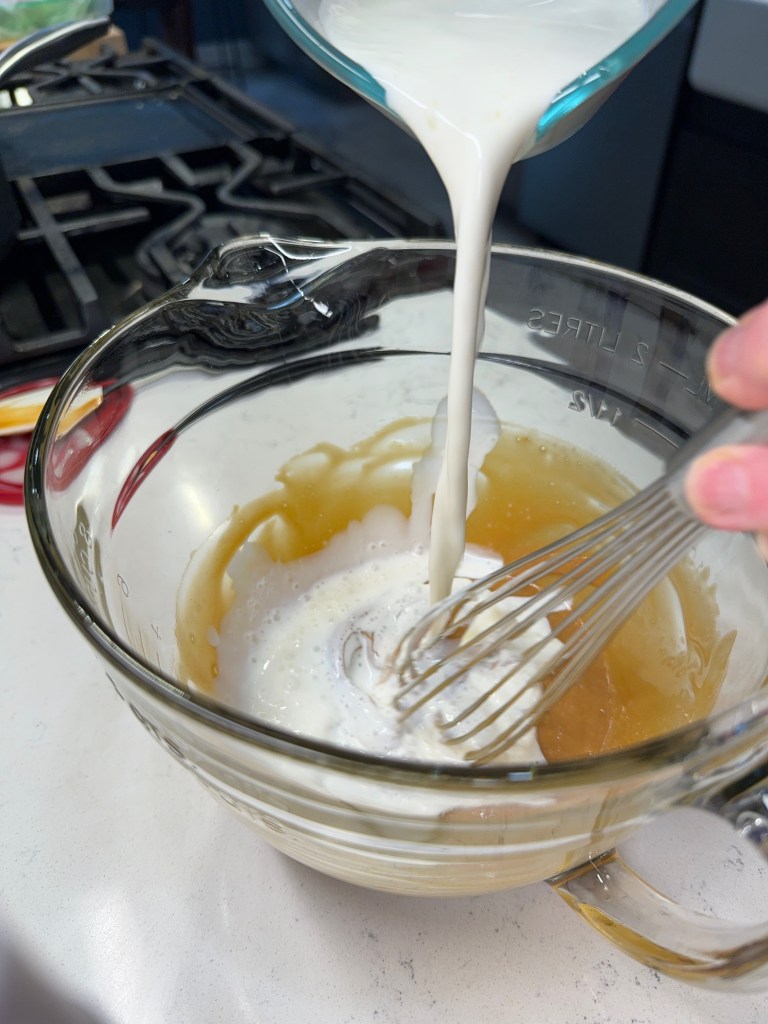
A bit of dulce de leche gave this a caramel touch.This is the best time to whisk in the cinnamon.Milk and cream finish up the base.
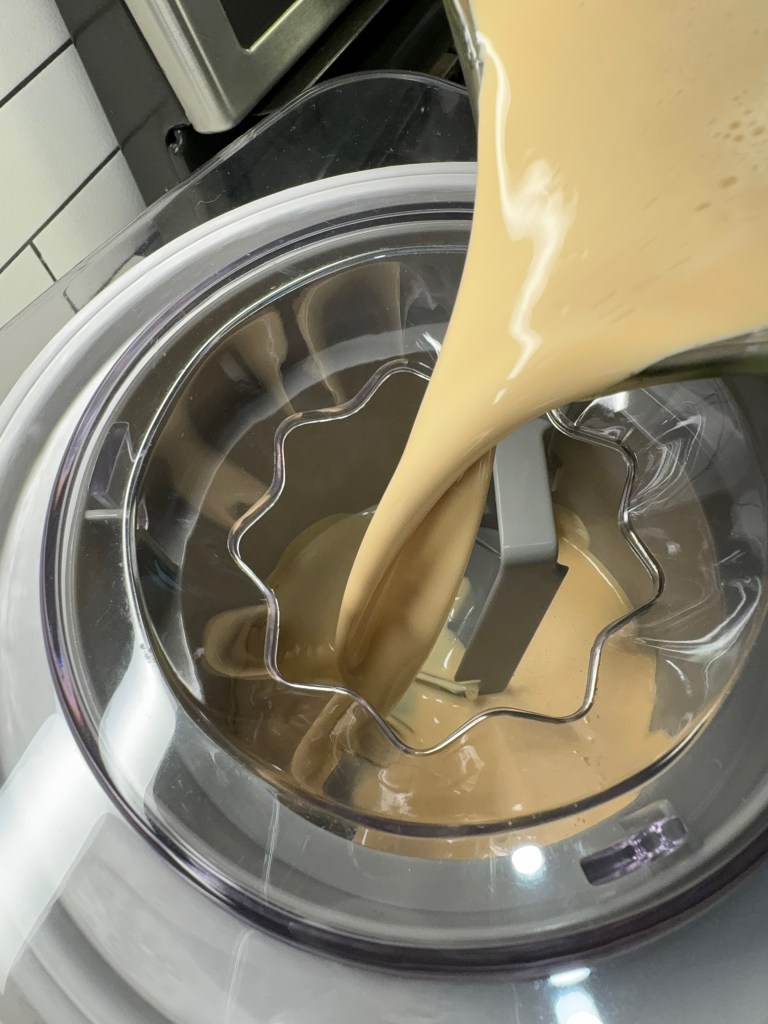
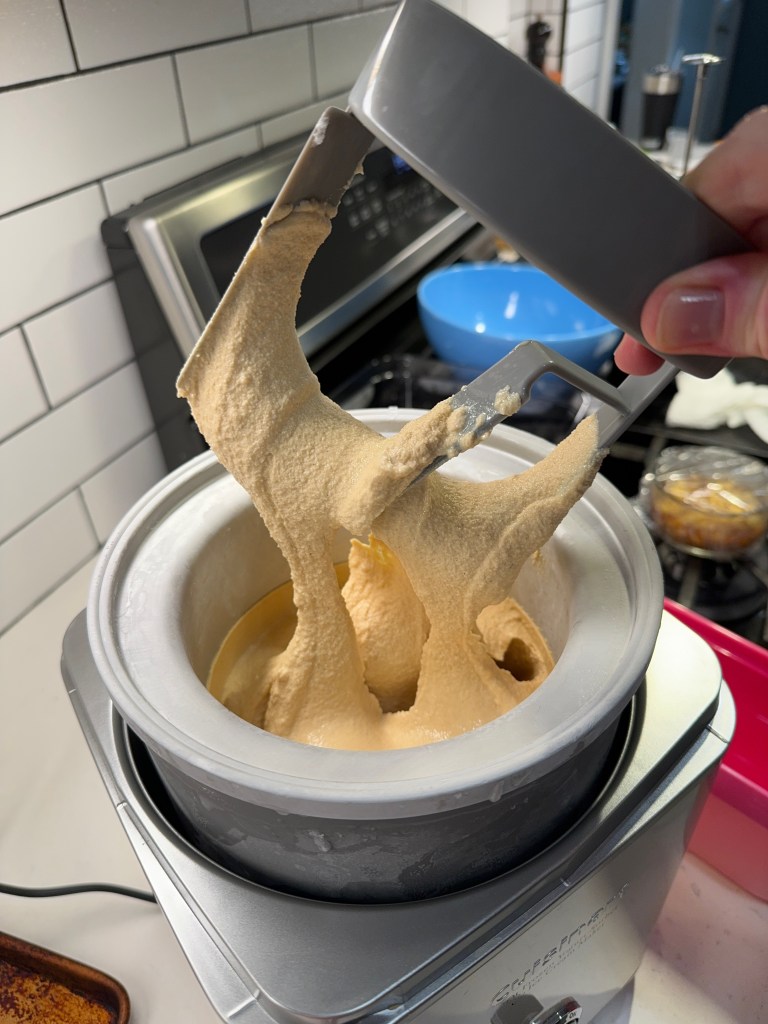
After churning the ice cream in my handy Cuisinart machine, which has paid for itself dozens of times over since I bought it more than 15 years ago, I layered the sweet base with those syrupy apples and some torn up bits of apple turnovers.
With the machine running, pour in the base mixture.A splash of vodka at the end for easy scooping.This is my favorite part!Layer a bit of the apples over some of the ice cream base.After a scatter of turnover bits, repeat the layers.Finish with a layer of ice cream and freeze!
My inner kid is grinning ear to ear for this one, and it feels like a perfect way to kick off National Ice Cream Month. Don’t be surprised to see a few other fun flavors pop up here in the weeks to come. Hello, July! 😎
This is my adaptation of two favorite summer treats, all layered together into one scrumptious scoop!
Ingredients
14 oz. sweetened condensed milk (or swap in a small amount of dulce de leche)
1/2 tsp. cinnamon
1 cup whole milk
1 cup light cream
2 small gala apples, peeled and chopped into bits
1/4 cup sugar
1/4 tsp. cinnamon
1/8 tsp. ground cardamom
pinch of salt
2 tsp. pie filling enhancer (a King Arthur product, or sub a teaspoon corn starch)
2 Tbsp. water
1 large baked apple turnover, torn into small pieces
Notes: Do your prep ahead so that everything has time to chill thoroughly in the fridge before churning and layering the ice cream. For easy scooping straight from the freezer, add a tablespoon of vodka during the final minute of churning. This ice cream is best after ripening in the freezer at least 8 hours or preferably overnight.
Directions
Whisk together sweetened condensed milk and cinnamon. Add milk and cream, and whisk until smooth. Refrigerate until mixture is completely cold.
Toss apple bits with sugar, cinnamon, cardamom, salt and pie filling enhancer (or corn starch). Add to a small saucepan with water and cook over low heat until mixture is thickened and apples are soft with only a light resistance to the bite. Transfer to a small bowl to cool and refrigerate until chilled.
Chop or tear the apple turnover into small pieces. Spread the pieces out on a parchment lined plate or small baking sheet and place in the freezer for at least one hour.
Churn the dairy base in ice cream machine, following manufacturer’s instructions. If using vodka for texture, only add it during the final minute of churning. Transfer ice cream to an insulated freezer container, layering with stewed spiced apples and torn bits of frozen turnover. Ripen in freezer several hours (overnight is best).
To say that I love a bargain is an understatement. I’ve never fawned over the vanilla-scented gourmet kitchen stores at the mall— the ones that sell the high-dollar pan sets, expensive crystal, and pre-made mixes for quick breads and specialty gravy bases. Those stores are filled with lovely things, don’t get me wrong. But you’re more likely to find me pacing the aisles at T.J. Maxx, Home Goods and Big Lots, where I’ve found many a bargain. I’m not talking about low prices for cheap items, but the way. It’s quality at a better price that I want, and I’m willing to take my chances with the unpredictability of these bargain stores’ inventories.
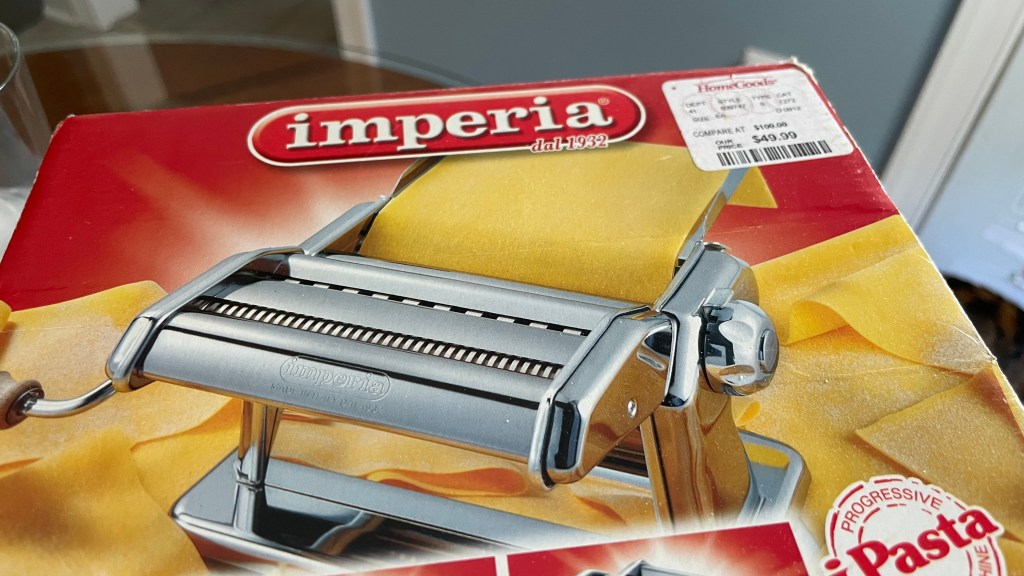
For example, my Italian-made pasta rolling machine that had been on my wish list for at least two Christmases (if not for the $100+ price tag), jumped into my cart unexpectedly about 12 years ago for the low, low price of— well, zoom in on the picture below and see for yourself. The exact item sells today at the vanilla-scented store for $149.95. I’d rather apply that hundred-dollar savings to the food I will make with the thing and just sniff my own bottle of vanilla at home as I delight in my good fortune.
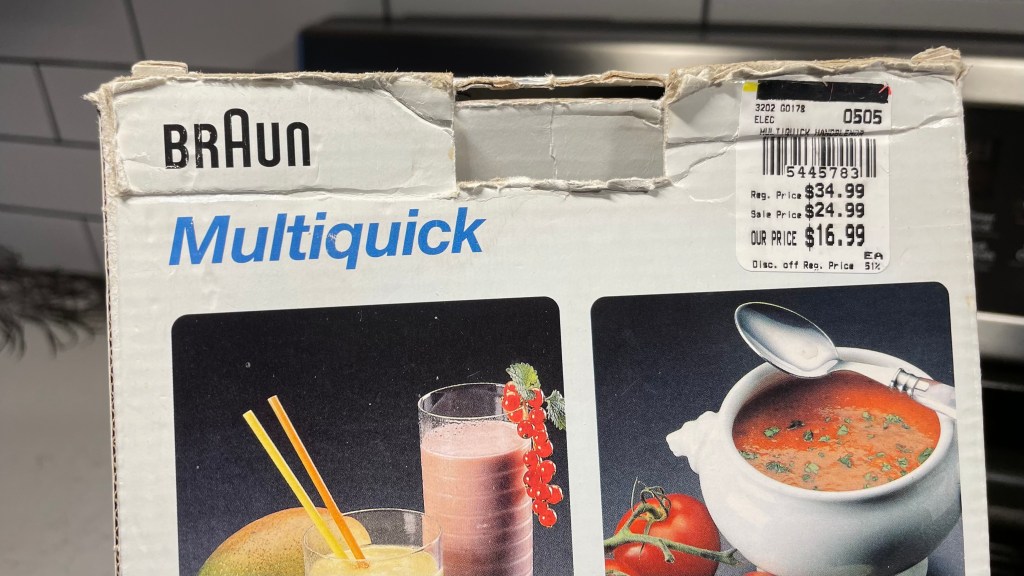
Likewise, my Braun immersion blender, which is still going strong after pureeing hundreds of soups and cheese sauces for the past 15 years, only set me back $17. Could we please have a moment of silence for Tuesday Morning? Thank you. Oh, how I miss that store.
Another super find that has served me well is my Cuisinart Pure Indulgence 2-quart ice cream maker, and this was a major scoop at only $49, but wait, it gets better! I bought this when Big Lots was still doing its old rewards program of 20% off an item after 10 purchases of $20 or more. In other words, I only spent $39 for an ice cream machine that retailed for more than double that price. The purchases I made to get that discount were staple items that I would have bought anyway— mostly Bob’s Red Mill products and cleaning supplies.
It’s the thrill of the hunt that I love, but I also enjoy having these quality items in my cabinets because they make it easier for me to produce delicious foods for myself and my loved ones. Plus, I can count on them to last a long time.
This past week, I made my latest ice cream— using my Cuisinart machine, of course— and though I don’t usually post two desserts in a row, I decided to share this right away for a couple of reasons. First, it’s super easy and might take some pressure off my foodie friends as we all plan the various holiday meals on the horizon. Second, it’s a natural follow-up to a question posed by my New Jersey blog buddy, Bernadette, in the comments section of my pumpkin chai blondies post a few days ago. I’m keeping good on my promise. 😁
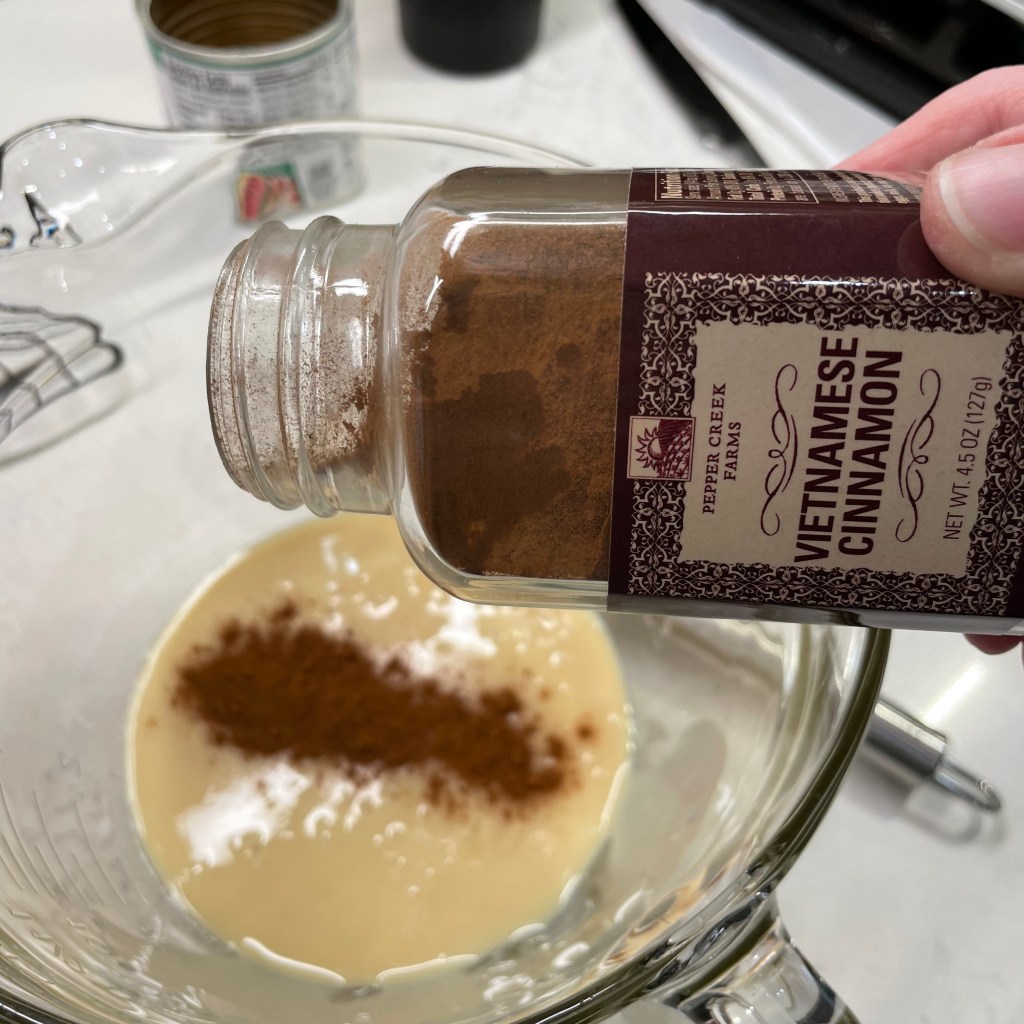
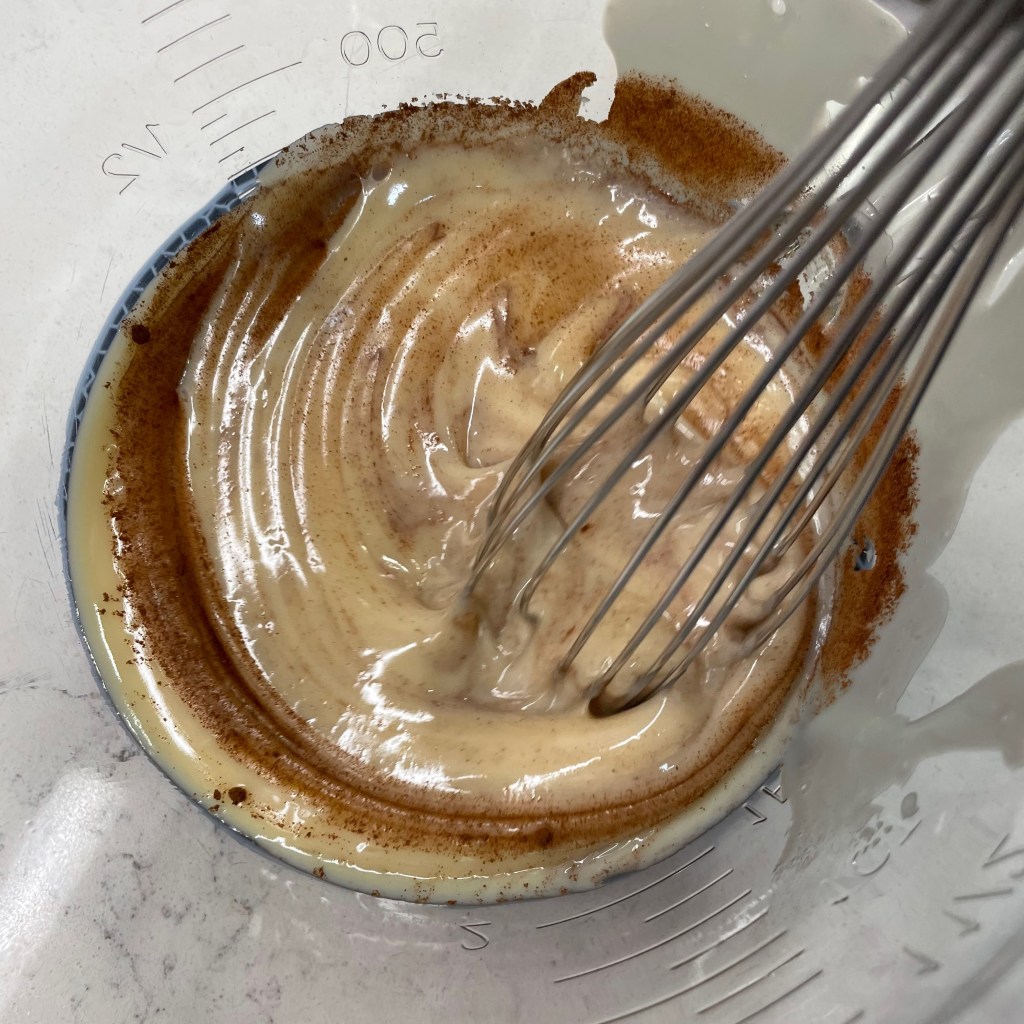
Here it is, Bern— not maple, but cinnamon, and I think you’re gonna love it! The base takes mere minutes to make, and the ingredient list is short: just cinnamon stirred into sweetened condensed milk (fat-free is totally fine here), then milk and heavy cream, plus a little splash of vanilla (or vanilla bean paste, if you’re me).
It’s worth mentioning that the cinnamon and vanilla bean paste were purchased at Home Goods, in the gourmet foods section. 🙂
I chilled the base thoroughly in the fridge for a few hours, and then my Cuisinart churned it into silky ice cream in about 25 minutes. Into the freezer for overnight ripening, and it was done.
This cinnamon ice cream is the little black dress of the holiday dessert table— versatile and perfect for any type of occasion. It was a great complement to the pumpkin chai blondies, but it would also be a stunning sidekick to my pal Christine’s mile high apple pie, or the festive fig butter cranberry apple galette that I made last fall. How about chocolate cake or pecan pie or— well, what desserts are you making this holiday season that would be good with a sweet scoop of cinnamon ice cream?
This easy-to-make ice cream is creamy, delicious on its own, and pairs nicely with nearly any autumn or holiday dessert.
Ingredients
14 oz. can sweetened condensed milk (regular or fat-free, see recipe notes)
1 teaspoon ground cinnamon
1 cup whole milk
1 cup heavy cream
2 teaspoons vanilla extract or 1 Tablespoon vanilla bean paste
1 Tablespoon vodka (optional, added in the final minute for improved texture)
Notes: When you mix the ice cream base, add the cinnamon to the sweetened condensed milk first. Ground spices tend to “float” on liquids, so this helps to incorporate it into the mix before the thinner liquids are added.
I’ve found the fat-free version of condensed milk perfectly acceptable for making ice cream, with only one caveat: plan to use the ice cream within a couple of days of making it, or the texture may become more icy than creamy.
Directions
Combine sweetened condensed milk and cinnamon in a large bowl and whisk to thoroughly incorporate the cinnamon. Whisk in milk, cream and vanilla. Cover the bowl and refrigerate until the mixture is thoroughly chilled, at least a couple of hours.
Set up your ice cream machine. Gently whisk the ice cream base to re-blend any ingredients that may have settled during chilling. Pour the ice cream base into the machine and churn according to manufacturer’s instructions. My Cuisinart gets this done in about 25 minutes. Add vodka during the final minute of churning to make the ice cream easier to scoop directly from the freezer (omit this step if the ice cream will be served to children or other non-drinkers).
Transfer the ice cream to an insulated freezer container and freeze at least eight hours, preferably 24 hours, to ripen.
How in the world can an ice cream stir up such a mixed bag of emotions? That’s what I have been asking myself for the past week as I wrestled with the decision to share this post. I almost didn’t even bother, but it seems so appropriately timed to tonight’s “blue supermoon,” an astronomical phenomenon that we haven’t seen since 2009 and won’t see again until 2037. So, I reasoned, it was now or never.
But oh, the drama! Allow me to explain.
For me personally, a very specific childhood event involving this ice cream dredges up difficult feelings about being gaslighted into becoming a timid kid. I’ll spare you the dreadful details, but in some weird, wishful-thinking way, I thought that revisiting the event by making this ice cream would redeem those feelings. It didn’t, but that is not the ice cream’s fault.
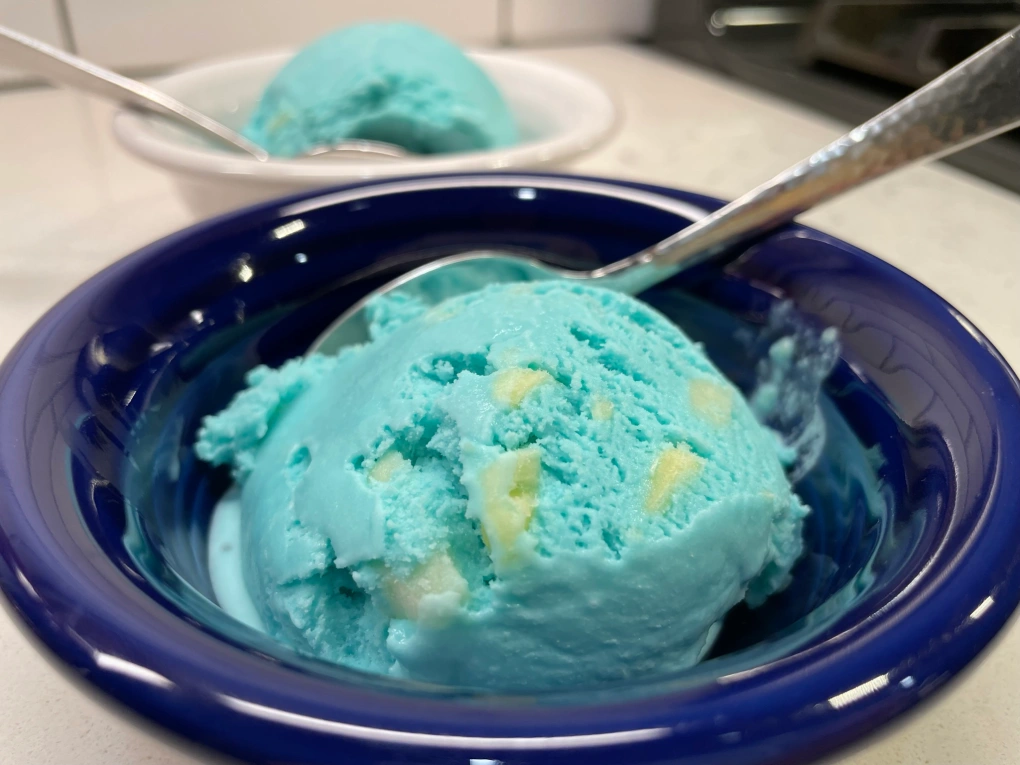
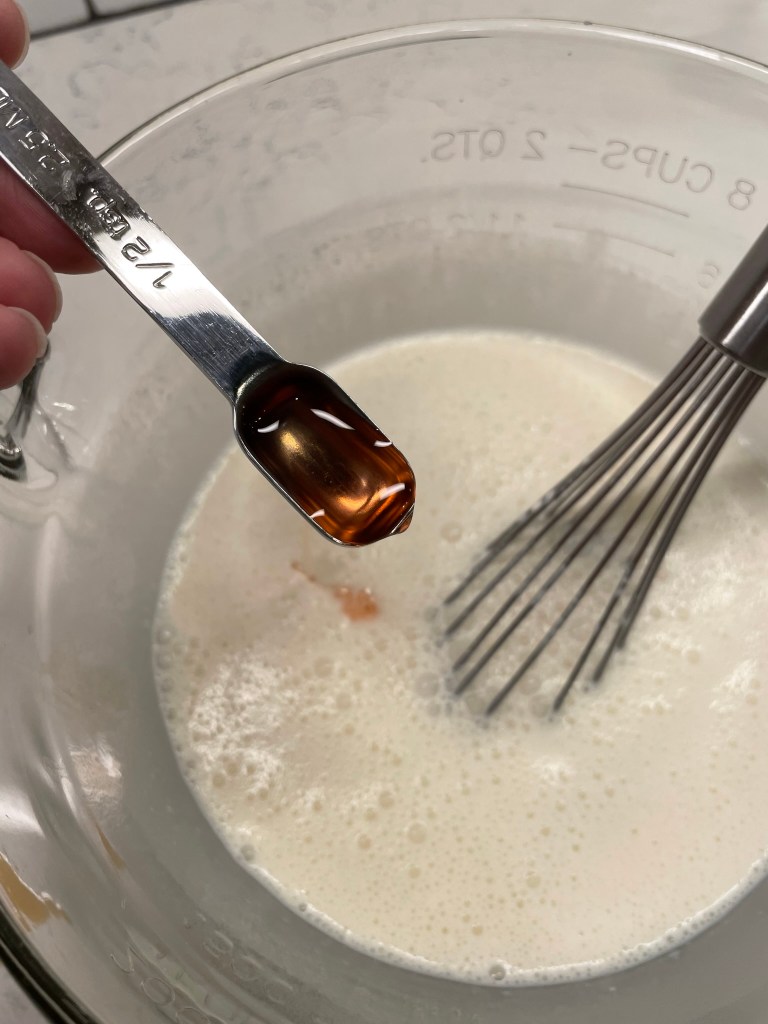
The recipe itself is a bit of an enigma, given that nobody really seems to know for sure what flavors go into blue moon ice cream, and I struggled with my own memory to describe the flavor of it, which is “fruity,” but not specific to a single fruit. Is it raspberry or lemon? Almond or vanilla? In my memory, it tasted like some mashup of bubble gum, cotton candy and tropical fruit punch. Oh, and with pineapple bits. And that’s where this adventure began to go off the rails.
I pulled several extracts from my pantry for this experiment.
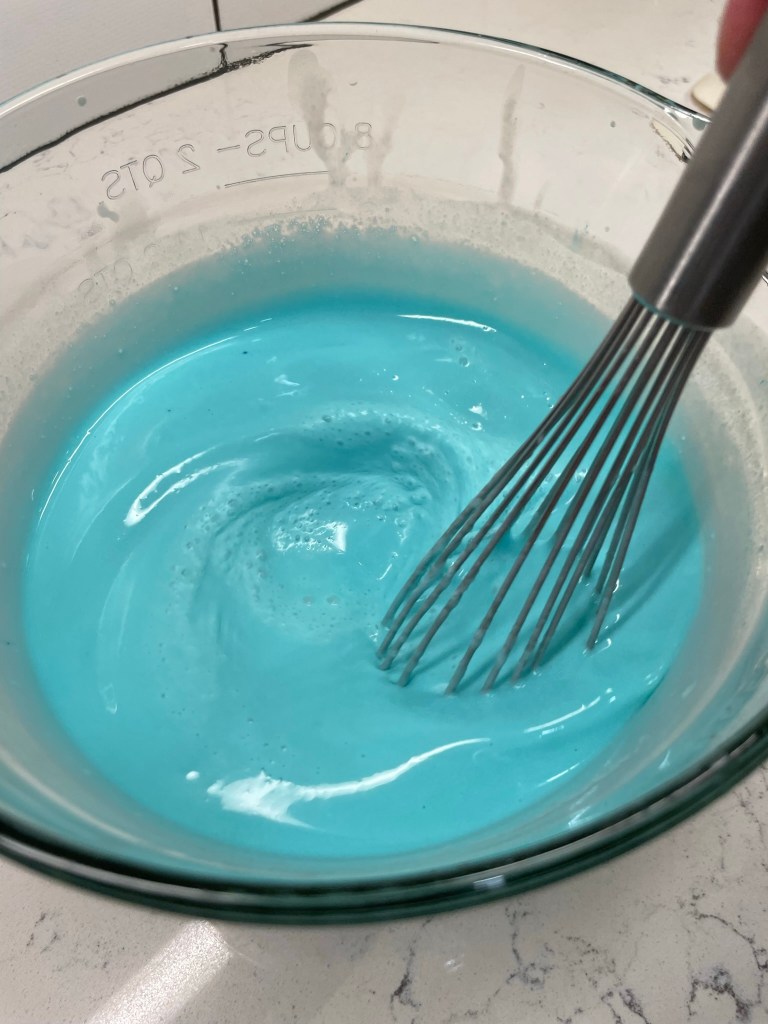
My search for an inspiration recipe for blue moon ice cream turned up massive volumes of denials of my own memory of it. Nearly every recipe on the internet emphatically declares (often in all caps) that “blue moon DOES NOT contain pineapple!” But here’s the problem— I was there during my childhood and the blue moon ice cream I had most certainly did contain pineapple; in fact, it was the pineapple that I remember most. Lovely little bits of crushed pineapple amid all that artificially teal ice cream base. Another thing that struck me odd about the online recipes I found was that most of them included a package of instant vanilla pudding, which sounds so wrong to me. What would instant pudding add to an ice cream, I wondered, besides more artificial flavoring? Wasn’t the teal blue color artificial enough? My iPhone camera certainly thought so!
The discrepancy of opinion on the flavor of this ice cream, and especially the pineapple, apparently results from the fact that blue moon originated in the Midwest— Michigan to be specific— and my experiences of it were in upstate New York. What I enjoyed as a kid was obviously an adaptation of the original recipe, but it was still sold as “blue moon.” Was I wrong to enjoy it that way? I can not bear this level of gaslighting.
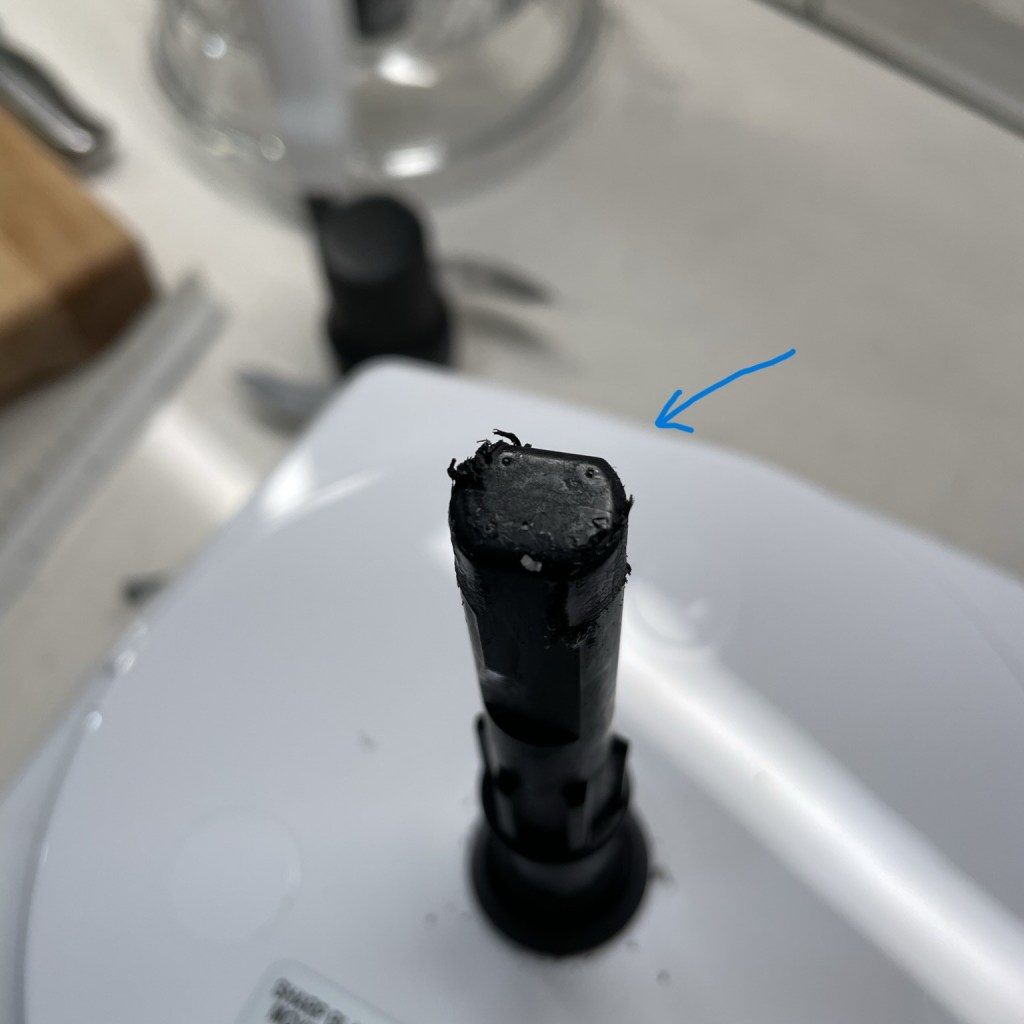
If the argument around this was not turbulent enough, I also had the unfortunate experience of damaging my fancy new French-made food processor in the making of my blue moon ice cream. As I have done many times before, I used my processor to pulse partially frozen pineapple into smaller chunks, and this was to be mixed into the blue base at the end of churning in my ice cream freezer. But something went terribly wrong, and my processor is currently on a UPS truck, headed to the service center for a warranty repair. Was this the universe’s way of confirming that pineapple is NOT meant to be in blue moon ice cream? Good golly, what chaos!
The stem of my food processor was stripped in the process of this misadventure.
After all my tinkering with the raspberry, vanilla, lemon and almond, plus the addition of the pineapple, I’m still not sure I got it right (Les disliked it so much, he didn’t even finish a serving of it). Perhaps the proof is in the pudding, but I have neither the time nor the motivation to make blue moon ice cream again right away. At the end of this ridiculous string of events, I decided that it was at least worth sharing because it does move an item to the done column of my culinary bucket list, and just in time for tonight’s blue supermoon. Blue moon ice cream is now completed, and even though I didn’t particularly appreciate the resulting flavor, I did learn an important lesson, which can be summed up in a line from a Don Henley tune:
Out on the road today, I saw a Deadhead sticker on a Cadillac. A little voice inside my head said, “don’t look back, you can never look back.
Don Henley ~ “The Boys of Summer”
I wish I had left blue moon ice cream in my memories, where it still held mystery and intrigue. It could be that 11-year old Terrie enjoyed it just because it was different from the mint chocolate chip ice cream that everyone else my age was screaming for that summer. I probably should have followed my own advice about recipes and disregarded the “alternate facts” presented by so many others on the internet regarding the pineapple. Finally, if I hadn’t pushed so hard to make sense of the whole thing, I could be making hummus or spiralizing zucchini or pureeing fresh tomatoes into gazpacho today. Instead, I’m checking the UPS tracking to be sure my food processor arrives at the warranty service center in one piece. I hope it get it back in time for Thanksgiving.
As for the blue supermoon, I wanted to be excited about it as well. Supermoons are fairly common during the summer, but the odds of a blue moon (second full moon during a single month) also being a supermoon (appearing closer and larger than usual) are extraordinary. The blue supermoon will be a spectacle to behold, beginning after 9pm ET tonight. But I learned today that this supermoon— which is expected to exaggerate high tide— will likely wreak additional havoc on the gulf coast of Florida, where folks are already underwater from Hurricane Idalia.
At least I know my ice cream didn’t cause that.
For those of you wishing to recreate this astronomical mishap, here’s an easy, click-to-print recipe for you. Pineapple, of course, is optional. 😉
This recipe is my best effort at recreating a childhood favorite. Adjust the flavors to your liking, and decide for yourself whether to add the pineapple.
Ingredients
14 oz. can sweetened condensed milk (regular or fat free is fine)
1 cup whole milk
1 cup heavy cream
1 1/2 tsp. almond extract
1 1/2 tsp. raspberry extract
1 tsp. vanilla extract
1/4 tsp. pure lemon oil
1/8 tsp. Fiori di Sicilia extract (optional, and probably redundant to the lemon and vanilla)
2 Tbsp. cream of coconut (for extra sweetness)
1/2 tsp. blue food coloring gel (this is more concentrated than liquid colorant)
1/2 cup pineapple tidbits (added during final few minutes of churning)
Most recipes for the “Midwest” version of blue moon ice cream do not include the pineapple, so adding them is entirely up to you. The ice cream I knew and loved from my childhood in Western N.Y. included pineapple, so my nostalgia required it. 😉
Directions
Combine condensed milk, whole milk and heavy cream in a large mixing bowl or pitcher.
Stir in extracts, a little at a time if you wish, and adjust flavors to taste. Stir in food coloring gel. Refrigerate until base is completely chilled.
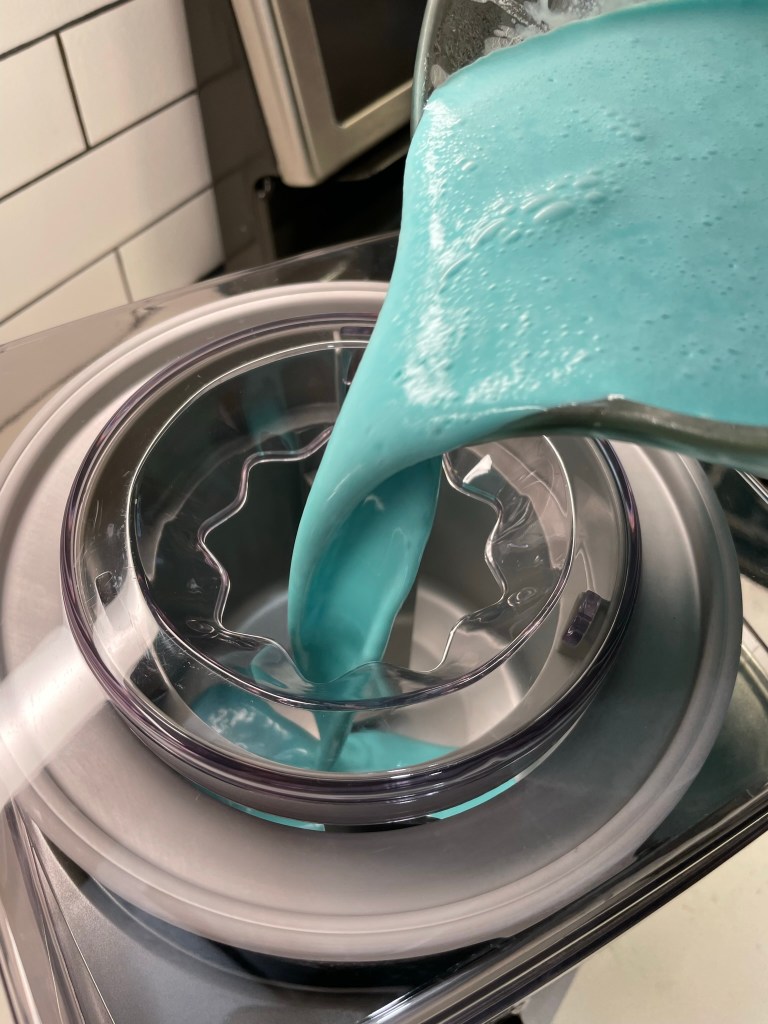
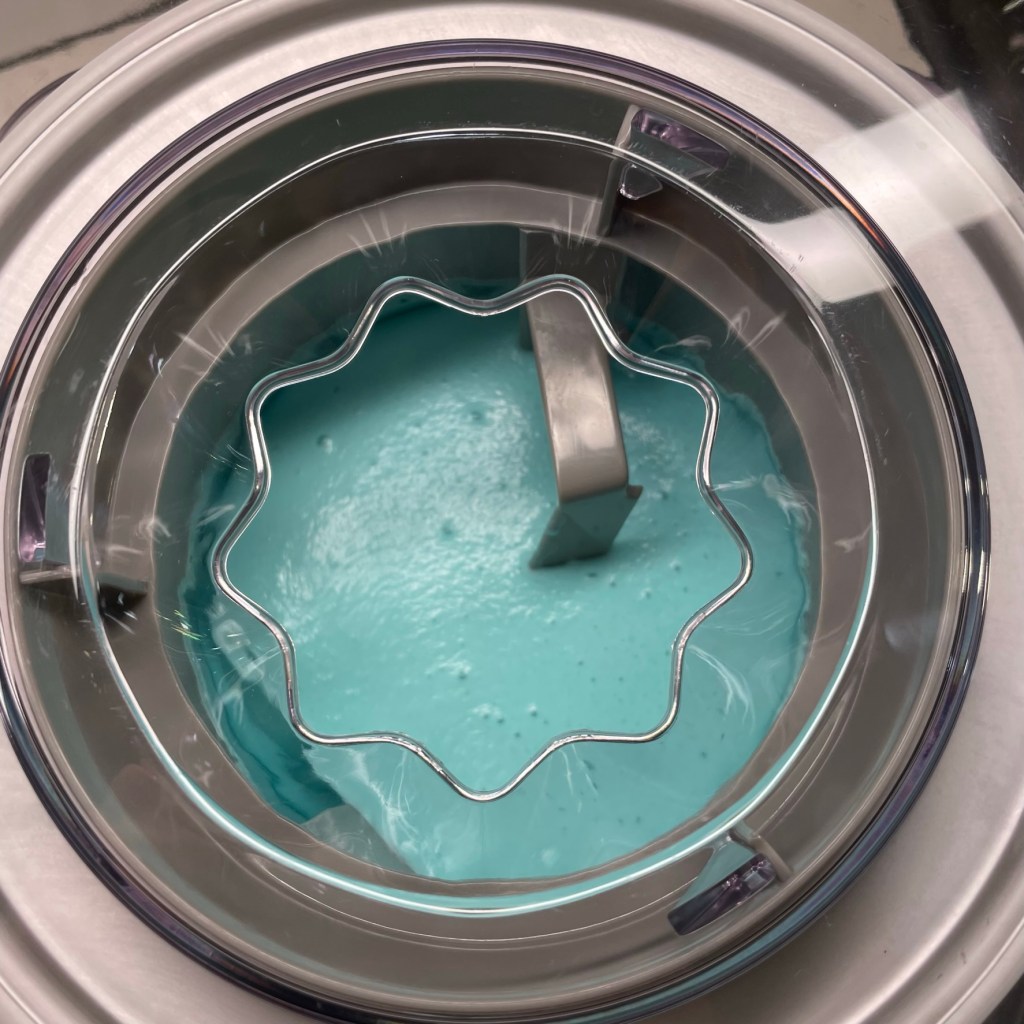
Freeze according to manufacturer’s instructions, adding partially frozen pineapple bits during the final few minutes.
Transfer to an insulated ice cream container and freeze several hours to overnight, until firm.
It’s interesting to me that some foods have their own variations in different parts of the country. Take barbecue, for example. Depending on where you go— Texas, Kansas City or the Carolinas— you might be presented with dry-rubbed beef brisket, saucy ribs or burnt ends, or slow-braised, pork shoulder with vinegar sauce. And for sure, natives of each area will proclaim theirs to be the “true” barbecue, the best or most authentic. It is, of course, a matter of opinion and upbringing.
The same can be said for peach cobbler. Here in the South, most cobblers I’ve had at church potlucks, diners or restaurants resemble another popular dessert here, the dump cake. Everything gets slopped into a pan, usually with the batter on the bottom and the fruit on top, and somehow during the baking process, the dough finds its way to rise up through the peaches. It’s tasty, but a bit soupy and mostly a mushy texture— definitely not the peach cobbler of my childhood, and we all know that comfort food is what you remember from those early days. So I’m about to say something that irritates Southerners more than anything else, ever:
Sweet juicy peaches, tossed with sugar, corn starch and a touch of cinnamon, cooked until tender and saucy under a crown of tender biscuits that have just a touch of crunch on the edges. Crystals of sugar on top that add a little extra something with each bite. Served warm with a scoop of vanilla ice cream. That, to me, is a real deal peach cobbler. As the sun sets on National Ice Cream month this year, I’ve transformed that favorite summer dessert into a single, glorious scoop of peach cobbler ice cream.
This recipe is my own, developed out of my experience with several other past recipes, with and without peaches. To explain how I got here, it makes sense to share what I’ve learned from past efforts and mistakes.
What’s the best way to make ice cream with fruit?
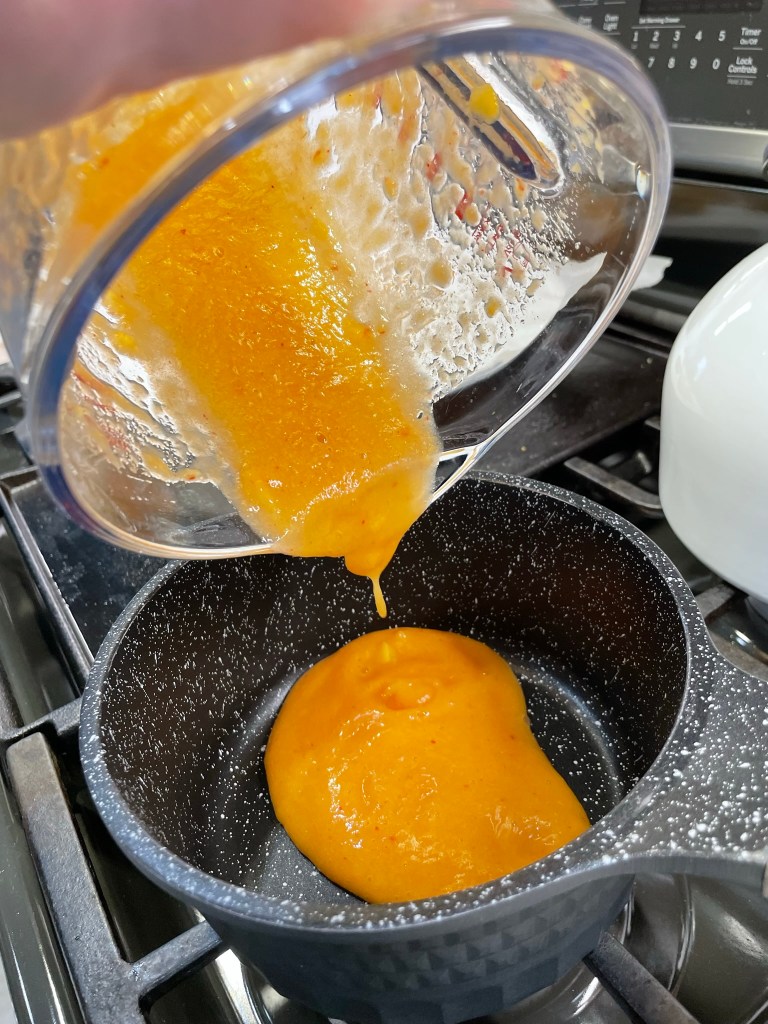
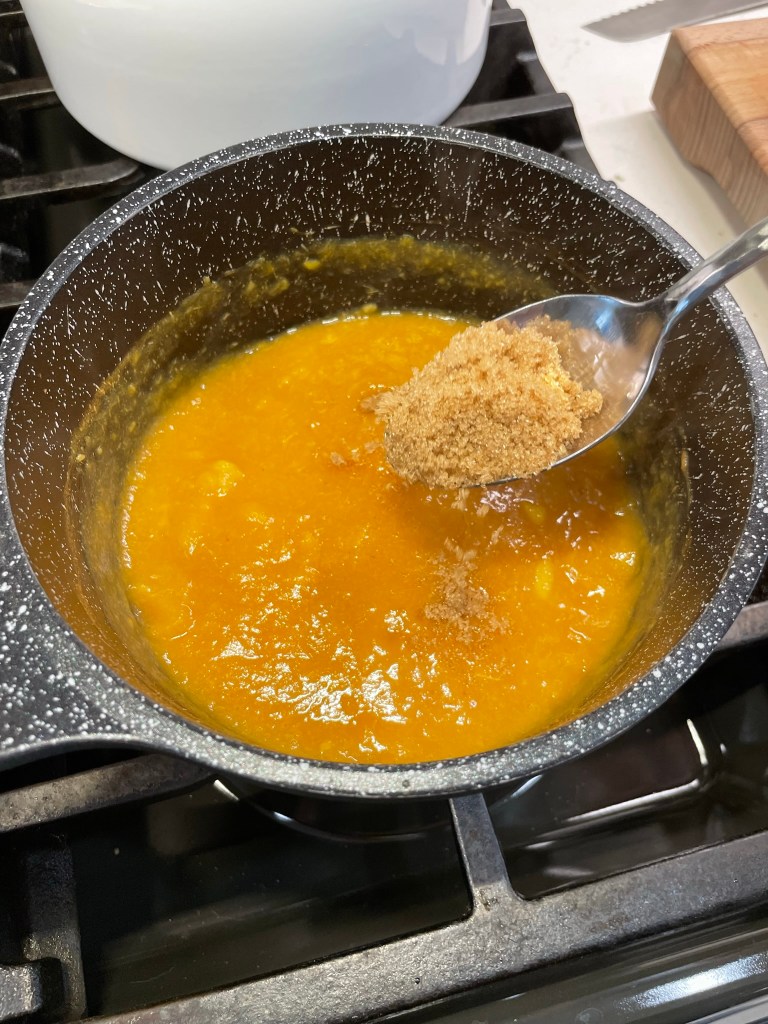
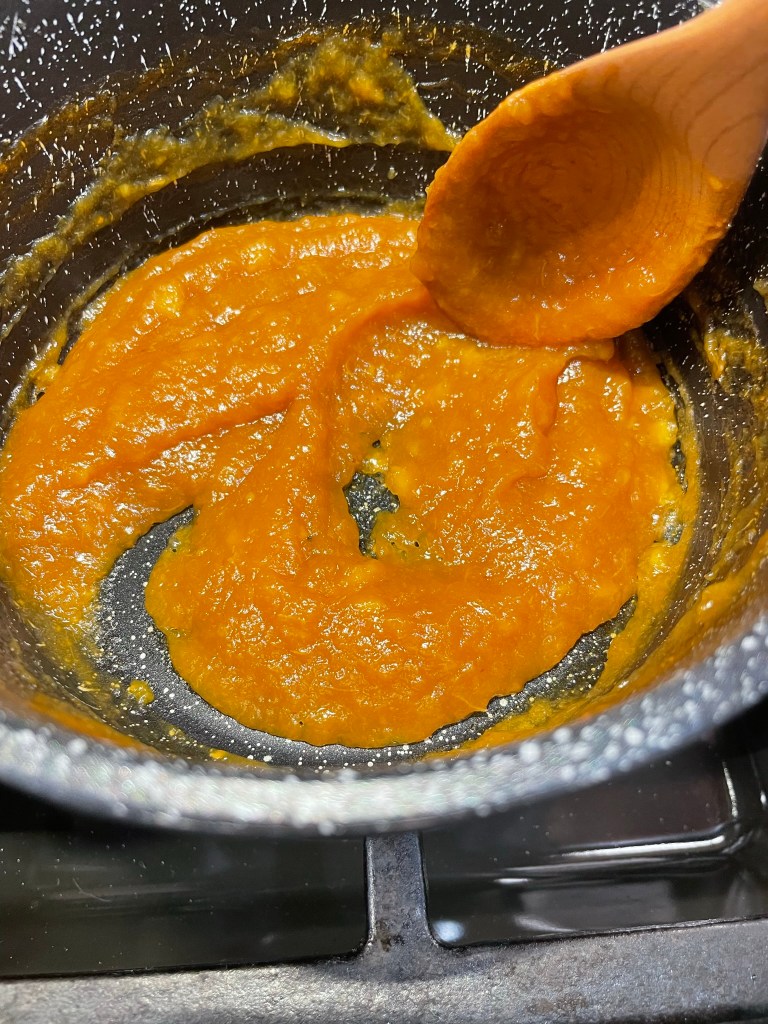
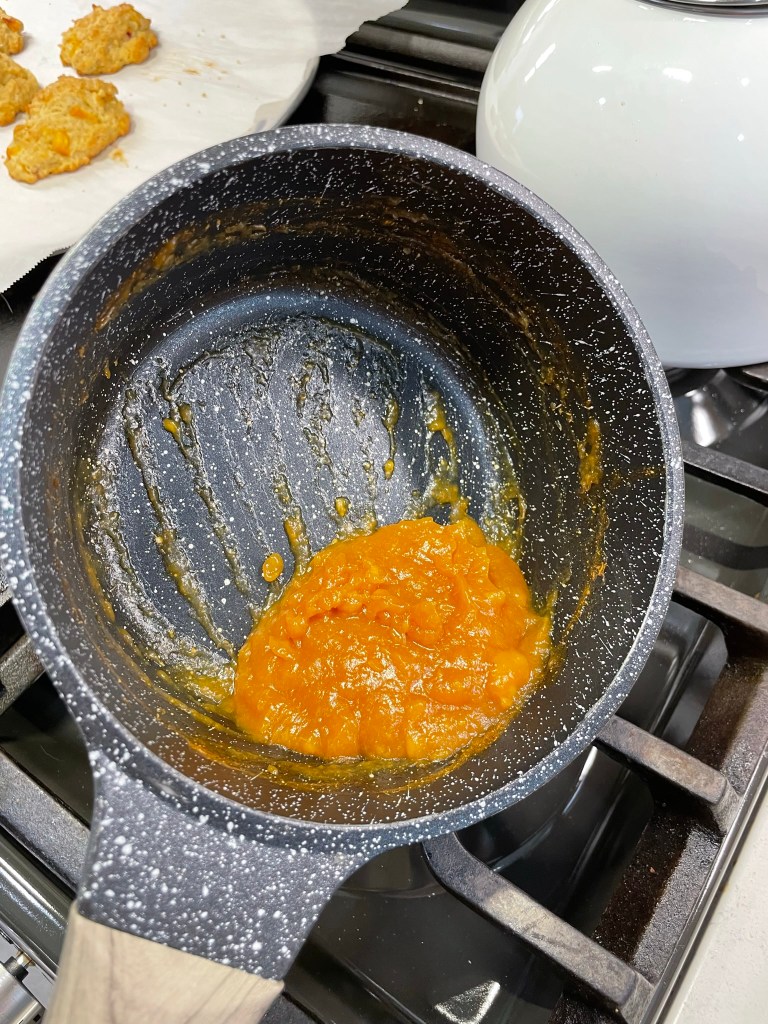
Too many fresh fruit bits can make the finished ice cream feel too icy. I learned this especially when I made a strawberry-mascarpone ice cream a few years ago. Fruit, especially fresh fruit, contains a great deal of moisture, and when you freeze it, ice crystals form inside, making for an unpleasant bite that hurts my teeth. One day, I will re-work that recipe to improve the texture. But to counter the icy effect in this peach cobbler ice cream, I cooked the peaches, borrowing a technique I learned recently when I made that heavenly, boozy strawberry daiquiri cake. Cooked fruit loses volume as the moisture evaporates, but all the flavor remains, so I peeled and pureed a couple of peaches, then cooked them down into a sticky, concentrated peach paste. I still embellished the ice cream with a few bits of fresh peach for pops of color and flavor, but the ice cream gets most of its peachy keen flavor from the puree.
A touch of brown sugar in the puree made this extra delicious!
How do you incorporate other foods into an ice cream?
I’ve had to get a little creative with some ingredients, because adding the ingredient directly would have resulted in a weird texture. For my s’mores ice cream, I wanted every element of a s’more— the melty chocolate, toasty marshmallow, the sweet graham cracker— but can you imagine what would happen if I tried to swirl actual melted chocolate into an ice cream base? Yep, a big mess. Same with toasted marshmallows, which just get hard and sticky in the refrigerator, let alone the freezer. My solution for that ice cream was to use a dark chocolate syrup to play the role of the Hershey square, and a marshmallow fluff-cream cheese mixture to stand in for the toasted marshmallow element. It was delicious, but I’ve been hankering for a re-do on that one as well, so stay tuned! For this peach cobbler ice cream, I wanted the “biscuit” texture that I loved in my up-north cobblers, but a plain old biscuit would have been dry and crumbly. That’s when I remembered one of my baking class experiences at King Arthur earlier this month— we made scones!
Thanks to Michelle, my baking partner, for taking this picture! It was such a hectic day, I forgot! 🙂
What’s the difference between a biscuit and a scone?
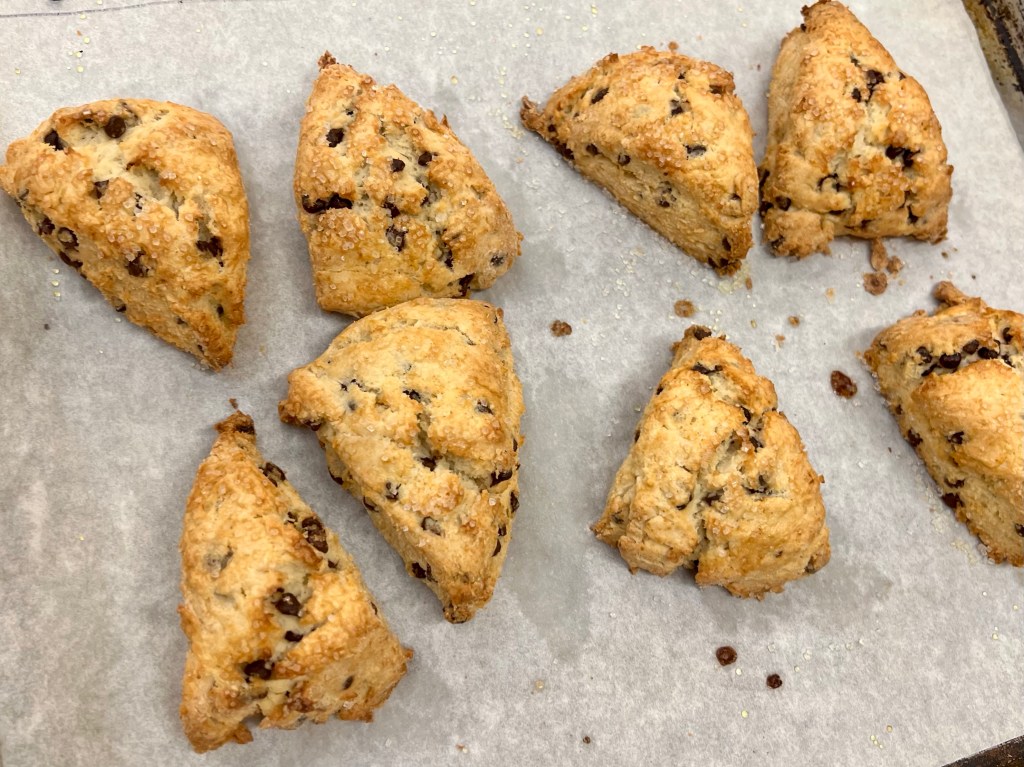
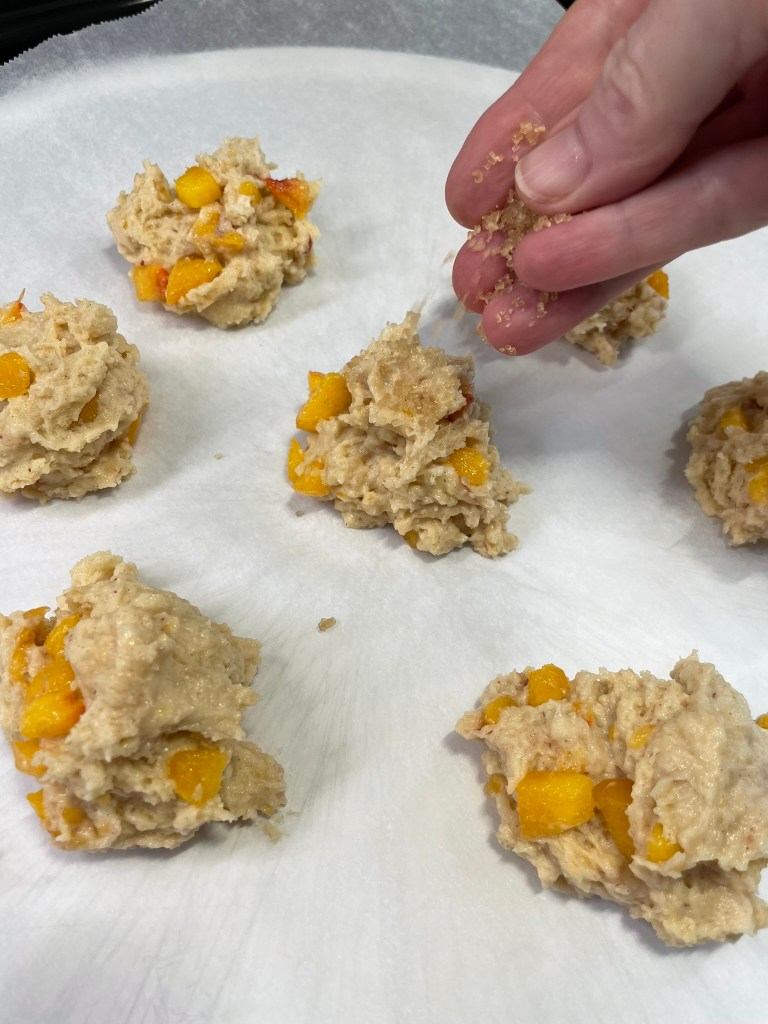
Scones are similar to biscuits in that they use a chemical leavening— baking powder, in this instance— but different because the dough usually incorporates more sweetness and an egg for richness and texture. At the tail end of my Bread: Principles & Practice class, we whipped up a batch of scones as we waited for another bread recipe to do its thing. The scones were delightfully tender, like a biscuit, but sweeter, softer and almost cookie-like. That, I decided, would be a perfect solution for the “cobbler” element of my ice cream, and would you believe it? King Arthur Baking has a recipe for tender peach scones! I whipped up half a batch (exactly as written, if you can imagine), and crumbled two of them to layer in my ice cream.
These drop scones were deliciously peachy, with a tender, almost spongy texture.
I hope I always find something new to learn in the kitchen. This is my blue ribbon-hopeful peach cobbler ice cream, my final bow for this year’s National Ice Cream Month. Enjoy!
A cooked puree of peaches adds a concentrated fruit flavor to the base of this ice cream, and tender peach scones provide the 'cobbler' element.
Ingredients
3 fresh, ripe peaches (you’ll puree two and dice the third)
2 teaspoons fresh lemon juice (divided between peaches above)
1 Tbsp. light brown sugar
14 oz. sweetened condensed milk (regular or fat free)
1 cup whole milk
1 cup heavy cream
1 Tablespoon vanilla bean paste
1 Tablespoon vodka (optional, added at end for improved scooping texture)
1 cup crumbled peach scones (recipe linked in story), or substitute as noted below.
To mimic the texture and sweetness of cobbler batter, I baked a half batch of tender peach scones, found on King Arthur Baking website, and crumbled two of them to layer in this ice cream. Other great options would be buttery sweet drop biscuits, a yellow cupcake or even a few snickerdoodle cookies! If you want to skip the cobbler portion, the peach ice cream on its own will still be sweet and summery.
Directions
Peel two of the peaches and add to a blender or food processor bowl. Add one teaspoon of lemon juice. Puree for 20 seconds, keeping a few bits if you wish. Cook the puree and brown sugar over medium heat, stirring constantly, until reduced to about 1/2 cup volume (about 20 minutes). Cool to room temperature, then press a piece of plastic wrap directly onto puree. Refrigerate until thoroughly chilled. Peel and dice the third peach and toss bits with lemon juice to prevent browning. Cover with plastic wrap and keep chilled until ready to freeze.
In a large bowl or pitcher, combine condensed milk, milk and heavy cream until evenly blended. Stir in vanilla bean paste. Refrigerate at least 3 hours until thoroughly chilled.
Gently whisk cold peach puree into ice cream base. Freeze in ice cream machine according to manufacturer’s instructions. In the final two minutes of churning, spoon the reserved diced peaches into the machine and pour in vodka (if using). Churn until fully blended.
Transfer ice cream to an insulated freezer container, layered with scone crumbles. Cover and place container in freezer several hours or overnight for best texture.
“This time, I’m gonna try something new!” I say it so many times when my husband and I visit Kilwins, a franchise candy shop and ice cream parlor that seems to always be on the way home from wherever the heck we’ve been. And if it isn’t already on the way home, we might conjure a reason that we must visit Trader Joe’s, and that makes it on the way home so we have an excuse to stop for a sweet treat.
The ice cream at Kilwins is superb— a huge variety of flavors, deliciously creamy, and big, generous scoops served up in your choice of three cones (or a bowl if you really can’t wait to just dig in). Les usually gets the one called “Kilwins Tracks,” which is a house version of Moose Tracks, a swirly mess of vanilla ice cream, chocolate-covered peanut butter truffles and trails of thick chocolate fudge. Or he might stray toward the ever-popular sea salt caramel, which is exactly as amazing as you expect it would be. There are dozens of other flavors, including mint chip, cherry, chocolate-coconut, peanut butter, rum raisin, a groovy, tie-dye colored variety called Superman, and even a few additional flavors hiding in the back.
But when I stand there in front of that long glass case, trying to keep my word on choosing something different from my usual, a wave of sadness comes over me. It isn’t because there aren’t enough delicious options— it’s because I just love the New Orleans Praline Pecan that much. And, for the sake of the growing line of people behind me as much as for myself, I usually just give in and get it. So much for trying something new!
I just can’t tear myself away from my favorite!
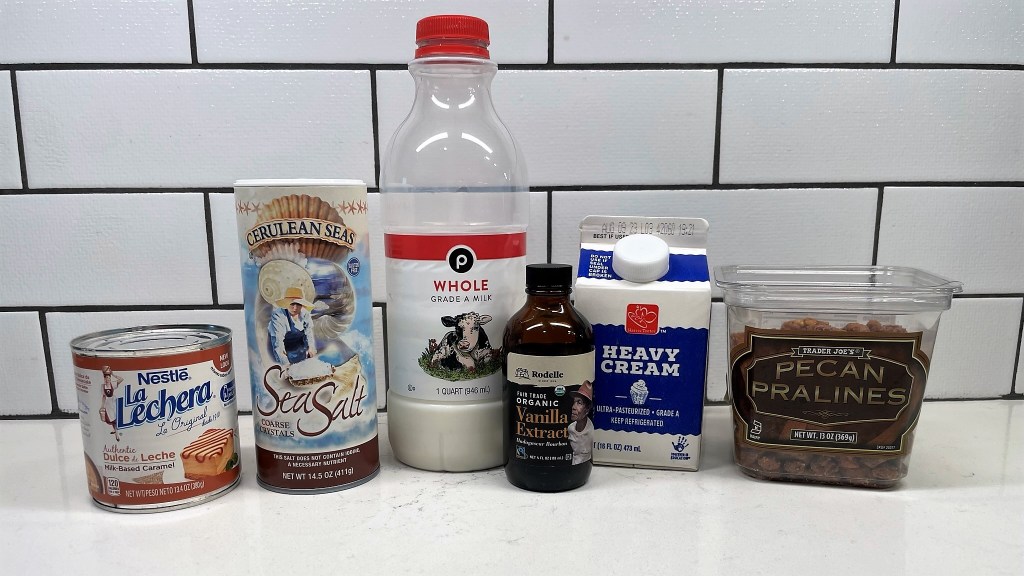
In my defense, I stopped dating other guys when I chose my husband, so why should it matter if I get the same ice cream each and every time? It’s a perfect blend of creamy, sweet, nutty, slightly salty, caramel-y goodness. Naturally, I decided it was time for me to try to re-create this decadent treat at home, and when I found these pecan praline candies last fall at Trader Joe’s, it was exactly the nudge I needed. I have made it a few more times since, and National Ice Cream Month feels like the right time to share it!
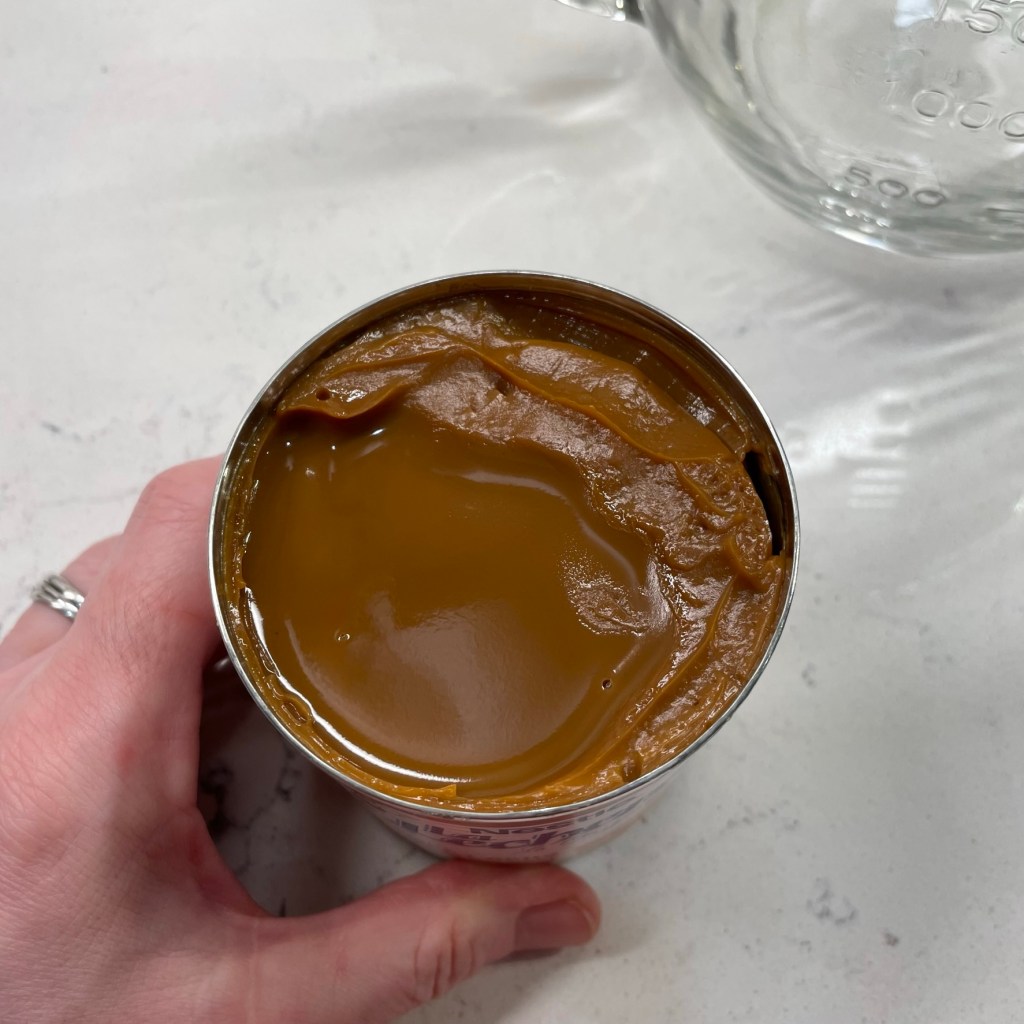
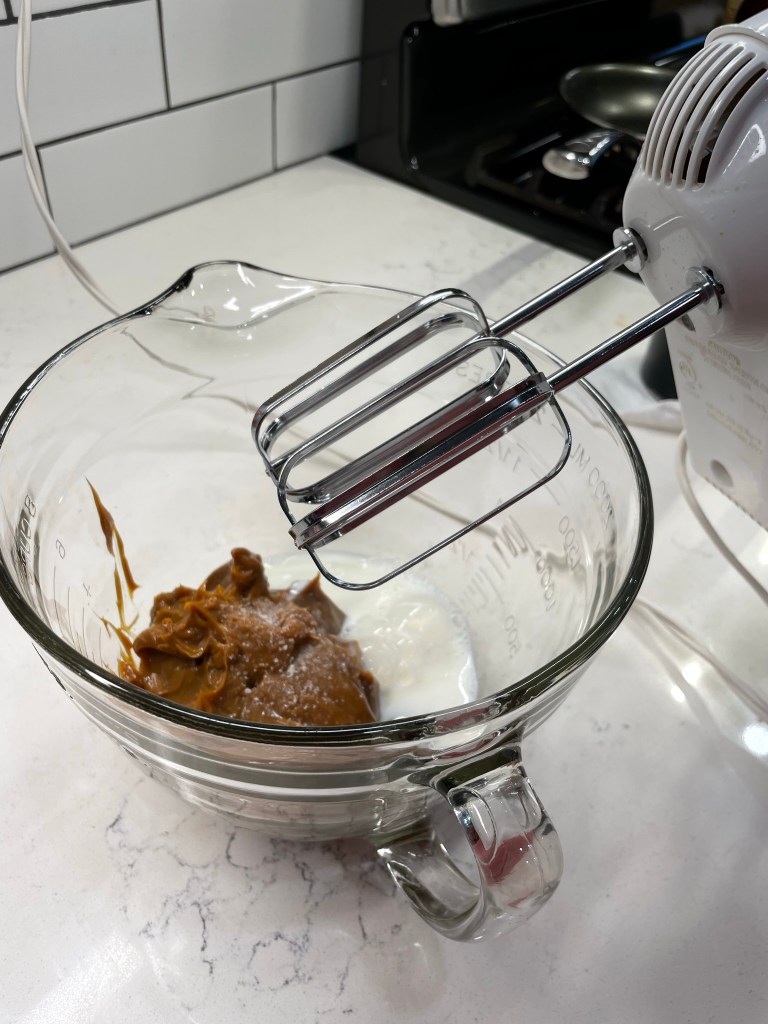
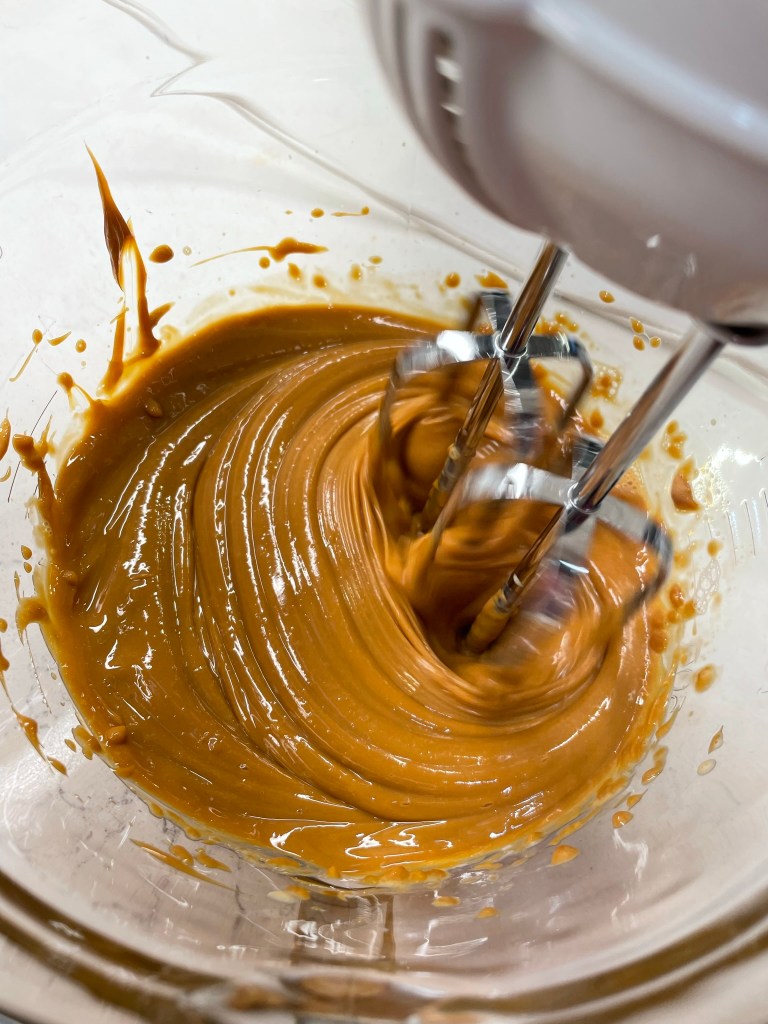
The ingredients for this ice cream are pretty simple, and if you have a recipe to make your own candied pecans, all the better! Rather than using regular sweetened condensed milk, as I have started doing in recent years, I use the dulce de leche variety, which has been cooked to a richly caramelized consistency. It is very thick, so you’ll have to use a small scraper to dig it out of the can. I sprinkle about 1/4 teaspoon sea salt over the caramel for that delicious contrast. Mixing in the milk is a little more challenging with the thick caramel, so I recommend using a handheld electric mixer over trying to whisk it. I also suggest blending in the milk a little bit at a time so you don’t spatter caramel milk all over the kitchen, as I did on my first effort!
It’s easy enough to switch to a whisk for blending in the vanilla and heavy cream, and then cover the bowl and send it to the fridge for several hours to overnight. Unless you have a fancy, professional-style ice cream maker, you always want your base to be super cold before you add it to the freezer bowl for churning.
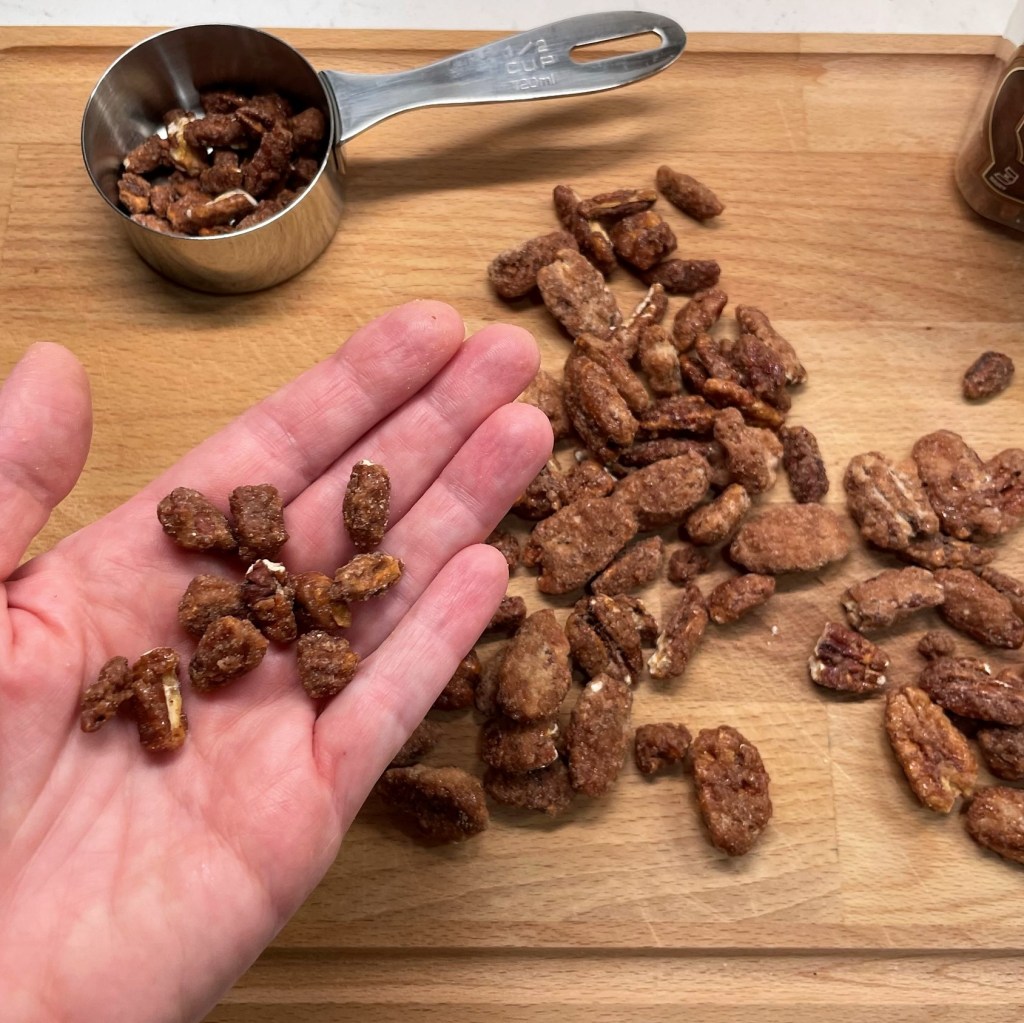
My Cuisinart machine usually takes about 25 minutes to achieve a perfectly churned consistency. While it’s going, I take a few minutes to break up about a half cup worth of the praline pecans into small pieces. It takes a little extra effort than chopping them, but I don’t end up with all the little shards that are not the most pleasant texture. If they are at most one-quarter the size of a whole pecan, that’s just right. When the ice cream is almost finished, the only step left is adding in the pecans and transferring to an insulated container.
For best results, freeze at least eight hours before enjoying. I should also point out that if you don’t like or cannot eat pecans, you could substitute toffee bits and still enjoy the contrast of a little crunch mixed in. Or, omit them entirely and you’d have sea salt caramel ice cream. Speaking from experience, I can tell you that would be pretty awesome, too!
You only need a few fridge and pantry ingredients to create a specialty ice cream at home. I've relied on a canned dulce de leche milk and store-bought candied pecans to replicate one of my favorite ice cream parlor treats!
Ingredients
14 ounce can Nestle’s dulce de leche condensed milk (see ingredient notes below)
1/4 teaspoon coarse sea salt
1 cup whole milk
1 teaspoon real vanilla extract
1 cup heavy cream
1/2 cup candied pecan pieces
Ingredient Notes: If you cannot find the dulce de leche condensed milk, it’s fine to use regular or fat-free condensed milk in its place. The finished ice cream will not have quite the same caramel-flavored base, but the candied pecans will still provide plenty of praline flavor.
Directions
Combine Lechera condensed milk and sea salt in a large bowl or mixing pitcher. Use a handheld mixer to blend in the whole milk, about 1/4 cup at a time to avoid spattering.
When the whole milk is completely blended in, add vanilla extract and heavy cream. Switch to a whisk if you wish, or blend only briefly with a mixer to avoid whipping too much air into the cream. Cover the bowl and refrigerate the base mixture several hours to overnight.
Freeze ice cream, following manufacturer’s instructions for your model machine. During the last couple of minutes, add the candied pecan pieces to incorporate them throughout the ice cream base. Transfer ice cream to an insulated container and freeze several hours to firm it completely before serving.
Do you remember your favorite frozen summertime treat? I had three, and they were pretty much neck and neck: an ice cream called “blue moon,” with an unidentified fruity flavor and bits of pineapple (one day I will figure out how to make it), the Rocket Pop in all its red, white and artificial blue glory, and of course, the Creamsicle. That combination of orange sherbet over vanilla ice cream on a stick was synonymous with summer in my youth. I loved it so much that I can’t resist sharing my scoopable version of a Creamsicle to kick off National Ice Cream Month.
I feel great about this ice cream for a few reasons. First, of course, is the nostalgia of it. The mingled flavors of vanilla and orange take me back to the summers of the 1970s, when life was so carefree. It conjures memories of splashing at the community pool with friends and walking barefoot in the freshly cut grass behind my grandmother’s house. I envision water balloon fights and the familiar sound of the ice cream truck coming down the street, drawing the kids like moths to a flame. God, I loved those days.
This is also exciting for me because my previous efforts at Creamsicle ice cream fell sorta flat, probably because I was still relying on my custard-based ice cream formula. Custard ice cream is wonderful, but it’s a lot of effort and sometimes the richness overpowers the flavors. The first time I used sweetened condensed milk for my ice cream— it was when I made S’mores Ice Cream, and I did it to keep the color nice and white— was a major “aha” moment for me. Homemade ice cream doesn’t have to be so fussy as standing over the stove tempering egg yolks and cream, crossing your fingers that you don’t scramble the eggs and have to start over. Then waiting for the mixture to cool overnight before you can churn it? It’s so extra.
Sweetened condensed milk provides an excellent, smooth texture in the base of an ice cream, it provides exactly the right level of sweetness, and it comes with a bonus advantage in that you can swap in the fat-free version with almost zero impact on the texture. Delicious ice cream and reduced guilt? Sign me up!
Who’s ready for some ice cream?
The base of this ice cream is so simple, with only four main ingredients— milk, cream, condensed milk and frozen orange juice from concentrate. The addition of vanilla extract alone would give the impression of a Creamsicle, but I’ve amped up the intensity with two secret weapons that I highly recommend.
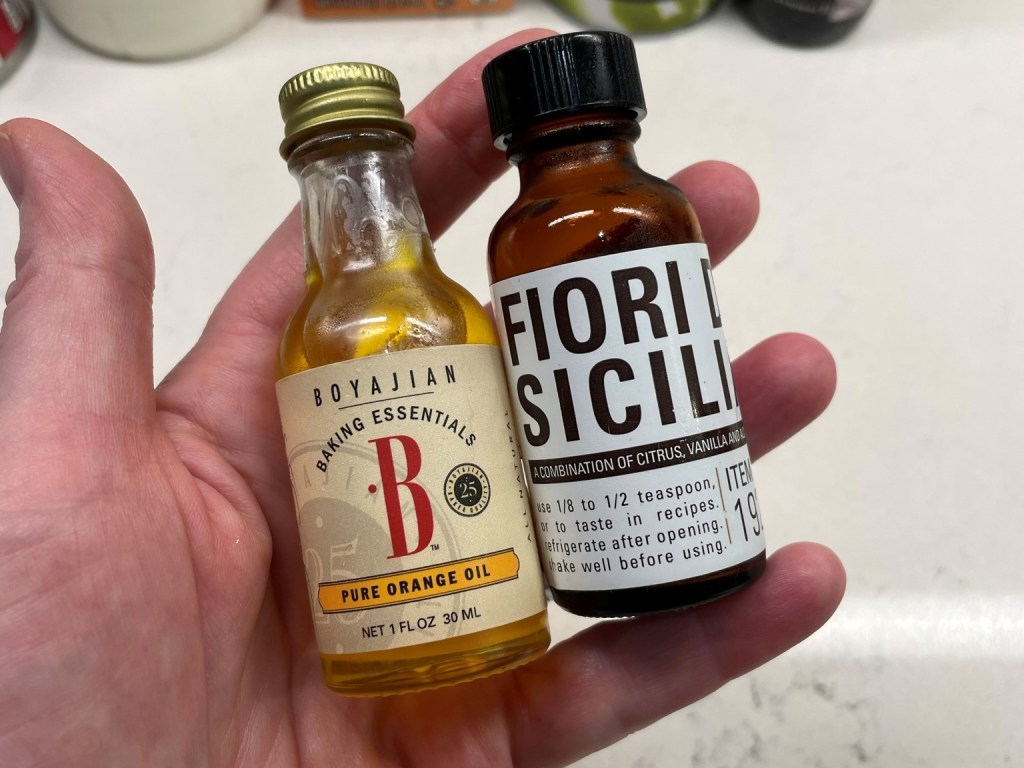
Orange oil is derived from real orange peel, and it adds a very concentrated orange flavor without adding more orange juice, which would make the ice cream too icy. Fiori di Sicilia is a citrusy-vanilla extract that is used for making panettone, and it is so potent that you only need a scant 1/4 teaspoon to get the job done in this ice cream. I purchased both of these specialty ingredients from King Arthur Baking Company, but you might also find them at a specialty store, such as Williams-Sonoma or Sur La Table, either in store or online.
Can you make the ice cream without these ingredients? Of course, but if you want more than a hint of Creamsicle in your ice cream, these will help you get there.
Here’s how it goes:
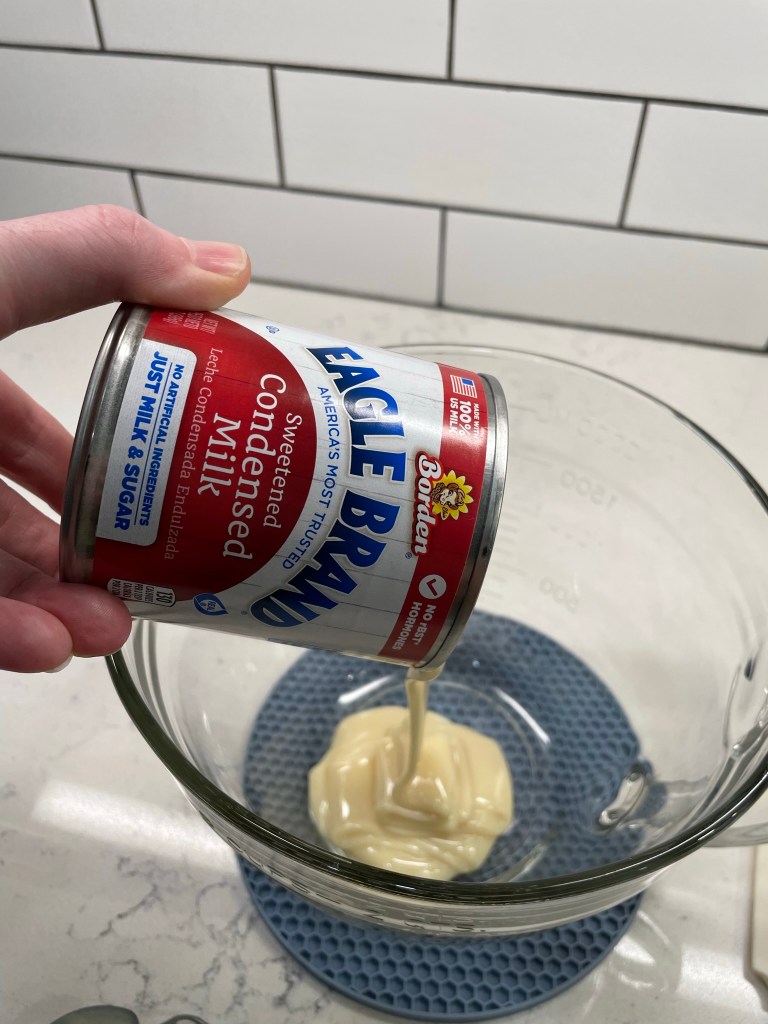
Feel free to swap in fat-free condensed milk here; on this day, I only had original in the cabinet. Whisk the whole milk into the condensed milk first, because their viscosities are very different and it requires some hefty whisking to combine them. Next, gently whisk in the heavy cream.
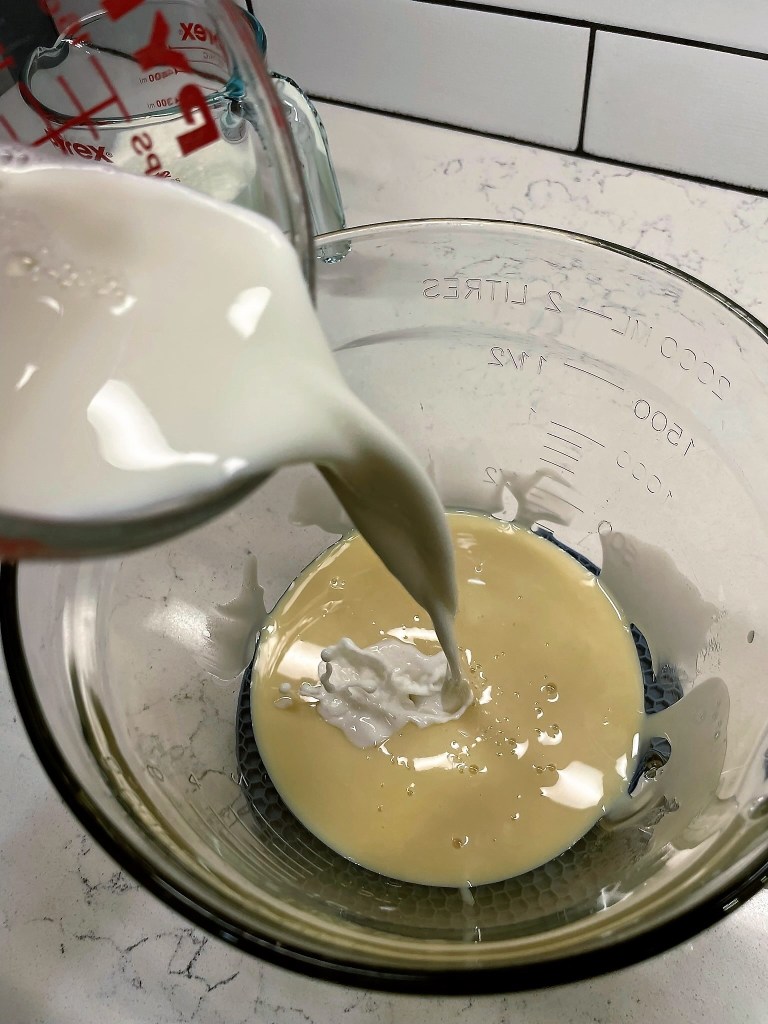
The flavoring agents are next: vanilla extract, orange oil and Fiori di Sicilia. Finally, half a can of orange juice concentrate, the kind your mom used to buy in the frozen section. Choose a reputable brand that lists only orange juice as an ingredient.
Whisk gently to incorporate the frozen orange juice, and then cover the bowl and refrigerate several hours or overnight. Now, something magical happens when you combine condensed milk and an acidic ingredient like citrus juice. OK, it isn’t magic, it’s science. This reaction happens with any kind of dairy milk, but the result with condensed milk is a nicer consistency. The acid changes the structure of the proteins in the milk, causing them to curdle or thicken. In the morning, you can expect it to look a little like pudding. Deliciously creamy, citrus-vanilla pudding.
Nobody would blame you if you eat a spoonful of it right on the spot.
The thickness is not a problem, and a quick whisking will bring the ice cream base to a thick but pourable consistency. Freeze as usual in an ice cream machine and then transfer to an insulated container to ripen it in the coldest spot of the freezer. Overnight is best, but if you can’t resist, you’ll still enjoy this Creamsicle ice cream in soft-serve form.
Orange and vanilla are a superb combination! With this recipe, I wanted to recreate the flavor of Creamsicles, which I loved so much in my childhood. Mission accomplished.
Ingredients
14 ounce can sweetened condensed milk (regular or fat-free)
1 cup whole milk
1 cup heavy cream
2 teaspoons real vanilla extract
1/2 teaspoon orange oil (optional, but recommended)
1/4 teaspoon Fiori di Sicilia (optional, but recommended)
Approximately 6 ounces frozen orange juice concentrate
Directions
In a large bowl or pitcher, combine condensed milk and whole milk and whisk to combine. Gently whisk in heavy cream. Stir in vanilla extract, orange oil and Fiori di Sicilia.
Add spoonfuls of frozen orange juice concentrate, gently whisking to incorporate each spoonful before adding more. Cover bowl with a lid or plastic wrap and refrigerate several hours to fully chill the mixture. The ice cream base will thicken significantly because of a chemical reaction between the dairy and citrus. Simply whisk to loosen it when you’re ready to freeze.
Freeze ice cream base, following manufacturer’s instructions for your particular machine. Transfer churned ice cream to an insulated container and freeze overnight before serving.
This ice cream is ready to scoop and serve straight from the freezer. As with any homemade ice cream, it is best enjoyed within about a week.