You know the drill when a song gets stuck in your head and certain parts of it play over and over and over, driving you nearly mad? It might be a song you love or one you hate, or maybe even one that you love to hate, and sometimes (but not always) its sudden appearance in your mind is triggered by something someone says or perhaps a TV commercial or a fleeting memory. Or it could just be completely random. In any situation, it drives me nuts, and the only method I’ve found for releasing it is to lean in. I search out the offensive song on Spotify and actually play it. Singing it loudly seems to help as well, and then I can get on with my life.
This phenomenon is widely known as an “earworm,” and research suggests that as many as 98% of people have experienced it, though it’s rarely considered to be a serious condition.
An earworm is not the same as a brain worm, which is a far more daunting phenomenon in which a weak human brain becomes invaded by a parasite that eats the lobe associated with common sense, leading to conspiracy theory-driven psychosis that prompts the afflicted to seek a government leadership position so that they can eliminate longstanding, important public health policies in favor of nonsensical theories, such as rendered beef fat possibly being more beneficial than monounsaturated plant oils or the notion that vaccines are more dangerous than the diseases they aim to prevent, or that food dyes in soda are a greater enemy than childhood cancer. But I digress.
For some reason, the songs that become earworms in my head are generally tunes that annoy me— that damn “Piña Colada Song” from 1979, for example, or the repetitive hook that’s currently making the rounds on social media, actually creating the very anxiety it speaks of. Or (dare I suggest) “Pink Pony Club.” And there are occasionally good earworms that I actually enjoy— one of them being an old Schoolhouse Rock ditty, and I frequently bust out the chorus these days, easily recalling from my Gen-X childhood every single word of the Preamble to the Constitution. Again, I digress.
My latest earworm, however, is not musical. It is more an obsession with color and possibility, and it was re-triggered after an activity my husband, Les, and I enjoyed last weekend when we visited the Van Gogh Immersive Experience (speaking of people crippled by persistent thoughts). This was a multimedia adventure, filled with detail about the artist’s life, work, death and legacy, and we concluded our visit with a virtual-reality experience that was by far the coolest part of the exhibit. Since then, visions of sunflowers and starry night scenes have been swirling in my mind, and I’m not exactly fighting them. I’m leaning in, allowing the visions to swirl, and trying to immerse myself in them. For years, my muse has been challenging me to produce two specific, highly creative things from my culinary bucket list that are directly connected to Van Gogh’s art. I’ve accepted the challenge, and I’ll tell (and show) you how it goes.
Until we get there, please enjoy this quick recap of the Van Gogh Immersive Experience, along with one of Les’s very favorite ear worms.
The past few weeks have been a struggle for me as my husband and I have committed to making mindful changes to our eating plan. I don’t mind the challenge of eating better, so it isn’t that. My problem has been that I’ve tried too hard to develop original recipes worth sharing here on Comfort du Jour, but so much of what I have done has been with random leftovers that nobody else in their right mind is likely to have on hand. At the end of this post, I’ll show you a glimpse of some of those dishes, and perhaps you’ll draw inspiration for how to repurpose some of your own leftovers with a shift toward healthy.
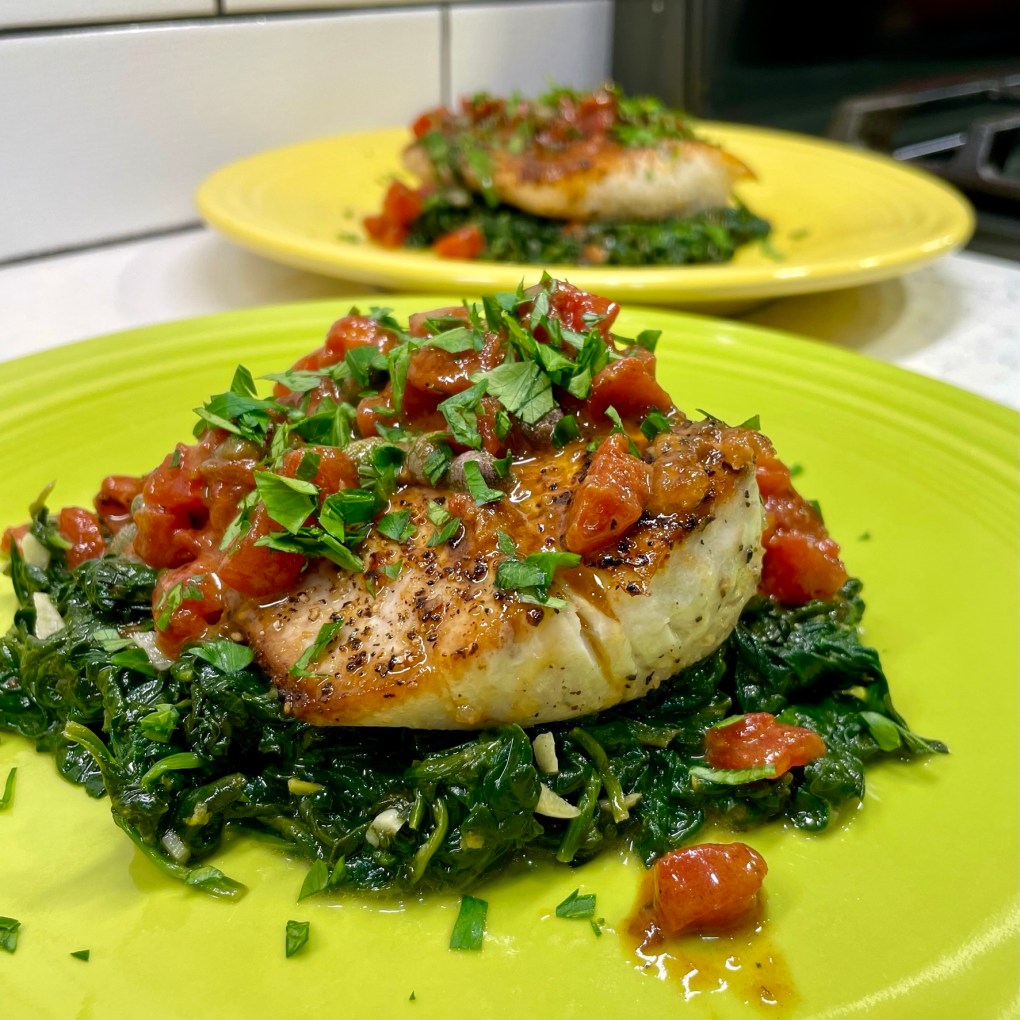
Moving forward, one of the easiest ways I know to eat better is to choose lean meats and seafood and add a lot of vegetables. So in the weeks to come, you’ll likely see a lot more green on my plate, and I mean that quite literally with this dish, featuring a gorgeous, bright green bed of sautéed spinach, my husband’s all-time favorite vegetable.
What’s so great about spinach?
We all remember from the Popeye cartoons of childhood that spinach made Popeye strong— OK, that connection was overstated. But there is a hint of truth in it, as nutrition science shows the natural nitrates found in leafy greens support healthy muscle function. Spinach is also rich in Vitamins A, C and K, as well as iron, potassium and folate, a B vitamin that helps the body generate healthy cells.
Is it better to eat spinach raw or cooked?
There is no health consequence of eating raw spinach; one of my favorite salads is made from it, along with hard-boiled eggs, red onion slices and goat cheese. But we might miss more than we gain by eating it raw. In addition to all its benefits, raw spinach also contains oxalic acid, which is the stuff that makes your teeth feel squeaky. Oddly, the oxalic acid blocks absorption of some of the very nutrients spinach provides. The cooking process breaks that down, though, so a quick sauté or steaming helps you reap the most benefit of this versatile vegetable. I’ll be using spinach again and again in the coming weeks, so all of my leafy green lovers will want to stay tuned. 😀
So what about this dish?
Today’s recipe is a twist on Mahi Hemingway, a dish I posted a few years ago, and my copycat version of a pricey meal I had enjoyed many times at a local restaurant. This time, I’ve plated the fish and sauce atop fresh spinach rather than a pile of carb-y pasta. It’s colorful, easy to prepare and absolutely delicious!
Delicious, and pretty!
To make it, you’ll need a couple fillets of fresh mahi—season them with salt and lemon pepper— plus a fat handful of fresh baby spinach, a little garlic, diced tomato, capers, dry white wine, a squeeze of fresh lemon and a little swirl of butter at the end for a delicate but flavorful sauce. If mahi is unavailable (or not your favorite), try this dish with halibut, grouper or even a mild cut of salmon.
Parsley garnish is optional, but recommended, and you can make two servings of this meal for less than half the cost of a restaurant meal for one. It’s light, delicious, gluten-free and diet-friendly. It’s also easy to make (there’s a click-to-print recipe below), and my Instagram reel will show you in 60 seconds how to put it on your table tonight. Mise en place (having everything in place) is important here, because the dish moves quickly once the pan is hot. Enjoy!
There's plenty of flavor and nutrition in this light and easy seafood dish, and it comes together in under half an hour. Perfect for a busy weeknight!
Ingredients
2 skinless mahi fillets, about 6 ounces each
Several shakes salt-free “lemon pepper” seasoning, such as Mrs. Dash
Kosher salt and freshly ground black pepper
3 Tbsp. extra virgin olive oil, divided (1 for the spinach, 2 for the fish)
2 fat handfuls fresh baby spinach, roughly chopped (this is approximately six ounces)
2 cloves fresh garlic, minced
1/3 cup dry white wine, divided (you’ll use some for the spinach, some for the fish; substitutions in the recipe notes)
Juice and zest of 1/2 large lemon
1/3 cup petite diced tomatoes, drained
1 Tbsp. nonpareil capers, drained but not rinsed
1 Tbsp. cold butter, cut into teaspoon-size pieces, for swirling into sauce at the end
A sprinkle of fresh, chopped parsley to garnish
Notes: This recipe moves quickly, especially once you remove the fish from the skillet. Be sure to have all your ingredients lined up and ready before you begin cooking.
Any firm fish fillet may be substituted for the mahi; I think salmon, grouper, tilapia or halibut would all be terrific in this dish.
Dry vermouth may be used in place of the white wine. If you prefer to avoid alcohol, substitute a quarter cup of low-sodium vegetable broth for the wine and add an extra squeeze of lemon.
Use fresh tomatoes when they’re in season; otherwise, salt-free canned tomatoes work great. If you have trouble with the acidity in tomatoes, try neutralizing it with a pinch of baking soda. Stir the soda into the tomatoes before you begin, and give it a few minutes for any foaminess to subside before proceeding. This will help take the edge off the acid of the tomatoes.
Directions
Pat the mahi fillets dry with a paper towel. Season with salt and pepper, plus a generous few shakes of the lemon pepper seasoning. Set aside to warm to room temp while you prepare the spinach.
Place a non-stick skillet or pot over medium heat. Swirl in about a tablespoon of the olive oil, and then add the spinach a handful at a time. Give it a toss through the oil, then season lightly with salt and pepper. Use an easy touch here, so the spinach isn’t too salty after it wilts down.
Add garlic to the pan and toss until spinach is fully wilted but still bright green. Add a splash of the white wine, plus the zest of the half-lemon. Continue to cook until the wine evaporates. Remove from heat and cover to keep warm.
While the spinach is cooking, heat a second skillet (preferably not non-stick) over medium heat. Add remaining oil when the pan is hot. Place the fish fillets, “pretty” side-down, into the skillet. You should hear them sizzle instantly. Leave the fillets alone until you can see the fish is cooked through about 1/3 of its thickness, about three minutes. Use a metal spatula to carefully turn the fillets to cook the other side, about two additional minutes. They will be a little translucent in the center, but the residual heat will cook them through. Transfer the fillets to a warm plate and set aside while you prepare the sauce.
Add the diced tomatoes and capers into the fish skillet. Add a generous splash of the white wine, and use a whisk or utensil to scrape up all the cooked-on bits in the pan. Turn down the heat to medium-low and cook until wine is reduced by half. Squeeze in the lemon juice and stir until the moisture is reduced by about half; this should happen within about a minute.
Turn off the heat. Carefully swirl the cold butter, a teaspoon at a time, into the pan sauce. This will emulsify and thicken the sauce.
Divide the spinach between serving plates. Place a mahi fillet on top of each and spoon the pan sauce over the fish. Garnish with fresh parsley and serve at once.
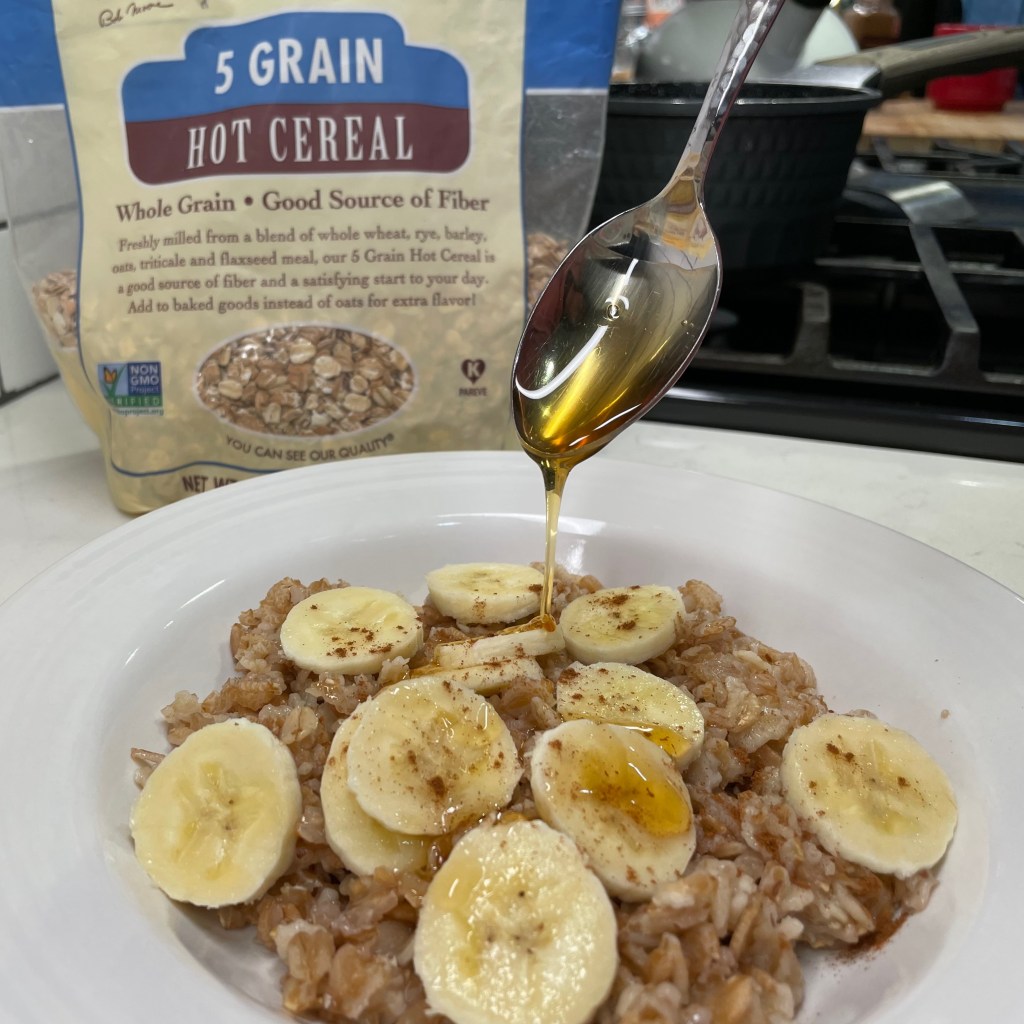
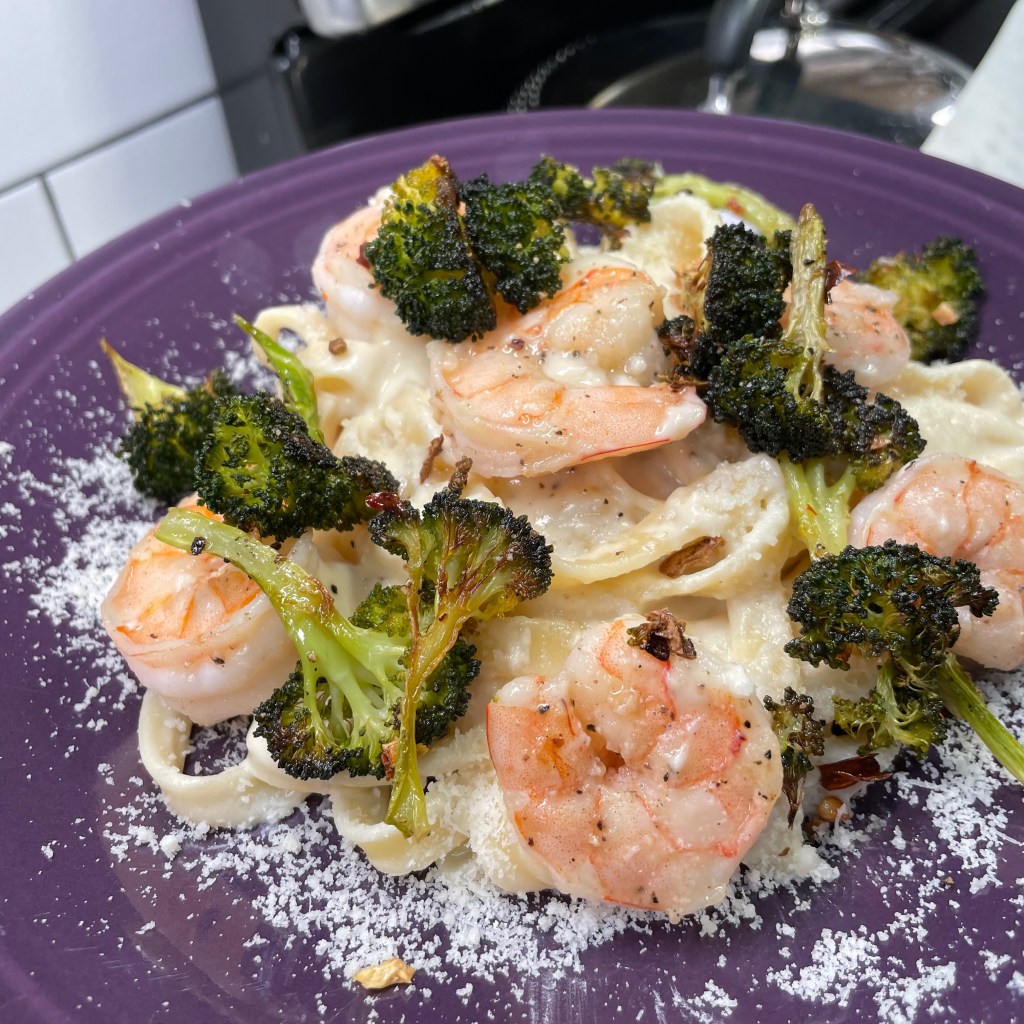
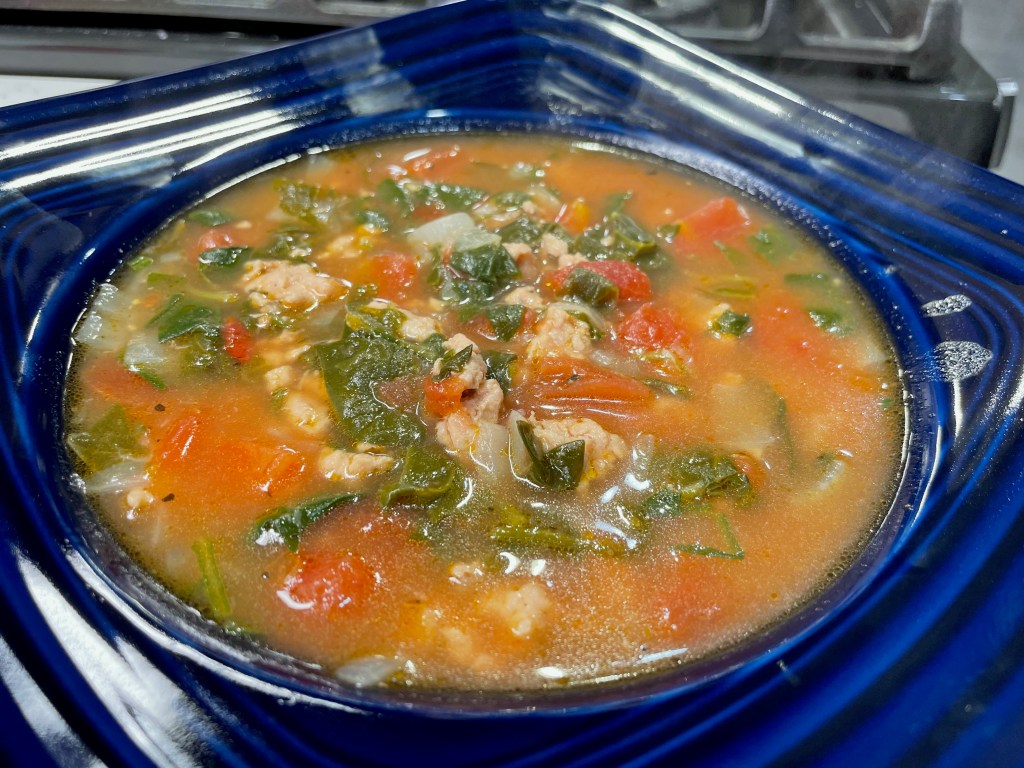
Here’s a snapshot of some of the other delicious foods I’ve made since we committed to healthier eating. Some were made from leftovers that you probably don’t have, but others are repeats of favorites, with previous recipes linked for your convenience.
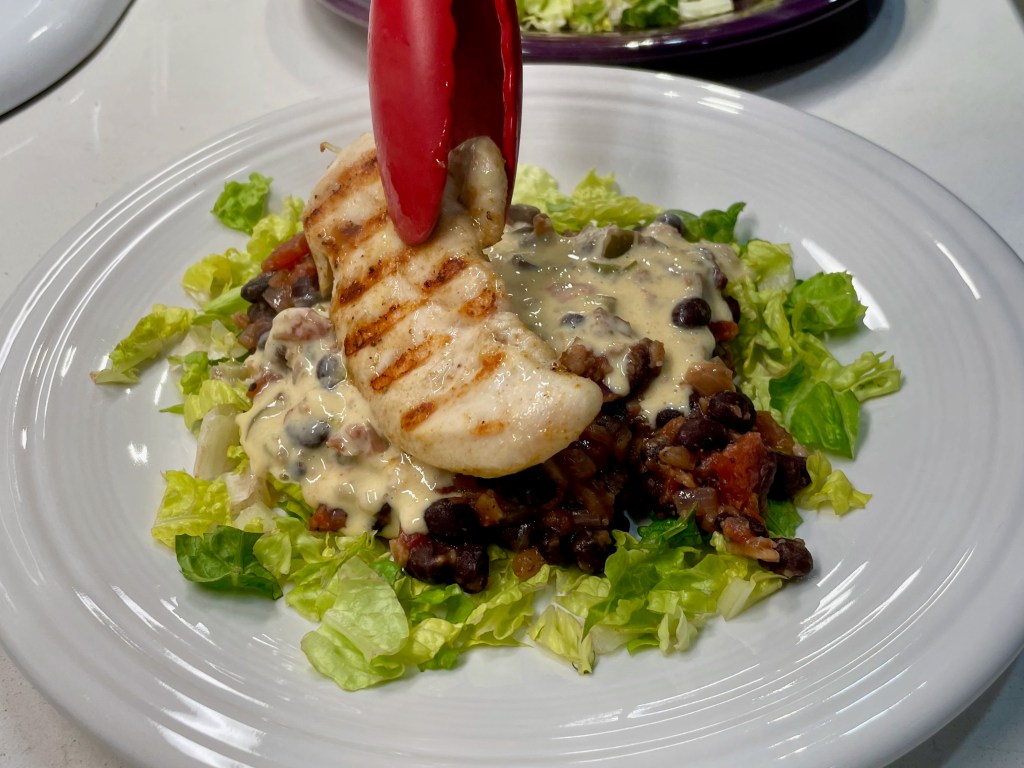
Leaning into whole grains helps me feel full longer. I love Bob’s Red Mill products!Fettuccine with shrimp and roasted broccoli. Link here for my “No-Guilt Alfredo Sauce,” made with loads of cauliflower!A leftover-based version of wedding soup, but I skipped the pasta and didn’t bother turning the ground chicken into meatballs.One of my all-time faves! Link here for the recipe for “Salmon with Fennel & White Beans.”Just a tablespoon of queso dip (leftover from Super Bowl) on this salad, topped with black bean-tomato hash and grilled chicken tenders.Breakfast for dinner always satisfies! Link here for my my “Shiksa-style Shakshuka!”
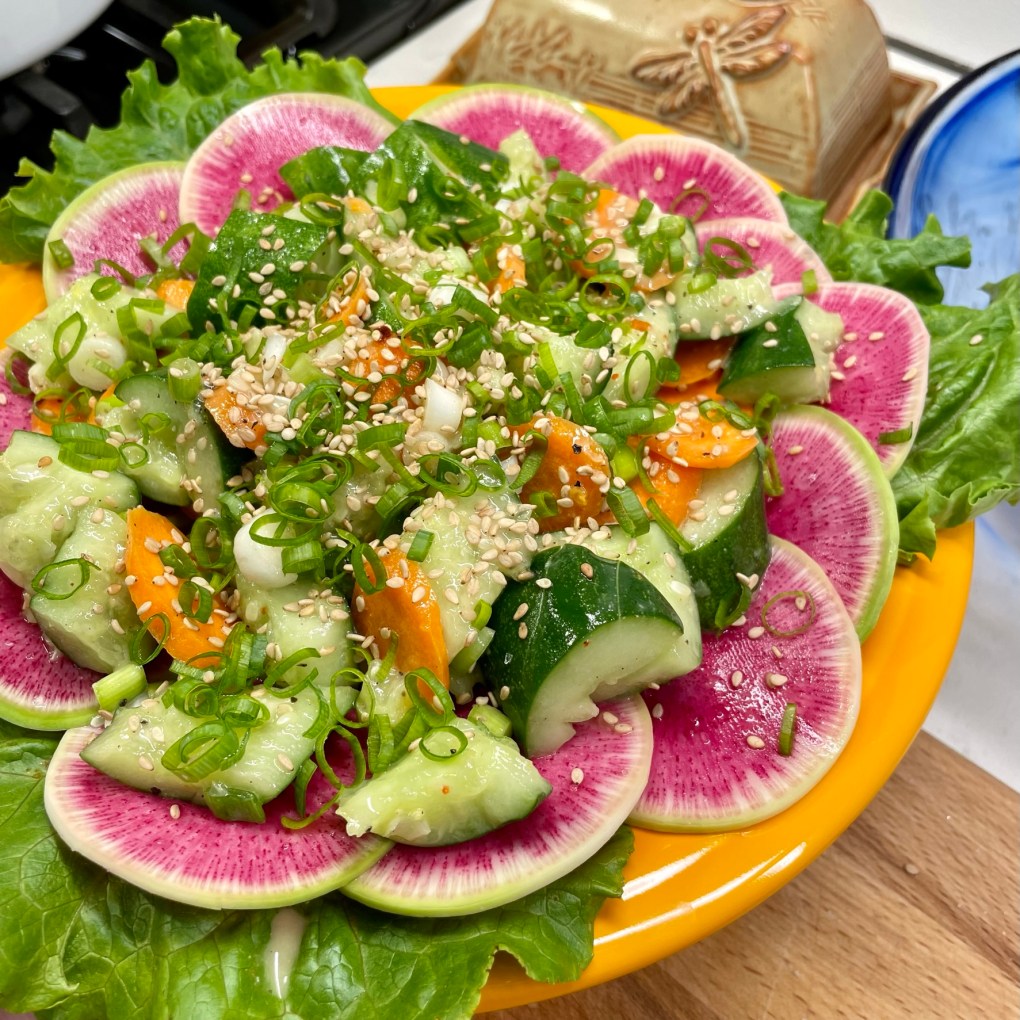
Over the past few months, I’ve seen numerous recipes for something called smashed cucumber salad and wondered, what’s so special about that? Sure, I love cucumbers and the way they freshen up a salad with an extra level of cool and crunch. But why not just, you know, slice them? Of course, that was before I tried one, and I may never be the same.
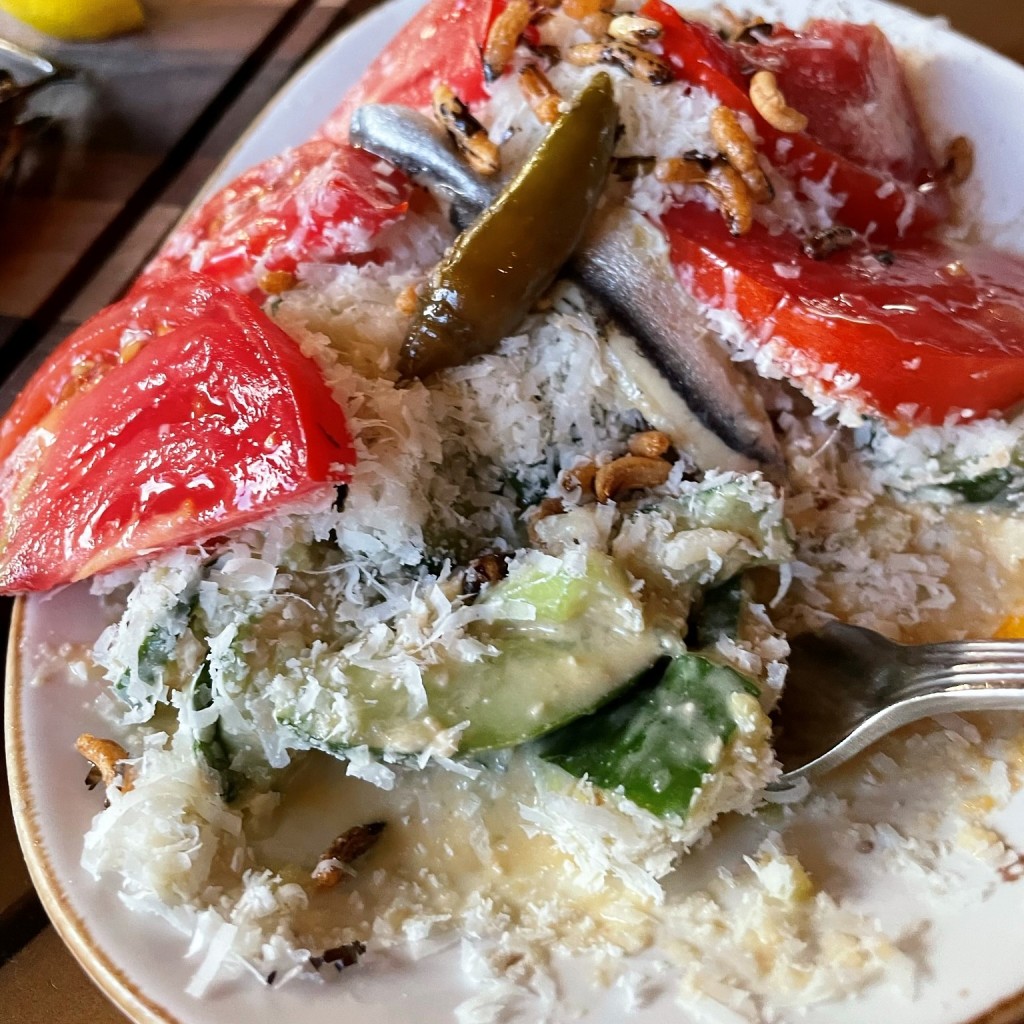
I enjoyed my first-ever smashed cucumber salad last month, when I joined my blog buddy, Dorothy, and her husband at one of their favorite restaurants, Starry Night Cafe in Ferrisburgh, Vermont. That salad had a rustic Italian flair with Calabrian chili flakes, anchovy, parmesan and ripe heirloom tomatoes. It was a masterful arrangement of fresh, seasonal food just doing its thing.
Every flavor complemented the next, but what struck me most about “smashed” cucumber salad was the texture— the open, craggy edges held onto the dressing, and the big chunks made it sooo crunchy and satisfying. And that was only the opener of our incredible meal.
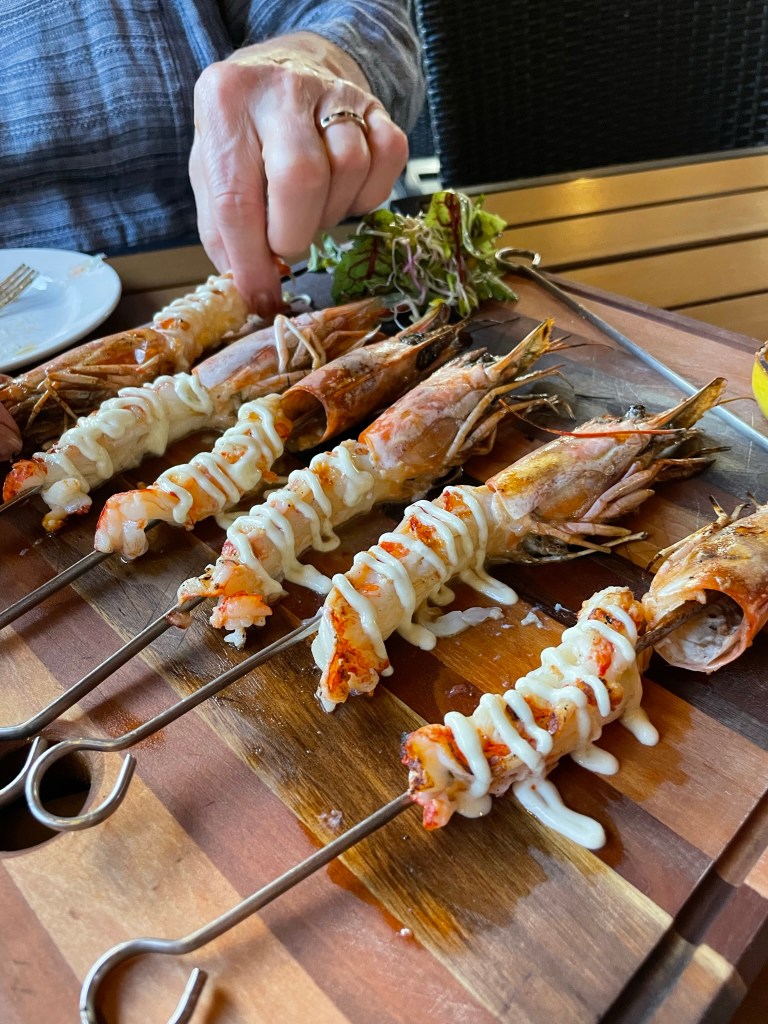
Starry Night Cafe demonstrated its commitment to partnering with local farmers and producers in every single thing brought to our table. From the specialty cocktail (don’t you worry, I’ll share it soon) to the coal-roasted oysters and grilled shrimp spiedini all the way to the stunning main course of wild halibut, I found myself wishing we lived closer!
Food really does taste better when it’s fresh and seasonal, grown without pesticides or chemical fertilizers and picked at peak ripeness. My entire visit through Vermont reignited my excitement for local food, and our Starry Night experience was the icing on the cake— er, salad. I started imagining what other flavors would play nice with the versatile cucumber, and I think I came up with a winner in this pretty plate.
My smashed cucumber salad is not a remake of the Italian-ish salad we shared at Starry Night Cafe, but an Asian-inspired interpretation, built on some fun ingredients I found when Les and I visited our own farmers’ market here in Winston-Salem. I wanted a dressing that was savory, sweet and tangy. Creamy but without cream. And with a touch of heat to accent all of the above. So I poked around on the internet for a bit and found a lemon-miso dressing on a blog calledA Nourishing Plate.
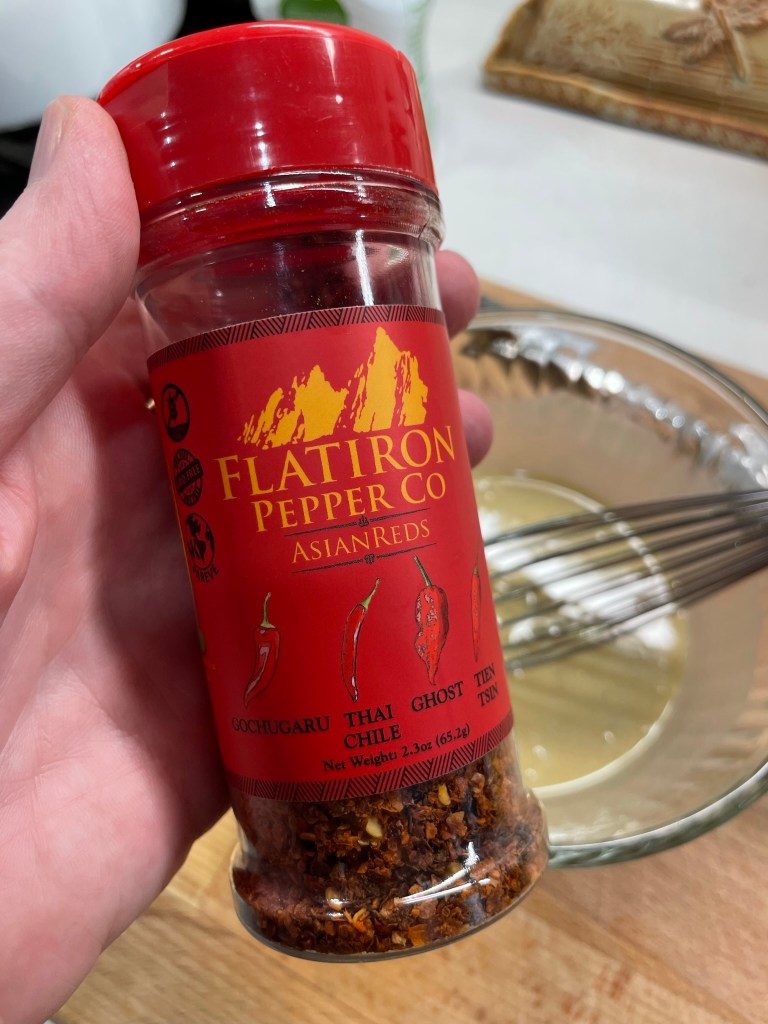
The author’s recipe satisfied most of my wish list, and I followed it mostly as written, subbing tahini in place of cashew butter because I always have a jar of tahini in the fridge. I used slightly less sugar and oil, and for a pop of heat, I added a few shakes of Asian Reds hot chile flakes from Flatiron Pepper Company. This is different from generic “red pepper flake,” as the chiles are specific to various parts of Asia. The dressing is so good, and easily adjusted for sweet and heat. I love the contrast it provided this cooling cucumber salad, and I can imagine it would also be good as a roast vegetable topper. The dressing thickens up a bit in the fridge, so I’d recommend making it ahead.
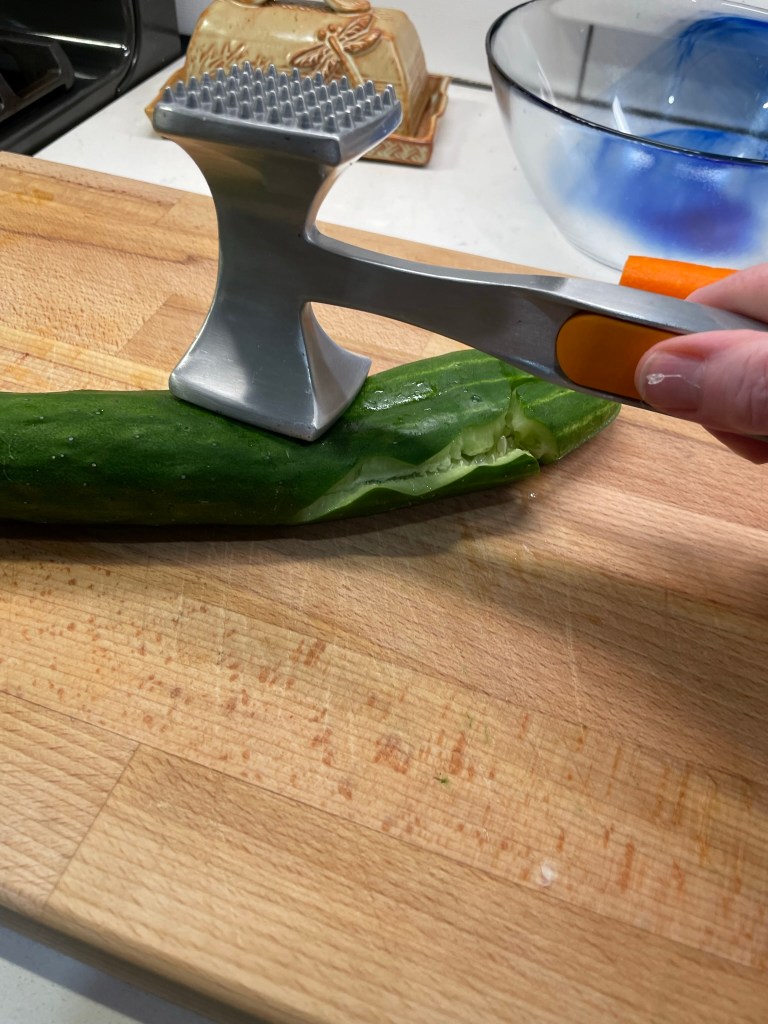
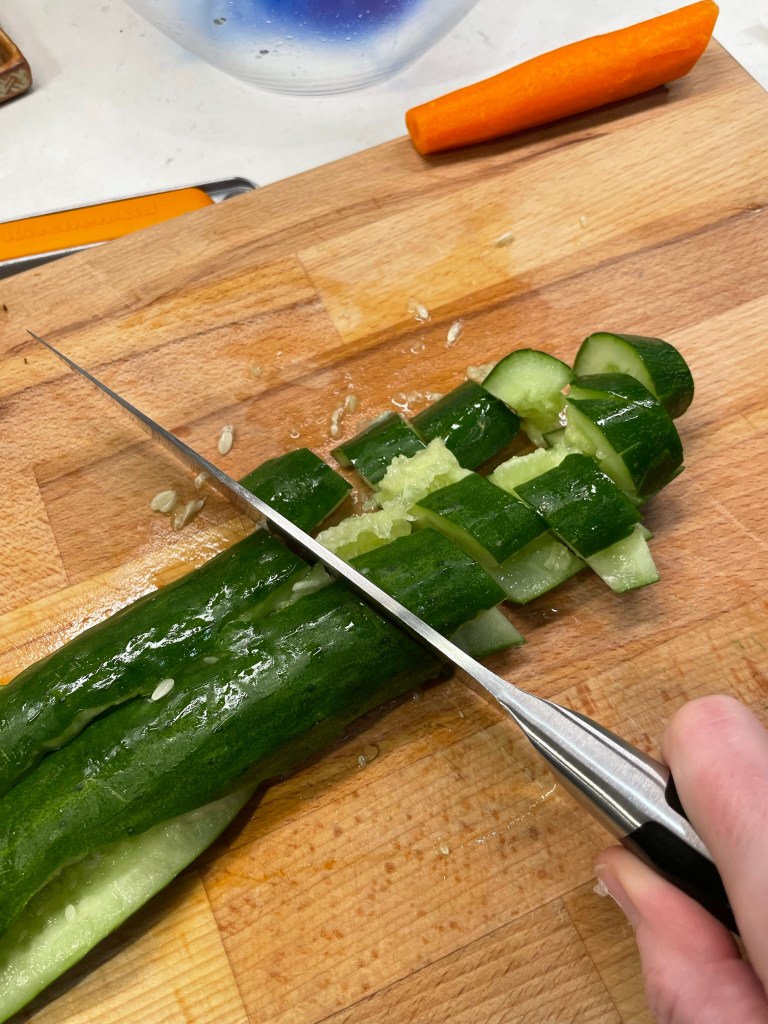
English cucumber is ideal for this type of salad, for its smaller seeds and thinner skin. My grocery stores all sell this type of cucumber, but usually they have a waxy coating to keep them fresh during transport from God-knows-where (yet another reason to choose local). You can use anything you have on hand for smashing it— the flat side of a chef’s knife, bottom of a skillet, whatever— but don’t use a heavy hand unless you want cucumber juice all over yourself and the kitchen. Just enough to crack it open is good, and then use a knife to cut the smashed cucumber into generous chunks. Season it, and toss with the other ingredients. Could it be more simple?
The most brilliant element of this dish— and I mean brilliant in the sense of “wow, look at that shocking pink color!”— is the watermelon radish. That neon pink color seems to be everywhere right now, thanks to the Barbie movie, and though I’ve seen these radishes in food magazines and cooking shows, I have never run across one in the supermarket.
Just gorgeous!
Turns out the farmers’ market is also the place to score Barbie-colored vegetables, and I couldn’t resist slicing one up to complement my smashed cucumber salad. It made a lovely border, don’t you think? And it carries the same pungent, spicy flavor as a typical radish— just larger and way prettier. I’m still deciding what to do with the other watermelon radish (stay tuned).
I love trying new foods! What ingredients are you curious to try, and will you scout them out this weekend at the farmers’ market in your neck of the woods? I hope so!
An Asian-inspired dressing puts a flavorful jacket on this super-refreshing and oh-so-fresh cucumber salad. Don't skip the smashing part, as it contributes to the amazing texture of this new summer favorite.
Ingredients
1 large organic English cucumber, cleaned and dried
1 large carrot, peeled and sliced thin
3 scallions, washed and sliced thin (green parts reserved for garnish)
1 medium watermelon radish, peeled and sliced thin
Spicy lemon-miso dressing (see below)
Lettuce leaves for plating, optional
A few shakes toasted sesame seeds (for garnish)
Directions
Prepare the spicy lemon-miso dressing and refrigerate until you’re ready to make and serve the salad. If using the red pepper flake, remember that the flavor will become more intense after the flakes rehydrate.
Lightly smash the cucumber, just enough to split it open. Cut into chunks and add them to a large bowl with the carrots and the white parts of the scallions. Sprinkle with kosher salt and gently toss to distribute the seasoning.
Spoon about half of the dressing over the salad and toss to coat.
Arrange lettuce leaves and watermelon radish on a serving platter. Spoon the smashed cucumber salad onto the plate and garnish with reserved scallion tops and sesame seeds.
Notes: Make the lemon-miso dressing ahead; the flavors mingle nicely in the refrigerator, and the red pepper flakes will rehydrate for maximum punch. You will only need about half of the dressing recipe for this smashed cucumber salad. Save the rest for another salad or to drizzle on grilled vegetables.
Ingredients
2 Tablespoons white miso paste
1 Tablespoon rice vinegar
1 Tablespoon tahini paste
2 teaspoons organic cane sugar
Juice and zest of one large lemon
Kosher salt and black pepper
A few shakes of red pepper flake, optional but wow!
3 Tablespoons extra virgin olive oil
Directions
In a small bowl, combine miso, vinegar, tahini, sugar and lemon juice plus zest. Season to taste with salt and pepper. Add a few shakes of red pepper flake if you want a bit of heat. I like Flatiron Pepper Company’s Asian Reds here.
Slowly drizzle oil into the dressing, whisking constantly to create an emulsion. Adjust seasoning to taste and refrigerate. Dressing will thicken slightly in the fridge.
I’m so glad I didn’t give up on homemade pasta. My first few attempts were equal parts disaster and comedy, as I naively believed it might be as simple as TV chefs made it seem. Don’t get me wrong, it is not difficult to make fresh pasta dough. But unless or until you are a pro with many years experience doing it, I do not recommend the method some of those chefs follow— building up a mountain of flour on a counter and then using your hands to mix in the eggs that are cracked right into the top of the pile. The likely outcome is a big mess, and I am definitely speaking from experience.
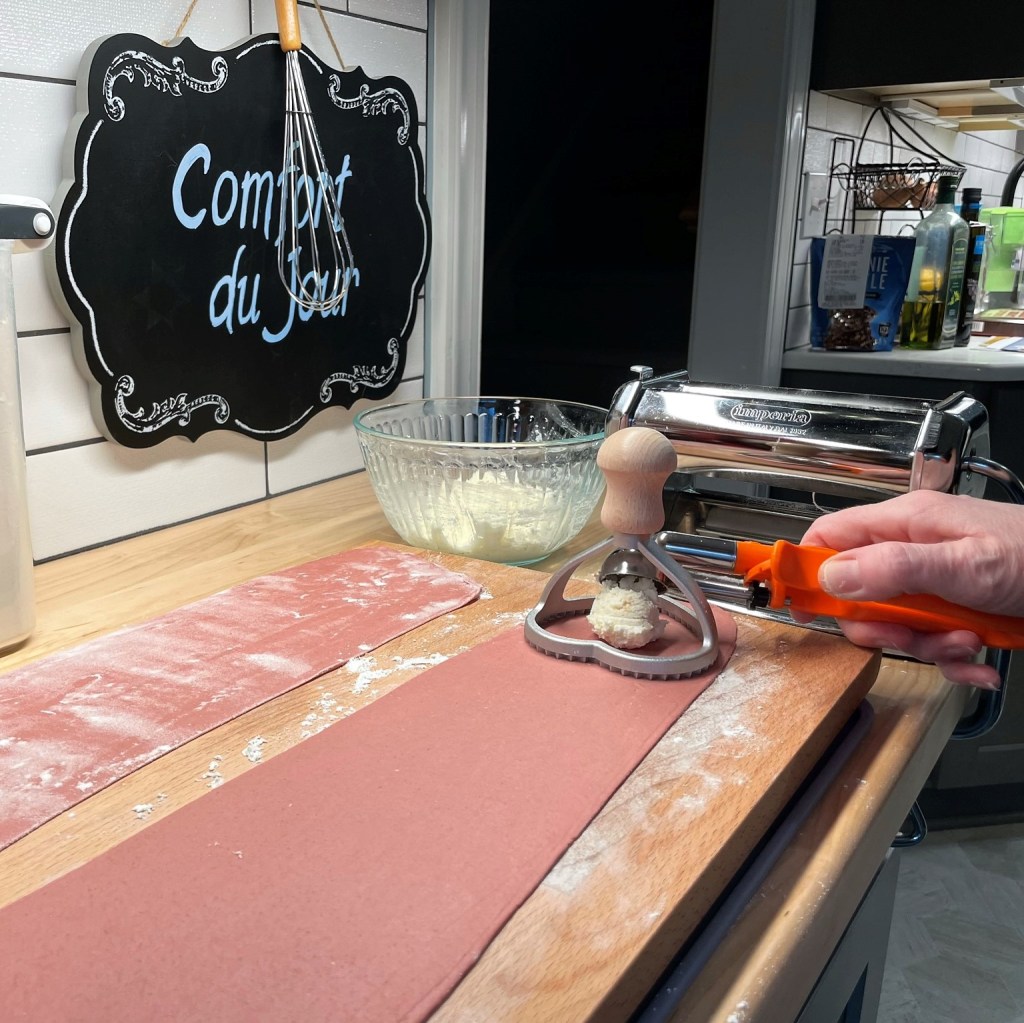
Those early failures prompted me to suspend my efforts, and I didn’t have the gumption to try again for a few years, until after I’d purchased my first stand mixer. Let me tell you, a high-sided mixing bowl and the squiggly dough hook attachment make far easier, cleaner work of homemade pasta dough. I was still rolling it out by hand with a wooden rolling pin, which is perfectly acceptable, but when I found my hand-crank pasta machine, I was on my way to making sheets of pasta for homemade linguine and fettuccine. Fast forward another year, and I picked up a three-tray set of ravioli molds, finding my way to all varieties of sweet little pillow pastas, including the handmade spinach ricotta ravioli I shared in another post.
One day, I hope to improve my technique for hand-shaping some of the special pasta, like oricchiette and casarecce. Practice makes perfect, right? There is so much to learn in the world of handmade pasta, and my most recent obsession has been adding big flavor and color to pasta dough through the addition of pureed vegetables and other natural ingredients. This book, Pasta, Pretty Please, by Linda Miller Nicholson has inspired me to try fun new combinations, including beet-infused pasta dough, which is featured in the top left of this color chart in Linda’s book.
How long will it take me to make all these pasta colors?
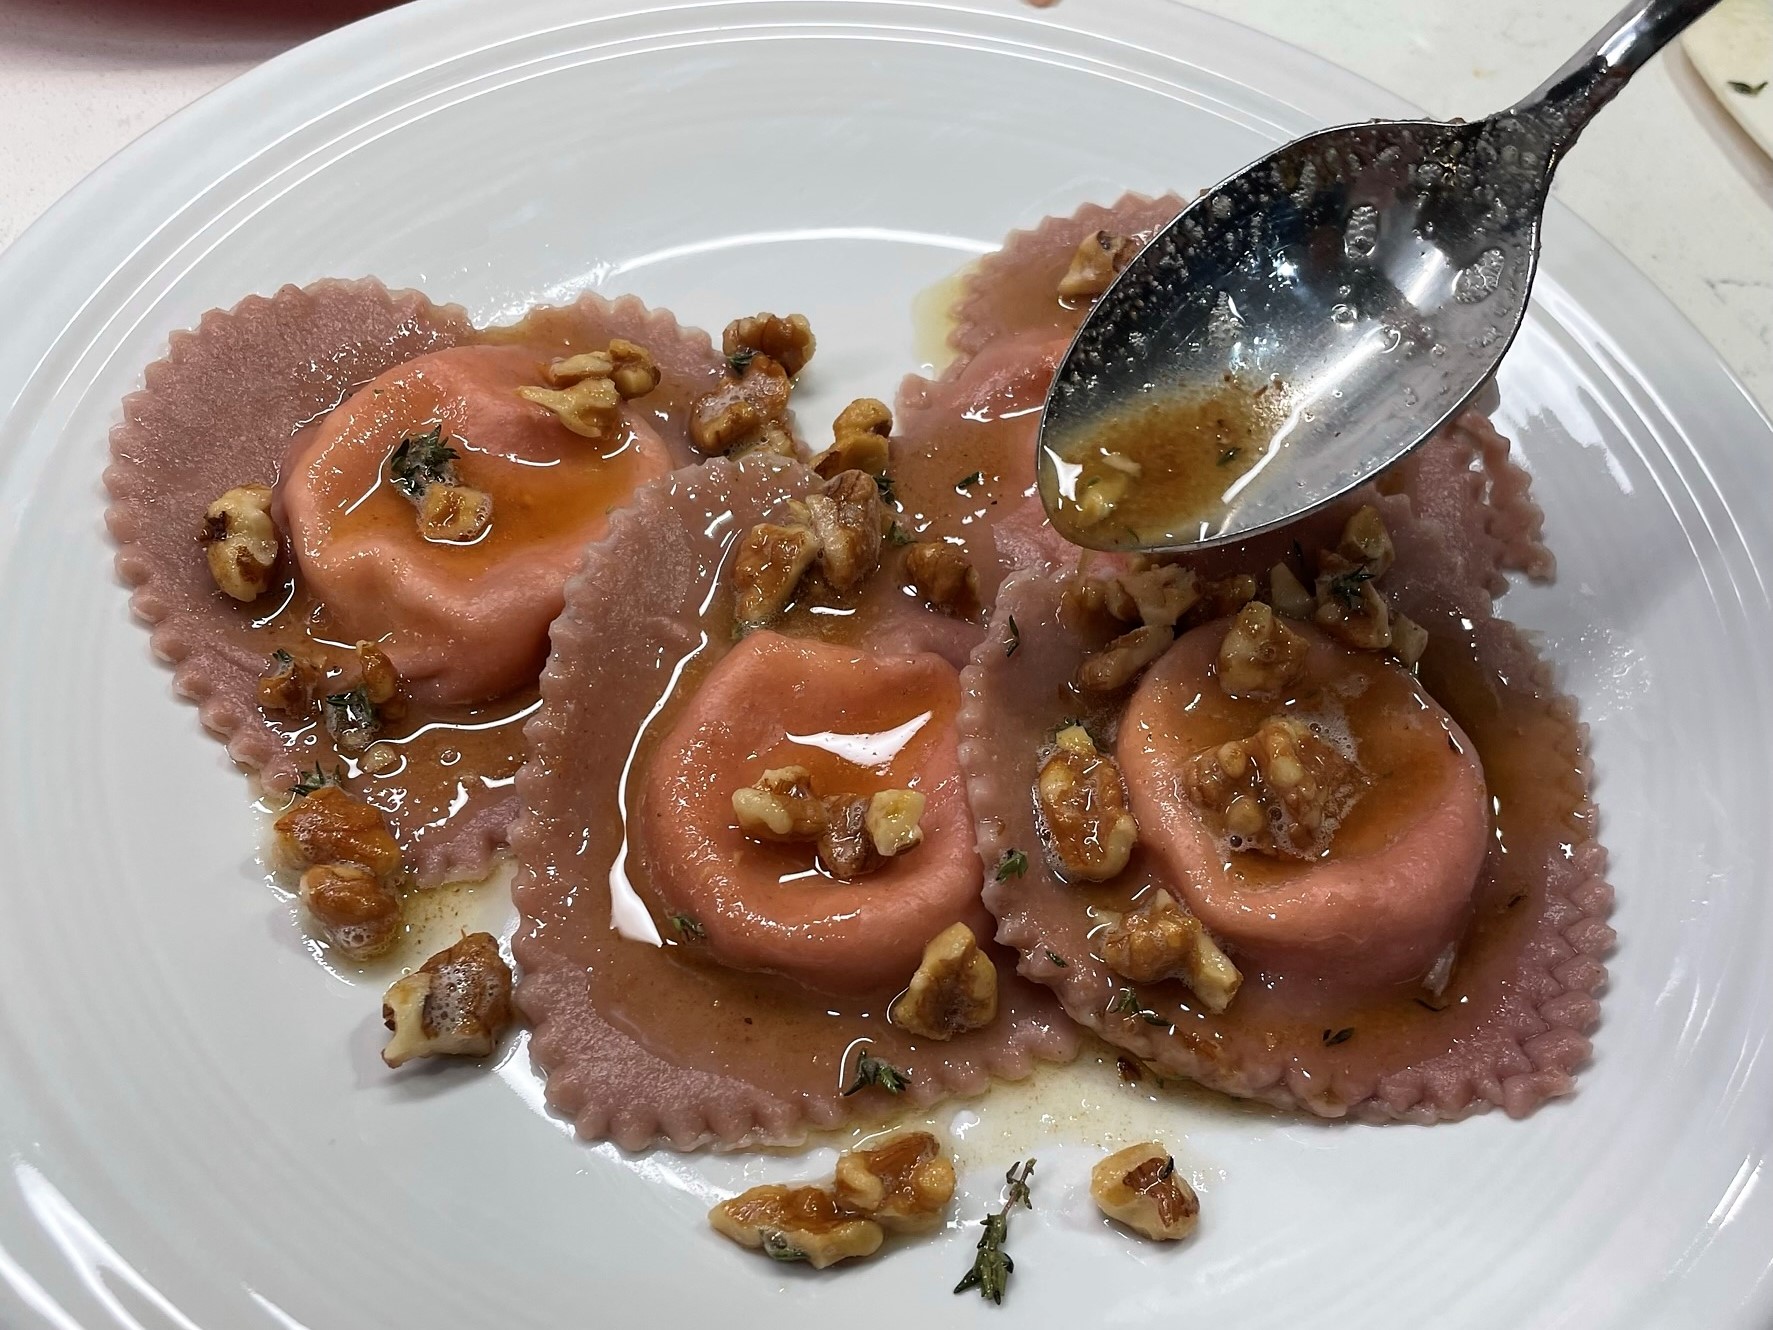
You can see that my pasta dough, which was made with roasted beets, has a soft pink color— not the bright magenta hue that Linda makes. I realized too late that Linda uses frozen pureed beets for her pretty pasta. I love that vibrant color she achieves, but you know what? My soft pink, heart-shaped pasta is still perfectly appropriate for Valentine’s Day, and the beets in the dough are good for cardiovascular health, so there’s that. You hardly taste the flavor of the beets, but the nutritional benefit is still in there.
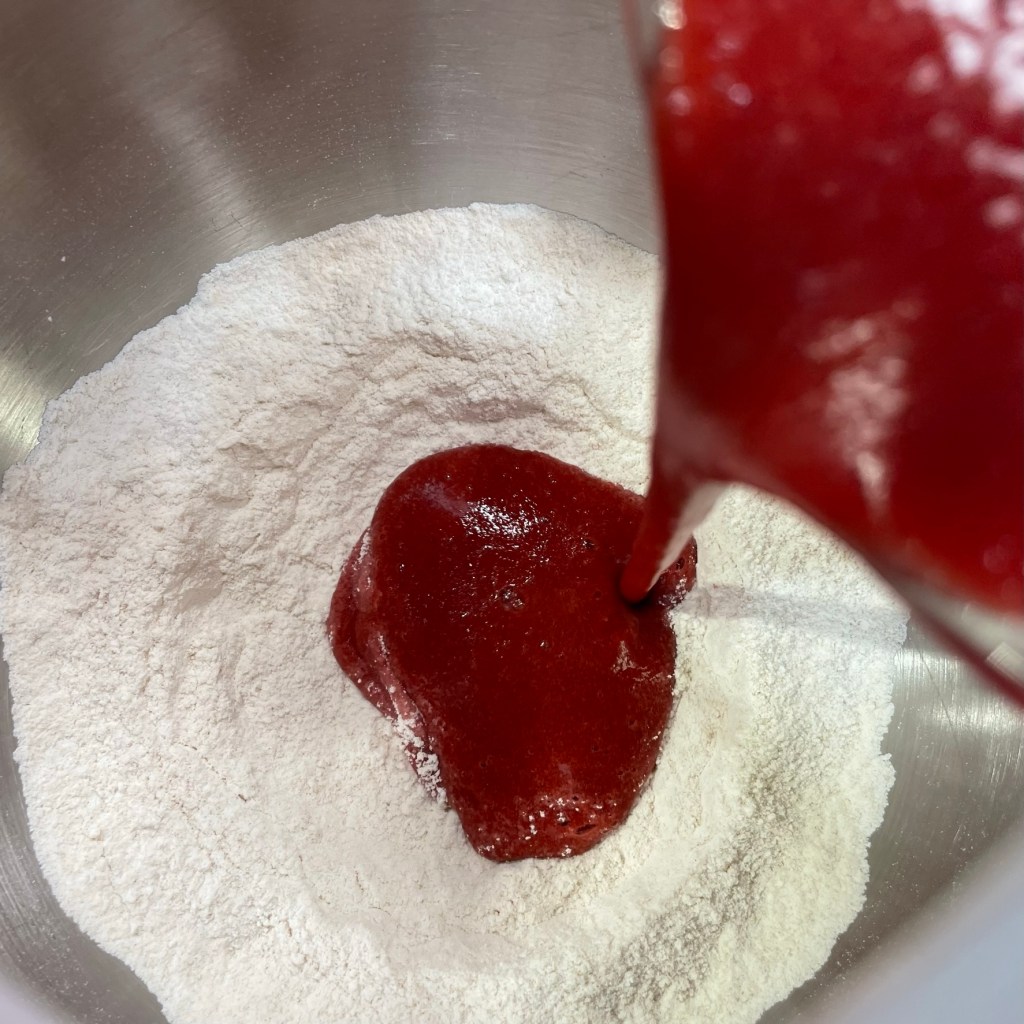
The beets and egg whites are pureed and added to the flour mixture.
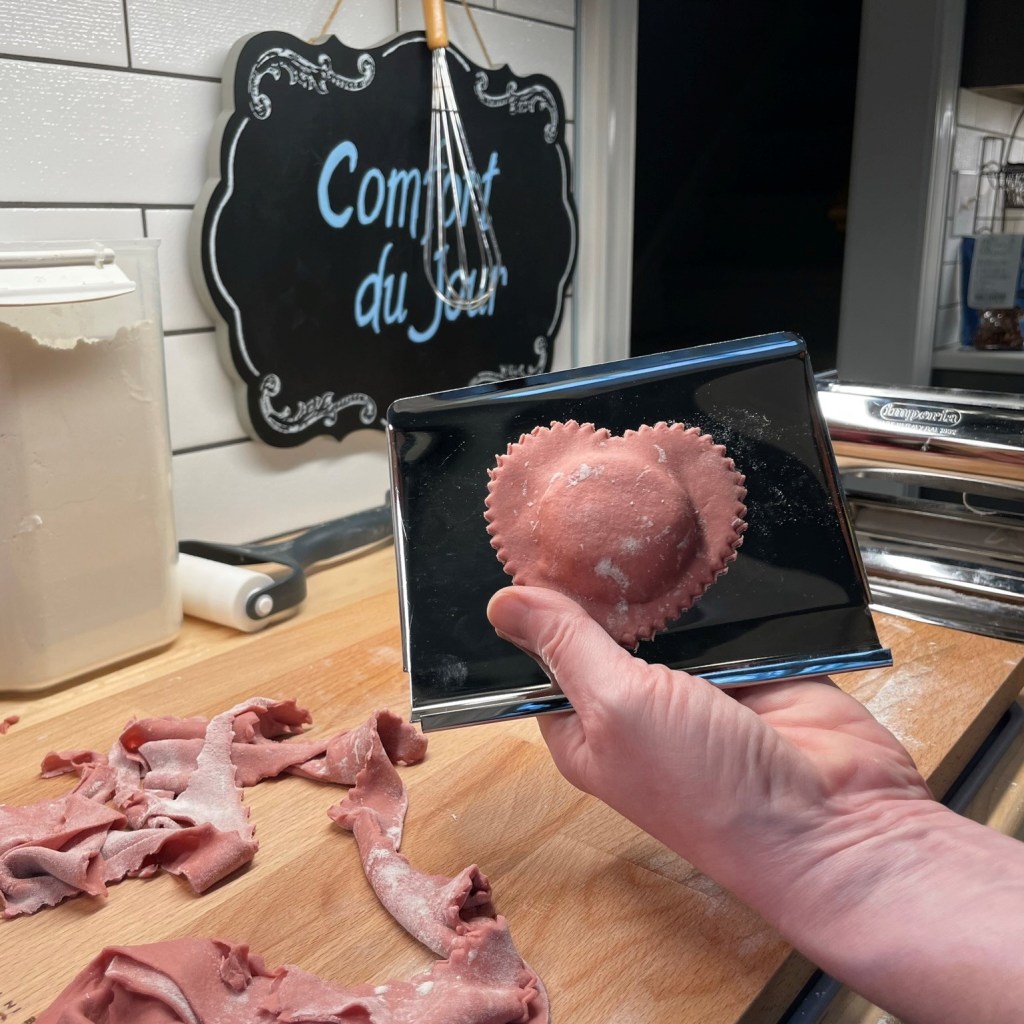
This pasta would be lovely as fettuccine, farfalle or linguine, but I whipped up a quick filling and turned it into ravioli. The filling is a simple, lemon zest-scented ricotta mixture, and to keep the pasta front and center, I topped the ravioli with a simple, browned butter walnut sauce and a last-minute sprinkle of our beloved parm-romano blend.
You don’t need a heart-shaped ravioli cutter. These would be just as good as simple squares!
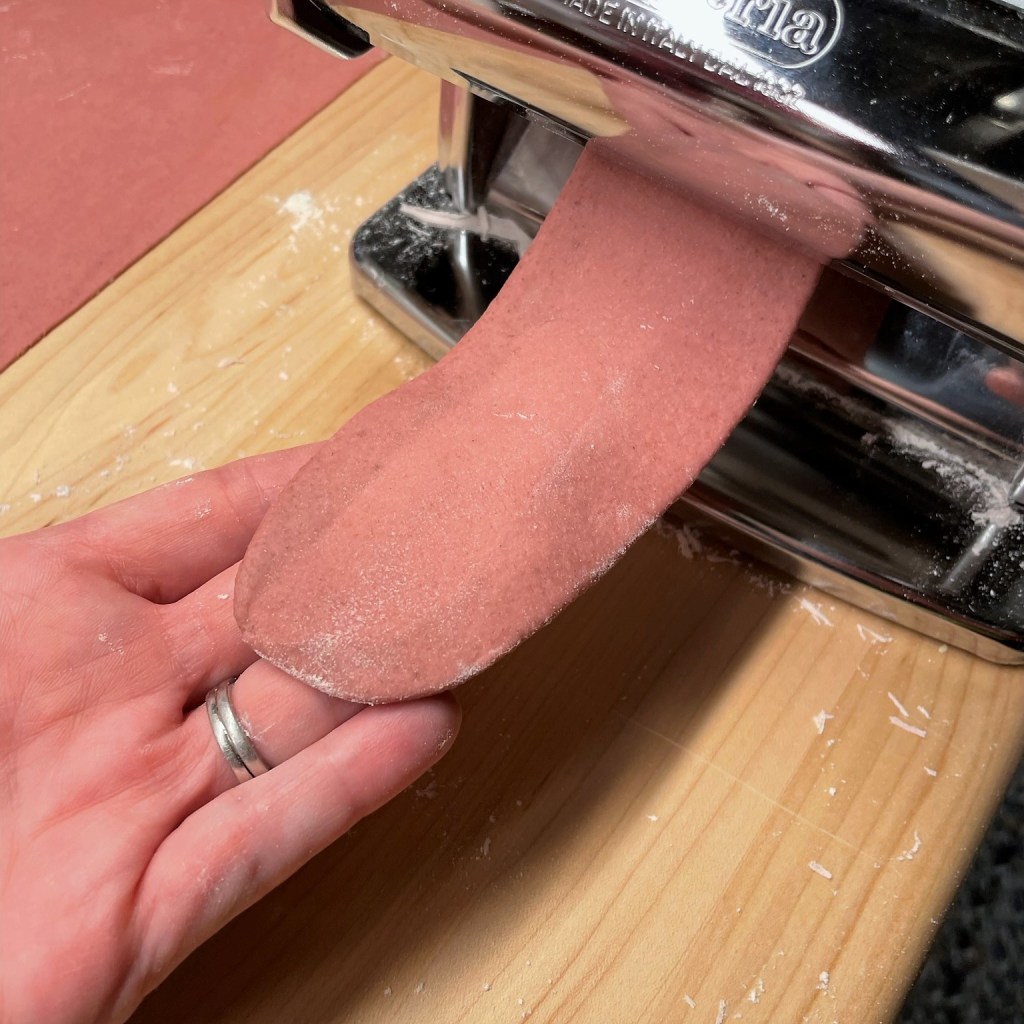
If you have ever dreamed about making your own pasta at home, my advice is simple— start doing it! You may not get it perfect the first time, and that’s OK. This is one of the most rewarding kitchen adventures and once you get the feel for it, you’ll surprise yourself with the creative ideas that come to you. Every once in a while, you may also get a good laugh, as I did when I realized while rolling this dough that it looked weirdly familiar to me, and not necessarily in a good way. 😂
OMG, It looks like a tongue!
Thank goodness, it turned out delicious! If you’re interested in purchasing Linda Miller Nicholson’s book, which is filled with instruction for making every color and shape of pasta you could possibly imagine, search for it on Amazon or check at Barnes & Noble.
Roasted beets bring a sweetheart color to my homemade pasta. If you've ever wanted to make your own pasta, I hope this inspires you!
Ingredients
1 1/4 cups all-purpose flour
1/2 cup white whole wheat flour
1/2 cup fine durum (semolina) flour
1/4 tsp. kosher salt
1/2 tsp. onion powder
4 small beets, roasted and peeled
2 egg whites at room temperature
Directions
Combine flours, salt and onion powder in the bowl of a stand mixer.
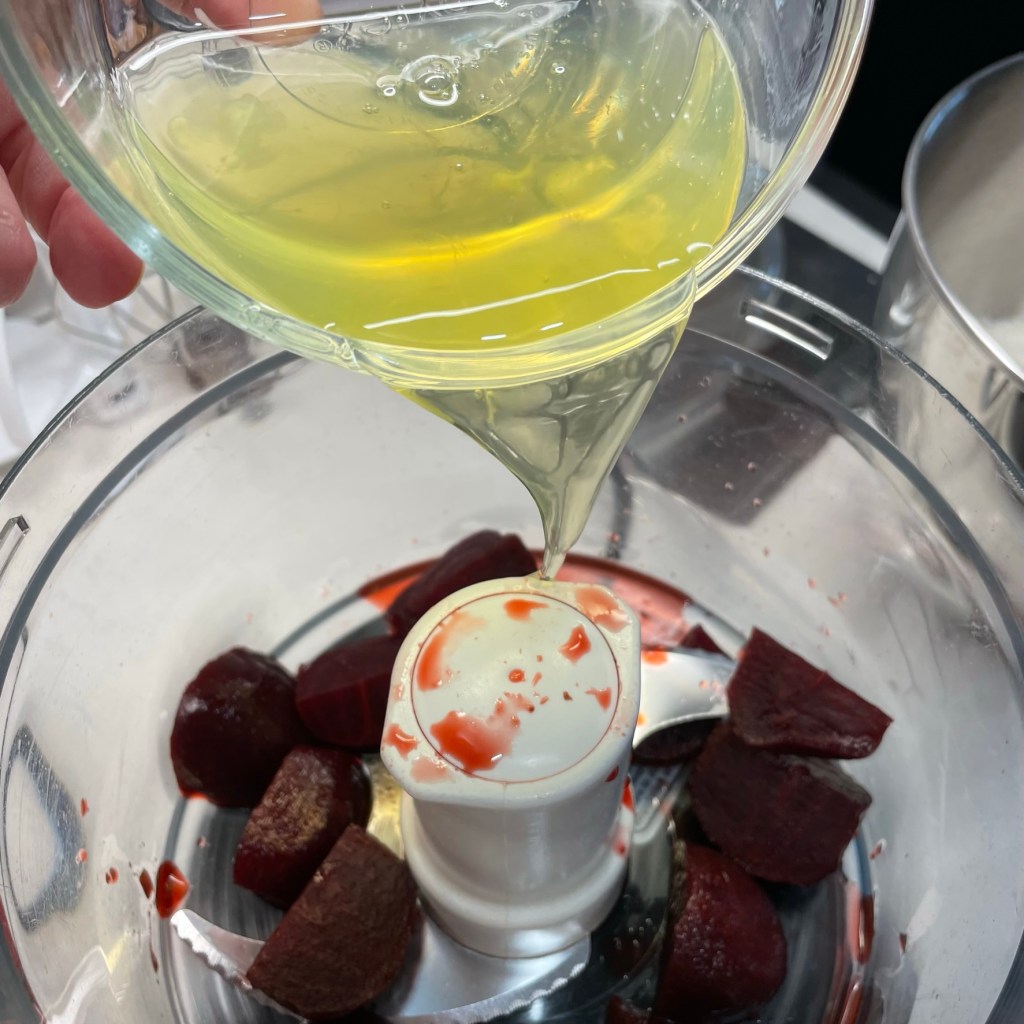
Place beets and egg whites in the small insert bowl of a food processor and blend until pureed. Pour through a fine mesh strainer into a measuring cup. Add water if necessary to measure 3/4 cup.
Pour beet-egg liquid into flour ingredients. Use the dough hook attachment of the stand mixer to blend the liquid into the dry ingredients. Dough should be somewhat shaggy and not quite sticky. Transfer dough to a lightly floured countertop and knead by hand for about 5 minutes until it’s smooth and supple. Shape it into a ball and wrap tightly with plastic wrap. Let it rest at least 30 minutes.
Roll pasta dough by hand or through pasta machine to thickness about 1/16-inch. If making ravioli, proceed with filling as described below. This pasta dough would also make beautiful fettuccine.
If you’re making ravioli, I’ve included ingredients below for the filling and browned butter-walnut sauce. It’s easy to make the filling ahead. The sauce should be made just before serving.
Ingredients
1 cup full-fat ricotta, strained to drain off excess moisture
Zest of one organic lemon
1/4 cup grated Parm-romano blend (or Parmesan)
Ingredients
3 Tbsp. salted butter
1/2 cup walnut pieces, toasted until fragrant
A few leaves of fresh thyme
About 2 Tbsp. Parm-Romano blend, for serving
Directions
Combine all ravioli filling ingredients in a small bowl. Refrigerate until ready to fill pasta.
Lay one sheet of pasta dough on a floured counter. At evenly spaced intervals, place a dollop of ricotta mixture. Using a thin pastry brush or your fingertip, moisten the dough around the ricotta with cold water. Place a second sheet over the sheet with ricotta filling. Gently close the pockets of filling, pushing out as much extra air as possible. Use a pasta cutter or stamp to separate raviolis. Place on a semolina-dusted sheet until ready to cook.
In a small skillet, heat butter until melted and bubbly. Add walnuts and toss to coat. Continue cooking until butter is browned and very fragrant. Add thyme leaves and remove from heat.
Bring a pot of water to boil and season with a tablespoon of kosher salt. Cook pasta gently for about 4 minutes. If making ravioli, reduce heat somewhat and turn pasta carefully to avoid breaking the pillows. Top pasta with butter-walnut sauce and sprinkle with Parm-Romano blend cheese. Serve immediately.
For me, the scariest thing about learning to cook plant-based food was accepting that it’s more than ingredient swaps, it’s a new process. Learning vegan cooking forced me out of my comfort zone of using what I call “crutch” foods—the easy things we were all taught to reach for—like cheese, eggs, cream and chicken broth. The only way to overcome this hurdle of making foods in new ways is to practice, and if you have vegetarians or vegans coming for Thanksgiving, the time to practice is now. There are plenty of plant-based convenience foods out there today, but they aren’t always an even swap and it’s important to also know how to cook real, whole foods without needing those processed substitutes.
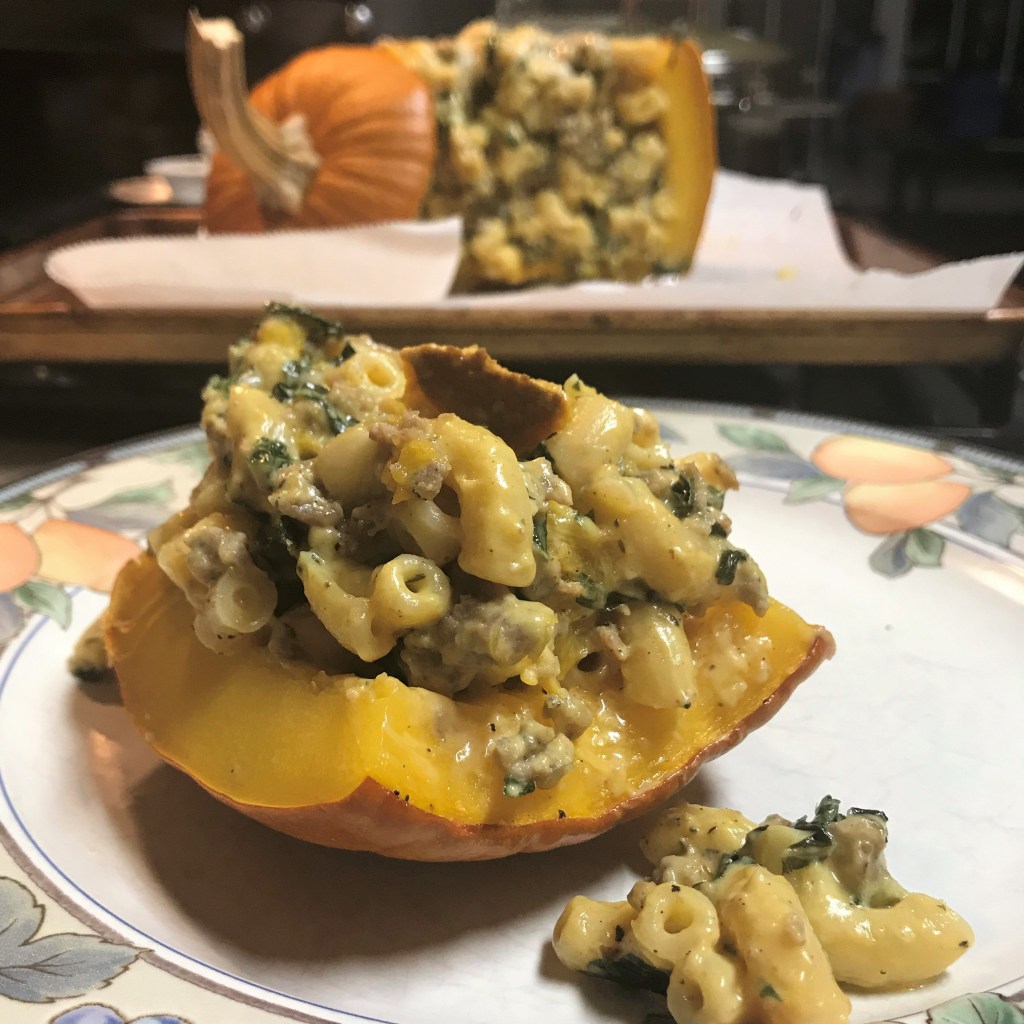
A couple of years ago, when Comfort du Jour was new, I went over the top with a Savory Sausage Mac & Cheese (baked in a pumpkin). It was fun to serve and tasted as good as you’d imagine. This year, I decided to do something visually similar but with all plant-based ingredients, and this is that dish.
Loaded with nutrients, satisfying and perfectly festive for fall!
Unlike my earlier creation, which was stuffed with rich, decadent cheese, heavy carbs and calorie-laden pork sausage, today’s recipe is entirely plant-based. It also happens to be free of gluten and nuts, so it’s suitable for people with those dietary restrictions, too. I start thinking about dishes like this around mid-October, because my husband’s daughter is a committed vegan, and as I see it, we can dread cooking for loved ones with dietary restrictions (and believe me, they will feel it at the table), or we can adjust in a way that is as fun as it is nutritious.
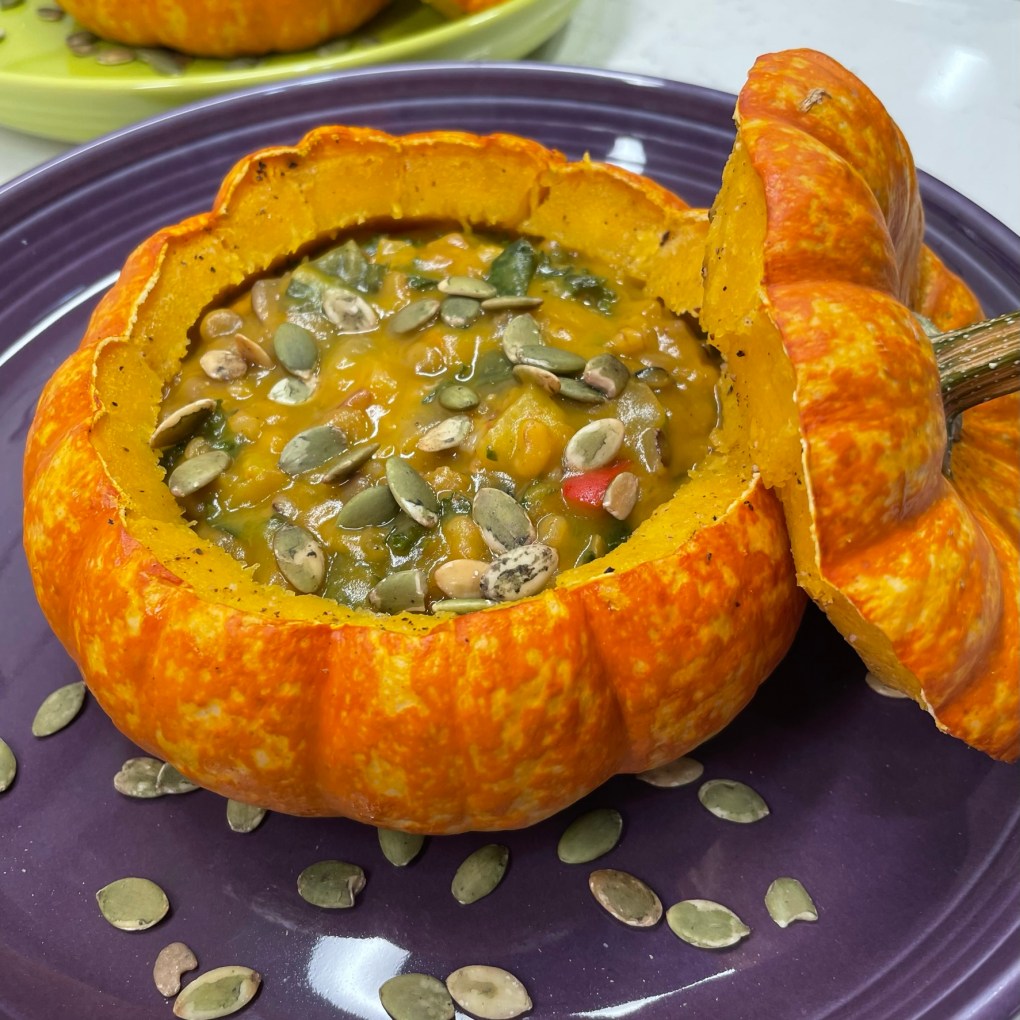
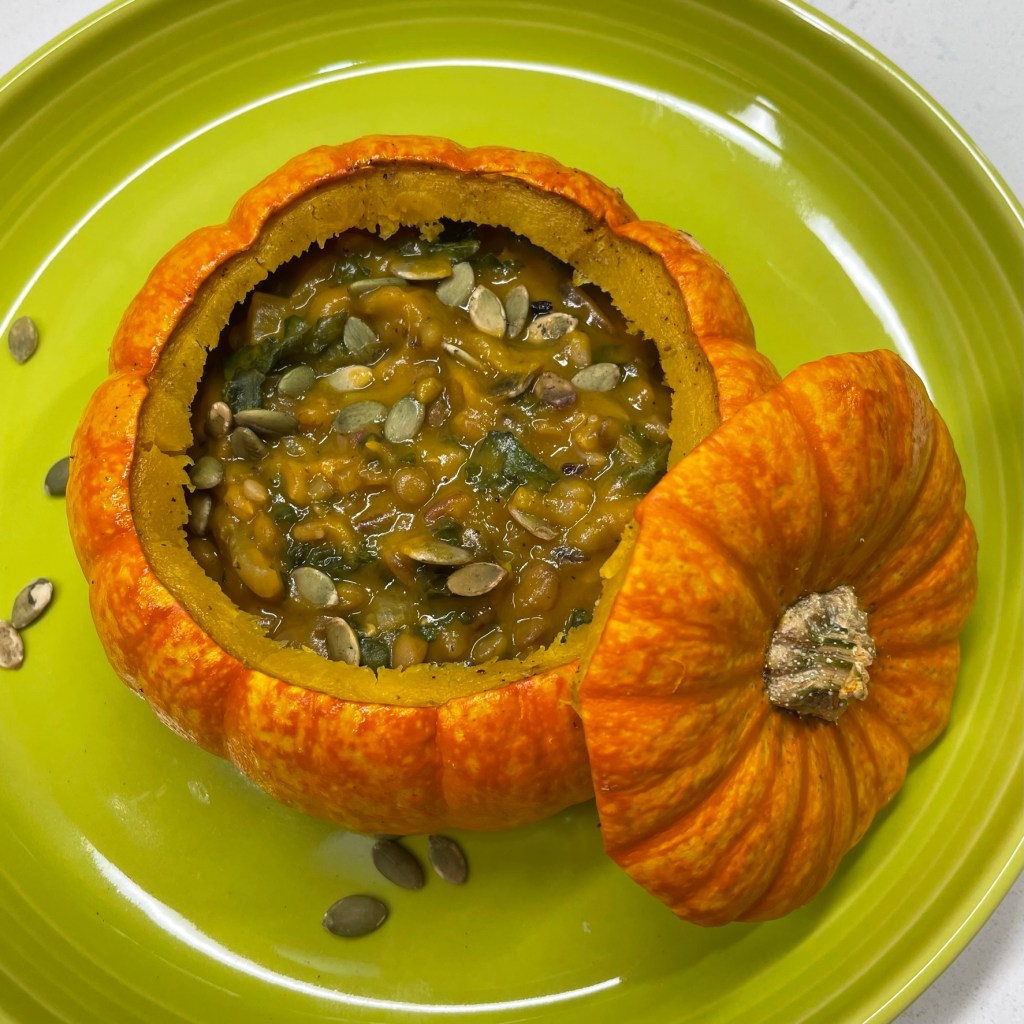
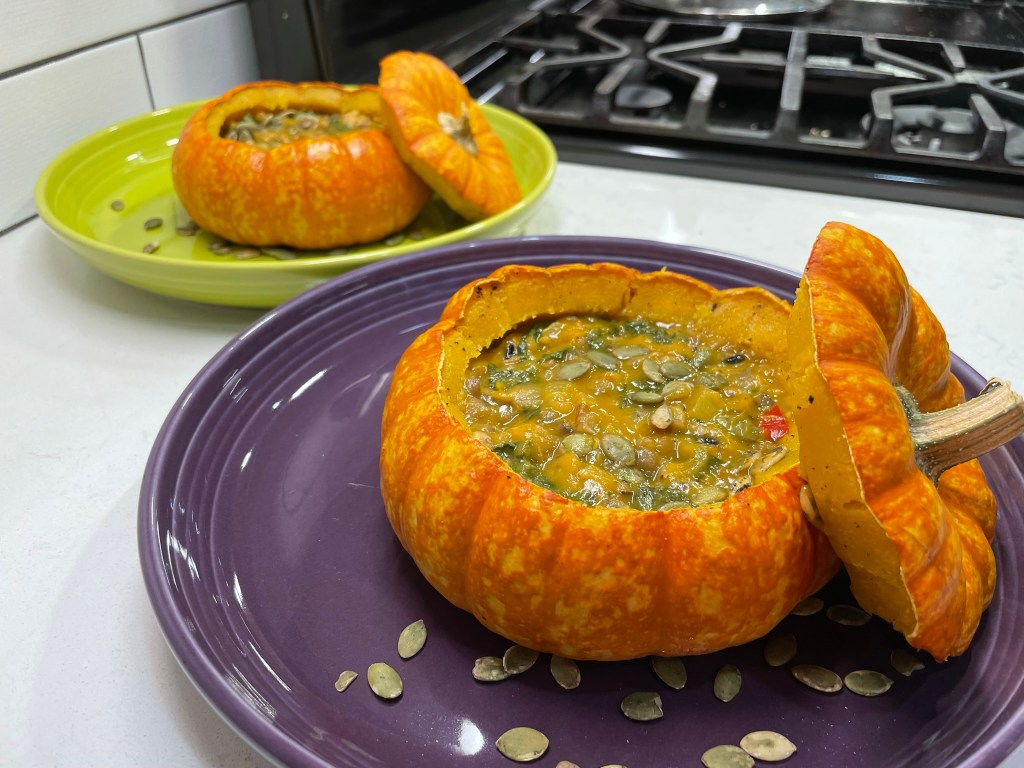
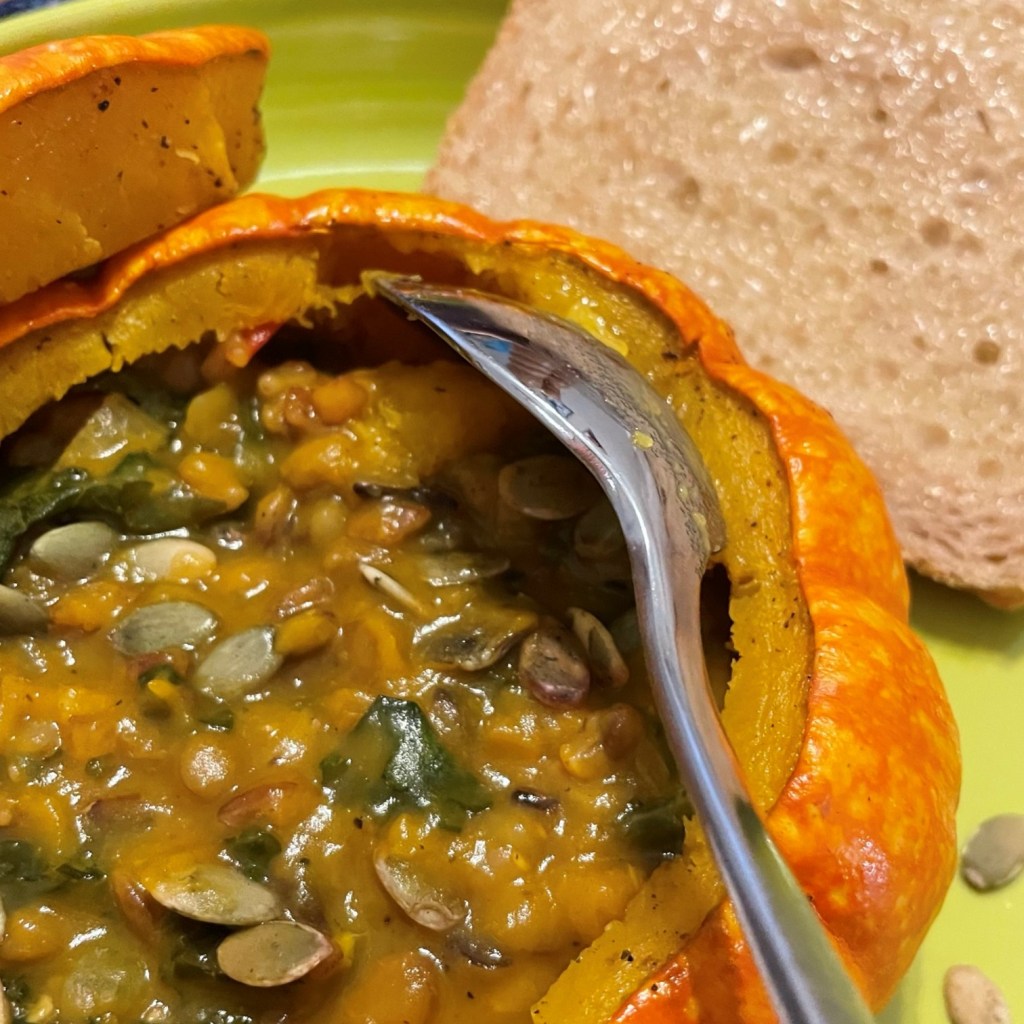
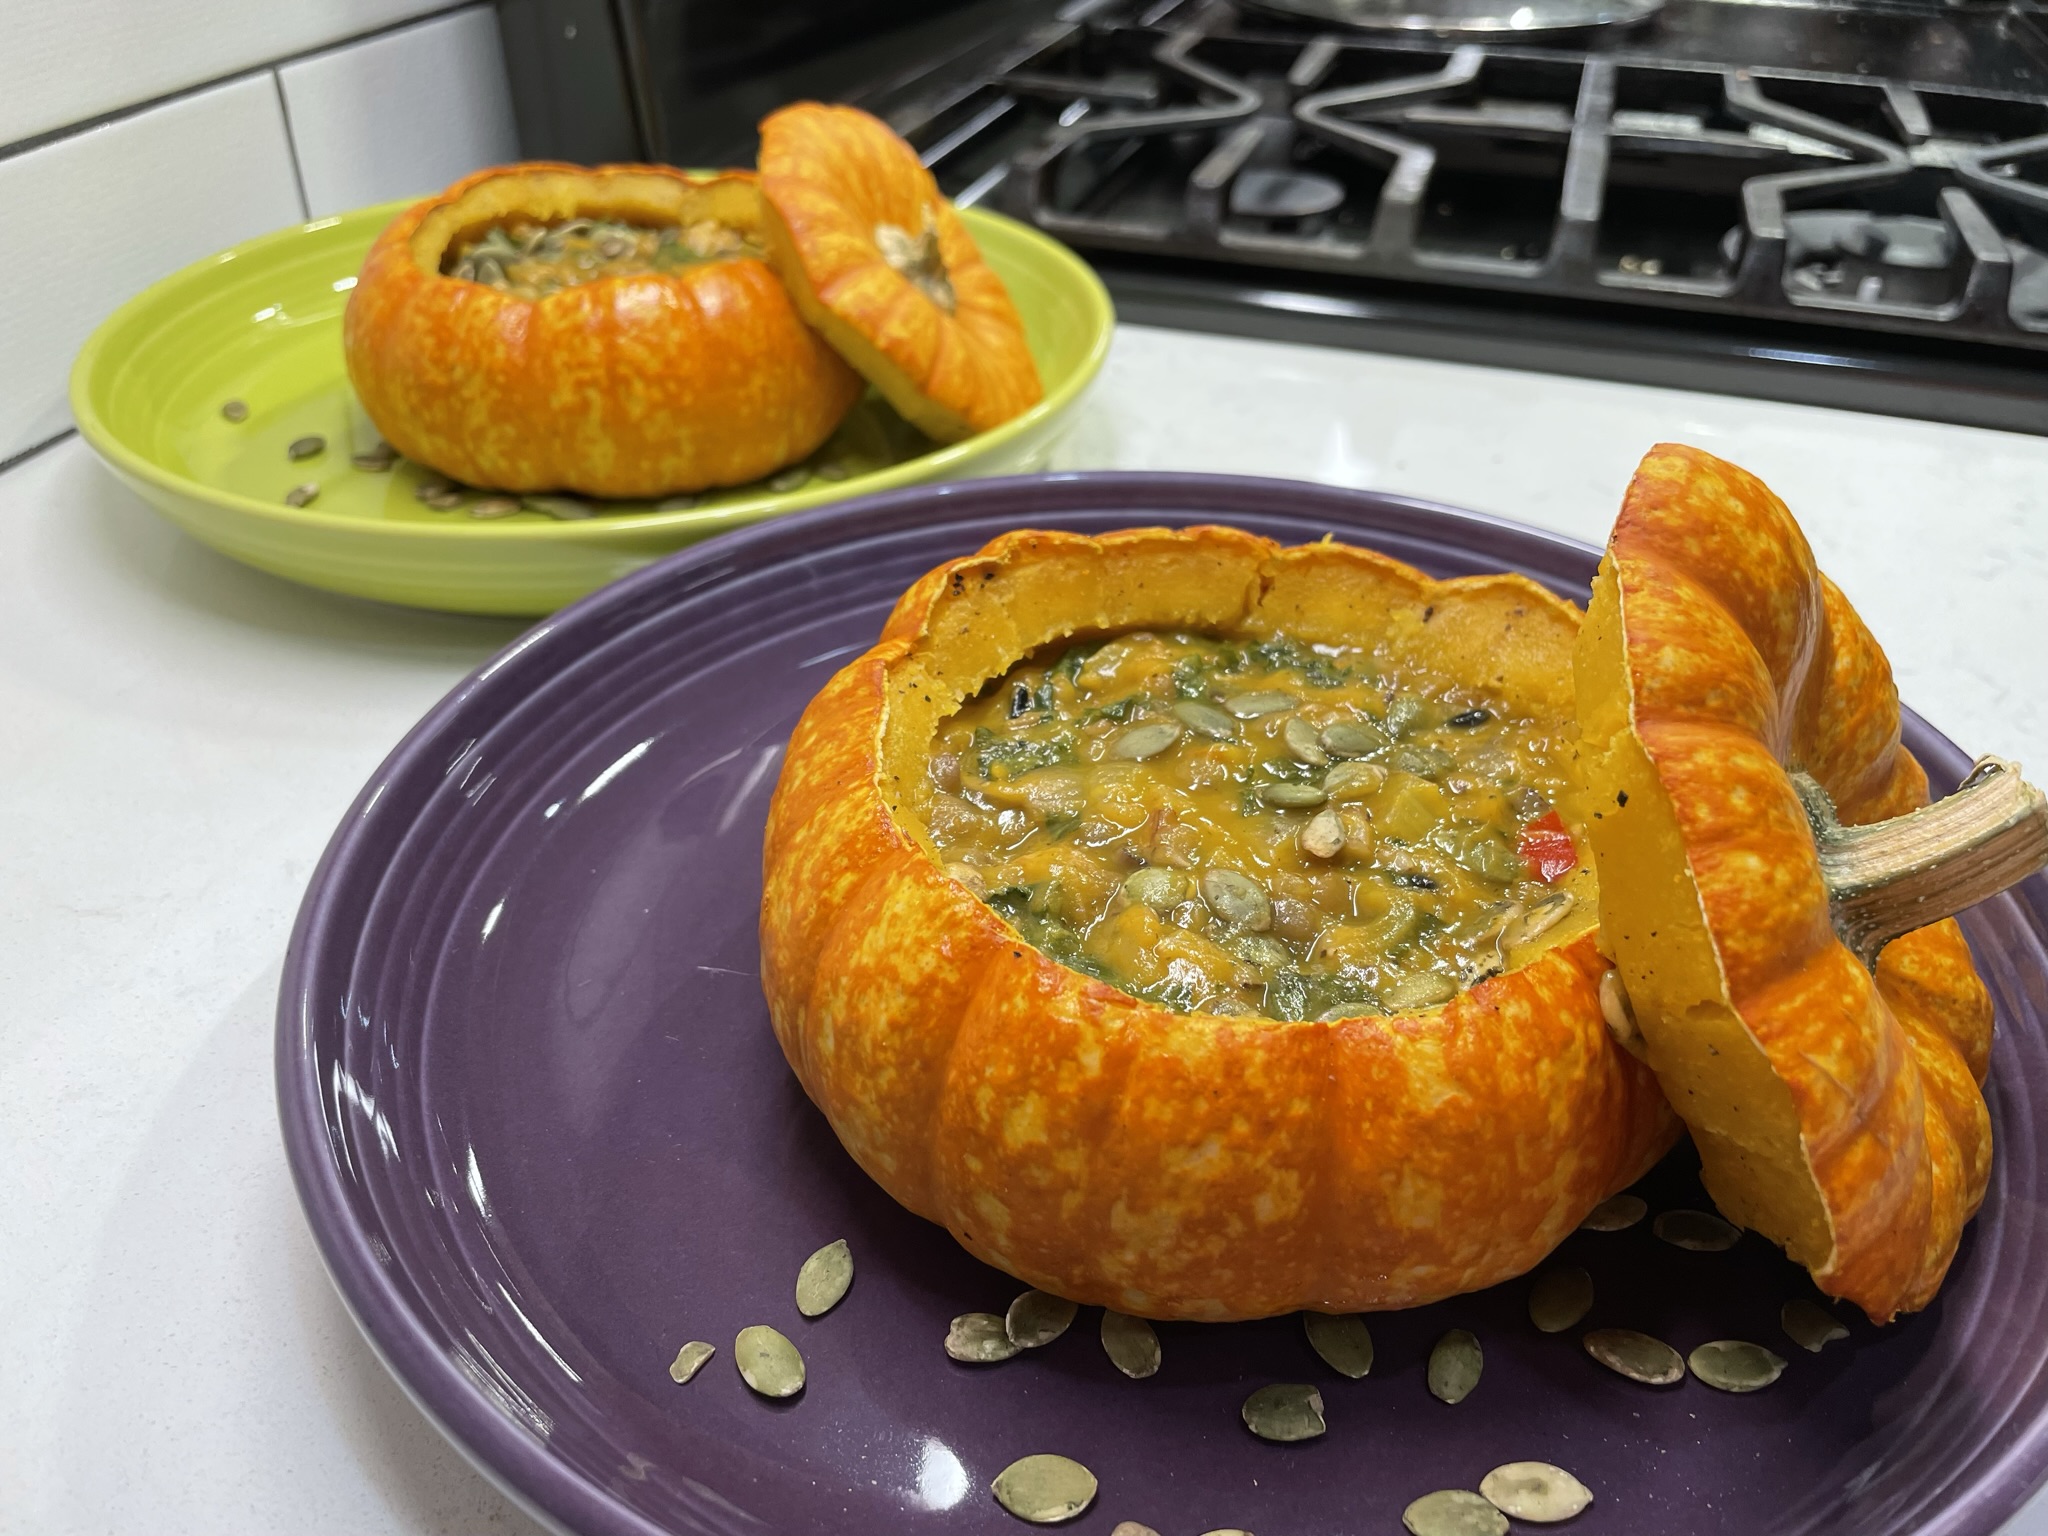
Who needs a bread bowl when you can have a pumpkin bowl?
This effort was also a reminder that a meal doesn’t have to be heavy to be satisfying; after we finished our pretty pumpkin supper, both my bacon cheeseburger-loving husband and I acknowledged that we were “stuffed” (in a good way). We didn’t miss what wasn’t in it, and no wonder, because what was in it was hearty and full of texture.
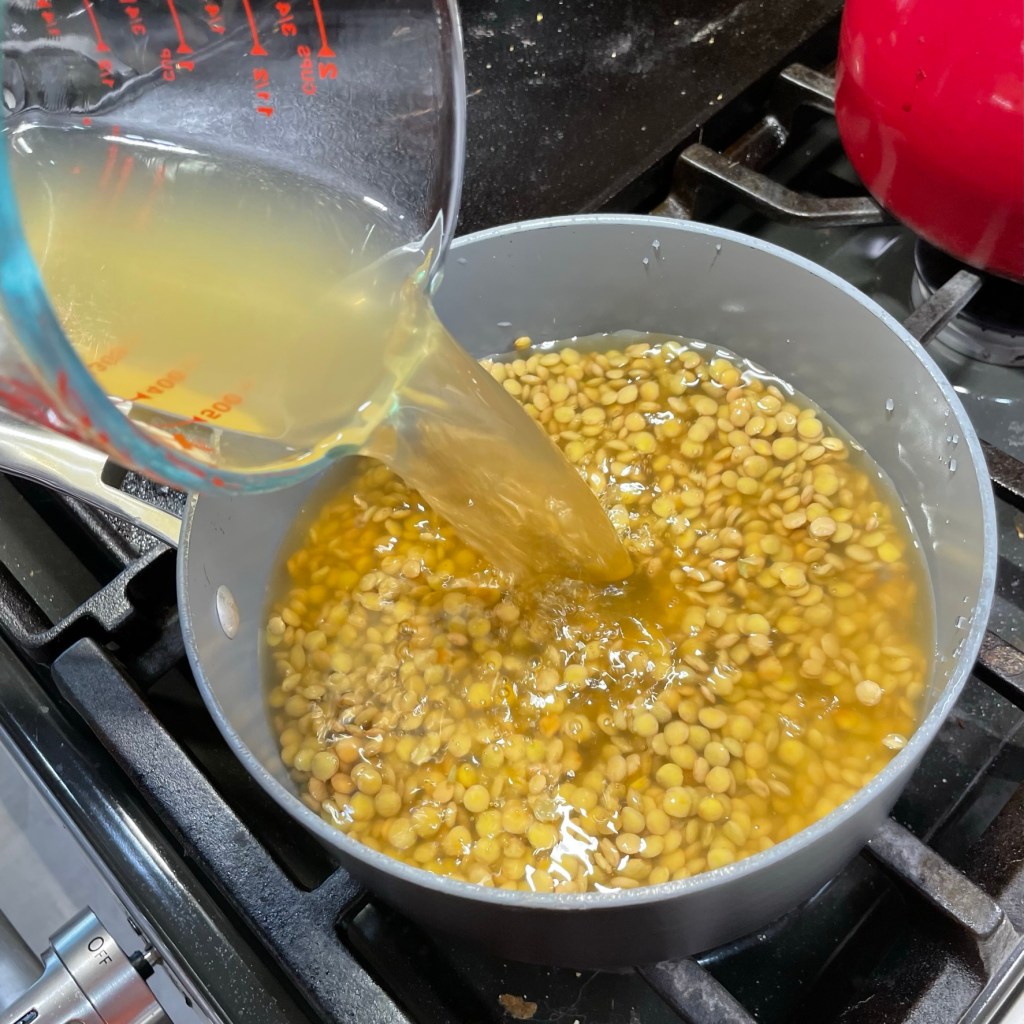
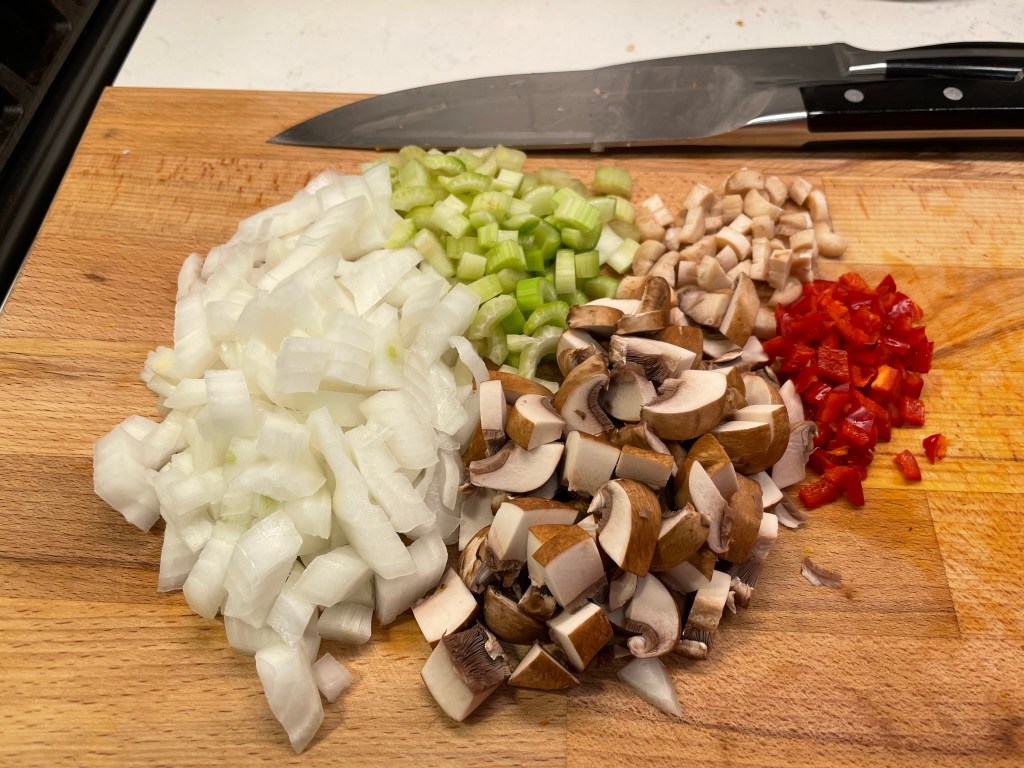
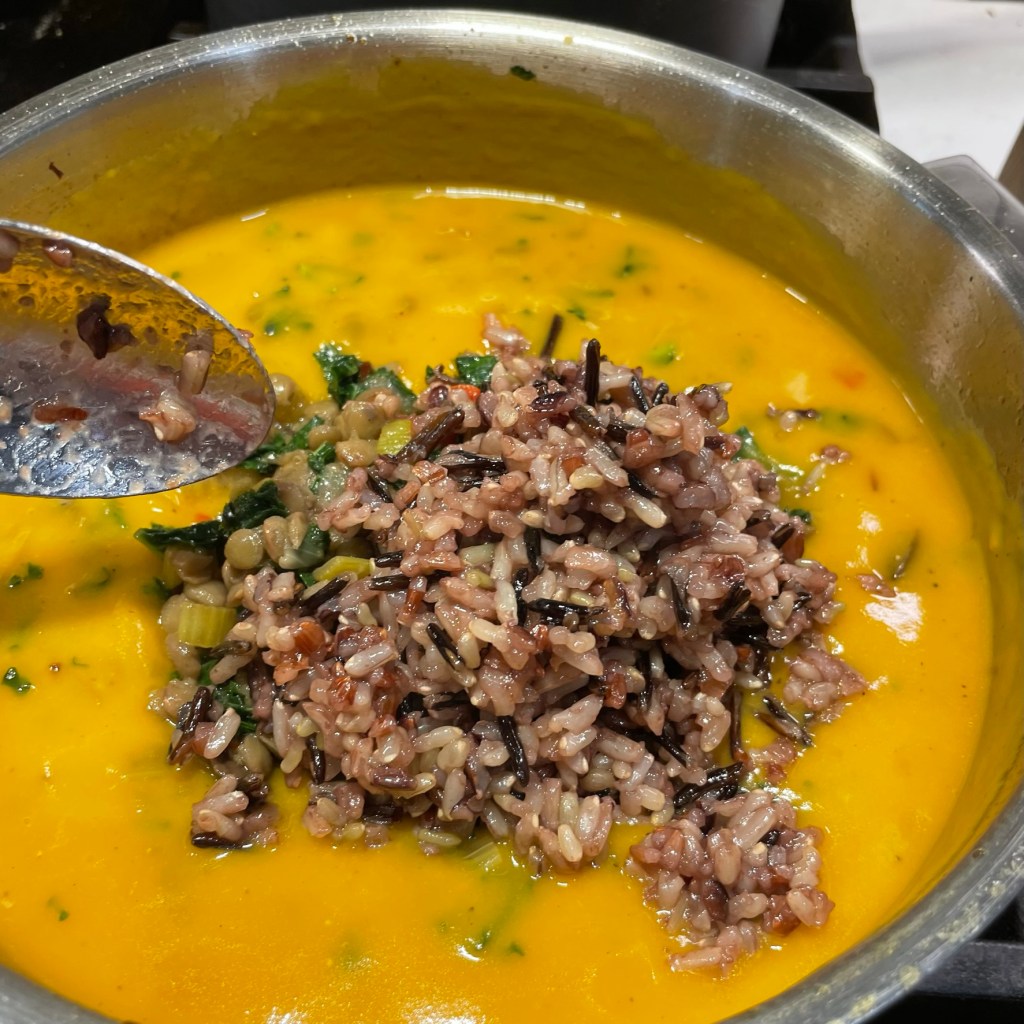
There are three main components of this dish: roasted pumpkin (which did double duty as a serving vessel), creamy pumpkin bisque (without actual cream, to keep it vegan) and a mixture of cooked lentils and rice with sautéed mushrooms and aromatics.
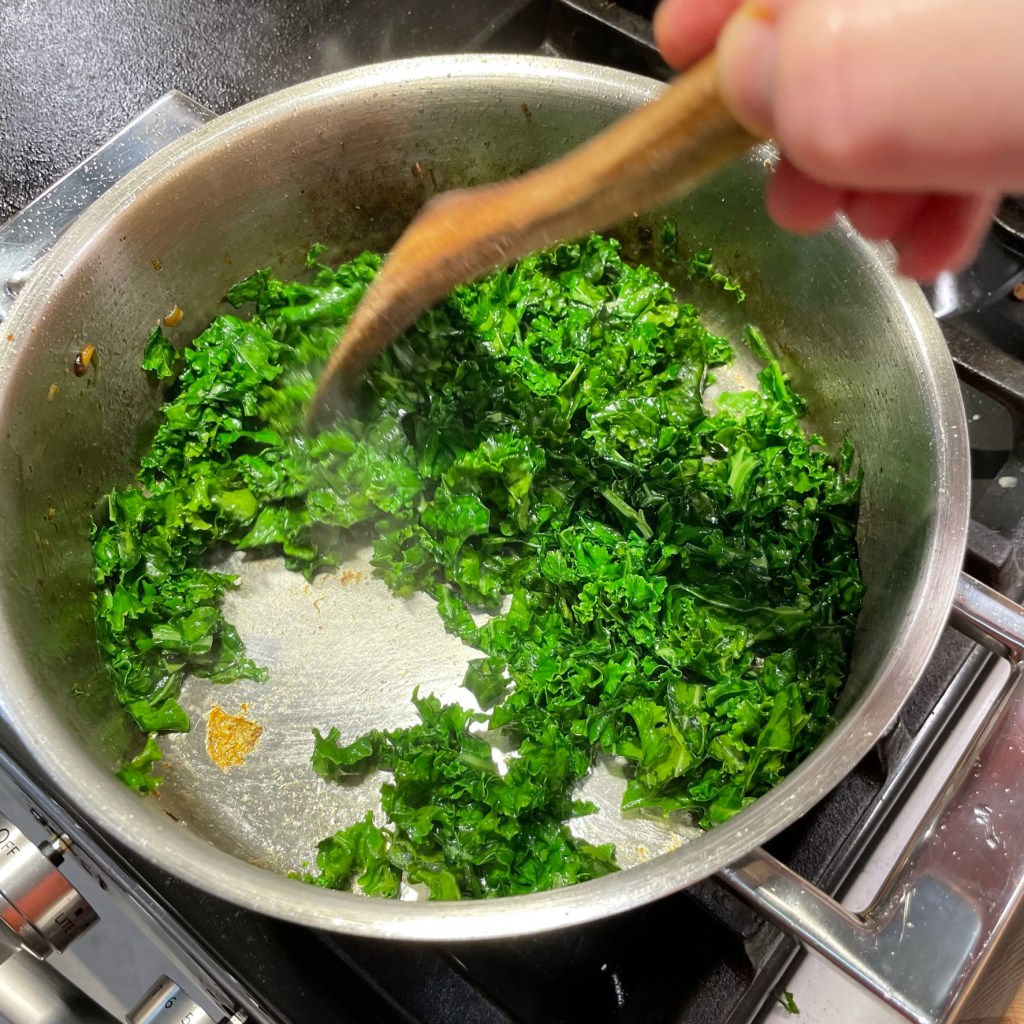
I roasted the garlic at the same time.You could save time by using packaged, cooked lentils.It helps so much to prep veggies in advance.Chop kale into small pieces for quicker cooking.
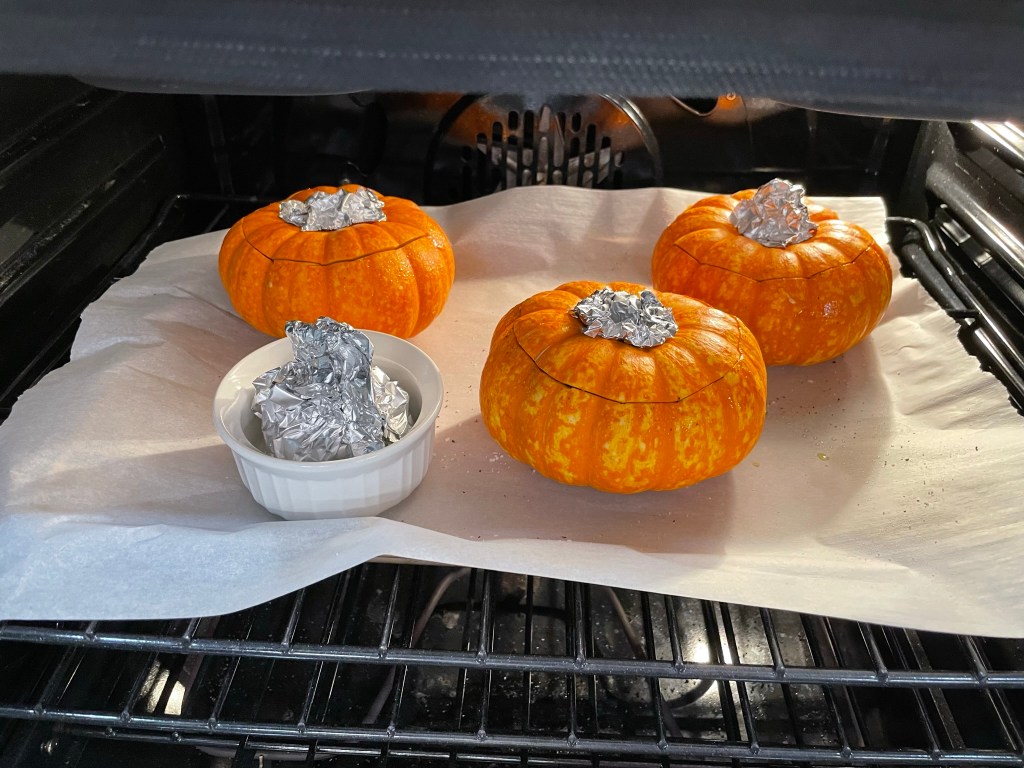
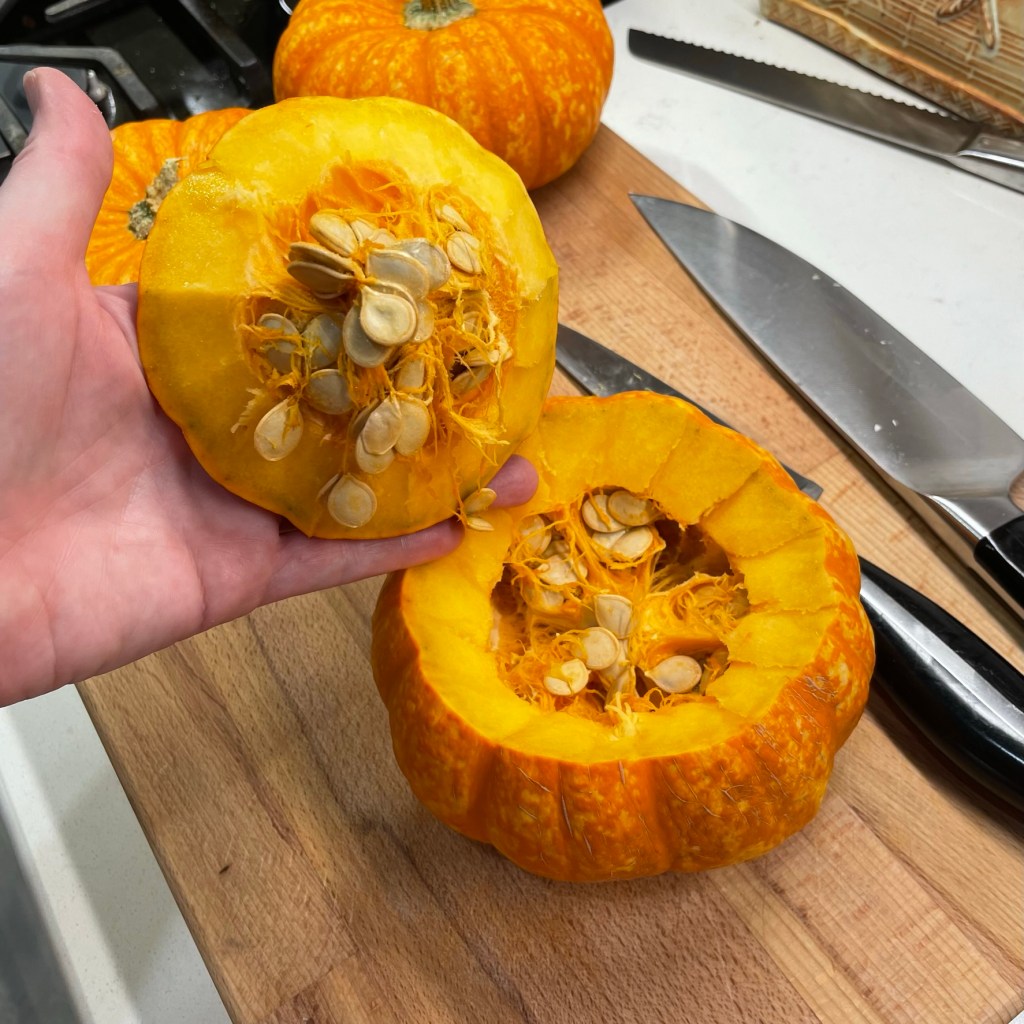
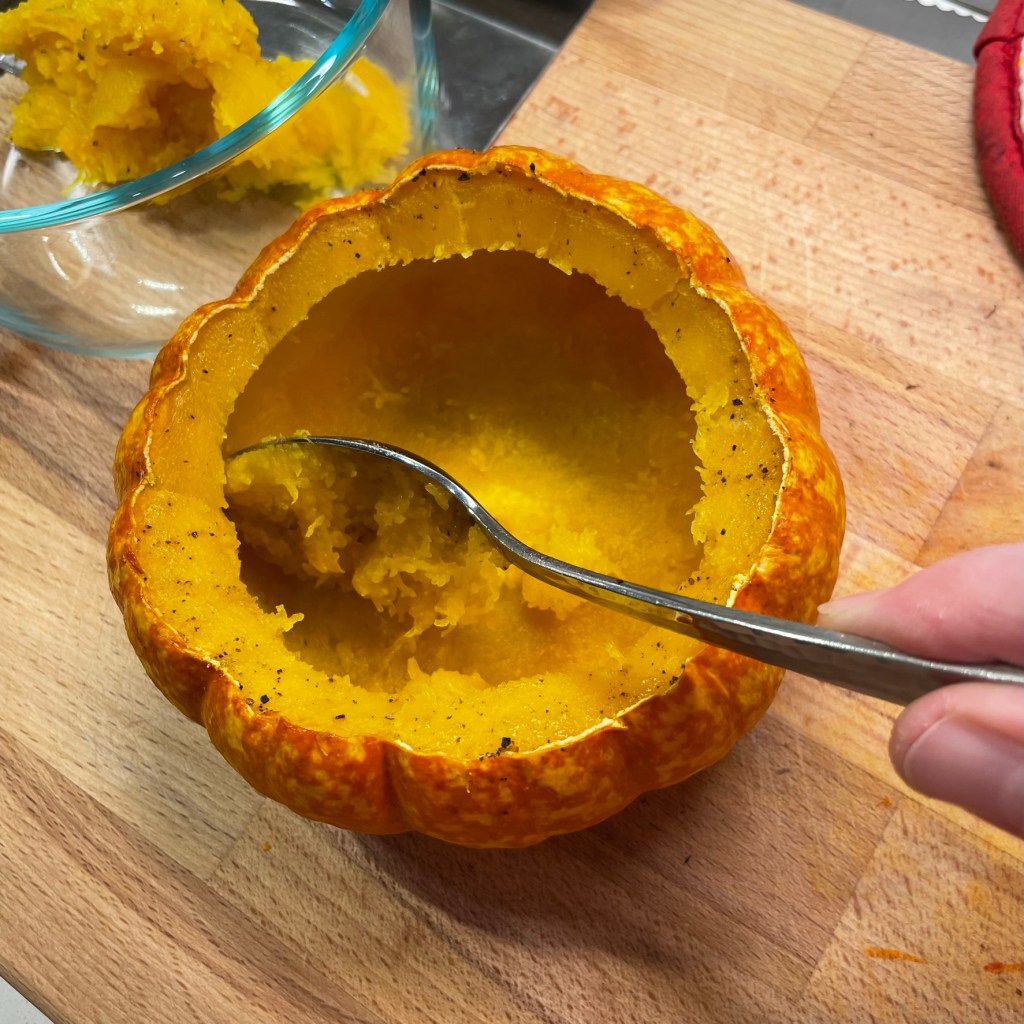
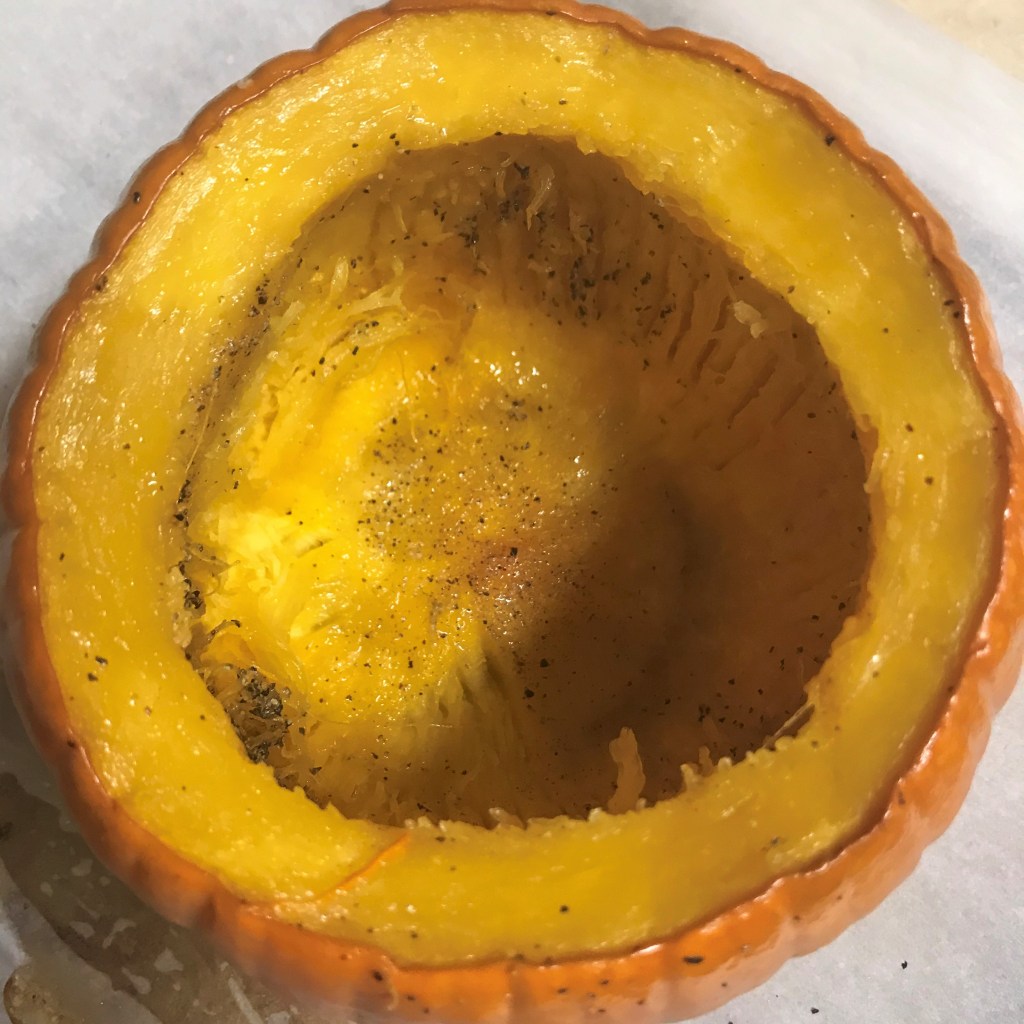
If you prefer, you could swap in another sturdy winter squash, such as buttercup or acorn. If you wish to serve the stew inside the roasted squash, be sure to choose one that will sit flat on a plate. Or you could simply serve the soup in a bowl and save time by using canned pumpkin. I found it comforting to roast the pumpkin. My mini pumpkins were small—about six inches across—and I roasted them at 350° F for 45 minutes, then scraped out some of the soft pumpkin pulp when they were cool enough to handle. I was careful to keep enough pulp in the bottom of the gourd to prevent my soup from leaking, and enough along the top cut edge to keep the carved top from falling inside
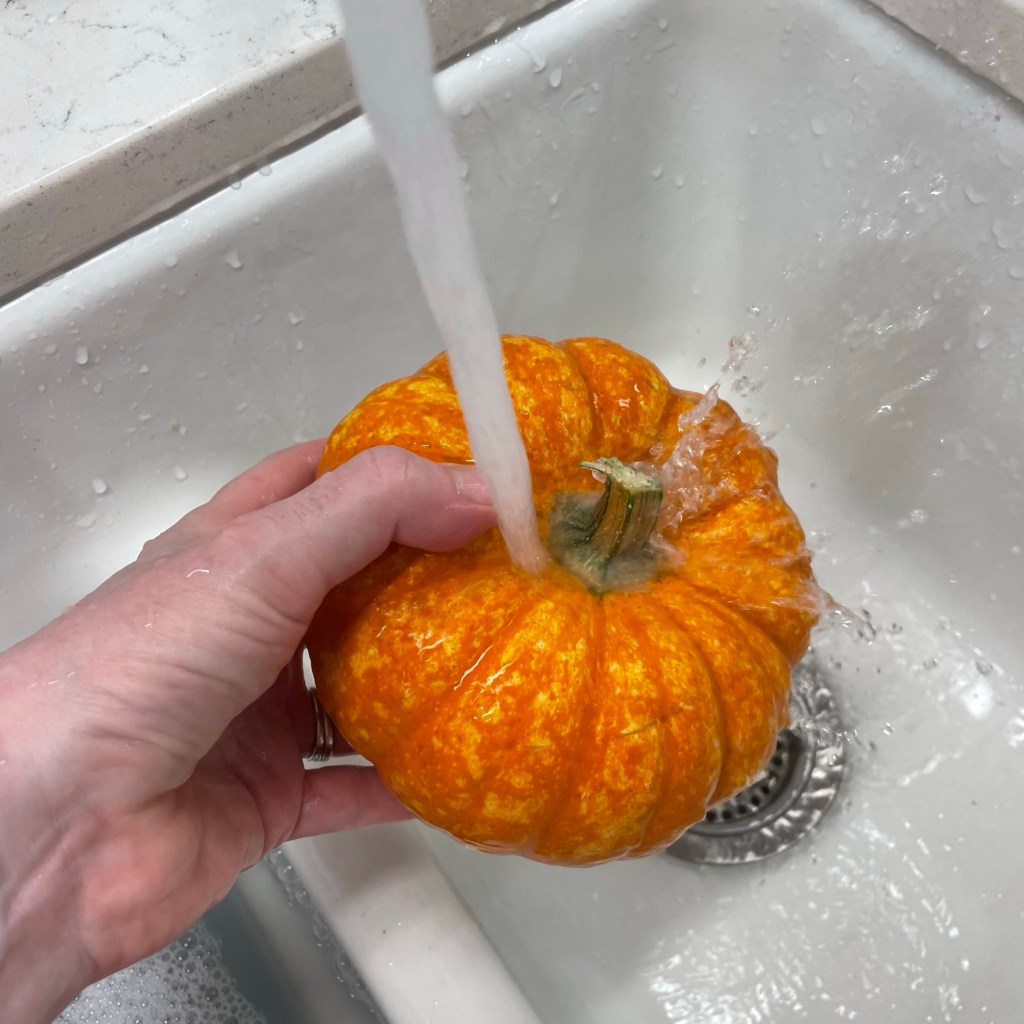
Wash the pumpkins first, then clean them out and roast until they’re tender enough to scoop.
The pumpkin bisque was the simplest part of this, made with the scooped-out roasted pumpkin, enough vegetable broth to blend smoothly, and a couple of other ingredients to punch up the flavor a bit. Roasted garlic adds a depth of flavor. The carrot-turmeric juice is something I bought for smoothies, and it worked great here for spice and color. And the smoked maple syrup is a fall/winter staple in my smoked maple old fashioned cocktails, and I liked it here for a slight touch of sweetness but mostly the smoke. I might have added some plant-based creamer here as well, but I never have it on hand unless I have a vegan guest coming. Honestly, the soup was great without it. If you have some almond milk, go for it!
I’ve made substitution suggestions in the recipe card notes below.
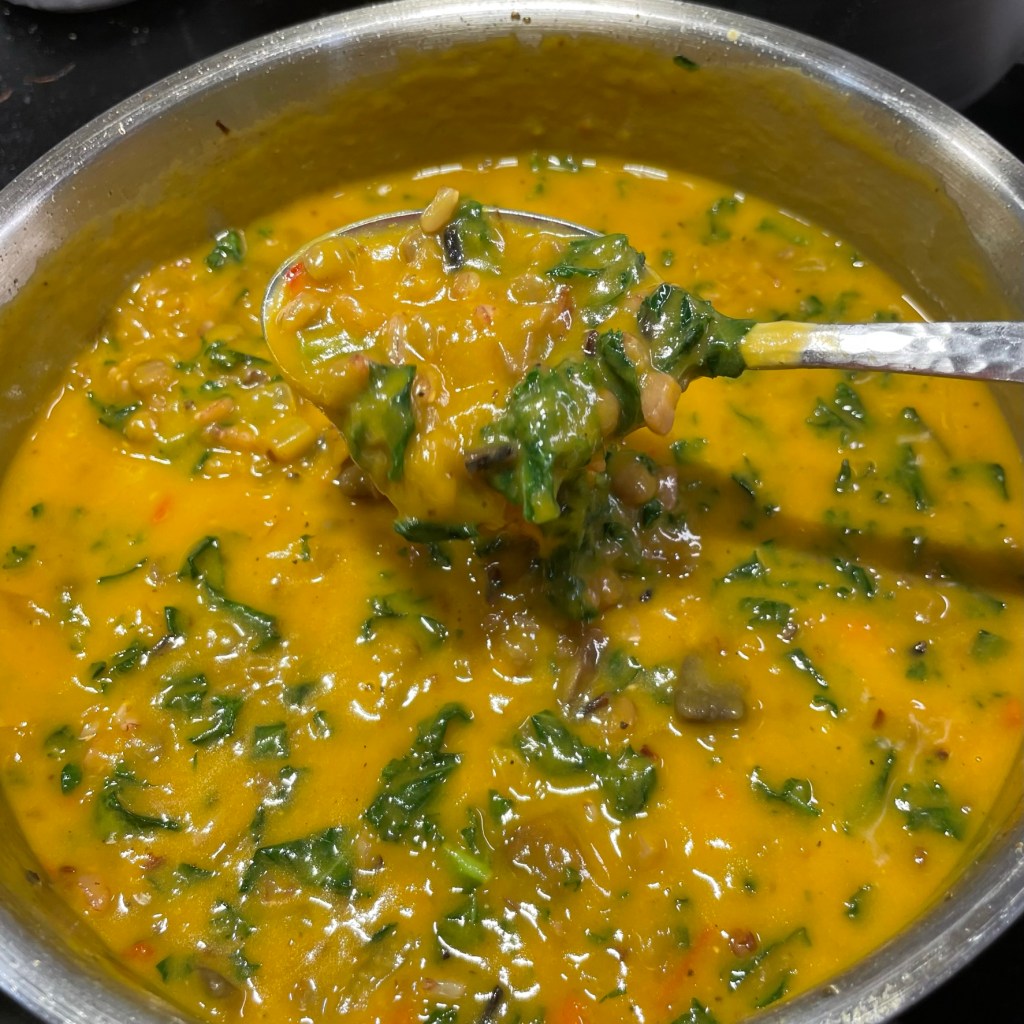
Finally, a mixture of cooked lentils, kale, sautéed mushrooms and aromatics gave my dish all the texture and fiber it needed to satisfy our hungry bellies. I also added a portion of wild rice blend to my stew, but next time I would sub roasted Yukon potatoes for extra chunkiness. If gluten isn’t a concern, I think cooked wheat berries would also be great in this, for a little snappy texture.
This was a time-consuming project, partly because I was multi-tasking and making it up as I went along. Next time, it’ll be a breeze, especially since I’ve made a click-to-print recipe card below to guide me (yes, I make those for sharing, but I also use them myself)! Please, don’t be intimidated. Cooking is as fun as you make it. By the way, every part of this dish can be prepared in advance. Simply warm the stew and pumpkins before assembling and serving.
We scooped a little pumpkin flesh with each bite of the stew.
A word to the wise, though—if you decide to make this for a vegan guest at Thanksgiving, you might want to make enough for everyone. This is exactly the kind of dish to make the meat eaters jealous. 😉
This is a satisfying, autumn-themed dish that also happens to be vegan, gluten-free and nut-free. It would make an excellent main course for a vegan Thanksgiving.
Ingredients
4 mini pumpkins, tops removed and cleaned (see ingredient notes below)
1 bulb roasted garlic
About 1-1/2 cups cooked lentils (see notes)
1 cup cooked wild rice blend (substitute cooked wheat berries or cubed and roasted Yukon potatoes, if you wish)
4 Tbsp. extra virgin olive oil, divided (you’ll use a little for each thing you saute)
1 medium sweet onion, chopped
8 oz. carton cremini mushrooms, cleaned and cut into chunks
1 rib celery, strings removed and chopped
1 jalapeno pepper, seeded and minced (I used a red one for color)
Kosher salt and black pepper
A fat handful of kale (substitute with double the amount of spinach, if you prefer)
1/2 cup vegetable broth
1/4 cup carrot-turmeric juice (or substitute more broth)
1 Tbsp. smoked maple syrup (substitute with regular maple syrup or omit)
Roasted, shelled pumpkin seeds for garnish
Ingredient notes: The pumpkins I used were about 6-inches across and more squatty than round, primarily because I intended to use them as serving dishes. If you only find pie pumpkins, you may want to cut the tops a little deeper so it isn’t awkward to reach a spoon down into it at serving time. If you prefer to serve in bowls, any roasted pumpkin or winter squash will be fine, and you’ll need about 2-1/2 cups of pumpkin pulp. You could even use canned pumpkin puree, and one standard can should cover it.
I used dried brown lentils for this dish, and cooked them in veggie broth for extra flavor. To save time, purchase lentils already cooked, such as canned, or those sold by Trader Joe’s.
Directions
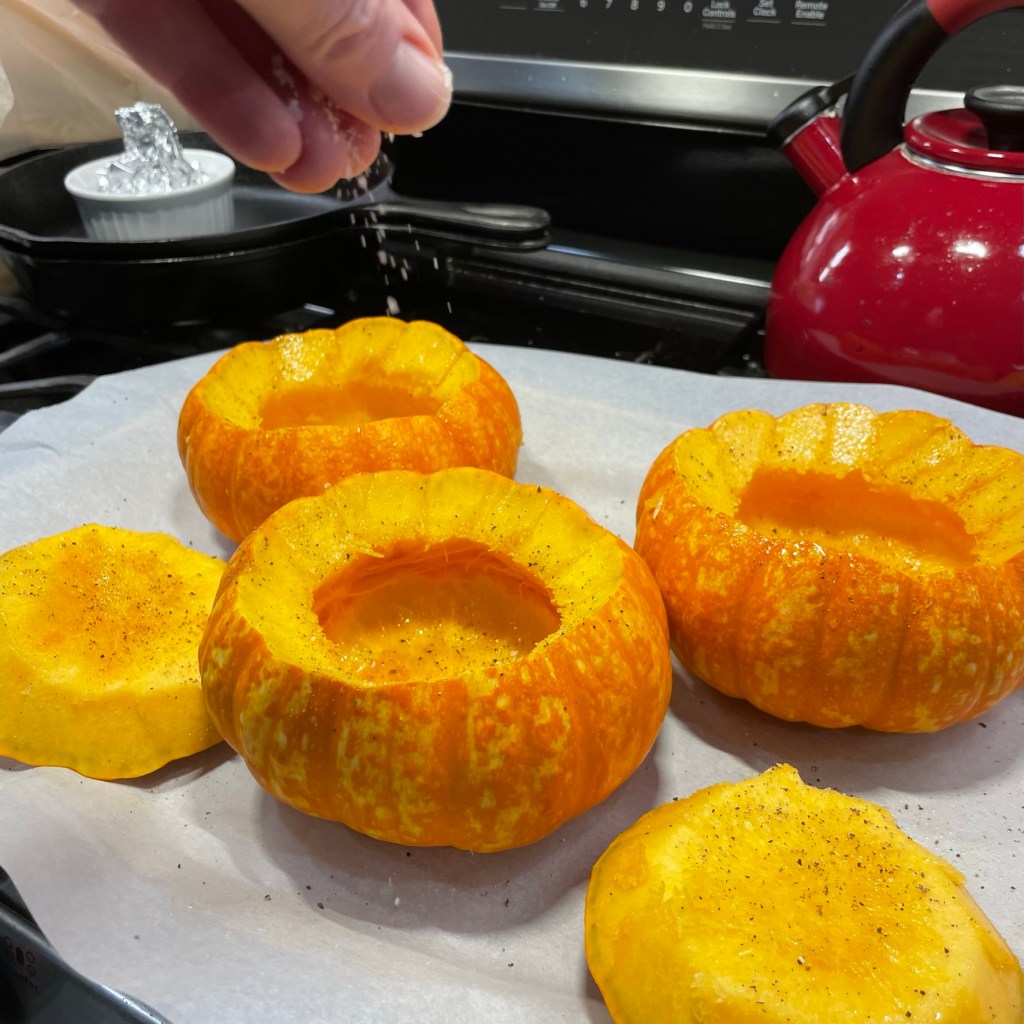
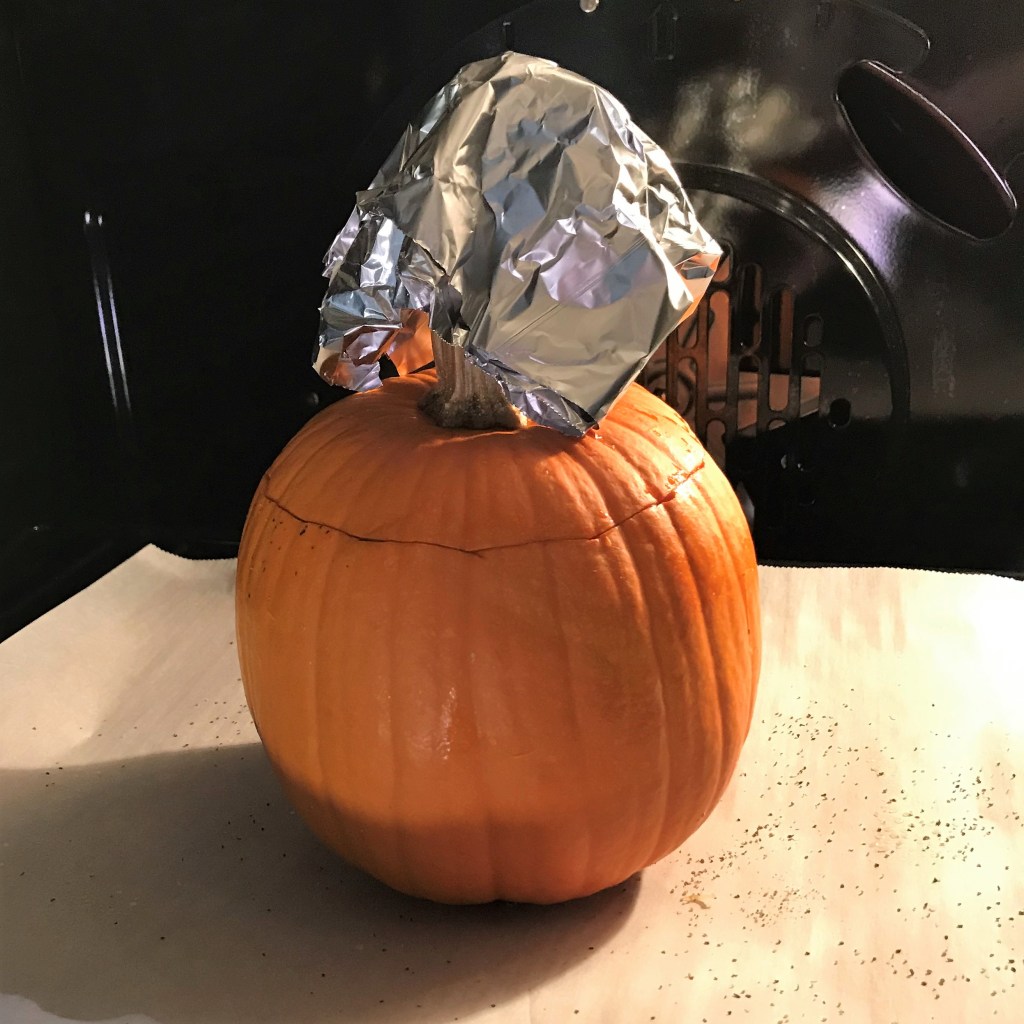
If using canned pumpkin puree, skip to Step 3. If roasting the pumpkins, pre-heat oven to 375° F, with rack in center position. Spray or brush a small amount of olive oil inside the pumpkins and sprinkle the flesh with salt and pepper. Replace the tops, capping the stems with a piece of foil to prevent burning them.
Roast pumpkins for 45 minutes, until flesh can easily be scraped with a fork. Let them rest until cool enough to handle, and then use a small spoon to gently scrape out some of the flesh, keeping about 1/2-inch intact on the bottom and sides of the pumpkins’ interiors so they hold their shape. Transfer the scooped flesh to a blender container, and set the roasted pumpkin bowls aside at room temperature.
Combine pumpkin with roasted garlic (squeezed from it’s paper shell) in the blender container. Add veggie broth, carrot juice (if using) and maple syrup. Pulse a few times to combine, then puree until completely smooth. Transfer to a bowl and set it aside.
Place a skillet or wide pot over medium heat and swirl in a tablespoon or more olive oil. When the oil shimmers, add onions, celery and jalapeno. Season with salt and pepper, and saute until slightly softened. Push the vegetables to one side of the pan. Swirl in another tablespoon of oil and cook the mushrooms until they become soft and give off most of their moisture. Transfer the vegetables to a bowl and set it aside. Add a final tablespoon of oil to the pot and saute the chopped kale until it has wilted and softened. Adjust salt to taste. Transfer the kale to the same bowl with the other vegetables. Add lentils to the vegetable bowl and fold gently to combine.
Transfer the pureed pumpkin base to the same pot used for cooking the vegetables, and place it over medium-low heat. Gently stir in about half of the lentil-vegetable mixture, then add more until the stew seems balanced to you. Add more vegetable broth if you wish, and adjust salt and pepper to taste.
If the pumpkin bowls have cooled completely, slide them into a warm oven on a cookie sheet for about 15 minutes. Ladle the pumpkin-lentil stew into the bowls, sprinkle with roasted pepitas and serve.
Oh yes, I did. Working on Comfort du Jour has inspired me to new levels of creativity, and I’m having a great time throwing playful twists onto foods everyone already loves. I have been thinking about the humble pumpkin, and how it has been unfairly pigeonholed into the category of “sweet” foods. Does anyone even remember what pumpkin tastes like without the “spice?” This edible gourd has so much going on, nutritionally and flavor-wise, and I wanted to remind my friends that pumpkin can be enjoyed without all that sugar. My goal with this post is kind of like the old Sears campaign, except that here I’m elevating “the savory side of pumpkin.”
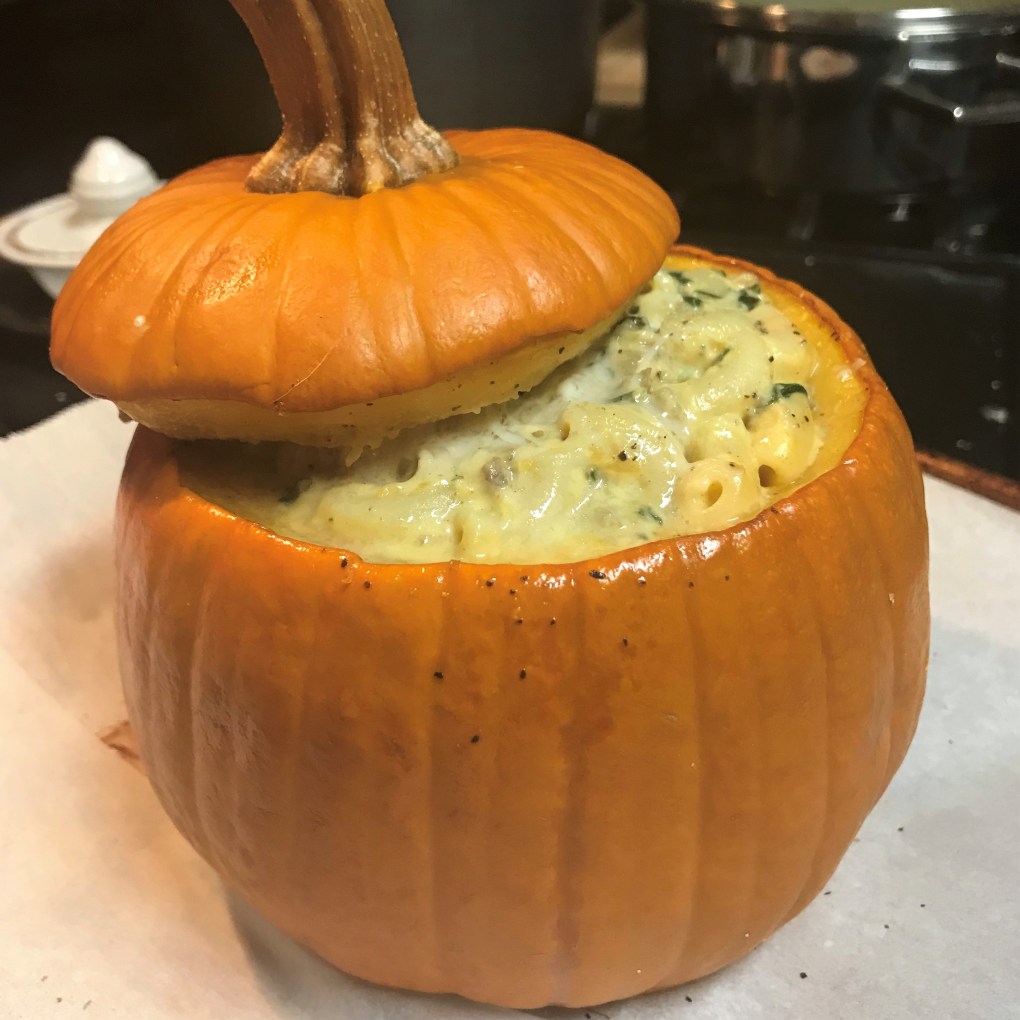
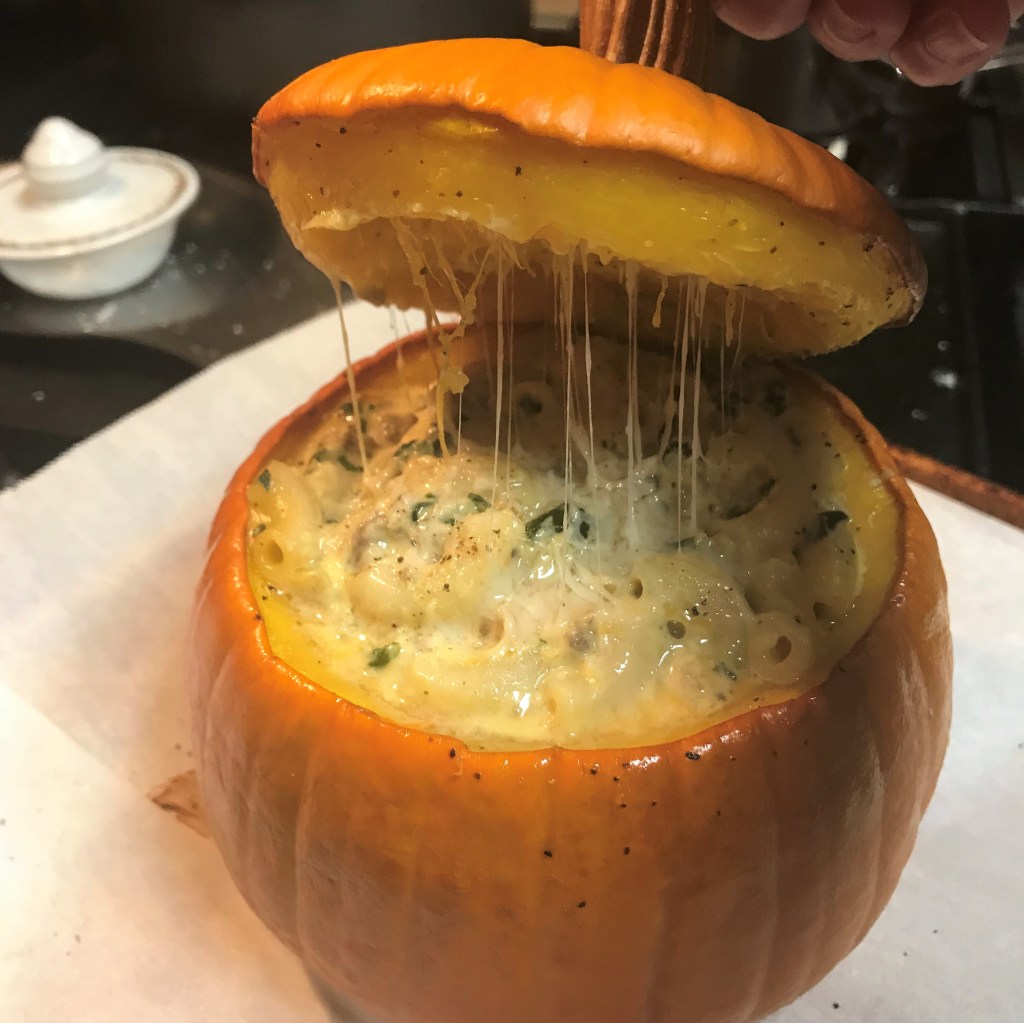
For some time, I’ve imagined making a showstopper like this—I’ve taken the quintessential comfort food, macaroni and cheese, and merged it with the best flavors of Thanksgiving—sausage, dark greens, onions and sage, and then stuffed the whole thing into a sweet little pumpkin. The result is as delicious as it is delightful to look at, from the creamy and comforting texture of a gruyere cheese sauce that’s been spiked with pumpkin and savory roasted garlic, to the warm and rustic flavors of pork sausage, sautéed leafy kale and twice baked seasonal pumpkin.
This turned out even better than I imagined!
To be fair, you could make this recipe with half as much mac and cheese filling as the instructions describe. I only used a third of it in my small-ish pumpkin and poured the rest into a separate casserole dish for later. On my first try, I was leery of using a larger pumpkin, though I will surely try it again. If you don’t feel up to the task of messing with the pumpkin at all, I promise the mac and cheese is worth its weight all by itself. Yum.
This was SO much fun!
These were the star ingredients of the dish, but it was the combination of all the ingredients that made it so special!
Approach this the same way you would if carving a jack-o’lantern.
Locally produced in the “SausageWorks” section of our supermarket. The flavors were spot-on for my savory stuffed pumpkin!
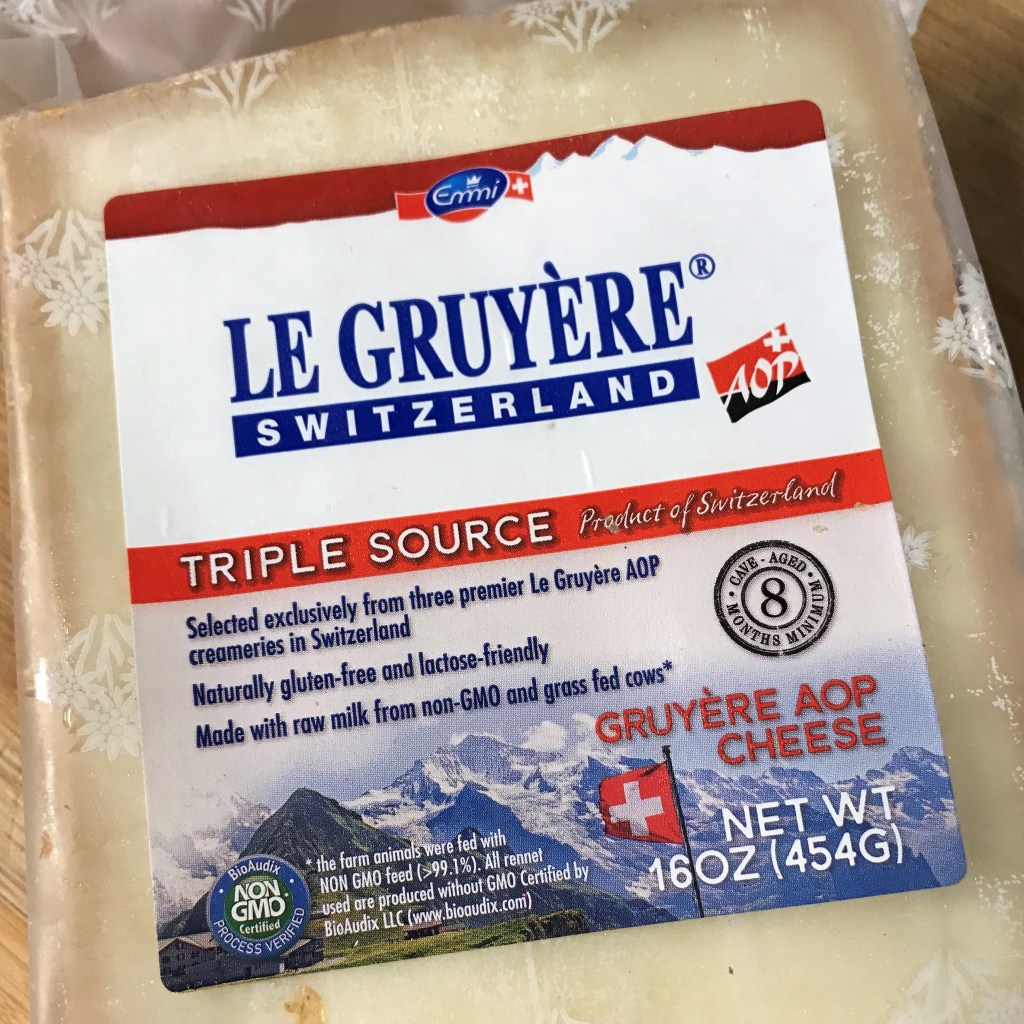
Gruyere has a wonderful creamy texture and slightly nutty flavor. As always, I recommend shredding it fresh.
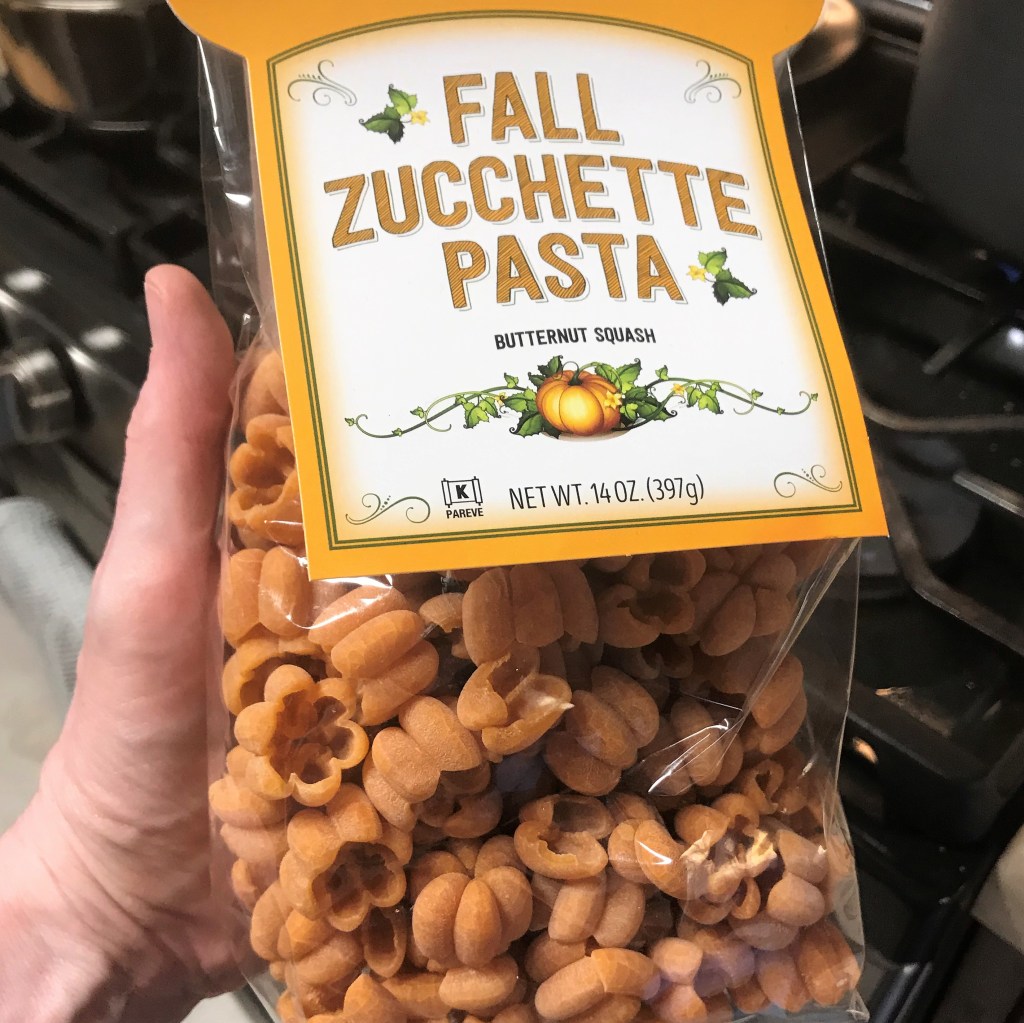
I couldn’t resist this cute pumpkin-shaped pasta! Spoiler alert: this one didn’t work out. 😦
Ingredients
1 small pie pumpkin (mine was about 3 pounds)
Extra virgin olive oil, salt and pepper
1 medium onion, chopped and divided between cheese sauce and sausage filling
3 Tbsp. salted butter
3 Tbsp. all-purpose flour
2 cups whole milk
3 oz. (6 Tbsp.) mascarpone (or full fat cream cheese)
1/2 cup canned pumpkin puree (not pie filling)
1 cup freshly shredded gruyere cheese
1/2 cup freshly shredded sharp white cheddar cheese
1 whole bulb roasted garlic
12 oz. box elbow macaroni, cooked to al dente stage
8 oz. seasoned bulk pork sausage (mine had sage and black pepper)
2 heaping cups fresh kale leaves, washed and chopped
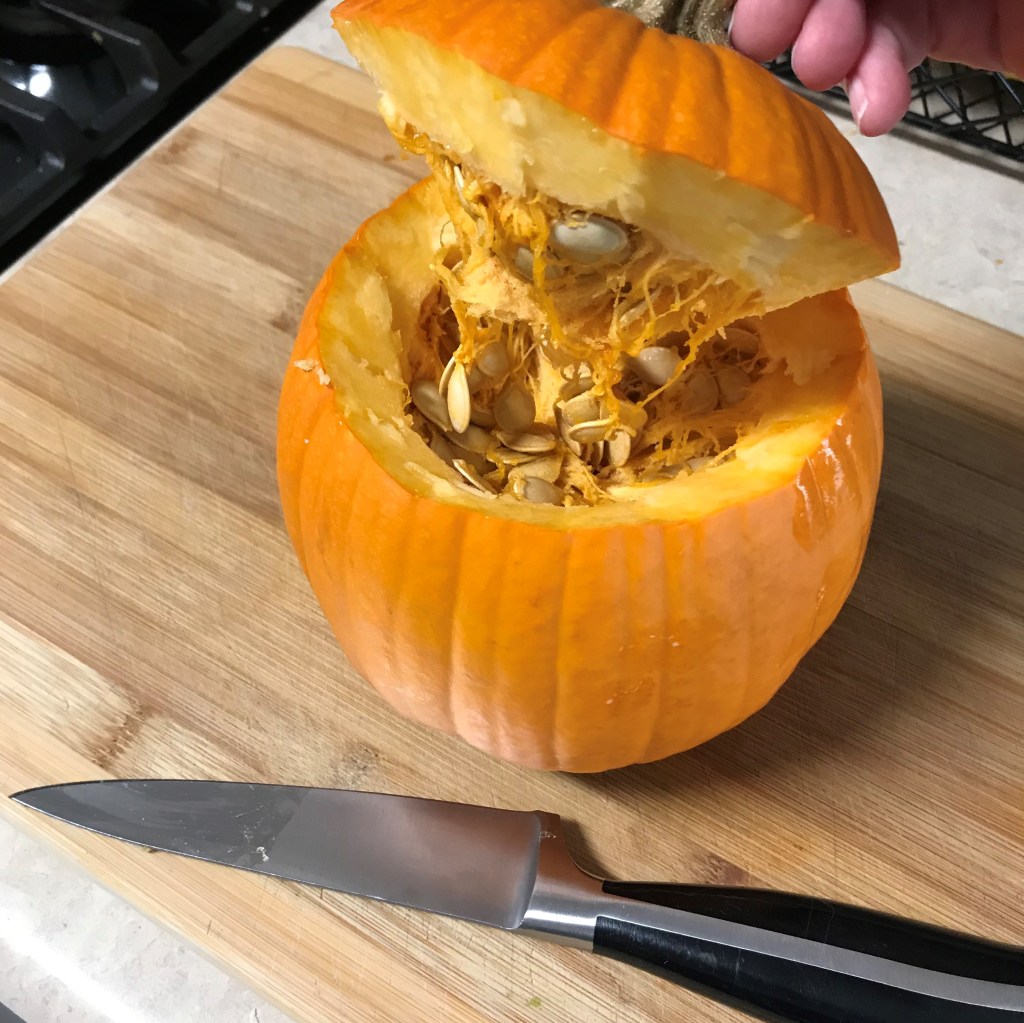
First, I prepped the pumpkin for roasting, which was pretty simple. I followed the same steps as when making roast acorn squash.
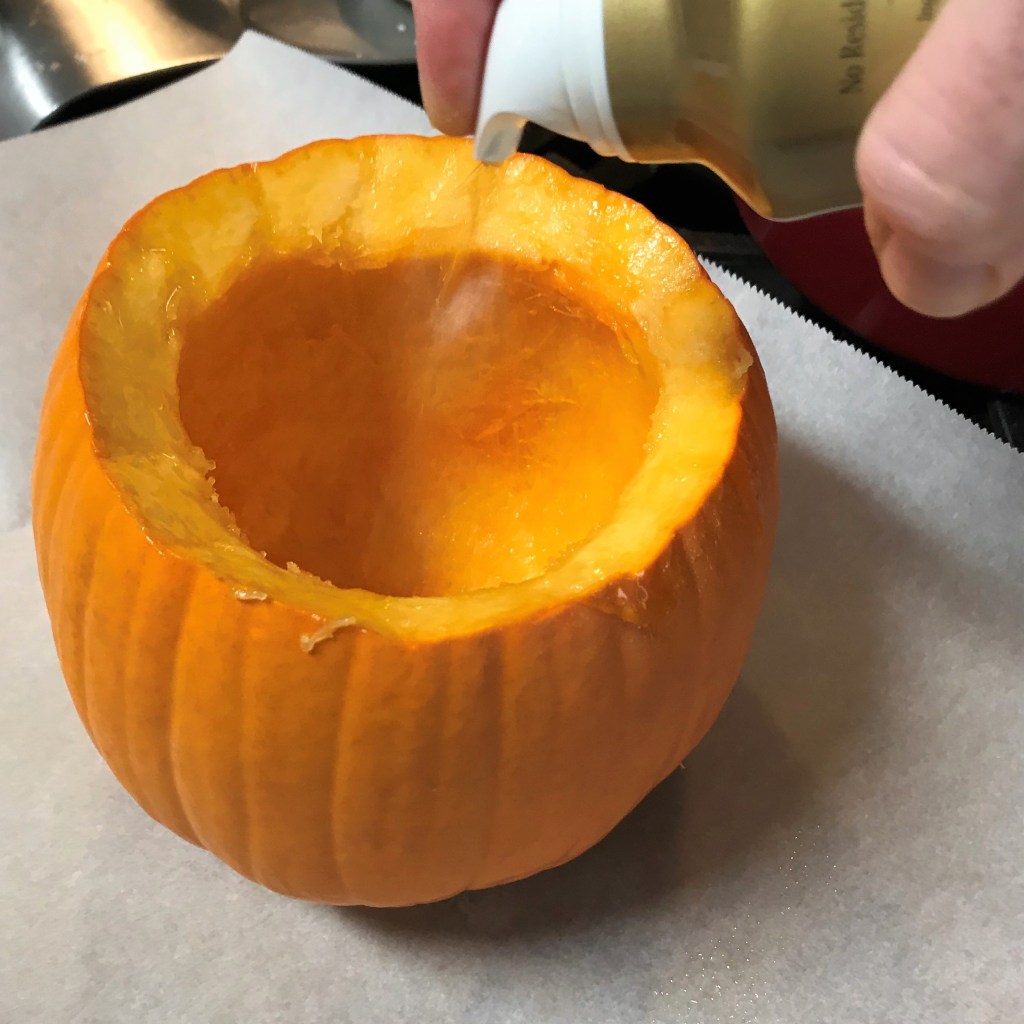
I use extra virgin olive oil spray, which is super convenient. Try to choose one that does not contain propellants.
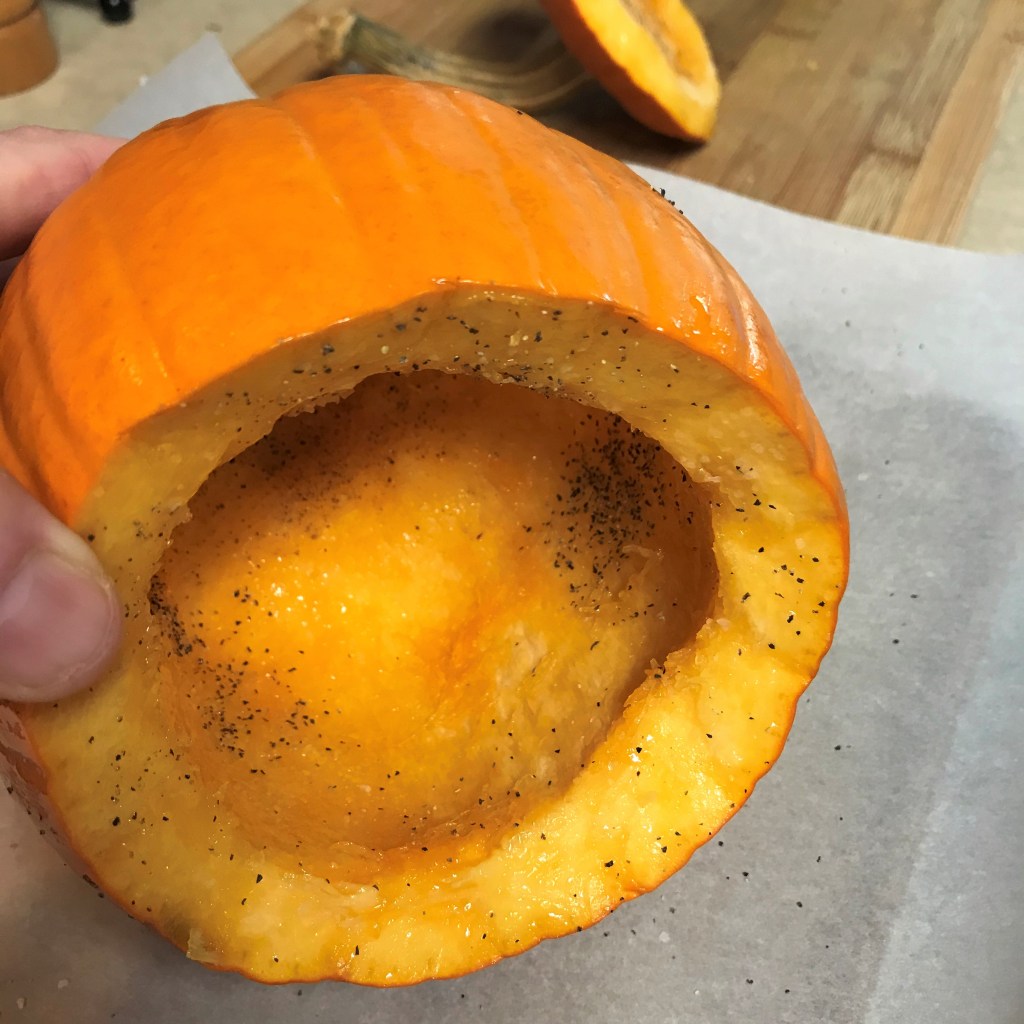
Twist and turn the pumpkin to get the salt and pepper inside.
A loose foil wrap covered the stem to prevent burning.
The roasted pumpkin is still slightly firm, but easily scraped inside with a fork. I let it cool while I prepped the filling ingredients.
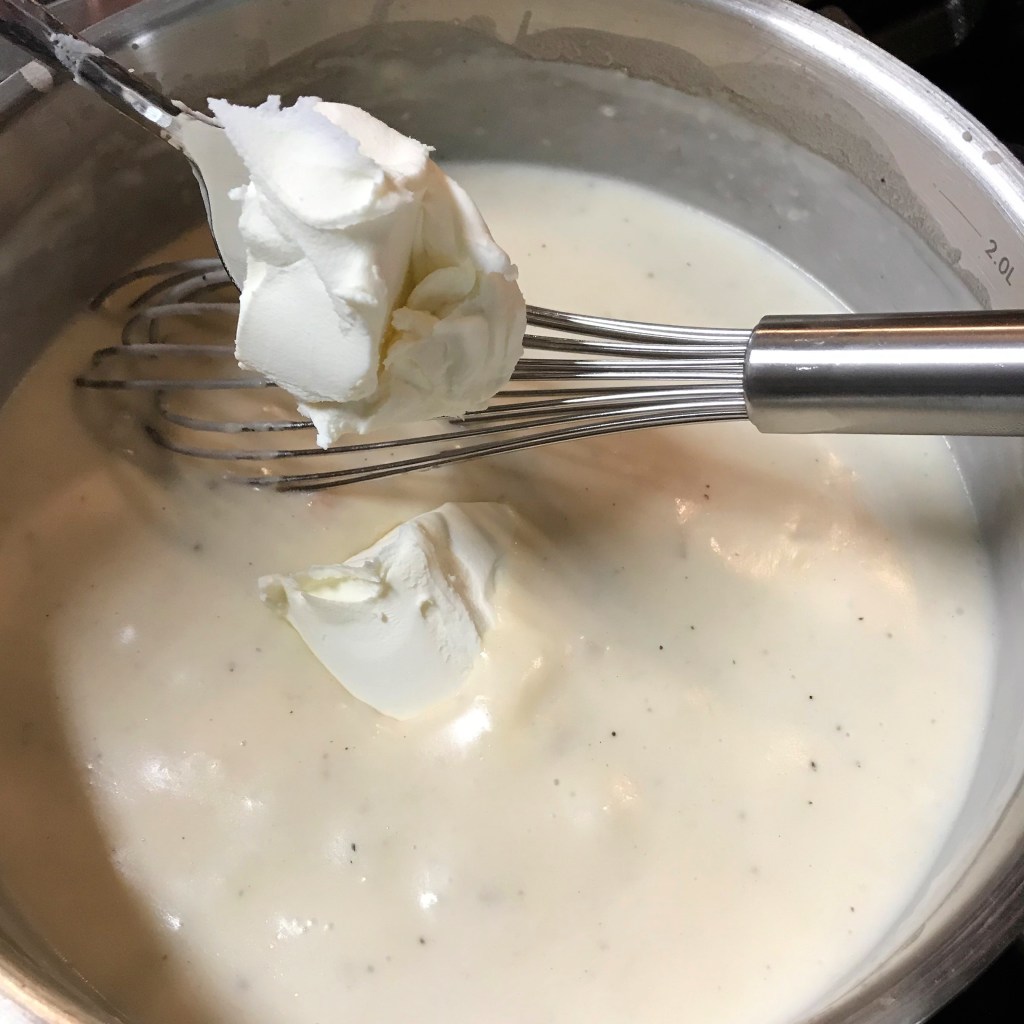
The next step was the béchamel, my go-to base for any mac and cheese recipe. You may remember this part from my first recipe post, or from one of my leftover creations, such as my version of “mac and greens“ or the ultra-decadent “mac and cheese waffles.“ Once you master a béchamel sauce, the possibilities are endless. 🙂
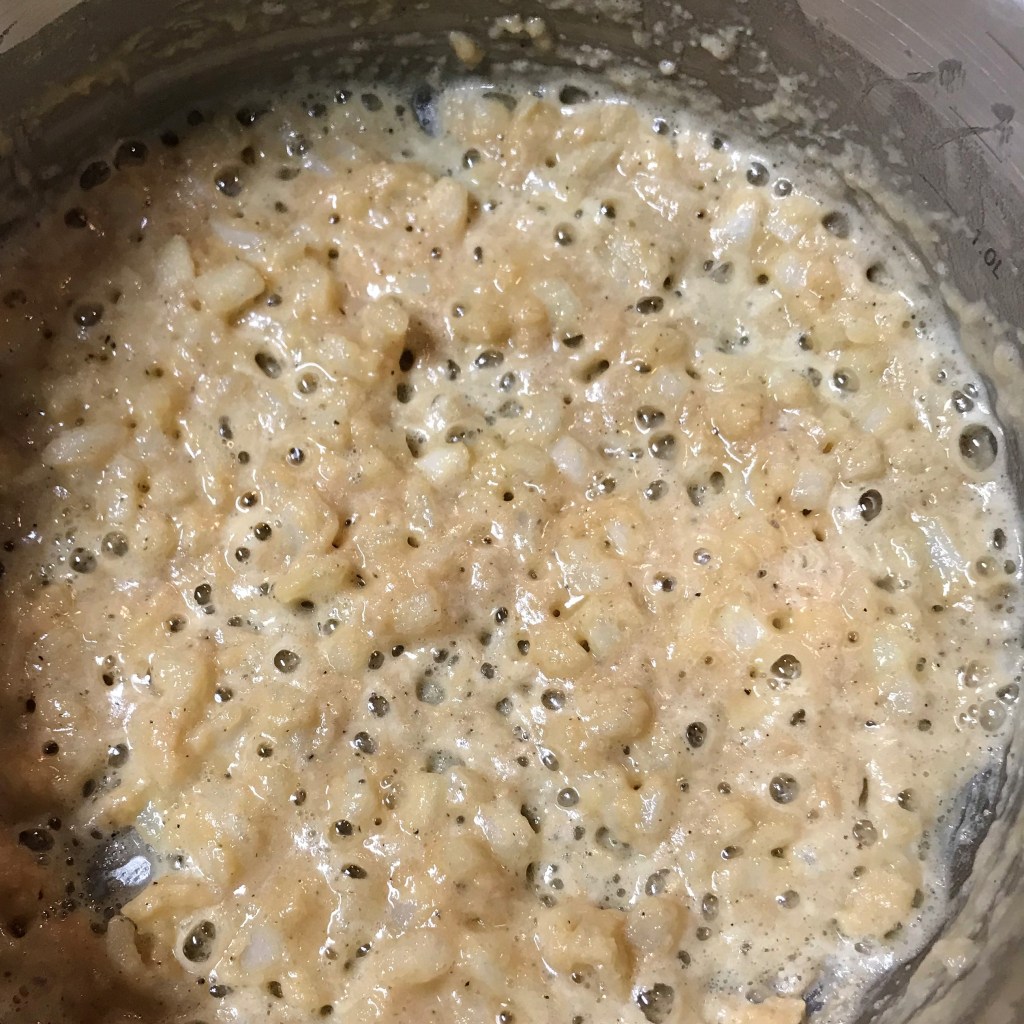
Cook the chopped onions and flour in the butter until it’s lightly browned and bubbly all over.
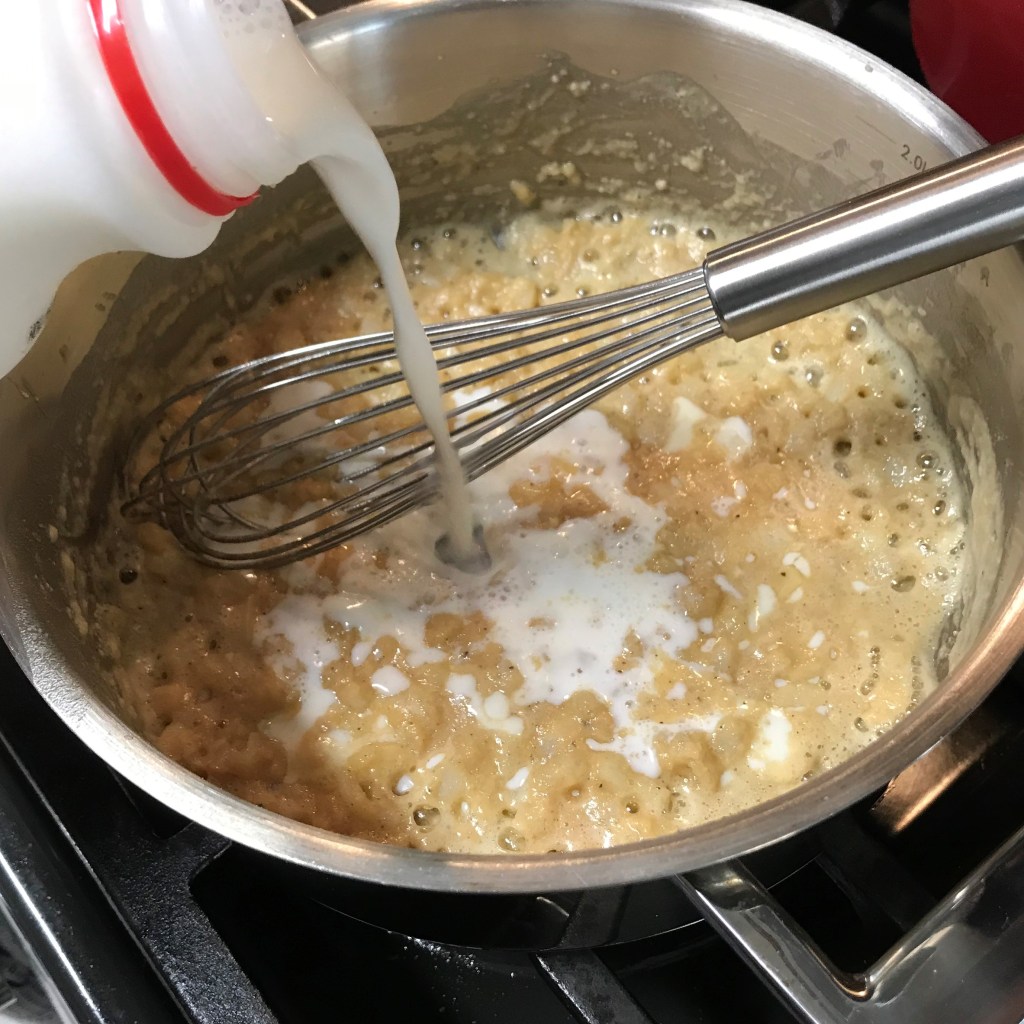
Add milk, a little at a time, and whisk to incorporate each addition.
Add cream cheese or mascarpone and whisk until smooth. This will provide a good base for the rest of the cheese sauce.
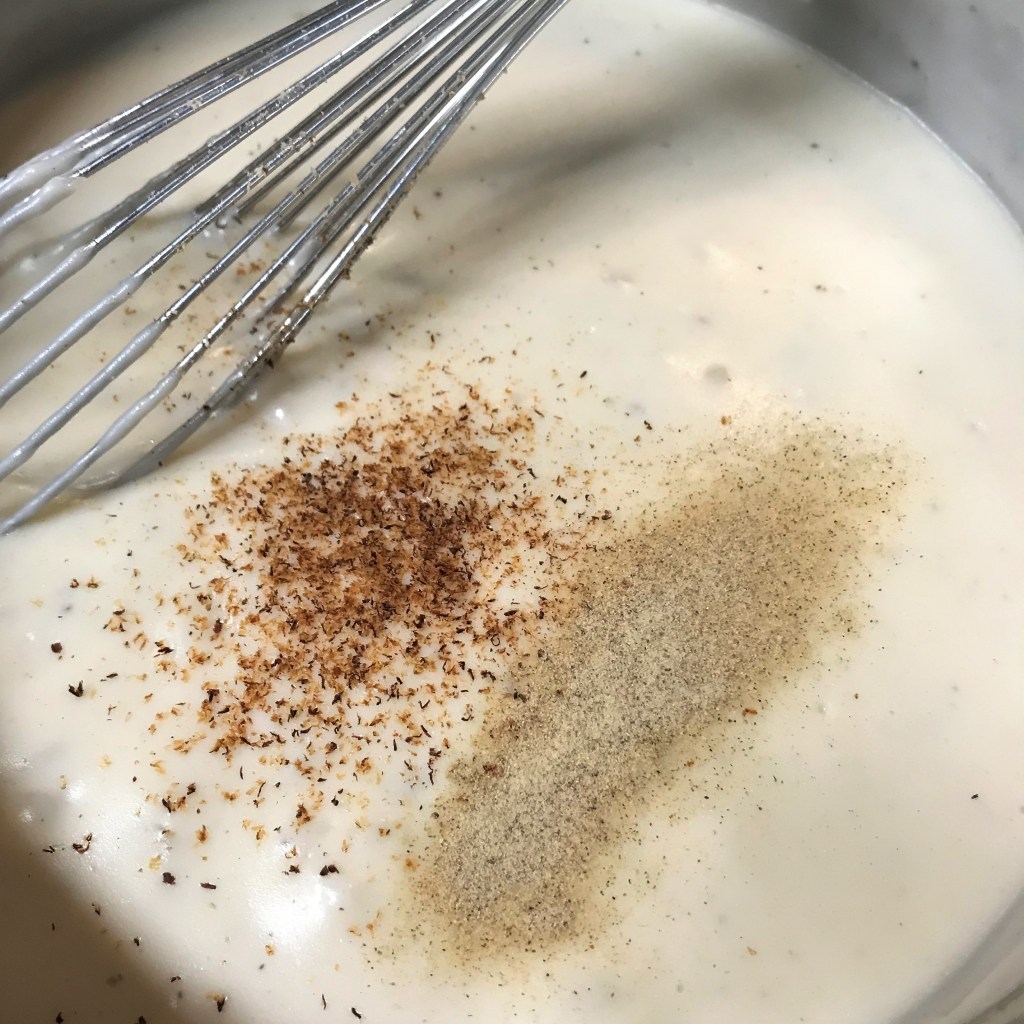
Nutmeg and white pepper are “must-haves” in every bechamel I make.
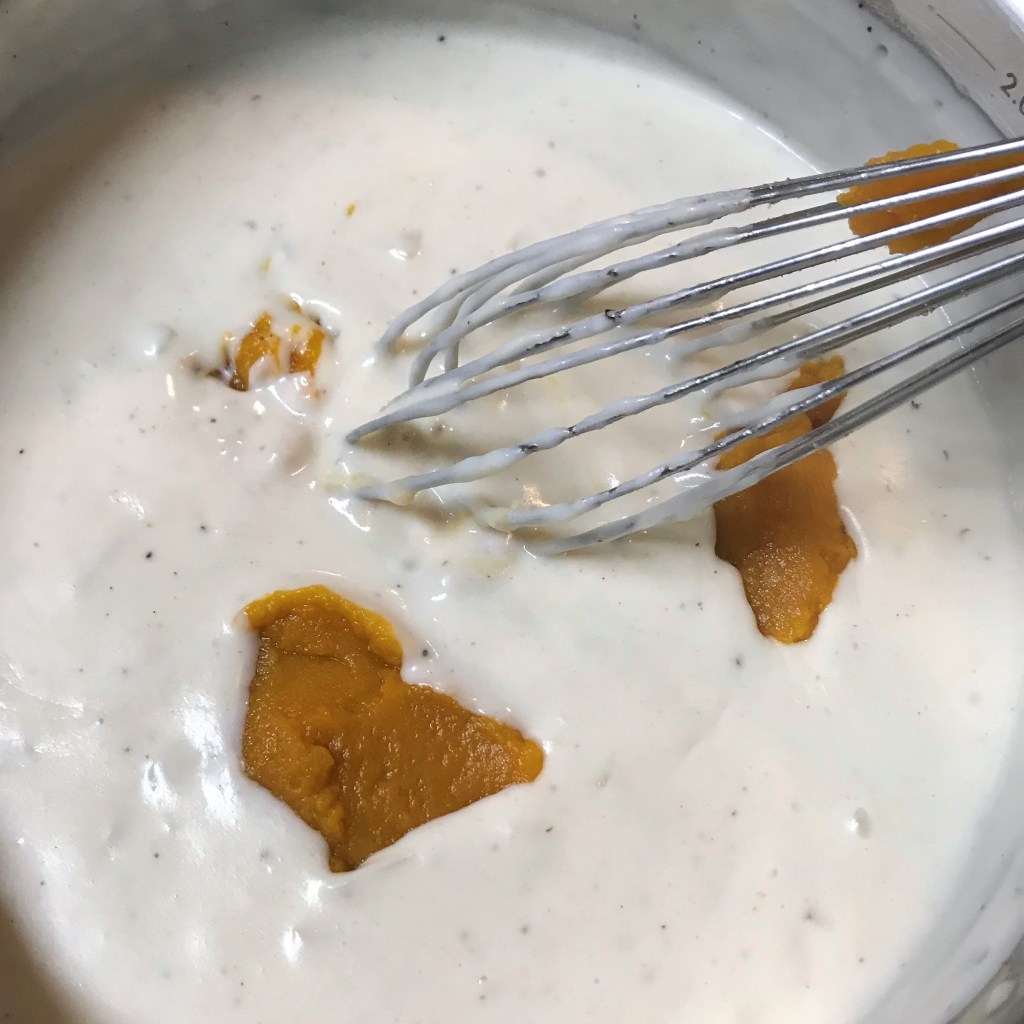
My pumpkin was cold, so I added a little at a time. I didn’t want to shock the bechamel and lose its smooth texture.
The color gets richer with each addition of pumpkin.
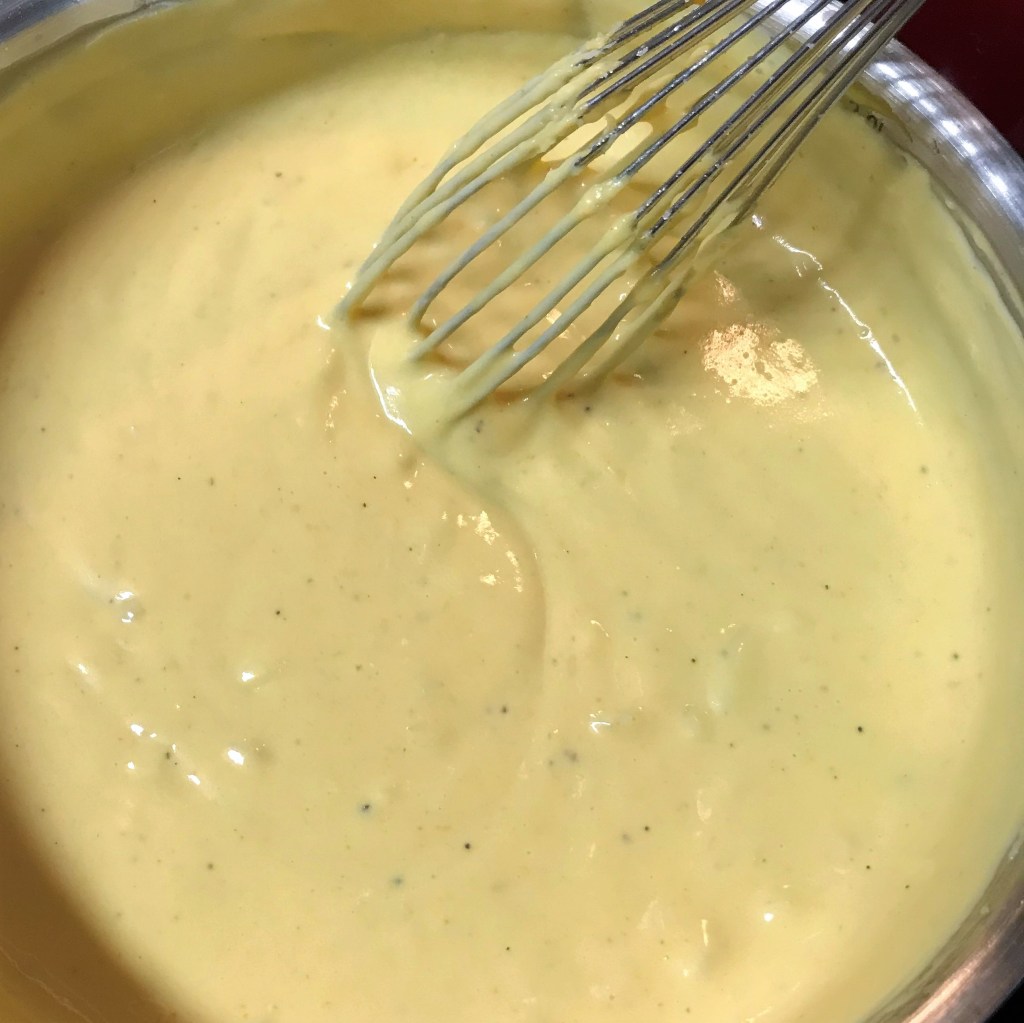
Doesn’t this look gorgeous? The visible lumps here are the onions.
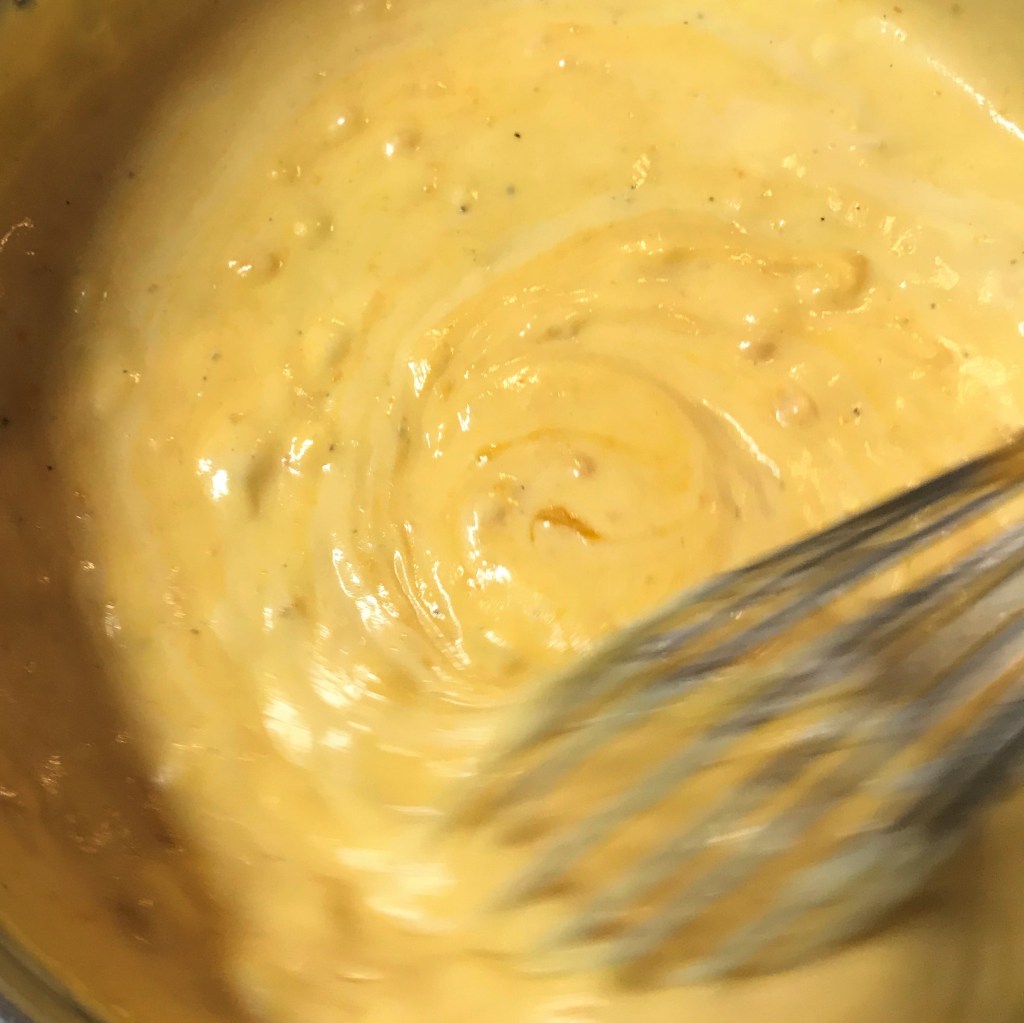
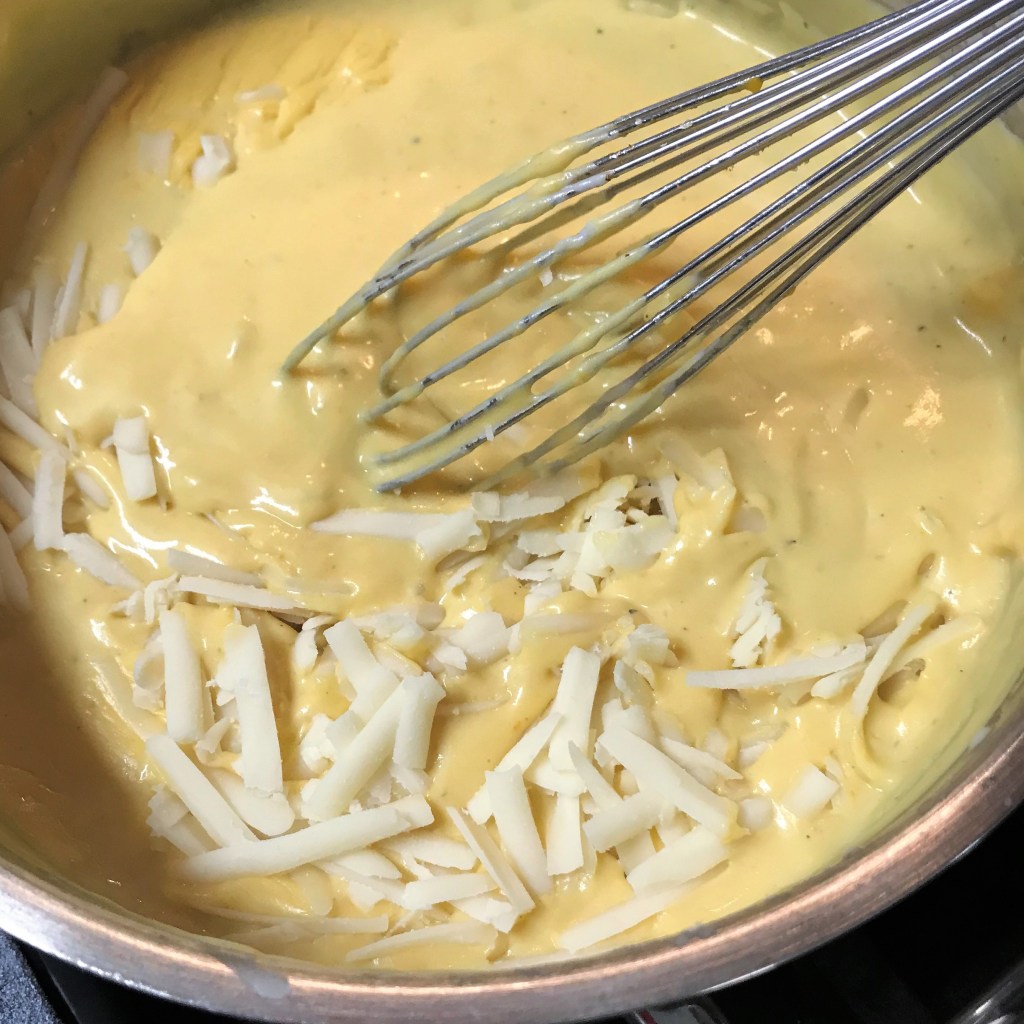
Blend in the shredded cheeses, a little at a time, and whisk until smooth.
The caramelized roasted garlic will add another level of savory depth to my cheese sauce.
The sauce is already looking good, but you know what comes next, right?
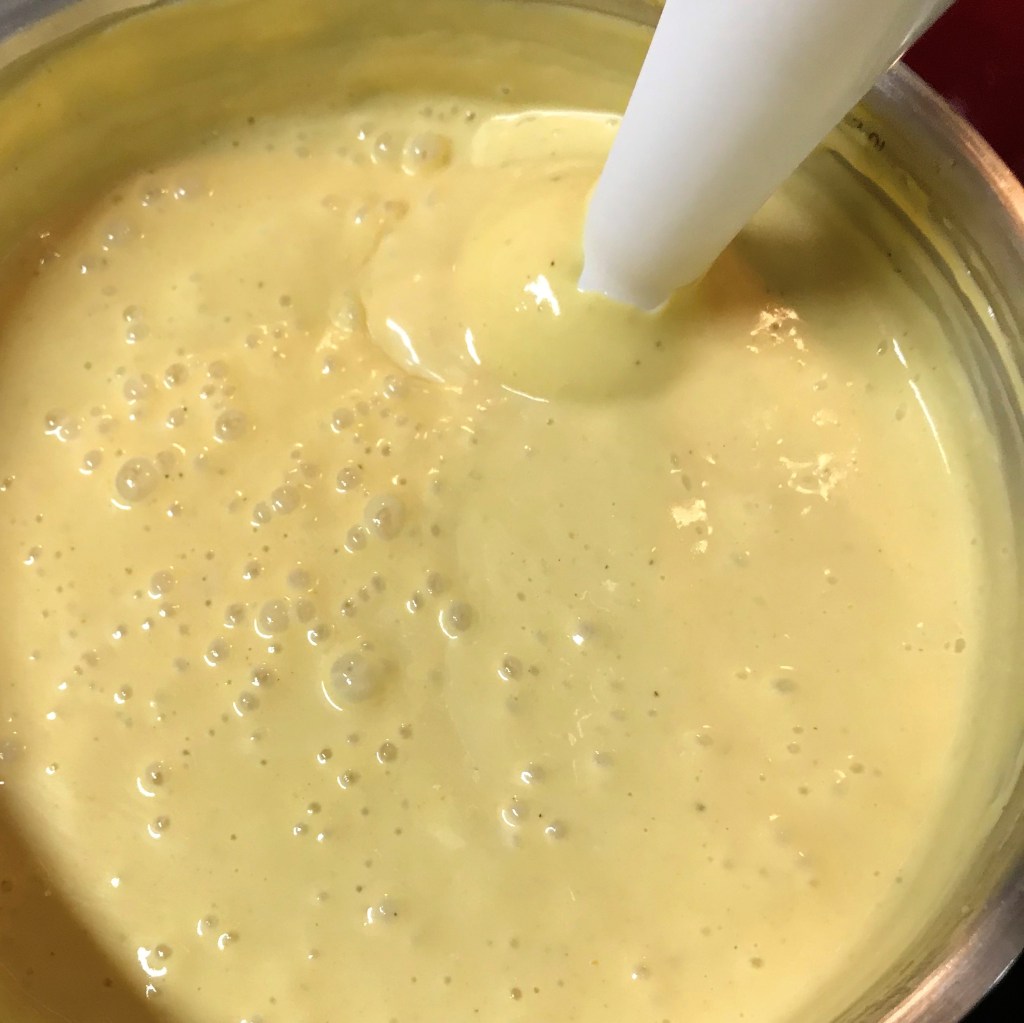
Aww, yeah! My immersion blender is the secret weapon that elevates my mac and cheese every time.
After about 20 seconds, my sauce has gone way over the edge into extreme creaminess.
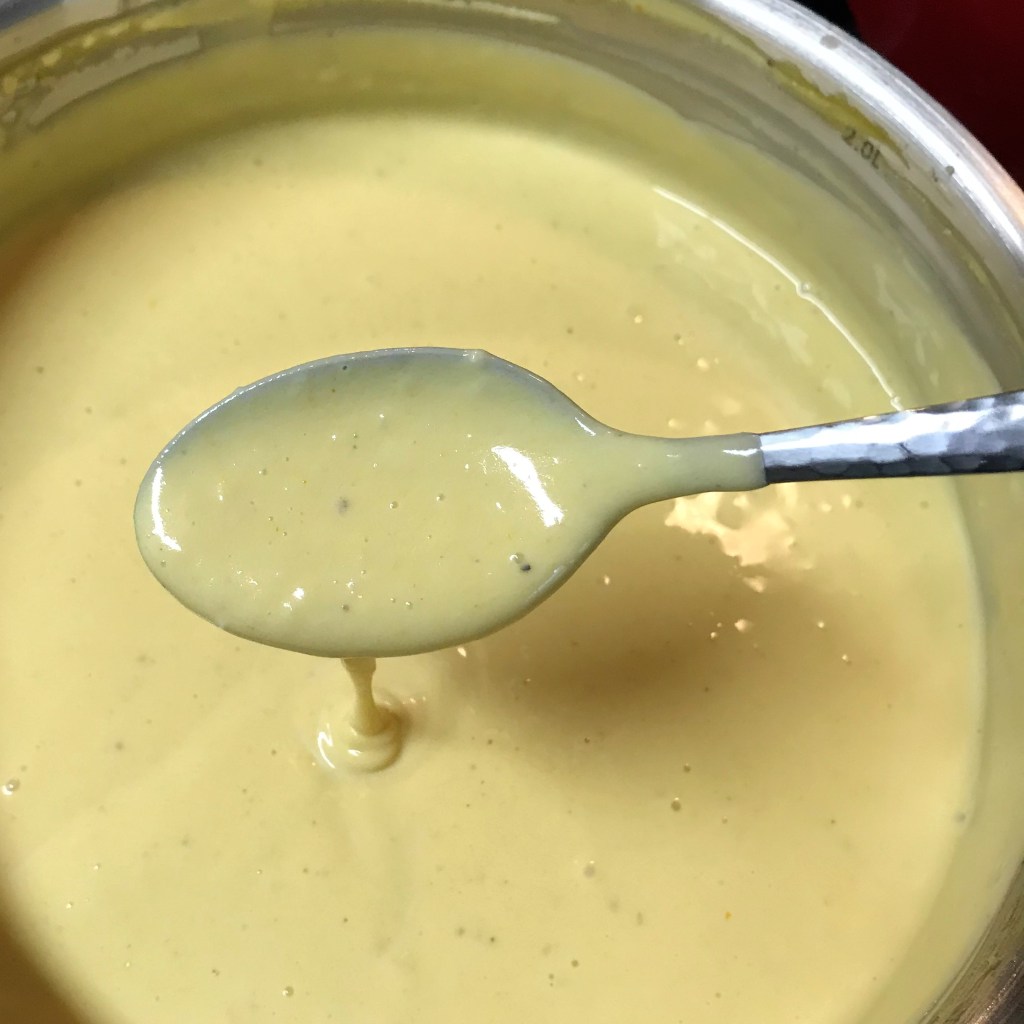
This is just so silky and creamy.
My cheese sauce made me very happy. I took a spoonful into the den for my husband, Les, to taste, and he immediately loved it as well. But here’s where things took a slightly disappointing turn. Remember the cute little pumpkin pastas? Well, they were pretty much a mess. In addition to their thick, heavy texture (and the fact that all the pieces fell apart), the primary flavor was starch. I was not having it. You guys know I get pretty excited about the specialty items at Trader Joe’s, but this one was decidedly not a winner. Thankfully, we have another supermarket very near the house, and I hightailed it over there for some dependable elbow macaroni. I’m not willing to “settle” when I’m trying to make a special dish, you know what I mean? 🙂
This is NOT working for me.
Sometimes, disasters just happen. I ditched this sticky mess to the trash and went with Plan B!
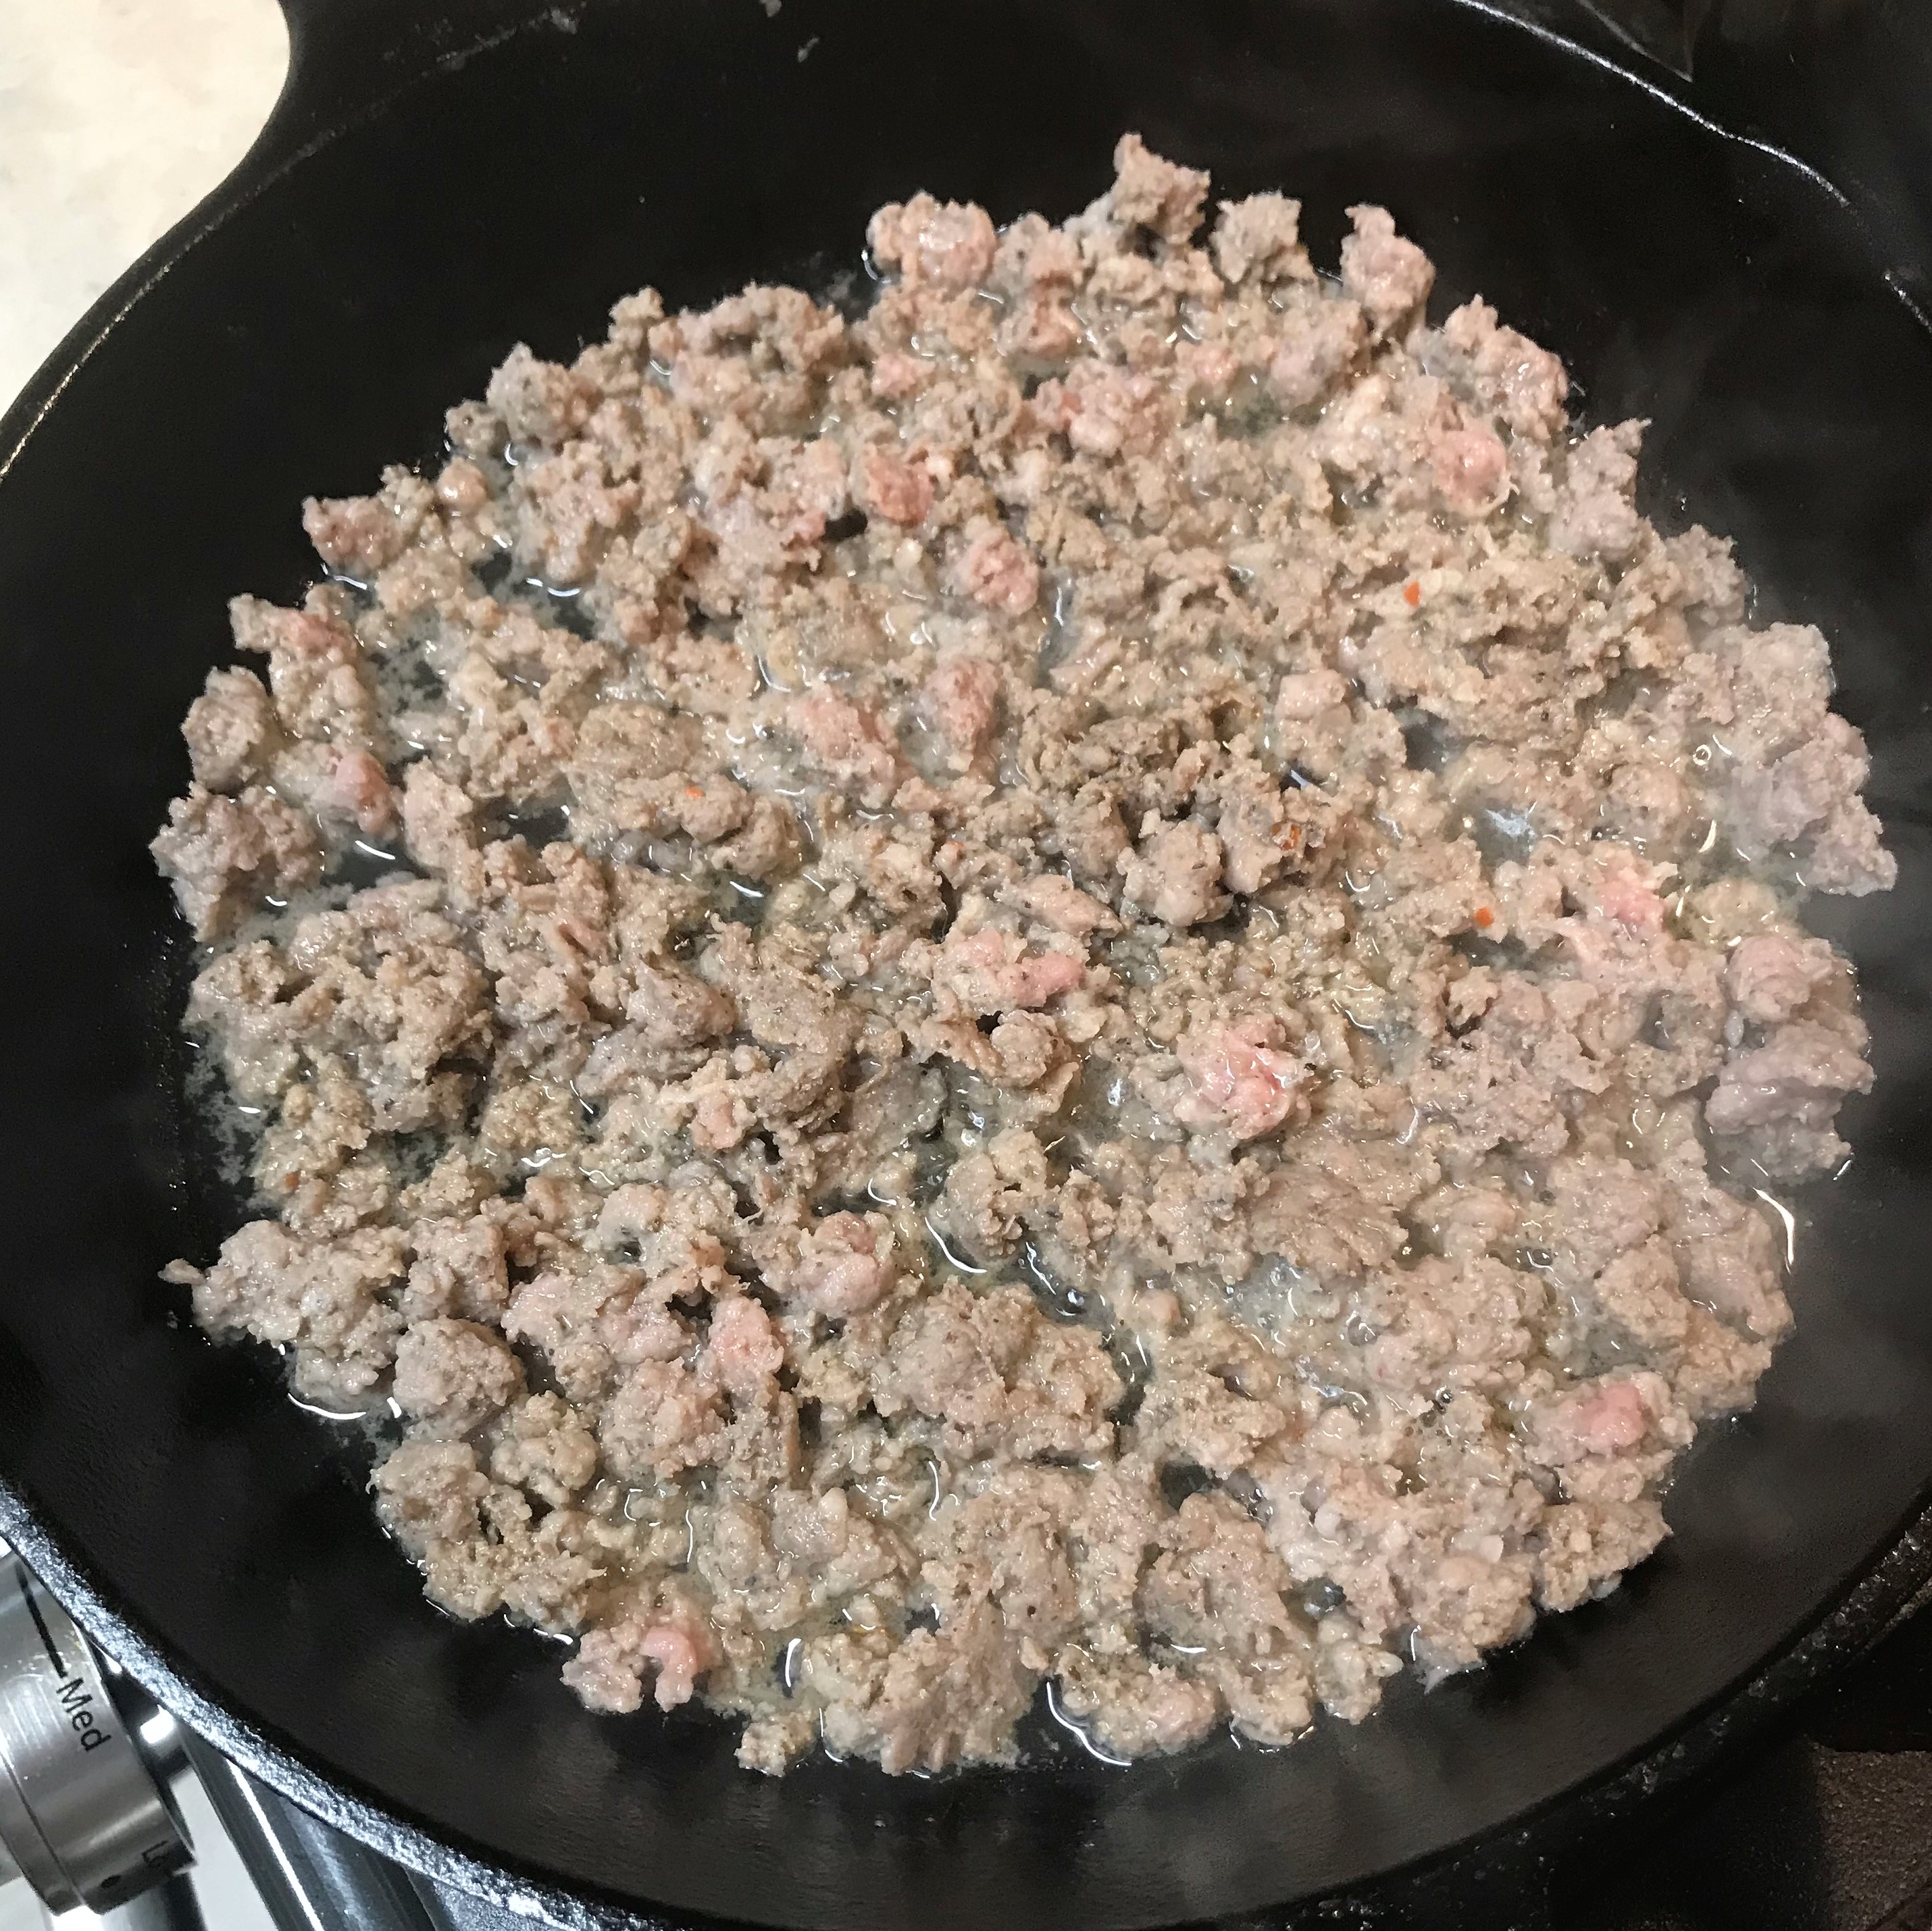
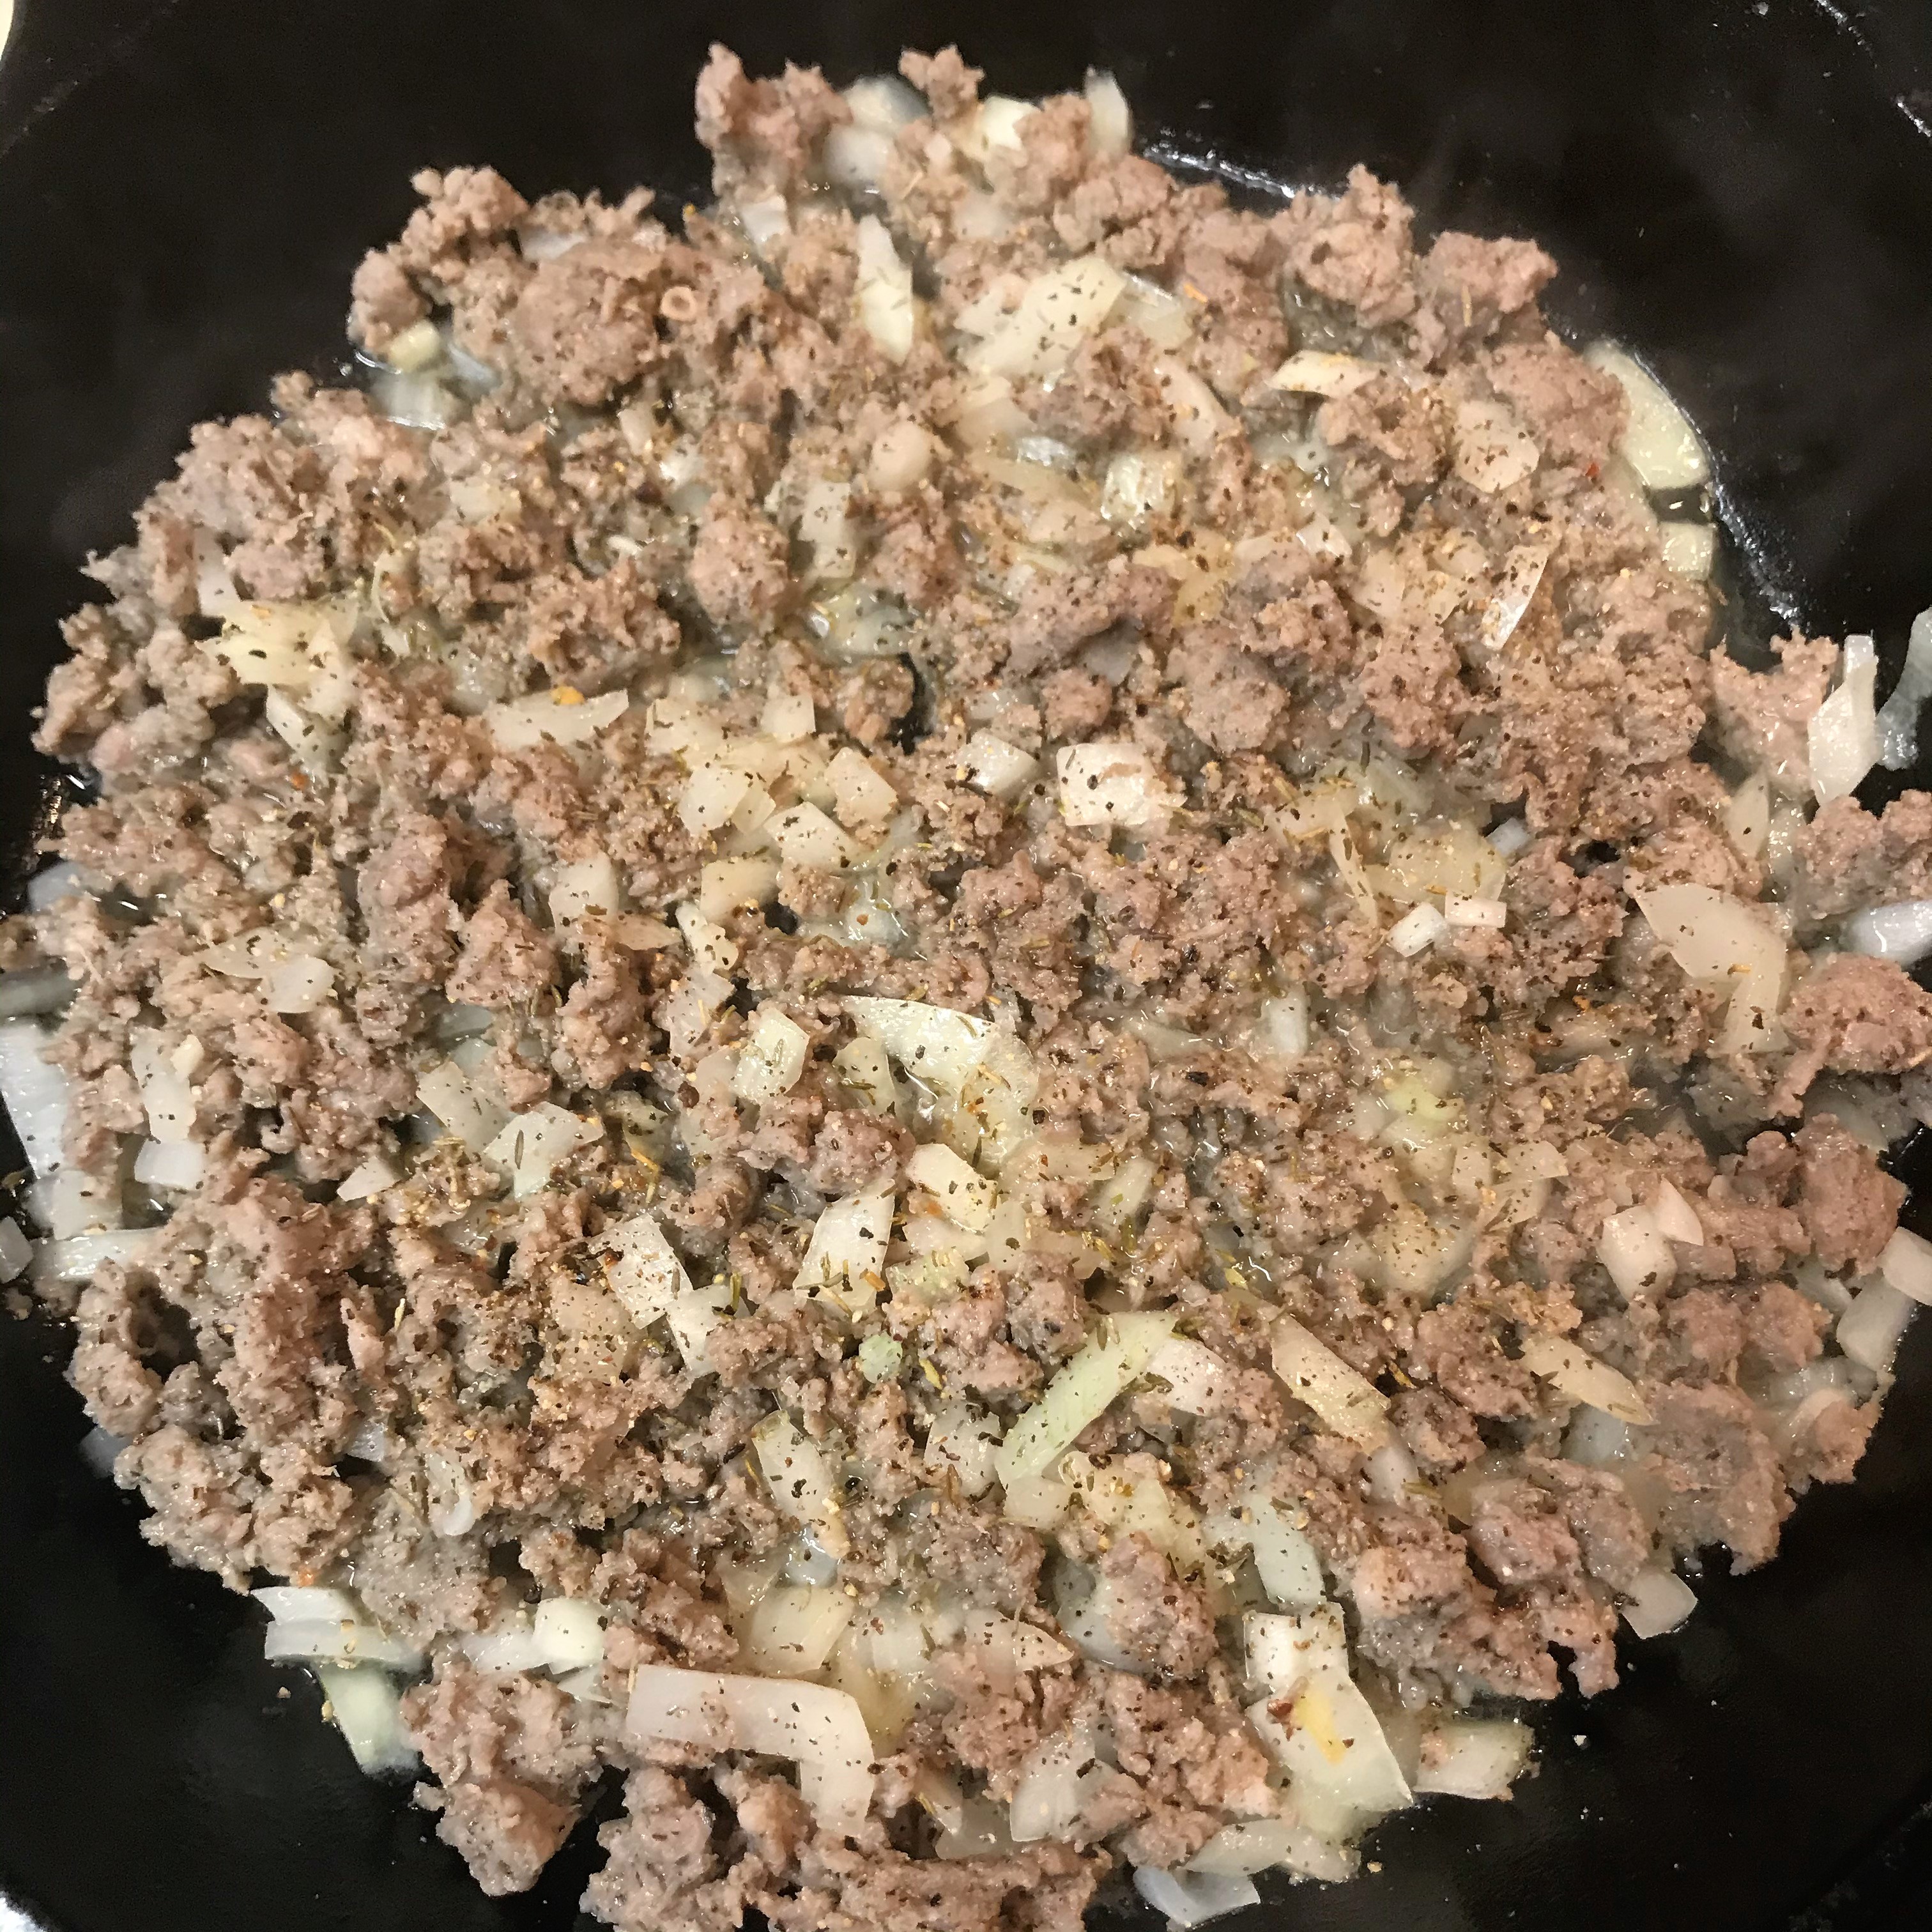
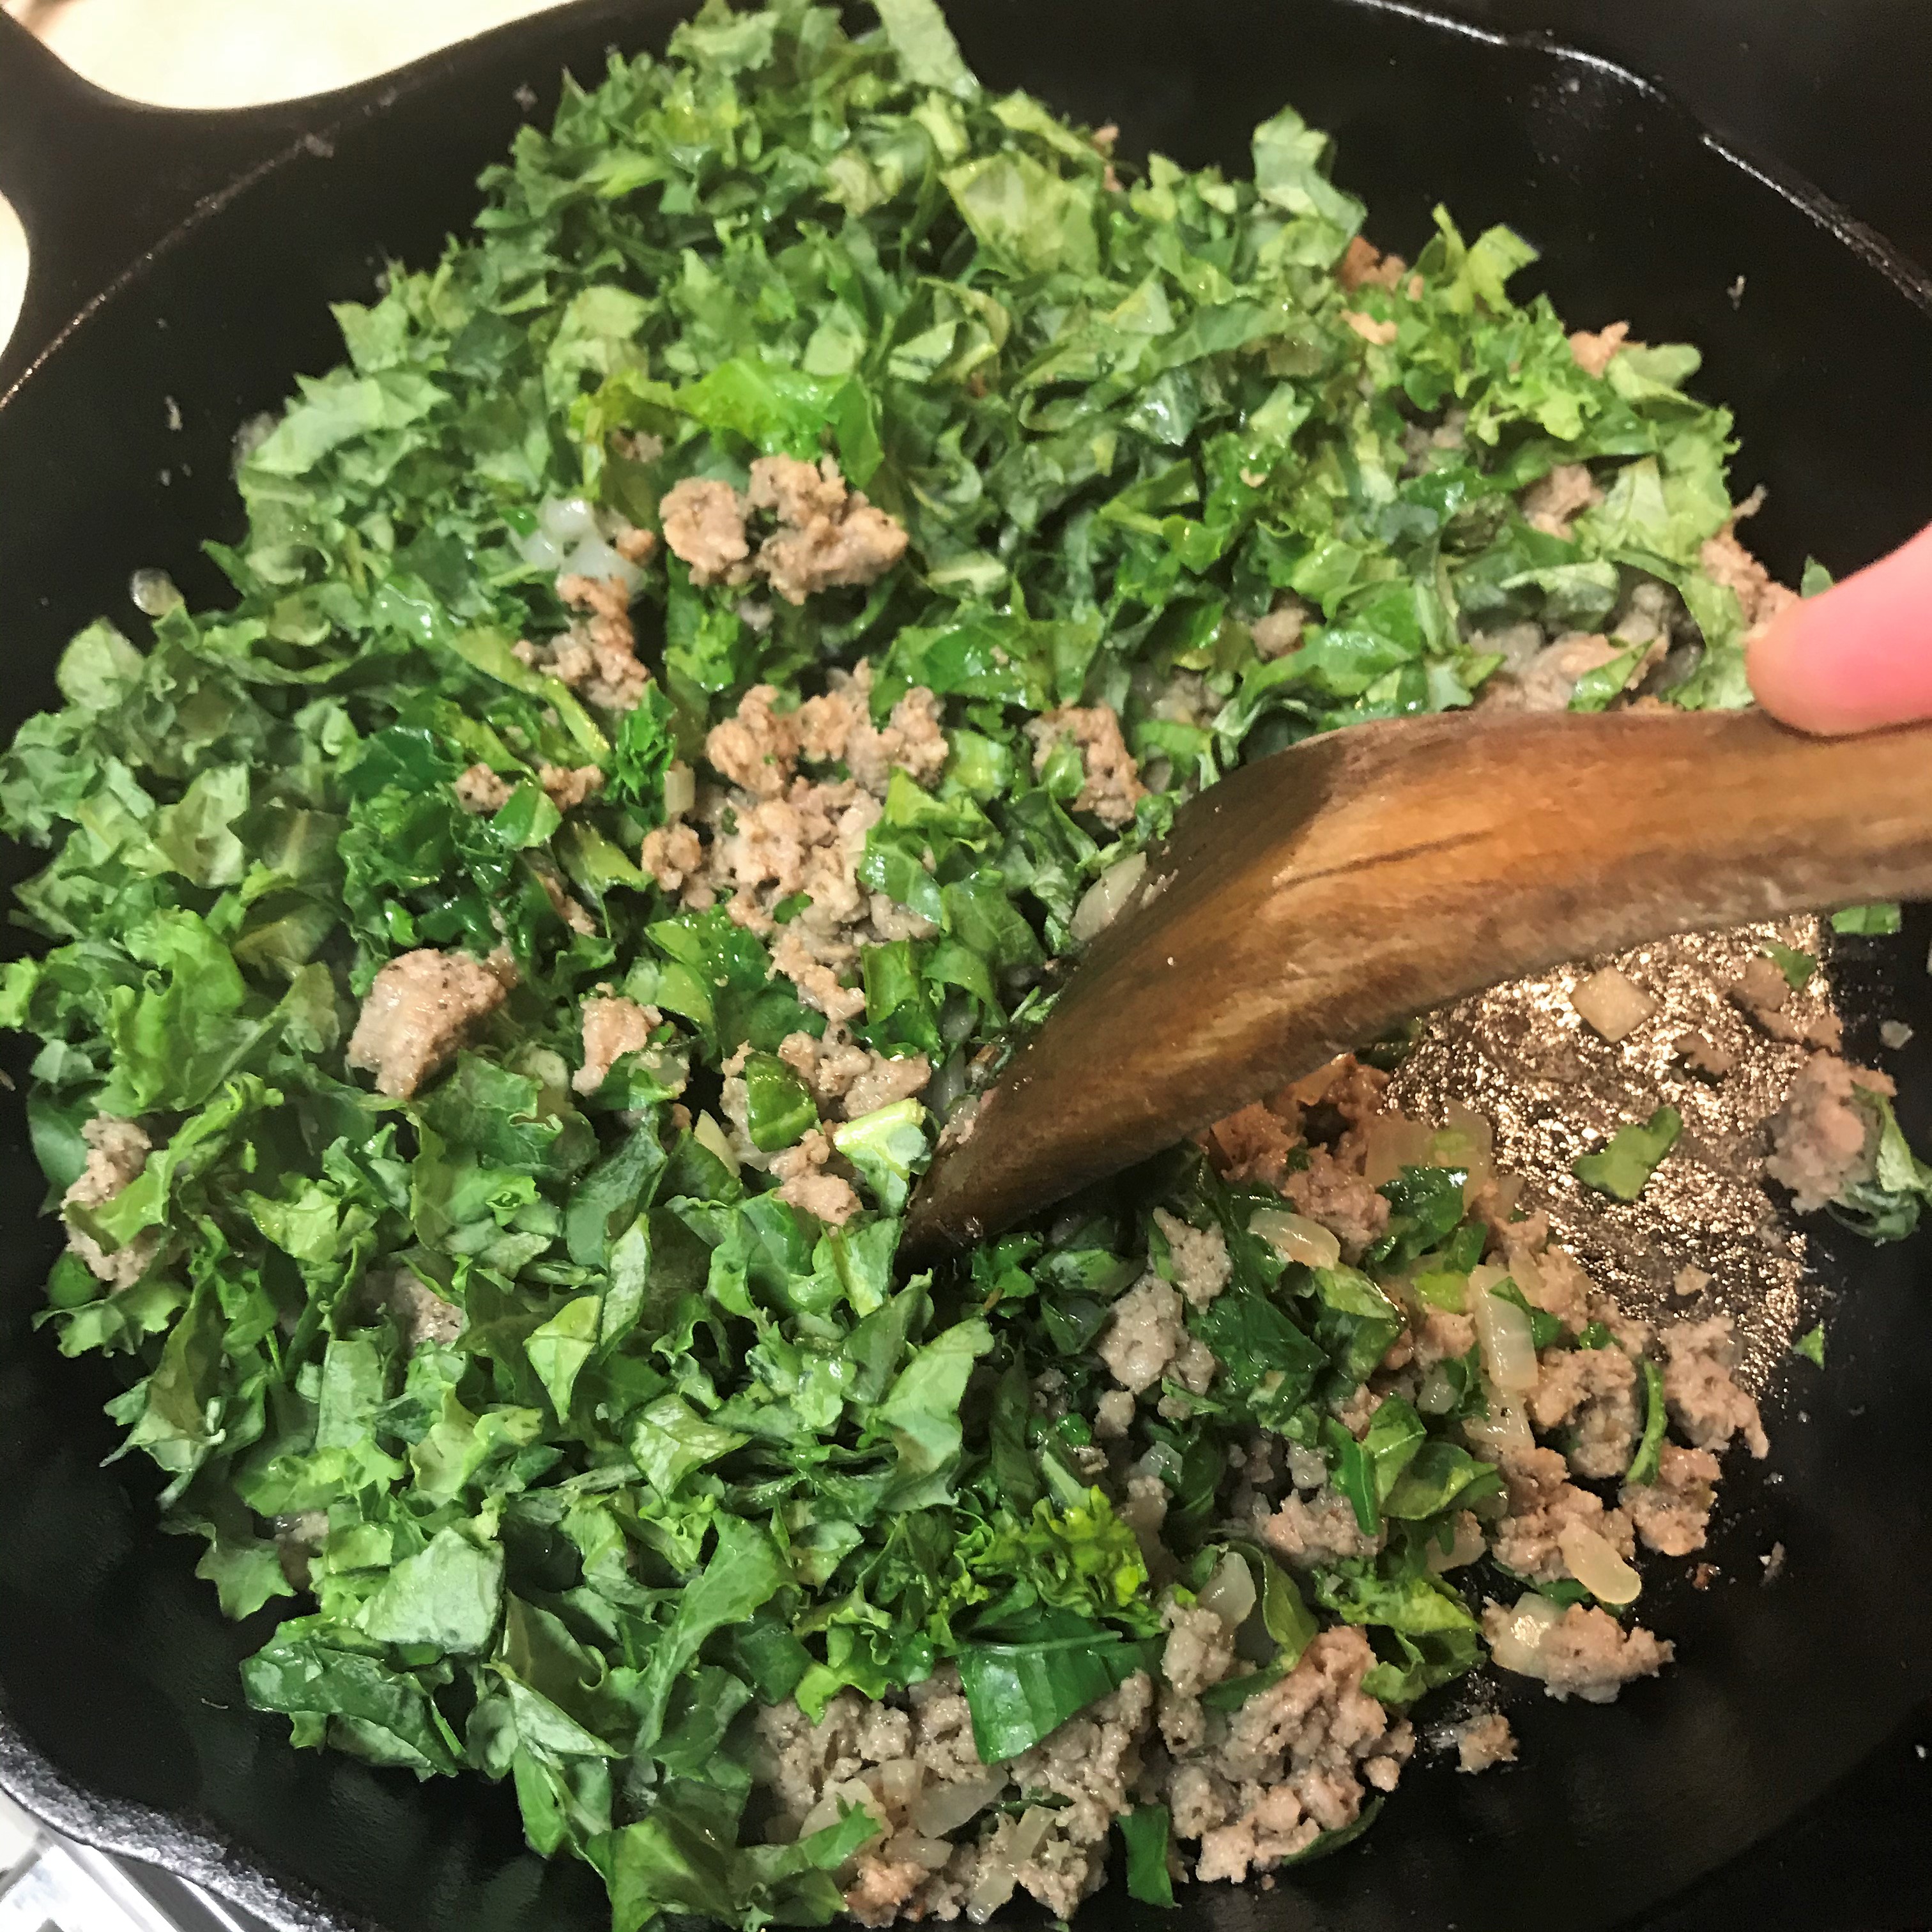
Moving along to the sausage, and this part was easy! I browned the sausage in a skillet, using a little vegetable broth to assist with breaking up the larger pieces. I added the chopped onion and then the kale, and cooked until the onions were tender and the kale was wilted, but still bright green. It smelled amazing in my kitchen!
Cooking the sausage in a few tablespoons of broth helps me achieve a finer texture. You could also use water, beer, whatever.
I seasoned the sausage and onion mixture with a few shakes of poultry seasoning, salt and freshly ground black pepper.
Spinach would work here also, but I love the rustic texture of chopped kale.
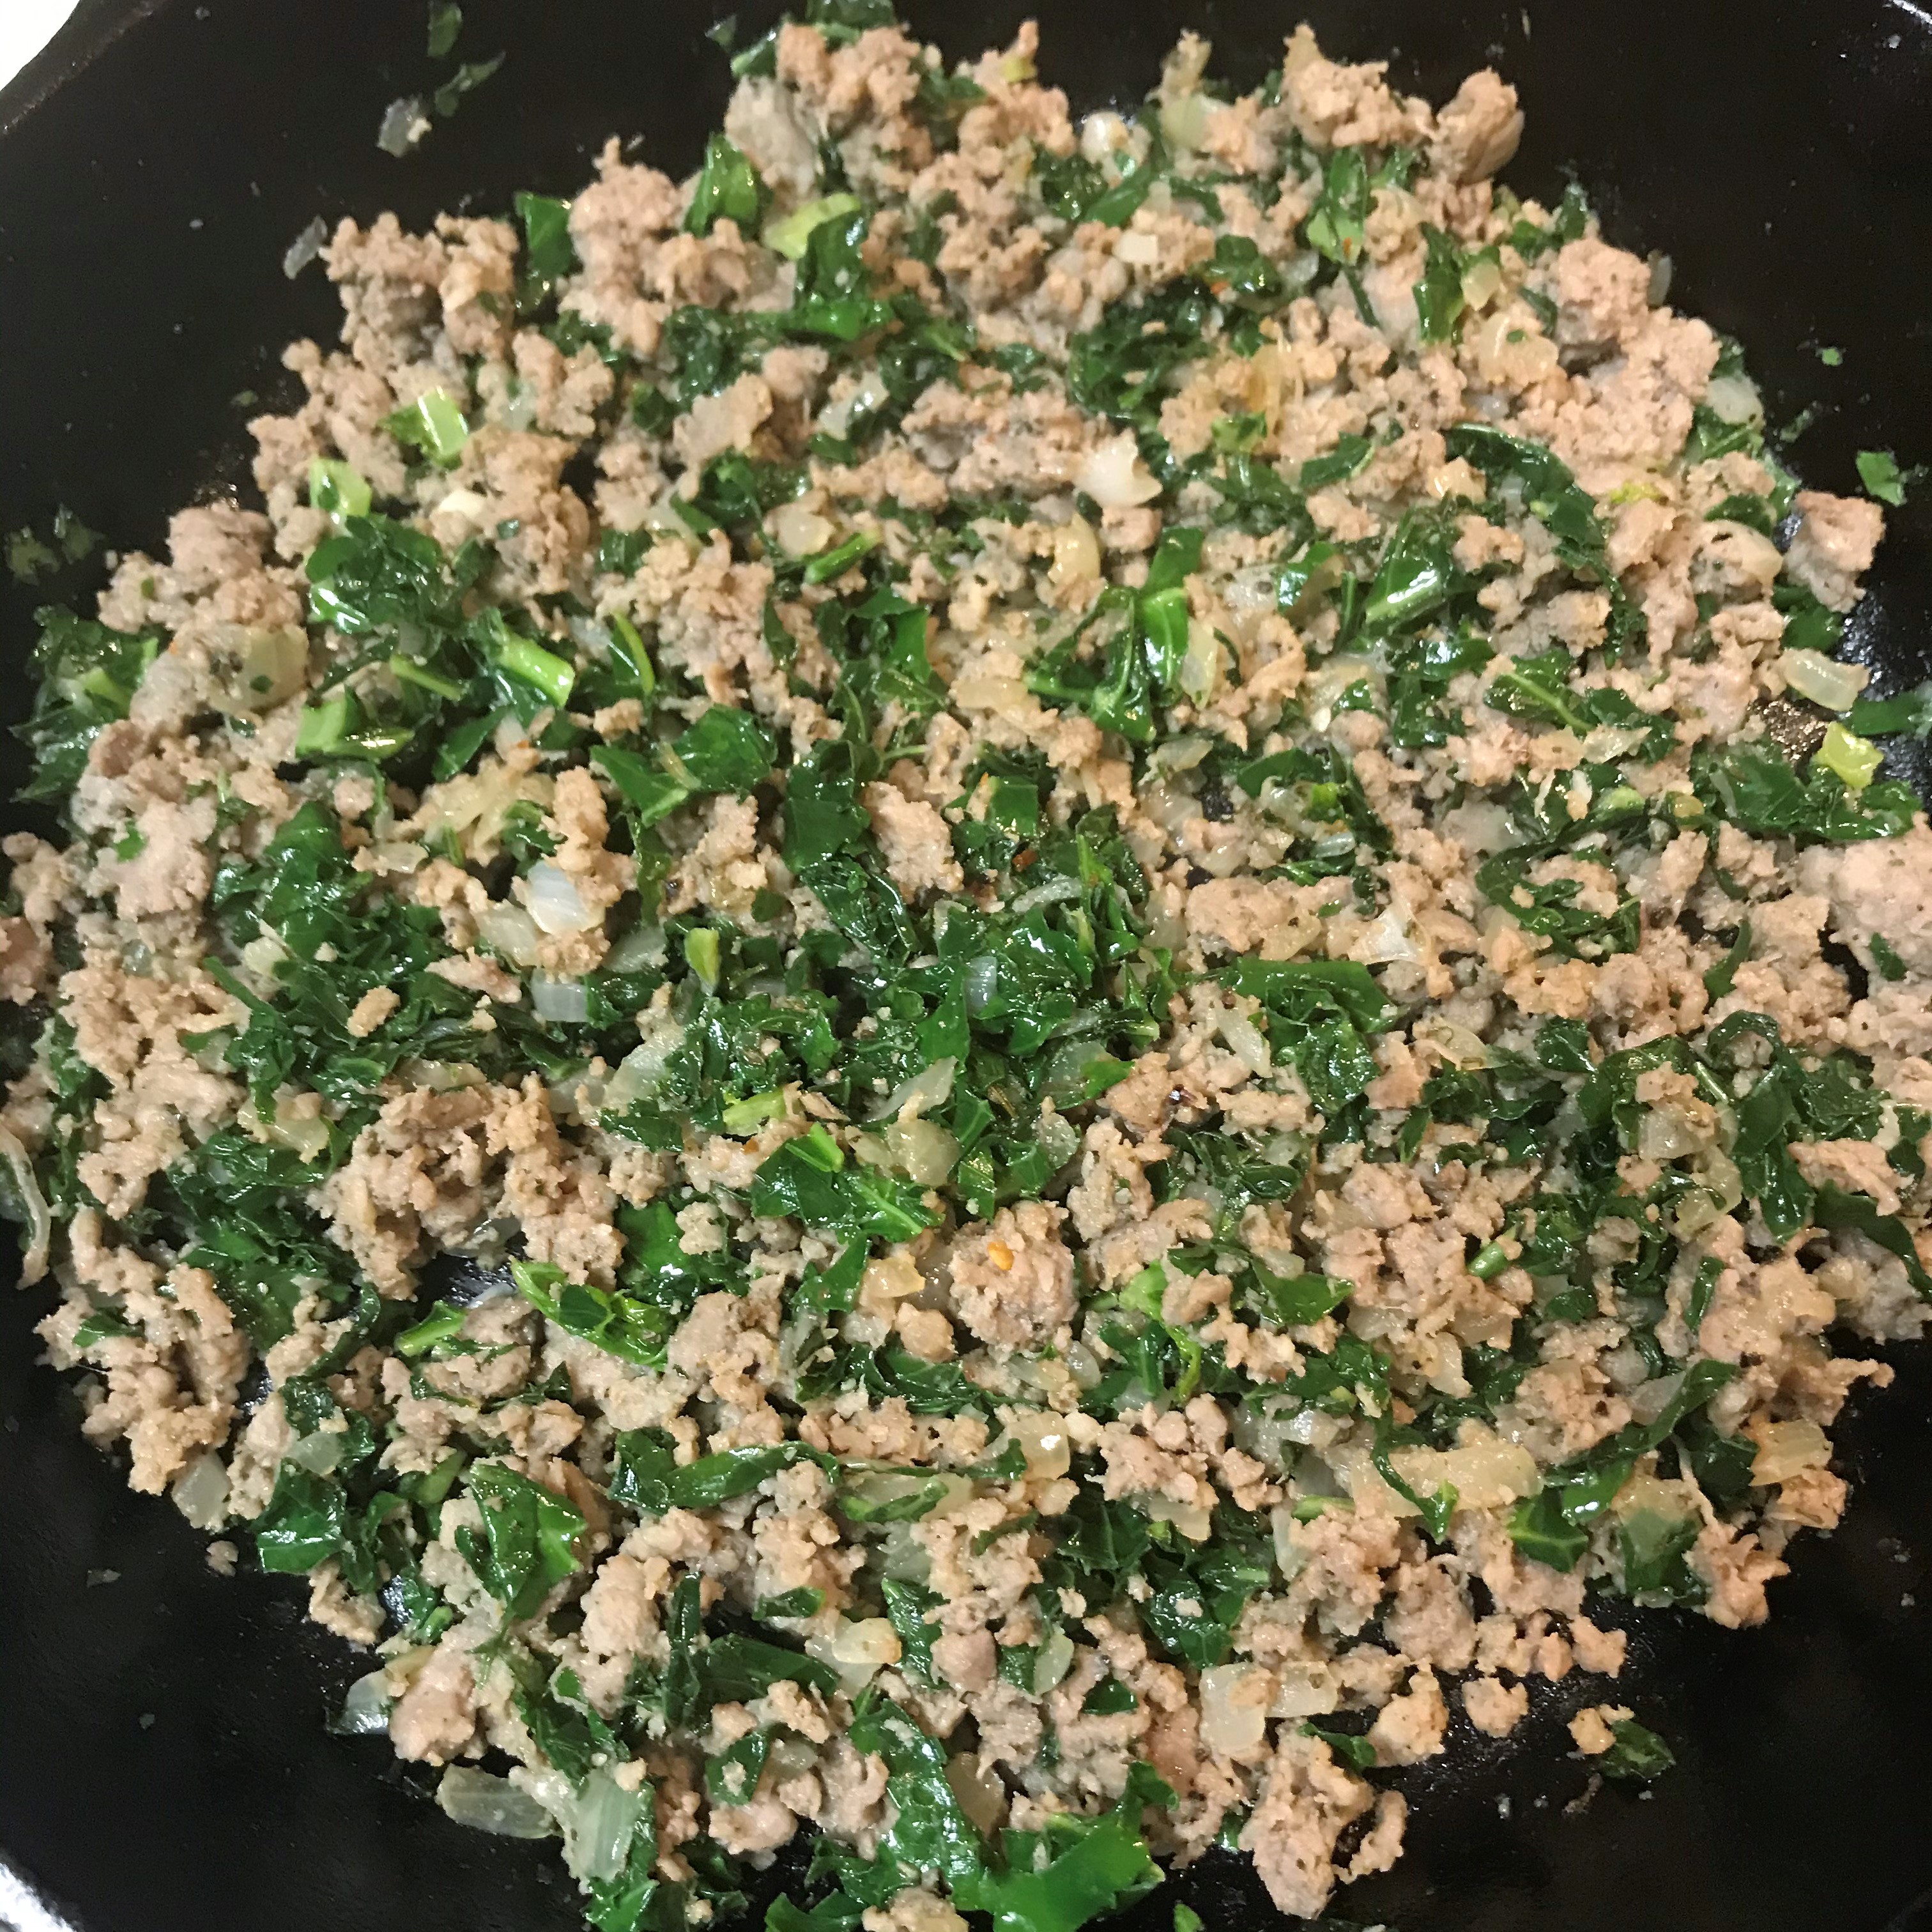
This tastes delicious all by itself. You know I will eventually put these flavors on a pizza, right? 🙂
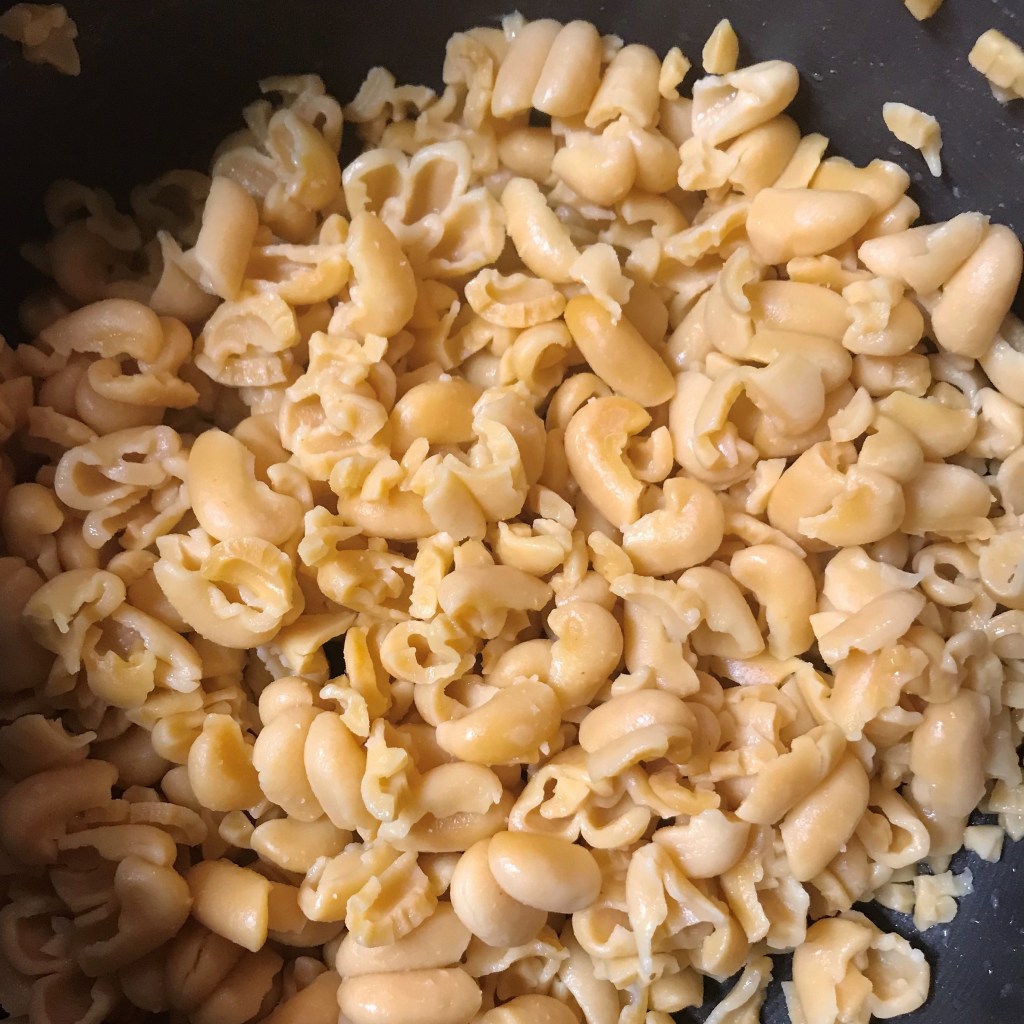
From here, the assembly was a cinch. I cooked up my elbow macaroni to al dente stage, which is just shy of done, and still a little resistance to the bite. Thankfully, this pasta came out perfect! Fold in all of the creamy cheese sauce (even if it seems like too much), and then fold in the sausage mixture. I spooned as much of the mac and cheese as would fit inside the roasted pumpkin, and the rest went into a casserole dish for another meal. How much do you wanna bet I end up putting the leftovers in the waffle iron?
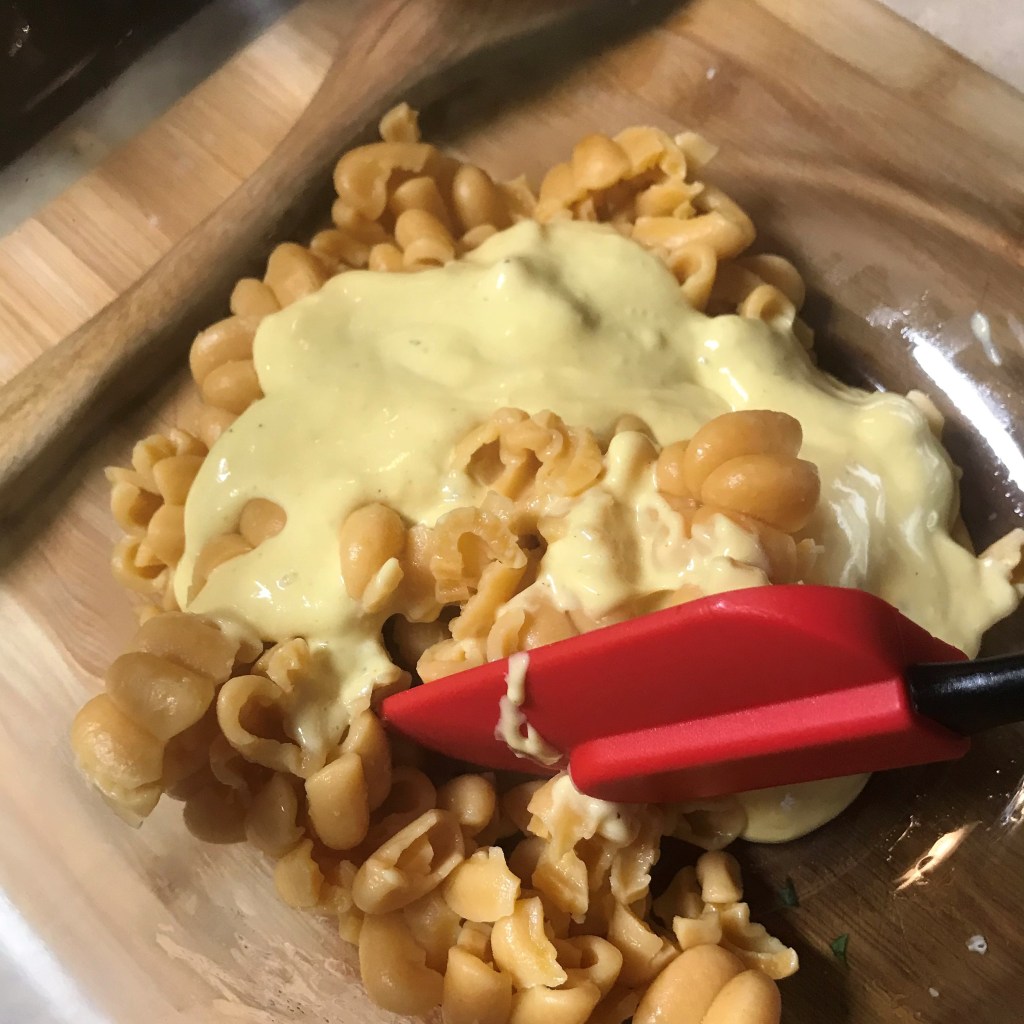
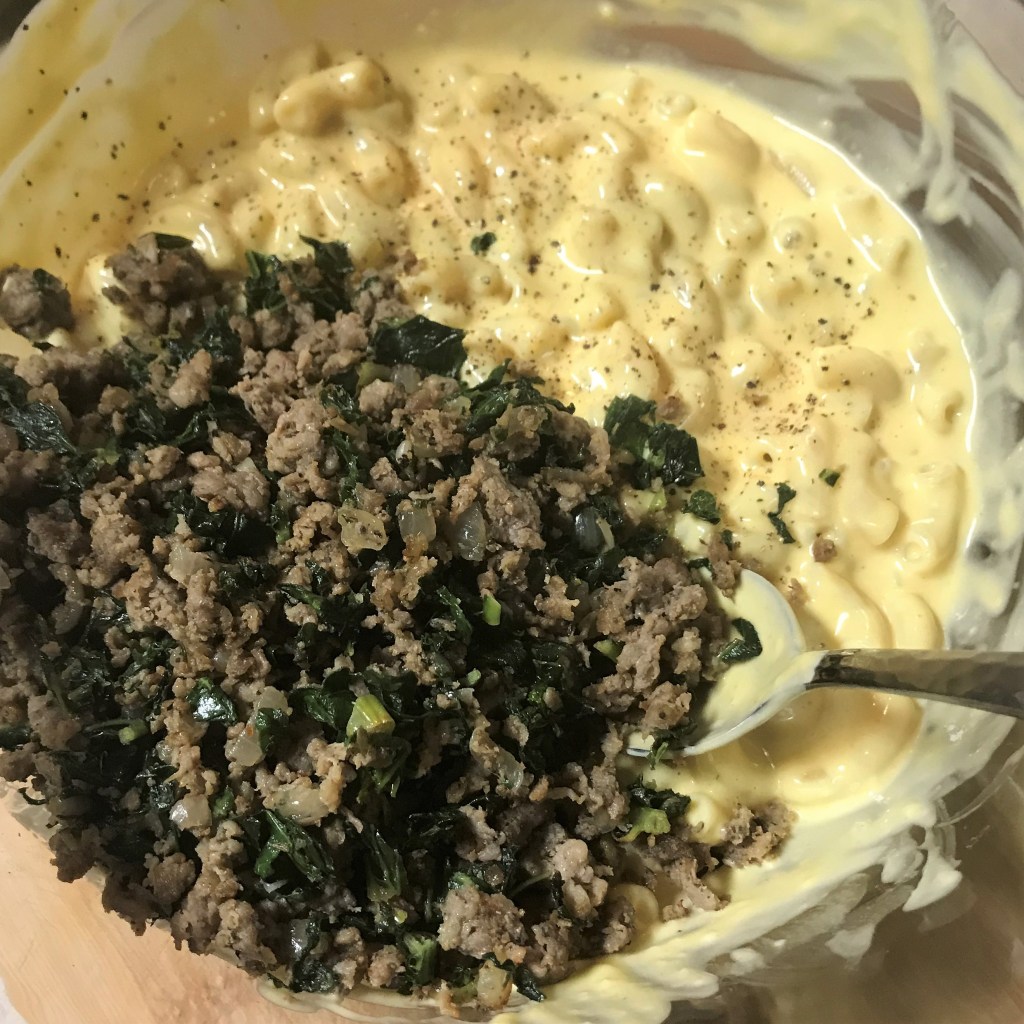
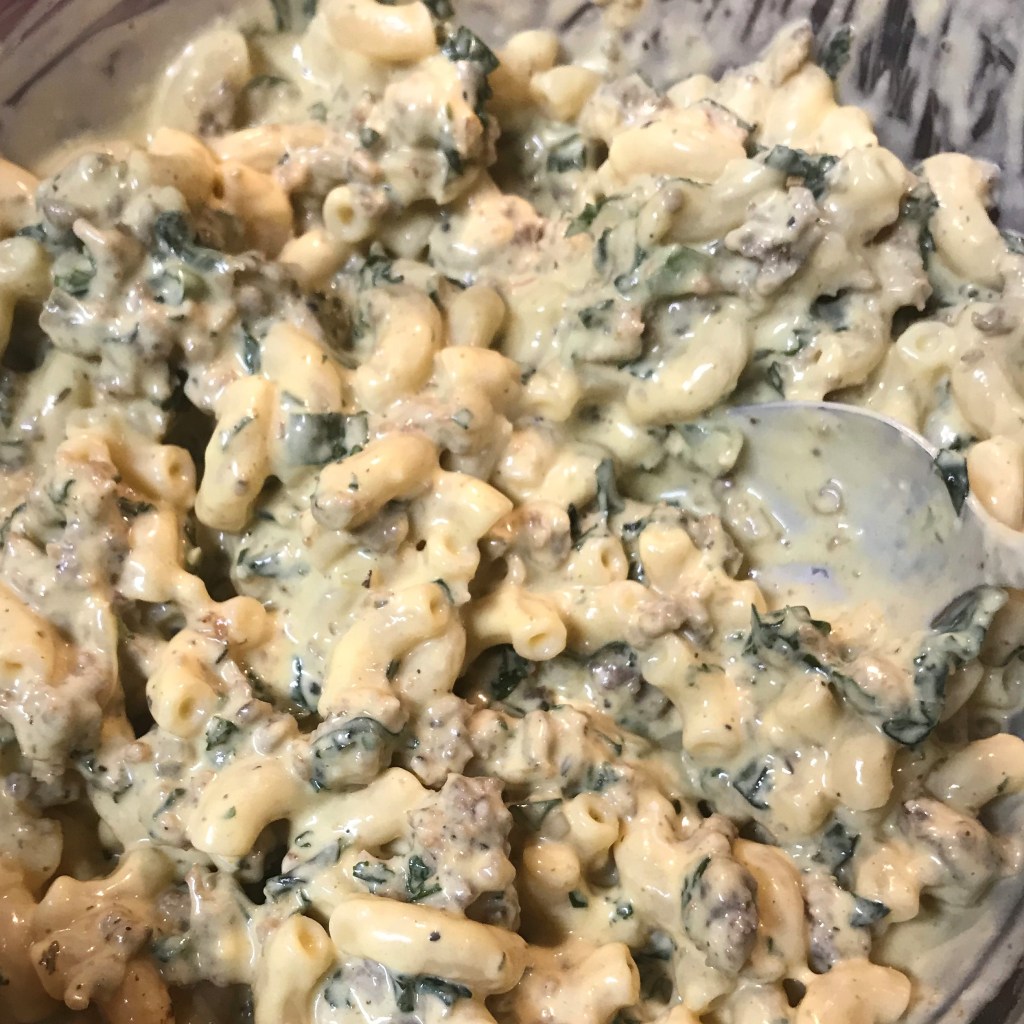
Fold the sausage mixture into the ultra creamy mac and cheese.
I will confess that I “tasted” almost a half cup of this mixture on its own. It was so delicious!
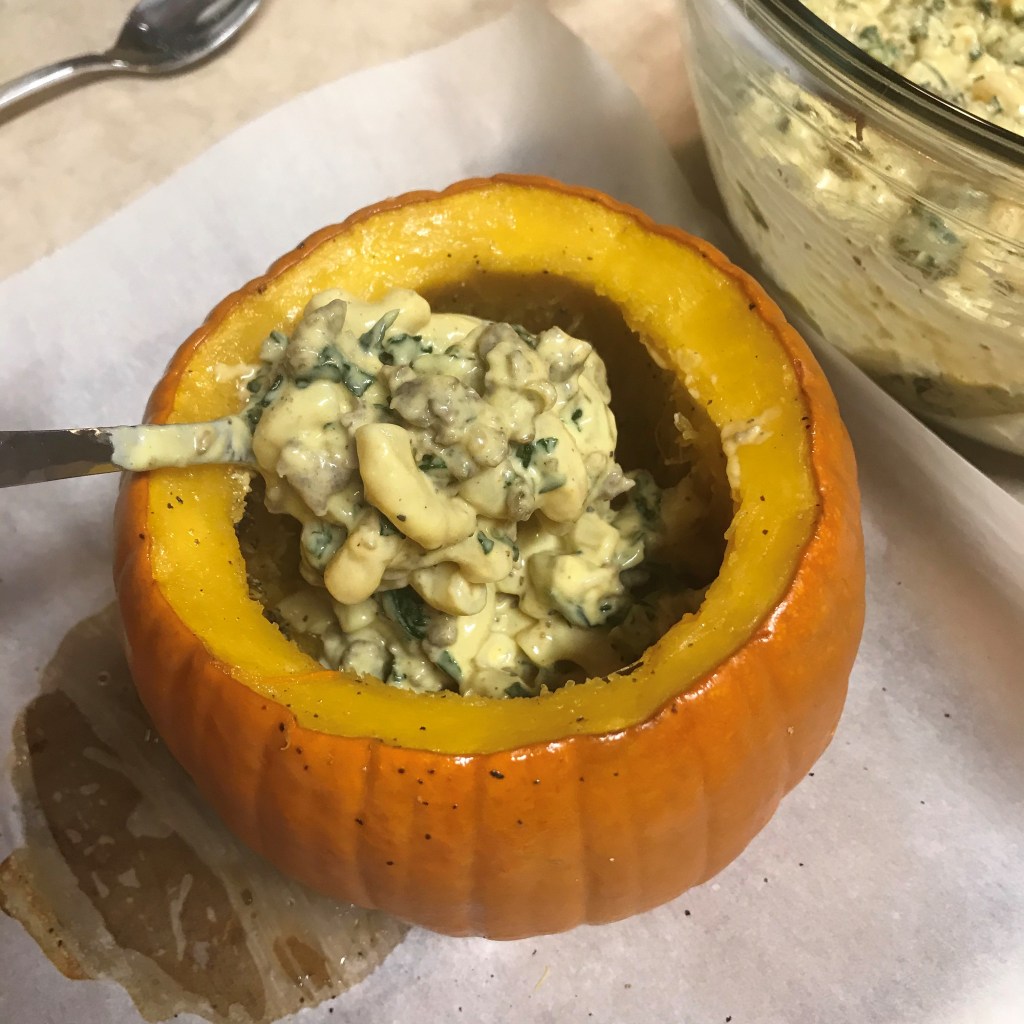
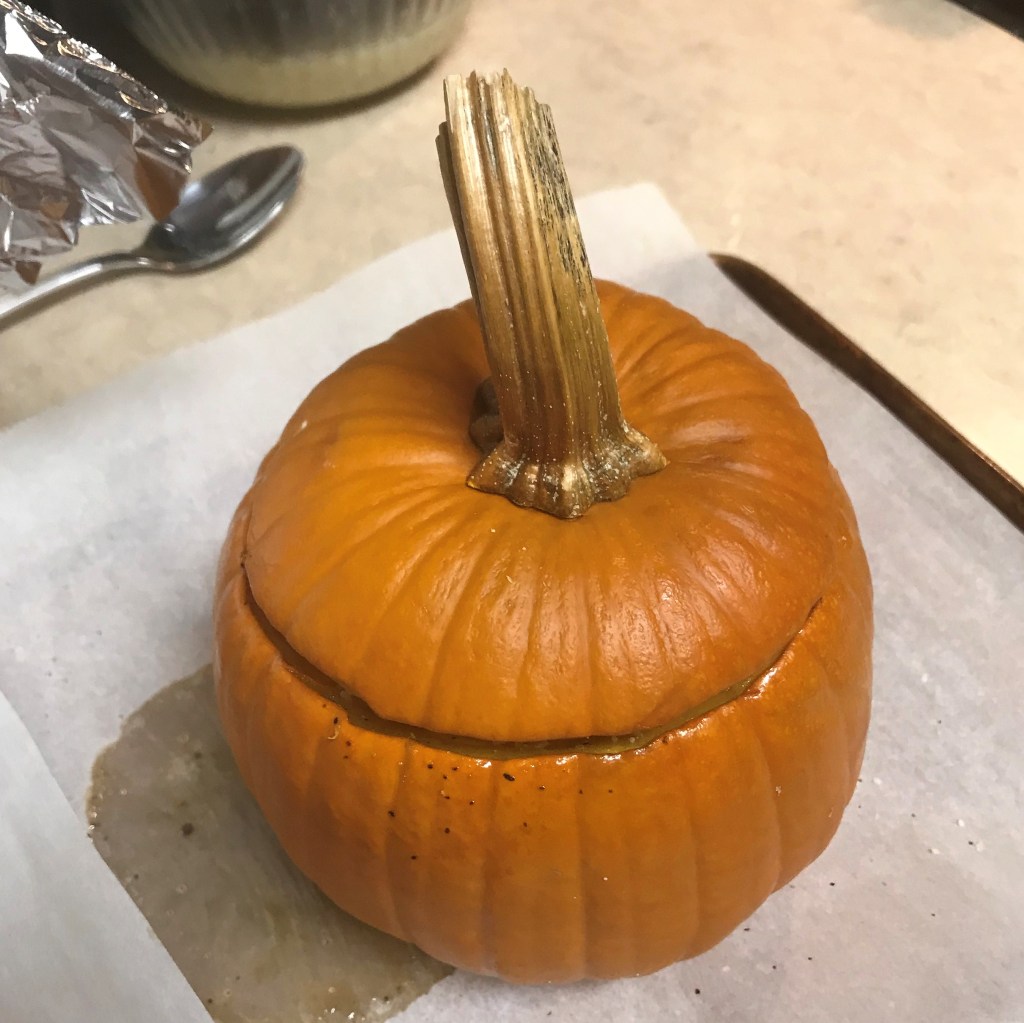
Spoon the savory mac and cheese into the pumpkin, and press to pack it completely tight. Sprinkle the top with parm-romano blend, then replace the lid.
Is this the cutest thing? I covered the stem with foil again and baked it for about 45 minutes.
This turned out even better than I imagined!
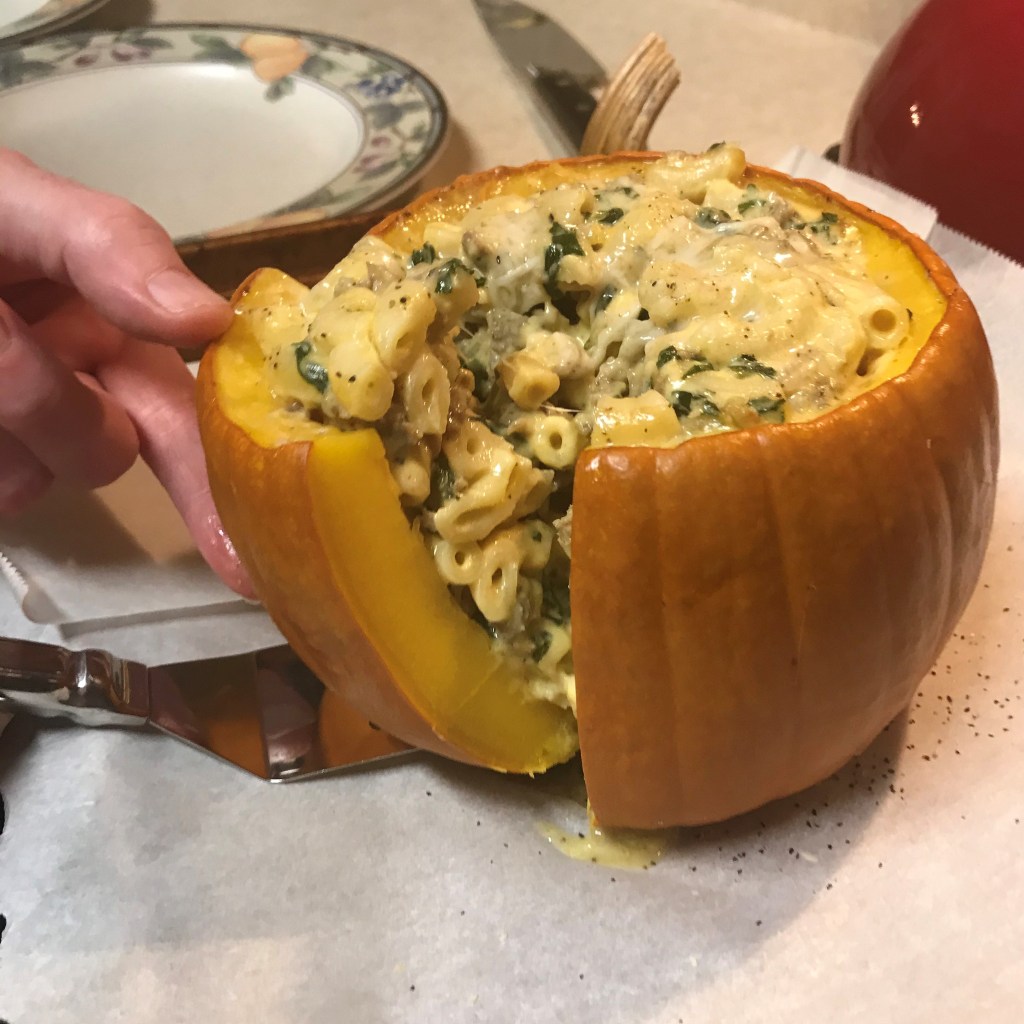
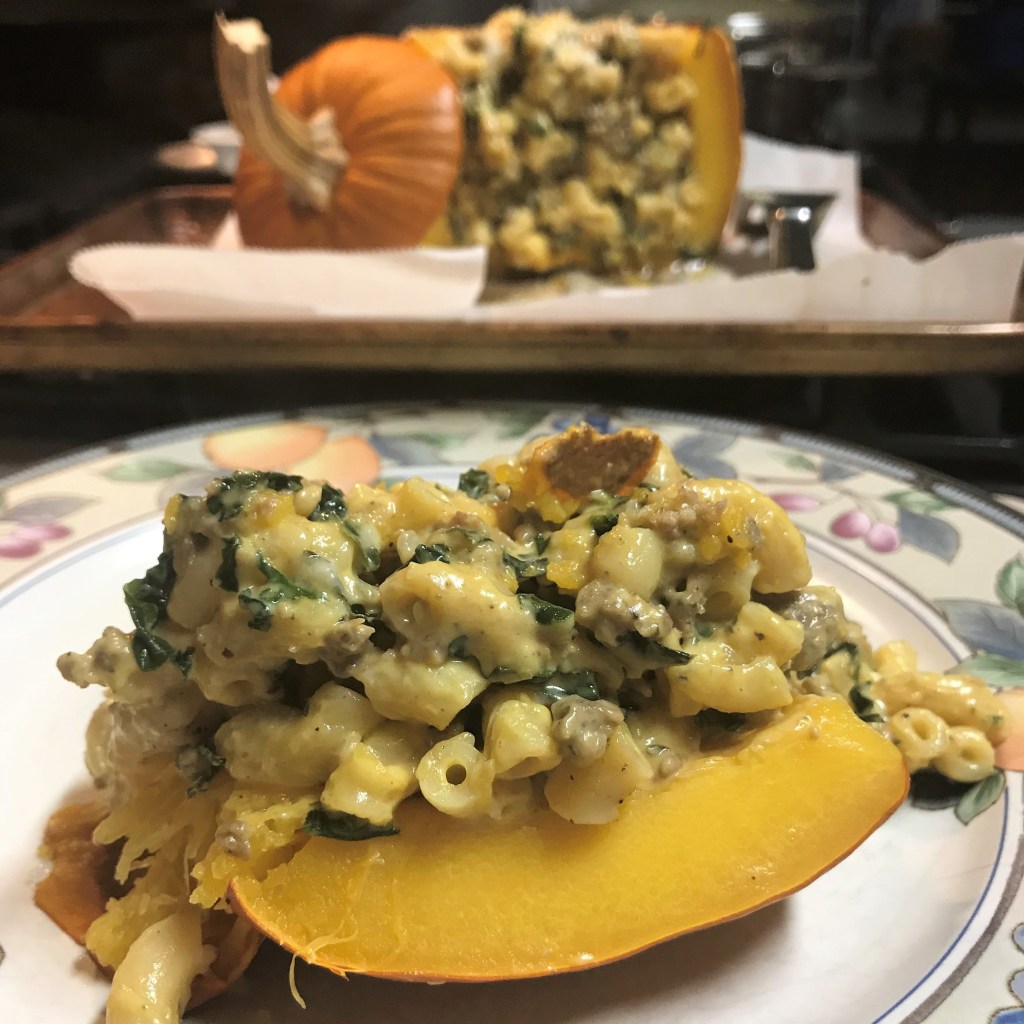
The pumpkin was easy to cut, just like an acorn squash. We served our masterpiece in wedges.
The extra sauce in the mac and cheese has enrobed every single bite, and the gruyere was an excellent choice to accompany the sage and pumpkin.
The stuffed pumpkin went back into the 350° F oven. It roasted for about 45 minutes, then I turned off the oven and left it alone while we finished a Zoom call with friends. Honest to goodness, this turned out better than I dreamed it would. The flavor was exceptional, and it was so pretty and just plain fun!
This was creamy, satisfying, and absolutely brimming with savory fall flavors!
Want to make this fun fall recipe?
Follow the steps and instructions above, or download and print a copy for your recipe files.