Think of these as very grown-up candies! During the mixing step, it will seem a little bit like you’re making mortar—it’s sooo thick and gooey. But once you have shaped and chilled them, they’ll be wonderful. What I like about this recipe is that it doesn’t involve making ganache, which is an extra step of melting chocolate in heavy cream in a double boiler. Using pantry ingredients keeps it simple, but make no mistake—these itty bitty bites are still impressive. Unlike the ganache-style truffles, these have some texture to them, thanks to the graham crumbs and pecans.
This recipe makes about 24 bourbon truffles. They pack a pretty boozy punch so don’t serve them to children or non-drinkers.
Ingredients
1 cup dry toasted, unsalted pecan pieces
3/4 cup Kentucky bourbon, divided
2 sleeves graham crackers
1/2 cup dark cocoa powder, divided
1/2 cup powdered sugar, divided 1/4 cup Karo corn syrup (light or dark is fine)
Instructions
In a small bowl, pour about half the bourbon over the pecan pieces and let them relax (in a drunken stupor) for about 3 hours.
Break the graham crackers into pieces, pulse in a food processor or blender until they are fine crumbs. Transfer the crumbs to a large mixing bowl.
Preheat the oven to 325° F. Use a slotted spoon to remove the pecans from the bourbon and transfer them to a single layer on a baking sheet lined with parchment paper or silicone baking mat. Reserve the soaking bourbon. Bake the pecans until they’re dry and lightly toasted, about 12 minutes or up to 15 minutes (be careful not to burn). Cool, then chop finely or pulse in a food processor, but not to the point of powder. They should have a texture similar to panko crumbs.
Combine 1/4 cup each of the cocoa and powdered sugar in a small bowl or zip-top bag, and set aside for dusting the finished truffles.
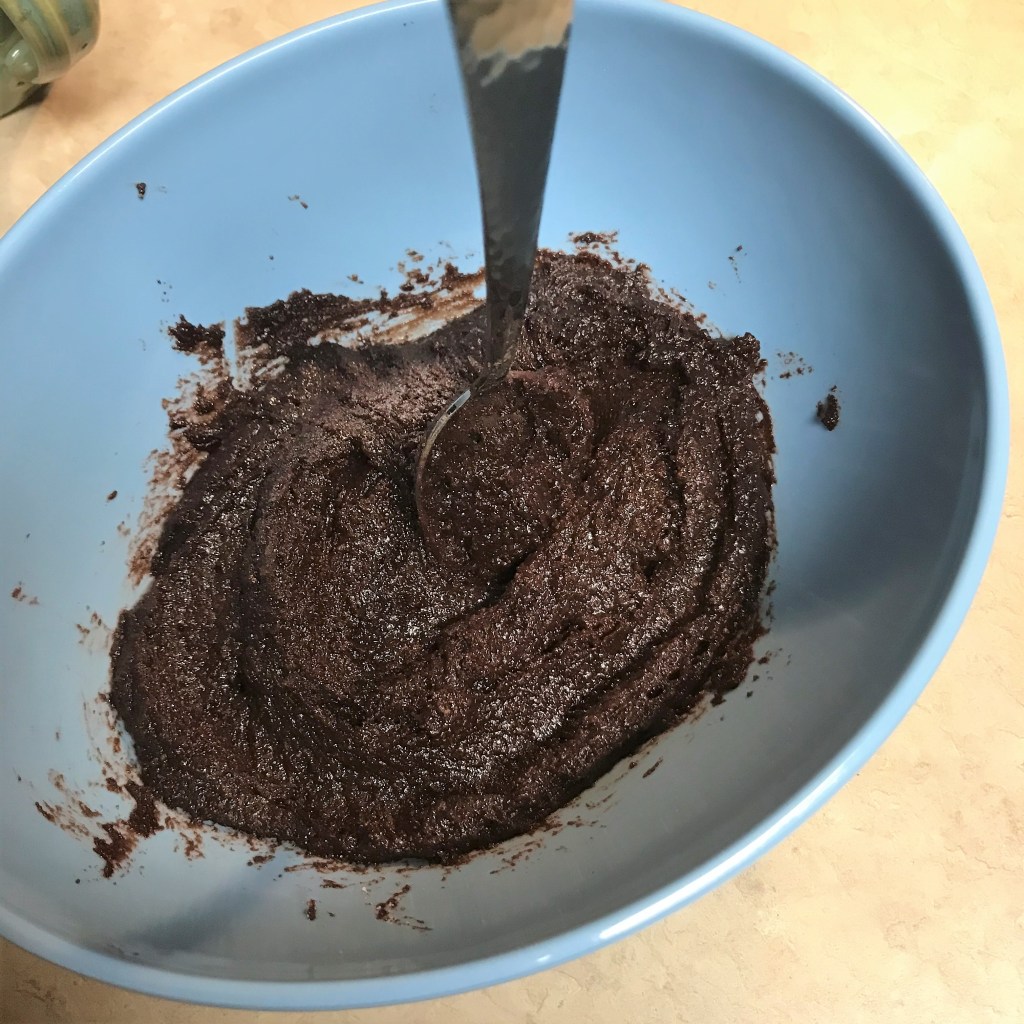
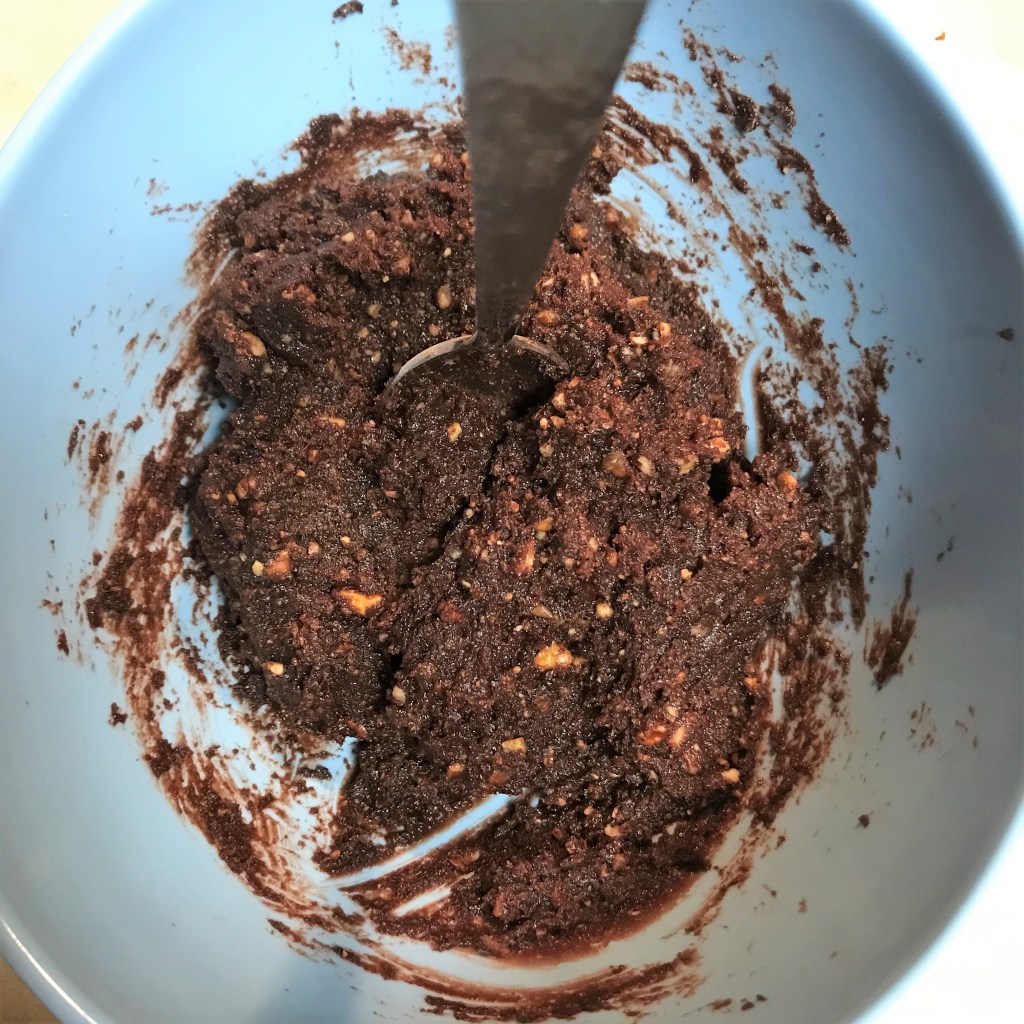
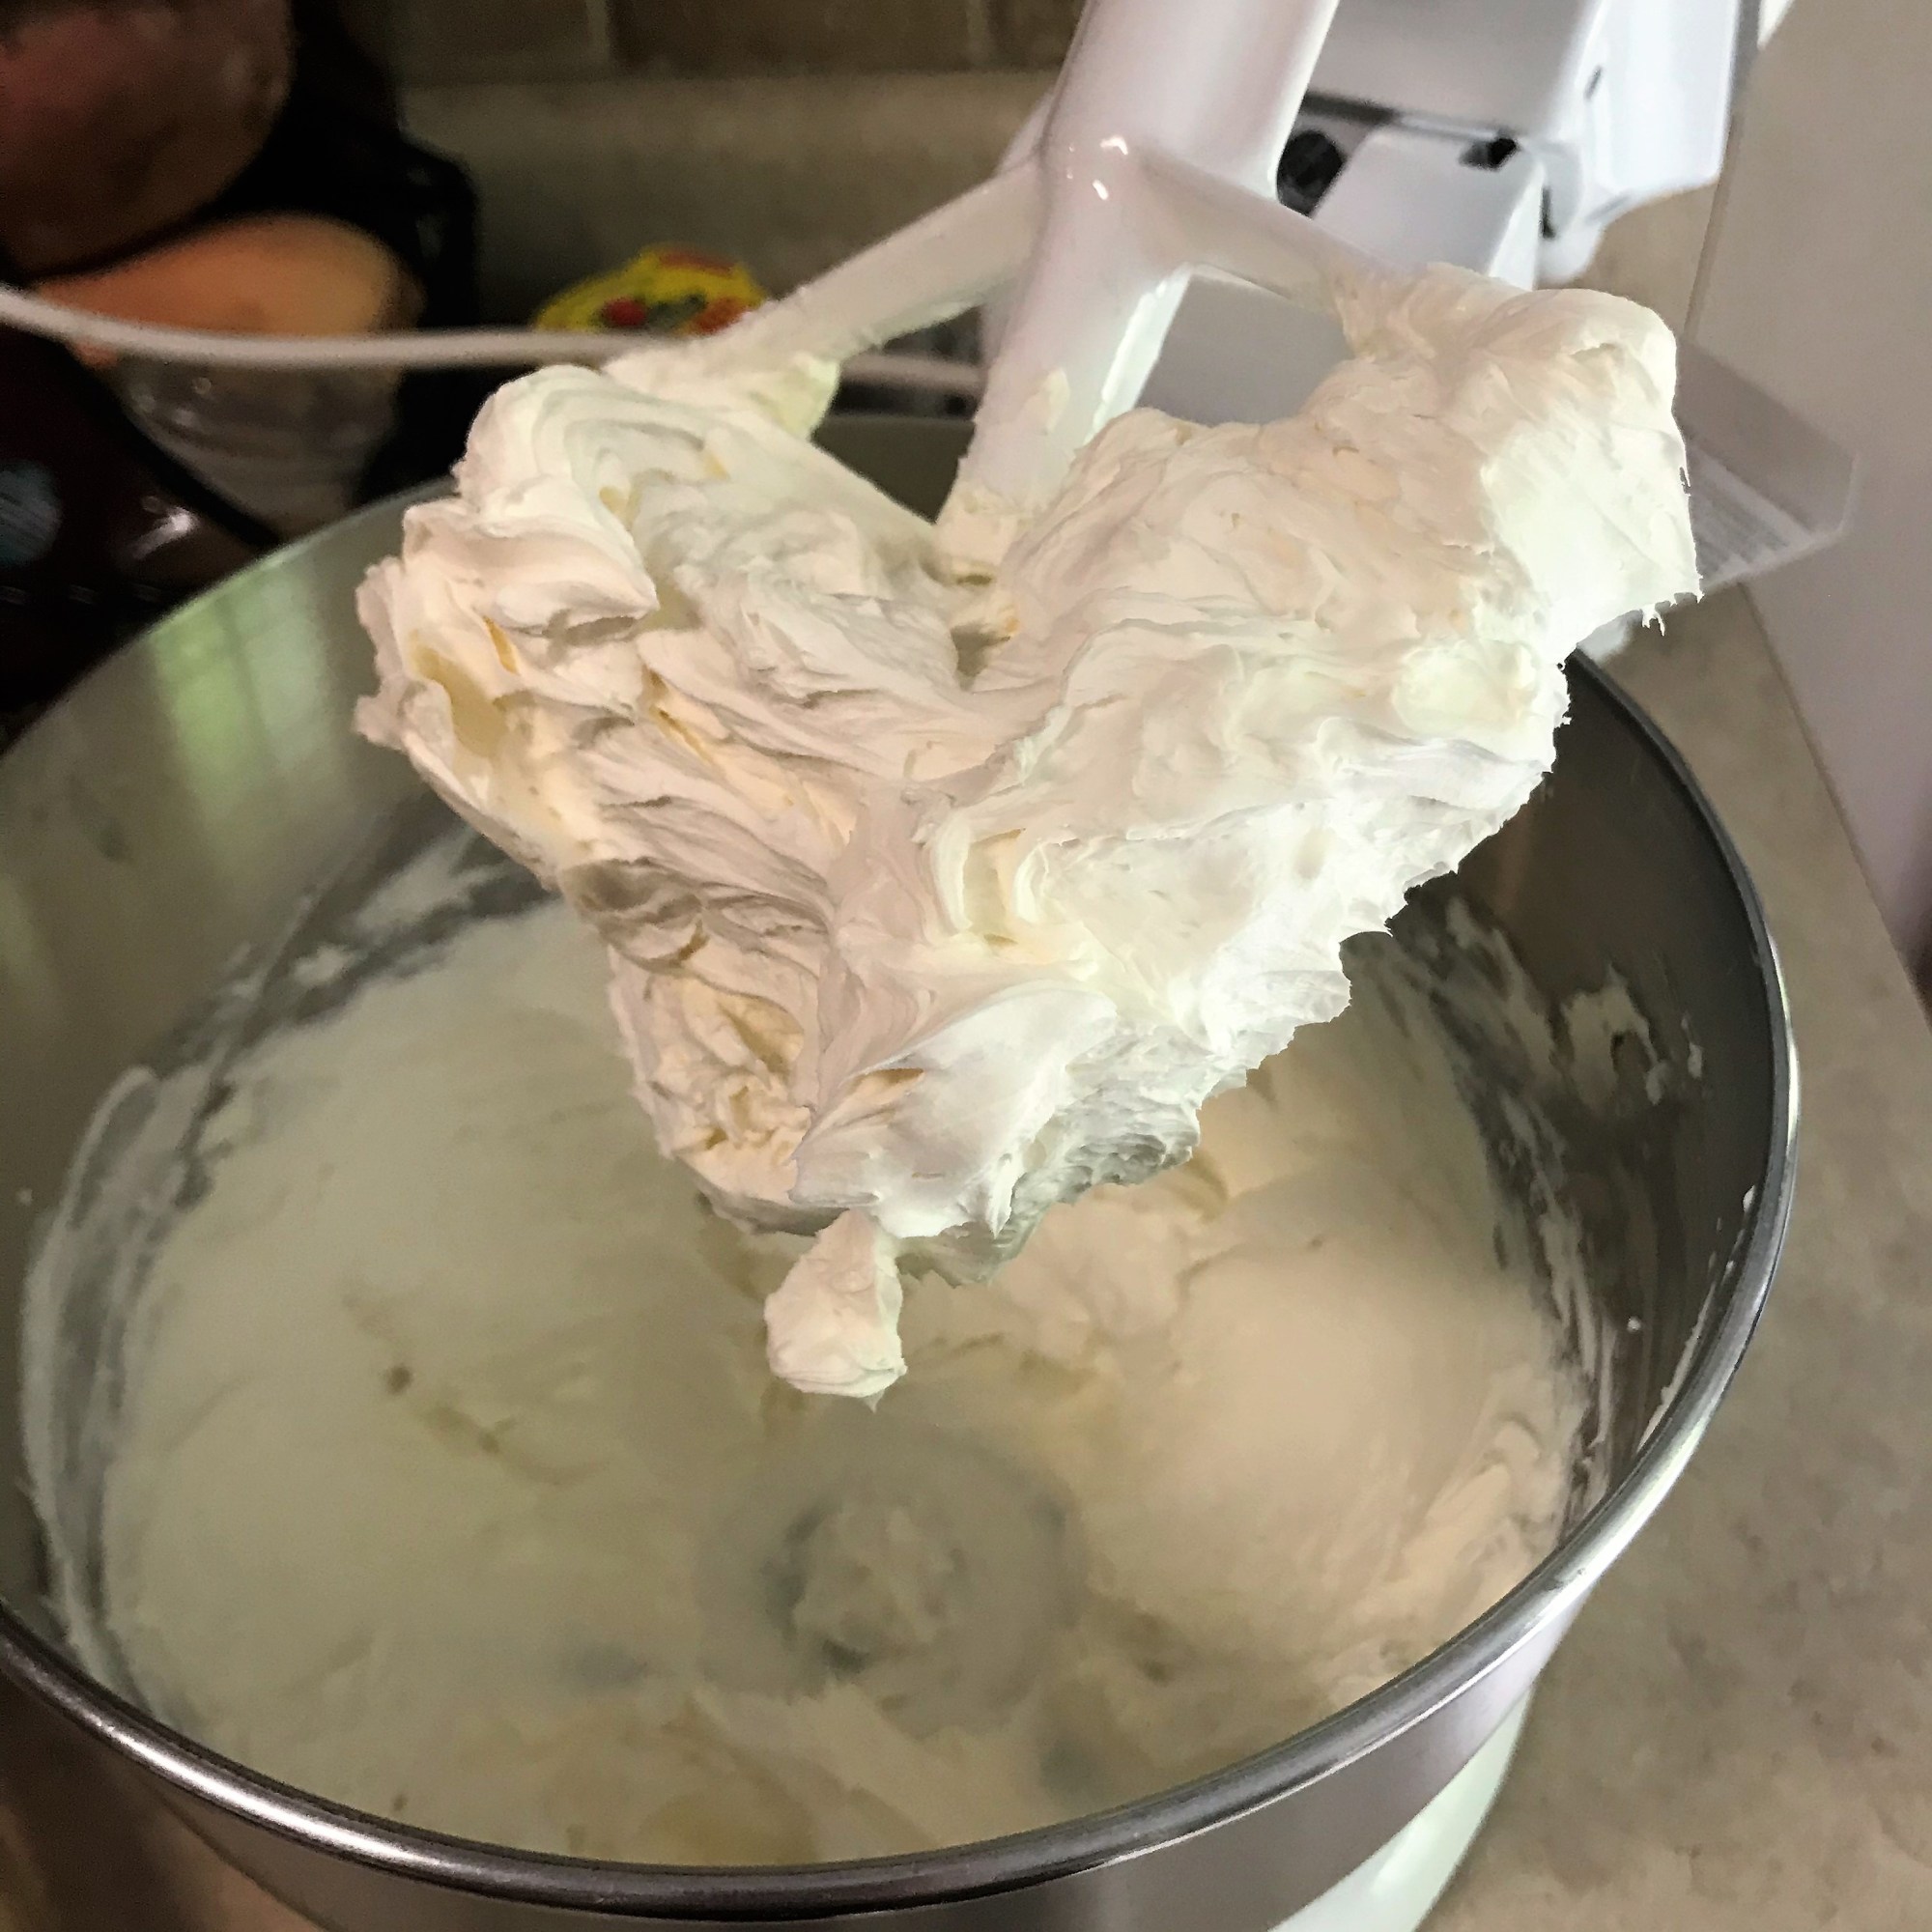
Add the chopped pecans, all remaining bourbon (including the soaking portion), corn syrup, and the remaining cocoa and powdered sugar to the bowl of graham cracker crumbs. Prepare to get messy. Stir these ingredients together until no dry pockets remain. It will be sticky and gooey, but keep going. When the mixture is fully blended, rub your hands with a little dab of butter and roll a heaping tablespoon at a time into a ball. Place the bourbon balls on a parchment-lined tray, cover with plastic and chill for about 2 hours.
Before and after addition of the pecans, this mixture is so thick, my spoon is standing on end!
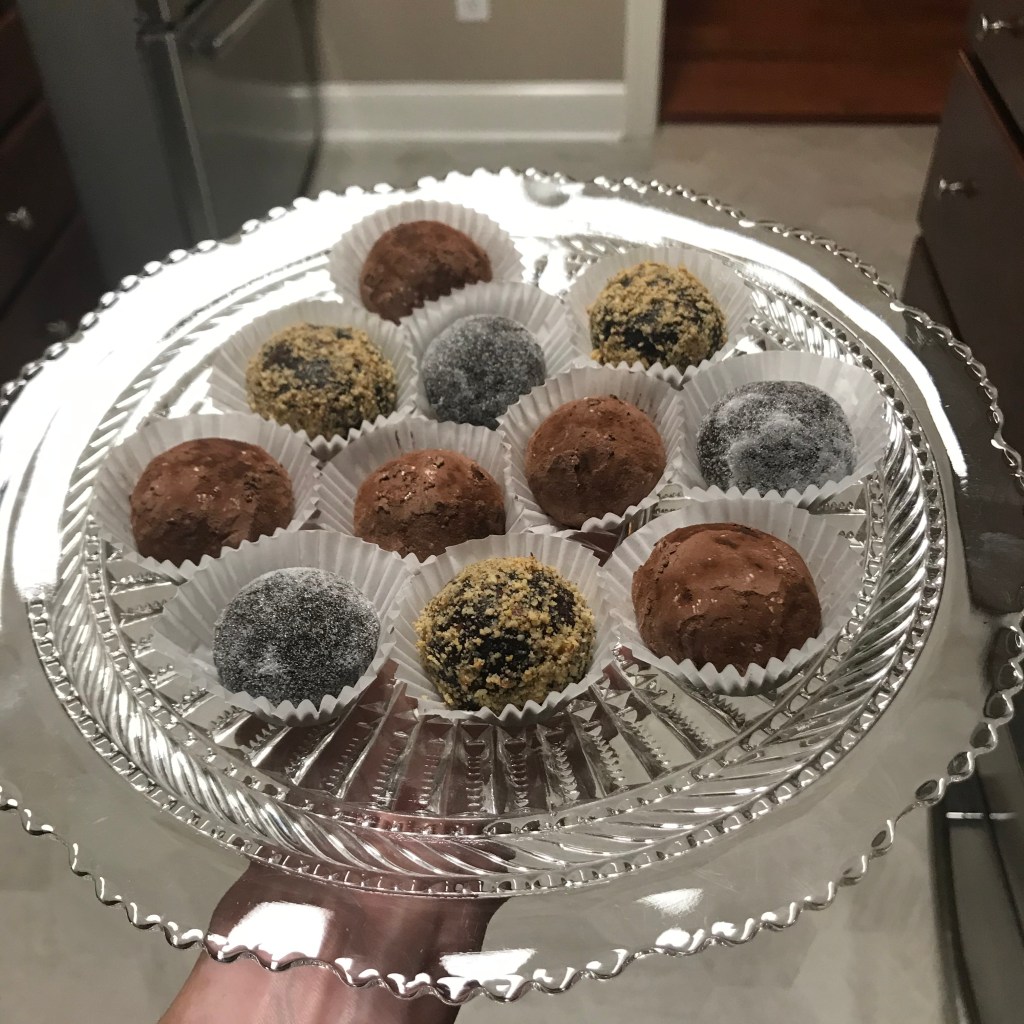
When balls are chilled and firm, gently roll them around in the reserved cocoa-sugar mixture until they’re well coated. Cover and chill again until ready to serve. If desired, give them another roll in the cocoa-sugar when you’re ready to present them. I think they’re cute in these little mini-muffin papers, and your guests will be able to pick them up without tongs.
Boozy truffle, anyone?
Elevate your happy, Comfort du Jour style!
I decided to make these Chocolate Bourbon Pecan Truffles even more impressive by rolling them in different types of coatings. Try doing a third of them in the cocoa-powdered sugar blend, a third in super-fine (caster) sugar and a third in finely chopped pecans. One recipe, but three treatments, gives the impression of variety but with very minimal extra effort.
The quintessential cocktail of the Kentucky Derby, the mint julep, is a mashup of bourbon, mint and sugar. A typical recipe for making one begins “muddle the mint leaves and sugar in the bottom of the glass,” but then the muddled mess never leaves the drink. I like the flavor of mint, but not the idea of mint shards floating around in my cup. And if it should get stuck on my teeth? No thanks!
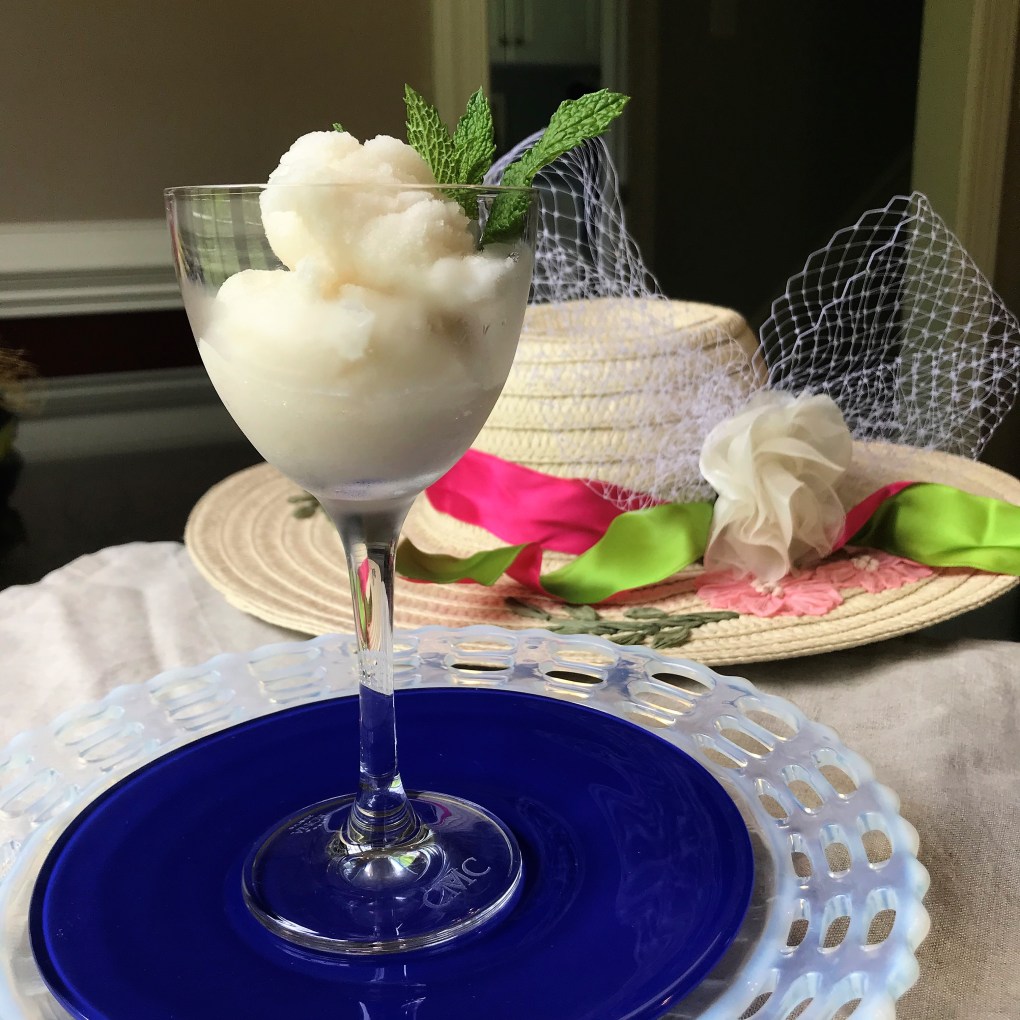
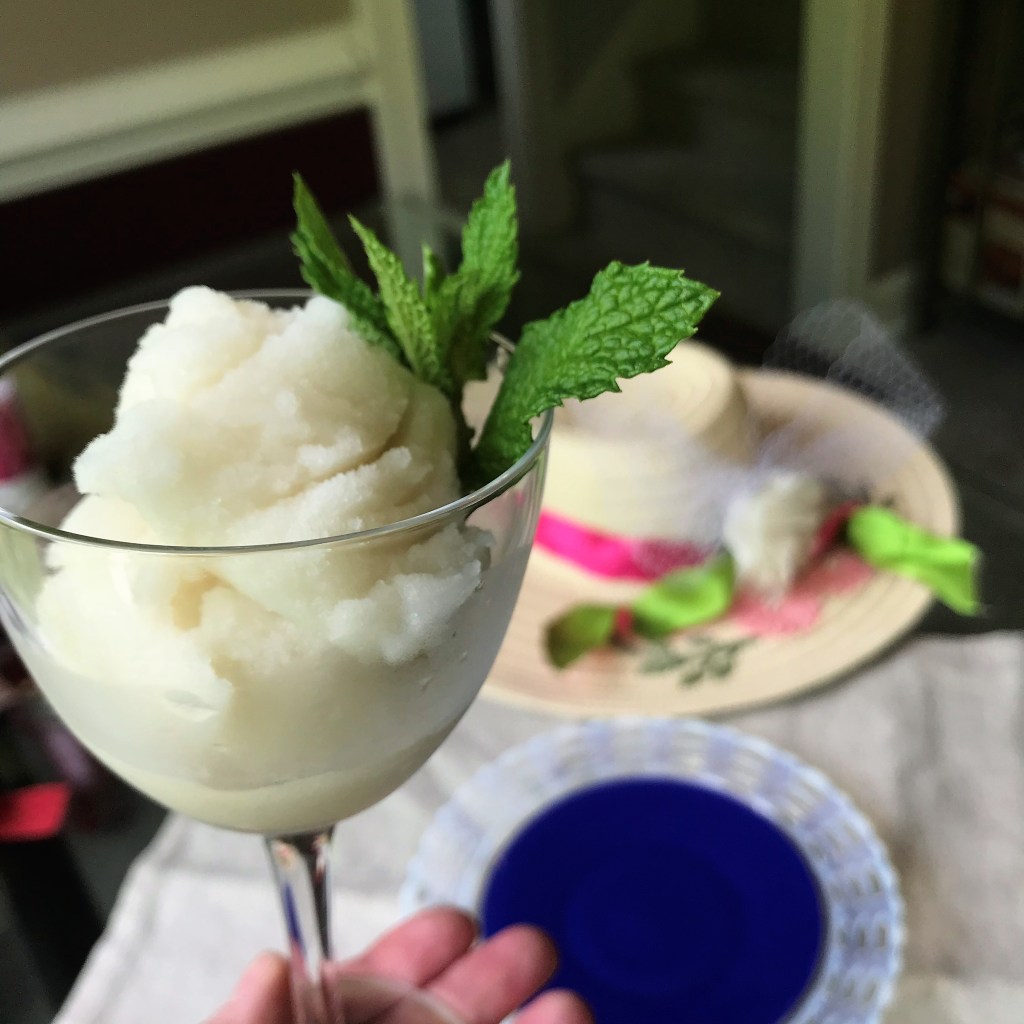
We are ending our Kentucky Derby party (preview though it is) with the taste of mint julep on our lips, with an ultra-refreshing sorbet, made of nothing more than mint, thin simple syrup (sugar and water) and bourbon. Yep, just four simple ingredients, and you can make this as much as a week ahead and enjoy it on your schedule.
Note that the simple syrup is a 2:1 ratio, different from the syrup we used in the cocktails. If you don’t have an ice cream maker, don’t despair—I’ve included an alternate method that requires only a freezer-safe container and a fork.
This “dessert” is really more of a palate cleanser, just a small sweet bit of lightly boozy refreshment after the rich foods of the day. Recipe will yield about 6 servings. Enjoy!
Ingredients
Handful of organic fresh mint (about 1 oz.) 2 cups filtered water 1 cup cane sugar 1/2 cup bourbon Up to 1 cup unflavored seltzer water (or a subtle flavor such as lemon)* Additional fresh mint for garnish
Gently rinse the fresh mint in cool water, remove heavy stems and set aside on paper towel.
Instructions
Place a small saucepan over medium heat and add the bourbon. As you know, alcohol doesn’t freeze completely, so we are going to evaporate some of the alcohol out of the bourbon, thereby concentrating its flavor. Allow it to come to a very slight boil, then reduce heat to low and simmer until it’s reduced by half. You can check this by pouring the reduced bourbon into a glass measuring cup—you should end with 1/4 cup or slightly less. Pour into a large glass jar and cool completely, then put it into the fridge.
Rinse the saucepan and combine water and sugar over medium heat. Bring it to a light boil, then turn off the heat. Add the mint leaves and steep for a couple of hours until completely cooled. Strain and discard mint, add syrup to the jar of reduced bourbon and refrigerate.
To freeze the sorbet in an ice cream machine, combine syrup and seltzer, then add the mixture all at once and freeze according to manufacturer’s instructions, which is probably about 20 minutes. Transfer to a freezer-safe covered container and freeze several hours or overnight. It will still be pretty soft when you finish the blending, but the deep freeze will firm it up a bit more.
No ice cream machine? No problem—combine the syrup and seltzer in a freezer-safe container (something wide and shallow works best), cover and freeze about 2 hours. Use a fork to scrape through it and “fluff” it up, then freeze another 2 hours (repeat again as needed until it’s as slushy as you like. Or, wait until it’s fully frozen, scoop mixture into a blender or processor and blend until smooth, then re-freeze until ready to serve. This will allow you to incorporate some air into the sorbet.
*This is a very sweet sorbet recipe. If you prefer a lighter essence, combine frozen sorbet with up to a cup of very cold seltzer water in a food processor and return to the freezer. The bubbles in the seltzer will help incorporate air into the sorbet for even freezing.
To serve, scoop sorbet into a small glass dish or shallow cocktail glass, and garnish with a fresh sprig of mint.
This refreshing treat is best enjoyed whilst wearing a fancy hat.
If you love hummus, but not the price of a small container, this recipe is for you. With only a few simple ingredients, and a processor or blender, you can make delicious hummus at home. I’m finding this a great way to use some of the extra garbanzo beans I purchased when the shelter-in-place rules went into effect.
The biggest difference I’ve found between grocery store hummus and the homemade variety is the texture; my homemade always leaned toward the grainy side. I searched on Pinterest and found the guaranteedbest method for creating smooth, silky hummus (because literally everyone on Pinterest makes claims like that). It involved heating the beans with a small amount of baking soda to loosen the skins so they could be removed. I love little tips like that! So I tried it. An hour and a half later:
The pile of peels was almost as large as the pile of beans!
Seriously. So we’re not doing that today. I dug deeper and tried a few other tricks, and I have some good news to share: the trick to making silky smooth hummus is heating the beans in their liquid before processing them, and having patience with the processing. Follow along, and you’ll be successful. This recipe makes about 2 cups of hummus; flavor variations are suggested at the end.
Ingredients & Tools:
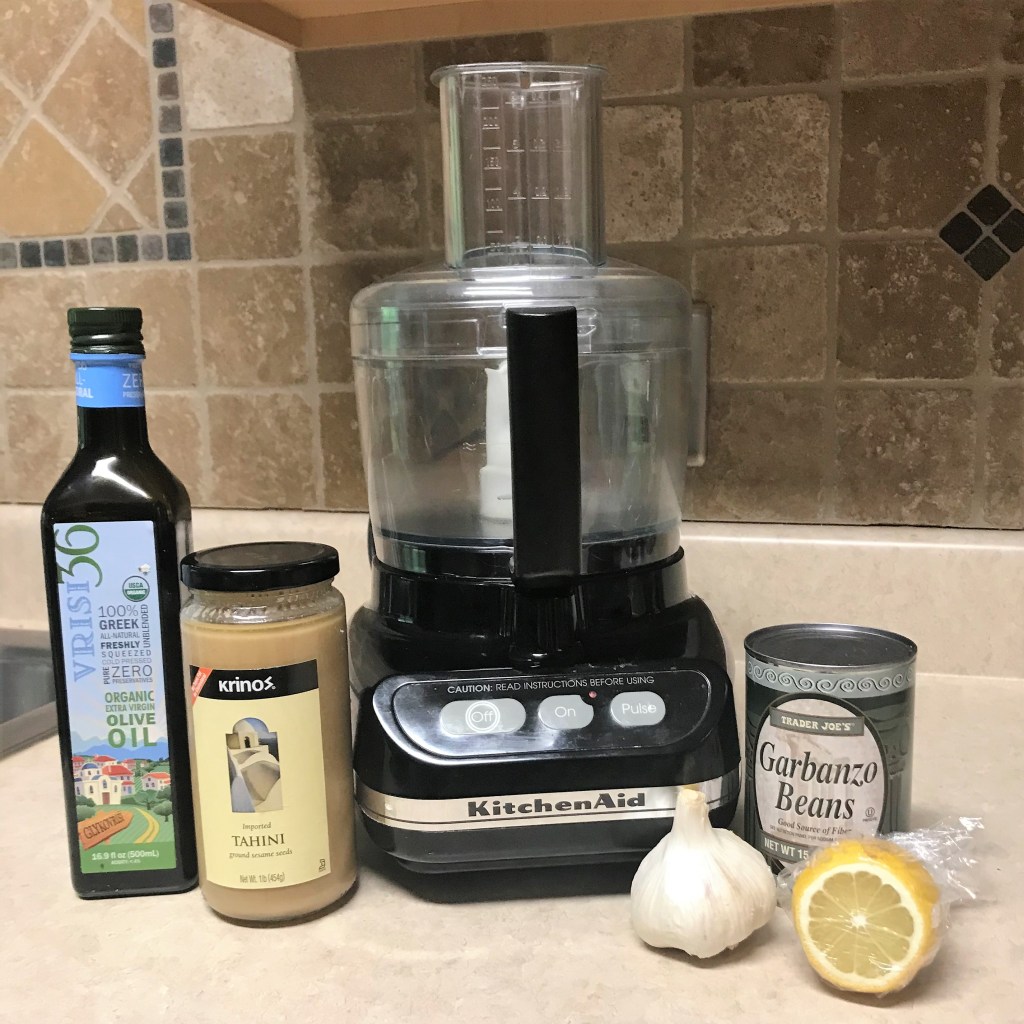
1 can (15 oz.) garbanzo beans, with minimal additives (ideally, just beans, water and salt) 2 Tbsp. tahini* (see note below) 1 to 2 cloves chopped fresh garlic (should measure about 1 Tbsp.) 2 to 3 Tbsp. extra virgin olive oil (if you have some of the premium stuff, this is a good recipe to use it!) Juice of half a small lemon Kosher or sea salt to taste
Food processor or blender (you need one or the other to make this) Small saucepan for heating beans Measuring cup with spout for drizzling liquid into processor Citrus squeeze juicer (helpful, but not necessary)
*Notes
Tahini is essentially a paste made of ground sesame seeds. It has a mild nutty flavor and sticky texture, like a thin peanut butter. In a pinch, if you don’t have tahini, you could use a natural, unsweetened peanut butter as a substitute. But if you pick up tahini on your next essentials run, I promise I’ll help you use it!
Instructions:
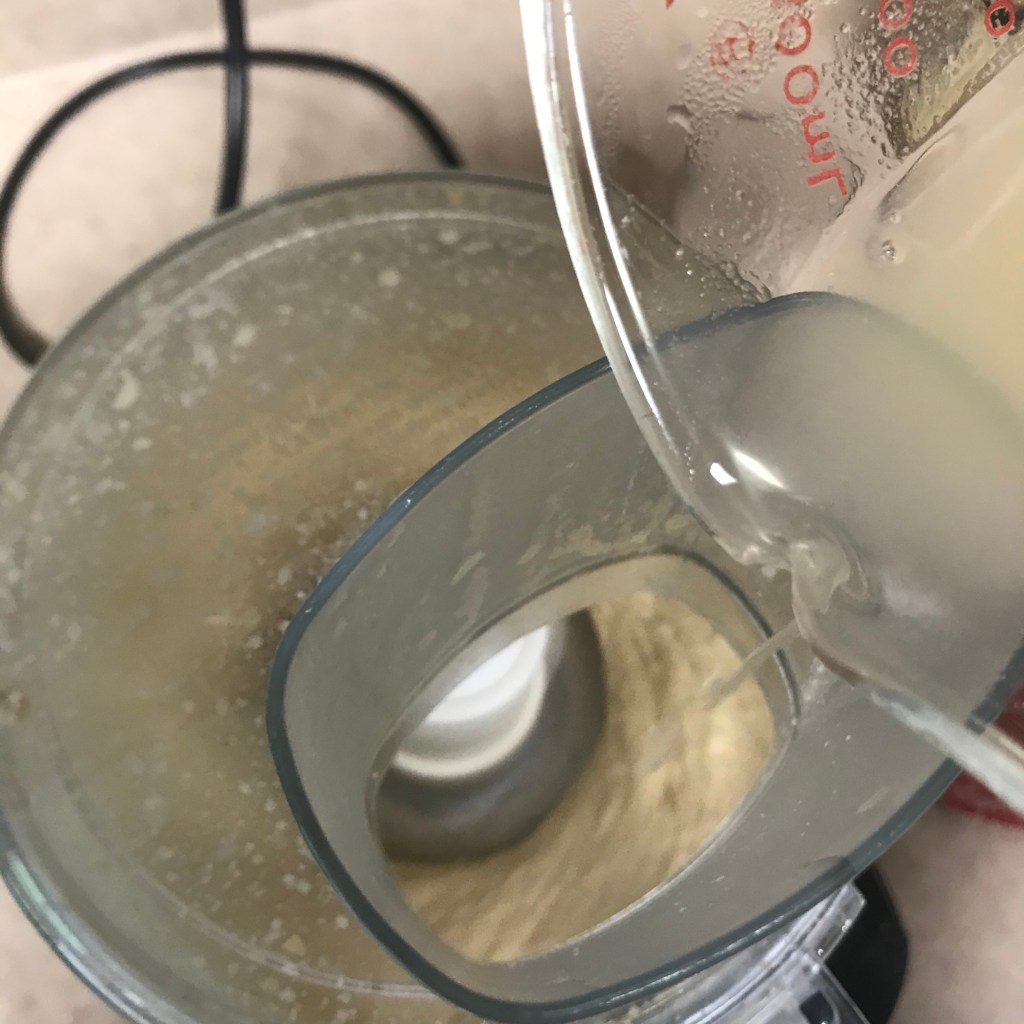
Warm beans and liquid in small saucepan over medium-low, until simmering and heated through.
Drain beans, reserving the liquid in a measuring cup with pour spout.
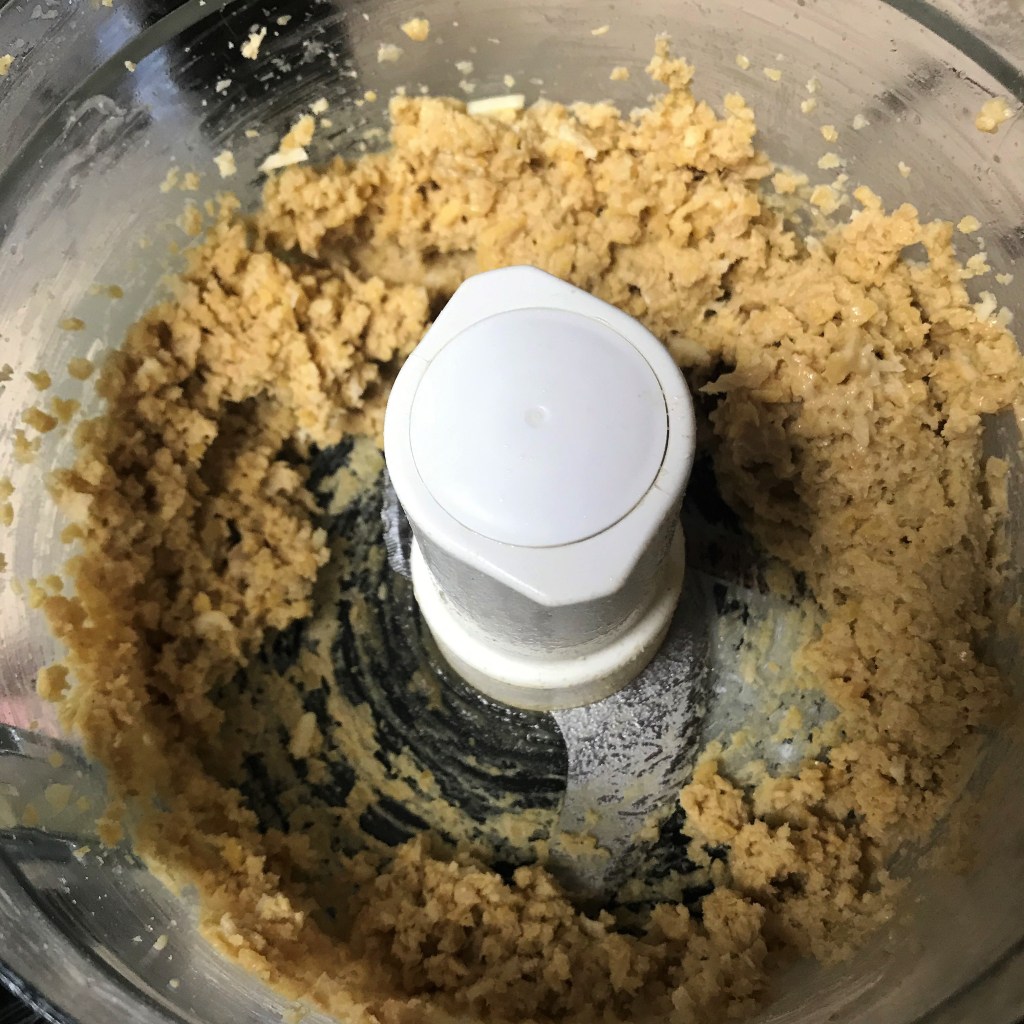
Empty all the beans, tahini, chopped garlic and about 1 Tbsp. bean liquid into the processor bowl, and pulse 5 times for about 3 seconds each time. The mixture will be sticky and clumpy, but that’s OK.
Add another tablespoon of liquid and pulse 5 times again. Use a rubber spatula to scrape the mixture down into the processor bowl, then replace the cover and turn on the processor to run continuously.
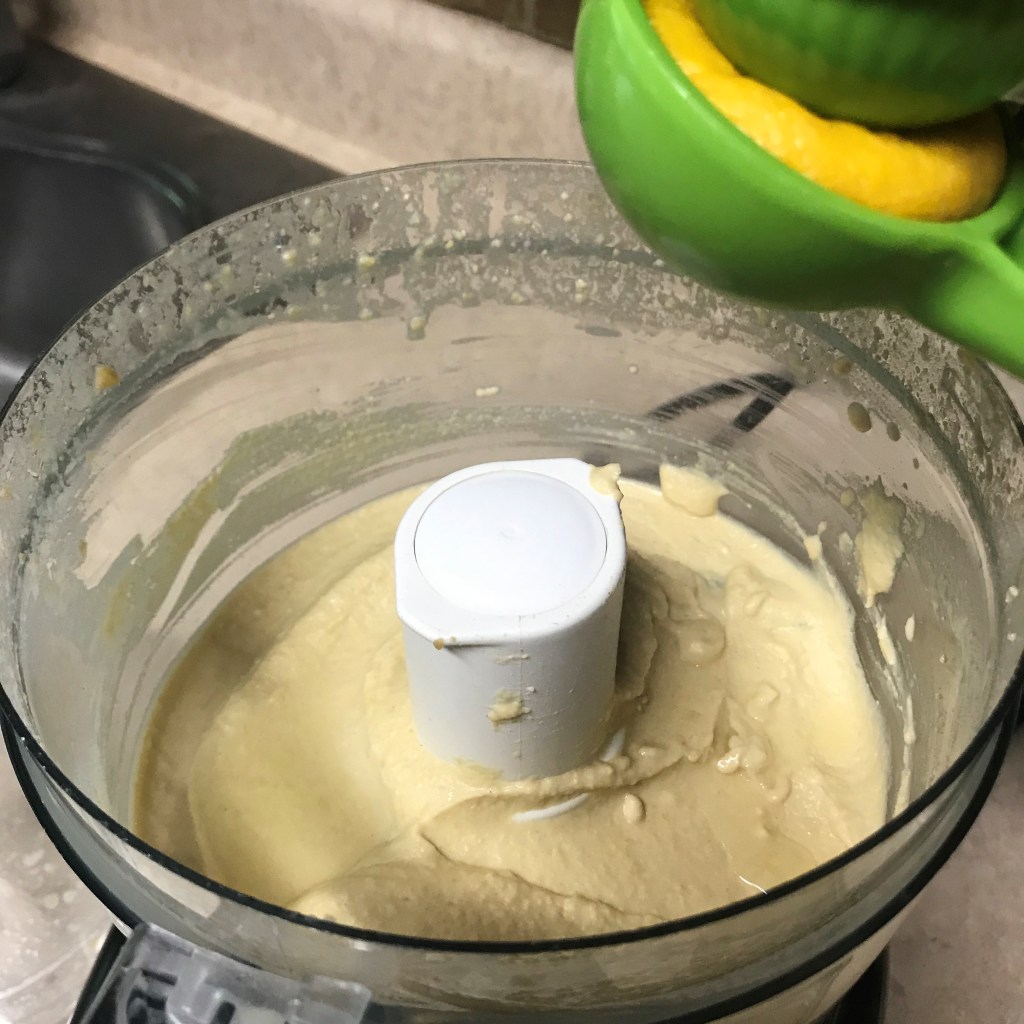
With the processor running, slowly drizzle 2 Tbsp. of the olive oil into the mixture (or more if you like a more intense olive oil flavor). Stop and scrape down again, and then process again, slowly streaming more of the warm bean liquid into the garbanzo mixture until you achieve the desired smoothness and consistency. Keep in mind the mixture will firm up a bit when chilled.
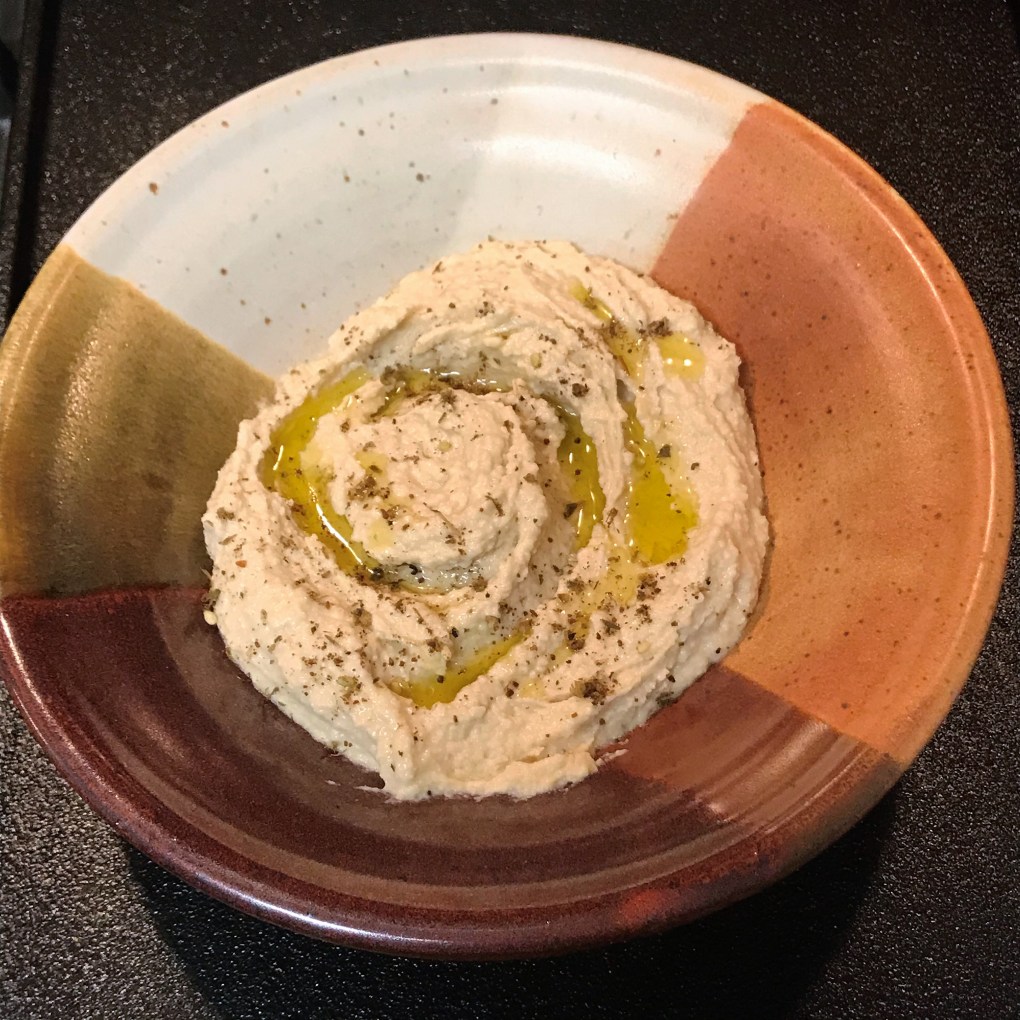
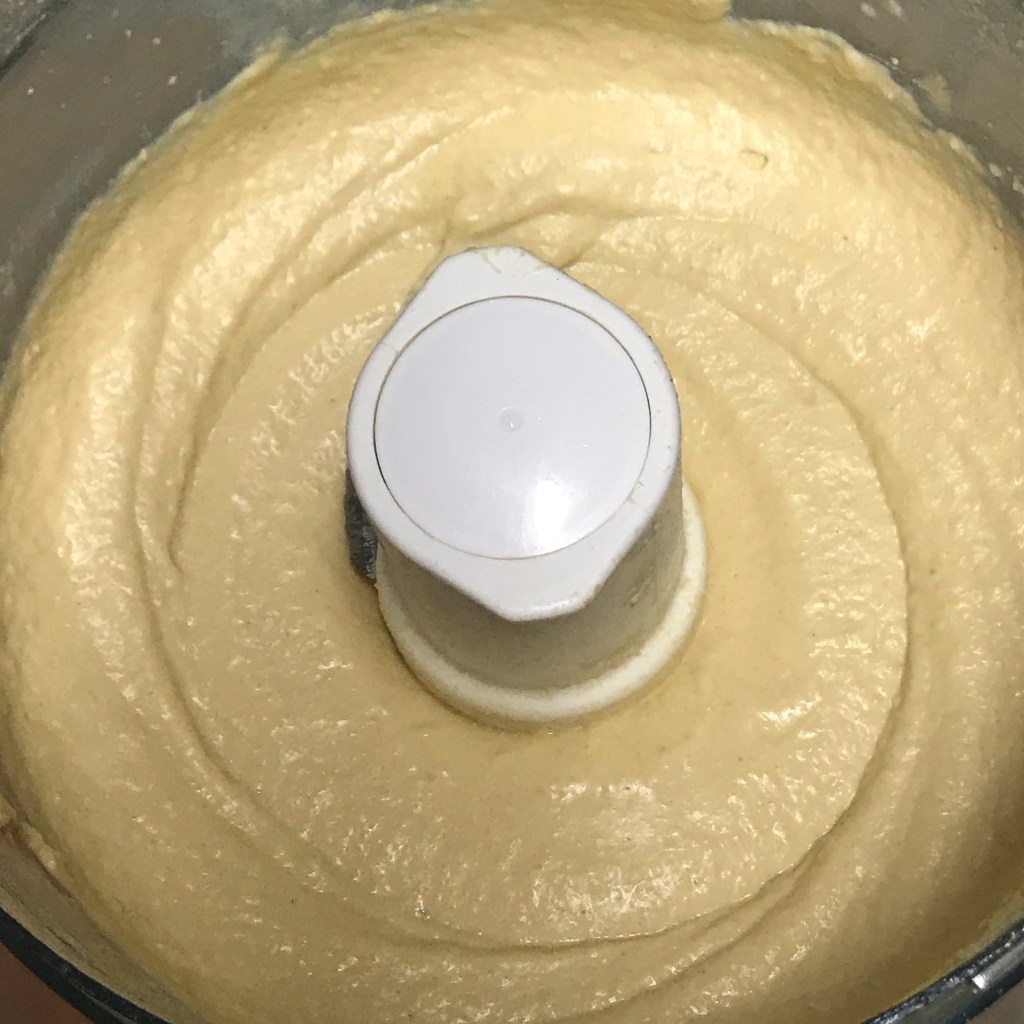
When you’ve reached the desired consistency, turn off processor, squeeze lemon juice into the hummus and pulse a few times to blend; add sea salt to taste. Transfer the mixture to a covered container and chill a few hours until ready to serve.
A food processor is one of the most helpful tools in my kitchen. And as you can see, the ingredients for making easy hummus at home are pretty basic.
With minimal liquid, the processed bean mixture will look rough like this; it’s okay though, because you’re just getting started.
A steady, slow drizzle is what you’re going for in this stage of mixing. You’ll do this with both the olive oil and the warm bean liquid. Keep watch as you go, and stop as needed to scrape down the hummus mixture from the sides of the bowl.
I love these citrus squeezers; it’s the best way to extract the most juice without dropping seeds into your recipe. Here’s another tip: press and roll your lemon on the counter or cutting board before halving and squeezing.
Perfectly smooth and delicious; remember that the hummus will firm up a bit in the refrigerator, so if it seems little thin, don’t worry.
Hummus is a healthful and versatile snack. Enjoy it as a dip with fresh cut vegetables, crackers or pita bread, and even as a sandwich spread in place of mayo. Below are some of our favorite hummus flavor variations. Each recipe begins the same as the simple recipe above; for smooth texture, add mix-ins earlier in the recipe. For more distinct chunks, add them later.
Hummus Flavor Variations
Artichoke and garlic
Use about 5 to 6 artichoke heart quarters with the base recipe; I usually do a rough chop on them before adding to the garbanzo mixture. If your artichoke hearts are marinated in oil and herbs, use less olive oil in the blending step of the recipe.
Roasted red pepper
Use amount equivalent to one bell pepper, either roasted at home or purchased. If they’re packed in oil, use less olive oil in the blending step of the recipe. I like to add sweet or hot smoked paprika for an extra flavor punch.
Sun-dried tomato
Use 5 or 6 pieces of tomato, rough chopped before adding. If they’re packed in oil, they’re good to go. If dried, plump them first in hot water or in the bean liquid you’ve drained. A little dried basil would be a nice complement to the flavor of the tomatoes.
Spinach
Sauté a generous handful of fresh spinach until fully wilted, or thaw (and squeeze dry) about 1/2 cup frozen spinach; add to bean mixture early to blend very smoothly.
Caramelized onion (slightly sweet)
Sauté a small onion in olive oil until very soft and golden in color; add to bean mixture at any point of the recipe (I like to add it later to retain some of the onion shapes).
Roasted beet (slightly sweet)
Purchase the roasted beets ready-to-go from the produce section. I usually buy them at Trader Joe’s, but have seen them in other stores as well. I don’t recommend canned beets because of the water content. About 3 small beets will be good; rough chop and add them early to the bean mixture. Finished hummus will be a lovely pink color.
White bean hummus
Use cannellini beans instead of garbanzos. Add fresh chopped or dried oregano; use slightly less bean liquid and oil. Cannellini beans have a creamy texture, and this hummus is very elegant and silky. Sprinkle with toasted pine nuts just before serving.
Black bean hummus
Use black beans instead of garbanzos. I like to throw lots of spice into this one; think chili and cumin spices, maybe even a small can of roasted green chiles. Rather than lemon juice, use red wine vinegar.
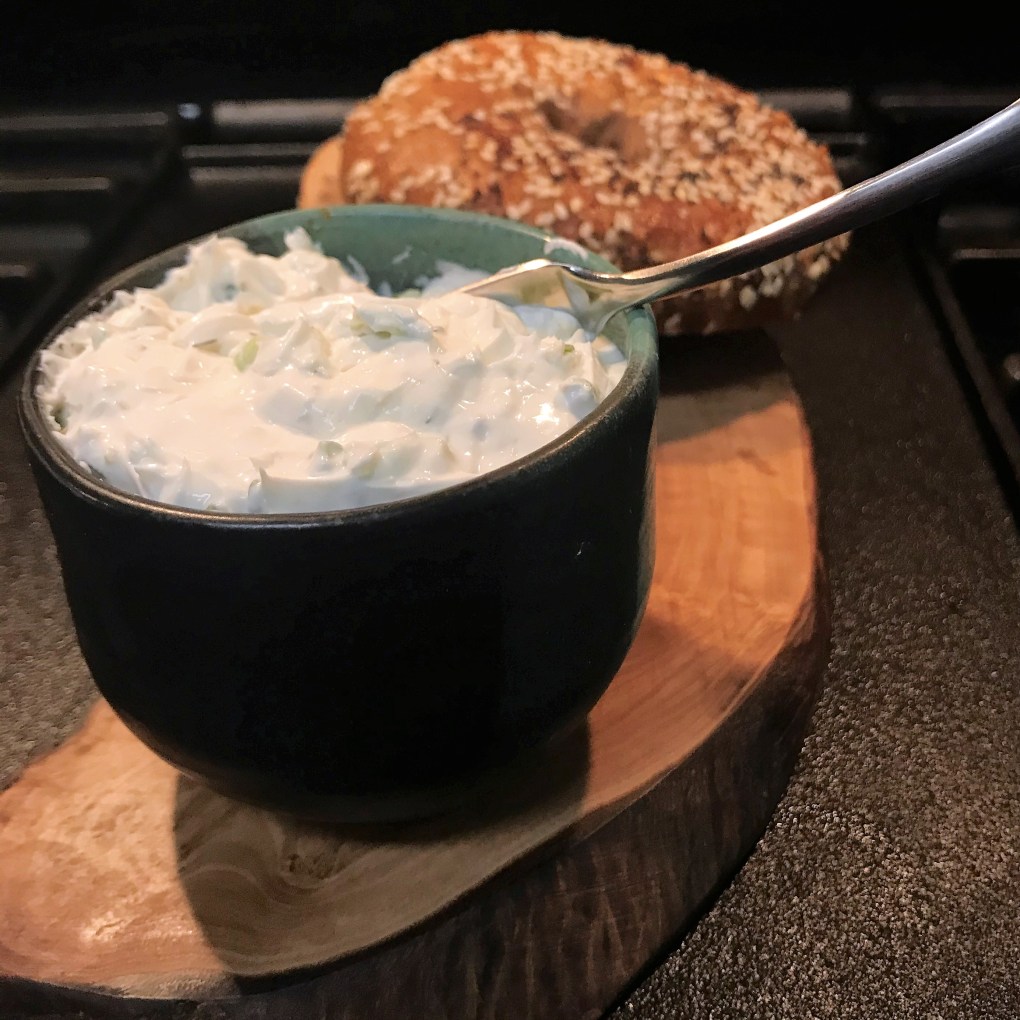
We eat a lot of bagels with lox at our house, and we like a little more pizzazz than just plain ol’ cream cheese. According to my husband, Les, “schmear” is the appropriate Yiddish word for bagel-worthy cream cheese, and it implies a smoother, spreadable consistency than what you get in the store-bought bricks. But the first time I did the shopping for us as a couple, I developed a serious case of sticker shock in the pre-made, spreadable cream cheese section. And for such a tiny container of it, not to mention that the “whipped” varieties are basically half cream cheese and half air!
It was pretty easy to replicate Les’s favorite, which is scallion cream cheese; to be fair, he says our homemade version is not only more economical, but also tastier. I love being able to customize the flavors, without a bunch of additives we can’t pronounce. My double-batch version here calls for plain Greek yogurt, but you could just as easily substitute sour cream. If you want a smaller amount, just reduce the ingredients by half. At the end, I’ve suggested additional flavor variations. I hope you find one you love!
Ingredients and Tools:
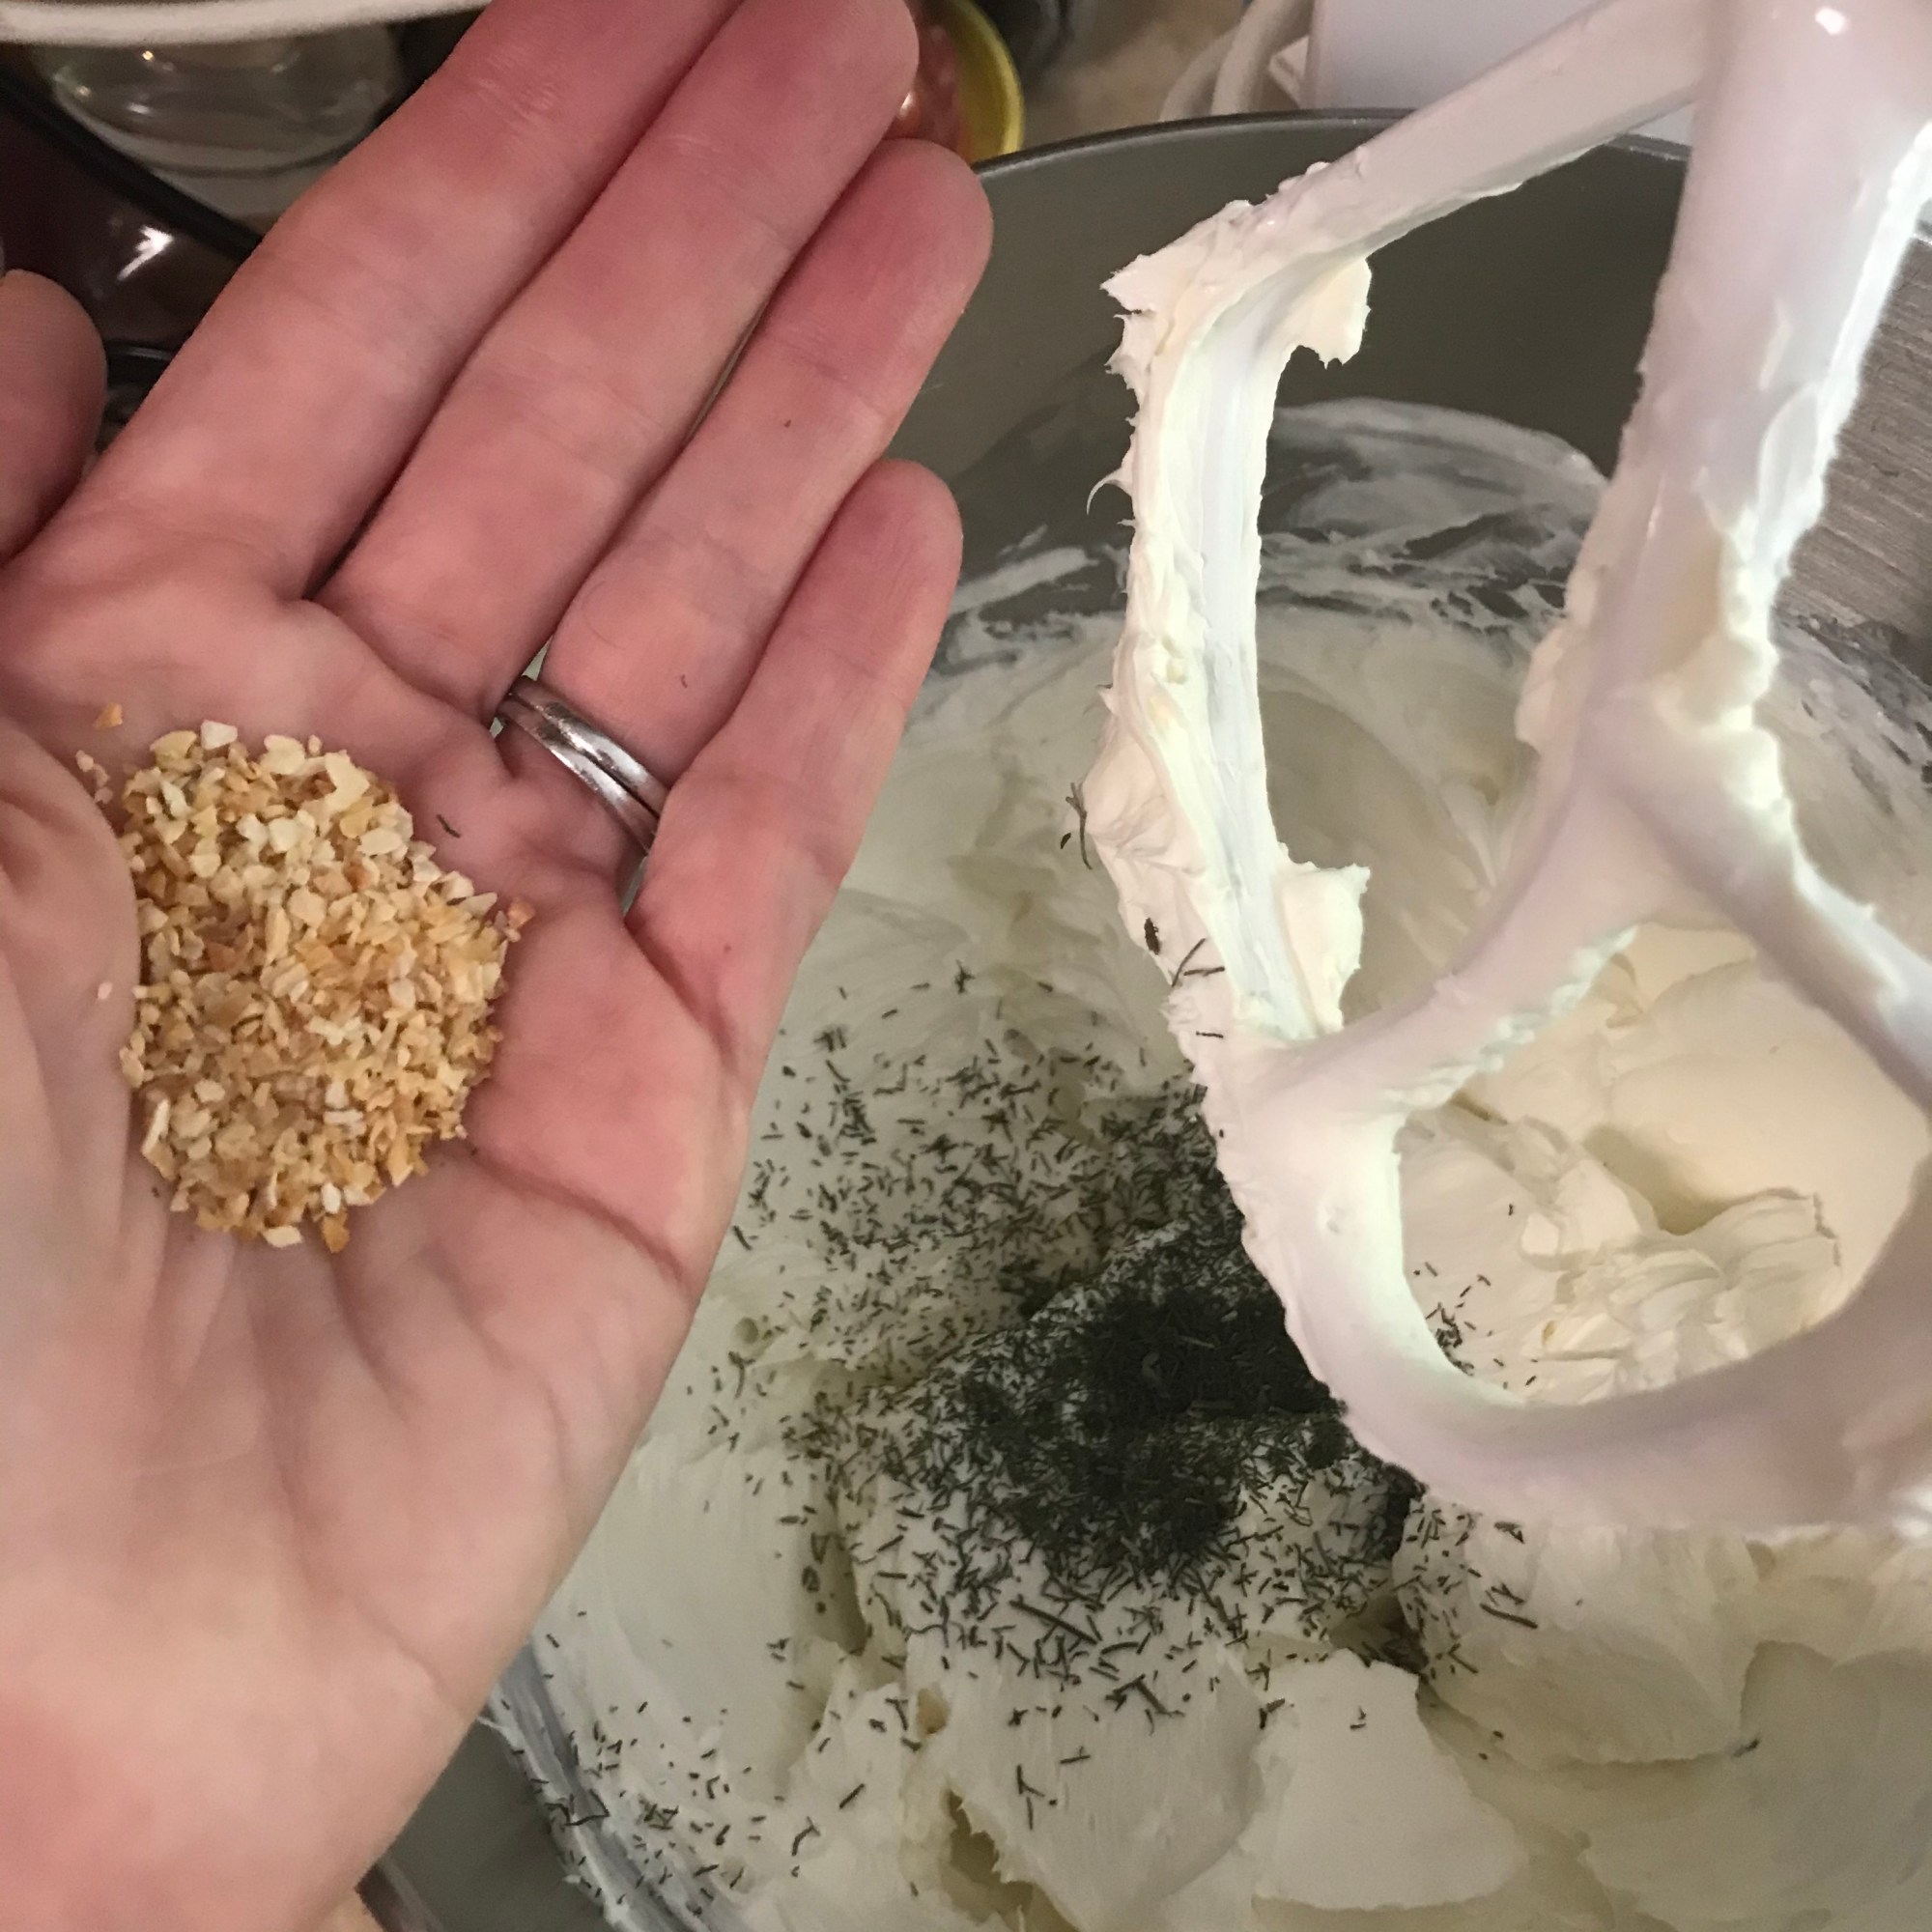
2 bricks (8 oz. each) regular or Neufchatel (reduced fat) cream cheese 1/4 to 1/3 cup plain Greek yogurt (whole or 2%) 1/2 tsp. dried dill 1/2 tsp. dried minced garlic 1 small bunch scallions (green onions), washed and trimmed, white and green parts sliced thin
Stand mixer or electric hand mixer, unless you have some serious guns to whip it by hand!
Instructions:
Put both packages of cream cheese into the mixing bowl, straight from the fridge. Whip the cream cheese by itself for about 1 minute, then add the yogurt (begin with 1/4 cup, add more as you like) and whip until blended. Stop a couple times to scrape down the sides and across the bottom of the bowl. When the whipped mixture has the appearance of cream cheese icing, add the dill and dried minced garlic and whip again just until blended.
Next, add all of the scallions; it may seem like a lot, but it’ll be just right once it’s mixed. Blend on a low speed until fully incorporated, then transfer to a covered bowl and refrigerate.
The dried garlic needs at least a few hours to soften and spread its flavor through the cream cheese. If you’re making this for something right away, I’d recommend scooping out what you need immediately before adding the garlic. Otherwise, you’ll have a few potent, crunchy bites. Les has taught me to adore this stuff, especially on a lightly toasted “everything” bagel. But we also use it in other ways—on crackers, as a spread on sandwiches and even slathered on the inside of a tortilla for breakfast burritos.
Want to elevate your happy, Comfort du Jour style?
Like so many things I make at home, cream cheese is a blank canvas just begging for interesting variations. Swap out the dill for any other dried herbs you like, but I’d suggest using them sparingly until you have a feel for the concentration of flavor—these herbs really open up after some time in the fridge. Mix in chopped pickled jalapeno, capers, sun-dried tomatoes, pepperoncini or olives, but blot them dry first on paper towels.
Prefer sweeter spreads? Skip and garlic and herbs; mix in 1 Tbsp. of powdered sugar along with 1/4 teaspoon cinnamon or 1/2 teaspoon vanilla, and fold in raisins, chopped toasted nuts or dried cranberries. Les would argue that sweet cream cheese is not “authentic” (you can’t take the NYC outta the boy), but I say make whatever makes you happy!
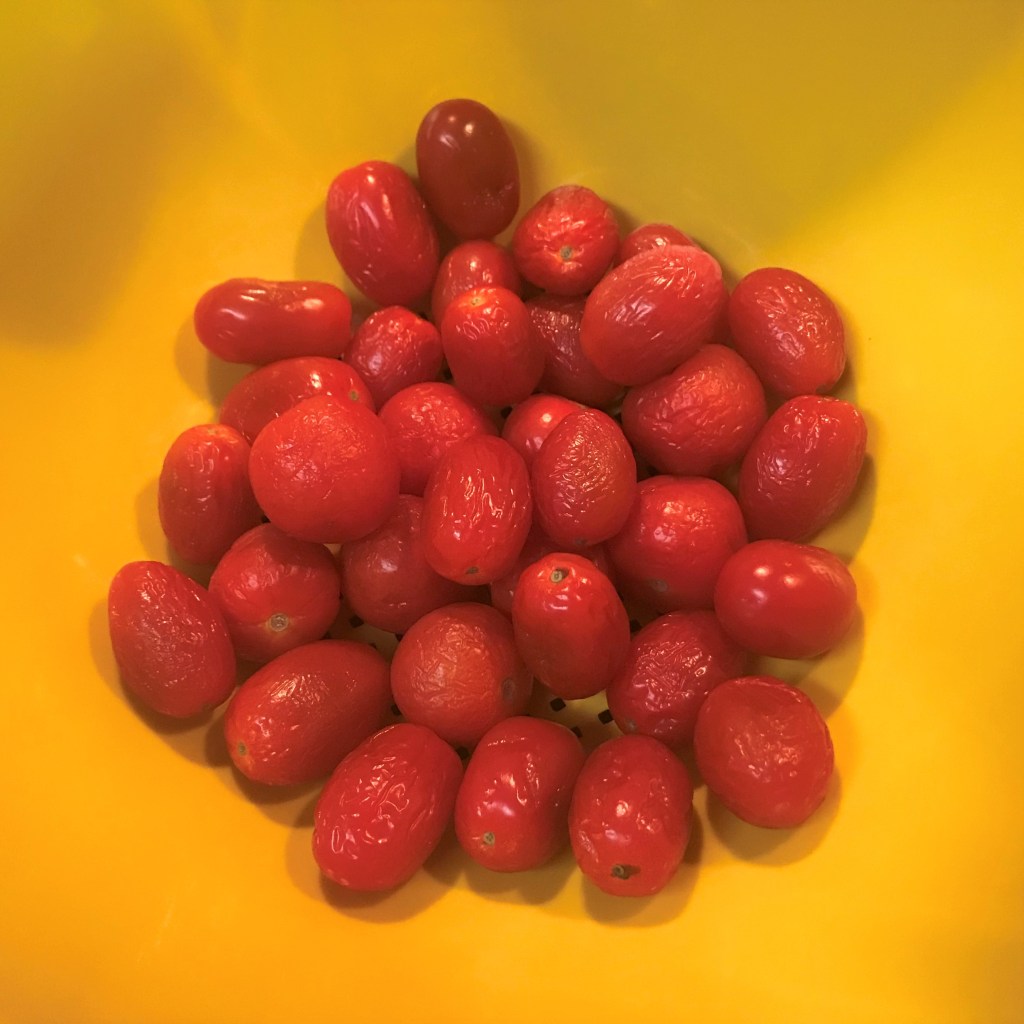
It’s only been three weeks since our state went into lockdown over the COVID-19 risks, but it sure seems like I’ve been rationing fresh food items a lot longer than that. We’ve managed to only do our grocery runs about once every 10 to 14 days since the middle of March, when the walls first started to close in. And the consequences of our few-and-far-between trips became evident a few nights ago when I reached for the “brand-new” package of grape tomatoes I’d purchased, and found this:
Definitely not delicious.
If that isn’t disappointing enough, imagine my horror when I peeked into the crisper drawer to find another so-called fresh item to be way past its prime.
This is just pitiful.
I know. Kind of like those pics all over Instagram of celebrities without their makeup. Our produce drawer has been so jam-packed these past weeks, it has become a real challenge to keep up with the fresh ingredients we’re buying in greater quantity than usual. This discovery of wrinkly tomatoes and shriveled zucchini wrecked my plan for making ratatouille, one of my very favorite vegetable-centered dishes. I’m not even going to show you a picture of the eggplant. It’s rough, people.
So, a change of plans, but this need not be a disaster. I’ve been here before with the tomatoes and knew I could save them. With a little patience and the magic of slow poaching in some good quality olive oil, you can do it, too. We’re going to turn these sad little misfit vegetables into something delicious. This recipe serves two.
Let’s Get Cooking!
Ingredients:
One pint really wrinkled baby tomatoes (of course, fresh is good, also!) 1/2 cup chopped onion (I like sweet ones, but use whatever you have) 3 cloves fresh garlic, chopped 1/4 cup good quality extra virgin olive oil 1 tsp. Italian blend herb seasoning About 1 1/2 cups leftover cooked chicken (shredded scraps from a rotisserie market chicken is perfect) 1 medium shriveled-up zucchini (or fresh, if you must) Kosher or sea salt and freshly ground black pepper Parm-Romano cheese for serving
Instructions:
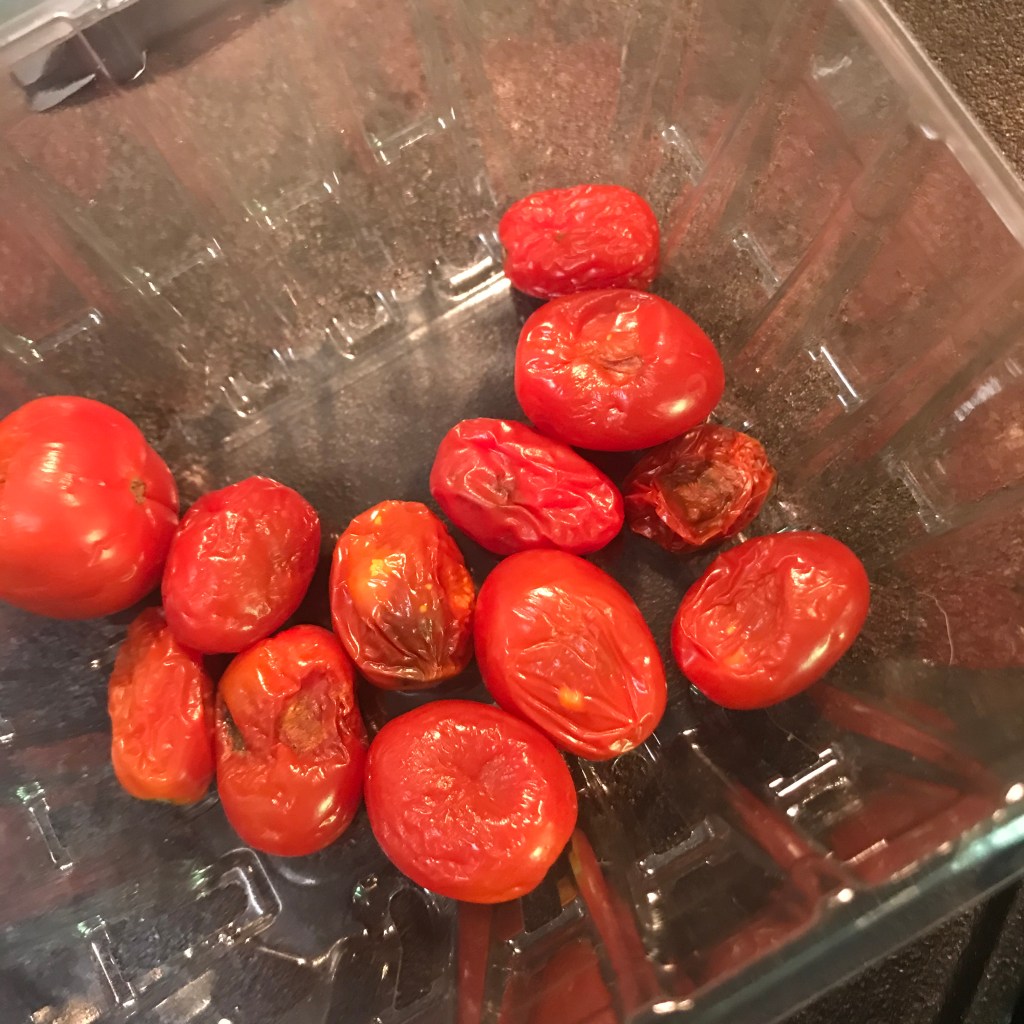
First things first—we need to identify any tomatoes that truly shouldn’t be used. If they are wrinkled and a bit withered, they’re OK. Soft, oozing or moldy? Sorry fellas, you’ve been chopped.
Ick. At least I was able to salvage most of the tomatoes.
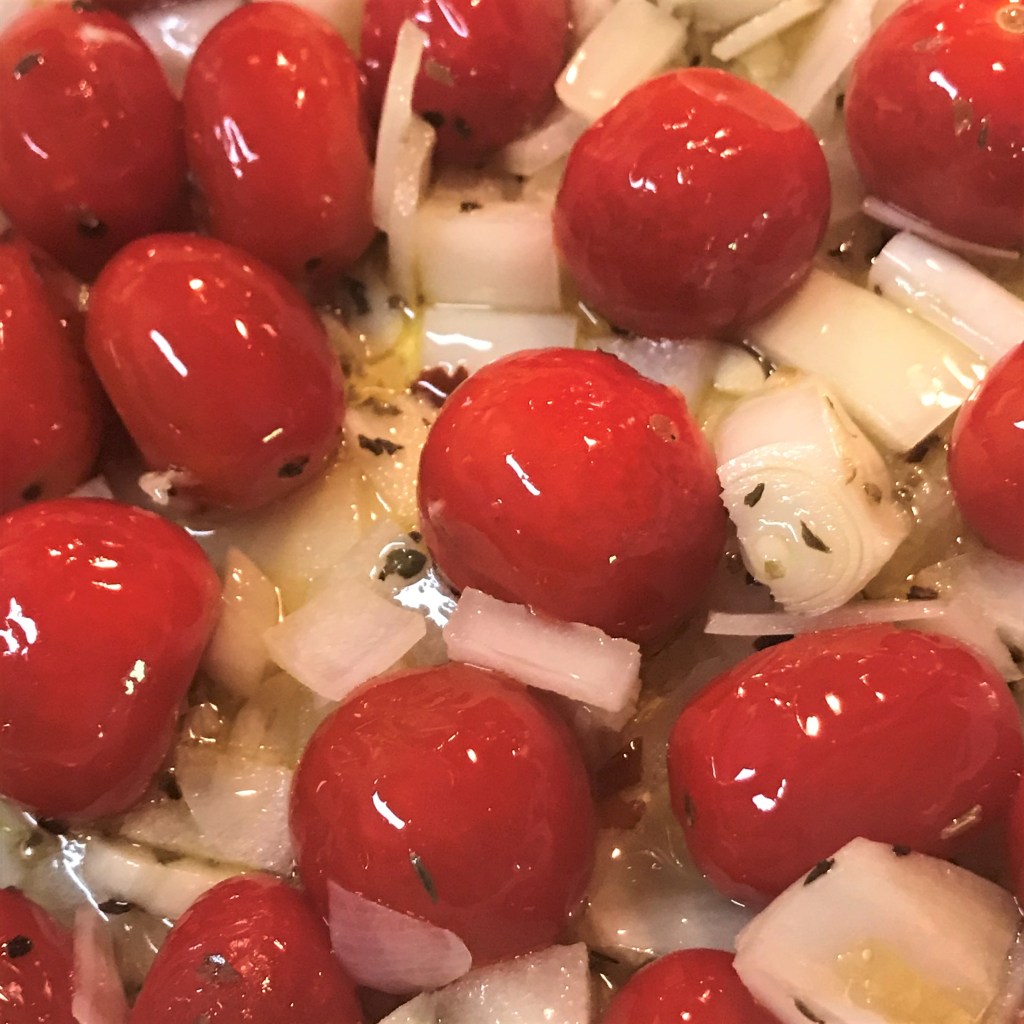
Rinse the tomatoes that remain and set them aside on a paper towel to absorb the excess water. Place a large, non-stick skillet over very low heat and add the full amount of olive oil. It’s going to seem like a lot, but it’s all good.
Add the onions, garlic and baby tomatoes to the olive oil and tilt the pan around to “roll” and coat the tomatoes in the oil. Add the Italian herbs, and season with sea salt and freshly cracked black pepper. Keep the heat to a bare minimum. This super-slow pace might feel a little awkward if you are accustomed to sautéing in oil. We’re doing something else—rehydrating the tomatoes should not be rushed, and I can’t emphasize enough that your heat should be at the lowest setting your burner allows. You don’t want to see or hear any sizzling at all; if you do, it’s too hot. The pictures in this slideshow are time-stamped, and the captions will help explain how this should progress:
5:43pm – the extra virgin olive oil is just being introduced to the low flame; can’t you just about smell those grassy notes?
5:53pm – 10 minutes in, and it looks like not much is happening, but the oil is beginning to soften up the tomatoes.
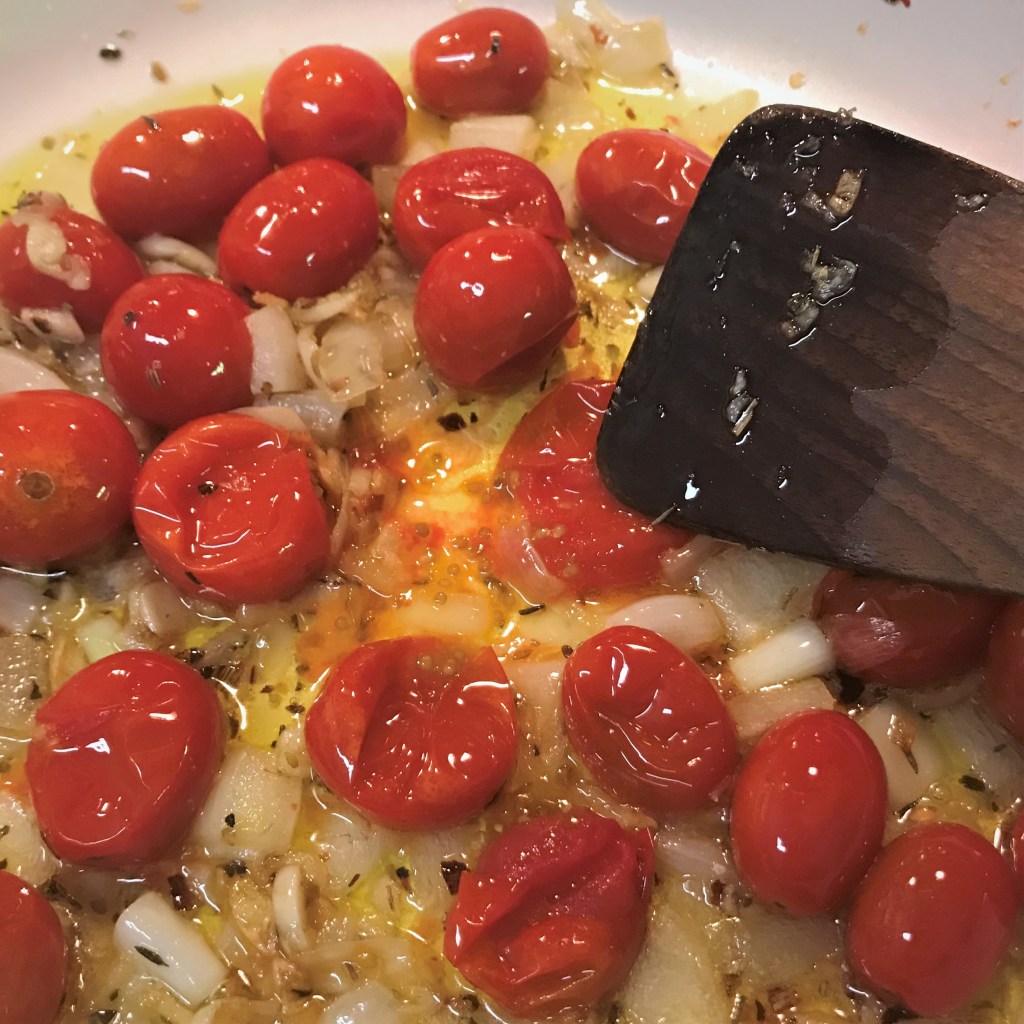
5:58pm – up close and personal, we can really see the difference in the tomatoes after 15 minutes. They are plump and juicy!
6:08pm – At the 25 minute mark, the tomatoes are becoming soft enough to burst, and that’s exactly what I’m doing here.
6:12pm – Is this beautiful, or what? All the tomatoes have been lightly smashed, and the sauce has taken on a delicious color!
Pretty awesome, right? And you wouldn’t believe the depth of aroma and flavor the olive oil is able to extract from those sad little tomatoes. Actually, it’s more than that; studies have shown that cooking tomatoes in oil releases more of their lycopene, an antioxidant linked to heart health and protection against certain types of cancer. And to think, we almost threw them away!
If you only had the tomatoes, you could stop right here, toss this sauce with some freshly cooked pasta and call it dinner (just add a sprinkle of parmesan and a glass of wine). But today is also the deadline for that pitiful zucchini, so I’m going to take this a step further and turn the squash into “noodles.”
One day soon, I’ll share my honest opinion about the different spiralizers I’ve tried. They definitely are not created equal, and although you’d think the expensive ones would be the best, I usually prefer this little gadget—called a “Vegetti”—that I picked up for about $6 at TJMaxx (a couple years ago—you know, when things were open).
It has two sides: one for thick spirals and one for thin. I’m using the thick side today, and as you can see, after twisting the zucchini through it, there’s very little waste. Just the butt ends and these cute little swirly buttons. Lucky for me, even these will not be wasted because our dog, Nilla, is certifiably crazy about vegetables. Sweet girl has such patience.
We’re now in the homestretch, where we will see the final transformation of too-far-gone vegetables turned into a delicious and healthful, zero-waste meal. I’m scattering my leftover chicken pieces over the top of my luscious poached tomato sauce, then the zucchini noodles, salt and pepper, and covering it with a lid to heat it through.
Turn up the heat about two notches to medium, set the table and pour the wine. By then, this one-skillet meal will be ready to be tossed and plated. Enjoy!
This week, I imagine two reasons you might have a bunch of extra eggs in the fridge—you stockpiled them to get through COVID-19 self-isolation or you got creative with coloring them for Easter. Either way, here’s a list of ideas to help jazz up a classic comfort food—deviled eggs!
My husband, Les, and I have gotten pretty adventurous with deviled eggs in the years we’ve been together, and each time we make them, we ask each other, “why don’t we make these more often?” Honestly, they are a perfect light bite—packed with protein, ridiculously easy to make with basic ingredients and no special tools, and an amazingly versatile blank canvas for a wide array of other flavors. They work for breakfast, lunch and dinner, or even a late-night snack. Perhaps best of all, given that we enjoy them so much, they are relatively easy on the waistline (depending on your filling choices, of course).
If you’ve never made them yourself, now is a great time. Here’s my very basic recipe for deviled eggs, along with some creative, flavorful change-ups to help you use up some other stuff in the fridge while you’re at it. Let me know if you find a new favorite!
Ingredients
6 chilled hard-boiled eggs, peeled (obviously)
Filling
2 to 3 Tbsp. canola mayonnaise 1 tsp. Dijon or other prepared mustard Sea salt and freshly ground black pepper Sweet or smoked paprika
Instructions
Cut the eggs in half lengthwise, and empty the yolks into a small mixing bowl. Set the whites aside on a covered plate while you make the filling.
Add 2 Tbsp. mayo and the mustard to the egg yolks and mash with a fork or back of a spoon to combine into a soft, smooth mixture. Add more mayo if mixture seems too dry. Salt and pepper to taste. Spoon filling into a zip-top bag and squeeze out as much air as possible. Carefully snip a small bit of one corner off the bag, and pipe the filling into the egg white halves; sprinkle with paprika and enjoy!
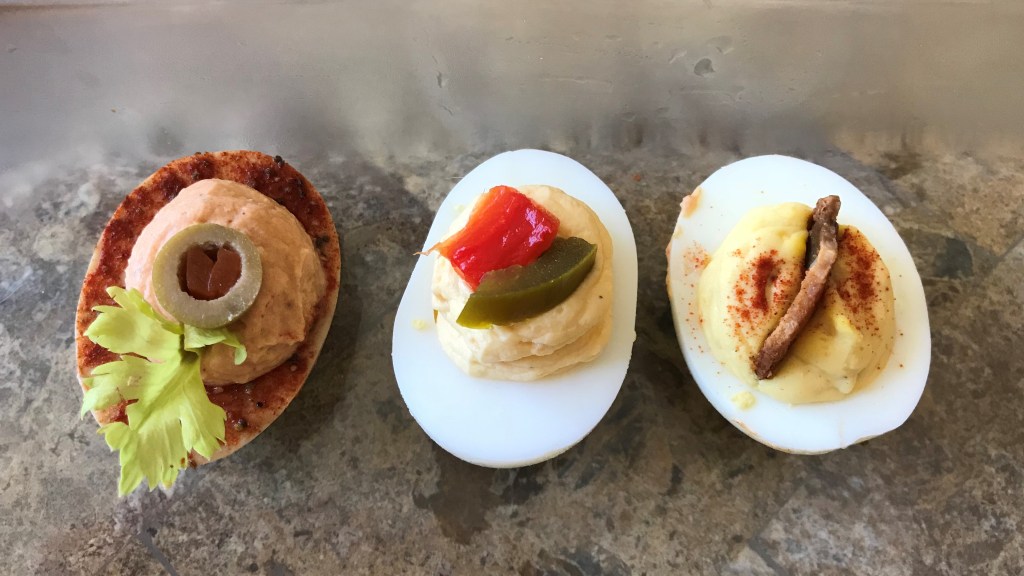
Jazz em up! (left to right) Bloody Mary; Jalapeno pimiento cheese; Bacon, egg and cheese.
Fun Flavor Variations
Change it up with a simple swap of fillings.
Bloody Mary
Filling: egg yolks, 1 Tbsp. mayo, 2 Tbsp. tomato paste, 1 Tbsp. prepared horseradish, a dash or two of hot sauce and/or Worcestershire sauce, salt and pepper to taste. Press cut side of egg white halves onto a plate sprinkled with Old Bay seasoning so when you turn them back over the rims are nicely coated and colored. Pipe filling into egg white halves; garnish with olive half and celery leaf.
Jalapeno-pimento cheese
Filling: egg yolks, 2 to 3 Tbsp. prepared pimiento cheese, 2 tsp. chopped pickled jalapeno slices (drain them well and pat dry on paper towels). Salt and pepper to taste. Pipe filling into egg white halves; garnish with piece of pimiento and jalapeno.
Bacon, egg and cheese
Filling: egg yolks, 3 Tbsp. mayo, 2 Tbsp. very finely shredded cheddar cheese, ½ slice crispy bacon (wrap in a paper towel and use a rolling pin to crush it into very fine crumbs). Pipe filling into egg white halves (you will have extra – you’re welcome); sprinkle with sweet paprika and garnish with a small strip of crispy bacon.
Smoky guacamole
Filling: egg yolks, no mayo, 2 Tbsp. mashed avocado, ¼ tsp ground chipotle or chili powder, 2 tsp. very finely minced red onion, squeeze of fresh lime juice to preserve color. Salt and pepper to taste. Pipe filling into egg white halves just before serving; garnish with a cilantro sprig.
Lox and bagels
Filling: egg yolks, 2 Tbsp. mayo, 1 Tbsp. finely chopped smoked salmon or lox, 1 tsp. very finely minced red onion. Pipe filling into egg white halves; garnish with “everything bagel” seasoning and capers.
Sweet southern
Filling: egg yolks, 3 Tbsp. mayo, 1 tsp. each yellow mustard and sweet pickle relish (pat dry on paper towel). Salt and pepper to taste. Pipe filling into egg white halves; garnish with chopped sweet pickle and/or a slice of pickled okra.
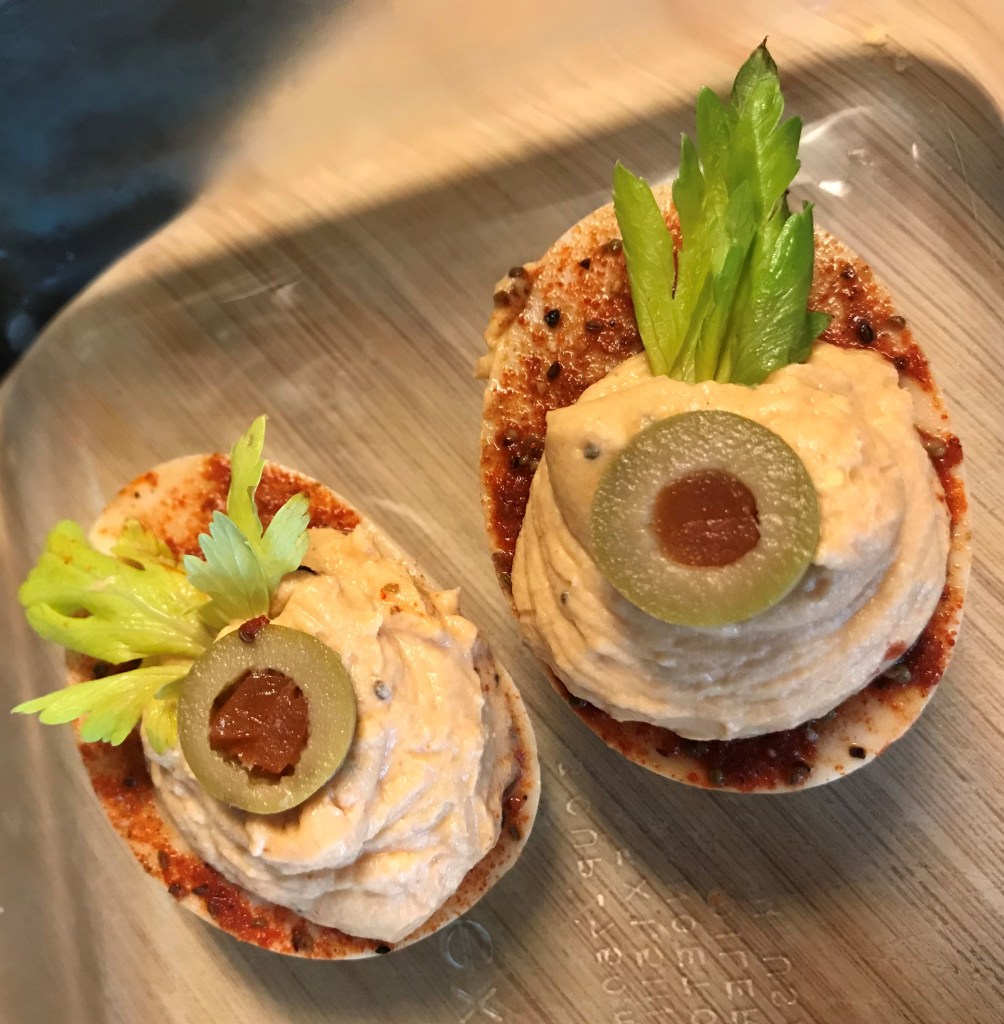
Roasted garlic hummus
Filling: egg yolks, no mayo, 2 Tbsp. prepared hummus, 3 smashed cloves of freshly roasted garlic. Salt and pepper to taste. Pipe filling into egg white halves; garnish with paprika if desired.
Bloody Mary (center); Sweet southern and Roasted garlic hummus (alternating, outside)
A Dutch baby (also known as a German pancake) is an elegant breakfast or brunch dish you can make from basic pantry ingredients. It’s terrific because you can swap in whatever fruit you have on hand—fresh peaches or berries make delicious toppings, with just a dusting of powdered sugar. But for this one, I’ve used a single, unpeeled apple for rustic appeal, and created a sweet apple cider sauce that takes it way over the top, almost into dessert territory.
The basic German pancake recipe was graciously offered to me by the innkeeper at a Virginia bed and breakfast I visited many years ago. It uses the simplest of ingredients, but something almost magical happens in the oven, as the batter rises up and curves inward over the filling—almost like it’s giving a hug.
There are three components to this dish, and I’ve listed the ingredients for each separately along with the steps. You may want to read all the way through before you begin. Enjoy!
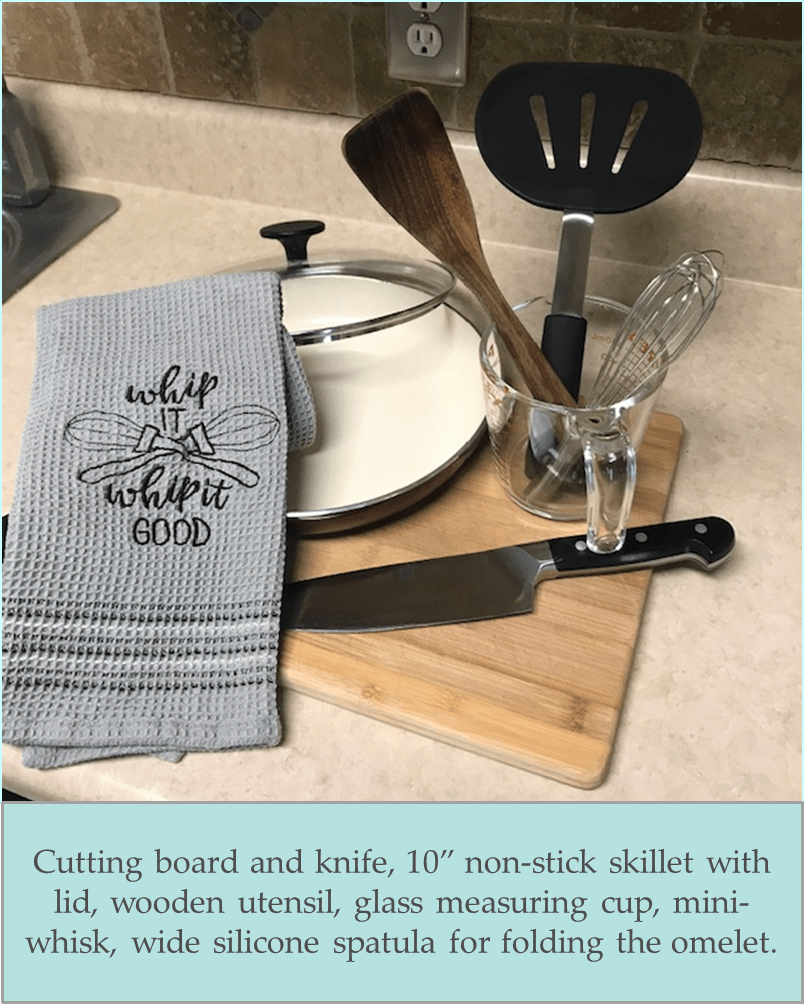
Tools you’ll need:
10 1/2 inch cast-iron skillet (and potholder) Whisk 2 medium mixing bowls Small microwave safe bowl or measuring cup Medium, heavy-bottomed sauce pan Cutting board and knife Flat wood utensil or wooden spoon
Ingredients – cider sauce:
2 cups apple cider 1 Tbsp. unsalted butter 2 Tbsp. maple syrup (I love the dark amber, formerly known as “grade B”) 1 tsp. vanilla extract Pinch of sea salt (this simultaneously enhances and balances the sweetness of this decadent sauce)
In a heavy-bottomed sauce pan, combine all ingredients except vanilla and sea salt over medium-high heat. Bring to a boil, stir and cook about 2 minutes. Reduce heat to medium-low and simmer, stirring occasionally, until mixture is reduced by nearly half, about 30 minutes. Remove from heat and stir in vanilla and sea salt. Set aside to cool. This may be made ahead and refrigerated for up to a week; warm before serving.
Ingredients – apple filling:
1 large, firm apple (Granny Smith, Honeycrisp, Gala or Fuji would be good), cored and sliced thin 2 Tbsp. unsalted butter 1 Tbsp. brown sugar (light or dark) 1/4 tsp. ground cinnamon 1/4 tsp. ground cardamom (or extra cinnamon) Pinch sea salt
Preheat oven to 425° F. Heat cast-iron skillet over medium heat and melt butter. Add apple slices and sprinkle with brown sugar, cinnamon, cardamom and sea salt. Toss to coat, and stir frequently for about five minutes, until apples are evenly coated and beginning to soften. Remove from heat, empty apples into a bowl and wipe the skillet clean of any bits that might burn. Place skillet into preheated oven for about 10 minutes.
Ingredients – Dutch baby:
3 Tbsp. salted butter (for the batter) 1 cup all-purpose flour ¼ tsp. ground cinnamon 1 cup whole or 2% milk 2 Tbsp. unsalted butter (for the skillet)
Melt 3 Tbsp. salted butter in a microwave safe bowl or glass measuring cup. Whisk together flour and cinnamon in a medium bowl. In another bowl, whisk eggs until uniform consistency. Make a well in the center of the flour mixture then add milk, eggs and melted butter. Whisk just until all flour is incorporated.
Carefully remove skillet from the oven and add 2 Tbsp. unsalted butter, swirling around to coat the bottom and sides of the pan. Spoon the apples into the center of the pan. Give the egg mixture another quick whisk, then pour gently over the apples. Place the skillet back into the oven, reduce heat to 400° F and bake about 25 minutes, until edges are golden brown and center is set, but still a bit soft and “eggy.”
Straight from the oven; notice those little pockets of custard and butter?
Remove from skillet, drizzle the warm cider sauce over the pancake and serve in wedges.
The fragrant apple and spices will warm you up from the inside.
Can I make a Dutch baby without a cast-iron skillet?
Alternatively, you can use an oven-safe casserole dish and get great results. Butter and flour the inside of the dish before adding the batter. Because the casserole dish won’t be preheated like the skillet, it may take a bit longer. Bake at 400° F, and check for doneness after about 30 minutes.
Can I make individual Dutch baby pancakes?
Yes! If you have individual size cast-iron skillets, simply preheat them as instructed for the large skillet, and divide the melted butter and batter into them. Check for doneness after about 15 minutes. Or butter and flour individual glass casserole dishes and check them at 20 minutes. This recipe should work for about four of them.
Can I serve a Dutch baby for dessert?
I can’t think of a reason not to, especially if you make a decadent sauce! This apple dutch baby with cider sauce would be fantastic as it is for dessert; I’d probably even add an ounce of bourbon or brandy to the cider as it reduces (I’m spontaneous like that). It would also be great with cooked cherries rather than apples, and maybe a nice dark chocolate sauce. Or what about caramelized bananas with a caramel rum sauce…like Bananas Foster? Okay, now it’s just getting crazy in here.
I like this style of omelet because it’s quick and simple, and it doesn’t require removing the extras from the pan and then stuffing them back in. Your “fillings” will be cooked into the outside of the omelet, with melty gooey cheese layered inside. This recipe is super flexible, too! You can add or substitute leftover vegetables of any kind if you don’t have spinach and mushrooms on hand—peppers, kale, broccoli, asparagus or whatever is taking up space in the fridge. If they’re already cooked, just chop into smallish pieces and toss them in the pan long enough to warm them and proceed with the recipe from there. As with most my recipes, I rely on formula and technique more than the ingredients. So, let’s talk about that:
How do you make an omelet fluffy?
Whisking cold water (not milk!) into the eggs just before cooking them gives a nice airy lift to the omelet. The scientific upshot is that the tiny water droplets evaporate quickly in the heat of the pan, creating airy pockets inside the egg mixture. If you want even more fluff, separate the eggs before you begin (this works best when they’re cold) and whip the whites into a soft foam (this works best at room temperature). Fold this into the rest of your egg mixture just before pouring into the hot pan.
Which cheese melts best for an omelet?
Good melting cheeses include Monterey jack, cheddar, Colby, Muenster, Havarti, Gouda and gruyere. Hard or crumbly cheeses such as feta, chevre and parmesan will add tons of flavor; just don’t expect gooey goodness from them, as they pretty much hold their shape when warmed. Whenever possible, grate your cheese from a block. The packaged pre-shredded cheeses are coated to prevent sticking in the bag, and this also prevents them from melting well.
Do you need a special pan for an omelet?
Years ago, my mom had one of those hinged, fold-over pans “designed for omelets,” but this is absolutely not necessary. It didn’t produce a fabulous omelet and mostly just made a mess. My go-to pan for omelets is a good non-stick skillet with curved sides. The shape and coating makes it easier to slide your spatula underneath the set egg mixture for folding and serving. If your skillet is not coated, swirl in a little extra oil just before adding the eggs, to guard against sticking.
This recipe is a delicious way to work in an extra serving of vegetables and works especially well as “breakfast for dinner.” Three eggs make just the right size for my husband and me to share, but we are not big eaters at breakfast. Feel free to throw in a fourth egg with no other adjustment needed.
Ingredients
Extra virgin olive oil, salt and pepper
1 thick slice of onion, finely chopped (we like sweet onions, but red or yellow ones are fine)
3 to 4 mushrooms, cleaned and sliced (cremini is my go-to, but white button or shiitake would also work)
Big handful of fresh baby spinach, roughly chopped and tough stems removed
3 large eggs, room temperature
About 1/2 tsp. prepared Dijon mustard (or hot sauce for a spicier twist)
Splash of cold water
1/3 cup freshly shredded cheese (or less if using more pungent cheese, such as Parmesan or feta)
Tools
Get Cooking!
Place a 10 inch non-stick skillet over medium heat and add a generous swirl of olive oil.
When you notice the oil beginning to shimmer and flowing easily around the pan, add your chopped onions. Give them a stir and cook until they are just soft but not quite browning, about 2 minutes. Add the sliced mushrooms and toss them around with your wooden utensil to be sure they get lightly sautéed on both sides. Add the chopped baby spinach leaves and stir until wilted and noticeably reduced, but still bright green. Salt and pepper to taste.
While the veggies are doing their thing, crack your eggs into a large measuring cup, add Dijon mustard (or hot sauce) and whisk briskly until lightly foamy. Add a splash of cold water – about 1 Tablespoon – and whisk again until light and foamy. You want lots of bubbles in this mixture, so whip it…whip it good!
Spread out the sautéed veggie mixture evenly in your pan. Slowly pour the eggs around the outer edge of the mixture, encircling your veggie ingredients, then pour gently to “fill in” and cover the entire mixture. Again, salt and pepper. Reduce the heat to medium-low and cook about 2 or 3 minutes, or until the egg mixture looks set about one half inch around the edges but still wet and somewhat loose in the center.
Sprinkle shredded cheese over the entire mixture, turn off the burner and place a cover over the pan, allowing trapped heat and steam to finish cooking the eggs and melting the cheese into them. This will take about 3 minutes. Using a wide silicone spatula, fold in half. Or for a slimmer omelet, fold one third toward the center, then fold the other side over the top of that, as if folding a letter. Carefully cut the omelet in half crosswise to share the other half with your other half, and enjoy!
It’s one of the world’s most beloved comfort foods. From the blue box variety with the envelope of “cheese” powder to the saltine crumb-topped church potluck kind, macaroni and cheese isn’t particularly sophisticated—it’s just a dish full of noodles, cheese and milk. I have a few ideas why it endures as a favorite:
Everyone likes it Okay, maybe not everyone. Folks with celiac disease or dairy allergies don’t. Nor would a vegan. But bring it to a dinner party and you’re pretty much guaranteed to have a home run.
It satisfies all our primal cravings If science is correct—that humans are hard-wired to crave fats, carbs and salt—well, this food ticks all the boxes.
It’s versatile and adaptable Like an essential “little black dress,” you can modify a good mac and cheese recipe up or down to suit the occasion. A stove-top version is great for a quick weeknight dinner and an embellished baked casserole version rocks for a family reunion. Many upscale restaurants have taken it even further by addition of fancy-pants ingredients such as lobster and truffles.
It’s easy to make with ingredients you probably already have This has never been more important, as we are all looking for ways to make satisfying meals without one more run to the grocery store.
It reheats well In the oven, on the stove top or even in the microwave. That is, if you actually have leftovers.
There are a million “best ever” mac and cheese recipes out there, but taste is subjective so I’m not going to make that claim here. This really is about the cheese sauce, and your technique can make or break your dish. I’ll admit that I hardly ever make this dish the same way twice. I change up the type of pasta depending on what’s in the pantry, and I use whatever leftover bits and pieces of cheese we have in the deli drawer at the time. But the main formula is the same and each step has a purpose. In case you’re wondering:
What is the best cheese for macaroni and cheese?
I like to start with American cheese, which is processed with salts and enzymes for super melting ability. If you are averse to the idea of American cheese (first of all, why? And read this), or if you just don’t have any, you may substitute a lesser amount of real cream cheese, which also has some stabilizers for a creamier sauce, but it’s bland so you’ll need to season it more. The rest of the cheese is your choice, but go with something that melts well: medium to sharp cheddar, Monterey jack, Havarti, Gouda, fontina, gruyere or even a bit of brie (without the rind) are delicious. Avoid super-stretchy cheeses such as mozzarella or Swiss and hard or crumbly cheeses such as feta, parmesan and manchego. Also, freshly shredded cheese is best. Pre-packaged shreds are coated with modified starch substance that keeps the cheese from clumping in the bag. Guess what else it does? It prevents even melting.
What kind of pasta is best for macaroni and cheese?
Consider mainly shape and texture, but if you’re looking to step up your game, also peek at the ingredients. Pasta made with “durum” or “semolina” flour (same thing, two names) provides a richer, deeper flavor than “enriched wheat” flour. If you like whole grain, that’s fine, too. Look for shapes with curves, nooks and crannies to grab onto your creamy cheese sauce. Elbows are classic, but rotini, fusilli, orecchiette, ditalini, and shells are all going to work well. Look for pasta labeled as “bronze cut,” which has a rougher texture, ensuring even greater hold on the cheese sauce.
What is the best way to cook pasta?
No matter how much pasta you’re cooking, use a large pot, at least 6 quarts. There’s a very scientific reason for this, but suffice to say it gives the pasta room to move so it doesn’t stick and clump together. Add kosher salt once the water is boiling. Adding it too early could damage the surface of the pot. Don’t be stingy with the salt; use about a tablespoon, and don’t worry—most of that salt will end up going down the drain. Regardless of what you’ve “always been told,” do not add oil to the water. It doesn’t prevent a boil-over and it does not prevent the pasta from sticking. On the contrary, it hinders your sauce from clinging to the cooked pasta. For the same reason, don’t rinse your cooked pasta.
Ready to get cooking?
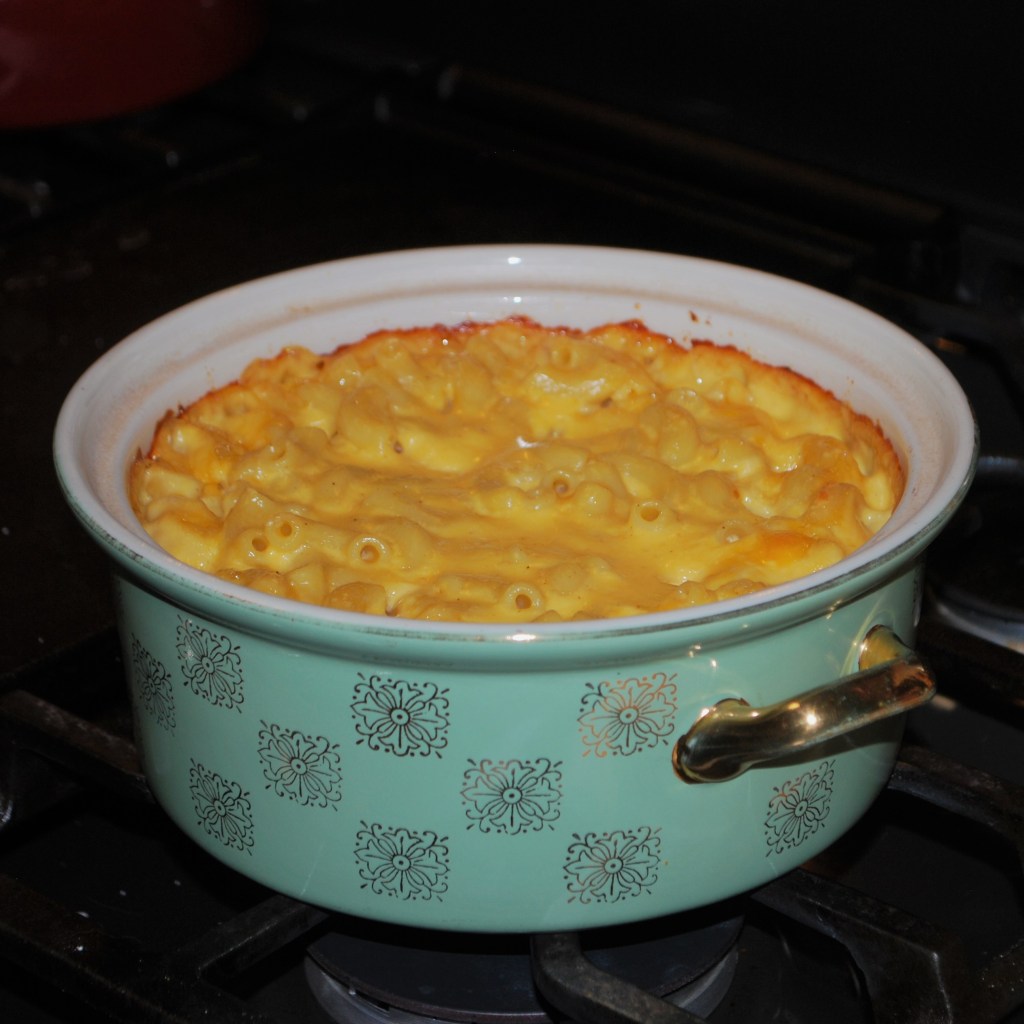
Still as creamy as can be, and ready to serve.
Follow along, but by all means flex my basic recipe to suit your taste and your inventory. The best part of cooking is making it your own.
Ingredients & Tools
3 Tbsp. butter (salted or unsalted)
½ cup finely chopped onion (I like sweet, but use Spanish, shallots, white, red or whatever)
3 Tbsp. all-purpose flour
2 cups whole milk (see sidebar notes)
About 8 oz. real American cheese (the kind sold by the pound in the deli, not the pre-wrapped slices)
2 packed cups good melting cheese, freshly shredded (see sidebar notes)
Kosher salt and freshly ground black pepper to taste
¼ tsp. white pepper
¼ tsp. dry mustard powder
12 oz. box good quality pasta (see sidebar notes)
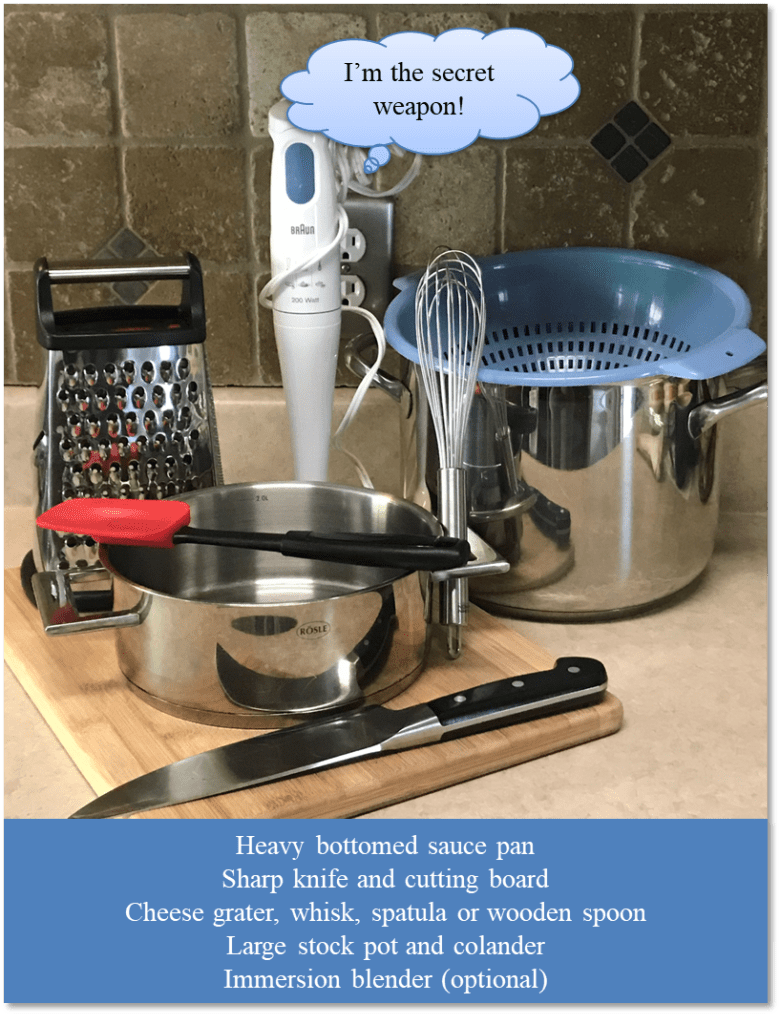
One more tool you’ll need…
A 2-quart covered casserole dish, if you should decide to go one step further (better) and finish your mac and cheese in the oven. In memory of my maternal grandmother, who taught me all the basics of cooking, I’m using this beautiful vintage casserole. Gram gave this to me many years ago, when I moved into my first apartment. I simply LOVE this dish!
Instructions – the Béchamel (fancy French word for “cream sauce”)
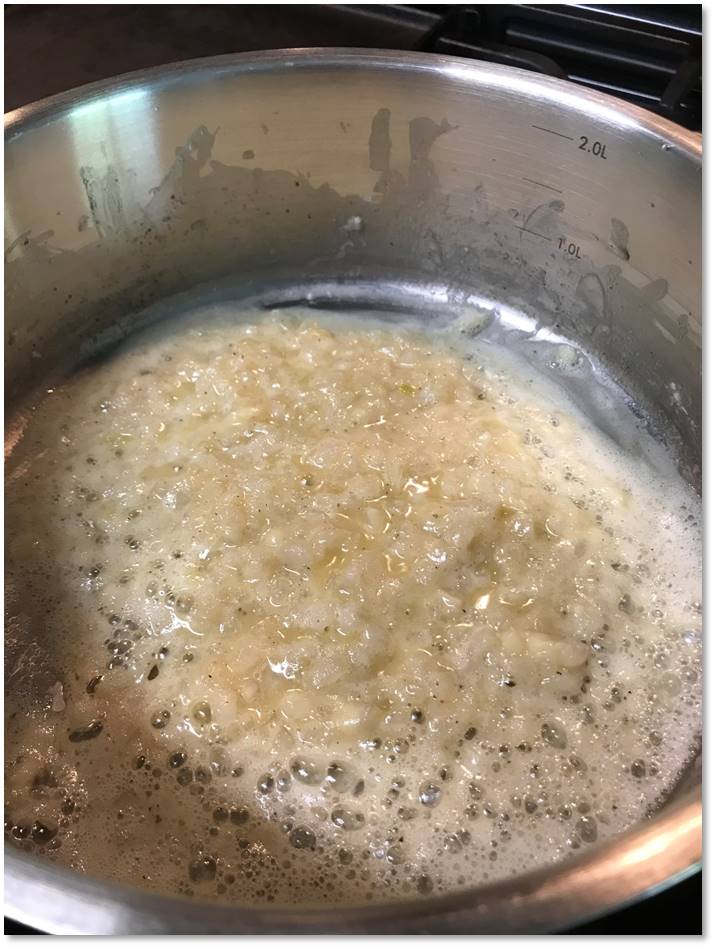
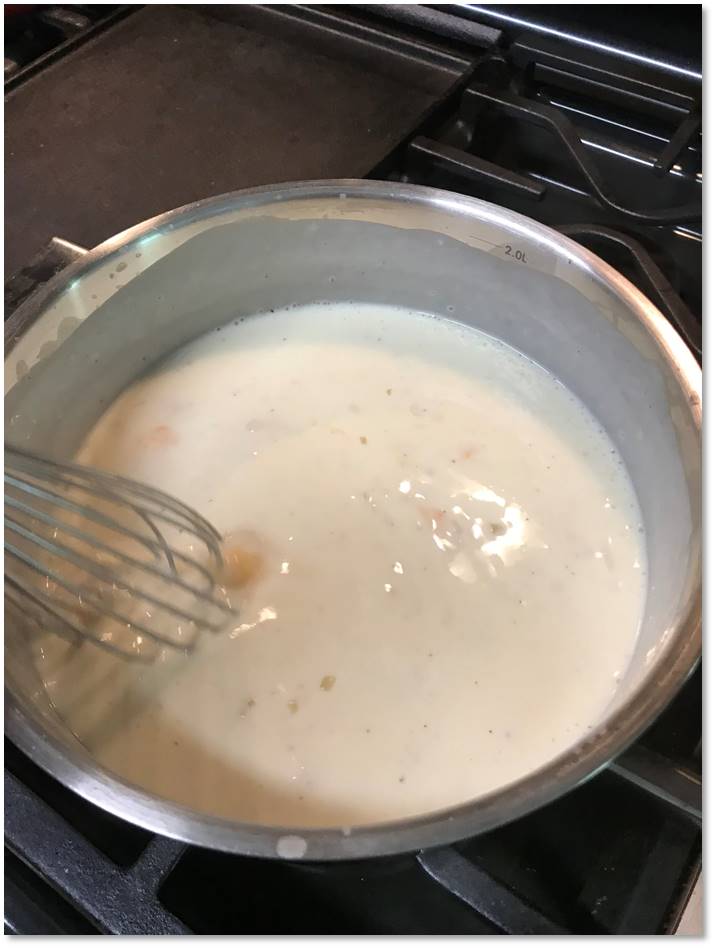
Over medium low heat, melt butter in your heavy-bottomed saucepan and add onions, simmering very slowly until they are soft and translucent. Do not rush this step. You don’t want the onions to brown, only to soften. This step should take about 6 to 8 minutes. Get the rest of your ingredients lined up, because it will go quickly from here.
When onions are soft, season with salt and pepper then sprinkle flour over them and stir to coat well. Increase the heat to medium and cook until bubbly and just turning golden.
Add milk slowly but all at once, whisking constantly to create a smooth mixture. Add dry mustard and white pepper and continue to cook over medium heat until mixture is just simmering and slightly thickened. Add cubes of American cheese and whisk until melted and uniform consistency.
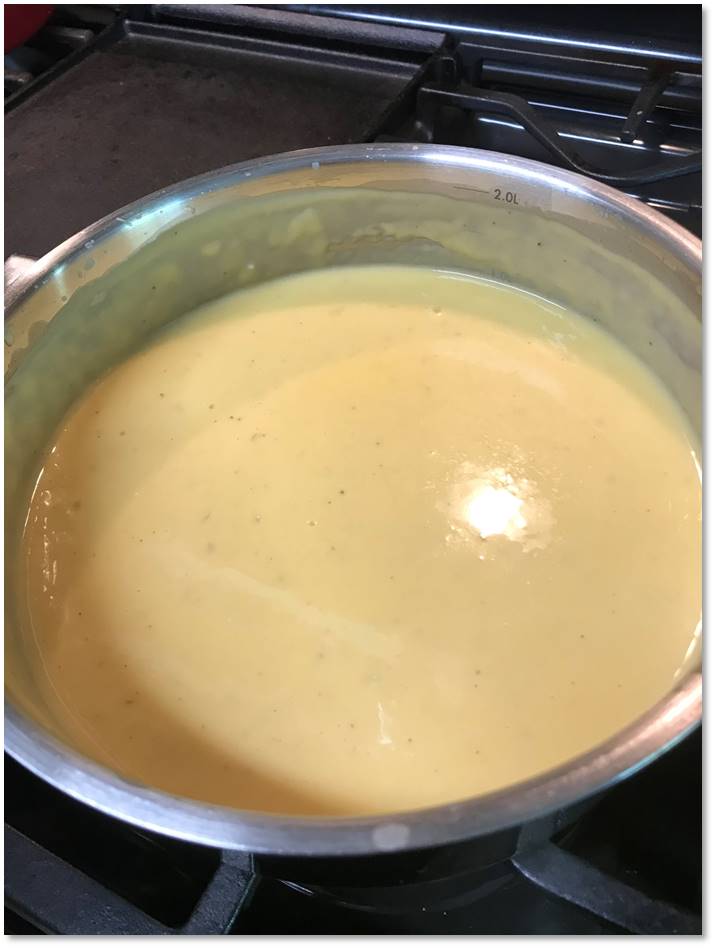
Add shredded cheese, one cup at a time, and whisk after each addition until smooth. Adjust salt and pepper to taste, remove from heat. At this point, you have a lovely creamy cheese sauce.
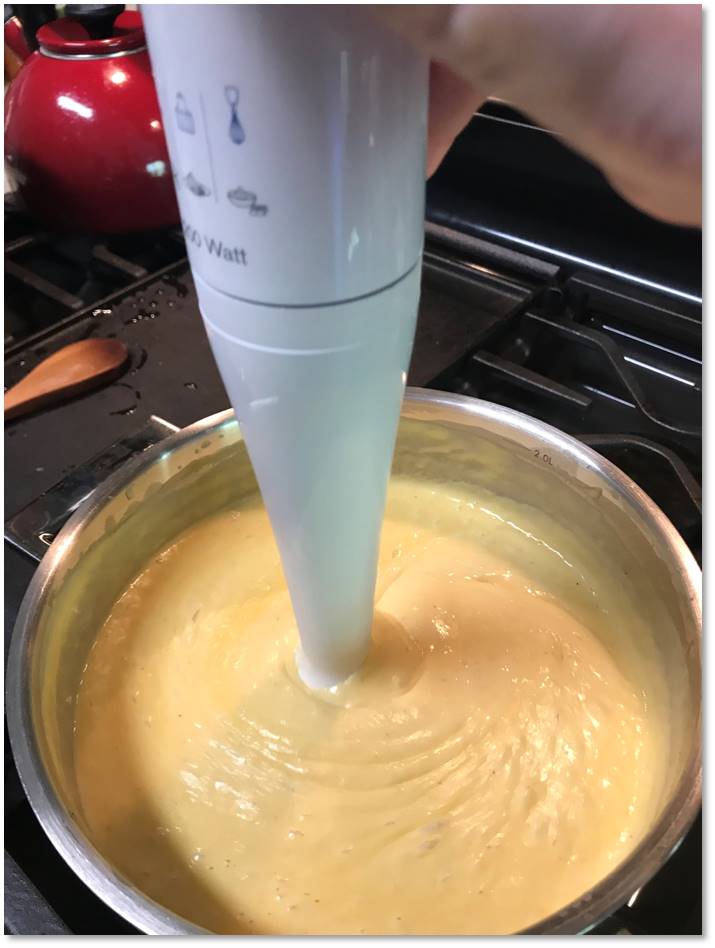
Want to take it up a notch to pure decadence? Use an immersion blender to whip the sauce into a completely smooth and silky consistency. Either way is fine, but if you have the stick blender, I highly recommend it.
I like to cook the onions right in the butter, then add flour and cook until it’s bubbly and smells “nutty.”
Add the milk and whisk until it’s smooth and thick. The American cheese will melt in very easily, and this provides the perfect base for a silky sauce.
It looks good, right! Nice and cheesy, smooth and creamy. But wait…
NOW we’re getting down to business. If you have an immersion blender, hit the sauce with it for about 60 seconds. Friends, this will absolutely change the game on every cheese sauce you make going forward.
You want it to be overly cheesy, because some of the sauce will find its way inside the elbows during baking.
Instructions – the Pasta
Fill your stockpot with cold tap water and place over medium-high heat until water comes to a boil. Add a generous spoonful (about a tablespoon) of kosher salt and stir to dissolve. You have one shot at seasoning your macaroni; don’t miss it. Do not add oil to the cooking water.
Add the pasta to the pot all at once and stir immediately to prevent sticking. Cook according to package instructions for “al dente” or “firm” texture. You don’t want the pasta to be too soft or it will become mushy later when you bake it with the cheese sauce. Drain pasta in a colander, shaking to rid all excess water, but do not rinse it.
Instructions – Assembling for Baking
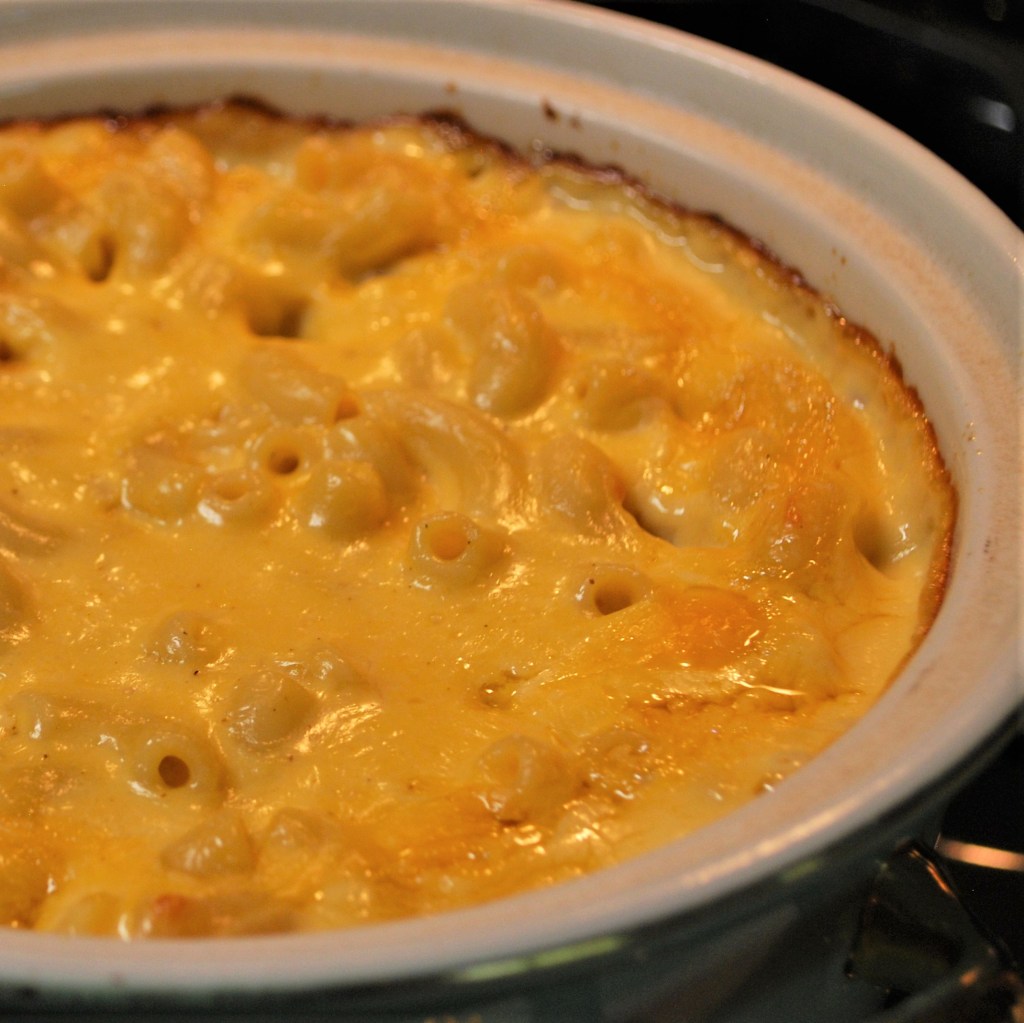
Combine sauce and pasta together in the cooking pot, folding gently to incorporate everything into a nice even mixture. This may seem overly cheesy, but please use all the cheese sauce. Remember that during the baking time, a lot of the sauce will be wiggling its way to the inside of your pasta shapes. More is better! Spoon into a buttered casserole dish and let cool slightly while you preheat the oven to 350° F. Cover and bake about 40 minutes then remove cover and bake 20 minutes more. Enjoy!
I love the baked-on cheesy crust that forms on oven mac and cheese.
You can hear and feel how gooey and creamy the sauce is, from the first spoonful!