When Terrie asks me to share a recipe for her blog, my immediate thought about the specific post is where my recipe came from. In the case of applesauce, which I make at various times throughout the year, I have no answer.
I simply cannot recall the origin of my homemade applesauce. I suspect it came about originally because of my son’s absolute love of apples; he started eating apples before he was 2, and had one daily into his high school years.
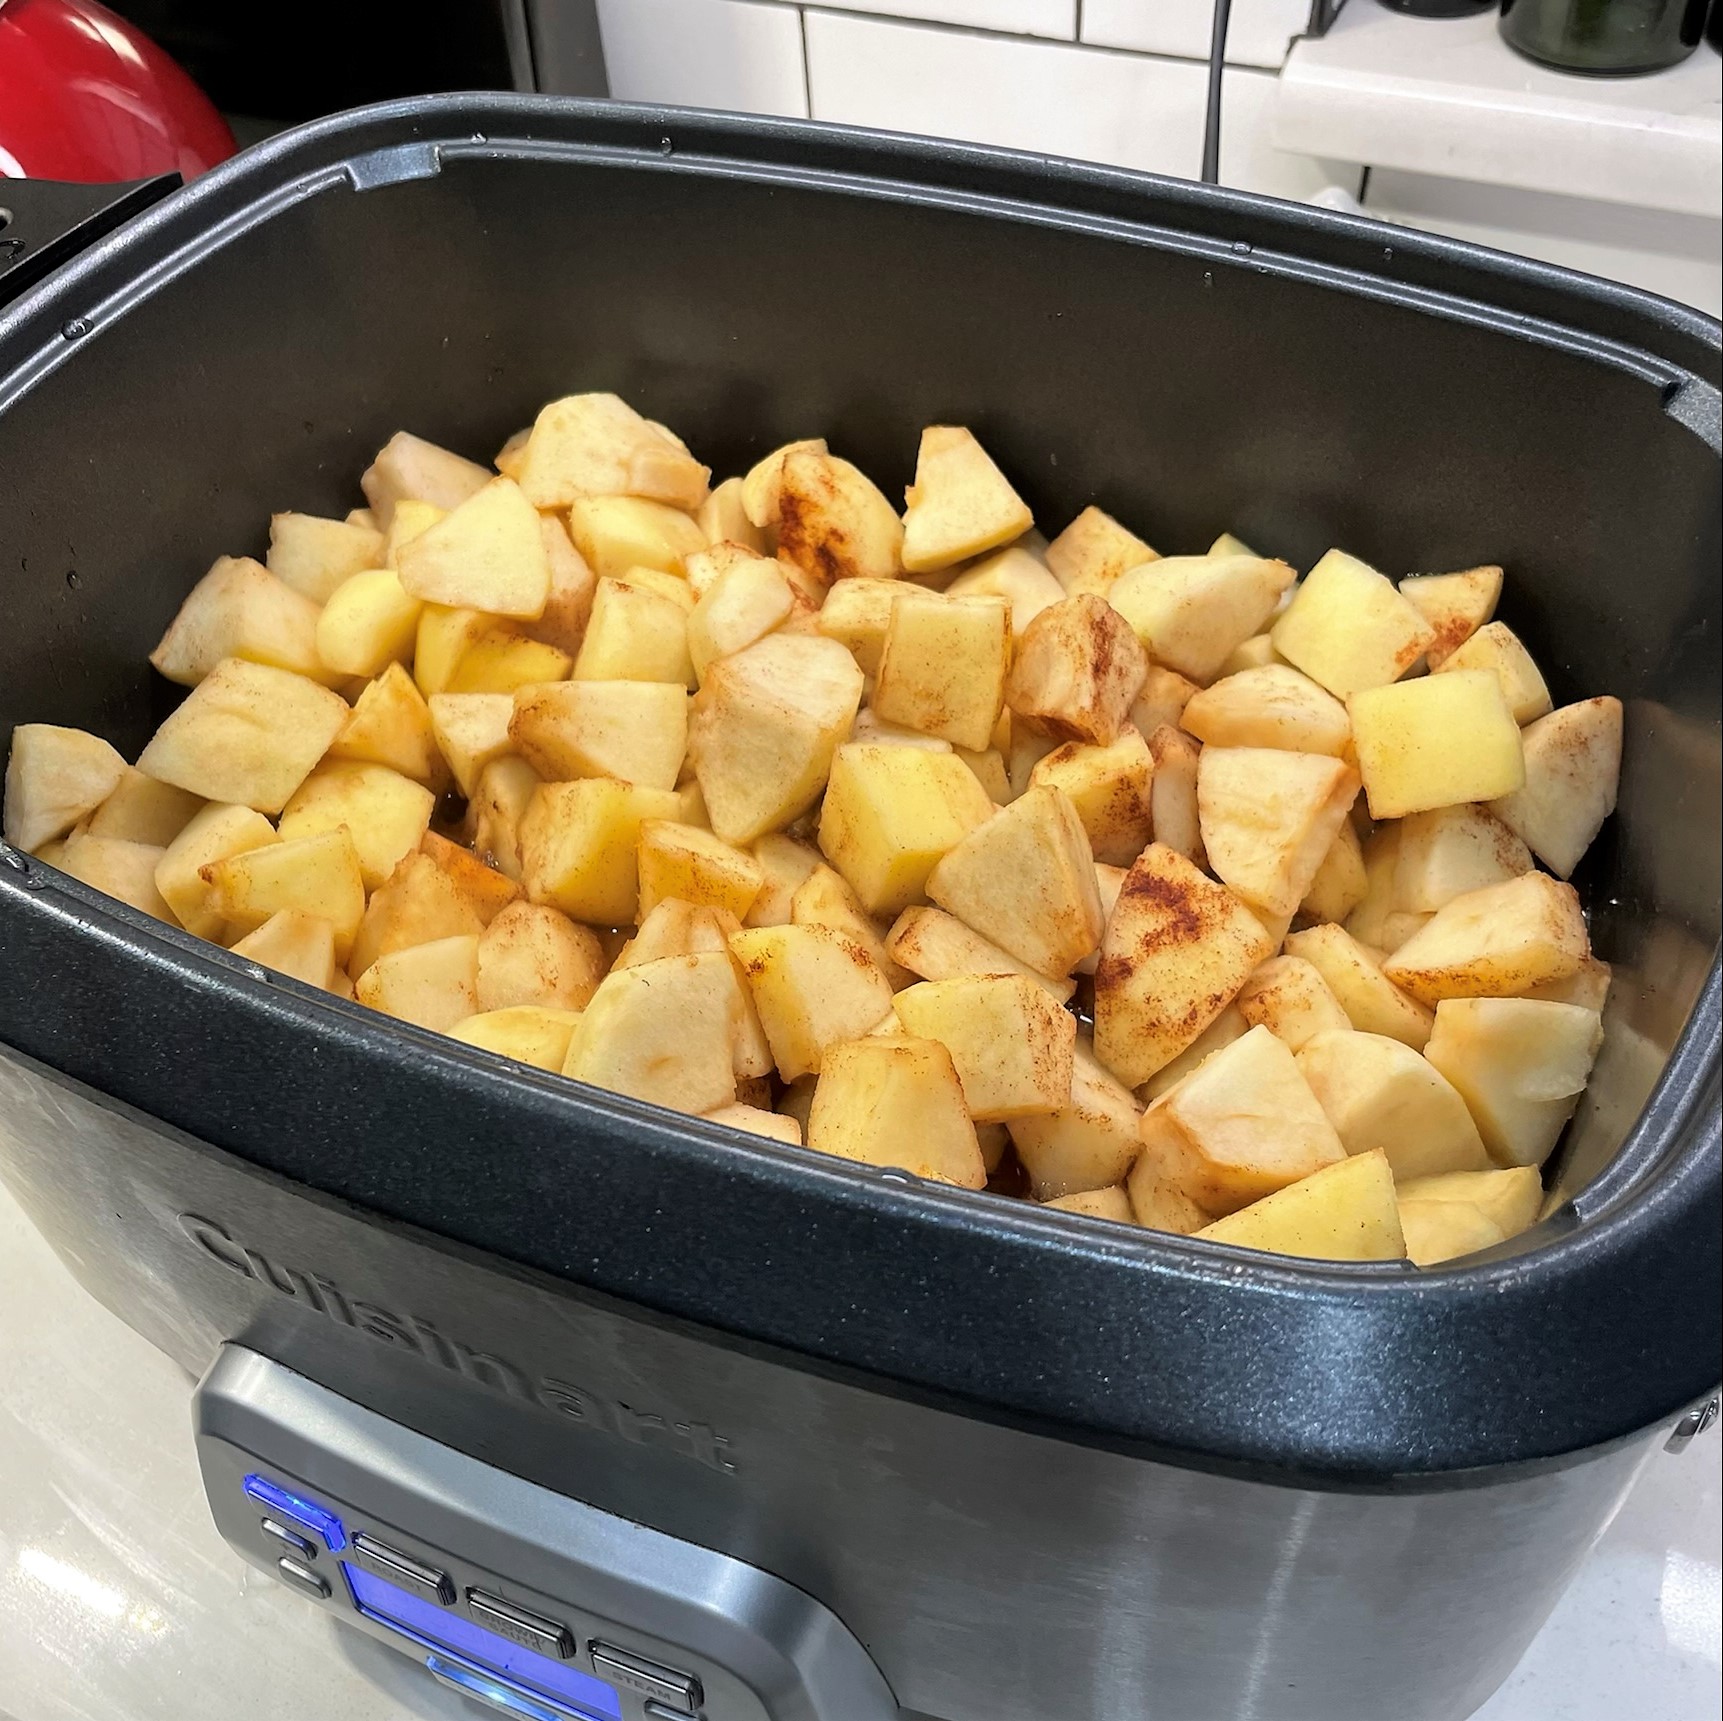
I do know my recipe took a turn when two things happened. First, somewhere along the way, I decided to do with the applesauce what I have done with mashed potatoes, which is mix varieties to increase the flavor and texture. Rather than two varieties (russet and Yukon gold), as I do with my roasted garlic mashed potatoes, I decided three was the perfect mix for apples in applesauce. Second, back about 2013, for my annual gift to self for Thanksgiving (a story unto its own), I bought a Cuisinart multi-cooker, a juiced-up version of a slow cooker. This is the same slow cooker that saved many a day for us during our recent kitchen remodel.
For applesauce, the slow cooker suffices—and it is easier than tending a cast-iron pot, my old method. As for varieties, I’m quite consistent in using Honeycrisp for sweet and Granny Smith for tart; then, the third variety is whatever strikes my fancy. Unless, that is, I can find my all-time favorite, Jonagold, which happen to be extremely tough to locate in North Carolina. This year, the third variety was Kanzi, a style of apple that basic research reveals comes from Belgium. The name means “hidden treasure,” and the apple is considered a cross between a Gala and a Braeburn. It is a mix of tangy and sweet, a fine add to the first two. All three apples are in the crispy category, which I believe makes for better applesauce.
A couple of years ago, Terrie asked me to make this for Thanksgiving as an add to the usual cranberry sauces on our table. It had more to do with the proximity of the Jewish holiday Hanukkah, where applesauce is a wonderful complement to Terrie’s homemade latkes. This year it was a complete no-brainer, as Hanukkah begins the Sunday night of Thanksgiving weekend.
This recipe requires some upfront labor in peeling and dicing the apples. But after that, the slow cooker does the rest and a few hours later—voilà!—a homemade applesauce that will have your dinner table guests thinking you’re a genius in the kitchen.
This recipe could not be simpler. Combine your ingredients in the slow cooker and wait nearby with a spoon.
Ingredients
Eight to nine large apples, three varieties
One small lemon, juiced
1/2 to 3/4 cup brown sugar
Vietnamese cinnamon to taste (I use about 1/2 teaspoon)
Instructions
Peel and core the apples, then cut into bite-size chunks. Add to the slow cooker. Juice the lemon over the apples and toss to prevent browning. Add the brown sugar and cinnamon and toss to coat. Turn the slow cooker to high and let it cook for four to six hours. I usually set it up at bedtime and by morning, the cooker has cooled. Mash the softened apples by hand (I use a potato masher). If you like the applesauce chunky, use a light mashing touch. Chill and enjoy.
In the 35 years I’ve been cooking Thanksgiving dinners, one of my favorite things to make is cranberry sauce. Although I have the same fondness for the jelled cranberry of Ocean Spray fame that we all grew up with (you know, the kind you used the can opener on one end and punched two holes in the other end and secretly thrilled to the sucking sound as it plopped out onto a plate), I instinctively knew early on that there had to be a better way.
Initially I began to make fresh cranberry sauce by boiling the berries in water and adding sugar. I wanted more flavor, and in 2002, I hit the jackpot with a website recipe that adapted a version originally published in Cooking Light magazine. That means my batch for Thanksgiving 2021 will be the 20th year I’ve made this delicious concoction.
It’s about sugar and apple cider (instead of water) offsetting the tart of the cranberries, and mandarin oranges adding back a different type of tart. If you make it, I guarantee you’ll be hooked. Terrie even loves it on vanilla ice cream.
Ingredients
12-ounce bag of fresh cranberries
1 cup of white sugar* (see notes)
½ cup of brown sugar
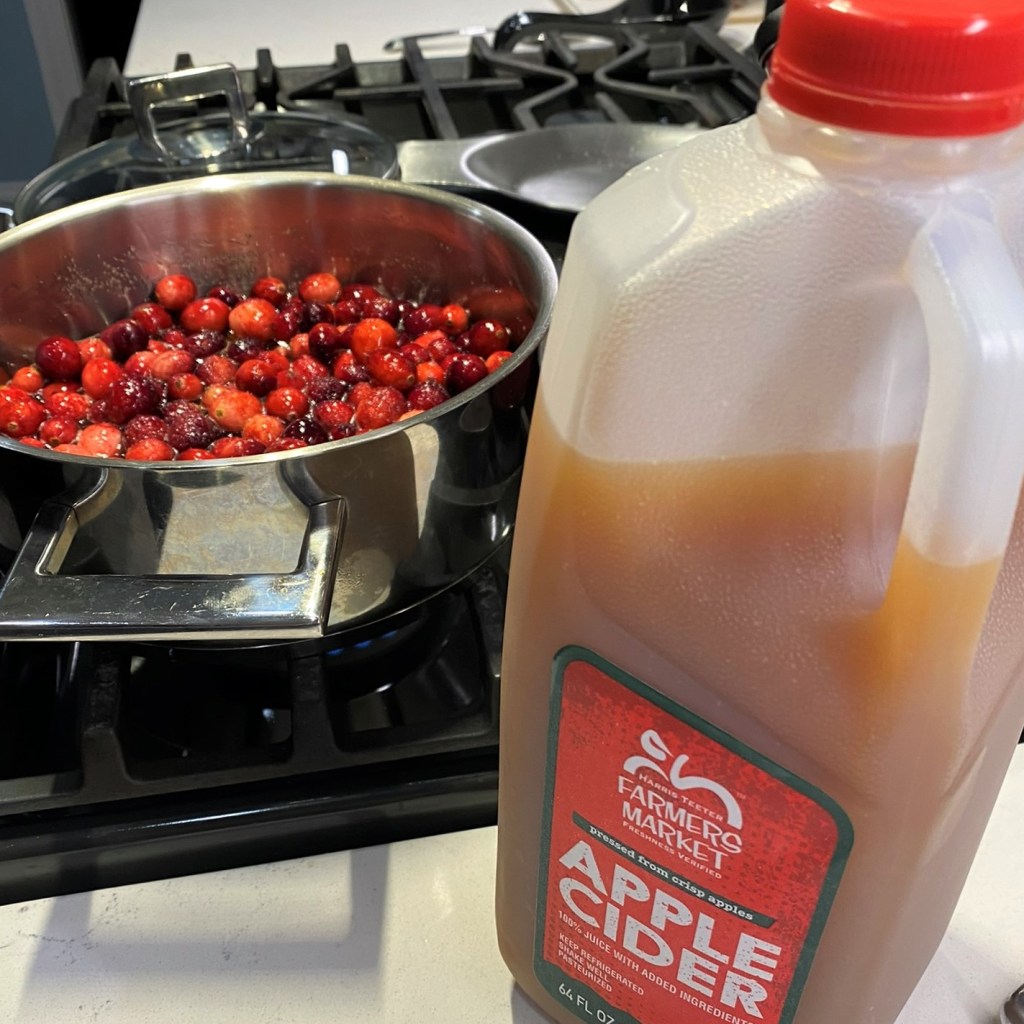
1 cup of apple cider*
½ jar of mandarin oranges*
*Notes
The original recipe called for 1½ cups of white sugar and ½ of brown sugar. I cut down the white sugar because it is plenty sweet. Either light or dark brown sugar works well.
Although I do typically use apple cider, the recipe certainly would work with water. Better yet if you can find it, as I’ve only been able to do a couple of times over the years, apple-cherry cider is the bomb!
I used half of a 23.5 ounce jar of Dole mandarin oranges; I like jars better because I feel that canned oranges have a “tell” of can flavor (coincidentally, not unlike Ocean Spray jellied cranberry sauce).
Instructions
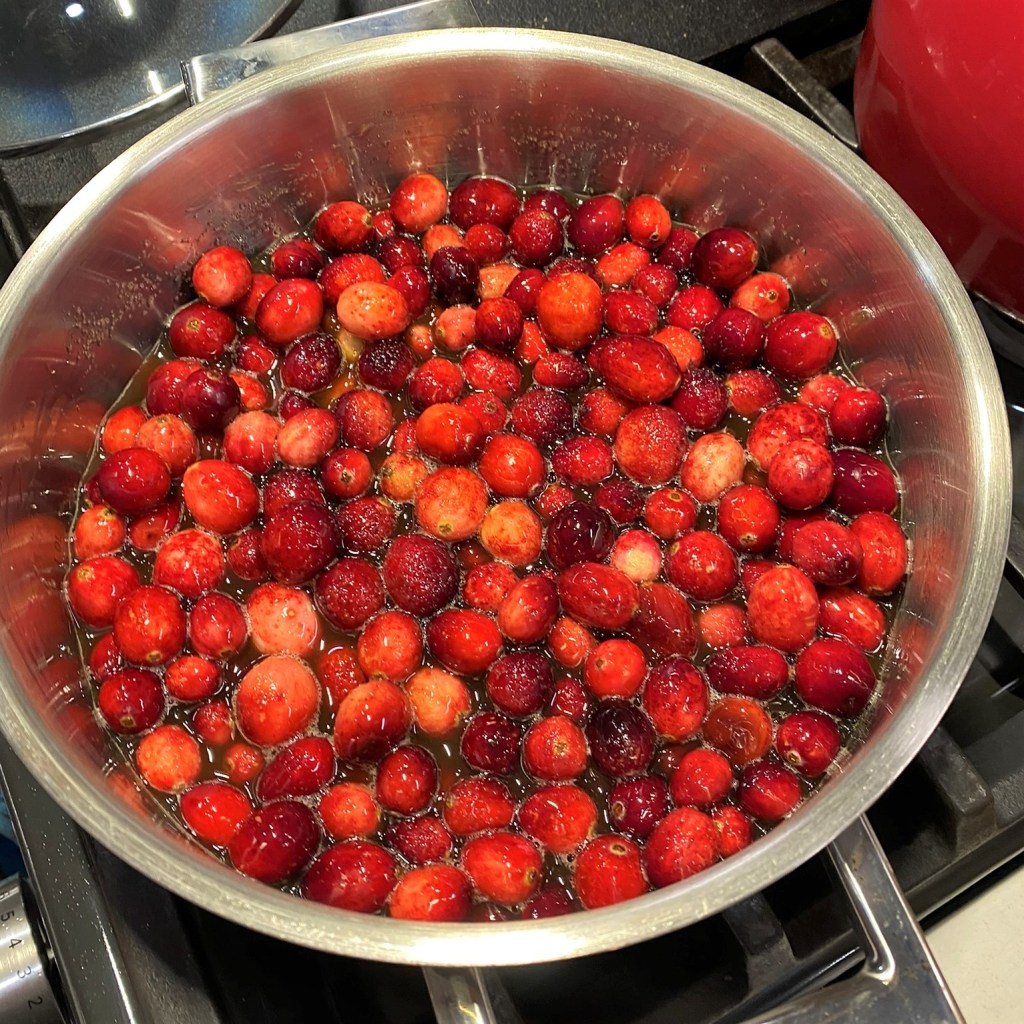
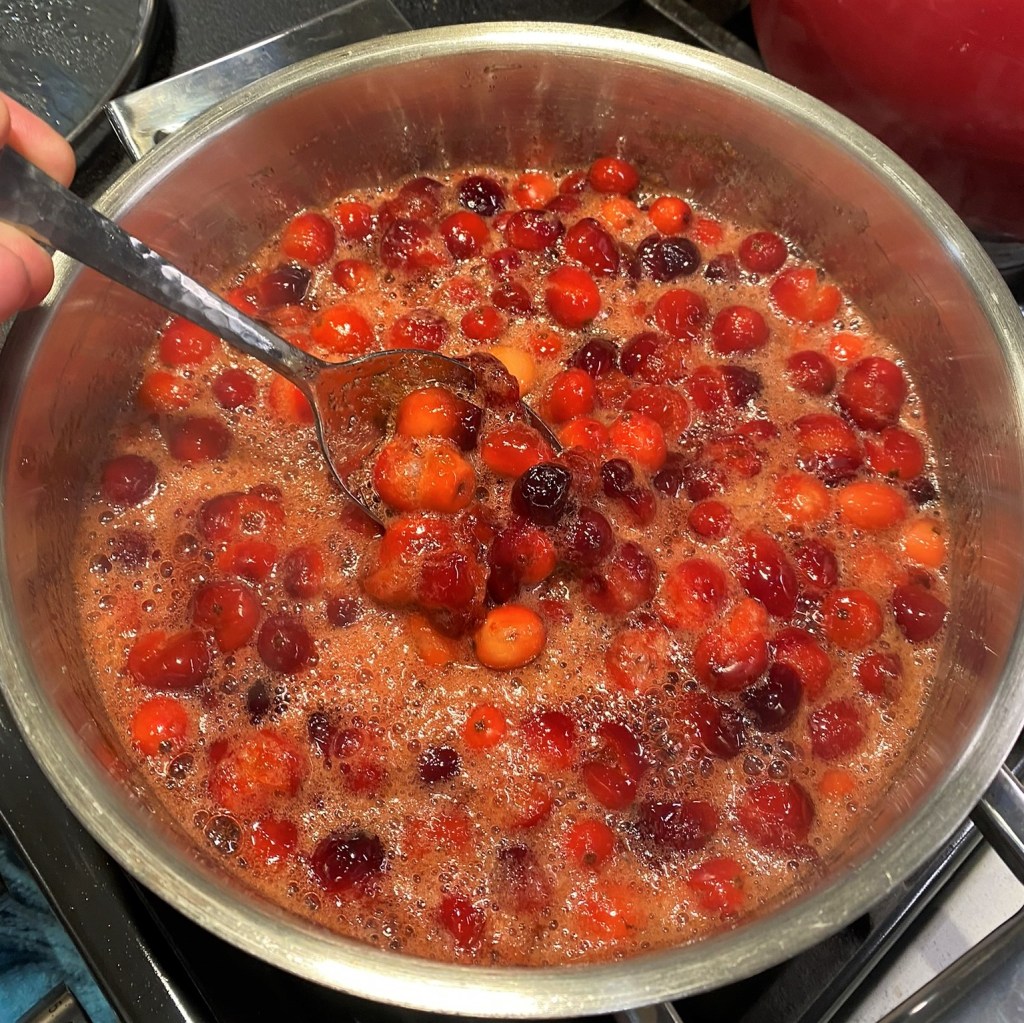
The recipe begins simple enough, with only cranberries, cider and sugar in the pot.
Use fresh cider from the produce department for best results.
After a few minutes of simmering, the berries will begin to pop.
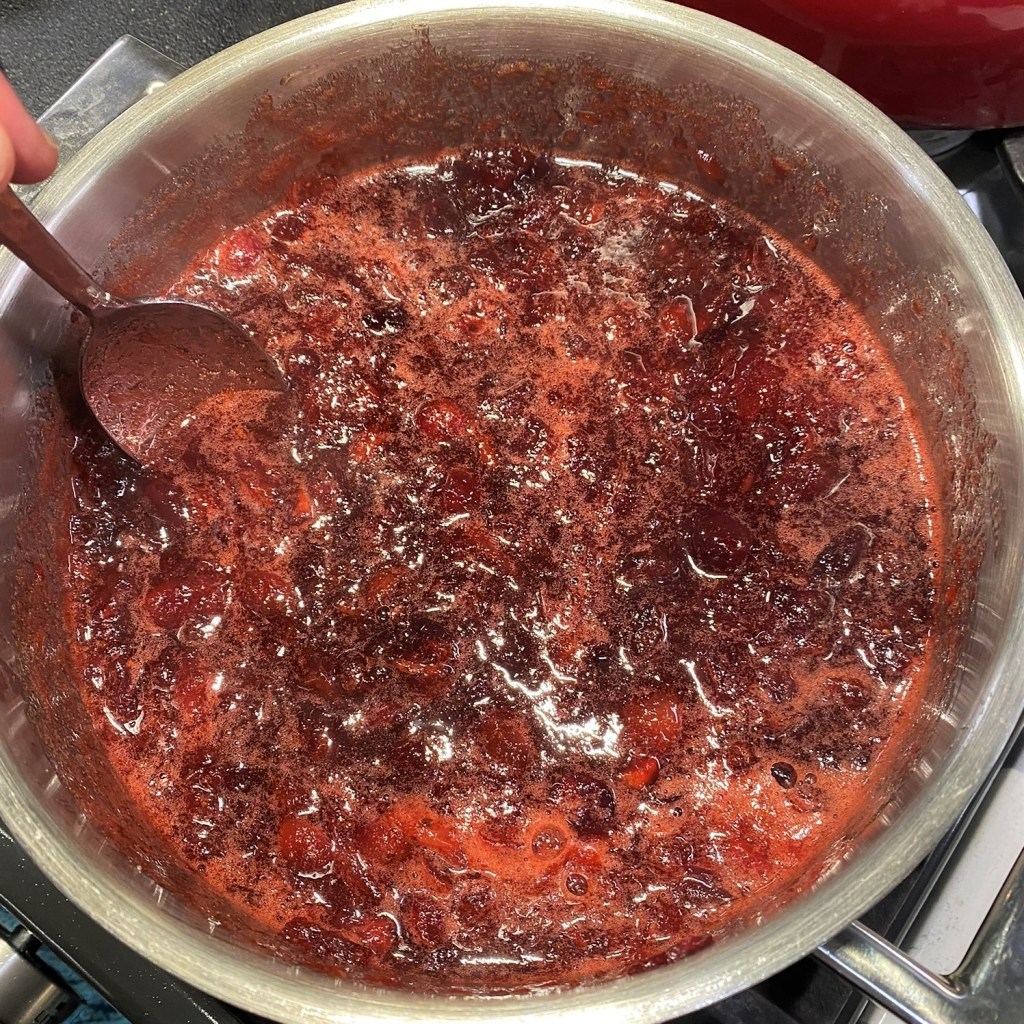
When the sauce is darker and thickened, remove from heat and cool. Refrigerate for about an hour.
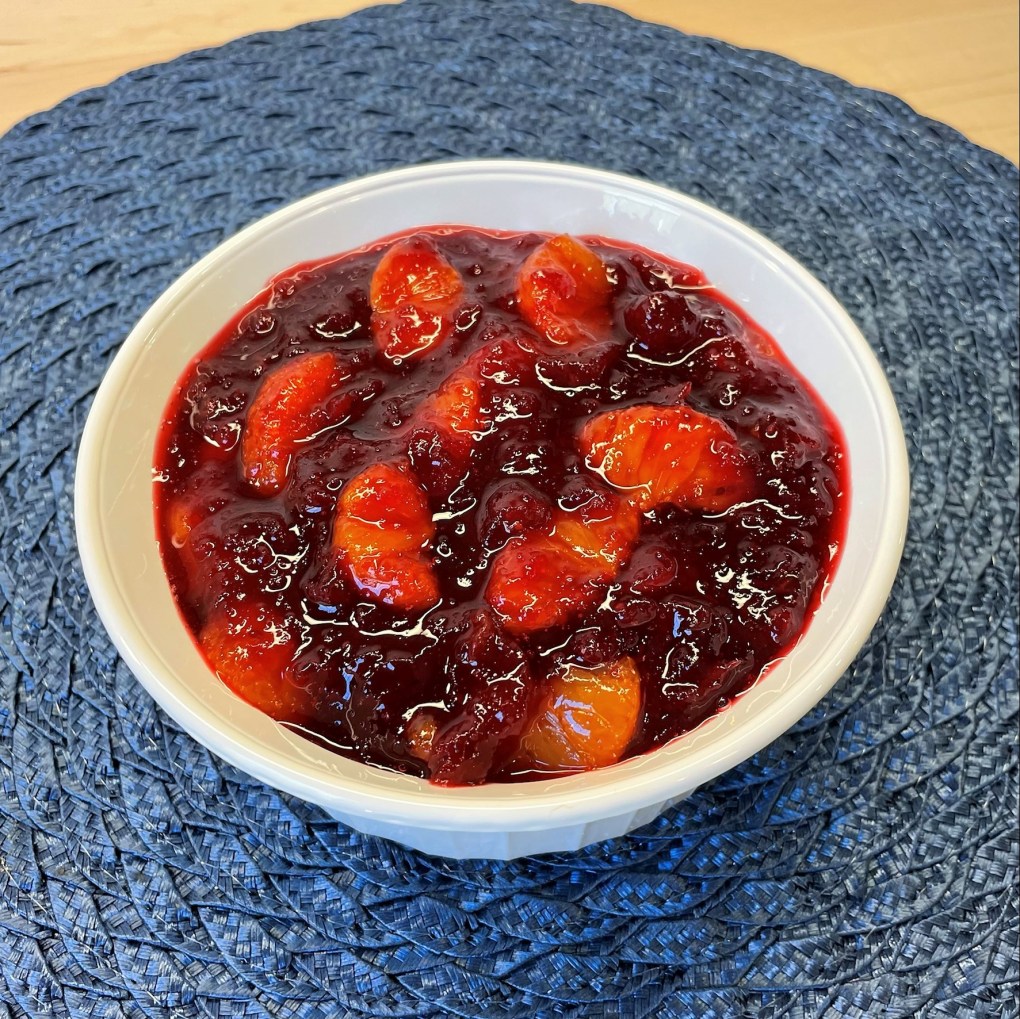
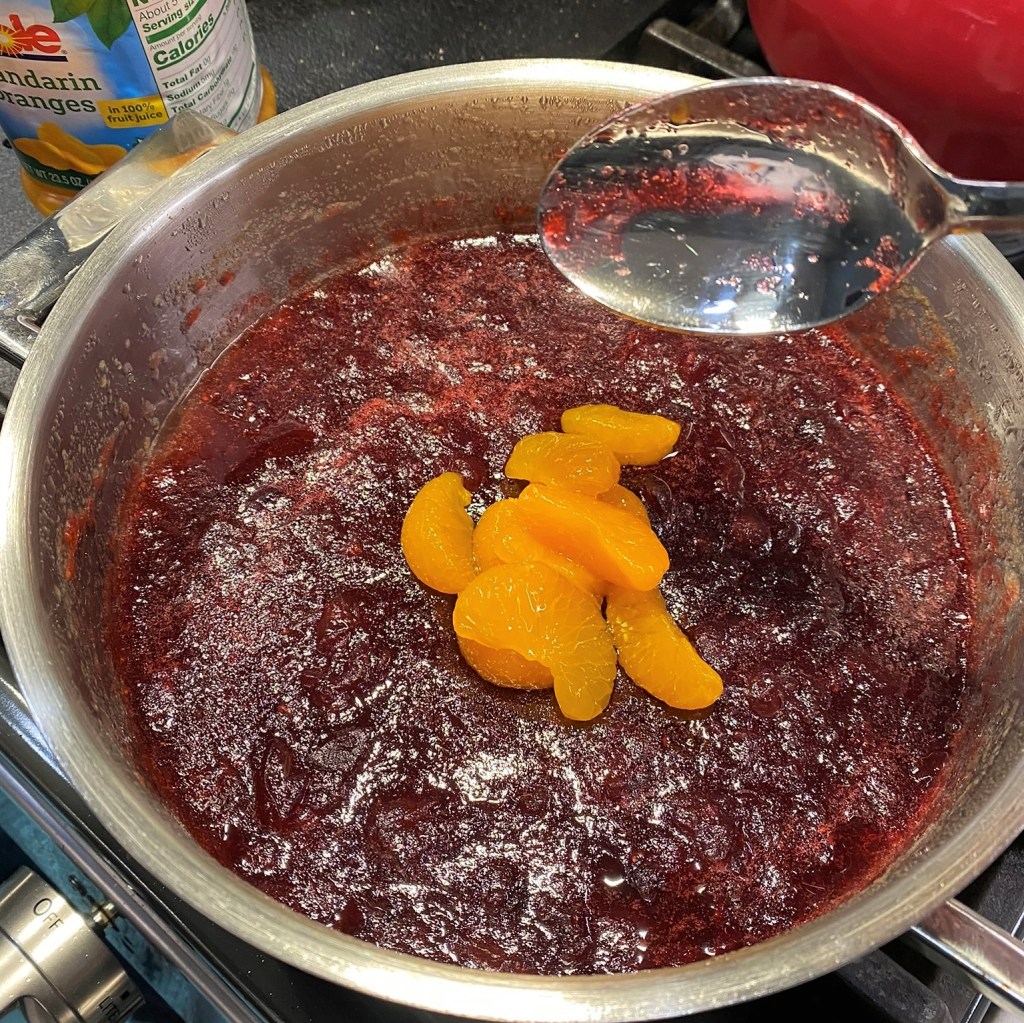
After chilling, the sauce will be more jelly-like. Stir in the Mandarin oranges.
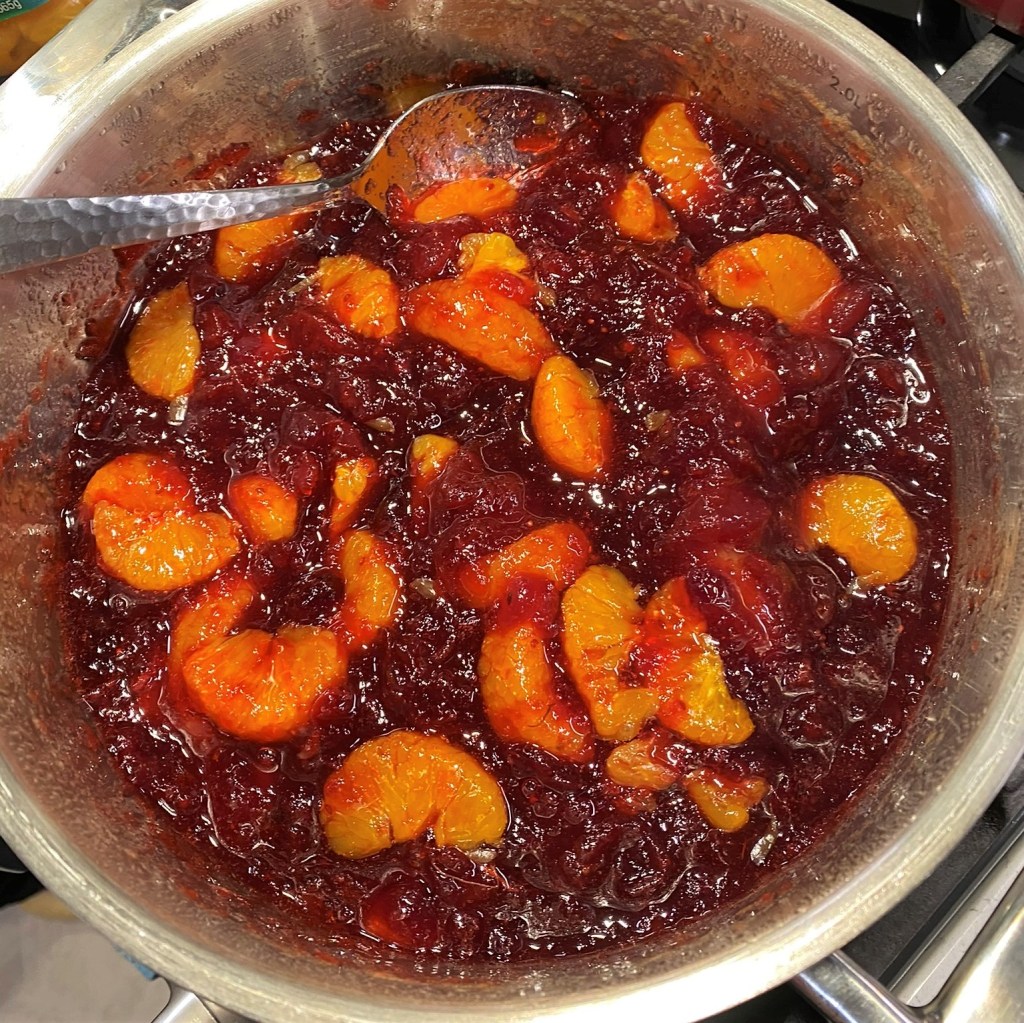
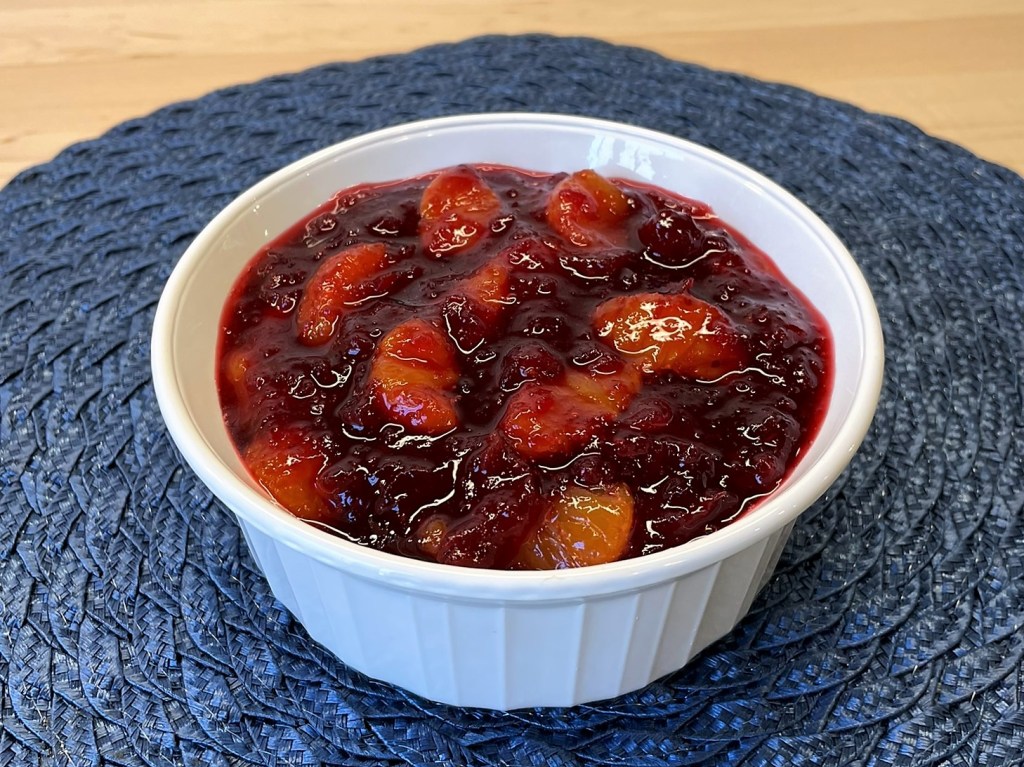
The big chunks of Mandarin orange make a very pleasant tart contrast to the sweetened cranberries. Your guests will love it!
Combine all ingredients, except Mandarin oranges, in a medium saucepan on medium heat and bring to a simmering boil over the course of 15 to 20 minutes. Turn down heat as cranberries begin to pop and work a spoon around the outside of the pot, crushing them into a sauce. When all berries have popped, remove from heat and refrigerate for an hour. Then, add the mandarin oranges to the slightly gelled sauce and refrigerate again until ready to serve.
With so much to do in advance of Thanksgiving, it may seem a little nuts to make the gravy ahead but hear me out on this. There are two big reasons I like to make this vegan mushroom gravy, and neither is related to having a vegan guest at the table.
First, the final minutes before dinner are hectic—the turkey has to be rested before carving, and the oven braces itself for round two, as I shove a baking sheet of vegetables in to roast or a casserole for final re-heating. The warmed dishes all need to be brought to the table and you can’t really make the turkey gravy until after the bird has emerged from the oven. If something goes wrong with the turkey gravy (been there, done that), I love having the savory, earthy flavors of this mushroom gravy as a backup.
Mmmm, mushrooms!
Secondly, the mushroom gravy is less heavy—both in flavor and in calories—than a typical turkey gravy. It more than satisfies my craving for gravy without cranking up my cholesterol levels. Besides being completely delicious and easy to make several days ahead of the holiday commotion, this gravy can do double duty as a sauce for green bean casserole. And when we do have a vegan guest at the table, I like to do just one version of that dish for everyone to enjoy.
Rave reviews from all around the table, made from simple ingredients and easy to do ahead; this is a winner no matter how you slice, er, pour it. 😉
Ingredients
8 oz. carton of cremini mushrooms, cleaned and diced or pulsed in processor
4 oz. shiitake mushrooms, thinly sliced
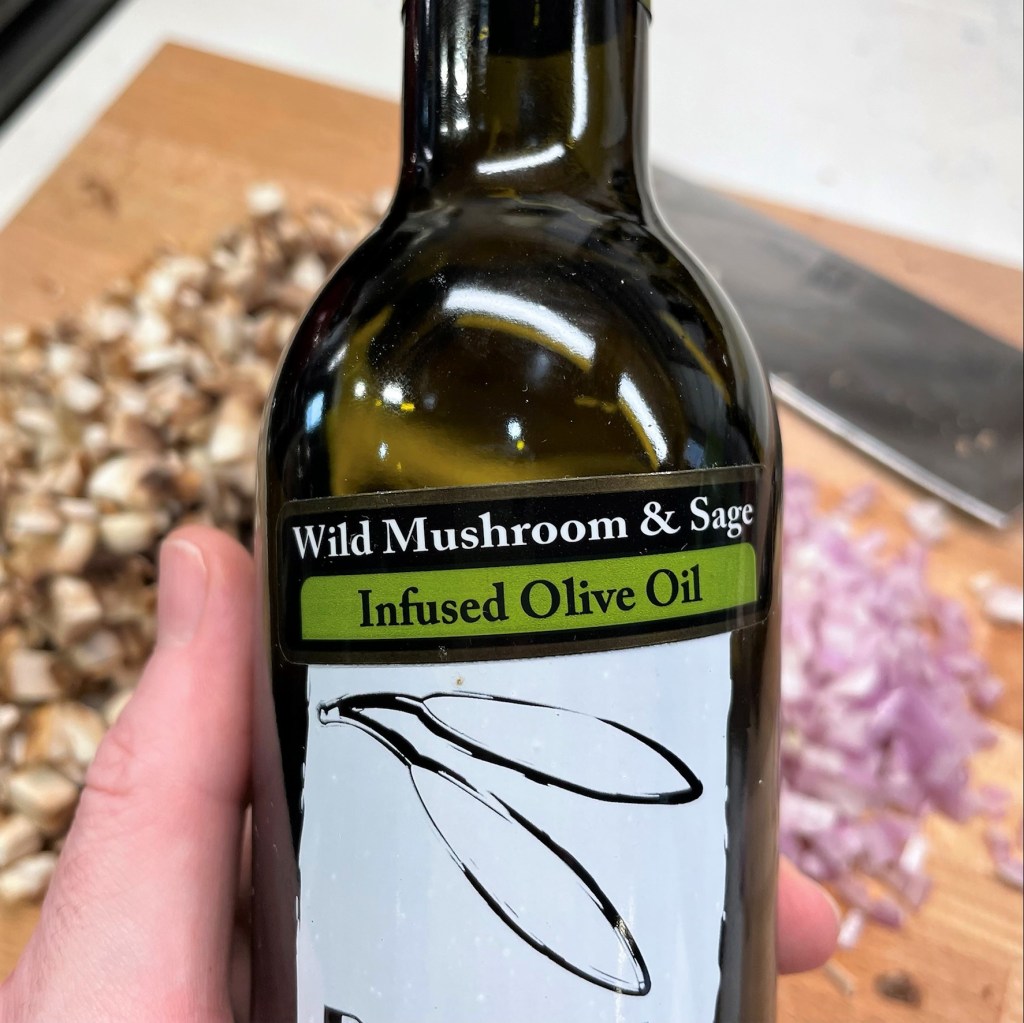
4 Tbsp. mushroom and sage-infused olive oil (+ 2 Tbsp. more later in the recipe)
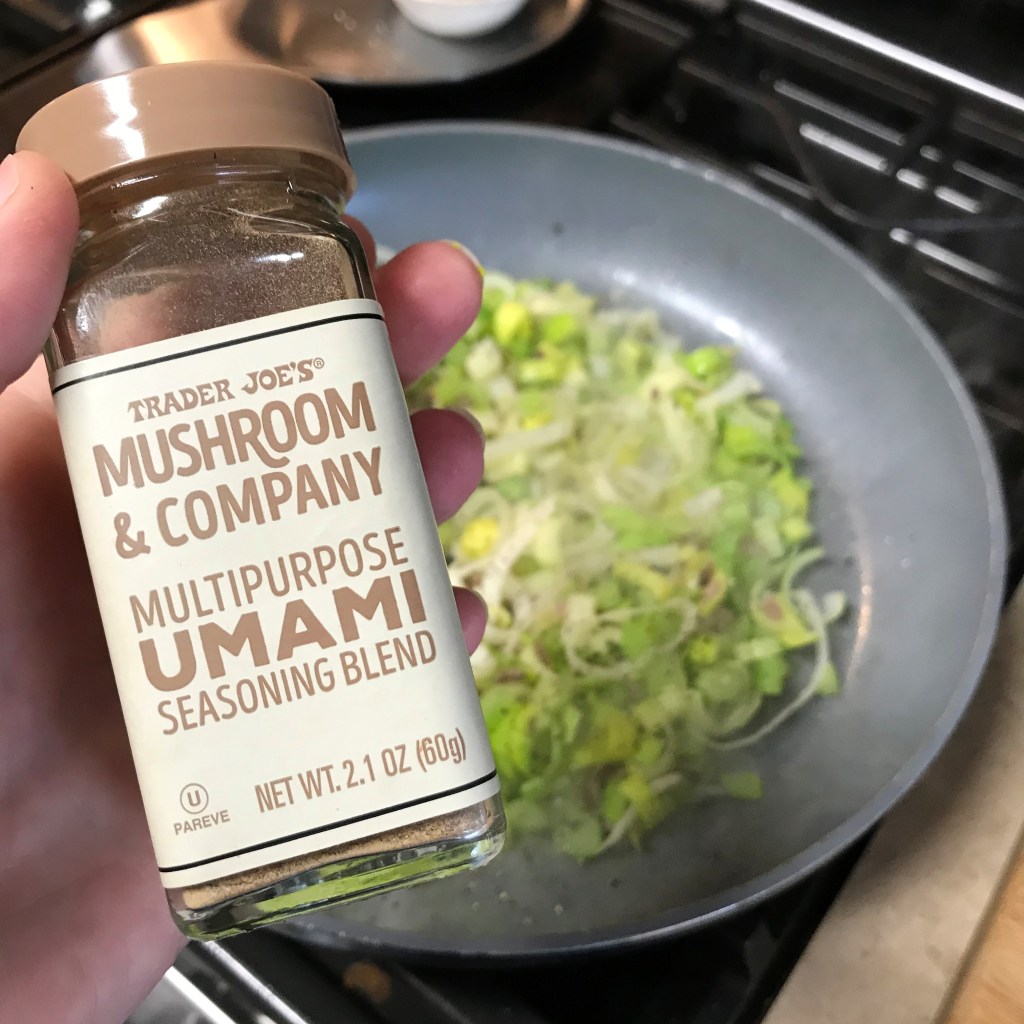
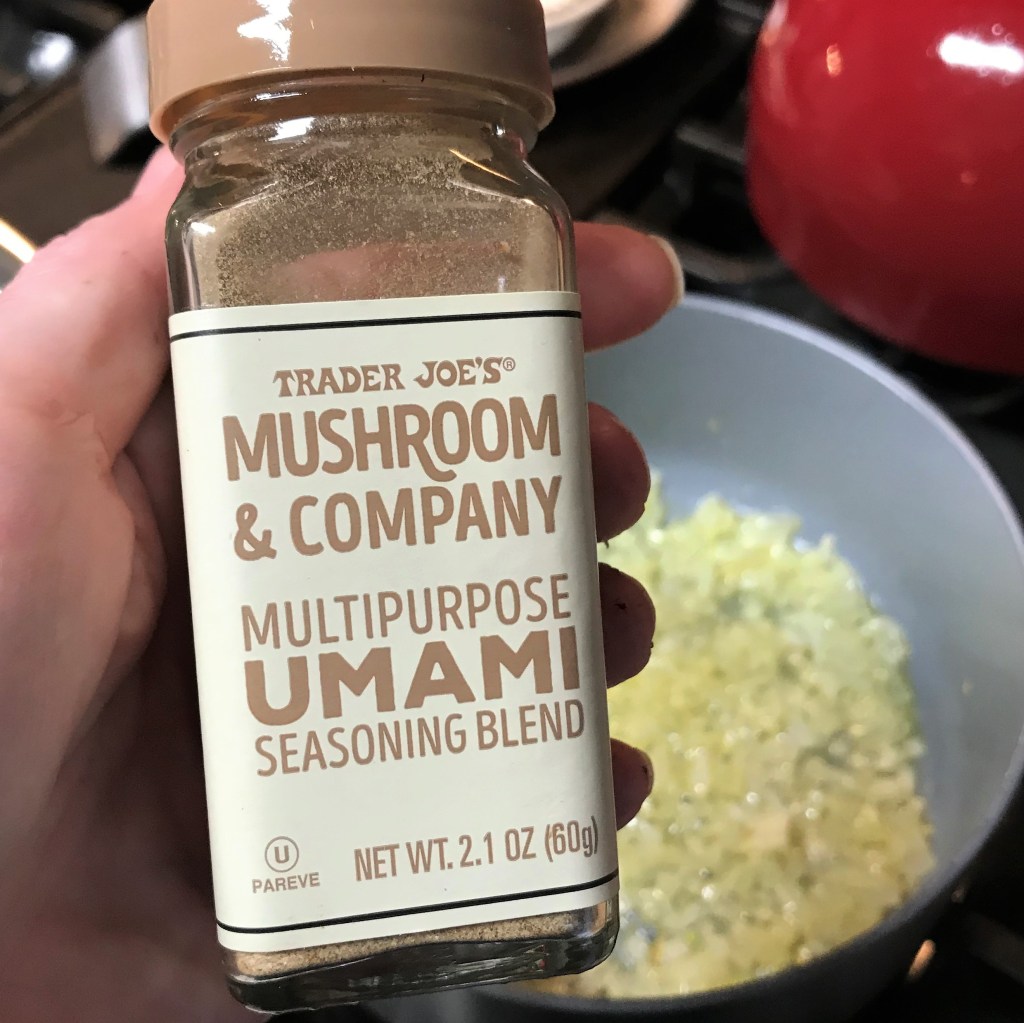
The umami seasoning is a Trader Joe’s product, and it gets plenty of use whenever I’m making a vegan dish. The ingredients are porcini and white mushroom powders, dried onions, ground mustard, crushed red pepper and dried thyme. It brings a depth of savory flavor to everything it touches, but if you cannot find it, I would recommend substituting with the flavors you do have and also use prepared mushroom broth in place of the vegetable broth. Look for mushroom broth in cartons in a well-stocked supermarket.
I always choose low sodium broths because it helps me control the overall sodium of a recipe. In this recipe, I specifically used a vegetable broth that does not contain tomatoes.
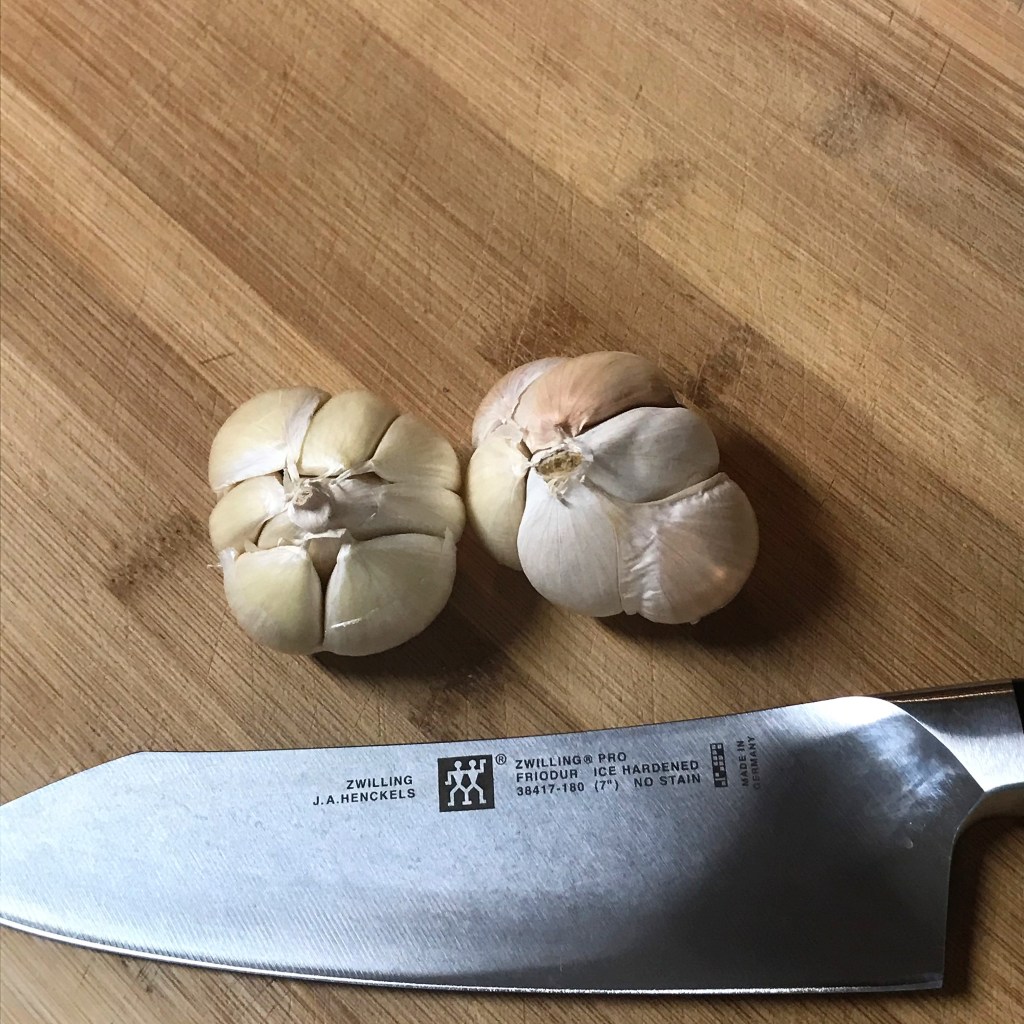
Roasted garlic is easy to make at home, and it gives a lot of depth and complexity to this mushroom gravy. If you have never made your own roasted garlic, please check out this post for step-by-step instructions.
Instructions
As usual, the photos tell the story better than written instructions. Please have a look at the slides and keep scrolling for a downloadable pdf for your recipe files.
First things first, make your roasted garlic, which is needed for this recipe. My instructions for this is linked in the ingredients list.
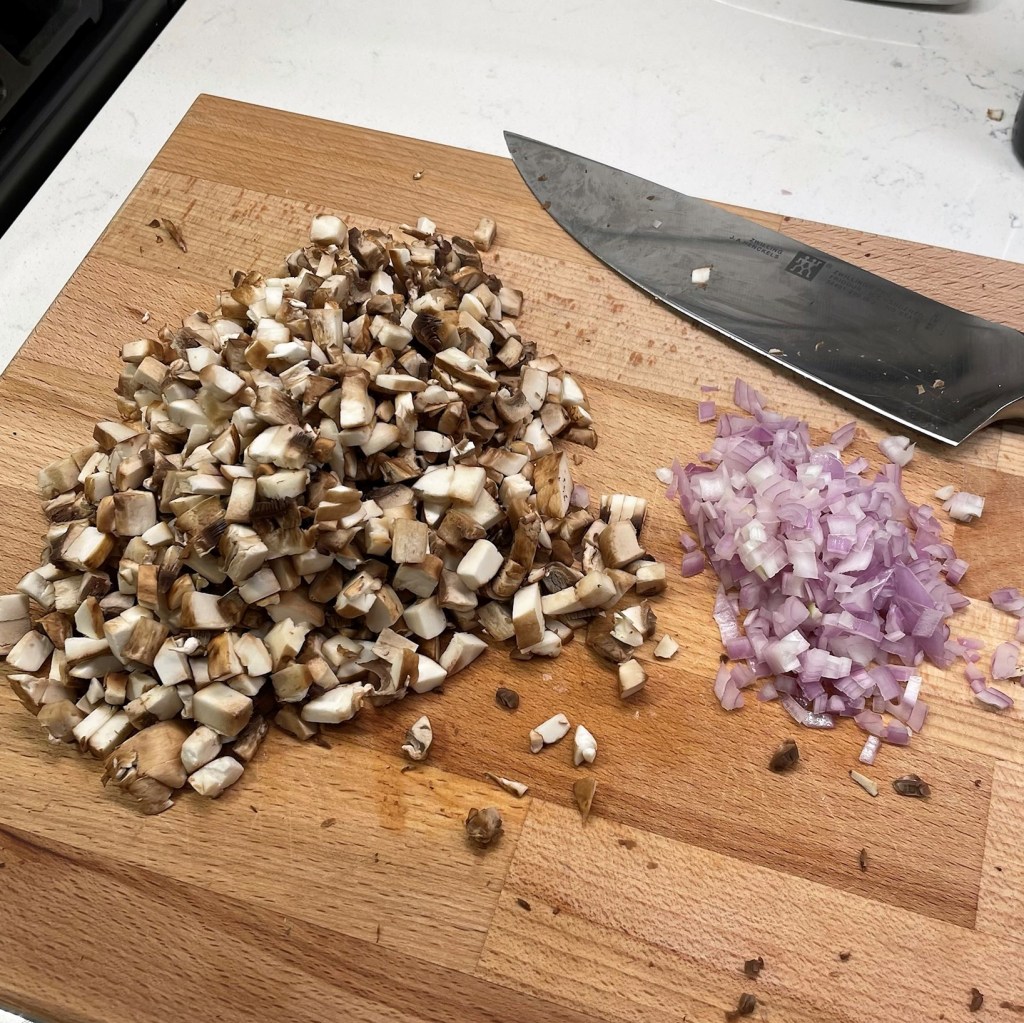
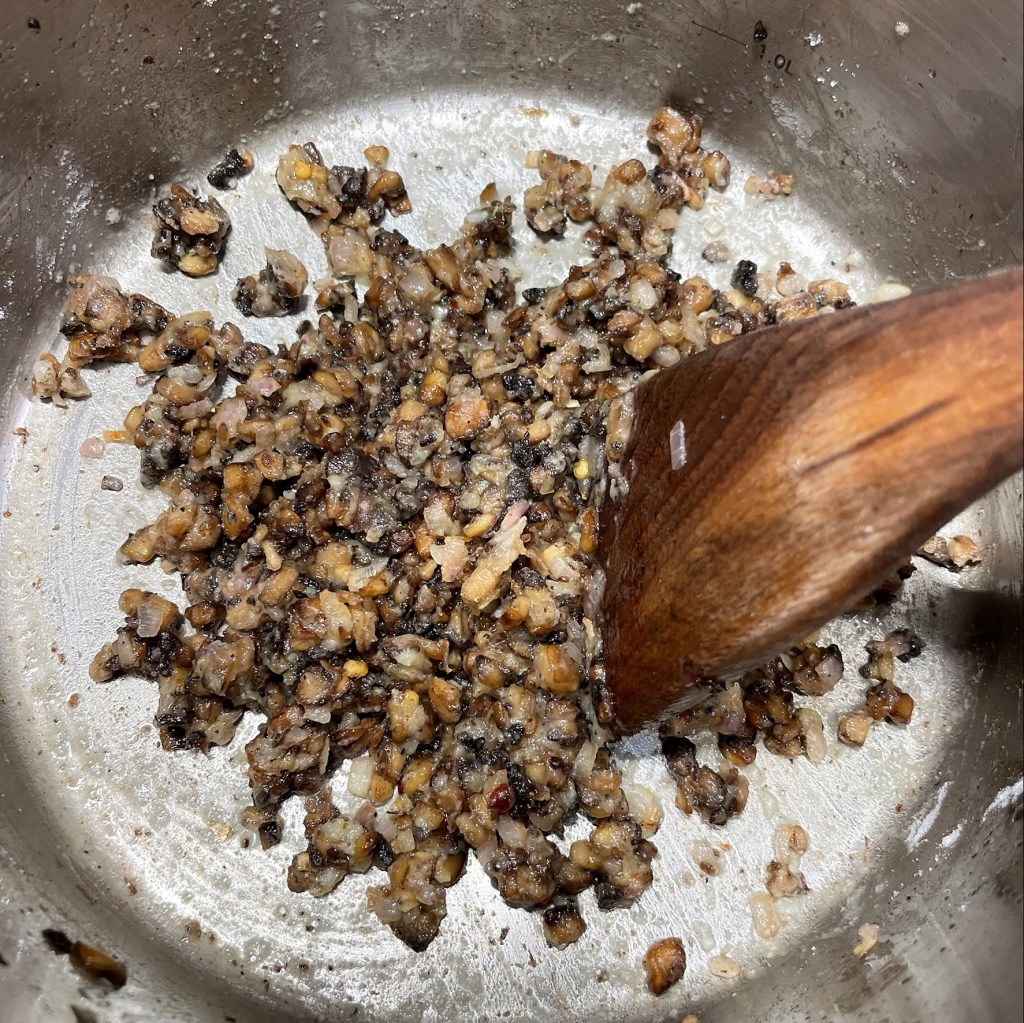
Cut the cremini mushrooms and shallots into a fine dice. If you prefer, use a food processor and pulse about six times.
I could not live without this stuff in the fall! If you don’t have a specialty olive oil store in your town, look for it online or swap in regular olive oil.
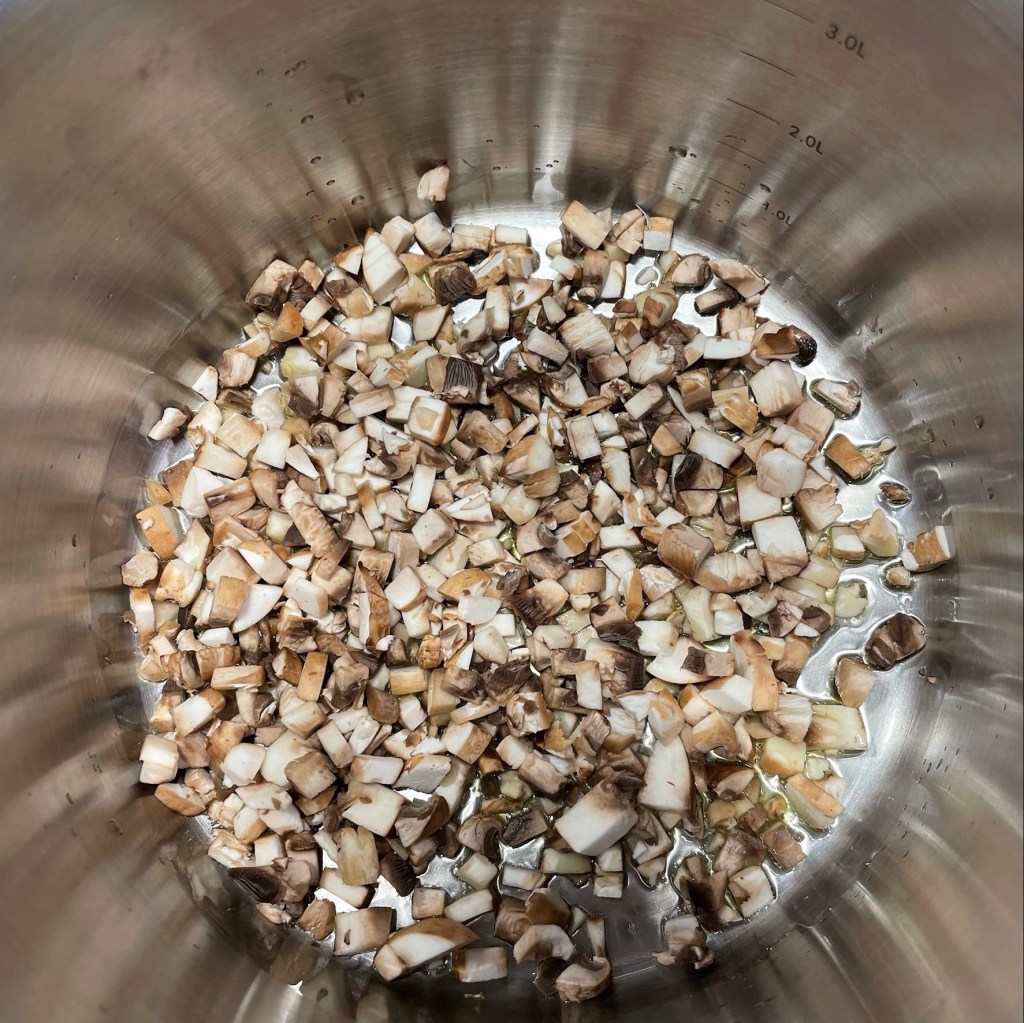
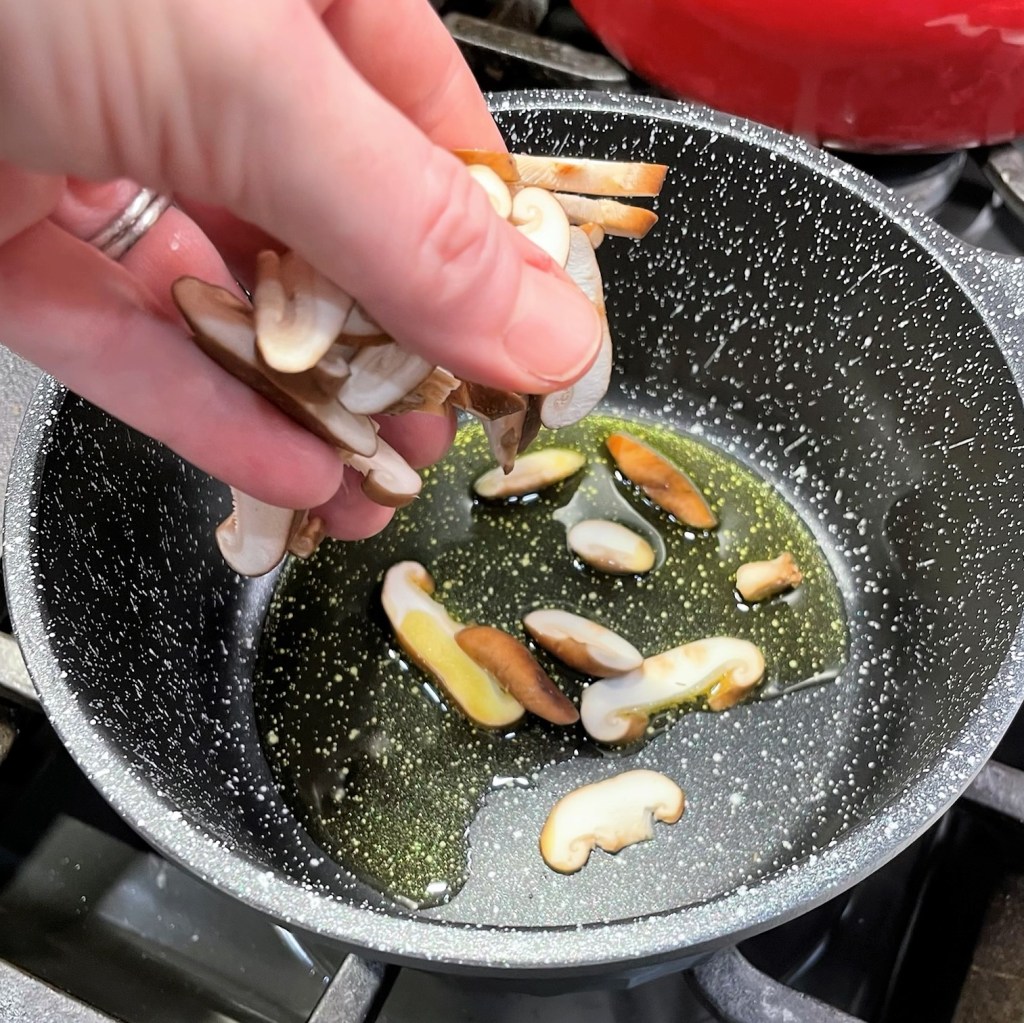
Cook half the mushrooms initially, so that they don’t overcrowd in the pan.
These two seasonings keep this gravy true to Thanksgiving, and still plant-based.
When the first mushrooms are softened, add the remaining mushrooms and continue to saute until golden.
Add an extra splash of oil to the center of the pot and then add the shallots.
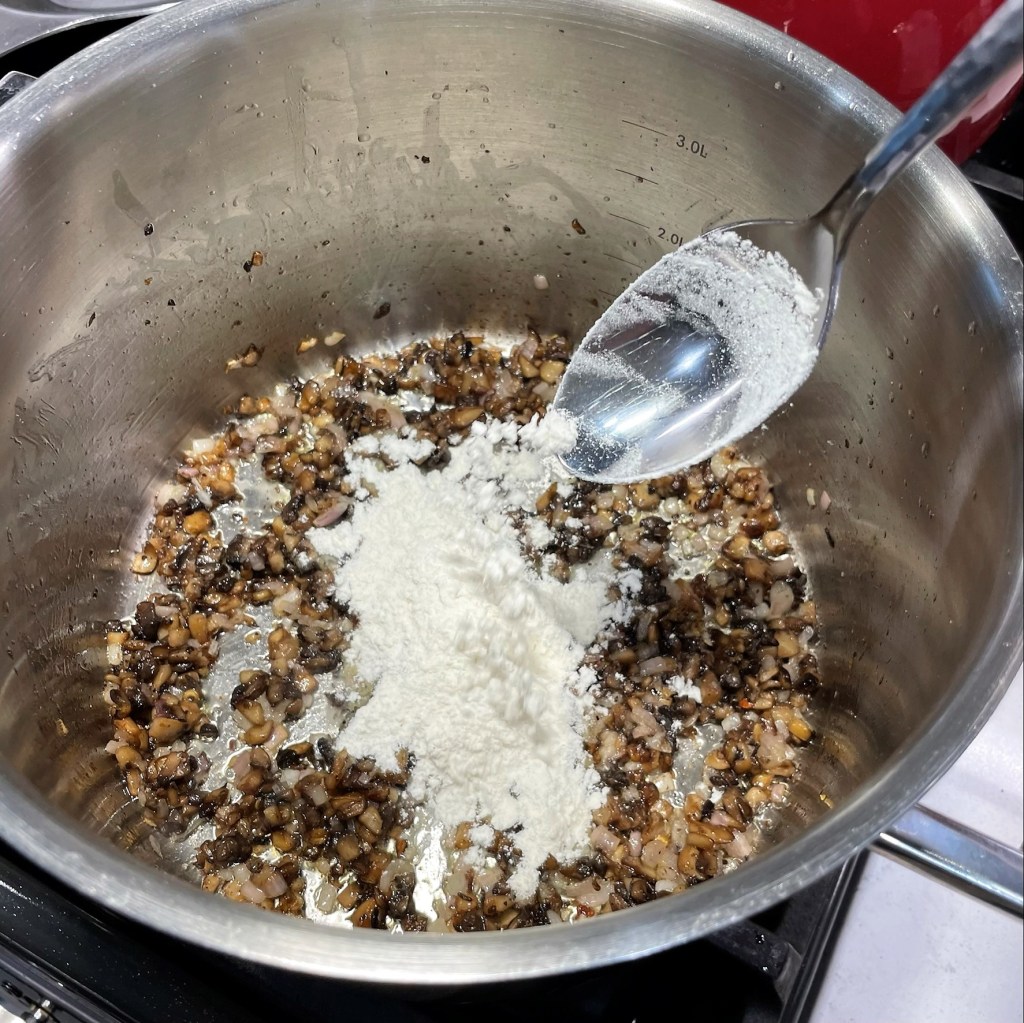
Measure about 3 tablespoons of flour into the mixture, and stir to coat evenly.
Cook this mix a few minutes so that the flour hydrates with the oil. If it seems dry or powdery, add a touch more oil.
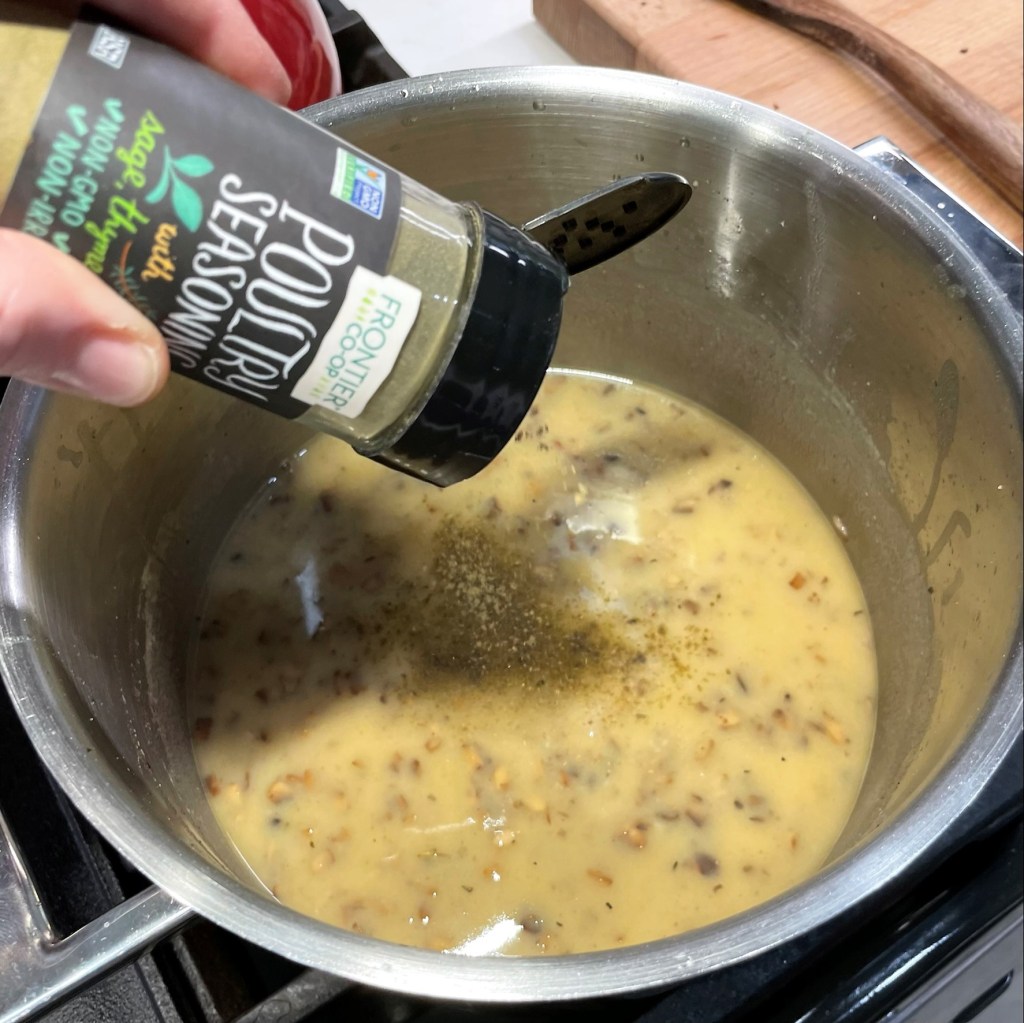
Low sodium vegetable broth adds extra layers of flavor. Mix it well until the gravy reaches a low boil, then simmer.
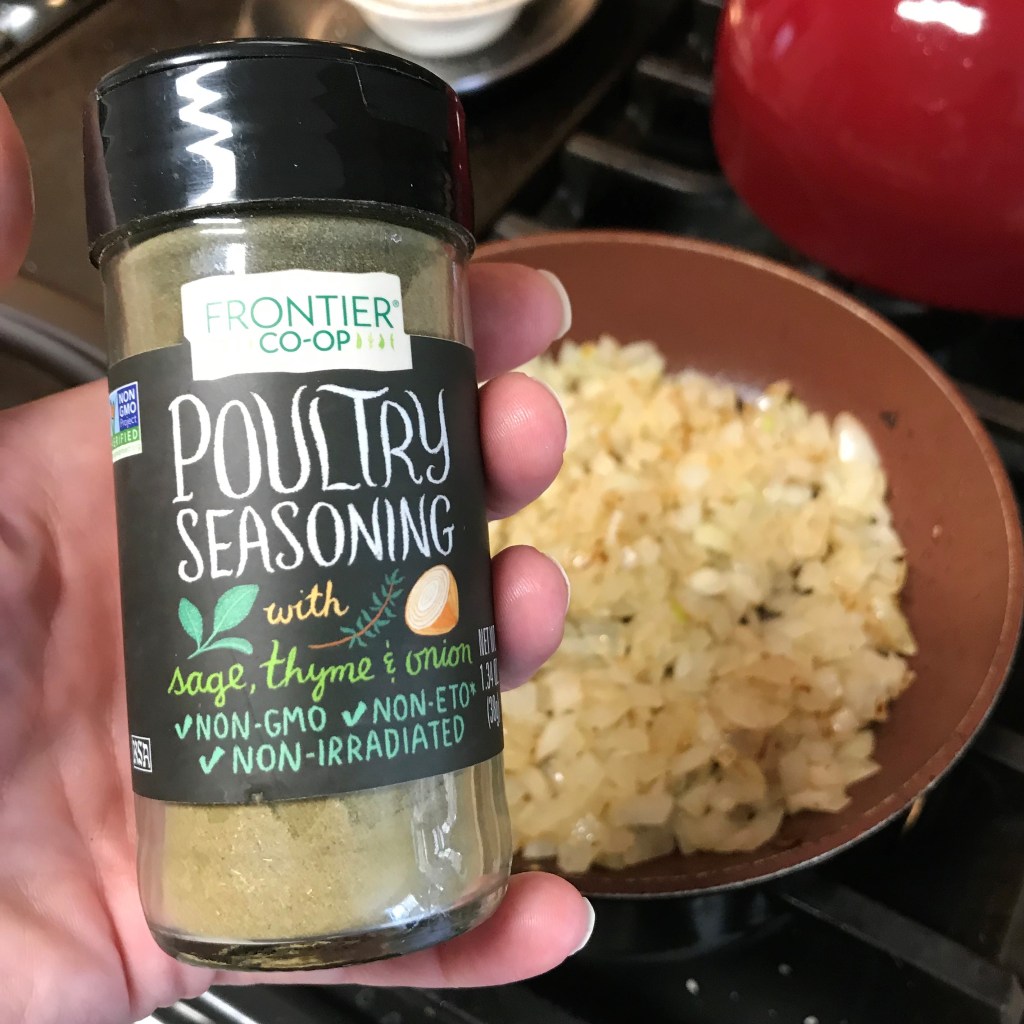
Despite its name, poultry seasoning has no poultry. It is usually a blend of sage, thyme and rosemary. Bell’s seasoning would be a terrific substitute.
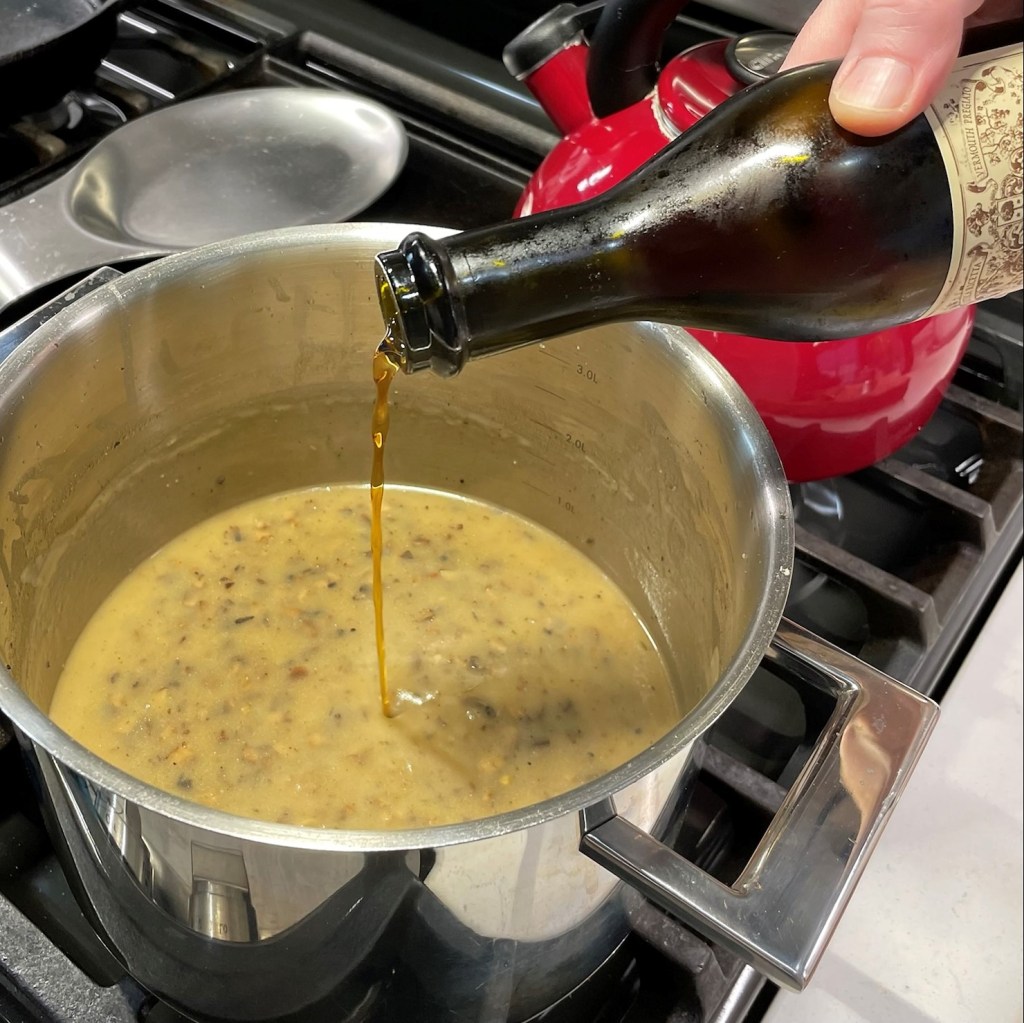
Add a splash of dry white wine. I went out on a limb this time and used a splash of red vermouth, but I like the white wine better.
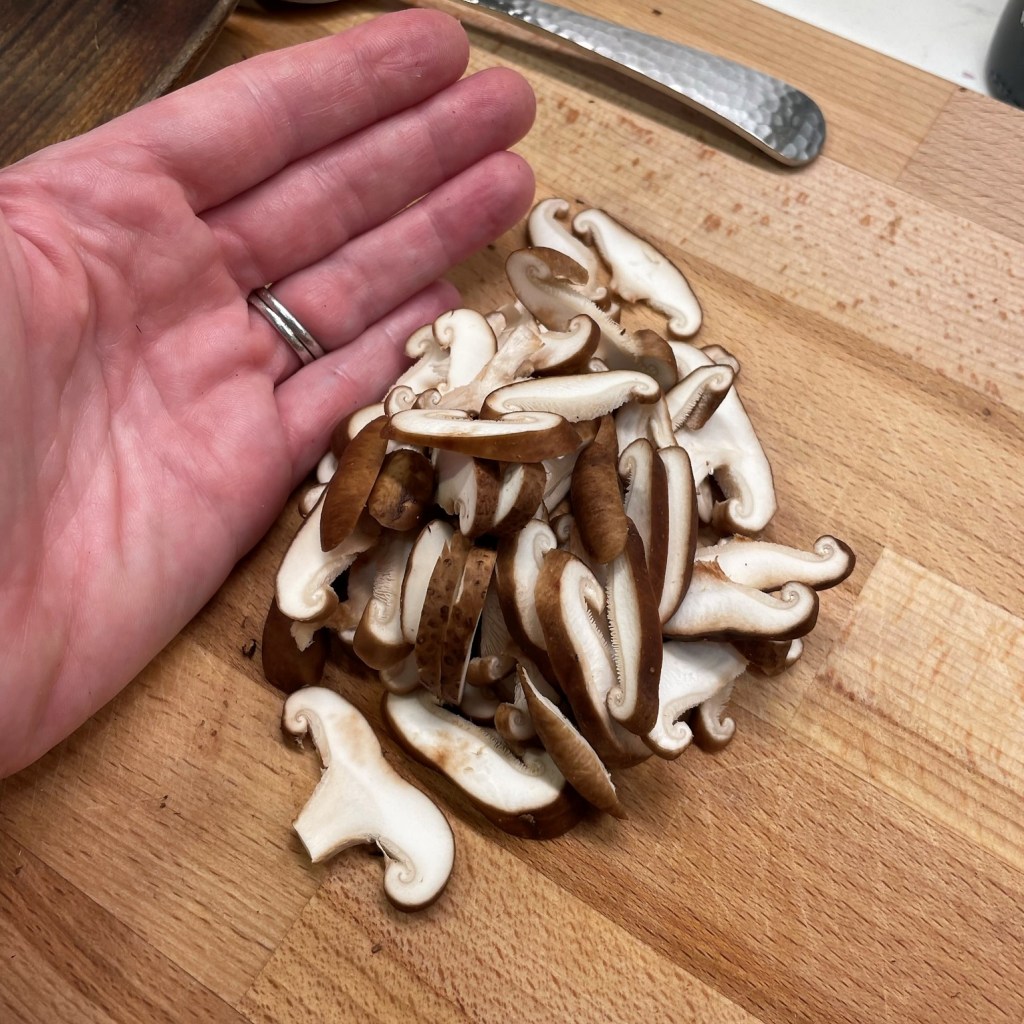
Slice the shiitakes thin to add to the finished gravy. I love the texture and mellow flavor of shiitakes.
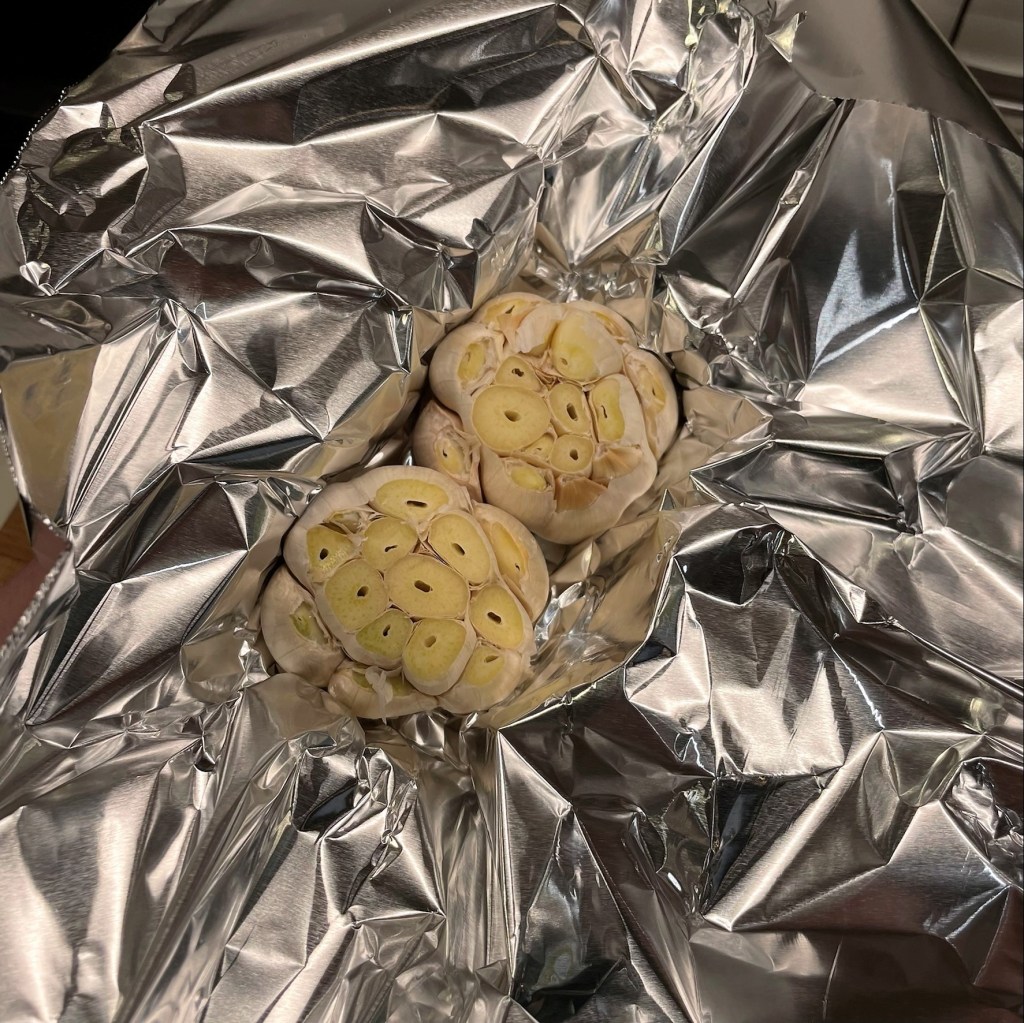
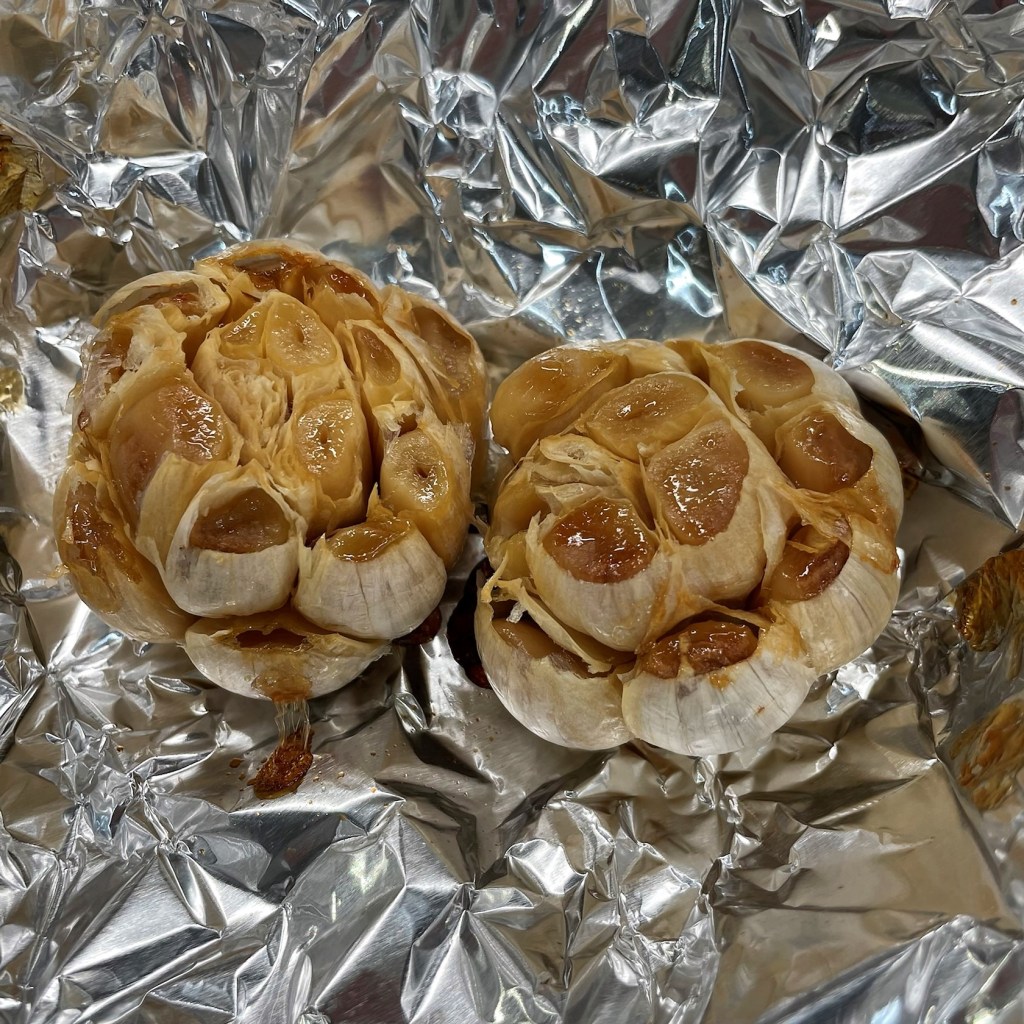
My garlic is ready! You want to roast it until it reaches this golden color. Only use one bulb in the gravy, and save the other for your mashed potatoes! 🙂
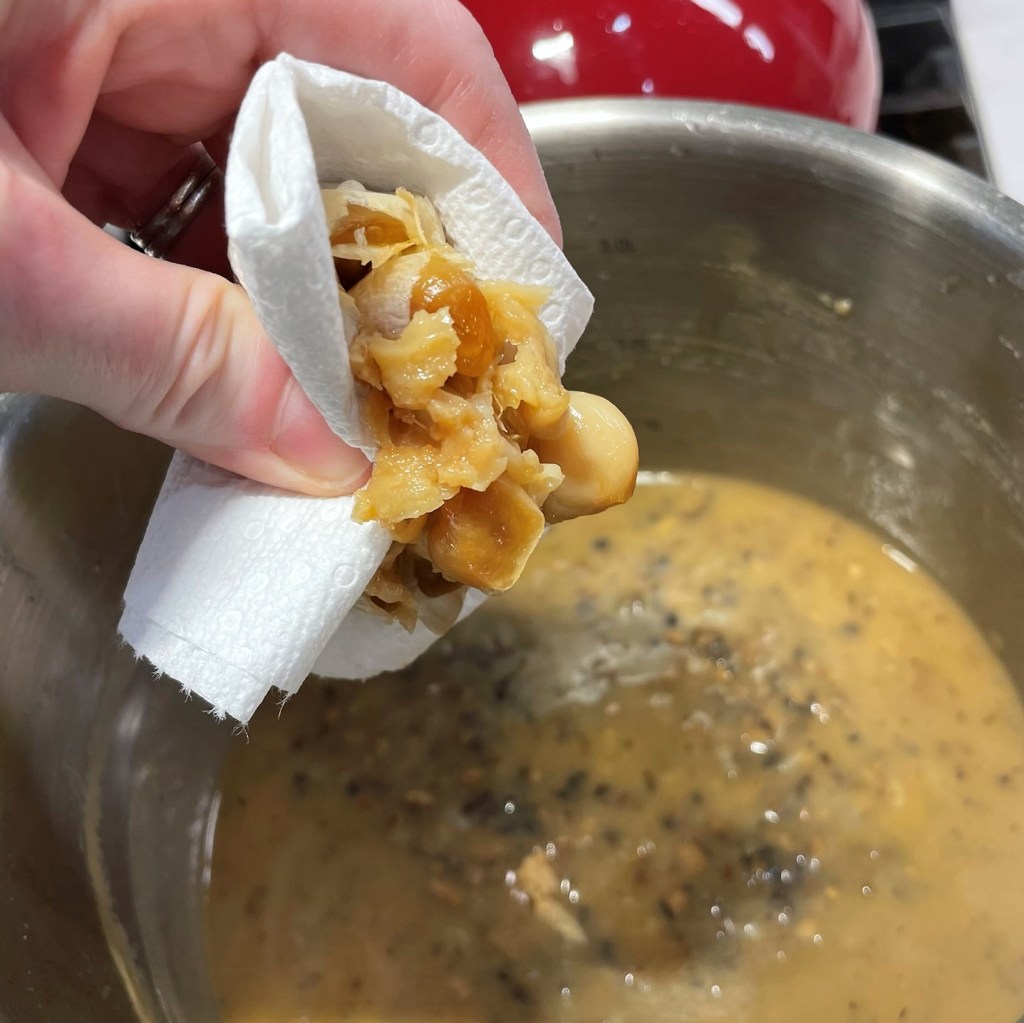
Grip the garlic bulb with a paper towel and gently squeeze the roasted cloves out, directly into the gravy pot.
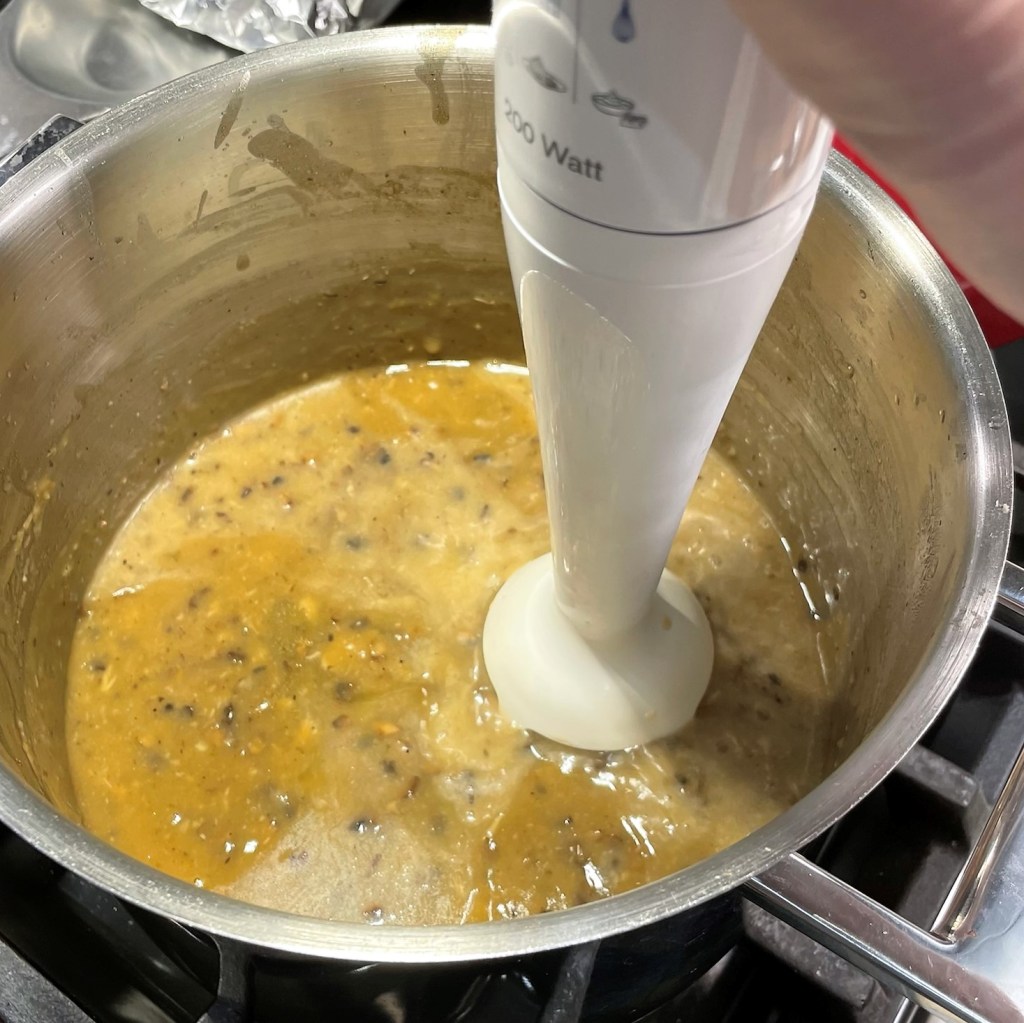
On a whim, I decided to use the immersion blender to puree the gravy. It is fine to keep the bits of mushroom as they are.
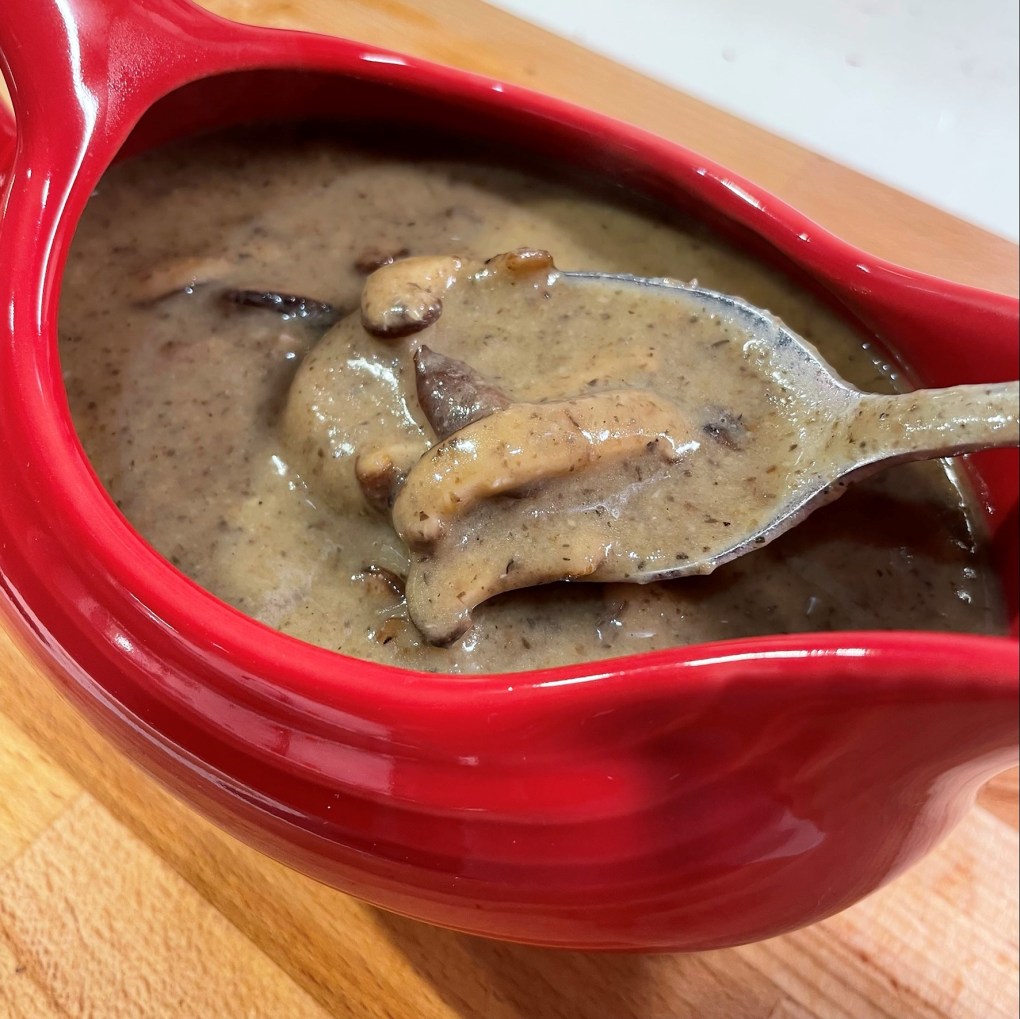
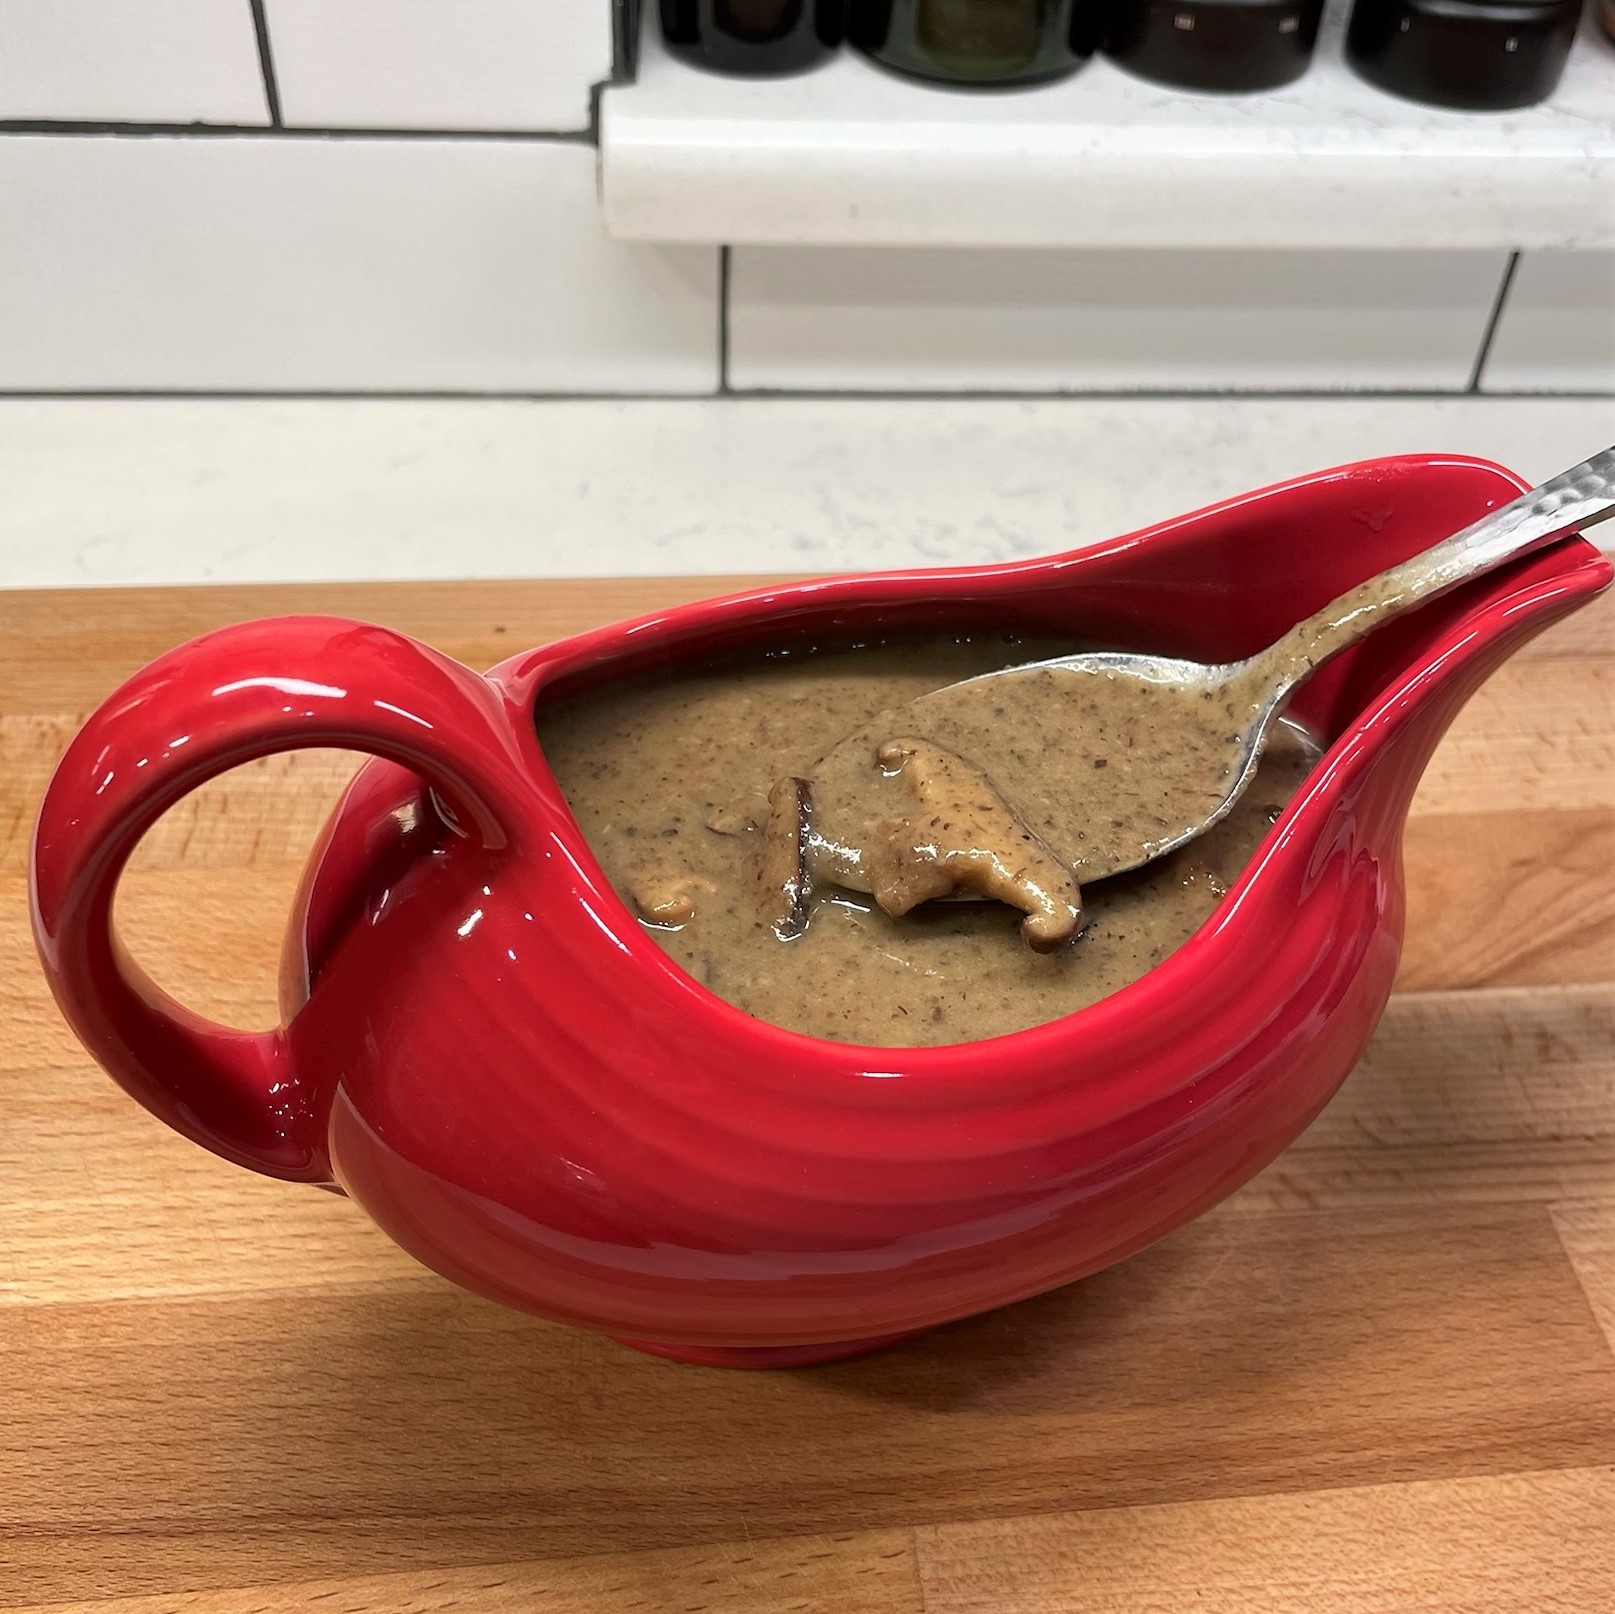
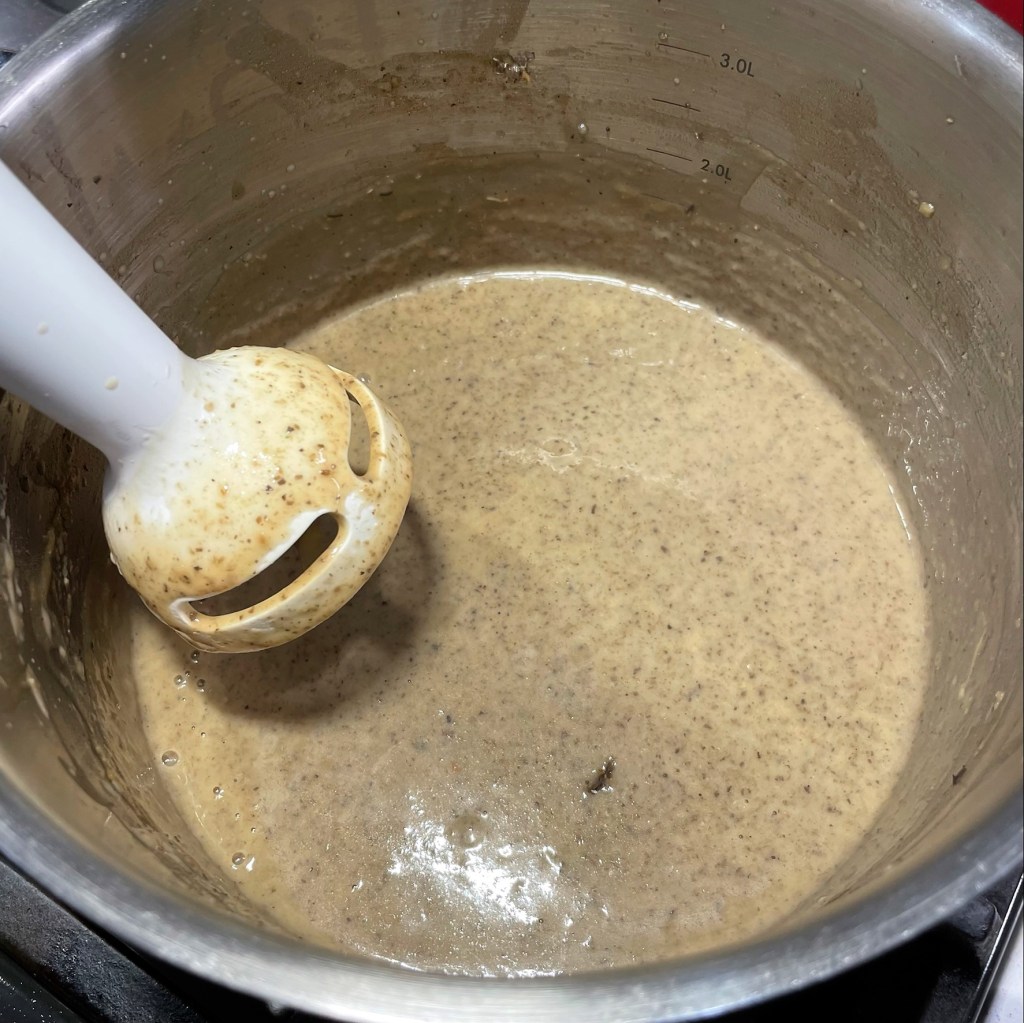
After blending, the gravy resembles a creamy mushroom soup.
Brown the shiitake slices in a touch of olive oil, then add them to the gravy.
Call me to the table, already!
If you don’t already have your roasted garlic, go make that. Please don’t try to substitute with fresh sauteed garlic. The flavor will be too strong.
Heat 4 Tbsp. olive oil over medium heat. Sauté half of the mushrooms, tossing to coat them in the oil, until they give off their moisture and shrink in size. Repeat with remaining mushrooms. Season with salt, pepper and umami seasoning. Move the mushrooms to the sides of the pot.
Swirl another tablespoon of oil into the center of the pot and add the shallots. Saute until slightly softened. Add flour and toss until absorbed into the oil. The mixture should look somewhat pasty, but not dry. Add a final tablespoon of oil if needed to reach this consistency. Cook the mixture for a minute or two.
Add vegetable broth all at once and stir continuously for a minute or two to hydrate the roux. Bring to a slight boil, then reduce heat and simmer for 10 minutes until mixture is thickened. Stir in wine and simmer over very low heat for about an hour.
Squeeze in the entire bulb of roasted garlic, taking care to not drop the garlic paper into the pot. Use a whisk to ensure the garlic is fully blended, or use an immersion blender to whip the gravy into a smoother consistency.
In a small skillet, heat 1 Tbsp. olive oil and sauté the sliced shiitake mushrooms until softened and slightly browned, then stir them into the gravy. Serve immediately or refrigerate up to three days ahead.
This gravy has so much rich, savory flavor, you’ll never miss the meat.
This gravy is delicious on a lentil mushroom wellington or use it as a substitute for cream of mushroom soup in any casserole you’d like to convert to vegan.
My love for Brussels sprouts is not exactly new, but I remember a time when my nose would wrinkle at the mere mention of them. If you were forced to try them, as I was for the first time, from the frozen section of the grocery store and drenched in a nasty, congealed “butter” sauce, then you can probably relate. They were mushy, bland and bitter, and the sauce only made them worse. There should be laws against this kind of vegetable abuse.
Later, when I was a teenager fulfilling my household chore of tending the home garden, I found myself intrigued by these enormous stalks covered in bulbous little cabbage heads. It was the first time I had ever seen them as nature intended, and it pleases me now to see them presented that way at Trader Joe’s, where they are proudly perched this time of year in a large case just inside the entrance.
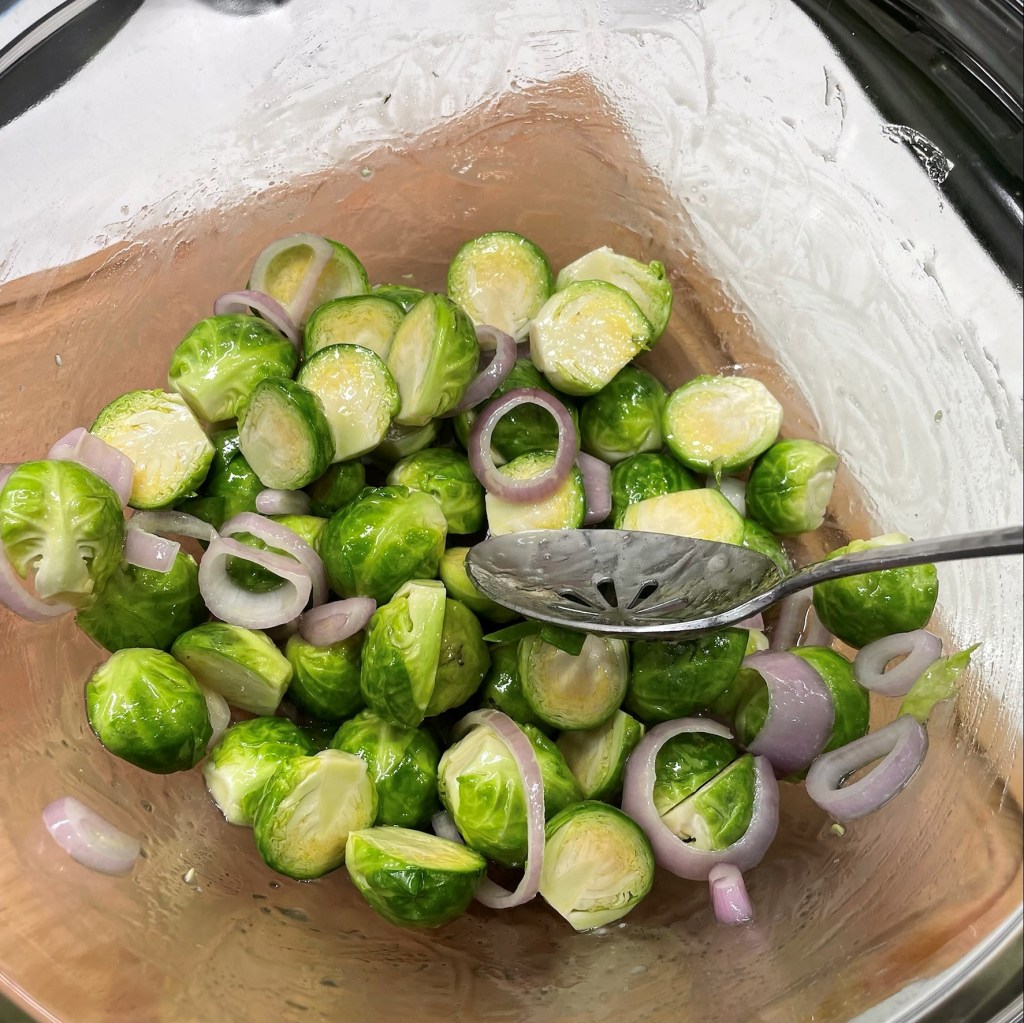
Cutting the individual sprouts off the stalk can be a bit tedious (I still cringe as I remember doing so all those years ago), and I’ll confess here that I usually prefer to buy them already cut and packed up in the mesh bags. They should be firm and bright green in color, with no wilted leaves in sight. To prep them, you only need to wash them under running water and trim a thin slice off the bottom, allowing the outer leaves to fall away. Cut them in half from top to bottom and toss them in the marinade for a few minutes, then into the oven on a parchment-lined baking sheet.
The sprouts should have tightly layered leaves and a firm exterior. Slice the shallot into rings.
Brussels sprouts are part of the brassica family of vegetables and, like their cousins (broccoli, cabbage, cauliflower and kale), they are positively loaded with nutrients. Additionally, they have terrific heft and body that make them an essential part of our Thanksgiving day table.
Last year, I shared a spicy-sweet version of Maple Cayenne Brussels Sprouts, and this year, an alternative for those who like a fresher, tangy twist. The lemon and pomegranate flavors are simple to impart—I love the flavor-infused balsamic vinegars that are available in the boutique oil and vinegar shops that seem to be everywhere these days (or can be found for online ordering). This recipe uses the pomegranate balsamic, plus lemon-fused olive oil and the juice and zest of a fresh lemon. These sprouts are simple to make, and you can roast them in the oven while your turkey is resting. Or, if you are going plant-based this year, they can probably be roasted alongside whatever else you have in the oven.
Enjoy!
Ingredients
1 pound bag of fresh Brussels sprouts (cleaned, trimmed and halved)
1 medium shallot, sliced into rings
2 Tbsp. fresh lemon juice plus the zest
Pinch of sugar
1/4 cup extra virgin olive oil (I love the lemon-fused)
2 Tbsp. pomegranate-infused balsamic vinegar
Kosher salt and black pepper
Instructions
Whisk the oil into the lemon juice with a pinch of sugar. You want the oil to become emulsified rather than separated, so that the marinade clings to the sprouts.
Toss them about in the marinade until evenly coated. Use a slotted spoon to transfer the sprouts to a baking sheet, and reserve excess marinade.
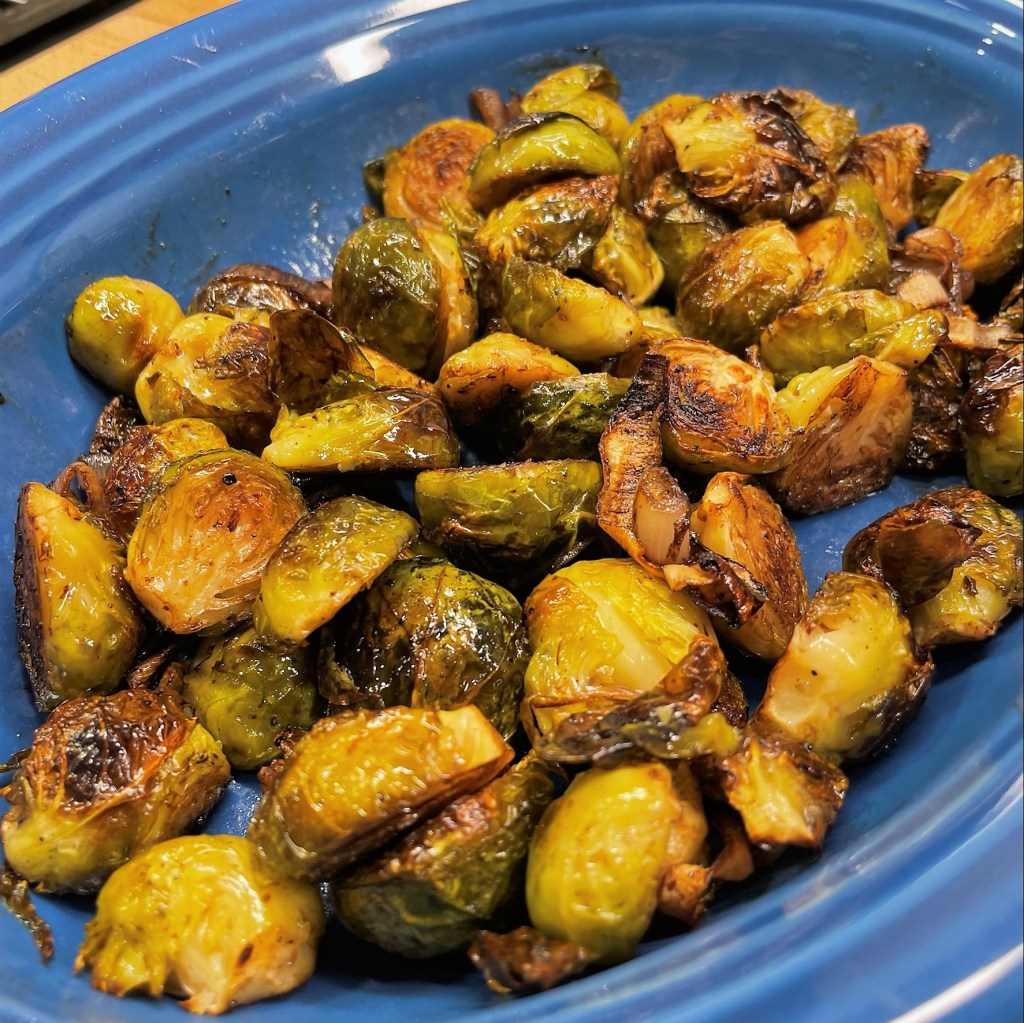
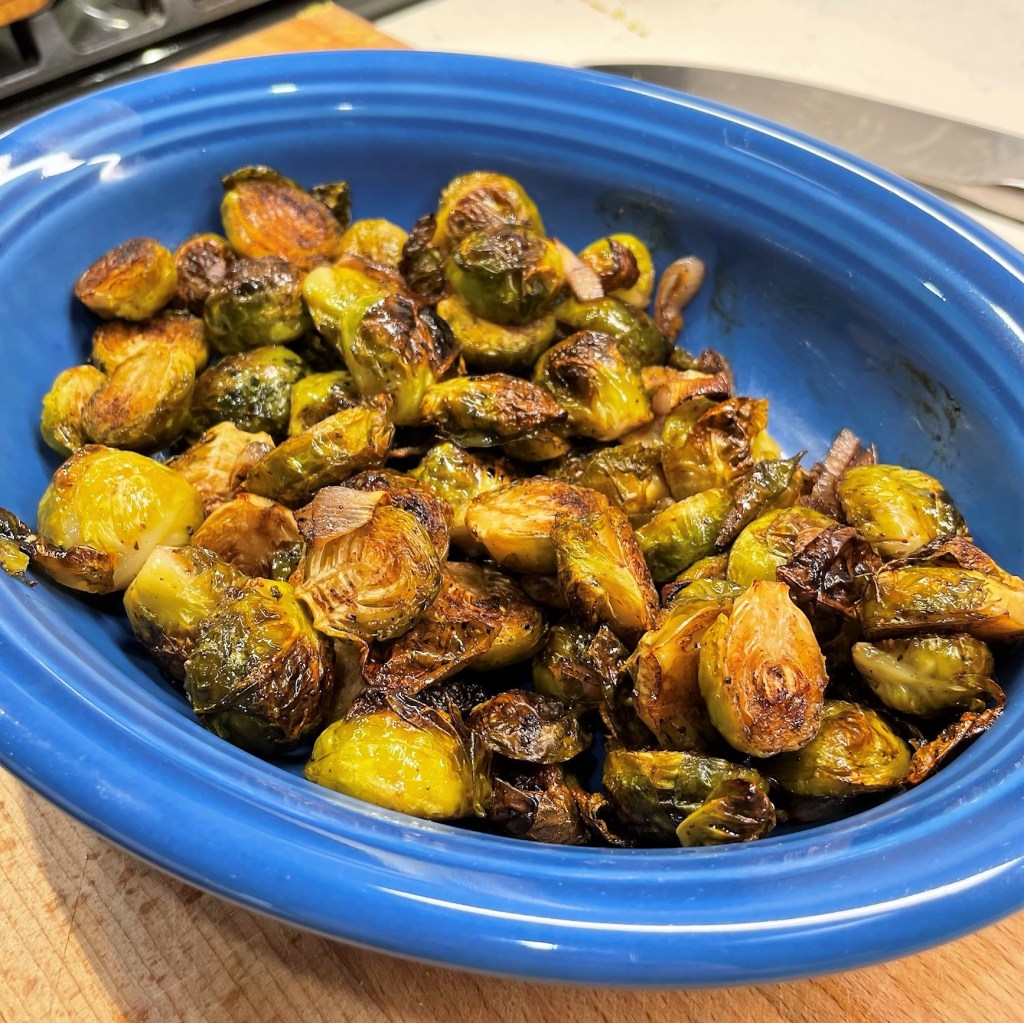
Give the sprouts a little breathing room, and place them cut side-down on the parchment paper. Roast for 20 minutes.
Transfer the roasted sprouts back into the bowl with remaining marinade and pour the balsamic mixture over them, tossing to coat.
The second roasting helps seal the tangy-sweet balsamic into the sprouts. They can face either up or down for the second roasting, which should be about 5 minutes.
The balsamic vinegar will caramelize slightly, and the lemon and pomegranate flavors are a nice balance to the richer foods on the Thanksgiving table.
Heat oven to 400° F, with rack in a center to upper position in the oven.
In a large bowl, whisk the olive oil in a slow, steady stream into the lemon juice, sugar and zest. Season with a pinch of salt and a few twists of black pepper. Do not add the pomegranate balsamic at this stage.
Add the trimmed brussels sprouts to the bowl and toss until evenly coated with the marinade. Use a slotted spoon to scoop them out of the bowl, and reserve the marinade that remains in the bowl. Arrange the sprouts, cut side down, on a parchment-lined baking sheet. Aim to separate them a bit so that they don’t steam from overcrowding. Roast for about 20 minutes.
Whisk the balsamic into what is left of the oil-lemon juice marinade until it is smooth and not separated. Toss the hot sprouts back into the bowl and toss until evenly coated. Spoon them back out onto the parchment-lined sheet and put them back into the oven for about five minutes, just long enough to heat through and add a touch of caramelization.
Delicious!
These lemon-pomegranate brussels sprouts are best served immediately, but you can reheat them in the microwave if you need the oven space for other dishes.
Thanksgiving is the favored holiday at our house. My husband, Les, and I both love preparing the traditional meal and we made an agreement early in our relationship to alternate responsibility for the turkey. We love having friends and family at the table and, more often than not, the friends outnumber the family members by at least two-to-one. I have no children, and Les’s two adult kids can’t always make it. His son, Alex, lives and works in Europe, and has only been here for one holiday season since I’ve known him. His daughter, Sydney, lives two hours away in the mountains of North Carolina, but she also sometimes has her own plans with her mother’s family or her friends. When she is able to join us, though, I have more than a few adjustments to make to the menu because Syd is vegan.
If the idea of having a vegan at the holiday table scares you, then I hope this recipe brings some relief. It most certainly will bring some big Thanksgiving flavor, and everyone at our table—vegan or otherwise—has asked for seconds. One of my friends, a regular guest at our Thanksgiving table, has been begging me for almost two years to share this recipe, so she is probably screaming right now to finally see it on my blog (you’re welcome, Linda). 😉
There’s so much texture and flavor, you will never miss the meat.
You might wonder, “why not just share it with your friend after the first request instead of making her wait?” Linda (who is not a vegan) has been asking the same, and the reason is simple—I didn’t actually have a recipe for it. As I have said many times about my way of cooking, I develop recipes by instinct (otherwise known as flying by the seat of my pants), and it has only been since I began blogging that I have bothered to write down how much of what goes into most of my dishes. The first time I made this lentil mushroom wellington, I couldn’t even quite remember all the ingredients so there was no possibility of describing it to someone else. But just after Christmas last year, I made the dish again when Syd came for a post-holiday visit—and on that occasion, I kept my notes—but I didn’t post it on the blog right away because the holidays were over at that point and I doubted that anyone would want to make a fuss over such a showstopper without a special occasion. It isn’t exactly a quick weeknight recipe.
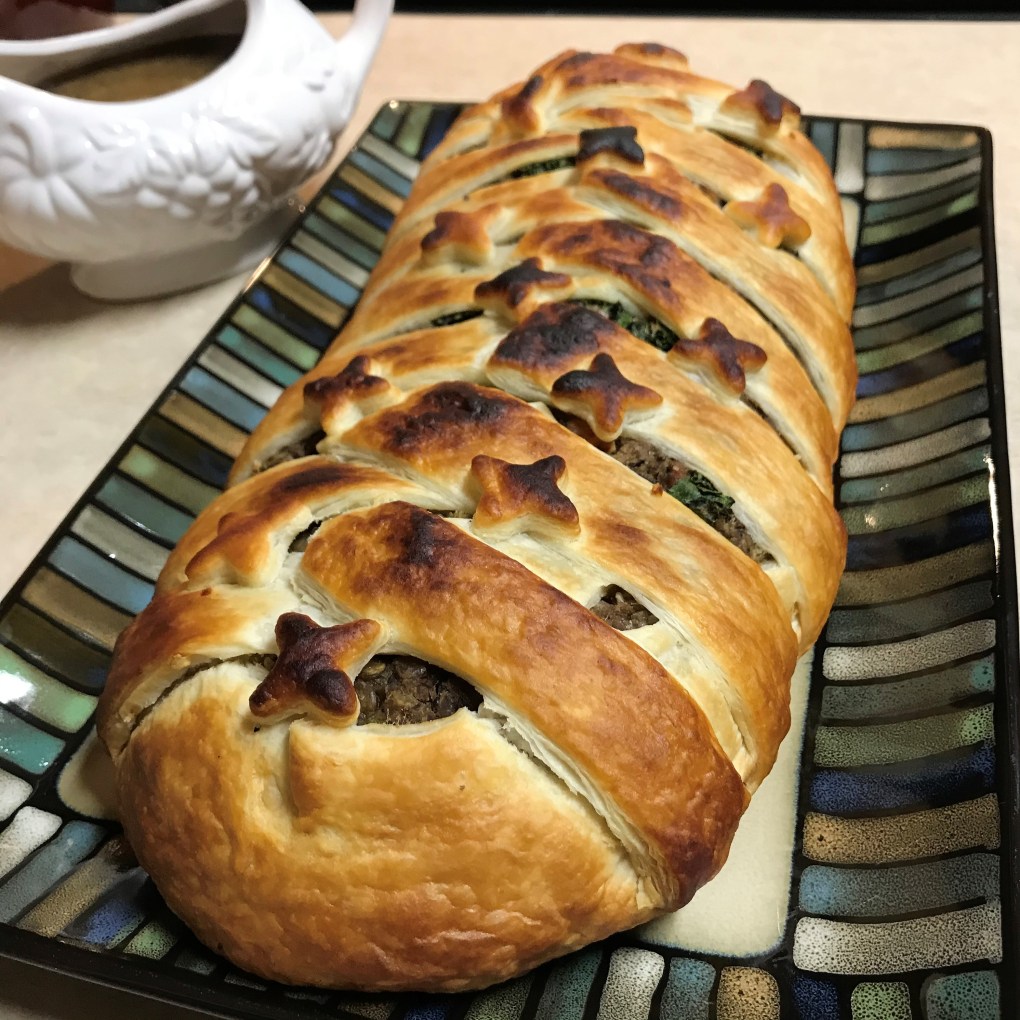
In the spirit of full disclosure, this dish does take time and effort, though none of it is difficult. If you wish to make it for Thanksgiving, perhaps for a vegan guest at your table, the good news is that almost all of it can be done in advance. You will find most of the ingredients familiar—cooked lentils, rice blend, cremini mushrooms, kale, sweet potatoes and (vegan) puff pastry—and I’ll describe in more detail how I put the whole thing together and even gave it a faux “egg wash” before baking, to give it a golden crust while keeping it plant-based.
Now, with the holidays upon us, the timing is right and I have a written-down recipe to share. So for Linda, and anyone else who wants to enjoy a pretty, entirely plant-based meal that still captures the essence of Thanksgiving, here is my recipe for the lentil mushroom wellington. Enjoy!
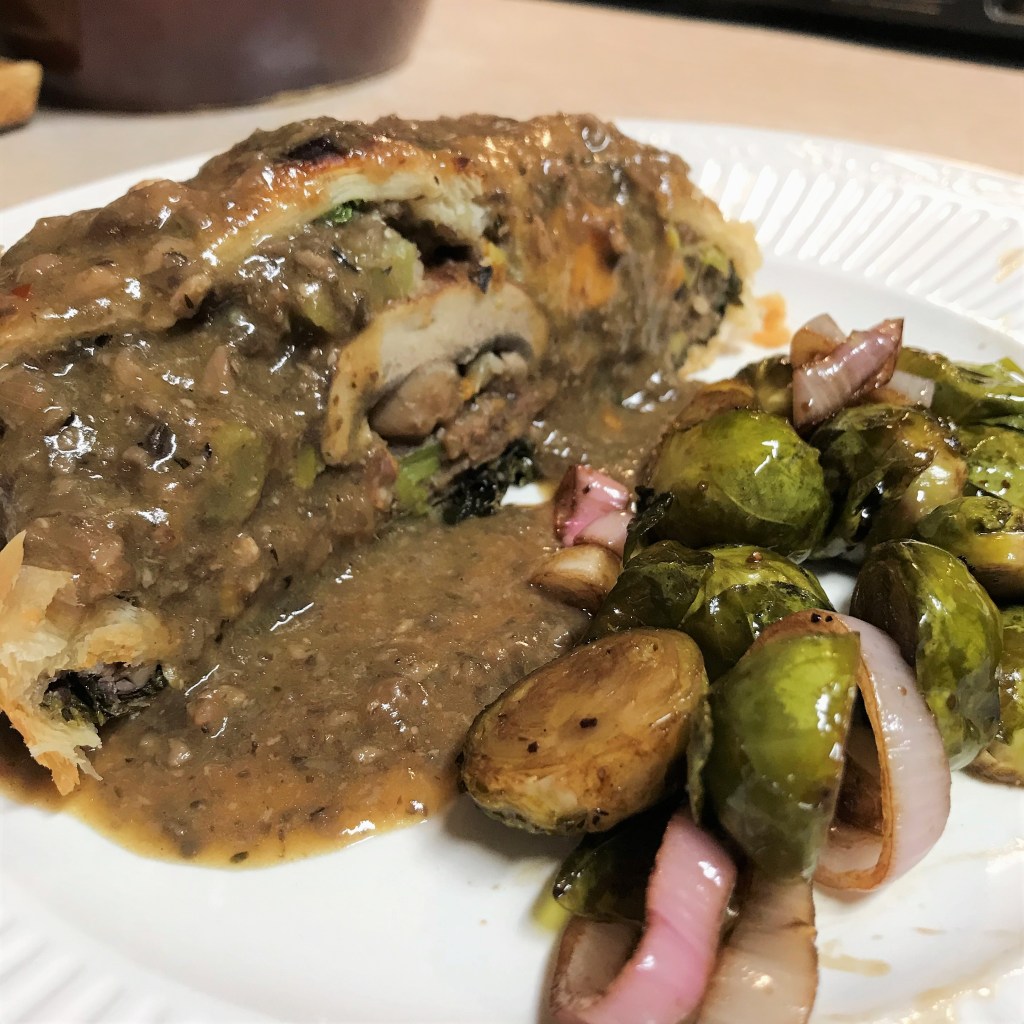
Arrange the whole mushrooms inside the wellington for a beautiful sliced presentation inside the flaky crust.
Ingredients
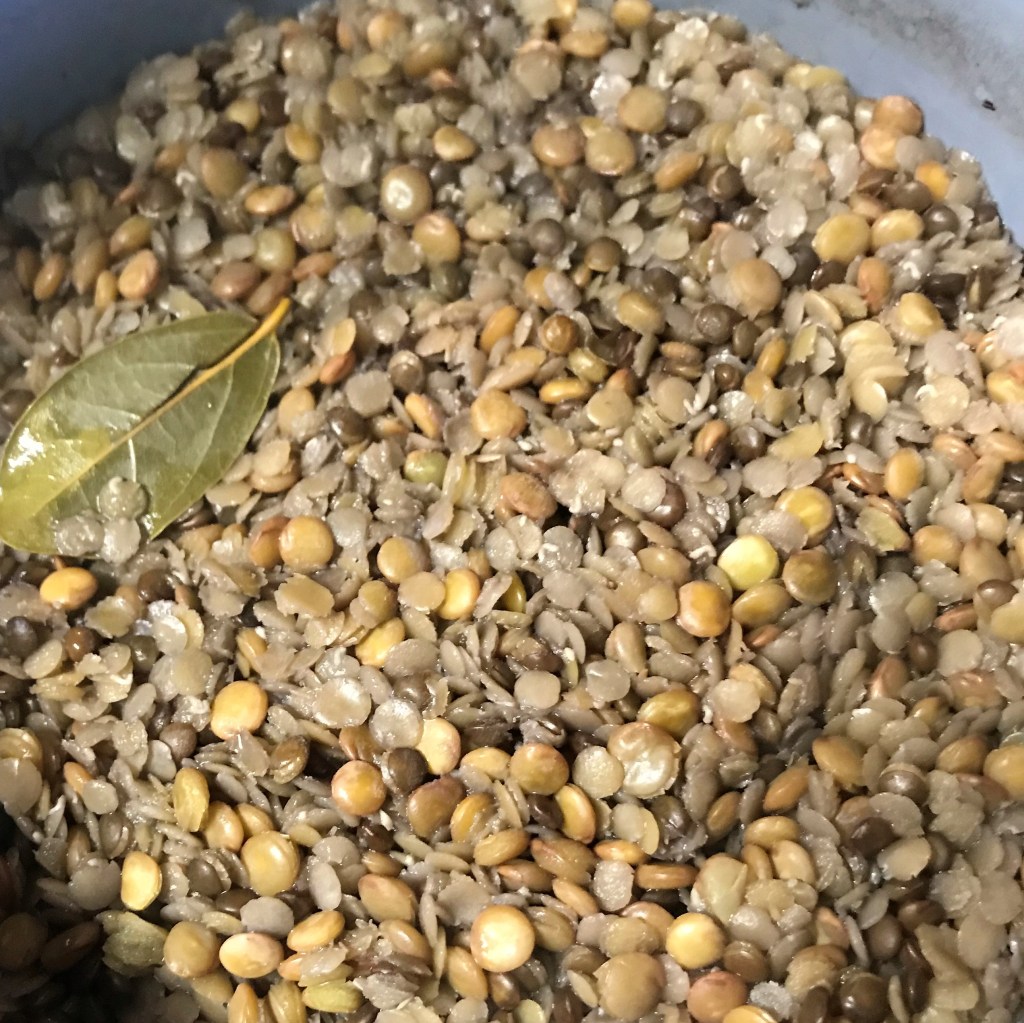
1 cup uncooked lentils, rinsed and picked over* (see notes)
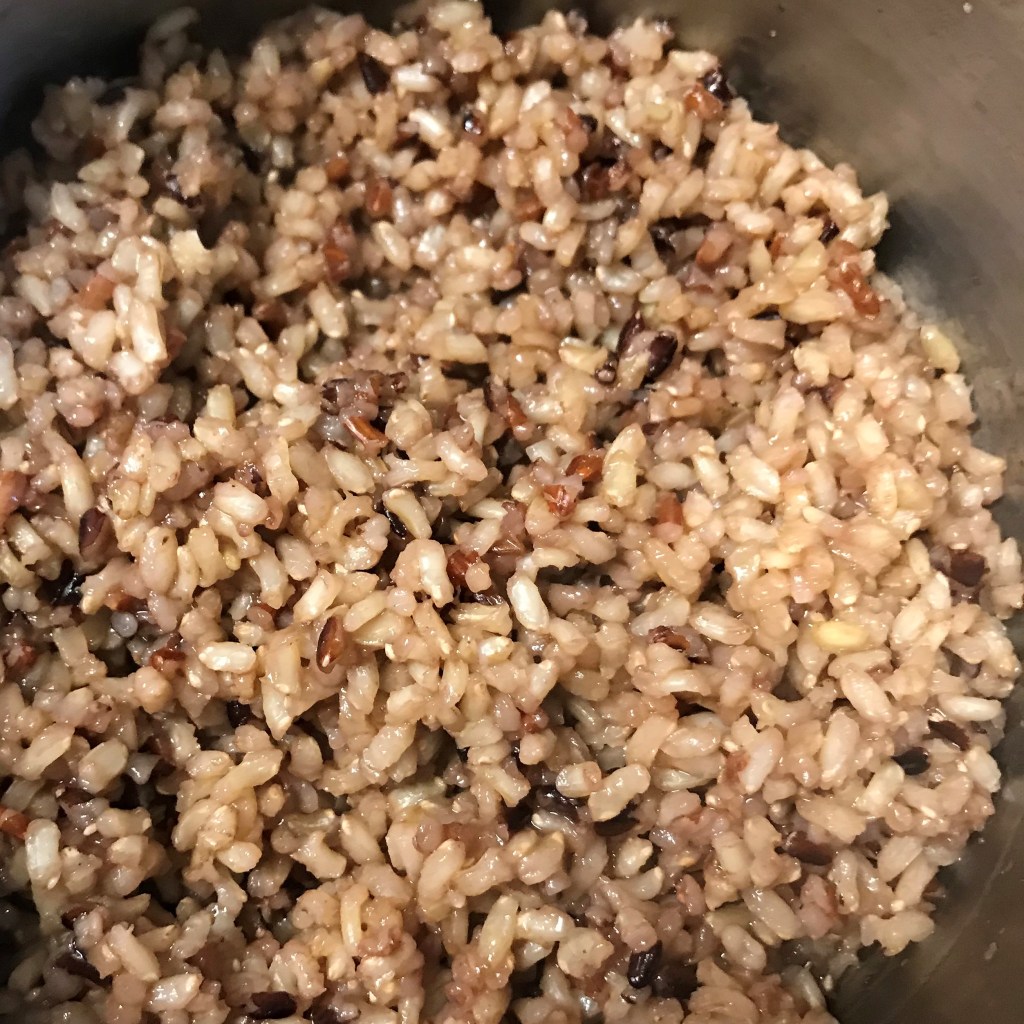
3/4 cup uncooked brown rice or rice blend
32 oz. carton low-sodium vegetable broth
1 or 2 bay leaves
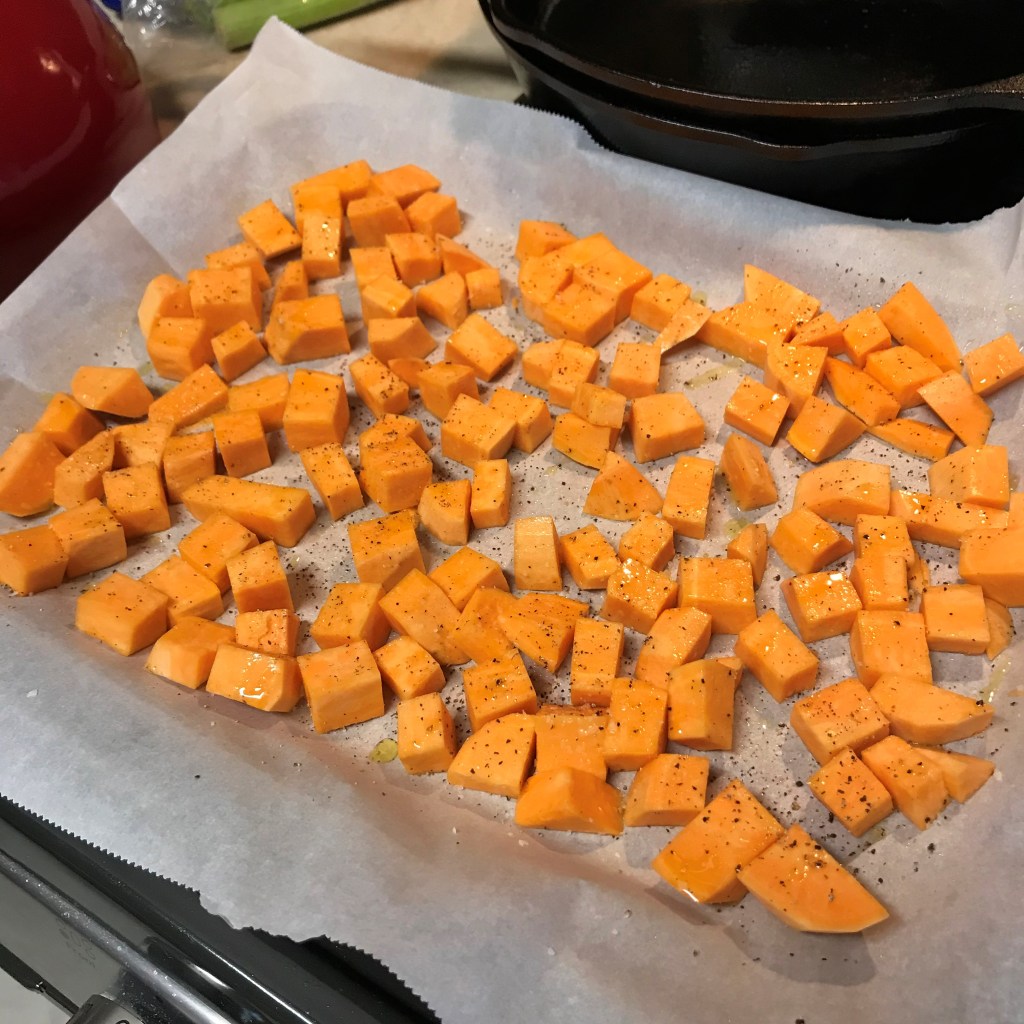
2 large sweet potatoes, peeled and cut into bite-size cubes
Extra virgin olive oil*
1 leek, cleaned and sliced (white and light green parts only)*
Liquid from a can of chickpeas (use low-sodium; reserve the chickpeas for another use)
1 Tbsp. milled flax seed*
1/4 cup pecan pieces, toasted
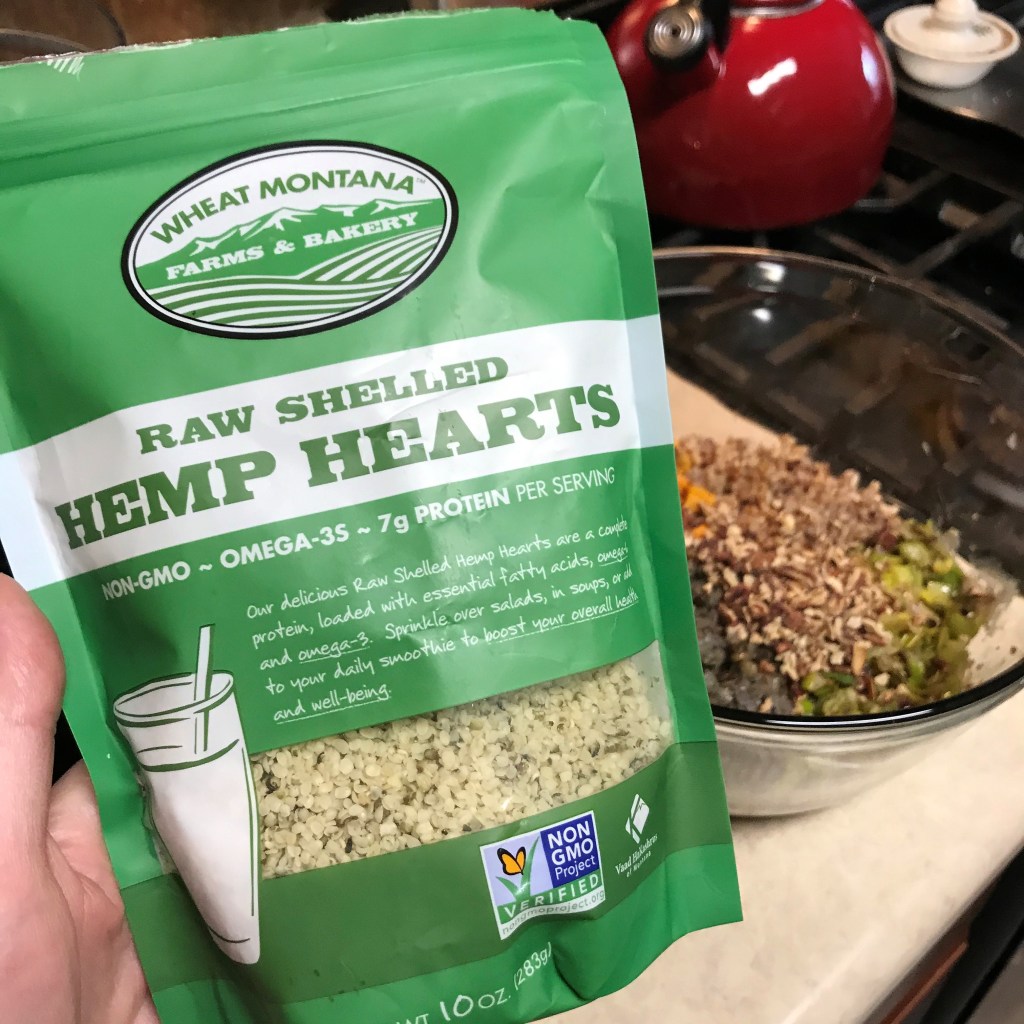
3 Tbsp. hemp hearts
A pinch (or two) of dried thyme leaves (or several sprigs of fresh thyme, if you have it)
Freshly ground black pepper to taste
1 sheet puff pastry (choose one with plant-based ingredients, such as Wewalka or Pepperidge Farm)
Flour to dust the countertop
Small handful (about 1/4 cup) of panko bread crumbs
For brushing, in place of egg wash:
1 Tbsp. plant milk, such as almond or soy
1 Tbsp. real maple syrup
1 Tbsp. canola or avocado oil
*Notes
I use a lentil blend, which includes green, red and black beluga lentils. If you choose a single type of lentil, I would recommend using the green ones. Cook the lentils in vegetable broth rather than plain water. Why miss a chance to add flavor?
My go-to olive oil this time of year is the wild mushroom and sage-infused oil found in specialty olive oil and balsamic vinegar stores. But any olive oil is fine, or substitute canola oil or a favorite plant-based butter, if you prefer.
If using leeks, be sure to clean them properly to remove all traces of grit between layers. Drain and pat completely dry on layers of paper towel before sautéing. If preferred, substitute 1 medium sweet or yellow onion.
The umami seasoning blend is a product sold at Trader Joe’s, and its flavors include dried mushroom, onion, garlic and red pepper flakes. If you can’t buy it, you can substitute with a combination of onion powder, garlic powder and a couple shakes of red pepper flakes, plus a pinch of salt. You might also want to mince up a couple of mushrooms to sauté with the kale or leeks to add earthy flavor to the lentil loaf.
Flax seeds are loaded with Omega-3 fats and very good for heart health, but you may not know that our bodies only reap that benefit when the seeds have been milled. You can buy flax seed already milled, but keep it fresh in a tightly sealed container in the fridge or freezer. I purchase bags of whole flax seeds and use my blade-style coffee grinder to mill it a little at a time as I need it. For this recipe, it’s essential for the flax to be milled because it will be used in place of an egg as a binding agent.
I chose a combination of cremini mushrooms and shiitake mushrooms for this recipe. Use the largest ones you can find; mine were each about the size of a silver dollar. Clean the mushrooms as suggested in the slideshow before sautéing them.
There are many components to this recipe, and I believe it is helpful to break it down into manageable tasks over two days, beginning with preparation of the lentils, rice, sweet potato and vegetable mixtures (steps 1-6). On the second day, you can relax and focus on assembling and baking the dish.
Helpful tools for this recipe: food processor or small blender, rolling pin, pastry brush.
Instructions
Cook the lentils in vegetable broth rather than water. In addition to the flavor they bring, lentils are an excellent source of protein.
Likewise, cook the rice in vegetable broth. I like the extra flavors of a rice blend, but regular brown rice is fine.
Toss the sweet potato chunks in olive oil and season with salt and pepper. Roast until tender (but still holding shape) with browned edges.
Slice the leek lengthwise, then into half-moon slices. Rinse well to remove any grit trapped between layers.
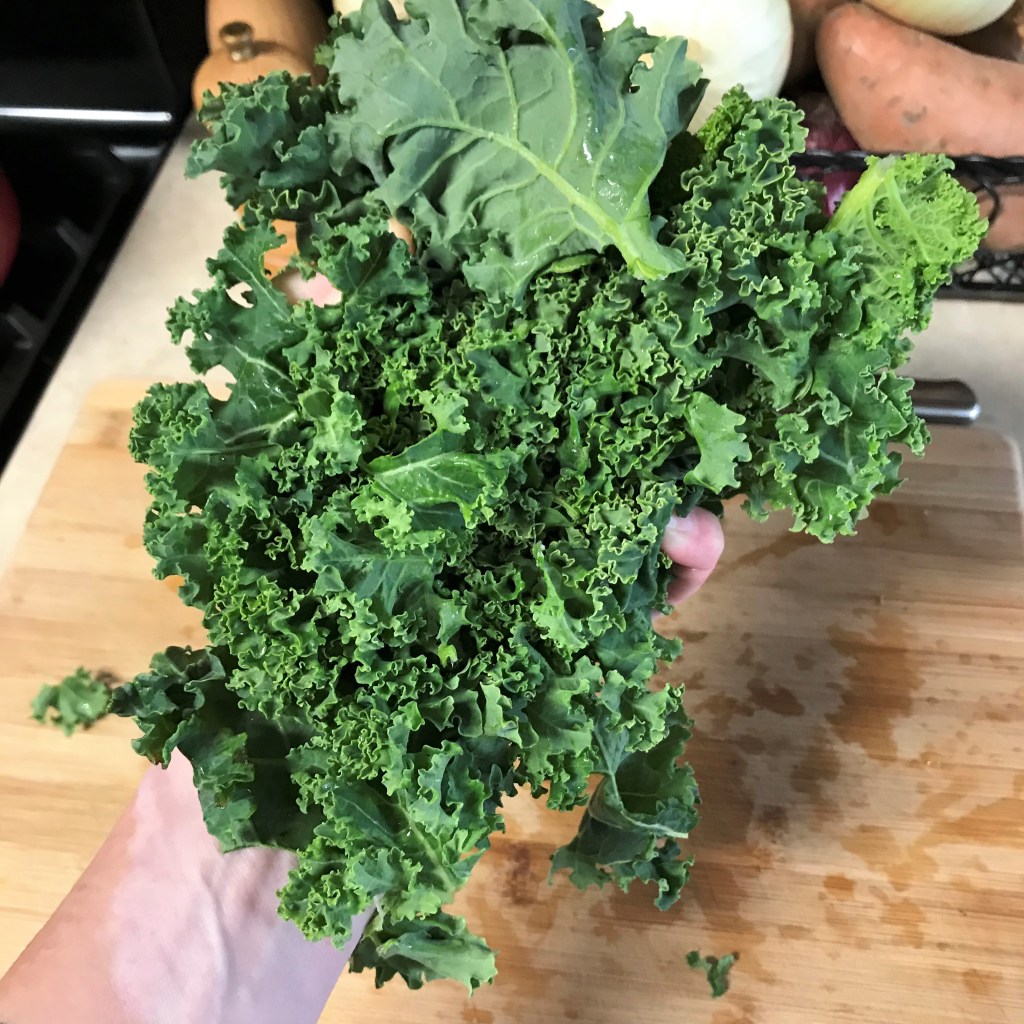
This is what I call a “fat handful” of kale. Trim off tough stems and chop it into bite sized pieces.
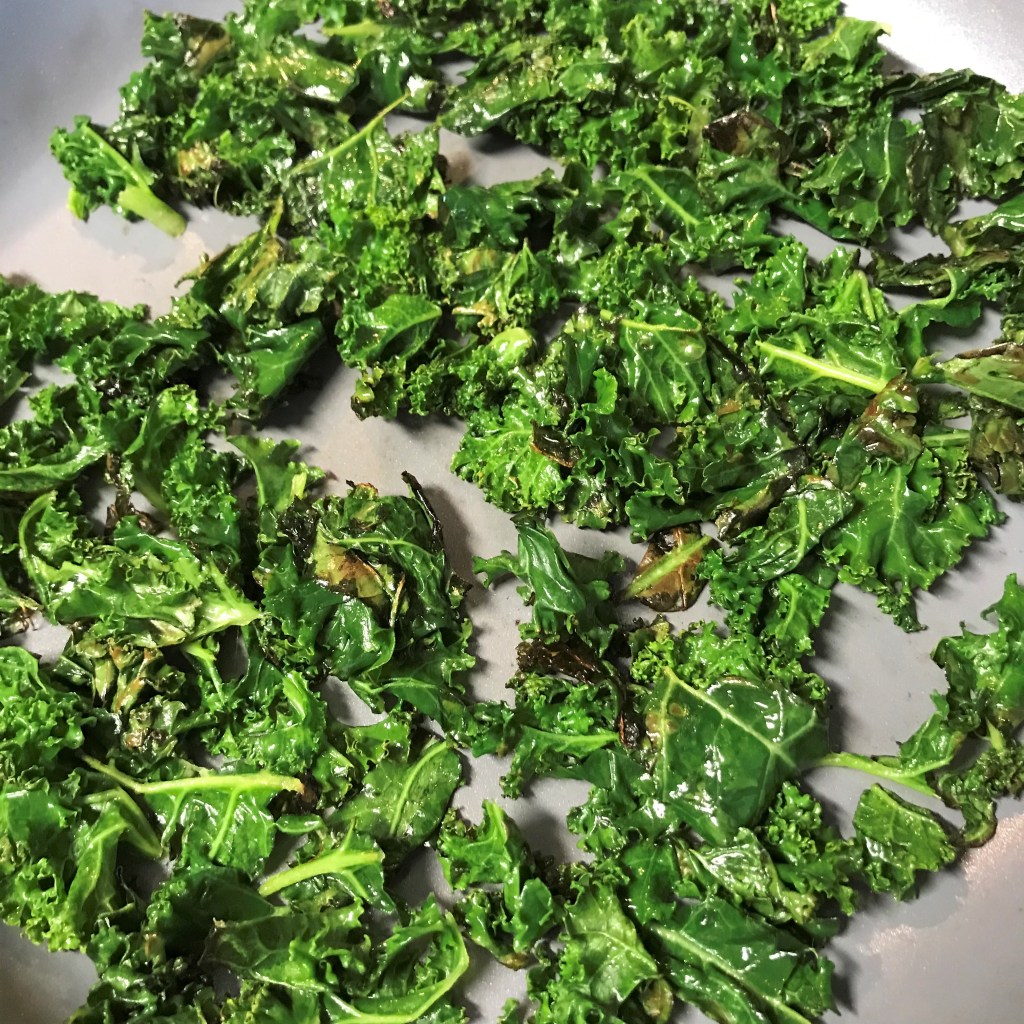
Saute the kale until it is softened and lightly browned at the edges.
Add umami seasoning when you saute the leeks. This is one of the easiest ways to add a rich, meaty flavor to vegan dishes. See the recipe notes for substitution ideas.
You can make a flax “egg” using milled flax seed and plain water, but for savory recipes, I prefer to use the reduced liquid from a can of chick peas, called aquafaba.
After several minutes, the flax will absorb the aquafaba and create a thickened, gel-like substance. This will be the binder that holds the lentil mixture together.
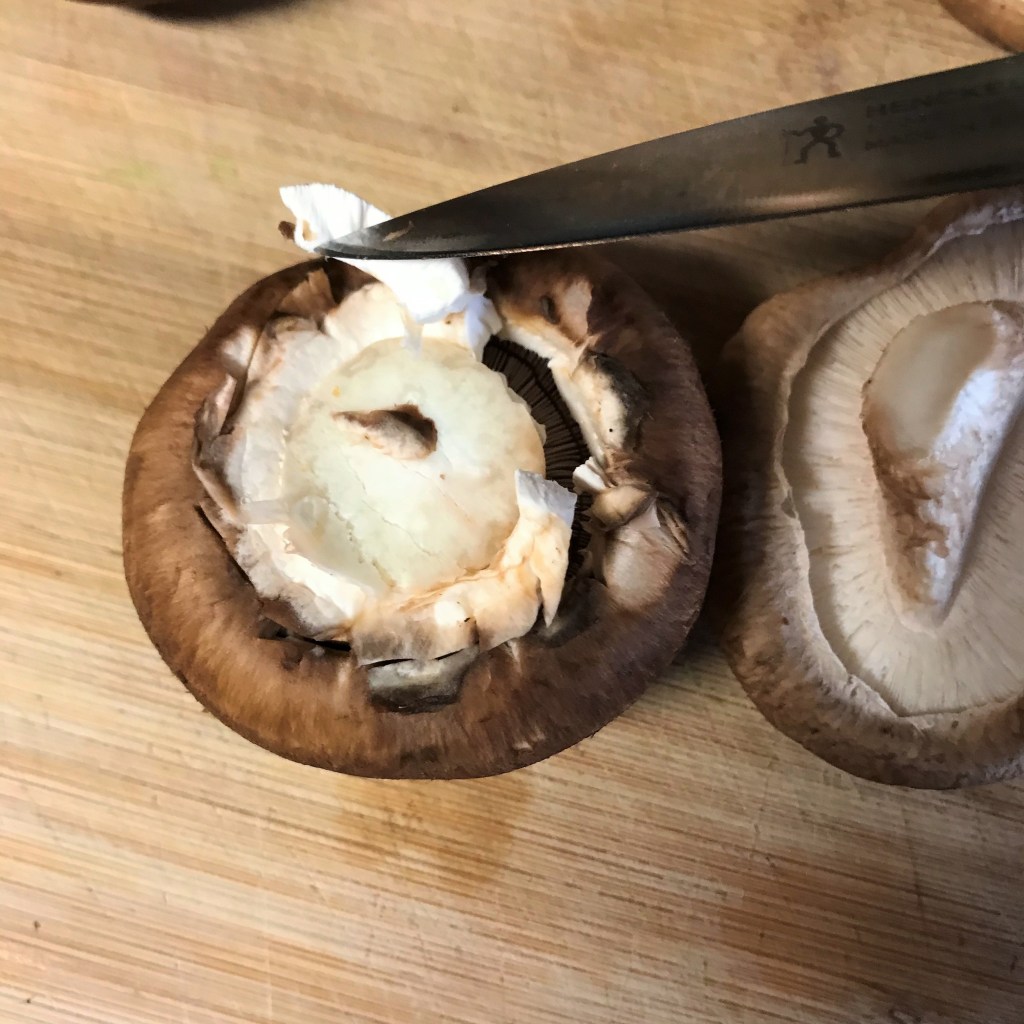
Use a paring knife to cut away the spongy, white edges around the stem of the cremini mushrooms, and pluck it away from the stem.
With the fluffy rim removed, moisture won’t get trapped under the mushroom cap.
Saute the mushrooms until browned, turning several times, to draw out excess moisture.
Lay the mushrooms on layers of paper toweling, to drain the excess moisture from the bottoms.
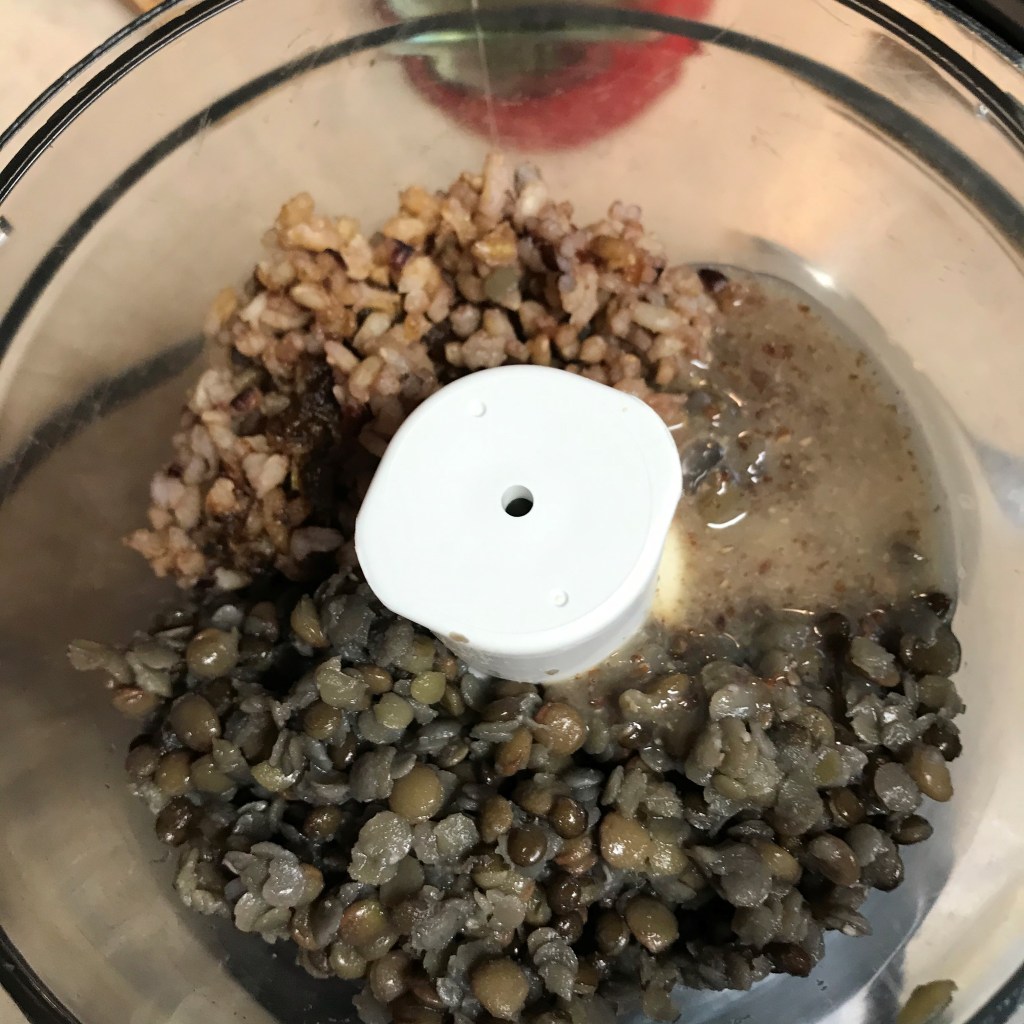
Add a scoop each of the cooked lentils and rice, plus all of the flax “egg” mixture, to the bowl of a food processor.
Pulse the mixture until it resembles a thick porridge. It won’t look very appealing, but don’t worry, it will disappear into the lentil loaf mixture.
Hemp hearts add another boost of protein to the lentil mixture, and they have an interesting, slightly nutty flavor.
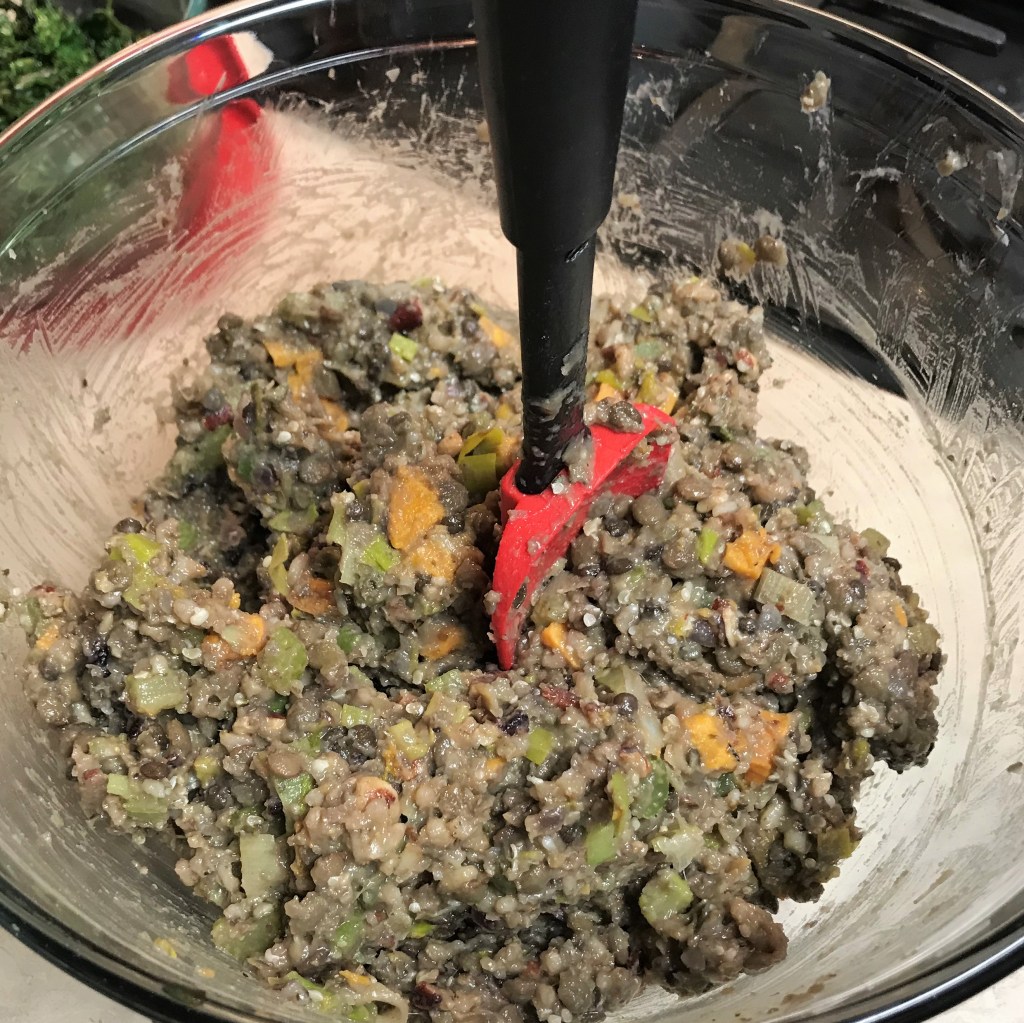
Time to mix up the lentil loaf! I added toasted pecans to the mix, but toasted walnuts or chopped pumpkin seeds would also be terrific.
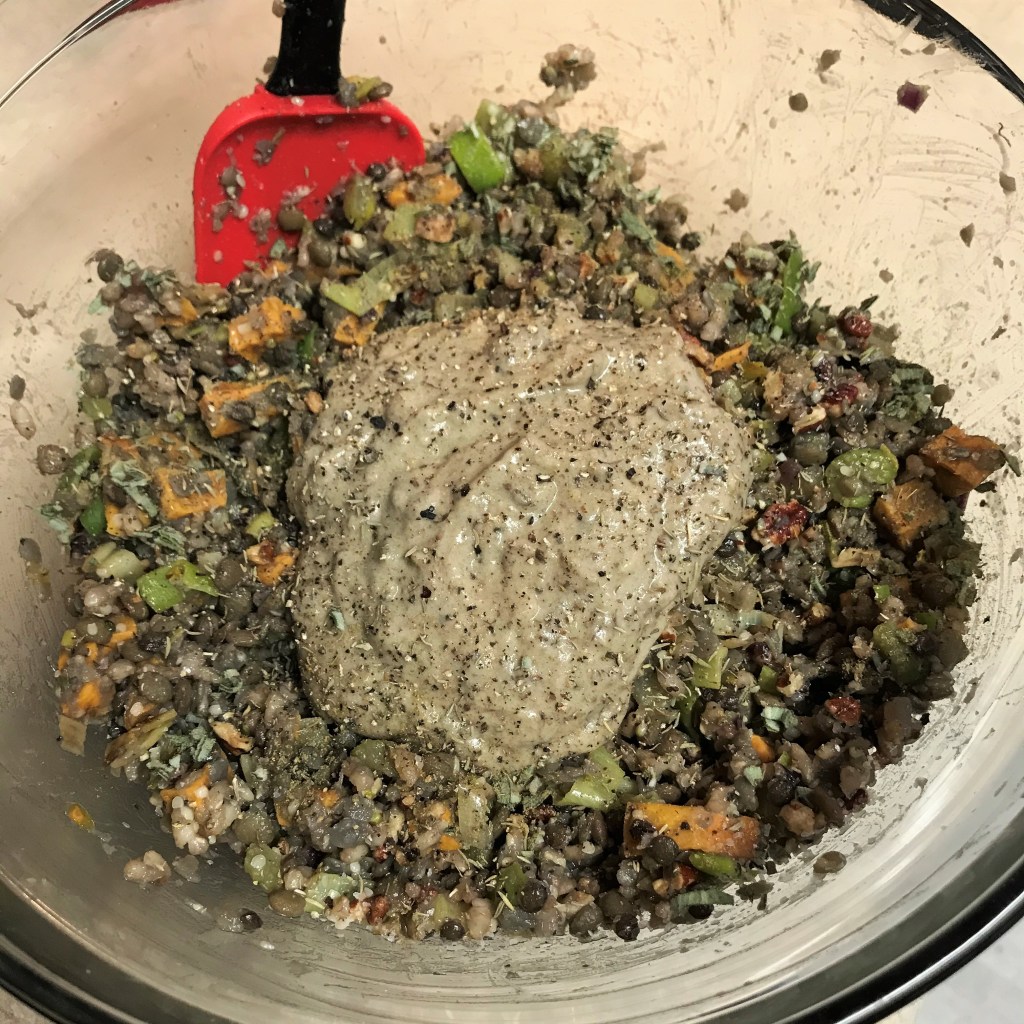
Add the binding mixture to the lentil mix. Season with pepper and thyme leaves. Fold gently to combine.
The lentil mixture should be thick. Adjust salt to taste and refrigerate the mixture for several hours before assembling the wellington.
Use a puff pastry with non-dairy ingredients. I like this brand, which is in the refrigerated section of the supermarket. Pepperidge Farm makes one also, found in the freezer case.
Dust your countertop with flour, and lightly flour the top of the dough. Use a rolling pin to smooth wrinkles and spread it slightly thinner.
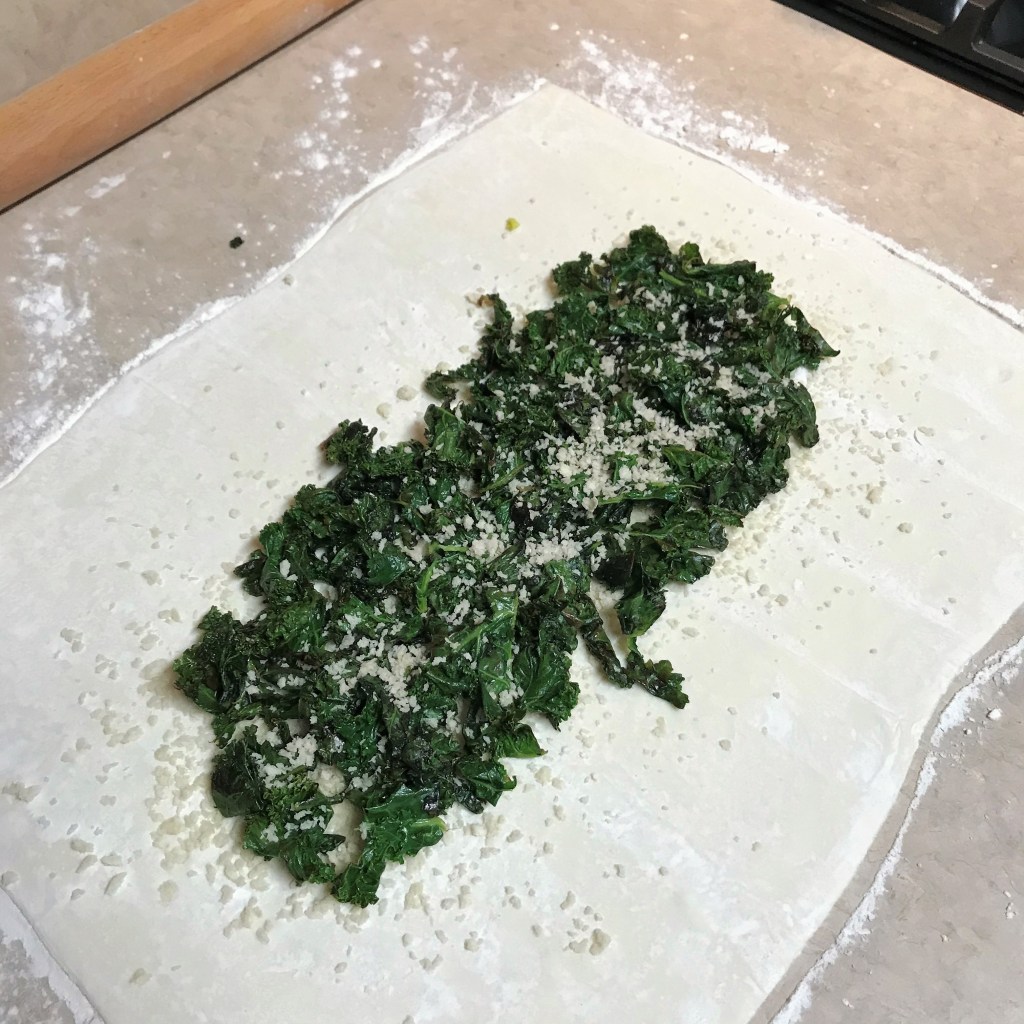
A layer of panko crumbs will help absorb moisture from the lentil loaf, so the bottom of your wellington won’t get soggy.
Lay the sauteed kale over the panko crumbs. I had just a shake of crumbs left in the carton, so I sprinkled more on top.
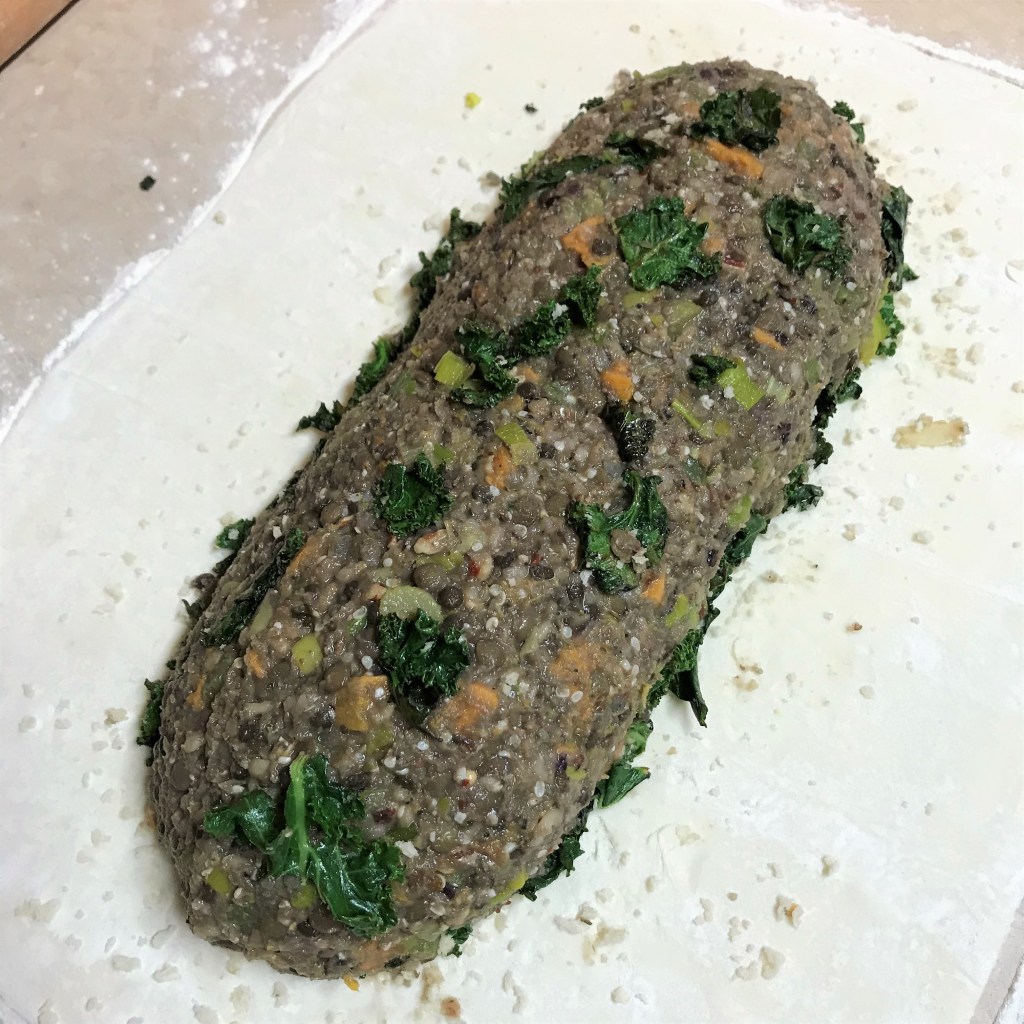
Mound half of the lentil mixture in a loaf shape with a slight indent down the center. Arrange the whole mushrooms in a tight line on top of the mixture, and press down slightly.
Shape the rest of the lentil mixture over the top, so that it resembles a meatloaf.
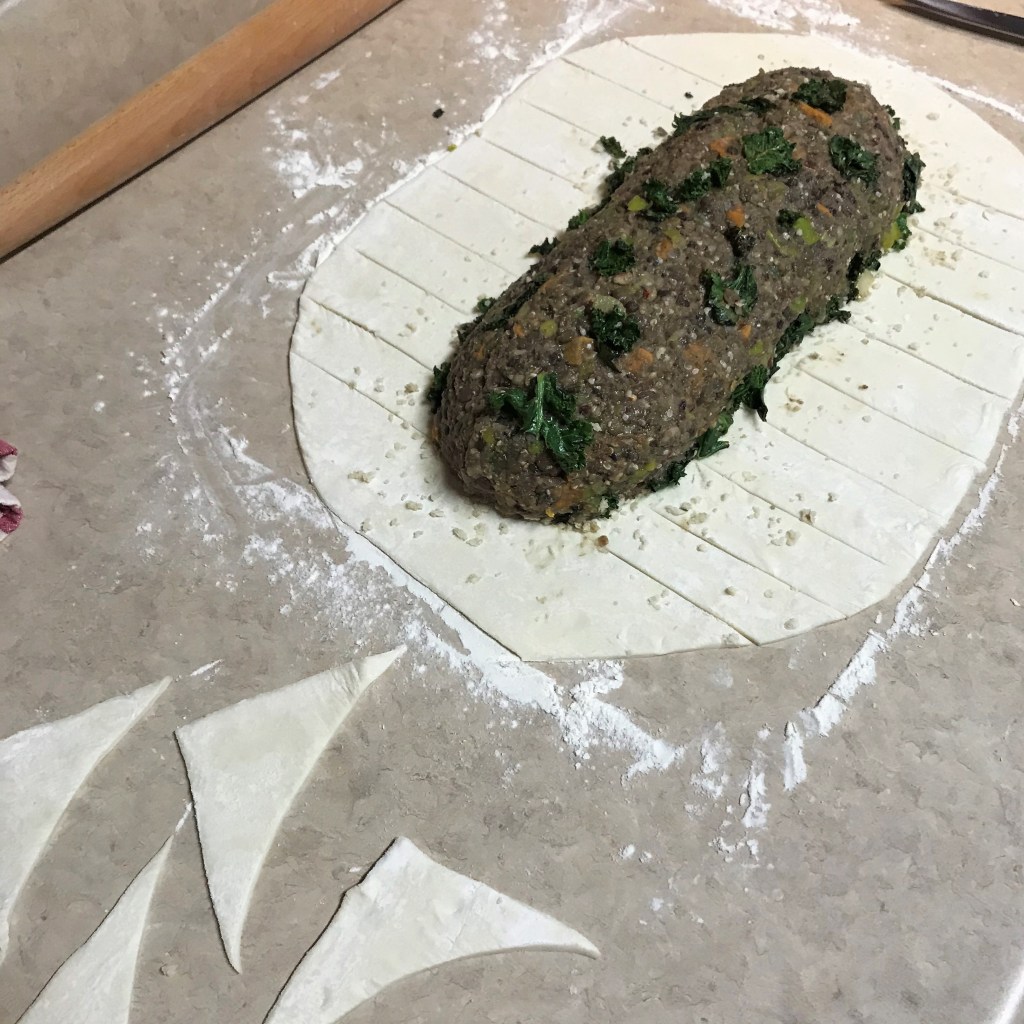
Trim off the corners of puff pastry in a rounded fashion. Reserve the excess pastry for patching or decorating. Cut strips along each side, about 1 1/2 inches apart.
Fold up both ends of the pastry, and shape them so they “hug” the ends of the lentil loaf.
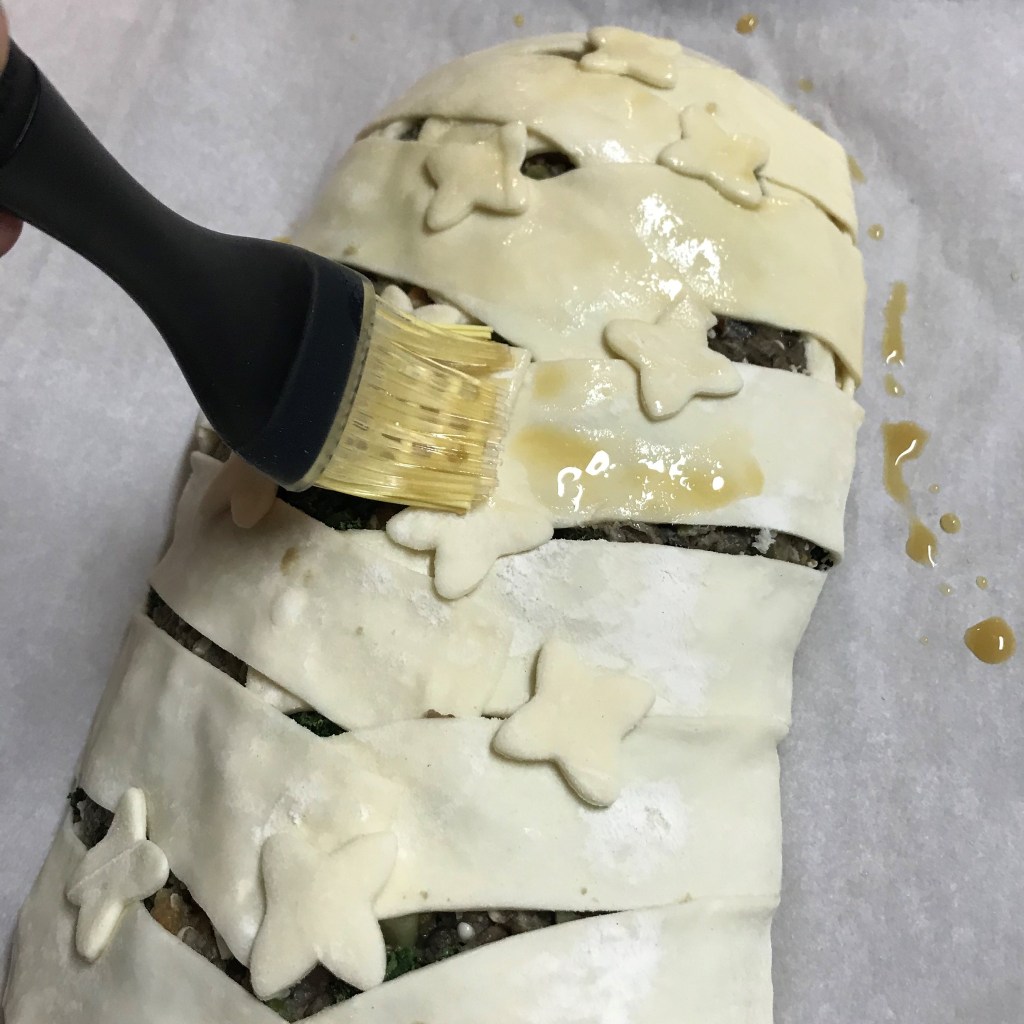
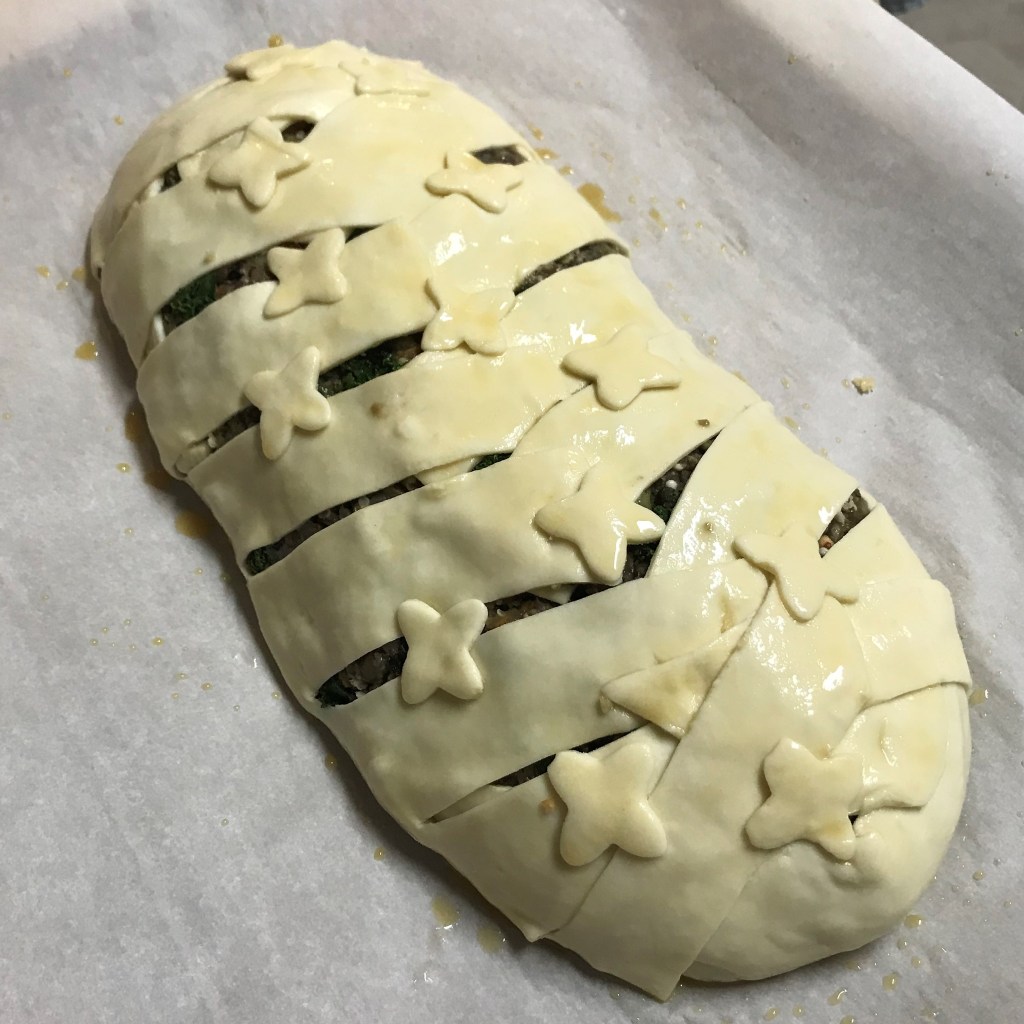
Fold the strips over the lentil loaf, alternating sides. It doesn’t have to be perfect, but aim for even coverage with just a bit of the lentil mixture peeking through.
For extra pizzazz, embellish the wellington with cut-out shapes of the excess puff pastry.
No egg wash for a vegan dish! But a mixture of plant milk, maple syrup and canola oil will help you achieve the same golden finish.
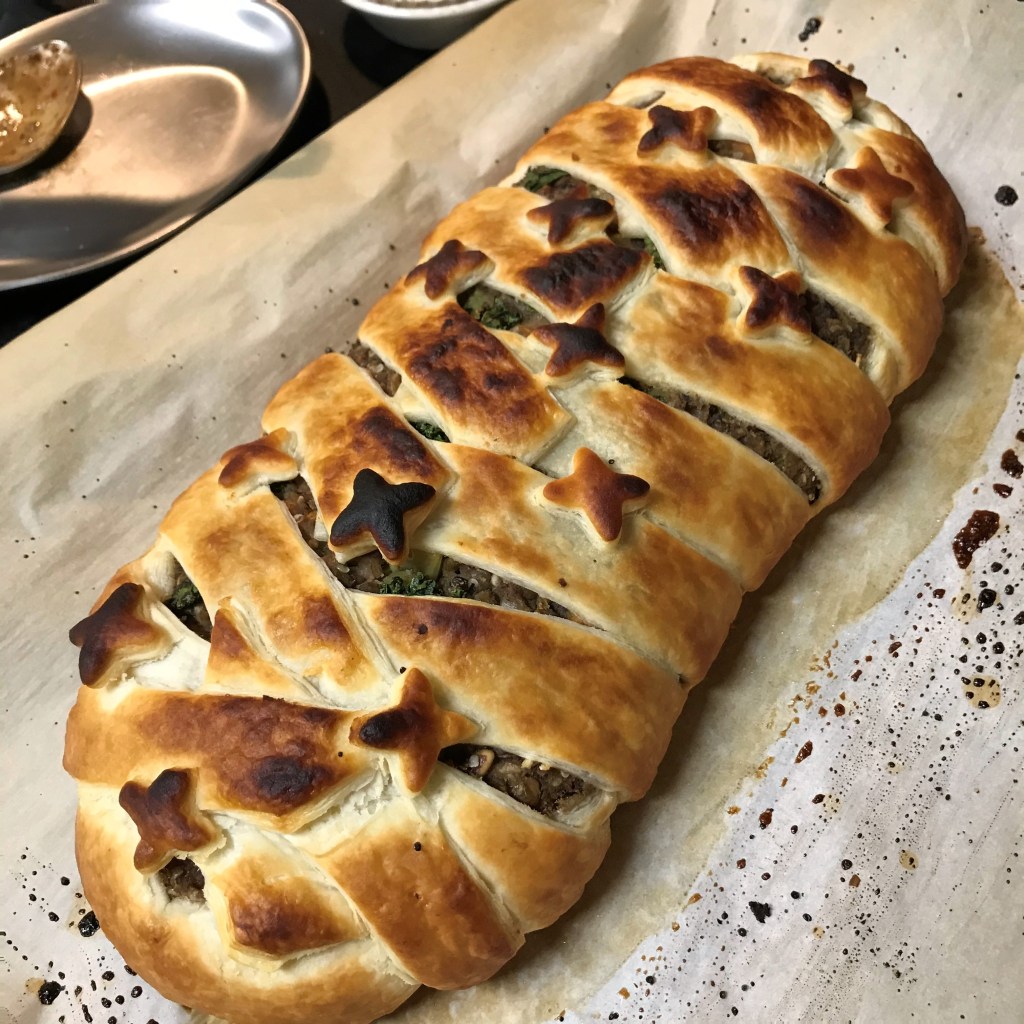
This wellington is ready for the oven. 400° F for about 45 minutes.
My oven rack was a couple of inches too high, but the wellington is lovely, even with a few dark spots.
Cook lentils according to package instructions, using low-sodium vegetable broth in place of some or all of the water. During simmer, add a bay leaf to the pot. Drain excess liquid when lentils reach desired tenderness. Transfer to a bowl and cool completely. Add salt to taste.
Cook rice according to package instructions, using low-sodium vegetable broth in place of some or all of the water. Transfer to a bowl and cool completely. Add salt to taste.
Toss the cubed sweet potatoes with enough olive oil to lightly coat all sides. Spread onto a parchment-lined baking sheet and season with salt and pepper. Roast at 400° F until they can be pierced with the tip of a paring knife and are only slightly firm to the bite. Cool completely.
Sauté leeks (or onions) and chopped celery in a tablespoon of olive oil. Season with umami seasoning (or recommended substitute) and black pepper. When vegetables are tender and have given up their moisture, transfer to a bowl and cool completely.
Swirl another teaspoon or so of oil into the skillet and sauté the chopped kale until it has softened and reduced somewhat in volume. Resist the urge to cook the kale together with the onions; it will be used as a bed for the lentil mixture, not as part of the filling.
Heat a non-stick skillet over medium heat with 1 tablespoon of olive oil. Arrange the mushrooms topside down, in the skillet, and then cook until the tops are browned and tender. Turn them over and sauté the underside. The mushrooms should give off a good bit of their moisture, but not to the point of shriveling. Lay them on layered paper towels to cool, allowing excess moisture to drain from the underside.
To assemble the mixture, gather up all the prepared components from steps 1 to 6. In a small saucepan, heat the liquid drained from the chickpeas over medium low heat. Simmer until it is reduced in volume to about 1/4 cup. Transfer the liquid to a bowl and stir in the milled flax seed. Let this mixture rest for at least 20 minutes. It will thicken up into a gel-like substance.
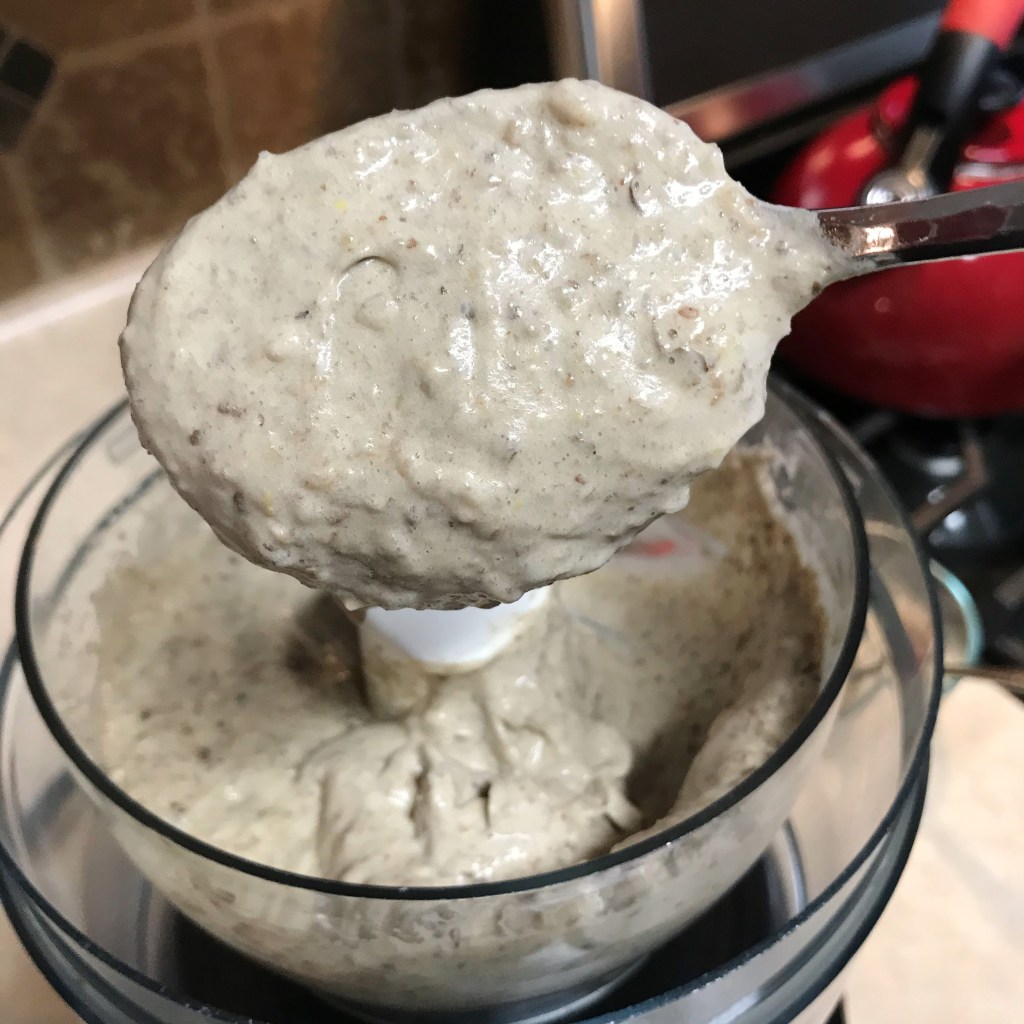
Transfer about 1/3 cup of the cooked lentils and about 1/4 cup of the cooked rice to the bowl of a food processor or blender. Add the flax mixture to the bowl and pulse a few times until the mixture has the consistency of a loose porridge.
In a large mixing bowl, combine the remaining lentils, rice, sweet potatoes, leek-celery mixture, toasted pecans and hemp hearts. Toss them all together. Give this mixture a final taste and adjust salt to your liking. Sprinkle thyme leaves and give the pepper mill a few twists over the mixture. Add the full amount of flax binder and fold to combine this mixture well. Cover and refrigerate for at least an hour.
Preheat oven to 400° F, with oven rack slightly lower than center, so that the wellington will rest squarely in the center of the heat.
Thaw puff pastry (if using frozen) according to package instructions. *Note: when working with puff pastry, do your best to work quickly to keep the pastry from getting warm.Sprinkle flour onto the counter and use a rolling pin to smooth out wrinkles and slightly enlarge the rectangle.
Spread panko crumbs over the center of the puff pastry, then layer the cooked kale on top of it. This will be a bed for the lentil mixture, and the crumbs will help absorb excess moisture so the puff pastry doesn’t become soggy on the bottom.
Scoop about half of the lentil mixture onto the kale, shaping it into an oblong mound like a meatloaf. Arrange the mushrooms in a tight line down the center, pressing them slightly into the lentil mixture. Shape the remaining lentil mixture over the mushrooms.
Use a paring knife to trim off the square corners of the puff pastry, leaving them rounded to match the shape of the lentil loaf. Use a cookie cutter on the scrap corners to make embellishments for the top of the wellington. Score the long sides of the puff pastry into strips, about 1 ½ inches apart. These will fold over the top of the lentil loaf, kind of like shoelaces over a sneaker. Turn up both ends of puff pastry to enclose the ends of the lentil loaf, then carefully fold the strips in alternating order across the top. Tuck in any loose edges.
Transfer the wellington to a parchment-lined, heavy cookie sheet. In a small bowl, whisk together plant milk, maple syrup and oil. Brush this mixture evenly over all exposed puff pastry, including down the sides. This will produce a beautiful golden color on the baked wellington.
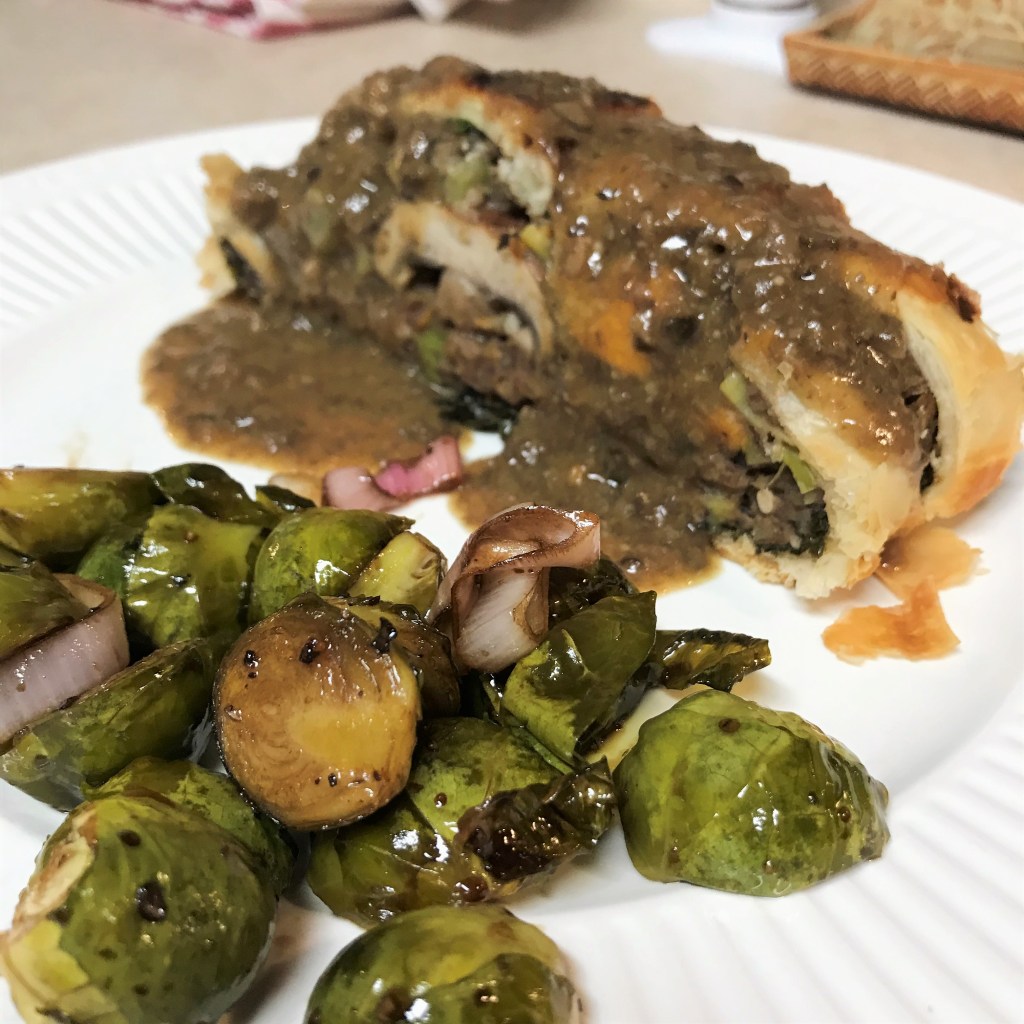
Bake for 45-50 minutes, rotating pan once after 25 minutes. Cool on the baking sheet for about 5 minutes before transferring to a serving platter. Cut into thick slices and serve on individual plates with vegan mushroom gravy and tangy lemon-pomegranate Brussels sprouts.
If I told you that you could serve up a pumpkin spice dessert for Thanksgiving that was creamy, indulgent, no-bake, no-cook and easy to prepare ahead with no special tools—well, you’d probably think I was lying or, at least, overpromising, right? But the proof is right there in the picture, and this tiramisu achieves all of that and then some.
As I surmised when I made the chocolate-cherry tiramisu at Valentine’s Day this year, the classic Italian dessert is basically a dressed-up version of an ice-box cake. Layers of sweetened mascarpone cream and espresso-soaked delicate ladyfingers are accented with a hint of rum or brandy, and dusted with pure cocoa for a chocolate-y finish. I am a huge fan of tiramisu, and I enjoyed it most recently in its traditional Italian style when my friend, Peg, and I traveled up to West Virginia and Ohio for the Fiesta Factory tent sale.
But I came home thinking, “why couldn’t I give this scrumptious dessert a little Thanksgiving twist?” And so I did. Note that I have made several substitutions from a typical tiramisu recipe:
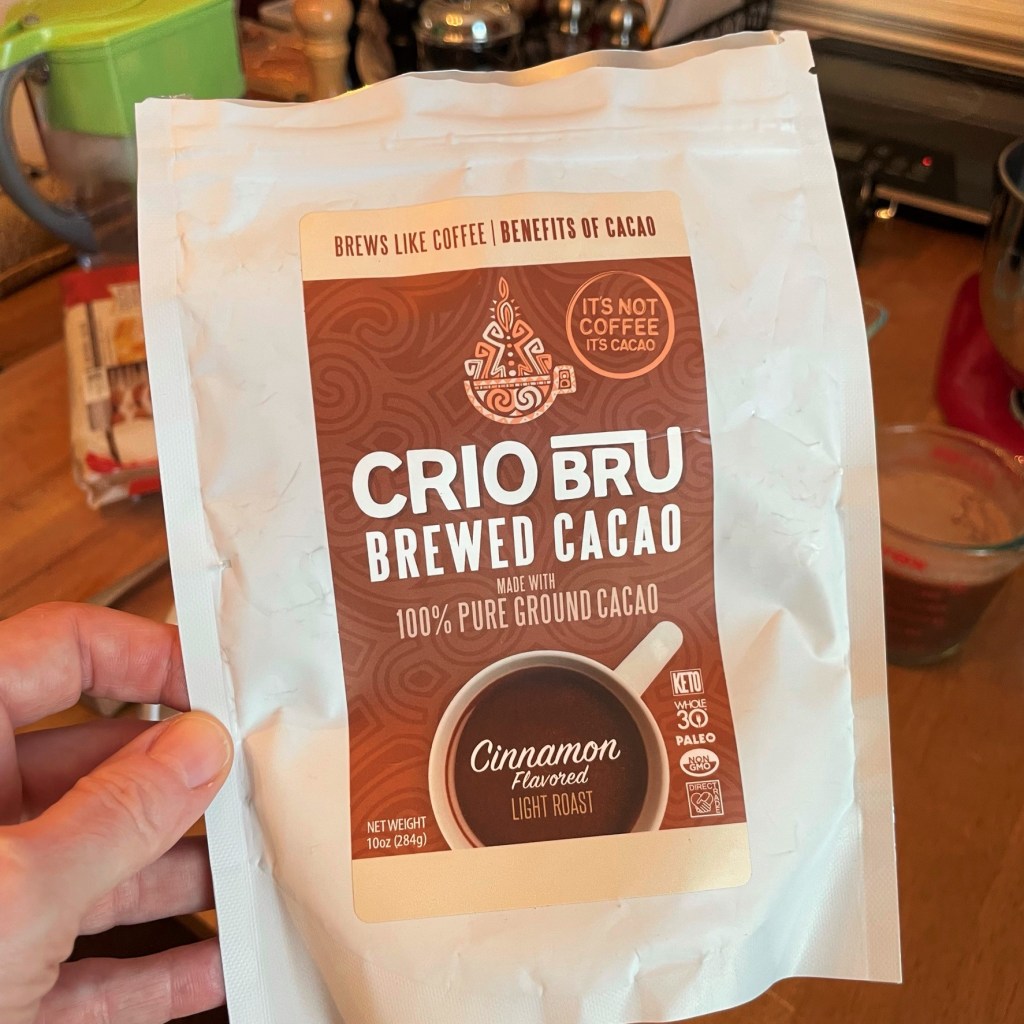
For the espresso, a brewed cacao beverage that’s flavored with cinnamon.
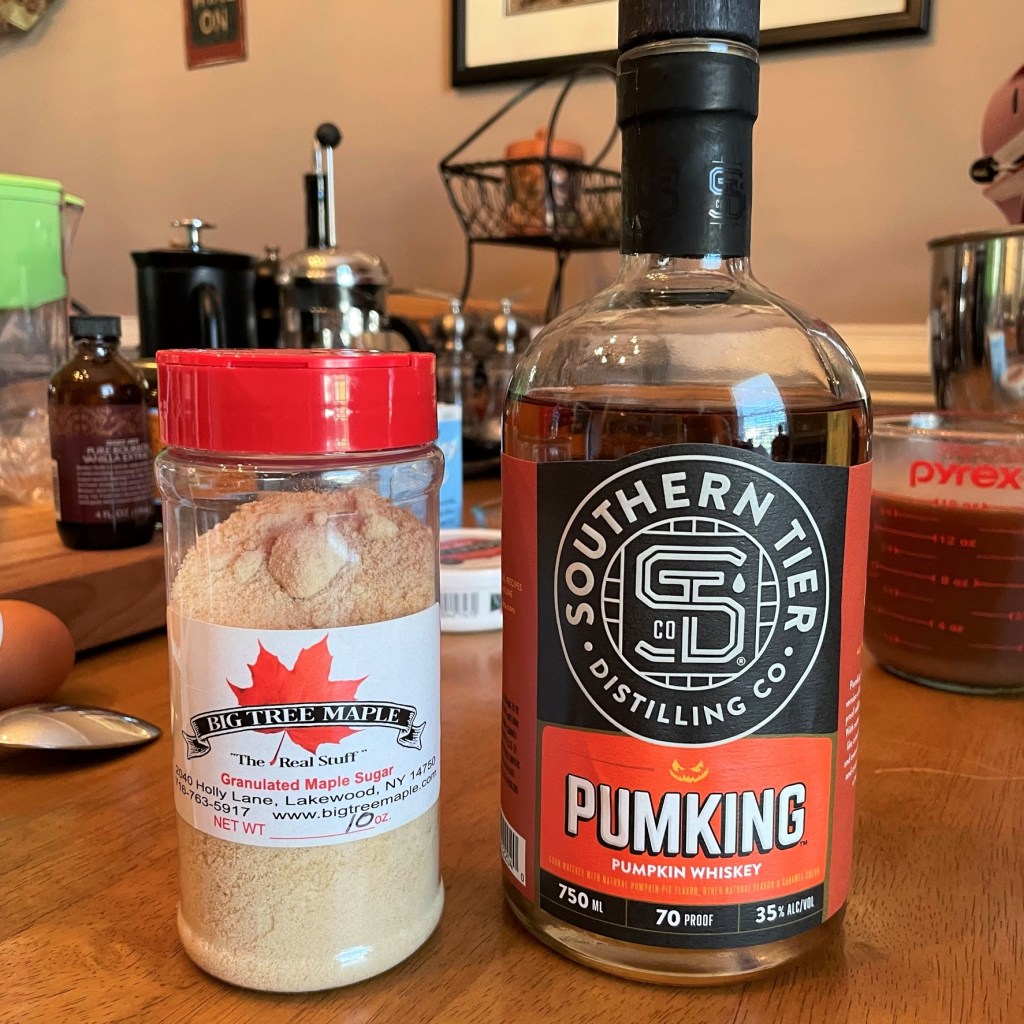
For the caster sugar, maple sugar, which tastes like autumn. For the rum, a pumpkin spiced whiskey, produced by Southern Tier Distilling Co. in Lakewood, N.Y.
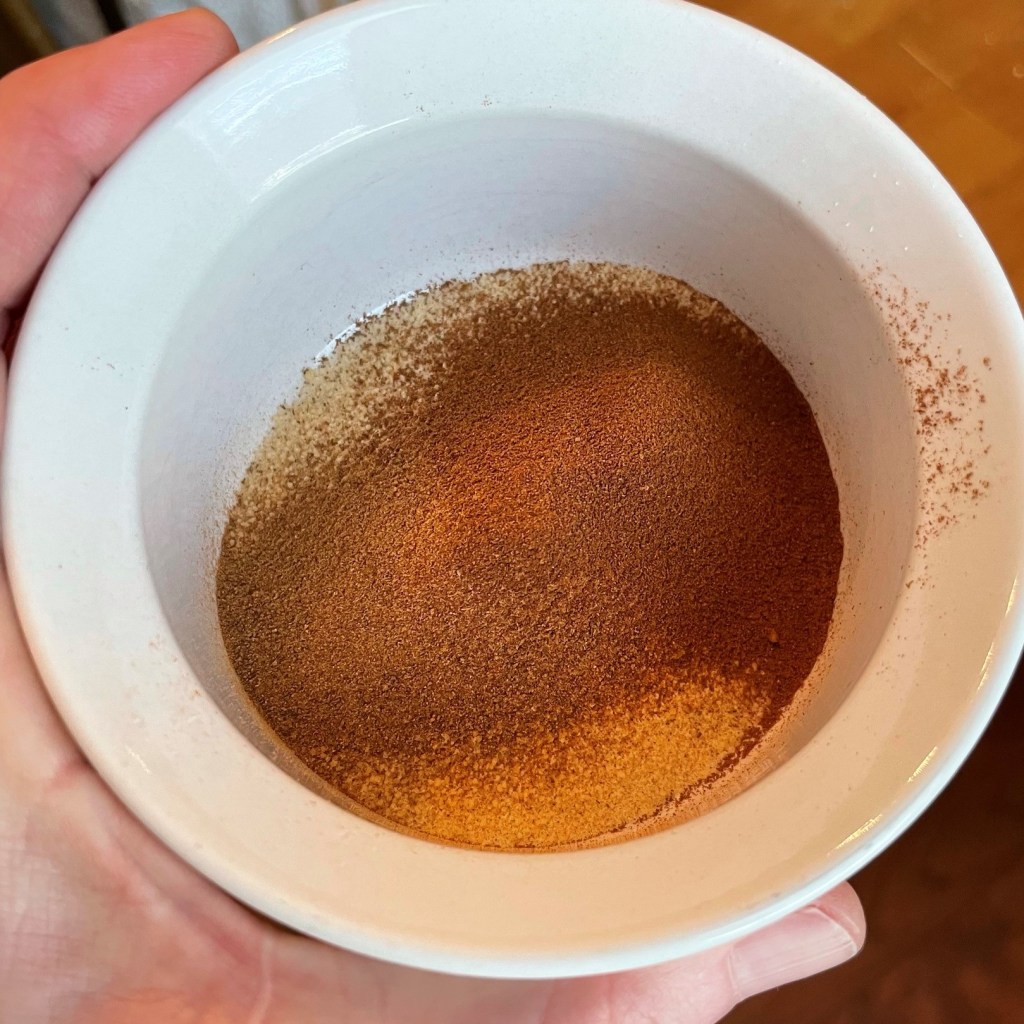
For the dusting cocoa, a blend of maple sugar, cinnamon and pumpkin pie spice.
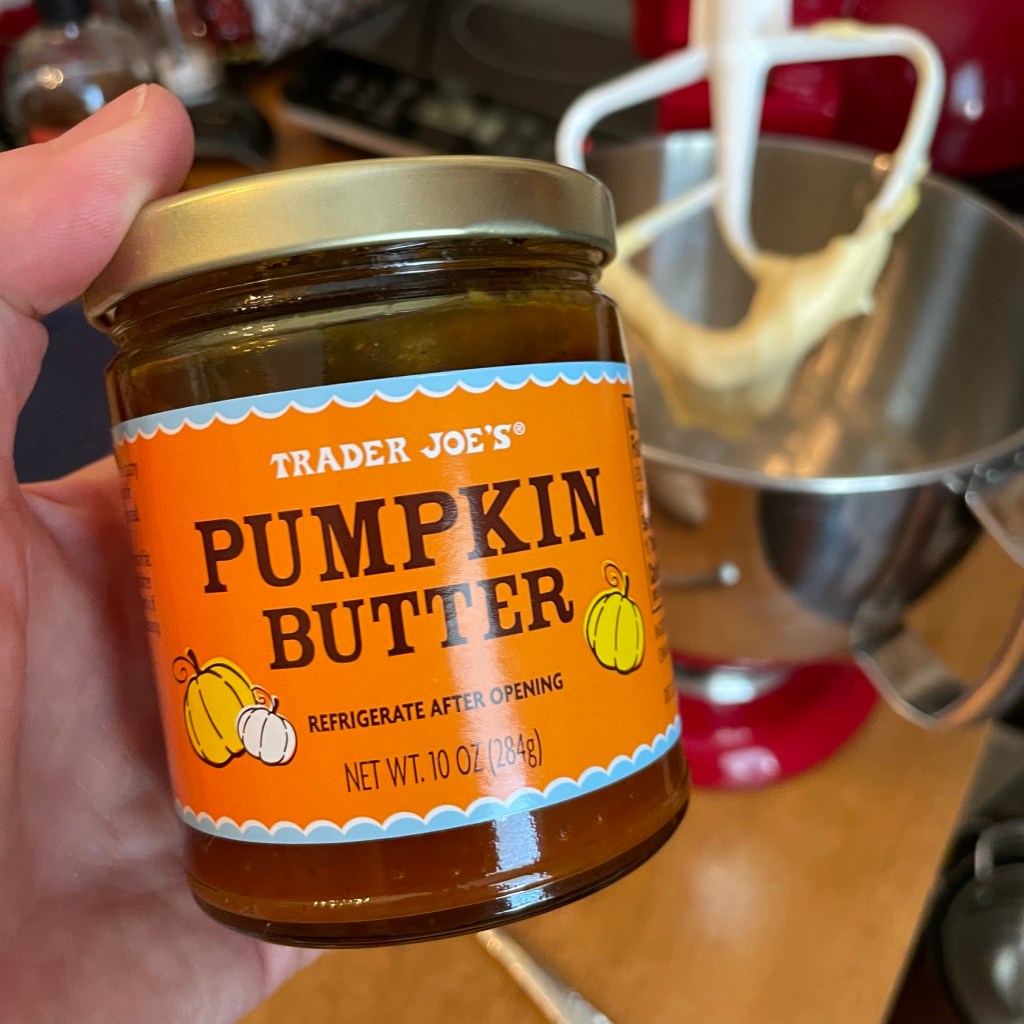
For an additional Thanksgiving twist, a bit of pumpkin butter, courtesy of Trader Joe’s.
The lighting in my dining room is the worst!
The recipe is made with raw egg yolks, so if you have health concerns about that, I’d encourage you to seek out an eggless or cooked egg recipe, or perhaps consider using pasteurized eggs. Also, planning ahead is more of a requirement than a convenience, as tiramisu improves after a 24-hour setup time. If you’re going to try the recipe for Thanksgiving, you might want to make it a couple of evenings ahead.
Ingredients (6 generous servings)
3 egg yolks, room temperature*
2 Tbsp. maple sugar (or use superfine if you can’t find maple)
8 oz. tub mascarpone, room temperature
5 Tbsp. Trader Joe’s pumpkin butter*
1 tsp. real vanilla extract
4 Tbsp. Pumking whiskey, divided* (see notes)
1 1/2 cups brewed light roast cacao with cinnamon*
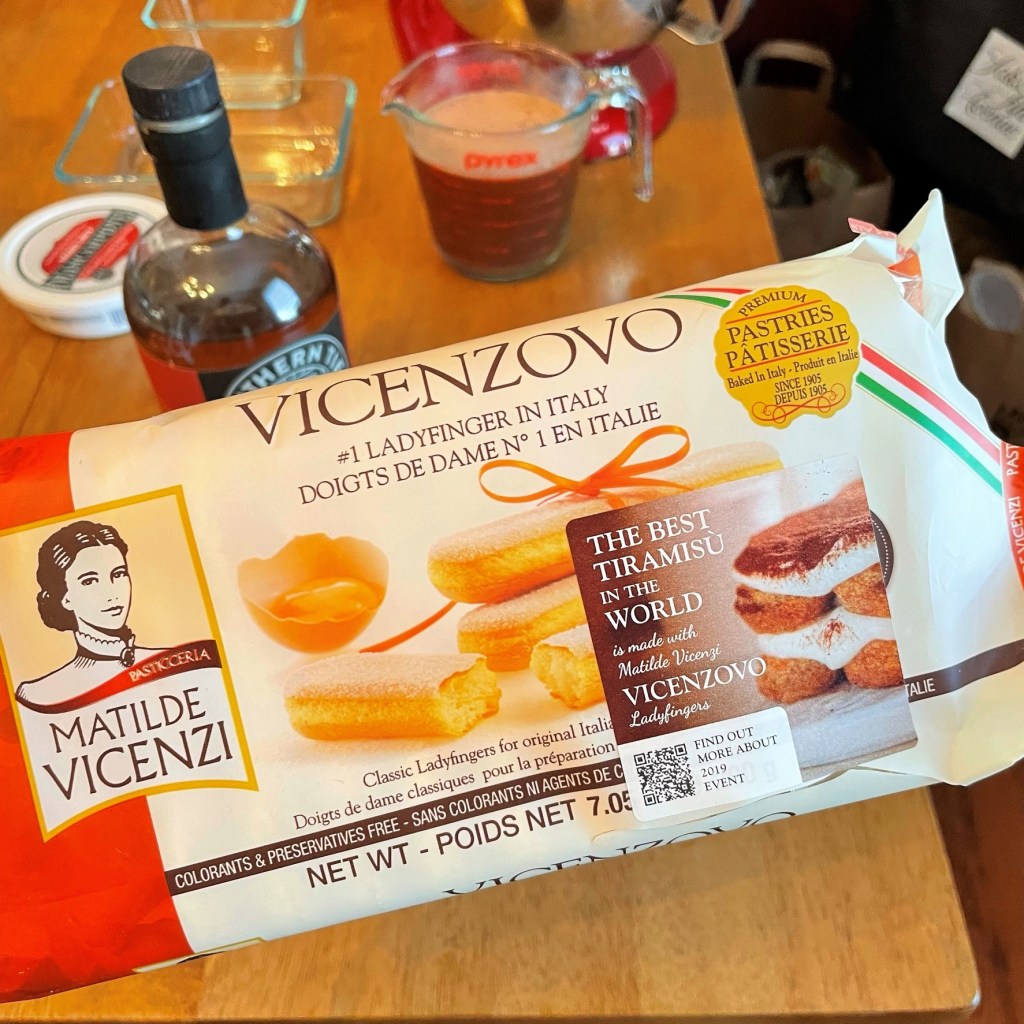
7 oz. package ladyfingers (this might be labeled as biscotti savoiardi)
2 Tbsp. maple sugar, mixed with 1/4 tsp. ground cinnamon and 1/4 tsp. pumpkin pie spice
*Notes
The egg yolks should be room temperature for this recipe, but it is easier to separate the eggs when they are cold from the fridge. Save the whites for your weekend omelet.
If you don’t have access to a Trader Joe’s store, any other brand of pumpkin butter will work just fine. Homemade would be even better!
I found the Pumking Whiskey completely by chance when my husband and I traveled through New Jersey and Connecticut at the end of summer, and it’s a real treat. Distribution from this craft distillery is limited, but readers in the northeast U.S. should have little trouble finding it. Otherwise, go with spiced light rum, or perhaps even Frangelico.
My first impressions of the Crio Bru brewed cacao were only so-so, but I’ve grown to really enjoy this as an occasional alternative to coffee. Since the time I first discovered the company, it has added an array of new seasonal flavors, and the cinnamon is one of my favorites. It’s a limited edition that is currently only available in a sample pack, but the company just added another flavor—you guessed it, pumpkin spice!
I made this in a Pyrex dish that measures 8 ½ x 7” inches, but I’m sure you could also make this recipe work in an 8 x 8” dish. Or double the recipe and use a 9 x 13.
It helps to have an electric mixer (either stand or handheld) to make this dessert, but it can also be done with a whisk and a good strong arm. 🙂
Instructions
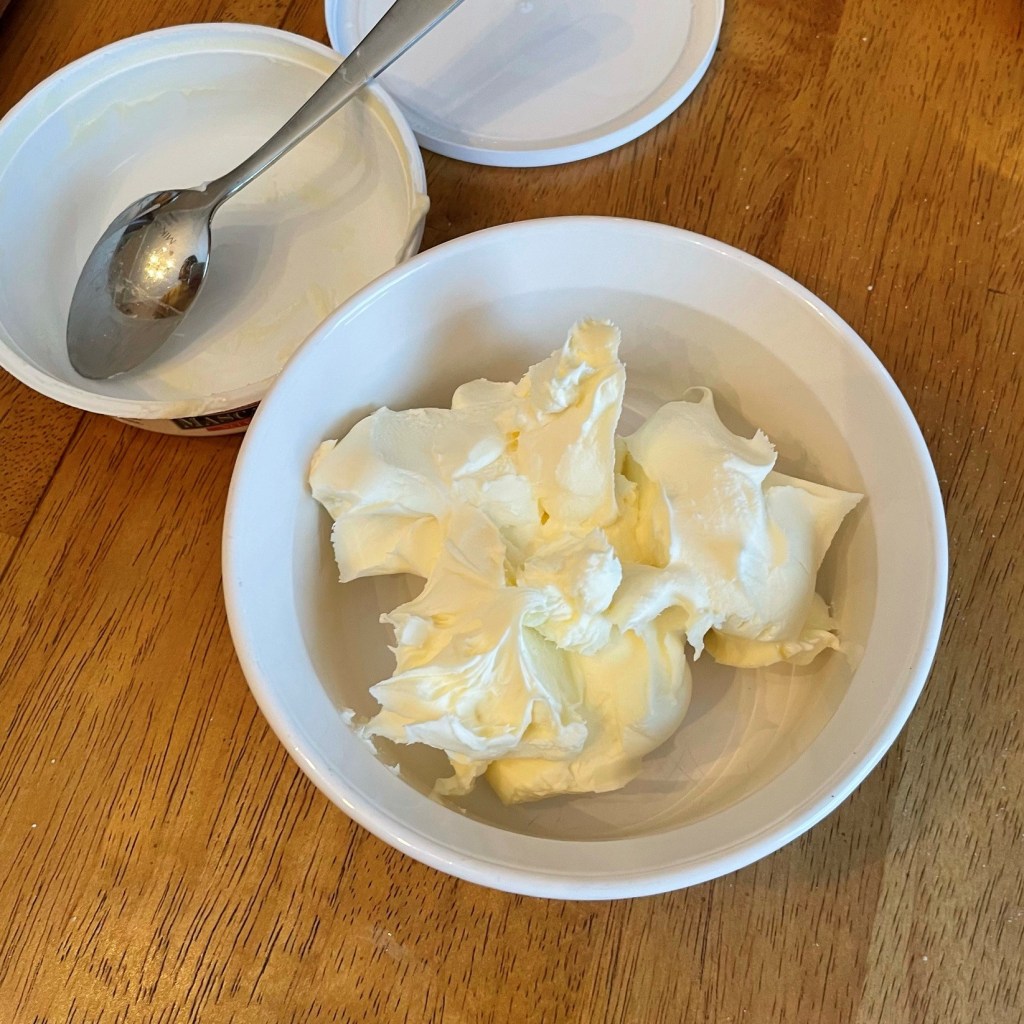
I spooned the mascarpone into a separate bowl to help it come to room temp.
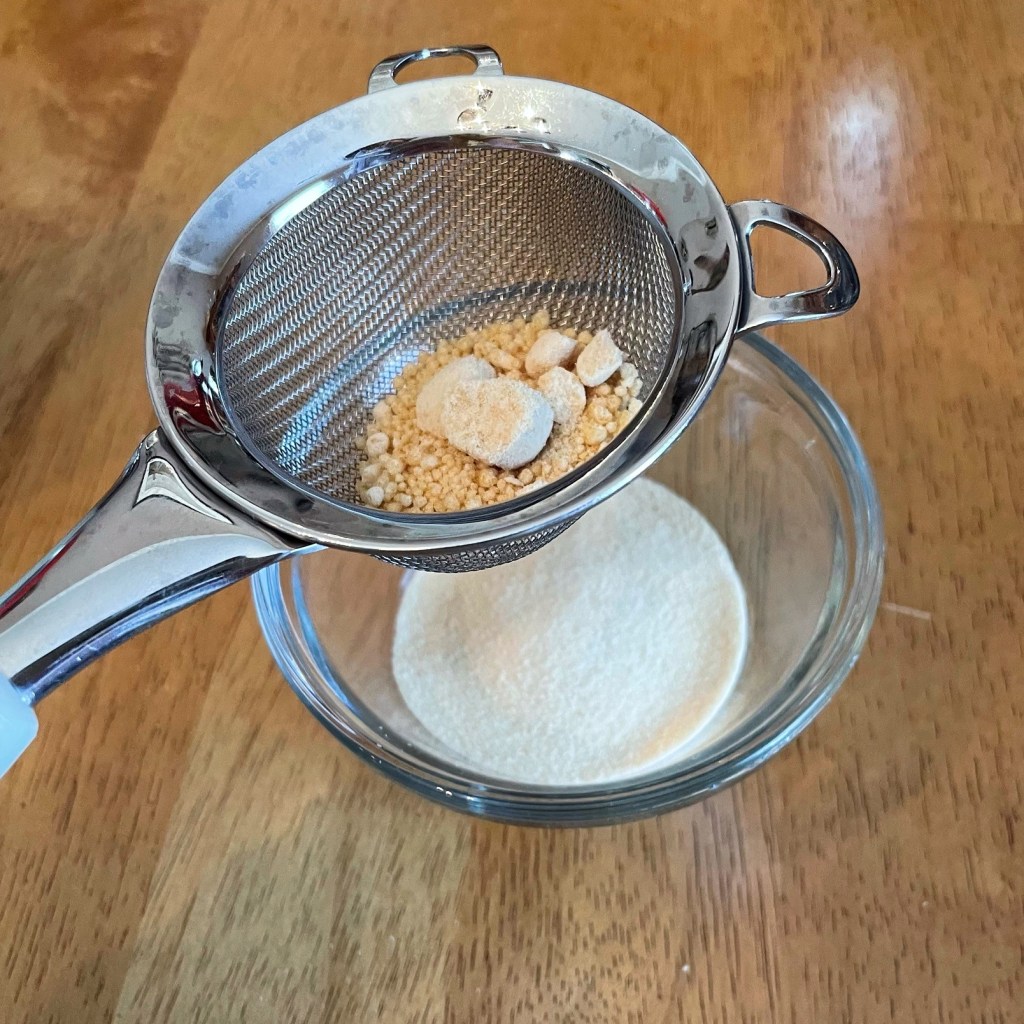
I sifted the maple sugar to weed out the clumps. This sugar is very fine, just like caster sugar.
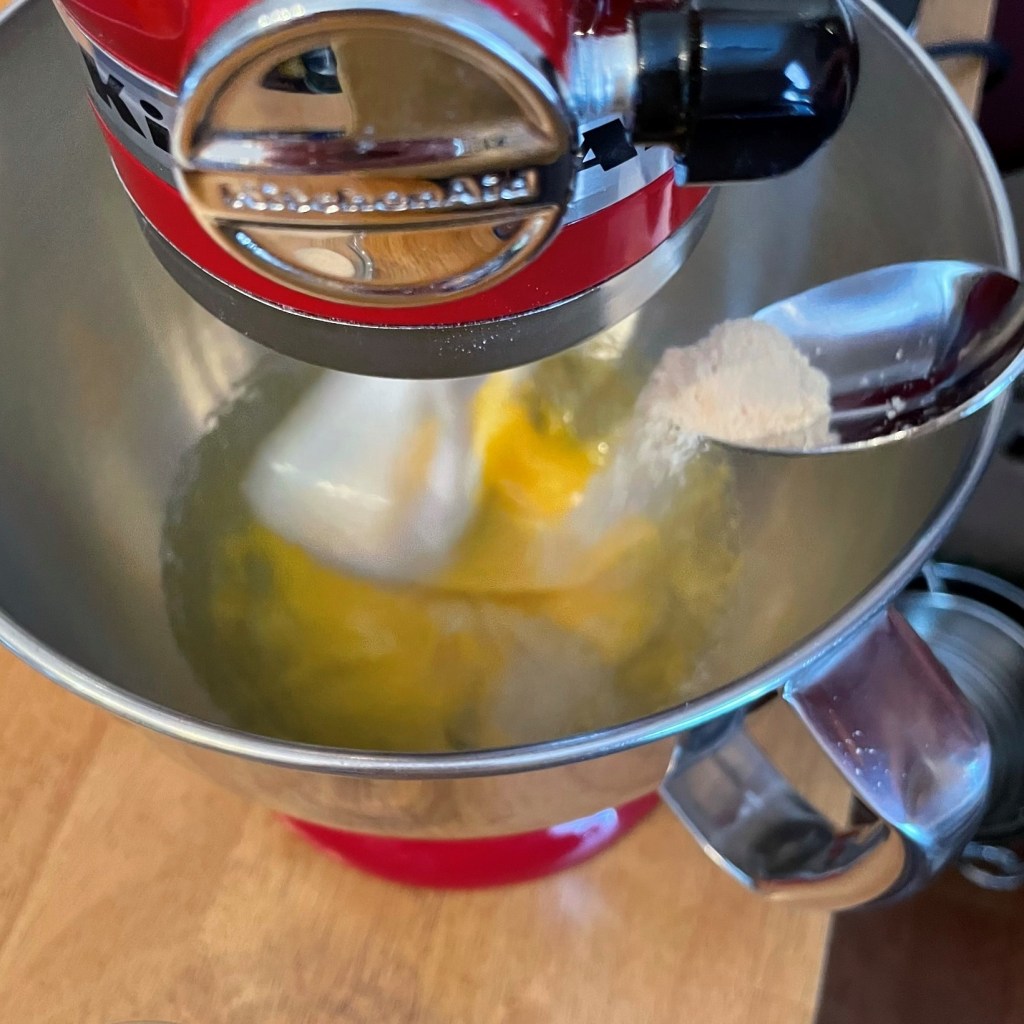
Add the sugar to the whipped egg yolks.
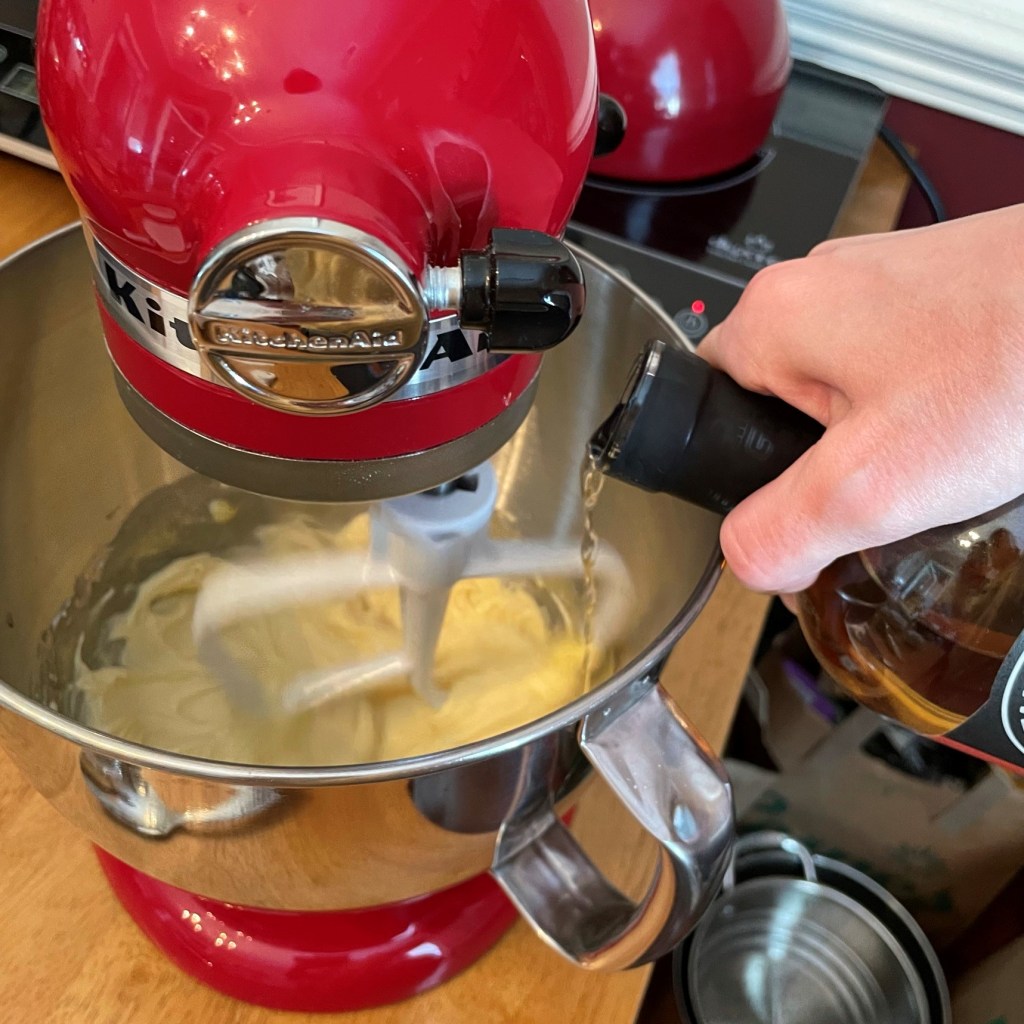
Whip in the mascarpone and spike it with two tablespoons of Pumking whiskey.
Mix in the pumpkin butter. That looks so pretty!
I used my trusty digital scale to measure out an ounce of the Pumking whiskey into the brewed cacao.
Ladyfingers are wispy little cookies, not very interesting on their own but amazing in tiramisu.
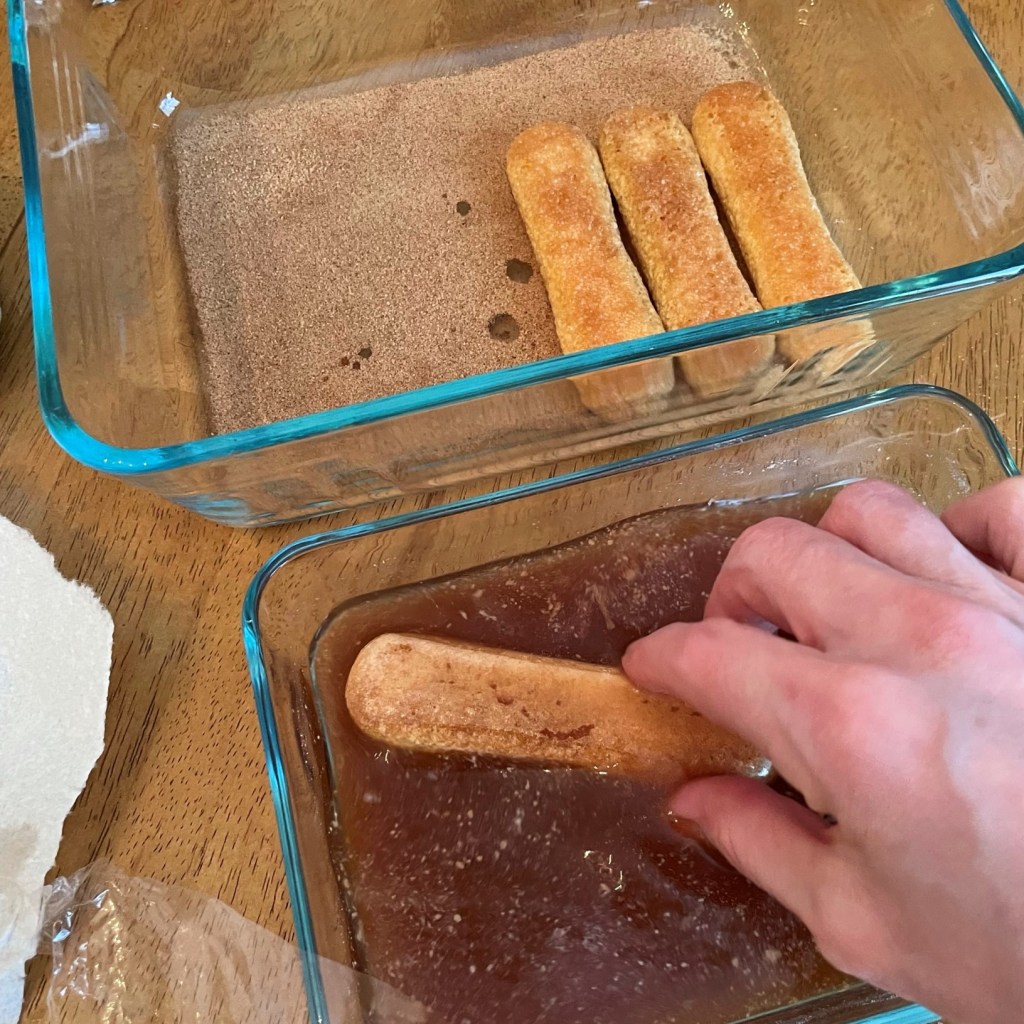
Give the ladyfingers a very quick spin through the spiked brewed cacao, then arrange in the dish. Don’t soak them too long or they will turn to mush in your hands!
Evenly spread half of the mascarpone mixture over the first layer of ladyfingers.
Repeat with a second layer.
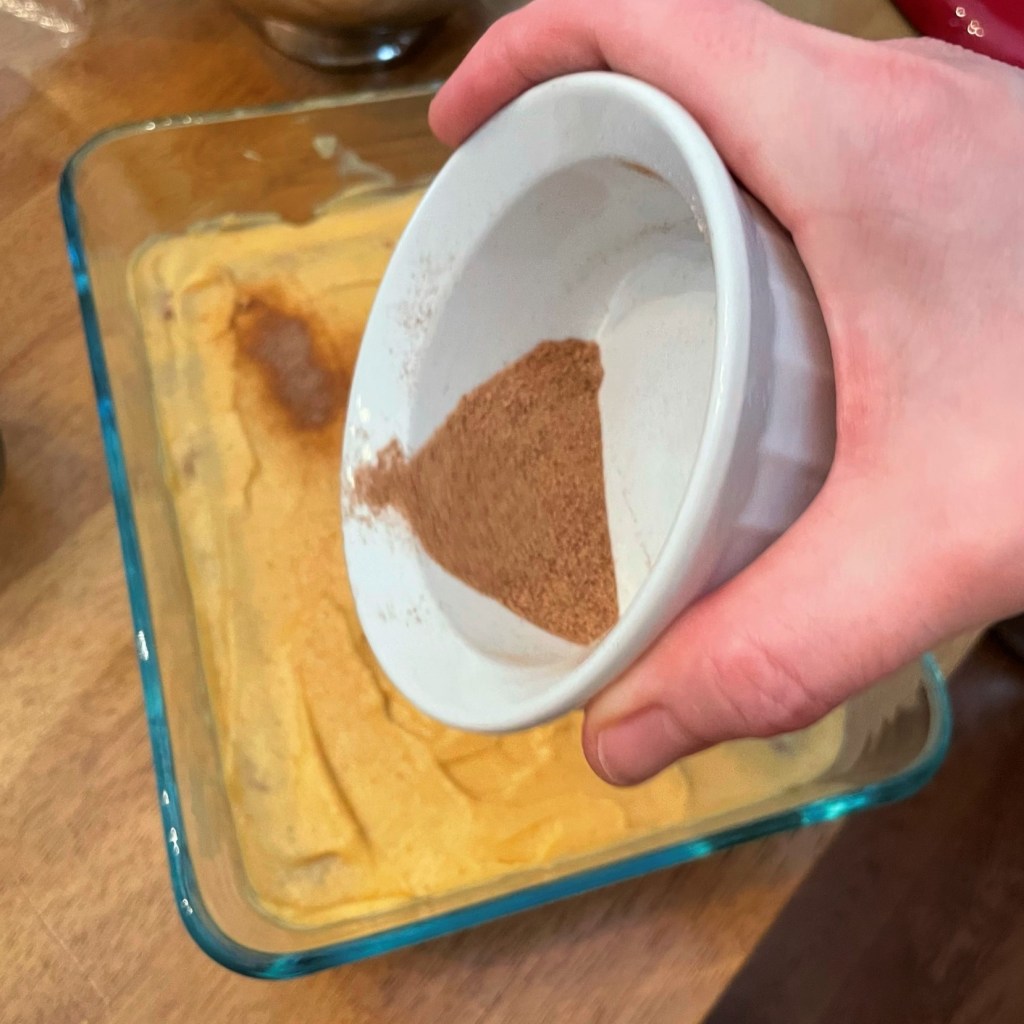
Sprinkle the remaining pumpkin spice sugar over the top of the dessert.
Lovely! Cover it and send it to the fridge for at least 24 hours.
In a mixing bowl or the bowl of a stand mixer, whip eggs until they are smooth. Gradually add maple sugar and continue whipping until all sugar is dissolved into the yolks.
Add mascarpone into the bowl and blend on low speed until the mixture is evenly mixed, smooth and glossy. Fold in 2 Tbsp. of the Pumking whiskey, plus the pumpkin butter and vanilla extract.
Using a mesh sifter, sprinkle about half of the maple-spice mixture into the baking dish.
Combine brewed cacao and remaining Pumking whiskey in a flat bowl. Carefully dip the ladyfingers, one at a time, into the liquid. Turn only twice before arranging the cookies in the dessert dish. I have learned that it is very easy to make the ladyfingers soggy, so err on the conservative side. Repeat until you have a complete single layer of ladyfingers in the dish.
Carefully spread half of the pumpkin-mascarpone mixture over the ladyfingers, smoothing it all the way to the edges of the dish.
Repeat with the next layer of ladyfingers, top with the remaining mascarpone mixture, and sprinkle the top with the remaining maple-spice mixture. Cover tightly and refrigerate at least 24 hours before serving.
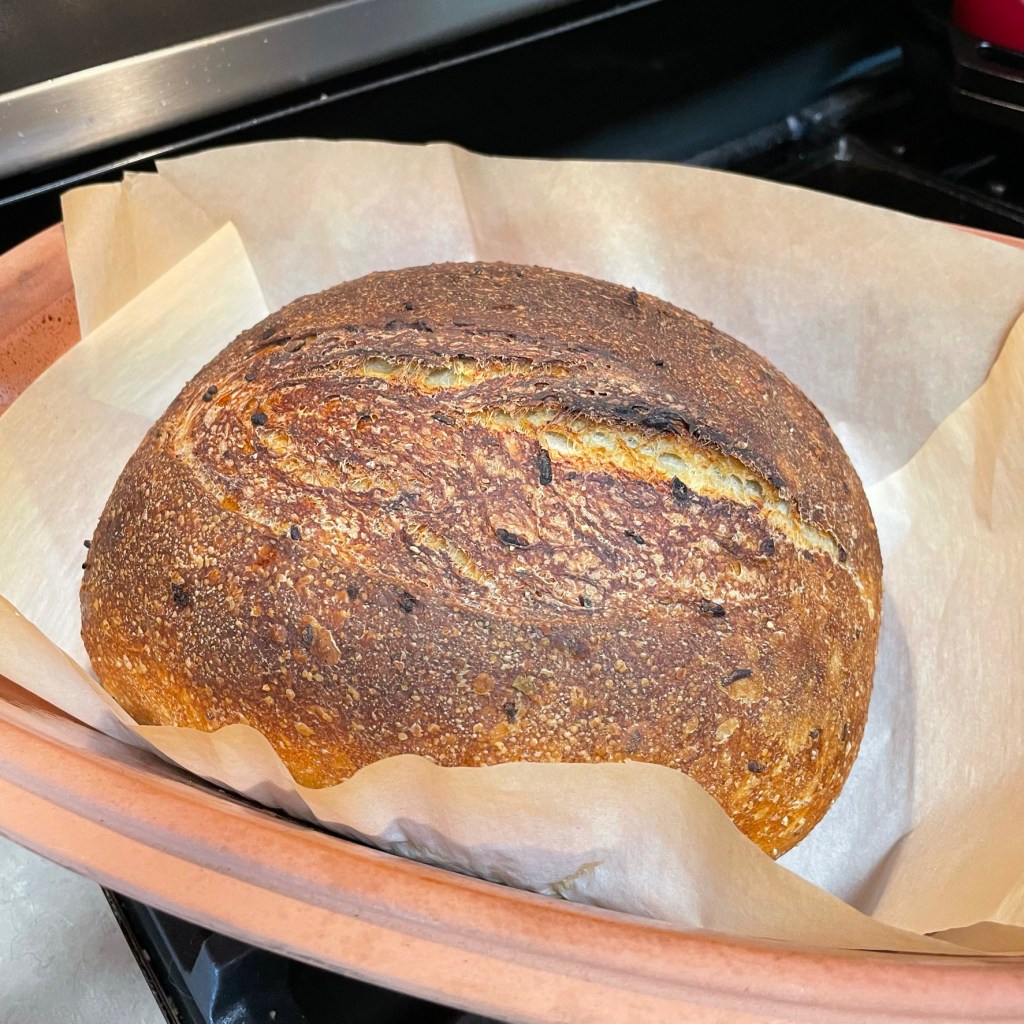
With the arrival of fall comes the joy of having the house filled with the addictive aromas of meaty stews, roasted vegetables, and every variety of freshly baked breads and desserts. A few days before we dismantled the kitchen for our remodel, I pulled this favorite sourdough recipe out of my arsenal and baked it to accompany the roasted butternut squash lasagna that I shared last month.
The recipe I share today is a mashup of several bread recipes I have tried from an amazing blog called “The Fresh Loaf.” The site is a virtual community and message board for sourdough lovers—from novice to expert—and over the years, I have gained invaluable wisdom by eavesdropping on the conversations of those I consider to be far advanced of my own skills. I was barely beginning my own sourdough journey when I discovered TFL, but the pictures and formulas I found there inspired me to attempt new techniques, and I now proudly consider myself to be an “intermediate” bread maker.
One of the methods I learned is baking with steam, a simple technique that results in a perfectly crusty yet chewy exterior and lovely crumb texture that the aficionados would call “gelatinized.” Breads made with this steam-baked method make fantastic toast and sandwiches (especially grilled cheese).
The extra hydration of the dough creates the big, open crumb inside the bread. The steam makes the crust perfectly chewy.
The generous amounts of onion and sage I’ve added to this loaf also make it perfect for Thanksgiving stuffing or dressing, or you can follow my lead with any stale leftovers and turn it into savory croutons for hearty salads and all the soups you’ll be simmering during the autumn and winter months ahead.
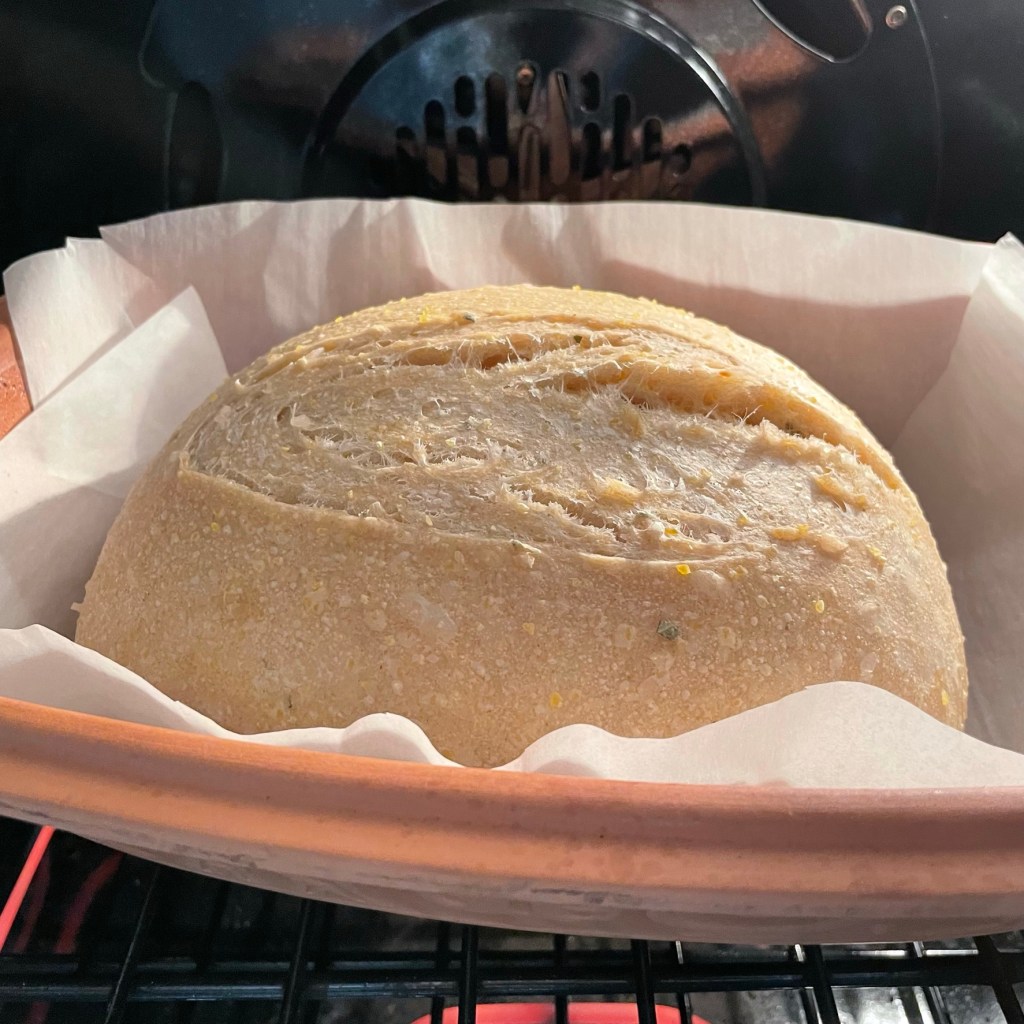
Up close, you can see the golden polenta, the bits of onion and flecks of sage. This bread is perfect for fall!
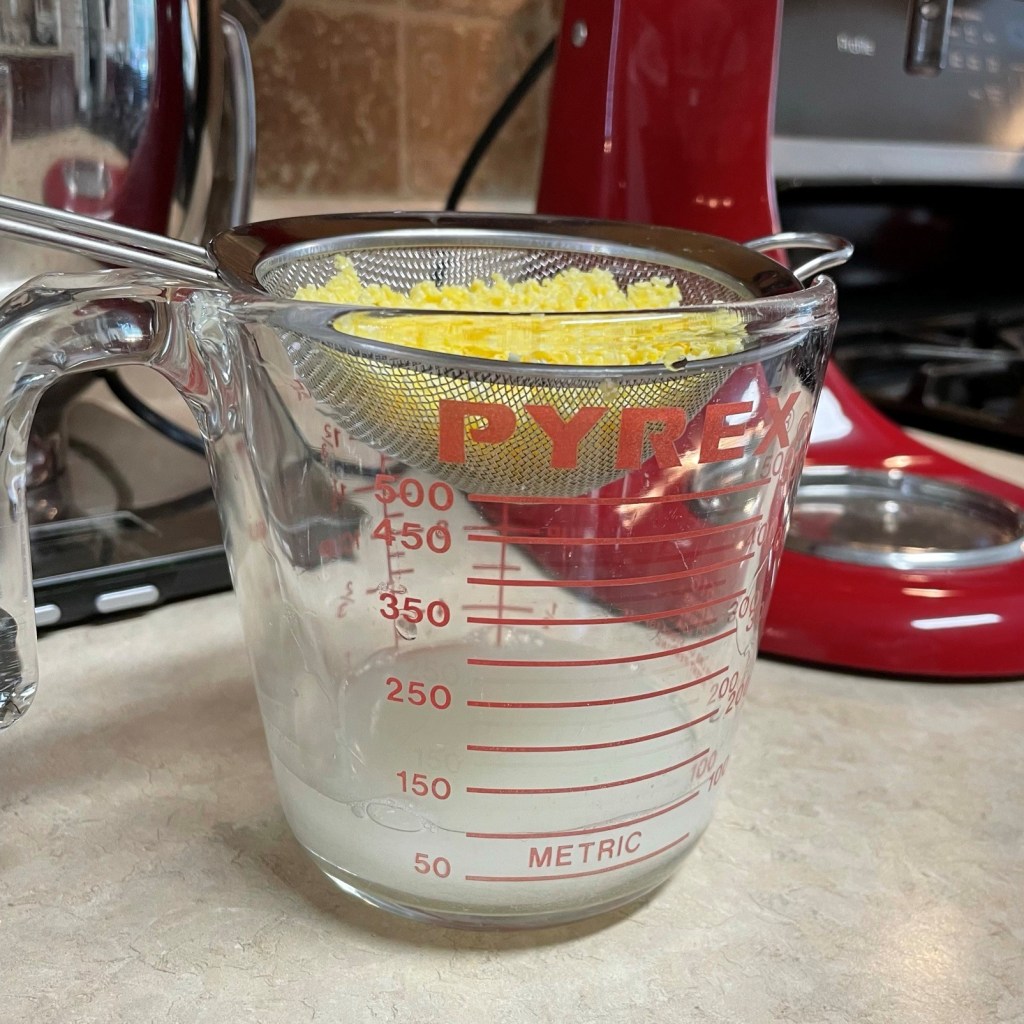
Besides the intoxicating fall-scented flavors, this loaf also uses a pre-ferment, which is a fancy way of describing a pumped-up sourdough starter, and a soaker, which is nothing more than grains (in this instance, corn) that have been soaked overnight in water—a technique that coaxes the deepest flavors out of the grain and into the bread.
The pre-ferment is a next-level feeding of my ripe starter.Polenta is soaked overnight, then drained. But keep the soaking water!
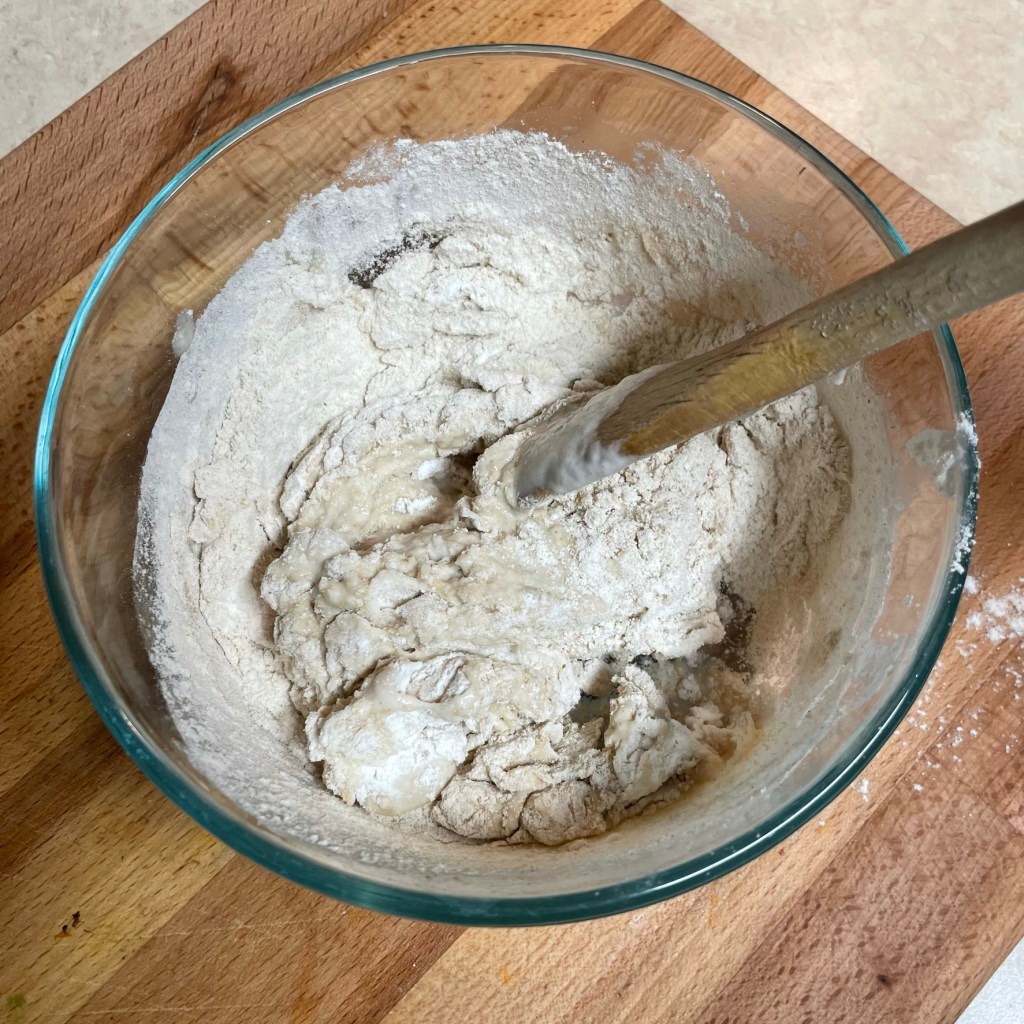
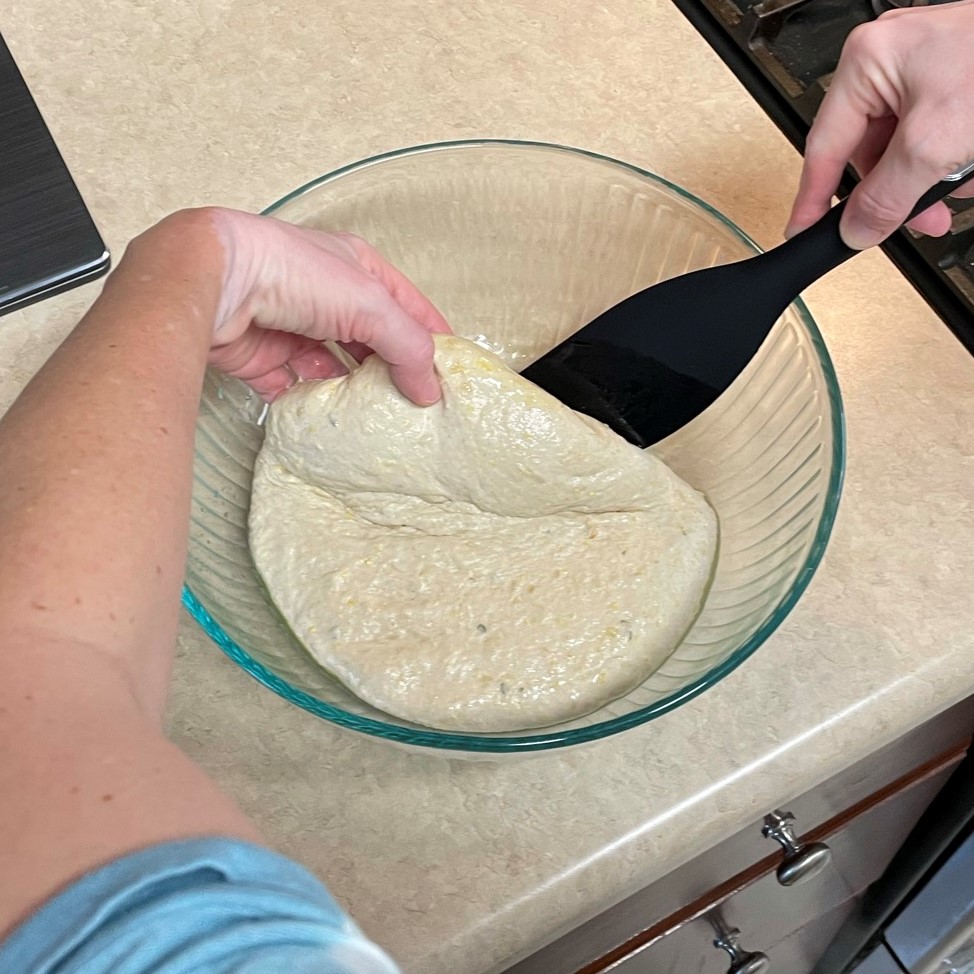
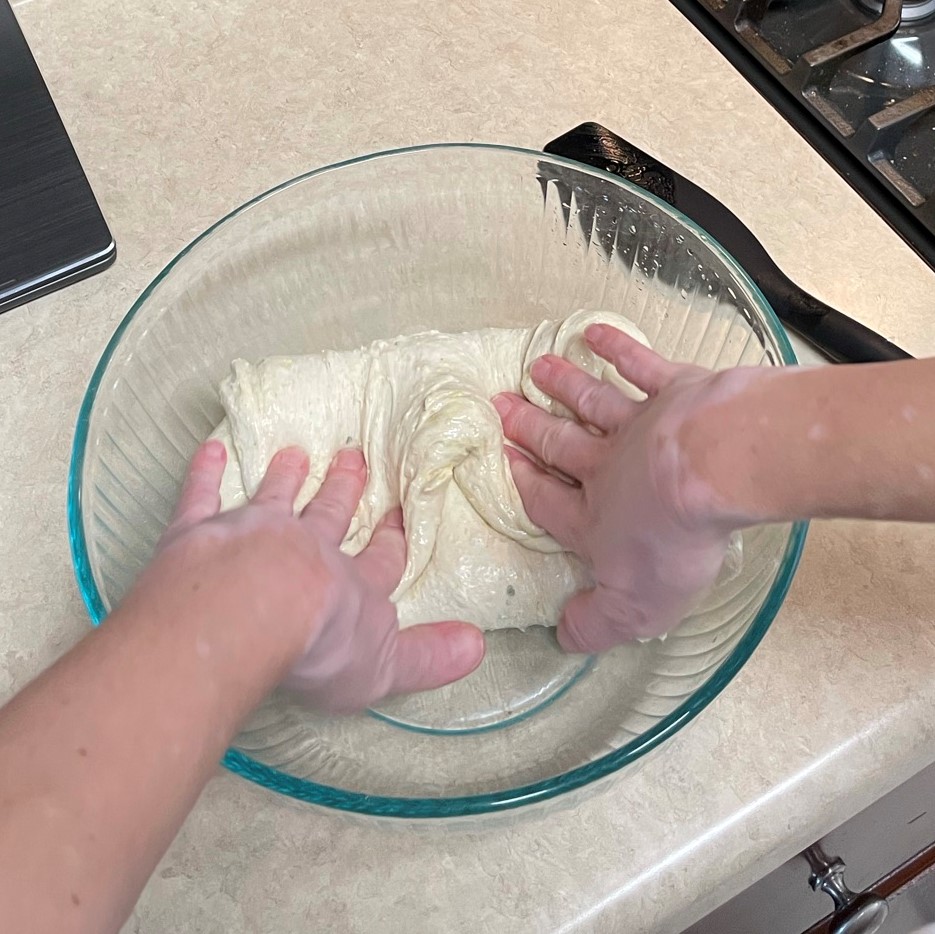
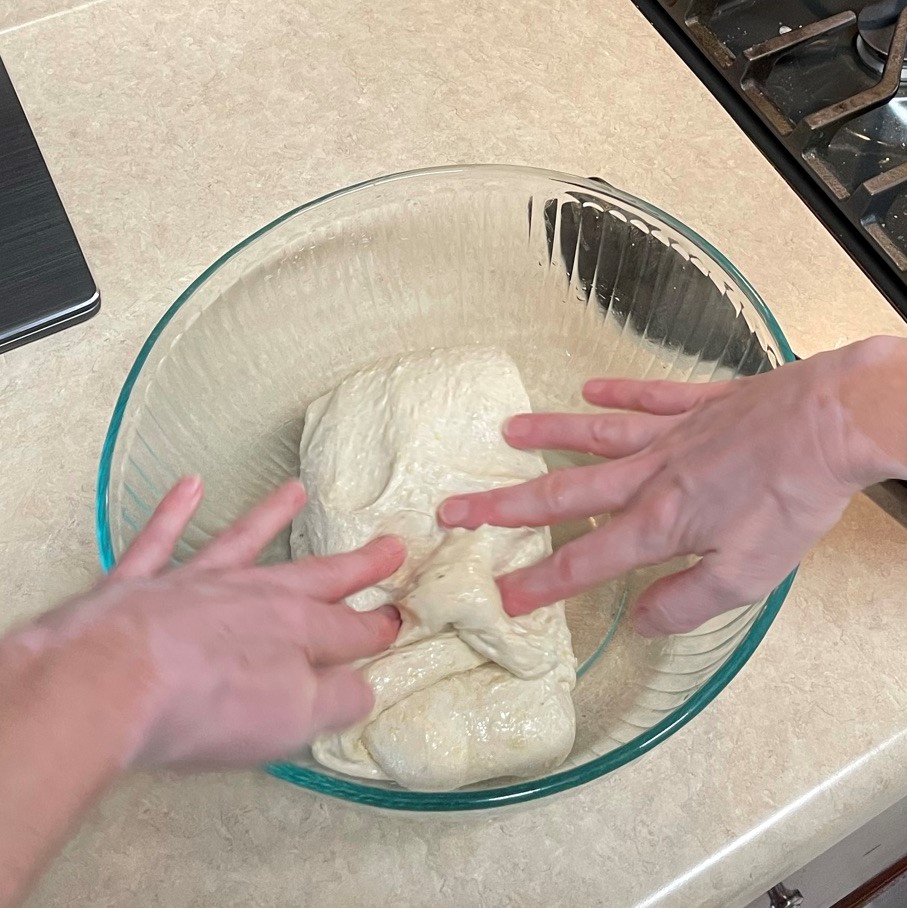
The kneading method used for this bread is also a bit different. It’s called “stretch and fold,” and it is an easy way to build strength in dough with a high volume of water, without so much messy, sticky kneading. Try this a few times, and you will be astonished at the elastic texture and volume achieved in the bread dough.
Wet hands and a silicone spatula help me get started with my first round of stretch and folds.Stretch upward until the dough resists, then fold it toward the front edge of the bowl. Press down when you fold, to push out trapped gas.
If this all seems confusing, trust me, it isn’t. I have found sourdough baking to be joyfully simple once you get the hang of it. As I mentioned last fall when I made the sourdough pumpkin challah, this kind of baking—naturally leavened and slow-fermented—is like a good relationship; the more you open yourself up to it, the more it comes back to you until you finally reach a point of familiarity that you can’t imagine ever buying a loaf of bread at the grocery store.
One more note: I strongly recommend measuring ingredients by weight when baking any kind of bread, but especially sourdough. Weight measuring takes the guesswork out of your ingredient ratios, and you can find an inexpensive, easy-to-use kitchen scale just about anywhere, including Walmart (where I bought mine).
That’s my story, and this is my favorite sourdough for autumn. I hope the pictures entice my fellow sourdough bakers to give it a go, and if you scroll to the bottom of the post, you’ll find a downloadable PDF for your recipe files. My ingredients are listed in grams (sorry, no volume measurements), so go on and get your kitchen scale and get baking.
Enjoy!
Add water to the soaking water until you have the total amount. No sense wasting that flavor!
Re-hydrate the dried onions with just enough water to cover them.
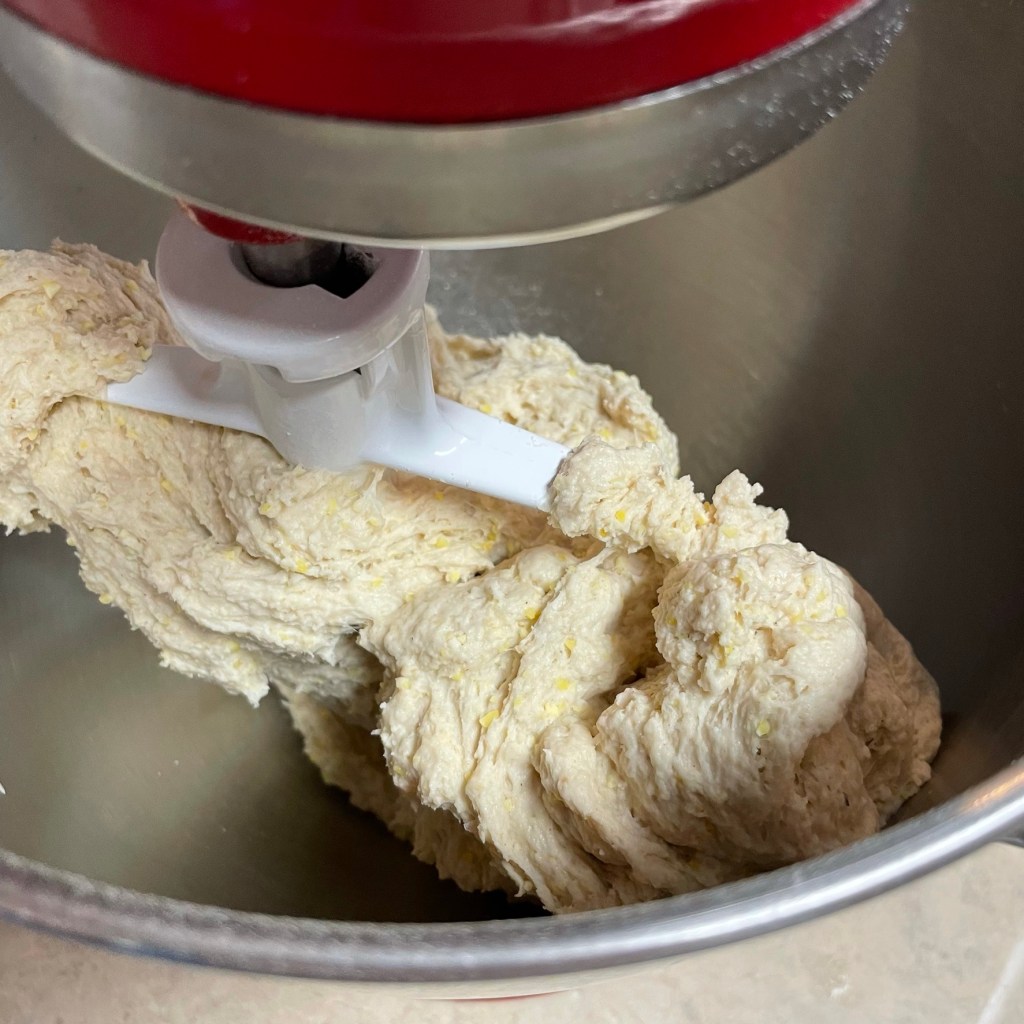
Combine the pre-ferment, soaker and water in a stand mixer bowl.
Add poultry seasoning to the flour blend for extra savory fall flavor!
The dough will ball up on the beater blade. Scrape it off the beater, then let it rest.
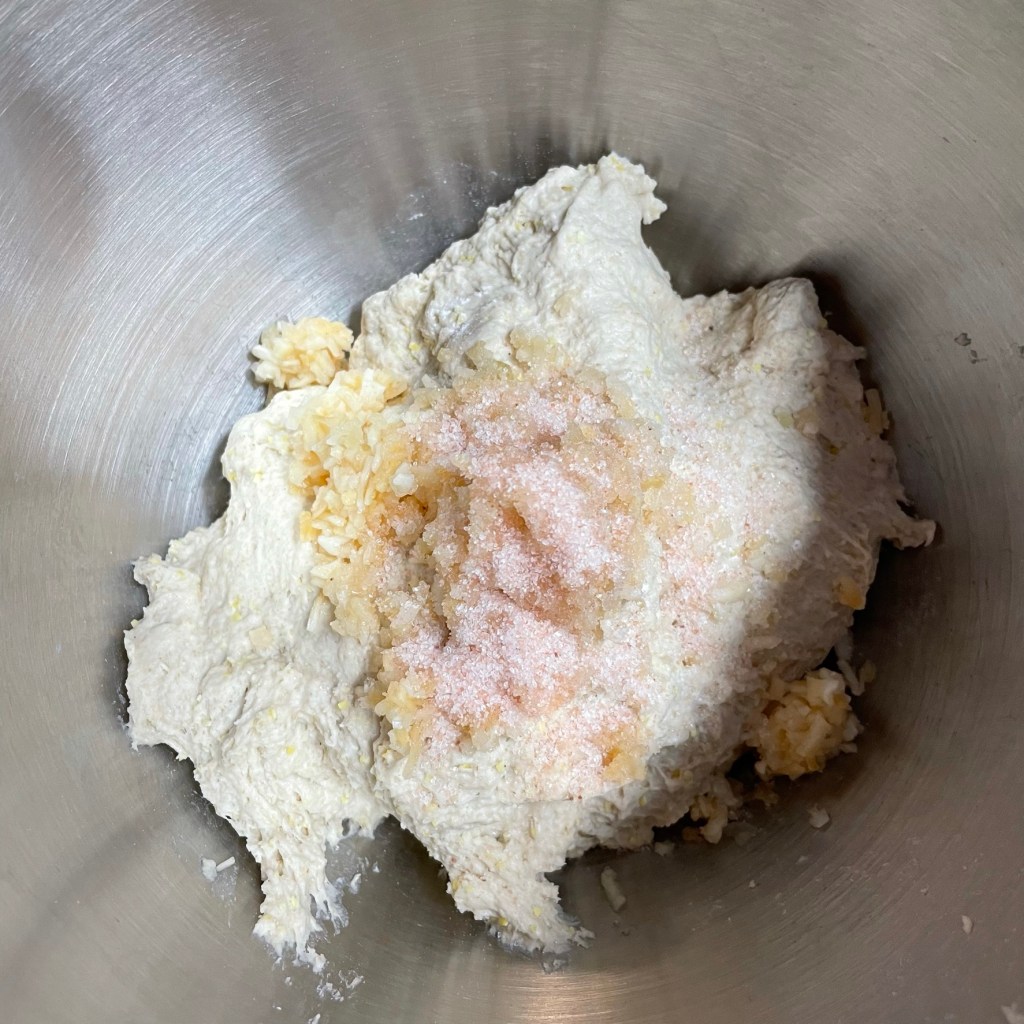
Dump the hydrated onions onto the dough, followed by the salt. I used Himalayan pink salt so you can see it! 😉
After a 45 minute rest, use the dough hook to knead in the onions and salt.
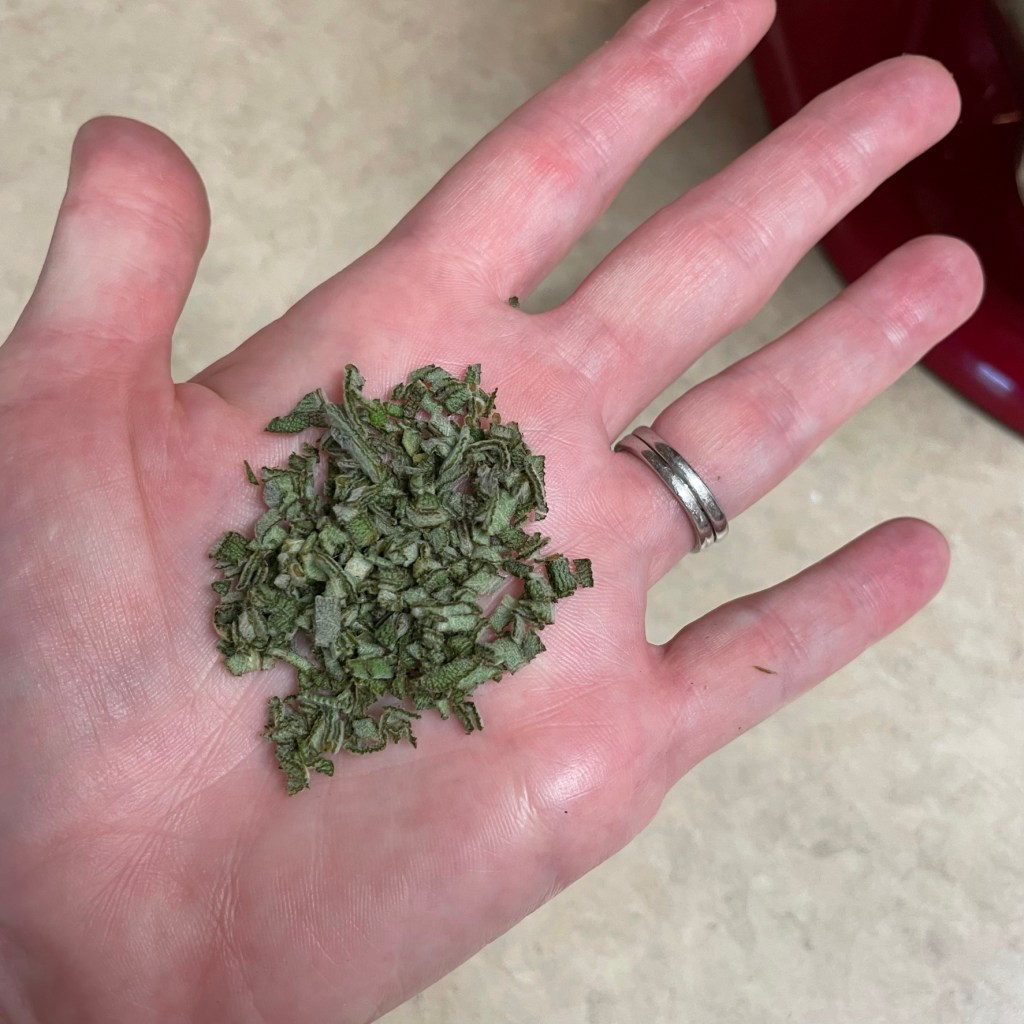
Rinse and dry the fresh sage leaves, about this much.
It measures approximately 1 tablespoon when finely chopped.
Knead the sage into the dough. Cover and rest 30 minutes before the first set of stretch and folds.
Stretch upward until the dough resists, then fold it toward the front edge of the bowl. Wet your hands to prevent sticking.
Press down when you fold, to push out trapped gas.
Rotate the bowl and fold the opposite sides of the dough, so that all four sides have been folded onto each other. Repeat this twice at 20 minute intervals.
By the third stretch and fold, the dough is noticeably stronger and puffier.
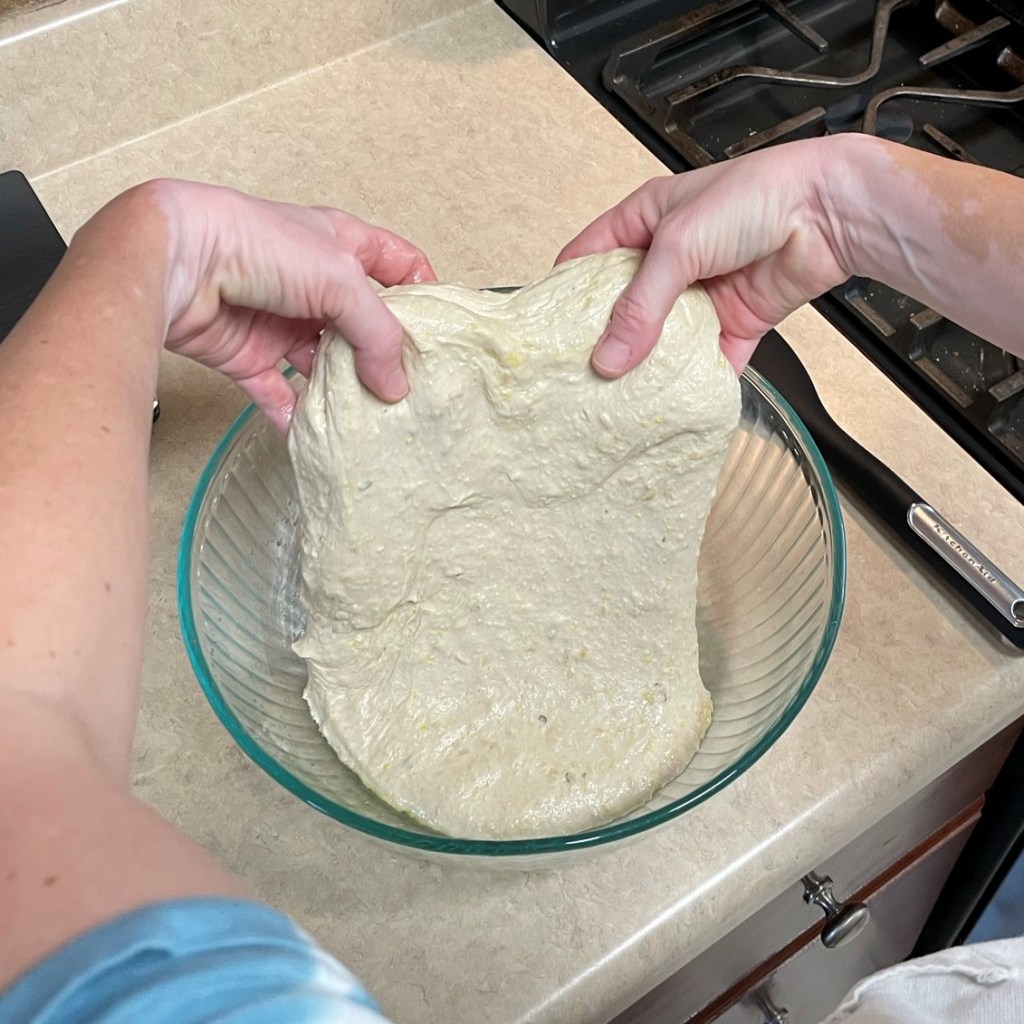
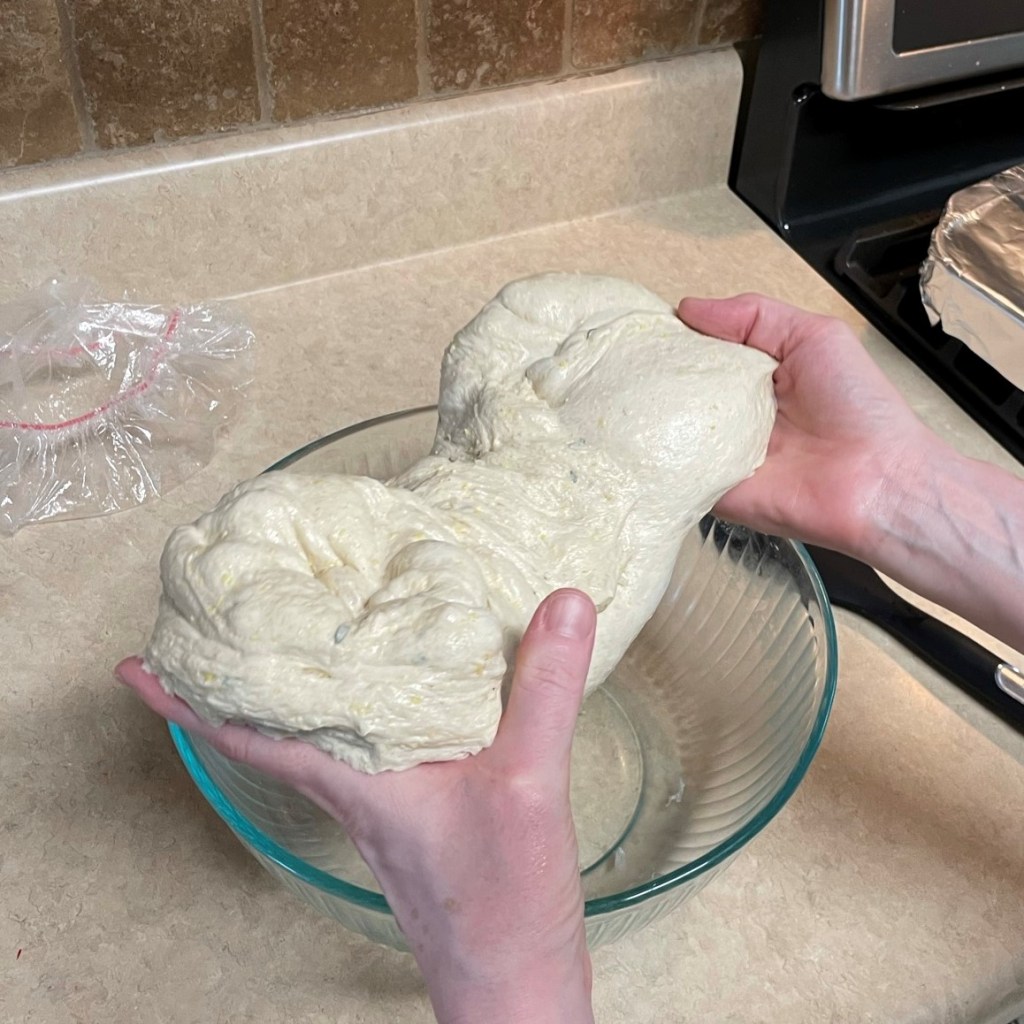
You can do the final stretch and fold by lifting it out of the bowl. Be sure to squeeze the fat air bubbles out.
Shape the dough into a ball by folding the edges to the center, and continue this while rotating the dough around.
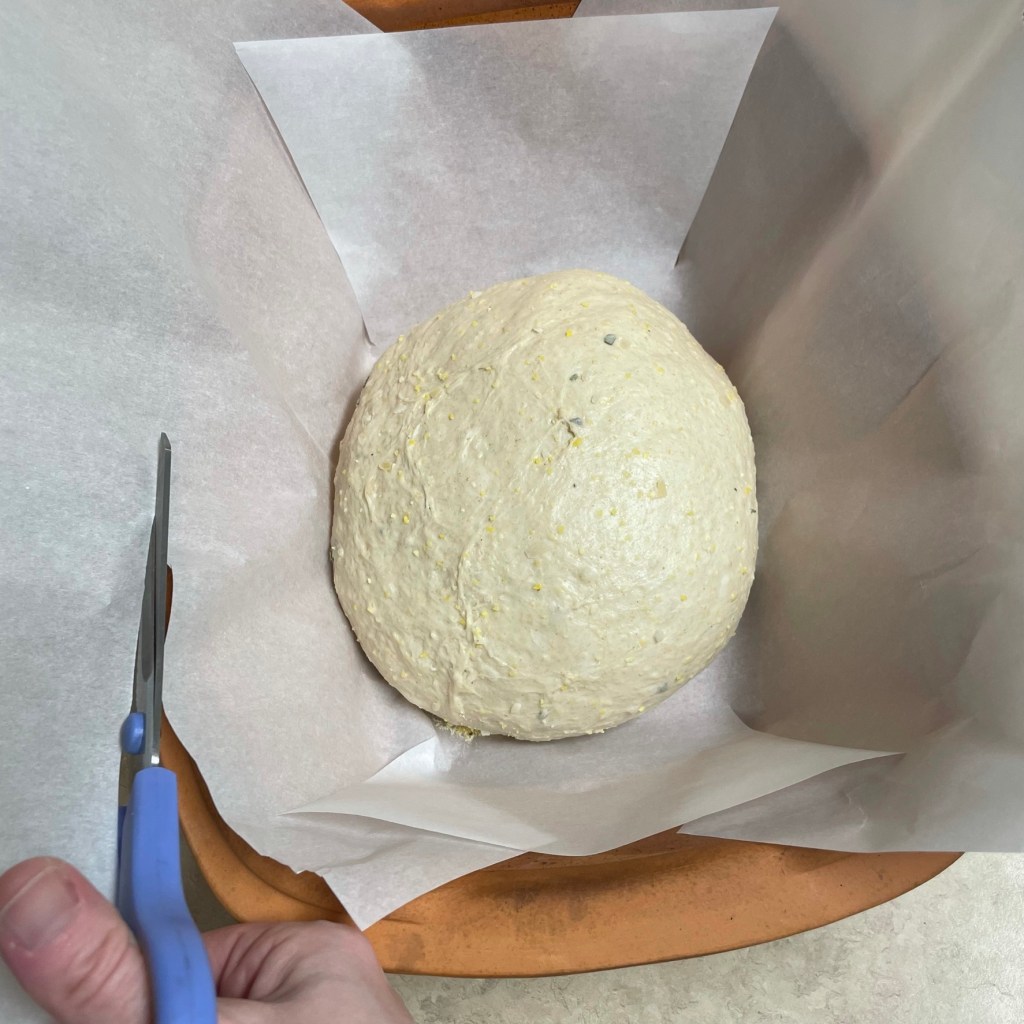
Tuck and pinch the bottom of the dough to seal it and place it on parchment paper. Cut darts in the paper so that it doesn’t wrinkle in the lidded baker.
I usually trim the excess parchment so the lid fits better without folding it onto the bread.
When dough is puffy and fully proofed, score it with a lame tool or a sharp knife, but make it quick and decisive!
The score should be about 1/2″ deep into the dough, and this will give steam inside the dough an easy escape.
Bake at 450° F for 20 minutes with the lid on, then remove the lid and bake for 25 more minutes.
Be still, my heart! This smells amazing.
Internal temperature should be 205° F. This one is done!
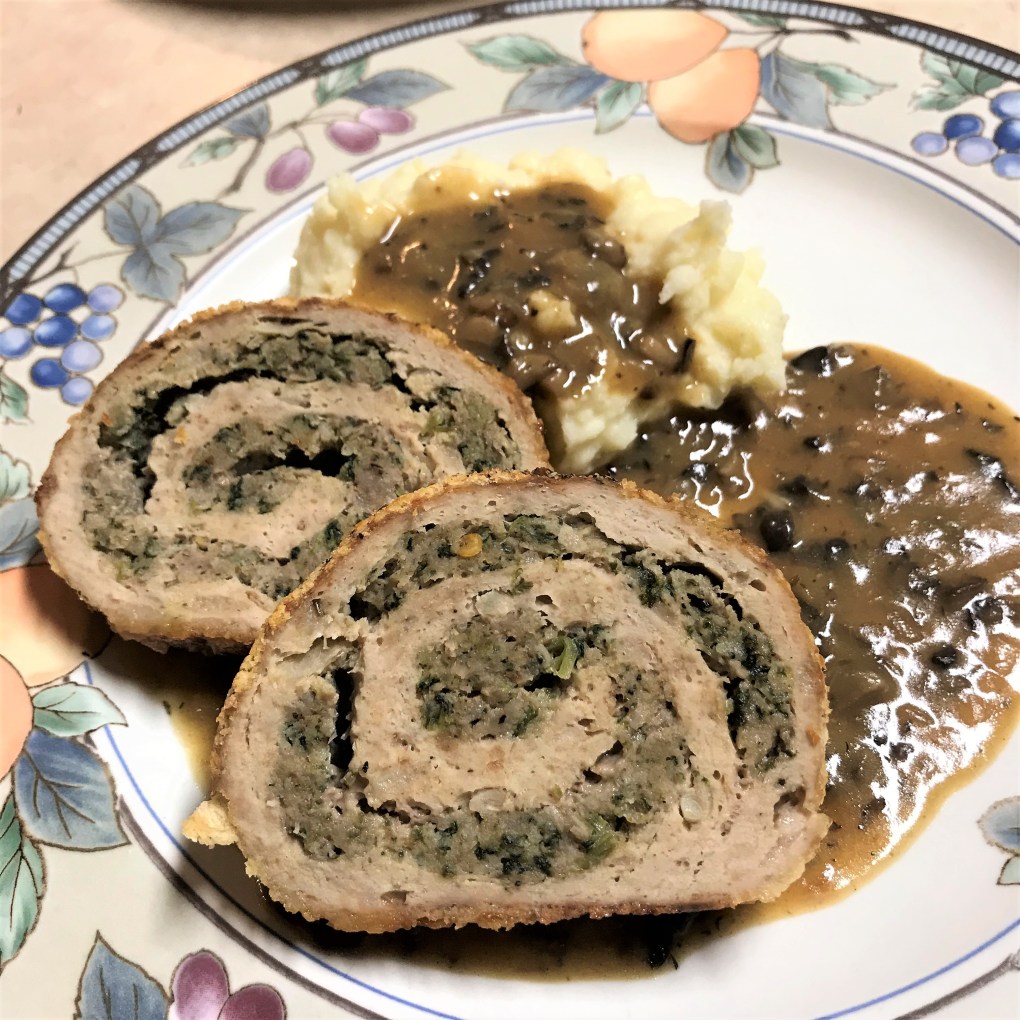
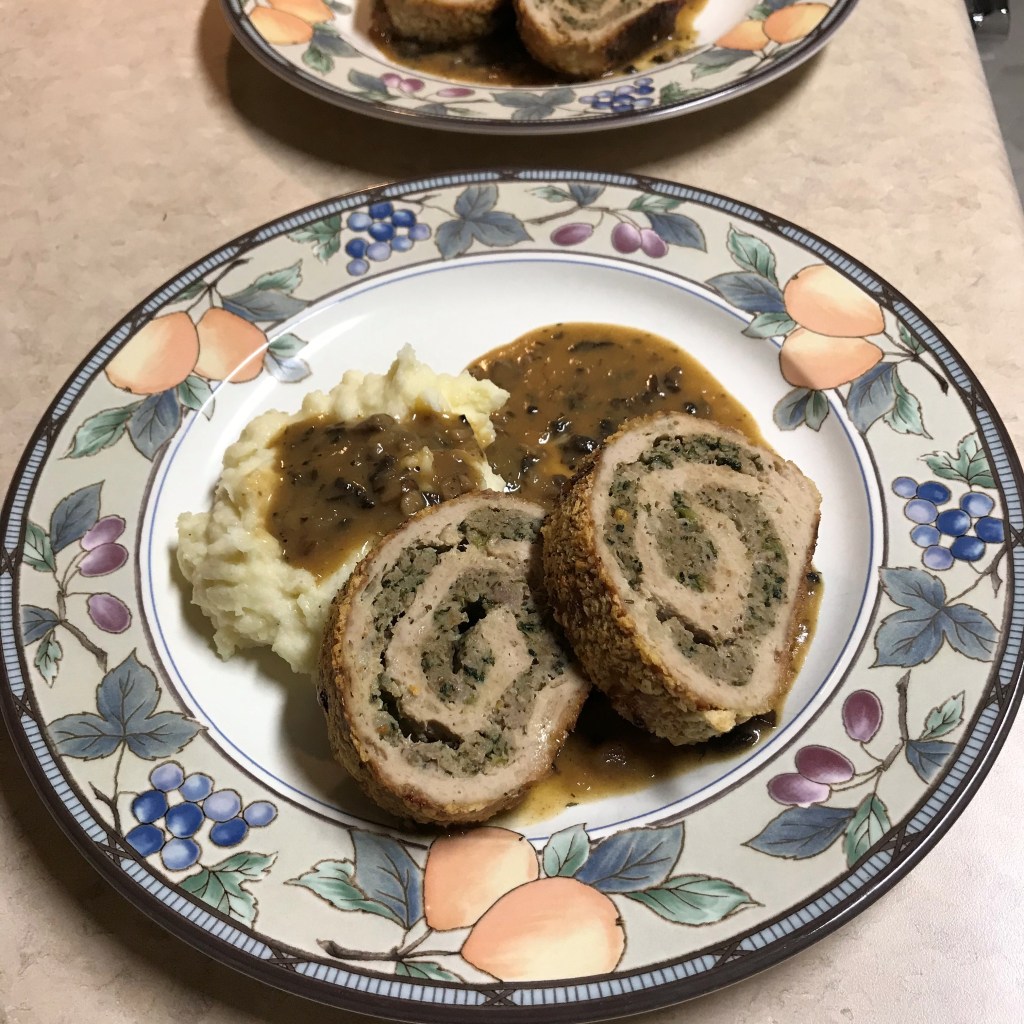
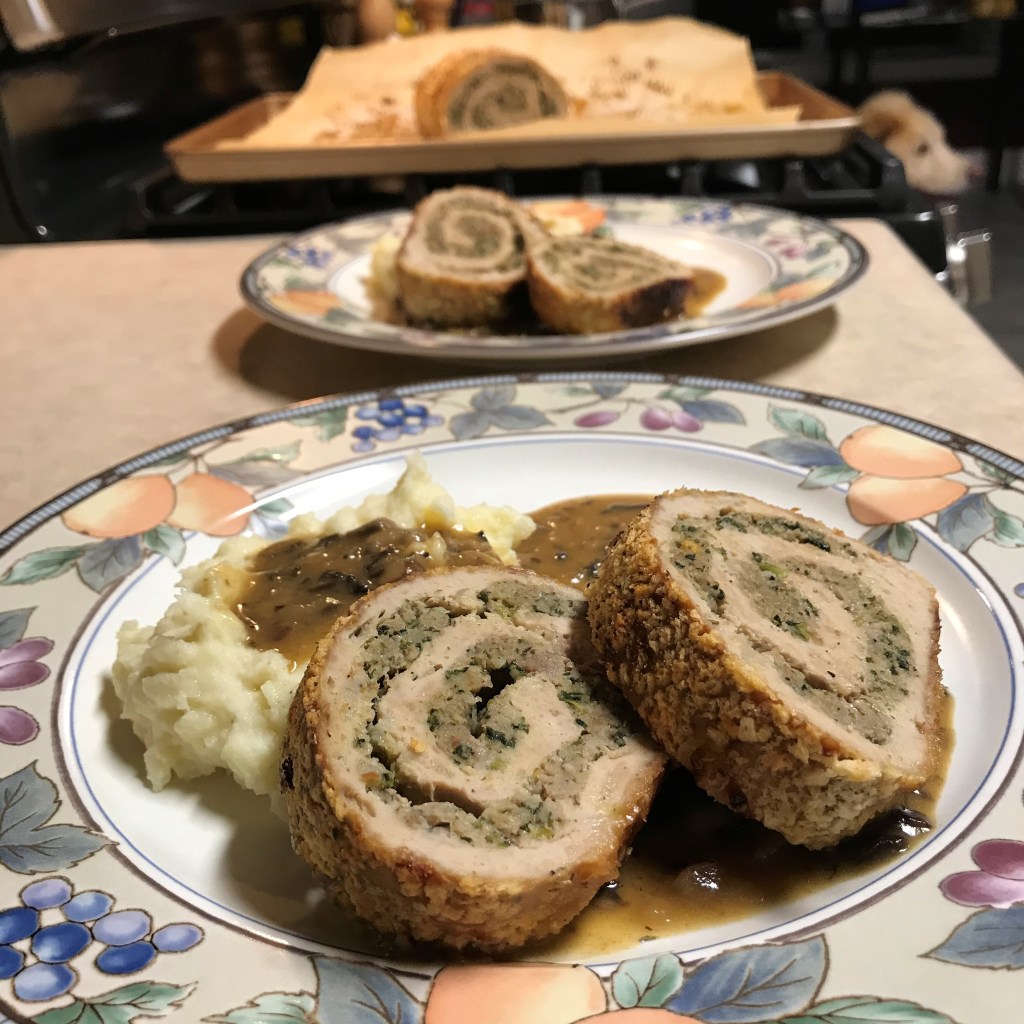
Here I go again, twisting up a classic to put the best flavors of Thanksgiving on the table with minimal stress. If you’re looking for a way to simplify your homemade holiday dinner, but still have your favorite turkey, sausage stuffing and gravy combo, this might be the best thing you read all day.
My ground turkey meatloaf has a swirl of spinach and sausage stuffing, packing all the flavor of Thanksgiving into one easy but impressive main dish. As a bonus, I’m sharing one of our family’s favorite turkey day sides—a rich and tasty mushroom gravy, which happens to be vegan (but don’t let that stop you). You may wonder, “why offer a vegan gravy over turkey meatloaf?” I love having a single gravy on the table that makes everyone happy, whether or not they eat meat, and this one is the stuff. It is as good on any meatloaf with mashed potatoes as it is in the sauce of your favorite green bean casserole or as a savory accompaniment to nearly anything you serve at Thanksgiving.
If you enjoyed my darling husband’s recent guest post for spinach balls, now is the time to make a batch because the sausage stuffing swirl in this meatloaf makes use of leftover spinach balls. If you don’t have time to make the spinach balls in advance, you could create a similar blend with some herb stuffing mix and frozen spinach (I’ll offer suggestions).
This meatloaf exceeded my own expectation, which is really saying something, given that I have made many other “stuffed” versions of meatloaf in the past. We liked it so much it will find its way to our table again as a Sunday Supper later in the winter, you can bet on it. And we’ll serve it up with Les’s amazing garlic mashed potatoes, just like we did with this one. This is teamwork, friends, and it is delicious!
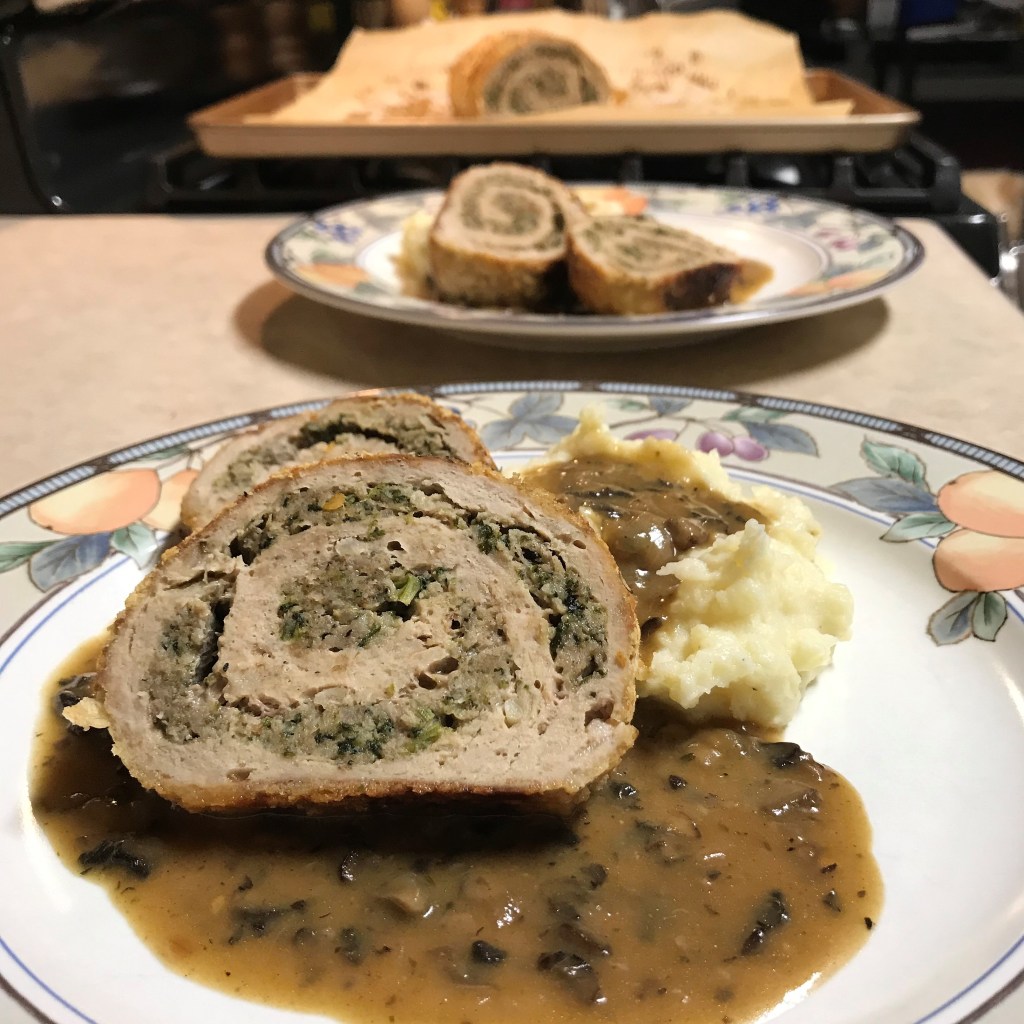
Served with Les’s incredible potatoes and the savory mushroom gravy. I’m in heaven!
Ingredients
1/2 cup dry herb stuffing mix (I used Pepperidge Farm brand)
1/4 cup whole milk
1 lb. all-natural ground turkey* (see notes)
About 1 Tbsp. extra virgin olive oil
1 medium onion, diced (divided between layers)
A few shakes poultry seasoning
1 large egg
2 large leftover spinach balls,* cut into very small dice, measuring almost 1 cup
For turkey meatloaf, I always choose regular ground turkey rather than turkey breast, which tends to be drier. If you choose ground turkey breast, consider adding an extra egg white or an extra tablespoon of olive oil to make up for the lost moisture.
The spinach ball recipe my hubby shared a couple weeks ago gets a lot of attention at our house, especially with Thanksgiving guests. If you don’t have time to make them in advance of this recipe, try this as a substitute:
3/4 cup dry herb stuffing mix 1/4 cup frozen dry spinach (thawed and squeezed dry) 2 Tbsp. parm-romano blend Additional egg white + 2 Tbsp. chicken or vegetable broth
Combine all ingredients in a bowl and allow time for the dry mixture to absorb the liquid ingredients. It should still feel somewhat dry and rather firm; from there, proceed with the recipe.
Instructions
Follow along in my kitchen to see how I made this mouthwatering meatloaf. Written instructions are below, along with a downloadable PDF for your recipe files.
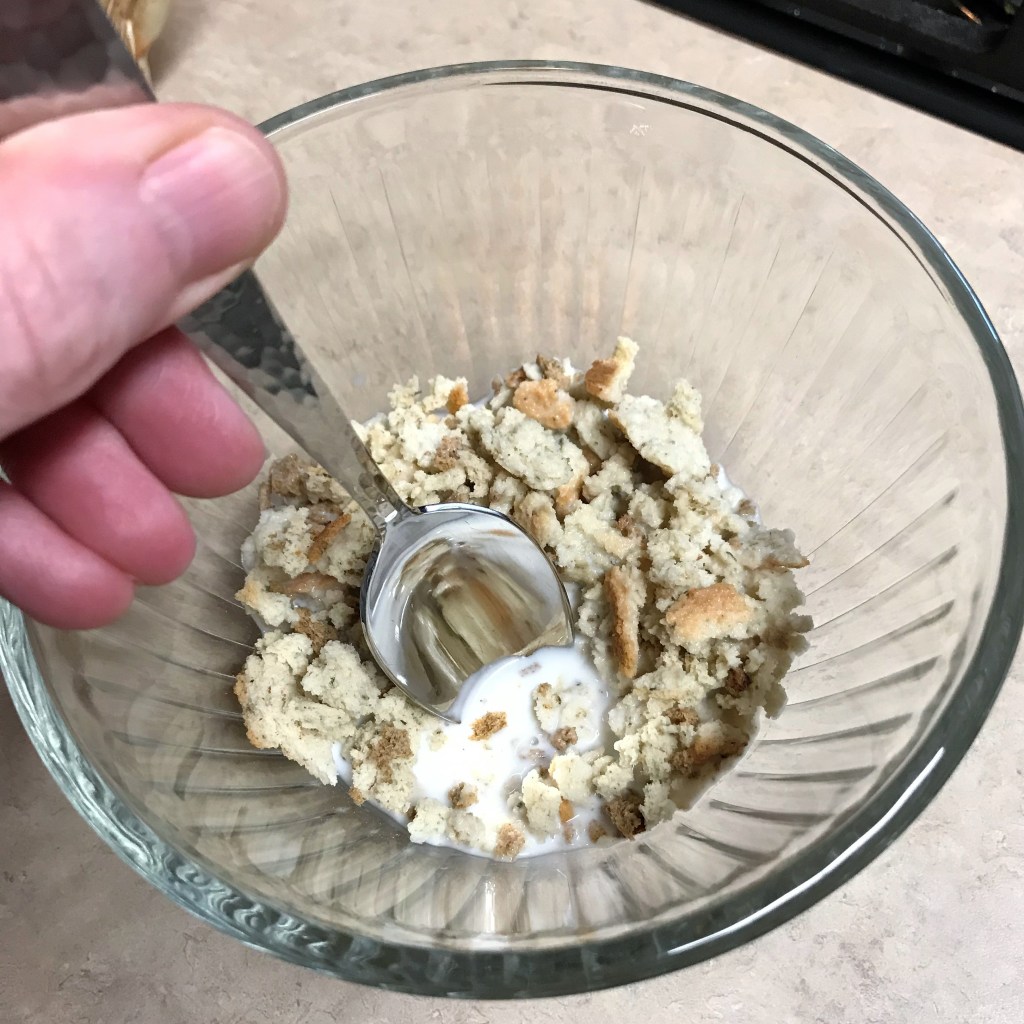
Smash the stuffing mix into the milk to break up large pieces. Give this mixture at least 20 minutes to become saturated and “paste”-like.
Any poultry seasoning will lend a savory touch that we all associate with Thanksgiving.
The stuffing “paste” will add soft texture and Thanksgiving flavor to the turkey meatloaf.
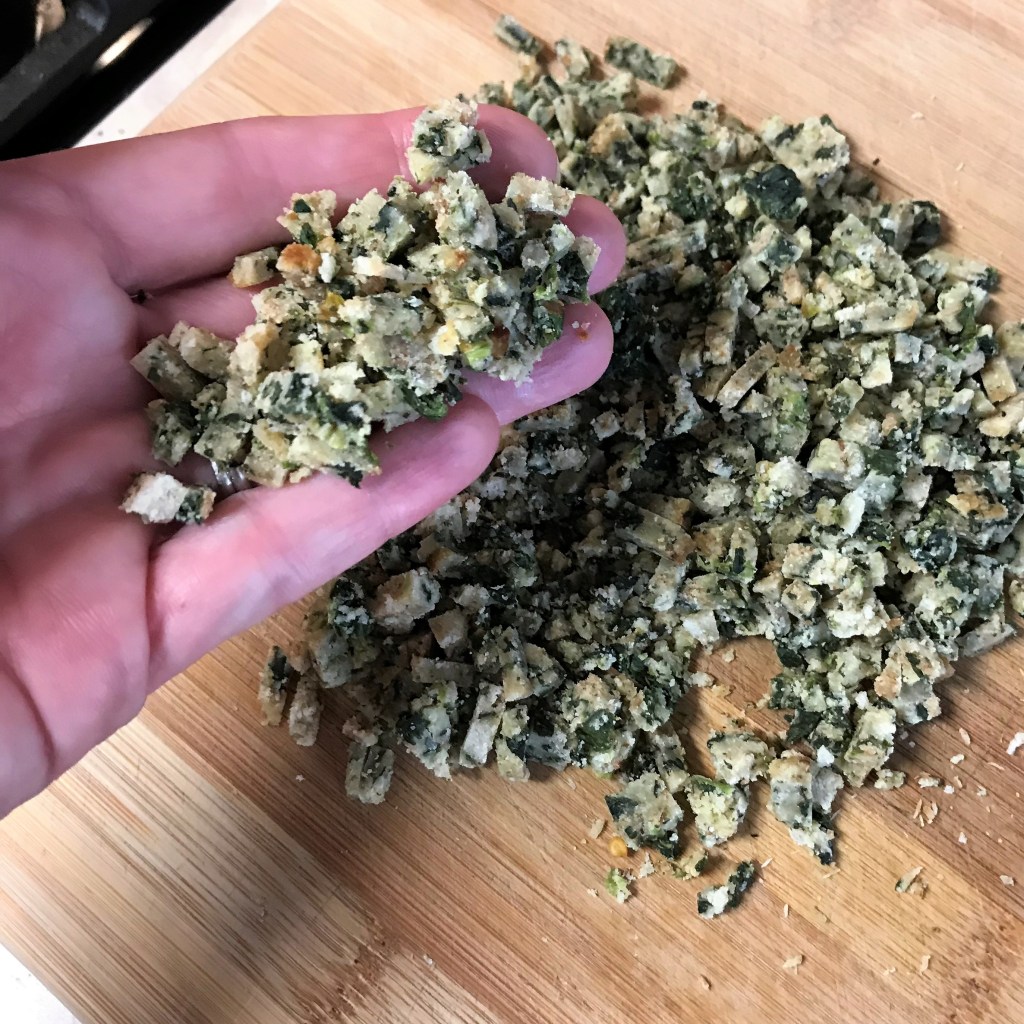
The spinach balls are easy to chop into fine dice when they are cold. I chopped enough to measure about one cup.
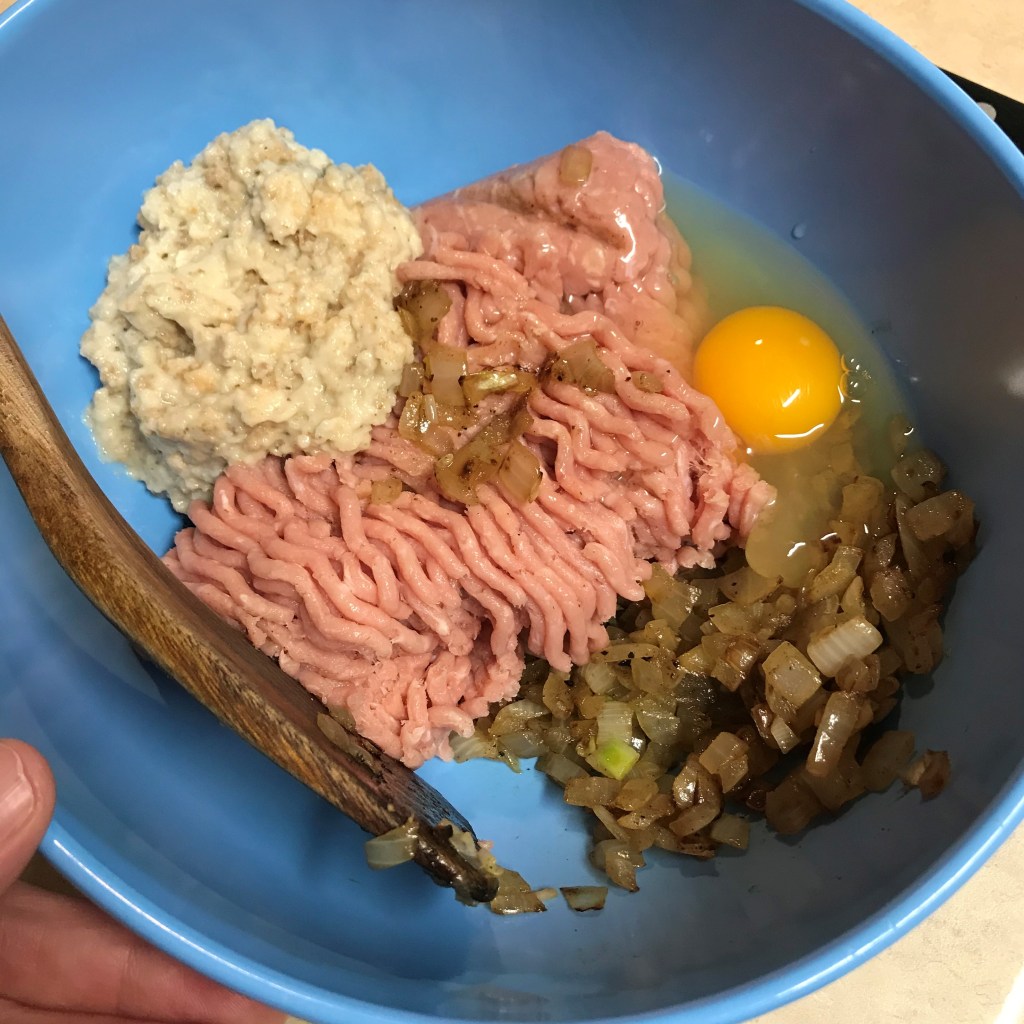
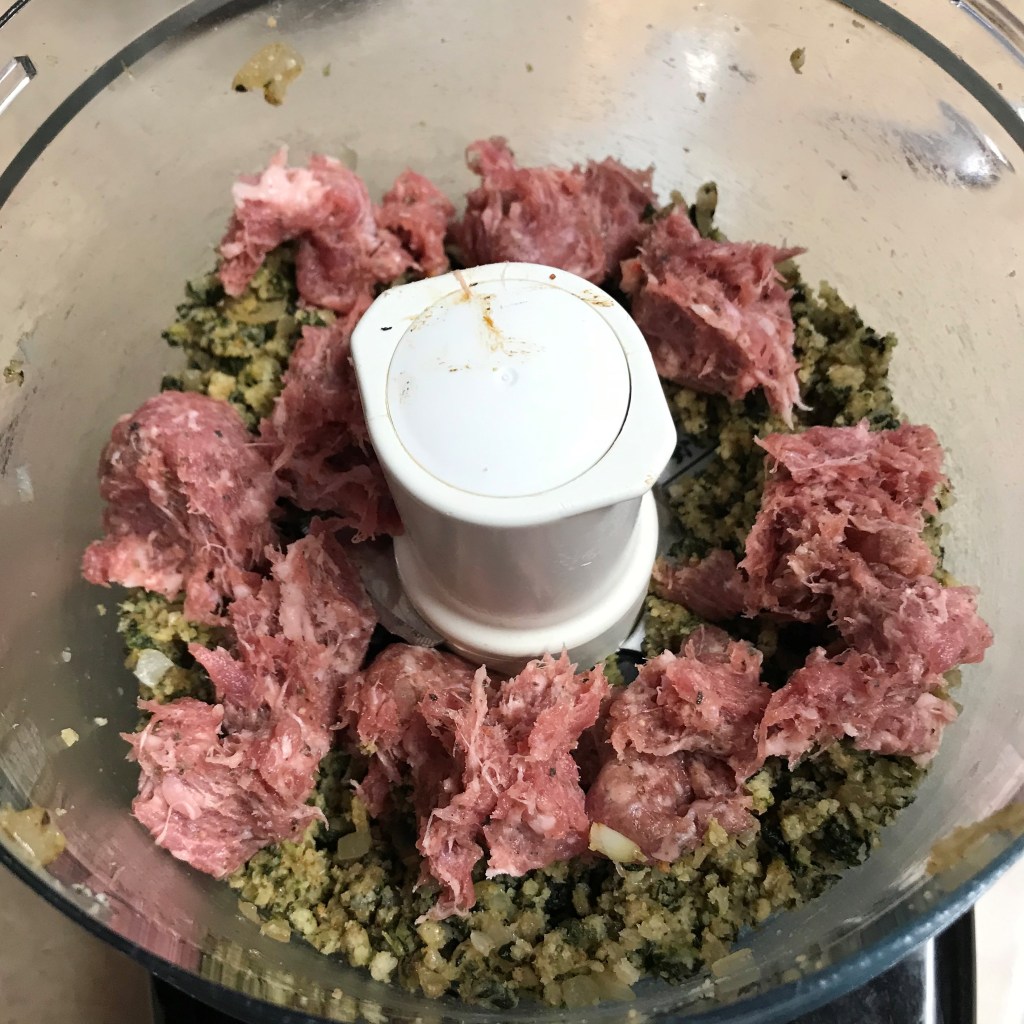
Add the remaining onions and roasted garlic. See my notes for substitution ideas for the spinach balls.
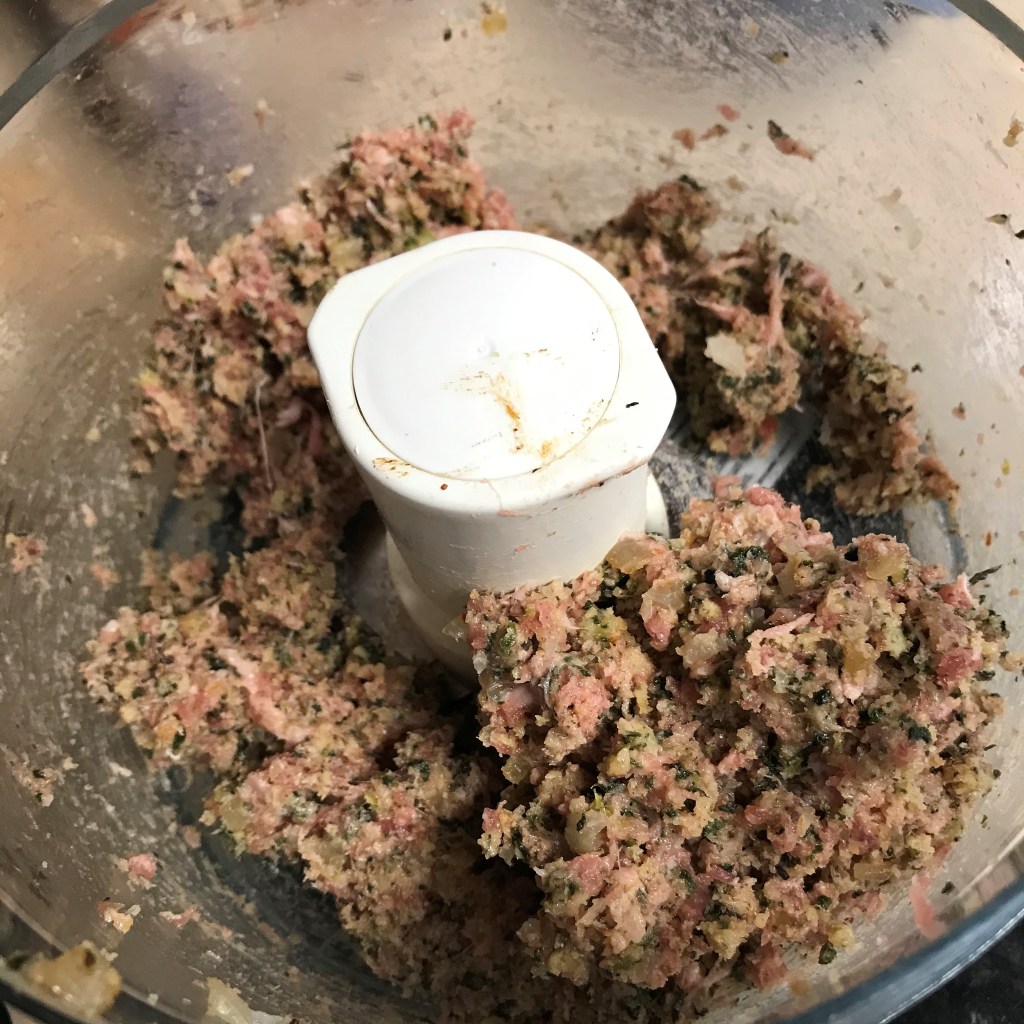
I added the sausage in small clumps so that the mixture could pulse together easier.
A few pulses gave me the texture I wanted. Not quite smooth, but fully incorporated and uniform.
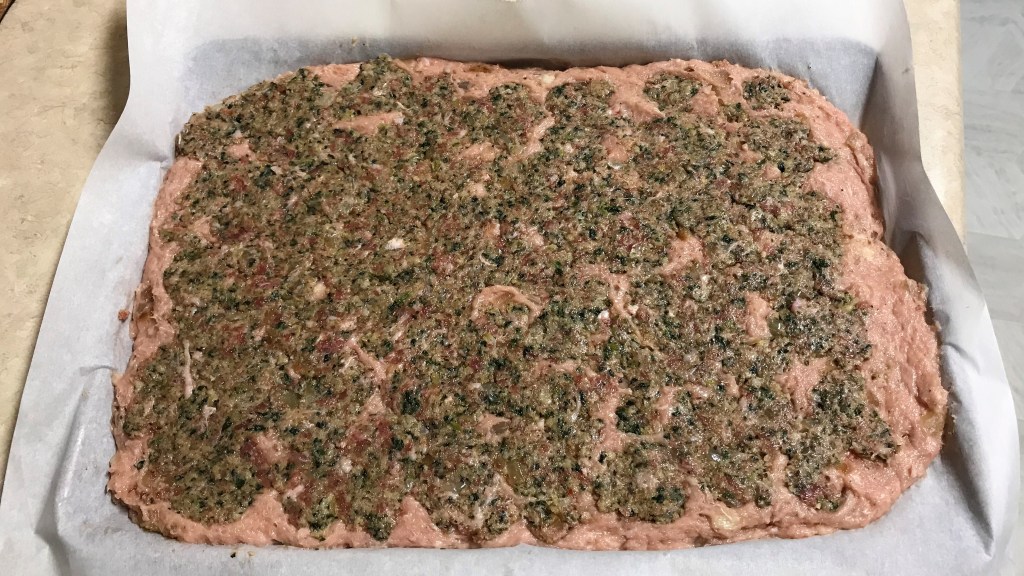
Arrange small lumps of the stuffing as evenly as possible over the turkey layer, then go over the layer again to fill in gaps.
Layer the sausage stuffing a bit heavier on one short end of the rectangle, where you will begin the rolling. Leave an inch “naked” on the other end, where you’ll seal the roll. Cover with plastic wrap and refrigerate at least an hour before you try to roll it.
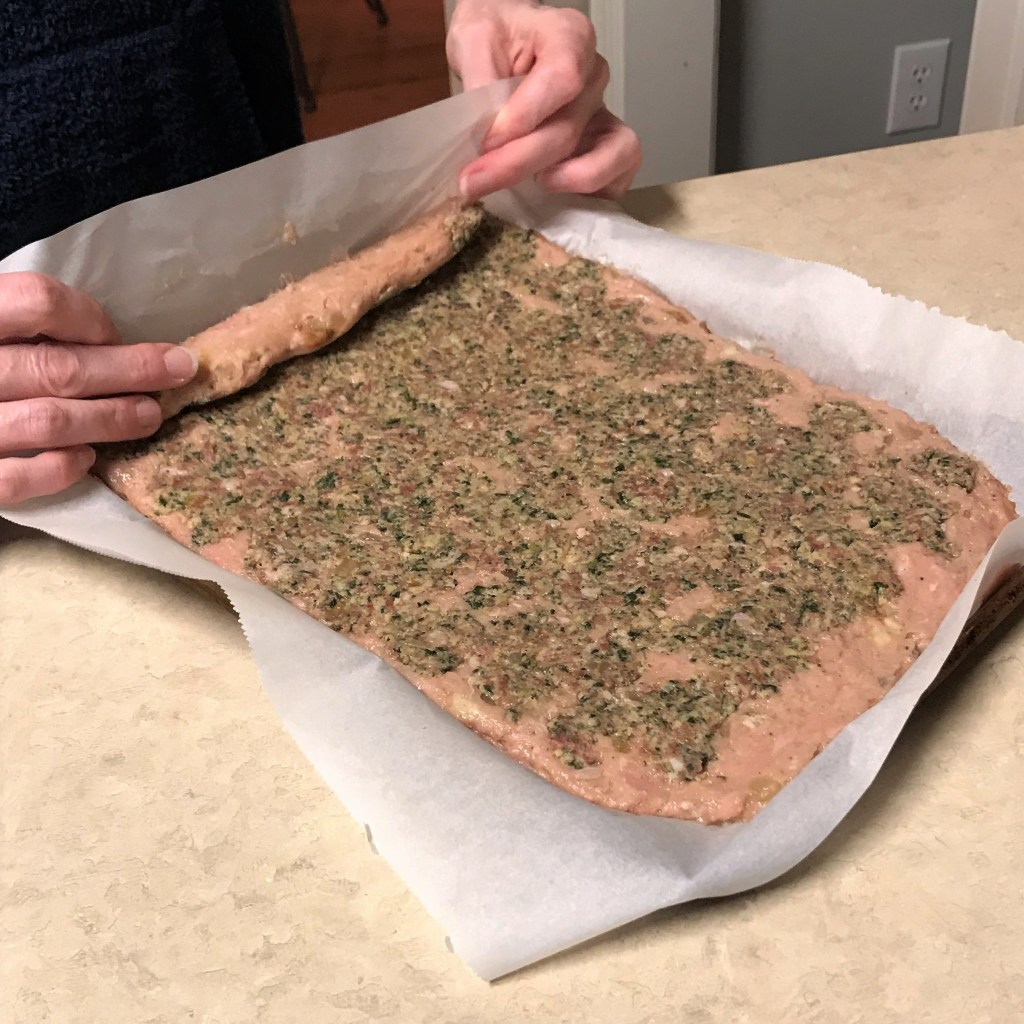
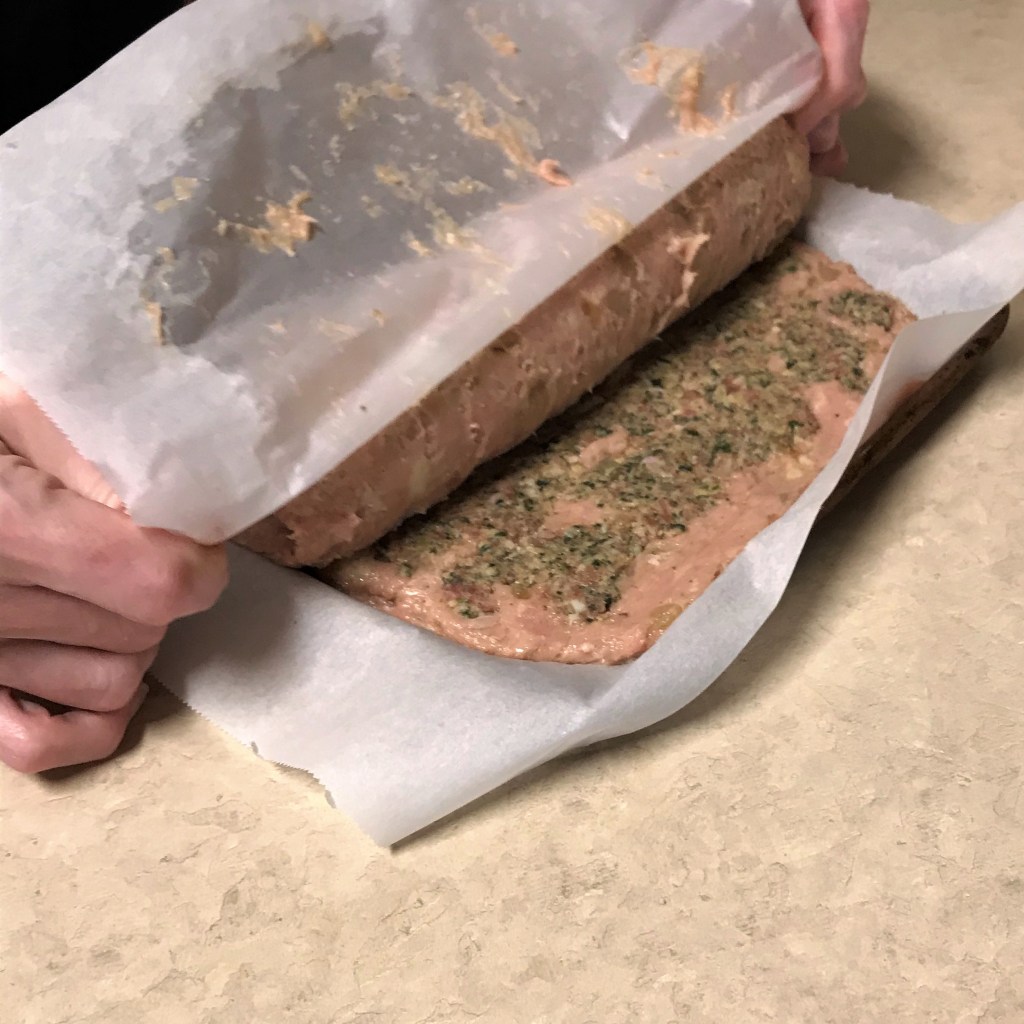
Use the short end of the parchment to assist with rolling the meatloaf. Begin with the end that is heavier on stuffing filling.
Keep tension on the parchment as you go, so the meatloaf will roll up tightly with no gaps.
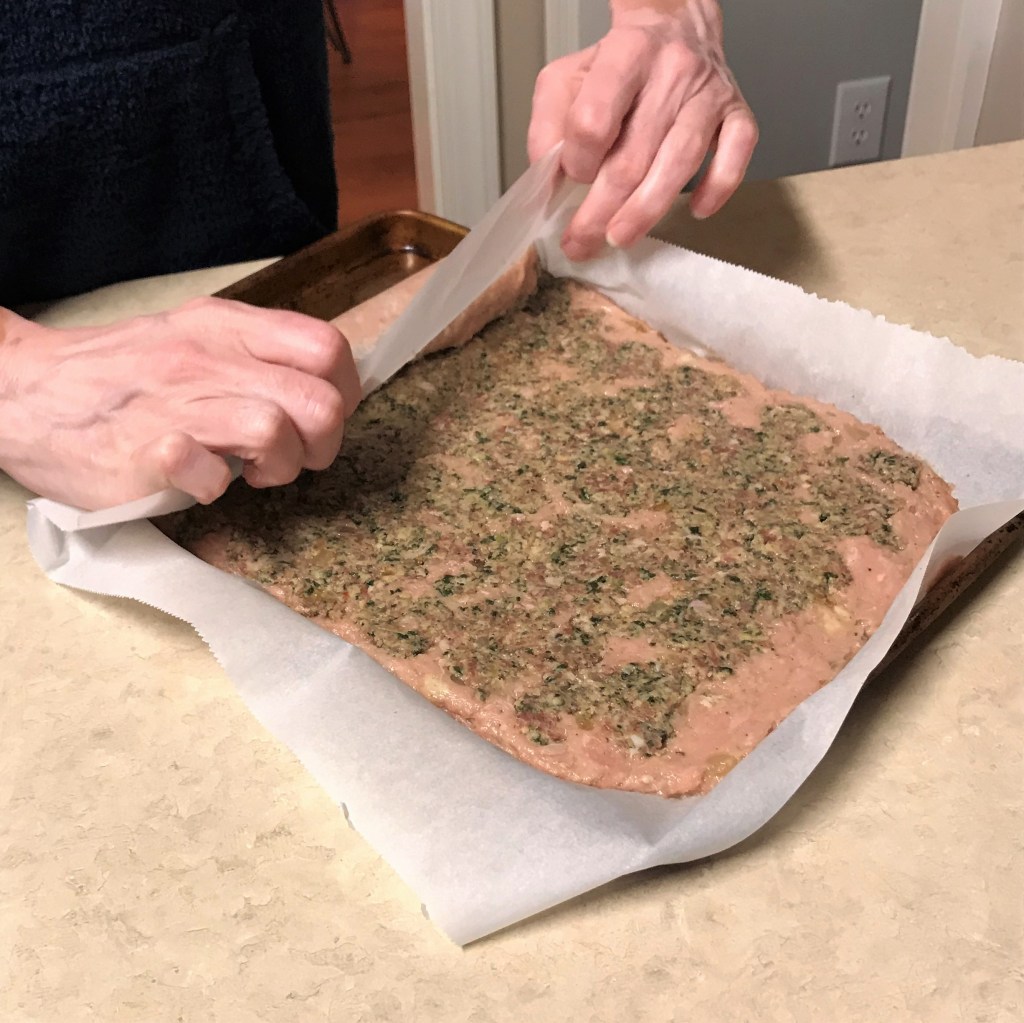
Some of the mixture will stick to the parchment, but press on. Use a rubber spatula to scrape it from the paper and patch the meatloaf.
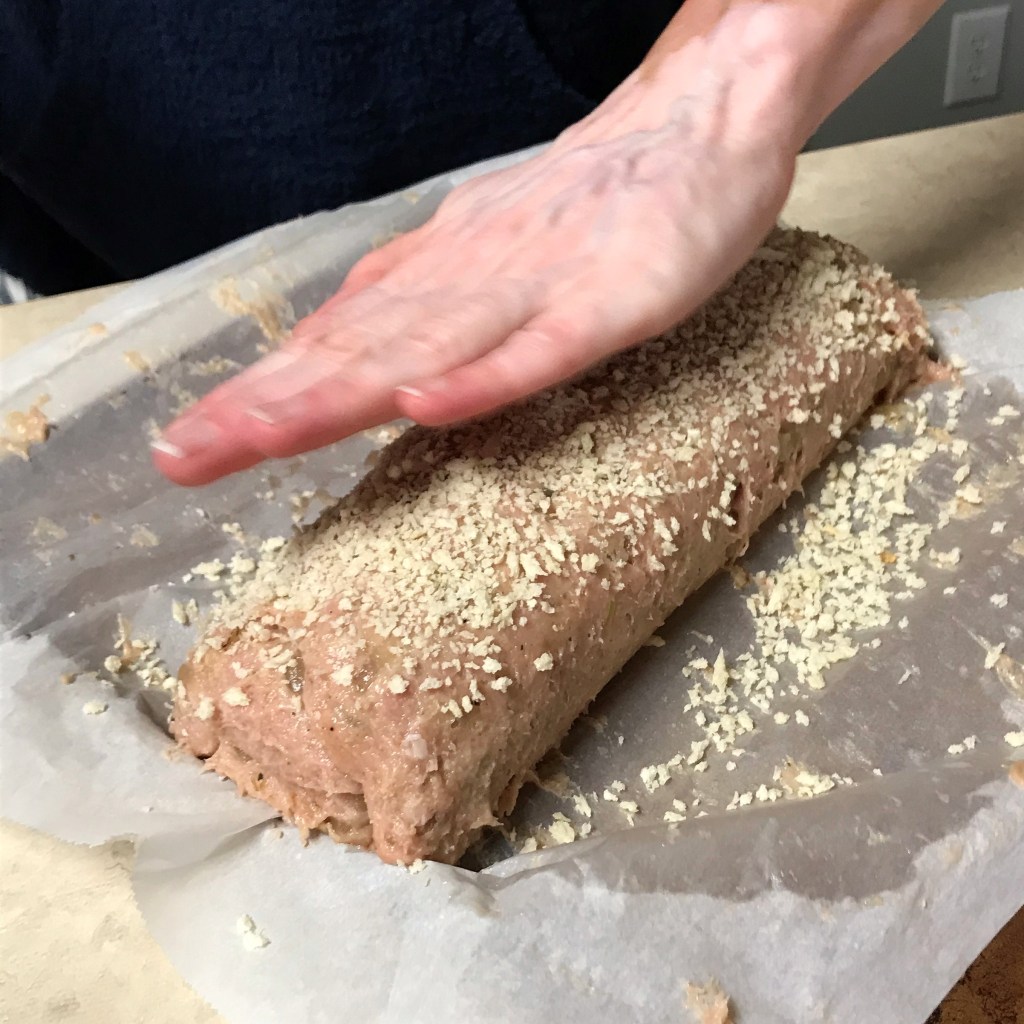
I pressed panko crumbs all over the top and sides of the meatloaf to add a “crust” texture during baking. Regular bread crumbs would work also.
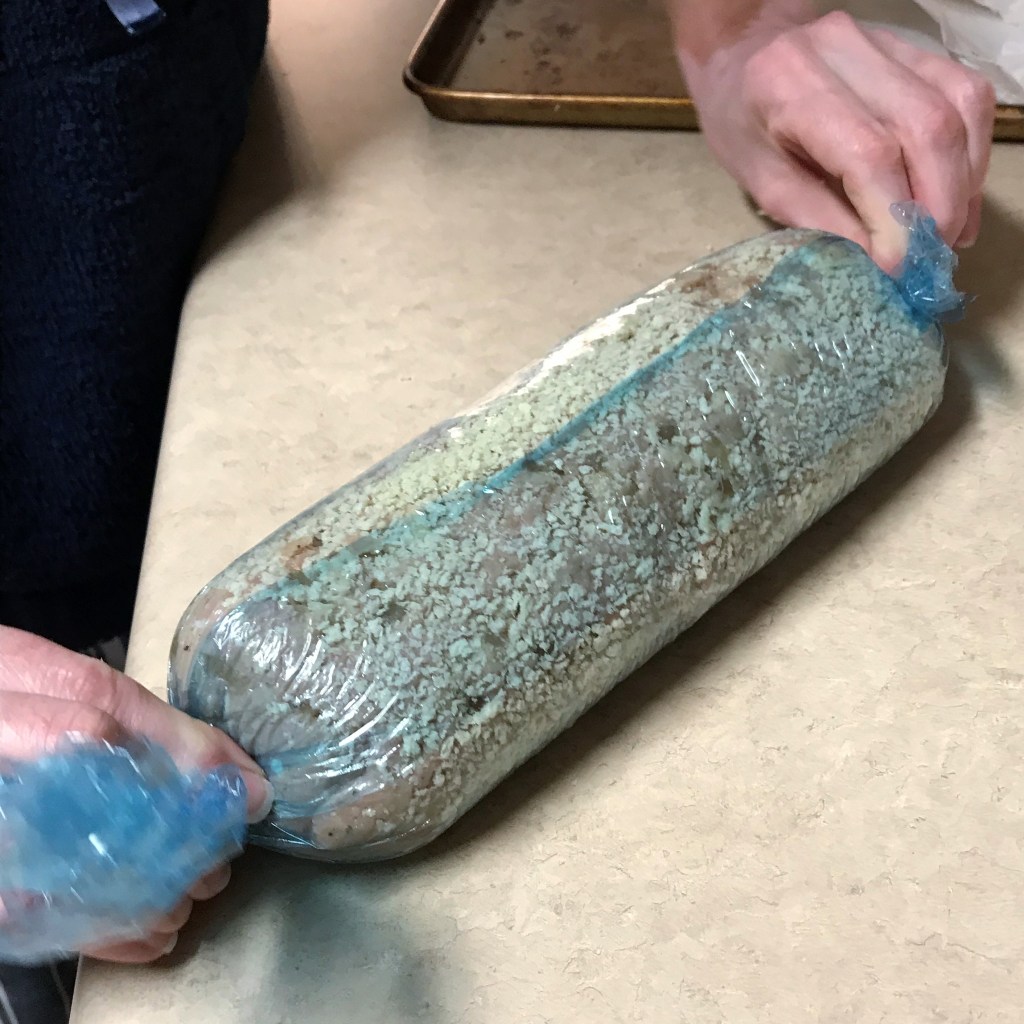
Wrap your rolled up meatloaf tightly in plastic wrap, and twist the ends to keep it compact in the fridge overnight. This will help the meatloaf hold its perfect shape in the oven.
To get the crust I wanted on the meatloaf, I spritzed it all over with olive oil spray.
One final quick seasoning of salt, fresh black pepper and a few shakes of dried thyme leaves, then into the oven for an hour.
The only way to know if meatloaf is done is to check internal temperature for at least 165° F. This one is ready! Rest 15 minutes before slicing.
This is exactly how I imagined this would look. Crispy crusted edges, with tender turkey and stuffing.
What favorite vegetable would you add to the open spot on the plate? 🙂
Combine dry stuffing mix and milk in a small bowl and rest at least 20 minutes, allowing time for crumbs to be fully moistened.
Heat a small skillet over medium heat. Swirl in extra virgin olive oil and add the diced onion. Saute until onions are soft and translucent. Sprinkle with salt, pepper and poultry seasoning.
In a medium bowl, combine the ground turkey, half of the sauteed onions, stuffing “paste” and egg. Season the mixture with salt and pepper, then set aside.
In the bowl of a food processor, combine spinach ball bits, remaining sauteed onions, roasted garlic and raw sausage (pulled apart into pieces). Pulse mixture several times until it is uniformly blended.
Line a small baking sheet with a piece of parchment paper. Scatter panko crumbs evenly over the paper. Using a rubber spatula, spread the ground turkey mixture evenly over the crumbs, shaping a rectangle approximately 9 x 13″.
Using your hands, grab up tablespoon-sized lumps of the sausage mixture and place them over the turkey layer. Don’t rush this step because it will be tough to separate the layers if you misjudge the amount as you go. I placed “dots” of the sausage mixture all over (keeping one short end bare for sealing the roll later), then filled in noticeable gaps with the remaining mixture until all was used. Press the sausage mixture firmly to seal it to the turkey layer. Lay a sheet of plastic film on top of the sausage layer and refrigerate the mixture for at least an hour. The chilling time will make it easier to roll up the meatloaf.
To roll up the meatloaf, begin by lifting the parchment and slightly fold the meatloaf onto itself. Continue this motion, keeping the roll tight as you go. Some of the turkey may stick to the parchment, but you can use a rubber scraper to remove it and patch the roll. Full disclosure: this step was pretty messy, but I pressed on to finish the shaping.
Press on any loose bits of panko crumbs, adding more if needed to lightly coat the shaped meatloaf. Wrap the rolled-up meatloaf as tightly as you can in a sheet of plastic film, twisting the ends as with a sausage chub. Tuck the twisted ends underneath, and chill the roll overnight.
Preheat oven to 400° F. Line a baking sheet with parchment paper.
Place the meat roll onto the lined sheet and lightly spray the entire meatloaf with olive oil spray.
Bake at 400° for 15 minutes, then reduce oven temperature to 375° and bake 45 more minutes.
Test internal temperature to be sure it is at least 165° F. Cool 15 minutes before slicing.
This all-purpose sauce is so delicious, and we use it in many ways at Thanksgiving, especially when Les’s vegan daughter has been able to join us. It’s fantastic on mashed potatoes and turkey, in casseroles with green beans or (I’m speculating) perhaps even straight from the pan by the spoonful.
Please don’t assume, if you’re a meat eater, that you’d feel cheated with a vegan gravy recipe. I’m not exaggerating to declare that everyone at our table chooses this gravy over standard turkey gravy, hands down. My friend, Linda, has a special word for it: “faboo!” 😀
I prefer to make this gravy ahead, so that I have it ready when the mood strikes me to add it to another recipe, but if you’re short on time, it can certainly be served immediately after preparing it.
Ingredients (makes about 2 cups)
4 Tbsp. extra virgin olive oil* (see notes below)
1/2 medium onion, finely minced
About 6 large cremini mushrooms, cleaned and diced small
1 tsp. Umami seasoning*
1 bulb roasted garlic
2 Tbsp. all-purpose flour
1 1/2 cups low-sodium vegetable broth*
Salt and freshly cracked black pepper
*Notes
Any good quality olive oil will work here, but I’m somewhat addicted to this one (pictured below), which is infused with the flavors of wild mushroom and sage. You can find it at one of the specialty olive oil stores that have popped up all over the U.S. It’s terrific for roasting butternut squash, too!
The Umami seasoning is a Trader Joe’s item, and it contains mushroom powder, garlic powder, sea salt and red pepper flakes. If you cannot find it, just add a few of the red pepper flakes or a slight sprinkle of ground cayenne for a subtle touch of the same heat. The recipe already has plenty of mushroom and garlic.
Vegetable broth ingredients vary a great deal, and for most of my recipes, I recommend one that does not have tomato in it. I favor this low-sodium version from Costco, which contains carrot, onion, celery and mushroom, but not tomato, which changes the acidity of some recipes. If you are not concerned with the vegan aspect, you could also use chicken broth.
This oil is produced by a company called Veronica Foods, supplier to so many of the boutique olive oil and balsamic vinegar shops around the U.S.I go through a bottle of this stuff during the holidays, especially when I’m creating a vegan dish. Try to choose a vegetable broth with pure, simple ingredients, and low sodium so you have more control of your recipe’s flavor.
Instructions
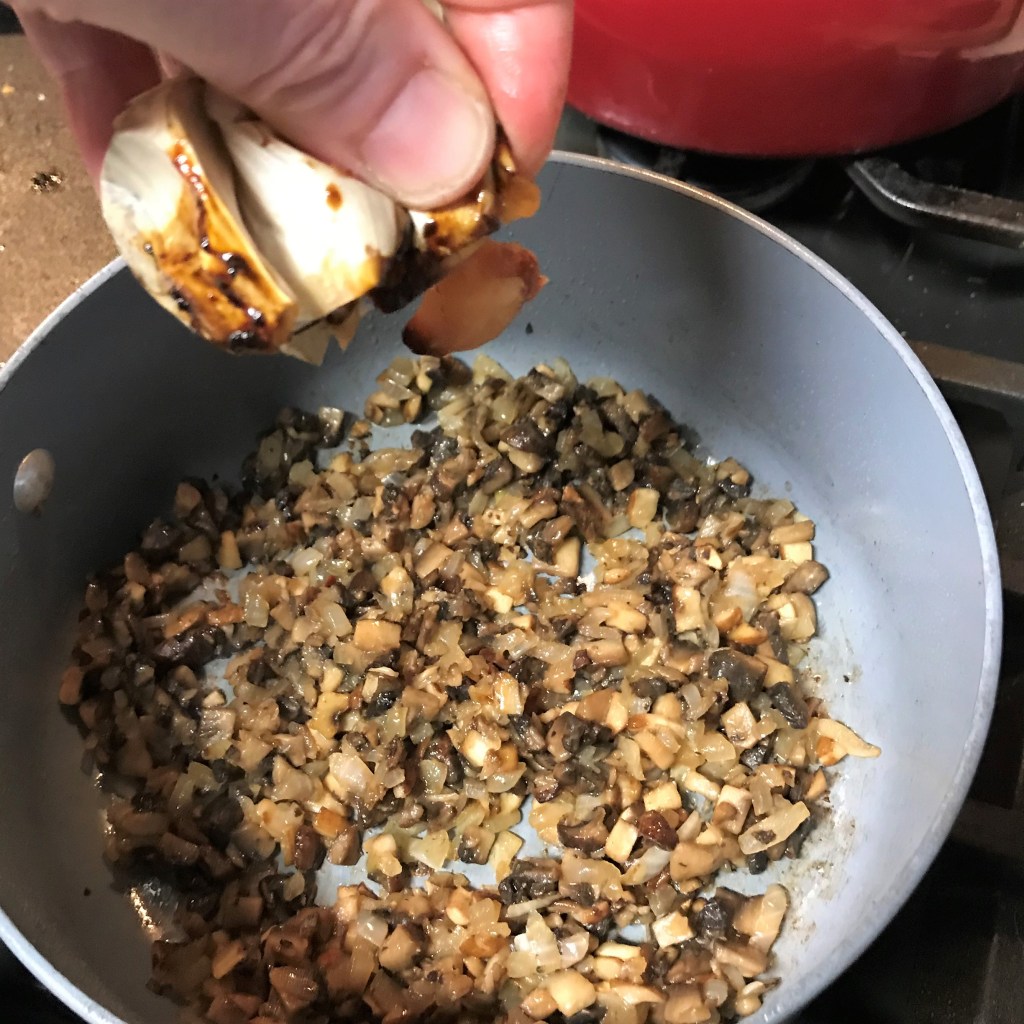
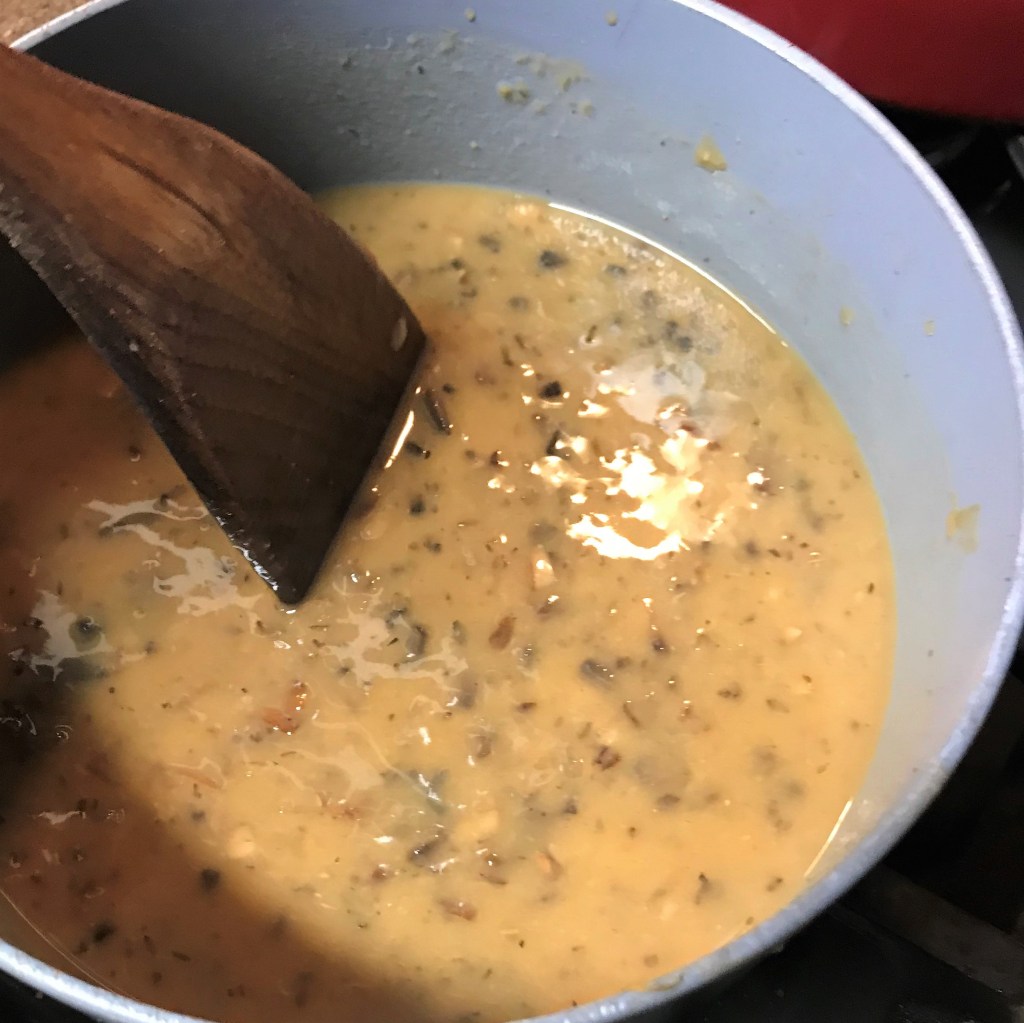
Add the mushrooms in batches. If the pan is crowded, they will steam rather than brown. Add more oil as needed.
Does it seem excessive to use an entire bulb of roasted garlic in this gravy? Yes, and that’s exactly the point. 🙂
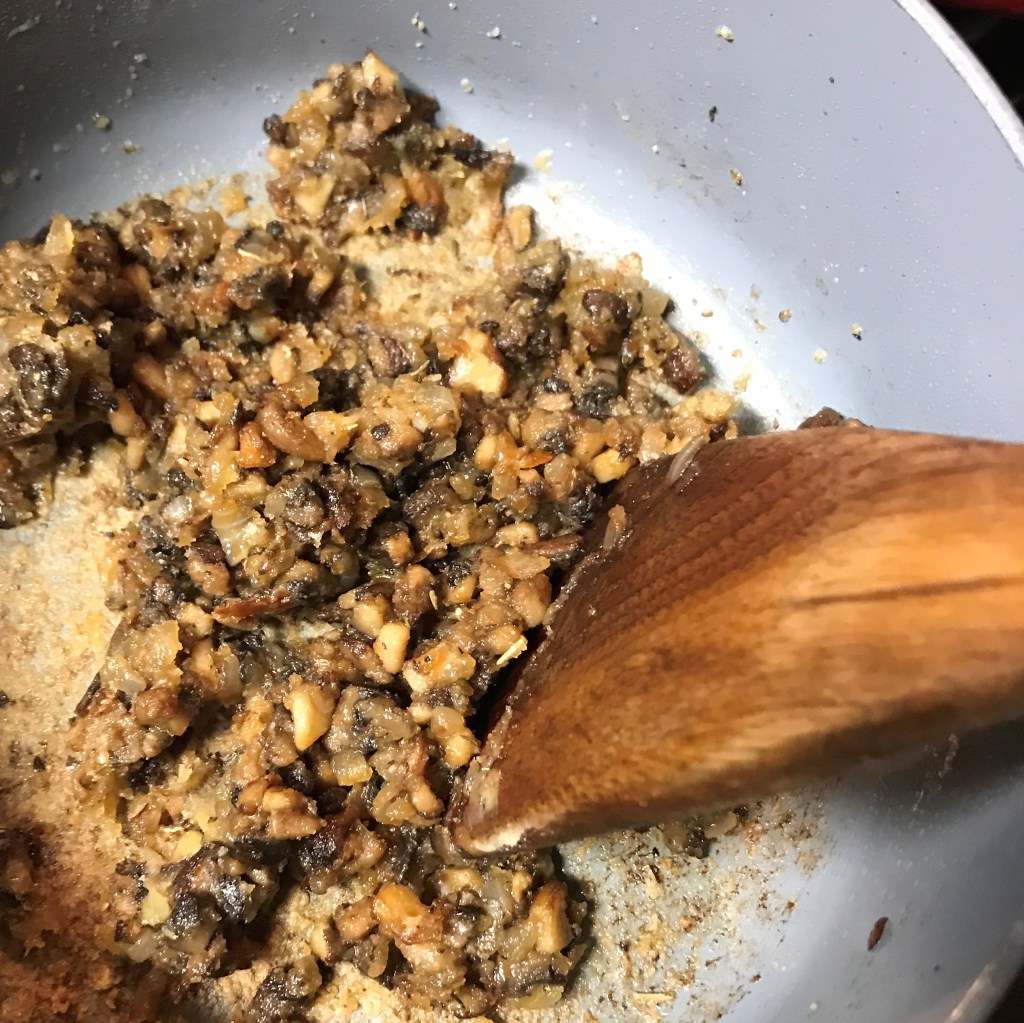
Cook the mixture until the flour is absorbed and it begins to bubble a bit on the edges. Don’t be concerned if it sticks to the pan at this point.
The broth will soften any bits stuck to the pan, and as the gravy simmers, it will thicken up.
Place a heavy-bottomed saucepan over medium heat. Swirl in 2 tablespoons of the olive oil and sauté the onions until soft and translucent.
Add another tablespoon of oil and half of the mushrooms. Sauté until moisture is reduced and mushrooms are soft, then repeat with remaining oil and mushrooms.
Season with salt, pepper and umami seasoning. Add roasted garlic and stir to blend it in.
Sprinkle flour over the mixture and cook one minute until the flour seems absorbed and mixture begins to bubble.
Add broth, a little at a time, and stir or whisk into a smooth and thickened sauce consistency. Simmer on low heat several minutes before serving.
I can’t remember exactly when I ditched boxes of potato flakes and started making mashed potatoes the real way for Thanksgiving (and every other time I wanted mashed potatoes). But I can say the process has evolved over the years. As my wife, Terrie, creator of this blog often says, cooking is about being inspired, taking chances and elevating your dishes. Just as I continue to try new methods and ingredients on the first dish I ever successfully created (chili), I’ve tweaked these garlic mashed potatoes over the past 20 years. In fact, they didn’t even start out as garlic mashed!
When I was growing up, I would sometimes take the baked potatoes my mother made, scoop out the innards, add margarine (Parkay, to be specific) and mash. It seemed to make them more tolerable.
For the current version, I’ve upped the ante by adding real butter, roasted garlic, our grated parm-romano blend and heavy cream, none of which were in the early year versions of this dish. About a decade ago, I decided to experiment with the potato mix. I loved Yukon Gold and had a hunch doing a 50-50 mix of Yukon and russet would work well. I was right. The garlic mashed I’m serving up here is a silky blend of flavor that kind of melts in your mouth. I usually add more butter than what the recipe calls for. Just because, as Terrie and I say about certain recipes, “There’s too much butter (or parm-romano blend, bacon, bourbon, chocolate). Said nobody. Ever.”
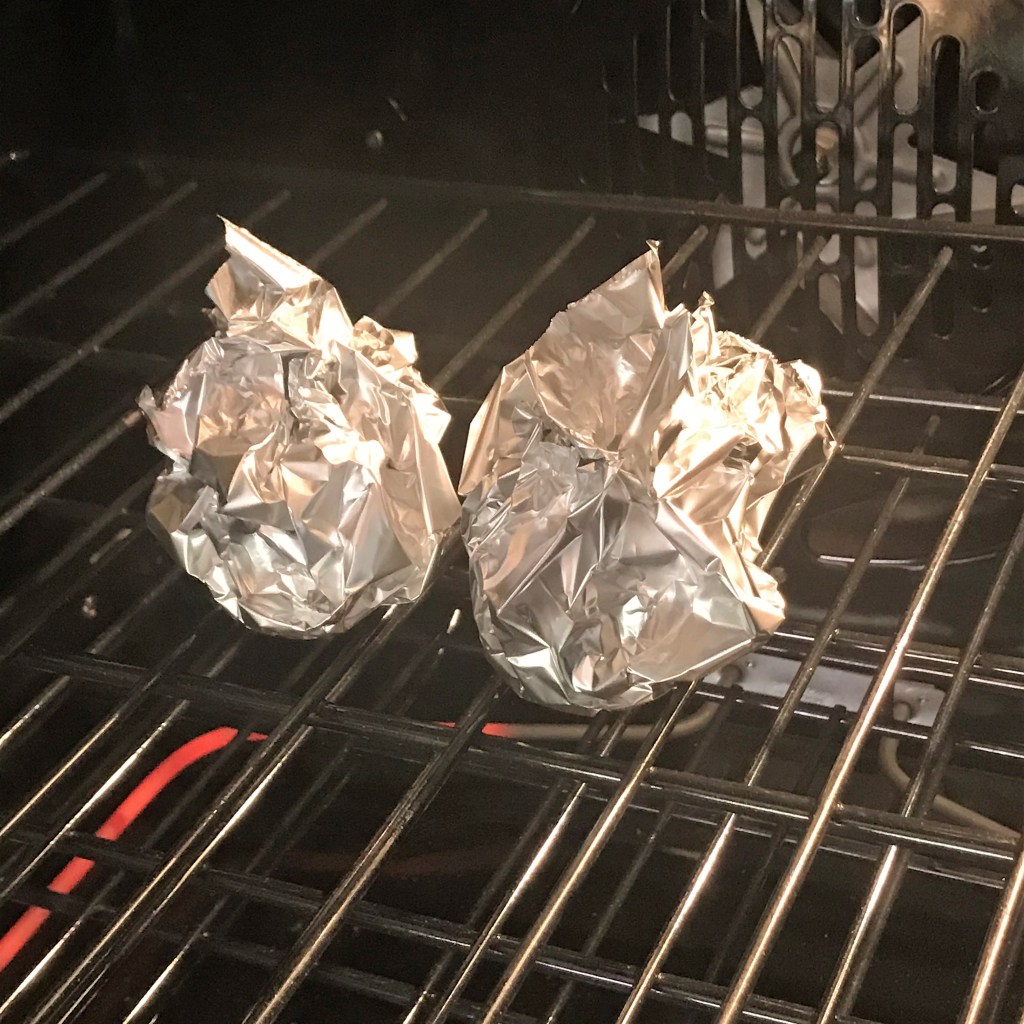
Preheat oven to 350° F. Roast the head of garlic by cutting off the top, adding oil (olive oil preferred) either from a bottle or a spray can. Wrap tightly in foil and roast for about an hour. You can check out Terrie’s post from yesterday for more detail and step-by-step pictures, but it goes like this:
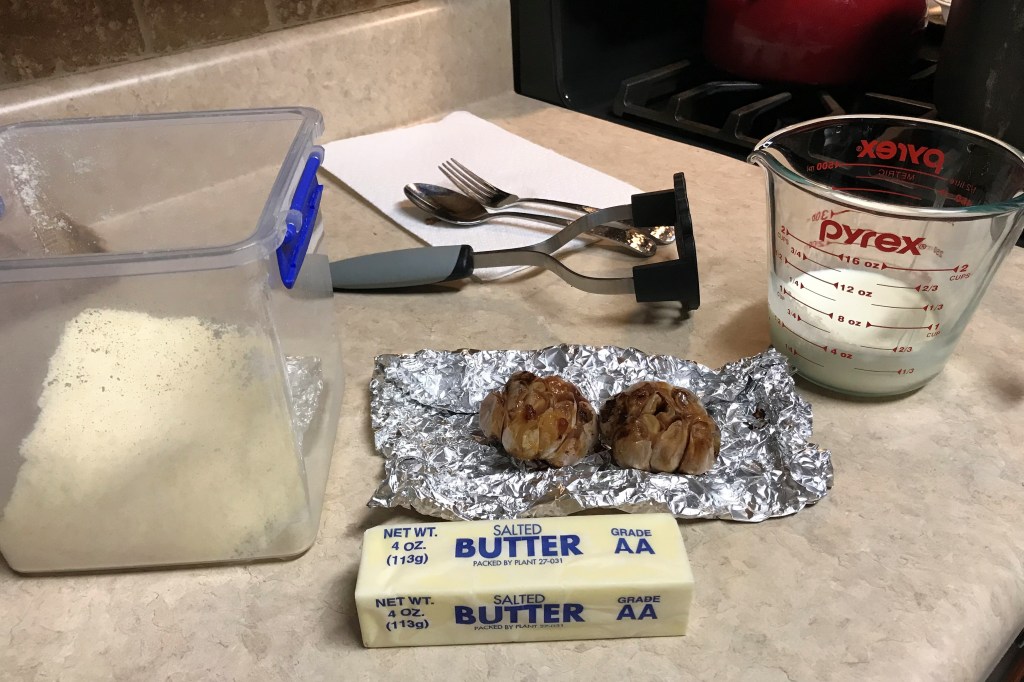
Peel away most of the paper around the garlic, so you can see the individual cloves. This makes it easier (and less messy) to squeeze them out when the roasting is finished.Olive oil spray is very convenient for this task. Be sure to choose one that does not contain propellants.You don’t need any special equipment to do this. I usually put the garlic pouches directly on my oven rack.After about an hour at 350 F, the garlic is soft and caramelized. Roasting really mellows the flavor and adds complexity to whatever you’re making.
Peel and dice the potatoes and heat stove-top on high. As the water begins to boil, add salt and reduce heat to simmer. Cook until potatoes are soft enough to pierce with a fork. Drain potatoes and return to pot.
I started with two large russets and three good sized Yukon golds. Altogether, about 3 pounds.We call this “mise en place,” everything in its place for the mixing stage.When they’re fork tender, I drain the potatoes and put them straight back into the hot pot.
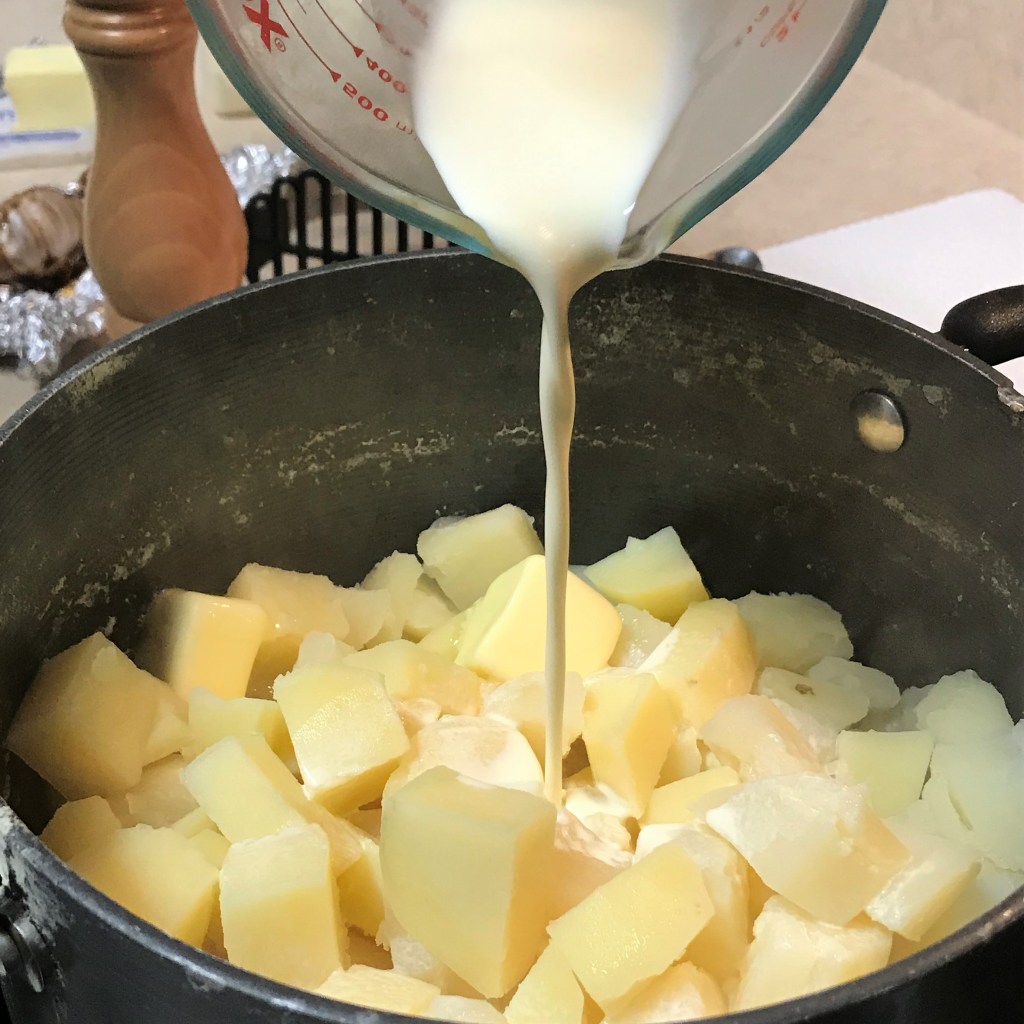
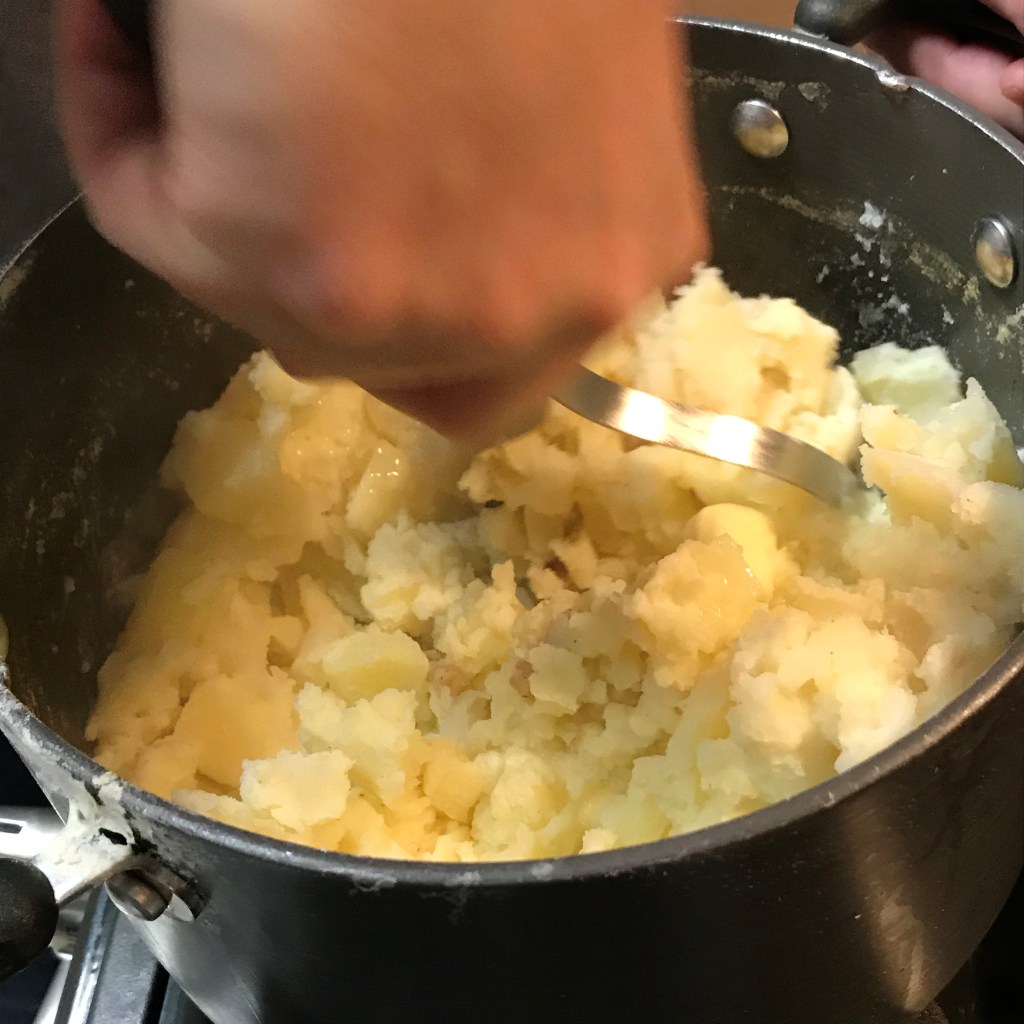
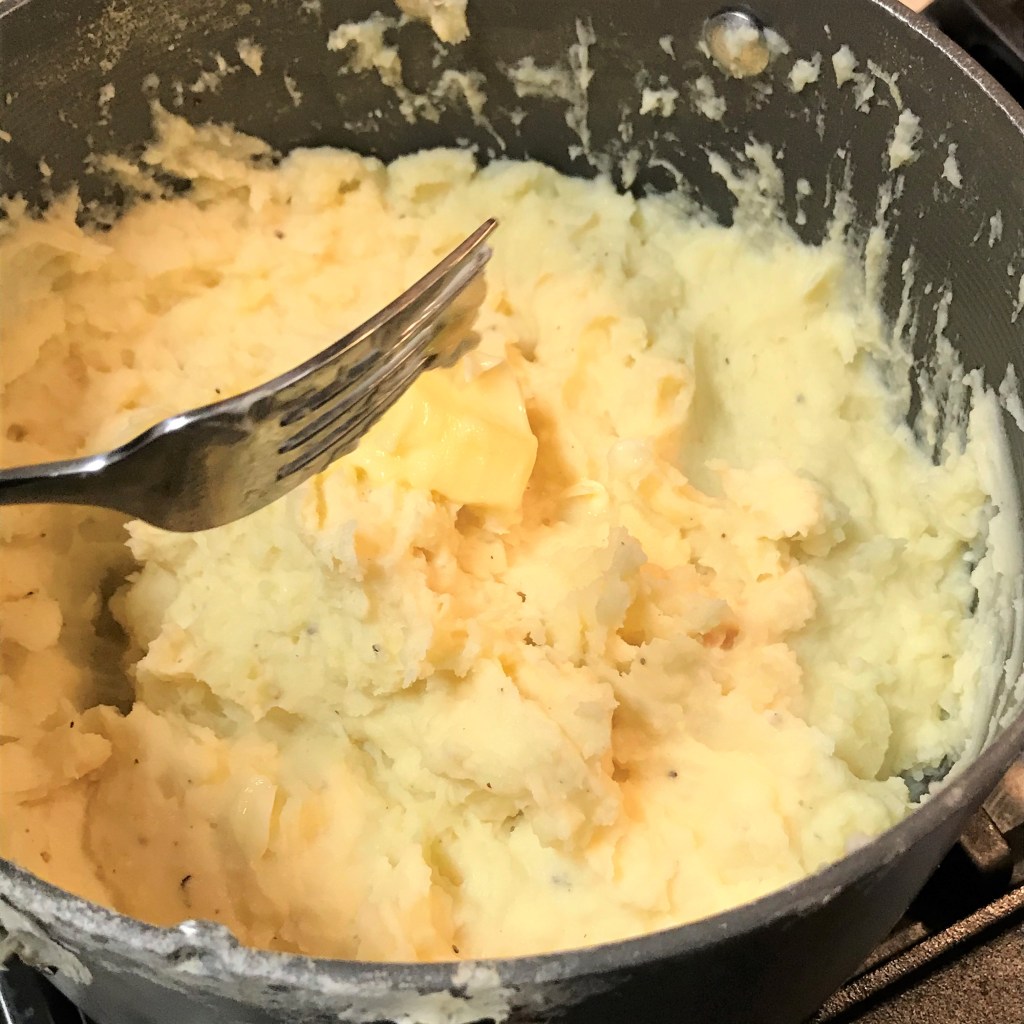
Add butter and heavy cream, add salt and pepper. Squeeze out the roasted garlic bulbs into the potatoes. Use a potato masher and mash by hand if you like. Or use a potato ricer if you like (before adding ingredients) for an even silkier texture. There was a time when I added the blend to a stand mixer, but I’ve since disavowed those years (the potatoes get too pasty).
Adding the initial cream. The butter is in there, too, the same color as the Yukon golds.The roasted garlic is the key to the garlic mashed.I get in there with my masher and start blending everything together.
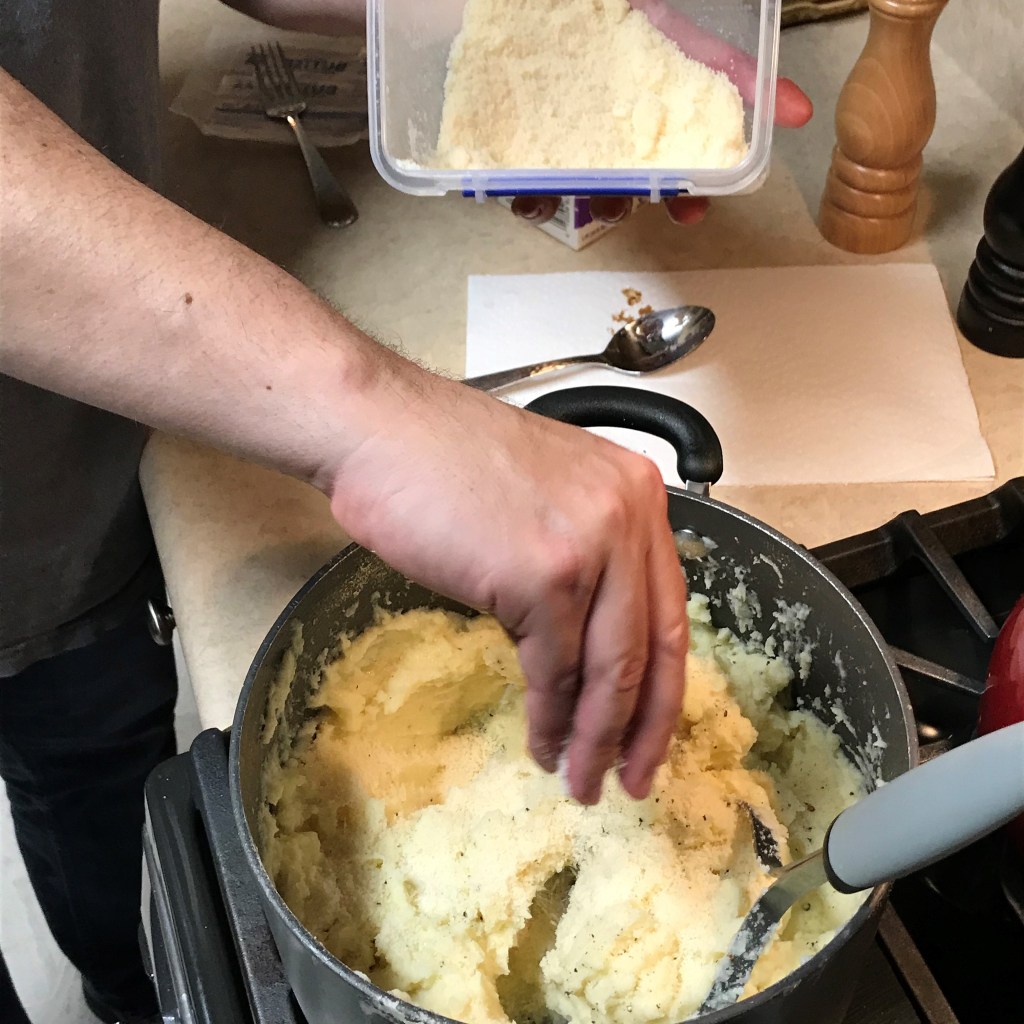
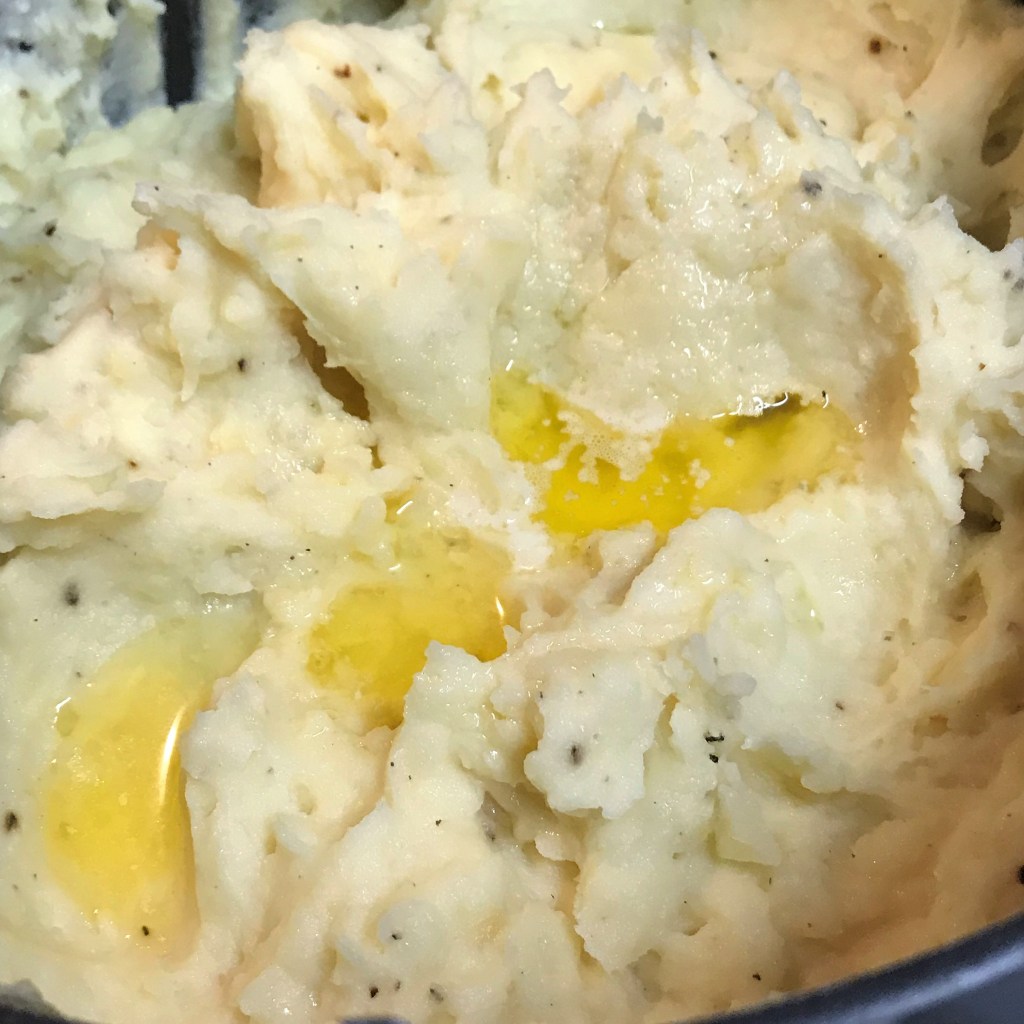
As you mix, continue to taste, adding salt and pepper as needed, but also adding additional butter and/or cream if it feels too potato-ey. Add the grated cheese blend and continue to mash until it completely disappears into the mix, which won’t take long.
You can never have too much parm-romano.More mashing to incorporate parm-romano and extra pepper.More butter. Of course!
Serve with an additional pat of butter, gravy or your own preferred alternatives. Terrie is already eating it straight from the pot.
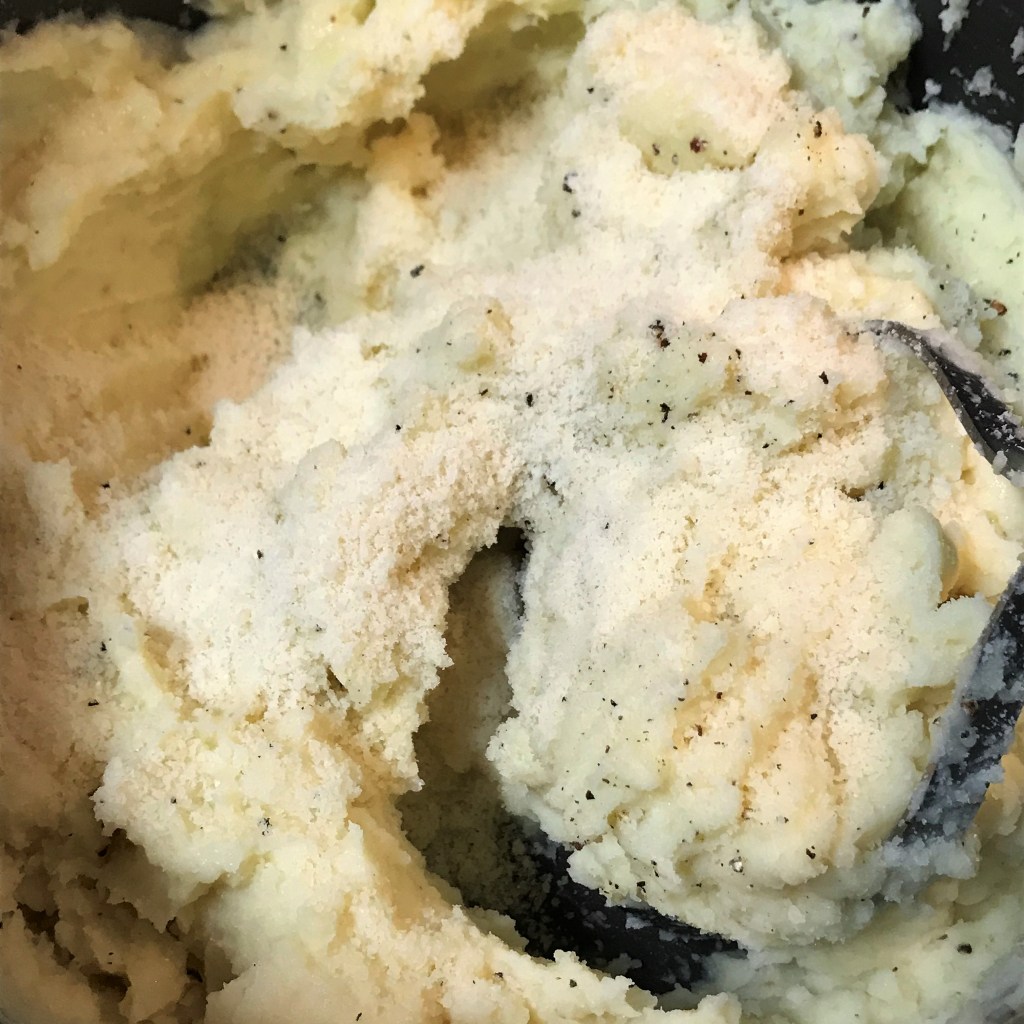
Now we have perfection.
Terrie’s note:
The blend of potatoes Les uses makes these so special because the Yukon golds are smooth and creamy, while the russets add a soft fluffiness. The roasted garlic and parm-romano add new levels of savory flavor. They are good for Thanksgiving, but we also make them as a side for more casual meals, such as meatloaf, steaks, pork chops and beer can roasted chicken. I confess that I’m always on the lookout for another new main dish that would be an excuse to make these again. Feel free to share your ideas in the comments section. 🙂
After much hemming and hawing, the verdict is in at our house—we are going big for Thanksgiving. No, I do not mean big in the gathering sense, because that is out of the question during a pandemic. It will only be the two of us, so our “big” means bold, less-than-traditional flavors. This departure from the usual has been my fantasy for several years, but other people get pretty attached to classic, traditional flavors and it almost feels cruel to spring big changes on friends and loved ones who have been building anticipation for the flavors they’ve come to expect at Thanksgiving.
As much as my husband, Les, and I also enjoy our own traditions (including taking turns with the preparation of the turkey—a pact we made when we got engaged), we are changing things up significantly this year, partly because we can do so without disappointing anyone, but also because it feels adventurous and fun in a year that has been pretty hum-drum. It’s Les’s year for the turkey, but rather than his usual brined, stuffed and basted 20-plus pounder, he has decided to do a dry spice rub and prepare our smaller turkey in his new charcoal smoker. And with these bold flavors on the bird, we are planning to keep pace with our sides and accoutrements, including the cranberry sauce.
Most years, we make everyone at the table happy with two different styles of homemade cranberry sauce. Les makes one that is sweetened with both brown and white sugars, simmered in apple cider, and accented with sections of mandarin orange. It’s slightly tangy, but mostly sweet, and more on the “saucy” side. I usually ask him to make extra so we have plenty left over to use as topping on vanilla ice cream. Yum. My version of cranberry sauce leans to the chunky, tart side, usually with spices such as cinnamon, clove and cardamom, and simmered in dry red wine. It is a decidedly “grownup” cranberry sauce, and stands in contrast to so much of the richness happening on the traditional table.
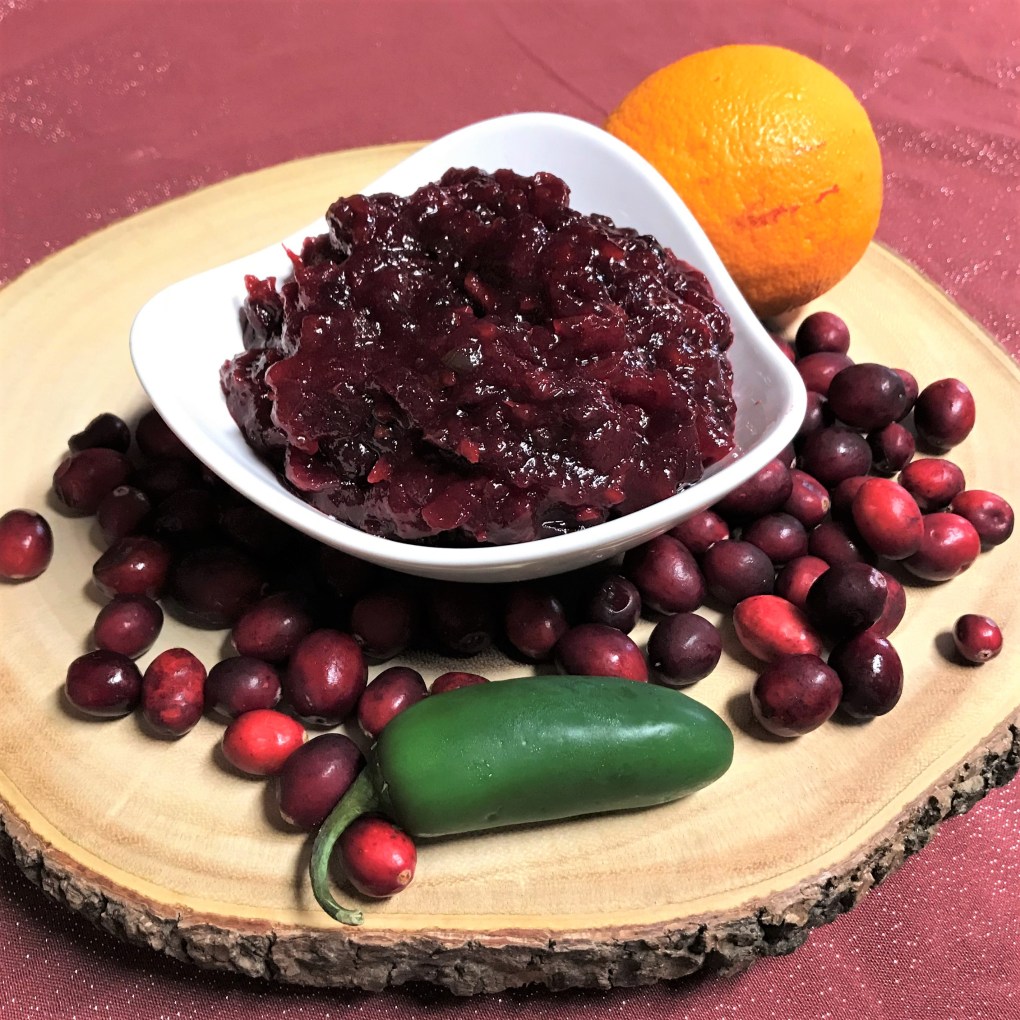
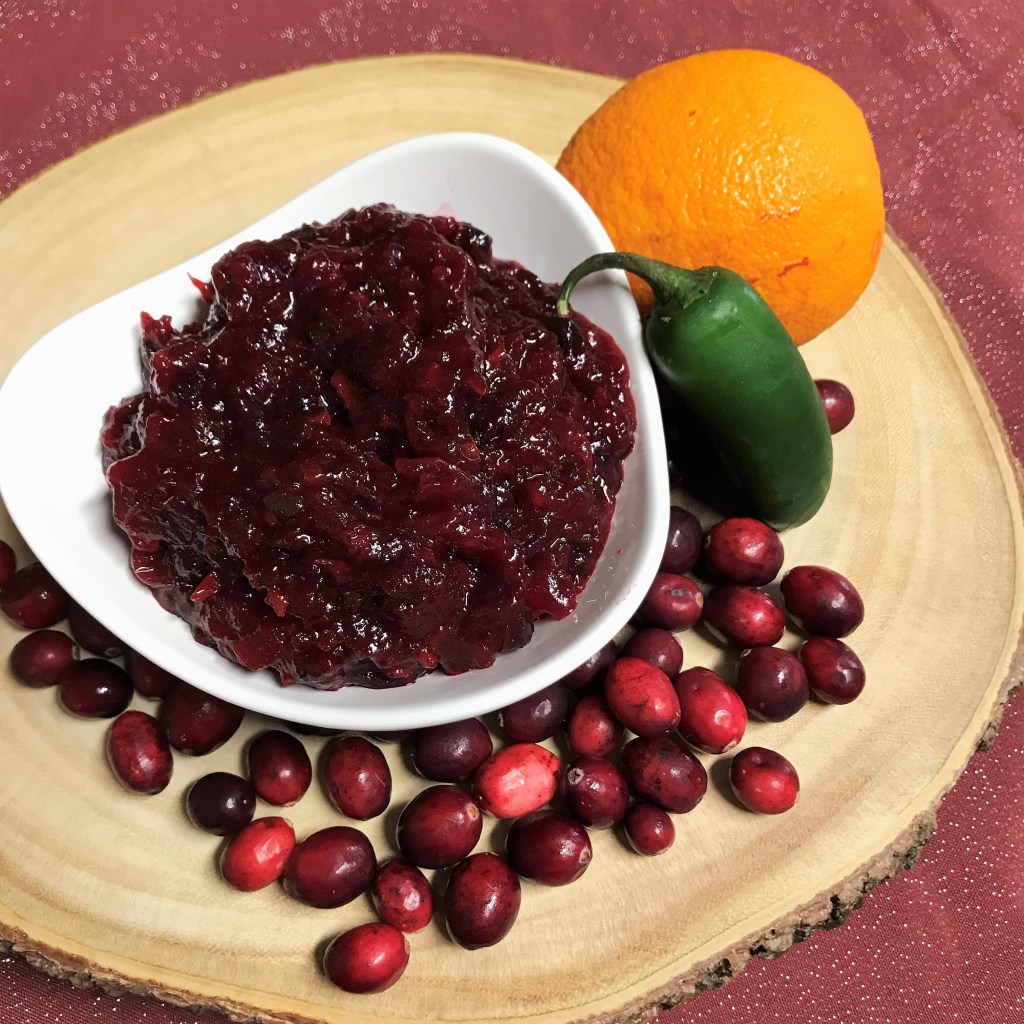
This year, however, we will have only this one cranberry sauce—bearing the bright and bold flavors of orange and jalapeno. Now, you may cringe at the suggestion of jalapeno, worried that it will be too intense, but let me assure you it’s a fantastic twist, a pleasant undertone that stands up to the bright citrus and tart cranberry, but does not overwhelm.
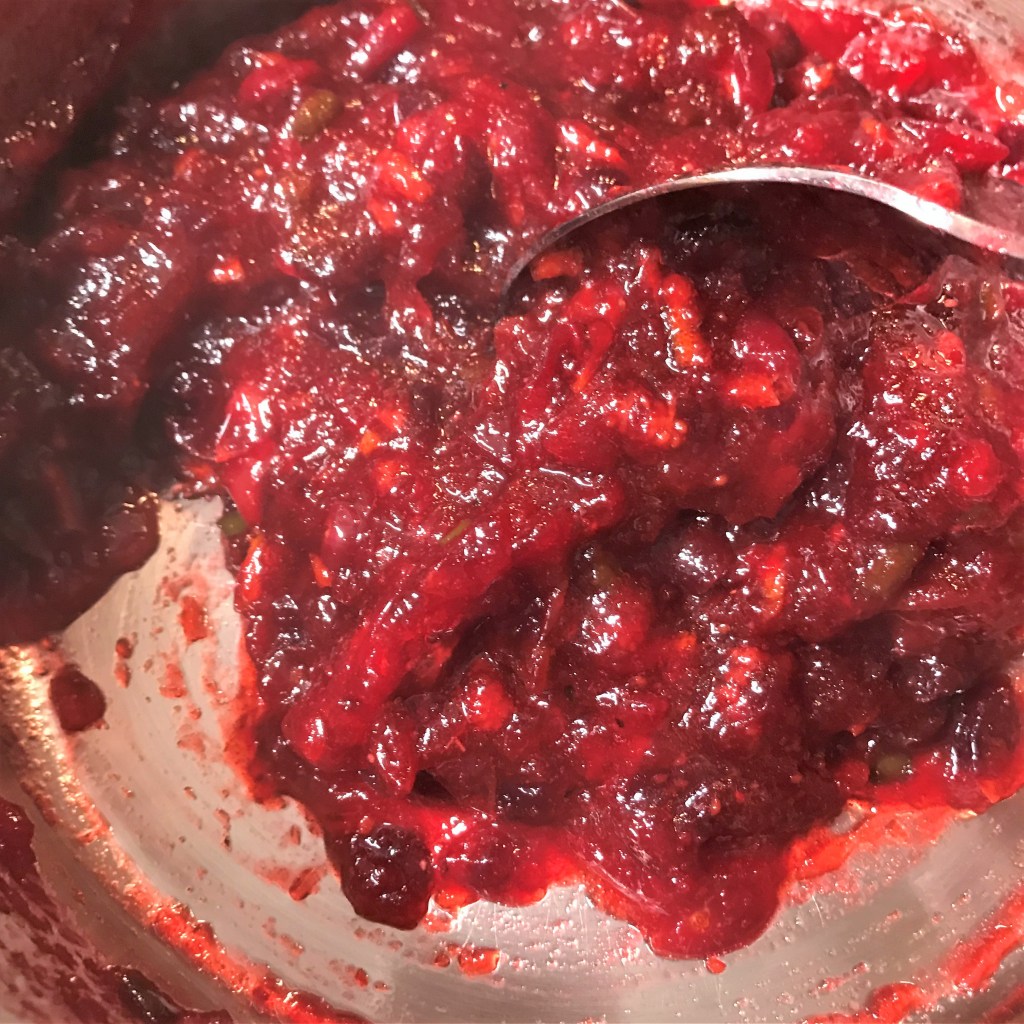
All three flavors are evident in this lively, festive sauce.
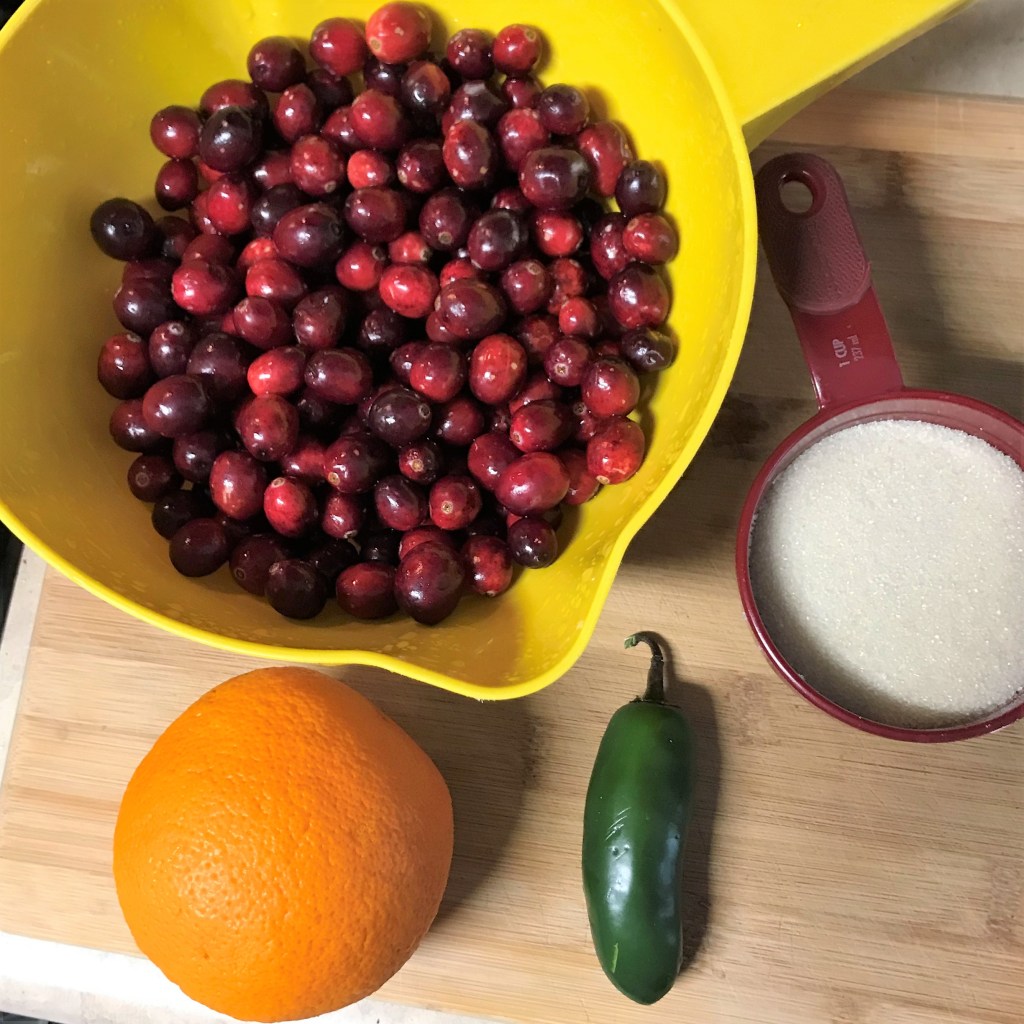
If you’ve never made your own cranberry sauce before, please let me show you how simple it is. All you need for this recipe is a large saucepan, a bag of cranberries, a large orange, a large fresh jalapeno and a cup of sugar. You can move this to the “done” column in less than half an hour, and it’ll keep in the fridge for a couple of weeks (that is, if you are disciplined to not eat it straight from the fridge with a spoon). Let’s do this!
Made from scratch doesn’t seem so difficult, right?
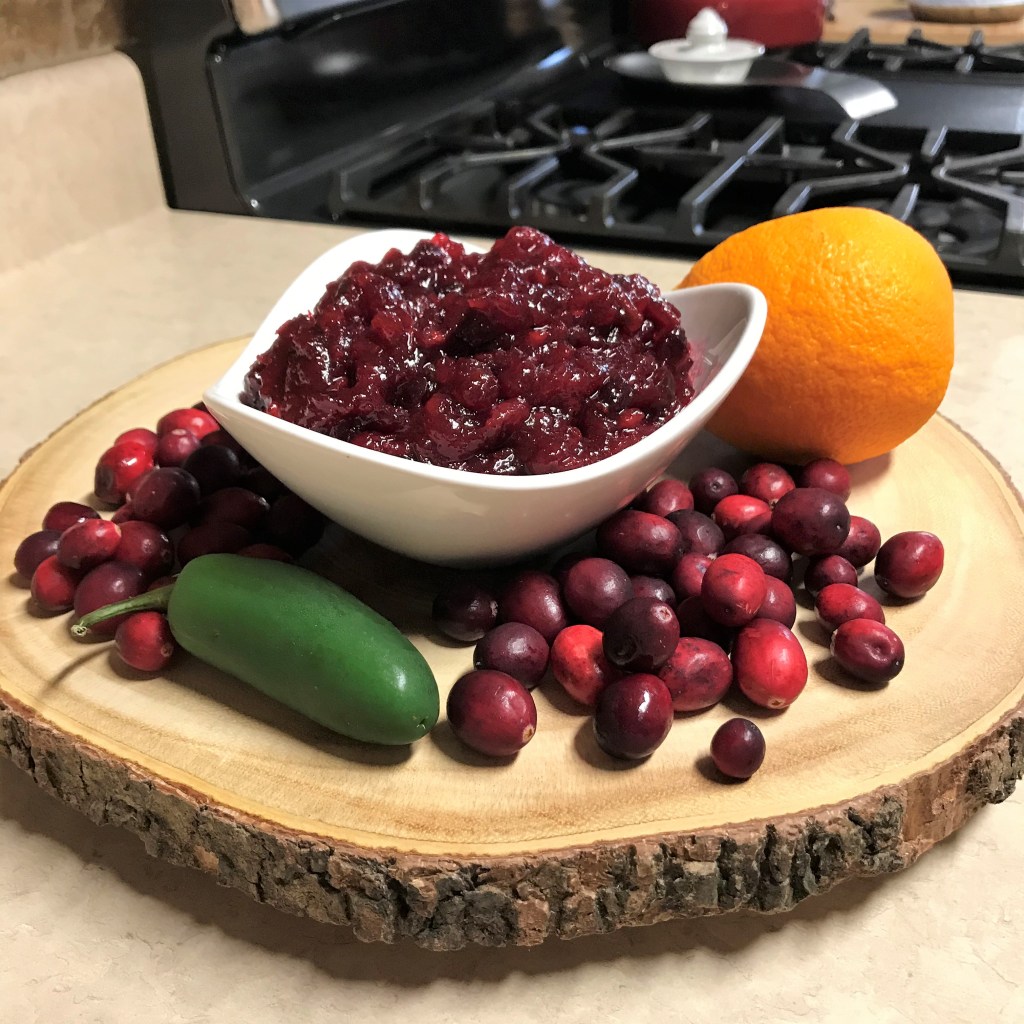
Ingredients
12 oz. bag fresh cranberries, rinsed and sorted for “losers”* (see notes)
1 cup real cane sugar (or slightly less if you prefer more tang)
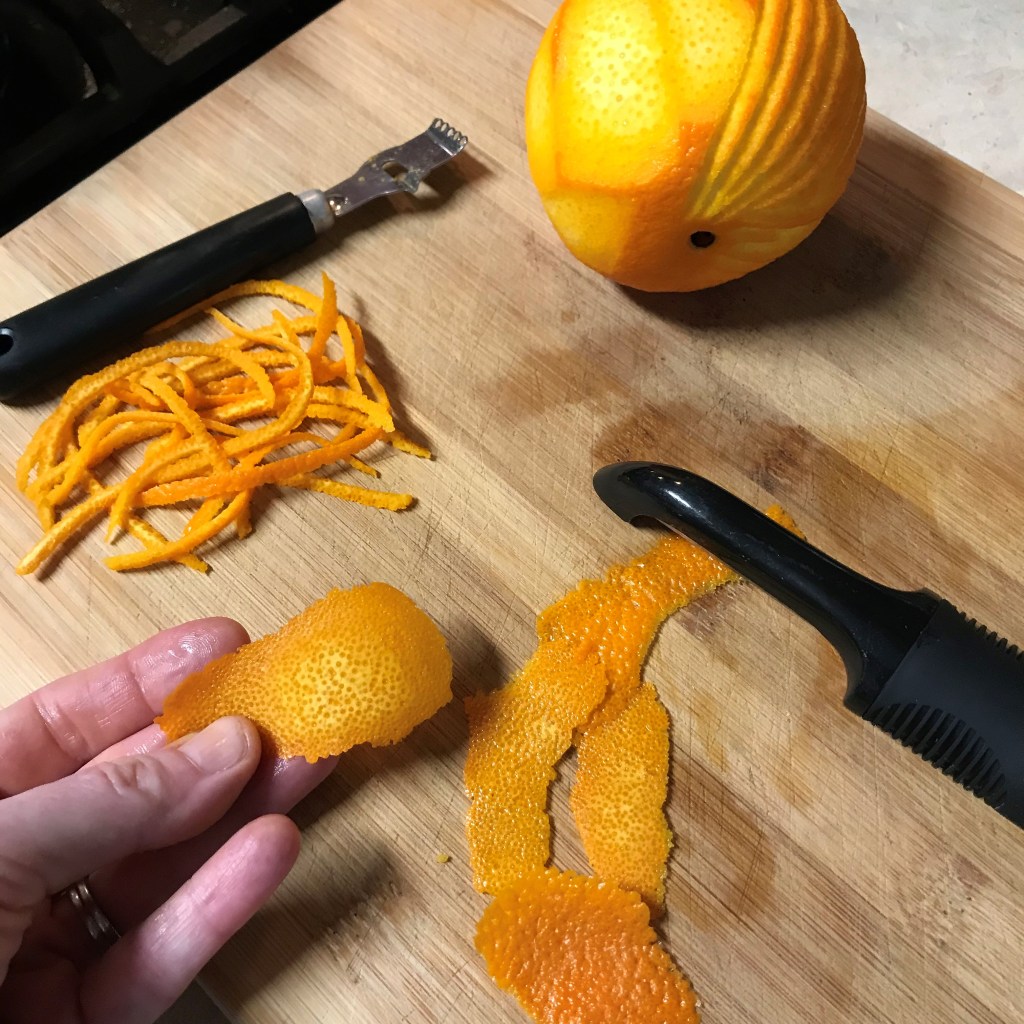
1 large fresh organic orange*, washed
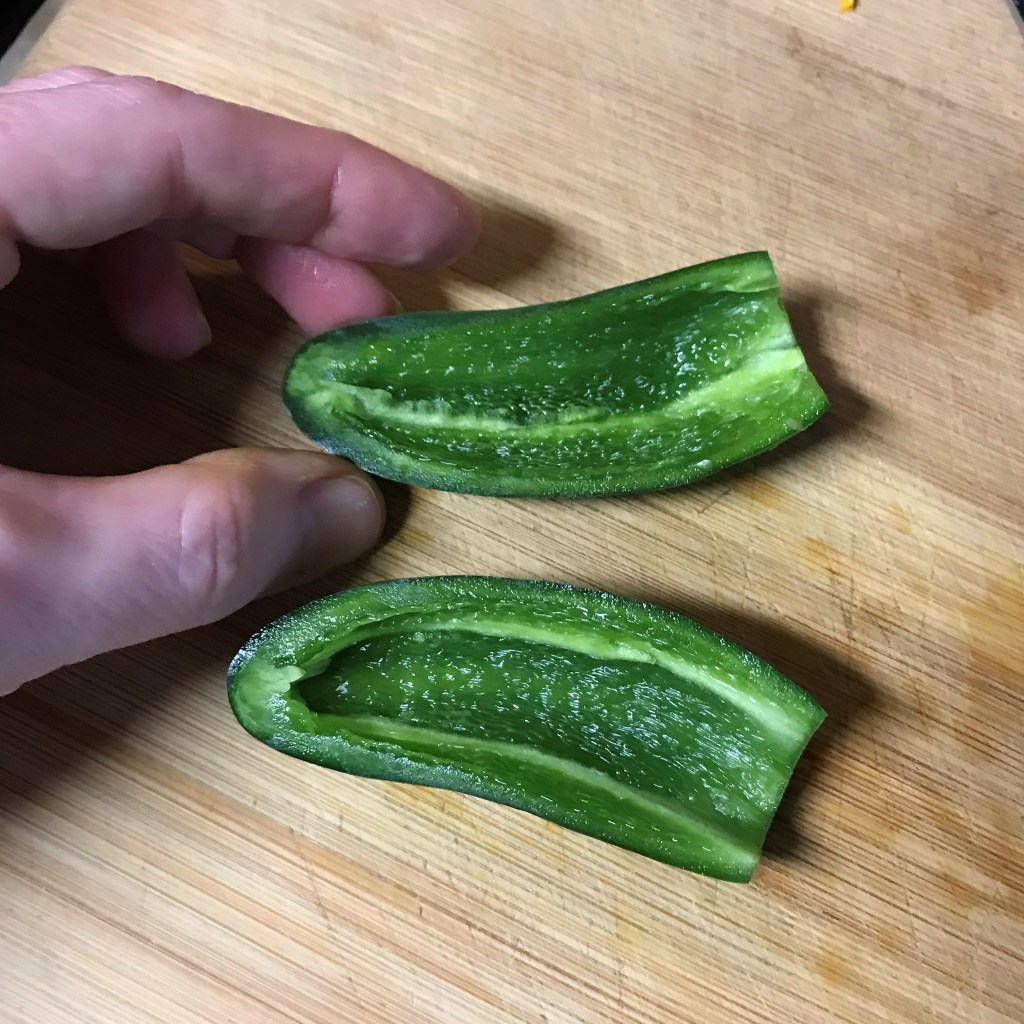
1 large fresh jalapeno pepper, seeds removed and minced*
A stingy pinch of kosher salt
A few twists of freshly ground coarse black pepper
*Notes
Rinse the cranberries in a wide colander that allows you to inspect the quality of the berries. Discard any that are dried up, soft or otherwise questionable. Even with a brand-new bag of cranberries, I usually find about a dozen losers that don’t make the cut.
Organic orange is best here because we will be eating the peel, and pesticides are neither tasty nor safe to ingest. Whether you use organic or conventional, be sure you wash the orange well before stripping the peel.
If you are nervous about handling the raw jalapeno, feel free to slip on some rubber kitchen gloves for this part of the recipe, then carefully peel them off and into the trash once done. I can’t work well with gloves, so here’s my advice: the sooner you clear the irritating jalapeno oils from your skin, the less likely you are to accidentally touch your eyes, nose or lips and get a painful reminder of the intensity of the capsaicin oils. But if you wash with water right away, you risk spreading the oils around rather than breaking them down. Here’s a simple way to stop the burn before it begins—Dawn dish liquid. Yep, the same blue stuff they use in the TV ads to save the baby birds from oil spills. Any good dish liquid would probably do it, but Dawn is what I use. Gently rub the dish soap, full-strength, straight onto your dry hands, covering every part that may have touched the raw pepper, and give it a few seconds to begin dissolving the pepper oils. Be sure to rub the dish liquid under your nails and between your fingers. Then, wash and rinse your hands and the knife you used to cut the pepper.
It may seem odd to add any amount of salt and pepper, but remember that salt is an enhancer that punches up whatever flavors are in your dish. As for the pepper, it’s an easy way to add an extra little “bite” to underscore the surprising flavor of jalapeno. You will not taste black pepper. Trust me, it works.
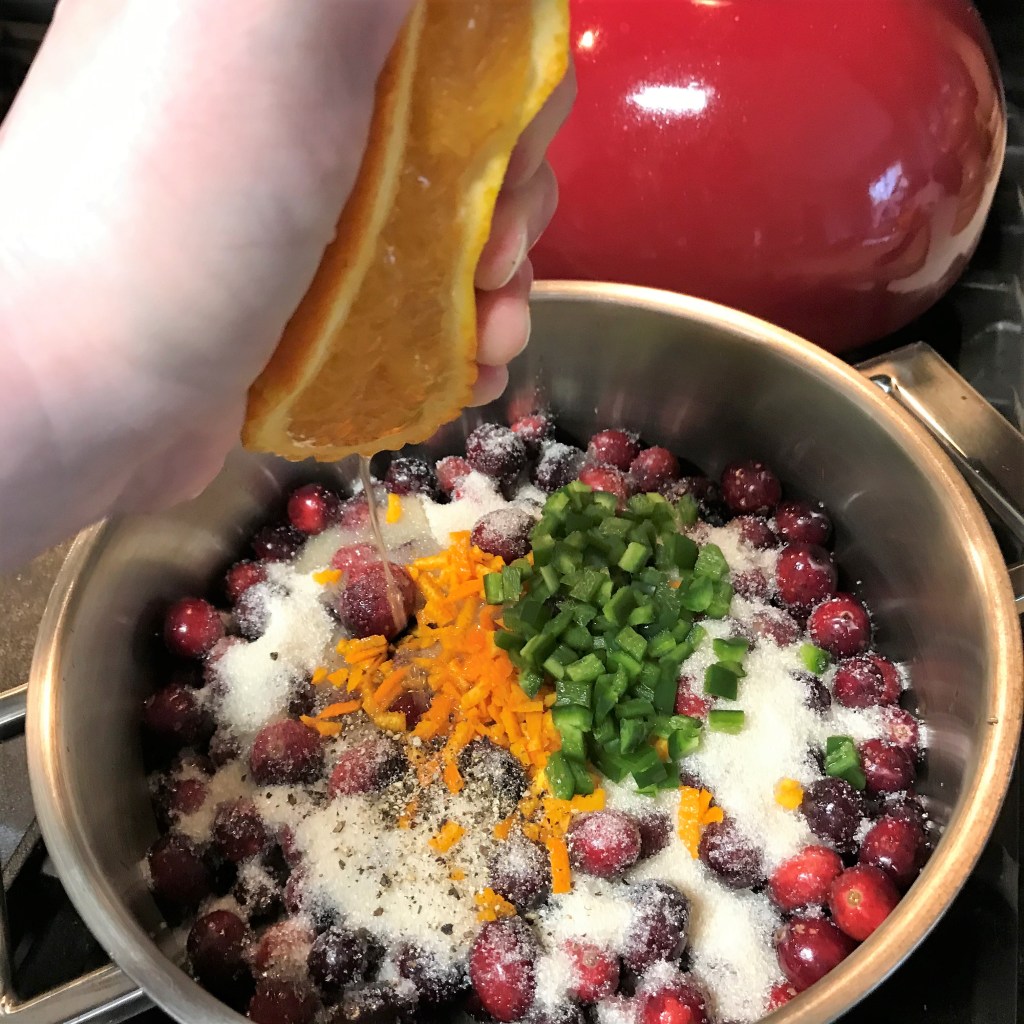
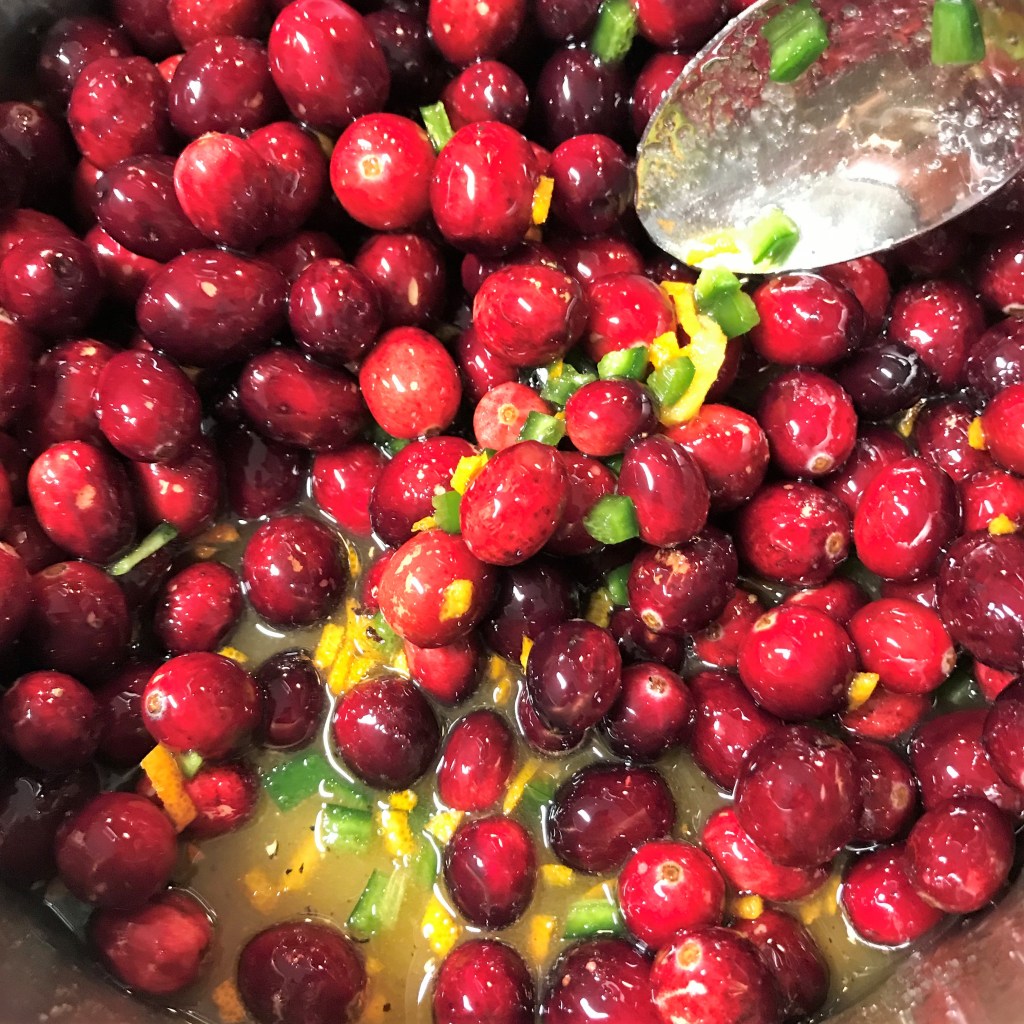
Berries, sugar, orange, jalapeno and just a few twists of fresh black pepper. This is such an easy thing to make.
Instructions
Real cane sugar is not highly processed, so it has a warmer color than white sugar.
My favorite garnishing tool is very useful for stripping the right part of the citrus zest.
A potato peeler works also, but be sure you only peel the bright orange part. Leave the bitter white pith out of the mix.
So much of jalapeno heat is in the seeds and membranes, but we are removing those, keeping bold flavor without the burn!
Do yourself a favor and wash the hot pepper oils off your hands before you proceed. Dawn liquid is my secret weapon for dissolving the irritating oils. See the notes section for tips.
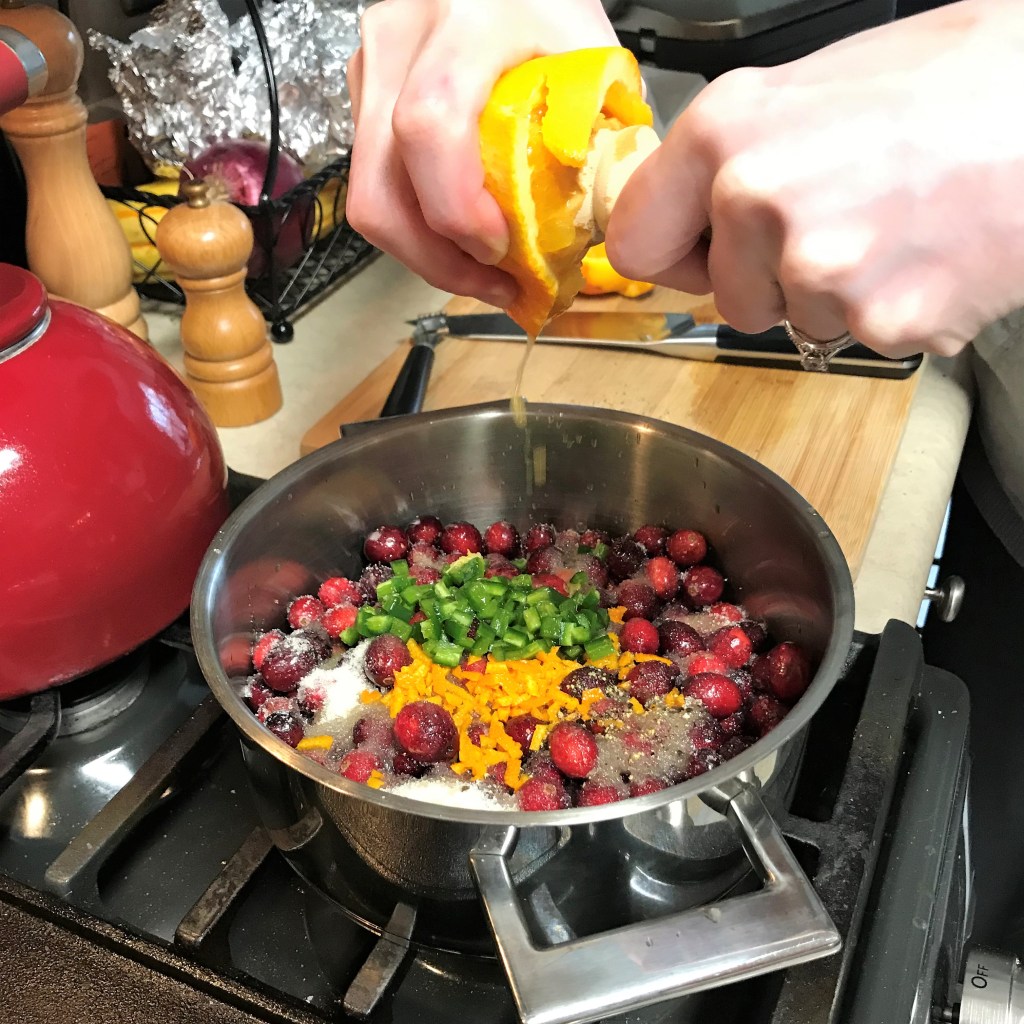
I could only squeeze so much of the juice by hand.
My citrus reamer helped me extract every last drop of fresh juice!
Ooh, these vibrant colors make me happy! Stir to combine then start cooking.
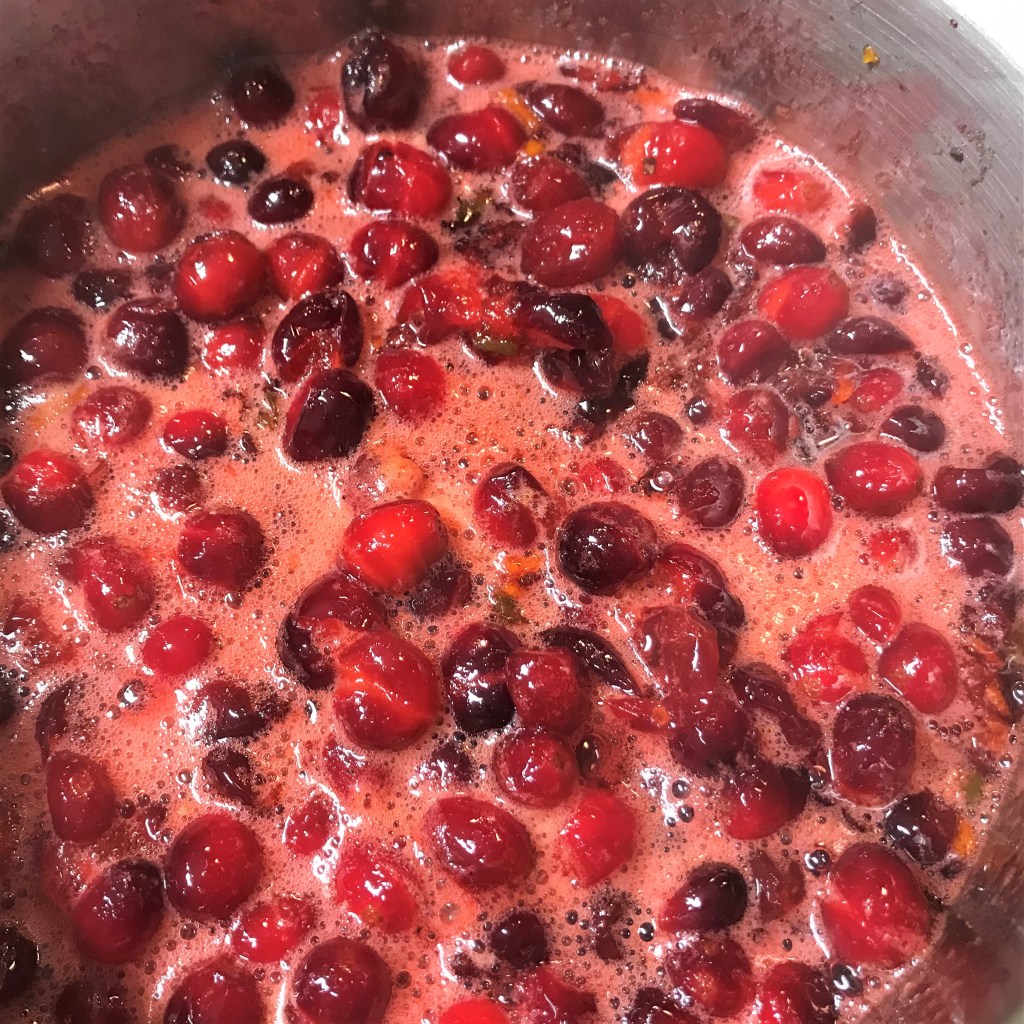
As the mixture boils, you’ll see some foaming and you’ll hear the berries begin to pop.
The berries should smash easily when pressed with a spoon.
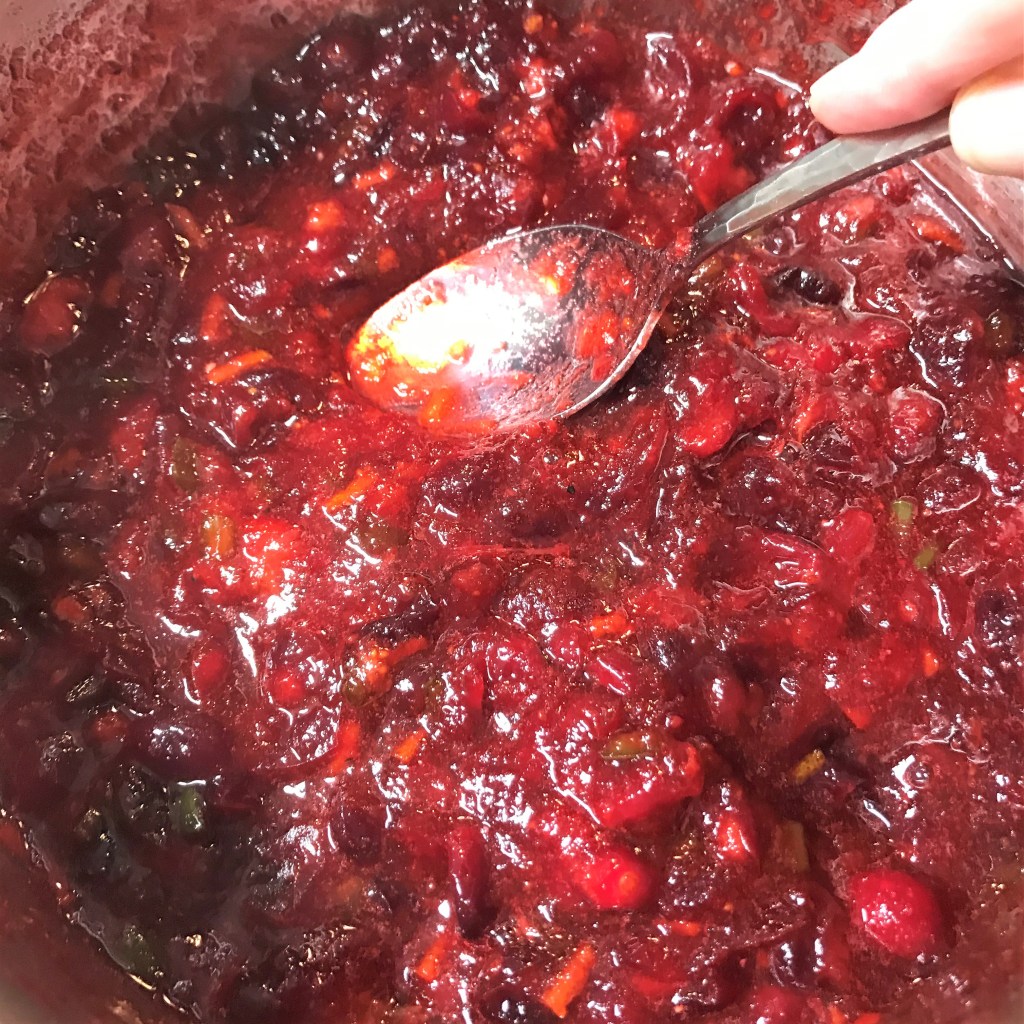
The sauce is thickened after 20 minutes cooking, and will continue to thicken as it cools.
This bright and zesty sauce will hold its own next to our spicy, smoked turkey!
The essence of orange is front and center, giving this cranberry sauce a bright and festive freshness, and the jalapeno is evident but not at all “hot.” It’s going to be a nice complement to the smoky flavors Les will be infusing into our turkey, but I’ll probably sneak into the fridge with my spoon for a few more taste tests (just to be sure) between now and Thanksgiving. And don’t be surprised if I find a way to use the leftovers in a post-holiday appetizer or something. As you all know, I cannot leave well enough alone. 😊
Want to make this recipe?
Follow the steps and images above, or click below to download a printable version for your recipe files.