One of things I love about food blogging is participating in the “National Days” that are related to popular comfort foods. I’m not sure who is responsible for deciding what day is right for celebrating chocolate chip cookies or fried chicken or pepperoni pizza, but I know it’s fun! Here on Comfort du Jour, I have paid particular attention to National S’mores Day, and this year will be no exception (watch for that on August 10th).
This Friday is National Chicken Wing Day, proclaimed as such in 1977 by then-mayor of Buffalo, N.Y., Stan Makowski—and for this gal, who was born and raised just south of Buffalo, that’s a big deal! But I’m torn, because I have really been trying to dial it back on the heavy foods to get my health back on the right track. As much I love Buffalo wings (oh, how I do), I can’t justify deep frying tiny, skin-on chicken pieces, drenching them in sauce and then dragging them through bleu cheese dressing, just because it’s a “National Day.” Talk about a calorie explosion! I wanted to see if I could find a lighter way to enjoy the flavors associated with this “taste of home.” Here it is—Buffalo chicken salad.
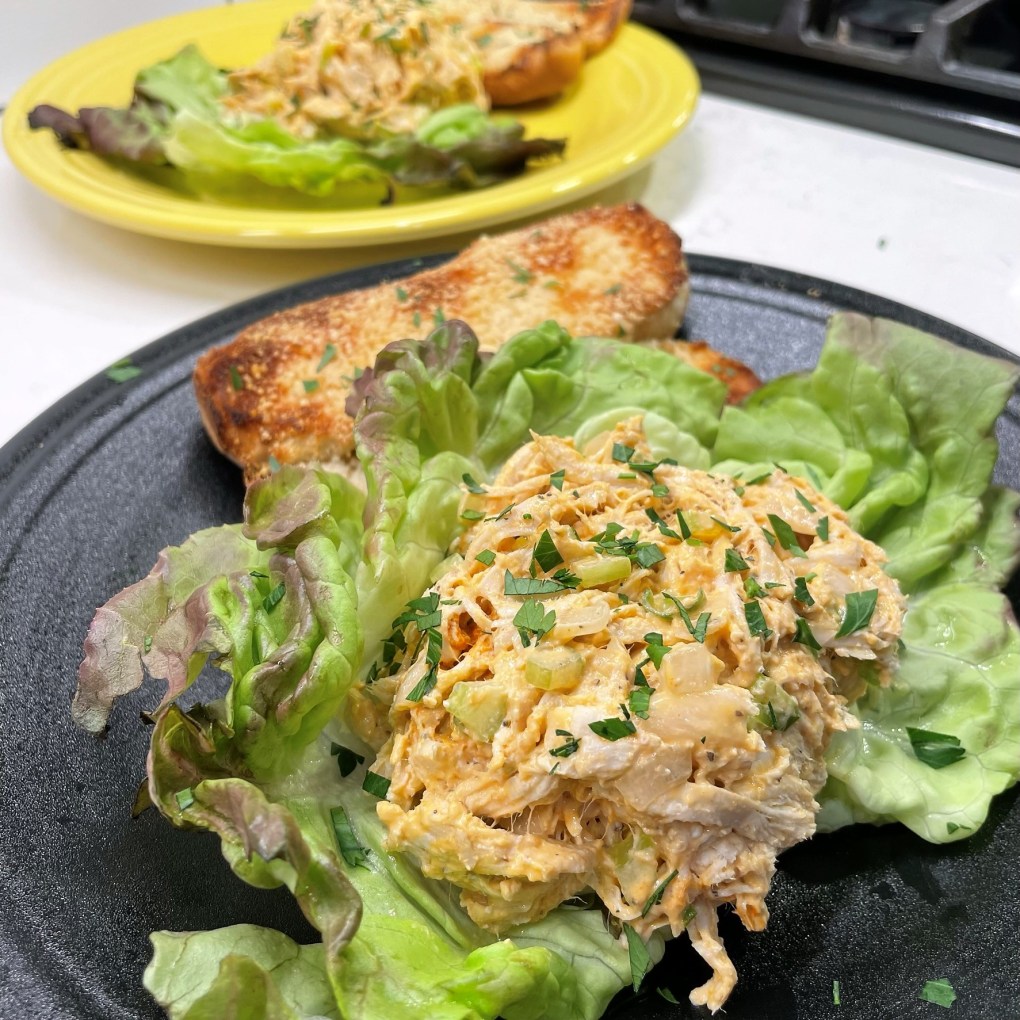
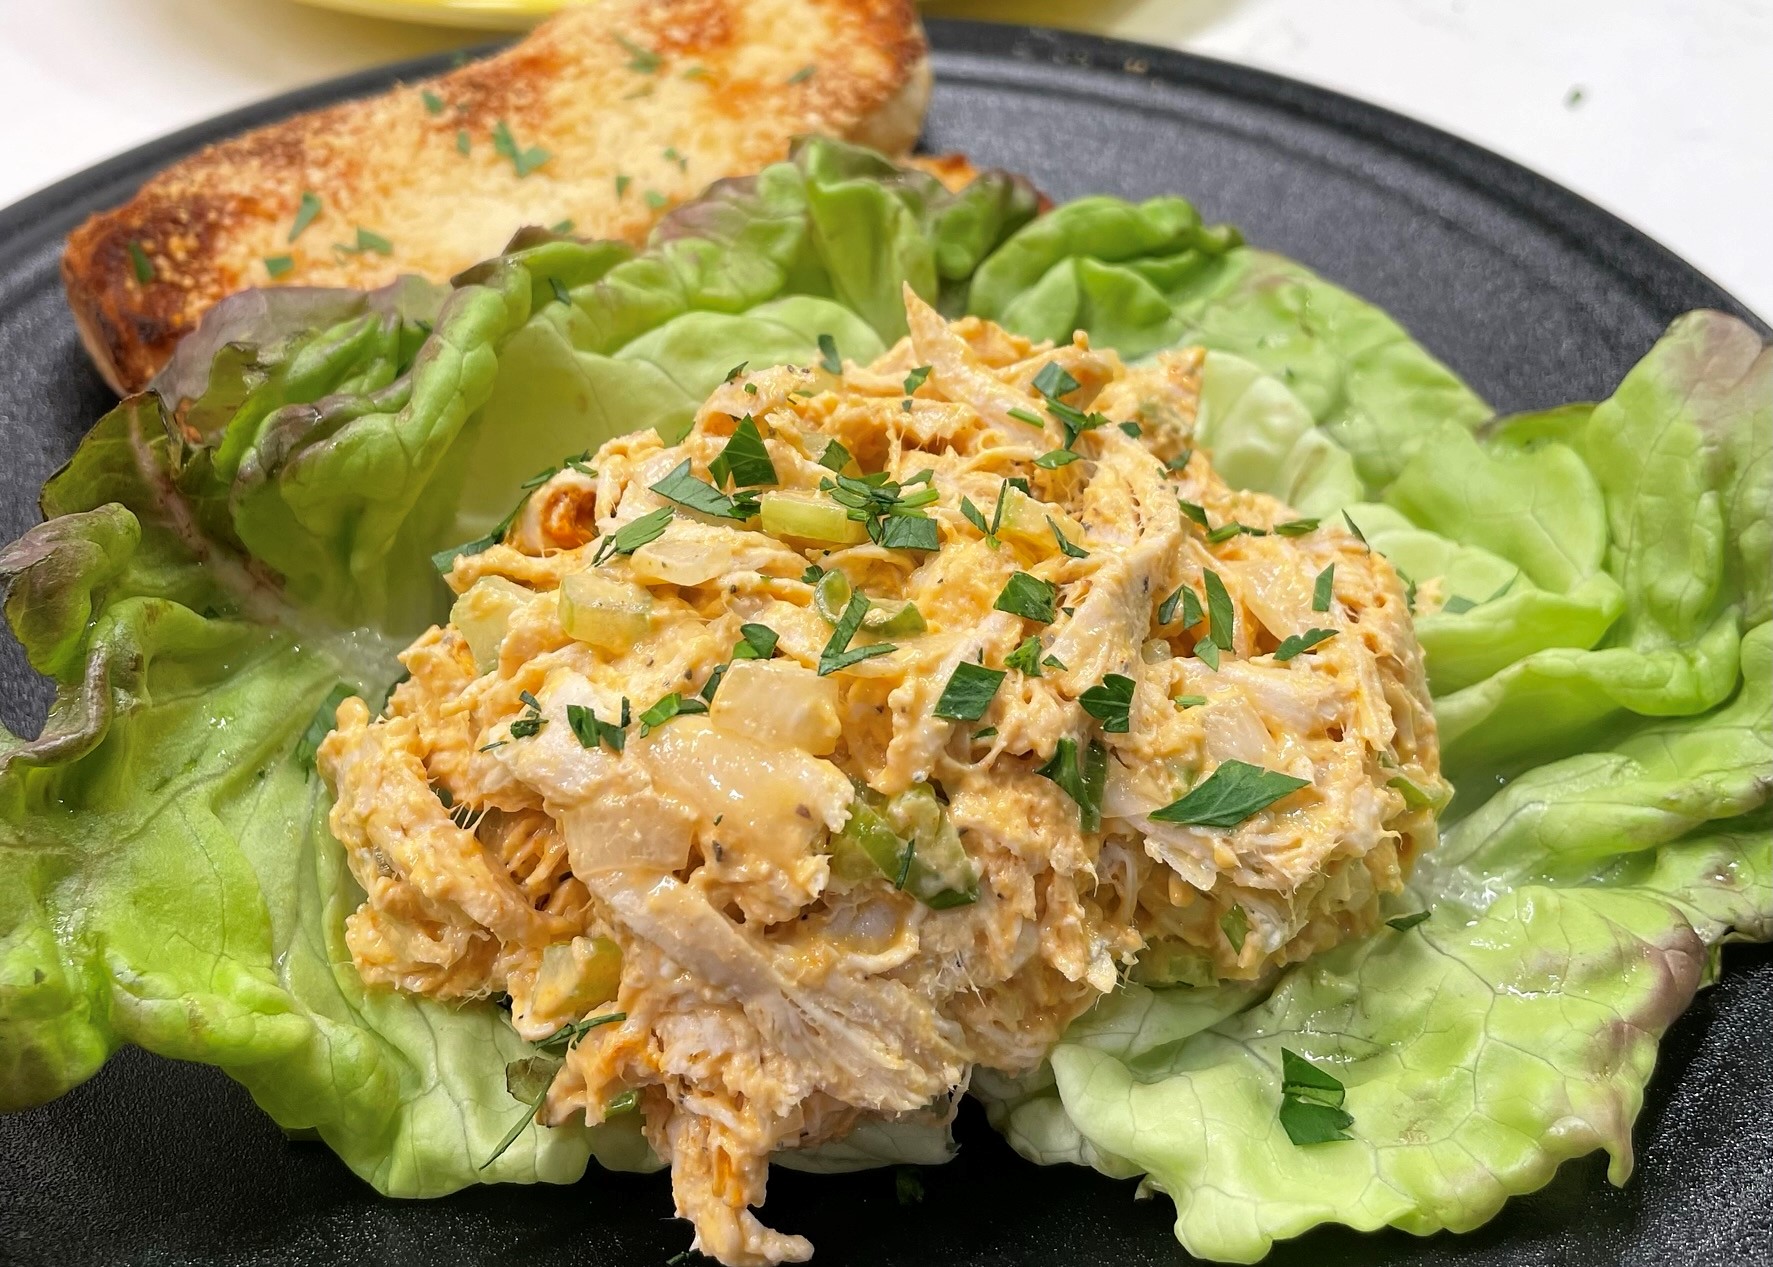
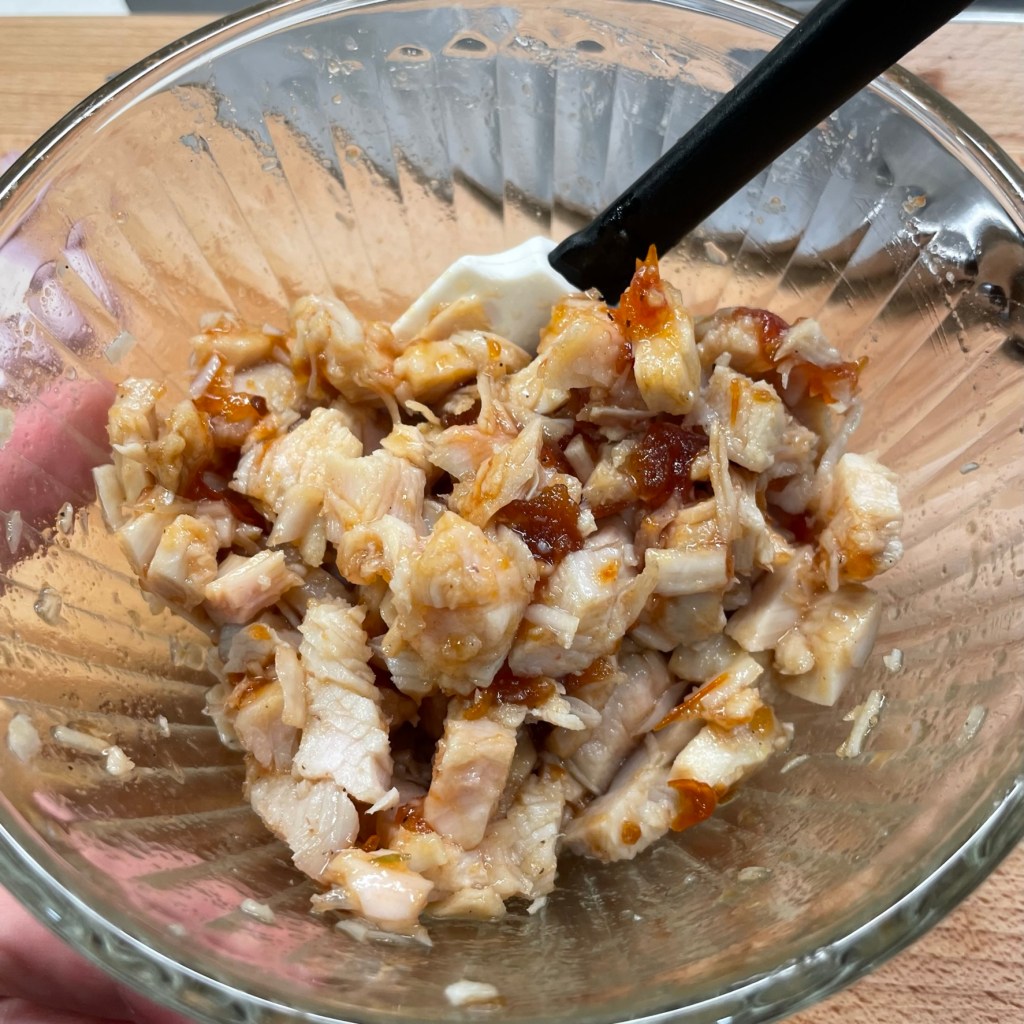
This has all the flavors of Buffalo wings, without the deep-fried calories!
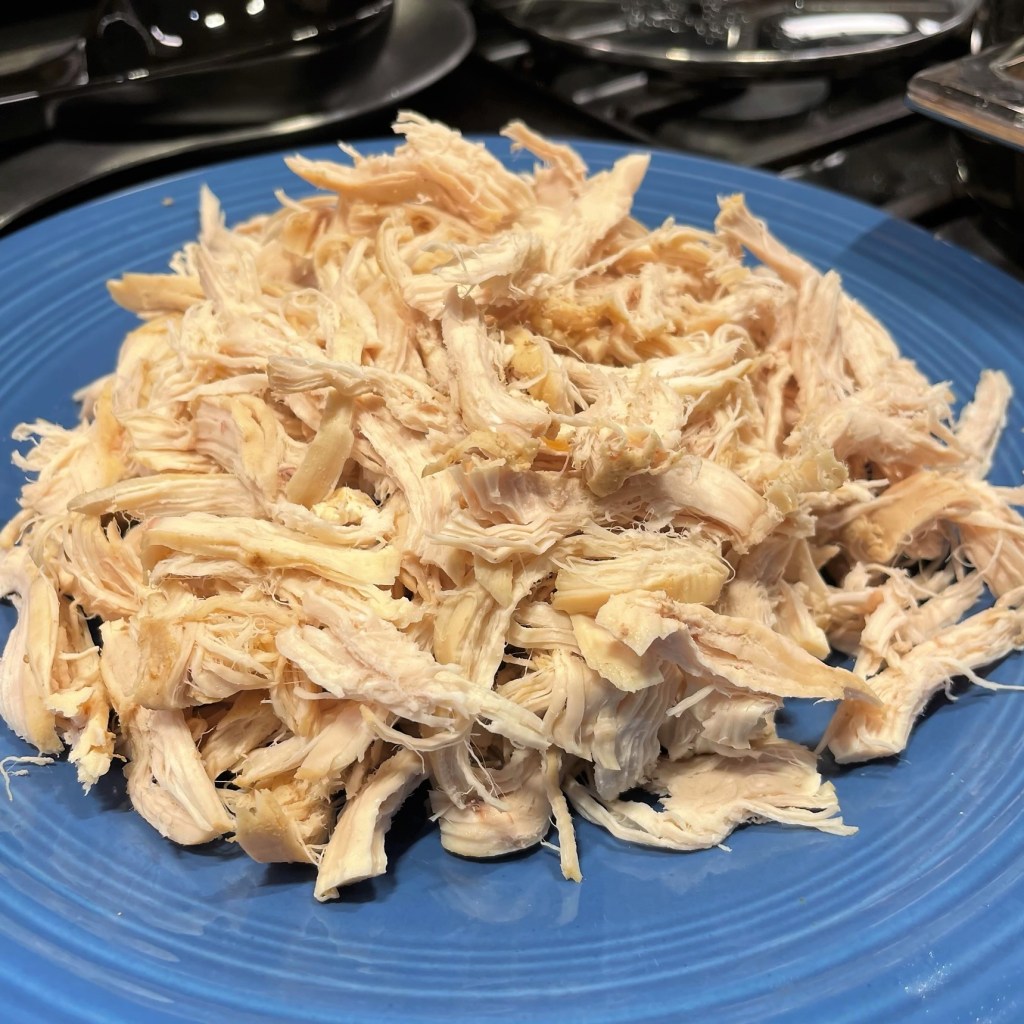
All the flavors are represented: tender chicken (obviously), spicy Buffalo wing sauce, bleu cheese, even celery—but at a fraction of the fat and calories of the usual preparation. The chicken here is lean, skinless breast meat, and you can make that part super easy by picking up a deli-roasted chicken (you can use the rest for another meal), or you can poach them at home with a few aromatics and some chicken or veggie broth, as I did:
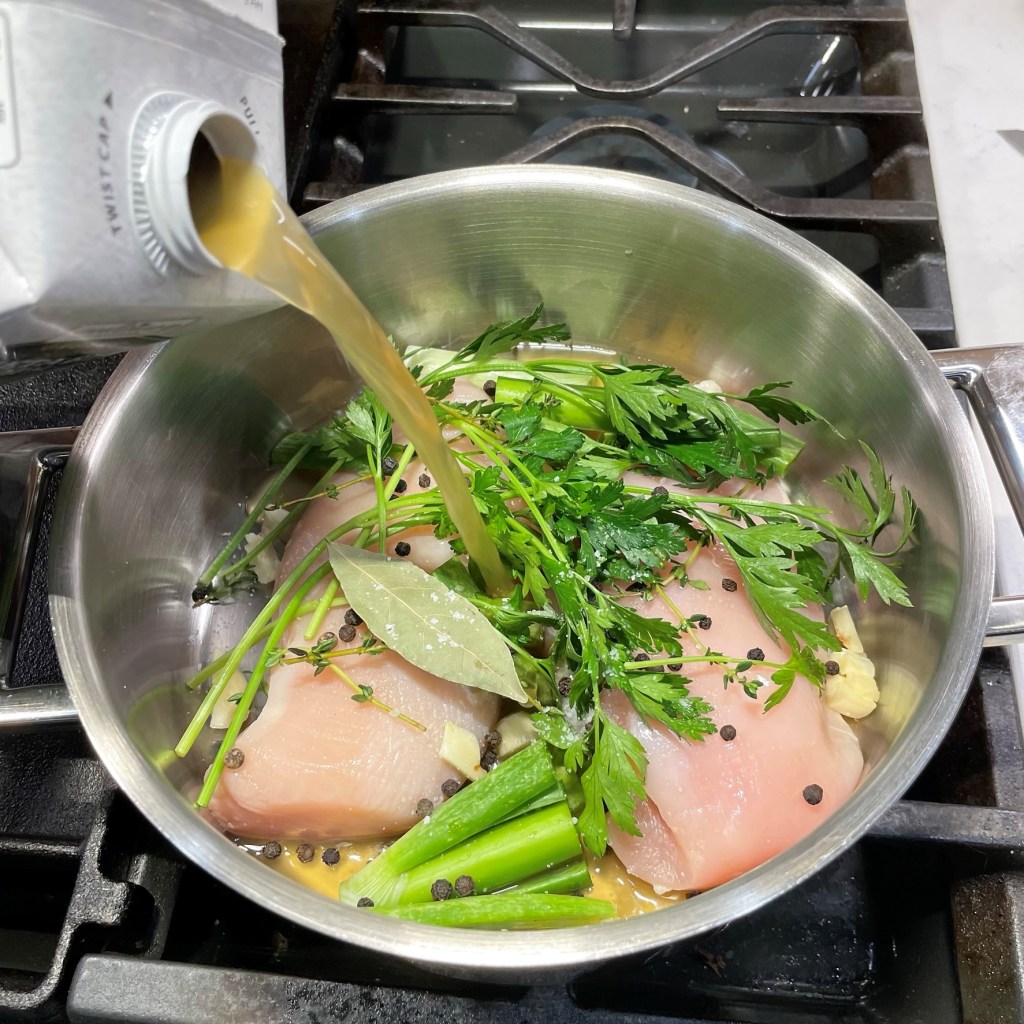
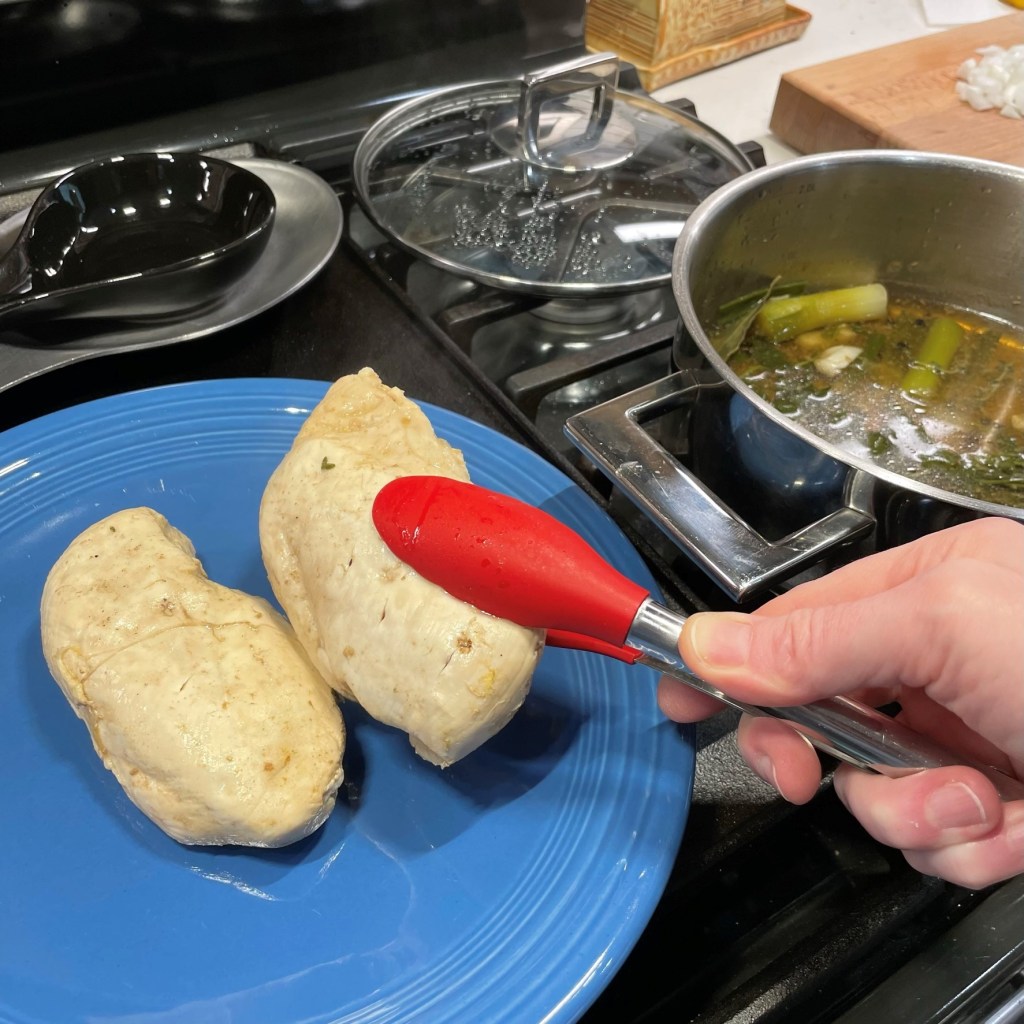
My recipe card describes how I poached the chicken breasts, or make this even easier by picking up a deli-roasted chicken.
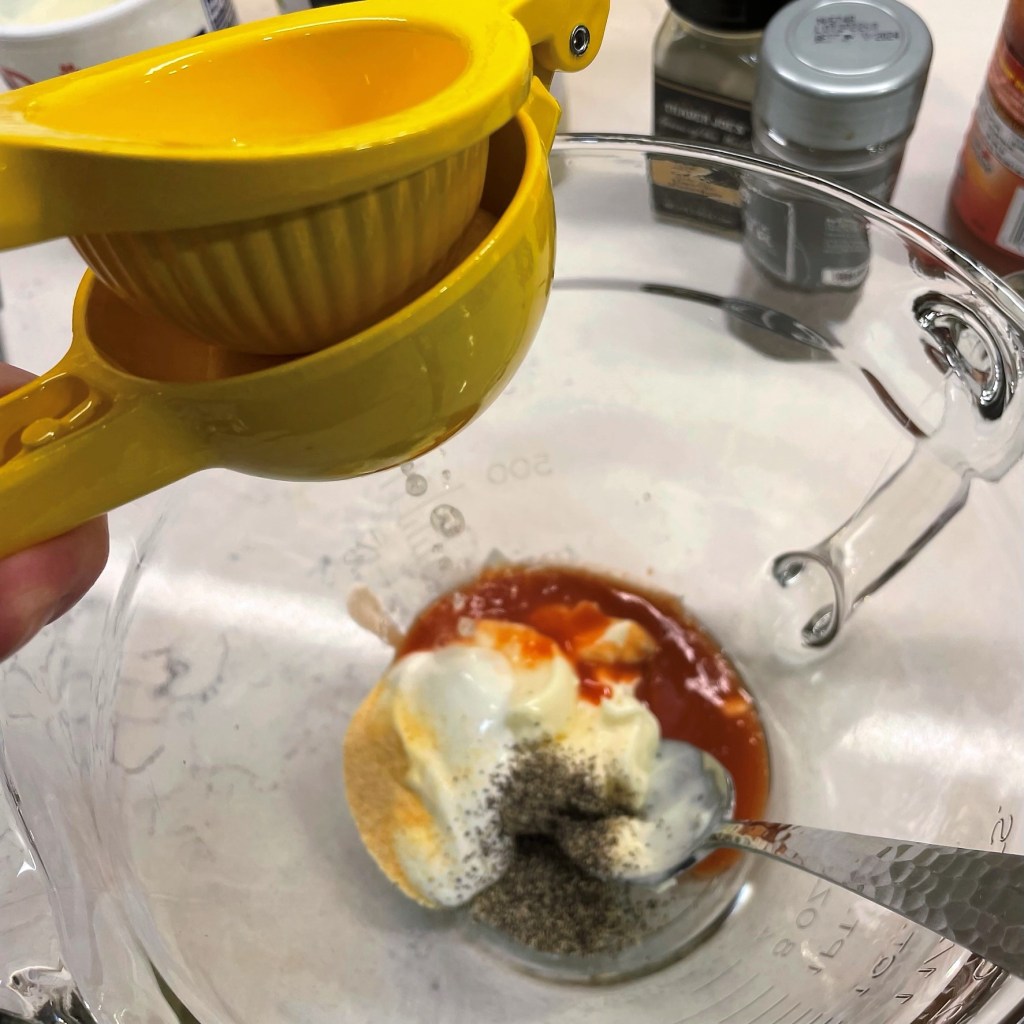
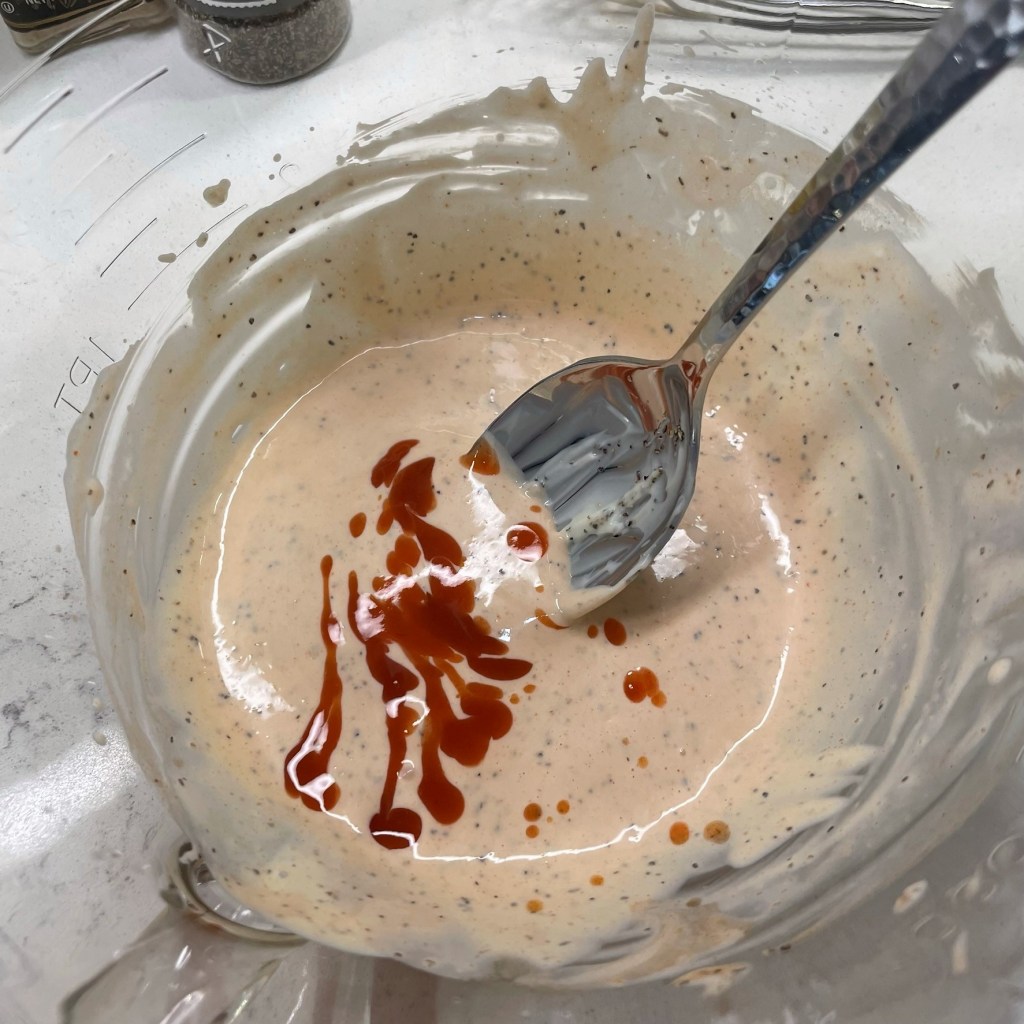
The dressing that wraps around the chicken shreds carries all the other flavors, beginning with mayonnaise and sour cream—just enough to hold it all together—and ending with however much Franks RedHot sauce tickles your fancy. To give it a really good kick, add a few pinches of cayenne pepper or keep it colorful with less heat by adding a spoonful of sweet paprika. This recipe is totally flexible to match your heat tolerance.
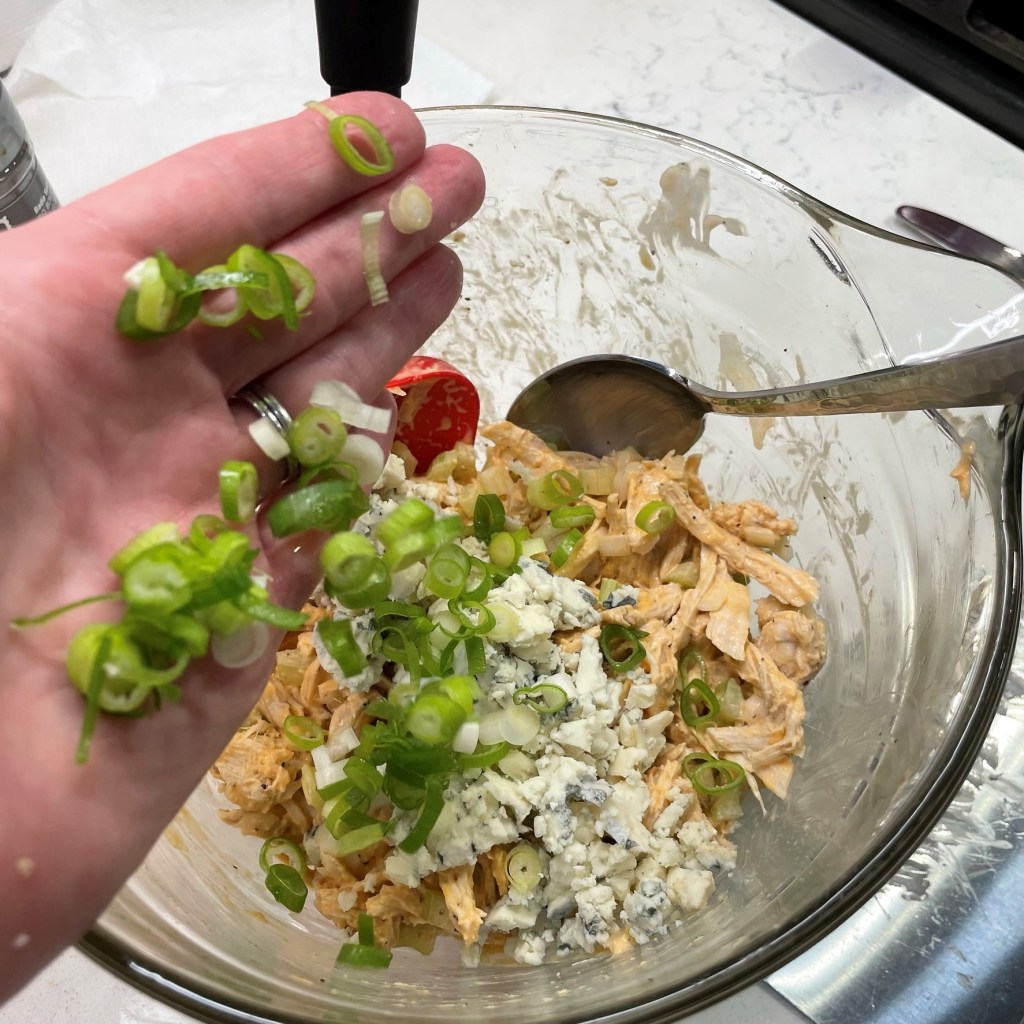
A squeeze of lemon wakes up all the other flavors.Adjust to taste; more heat, please.Add the tender shreds to the dressing.Here come the onions and celery for texture.I can always stand it just a little bit hotter!Bleu cheese for funk and a handful of scallions for bite.
This recipe made four generous servings of chicken salad. I served it on leaves of soft butter lettuce as dinner, alongside an impromptu slab of garlic toast; the latter was my husband’s genius creation made from leftover hot dog buns and a few sprinkles of our favorite parm-romano blend cheese. It was a great meal, both for the flavor and the satisfaction of throwing a low-calorie twist on a classic comfort food.
This is an easy way to enjoy the flavors of Buffalo wings, but without the high fat and calories. Adjust the amount of Frank’s RedHot sauce to match your desire for heat.
Ingredients
2 cooked chicken breasts, shredded
1/4 cup mayonnaise
2 Tbsp. sour cream
3 Tbsp. Frank’s RedHot sauce (give or take, depending on your heat preference)
Juice of 1/2 lemon
3/4 tsp. ground black pepper
1/2 tsp. garlic powder
1/3 cup bleu cheese crumbles
2 ribs celery, finely chopped
1/2 cup finely chopped onion
1 scallion, thinly sliced (white and green parts)
1/2 tsp. sweet Spanish paprika, optional for color
A sprinkle of fresh, chopped parsley for garnish, if you’re feeling fancy
Directions
In a medium bowl, combine mayonnaise, sour cream, RedHot sauce, lemon juice, pepper and garlic powder. Whisk until evenly combined. Adjust hot sauce to taste.
Add shredded chicken, onions and celery to the dressing bowl. Fold gently to combine ingredients. Taste the mixture and adjust seasonings to taste.
Fold in bleu cheese crumbles and sliced scallions, plus paprika if desired for extra color.
Cover and refrigerate Buffalo chicken salad until ready to serve.
If you prefer, you can poach the chicken breasts yourself. Simply place them in a shallow pot with aromatics, such as celery, onion, fresh herbs and black peppercorns. Pour in enough chicken or vegetable broth to cover the chicken about halfway. Bring to a slight boil, then cover and simmer about 20-30 minutes until chicken is cooked through and tender.
When I got to the bottom of the bowl of Buffalo chicken salad, I lost my way a little bit on the whole “light and healthy” thing. I couldn’t resist putting an over-the-top spin on it. I know, but it sure was delicious, and still not as heavy as chicken wings! 🙂
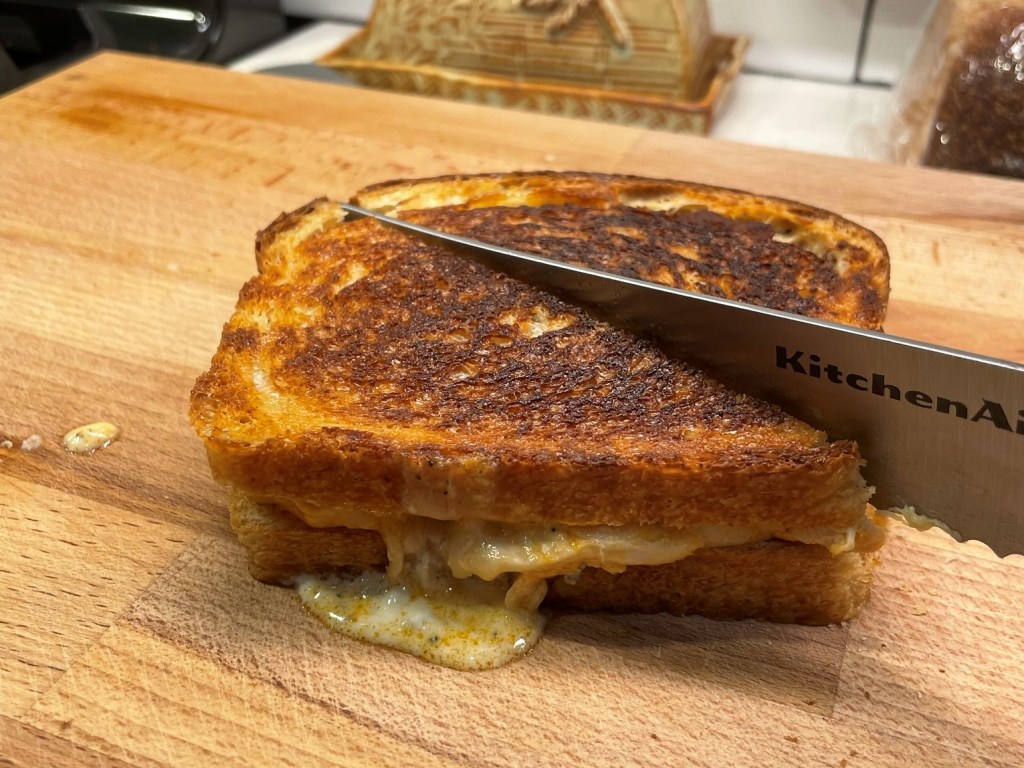
With muenster cheese and homemade, whole-grain sourdough, this was a wicked good grilled cheese!
Is there a more ubiquitous summer side than potato salad? But just because it’s always there hardly means it’s the best thing on the table. One of my most cringe-worthy food memories of childhood was played out on repeat at summer gatherings with family, friends and neighbors, and seeing what happened to the potato salad—which, many times, was little more than sticky, cooked potatoes with some hard-boiled eggs and mayonnaise. I know you’ve seen this, too, when it gets a little bit warm and separates into a greasy, gloppy mess with that thin filmy crust on the surface. Is it any wonder everyone passes over it in favor of potato chips? Nothing ruins a picnic faster than bland potato salad, slick with broken mayonnaise. Bleh.
It’s a shame to not give the versatile potato a greater chance to shine! If you are bored with potato salad or stuck in a rut with a recipe that gets left behind on the picnic table, maybe you just need a different approach—one that doesn’t depend on a heavy, mayonnaise-y coating to give it flavor because, honestly, mayo doesn’t have much flavor to begin with. Here’s something a little different and for me, it’s a winner every time.
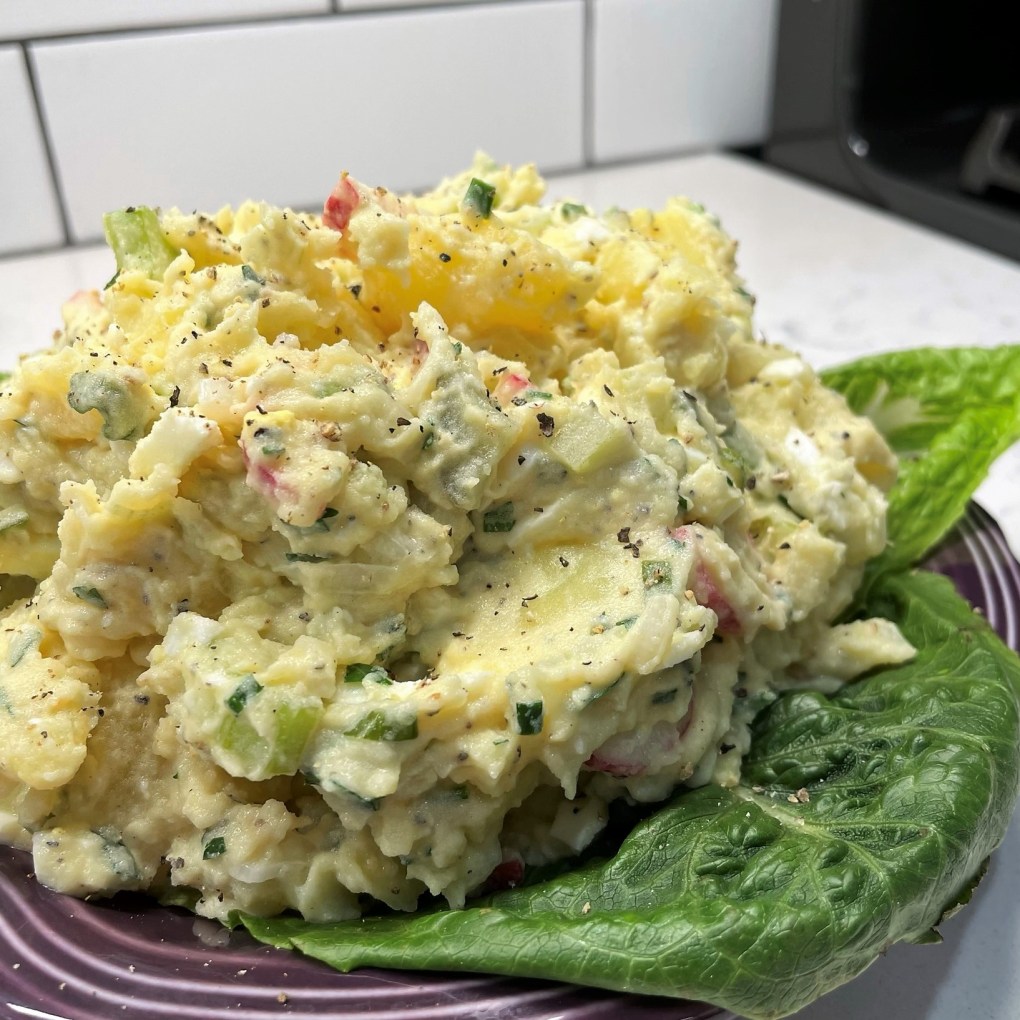
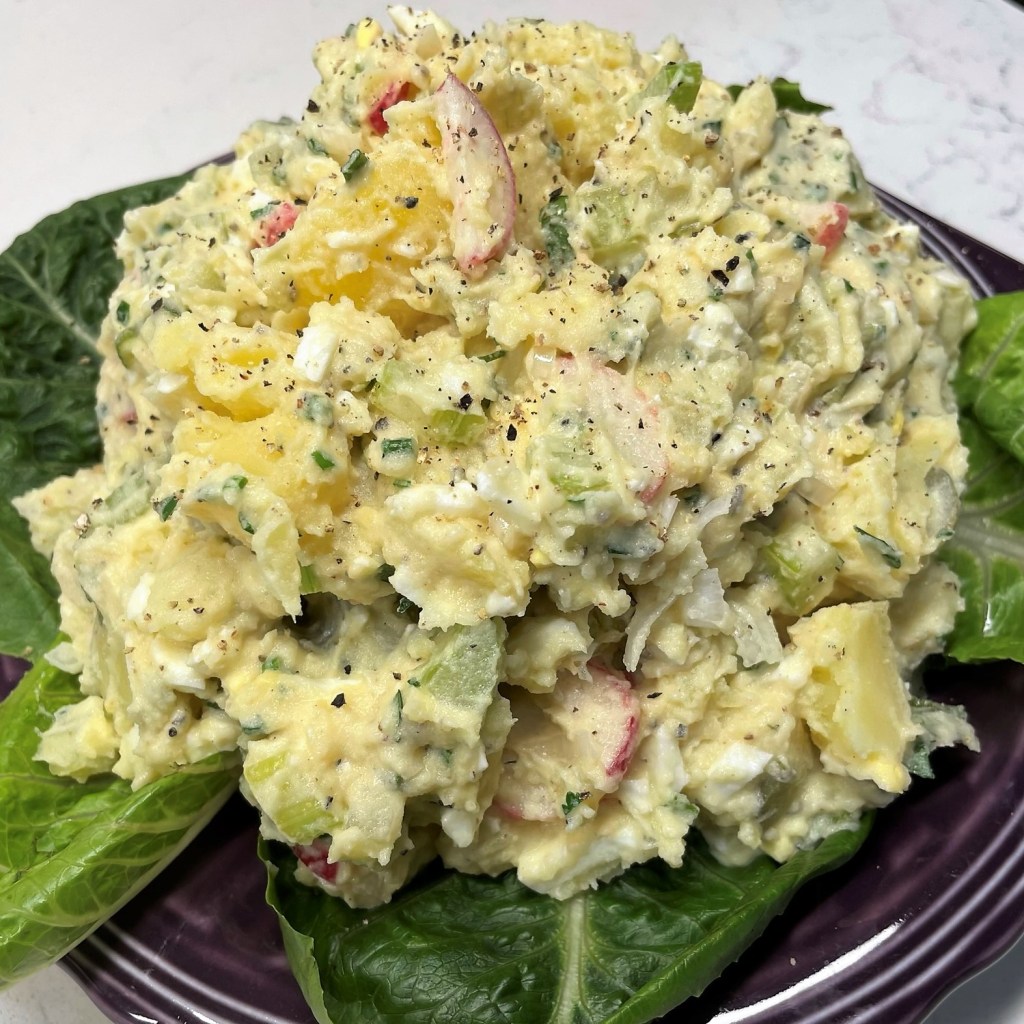
This potato salad does not disappoint, and it could never be accused of being bland because it is doubly dressed—first, with a tangy, heart-healthy vinaigrette that soaks flavor all the way through the potatoes, and then with the slightest amount of mayonnaise-based dressing for a creamy, picnic-ready finish that isn’t greasy and doesn’t clump or break.
I’ve made no secret of the fact that potatoes are one of my very favorite foods, and I have shared a few fun twists on potato salad here on Comfort du Jour, but of all the versions I like to make, this one is my favorite (especially in summer), and for a few fun reasons.
Any kind of potato works
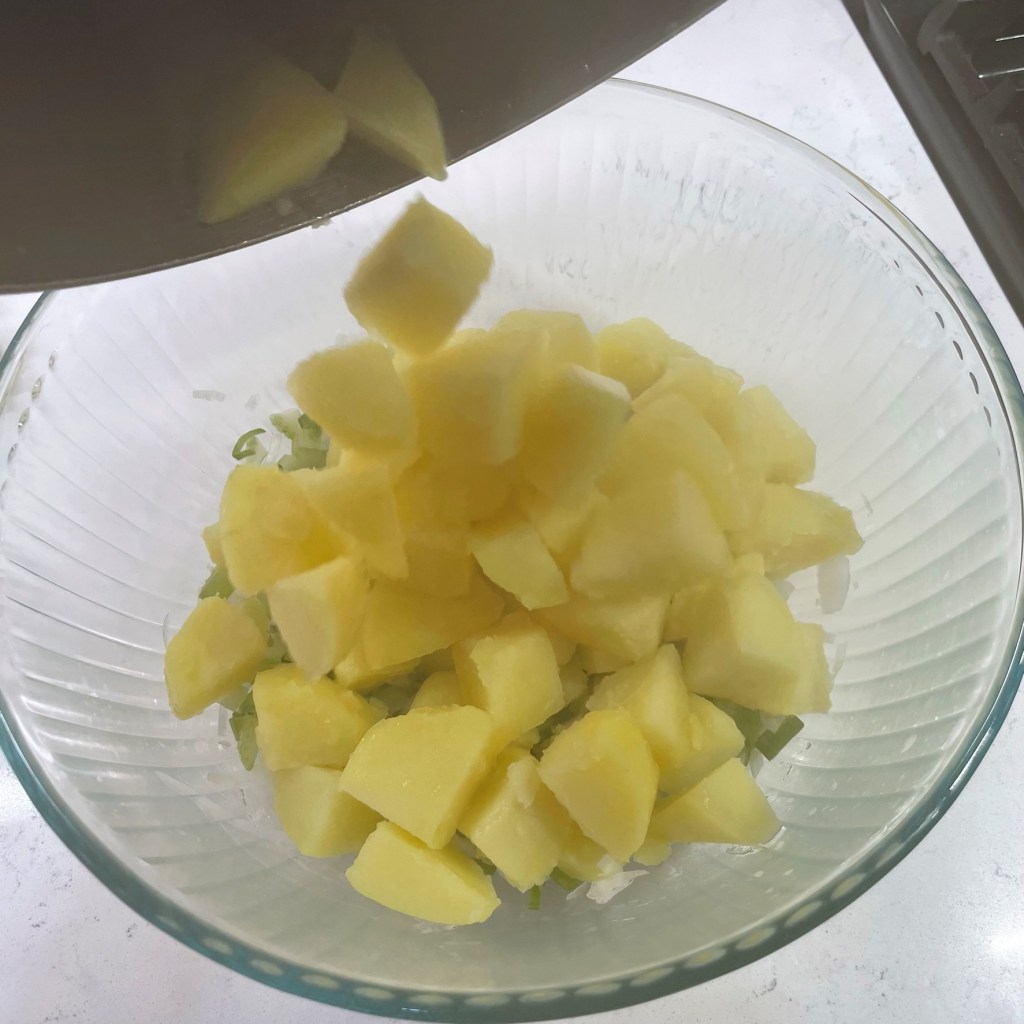
You can use starchy russets, baby reds or Yukon golds (my favorite, and my choice for this post). Peel the skins or keep ‘em—your call. The only thing to consider with the waxy style of potatoes is that they will absorb slightly less of the dressing, so you would want to proceed in stages to be sure it’s to your liking. But flavor-wise? Whatever you like is going to work.
This salad is adaptable
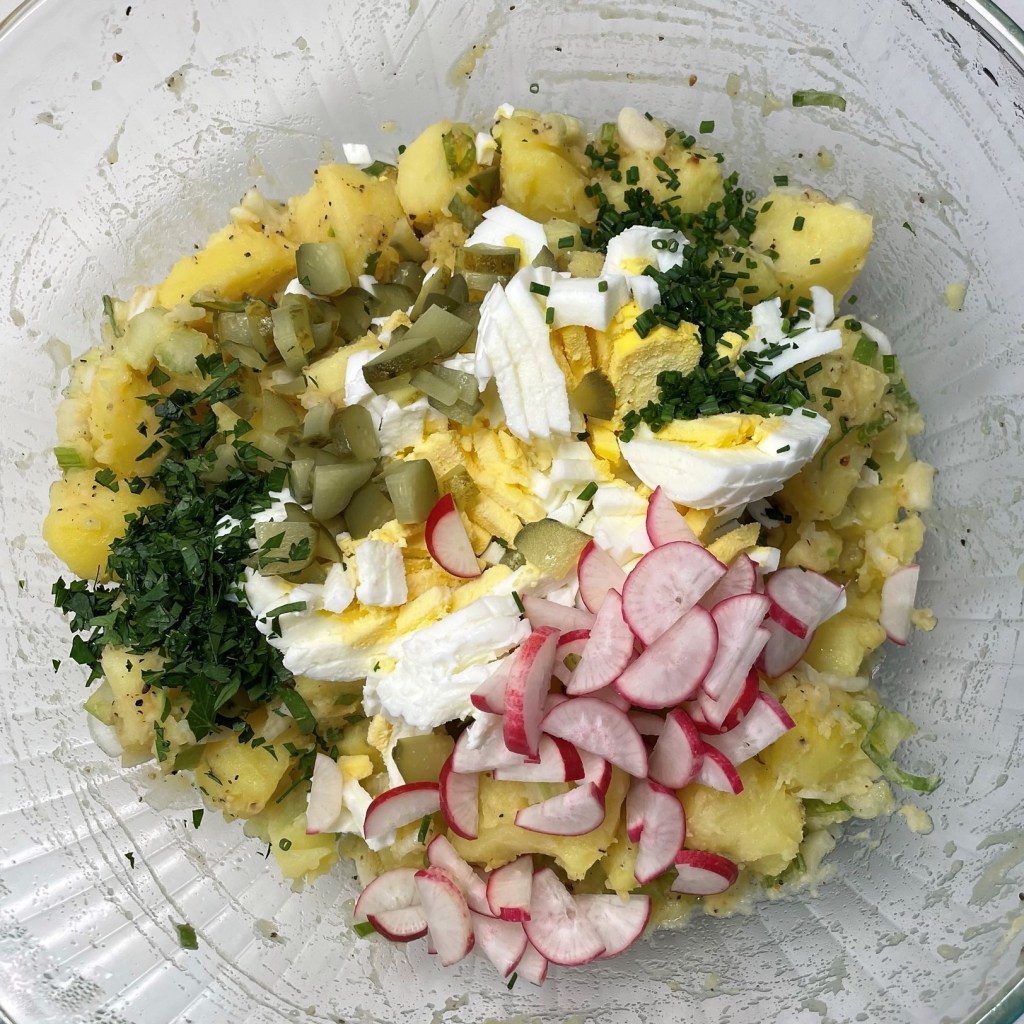
My main goal for any kind of salad is variety of texture, and you can adjust this one many ways by changing up the mix-ins. My go-to combination of mix-ins usually includes hard-boiled eggs, chopped pickles, crunchy bits of celery or radish (or both), fresh onions and any kind of fresh herbs. But that leaves it open for interpretation—I could swap out the chopped pickles for chopped olives and skip the onions but add some minced bell pepper. Dill has a completely different flavor than basil or parsley, so that’s another layer of options you can customize to your liking. As long as your ingredients are not overly wet (like tomatoes), the options are nearly endless.
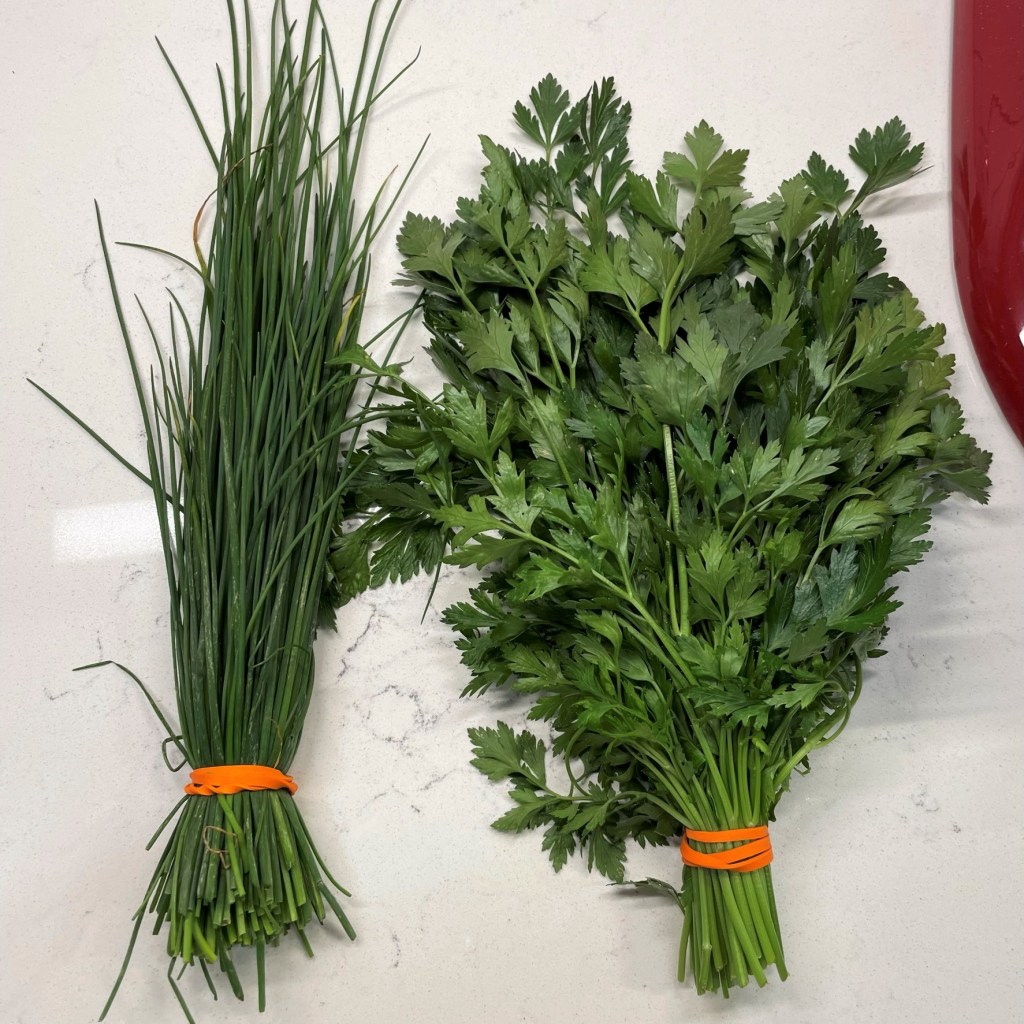
I picked up these beautiful fresh herbs at our farmers’ market, and I want to put them in everything!I usually begin with finely chopped celery and onions for crunch. For this batch, it was beautiful spring onions from the farmers’ market.A combination of crunchy, soft, fresh and pickled ingredients is always a winner for this salad.
It is not drenched in mayonnaise
We go through a lot of mayo at our house (mostly for my husband’s beloved tuna sandwiches), but it is not my favorite ingredient for dressing potato or pasta salads. Mayonnaise, which is essentially an emulsion of egg yolks and oil, is just plain heavy. And if you add mayo to cooked potatoes, you might notice that it takes a lot of it to keep them coated so the potatoes don’t seem dry, especially if your potatoes lean more starchy than waxy. Too much mayo is never appealing and it definitely is not healthful. Almost all its calories are from fat, and though recent reports have debunked the idea that warm mayonnaise is solely responsible for post-picnic foodborne illnesses (the culprit is usually the meat or fish that is dressed in the mayo), there’s no disputing that it looks completely unappetizing.
It’s actually delicious!
Unlike the typical mayonnaise-only potato salads, this one is mostly flavored with a tasty vinaigrette-style dressing that you can customize to your own palate. You can use a fancy French vinaigrette, a balsamic vinaigrette, a zesty, Italian-style vinaigrette or even a store-bought vinaigrette. There are only two types that I would not recommend, and for different reasons. An entirely fat-free vinaigrette is not ideal, because the extreme water content will turn your cooked potatoes soggy. The dressing should have some amount of oil in it, and you can choose one with heart-healthy fats, such as extra virgin olive oil or avocado oil. I also would not recommend a sweet, fruit-flavored vinaigrette, such as raspberry. It would be tough to choose mix-ins that would work with those flavors. It’s best to stick with a savory one.
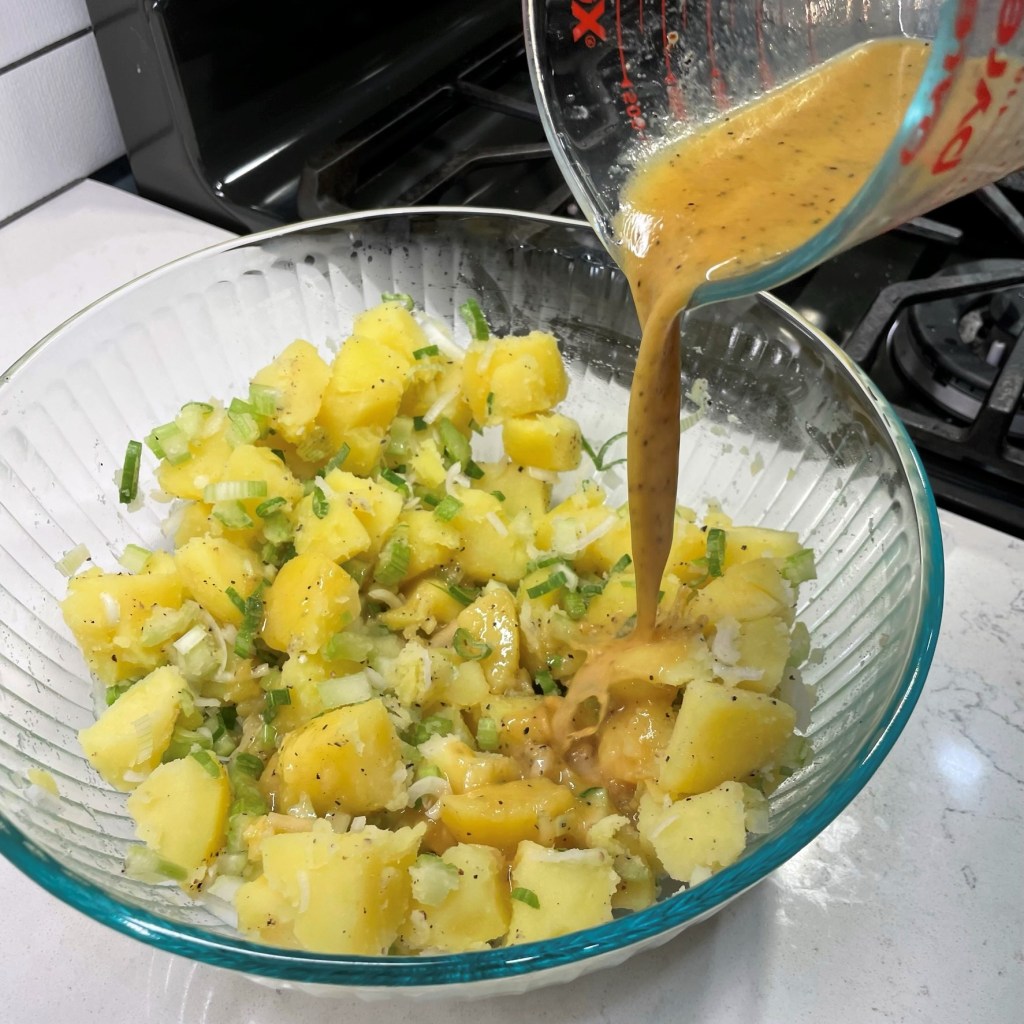
If you don’t have the time or desire to make your own vinaigrette, use a store-bought version, but avoid fat-free dressings or those with water as a key ingredient.Transfer the hot potatoes straight into the bowl with the celery and onions.Pour the vinaigrette over the potatoes while they are still hot. Fold with a spatula for even absorption.It only takes a minute or two for the vinaigrette to soak into the spuds. Cover and let it cool to room temperature.
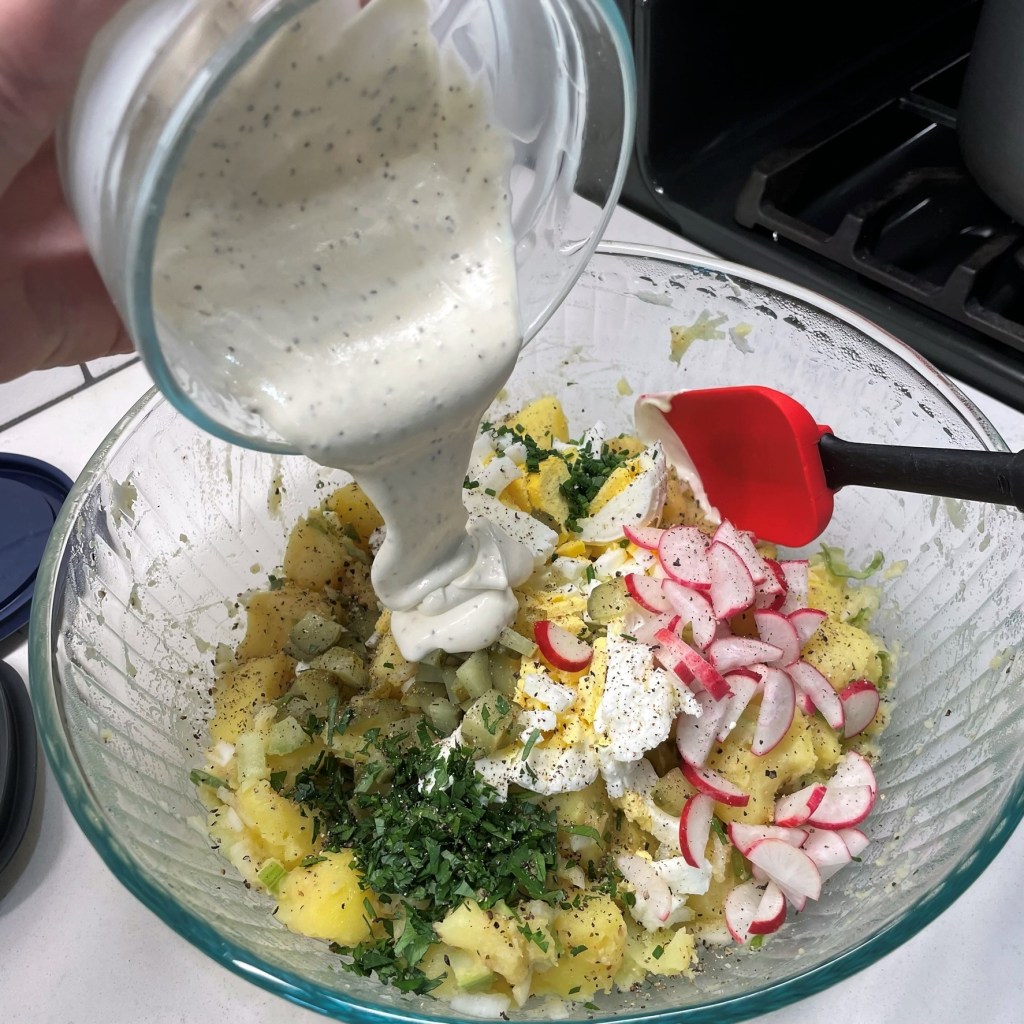
The vinaigrette is added to the cooked potatoes while they are hot—immediately from the pot after draining is best—and it only takes a few minutes for it to be absorbed. After the potatoes cool, you simply add your favorite mix-ins and a very small amount of mayonnaise, blended with equal amount of sour cream (or Greek yogurt) and a touch of Dijon mustard for extra flavor. I like to add celery seed as well, but this is optional.
You can give the potato salad a creamy finish with just two tablespoons of mayonnaise, equal amount of sour cream, a little Dijon and celery seed.Mix that together and pour it over the embellished (and cooled) potato salad.Fold it gently to combine, and chill it down in the fridge!
Our little secret…
Here’s one more nugget about this potato salad, and it is good news for anyone who can’t have (or doesn’t want) mayonnaise. This salad technically does not need mayo at all! The vinaigrette soaks so much flavor into the hot potatoes that you could skip the mayonnaise altogether and send it straight to the fridge for serving, just as it is—almost like a German potato salad, but chilled and delicious for summer!
What I love about this potato salad is that it is double-dressed. First, it’s flavored with vinaigrette, from the inside-out, while the potatoes are still steaming hot. The vinaigrette absorbs into the chunks for great flavor in every forkful. Then, when it’s cool, add your favorite salad mix-ins (aim for variety of textures) and a creamy dressing that has very little mayonnaise for such a large batch of salad. Enjoy!
Ingredients
1/2 cup prepared vinaigrette dressing (see below for my favorite blend)
1 1/2 pounds small Yukon gold potatoes, cleaned and cut-up (peeled or skin-on)
1/2 cup each finely chopped onions and celery
2 Tbsp. mayonnaise
2 Tbsp. sour cream or plain Greek yogurt (reduced-fat versions are fine)
1 tsp. Dijon mustard
1/2 tsp. celery seed
favorite mix-ins (I like hard-boiled eggs, chopped pickles or capers, radish slices, minced fresh herbs; avoid high-moisture ingredients such as fresh cucumbers)
Salt and pepper to taste
Directions
Prep and simmer potatoes until they can easily be pierced with a knife tip, about 25 minutes.
Add finely chopped onions and celery to a bowl large enough to mix the potato salad. When potatoes are tender, drain them and immediately add them to the bowl. Fold with a spatula to distribute the onions and celery throughout. Season with a couple pinches of salt.
Pour the vinaigrette over the hot potatoes. Gently fold with a spatula to mix the vinaigrette evenly with the potatoes. It will take a few minutes for the vinaigrette to be absorbed. Allow them to cool at room temperature. If you wish, you can refrigerate the potatoes before adding the creamy dressing.
In a small bowl, combine mayonnaise, sour cream, Dijon, celery seed, salt and pepper. Add your favorite salad mix-ins to the vinaigrette-drenched potatoes. Pour dressing over the bowl contents and fold gently to combine and coat the potatoes. Adjust salt and pepper to taste.
Refrigerate the potato salad until completely cold. Serve alongside your favorite summer cookout fare.
Any savory vinaigrette dressing is suitable for this potato salad, but I do not recommend using an “oil-free” version. The excess moisture may make the potatoes too mushy. Here’s my easy, go-to vinaigrette dressing recipe, but between you and me, at least half the time I make this salad, I use Good Seasons Italian. 🙂
Ingredients
3 Tbsp. red wine vinegar
Juice of 1/2 lemon
1 tsp. Dijon mustard
1/2 tsp. sugar
A few shakes of garlic-pepper seasoning
Salt and pepper to taste
1/4 cup extra virgin olive oil (or another heart-healthy oil, such as avocado)
Directions
Combine vinegar, lemon juice, Dijon, seasoning, sugar, salt and pepper in a small bowl or glass measuring cup.
Gradually drizzle olive oil into the mixture while whisking vigorously. The Dijon mustard will help emulsify the mixture.
Ah, fresh lemonade. Is there anything more refreshing on a scorching hot summer day? If you have never made homemade lemonade, I promise you that it’s very simple and totally worth the effort. All you need is a simple syrup (which is literally only a warmed mixture of water and sugar), a tiny pinch of salt (which is basically an exclamation point on the other flavors) and a whole bunch of freshly squeezed lemon juice.
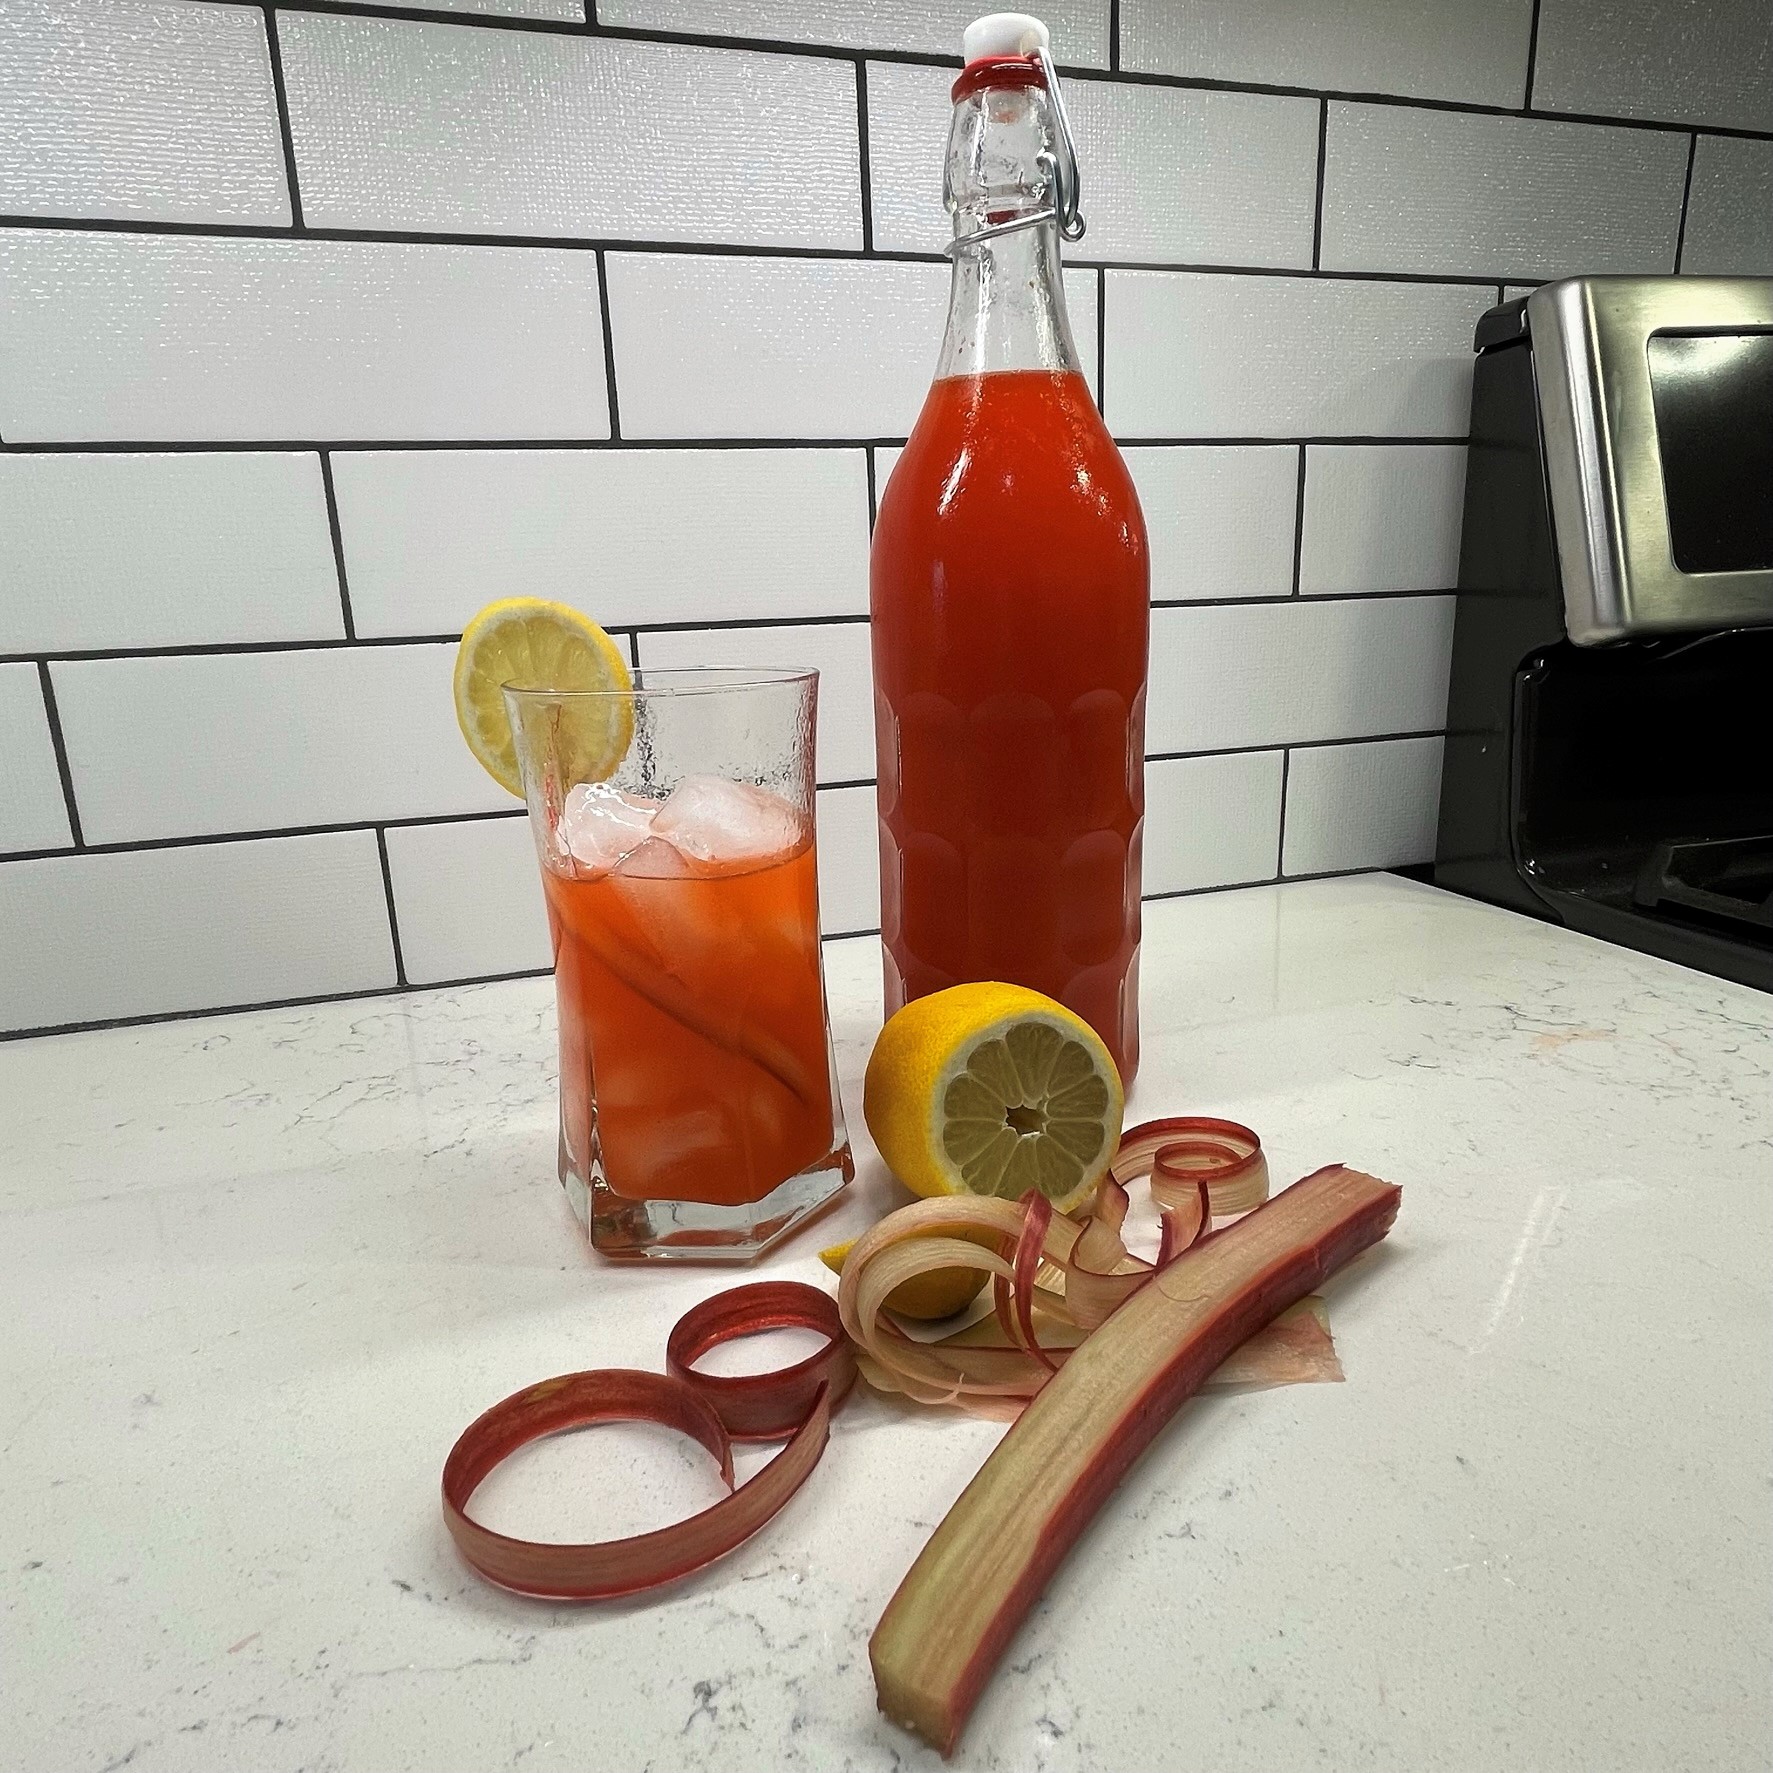
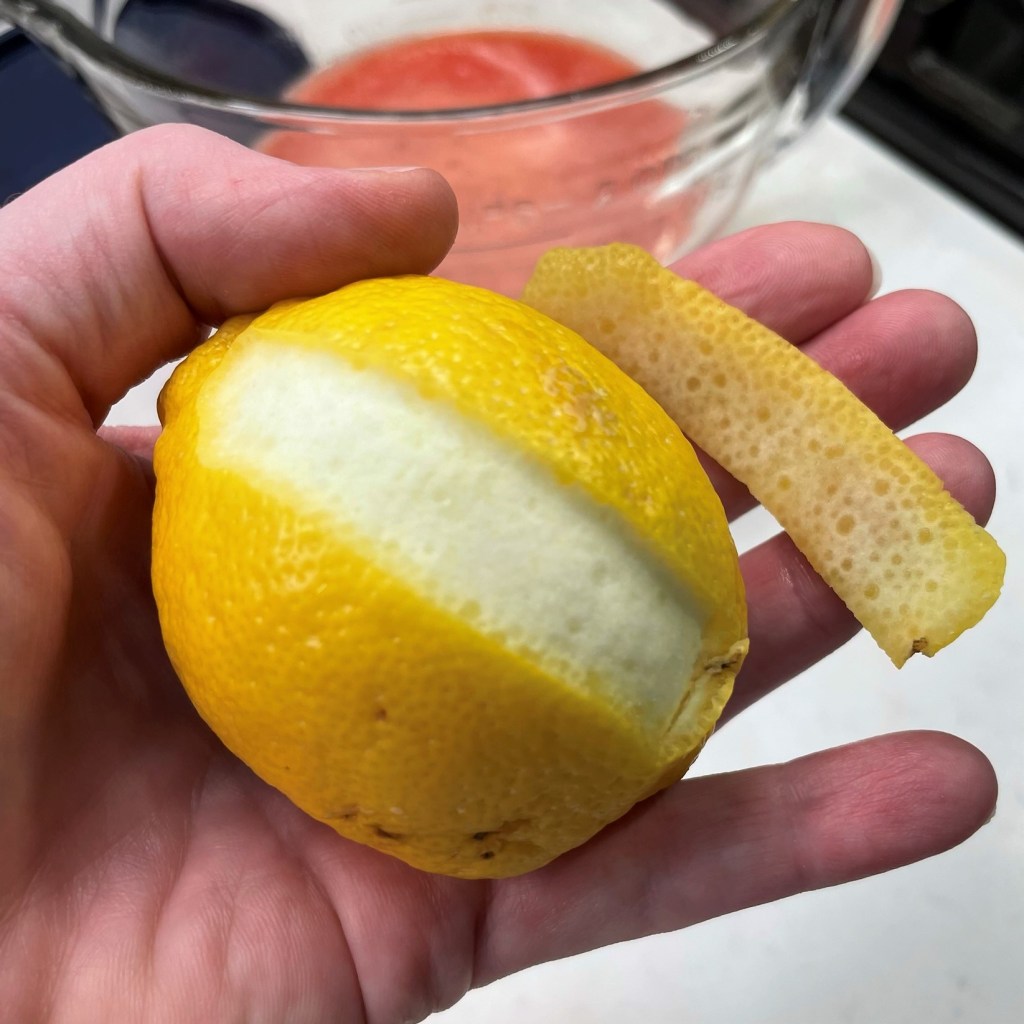
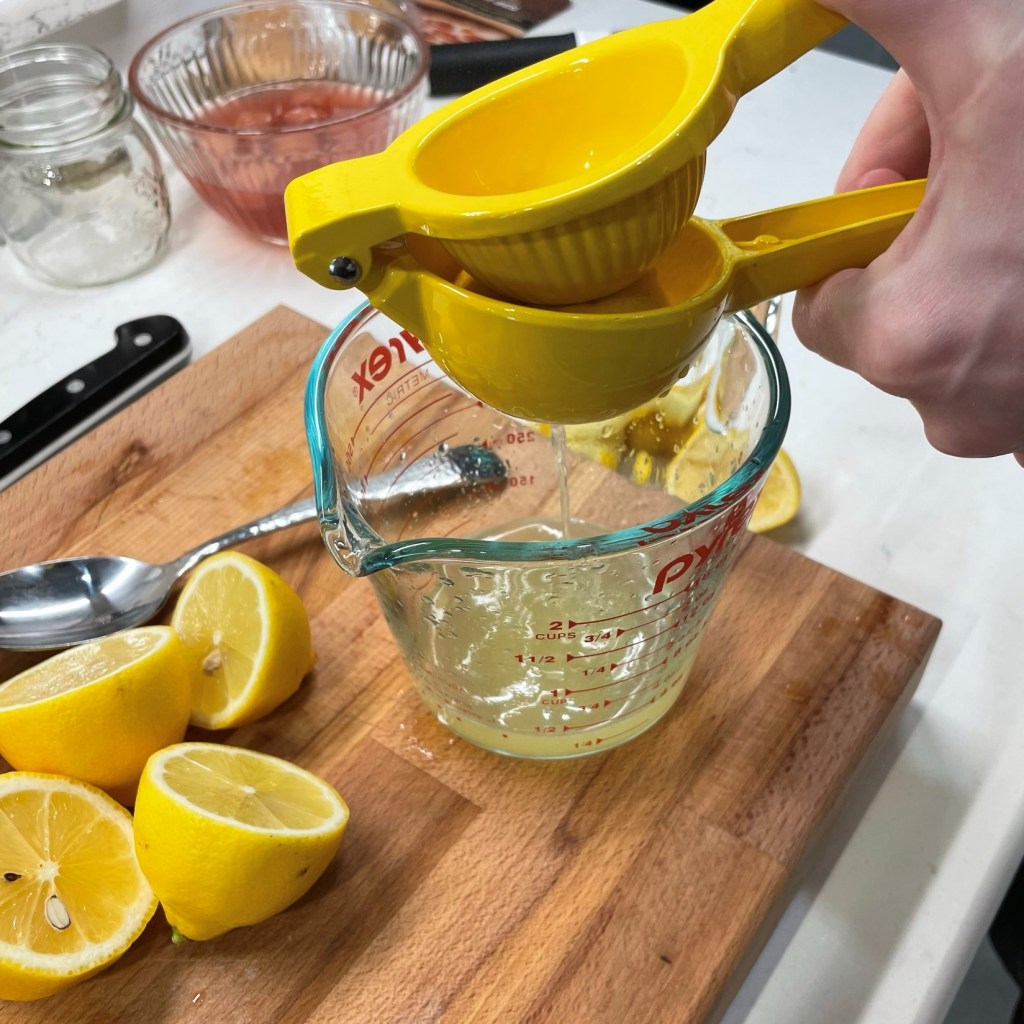
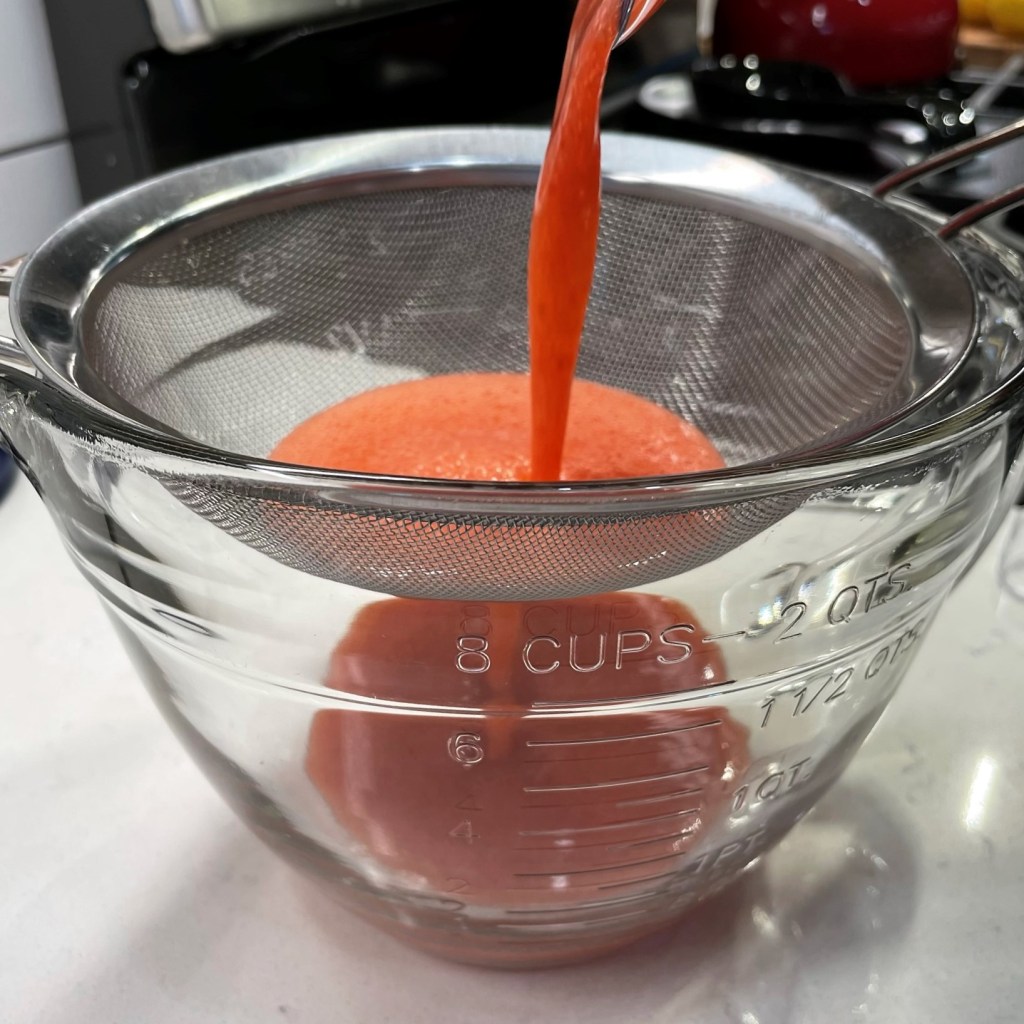
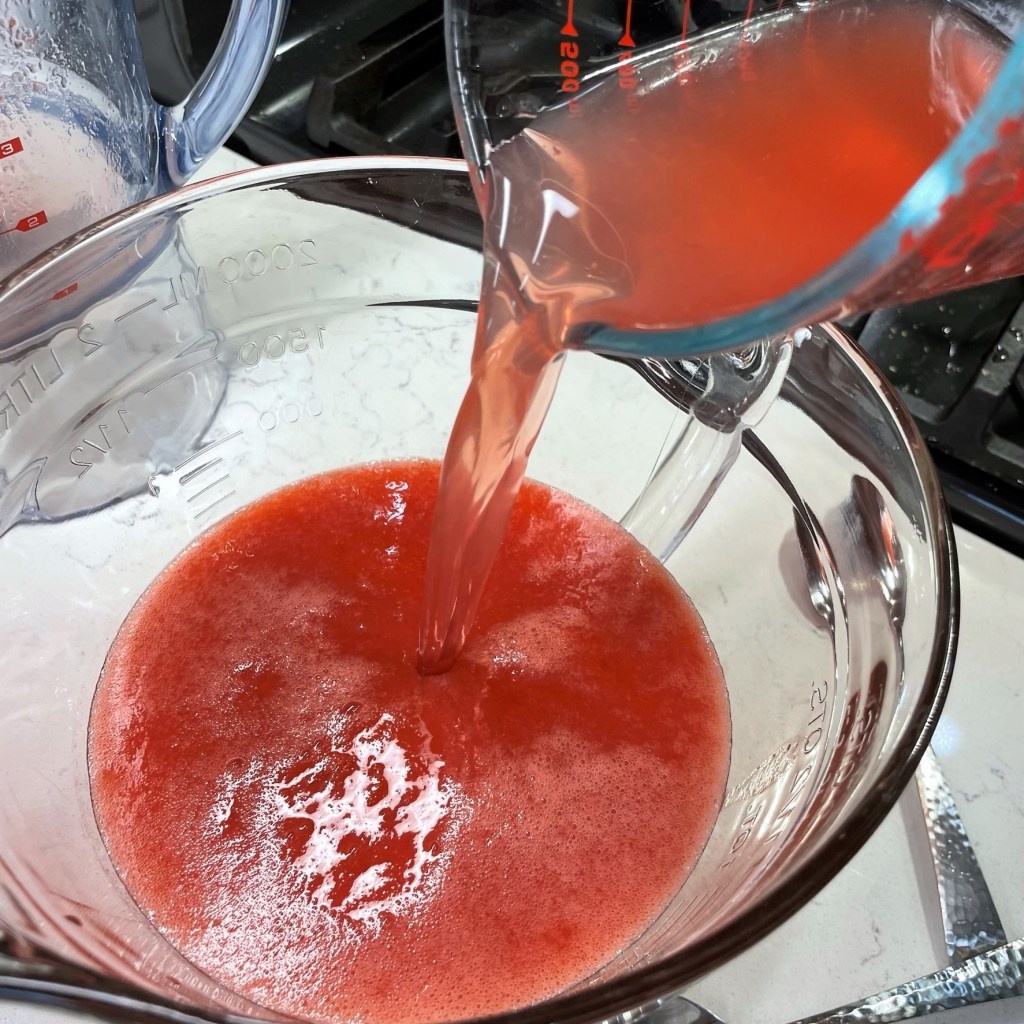
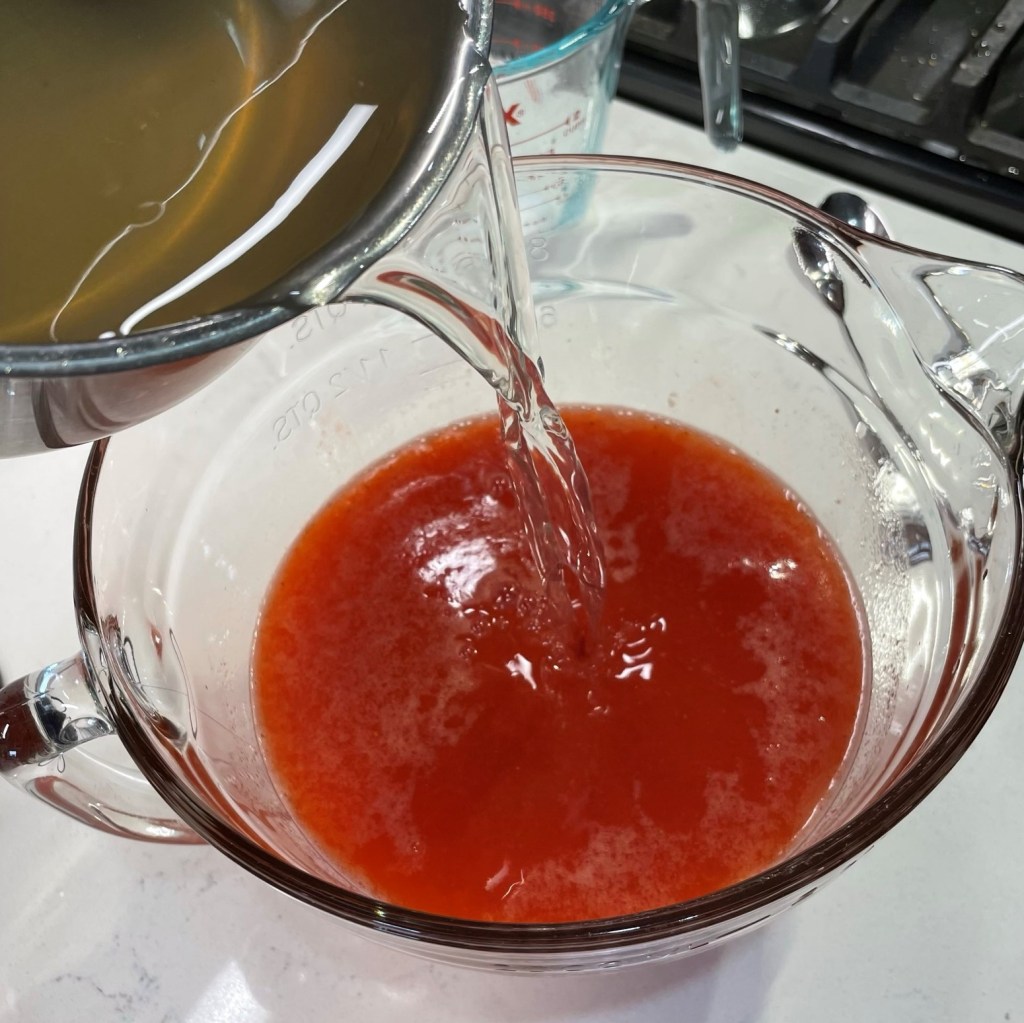
And if you want to elevate homemade lemonade with other flavors, it’s a simple twist of ingredients. For my strawberry-rhubarb version, I made two simple syrups, one infused with the bright citrus flavor of organic lemon peel, and the other with two stalks of cut up rhubarb. Then, I pureed fresh organic strawberries with water, strained out the seeds and combined the whole thing in a pitcher with the juice of six lemons.
This recipe makes a delicious base. Mix it in equal parts with still or sparkling water for the ultimate refresher!
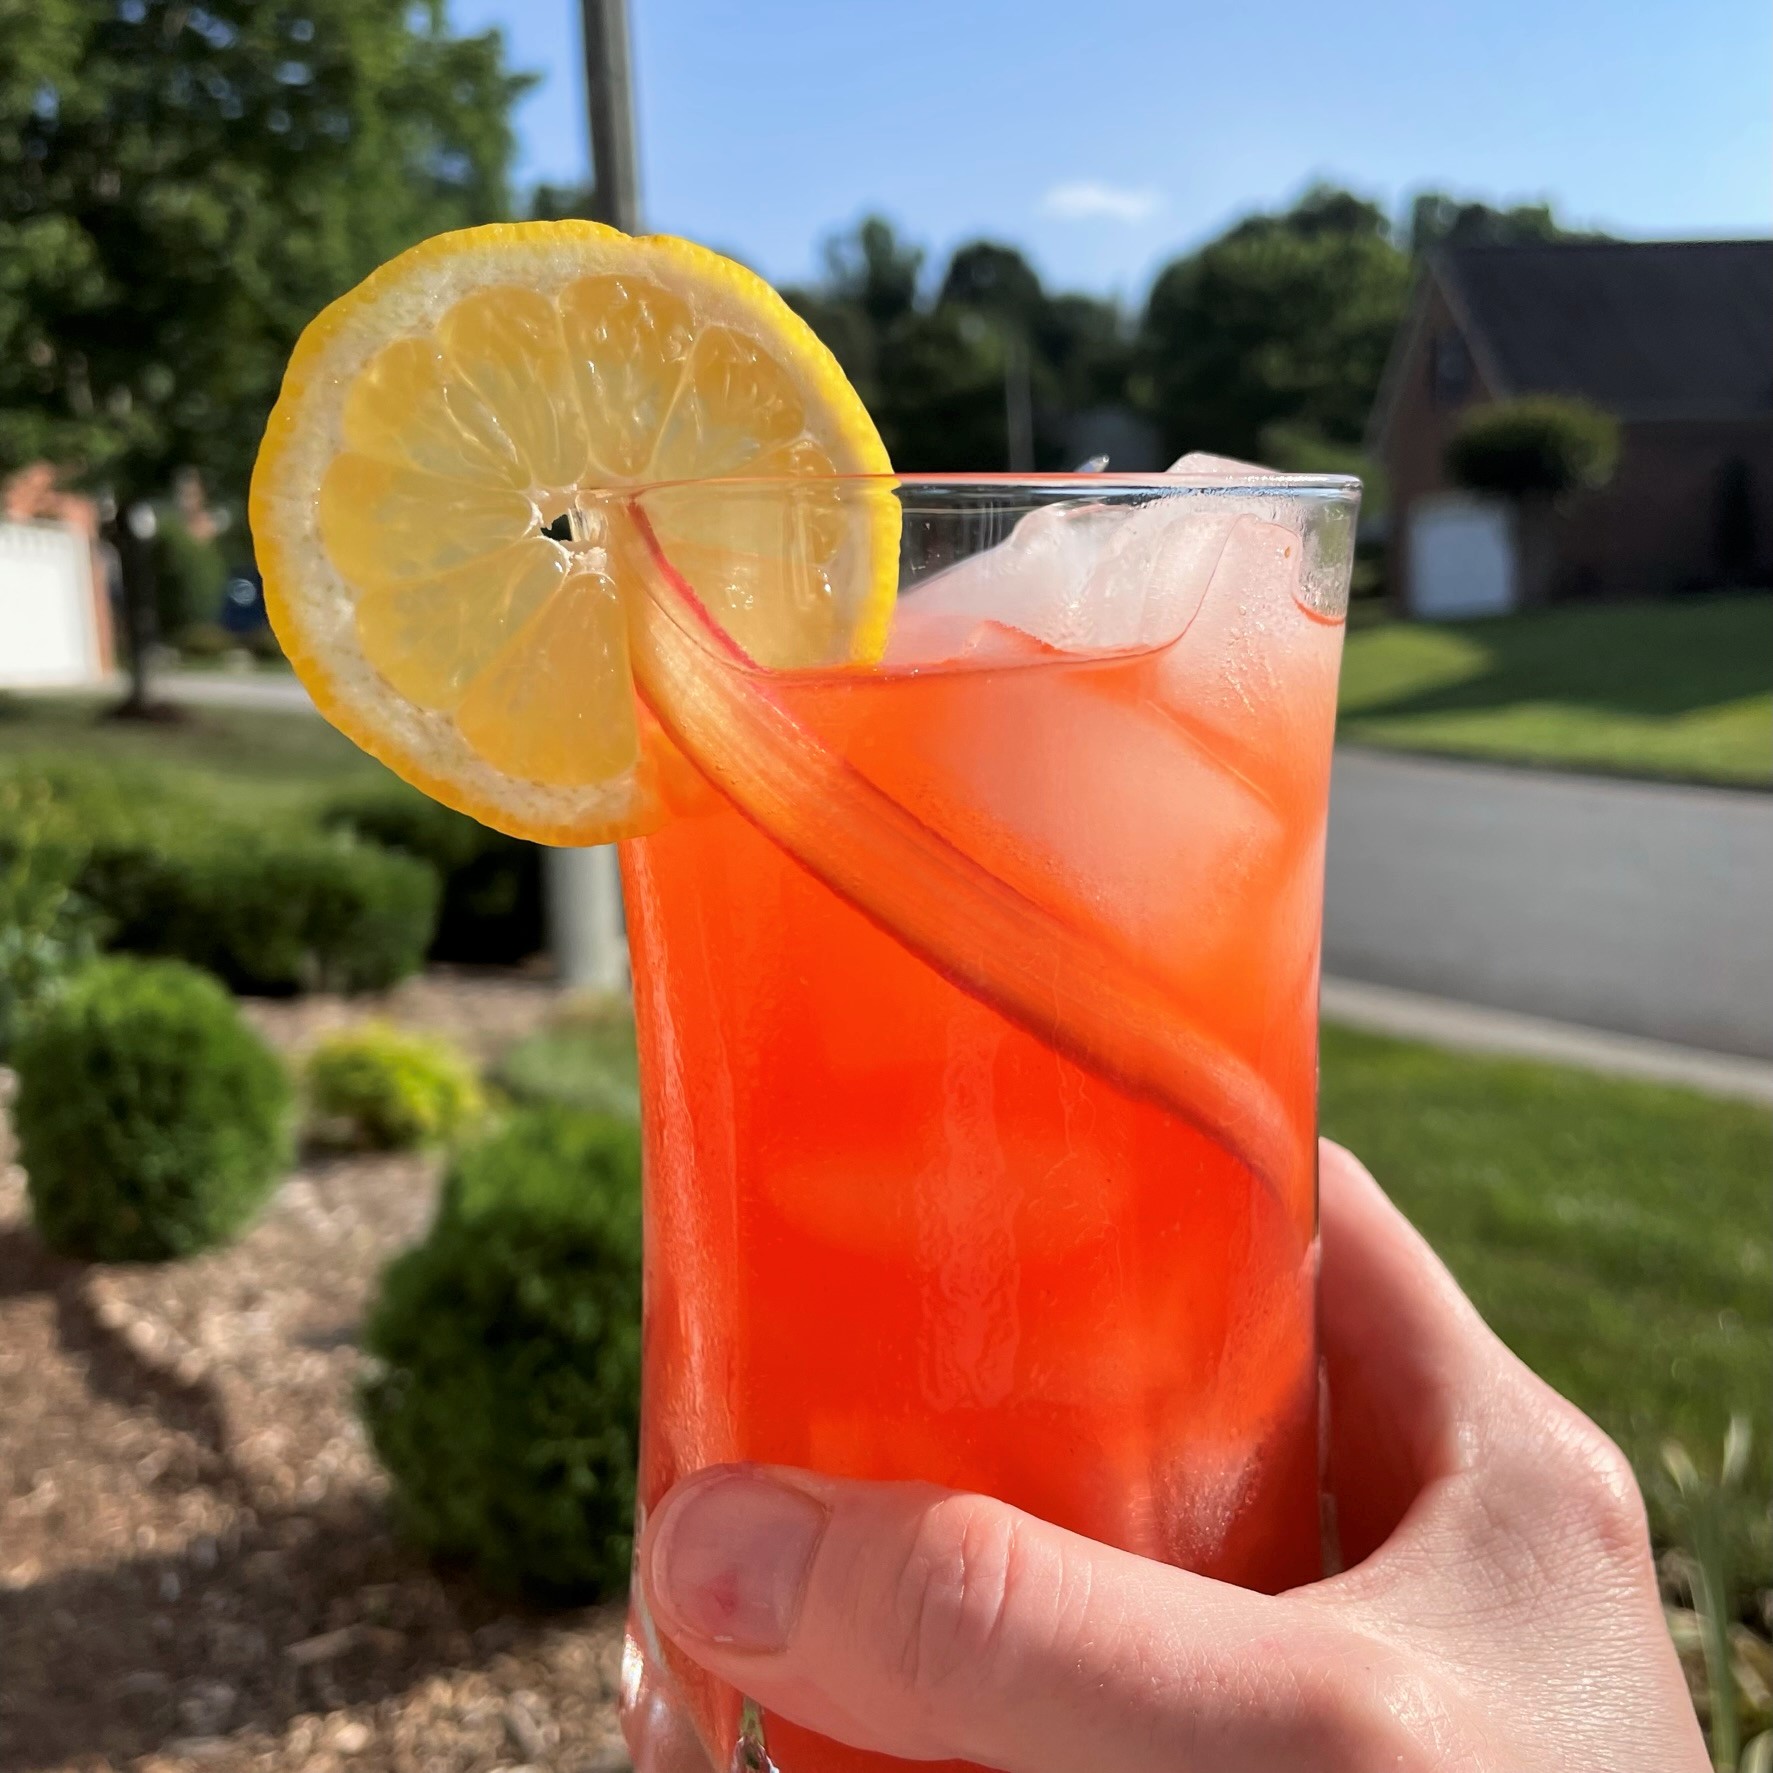
The result is this beautifully hued summer beverage with tart, sweet and tangy flavors that taste all at once like spring, summer and sunshine. The formula is slightly concentrated, leaving me with options for how to serve it. It’s delicious mixed 1:1 with cold water over ice, or 1:1 with chilled sparkling water, and I haven’t tried it yet, but I imagine it would make a great cocktail if shaken with ice and a shot of vodka or blanco tequila. My husband even suggested we blend it with crushed ice for an even more refreshing summer cooler—a slushie.
Here’s how it came together, and I’ll admit that it could have been easier if I had made only one simple syrup rather than two, but there’s a reason it happened that way. I’ll explain in a moment.
Rhubarb is technically a vegetable. Trim and cut up two fat stalks for this recipe.I made my rhubarb syrup first, with water and cane sugar brought to a boil, then steeped until cool.Don’t discard the rhubarb bits. Add them to your morning yogurt or just nibble them as they are!Next time, I would definitely combine the two syrups into one, but I was on a creative roll!Strip the peel from an organic lemon, but avoid the white pith, which is very bitter.Steep the strips of peel in the simple syrup until cool. This helps extract the lemon oils for extra flavor.Clean, halve and juice six average lemons, until you have about 3/4 cup juice. Any time you are using the lemon peel in a recipe, choose organic. The lemons I squeezed for juice were conventional.Add a cup of water to the fresh strawberries, to aid in pureeing them.It only took about 30 seconds for my tall, handsome blender to turn these berries to puree.Strain the puree into a large pitcher bowl, filtering out as many of the tiny seeds as possible.I used my fun new blender to puree the berries, but this would also work fine in a food processor.Strain the lemon juice into the strawberry puree. These flavors are so bright together!The rhubarb syrup adds another layer of “pink.”Finally, the lemon peel syrup, and the pink lemonade base is ready!Putting it all together is simple! Transfer the lemonade base to a bottle or pitcher and chill before mixing it with still or sparkling water.
Bring the heat, summer!
So, why two syrups for this recipe? It wasn’t necessary, and next time, I’d make them together in one batch. Truthfully, I made my rhubarb syrup first, and it was intended for some other recipes, but a story in my news feed last week caught my eye and I took a detour toward this pretty, pink lemonade. The story was about the upcoming “Strawberry Moon,” the full moon tomorrow night that has the distinction of also being a supermoon.
Supermoon occurs when the moon is full at the same time it is closet to Earth in its orbit. Nothing is different about the moon itself, of course, but the combination of its full phase and proximity to our planet give it the appearance of being larger and brighter than a typical full moon.
I am fascinated by the moon, which has tremendous influence over all life—from the ocean tides and reproductive cycles of animals to its effects on the human body and even (or, perhaps, especially) our emotions. Nobody understood these things more than the Native Americans, who are responsible for the names given to the full moons each month. They named the moons based on what was in season, or what was happening in nature at the time of each full moon cycle. Various tribes held this moon-naming practice, but the names that are still used today are mostly attributed to the Algonquin tribe, which made its home in the stretch from New England to the Great Lakes.
Strawberry Moon is the first of three supermoons this year. Next will be July’s Buck Moon (named for the time when male deers’ antlers will be in full growth mode, according to the Old Farmer’s Almanac). And some sources say that August’s full moon also qualifies for supermoon status. That will be the Sturgeon moon, so named for the abundance of sturgeon fish that historically filled the Great Lakes during late summer. That’s three consecutive supermoons, and I think that’s a natural phenomenon worth celebrating.
Want to see the Strawberry Supermoon? This site will help you find the best time for viewing in your area—Moonrise and Moonset Calculator (timeanddate.com)—but if you don’t want to try to interpret the scientific chart for an exact time, just pour yourself a tall glass of strawberry rhubarb lemonade and head outside for a sky check any time after sunset on Tuesday.
I’ve combined juicy strawberries, spring rhubarb and fresh lemon juice, making a beautifully hued beverage with tart, sweet and tangy flavors that taste all at once like spring, summer and sunshine. This is slightly concentrated, leaving me with options for how to serve it. It’s delicious mixed 1:1 with cold water over ice, or 1:1 with chilled sparkling water, and I can’t wait to try it as a cocktail, shaken with a shot of vodka or blanco tequila.
Ingredients
2 1/2 cups filtered water
1 1/2 cups organic cane sugar (more or less to taste)
2 or 3 stalks rhubarb, chopped
Strips of lemon peel from two organic lemons
Juice of 6 lemons (about 3/4 cup)
1/8 tsp. salt
About 1 cup fresh organic strawberries, trimmed and hulled
1 cup water (for pureeing the strawberries)
Directions
Combine filtered water and cane sugar in a large saucepot. Add rhubarb pieces and strips of lemon peel. Heat over medium heat until water comes to a gentle boil, then turn off heat. Stir until sugar fully dissolves. Stir in salt. Allow this mixture to cool to room temperature.
Add strawberries and 1 cup water in the pitcher of a blender or bowl of a food processor. Puree until no visible bits of berry remain. Strain through a mesh strainer over a large pitcher or bowl.
Add simple syrup and lemon juice to strawberry puree. Stir to blend. Chill overnight.
To serve, combine equal parts lemonade base and cold (or sparkling) water and pour over ice.
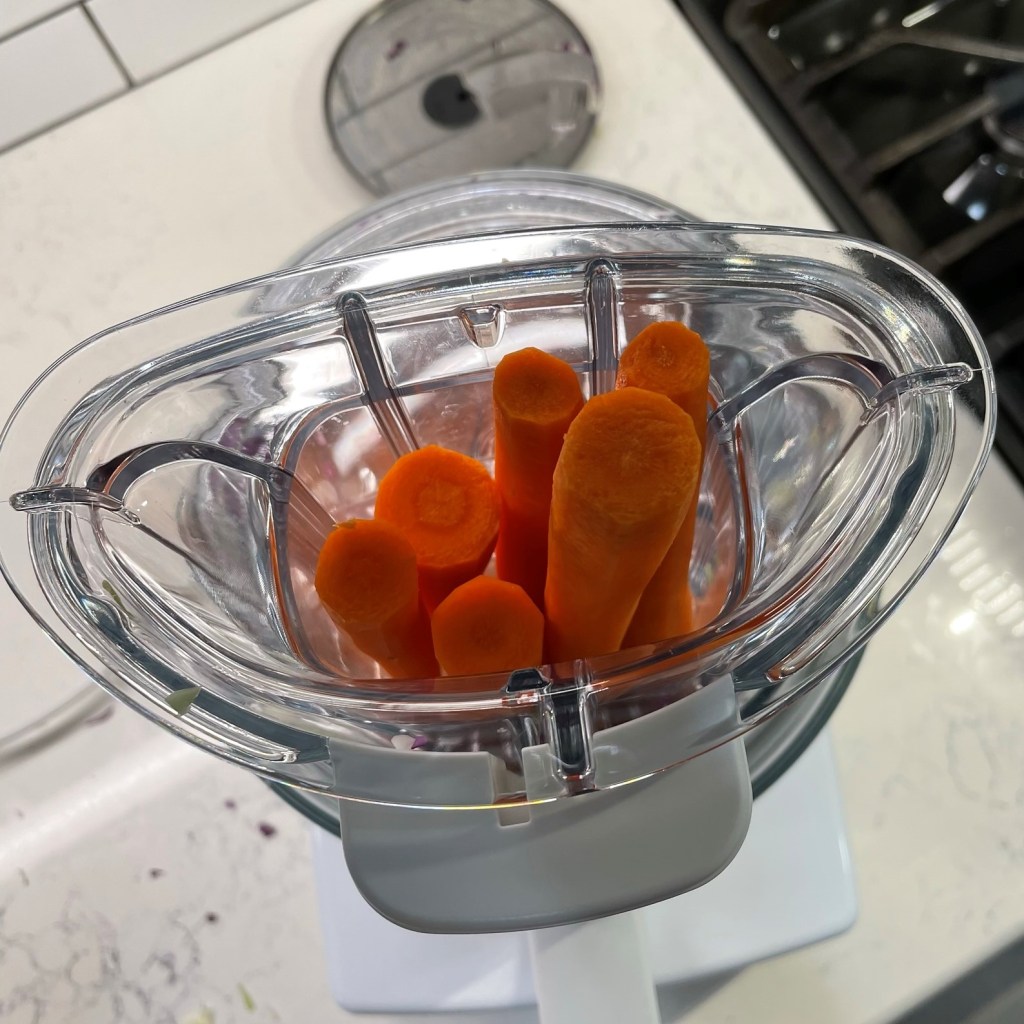
My intention for this post and recipe was to introduce you to my new food processor; I’m excited about my choice of machines and still learning how to use some of the features that are new to me. But I’ll save that for another day, because what this post is really about is a new trick I’ve learned in the kitchen—one that has very little to do with my food processor and everything to do with trying something new with an old tried-and-true: cole slaw.
This time, I’ve changed the dressing again (and I think you’ll love its delicate Dijon flavor), but I’ve also dabbled in a new technique that I read about from one of my newest kitchen idols, J. Kenji López-Alt. I love the way this guy approaches food, always with a “what if” attitude, and after his exhaustive experiments in what he calls “The Food Lab,” Kenji is great about sharing his culinary discoveries with home cooks like you and me. You will find a ton of his recipes on the Serious Eats website, but also on his own YouTube channel, which a basically a rabbit hole of exciting kitchen experiments.
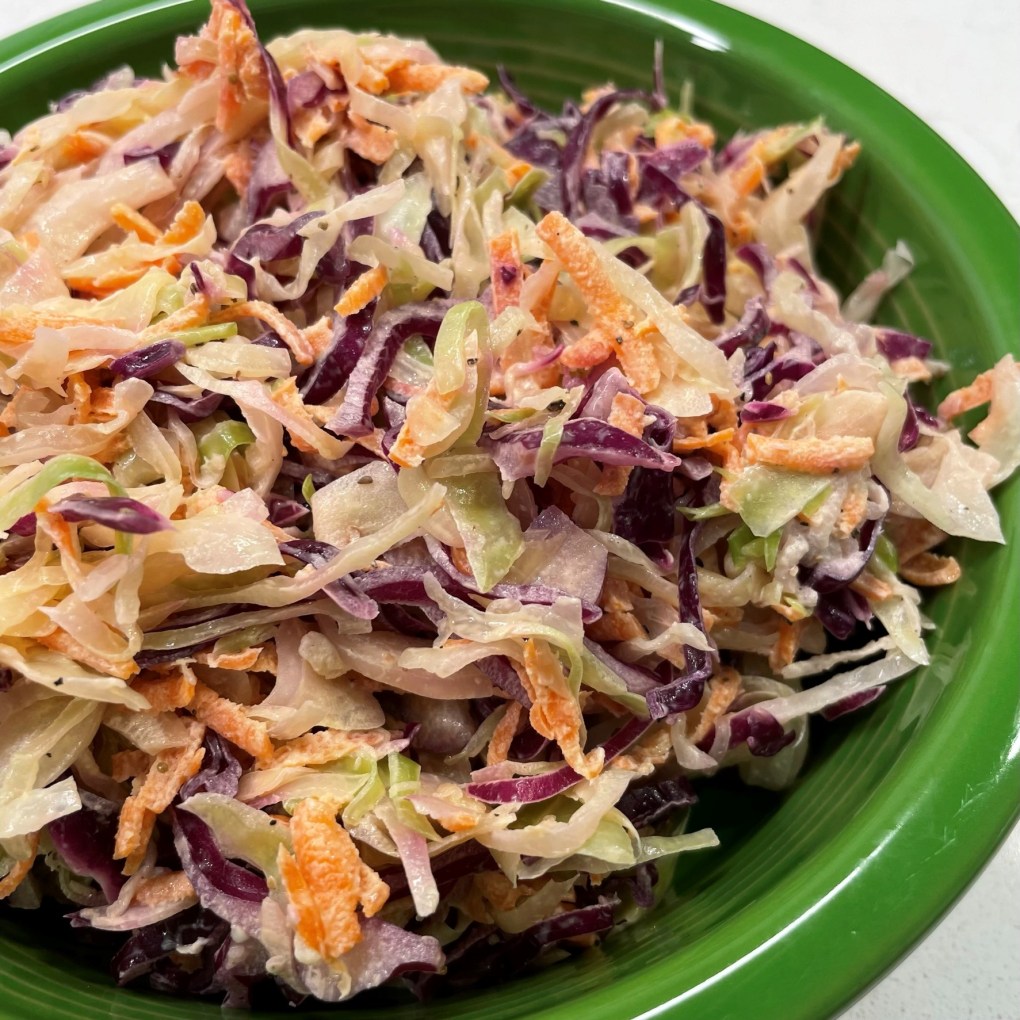
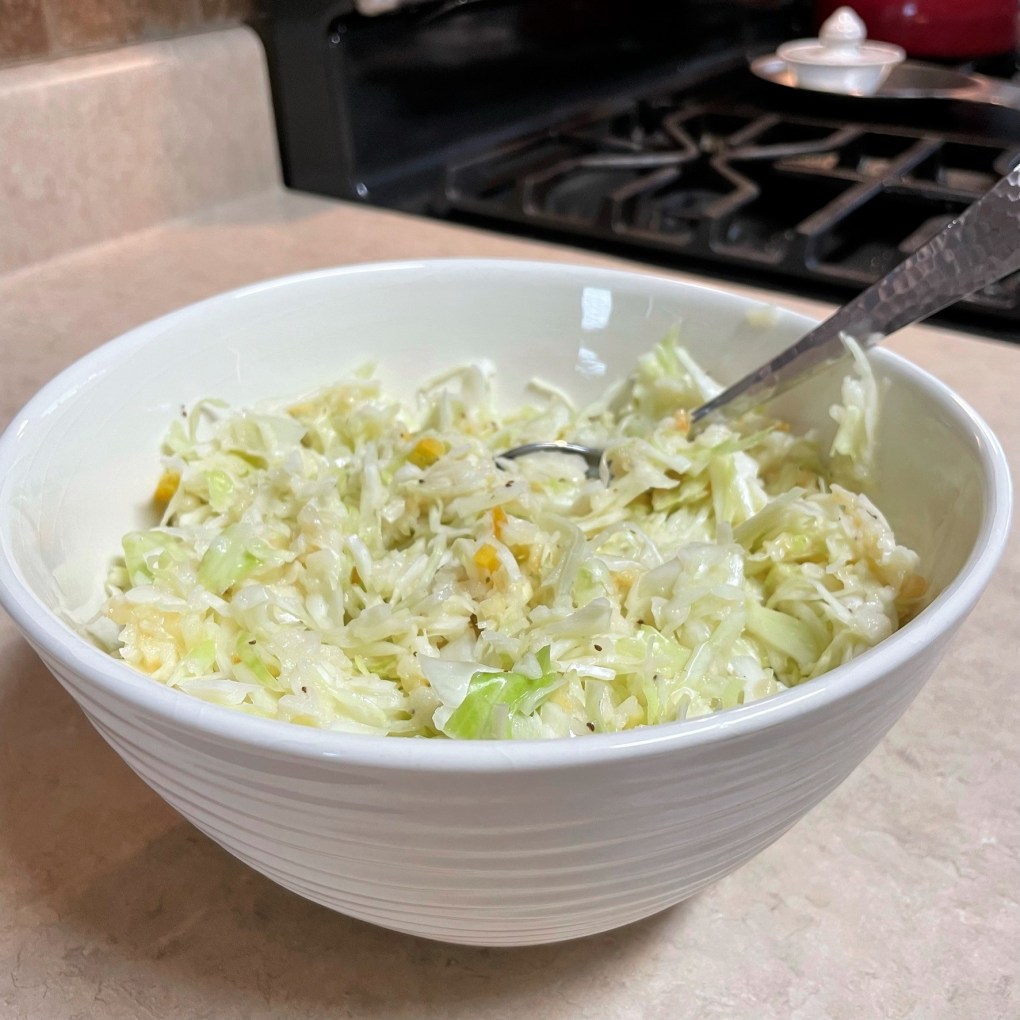
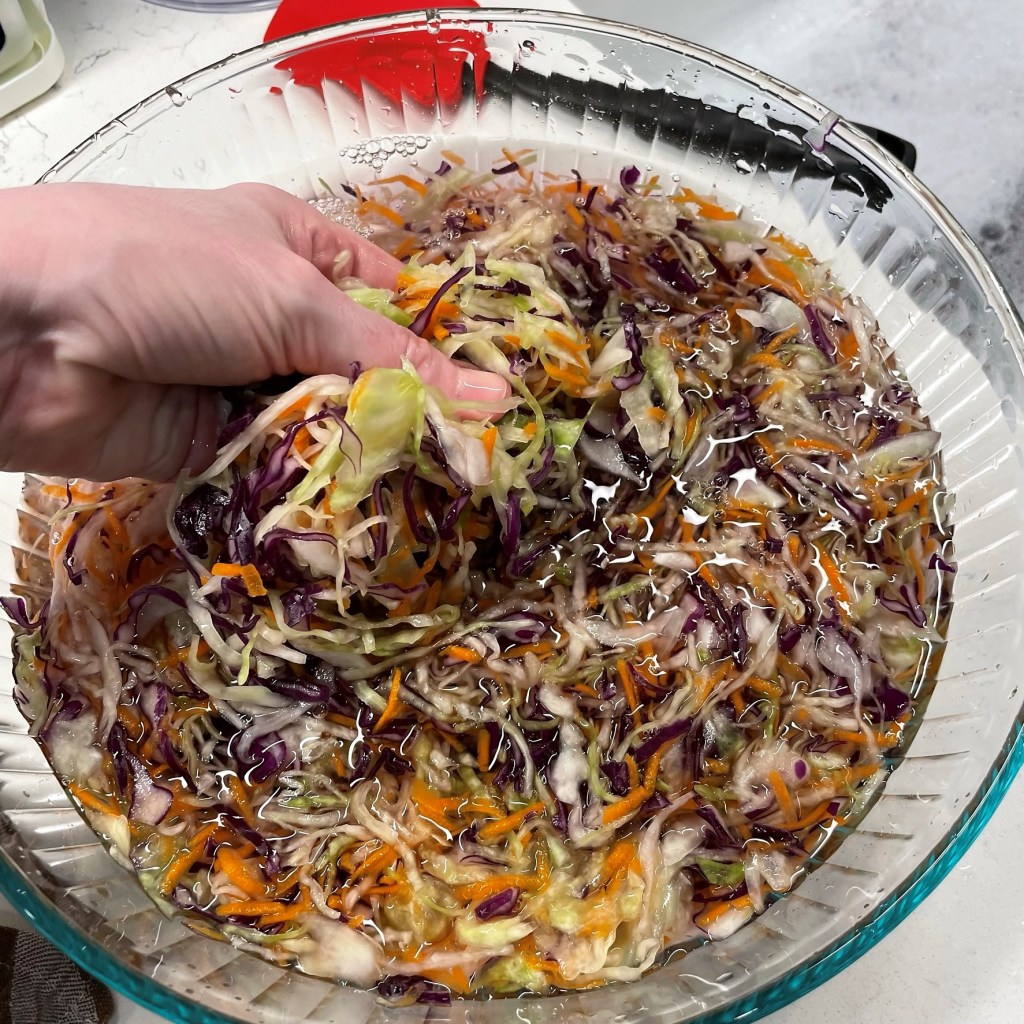
His method for making cole slaw produces a perfectly textured salad that is soft, yet pleasantly crunchy. It has all the right flavor but doesn’t get soggy in the bowl. That has always been the bummer, hasn’t it—to load up your plate with all your summer favorites, only to have everything turn milky and soggy because the cole slaw dressing runs everywhere? Well, friends, Kenji has fixed that! And this game changer is so darn simple. Rather than just adding dressing to freshly shredded cabbage and carrots, there’s an intermediate step of extracting most of the moisture from the vegetables first. Under Kenji’s guidance, I tossed the cabbage and carrots with a very generous scoop each of kosher salt and cane sugar, then rinsed it under cold water (which seemed counterproductive with the intention of removing excess water, but stay with me), and then I dried it before proceeding with the dressing. The results were outstanding, and the fine strands of cabbage held exactly enough dressing for flavor, but not so much to drown it.
The extraction of extra moisture results in a cole slaw that feels almost like sauerkraut, with a squeezed-dry texture, but with all the familiar crunch and flavor you expect.
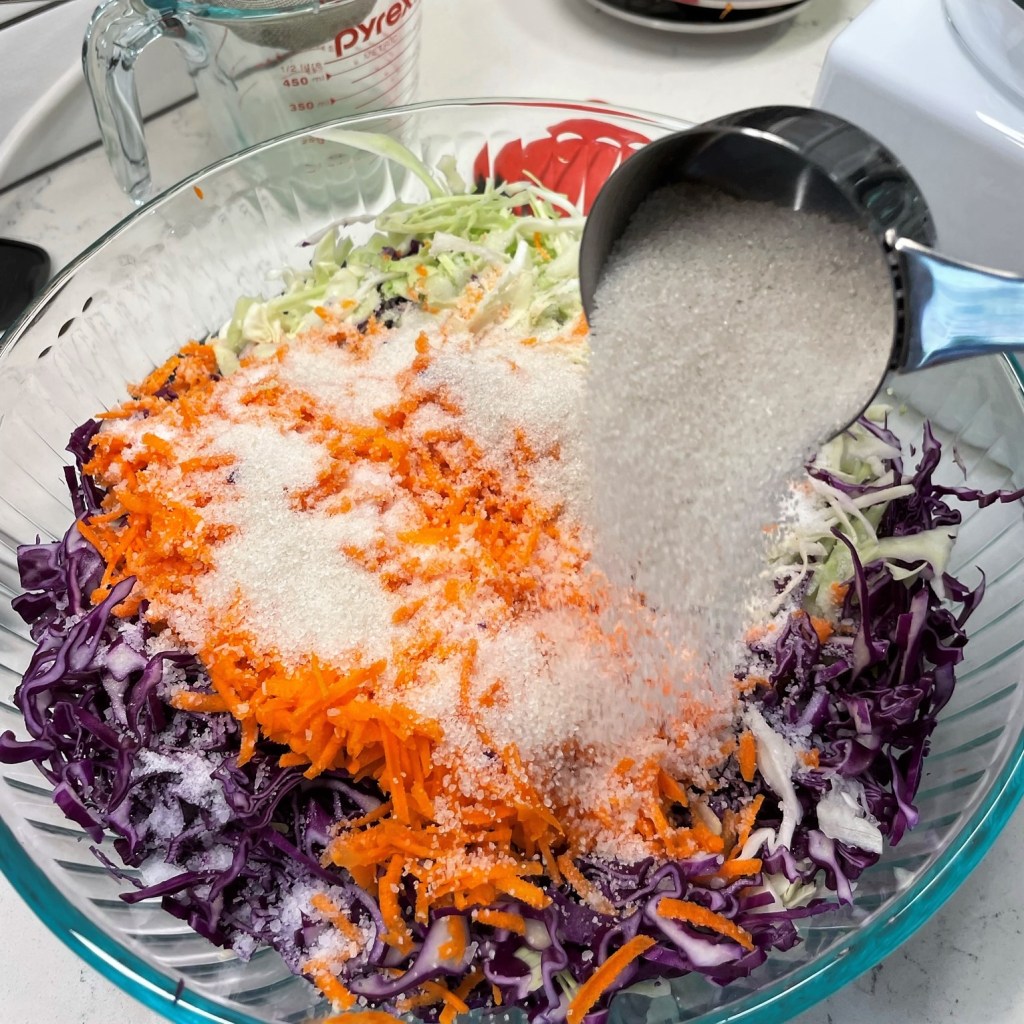
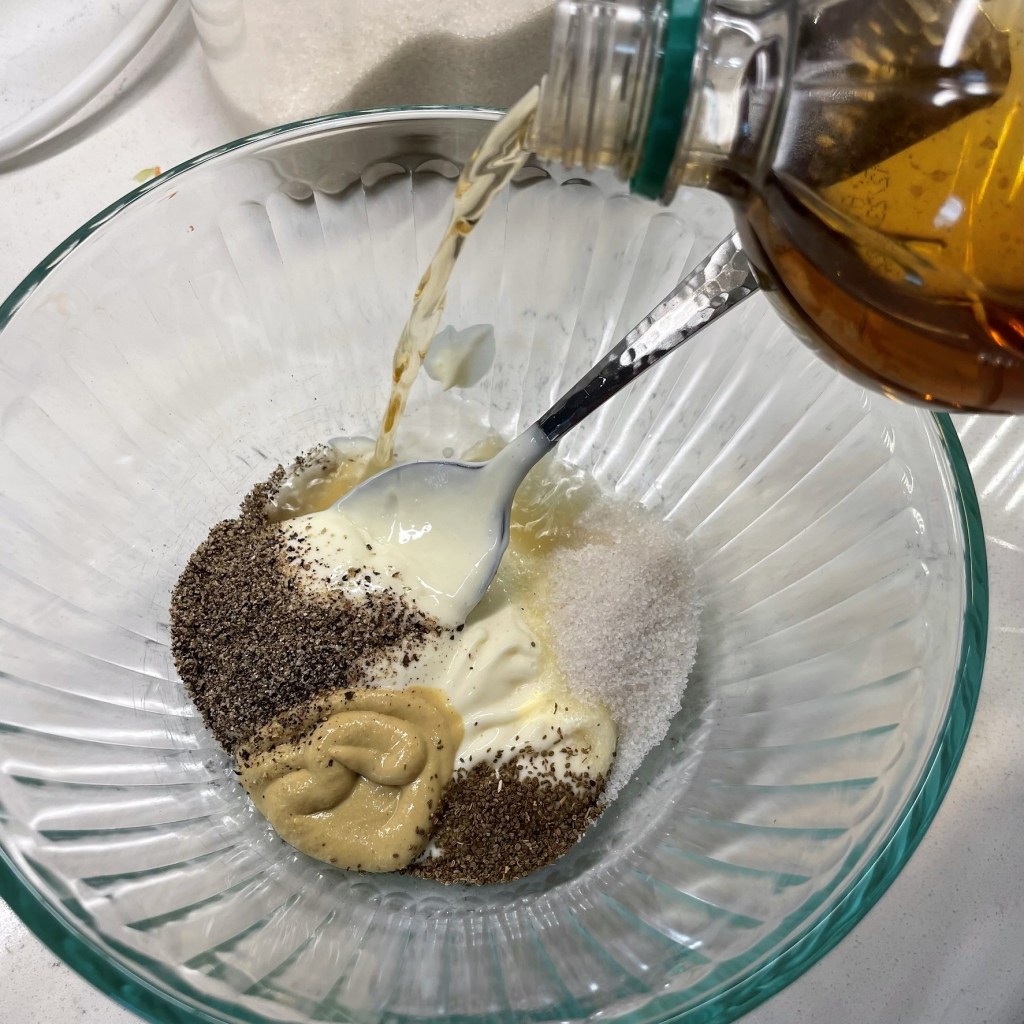
The dressing is a departure from other cole slaw recipes I’ve made, as it has only a slight hint of sugar (a lovely balance to the apple cider vinegar in the recipe). Dijon mustard lends a little sass to the creamy mayo, and I mixed in a dash of celery seed along with drained, finely shredded sweet onion and about two dozen twists of freshly cracked black pepper. Here’s how it goes, beginning with about 8 cups of shredded cabbage and carrots in a very large bowl:
I used my new food processor to shred the cabbage, carrots and onions in this cole slaw. I’ll share more about my new toy in another post. 😉
The shredded onions need to be drained, and I added those to the dressing rather than the salad itself because it blends better that way. I’ll save the onion juice for a bbq sauce.
Here’s where the recipe gets risky. A generous scoop of kosher salt gets sprinkled over the shredded veggies.
And a generous scoop of cane sugar, too. Together, these pantry ingredients are going to pull a ton of excess moisture out of the cabbage.
I know. It looks crazy. But toss the ingredients and let them rest for at least 5 minutes, up to 15.
Look how much liquid was released from my shredded cabbage in just 15 minutes!
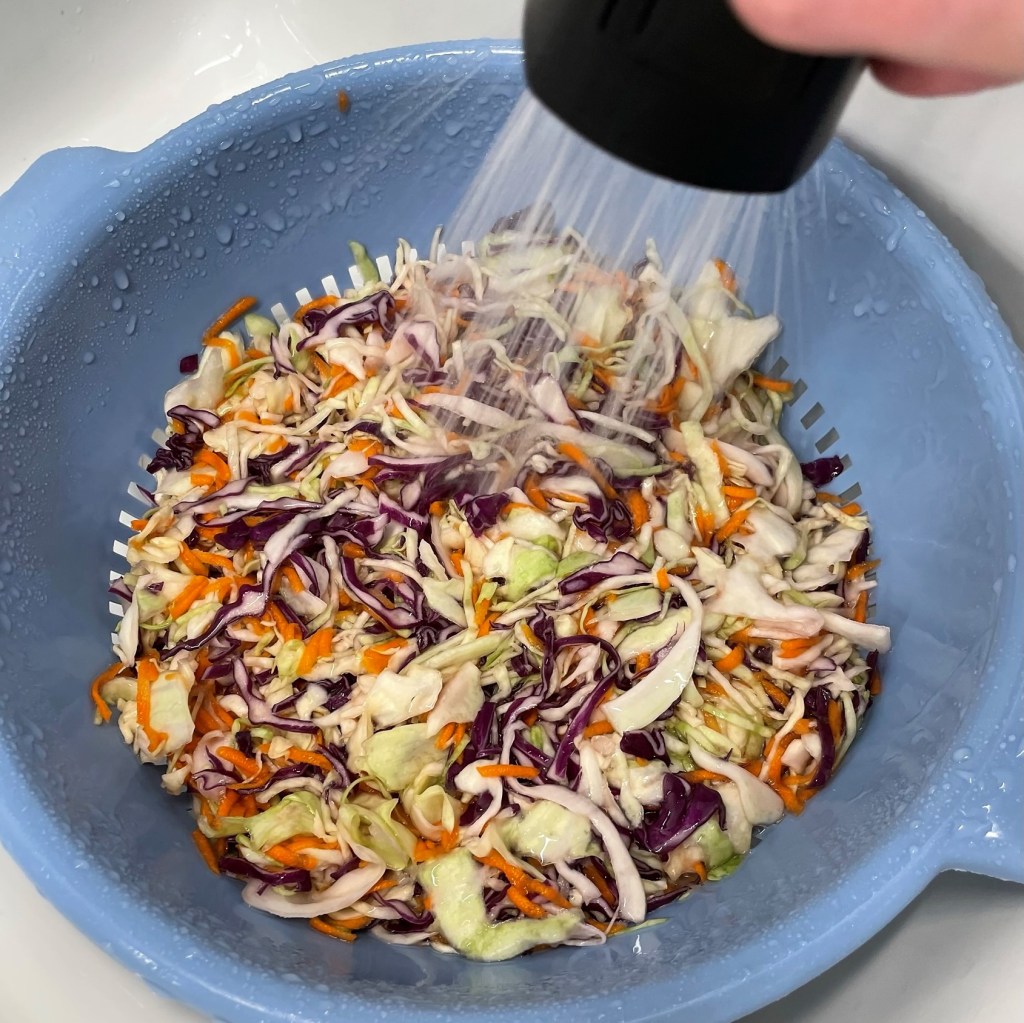
Transfer the cabbage blend to a colander and rinse under cold water for at least two minutes. Toss it gently to ensure even rinsing.
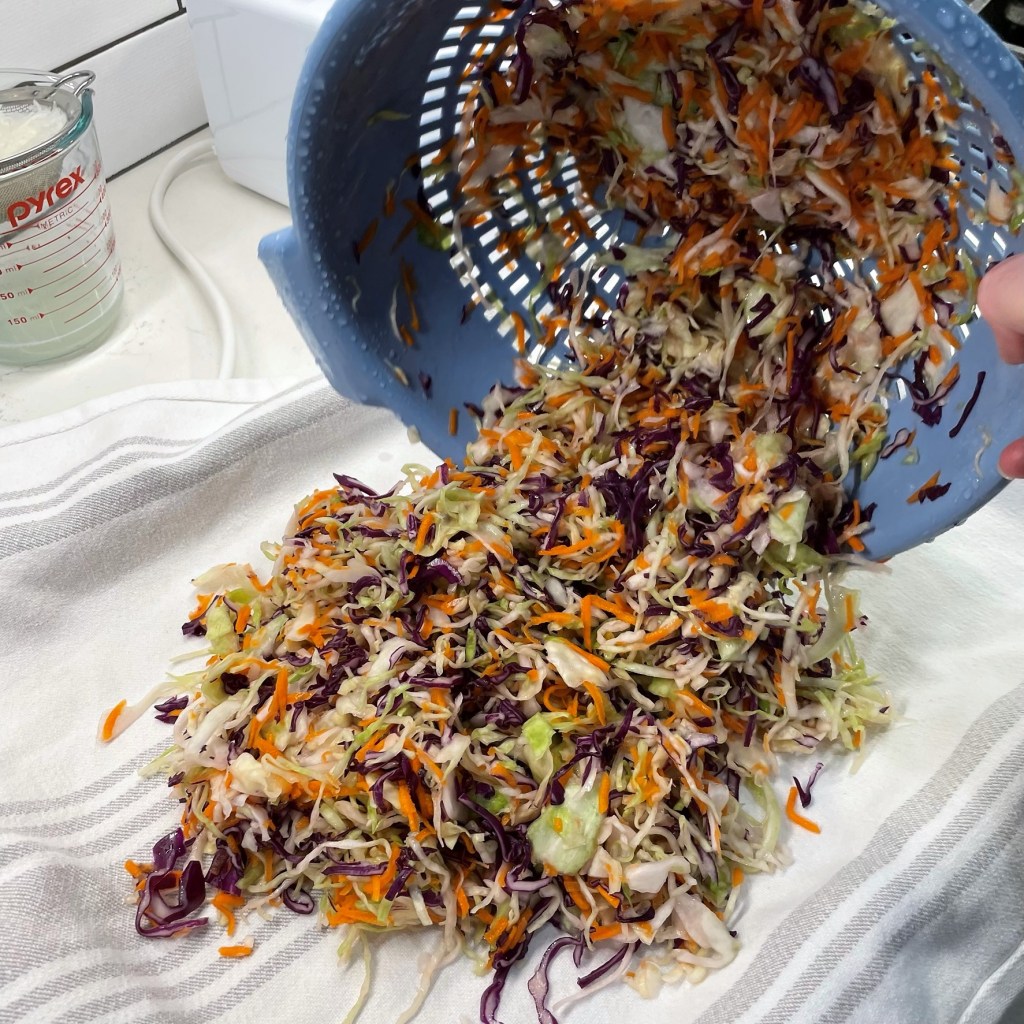
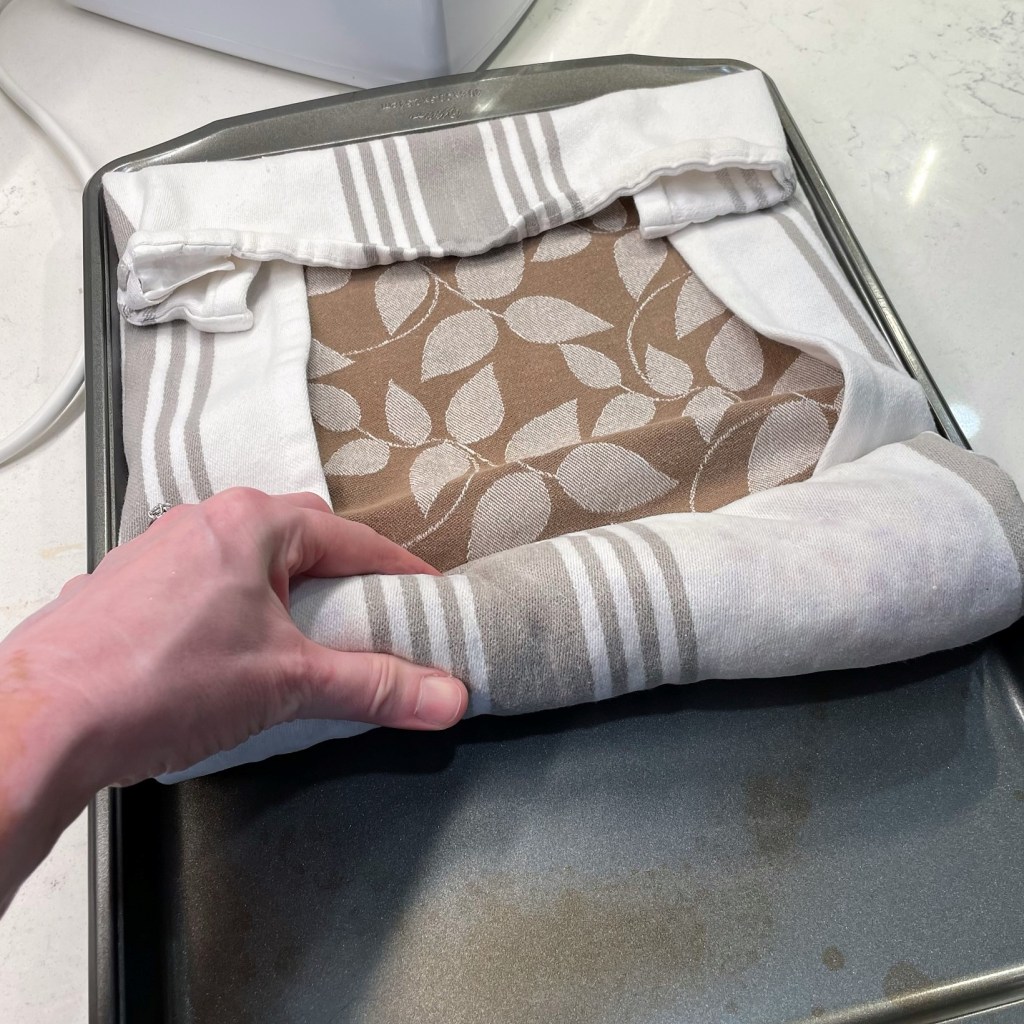
If you have a salad spinner, Kenji recommends drying it that way, in batches. I hate cleaning the spinner, so I went with plan B, spreading the cabbage out onto a clean kitchen towel.
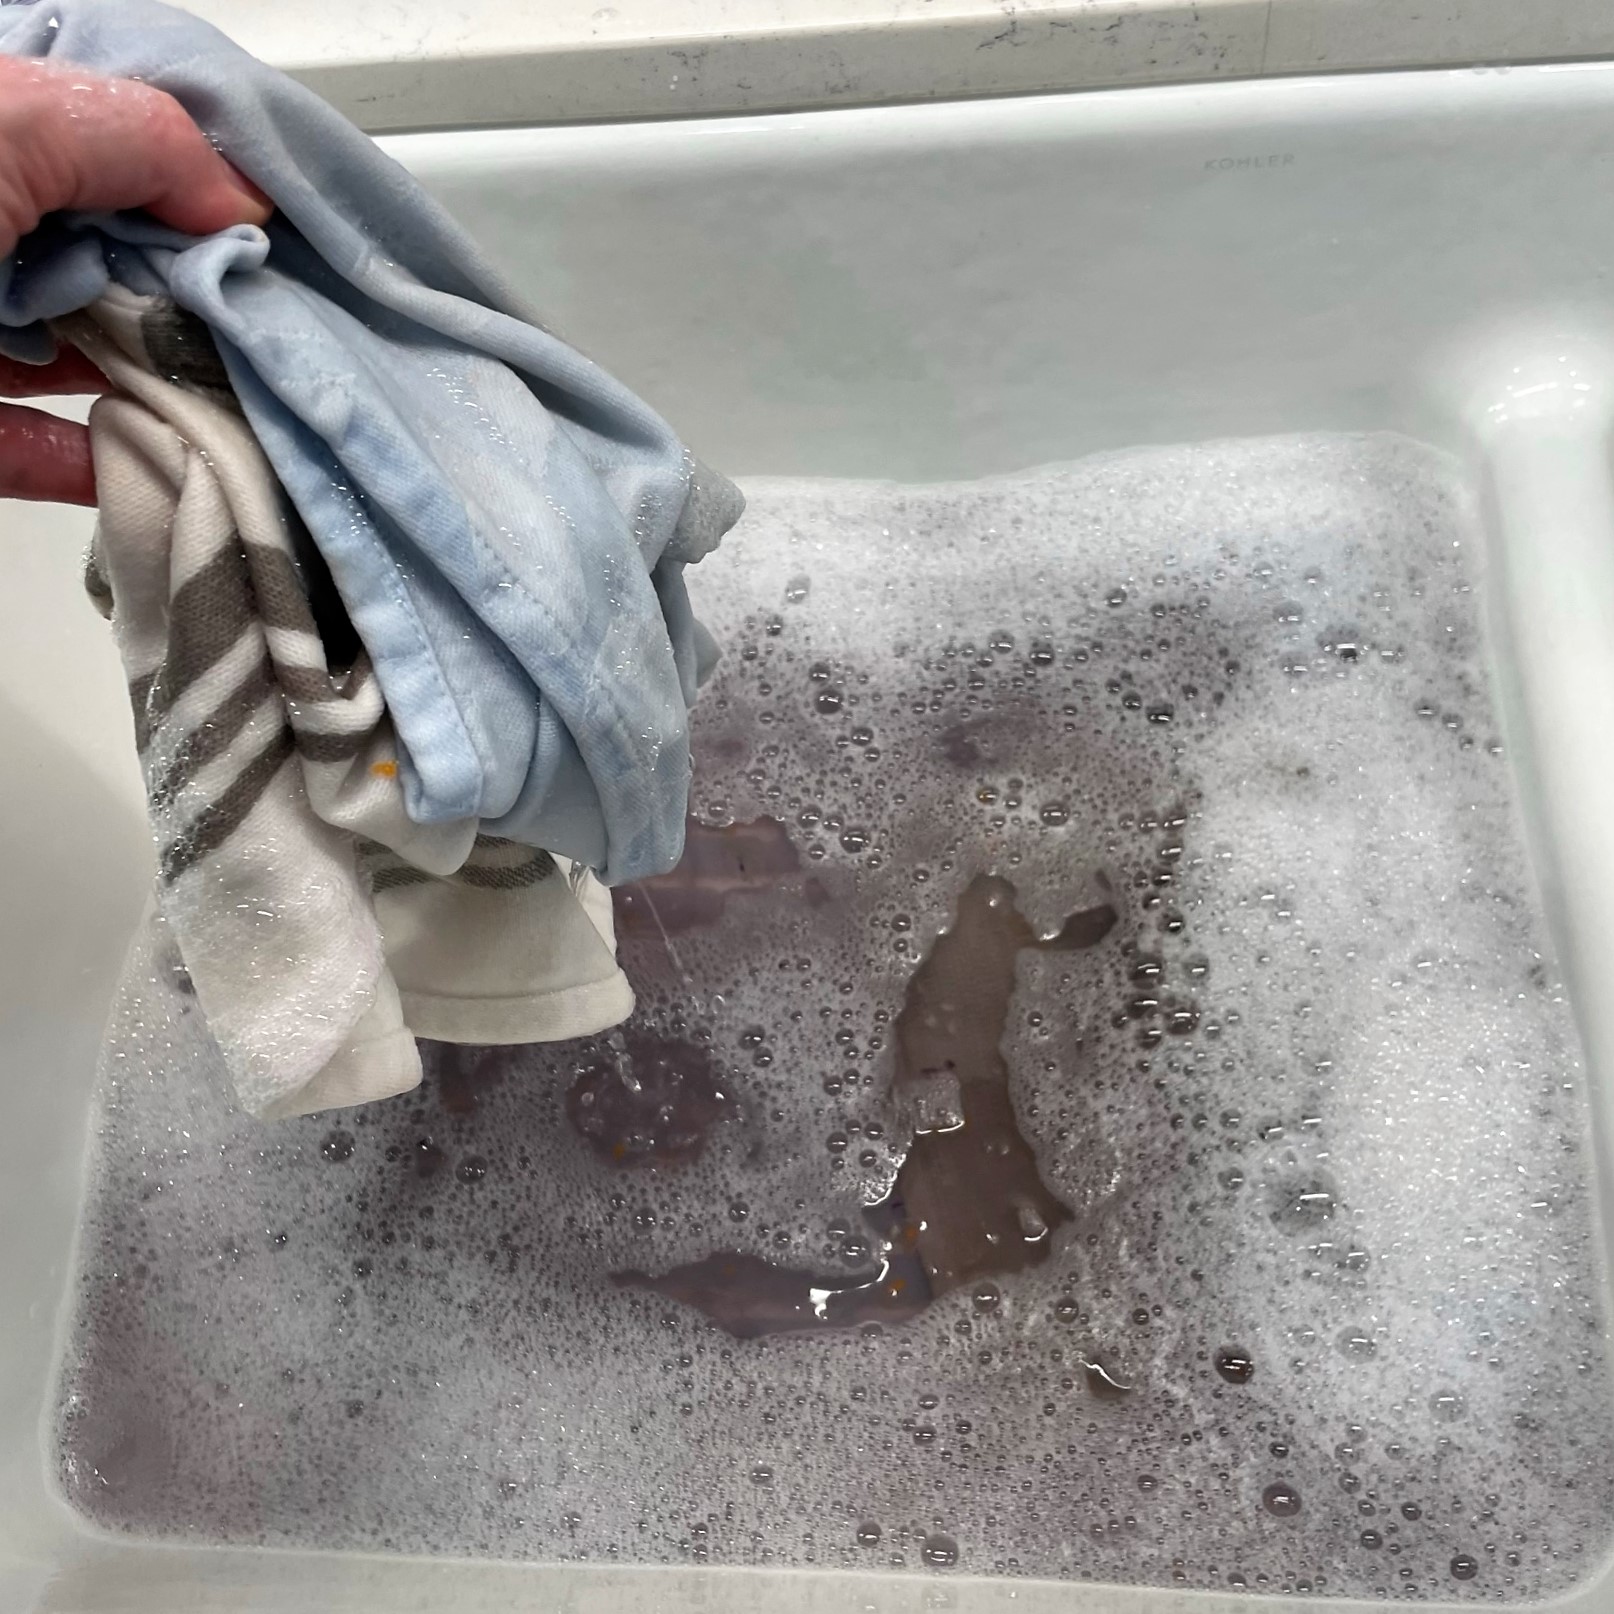
Place another towel over the cabbage and gently wrap it up to absorb excess water. This is a good time to mention that towels used in the kitchen should be washed with unscented detergent and no fabric softener.
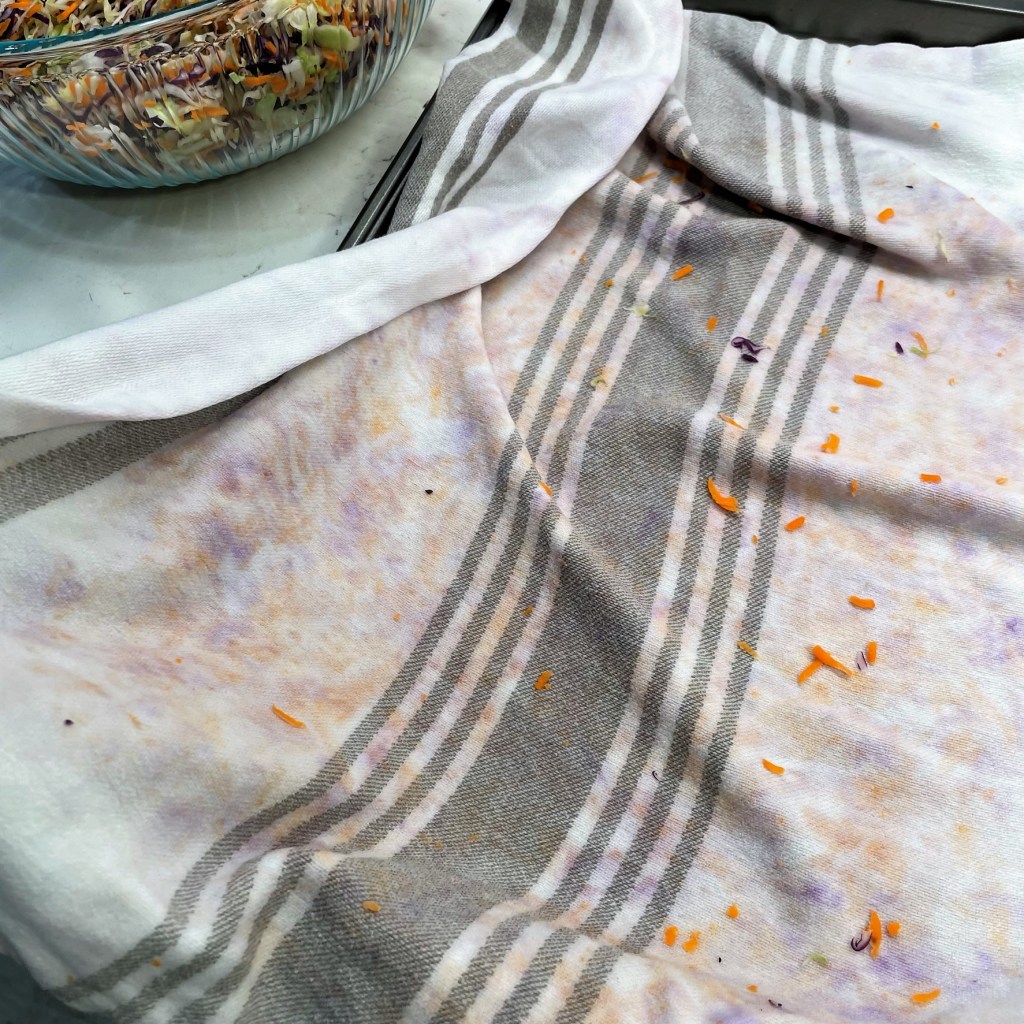
Oh, cool, a tie-dyed kitchen towel! (Don’t worry, it will rinse away.)
After a quick taste, it was obvious to me that I didn’t rinse long enough to remove that hefty dose of salt, so I gave it another rinse, this time in a bowl of cold water.
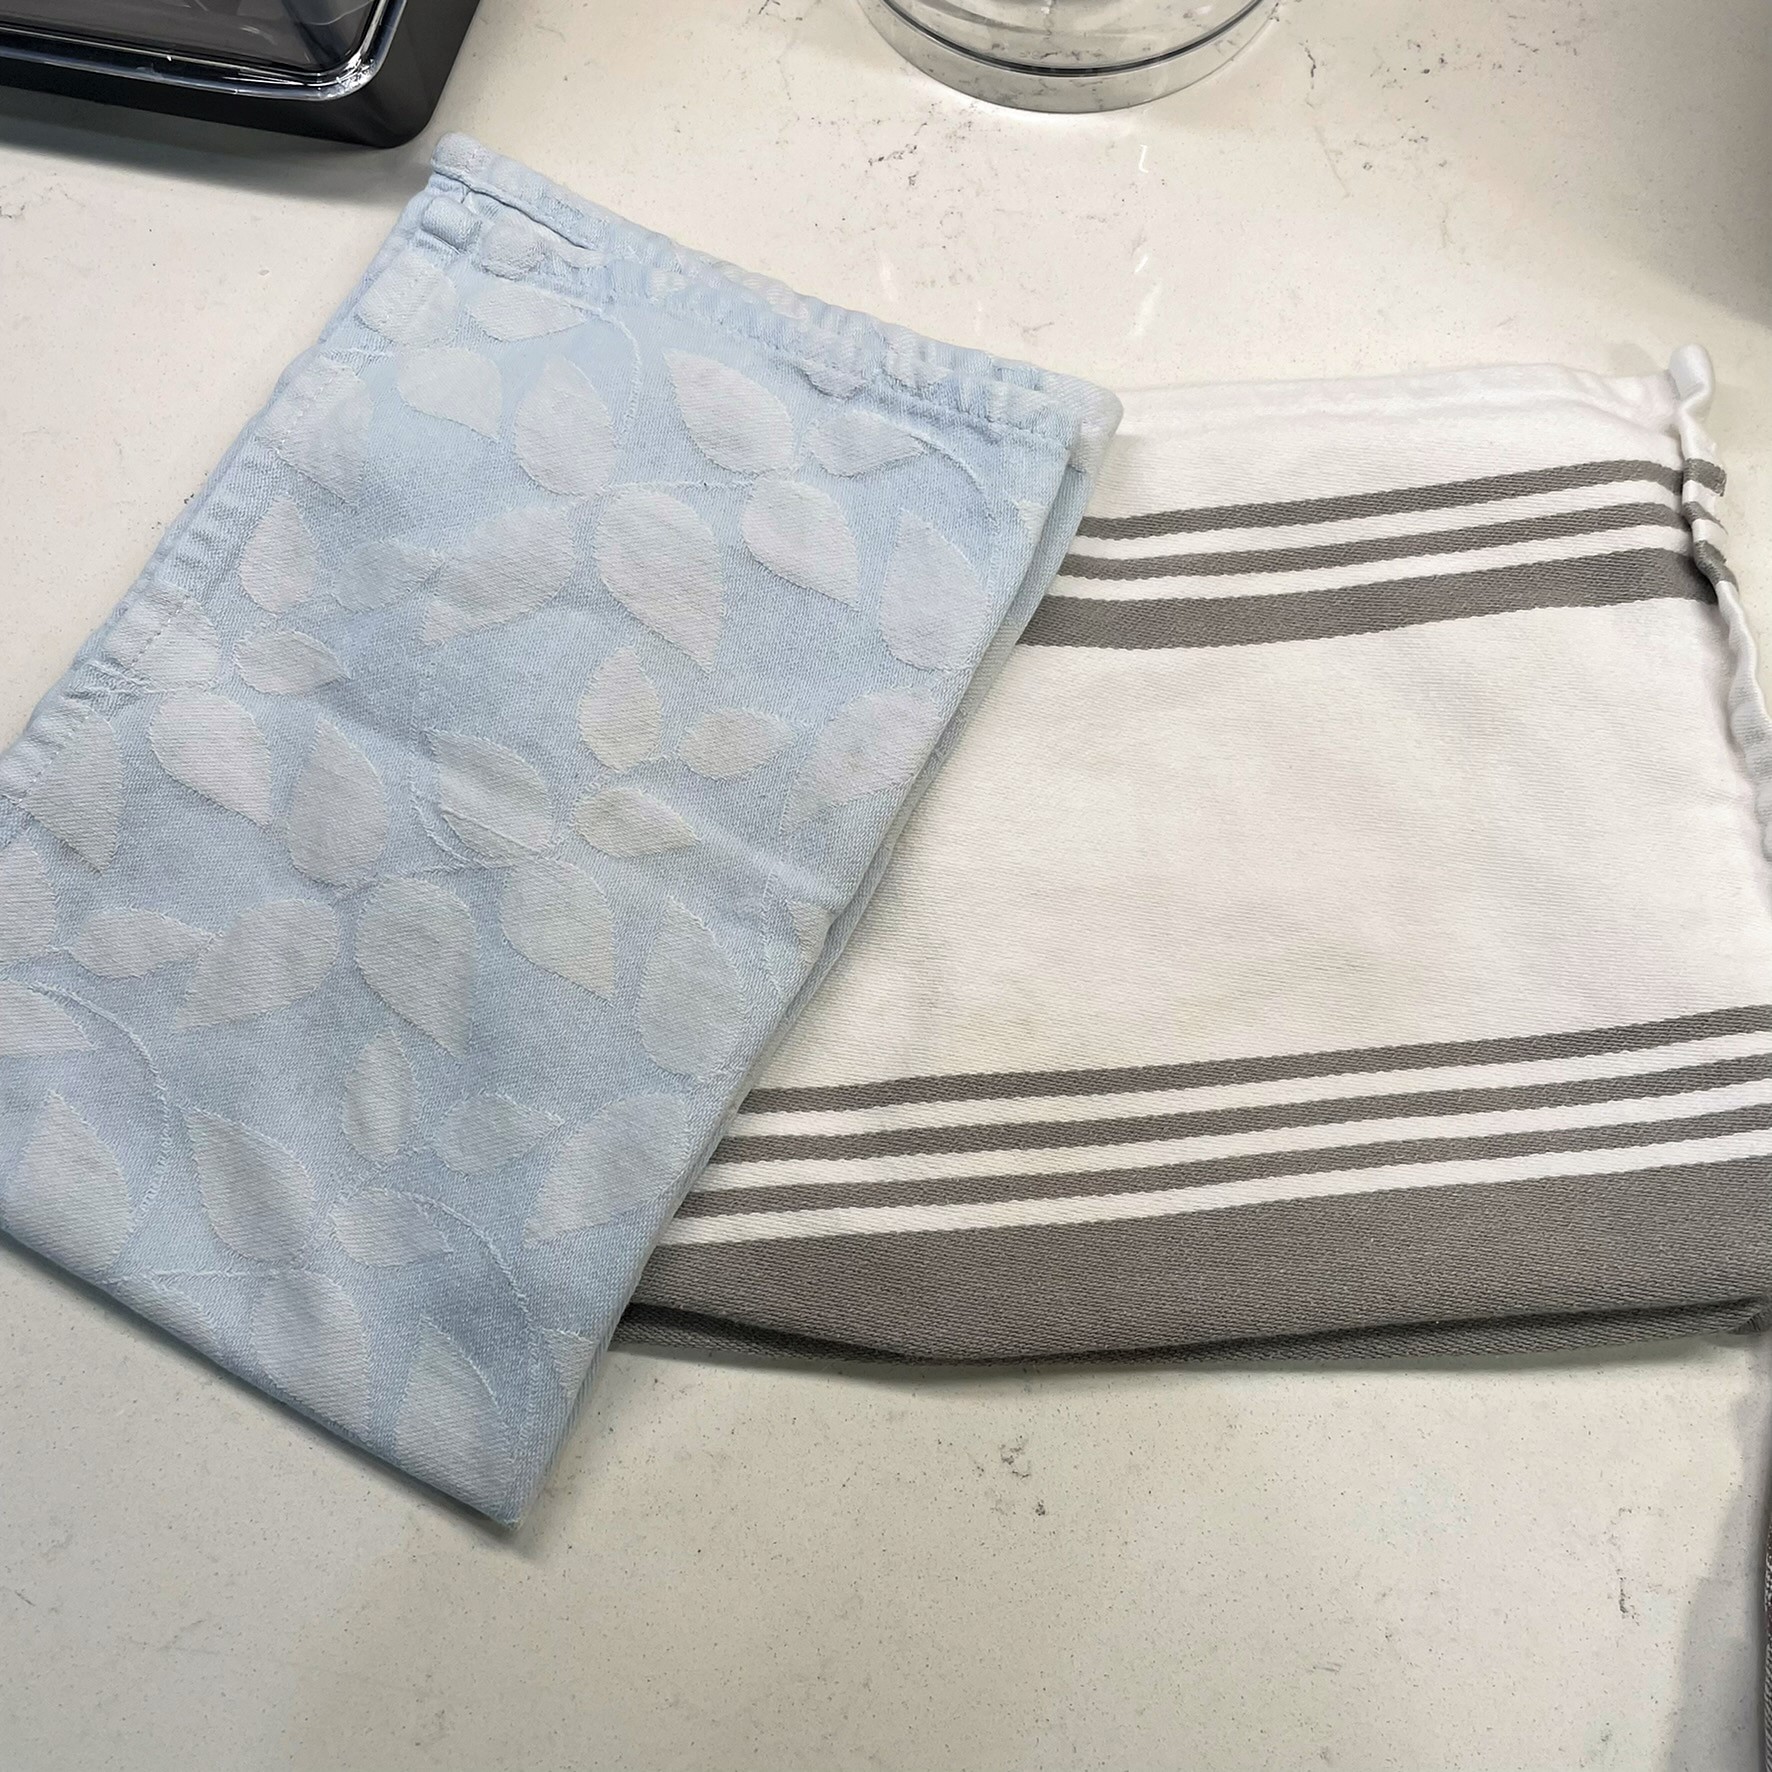
This time, the cabbage tasted perfect, and now I had TWO sets of tie-dyed kitchen towels. 🙂
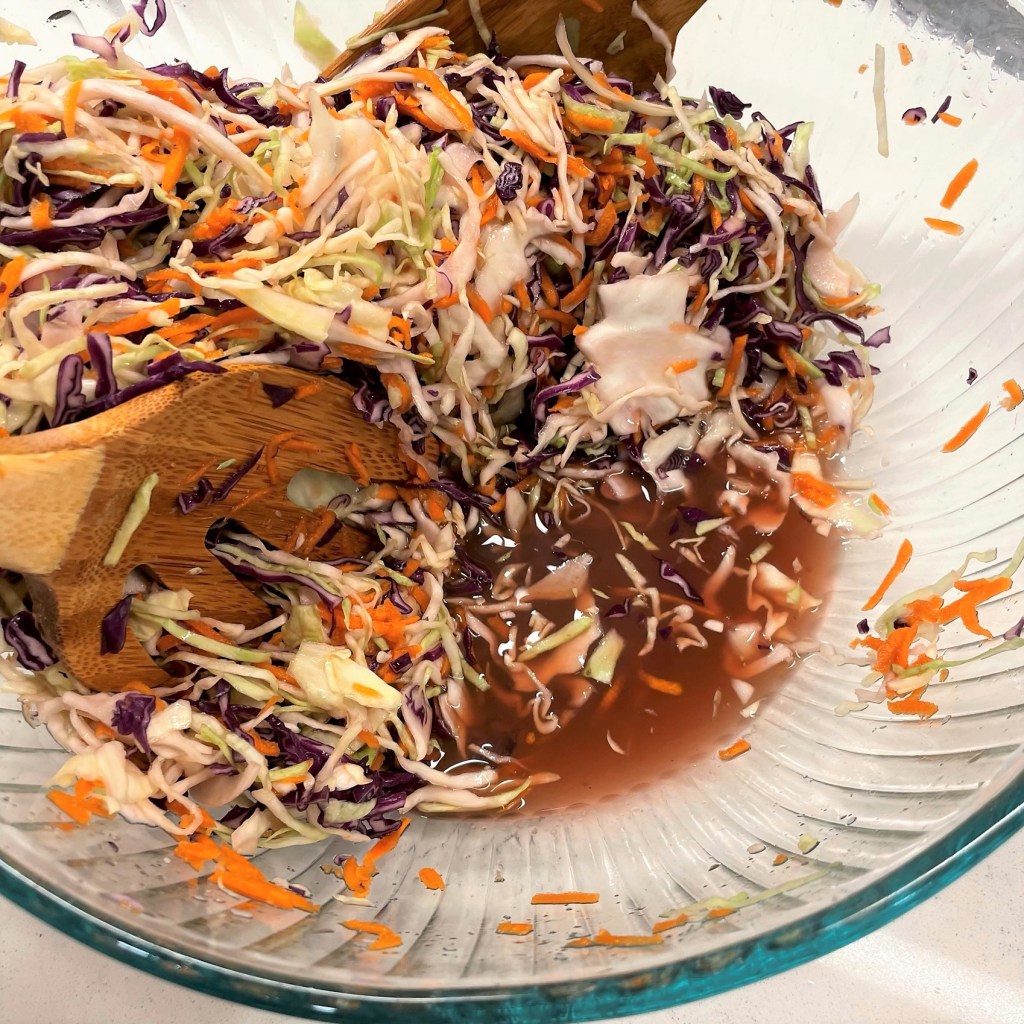
The slaw dressing is mayo, Dijon mustard, a teaspoon of sugar, celery seed, apple cider vinegar and a generous amount of black pepper.
I find that wispy shreds of onion are easier to blend into a salad by way of the dressing, so I added them here.
At first glance, this didn’t seem like enough dressing for so much cabbage, but it was perfect. Who else is in favor of LESS mayonnaise this summer? 🙂
This slaw is perfectly dressed with an even coating of the creamy Dijon dressing, and to show you how un-soggy it is, I transferred it to a fridge bowl using my kitchen tongs. No drips!
This salad was still delicious after several days in the fridge.
At the point that I noticed all that liquid resting in the bowl after the salt-and-sugar bath, it occurred to me that Kenji’s technique for cole slaw is basically the same one I use for making homemade giardiniera, and the outcome is similar, too—crunchy and firm, despite being soaked in a pickling liquid.
My inspiration for both the technique and dressing on this cole slaw comes directly from Kenji, and if you want to get geeked about the science behind it (as I already have), you may do so by linking to this article:
If you’ve never had cole slaw that didn’t water down your entire plate, then this recipe is for you! The intermediate step of “purging” the moisture from the shredded cabbage is changing the game on this favorite summer salad.
Ingredients
8 cups total, shredded green and red cabbage (fresh is best)
3 average sized carrots, peeled and shredded
1/4 cup kosher salt (for purging)
1/3 cup cane sugar (for purging)
Ingredients
scant 1/2 cup mayonnaise
2 Tbsp. apple cider vinegar
1 Tbsp. prepared Dijon mustard
1 tsp. cane sugar
1/2 tsp. celery seed
1 heaping teaspoon freshly ground black pepper
1/2 medium yellow or sweet onion, finely shredded and drained
To make this cole slaw, you will need a large colander for draining the cabbage, and a salad spinner or clean, unscented towels for eliminating the excess moisture.
Directions
Combine the shredded cabbage and carrots in a large bowl, with extra room for tossing. Pour the kosher salt and cane sugar all over the shreds and toss with salad forks or your clean hands to distribute throughout the cabbage mixture. Allow it to rest at least 5 minutes, or up to 15 minutes. The salt-sugar blend will coax the excess moisture from the cabbage.
Transfer the mixture to a colander placed in the sink. You should notice a significant volume of liquid in the bottom of the bowl. Rinse the mixture really well under cold, running water. Toss it thoroughly as you rinse, and continue for about two minutes to get all the excess salt removed. Taste a piece or two. If they are too salty, rinse another couple of minutes.
To dry the cabbage, use a salad spinner (in batches) or line a baking sheet with a clean kitchen towel or layers of paper towels. Place the cabbage on the towels, cover with another towel (or more layers of paper towels) and press heartily to soak up the moisture. I used kitchen towels and gently rolled up the cabbage to squeeze out the excess water. Transfer the cabbage to a large bowl for dressing.
Combine the dressing ingredients, stirring in the drained, shredded onion after mixing. Pour over the cabbage blend and toss to coat.
Have a safe Memorial Day weekend! And if you’re wondering what happened to my tie-dyed towels, never fear:
I swished them around in the sink, filled with hot soapy water. All the purple and orange colors went down the drain!Ready for the next kitchen experiment!
My taste for chocolate has evolved exponentially since childhood. The candy bars I loved back then—Kit Kat, Snickers, Mounds and Almond Joy were some of my favorites—all fall a little flat now that I have experienced fine, artisan chocolates. After you develop a palate for high quality, single-origin chocolate, it’s tough to go back. But occasionally, nostalgia sneaks in and makes me crave a taste of yesteryear, and that’s what happened when I had to reach past a jar of unsweetened coconut to get to my go-to brownie mix.
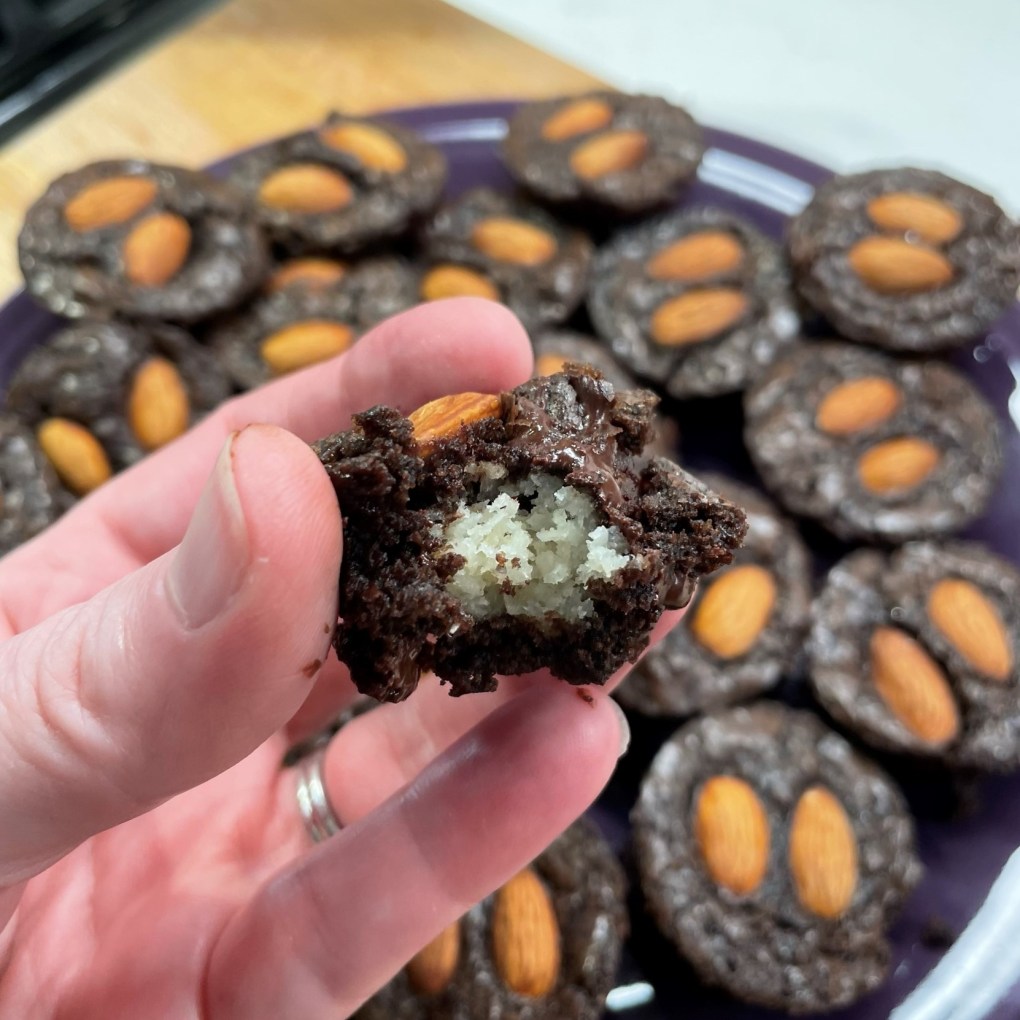
Why couldn’t I turn my brownies into a play on an Almond Joy candy bar, I thought, but with an elevated presentation and more texture? I reached for almonds, too, and had only one dilemma—how to incorporate the coconut so that it didn’t get lost into the brownies. I didn’t just want the flavors of an Almond Joy to be present, I wanted it to look kind of like an Almond Joy candy bar, too, and that meant I could not just add coconut to the brownie mix. No, I needed to create a filling that would be enveloped inside the brownie, and I wanted it to be bite size with two almonds, just like the candy bar.
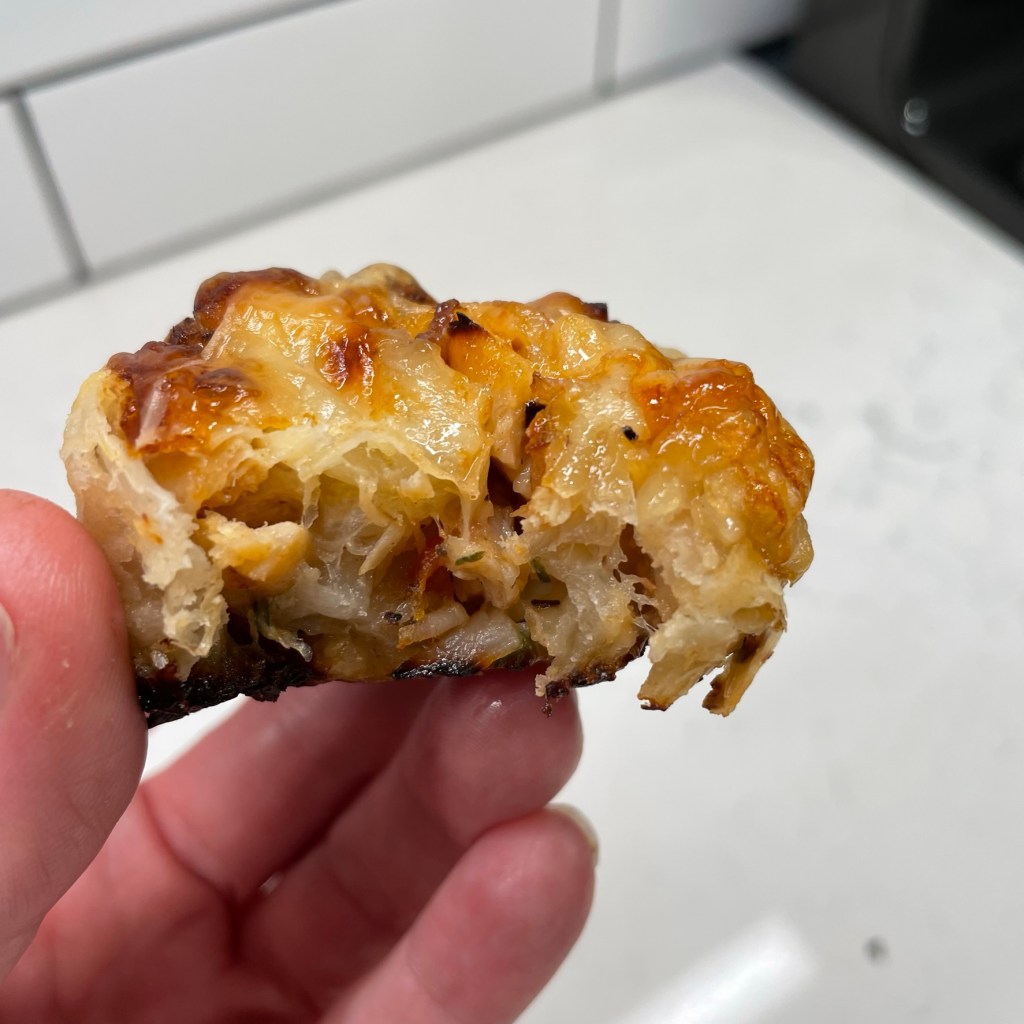
These miniature, two-bite brownies were a home run!
I found a recipe on Pinterest for a coconut filling intended for layer cakes, and as I considered the steps of cooking the milk and sugar together until it was dissolved and thickened, it occurred to me: isn’t that basically sweetened condensed milk, and why not just use that? It was perfect for transforming plain, shredded coconut into a thick, sticky, coconutty filling.
I love this new Eagle brand condensed milk in a pouch. It’s perfect when you only need a small amount. Use enough to hold the coconut together. If your spoon stands upright, it’s good!
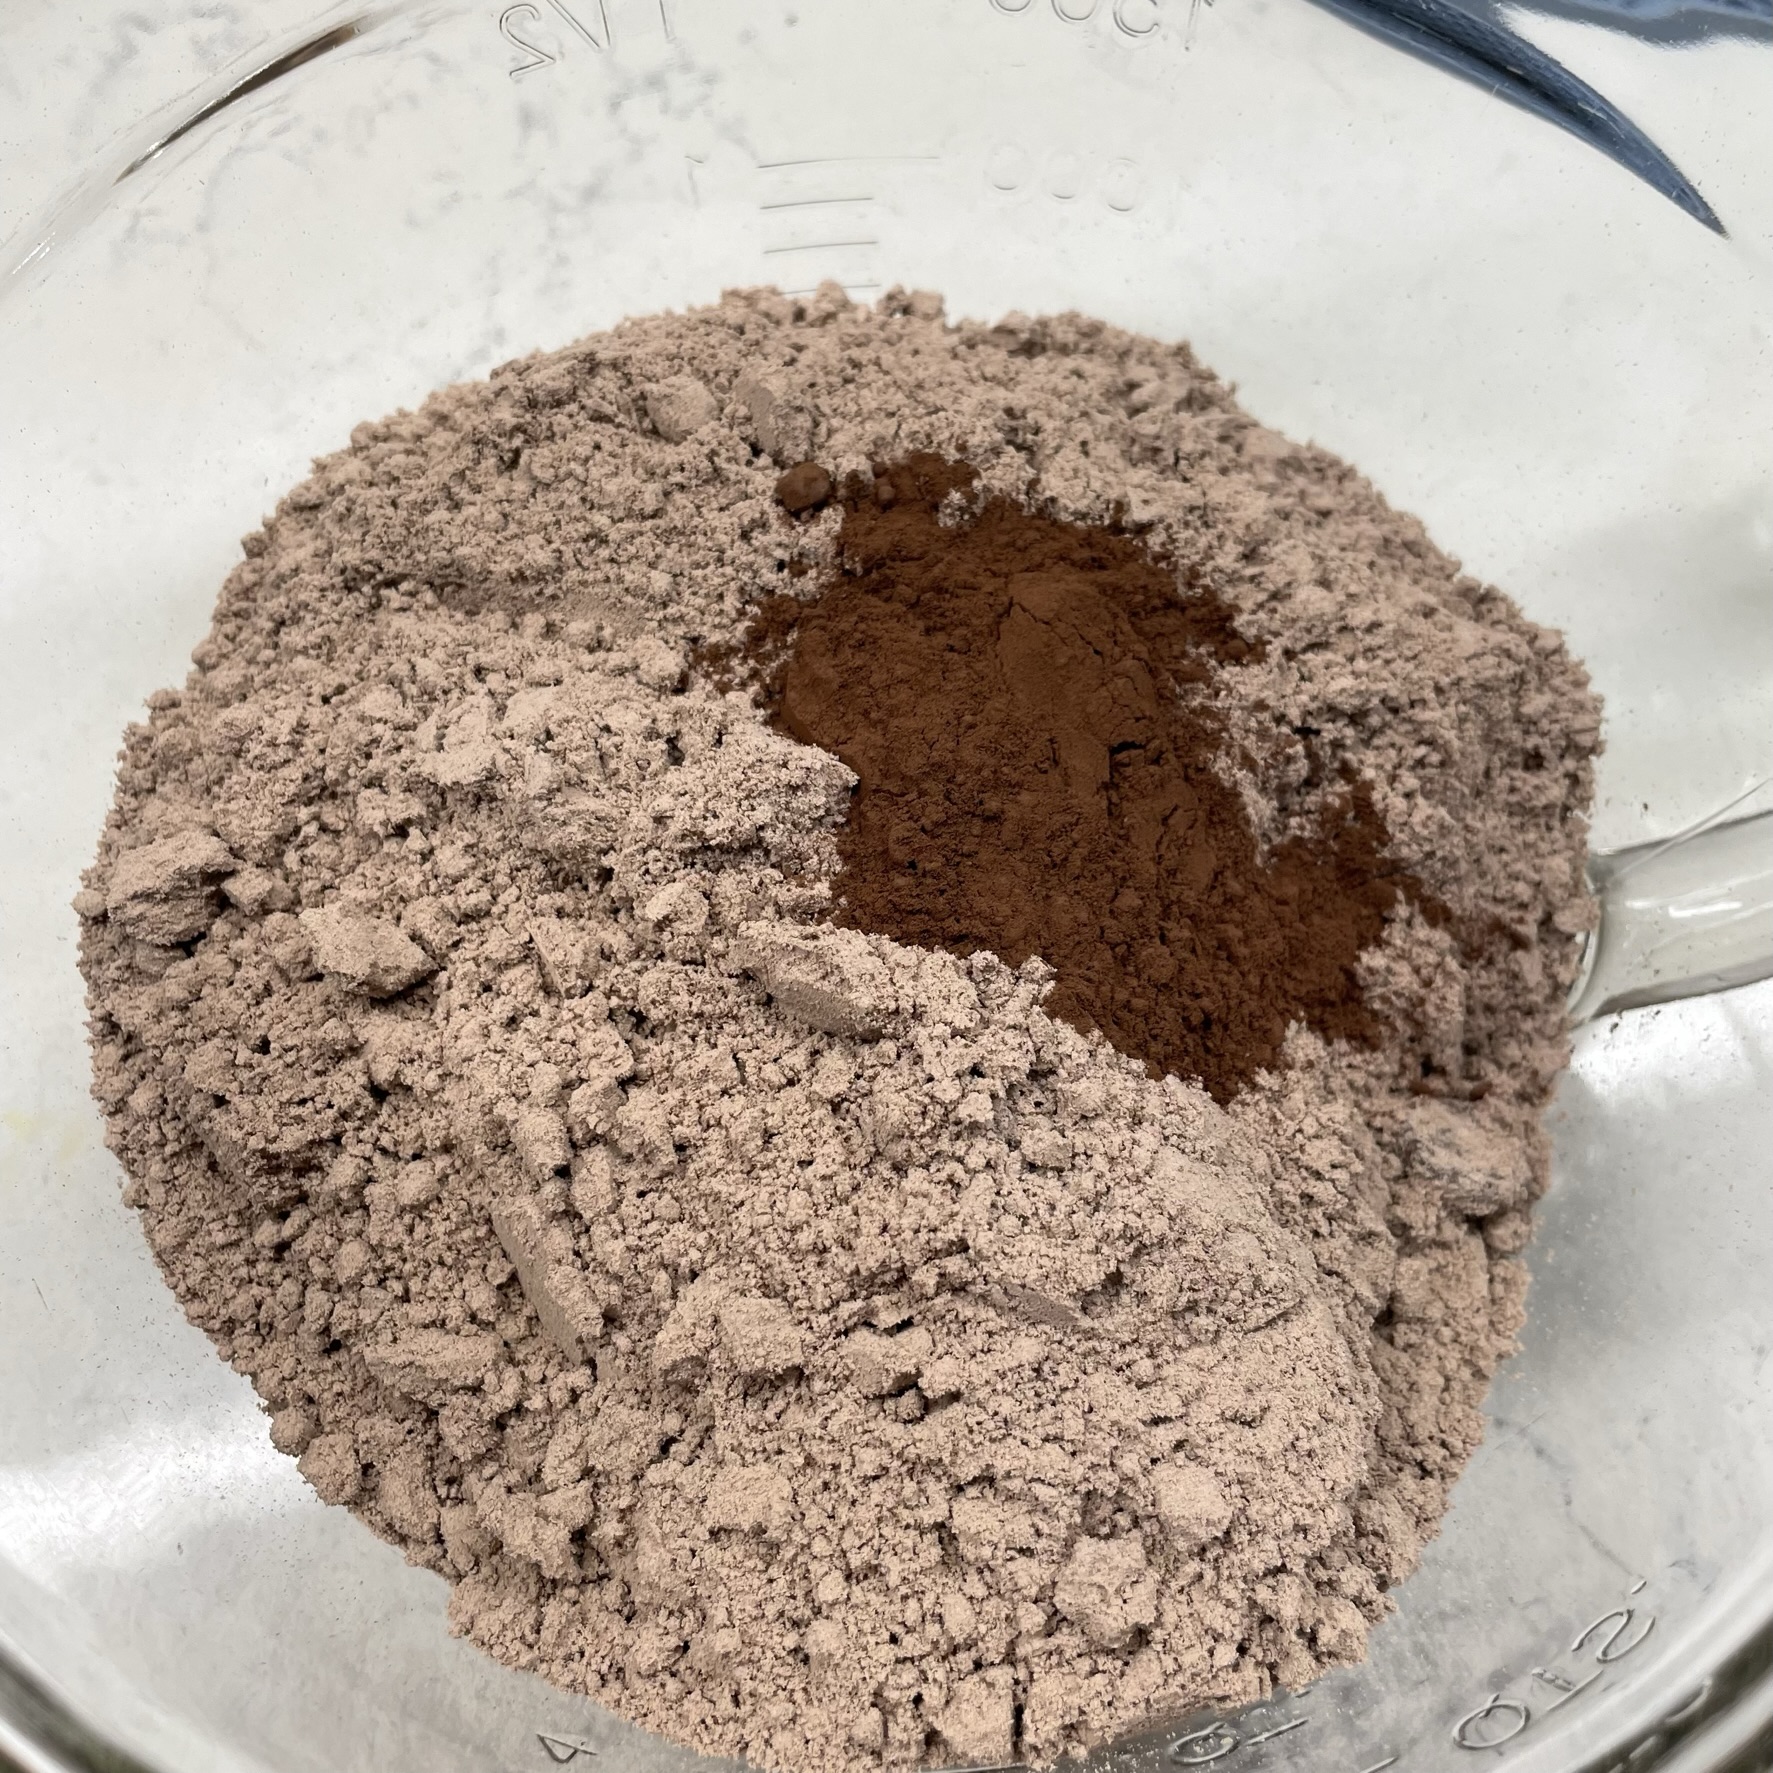
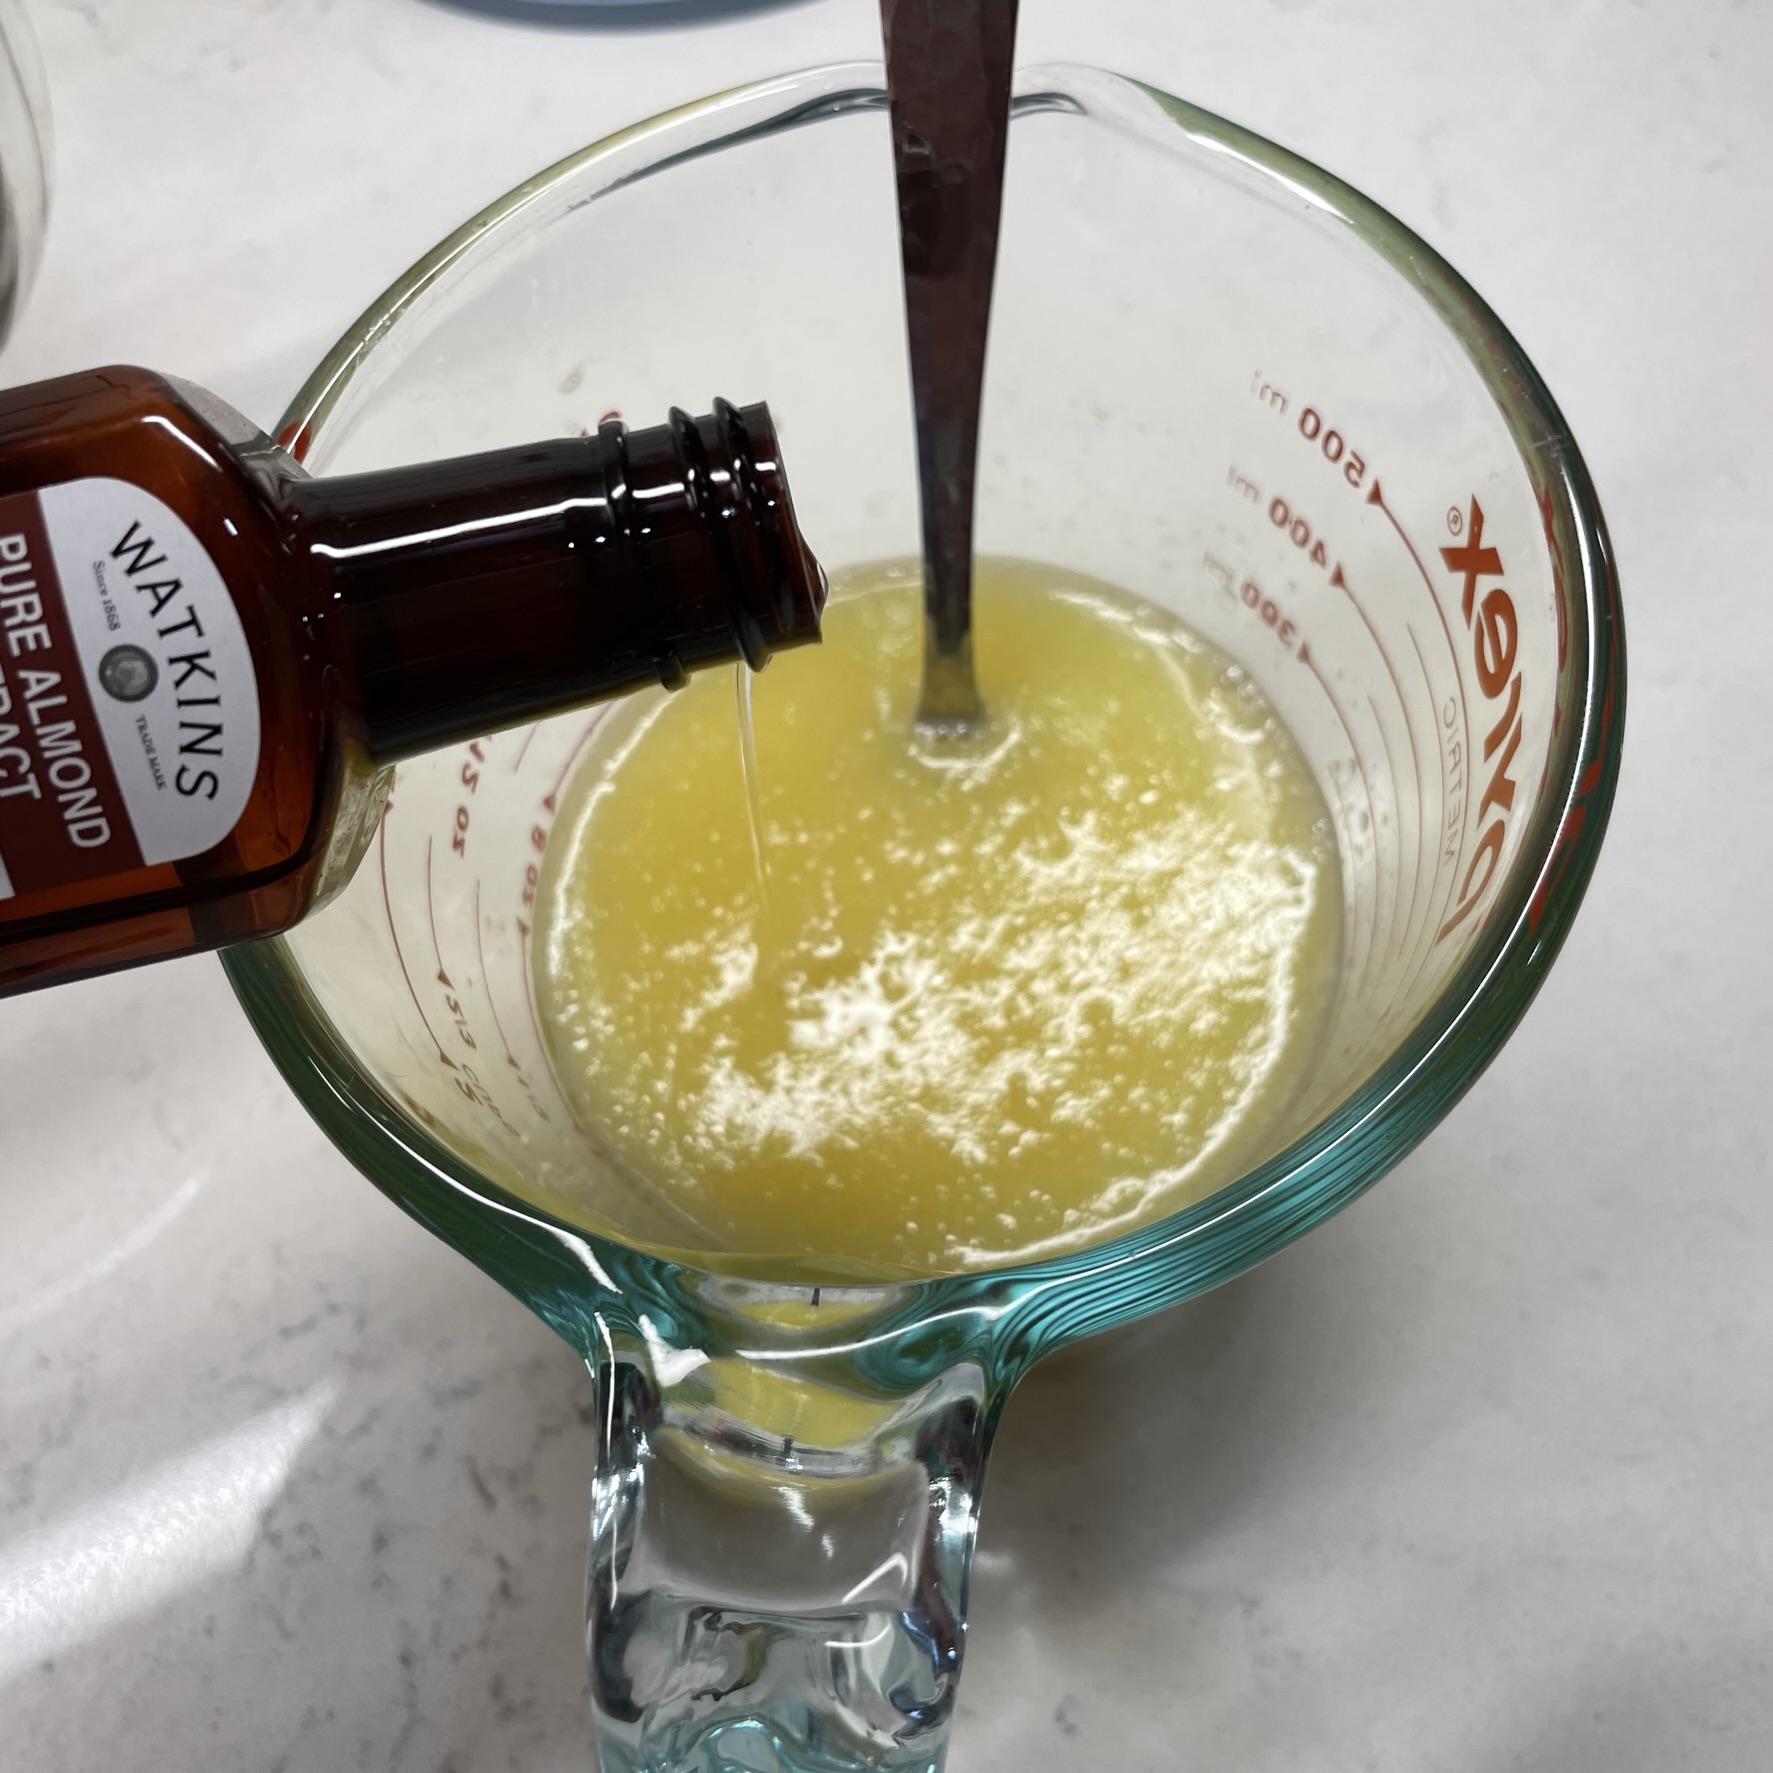
My brownie mix got an extra boost of dark chocolate from a spoonful of dark cocoa powder. I did this because I always wished that the candy company had made a dark chocolate version of the Almond Joy—sort of a Mounds-Almond Joy combination thing. I also gave the almond flavor a boost with a touch of almond extract added to the liquid ingredients used to make the brownie batter.
A few more notes worth mentioning before I dive into a visual walk-through of how I put these fun little treats together:
To keep this from being too sweet, I combined equal amounts of sweetened and unsweetened shredded coconut. The latter is sometimes labeled “dessicated” coconut, and you can find it in the baking aisle of a well-stocked supermarket or online from Bob’s Red Mill (where I get it). This is my preferred coconut for most recipes—cookies, smoothies, muffins, etc.—and I chose to use some of it here because I knew the filling would be sweet enough with the addition of the condensed milk and the amount of sweetened coconut. I pulsed the coconut in the food processor, too, to knock down some of the shaggy texture.
My go-to brownie mix is Ghirardelli Dark Chocolate, but (I can’t believe I’m about to say this) the chocolate chunks included in the mix may not be right for this recipe. If you are making this as mini muffins, as I did, you will find that the melted chocolate bits hinder the work of loosening and removing the brownie bites from the pan. The dark chocolate flavor is great but consider using a brownie mix that doesn’t have chips or pieces of chocolate in it; you’ll have an easier time removing the brownie bites without breaking them.
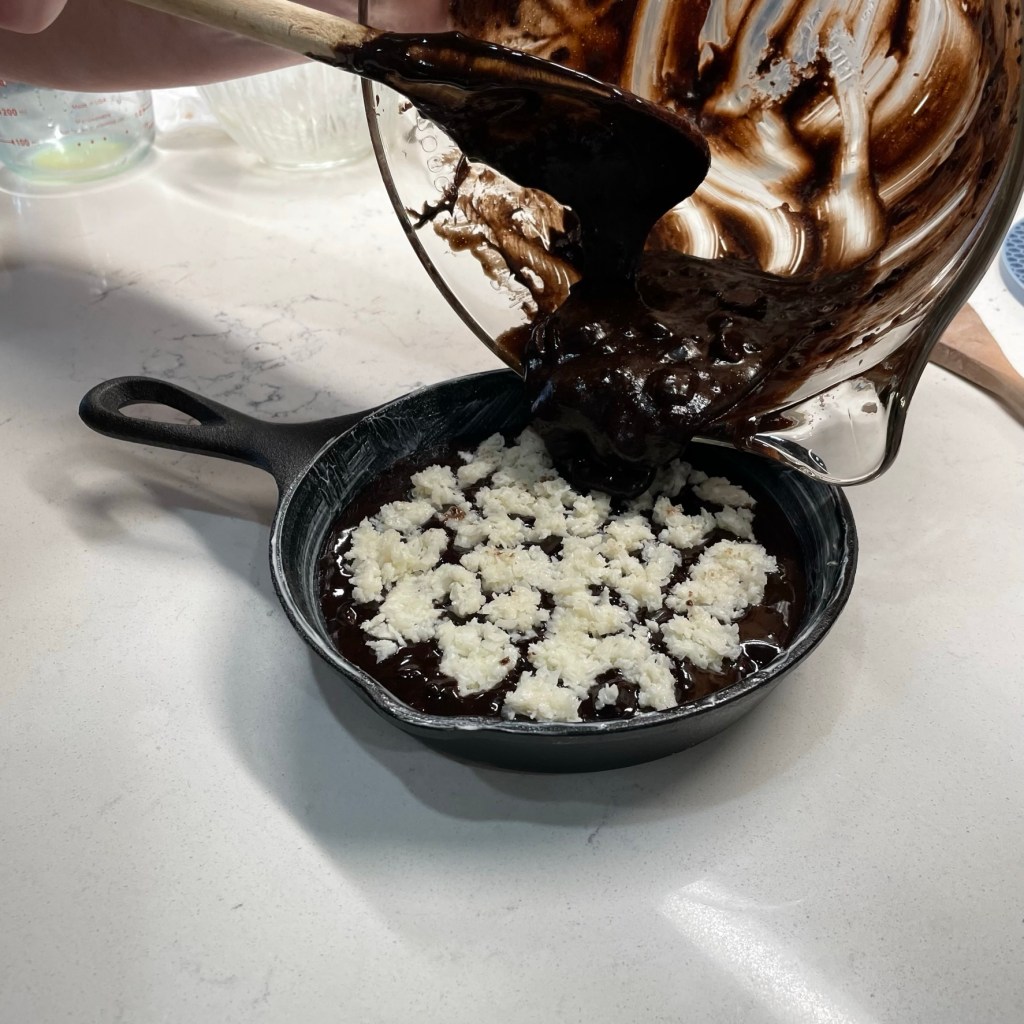
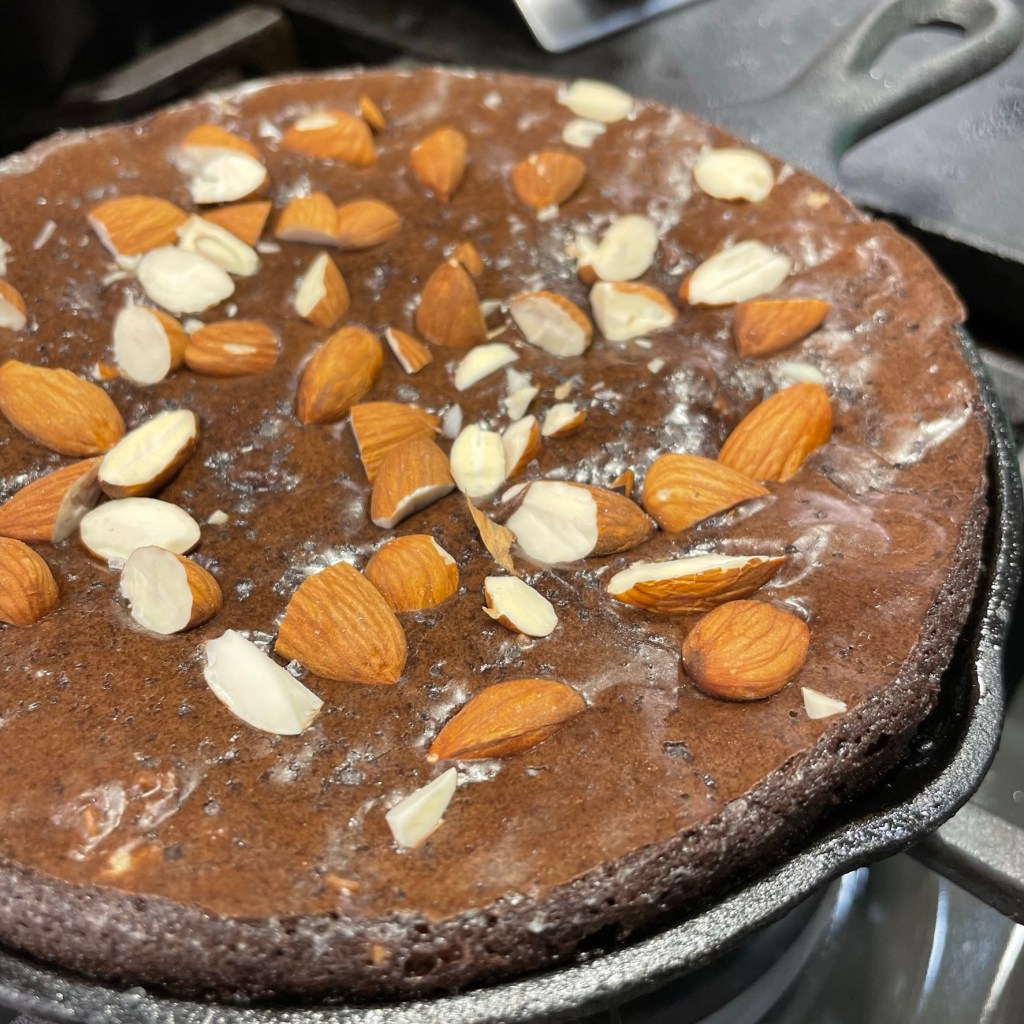
Finally, and this is important, the amounts of brownie batter and coconut filling exceed what is needed in the 24-count mini muffin pan. I had enough of both left over to make a small skillet brownie, and trust me when I tell you, that was not a bad decision either. If you decide to do this, I’d like to suggest that you eat it warm. Mmm…
Yes, really.
OK, preheat the oven to the temperature suggested on your brownie mix, and let’s get this started!
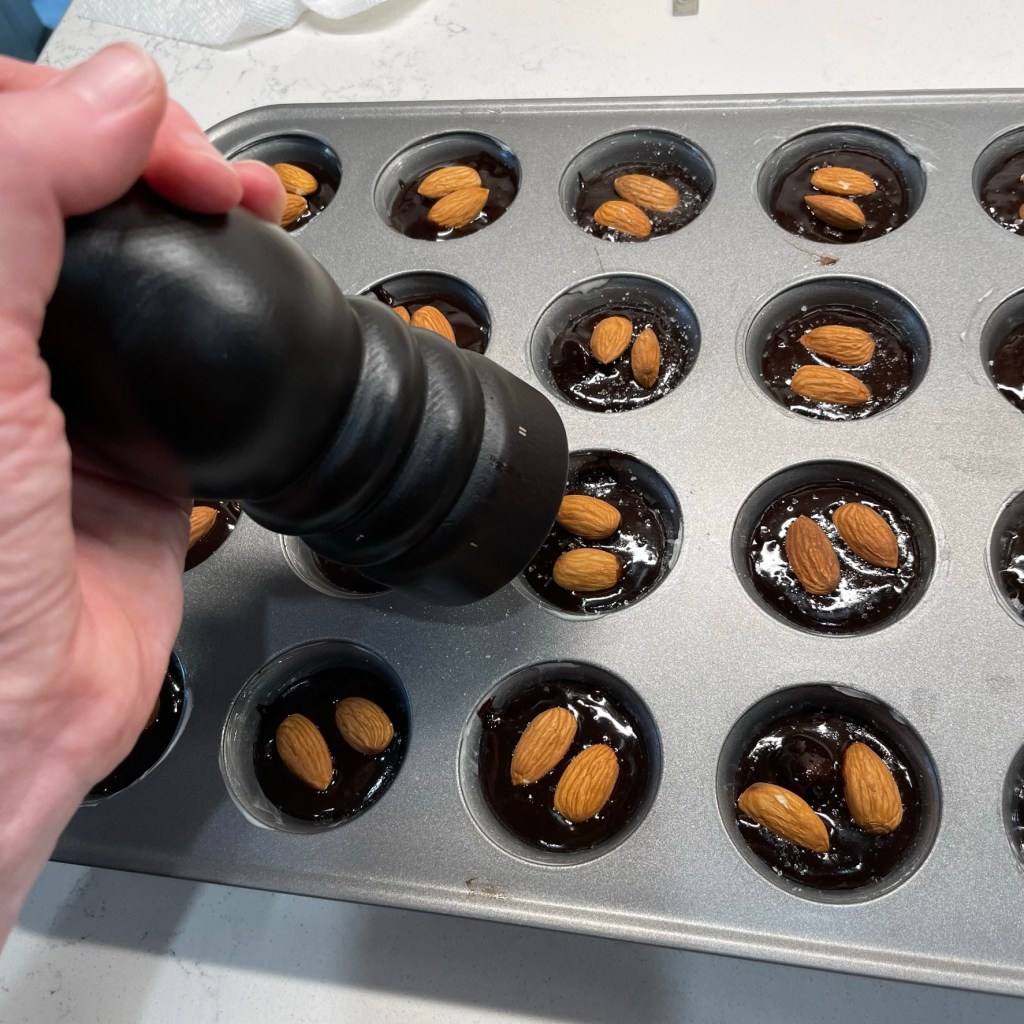
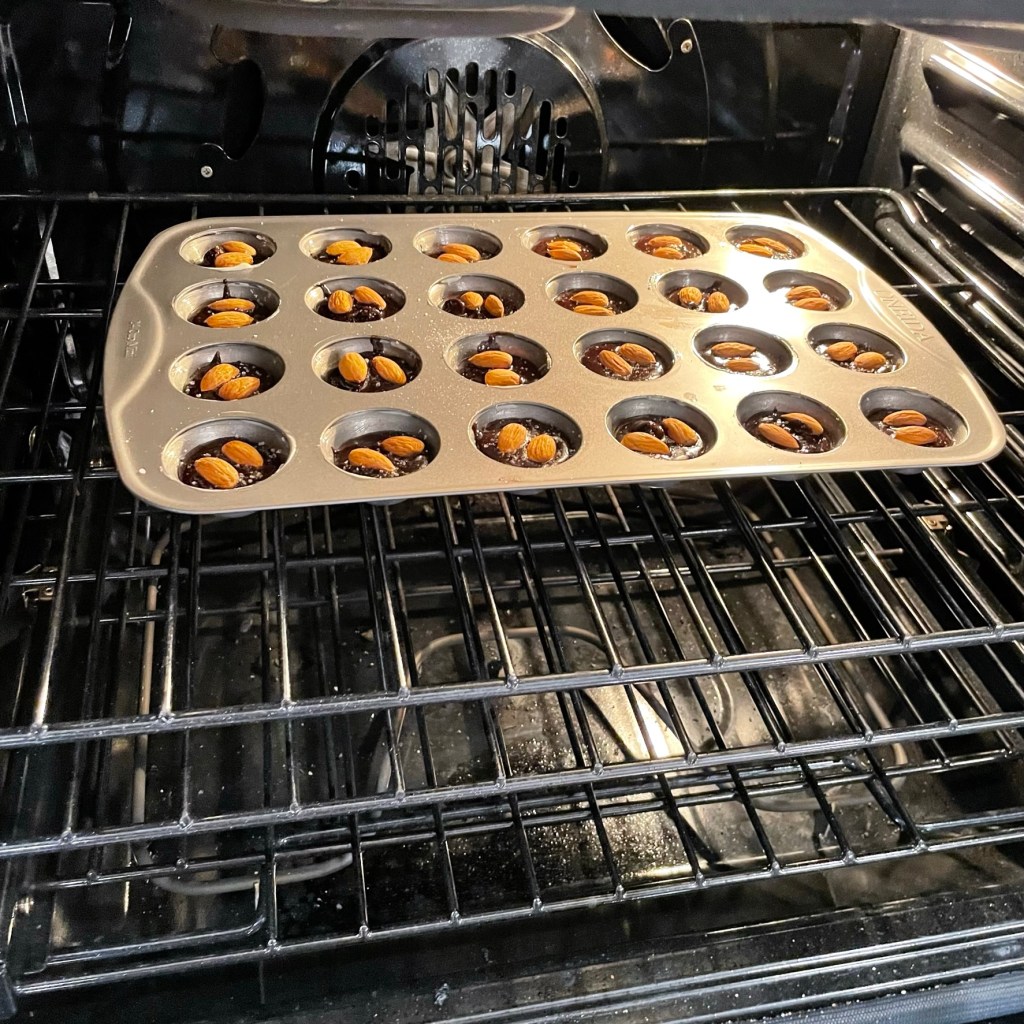
Use a spoon to fill each buttered mini muffin cup about halfway, leaving room for the coconut filling.
Roll a teaspoon of coconut filling into a ball about the size of a marble, and press it down into the batter.
Top with enough additional batter to cover the coconut ball.
Nothing makes dark chocolate better than a tiny touch of flaky sea salt!
Bake at 325 F. Check your brownies at 15 minutes. They should be plump and shiny on top.
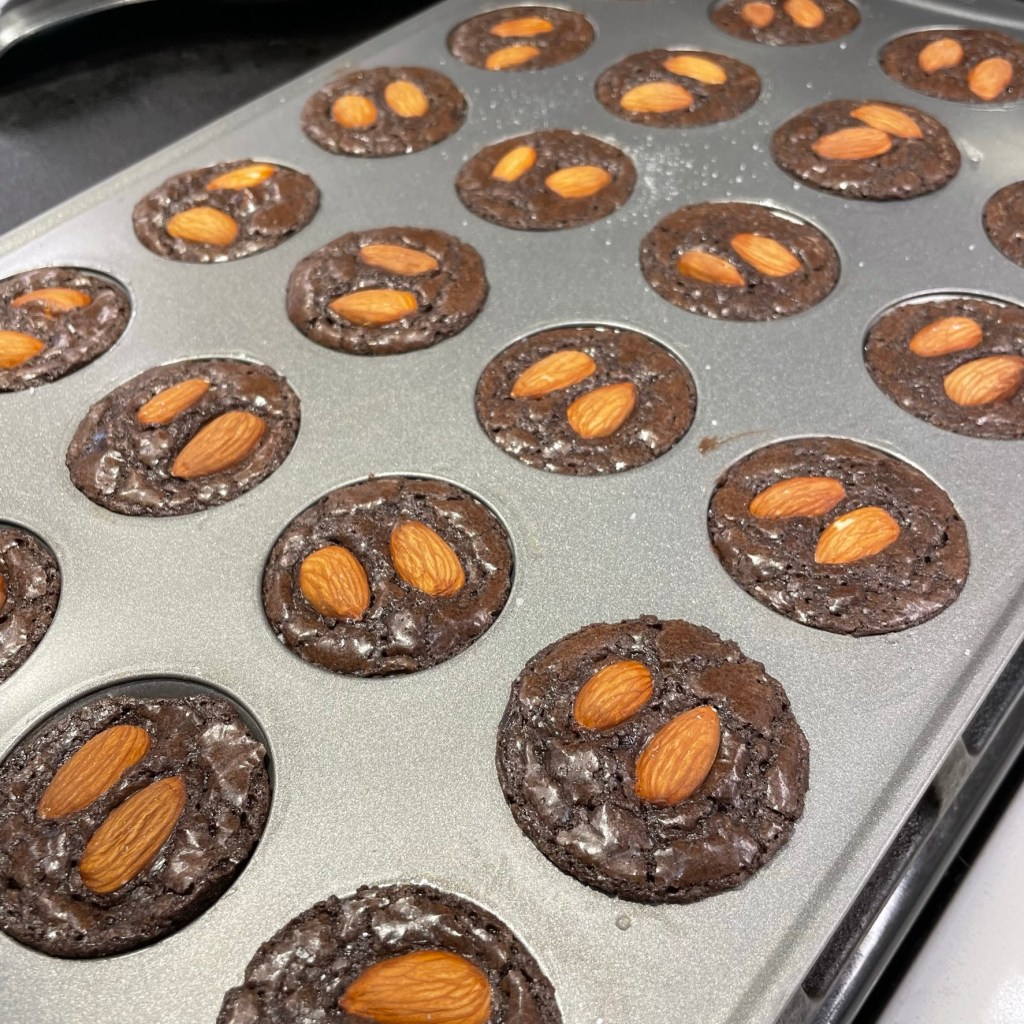
Allow them to cool in the mini muffin tin until they are easy to handle. Use a thin knife or offset icing spatula to loosen them.
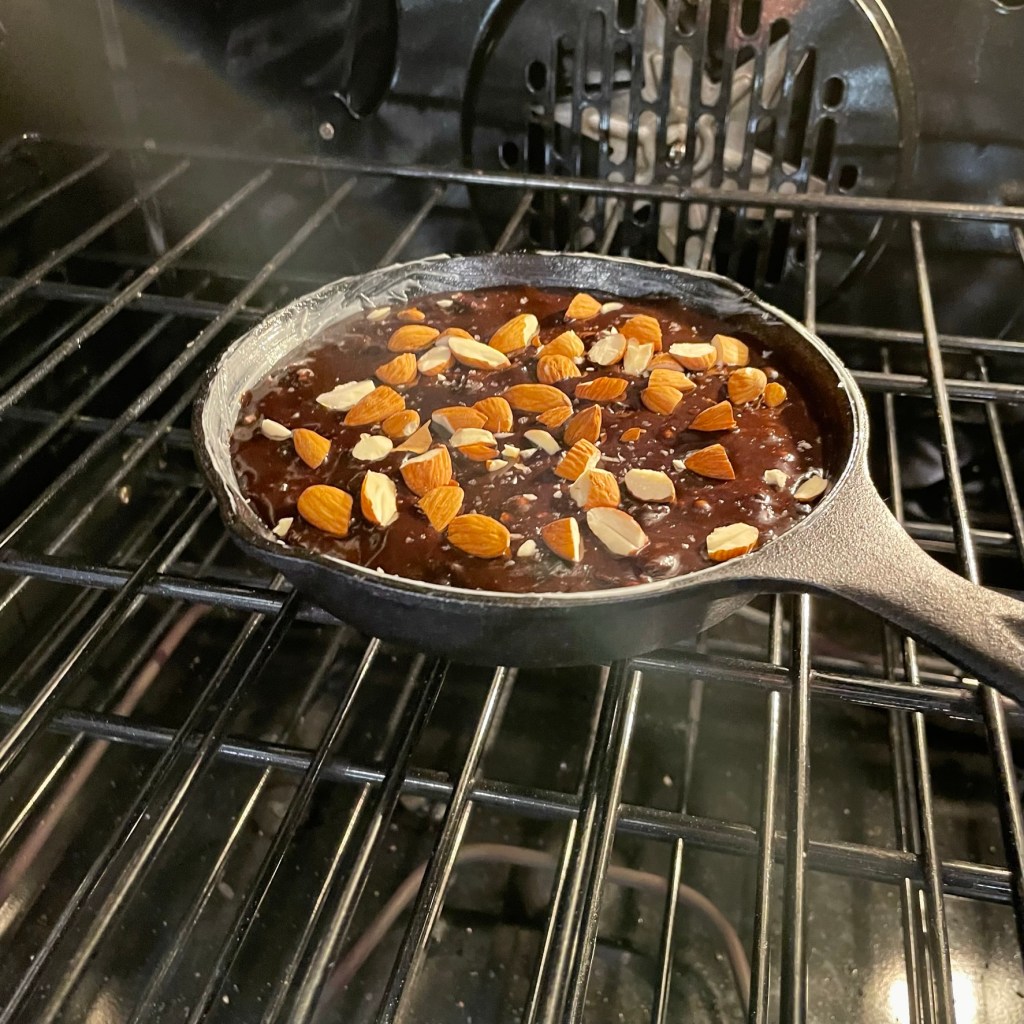
For the extra batter and filling, layer them in a mini cast iron skillet or small glass baking dish.
Top with chopped almonds and a slight sprinkle of flaky sea salt.
For this one, give it about 30 minutes in the oven. Watch for visual cues of doneness: shiny top with no jiggling.
Oh, my. 😉
So, was all this necessary? Couldn’t I have just chopped up some Almond Joy candies and added them to the brownies, the way I did with the Leftover Snickers Brownies I made at Halloween a few years ago? Sure, and that would have been tasty, too, but this was a lot more fun. 😊
This is a fun way to dress up a box mix, bringing together the flavors of a classic candy bar with fudgy, soft and chewy brownies.
Ingredients
1/2 cup sweetened shredded coconut
1/2 cup unsweetened shredded coconut
1/4 cup sweetened condensed milk
1 box brownie mix plus ingredients on package to make them
1 Tbsp. dark cocoa powder, optional
1/2 tsp. almond extract, optional
24 whole raw almonds
a few pinches flaky sea salt, optional
Note that this recipe will yield more batter and coconut filling than you will need for a single pan of mini muffin-size brownie bites. Plan ahead to use up the rest in a small baking dish or extra mini muffin pan.
Directions
Preheat oven to 325 F, or whatever temperature is recommended for the brownie mix. Generously butter the inside of every cup on a mini muffin pan.
Combine sweetened and unsweetened coconuts in the bowl of a food processor and pulse several times to make a finer texture. Transfer the coconut to a bowl. Add the sweetened condensed milk and stir until evenly blended. This will be a thick, sticky mixture.
Prepare brownie batter, adding the dark cocoa to the dry mix and the almond extract to the liquids. Fill the mini muffin cups about halfway. Scoop out a small amount of coconut filling and roll it between your hands into a ball about the size of a marble. Press the coconut ball into a muffin cup, letting the batter come up the sides around it. Repeat with the remaining muffin cups, then drop a slight spoonful of batter on top to fully enclose the coconut ball. You will have a significant amount of batter left over. See Step 5 for suggestions.
Place two almonds on each brownie bite and scatter a few small pinches of flaky sea salt over the pan. Bake at 325 for 15 minutes. Allow brownie bites to cool in the pan until they are easy to handle. Run a thin rounded knife around the edges of the brownie bites to aid in releasing them. Let them cool completely on a plate or tray.
With the remaining batter and filling, we made a warm miniature skillet brownie for two. This could also be baked up in a small glass baking dish, or make a second batch of mini brownie bites when the pan is fully cooled. Use the same method of layering coconut filling over about half of the batter, then pour the last of the batter over to cover it. Sprinkle with chopped almonds and bake for 30 minutes. Enjoy warm!
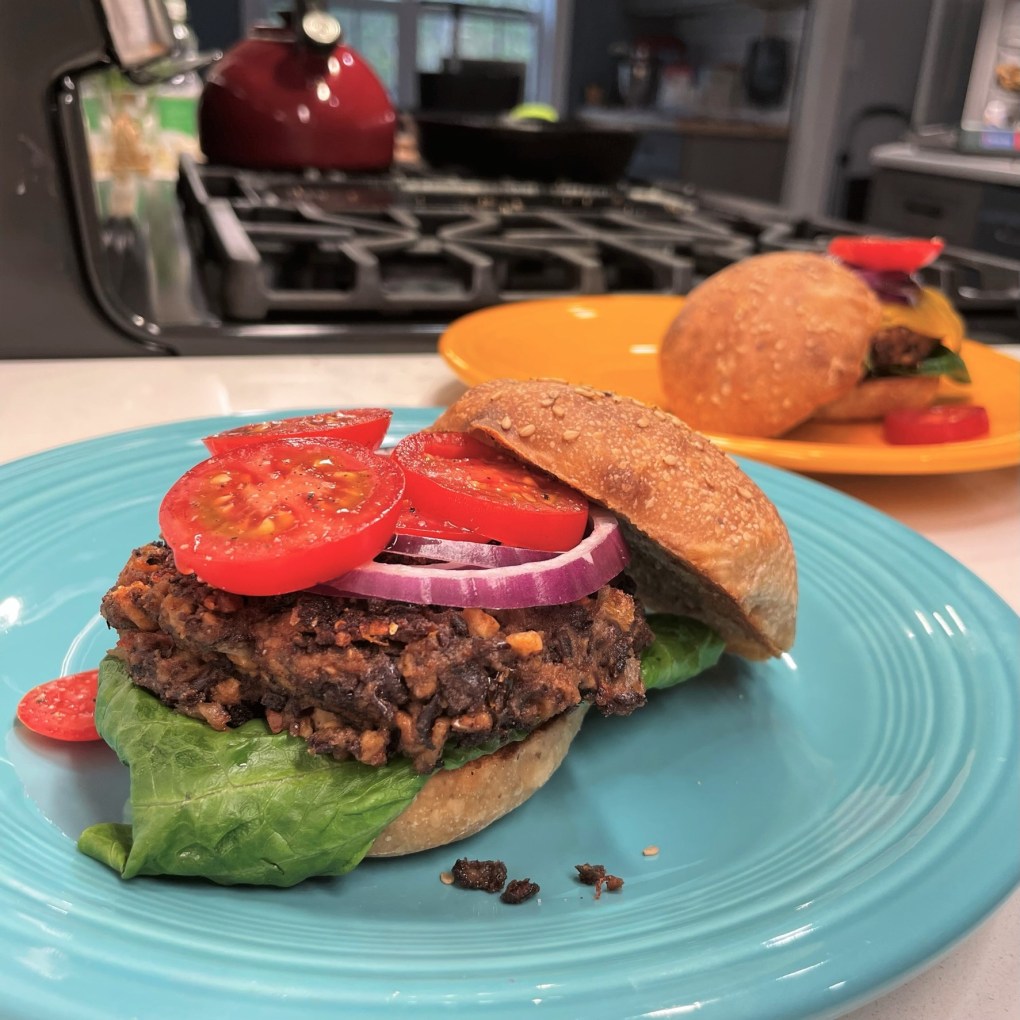
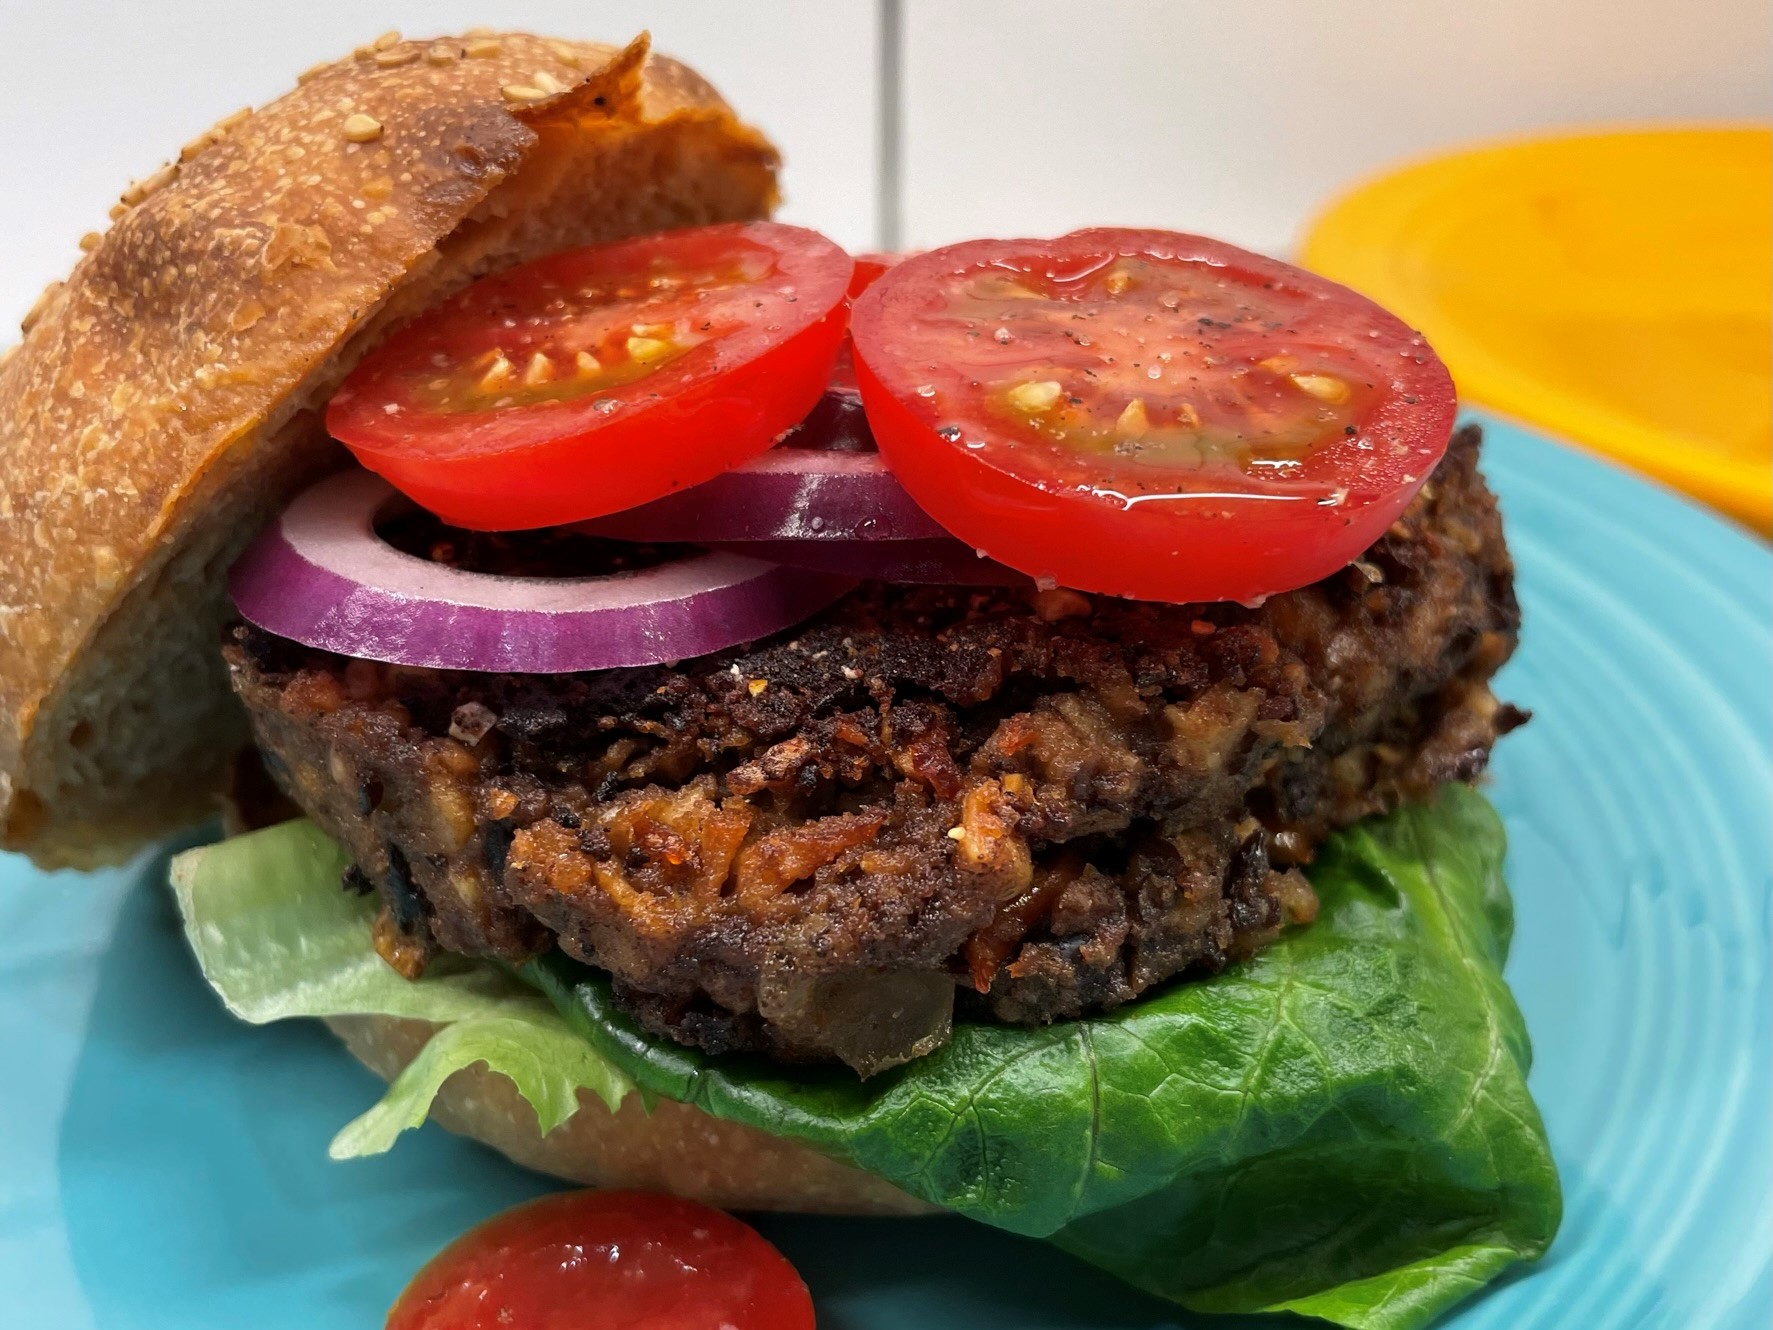
At our house, we enjoy doing Meatless Monday—for the good of the environment, yes—but mostly for the health benefit of eating more vegetables and whole grains, and to test recipes that I’d like to serve when my husband’s vegan daughter visits. When I set out several years ago to “make a better black bean burger,” I tried every which way to make it flavorful and simple, but I kept running into the same problem: the burger looked great on the bun until I bit into it, at which point it just squished. The black beans must be smashed or processed to hold together in a patty, but once they are, the texture is just, well, lost.
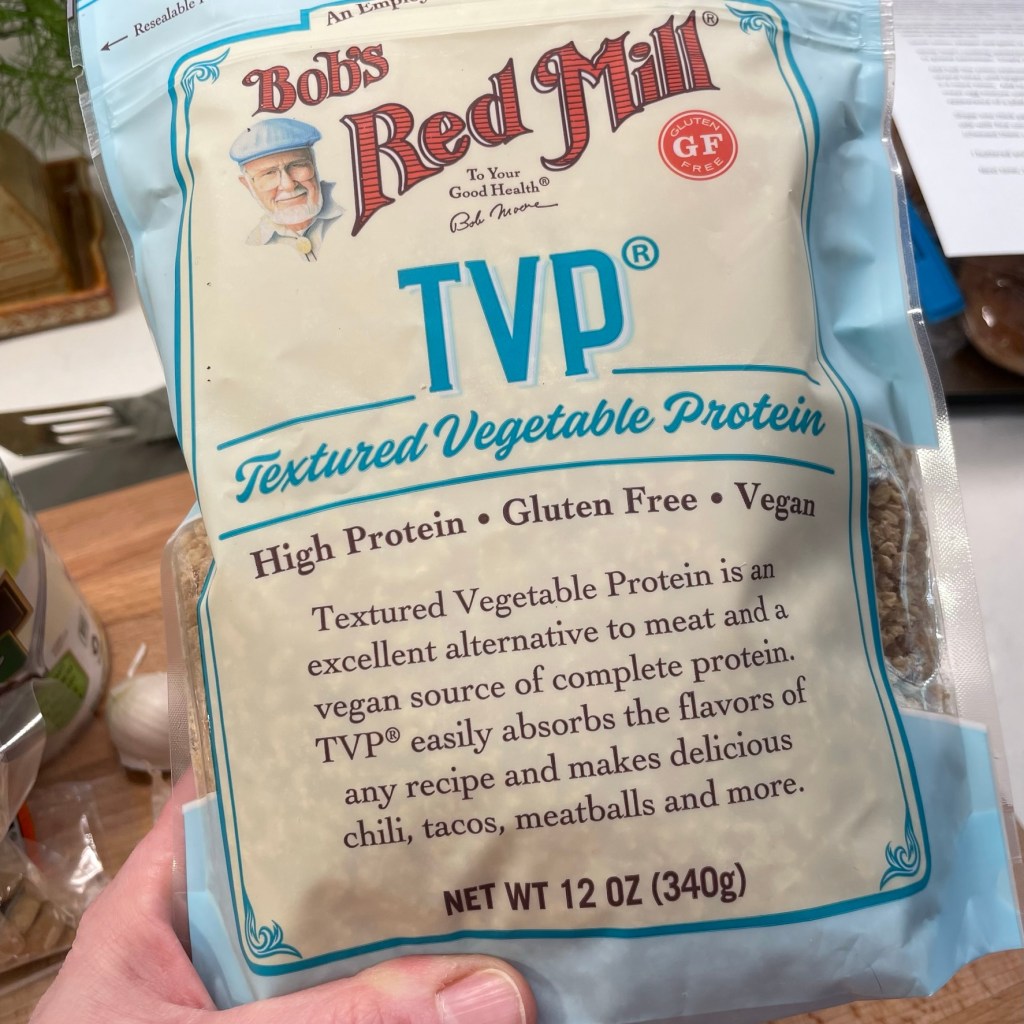
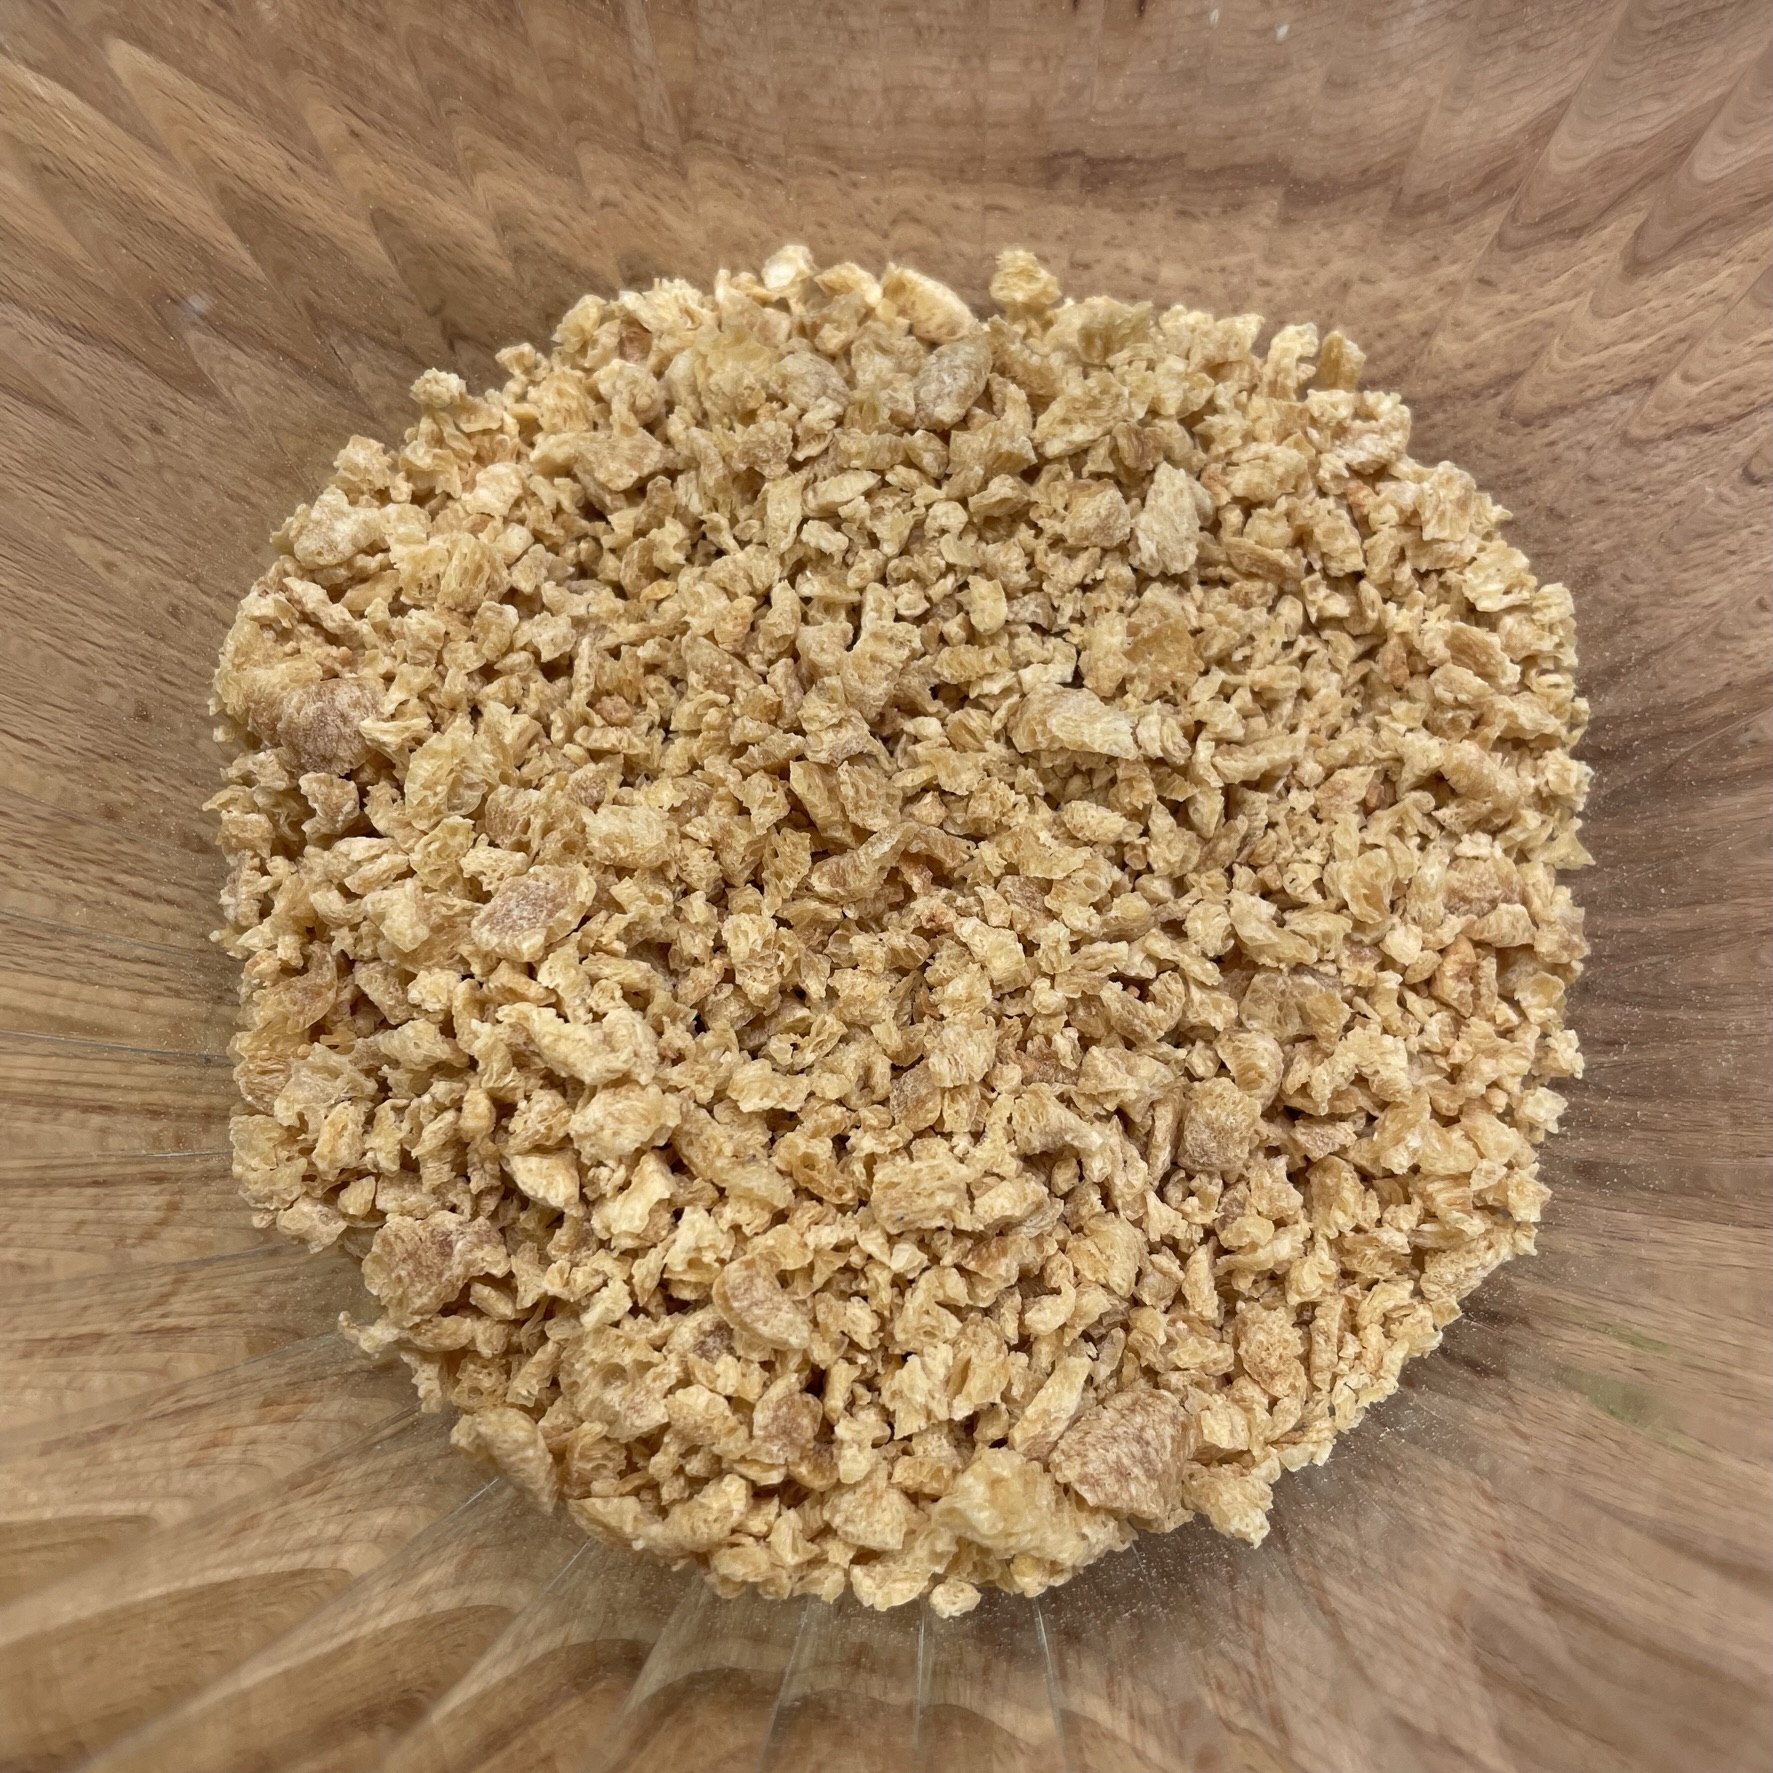
This time, however, I turned to a new ingredient that I’ve seen and tasted before but had never employed in my own kitchen—textured vegetable protein. With the increased popularity of and demand for plant-based foods, it has become easier to find ingredients such as this one in a regular supermarket, rather than trudging to a health food store or taking a chance with an online purchase.
TVP is a true blank canvas of vegan foods.
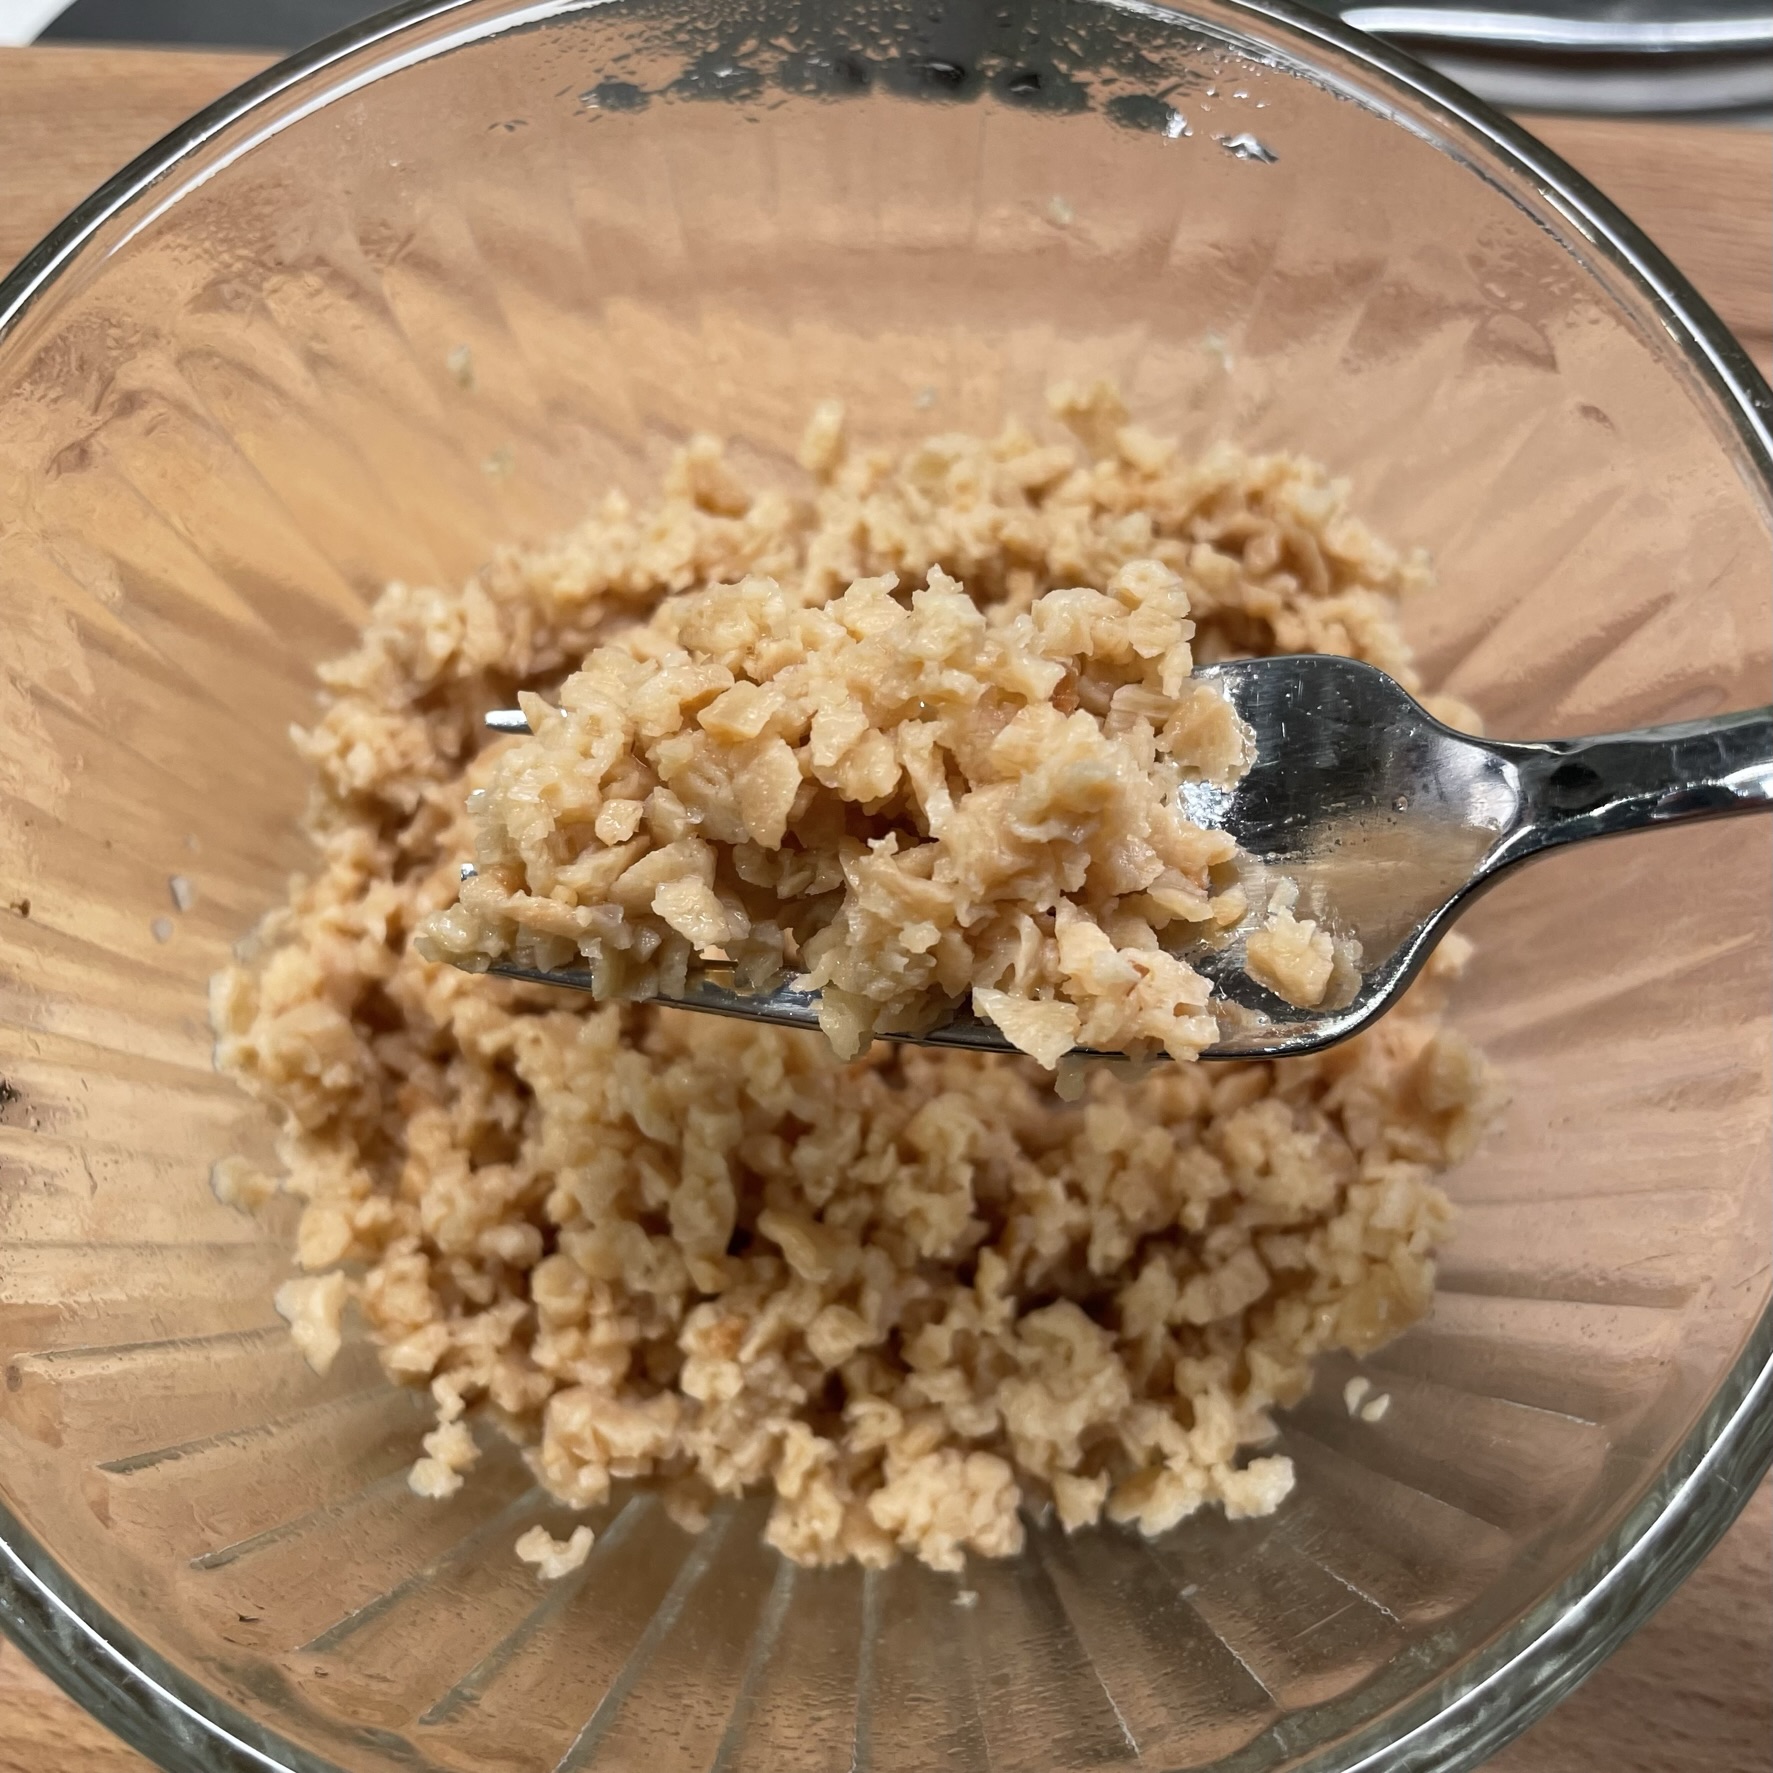
This product, known to plant-based eaters as “TVP,” is a defatted soy product, with a pleasant, chewy texture after rehydrating, and a neutral, almost sweet flavor that can be shifted to the cuisine of your choice. In this recipe, my first-ever shot at cooking with TVP, I wanted to boost the protein content of my Southwest-inspired black bean burgers, but I was also looking for an assist with the texture. The TVP packs a whopping 12 grams of protein per serving, and it only takes a few minutes to soften up with water or broth, but it holds its shape after rehydrating. In other words, it’s exactly what my smashed black beans needed to keep their composure. I found this product in one of our larger supermarkets, but you can also find it online from Bob’s Red Mill.
The other trick I used to give my burgers more heft was oven-roasting the beans before pulsing them into bits. This technique has worked for me in the past, but at that time, I was still using egg as a binder, which made it vegetarian but obviously doesn’t fly for a burger claiming to be vegan. This time, to keep it truly plant based, I further modified my old recipe and substituted a “flax egg,” which was nothing more than ground flax meal combined with the reduced liquid from the can of beans (I could have used water, but I’m always looking for a way to add one more bit of flavor). The flavor boosts came from a generous spoonful of my spicy coffee rub, a few sun-dried tomatoes and the last tablespoon of chipotle puree lingering in the fridge, left over from my pollo chipotle.
The color was right, the texture was good, and the flavor was totally on-point for the burger lovers in this house. Which is both of us, of course!
The textured vegetable protein and oven-roasted black beans gave these all the texture I crave in a burger!
Ingredients (makes about 5 burger patties)
2 cans organic black beans, drained and rinsed (reserve liquid from one can)
2 Tbsp. extra virgin olive oil, plus extra to drizzle on beans before roasting
1 cup diced sweet onion
1/2 red bell pepper, seeded and chopped
1/2 jalapeno pepper, seeded and chopped
3 cloves fresh garlic, smashed and rough chopped
1/2 cup roasted salted cashews (from a can is fine, or roast them yourself)
1/2 cup textured vegetable protein, dry from the package
About 5 sun-dried tomatoes, cut up into bits* (see recipe notes)
1/2 cup water or vegetable broth*
1 Tbsp. milled flax seed*
1 Tbsp. spicy coffee rub or other favorite smoky-spicy seasoning*
Medium-grind corn meal, for crusting the burgers before frying
Canola oil, for trying the burgers
Soft vegan buns and favorite toppings, for serving
*Recipe Notes
I learn many things from my trials in the kitchen, and one shortcut occurred to me a moment too late. My photo steps reveal that I rehydrated both the sun-dried tomatoes and the textured vegetable protein with low-sodium vegetable broth. Eventually, I combined them, so my recommendation is doing them together in one bowl to save time and dirty dishes.
Low-sodium vegetable broth is one of my core pantry items and I frequently use it for rehydrating ingredients or cooking dry goods such as rice or quinoa. My philosophy is, why use water if you have an opportunity to elevate flavor?
Flax seed is a nutritional powerhouse, but dieticians are quick to point out that our bodies can only benefit from it when it has been milled. You can buy flax “meal” pre-packaged, but it turns rancid rather quickly. If you buy a bag of seeds, you can keep them fresh longer and mill them in a blade-style coffee grinder as you need them. To make a flax “egg,” combine a tablespoon of the meal with an equal part of warm liquid. The mixture will thicken into a gel-like substance that works great as a binder.
My spicy coffee rub was excellent for flavoring these burgers, and I’ve included the recipe for it on the downloadable PDF if you’d like to try it. Otherwise, use any spice blend you like for grilling. If you are committed to making the burgers vegan, confirm the ingredients of your spices. You might be surprised at some of the stuff they sneak in there. 😉
Instructions
There are several components of these burgers, and most of them can be prepared concurrently, or the day before. My instructions are broken out into each component, and I trust that you’ll manage the prep however it works best for you.
Prepping the black beans
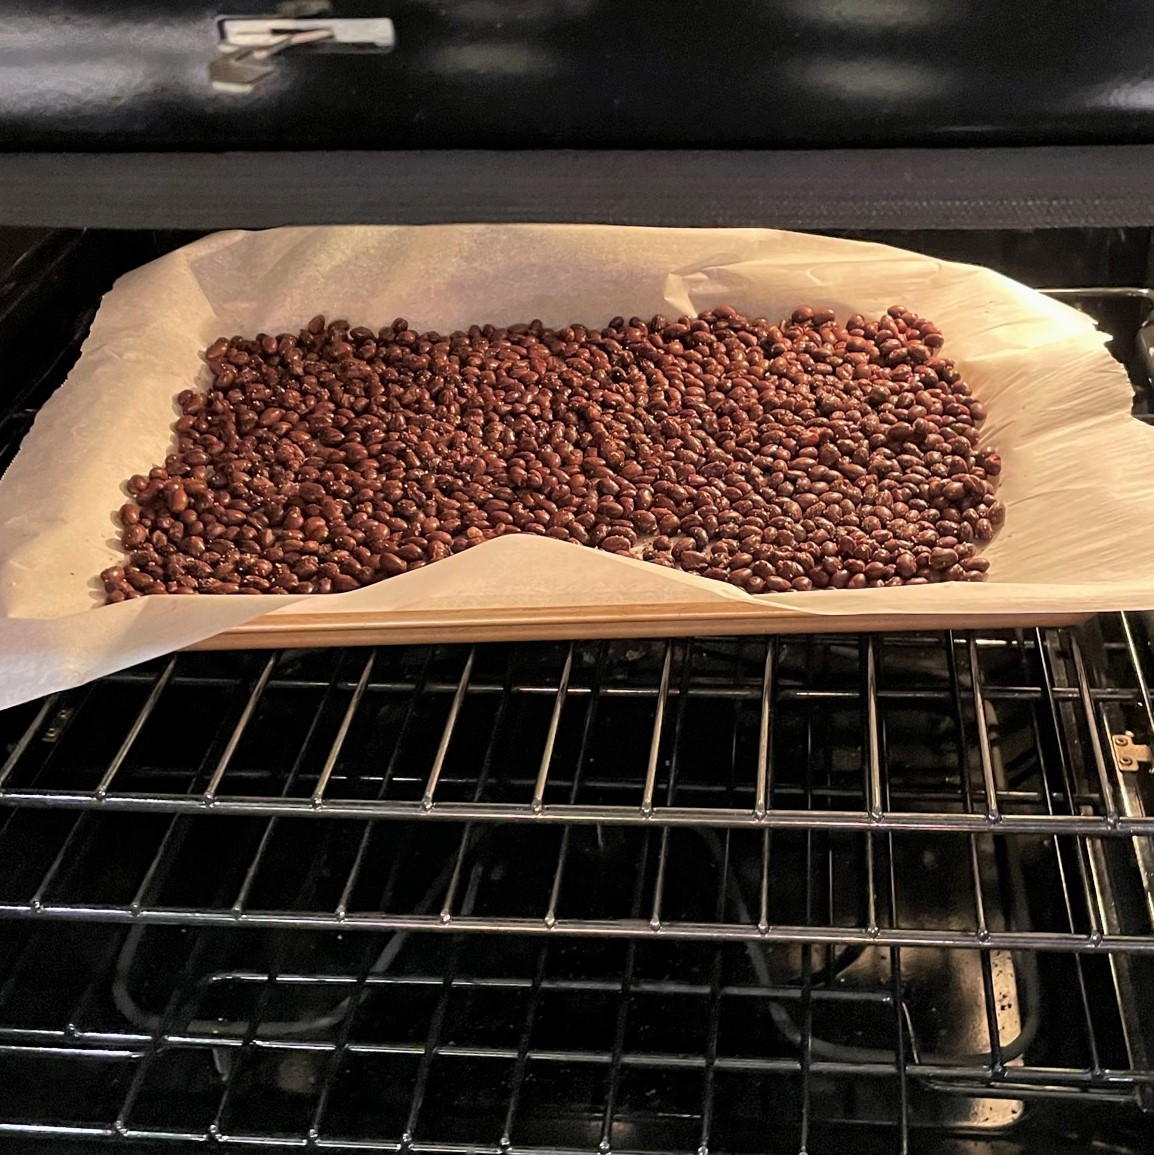
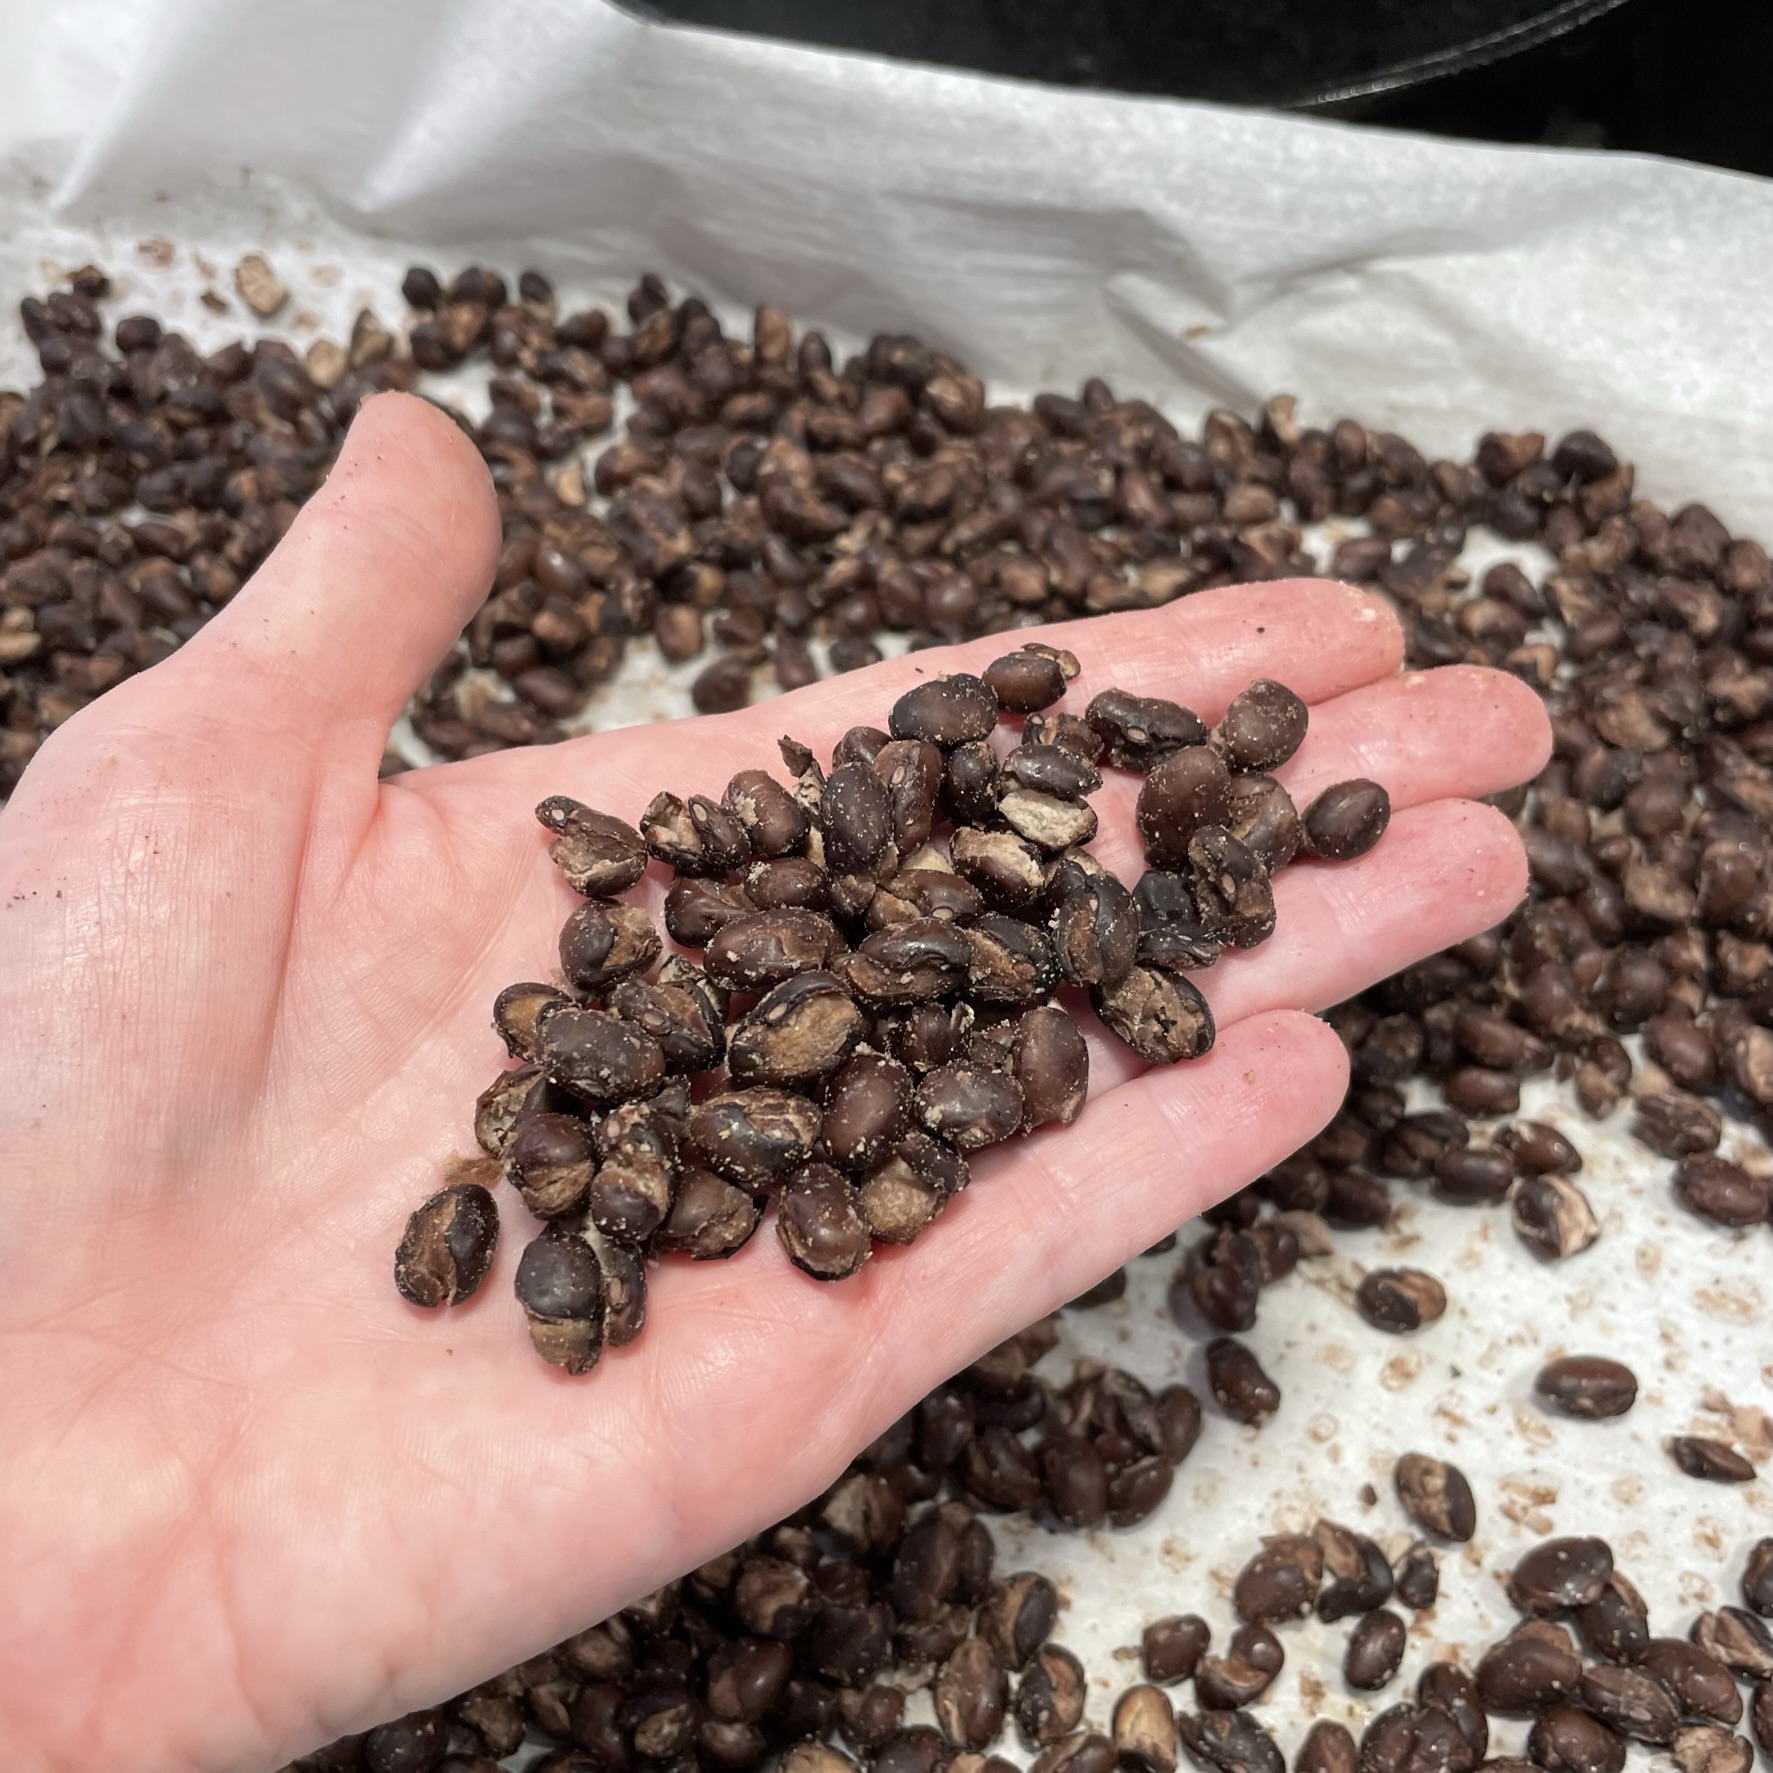
Preheat oven to 350° F. Line a baking sheet with parchment paper or silicone mat. Spread black beans out in a single layer and let them air dry while the oven heats. When it comes to temperature, drizzle olive oil lightly over the beans and roll them around to lightly coat them. Season with salt and pepper, and then roast the beans for 30 minutes or until they have a dry, slightly crumbly exterior.
Making the flax egg
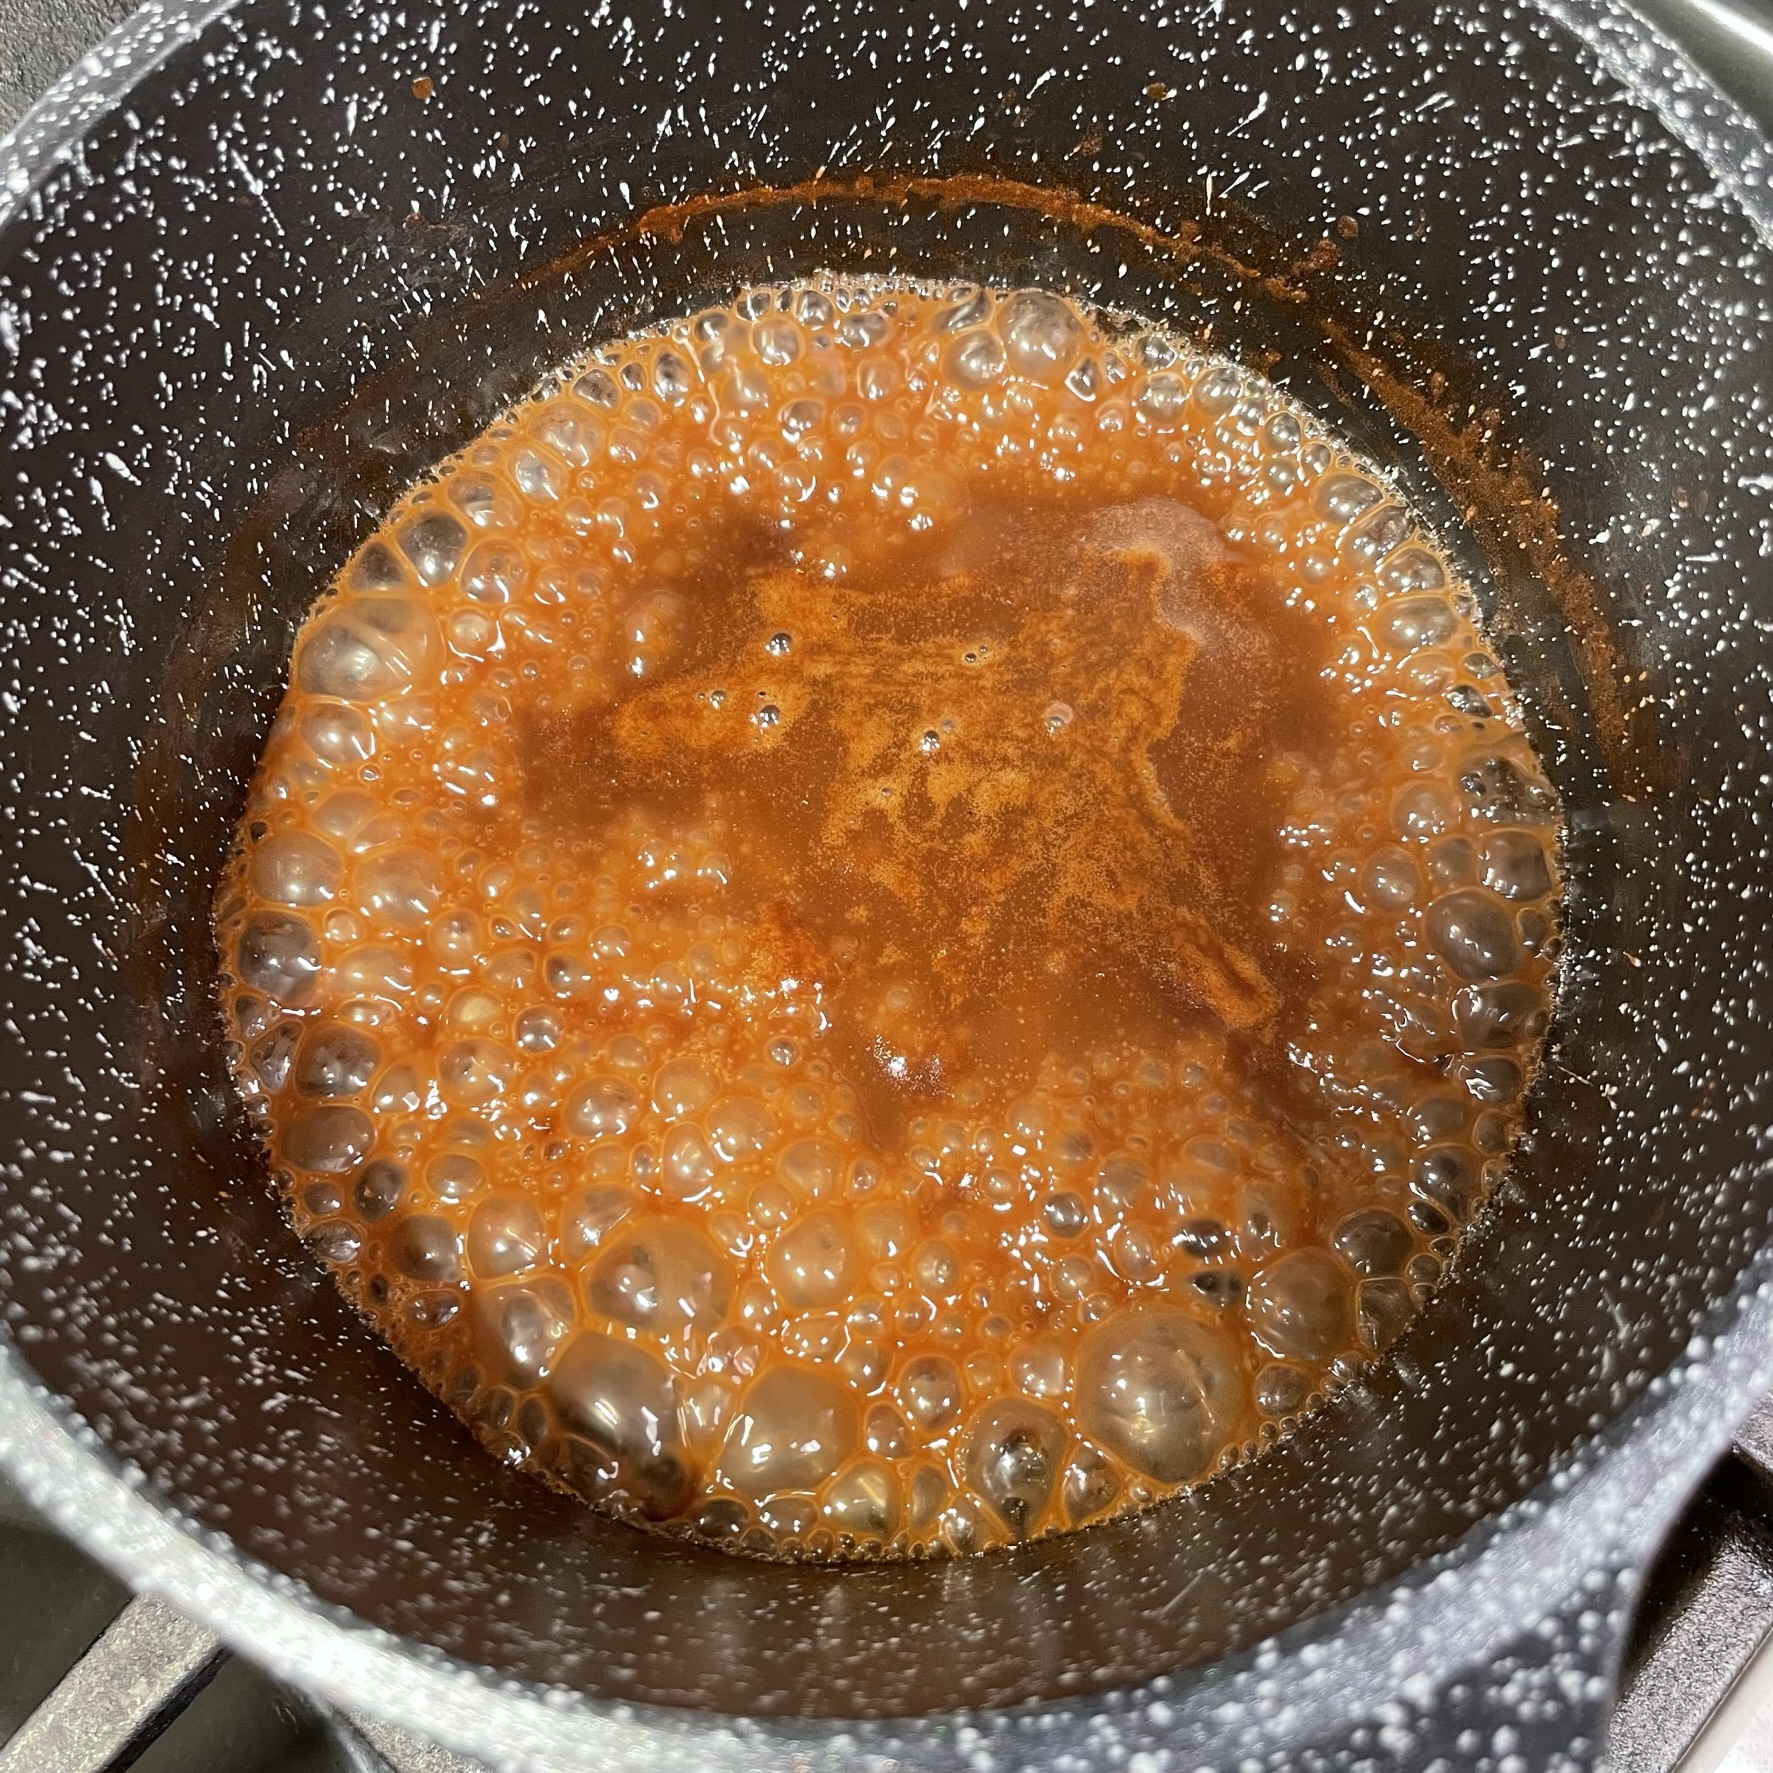
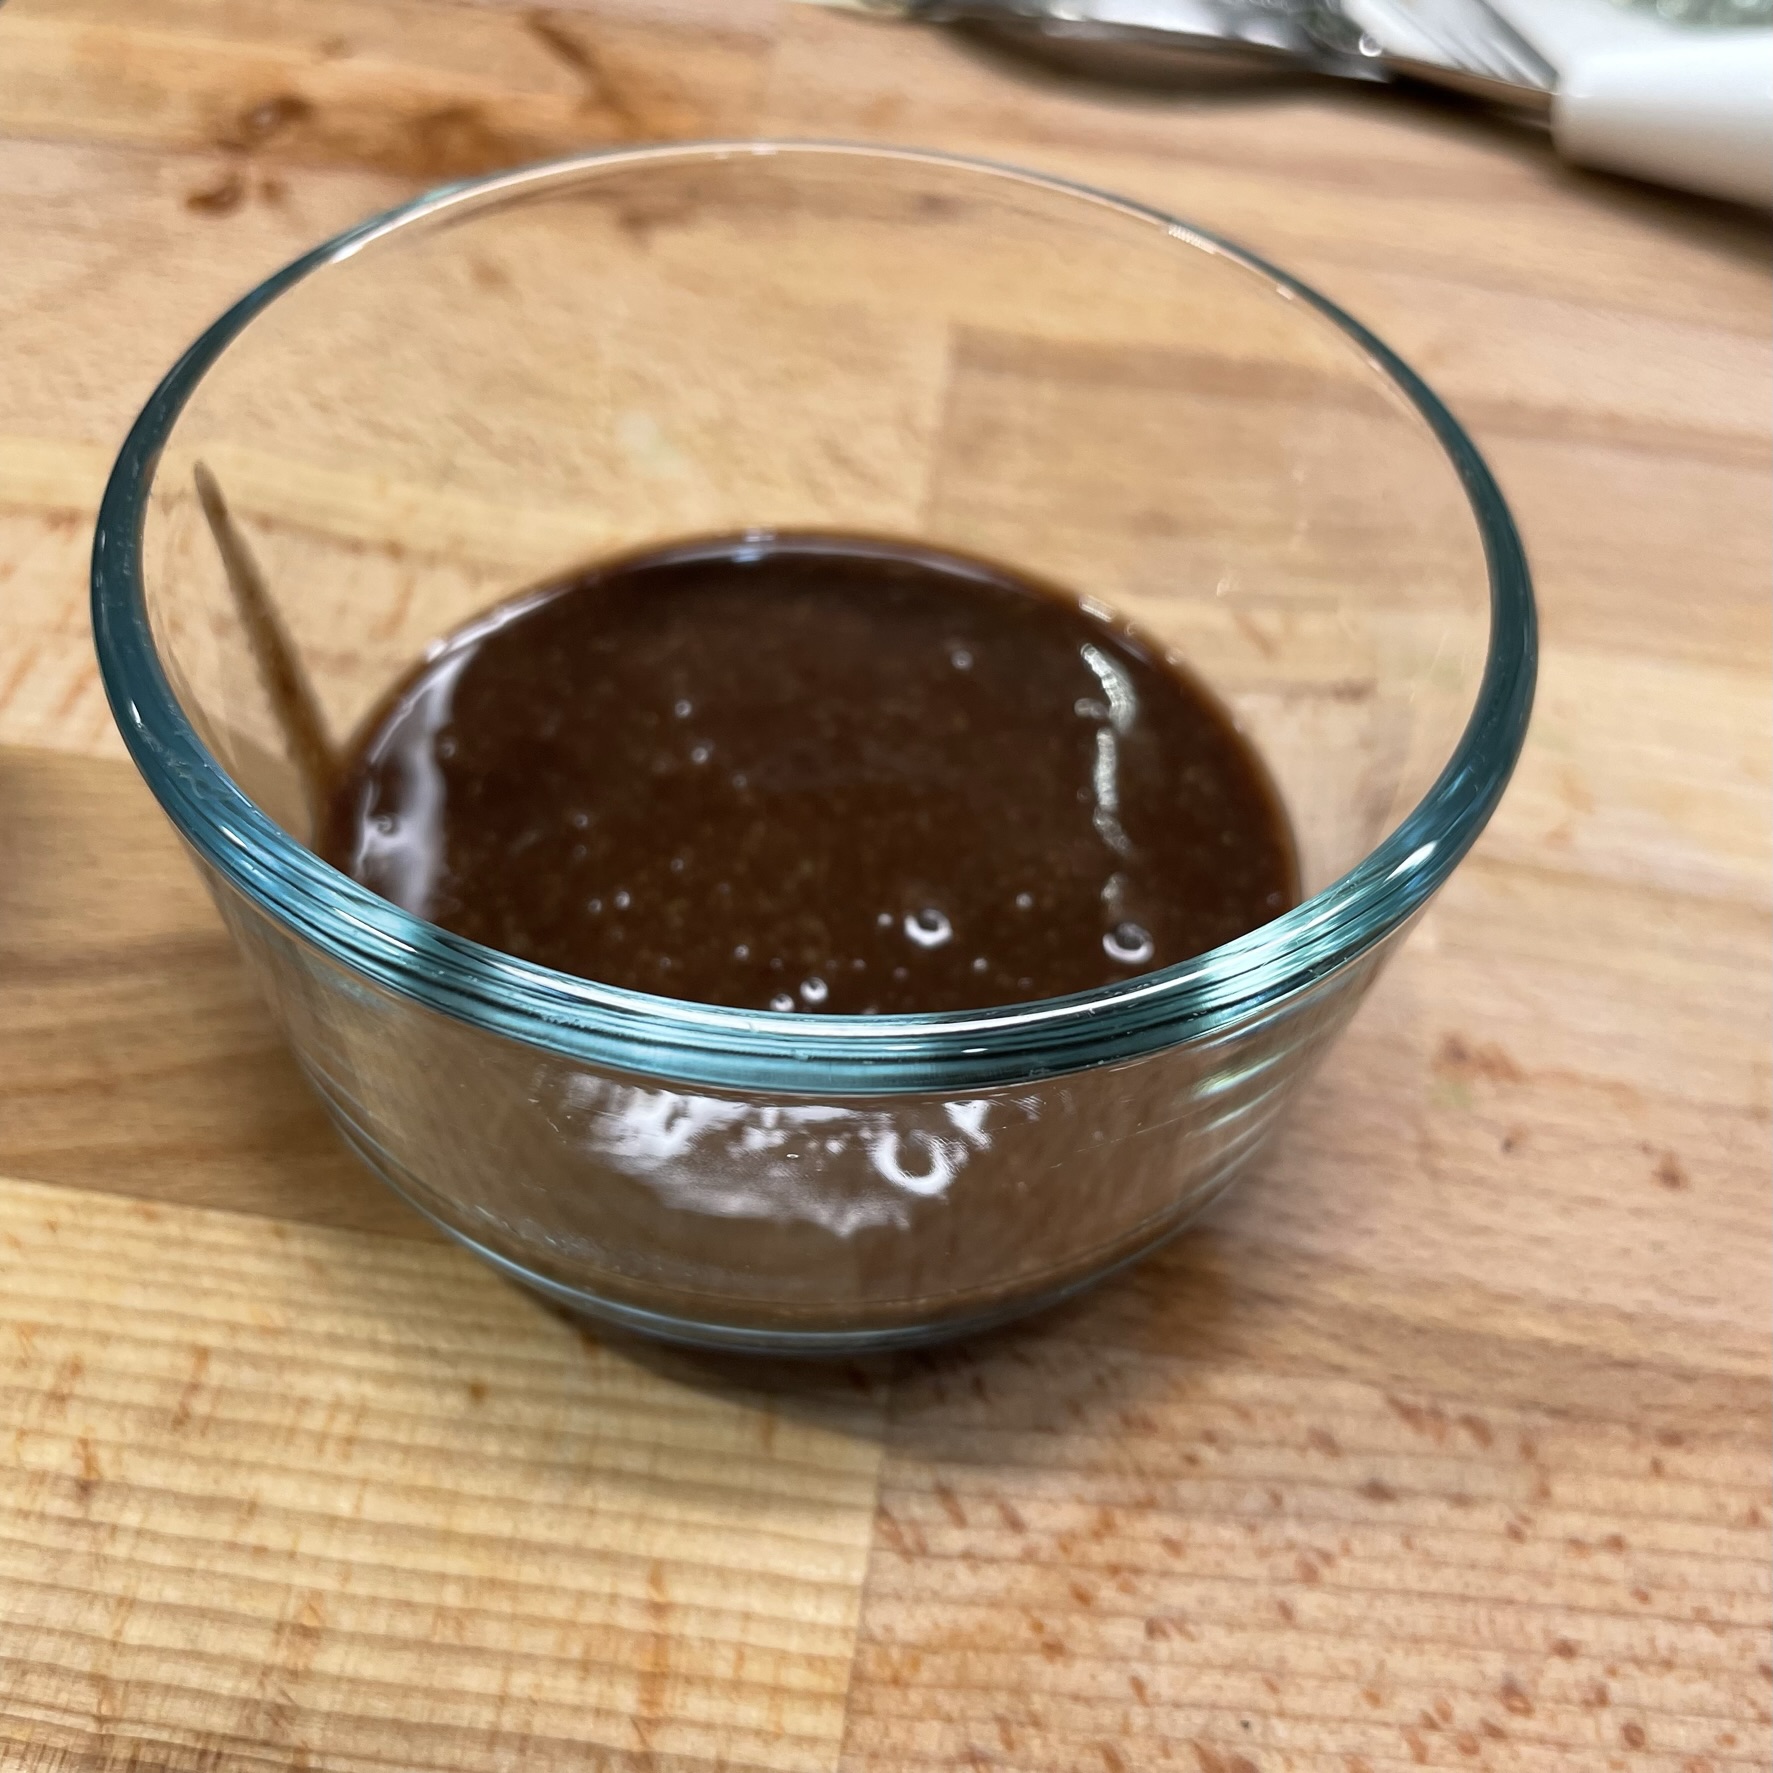
Reduce the reserved black bean liquid in a small saucepan until it’s reduced to about 2 tablespoons. Let it cool slightly. Sprinkle the milled flax into the liquid and stir to blend. Let this mixture rest for about 15 minutes until it’s a thick, gelled mixture.
Rehydrating the TVP
Heat vegetable broth in a small saucepan or the microwave. It should be at least the temperature of hot bath water. I hydrated the sun-dried tomatoes separately, but I could have added them to the bowl with the TVP. I’m still learning here! Pour the hot broth over the mixture, stir to moisten and let it rest at least 10 minutes to fully rehydrate. Refrigerate this if you are working ahead.
Prepping the veggies
Heat skillet over medium heat. Add olive oil and sauté onions, peppers and garlic until softened and slightly caramelized. I usually judge this not by time, but by appearance. When the steam rising from the skillet is replaced by the sound of oil sizzling, they are done. If you still see a lot of steam, that moisture will come back to cause trouble when the burgers are in the skillet. Divide the mixture (at least visually) into halves.
Putting it all together
All ingredients should be cooled to approximately room temperature before mixing. It’s OK if they are cold or lukewarm, but do not process the beans and veggies if they are still hot because this will result in a mushy mixture that won’t hold together well in patties.
My spicy coffee rub gave these vegan burgers great flavor, but equal amount of any burger seasoning you like would be just fine.
I had one little dab of chipotle puree left over from other recipes. Might as well add it to my vegan burgers.
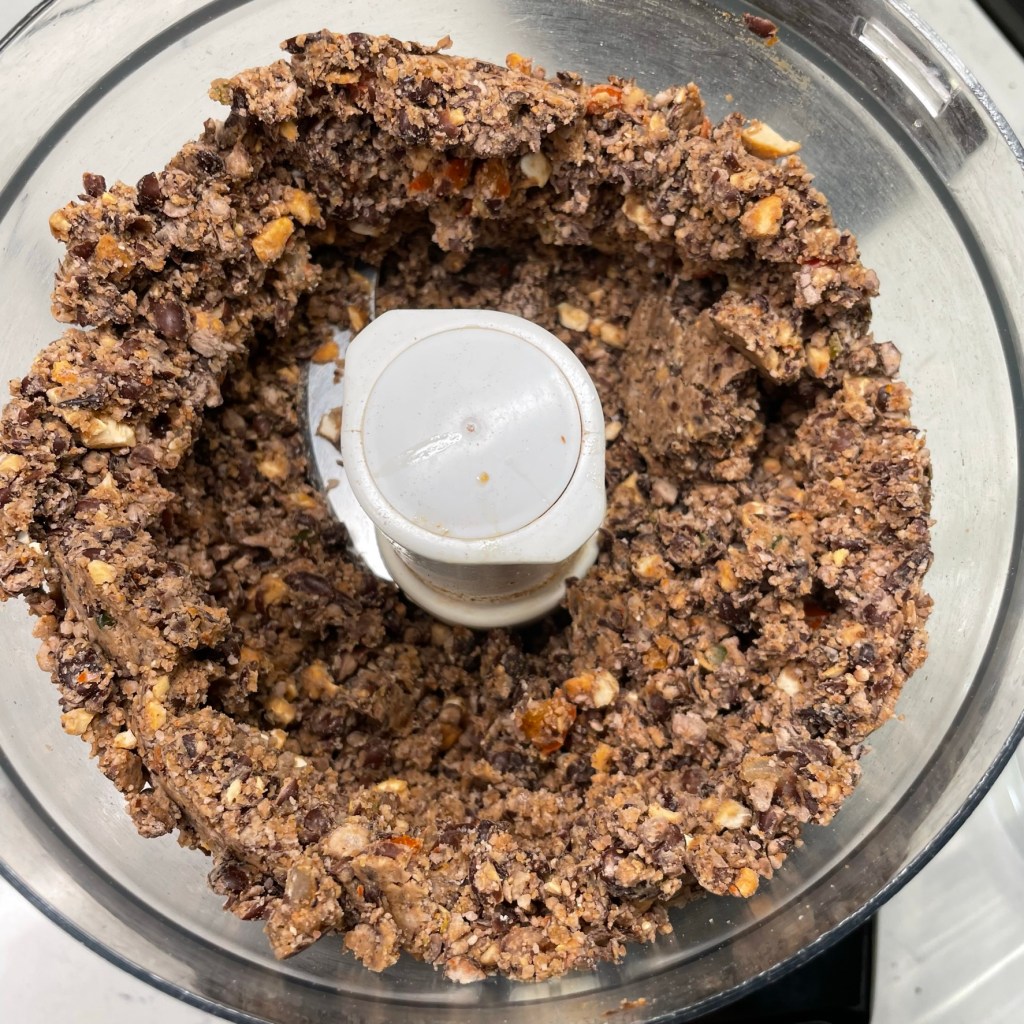
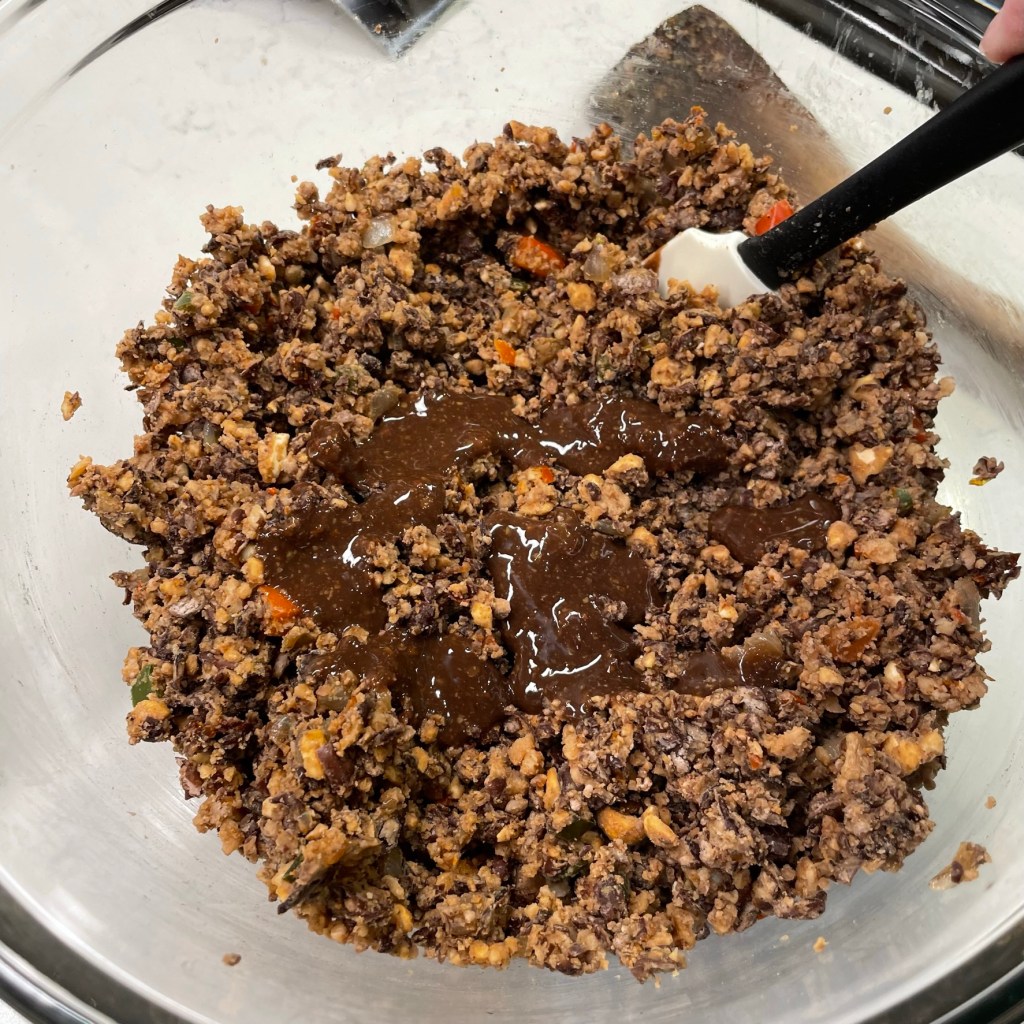
Combine all the beans, half the onion mixture, the cashews and spices into the large bowl of a food processor.
Pulse about 10 times, until the mixture resembles a coarse meal. When you squeeze a bit in your hand, it should mostly hold together. Transfer it to a large bowl.
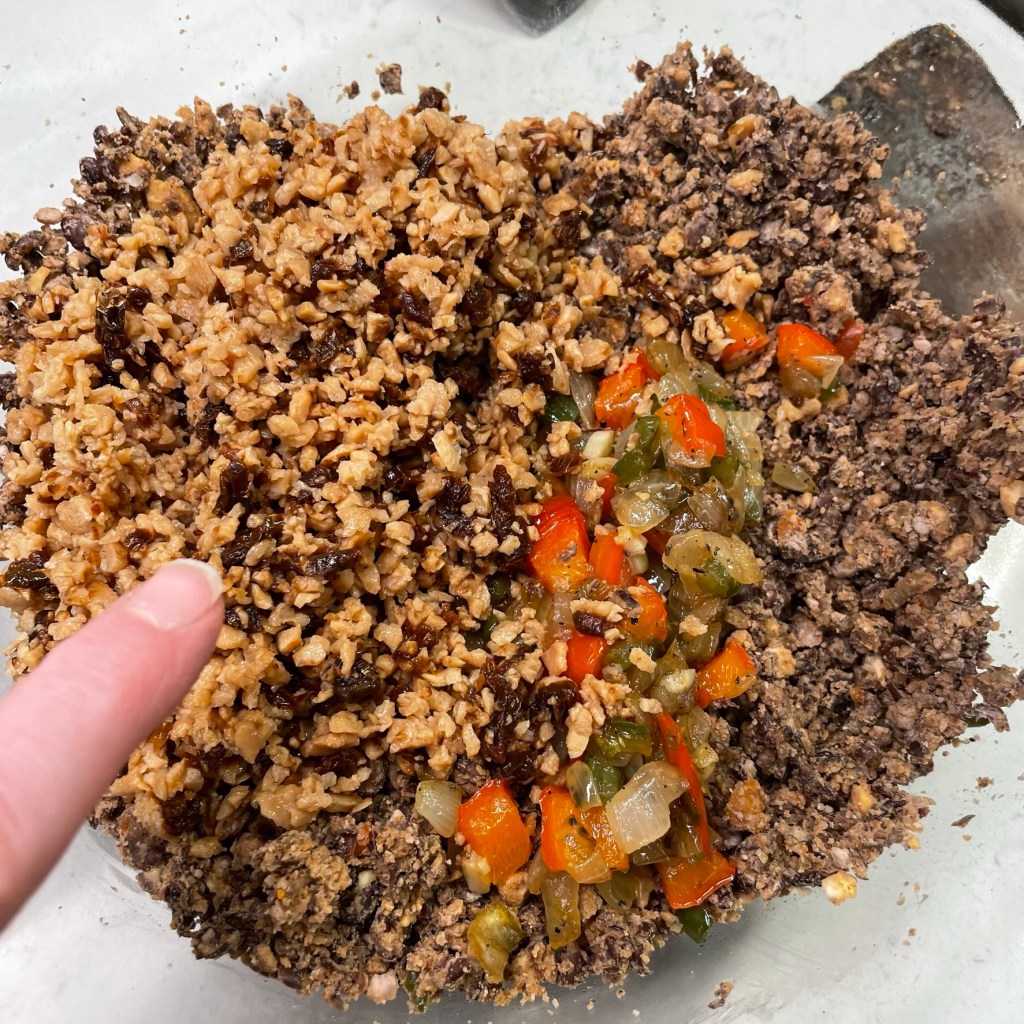
Fold in the TVP and sun-dried tomato, plus the remaining onion mixture.
Add the flax “egg” mixture and fold to combine.
Shape the black bean mixture into patty shapes, the same size as your burger buns. Remember that these will not shrink as meat does. Sprinkle cornmeal onto both sides for texture during frying. Refrigerate the patties for an hour or two to set up.
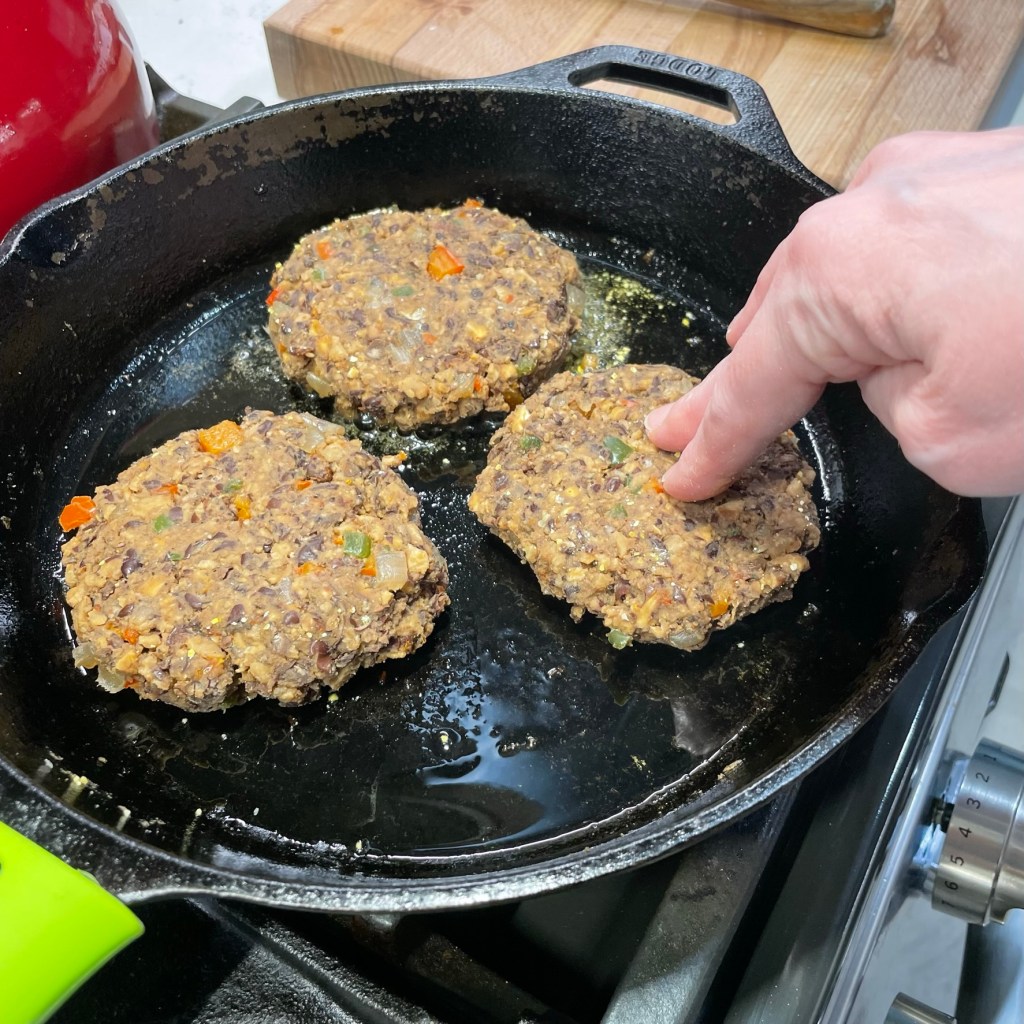
Arrange the burgers in a hot skillet with a generous glug of canola oil. Cook without moving them around too much.
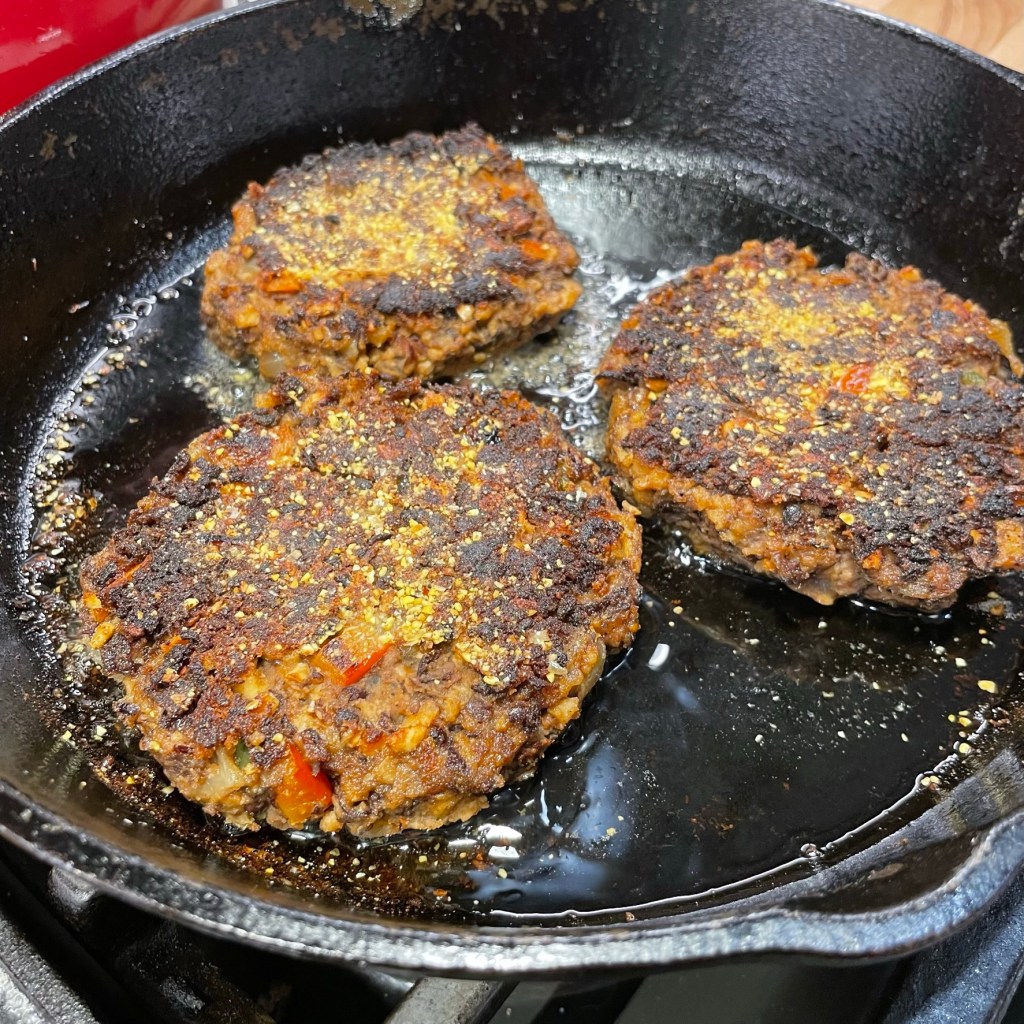
When the bottoms are crisped and darkened to your liking, gently turn the burgers to cook the other side. Don’t flip them like meat burgers because they may break.
Go crazy with your favorite toppings, even a vegan cheese substitute if you wish.
To the large bowl of a food processor, add all the roasted black beans, half the sauteed veggies and cashews. Add the spicy coffee rub (or substitute) and chipotle puree. Pulse a few times, just until the beans are about 1/3 their original size and the mixture looks uniform in texture. Don’t process it to the point of being smooth. Transfer the mixture to a large bowl.
Add the remaining vegetables and TVP mixture to the processed bean mixture and fold to combine. Add the flax egg and fold to blend. Shape the mixture into burger-shaped discs that are the same size as your burger buns (they will not shrink during cooking as meat does). Sprinkle both sides of the burgers with cornmeal and press on them to adhere it. Put the burgers on a plate or cookie sheet, covered with plastic wrap, and refrigerate for an hour or two so the patties set up for cooking. Remove from fridge about 30 minutes before frying.
Heat a cast-iron skillet over medium high heat. Add canola oil to a depth of about 1/4” and place the burgers in the skillet, keeping enough distance between them for easy access to turn them. Cook each side until crispy and browned, about 5 or 6 minutes. Take care when turning, as they will fall apart if you “flip” them as you would a meat burger.
Serve with your favorite plant-based toppings and enjoy!
You may be wondering if I’m a paid endorser for the brands and products I spotlight on Comfort du Jour, and the answer is “no.” I do not receive money or merchandise for my recommendations, and what that means for you is that you can count on me to give an honest opinion. If something changes, I will update my disclosures. Either way, you can still count on me to be honest in my recommendations, as I will only stand behind services and products I believe in. Fair enough? 😀
The funnest thing about doing a food blog is putting all the new spins on the old dishes. Wait, did I just write “funnest?” Well, a word like that fits the situation, given that I am feeling playful about twisting up a classic. If I’m taking all kinds of liberties with the flavors so beloved for Kentucky Derby, I may as well do it with my words, too.
My celebration of the Kentucky Derby—which is Saturday, by the way, in case time has gotten away from you—is purely vicarious. I’ve never been to the Derby and honestly don’t know how I feel about the way they pressure the horses to perform for profit, but I know that I like the pomp and circumstance, the food traditions, the fancy hats and especially the bourbon! The Kentucky Hot Brown is the most classic dish associated with the Kentucky Derby, and I have twisted it up in several ways already, including a Kentucky Hot Brown Benedict, a Kentucky Hot Brown Pizza and a super simple Kentucky Hot Brown Dip. When Derby time rolled around this year, I wanted to make a fun, crowd-ready food that’s easy to pick up and enjoy in just a few bites because, honestly, who wants to sit down in the middle of a party with a knife and fork and eat a messy, traditional Kentucky Hot Brown open-faced sandwich, with all its oozing Mornay sauce? Yeah, these are much easier!
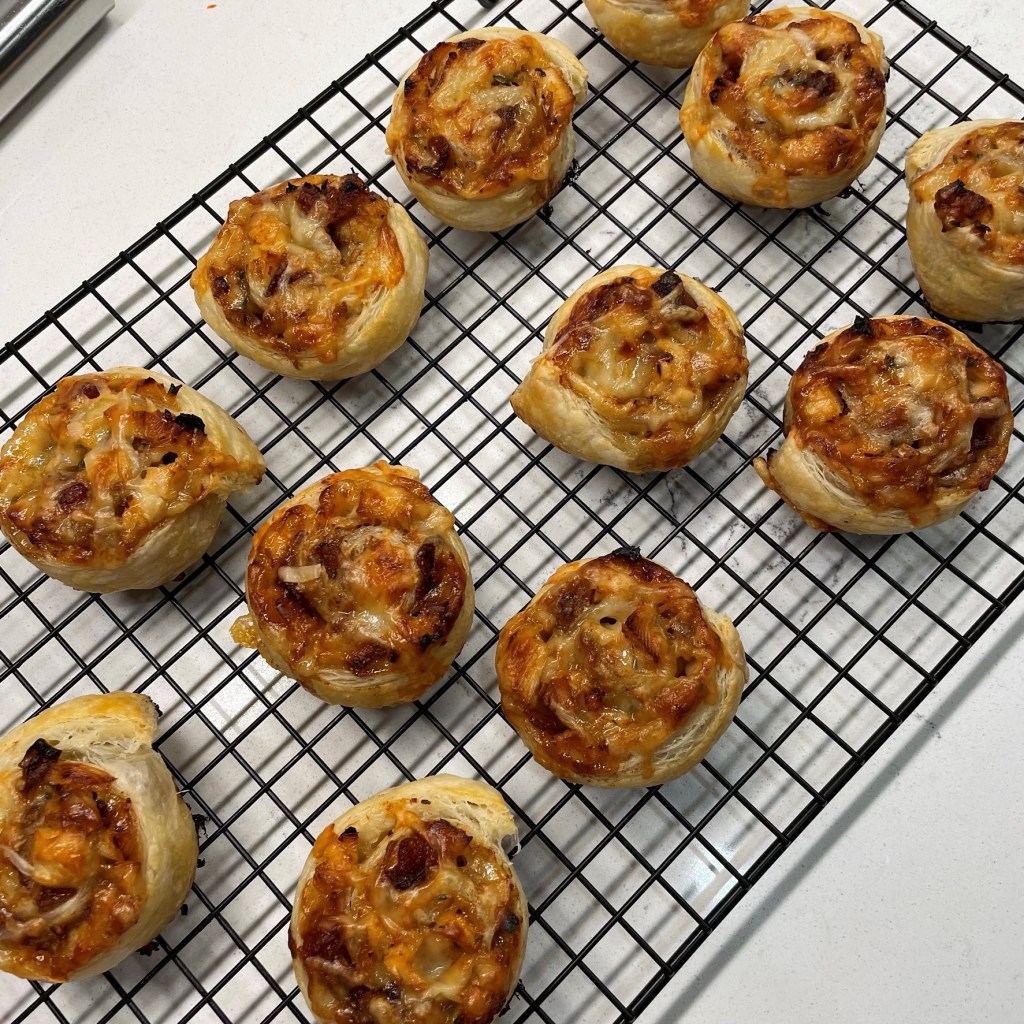
It’s no coincidence that these Kentucky Hot Brown swirls are delicious with bourbon.
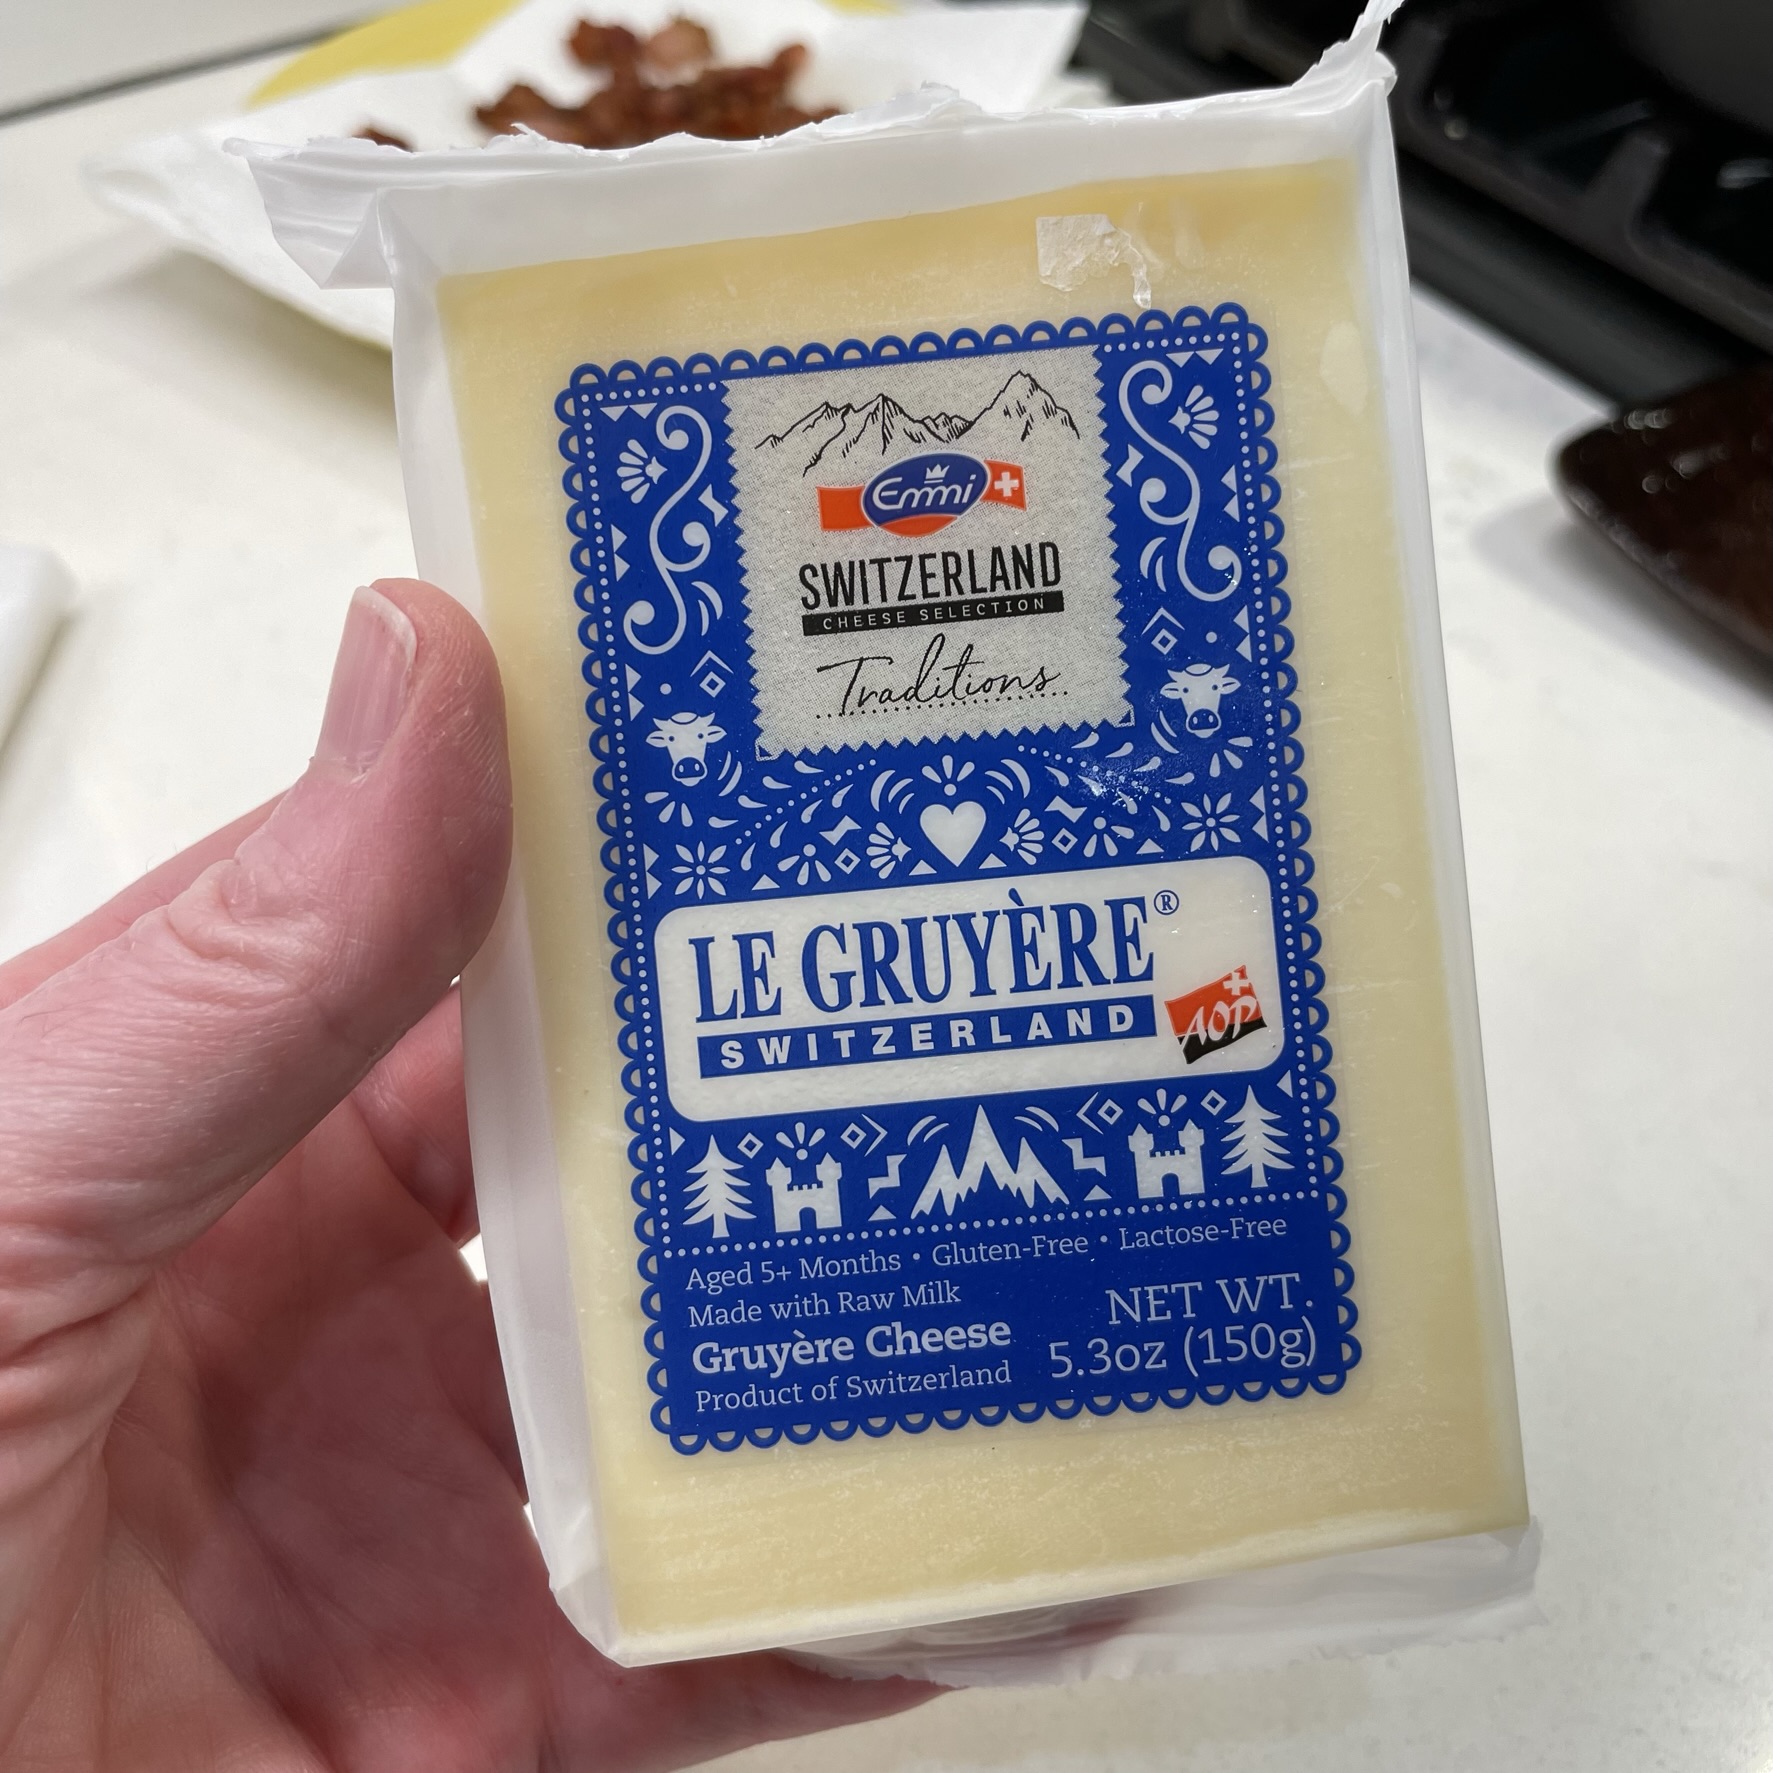
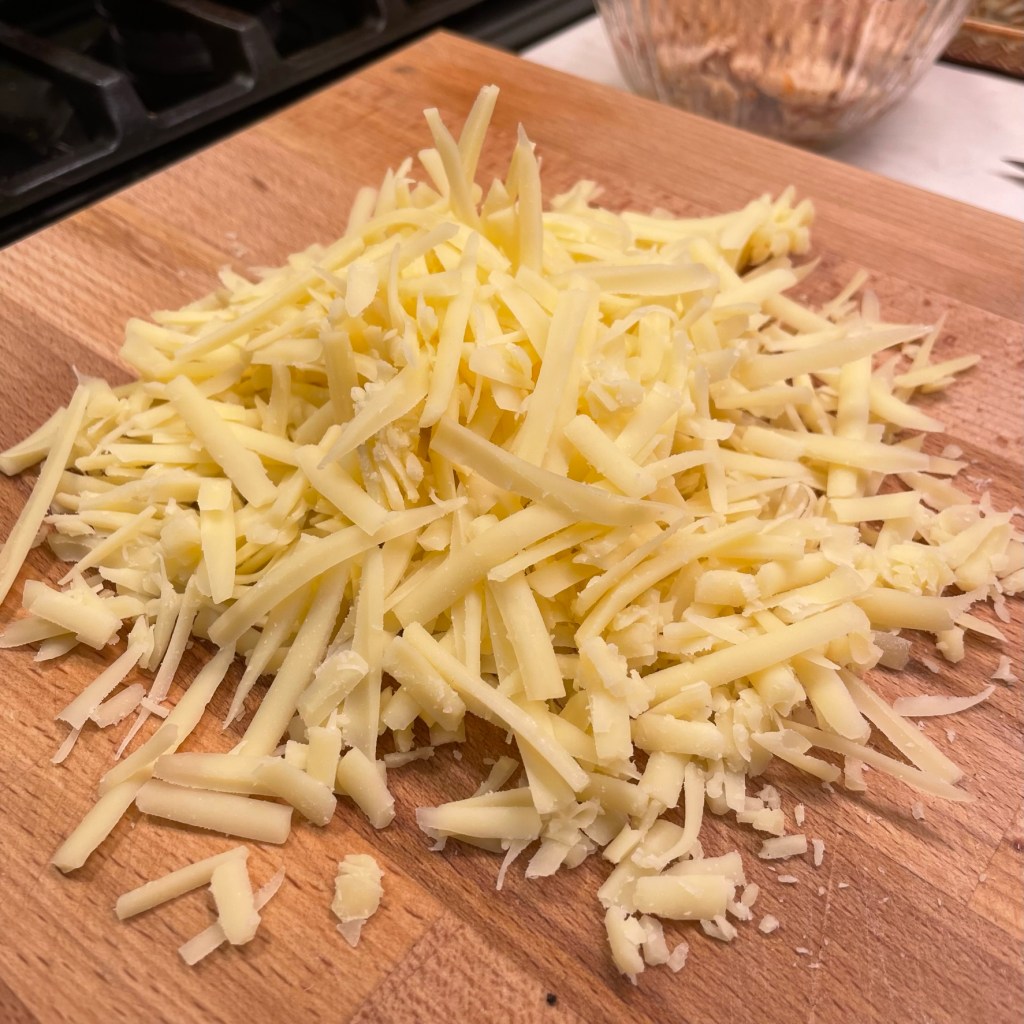
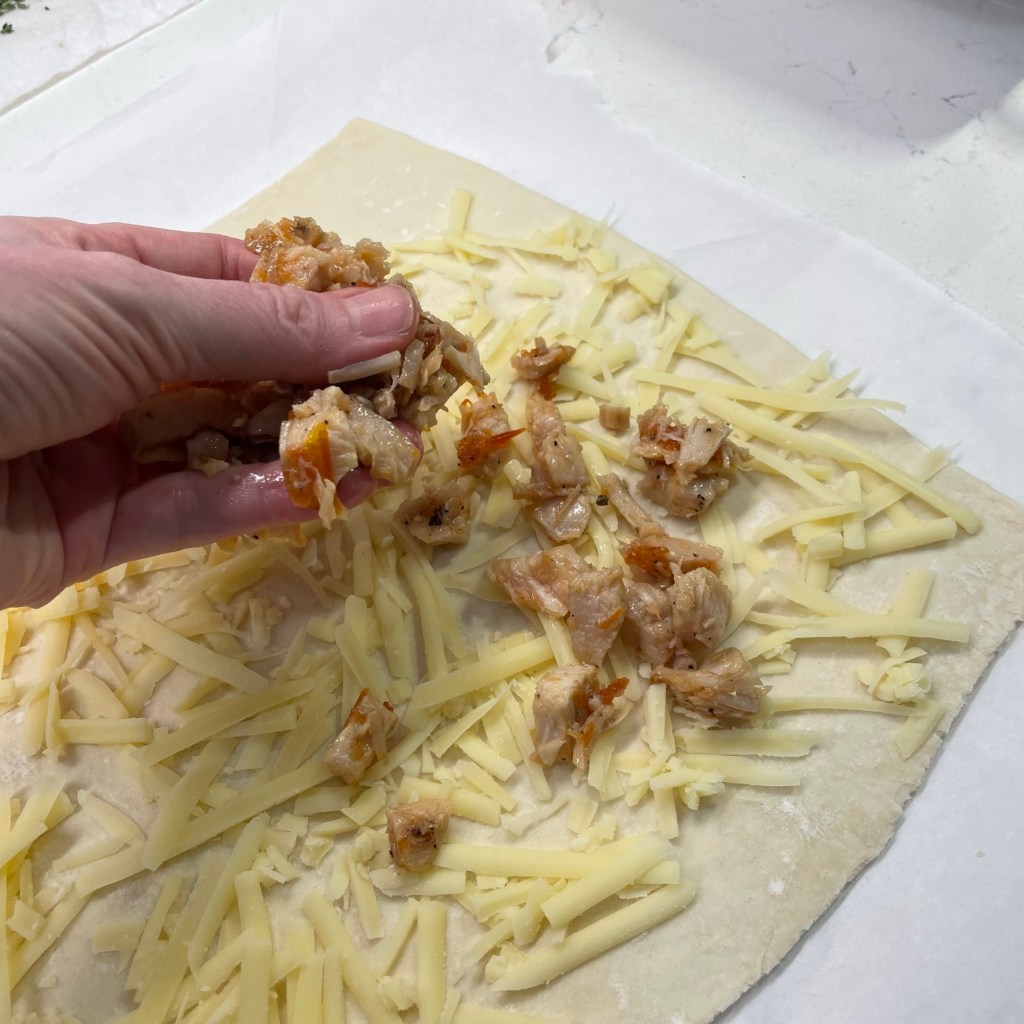
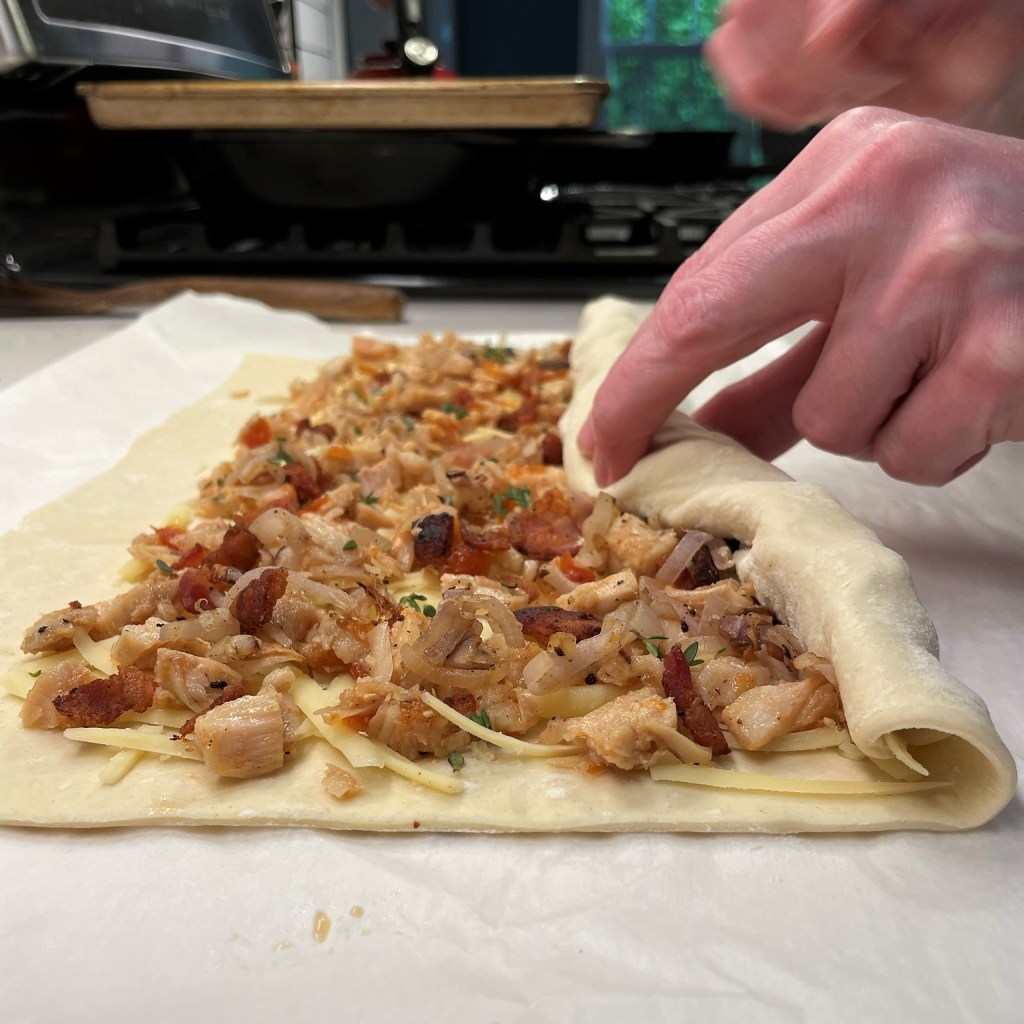
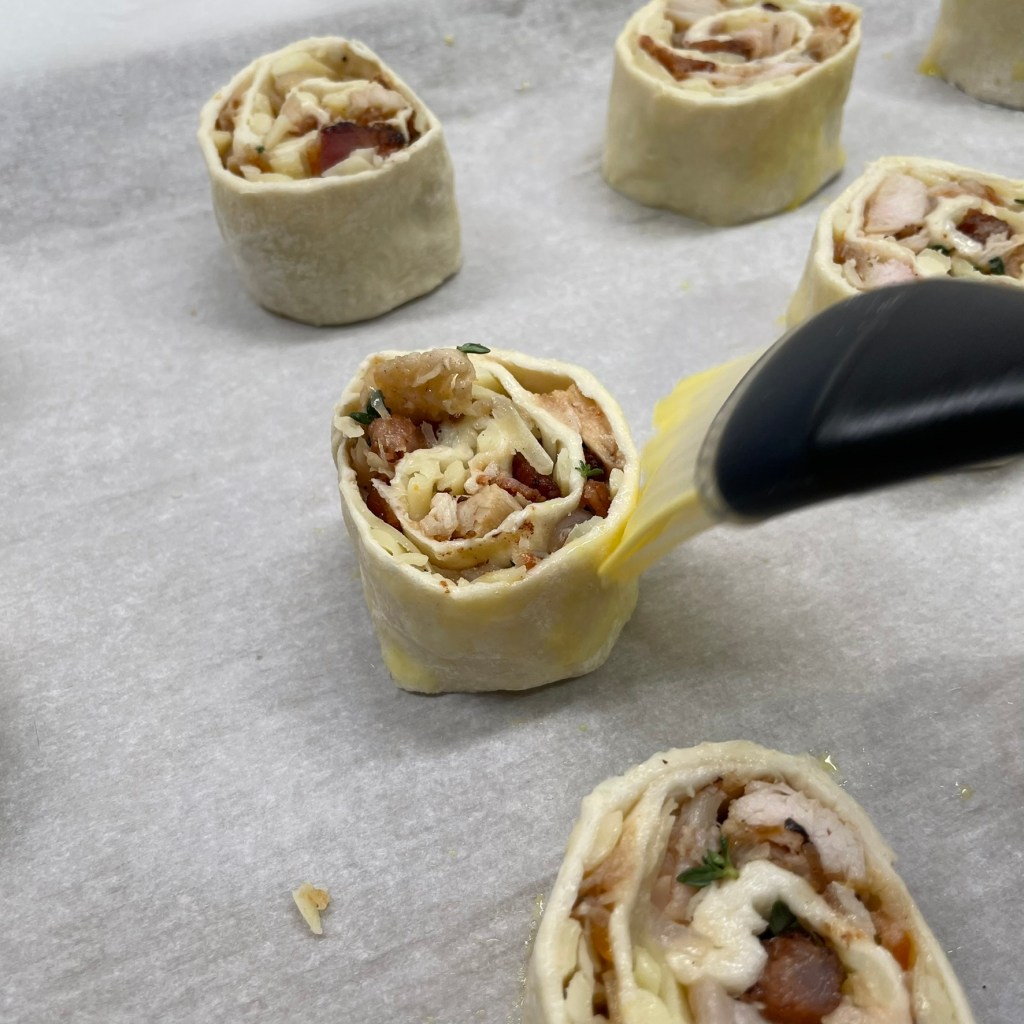
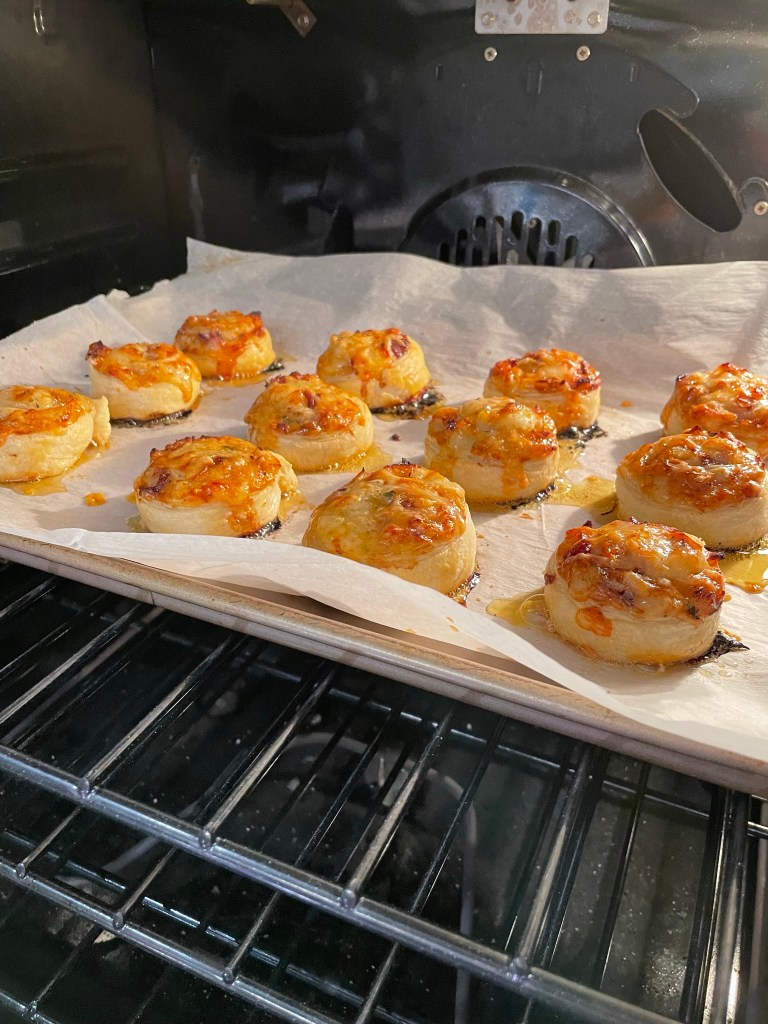
If you’re entertaining friends for the afternoon leading up to the “most exciting two minutes in sports,” may I suggest these adorable little puff pastry swirls? They have all the flavors of the beloved Kentucky Hot Brown, including roast turkey, bacon, tomatoes and gruyere, plus a touch of sauteed shallot and (in a nod to the catering kitchen where I worked so long ago) “A Pinch of Thyme.”
I expected a few obstacles along the way to these tasty rollups, mostly because puff pastry can be fussy to work with. It bakes up best if it goes into the oven cold, so the first thing I planned was to work quickly. Get all your filling ingredients ready first, and refrigerate the ones that are cooked, such as the bacon and shallots. Cook the bacon long enough to render as much fat as possible, so the lingering fat doesn’t make the pastry soggy, but not so much that hard edges will tear the pastry. Shred the cheese and keep that in the fridge until assembly time, too. Fresh roast turkey is probably better than deli turkey (mainly for keeping the sodium in check), and I confess that I used leftover turkey that we had stashed in the freezer after Thanksgiving. As for the tomato, I knew that my sweet and savory tomato jam would not spread neatly onto the puff pastry without tearing it, and I didn’t want to heat it (see the first point about baking puff pastry cold), so here’s how I overcame that challenge—I added a few tablespoons of tomato jam to the bowl with chopped turkey and stirred it together. Problem solved!
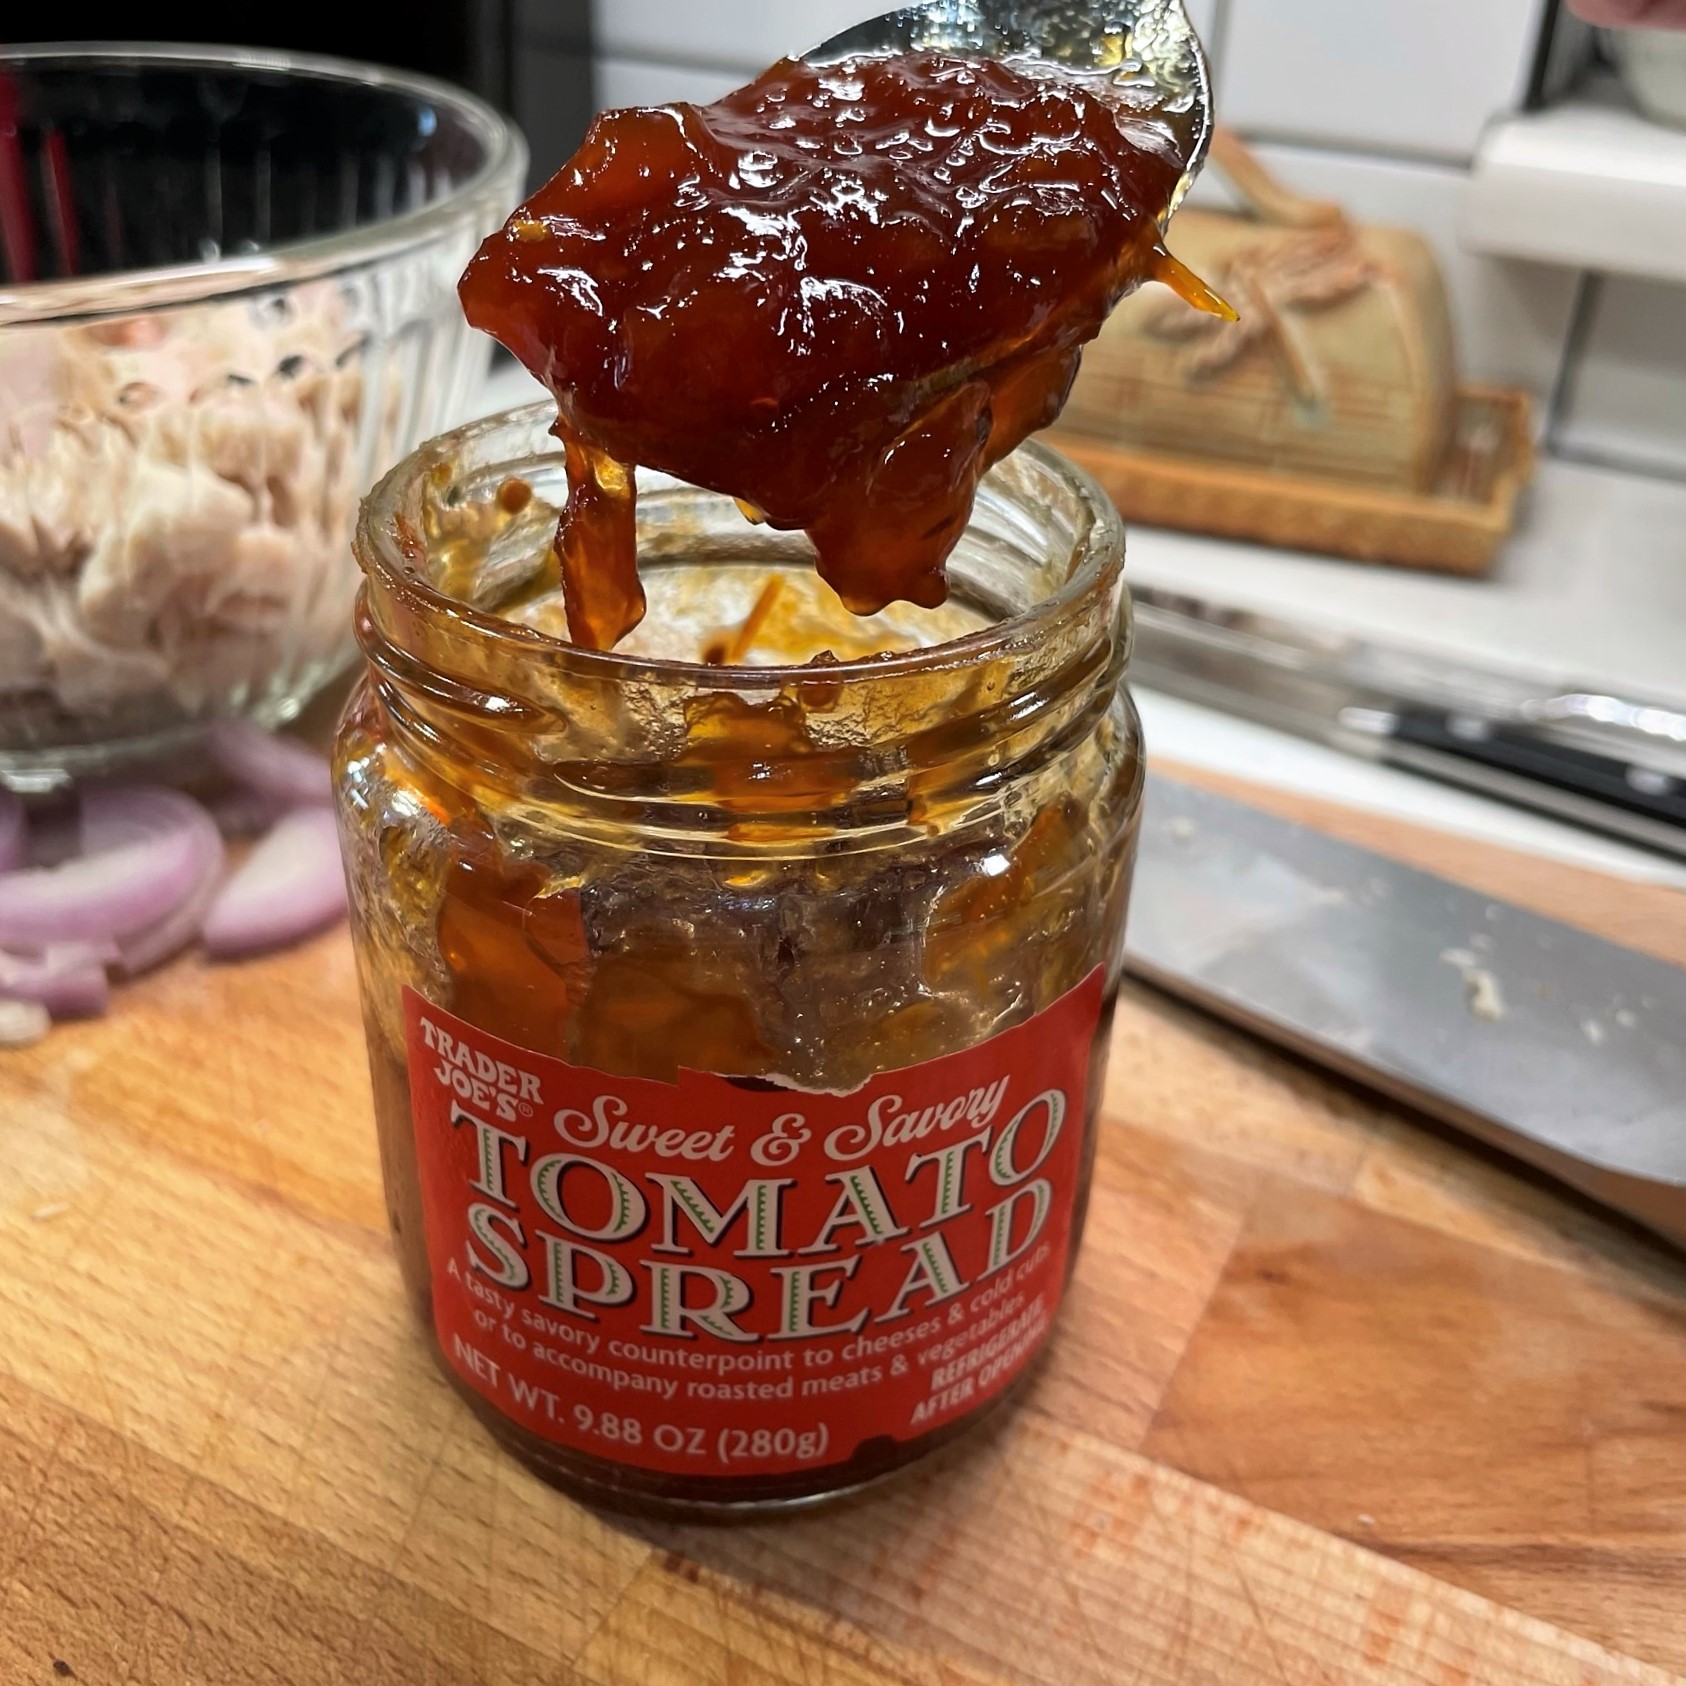
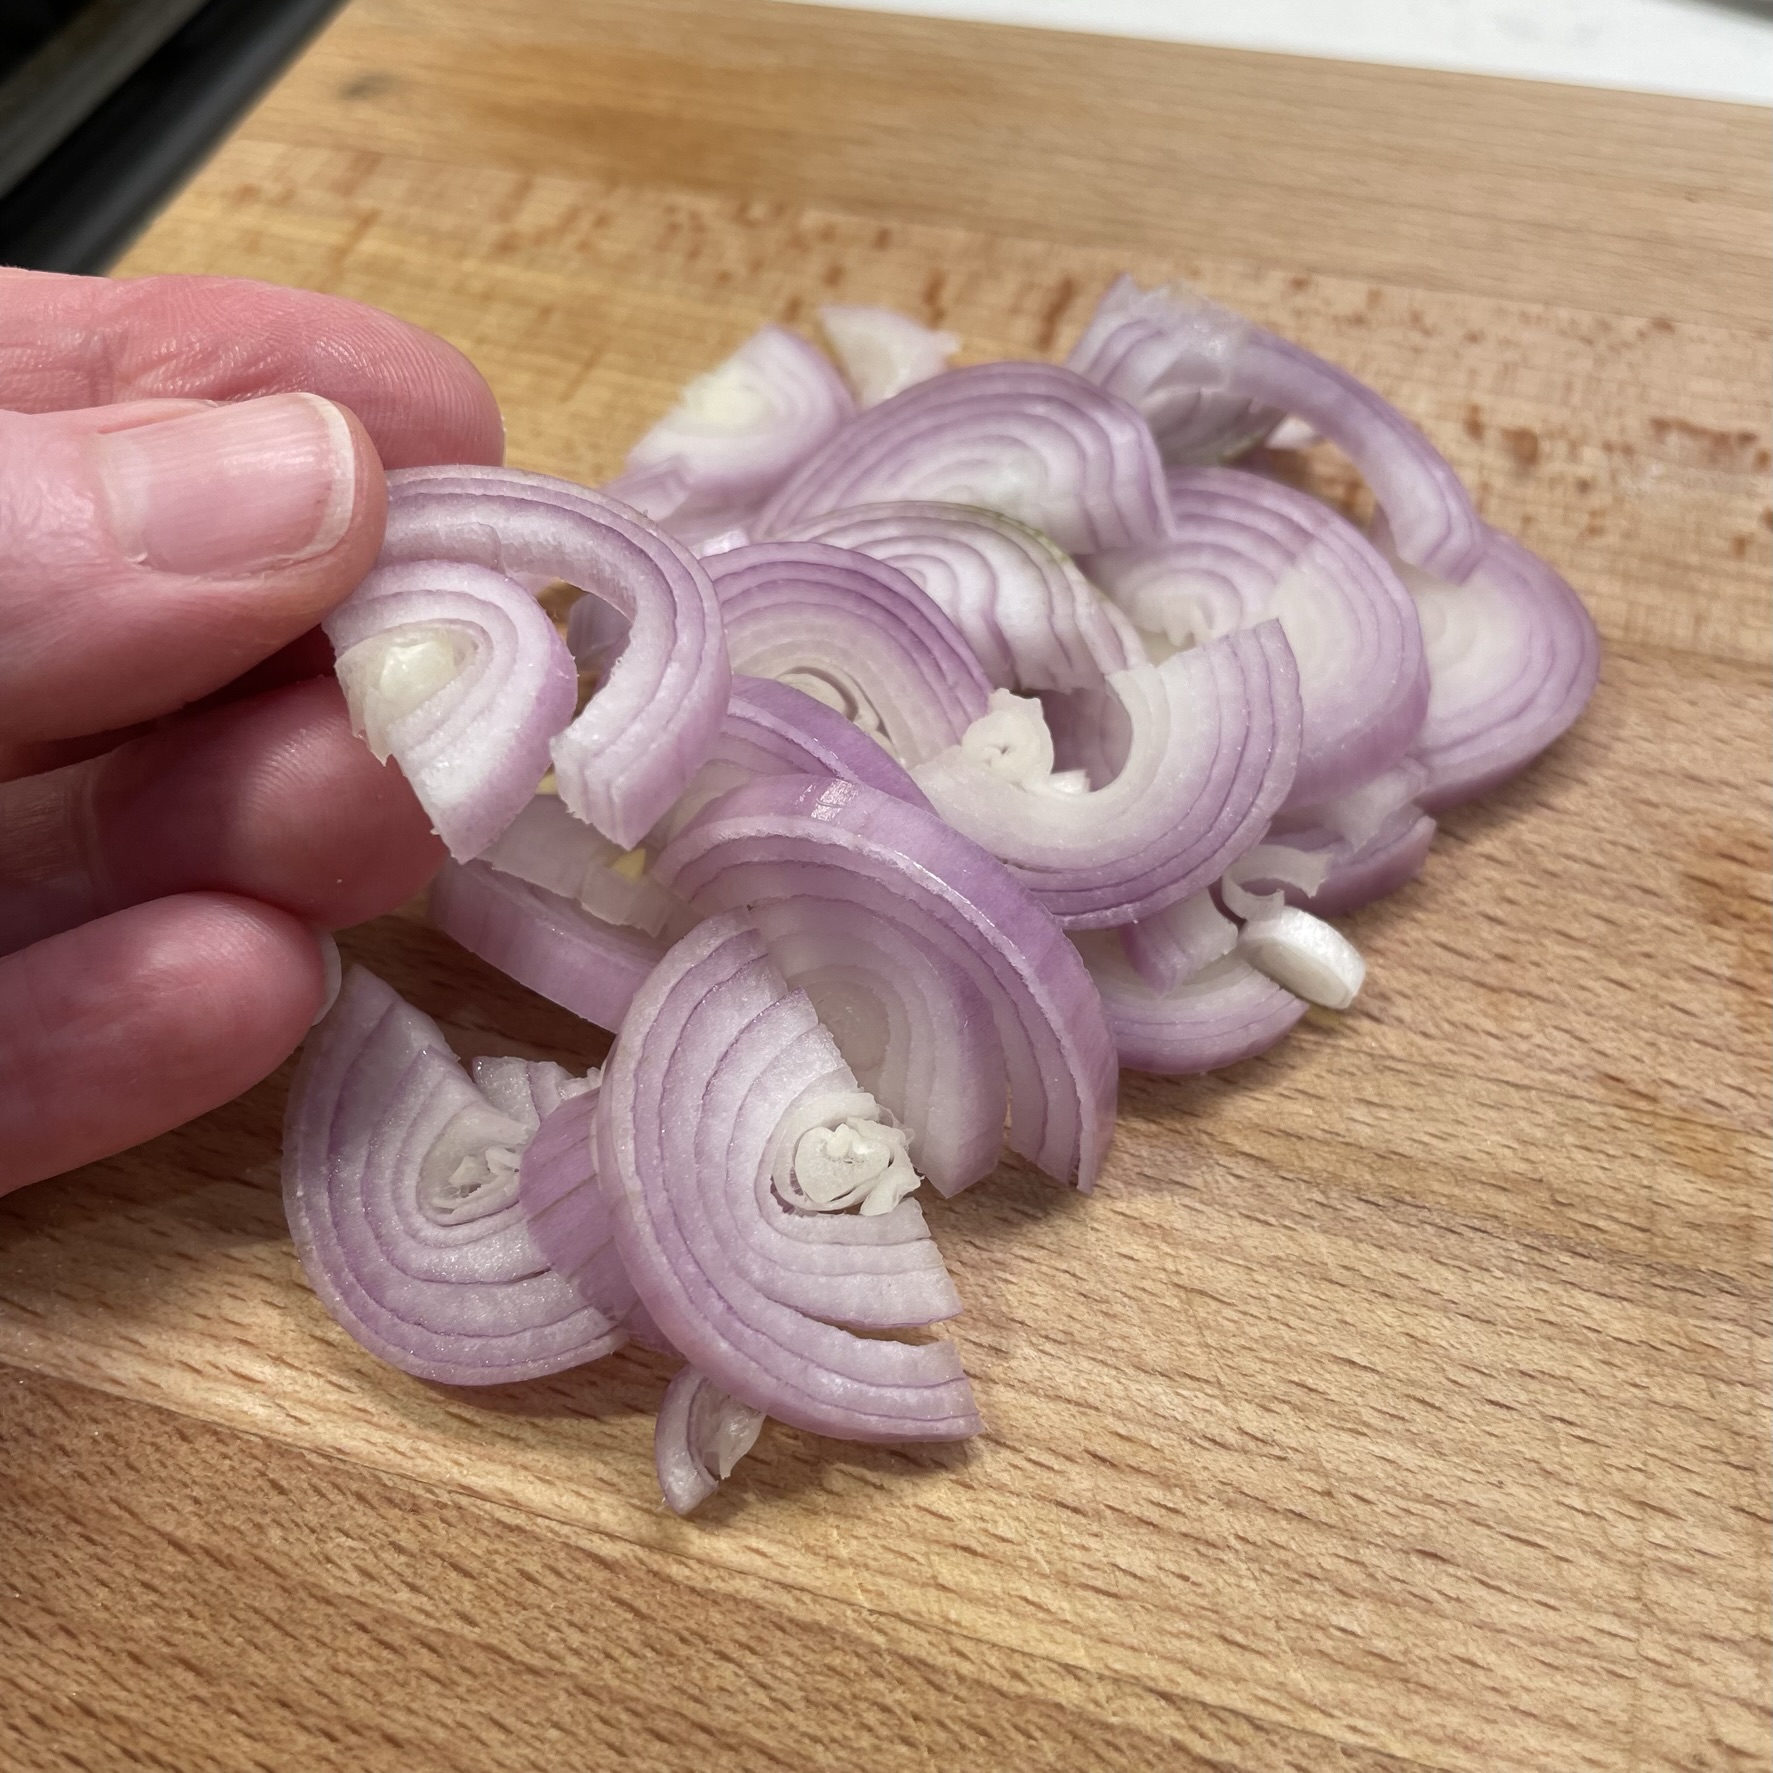
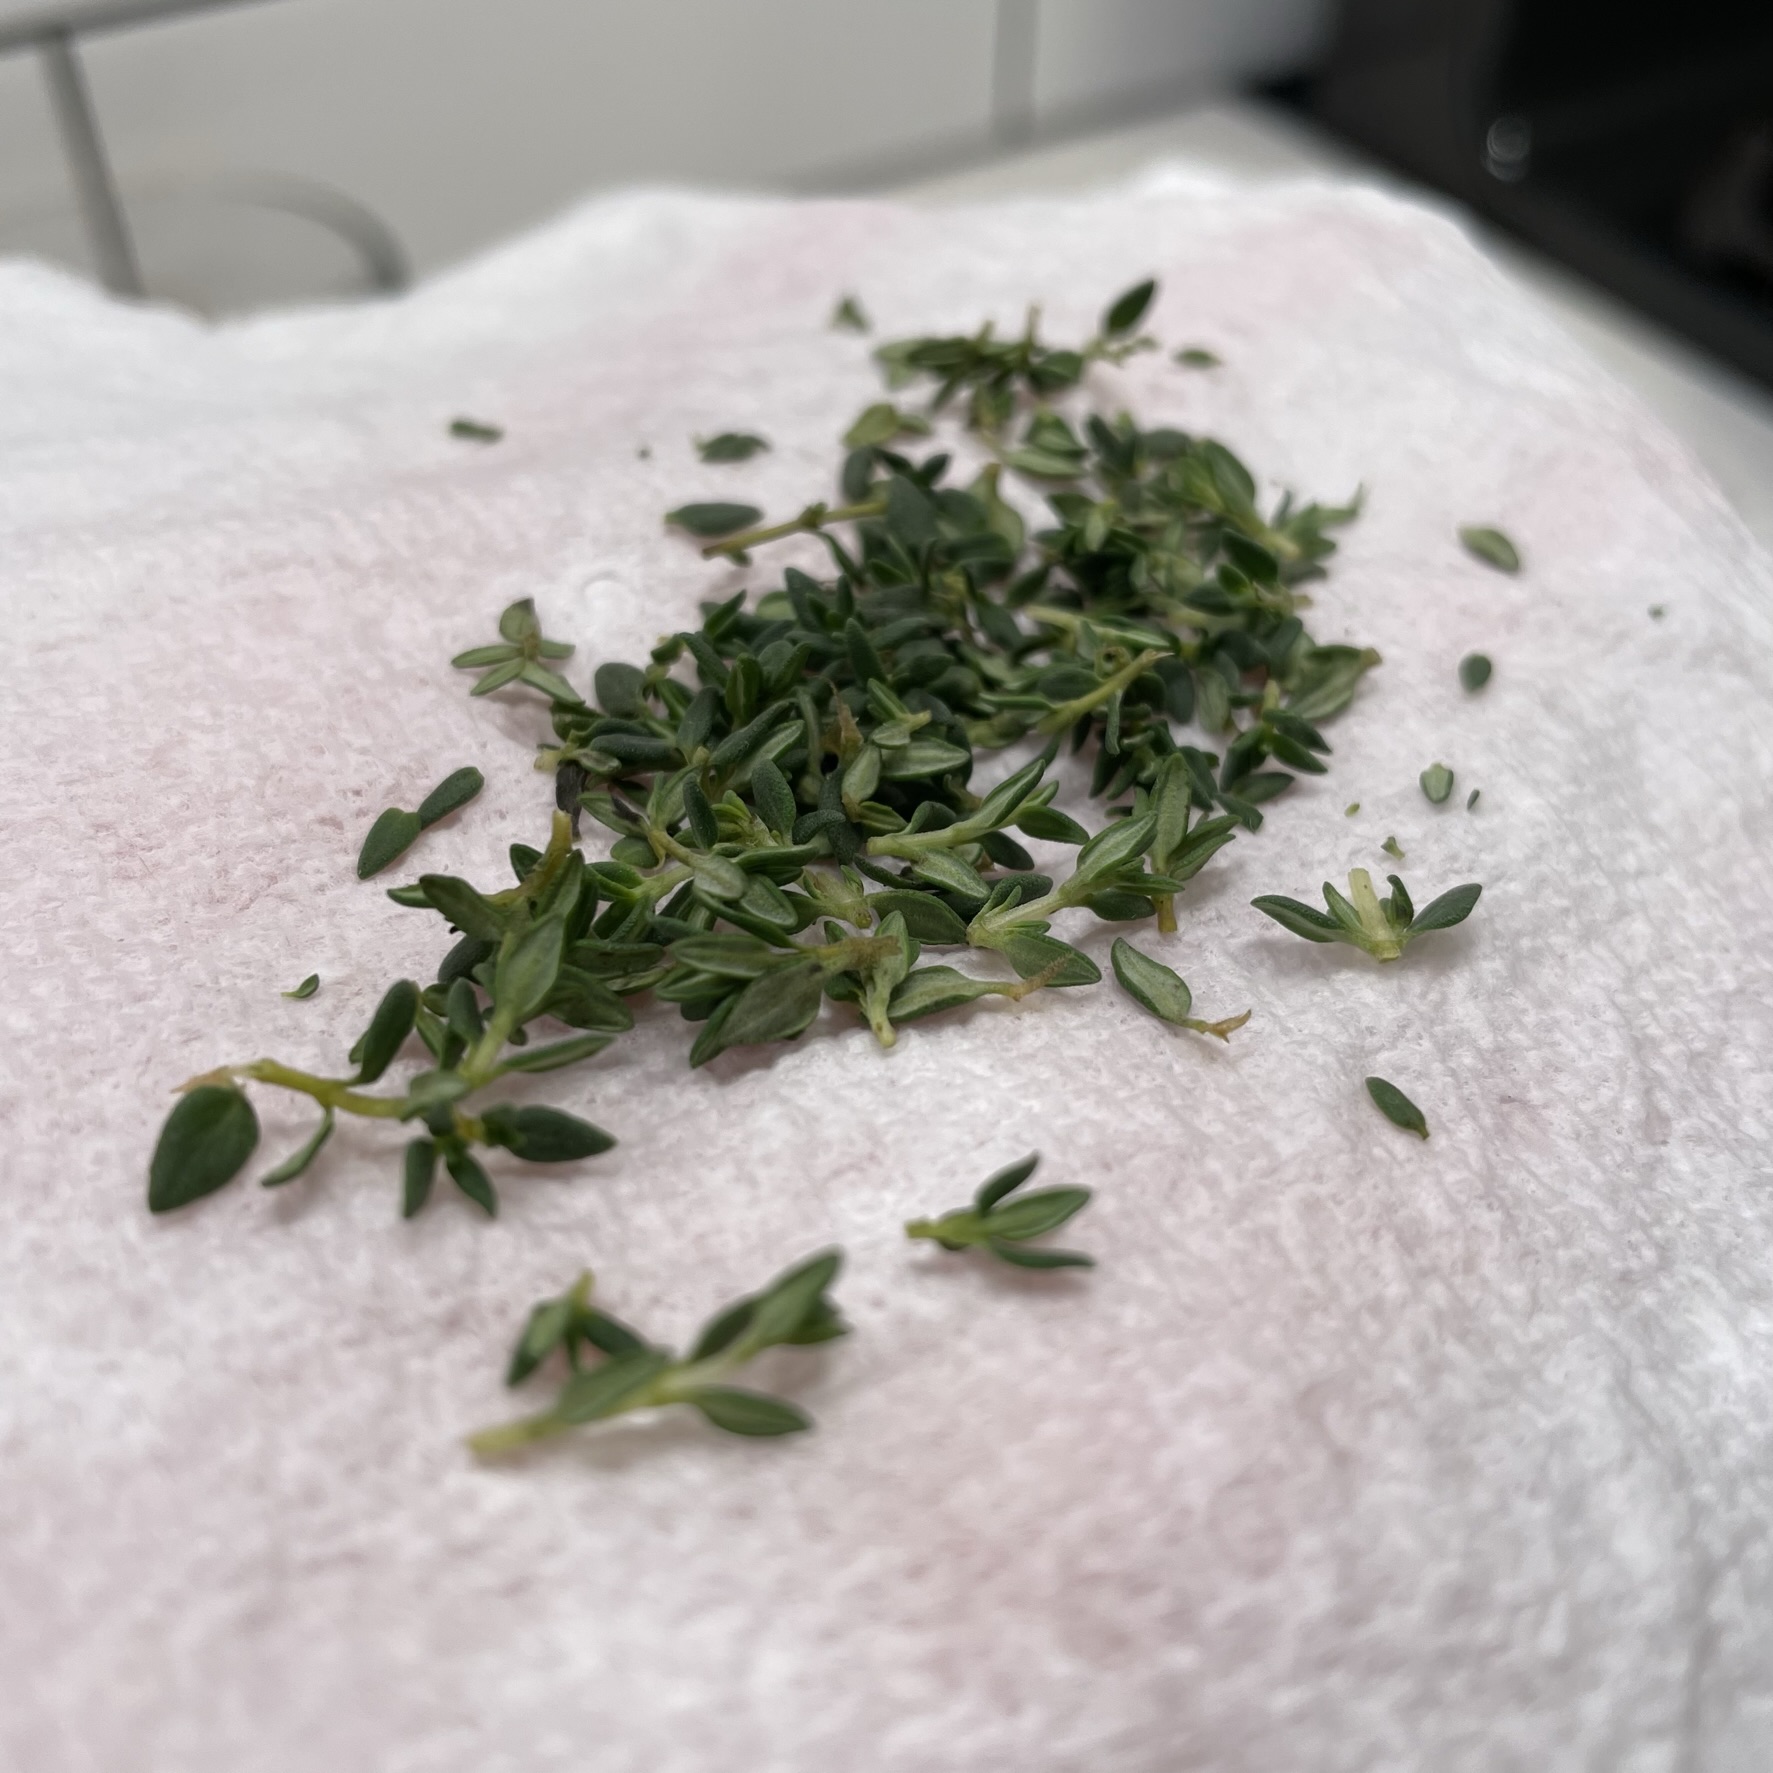
Gruyere is the cheese in a Mornay sauce, so I shredded and folded it right into the swirls.I’m kind of crazy about tomato jam. This spread from Trader Joe’s was perfect.Shallots are a mild form of onion, and they are small, which worked perfectly here.A pinch of fresh thyme was a perfect touch of herbal flavor, and always reminds me of my catering days.
You can put these two-bite treats together in the morning or afternoon, even the night before, all the way up to slicing them into swirls, and then refrigerate them until about a half hour before your guests arrive. A quick egg wash and some extra sprinkles of gruyere just before they hit the oven, and, well—riders up!
This recipe makes 12 swirls, just about right as appetizers for 6 people.
Ingredients
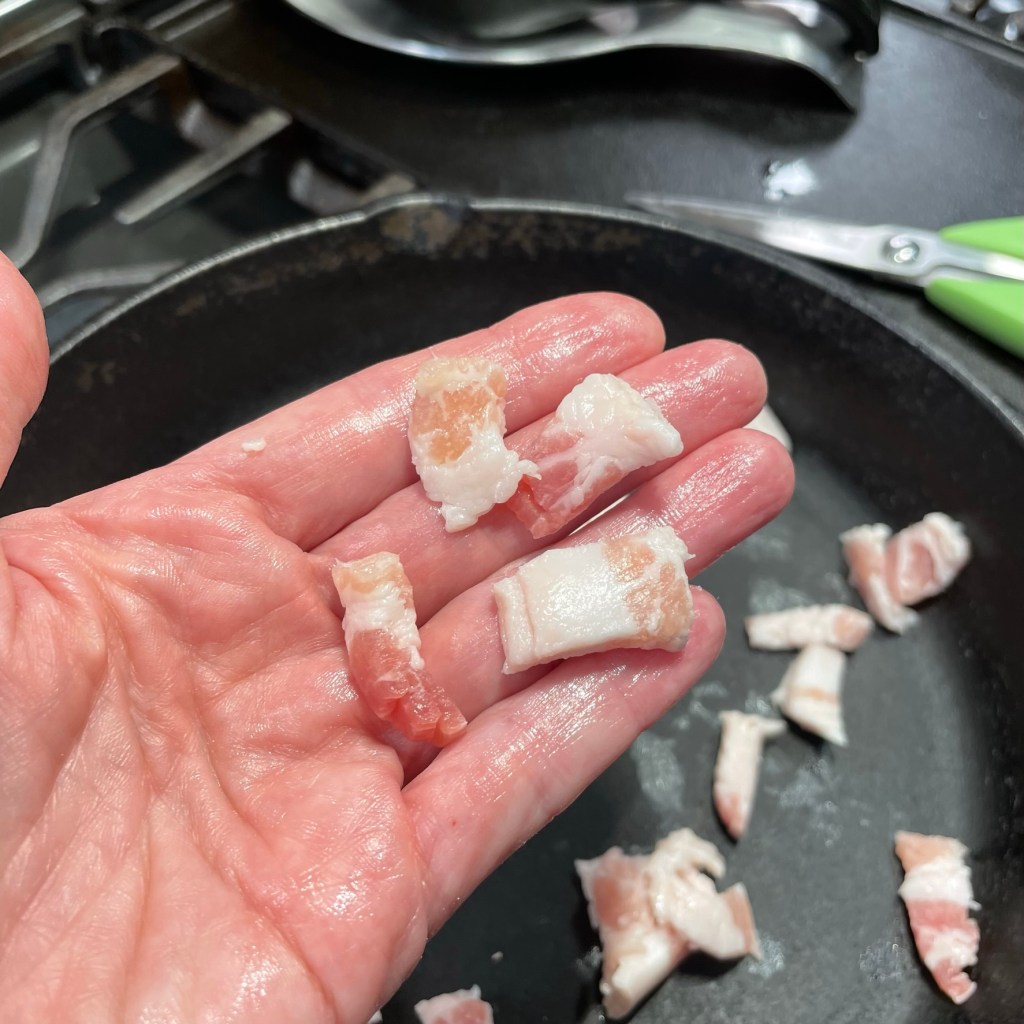
3 slices smoked bacon, cut into pieces no larger than a postage stamp
1 smallish shallot, peeled, halved and cut into half-moons
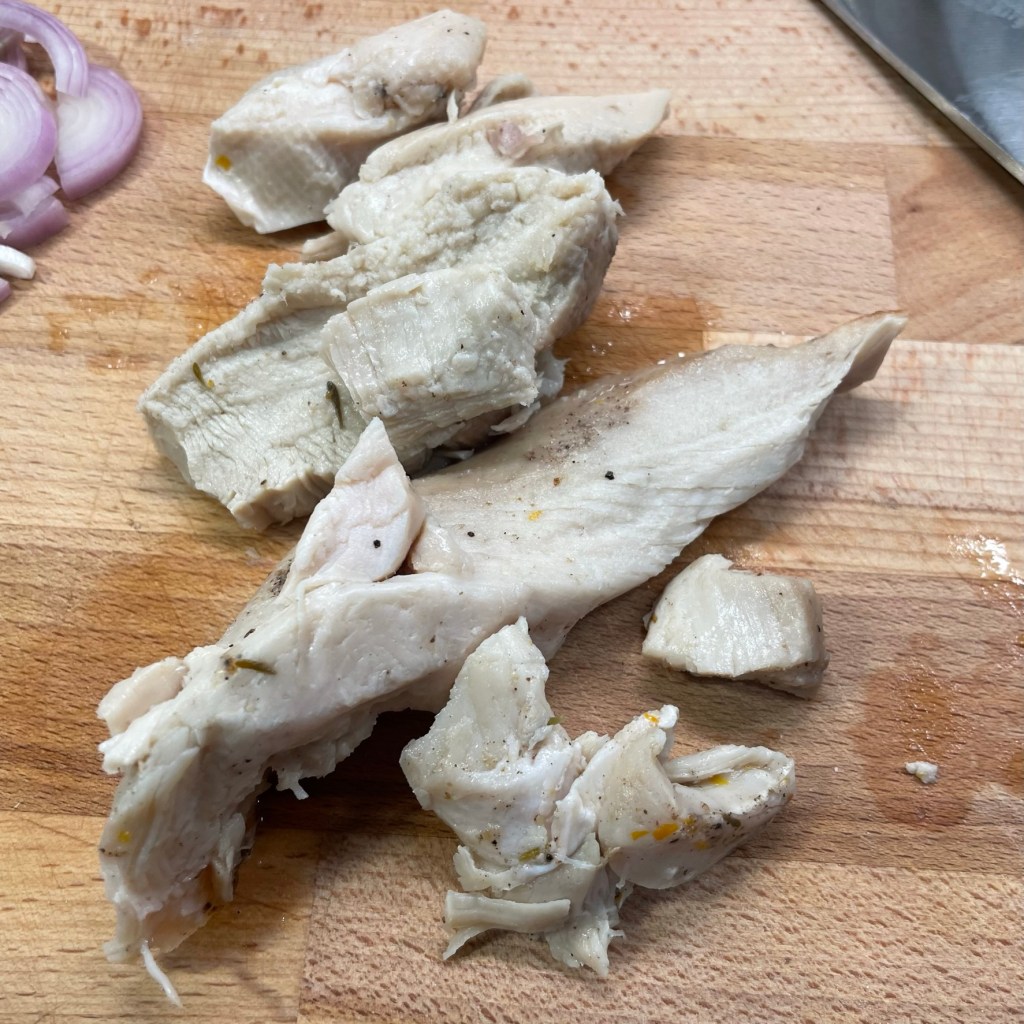
1 cup chopped, cooked leftover roast turkey breast
3 Tbsp. tomato jam (store-bought or homemade, if you have it!)
1 heaping cup shredded gruyere cheese (or Swiss), divided
A few sprigs fresh thyme, leaves stripped
1 sheet store-bought puff pastry, thawed according to package instructions
1 egg, whisked with a teaspoon of water, for egg wash just before baking
Instructions
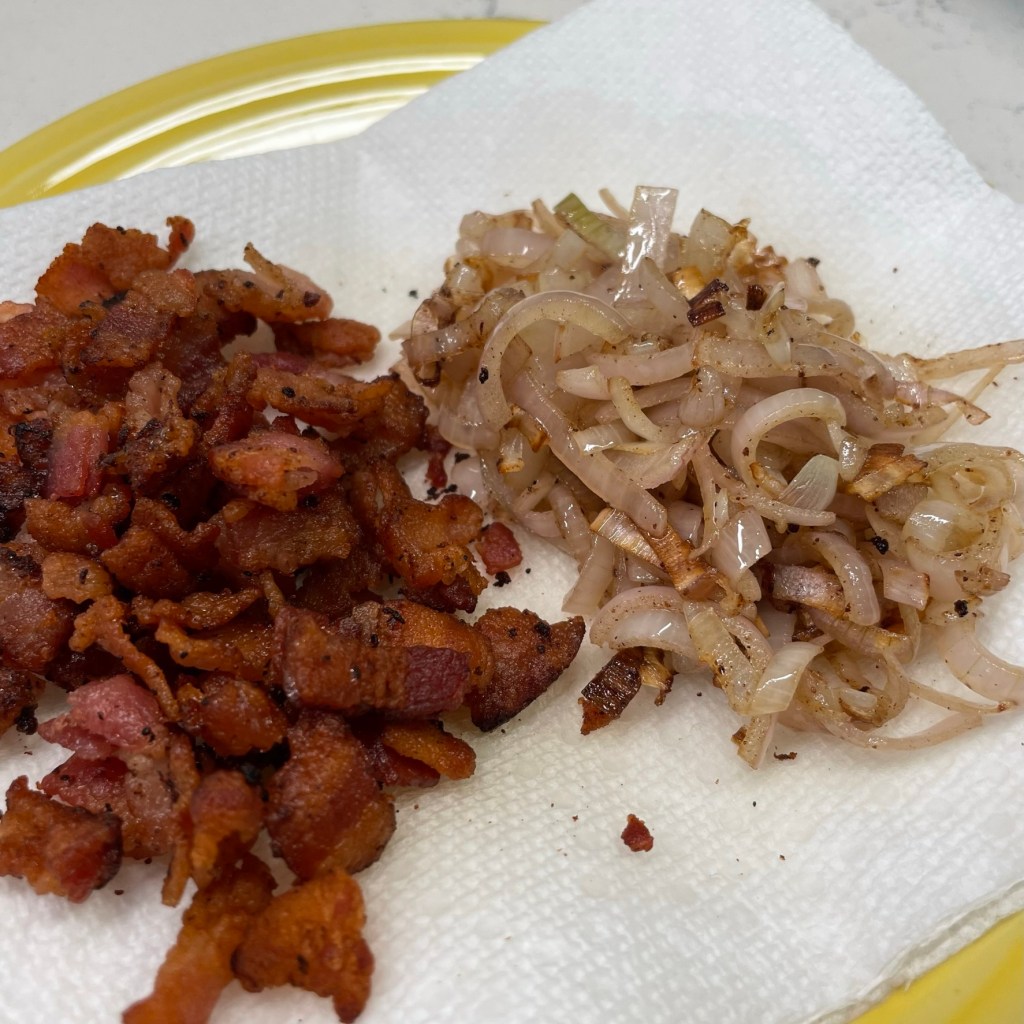
Cut the bacon into pieces no larger than a postage stamp, and cook them in a skillet until lightly crispy.
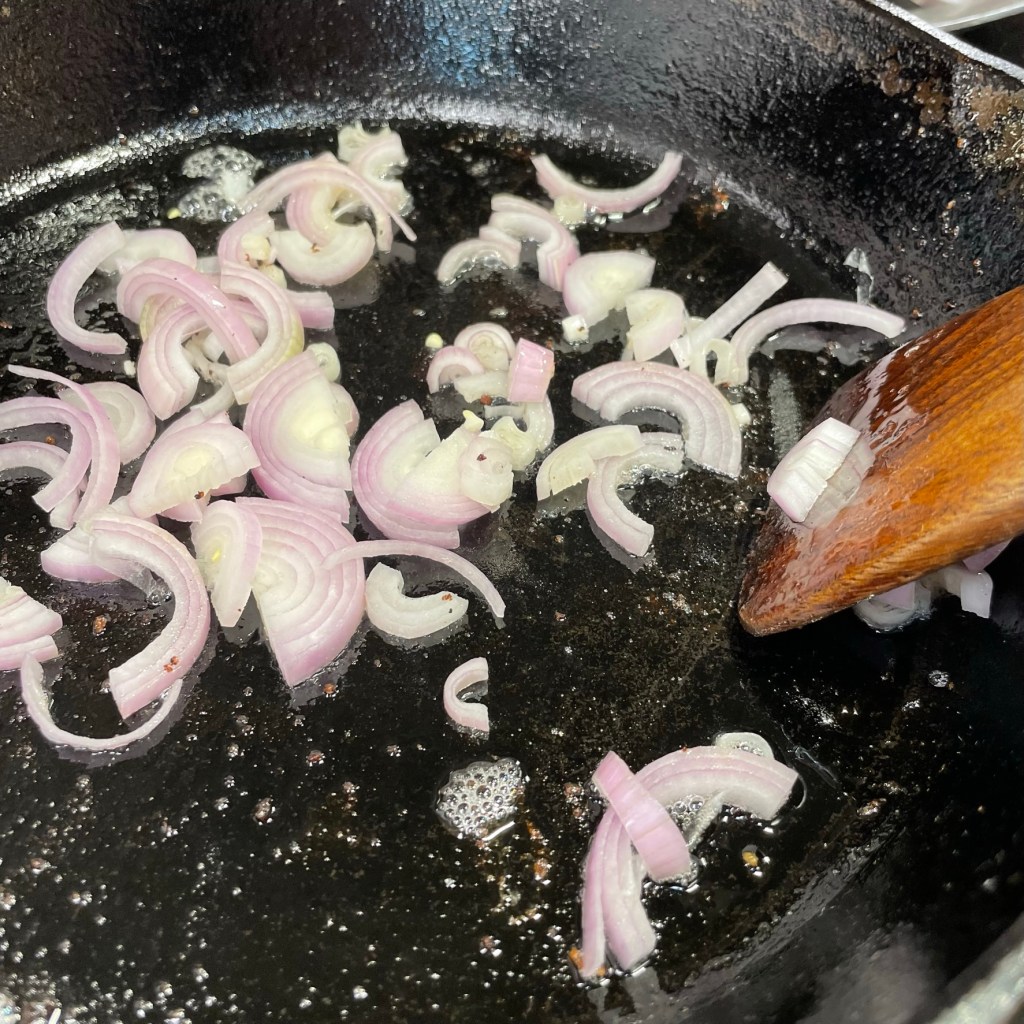
Drain off the excess bacon grease, then saute the shallots until they are softened and lightly golden.
Transfer the bacon and shallots to a plate or dish and refrigerate to cool them down.
Turkey breast is best for this recipe. Chop it into chunks no larger than sugar cubes.
Toss the turkey cubes with a few tablespoons of the tomato jam. If you have a sweet tooth, you won’t regret spooning in a little extra!
Shred the gruyere (or Swiss) cheese and keep it in the fridge until you’re ready to assemble the swirls.
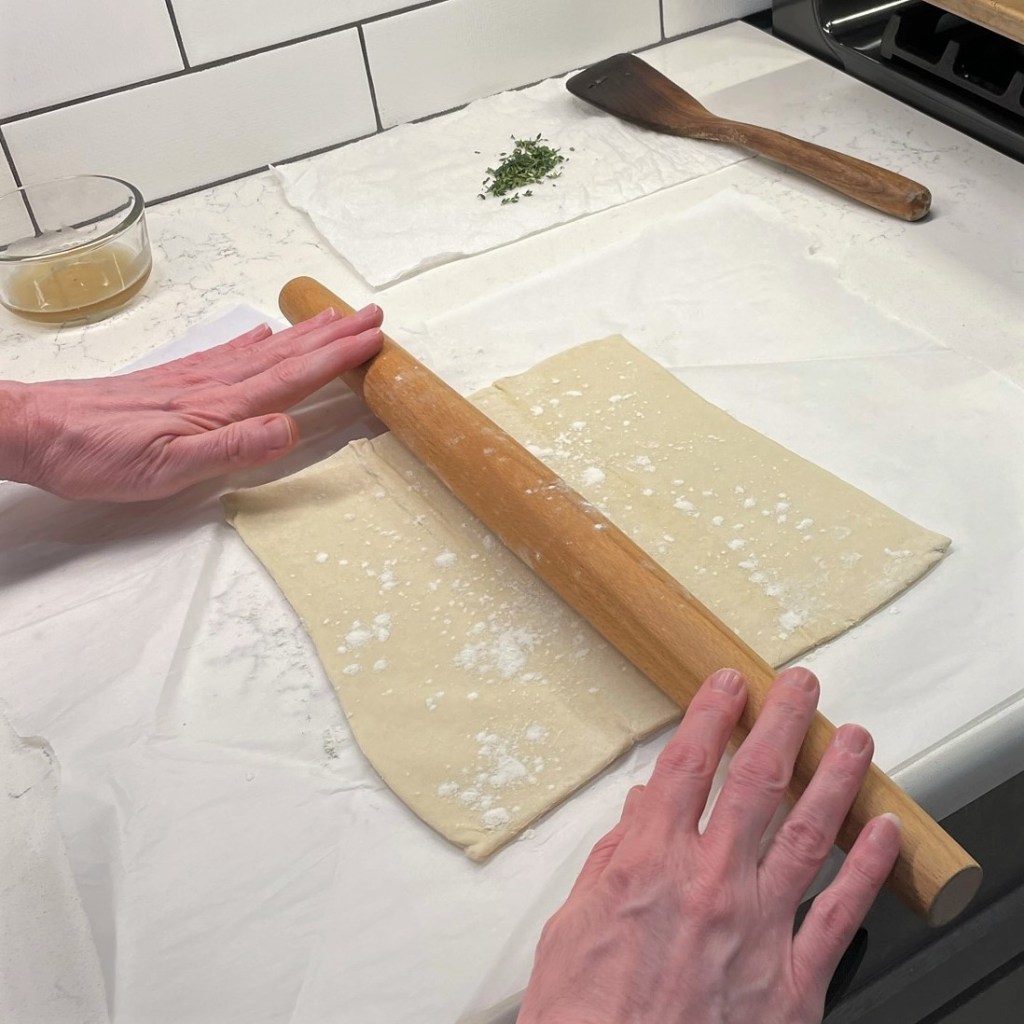
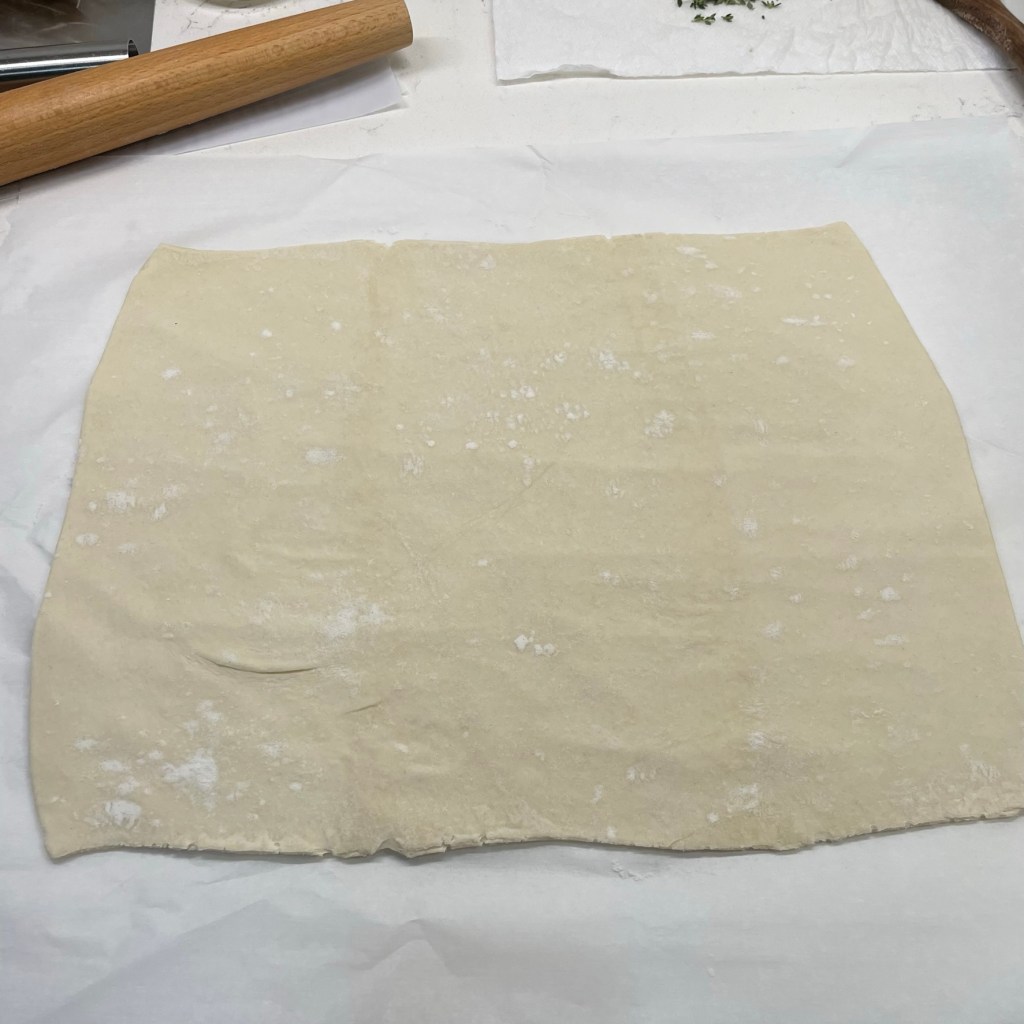
Roll out the puff pastry on a lightly floured sheet of parchment paper. Do your best to keep it in the shape of a rectangle.
After rolling, my puff pastry was about 12 x 15″.
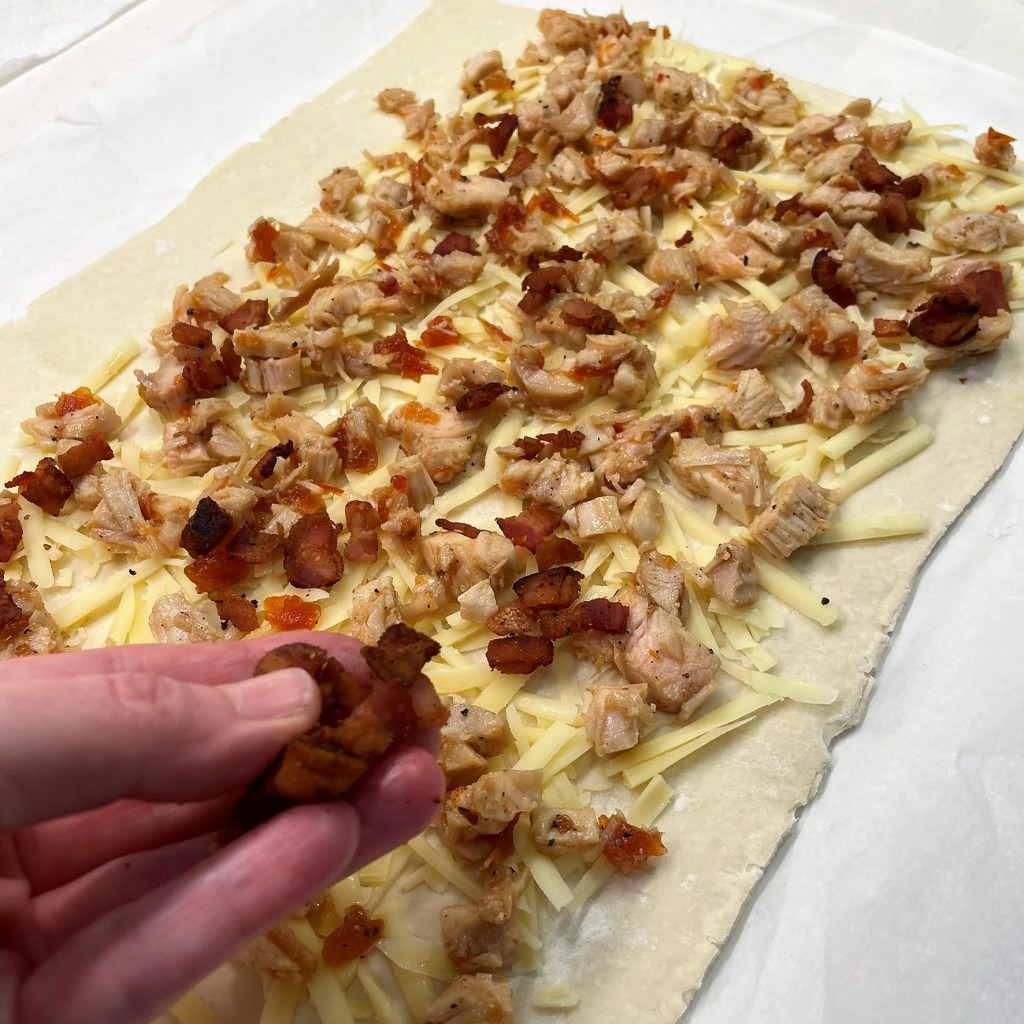
Layer on 3/4 of the total shredded cheese (you’ll want the rest for topping the swirls) and then layer the turkey pieces.
Follow up with the bacon pieces and sauteed shallots. Keep the far long end clean about 1 1/2″, so you can easily seal it up after rolling.
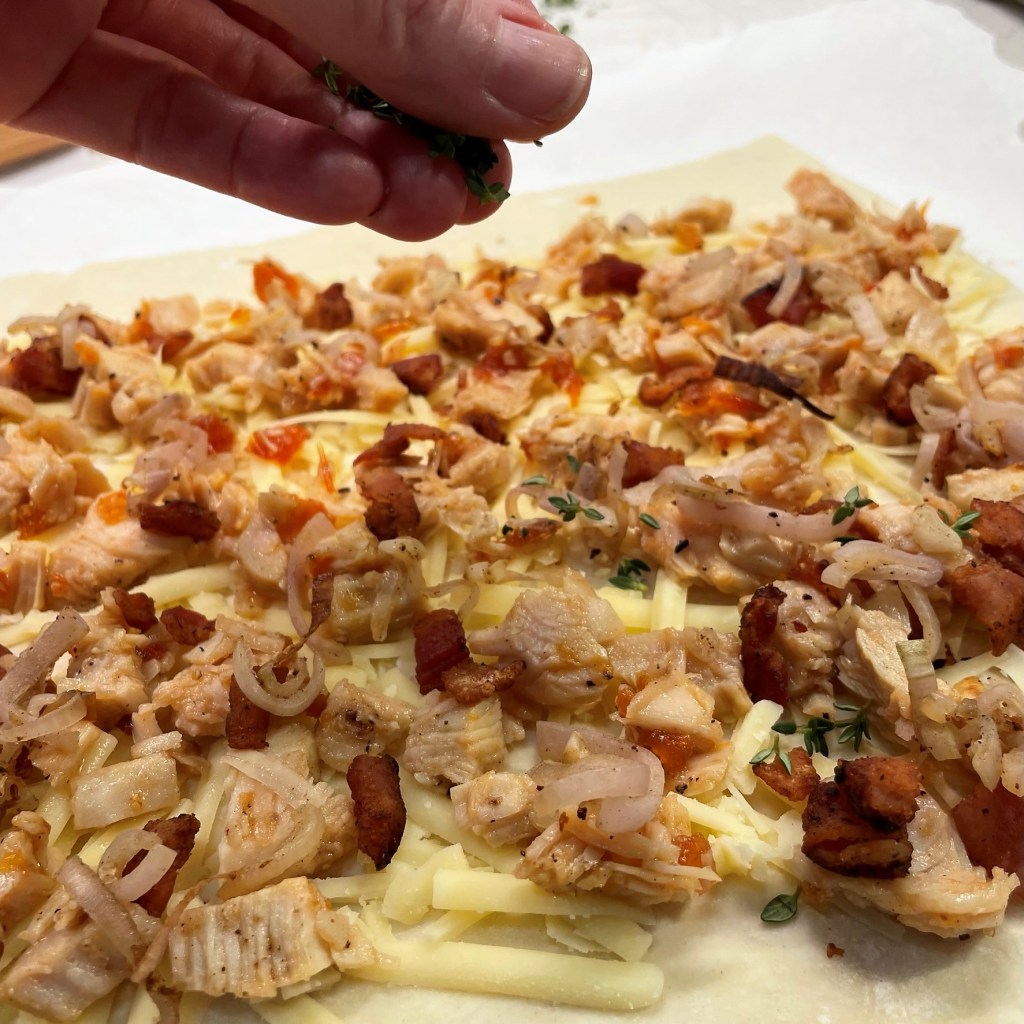
Scatter the fresh thyme leaves over the whole thing. It’s amazing the difference this makes!
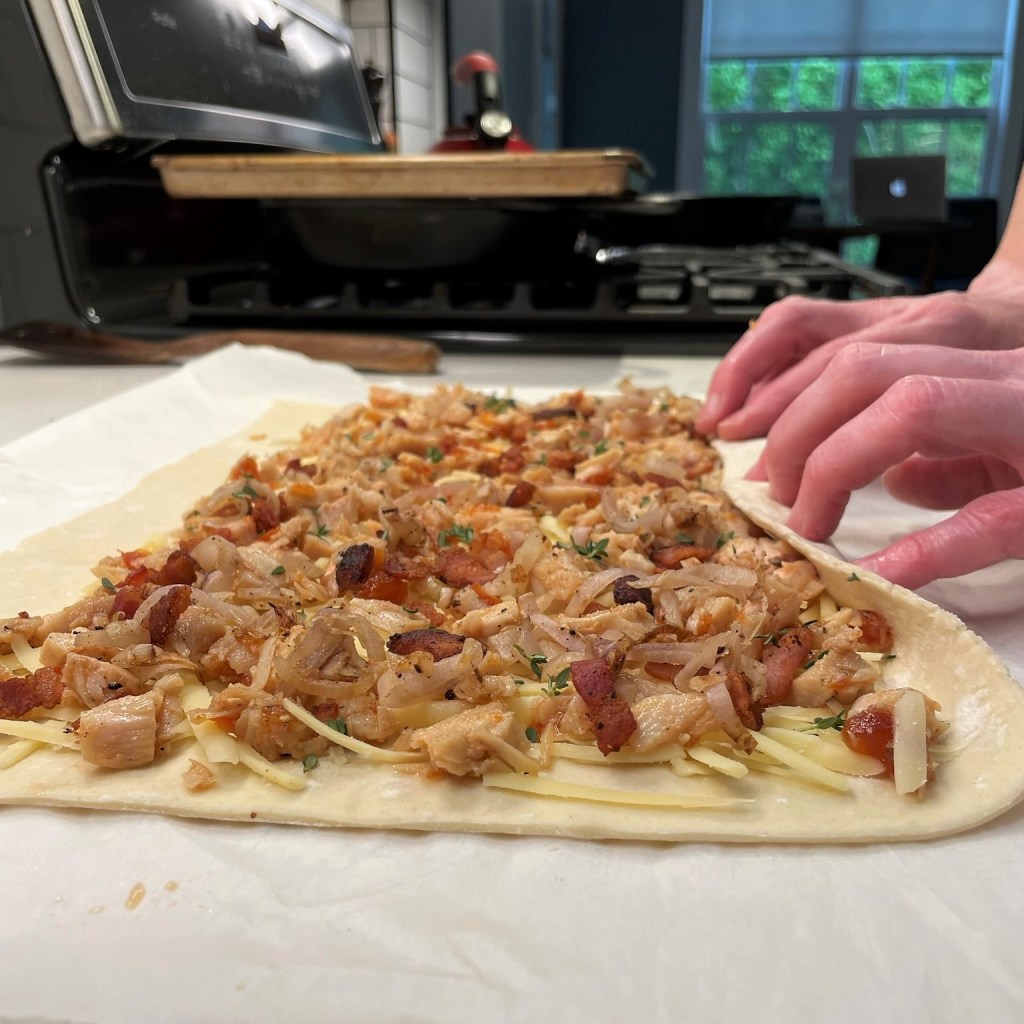
Begin rolling from the near long end, and try to keep the roll tight without stretching or tearing the pastry. You want to roll toward the “clean” end.
As you go, you’ll find large lumps because of the turkey cubes. Don’t be afraid to softly crimp the pastry around them.
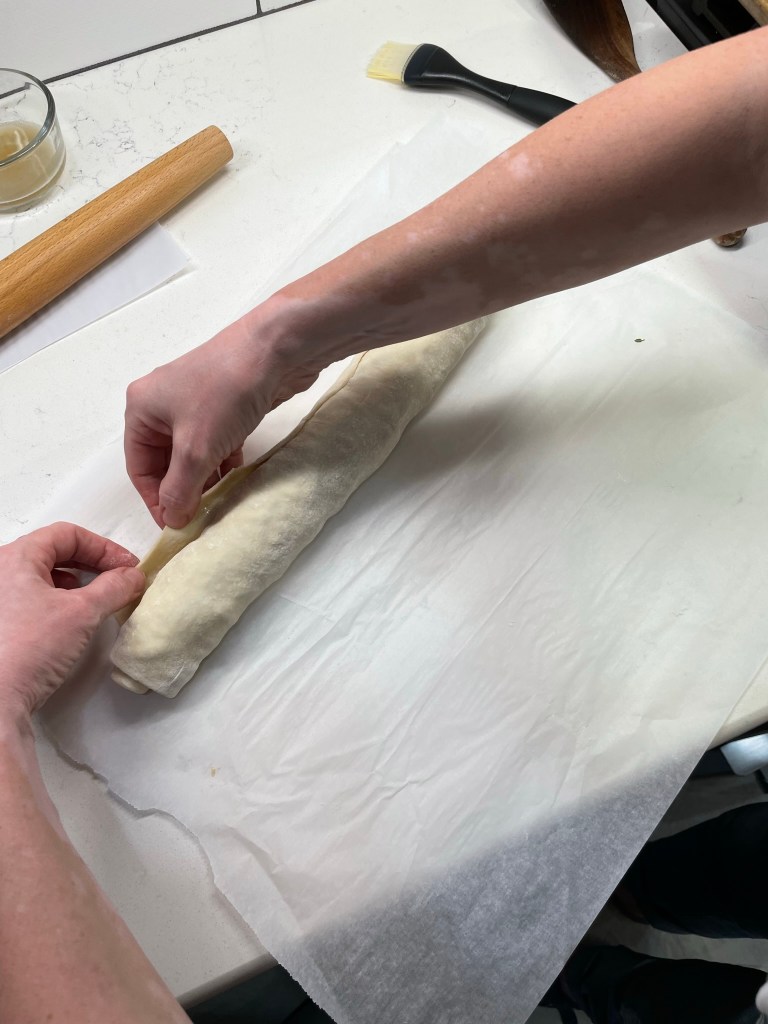
When you reach the clean edge, lightly brush the inside with a slightly wet pastry brush. This will help seal the pastry together.
After sealing the wet edge to the rolled up spirals, transfer it (parchment and all) to a cookie sheet. Slide it into the freezer for 15 minutes to firm it up for easier slicing.
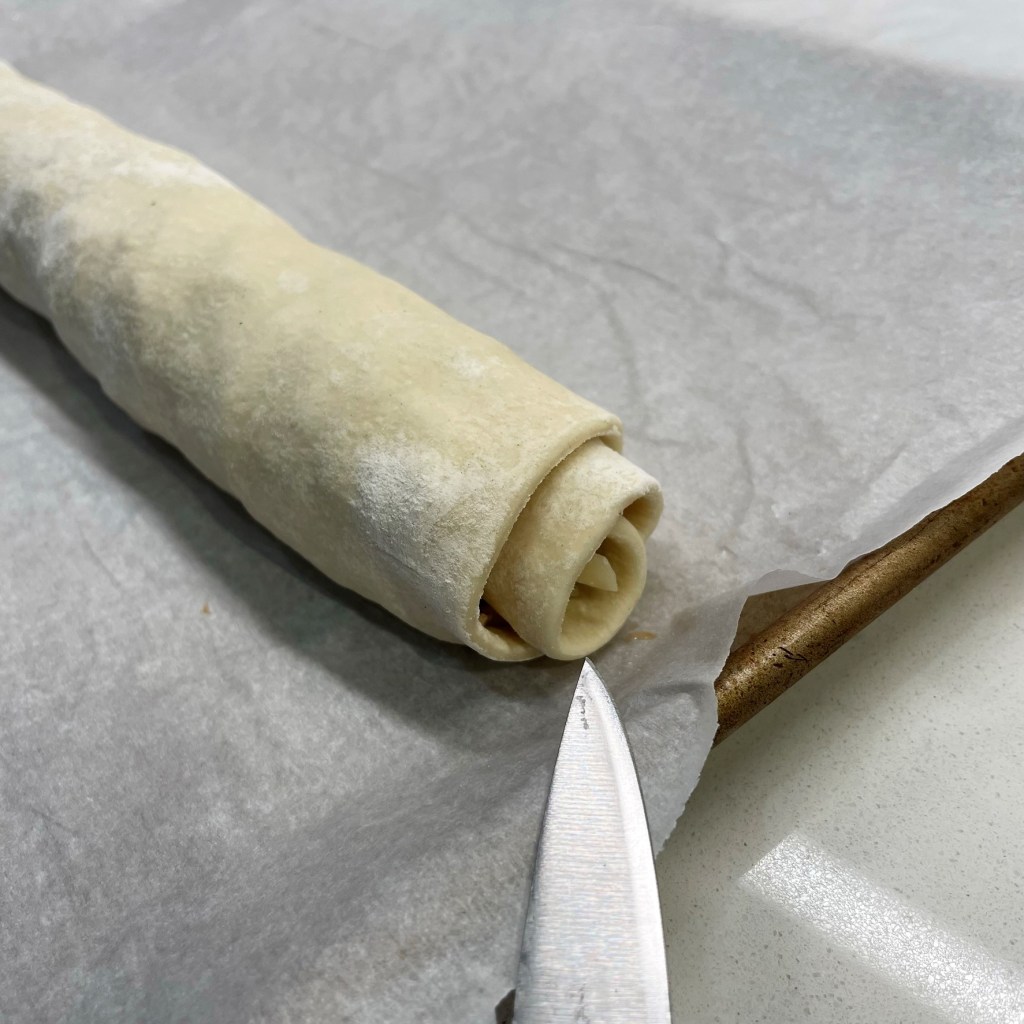
The dough is very manageable after time in the freezer. Use a sharp paring knife to trim off the ragged edges that don’t have any filling.
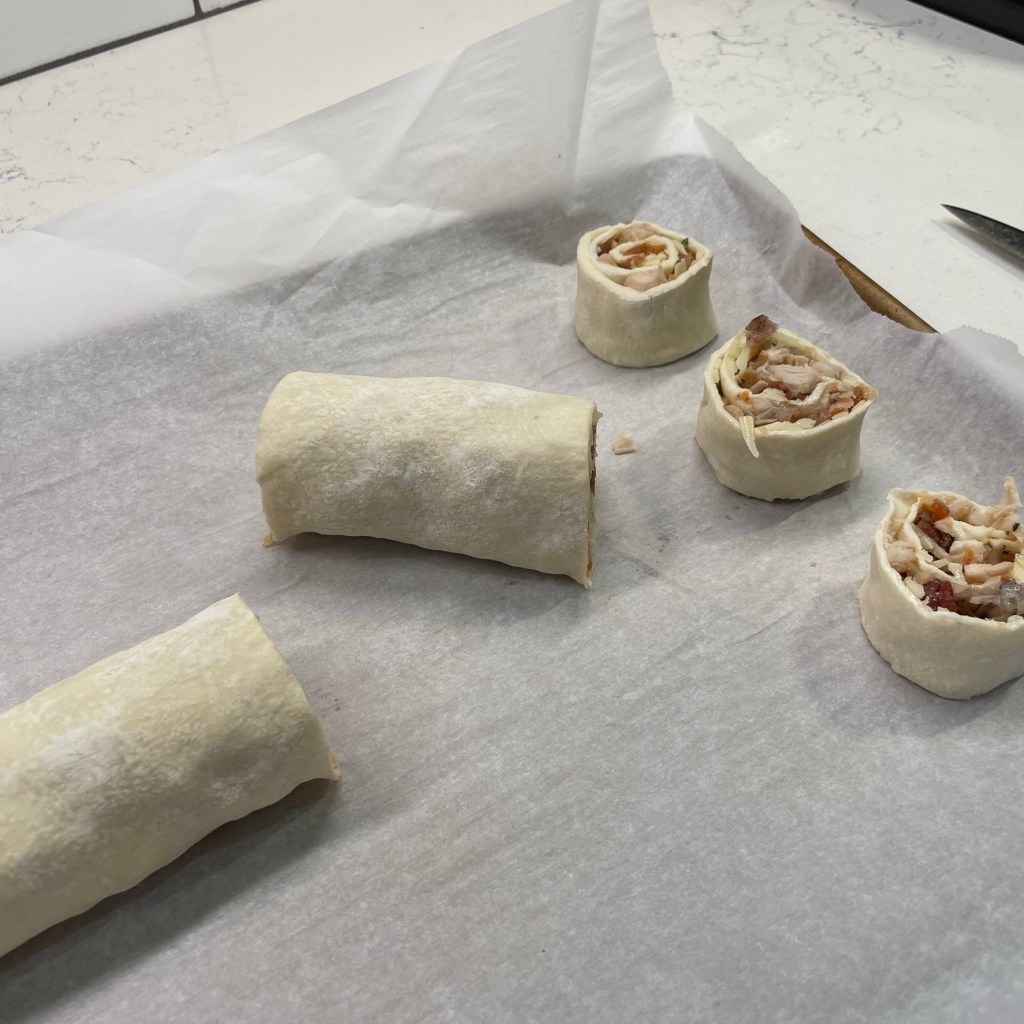
Cut the roll into 12 slices. Start by cutting the roll in half, then each half in half, then in threes. The slices will be about 1 1/4″ thick.
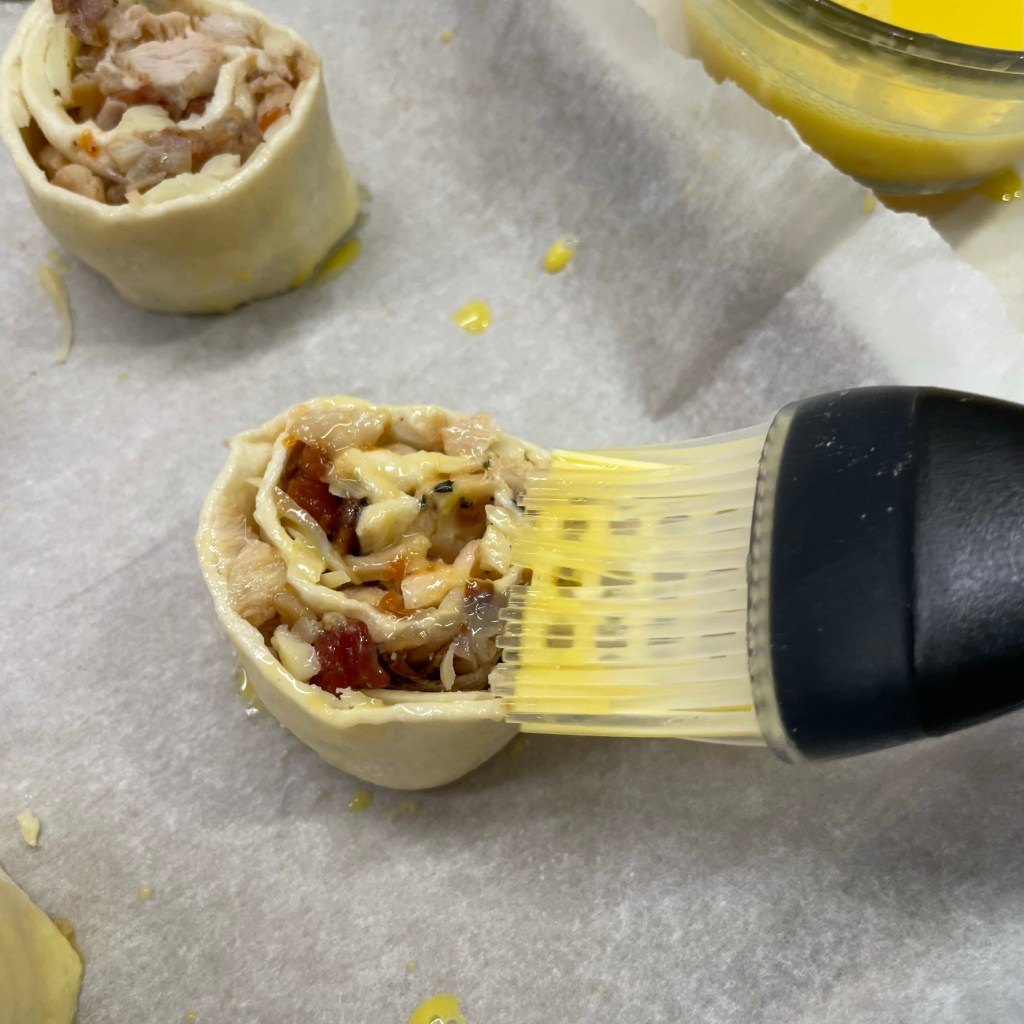
Brush the sides of the swirls with egg wash, for a lovely golden finish during baking.
Brush the tops, too, so the exposed puff pastry gets the same color.
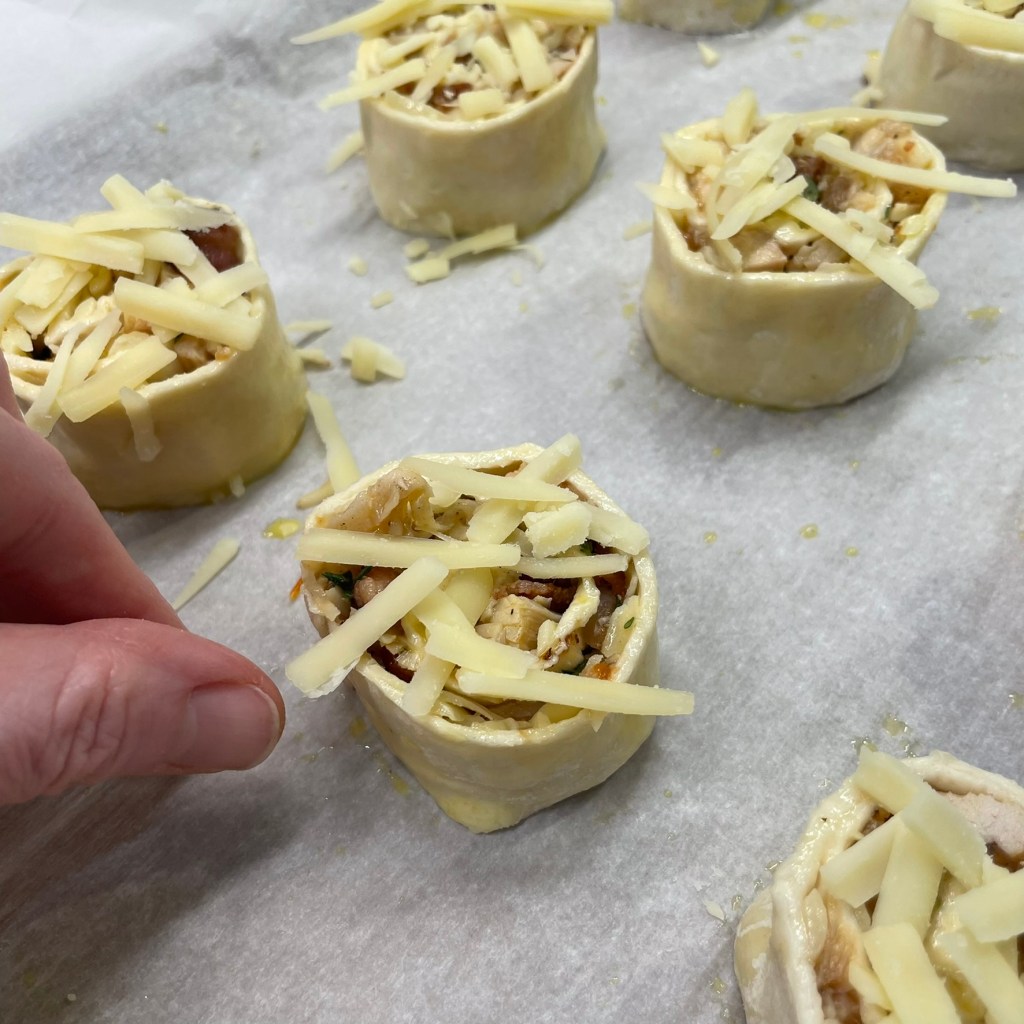
Arrange the remaining shredded cheese on top of the swirls. Let it hang over the edges so it melts down the sides. 🙂
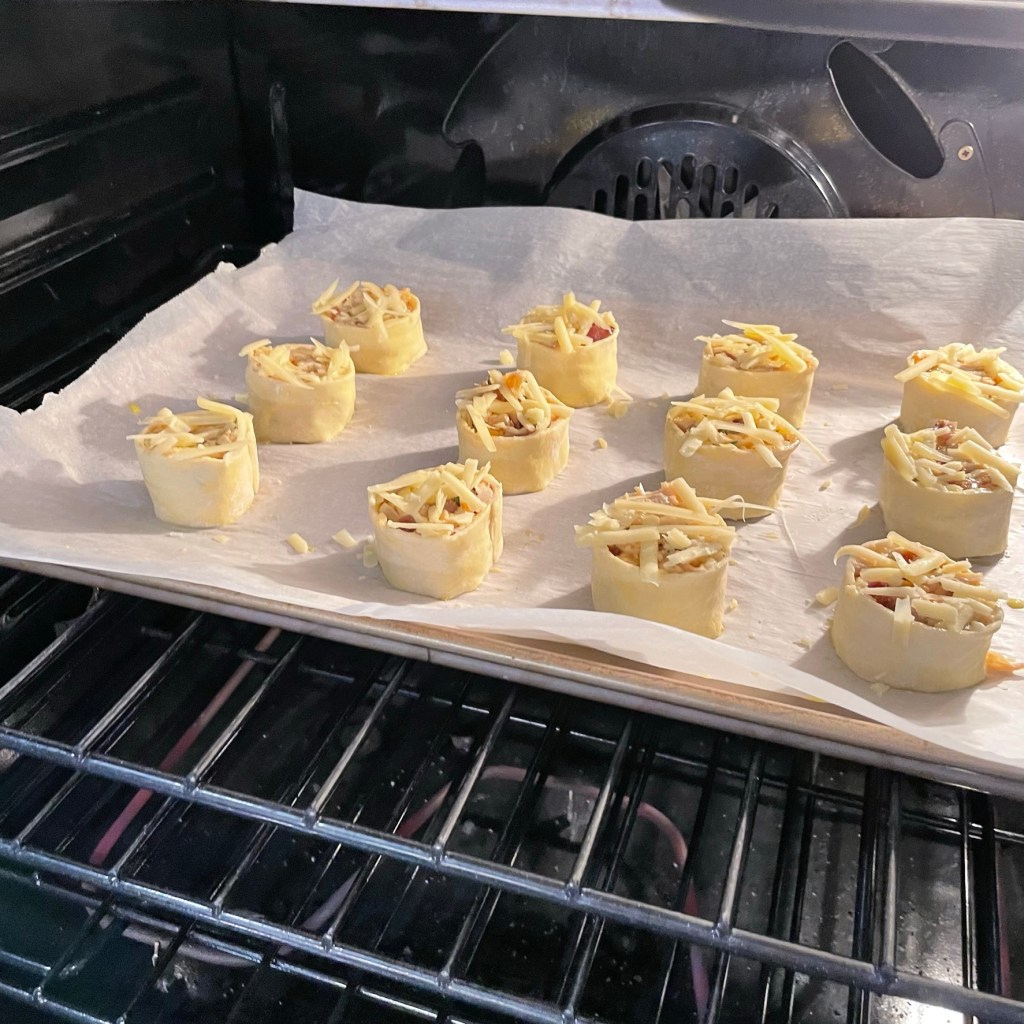
Bake the swirls for about 25 minutes at 375° F. Rotate the pan halfway through if your oven has cool spots.
You can see how the gruyere melted into golden yumminess down the sides of the swirls! Yum…
These turned out fantastic! My favorite bite was the one with a touch of the sweet-savory tomato jam.
This weekend, I will have the privilege of introducing my husband to live music by the one and only Jimmy Buffett. Despite being an avid music lover and concertgoer, Les has somehow managed to miss seeing the Son of a Son of a Sailor on stage (not to mention the pre-show tailgating), but that will all change on Saturday.
It may be difficult for me to make these fabulous margaritas in the parking lot of the Buffett concert, and it certainly would not display its layers of color through a red plastic cup, but it will taste as wonderful, and at least we enjoyed it at home a few times in all its beautiful, grown-up-cocktail glory.
The raspberry “sinker” has a way of stealing the show.
I created this drink from memory after a getaway weekend Les and I had back in February. We had a mouthwatering Mexican meal in Asheville, North Carolina, and I was intrigued by the descriptions (and the flavors) of the restaurant’s specialty margaritas. This one was called “1800 Sunset,” and the highlight—besides the 1800 reposado tequila that is the star spirit—was the Grand Marnier float and something the menu called a “raspberry sinker.” A float, I understand, and I’ve done it before by slowly pouring a spirit over the back of a bar spoon on top of the finished drink. But a sinker? How in the world do you get an ingredient to stay put in the bottom of the glass? After much searching on Pinterest, YouTube and a few of my favorite professional cocktail sites, I finally learned two ways to achieve this feat, one of which I’ll share with you in the slideshow (hint: I was seriously overthinking it).
A little sweet, a little heat, a little tart and a whole lot of fun!
For the rest of the drink, I wanted pure tropical bliss, so added a few twists of my own. I mixed the tequila with freshly squeezed lime, a splash of pineapple juice and a bar spoonful of jalapeno-infused simple syrup to shake things up. Raspberry on the bottom, orange on the top, and no sign of any “shaker of salt” —no, this pretty drink is rimmed with pink sea salt. These are no ordinary margaritas. Jimmy Buffett, eat your heart out!
You don’t need special “margarita” glasses to make this drink, but it is prettiest in a clear glass that is wider at the top than the bottom. Even a martini glass would work, if that’s what you have. Make up to two drinks at a time in your shaker.
Ingredients, per cocktail
2.0 oz. 1800 reposado tequila
1.0 oz. pineapple juice (canned or fresh)
0.5 oz. jalapeno-infused simple syrup (recipe below)
Juice of 1/2 lime
0.5 oz. Chambord raspberry liqueur (for sinker)
0.25 oz. Grand Marnier or Cointreau liqueur (for floater)
1 tablespoon pink sea salt (for rimming the glass)
Instructions
Prepare the glasses first by swiping a lime wedge around the rim. Pour a couple of spoonfuls of Himalayan sea salt onto a paper towel. Roll only the outside of the glass on the salted towel, so that the rim is evenly salted, but the salt will not fall into the cocktail. Place the glasses in the freezer for at least 10 minutes.
Slice thin wheels of fresh lime, one for each drink. Place them on a paper towel to absorb excess juice and sprinkle them lightly with sea salt, if desired. Measure out the Grand Marnier into a shot glass or small measuring cup. This will aid in “floating” the liqueur over the drink without overdoing it.
Here comes the “sinker” part of the recipe, and you may be surprised how easy it is. Remove the glasses from the freezer and measure the Chambord into the bottom of the glass. Add several ice cubes (or one giant one) to the glass so the Chambord cools down while you shake up the rest of the cocktail.
The drink begins with a pour of Chambord, topped immediately with ice. I use my digital scale for measuring; it’s less sticky! 🙂
In a cocktail shaker, combine tequila, pineapple juice, jalapeno syrup and lime juice over one cup of ice cubes. Shake about 20 seconds to blend the ingredients. Strain the cocktail over the ice in the glass, pouring slowly to avoid disturbing the raspberry sinker underneath.
Finally, turn a bar spoon or teaspoon upside-down over the drink, resting the tip of it on one of the ice cubes. Pour the Grand Marnier slowly over the curved back of the spoon—easy does it! Garnish the drink with a lime wheel and enjoy!
I missed getting a picture of the Grand Marnier float, but it really is as easy as it sounds!
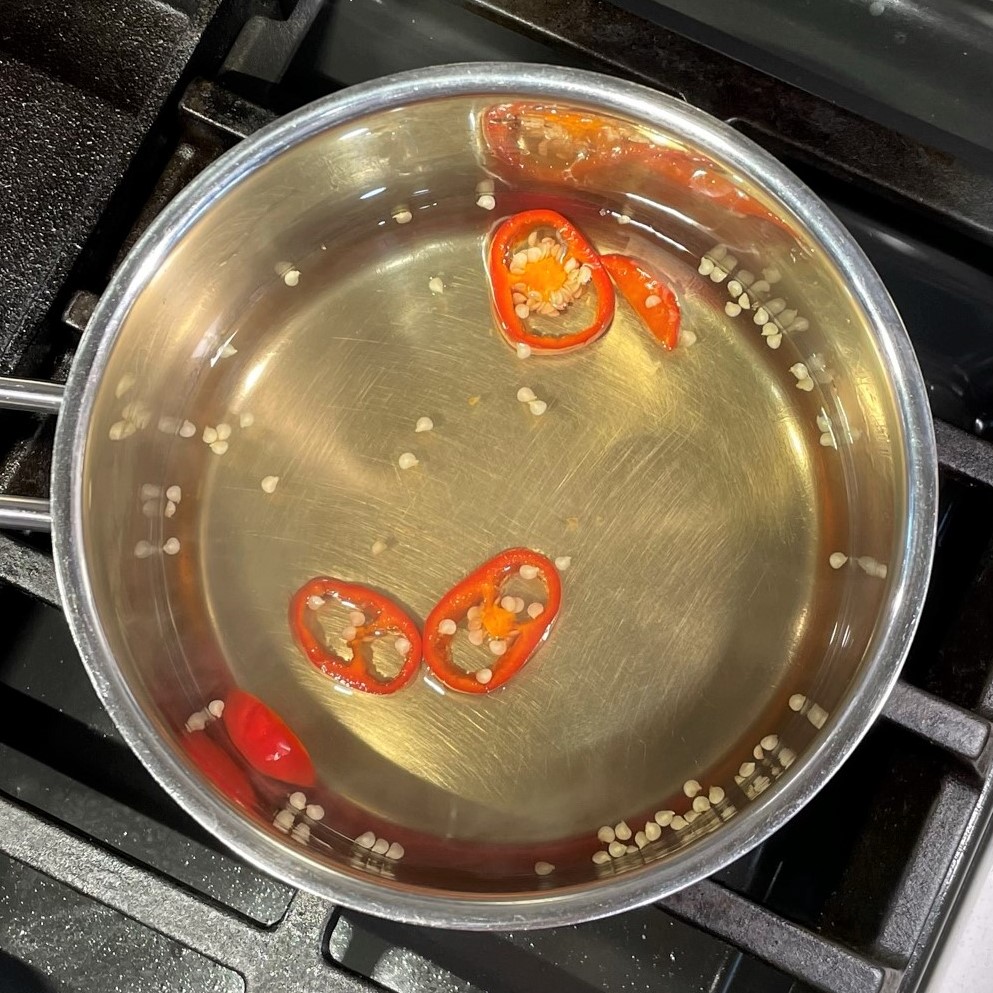
Jalapeno-infused Simple Syrup
1/2 cup filtered water
1/2 cup cane sugar
1/2 red jalapeno, thinly sliced (seeds included, if you dare)
Simple syrup can be infused with just about anything. This time, I used a red jalapeno for heat to balance the sweet pineapple and raspberry.
Bring water to a gentle boil. Turn off the heat, add sugar and stir until dissolved. Add the jalapeno slices and allow the syrup to steep until completely cooled. Strain out the jalapeno slices. Transfer the syrup to a sealed jar or squeeze bottle. Keep syrup in the fridge for up to two weeks.
I’ve lived in and around Winston-Salem for 35 years, and from the day I arrived as a fresh-faced 20-something, I’ve explored every corner and tried every restaurant and sought out all the specialty shops in a quest to satisfy my food-loving soul.
Or so I thought.
A few years ago, some friends of ours made mention of Sea Products, a hidden gem that has been in business three years longer than I’ve been here, and their recommendation has changed my life. OK, that’s probably a bit overstated, but it has definitely changed my seafood game for the better.
I love stepping into this little shop in the West End of my city. It smells like the ocean in the best possible way and is always amply stocked with fresh seafood—mostly from our own coastline, but sometimes from as far as Canada—and all kinds of accoutrements for whatever preparation you have in mind for your fresh catch. Sea Products throws in a fresh lemon with every seafood purchase, and sells housemade tartar and cocktail sauces, side salads in ready-to-go containers, and fresh breads from a local bakery. They even have a small, curated wine selection, and every bottle pairs with fish. It’s a one-stop shop, and I am a proud supporter of local businesses such as this. The selections are always interesting, to the point that I don’t even bother making a shopping list.
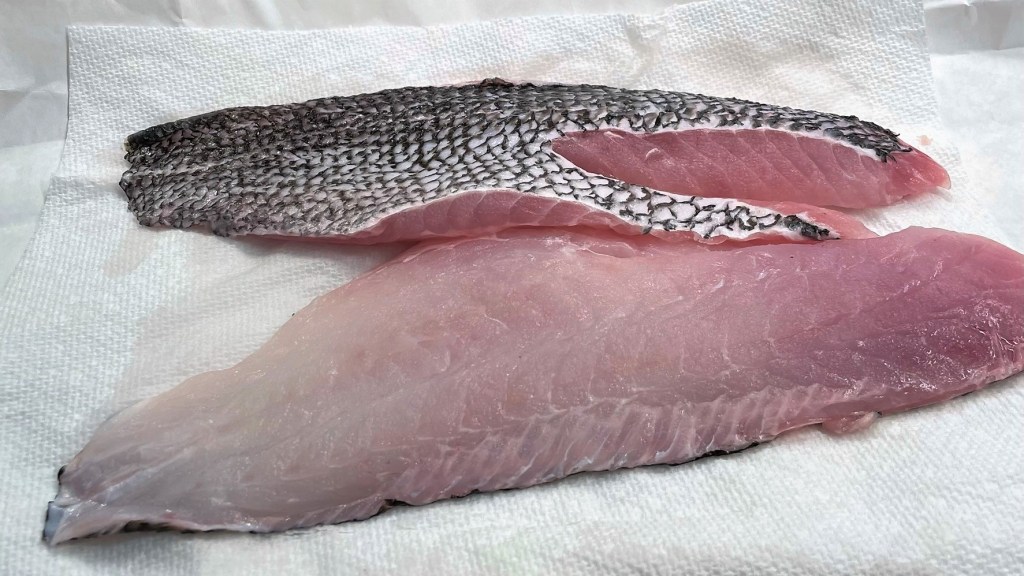
What would it be this day—fresh shrimp, clams or scallops? Pre-made crab or fish cakes? Halibut or grouper? And then something caught my eye from the corner of the case, a fish that I hadn’t seen on previous visits. Black sea bass. The clerk described it as “mild and flaky, similar to snapper but a touch sweeter.”
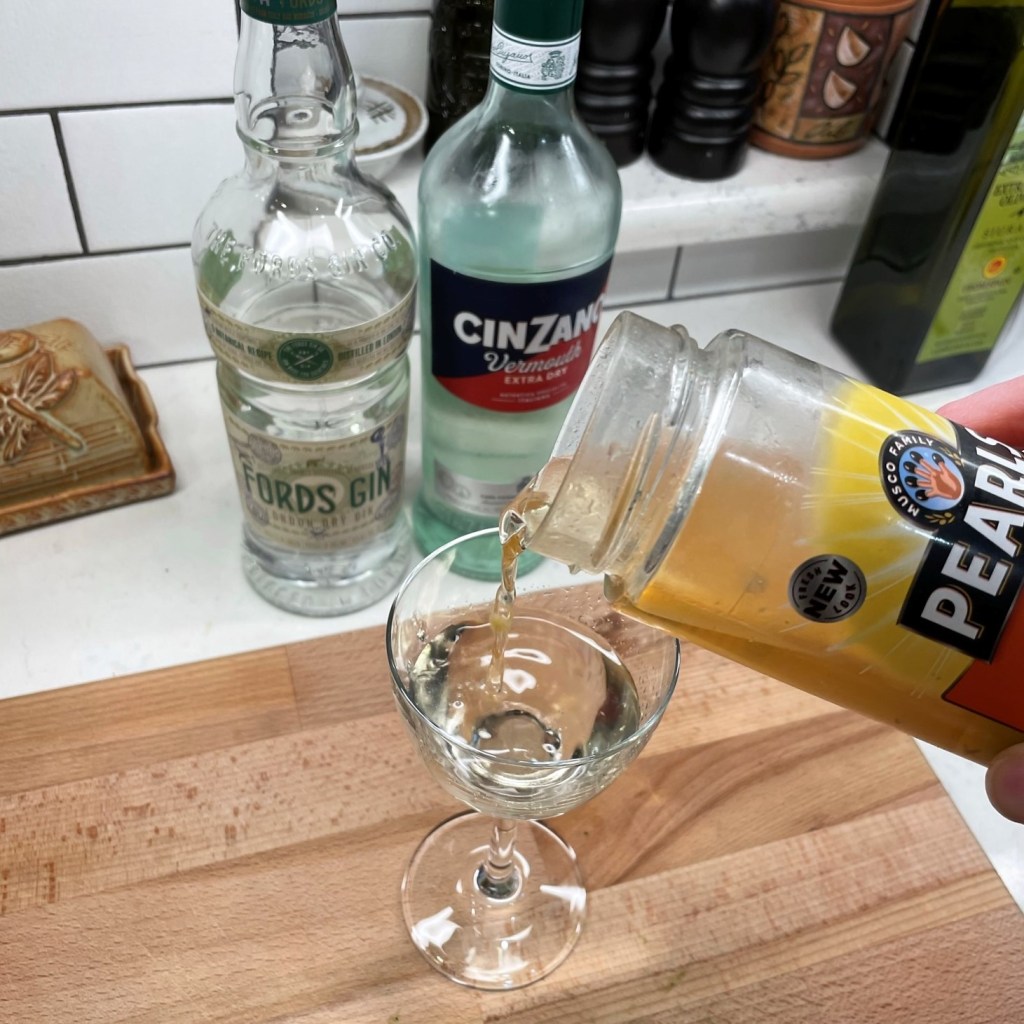
I am always interested in trying new fish, and thought it made sense to pair the unfamiliar black sea bass with flavors we already knew. OK, I thought, piccata sauce. It’s light enough to let the flavors of the fish shine, and both my husband and I like the balance of brine and tartness, softened by the butter that’s swirled in at the end of cooking. Piccata was the plan, at least, until I opened the fridge. As I shuffled jars to reach the capers, my eyes locked in on a taller jar of pimento-stuffed cocktail olives. Ooh, a martini would be nice right now, I thought.
And then, hmmmm.
I could not help but wonder what would happen if I made the olives an understudy to the usual capers. And because savory olives work so nicely in a martini, what would happen if I substituted gin and vermouth for the white wine in my piccata? Well, this happened!
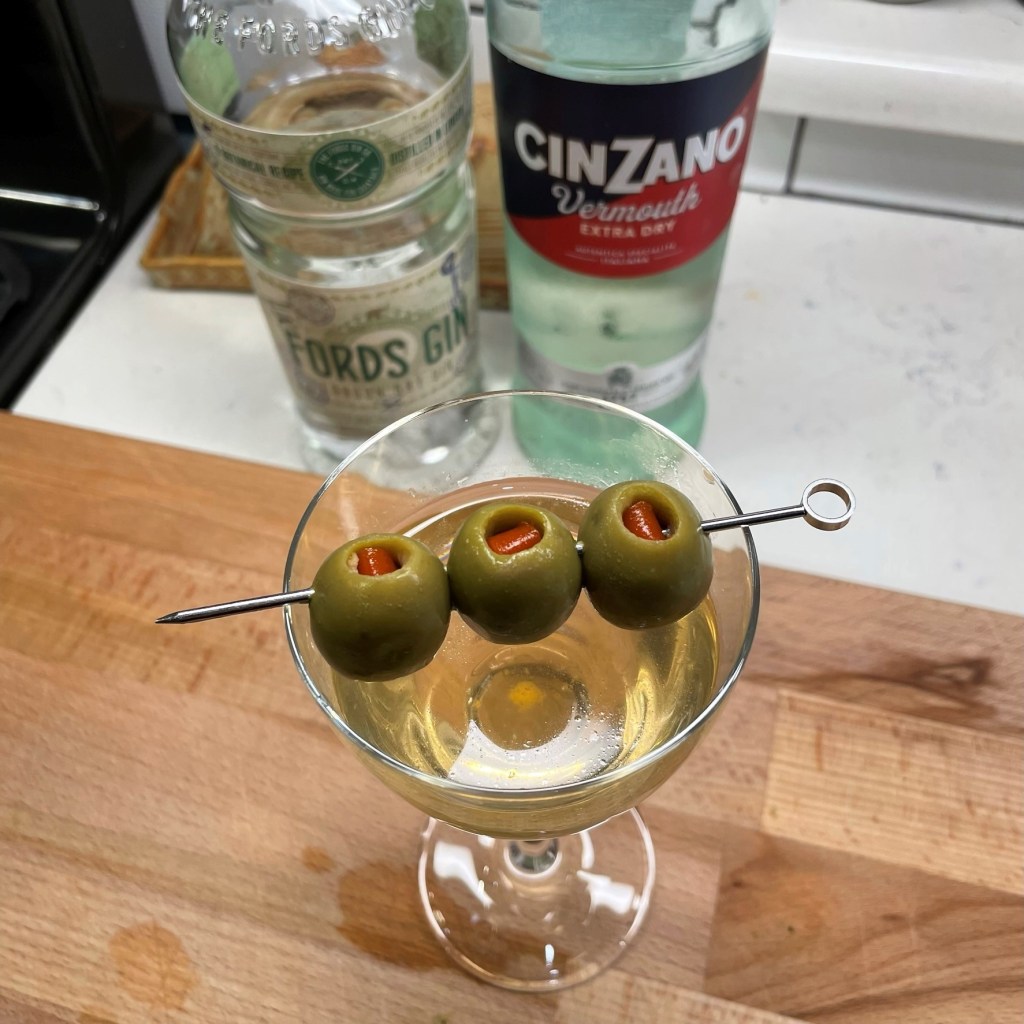
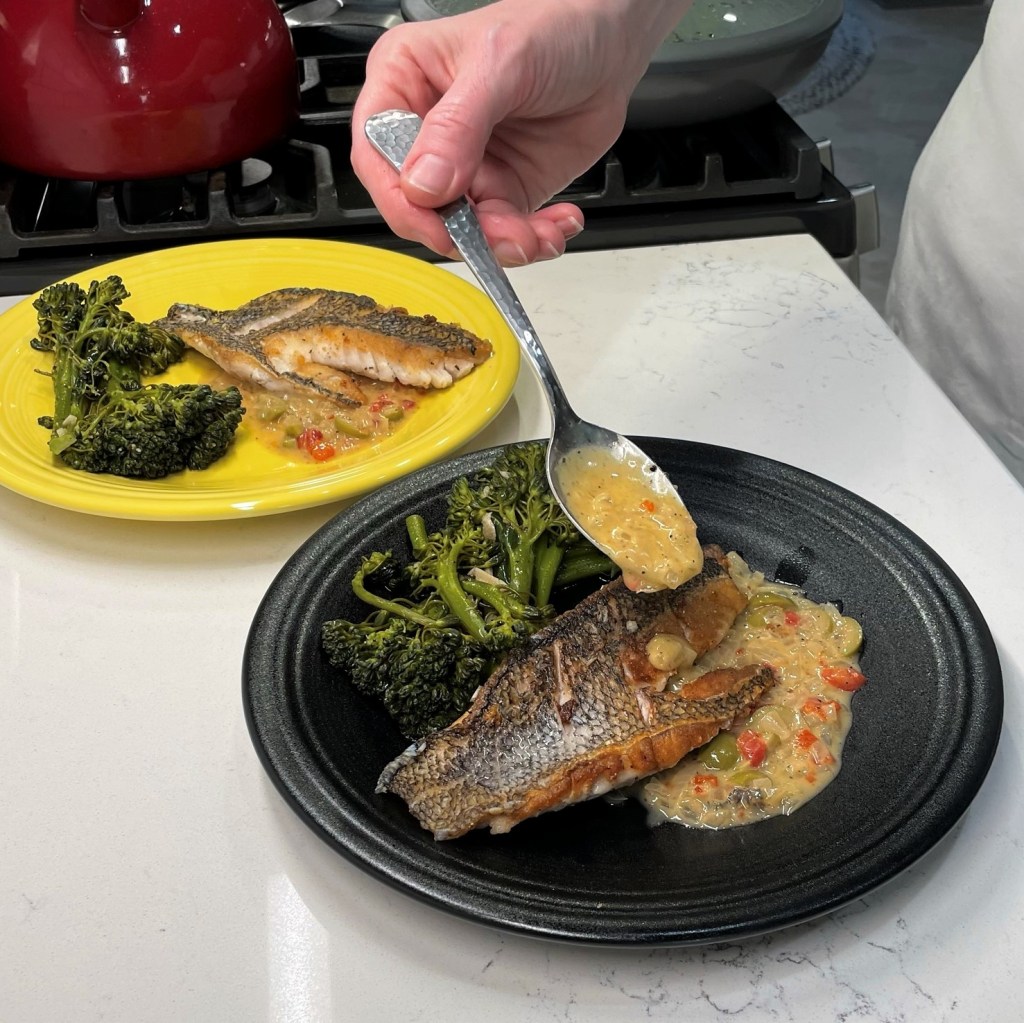
Black Sea Bass with Dirty Martini Butter Sauce
Technically, the alcohol infusion I’ve used here is what a bartender would call a “reverse martini,” because the ratio of gin to vermouth has been flipped. This seemed the right thing to do, not only because my husband is decidedly not a gin lover, but also for the fact that gin is much higher alcohol by volume than white wine. Dry vermouth, on the other hand, is on par with wine, alcohol-wise, and it would be a better flavor choice to highlight the olives without over-boozing the fish. Finally, my splash of olive juice was far more generous than I’d ever drink in a cocktail (I used a full ounce of it), so a bartender would probably declare the drink infusion to be a “filthy reverse martini.” Filthy indeed.
Two olives in a martini is said to be bad luck. One wasn’t enough, I went with three! 😉
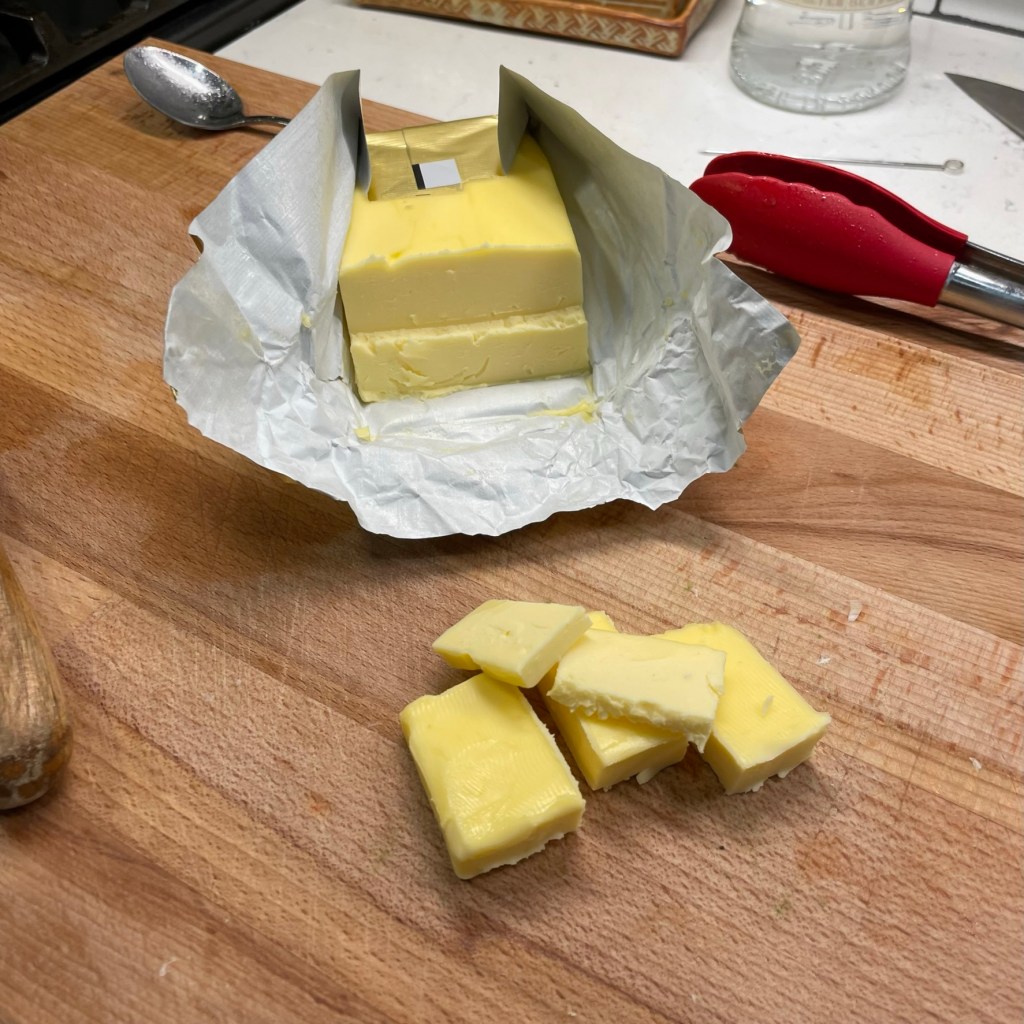
So, those are the flavors and here comes the technique. If you have ever marveled at the elegance of a butter sauce on fresh seafood, you may find it surprising to know that it is simple to make. The trick is to remove the pan from the heat as soon as the juices are reduced, and to swirl cold-from-the-fridge pats of butter into the sauce, one at a time. This easy technique transforms the otherwise liquid leavings in the pan into a silky, rich sauce.
Come, join me in the kitchen!
Ingredients
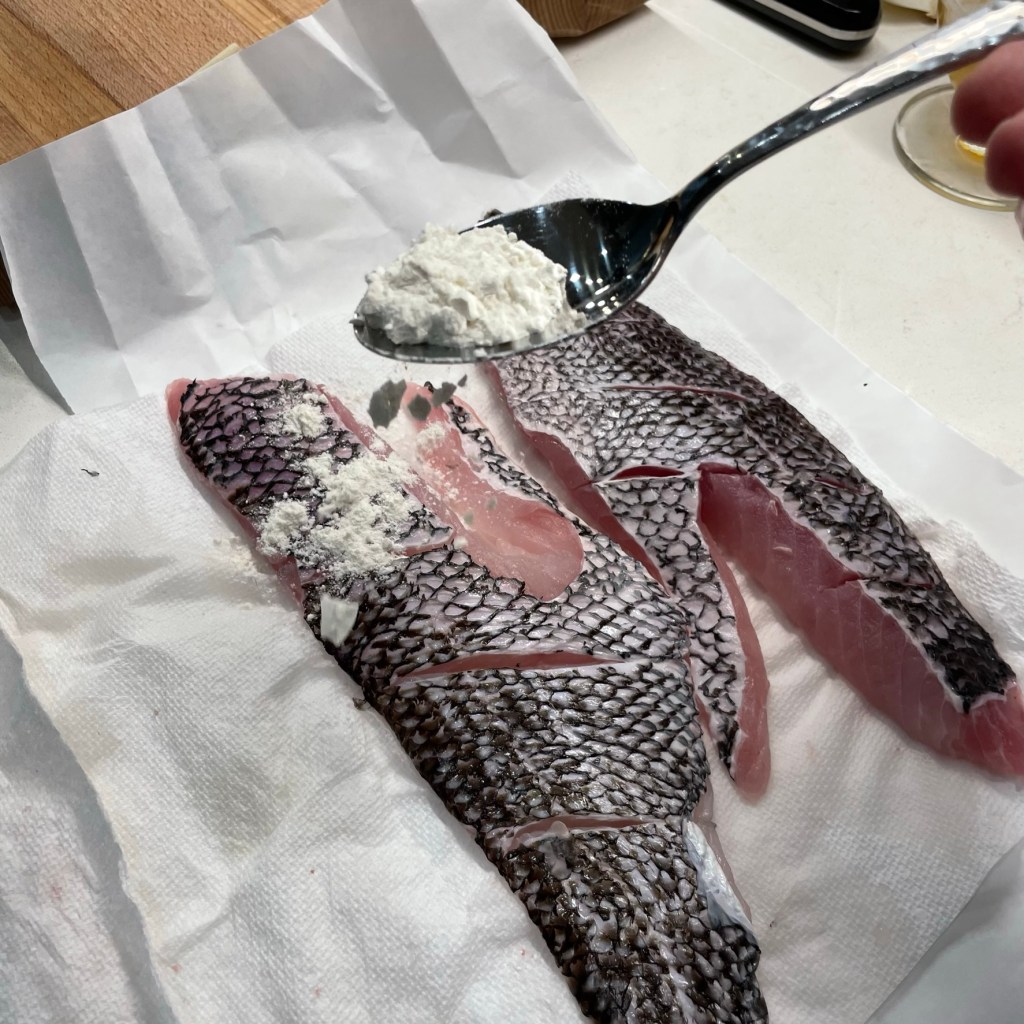
2 fillets fresh black sea bass (or other mild, flaky whitefish)
1 Tbsp. all-purpose flour
2 Tbsp. canola or other neutral oil
1 Tbsp. extra virgin olive oil (a rich, fruity one is great)
1/2 medium onion, diced (about 1/2 cup)
1 reverse filthy martini* (see note below)
1 heaping tsp. pimentos from a jar
3 Tbsp. completely cold butter (for swirling in at the end)
Small handful of fresh parsley, chopped (for serving)
Lemon wedge (to squeeze at serving time)
*Notes
Reverse martini ingredients are 1.5 oz. dry or extra-dry vermouth, .5 oz. gin, 1 oz. olive juice, 3 olives. Do not shake or stir the martini with ice, as you would for drinking. Just combine the ingredients in a glass or measuring cup at room temperature. Chop or slice the olives and set them aside.
If you don’t care for gin, swap it for vodka or omit it altogether.
Instructions
I would never add a whole ounce of olive juice to a martini cocktail, but the flavor was right for this fish dish!
Filthy, dirty reverse martini, complete with three briny olives.
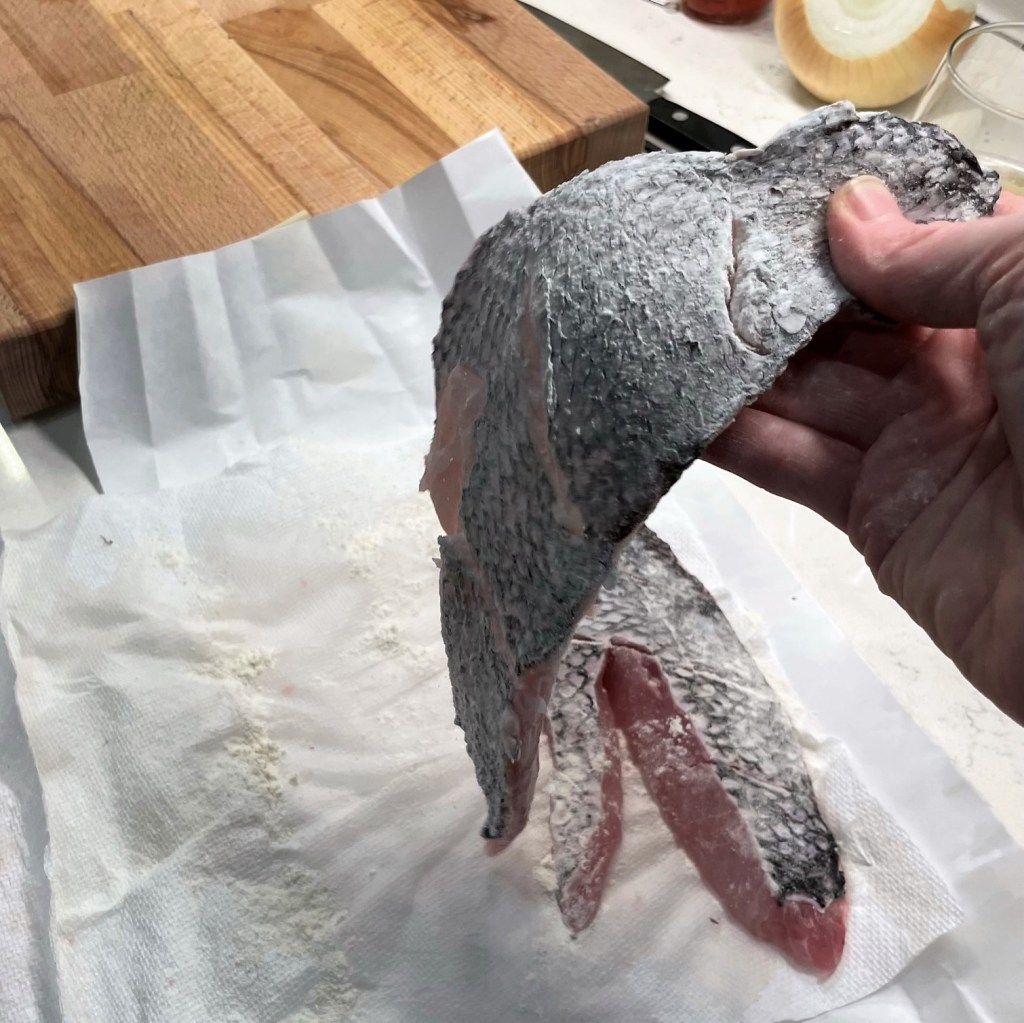
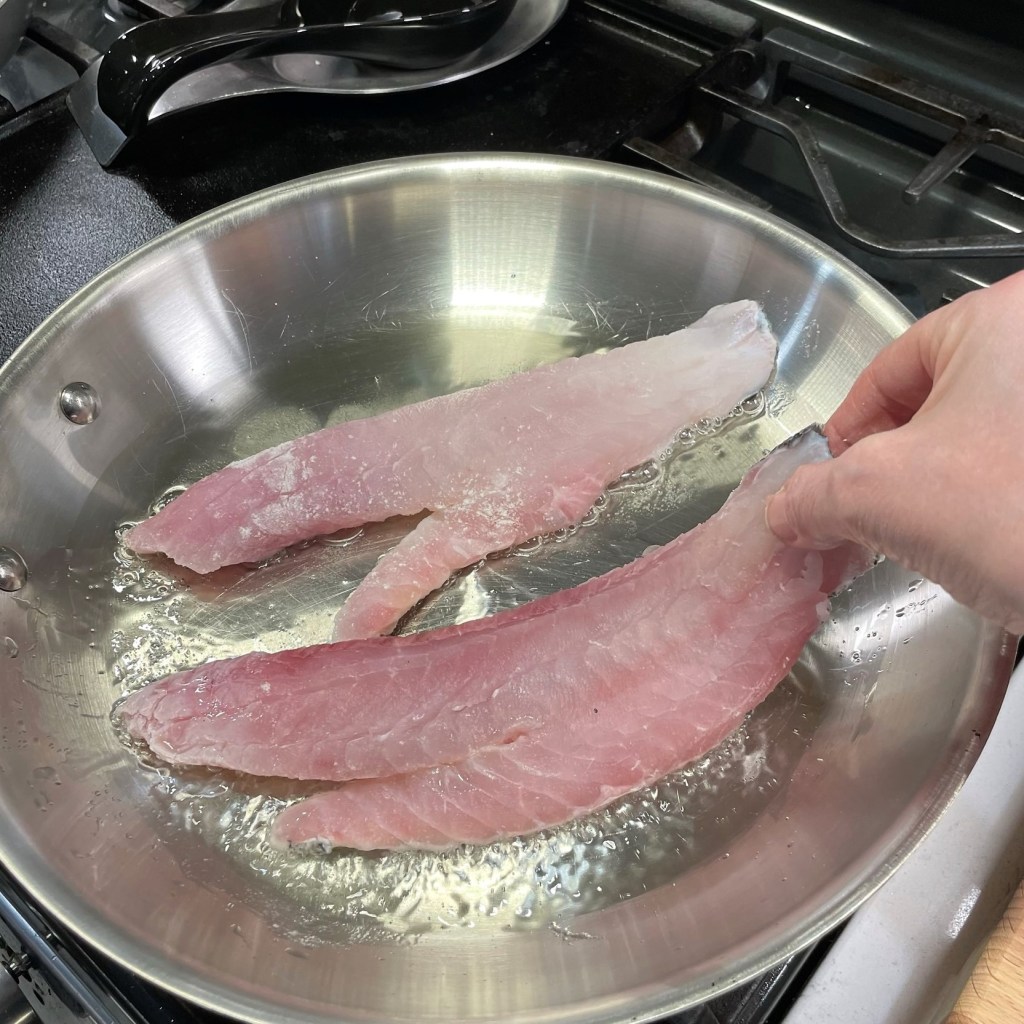
Heat a stainless skillet over medium heat. Use a sharp knife to slash shallow cuts into the skin side of the fish. Dust this side with flour and gently rub to coat evenly.
Shake off the excess flour so that only a thin film of it remains. Add the oils to the skillet.
Lay the fillets, skin side-down, into the hot oil in your skillet. Resist any temptation to move them.
Season the fish with salt and pepper as soon as it goes down into the pan. Let it cook 4 or 5 minutes, until the flesh is opaque most of the way through.
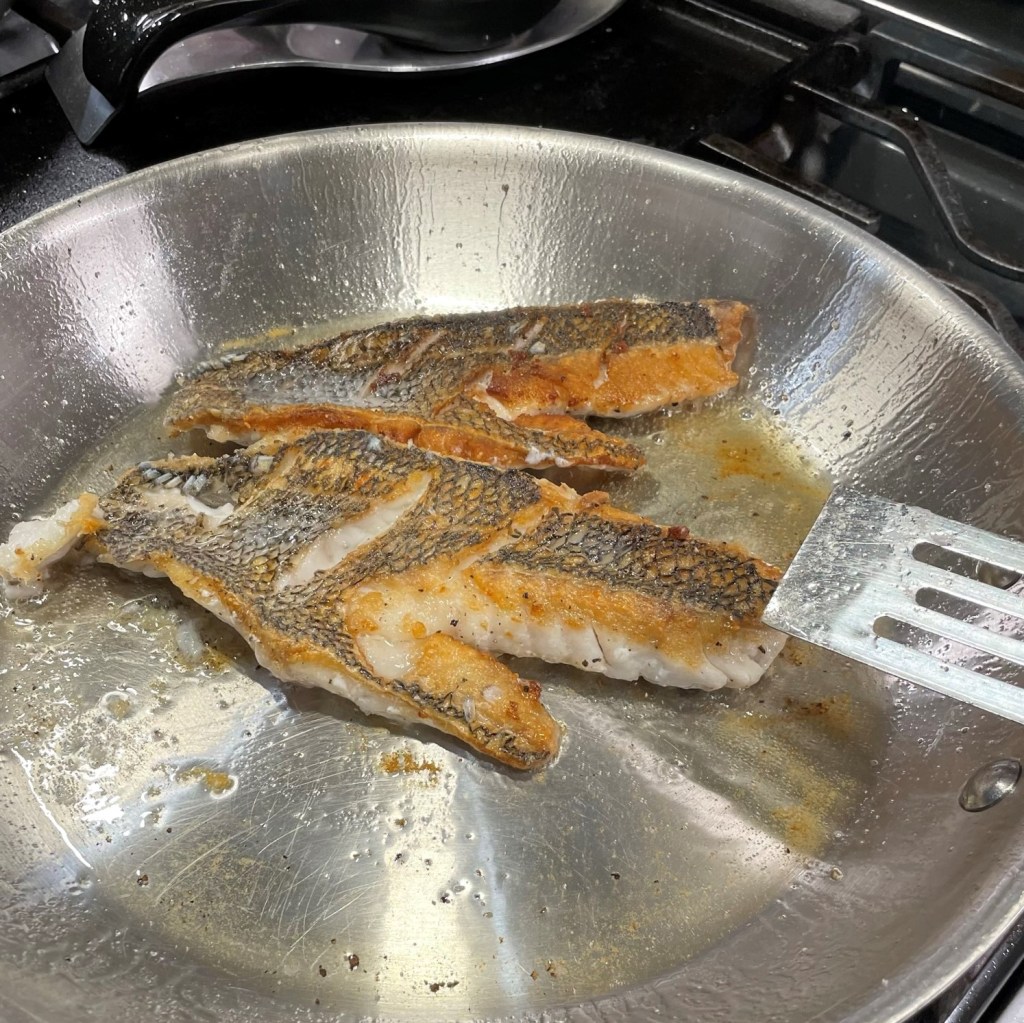
Turn the fish and cook the other side only about a minute. Cooking it longer on the skin side ensures a super-crispy skin.
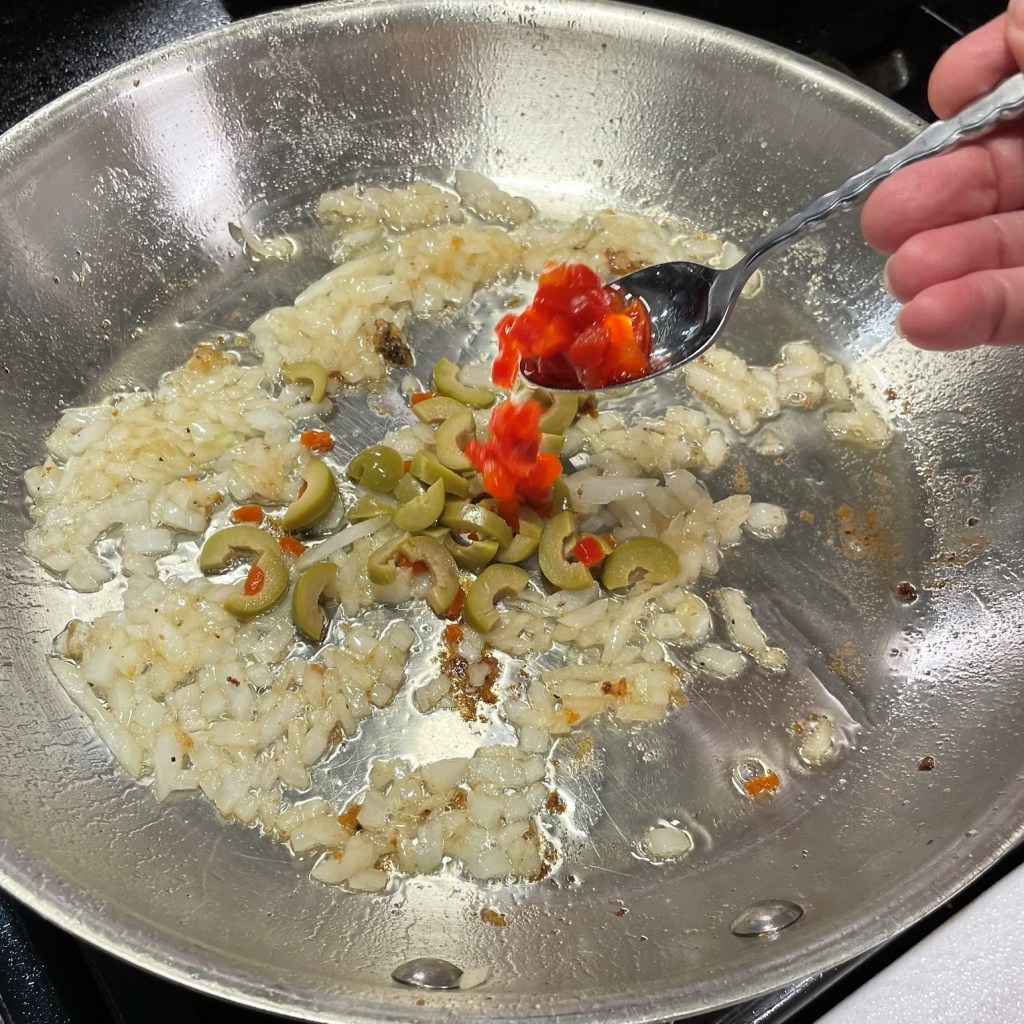
Transfer the fish to a warm plate, then saute the onions until softened. Add the chopped olives and pimentos and heat through.
Here comes the fun part! Pour the entire dirty reverse martini into the hot skillet and stir the mixture to loosen any browned bits. Reduce the heat to low and simmer.
While that mixture simmers, cut three tablespoons of very cold butter to be swirled in at the end of the sauce.
Tilt the skillet to gauge how much liquid remains after simmering. When the liquid portion is reduced to 3 tablespoons, turn off the heat.
Use a fork to swirl one pat of the cold butter around in the skillet. Be sure to swirl through the onion-olive mixture. When the first pat is fully melted, repeat with the others.
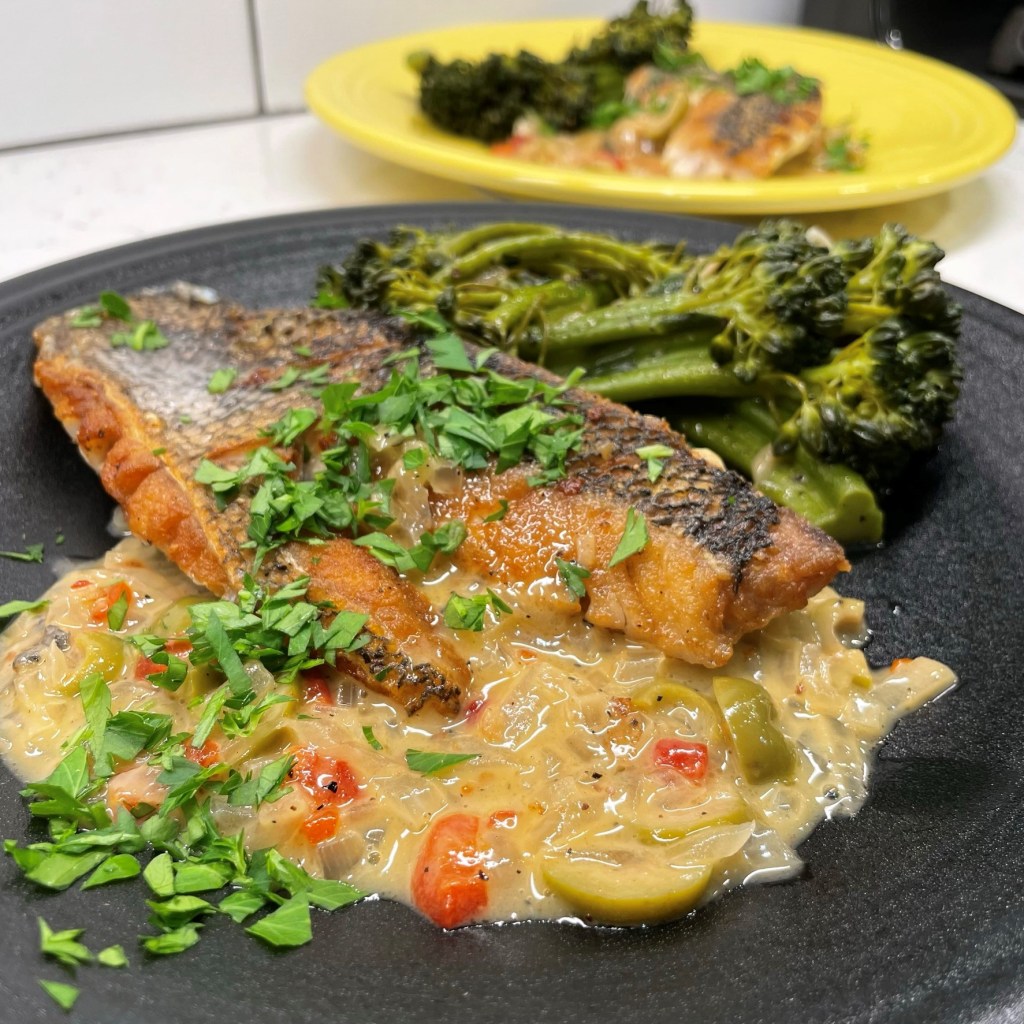
Divide the sauce between serving plates and gently lay the crispy fish fillets on top of it.
Drizzle a little bit of the sauce over an edge or two of the fish to dress it up. Finish it with parsley and a squeeze of fresh lemon and serve immediately.
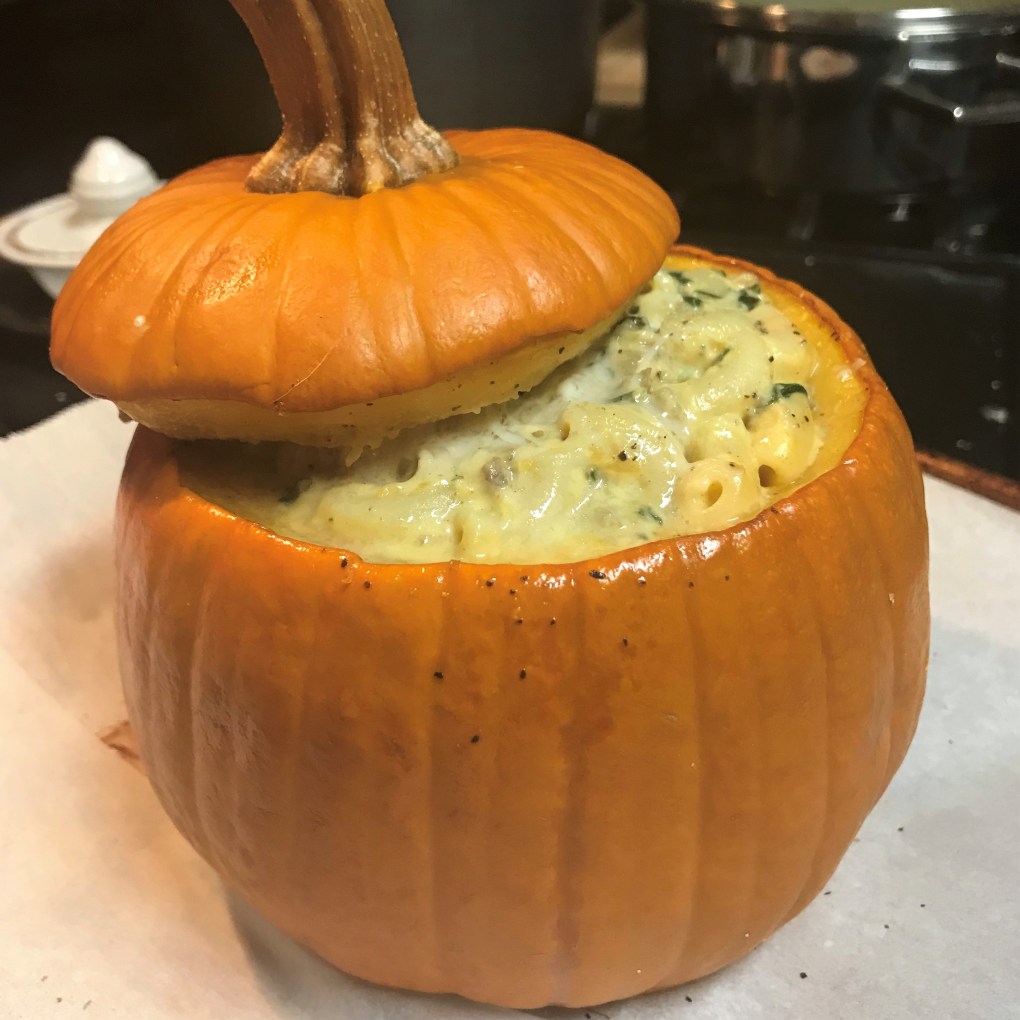
It only ranks third in America’s overall favorite comfort food (behind pizza and burgers), but here in the South, mac and cheese reigns supreme. It was the first dish I posted on Comfort du Jour when I finally got the nerve to start my blog and, as you can see, we enjoy making fun variations of it at our house! This simple, versatile side dish is like a blank canvas—you can apply so many flavors to it and, with all the different pasta shapes available, hardly ever have a repeat.
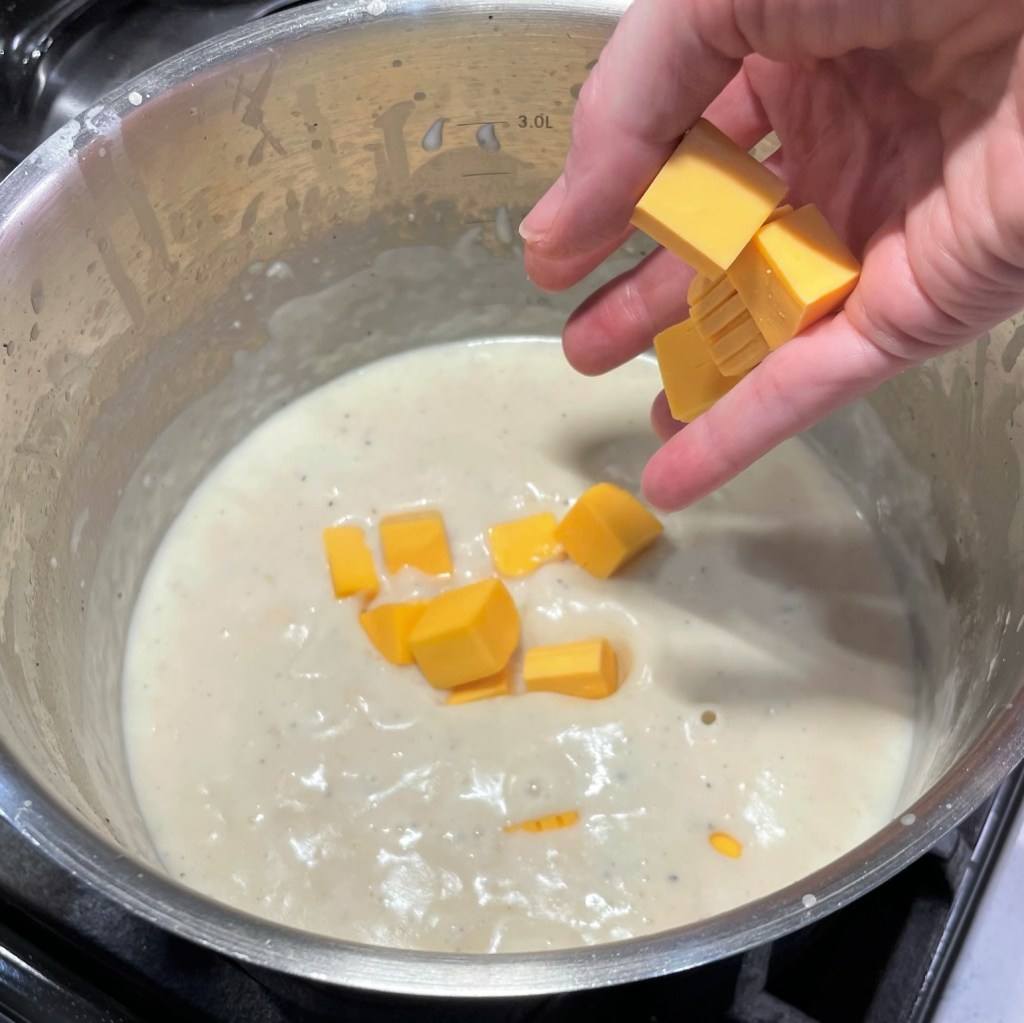
The main thing you need for super creamy mac and cheese is a velvety base, and for me, that means a bechamel—which is just a fancy French word that describes “white sauce.” Bechamel is one of the five so-called mother sauces, because it serves so many purposes. The key ingredients of a classic Bechamel are butter and flour (cooked together in equal parts), and milk. The fat in the butter coats the starch in the flour, and the resulting paste serves to thicken whatever liquid is added to it—in this case, milk.
This butter-flour magic is called a “roux,” and it’s one of the first things I remember really learning from time spent in my grandmother’s kitchen. When she first told me about this important technique, I thought Gram was calling it “Roo”—like Kanga’s baby from the Winnie and the Pooh books (that’s how young I was). Since that very early lesson, I’ve learned how to spell roux, and how to adjust it for different applications.
The intensity of cooking on the roux changes its properties, and you can easily use this to your advantage, based on what you are making. For a thick, creamy white sauce, cook the flour in the butter over medium heat, just long enough to achieve a foamy appearance, then add milk all at once and whisk until it is thickened. Season it with salt and pepper, perhaps a little grated nutmeg (essential, in my opinion, for a real bechamel) or another seasoning you like, to match how you plan to use it. If I were to layer this creamy sauce with thinly sliced Yukon gold potatoes and onions, I might substitute ground cumin for the nutmeg, because I love the flavor of cumin with potatoes. Slide that into the oven for about an hour, and you’d be enjoying scalloped potatoes. Melt cheese into the sauce before layering, and you’d have potatoes au gratin.
Cook the flour and butter a bit longer to the point of being brown and toasty-looking, and you’ll have a roux with more complex flavor, but slightly less thickening power. This is what I usually do when I make mac and cheese, because I don’t need the bechamel to be quite as thick on its own (the melted-in cheese makes up for that), and because the browned butter in the base lends a warm, nutty aroma and flavor to the dish.
The butter and flour create a paste that will thicken whatever liquid you add to it.
Incidentally, it does not have to be real butter. A roux can be made with any type of fat, including plant-based butters, cooking oil or even lard or bacon grease. I have also found success using gluten-free flour, as there is usually enough starch in it to produce similar results as one made with regular, all-purpose flour. I have even read that almond flour can be used in roux (though I have not tested this). As long as the starch and fat molecules play nice, you’ll end up with a roux that will thicken.
For a roux with even more heft and complexity, such as for gumbo, cook the flour in oil rather than butter, and do it low and slow—even in the oven, if you want to go hands-free—and you’ll have a developed flavor that can’t be equaled with any add-in ingredient. More on that another day. 😊
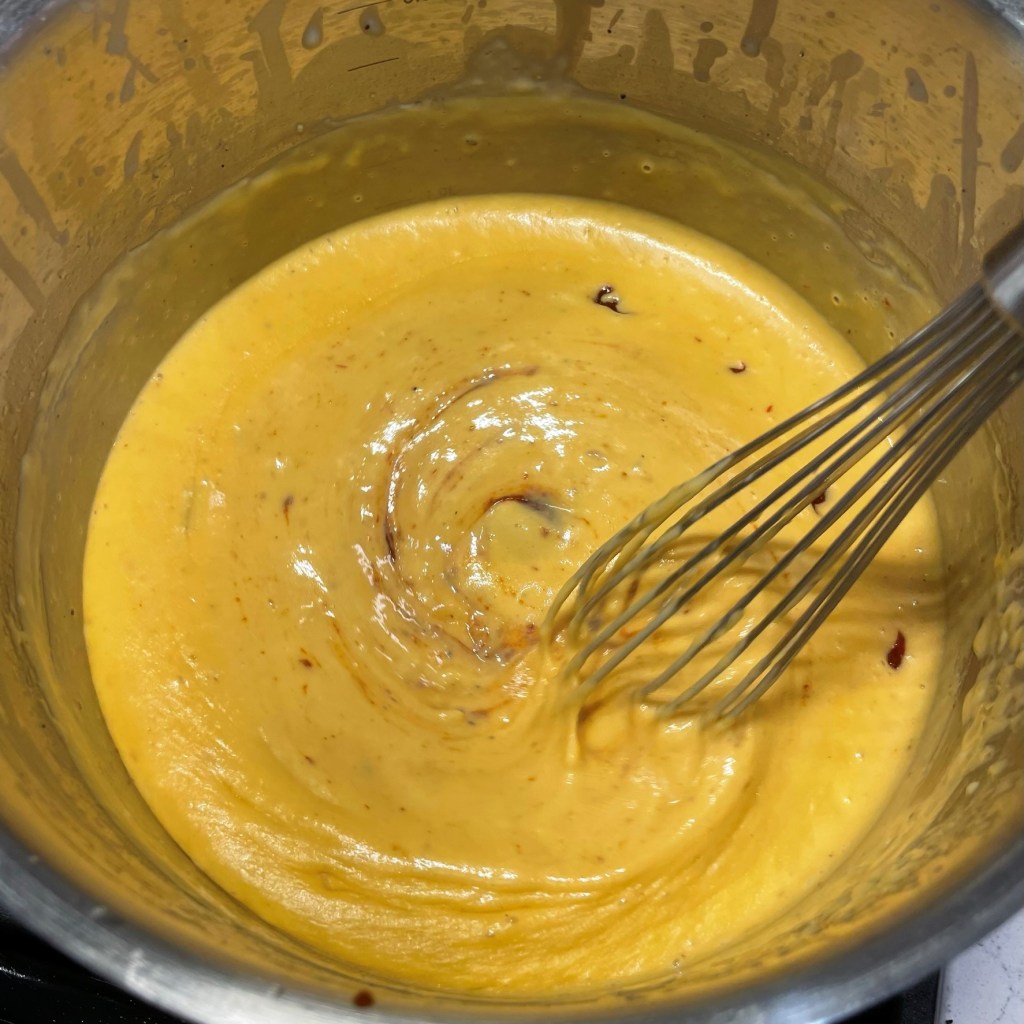
The dish I’m sharing today is another spin on my basic mac and cheese, with the addition of chipotle, one of the most favored flavors at our house. Though a subtle touch of chipotle could be added with a few sprinkles of ground chipotle powder (either before or after the cheese is added to the roux), I’ve opted to use a couple of spoonsful of pureed chipotle with adobo sauce. These are the little cans you find in the “international” section of the supermarket. Chipotle peppers are essentially dried, smoked jalapenos that have been rehydrated to a plump state. We dump the entire contents of a small can into the food processor, to be used in a variety of Mexican-themed dishes, including Les’s Smoky Guacamole and my South of the Border Crab Cakes.
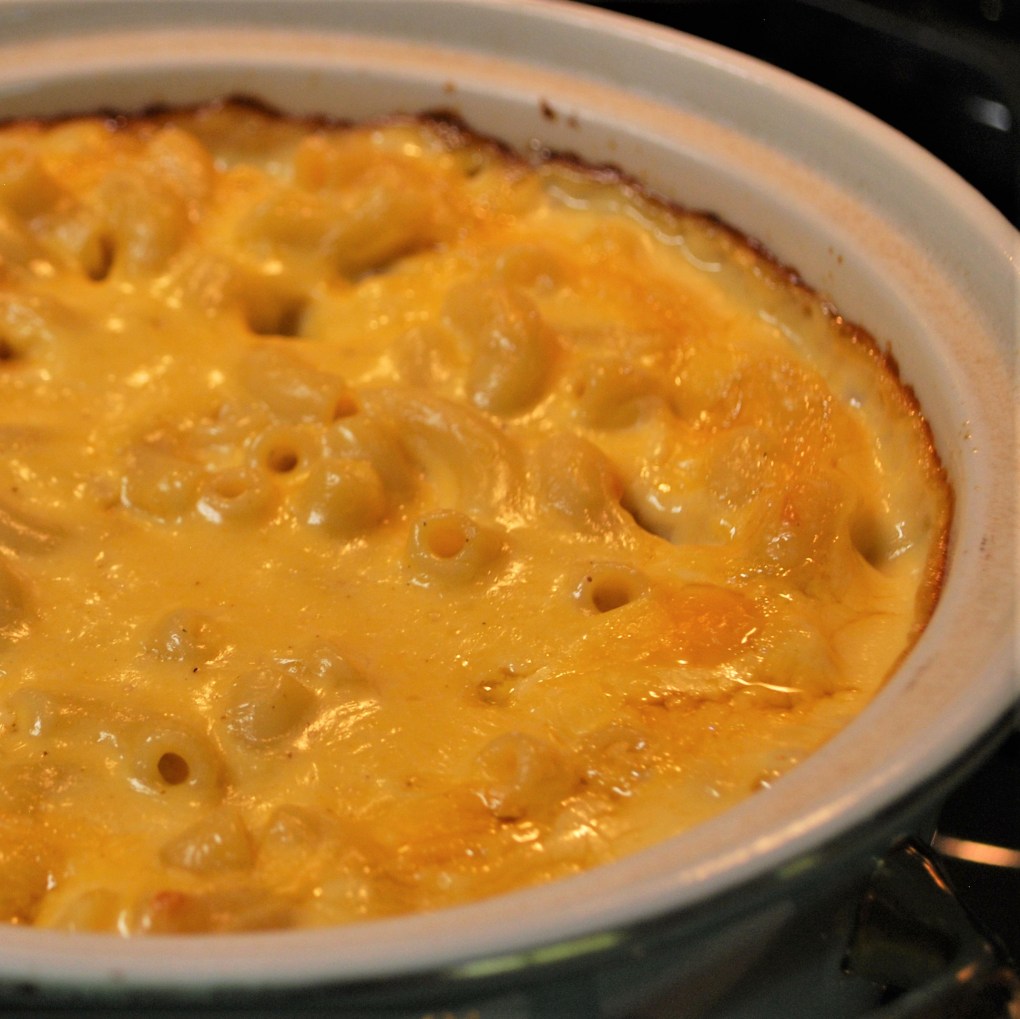
For this batch of mac and cheese, I chose whole grain rotini because of its heft and texture. When you choose a pasta with lots of surface area, you should expect to adjust the pasta-to-sauce ratio (all those twists and curves are going to need extra sauce). I topped the dish with a mixture of crushed crispy fried jalapenos (from Trader Joe’s) and plain panko breadcrumbs.
As for the cheese, I went with a medium-sharp cheddar as the main flavor, but the base cheese is yellow American. You probably already know that very sharp cheeses do not melt as well as their milder counterparts. And I’m sure you know about the exquisite melting qualities of American cheese, despite its bad rap, which is not fairly earned.
Saying “American cheese is not cheese” is like saying “meatloaf is not meat.”
J. Kenji Lopez-Alt
Ingredients
2 Tbsp. extra virgin olive oil
1/2 large onion, diced fairly fine
3 Tbsp. salted butter
4 Tbsp. all-purpose flour
2 cups milk
6 oz. yellow American cheese, cubed* (see notes)
10 oz. medium-sharp yellow cheddar, shredded
2 Tbsp. chipotle w/ adobo puree (more or less, depending on your tolerance for heat)
A few shakes of ground cumin, for added smokiness
Salt and pepper to taste
2/3 lb. whole grain rotini (if using smoother pasta, use an entire pound)
Topping:
1/3 cup crispy fried jalapenos (or fried onions, if you prefer less heat)
1/4 cup plain panko breadcrumbs
*Notes
I used to think that American cheese was fake food, but this article on Serious Eats convinced me otherwise. Yes, it is processed, but it is not made up of ingredients and chemicals pretending to be cheese. It is real cheese, processed with special salts to result in a smooth, creamy texture when melted. I do not feel this way about the brand that begins with a V (and I think you all know which one I’m referring to), but I am OK with American cheese now and then, and I consider it essential as a melting base for my mac and cheese. Yeah, what J. Kenji said.
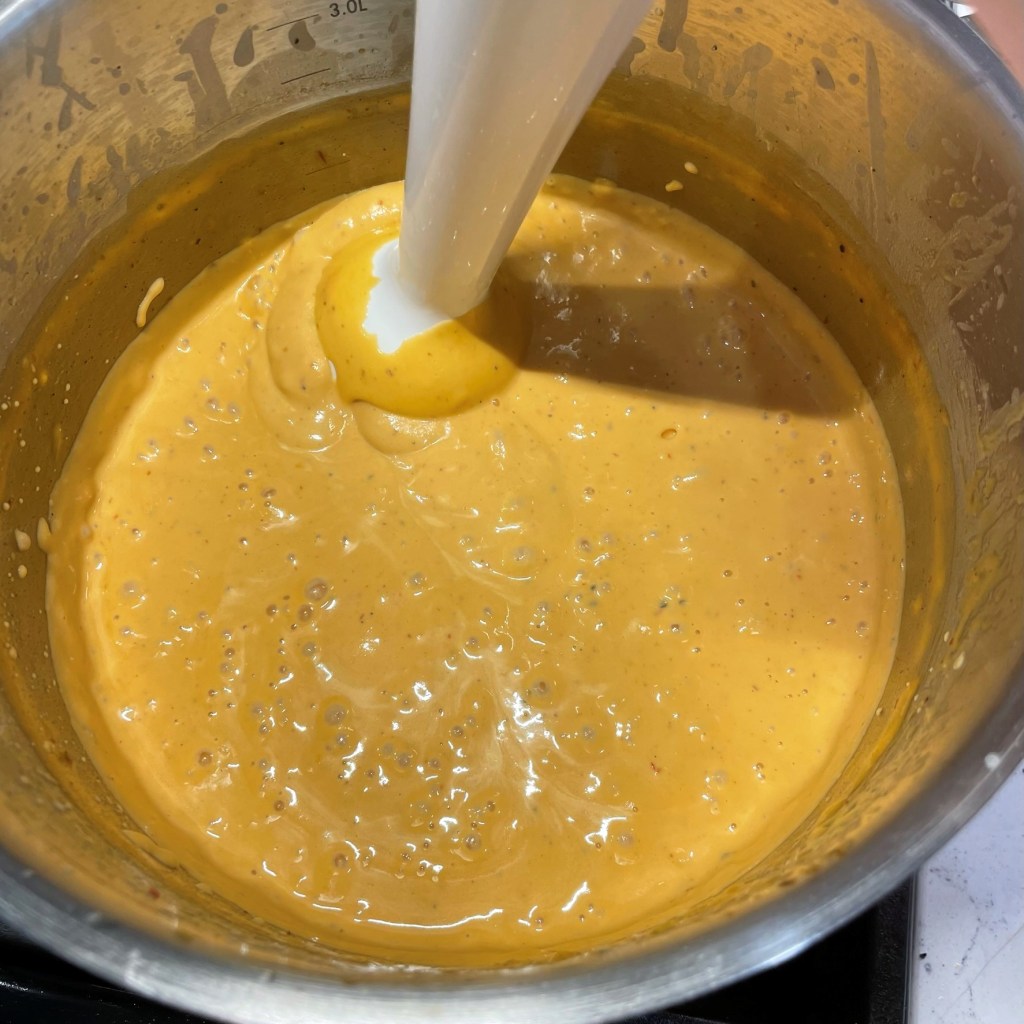
If you have an immersion blender, I encourage you to take the step I’ll describe for whipping your cheese sauce into ultra-creamy territory. It is optional, of course, but a total game changer in my mac and cheese endeavors.
Instructions
Cooking the onions and garlic into the roux ensures layers of flavor.
If you intend to use the immersion blender on the sauce, remove half of the onions to stir into it later. The remaining half will get pulverized into the creamy sauce.
When the butter is nice and bubbly, sprinkle in the flour and whisk to combine. Cook it until the whole mixture is bubbly again.
Add the milk, all at once or in batches, as you wish. I generally do half at a time for easier whisking.
The fat-and-flour roux mixture thickens the milk into a flavorful sauce that’s perfect as a base for mac and cheese.
American cheese melts up super creamy and smooth and yes, it is real cheese. It’s just processed with special salts that change the structure of the fat molecules.
Sharper cheeses in general do not melt as smoothly as milder cheese. For this mac and cheese, I chose a medium sharp cheddar and shredded it myself.
The amount of chipotle puree is directly related to your tolerance for heat. My husband and I both love the flavor and spice, so I used 3 tablespoons.
The chipotle really gave the cheese sauce a boost in color as well as flavor!
This is optional, of course, but I do love hitting my cheese sauce with an immersion blender. The resulting sauce is unbelievably creamy.
Time to add the reserved onions back into the sauce.
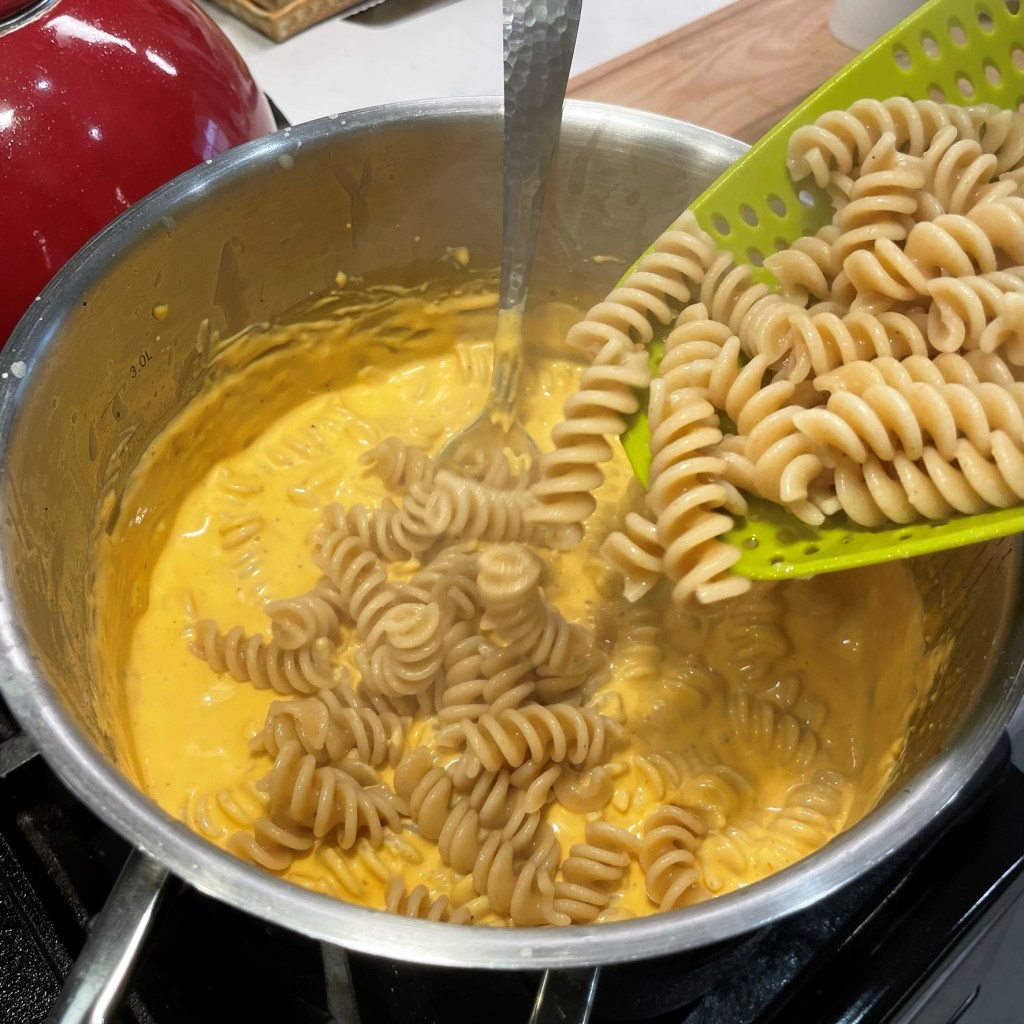
All the twists and curves in this pasta choice will have an impact on my finished dish.
You have one chance to get seasoning into your cooked pasta. Be generous with the salt in your cooking water!
Cook your pasta just shy of al dente if you plan to bake the mac and cheese, because it will continue to cook in the sauce during baking.
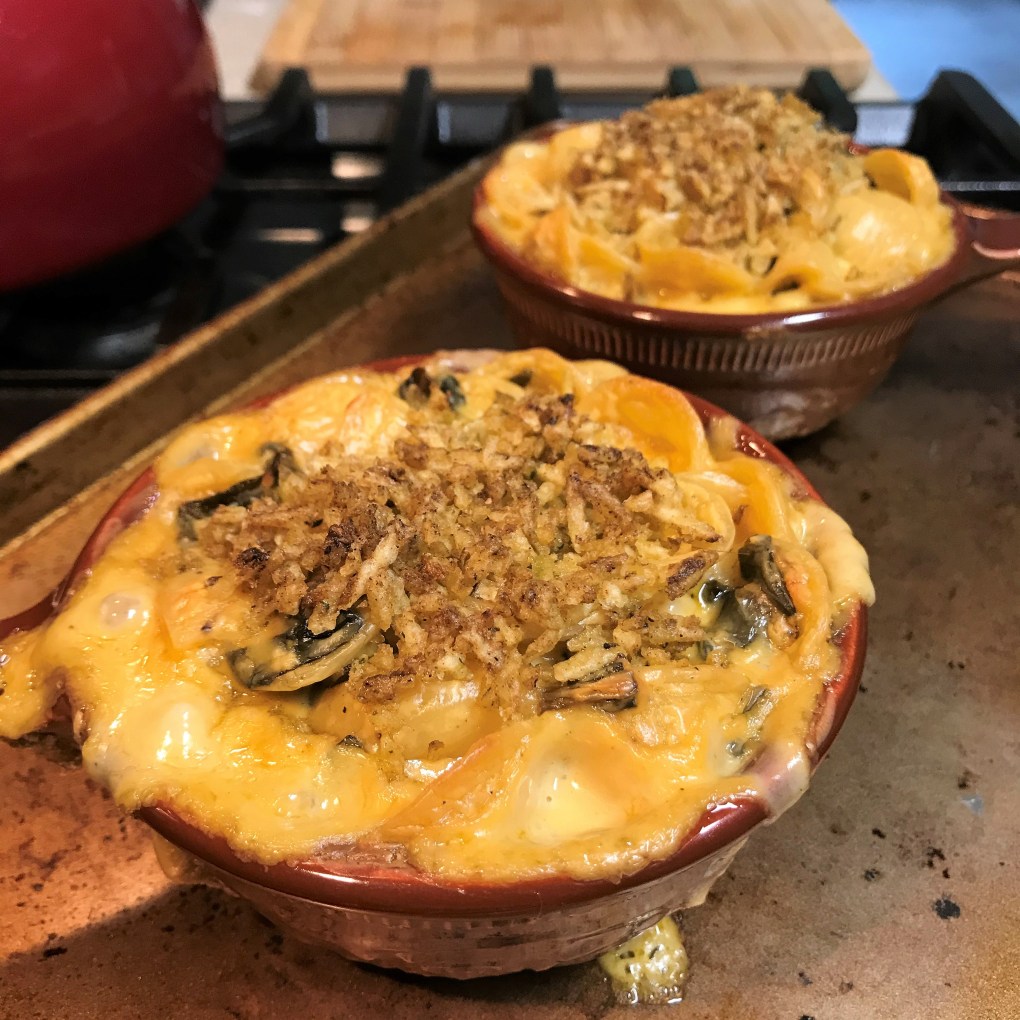
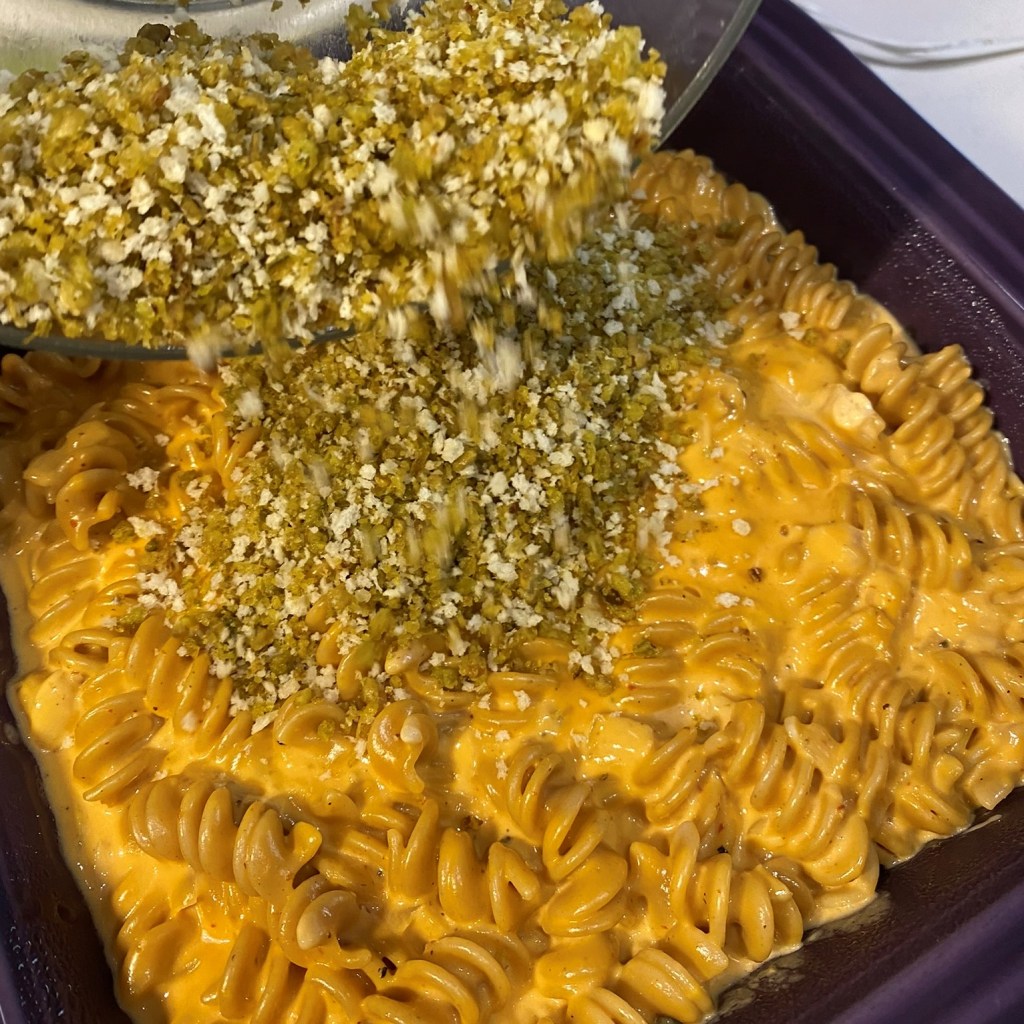
Transfer the cheesy goodness into an oven-safe baking dish. This recipe is good for an 8″ square dish.
For most of my mac and cheese dishes, I like to add a crunchy topping. This time, I reached for these crispy jalapeno pieces from Trader Joe’s.
Pulse them in the food processor, then pulse in a handful of plain panko crumbs for extra texture.
Just before baking, top the mac and cheese with the jalapeno-panko crumbs. Cover the pan with foil and bake at 350°F for 15 minutes. Remove the foil and bake another 20 to 30.
When the mac and cheese is baked, the hot sauce will bubble up around all the edges of the pan. The topping should be golden and crispy.