If you love the idea of homemade ice cream but don’t feel like messing around with a cooked custard base, this recipe will be right up your alley. The cream cheese (or, in this case, mascarpone) gives it a luxurious, silky texture, but it comes together quicker without the extra, fussy step of tempering eggs and straining a custard. Greek yogurt helps lighten it up a bit without compromising the creaminess. The layers of fruit syrup and crushed graham crackers bring home all the memories of a fresh summer cheesecake.
I’ve broken the recipe into tasks over a couple of days, but you could easily start this in the morning and finish it the same evening. Just be sure you give the berries enough time to macerate, and the cream mixture time to thoroughly chill before freezing.
Not wild about strawberries? Feel free to swap them out in favor of another favorite fruit, but consider that some fruit might need to be cooked first. Blueberries and raspberries, to name two, aren’t as juicy as strawberries so they would need a little help getting there. I think fresh summer peaches would be amazing in this recipe—and, of course, cherries.
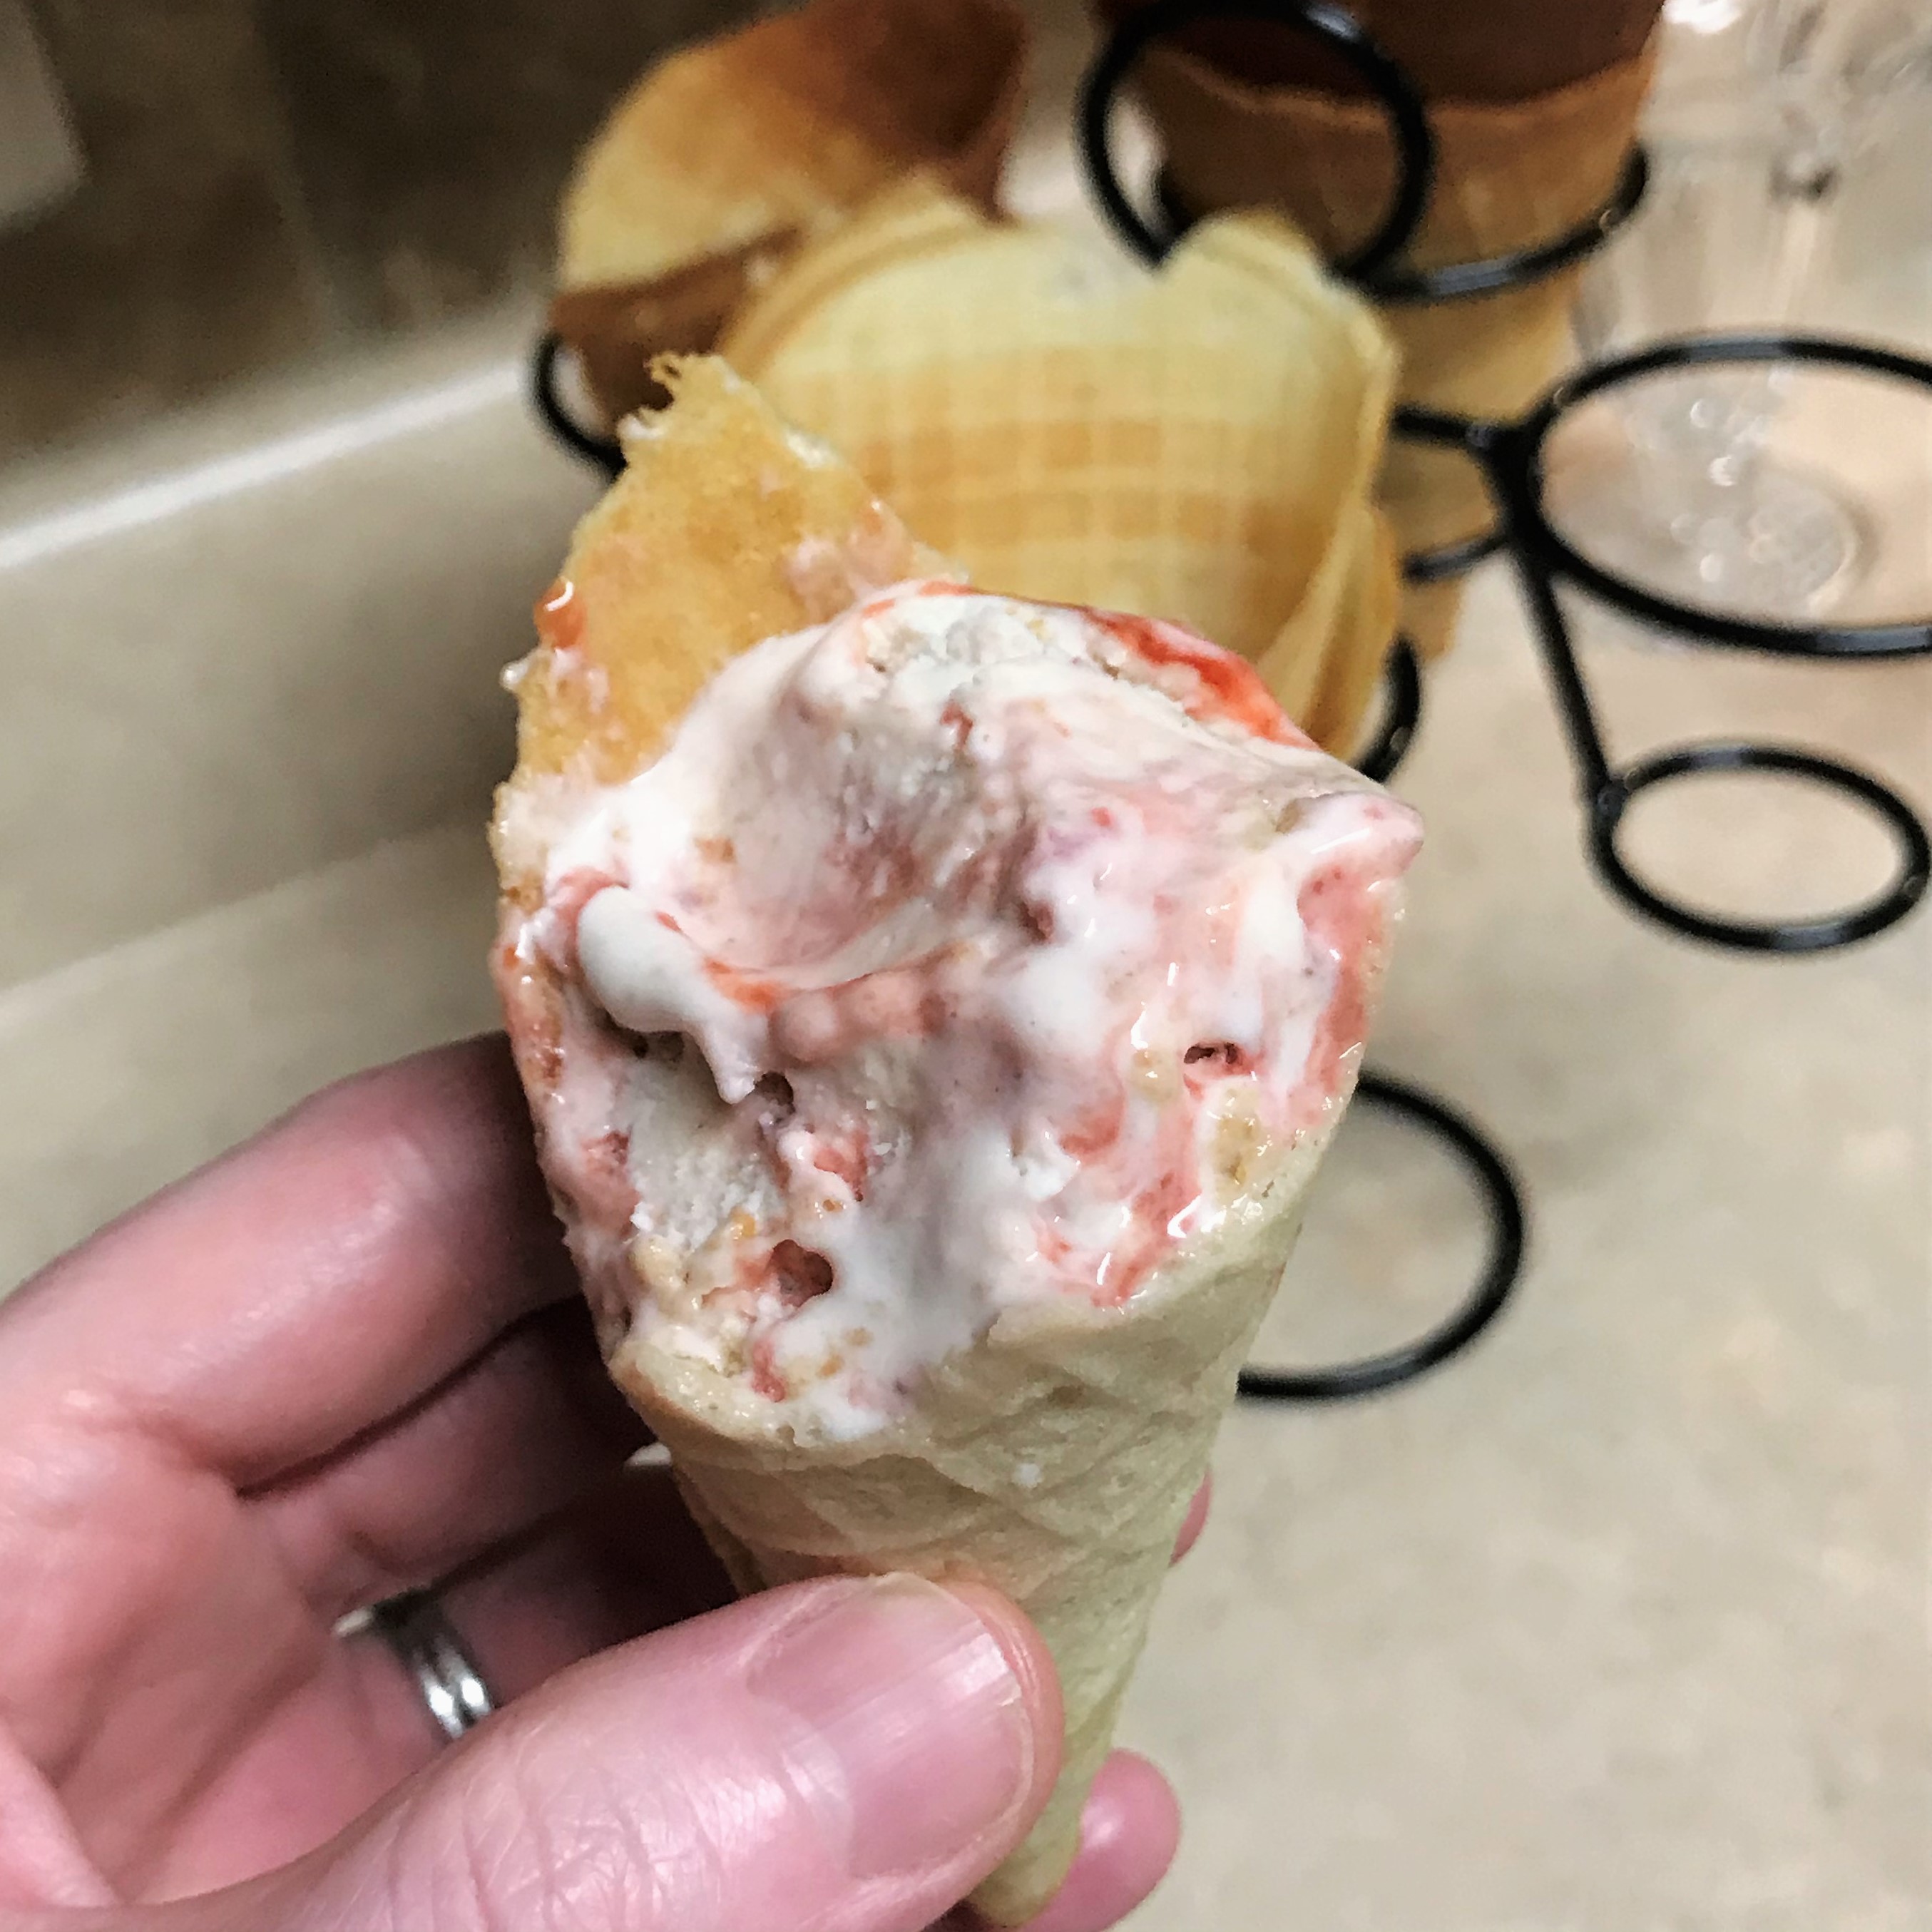
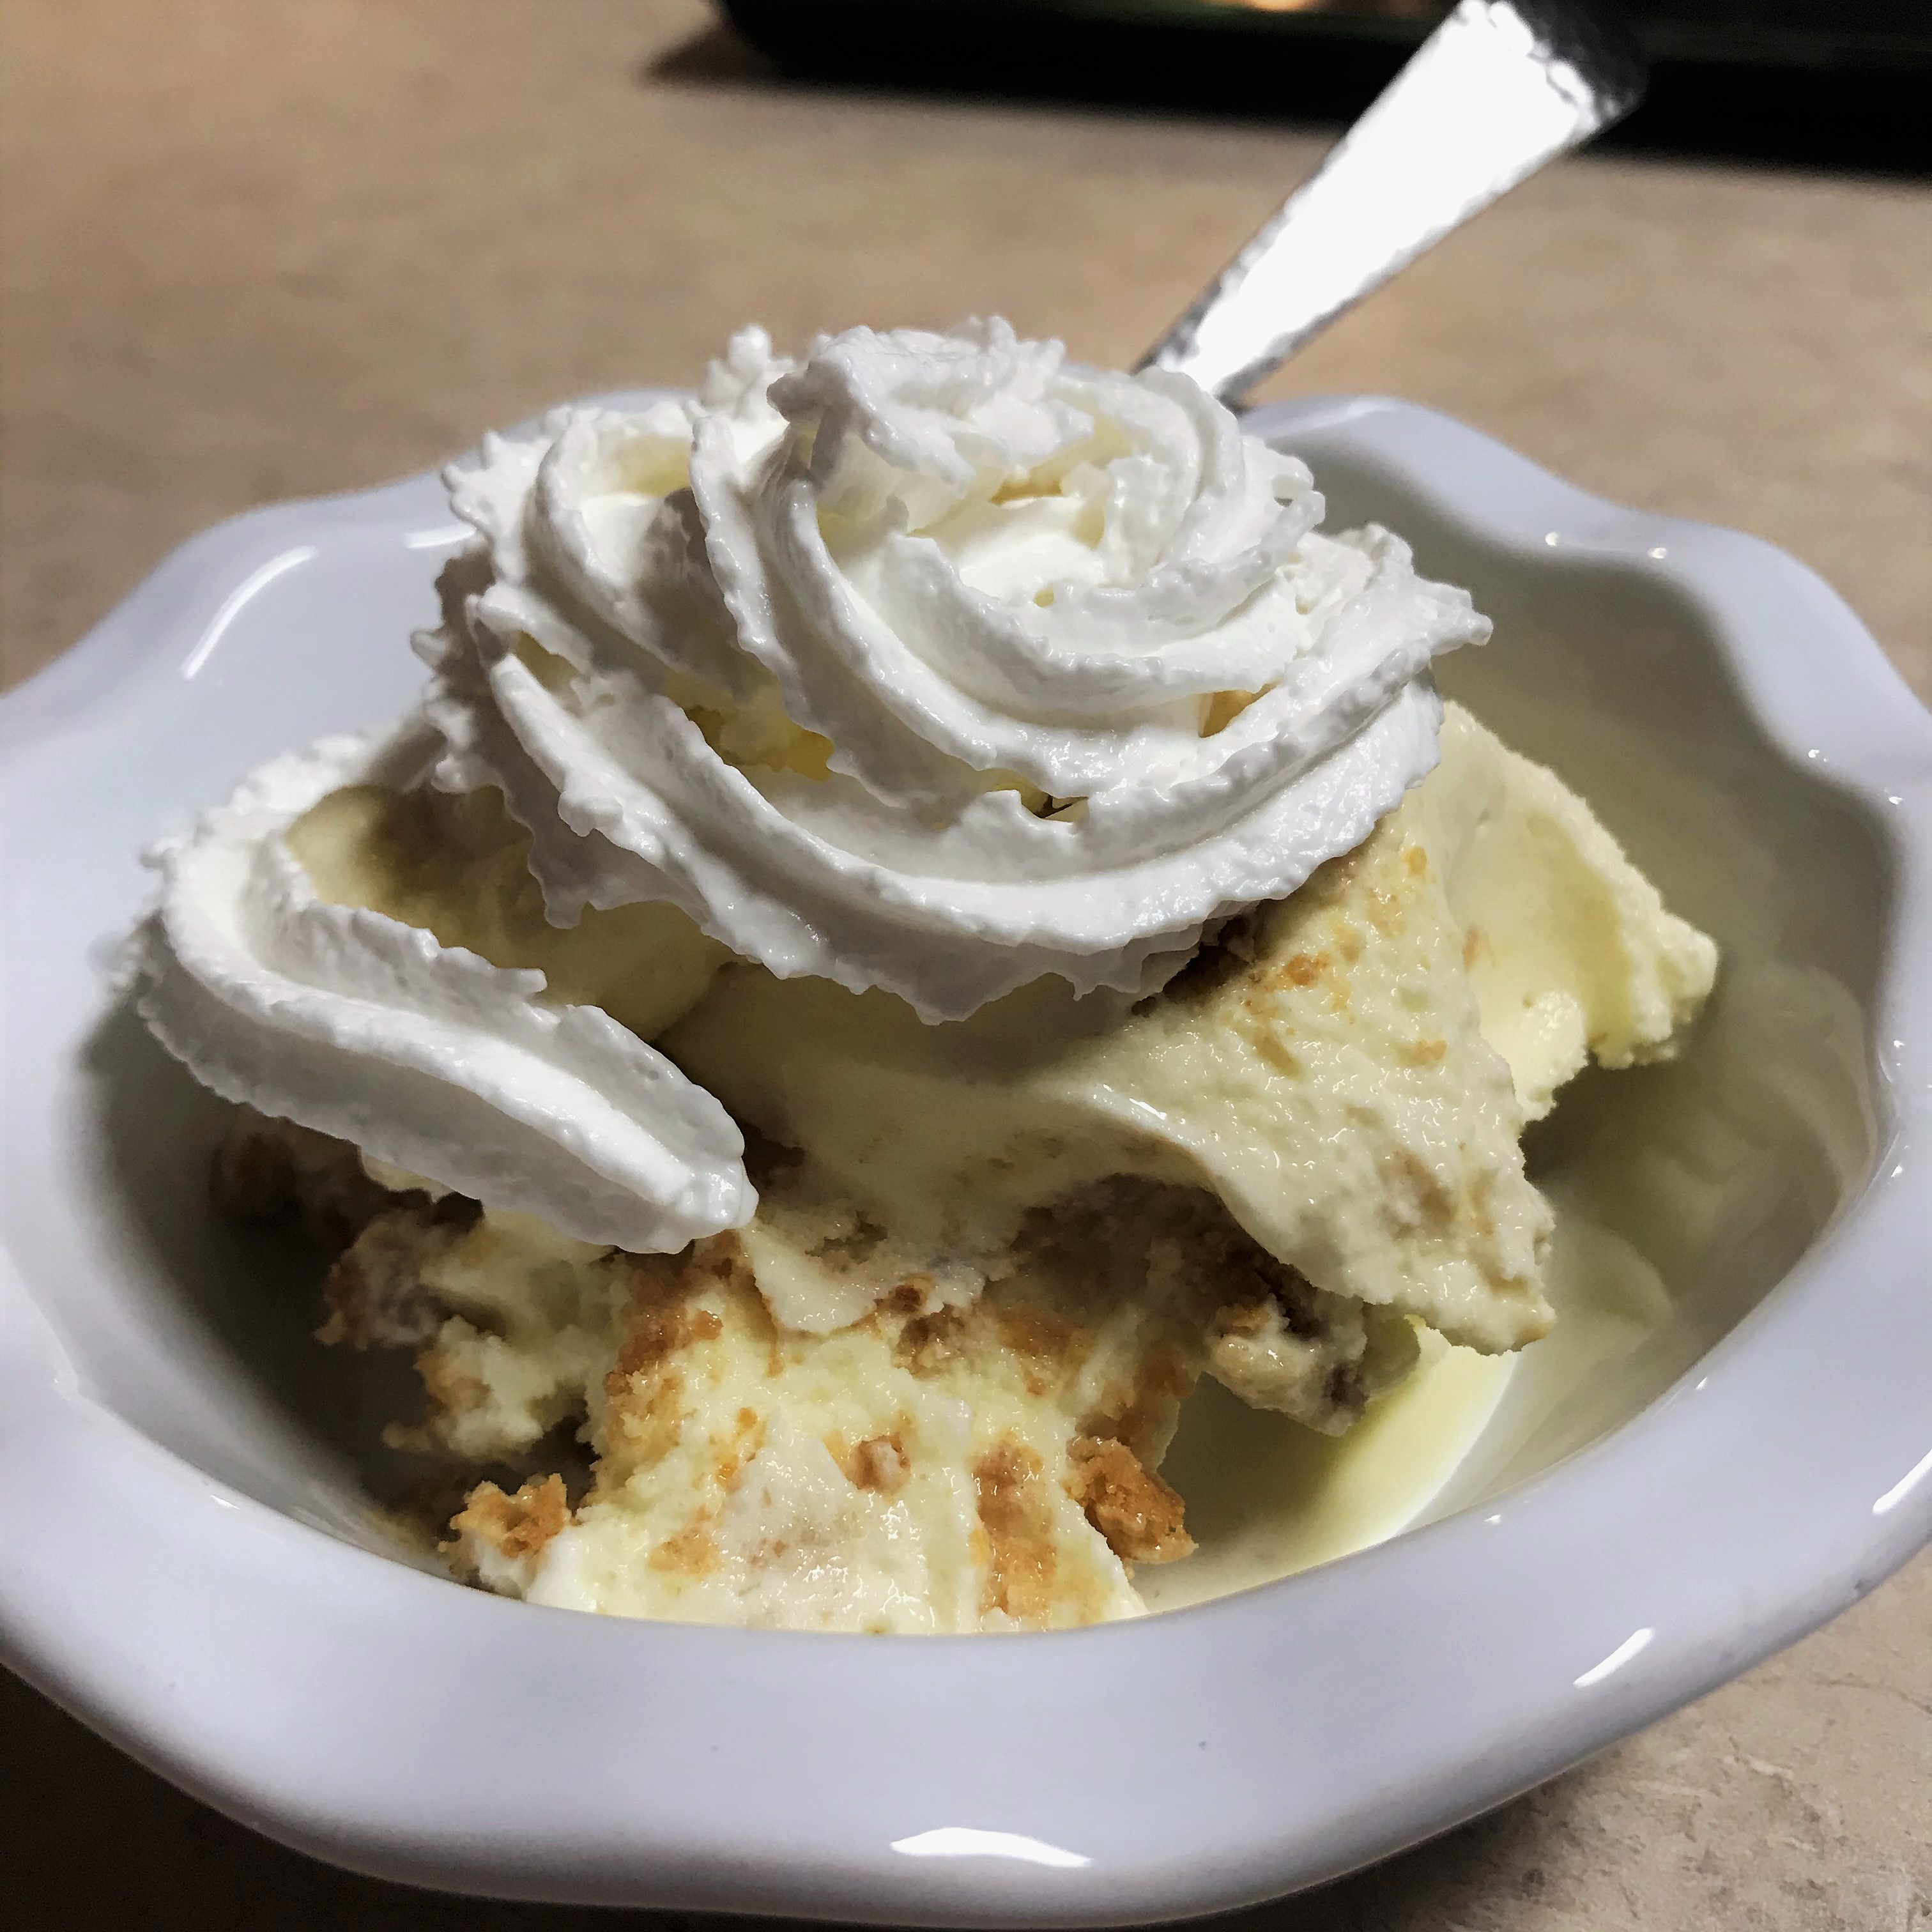
In a bowl, off the spoon, in a cone. However you take it, this ice cream is delicious!
Ingredients
8 oz. mascarpone* or cream cheese
3/4 cup caster (super-fine) sugar*
1 cup heavy cream
1 cup whole milk
3/4 cup Greek yogurt* (plain or vanilla)
1 tsp. vanilla extract
1/4 tsp. almond extract
2 1/2 cups fresh organic strawberries*
1/2 cup light brown sugar
1 Tbsp. vodka* (optional for improved texture)
*Notes
Mascarpone is an Italian-style creamy cheese, a bit denser and definitely silkier than regular cream cheese. It will lend an ultra-creamy texture to this ice cream which, unlike most of my others, does not begin with an egg custard. If mascarpone is not available in your market, use full-fat cream cheese (the brick kind) for similar result.
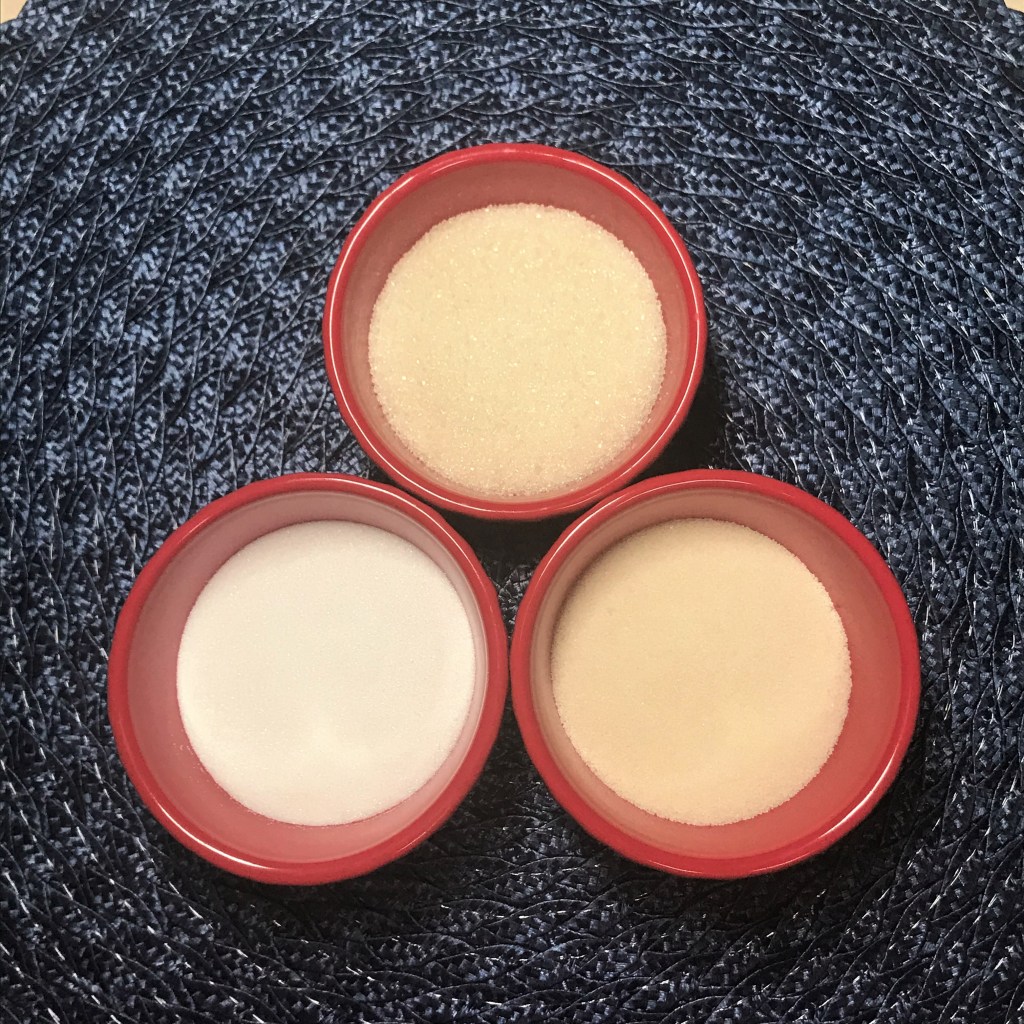
Caster sugar is sometimes called “super-fine” sugar. I’ve chosen it for this recipe because it is easier to dissolve in cold ingredients. In my custard-based ice creams, I use pure organic cane sugar, which I’m certain would not fare well in this recipe because we are not cooking the base.
From top, clockwise: pure organic cane sugar, fine organic cane sugar, caster sugar.
Caster sugar is pure white and extremely processed (a quality that makes it practically against my religion), so it’s rare for me to use it at all. It’s also pretty expensive compared to most sugars. If you can’t find caster, put your regular sugar in a blender and grind it into as fine a powder as you can. Measure the amount after grinding. Otherwise, warm the milk called for in the recipe and dissolve your sugar into it, then cool completely before proceeding.
Because the mascarpone already has cream in it, I’m using less heavy cream than I normally would for ice cream. To make up the difference, I’ve opted for Greek yogurt, and the one I chose is vanilla with a touch of cinnamon, which I think is going to play really nicely against the strawberries. I’m always on the lookout for a twist, which typically leads me to develop favorite new recipes.
Unfortunately, strawberries top the 2020 “Dirty Dozen” list of potentially toxic produce items. Each year, the Environmental Working Group, a non-profit organization, issues a list of produce items most likely to be contaminated with pesticides and other questionable chemicals. You can learn more about it here, but in the meantime, choose organic strawberries whenever possible.
The vodka in this recipe is optional, and it does not affect the flavor, but it helps with the final texture of the ice cream, making it easier to scoop straight from the freezer.
This time, I did not add the vodka at the end, and I can feel the difference as this ice cream is very solid.
Instructions
Day one:
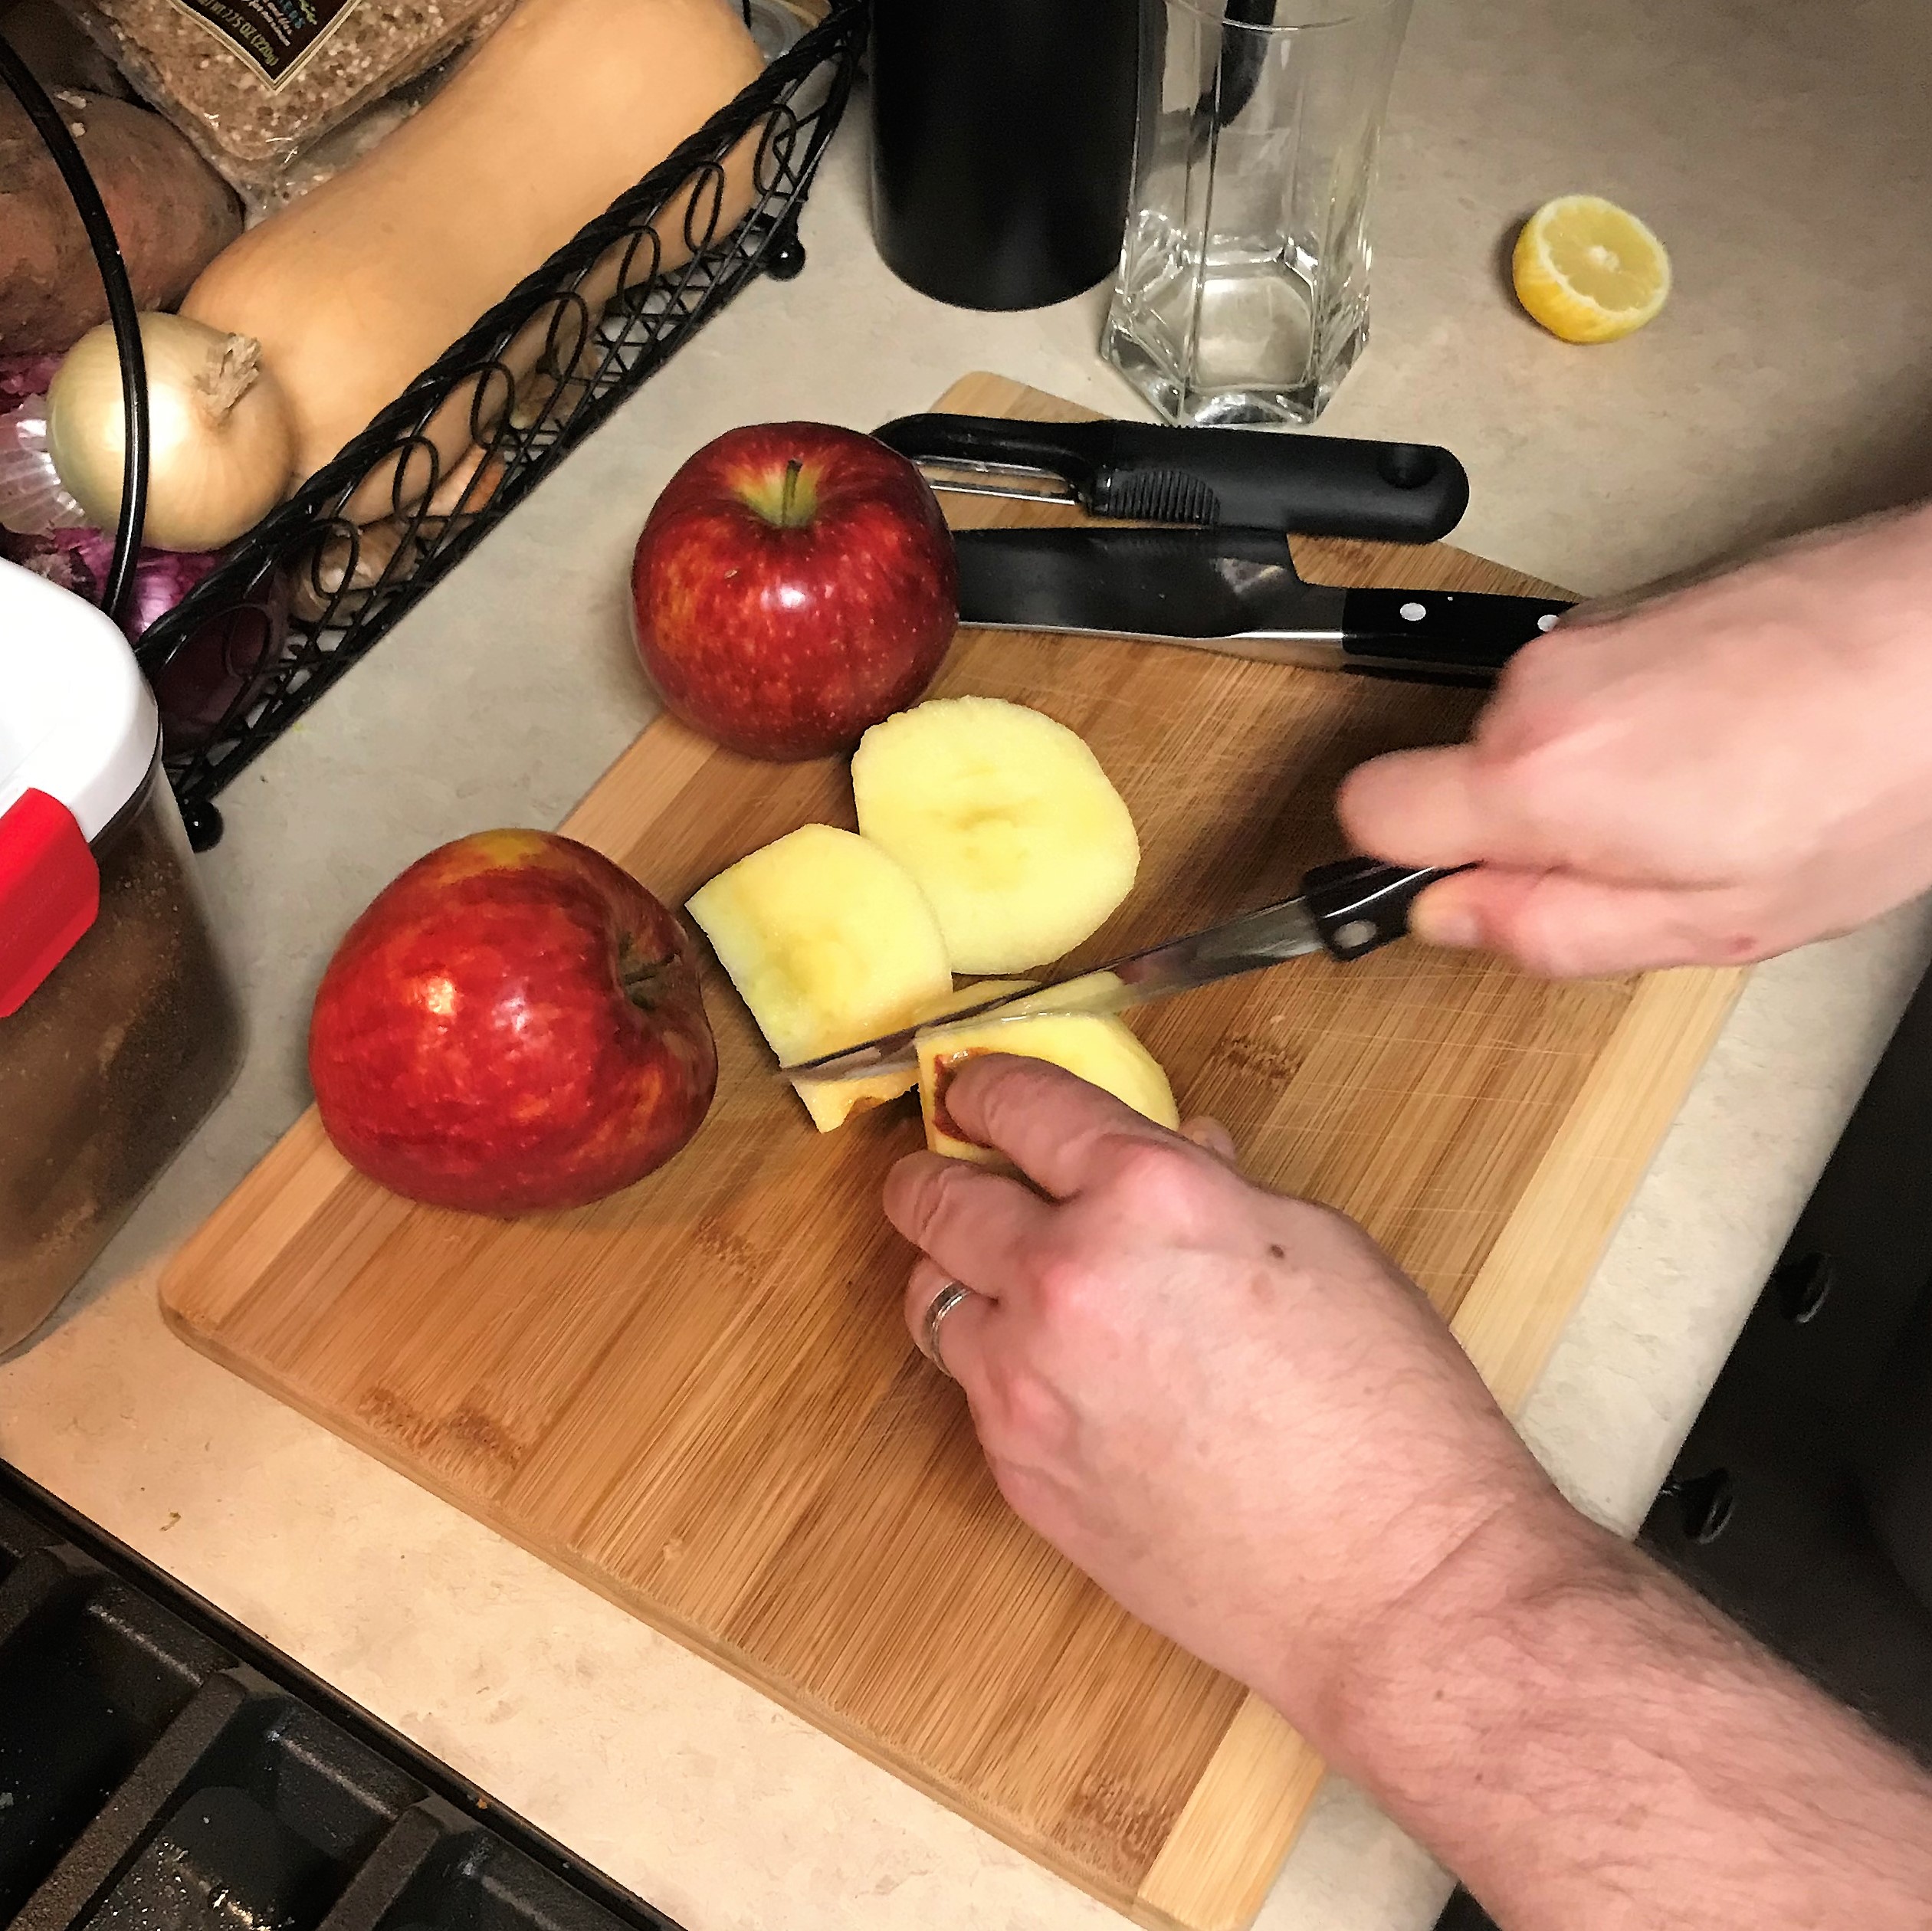
Clean and hull the strawberries, and slice into pieces. I use an egg slicer for this task—it’s quick and simple, and I end up with uniform slices. Add the berries to a medium size bowl and stir in brown sugar. Give the berries time to fully macerate at room temperature, then put them in the refrigerator.
If you’re cool with having a pink-colored ice cream, feel free to skip this next step. I’ve decided this time around that I want to create a ribbon of strawberry syrup through the white ice cream, so I’m going over the top, even though it means I’ll add a day to my ice cream prep. Care to join me? Allow the strawberries to macerate overnight, then use a large mesh strainer to drain off the liquid and simmer it over medium-low heat until it is reduced by half and has the consistency of a thin syrup.
After reducing, I have about 1/3 cup of strawberry syrup– more than enough to create my “ribbon.” If there’s enough left over, I’ll drizzle it over the first serving of ice cream!
Allow the syrup to cool to room temperature, then return it to the fridge in a separate bowl from the drained berries.
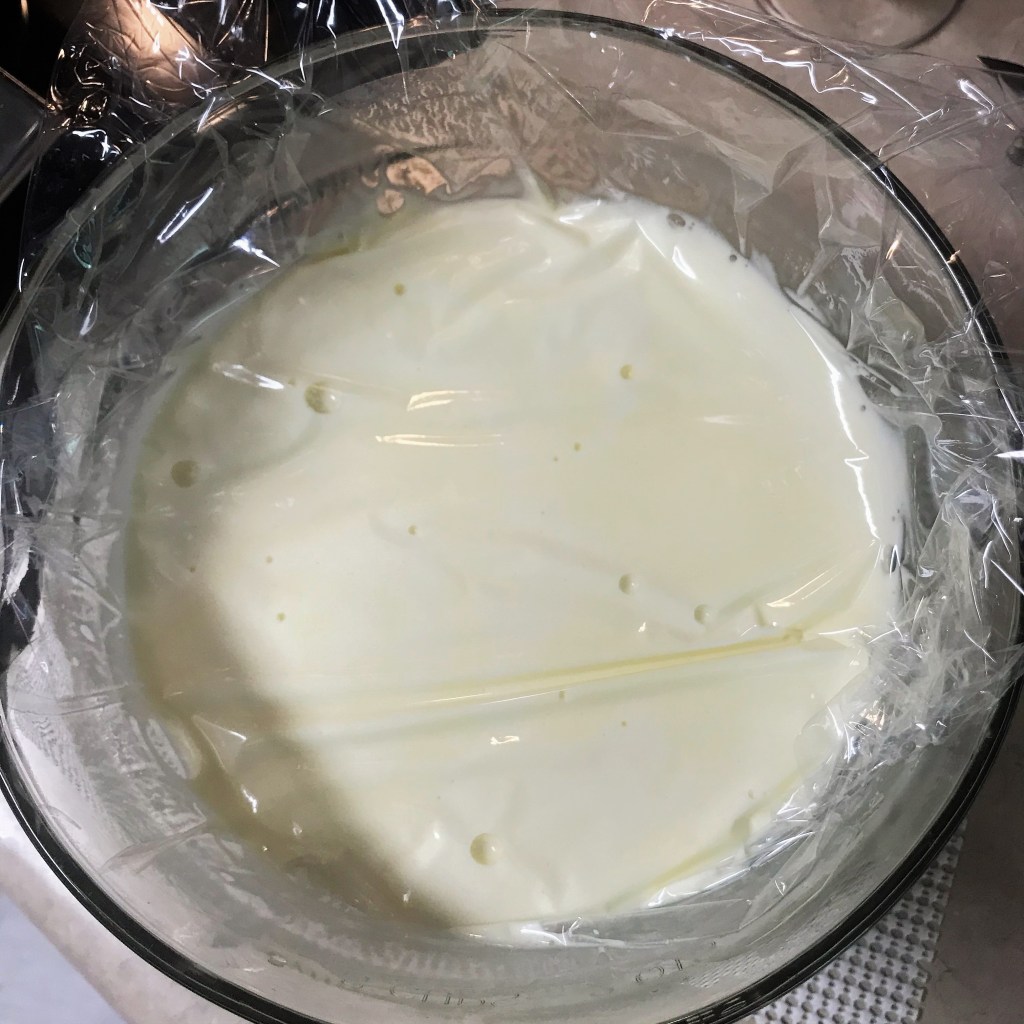
In the bowl of your mixer, beat the mascarpone together with the caster sugar, milk and Greek yogurt until fully combined. Slowly beat in the heavy cream, taking care not to whip it too much. Add the vanilla and almond extracts. Transfer the cream mixture to a sealed bowl and refrigerate several hours until fully chilled.
You don’t want to whip the cream into a frenzy. Run the mixer on low to incorporate it, or whisk by hand.
Day two (or three, if you went down the rabbit hole with me on the strawberry syrup):
Stir the cream mixture to reincorporate all ingredients, as some separation will have occurred. You don’t need to whip it here—just mix or gently whisk until the mixture has a uniform, creamy appearance. If you didn’t make the strawberry syrup, drain the berries at this point and blend their liquid into the cream mixture.
Pour the cream mixture into the ice cream machine and mix according to manufacturer’s instructions. Mine takes 20 to 25 minutes to freeze. For the final few minutes of freezing, spoon in the strained strawberries (and vodka, if using), allowing them to blend in before adding another spoonful, and repeat until all strawberries are used.
Place the graham crackers into a paper or zip top bag, and gently crush them with a rolling pin or the bottom of a bowl or measuring cup. I didn’t want it to be fully crumbs—try to keep a few bits of the crackers for texture in the finished ice cream.
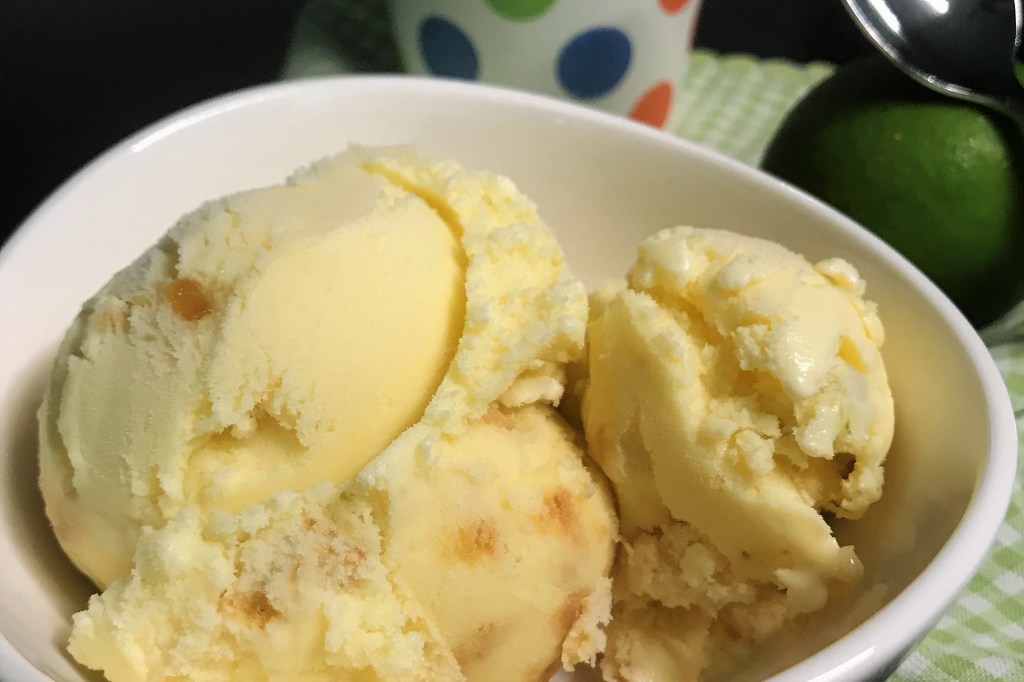
This ice cream is every bit as silky and creamy as my usual custard-based recipes. I’ve had good success with both mascarpone and regular cream cheese. I hope you’ll try it!
The gang’s all here. My add-ins are lined up and ready. As Tom Petty sang, “the waiting is the hardest part.”
The strained berries give off a little bit of their pink color, but I’m already loving the contrast of the creamy white base.
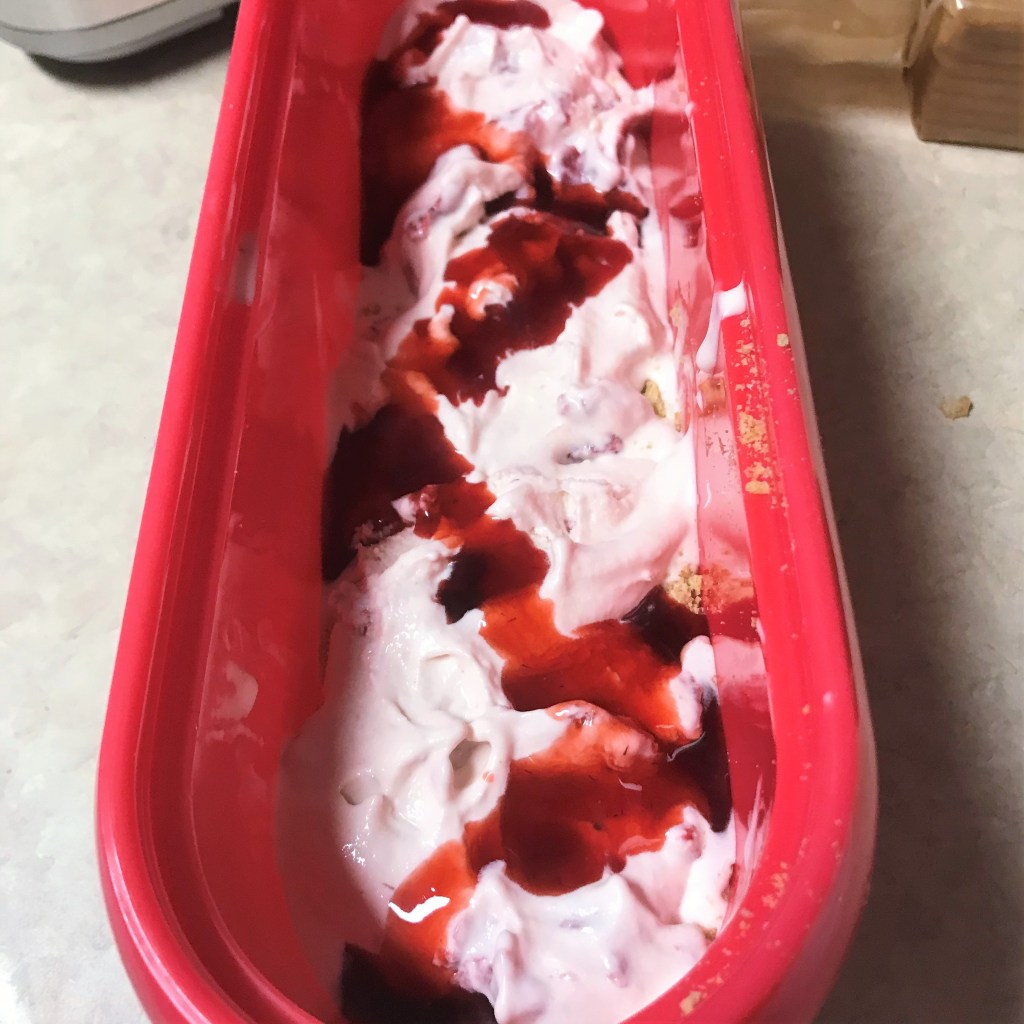
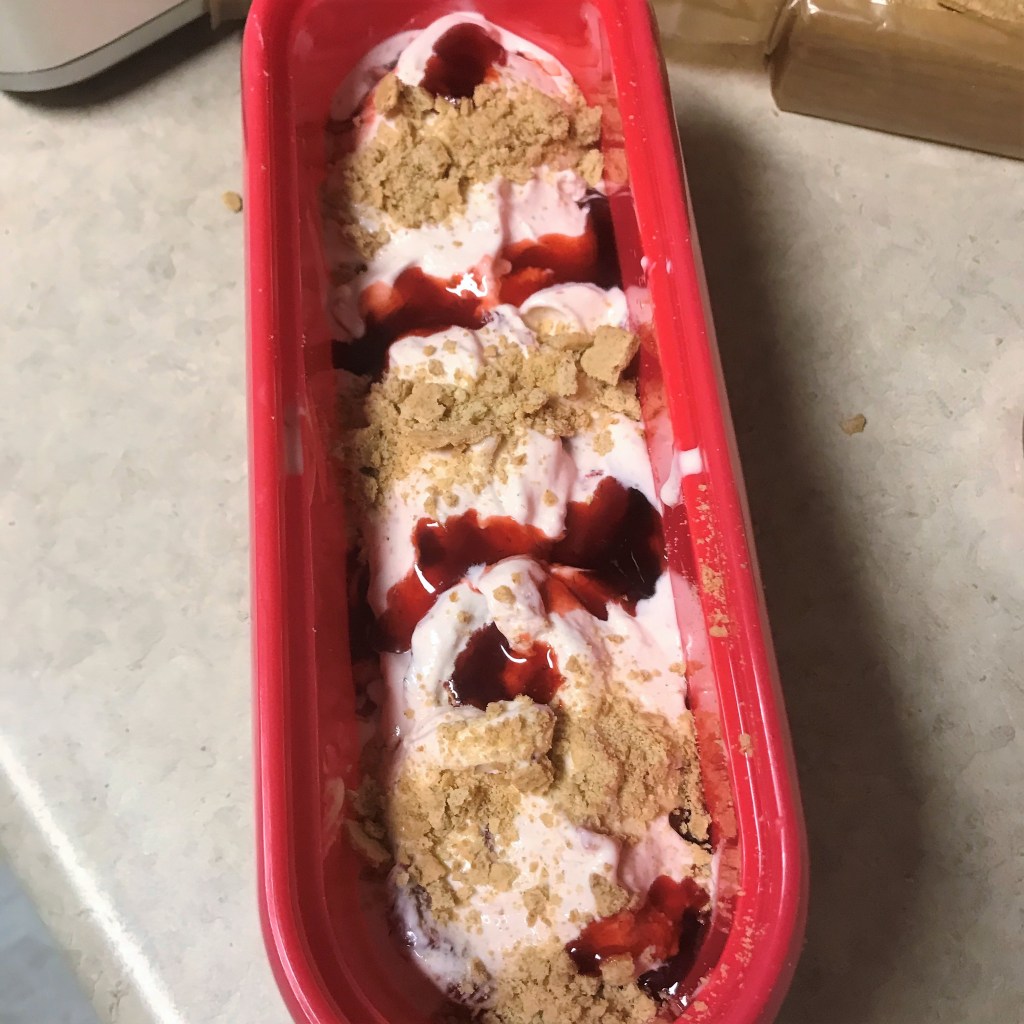
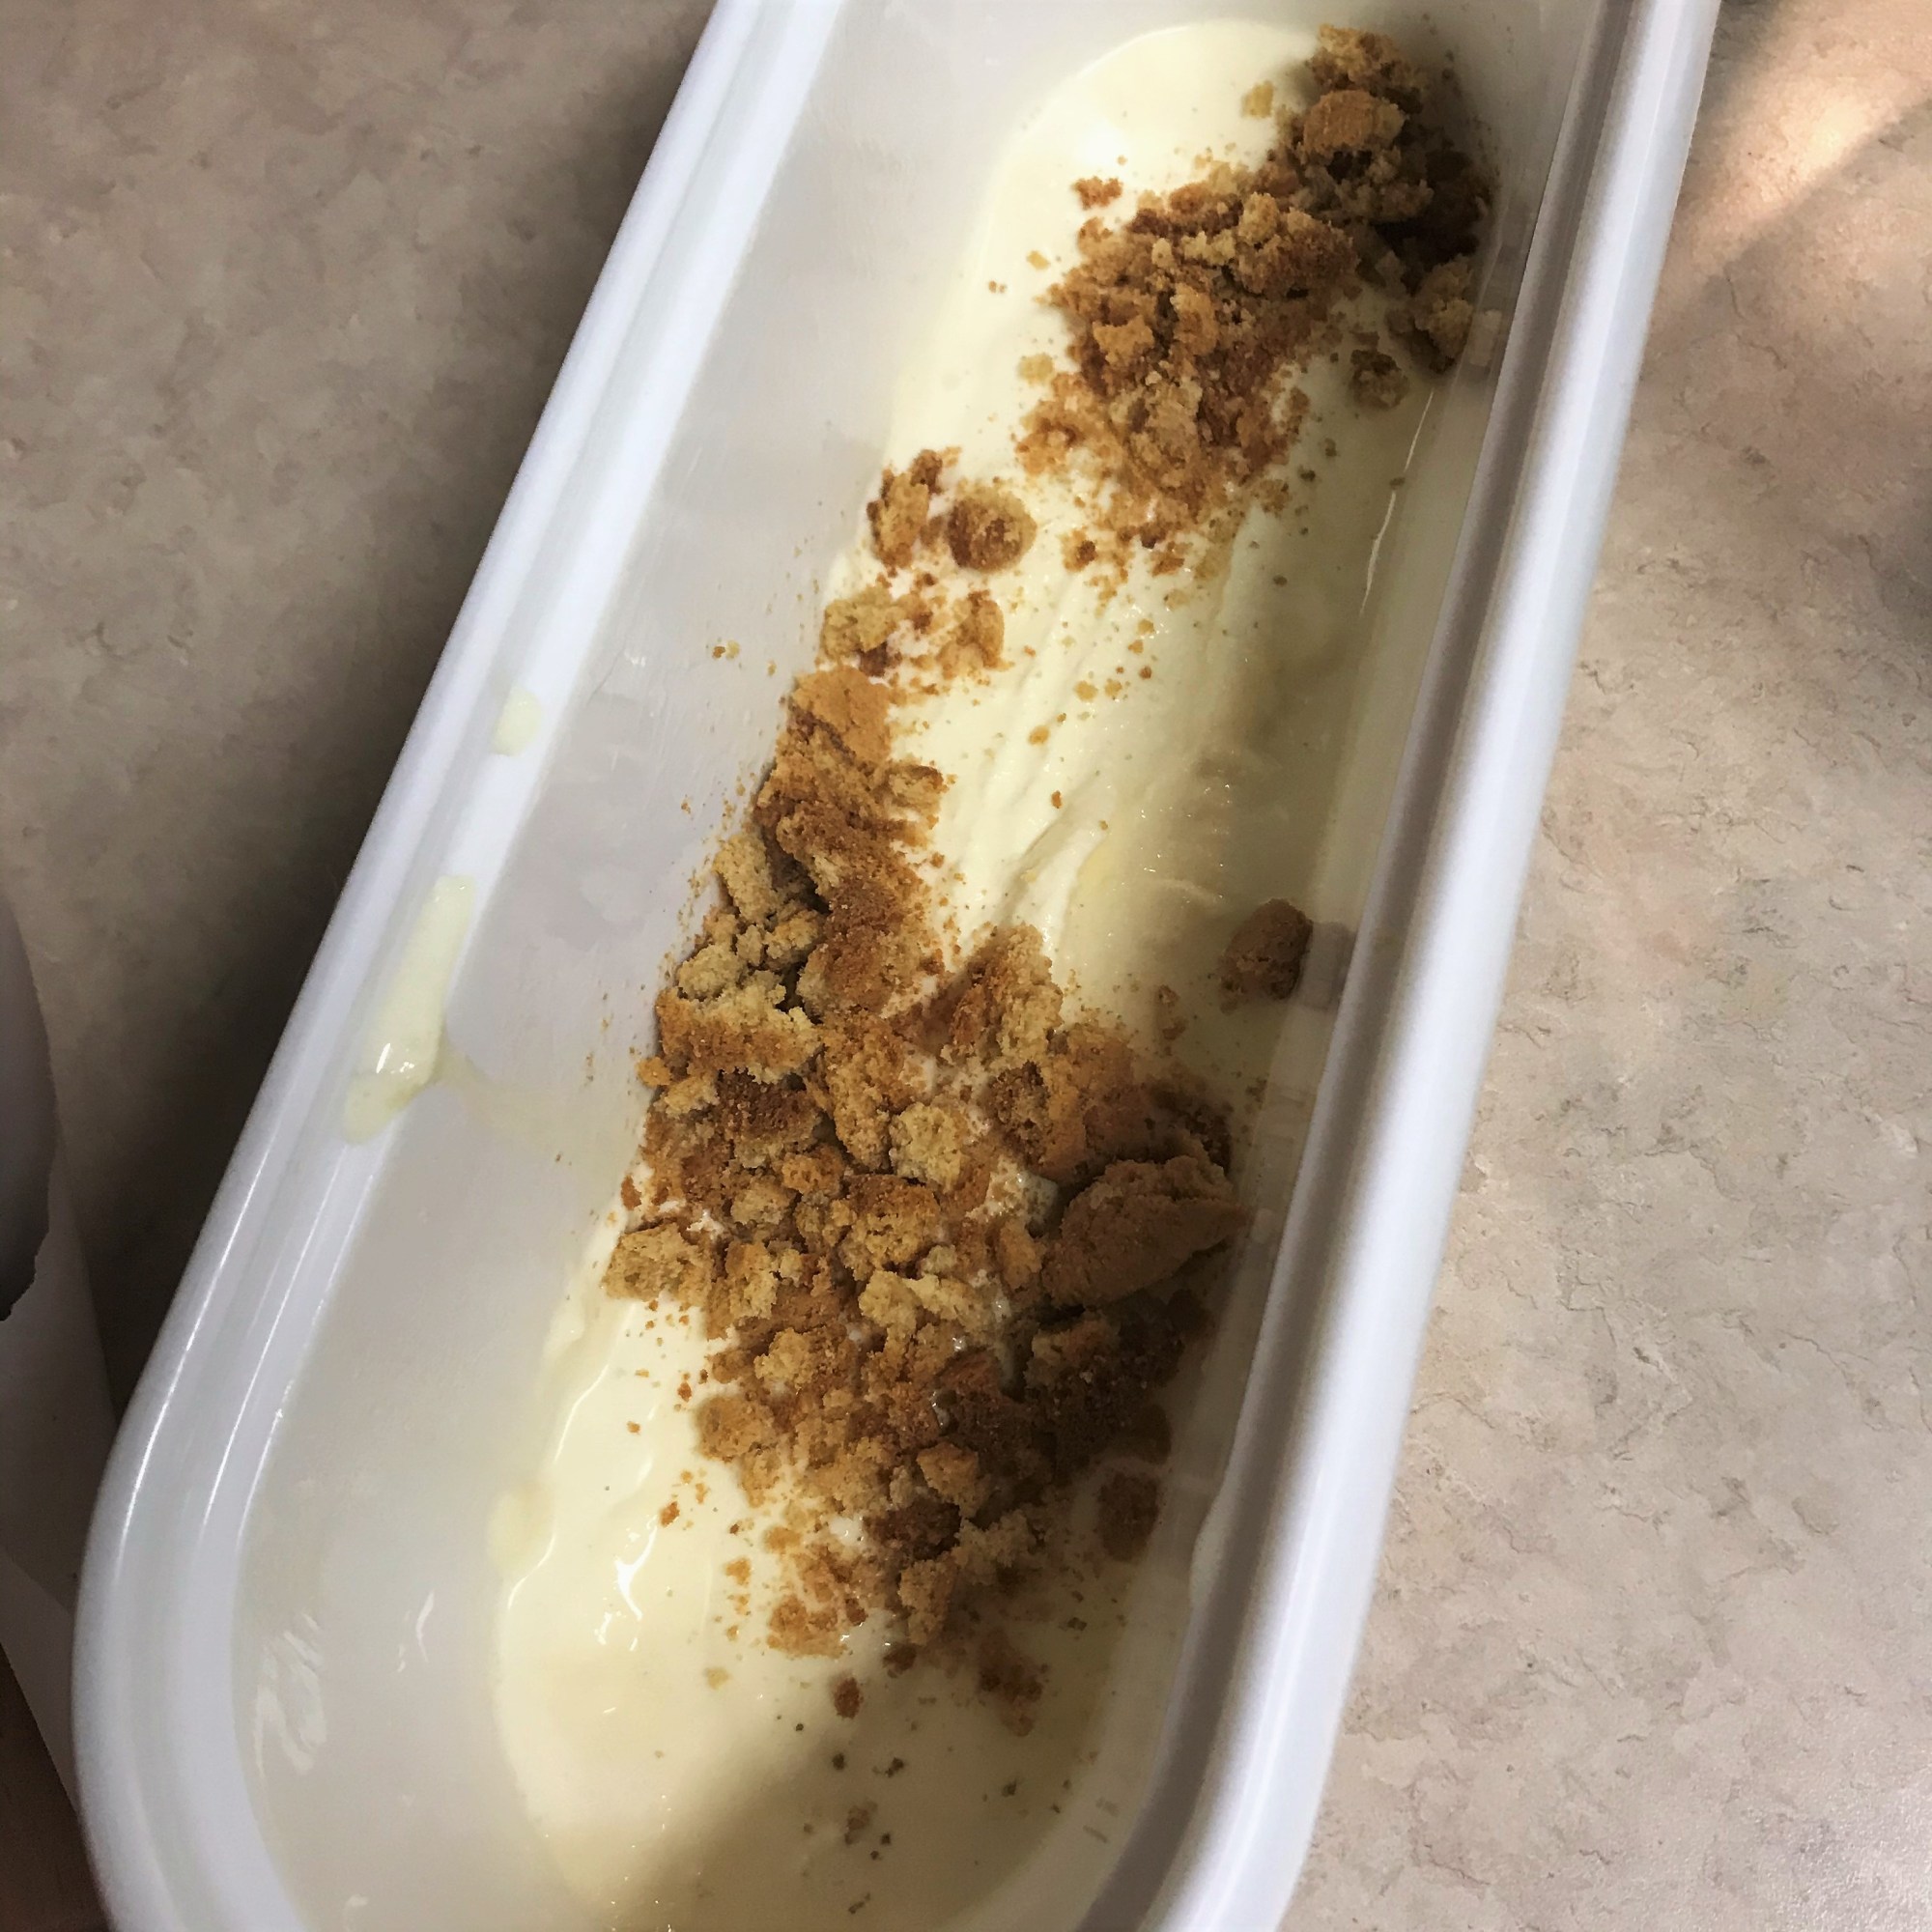
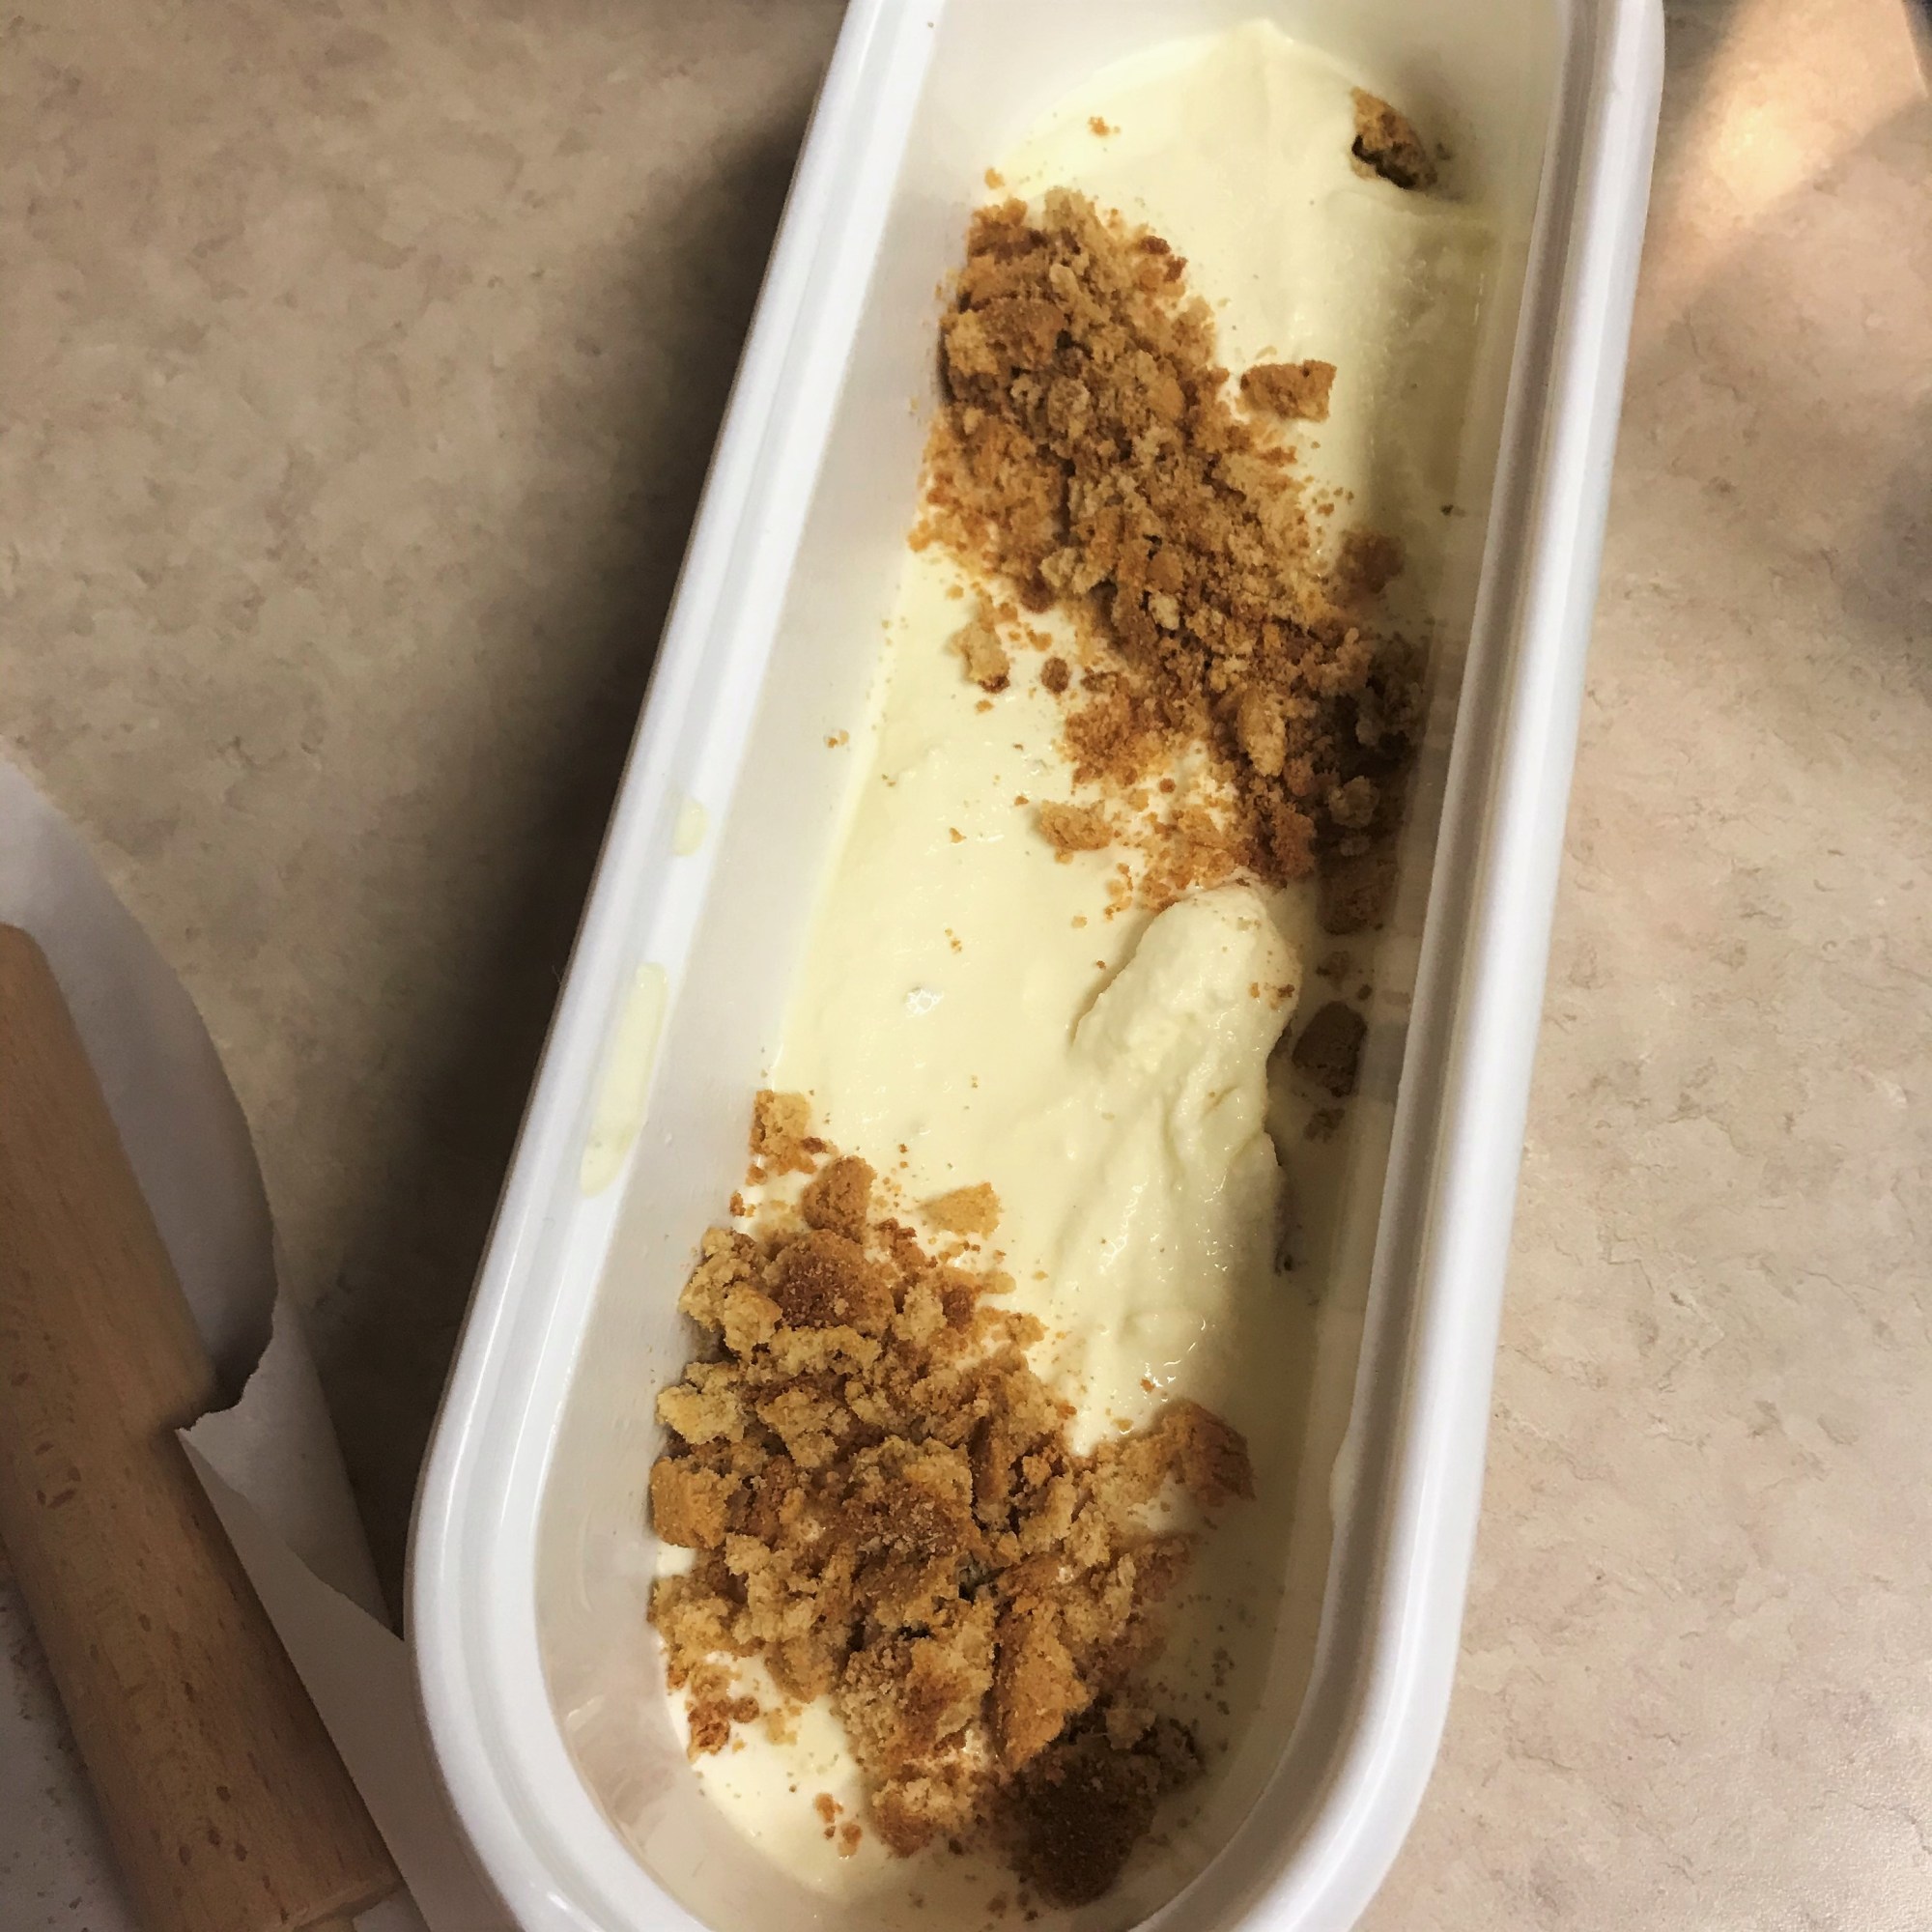
Try to do the layering quickly so the ice cream doesn’t soften. I started with a layer of ice cream, then crumbs, then more ice cream and a zig-zag syrup ribbon.
For the final add-in layer, I’ve alternated stripes of crumbs and ribbon. I want every scoop to come out perfectly marbled with texture and flavor!
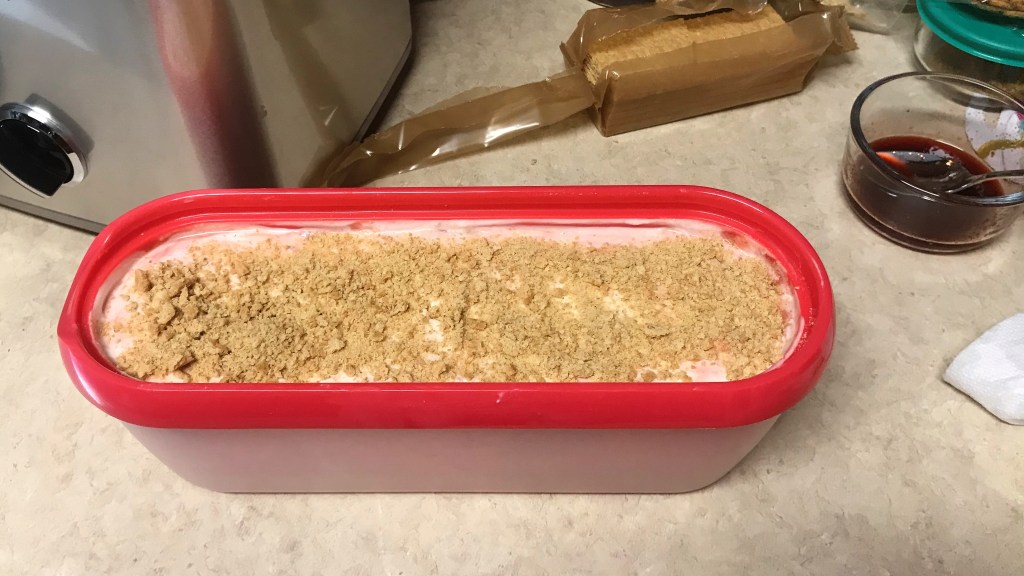
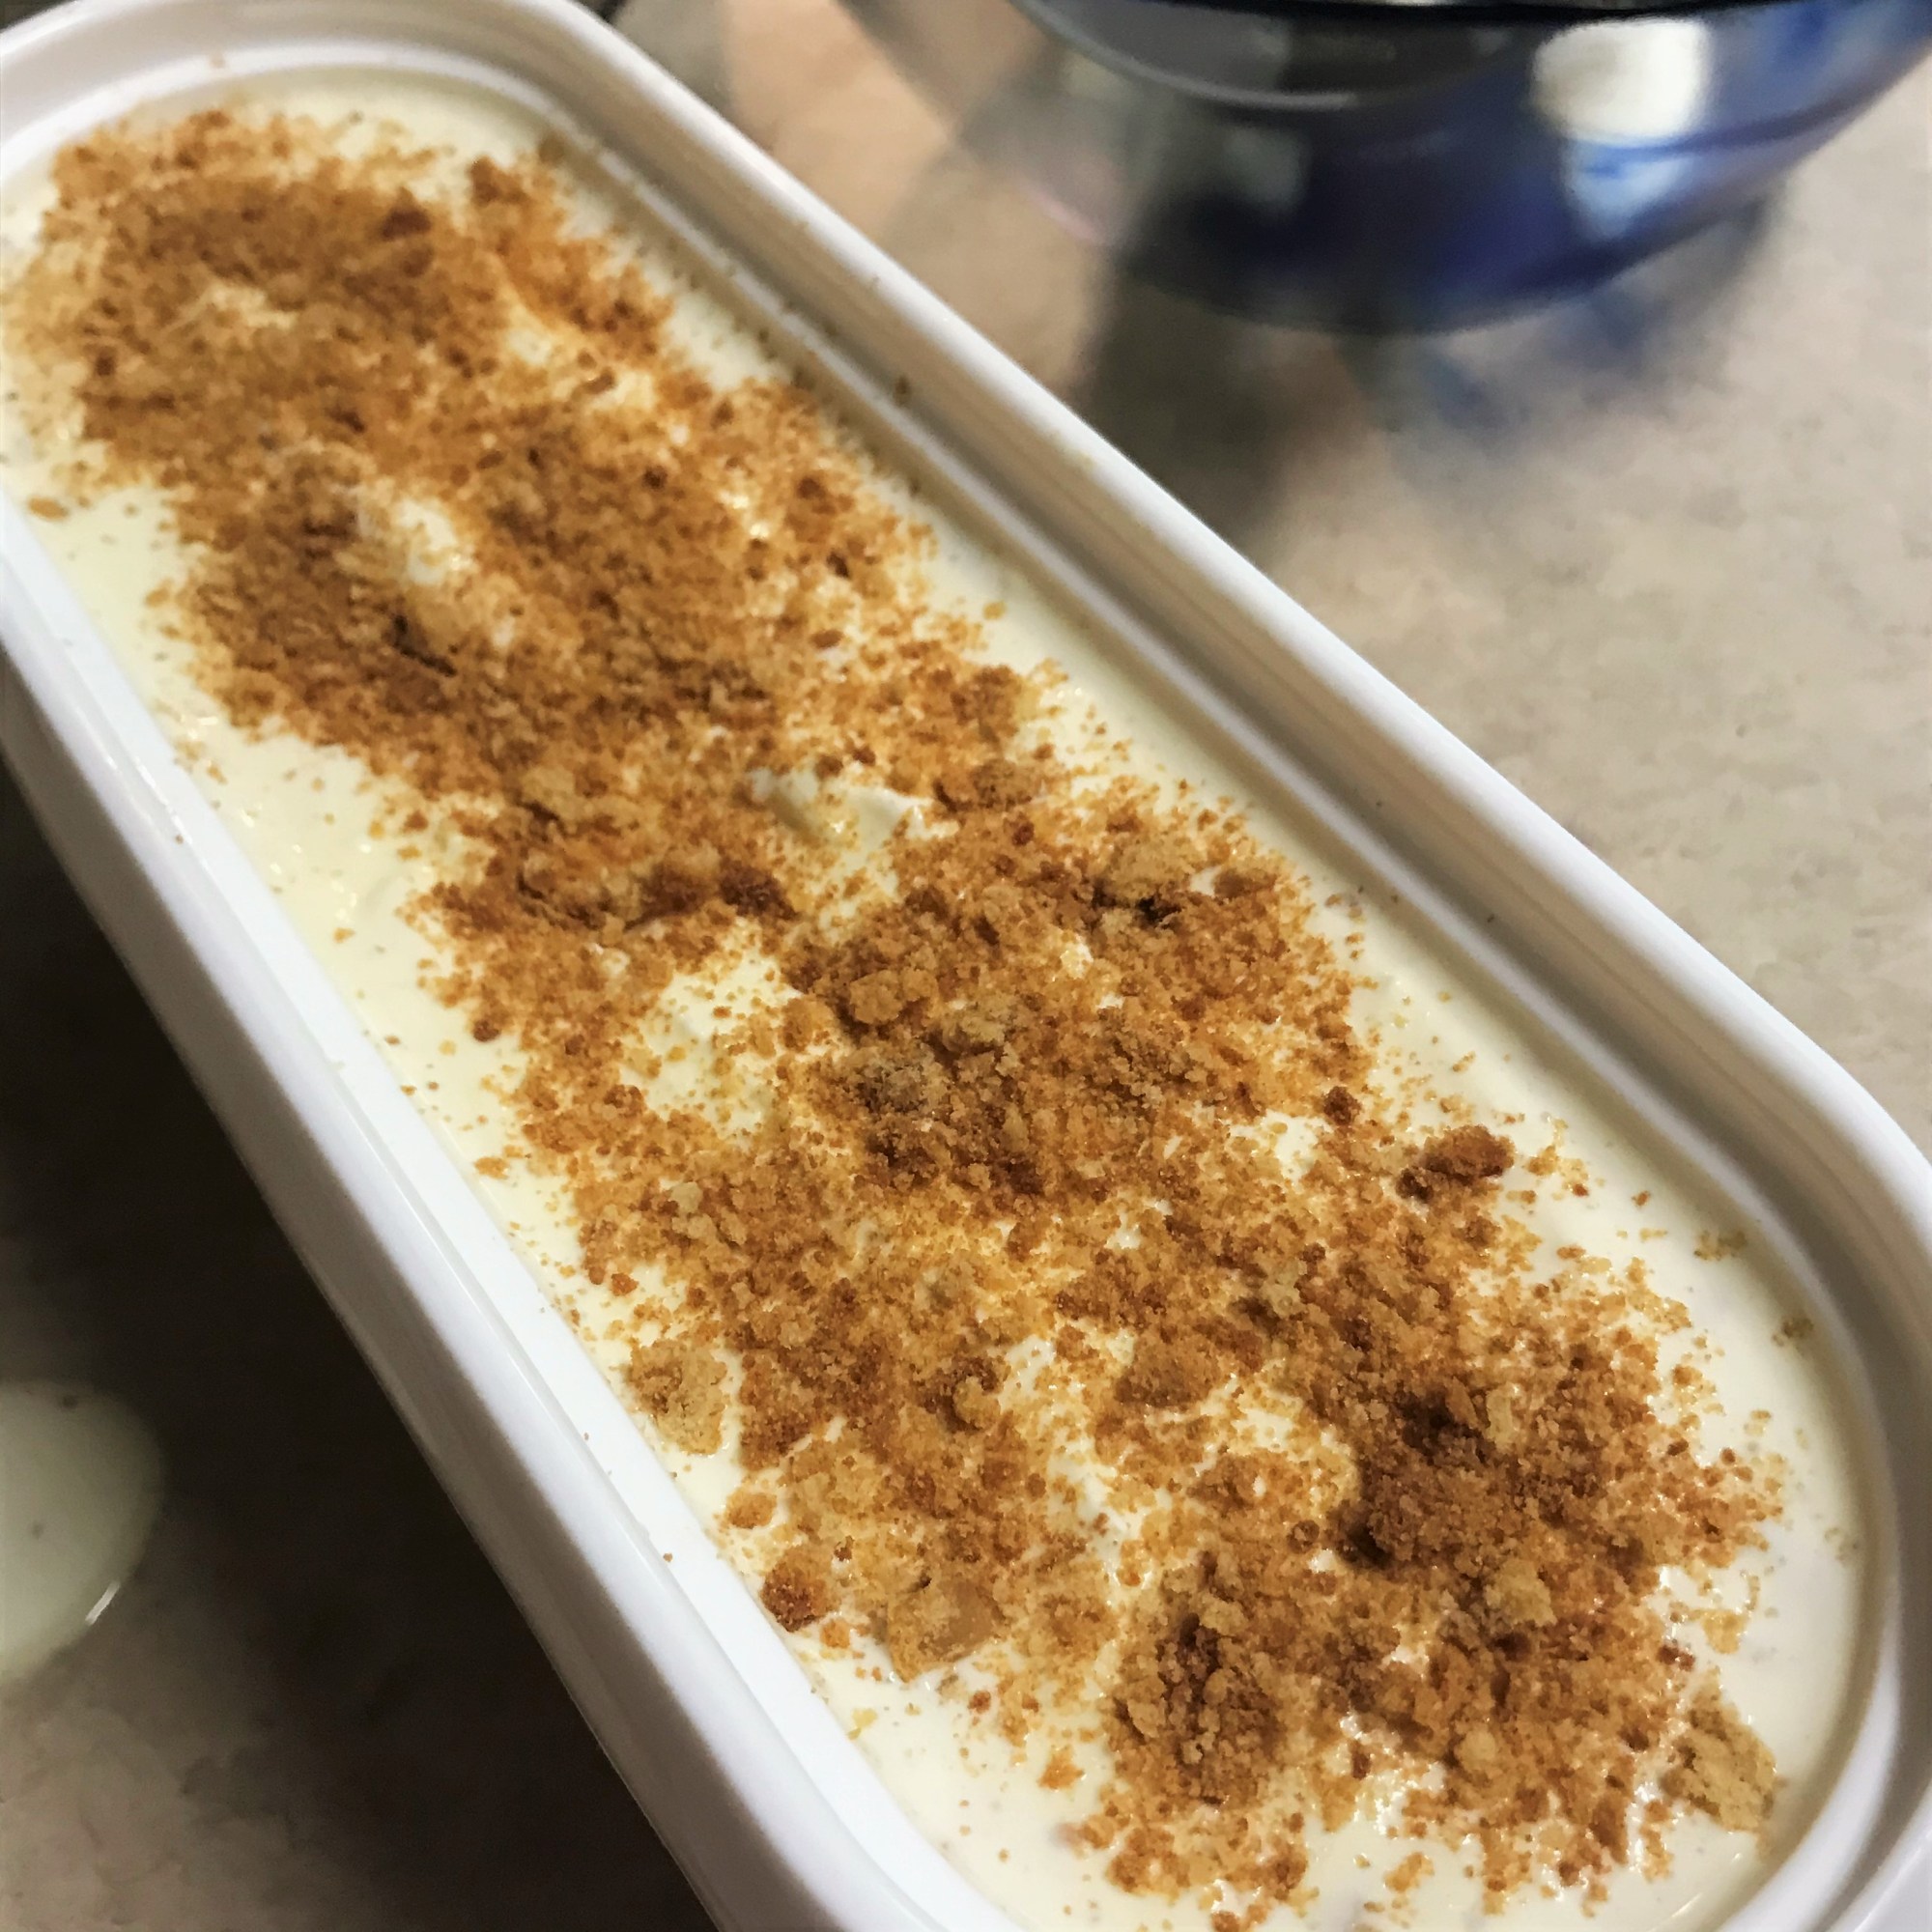
Press whatever crumbs are leftover right into the top of the ice cream, then cover and move the container straight to the freezer.
Layer the ice cream in an insulated container, beginning with ice cream, then staggered layers of reduced syrup ribbon (if using) and graham crumbles. Finish with the leftover fine crumbs. Cover the container and freeze at least 4 hours until firm.
The strawberry syrup pushes this treat right over the top!
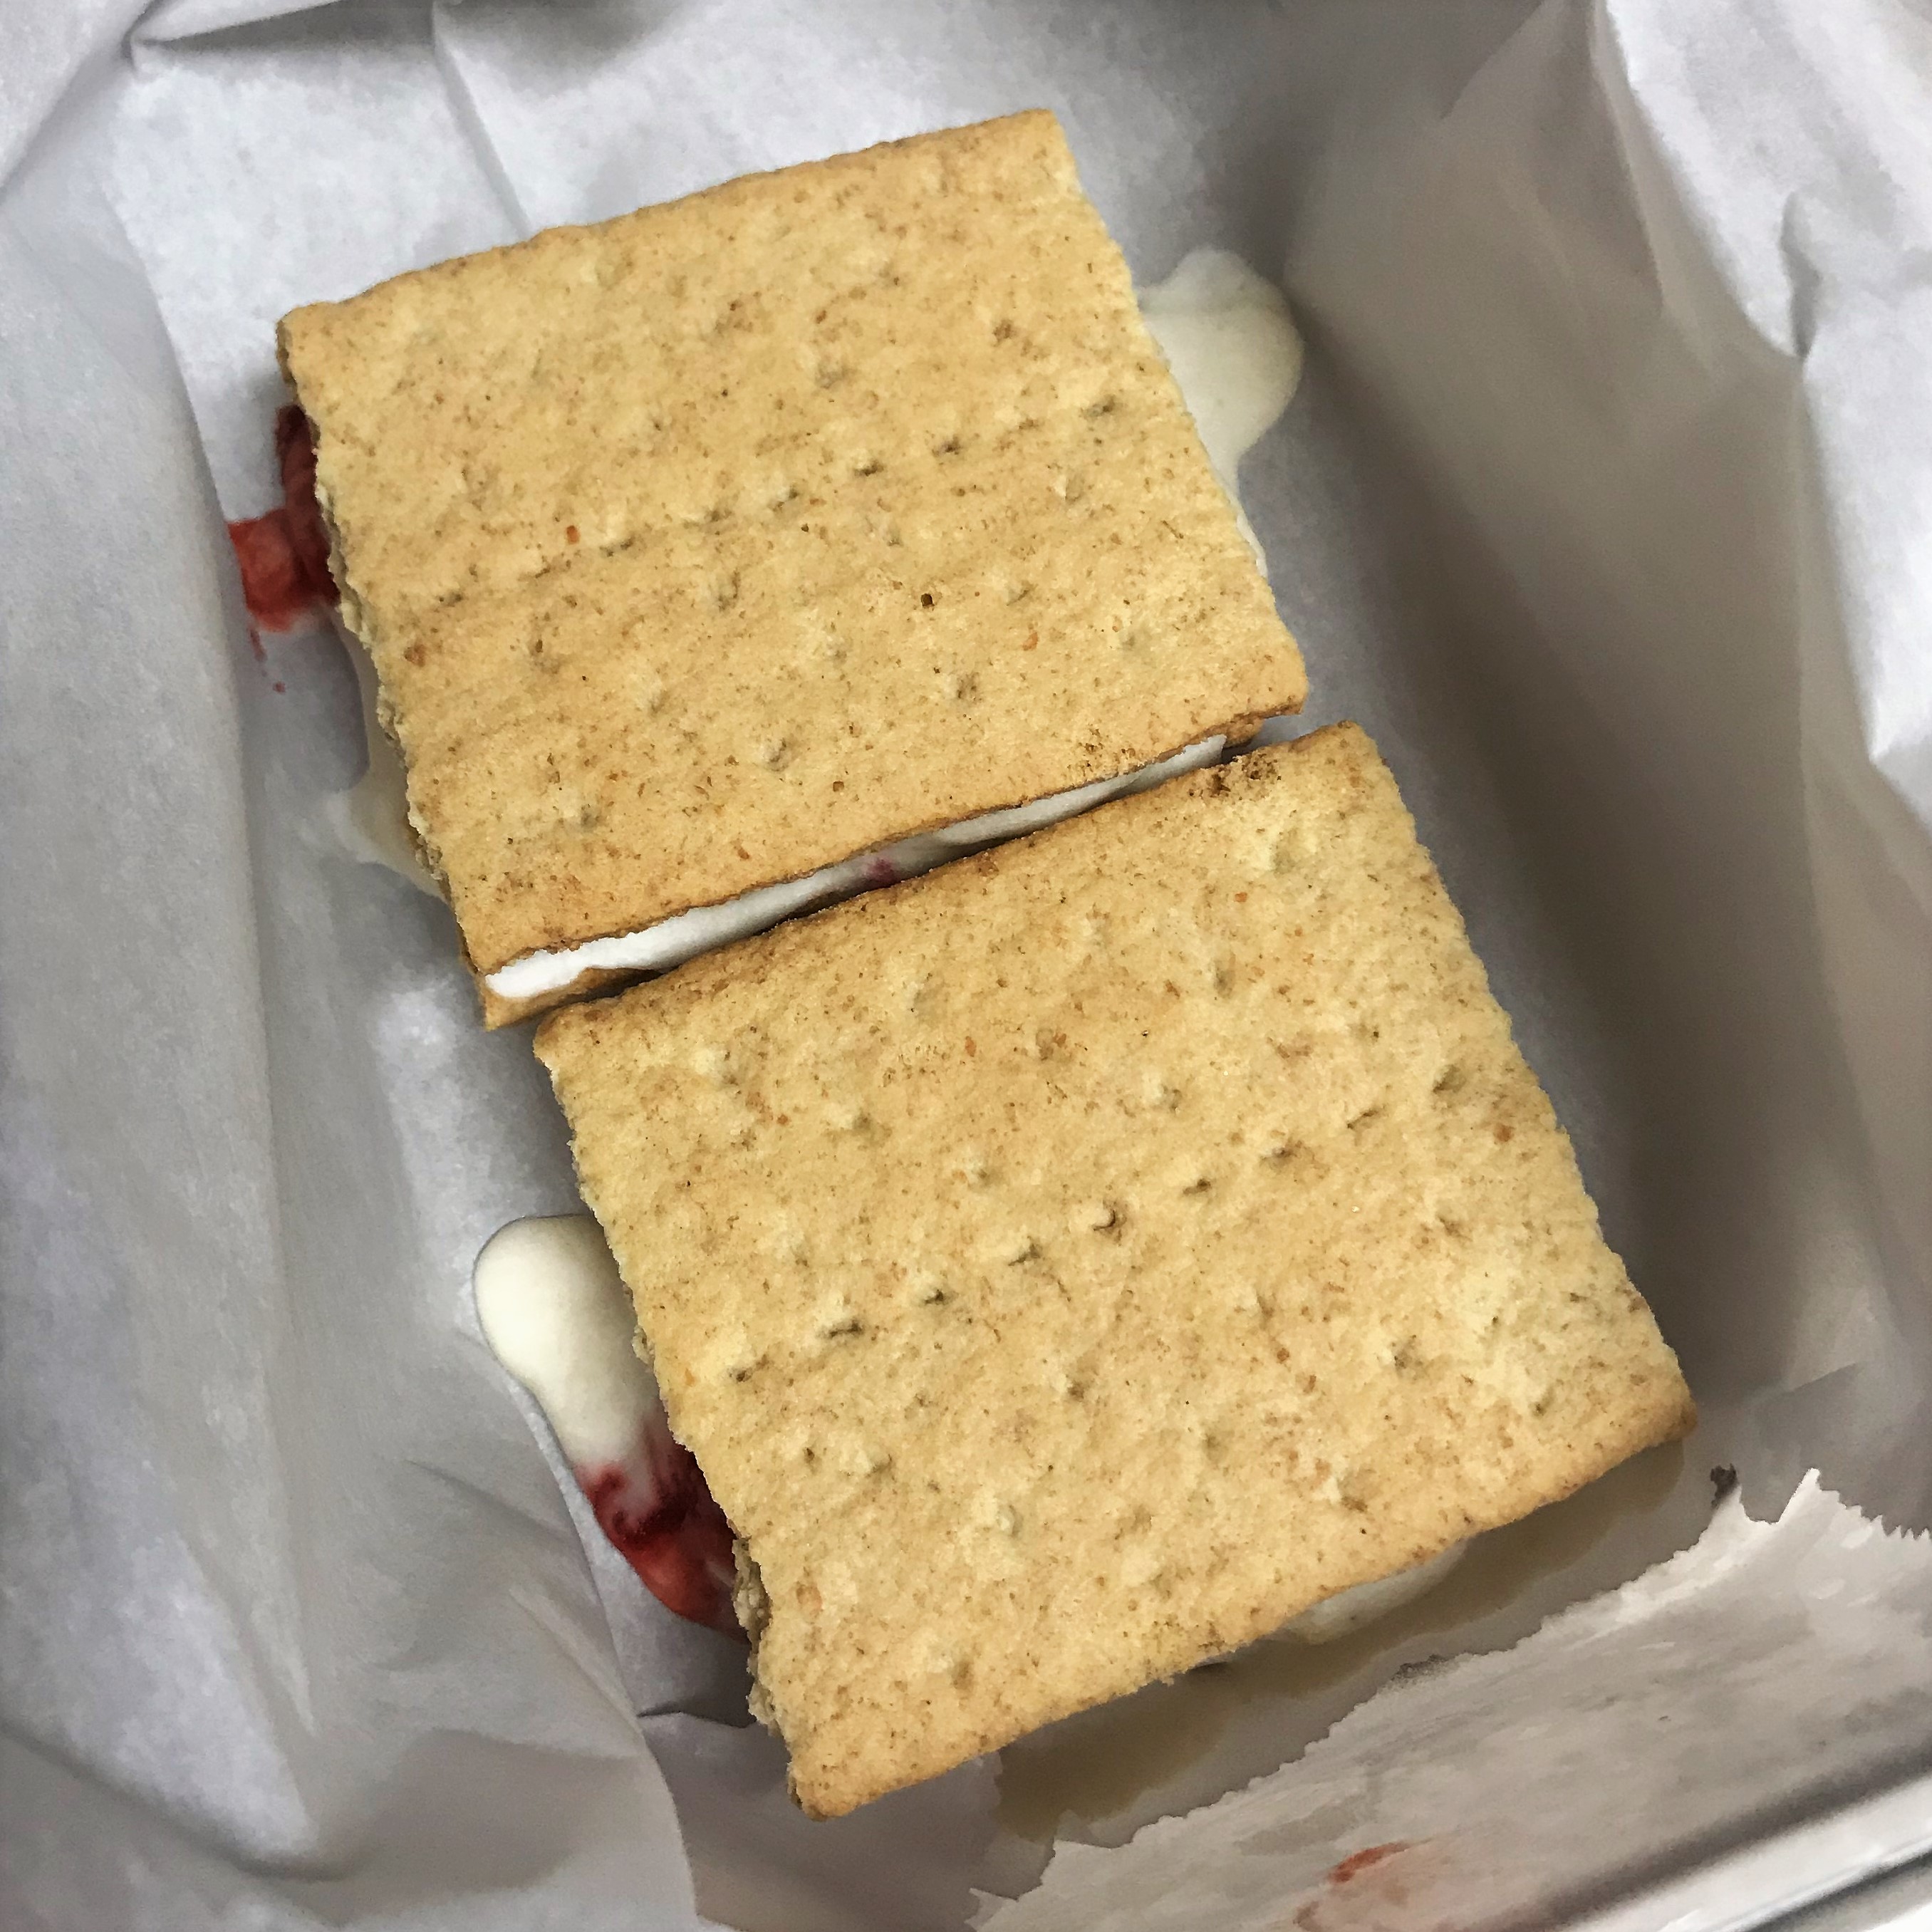
Just for fun, and because we had already licked the bowl, the spoon and the ice cream maker paddle, I gathered up the dregs that freeze hard to the freezer bowl and made miniature ice cream sandwiches with a couple of graham crackers. They were not the prettiest things, but it was a delicious taste test!
If there’s a better way to knock down a huge pile of peppers, I don’t what it is other than stuffing them with great flavors. Like you, I’ve had them the traditional way—with ground beef and rice, topped with tomato sauce. One of my go-to recipes through the years has been turkey stuffed peppers. But this time, my pepper purchase included a half dozen of these huge red beauties, and they have been begging me for something a little special.
Red bell peppers have so much going on. They are far sweeter than green bell peppers, packed with vitamin C (more than oranges, in fact) and well-suited to a number of terrific ethnic cuisines, including Italian, Asian, Spanish and, as we’re about to dive into today, Caribbean.
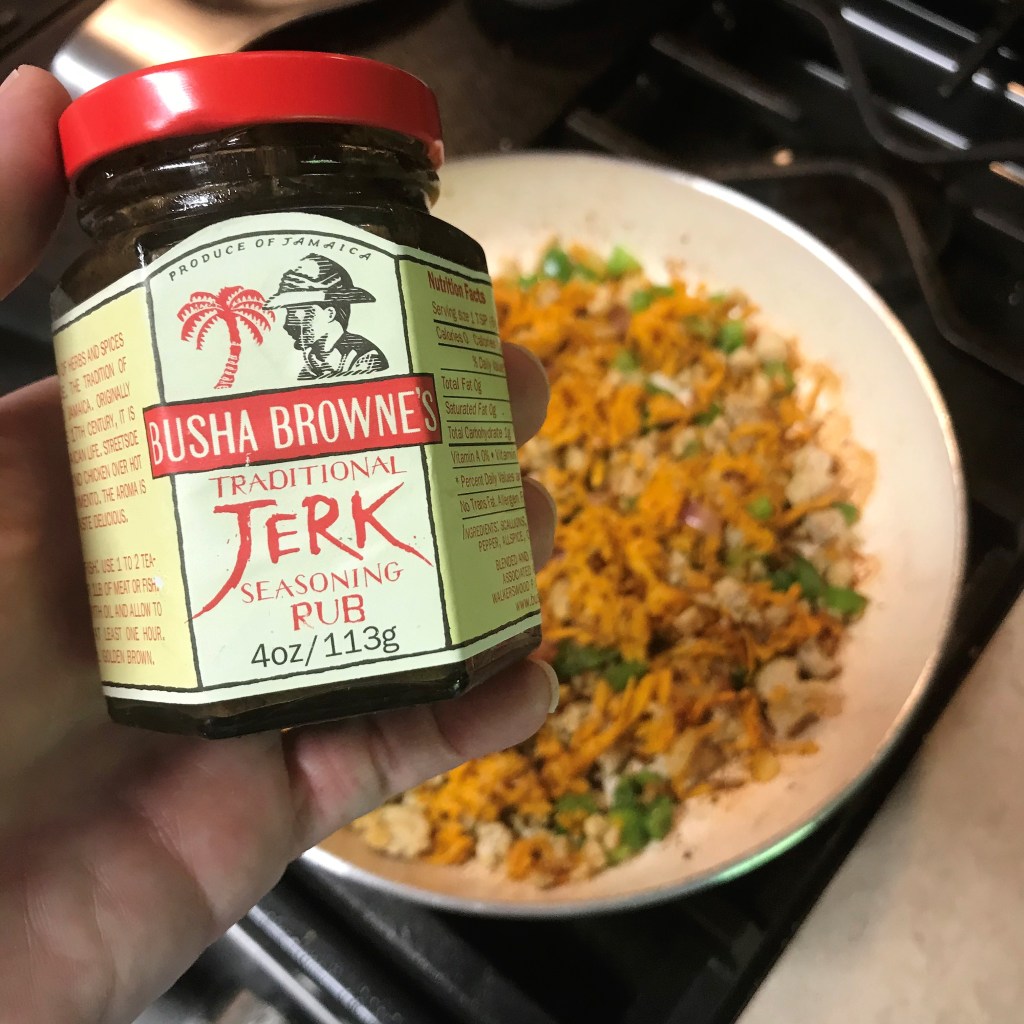
You don’t have to love spicy flavors to enjoy Jamaican jerk, but it certainly helps. A traditional jerk blend includes fresh thyme, allspice, scallions, a bunch of black pepper, ginger, nutmeg and a good dose of super-hot habanero pepper. But it’s not difficult to find a seasoning that backs off the habanero, and of course, you can always make your own from scratch.
This is the stuff, right here! Find it at Whole Foods, gourmet specialty stores or online.
This one happens to be my favorite, straight from Jamaica (as it should be) and packing plenty of heat. The brand is available at most Whole Foods stores or online. If your market doesn’t carry it, look for another with the aforementioned ingredients.
Another thing I love about the flavors in this recipe is that it’s very adaptable to vegan preferences. I’m always on the lookout for ways to make a recipe completely plant-based, because we never know when Les’s daughter may be free for a visit, and this one would be a snap. Just omit the chicken and double the sweet potato and black beans—done!
This recipe serves 2, double it up to feed a hungry family.
Ingredients
Extra virgin olive oil
1/2 lb. ground chicken
1 small red onion, chopped
1 medium raw sweet potato, shredded* (see notes)
1/2 can black beans, drained and rinsed
1/2 green bell pepper, chopped
1 Tbsp. Jamaican jerk seasoning*
2 large red bell peppers
*Notes
Shredding the sweet potatoes helps speed up the recipe because they cook so quickly. If you prefer, you could cut them into small cubes and give them a little more time to soften before adding the black beans. I used the food processor to shred them, but a box grater would also work.
The jerk seasoning I like is meant to be a rub for grilling or smoking, rather than an add-in, so it’s tipping the scale toward the sodium side. For this reason, no additional salt is mentioned in the recipe—the jerk seasoning has it covered. I always recommend examining the nutrition information on labels so you know what you’re getting into. If you use a dry jerk seasoning rub, it’s likely to have even more salt, so use your judgment and cut back to a lesser amount accordingly.
Instructions
Preheat oven to 350° F, with rack in the center.
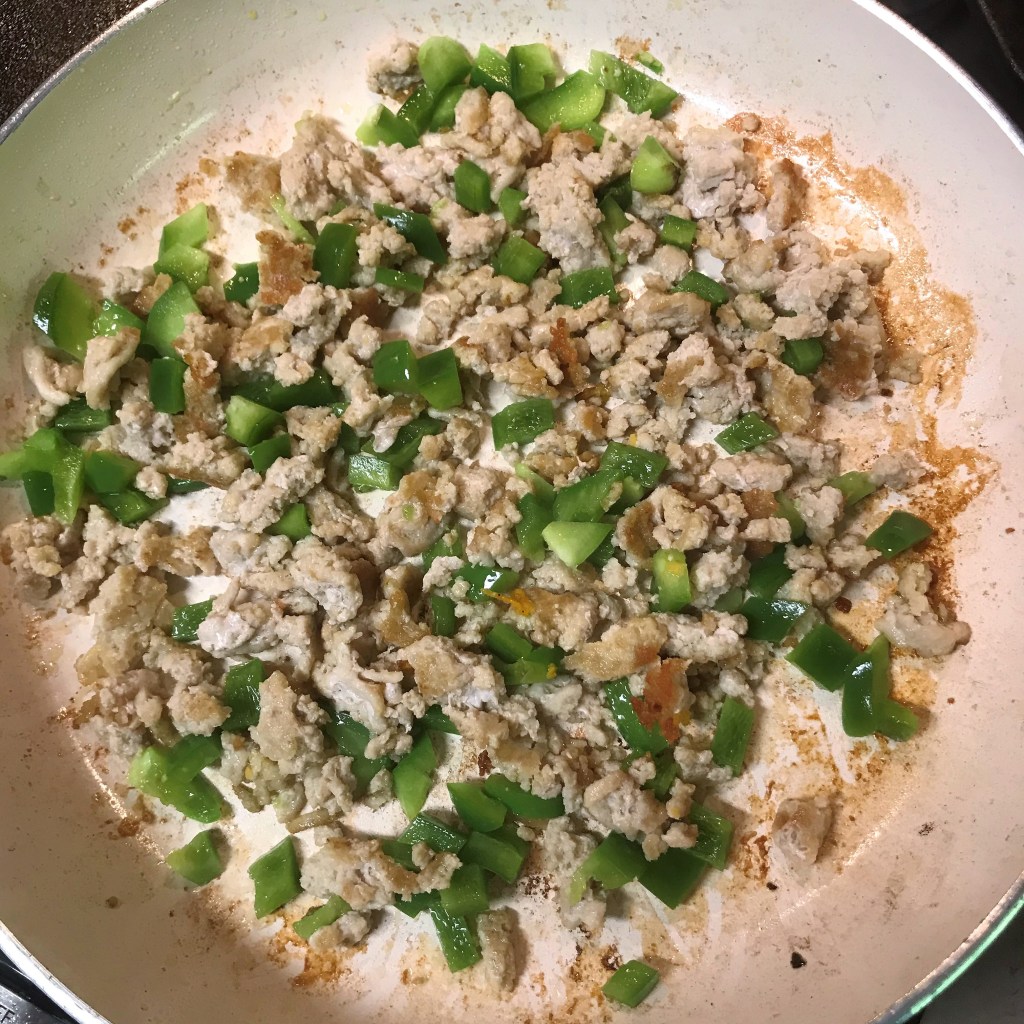
Heat a non-stick skillet over medium heat, swirl in olive oil and brown the ground chicken with the onion and green bell pepper. When chicken is no longer pink and vegetables are softened, add shredded sweet potato and black beans. Cook a few more minutes, until sweet potato is tender. Mix in the Jamaican jerk seasoning rub and stir to combine.
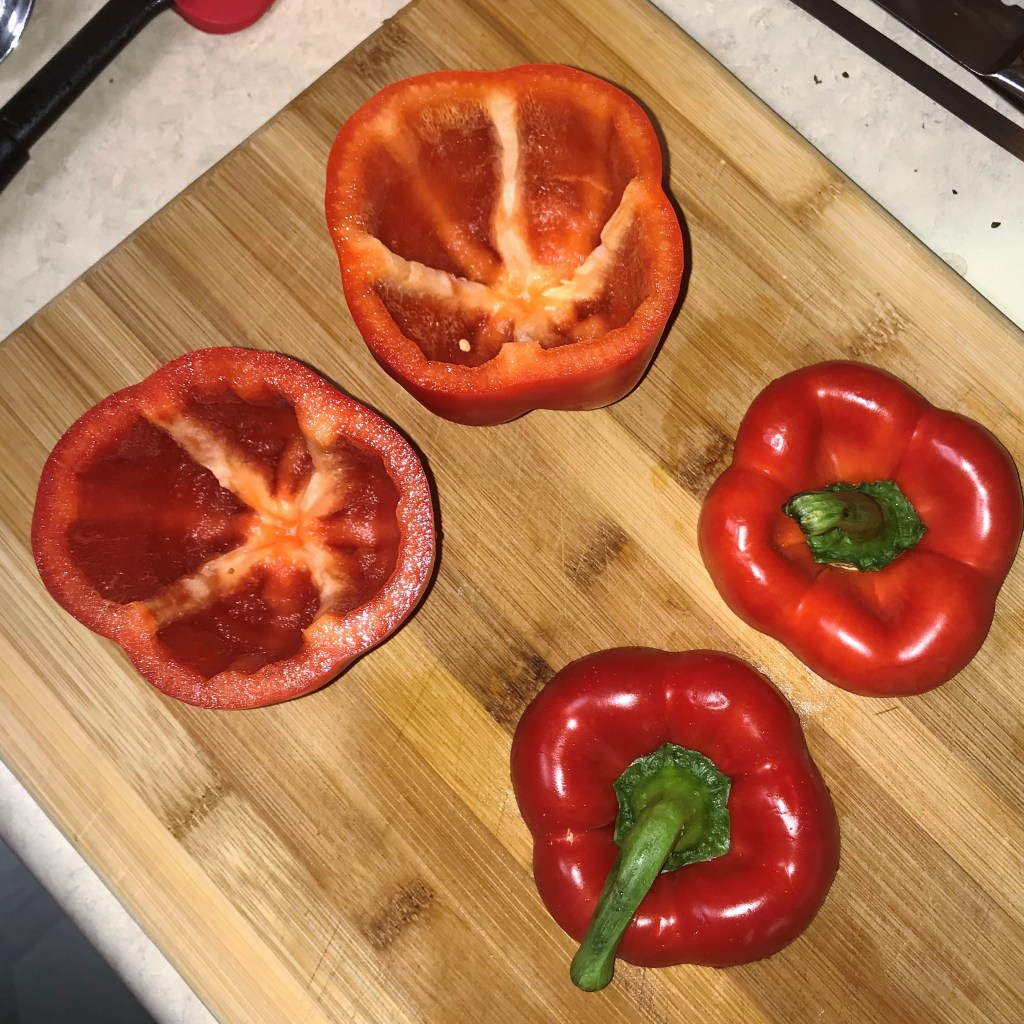
Prep the red bell peppers by cutting the tops just below the stem line. I like to replace the top during baking and presentation, so it helps to cut low enough to keep the stem intact. Use a paring knife to cut around the seed pod and remove seeds and membranes.
Soften the whole peppers by putting them upside-down in a microwave-safe dish with about 1/2” water (with the tops squeezed in the side), and microwave at full power about 2 minutes.
Fill peppers with jerk chicken mixture, replace tops and cover peppers tightly with foil. This will help retain moisture while the peppers bake for 35 to 40 minutes.
Cooking the chicken first ensures I can get a little bit of “crust” on the meat, to give extra flavor to the finished filling.
Shredded sweet potatoes add texture, fiber and flavor.
If you want to make this dish vegan, just omit the ground chicken and double the sweet potato and black beans.
Carefully cut the pepper just below the level of the stem, so you can use the tops in the final dish.
Softening the peppers in the microwave will save some time in the oven.
With the tops back in place, I’ll wrap these beauties up in foil to retain moisture during baking.
They’re spicy, fresh and satisfying, packed with plenty of nutrients. Serve the peppers piping hot, just as they are, or with your favorite island-inspired sides. This was a test run for me, and now that I know it’s a keeper, I’ll make some mango-scallion rice to go with it. Won’t that be pretty?
There’s so much flavor and nutrition packed into this dish. My husband feared he wouldn’t be able to finish his portion.
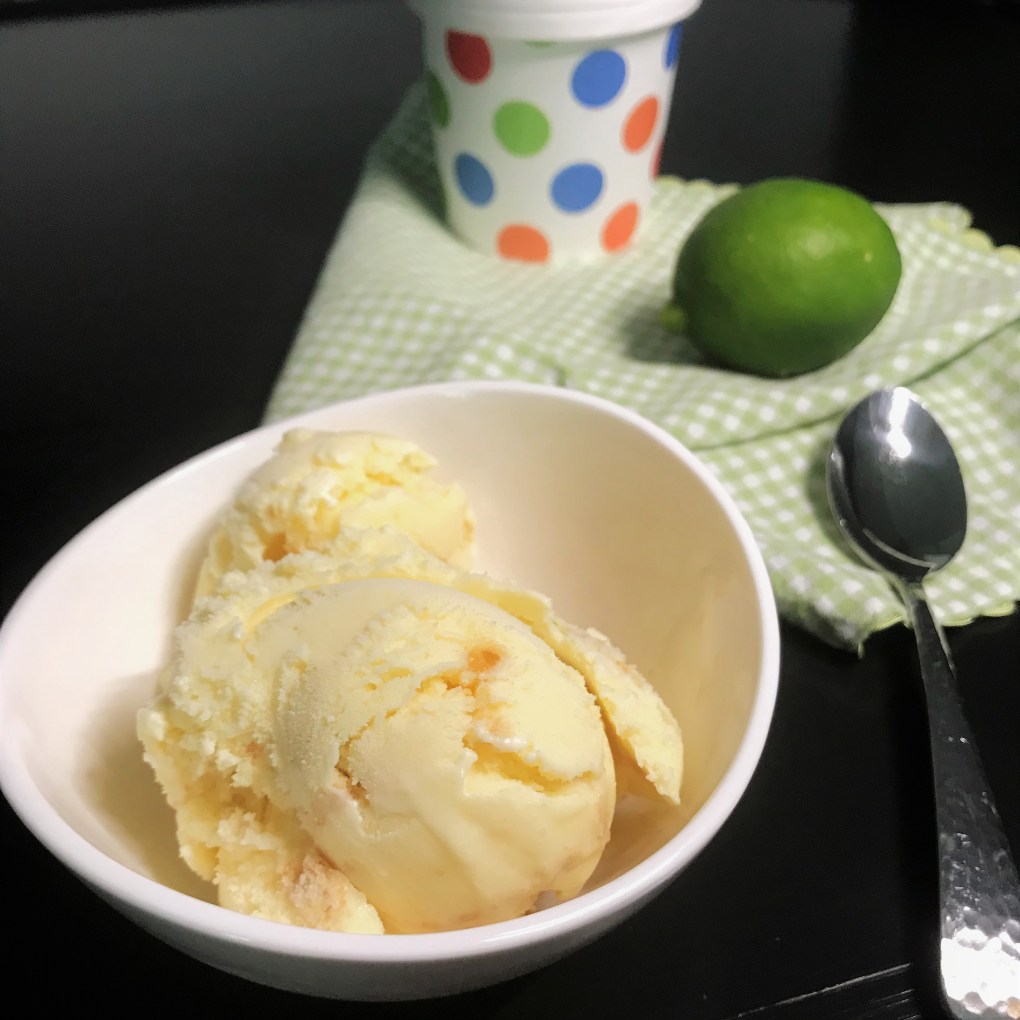
When the pandemic eases and we finally decide travel is safe again, Key West, Florida is one of the first trips I’d like to make. I’ve only been to this magical place twice in my life, but I cannot shake the memories of the uber laid-back lifestyle, the six-toed Hemingway cats, the ease of meeting strangers, the quirky street art and performers, the incredible freshness of seafood straight off the fishing boats, and, of course, the perfectly sweet-tart flavor of key lime pie.
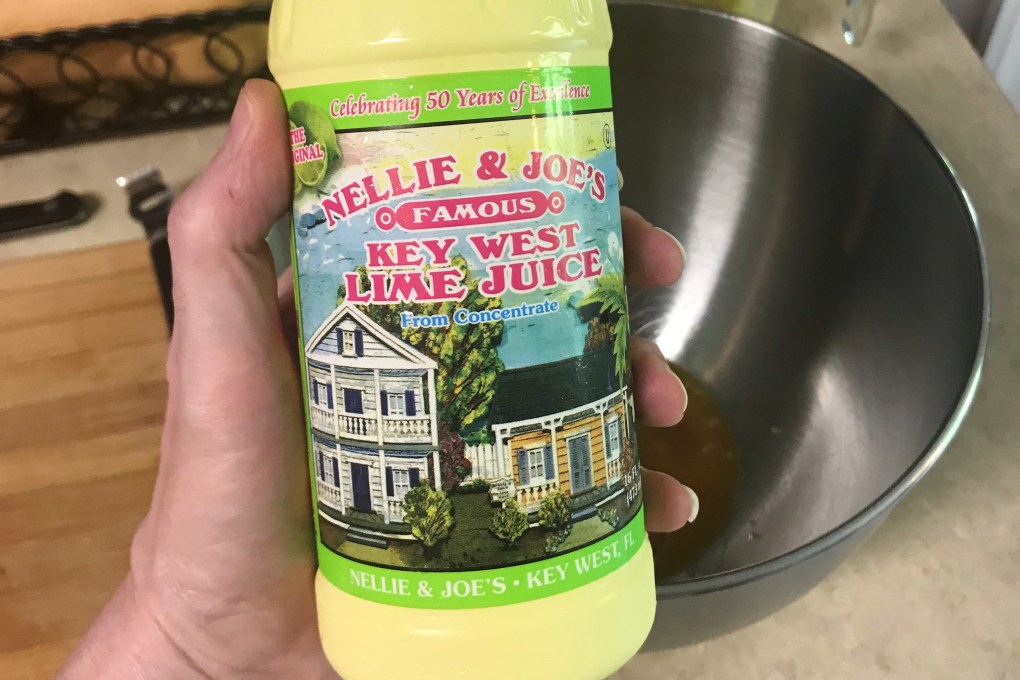
This southernmost U.S. treat is adaptable to so many things I love—cookies, cocktails and this delightful frozen treat. For the most authentic flavor, purchase about 3 pounds of real key limes (good luck finding them) and start squeezing. You should be finished in a day or so. Or, better yet, just get your hands on a bottle of this:
This is the stuff! If you don’t find it in the juice aisle, check in the aisle with the cocktail mixers.
It comes from Pompano Beach, just a few hours up U.S. Route 1 from its birthplace, Key West, and it’s been the standard for key lime pie pretty much since the pie was invented (allegedly by the Borden company, maker of sweetened condensed milk). I always have a bottle of this juice in the fridge, and I’ve used it in everything from pie to cocktails to ceviche. It’s fantastic.
This ice cream makes me happy on so many levels, I don’t know where to begin. The custard base makes it super creamy, the authentic key lime gives it a perfect balance of tart with sweet, and the layers of ginger cookies punctuate the whole thing with exactly the right amount of texture and spice. Oh my goodness.
Ingredients
2 cups whole milk
1 1/2 cups heavy cream
1 cup cane sugar, divided
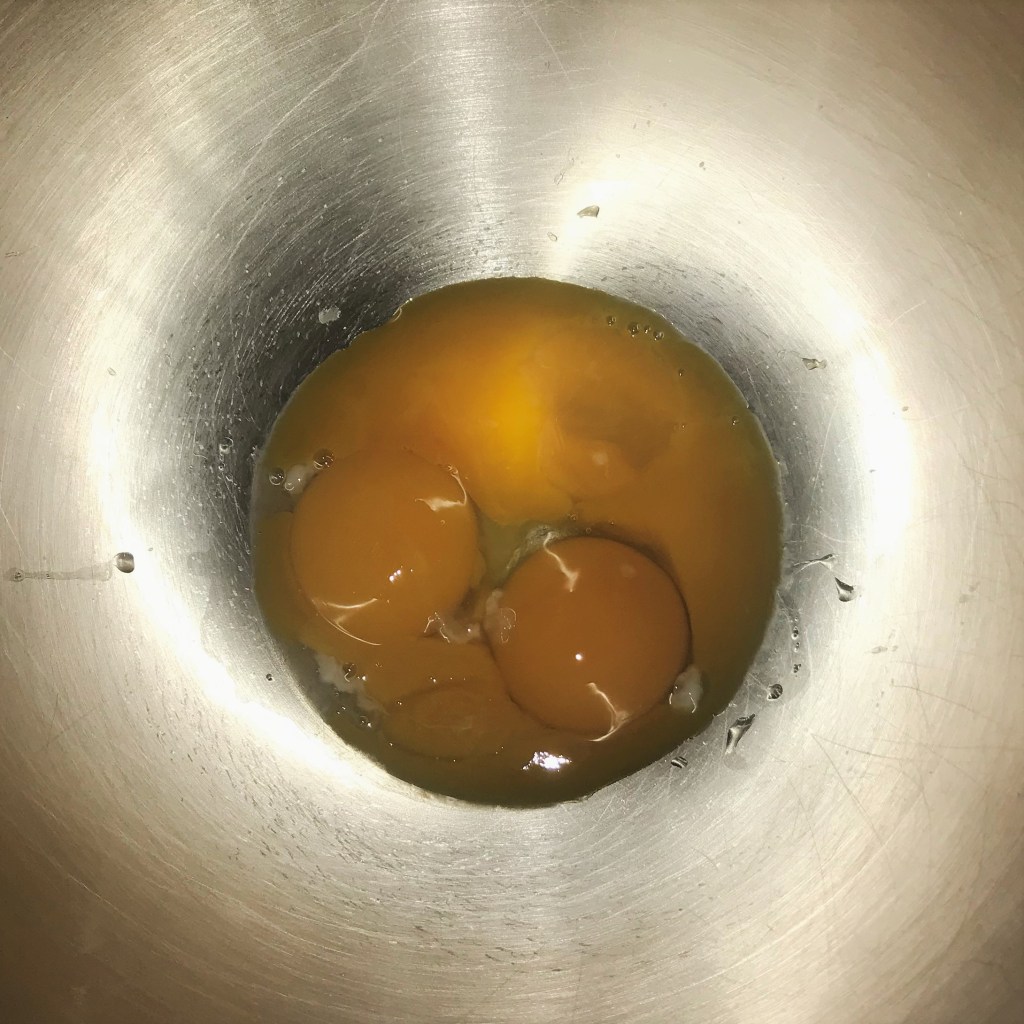
4 egg yolks, room temperature (preferably free-range)
1/2 cup key lime juice* (see notes)
1/4 tsp. Fiori di Sicilia* (optional, but adds a “special something”)
Zest of 1/2 lime (optional, add at the very end)
2/3 cup crushed ginger snap cookies*
*Notes
I’ve never bothered with squeezing the fresh key limes, partly because they are so expensive, and partly because I have imagined it would take the better part of an hour to squeeze so many. Key limes are about 1/3 the size of the typical Persian limes you see in the market. The great news is you don’t have to have fresh limes to make a delicious pie—as long as you have the real deal key lime juice. Look for Nellie and Joe’s brand in the juice section of your supermarket. Or maybe even in the cocktail mixers section.
Fiori di Sicilia is the same ingredient I mentioned for the Southern Belle Lemon Bars, part of the Kentucky Derby Preview Party collection of recipes a couple of months ago. It’s a unique Italian extract, imparting flavors of bright citrus and a hint of vanilla. A little goes a long way, so use it sparingly. Find Fiori di Sicilia in specialty stores such as Sur la Table, or online from King Arthur Flour.
You guys already know that I can’t leave well enough alone when it comes to food, and this ice cream is no exception. A classic key lime pie sits on a graham cracker crust base, but Comfort du Jour is all about twisting and turning to elevate your happy, so my pie (and this ice cream) has ginger snap cookies rather than graham crackers. The zippy flavor of ginger plays so nicely with anything citrus, I just have to. We are big fans of the Trader Joe’s “triple ginger” cookie, and I used about 12 of them in this ice cream recipe.
Instructions
Heat milk and heavy cream over medium heat in a heavy bottomed saucepan until steaming but do not allow it to boil. Reduce heat to low, add about half the sugar (this doesn’t have to be exact—just eyeball it) and whisk until completely dissolved. Turn off the heat.
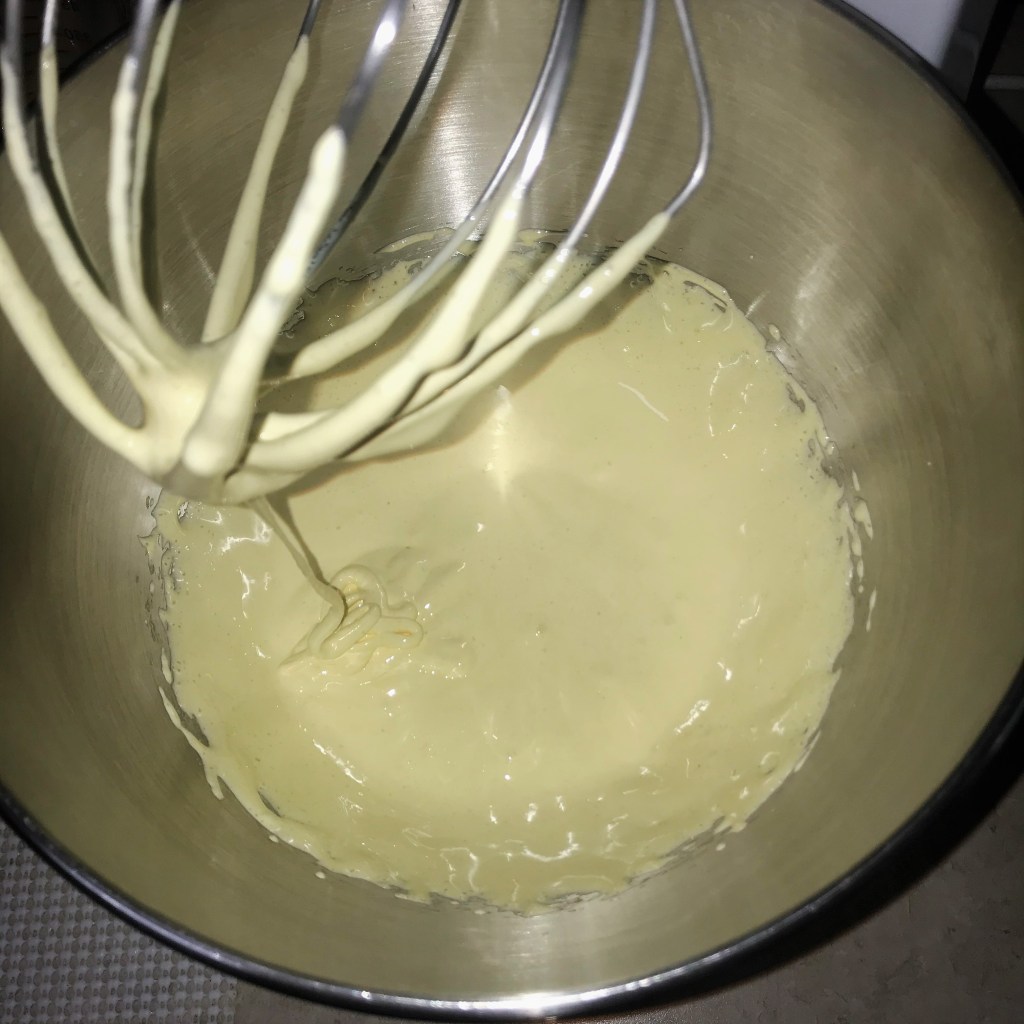
In a mixing bowl, whisk egg yolks together with remainder of sugar until light, fluffy and pale yellow.
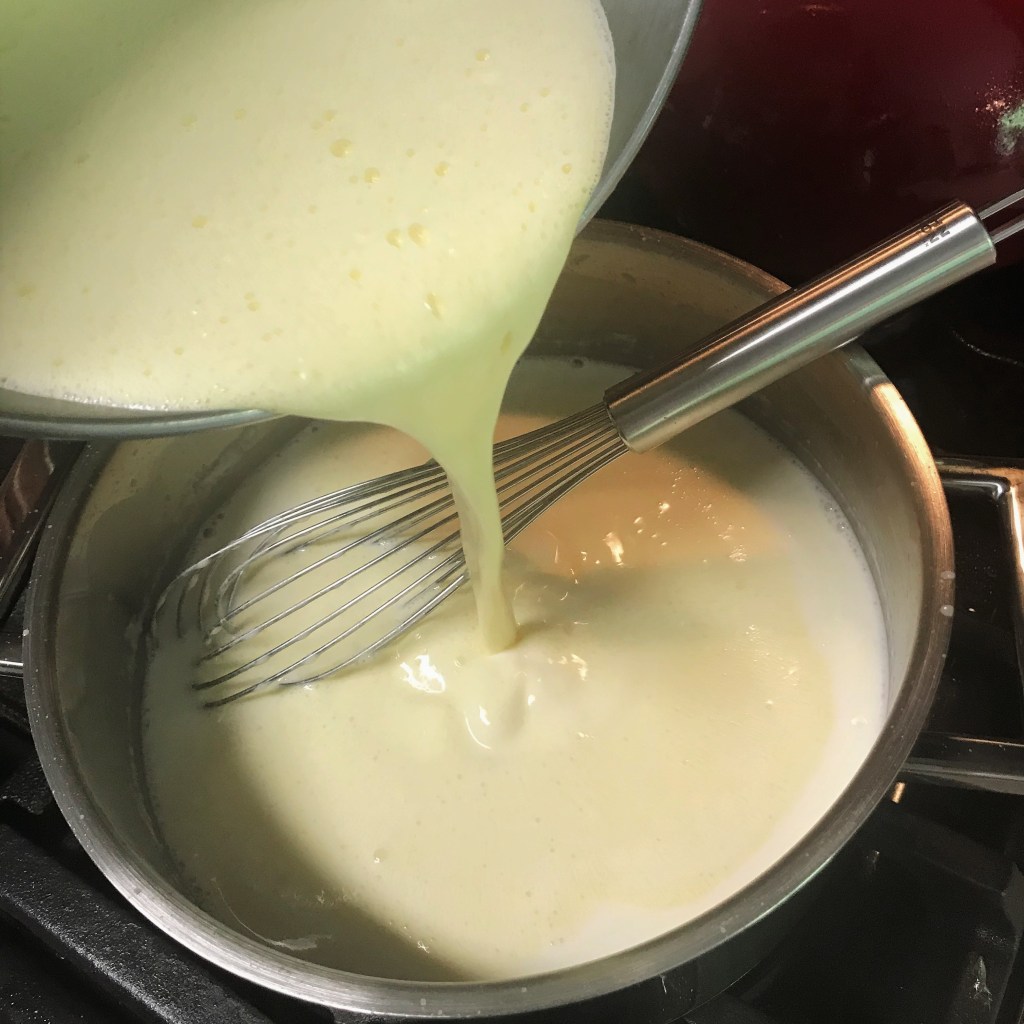
Ladle out about 1 1/2 cups of the hot milk mixture into a measuring cup with a pour spout. Very slowly, stream milk mixture into the eggs, whisking constantly. This step is “tempering” the eggs, so that they can be incorporated into the milk mixture without turning to scrambled eggs. Take your time here.
Turn the heat back on low under the milk/cream mixture still on the stove, then pour the tempered egg mixture back into the pot. Combine with the remaining cream mixture and cook over low heat, stirring constantly, until mixture is thick enough to keep its shape on the back of the spoon. This should take about 7 minutes, but the simplest marker for doneness is the spoon test.
I can’t get over the gorgeous color of these free range yolks! Separate the eggs while they’re cold, but let the yolks come to room temp before you make the custard.
The yolk-sugar mixture should be light, fluffy and lemon colored before you add the hot milk.
Let the mixer run on low while you slowly pour the hot milk mixture into the yolks. This step is called “tempering,'” and you don’t want to rush it.
When the hot milk has been fully incorporated into the yolk mixture, pour it back into the pan with the remaining milk-cream, and cook until custard is finished.
Check the back of your spoon frequently to see if the custard is holding its shape. It’s close here, but not quite.
Done! When the custard reaches this point, remove it from heat and proceed with the recipe.
Placing the plastic wrap directly on the custard prevents condensation that would cause crystals to form in your ice cream. Cover the entire bowl again, and refrigerate overnight.
Remove from heat. Pour custard into a large bowl. Add key lime juice and Fiori di Sicilia and whisk gently to combine. Place heavy plastic wrap directly on top of custard mixture. Cover entire bowl with another layer of plastic wrap or a fitted lid and refrigerate overnight.
Set your ginger snap cookies out overnight to get “stale.” They’ll soften a bit, which will make them easier to crush tomorrow.
Next day:
Stir or gently whisk chilled mixture thoroughly to reincorporate ingredients, then freeze according to ice cream machine instructions (mine usually takes about 20 to 25 minutes).
While that’s going, prepare your lime zest (be sure to wash it first!), and gently crush the ginger snap cookies with a rolling pin. I wrapped them loosely in a piece of parchment and only pressed down on them with my rolling pin, first in one direction, then across the other. I want a few little shards of cookie mixed in with the crumbs.
In the last minute, add the lime zest and 1 Tbsp. neutral alcohol (such as vodka). The alcohol will not affect flavor but will improve the texture of the finished ice cream and make it easier to scoop for serving. Layer into an insulated ice cream container, alternating key lime custard mixture with the crushed ginger snap cookies. Try to stagger the position of the crumbs as you layer, so each scoop is perfectly marbled with the cookie flavor. Top with fine crumbs at the end. Cover and transfer container to freezer for several hours to ripen (firm).
I’ve found the texture of the ice cream best when it’s been in the freezer at least 24 hours. I like this ice cream au naturel, but feel free to top with whipped cream, as my husband does!
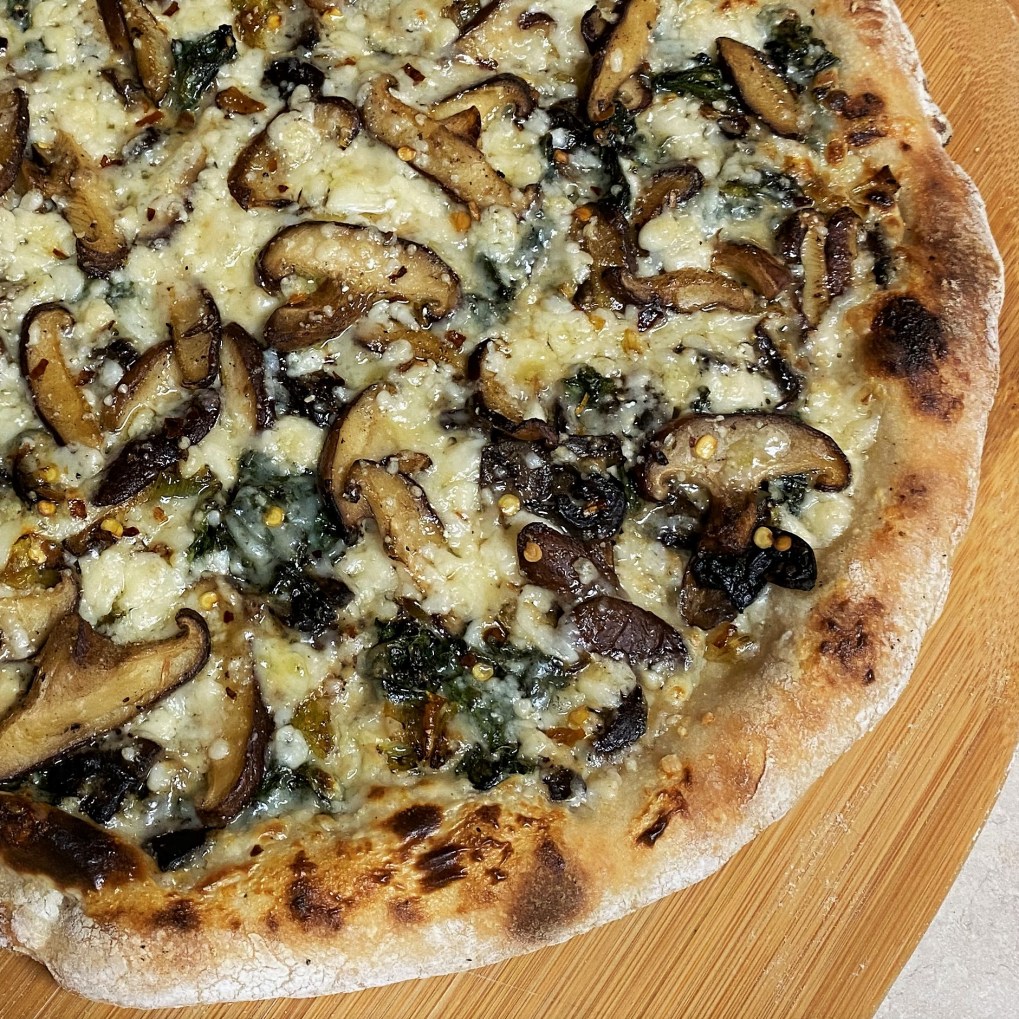
The savory, earthy flavors of this non-traditional pie will transform your ordinary pizza night into something far more elegant. The two different kinds of mushrooms provide a meaty texture in every bite, leeks and spinach add depth of flavor, and the trio of cheeses are in pleasantly sharp contrast to the creamy béchamel base.
I recommend prepping all the topping ingredients as much as a day ahead of time, as assembly of the pizza moves quickly and you won’t want to wait one extra minute for a bite of this!
Ingredients
1 Tbsp. butter
1 Tbsp. all-purpose flour
1/2 cup whole milk
Freshly grated nutmeg
Pinch white pepper
1 whole bulb roasted garlic
1 leek, cleaned and sliced thin (white and light green parts only)
4 oz. cremini mushrooms, cleaned, sliced and sautéed
8 oz. shiitake mushrooms, cleaned, sliced and sautéed
2 Tbsp. dry white wine (or dry vermouth, which is what I had open)
1 fat handful fresh baby spinach leaves
1/4 cup extra sharp white cheddar cheese (try Cabot’s “Seriously Sharp” or Trader Joe’s “Unexpected Cheddar”)
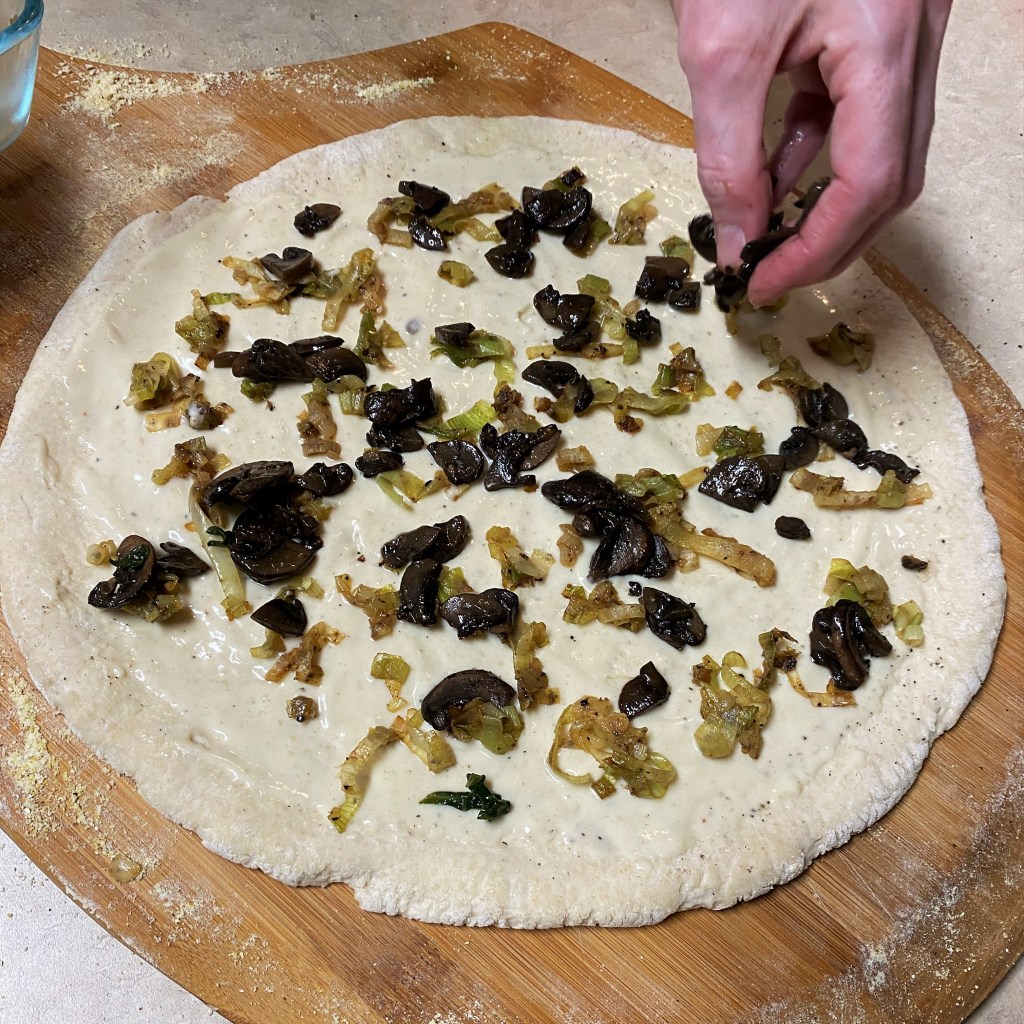
Make the béchamel by melting butter in a small skillet, then sprinkle in flour and cook until bubbly. Add the milk and whisk until smooth and thickened. Season with fresh nutmeg and white pepper. Squeeze entire bulb of roasted garlic into sauce and whisk until fully incorporated. Remove from heat and set aside to cool (or refrigerate until ready to make the pizza).
Place a large cast-iron skillet over medium heat, swirl in about 2 Tbsp. olive oil and sauté leeks until cooked down and lightly browned. Remove from heat. Sauté mushrooms in two batches, being careful not to crowd the pan. Add a small amount of additional olive oil if needed. When all mushrooms are finished, remove them to a bowl, then de-glaze the skillet with wine or vermouth and scrape up all the browned bits. When liquid is almost fully evaporated, add spinach leaves and cook until wilted.
Shape pizza dough into a 12- to 14-inch disk. Remember how we do this?
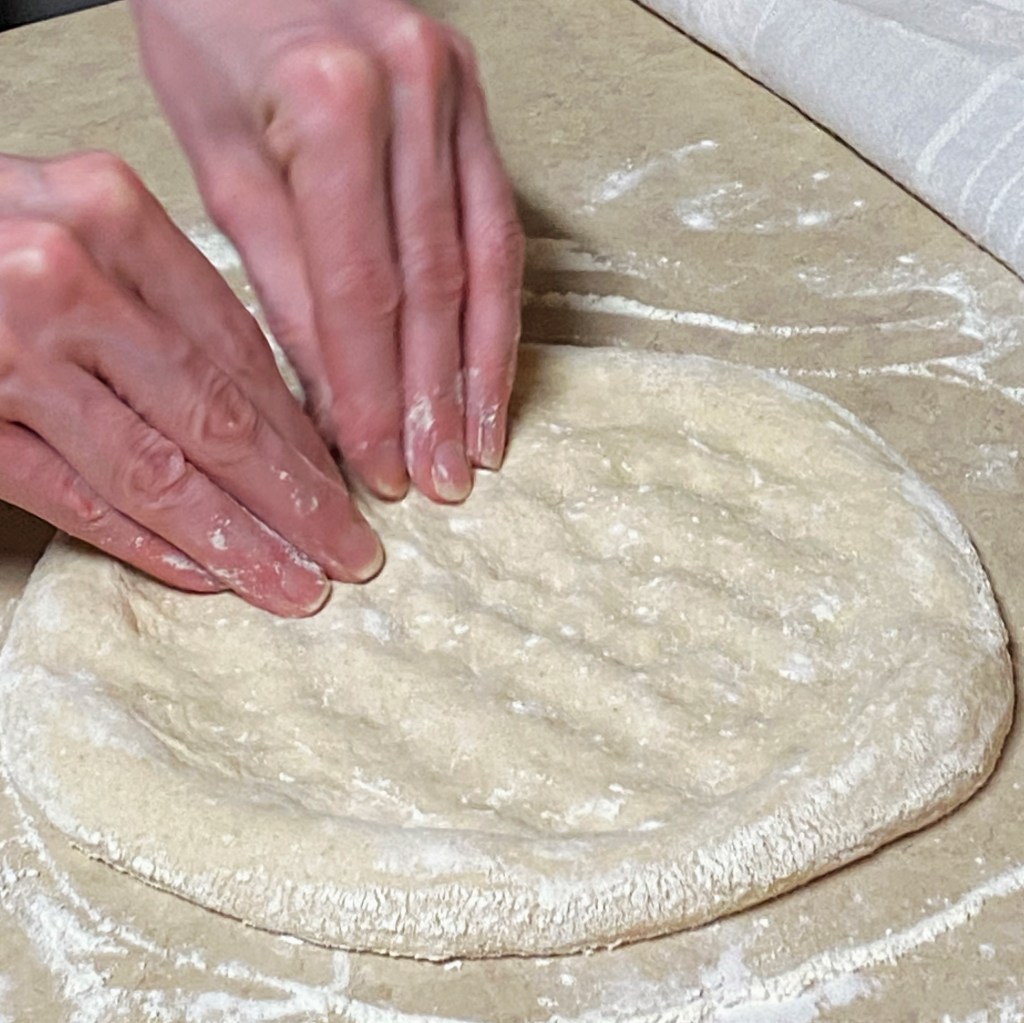
Press gently to create a “lip,” making quarter turns with the dough all the way around.
Use your finger tips to “tap” the dough straight down the center. This stretches the dough while keeping air pockets inside.
Gently turn the dough over, and repeat the pressing steps on the second side.
Rub flour into the wooden peel, then dust generously with cornmeal before placing the dough on it. These makes it easier to slide into the oven after topping.
The roasted garlic bechamel is almost invisible on the dough, but it provides a perfect creamy base for these savory toppings.
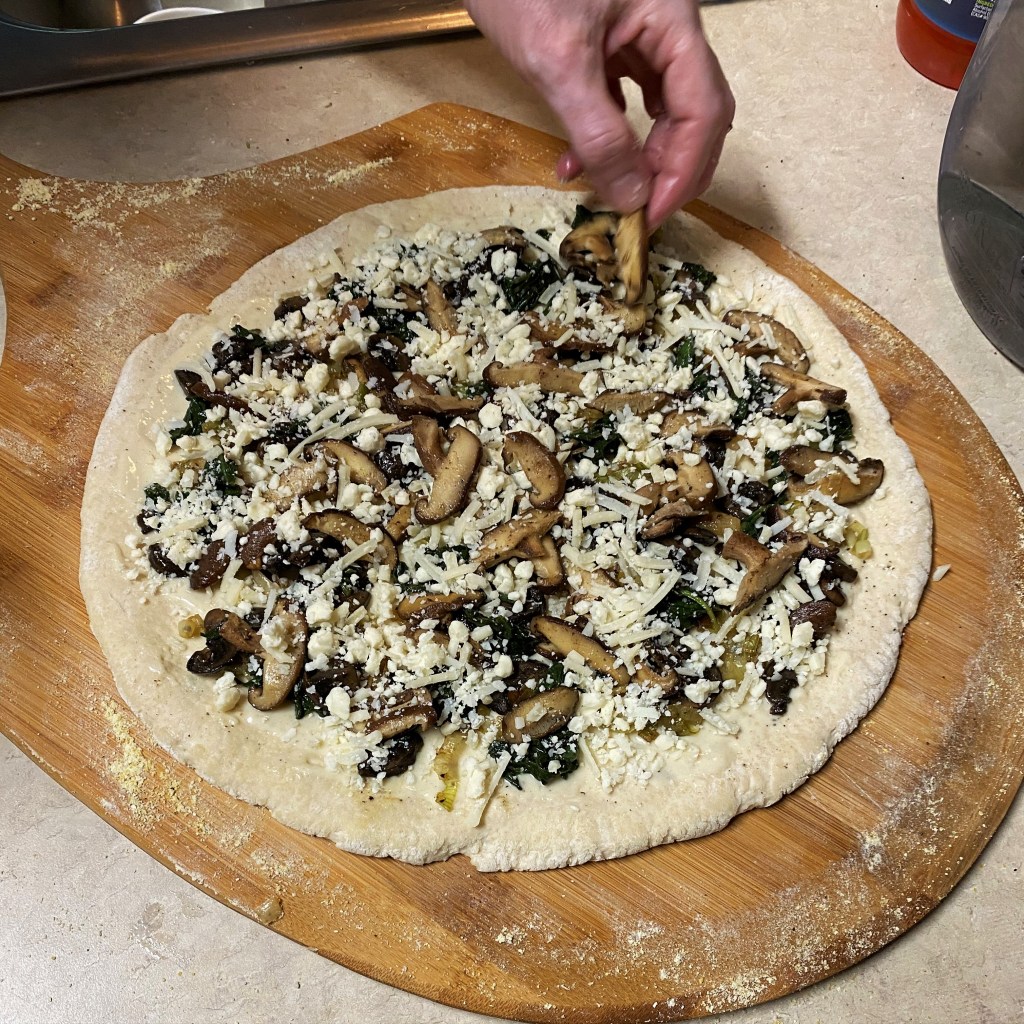
We usually put all the cheese on last, but for this one, we reserved a few of the shiitake mushrooms for last, just for looks.
Drizzle or brush the dough with olive oil and season with salt and pepper. Carefully spread the roasted garlic béchamel onto the dough, and spread it out to within 1/2” of the edges. Distribute leeks, cremini mushrooms, spinach and shiitake mushrooms onto the pie, then scatter all cheeses evenly over the top. Add a quick shake of crushed red pepper, and slide it onto a steel in a 550° F oven for about 8 minutes, until crust is golden brown and cheese is bubbly.
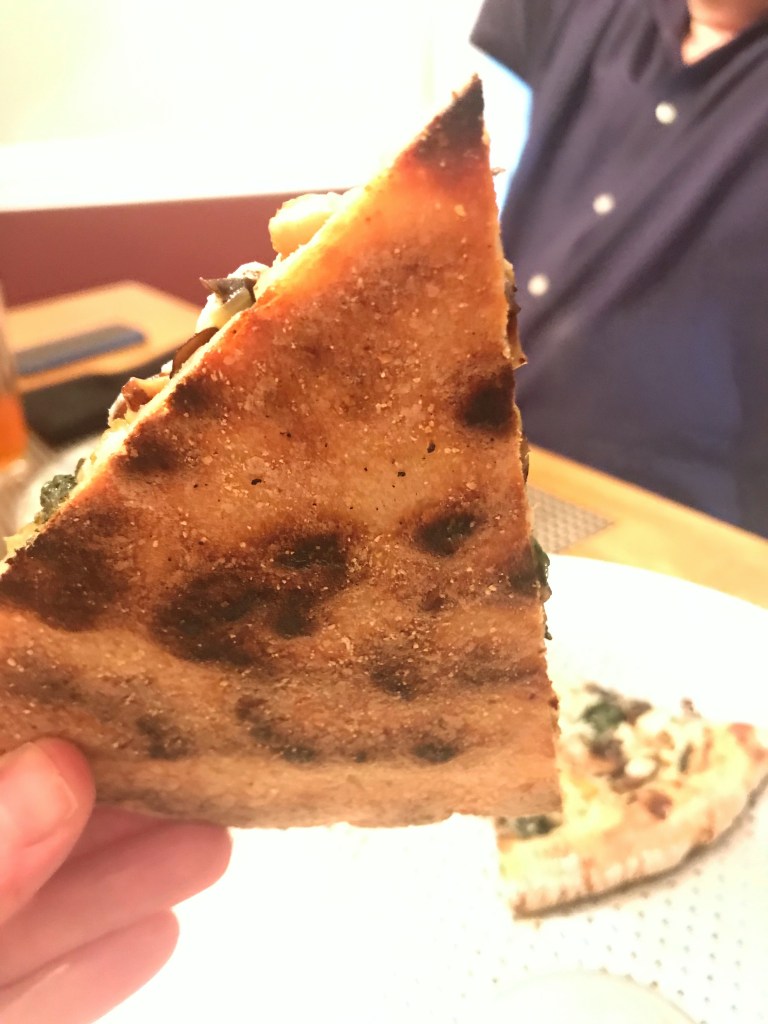
This pie is earthy and savory, and not missing a thing. But if you wanted to add crumbled cooked bacon? Who am I to judge?
For baking on a pizza stone, follow manufacturer’s instructions regarding maximum temperature. Some stones will crack or break at higher temperatures. For baking on a pizza pan, lightly grease the pan before placing dough on it, and bake in the lower third section of your oven for a few minutes longer than recommended in the above recipe. We do all our pizzas on a baking steel by Dough-Joe, and it is the best thing that has ever happened to our homemade pies.
The crust is perfectly crisp, and you can see the lovely char marks on the underside. Thank you, Dough-Joe!
Thanks to the classic Brady Bunch episode in which young Peter tries to imitate Humphrey Bogart, I can hardly imagine eating pork chops without applesauce. My husband, Les, and I recently had an online happy hour with some friends in Raleigh and we were shocked to learn they had no recollection of the episode. Just in case you missed it as well, this should help provide a little context, and, in honor of Father’s Day, some good advice from one of America’s favorite TV dads about the importance of being yourself.
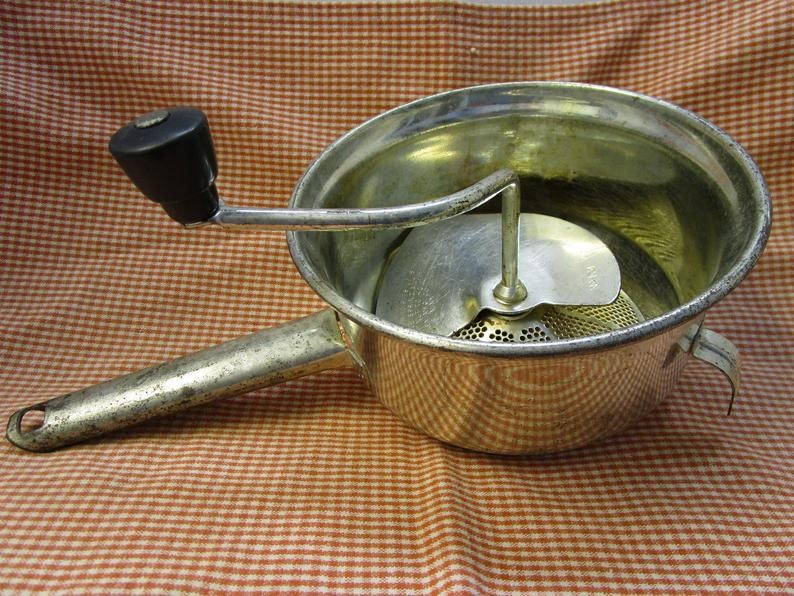
With or without the pop culture reference, there’s no question that pork chops and applesauce make a great combination. They were a frequent menu item at my grandmother’s house for Sunday supper. The applesauce was always homemade, as my grandparents had a small tree in the side yard that was prolific with small, greenish apples during the late summer. She’d send me and one of my cousins out there to pick up apples that had fallen, and she’d wash them and cut out any bad spots, then throw them into a pot—peels, cores, seeds and all. When they were cooked and tender, she’d scoop them into her Foley food mill and call in the kids to crank the handle. The food mill had a spiral blade that pressed the cooked apples through a mesh strainer, while keeping all the unwanted peels and parts behind. We’d sweeten it to taste and flavor it up with cinnamon, and it was just about the best thing ever. To this day, my cousin, Brad, and I are convinced that these adventures laid the groundwork for our passion for food.
I found this image on Etsy, and its very similar to the Foley food mill my Gram used to make her applesauce.
As much as I’d love to have Gram’s Foley food mill, I must admit that Les has found another really easy way to make homemade applesauce from scratch, and I’m grateful that he’s willing to make it several times a year on request. We always have some on our Thanksgiving table, and if we time it right, enough leftover to enjoy on latkes during Hanukkah. All you need is a slow cooker and a potato masher, and of course, fresh apples.
Gram usually did her pork chops in a cast iron skillet with a simple gravy, but I’m elevating them today with a quick and easy brine. We want to enjoy them on the grill, and the brine ensures the meat will stay moist and flavorful. I’ll top the chops with the easiest chutney you’ve ever heard of, and it really pulls the whole meal together.
Doesn’t this look schwell? 🙂
Ingredients – the pork chops
4 bone-in loin end pork chops
1 cup coarse kosher salt (do not use iodized table salt)
1 cup brown sugar
1 Tbsp. black peppercorns
1 Tbsp. dry mustard powder
2 cups apple cider vinegar
3 cups ice cubes
For chutney:
1 medium onion, halved and sliced lengthwise into crescent shapes
1 Tbsp. extra virgin olive oil
3 Tbsp. homemade applesauce
1 tsp. apple cider vinegar
Kosher salt and freshly cracked black pepper
The brine recipe has been my go-to since I first saw Alton Brown make it on Food Network. Brown sugar and dry mustard bring a terrific balance of sweet and savory. If you wanted to echo the apple flavor, you could swap in some apple juice or cider in place of some of the ice, but I usually use it exactly as ordered. Don’t brine your chops longer than two hours, or they will be too salty.
Instructions for brining
Heat the cider vinegar in a small sauce pan until hot.
In a large glass bowl, combine the salt, sugar, peppercorns and mustard powder. Pour in the vinegar and stir to dissolve the other ingredients. Give it 10 minutes to mingle the flavors, then add ice cubes and stir until they are melted. If brine isn’t completely cool, refrigerate before proceeding.
We ordered extra thick chops from our favorite local butcher, so we only used two. Use a heavy plate to help keep the chops submerged in the brine.
Place the pork chops in a gallon size zip top bag and pour the brine over them to cover completely. Squeeze out as much air as possible, seal the bag and refrigerate for two hours. I usually place the zip bag inside a container large enough to hold the brine, just in case the bag springs a leak (which is always possible when using bone-in meats). Turn the bag over halfway through brining time for more even flavoring.
Ingredients – the applesauce
9 large apples*, peeled, cored and cut into chunks
1/2 cup brown sugar (either light or dark)
Juice of 1/2 large lemon*
1 tsp. ground cinnamon
*Notes
Consider mixing together a few different varieties of apple, for more interesting flavor. Choose apples with a firm texture, such as Granny Smith, honeycrisp or fuji. Varieties with a “mealy” texture, such as red or golden delicious or McIntosh, are not the best for applesauce.
The lemon juice helps to prevent browning of the apples as they begin to cook and soften, and the acidity gives a nice tart balance to the sweetness of the applesauce. In a pinch, a couple teaspoons of bottled lemon juice can be substituted here, but fresh is always better because it’s pure and doesn’t contain weird preservatives.
Instructions
You’re going to love how easy this is!
Les always uses a blend of apple varieties for more interesting flavor. Be sure to cut off all the core bits.
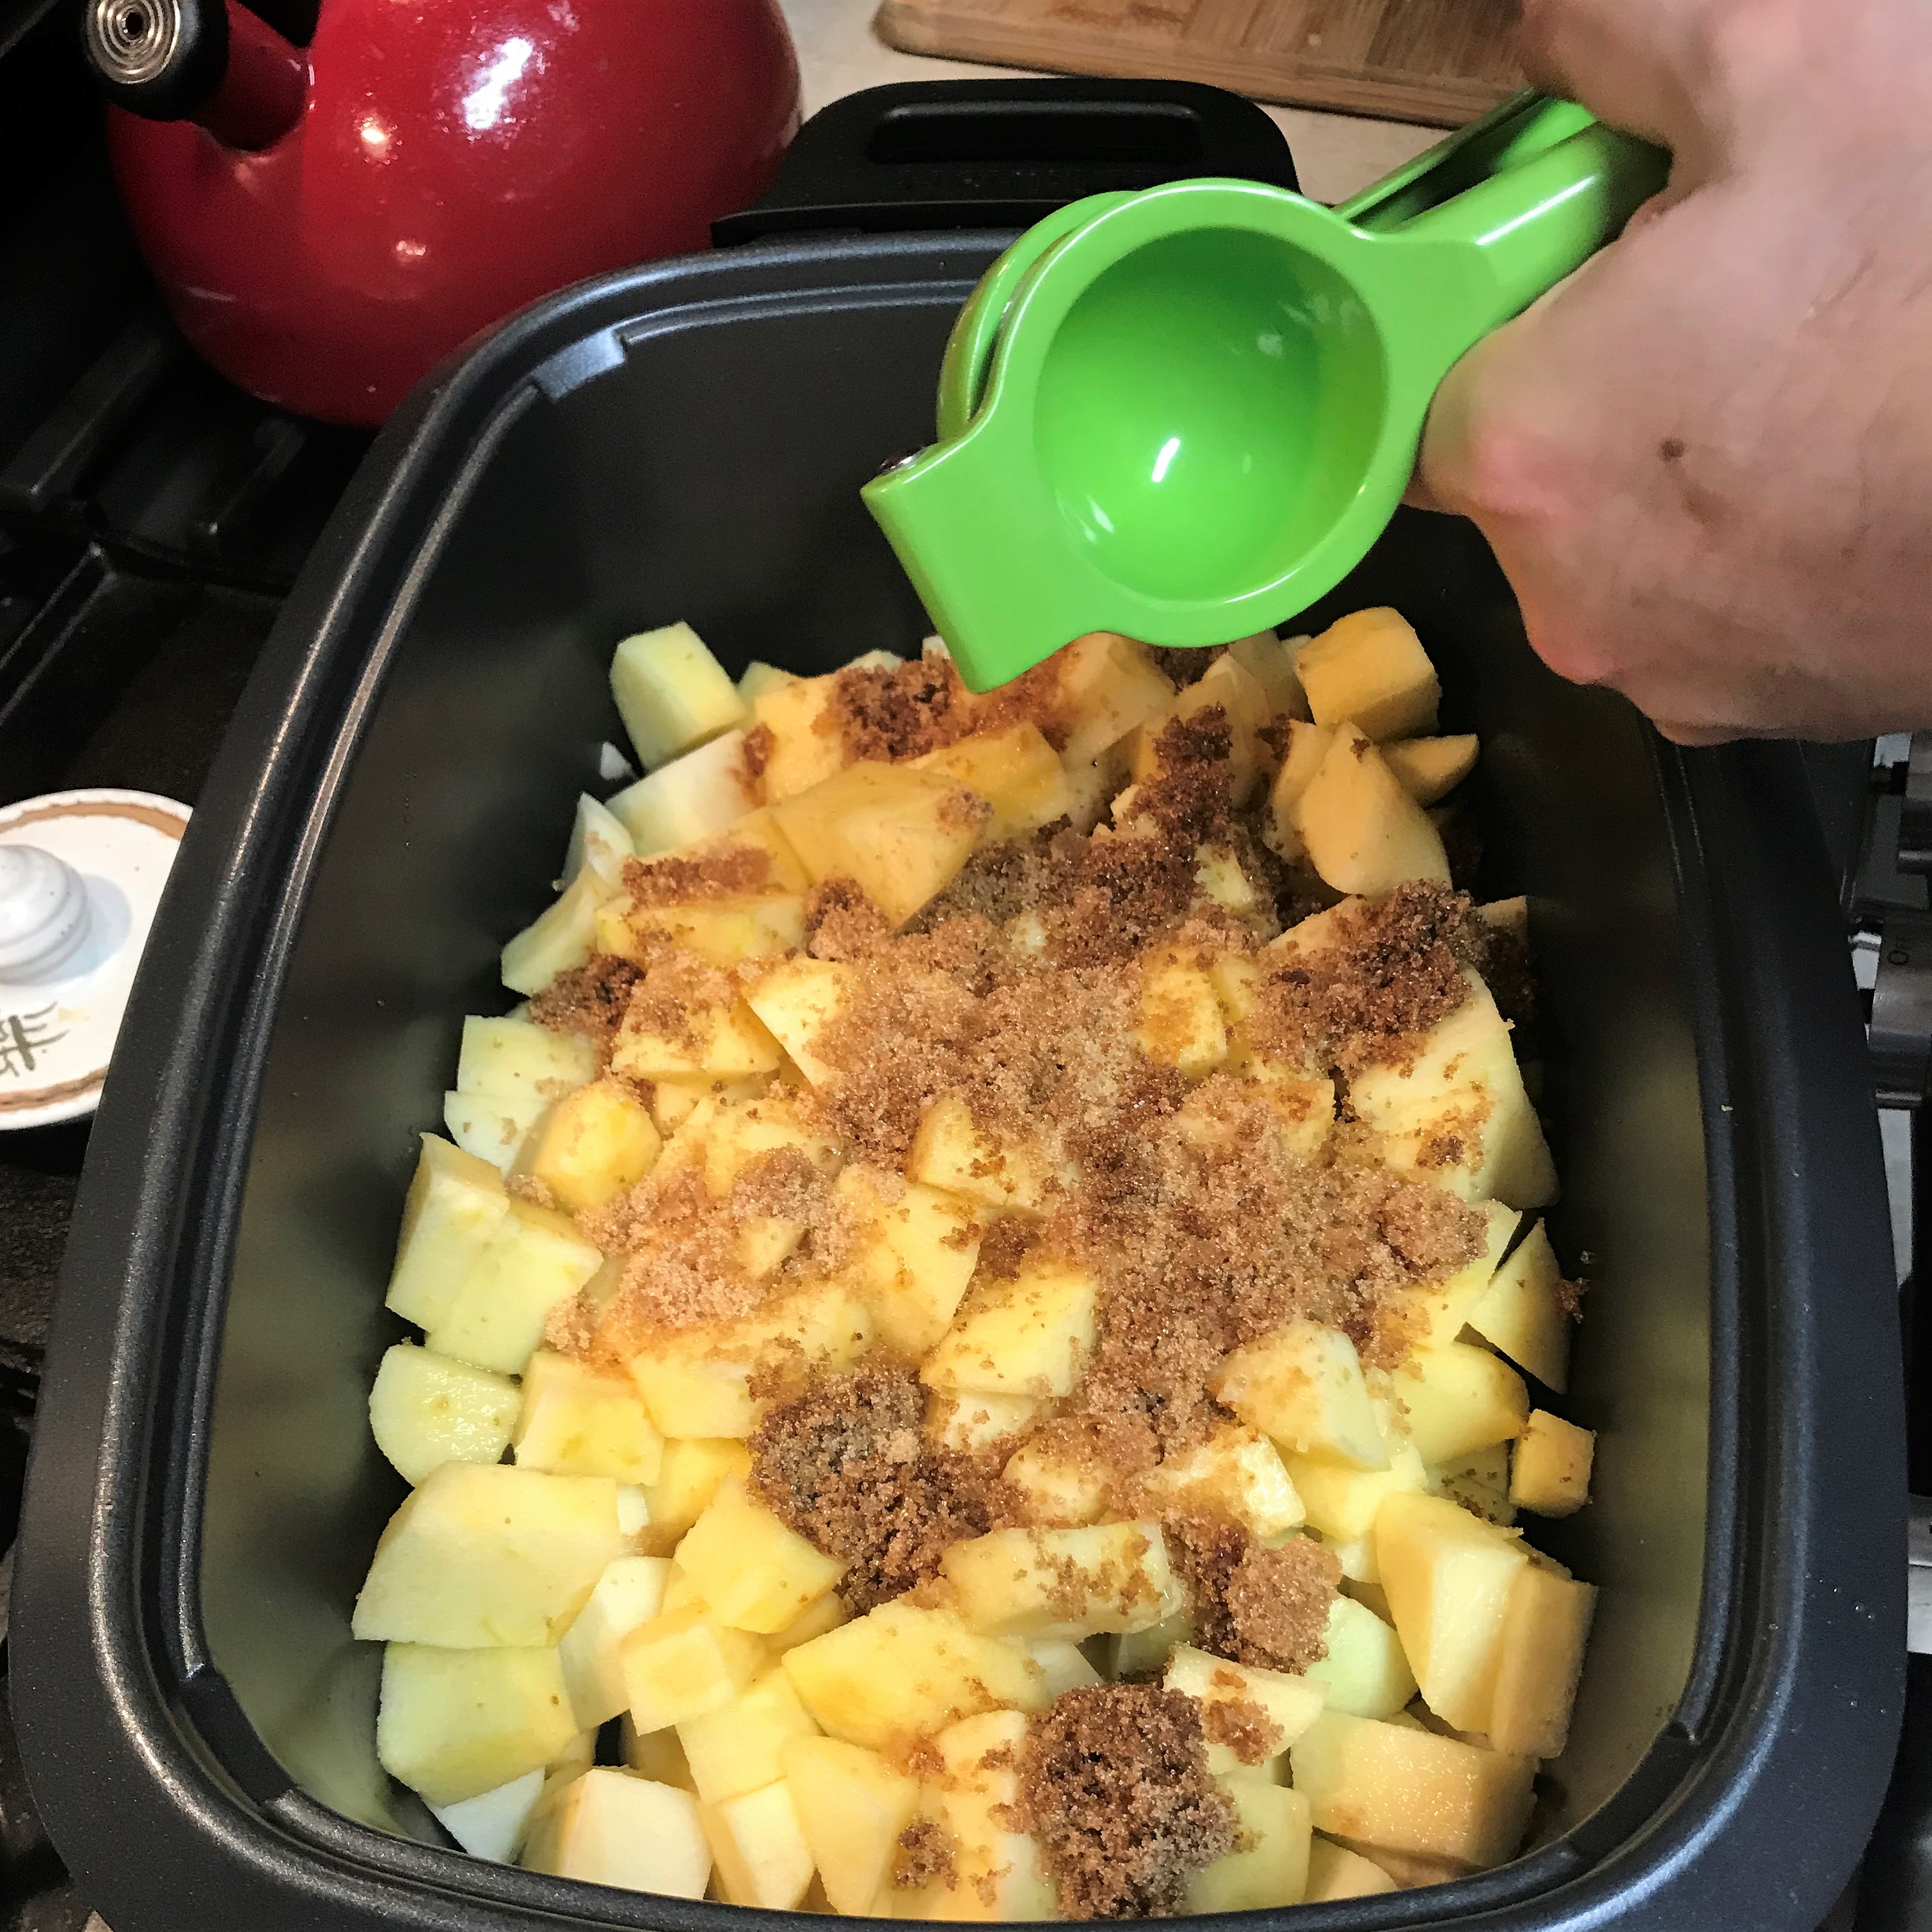
A sprinkling of brown sugar, a few shakes of cinnamon and a squeeze of lemon juice. The slow cooker will take it from here.
Place all apple chunks into the slow cooker, toss chunks in the lemon juice and sprinkle the brown sugar and cinnamon. Give it a good stir to mix everything up and cook on low setting for about 8 hours or overnight.
In the morning, use a potato masher to break up any pieces still large enough to stand out. We enjoy having a few chunks, but that’s just how we roll. Transfer to a bowl and refrigerate.
Instructions – the pork chops and chutney
Remove chops from brine mixture, rinse under cold running water and pat dry with paper towels.
A quick sear on both sides helps seal in the juices, then nice and slow to finish them.
Grill the chops. Les seared them for 30 seconds on both sides, then reduced the grill temperature to low, cooking to medium well (about 150° F). I know we’ve all been told that pork must be cooked all the way to well done, but this is OK because they will continue to cook during a 5-minute rest inside.
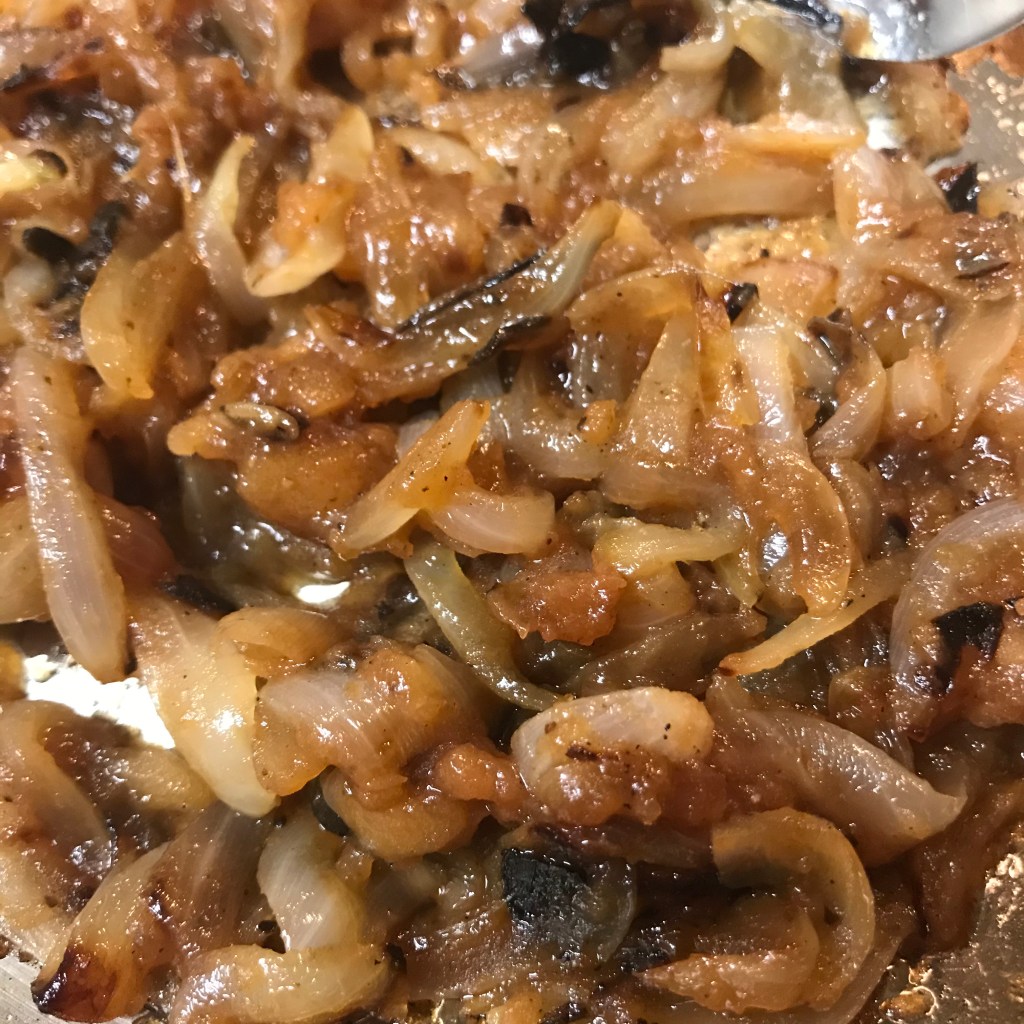
Make the simple chutney. I sautéed the onions in olive oil until they were softened and lightly caramelized on the edges. A quick seasoning of salt and pepper, and at the last second, I opted for a quick shake of dried thyme leaves. Then, stir in applesauce and cider vinegar. Mix until heated through.
I sauteed the onions until they were tender with a bit of char on some of the edges.
Some of Les’s applesauce and a splash of cider vinegar makes it seem like this topping was cooking all afternoon.
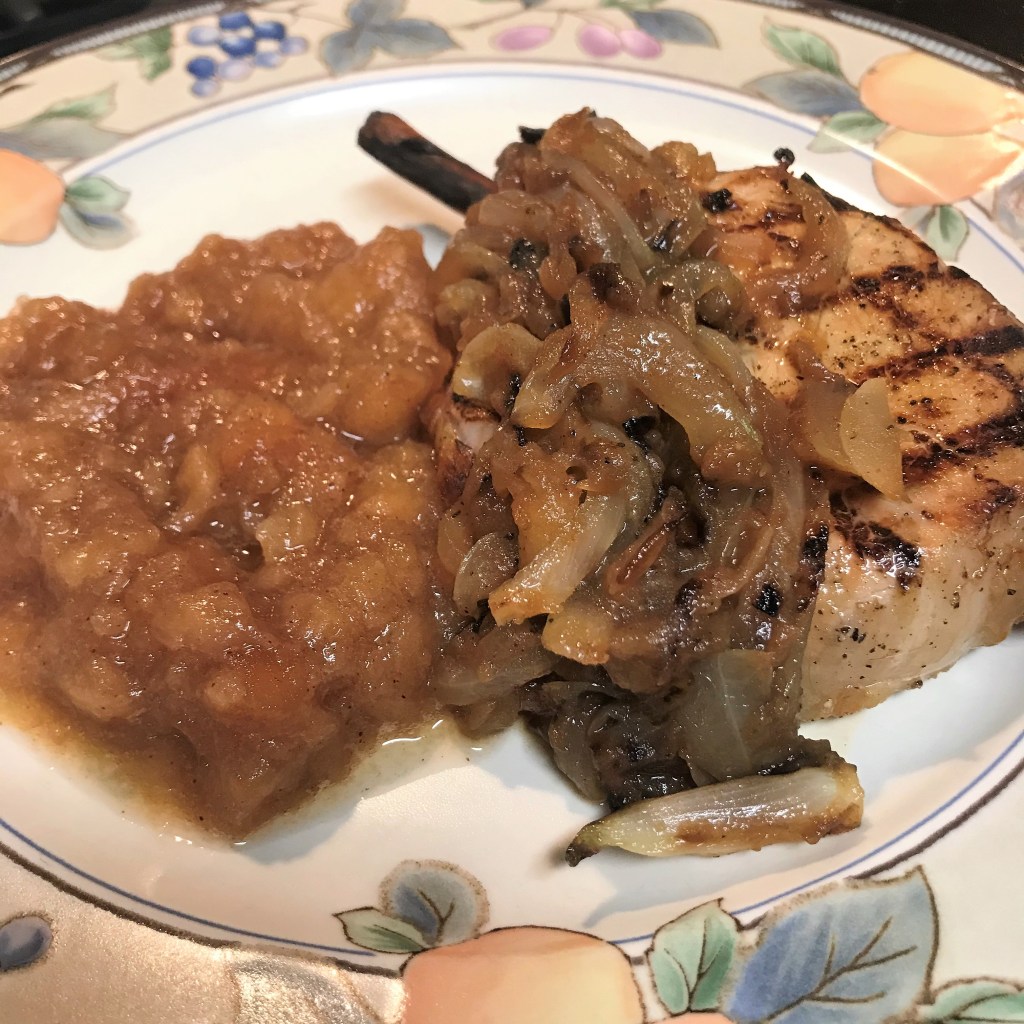
This chutney will connect the dots between the savory pork chops and the sweet applesauce—an easy little Comfort du Jour twist to a classic “pork chopsh and appleshaucsh.”
I’m loving those perfect grill marks. The quick “chutney” pulls everything together to elevate our simple Sunday supper!
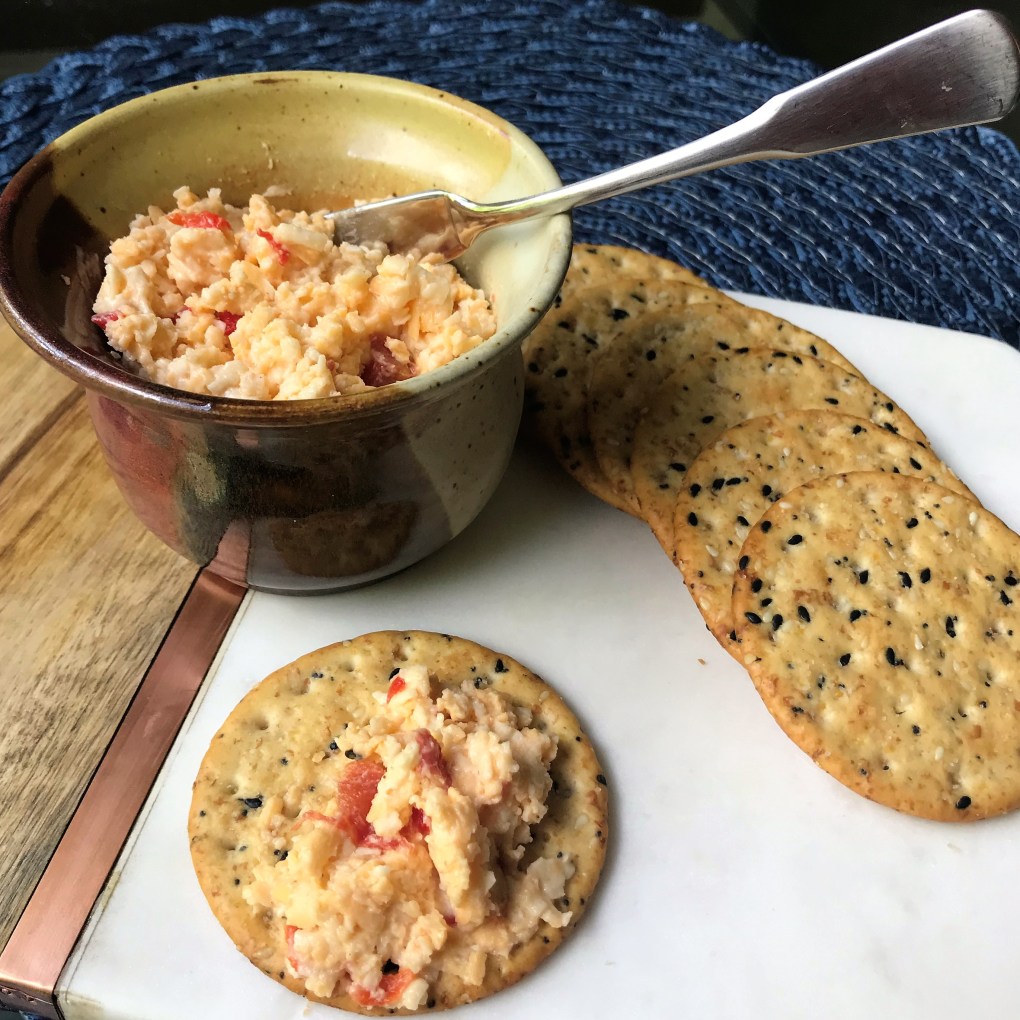
Every Super Bowl party, every Thanksgiving appetizer hour and several other times throughout the year—you’ll find this quick and simple spread on our table. Though he doesn’t know the exact origin of his pimiento cheese recipe, my husband, Les, recalls that it was shared with him by a colleague at one of his former jobs. And that’s the nature of recipes, isn’t it? We enjoy a food that someone else prepared and we ask for the recipe. Maybe it’s their original recipe or maybe they got it from a cousin or a neighbor or their church potluck cookbook or the back of a soup can. When the recipe tickles your fancy, it doesn’t matter where it came from—just enjoy the fact that someone is willing to share it.
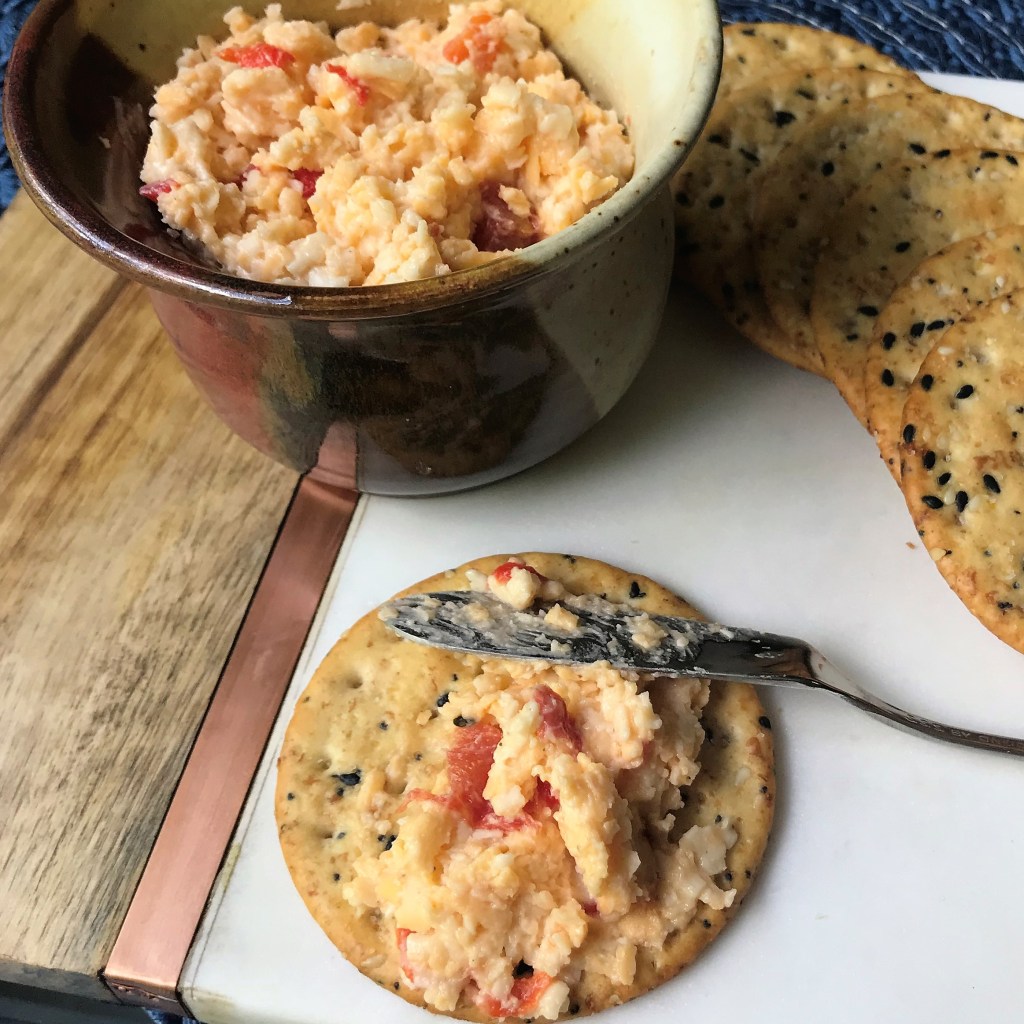
Les has graciously shared this one with me, to be shared with you. I was busy watching and jotting down the amounts of each ingredient he used, so I missed getting pictures along the way. But would you really need them for a recipe this simple? Let’s just go straight to the money shot.
Pimiento cheese is a southern food staple, delicious on a burger or little luncheon sandwiches, or even just spread on a cracker.
Unlike so many southern-style pimiento cheese recipes, this one is easy on the mayonnaise and lets the cheese take center stage. Nothing turns me off, food-wise, more than too much mayonnaise. The addition of diced tomatoes provides a nice touch of acidity to balance the richness of the cheese, and the tiniest splash of an unexpected ingredient adds a savory undertone. This spread is sturdy enough that a delicate cracker will break when you dip it. You need a hefty cracker or crostini, or do as we do and use a serving knife to spread it on your preferred snack canvas.
We enjoyed some of this recently when we had a small, physically distanced gathering with another couple. It was a fabulous backyard happy hour, long-overdue, and complete with snacks and David’s awesome martinis.
Go on, open a box of crackers, and make it a big one—in case you decide to devour the whole batch in one sitting. Nobody would blame you.
Ingredients
2/3 cup mayonnaise (we use an all-canola oil brand)
1/2 can Rotel tomatoes, very well drained*
2 oz. jar of diced pimientos, drained of excess moisture
1 tsp. Worcestershire sauce (surprise!)
2 blocks (8 oz. each) cheddar cheese, freshly shredded*
Freshly cracked black pepper
*Notes
Les uses the “hot” version of Rotel, which has habanero pepper but honestly isn’t really that hot. If spicy isn’t your thing, use the original.
Try using a couple different types of cheese, to keep it interesting. This time around, Les used sharp yellow cheddar and extra sharp white cheddar. But if you want to get creative and use smoked cheddar, or mix it up with gouda or another favorite firm cheese—we would both say, “go for it!”
For sure, do not use the pre-shredded cheese in a bag. They coat that stuff with a substance that keeps it from sticking together in the bag, and it adds a weird texture to finished recipes. In our opinion, all cheese is best when you buy it whole and grate it yourself.
Instructions
Stir together the mayonnaise, tomatoes, pimientos and Worcestershire sauce in a large mixing bowl, and season to your liking with black pepper. You won’t need to add salt because the cheese has enough. Add the shredded cheddar cheese and mix until evenly combined. I will note that Les and I differ on how to put together certain types of dishes, this being one of them. He grates the cheese first and then blends in each ingredient after that; my thought is that mixing the wet ingredients first and then blending in the dry makes life far easier. (Coincidentally, our methods differ in the same way for cookies. But that’s another post.) You can serve the spread immediately, but the flavor is best after a few hours in the refrigerator.
Simple ingredients, simple to make, and delicious!
Pimiento cheese is practically its own food group in the South. If you have never heard of it (or maybe even pimientos themselves), here’s some background info to bring you up to speed:
What are pimientos?
Also sometimes spelled “pimento,” these are smallish round sweet peppers, about the size of a golf ball, and they are commonly referred to as “cherry peppers” because they have a similar shape. When jarred, the peppers are usually diced quite small. Most likely, you’ve seen pimientos before, stuffed into the inside of pitted green olives. Of course, now I’m craving a martini.
Are pimientos spicy?
Most people would agree that pimientos are not spicy, but sweet in flavor. For reference, they land somewhere about 200 on the Scoville scale, which measures the capsaicin, or heat value, of peppers. To compare, jalapenos are somewhere around 3,000. Having said that, if you decide to grow some pimientos, give them some distance from spicier peppers in your garden, as they have a tendency to take on more heat once they have cross-pollinated.
What else can you do with pimientos?
You can use pimientos the same way you’d use any other sweet pepper—in salads, soups, spreads or omelets. They are nearly bite-sized, so you might also remove the stem and clean out the seeds, then stuff them with herbed cream cheese or tuna salad. If you just have way too much time your hands, I suppose you could buy a bushel, dehydrate them and grind them into a powder. Voilà—homemade paprika.
How can I dress up pimiento cheese?
Adjust the flavor profile by blending in different kinds of cheese—smoked gouda, asiago or bleu cheese would each lend an interesting twist to pimiento cheese. Or add small amounts of other ingredients, such as pickled jalapenos, pickles or even cooked crumbled bacon for variety.
How can I use leftover pimiento cheese?
I’m sorry—I don’t think I understand this question, because we never have leftovers! 🙂 But sometimes, Les makes a double batch so we have enough to use for other things, such as topping a burger, melting over a toasted bagel, slathering inside omelets or elevating our happy in a macaroni and cheese. Go on, make some!
Before I present my recent addition to the Meatless Monday lineup of recipes, some unfortunate news—it looks like my garden isn’t going to make it this year. After only four weeks in the soil, so many of my tender plants have succumbed either to the deluge of rain we had over Memorial Day or the woodland critters who have decided to munch on the leaves. The yellow squash is withering, its stems split wide open from too much water. The zucchini vine is missing several of its broad protective leaves, having fallen victim to the hungry deer. And at least three of my red bell pepper plants are nothing but stubs. Though the deer don’t particularly care for the fruit of the pepper plants, they’ve made it clear they don’t mind snacking on the tender leaves and blossoms. What’s left of the garden is looking sad and puny, and I fear the nutrients in the soil have washed away with last month’s rainwater. Poor plants hardly stood a chance.
Every single leaf, chomped.
The happy news is that I’ve been able to find some fresh and good-looking vegetables at the market, a little ahead of season, and I’m not going to waste any more time wishing for my beloved ratatouille. On the contrary—I intend to enjoy it in as many different ways as possible. The dish is a favorite of mine, though I didn’t really become acquainted with it until I was well into adulthood. In case you have trouble remembering what’s in ratatouille, let me share with you a simple word trick that makes it easy. Several years ago, during the season five competition of the “Next Food Network Star,” finalist Melissa D’Arabian (who went on to win the title that year) shared an acronym that perfectly describes ratatouille.
“Just remember E-Z-pot,” she told the judges. Eggplant, zucchini, peppers-onions-tomato, easy to put together and made in a pot. That’s a perfect description, and also an easy way to jot down the ingredients on my grocery list.
Ratatouille, in its most rustic, southern-French form, is a hearty, chunky summer vegetable stew, seasoned with garlic and fresh herbs—a satisfying meatless meal made complete with a piece of crusty baguette and a glass of Provençal wine. In a fancier version, you might see ratatouille assembled in a striking pattern of layered thinly sliced vegetables, elegantly stacked with a garlicky tomato sauce and fresh sprigs of thyme.
If you’re a fan (as I am) of the Disney-Pixar film Ratatouille, you probably can’t help but recall the scene near the end, in which harsh, unemotional food critic Anton Ego takes a single bite of such an elegantly presented ratatouille, prepared by Remy—a rat (yes, a rat) who defied convention to follow his dream of being a chef. In a fraction of a moment, the stodgy Ego is transported back in time to his mother’s kitchen, where, as a young boy, he created his early memory of the rustic dish considered by many to be “peasant food.” One taste brought back all the feelings for him, and the incident changed his mind and his heart. For real, that one scene sums up Comfort du Jour. I’m even crying a little bit right now.
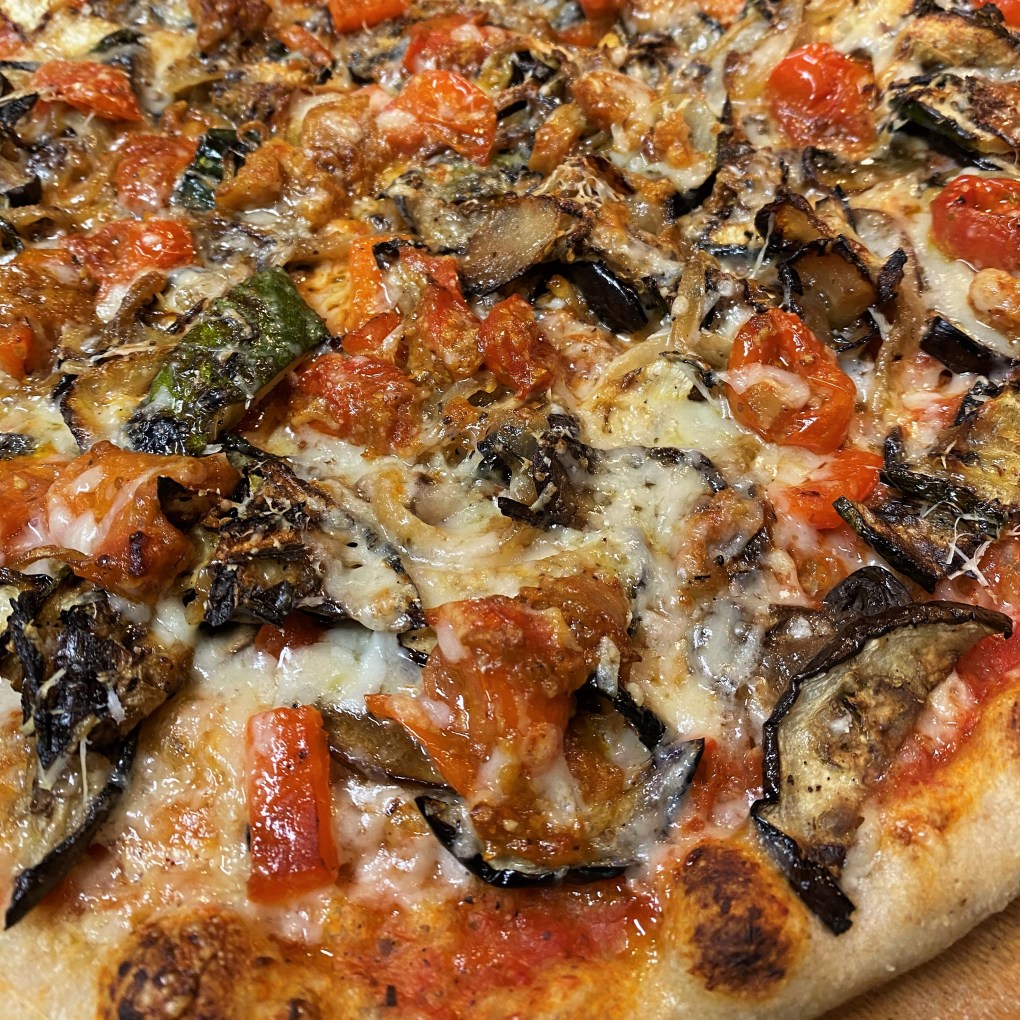
Today, I’m taking the rustic, casual approach to ratatouille and adding yet another twist. We are going to put those fresh garden flavors onto a pizza. I’ll send hubby out to the grill with the eggplant, zucchini and red bell pepper to reduce their moisture and bring out the best of their flavors. The onions will be pan-caramelized with fragrant herbs de Provence, and just for the heck of it, I’m tossing in some sautéed mushrooms. With the application of ratatouille’s classic flavors on a pizza crust, I’m sort of visualizing the south of France knocking on neighboring Italy’s door to borrow a couple of ingredients. A simple Italian tomato sauce will lay on an airy, rye-infused crust (sourdough, naturally), with a combination of gruyere, parmesan and romano to punctuate the grilled vegetables. Wow, it’s making me sooo hungry.
You don’t have to make your own dough to enjoy this pizza—before I made my own bread, I favored the Boboli pre-made crusts. There’s no judgment here if you want to use a pre-made pizza dough or other favorite crust and just focus on the flavors of the vegetables. Or trade in the crust altogether for a fresh bowl of hot pasta, tossed with the grilled vegetables and herb-infused sauce. Or really merge Italian into it by serving it on risotto or polenta. Re-imagine it exactly however you like. Isn’t that the beauty of comfort food?
Ingredients
1 ball rye pizza dough*
1 medium eggplant, sliced into 1/2″ rounds, salted and sweated*
1 medium zucchini, cleaned and sliced 1/4″ thin, lengthwise
1 red bell pepper, seeded and cut into wedges
Extra virgin olive oil
Kosher salt and freshly cracked black pepper
1/2 large sweet onion
4 oz. cremini mushrooms, cleaned and sliced thick
1 cup cherry or grape tomatoes
1 bulb roasted garlic
1 tsp. herbs de Provence seasoning*
2 oz. dry white or rose wine
2 oz. finely shredded gruyere cheese
2 oz. coarsely shredded parmesan and romano blend cheeses
3 Tbsp. prepared pizza sauce (we love Dei Fratelli brand for its authentic, simple flavors)
*Notes
If you wish to make the rye pizza dough, follow my instructions for My Real NY Pizza Dough but swap out the sourdough starter with equal amount of starter fed with 100% rye flour. Allow the starter to ferment 14 hours at room temperature before building the final pizza dough.
Instructions
An hour or so ahead of preparing the rest of the dish, spread a double layer of paper towels on a baking sheet, salt liberally and arrange the eggplant slices. Salt the tops of the slices, cover with additional paper towels and place a weighted baking sheet on top. This will draw out the moisture and remove any bitter flavor from the eggplant before you grill it. After the “salt and sweat” period, use a damp towel to wipe off all excess salt.
Herbs de Provence is a classic French blend of herbs and seasonings, including thyme, savory, basil, lemon and a hint of lavender. You can make your own, but it’s easier to pick up a bottle of McCormick or any other brand at the market. Take note of the salt content so you know how to adjust your recipe.
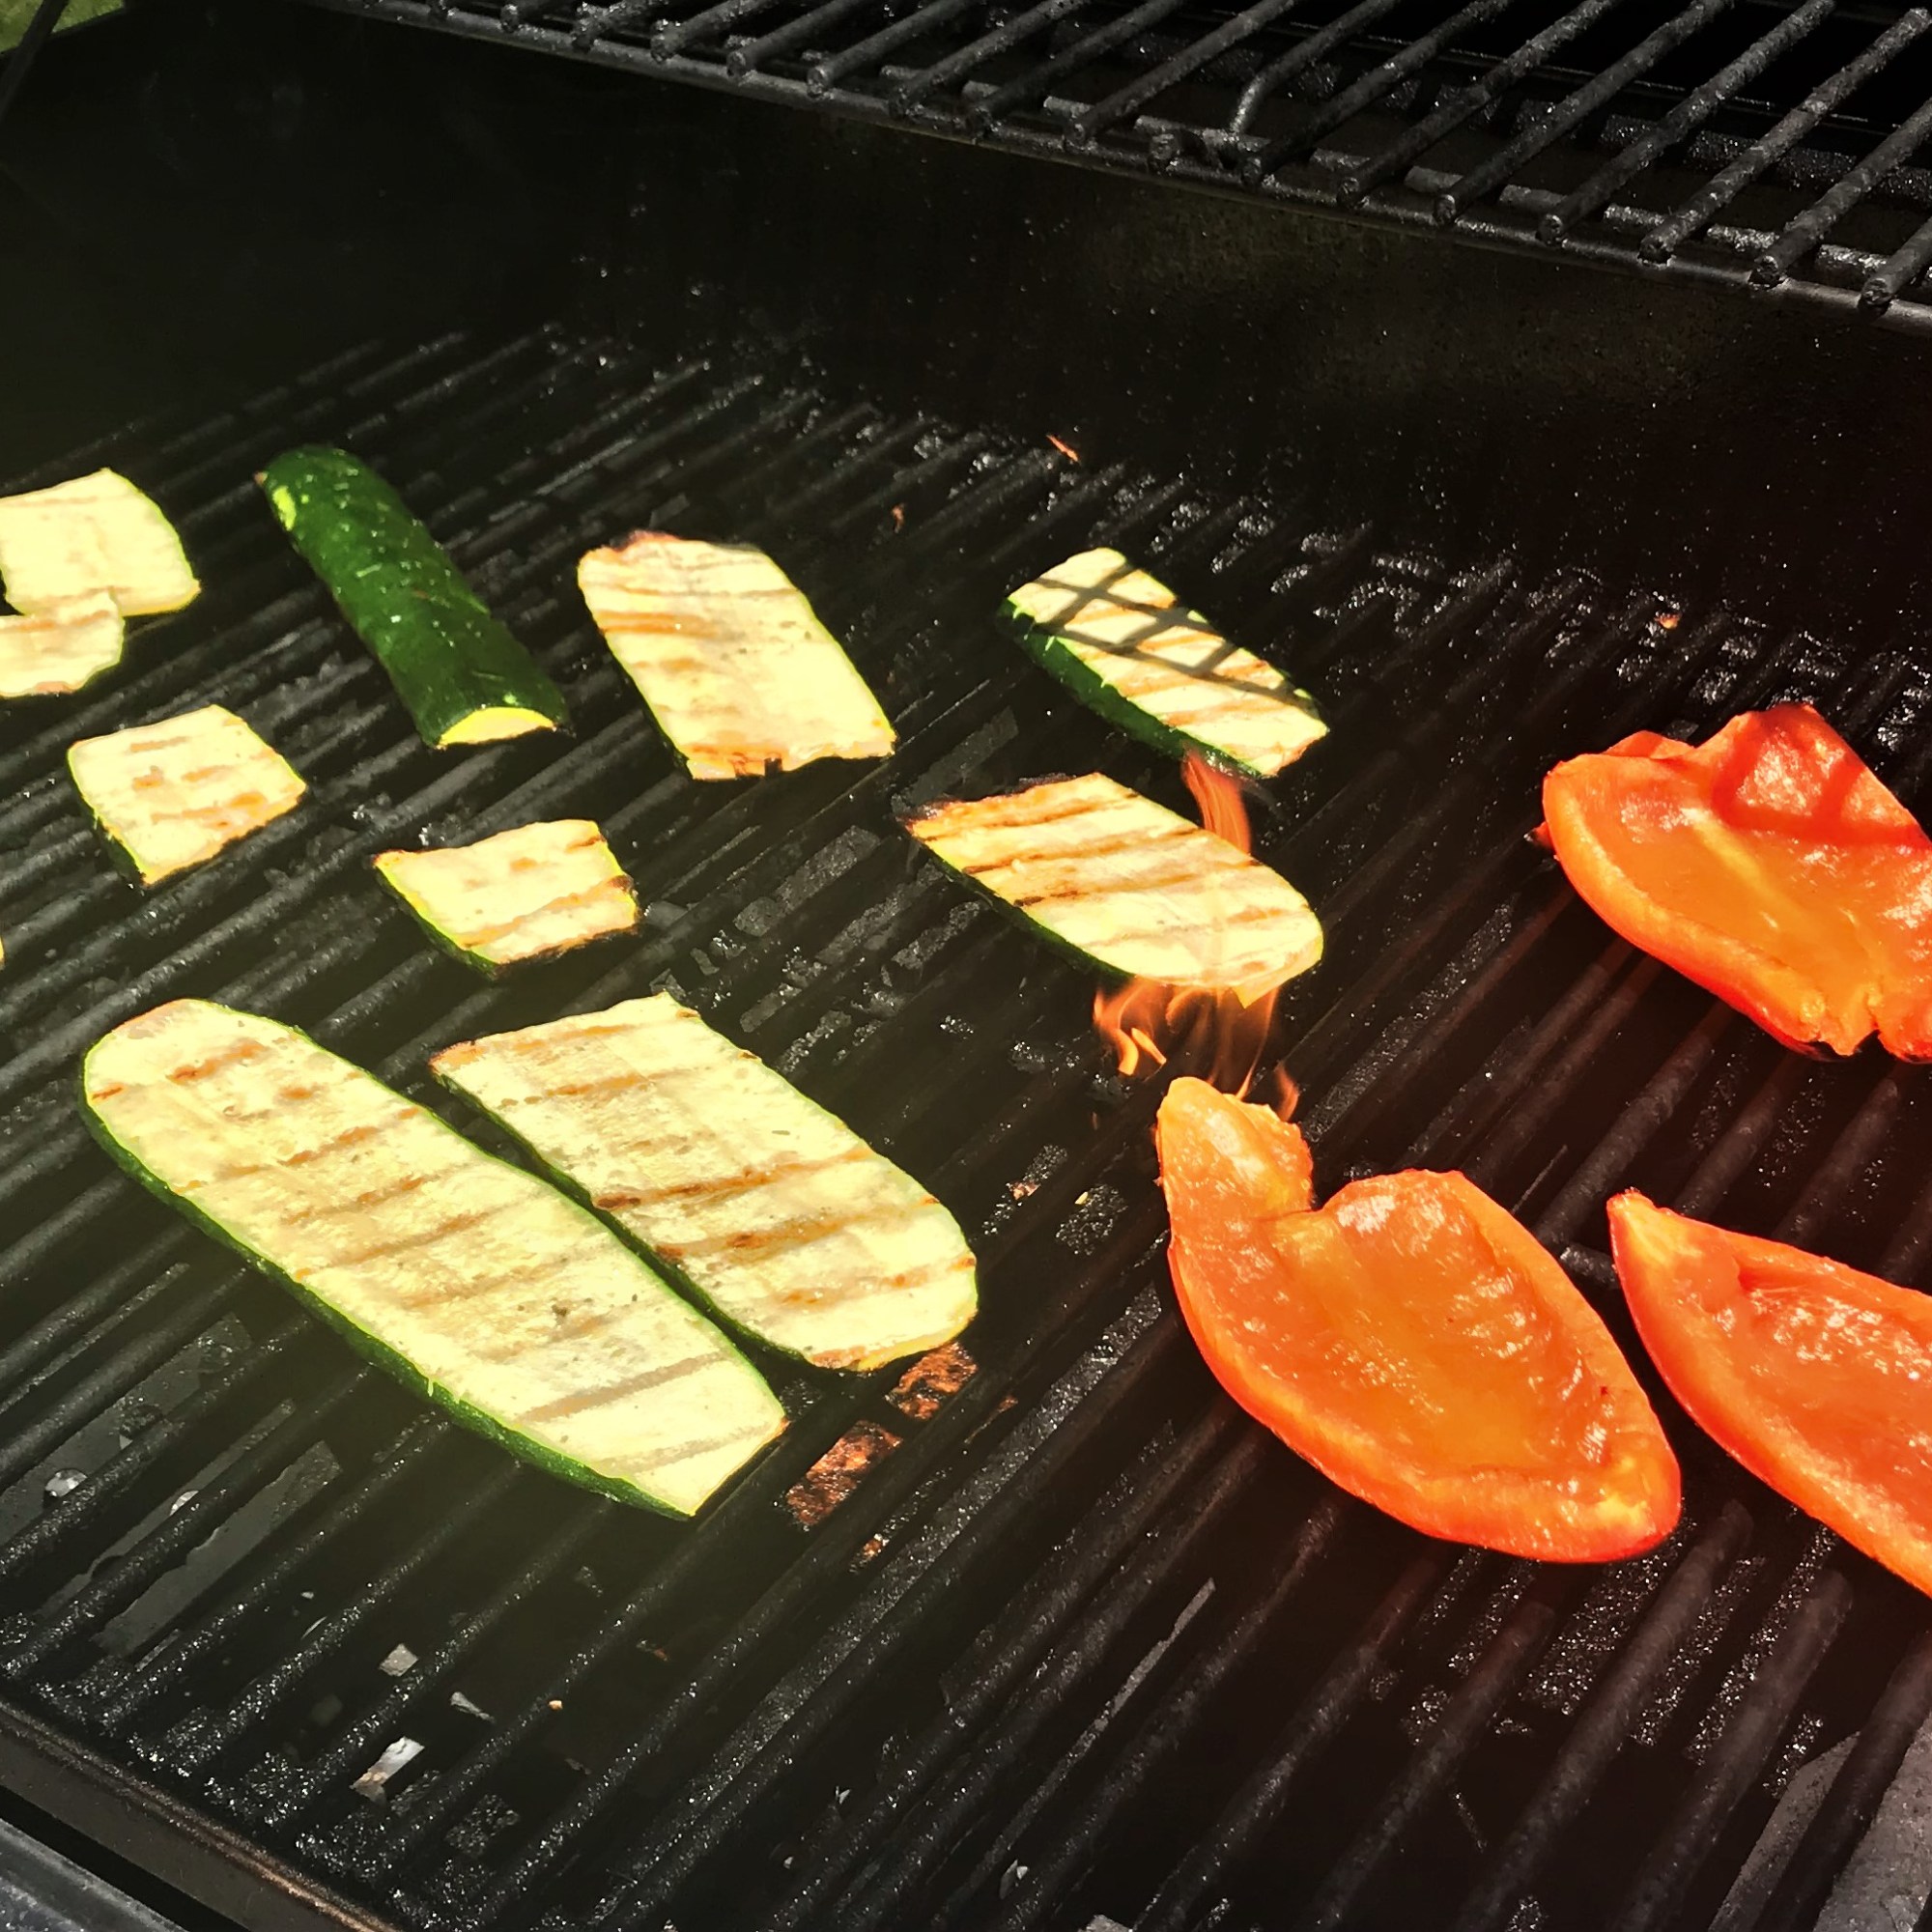
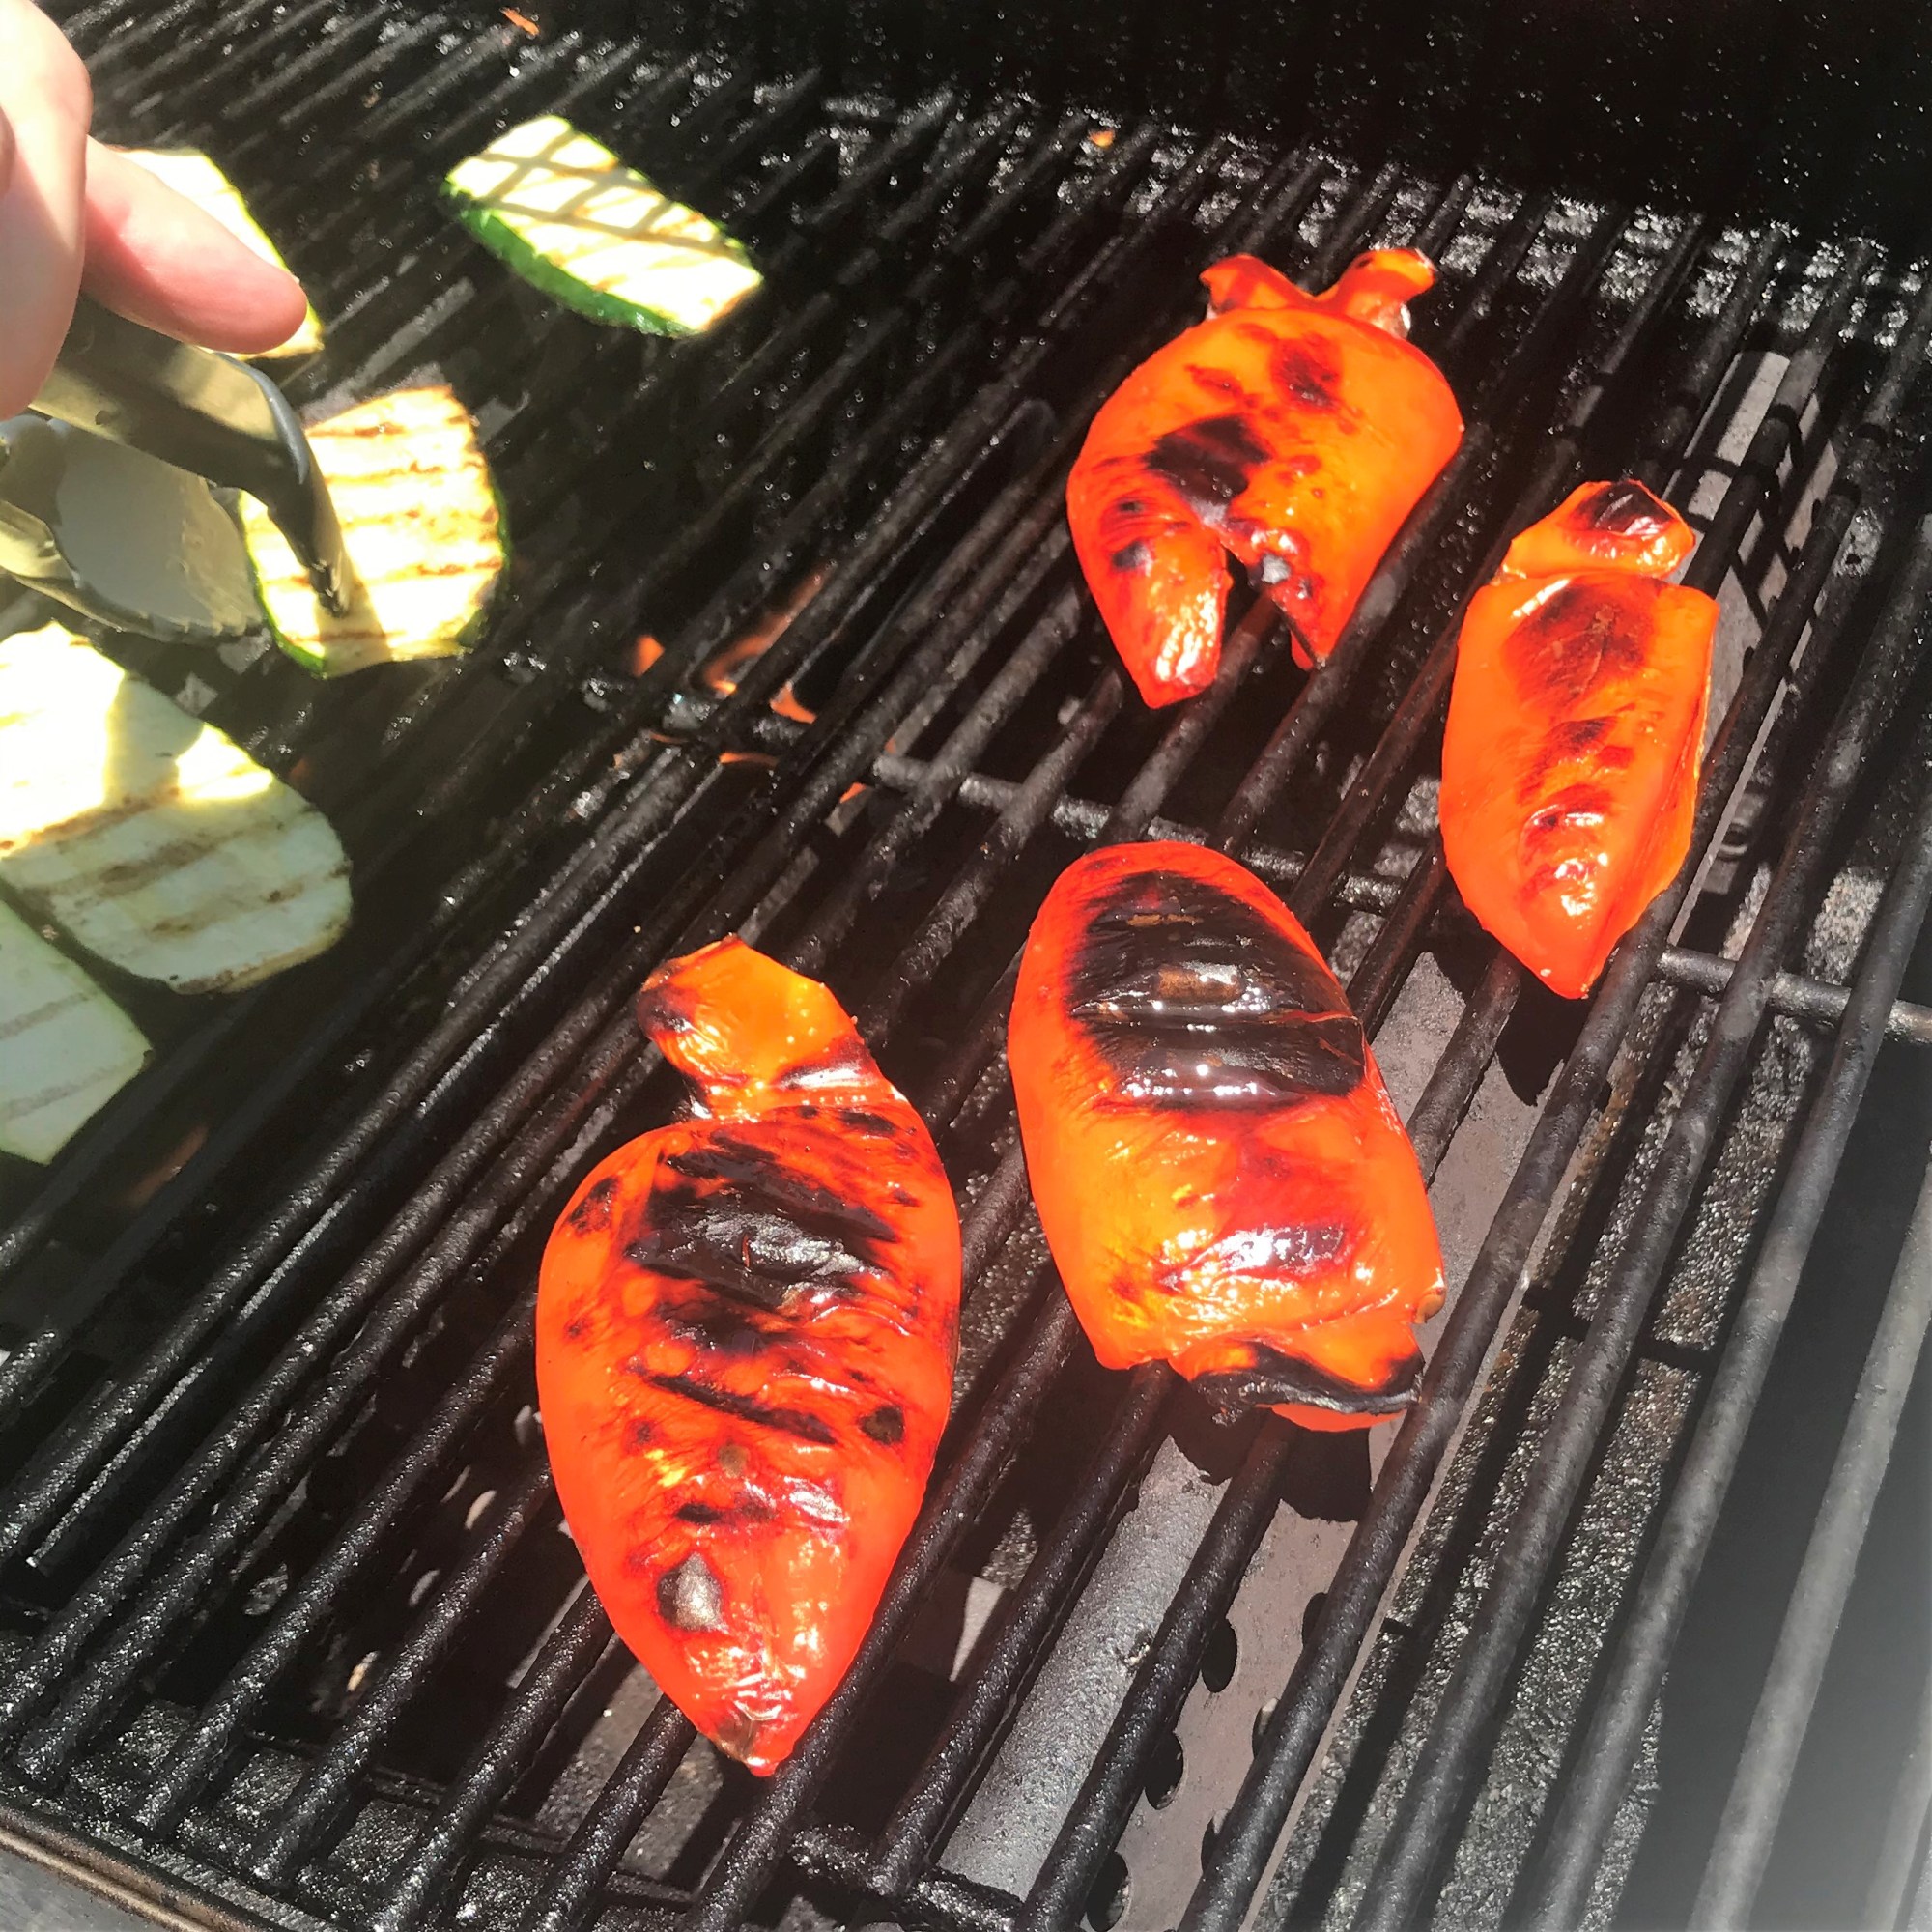
Spray or brush eggplant slices, zucchini and bell peppers with extra virgin olive oil. Season with salt and pepper, and grill at 350° F for approximately 10 minutes, or until they reach your preferred level of caramelization. We let them go until they were lightly charred, but still tender.
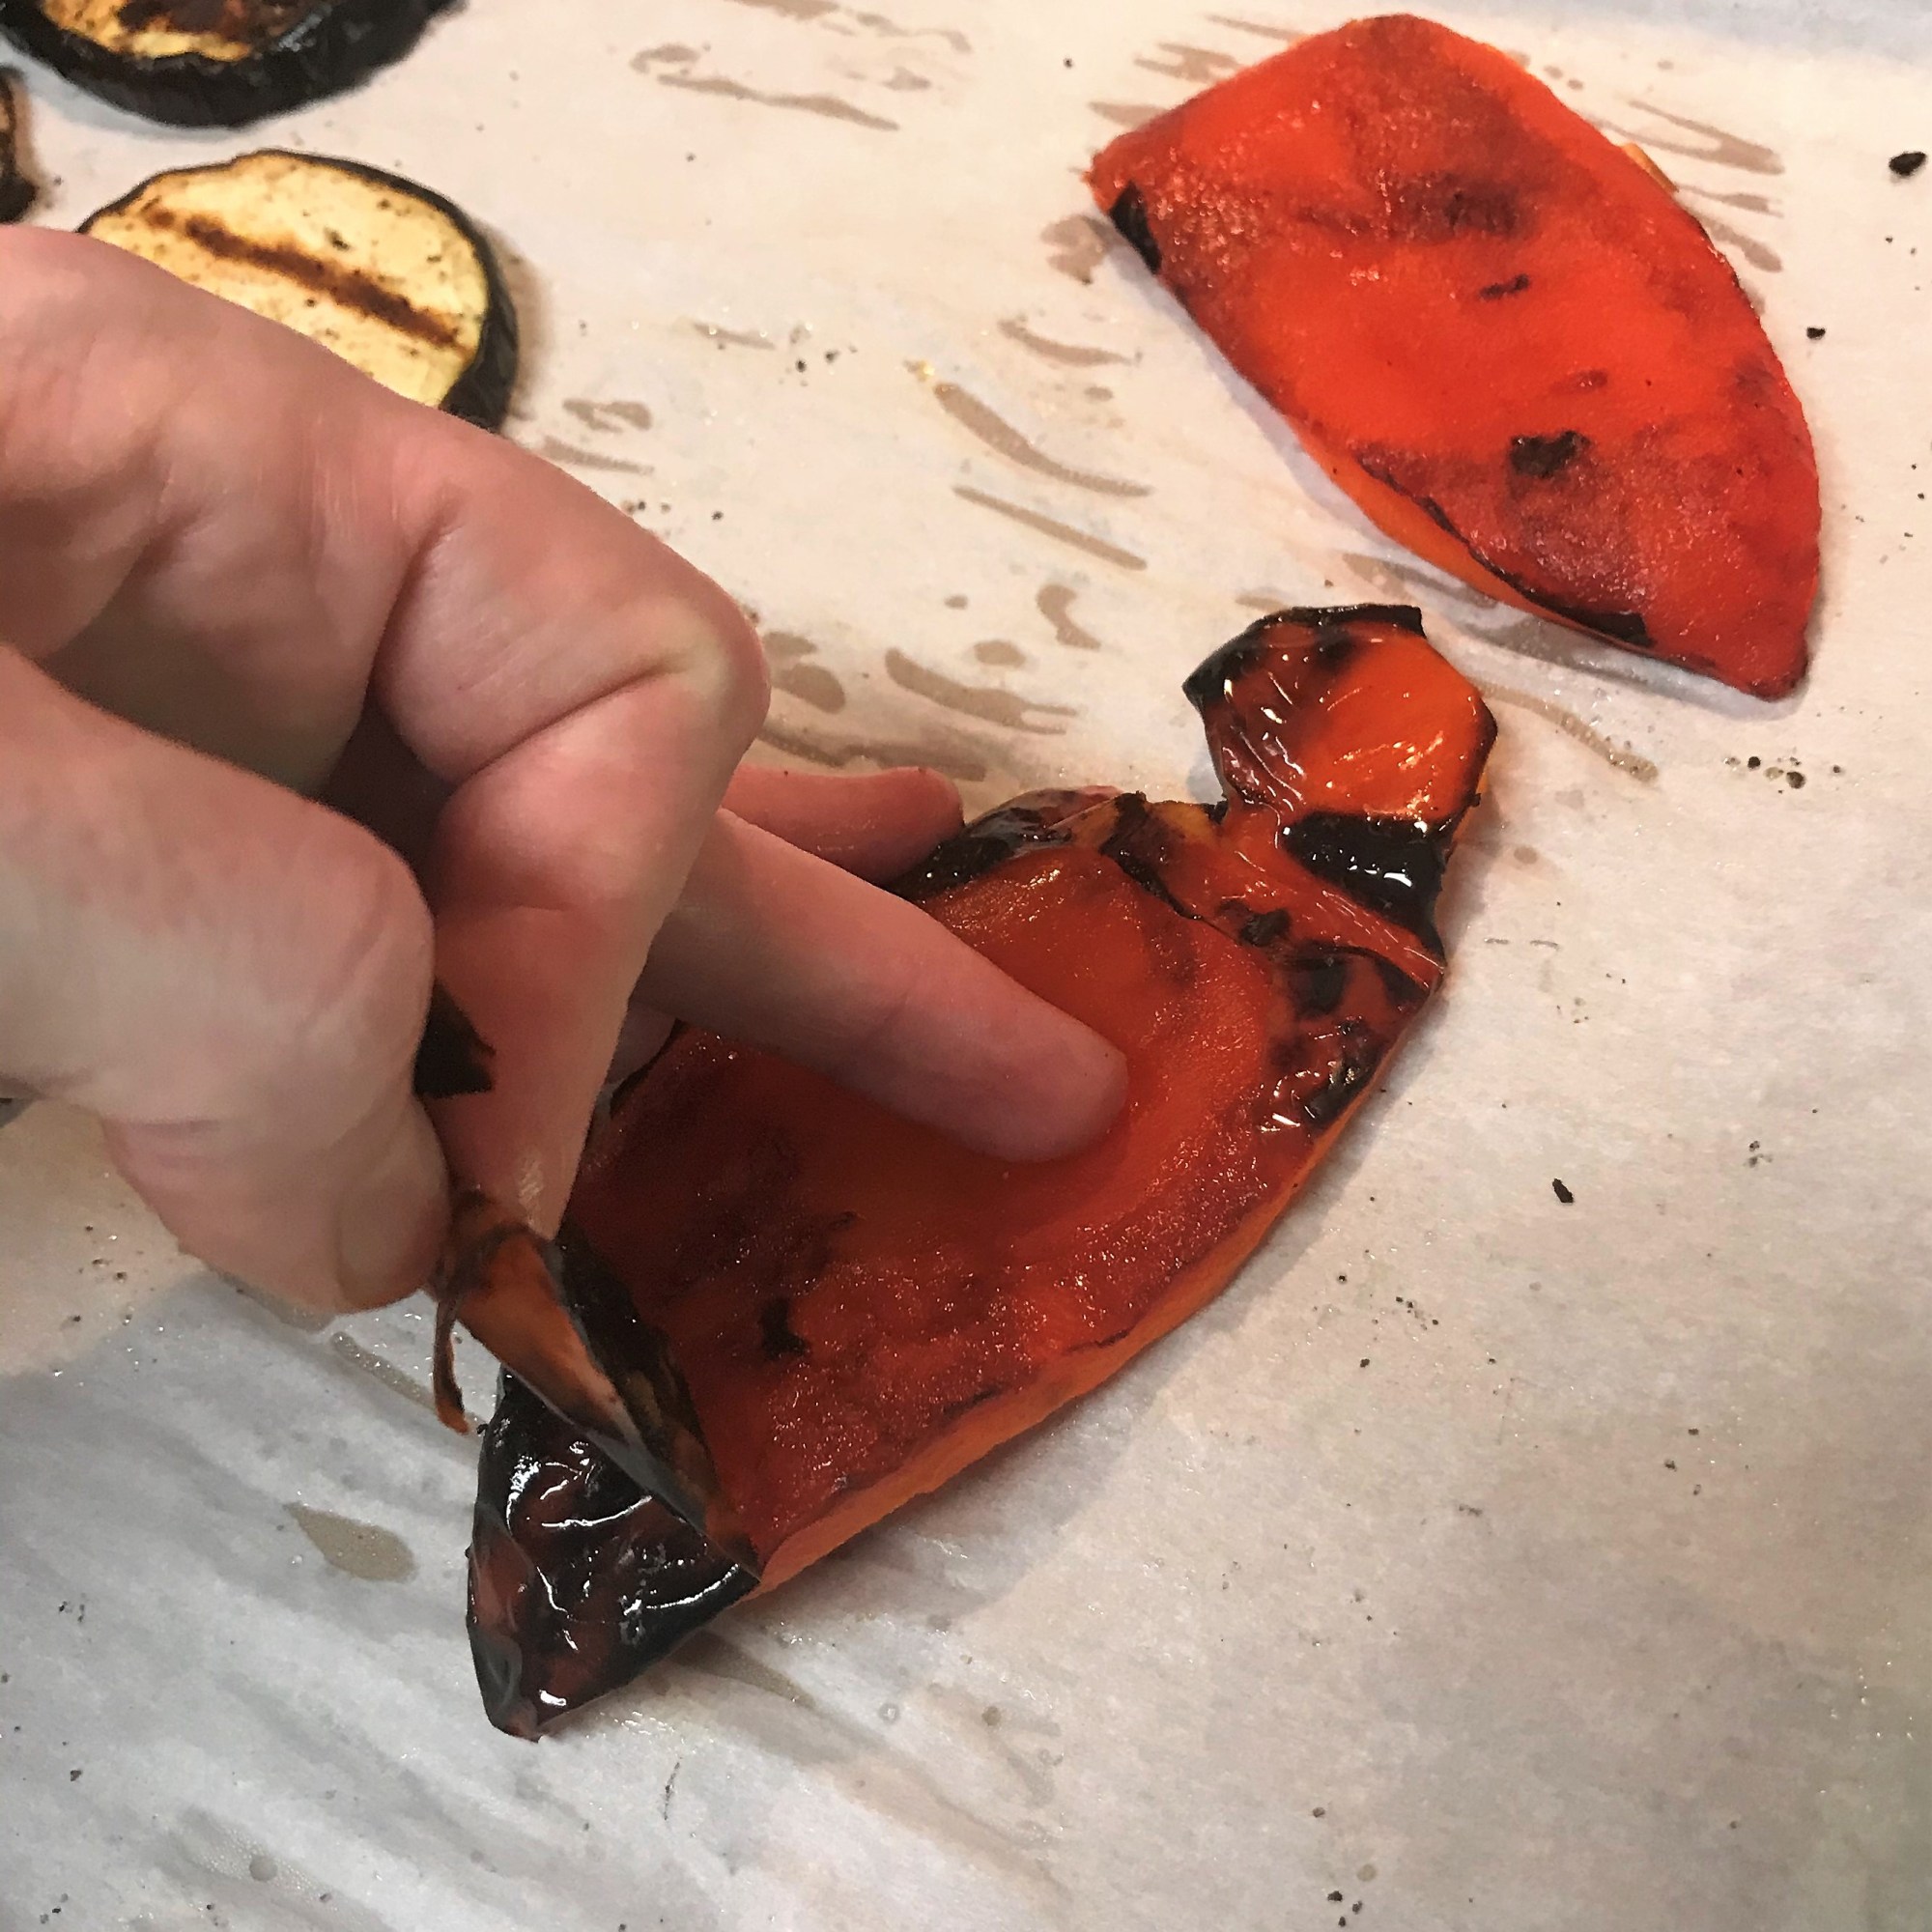
Place the grilled peppers in a bowl, cover with foil and wait 15 minutes until the skin is loosened enough to peel away. Cool all vegetables and chop into large, rough pieces.
Place a medium non-stick skillet over medium heat, add olive oil and sauté onions until they are softened with charred edges. Sprinkle onions with salt, pepper and 1/2 tsp. herbs de Provence. Remove onions to a bowl, and repeat the same process with the sliced mushrooms, seasoning with remaining herbs de Provence.
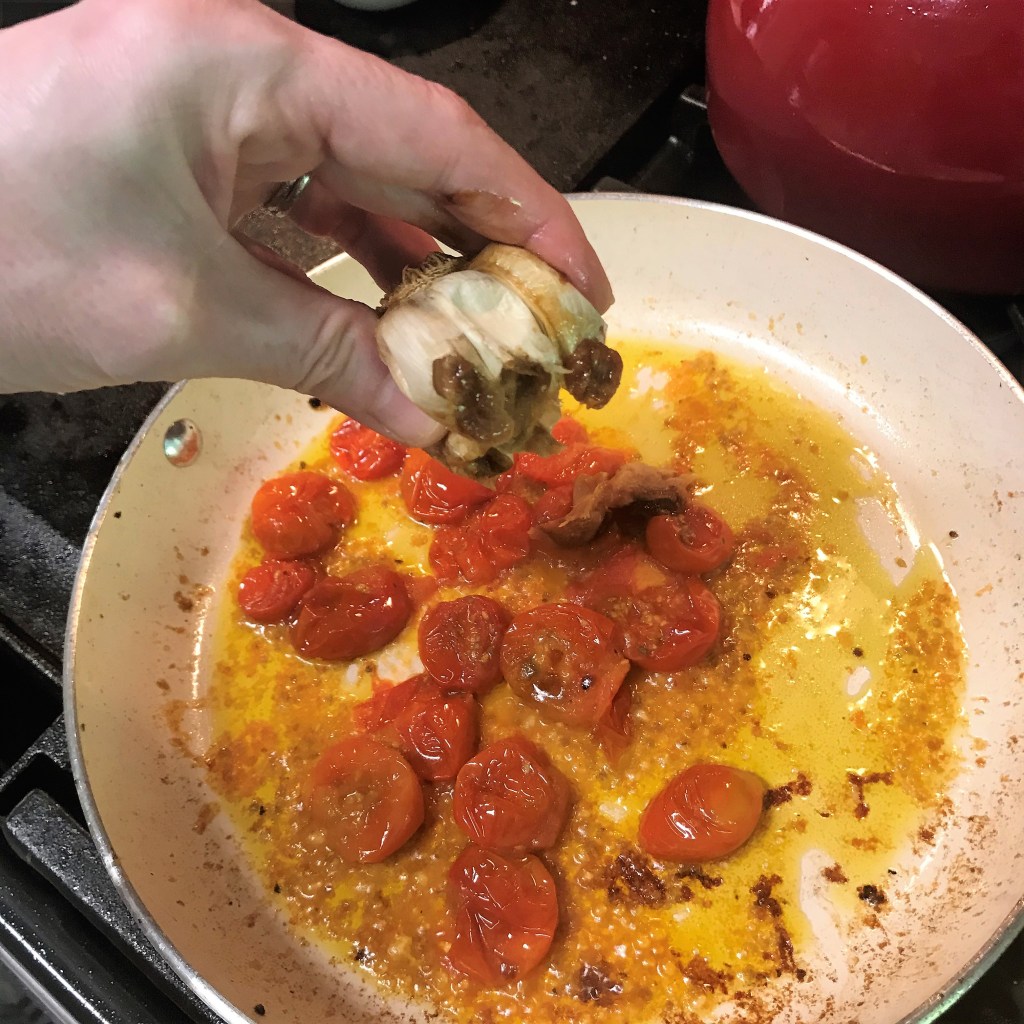
In the same non-stick skillet, heat 1 Tbsp. olive oil over low heat. Add the cherry tomatoes and heat slowly until tomatoes are soft enough to burst when pressed. Continue to cook until tomatoes are broken down and saucy and squeeze the roasted garlic into the pan.
Roasting the garlic makes a huge difference in flavor.
Season with salt and pepper, add dry wine and simmer until liquid dissipates. It should have the texture of a soft jam. Set all ingredients aside (or refrigerate them) until you’re ready to make pizza.
Time to bake!
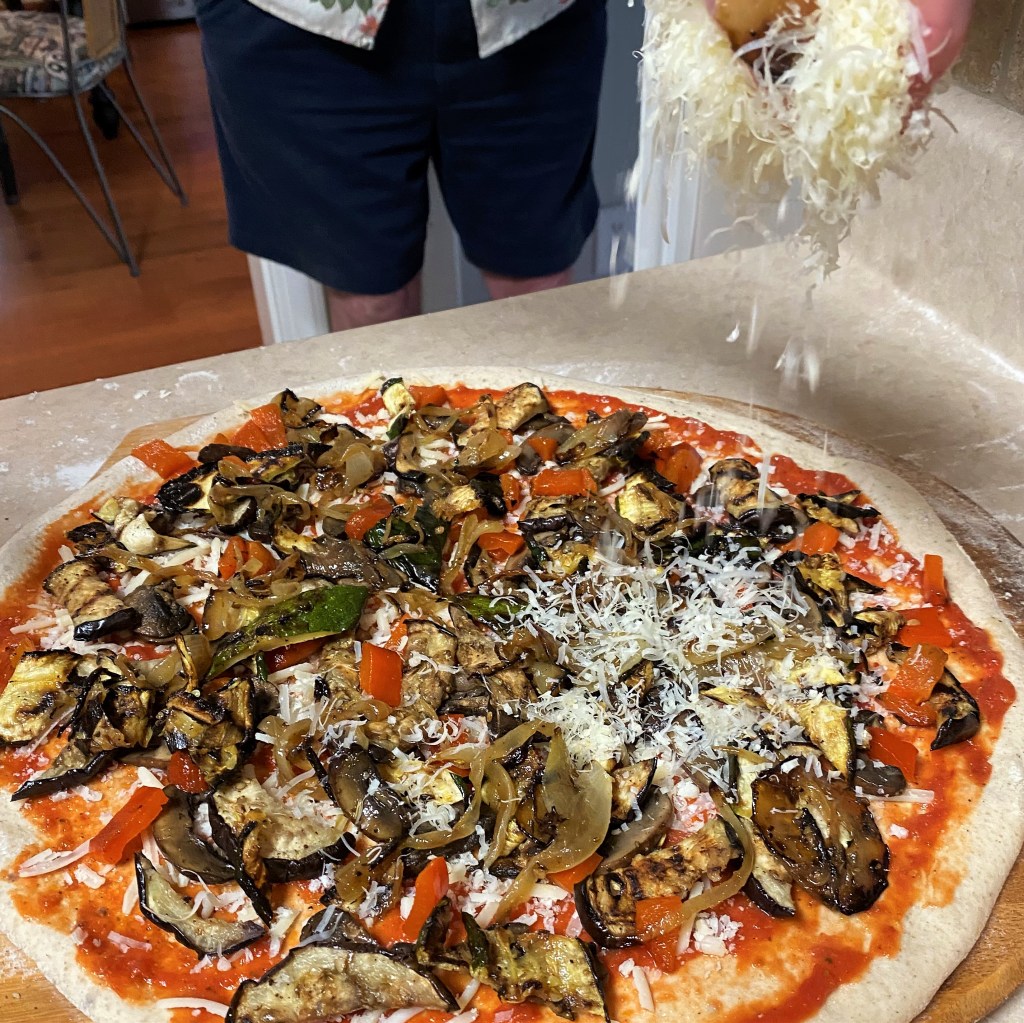
Shape pizza dough into a 14” circle. Brush or spray with olive oil, season with salt and pepper. Swirl on tomato sauce, parmesan and romano, sauteed and grilled vegetables, then finely shredded gruyere. Finish the pie with the roasted garlic-tomato mixture and slide into a very hot oven on a preheated pizza steel or stone.
I layered the Italian cheeses on first, then the veggies before a sprinkling of gruyere. Use a microplane, if you have one, for the wispiest cheese you could ever imagine.
The blistered tomato and roasted garlic mixture goes on last, kind of like a finishing sauce.
A little cornmeal on the peel helps with easy transfer to the hot steel.
First ratatouille of the season, and I am definitely loving it!
We bake our pizzas on a steel at 550° F for approximately 7 minutes. Please use the temperature and time best suited to your method.
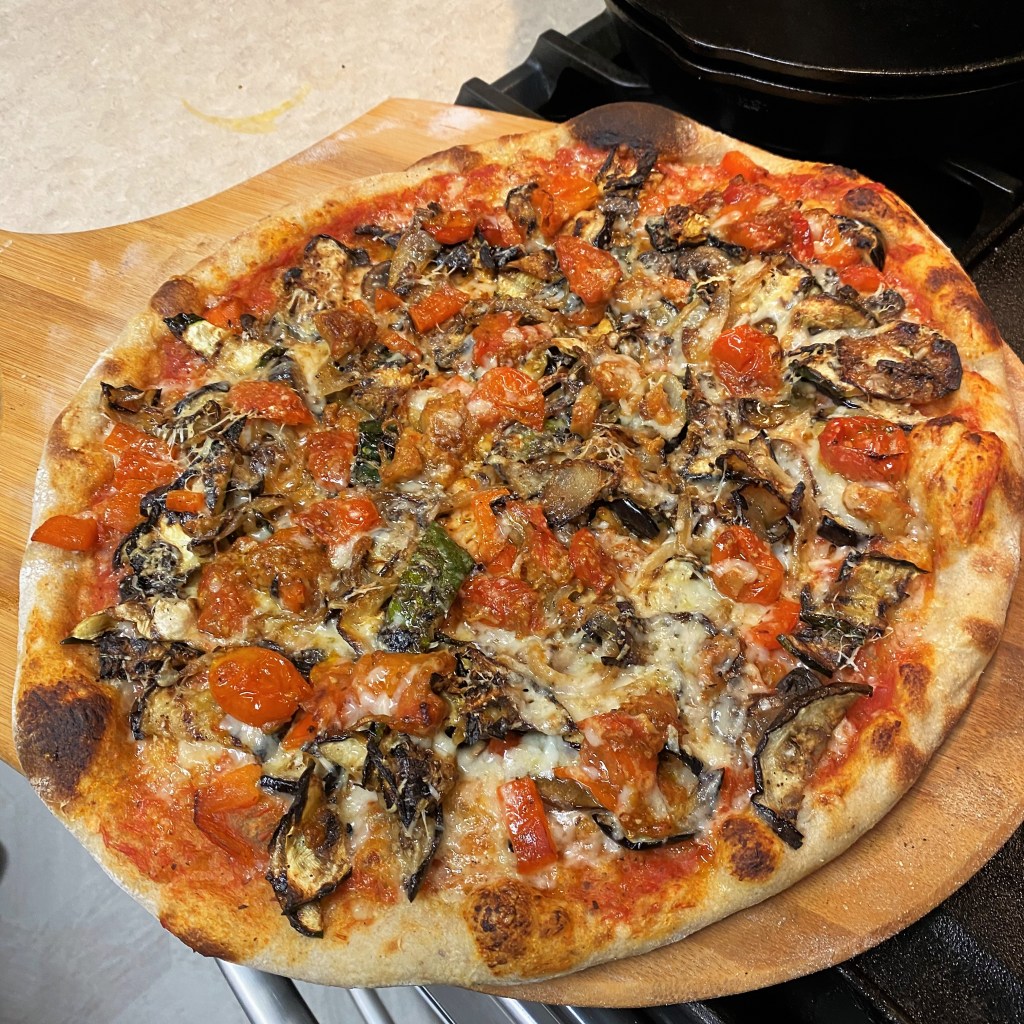
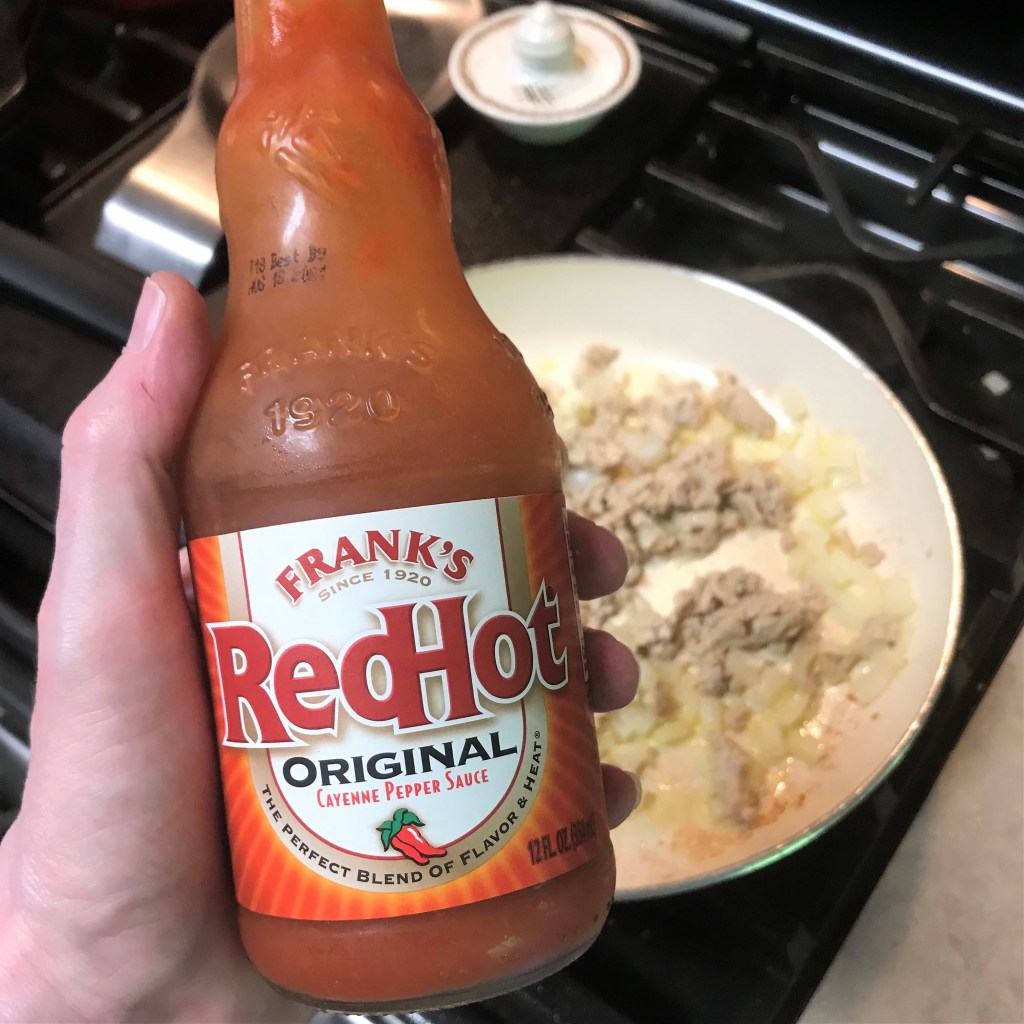
For this western New York girl, Buffalo chicken pizza is a favorite non-traditional pie, for those times when you just can’t quite decide between pizza and Buffalo wings. From the authentic Frank’s “Red Hot” sauce to the funky bleu cheese crumbles, and right down to the crunchy bits of celery, this pie delivers. All. The. Flavors.
These pizzas move very quickly once the dough is shaped, so do yourself a favor and prep all the ingredients as much as a day ahead. You’ll appreciate having more space in the kitchen, and I’ve recently discovered that placing cold toppings on your freshly shaped pizza dough seems to make it easier to slide the pie off the peel into the screaming hot oven.
We bake all our pizzas on a steel, which has quite literally been a game changer in our quest for the perfect slice. If you use a pizza stone or metal pan, please follow the alternate baking instructions.
Ingredients
1/2 lb. lean ground chicken
1/2 small onion, chopped
1/3 cup Frank’s original red hot sauce* (see notes)
1 Tbsp. fresh garlic, chopped
1 stalk celery, ribbed and sliced thin on diagonal
1 Tbsp. finely chopped jalapeno
1/3 cup whole milk ricotta cheese
1/2 cup shredded pepper jack cheese
1/2 cup crumbled bleu cheese*
1 ball real New York pizza dough (link to dough recipe)
Extra virgin olive oil
Salt and pepper (as you like it)
Notes
Not a fan of bleu cheese? Try feta instead, to mimic the texture and saltiness, but without the funk.
Don’t get confused when you see the selection of Frank’s sauces. They used to make only one (now labeled “Original”), and this is the one you want. Trust me, I’ve been eating it on wings since the 1970’s.
Frank’s has developed several new flavors since they began, but the “Original” red hot sauce is exactly what you want. True Buffalo sauce flavor.
Instructions
Heat a skillet over medium heat. Add a swirl of extra virgin olive oil and cook chicken with onions until browned. Remove from heat, stir in Frank’s Red Hot sauce and chopped garlic.
Shape pizza dough into 12- to 14-inch disk. If you missed the tutorial, here’s a quick recap for shaping your pizza dough.
Press gently to create a “lip,” making quarter turns with the dough all the way around.
Use your finger tips to “tap” the dough straight down the center. This stretches the dough while keeping air pockets inside.
Gently turn the dough over, and repeat the pressing steps on the second side.
Rub flour into the wooden peel, then dust generously with cornmeal before placing the dough on it. These makes it easier to slide into the oven after topping.
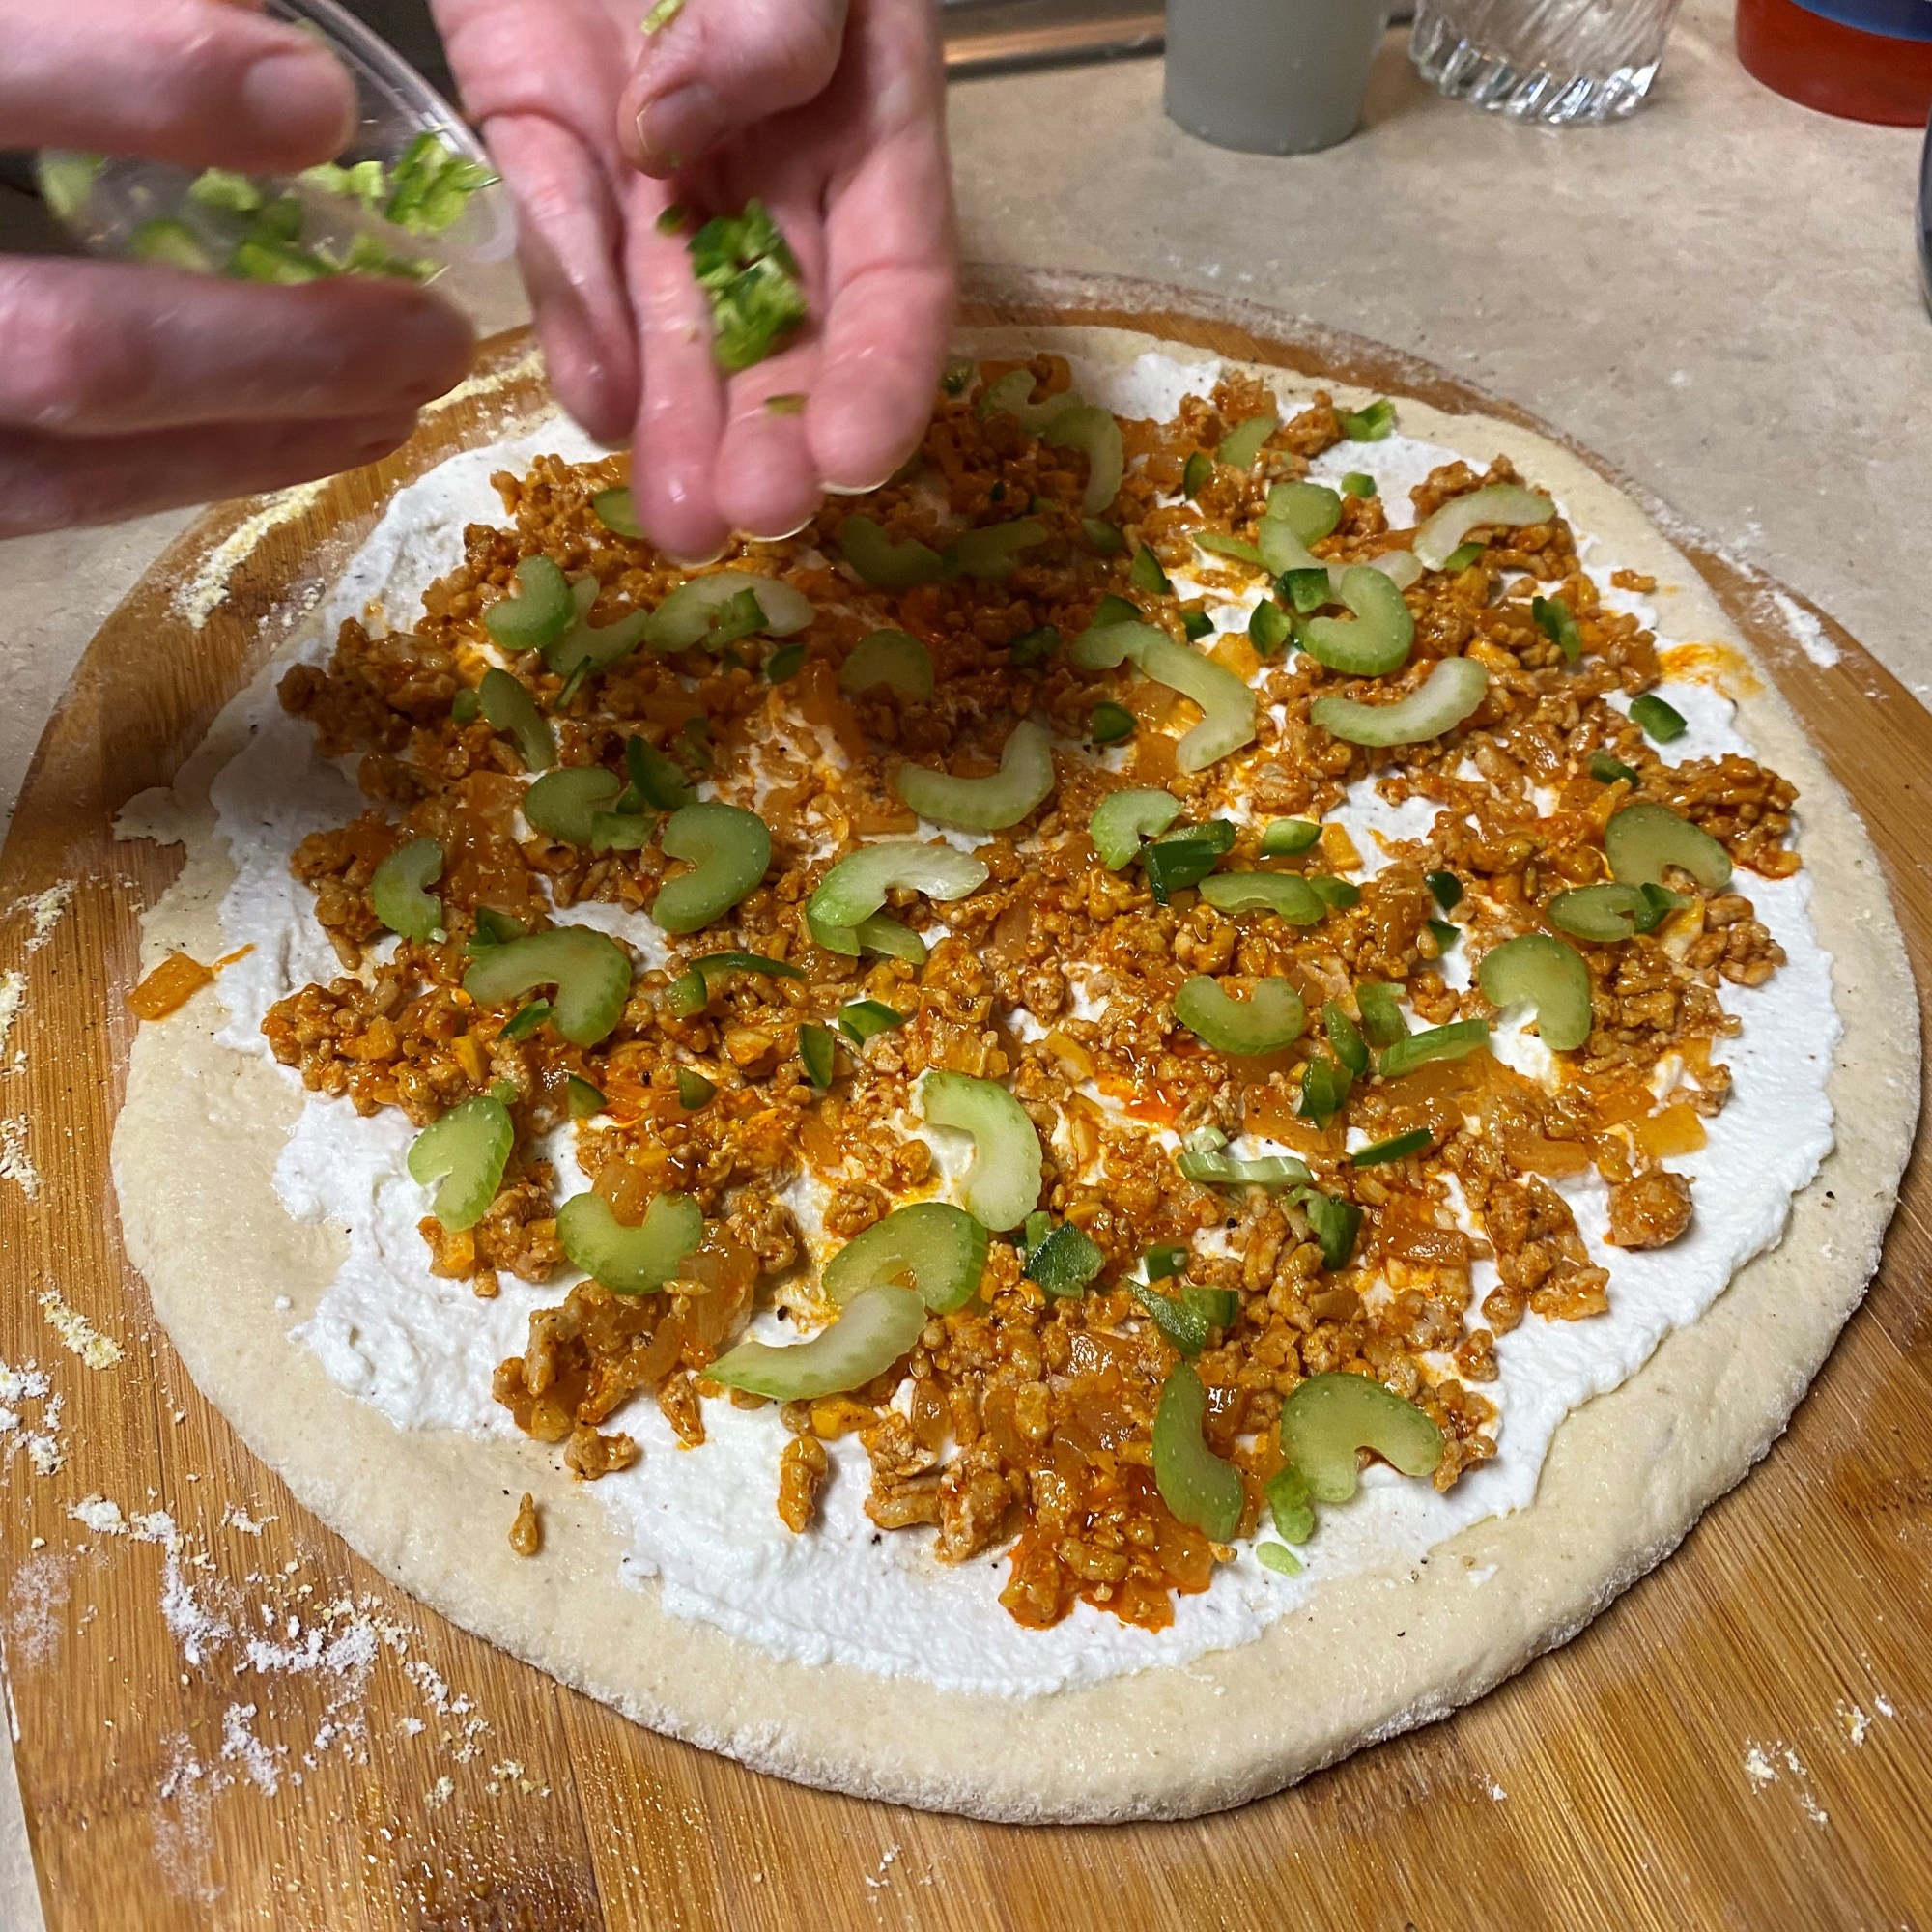
Brush or spray with olive oil and season with salt and pepper. Spread ricotta evenly over dough, keeping about 1/2 inch border on dough. As with any other sauce or base, you want to spread it thinly enough that you can see glimpses of dough through it.
Scatter chicken mixture evenly over ricotta base, then top with celery slices, jalapeno and pepper jack. Sprinkle bleu cheese crumbles over the top of the pizza and bake on a preheated steel at 550° F for about 7 minutes, until crust is golden brown and cheese is bubbly.
See what I mean? ALL the flavors! You might even go crazy and drizzle a bit of bleu cheese dressing right on top before you slice it.
For baking on a pizza stone, follow manufacturer’s instructions regarding maximum temperature. Some stones will crack or break at higher temperatures. For baking on a pizza pan, lightly grease the pan before placing dough on it, and bake in the lower third section of your oven for a few minutes longer than recommended in the above recipe.
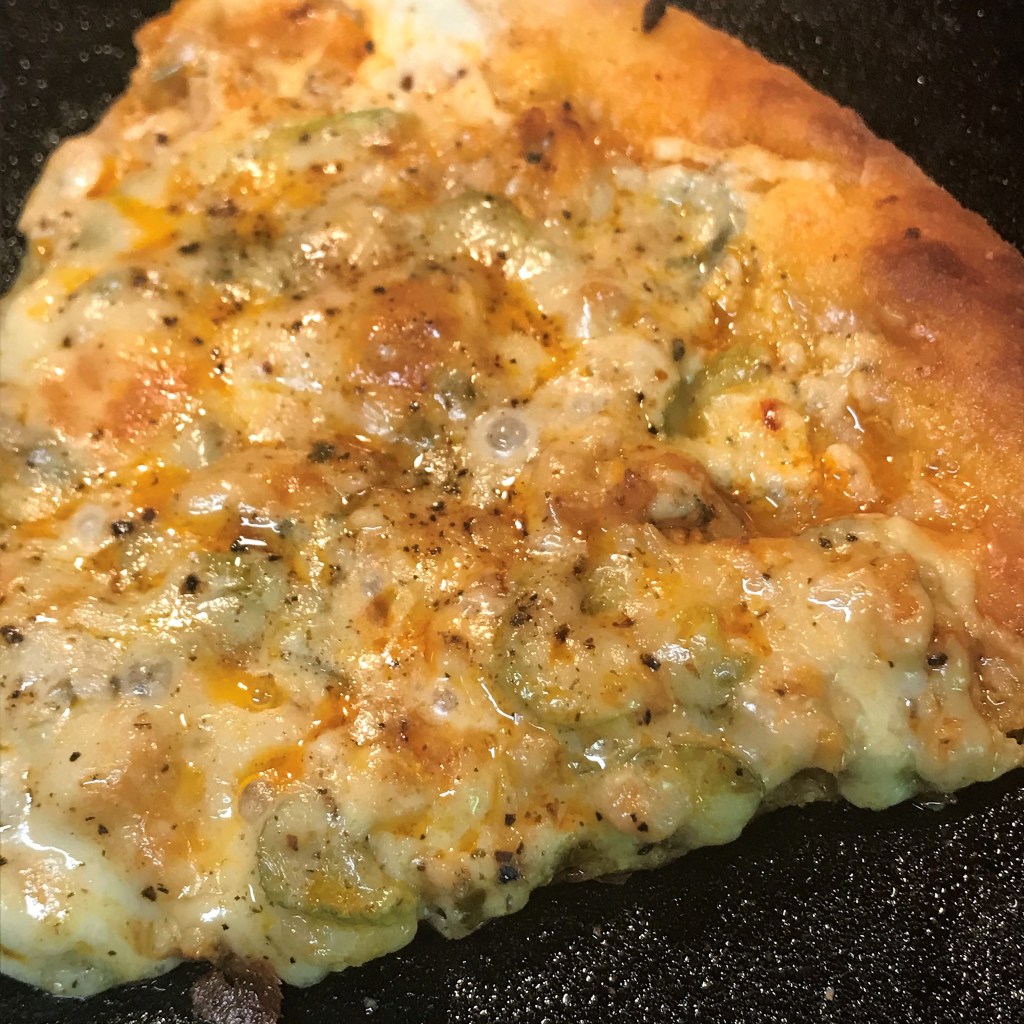
If you’re lucky enough to have leftovers, do you know the best way to reheat them? If you just said, “the microwave,” you’re excused from my blog. Just kidding! You can enjoy the leftovers as much as the original pizza, by placing the slices in a skillet or on a griddle, over very low heat. Place a vented cover over the slices, or lay a loose tent of foil over the top. This helps the cheese return to a glorious melty state, while the constant gentle heat on the crust surface brings back the crunch.
If you look at the spot right exactly in the center of this image, you’ll see the cheese getting bubbly again.
Homemade pizza dough isn’t as complicated as it seems. Unless, of course, you happen to live with the one person who is seemingly the expert on all things related to “New York pizza.” And I do.
My husband, Les, is a little finicky completely fanatical about his pizza, to such a degree that I am still nervous about making it for him, even 3+ years into marriage. Like, “Beat Bobby Flay” kind of nervous. If you ask him what part of the pizza is most important, he will answer before you finish the question—the sauce is important and you should never, ever use too much of it. And the cheese should be good quality and never, ever pre-shredded from a bag. But the crust? Ohhh, the crust—the very foundation, the bedrock of a good pizza—this, Les declares, is most important.
When we met, I was still early into my adventures of bread making, but I was gaining confidence in it. And because pizza crust is, essentially, a bread, it made sense to me that I would simply make it. As you have probably already imagined, I wasn’t quite prepared for the onslaught of constructive feedback I’d receive:
This one is OK, but it’s a little dry. The texture on this one is good, but the flavor is a little bland. This one is all right, but it’s a little too thin, like a cracker. This one is a bit too chewy, but not bad.
During our honeymoon, we went straight to a NYC mecca of pizza, so I could see what “true north” looked like. Between the aroma of great pizza emanating from the shops and the ubiquitous New York street performers, it was a great moment in time.
And the pizza at John’s of Bleecker Street was indeed amazing.
I’m not even slightly embarrassed to admit that we ate the entire pie.
Back at home, I got serious about upping my game. By day, I’d research formulas, test recipes, develop my technique. By night, I’d pray feverishly to the pizza gods for some kind of divine dough guidance. I scoured through books written by bread experts including Peter Reinhart and Ken Forkish, clicked through about a million Pinterest buttons claiming they had the “best New York pizza dough EVER” and I sat through dozens of YouTube tutorials to learn the correct way to shape my dough. In case you’re wondering, you don’t have to throw it into the air to be successful. My ceiling is thankful.
Finally, I found the dough recipe that was closest to Les’s memory of New York pizza, and with a few tweaks of my own (most notably, my effort to build the dough from my sourdough culture), I have earned my keep. You can imagine my joy today, each time we make pizza at home, when this man of mine declares out loud (and, of course, to all his Facebook friends) that our homemade pizza rocks.
Just go ahead and get one.
Beyond the recipe, we have discovered the beauty of a pizza steel, which has completely changed the game for us. If you’ve ever considered getting one, just do it. It inspires me to make even more homemade pizzas, and in the weeks ahead, I’ll elevate your happy by sharing some of my favorite unconventional toppings (because everyone can figure out a pepperoni and cheese).
Ready to roll in the dough (well, figuratively)? I’ve created a tutorial for replicating our favorite homemade pizza dough—complete with recipe, instructions for yeast version and sourdough version, and steps for shaping the crust so you can enjoy pizza at home that rivals the best local takeout joints.
Sumptuous layers of Mediterranean flavor—béchamel-topped eggplant, potatoes and ground meat seasoned with a delightfully different tomato-y sauce. Moussaka is one of my favorite Greek-themed foods. It’s not quite lasagna, not quite eggplant parmesan, but 100% the comfort food value of both, and while the one pictured is a vegetarian version, there is also a simple switch to make it vegan.
You read correctly. Vegan moussaka. All the flavor, all the richness, all the comfort, but none of the meat. And it’s way easier to make than you might imagine. I’ve learned that when it comes to “converting” a meat-centric recipe into a vegan delight, if you keep your focus on the spices and flavors, you’ll have a winner. It’s not the meat that makes moussaka special, but the other layers of flavor around it, and especially the tomato sauce. Unlike an Italian red sauce, this one gets its distinct flavor from warm spices, such as cinnamon and coriander. And if we can nail those flavors, it really doesn’t matter what goes in place of the meat—but of course, I’ll offer some suggestions to get you started.
This is my approach to making a vegan version of a classic dish. I want protein, texture and flavor—the three things the meat would otherwise contribute to the moussaka, and the rest of the recipe will remain traditional. Lentils will bring the protein, and they’re one of the earliest crops domesticated in ancient Greece, so they’re already speaking the same language as the spices and eggplant. And I love lentils! One cup of cooked lentils packs a hefty 16 grams of protein, about the same as a 3-ounce serving of cooked ground beef. They add more than 15 grams of dietary fiber, too. Nutrition-wise, this is a very smart substitute. If I didn’t have them, I’d probably be looking at garbanzo beans.
Plenty of vegetables provide the other qualities my recipe needs, but I want to avoid the ones that might compete with the eggplant and especially that scrumptious sauce. Bell peppers are great with eggplant (I can’t wait to make ratatouille this summer), but the flavor feels a little off for moussaka. Broccoli is too bitter. Green beans are too specific in shape. Zucchini is a little high on water content. I need something I can chop or pulse into smaller pieces in the food processor. That leaves me with cauliflower, washed kale leaves, onions and carrots. There’s good body in all of them, and they’ll hold their shape after a quick sauté.
There are a few other tricks I’ll employ to make this dish hearty and satisfying. I’ll salt and sweat the eggplant slices to make them more “meat-like,” and nutritional yeast will help bring an umami experience to the vegan bechamel topping, which would otherwise be bland and uninteresting. My husband’s adult daughter has embraced the vegan lifestyle, and she comes to town every so often for special dinners. As a result, all these ideas have become very common to me, but I don’t want to assume all of this makes sense to you, dear friends, so let me back up a little bit.
What does it mean to “salt and sweat” the eggplant?
Layering the sliced eggplant on salted paper towels will draw out the moisture from the eggplant, which improves the texture a great deal, especially when I want to grill or roast the eggplant as a replacement for meat. If you’ve ever had slimy, bitter or soggy eggplant, somebody skipped this step. Please give eggplant another chance. Properly “sweated,” eggplant will be remarkably meaty and substantial—exactly what we want in this moussaka. Take care of this step a couple hours before you’re ready to make the full recipe.
Sprinkle the salt on the paper towel AND on the eggplant slices. The moisture will draw from both sides, resulting in better texture.
Adding a little weight will speed up the process, but you should still plan on at least an hour. Two is even better.
Both the top and bottom paper towels pulled so much moisture from the eggplant, I could literally squeeze it out!
Yes, there will be “shrinkage” in the oven. But these slices are nice and sturdy after roasting, exactly what we need for moussaka.
What is nutritional yeast?
Nutritional yeast is a common substitute for cheesy flavor in vegan cuisine. It’s the same species, but not the same form as the yeast you’d use to bake bread. Nutritional yeast is a yellowish flaky substance, widely available at any natural foods store or online from Bob’s Red Mill. It provides some of the salty, savory quality you would expect in a hard cheese such as parmesan. It’s tasty just sprinkled on hot popcorn. And for the vegan moussaka, it will lend a familiar “cheesiness” to the béchamel alternative.
What does “umami” mean?
When I was a kid, we learned in science class that the human taste buds recognized four main things—sweet, sour, salty and bitter. But within the past decade or so, a fifth taste, “umami” was officially invited to join the party. It’s a savory flavor that is most easily described by example. Think of what you taste when you bite into a piece of steak, or a sautéed mushroom, or a piece of sharp cheese. This savory sensation is distinctly different from the other four tastes and is often the missing link in meatless dishes. If you can successfully supply this “umami” taste, you’ll be victorious in every vegan dish.
A.K.A. “The Bomb.”
This new seasoning from Trader Joe’s is one of the best ingredients ever for meeting this goal (no, they’re not paying me to say so). It is made from ground dried porcini and other mushrooms, plus garlic, onion, thyme, salt and some red pepper spice. I fell completely in love with this stuff last year at Thanksgiving, and I sometimes use it even in non-vegan dishes.
Ready? Let’s get cooking!
Ingredients
1 medium eggplant, sliced, salted and sweated
Kosher salt and freshly ground black pepper
3 medium Yukon gold potatoes, with peels
1 medium sweet onion, chopped
4 cloves garlic, rough chopped
1/4 head fresh cauliflower florets, rough chopped
1 large carrot, peeled and rough chopped
Several handfuls of washed kale leaves
Spice blend (listed below)
2 cups cooked lentils (I used a blend of red, brown and green)
1/4 cup dried potato flakes* (if needed for thickening)
*Notes
Some vegan butter brands will work better than others in this recipe. For the roux that will be the base of a cream sauce, choose an oil-based option. Earth Balance brand used to be my go-to, but my new favorite is the Country Crock line of plant-based butters (they’re not paying me, either). In this recipe, I used the avocado oil version. It melts perfectly and has a pleasant, neutral flavor.
When purchasing potato flakes (or any other processed ingredient) for vegan recipes, take notice of the label to be sure they don’t have some hidden dairy ingredient. I’m partial to the “instant mashed potatoes” available at Whole Foods. There’s only one ingredient—dehydrated potatoes. I love when something is simple.
Instructions
Wash the eggplant and trim the stem end, but do not peel it. Place a double layer of paper towels on a rimmed cookie sheet and sprinkle it liberally with kosher salt. Slice the eggplant into 1/2″ thick rounds and arrange them in a single layer on the salted towel. Sprinkle salt over the tops of the slices. Place another double layer of paper towels over the top of the eggplant slices, then place another cookie sheet, weighted by a cast iron pan, over the top. Allow this to rest on the counter a couple of hours.
When you are ready to proceed, pre-heat the oven to 350° F. Wipe the excess salt from the eggplant slices. You might be shocked at the amount of moisture the salting step has removed. Brush (or spray) both sides of the slices with extra virgin olive oil and arrange them on a parchment-lined cookie sheet. Grind some black pepper over them, and roast for about 30 minutes, turning once about halfway through. They will shrink considerably but that’s OK.
Scrub the potatoes clean and poke them all over with a fork. Microwave them for about 4 minutes, or until they are just tender enough to slice (not as tender as you’d serve). Cool, then slice them into rounds about 1/2” thick. This is a little thicker than I would slice them for a traditional meat-centric moussaka, but in this vegan version, I want them to provide a little extra body for the foundation of the casserole.
In a food processor with the chopping blade, add the rough chopped cauliflower and carrots. Pulse about 5 times, until vegetables have a coarse, uniform texture.
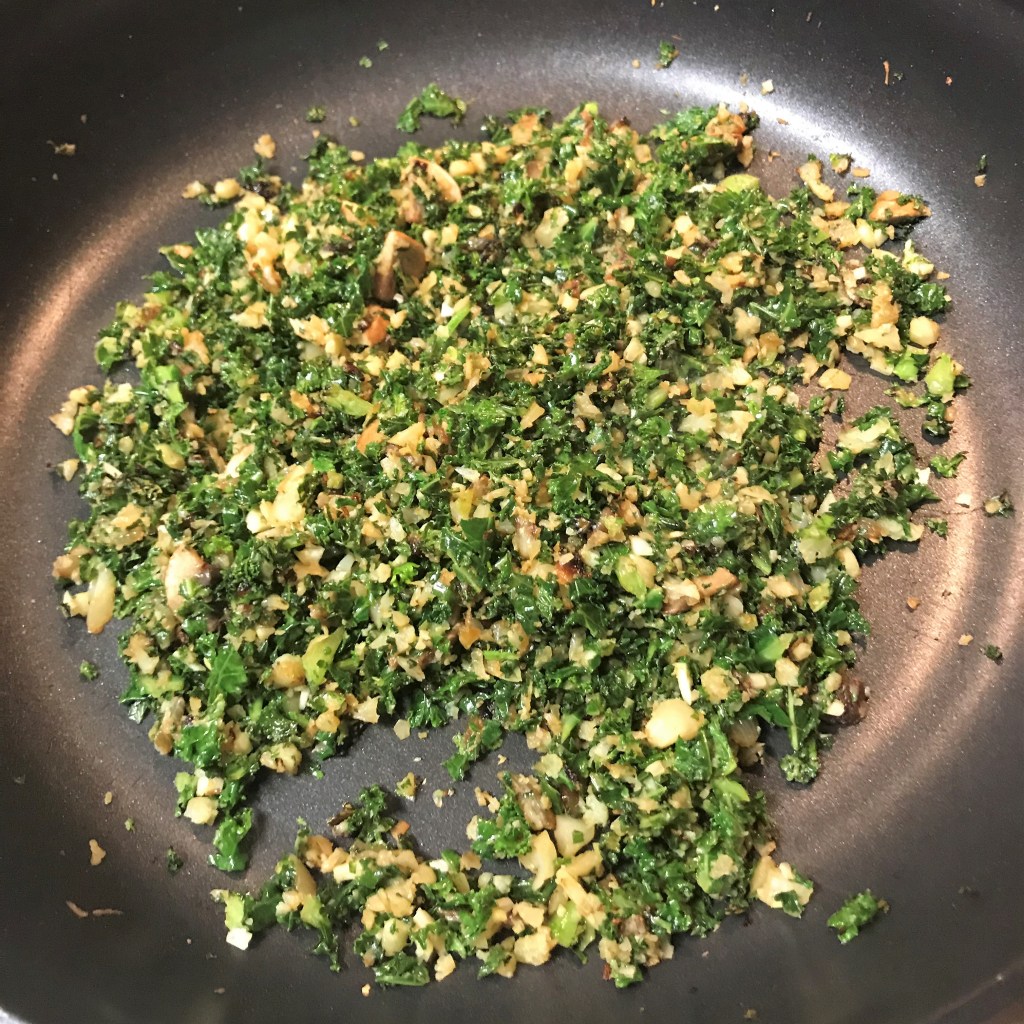
Place a large non-stick skillet over medium heat and add about 2 Tbsp. extra virgin olive oil. When the oil begins to shimmer, add the chopped onions and the processed carrot-cauliflower pieces. Stir and sauté while you process the kale.
Fill the food processor bowl with kale leaves, and pulse about 5 times until the kale is reduced to about half the original volume. The appearance of chopped parsley is just about right.
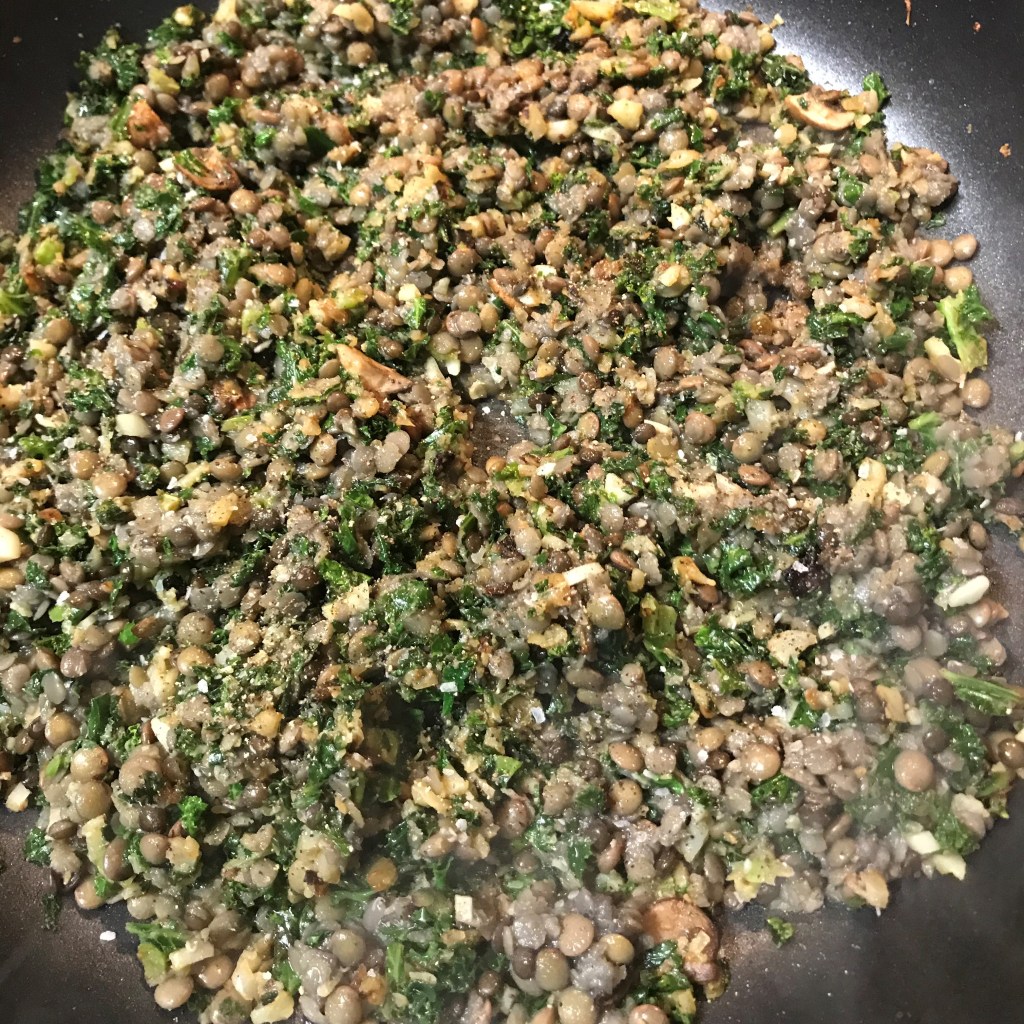
Add the chopped kale to the skillet and sauté the whole mixture about 3 minutes. Add the garlic, season with kosher salt, then add the spice mixture and cook another 2 minutes. Add the cooked lentils and the entire can of crushed tomatoes. Get every bit of flavor by “rinsing” the can with the red wine. Simmer on medium low heat about 10 minutes until liquid is reduced.
I save tons of prep time by purchasing the “pillow” bags of pre-washed kale. I filled my processor to the top and pulsed to this texture.
Give the vegetables a little head start, so they will be slightly tender when the lentils are added.
Don’t cook this mixture too long, or the delicate lentils will lose some of their shape. Just a light saute is good.
On a whim, I sprinkled some milled flax seed over the lentil mixture. Flax has more health benefits than I can list here, but our bodies use it best in milled form.
Notice that the sauce quickly seeps back to the center of the pan when I move my utensil through it. This is how I know it’s not quite ready.
That’s better. Like the parting of the Red Sea! When your sauce reaches this thickness, it’s done.
Assembling the Moussaka
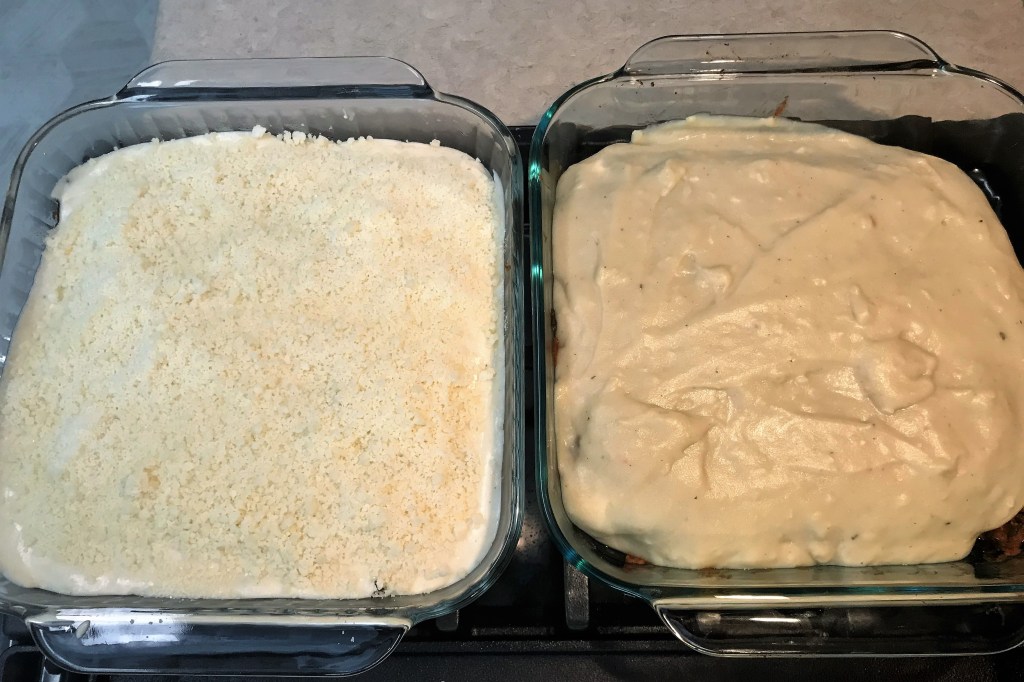
Spray an oblong (9 x 13) glass baking dish with olive oil spray. Arrange the cooked potato slices in a single layer, placing them as close to each other as possible to provide a good base for the casserole. Add about half of the sauce mixture and spread it evenly over the potatoes. Arrange the eggplant slices in a single layer, then top with the remaining sauce mixture. If you’re working ahead, you can pop this in the fridge for a day or two until you’re ready to add the vegan béchamel and bake the casserole. If you prefer a classic dairy béchamel, follow this recipe but with dairy butter and milk, and skip the nutritional yeast and umami seasoning. We usually toss on a handful of fresh parm-romano blend also. After baking, it should come out pretty much like this one:
Lentil moussaka with dairy bechamel
To make a vegan béchamel, begin by melting the vegan butter and cooking the flour in it until it becomes lightly golden and bubbly. Add the almond milk, then cook and whisk over medium heat several minutes until mixture begins to thicken. Add salt, fresh nutmeg, white pepper, nutritional yeast and umami seasoning. Spread over the layered casserole and bake at 350° F for about 40 minutes, or until you can see the inside sauce bubbling around the edges of the béchamel. Give it a couple minutes to cool and firm up, then dive right in.
My brand of almond milk was on the thin side and didn’t thicken as well as I’d expected. I resolved the viscosity issue by whisking in about 1/4 cup of dehydrated potato flakes. I’m a bread-making nerd, so I have such things on hand. Without it, I probably would have made flour or corn starch slurry to whisk into the sauce instead. But the potato trick worked like a charm, and it made kind of an “echo” of potato-ness from the bottom of the casserole. If your béchamel seems to be the correct consistency, this step would not be necessary, but still delicious.
This dish has become a “go-to” recipe for our Meatless Monday rotation, and my husband, Les, and I generally don’t mind having some dairy ingredients in the béchamel topping. Frankly, we prefer it because we love his DIY parm-romano cheese blend lavishly sprinkled on top. But we were delightfully surprised on Memorial Day weekend to hear from his adult daughter—Syd was planning to drive two hours into town for a visit and wondered if she could bring her boyfriend to meet us around midday the next day. Of course! Let’s plan on lunch while we’re at it. Normally, a bit more notice gives me greater confidence in preparing a completely plant-based meal, but as fate would have it, this lentil moussaka was already in my plan for the weekend. Coincidence? We don’t believe in coincidences in our house.
By the time Syd phoned us, I had already prepped the moussaka up to the point of adding the béchamel, so we made a last-minute decision to divide the 9 x 13 casserole into two smaller 8 x 8 casseroles—one with dairy béchamel and the other with a vegan alternative.
Dairy on the left, vegan on the right.
Side by side, you can see the slight difference between our two versions. Underneath the topping, they were exactly the same. The spices offered a nice complexity, and the texture of the lentils, cauliflower and kale made it feel substantial—all the things I described when we first talked about Meatless Monday.
Les is a great dad (and husband), and he gets pretty excited any time either of his kids pay a visit, and we were extra lucky that day because his adult son also happened to join us for our moussaka dinner. Alex came home unexpectedly from Hungary during the early weeks of the pandemic and having both of his kids with us at once was a real treat. Honestly, it was the first sit-down meal we’ve hosted for guests since New Year’s Eve—five whole months ago. For a couple of hours, life felt almost normal.
So excuse me forgetting, but I got a little sidetracked and missed taking pictures of the casserole just out of the oven or even at the table. One of the new things I’m learning during this pandemic is to pay closer attention to the people you love while they’re in front of you. If that means I miss a photo of the plated food—well, no big deal. I’ll update this post when I make it again one day. 😊