Zucchini Citrus Pasta

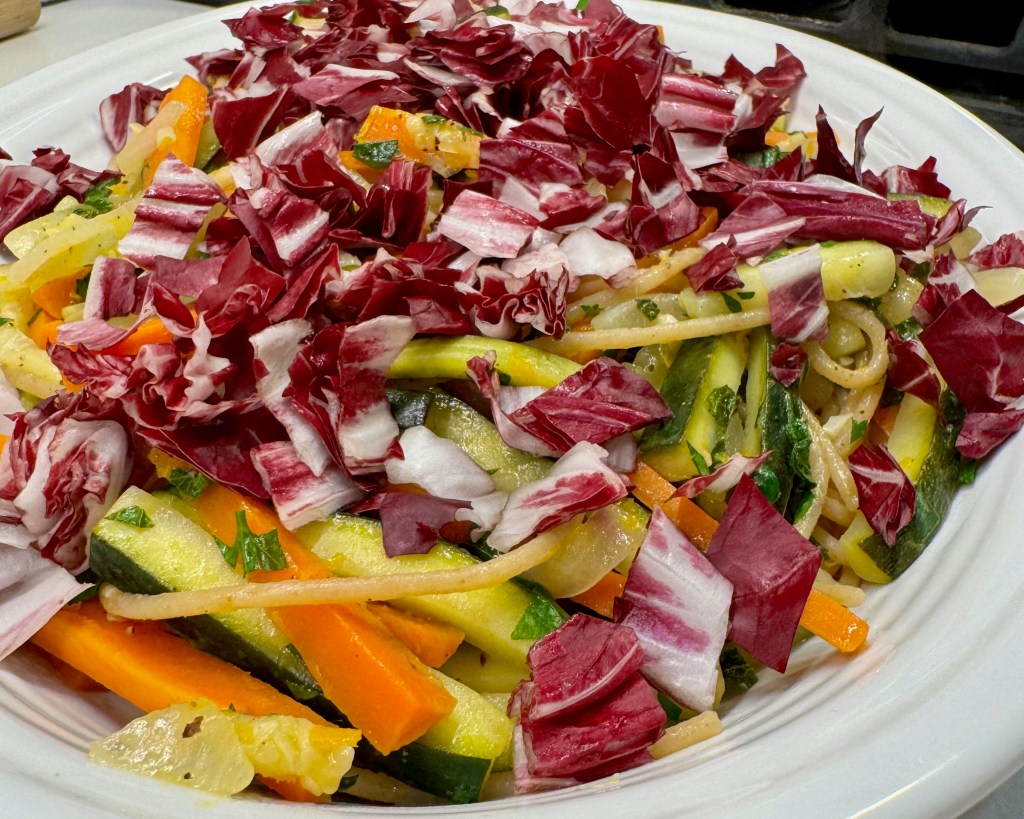
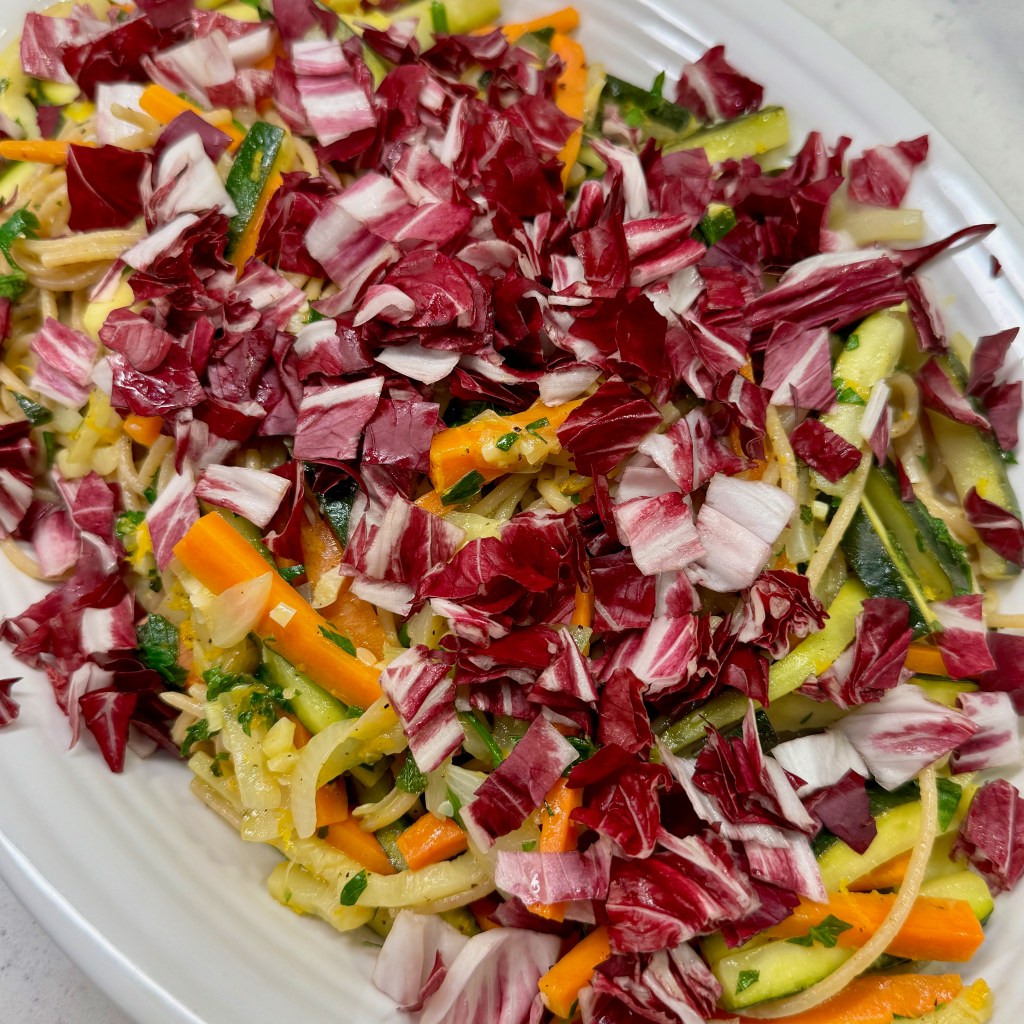
The best thing about summer, besides the sunshine, is all the light and easy food coming our way. From backyard cookouts to easy breezy friend gatherings, there’s always room for one more light and tasty side dish. This colorful platter has refreshing citrusy flavors on top of tender, sautéed zucchini and carrots, chewy-to-the-tooth pasta and a sprinkle of vibrant herbs and crunchy, slightly bitter radicchio. In other words, perfect for summer!

For a lighter appetite, this could be dinner on its own.

I know, of course, that we are still almost two weeks from the summer solstice when the season becomes “official,” whatever that means. But I also know that we’ve had a good number of days tipping toward 90° F, so it feels like summer is already here! Zucchini is one of my favorite summer foods, and though it may be a while before our local farmers start picking zucchini, we’ve seen plenty of it in the supermarket grown in Florida and Georgia, just a couple states away.

My introduction to this zucchini-forward recipe came about 18 years ago, when I was a faithful fan of Rachael Ray’s “30-Minute Meals” on Food Network. You do remember when the channel actually had shows that demonstrated regular people recipes, rather than just over-the-top competition shows, right? Those were the days! 😏

Rachael ruled Food Network in the 2000s (along with Emeril), and I found her casual, not-so-cheflike approach absolutely charming. Her skill was honed not in a culinary institute, but in her Nonna’s kitchen (I can relate) and in an upstate New York grocery store where she did cooking demos. Her food always looked delicious, it was made with common ingredients, and her instruction made even the most gorgeous meals seem approachable. For sure, she’s one of my culinary mentors, and I still love this recipe. Let’s make it!

Mise en place

I won’t say that Rachael taught me about mise en place— a French culinary term that means loosely, “get your ducks in a row.” No, I learned that in the 1990s when I worked in a catering kitchen. But Rachael frequently emphasized the importance of organizing ingredients and tools before starting a dish and it’s good advice here, as the recipe goes pretty quickly once it starts.


Multi-tasking for the win

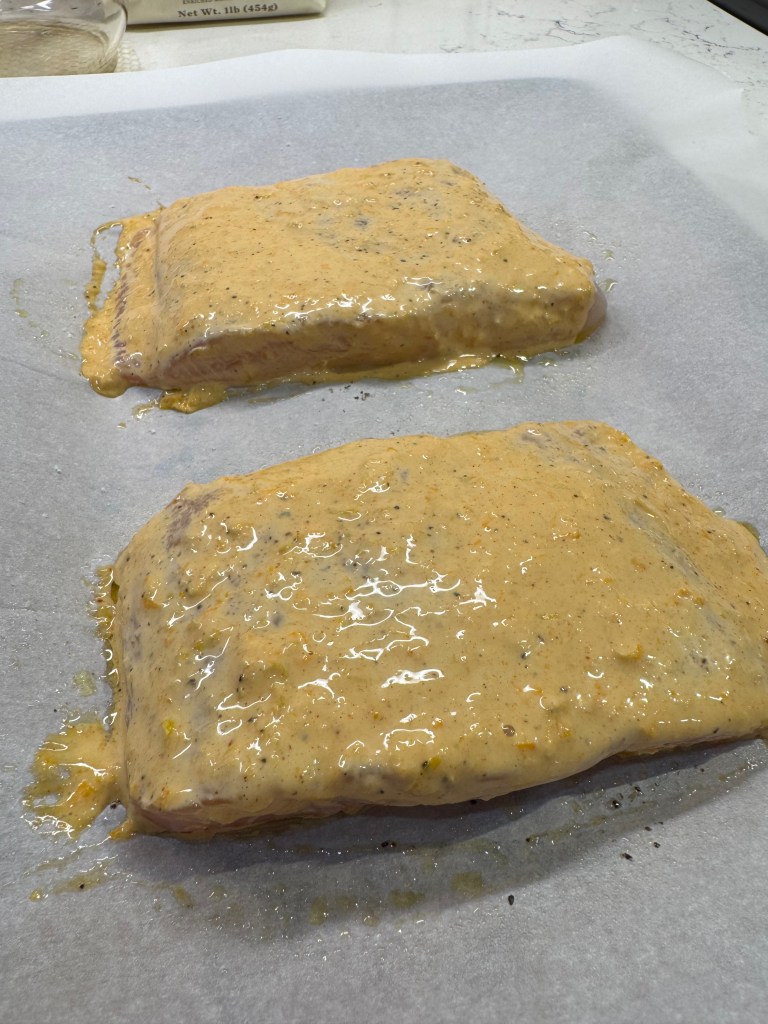
When I made this pretty dish for my husband, Les, I served it with baked halibut, which I seasoned up with the miraculous mayo marinade that I learned a couple of years ago. I mixed up the mayo with some lemon and orange zest, grated garlic and smoked paprika, and then added the pinch of baking soda that gives the marinade a turbo charge. This trick guarantees moist fish every time, so check it out when you have a chance!

This was a true “30-minute meal,” as I prepped all the veggies while I waited for the fish to marinate, and then cooked the dish while the fish was in the oven. Everything was ready at exactly the right time.


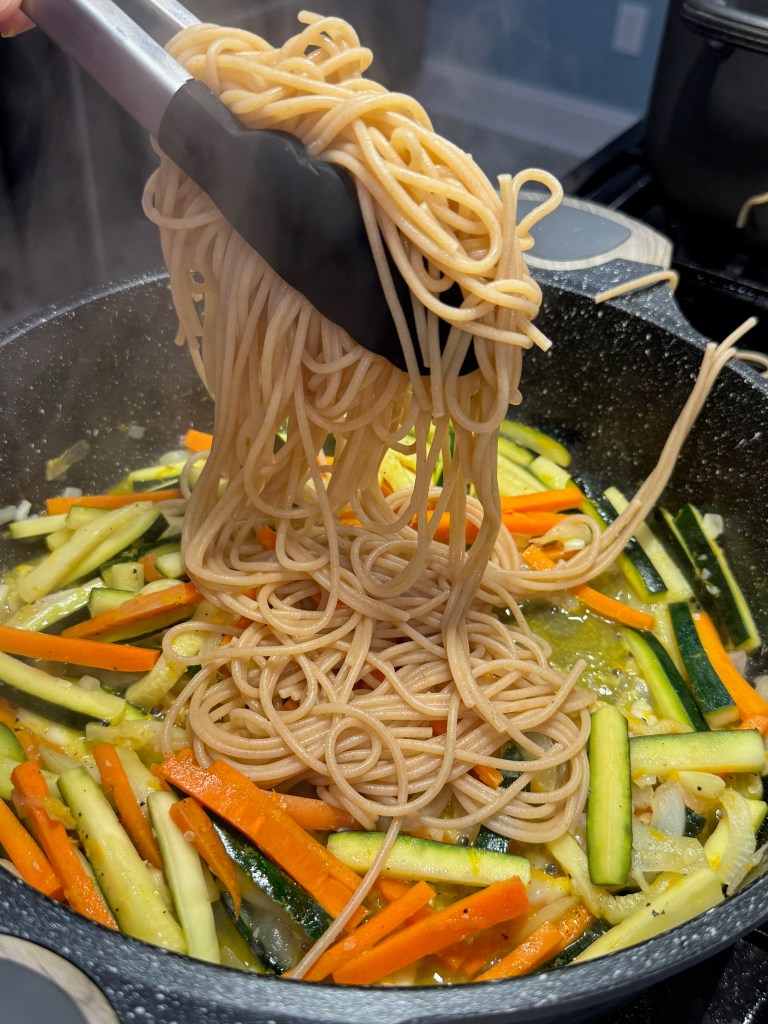
On one burner, get a pot boiling for spaghetti, which will be tossed into the dish at the end. Salt that water generously and keep half an eye on it while you work on the veggie part of the dish.

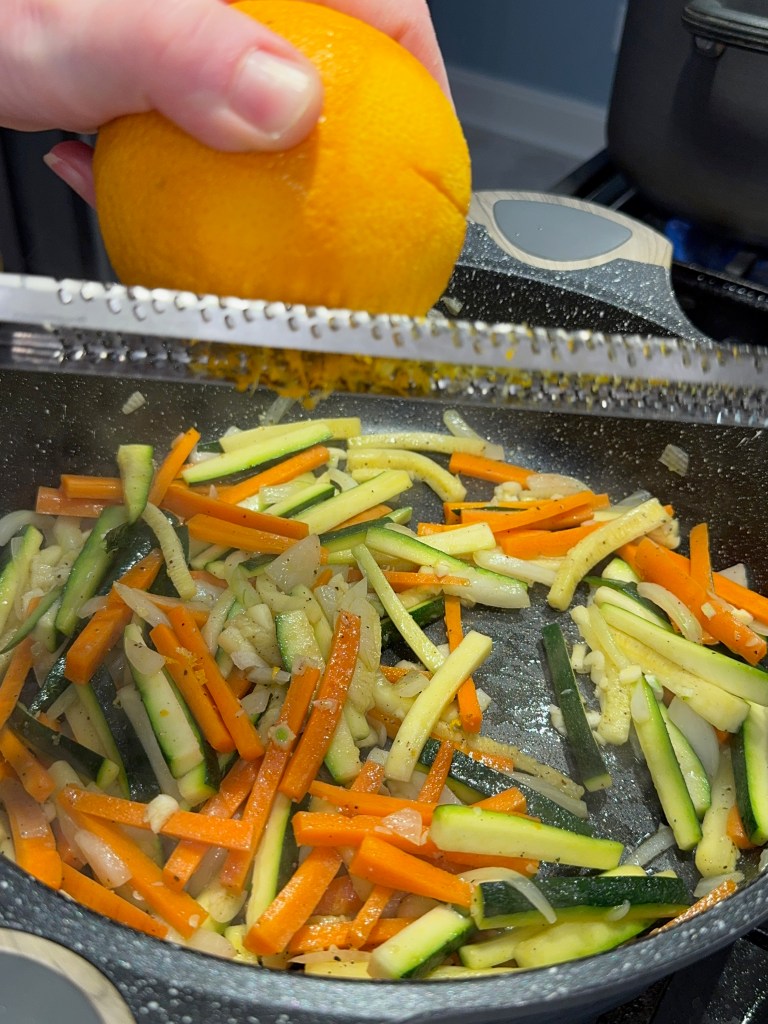
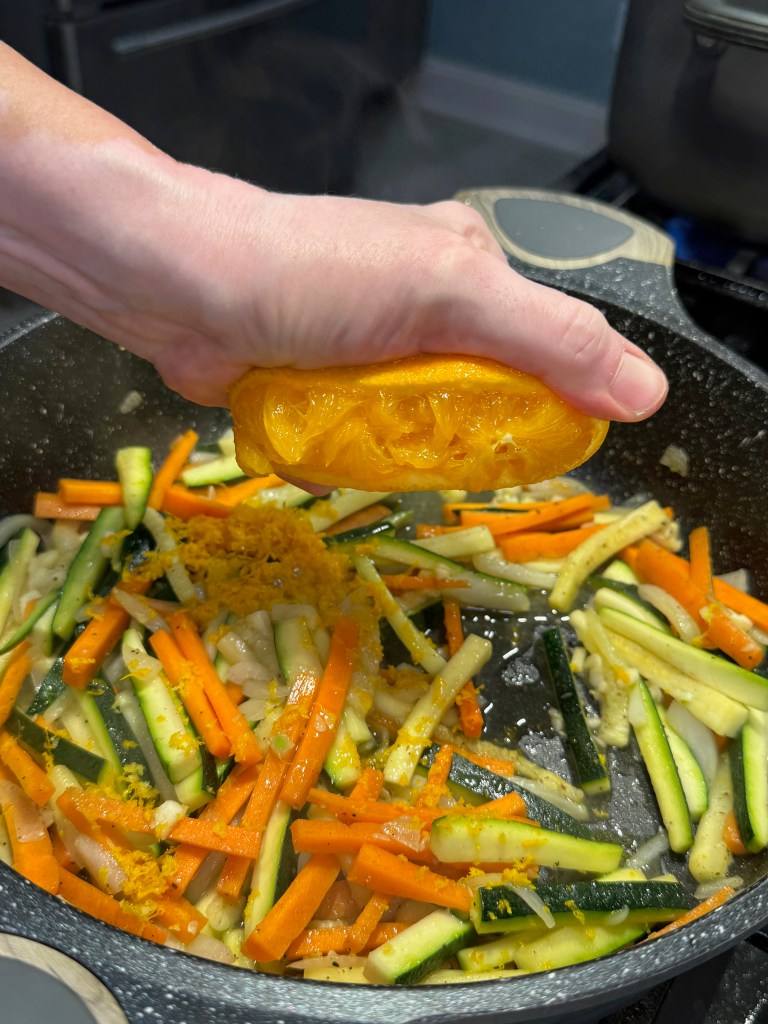
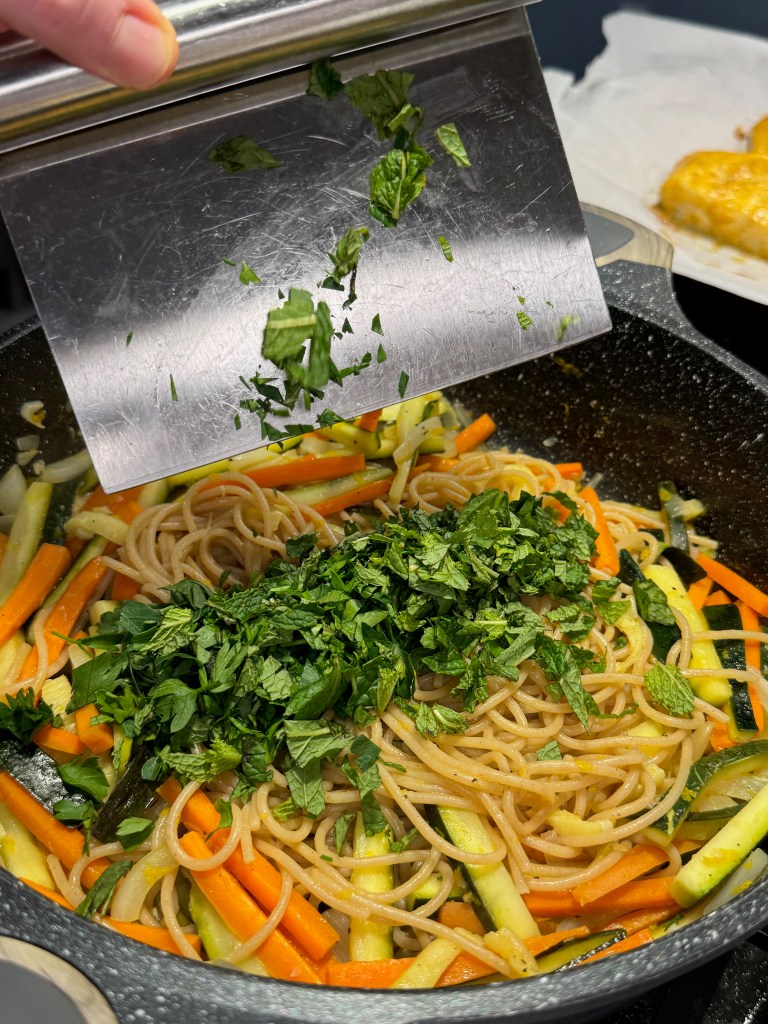
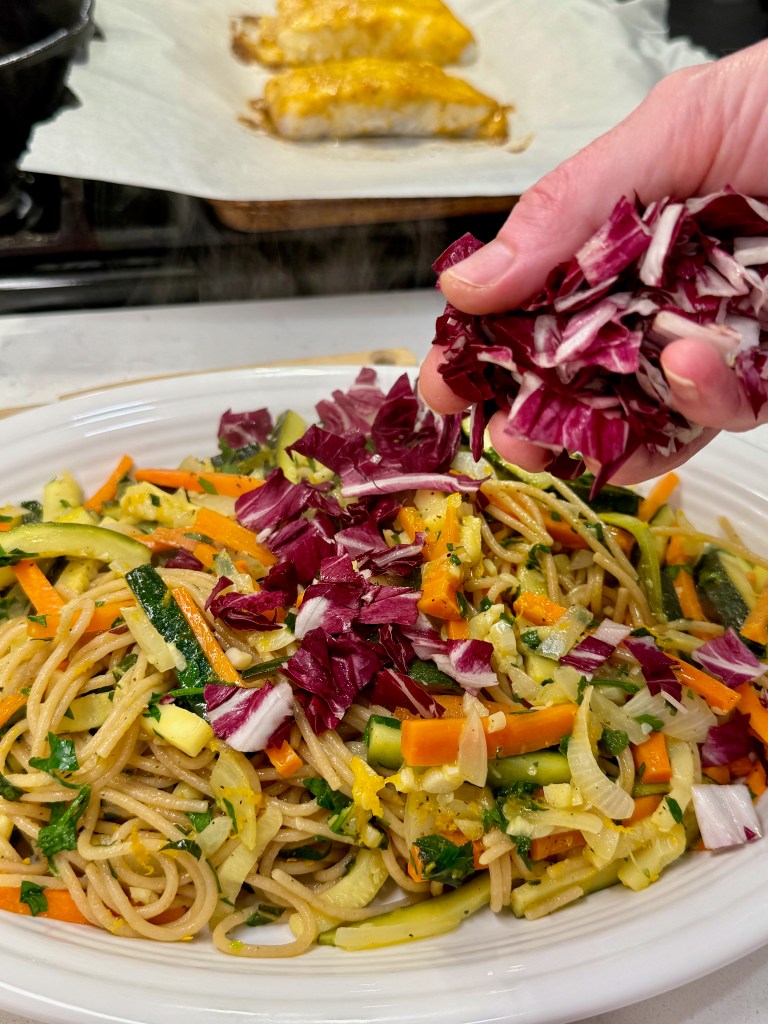
A big swirl of EVOO (as Rachael would say) goes into a large sauté pan for cooking the zucchini, carrots and onions— seasoned, of course— and then you’ll add garlic plus the juice and zest of a lemon and an orange. When the veggies are somewhat tender and the citrus juice has reduced a bit, use tongs to move the cooked spaghetti straight from the hot water to the pan, and toss the whole thing with the fresh parsley and mint. Transfer to a serving platter and scatter the chopped radicchio on top. Yes, it is as easy as it sounds and as delicious as it looks.


I went with my usual whole grain spaghetti for extra nutrition and a slightly chewier bite. As I was tossing the spaghetti with the veggies, it occurred to me that I’d never tried using another pasta shape, but I definitely will next time. Whole grain fusilli or bow ties would both work great, and might even make the dish easier to serve than with spaghetti.

Color, meet flavor. 😋

You’ll find this dish terrific served warm with a lean protein or, if your appetite is light, by itself. And it’s also tasty left over, cold from the fridge or at room temperature. That makes it ideal for taking along to a summer potluck as well as serving up on a busy weeknight. I could not find Rachael’s original recipe on the internet, but I have managed to remember the ingredients and the process over the years, and that’s a testament to the friend-next-door presentation of her cooking shows.

Do you have a favorite TV chef or cook— past or present— who inspires you to this day? Let’s talk about it in the comments!

Zucchini Citrus Pasta

  • Servings: About 6
  • Difficulty: Average
  • Print

This colorful side dish covers all the bases, with bright, fresh flavors and plenty of texture. Cutting the zucchini and carrots into matchstick-sized pieces allows them to cook quickly without turning mushy. Perfect for a busy summer weeknight or a backyard potluck.


Ingredients

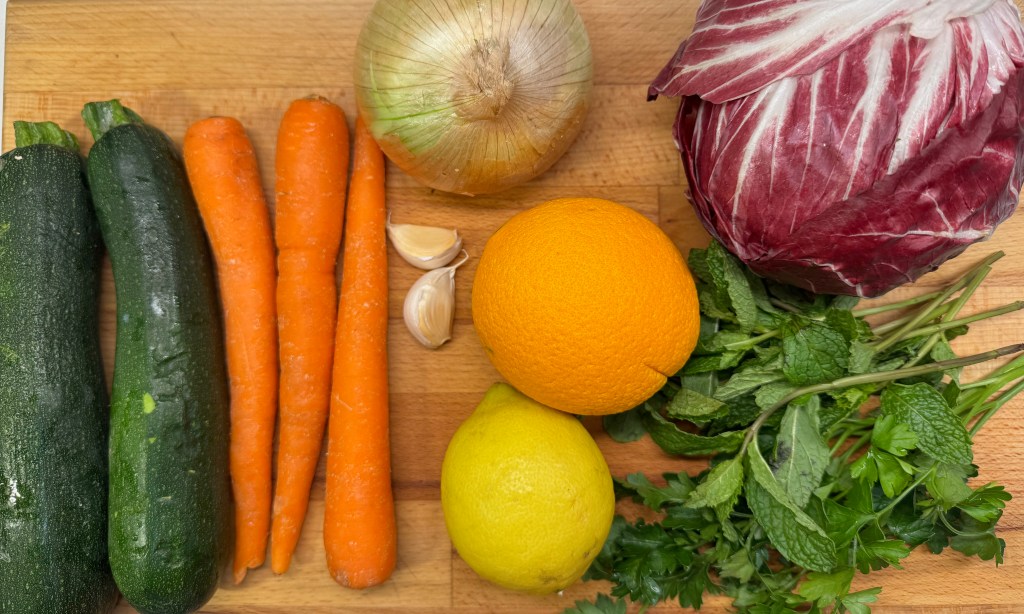
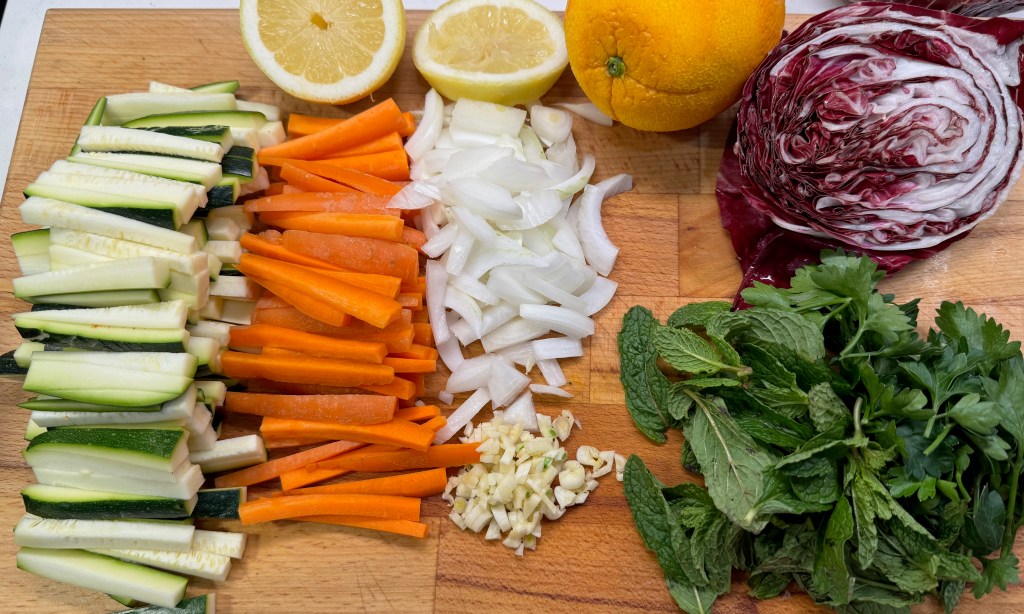
  • 2 medium or 3 small zucchini, julienned
  • 2 or 3 medium carrots, julienned
  • 1/2 sweet onion, sliced into crescents
  • 2 cloves garlic, chopped
  • Extra virgin olive oil
  • Kosher salt and freshly ground black pepper
  • Zest and juice of 1 lemon
  • Zest and juice of 1 orange
  • About 1/3 package hot cooked spaghetti or favorite small pasta shape
  • Handful of fresh Italian (flat leaf) parsley, rough chopped
  • Handful of fresh mint, rough chopped
  • 1/2 small head radicchio, rough chopped

Note: This dish is extremely versatile, as it can be served hot, room temperature or chilled. I used whole wheat spaghetti, but any small pasta shape, such as fusilli or farfalle would be great. If you don’t care for mint, fresh dill would also be delicious.

Directions

  1. Place a large, deep sauté pan over medium heat and swirl EVOO around twice (about 2 tablespoons). Add zucchini, carrots and onions to the pan, and season with salt and pepper. Toss and cook a few minutes until the onions are translucent and the carrots begin to soften.
  2. Add garlic, citrus zest and juices, and reduce heat to a simmer so that the liquid doesn’t evaporate too quickly.
  3. Add hot pasta straight to the pan, along with any cooking water that’s clinging to it, as the starchy water will help the citrus sauce cling. Toss to combine.
  4. Add chopped fresh parsley and mint. Toss lightly and then transfer the mixture to a serving platter. Scatter radicchio on top and serve immediately.


Pimento Cheese Cornbread

It took me nearly 10 years, but I’ve finally found a way to persuade my husband to appreciate cornbread. I love this humble side for its texture, its subtle sweetness and its perfectly rustic personality alongside a bowl of chili, a hearty Brunswick chicken stew, or even a plate of pulled pork barbecue and baked beans. But the grainy texture of plain cornbread, or maybe its simple flavor, has been a turnoff to Les as long as I’ve known him. As a result, I don’t make cornbread very often because I can’t (or shouldn’t) eat the whole batch myself. But now!

I highly recommend enjoying this warm! 😋

This version, featuring tangy pimentos, hot cherry peppers and a hefty amount of cheddar cheese, has made my husband a believer. He actually liked it! This is my adaptation of a recipe that dropped into my email inbox a few weeks ago from NYT Cooking. The NYT version called for roasted red peppers and feta cheese— flavors I also love, and a light bulb went off in my head, perhaps because Les had made a batch of pimento cheese the weekend before New Year’s, and I just knew that the same pimento cheese flavors would work in a cornbread. Did they ever!

What I changed to make it mine

The substitution of pimentos and cheddar is straightforward, but there were a couple of other things I modified from the NYT recipe to suit our preferences. I cut the suggested sugar in half, as recommended by many people who took time to comment on the NYT recipe. Many southerners do not use sugar in their cornbread at all— weird, given that we put it in literally everything else, but I’ll let the dissenters duke that out in the comments. My version had a quarter cup, and that was plenty.  

The only ingredients missing in this picture are melted butter and an egg.

Les loves spicy foods, so along with pimentos, I subbed in some hot cherry peppers, which made for a nice flavor kick. I only had a bit of sour cream, so I went halvsies with plain Greek yogurt. I’m grateful that the two are almost always interchangeable, but in this case, I had a very heavy batter so I splashed in a bit of buttermilk, too. It’s good to be able to pivot in the kitchen! 


A quick shake of sweet paprika in the dry ingredients lent additional color and a touch of smoke. I didn’t want green flecks in my cornbread, so minced onion stood in for the scallions called for in the NYT Cooking recipe. I rehydrated the onions with hot water so that they wouldn’t steal moisture from the batter. If I’d had a Vidalia onion, that would have been even better— sautéed first, of course.

Bringing it all together

Finally, rather than mess with lining a baking dish with parchment, I chose to bake my cornbread directly in a cast iron skillet. I love the crusty edges achieved this way, and in the South, everything is better in cast iron. To be successful with this, melt two tablespoons of butter in the skillet until it’s bubbly and starting to brown. Then pour the batter into the hot skillet and transfer it to the oven for the recommended baking time, 35 minutes.


This cornbread smelled amazing when I pulled it from the oven. The cheddar melted throughout, and the pimentos and hot cherry peppers gave the whole thing a “pimento cheese” vibe. The only thing I plan to do differently next time will be trade the melted butter for mayonnaise, which will serve the same purpose and bring it even closer to true pimento cheese. 


Our pimento cheese cornbread was a perfect side to our New Year’s Day “good luck” meal that also included spicy collard greens and black-eyed pea soup. How would you enjoy it?

Pimento Cheese Cornbread

  • Servings: 8 wedges
  • Difficulty: Average
  • Print

Sharp cheddar and diced pimentos have transformed a classic cornbread into something utterly addictive. If you're adventurous, swap in a few hot cherry peppers for even more great flavor.


Ingredients

  • 1 cup all-purpose flour
  • 1 cup medium grind cornmeal
  • 1/4 cup organic cane sugar
  • 1 Tbsp. baking powder
  • 1 tsp. kosher salt
  • 1/4 tsp. sweet paprika
  • 6 Tbsp. butter, melted
  • 1/2 cup sour cream
  • 1/2 cup Greek yogurt
  • 1 large egg
  • 2 tsp. dried minced onion, rehydrated in hot water
  • 1/3 cup pimentos, drained (or mix it up with diced hot cherry peppers)
  • 3/4 freshly shredded extra sharp cheddar
  • 1 tsp. coarse sea salt for sprinkling on batter before baking
  • 2 Tbsp. cold butter, for cast iron skillet

Notes: You may need to adjust the amounts of sour cream or Greek yogurt, given that consistency of these ingredients varies from brand to brand. If your batter is too thick, consider stirring in a couple tablespoons of milk or buttermilk so that the dry ingredients can be fully incorporated.

Directions

  1. Preheat oven to 375° F, with rack in center position. Place a 10-inch cast iron skillet over medium-low heat and add cold butter, rubbing the butter along the side of the skillet to grease it. Keep the skillet on low heat while you prepare the batter.
  2. Whisk together flour, cornmeal, sugar, baking powder, salt, pepper and paprika. Set aside.
  3. In a large mixing bowl or batter bowl, combine sour cream, yogurt, egg and melted butter. Stir in rehydrated onion.
  4. Stir dry ingredients into wet mixture, half at a time, only until flour is fully incorporated. If batter is too thick or dry, don’t hesitate to stir in a splash of milk. Use a silicone spatula to fold in the cheddar cheese and pimento/pepper mixture.
  5. The butter in the skillet should be completely melted and beginning to brown. Transfer batter to the hot skillet and lightly smooth the top with a spatula. Sprinkle coarse salt over the batter and bake 30 to 35 minutes, until edges are crispy and center passes the toothpick test. Serve warm, and then cool leftovers completely before wrapping and storing for up to three days.


Half-Sweet Mashed Potatoes

Can you make room on the table for one more Thanksgiving side dish? This is an easy one, and we’ve had it at our house for autumn meals other than Thanksgiving even more than on the holiday itself. Combining the fluffiness of Yukon gold potatoes and the sweetness of seasonal sweet potatoes satisfies two cravings at once, and there’s so much flavor and creamy texture between them that minimal extra ingredients are needed. Let’s get into this!

Who can resist a big bowl of mashed potatoes?

The first time I made these half-sweet mashed potatoes was just ahead of Thanksgiving, 2020, when my husband, Les, and I realized it would be just the two of us for the holiday (thanks for nothing, Covid). My food blog was still on training wheels, and I had fun sharing new food ideas with the homebound, given that we were all in the same boat of scaled-back Thanksgivings. I whipped up a batch of these potatoes to use as a topper for my Thanksgiving mini meatloaf recipe, and the sweet-and-gold combo of potatoes was so good, we made them again and again— with or without a holiday.

When I looked back at that mini meatloaf post, I cringed seeing the lousy lighting, crappy counters and sketchy photography skills that were the norm for me back in those days. My blog and my kitchen have come a long way since then, but I still remember the excitement I felt in trying new things and distracting myself from the news of the day (a feeling that is familiar once again). As I perused that first recipe, there was one standout thing about the potatoes I made for those mini meatloaf bites that I don’t recommend if you’re serving them on the side— I had whisked in some egg white to help the potatoes hold their shape on the mini loaves. This is completely unnecessary when making them for a side dish, but I wouldn’t blame you if you wanted to add a few sprinkles of Parm-Romano cheese blend, as I did for that post. Les would proclaim that Parm-Romano never ruined any dish! And he’s right, of course.

Let’s get cooking!

This recipe is geared toward smaller occasions, but it’s easy to double, triple or even quadruple if you’re cooking for a larger crowd. I began with a pound and a half each of Yukon golds and sweet potatoes, peeled and cut into manageable size chunks.

Use equal amounts, give or take.

While your large chunks of potatoes mingle in salted cooking water, get ready with a two-ounce bit of cream cheese. It’s helpful to have this at near-room temperature, though you’ll have a chance to warm it up while the potatoes drain. Place the cooking pot back over medium-low heat to melt the cream cheese with a thick pat of butter, a splash of milk and, of course, salt. The beauty of using these kinds of potatoes is that they don’t suck up as much liquid or butter as russets, so you can have good results with less of those high-fat add-ins.


This part of the recipe technique is one of several “poTAYto-poTAHto” moments that Les and I squabble over every Thanksgiving. If you want to add cold-from-the-fridge milk and butter straight into the hot potatoes (the way my husband does), you go right ahead— it’s your kitchen after all. But if you want to do it the right way (you see what I did there?), then for goodness sake, warm those ingredients in the pot first and then add the hot potatoes! In my thinking, it helps keep the overall dish warm, and also ensures that you don’t shock the starches with cold milk and change their texture. Besides, they’ll be ready to serve sooner. (I can’t wait ’til he reads this. 🤭)


Mash them to your liking with a handheld masher. No need to get fancy here with a ricer or any other kitchen gadget. There’s something nostalgic or even comforting about finding a lump or two in there. Give the dish a final seasoning to taste and— OK, Les wanted to toss in some Parm-Romano, so we did that, too. See? Despite our occasional differences in technique, we are still a team. ☺️

And there you have it— one of the easiest Thanksgiving sides ever— one that tastes great, looks good on the table and settles the question of whether to make sweet potatoes or mashed. The best of both, win-win. Your guests will enjoy them, and they can be made ahead for easy reheating, too. Do you realize we are less than a week from Thanksgiving?

Coming next week, a signature cocktail. Until then, cheers!

Half-Sweet Mashed Potatoes

  • Servings: About 6
  • Difficulty: So stinkin' easy
  • Print

This recipe for half-sweet mashed potatoes combines Yukon gold and sweet potatoes, offering a flavorful Thanksgiving side dish. Minimal ingredients enhance both taste and creaminess. The dish is easy to prepare, suitable for any gathering, and can be made ahead for convenience. A perfect solution for sweet and savory cravings.


Ingredients

  • 1 1/2 pounds russet potatoes, peeled and cut into large chunks
  • 1 1/2 pounds sweet potatoes, peeled and cut into large chunks
  • A hefty pinch of kosher salt for seasoning the cooking water
  • 2 ounces (about 1/4 standard package) cream cheese
  • 2 Tbsp. salted butter
  • 1/4 cup whole or 2% milk, or half and half (depending how rich you like them)
  • Salt (and pepper, if you wish) to taste
  • A few spoons freshly grated Parm-Romano blend cheese, if you feel like it

Notes: Cut yourself some slack on the weight of the potatoes. They don’t have to be absolutely equal amounts, by any means. If they weigh about three pounds together, you’re golden. Or sweet, whichever.

Directions

  1. Place a heavy-bottomed pot filled with cold water over medium heat. Add both kinds of potatoes to the pot and bring to a light boil, then reduce heat and simmer until potatoes are good and tender, approximately 20 minutes.
  2. Drain the potatoes in a colander and immediately return the pot to the stove over medium heat. Add cream cheese, butter and milk to the pot, along with a good pinch of salt, and stir or whisk until smooth and evenly combined. Do not boil this mixture.
  3. Add the drained, hot potatoes back to the pot with the cream cheese mixture. Mash with a hand masher until creamy. Don’t mind a few lumps here or there. Give it a final salt adjustment, and add grated Parm-Romano cheese, if desired, stirring in just before serving.


Roasted Brussels Sprouts with Delicata

Smaller holiday gatherings can still be special without the heavy lift of making a huge spread of food or having a bazillion dishes on the table. During the Covid years, my husband and I learned that combining favorite Thanksgiving foods into fewer dishes was a good way to satisfy all our cravings for tradition when it was only the two of us at the table.

I got the idea for this dish only a couple of years ago, and it features two of our favorite veggies, Brussels sprouts and winter squash. There’s a scatter of crispy bacon in there, too, and a luscious cranberry-maple dressing that makes it super addictive. For me, one of the requirements for Thanksgiving food is visual appeal, and this tasty side certainly has that covered, too.

This is making me hungry!

There’s nothing difficult about this autumn recipe, but it is best served immediately after cooking, so get ahead of the game by making the dressing and prepping the veggies early so that putting it together at dinner time is a snap. Here we go!

The basics of roasting Brussels sprouts

Choose Brussels sprouts that are large, if possible, as they shrink considerably during roasting. They should have a fresh appearance, with tightly formed leaves. Ideally, the sprouts should all be about the same size so that they roast evenly.

These sprouts were about the size of a ping pong ball, just right!

We follow two key principles for perfectly roasted Brussels sprouts, and the first is removing all excess moisture. You’ll rinse them, of course, and then trim off the brown ends and halve them top to bottom. Spread the sprouts out onto a clean kitchen towel, and then roll it up and place it in a large bowl in the fridge for a couple of hours or up to one day, and bring them back to room temperature before proceeding with the roasting stage. 


The second principle for roasting any vegetable, including Brussels sprouts, is to toss them lightly with olive oil—I like to do this in a large zip-top bag— and then roast them at a high temperature so that good caramelization can take place before the veggies have a chance to turn soft or soggy. An ideal temperature is 425° F, so crank up the oven right after you take the turkey out. 


And now, the rest of the recipe

The rest of this dish is easy peasy, with sautéed onions and bacon and roasted slices of tender delicata squash. This variety of winter squash is so easy and doesn’t require peeling, because the skin is soft and edible after cooking. Go ahead and prep the squash ahead, as with the sprouts, and let them rest at room temp for a bit before you toss them in oil for roasting.


You will roast the squash at the same time as the sprouts, but not together on the same pan. They each need some breathing room for proper roasting, and then the two are layered and and drizzled with the cranberry-maple dressing when you’re ready to serve.

Ooh, this autumn dressing! 😋

This tart and sweet dressing would be delicious on any roasted autumn vegetable or even a green salad, and if you make vinaigrettes at home, you already know how easy it is to whisk a few simple ingredients together to create an emulsion. If you prefer, you could choose any store bought vinaigrette with flavors that say“autumn” to you. Avoid oil-free dressings, as their moisture content would wreck the crispy edges of the roasted sprouts.


As with most roasted vegetables, this dish is best served right away, so make it one of the last things you do while the turkey is resting under foil. If you choose to make the entire thing ahead, it will still have terrific flavor, but it will lose the satisfying crispy texture after reheating.

Just one more thing. If you omit the bacon, this dish is entirely vegan. 😊 Enjoy!


Roasted Brussels Sprouts with Delicata & Cranberry-Maple Dressing

  • Servings: About 8
  • Difficulty: Average
  • Print

Ingredients

  • 1 1/2 pounds Brussels sprouts, trimmed and halved
  • 1 medium delicata squash, seeded and cut into 1/2-inch slices
  • 2 Tbsp. extra virgin olive oil, divided (you’ll use some to roast each vegetable)
  • Salt and pepper to taste
  • 2 slices bacon, cut into 1-inch pieces
  • 1/2 medium onion, cut lengthwise into crescents
  • Cranberry-maple vinaigrette (recipe below)

Notes: All components of this dish may be done one day in advance, but for best texture and flavor, suspend roasting the vegetables and assembling the dish until just before dinner.

Directions

  1. Rinse and gently toss fresh Brussels sprouts in a colander under running water. Trim off brown ends and cut the sprouts in half lengthwise, discarding any damaged or discolored leaves. Spread the sprouts out onto a clean kitchen towel, and then roll it up and place it in a large bowl in the fridge for a couple of hours or up to one day. Let them sit a room temperature for an hour or so before roasting.
  2. Heat a heavy skillet over medium heat. Cook bacon and onions together until bacon is just crispy and onions are somewhat tender and browned. Remove from heat and set aside.
  3. Preheat oven to 425° F, with one rack just above center and the other just below. Line two baking sheets with parchment paper.
  4. Transfer the sprouts to a large bowl or zip-top bag and drizzle with a tablespoon of olive oil. Toss to coat, and arrange them, cut side down, on one of the baking sheets. Sprinkle with kosher salt and give them a few twists of freshly ground pepper.
  5. Toss squash slices in another tablespoon of oil and arrange slices on the other baking sheet. Resist the temptation to roast the squash and sprouts together, as they both need a little breathing room so that they don’t trap steam and turn mushy.
  6. Slide both baking sheets into the oven to roast for about 20 minutes, with sprouts on the top rack and squash on the lower one. At the halfway mark, turn squash pieces over and swap the pan positions.
  7. When you see plenty of roasted edges on the sprouts, remove both pans from the oven. Turn over all the sprouts to prevent steam getting trapped between the leaves. Arrange the squash slices over the sprouts and scatter the bacon and onions over the whole thing. Drizzle with the vinaigrette, but be careful not to drown them. You will have some dressing left over. Transfer to a serving bowl and enjoy!


This cranberry-maple dressing is a winner all by itself! Note that this recipe makes more dressing than you will need for the Brussels sprouts and delicata dish; enjoy the rest on a mixed greens salad with apples and candied pecans!

Ingredients

  • 2 Tbsp. white wine vinegar
  • 2 Tbsp. real maple syrup
  • 1 Tbsp. cranberry juice
  • 1 tsp. Dijon mustard
  • Kosher salt and freshly ground black pepper to taste
  • 4 Tbsp. extra virgin olive oil

Directions


Whisk together vinegar, syrup, cranberry juice and Dijon mustard. Season with salt and pepper to taste. Drizzle in olive oil, whisking constantly to create an emulsion.


Cider-braised Collards with Sweet Potatoes

The race is on toward the biggest food holiday of the year, and I couldn’t be more ready! It’s an even-numbered year and at our house, that means my husband, Les, will take the reins on the Thanksgiving turkey. This agreement to alternate years for the bird was literally written into our wedding vows because we both enjoy it so much, and on “his” years, I have more time to turn attention to the sides. All this month, I’ll be sharing a few new ways to enjoy some classic Thanksgiving side dishes. 

This first one is dedicated to my readers in the South, where collard greens reign supreme— on Thanksgiving or any other family meal. When I first learned to cook collards about five years ago, I didn’t imagine that there could be so many variations, but it seems that every time I try a new addition or different braising liquid, I find another favorite. This is the first time I’ve considered putting a seasonal spin on collards, and I’m so glad I did.

These are as flavorful as they look!

These collard greens have a touch of sweetness going on in the cubed sweet potatoes, and the smoky sausage makes each bite super satisfying. Did I mention that they’re braised this time in hard apple cider? So good!

Get to know collard greens

These sturdy leafy greens are similar to Lacinato kale (which is sometimes called dinosaur kale) in that they are huge, earthy and leathery. To cook collard greens, you must either boil and boil and boil them, or do as I do and fry them up in some kind of oil before braising a shorter time in liquid. The amount of liquid can vary, depending on how tender you’d like the collards to be. If you like them bright green and hefty— first of all, you clearly ain’t from the South— then you’ll use minimal liquid and cook them a shorter time. If you want them to be fall-apart tender, almost like sautéed spinach, then get that pot a’boilin’ from breakfast onward.

Either way, you have to prep the greens. Let’s get to it!

How to prep collard greens for cooking

In my earlier collard cooking days, I purchased the queen pillow-sized bags of chopped and pre-washed collards, believing that it would be a shortcut. But I spent so much time picking through the chopped pieces to remove all the tough stems that are as big around as a #2 pencil, I quickly realized that this “shortcut” wasn’t worth the trouble.


The easier way is to do them fresh, and it involves two quick tricks. After rinsing the collard greens really well, hold a stem firmly with one hand, keeping the other hand at the base of the stem and give the stem a good pull, zipping the leaf right off. Next, wrap the collard leaves in a clean kitchen towel to blot away excess moisture. 

Now, here comes the second trick, and it’s a fun knife technique called chiffonade that you might use when garnishing with fresh basil. Stack the collard leaves together as neatly as possible, and then tightly roll the stack up lengthwise so it looks like a big cigar. Make cross cuts with a sharp knife, and then cut through those pinwheel slices. Voilà, a quick and easy pile of chopped collards (and no bulky stems).


Let’s get cooking!

Most of my collard recipes involve bacon, but Les had brought in a successful haul from the smoker on the day that I made these, and I had a hunch that smoked sausage would be a terrific substitute. When I reached for a sweet onion in my countertop basket, I noticed a lone sweet potato in there and couldn’t help throwing some cubes of that in there, too.


The only remaining decision was a braising liquid, and that’s when I spotted a bottle of Angry Orchard hard cider in the back of the fridge. I’m not suggesting that regular apple cider wouldn’t have worked (though I expect it would have leaned very sweet), but I know from past adventures that a splash of booze helps tenderize the greens better than other liquids, so I went for it. I also appreciated that the hard cider had a tartness to balance the smoky sausage and sweet potatoes. My lucky day!


This autumn spin on collard greens would make a great addition to the Thanksgiving table, especially in the South, or serve them up with meatloaf, fried chicken or mac and cheese for any Sunday supper!

Cider-braised Collards with Sweet Potatoes and Smoked Sausage

  • Servings: About 8
  • Difficulty: Average
  • Print

There's so much autumn flavor going on in these collards, they'd be perfect as a side to your Thanksgiving meal!


Ingredients

  • 1 large bunch fresh collards, cleaned and chopped
  • 1 small Vidalia or other sweet onion, chopped
  • 2 Tbsp. extra virgin olive oil
  • Salt and pepper to taste
  • 1 link smoked sausage, halved lengthwise and then sliced
  • 1 medium sweet potato, peeled and cubed
  • 1/2 bottle Angry Orchard (or other brand) hard apple cider

Notes: The smoked sausage I used was a local butcher product, and it was seasoned with autumn spices. Any smoked sausage would work here, including kielbasa, Andouille or even hot links. Consider the sodium content of the sausage so that you may adjust additional salt accordingly.

Directions

  1. Heat a heavy-bottomed wide pot over medium heat. Swirl in olive oil and sauté onions briefly until just barely tender. Add collards, a handful at a time, until all are in the pot. Season with salt and pepper, and toss until all collard leaves are wilted.
  2. Add sweet potato cubes and smoked sausage and toss until the contents of the pot are heated through.
  3. Pour in hard cider, give it a stir, and then cover the pot and reduce heat to a simmer. Cook the collards for 20 to 45 minutes, until collards are tender to your liking. If you like collards extremely tender, consider delaying addition of the sweet potatoes until about a half hour before the finish.


Flavor Bomb Brussels Sprouts

There is no rule that says you have to serve your favorite Thanksgiving vegetables exactly the same way every year, and if there was, I promise I’d be the first to break it. Last year, my husband and I had a very small get together for Thanksgiving—just the two of us and a dear friend who loves big flavor as much as we do. It was my year for the turkey, and I broke the biggest rule of all about not experimenting on Thanksgiving. I dry-brined my bird for the first time ever and I have no regrets (more on that later). We also took a few liberties with the usual sides, and came up with winners in several categories, including these bursting-with-flavor Brussels sprouts.

If you’re ready to inject some serious flavor into one of your standard holiday sides— I’m talking scallions, capers, garlic, jalapeno peppers, anchovies and walnuts—then you’re going to love this recipe, with inspiration from a dish I enjoyed in one of Michael Symon’s restaurants in Cleveland, Ohio.

A dozen years ago, I had occasion to visit Cleveland while on a two-week getaway that also included a stop in Buffalo to the original home of hot wings. Ooh yeah, I was really living it up that summer! To be fair, there was purpose to my trip beyond my foodie cravings. Most of my crazy family lives in the Buffalo area, so that was my eventual destination and I went by way of Cleveland. I had scored tickets to the Rock and Roll Hall of Fame, where I spent—count ‘em—9½ hours walking around and gazing at the musical exhibits. It was a damn fun day for this former disc jockey, and I hope to get back there soon with my music-loving husband. But I digress.

This place alone is worth the trip to Cleveland!

The next evening after my Rock Hall adventure, I stopped for dinner at another Cleveland landmark—a neighborhood bar and restaurant called Lolita. It was opened by Chef Symon before he became famous as an Iron Chef on Food Network, and it still felt like a place for locals.


Sadly, a fire broke out in Lolita’s kitchen in 2016 and the restaurant is now permanently closed, but I’m still enjoying my memory of the dish that inspired today’s recipe. As I recall, when the server approached the table with a cheerful greeting, she asked, “Can I bring you a beverage to enjoy with your Brussels sprouts appetizer?” Apparently, it was a given that we would be ordering them, as nearly every guest did. They were that popular, and they were truly amazing with crispy, deep-fried edges and a feisty, umami-bomb vinaigrette dressing. I later tried making them at home, Symon-style, but I’m not proficient with deep frying and don’t care for the odor it leaves in the house.

If you want to give it a go in the deep fryer, you can still find Symon’s original recipe for them here. But if you’d rather try my lighter, healthier approach of roasting, then meet me in the kitchen!


I started by toasting a handful of walnuts for the dressing, then prepping the sprouts. For even roasting, be sure the sprouts are completely dry before you slice and drizzle them with oil. Lingering water from rinsing will effectively steam the sprouts, giving them more of a soft, mushy texture and you’ll miss out on the caramelization that happens when they roast.

Test doneness with a fork, and stop when the sprouts are al dente with some caramelized edges.

After roasting, I cooled the sprouts and set them aside while I finished a few other things for our Turkey Day feast. If you need to multi-task, as we usually do on Thanksgiving, par-cooking vegetables is a good way to go, as they only need a few quick minutes to finish them at serving time. You could even prep these Brussels sprouts a day before, and then take them from the fridge a half hour before dinner. They’ll finish better if they are room temperature rather than ice cold.

Now, let’s talk about the big flavor happening in this dressing! If you can’t tolerate the jalapeno heat, you could omit them or substitute a spoonful of pimientos, but I can assure you that the flavor gets dispersed so evenly, it is not all that hot. The red wine vinegar and honey do a lovely little contra dance in the background, and the garlic, scallions and anchovies keep the dish firmly grounded in savory flavor land. In other words, the dressing is the real star of this dish.


Whisk it together while the sprouts are roasting, and again just before dressing them. I kept the scallions a bit on the chunky side, so I stirred them in with the walnuts right at the end. I missed getting a picture of the final, important step (multi-tasking—sorry!) but it’s a simple one. Give the par-roasted Brussels sprouts a quick spin through a hot skillet for about two minutes, then toss them in the mouthwatering vinaigrette and serve them hot.

Flavor Bomb Brussels Sprouts

  • Servings: 6 sides
  • Difficulty: Average
  • Print

If your Thanksgiving table needs an injection of big flavor, the feisty vinaigrette on these Brussels sprouts will get the job done! You can prep these ahead somewhat by roasting and then chilling, and give them a few minutes in a hot skillet just before you toss them in the dressing to serve.


Ingredients

  • 1 lb. Brussels sprouts, washed and trimmed
  • A drizzle of extra virgin olive oil for roasting
  • 1/2 cup walnuts, toasted in oven for 8 minutes, then cooled and chopped
  • 2 Tbsp. red wine vinegar
  • 1/2 red jalapeno, seeded and finely minced
  • 2 cloves garlic, finely minced
  • 1 Tbsp. honey
  • 4 anchovy fillets, finely minced (mine were packed in chili oil, and the heat was great!)
  • 2 tsp. capers
  • Freshly ground black pepper
  • 2 scallions, white and green parts cut on bias
  • 1/4 cup extra virgin olive oil (mine was infused with lemon, but any bright variety will do)

Directions

  1. Preheat oven to 400° F, with rack in center position. Spread walnuts out onto a parchment-lined baking sheet and roast for about 6 minutes, until they are just fragrant. Cool completely and then break into pieces.
  2. Wrap the washed Brussels sprouts in a clean kitchen towel and roll them around to completely remove excess water. Carefully slice the sprouts into 1/4-inch slices. Wick away any residual moisture with a paper towel. Transfer the sprouts to a medium bowl and drizzle olive oil over them. Spread them out onto the parchment-lined pan and give them a quick seasoning with salt and pepper. Roast for about 20 minutes, until softened but still al dente and bright green. If you are working ahead, let the sprouts cool and then wrap them up and send them to the fridge until 30 minutes before serving time.
  3. While the sprouts are roasting, prepare the vinaigrette by stirring together vinegar, jalapeno, garlic, honey, and anchovies. Season with a few twists of ground pepper, but skip the salt because the capers and anchovies have plenty. Whisk in the olive oil and stir in the capers. and scallions.
  4. When you’re ready to serve, give the Brussels sprouts a quick spin through a hot skillet dashed with oil or bacon drippings. Let them get a few crispy edges. Toss in dressing with broken walnuts and serve immediately.


My Favorite Vinaigrette Potato Salad

Is there a more ubiquitous summer side than potato salad? But just because it’s always there hardly means it’s the best thing on the table. One of my most cringe-worthy food memories of childhood was played out on repeat at summer gatherings with family, friends and neighbors, and seeing what happened to the potato salad—which, many times, was little more than sticky, cooked potatoes with some hard-boiled eggs and mayonnaise. I know you’ve seen this, too, when it gets a little bit warm and separates into a greasy, gloppy mess with that thin filmy crust on the surface. Is it any wonder everyone passes over it in favor of potato chips? Nothing ruins a picnic faster than bland potato salad, slick with broken mayonnaise. Bleh.

It’s a shame to not give the versatile potato a greater chance to shine! If you are bored with potato salad or stuck in a rut with a recipe that gets left behind on the picnic table, maybe you just need a different approach—one that doesn’t depend on a heavy, mayonnaise-y coating to give it flavor because, honestly, mayo doesn’t have much flavor to begin with. Here’s something a little different and for me, it’s a winner every time.


This potato salad does not disappoint, and it could never be accused of being bland because it is doubly dressed—first, with a tangy, heart-healthy vinaigrette that soaks flavor all the way through the potatoes, and then with the slightest amount of mayonnaise-based dressing for a creamy, picnic-ready finish that isn’t greasy and doesn’t clump or break.

I’ve made no secret of the fact that potatoes are one of my very favorite foods, and I have shared a few fun twists on potato salad here on Comfort du Jour, but of all the versions I like to make, this one is my favorite (especially in summer), and for a few fun reasons.

Any kind of potato works

You can use starchy russets, baby reds or Yukon golds (my favorite, and my choice for this post). Peel the skins or keep ‘em—your call. The only thing to consider with the waxy style of potatoes is that they will absorb slightly less of the dressing, so you would want to proceed in stages to be sure it’s to your liking. But flavor-wise? Whatever you like is going to work.

This salad is adaptable

My main goal for any kind of salad is variety of texture, and you can adjust this one many ways by changing up the mix-ins. My go-to combination of mix-ins usually includes hard-boiled eggs, chopped pickles, crunchy bits of celery or radish (or both), fresh onions and any kind of fresh herbs. But that leaves it open for interpretation—I could swap out the chopped pickles for chopped olives and skip the onions but add some minced bell pepper. Dill has a completely different flavor than basil or parsley, so that’s another layer of options you can customize to your liking. As long as your ingredients are not overly wet (like tomatoes), the options are nearly endless.


It is not drenched in mayonnaise

We go through a lot of mayo at our house (mostly for my husband’s beloved tuna sandwiches), but it is not my favorite ingredient for dressing potato or pasta salads. Mayonnaise, which is essentially an emulsion of egg yolks and oil, is just plain heavy. And if you add mayo to cooked potatoes, you might notice that it takes a lot of it to keep them coated so the potatoes don’t seem dry, especially if your potatoes lean more starchy than waxy. Too much mayo is never appealing and it definitely is not healthful. Almost all its calories are from fat, and though recent reports have debunked the idea that warm mayonnaise is solely responsible for post-picnic foodborne illnesses (the culprit is usually the meat or fish that is dressed in the mayo), there’s no disputing that it looks completely unappetizing.

It’s actually delicious!

Unlike the typical mayonnaise-only potato salads, this one is mostly flavored with a tasty vinaigrette-style dressing that you can customize to your own palate. You can use a fancy French vinaigrette, a balsamic vinaigrette, a zesty, Italian-style vinaigrette or even a store-bought vinaigrette. There are only two types that I would not recommend, and for different reasons. An entirely fat-free vinaigrette is not ideal, because the extreme water content will turn your cooked potatoes soggy. The dressing should have some amount of oil in it, and you can choose one with heart-healthy fats, such as extra virgin olive oil or avocado oil. I also would not recommend a sweet, fruit-flavored vinaigrette, such as raspberry. It would be tough to choose mix-ins that would work with those flavors. It’s best to stick with a savory one.


The vinaigrette is added to the cooked potatoes while they are hot—immediately from the pot after draining is best—and it only takes a few minutes for it to be absorbed. After the potatoes cool, you simply add your favorite mix-ins and a very small amount of mayonnaise, blended with equal amount of sour cream (or Greek yogurt) and a touch of Dijon mustard for extra flavor. I like to add celery seed as well, but this is optional.


Our little secret…

Here’s one more nugget about this potato salad, and it is good news for anyone who can’t have (or doesn’t want) mayonnaise. This salad technically does not need mayo at all! The vinaigrette soaks so much flavor into the hot potatoes that you could skip the mayonnaise altogether and send it straight to the fridge for serving, just as it is—almost like a German potato salad, but chilled and delicious for summer!


My Favorite Vinaigrette Potato Salad

  • Servings: 8
  • Difficulty: average
  • Print

What I love about this potato salad is that it is double-dressed. First, it’s flavored with vinaigrette, from the inside-out, while the potatoes are still steaming hot. The vinaigrette absorbs into the chunks for great flavor in every forkful. Then, when it’s cool, add your favorite salad mix-ins (aim for variety of textures) and a creamy dressing that has very little mayonnaise for such a large batch of salad. Enjoy!

Ingredients

  • 1/2 cup prepared vinaigrette dressing (see below for my favorite blend)
  • 1 1/2 pounds small Yukon gold potatoes, cleaned and cut-up (peeled or skin-on)
  • 1/2 cup each finely chopped onions and celery
  • 2 Tbsp. mayonnaise
  • 2 Tbsp. sour cream or plain Greek yogurt (reduced-fat versions are fine)
  • 1 tsp. Dijon mustard
  • 1/2 tsp. celery seed
  • favorite mix-ins (I like hard-boiled eggs, chopped pickles or capers, radish slices, minced fresh herbs; avoid high-moisture ingredients such as fresh cucumbers)
  • Salt and pepper to taste

Directions

  1. Prep and simmer potatoes until they can easily be pierced with a knife tip, about 25 minutes.
  2. Add finely chopped onions and celery to a bowl large enough to mix the potato salad. When potatoes are tender, drain them and immediately add them to the bowl. Fold with a spatula to distribute the onions and celery throughout. Season with a couple pinches of salt.
  3. Pour the vinaigrette over the hot potatoes. Gently fold with a spatula to mix the vinaigrette evenly with the potatoes. It will take a few minutes for the vinaigrette to be absorbed. Allow them to cool at room temperature. If you wish, you can refrigerate the potatoes before adding the creamy dressing.
  4. In a small bowl, combine mayonnaise, sour cream, Dijon, celery seed, salt and pepper. Add your favorite salad mix-ins to the vinaigrette-drenched potatoes. Pour dressing over the bowl contents and fold gently to combine and coat the potatoes. Adjust salt and pepper to taste.
  5. Refrigerate the potato salad until completely cold. Serve alongside your favorite summer cookout fare.

Any savory vinaigrette dressing is suitable for this potato salad, but I do not recommend using an “oil-free” version. The excess moisture may make the potatoes too mushy. Here’s my easy, go-to vinaigrette dressing recipe, but between you and me, at least half the time I make this salad, I use Good Seasons Italian. 🙂

Ingredients

  • 3 Tbsp. red wine vinegar
  • Juice of 1/2 lemon
  • 1 tsp. Dijon mustard
  • 1/2 tsp. sugar
  • A few shakes of garlic-pepper seasoning
  • Salt and pepper to taste
  • 1/4 cup extra virgin olive oil (or another heart-healthy oil, such as avocado)

Directions

  1. Combine vinegar, lemon juice, Dijon, seasoning, sugar, salt and pepper in a small bowl or glass measuring cup.
  2. Gradually drizzle olive oil into the mixture while whisking vigorously. The Dijon mustard will help emulsify the mixture.


Tangy Apple Cole Slaw

It seems funny to me that the three most popular summer salads are based on the most economical ingredients—macaroni, potatoes or cabbage. Nothing fancy and yet we love them! As we wind down summer (which I can hardly believe is happening, even as I write this), I will share a few of my own twists on these three summer classic salads, beginning with the easiest—cole slaw.

The most obvious benefit of cole slaw is that you don’t have to cook anything to make it. This easy summer side comes together lickety-split (especially if you buy the pre-shredded bagged cabbage), it pairs nicely with everything from grilled chicken to pulled pork to burgers and beyond, and with cabbage as the primary ingredient, it packs a pretty hefty nutritional punch, with loads of fiber, vitamins and minerals. If you don’t drown it in mayonnaise or sugary dressing, it’s pretty darn good for you.

I’ve taken my standby “KFC-style” slaw in a slightly different direction with this recipe, keeping the cabbage and carrots (though I used yellow and white ones this time) and adding shredded Granny Smith apple for a little extra tartness. For my creamy-style dressing (which does have some mayonnaise but also cultured buttermilk and regular milk), I’ve swapped in a specialty white balsamic vinegar that echoes the flavors of the Granny Smith apple. The result is a tangier offering than usual, perfect as a side for anything rich or meaty that you might be pulling off the grill through the last days of summer.


Ingredients


About 6 cups finely shredded green cabbage

1 cup carrots, finely shredded or cut into thin matchstick pieces

1 large Granny Smith apple, peeled (or not), cored and shredded

Juice of 1/2 small lemon (to prevent apple browning)

1/2 medium sweet onion, shredded and squeezed dry of juice* (see notes)

1/3 cup mayonnaise (I used canola mayo from Trader Joe’s)

3 Tbsp. whole milk

3 Tbsp. buttermilk*

3 Tbsp. green apple white balsamic vinegar*

1 tsp. kosher salt

1/2 tsp. white pepper

1/2 tsp. celery seed


*Notes

It is important that you press out as much of the onion juice as possible; otherwise the dressing will break down and become watery. I shredded the onion in my food processor and then pressed it through a mesh strainer. When assembling the salad, add the onion to the dressing rather than the cabbage blend.

Real cultured buttermilk works best, but you could have similar results with the same amount of plain,  low-fat yogurt or Greek yogurt.

The green apple white balsamic vinegar is a specialty item that my husband picked up on a trip to California a few years ago. Check with a balsamic and olive oil shop in your area to see if it carries “Gravenstein apple” balsamic, as that would be a perfect substitution. Otherwise, use 2 Tbsp. apple cider vinegar and 2 Tbsp. sugar to mimic the balanced sweetness of the balsamic.


Instructions

Combine the shredded cabbage and carrots in a large bowl. Add the shredded apple to the bowl, immediately squeeze the fresh lemon juice over the apple and then toss the apple to distribute the lemon juice. This will help prevent the apple from browning while you mix the dressing.

In a large glass measuring cup, whisk together mayonnaise, buttermilk and milk until the mixture is smooth. Add vinegar, salt, pepper and celery seed, and stir to blend. Add the shredded onion to the dressing and stir until it’s evenly distributed.

Adjust the dressing to your taste; if you find it too tart, add a teaspoon of sugar at a time until it is to your liking. Remember that sugar (or salt) needs a few minutes to dissolve in a dressing, so you may want to let it rest a few minutes to be sure you have adjusted correctly.

Pour the dressing over the cole slaw mix and toss to combine. Refrigerate at least an hour for best flavor, but this salad will also keep in the fridge for several days.


Zesty Three Bean Salad

There is nothing new under the sun, as they say, and when I start to feel flummoxed over what side dishes to make for summer meals, one of the best things I can do is revisit a classic and modernize it for my grown-up palate.

About the same period of time I became enthralled with the immense variety of baked beans at my great grandmother’s Fourth of July celebrations, there was a popular salad showing up on everyone’s dinner table. It might have been called a three-bean salad, including cut green beans, dark red kidney beans and little round garbanzo beans, which my dad always called “ceci beans.” But once in a while, yellow wax beans would also be in the mix, technically making it a four-bean salad but with generally the same flavors. This salad was often purchased ready-made, and as I recall, it was a popular item in the deli department of the grocery store where I worked as a young adult. The main thing I remember about it, besides its ubiquitous presence, is that it was sweet. Too sweet, in my opinion. I have no problem with a touch of sweetness in a salad dressing, but if it’s too sweet, it counters the benefit of eating vegetables.

Why diminish the goodness of these ingredients with a bunch of sugar?

So this summer, I have created an updated version of this otherwise good-for-you salad, shifting the flavor profile from sweet to zesty and herbaceous. The sugar in the recipe is nominal, and I’ve amped up the other side of the salad flavors with a hefty addition of minced garlic and a good bit of chopped fresh parsley and basil. The salad is quick and easy to make, as it relies somewhat on canned beans, and I’ve used ready-to-go fresh green beans to save time. If you’re lucky enough to have garden-fresh green beans, well, that would be awesome.


Ingredients

3/4 lb. fresh green beans, trimmed and cut into 1 1/2 inch pieces

15 oz. can dark red kidney beans, drained and rinsed

15 oz. can garbanzo (ceci) beans, drained and rinsed

1/2 cup sweet onion, finely diced

1/2 cup green bell pepper, finely diced

1/2 cup red bell pepper, finely diced

3 large cloves garlic, finely minced

1 handful fresh Italian parsley, chopped

Small handful fresh basil leaves, chopped


Dressing ingredients

1/4 cup red wine vinegar

2 tsp. Dijon mustard* (see notes)

2 tsp. cane sugar

1/2 tsp. celery seed

1/2 tsp. garlic pepper seasoning

2 Tbsp. cold water

1/4 cup extra virgin olive oil


*Notes

In lieu of regular Dijon mustard, I used the recently-discontinued Honey Pale Ale mustard from Trader Joe’s. Does anyone besides me have a gripe about how they pick and choose which products to keep? If you happen to have a jar of it, I think it’s terrific in salad dressings. Otherwise, just use regular Dijon.

Why, Trader Joe’s? I love this mustard. 😦

Instructions


  1. Heat a pot of water to a gentle boil. Add a generous pinch of kosher salt to the water, along with a half teaspoon of baking soda, which will help the beans retain their bright color.
  2. Make dressing for the salad; combine all ingredients except the olive oil. Whisk in olive oil gradually to create an emulsion. Salt and pepper to taste.
  3. Spoon the trimmed green beans into the simmering water and cook for about 6 minutes, or just until beans are tender enough to bite. Immediately spoon the cooked beans into a bowl of ice water to stop the cooking process. Drain beans to remove excess water.
  4. Combine green beans, canned beans, peppers, onions and garlic in a large mixing bowl.
  5. Pour in dressing and toss gently to combine. Adjust salt and pepper to taste. Add fresh herbs and toss again. Chill salad several hours and toss lightly to redistribute dressing just before serving. The olive oil in the dressing will solidify in the fridge, so plan to remove the salad at least ten minutes before serving for best presentation.
This zesty salad is loaded up with bright color, texture and flavor!


Apropos of nothing


Bleu Cheese Potato Salad

Here’s a truth I have learned in the past couple of weeks: you don’t realize how much you use all of your fingers until one of them is out of commission. It has been almost two weeks since my little accident with the mandoline slicer, and I’m constantly reminded of my limitations in the kitchen. I am not in any kind of pain, mind you, but the urgent care doctor was specific to instruct that I should not let my injured right ring finger get wet during the healing process. That means asking for help (not one of my strong points) with washing dishes, prepping vegetables and moving hot pots. Everything takes longer than usual, and my husband, Les, has done half (or all) of the cooking, or we have ordered takeout.

I am pleased to report that on Thursday, the two-week mark after my second COVID jab, we ventured out to a real, honest-to-goodness restaurant—one of our favorite casual, but delicious, places in our city. We sat inside (gasp!) and enjoyed a lovely dinner that included this incredible plate:

This plate was a work of art, and as delicious as it was beautiful!

OMG, it was sooo delicious! The grilled shrimp accompanied a salad of arugula with candied bacon and vinaigrette, flanked by walnut-crusted goat cheese medallions, chilled, roasted carrots and dollops of fresh pesto with microgreens, artfully arranged on a roasted carrot puree. We even ordered an appetizer and a glass of wine, and I literally wanted to lick my plate. It was a real treat, and so good to see the friendly, familiar staff at West End Cafe after such a long separation.

At the same time, with the CDC announcement last week that vaccinated people can relax a bit, we are eagerly anticipating some in-person time with friends, and excited that our social re-entry will coincide perfectly with the start of summer grilling season. For practice, we prepared one of our favorite grilled items—the coffee-rubbed grilled tri-tip steak that Les shared yesterday, and an easy side that takes a favorite steakhouse combination down into casual mode. This bleu cheese potato salad was Les’s idea, as we were pondering what to make as a side for the bold and spicy tri-tip. Think of it as a bleu cheese-stuffed baked potato, but cold. And creamy.

The slight funk of bleu cheese is such a great complement to grilled steak, and it worked out great in this easy potato salad.

The bleu cheese flavor is assertive, which is exactly what we wanted, but the combination of mayo with sour cream gives the salad a creamy texture without the slick greasiness of too much mayonnaise. This potato salad was a perfect complement to the tri-tip, and equally good over the next couple of days with sandwiches. I love that his creative flavor idea and my kitchen instincts made it such a winner on the first effort. Yeah, this teamwork thing is working out pretty well.


Makes about 6 servings

Ingredients

1 1/2 pounds small Yukon gold potatoes, boiled tender and chilled

1/3 cup mayonnaise

1/3 cup sour cream

A few shakes granulated garlic

Kosher salt and black pepper

1/2 cup bleu cheese crumbles

2 large scallions, cleaned and sliced (white and green parts)

Small handful of fresh flat-leaf parsley, chopped

Romaine or leaf lettuce leaves, for plating (optional)


Instructions

  1. Cut up the chilled cooked potatoes into bite sized chunks.
  2. In a large mixing bowl, combine mayonnaise and sour cream, plus granulated garlic, salt and pepper. Fold in bleu cheese crumbles and half of the scallions. Fold in chopped parsley.
  3. Add the chilled, cut-up potatoes and gently fold to combine with the dressing mixture. Adjust salt and pepper to taste.
  4. Plate onto a lettuce-lined platter and sprinkle with remaining sliced scallions.

Easy to notice that I was working with one good hand. My lettuce-lined plate is a little lopsided!

Catering tip: When serving any kind of side or salad for a group, present it on a platter rather than in a bowl. It allows guests to serve themselves from both sides of the table, and it looks prettier and larger!