Sweet Potato-Harissa Hummus

It’s sweet potato season, and I’m committed to finding ways to enjoy this vegetable that grows prolifically in my state of North Carolina. Sweet potatoes are incredibly versatile and highly nutritious, yet they frequently get turned into something that looks like dessert, especially around Thanksgiving. I’m picturing that marshmallow crusted calorie bomb that everyone calls a casserole. Or my own classic sweet potato dish with loads of butter, brown sugar and pecans. Come to think of it, that one is quite delicious. It’s probably why I turned it into a signature cocktail a couple of years ago. But I digress.

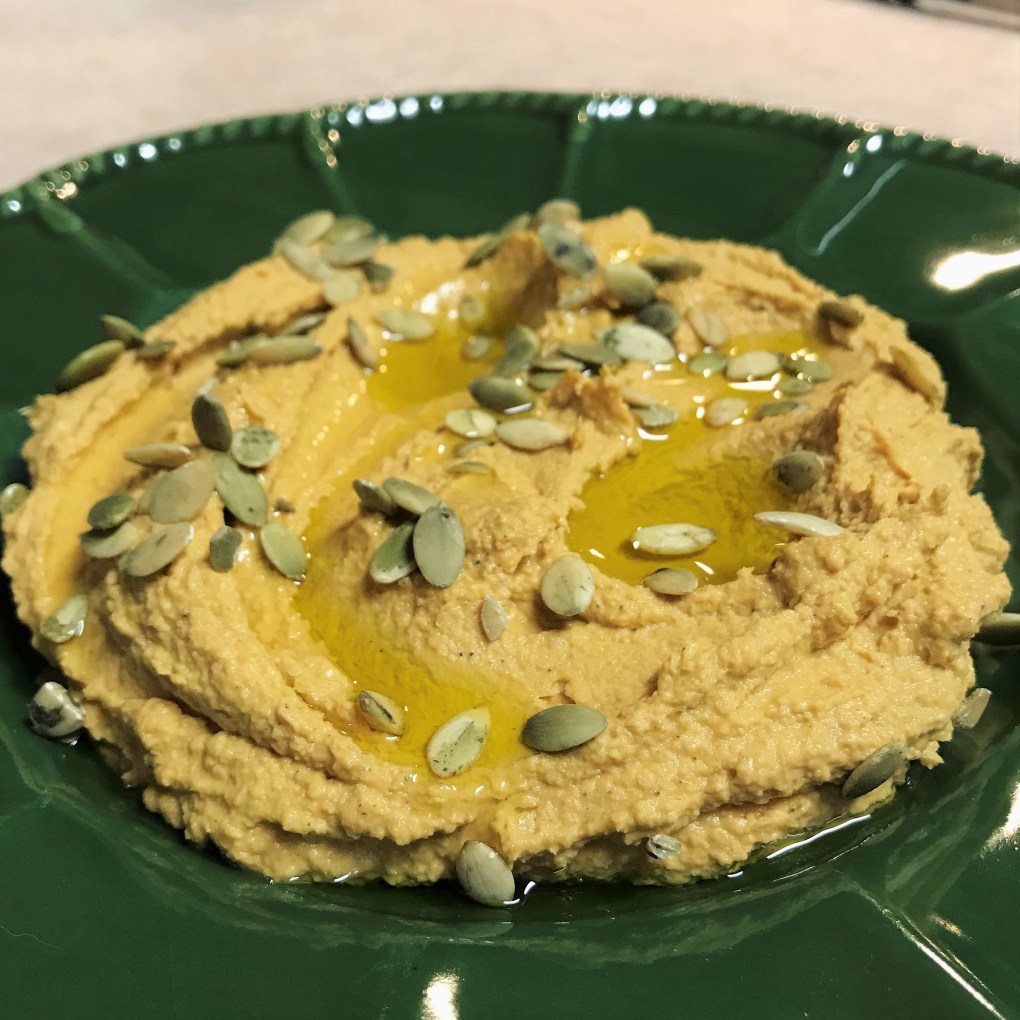
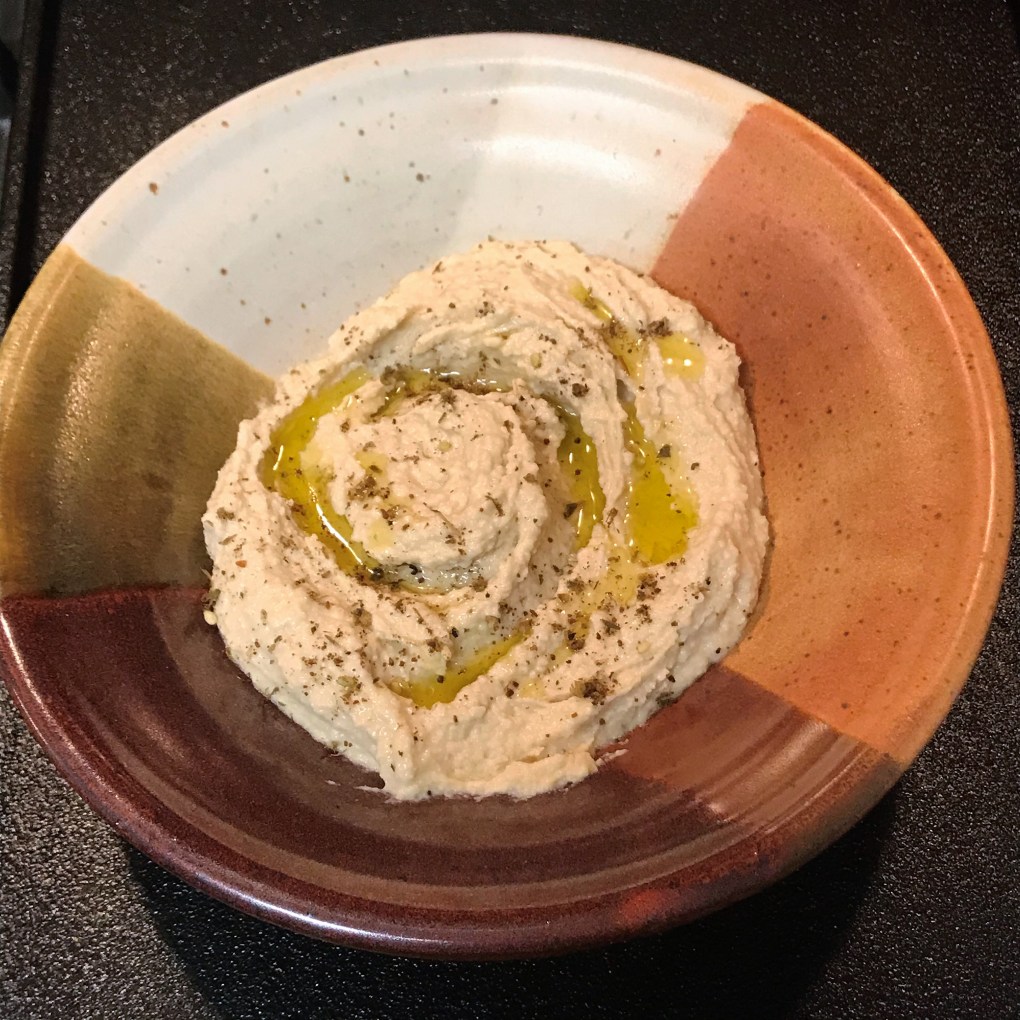
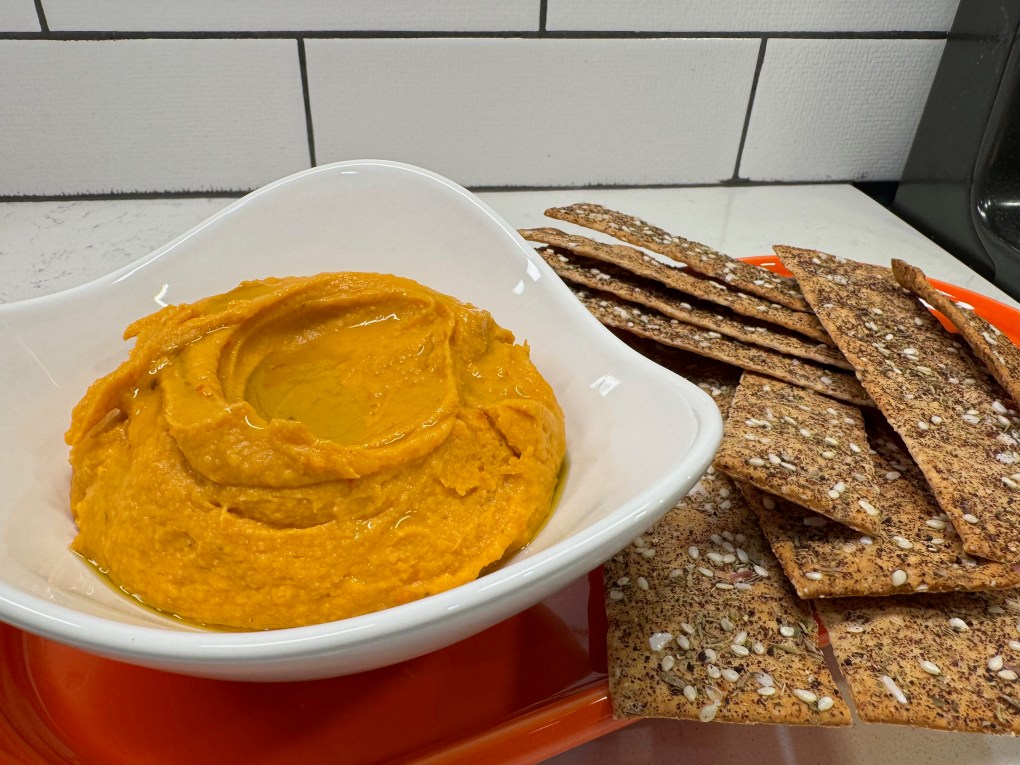
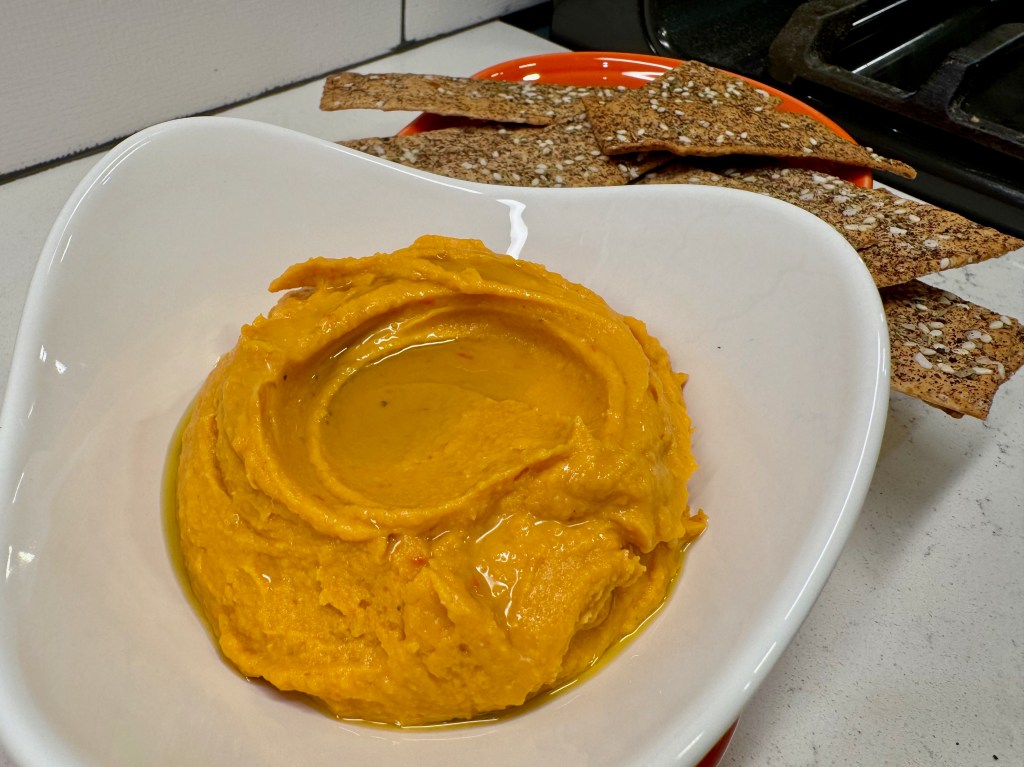
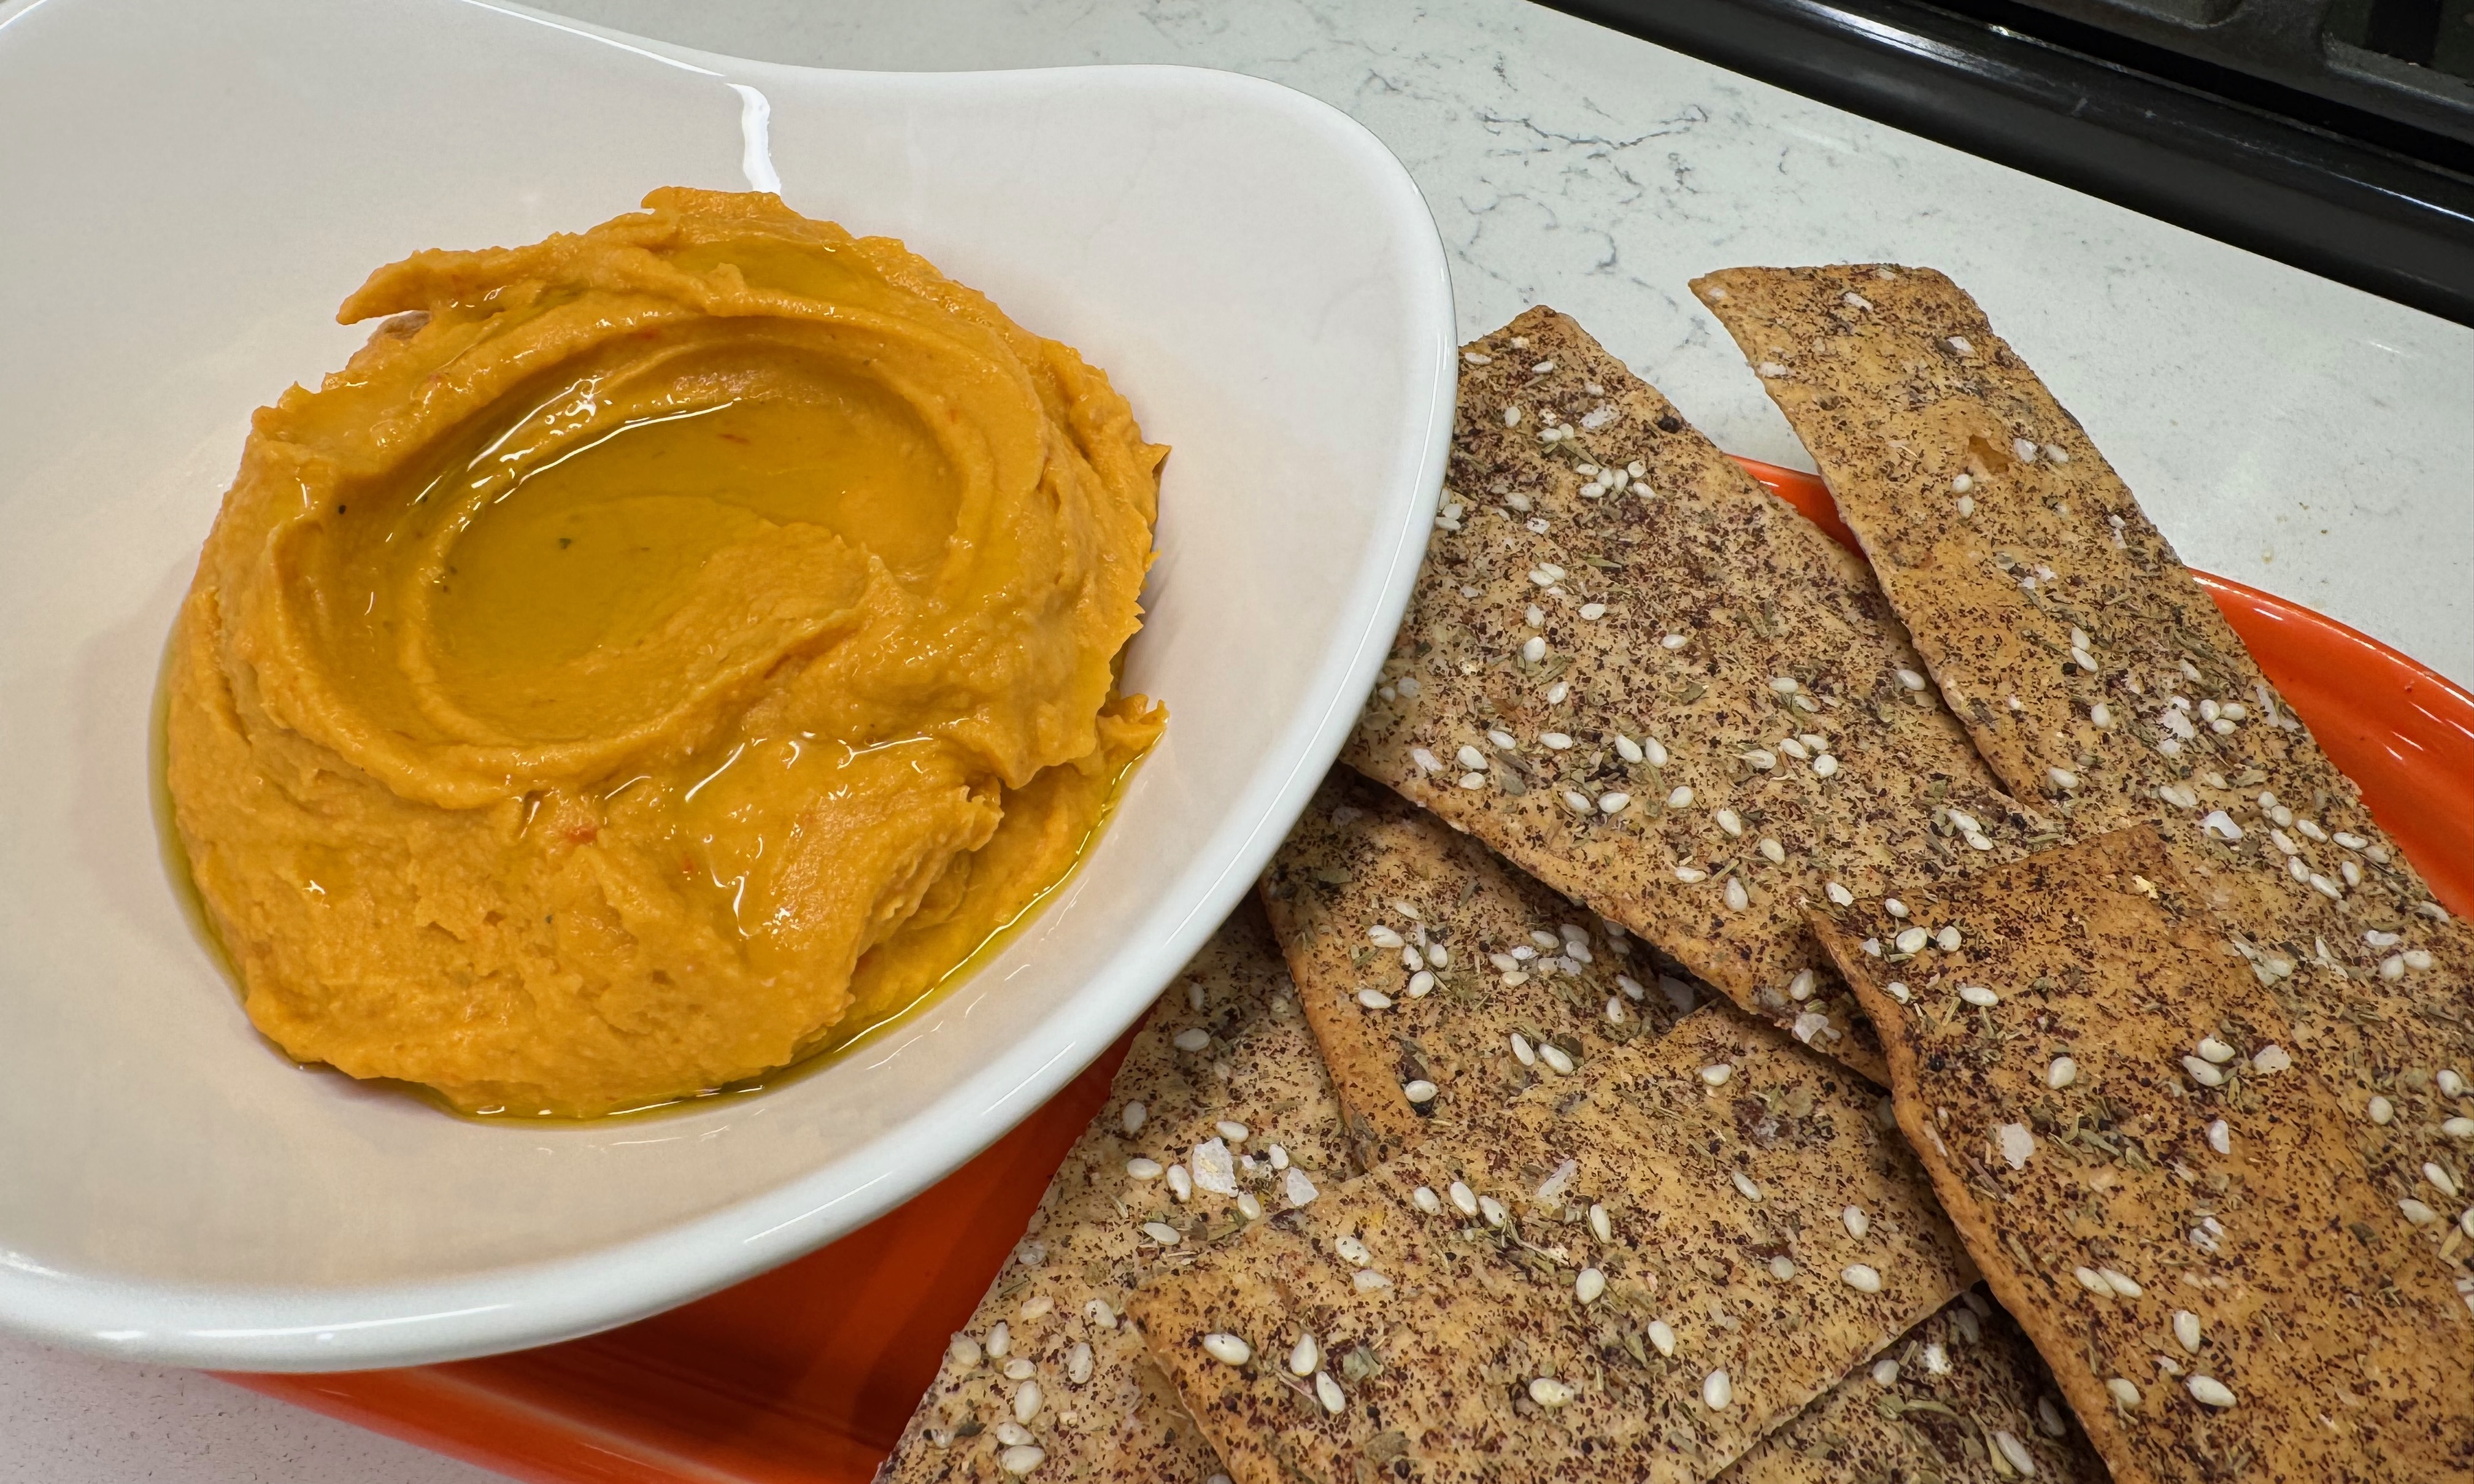
Anyway, today I’m honoring the savory nature of sweet potatoes with an easy-to-make hummus, embellished with roasted sweet potato and harissa. It’s a fun little twist that celebrates the health benefits of sweet potato— antioxidants, potassium and lots of fiber— with just enough Moroccan spice to make it interesting and unique.

A little swirl of olive oil at serving time is the perfect finish.

I happened to mention this hummus recently when we were out to dinner with friends, and they were so intrigued that I’ve decided to make it again when they come over for cocktails and appetizers in a couple of weeks. I’m determined to heed my own advice about carving out time to get together with friends more frequently, even if it’s only for a casual bite (or maybe especially so). It’s the company that matters most, and who doesn’t love appetizers? Come along and I’ll show you how easy this one is!

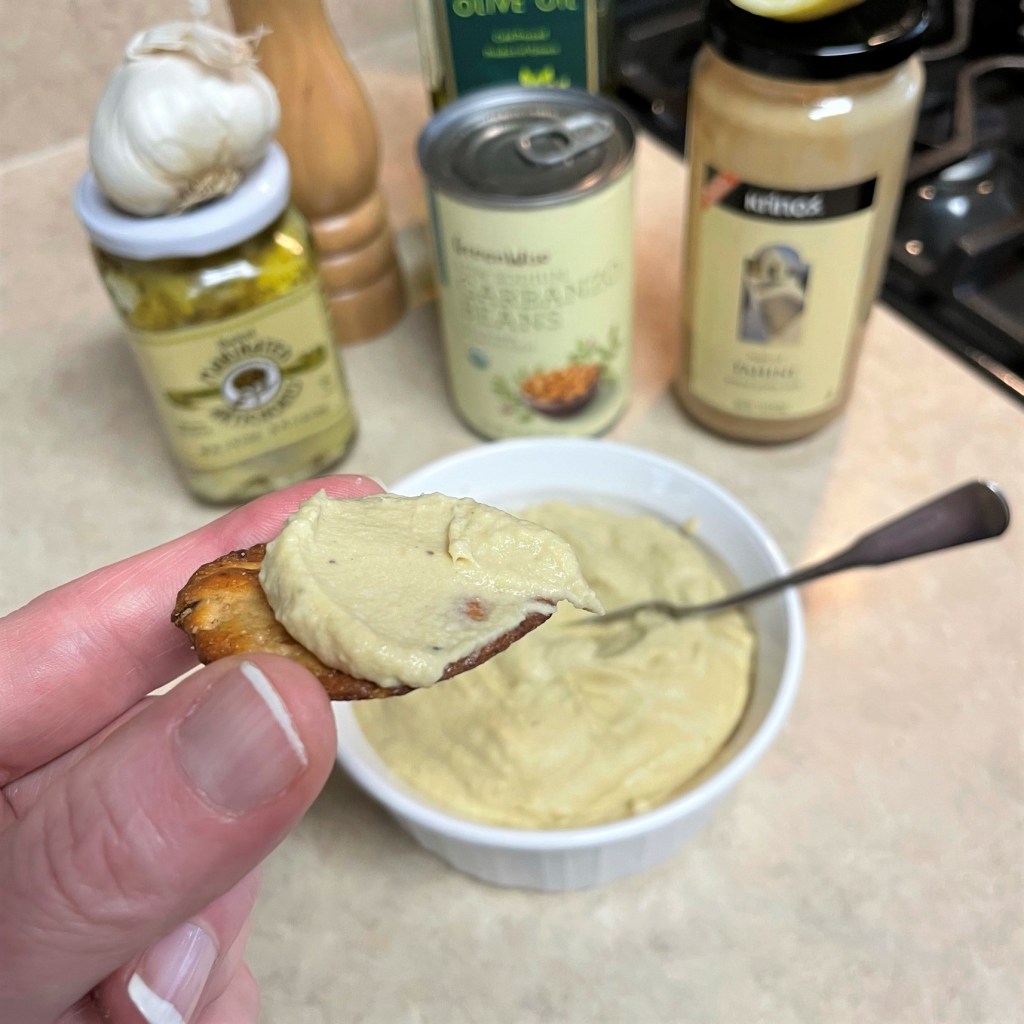
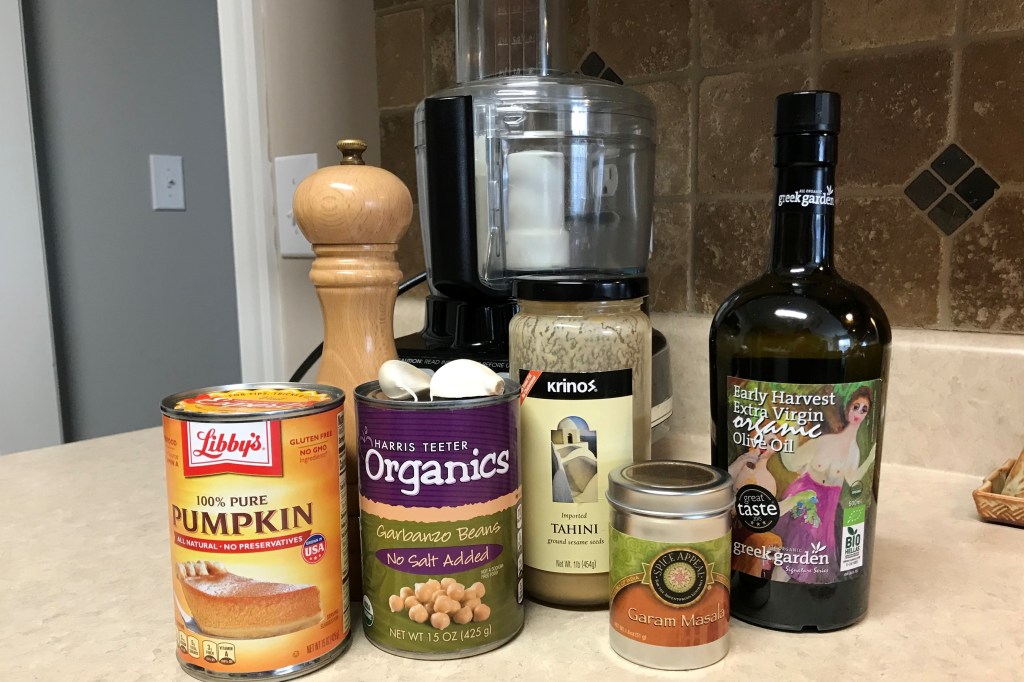
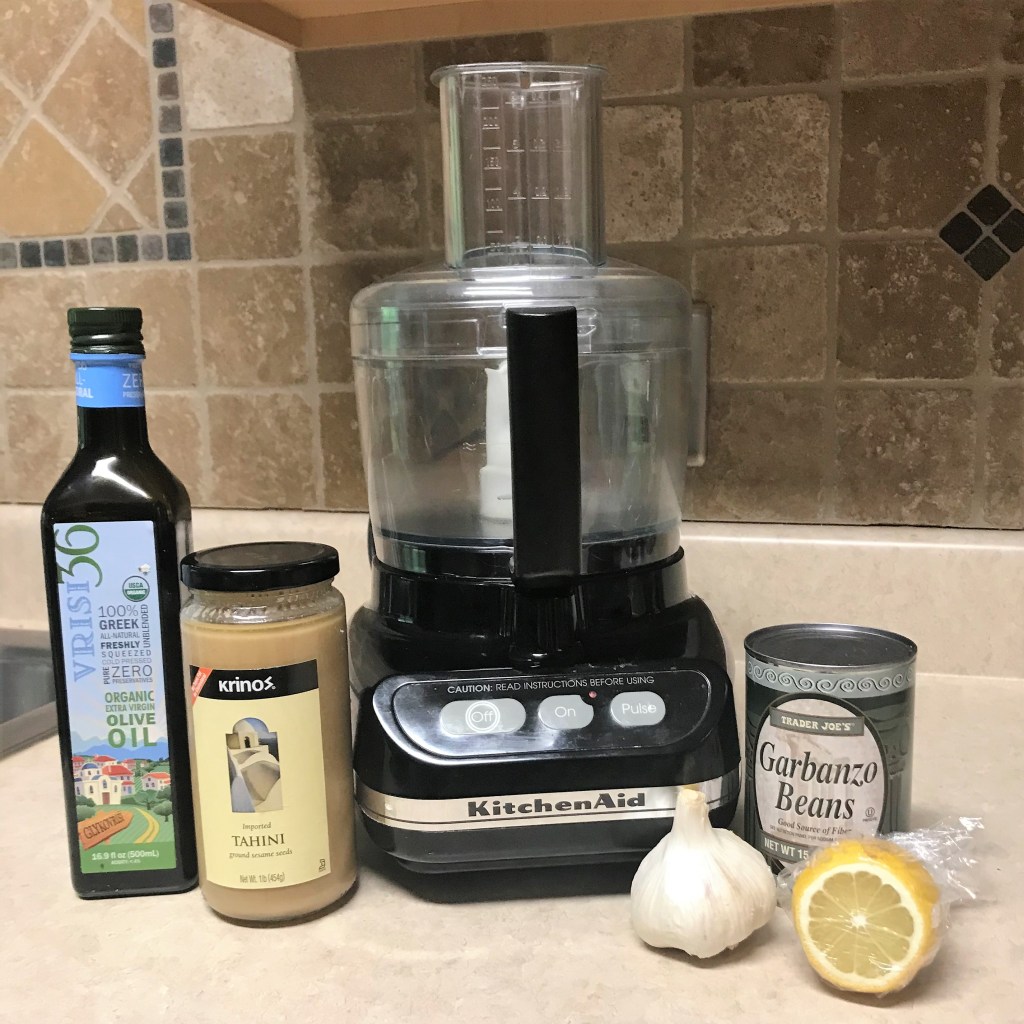
Ingredients for hummus

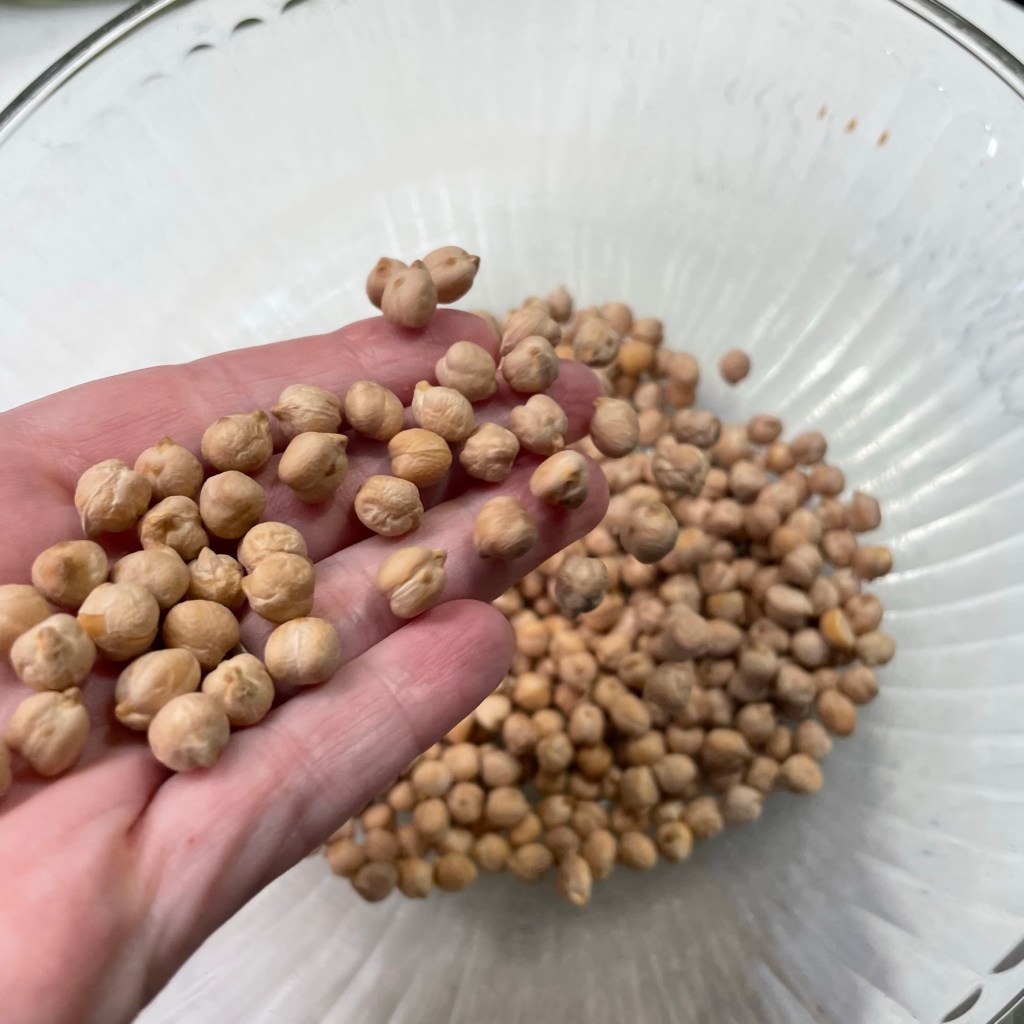
Gather up a few key ingredients, including: garbanzo beans, which I like to call “chickpeas;” tahini, which is a thin sesame seed paste; olive oil and some seasonings. You’ll need a food processor or a good strong blender to make it, though I would not recommend using a bullet-style blender. The mixture will be somewhat hot, so you need to vent the container you use to blend it. If you only have a bullet blender, let it cool before you get to that step (for safety sake).

I generally take the shortcut of using canned chickpeas, but freshly cooked is probably even better— just be sure you cook them tender enough to blend well, and hold back some of the cooking liquid, too. Here’s a bit of good news for readers with certain legume allergies, including my high school bestie, who cannot eat chickpeas, soybeans or lentils. You can absolutely make hummus with other canned beans, including cannellini, which I think are divine! They are softer than chickpeas so a few adjustments are needed, and I’ll spell those out in the click-to-print recipe card you’ll find at the end of this post.

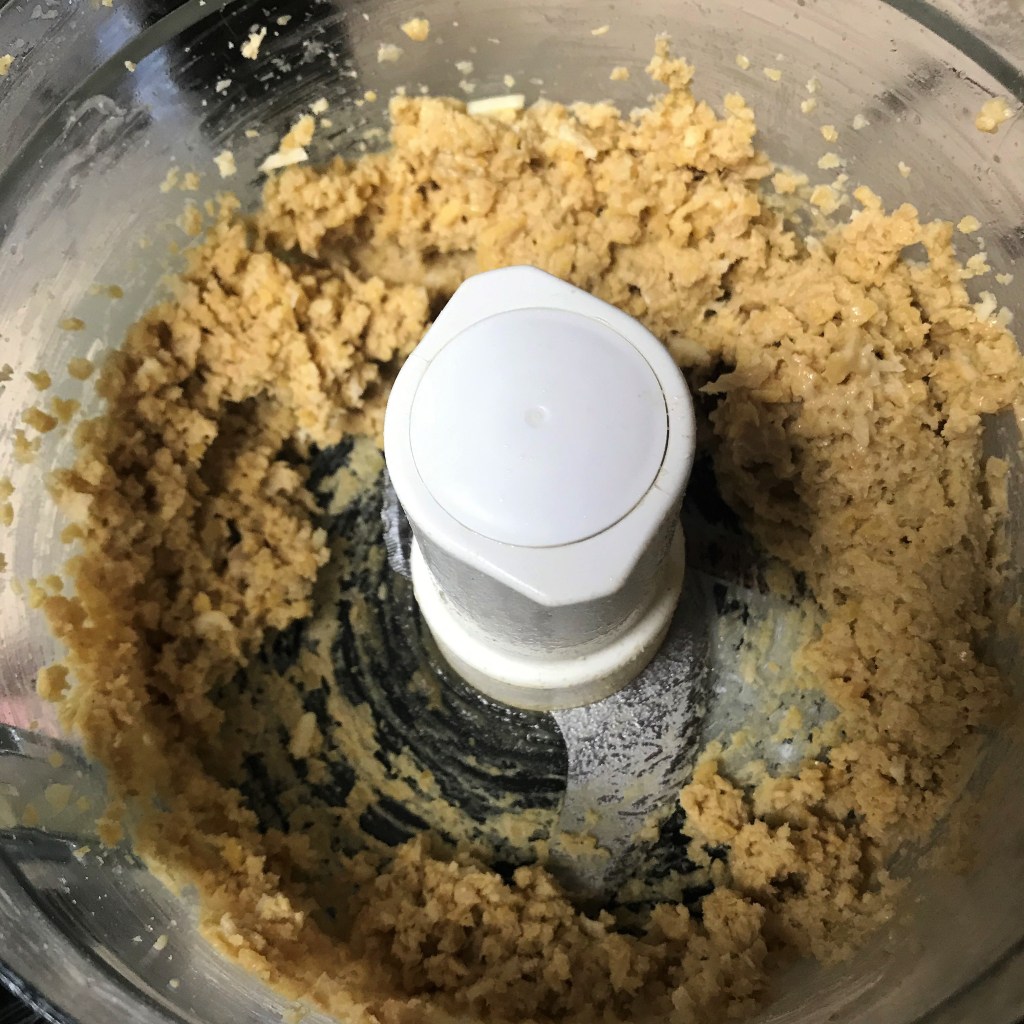
The process for making hummus

One burning question my friend, Charlotte, asked when I shared the exciting news of this sweet potato hummus was, “did you peel the chickpeas?” And this is a fair question, given that some traditionalists say it’s necessary. The answer is no, though I have done it once and I found it to be a complete waste of 90 minutes, only to end up with a pile of chick peas roughly half the size of when I started and a huge pile of skins that went straight to the trash. The theory behind this frustrating and tedious step is that the thick skins hinder achieving the smooth, silky texture that is so wonderful about hummus. And it’s true that the skins can be a little chunky, but I have an easier way around that.

My first tip is to look for chickpeas that don’t have “calcium chloride” listed as an ingredient. This additive helps beans hold their shape during the high-temperature canning process, and it may be fine if you intend to put the beans on a salad or crisp them up as a topping for something. But for hummus, you want them to blend smooth, so avoiding calcium chloride will help you get there. The easiest route to avoiding it is to pick up a can labeled “organic.”

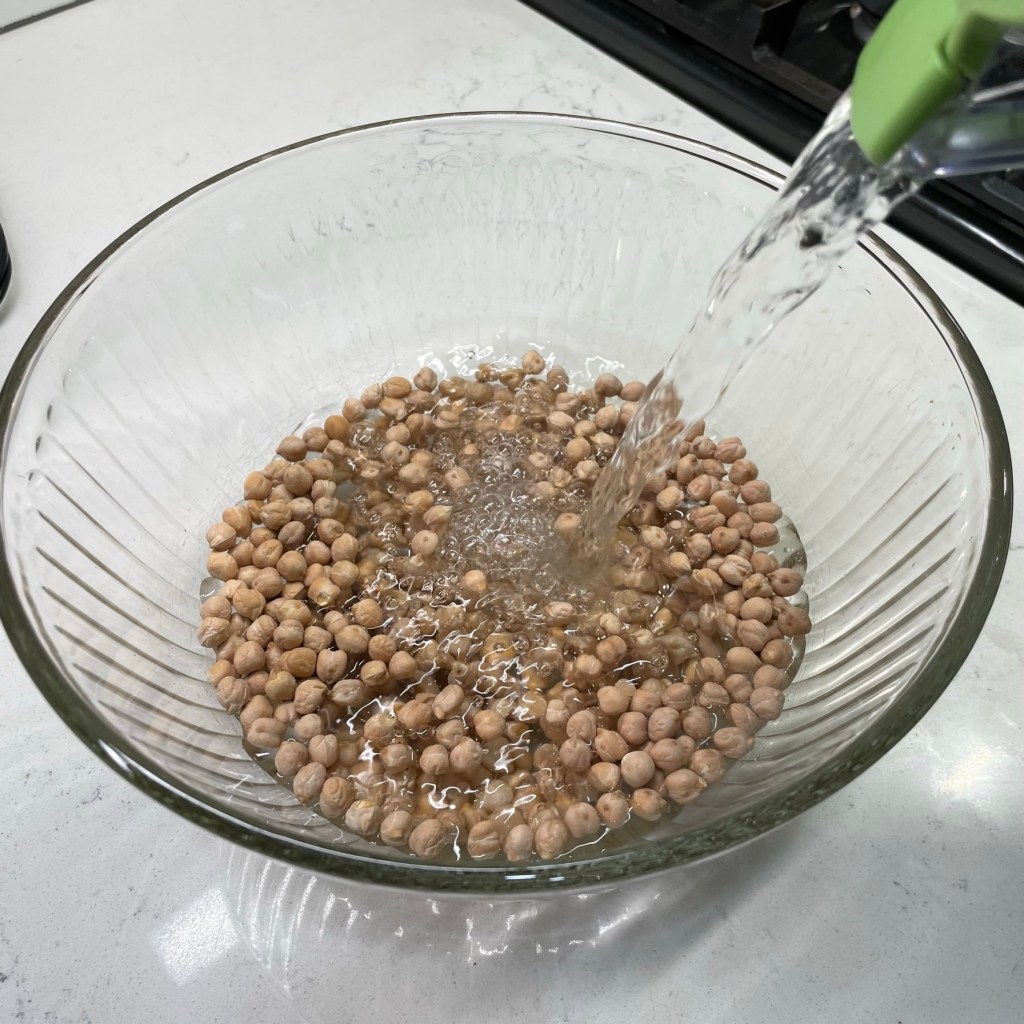
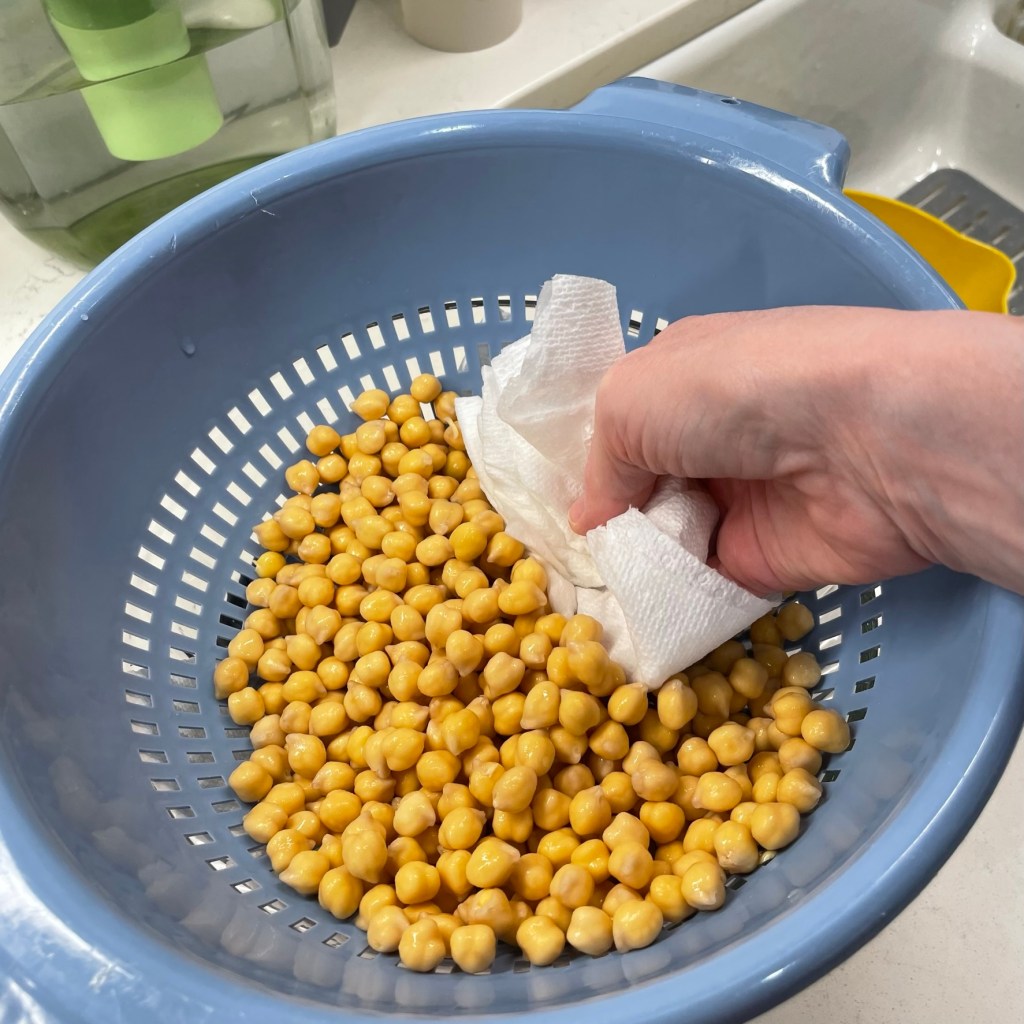
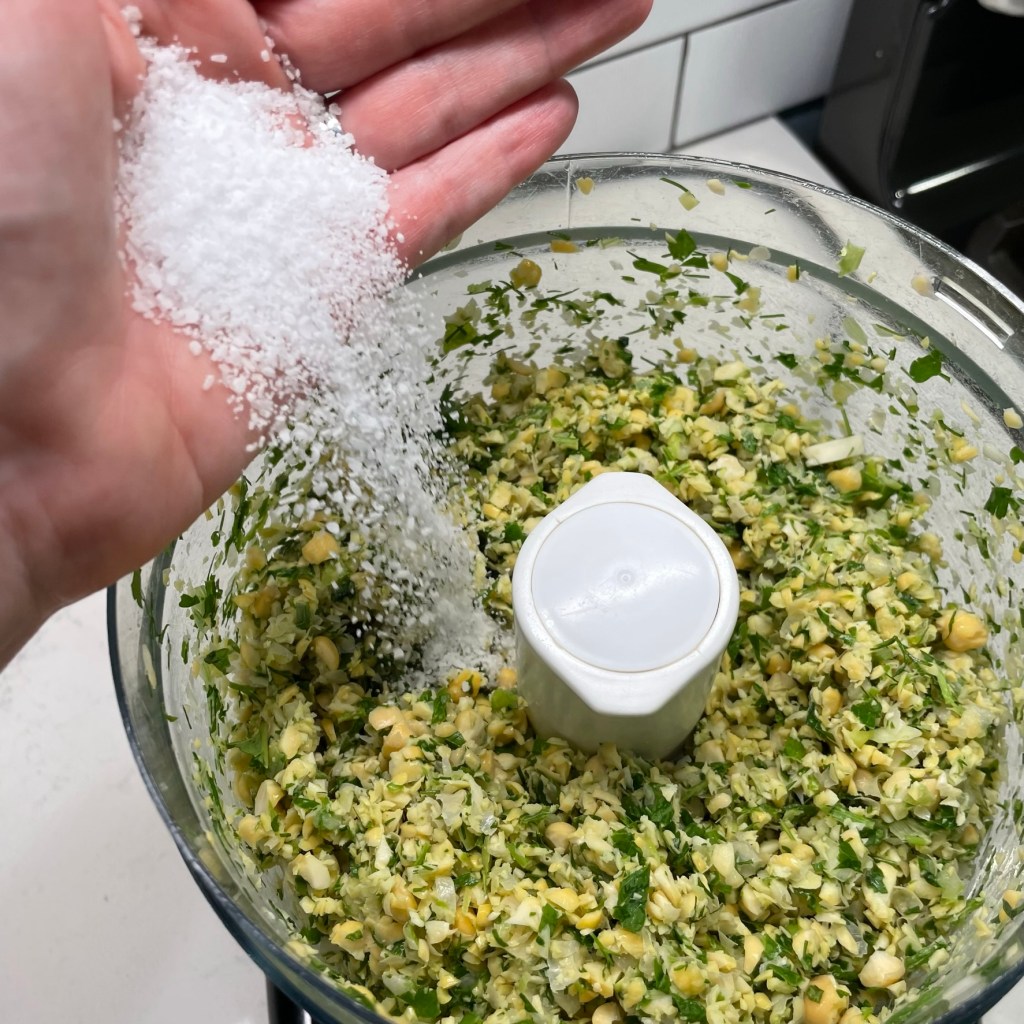
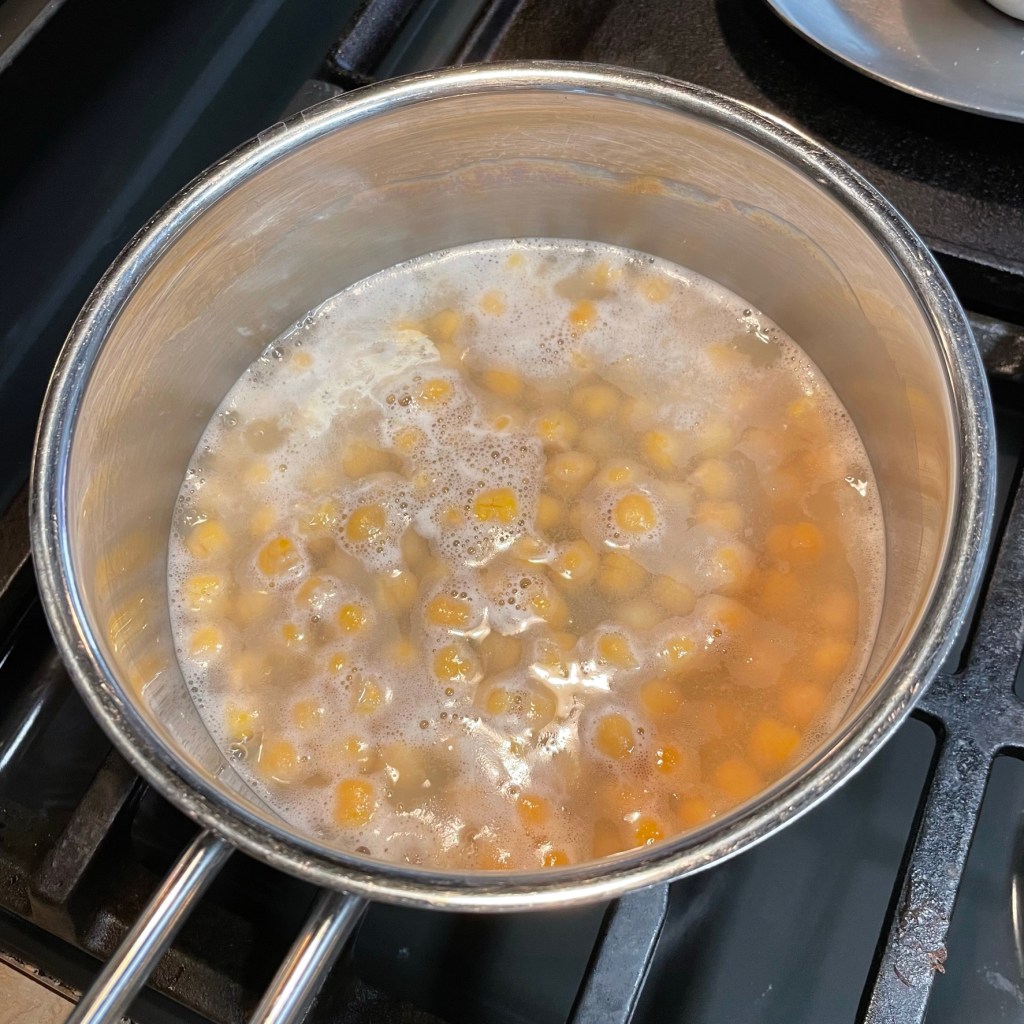
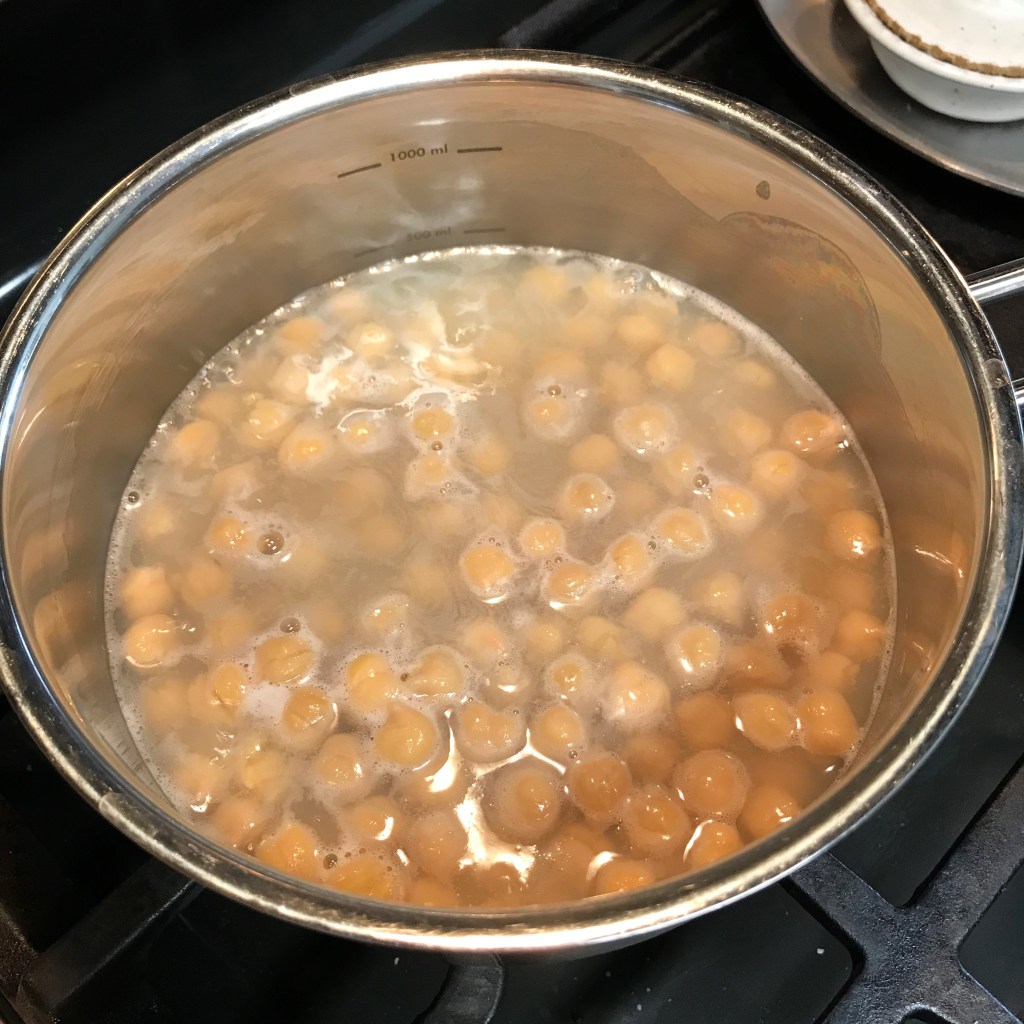
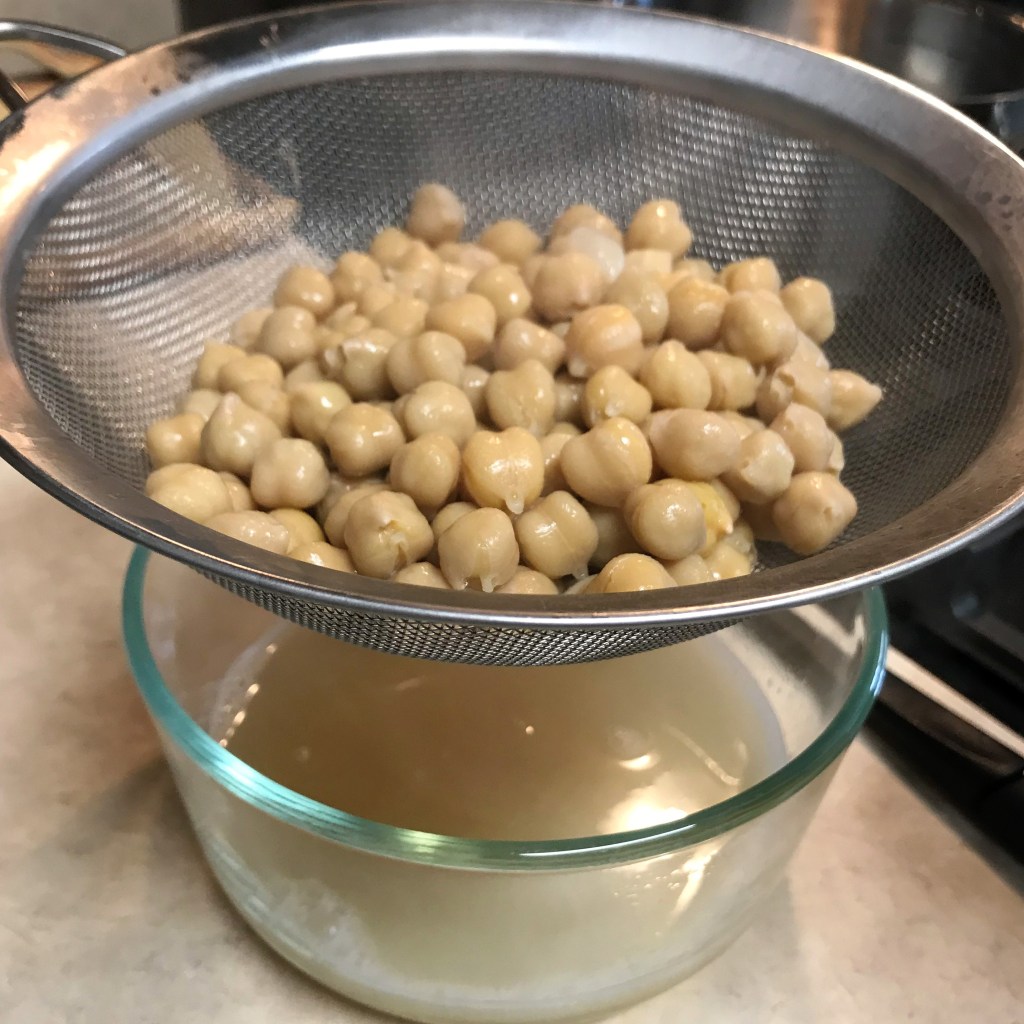
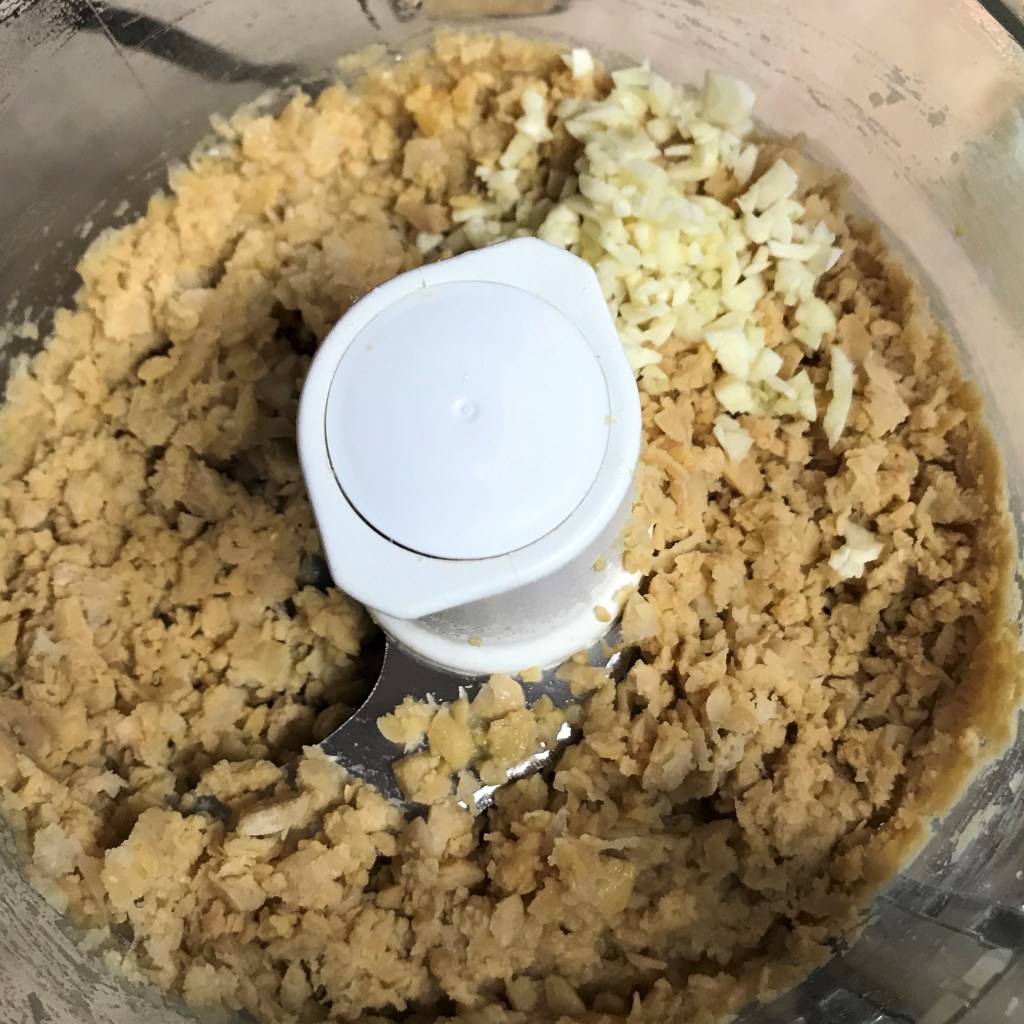
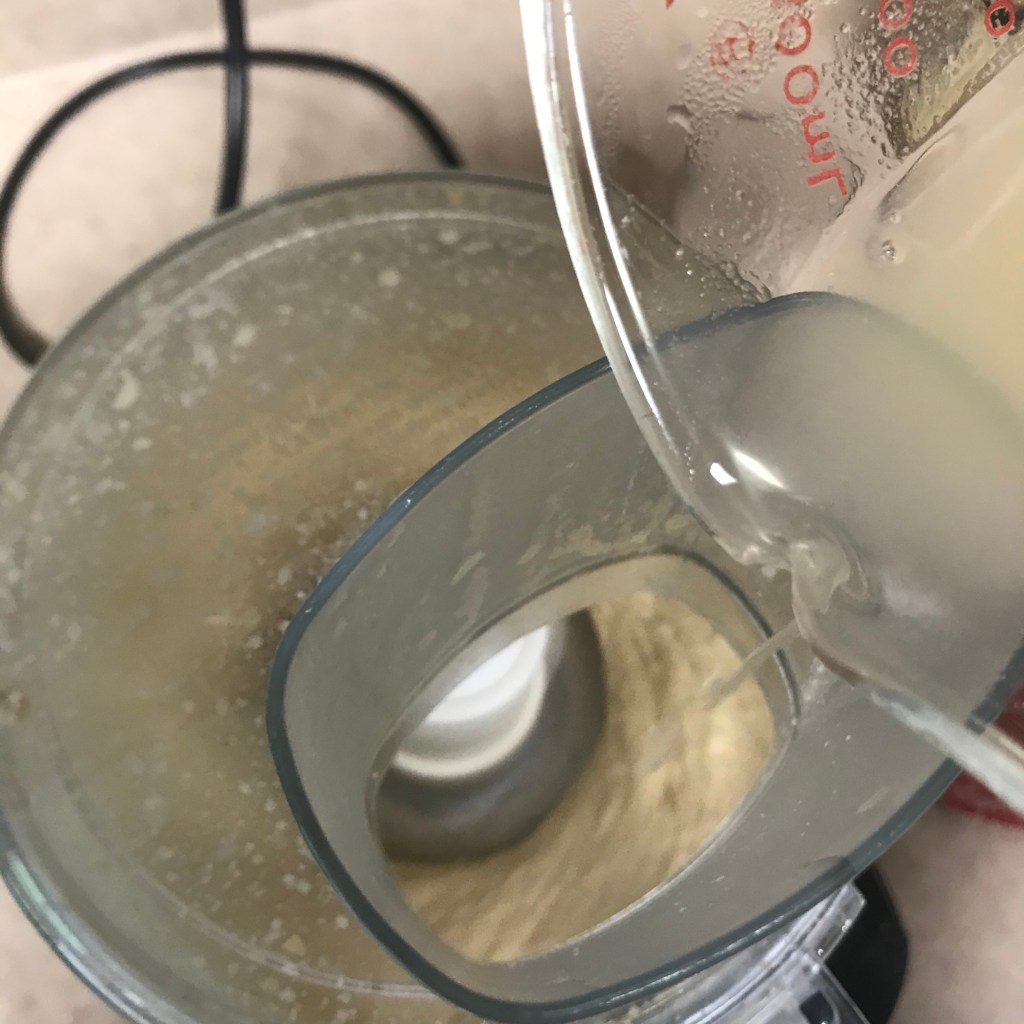
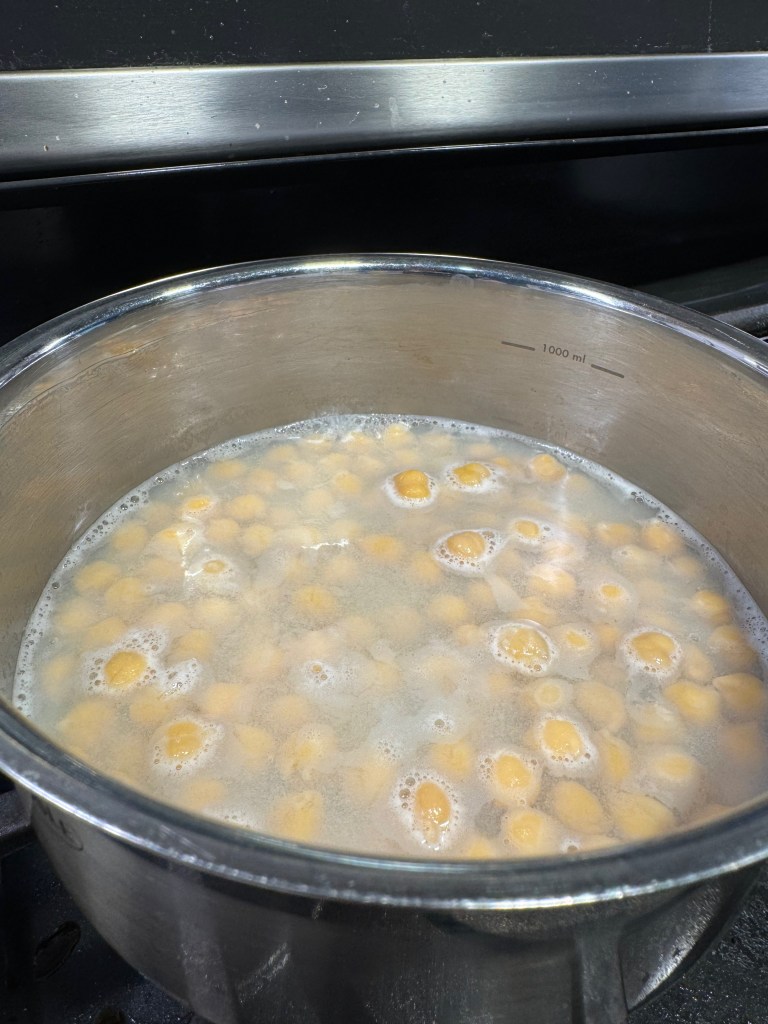
My second tip is simple— heat the garbanzo beans in their liquid before blending, and add a pinch of baking soda to soften up the skins. Dump the entire can (liquid and all) into a small saucepan over medium low heat and let them go until you see small bubbles and steam coming off the pan. Strain the chickpeas through a mesh strainer, but keep the liquid because you’ll need some of it for blending.

Let’s make sweet potato hummus!


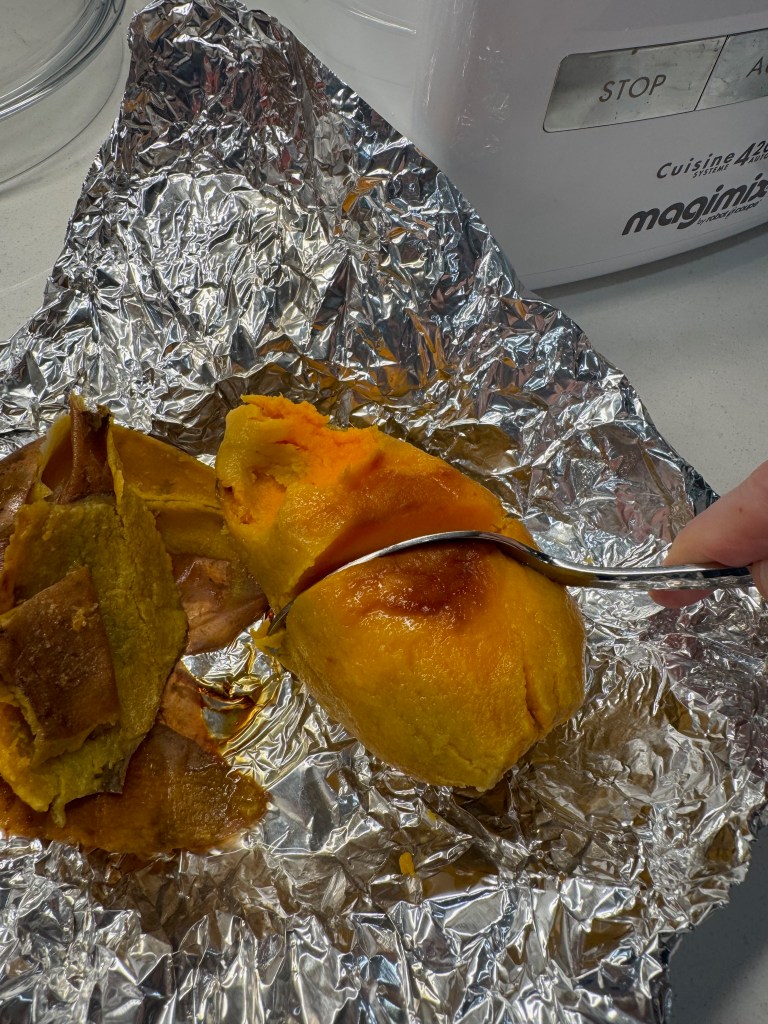
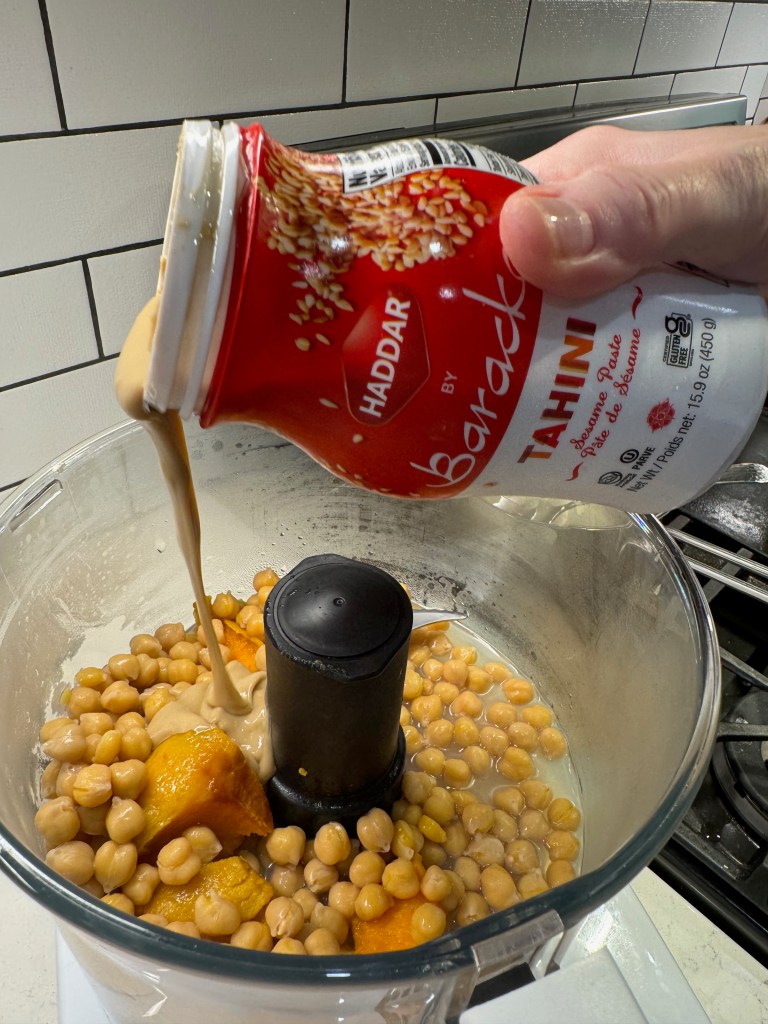
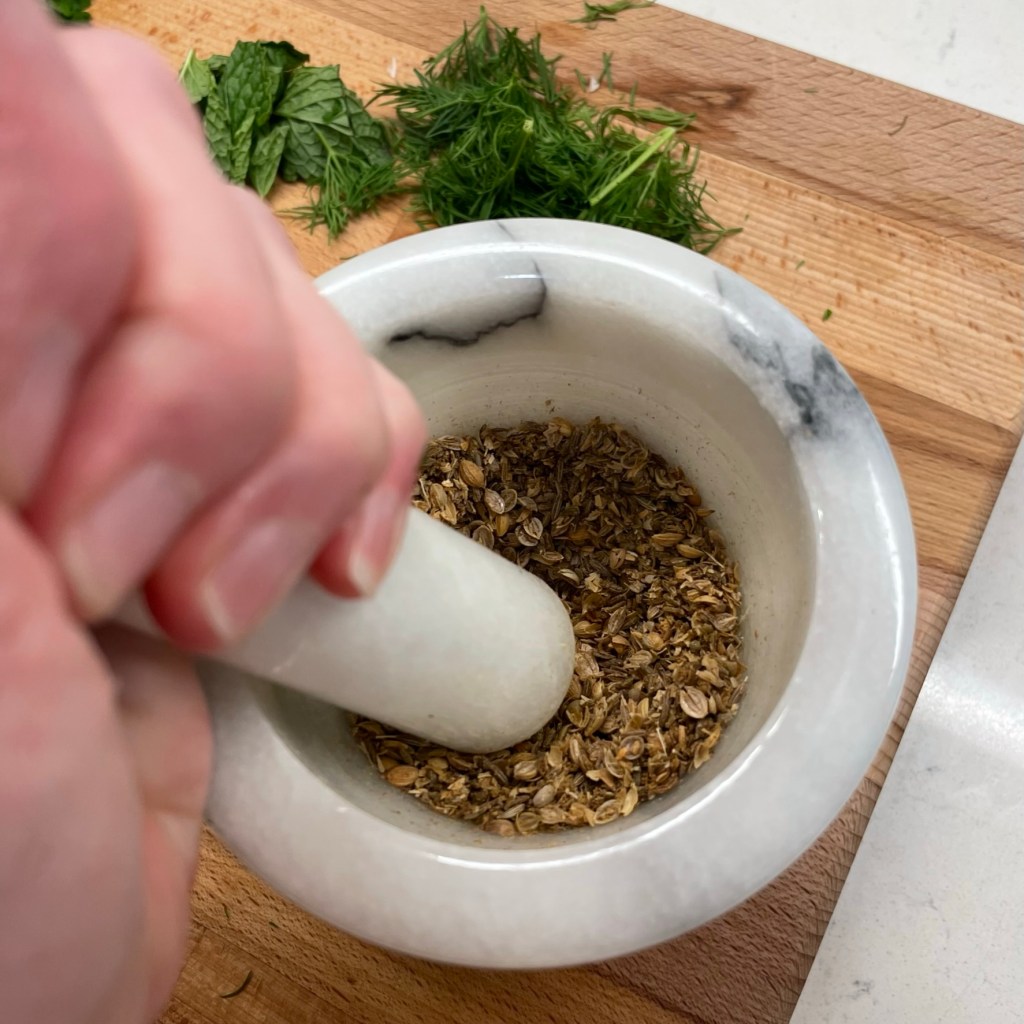
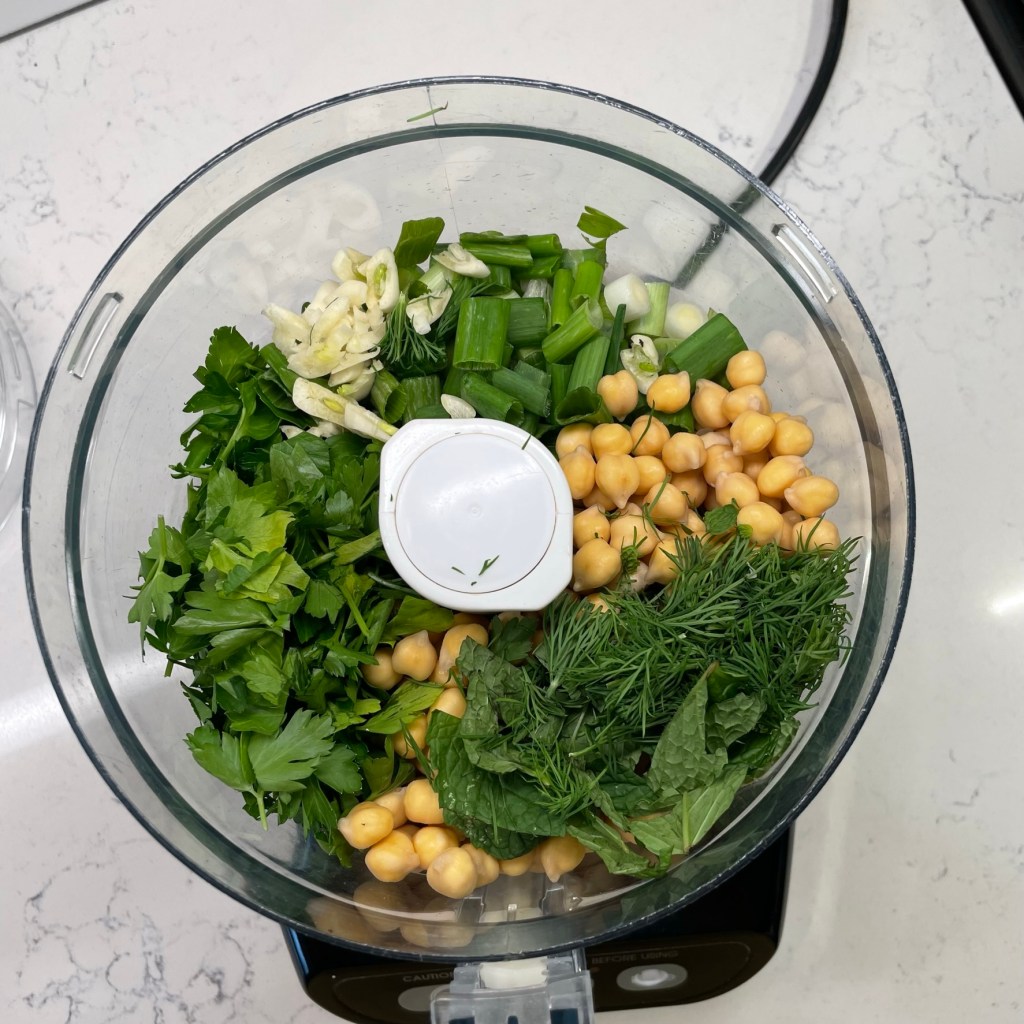
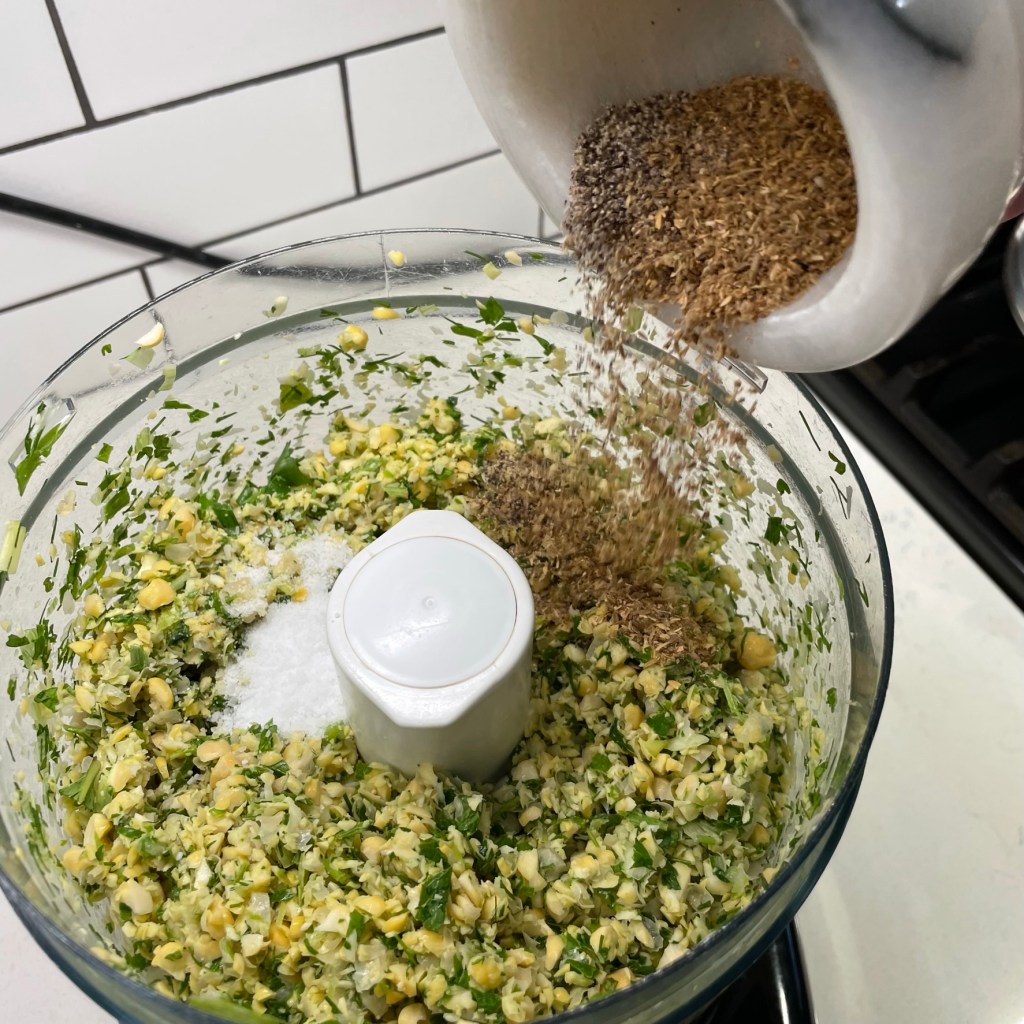
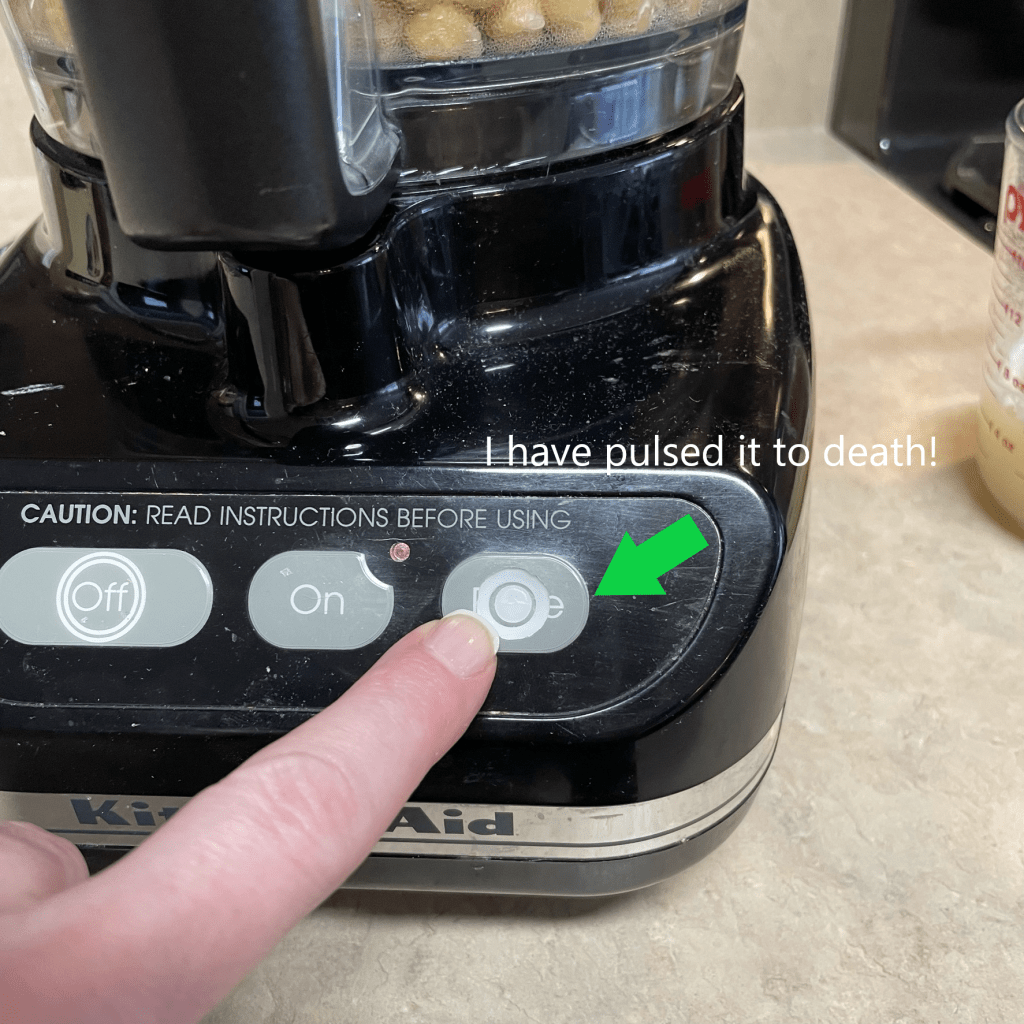
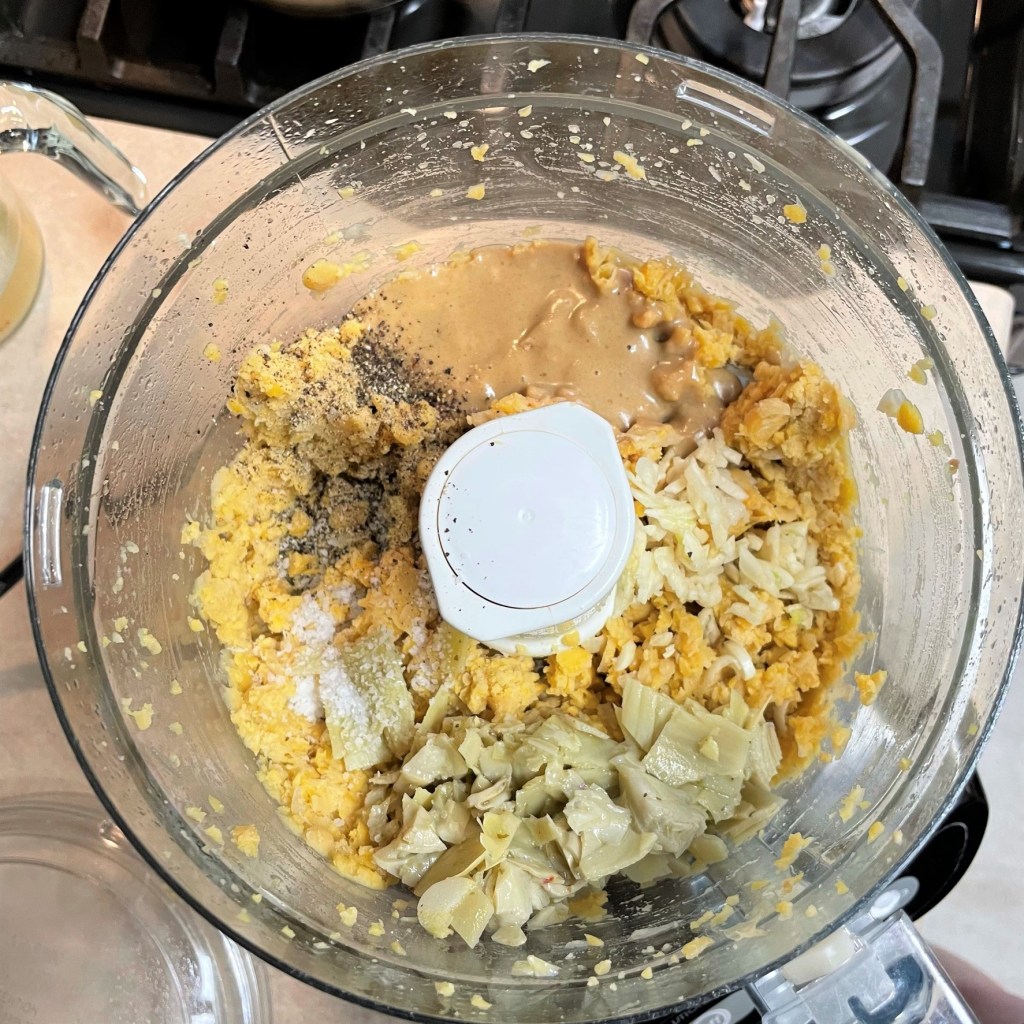
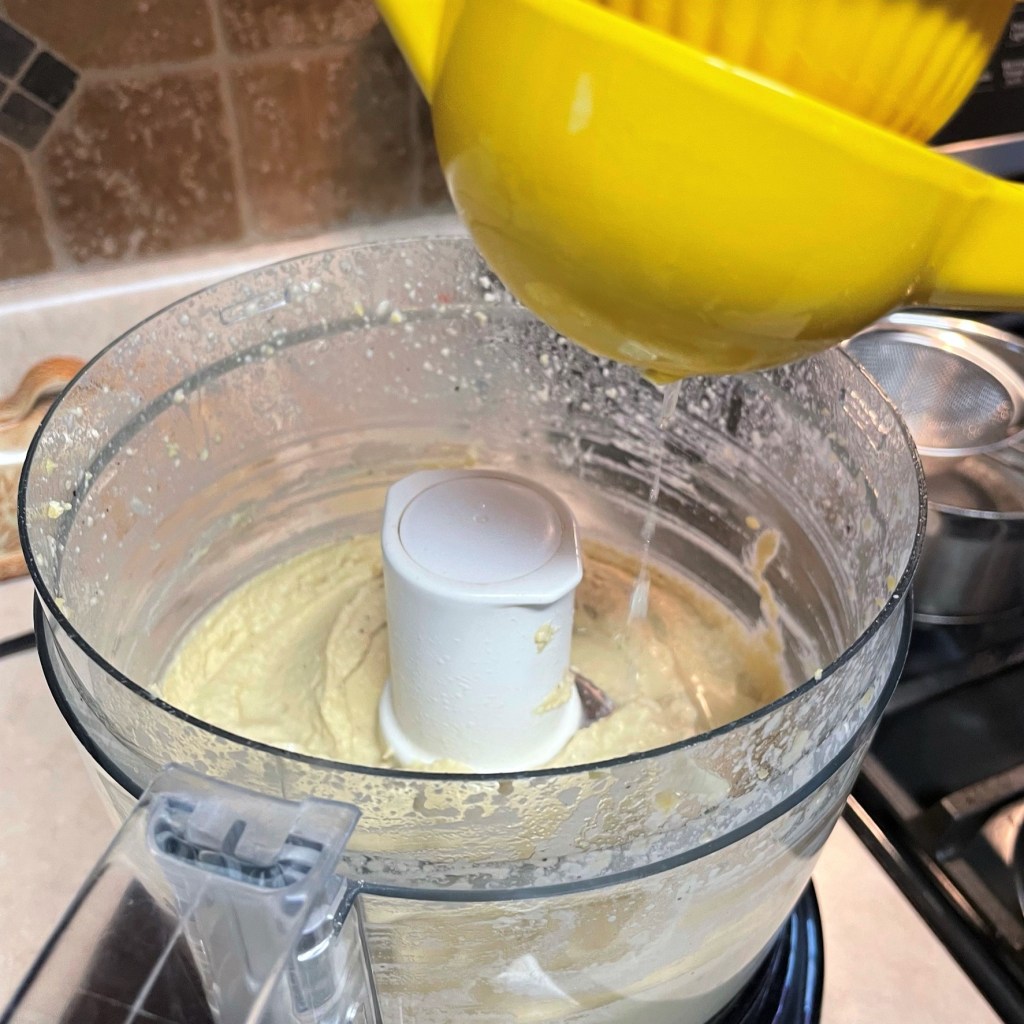
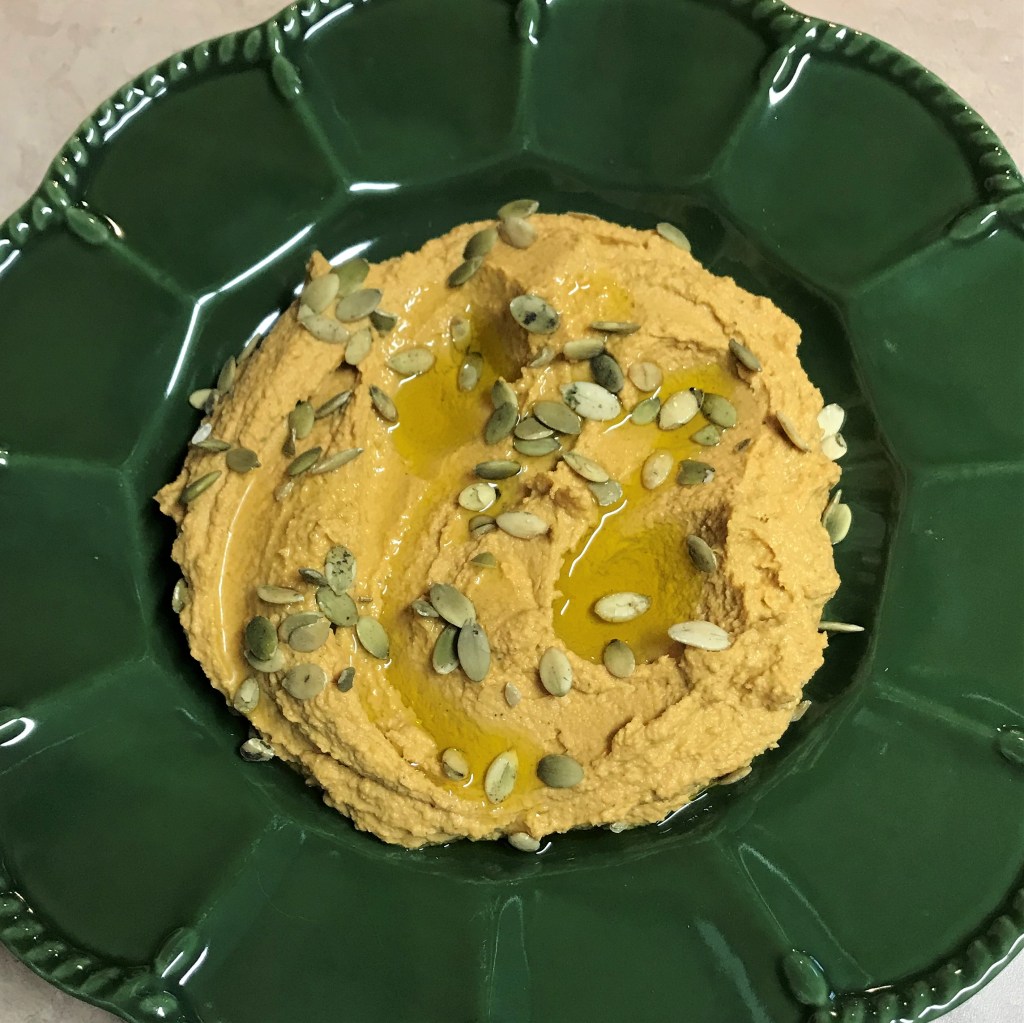
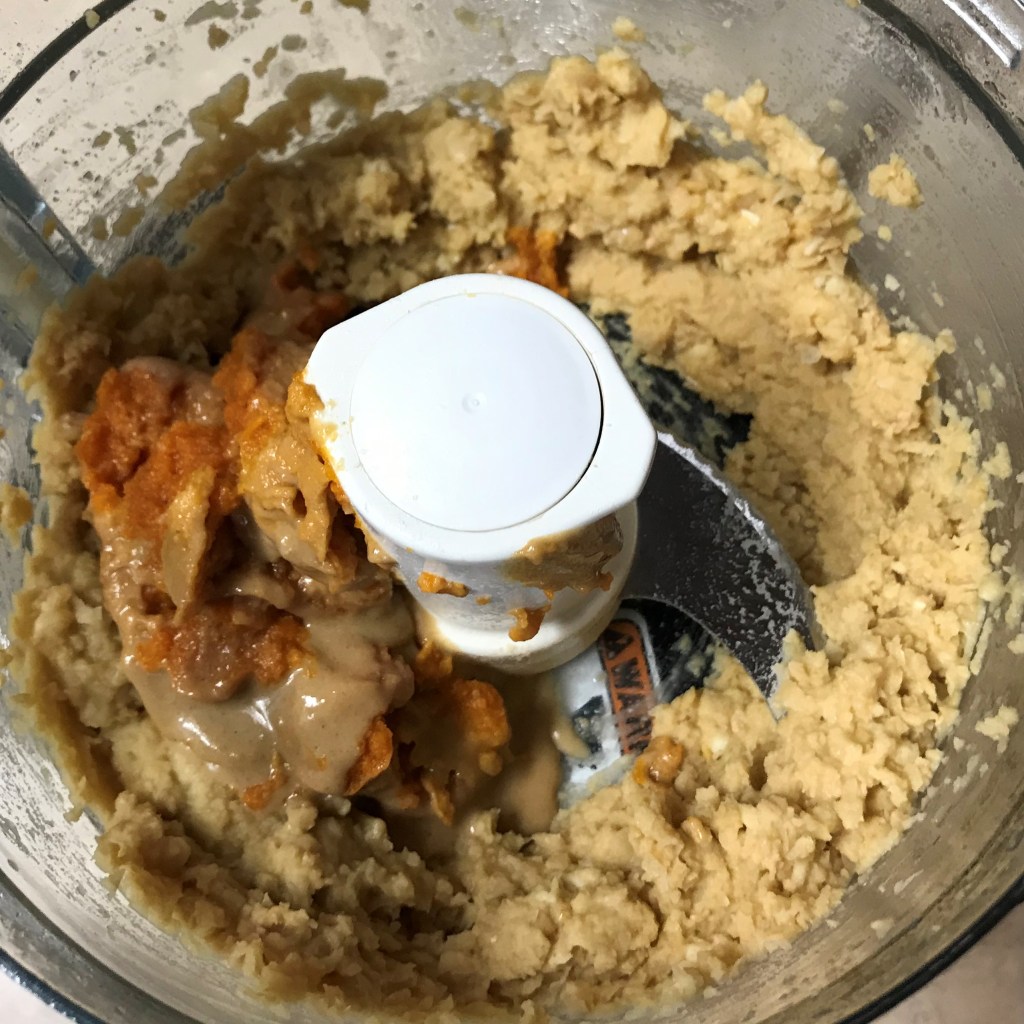
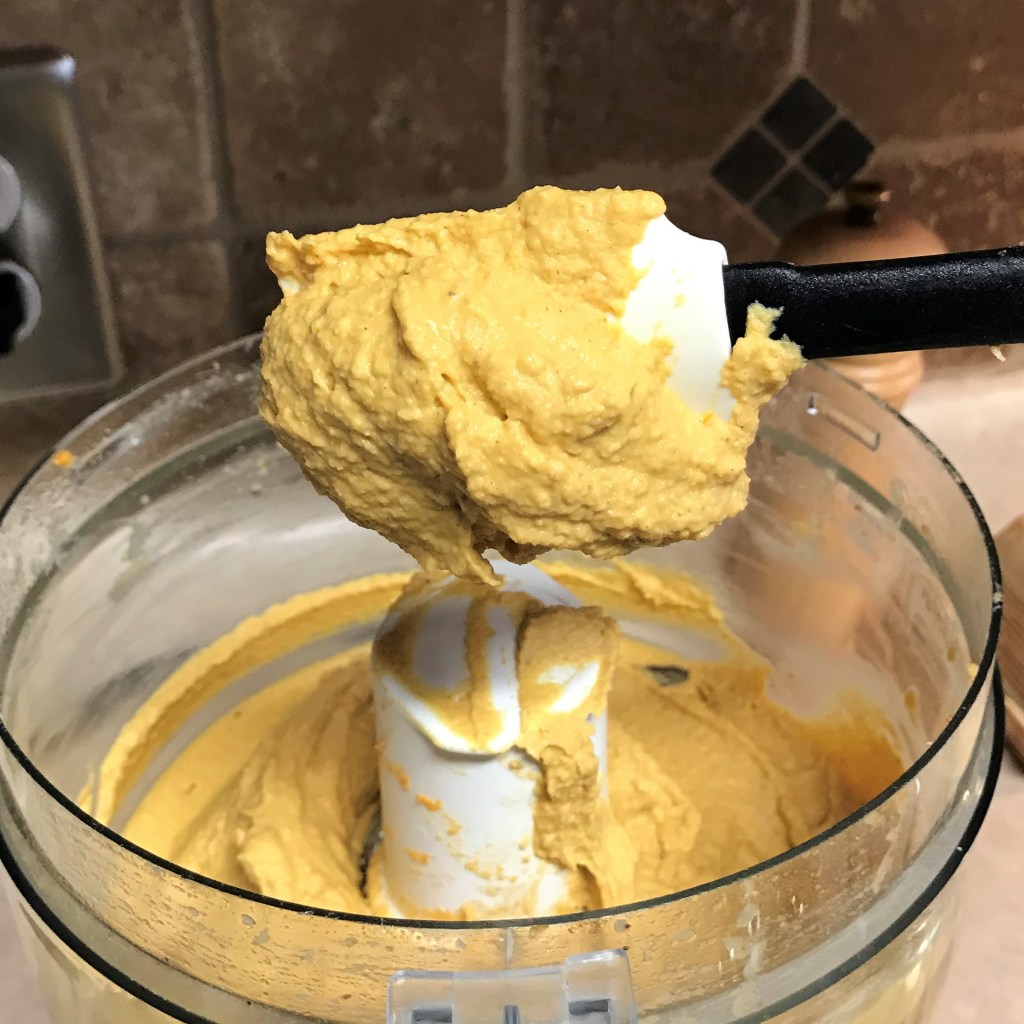
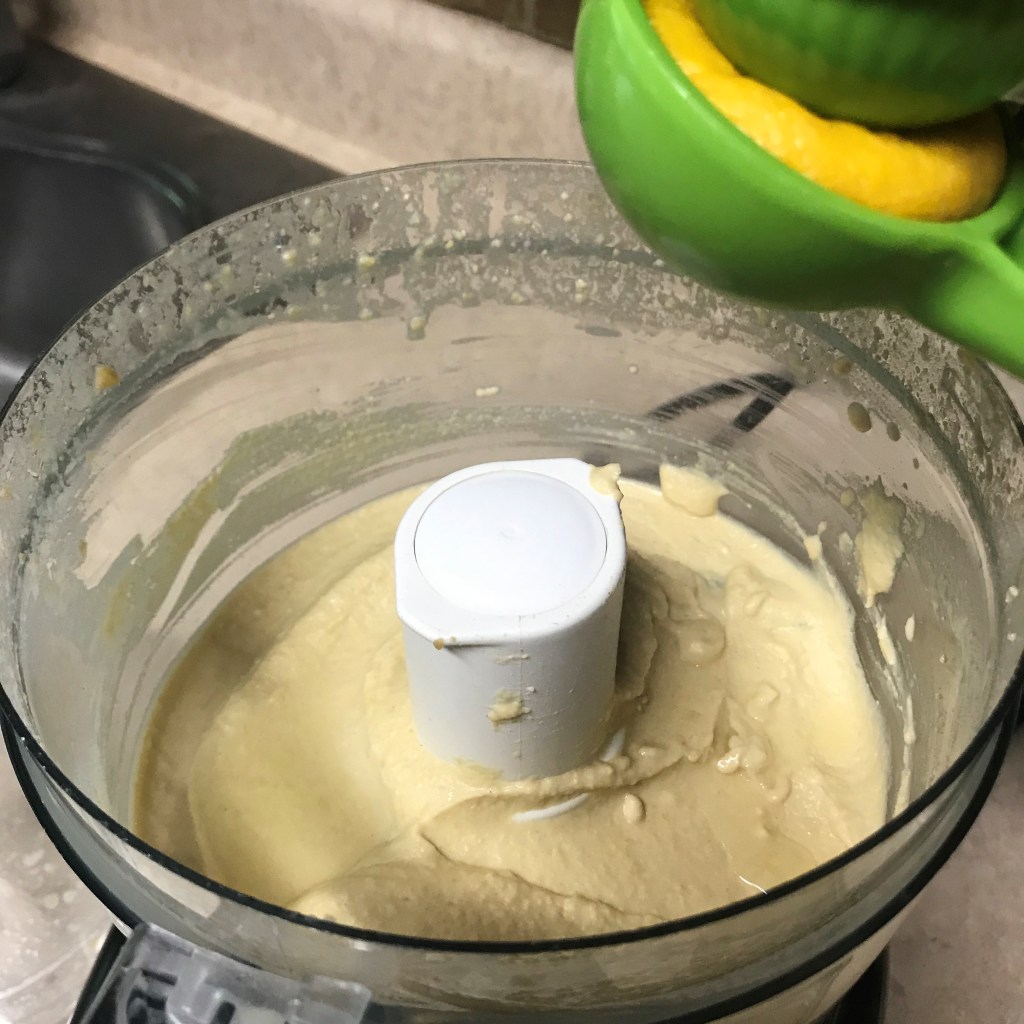
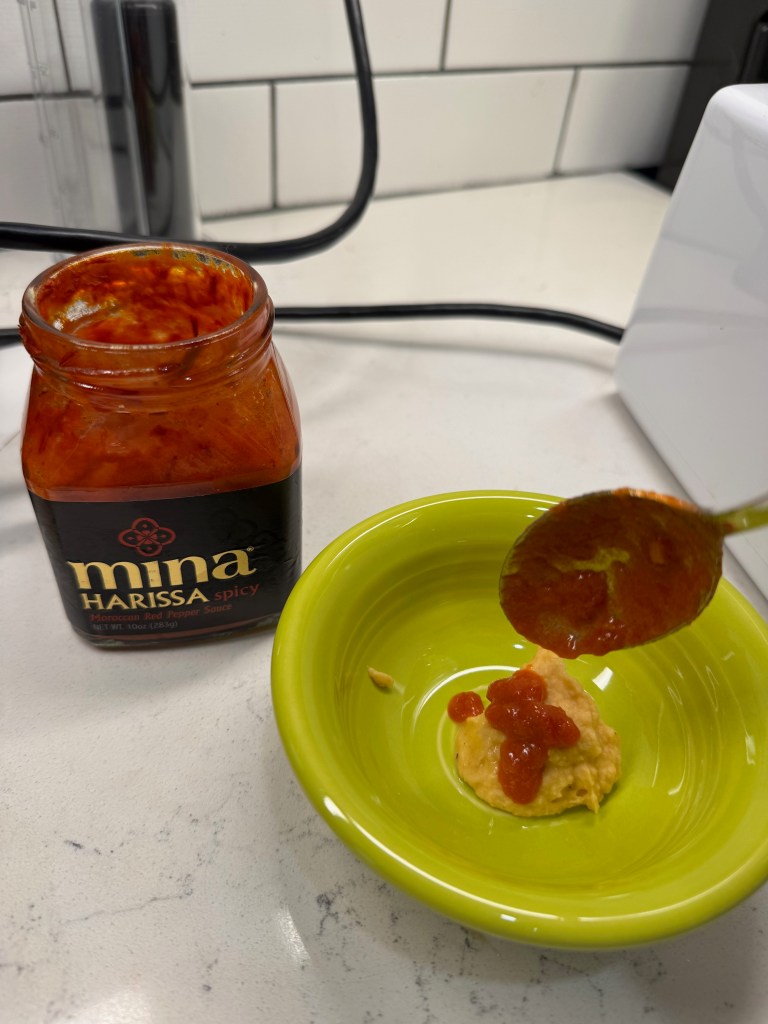
Use the large bowl of a food processor (or a good blender with the vent cover off) to combine the warm chickpeas plus a little bit of the liquid, half a roasted sweet potato, some tahini and salt. Pulse several times until you have a somewhat smooth mixture of hummus. This was my first shot at using harissa in hummus, so I gave it a quick sample test and found it to be a great pairing with the sweet potato! If you are not familiar with harissa, it’s a spicy chile pepper paste common to Morocco and other mideast cultures. It usually includes some variety of chiles, plus garlic and seed spices, such as caraway, coriander and cumin.

This brand of harissa is labeled “spicy,” but don’t you believe it. I barely tasted any heat at all and my husband said the same. If you are sensitive to capsaicin heat, be sure you evaluate the level in your harissa and use your judgment on how much can be added without it sending you to the ER. If your body can’t take capsaicin at all, simply omit it. The sweet potato hummus is delicious without further embellishment.


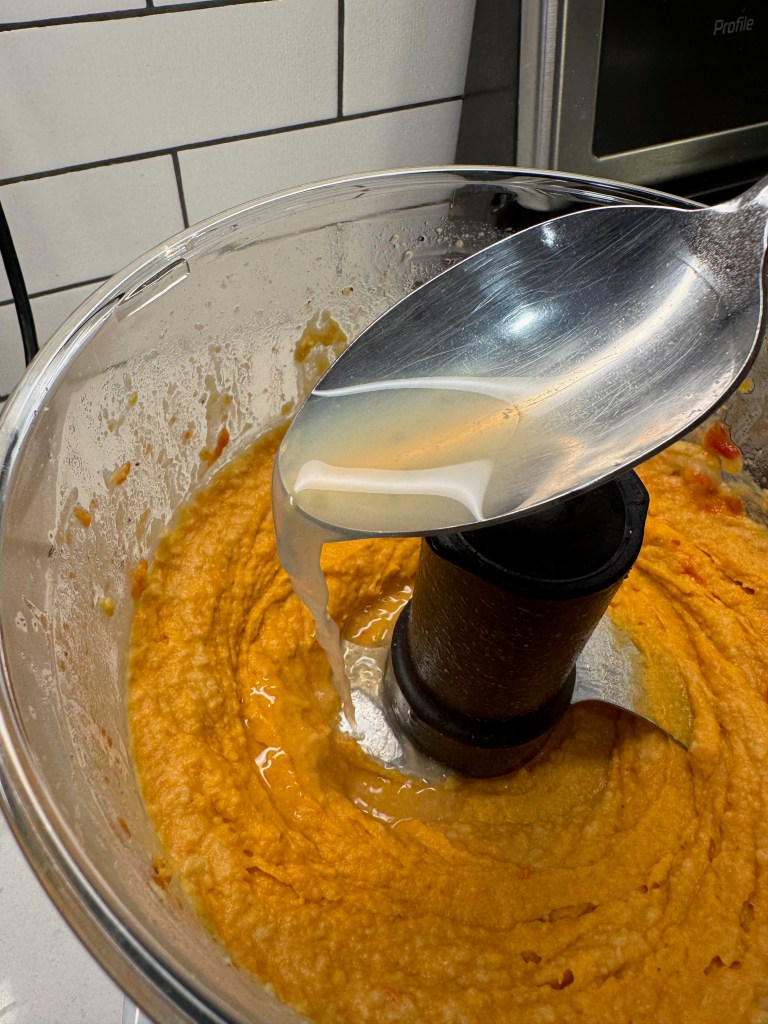
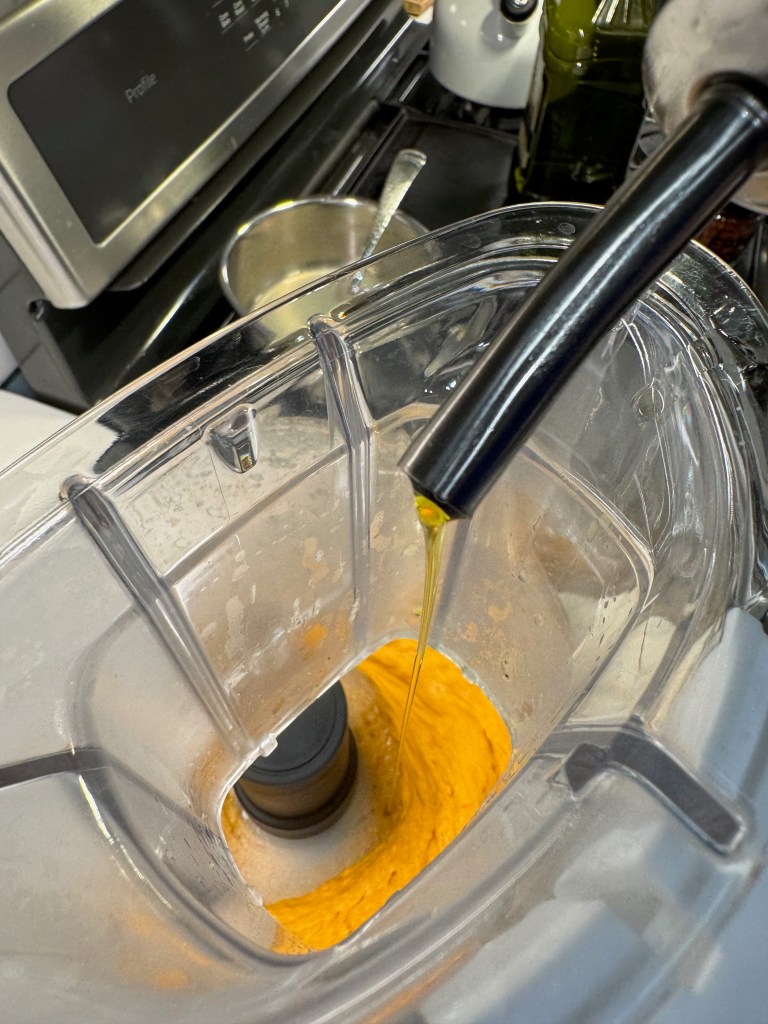
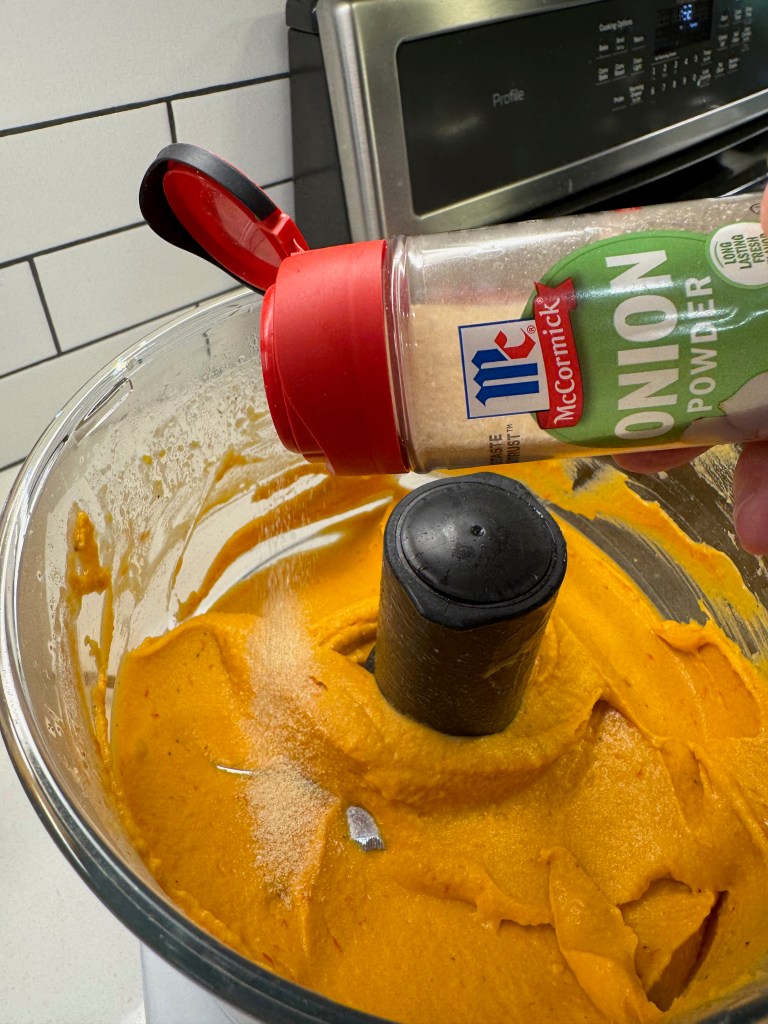
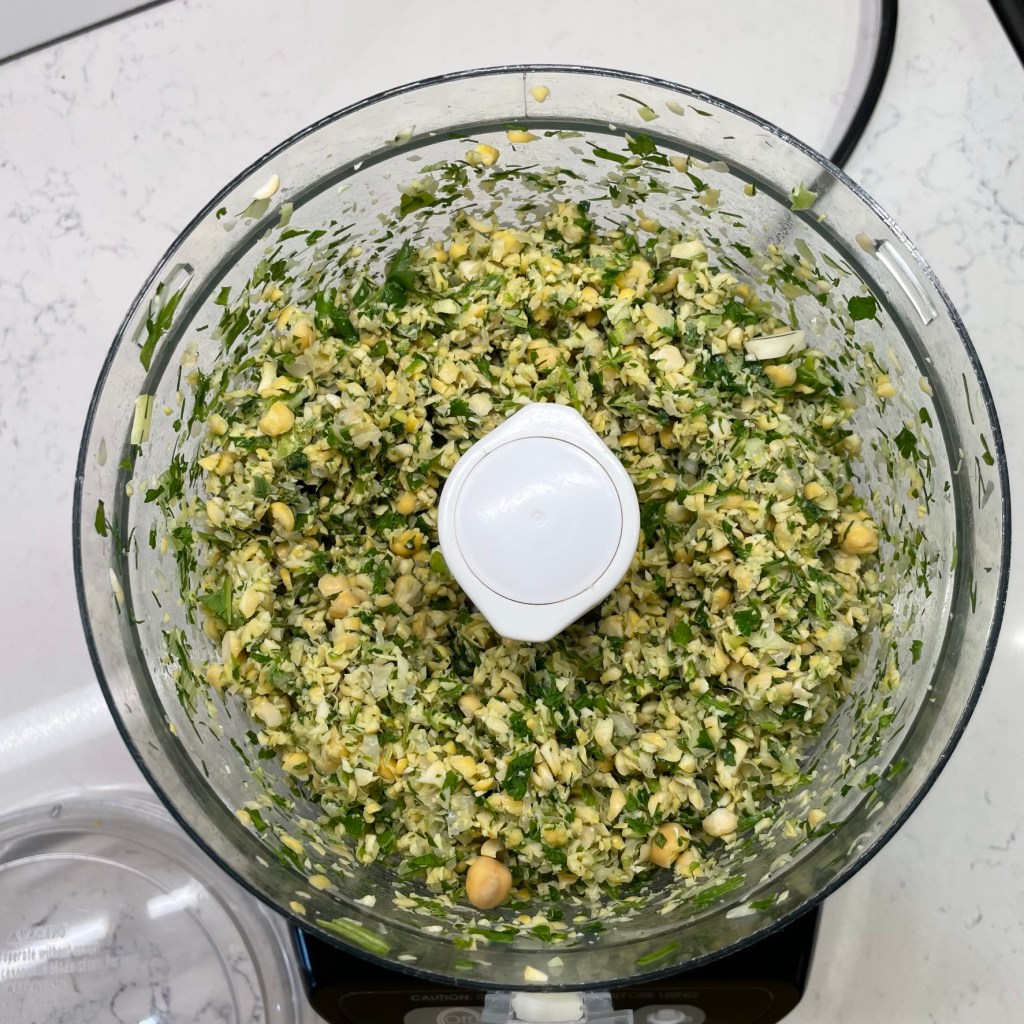
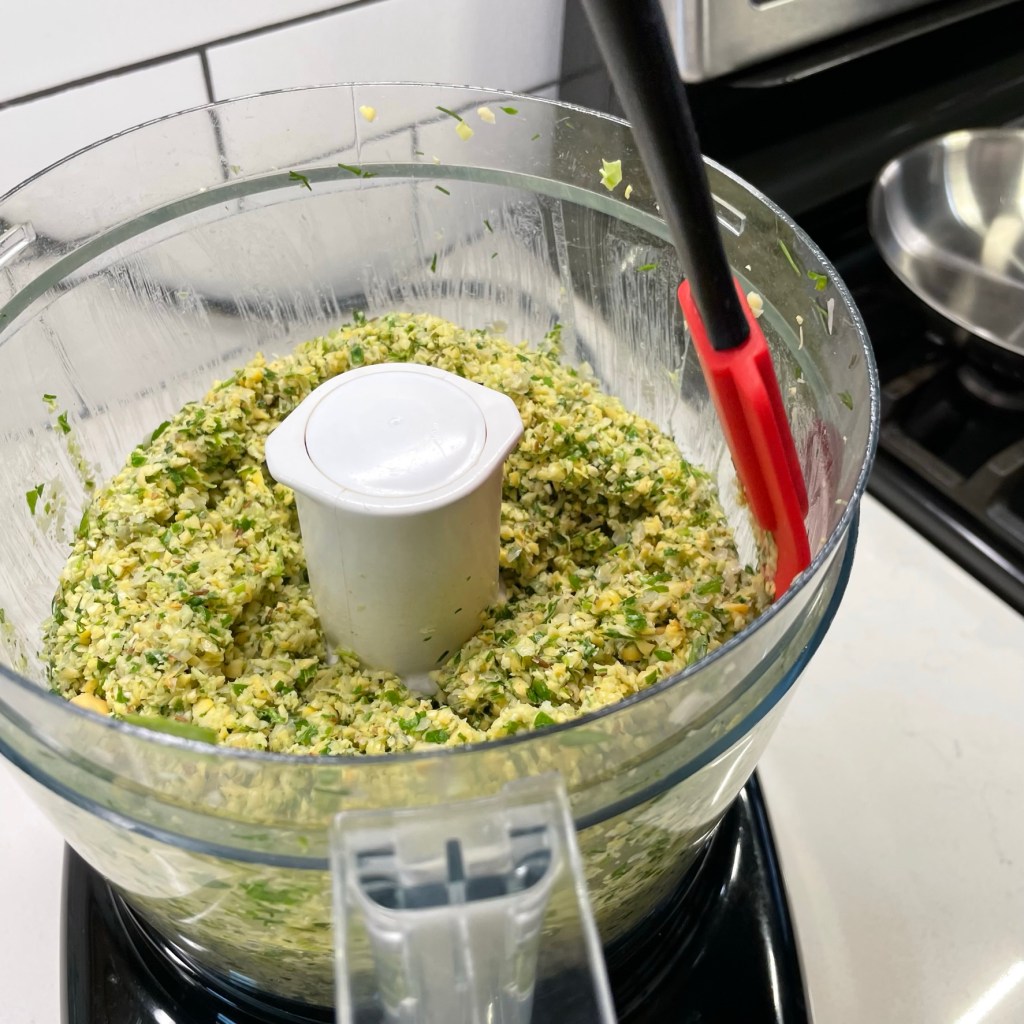
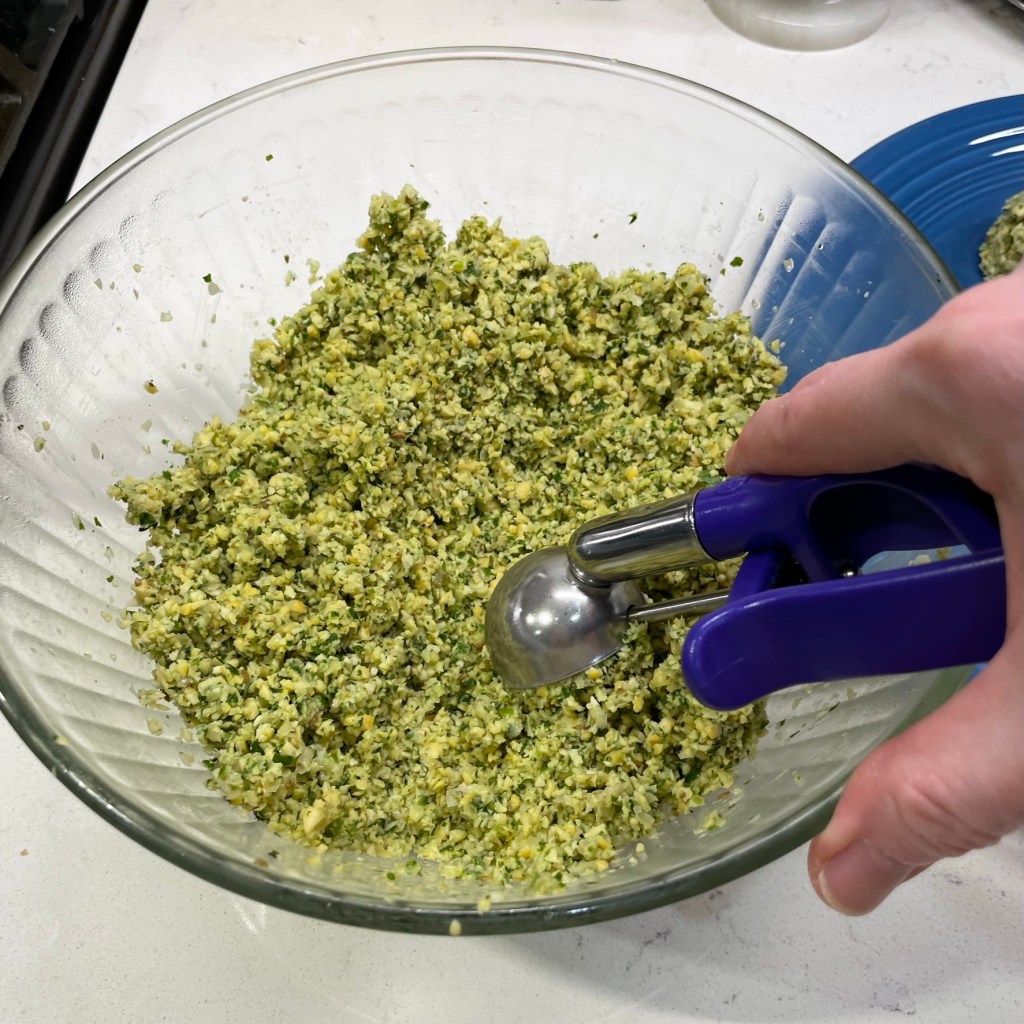
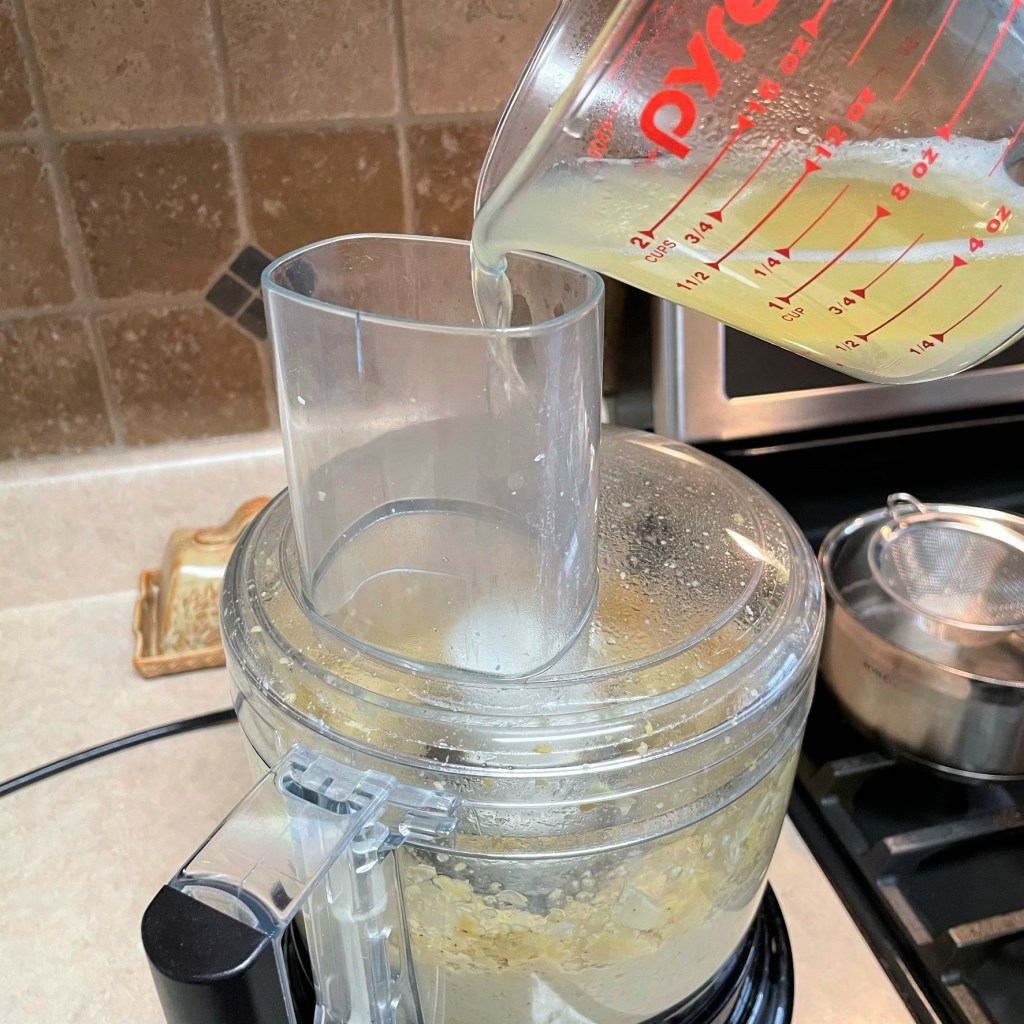
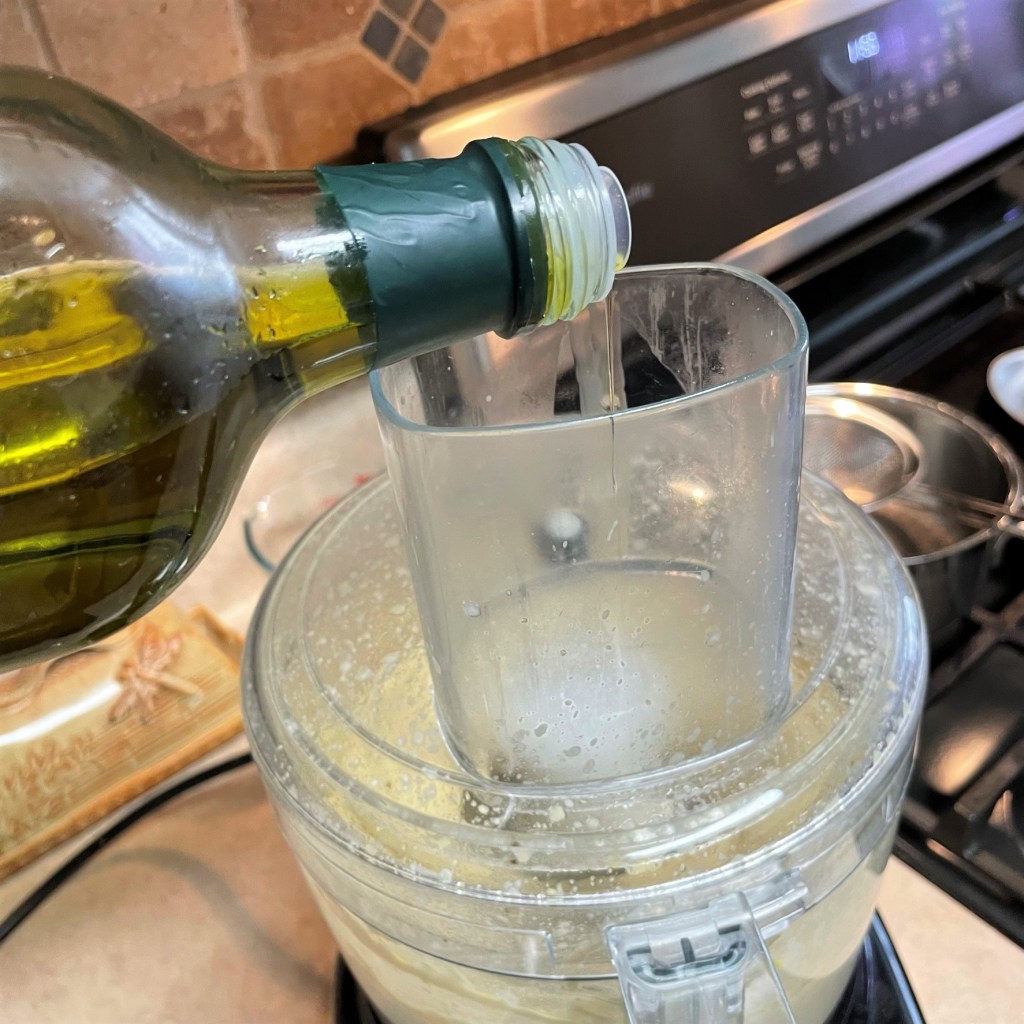
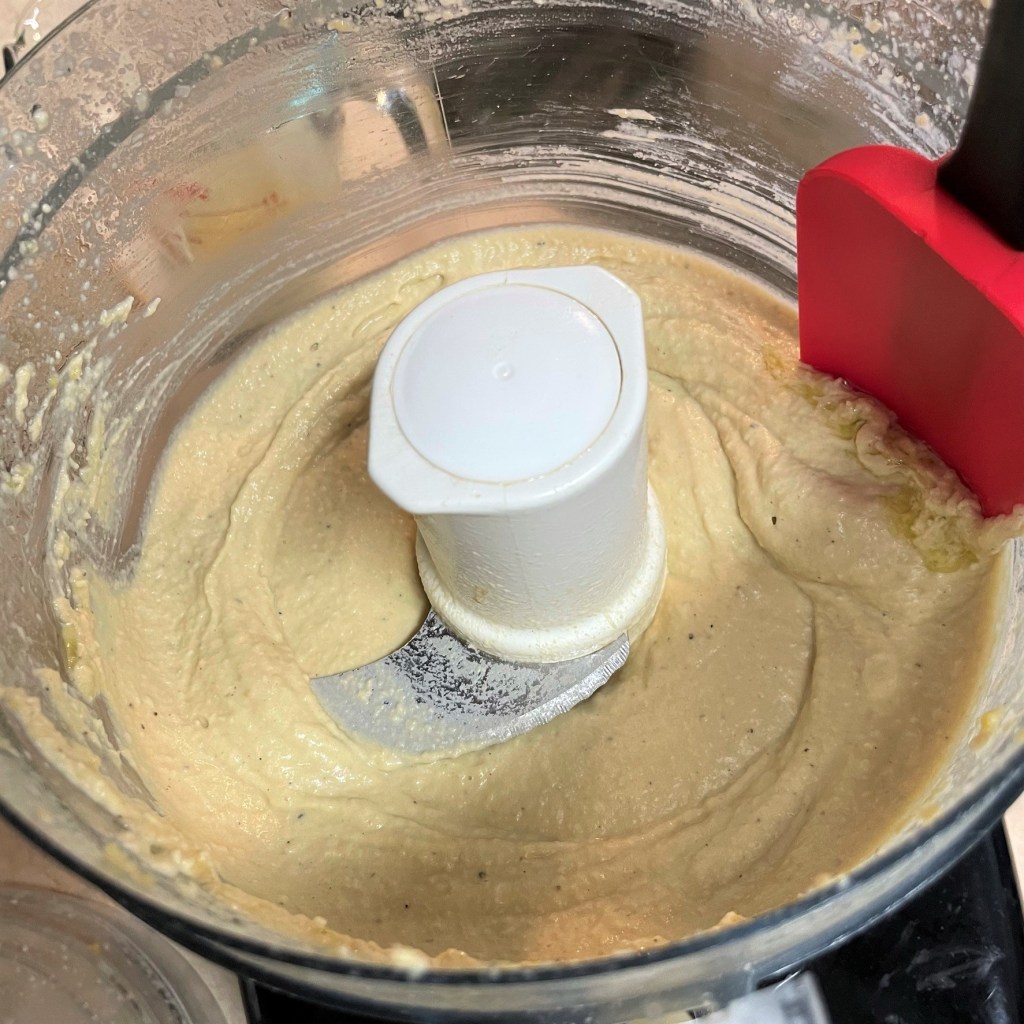
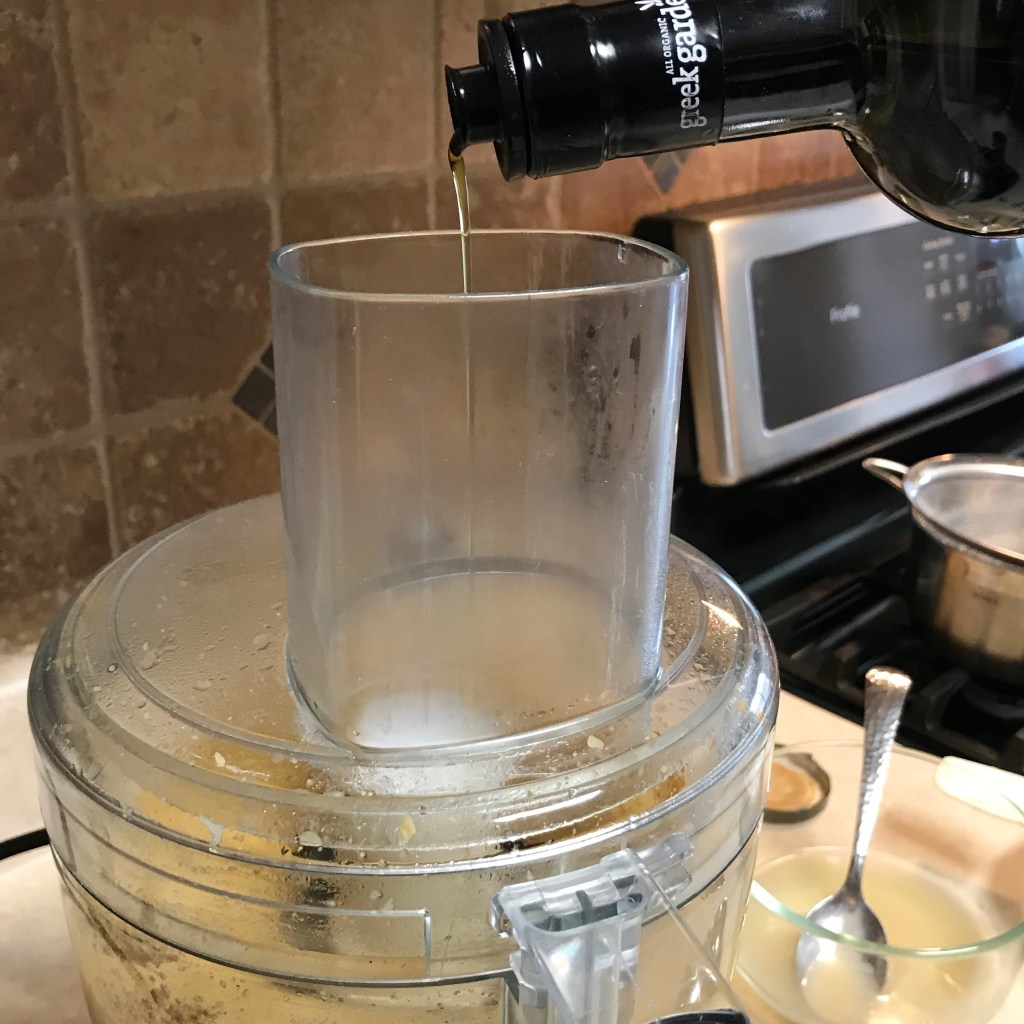
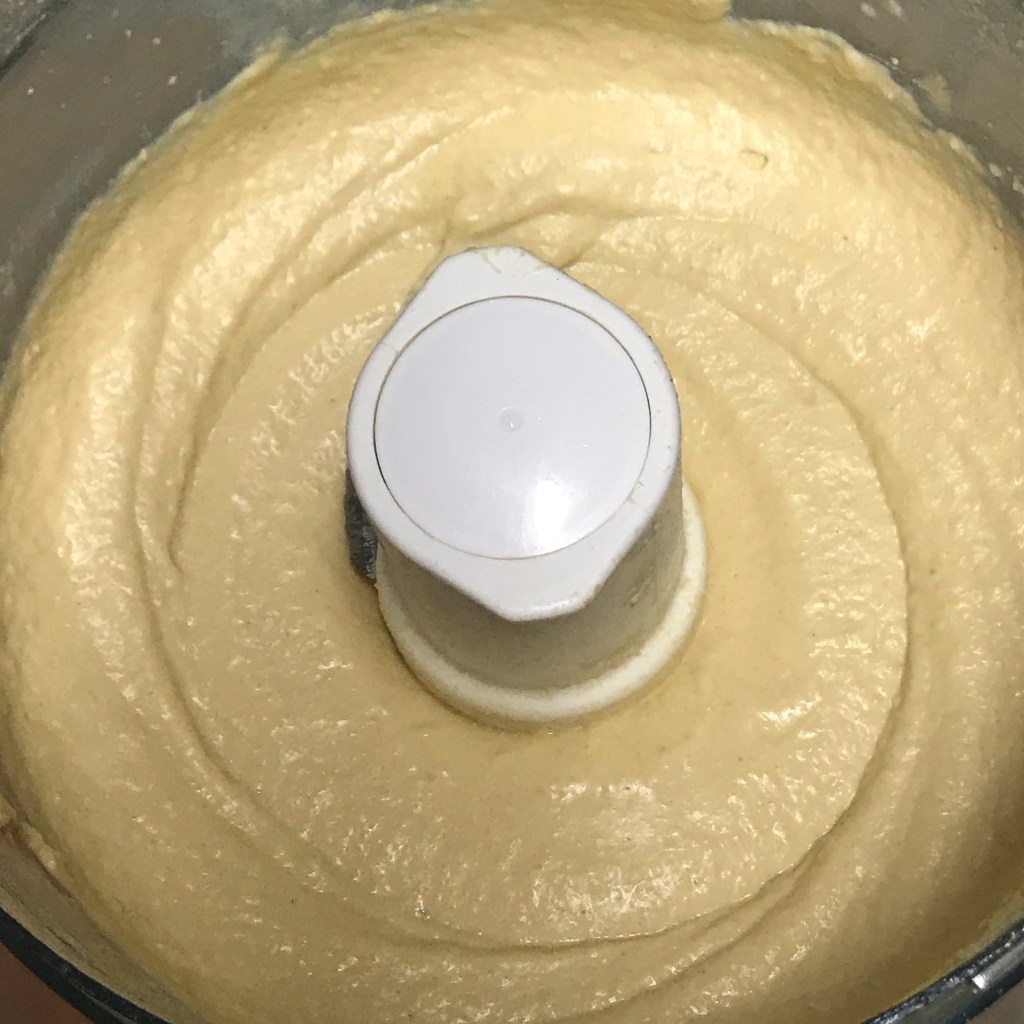
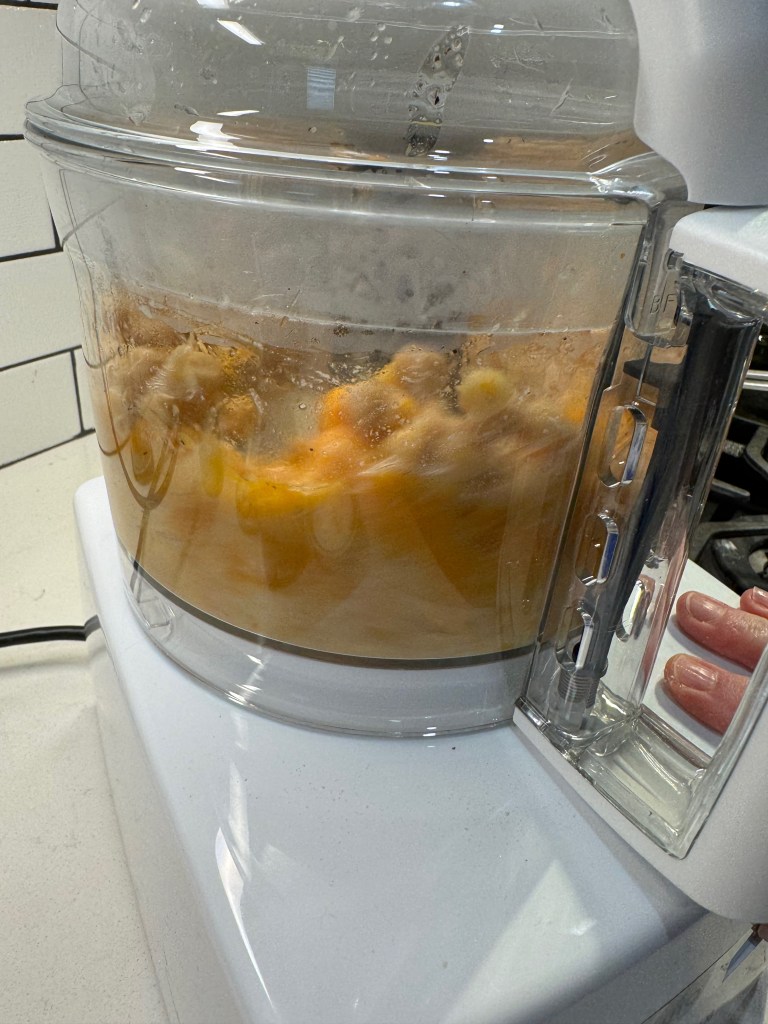
For this final step, scrape down the sides of your processor bowl and then run it continuously until the hummus is a silky consistency. If you find the mixture to be too stiff, stream in a little more of the chickpea liquid and process again. Keep in mind that the hummus will be thicker once it’s chilled. Drizzle in olive oil while the machine is running. When it is smooth to your liking, give it one more taste test and adjust seasoning as needed. For mine, I decided to add a few shakes of onion powder to emphasize the savory flavor of the harissa, but I’ll leave that up to you.

Would you try this sweet potato and harissa hummus? What are your favorite appetizers for sharing with friends at home? 

Sweet Potato-Harissa Hummus

  • Servings: Makes about 2 cups
  • Difficulty: Average
  • Print

This is a fun, savory twist on classic hummus, using harissa paste from Morocco and seasonal sweet potatoes. Other beans may be substituted for chickpeas as noted.


Ingredients

  • 1/2 cup roasted sweet potato
  • 15 oz. can organic garbanzo beans (chickpeas)*
  • 1/8 tsp. baking soda
  • 3 Tbsp. tahini paste
  • 1/4 tsp. kosher salt
  • 3 Tbsp. harissa paste (see notes)
  • 2 Tbsp. extra virgin olive oil
  • 1/4 tsp. onion powder
  • Crackers, crostini or pita chips for serving

Note: Hummus may also be made with other canned beans, such as navy, Great Northern or cannellini. These alternative beans will be softer than chickpeas, so plan to adjust your liquid amounts accordingly. I still recommend warming them before blending for the smoothest consistency.

Harissa paste varies significantly by brand in both heat and thickness. Take note of the heat intensity before you add it to your hummus, so you may adjust the amount to suit your taste. My brand was Mina, labeled “spicy,” but had almost no heat at all. I’ve purchased other brands of harissa that were extremely hot, so it bears checking.

Directions

  1. Pour entire can of garbanzo beans (including the liquid) into a small saucepan over medium-low heat. Add baking soda and bring to simmer until you notice light boiling around the edges and steam rising from the pan. Remove from heat and strain the beans, reserving the liquid.
  2. Add beans, plus about 1/4 cup of the liquid, to the large bowl of a food processor or blender (with vent cover removed). Add sweet potato, tahini and salt to the processor and pulse several times until the mixture is blended but still slightly coarse. Use a spatula to scrape down the sides of the processor bowl.
  3. Add harissa to the processor and pulse a few times. If the hummus seems too thick, add another tablespoon or two of the chickpea liquid to attain desired consistency.
  4. Run the processor consistently while you drizzle the olive oil into the chute. Give it a final taste test, adjusting as needed with onion powder, garlic powder, salt and/or pepper. This hummus is best after refrigerating for a few hours, and it will firm up a bit in the fridge.


Finally, Falafel!

If at first you don’t succeed, wait a year and try again. Yes, I know that isn’t exactly how the adage goes, but it seems to be my M.O. when I get discouraged over failed recipes. Falafel has confounded me as much as it has enchanted me, from my first-ever taste of it at a now-closed corner diner near the campus of UNC-Greensboro to my most recent experience of it at Miznon in New York’s Chelsea Market. It was that most recent taste that inspired me to give falafel another go.


I love the texture of these crispy little gems and especially the vibrant flavor that is jam-packed into every delicious bite. Falafel is a Middle Eastern specialty, made from ground-up chickpeas and a ton of fresh herbs and spices. It is usually shaped into balls or disc shapes and fried until crispy, though I have also seen oven-baked falafel, which has a somewhat pale and less visually enticing appearance. Undoubtedly, it can be made in an air fryer—and perhaps someone reading this will chime in to share their results of that method. I have tried both fried and oven-baked falafel a few times but got increasingly frustrated with each fail, and then put off trying again for longer and longer stretches of time. How could this be so difficult, I wondered? The dish eventually moved to the top of my culinary “bucket list,” and I’m pleased to say that I finally won the falafel challenge.

As it turns out, falafel was only difficult to make because I was resisting the instructions that were right in front of me the whole time. I tried to make them from canned chickpeas (which doesn’t work) and then I tried making them with canned chickpeas that were subsequently roasted and dried out in the oven (which also doesn’t work). When I finally gave in and tried them the correct way, they turned out terrific! What is the correct way, you ask? Using chickpeas that have been soaked but not cooked.

My favorite thing about cooking—besides the obvious enjoyment of delicious food that’s made cheaper at home than you would buy somewhere out—is the science behind it, and it turns out there is a perfectly good reason that soaked, uncooked chickpeas are the best bet for perfect falafel. Thank goodness for J. Kenji Lopez-Alt, the culinary genius who runs “The Food Lab,” and a frequent contributor on the Serious Eats website. He is sort of an Alton Brown for the new generation, and his scientific explanation on falafel is the best I’ve read to date. Here’s the upshot: soaking rehydrates the chickpeas so you can work with them, and it keeps the sticky starches trapped inside. Those starches get released when the chickpeas are cooked during frying (or baking), and that starch release is what helps the falafel rounds hold together. If the chickpeas are already cooked (as in canned), the starch is spent, and you end up with a mess. My ridiculous attempts to return canned chickpeas to a firmer, drier texture by roasting them in the oven didn’t work because they were still already cooked. This time around, I followed the science offered by J. Kenji, and guess what I ended up with? Near-perfect falafel.

Crispy on the outside, moist and soft on the inside, and sooo much flavor!

In a weird twist of fate, the best way also happened to be the easiest of the methods I had previously tried. Soaking the chickpeas took almost no effort, then I drained and rinsed them in a colander, rolled them around on paper towels to wick away excess moisture, and then pulsed them in my food processor with a fat handful of fresh herbs and generous amounts of Mediterranean spices. Further following J. Kenji’s advice, I kept my falafel small, using my large cookie dough scoop to compact them into rounds, which I fried up nicely in a shallow skillet. For the love of flavor, why did I wait so long to follow the rules?

As much as I love falafel in a wrap sandwich, I also love just dipping and snacking on them.

Falafel is great as a pick-up snack, dipped in tahini-lemon sauce. We enjoyed it as a sandwich filler, nestled with lettuce, tomatoes and pickles into a warm, whole grain soft pita. My husband and I agreed that the flavors in this revelatory batch of falafel could stand to be a little bolder, and maybe even a bit more garlicky. I will play with the seasonings a bit on my next go, and you can bet that I won’t be waiting a year.


Ingredients

1 cup dried chickpeas, sorted and rinsed

4 cups cold or room temperature water

Several scallions (white and green parts)

About 2 cups loosely packed fresh Mediterranean herbs* (see notes)

2 large garlic cloves, peeled and rough-chopped

1 tsp. each cumin and coriander seeds*

1/4 tsp. ground cayenne (optional)

1 1/2 tsp. kosher salt

Several grinds black pepper

A few teaspoons flour (if needed), as a binder for overly wet falafel mixture*


*Notes

Falafel is of Middle East origin, so the Mediterranean herbs work best here. Parsley (curly or flat), mint, dill and cilantro (also called “fresh coriander”) all work great in this recipe, but I would not recommend basil, thyme or rosemary. It is essential that you use fresh herbs for this recipe, as they contribute texture in addition to flavor. After rinsing the fresh herbs, take time to also dry them on a clean kitchen towel or layers of paper towel, so that you don’t add unwanted moisture to the falafel mixture.

I prefer the intensity of freshly ground seed spices, but if you only have pre-ground cumin and coriander, it’s no problem. Use slightly less, perhaps 3/4 tsp. of each.

Ideally, the chickpea mixture will hold together without the flour binder. But I found that a few sprinkles of flour were necessary to pick up lingering moisture. I used a tablespoon of garbanzo bean flour, but all-purpose or rice flour would probably work also.


Instructions


Artichoke & Garlic Hummus

In six short weeks, life will be turned upside down for my husband, Les, and me. This is when our kitchen tear-out will begin, and we are beginning to shift our expectations as we prepare for the eight weeks or so that we will be “without” a kitchen. Welcome, friends, to our “in-between” kitchen!


We have rearranged our dining room space to accommodate a baker’s rack that will hold some of the appliances that will help us get through the chaos. A new two-burner induction cooktop will allow us to do simple stove-top cooking, including heating water for my daily dose of French press coffee. We will make good use of our slow cooker, toaster oven and the panini griddle that doubles as a waffle iron. We have the gas grill for outdoor cooking, and so far, the only thing I haven’t quite figured out is how I will make bread without our oven, though don’t be surprised if I use one or more of the above to make it happen!

As we are preparing for the load out of the old kitchen (not to mention a bevy of random pantry and freezer ingredients), I’m giving all of our other small electrics a chance to prove themselves worthy of a spot in our new space. One item that will be (sadly) getting the boot is our KitchenAid 11-cup food processor, but not because we don’t use it; on the contrary, this thing gets so much action, it is on its last legs. The protective film over the power buttons has become brittle and is completely worn away from the pulse button, the feed chute is cracked and the inside of the “S” blade stem has some dried-on crud that I have not been able to remove. I have had the appliance nearly 20 years, and KitchenAid no longer makes my model (or any of the parts), so my only choice will be to replace the machine.


Until then, I’ll keep going with recipes like this one, for easy homemade hummus made with garbanzo beans, lemony artichoke hearts and lots of fresh garlic. Hummus is one of my favorite “blank canvas” foods, and it’s so simple at home, it makes no sense to buy it. The other key ingredients include tahini, olive oil and a squeeze of fresh lemon, which is a perfect highlight to the tangy artichoke. 

Warm the garbanzo beans to soften them up before you begin and use a food processor or a good blender for best, smoothest results. Enjoy your hummus on crackers, chips, crostini or fresh veggie slices.


It’s so much tastier than store-bought!

Ingredients

15 oz. can garbanzo beans, with liquid

3 Tbsp. tahini* (see notes)

2 to 3 cloves garlic, finely chopped

About 1/2 cup marinated artichoke hearts*, drained and rough-chopped

Juice of 1/2 lemon

Kosher salt and pepper

3 Tbsp. extra virgin olive oil


*Notes

Tahini is a paste made of ground sesame seeds. It is available in most larger supermarkets, usually in the same section as olives, or perhaps in the international aisle.

The artichoke hearts I used were Trader Joe’s, marinated in sunflower oil, vinegar and spices. If you use plain hearts, consider adding a pinch or dried herbs (dill or oregano would be great), and either way, drain all the excess liquid from them.


Instructions


Pour the entire contents of the canned garbanzo beans into a small saucepan. Heat over medium-low heat until mixture just begins to boil. Remove from heat and drain liquid off beans, but do not discard it (you’ll use it for blending).

Transfer warm beans into a food processor or blender and pulse a few times to grind the beans into a meal-like texture. Scrape down sides of the processor bowl. Add tahini, garlic, artichoke hearts, salt and pepper. Pulse a few times to combine. Scrape down the sides again.

Turn processor on and run continuously while slowly pouring about 3 tablespoons of the warm liquid into the processor. Blending slowly will help to emulsify the ingredients into a smooth blend. Add more or less of the liquid, depending on your preference for hummus consistency. Remember that the mixture will become firmer after chilling. Scrape down sides once more.

Run processor continuously and slowly blend in about 3 tablespoons of extra virgin olive oil.

Transfer hummus to a bowl and refrigerate, covered, for up to a week.


Artichoke & Garlic Hummus


Spiced Pumpkin Hummus

Amid the pies, cookies, muffins and lattes that have unfairly typecast pumpkin as being exclusively sweet, I’m flipping the script and respecting the savory side of this autumn favorite. This tasty twist on hummus is a simple appetizer that you can put together last minute for your Thanksgiving pre-feast. It’s satisfying, but low-fat, good for you and vegan.

All you need to make it is a can of garbanzo beans, a little pumpkin puree, some tahini and your preference of savory spices, and I’ll give you a few flavor ideas that will work splendidly.

Hummus is a blank canvas for your favorite flavors. This time, canned pumpkin and garam masala are making it special.

As with any hummus, you need to have a food processor or blender to be successful. For tips and tricks to make your hummus super smooth, you may want to check out my recipe for easy hummus at home. If you’re in a hurry, don’t worry; I’ll also walk you through it in a slideshow below. This is easy stuff.

At our house, a green plate means the dish is suitable for vegan guests.

Ingredients

1 can garbanzo beans (chickpeas), preferably low sodium

2 cloves garlic, minced (optional but recommended)

1/2 cup pure pumpkin puree (not pie filling)

2 Tbsp. tahini (sesame paste)

1/2 tsp. savory spice* (pick a favorite or use one of my suggestions below)

Extra virgin olive oil (2 or 3 Tbsp., depending on taste)

Kosher salt and freshly ground black pepper

*Notes

I used garam masala for this batch of hummus, but you might try chai spice, chipotle or ancho chile, cayenne, chili powder, cumin or smoked paprika. Make it your own!


Instructions

Follow along with my pictures, or skip ahead for the written instructions and downloadable PDF for your recipe files!


  1. Pour the garbanzo beans and their liquid into a small saucepan over medium heat for about 8 minutes, or long enough to see moderate bubbling as it boils lightly.
  2. Drain the beans through a mesh strainer, but do not discard the liquid; you’ll need some of it for blending the hummus.
  3. Transfer the beans to the food processor bowl and pulse a few times until it has appearance of a coarse meal. Add the garlic, a pinch of salt and two tablespoons of the reserved liquid and pulse a few more times.
  4. Add pumpkin, tahini, spices, and several twists of freshly ground black pepper. Pulse until combined, and then run the processor constantly while streaming in additional bean liquid, a tablespoon at a time, until the mixture reaches your preferred consistency. This will only take a minute or so. Stop and scrape down sides as needed. Taste hummus and adjust seasonings to taste.
  5. To finish the hummus, run the processor constantly and slowly stream in olive oil. This adds a touch of healthy monounsaturated fats, as well as a silky creamy texture.

Transfer hummus to a covered bowl and refrigerate until ready to serve. Drizzle hummus with olive oil and sprinkle with additional spice or chopped pepitas, or both, for a pretty presentation. Serve chilled or room temperate with pita chips, crackers, vegetables or my soft pita breads.

Pita chips, cut-up veggies and crackers are all great for serving any kind of hummus.

Want to print this recipe?


Easy Hummus at Home

If you love hummus, but not the price of a small container, this recipe is for you. With only a few simple ingredients, and a processor or blender, you can make delicious hummus at home. I’m finding this a great way to use some of the extra garbanzo beans I purchased when the shelter-in-place rules went into effect.

The biggest difference I’ve found between grocery store hummus and the homemade variety is the texture; my homemade always leaned toward the grainy side. I searched on Pinterest and found the guaranteed best method for creating smooth, silky hummus (because literally everyone on Pinterest makes claims like that). It involved heating the beans with a small amount of baking soda to loosen the skins so they could be removed. I love little tips like that! So I tried it. An hour and a half later:

The pile of peels was almost as large as the pile of beans!

Seriously. So we’re not doing that today. I dug deeper and tried a few other tricks, and I have some good news to share: the trick to making silky smooth hummus is heating the beans in their liquid before processing them, and having patience with the processing. Follow along, and you’ll be successful. This recipe makes about 2 cups of hummus; flavor variations are suggested at the end.


Ingredients & Tools:

1 can (15 oz.) garbanzo beans, with minimal additives (ideally, just beans, water and salt)
2 Tbsp. tahini* (see note below)
1 to 2 cloves chopped fresh garlic (should measure about 1 Tbsp.)
2 to 3 Tbsp. extra virgin olive oil (if you have some of the premium stuff, this is a good recipe to use it!)
Juice of half a small lemon
Kosher or sea salt to taste


Food processor or blender (you need one or the other to make this)
Small saucepan for heating beans
Measuring cup with spout for drizzling liquid into processor
Citrus squeeze juicer (helpful, but not necessary)


*Notes

Tahini is essentially a paste made of ground sesame seeds. It has a mild nutty flavor and sticky texture, like a thin peanut butter. In a pinch, if you don’t have tahini, you could use a natural, unsweetened peanut butter as a substitute. But if you pick up tahini on your next essentials run, I promise I’ll help you use it!


Instructions:

Warm beans and liquid in small saucepan over medium-low, until simmering and heated through.

Drain beans, reserving the liquid in a measuring cup with pour spout.

Empty all the beans, tahini, chopped garlic and about 1 Tbsp. bean liquid into the processor bowl, and pulse 5 times for about 3 seconds each time. The mixture will be sticky and clumpy, but that’s OK.

Add another tablespoon of liquid and pulse 5 times again. Use a rubber spatula to scrape the mixture down into the processor bowl, then replace the cover and turn on the processor to run continuously.

With the processor running, slowly drizzle 2 Tbsp. of the olive oil into the mixture (or more if you like a more intense olive oil flavor). Stop and scrape down again, and then process again, slowly streaming more of the warm bean liquid into the garbanzo mixture until you achieve the desired smoothness and consistency. Keep in mind the mixture will firm up a bit when chilled.

When you’ve reached the desired consistency, turn off processor, squeeze lemon juice into the hummus and pulse a few times to blend; add sea salt to taste. Transfer the mixture to a covered container and chill a few hours until ready to serve.


Hummus is a healthful and versatile snack. Enjoy it as a dip with fresh cut vegetables, crackers or pita bread, and even as a sandwich spread in place of mayo. Below are some of our favorite hummus flavor variations. Each recipe begins the same as the simple recipe above; for smooth texture, add mix-ins earlier in the recipe. For more distinct chunks, add them later.

Hummus Flavor Variations

Artichoke and garlic

Use about 5 to 6 artichoke heart quarters with the base recipe; I usually do a rough chop on them before adding to the garbanzo mixture. If your artichoke hearts are marinated in oil and herbs, use less olive oil in the blending step of the recipe.


Roasted red pepper

Use amount equivalent to one bell pepper, either roasted at home or purchased. If they’re packed in oil, use less olive oil in the blending step of the recipe. I like to add sweet or hot smoked paprika for an extra flavor punch.


Sun-dried tomato

Use 5 or 6 pieces of tomato, rough chopped before adding. If they’re packed in oil, they’re good to go. If dried, plump them first in hot water or in the bean liquid you’ve drained. A little dried basil would be a nice complement to the flavor of the tomatoes.


Spinach

Sauté a generous handful of fresh spinach until fully wilted, or thaw (and squeeze dry) about 1/2 cup frozen spinach; add to bean mixture early to blend very smoothly.


Caramelized onion (slightly sweet)

Sauté a small onion in olive oil until very soft and golden in color; add to bean mixture at any point of the recipe (I like to add it later to retain some of the onion shapes).


Roasted beet (slightly sweet)

Purchase the roasted beets ready-to-go from the produce section. I usually buy them at Trader Joe’s, but have seen them in other stores as well. I don’t recommend canned beets because of the water content. About 3 small beets will be good; rough chop and add them early to the bean mixture. Finished hummus will be a lovely pink color.


White bean hummus

Use cannellini beans instead of garbanzos. Add fresh chopped or dried oregano; use slightly less bean liquid and oil. Cannellini beans have a creamy texture, and this hummus is very elegant and silky. Sprinkle with toasted pine nuts just before serving.


Black bean hummus

Use black beans instead of garbanzos. I like to throw lots of spice into this one; think chili and cumin spices, maybe even a small can of roasted green chiles. Rather than lemon juice, use red wine vinegar.


Want to print this recipe?