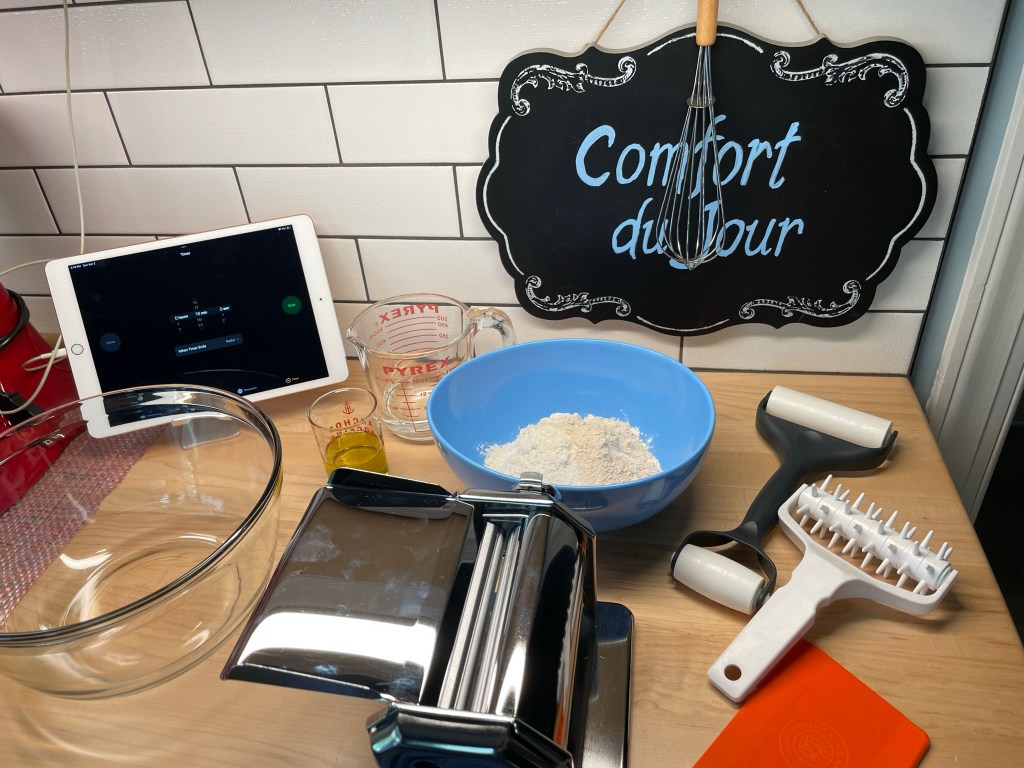
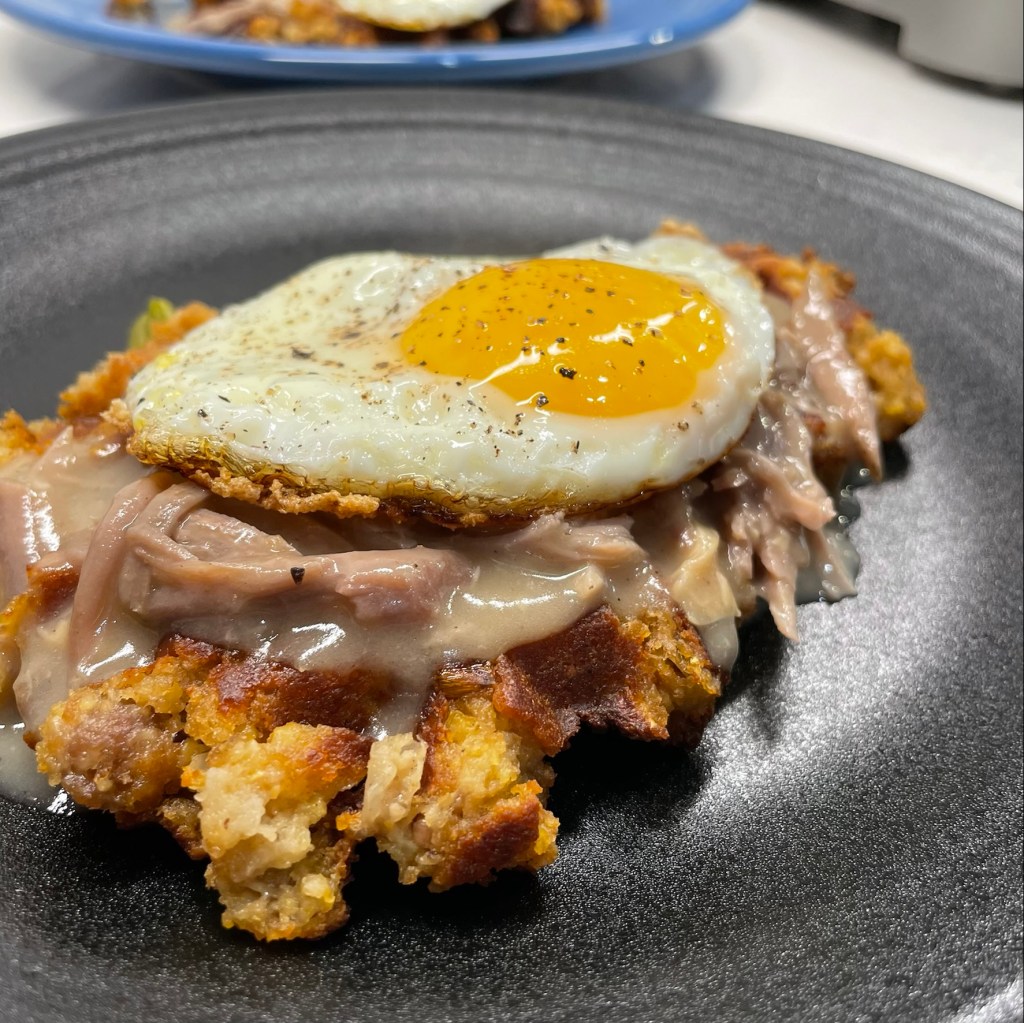
When I set out last week to make a somewhat traditional Rosh Hashanah meal to enjoy with my semi-observant husband, I felt a bit of a knot in my belly. What if I get it wrong and ruin Rosh Hashanah? Dramatic, I know, but this is me. I have no Jewish heritage myself— at least not that I’m aware of— and I always worry that my effort might be disrespectful to someone else’s tradition. Les says this is silly, and has at times even suggested that in all my diligence, I might even be more Jewish than he is.
Still, I gave much thought to our meal for Rosh Hashanah (the Jewish New Year) and I settled on roasted chicken with a bevy of root vegetables, including carrots, red potatoes and parsnips with a simple pan dripping gravy. Delicious! And for dessert, kugel, made with noodles, sugar, eggs and various forms of dairy. I want to emphasize that in a kosher household, this dessert would not be served with chicken because Jewish dietary law prohibits meat and dairy together on the table. This rule is born from the commandments in Exodus and Deuteronomy that you should not cook a young goat in its mother’s milk— which over time expanded to “no kind of meat with any kind of dairy, even if said meat doesn’t make milk.” Don’t blame me, I don’t make these rules.
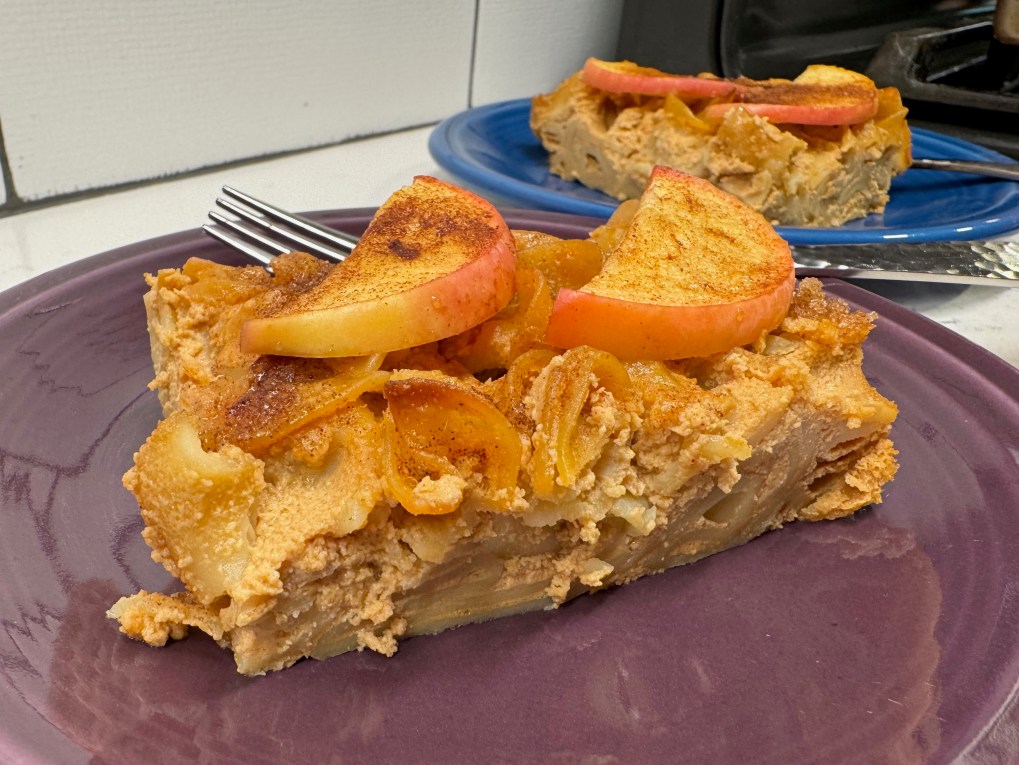
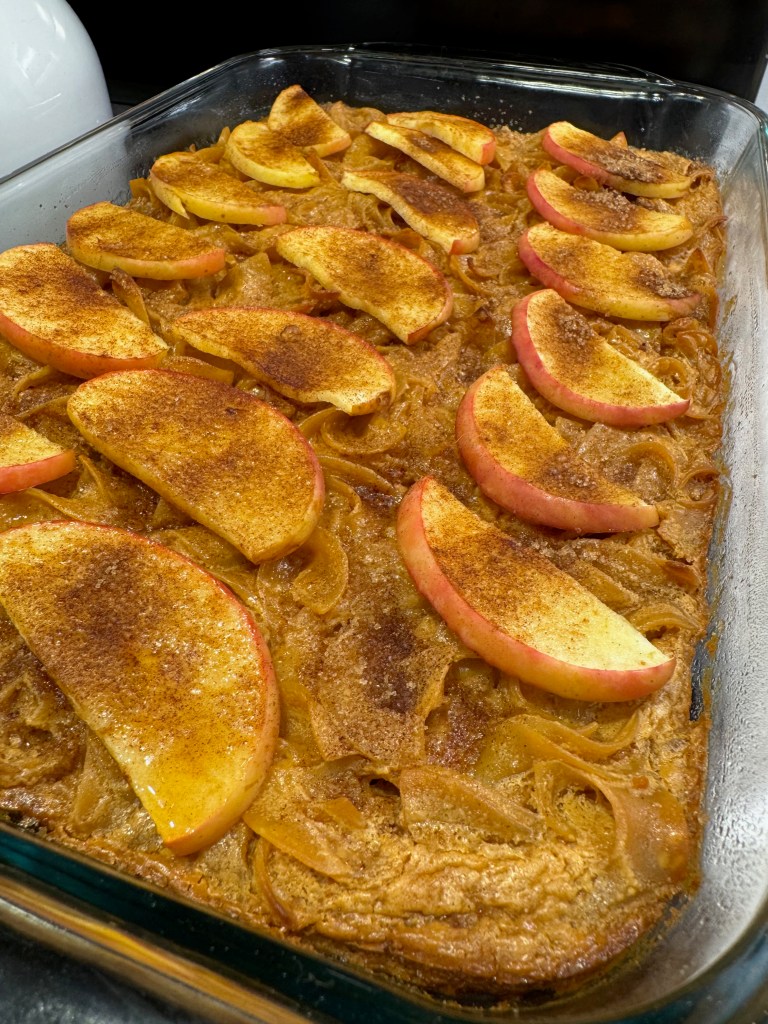
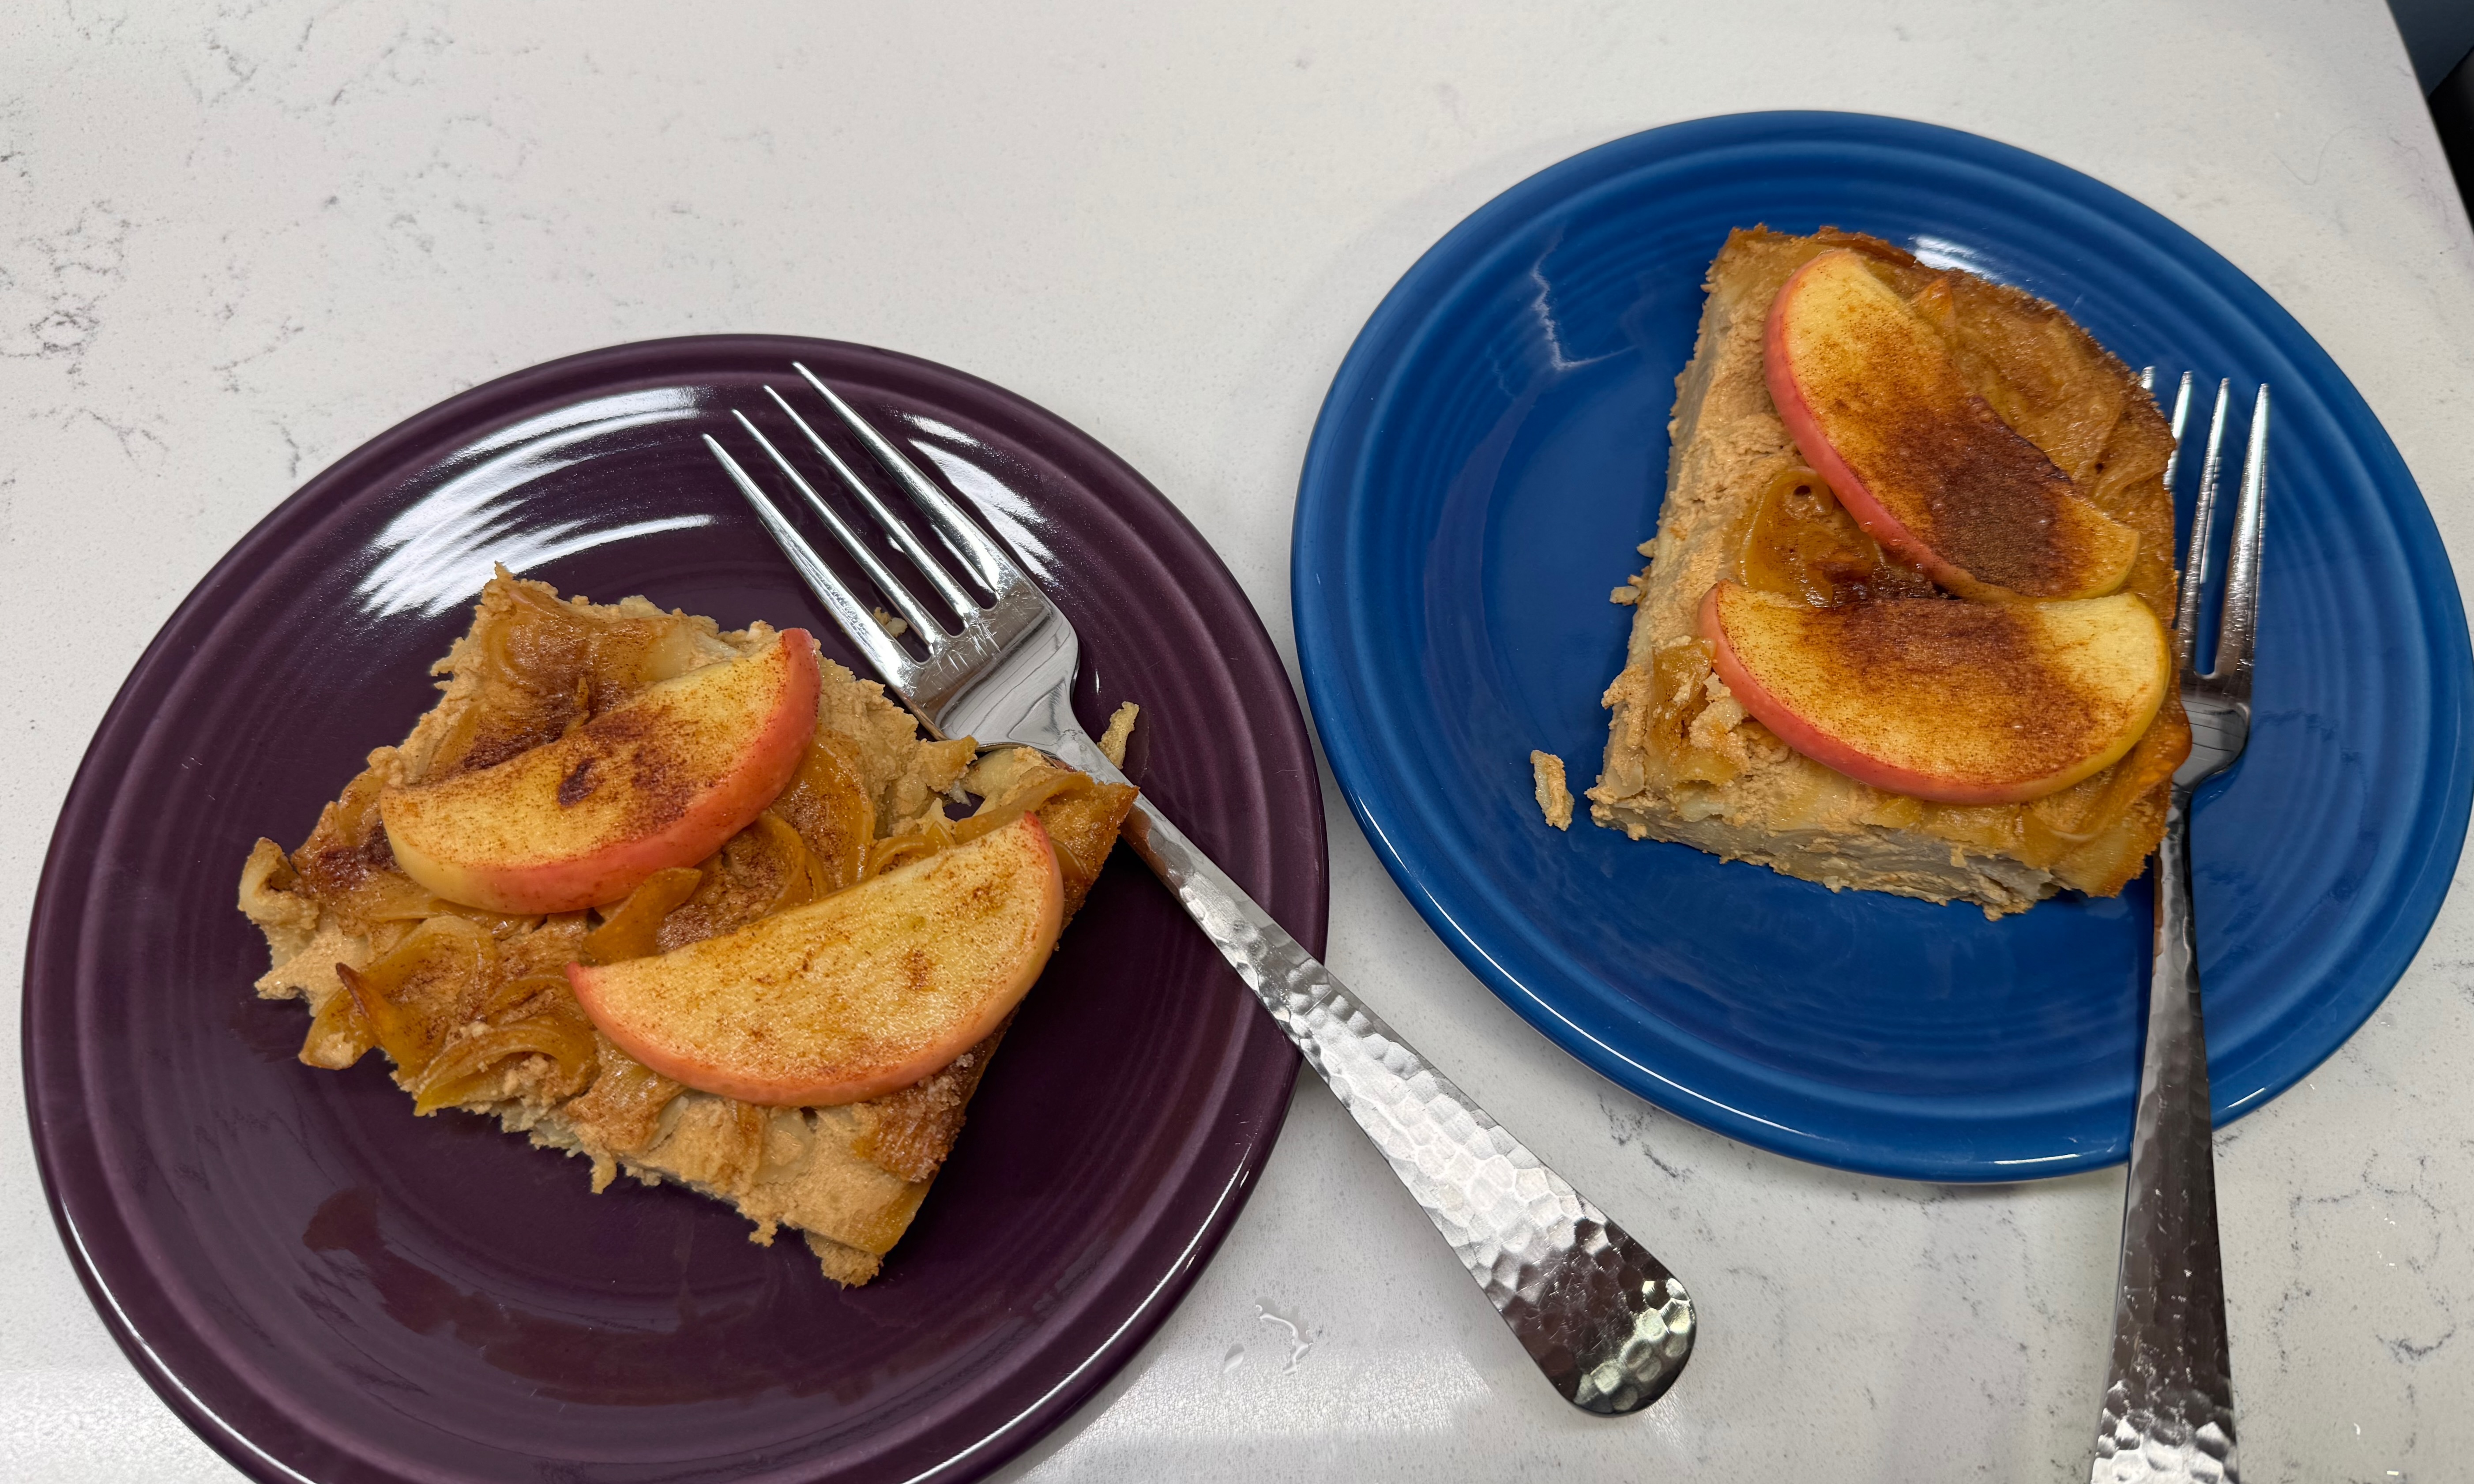
Our meal was delicious and fully representative of autumn, especially with this kugel, with all the flavors of a sweet caramel apple from the county fair.
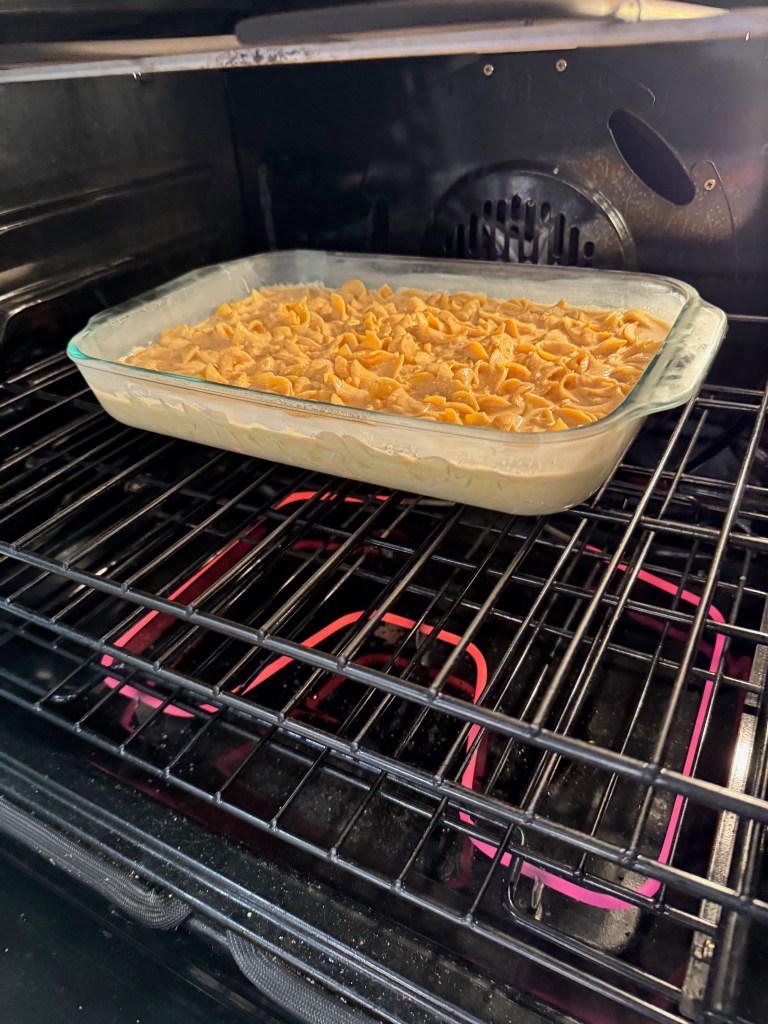
This smelled sooo good from the oven!
Apples are traditional at Rosh Hashanah, usually paired with honey and symbolic for sweet wishes in the new year. I had been thinking about apples and caramel together in a dessert after spotting a caramel apple display at the supermarket. Kugel is a dish perfected by the Ashkenazi (ASH-kuh-NAH-zee) Jews of Eastern Europe, and it is a blank canvas of sorts for any combination of sweet ingredients. It may seem strange the first time you make one; I mean, noodles in a dessert? But trust me, it’s delicious!
Here’s how my dish came together. Enjoy!
The caramel
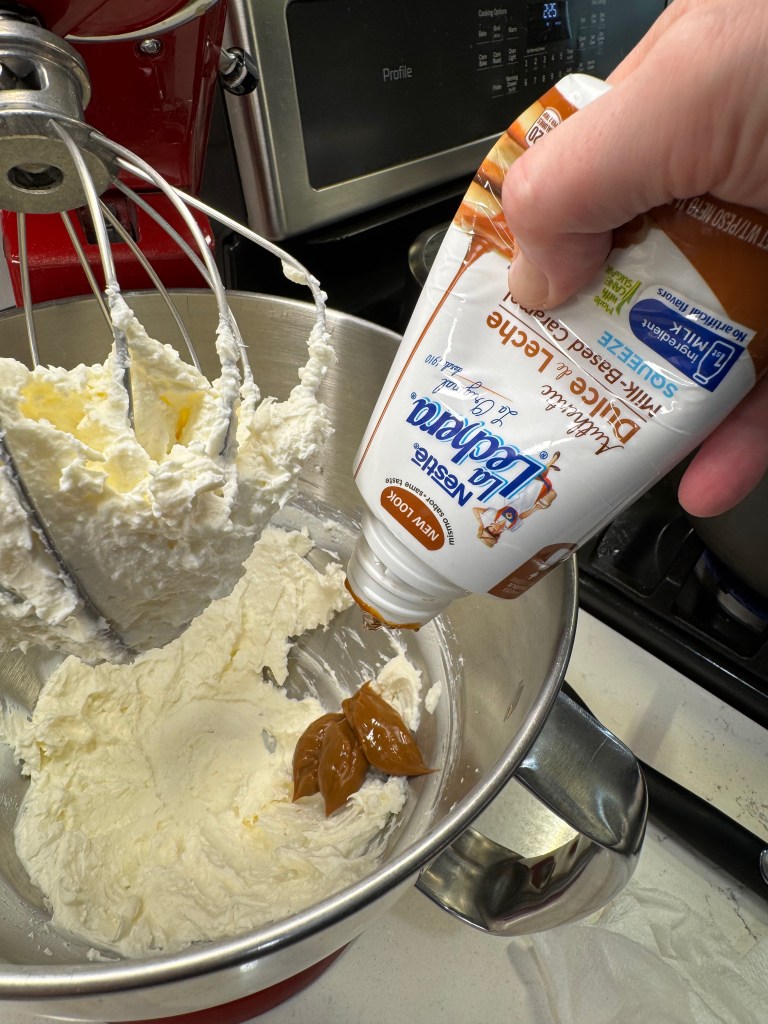
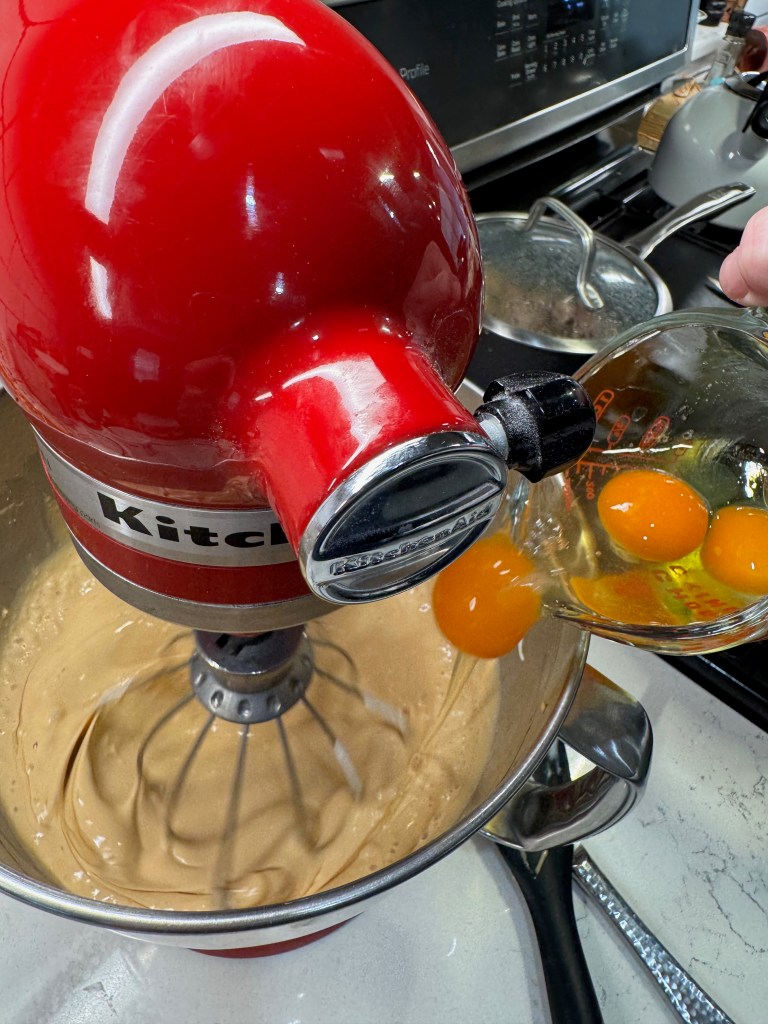
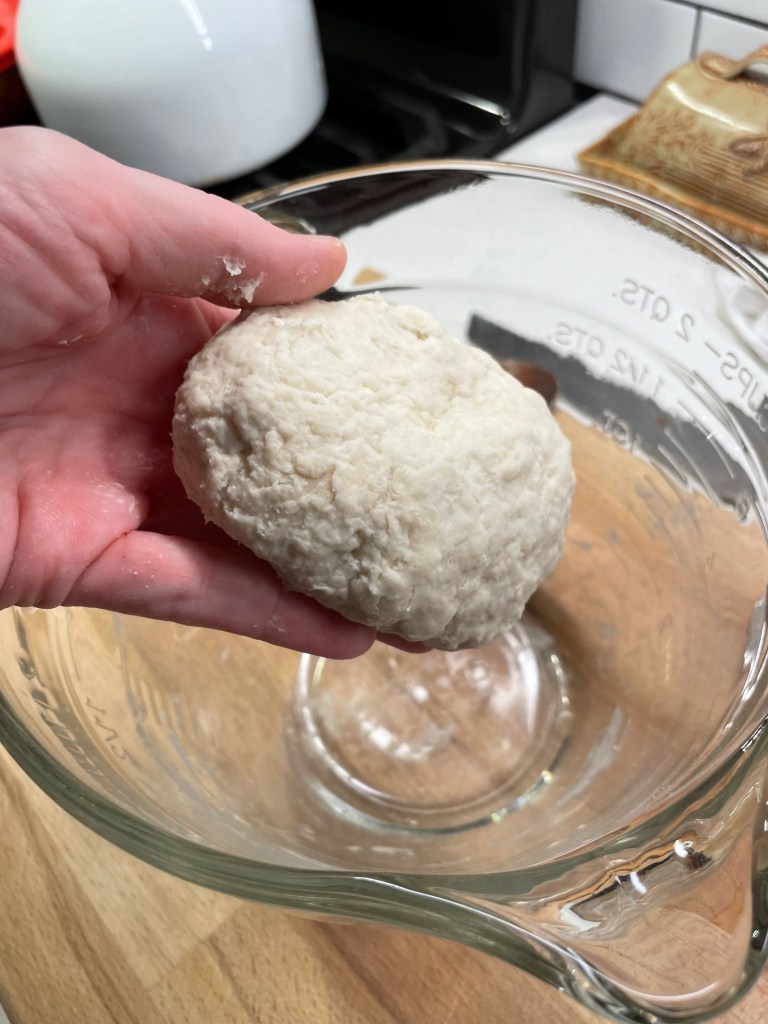
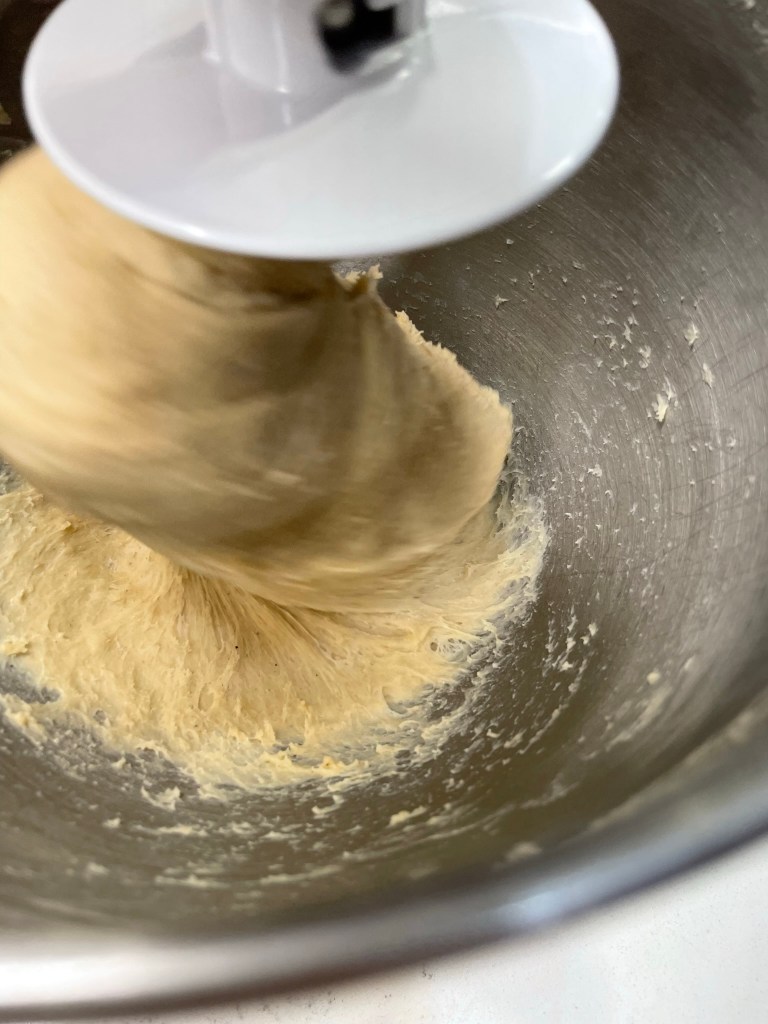
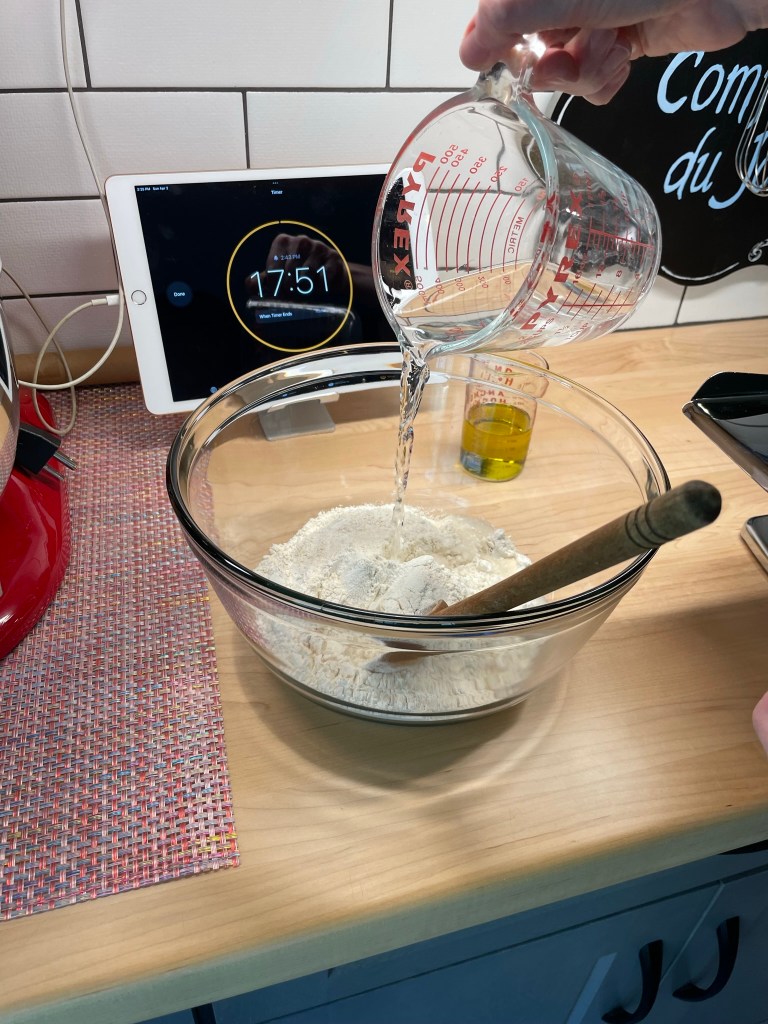
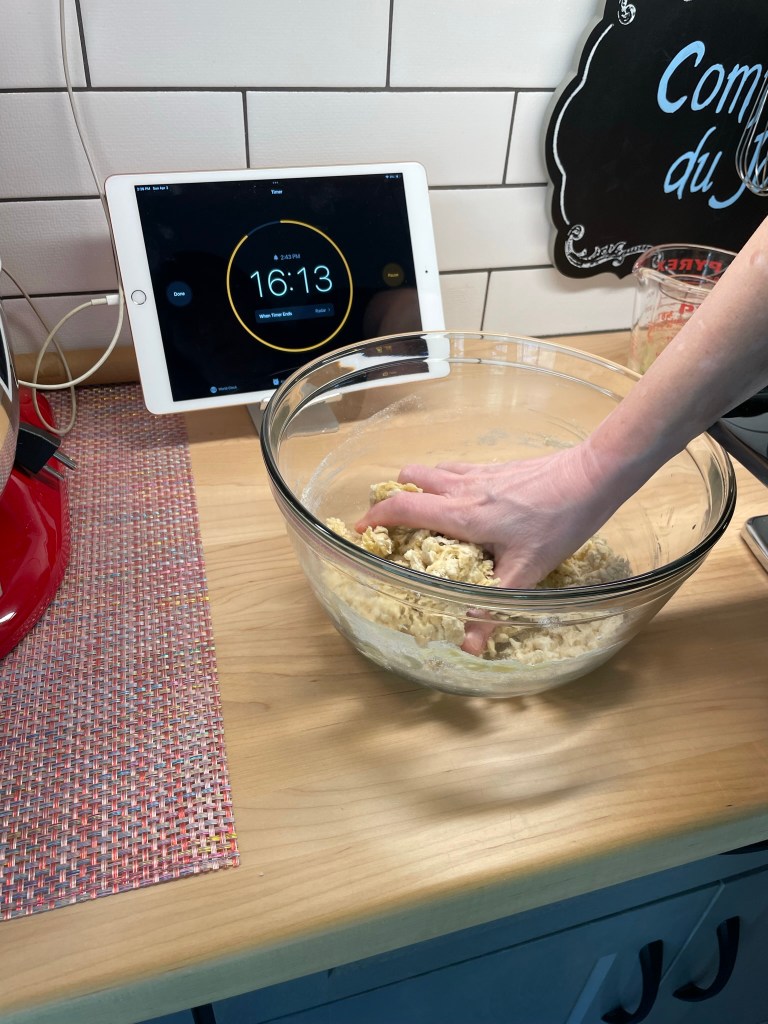
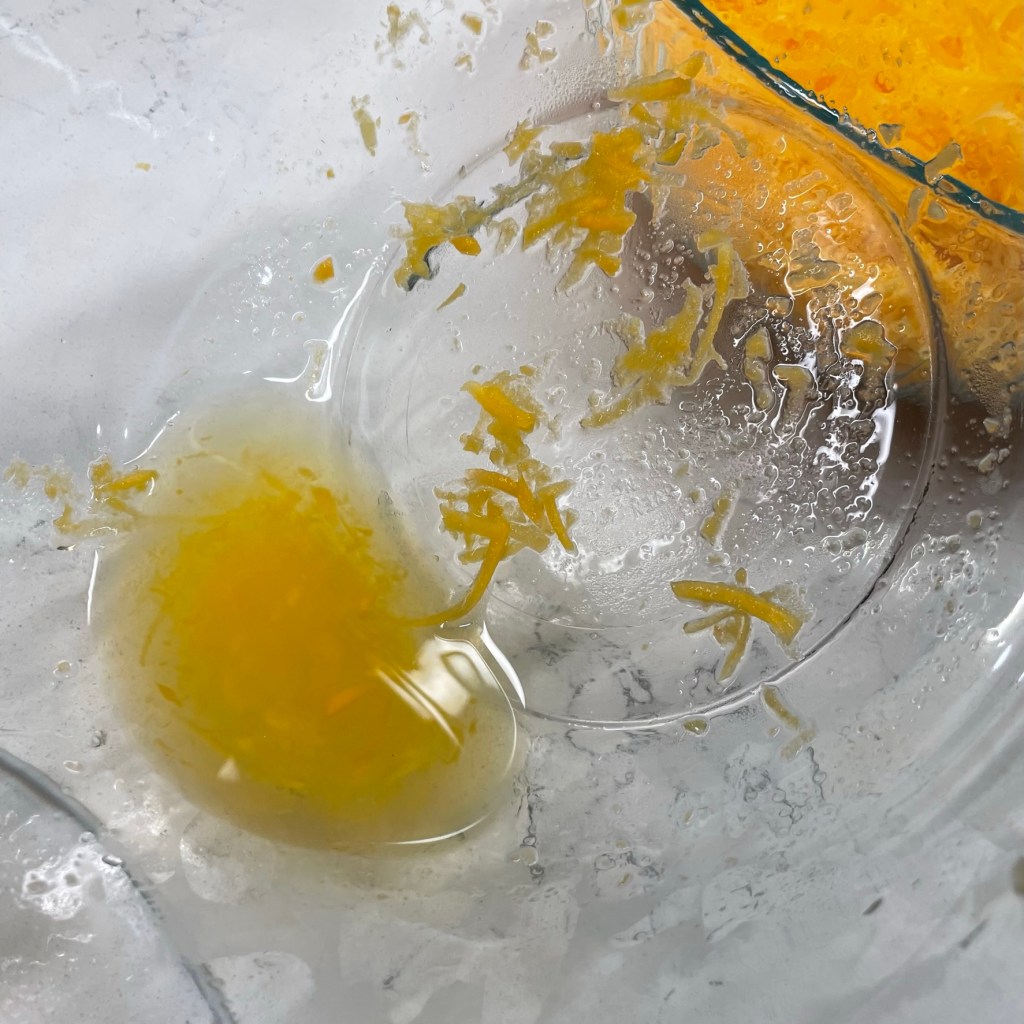
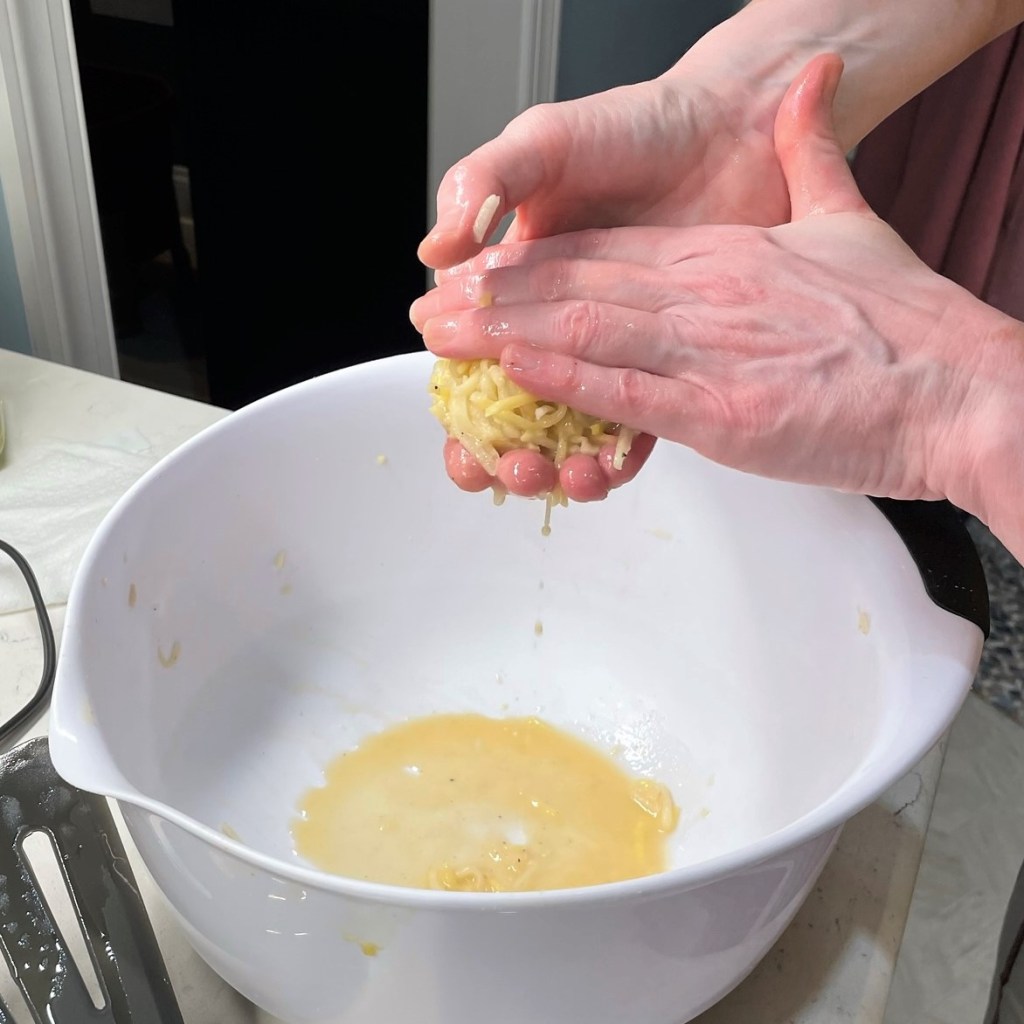
Now, I may not be Jewish, but I come from a long line of improvisers, and my instinct told me that dulce de leche, a thick, rich caramel sauce, would be a reasonable stand-in for most of the sugar in the basic kugel recipe I had found, and for some portion of the milk as well. I blended the thick dulce de leche with cream cheese, cottage cheese, milk, eggs, sour cream and vanilla, and folded in the buttered egg noodles, hoping that some measure of Ashkenazi wisdom would emanate from the wooden spoon that we had rescued from Les’s mother’s condo after she passed. Surely the spoon had done this before.
Think of it as bread pudding, but with noodles instead of bread!
The apples
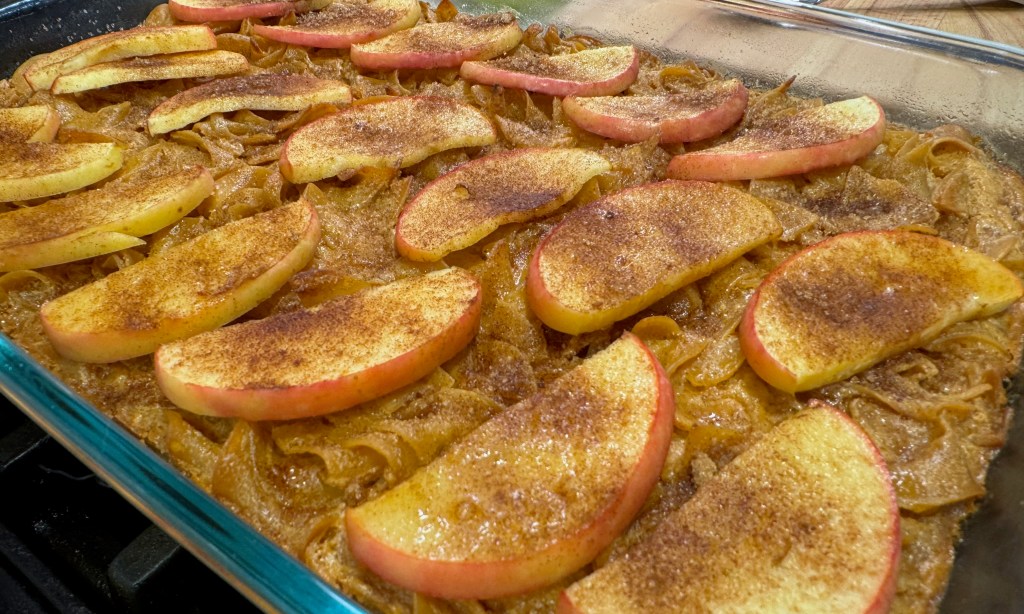
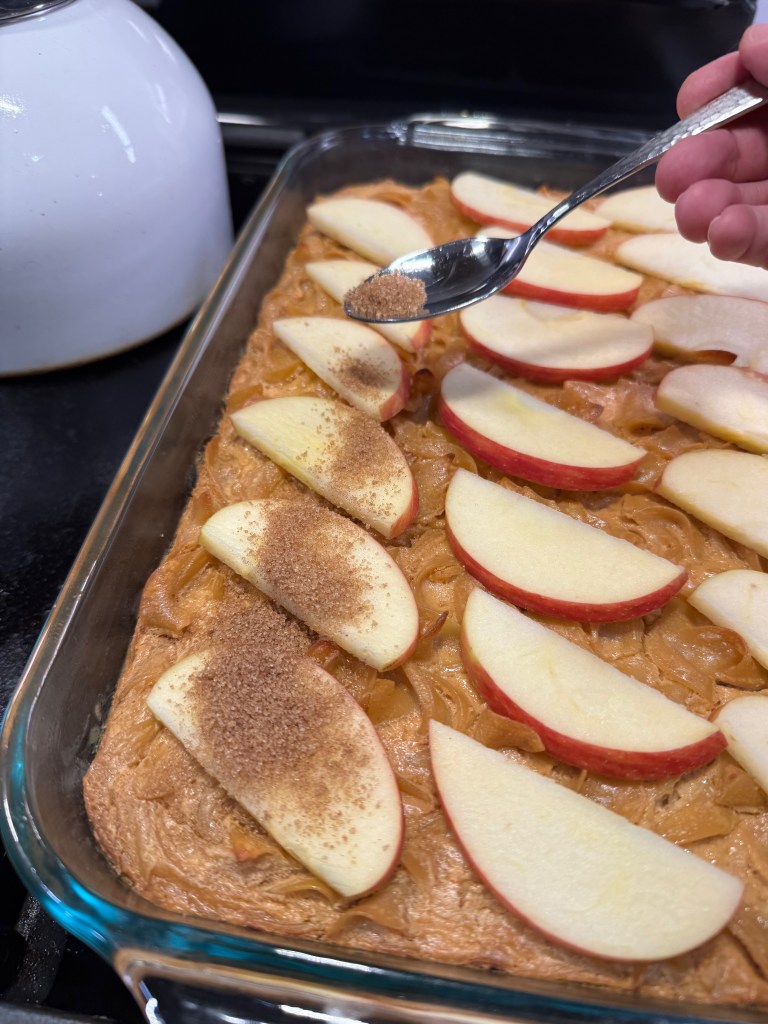
My doubts set in again about the apples because kugel is usually dotted with dried fruits such as raisins, prunes or apricots. Should I cook the apples first? Or dice them up and stir them into the custardy noodles, or would the moisture cause the whole thing to become a big mess? In the end, I decided to par-bake the noodle custard, top it with thin slices of apple and a sprinkling of brown sugar and cinnamon and then bake it again. It turned out to be just the right amount of apple, and the brown sugar-cinnamon topping emphasized the caramel flavors inside.
Adding the apple topping
This kugel was very well-received by my hubby, who had made his own version of kugel a few years back when we were clearing out the pantry for our kitchen remodel. We enjoyed this caramel apple version at Rosh Hashanah and again straight from the fridge later in the week, and I think we may even have a couple of slices left for our “break the fast” meal when Yom Kippur ends tonight.
Jewish New Year calls for a celebratory dessert, and I chose apples and caramel to bring in some comforting fall flavors.
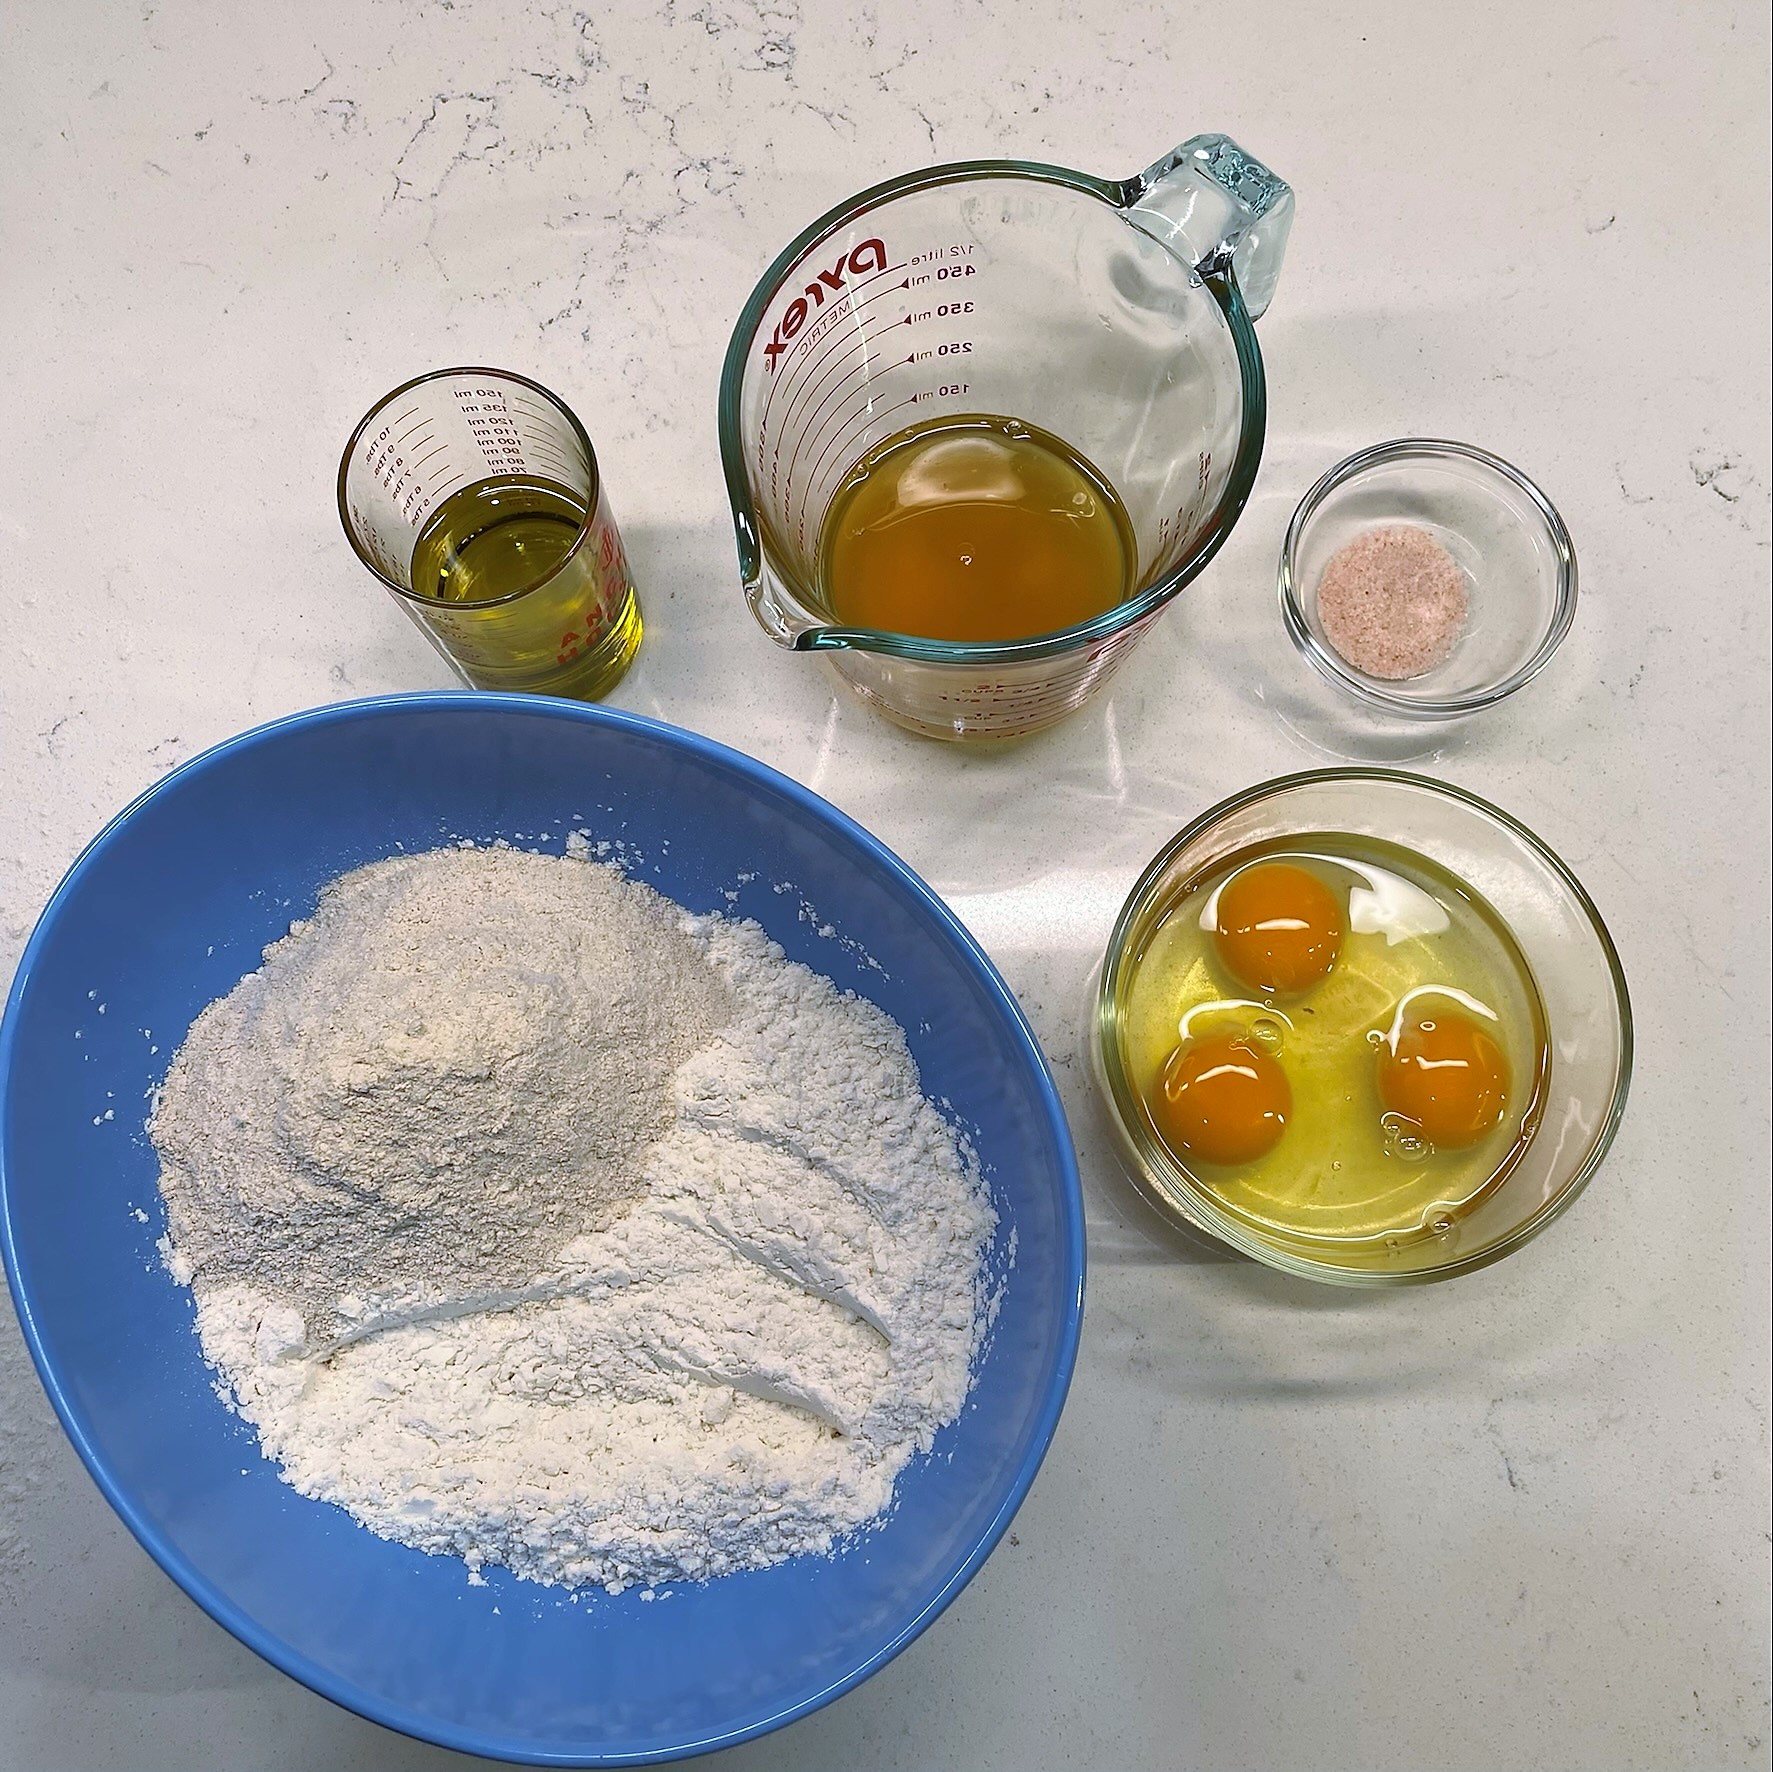
Ingredients
8 oz. cream cheese, softened to room temperature
1 cup small curd cottage cheese
1/2 cup (or more) dulce de leche
2 Tbsp. brown sugar
1/4 cup sour cream (or plain Greek yogurt)
1 1/2 cups whole milk
3 large eggs
1 tsp. vanilla
12 oz. package extra wide egg noodles
6 Tbsp. butter, room temperature (I used salted)
1 large Honeycrisp apple, cored and cut into thin slices
1 Tbsp. brown sugar, mixed with 1/2 tsp. ground cinnamon
Notes: Dulce de leche is usually found in a can, in the same supermarket section as sweetened condensed milk, or possibly in the Hispanic section. If you cannot find this product, a thick, milk-based caramel ice cream topping would work fine.
Directions
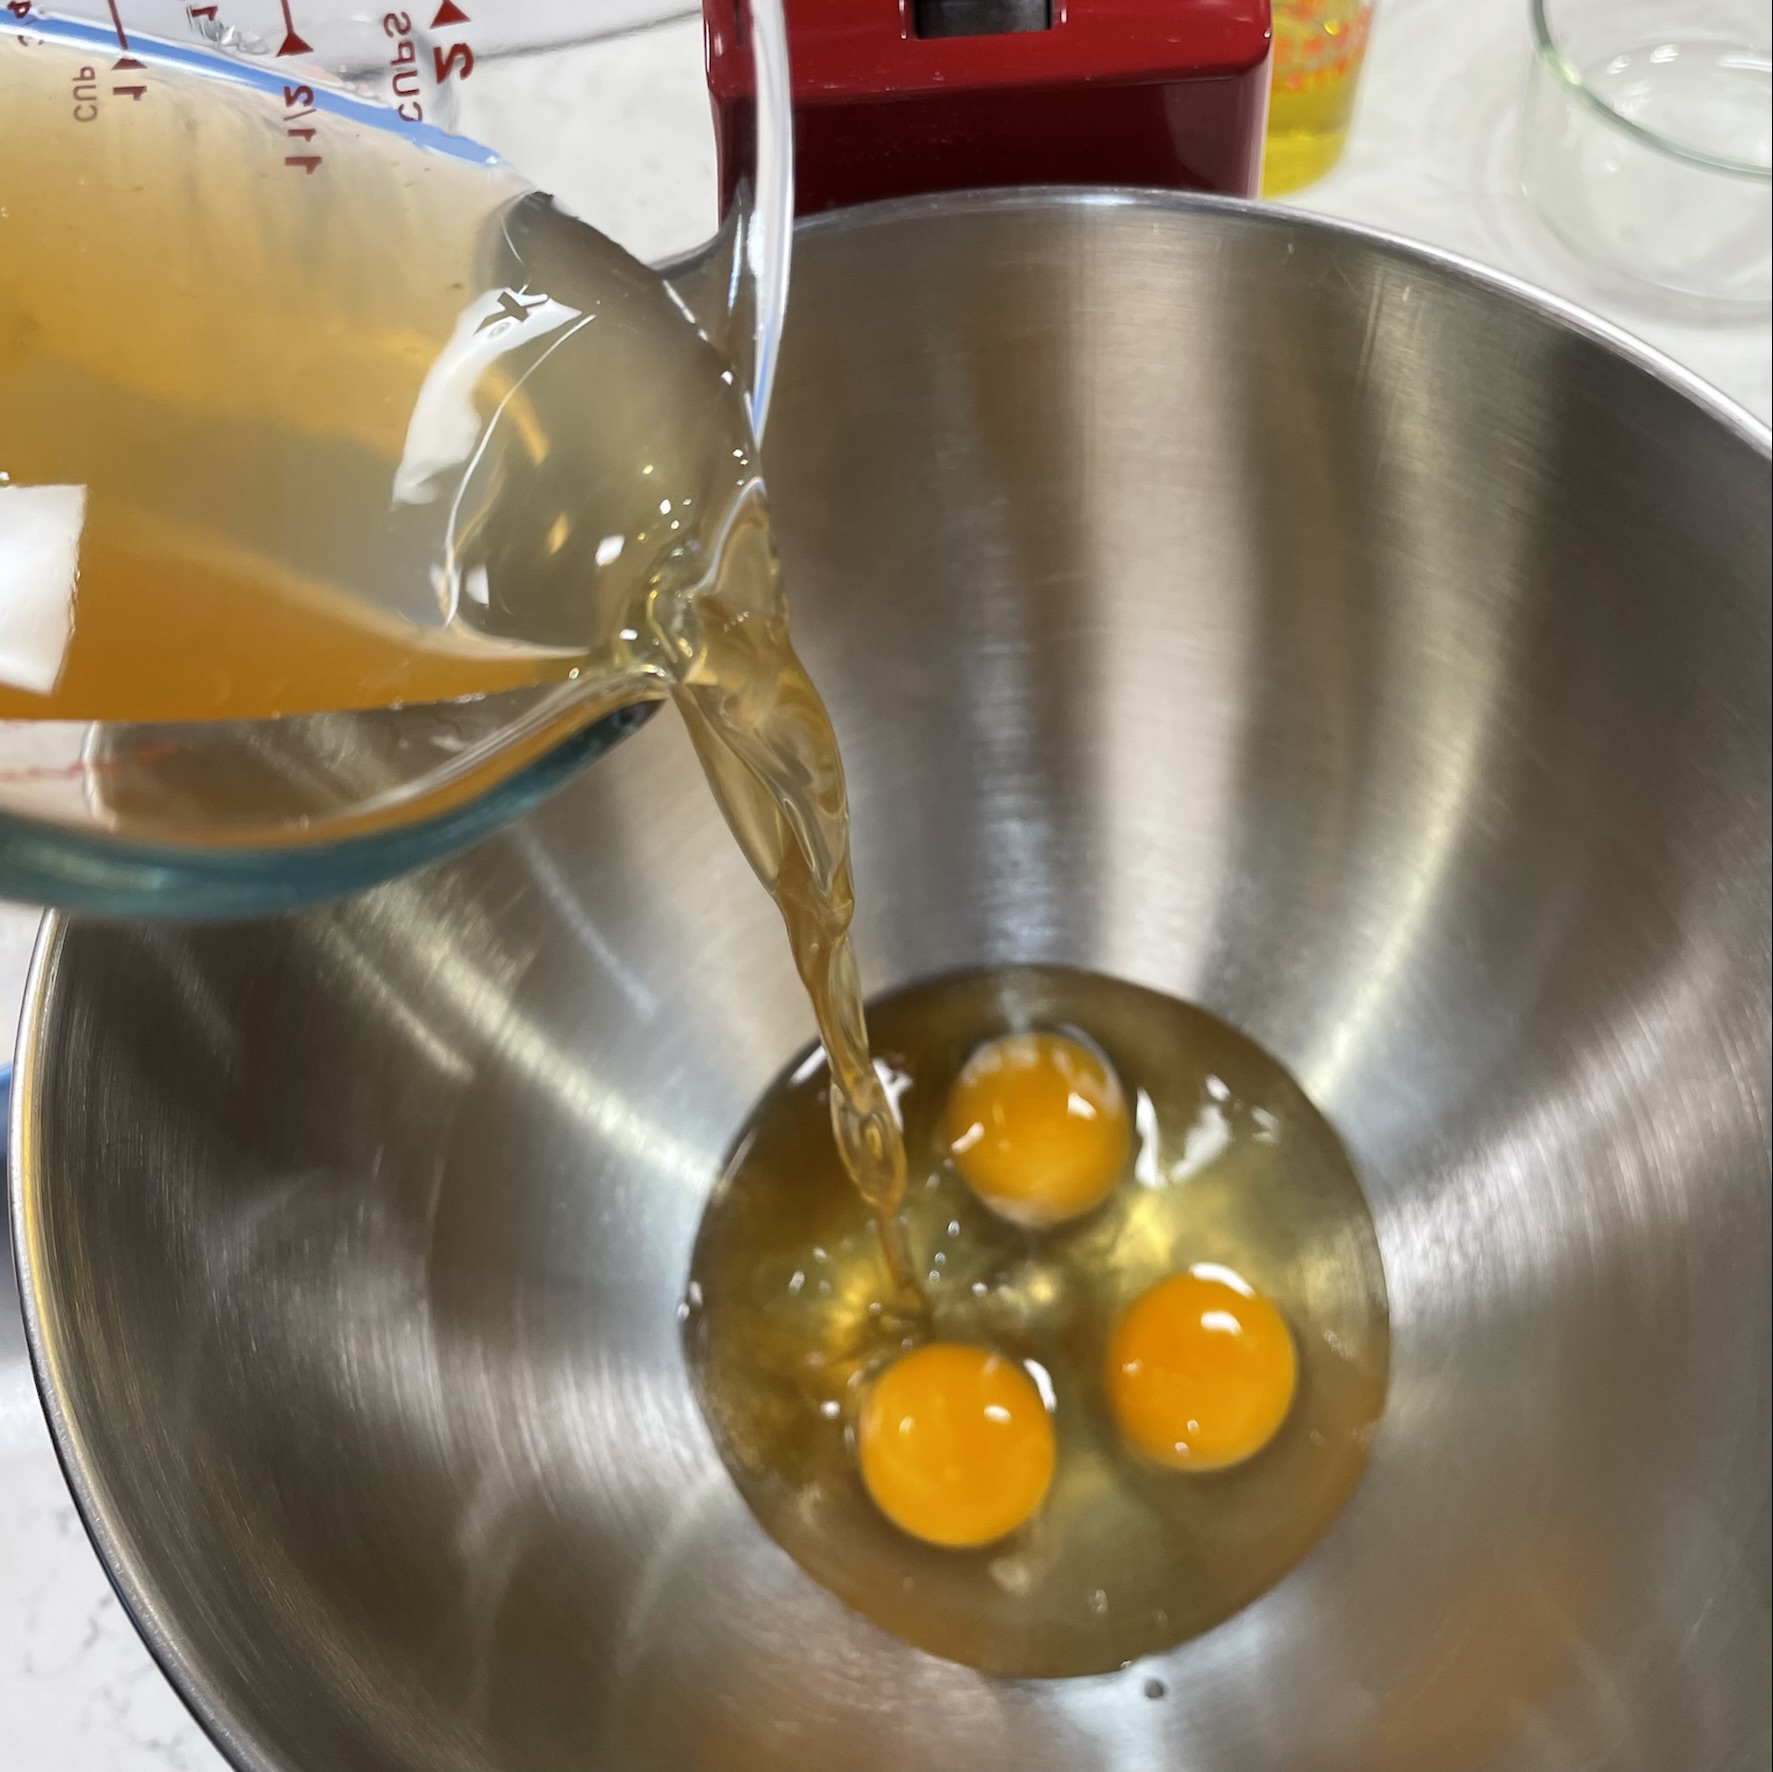
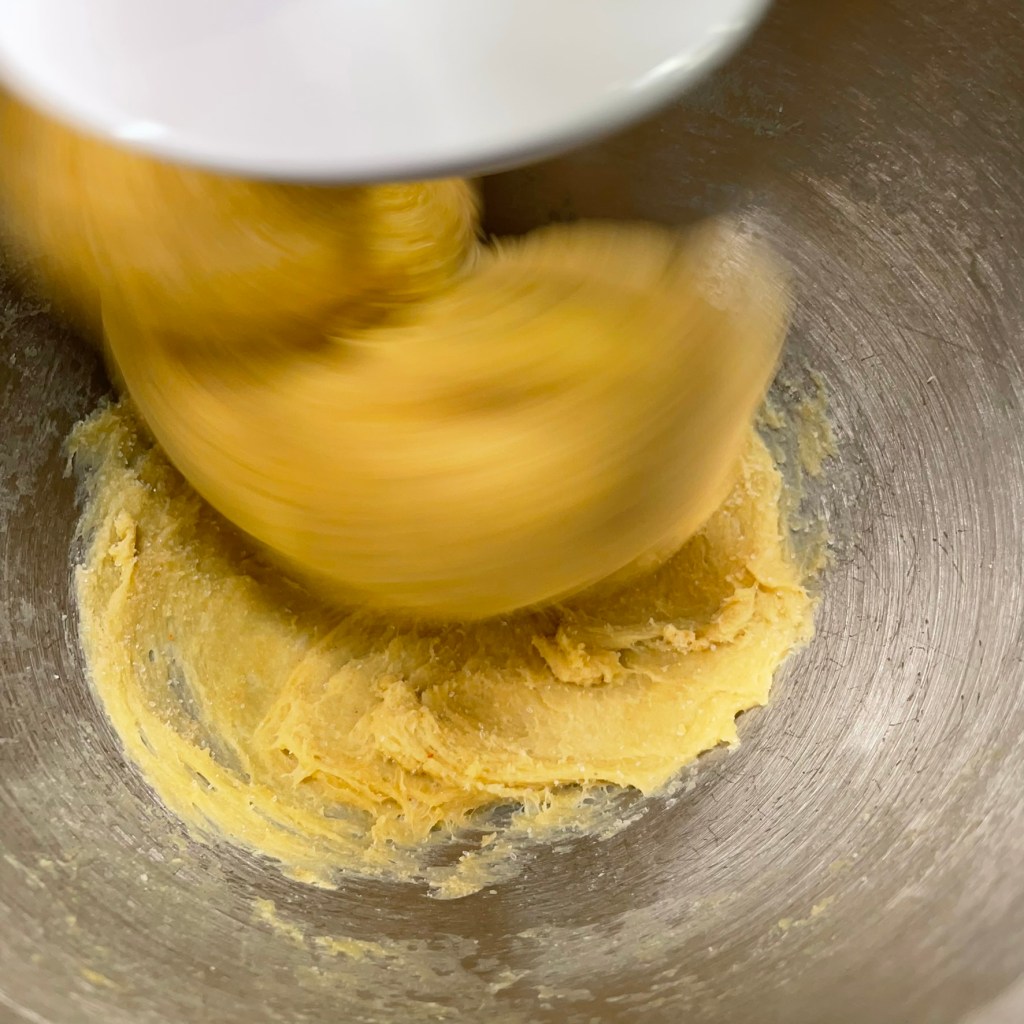
Add cream cheese, cottage cheese and dulce de leche to the bowl of a stand mixer, fitted with the whisk attachment. Blend together on speed 2 or 3 for about two minutes, or until the mixture is evenly combined.
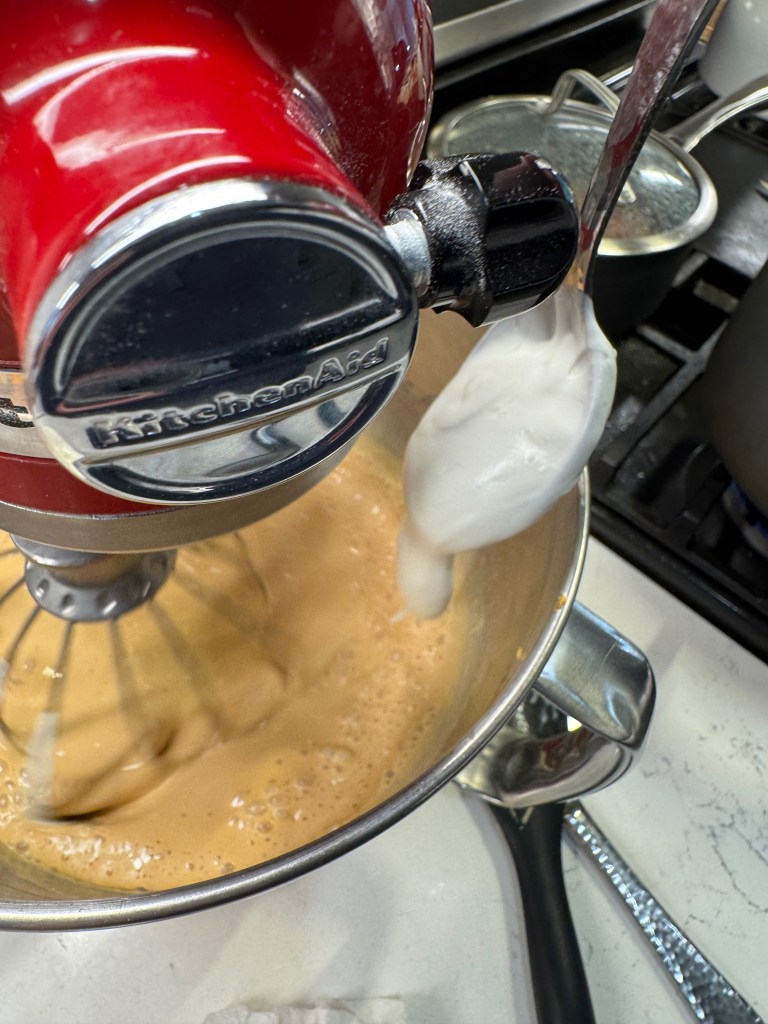
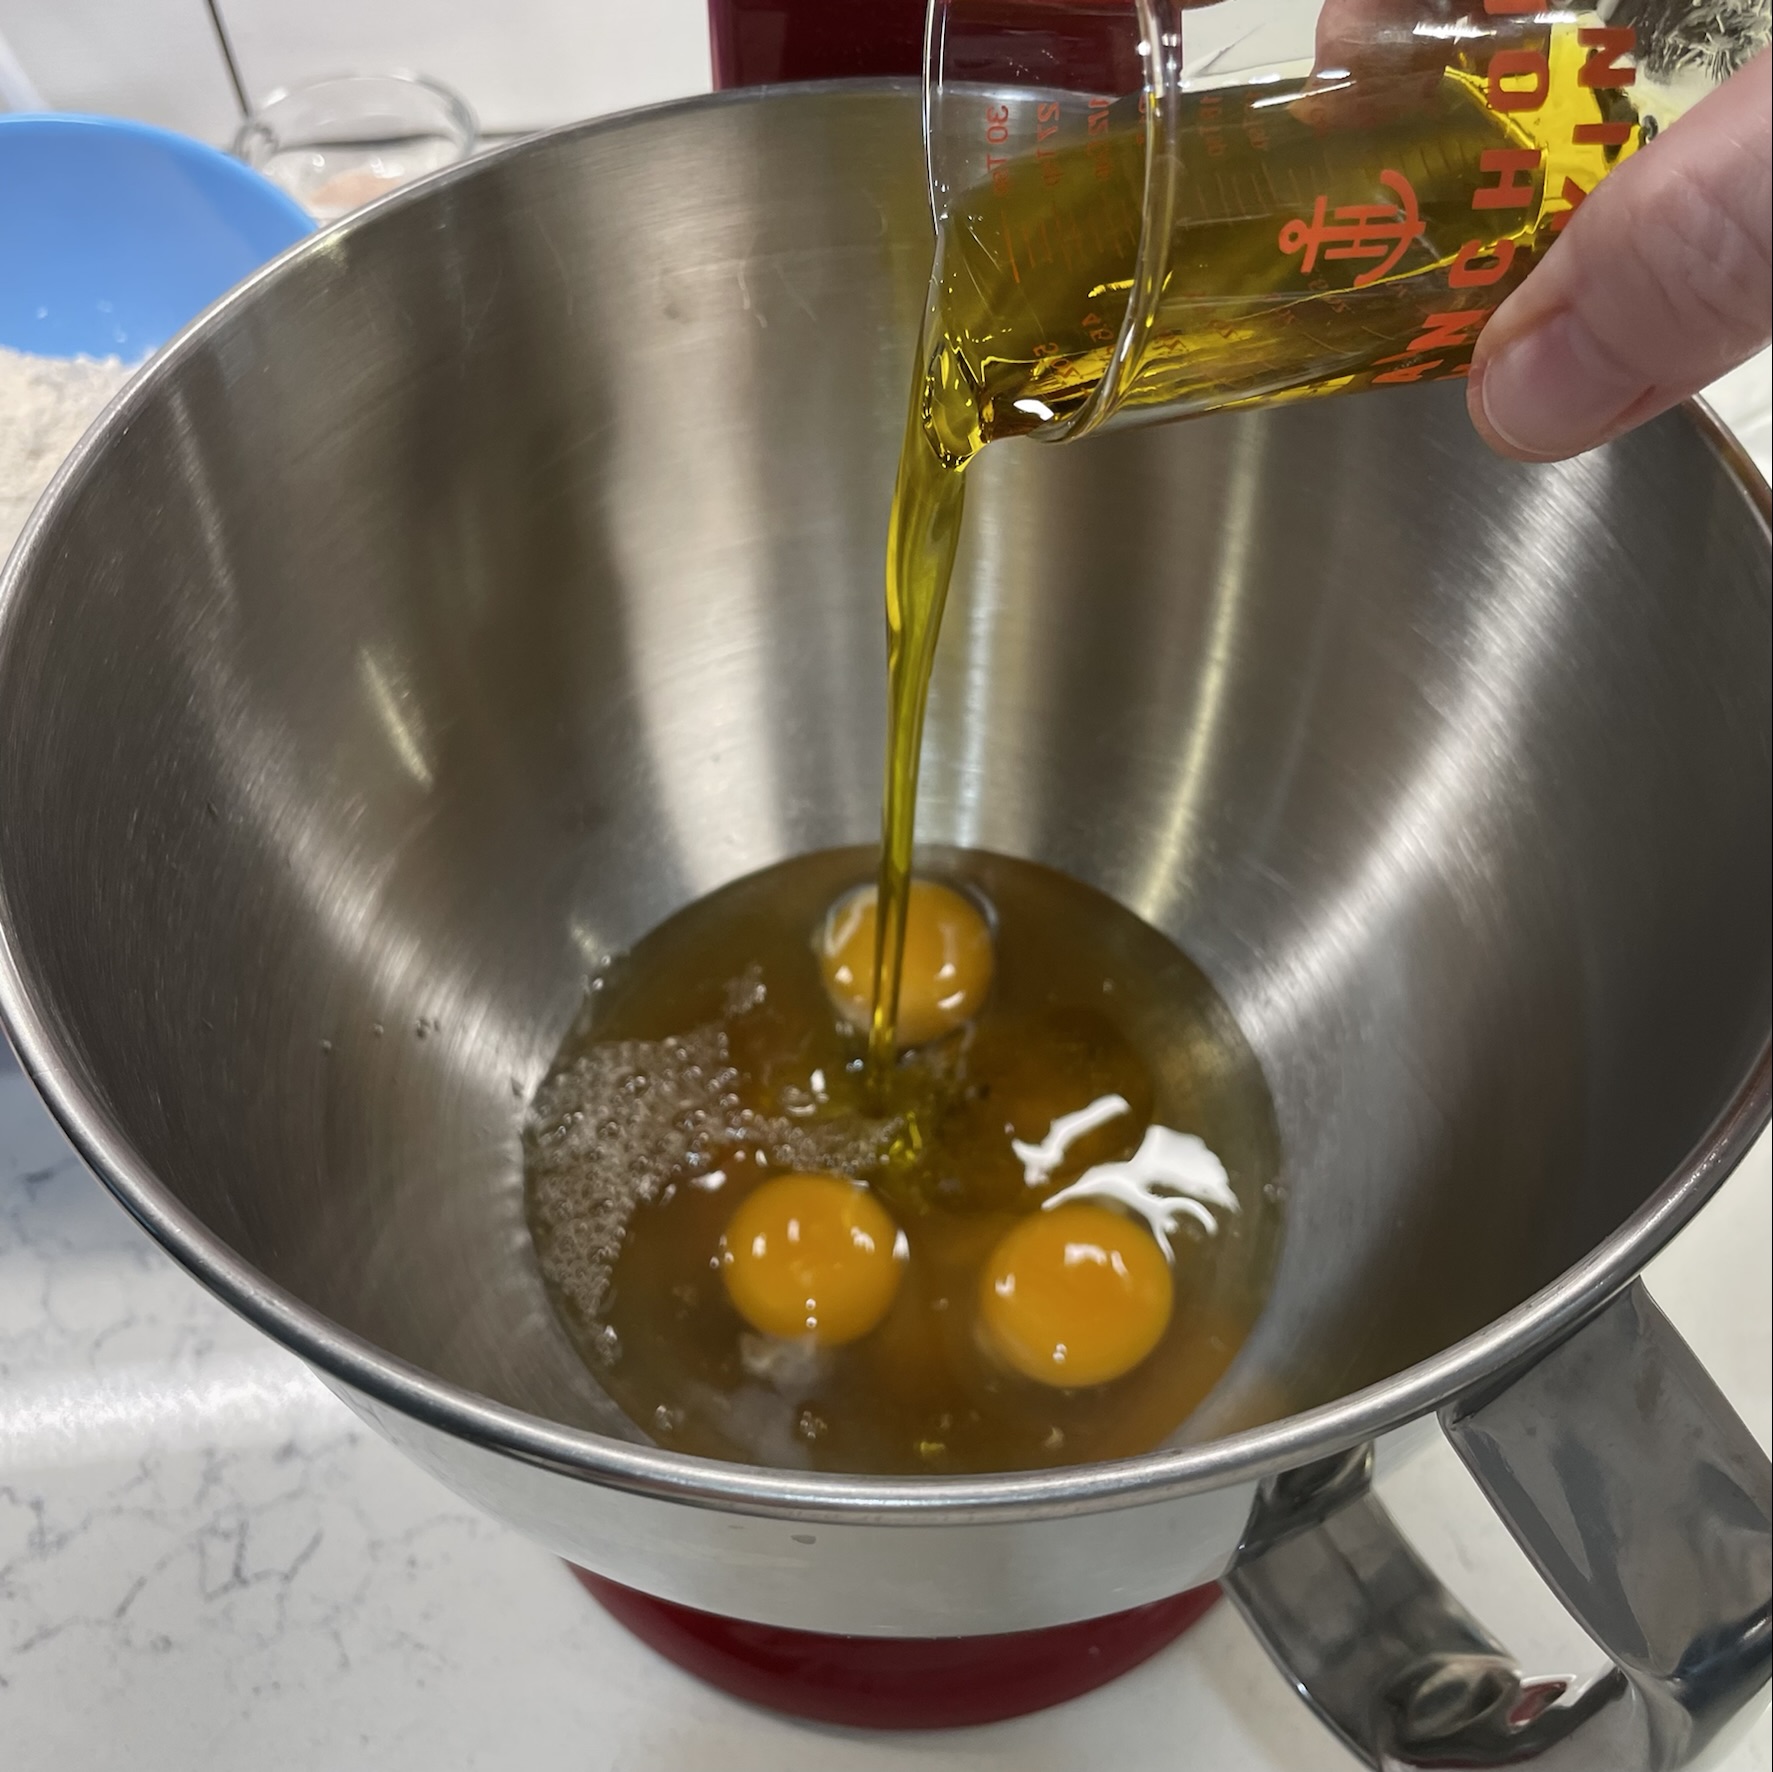
Add brown sugar and sour cream, whisking on low speed until blended. Gradually pour the milk into the bowl while the mixer is running, to avoid splashing. Add the eggs, one at a time and then stir in vanilla.
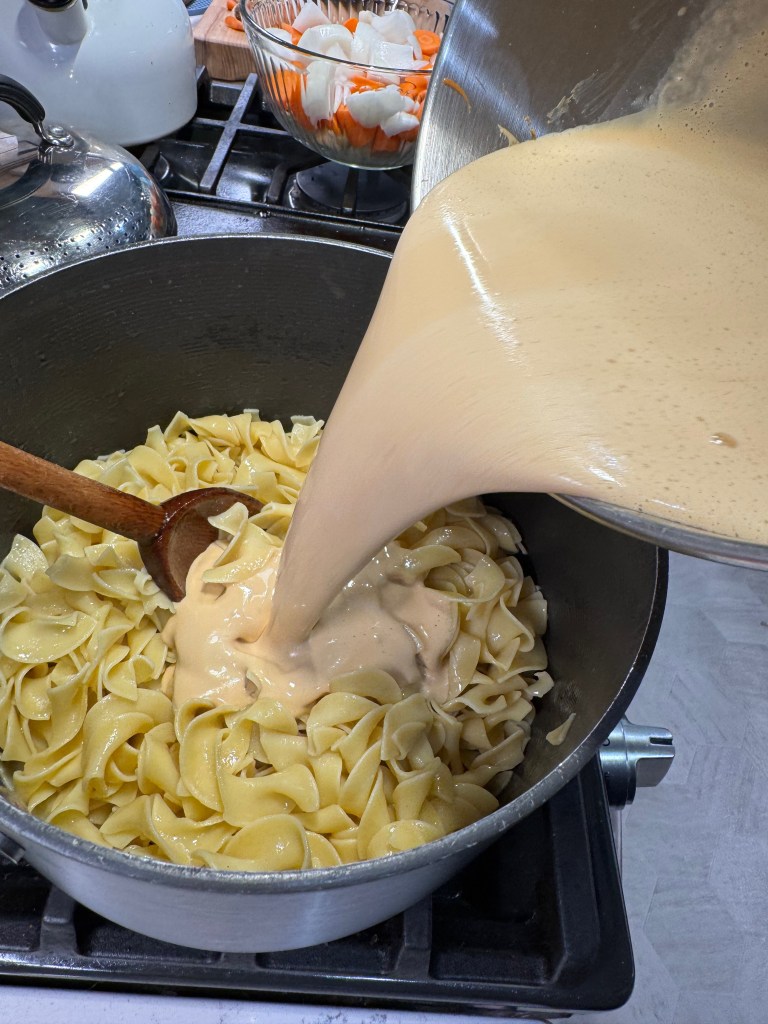
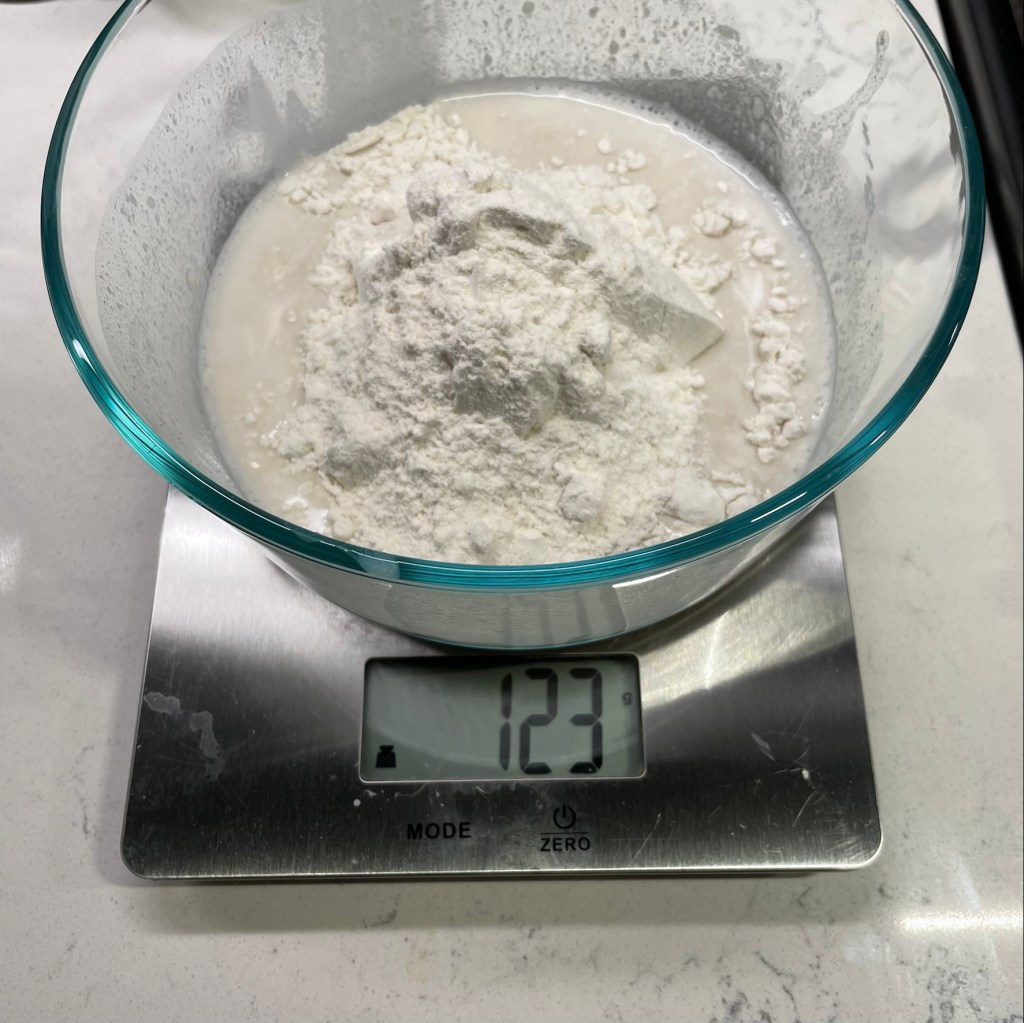
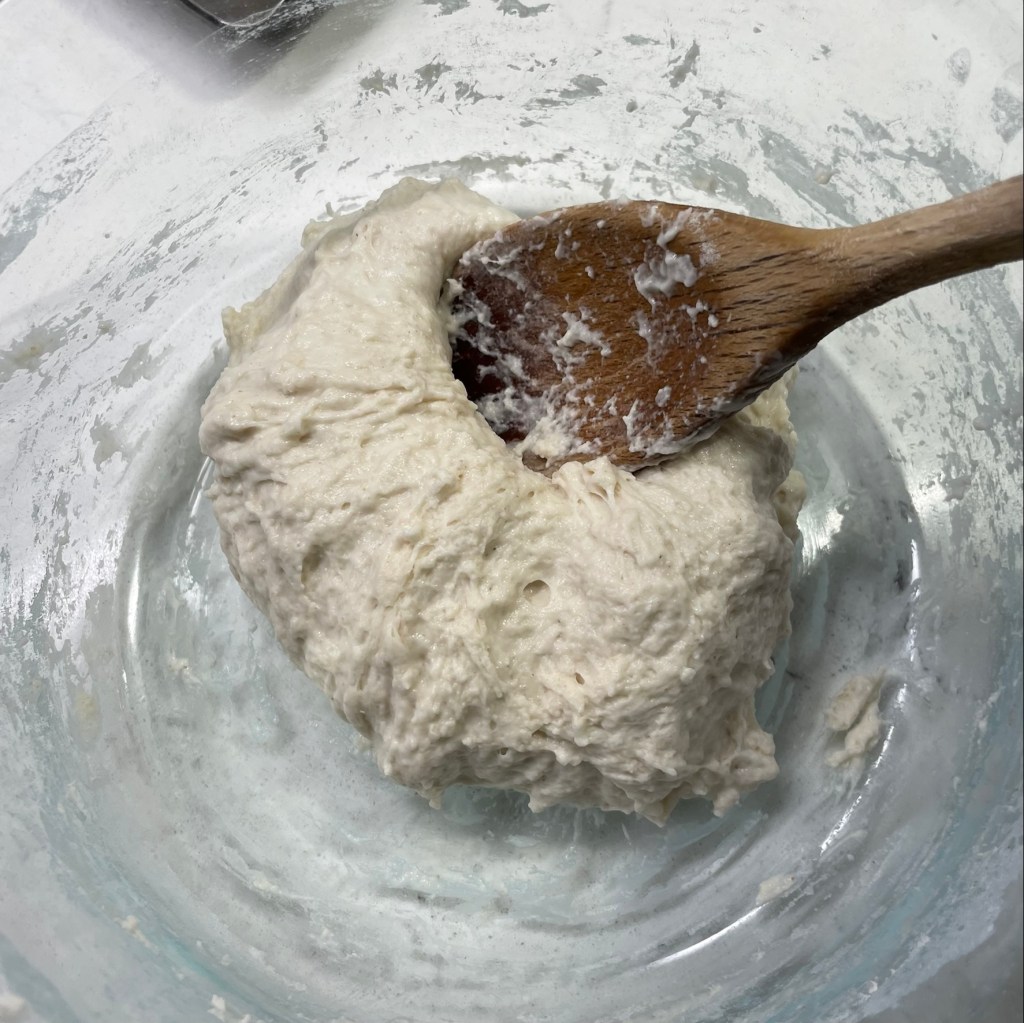
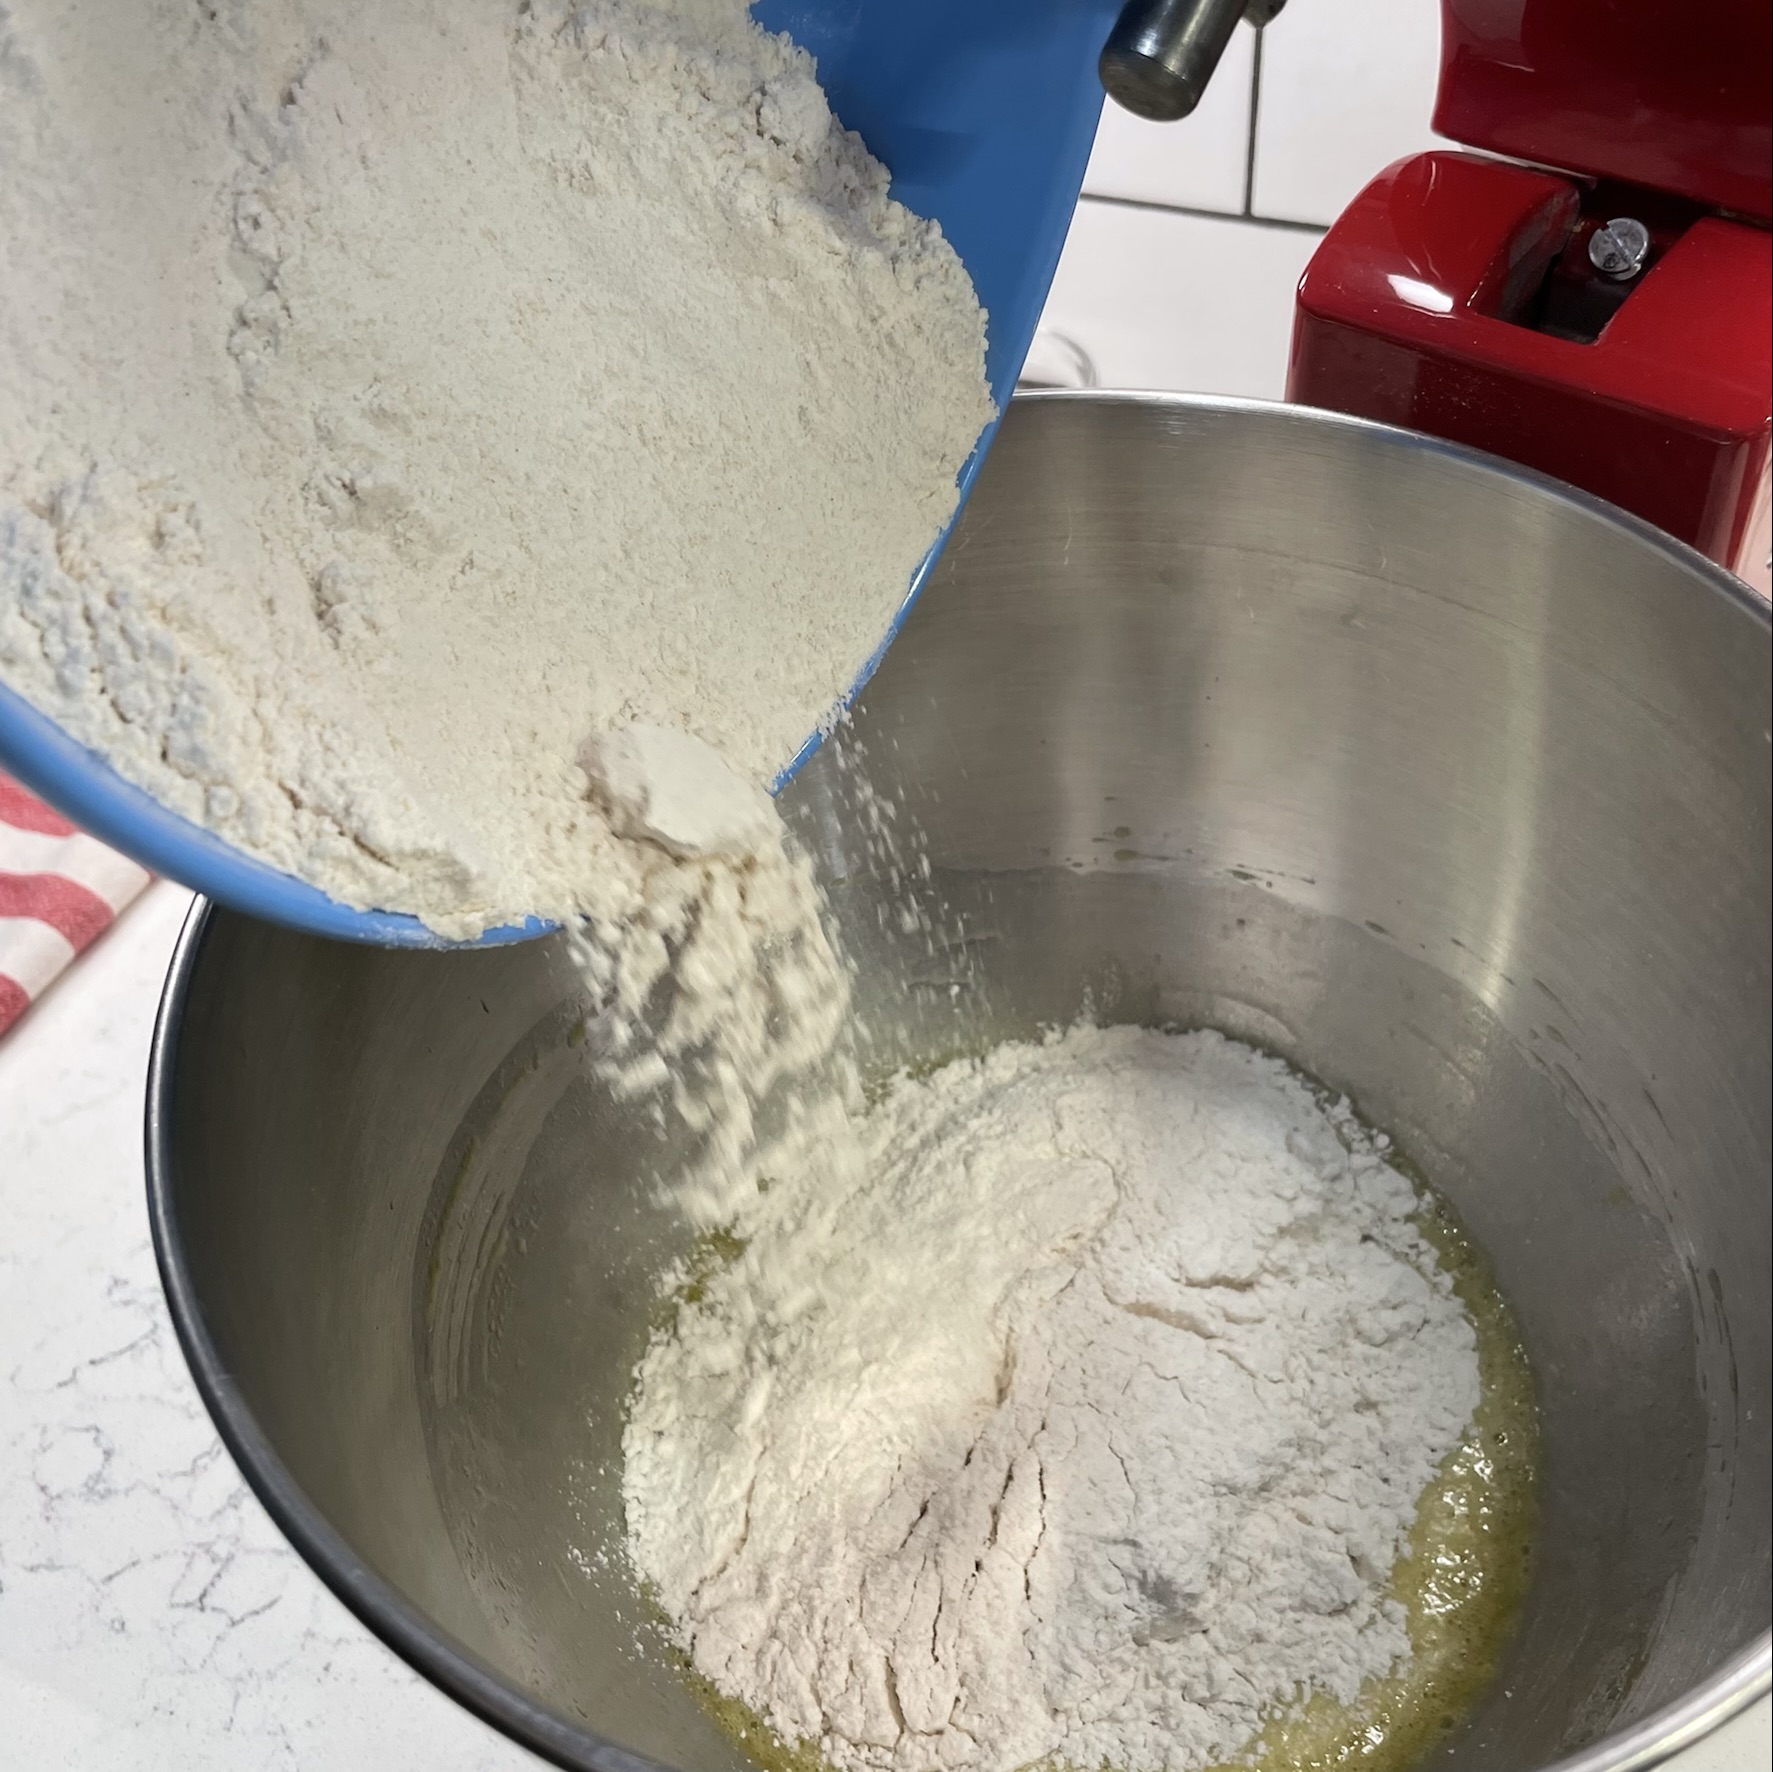
Meanwhile, cook the egg noodles until just tender, according to package instructions. Drain the noodles and toss with butter until fully melted.
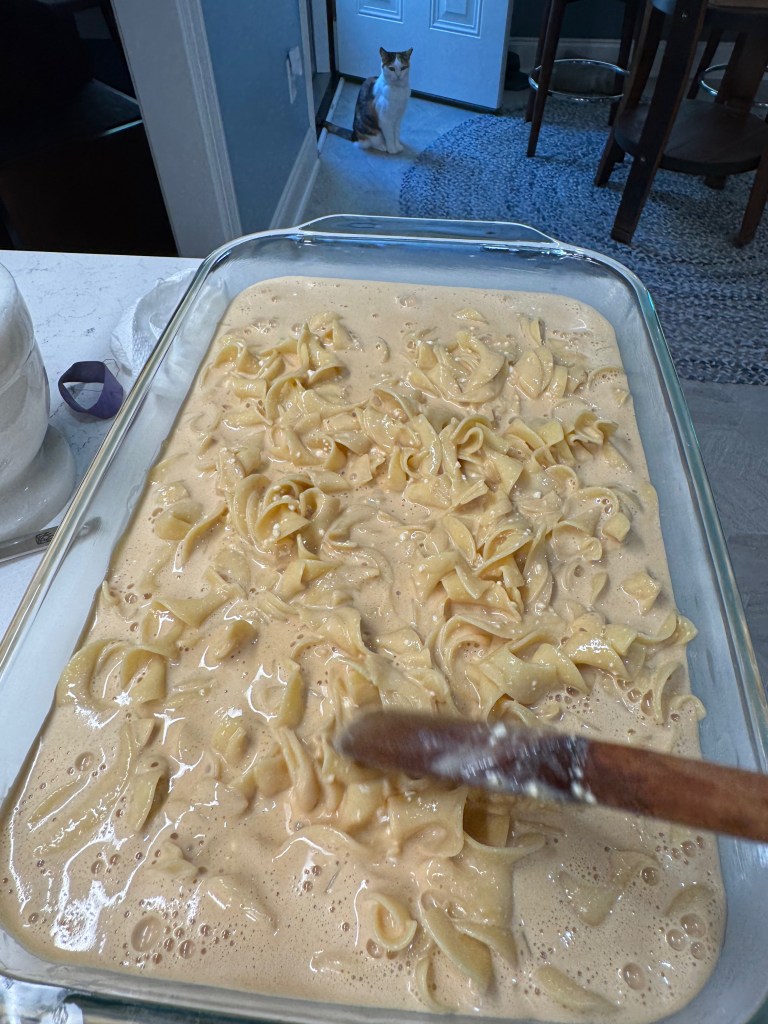
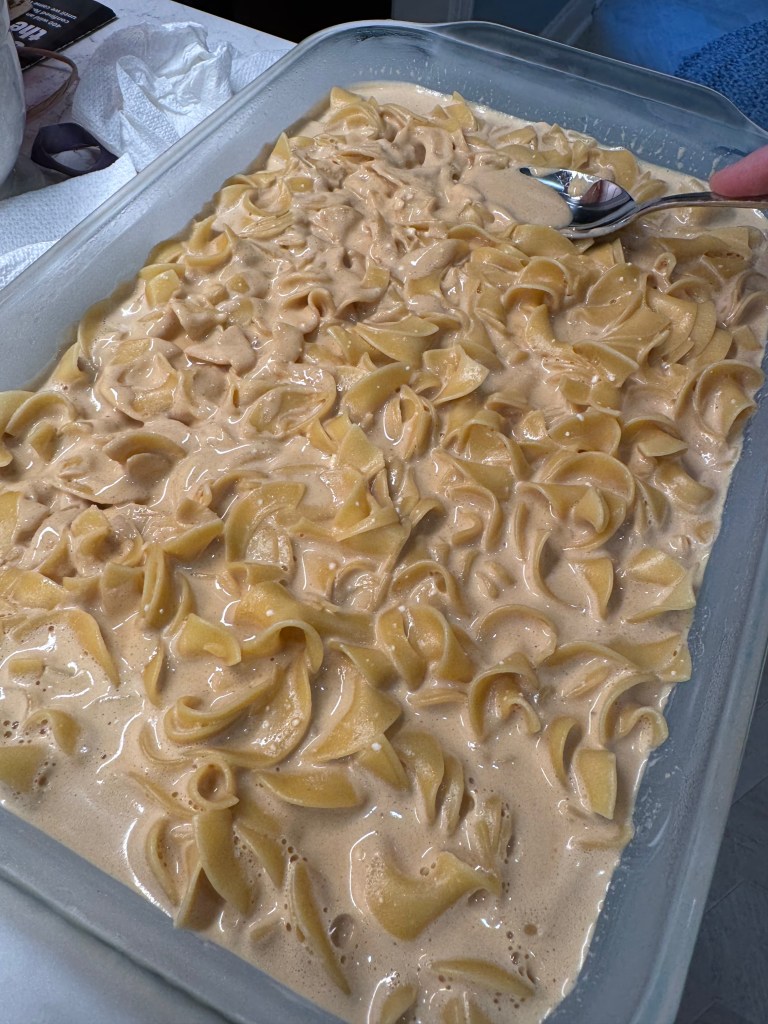
Pour the caramel mixture into the warm noodles and toss to combine. It will seem very liquid-y. Transfer this mixture to a buttered 9 x 13 glass baking dish and spread it out until even. Cover the dish and refrigerate for a couple of hours or overnight.
Preheat oven to 350° F, with rack in center position.
Uncover kugel and use the back of a spoon to press down any noodles that have emerged from the caramel custard mixture. Bake uncovered for 35 minutes. Remove from oven, arrange sliced apples evenly over the top and sprinkle the surface with the brown sugar-cinnamon mixture. Return to oven for 15 more minutes.
Cool to room temperature before enjoying, and refrigerate leftovers. When chilled, the kugel can be cut easily into squares and served almost like brownies.
Just for grins
As desserts go, this one packs a substantial amount of protein with cream cheese, cottage cheese, eggs, sour cream and milk. It also doesn’t have as much sugar as you might expect, with only three tablespoons, plus the sugar in the dulce de leche. Les and I got into a lukewarm debate about the protein content of this dish, with him asserting that the ingredients are spread out across 12 portions, making each portion skimpy on protein. I disagreed, so I did the math to bolster my case and here’s the result:
INGREDIENT
PROTEIN GRAMS
cream cheese, full-fat
16
cottage cheese, 2%
28
whole milk
12
dulce de leche
6
eggs
18
sour cream, full-fat
4
noodles
(this number surprised me!) 40
butter
2
Total grams protein
126
divided by 12 servings
10.5
Each square contains 10 1/2 grams of protein, significantly more than you can say for most desserts. A serving of vanilla ice cream, for example, typically contains 2 to 3 grams and a slice of chocolate cake is around 4 grams. I’m not claiming this to be a health food by any stretch of imagination. The fat and sugar content are high, and there are irrefutable downsides to that. I’m only suggesting that this could be considered something of a power dessert, if there is such a thing. 😉
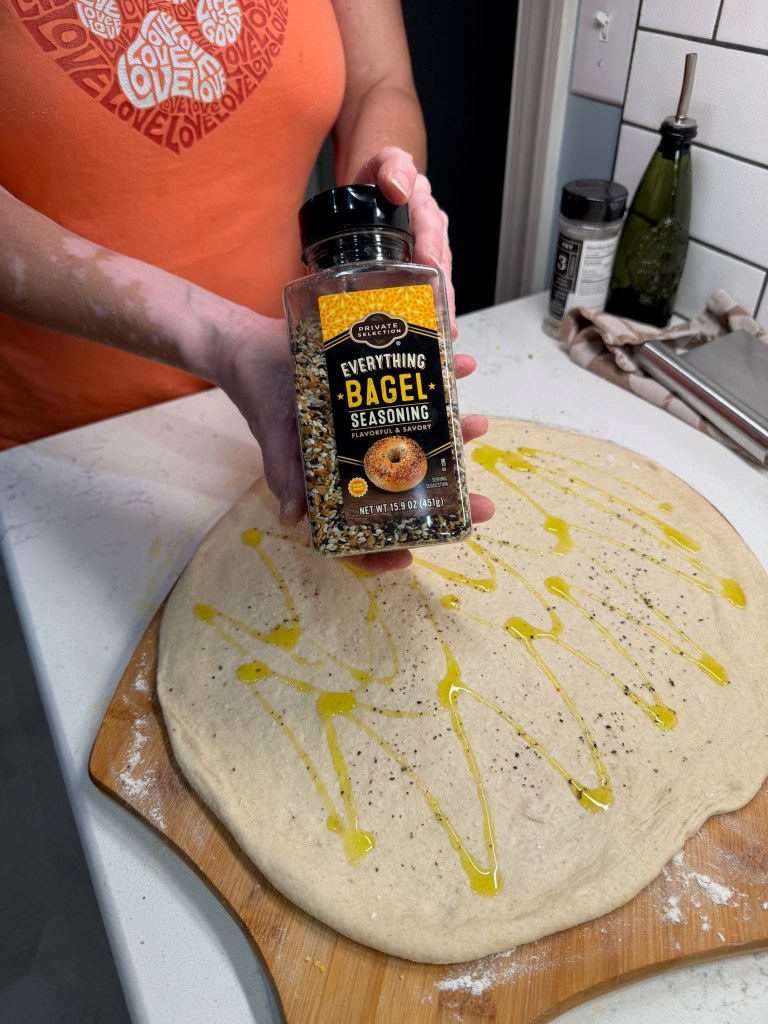
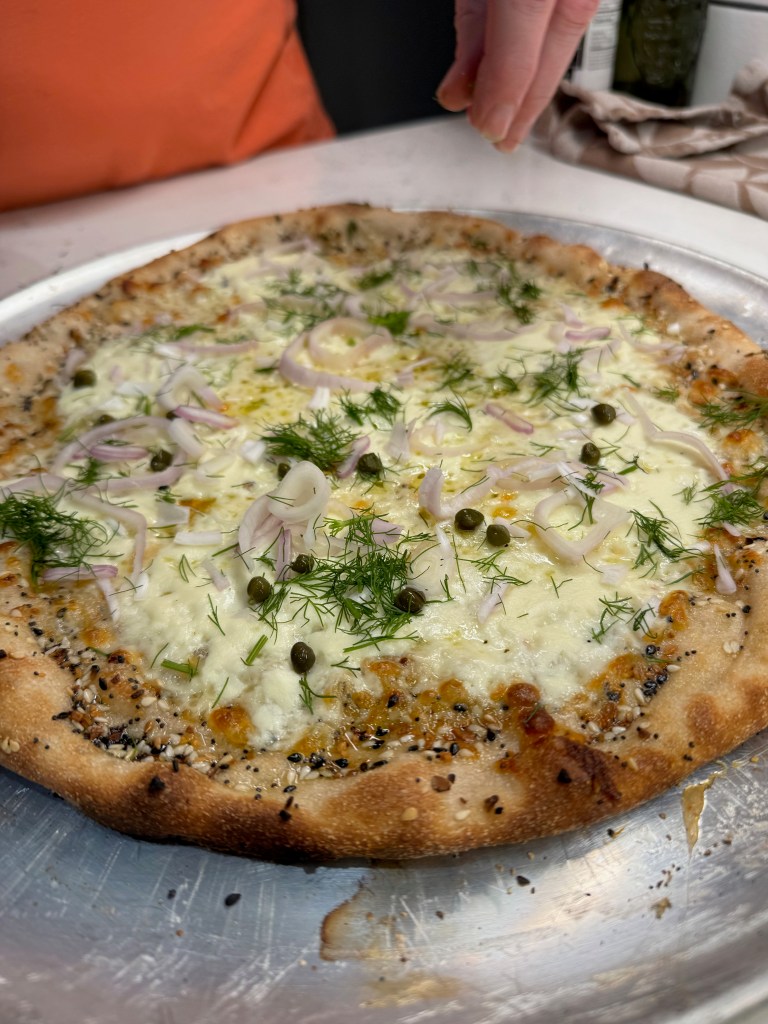
There’s almost no limit to what can be put on a pizza. The question is whether you should. And in this case of Jewish bagel toppings, I’m saying that the answer is yes! It’s a no-sauce, creamy cheese topping on an “everything” seasoned sourdough crust, finished with all the fixings you’d find on a Jewish deli bagel— onions, capers, dill and lox.
Think of it as a really big bagel!
Before I met my husband, who is Jewish, I could count on one hand the number of times I’d eaten bagels with lox. But this has become very much a staple in our home, and Les and I enjoy it for breakfast at least once a week. I love the flavors (especially when fresh dill is in season), and we’ve adapted it to dips and cheese spreads for parties, but I was eager to apply the unique flavors and textures to something else.
It wasn’t until we finally had a date on the calendar to have Rabbi Charlie and his family over for pizza that I decided to test it. You see, the rabbi keeps kosher rules, and that means meat and cheese cannot co-exist on the table. This regulation stems back to verses in Leviticus that declare you “shall not cook the kid in its mother’s milk,” and over time, the rule has expanded to include any kind of meat with any kind of dairy. Pizza without cheese is a sin in my book, so it would have to be the meat that would be kicked to the curb when we hosted them.
But isn’t fish meat?
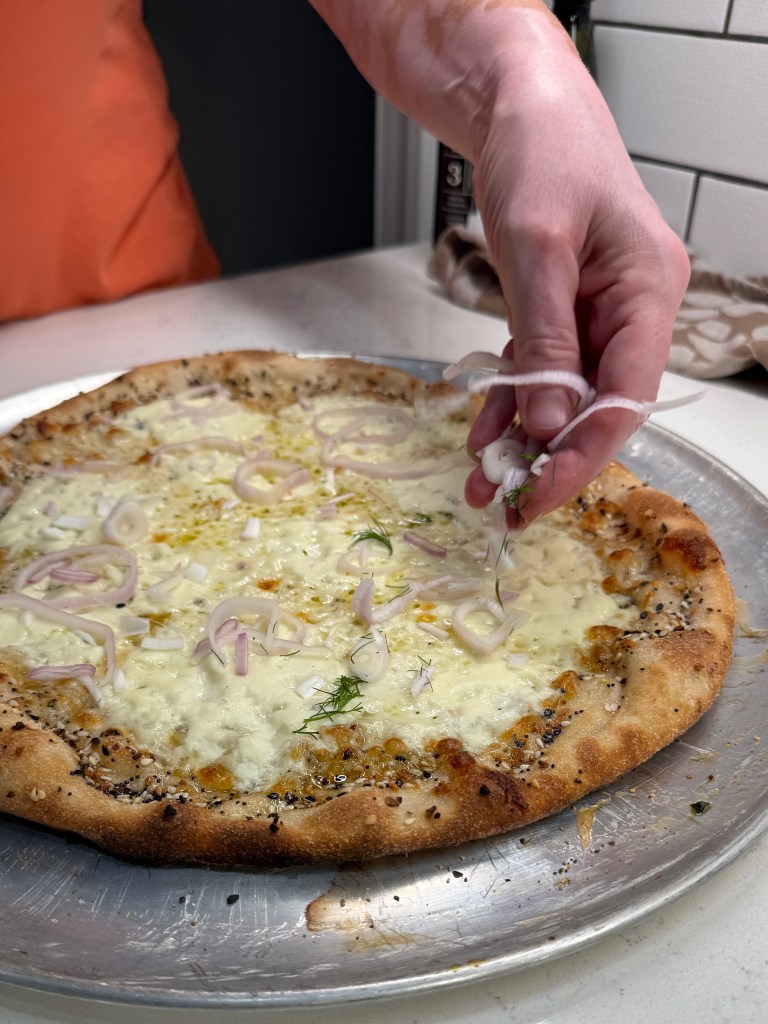
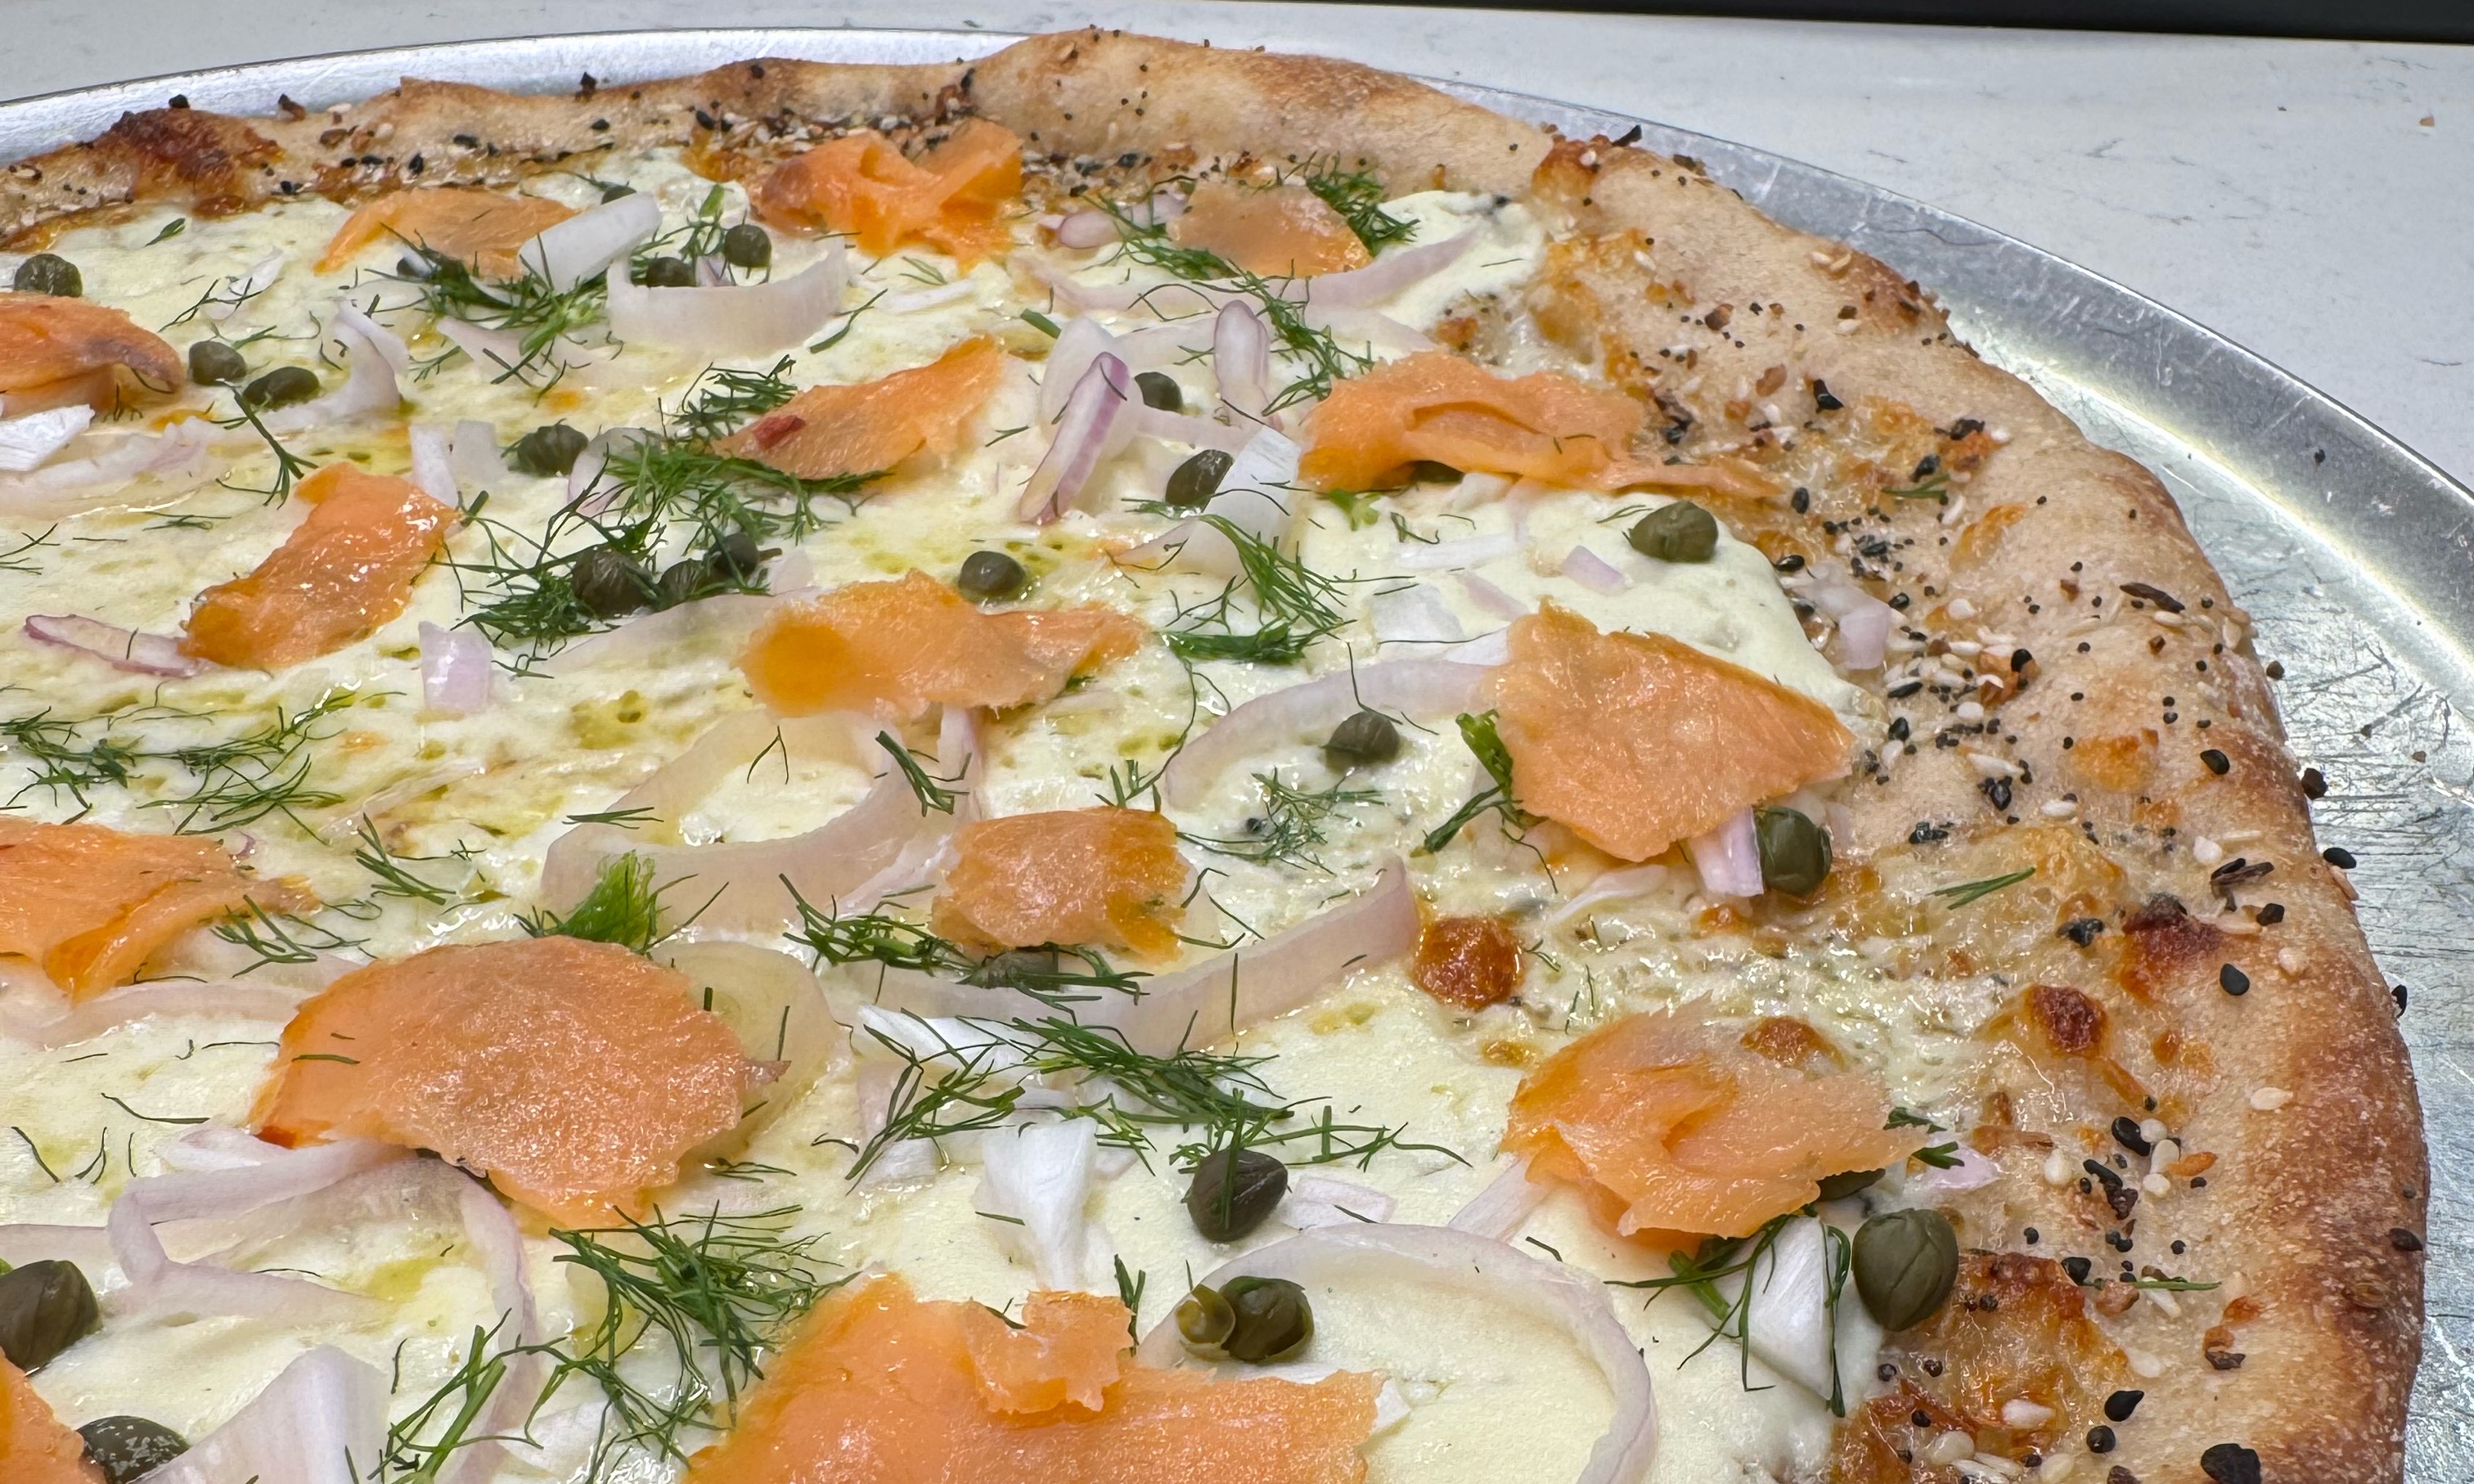
Nope. In Jewish kosher regulations, fish—or at least those fish with both fins and scales— are given a pass; they are considered “pareve,” neither meat nor dairy. The only fish (other than anchovies) that sounds evenly remotely good to me on a pizza is salmon, and this is how I decided to go for it. We used a lox-type of salmon, and it was not cooked but added to the pizza after the crust emerged from the oven. In fact, most of the toppings were added after baking, the same as we would dress a bagel after toasting it.
Now, before I get too far ahead of myself, I want to clarify that we actually did not serve this everything bagel pizza when we hosted the rabbi because I felt it needed some tweaking. When the time came, we opted for all-veggie pizzas for our guests. But this test was tasty and fun, and I learned at least two things that will make it better next time. Ready to see how we made it?
How to make everything bagel pizza
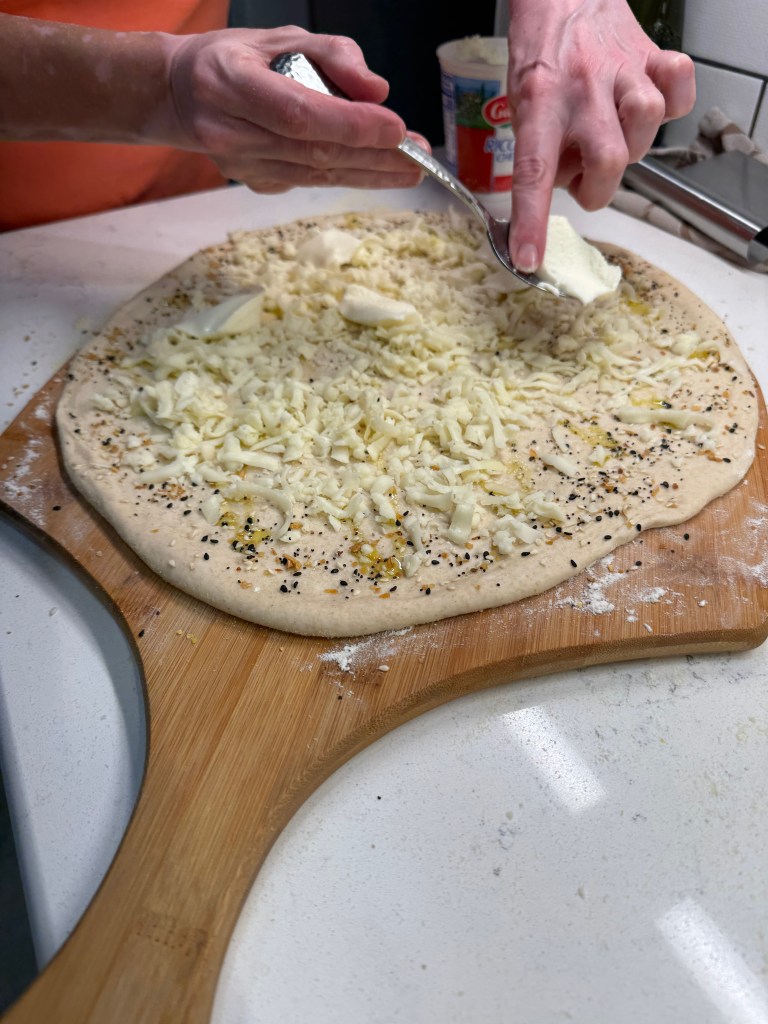
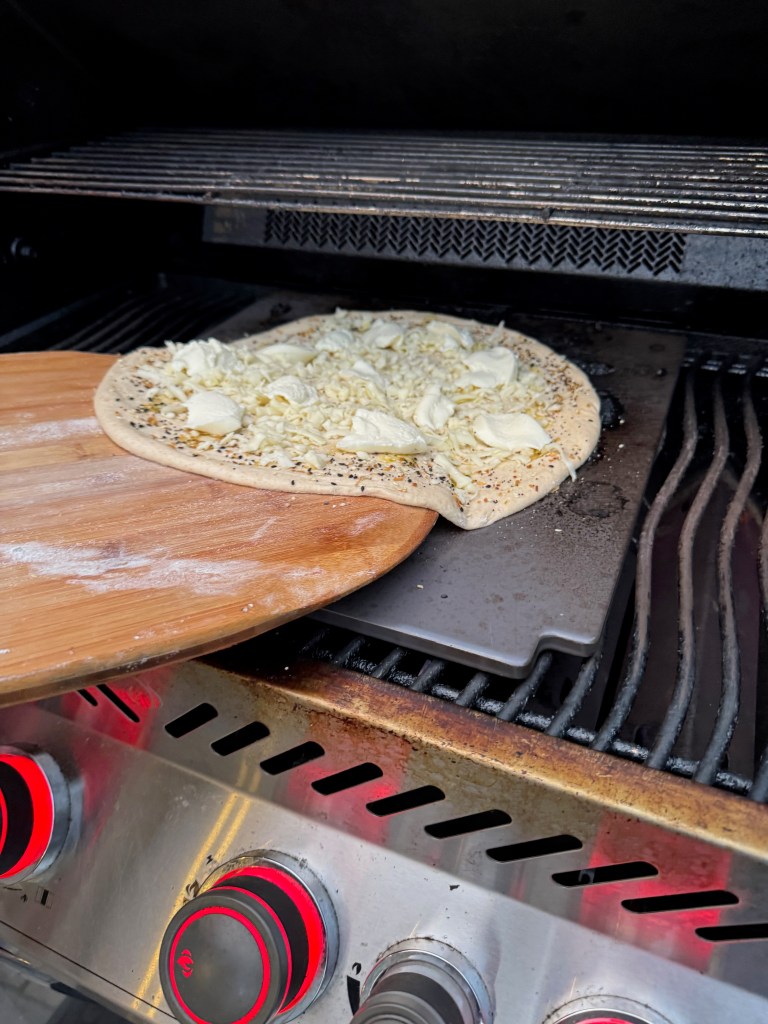
The crust for my pizza is the same as always: sourdough from scratch, made two days ahead and kept in the fridge for a cold ferment until pizza time. There was no sauce on this pizza. I sprinkled the dough generously, especially on the edges, with everything bagel seasoning and then spread a light layer of freshly grated mozzarella and a few dollops of ricotta cheese before we slid it onto the preheated stone on our outdoor grill.
I always dress my dough with olive oil, salt and pepper before I add toppings.
I know what you’re thinking—“doesn’t a bagel get spread with cream cheese?”— and you’d be correct. But I wasn’t sure how well cream cheese would hold up under the intense heat we use for pizza, so I substituted ricotta, which I’ve used successfully on other pies in the past. In hindsight, this is one thing I’ll do differently next time. There was nothing wrong with the ricotta, but I missed the smooth texture of cream cheese. I think if the cream cheese was very cold, straight from the fridge, it would do just fine and would provide a more expected flavor.
We use red onion on our bagels, but I thought shallots were slightly more refined for my pizza.
The ricotta oozed out into thin puddles, which gave every bite a nice even base. I scattered thinly sliced shallots, small capers and fresh dill over the hot pizza, and then arranged bite-sized bits of our smoked salmon all over just before serving. This kind of salmon would have shriveled terribly in the oven, so I believe this was the way to go. But here’s the other thing I’ll do differently next time—and there will be a next time—I’ll double the amount of salmon. It looked pretty in pictures to have a sparse amount of salmon, but when sliced and served, it felt a little skimpy. The salmon I used was supposedly a “hot honey” variety, but neither Les nor I found it to taste any different from a regular smoked salmon. I won’t spend extra next time for the fancy flavor (given that it didn’t have any).
So what did we serve the rabbi and his family?
Pizza without meat is easy-peasy, and we managed just fine with a variety of veggie-forward pies for our kosher-keeping guests. One pizza was half classic veggie (peppers, onions, mushrooms and spinach) and half plain cheese. Here are the other two, and I promise that nobody ended the evening hungry. Especially after the ice cream, which is coming later this week. 😉
I learned only within the past few years that traditional Italian hard cheeses, such as Parmigiano-Reggiano and Pecorino-Romano, are made with animal rennet and therefore not generally regarded as vegetarian. This is important to consider when serving guests who steer clear of meat for any reason, and I called this out when we were prepping pizzas, assuring our kosher guests that I had found a Wisconsin-made parmesan that used plant-based enzymes rather than rennet. The rabbi shared the good news that there is a kosher (though not vegetarian) exception, using rennet from kosher-slaughtered lambs. This would not exonerate parmesan for vegetarian diets, but for religious purposes, it has been deemed acceptable.
If you know me at all, you know that I can’t resist a good rabbit hole, so I dug in a bit and found this interesting article to explain more about it, in case you’d like to check it out.
This is a unique twist on an everything bagel, topped with all the ingredients we enjoy at breakfast. But this time, it's on a sourdough pizza crust!
Ingredients
11 oz. pizza dough ball, at room temperature
Extra virgin olive oil
2 Tbsp. “everything bagel” seasoning (a combination of sesame seed, coarse salt, poppy seed and dried garlic)
1/2 cup freshly shredded firm mozzarella
About 1/3 cup whole milk ricotta, cold from the fridge
1/4 cup thinly sliced shallots (or red onion)
1 Tbsp. small capers, drained but not rinsed
Small handful fresh dill, chopped
3 oz. cold smoked salmon (lox)
Note: We make most of our pizzas on a steel that has been pre-heated for one hour at 550° F, or sometimes on a specialty stone on our outdoor grill, also at least 550° F. This very closely replicates a brick oven-style pizza that is finished in about seven minutes. If you are using an oven pizza stone or a pizza pan, you will need to adjust your temperature and cooking time accordingly.
Directions
Preheat your oven or grill, and bring the pizza dough to room temperature.
Shape pizza dough by hand into a 14-inch round and place on a flour- and cornmeal-dusted wooden peel for easy transfer to and from the oven or grill.
Drizzle dough with olive oil and sprinkle salt and pepper over the surface. Generously scatter the everything bagel seasoning over the crust, concentrating mostly on the outer edges.
Spread mozzarella evenly over the center of the dough, and use a large spoon to arrange dollops of the ricotta around the pizza.
Transfer to the pizza steel or stone and bake for 6 to 7 minutes, rotating the pizza after about four minutes.
Transfer hot pizza to a serving pan. Quickly scatter shallots, capers and dill over the pizza, and then arrange the smoked salmon so that every slice has an equal amount.
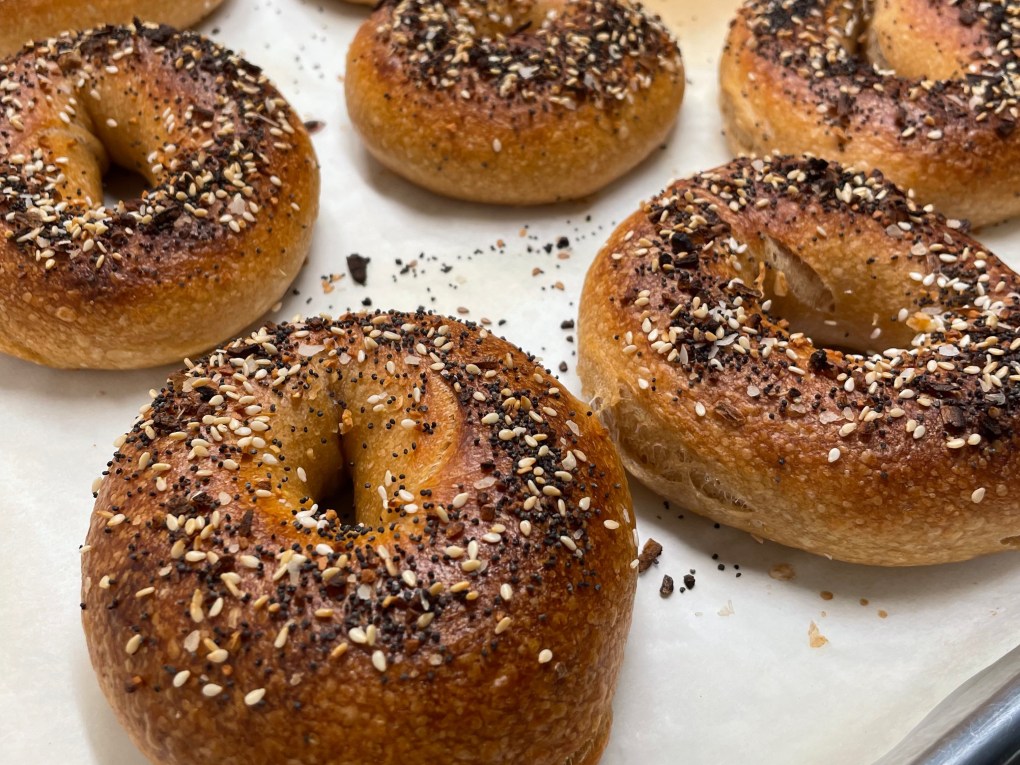
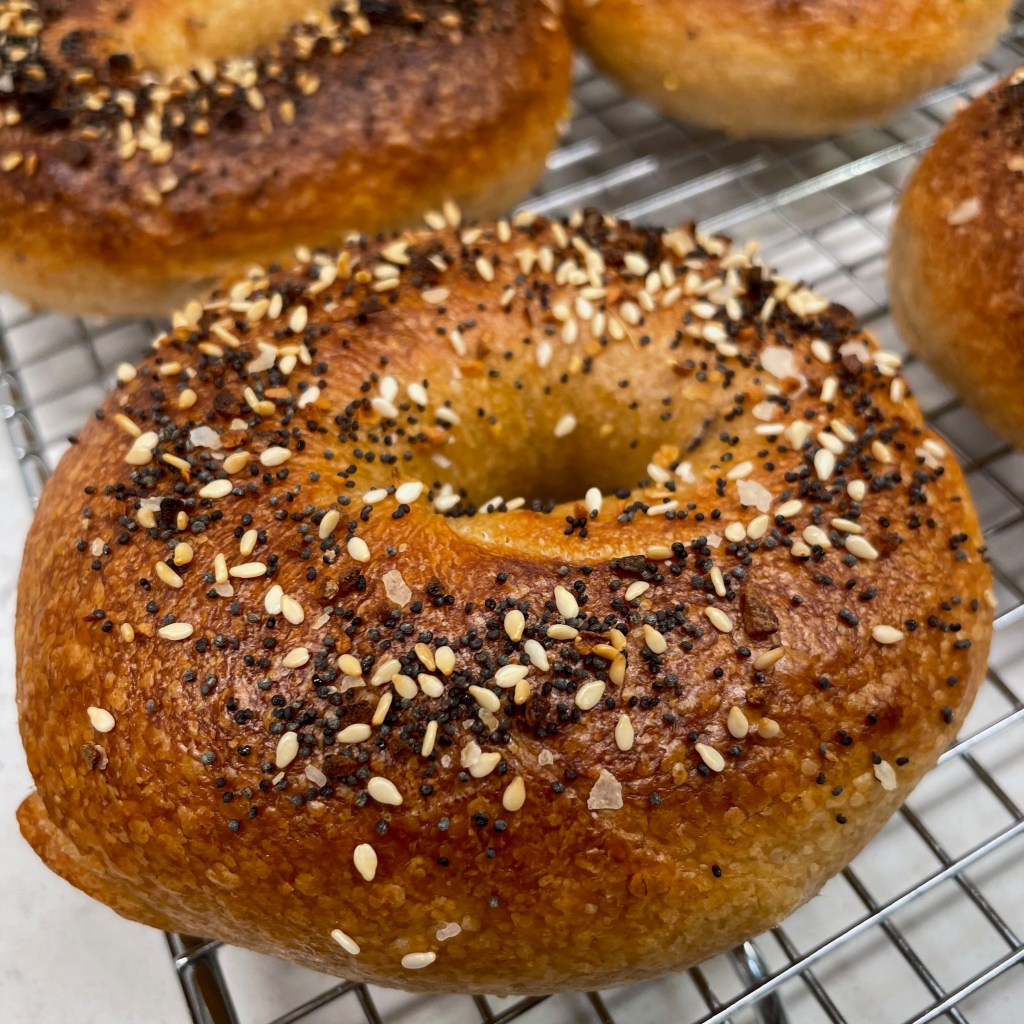
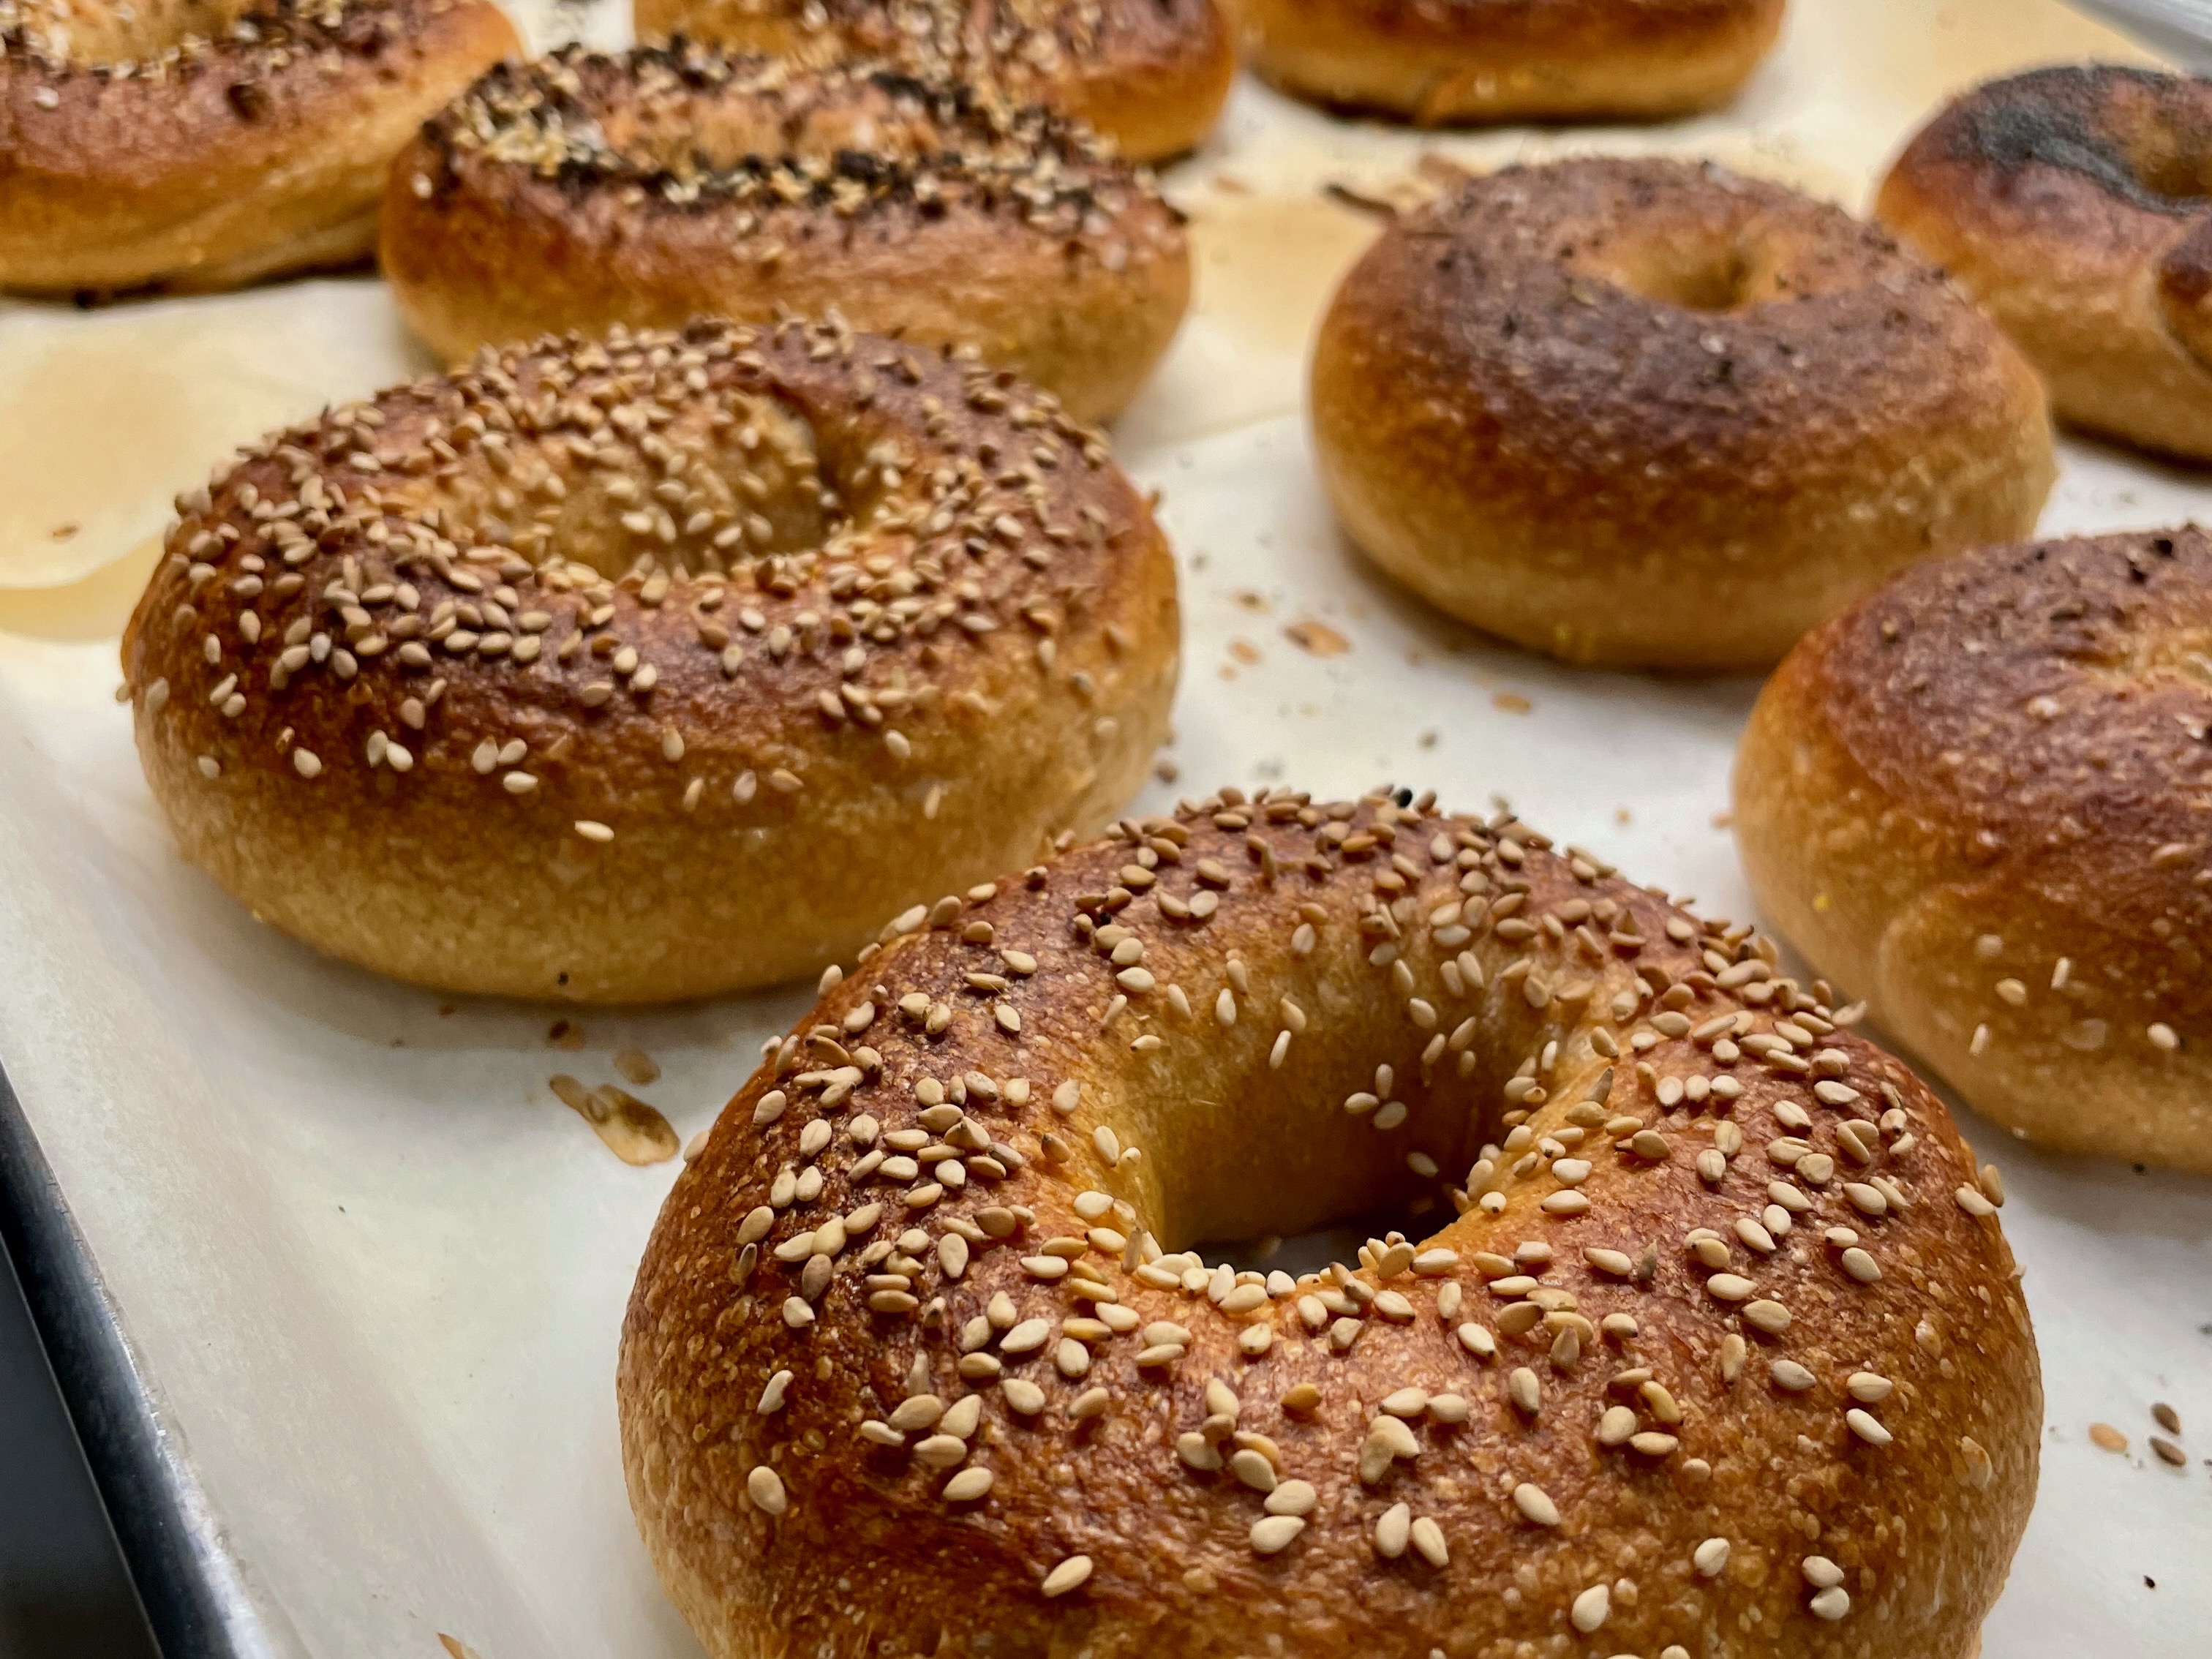
If someone had asked me how I spent last weekend, this would be my answer. It is not that making these bagels took the whole weekend, but that I spent most of the weekend thinking about them and anticipating the crispy crust, chewy interior and the sheer satisfaction of having them turn out so well.
The adventure I had making sourdough bagels is much more than a recipe, though I’ll be happy to share where my recipe came from. Here you go: https://www.theperfectloaf.com/sourdough-bagel/
Maurizio Leo’s creations have been intimidating, er, fascinating me for a few years now, since I first discovered one of his recipes on the King Arthur Baking site, where Maurizio had been an occasional contributor. This guy is one of my culinary idols, and his expertise with sourdough is astounding. One of the things that used to scare me about his recipes was his attention to the science, and especially his guidelines for the temperature of the dough at various stages. But my worries were eased when I remembered something I learned in my King Arthur Baking class last summer: concern about temperature is more crucial in a production environment, where you have to be ready for baking on a schedule, than in a home kitchen. Once I recalled that fact, I’ve been able to relax and just appreciate the outcome with less worrying along the way. Baking is supposed to be enjoyable, right?
It does help to remember two simple tips about temperature: yeast dough (including sourdough) rises more quickly in a warmer environment, and dough develops more flavor in a cooler environment. Both of these principles come into play with this bagel recipe.
When I got the itch to make bagels for the first time in ages, it was Maurizio’s blog that I turned to for the best recipe and expert advice. He did not let me down.
This renewed interest in making bagels came about in early November, after my husband, Les, and I had participated in a trivia night at the temple in our city. We were assigned to a team and challenged in a variety of categories— from movies, sports and music to Jewish culture and history. Thanks to the diverse interests of our team, we did very well in round after round, and then came a food question that left us, shall we say, farblonjet (a Yiddish word that loosely translates to “we don’t know what the heck”). The trivia clue went something like this:
What staple Jewish food was said to have originated when Polish King Jan Sobieski saved Austria during the Ottoman Empire?
I’m paraphrasing because I don’t remember the exact details of the question; I only remember that we had a lot of discussion at our table and we still got it wrong. One teammate said knishes, which we thought might have had ties to Poland but we weren’t sure. I thought perhaps bialys, which I was certain were Polish but that’s all I knew about them. And a third person on the team said bagels because it seemed the most obvious. I chimed in that maybe it was too obvious, and then we agonized until time was up and we went with “knishes.”
The answer was, of course, bagels! And then a whole conversation ensued across the entire room, about what makes a bagel great— from the New York City water to the best toppings— and I haven’t stopped thinking about them since.
We are lucky to have a very good local bagel store in Winston-Salem (conveniently located practically next door to the temple), and we are perfectly content with their bagels most of the time. But when I found myself with a little free time last weekend, I decided to go for it. Making bagels requires a fair amount of planning and a few weird ingredients, which I happened to have on hand because, despite my lack of knowledge about the history of bagels, I’m still a bread nerd. This has been a long time coming!
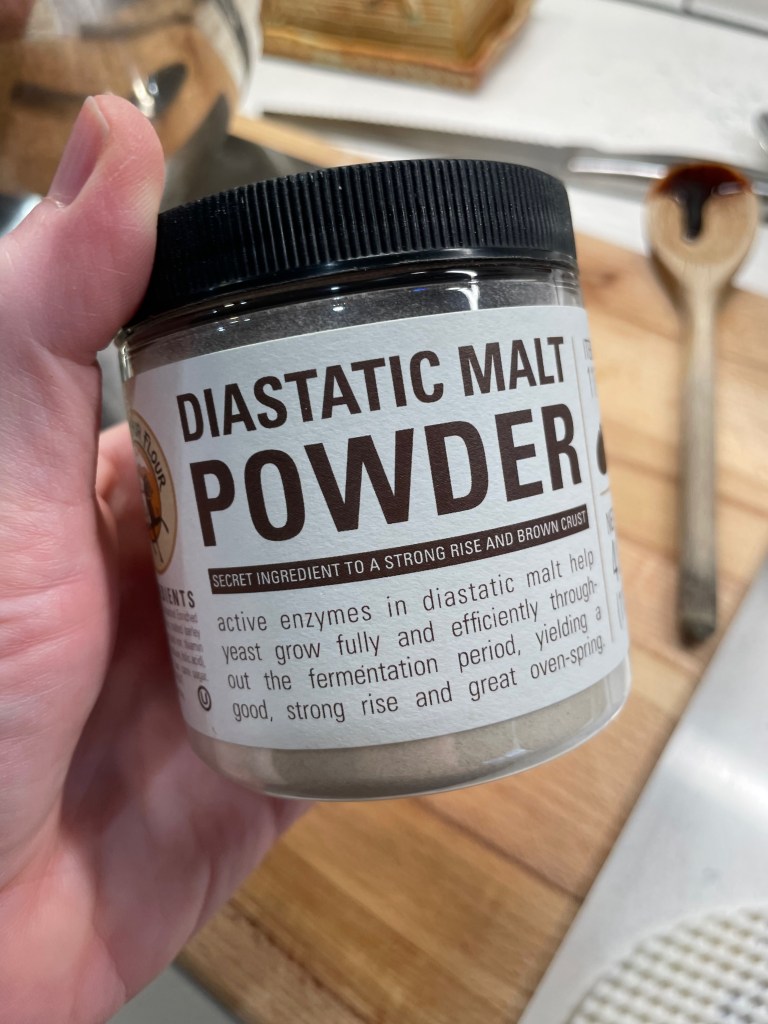
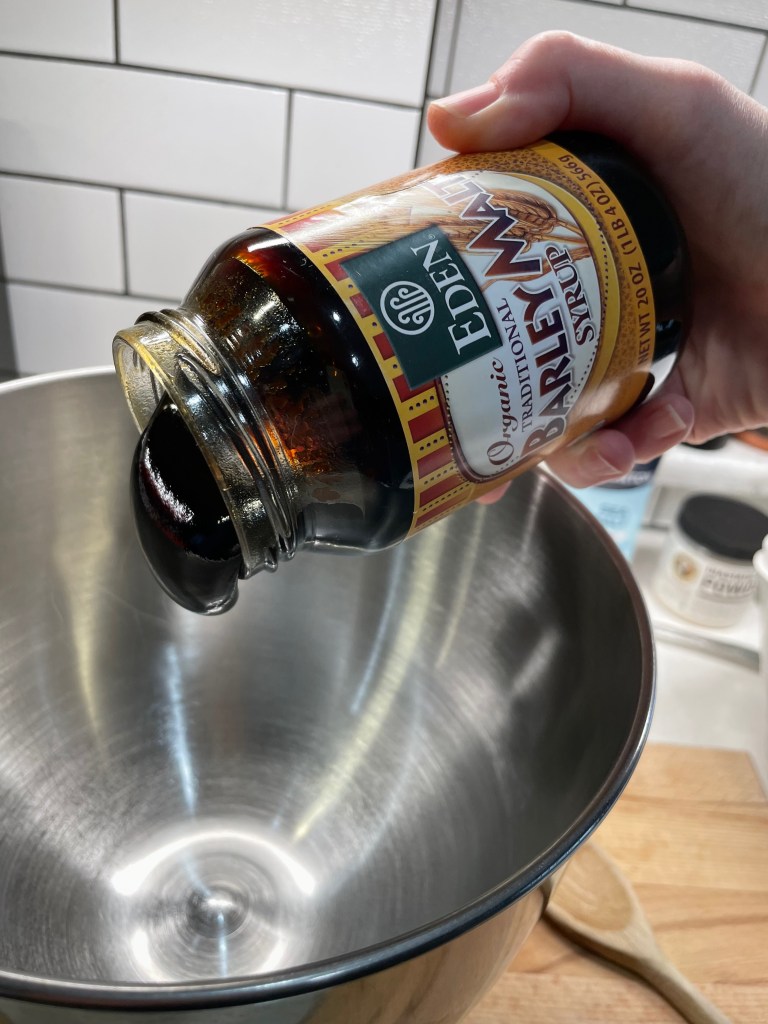
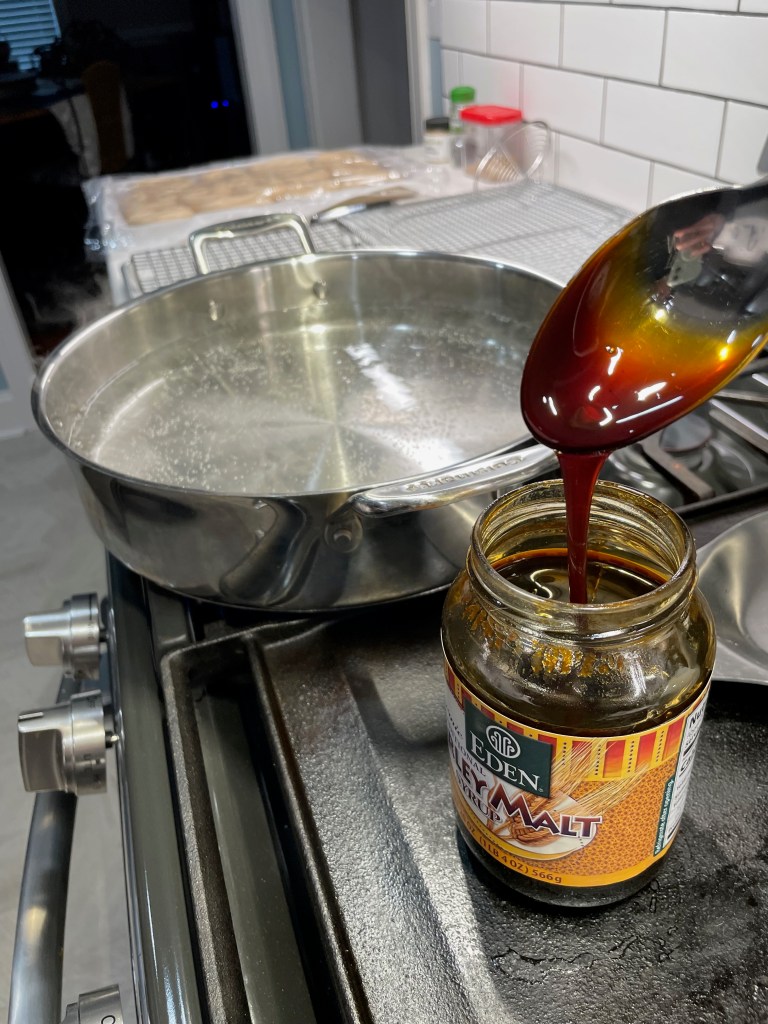
Diastatic malt powder boosts oven rise and browning.Barley malt syrup is kinda like cold molasses in January… but slower. 😂
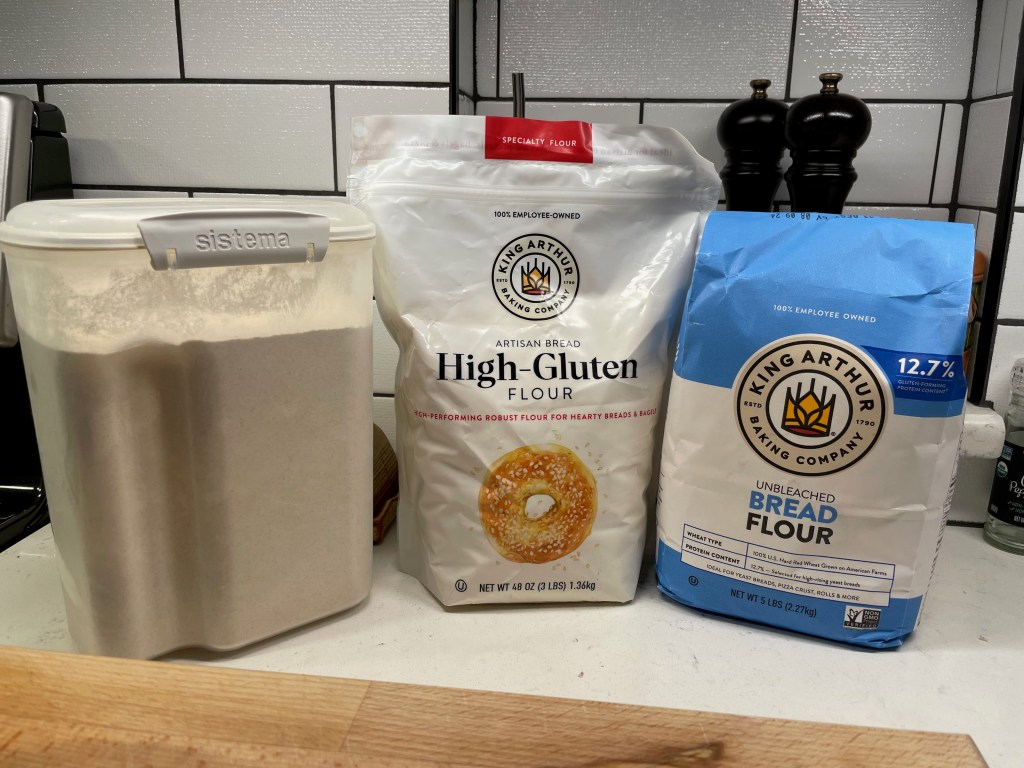
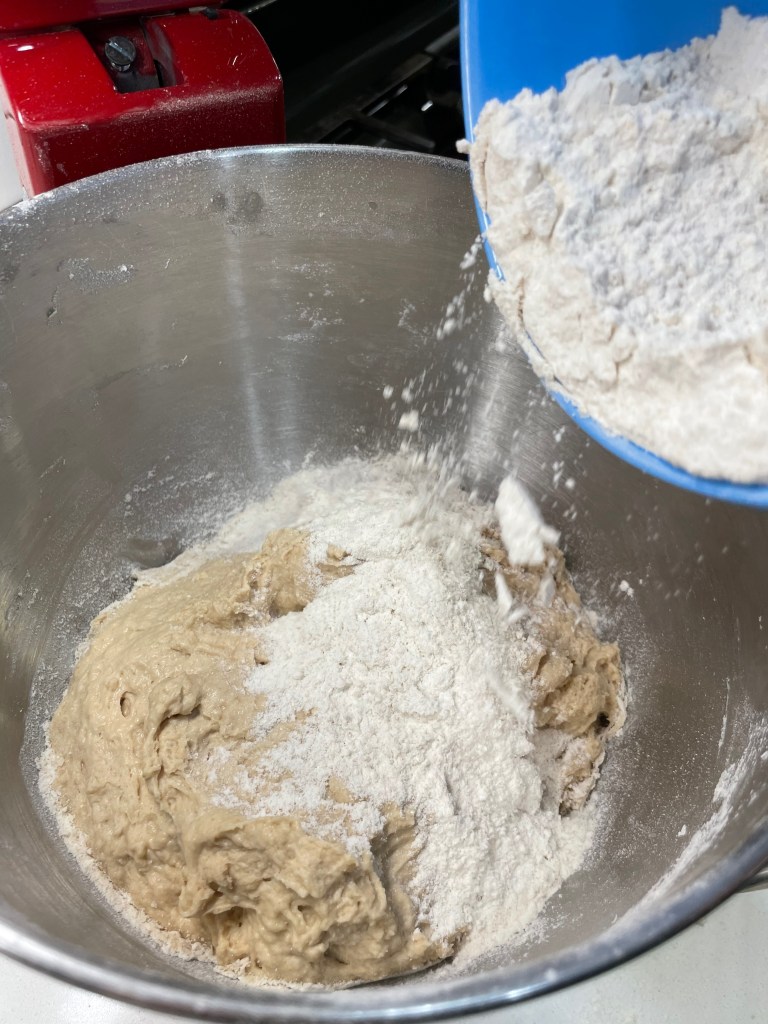
I made only two changes to Maurizio Leo’s recipe, and I’ll describe them in case you want to follow my variations. The first was a flour swap— rather than the full amount of bread flour suggested in his recipe, I used half bread flour and the other half was a split of high-gluten flour and white whole wheat flour. Both of these substitutes are thirstier than bread flour so I also increased the water somewhat (though perhaps not enough) to ensure hydration. Still learning here!
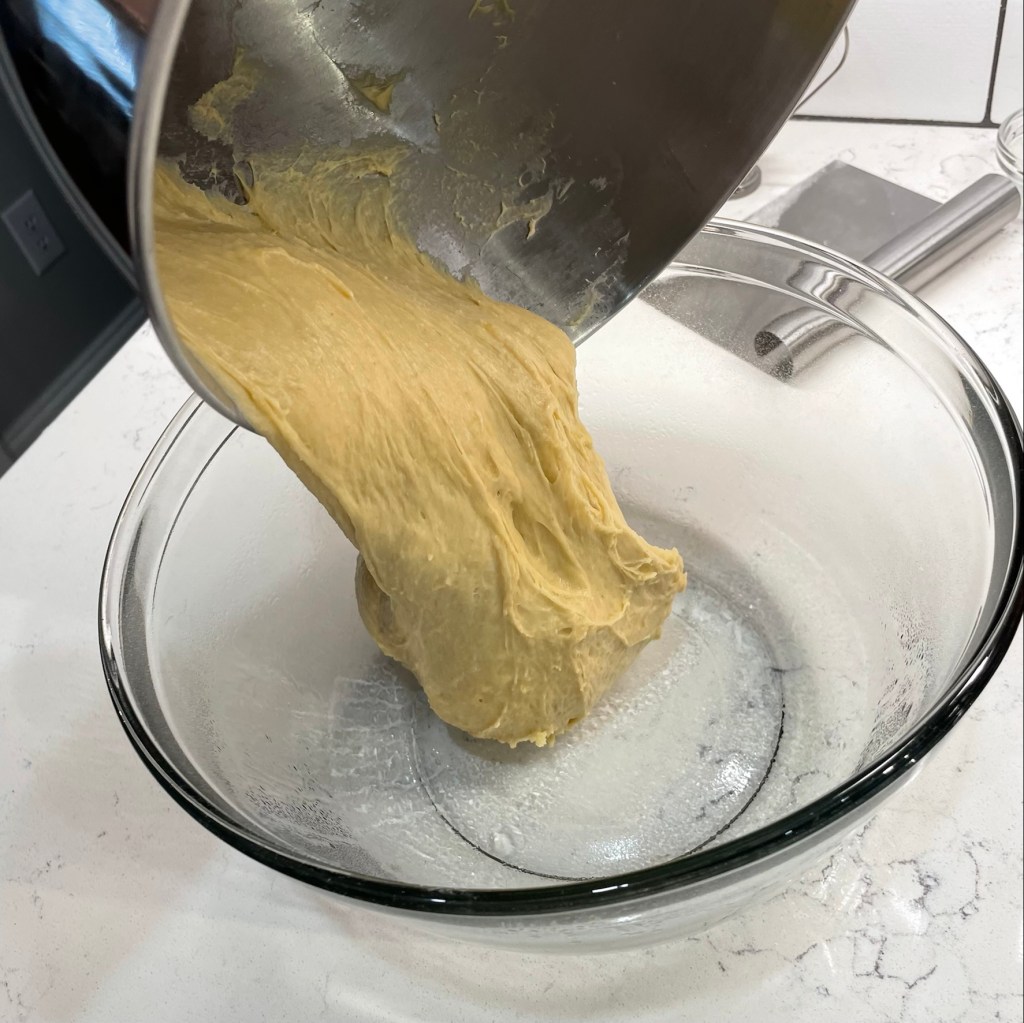
A trio of flours gave my bagels great body and flavor.The steam pan keeps the oven humid and the baking steel is crazy hot.
The other change was a technical one— I used my own version of a steam bake, which is simply an oblong baking pan filled halfway with hot water that preheats with the oven. Maurizio’s suggestion (a roasting pan filled with preheated lava rock, onto which you’ll toss ice cubes) is a good one if your oven has room for the setup he describes. But I’ve been leery of using ice in the oven ever since 2016, when an unfortunate accident resulted in shattering the oven light in my rental apartment. After that, I read on another baking blog that when you’re baking with steam, it does not need to be dramatic; you just need to have a very humid environment in the oven. I’ve never had trouble with my method of steam baking, and the result with my bagels was terrific.
The recipe begins two nights before you plan to bake, with an intermediate feeding of a tiny bit of ripe sourdough starter to create a dough called levain, an intermediate starter that will be worked into the final dough. This levain is a very firm, tight dough, and after mixing it, I let it rise overnight in the oven with the light on. This kept it warm and cozy for its 12-hour ferment, and it’s the first of the two principles I mentioned earlier about temperature.
After the overnight ferment, the levain was spongy and bubbly. Success!
The final dough is made the next day, beginning with a slurry of the barley malt syrup, some cane sugar, salt and a splash of the warm mixing water. This is the simplest way to thoroughly blend in an ingredient as sticky as the malt syrup. The slurry was blended with all of the overnight levain, the rest of the water and my flour blend. If I could back up to change any part of my process, it would have been this point— my increase of water may not have been enough, given the swaps I made to the flour.It can be risky to add more water to an already-formed dough, so I pressed on with this very firm dough. But next time, I’ll adjust the water further or hold back some of the flour toward the end to be sure the dough can handle it.
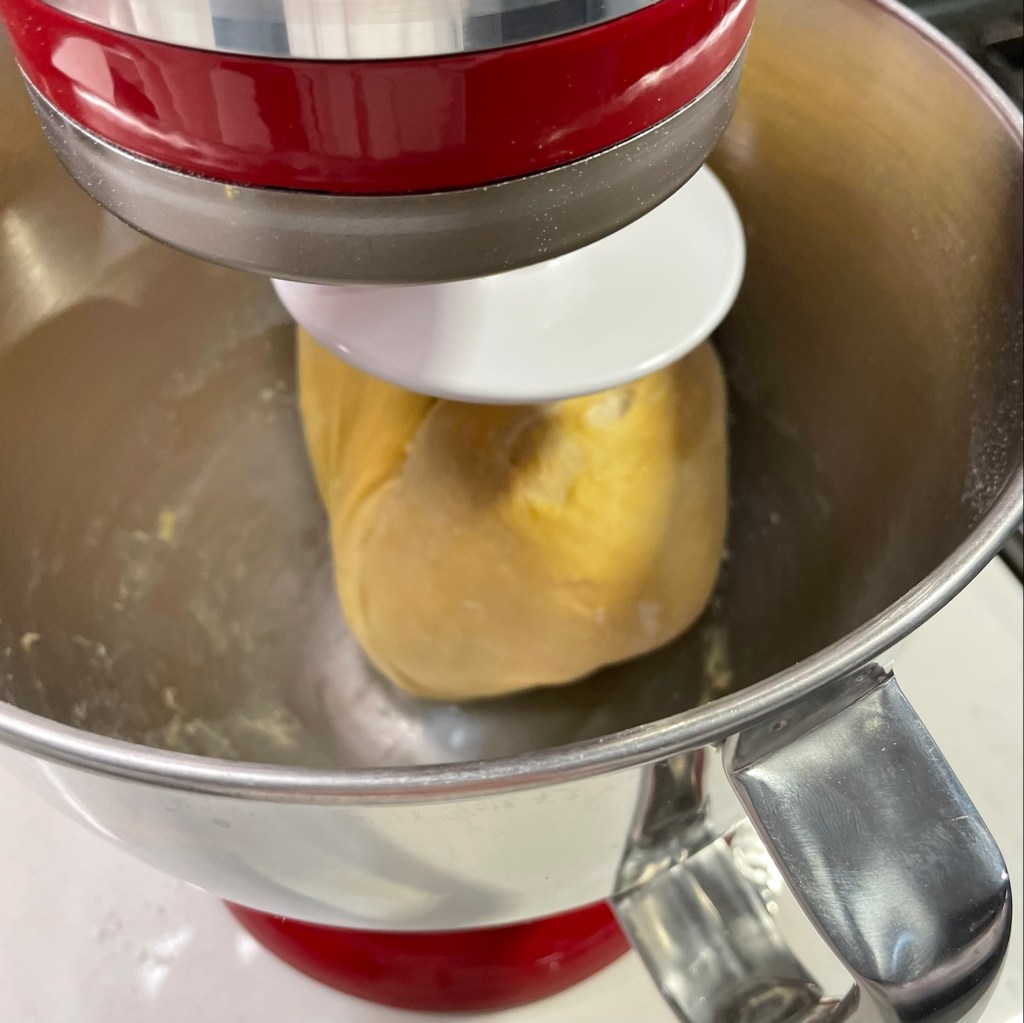
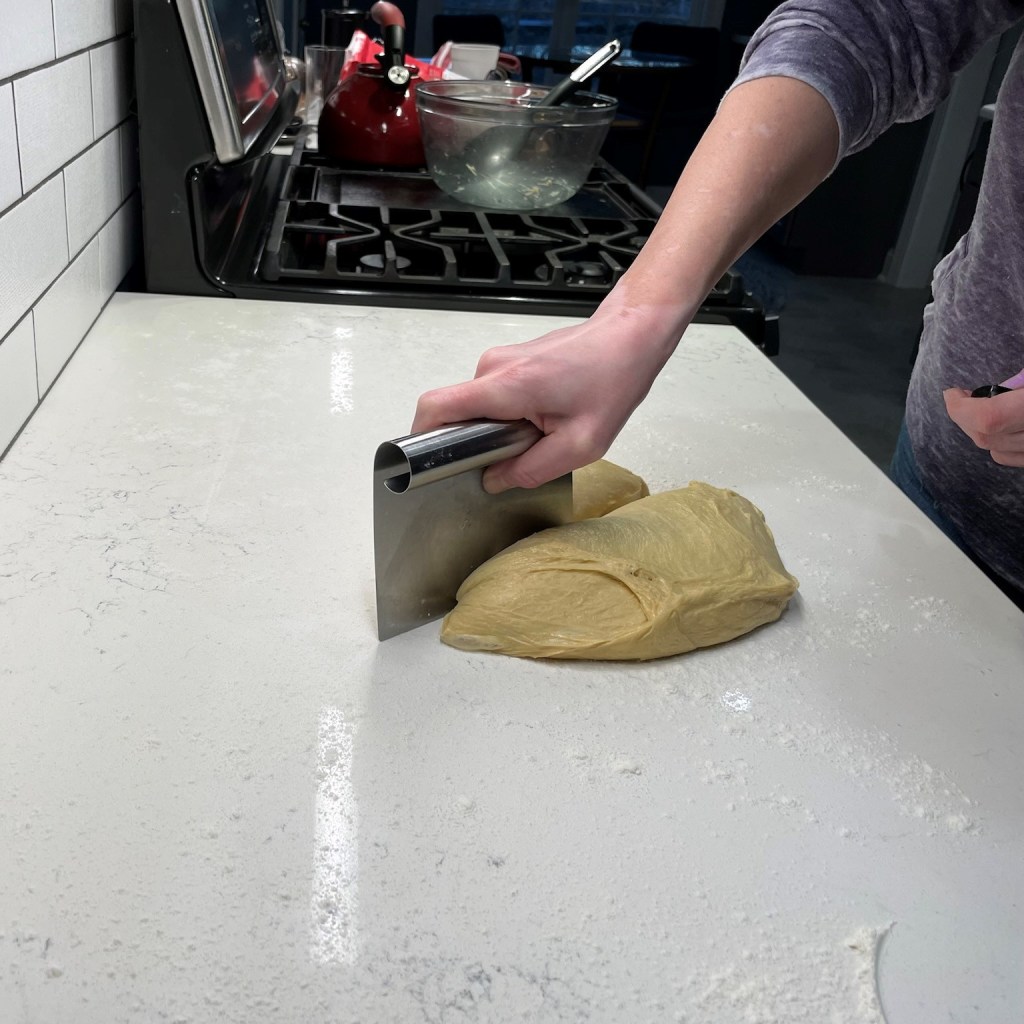
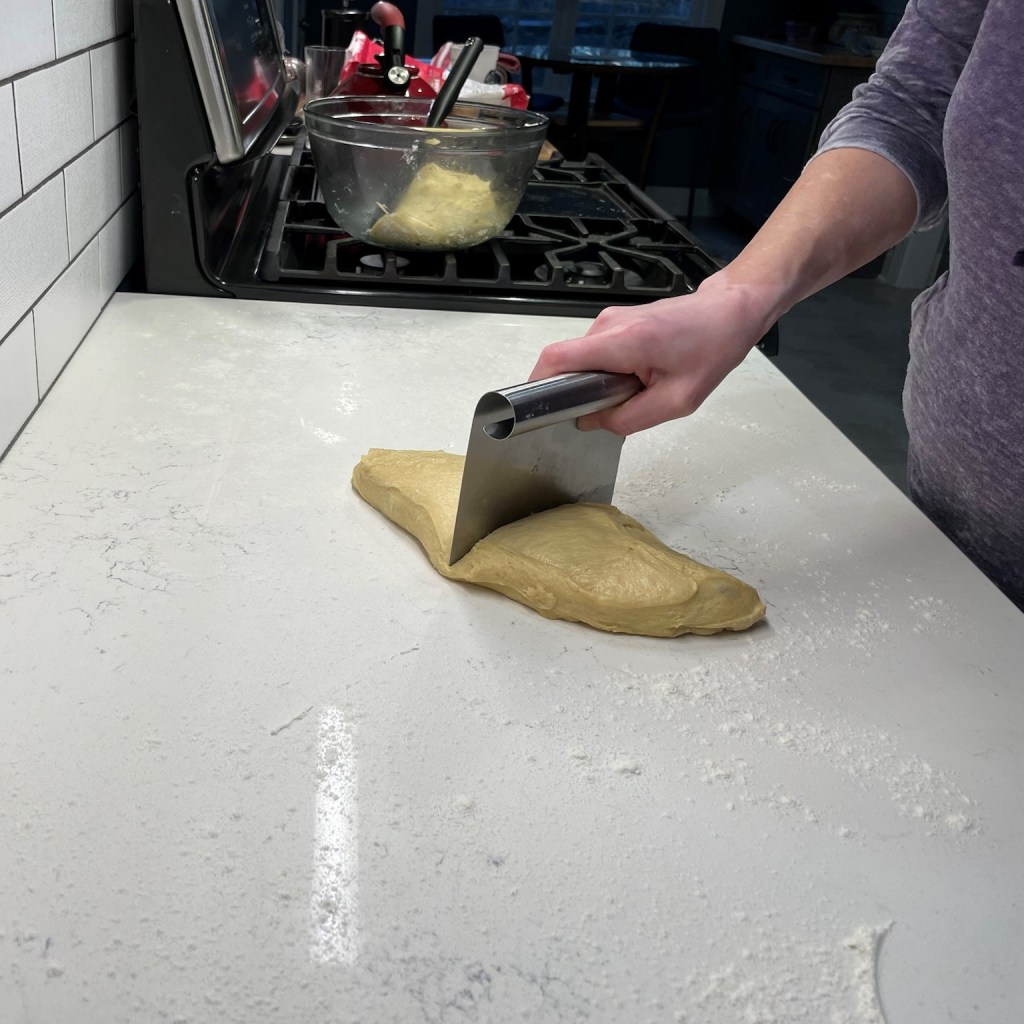
I mixed the bagel dough as much as I could in the mixer before I turned it out onto the counter to finish it by hand.
This was such a large volume of dough that I could not mix it completely in my KitchenAid, and that’s part of the reason it took me so long to pursue making bagels. Things get messy with a big batch of dough, and though I used my mixer’s splash guard (for the first time ever), I still needed to roll up my sleeves to finish the kneading by hand. Once I got into the rhythm, I found it almost therapeutic.
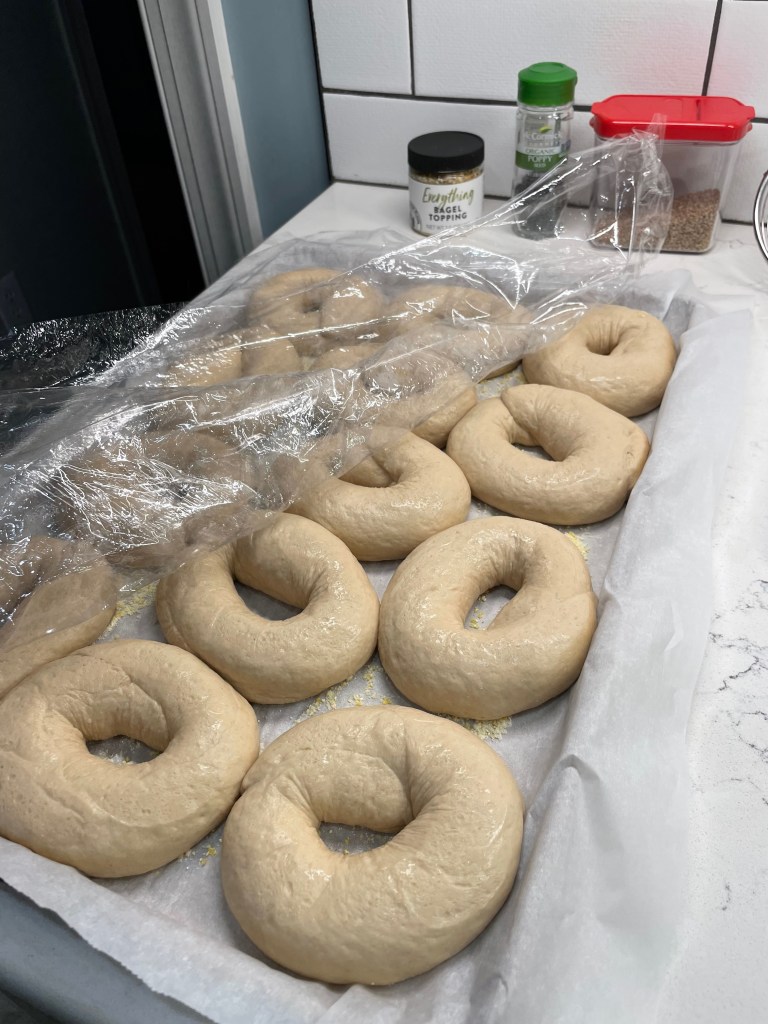
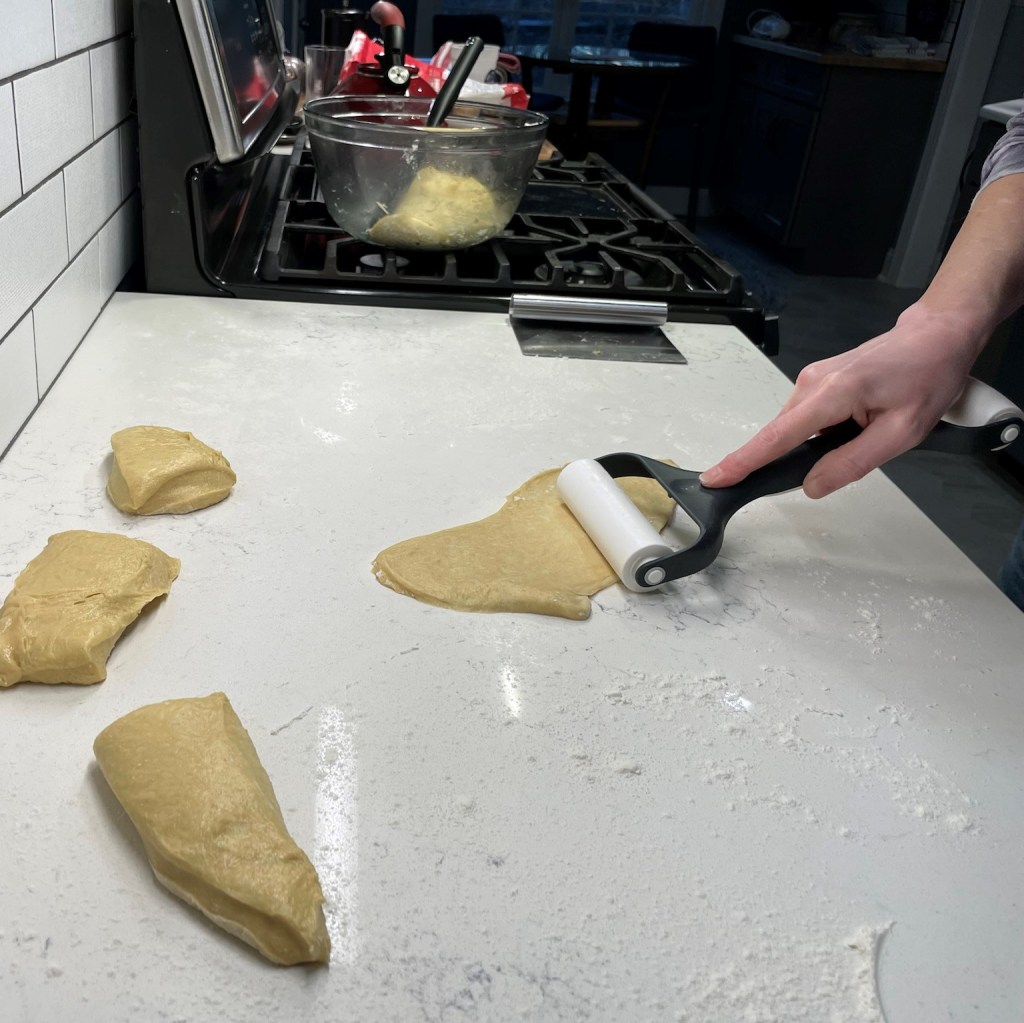
My cold-risen bagels and setup for parboiling, an essential step for making authentic bagels.
The second principle about temperature applies to the bagel dough after it’s shaped into rings. The bagels rest at room temperature for a couple of hours and then in the refrigerator overnight. That chilling time ensures the best and most flavor in the finished product. There is one other change I made from Maurizio’s recipe, and that was to add a little of the barley malt syrup to the boiling water. It isn’t necessary, but I love the aroma and besides, what else am I going to do with a huge jar of that sticky stuff? Unless I make pretzels. Hmm…
Here’s how the rest of my bagel adventure went, and boy, was it worth the trouble!
Before I forget to mention, our team took first place that night at the temple trivia event! It was a fun time that inspired me to aim for bagel greatness, and Maurizio Leo helped me get there. I may have missed the mark on their history, but for sure, I’ll make room for more of these homemade sourdough bagels in our future!
Way to go, Table 3!
Wanna give it a go? If you’re a sourdough baker, you’re gonna love these. Thanks, Maurizio! 😁
Each fall since I began dating my husband, I’ve made a concerted effort to celebrate the season of Rosh Hashanah— the Jewish New Year— by baking a special bread. That first year, Les had visited a local apple festival and brought back a bagful of gorgeous Jonagold apples, which were lovely in a coiled-into-a-round challah. I was so proud of my bread that I took a picture of it— way before I began blogging— and I even took time to leave a review on the King Arthur website to report my great results.
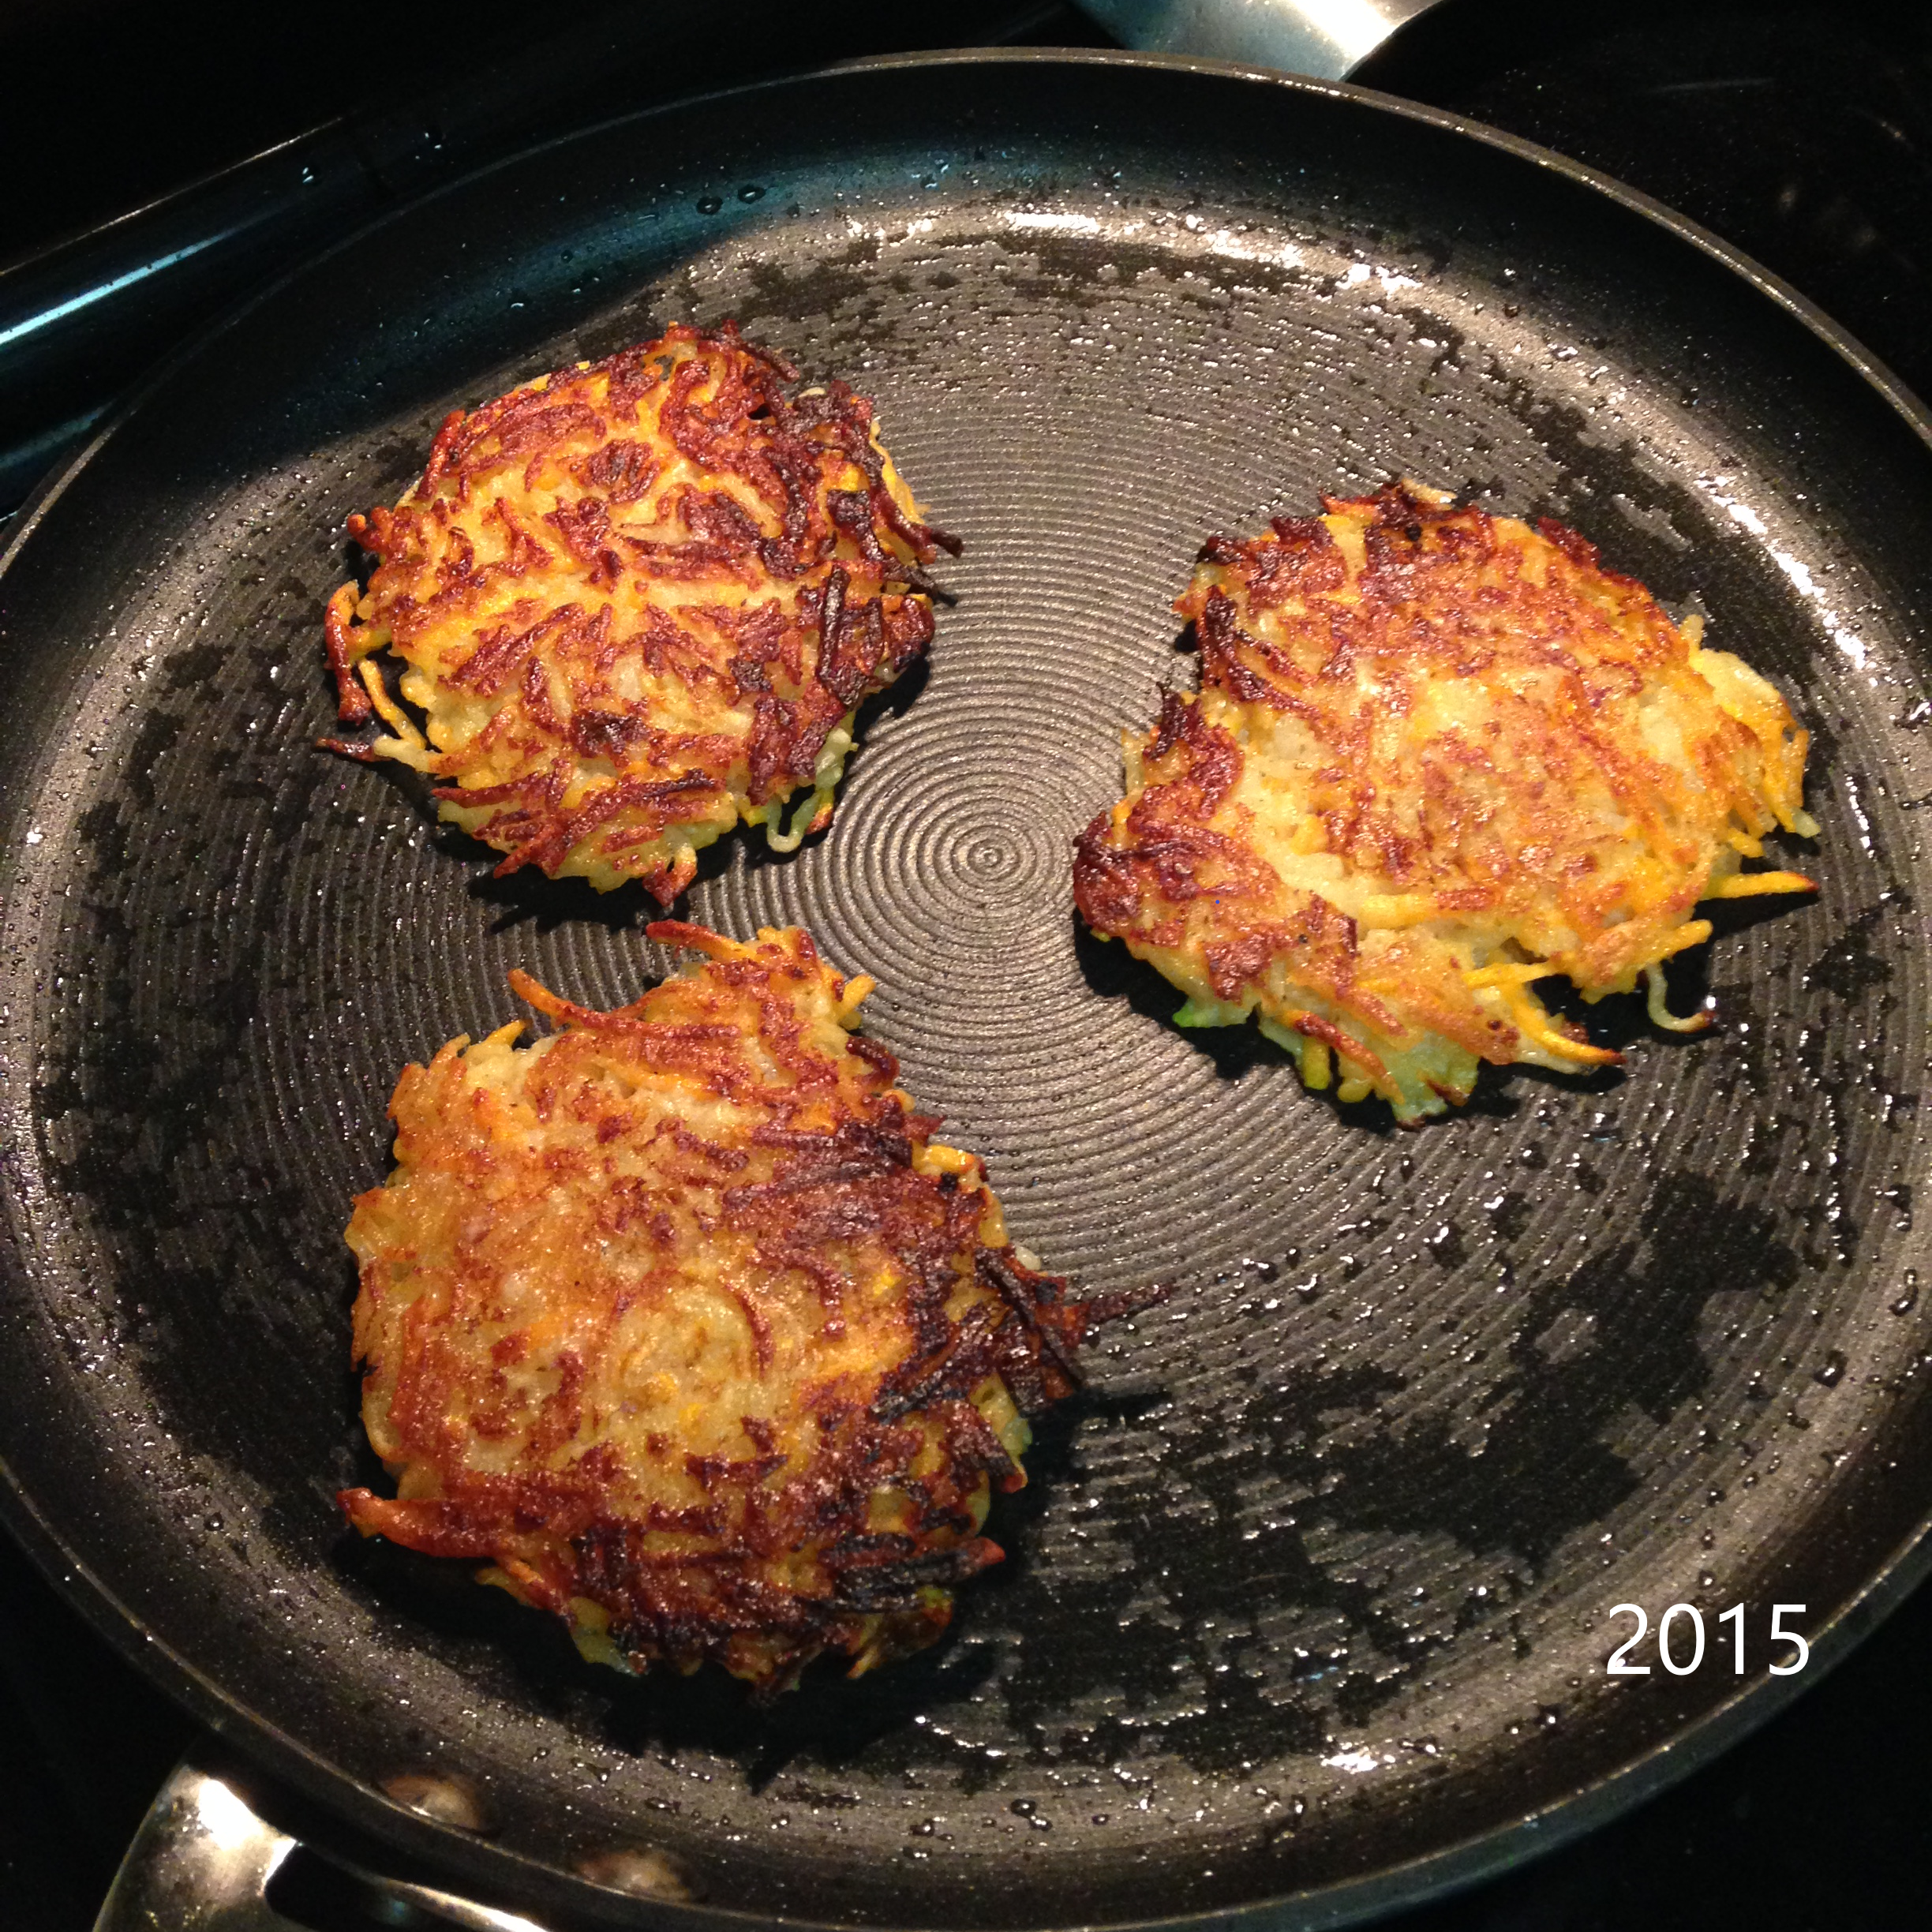
Not a bad effort in 2015! But my iPhone 5 camera…
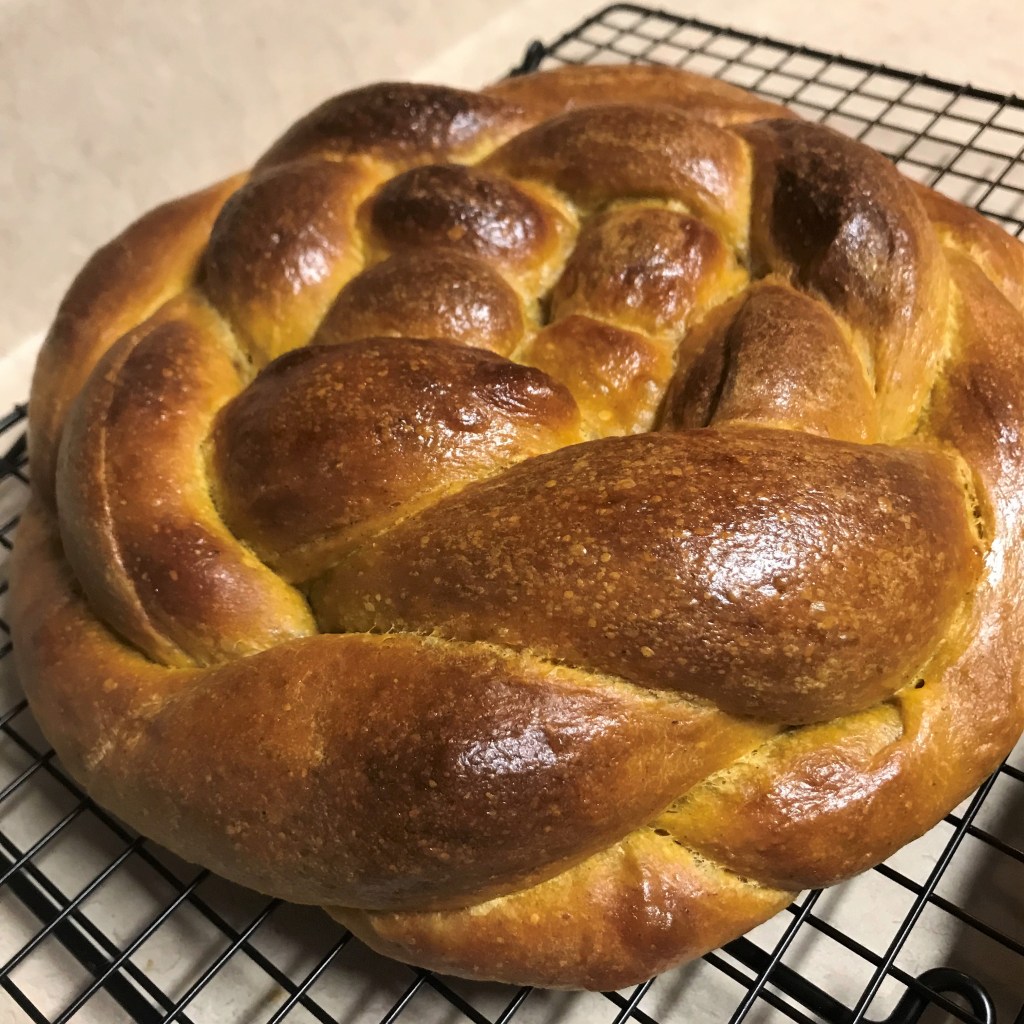
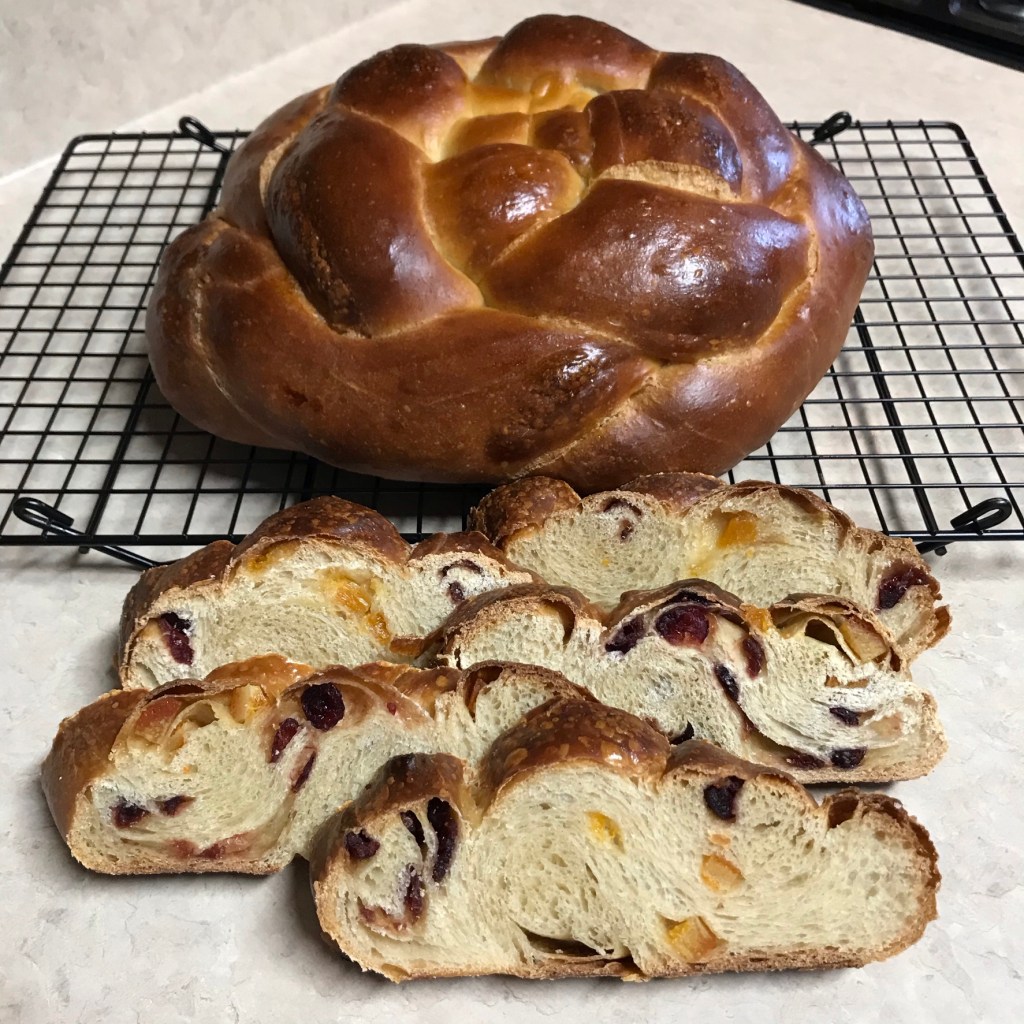
The round shape is significant to Rosh Hashanah because it represents the idea of coming full circle into a new year. The apples were a nice touch, because apples and honey make an appearance on everyone’s holiday table— symbolizing the wishes for a sweet year ahead. Most years since that first one, I’ve worked on my challah braiding skills, specifically the four-strand loaf that is woven like a basket. Here are a few examples of those breads, using my sourdough starter.
L to R: pumpkin challah, fruit-studded challah, over proofed challah!
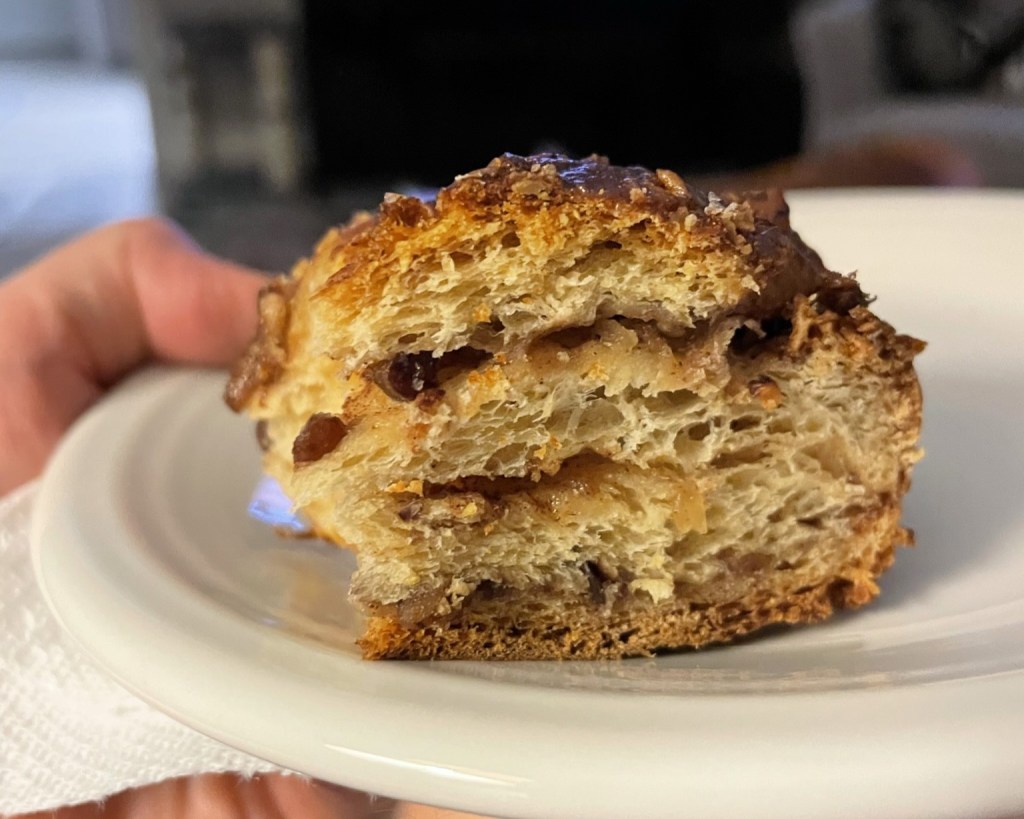
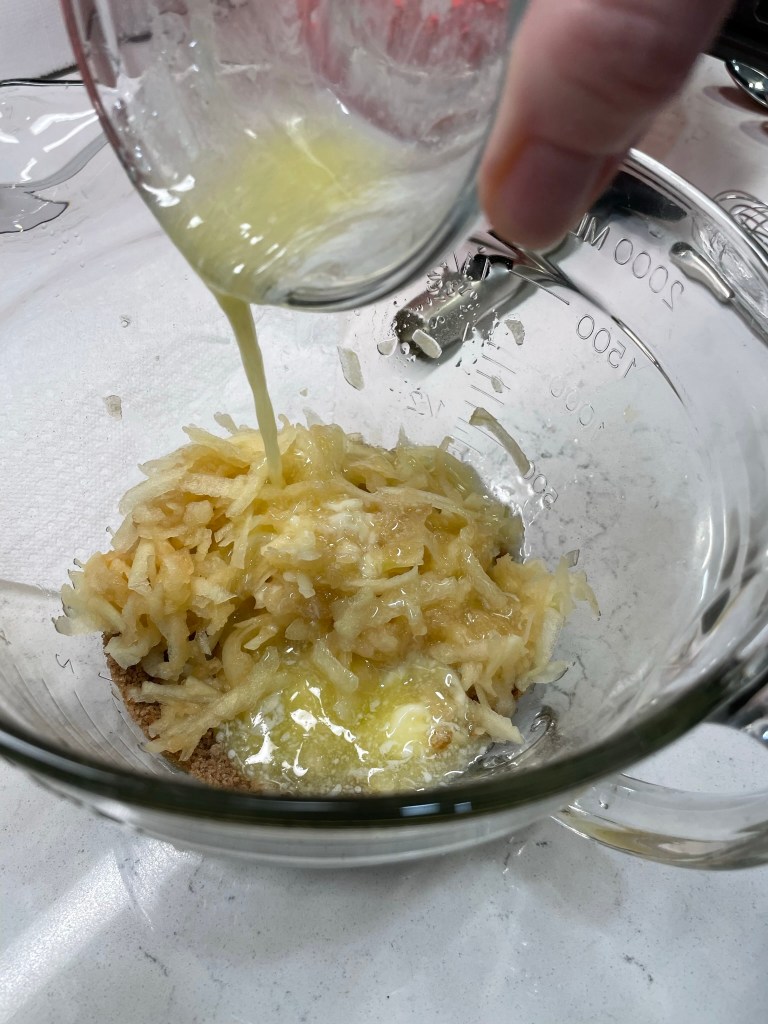
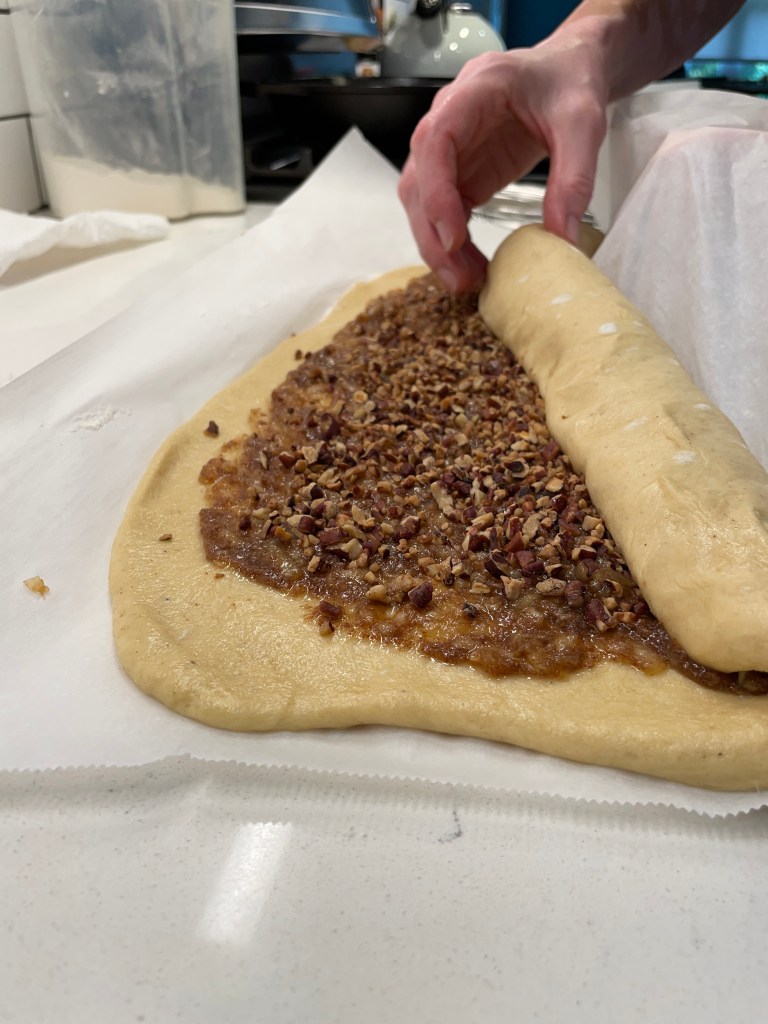
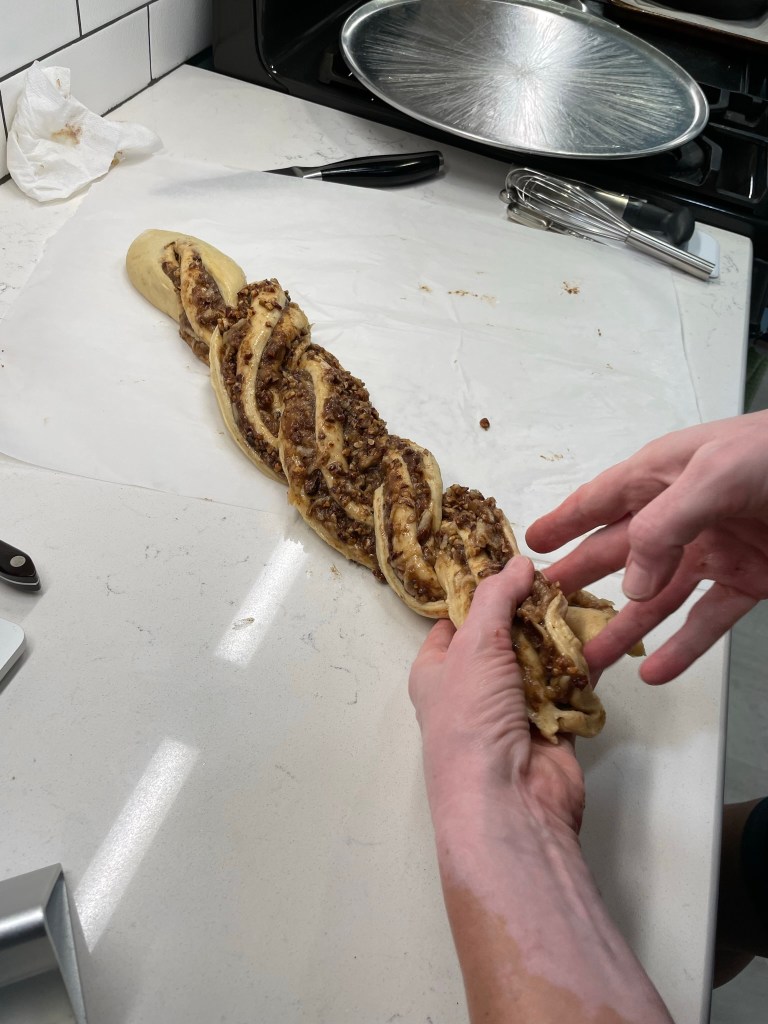
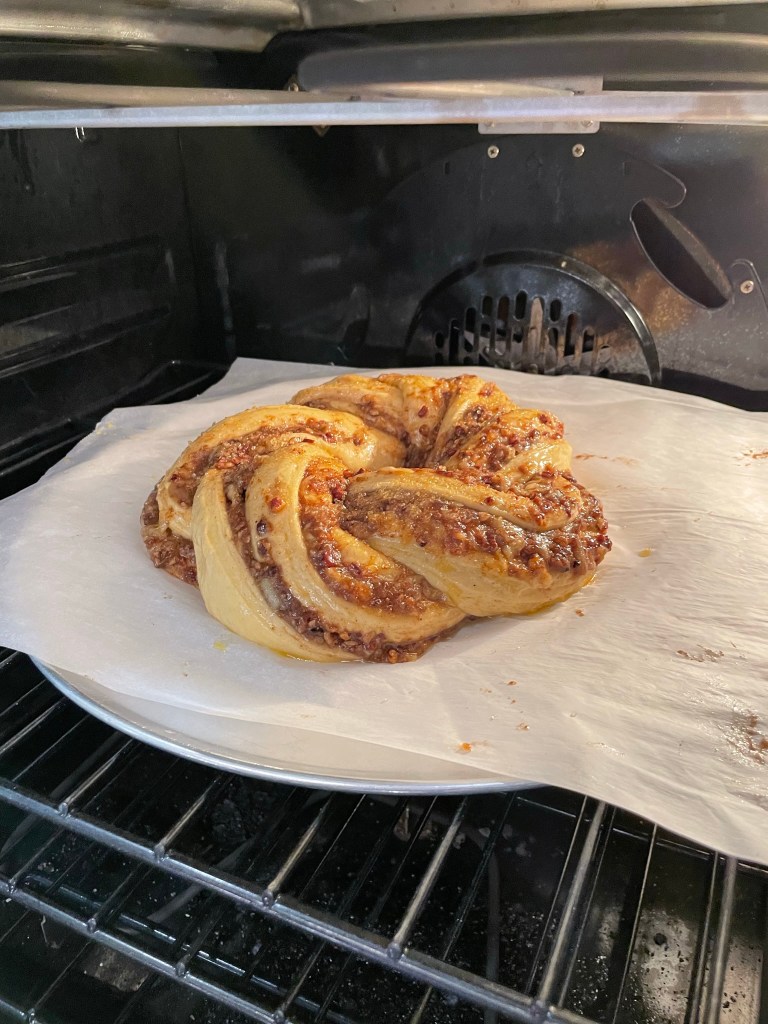
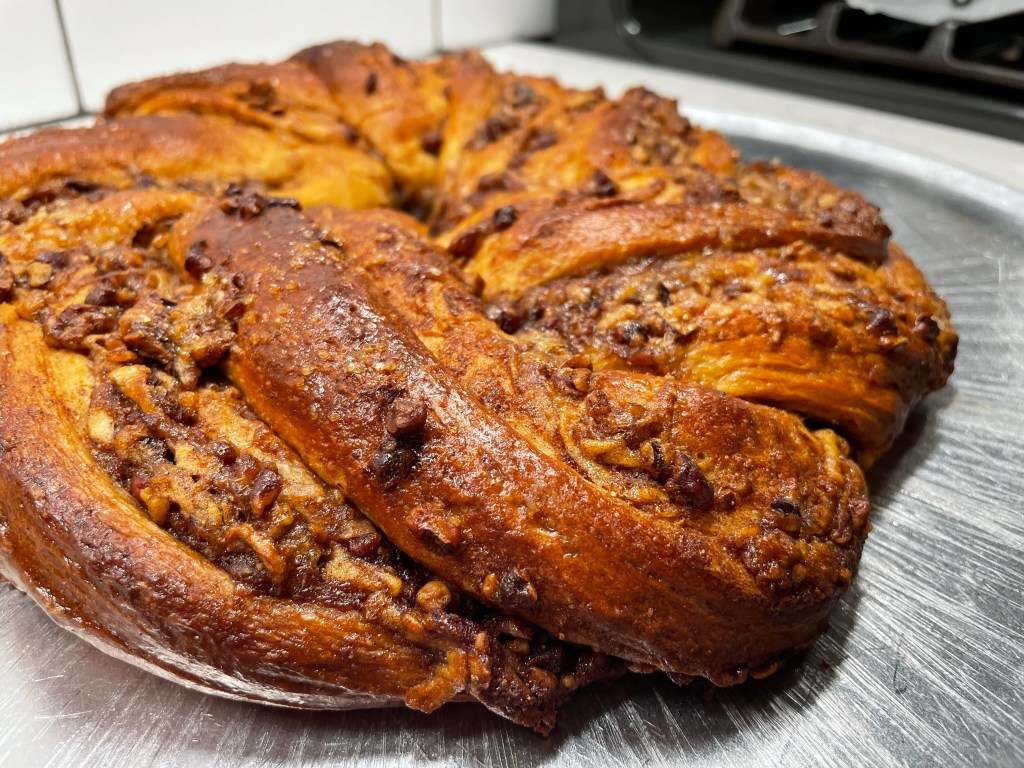
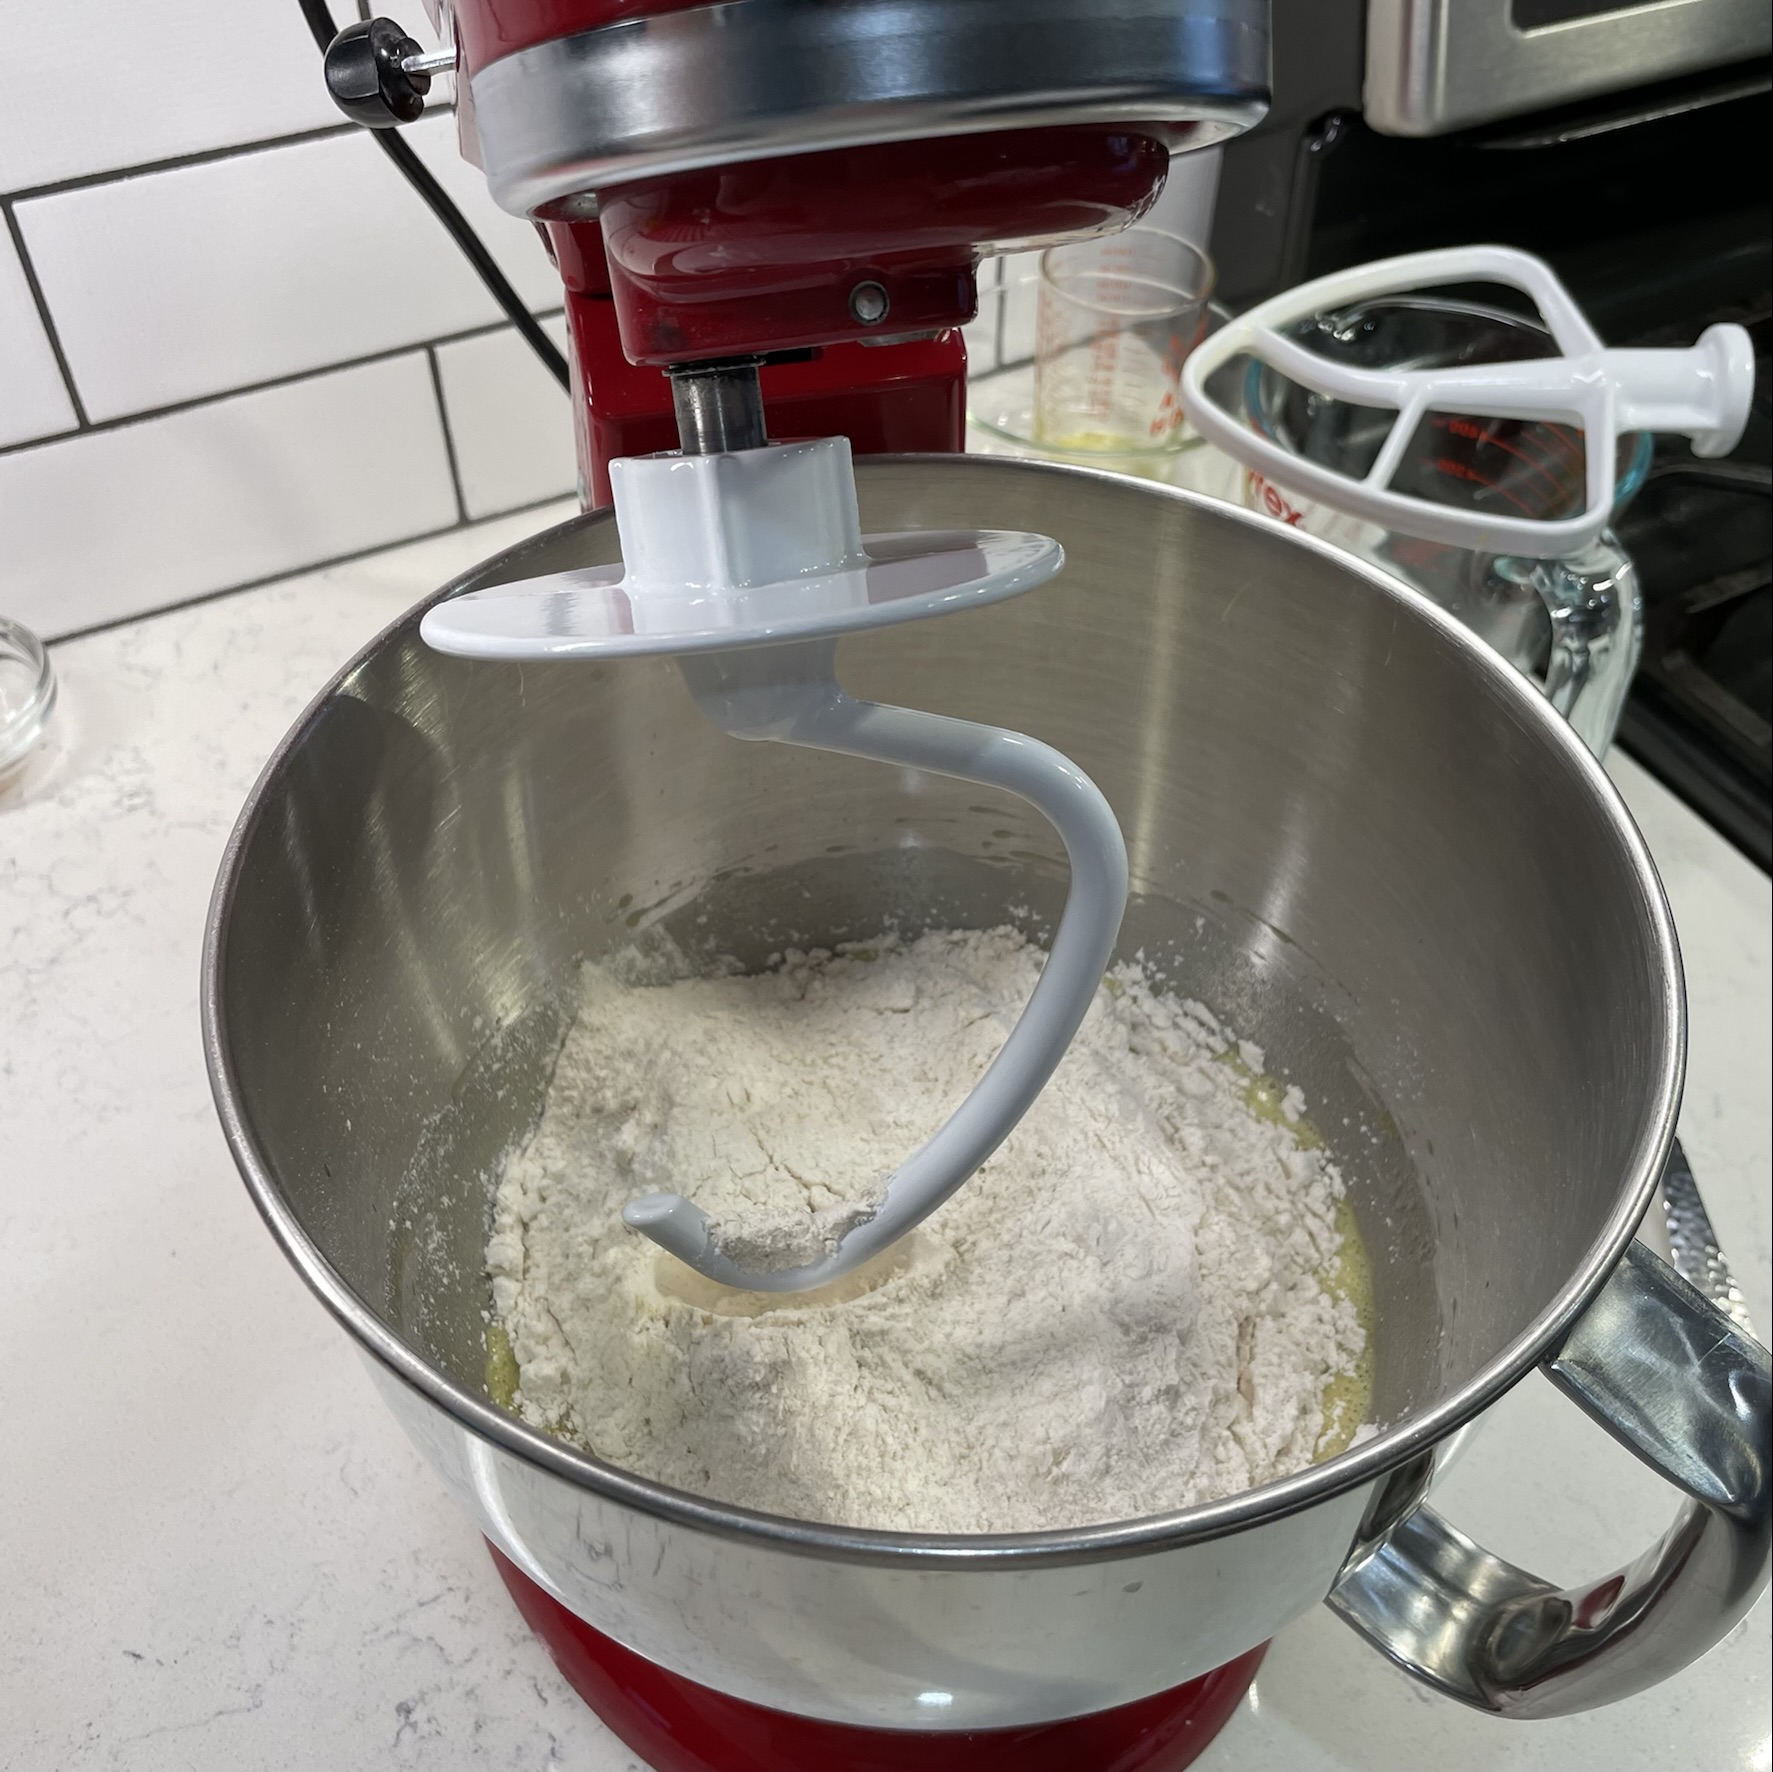
This year, however, I decided to tackle another item on my culinary bucket list, and I’ve made a babka! This is another traditional Jewish bread, and I’ve wanted to make one for years but never got around to it until now. Most babka recipes I have seen involve a chocolate filling, which is most dramatic looking in the typical swirly pattern. I pondered, what about a babka that had apples and honey? That would be perfect for Rosh Hashanah, and a double win in that it finally moves babka to the “done” column.
I didn’t have to look very far for an inspiration recipe, because the first place I looked was King Arthur Baking. Of course!
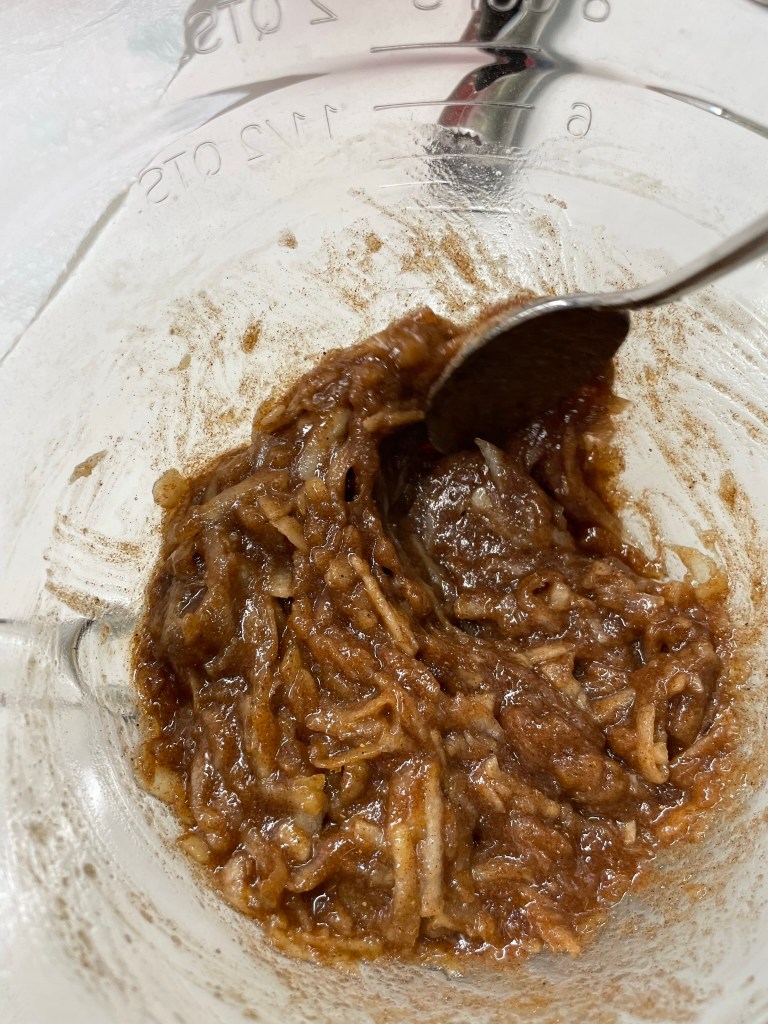
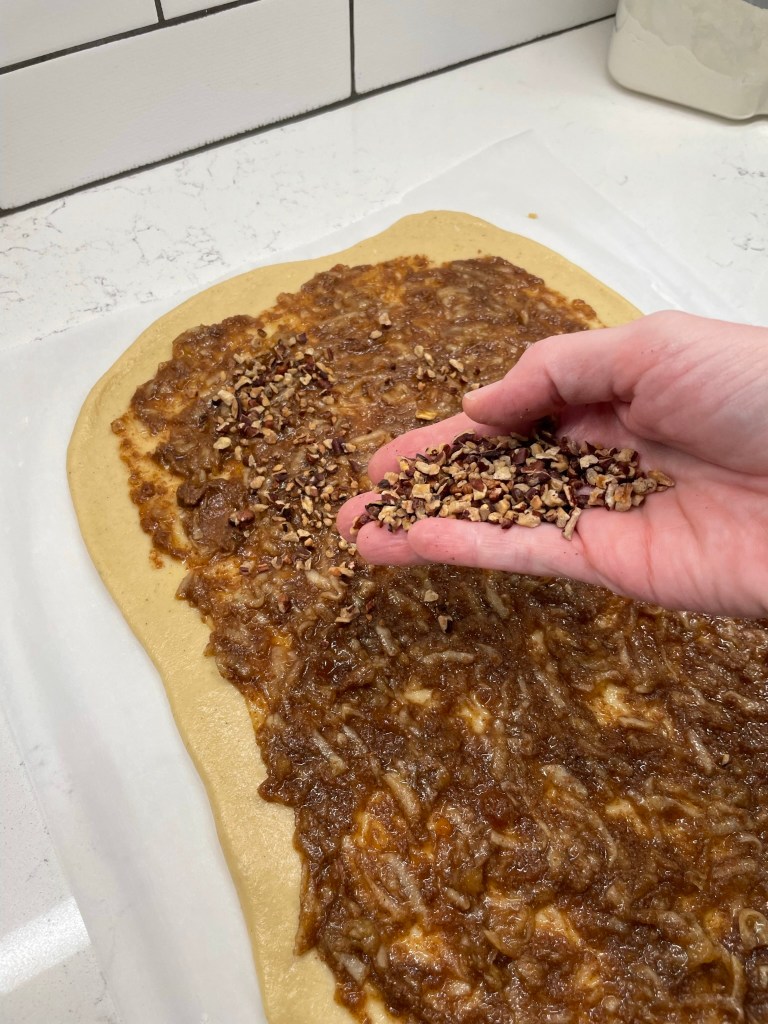
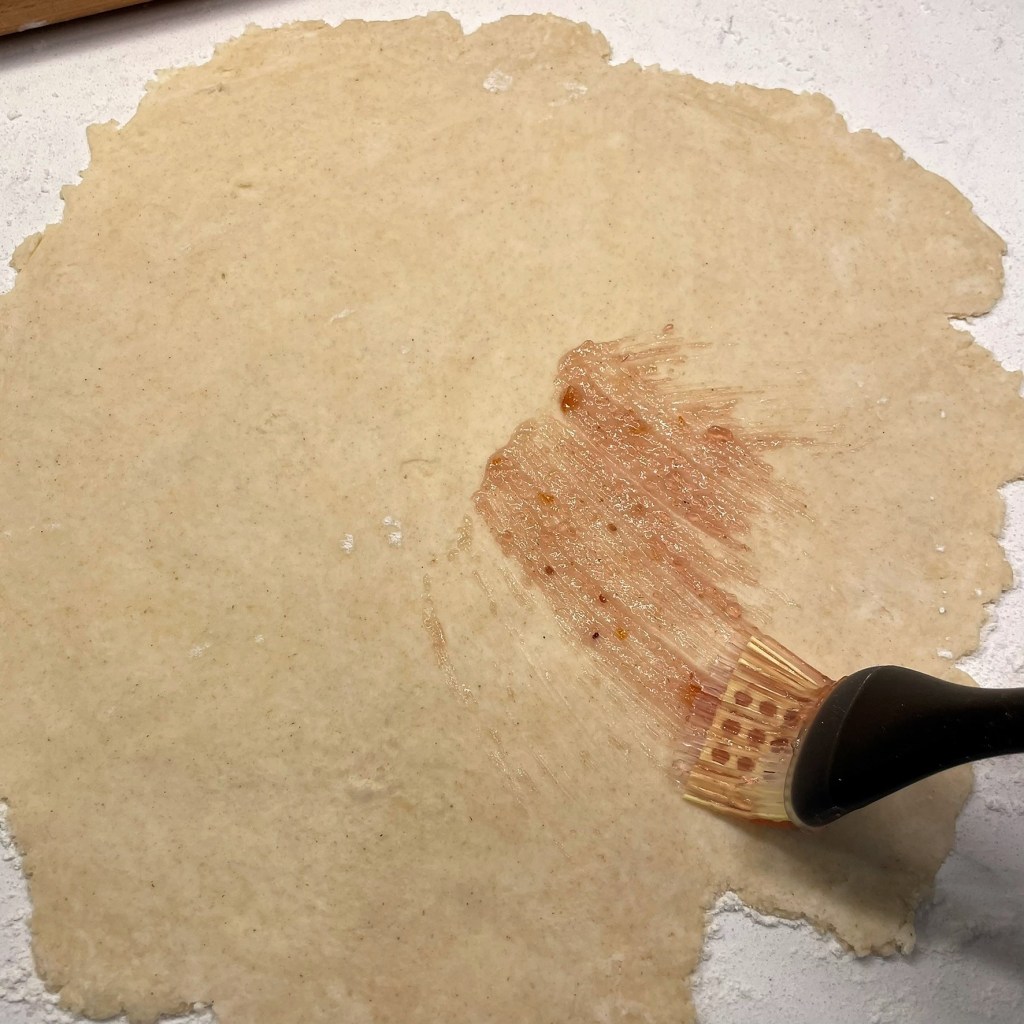
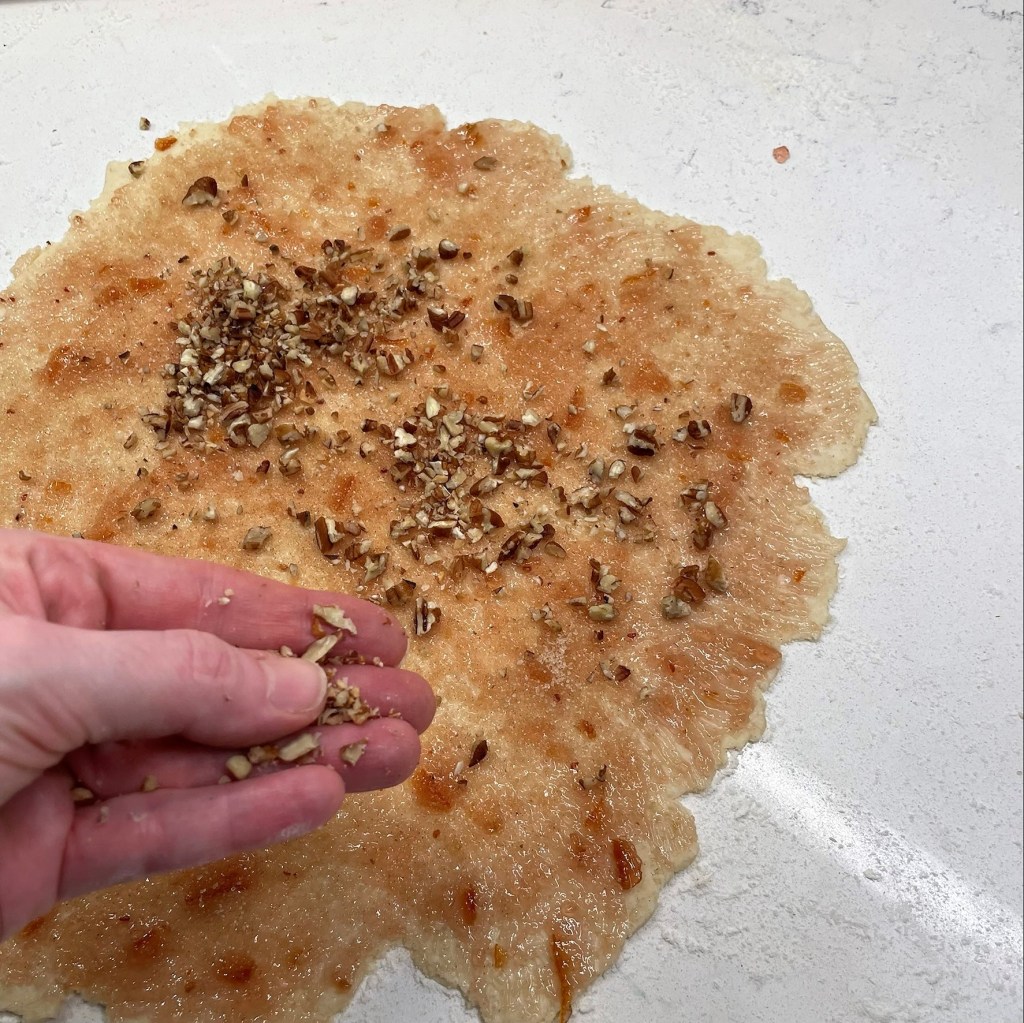
The layers of apple, spices and pecan make this extra special!
I’ve been a big fan of King Arthur products for years (and no, they never have paid me to say so), and my devotion to them is stronger than ever since my trip to their Vermont baking school, where I am proud to have completed their four-day “Principles & Practice” baking course. I learned a good many things during my time there, and made friends with several of my classmates. Among the takeaway lessons was the importance of using high-quality ingredients (i.e., theirs) and having them organized and properly measured before you begin mixing. That’s how I set up for this recipe, and I swapped in honey for the sugar, following the same helpful tips I used last month when I made my s’mores cupcakes.
Baking is much easier when I’m organized!
My main dry ingredients were measured by weight, which is something I was already doing before my King Arthur class, and all of our instructors during the four days emphasized the benefit of this. I cannot remember the last time I measured by volume, but there is a sensible way to do it for consistent results. They call it the fluff, sprinkle, level method, and it helps ensure that you don’t have dense results in your baked goods. If you are reluctant to get a kitchen scale, I highly recommend following that three-step method; otherwise, you may find your baked goods dense from being flour-heavy.
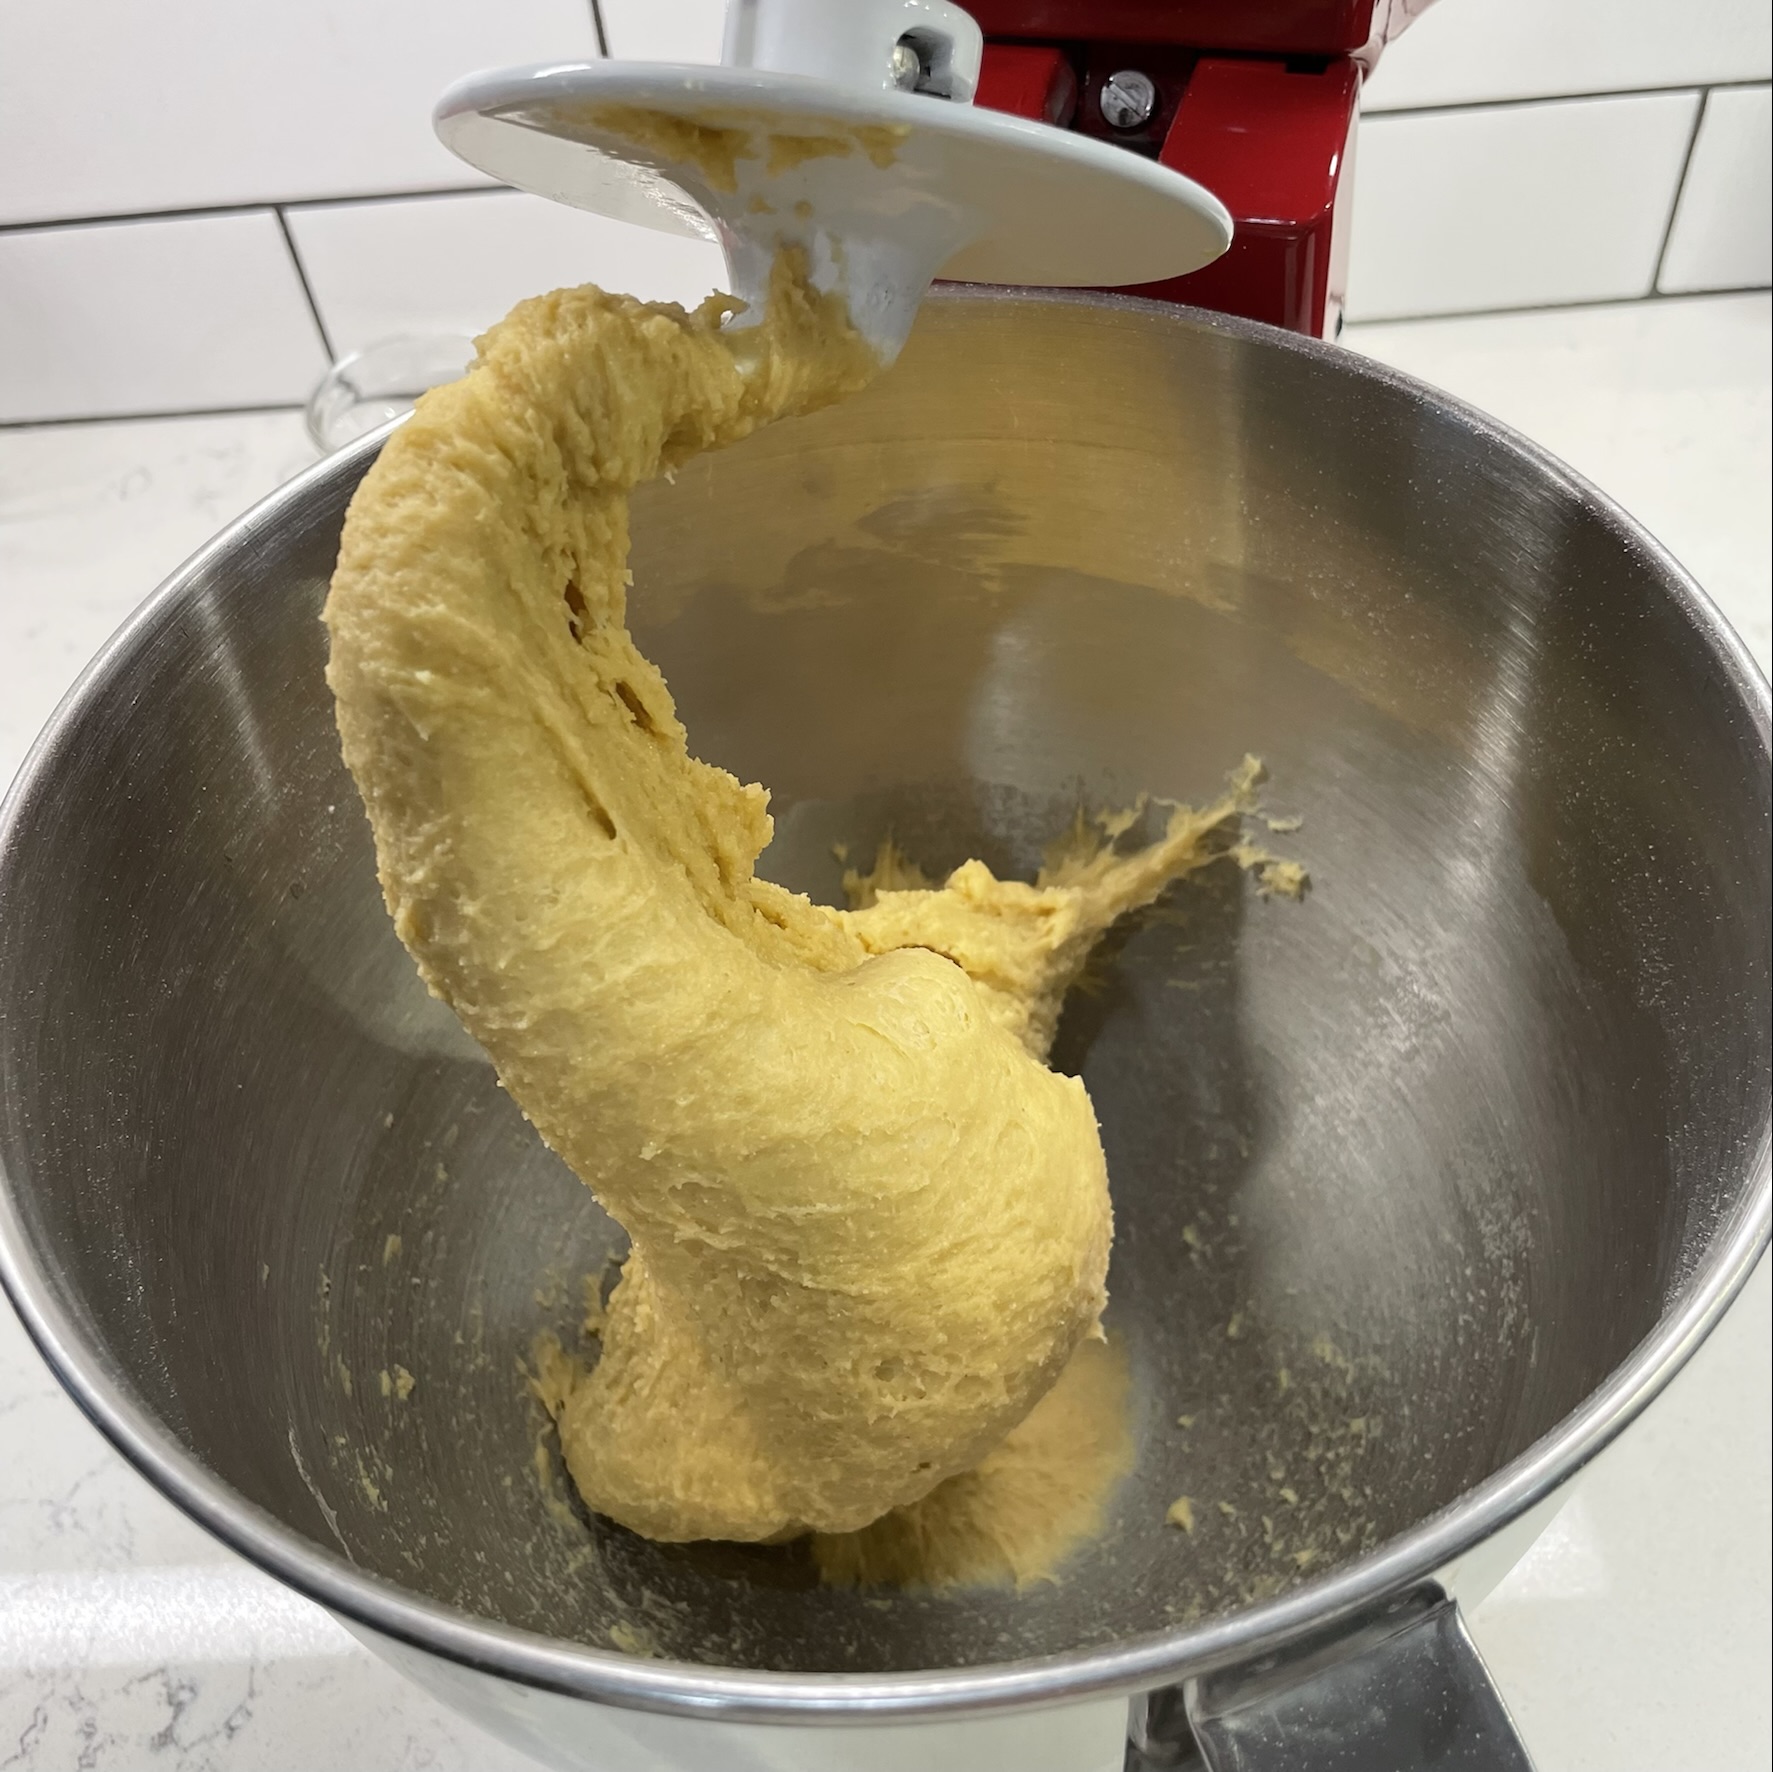
The process of the apple babka recipe was straightforward. I introduced the wet ingredients to the dry ones, then switched to the kneading hook and worked in the softened butter. This recipe would not be suitable for a meal that also includes meat— kosher rules require that meat and dairy not be served together— but it would be wonderful served with breakfast or dessert on another occasion. The dough rested about two hours until it was doubled and puffy.
With 6 tablespoons of butter, this dough was very silky.Did I sample the filling on its own? Of course!
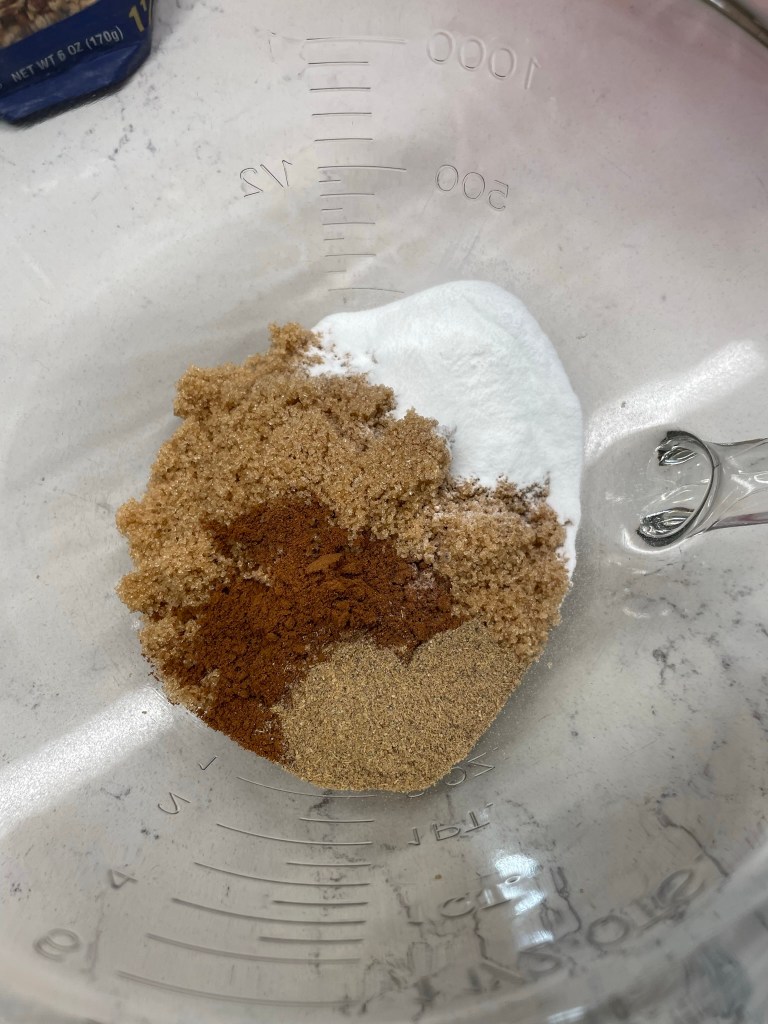
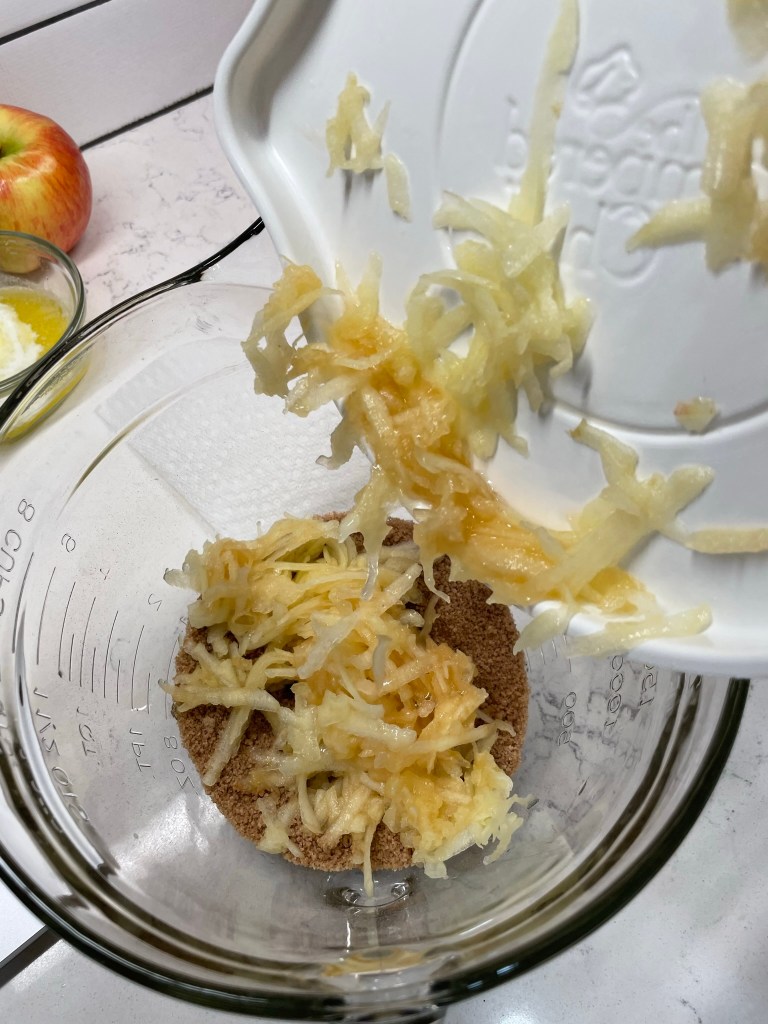
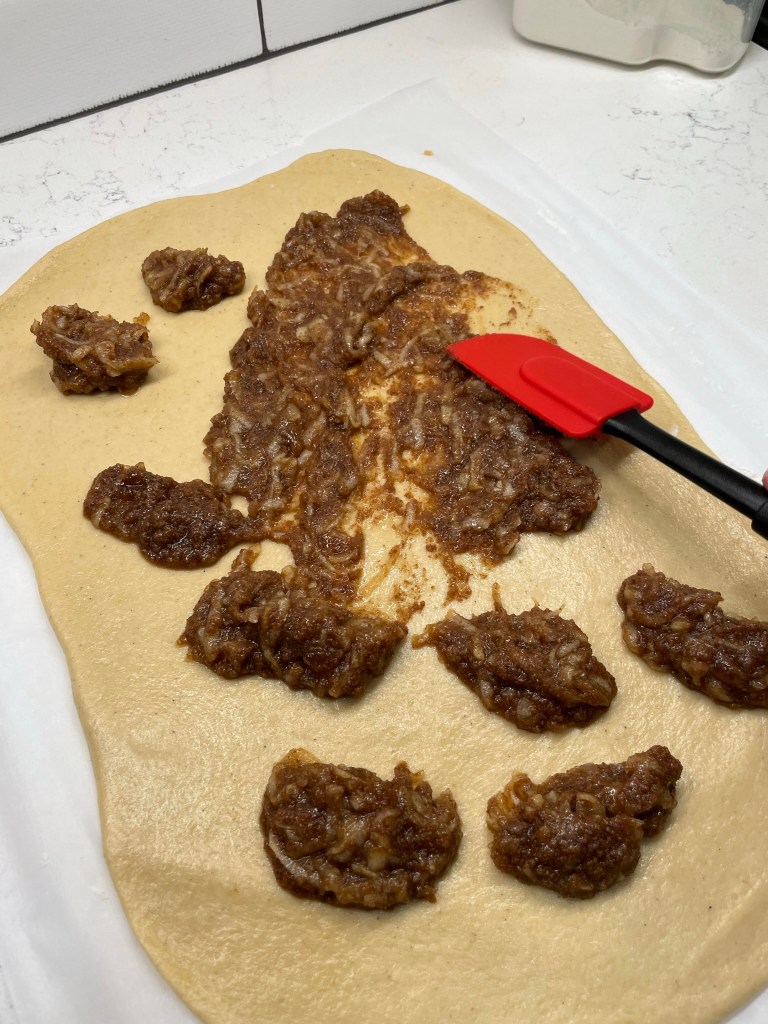
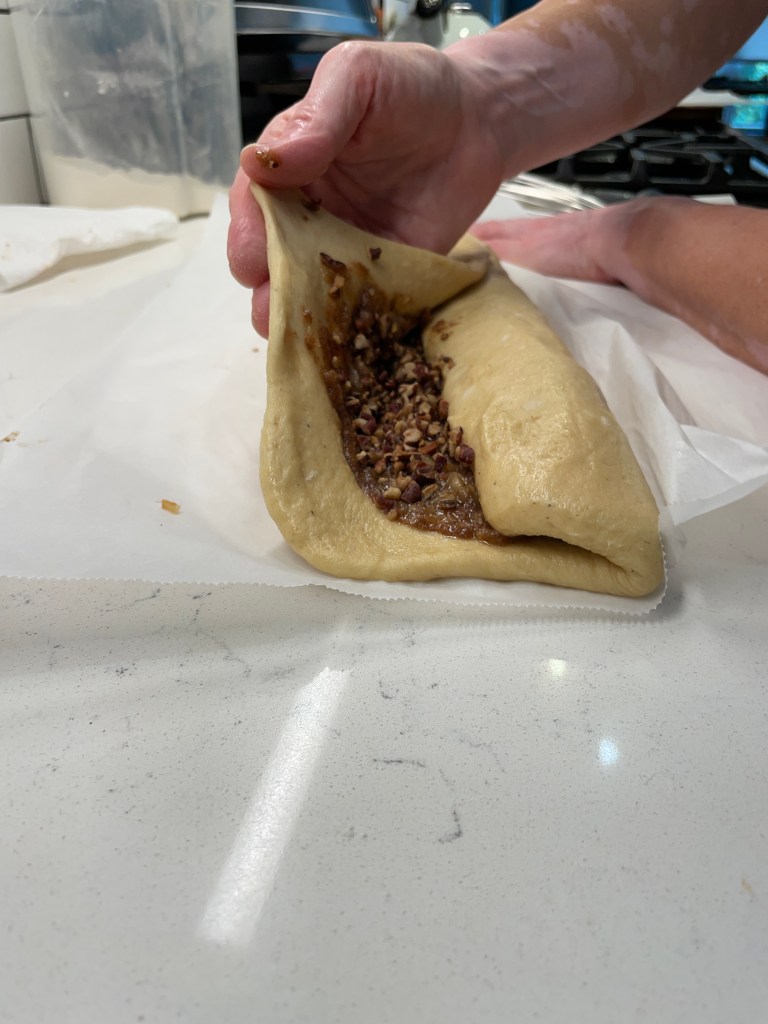
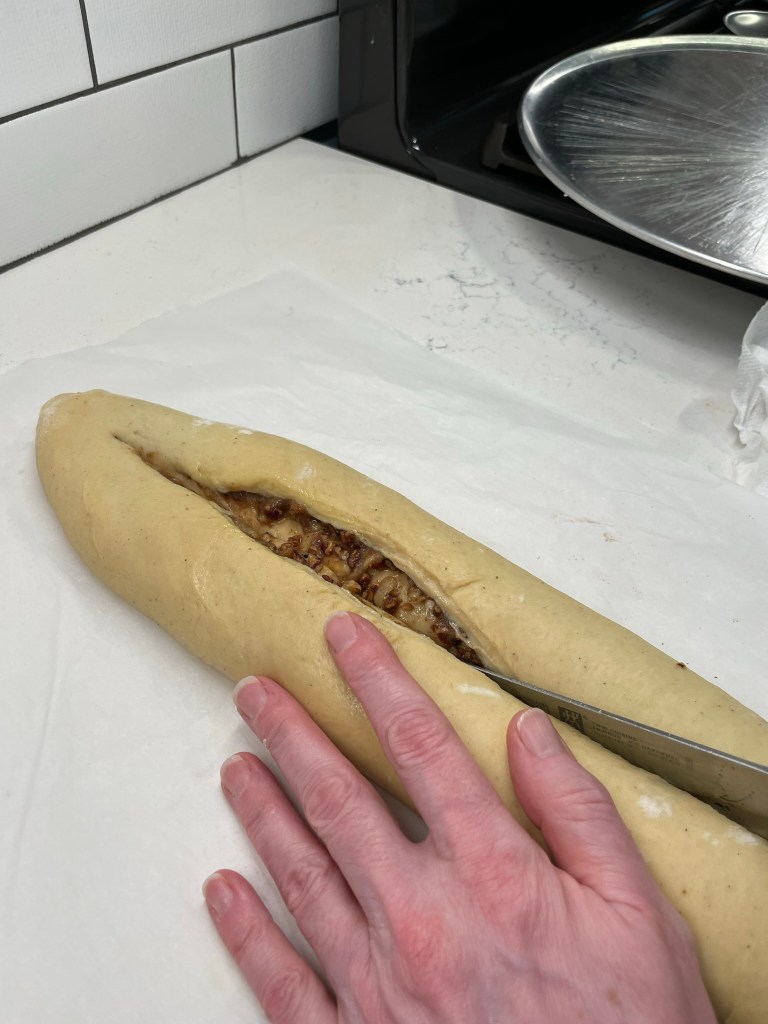
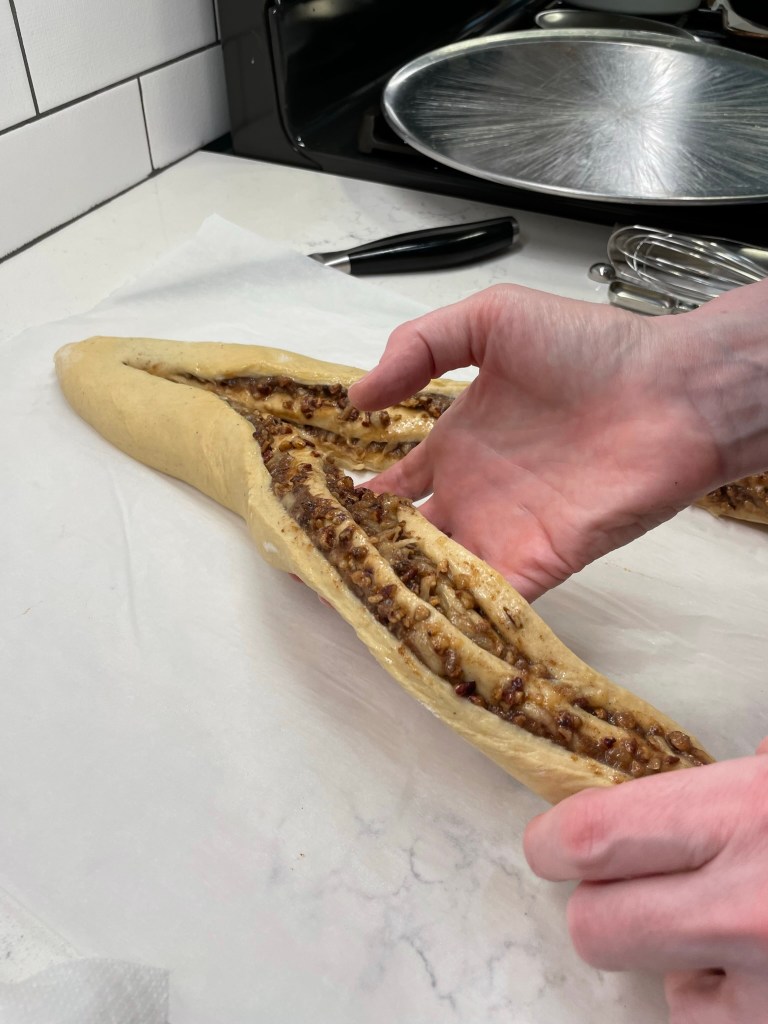
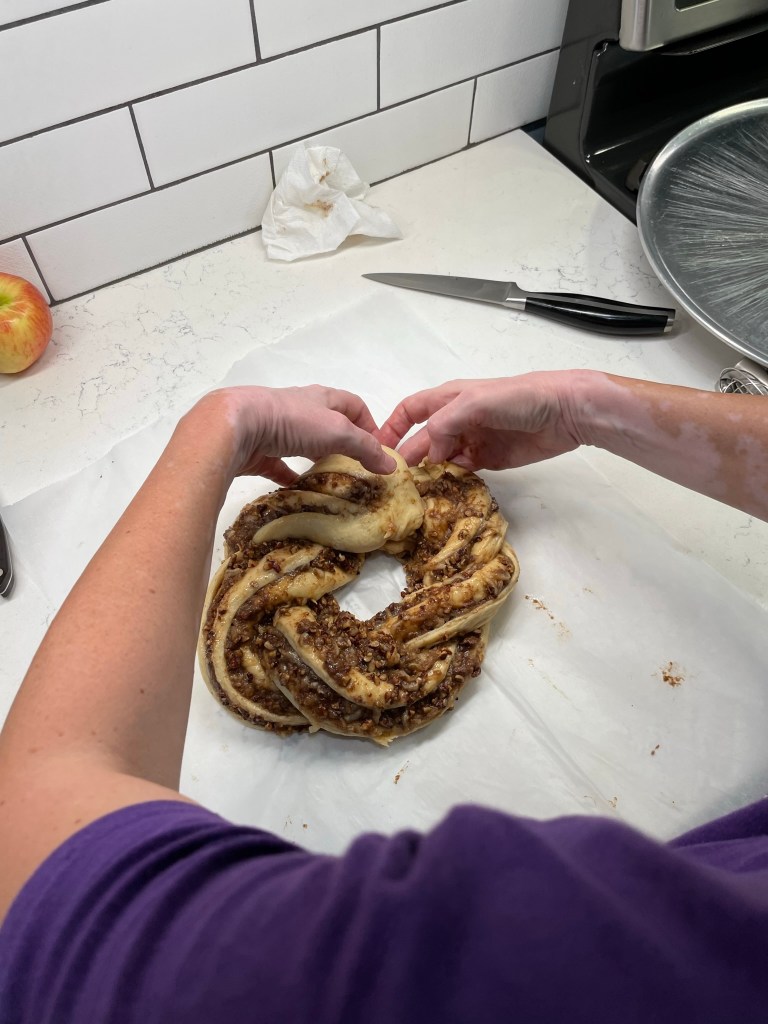
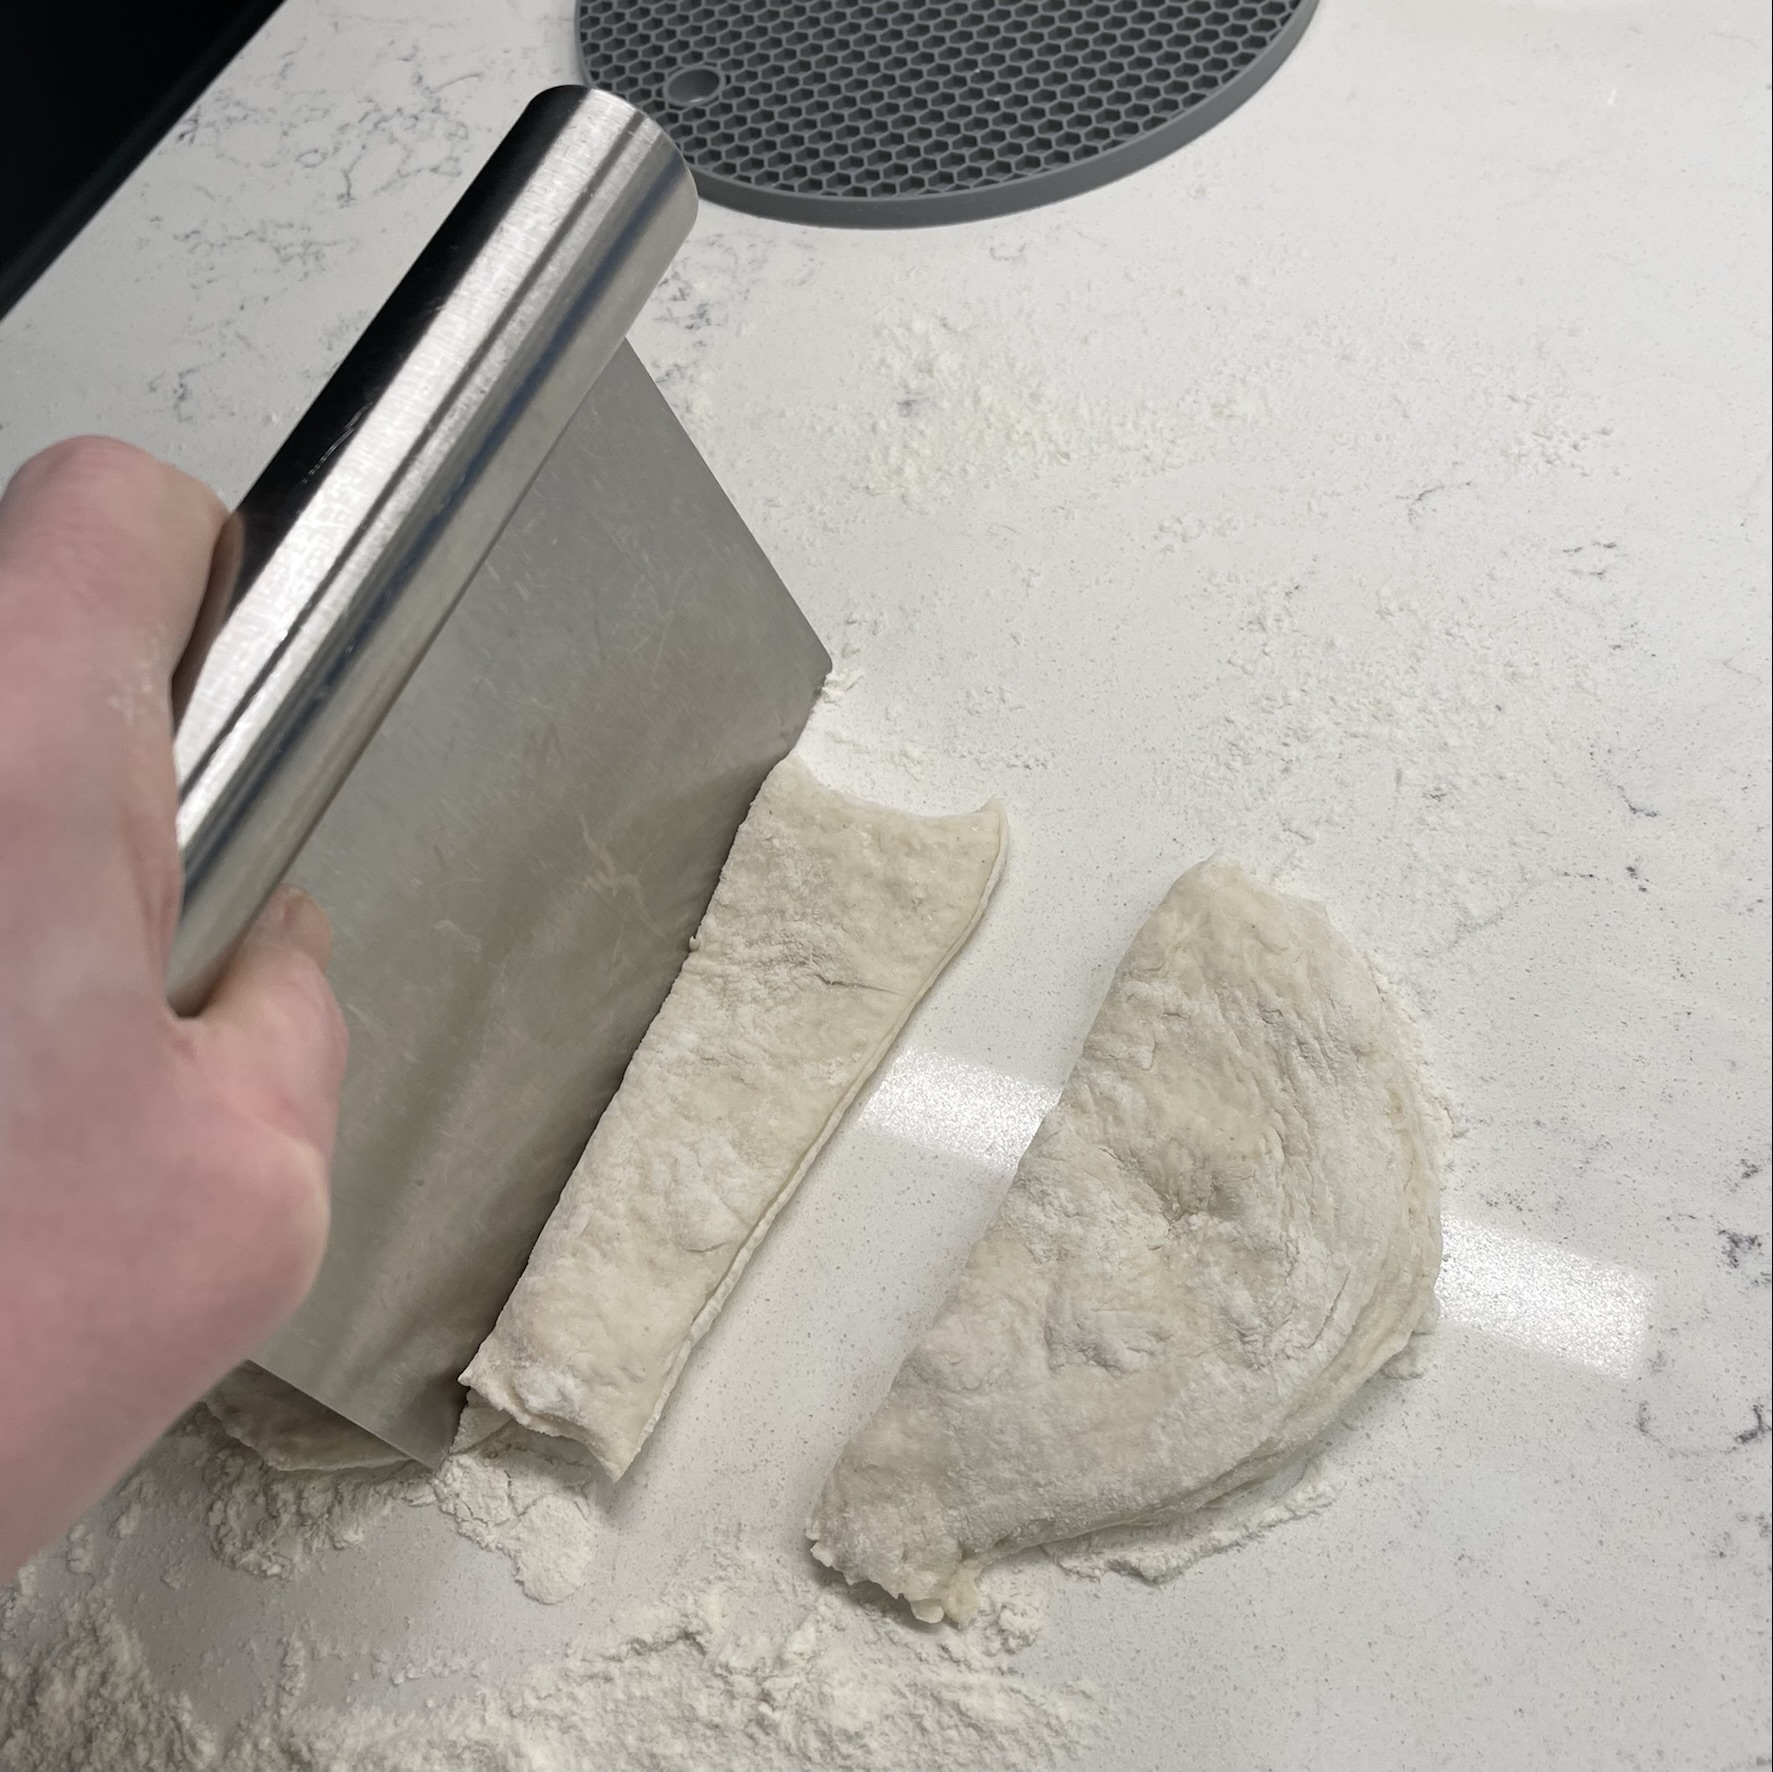
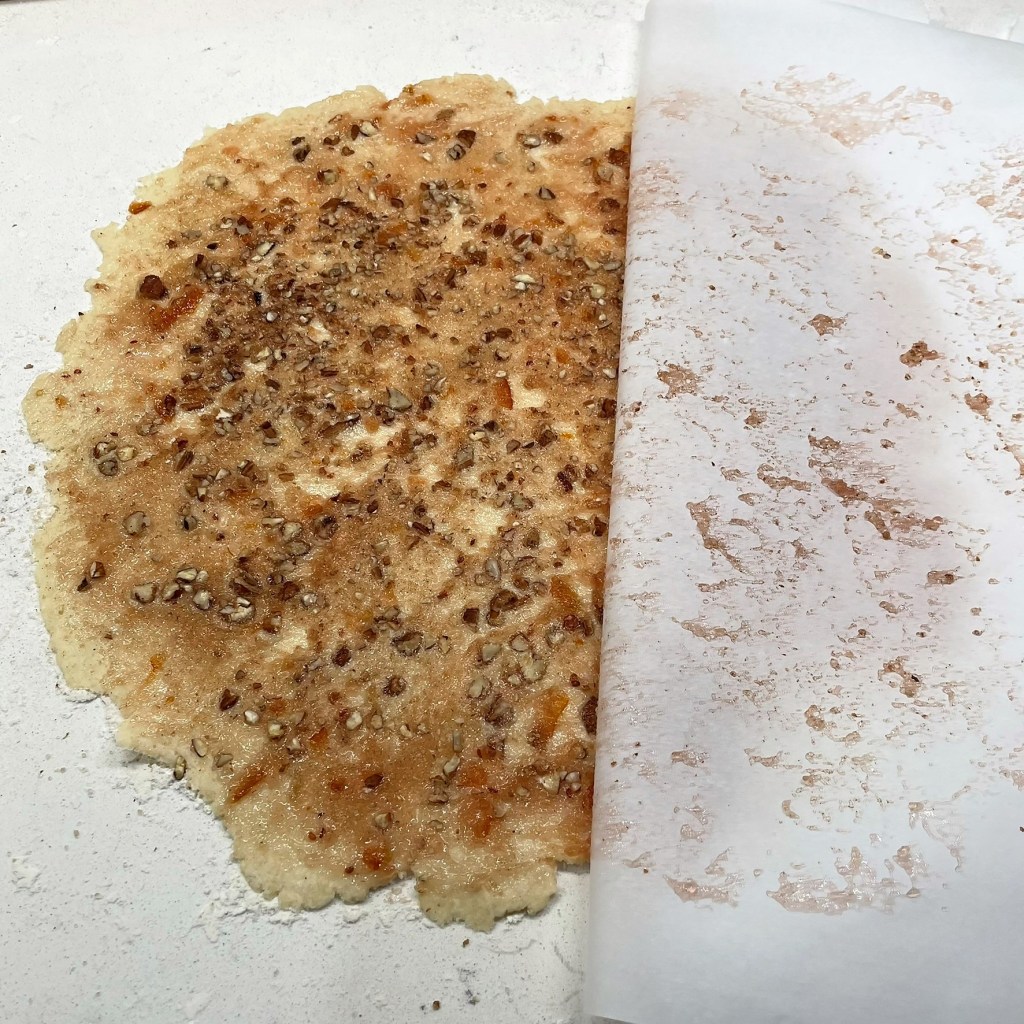
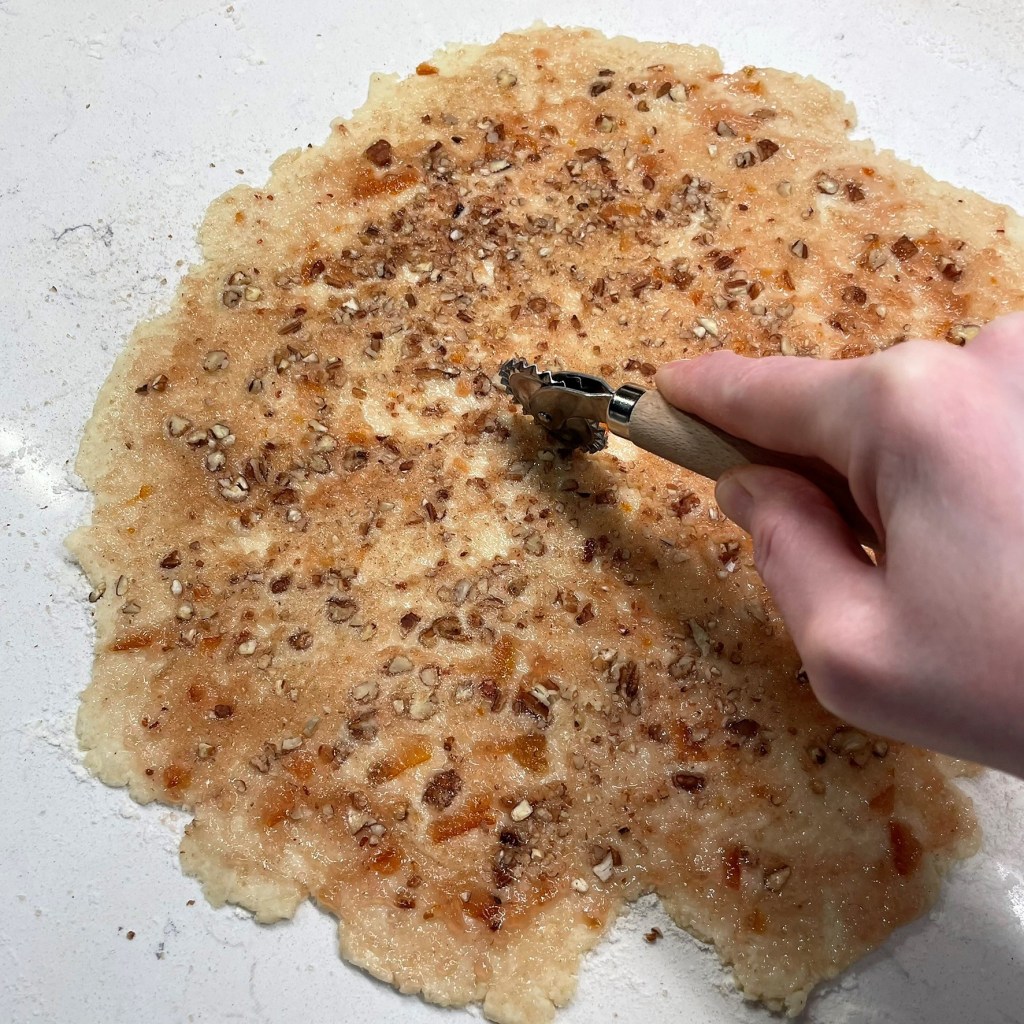
The filling was easy as well— brown sugar, cinnamon, cardamom and grated apple. Honeycrisp seemed appropriate for the occasion of Rosh Hashanah. Next came the rolling up and cutting, and I think this part would have been easier if this dough had been chilled, as the filling was very wet and loose. It was not difficult, but very messy, and not as pretty as I wanted it to be. I shaped the braided babka into a round, like a wreath, and covered it to proof for baking.
Next time, I will refrigerate the roll before cutting and shaping.
One of the other lessons in the King Arthur class was the simple way to determine whether your dough has proofed sufficiently for baking. If you poke the dough with a floured fingertip and the indent remains, it’s ready. If it bounces back, it needs more time. This one was ready!
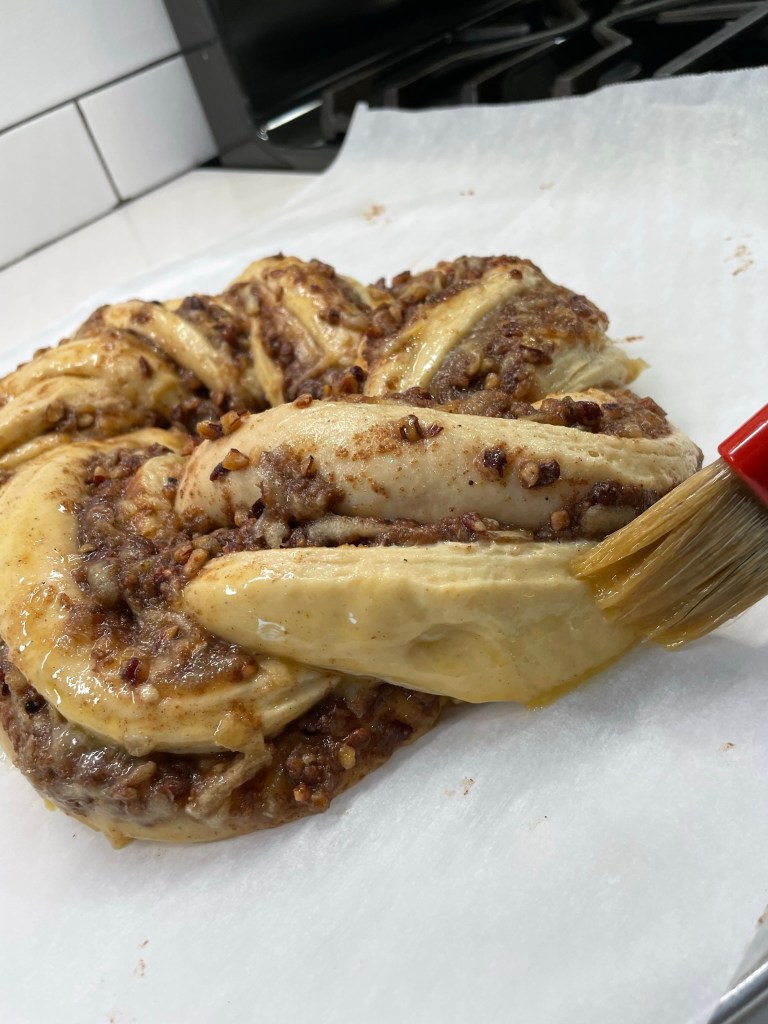
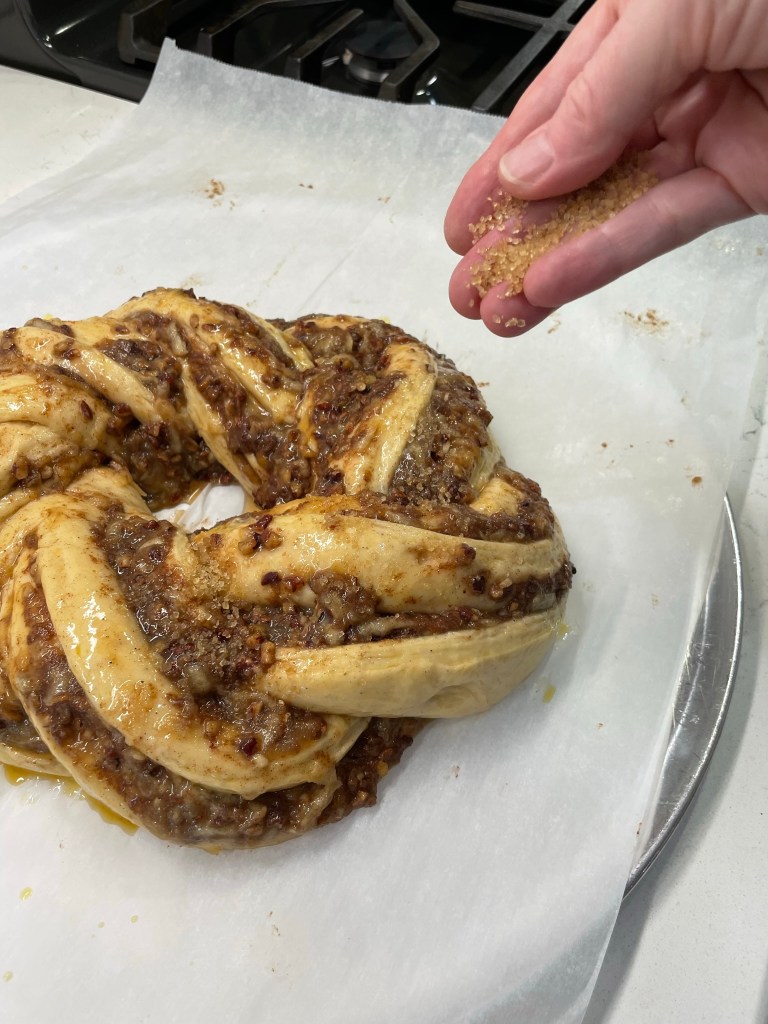
The egg wash and sprinkles of turbinado sugar made this beautiful!
Time for an egg wash and bake, and we are ready for Rosh Hashanah! Of course, you don’t have to be Jewish to enjoy the lovely flavors. The apple, honey and spices make it perfectly appropriate through the rest of the year.
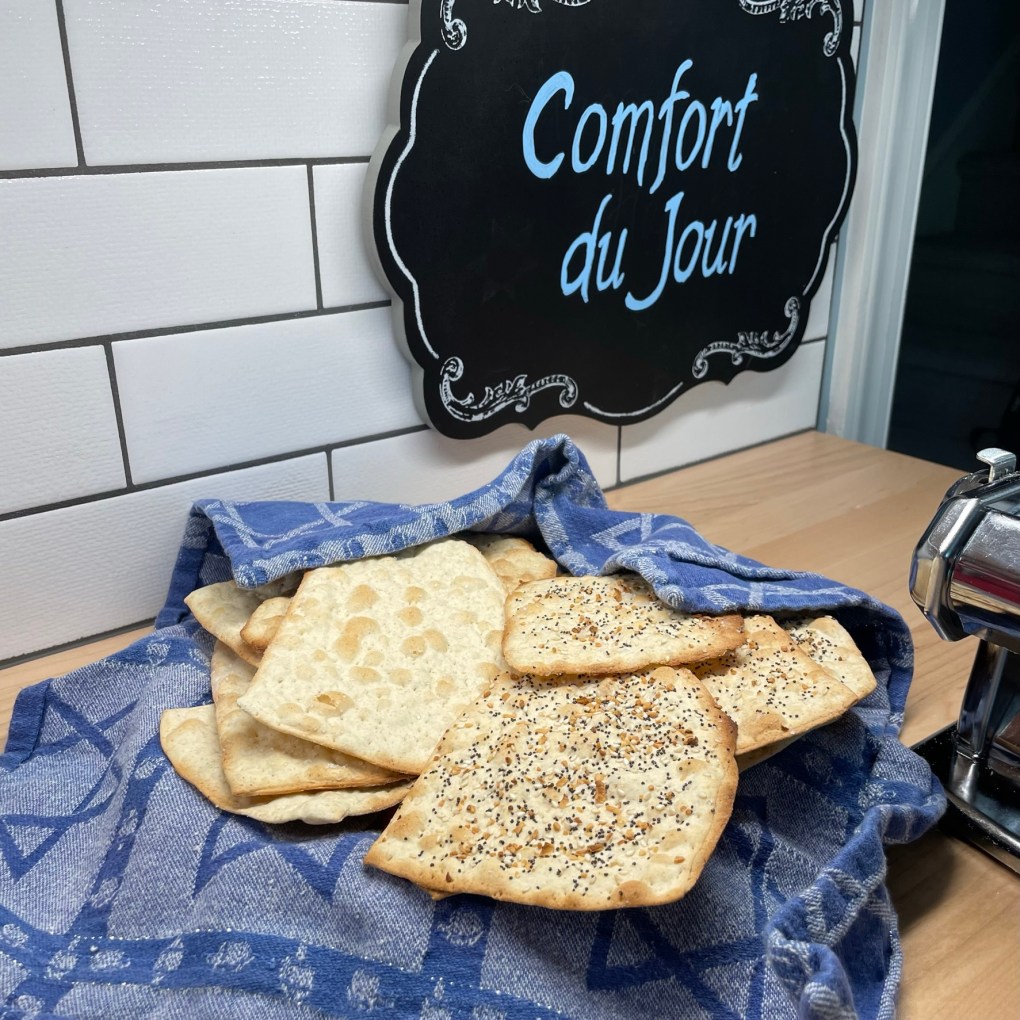
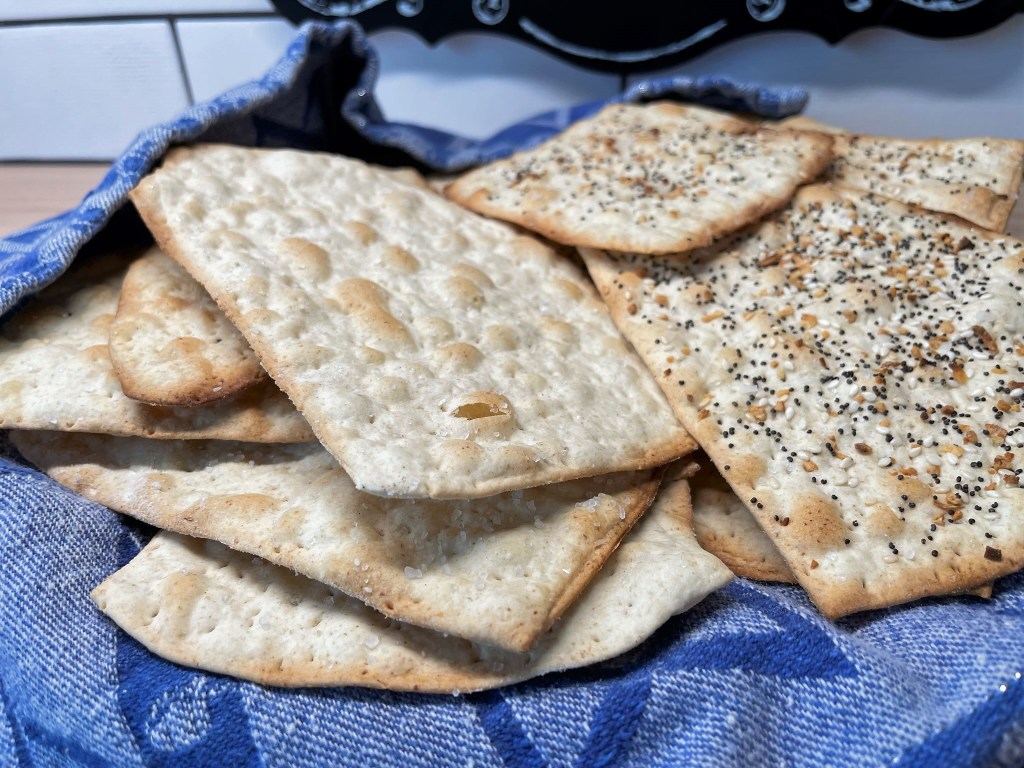
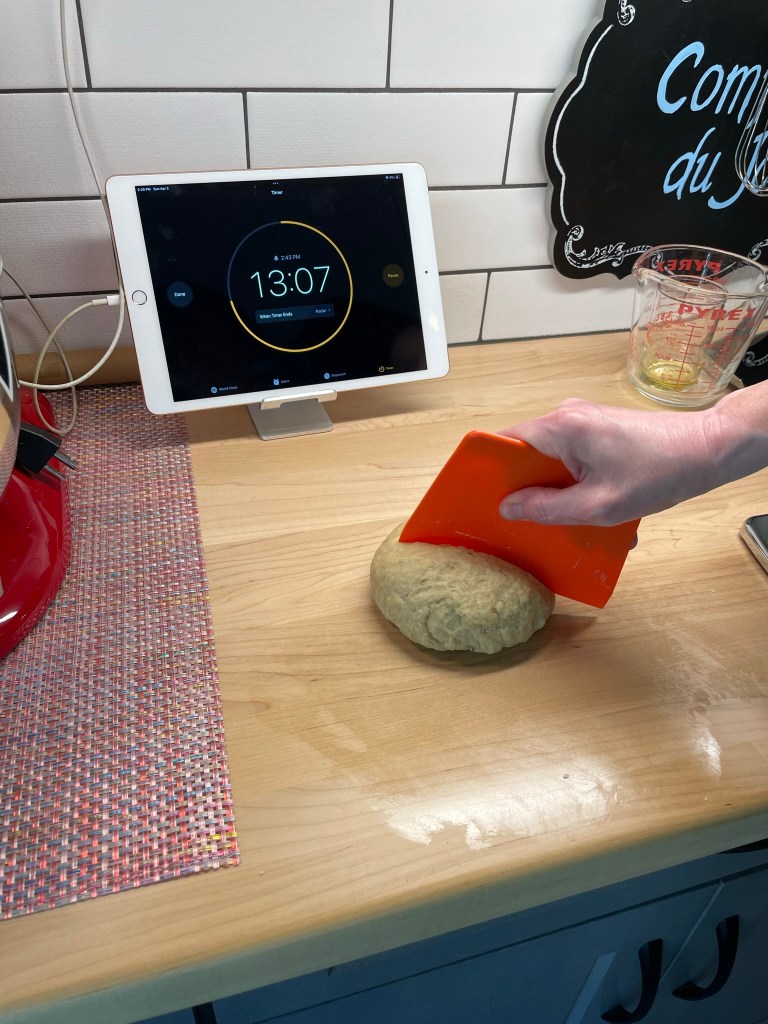
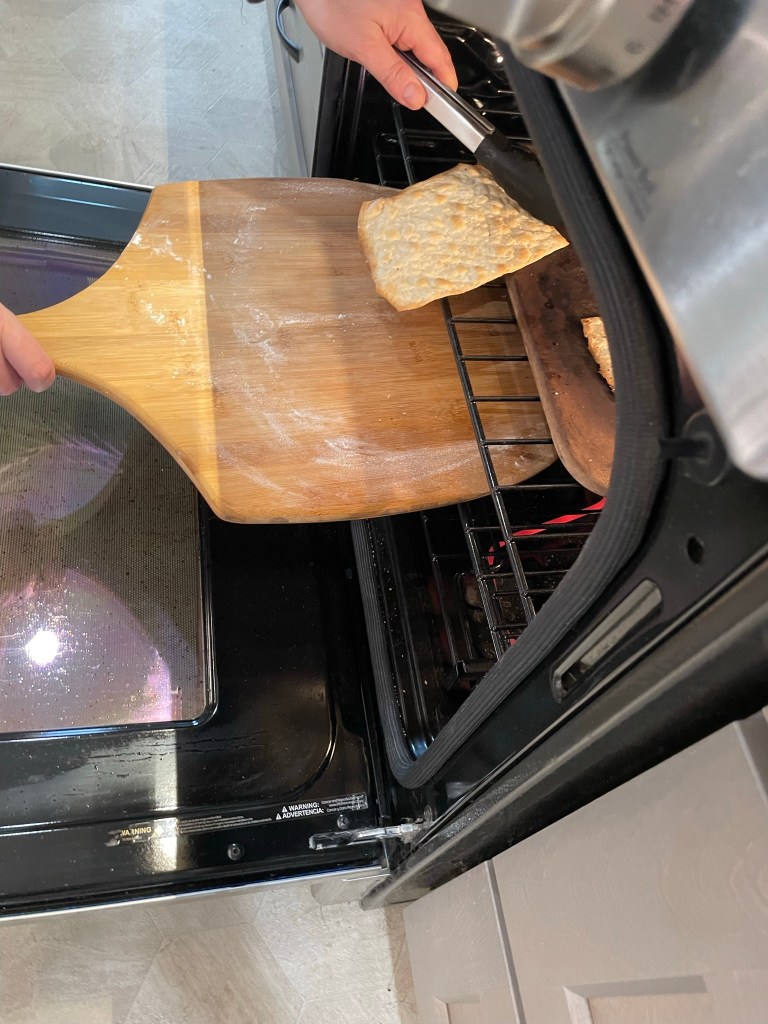
First things first, this matzo is not kosher for Passover, and honestly not even kosher at all. I know this because, for starters, I am not Jewish and I don’t keep a kosher kitchen. After that, there are probably at least a dozen other reasons that my matzo is not kosher, but none of that is important right now because I have big news.
Passover starts on Wednesday, and I have finally done my DIY matzo challenge, moving it to the done column of my culinary bucket list. To me, this is worth celebrating!
Matzo!
When I first met my now-husband, Les, I had a lot of questions about his Jewish heritage and especially the foods. Though Les has never kept the dietary kosher rules, he does avoid leavened bread during the eight days of Passover. That first year we were together, he shared some of his matzo with me and, well, what can I say— blah. The standard boxed matzo— unleavened bread— is like the worst, most bland, boring cracker you can imagine. But, you know, tradition!
The Jewish tradition around matzo is a remembrance of the enslaved Hebrew people, who had a moment’s notice to pack for the Promised Land when Moses was called to lead them out of Egypt. They didn’t have time to make their usual bread, so they mixed the flour and water, rolled it out and baked it on the spot without fermentation or leavening. By kosher rules, it all has to happen in under 18 minutes, start to finish. No wonder it tastes so bland— and does such a negative number on the digestive system (it ain’t pretty).
But Les chokes down this dry stuff every Passover, subbing it in for his usual morning half bagel, using it as a canvas for his tuna salad, and sometimes just laying a schmear of butter on it as a snack. Anything to use up the box! I’ve been threatening for at least five years to make matzo from scratch, and between the internet and my Jewish recipe books, I had done a lot of research. I was confident about getting it done, so I set up my matzo-making station with all my ingredients, tools and even my iPad to keep me on track for the 18-minute limit. How hard could it be? Turns out, I still had a lot to learn, and no “Bubbie” (Jewish grandmother) to walk me through it.
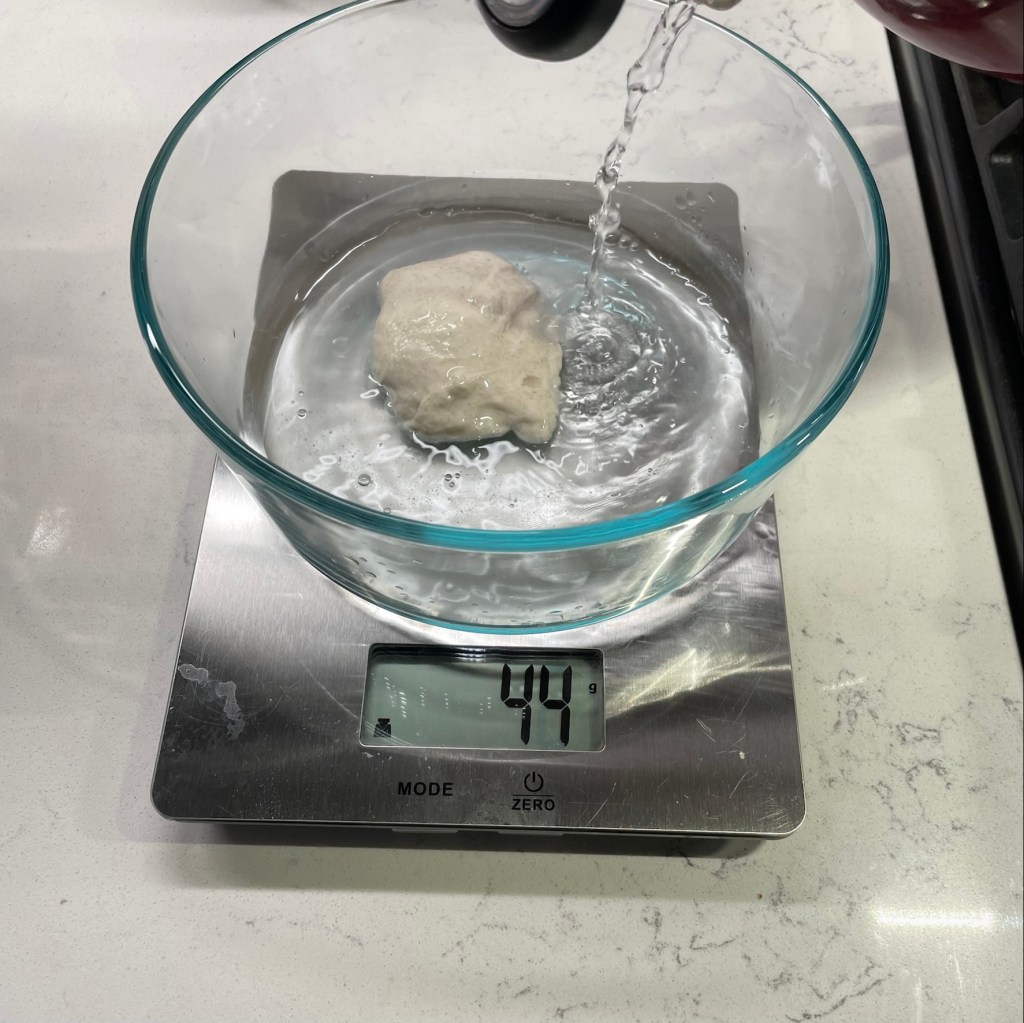
I had things set up and ready, hoping to beat the 18-minute buzzer!
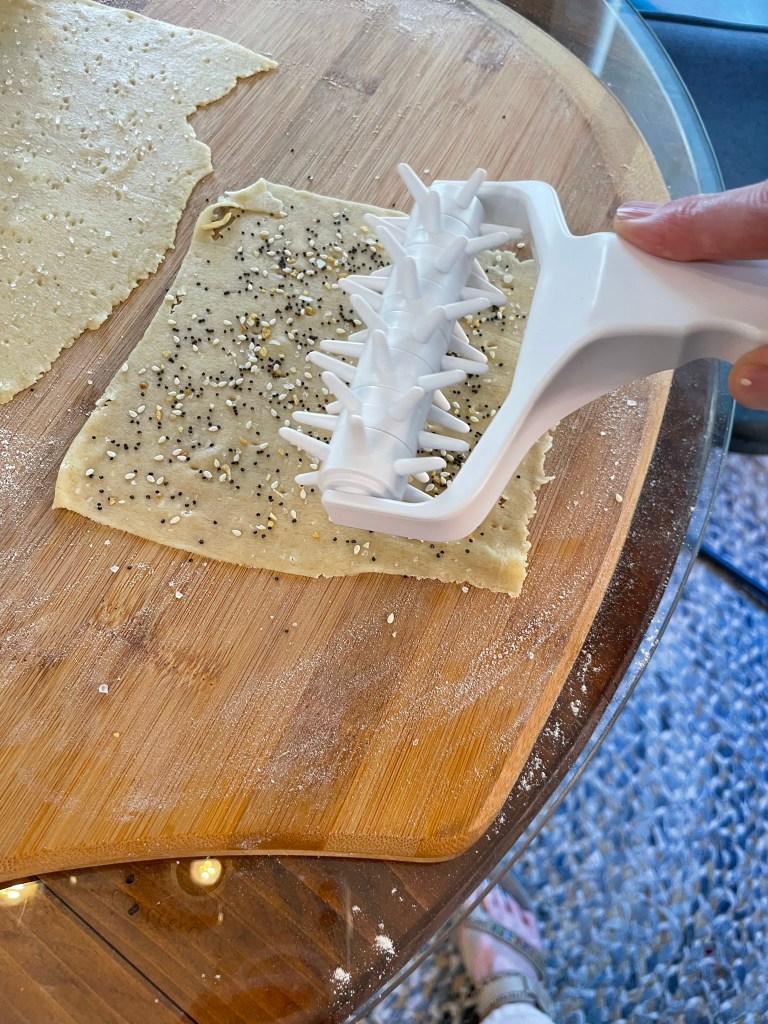
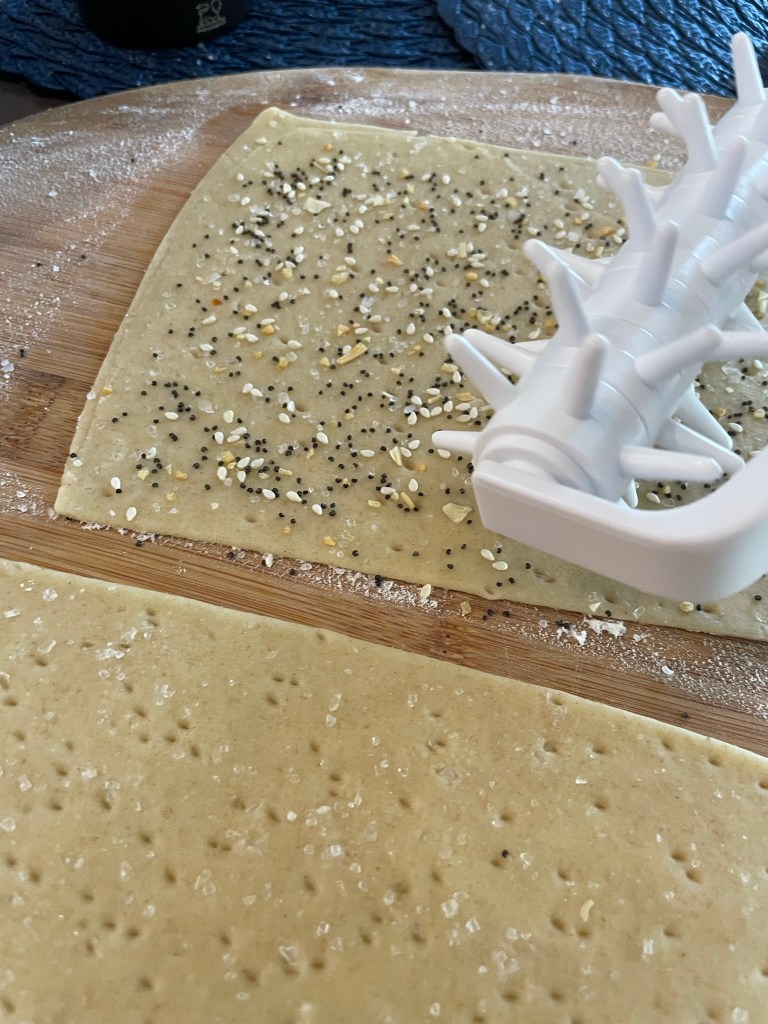
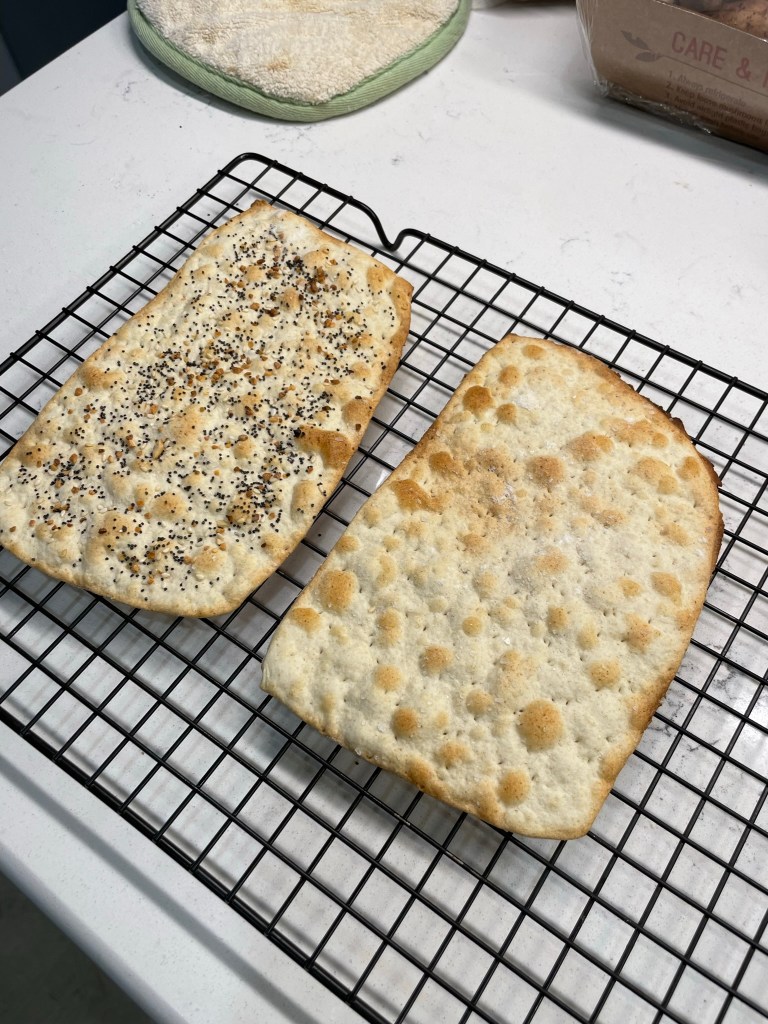
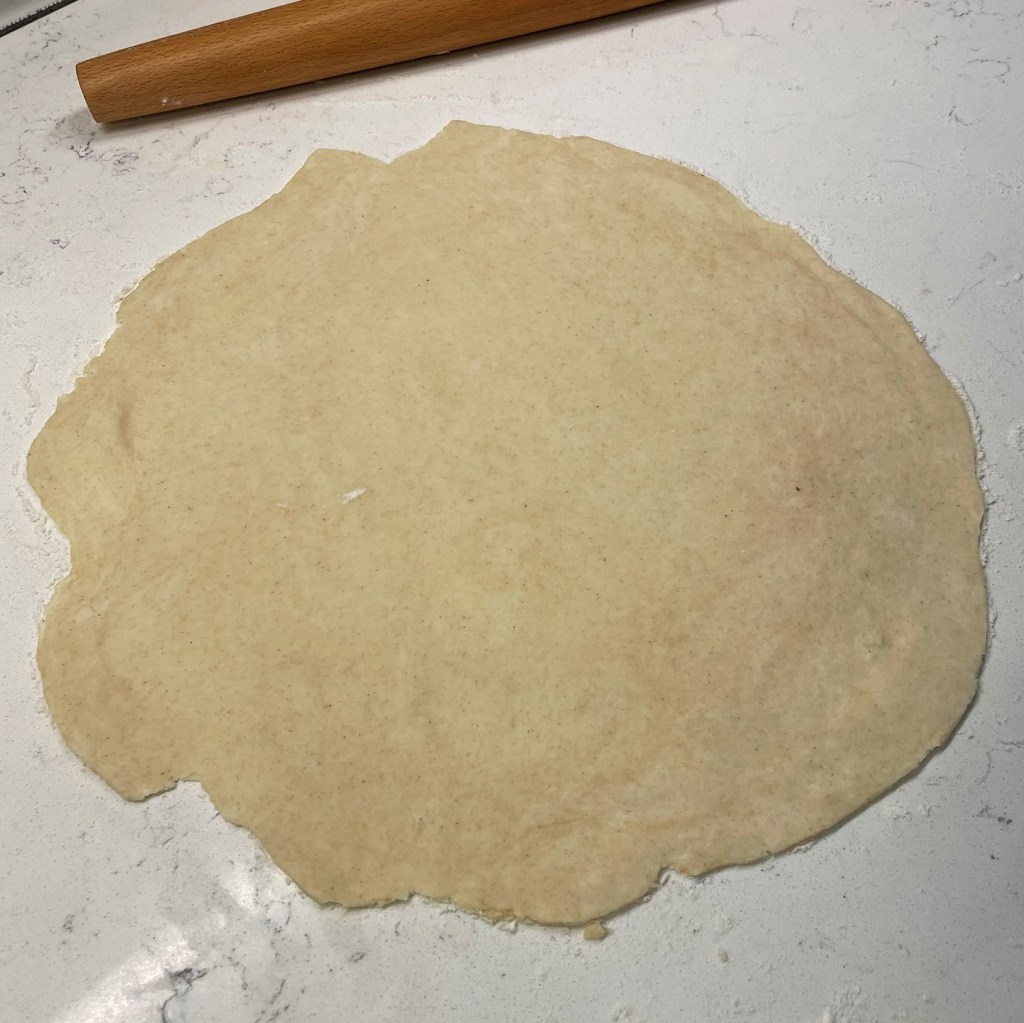
Making matzo is a full 180 from my usual sourdough bread baking, which relies on long, slow fermentations and higher hydration doughs. My breads bake up light and airy, not flat and dry. Matzo is nothing but flour and water in its most traditional state (in other words, boring). But we have already established that my version would not be kosher, and I wanted to bend the rules a little further, adding a sprinkle of sea salt and maybe even some everything bagel seasoning to jazz it up a bit.
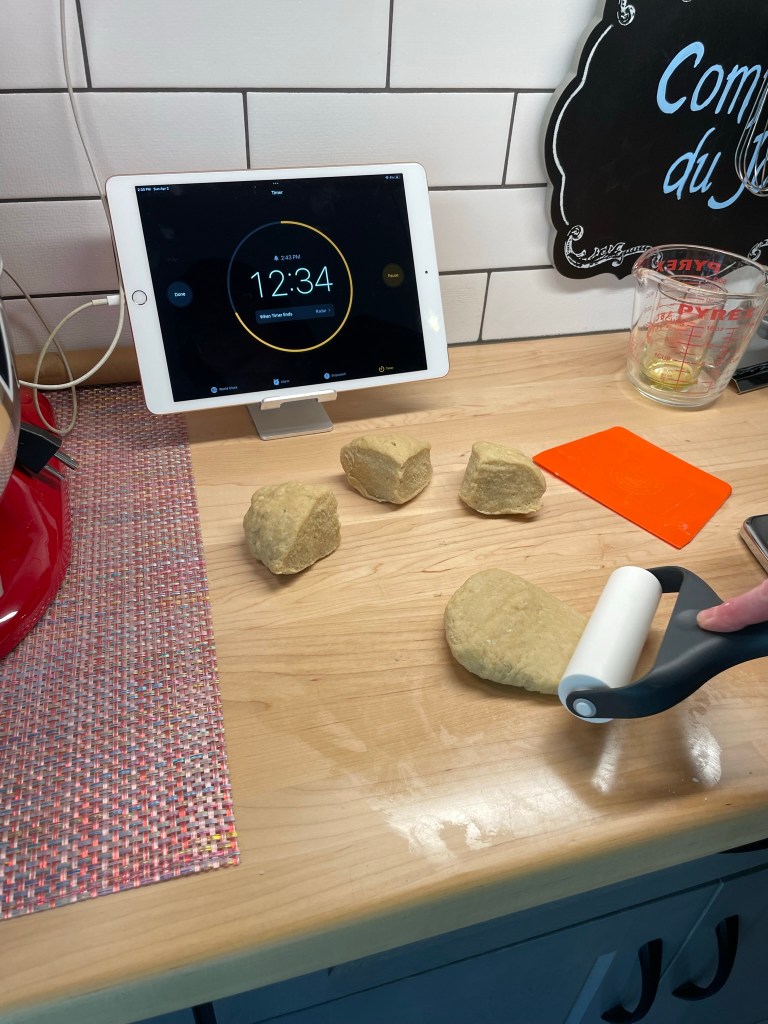
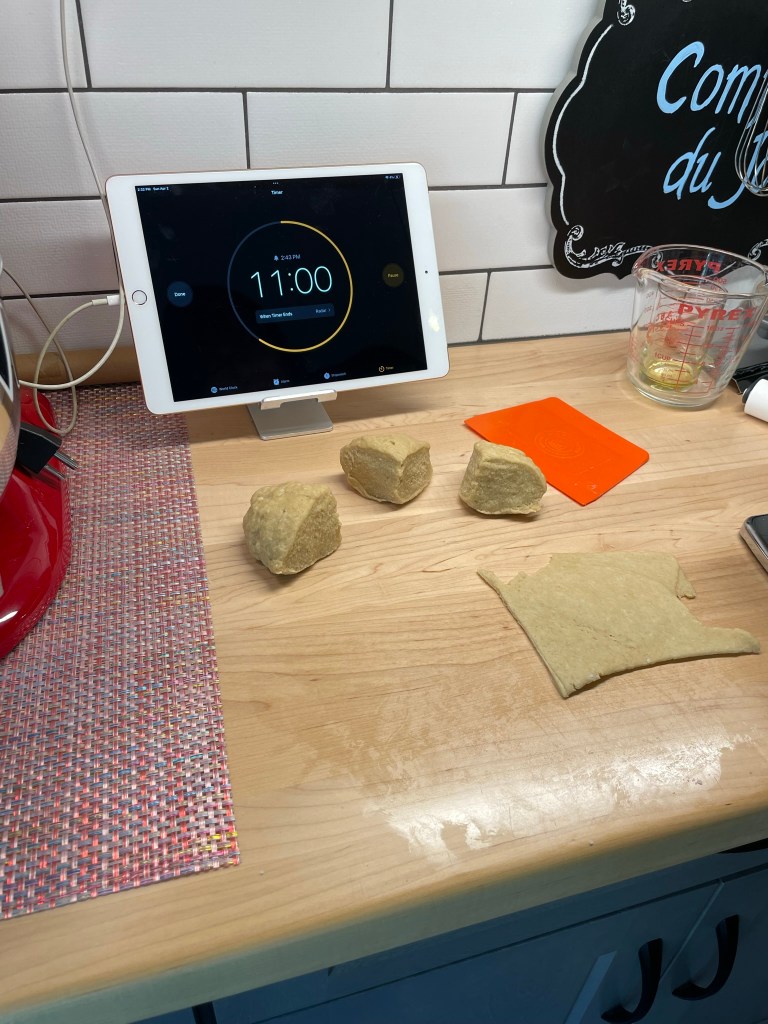
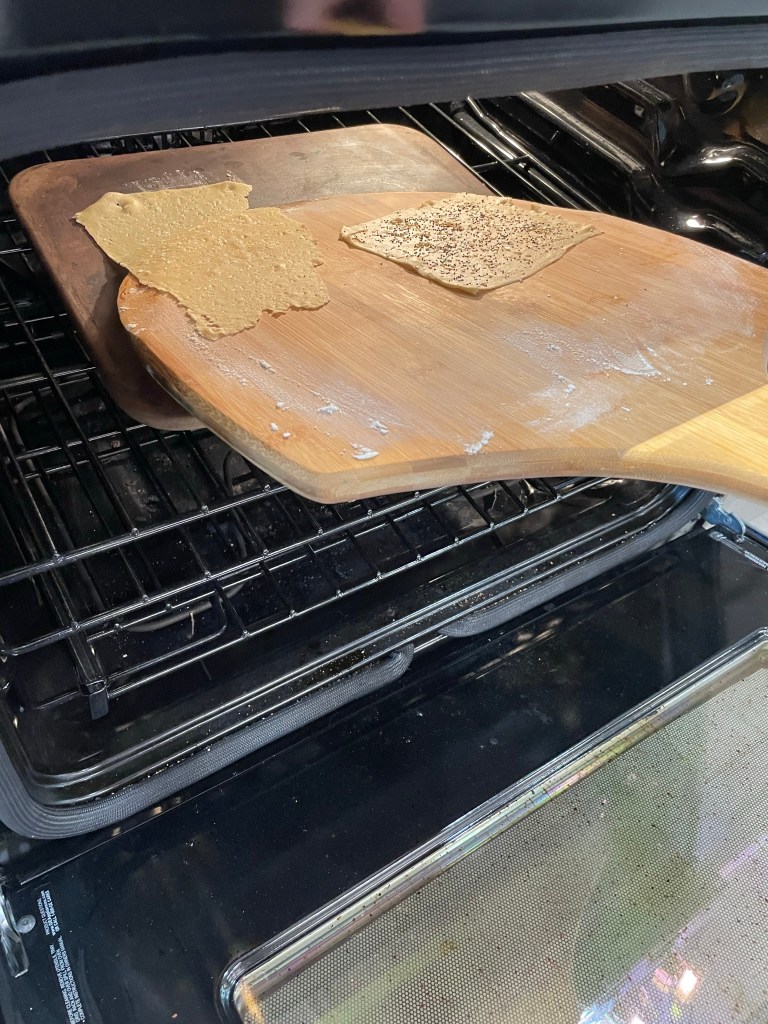
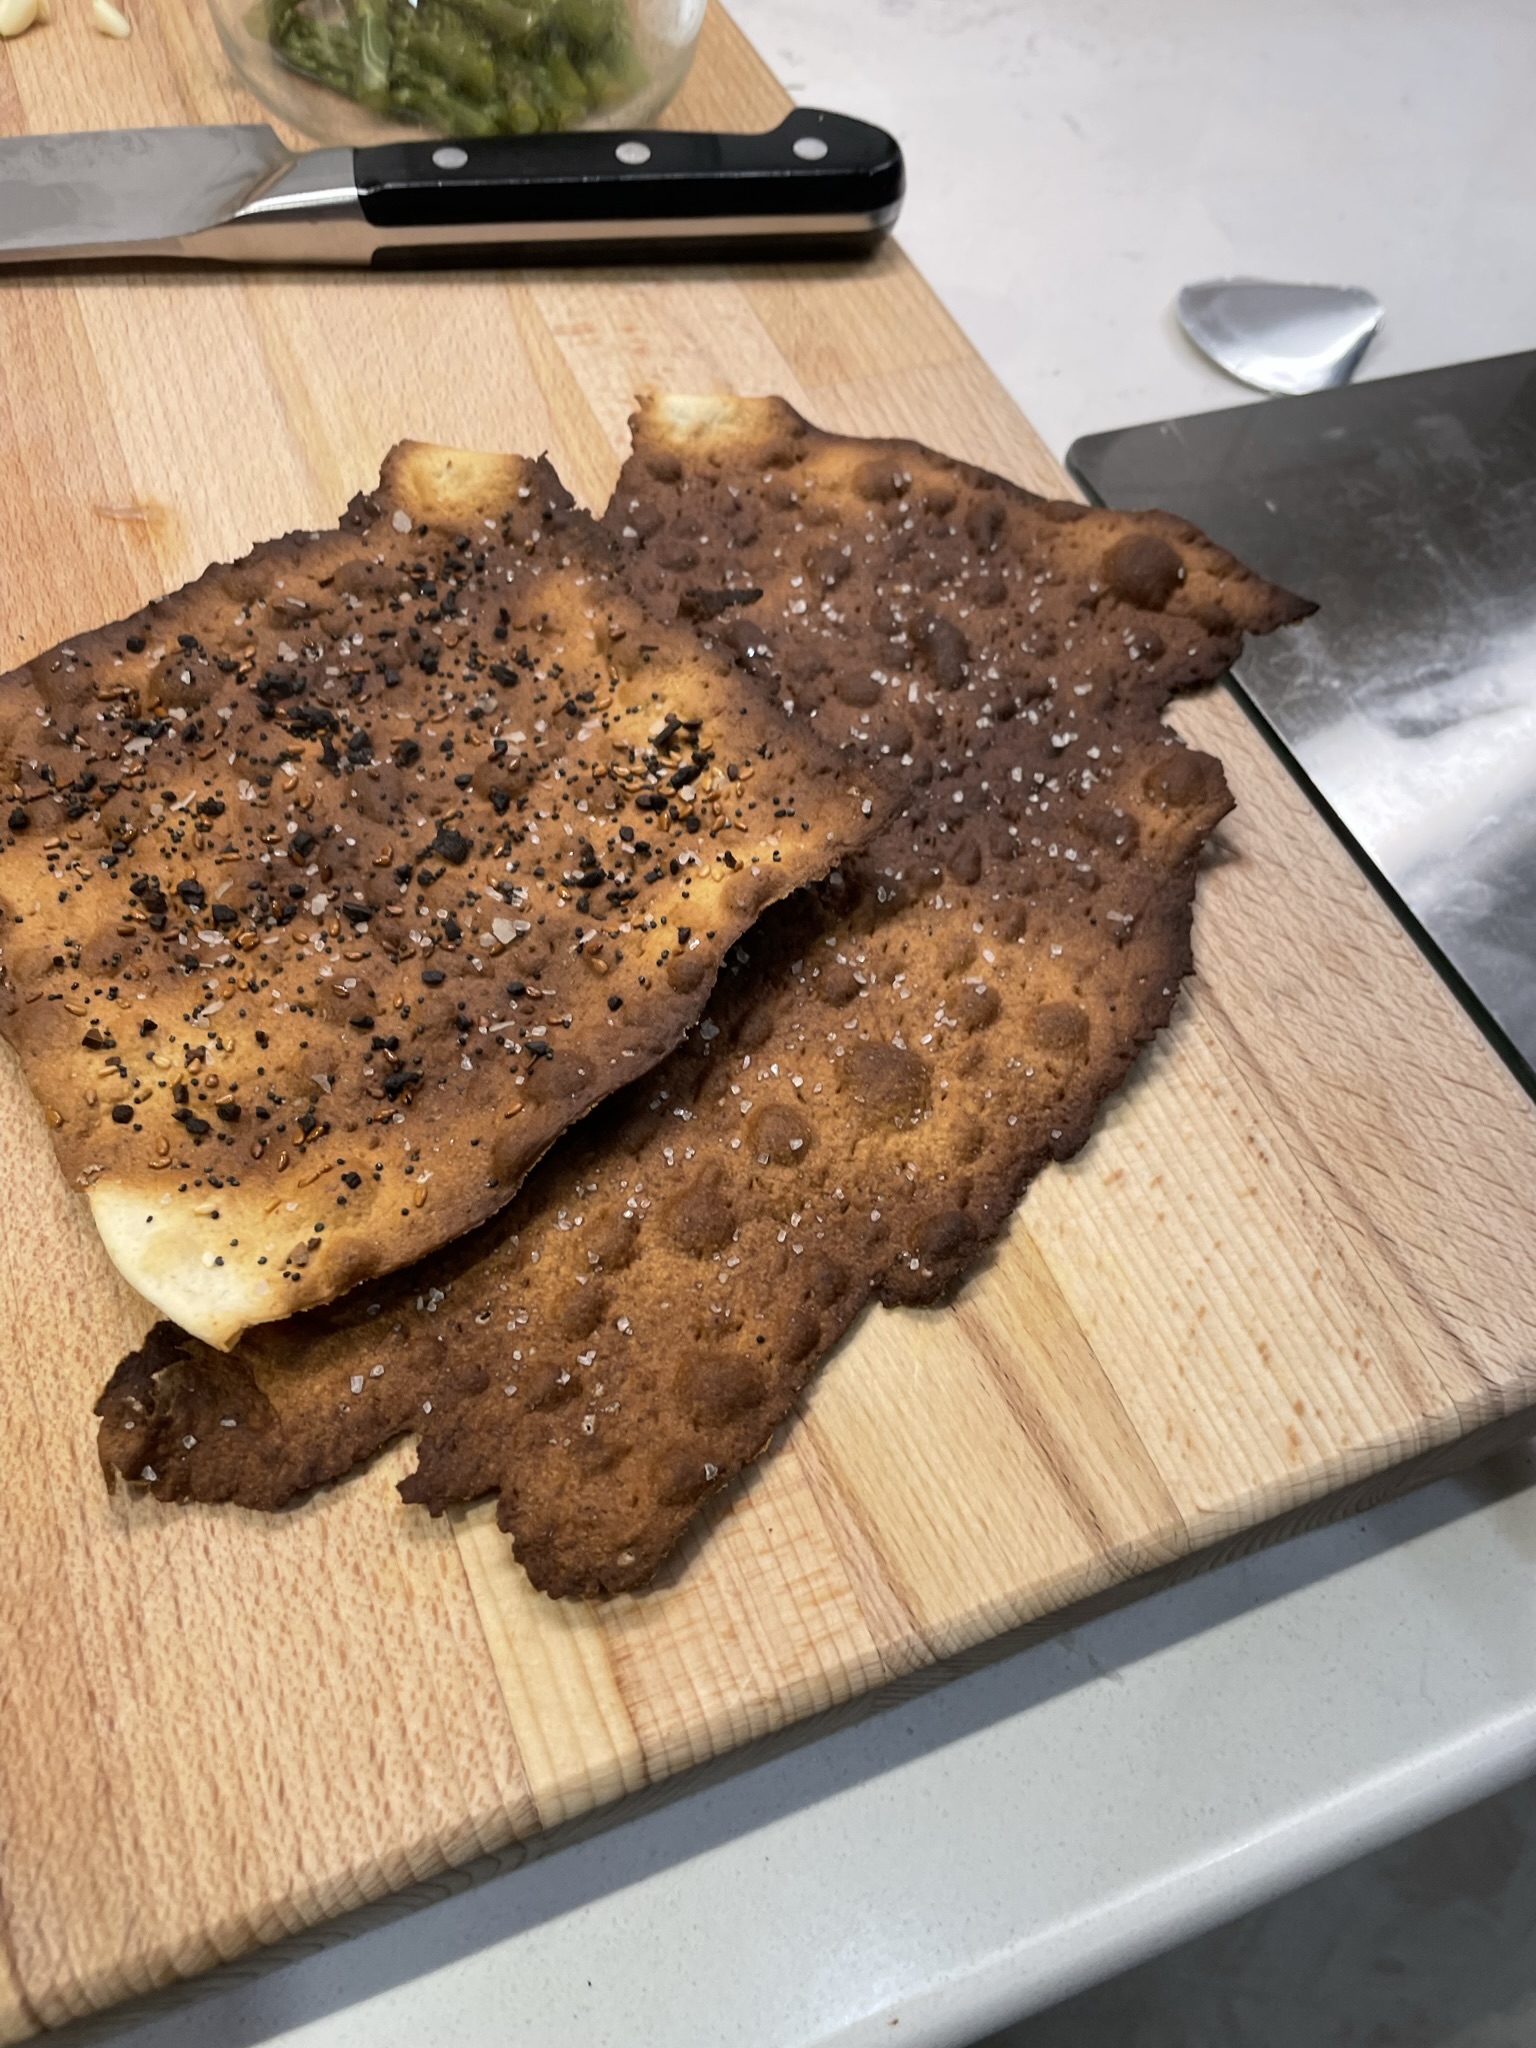
I found a recipe on NYT Cooking that included salt for flavor, olive oil to make the dough more workable and a swap-in of some whole wheat flour, so I was on board for the ingredients, but I ditched the rest of the recipe. It called for rolling out the matzo dough with a rolling pin (a challenge with such a hard dough) and would have produced four dense, tortilla-like flatbreads— nothing like the thin sheets of matzo we usually pick up from the store. I set up my trusty pasta machine to roll the dough out thin, like the matzo we are used to, and kept a close eye on the oven because they baked quickly on my preheated baking stone— so quickly, in fact, that my first batch was burnt to a crisp. I was not deterred!
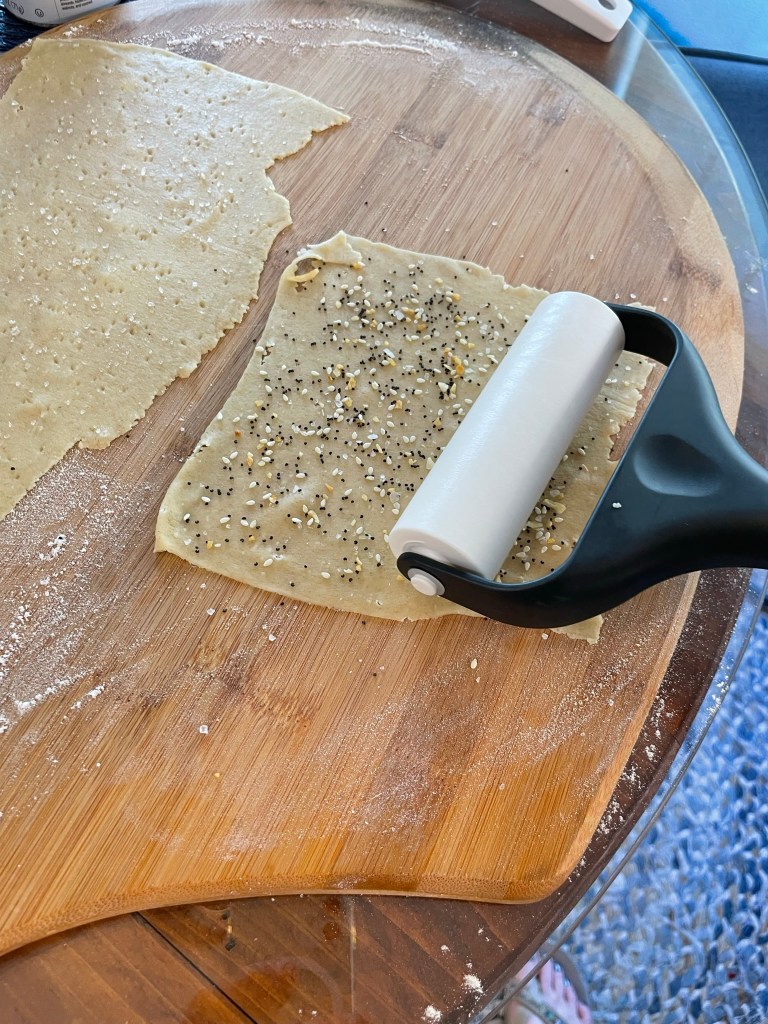
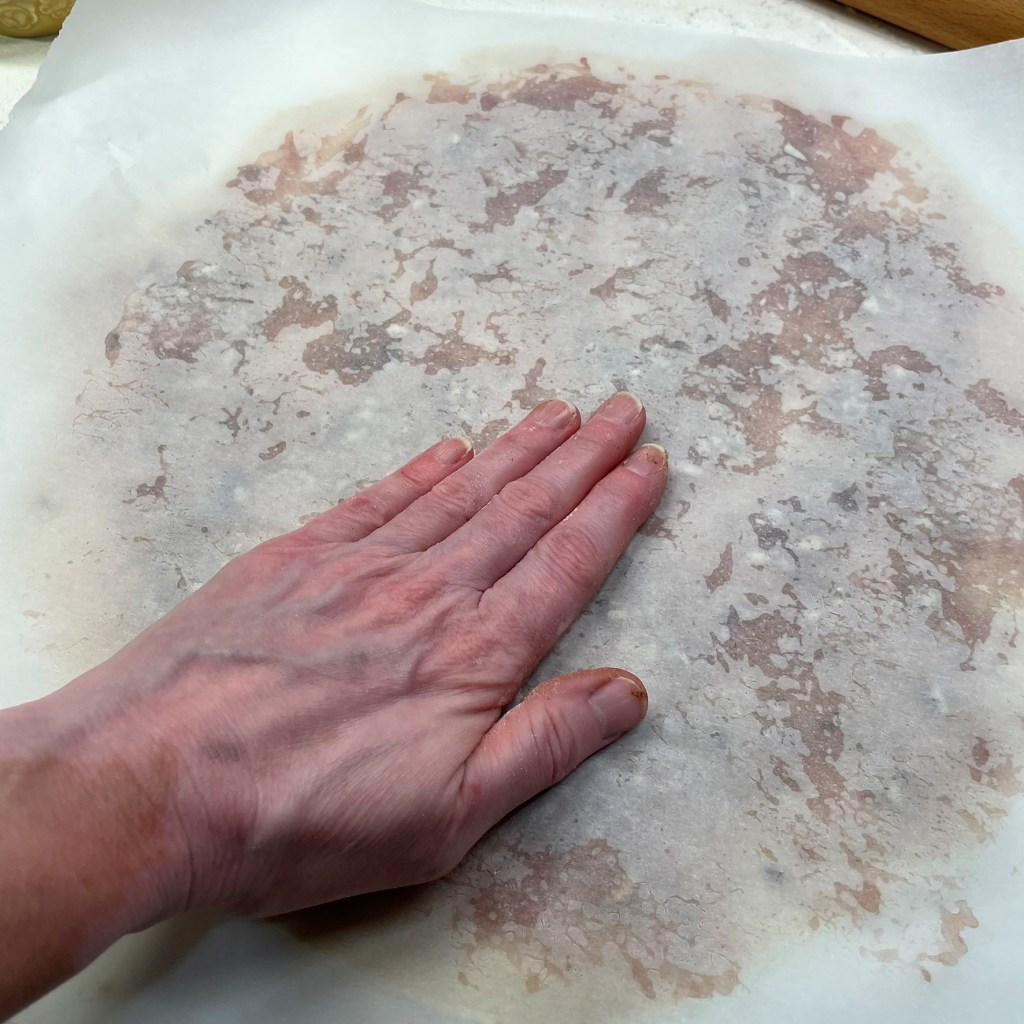
Already 9 seconds in!My large bowl allowed easier kneading.I finished the kneading by hand.Five minutes in, and cutting the dough into pieces.The dough is very firm and tough to roll by hand.It took MANY passes through my pasta roller, and I had to trim the dough a few times to keep it manageable. Yikes, the clock!!!I pressed the salt and seeds on with my hand roller.Docking the matzo dough ensures the pieces don’t puff in the oven.The recipe said “as thin as possible,” but mine were like parchment paper.
Oy vey, that didn’t go well!
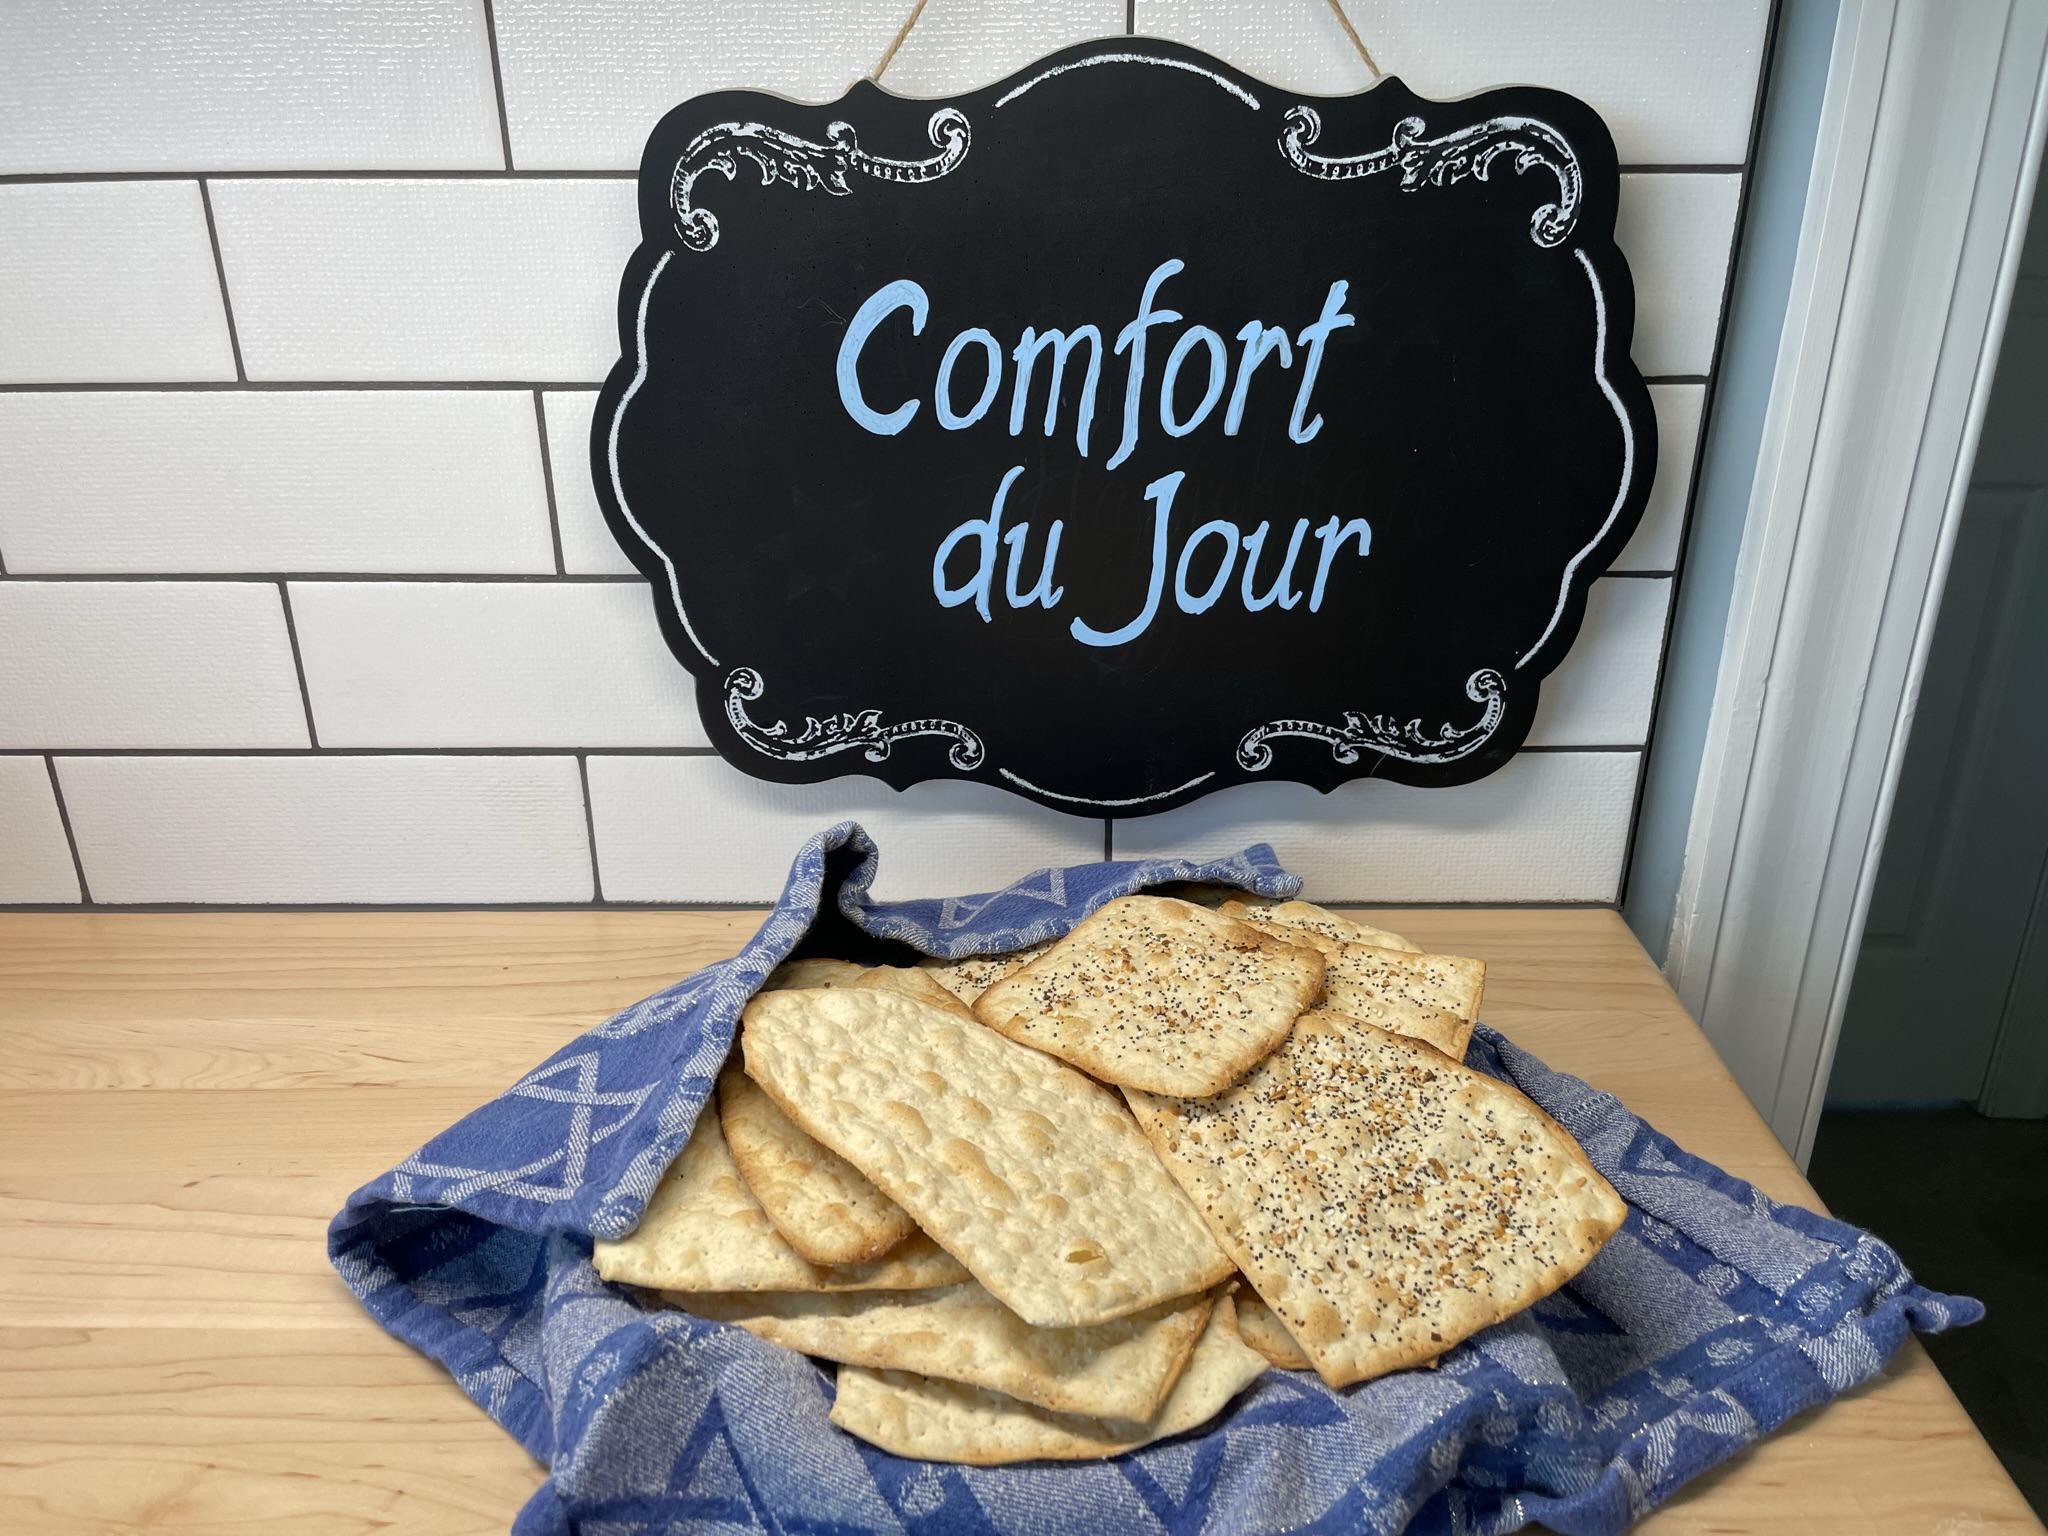
Moving forward, I rolled the dough a little bit thicker and called out to Les to find out which Yiddish word for “crazy” was appropriate for my situation (it’s meshuggeneh). I put him in charge of the oven, and the subsequent batches turned out great. We ended up with enough matzo to fill a large Rubbermaid container, and, of course, we still have a box of the grocery store matzo, just in case. 🙂
For my remaining batches, I rolled the dough a little thicker and gave up on beating the buzzer.Les added his helping hands, and things went much smoother.Thicker dough and shorter baking time redeemed my matzo-making effort.
My matzo challenge is complete, and I will probably change things up a bit next time— less salt on top for sure, and I might play around with different types of flour.
Eighteen minutes is a tough time goal, though, and probably best accomplished in a kosher kitchen full of Jewish bubbies who actually know what they’re doing. I gave up on beating the buzzer when I was pulling the burnt ones from the oven.
Flaky sea salt and everything bagel seasoning, optional
This dough is very stiff and requires a heavy hand for rolling. If you have one, set up a pasta rolling machine, as it makes the process much quicker. I rolled my dough to the thinness of the second-to-thinnest setting, and baking time was 4 minutes. For thicker dough, adjust baking time accordingly.
Directions
Preheat oven and baking stone at 500F for at least 30 minutes from the time it reaches temperature. Prepare a pizza peel or back of a baking sheet by dusting lightly wtih flour. This will be an aid for easy transfer of the matzo dough into and out of the oven.
Combine flours and salt in a large bowl. Add warm water and olive oil all at once and stir with a wooden spoon until the mixture resembles a shaggy dough.
Turn dough out on to a counter and knead by hand for a few minutes until all dry ingredients are incorporated. Use a knife or bench scraper to divide dough into four equal quarters. Use plastic wrap to cover three of the dough sections.
Use your hand or a rolling pin to flatten the first dough section into a disc. Cut the disc into two pieces and flatten each into an even thinner disc. Run the dough through a pasta roller, reducing the thickness after each pass until you get to the second-to-last notch on the machine. You will need to cut the dough in half at some point, as smaller pieces are easier to work with.
Arrange two pieces of matzo dough on the pizza peel or reversed cookie sheet. Sprinkle each with sea salt or everything bagel seasoning and lightly roll with a rolling pin to adhere the seasonings. Prick each piece of dough all over with a fork.
Slide matzo onto the preheated baking stone and bake for 3 to 4 minutes (watch the clock closely). Matzo is ready when it has air bubbles and is lightly golden brown all over. Use tongs to pull the baked matzo from the oven. Cool on a baking rack. Repeat with remaining dough.
When matzo is completely cooled, stack the sheets in a sealable container or zip-top bag and store on the counter for up to a week (if it lasts that long).
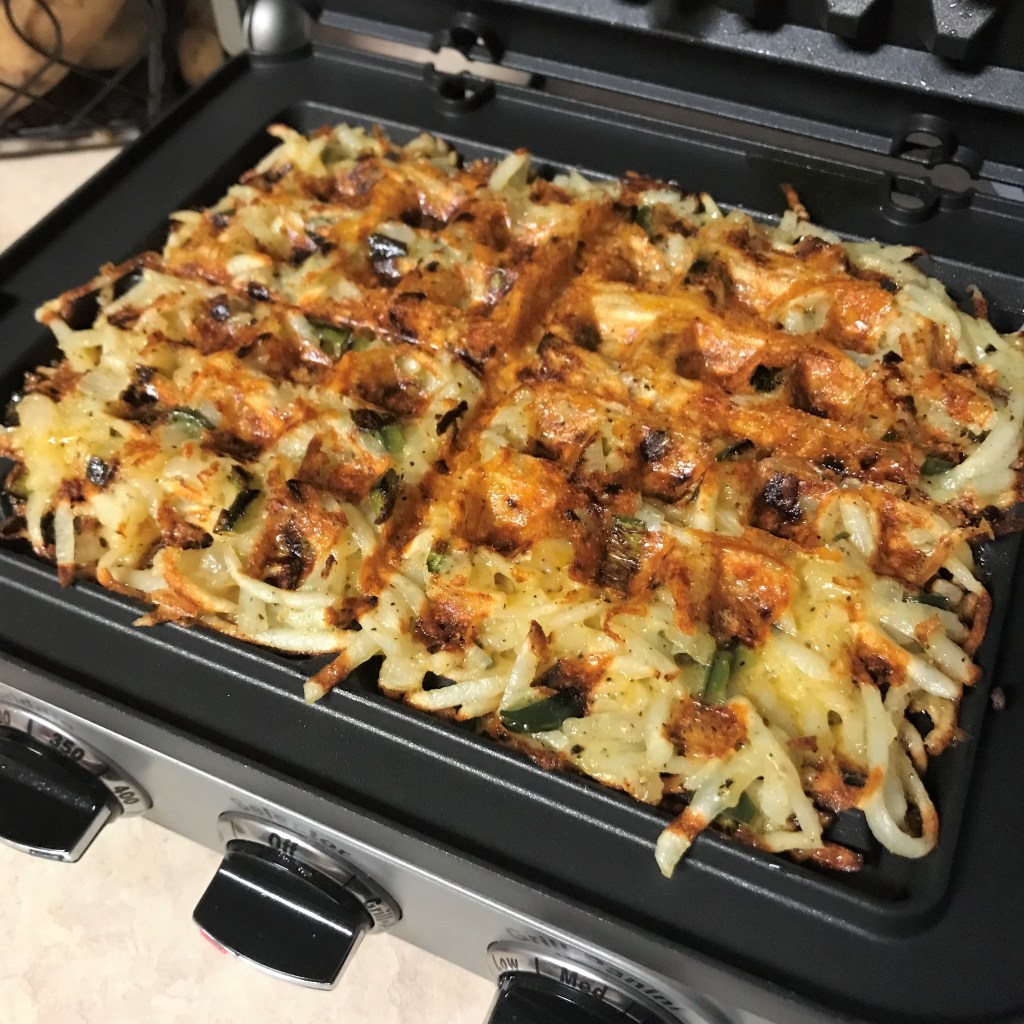
One of the emails I received last week from The New York Times Cooking carried the heading, “The Veggie: Will It Latke?” This tickled my funny bone because it seems to be a play on a question I asked many years ago when I bought my first waffle iron. Will it Waffle was the title and subject of a creative little cookbook that challenged other foods, such as falafel, s’mores, spaghetti and pizza to become “waffled.” Personally, I love this idea because I like playing with my food, especially when it involves something unexpected. Here are a few things we have waffled at our house:
When it comes to latkes, however, there are a few limits to what can be turned into a latke, and this is largely based on the starch content of the ingredients you wish to “latke.” When you start leaning toward less starchy vegetables, you may run into trouble getting the well-composed patties and delicate, crispy edges that make latkes so irresistible— not only during Hanukkah (which started last evening), but anytime you get a hankering for tasty fried nuggets.
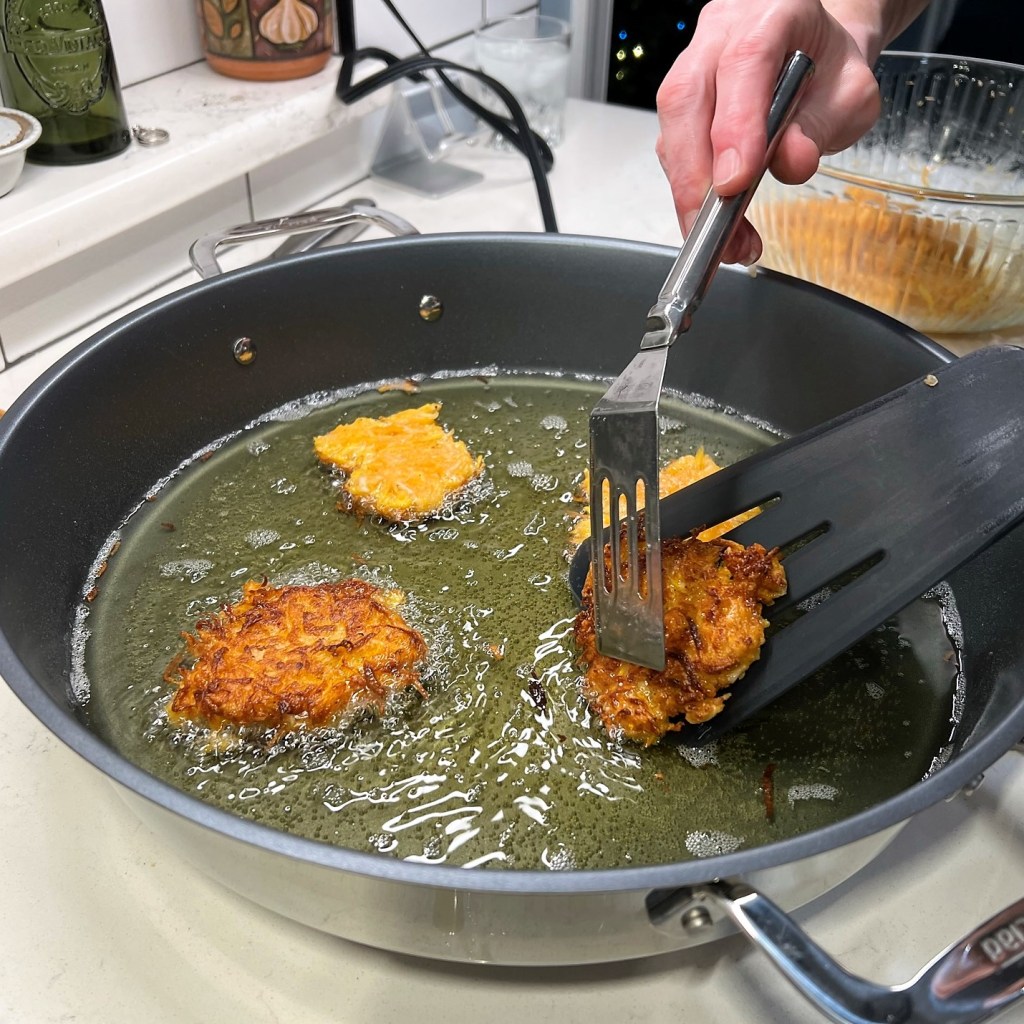
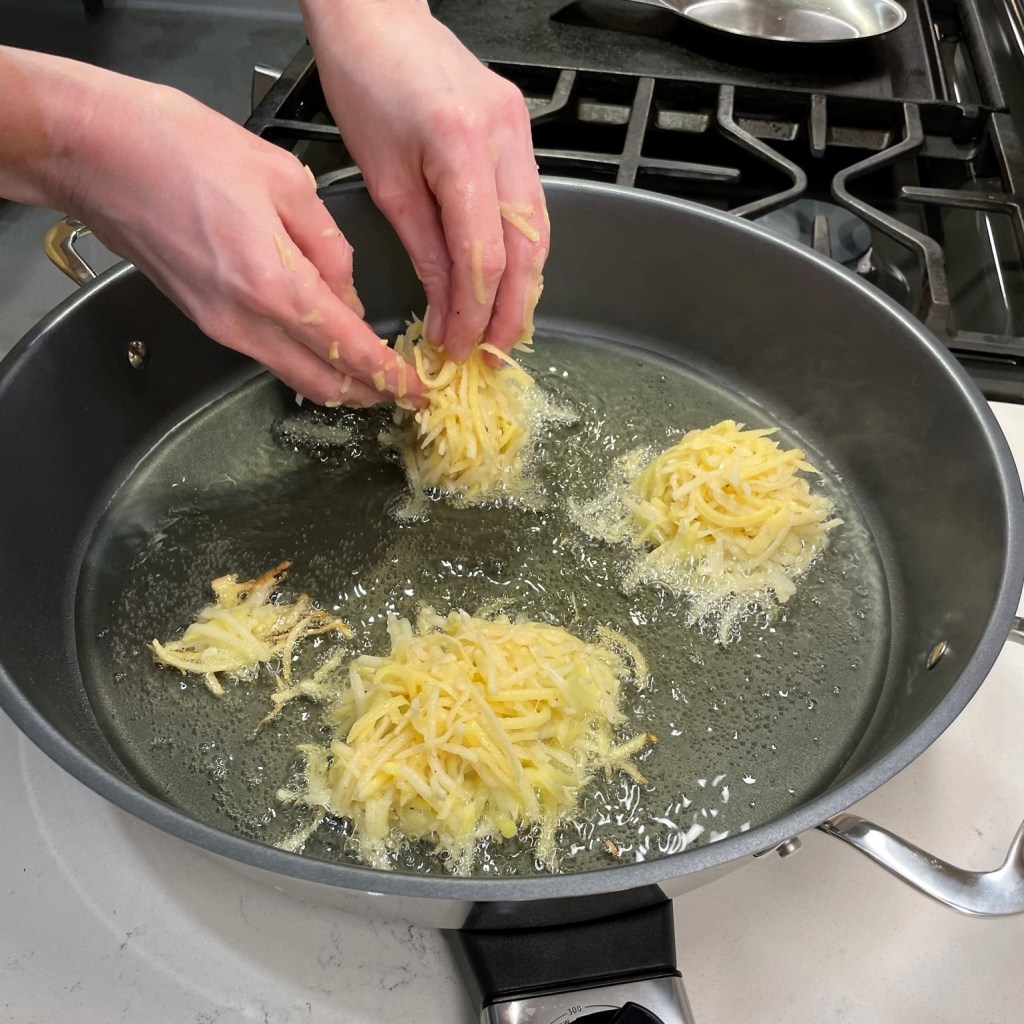
This post is the result of my experiment making latkes with butternut squash— botanically, it’s classified as a starchy vegetable, but clearly less so than a potato— and I’ll confess now that I did not follow a recipe from the email that raised this “will it latke” question. Rather, I decided to wing it, trusting my instincts and knowledge of starch and frying, plus my past experience with making my “regular” Classic Crispy Latkes.
I held firmly to the handful of immutable rules for making latkes, including making the “batter” as dry as possible so that the latkes hold together and fry up crispy, heating the oil to a fairly high temperature so the latkes don’t soak up too much of the oil, and seasoning the latkes the moment they emerge from the frying pan to make them even more delicious.
The rest of my effort was learn-as-you-go, and I’ll walk you through the lessons this experiment taught me, with a printable recipe at the end, laying out the roadmap to the best outcome. Ready to make these?
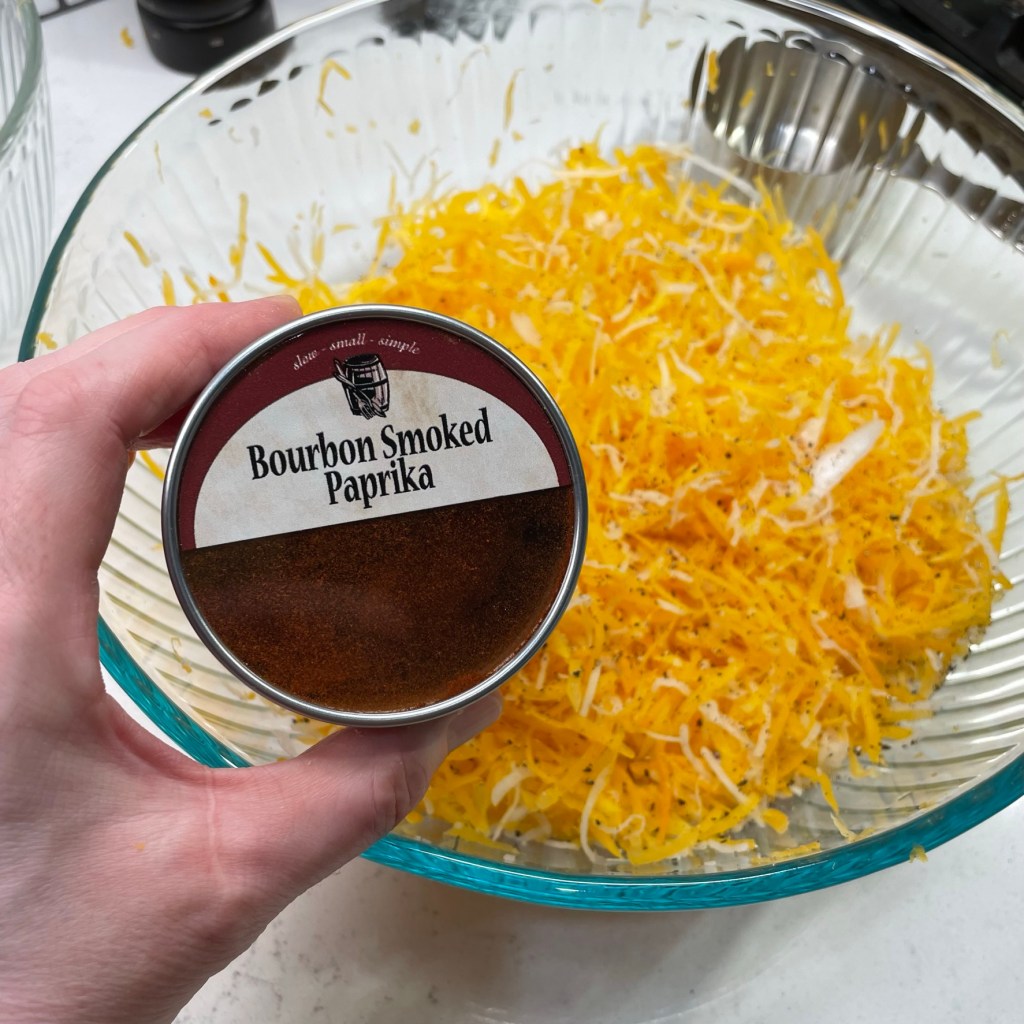
First, I chose my flavor profile, and I kept it simple with onion— to keep them more savory than sweet, as squash tends to be— and smoked paprika for a little bit of spice without heat.
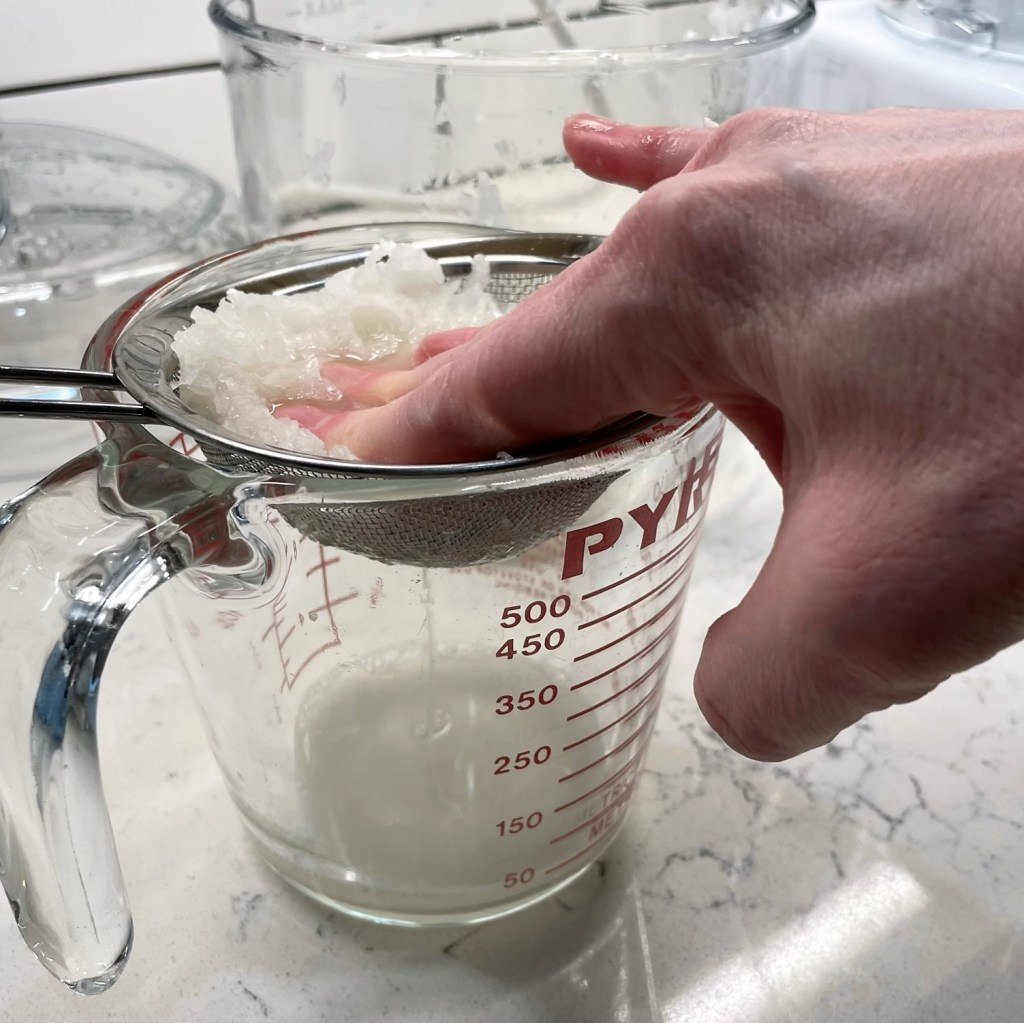
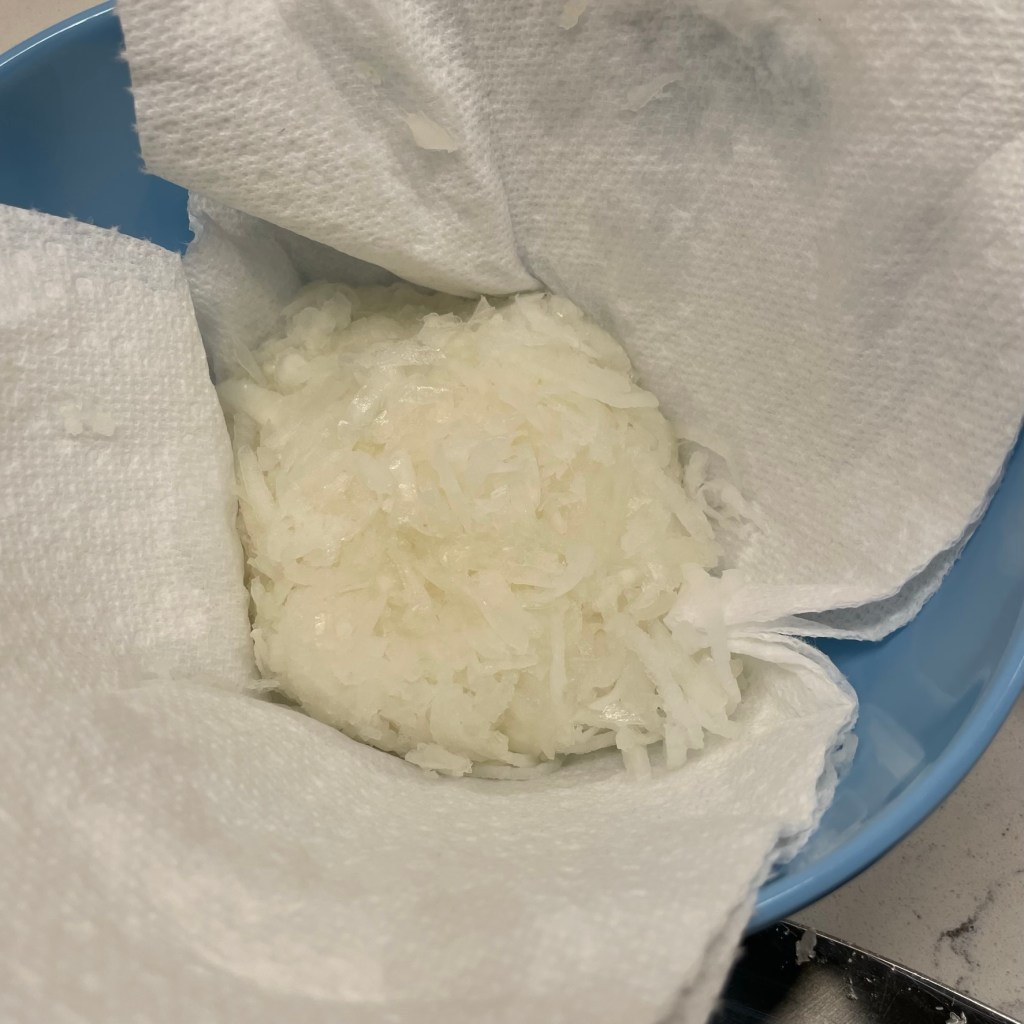
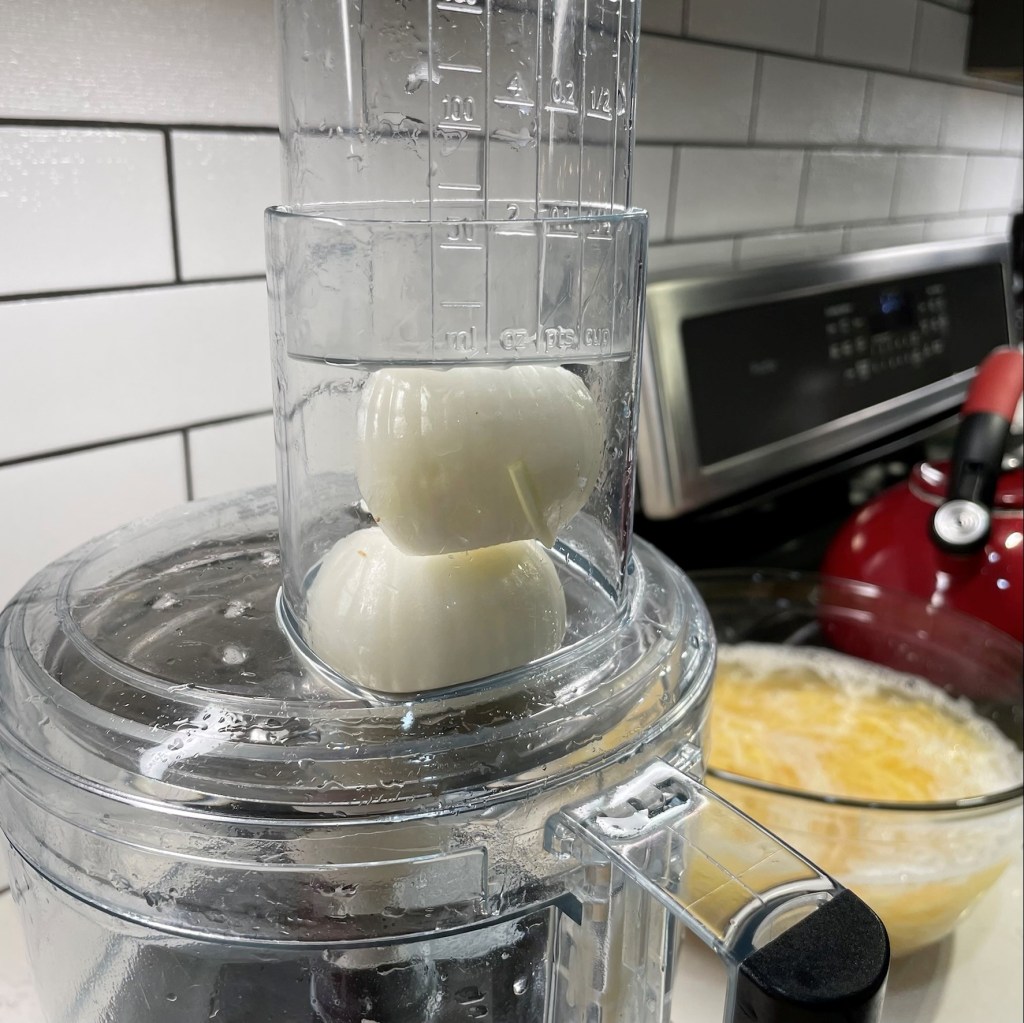
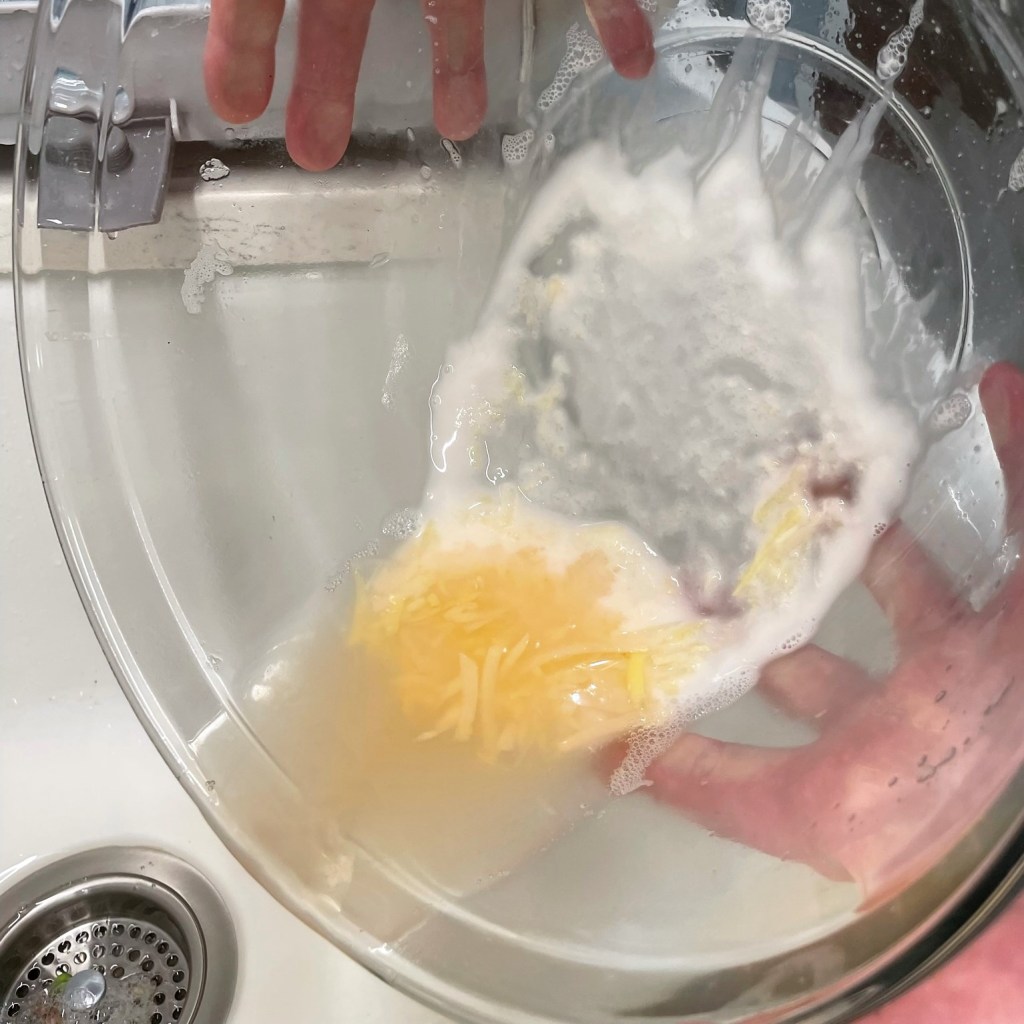
I fitted my food processor with the small hole shredder plate to shred up the onions, then pressed them through a fine mesh strainer to squeeze out every bit of juice.
By pressing the onion, I spared my latkes of nearly 1/2 cup of liquid!
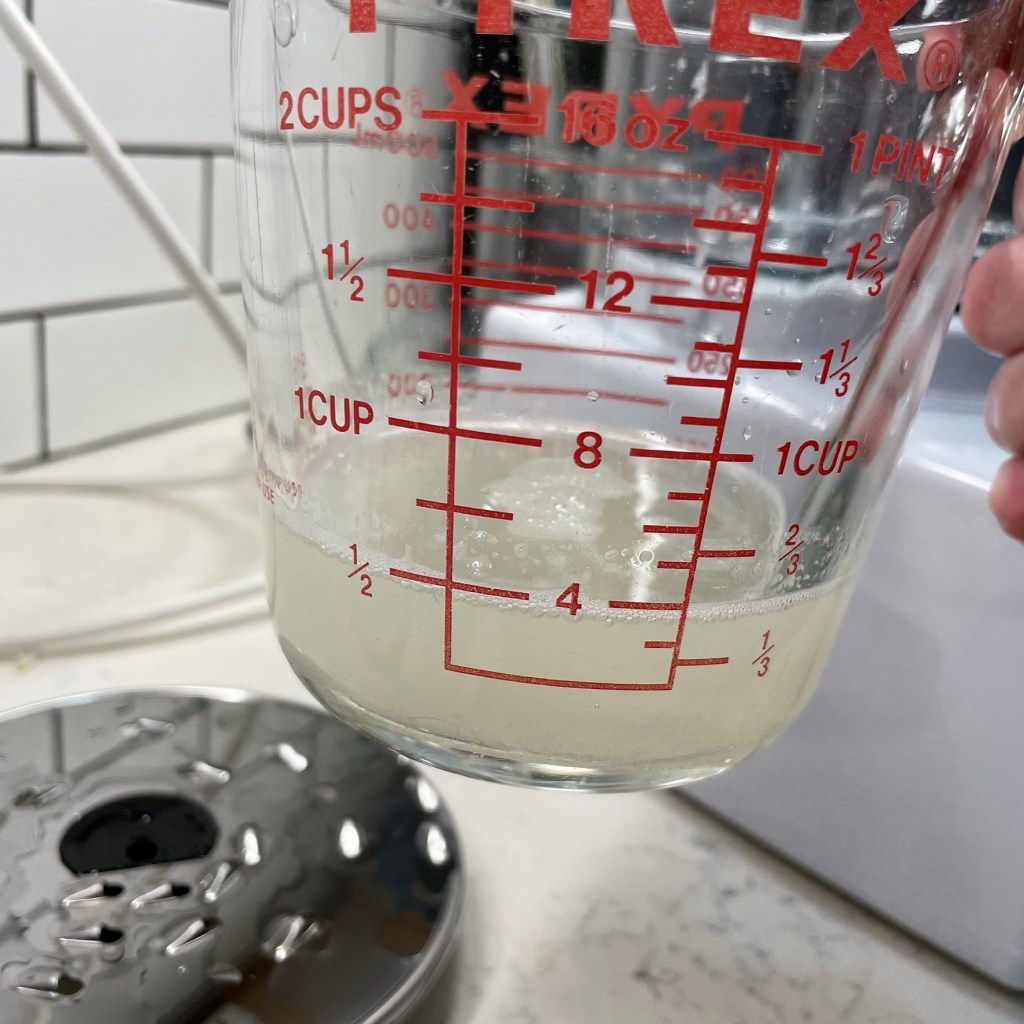
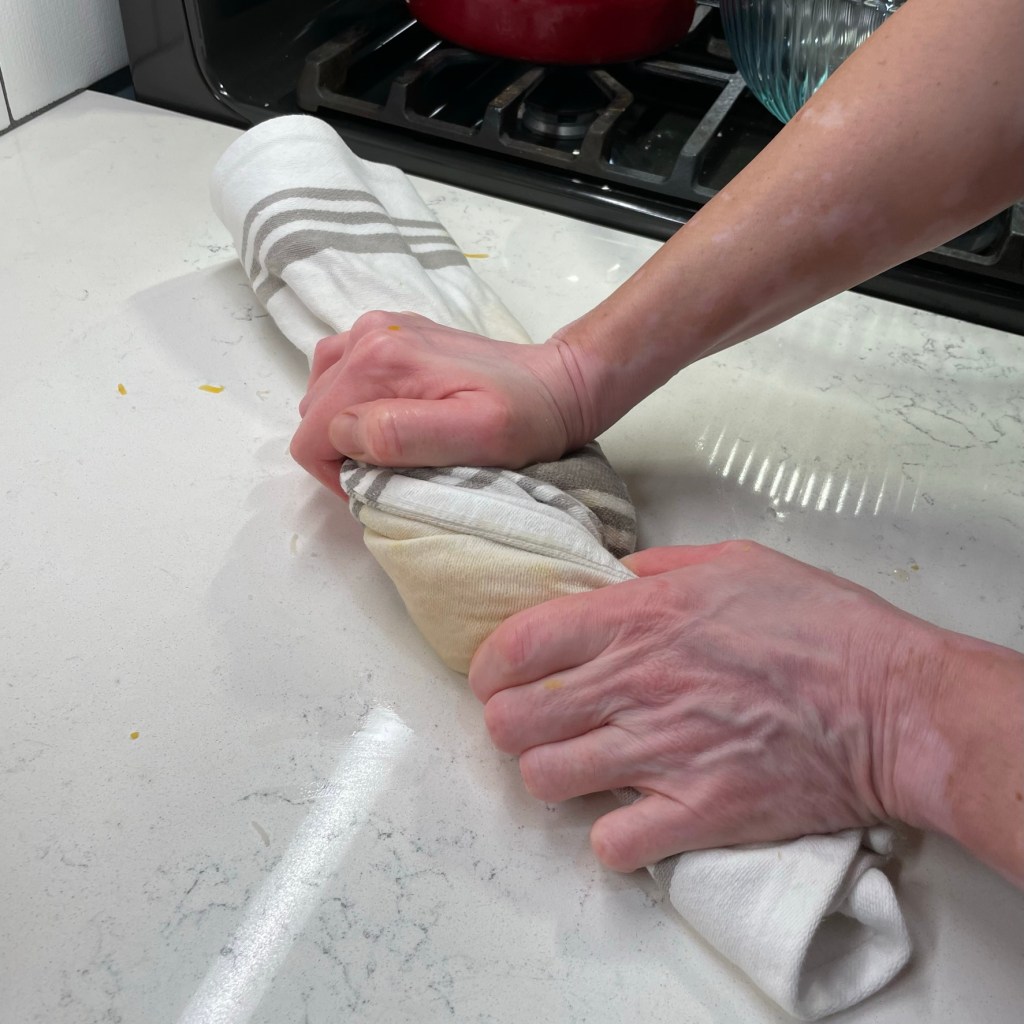
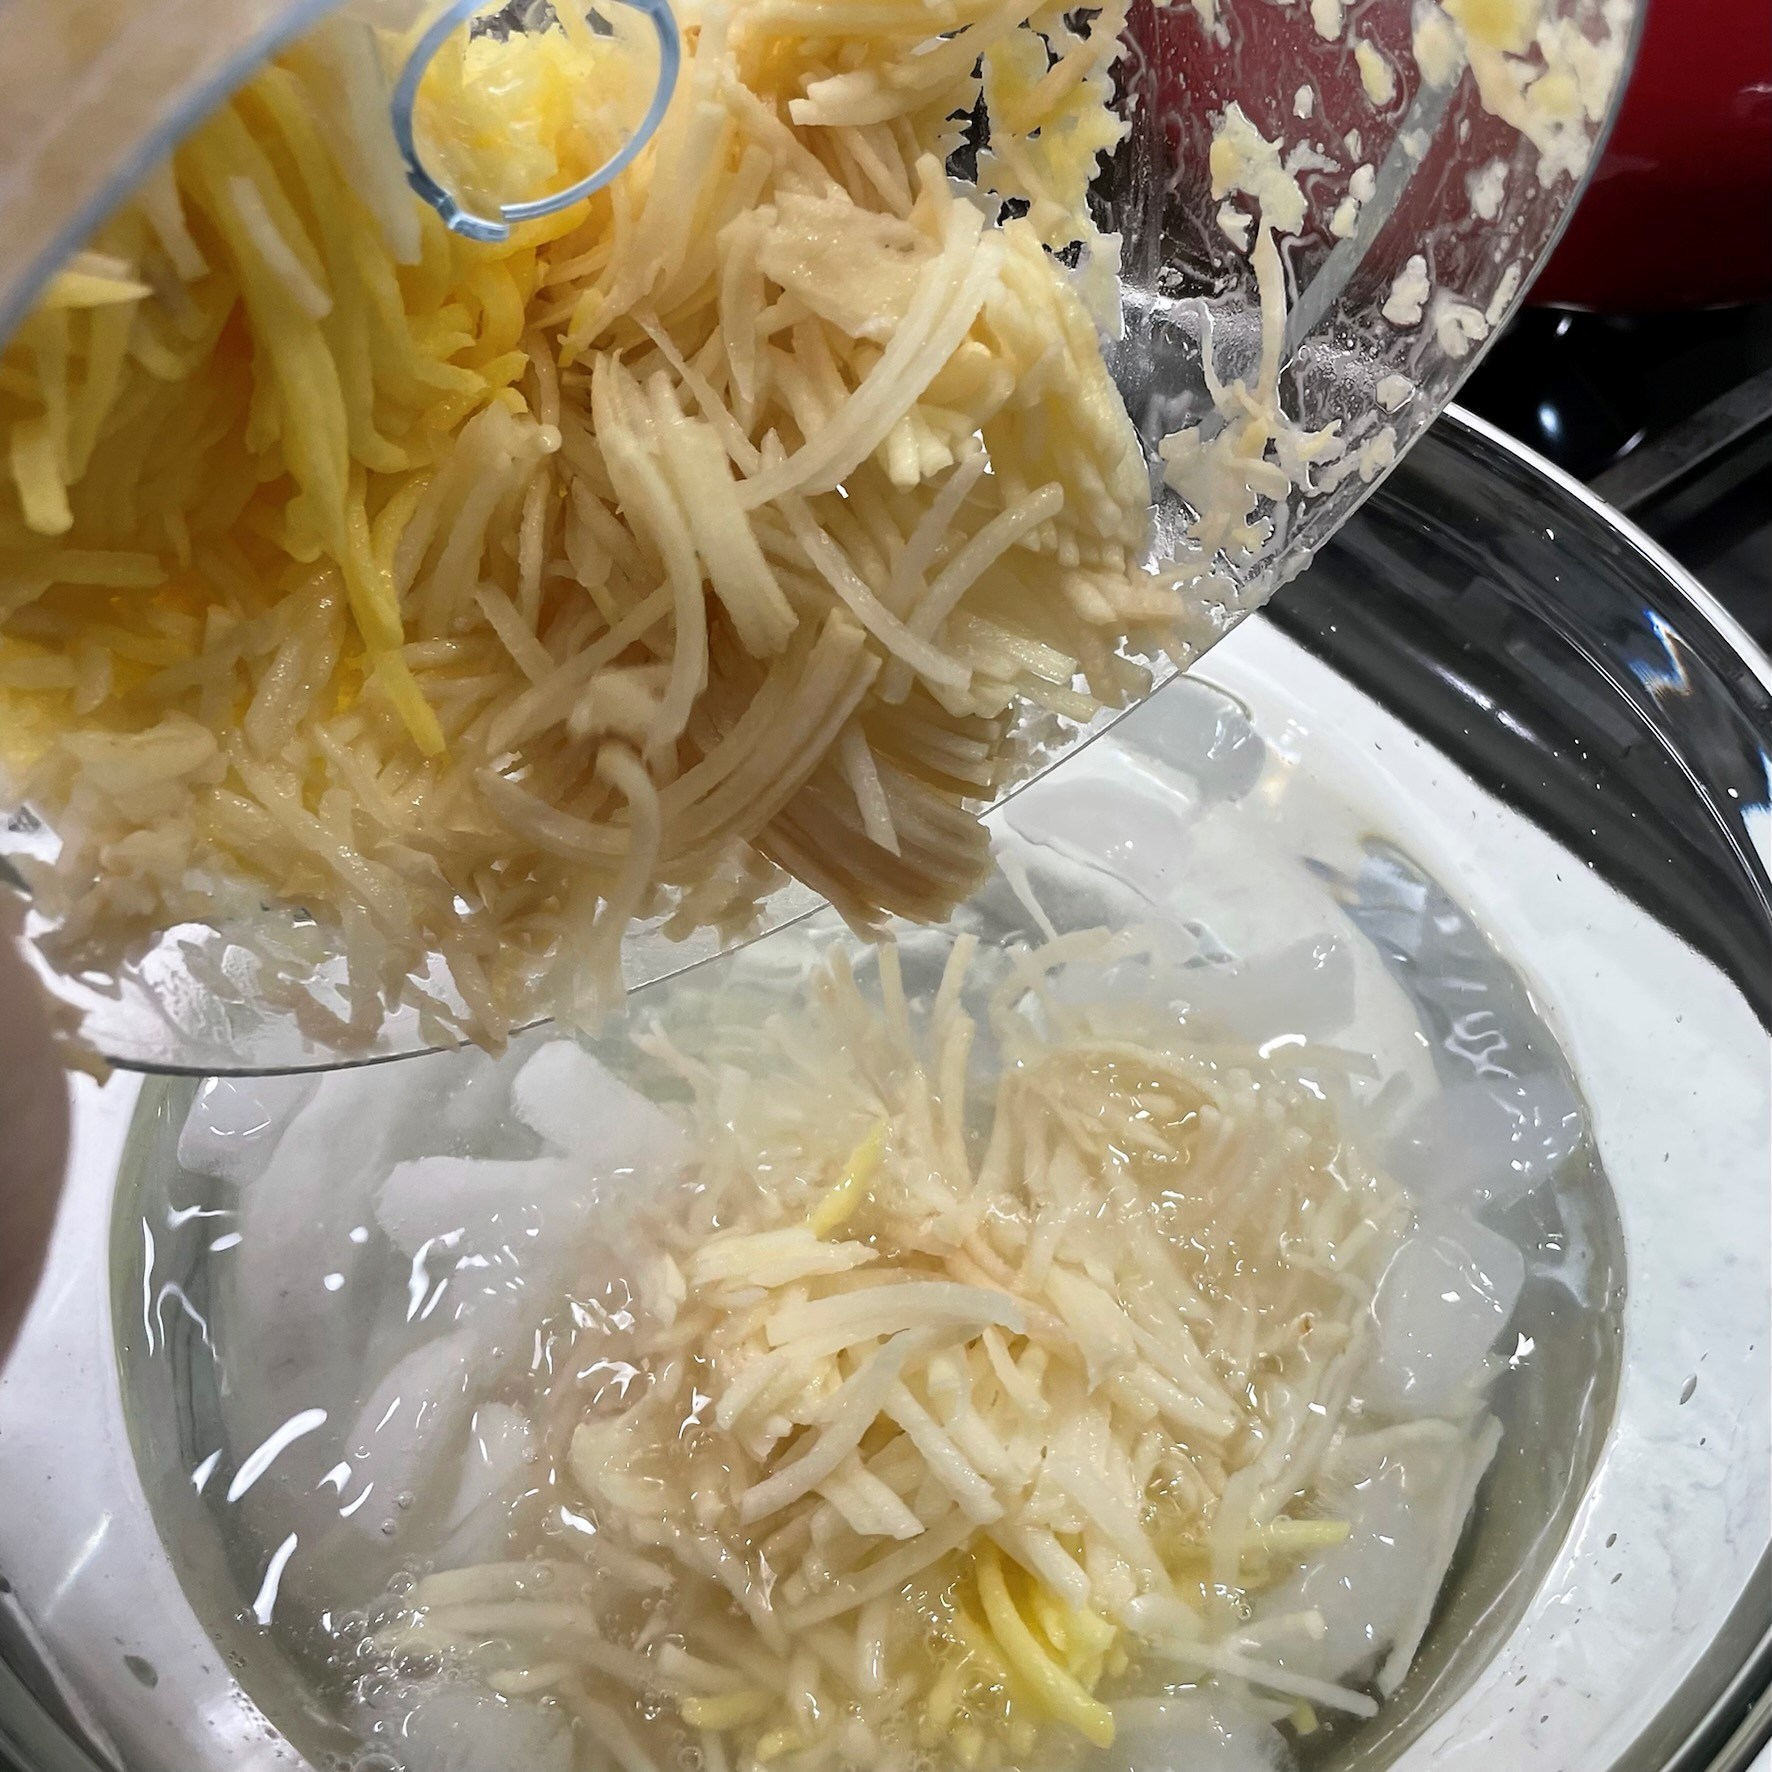
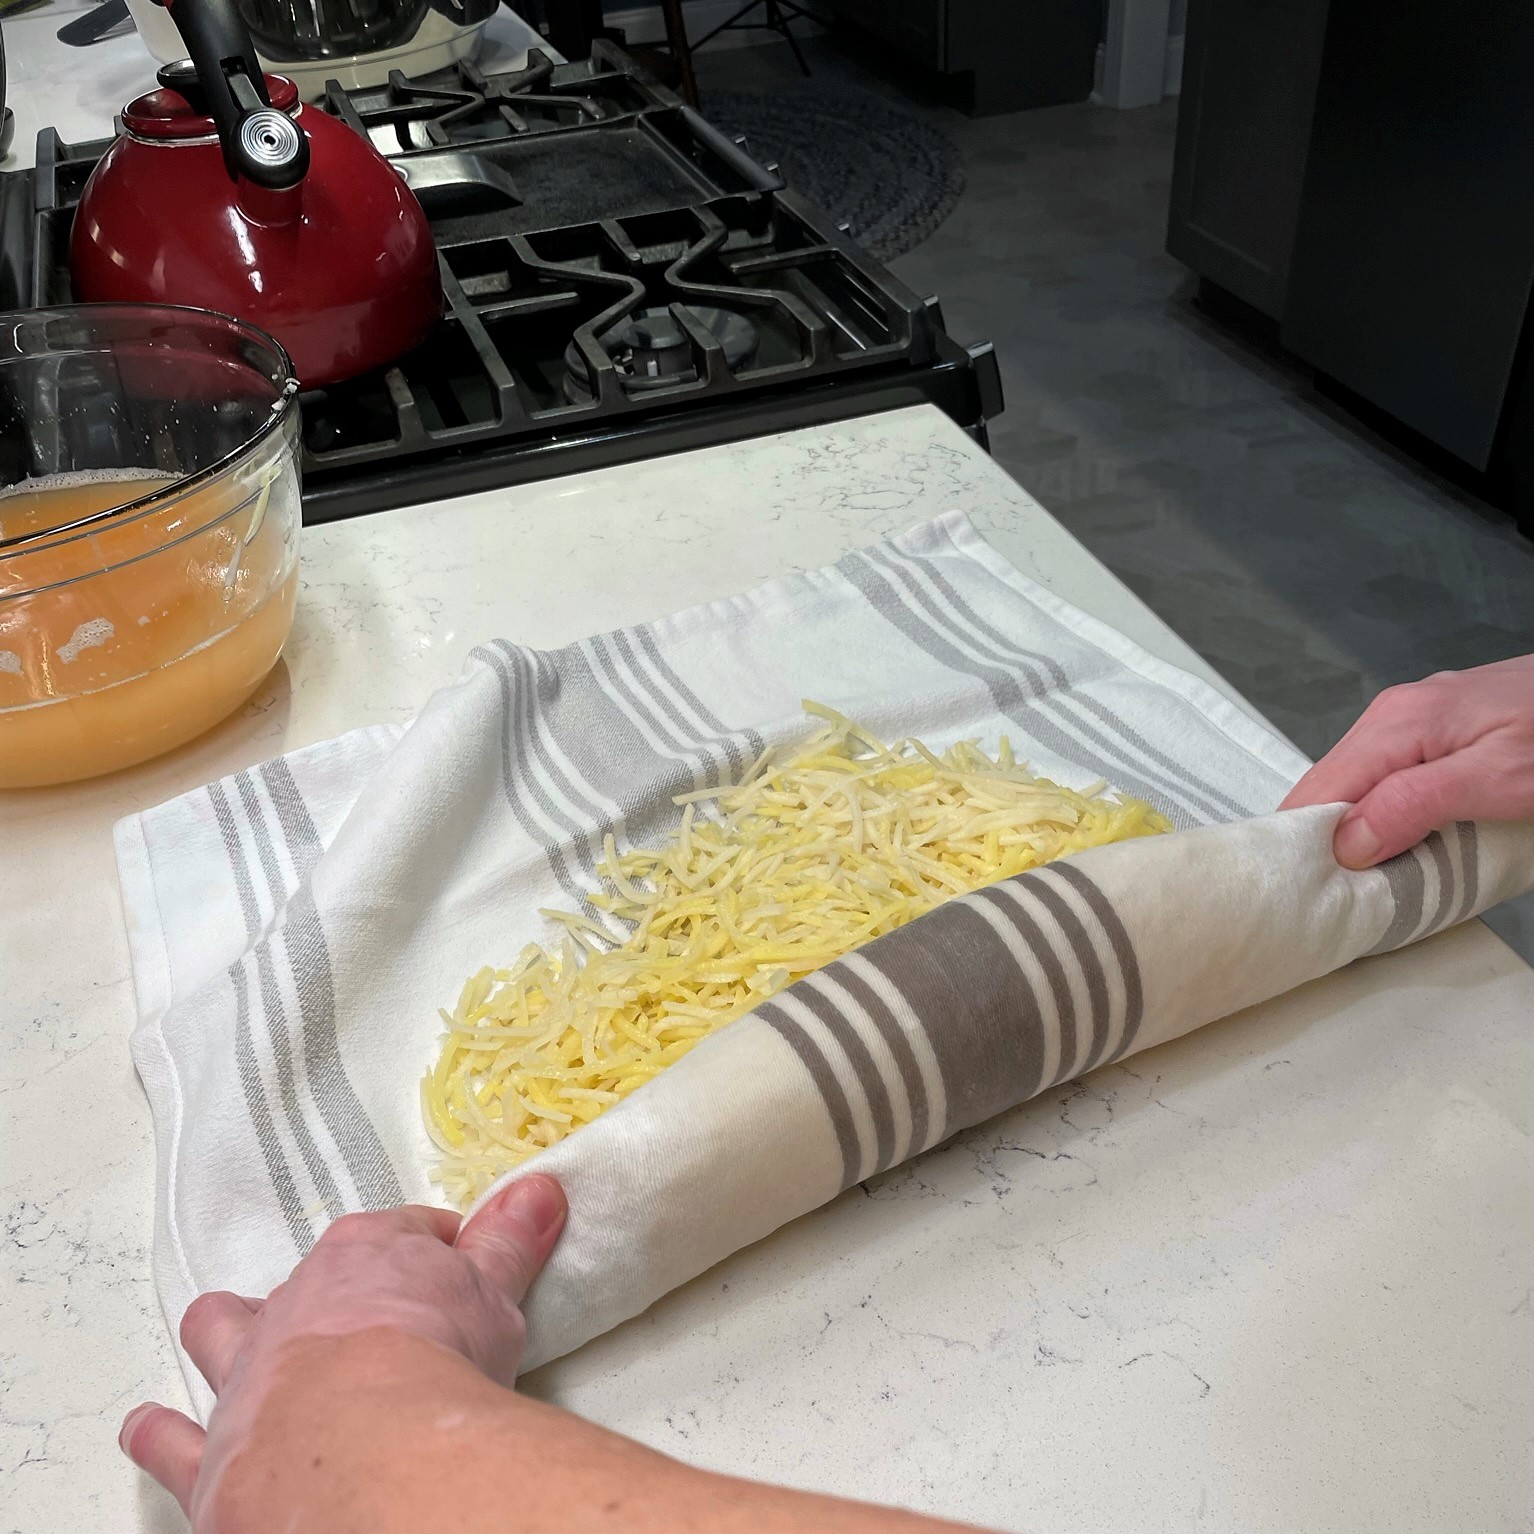
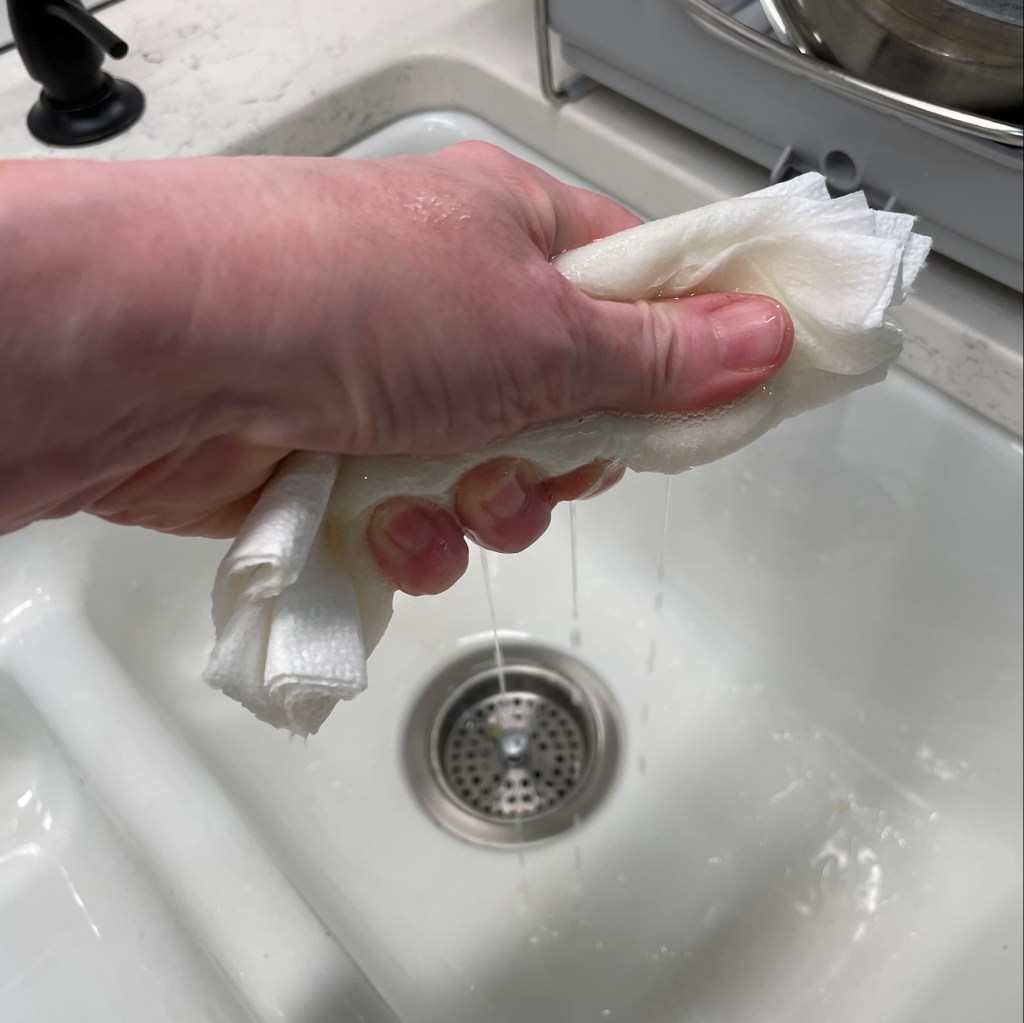
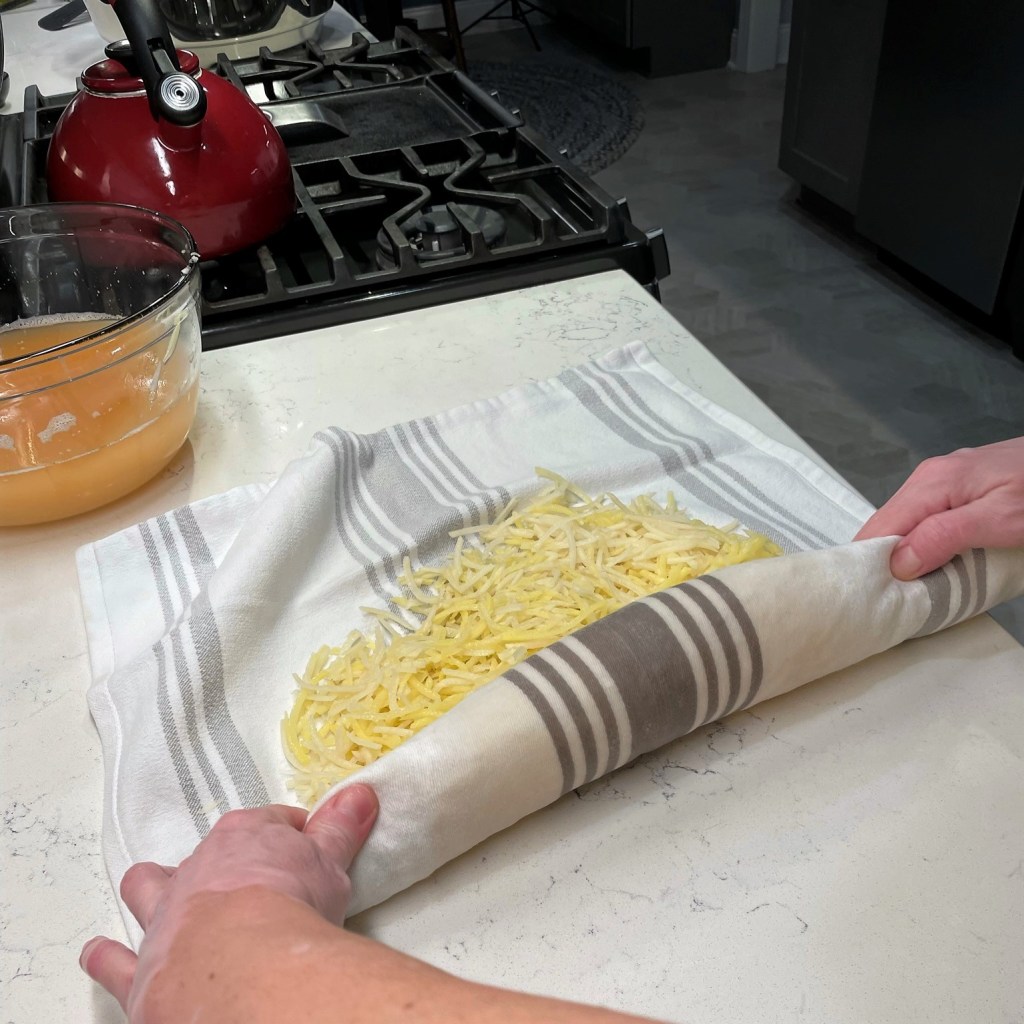
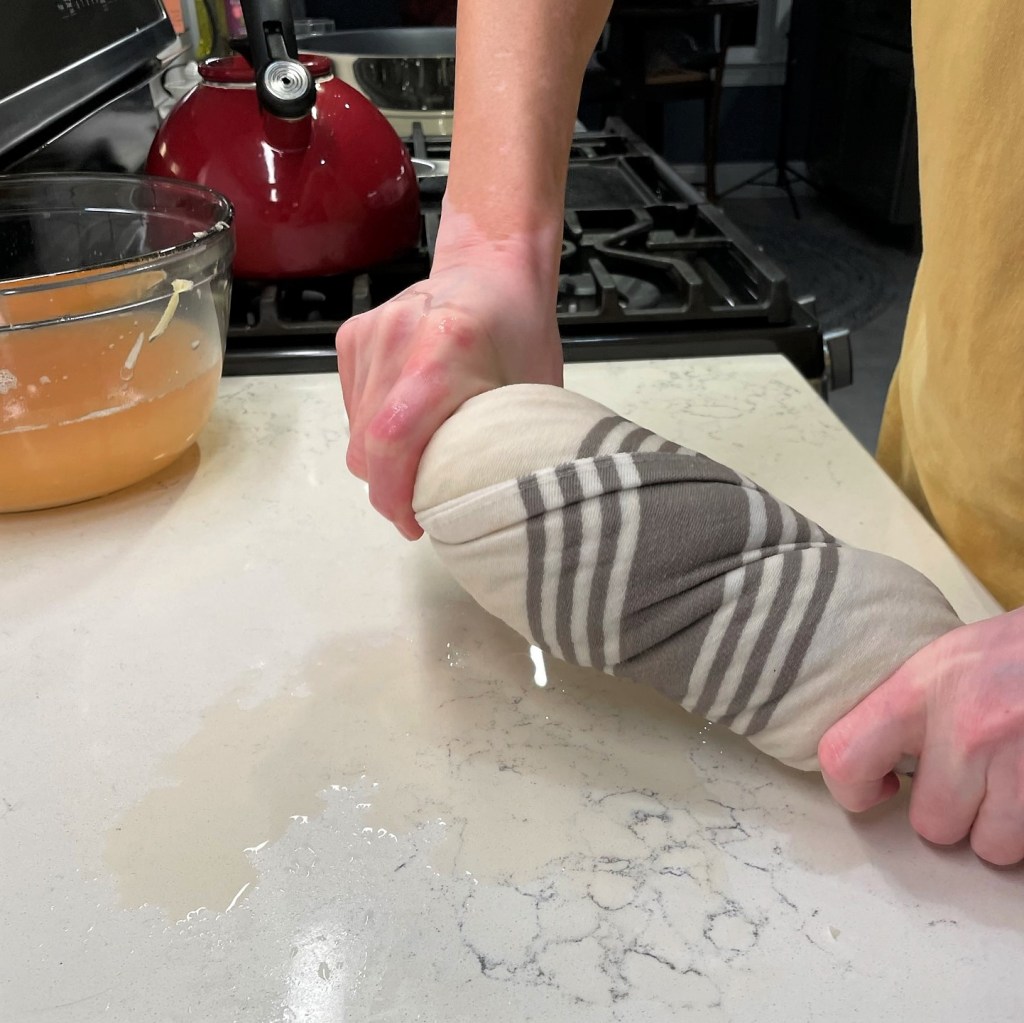
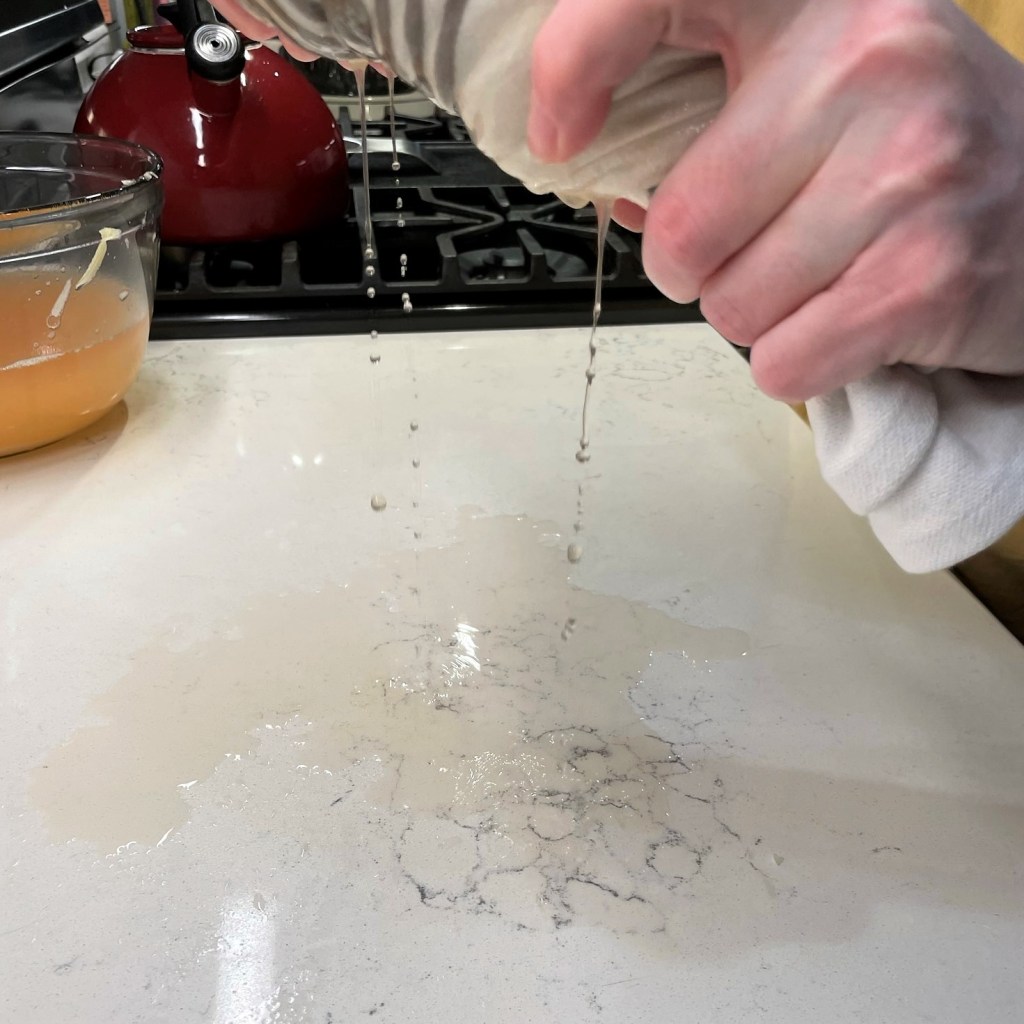
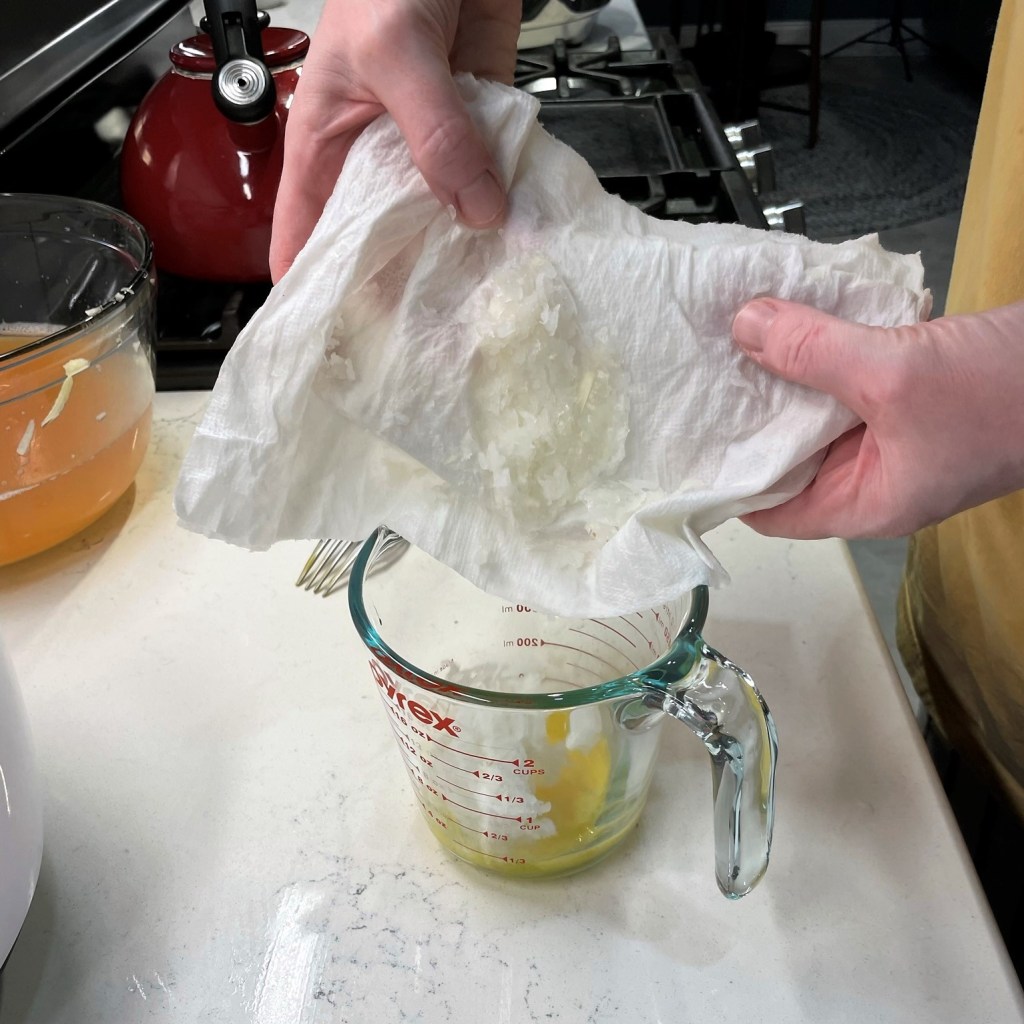
I knew that additional starch would be needed to make up for what the butternut squash lacked, and I went with a peeled russet potato (the starchiest variety), which I also shredded with the fine hole plate. Shredding it fine helped me to coax out as much starch as possible to aid in binding the squash shreds. I covered the russet shreds with ice water and let them soak for about 45 minutes. After soaking, I scooped the potato shreds out of the bowl and squeezed them dry in a clean towel. Then I carefully poured off the water, preserving the valuable starch that had settled to the bottom of the bowl. A quick, light blotting with a paper towel removed the remaining moisture without losing the starch.
It’s kind of amazing that so much starch was coaxed from a single russet potato.
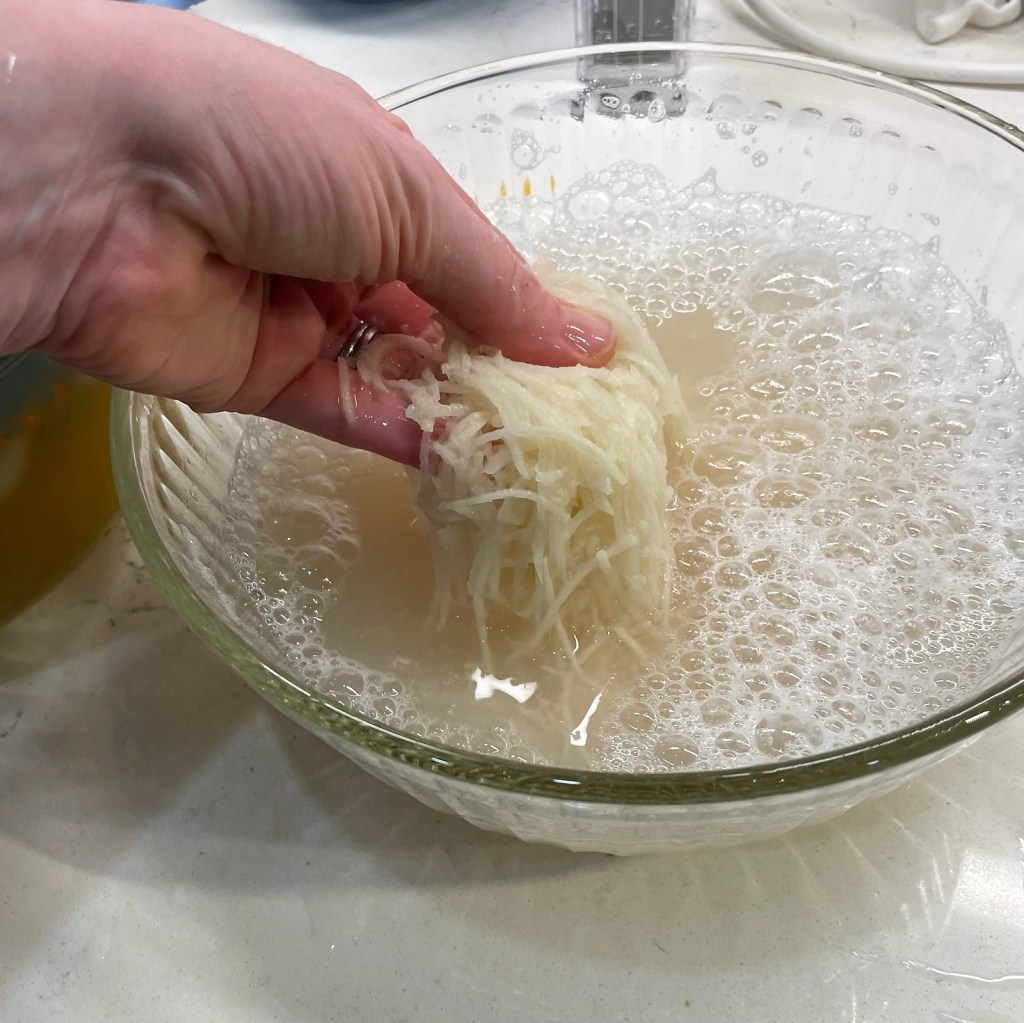
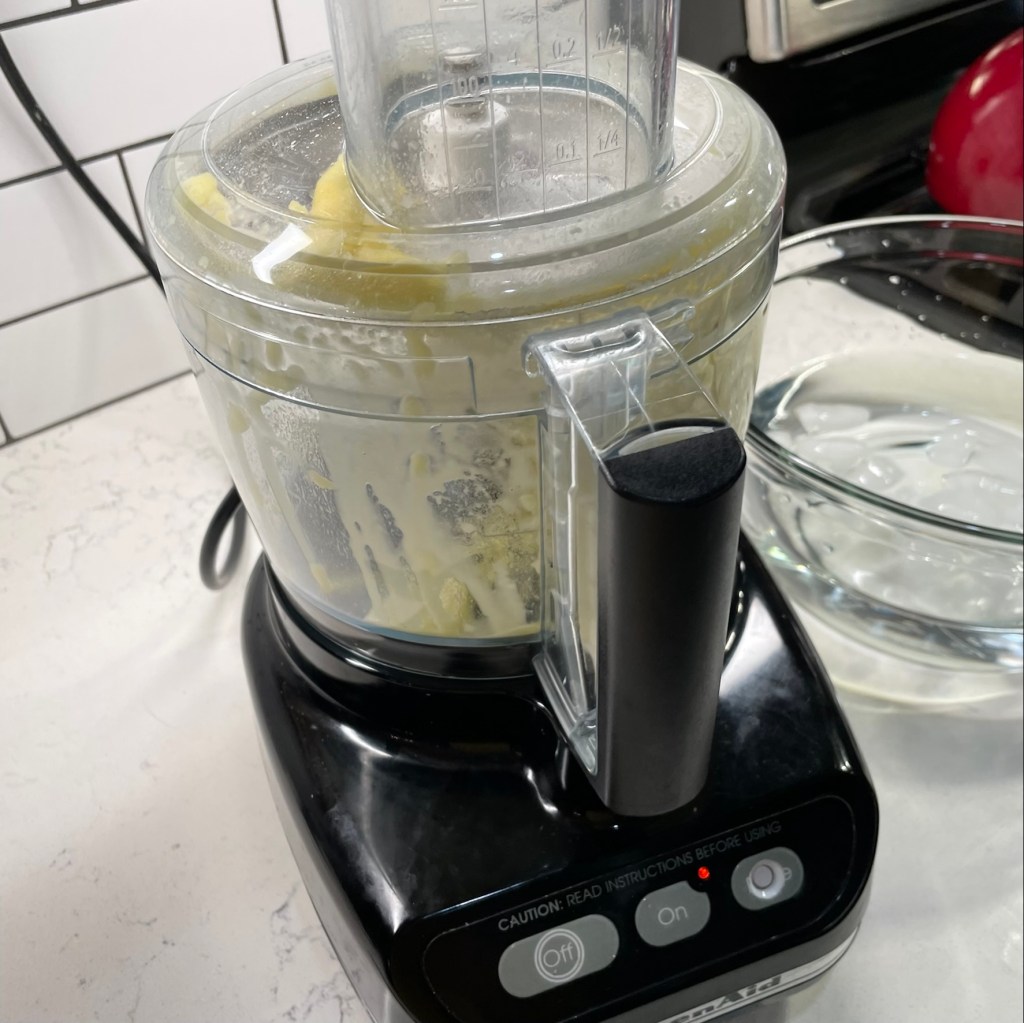
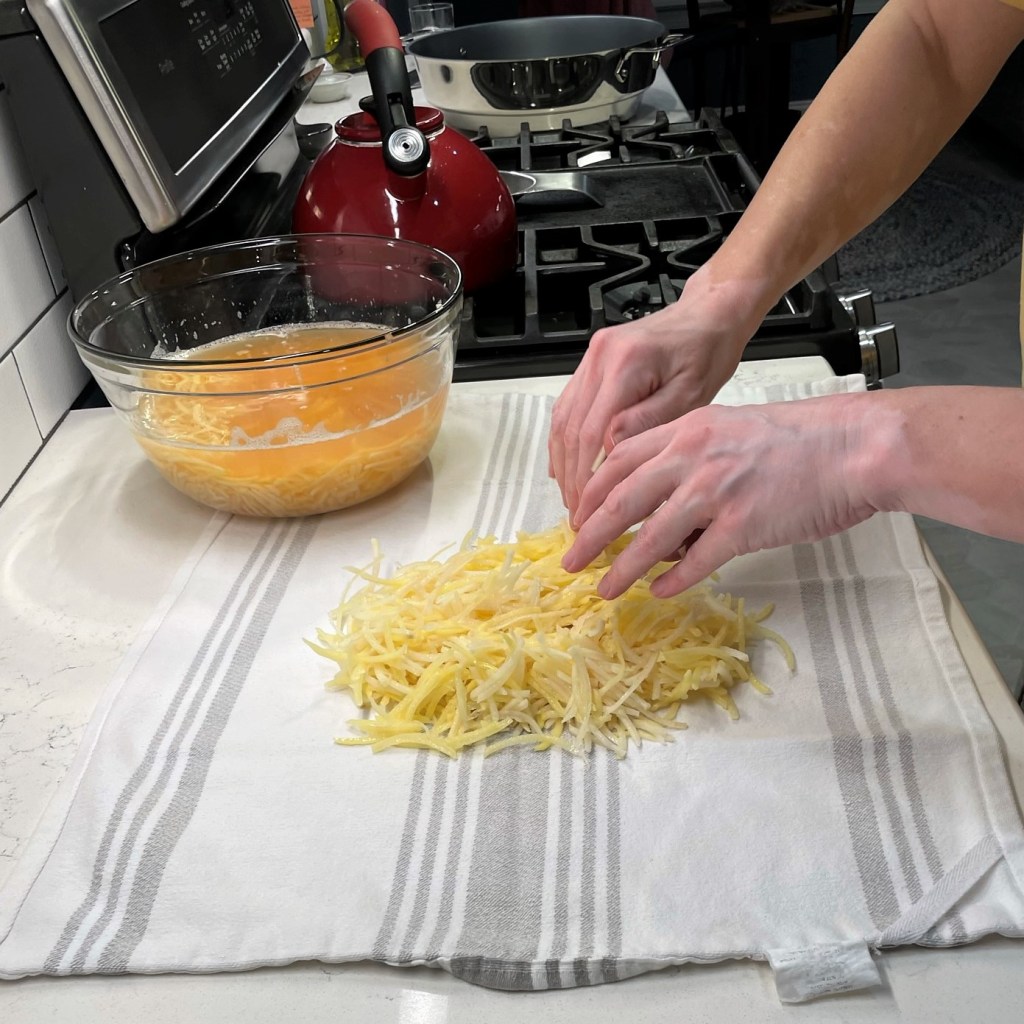
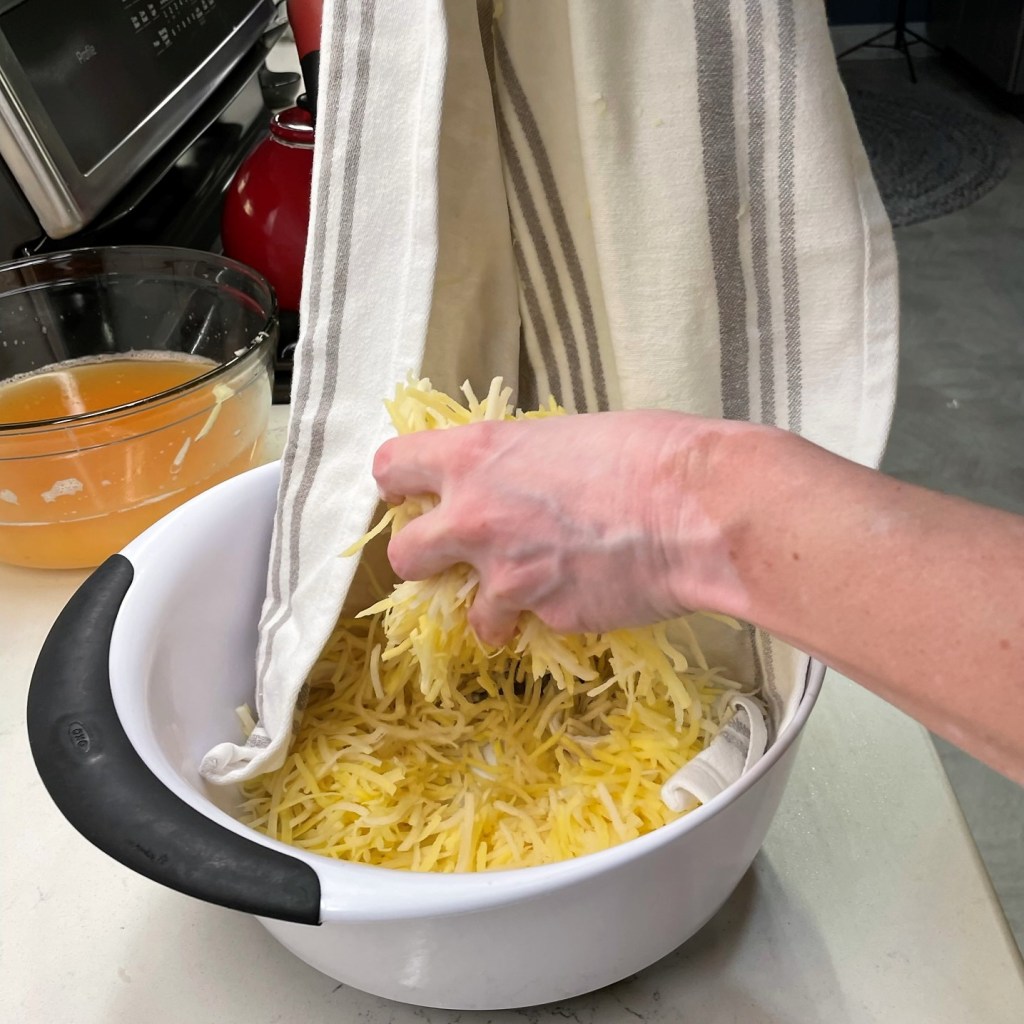
If there was any doubt about whether the squash has enough of its own starch to make latkes, this next part of my experiment settled it. I switched to the large hole plate for shredding the squash and applied the same ice water trick I used on the russet. Unfortunately, this was futile— almost no starch was visible in the bowl, so I’m pretty sure this could have been skipped altogether. Next time, I’ll simply shred the squash and blot it dry on a clean towel. This will also save me from having to wash so many dishes; to this point, I had every large glass bowl in my kitchen involved in this latke project.
All that soaking and draining and squeezing, for nothing!
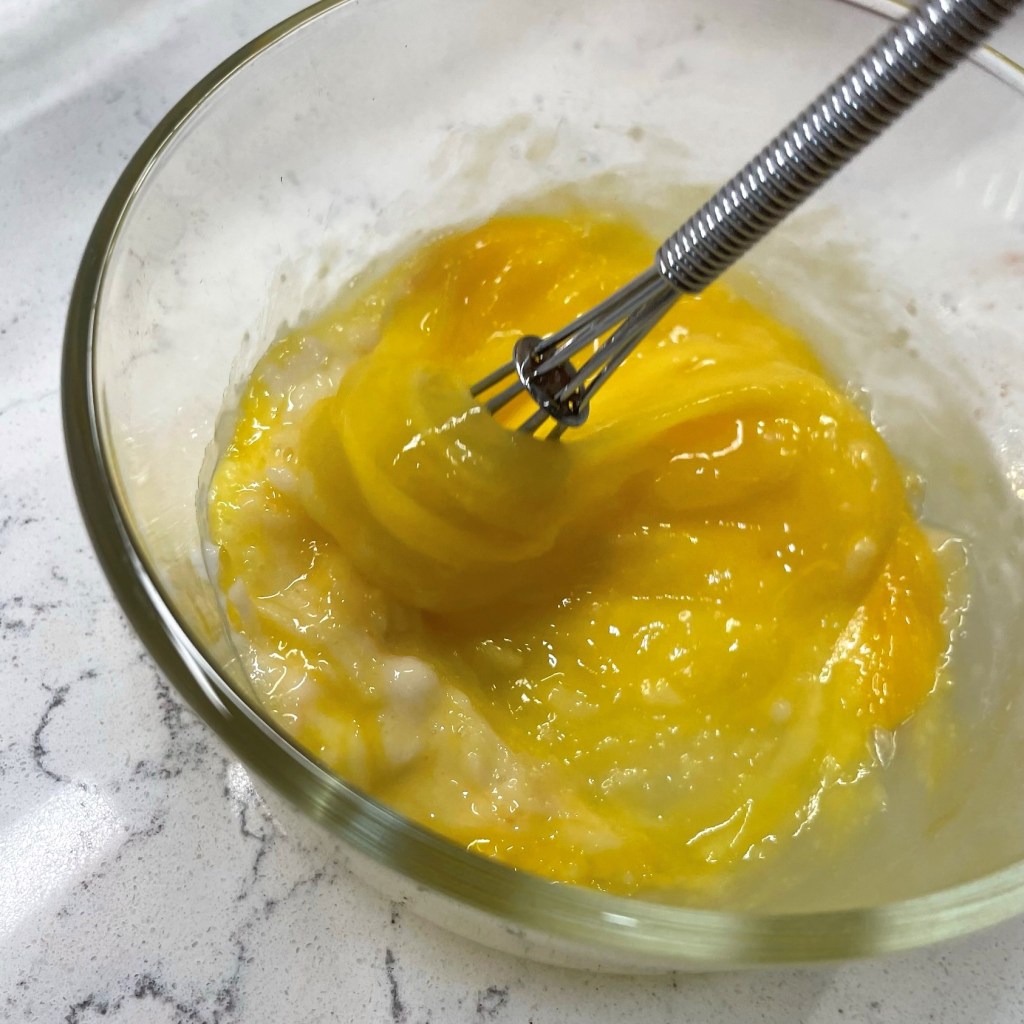
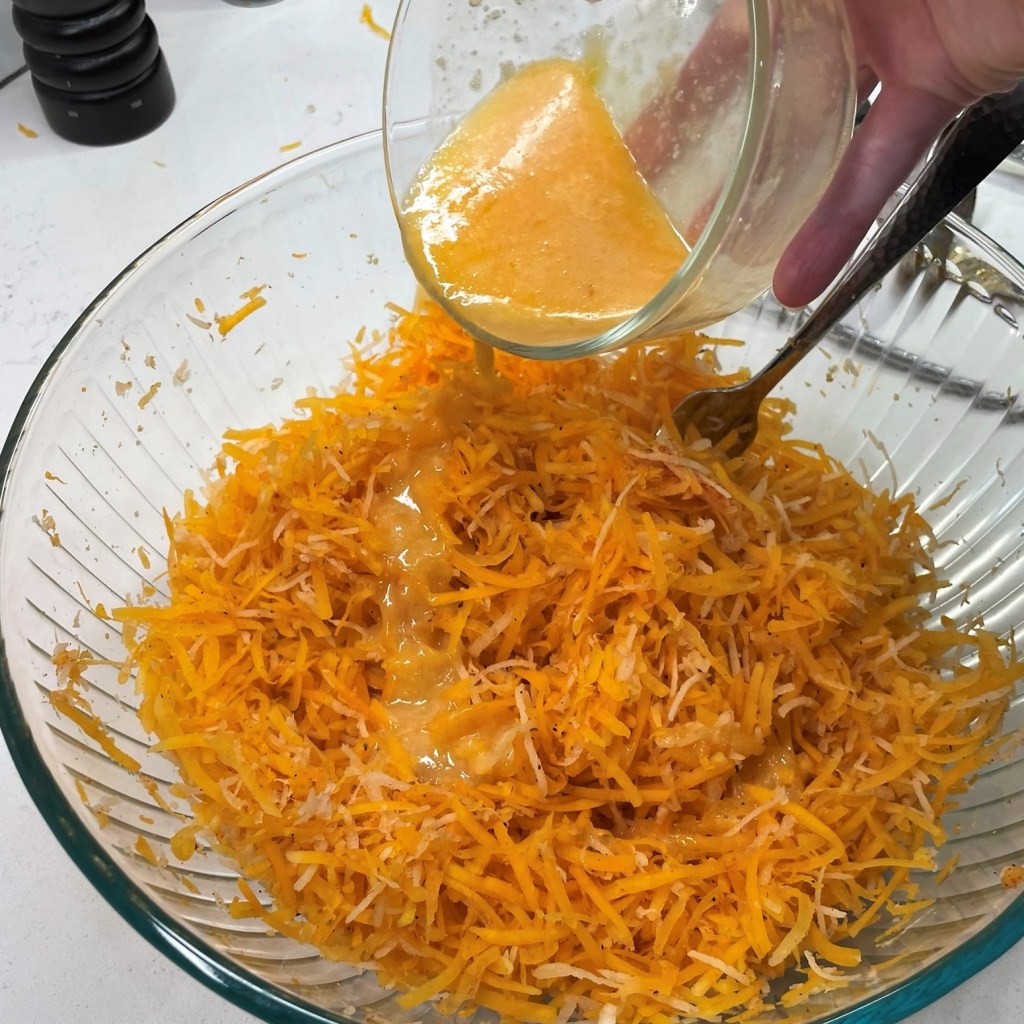
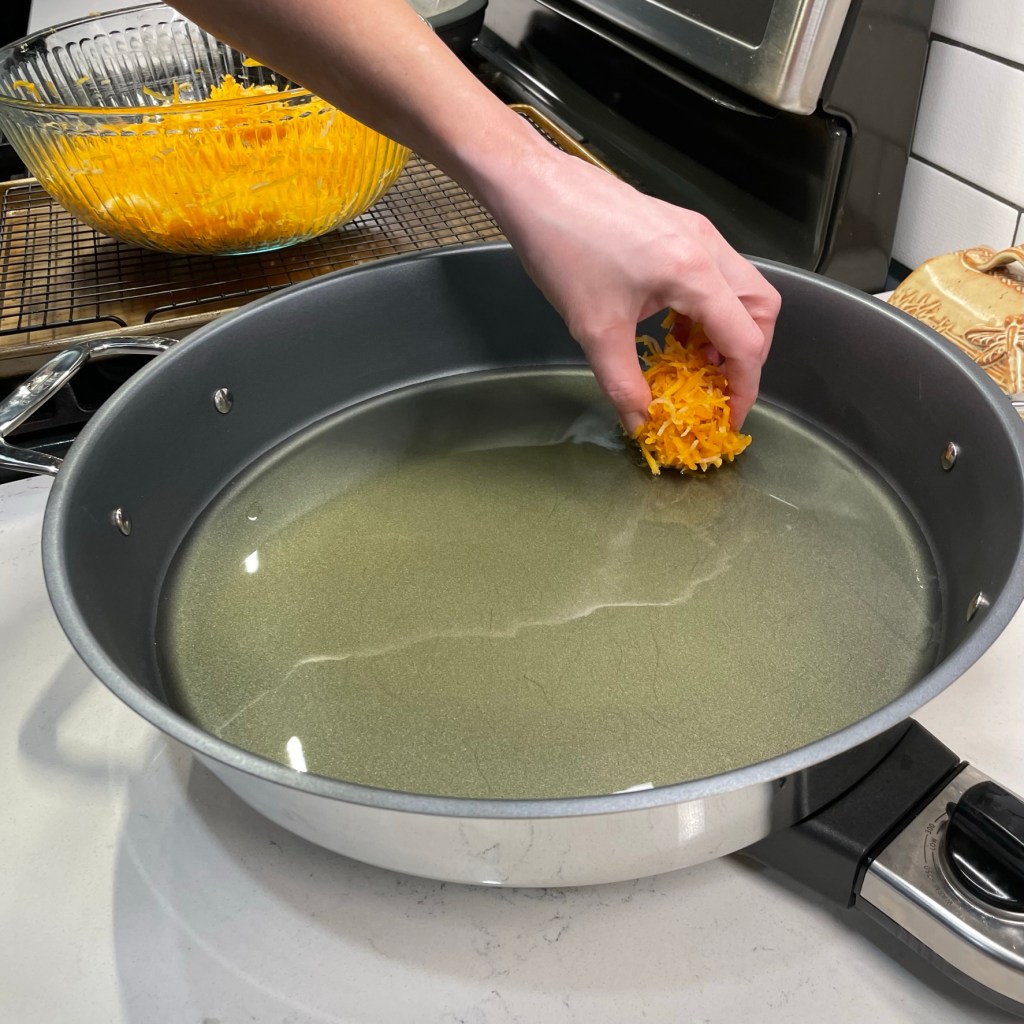
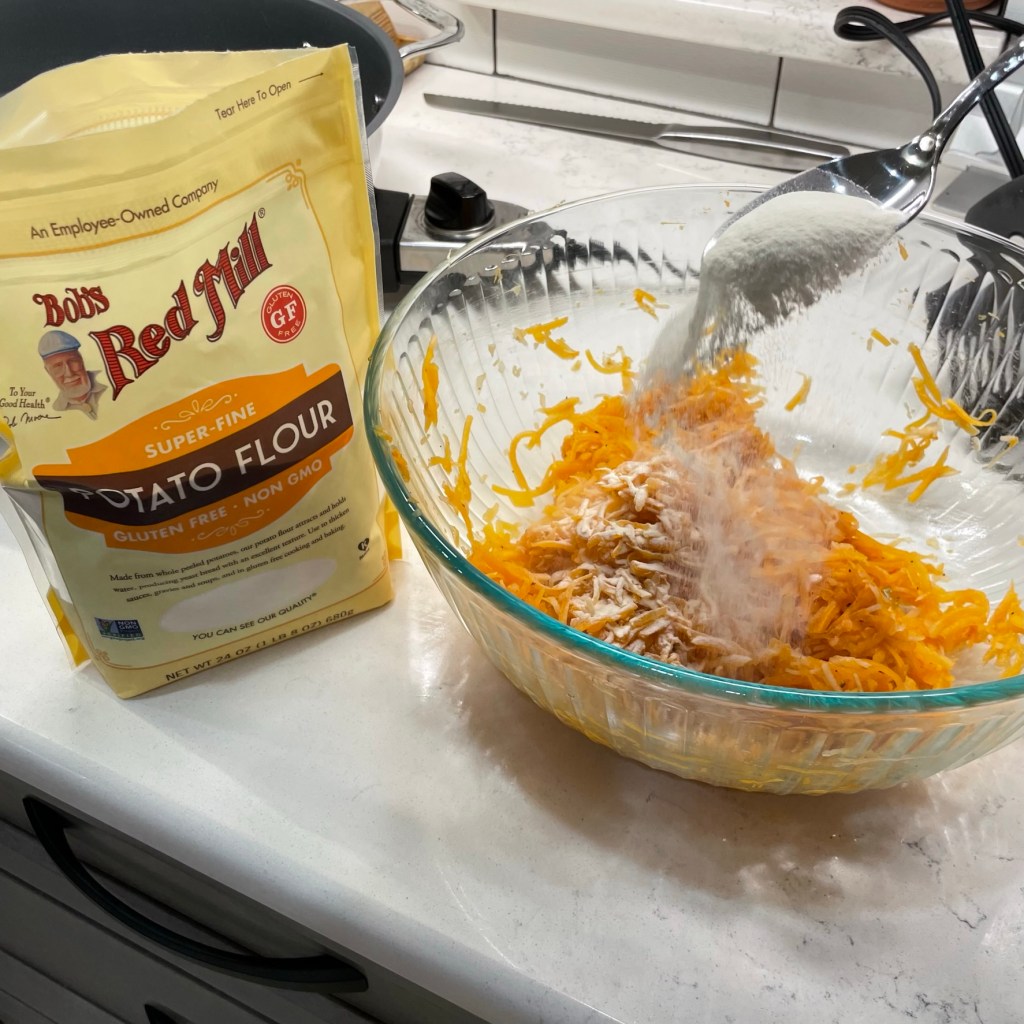
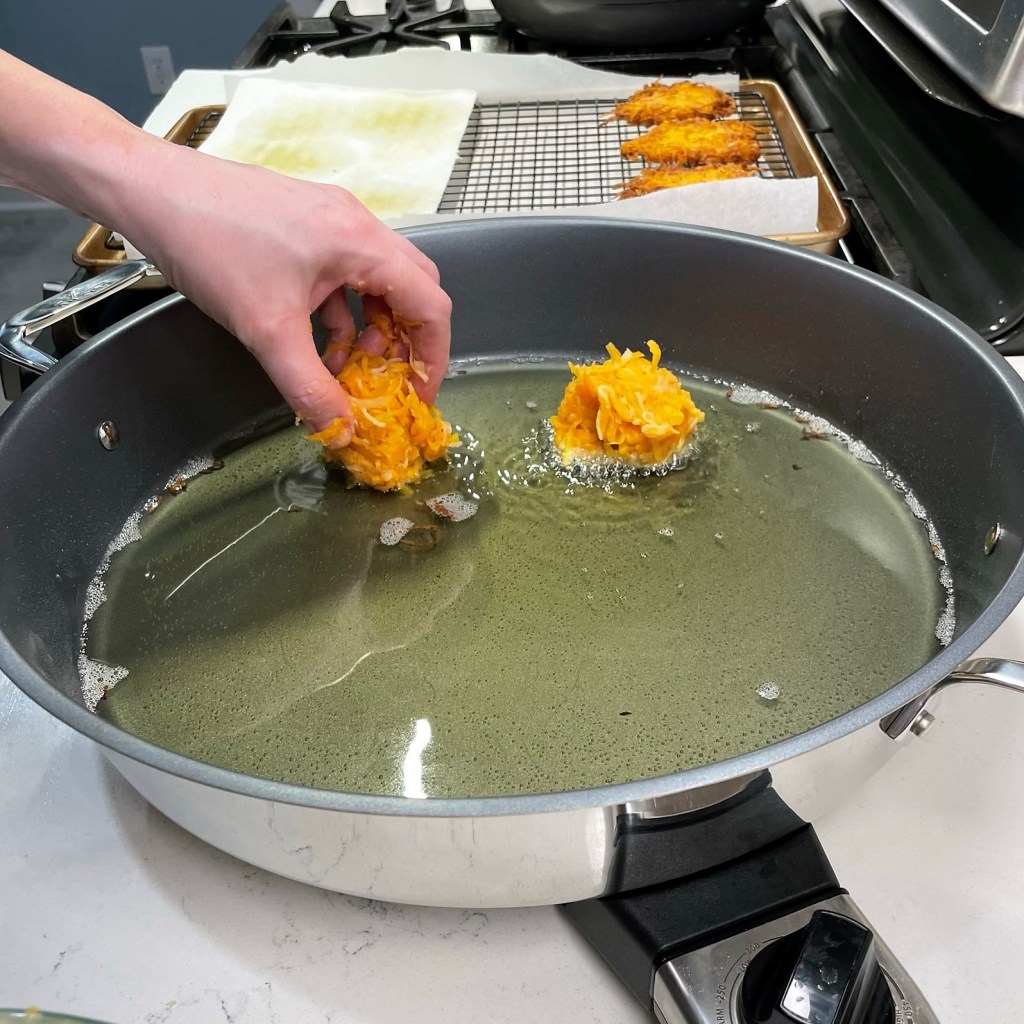
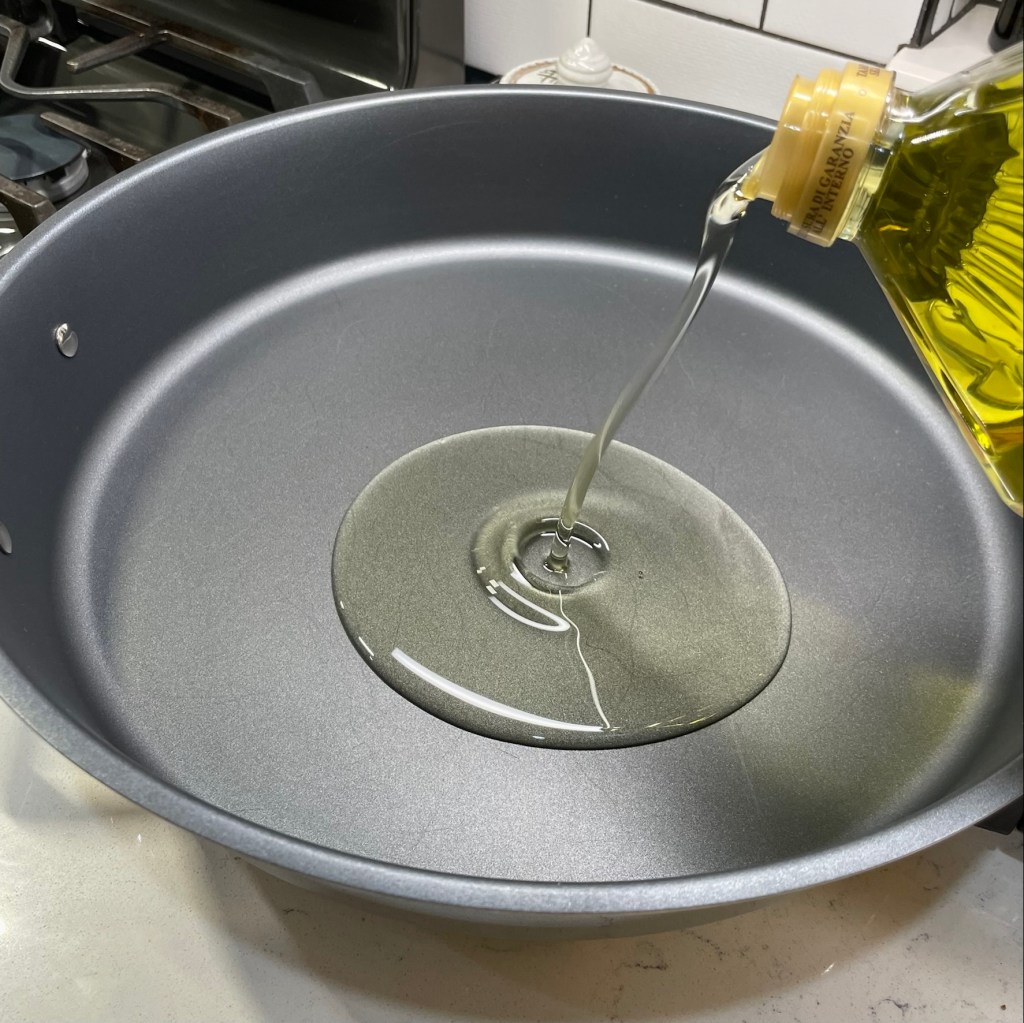
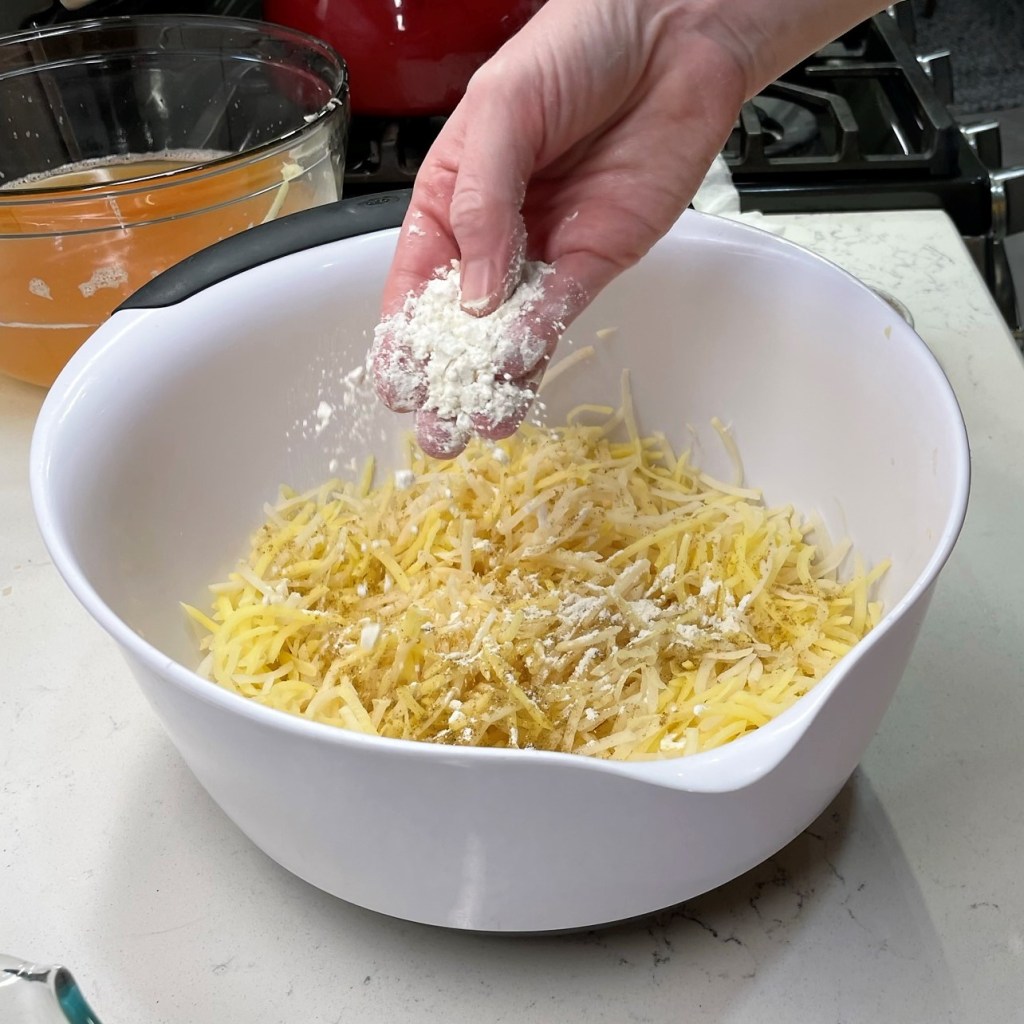
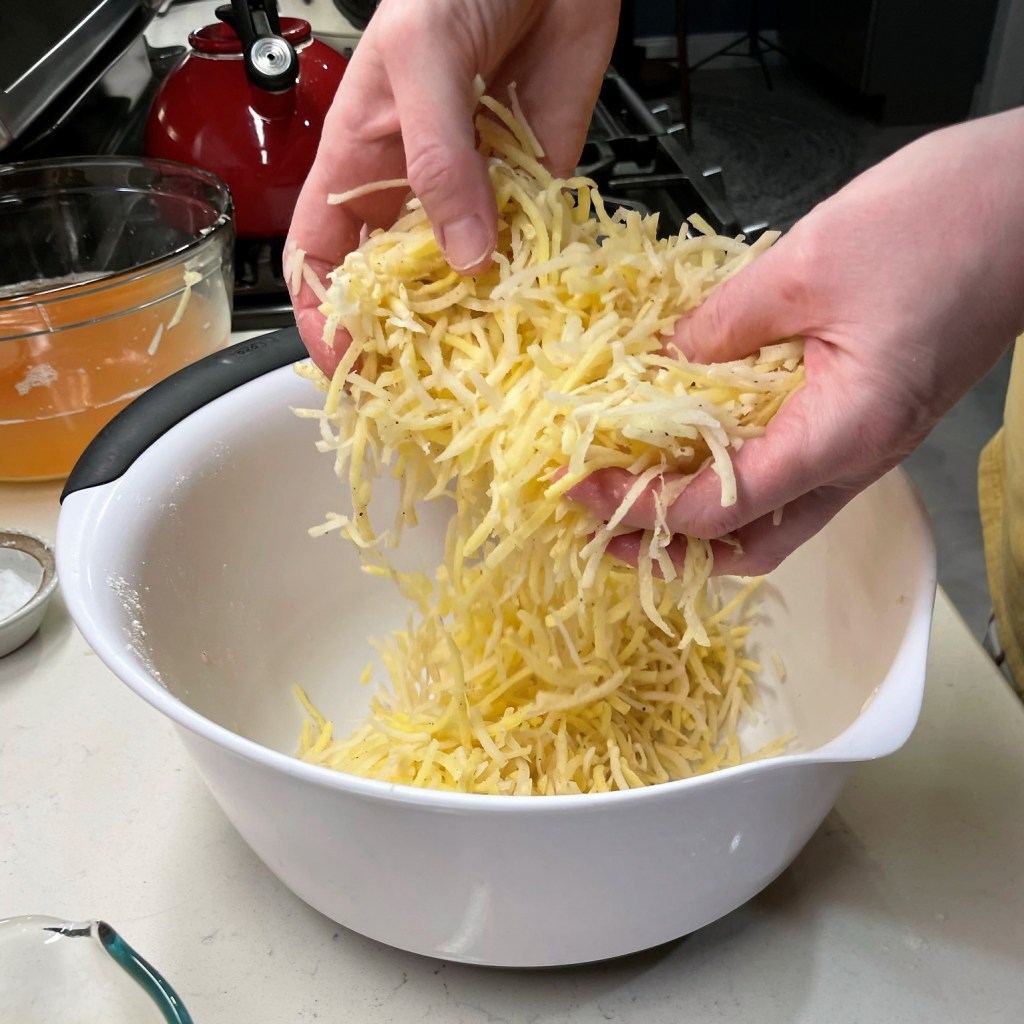
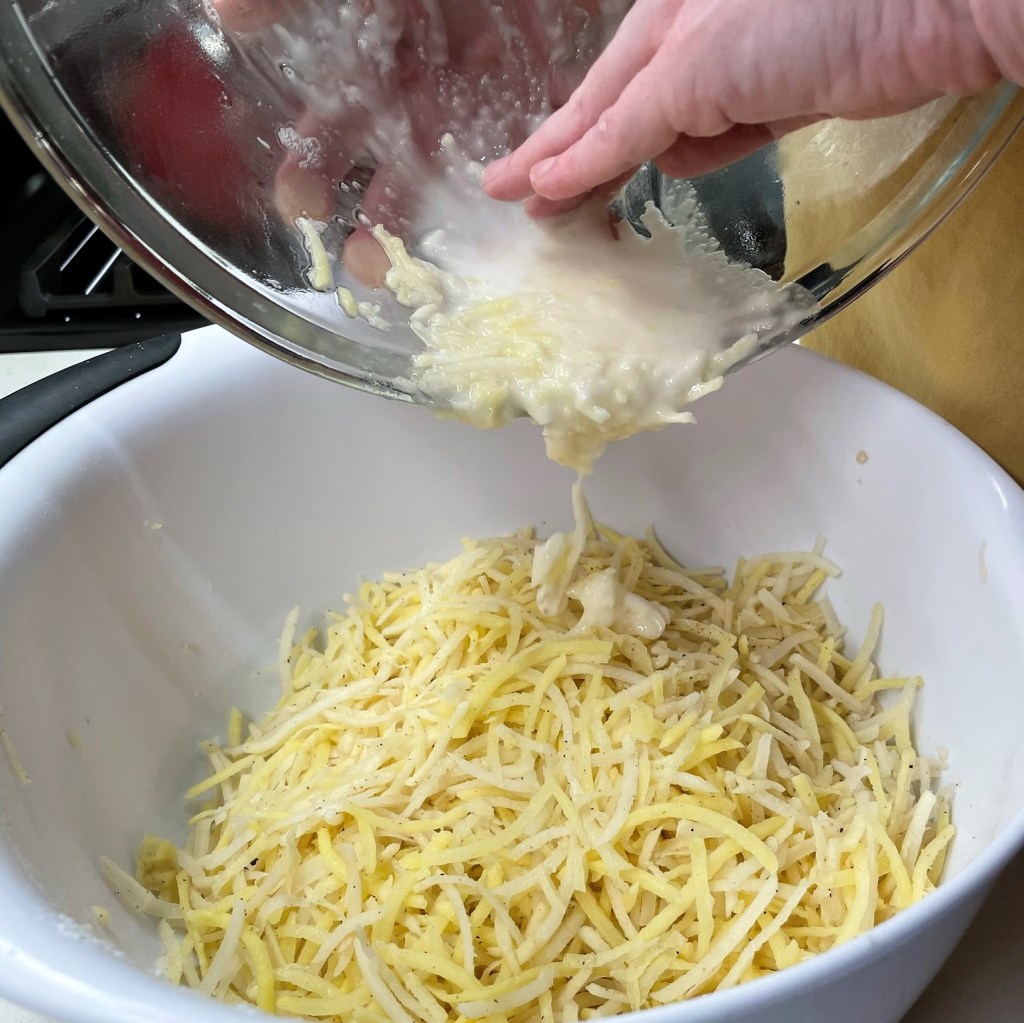
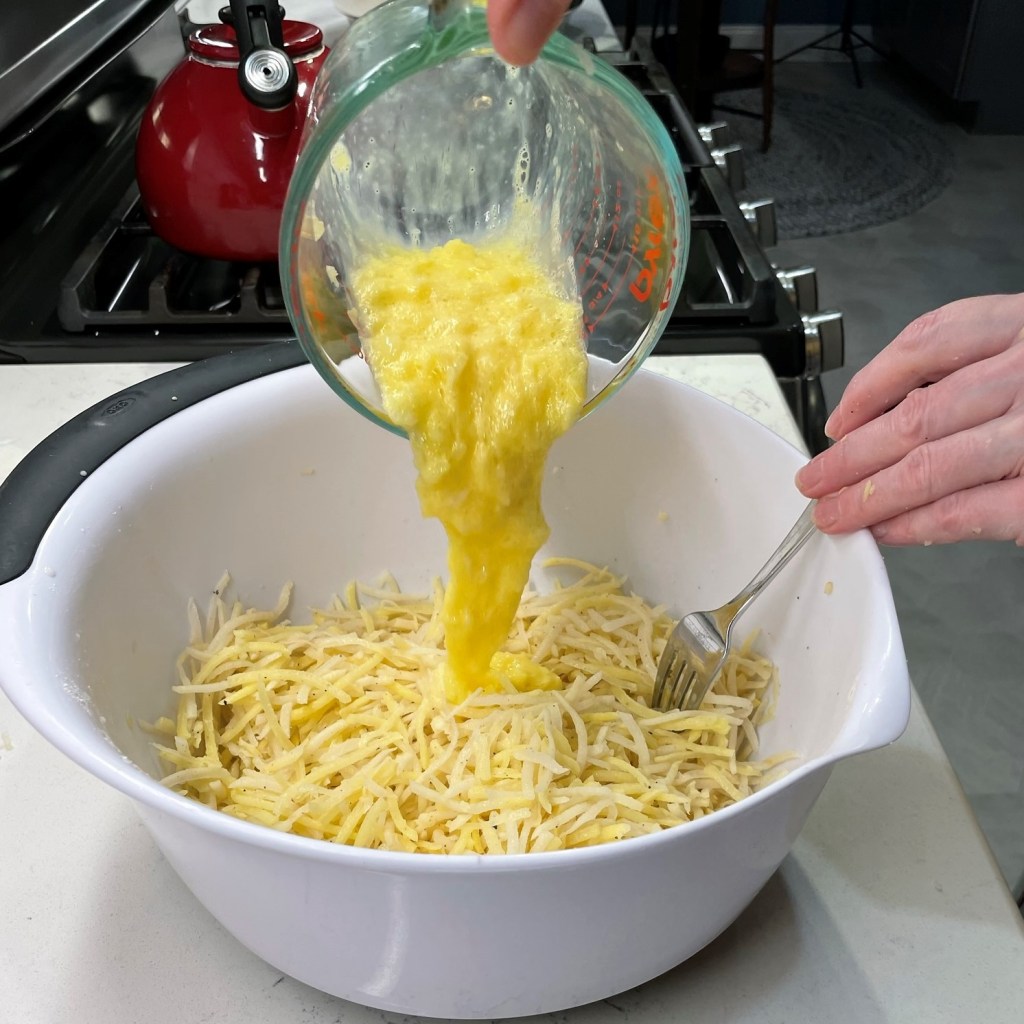
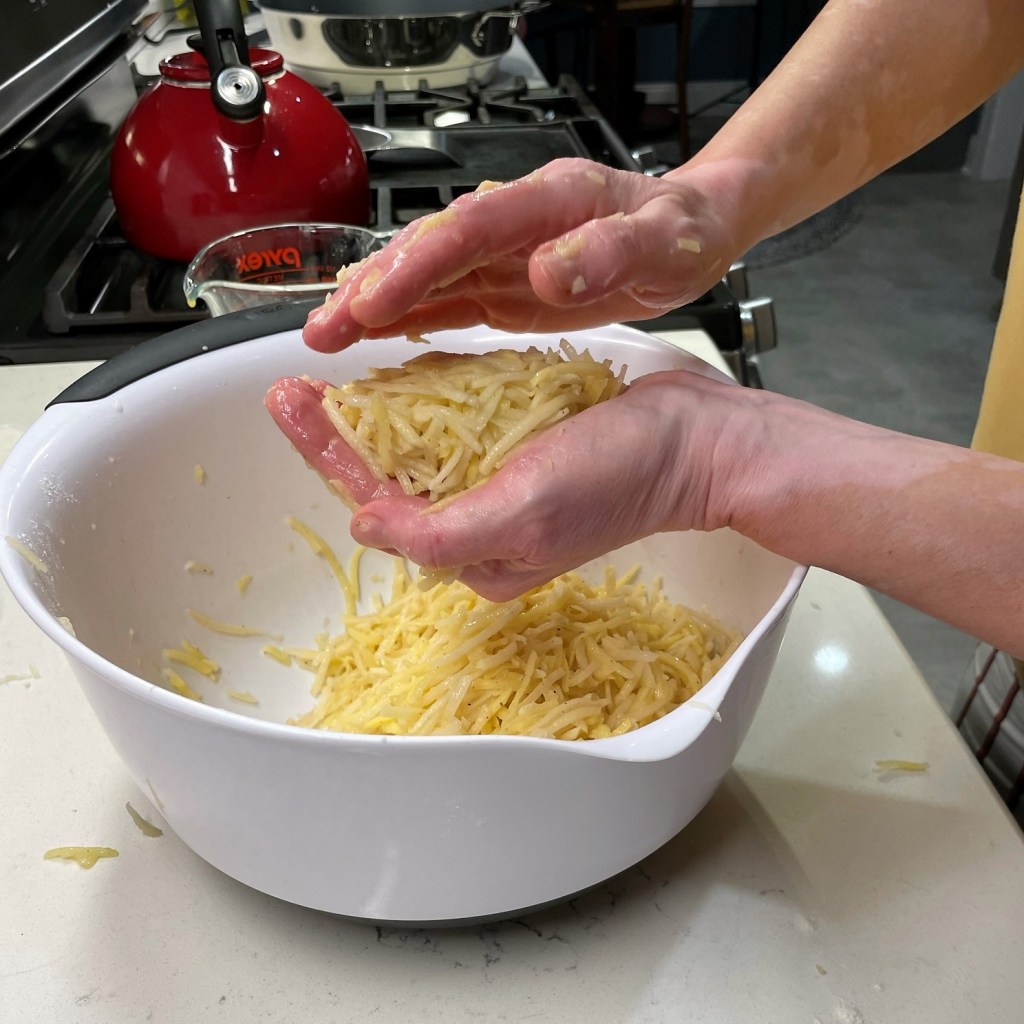
With everything shredded and prepped, I was finally ready to make the latkes! As with my regular recipe, I heated grapeseed oil (about 1-inch deep) in my large electric skillet. Figuring that the winter squash might take longer to cook than potatoes, I set the temperature at 350 rather than my usual 375. This turned out to be the wrong thing, as you’ll see in a moment. I mixed that beautiful, sticky russet potato starch with a beaten egg and blended it into the big bowl of squash, potato and onion shreds. The whole thing got a seasoning of salt and pepper, and with a quick test of the hot oil, I was in business.
Add the finely shredded russet.Add the dry onion shreds.Add the paprika, salt and pepper.Add the reserved potato starch to the egg.Whisk together to distribute the starch evenly.Combine it all to make the latke batter.
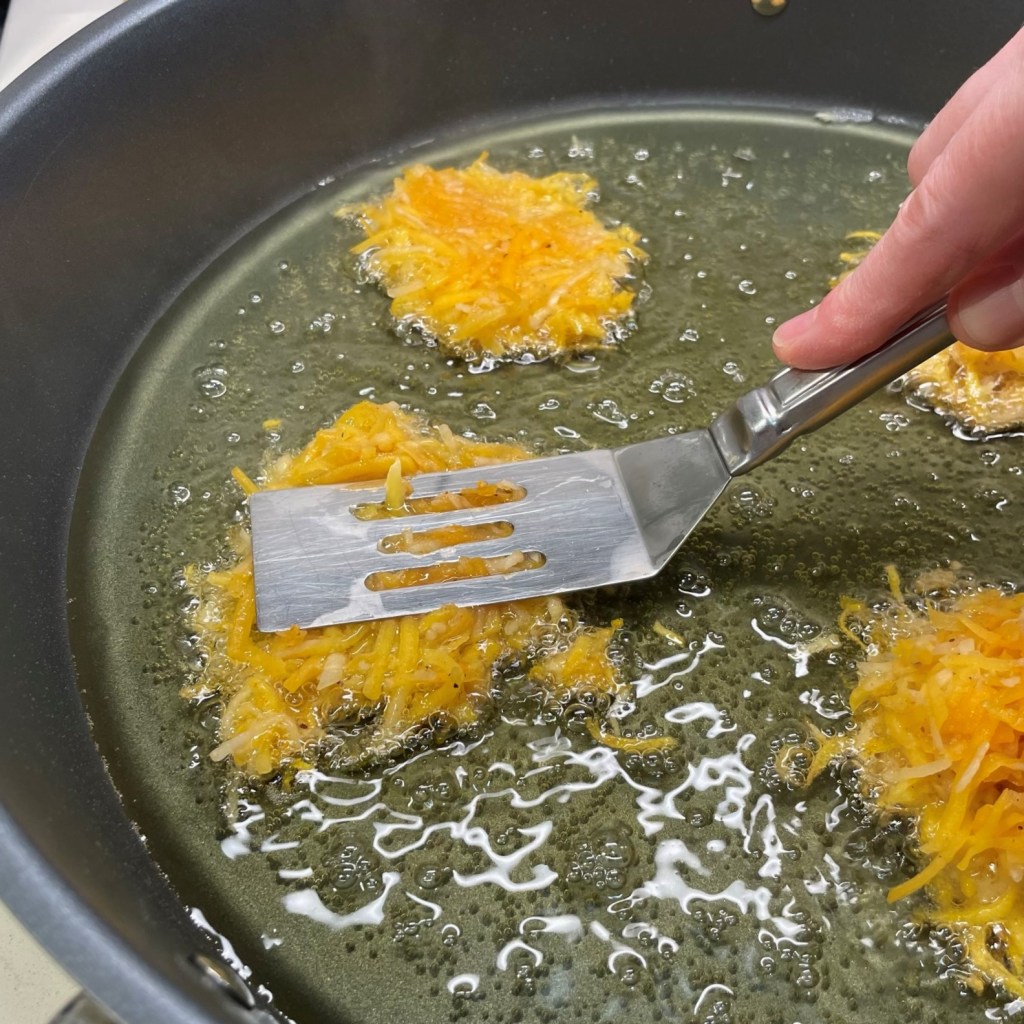
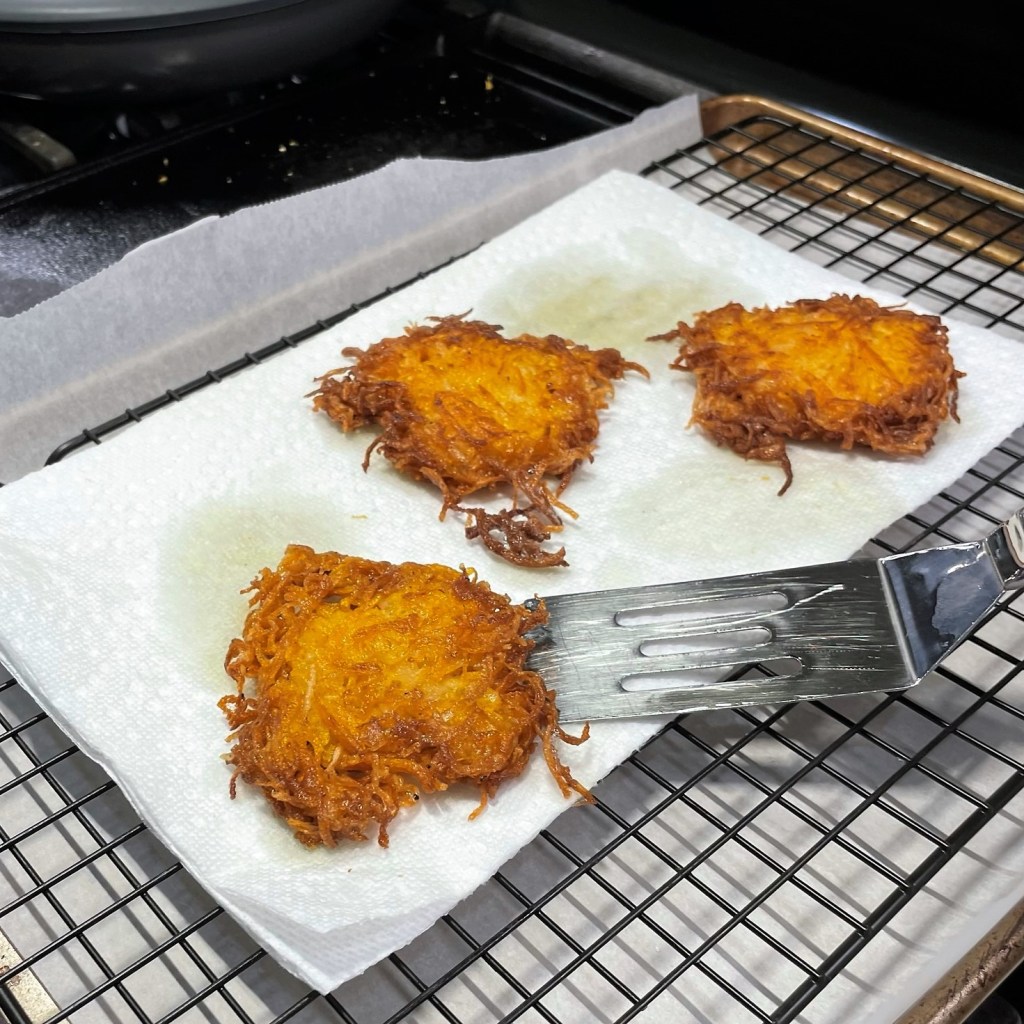
My first batch didn’t sizzle much when the batter hit the oil (the first sign that it wasn’t hot enough), they were tricky to turn (a sign of poor binding), and sure enough, these first few latkes turned out really greasy (strike three)! The patties had soaked up so much oil they were unpleasant to eat.
Place the latkes gently into the hot oil.Press latkes to flatten slightly.It’s easy to see how greasy this first batch was.GREASE was the word! 😦
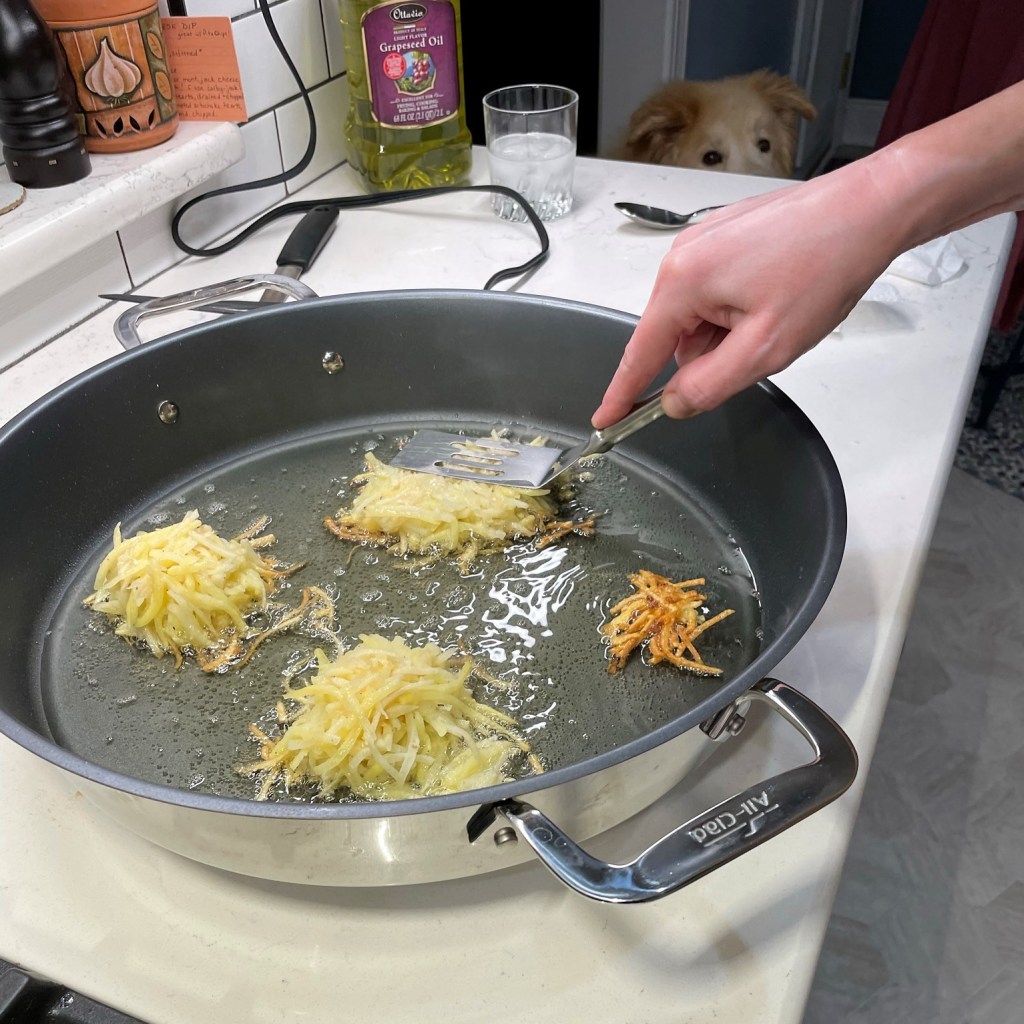
I had a couple of problems to be solved, so I adjusted both my ingredients and my technique. For better binding, I sprinkled in a generous spoonful of potato flour to stiffen up the batter. I also turned up the temperature to 375 F, and they were better but still a bit fragile and difficult to turn.
Potato flour, starch or flakes would work here.The second batch held together better.But they were still difficult to turn without breaking.
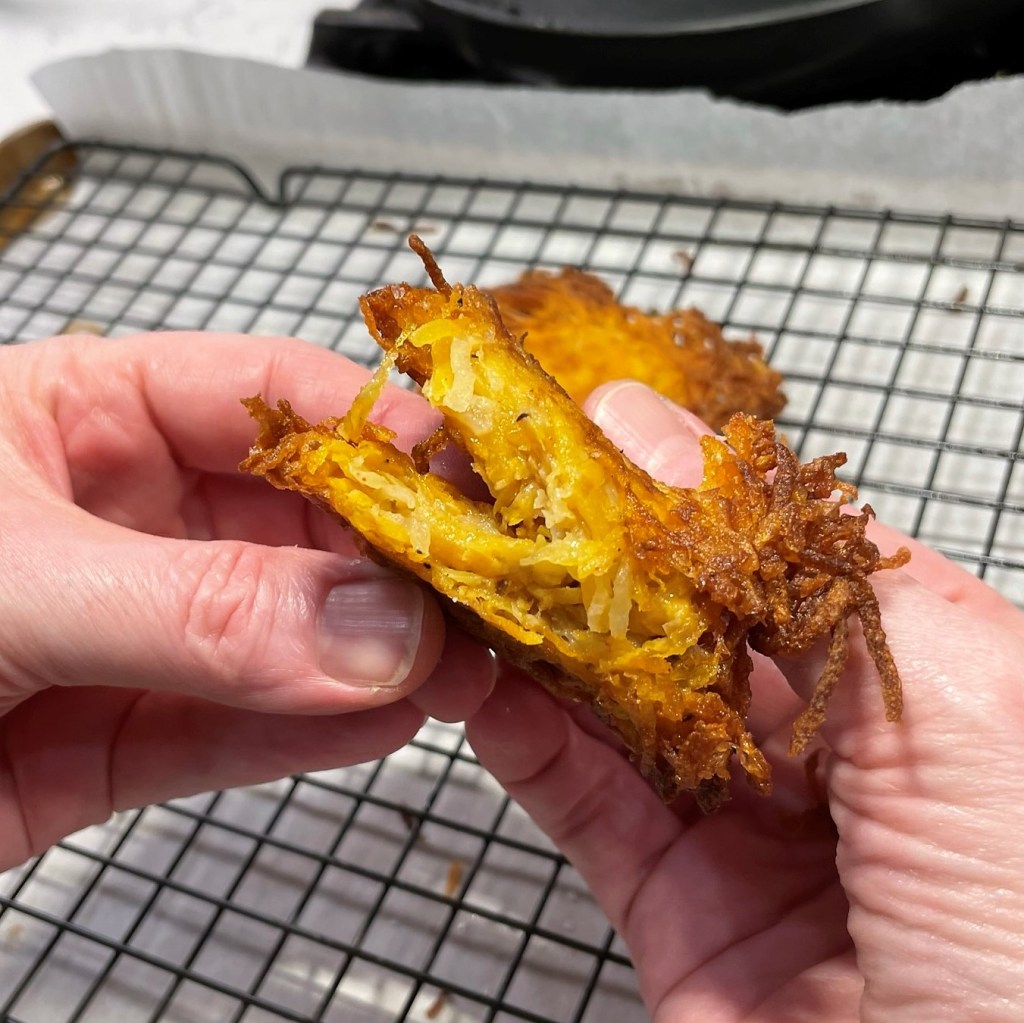
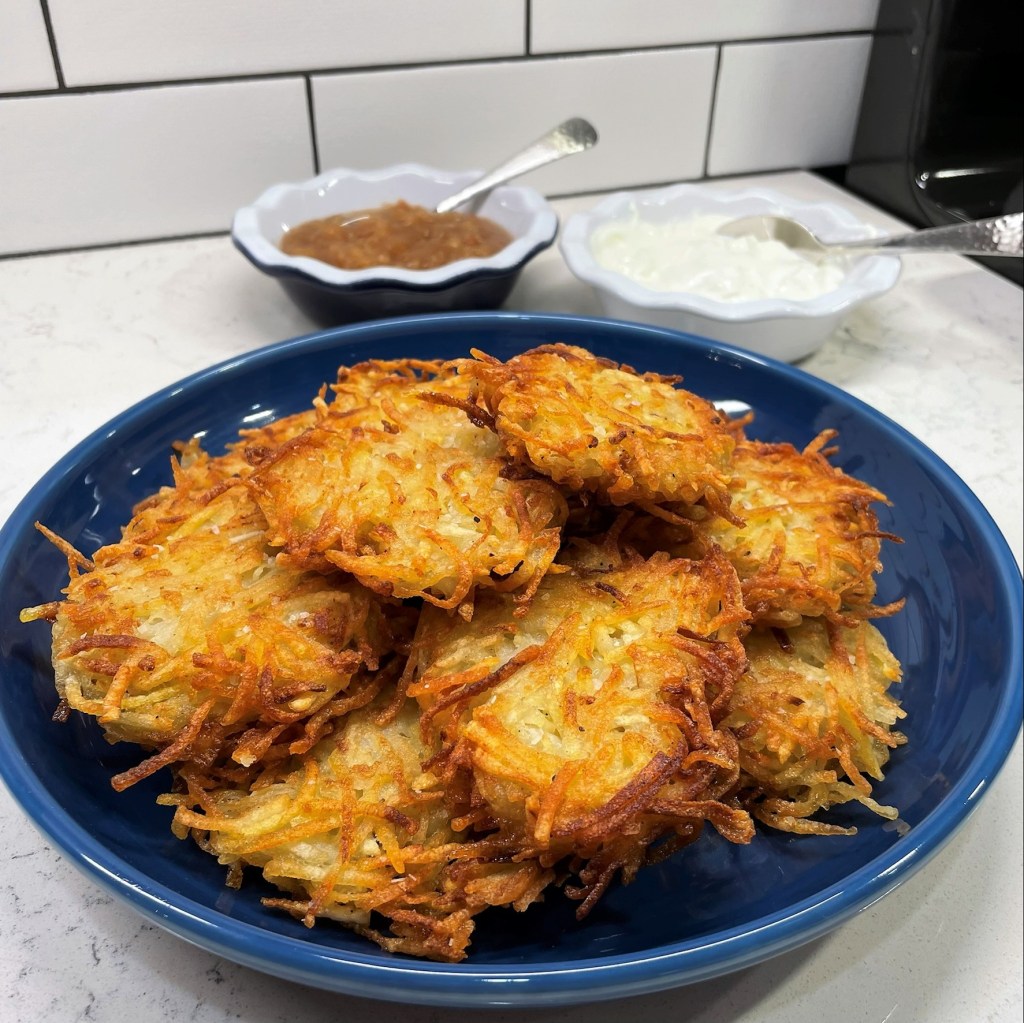
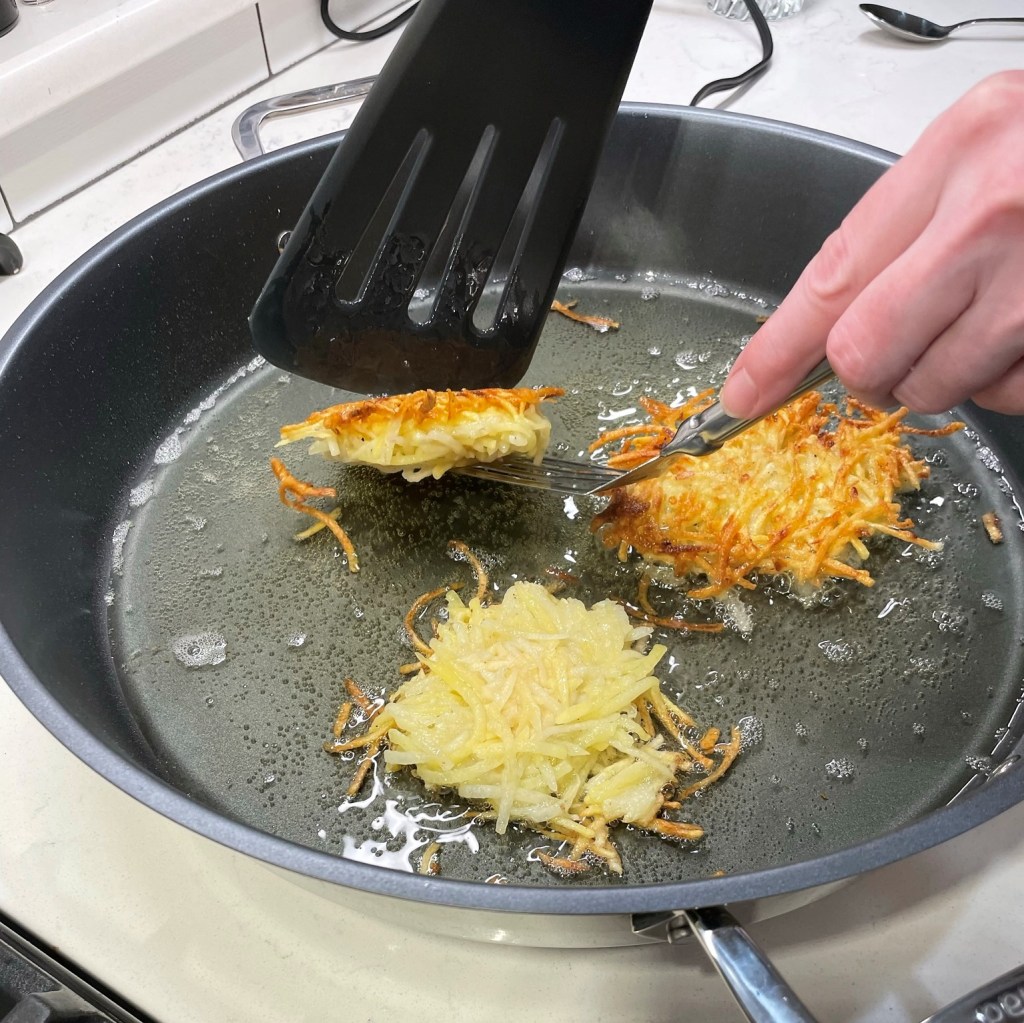
With only a third of my batter remaining, I had time to make one more adjustment and it was a simple one. For easier turning, I made the latkes a little bit smaller. This turned out to be a game changer, and the final two batches of smaller latkes came out crispy outside, tender inside and flavorful through and through!
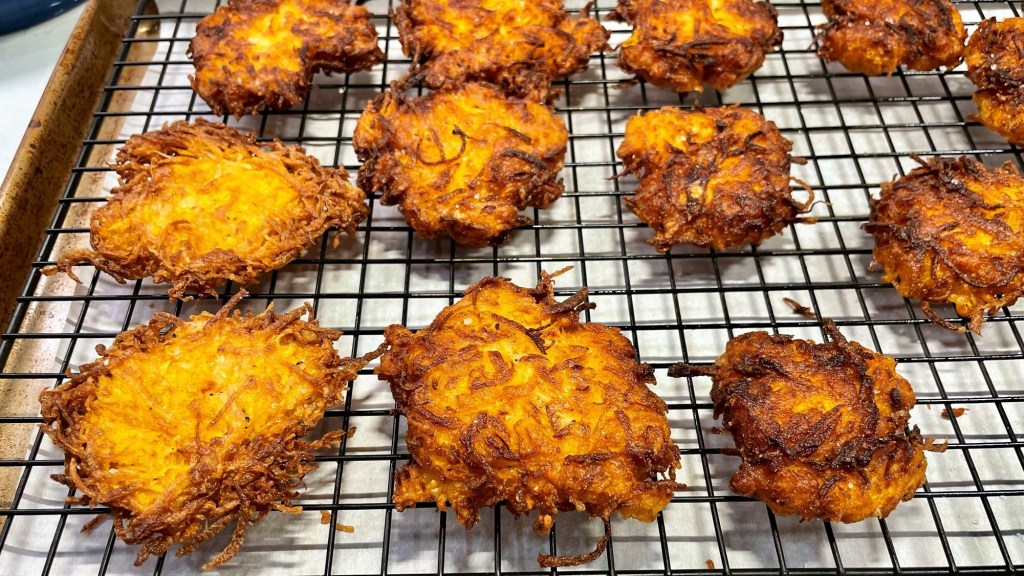
From the left: Batch 1 (too greasy), Batch 2 (better but fragile), Batch 3 (smaller, crispy and just right!)
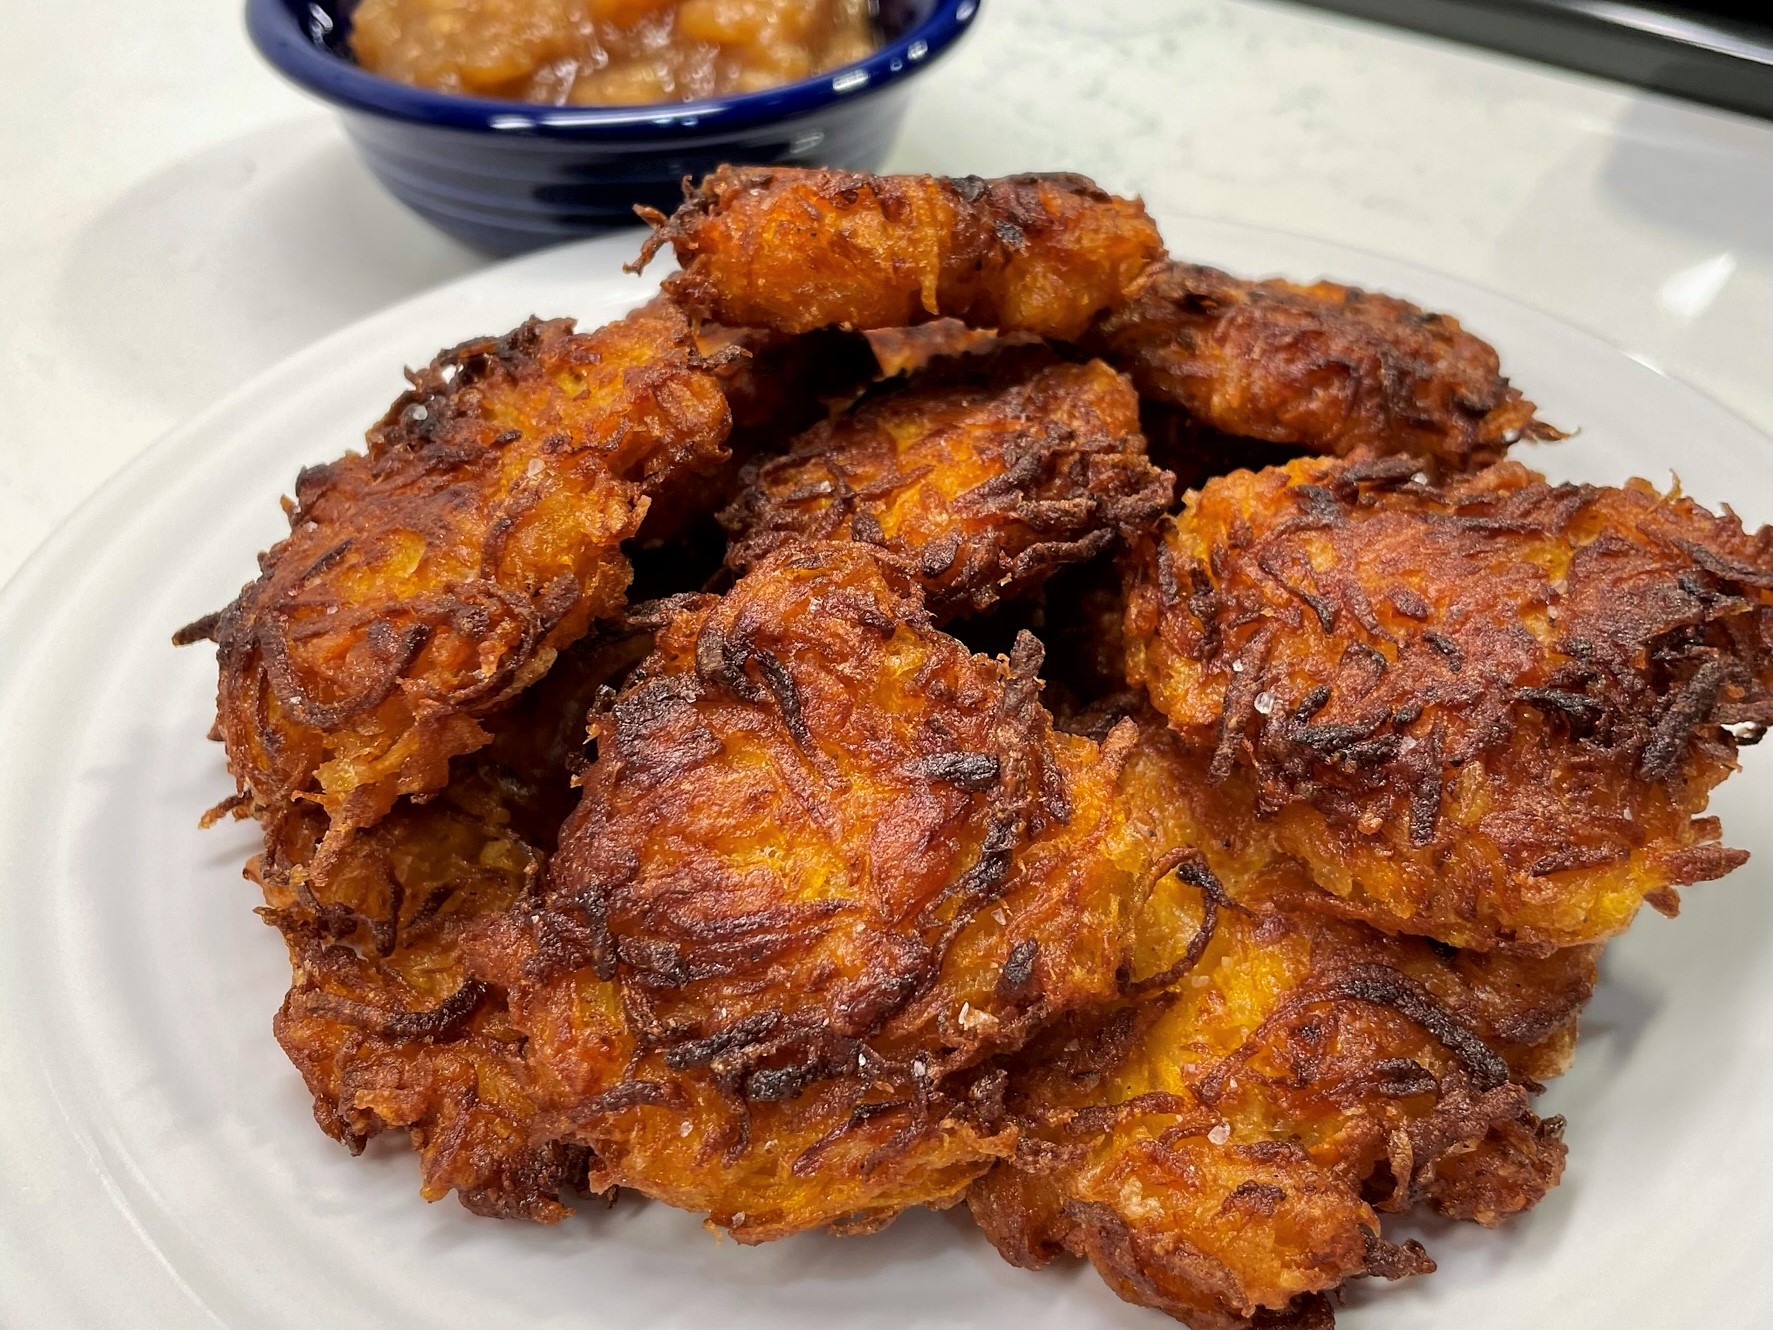
So this settles it— butternut squash does indeed make a delicious latke, and next time I want to make them, I’ll keep these simple takeaways in mind and I’ll follow the recipe below to make them right from the start!
Latke Lessons
Incorporate extra potato starch to make up for what your alternate ingredients might be missing.
Keep the oil temperature hot to ensure crispy edges and prevent greasy latkes.
Make the latkes a bit smaller for easier turning and faster cooking.
Grapeseed oil for frying (enough to fill frying pan to 1-inch deep)
Salt draws moisture out of ingredients. For best results, have everything lined up in advance, and wait to add salt until just before you fry the latkes, so the batter doesn’t get liquidy.
Directions
Grate onion with fine shred plate. Press shreds through a fine mesh strainer placed over a measuring cup. Discard onion juice or save it for another use (I usually add it to a meat marinade).
Grate potato with fine shred plate. Transfer potato shreds to a medium sized bowl and cover with ice water. Set aside for 45 minutes, and then scoop out shreds and squeeze dry in a clean towel. Carefully pour off water, preserving the starch that settles to the bottom of the bowl.
Grate butternut squash with large shred plate. Transfer squash to a clean towel and squeeze dry. Add squash shreds to a large bowl. Add potato and onion shreds. Sprinkle in smoked paprika and black pepper. Use a fork, tongs or your hands to mix everything evenly. Sprinkle on potato flour and mix again.
Heat grapeseed oil to 375 F, with oil about 1-inch deep in a cast iron or electric skillet.
Whisk the reserved potato starch and potato flour into the egg in a small bowl. Stir in salt.
When the oil reaches temperature, blend the egg mixture into the squash and potato shreds. Shape the latke “batter” into small clumps approximately the size of walnuts. Shape one at a time and place them immediately into the hot oil. After about 1 minute, use the back of a flat metal spatula to lightly press the latkes flat.
Turn the latkes to cook the other side after 3 to 4 minutes, when they are crispy and golden brown on the first side. Cook the second side until done to match, for a total of about 7 minutes for each batch.
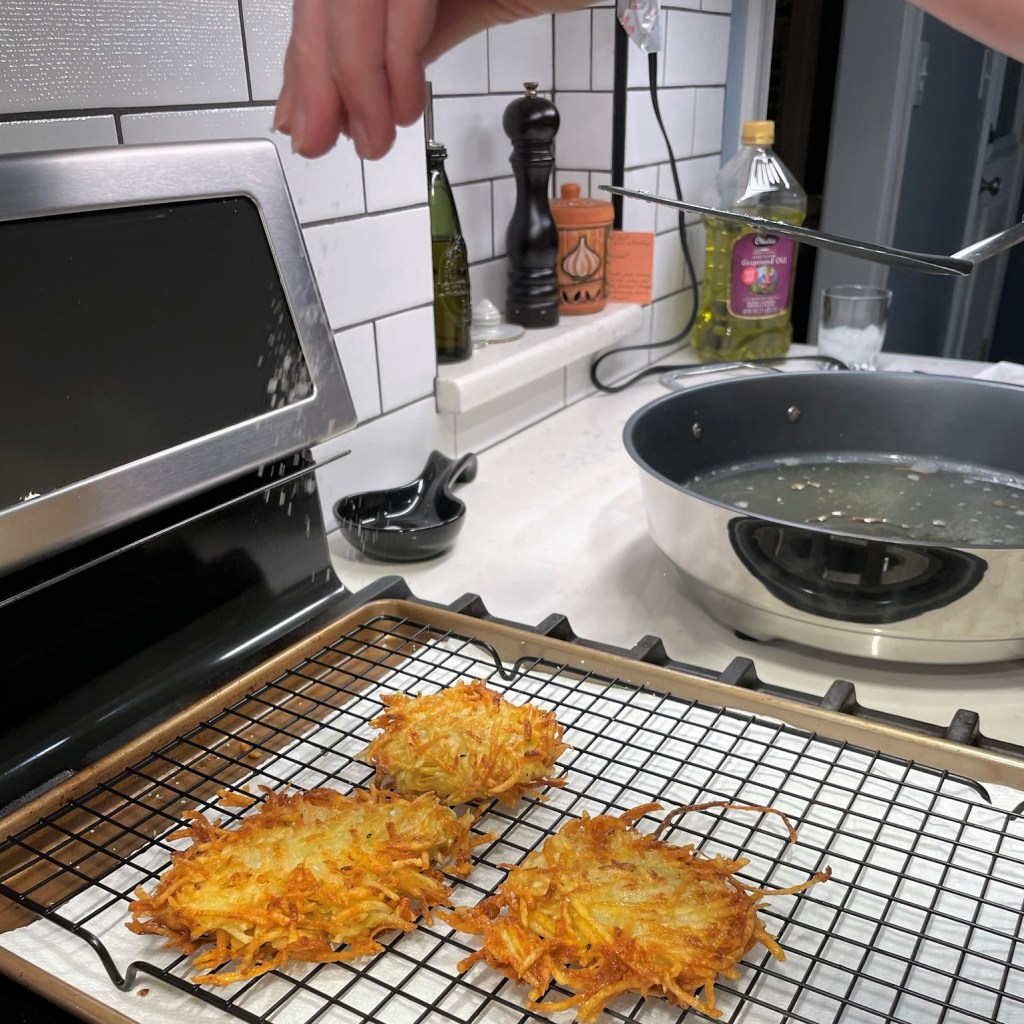
Transfer finished latkes to a paper towel-lined baking sheet or rack. Sprinkle them immediately with a pinch of salt.
Repeat with remaining latke batter. Serve immediately.
Latkes don’t reheat particularly well, so it’s best to make only as many as you intend to eat right away.
A helpful word to the wise: the towels you use to squeeze the potato and squash dry will be starchy and/or stained. It’s best to rinse them right away before adding them to your laundry.
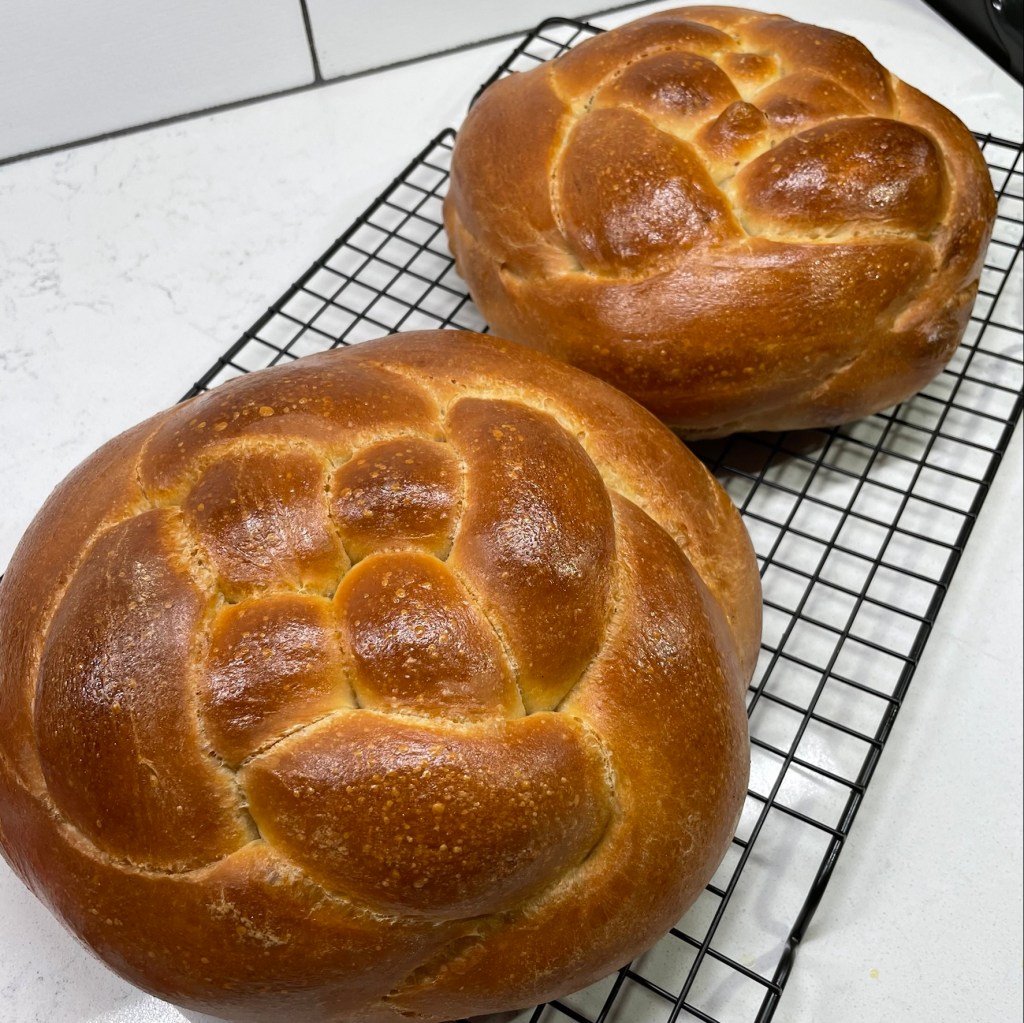
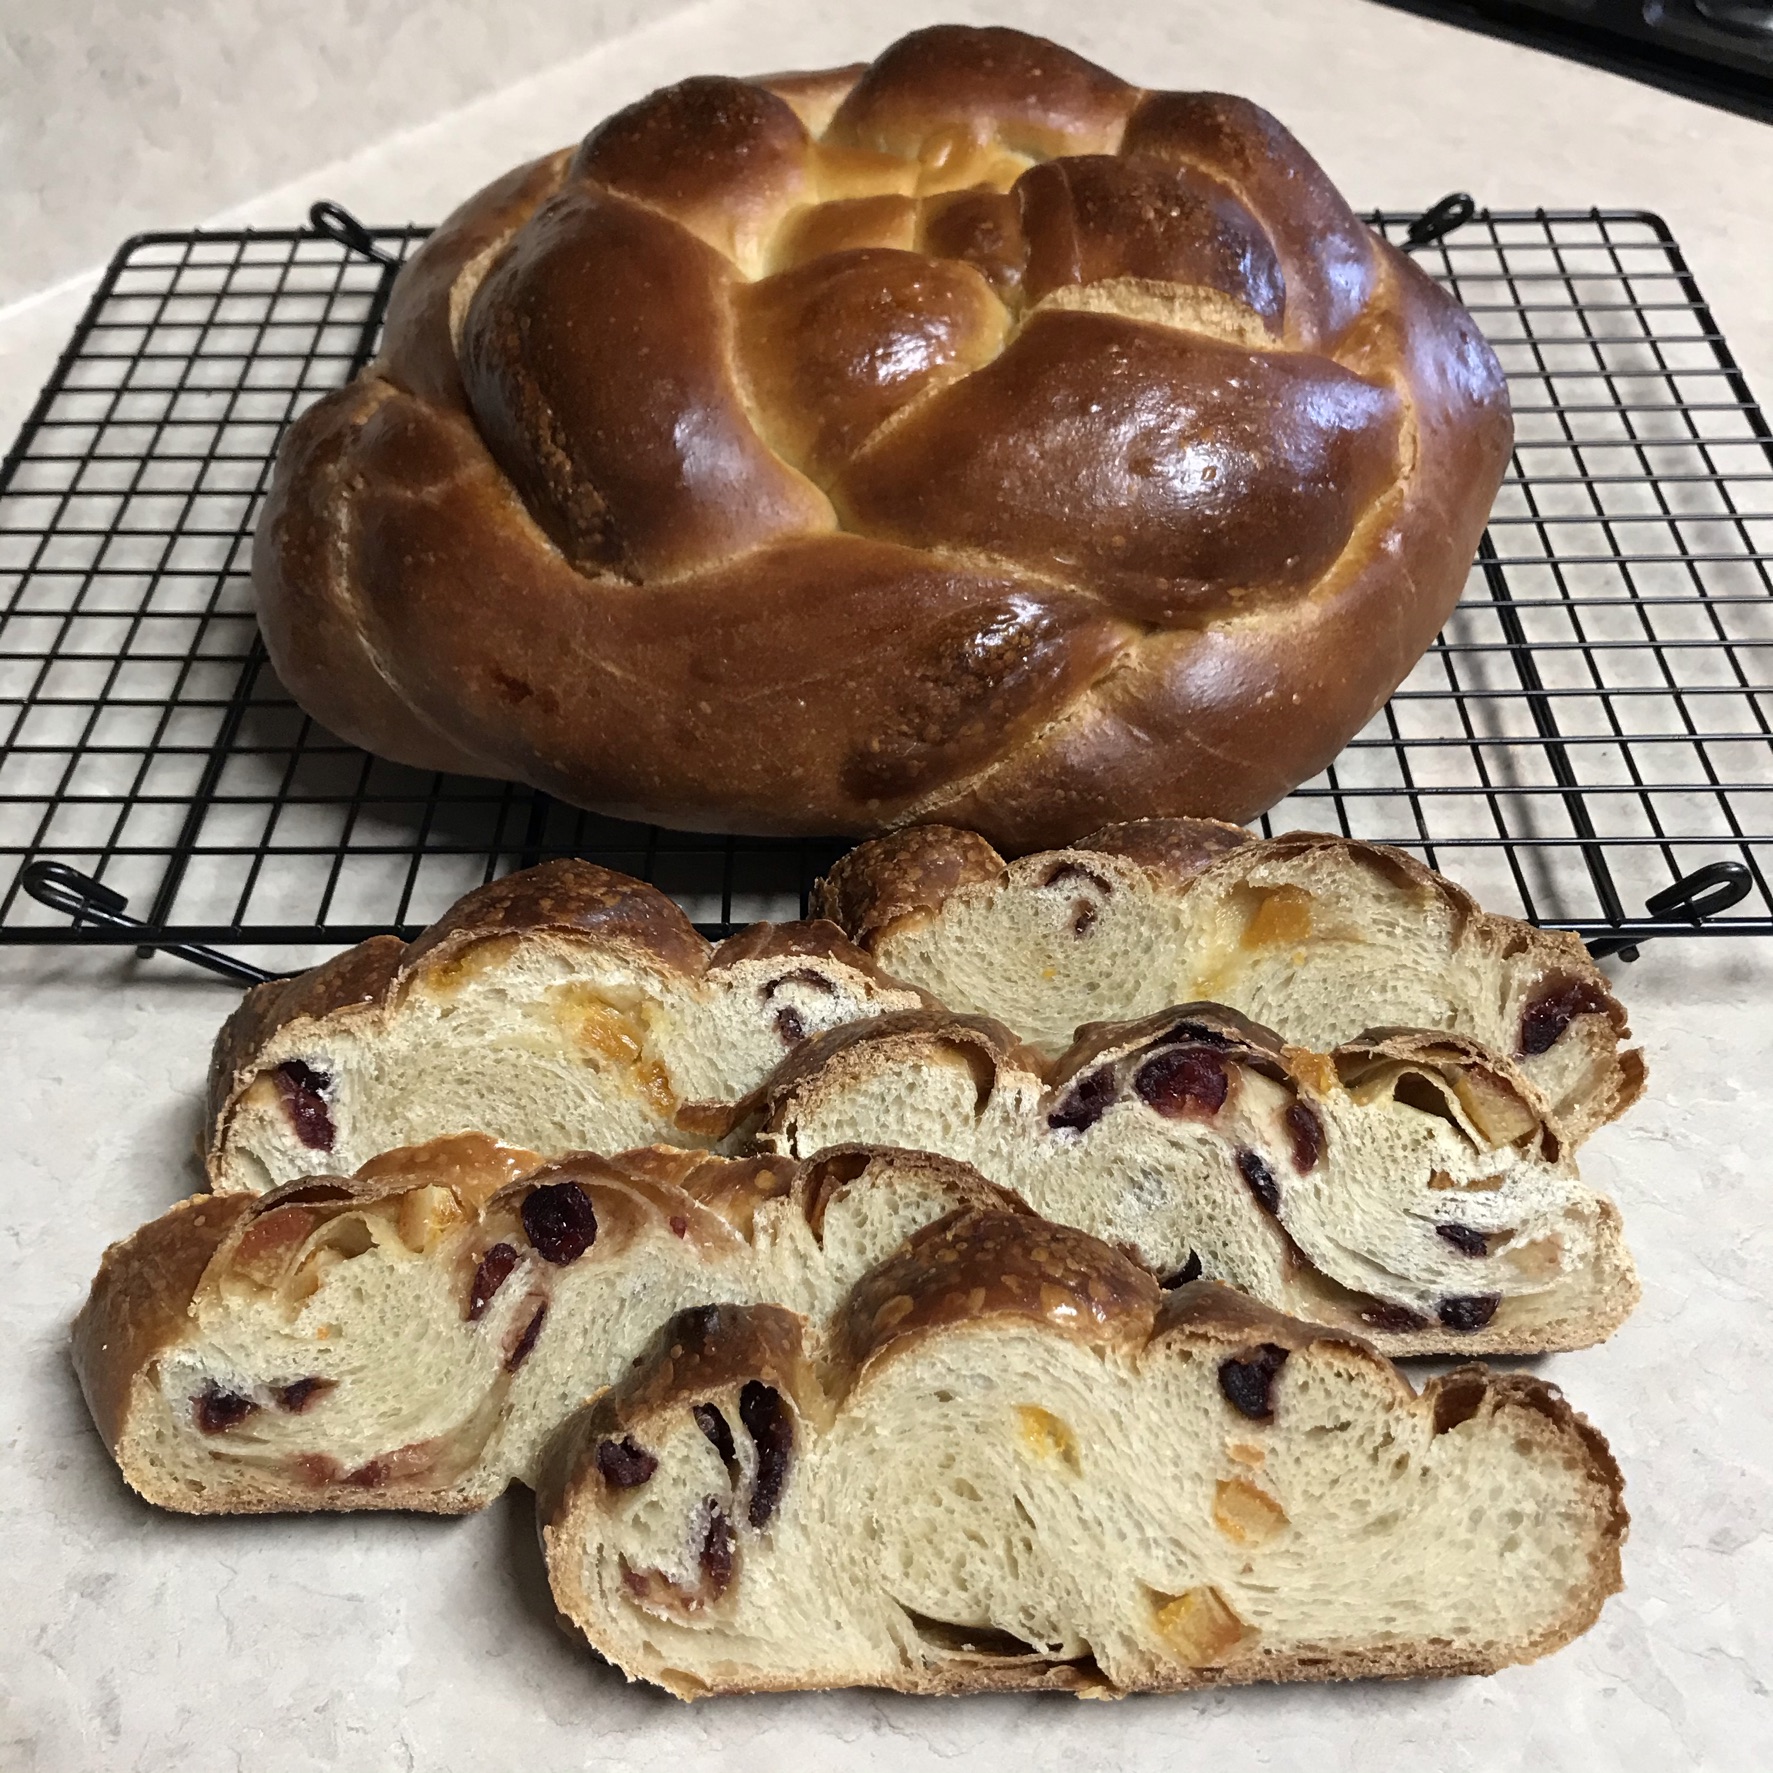
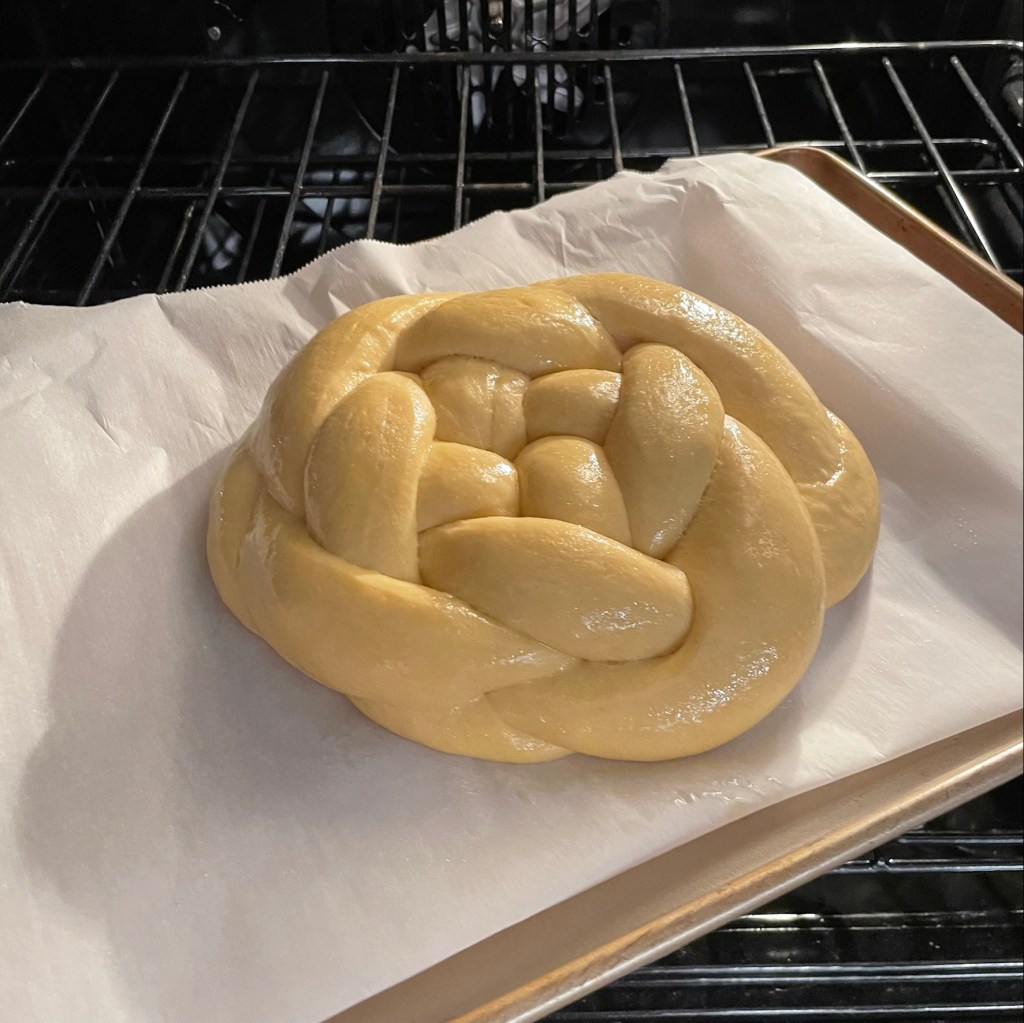
The Jewish High Holy Days are upon us, and that means it’s time for me to share one of my favorite breads. Regardless of your religious background or practices, you have probably heard of, seen or tasted this classic Jewish bread, which is rich with eggs, oil and honey. Challah is a mainstay of Jewish life, and is served weekly at Shabbat services and especially during holidays—or, at least, the ones in which leavened bread is allowed. Rosh Hashanah is a perfect time to enjoy this round version of challah, and there’s no doubt every last crumb will be gone before the fasting of Yom Kippur begins next Tuesday.
The great thing about challah, besides the fact that it is a sweet, soft and tasty bread, is that you don’t have to be Jewish to enjoy it or to make it (I’m proof of both points). From the time I became seriously involved with my husband, Les, I have been very interested in learning the foods of his Jewish heritage, and challah has become a favorite in our rotation. My sourdough version is a bit sturdier than a yeasted loaf, thanks to the higher protein bread flour that ensures a good oven rise. But the texture is still airy and it makes excellent toast, French toast and bread pudding.
There are two main challenges I’ve faced in making sourdough challah, but both can be resolved with time and practice. The first is the challenge of getting this dough to rise; any bread dough with a high volume of sugar (or honey, in this case) struggles against the yeast action, and challah is even more so because it contains so much heavy oil. The best way to win this battle is simply to give it more time. From start to finish, this bread takes almost a full day, but most of that time is spent just waiting—for the pre-ferment to be ready, for the dough to double in size (which it hardly ever does), and for it to rise for baking. Make it on a day that you have lots of other things going on at home so you aren’t tempted to stand and watch it, which I have learned the hard way doesn’t make it happen any faster.
The second challenge with making challah (sourdough or otherwise) is creating the beautiful, braided shapes. This is not nearly as complicated as you might think, and I’ll share my own technique for doing this, whether you want to try making a basket-weave round (as in the featured photo) or a simpler straight braid, which is no more difficult than braiding a kid’s hair. For Rosh Hashanah, I like to make challah in a round, as its shape is a symbol for coming full circle into a new spiritual year.
For extra flair and flavor, I use orange- or lemon-infused olive oil in my dough because I love the aroma of the challah in the oven and the intoxicating citrus scent in the finished loaf. Extra virgin olive oil does impart a slightly stronger flavor to the challah, but I find it delicious. Also, I frequently add dried fruit to the dough as it is rolled up for braiding, but the photos I’ll share are mainly without it. If you do choose to add dried fruit, such as raisins or cranberries, don’t concern yourself with rehydrating it first; it bakes up beautifully straight from the package, and for your effort, you’ll be rewarded with beautifully studded slices. Did I mention that it is amazing in French toast? 🙂
This is an old photo of a loaf I made before our kitchen remodel last year. The braids are stuffed with dried cranberries and oranges.
This bread requires a ripe sourdough starter, an intermediate overnight feeding, about 3 hours to ferment on baking day, and up to 5 hours for final rise after shaping, so plan accordingly. Don’t let this lengthy process alarm you; if you make the starter the night before, you only need about an hour of hands-on time for making the dough and about half an hour to shape it for proofing. As I said, there’s a lot of waiting. All my measurements are metric, so please depend on a digital scale for getting your ingredients right.
You’ll begin the night before you plan to bake, with creation of a firm starter, which is essentially an in-between feeding that bridges the basic wet starter and the final dough. This type of starter, also called “levain,” uses less water than a wet starter, and it concentrates the rising power of the culture in your final dough. Begin with a slight amount of ripe wet starter, stirring in water to make a slurry and then flour and mixing it together until no dry flour remains. The firm starter must ferment several hours, so it’s easiest to do this the night before and leave the bowl covered at room temperature, then bake the next day. If you wish, you can make the firm starter farther ahead and then refrigerate it for up to one day.
The next morning, measure out your flour and get all the other ingredients lined up, including your firm starter, which should be cut into pieces for easy introduction to the final dough. Most of the moisture in this dough comes from oil and eggs, so there is very little water to measure for the final dough. In this picture, my honey is stirred together with the small amount of water, but I usually measure the oil first and then measure the honey in the same cup—it slides right out without sticking. You’ll have an easier time mixing the eggs into the dough if they are closer to room temperature, so give them a few extra minutes on the counter before you begin.
Challah ingredients, clockwise from the top: honey and water, salt (I like to use mineral-rich pink salt), whole large eggs, flour (I use a blend of high-protein bread flour and white whole wheat) and olive oil (mine is blood orange-infused extra virgin).
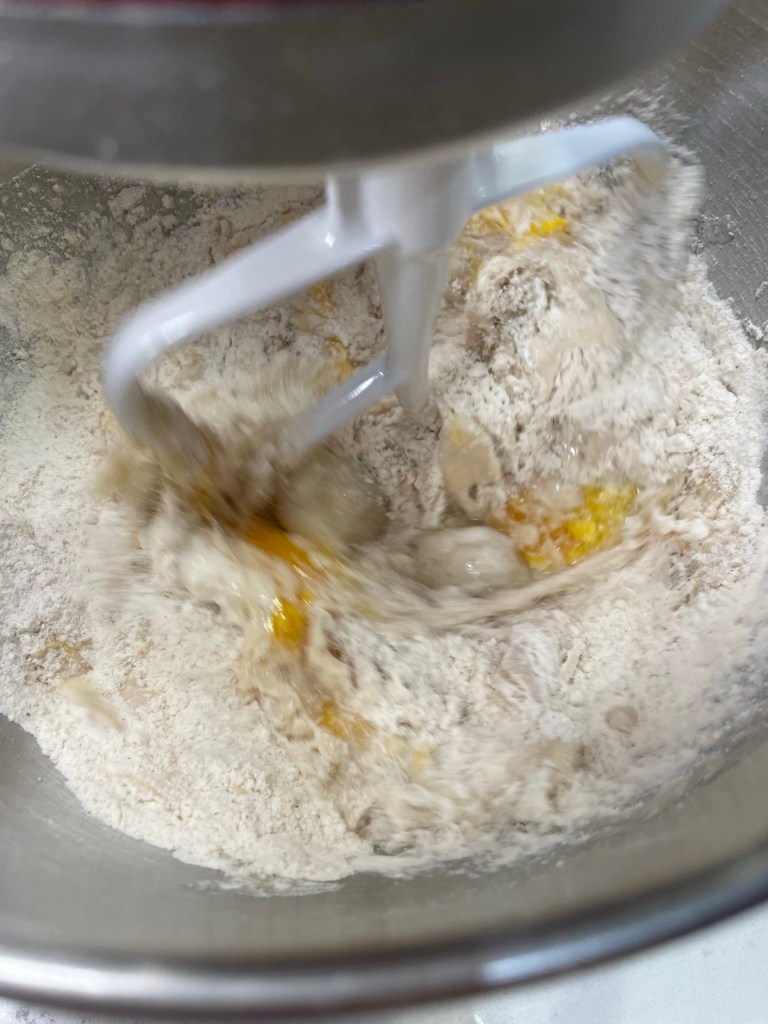
In the bowl of a stand mixer (or in a really large mixing bowl, if you don’t mind mixing by hand), combine the eggs, oil, honey and water and whisk until even. Add the flour all at once. Mix until all flour is completely incorporated, about two minutes in a mixer. Sprinkle the salt over the dough, cover the bowl and let it rest for about 30 minutes. This gives the flour time to absorb the moisture, and kneading is easier at that point.
Mixing the honey with the water makes it easier to pour. Add it to the eggs in the bowl of a stand mixer.
This is a rare occasion when the oil is added to the dough early on. Mix these wet ingredients until completely blended.
Next, add the flour all at once.
I use the dough hook for this initial mixing. It replicates the action of mixing by hand better than using the paddle, and produces less splash.
Blend just until the dough comes together on the hook, with no flour remaining on the sides of the bowl. Swipe it off the hook to rest in the bowl for about 30 minutes.
Sprinkle the salt over the dough, which will be very dense at this point. As the dough rests, the flour will absorb moisture and the salt will begin to dissolve.
Turn the firm starter out onto a floured counter and cut it into pieces about the size of walnuts. Cover with a towel and set aside while the dough rests.
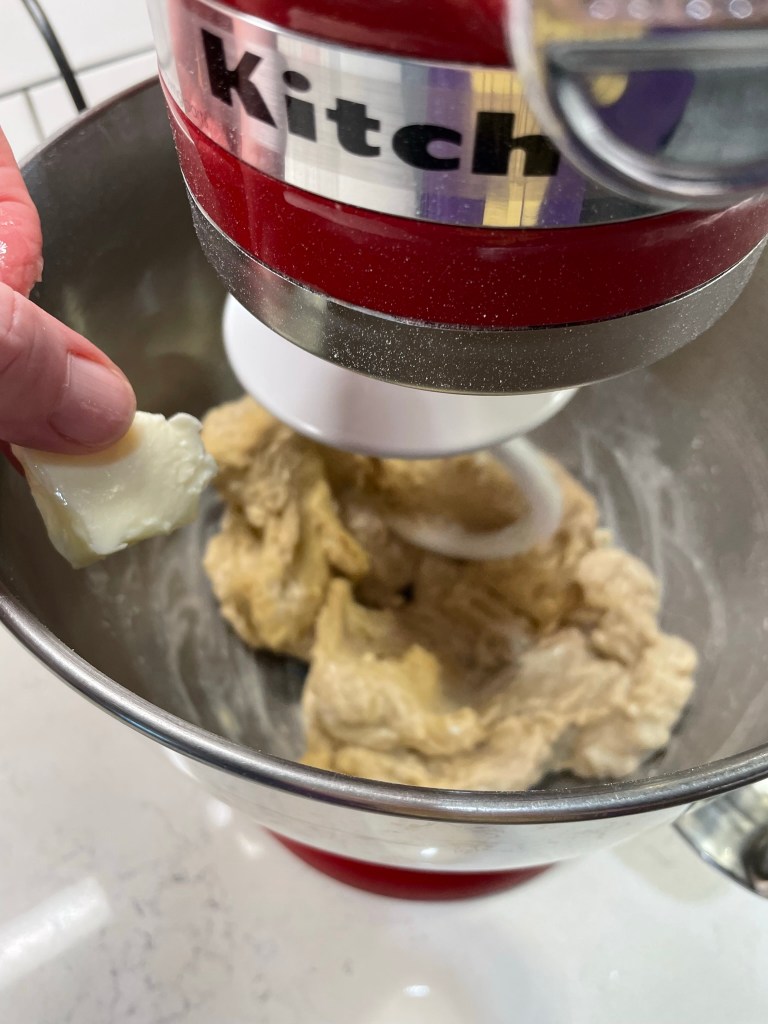
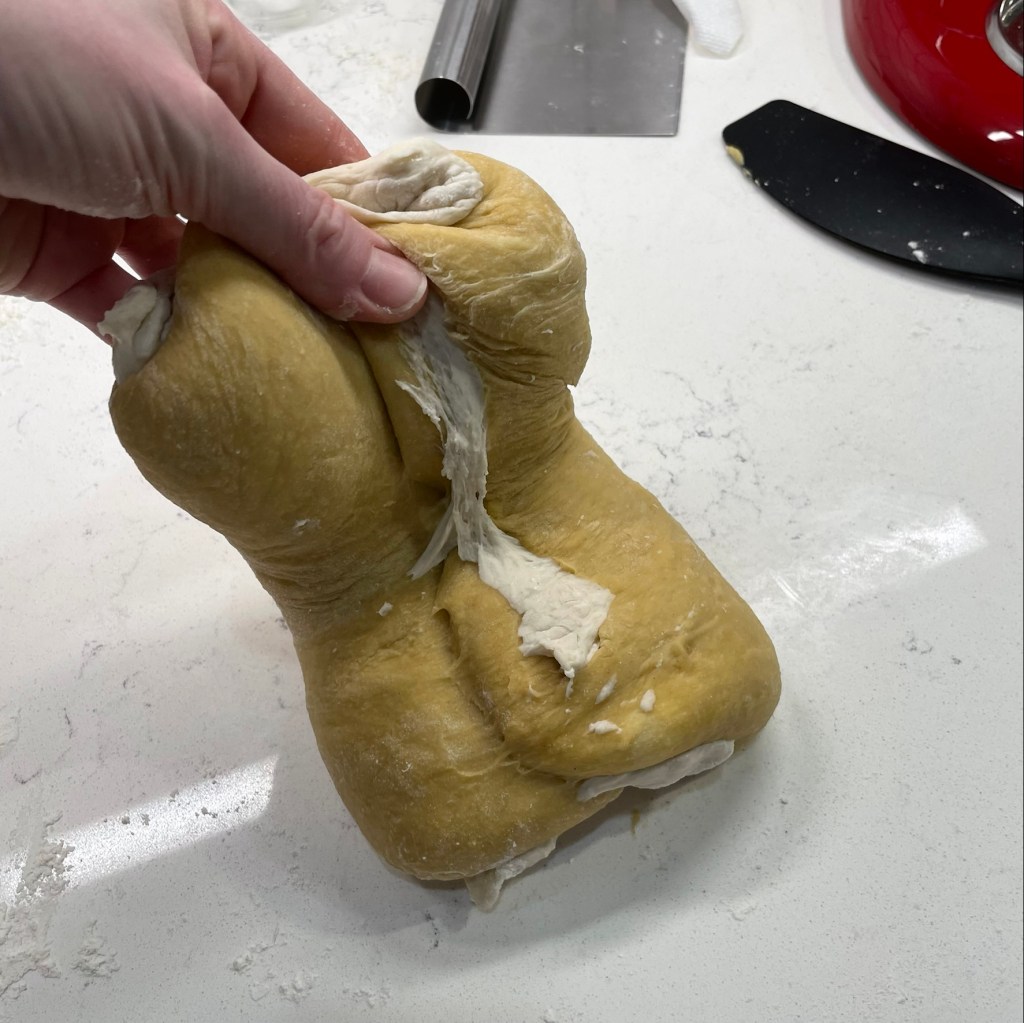
After the rest time, the salt will have begun to dissolve. Knead on medium speed to fully incorporate the salt, which should take 3 to 4 minutes. Transfer the dough to the counter or kneading board and press several pieces of the firm starter all over it. Fold the dough into thirds (like a letter) and press in the remaining pieces of firm starter. Move the dough back into the mixing bowl and knead on medium speed for 6 minutes, long enough to evenly blend the firm starter into the dough and also to get the gluten development going. Transfer the dough to a large bowl, cover and let rest at room temperature for at least 3 hours to ferment.
When the dough has fermented (you’ll know because it won’t spring back from a good finger poke), turn it out onto the counter and divide it into halves. This recipe makes two loaves; return one half of the dough to the bowl while you shape the first. Depending on how adventurous you want to be with braiding, divide the first dough section into either 3 or 4 equal-sized pieces. A 3-strand challah is made the easy way, as you would braid a child’s hair. To make the basket-weave round challah, you need 4 pieces.
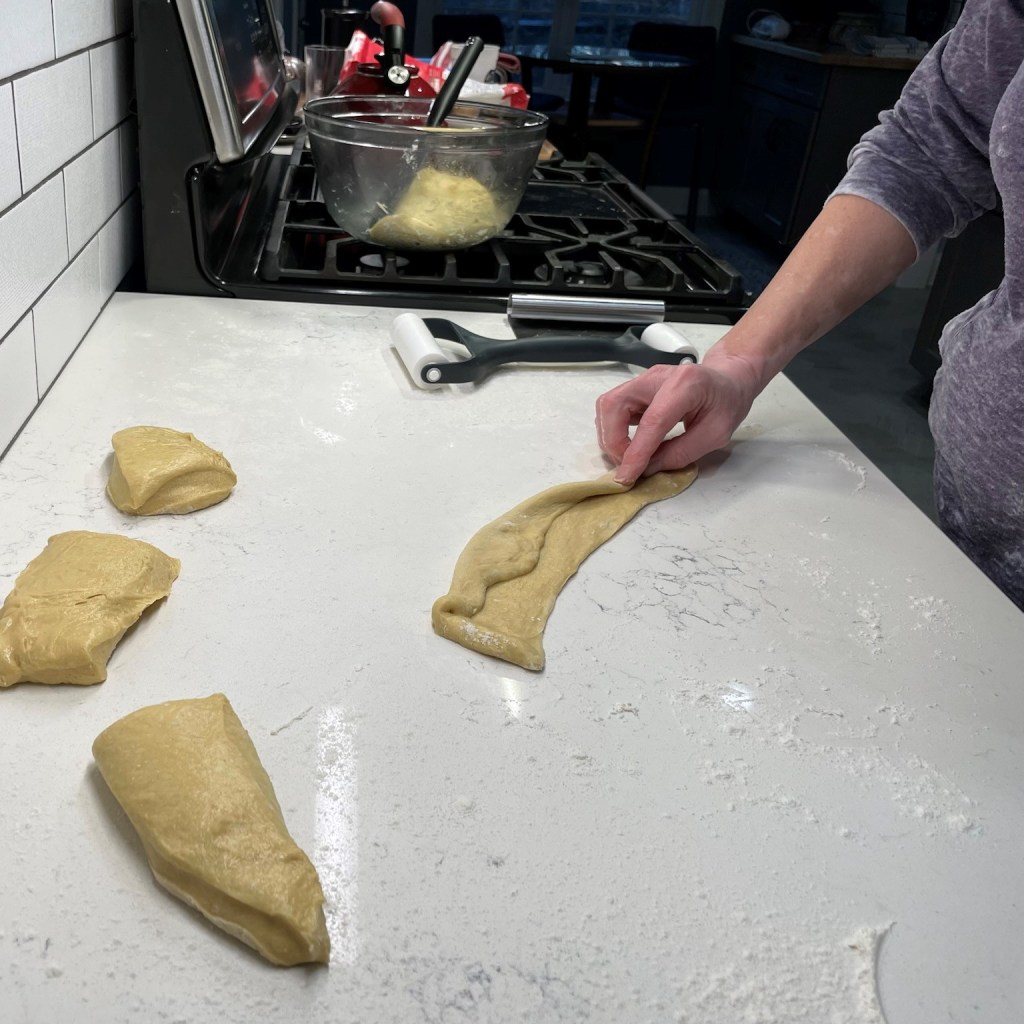
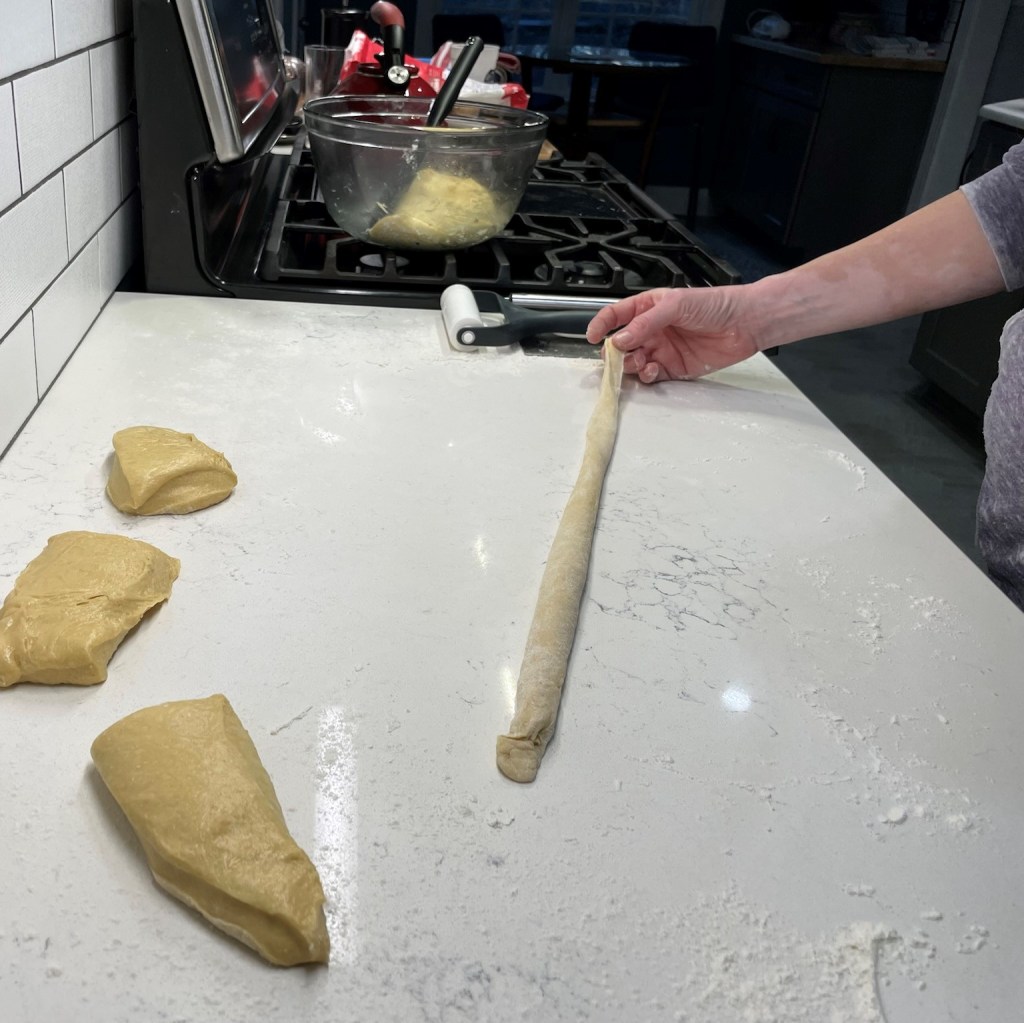
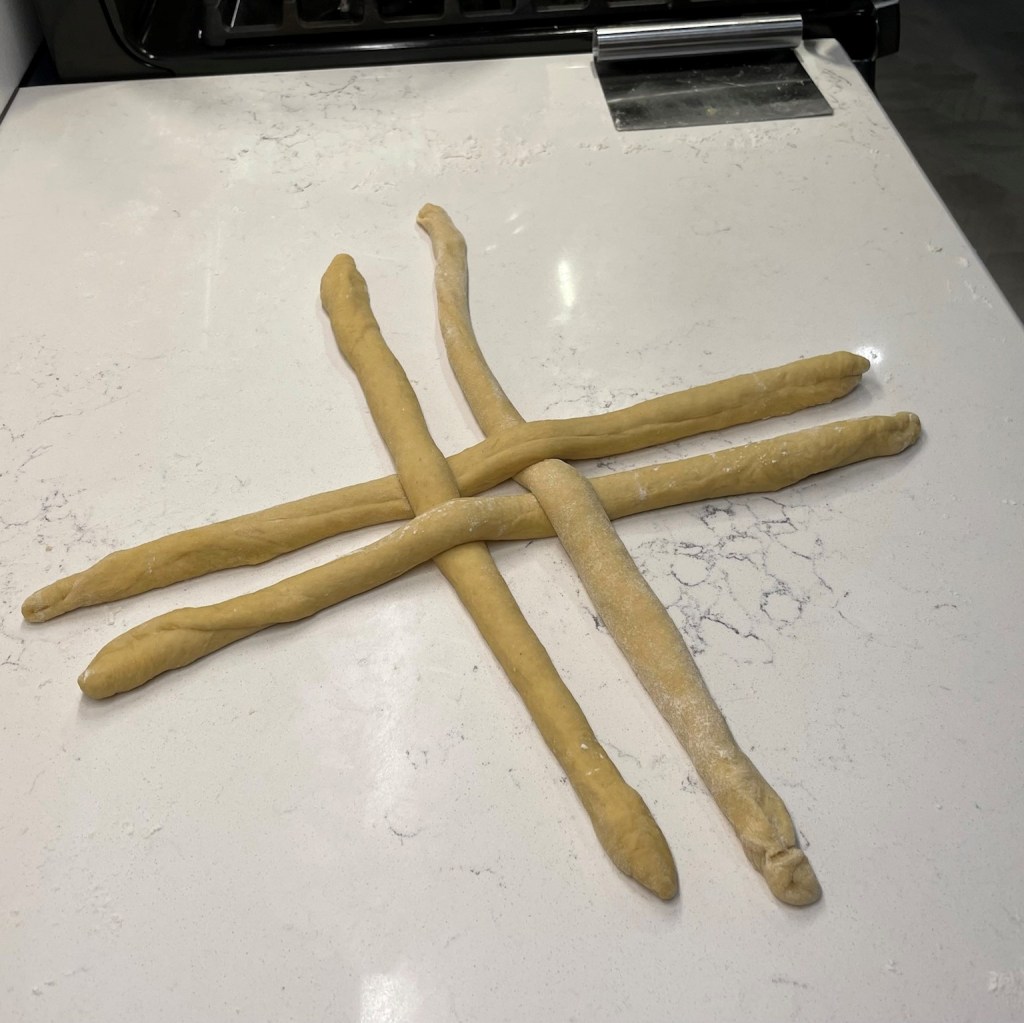
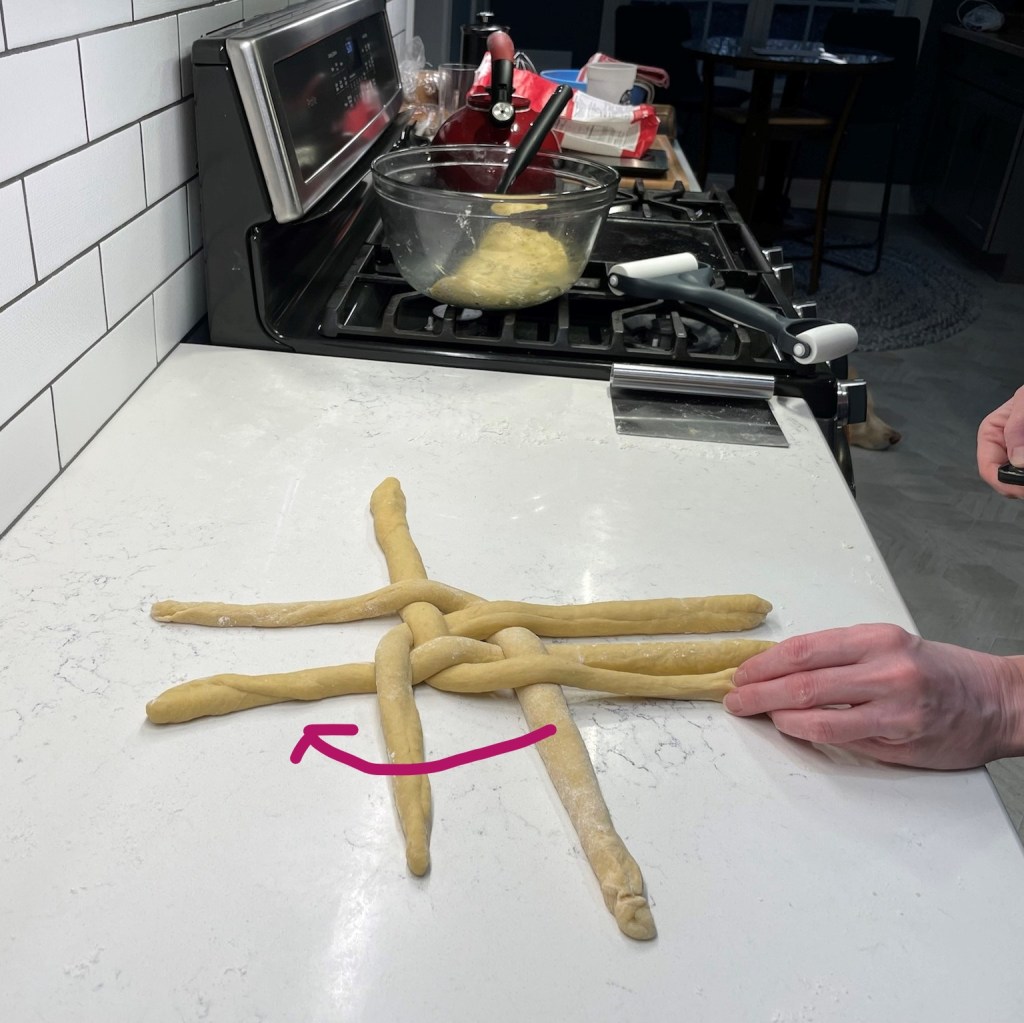
Stretch each section of dough out into an imperfect rectangle shape, and then use a rolling pin to roll it into a long, oval shape. The dough will be very thin on the counter, and that’s good. Use spray oil to keep it from sticking, or dust the counter with a very light amount of flour. Roll up the oval into a long rope shape, keeping it tight as you roll and pinching the seam to secure it. Roll it out firmly to stretch the rope into an 18″ length, with the ends somewhat tapered from the fuller, center part of the rope. Repeat with the other three pieces and arrange them in a tic-tac-toe shape, with the centers fairly close together (but not tight) and long strands extended in all four directions. Notice the over-under pattern, as this is the important starting position for braiding a round.
One important thing to note is that you do not want the dough strands to be too tightly crossed, either at the start or after braiding. You should be able to wiggle a finger between strands after braiding, and this is important because the dough needs room to expand during proofing; otherwise, it will expand into one large blob and you’ll lose the beautiful pattern.
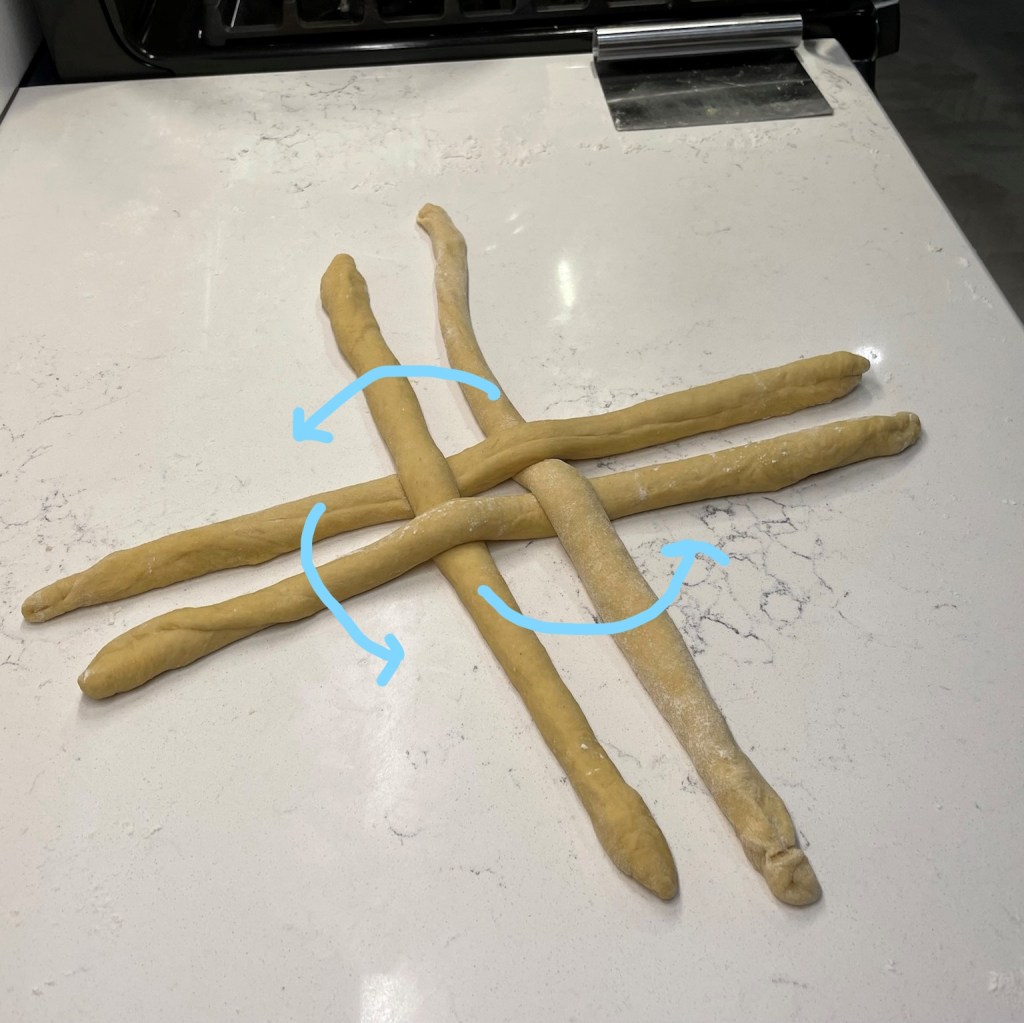
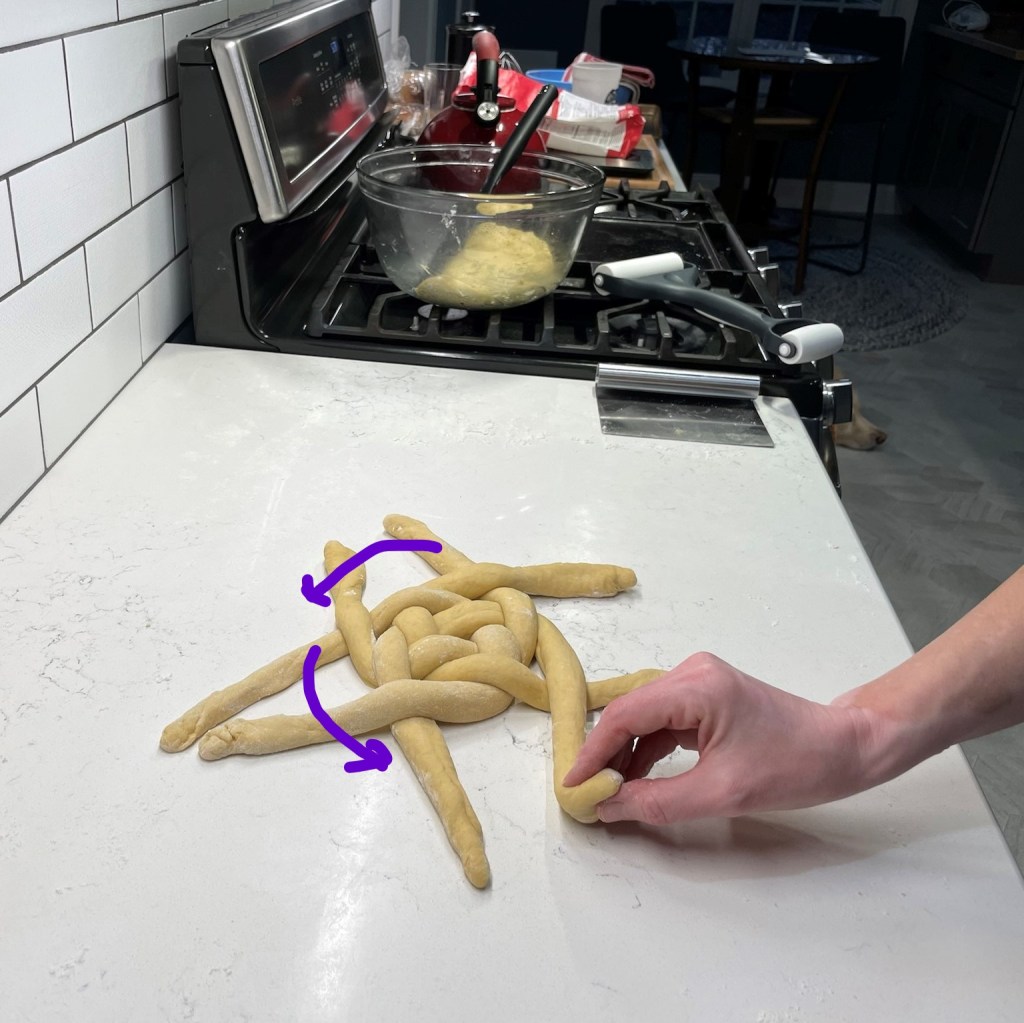
Shaping the dough is probably best learned through pictures, but I’ll try to describe it here. Take any long strand that is under the piece that crosses it, and sweep it over the piece parallel to it so that its new position is parallel to the cross piece. Repeat with the other four strands. Next, reverse direction but do the same thing, taking the underneath pieces and cross over to make them parallel to the piece next door. Repeat with the other four. Continue this pattern of reverse-crossing until the strands are too small to cross over. At that point, twist and pinch together the ends you would otherwise cross so that the dough doesn’t unravel. Tuck the twisted ends underneath and transfer the bread to a parchment-lined baking sheet.
Follow the arrows to see how the braiding goes. To begin, you’ll simply move the ropes that are underneath a cross piece over top of their parallel rope and perpendicular to their original direction.
Next, reverse the direction and do the same with the ropes that are now in underneath position.
Keep reversing and crossing until you run out of dough length.
When you can no longer cross the ropes, bring them together in a twist to seal them into place.
Tuck the twisted ends underneath. Remember that it doesn’t have to be perfect, and you can practice the technique with yarn, twine or strips of fabric to get a feel for it.
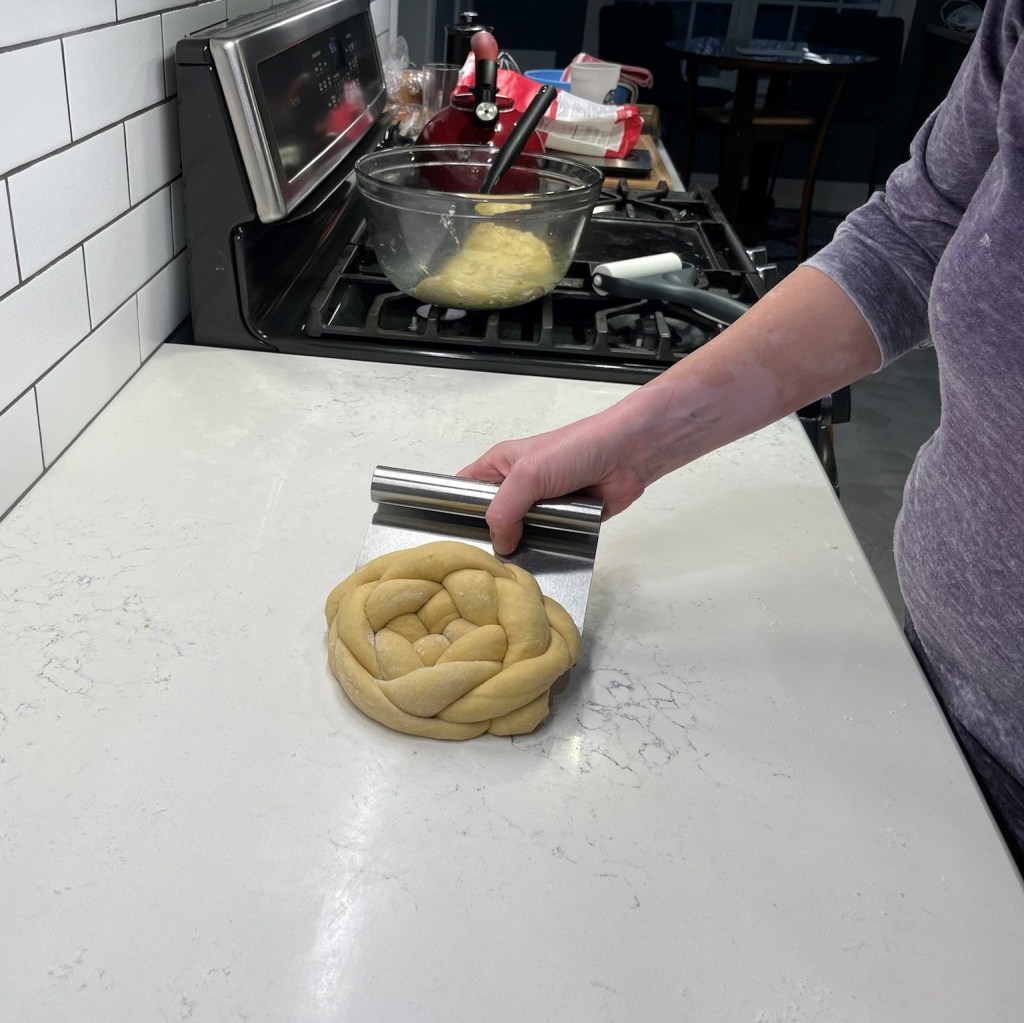
When the braiding is finished, the challah round won’t be much larger than a bread plate, but don’t worry, it’ll rise significantly during the proofing stage!
Here’s how I fill a braid with fruit. Simply scatter about two tablespoons worth of dried fruit over the section of dough before rolling it into a rope. It will feel lumpy as you stretch out the rope, but it settles down during proofing.
Repeat with the second batch of dough and lightly spray or brush the loaves with olive oil and secure a couple of layers of plastic wrap over them. Keep the plastic somewhat loose, allowing room for rising, but not so much that air can dry out your loaves.
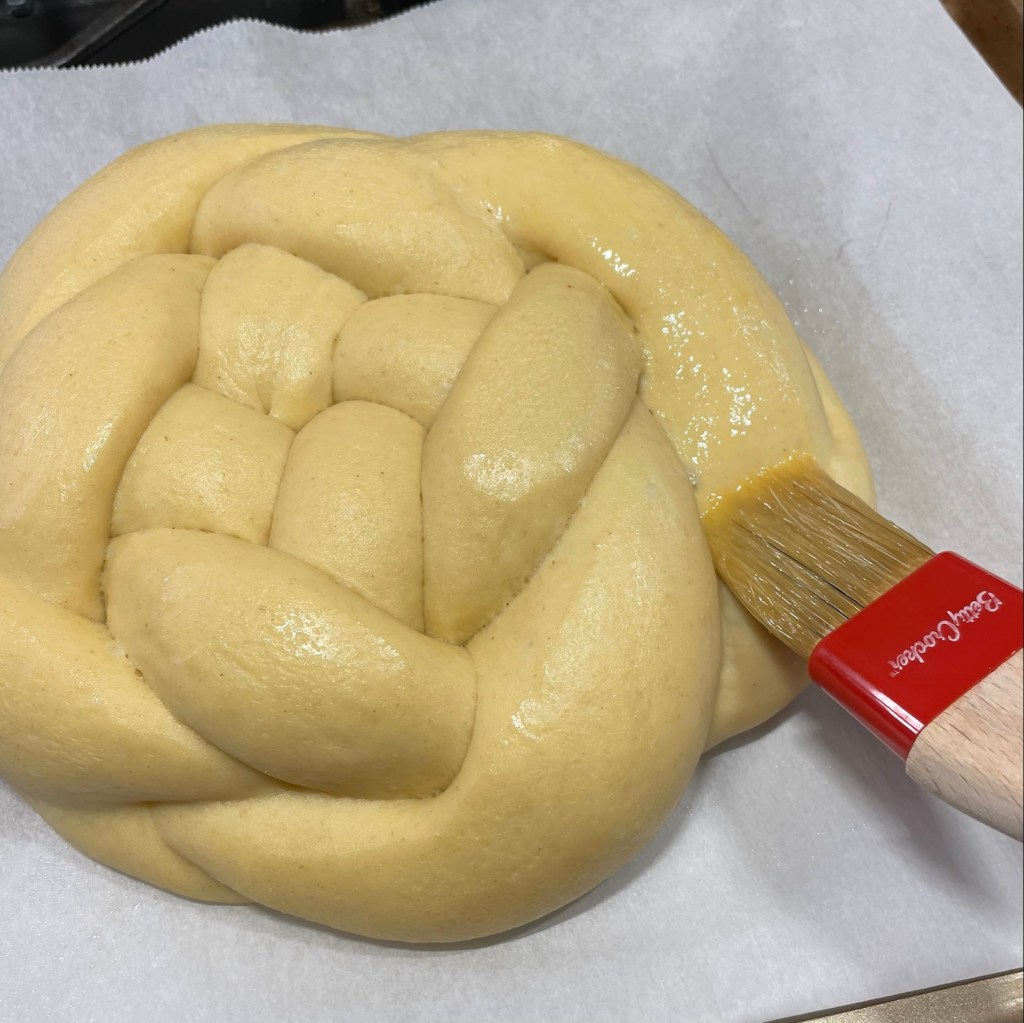
Proof the loaves at warm room temperature for up to 5 hours, until they have at least doubled in size. They will be quite “poofy” when they are ready. Preheat the oven, brush all over with egg wash (get into every nook and cranny) and bake until they are deep golden brown all over, with internal temperature at 200° F.
Transfer to cooling racks and cool completely before slicing or wrapping.
The braiding technique is the easiest thing about these loaves, which are enriched with eggs, citrus-scented olive oil and sweet honey. The recipe takes time, but the reward is as sweet as my wish for you in the Jewish New Year.
Ingredients
35g recently fed sourdough starter
80g room temperature water
130g bread flour
Mix the firm starter ingredients together, cover and let stand at room temperature overnight. Or, refrigerate after 8 hours fermentation and remove from fridge one hour before proceeding.
Ingredients
65g warm water
65g honey
3 large eggs, room temperature
55g olive oil
300g bread flour
100g white whole wheat flour
1 1/2 tsp. fine sea salt
all of the firm starter (above)
1 large egg, mixed with a tablespoon of water (for egg wash)
Directions
In the bowl of a stand mixer, combine the water, honey, eggs and oil. Whisk together until fully blended. Add flour ingredients and mix with the dough hook until all flour is incorporated.
Remove dough from hook, sprinkle with salt and cover. Rest the dough for about 30 minutes, as this will make kneading easier. Rinse all dough bits from the hook so it’s ready for the next kneading step.
Turn the fermented firm starter out onto a floured countertop. Use a bench scraper to cut the dough into several pieces, toss them in the flour to coat, and then cover with plastic wrap or a clean towel to keep it from drying out.
After resting, the salt on top of the dough will have dissolved a bit. Knead with the dough hook for a few minutes to fully incorporate the salt, then transfer the dough to a lightly floured countertop.
Spread the challah dough out to enlarge it, and then press several pieces of the firm starter into it. Fold it up in thirds, like a letter, and press the remaining pieces of firm starter into it. Return the dough to the mixing bowl and knead with the dough hook for several minutes. You should not see any streaks of starter, and the dough should be dense, smooth and shiny. Transfer it to a large, oiled bowl and cover. Let it ferment at room temperature for about 3 hours. It likely will not double in size, but it will expand somewhat.
Turn the dough out onto a clean counter and use a bench scraper to divide it in half. Return one half to the bowl and cover to prevent drying while you shape the first loaf.
Cut the first dough portion into equal parts for braiding, either 3 or 4 pieces. Flatten into rough rectangle/oval shapes and roll up tightly into ropes, pinching to seal the edges. Roll out with the flat part of your palms to stretch the ropes to 18″, with ends that are tapered a bit.
8, Arrange the dough ropes for braiding, following visual instructions in this post. Place braided loaves on parchment-lined baking sheets and cover with lightly oiled plastic wrap. Proofing time will be anywhere from 3 to 5 hours, depending on the temperature of your kitchen, humidity and moon cycle. Just kidding on that last one, but honestly, the time needed for proof can vary broadly, so my best advice is to begin checking after 3 hours. Dough will double or nearly triple in size, and it is ready to egg wash and bake when it refuses to bounce back after a finger poke.
Preheat oven to 350° F. Gently brush egg wash all over every visible surface of the challah loaves. Bake for approximately 35 minutes, until bread is deep golden brown all over. Internal temperature should be about 200° F. Transfer to a cooling rack and cool completely before slicing or wrapping.
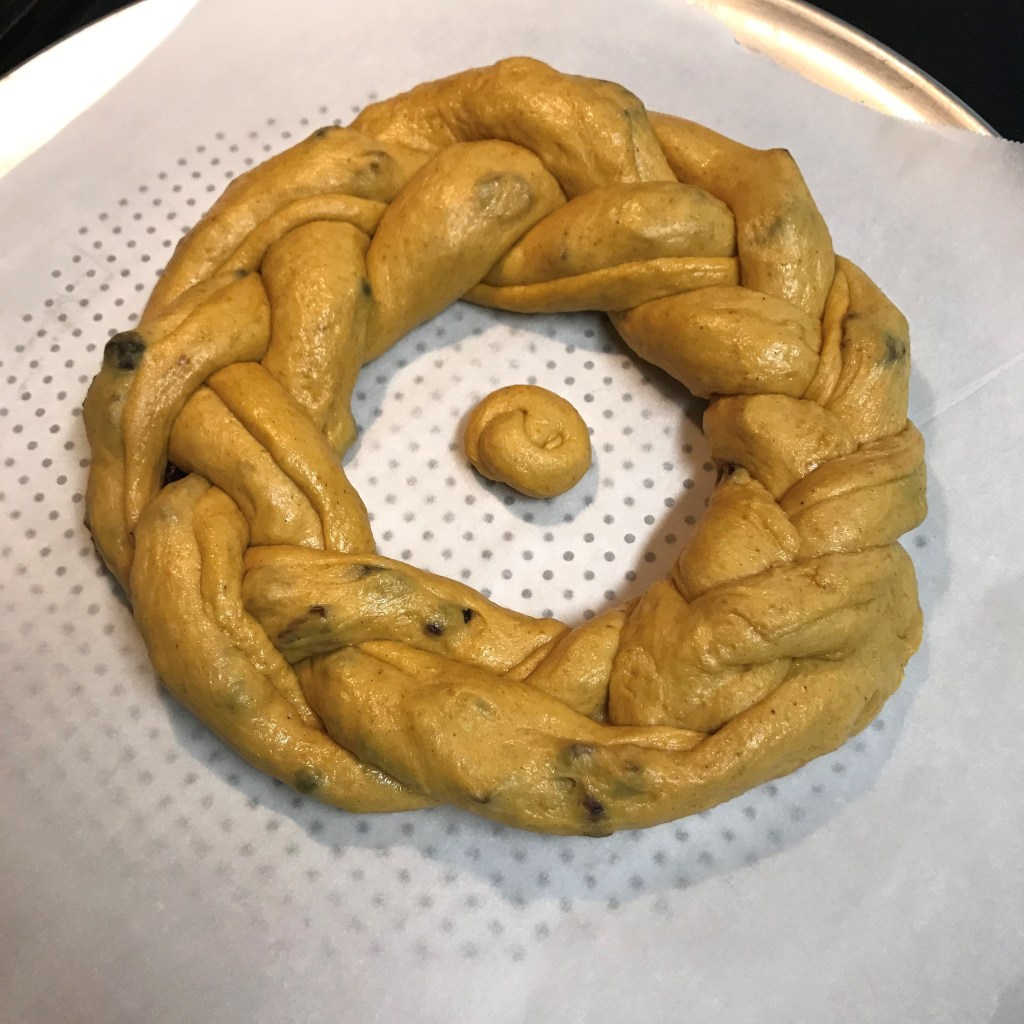
From the CDJ archive, here’s another way you can achieve a “round” challah, if you aren’t feeling the love for the basket-weave design. Divide your dough for one of the loaves into three equal segments and braid them like a hair braid, and then curl it around, tucking and pinching to seal the ends together. It’s more of a wreath than a round, but still has the circle symbolism. This was an experimental sourdough pumpkin challah, filled with Trader Joe’s “golden berry blend” dried fruit, and it was nothing short of fabulous. 🙂
The wreath shaped loaf is filled with a blend of dried fruits: cranberries, golden raisins, blueberries and cherries.
Make something off limits, and that’ll be exactly what you crave, right? We only started Passover on Friday evening, and I can’t stop thinking about wanting a big, fat sandwich. To be clear, my husband does not expect me to adhere strictly to this Jewish custom of his—heck, he’s the first to admit that he is not religious himself about this requirement when he is out and about—but he does not eat bread at home during the Passover week. His choice is not about strict religious mandates, but tradition that helps him feel connection with his ancestors, and especially his late father. I am not Jewish myself, but I respect the tradition and so I am making an effort to accommodate this food called matzo.
Iconic, yes. But matzo needs a whole lot of help to become flavorful or interesting.
If you have never had the anti-joy of eating matzo, allow me to describe it for you— try to remember the driest, most bland, and perhaps even stalest, saltine cracker you’ve ever eaten. It may have been a cellophane-wrapped packet that a diner waitress fished out of her apron pocket for your bowl of chili in 1974. Maybe you got stuck in traffic on the interstate during a blizzard and had to resort to eating whatever random things you found in the glove compartment. Or perhaps you found some old takeout crackers in the back of your desk drawer when you finally made it back to the office after two years of COVID shutdown. Whatever memory you conjured, hang onto that for a moment and try to remember the taste. Yep, matzo is like that. But not as good. And without salt.
You could search the entire world and not find a less interesting cracker. Or is it considered bread? The Jewish people developed matzo as a reference to the unleavened bread their ancestors were forced to eat when they fled Egypt in a hurry. There was no time for the bread to rise, so they baked the dough as it was and took it on the run. Whatever category you put matzo in (bread or crackers), this stuff is undeniably boring, but a common sight in my home now—at least during Passover. My goal, as the primary meal maker, is to find ways to make matzo more palatable because eating it from the box can only be described as “choking it down.” And I won’t even mention what it does to the digestive system (it ain’t pretty).
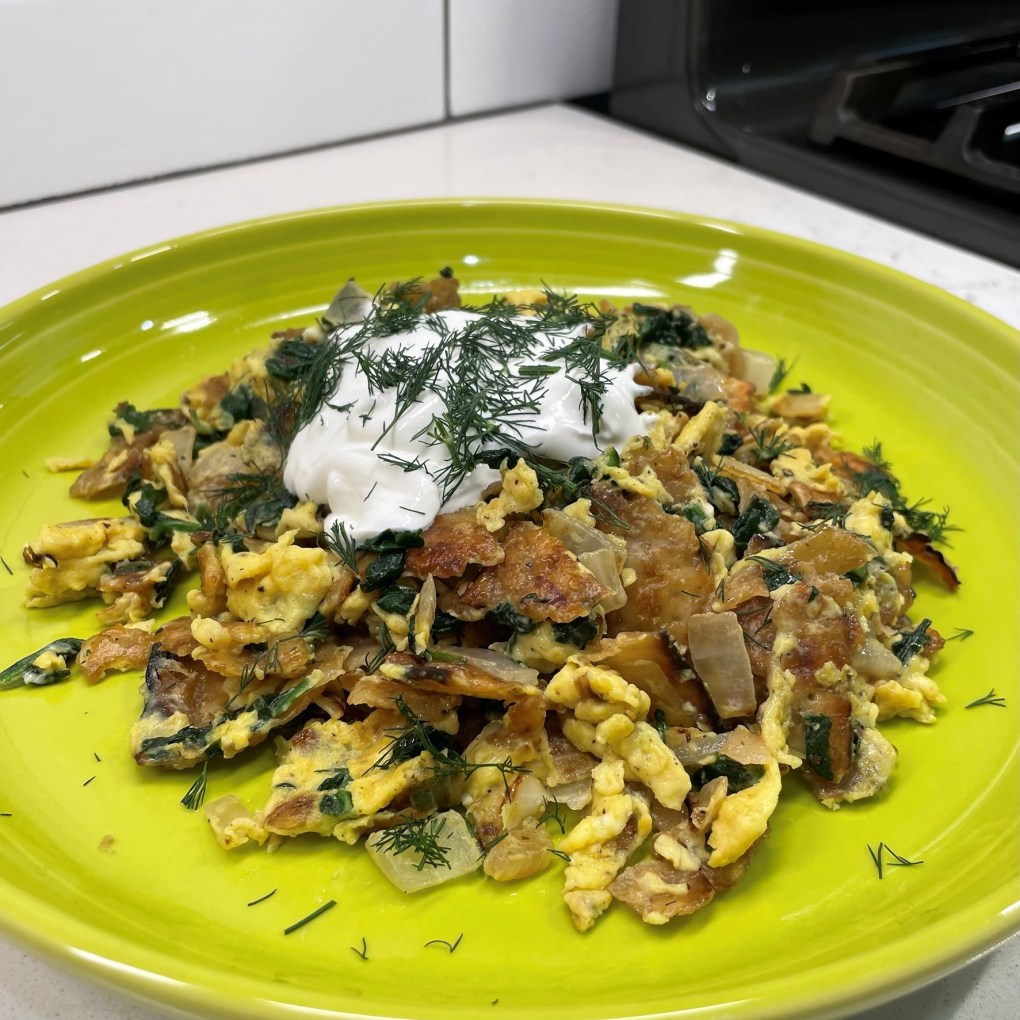
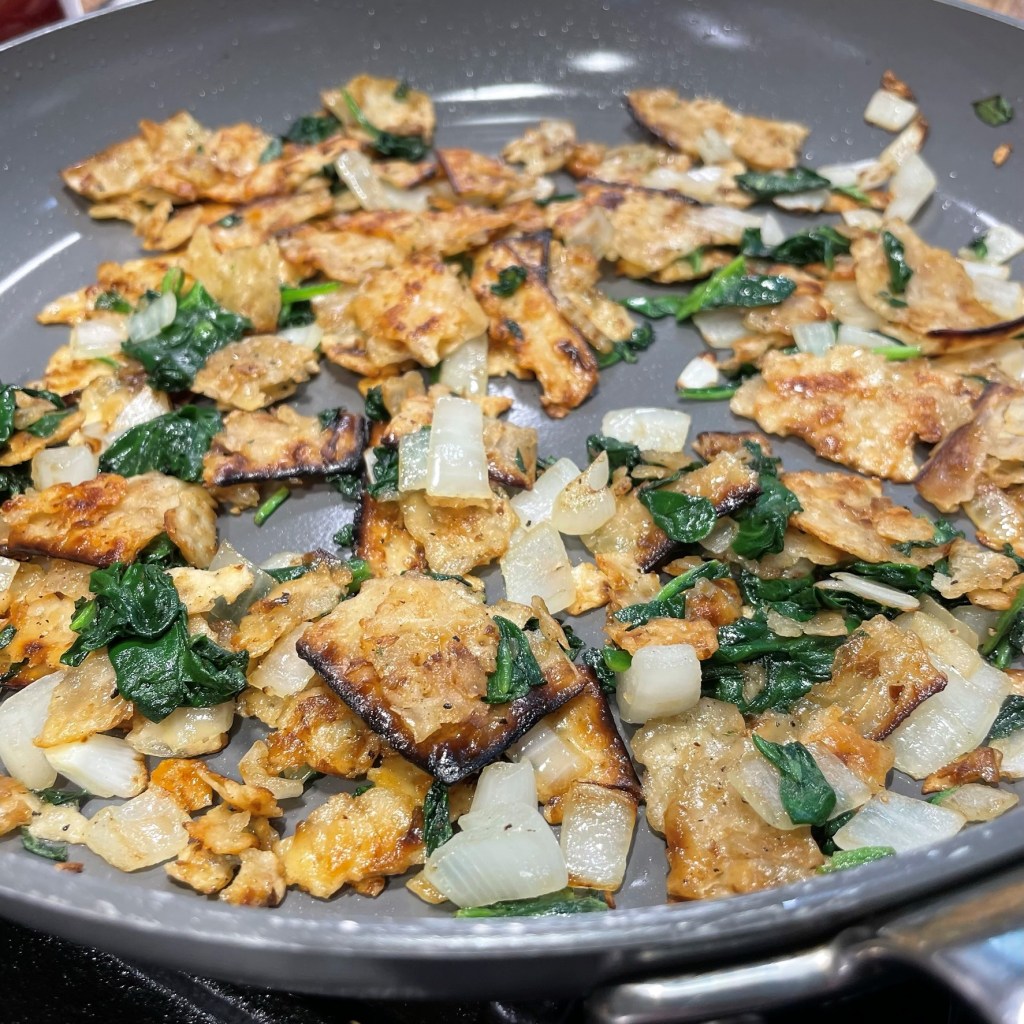
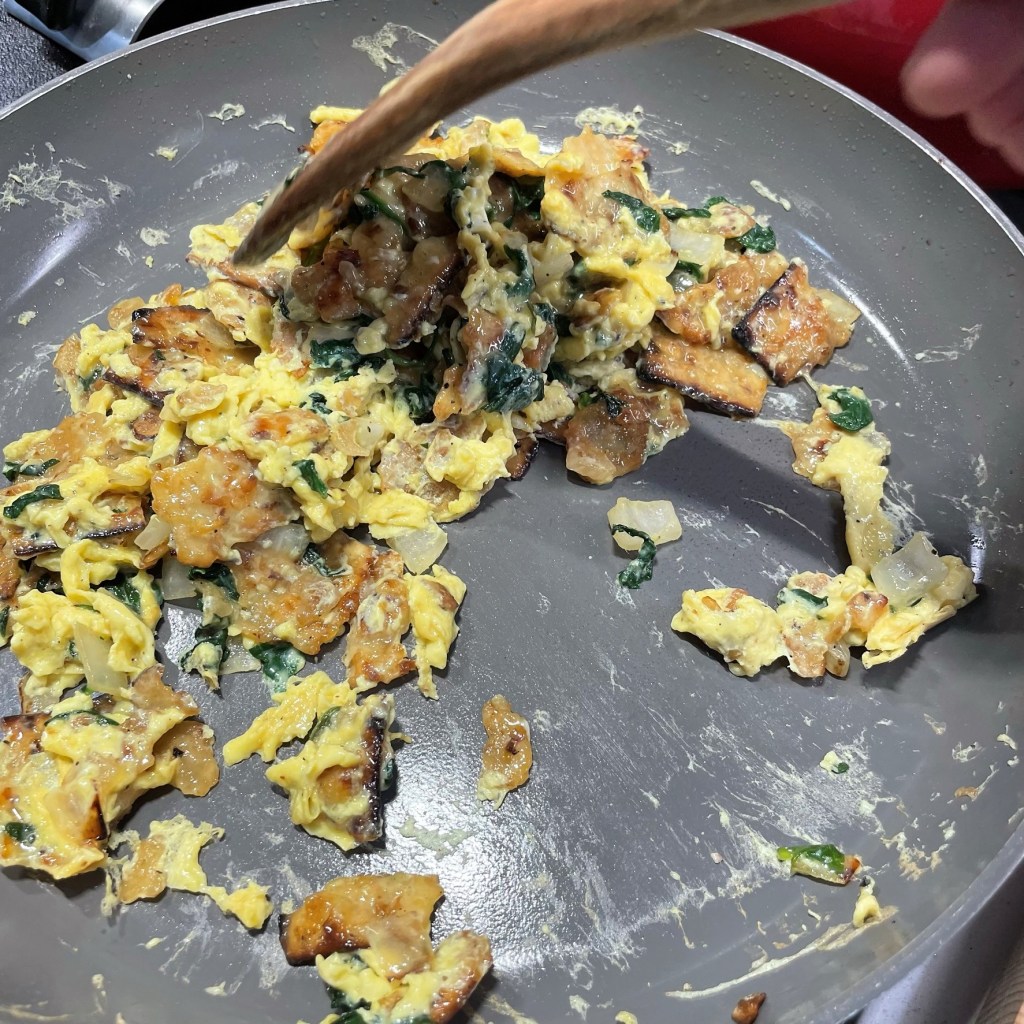
Thank goodness for the New York Times Cooking e-letter, which is always brimming with menu ideas, including a classic, basic version of this dish, called matzo brei. According to Melissa Clark, the author of the recipe, brei rhymes with “fry,” which is exactly what you do with the matzo before scrambling it into eggs. As written, the recipe sounded dull, but as I started working at the stove, I asked Les if there was any reason that I couldn’t jazz up this humble dish just a bit—maybe with addition of onions and some spinach? Sure, was his response, and this was the result.
My first attempt at matzo brei got my gears turning about other possible flavor twists. What do you think would be good?
I liked this dish! Spinach is nothing new with eggs at our house, as I incorporate it often into omelets. Onions were a no-brainer, and some matzo is even onion-flavored, though that variety is not usually considered kosher for Passover. And the matzo pieces, fried in butter and mingled throughout the scrambled egg mixture, reminded me a little bit of a baked pasta, especially for the crispy, buttered edges. I don’t know what prompted me to top the dish with sour cream, but it was a good call, and the fresh dill I had picked up at the market was a perfect finish for this savory, ready-in-15-minutes breakfast. As Les and I scarfed down our matzo brei with spinach (Florentine, if you will), we began brainstorming other flavor combinations— maybe peppers and mushrooms, or feta and asparagus. Wait, how many days of Passover do we have left?
The recipe was not without challenges, despite its simplicity. I messed up the beginning of the recipe by commencing to fry the matzo in butter straight from the box, and it wasn’t until my common sense began to question the technique that I noticed in the recipe’s steps that I was supposed to rinse and soak the matzo first. Why it was not listed as such in the ingredients, I’ll never know, but I’ll add the oversight to my list of what I call the problem with recipes. The ingredients of the NYT Cooking recipe did not include water, so it didn’t occur to me until it was (almost) too late.
All’s well that ends well, and I’ll describe in my recipe notes how I recovered from my mistake (it was easy). Regardless of whether I ever make matzo brei again, I discovered for sure that I always want to have sour cream and fresh dill on my scrambled eggs now. And with five days of Passover left to go, we are least down two more sheets of matzo.
Ingredients (serves 2)
2 sheets plain matzo, rinsed under warm water and set aside to soften* (see notes)
3 Tbsp. salted butter
1/4 cup chopped sweet onion
Good handful fresh baby spinach, rough-chopped
Kosher salt and ground black pepper (to taste)
3 eggs*, room temperature, beaten with a splash of water or milk
A hefty dollop of sour cream (for serving)
1 Tbsp. chopped fresh dill (for garnish)
*Notes
My mistake led me to an alternate method of softening the matzo. Since I had missed the step of rinsing and resting the matzo ahead of time, I simply poured about 1/4 cup warm water from my tea kettle right into the skillet with the butter and matzo pieces. The dry matzo soaked up the water and fried in the butter with no issues. This may truly be a better method than the original because I didn’t have to wash an extra “soaking” dish or clean up a soggy matzo mess from the counter. Do what works for you!
The original recipe that inspired me suggested using four eggs, but I followed my instinct and used three, as I always do for an omelet-for-two. If you have an extra hearty appetite, go with four eggs.
Instructions
I’ll walk you through it in pictures, and keep scrolling to find it ready to print or save for your recipe files!
I mistakenly missed the step of pre-rinsing the matzo sheets, but a generous splash of water in the skillet accomplished the same thing.
I added onions for flavor, and fresh spinach is great in an omelet, so I thought, “why not?”
Spinach always cooks down significantly, so feel free to add more than suggested if you love the leafy green as much as we do.
Finally, add the beaten eggs to the skillet.
Use a wooden spoon or utensil to scramble the eggs. This will only take about a minute.
A dollop of sour cream and sprinkling of fresh dill finished this plate nicely.
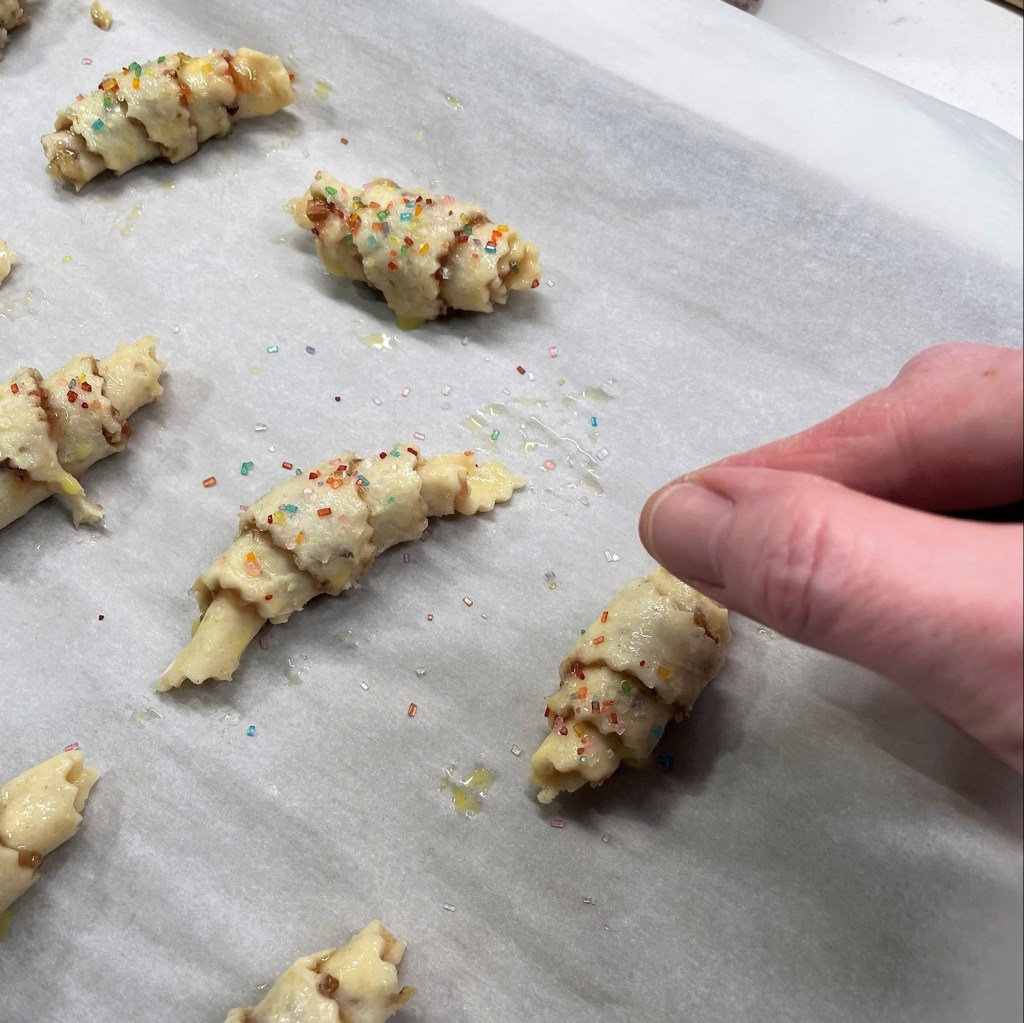
Sometimes, saying your goals out loud is enough to cement them into reality, and this has been true for my quest to have a calmer, more peaceful holiday season. Letting go of expectations for a “perfect” holiday has given me the freedom to enjoy it more, regardless of how things unfold. One thing I really wanted to do this year (for the first time in a long time) was settle in to making Christmas cookies, and I am on a roll—figuratively and literally—with these sweet little rugelach. They are my first cookies of the season and making them satisfies not only my desire for a pretty holiday treat, but also another item on my culinary bucket list.
As much as I love to bake bread and rolls, I hardly ever bake sweet things, such as cakes, pies or cookies. I’m not sure why, because I do like them, and I have fond memories of doing that kind of baking in my grandmother’s kitchen. The holidays are a perfect time for baking sweets, and so far, I am loving it.
Rugelach (which is pronounced in such a way that it might seem you are gargling with a feather in your throat) is a treat that originated in Poland and is popular in Jewish culture, and it has been on my bucket list for a couple of years. My husband, Les, remembers them from childhood, not only because he is of Polish-Jewish descent, but also from the bakeries and pastry shops all over New York, where he was raised.
It’s a perfect, little two-bite cookie.
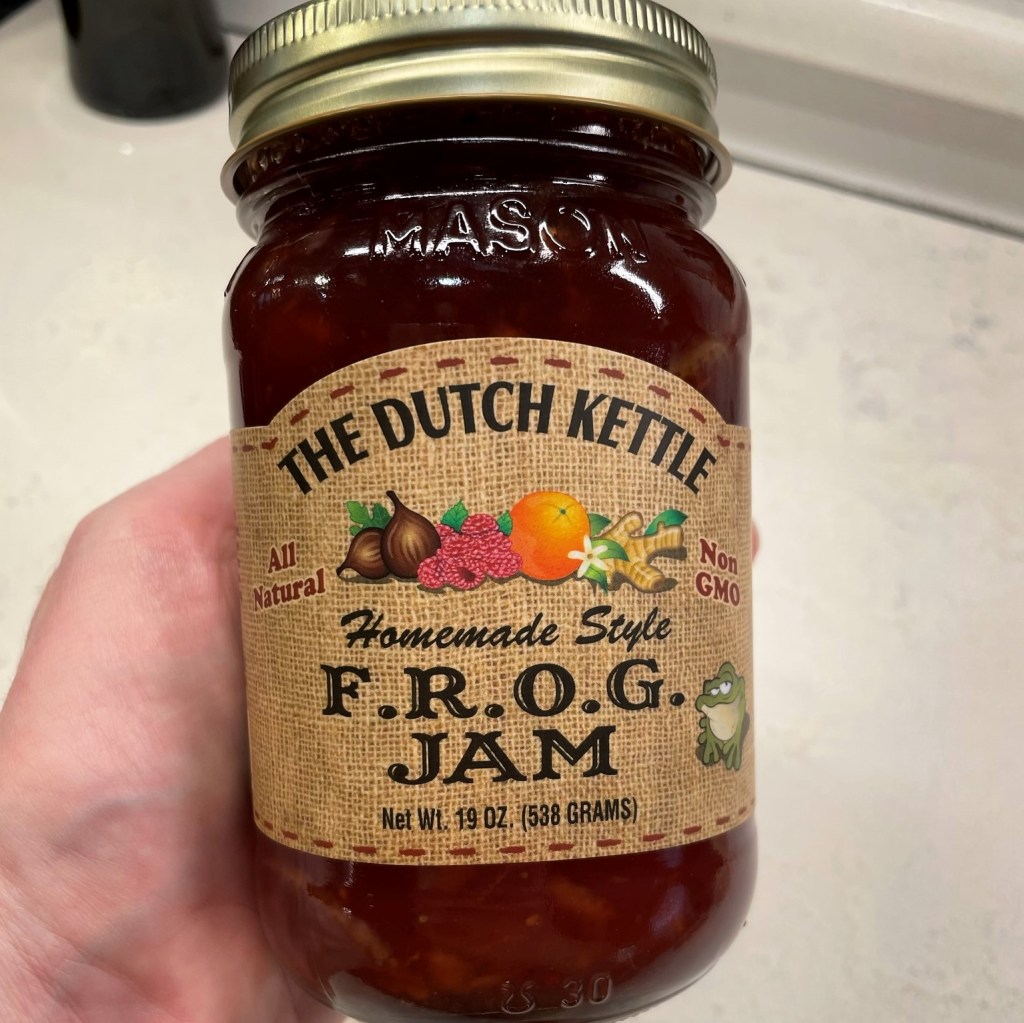
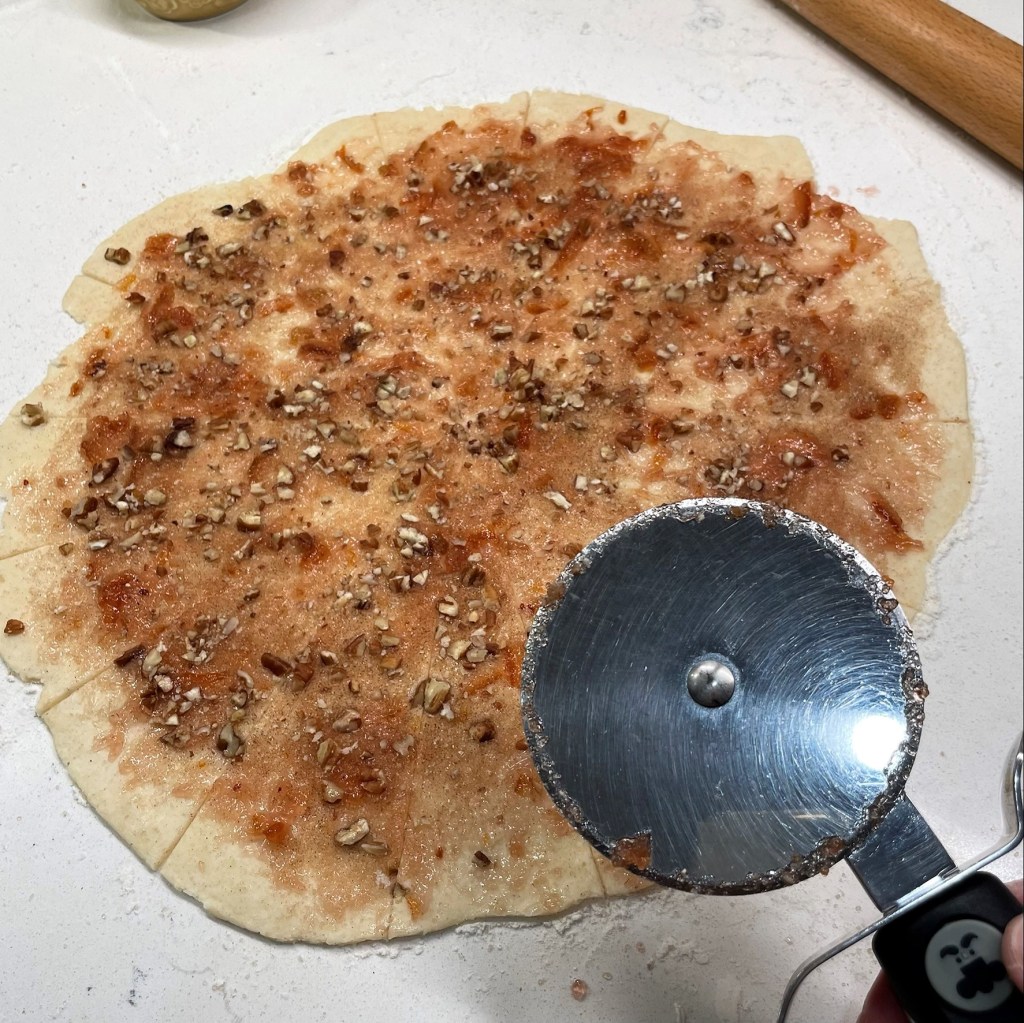
The cookies are tiny, which makes them perfect for gift-giving or tucking into an extra little space on a dessert platter. My rugelach dough is made of butter, cream cheese and flour, with only a slight hint of powdered sugar. The rest of the sweetness comes from the layers of filling and the large crystals of sugar sprinkled on top before baking. Given the variety of flavors I have seen, you can put almost anything in rugelach, and the gears of my mind are already spinning ideas for my next batch. This time, I used a jar of jam we spotted while waiting in line to purchase our fancy Christmas tree stand.
No frogs were harmed in the making of these cookies. 🙂
The fruity filling in these bite-sized little rollups is F.R.O.G. jam, with the letters representing the flavors of fig, raspberry, orange peel and ginger. That’s a whole lot of holiday flavor happening in one spoonful, and though Les is not particularly fond of ginger, he likes the other flavors and said my addition of cinnamon sugar and chopped pecans rounded these out nicely for him. The cookies are made in stages, including a significant amount of time chilling the dough, and then the cookies before baking, so plan accordingly.
As always, I learned a few things along the way to making these, and I’ll share those discoveries throughout the instructions below.
Ingredients
4 oz. full-fat cream cheese (this is half a brick package)
1 stick cold unsalted butter
3/4 cup all-purpose flour* (see notes)
1/4 cup whole wheat pastry flour*
1 Tbsp. powdered sugar
1/4 tsp. kosher salt
2/3 cup jam, preserves or marmalade
2 Tbsp. organic cane sugar
1/2 tsp. ground cinnamon
1/4 cup chopped, toasted pecans
Egg wash and coarse sugar sprinkles, for baking
*Notes
For best results, measure flour using the fluff, sprinkle, level method. If you dunk your scoop directly into the flour bag, you will compact the flour and end up with heavy cookies.
I always sub in a portion of whole grain into everything I bake, but if you do not have whole wheat pastry flour (I like Bob’s Red Mill) or white whole wheat (King Arthur is a great choice), it is fine to use a full cup of all-purpose flour. I personally like the flavor boost of the whole wheat, and it helps me justify eating an extra cookie. 😉
Instructions
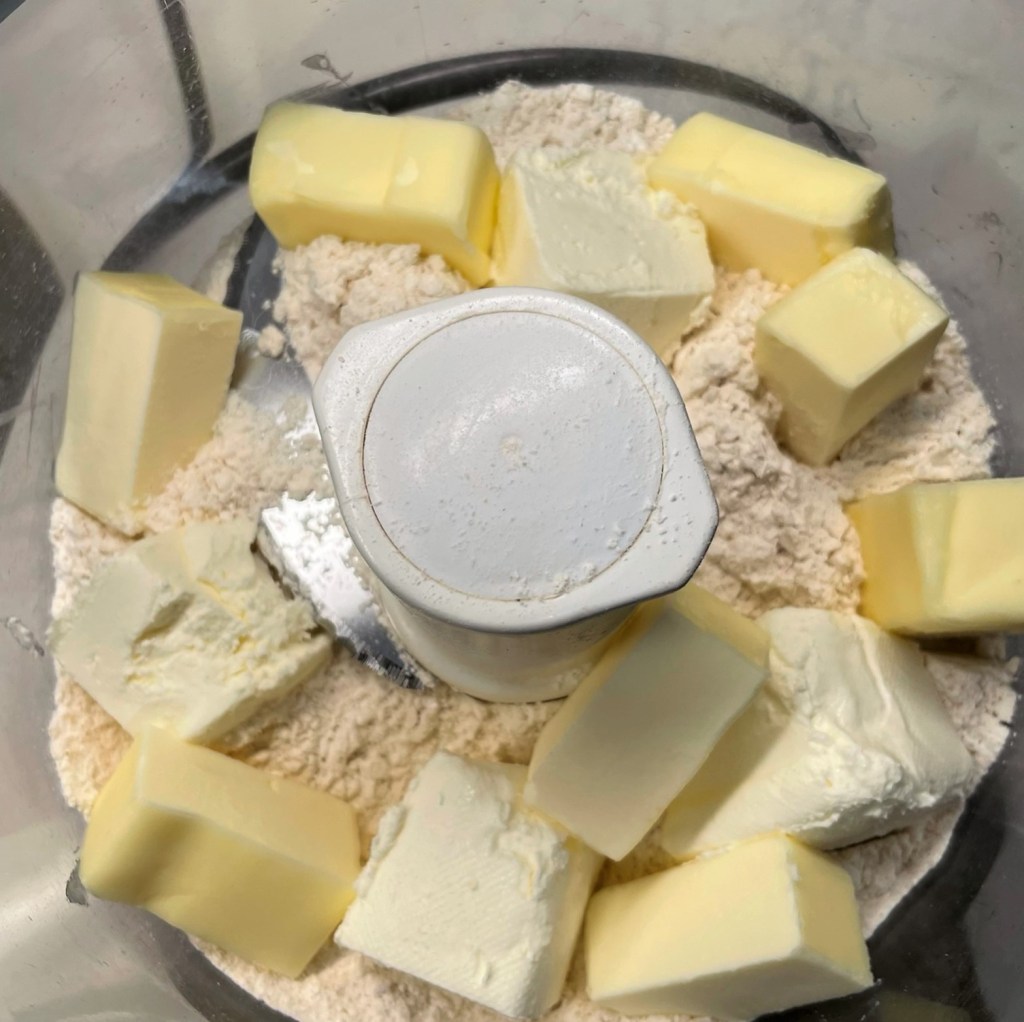
Cut the cold butter and cream cheese into cubes before pulsing into the flour a few times.
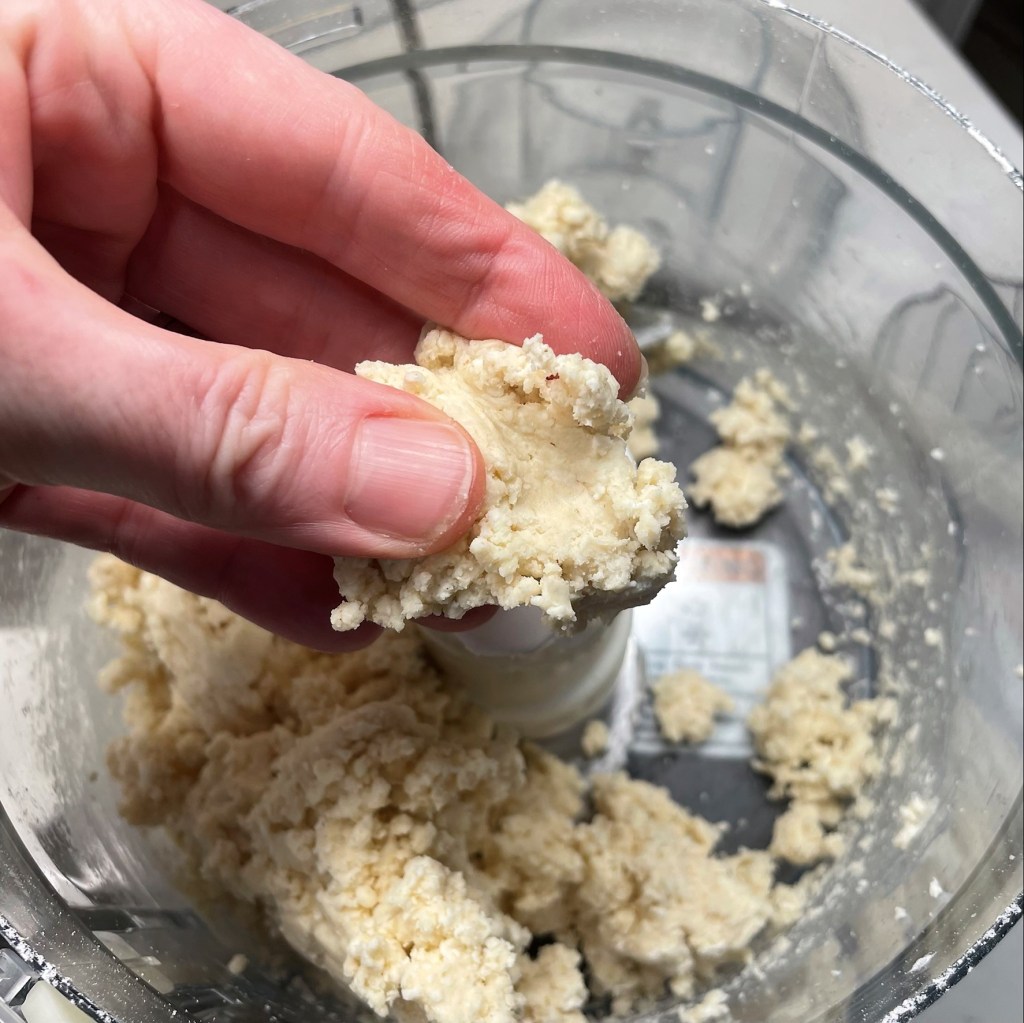
After a few pulses, run the processor continuously, but just until the dough comes together like this.
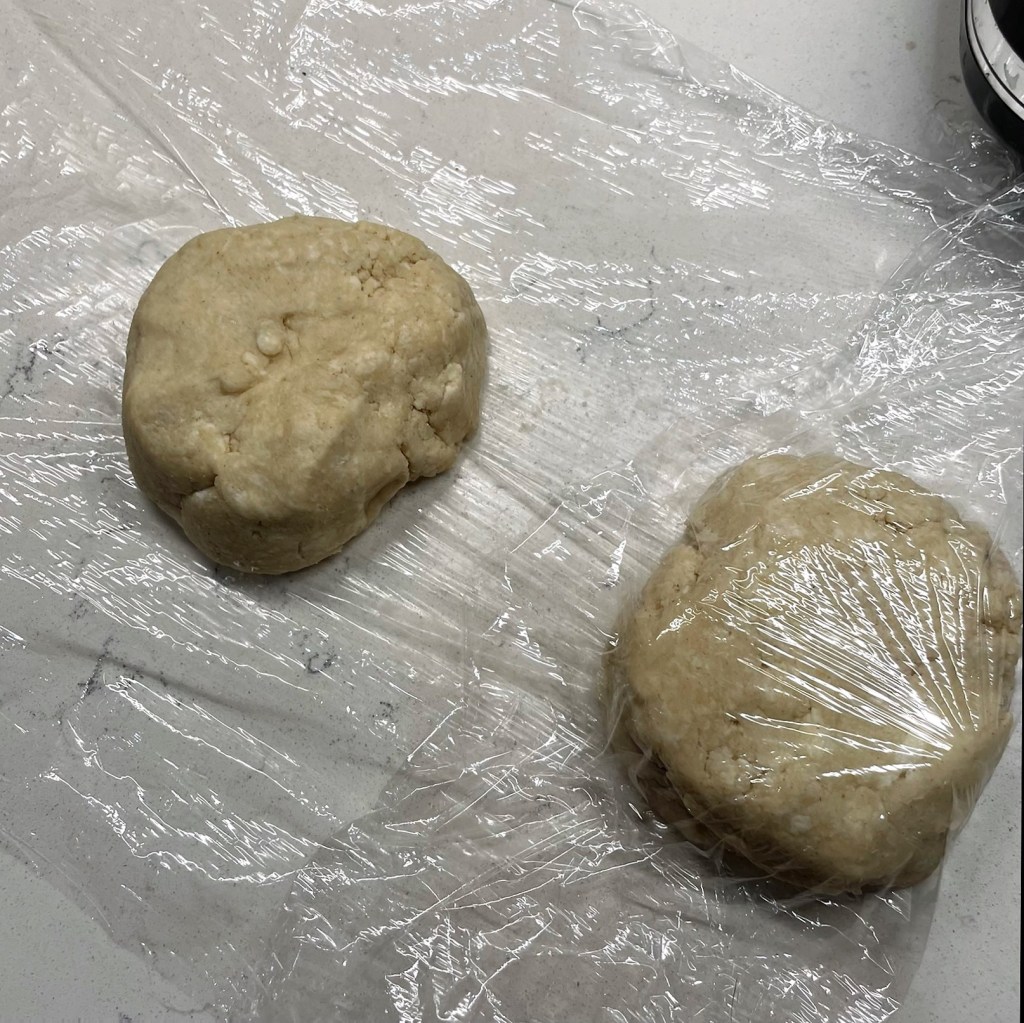
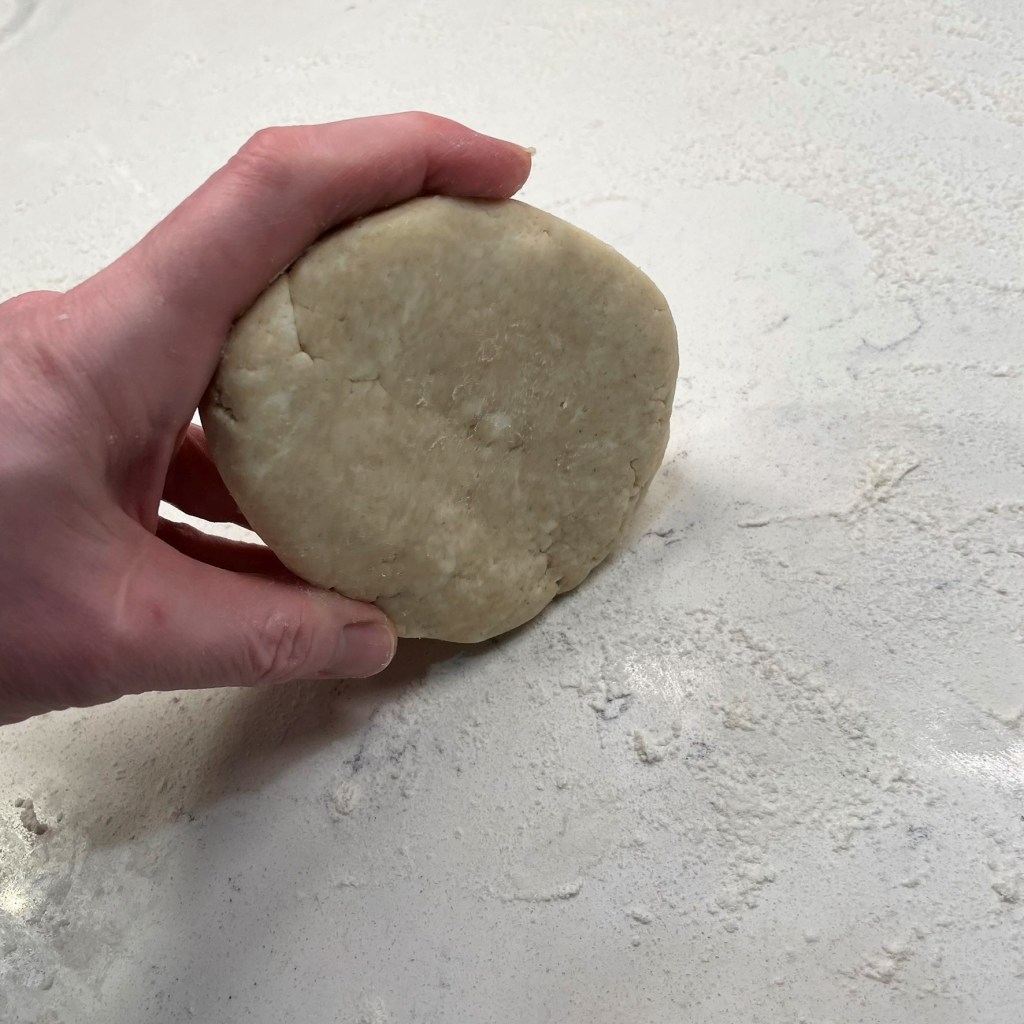
Divide the dough into two disks and wrap them up to chill several hours or overnight.
This is tricky, because you want the jam to melt but you don’t want it too warm.
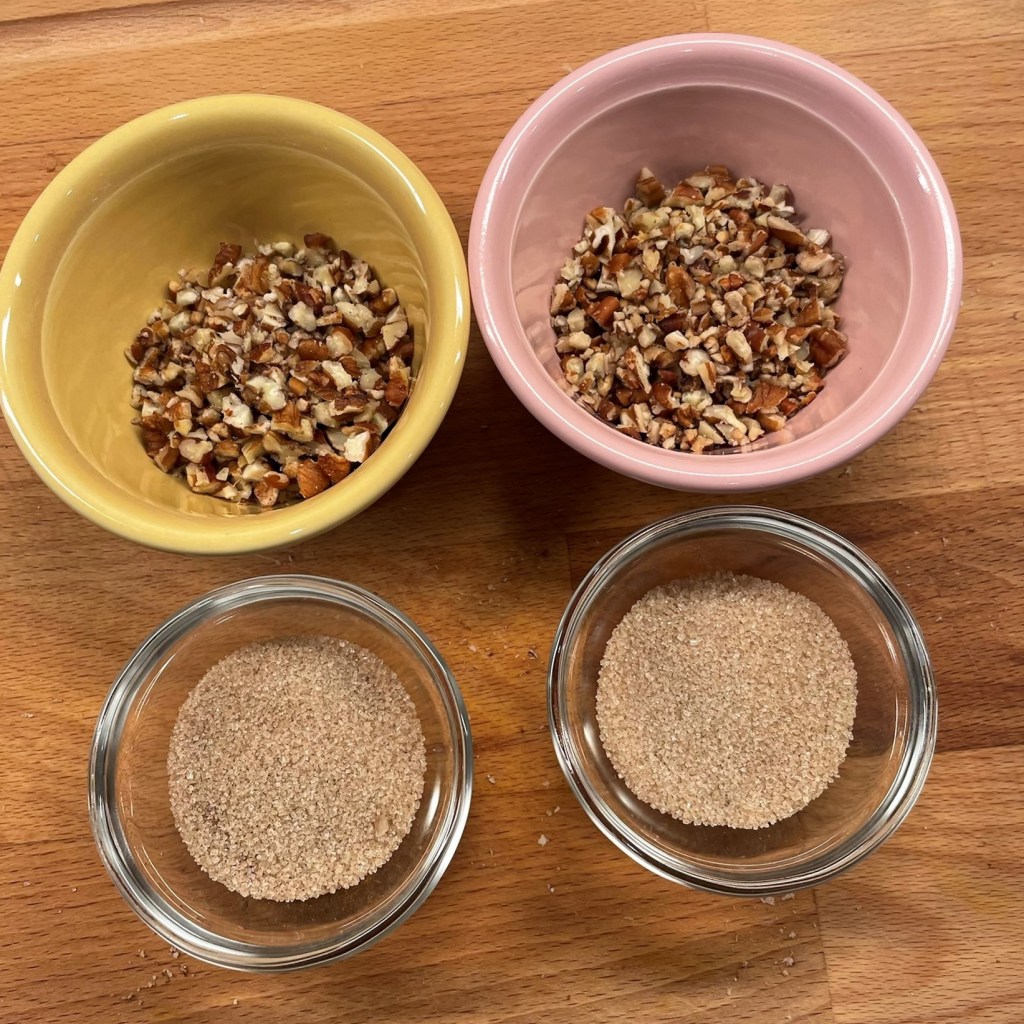
For the sake of consistency, I divided my cinnamon sugar and pecans so that both wheels of rugelach got the correct amounts.
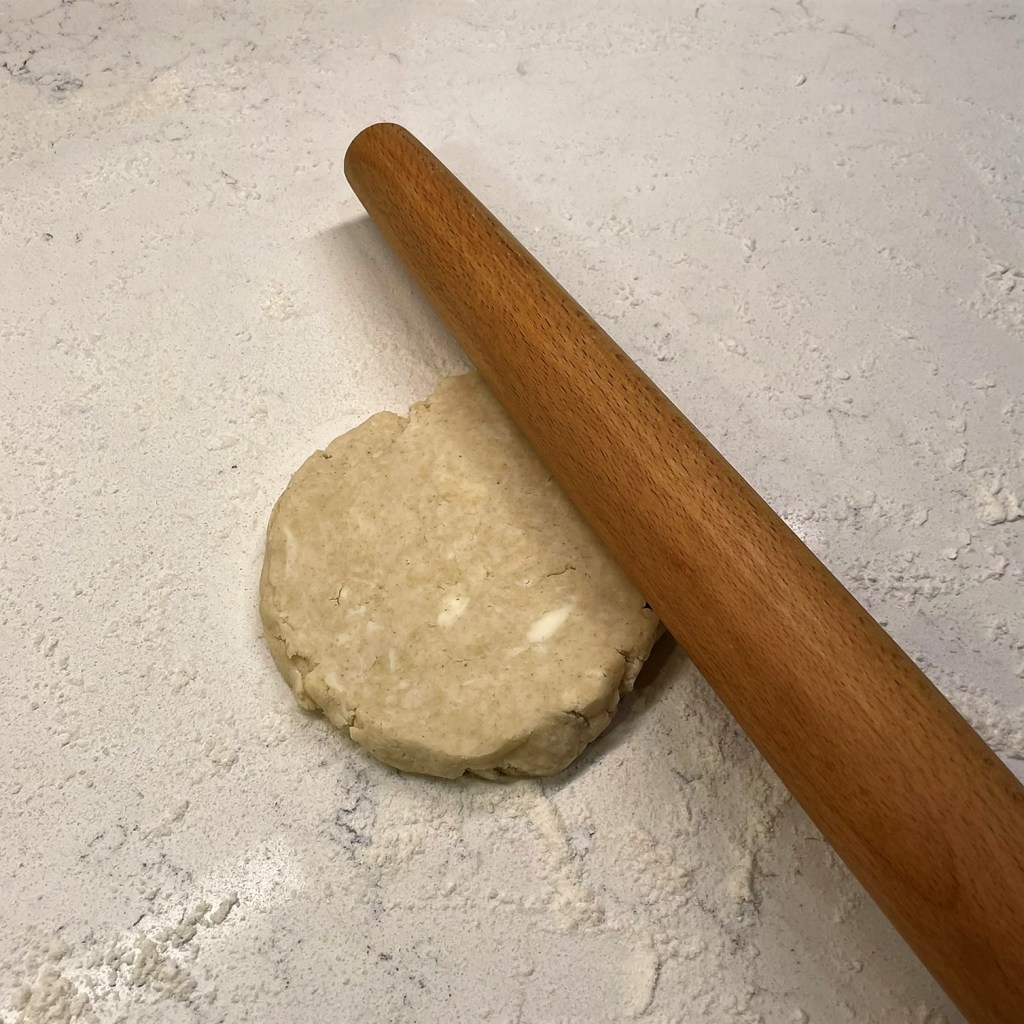
The chilled dough was rock hard, so I gave it a few gentle smacks with my rolling pin before pressing it out into a 12″ circle.
Yes, my edges are wonky, but I figured it would be OK since they’ll be rolled up. Spread the melted jam out thinly over the entire dough.
Sprinkle on the cinnamon sugar and scatter the pecan bits. I had to move them around a bit for more even coverage.
I used my rolling pin to press the parchment paper over the dough to secure the toppings. This turned out to be a mistake…
The rolling pin pressed it a little too well, and I had trouble peeling off the parchment. I peeled it back flat, the same as I do when making corn tortillas.
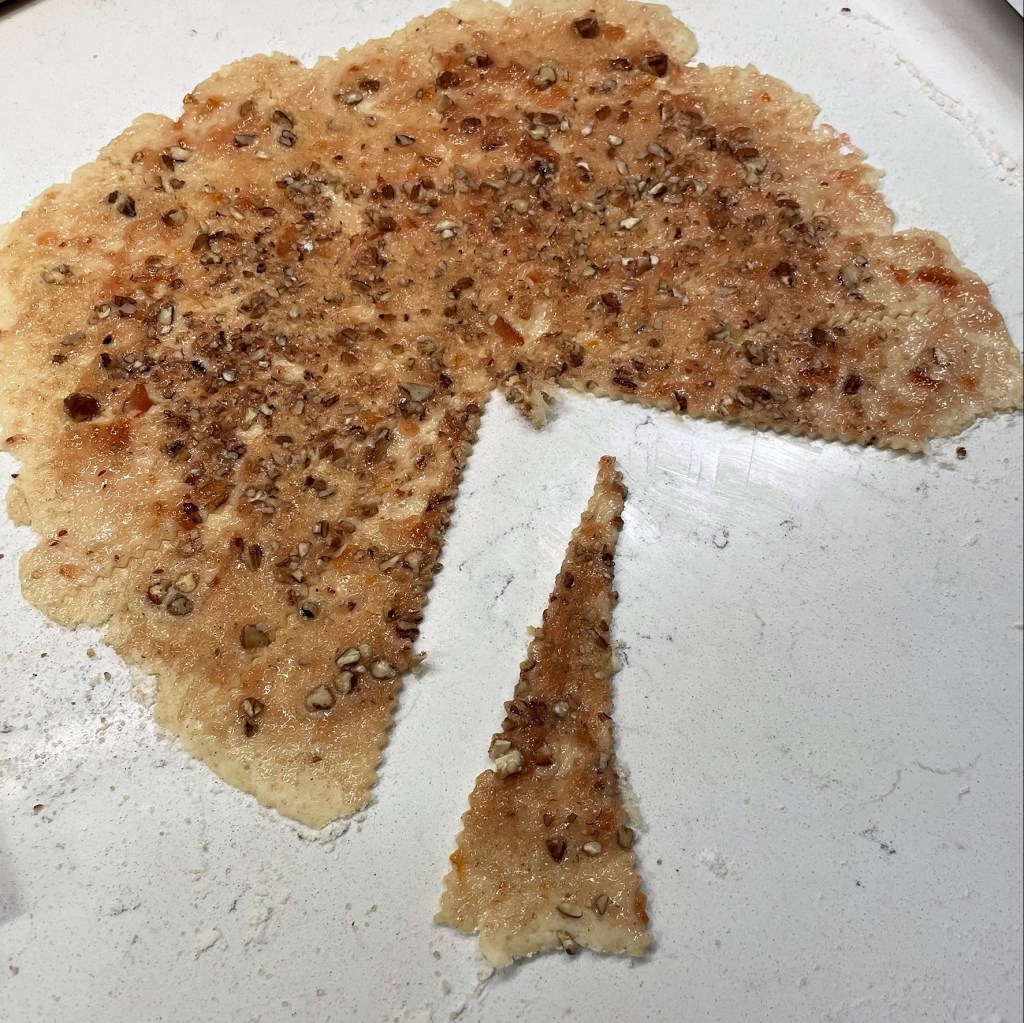
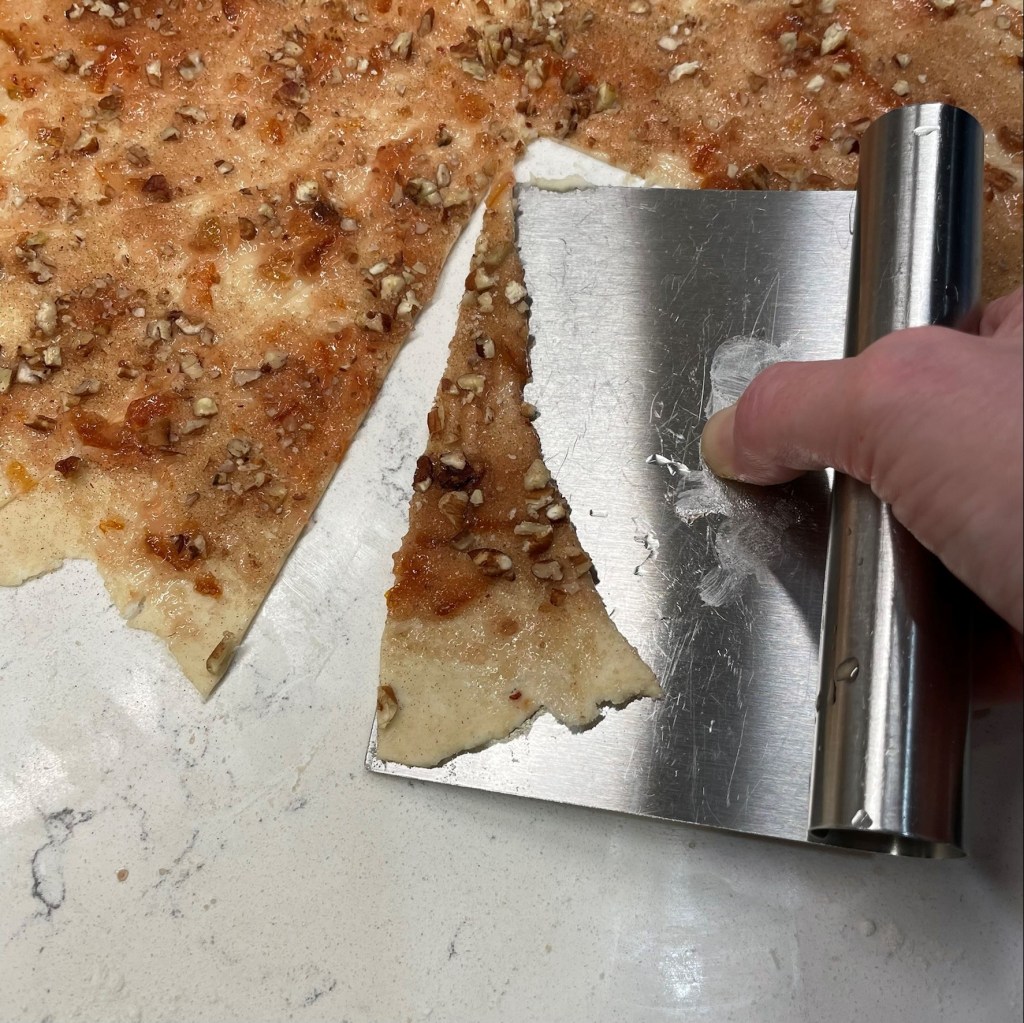
For a prettier cookie, I decided to use my wavy pasta roller to cut it into 16 equal wedges. Also, not the best idea because it made rolling them pretty tricky.
My wavy edges caused the pecan bits to fall off the sides when I rolled, and I had a tough time separating each wedge because the cuts were not clean.
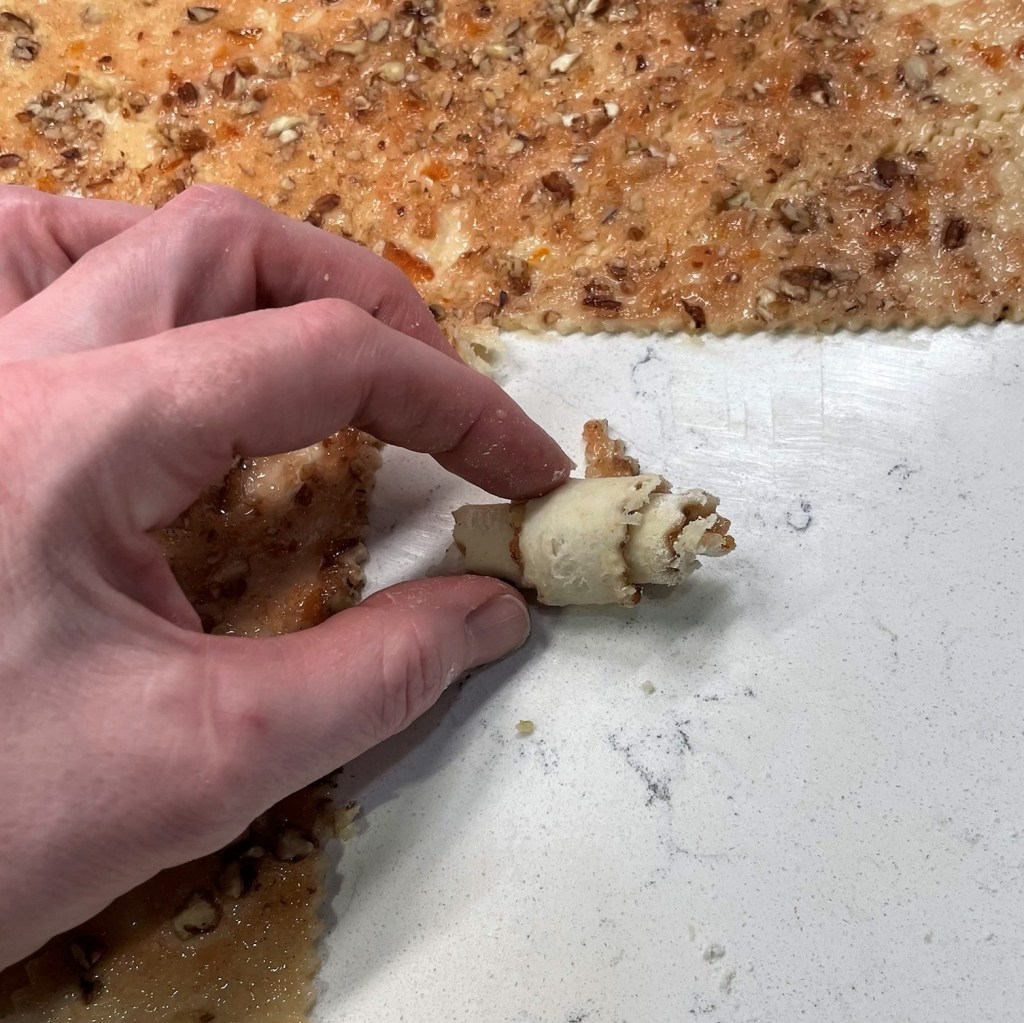
The rolling step is pretty straightforward. Just like a crescent roll, but way tinier!
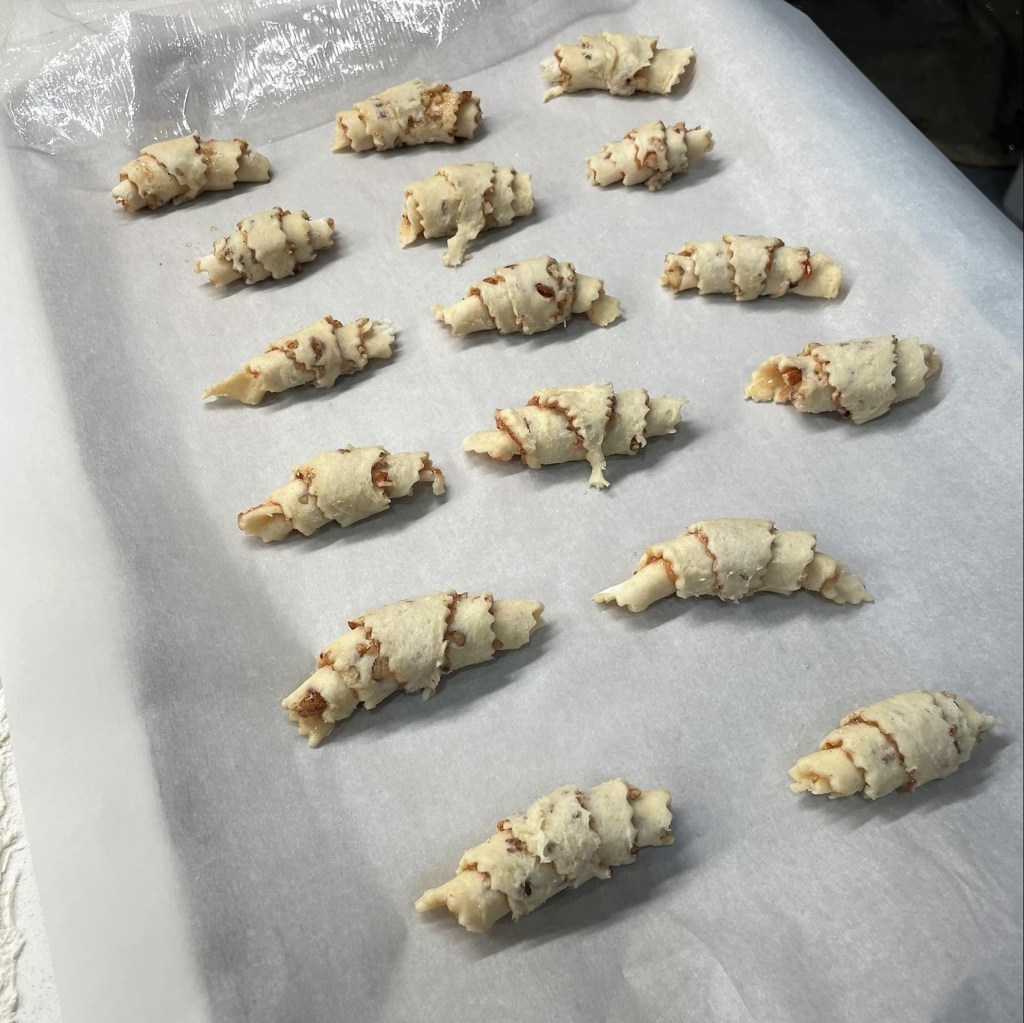
Whew, I got 16 of them onto my baking sheet! Cover with plastic and into the fridge.
I made three changes for my second disk of dough. First, I rolled the edges flat before I began rolling out the dough. I learned this a long time ago with pie crust.
Much better rollout, and without so many shaggy edges!
My second change was pressing the pecans into place with my hand rather than the rolling pin. Much easier to remove the parchment!
And I used a pizza wheel to cut my wedges, which made the rolling step easier and cleaner. The little things can make a big difference!
Even with clean cuts on the dough, I found it easier to roll the rugelach by pulling a wedge away from the larger whole.
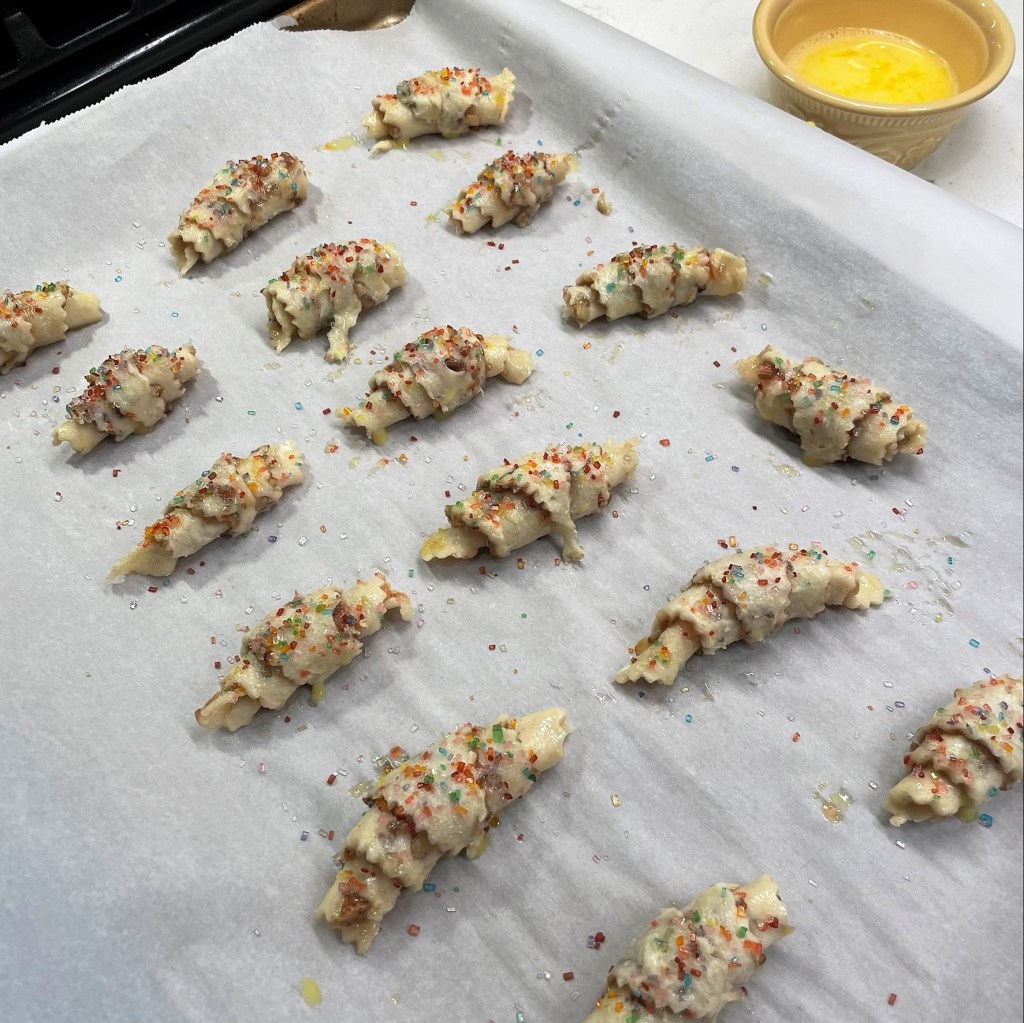
Time for baking! I brushed on a quick egg wash.
And sprinkled each cookie with coarse sugar. On my first batch, I used colorful sprinkles; on the second, natural turbinado.
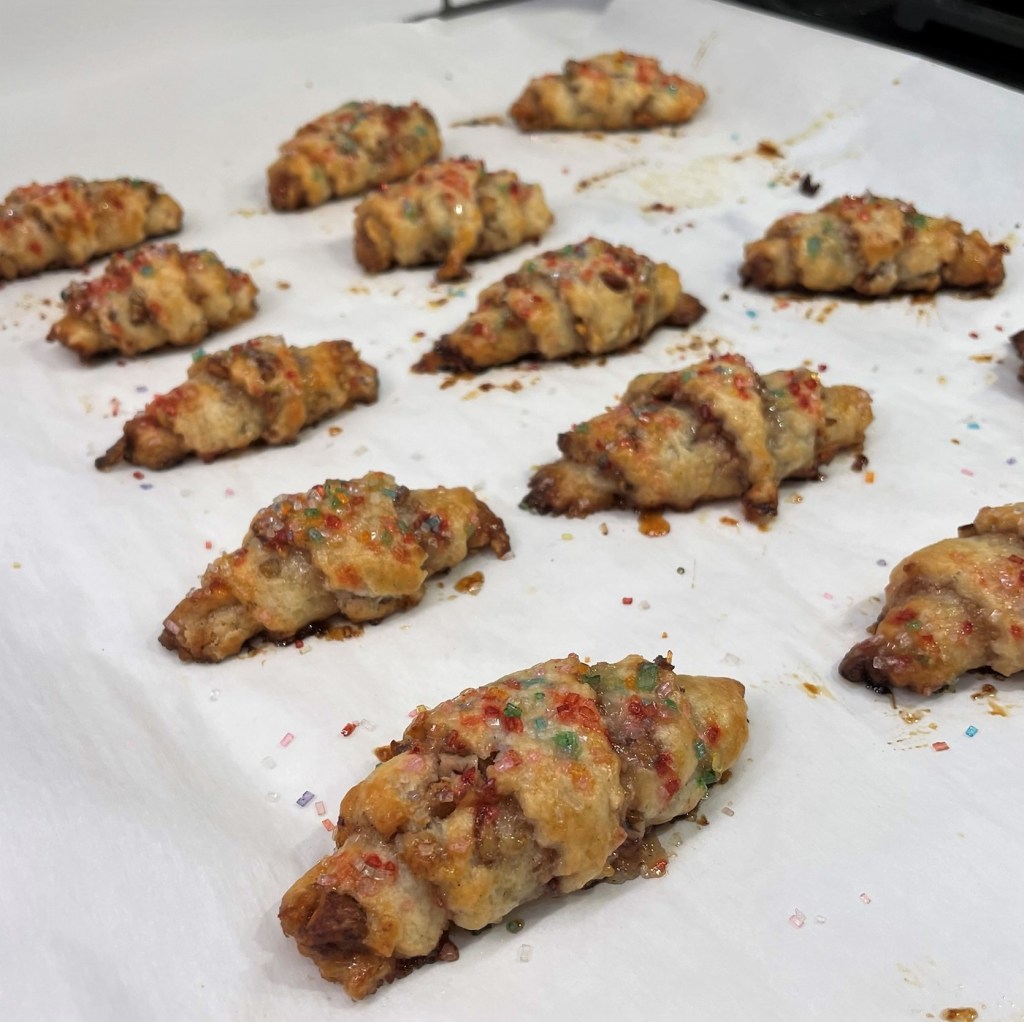
I do like the wavy edges on this batch. Into the oven for 25 minutes, until puffy and golden.
I love how the filling peeks out of the baked rugelach, and these little bite size cookies were delicious!
I’m excited to move rugelach to the “done” column of my bucket list. Next time, I want to make them with chocolate and cherry!
Combine flour, powdered sugar and salt in the bowl of a food processor and pulse a couple of times to blend them evenly. Add cold pieces of butter and cream cheese. Pulse a few times to cut the fats into the dough, then run the processor continuously just barely long enough to see it come together but not long enough for it to clump in a ball around the blades.
Scrape the dough out onto plastic wrap. Divide it into two equal pieces and shape them into disks about the size of hockey pucks. Wrap them tightly in the plastic wrap and refrigerate a few hours to overnight.
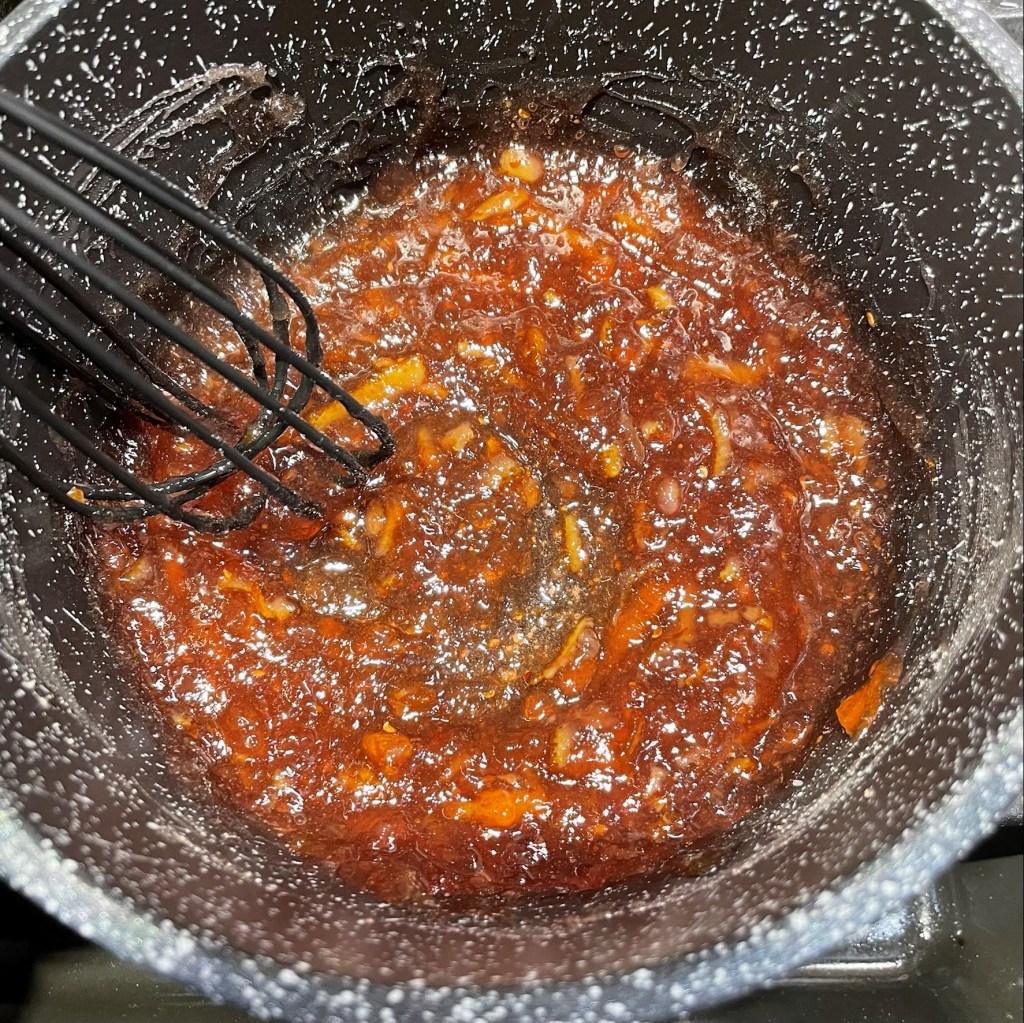
The rolling out and rolling up stage of this recipe moves quickly, so I encourage reading through it completely before beginning. As with any butter-based dough, you want to try to keep it as cold as possible so that it remains flaky during baking. Get all your filling ingredients measured, lined up and ready. Warm the preserves in a small saucepan until they loosen up to spreadable consistency, then remove from heat. Divide the cinnamon sugar and toasted pecans so that you have equal amounts for each dough disk. Set up two baking sheets, lined with parchment, and arrange enough space in the fridge to chill them for an hour or two.
Roll the dough out on a lightly floured countertop, until it is about 1/8” thick and roughly 12” in diameter. Working from the edges inward, brush half of the melted preserves onto the dough round. You should see quite a lot of dough through the preserves and try to keep the glaze light in the center of the dough round, which will ultimately be the tips of each rugelach.
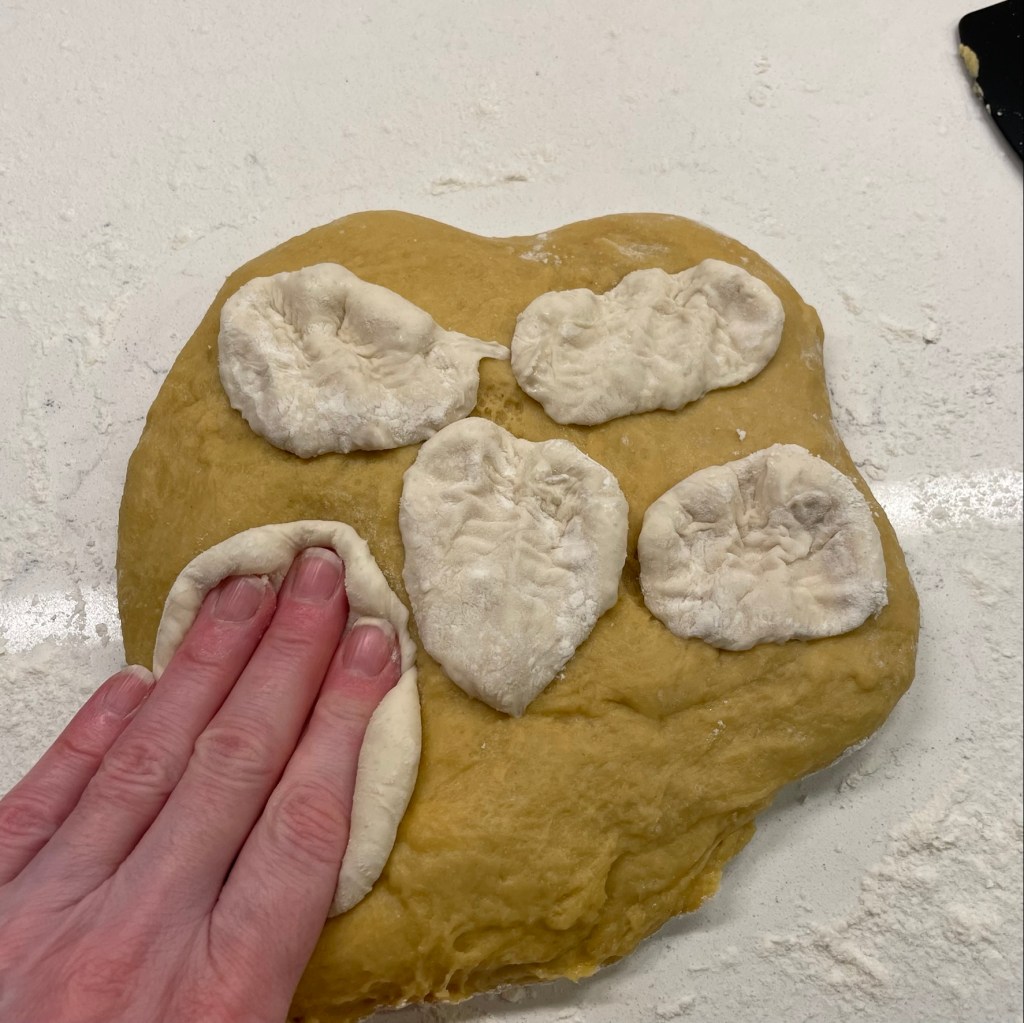
Sprinkle the cinnamon sugar all over the glazed dough, and then scatter the toasted pecan bits evenly over the sugar. Lay a piece of parchment or waxed paper over the dough round and gently press to secure the pecan bits into the dough. Carefully peel the paper away and set it aside for the second batch.
Using a pizza wheel, cut the dough into 16 equal triangles, with tips at the center of the dough round. The easiest way to do this is to cut it into fourths, then cut the fourths into eighths and finally the eighths into sixteenths. This will make sense to you when you begin cutting. Some of the pecan pieces will fall off or come loose; just press them back onto the dough.
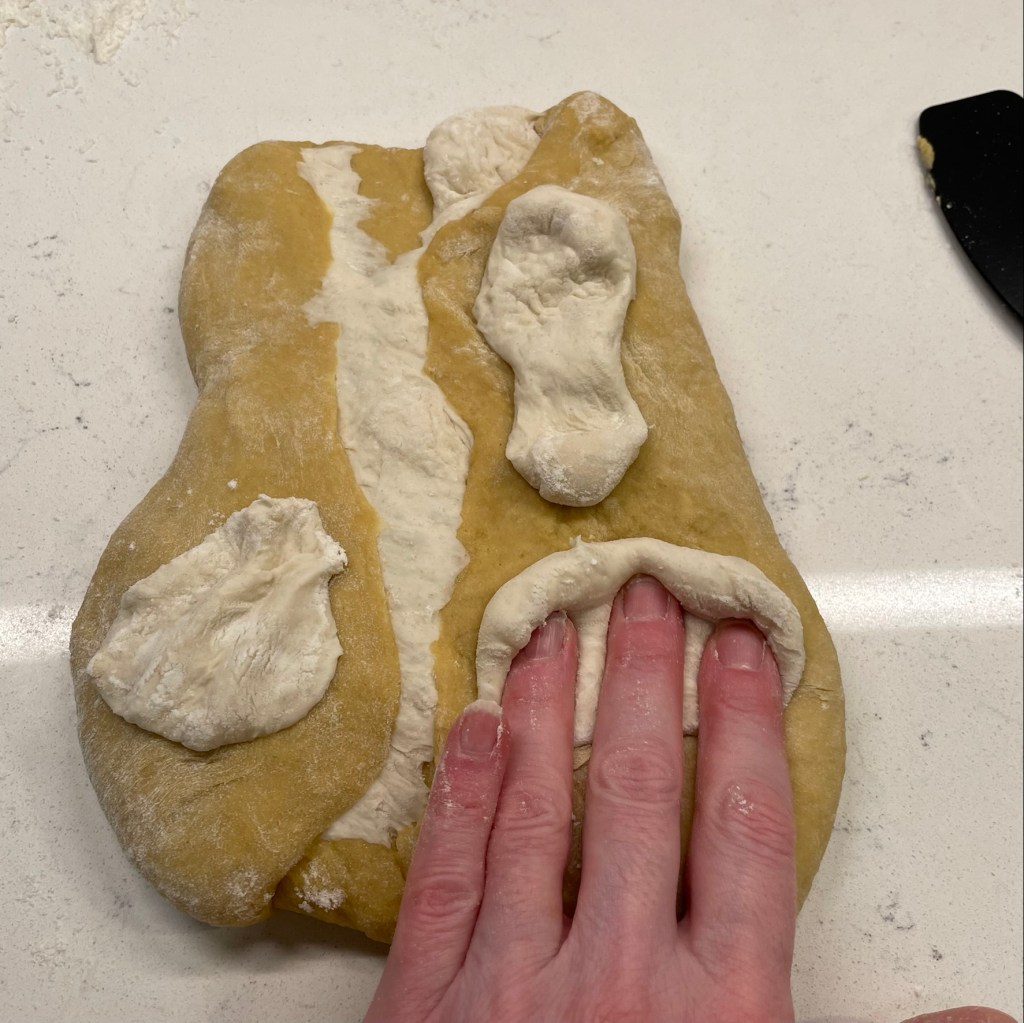
Beginning with one of the triangles, start rolling from the outer, wide end toward the center, as if rolling up a crescent roll. Keep it tight as you go and place the cookie on the parchment-lined baking sheet. I found it easier, once I had about three of the triangles rolled, to use my bench scraper to loosen a triangle away from the round before rolling. The far-away side of the dough round was the trickiest, and next time I may try rolling it on parchment paper that can be moved around for the rolling step.
When all 16 cookies have been rolled, cover the baking sheet with plastic wrap and place it in the fridge. Repeat with the second dough disk. Chill the cookies for at least an hour before baking.
Toward the end of chill time, pre-heat the oven to 350° F, with the oven rack in the center position. I baked only one sheet at a time, but if you wish to bake both at once, arrange the racks with enough room for both and plan to rotate the pans halfway through baking time.
Prepare an egg wash (beaten egg with a teaspoon of cold water) and lightly brush the chilled cookies. Sprinkle them with a pinch of sugar. You can use decorative sugar or (as I did with my second batch) a pinch of natural turbinado sugar.
Bake for about 25 minutes, until cookies are puffed up a bit and golden brown in color. Cool on the pan for about 5 minutes, then use a spatula to transfer them to a cooling rack.
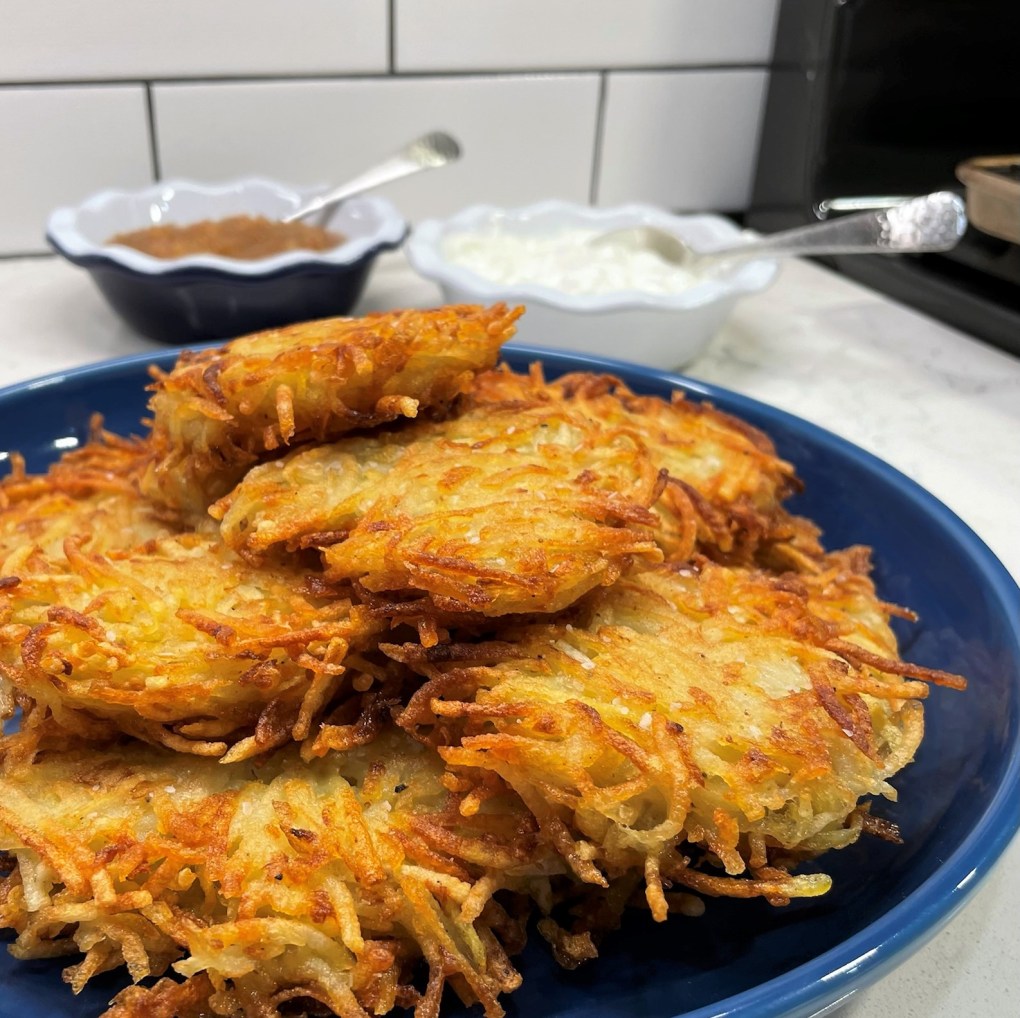
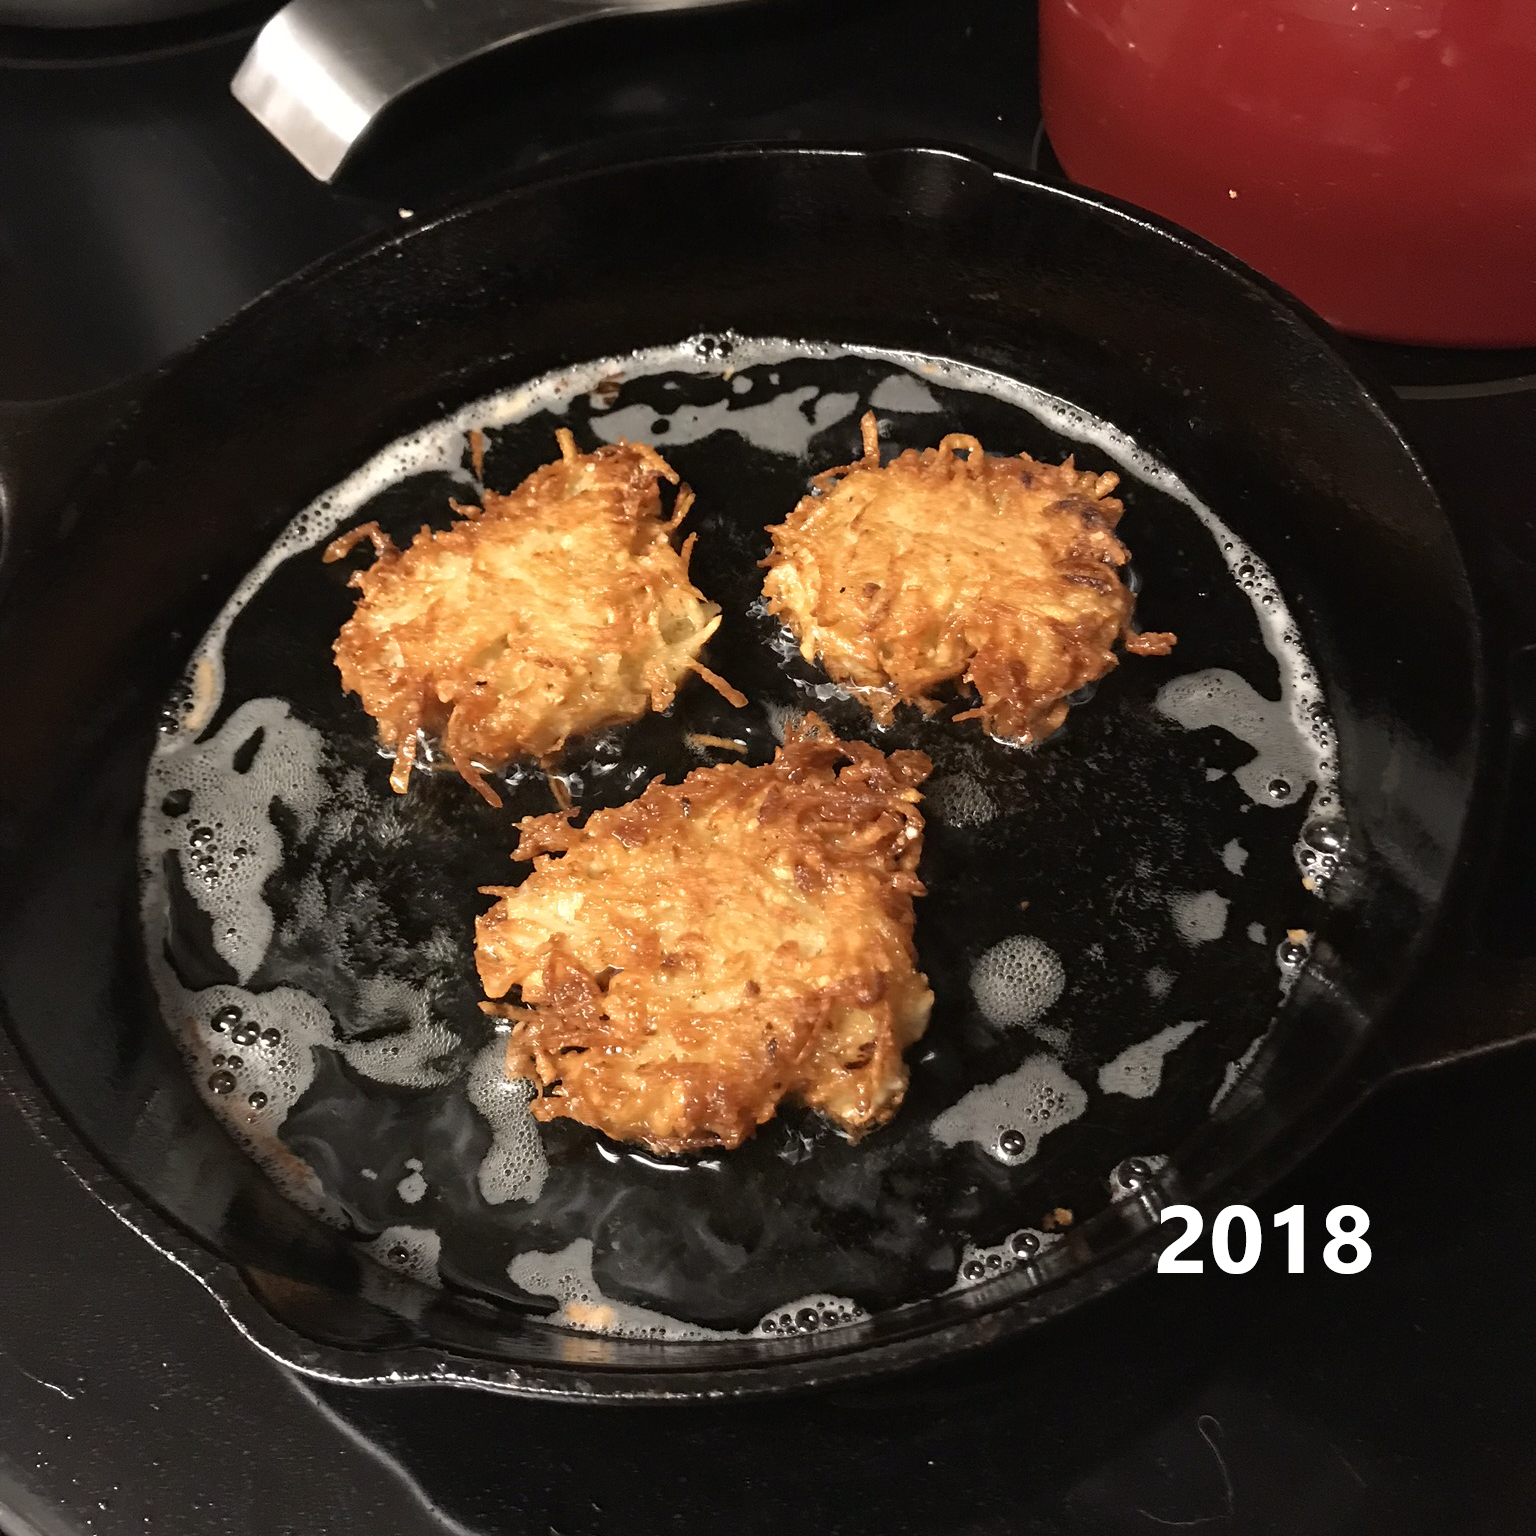
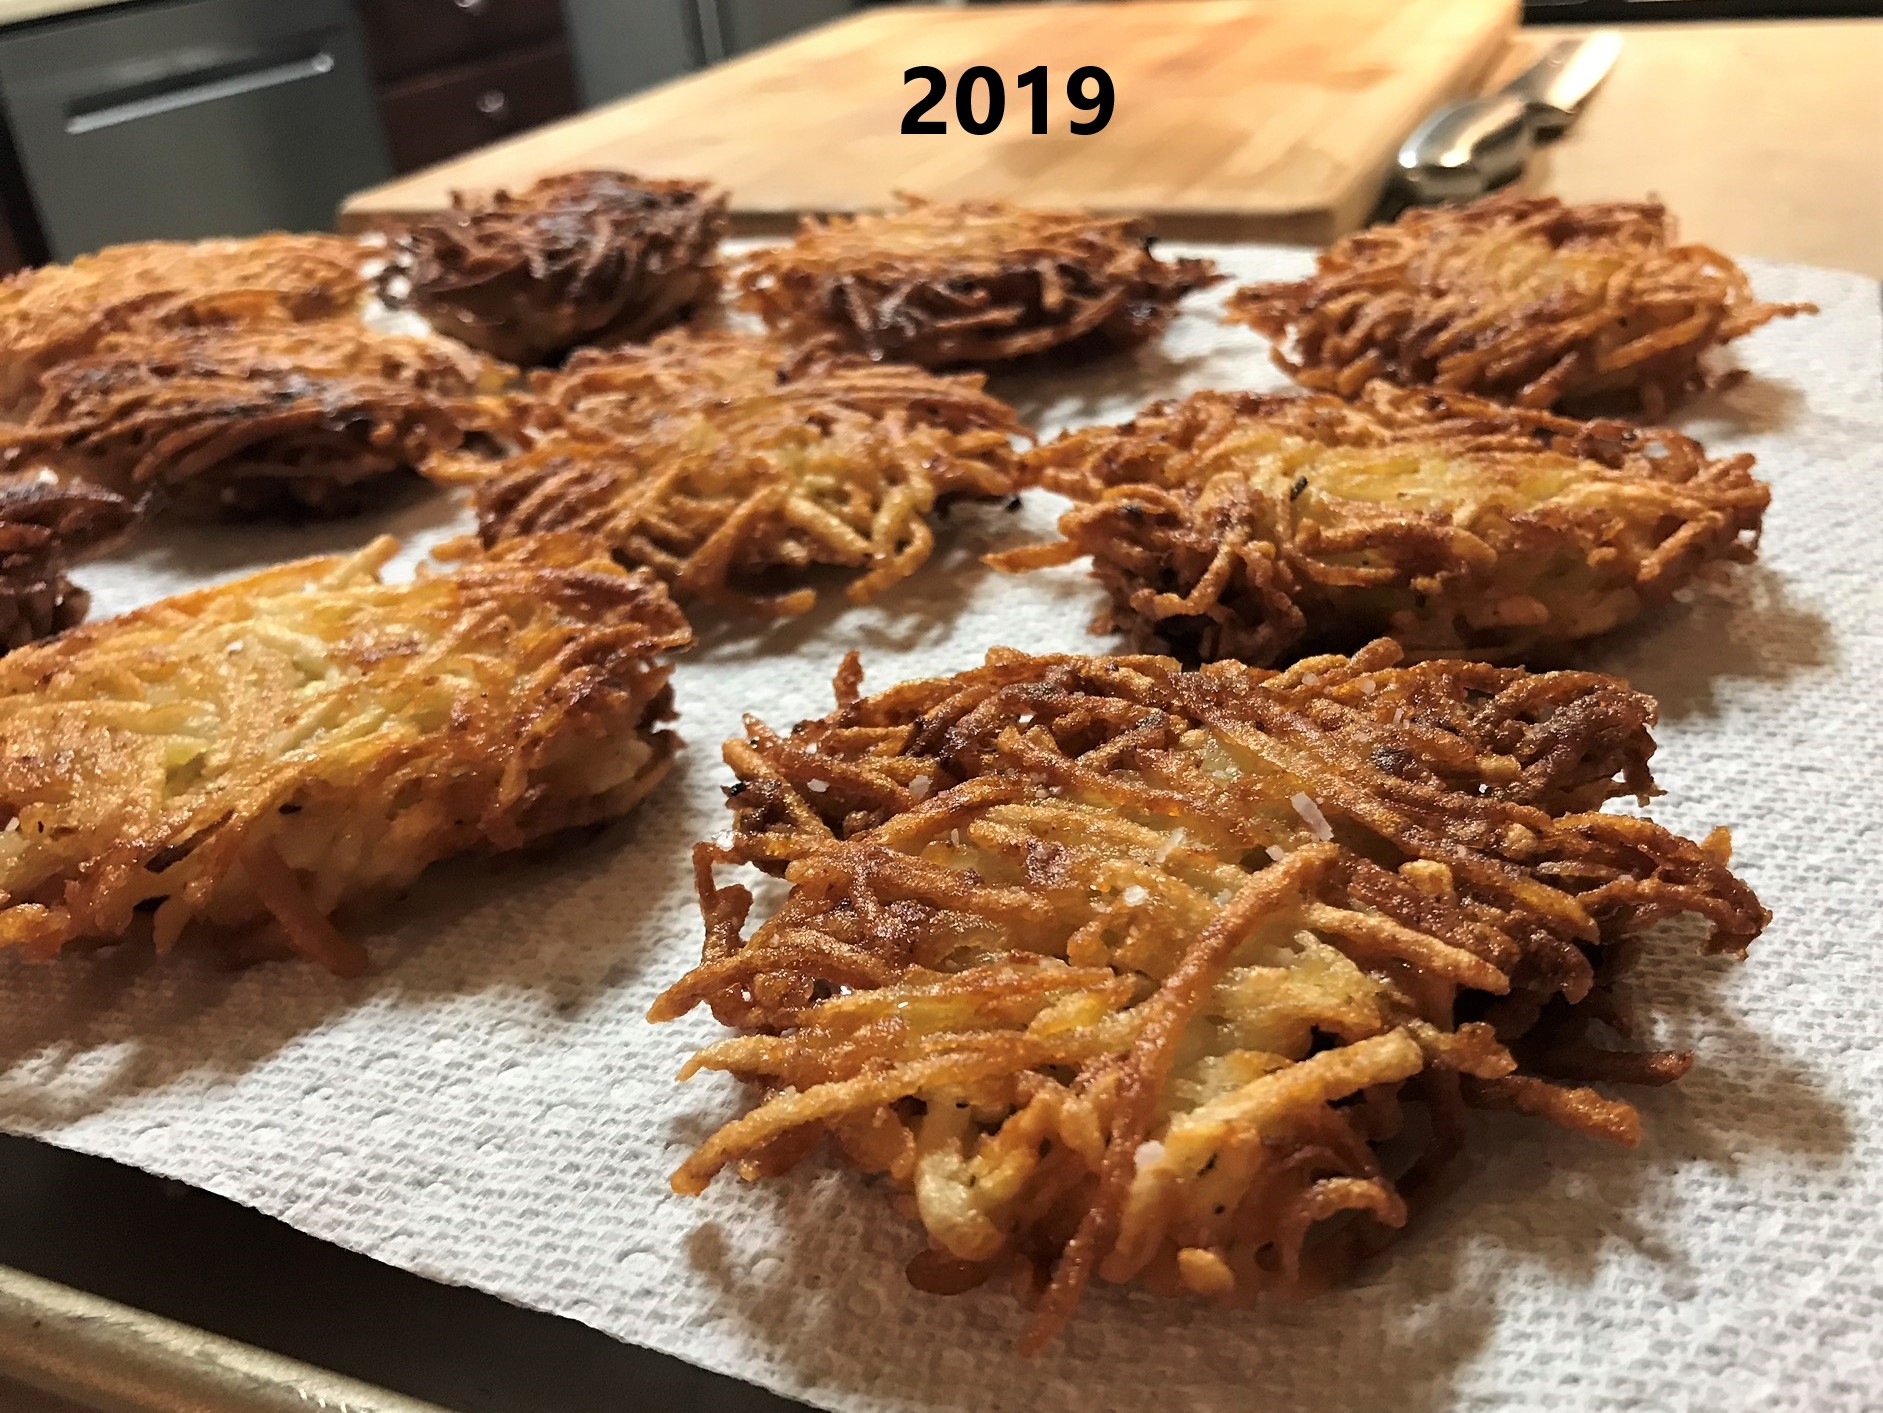
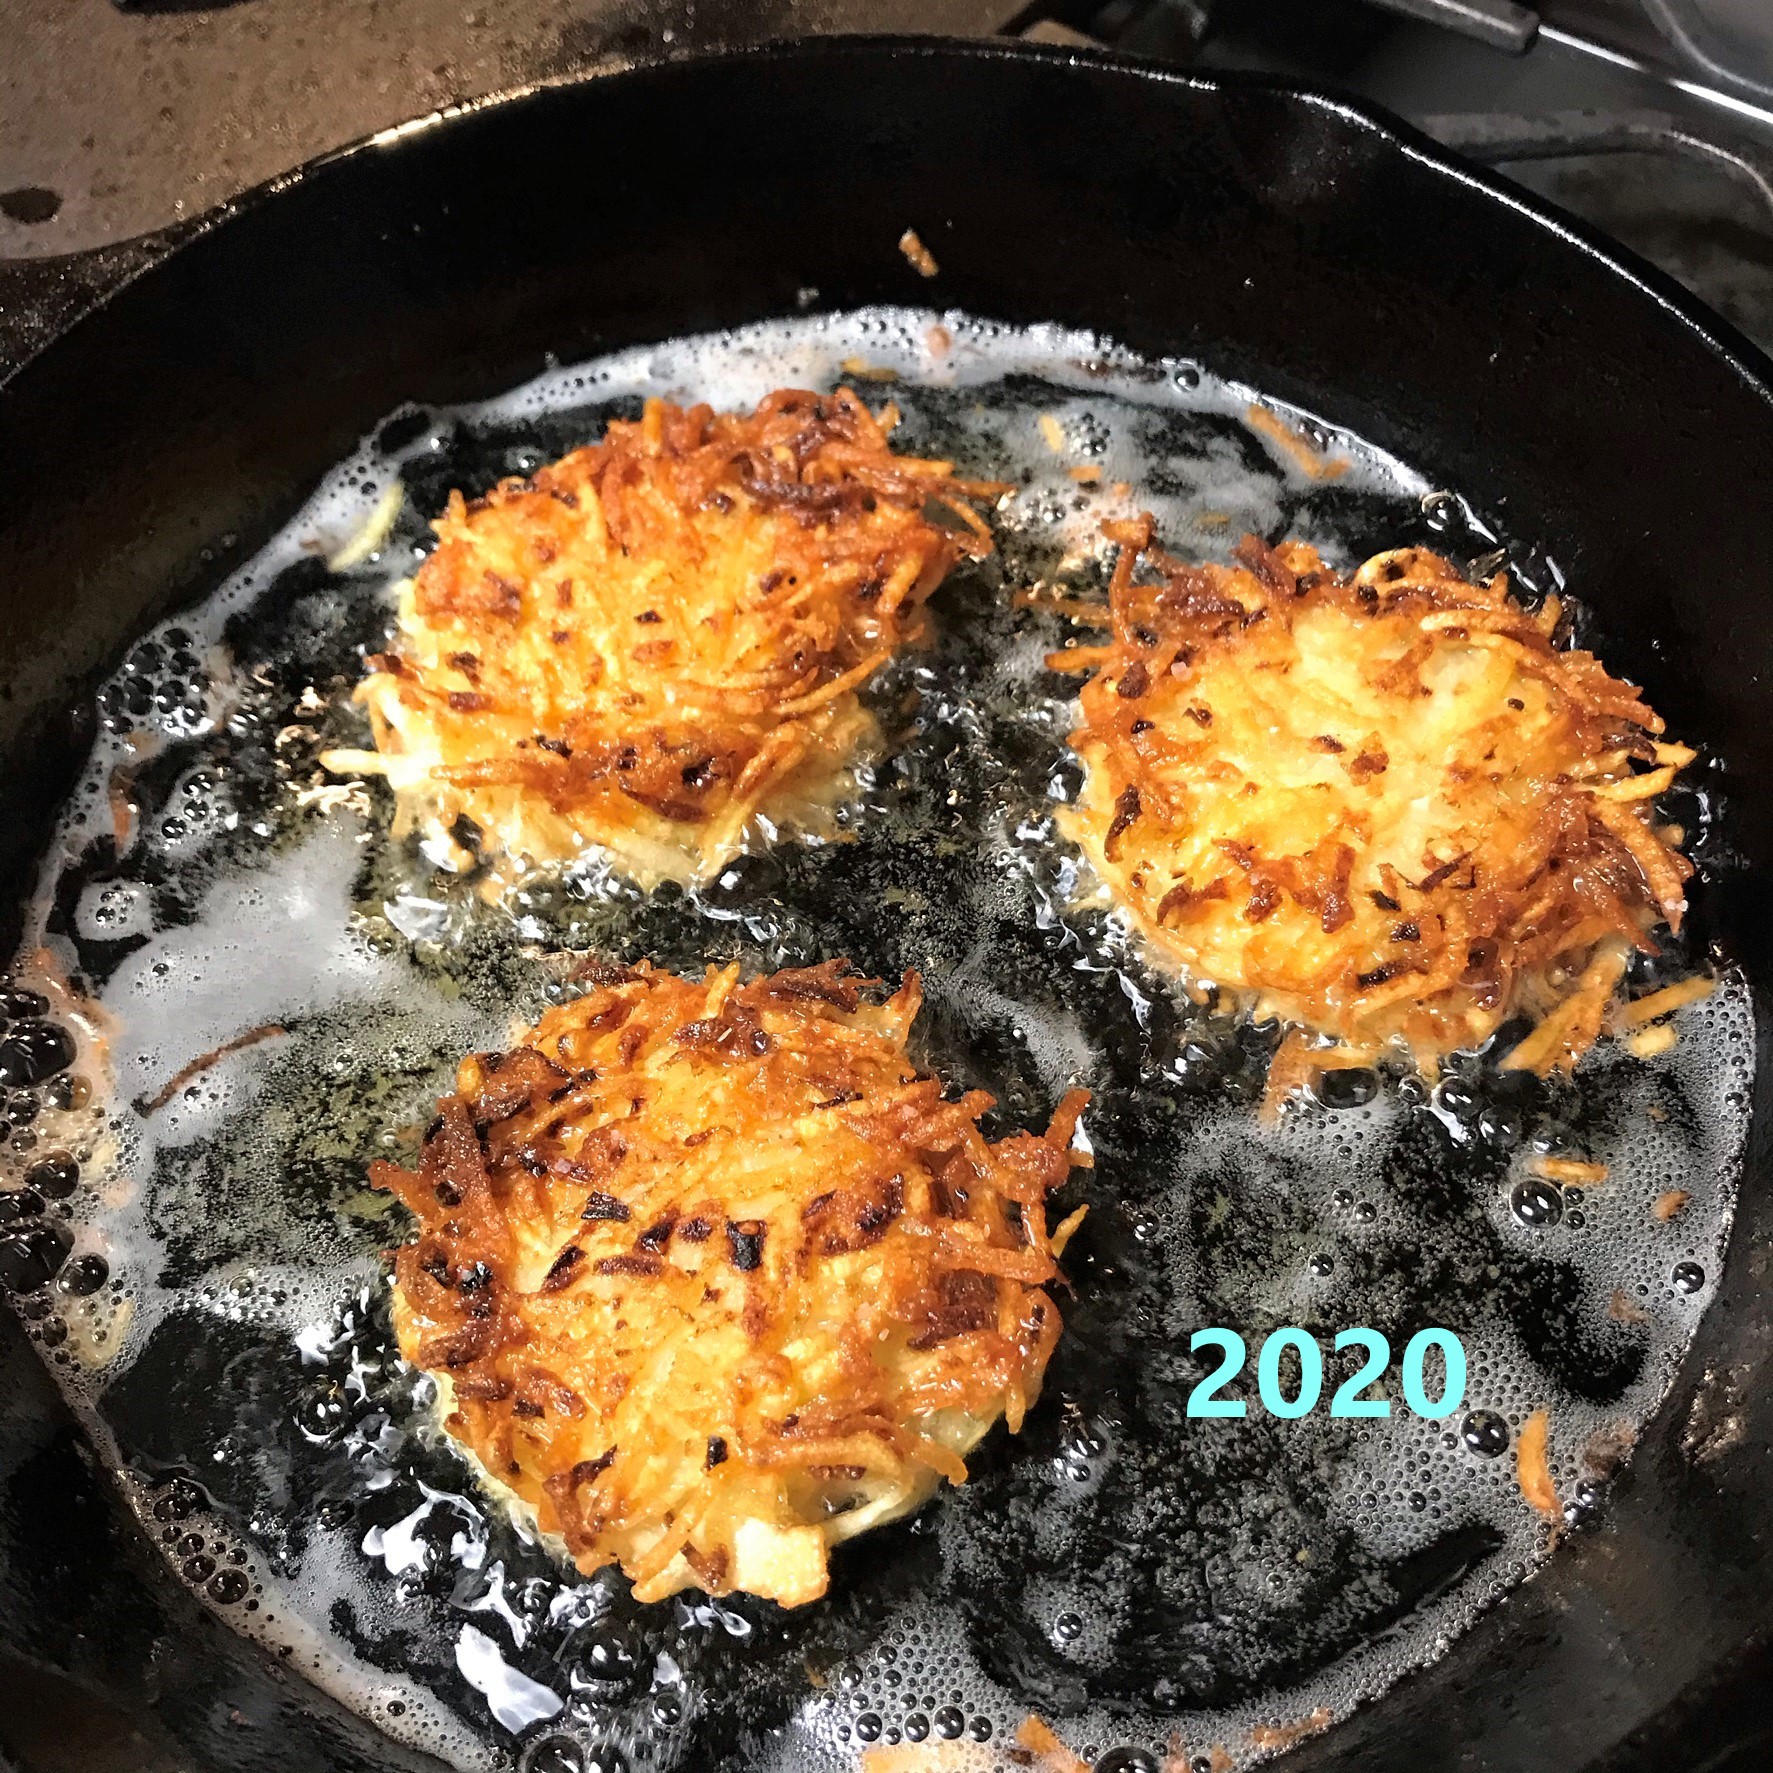
Crispy outside, soft and chewy inside. A hint of onion and just enough salt. That’s what you want in a classic latke, the delightfully simple, traditional food of Hanukkah. Getting them just right takes practice, and what I lack in personal heritage, I hope to make up for in effort. When I started dating my husband in 2015, I found myself intrigued by the foods that are central to the Jewish holidays, and latkes have been on the menu every year since then. Let’s review:
My recipe has evolved, as has my technique. I’m not sure what I was thinking in my first couple of efforts, except that I wasn’t giving enough attention to the oil. And that means I was missing the point, because Hanukkah is all about the oil.
Hanukkah, nicknamed the “festival of lights,” is an eight-day observance of an ancient miracle. The story is multi-layered and, frankly, hard for me to fully understand, let alone explain. But the gist of the story is that God came through for the faithful, and a small jar of oil that was only enough for one night’s lighting of the eternal lamps at the Temple, somehow (miraculously) lasted for eight nights.
In observant Jewish homes, families still mark the occasion by lighting candles on a menorah for eight nights during Hanukkah, and foods are fried in oil in remembrance of the miracle. Traditional fried foods served during this eight-night celebration include jelly-filled doughnuts and, of course, latkes!
Those crispy, golden latkes make me wish Hanukkah lasted for more than eight nights!
The secret is in the starch
The key to crispy latkes is removing the excess liquid from the shredded potatoes, while simultaneously preserving the starches that aid in holding those shreds together. After you shred the potatoes, which you can do either by hand on a box grater or (the easy way) in a food processor, simply soak them in ice water long enough to draw the starch out of the shreds. Next, squeeze as much moisture as possible out of the shredded potatoes, then reunite them with the sticky starch that has settled at the bottom of the soaking bowl. Add in some shredded onions (also squeezed dry), a beaten egg and a few sprinkles of flour, and you’re good to go!
The miracle of the oil
Frying latkes is the traditional way, and I don’t recommend trying to fry them in a thin film of oil as I did those first couple of years. You may get a nice crispness on the outside, but the inside won’t be done. You need about a half-inch of oil in a hot skillet to make a crispy latke, and the type of oil can make a difference as well. As much as I love and rely on unfiltered, extra virgin olive oil for most of my cooking, its smoke point is about the same temperature as you need for frying the latkes, so it is not the best choice. For this kind of frying, I’ve chosen grapeseed oil, which has a higher smoke point and produces a nice crispy exterior with a neutral flavor.
Grapeseed oil is a good bet for frying at high temperature. I’m pretty sure this bottle will last well beyond the eight nights of Hanukkah!
Enjoy latkes your own way
Not all latkes are the crisp-textured, straw-colored wafers that I am sharing today. Some cooks make their latkes with a soft, almost mashed potato-like texture, and those are delicious also. Onions are usually included in the mix for flavor, but I have seen latke recipes that lean toward the sweet side and there are plenty of other vegetables that can be substituted for potatoes, if you don’t mind a less-than-traditional treat.
Not all spuds are created equal
Although it is true that you can use different ingredients to make latkes, it’s important to recognize the strengths and weaknesses of certain potatoes. For best results and crispy latkes, choose a starchy potato, such as russet or Yukon gold. Potatoes that are described as “waxy,” such as red potatoes, are higher in moisture and lower in starch. That isn’t to say you can’t use them, but you would need to give extra attention to the step of moisture reduction and supplement the starch a bit to hold them together. Also, be prepared for a slightly less crispy latke when using waxy potatoes, or any other substitute that doesn’t measure up in the starch department.
Use starchy potatoes for best results, such as russet and Yukon gold. It isn’t necessary to peel them, but I usually do for presentation sake.
What to serve with latkes
Traditionally, latkes are served with applesauce and sour cream, and therefore I asked Les to cook up a batch of his mouthwatering overnight applesauce for Thanksgiving. With Hanukkah falling so close behind this year, I hoped to carry over some of that delicious, chunky applesauce as a side for what has turned out to be one of my best batches of latkes to date.
Ingredients
2 pounds potatoes (I used a combination of russet and Yukon gold)
1 smallish sweet onion
1 egg
2 Tbsp. all-purpose flour
Kosher salt and black pepper
A few shakes ground cumin (if you are not keeping strict kosher)
Grapeseed oil (or other neutral cooking oil with high smoke point, such as canola)
The large shredder blade on my food processor gets this job done quickly, and my knuckles are grateful. Use a box grater if you wish.
However you shred, transfer your potatoes immediately to ice water to help prevent discoloration and to draw out the starch.
I use my processor for the onions too. Sweet, yellow or Spanish are recommended. Red onions are too strong and, well, too red.
Wrap the onion shreds in layers of paper towel and squeeze to remove the excess liquid. Set aside for later.
I’ve used my trusty cast iron skillet in the past, but found this year that my electric skillet offers foolproof temperature control. Heat about 1/2″ oil to 375° F.
Carefully scoop out the potato shreds onto a clean towel. Try not to disturb the starch that has settled to the bottom of the bowl. You’ll need it.
Roll up the towel to absorb the excess moisture. This is a good time to mention that I never use scented detergent or fabric softener. I just haven’t found a scent that works with latkes! Haha
Twist the towel until you think you have all the moisture out.
And then, twist it some more.
Transfer the shreds to a clean bowl. May I recommend that you immediately rinse the towel? Trust me, you don’t want that starch moving through your entire laundry load.
Add the shredded, drained onion to a beaten egg for easy mixing.
I love the flavor of cumin with potatoes. Apparently, there is a concern about whether cumin (and some other spices) meet Kosher standards. Omit it if your conscience requires.
Some recipes suggest using matzo meal in place of flour, but we only have that in the house during Passover. A couple tablespoons of all-purpose flour will aid with binding the latkes.
Use your hands to toss the shreds, fully incorporating the flour. You should also add salt and pepper at this stage.
Exposure to oxygen causes a chemical reaction that makes the potatoes (or in this case, the water) turn pinkish. There’s no harm. Drain carefully to preserve the starch that has settled.
There it is! The magical potato starch that lends stickiness to our latke batter. Do your best to empty the water without losing that beautiful starch.
Add the starch to the bowl of shredded potatoes and toss again to fully mix it into a batter.
Add the egg and onion and toss again.
Shaping the latkes is not complicated, but don’t expect them to hold firmly together. Aim to have a manageable mass of sticky potato. You can shape them further in the frying oil.
Always do a small test latke, as mine on the left there. If the oil does not immediately go crazy with bubbles, it isn’t ready. Gently place the latkes in the oil, but don’t press them.
When you begin to see the bottoms turn golden, use the back of a firm spatula to gently press the tops of the latkes flat.
Yes, Nilla, we see you watching! ❤
Turn the latkes only once, when the edges and bottom are completely golden brown. Use two utensils to keep them stable so you can turn them without splashing hot oil.
Don’t forget to season the latkes, and do this the second they come out of the oil. Place them on a rack over paper towels and rest them in a warm oven while you prepare the rest.
The last dregs of the latke batter is likely to feel wet. Squeeze out as much of that moisture as possible when you shape your final latkes.
Happy Hanukkah!
Peel and rinse the potatoes. Shred them by whatever means is easiest for you and transfer the shreds immediately to a bowl filled with ice water. Allow them to soak for about 45 minutes.
Trim, peel and shred the onion. Use paper towels to wick away the excess moisture from the onions.
Beat the egg lightly in a measuring cup. Add the shredded onion and mix to combine evenly. I have found this easier for even mixing of the onion into the potato mixture.
Pour enough grapeseed oil into a large skillet or electric frying pan to measure about 1/2″ deep. Heat oil to 375° F.
Use your hands to carefully scoop the soaked potatoes from the bowl and onto a clean kitchen towel. Try to avoid stirring up the starch from the bottom of the bowl. Spread the potato shreds out over the towel. Roll up the towel and twist to extract as much moisture as possible from the potatoes. Empty the shreds into a large, new bowl.
Sprinkle the cumin and flour over the shreds and toss with your hands to evenly distribute.
Pour out the water from the soaking bowl, and take it slow enough to keep the powdery white starch in the bottom of the bowl. Scoop the starch into the bowl with the dried potato shreds and toss again with your hands to combine. Finally, add the egg-onion mixture and toss until evenly combined.
Form a clump of potato mixture in the palm of your hand, pressing to shape it as best you can into a flattened ball. Do not try to shape it as a disc at this point. Carefully lay the ball of potato mixture into the hot oil and repeat until you have three or four clumps in the oil. When the edges begin to turn golden, use the back of a small spatula to gently flatten the balls of mixture into more of a disc shape. Turn the latkes after all edges (and the bottom) are golden brown. Fry the second side until golden. Transfer to a rack over layers of paper towel and repeat until all latkes are fried. Season the latkes with kosher salt as soon as they come out of the hot oil.