I’ve been ruminating lately about my grandmother’s ways in the kitchen. How she fed everyone on scraps— not because she had to but because she could— and realizing that I don’t employ her tactics as often as I have opportunity. Pinching pennies doesn’t have to be a necessity; it can be a strategy for ensuring that we always have enough. And in times of financial uncertainty (which lately seems to be always), that strategy can keep us fed, not only physically, but also emotionally.
My grandmother knew this, and it’s why she used up all the bread heels and stale sweet rolls to make her amazing bread pudding, which we all loved. It’s why 10-year-old me could sit at her dinner table, puzzled at her claim that we were having leftovers, not recognizing the food before me as something we’d already eaten that week. She was terrific at transforming, and I have that spirit in my bones, too— I just don’t always realize when I’m doing it.
We are about to enter an era where many ingredients we take for granted will be less available or more expensive than we’ve come to expect, thanks to climate change, tariffs, supply chain chaos and farm worker shortages. I thought it timely to share one of my favorite ways to stretch expensive ingredients: a pasta salad. My offering is a Caprese-inspired summer side dish that uses half a bag of pasta bowties, a small container of cherry tomatoes, fresh summer basil and mozzarella. None of these items is particularly expensive— especially if you happen to have a little garden at home— but I hope to provide a template that might help you stretch out other ingredients that lean toward the pricey side.
Summer in a bowl! 😎
Classic caprese— sort of
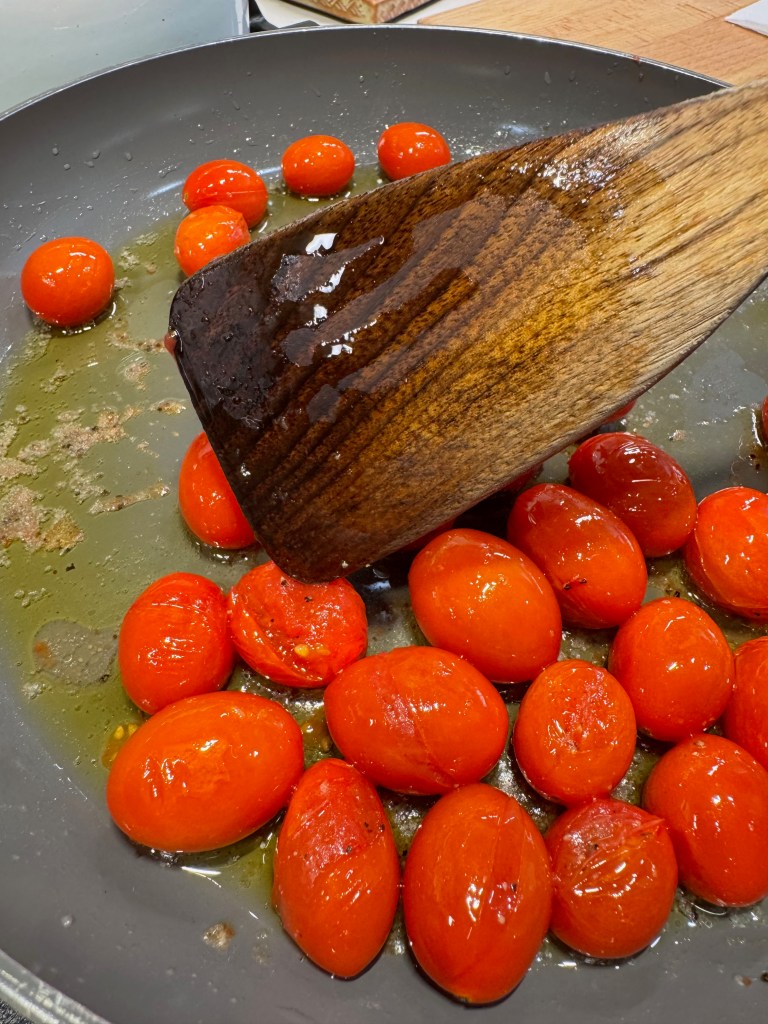
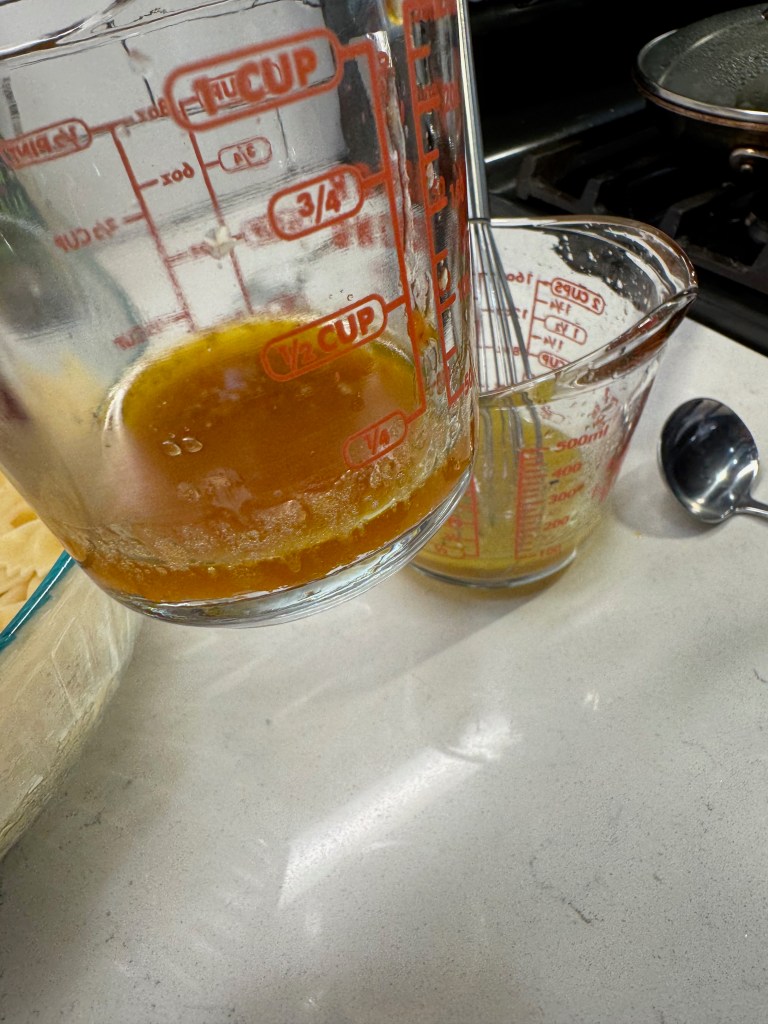
The flavors (and 🇮🇹 colors) of Caprese are all present here, but I’ve taken a few liberties to amplify the key ingredients. For starters, I poached the tomatoes in a bit of extra virgin olive oil to concentrate their sweetness and to reduce some of the moisture, and then I scooped the cooked tomatoes into a bowl to cool, reserving the flavorful oil for later. This is a simple trick for getting the most flavor out of the tomato and, as a bonus, it’s easier to eat them without the juice bursting out everywhere.
Slow poaching concentrates the tomato flavor. Don’t toss that beautiful oil!
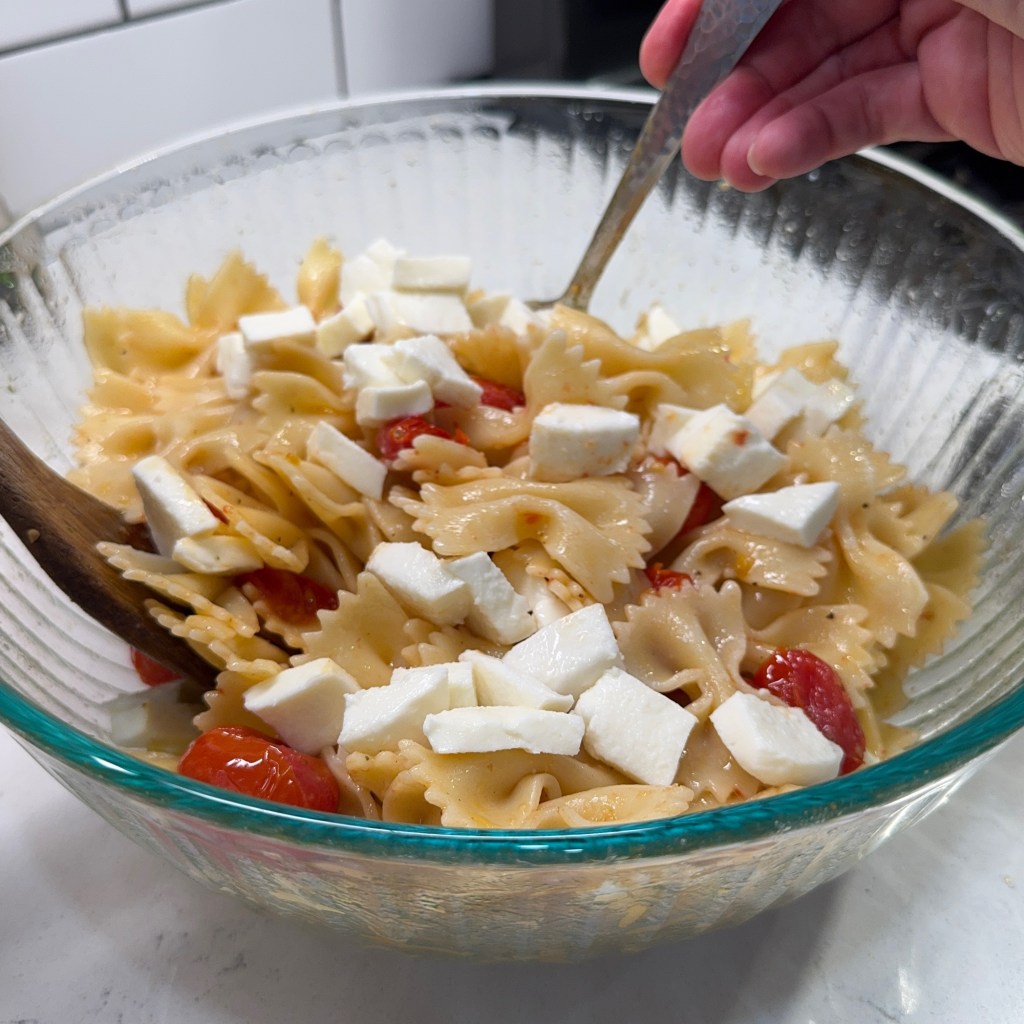
Next, I had a ball of sliced soft mozzarella, as well as a small package of the more expensive mozzarella pearls. I blotted all of it with paper towels and cut the slices into bite-sized pieces. I saved the prettier pearls for the top of the salad. Same flavor, a few pennies cheaper.
My mozzarella was pre-sliced, so this was quick work.
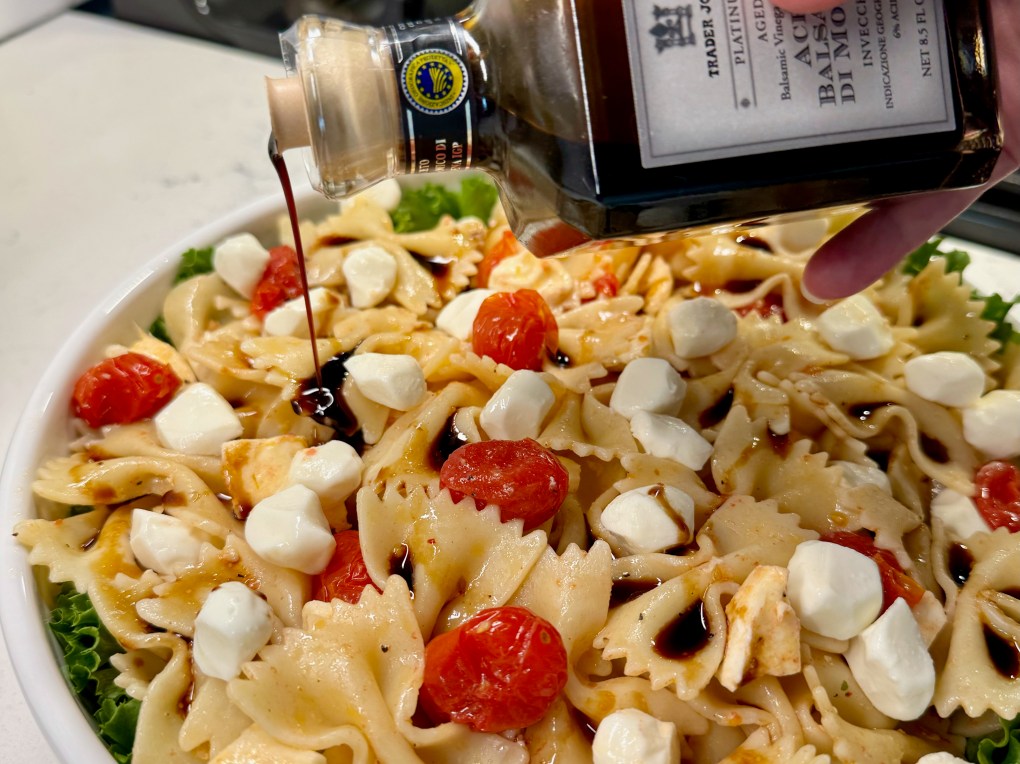
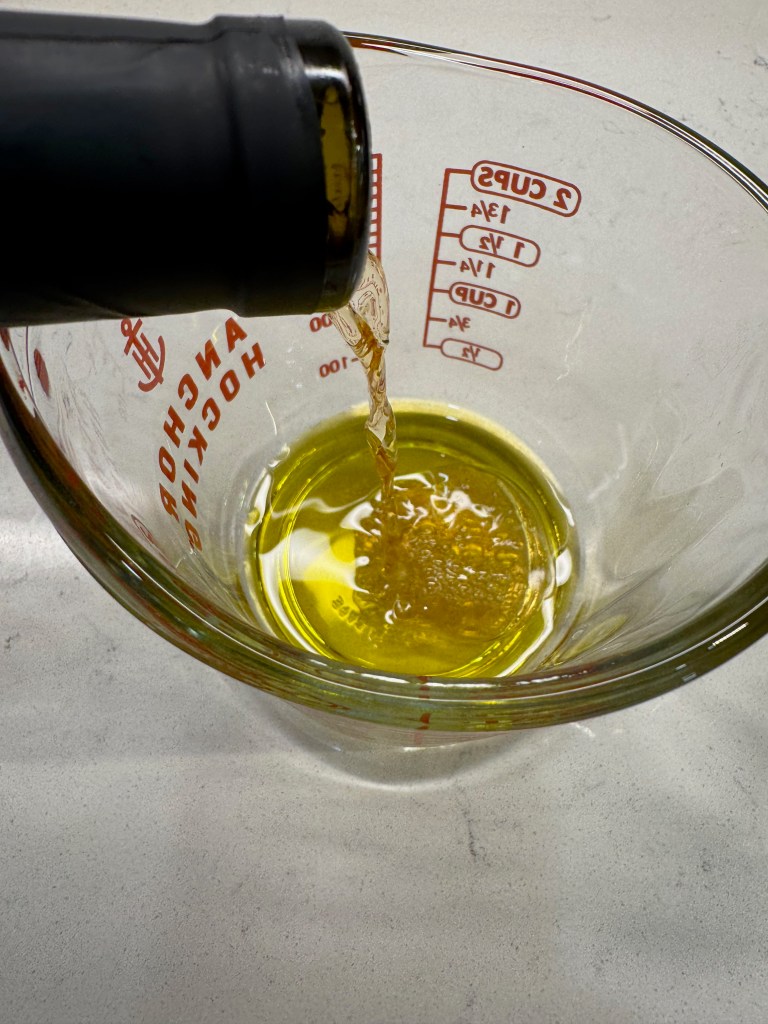
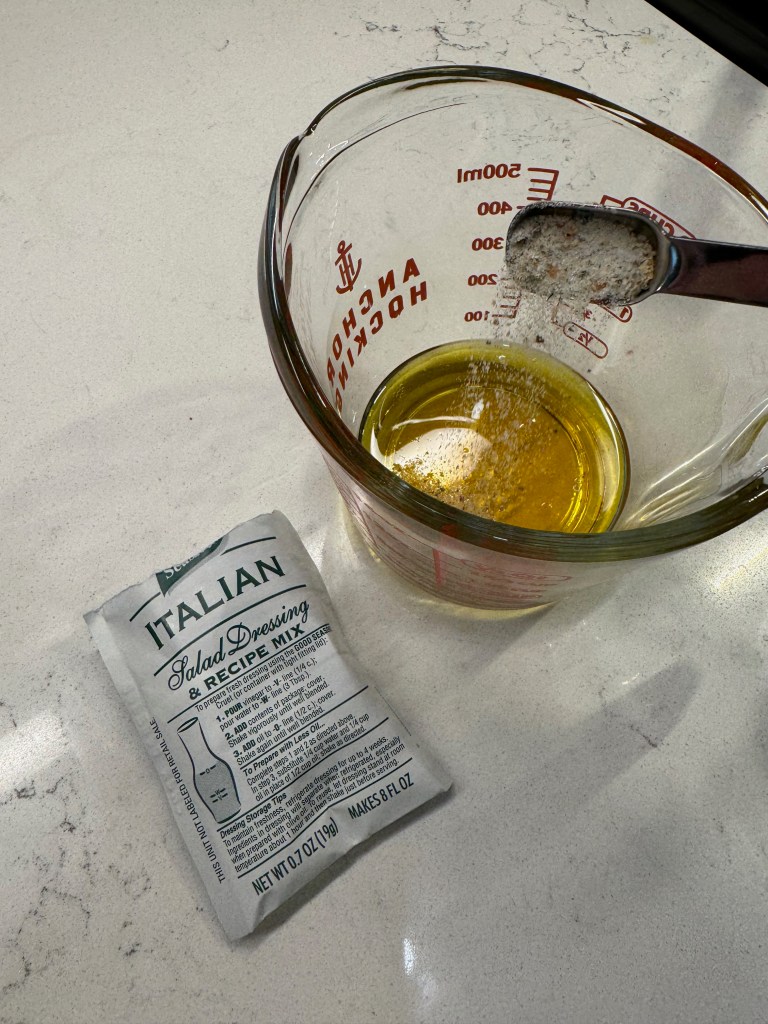
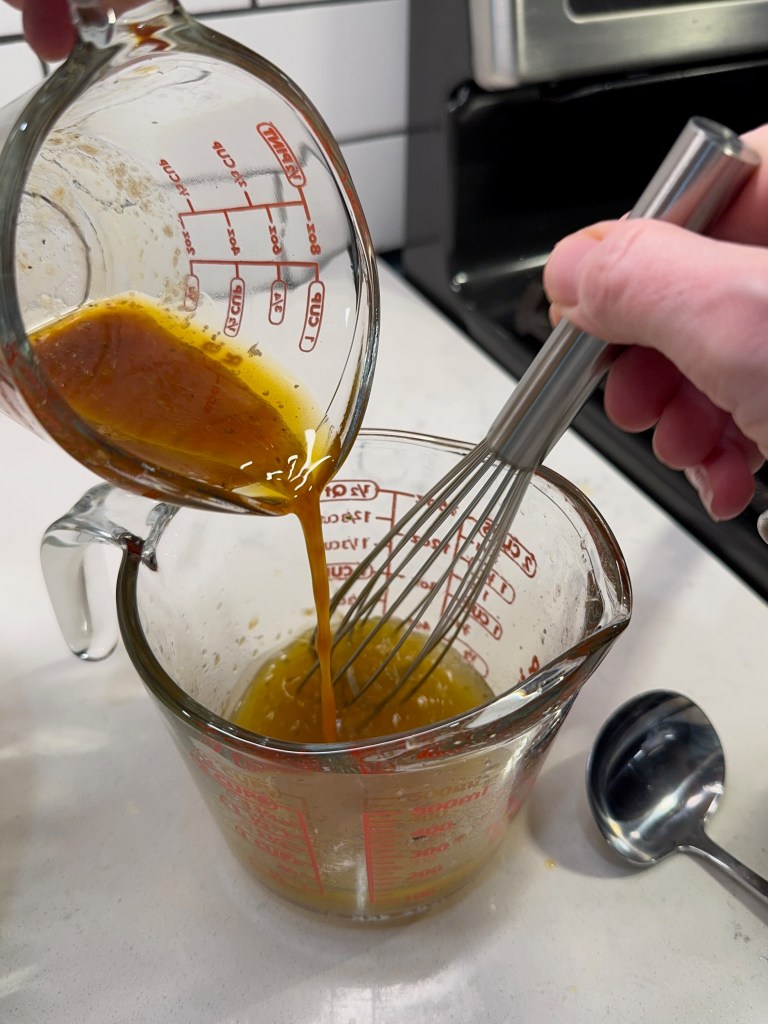
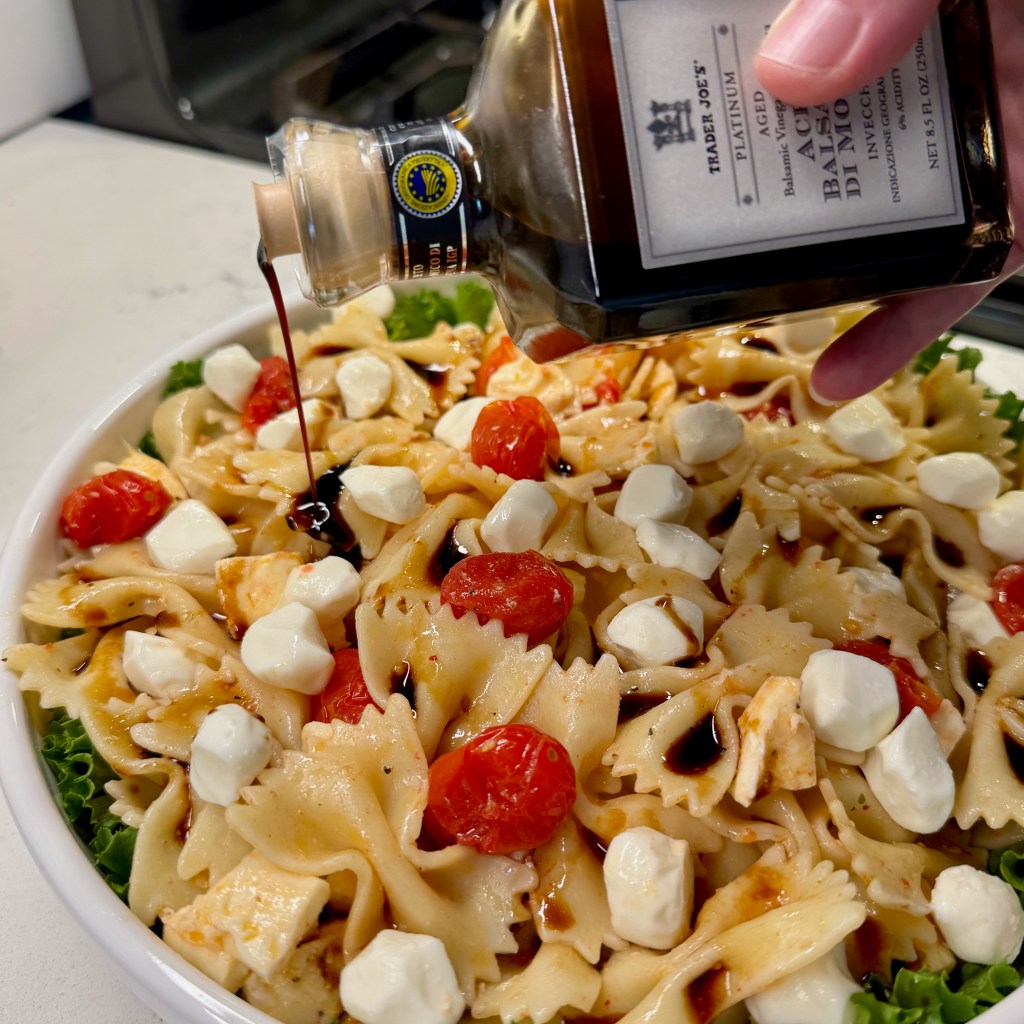
Dark balsamic vinegar, typical for Caprese, leaves splotchy stains on mozzarella, and that’s not a good look when you’re tossing the salad rather than drizzling it. I opted instead for a white balsamic-based dressing, jazzed up with fresh lemon, olive oil and a spoonful of Italian dressing mix. I had a plan to include a touch of dark balsamic, but not yet.
Keep the remaining dry dressing mix to jazz up other recipes!
Rule #1 – Season every layer!
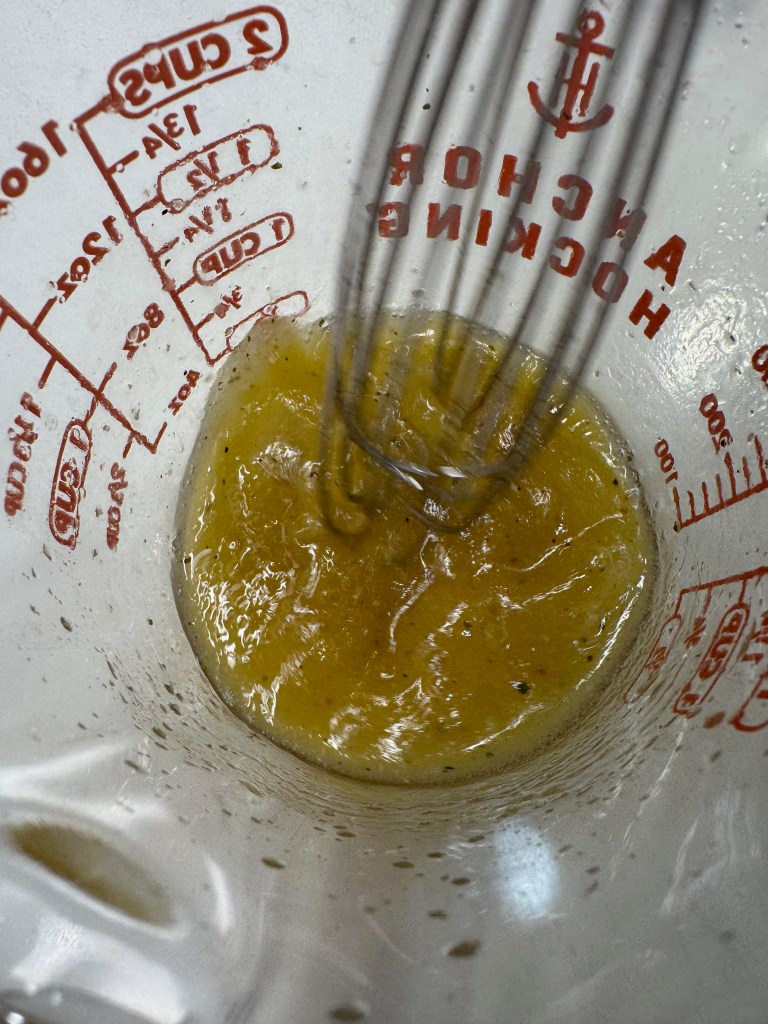
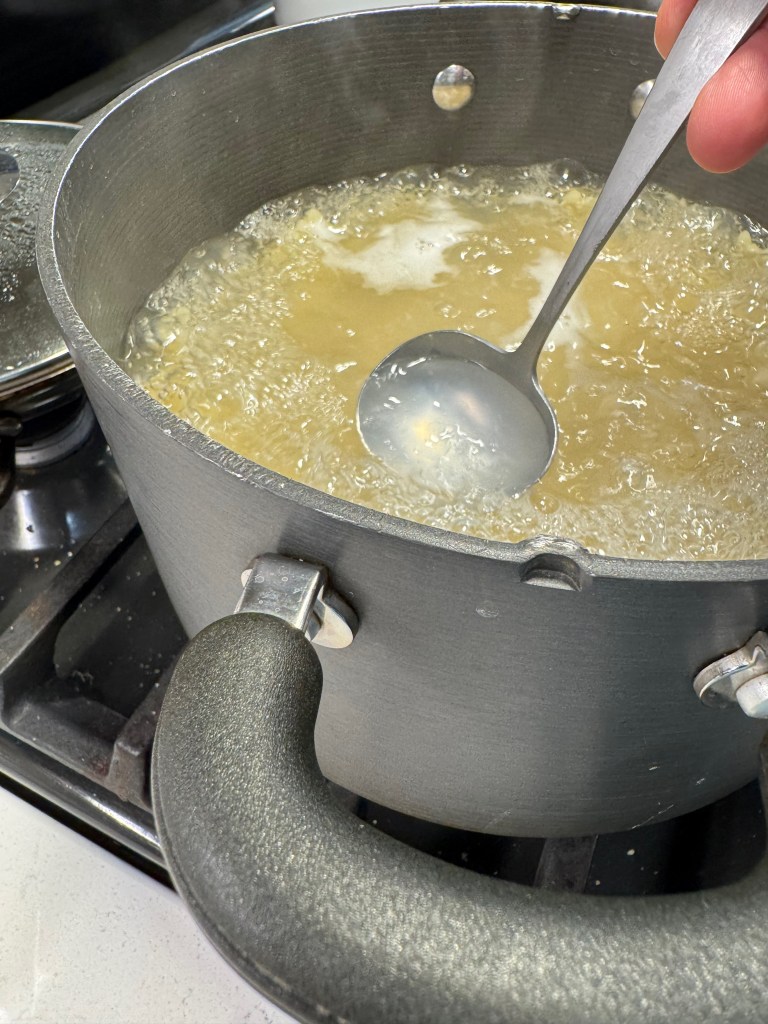
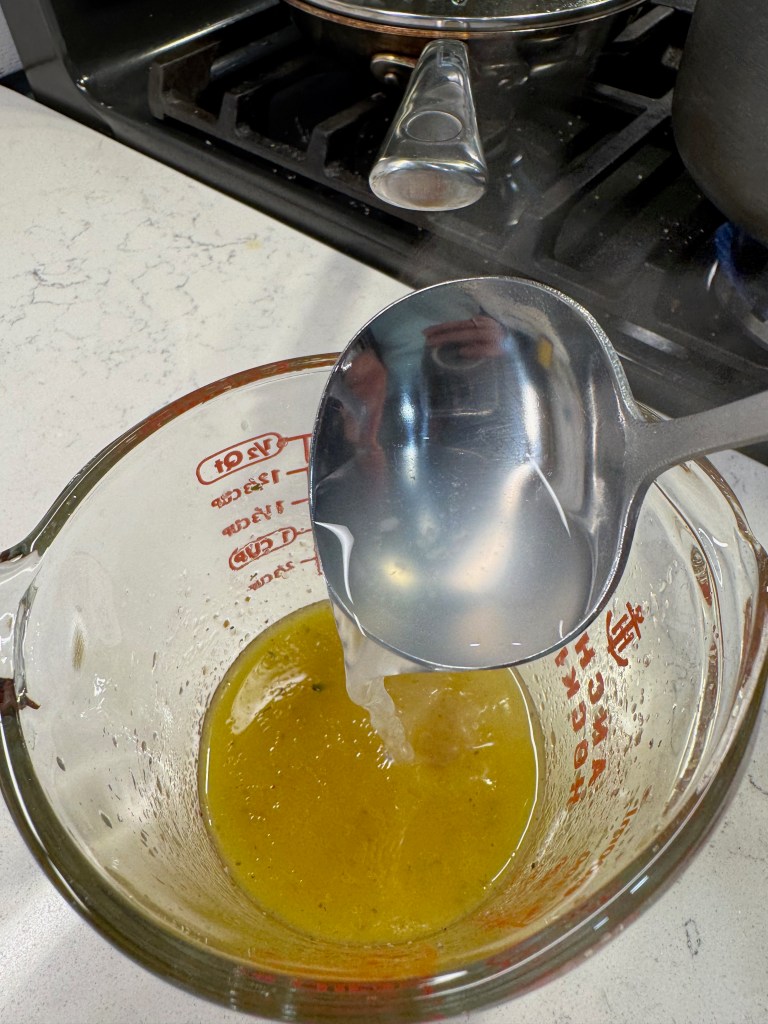
As always, I recommend plenty of salt in the pasta water. You only get one shot to add flavor, so be generous and remember that most of that sodium goes down the drain— you’re not eating it all. When the pasta was al dente, I scooped out a little bit of the starchy water and whisked it into my dressing to help it cling to the pasta.
Yes, this works for chilled dishes as well as hot ones. ✔️
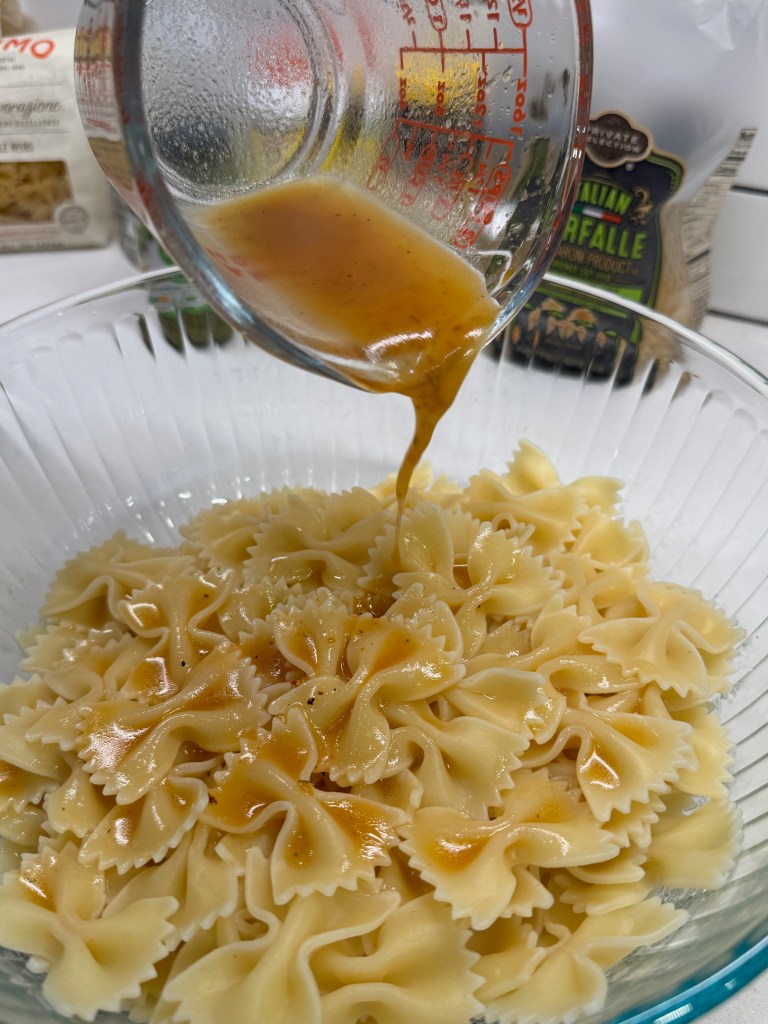
Finally, remember the tomato-scented oil that was left over after poaching the cherry tomatoes? I whisked that cooled oil into the dressing, too, extending the sweet tomato flavor throughout my salad in the process. I poured the dressing over the pasta while it was hot, ensuring that it would soak into every bow tie. Toss this for a couple of minutes to distribute the dressing evenly.
The pasta bowties should be slightly firm to the tooth, and you want to dress it while it’s HOT.
Bring on the Caprese
A few minutes later, when the pasta was cooled to room temperature, I gently tossed in the poached tomatoes and the pieces of sliced mozzarella, and sent it to the fridge until we were ready to pack up for dinner with some friends.
You can almost taste it, right?
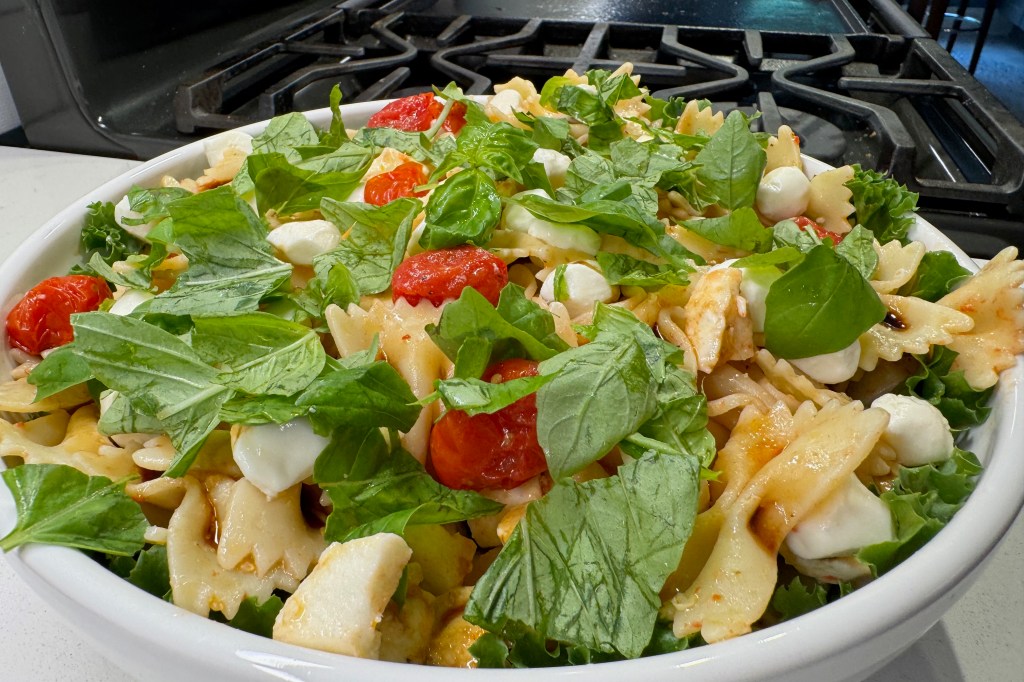
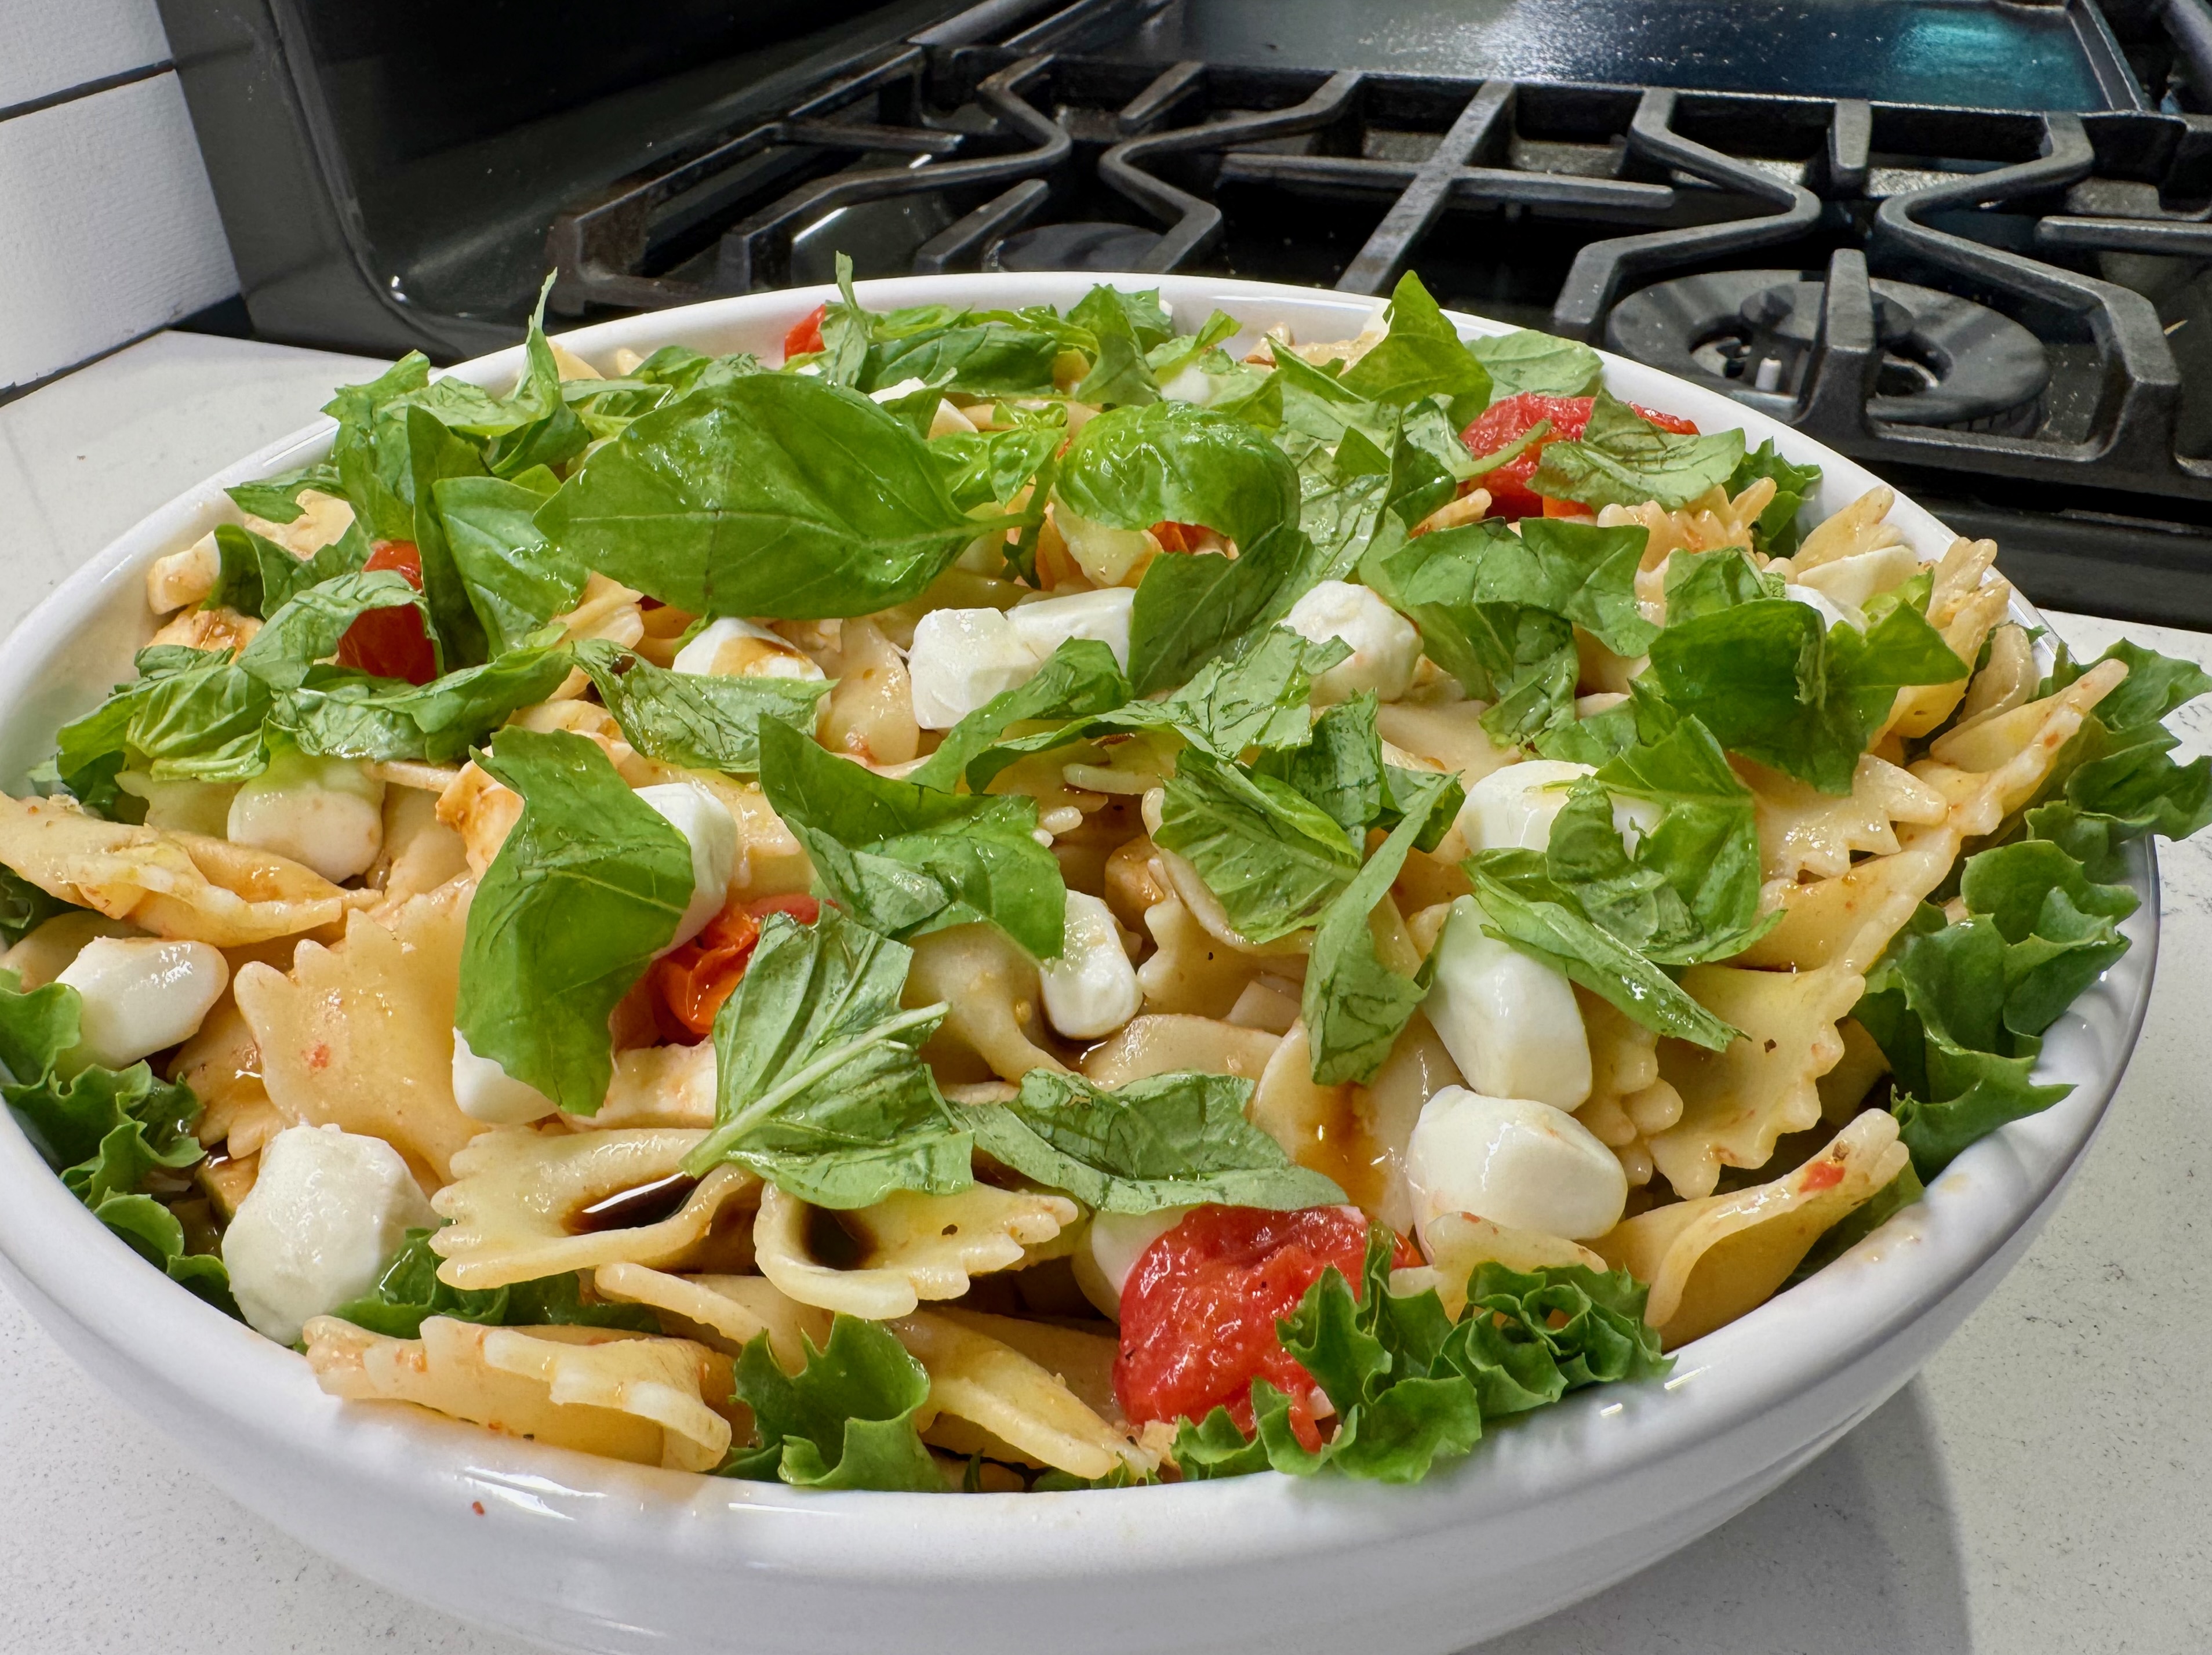
For serving a pasta salad, I love to line the bowl or platter with leafy lettuce greens. It looks pretty, and it also gives excess dressing a place to run so that the salad doesn’t get too drippy. If you are entertaining a larger crowd, a deep platter with extra spoons is nice because it allows more people to self-serve at once. For a small crowd, or if you have limited space on the table, a bowl works great.
Final touches on this Caprese-inspired salad
A good quality bottle of balsamic is a secret weapon in the kitchen!
I scattered the mozzarella pearls on top, and then it was finally time for a touch of classic dark balsamic. Just a few drizzles over the pasta bowties, and I used a reduction that was thick and syrupy, so it stayed in perfect little puddles. Fresh basil is classic on a Caprese, and it’s easy to find this time of year, especially in my patio container garden. If basil isn’t your thing, I think fresh Italian parsley would be a good substitute here.
It's summer salad season, and this Caprese-inspired dish is a great way to highlight the classic flavors when serving a crowd.
Ingredients
8 oz. semolina bowtie pasta (see recipe notes)
1 dry pint cherry or grape tomatoes, washed and patted dry
2 Tbsp. extra virgin olive oil
Salt and pepper to taste
2 to 3 Tbsp. white balsamic vinegar
1 tsp. fresh lemon juice
1 tsp. dry Italian salad dressing mix (see recipe notes)
2 Tbsp. extra virgin olive oil
2 Tbsp. hot pasta cooking water
1 lb. fresh soft mozzarella (cut into cubes or pearls)
2 Tbsp. dark balsamic glaze
1 handful fresh torn basil leaves
Recipe Notes: Whenever possible, seek out pasta that is made with durum (semolina) flour, and labeled as bronze-cut. This method of cutting leaves a slightly rough texture, better for sauce or dressing to cling.
I used Good Seasons brand dressing mix, but you could easily substitute a pinch of garlic powder and some dry Italian herbs.
Directions
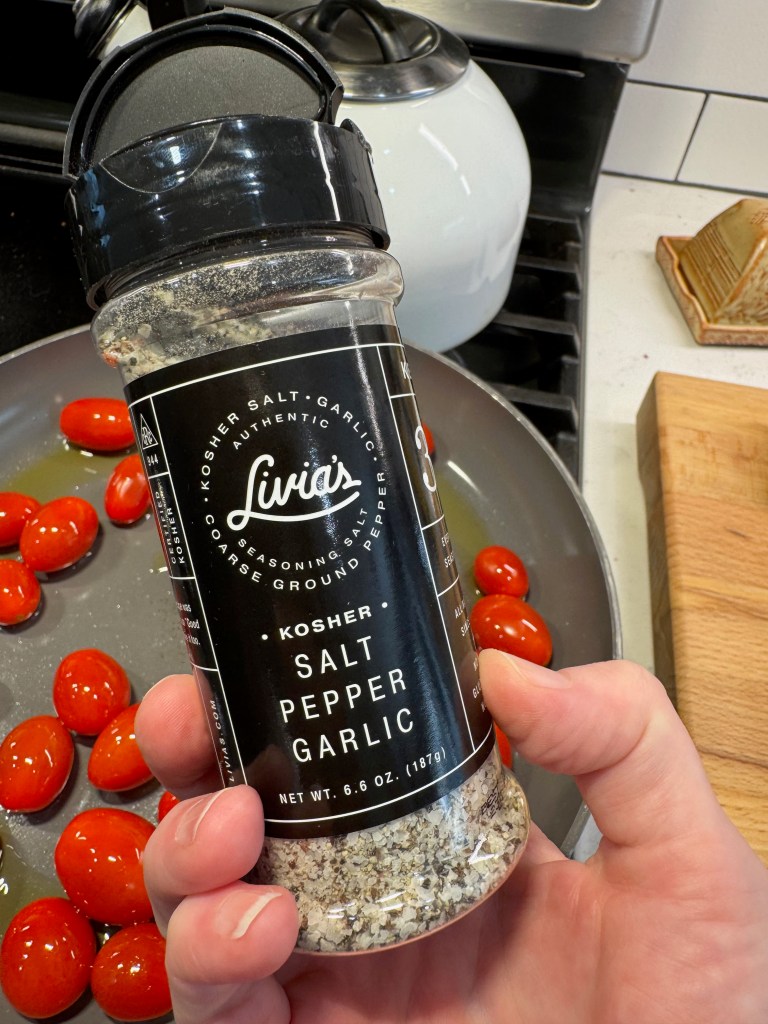
Prepare a pot to boil the pasta, and season it generously with kosher salt. Begin cooking pasta when tomatoes are nearly finished cooking.
Heat a medium-size skillet or sauté pan over low heat, and swirl in extra virgin olive oil. Add tomatoes, season with salt and pepper and roll to coat them in the oil. Cook the tomatoes very slowly until the tomatoes are softened and easily smashed with a utensil (about 25 minutes). Press each of them when they reach this softened stage to release the juice inside. Cool slightly, and then spoon out the oil into a measuring glass. Reserve this for the dressing.
In a second measuring glass, combine white balsamic, lemon juice, Italian dressing mix and olive oil. Whisk to combine and set aside.
When pasta reaches al denté stage, spoon out about two tablespoons of the hot pasta water. Whisk it into the dressing mixture, along with the reserved tomato cooking oil.
Drain pasta thoroughly and transfer to a large bowl. Pour dressing over the pasta while it is still hot, and toss gently a few times to coat evenly. Toss again after a minute or two, and then allow the pasta to cool to room temperature.
Gently toss cooled tomatoes and half of the mozzarella into the pasta. Refrigerate until serving time.
Transfer chilled pasta salad to a serving bowl. Top with remaining mozzarella, drizzle dark balsamic over salad, and scatter fresh basil leaves just before serving.
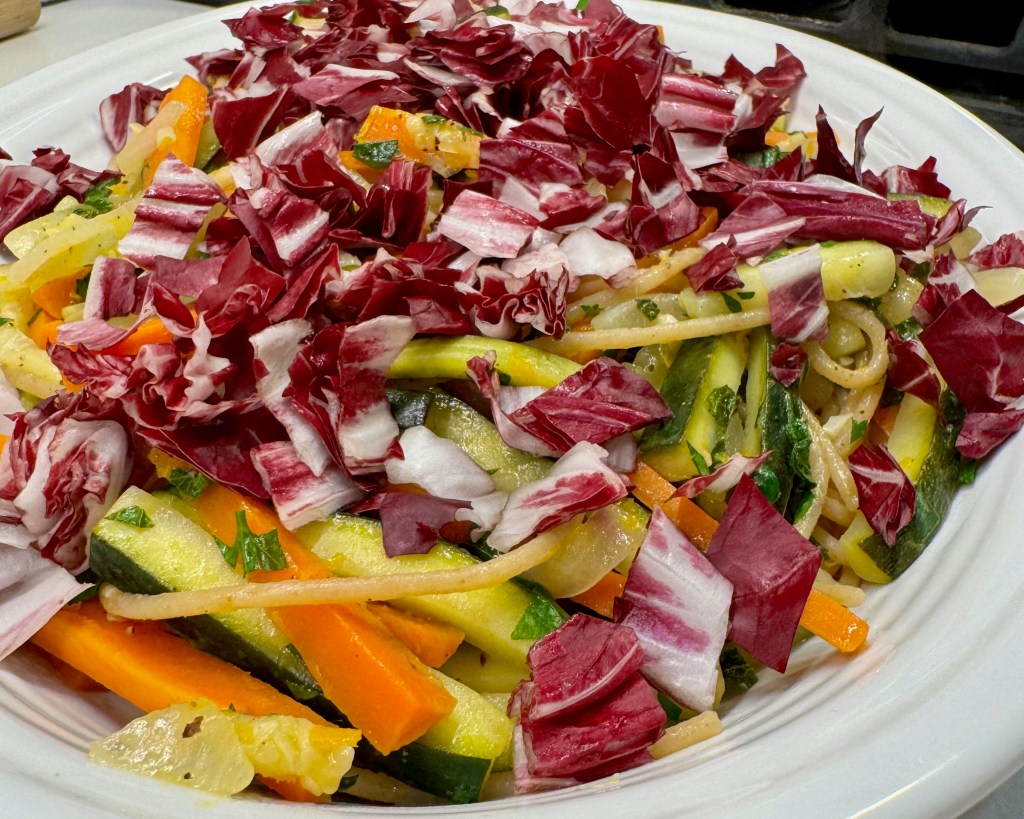
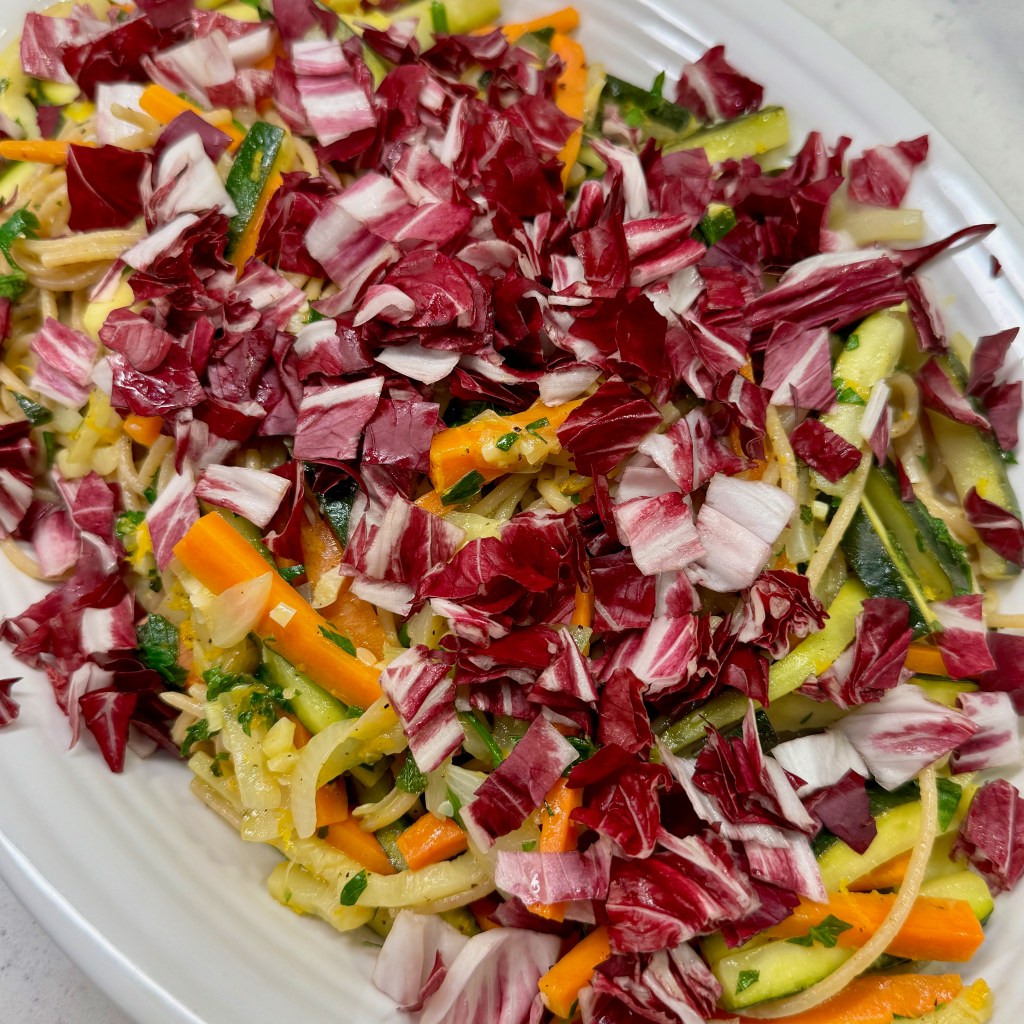
The best thing about summer, besides the sunshine, is all the light and easy food coming our way. From backyard cookouts to easy breezy friend gatherings, there’s always room for one more light and tasty side dish. This colorful platter has refreshing citrusy flavors on top of tender, sautéed zucchini and carrots, chewy-to-the-tooth pasta and a sprinkle of vibrant herbs and crunchy, slightly bitter radicchio. In other words, perfect for summer!
For a lighter appetite, this could be dinner on its own.
I know, of course, that we are still almost two weeks from the summer solstice when the season becomes “official,” whatever that means. But I also know that we’ve had a good number of days tipping toward 90° F, so it feels like summer is already here! Zucchini is one of my favorite summer foods, and though it may be a while before our local farmers start picking zucchini, we’ve seen plenty of it in the supermarket grown in Florida and Georgia, just a couple states away.
My introduction to this zucchini-forward recipe came about 18 years ago, when I was a faithful fan of Rachael Ray’s “30-Minute Meals” on Food Network. You do remember when the channel actually had shows that demonstrated regular people recipes, rather than just over-the-top competition shows, right? Those were the days! 😏
Rachael ruled Food Network in the 2000s (along with Emeril), and I found her casual, not-so-cheflike approach absolutely charming. Her skill was honed not in a culinary institute, but in her Nonna’s kitchen (I can relate) and in an upstate New York grocery store where she did cooking demos. Her food always looked delicious, it was made with common ingredients, and her instruction made even the most gorgeous meals seem approachable. For sure, she’s one of my culinary mentors, and I still love this recipe. Let’s make it!
Mise en place
I won’t say that Rachael taught me about mise en place— a French culinary term that means loosely, “get your ducks in a row.” No, I learned that in the 1990s when I worked in a catering kitchen. But Rachael frequently emphasized the importance of organizing ingredients and tools before starting a dish and it’s good advice here, as the recipe goes pretty quickly once it starts.
I love a dish that brings vibrant color to the table!
Multi-tasking for the win
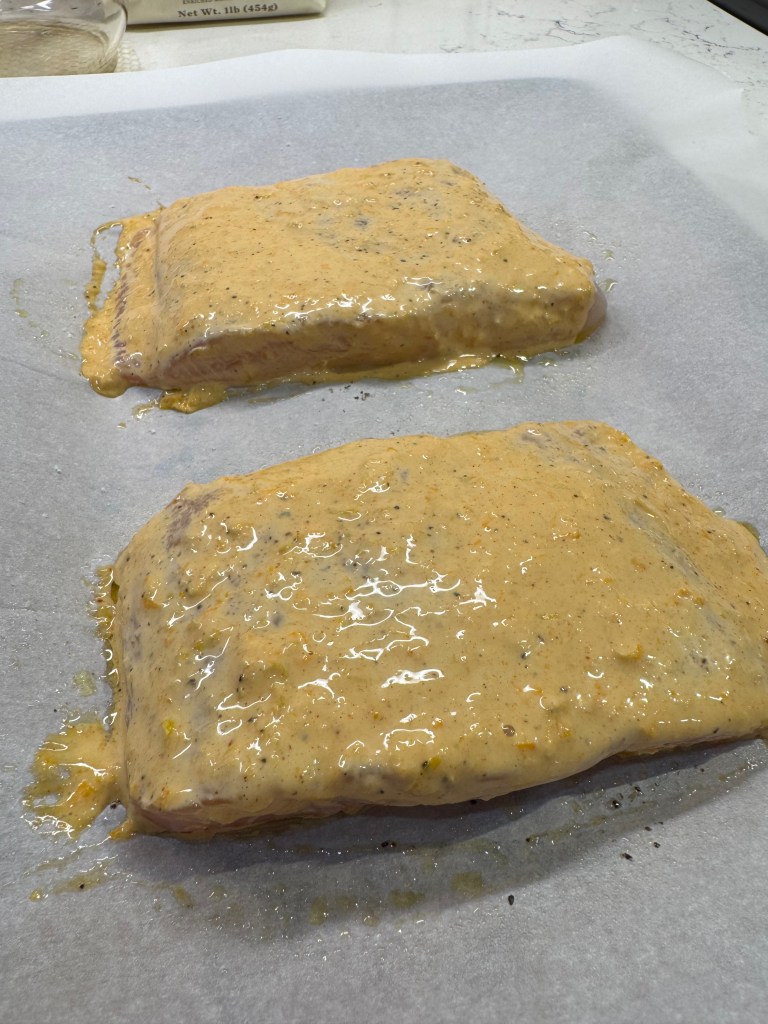
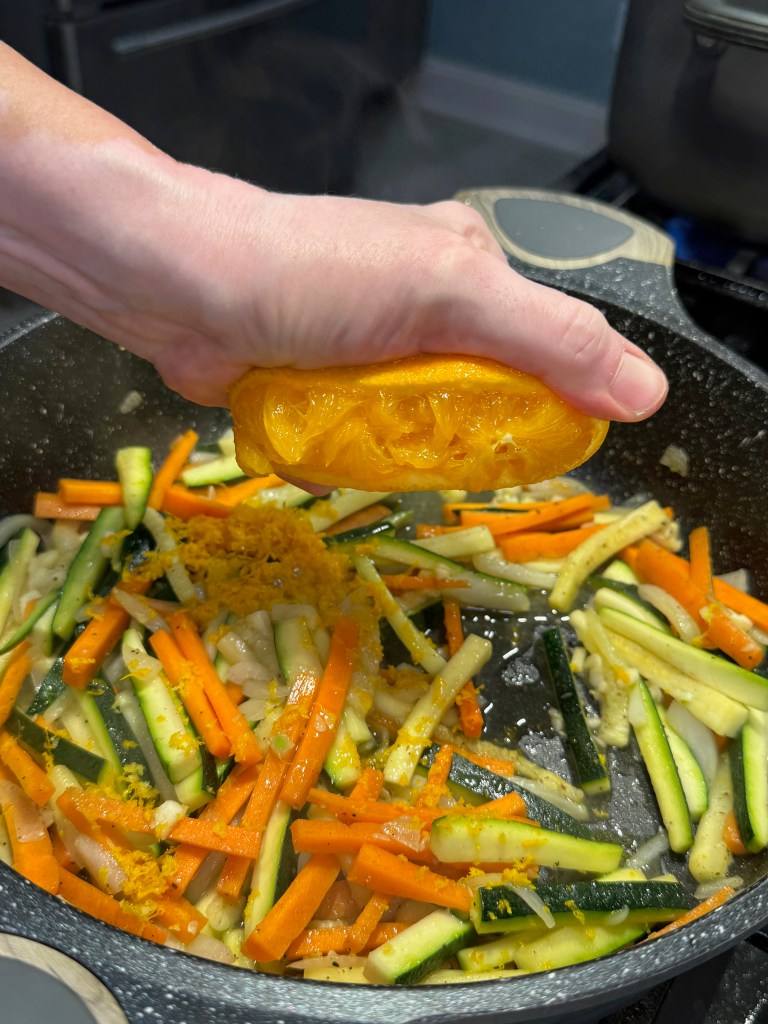
When I made this pretty dish for my husband, Les, I served it with baked halibut, which I seasoned up with the miraculous mayo marinade that I learned a couple of years ago. I mixed up the mayo with some lemon and orange zest, grated garlic and smoked paprika, and then added the pinch of baking soda that gives the marinade a turbo charge. This trick guarantees moist fish every time, so check it out when you have a chance!
This was a true “30-minute meal,” as I prepped all the veggies while I waited for the fish to marinate, and then cooked the dish while the fish was in the oven. Everything was ready at exactly the right time.
A pinch of baking soda brings the magic in this marinade trick! This time, I flavored it up with seasonings to complement my pasta dish.
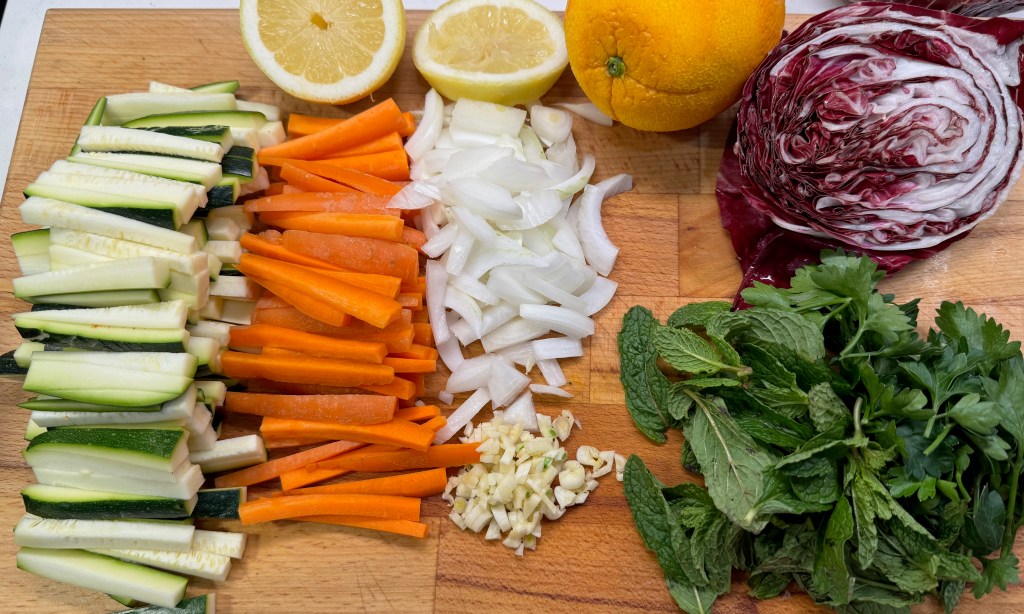
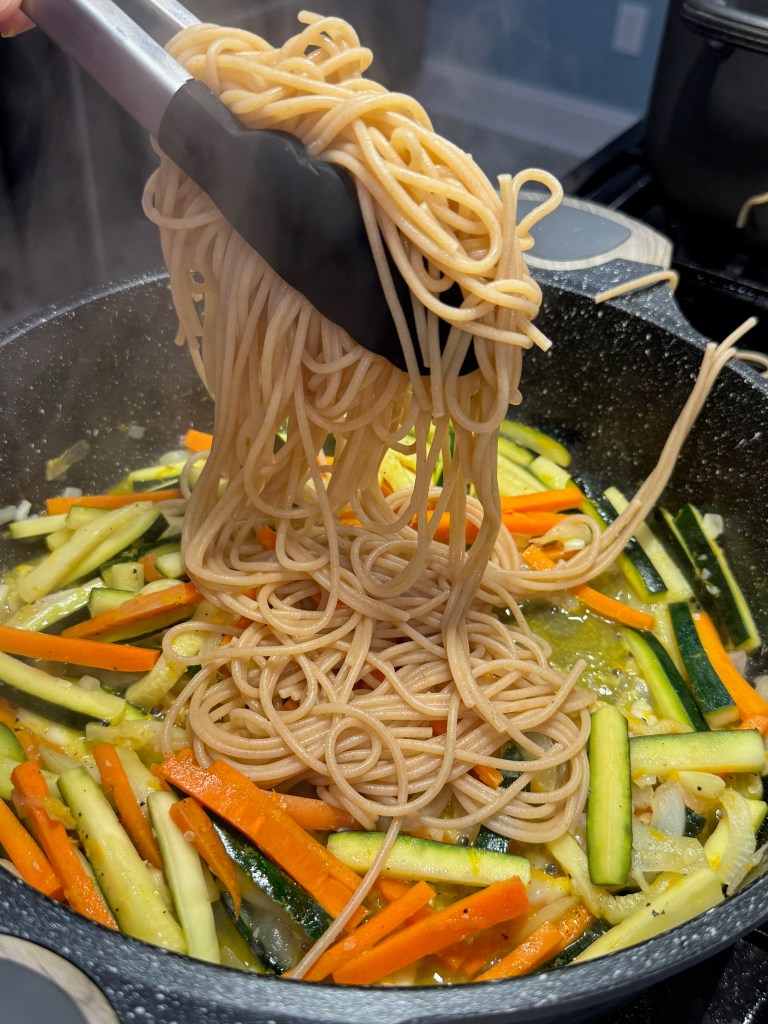
On one burner, get a pot boiling for spaghetti, which will be tossed into the dish at the end. Salt that water generously and keep half an eye on it while you work on the veggie part of the dish.
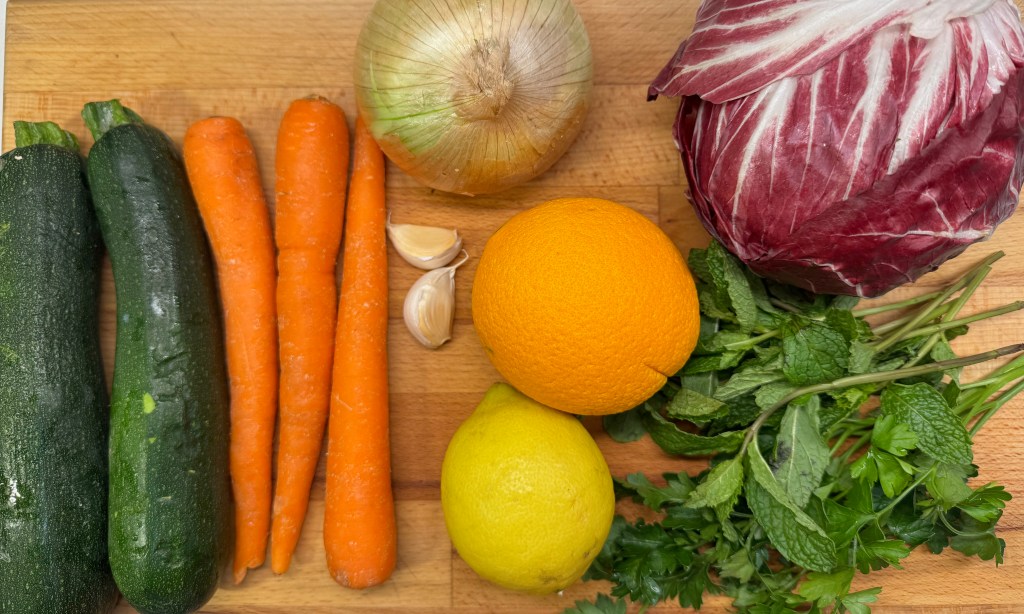
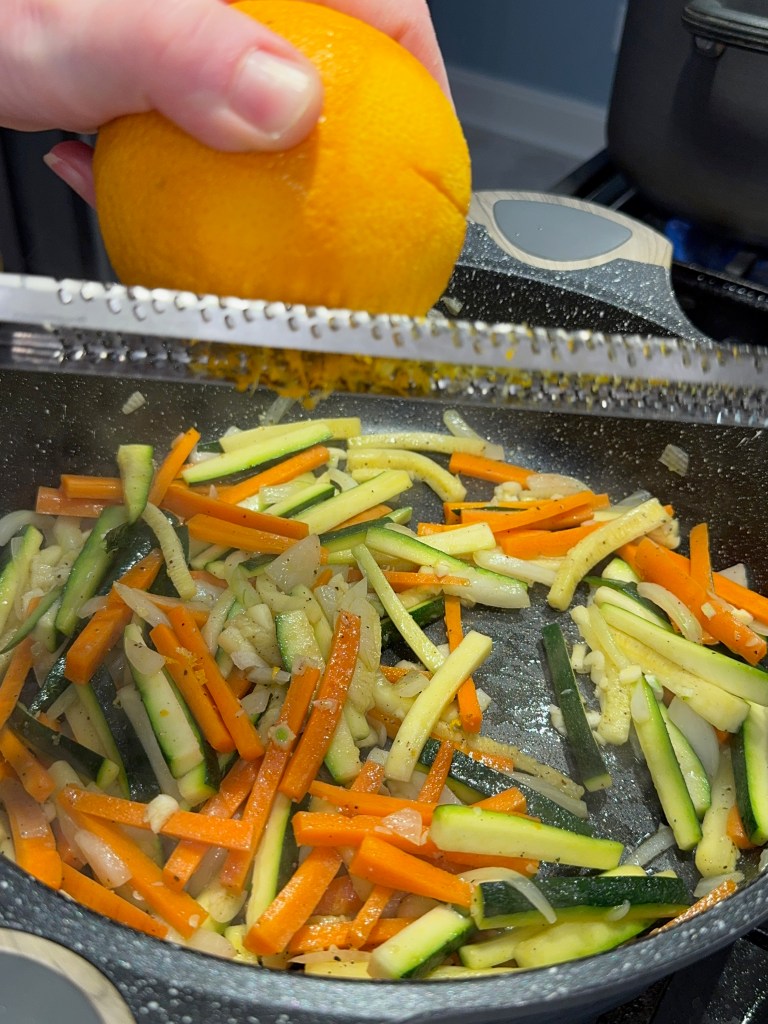
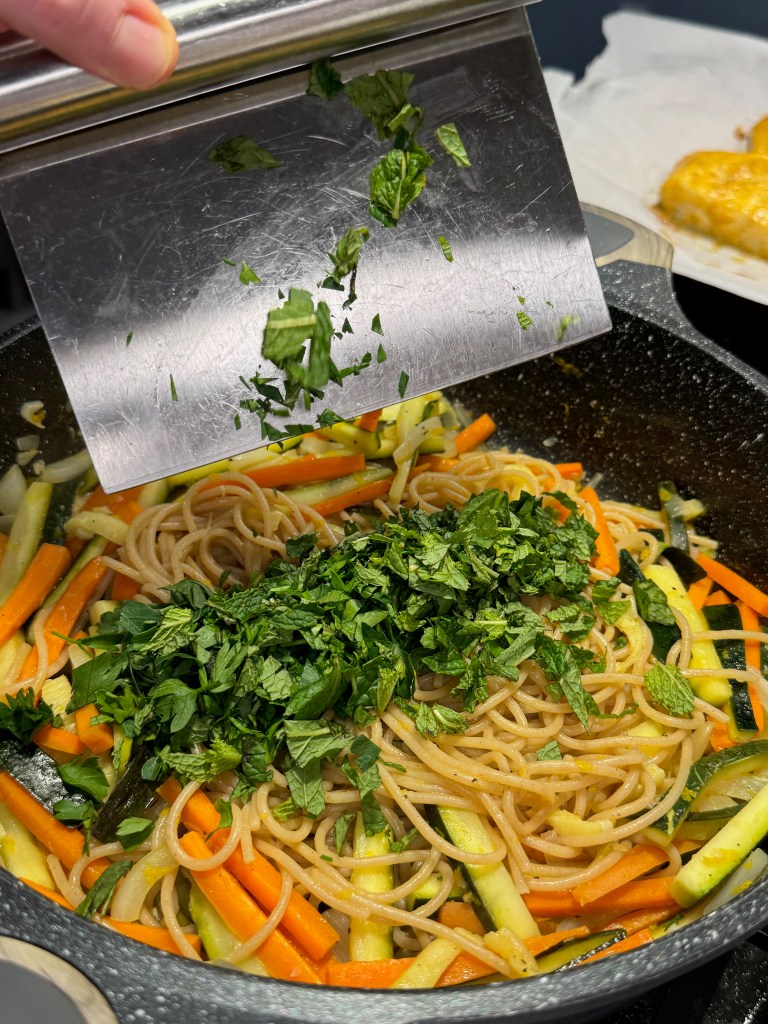
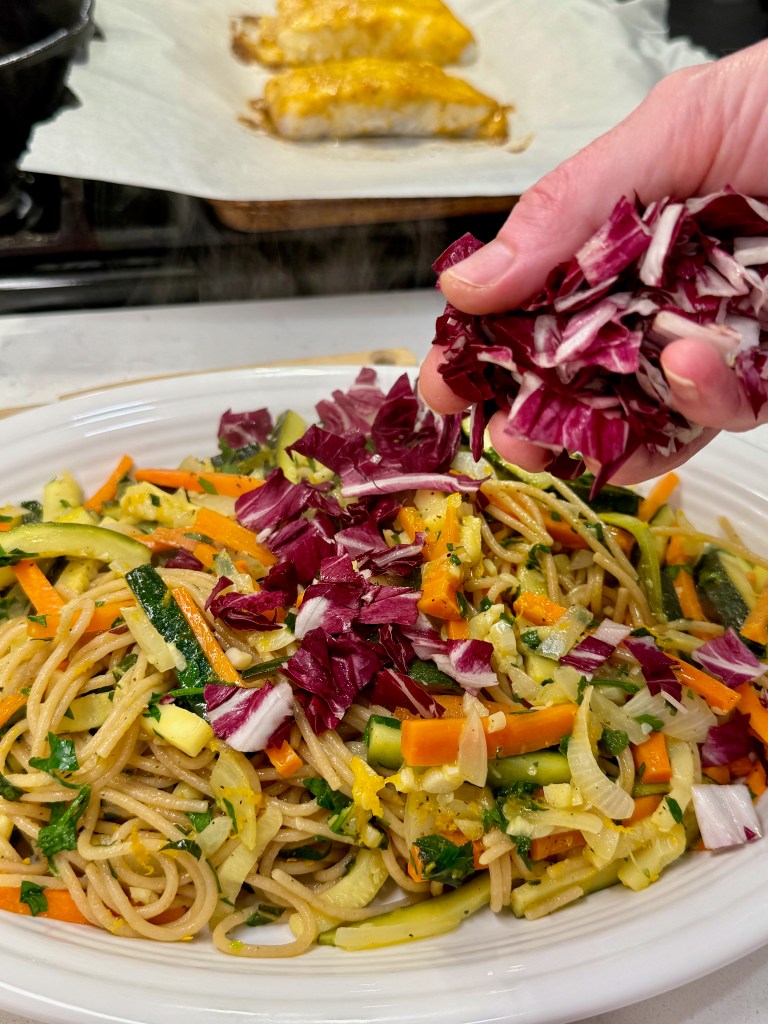
A big swirl of EVOO (as Rachael would say) goes into a large sauté pan for cooking the zucchini, carrots and onions— seasoned, of course— and then you’ll add garlic plus the juice and zest of a lemon and an orange. When the veggies are somewhat tender and the citrus juice has reduced a bit, use tongs to move the cooked spaghetti straight from the hot water to the pan, and toss the whole thing with the fresh parsley and mint. Transfer to a serving platter and scatter the chopped radicchio on top. Yes, it is as easy as it sounds and as delicious as it looks.
The freshness is off the charts!
I went with my usual whole grain spaghetti for extra nutrition and a slightly chewier bite. As I was tossing the spaghetti with the veggies, it occurred to me that I’d never tried using another pasta shape, but I definitely will next time. Whole grain fusilli or bow ties would both work great, and might even make the dish easier to serve than with spaghetti.
Color, meet flavor. 😋
You’ll find this dish terrific served warm with a lean protein or, if your appetite is light, by itself. And it’s also tasty left over, cold from the fridge or at room temperature. That makes it ideal for taking along to a summer potluck as well as serving up on a busy weeknight. I could not find Rachael’s original recipe on the internet, but I have managed to remember the ingredients and the process over the years, and that’s a testament to the friend-next-door presentation of her cooking shows.
Do you have a favorite TV chef or cook— past or present— who inspires you to this day? Let’s talk about it in the comments!
This colorful side dish covers all the bases, with bright, fresh flavors and plenty of texture. Cutting the zucchini and carrots into matchstick-sized pieces allows them to cook quickly without turning mushy. Perfect for a busy summer weeknight or a backyard potluck.
Ingredients
2 medium or 3 small zucchini, julienned
2 or 3 medium carrots, julienned
1/2 sweet onion, sliced into crescents
2 cloves garlic, chopped
Extra virgin olive oil
Kosher salt and freshly ground black pepper
Zest and juice of 1 lemon
Zest and juice of 1 orange
About 1/3 package hot cooked spaghetti or favorite small pasta shape
Handful of fresh Italian (flat leaf) parsley, rough chopped
Handful of fresh mint, rough chopped
1/2 small head radicchio, rough chopped
Note: This dish is extremely versatile, as it can be served hot, room temperature or chilled. I used whole wheat spaghetti, but any small pasta shape, such as fusilli or farfalle would be great. If you don’t care for mint, fresh dill would also be delicious.
Directions
Place a large, deep sauté pan over medium heat and swirl EVOO around twice (about 2 tablespoons). Add zucchini, carrots and onions to the pan, and season with salt and pepper. Toss and cook a few minutes until the onions are translucent and the carrots begin to soften.
Add garlic, citrus zest and juices, and reduce heat to a simmer so that the liquid doesn’t evaporate too quickly.
Add hot pasta straight to the pan, along with any cooking water that’s clinging to it, as the starchy water will help the citrus sauce cling. Toss to combine.
Add chopped fresh parsley and mint. Toss lightly and then transfer the mixture to a serving platter. Scatter radicchio on top and serve immediately.
Thank goodness for frozen shrimp. I mean this sincerely, as there are many times when life is too busy and even the best-laid plans can’t be pulled together in time to feed the hungry faces in my house.
We have a weekly ritual here that begins around Sunday morning, when my husband, Les, and I sit down with our respective calendars, the long-range forecast displayed on one of our phones, and we do our best to map out what we are going to do about dinner in the week ahead. This includes a quick inventory of what we already have in the fridge and freezer, consideration of what nights might be good for cooking outdoors, acknowledgement of whether one of us has a hellish workday that week, and— last but not least— how much time we can allot to said meals and which of us will be cooking them.
It’s a lot of moving parts and sometimes, our meal game falls apart and we need to punt.
On such an occasion recently, I postponed a more-involved food plan in favor of this ad hoc dish, which turned out so good that I wrote down the ingredients to share it here. It’s something of a mashup of Italian shrimp scampi and Greek spanakopita, and it met all the requirements for a busy weeknight: quick, easy, flavorful and relatively healthful.
Not too shabby for a last minute improvisation.
What ingredients do you need for spanakopita scampi?
My dish features peeled shrimp (fresh or thawed), garlic and plenty of olive oil, onions, spinach, feta, lemon, parsley and dill. And though I had both angel hair and linguine pastas— two options I’d typically reach for when making scampi, I decided to use the whole wheat orzo that was feeling ignored in the pantry. Orzo is a staple pantry ingredient in Greek cuisine, so it seemed a logical stand in for the spanakopita element of the dish, but almost any small pasta shape you like would work fine.
The most time-consuming part of this meal was thawing and prepping the shrimp, a task that I almost always hand off to Les’s capable hands. If you’re in a hurry, purchase shrimp that is already peeled and deveined to save valuable time.
How to make spanakopita scampi
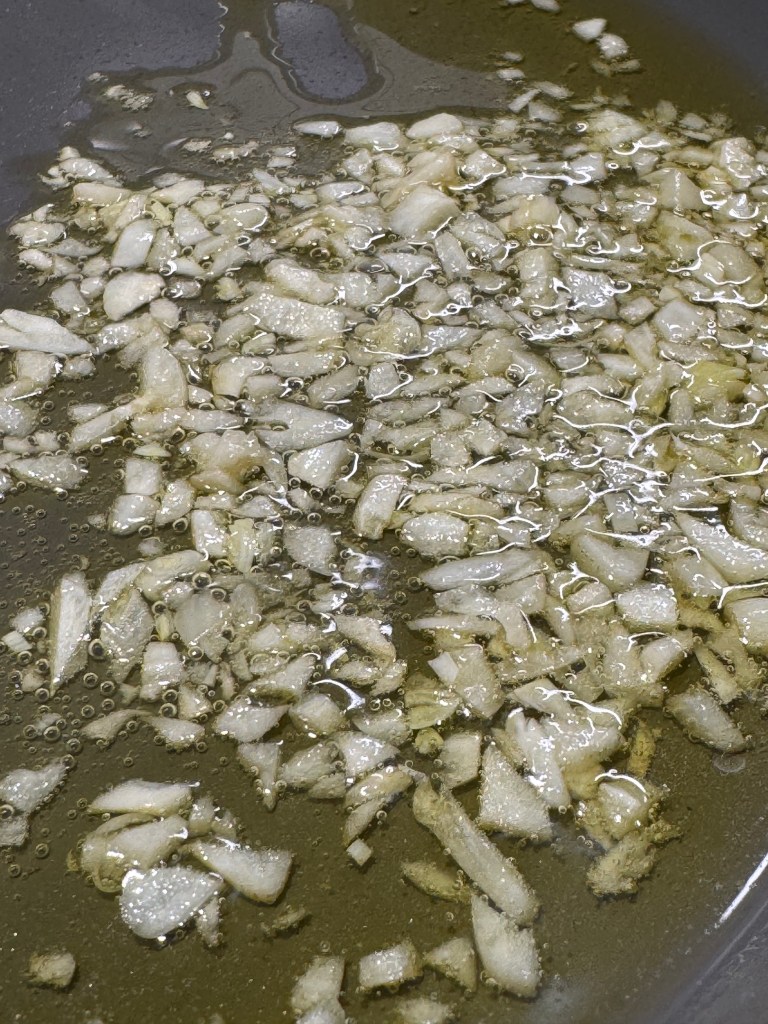
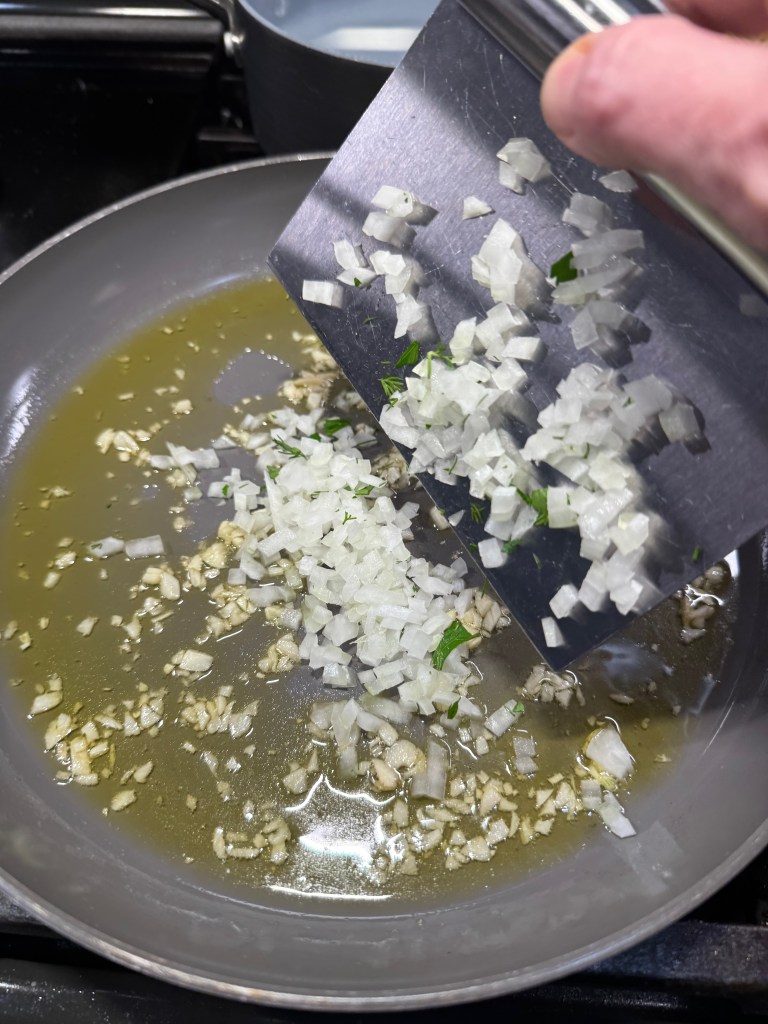
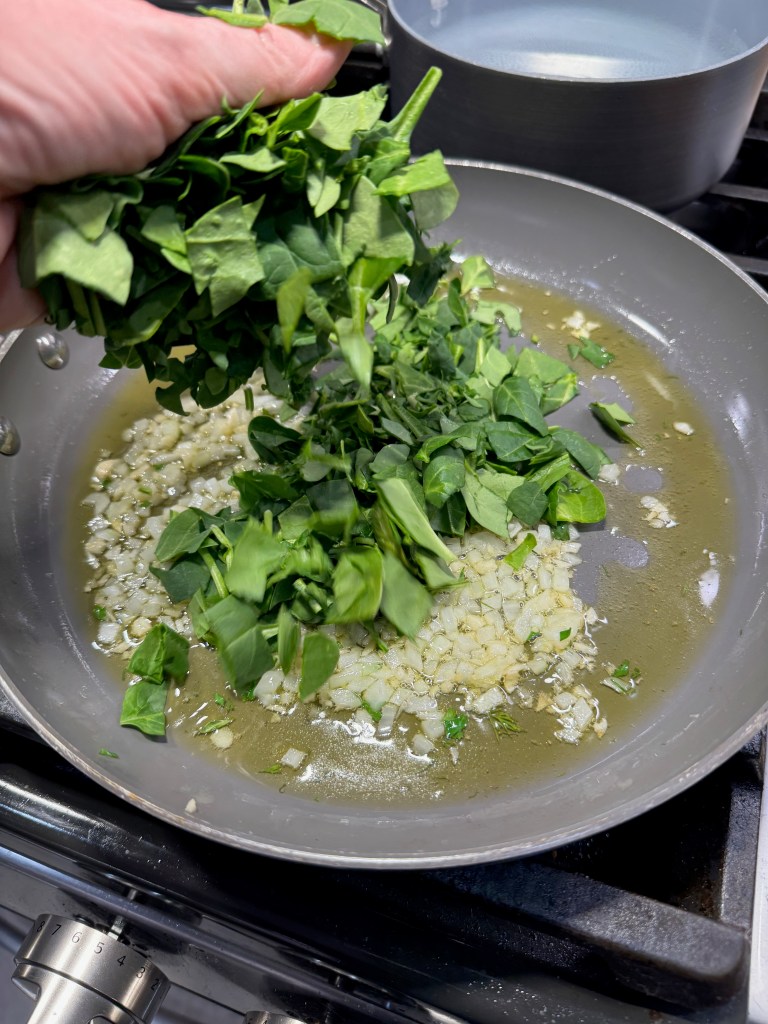
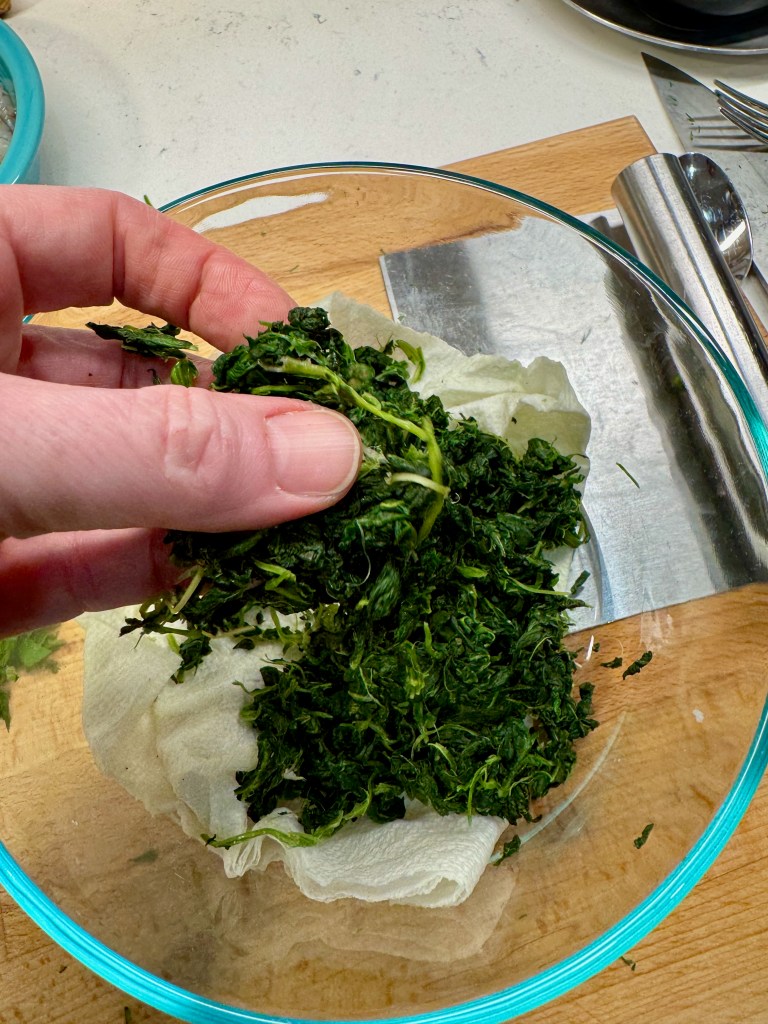
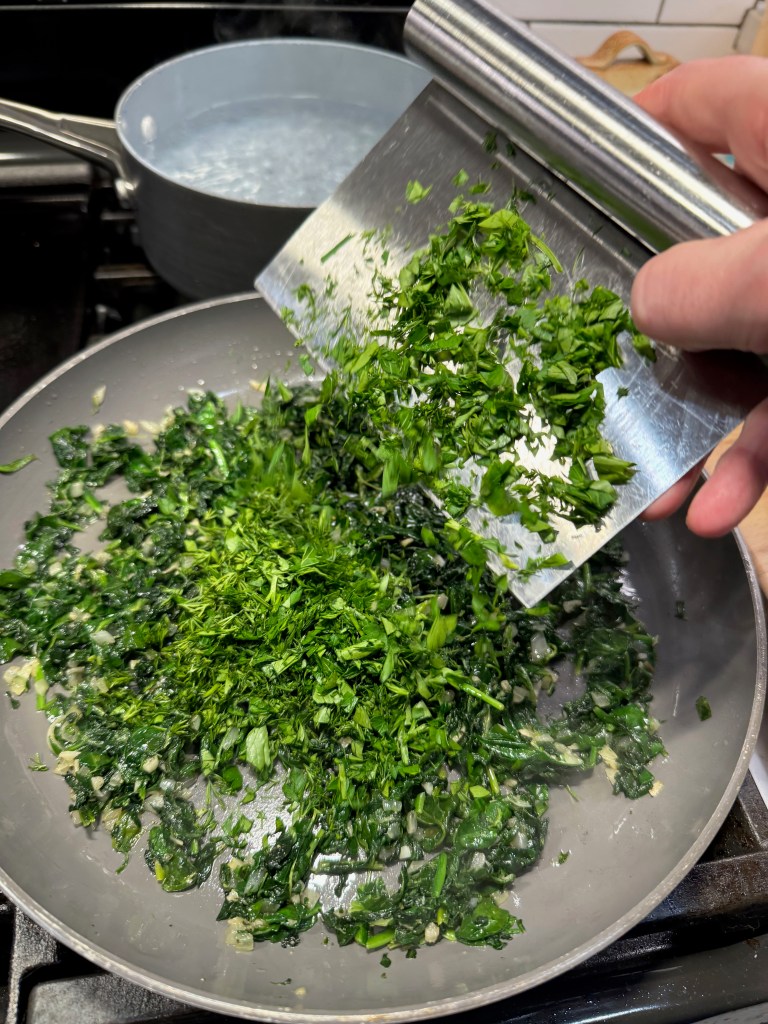
Everything else comes together quickly, beginning with a patient poaching of minced garlic in a large sauté pan. This should be done at a very low temperature, with almost no bubbles evident, so that you don’t burn the garlic. After about 10 minutes, increase the heat and add the diced onions, tossing to soften them in the warm, garlicky oil. Add the chopped spinach (I didn’t have enough so I supplemented with some thawed and squeezed frozen spinach), and then the fresh herbs.
This was the “spanakopita” part of the dish!
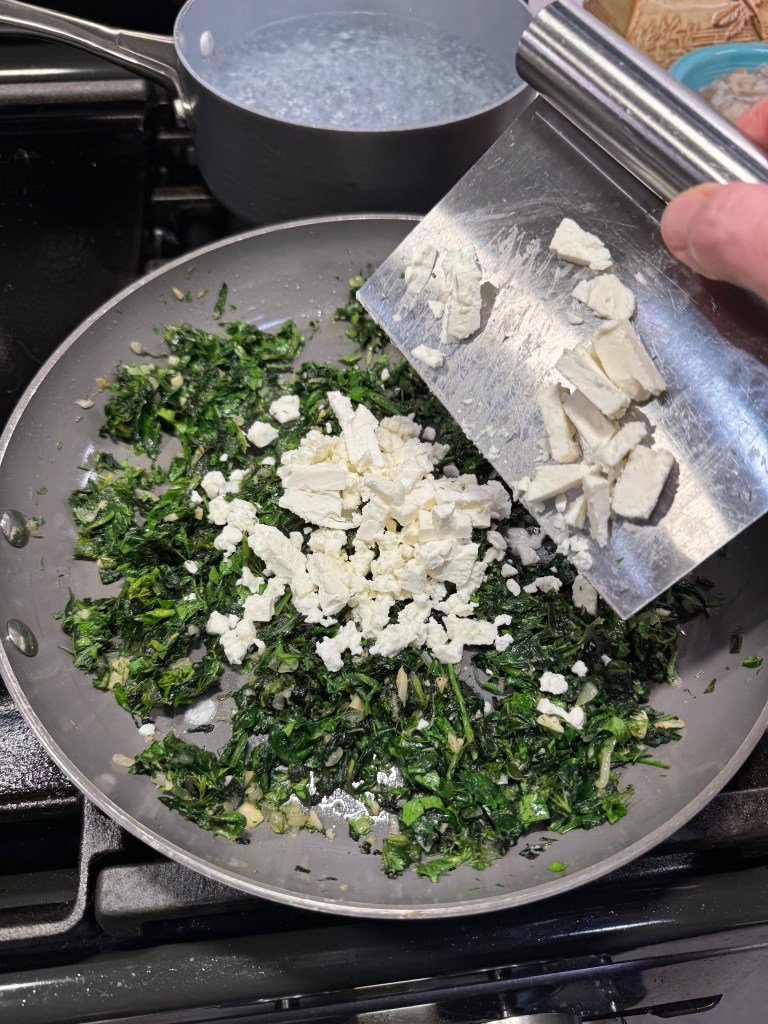
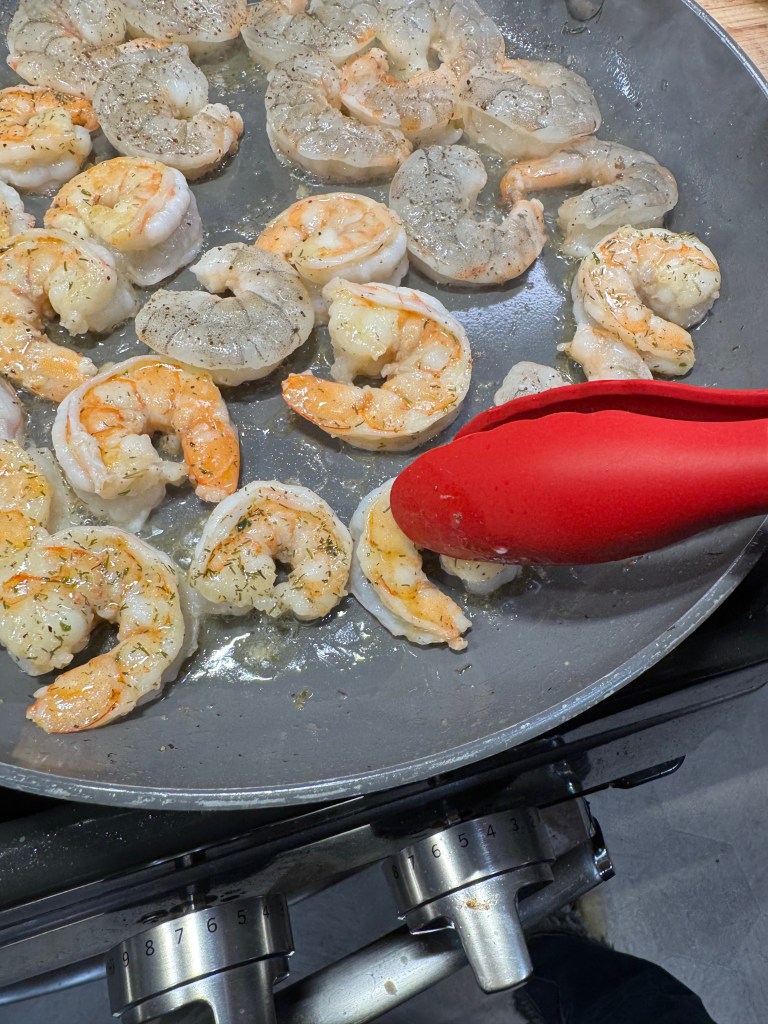
Get the orzo going and toss the feta into the spinach mixture, then transfer that to a bowl and keep it warm. Heat some more olive oil in the same pan, or a bit of butter (or both), and cook the shrimp until it’s just barely a pink/coral color. Always use a delicate touch when cooking shrimp, as it only takes one extra minute to overdo it. My method is to place the shrimp into the hot pan one at a time in concentric circles, and by the time the last shrimp goes in, the first is ready to turn. If you can see a bit of color on the inside curl of the shrimp, that’s your sign to turn it over and cook the other side. The smaller ones will usually cook faster, and if your burner has a hot spot (as mine does), then check the ones there first.
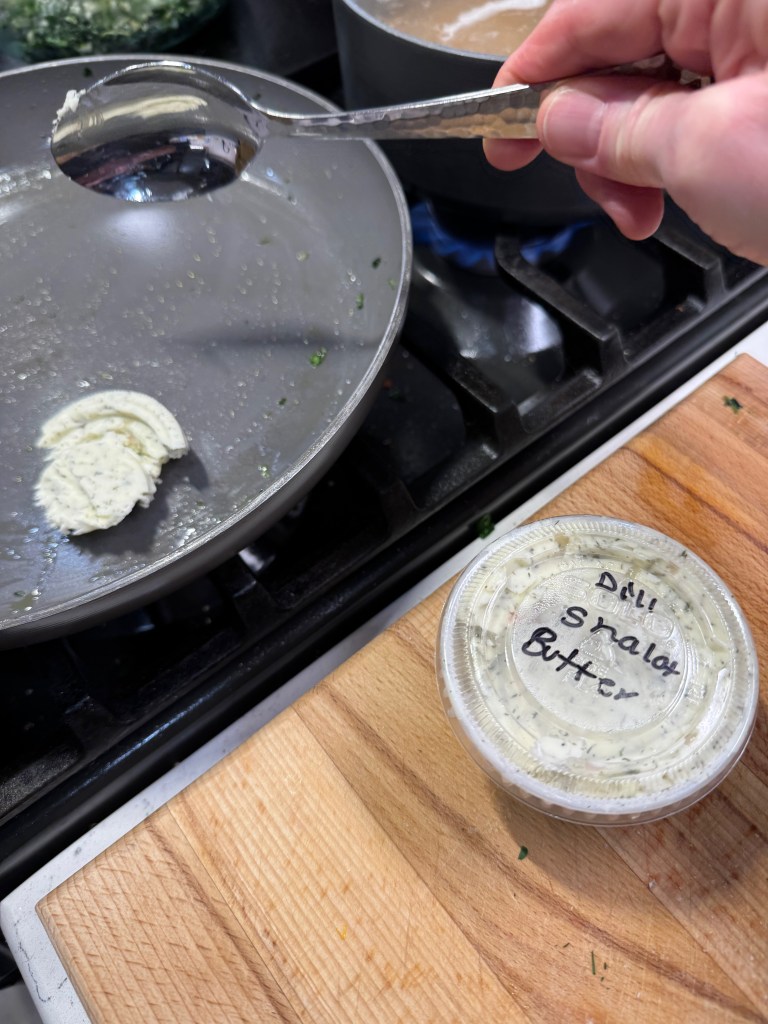
I had some dill-shallot compound butter left over from another dish, and it was perfect for cooking the shrimp!
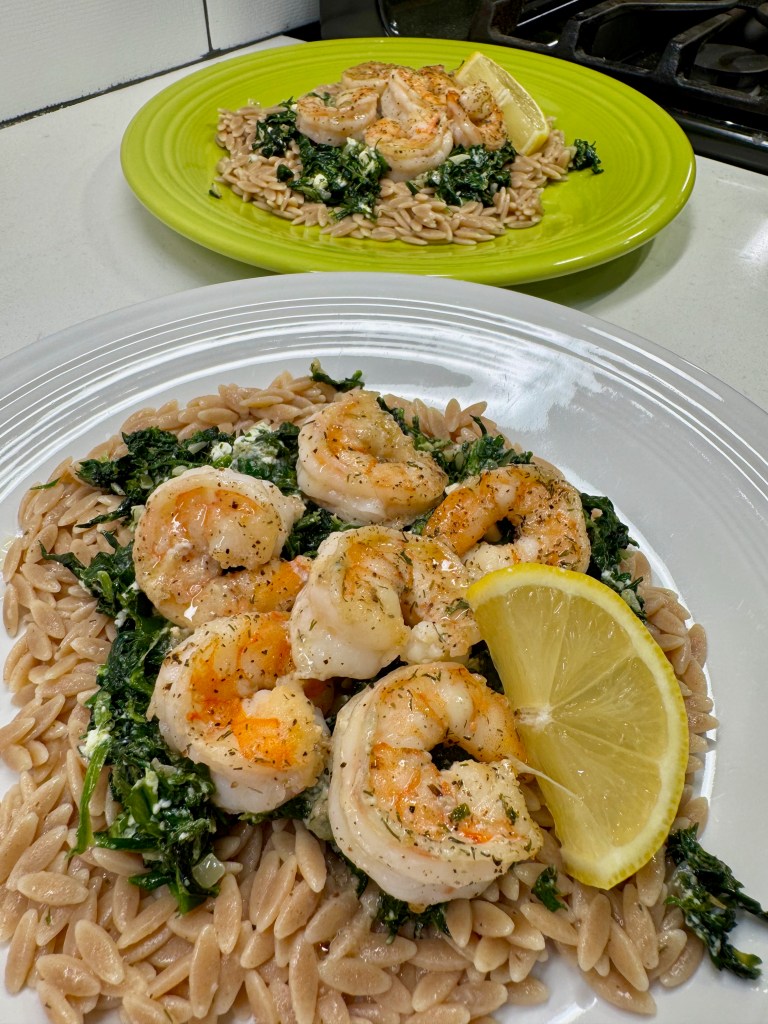
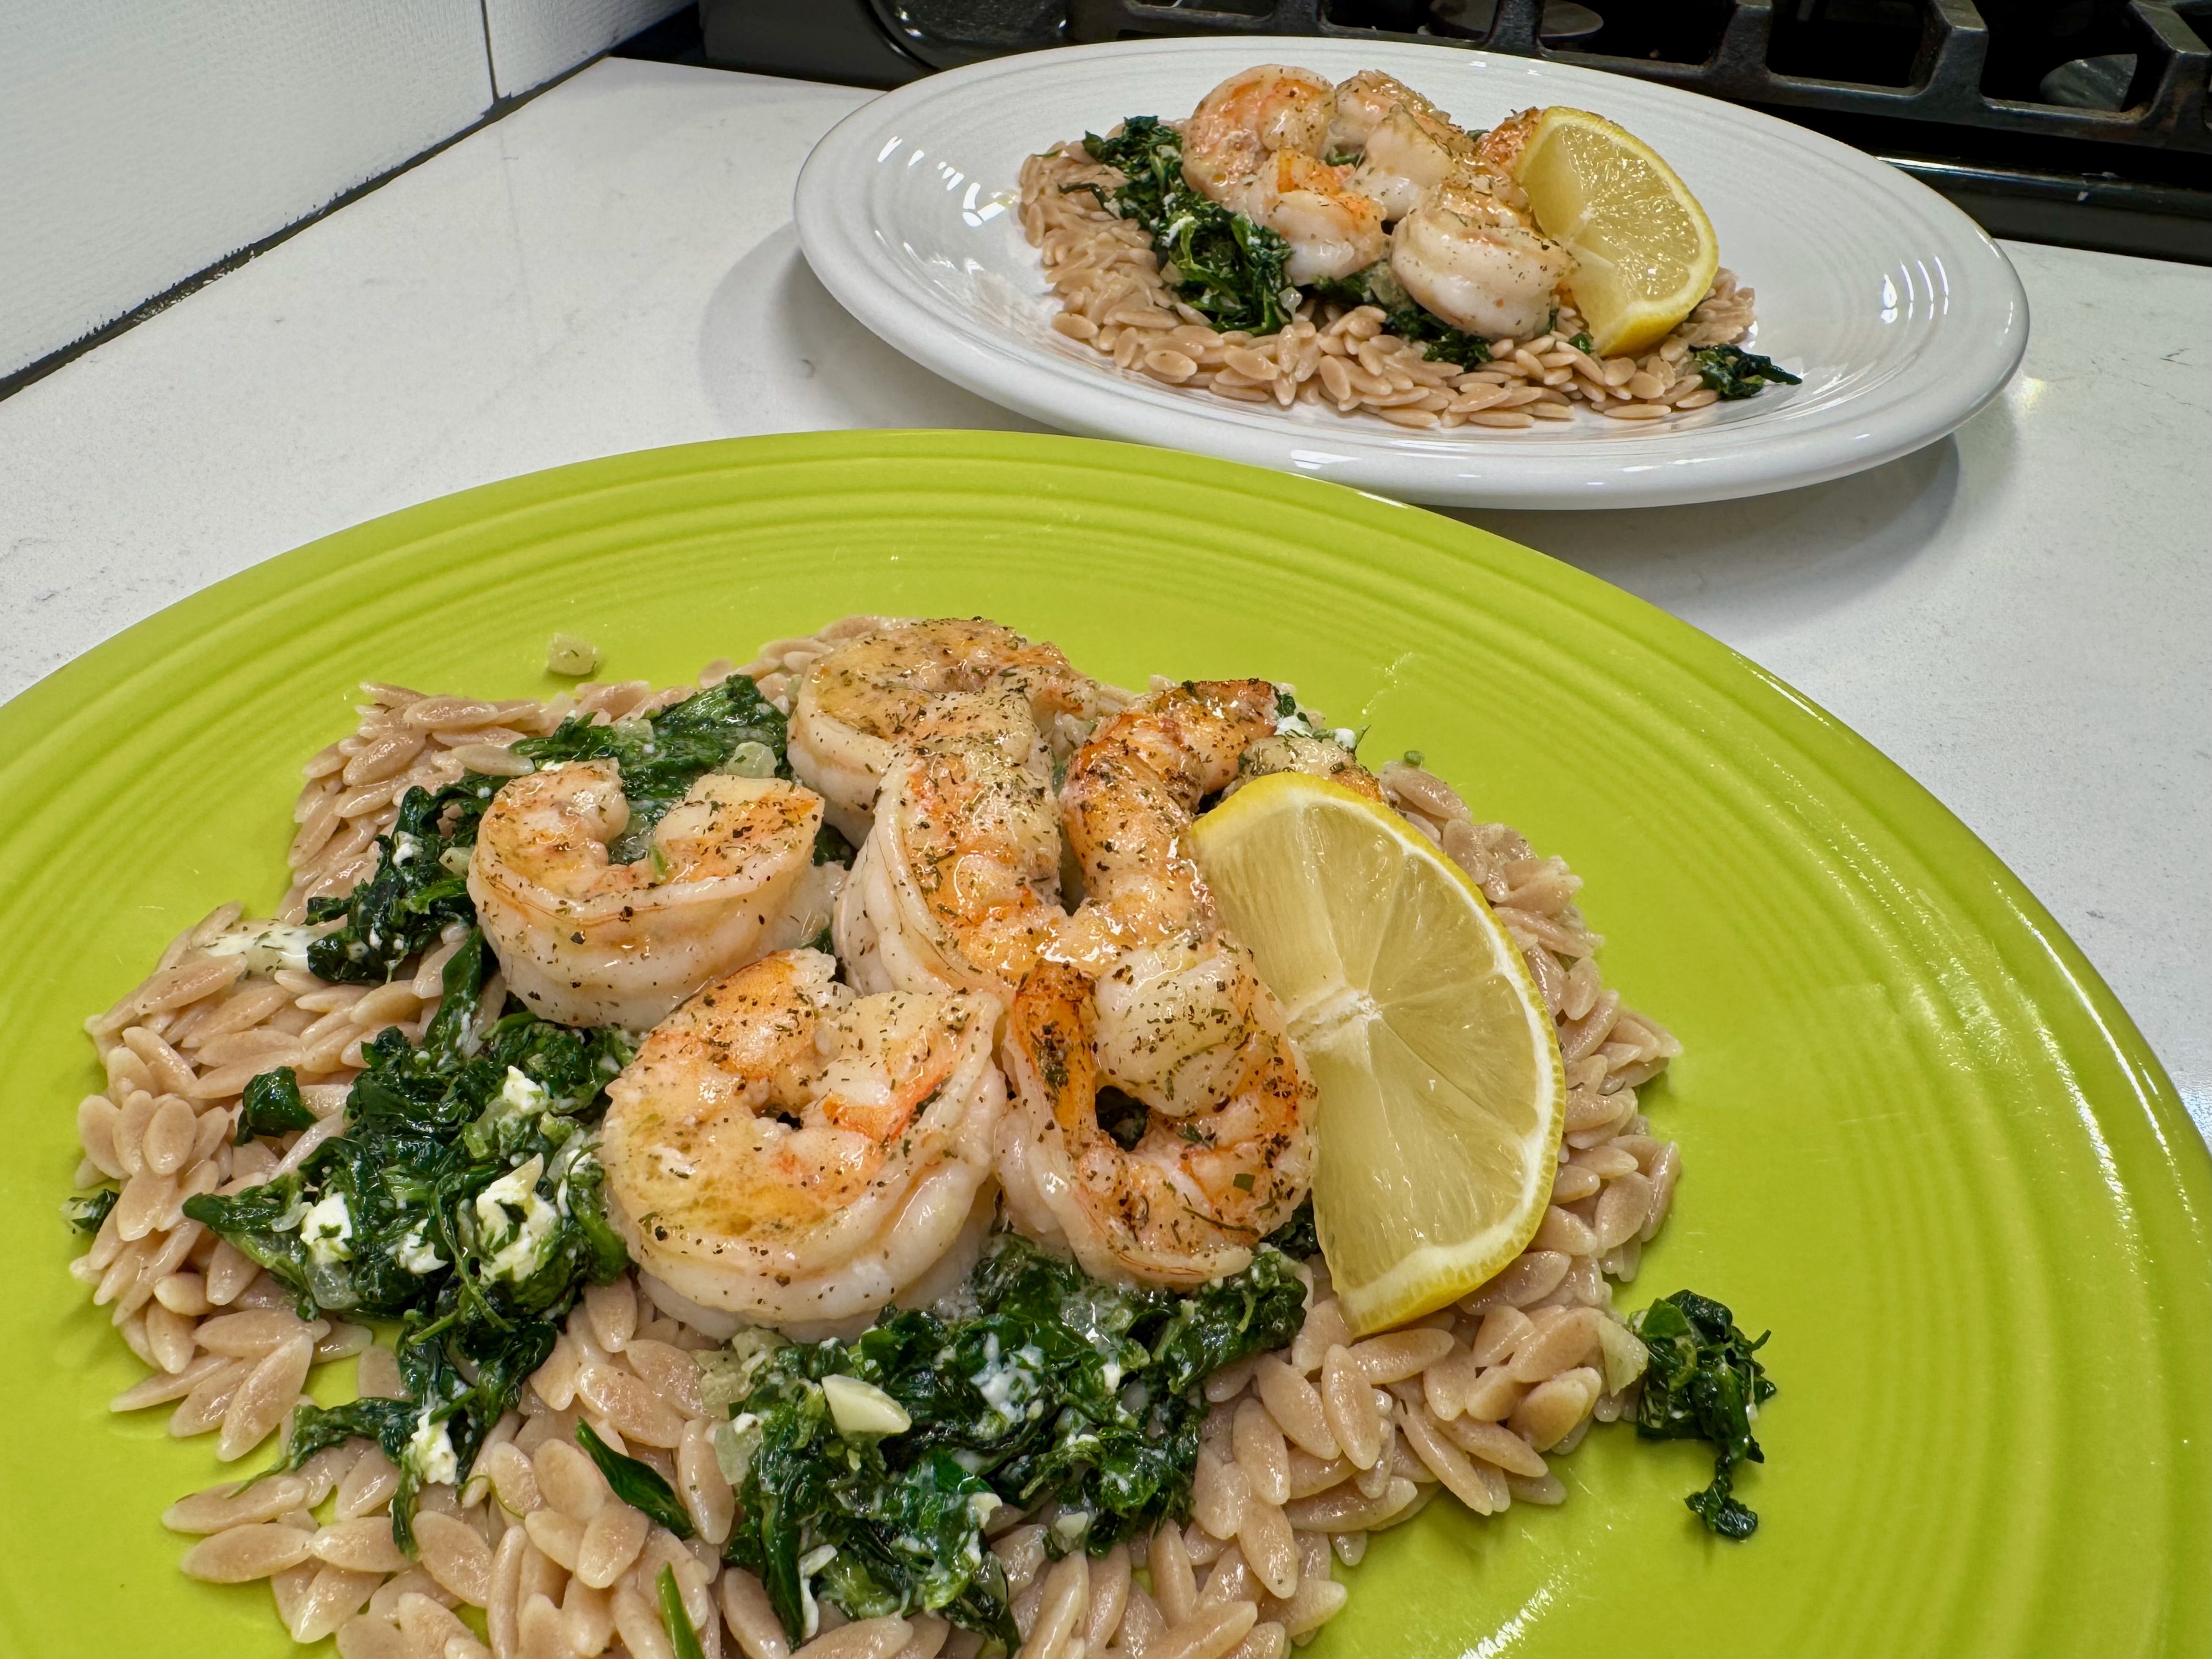
When all the shrimp have been turned over, squeeze fresh lemon over them and turn off the heat. Drain the orzo and toss it in a bit more of butter. Plate it up with the warm spinach-feta mixture and shrimp. Enjoy!
I love to serve meals in a “pile.” It keeps everything warm and seems more like a restaurant meal. 🙂
This is a quick and easy weeknight dinner that combines two of my all-time favorite Mediterranean classics. If you don't have orzo, use any kind of small pasta shape that you have on hand.
Ingredients
2 Tbsp. extra virgin olive oil (possibly more for cooking shrimp)
2 cloves garlic, minced
1/3 cup diced sweet or yellow onion
Kosher salt and freshly ground black pepper
4 fat handfuls baby spinach leaves, rough chopped* (see notes)
A handful each of fresh dill and flat-leaf parsley, chopped
1/3 cup feta, drained and cubed or crumbled
1 Tbsp. butter* (see notes)
1 pound fresh wild-caught shrimp, peeled and deveined
Juice of 1/2 fresh lemon
Cooked orzo and fresh lemon slices, for serving
Note: Fresh spinach is best, but if you don’t have enough, you can supplement with some frozen chopped spinach. Microwave it in a glass dish until thawed, then press out as much water as possible and add it to the onions after they’re already softened. Proceed with the rest of the recipe as usual.
I was fortunate to have a bit of “dill and shallot” compound butter left over from another recipe, and it was perfect for cooking the shrimp! If using regular butter or oil, consider adding a few shakes of dried dill weed at this step, or reserve a bit of fresh dill for sprinkling over the top of the finished dish.
Directions
Please a large skillet over low heat and add two generous swirls of olive oil with the garlic. Cook this very low and slow, with almost no bubbling action in the pan, so that the garlic become very soft and fragrant. It should take about 10 minutes, and this mellows the flavor of the garlic. Too much heat will give the garlic a burned and acrid taste.
When the garlic is softened, increase the heat to medium and add the onions. Season with salt and pepper and toss to sauté until onions are translucent. Add spinach by the handful, tossing until each handful has wilted before adding the next. If supplementing with frozen spinach, wait until the fresh spinach has fully cooked.
Add fresh herbs and toss for about 30 seconds, then add feta and remove the pan from heat. You may either transfer this mixture to a bowl (keep it warm) and use the same pan for the shrimp, or use a second pan for the shrimp.
Add butter (or oil) to the skillet over medium heat. Place shrimp down in the hot butter and season with salt and pepper, and a quick shake of dried dill if you have it. Watch the shrimp closely, and turn them when you notice the color changing on the inside curl. Depending on the size of your shrimp, two to three minutes total should do it. After the shrimp has cooked on the second side, squeeze the fresh lemon juice into the pan and toss to coat.
Toss cooked orzo with a bit of butter or oil, and serve it with the spinach mixture and shrimp piled on top. Add a lemon slice on the side for one last burst of freshness.
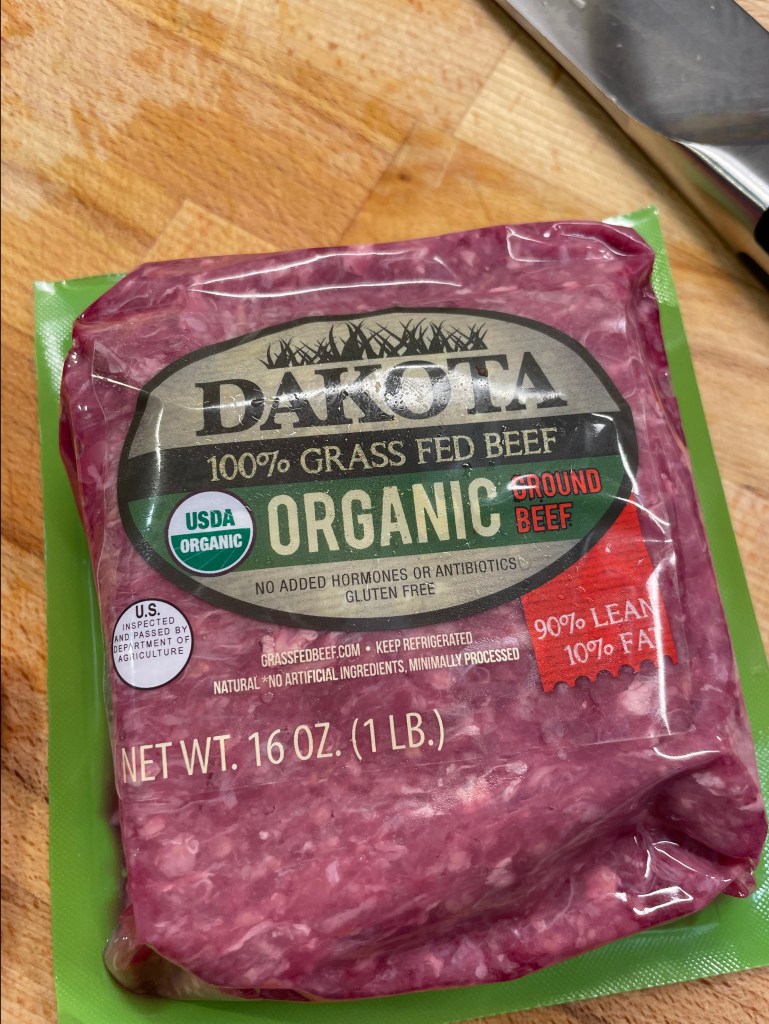
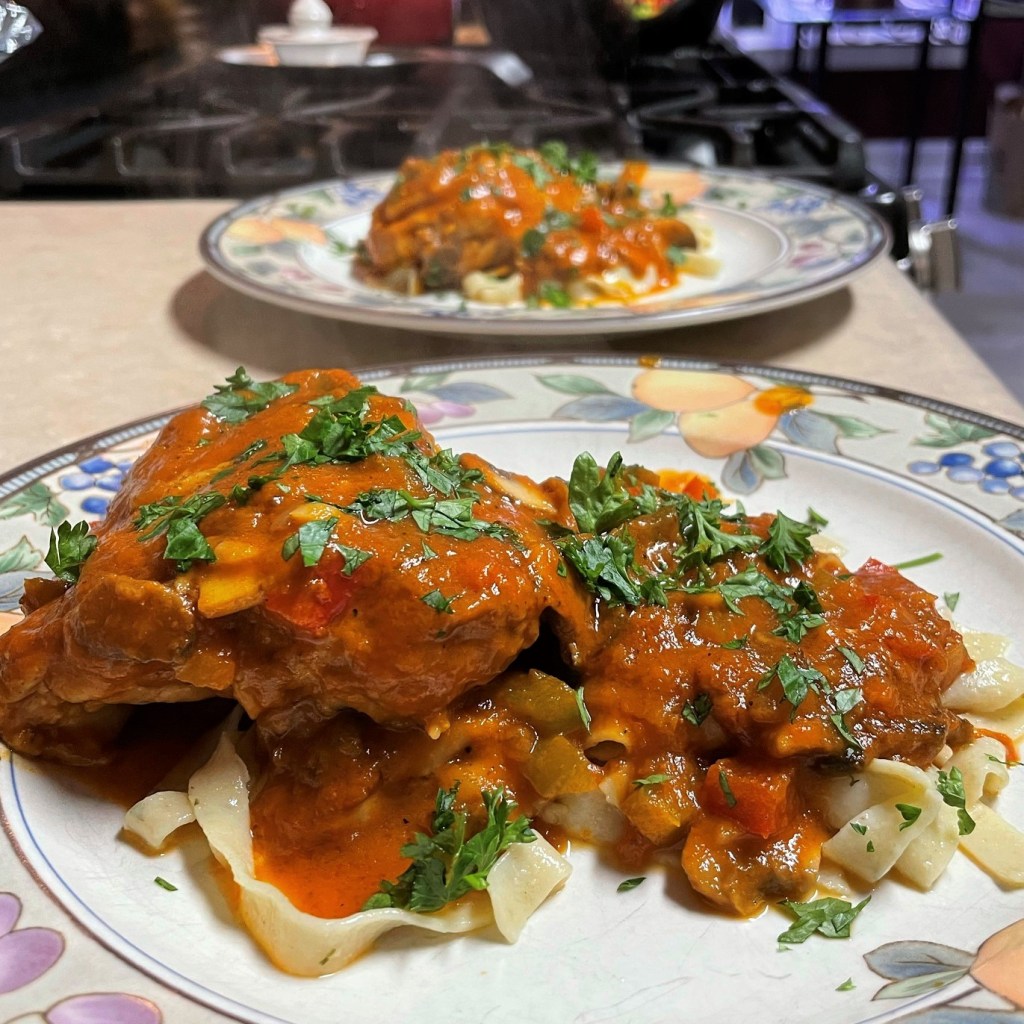
Here’s an easy, kid-friendly main dish that brings back a lot of memories from my childhood. There were just a few foods that my mother made on repeat, including some of the Mexican-themed meals I’ve shared here. Ground beef tacos were in hot rotation, as was tuna noodle casserole, green chili burritos and something she called “Swiss steak.” Once in a while, she also whipped up a pot of good old American goulash, but not quite the way I’ve prepared this batch. My single mom was all about shortcuts in the kitchen, so her version of goulash usually involved a jar of store-bought spaghetti sauce, probably Ragú, given that there weren’t many other brands available in the 1970s when I lived with her.
In the traditional sense, goulash— which has its roots in Hungarian cuisine— would not have the Italian flavors found in spaghetti sauce, and I’ve come around to making it my own way in my adult years. I do use ground beef, as my mom did, and this is a distinct Americanization of goulash, which would traditionally be made with stewed cuts of meat, plus vegetables and probably potatoes.
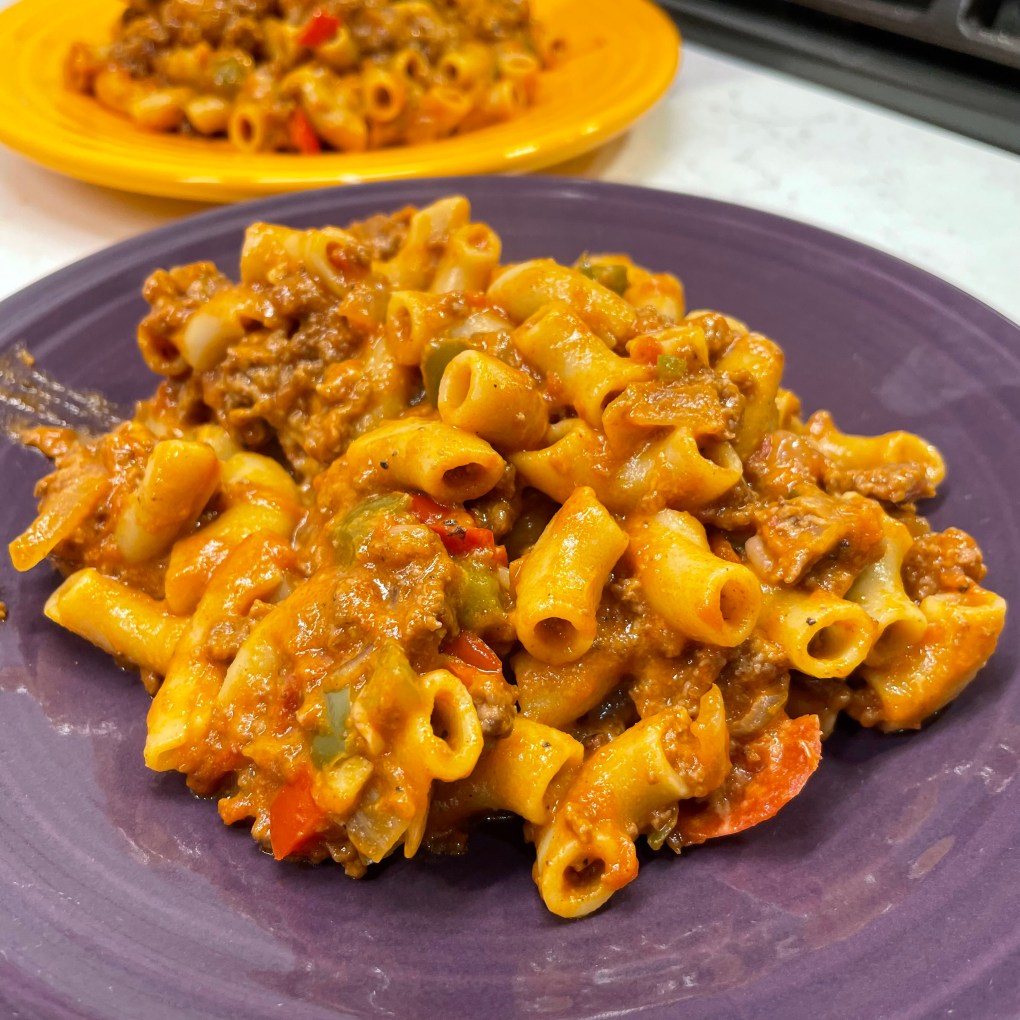
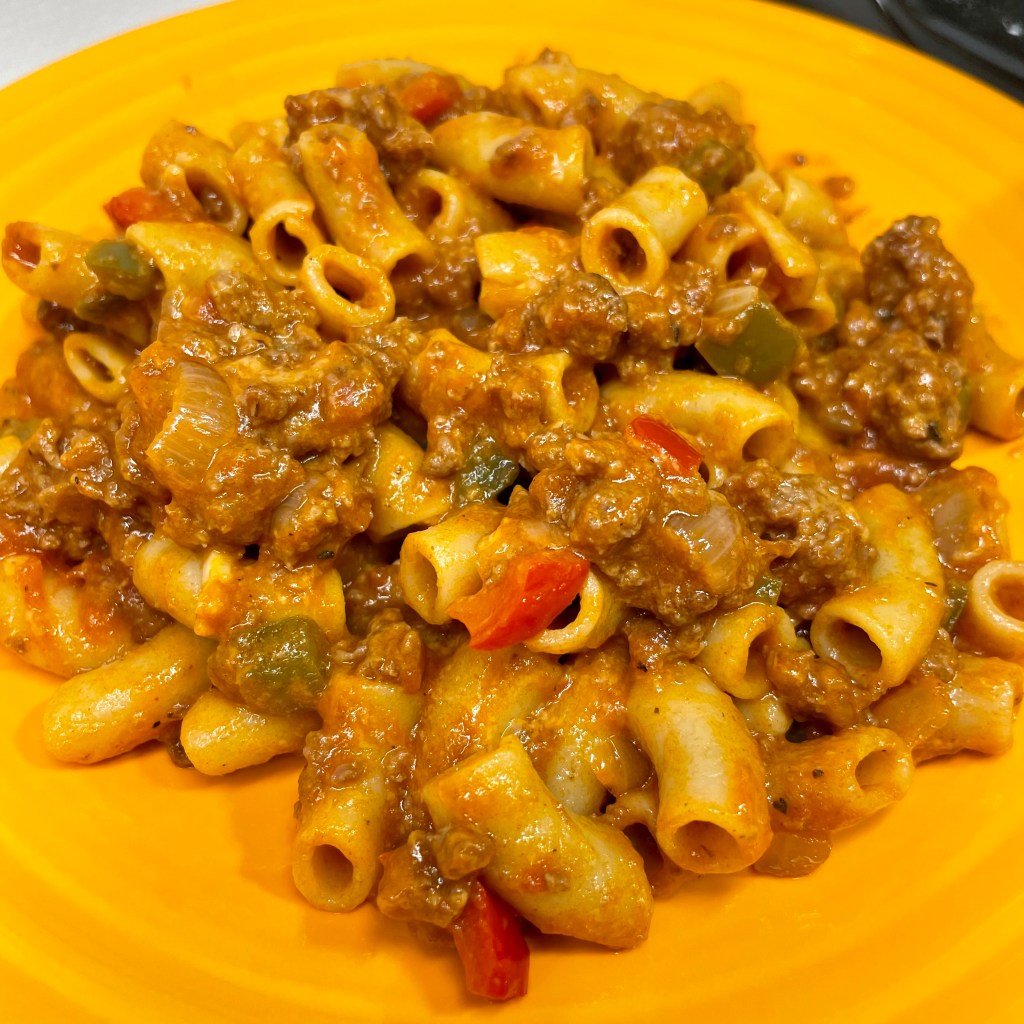
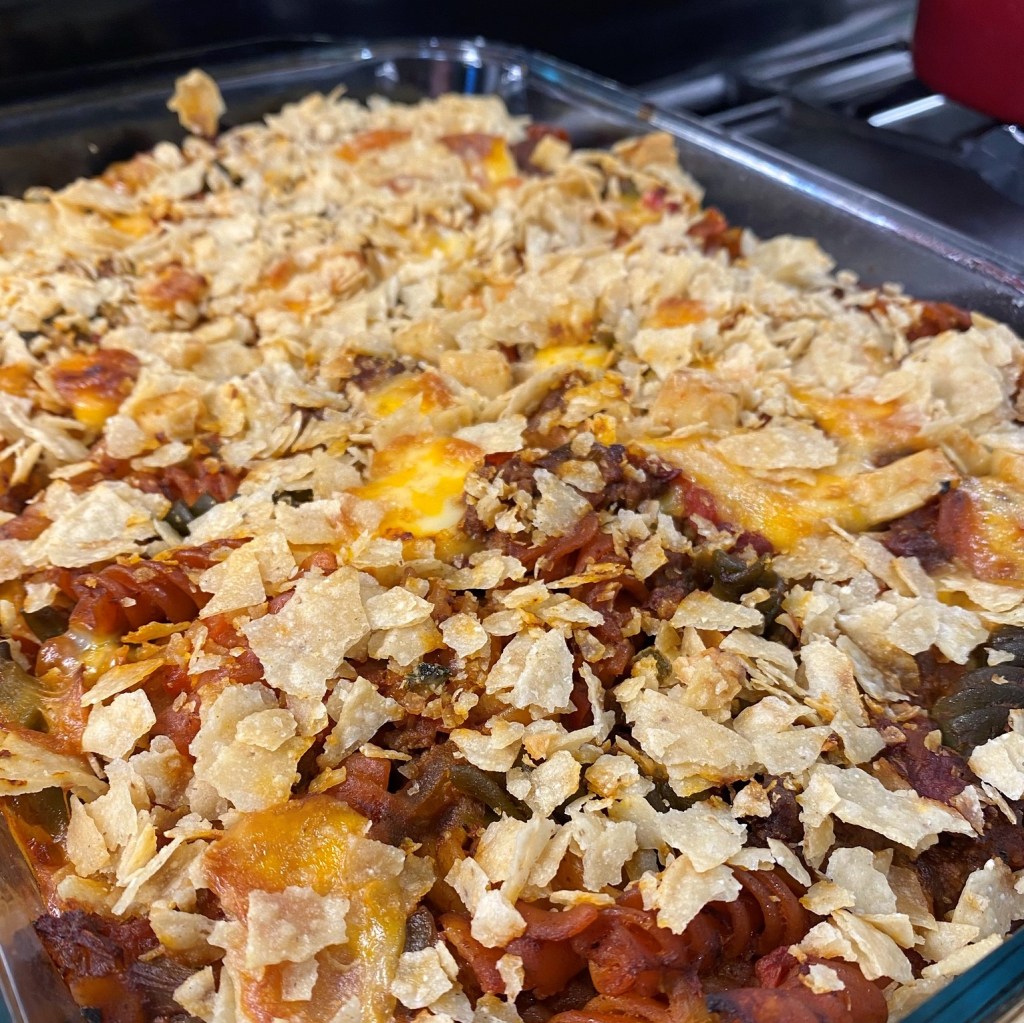
Not a Hungarian goulash, but so delish! And look at that brilliant Halloween color.
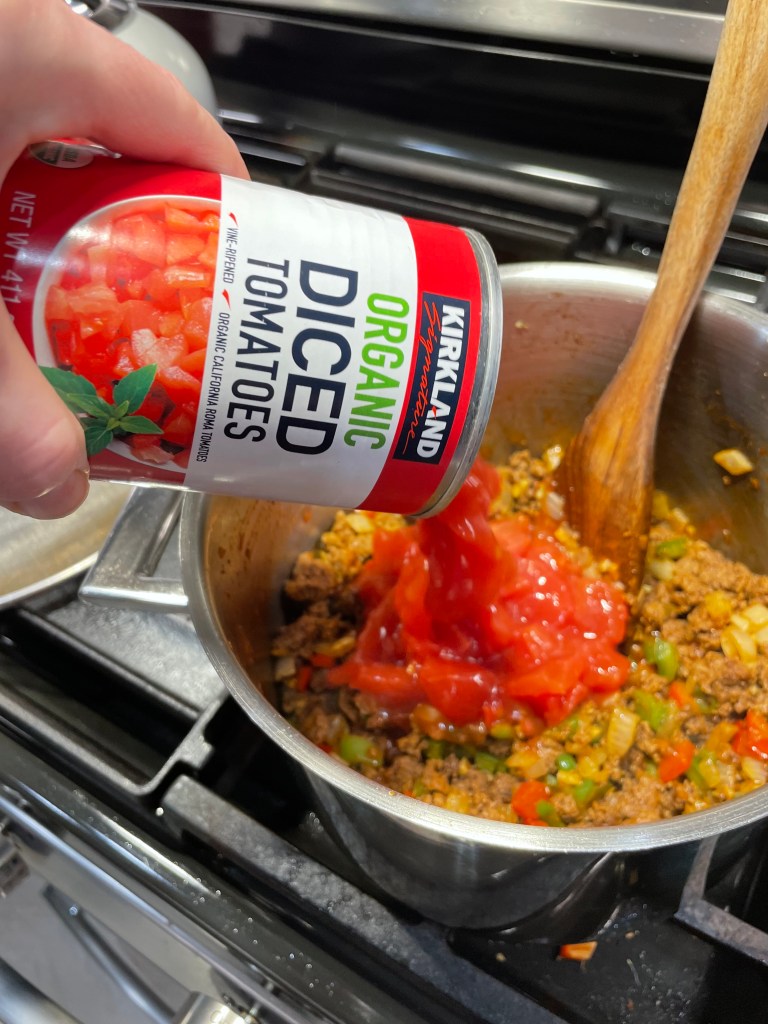
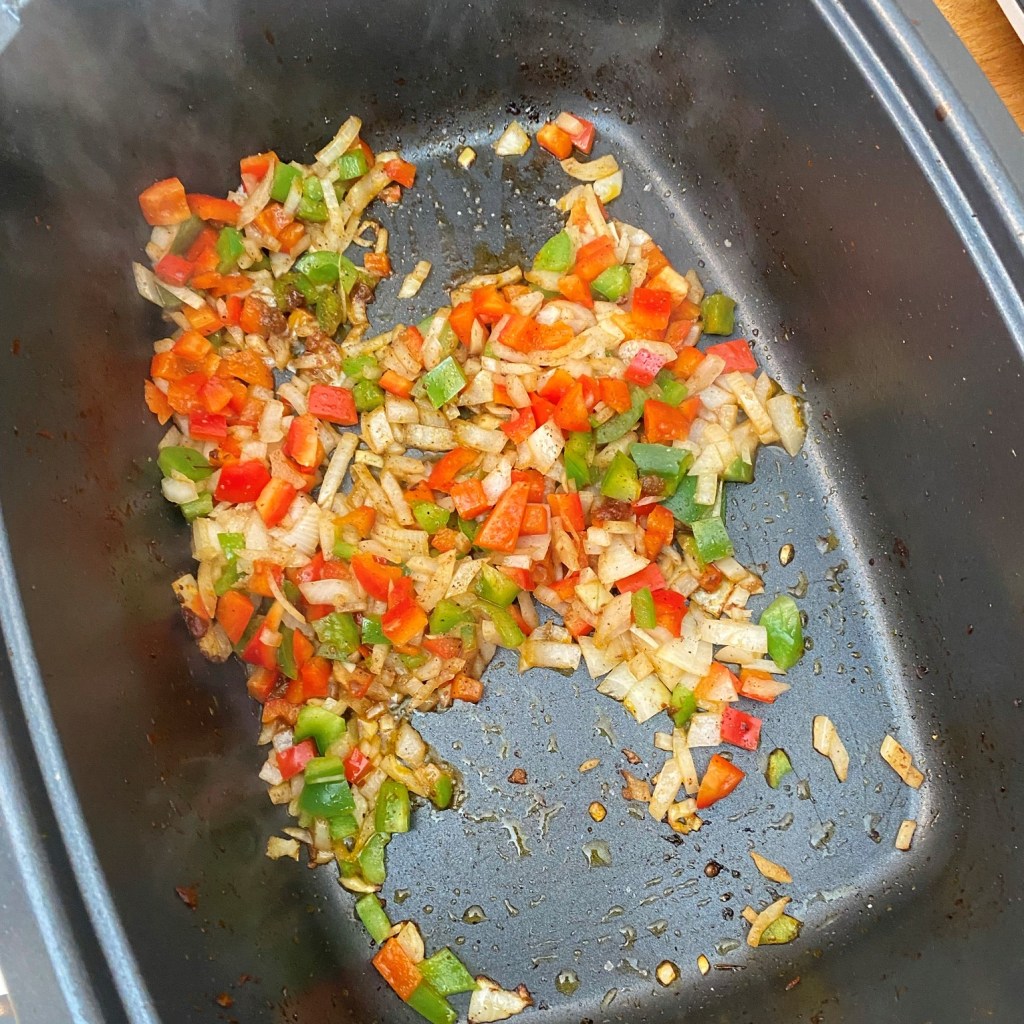
My version brings back some of the traditional goulash flavor, seasoned with plenty of smoked paprika, canned whole tomatoes, bell peppers, onions and garlic. In the devilish spirit of Halloween, I have also taken the liberty of adding some fiery heat in the form of a fresh jalapeño, chopped up with seeds and all. Even when I was a kid, I loved spicy flavors, and that was my mother’s influence, especially during the years we lived in southern Colorado.
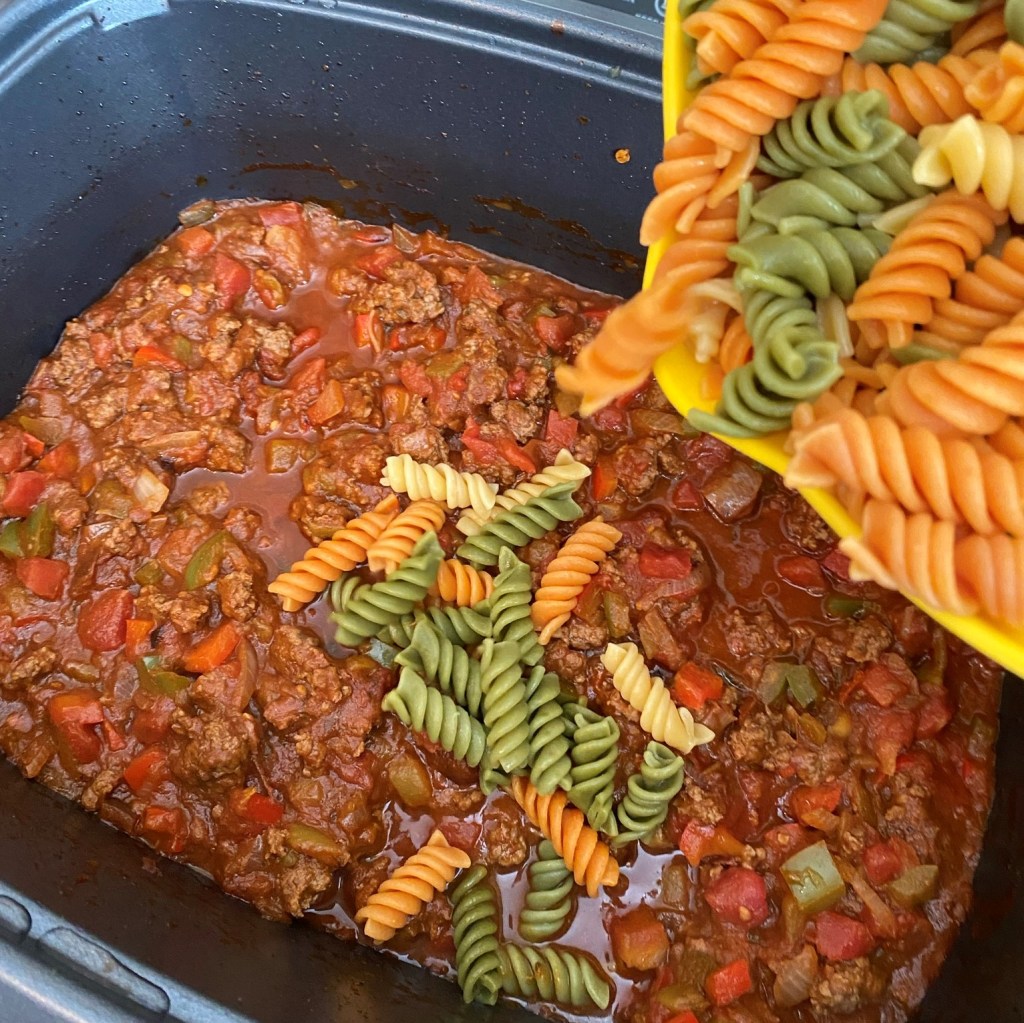
If you’re not feeling it for the fire, or if you’re feeding little goblins whose taste buds aren’t quite there yet, feel free to omit the jalapeño, and maybe pull back on the smoked paprika a bit, too. Cooked pasta is another “American” twist on goulash, and I like large elbows for this because the shape is open to grab up plenty of that flavorful sauce, and it’s also easy to pick up with your fork, along with the tasty bits of meat, onion and pepper.
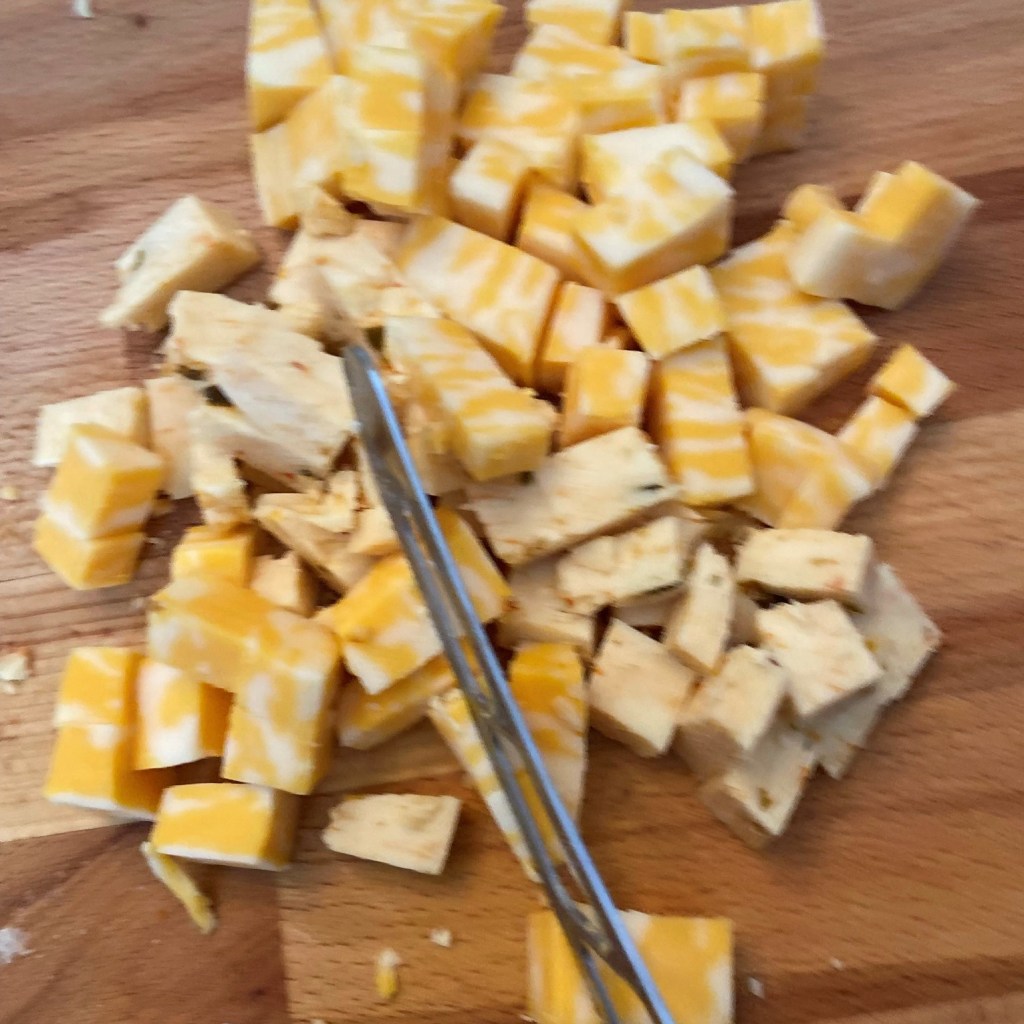
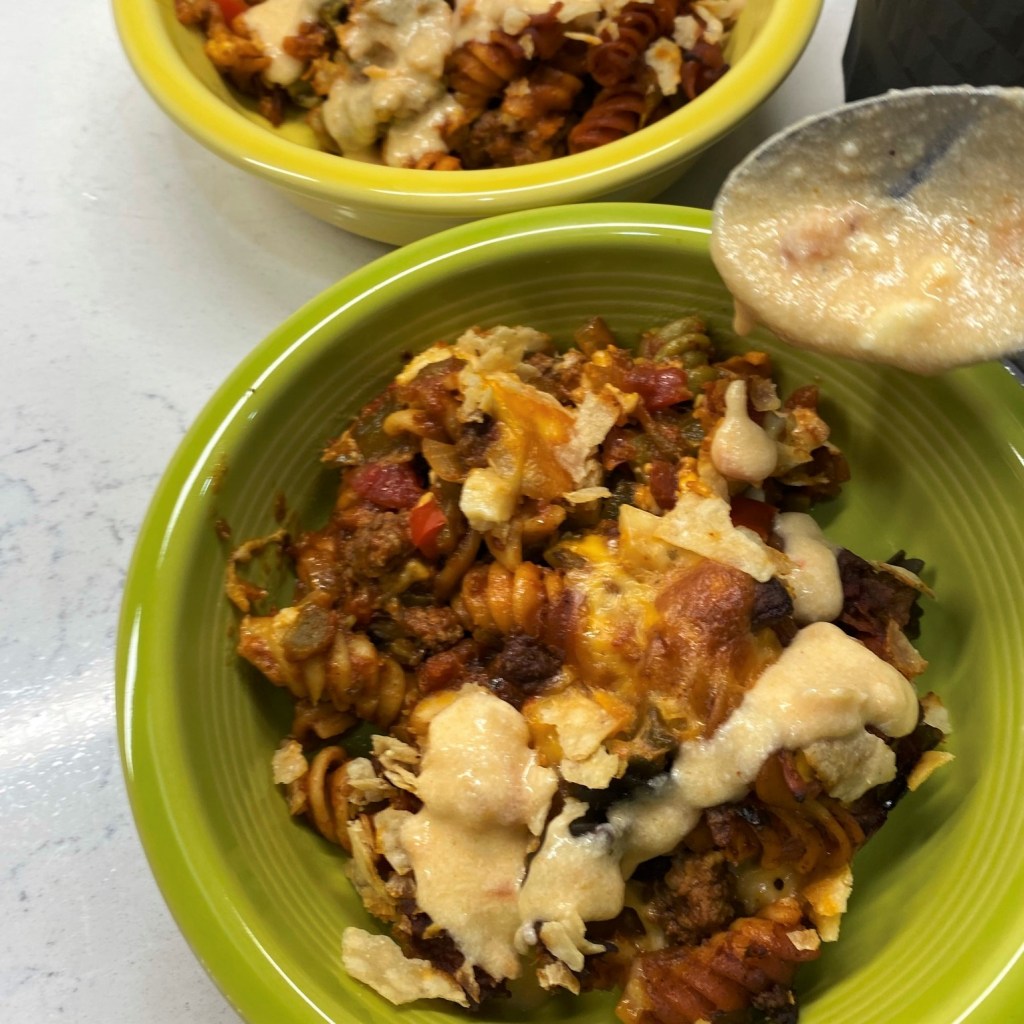
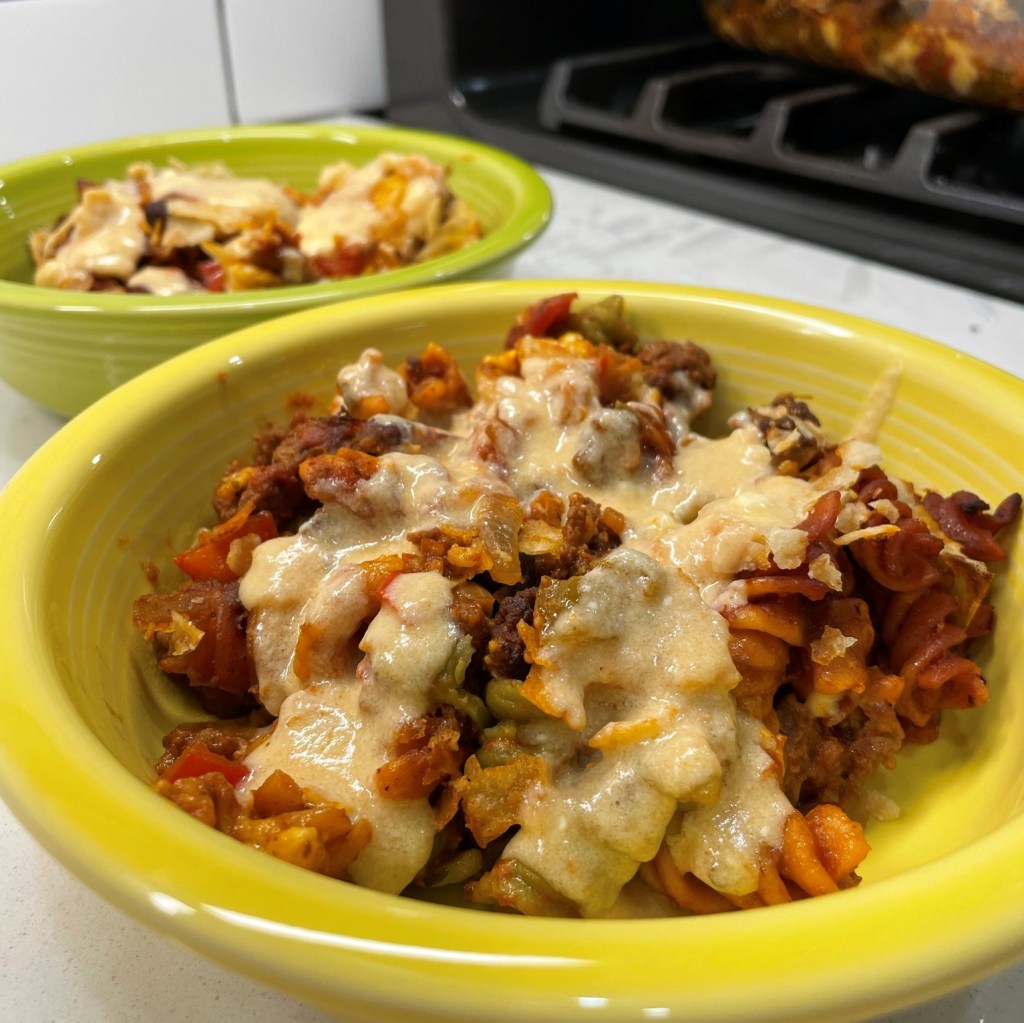
One last thing, and this is also a departure from my mom’s old standby recipe but is very popular in my house today. Just before serving, I stir in a half cup or so of shredded sharp cheddar. It’s a tangy little twist that makes this an even heartier meal, or perhaps even a graveyard smash. 👻
This is my adaptation of a dish I had countless times during my childhood. It makes good use of simple pantry ingredients and it is economical, using ground meat of your choice. I prefer it served from the stovetop, but it easy to adapt to a baked dish if you prefer to make it ahead.
Ingredients
Extra virgin olive oil
1 pound lean ground meat (beef, bison or turkey work well)
1/2 sweet or yellow onion, chopped
1 bell pepper, chopped (use green, red or a combination)
2 cloves garlic, minced
1 fresh jalapeño (optional), minced with or without seeds
Salt and pepper
1 teaspoon smoked paprika (Hungarian is traditional, but Spanish works nicely)
15 oz. can diced tomatoes, including juice
8 oz. can low-sodium tomato sauce
1/2 pound large elbow macaroni
About 1/2 cup shredded sharp or medium cheddar cheese
You can adjust the smoke and spice of this dish to your liking. For less heat, discard the seeds and membranes of the jalapeño or omit it entirely. For extra “smoke,” use two teaspoons of the paprika. For less smoke, substitute sweet paprika.
Directions
Bring a pot of salted water to boil for cooking the pasta. Heat a medium size, heavy-bottomed pot over medium heat. Swirl in a tablespoon or so of olive oil and add the ground meat, a little bit at a time, cooking until most of the pink color is gone.
Add chopped and minced vegetables and season with salt and pepper. Cook and stir until vegetables are softened and onions are slightly translucent.
Stir in paprika and then add tomatoes and tomato sauce. Reduce heat and cook at low temperature, stirring occasionally to prevent burning.
While the goulash mixture simmers, cook the pasta to al dente or desired doneness for serving from the stovetop. If you intend to bake the dish after mixing, undercook the pasta slightly as it will continue to absorb moisture and cook during baking.
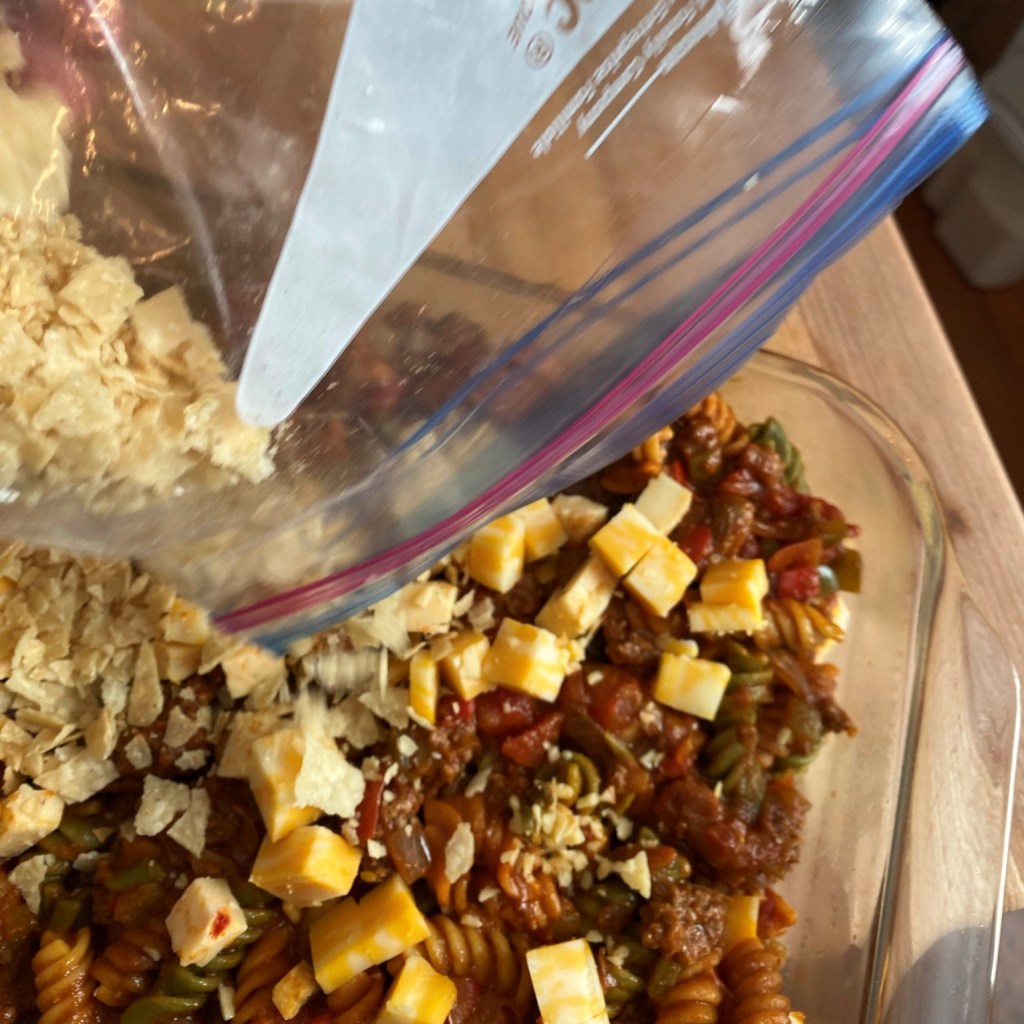
Add cooked pasta and a few tablespoons of the pasta water to the meat mixture. Gently fold to combine. Stir in shredded cheddar and serve. If baking, transfer the mixture to a casserole dish and bake at 350° F for about 40 minutes. Consider topping the casserole with extra cheese before baking.
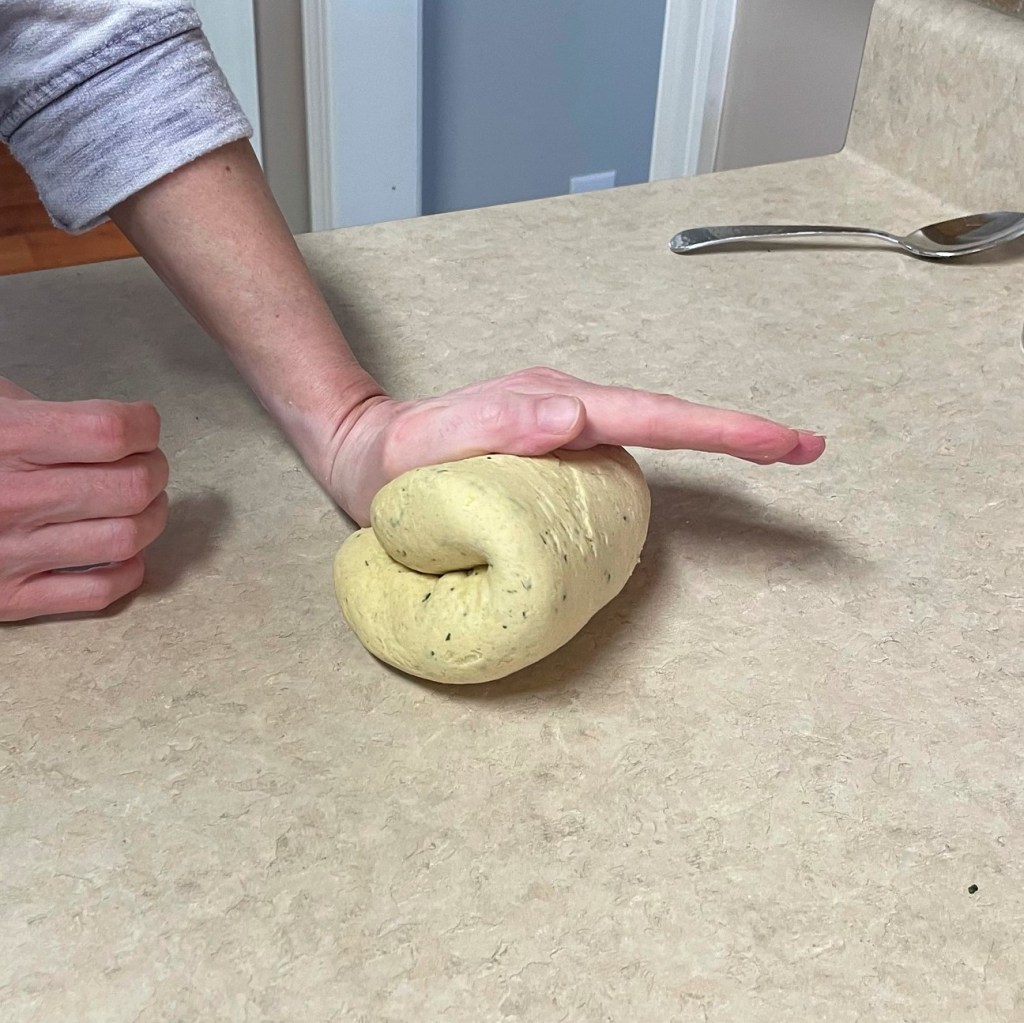
I’m so glad I didn’t give up on homemade pasta. My first few attempts were equal parts disaster and comedy, as I naively believed it might be as simple as TV chefs made it seem. Don’t get me wrong, it is not difficult to make fresh pasta dough. But unless or until you are a pro with many years experience doing it, I do not recommend the method some of those chefs follow— building up a mountain of flour on a counter and then using your hands to mix in the eggs that are cracked right into the top of the pile. The likely outcome is a big mess, and I am definitely speaking from experience.
Those early failures prompted me to suspend my efforts, and I didn’t have the gumption to try again for a few years, until after I’d purchased my first stand mixer. Let me tell you, a high-sided mixing bowl and the squiggly dough hook attachment make far easier, cleaner work of homemade pasta dough. I was still rolling it out by hand with a wooden rolling pin, which is perfectly acceptable, but when I found my hand-crank pasta machine, I was on my way to making sheets of pasta for homemade linguine and fettuccine. Fast forward another year, and I picked up a three-tray set of ravioli molds, finding my way to all varieties of sweet little pillow pastas, including the handmade spinach ricotta ravioli I shared in another post.
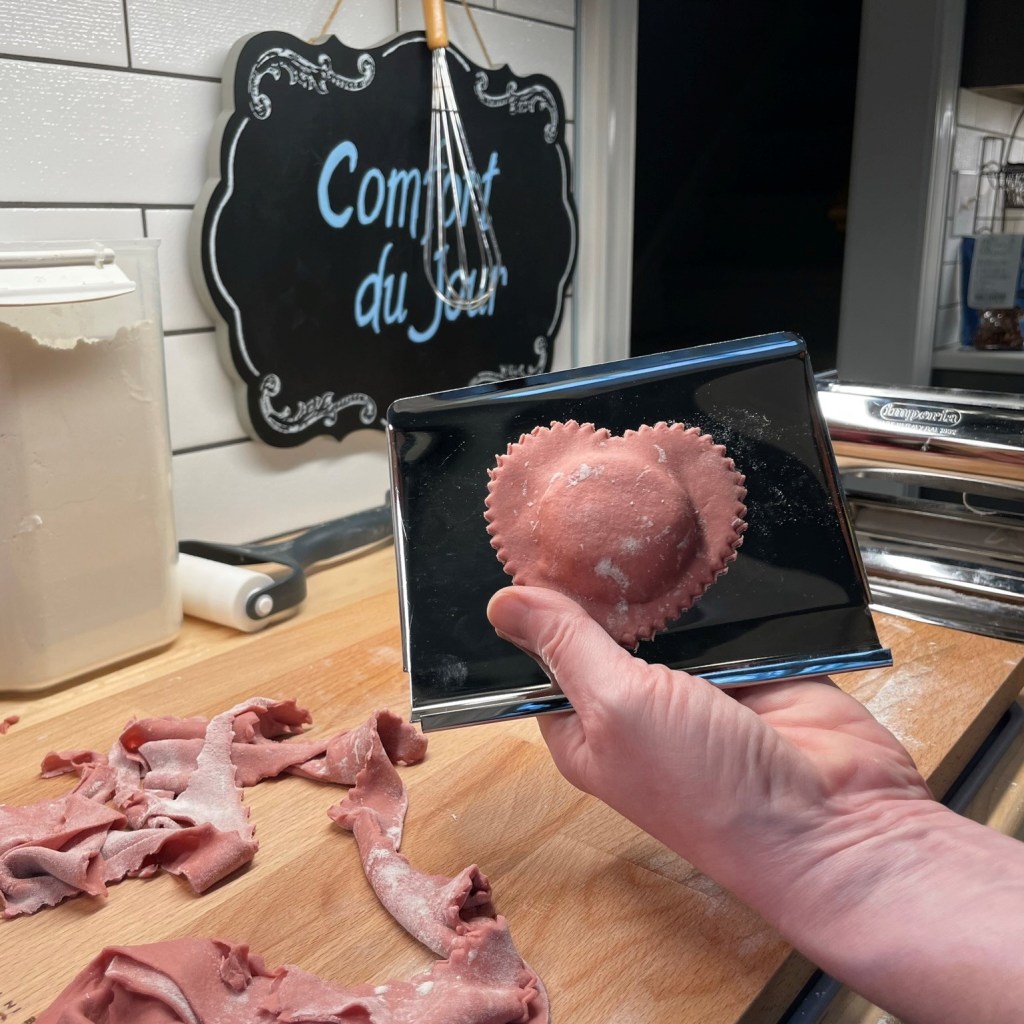
One day, I hope to improve my technique for hand-shaping some of the special pasta, like oricchiette and casarecce. Practice makes perfect, right? There is so much to learn in the world of handmade pasta, and my most recent obsession has been adding big flavor and color to pasta dough through the addition of pureed vegetables and other natural ingredients. This book, Pasta, Pretty Please, by Linda Miller Nicholson has inspired me to try fun new combinations, including beet-infused pasta dough, which is featured in the top left of this color chart in Linda’s book.
How long will it take me to make all these pasta colors?
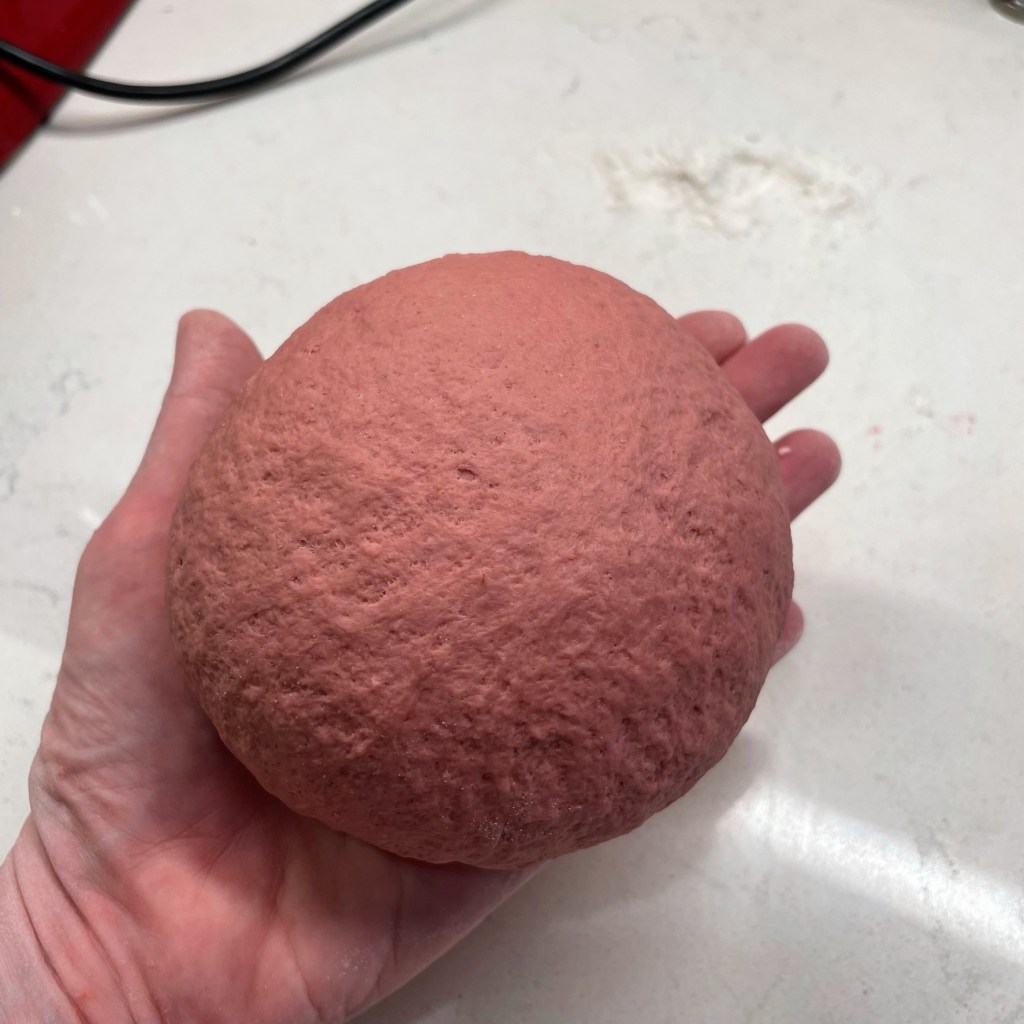
You can see that my pasta dough, which was made with roasted beets, has a soft pink color— not the bright magenta hue that Linda makes. I realized too late that Linda uses frozen pureed beets for her pretty pasta. I love that vibrant color she achieves, but you know what? My soft pink, heart-shaped pasta is still perfectly appropriate for Valentine’s Day, and the beets in the dough are good for cardiovascular health, so there’s that. You hardly taste the flavor of the beets, but the nutritional benefit is still in there.
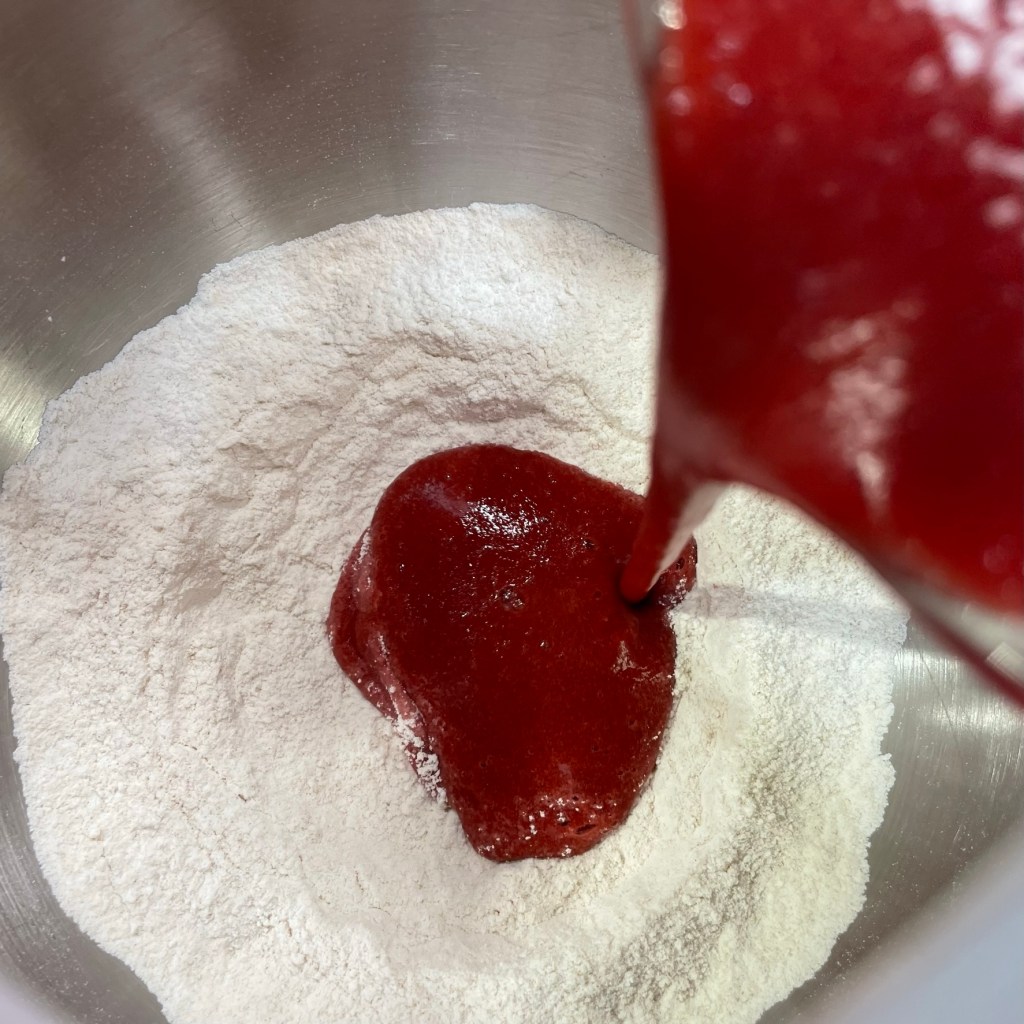
The beets and egg whites are pureed and added to the flour mixture.
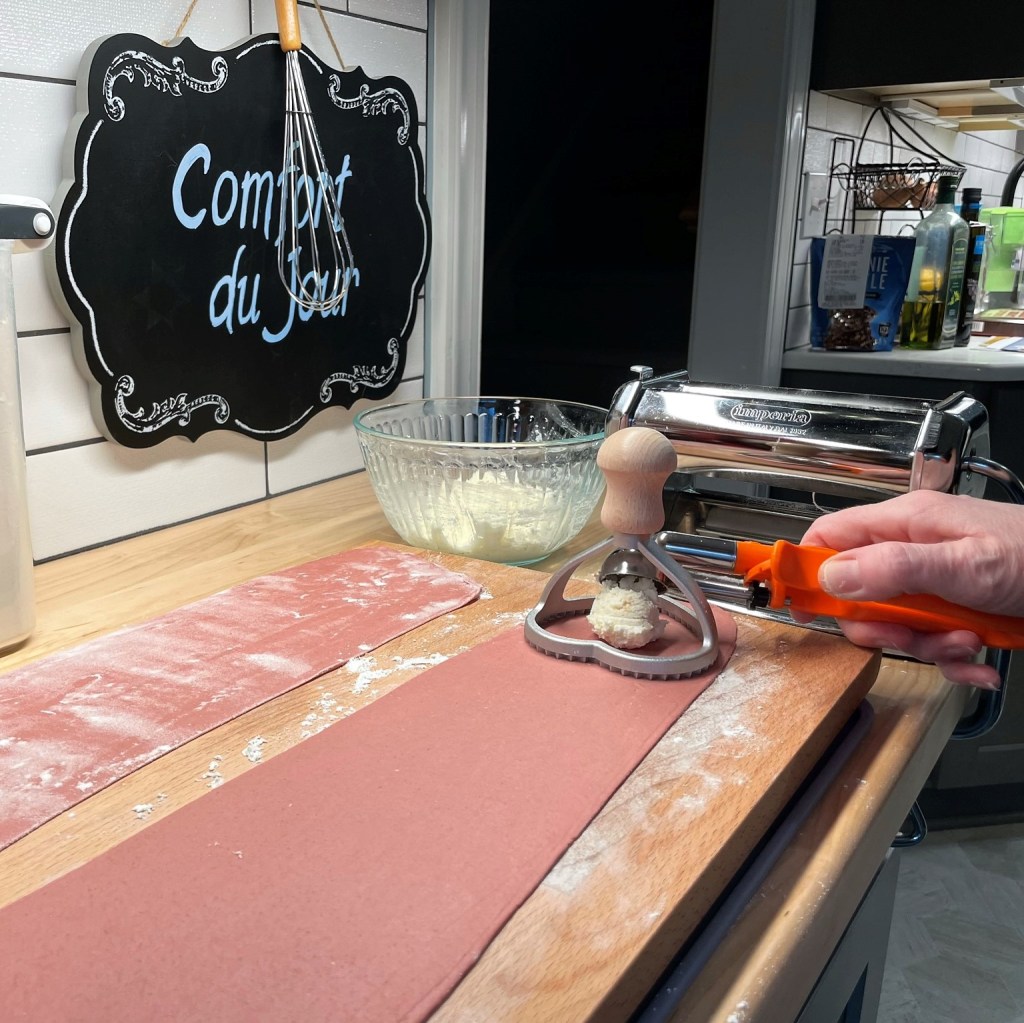
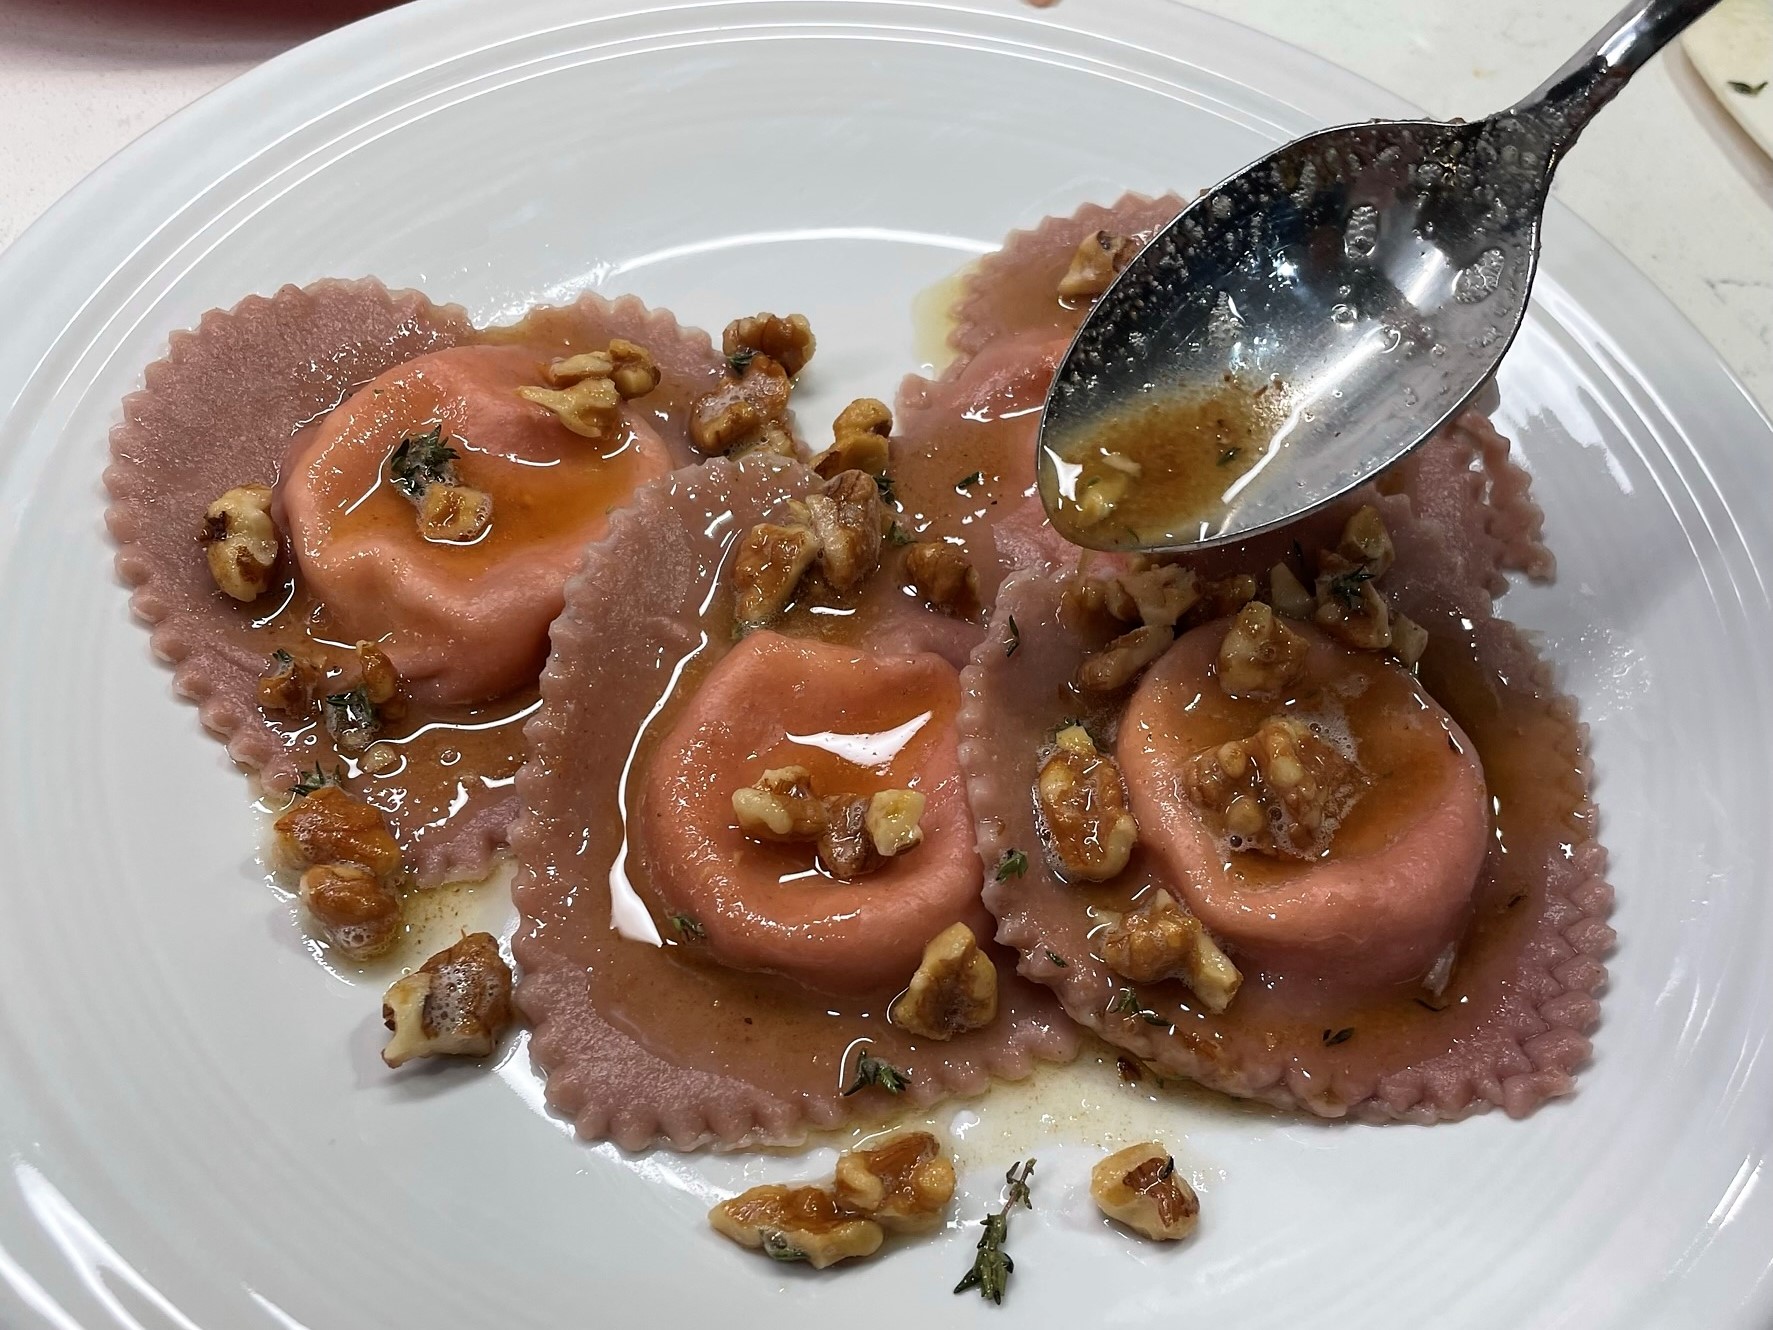
This pasta would be lovely as fettuccine, farfalle or linguine, but I whipped up a quick filling and turned it into ravioli. The filling is a simple, lemon zest-scented ricotta mixture, and to keep the pasta front and center, I topped the ravioli with a simple, browned butter walnut sauce and a last-minute sprinkle of our beloved parm-romano blend.
You don’t need a heart-shaped ravioli cutter. These would be just as good as simple squares!
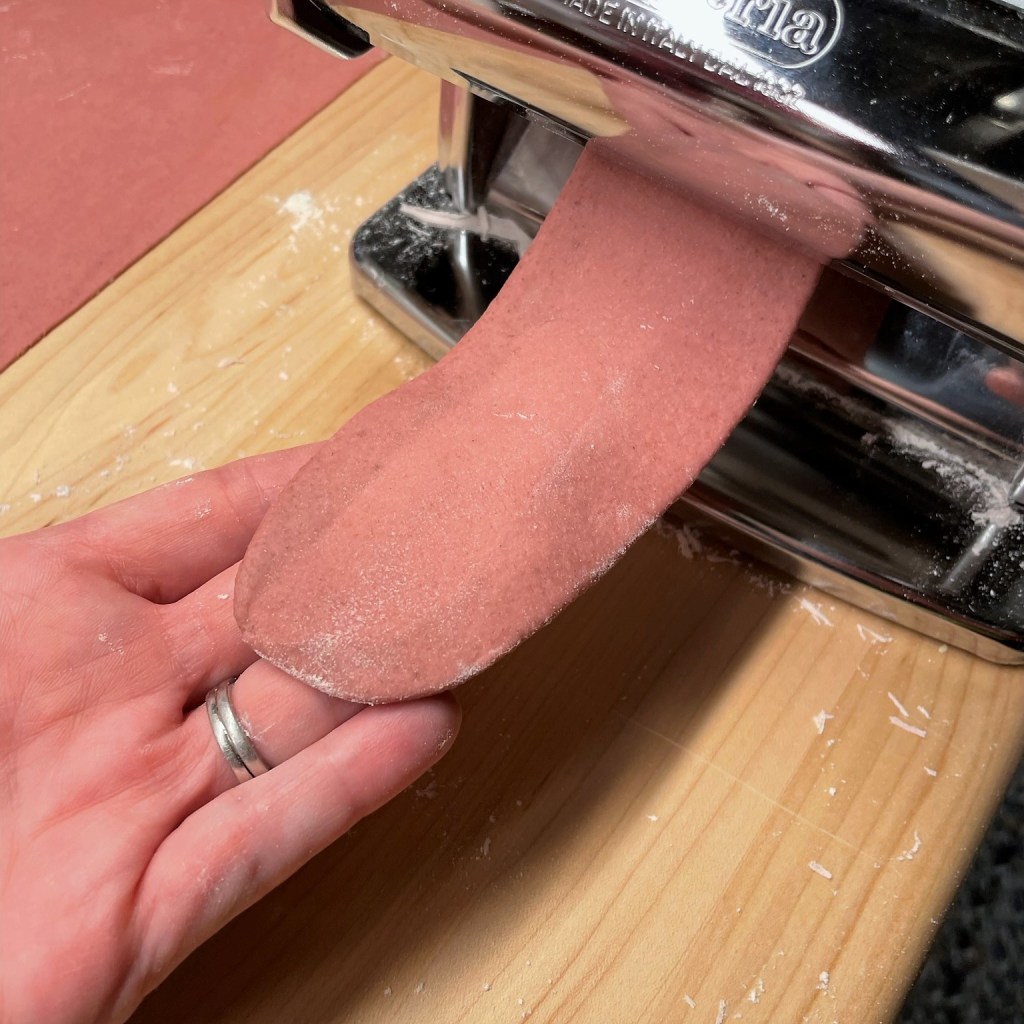
If you have ever dreamed about making your own pasta at home, my advice is simple— start doing it! You may not get it perfect the first time, and that’s OK. This is one of the most rewarding kitchen adventures and once you get the feel for it, you’ll surprise yourself with the creative ideas that come to you. Every once in a while, you may also get a good laugh, as I did when I realized while rolling this dough that it looked weirdly familiar to me, and not necessarily in a good way. 😂
OMG, It looks like a tongue!
Thank goodness, it turned out delicious! If you’re interested in purchasing Linda Miller Nicholson’s book, which is filled with instruction for making every color and shape of pasta you could possibly imagine, search for it on Amazon or check at Barnes & Noble.
Roasted beets bring a sweetheart color to my homemade pasta. If you've ever wanted to make your own pasta, I hope this inspires you!
Ingredients
1 1/4 cups all-purpose flour
1/2 cup white whole wheat flour
1/2 cup fine durum (semolina) flour
1/4 tsp. kosher salt
1/2 tsp. onion powder
4 small beets, roasted and peeled
2 egg whites at room temperature
Directions
Combine flours, salt and onion powder in the bowl of a stand mixer.
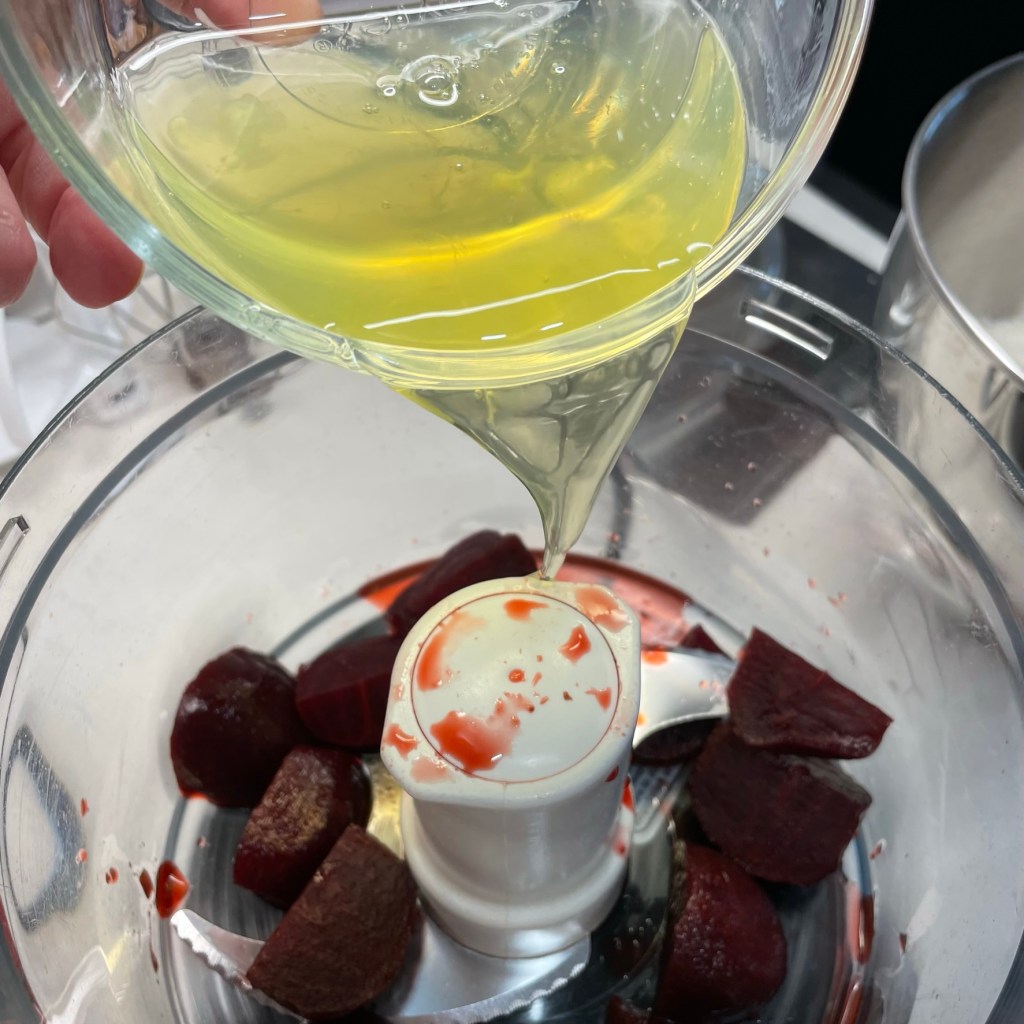
Place beets and egg whites in the small insert bowl of a food processor and blend until pureed. Pour through a fine mesh strainer into a measuring cup. Add water if necessary to measure 3/4 cup.
Pour beet-egg liquid into flour ingredients. Use the dough hook attachment of the stand mixer to blend the liquid into the dry ingredients. Dough should be somewhat shaggy and not quite sticky. Transfer dough to a lightly floured countertop and knead by hand for about 5 minutes until it’s smooth and supple. Shape it into a ball and wrap tightly with plastic wrap. Let it rest at least 30 minutes.
Roll pasta dough by hand or through pasta machine to thickness about 1/16-inch. If making ravioli, proceed with filling as described below. This pasta dough would also make beautiful fettuccine.
If you’re making ravioli, I’ve included ingredients below for the filling and browned butter-walnut sauce. It’s easy to make the filling ahead. The sauce should be made just before serving.
Ingredients
1 cup full-fat ricotta, strained to drain off excess moisture
Zest of one organic lemon
1/4 cup grated Parm-romano blend (or Parmesan)
Ingredients
3 Tbsp. salted butter
1/2 cup walnut pieces, toasted until fragrant
A few leaves of fresh thyme
About 2 Tbsp. Parm-Romano blend, for serving
Directions
Combine all ravioli filling ingredients in a small bowl. Refrigerate until ready to fill pasta.
Lay one sheet of pasta dough on a floured counter. At evenly spaced intervals, place a dollop of ricotta mixture. Using a thin pastry brush or your fingertip, moisten the dough around the ricotta with cold water. Place a second sheet over the sheet with ricotta filling. Gently close the pockets of filling, pushing out as much extra air as possible. Use a pasta cutter or stamp to separate raviolis. Place on a semolina-dusted sheet until ready to cook.
In a small skillet, heat butter until melted and bubbly. Add walnuts and toss to coat. Continue cooking until butter is browned and very fragrant. Add thyme leaves and remove from heat.
Bring a pot of water to boil and season with a tablespoon of kosher salt. Cook pasta gently for about 4 minutes. If making ravioli, reduce heat somewhat and turn pasta carefully to avoid breaking the pillows. Top pasta with butter-walnut sauce and sprinkle with Parm-Romano blend cheese. Serve immediately.
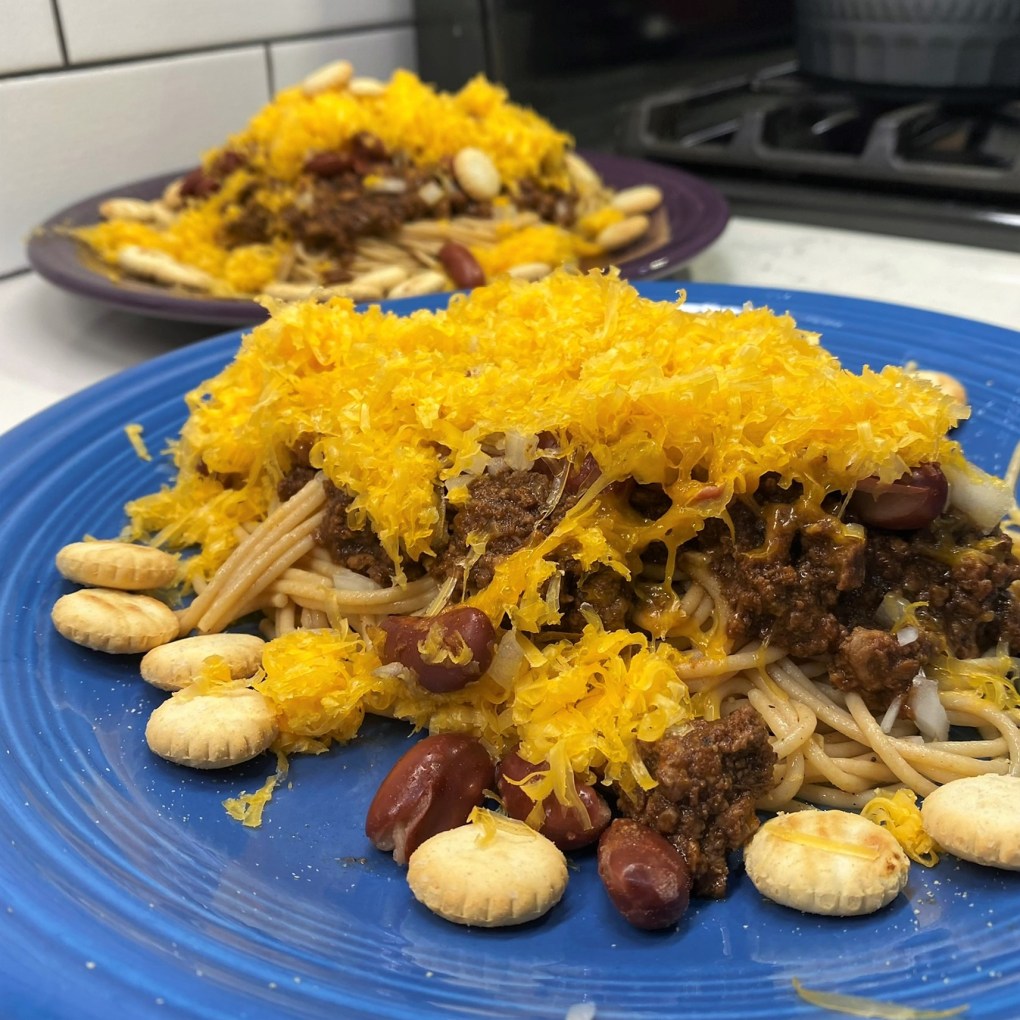
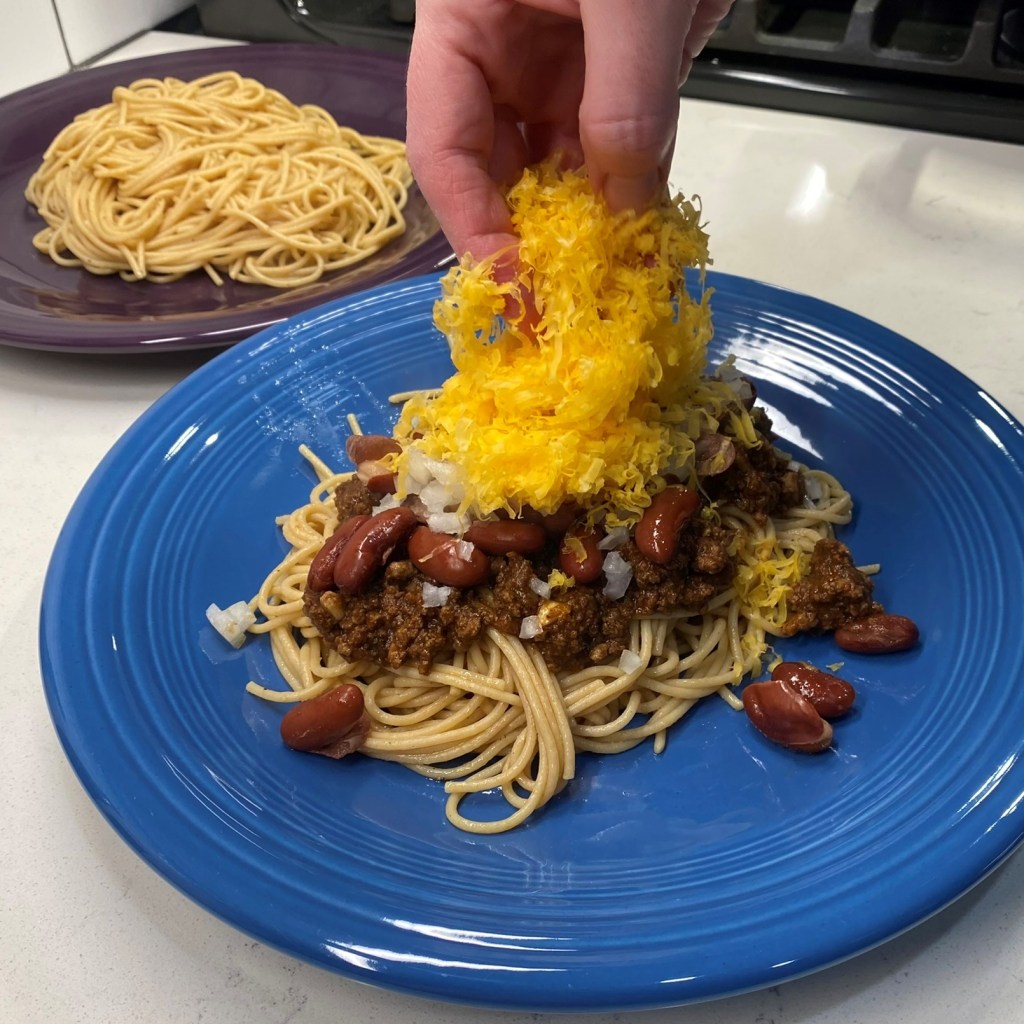
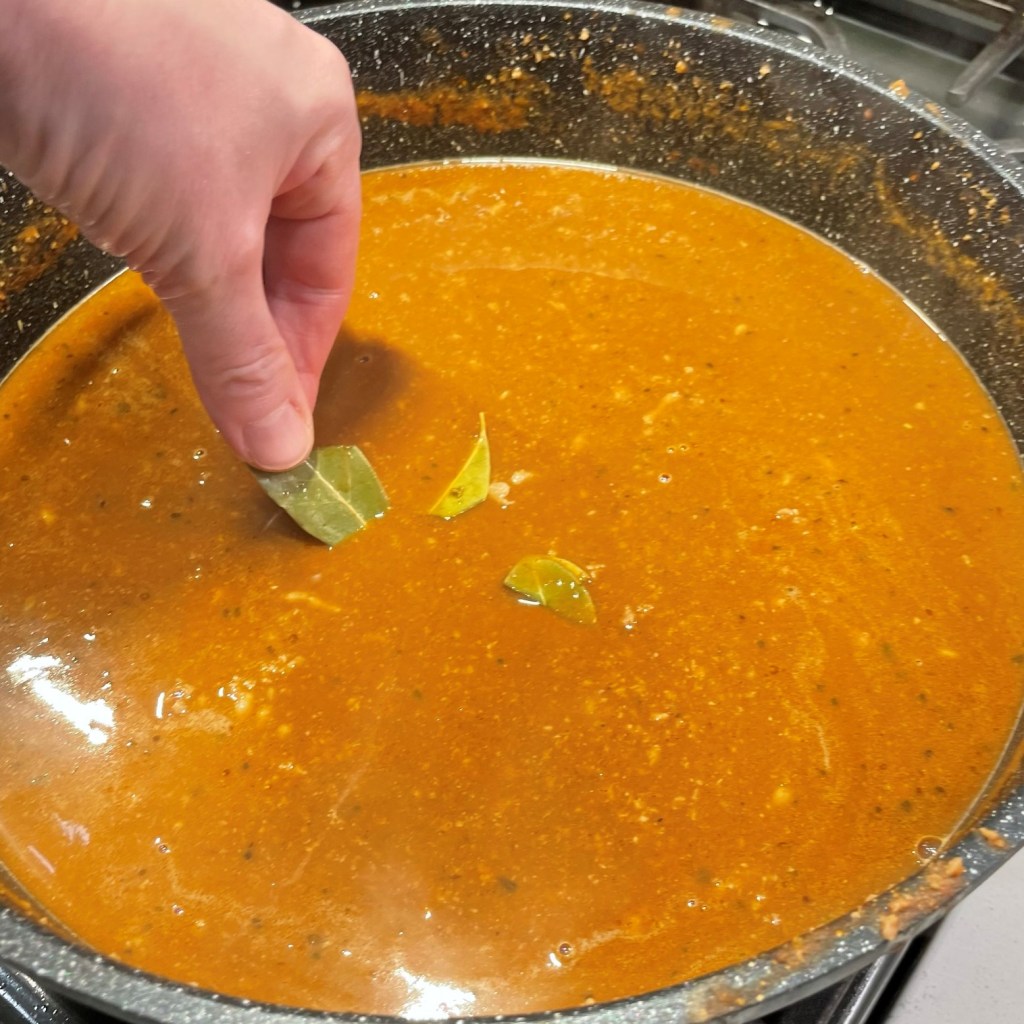
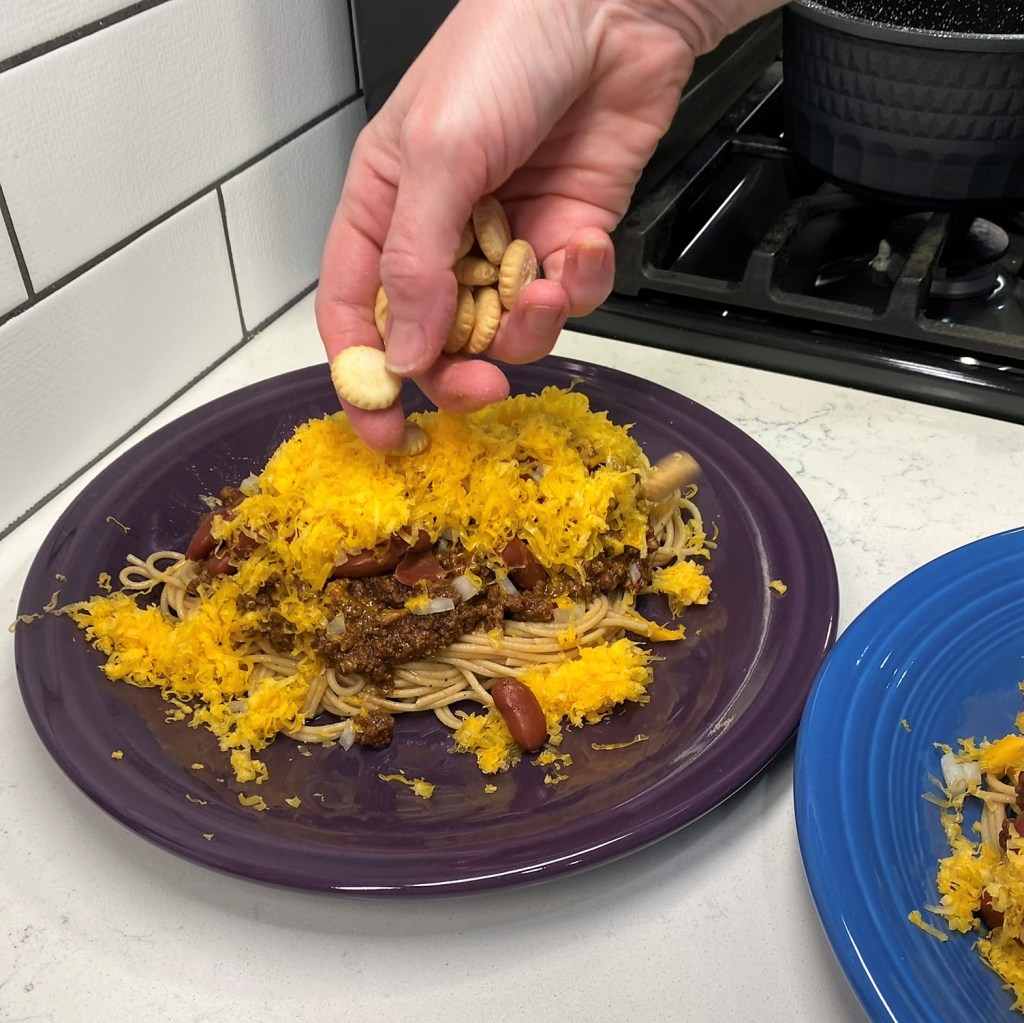
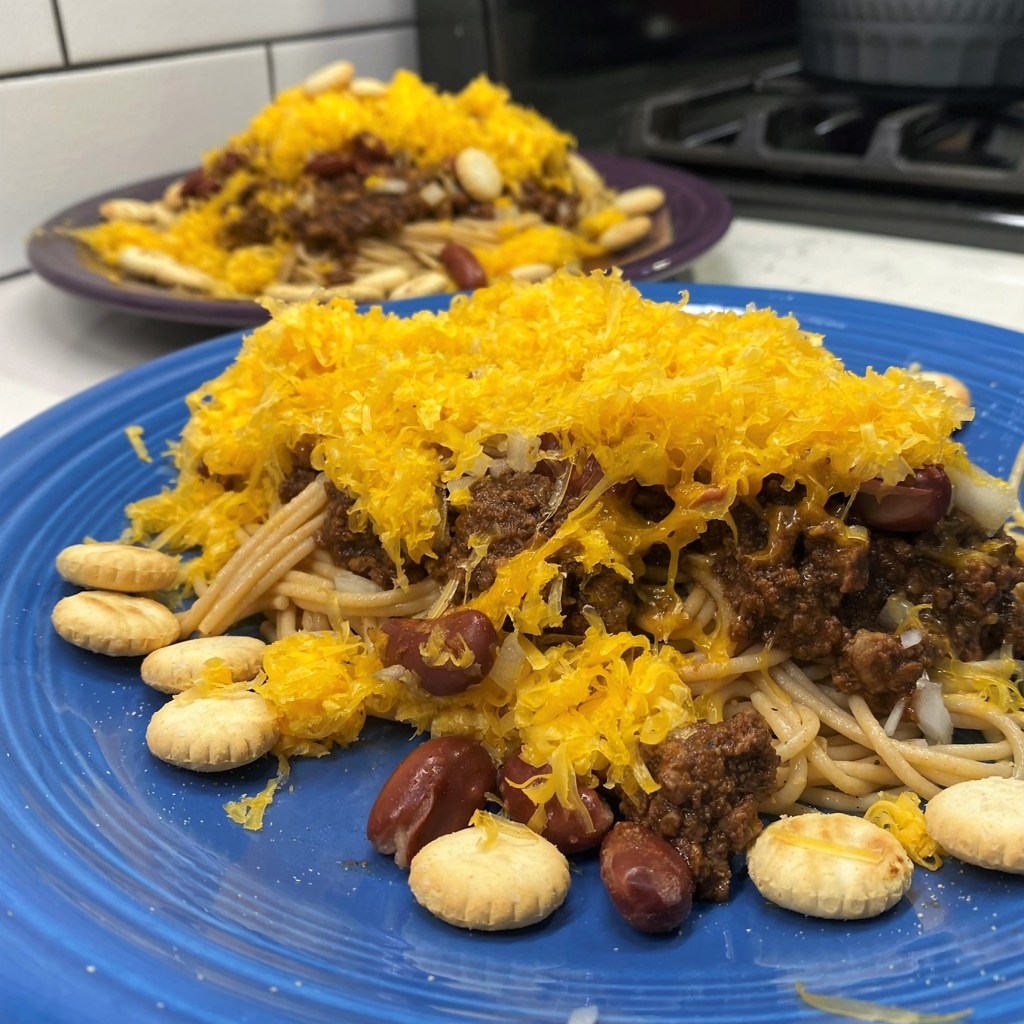
Everything about this recipe is upside-down for me. It defies almost every cooking instinct I live by, except the most important one—it’s delicious! Cincinnati Chili is unlike any other chili you’ve tried. It does not have spicy Mexican or even smoky Tex-Mex flavors, and that’s because its roots are Mediterranean. The cooking begins not with browning meat and onions, but with water and a small amount of tomato juice in the pan. The spices come next, and they are not the ones you would ordinarily associate with chili—including cinnamon, cloves, allspice and bay leaf. The raw meat is simmered directly in the liquid, so it stays very fine-textured (much like my recipe for hot dog chili). And the most noticeable difference is in the presentation—this “chili” is served on a bed of spaghetti and buried under shredded cheddar cheese, and any “way” you like it. Honestly, it doesn’t seem like chili at all.
Top with any of the traditional ingredients. Make it “all the way” with heated kidney beans, onions and fine shredded cheddar cheese.
This tasty dish was born when two brothers settled in Cincinnati, Ohio from their native Greece and opened a restaurant. Their recipe for a hot dog chili topping was seasoned with all the flavors of the Mediterranean, and it was such a hit with the locals, they eventually began serving it as a signature entrée, and “Cincinnati chili” earned its title as the most iconic food of the city.
My first taste of Cincinnati chili did not happen in southwestern Ohio, but in Greensboro, N.C., in a hidden little downtown gem called Cincy’s. It’s a woman-owned business with bragging rights of being the city’s oldest downtown eatery. This out-of-the-way place is only open three hours a day for lunch, and it happens to be a short walk from the radio station where I used to work. Despite the limited hours, Cincy’s was usually jumping, and though it offers a wide variety of sandwiches, wraps and burgers, the restaurant is best known for its namesake, Cincinnati-style chili.
I looked at several “authentic” online recipes for this dish, and especially at the reviews, to see what natives of Cincy—the experts, if you will—had to say in feedback, and that became the basis for my version. This final composition is based on my taste buds’ memory of those downtown lunches from yesteryear.
What I have plated up here is every bit as good as I remember, though I’m sure I’ll have to visit Cincy’s again soon, just to be sure!
Ingredients
2 3/4 cups water
1 cup tomato sauce or strained puree (no chunks!)
1 lb. lean ground meat* (see ingredient notes)
4 cloves fresh garlic, minced
¼ cup red wine vinegar*
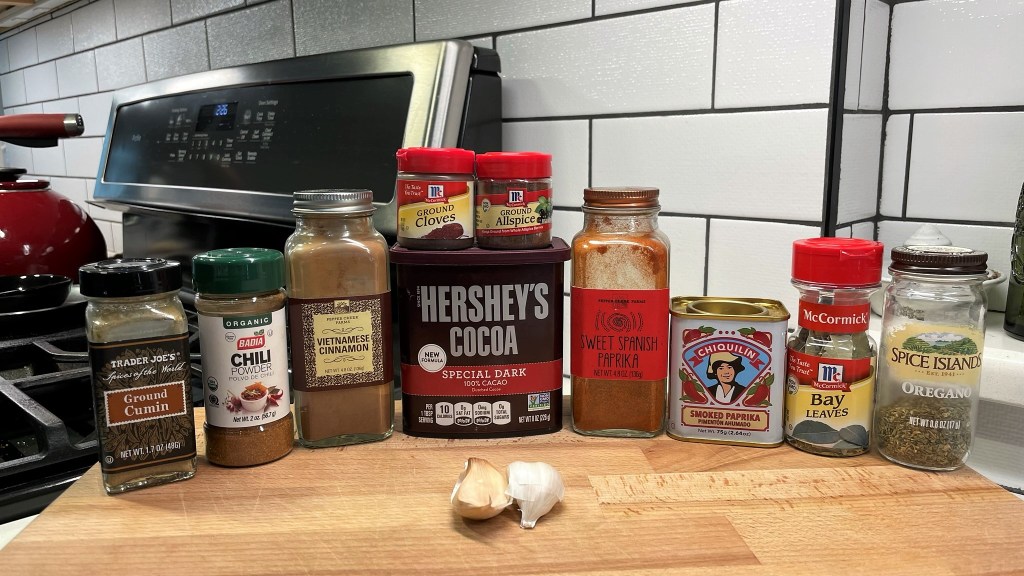
Dry Seasonings:
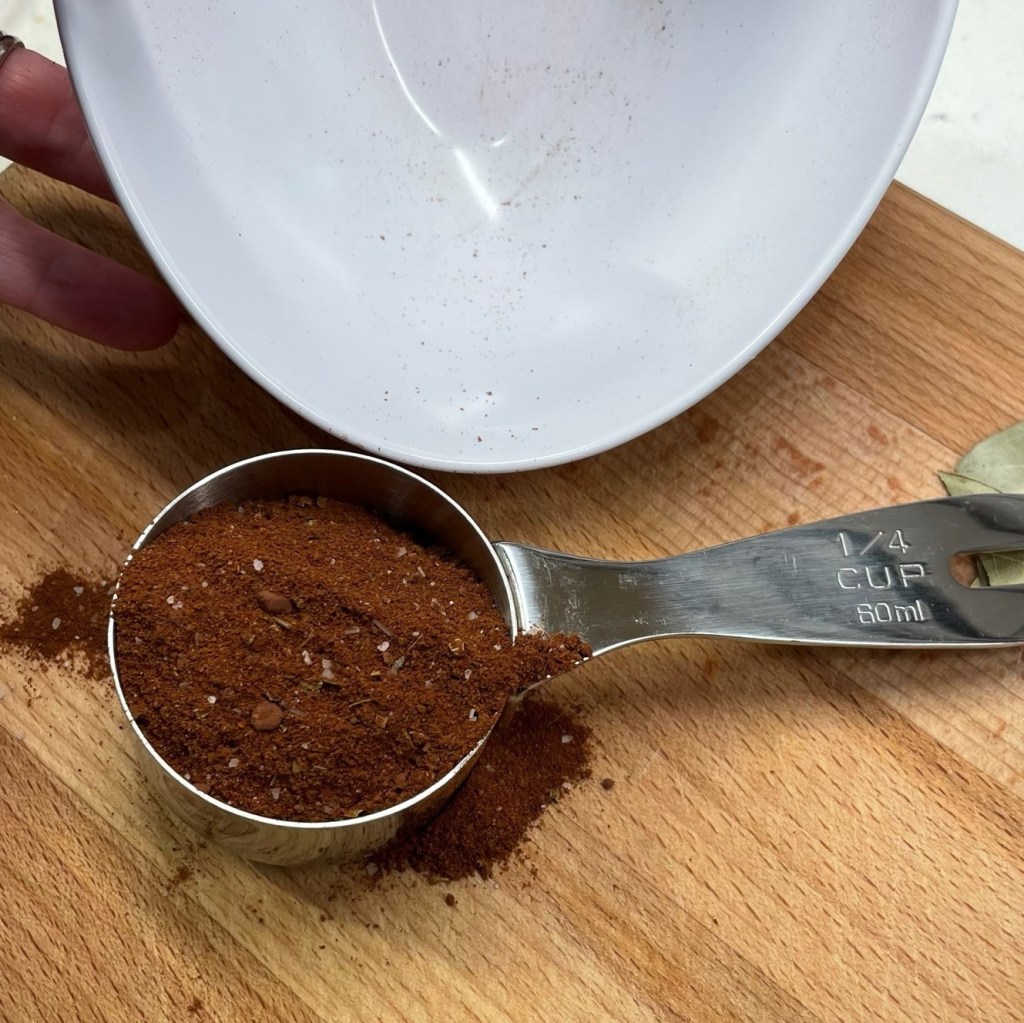
Is there anything from my spice cabinet that ISN’T in this so-called chili?
1 Tbsp. chili powder*
1 ½ tsp. cocoa powder
1 tsp. ground cinnamon
1 tsp. sweet Spanish paprika
1 tsp. smoked paprika*
½ tsp. ground cumin
½ tsp. dried oregano
¼ tsp. ground cloves
¼ tsp. ground allspice
1 tsp. kosher salt (or 3/4 tsp. regular table salt)
Several twists freshly ground black pepper
2 dried bay leaves
For serving:
½ lb. spaghetti (I used whole wheat)
1 can light red kidney beans, rinsed and warmed
½ cup finely minced onion
4 oz. finely shredded cheddar (I used medium sharpness)
Oyster crackers, if desired
*Notes
Any combination of lean (90%) ground beef or turkey works well in this recipe, but for a vegetarian version you could substitute with a combination of cooked lentils and cracked bulgur wheat, as they do at the restaurant where I first enjoyed this dish. Follow the package recommendations for cooking time of those products and add them to the pot at the appropriate time to avoid overcooking them.
Apple cider vinegar would probably work in this recipe as well, but given that the recipe has Mediterranean roots, I used red wine vinegar, which is typical in Greek cuisine.
Chili powder is one of those spice ingredients that is different from one brand to the next. Peek at the label to see whether your chili powder contains salt or any other ingredients you may want to adjust in the overall recipe.
My smoked paprika is a sweet (not hot) variety. The slight smokiness was nice in this dish, but if you don’t have this, you could simply double the amount of regular sweet paprika.
Instructions
My suggestion is to measure out the dry spice ingredients into a bowl before you begin with the rest of the recipe. Mmm, this mix smells amazing!
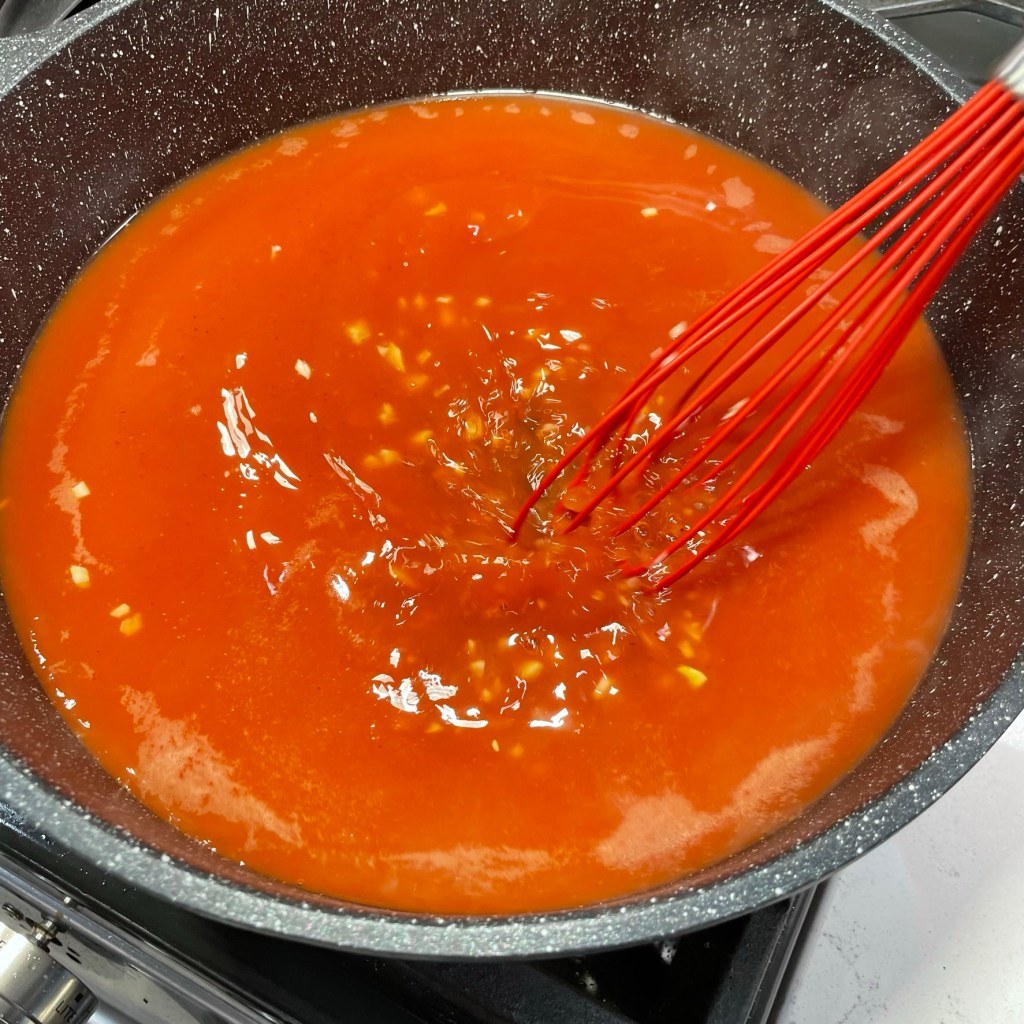
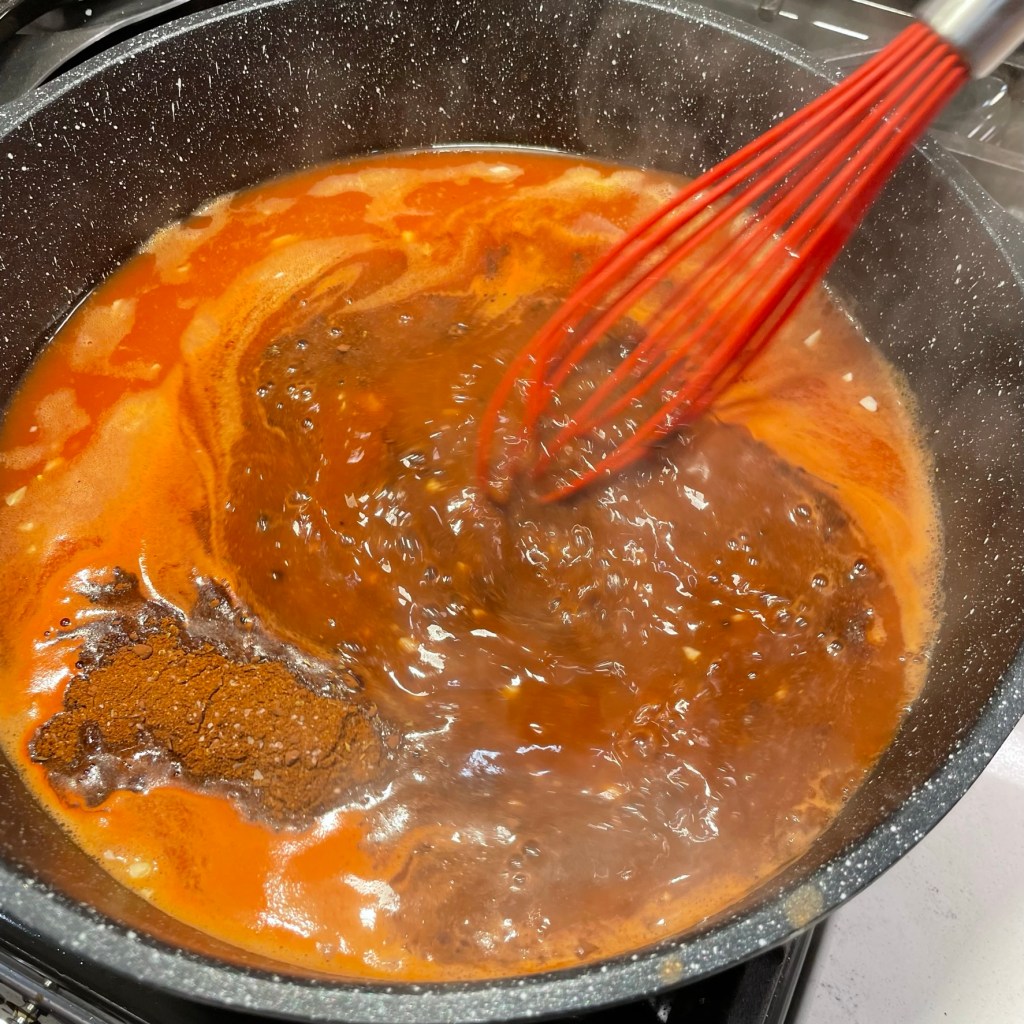
What a strange recipe, that it begins with the water and tomato sauce. But this is how it goes, and the meat cooks IN the water.
A splash of red wine vinegar (or cider vinegar) sets the tone.
I whisked in the garlic next, and it feels so strange to skip sauteing it.
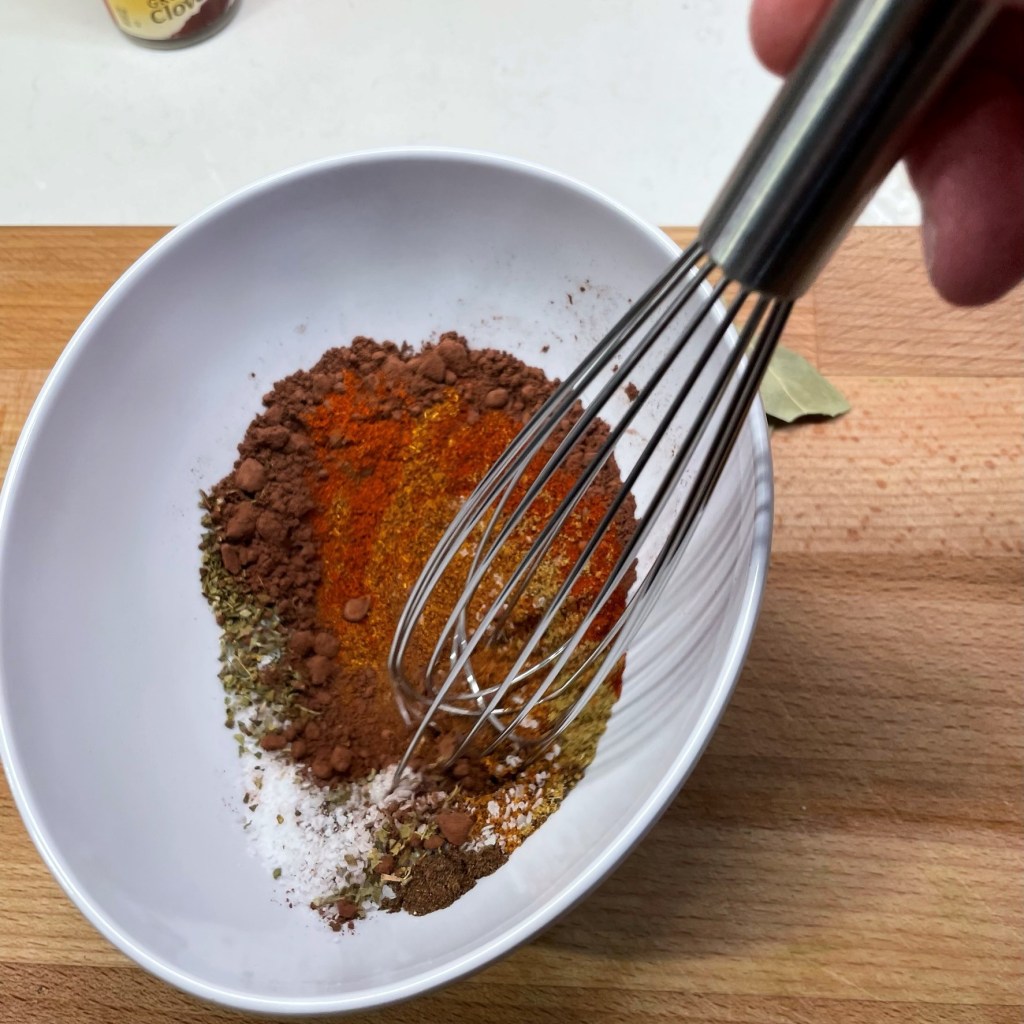
Blending the dry spices together before adding them helps keep them from clumping when they hit the water.
This is almost exactly 1/4 cup total spices for my batch of chili. The flavor will be complex and delicious!
Whisk in the spices as the water begins to heat.
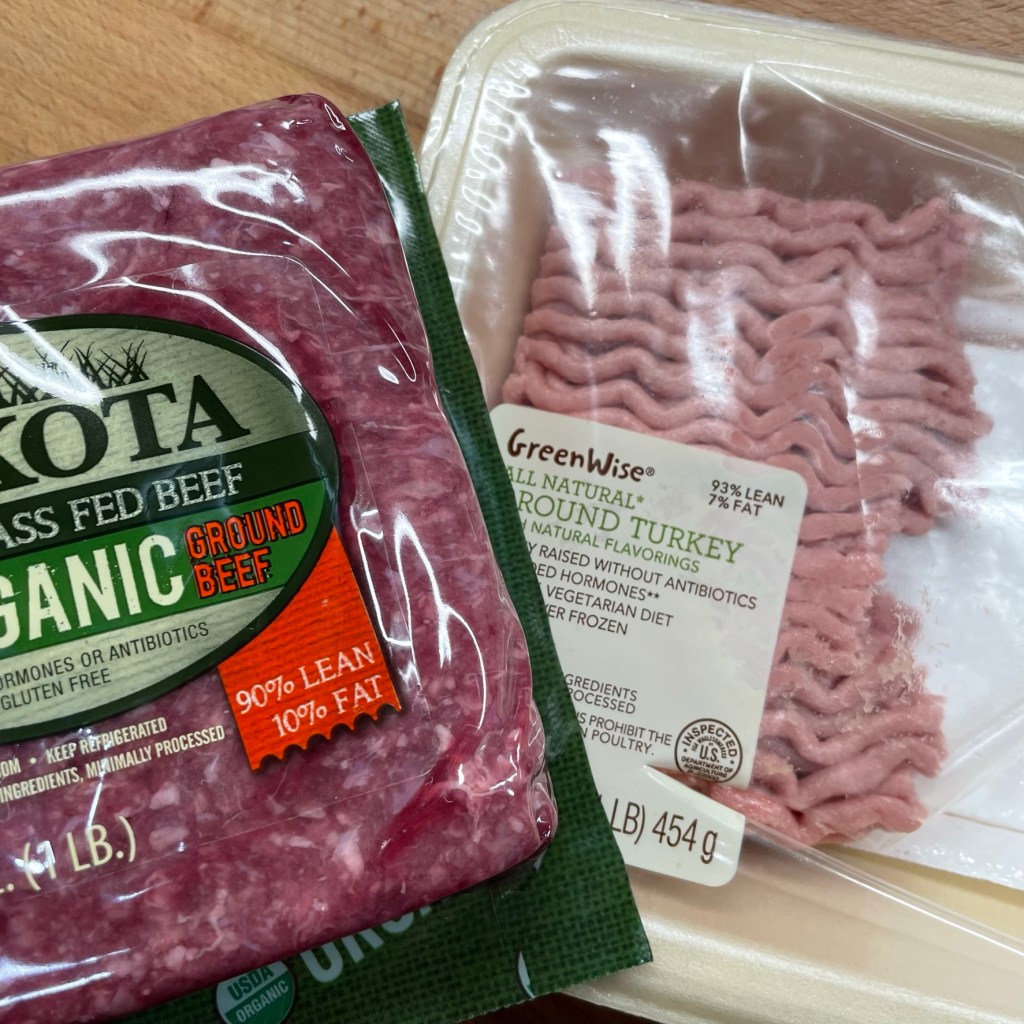
I had a small amount of ground turkey left over from another recipe, so I mixed it with enough ground beef to equal one pound. Whatever meat you choose, stick with at least 90% lean.
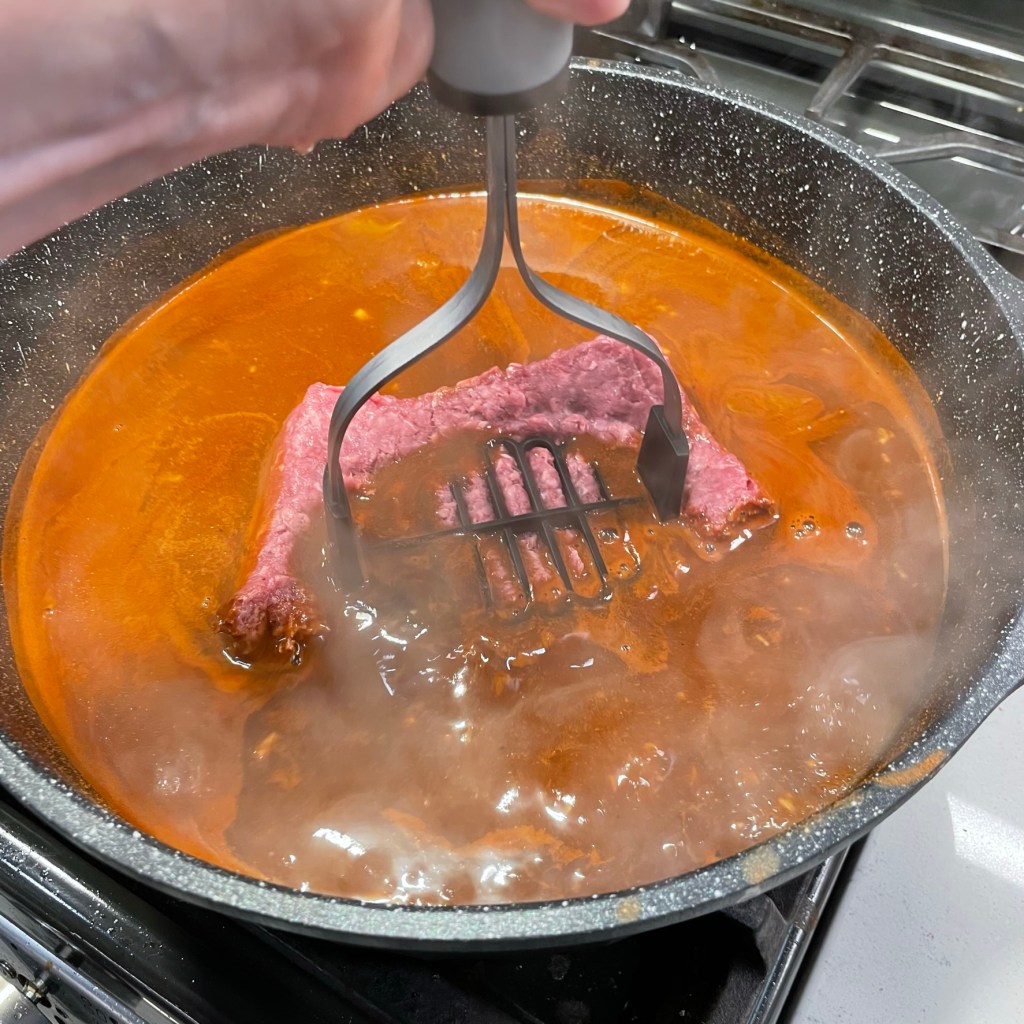
Ideally, the ground meat should be added while the water is still warming up, but I spent too much time taking pictures. I had to use a masher to blend this more quickly.
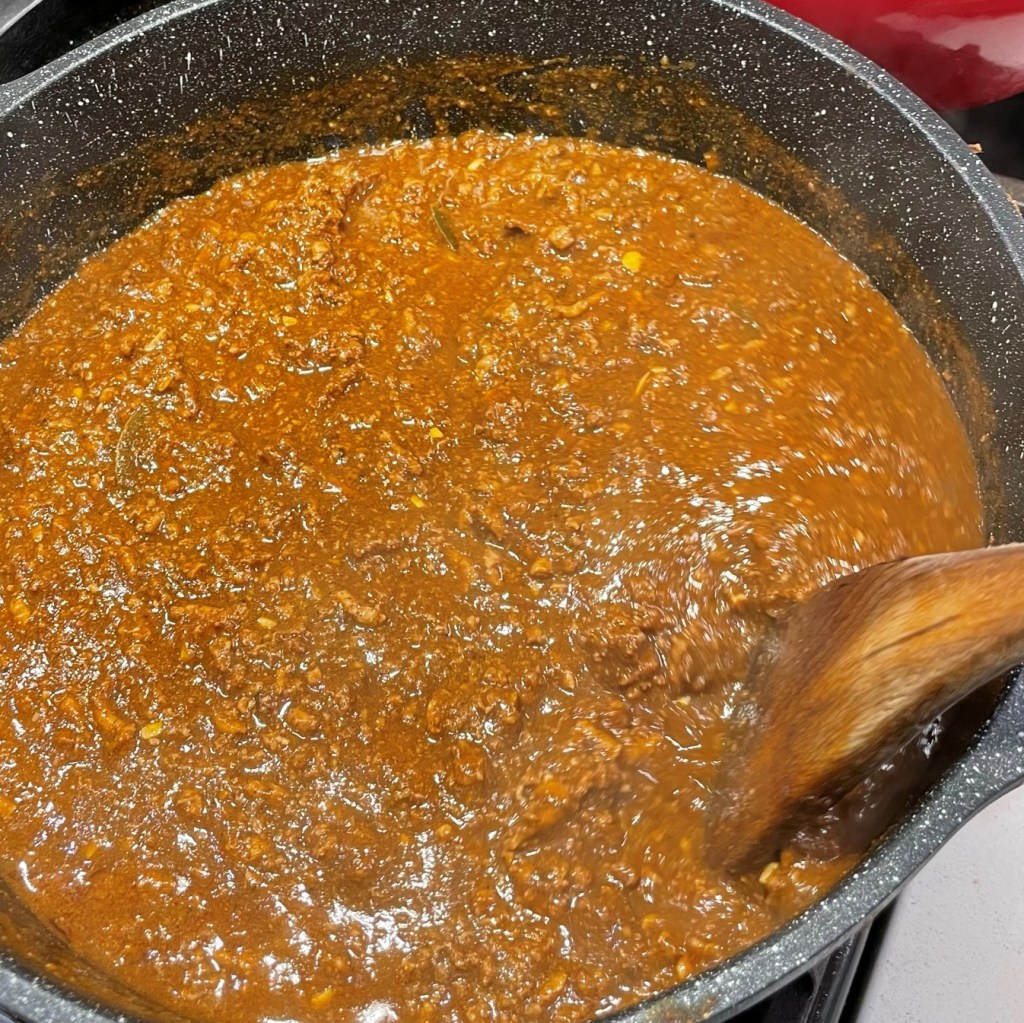
The meat should have a very fine texture as it cooks in the thin, spiced sauce.
Bay leaf adds lovely flavor to any kind of braise.
Finally, after about one hour, the liquid is reduced enough to allow me to see the meat.
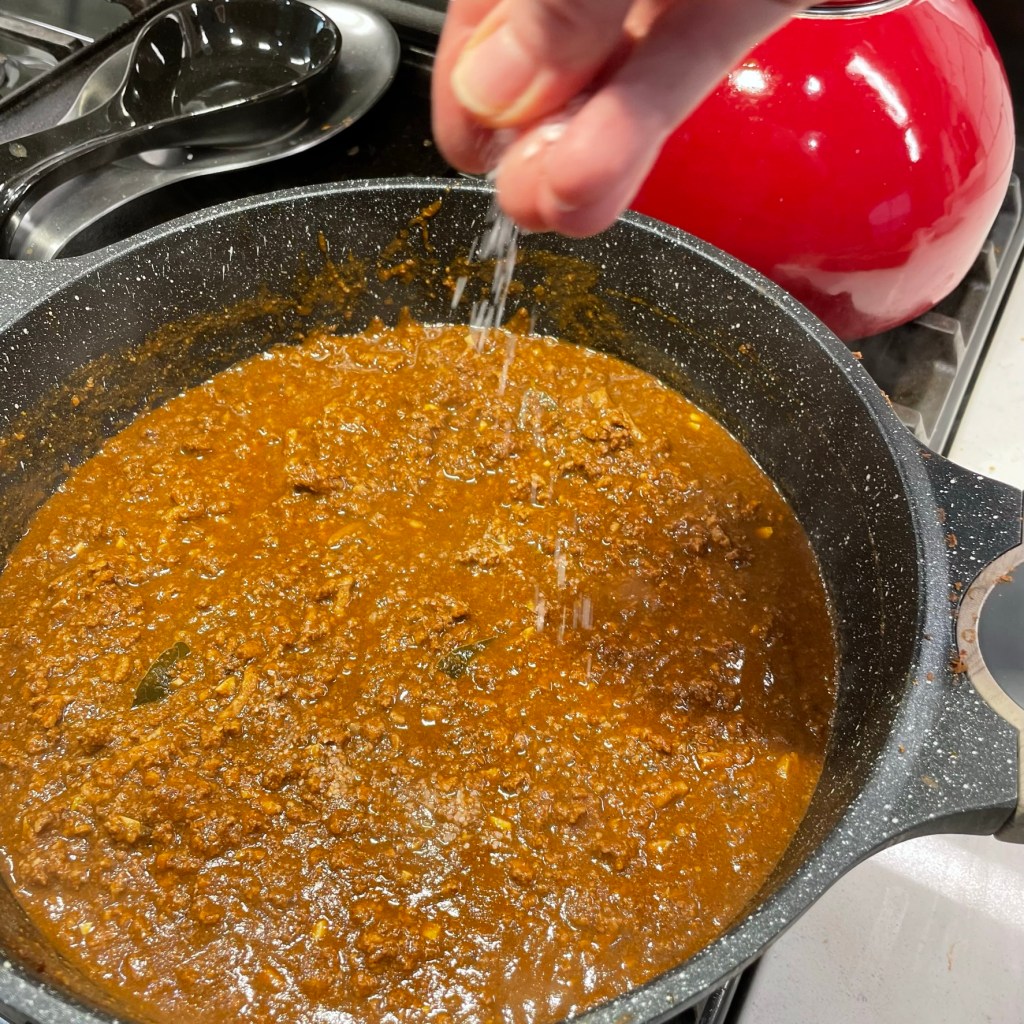
When it reaches this “meat sauce” stage, adjust the salt to your liking.
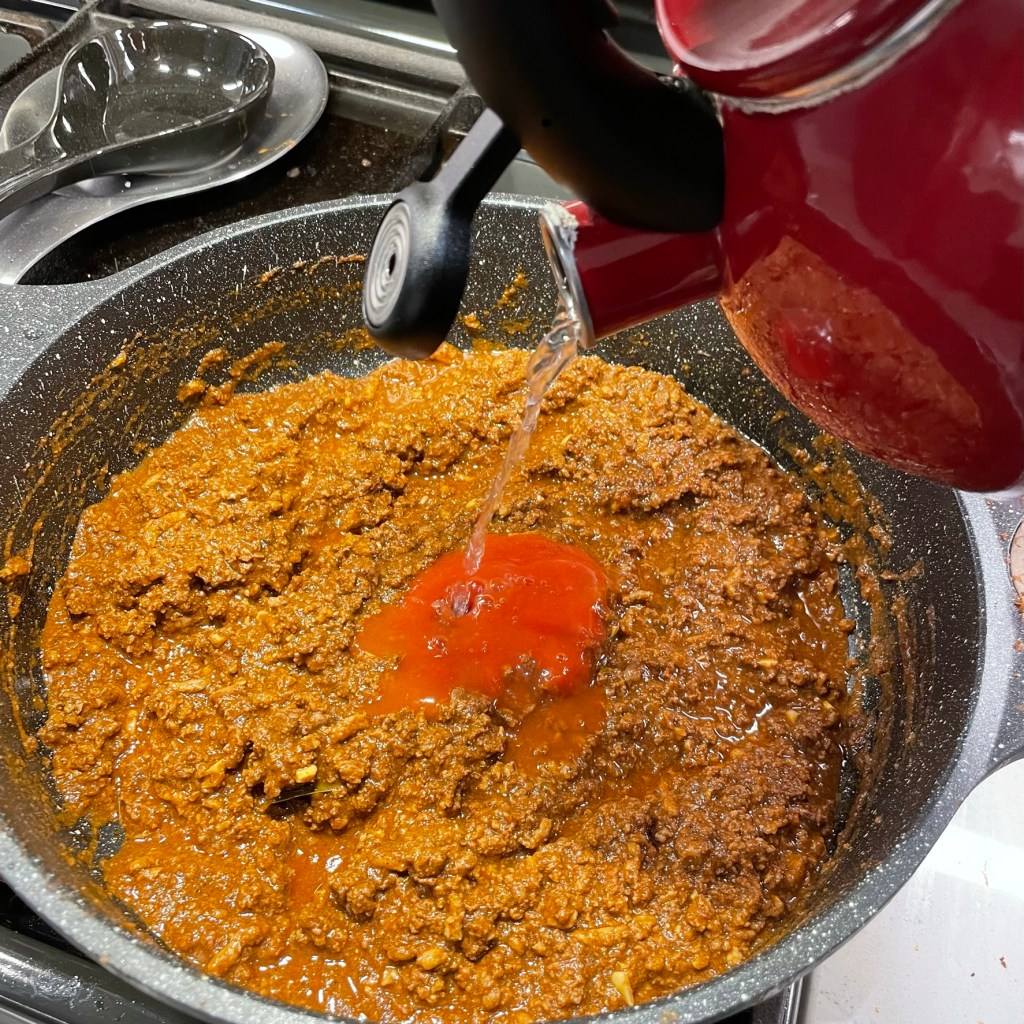
I continued to simmer, which resulted in a drier sauce than I wanted.
No big deal; add a little more tomato sauce and water and heat it through.
Despite my rule to NEVER put oil on your pasta, for this recipe, I am recommending that you drizzle a dab of oil on your spaghetti. This will help prevent sticking.
Top with any of the traditional ingredients. Make it “all the way” with warmed kidney beans, onions and fine shredded cheddar cheese.
At Cincy’s in Greensboro, they serve their Cincinnati chili with oyster crackers. Call me sentimental! 🙂
Combine all the dry seasonings (except bay leaves) in a bowl and set aside.
Combine the water and tomato sauce in a large saucepot, over medium-low heat. Stir in the dry seasonings, garlic and red wine.
Crumble the raw ground meat into the pot and use a utensil or potato masher to break it up as much as possible into a fine texture. Add the bay leaves. Bring the mixture to a low boil, then reduce heat and cover the pot. Simmer, stirring occasionally, until liquid is reduced, and sauce is thick but not dry. Give it at least an hour. Add a bit more tomato sauce and water, as needed, if the sauce has cooked down too much. It should be more meaty than “saucy.”
Cook spaghetti noodles to al dente stage, then drain and immediately toss with a bit of oil or butter to keep the noodles from sticking.
Plate spaghetti and top with meat sauce, plus any of the other toppings you like. Here’s how they break it down, Cincy style:
“2-way” = spaghetti with chili only
“3-way” = with chili and cheese
“4-way” = with chili, cheese and beans OR chili, cheese and onions
“5-way” = with chili, cheese, beans AND onions (the best)!
I used to be a sucker for interesting cookbooks. When my kids were young (and I was always looking for fun things to make that might somehow appeal to them), I bought a collection of recipes bound in a half book, half loose-leaf from a church, featuring members’ faves.
One day, I decided, based on the name and ingredients, that one of those recipes looked safe to try for the kids. It was called “crunchy cheesy beefaroni,” and basically was a home version of hamburger helper. As I recall, the recipe included ground beef, a can of tomato soup, a can of cream of mushroom soup, elbow macaroni, and lots and lots of cheese. In fact, the recipe called for two full 8-ounce blocks of cheddar, one sharp and one medium sharp. The casserole was topped by French-fried onion rings. Hence, the crunchy.
Now my kids loved this concoction, but it had an unfortunate side effect on some in the household. And the kids, who do speak their truth, did some intentional mangling of the name when they asked for it again. They asked for “crunchy cheesy fartaroni.” It was a big laugh at the time.
Time marches on. My son now lives in Budapest. My daughter is a vegan and wouldn’t touch this stuff with a ten-foot pole.
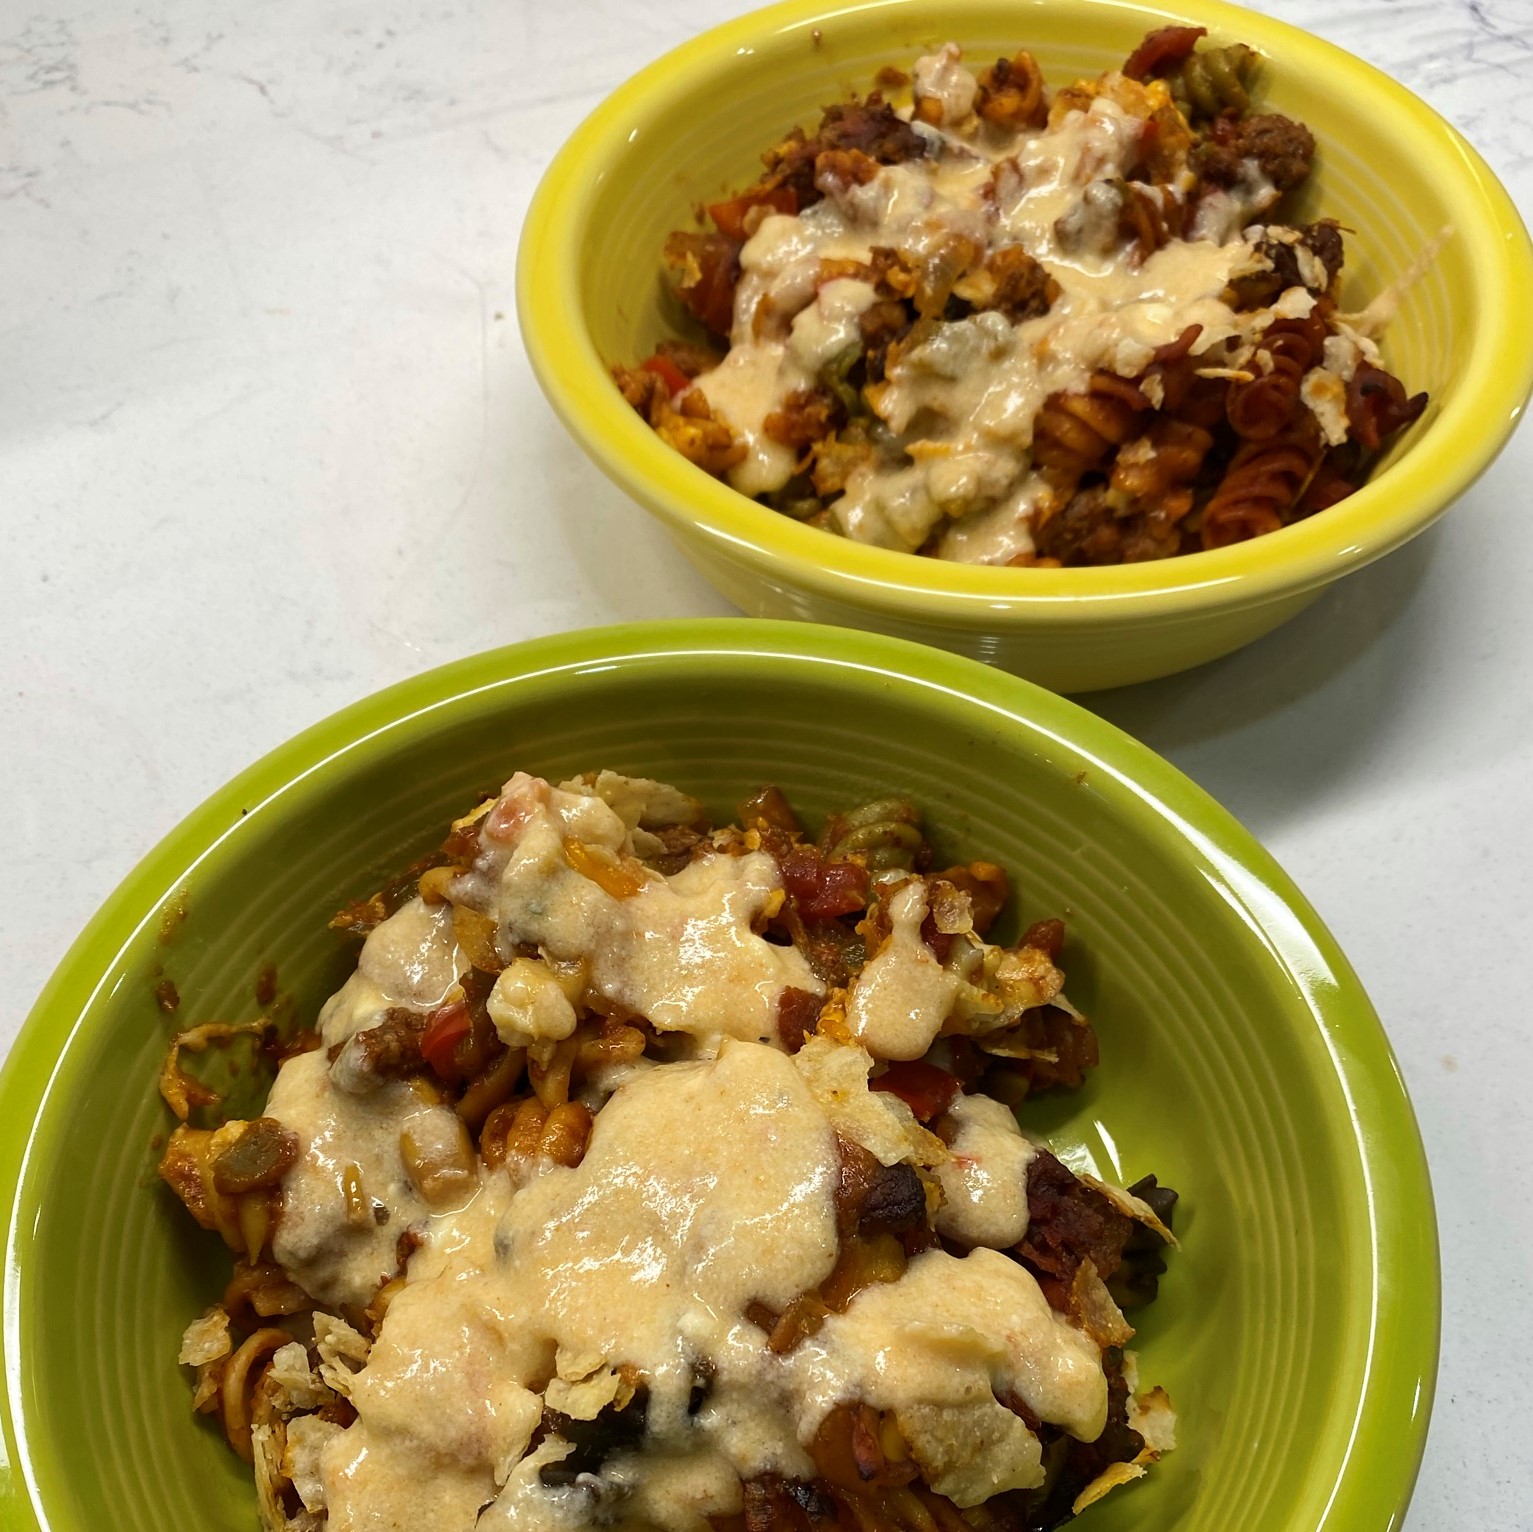
A meaty, cheesy casserole never disappoints.
I hadn’t made it in many years, but from the time I shared the story of this legendary dish with Terrie, she wanted me to go for it. This even though Terrie typically recoils at the mention of Campbell’s condensed soups, and any of the other ingredients with decidedly “GMO” and other non-organic leanings. However, in our household, I have learned that everything has a substitute, and this dish can, indeed, be made in a “clean” fashion. More than a year ago, I made it for Terrie for the first time, using some leftover shaved steak meat from another dish, as well as incorporating previously made mac and cheese. I threw in some organic mushroom soup and some organic diced tomatoes, and the 2020s version tasted great and met Terrie’s environmental and food-quality standards.
With the kitchen renovation still rendering our kitchen in a largely “not-ready-for prime time” state, we’ve been looking for some filler meals. On a recent weekend while Terrie was under the weather, I decided to take on the cooking duties and try the beefaroni again, this time with a southwest spin.
I’m pleased to say that southwest crunchy cheesy “fartaroni” worked out great. A bowl of protein, veggies and carbs with flavor, kick and comfort.
Ingredients
1 pound ground beef, 85% lean* (see notes)
1 12-ounce box of Barilla veggie pasta rotini*
Half a medium yellow onion, diced
Half a red and half a green bell pepper, diced
1 small can of chopped green chilis
1 can of Rotel diced tomatoes*
1 6-ounce can of tomato paste
½ packet Frontera skillet sauce with chipotle and lime*
8 ounces colby-jack cheese, cubed or shredded
2 ounces habanero cheddar*
Tortilla chips
Salt
Pepper
Onion powder
Ingredients for Cheese Sauce
Terrie suggested the cheese sauce, with a thin bechamel base, as a topping for the casserole because it seemed dry after its 45 minutes in the oven. This version had no soup! And who am I to argue against more cheese? Or against anything Terrie suggests in the kitchen (OK, Terrie, I can see the look on your face already).
2 Tbsp. unsalted butter
2 Tbsp. all-purpose flour
1 cup of milk*
8 ounces of sharp cheddar, cubed or shredded*
1 ounce habanero cheddar*
3 ounces cream cheese*
3 to 4 Tbsp. salsa*
Notes
One of Terrie’s standards is that in our household, we eat only grass-fed beef, and that’s what I used for this. Any ground meat with similar fat content would work.
We like the veggie pasta for a healthier option, so I used rotini, as I couldn’t find a veggie version of elbow macaroni, which was part of the original recipe. Rotini worked great and offered plenty of texture.
I used Rotel’s Mexican-style version with lime juice and cilantro. If you want to seriously kick up the heat in the dish, try the hot diced tomatoes or the diced tomatoes with serrano peppers.
The Frontera skillet sauce was the same thing I used to flavor the ground meat in my thick and hearty chili recipe. Look for it in the grocery section where you’d find packets of seasonings.
The habanero cheddar is a Trader Joe’s product, and it packs some major heat. You can use other cheeses to add variety to the cheese sauce; notice I only used 10 ounces total cheese, well below what the original recipe called for. The dish is plenty cheesy, even before the cheese sauce.
You might use a little more or a little less milk depending on your preferred thickness of cheese sauce.
Terrie also noted that, especially for queso-style sauces, American cheese provides a smooth base, but I had no American on hand for this meal, so I settled for what was left in the fridge, plus a little cream cheese (another Terrie suggestion). And I supplemented with another small dose of the habanero cheddar for heat.
Any salsa will do, but pick what you like for your heat preference, keeping in mind everything else you’ve put in the dish.
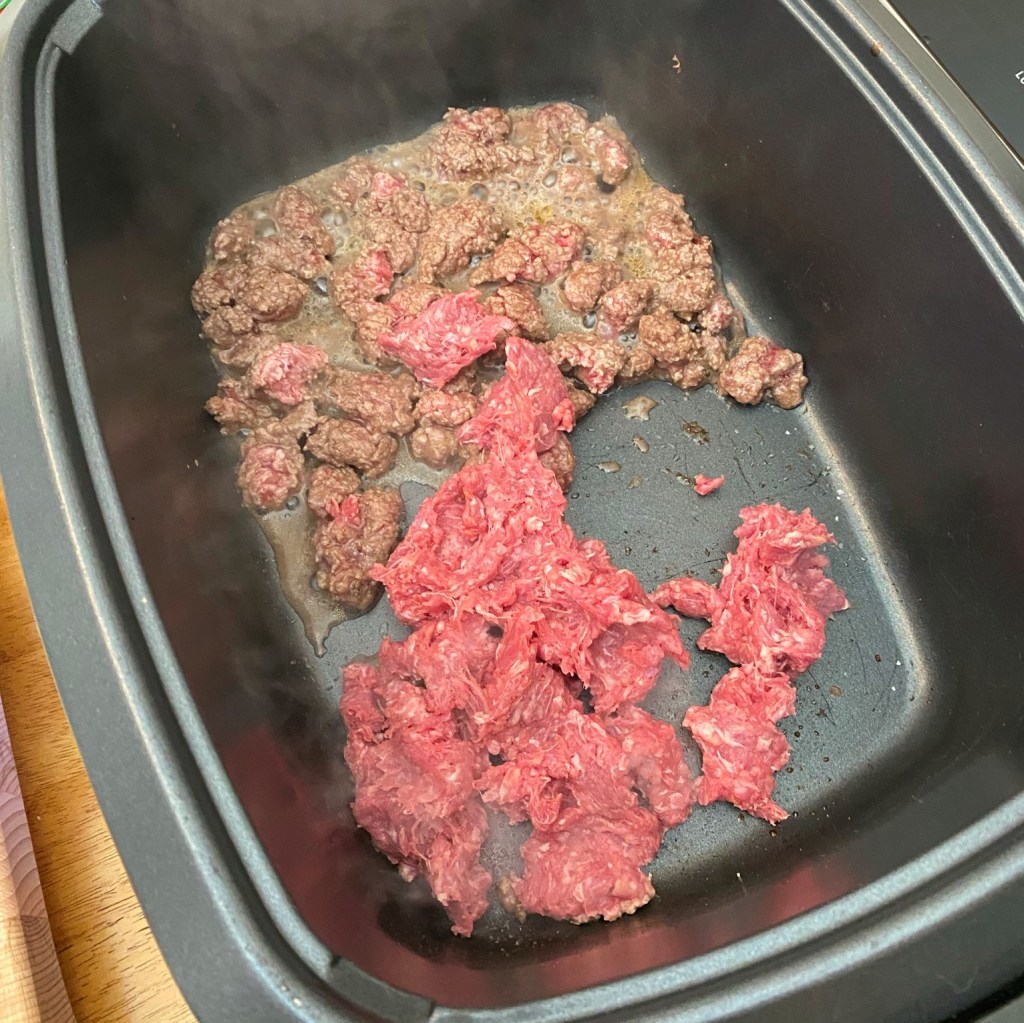
Brown the ground beef in batches, then transfer it to a separate bowl.
Saute the vegetables in the cooker until they are slightly softened. Return the beef to the cooker before adding the other ingredients.
Cheese, glorious cheese! You could use shredded cheese, but I like the chunky cubes.
Cook the pasta to al dente stage, then add it to the meat mixture.
Layer the meat mixture with the cubes of cheese, then top it with the crushed tortilla chips.
Baking the casserole leaves the cheese very melty and the tortilla chips on top nice and crunchy.
A simple cheese sauce brings a slightly dry casserole back to life. Plus, it’s more cheese!
I used our multi-function slow cooker for the heavy lifting in putting together this casserole. I browned the ground beef in it, seasoning with salt and pepper and then mixing in the Frontera skillet sauce. I removed the ground beef and sauteed the onions and peppers, then returned the beef to the slow cooker, which I set to slow cook. I then added the diced tomatoes and chopped green chiles, as well as the tomato paste, using a little less than 2 chile cans of water (10 ounces) to thin the mixture.
I’d already had salted water boiling and added the rotini, draining it when it reached al dente state. I also used this period to cube up the cheese. I added the drained rotini to the slow cooker and mixed it all up.
I pre-heated our oven (which we could finally access, though the kitchen was not completely ready) to 350° F and sprayed a 9-by-13 casserole dish. Then, I doled out about half of the pasta/beef/vegetable mixture into the casserole and topped it with about half the cheese. Repeat with the rest of the mixture and cheese. Then crush up some tortilla chips until they are small and sprinkle over the entire casserole and place into the oven for 40 to 45 minutes, depending on how your oven heats.
While the casserole is baking, prepare the cheese sauce. I did this using our induction burner by creating a roux with the butter and flour. Once the roux is yellow or golden, add the milk and keep stirring. Once it thickens and appears creamier, begin blending in the cheese, stirring until smooth and adding the onion powder to offer a little seasoning. Finally, add the salsa, which should give the mixture a more orange-reddish look.
The casserole is ready when you can see the cheese bubbling; you may need to cover the casserole with foil about halfway through cooking if it appears to be dry on top. Serve in a bowl and spoon the cheese sauce over the top.
A simple cheese sauce brings a slightly dry casserole back to life. Plus, it’s more cheese!
It does not seem possible that we are already heading into Labor Day weekend, the U.S. holiday that was established in 1894 to honor all the hard-working people whose efforts built social and economic strength for our country. But here we are, days away from the first Monday in September, and for most of us, that means an end-of-summer cookout, or at least some time in the great (hot) outdoors.
I promised a couple of weeks ago to present a few new ideas for easy salads that are perfect for backyard gatherings—I shared the tangy apple cole slaw, which brings a bit of tart fruit to the usual cabbage-and-carrots mix, and the tzatziki potato salad, leaning on the zesty flavors of a popular Greek condiment to bring some zip into one of our favorite summer sides.
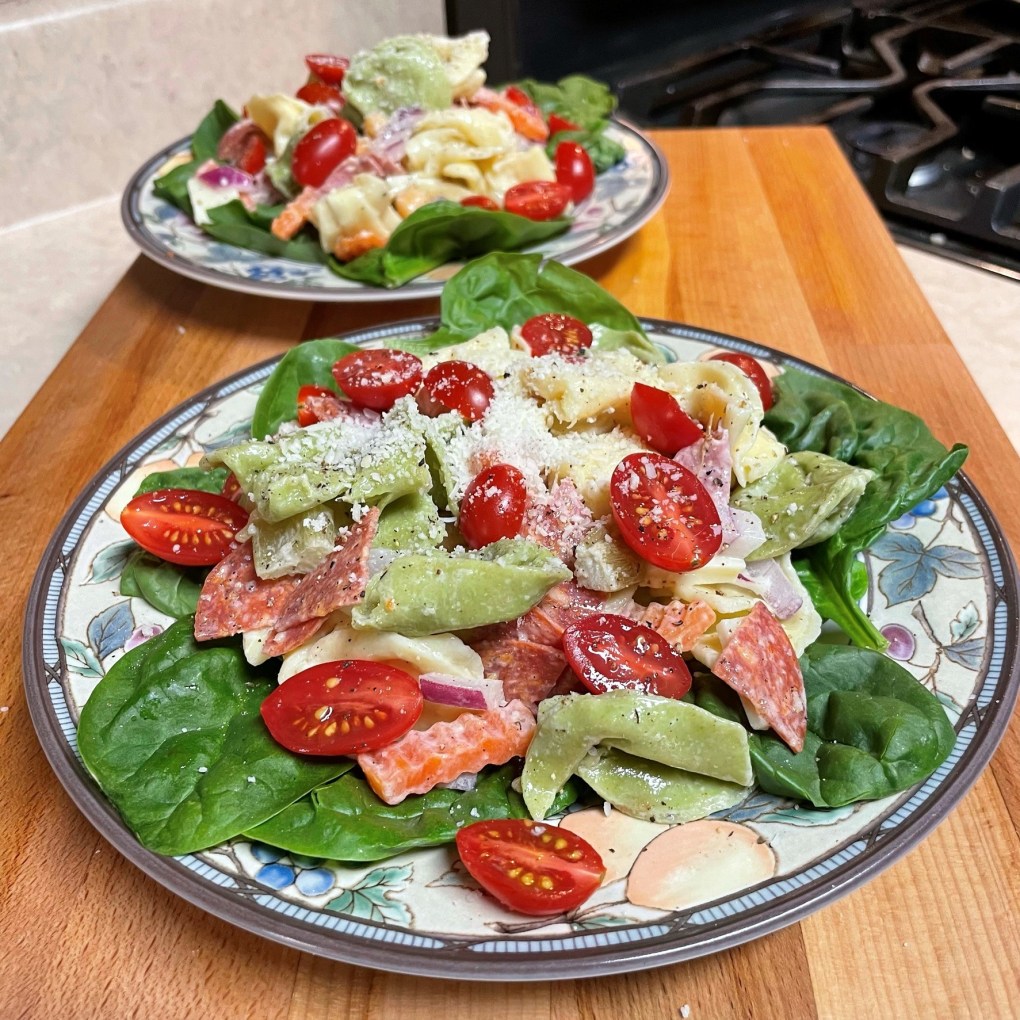
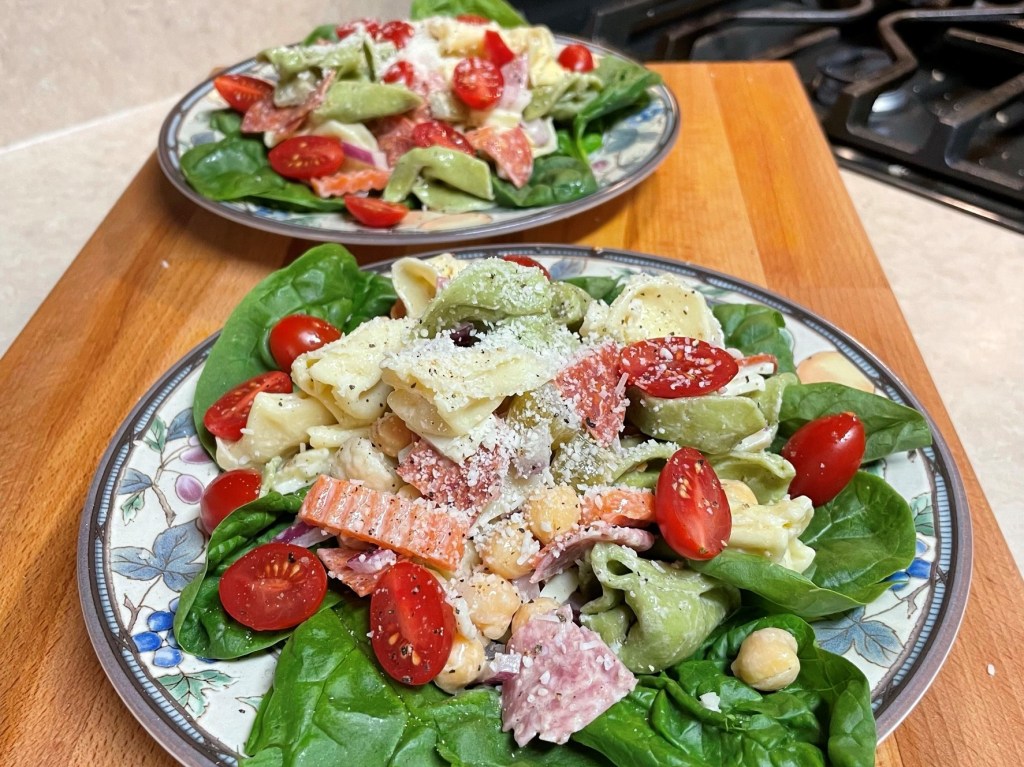
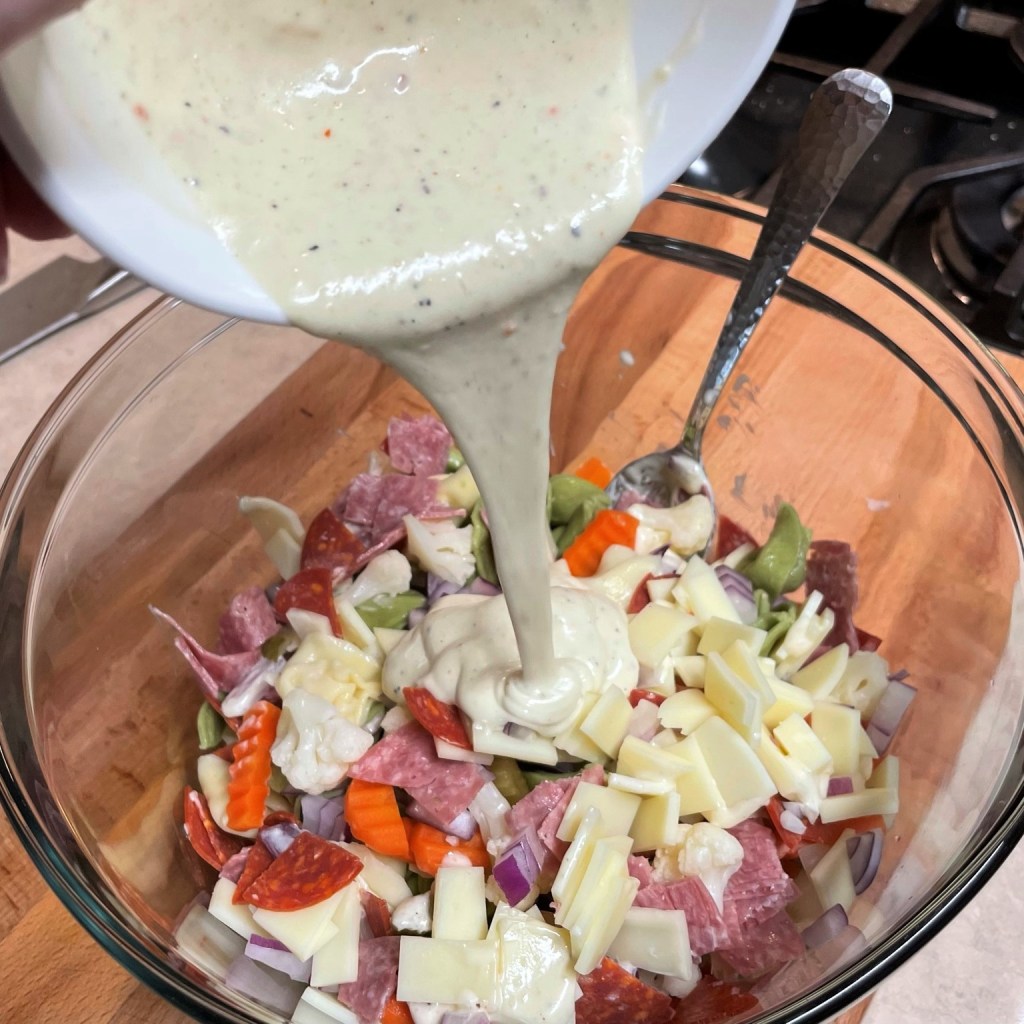
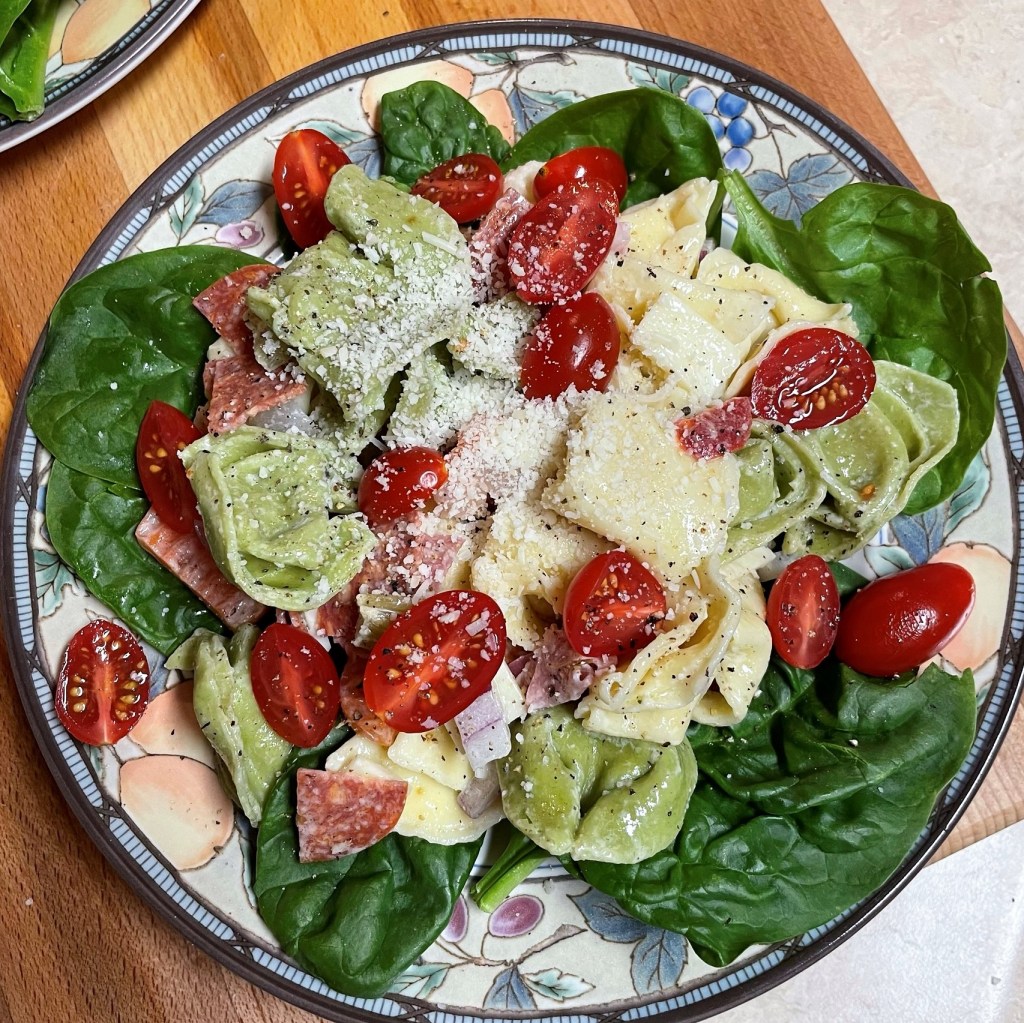
To make good on my promise for a twist on pasta salad, I let my imagination run wild through an Italian deli case and all the salty, meaty, cheesy flavors one might find there. Initially, I had planned to use a basic pasta shape, such as penne or rotini, but I stepped it up and used cheese-stuffed tortellini instead. The result is this hearty, satisfying salad that could be a side dish (if you have the discipline to only scoop out a little bit of it), but we found it perfectly filling as a cool dinner salad, served up on a bed of fresh baby spinach and topped with halved grape tomatoes.
Since the time that I made this hearty salad, I have had the pleasure of visiting a real Italian deli, so I expect that my next version of this salad might hold a few additional flavors, but this was a good, flavorful start. 🙂
Mangia!
A small scoop of this salad would be a good side, but a large scoop on a bed of baby spinach was hearty enough for dinner!
Ingredients
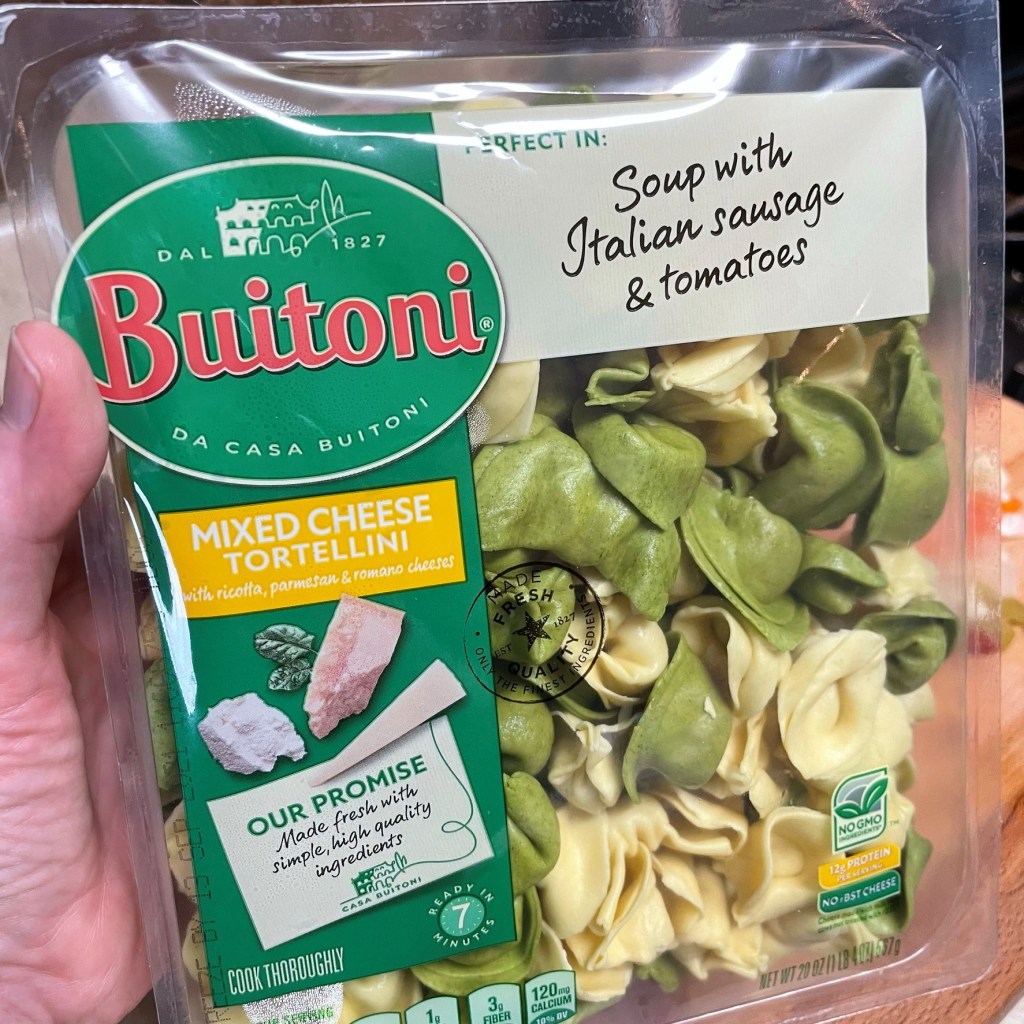
1/2 package fresh cheese-filled tortellini* (see notes)
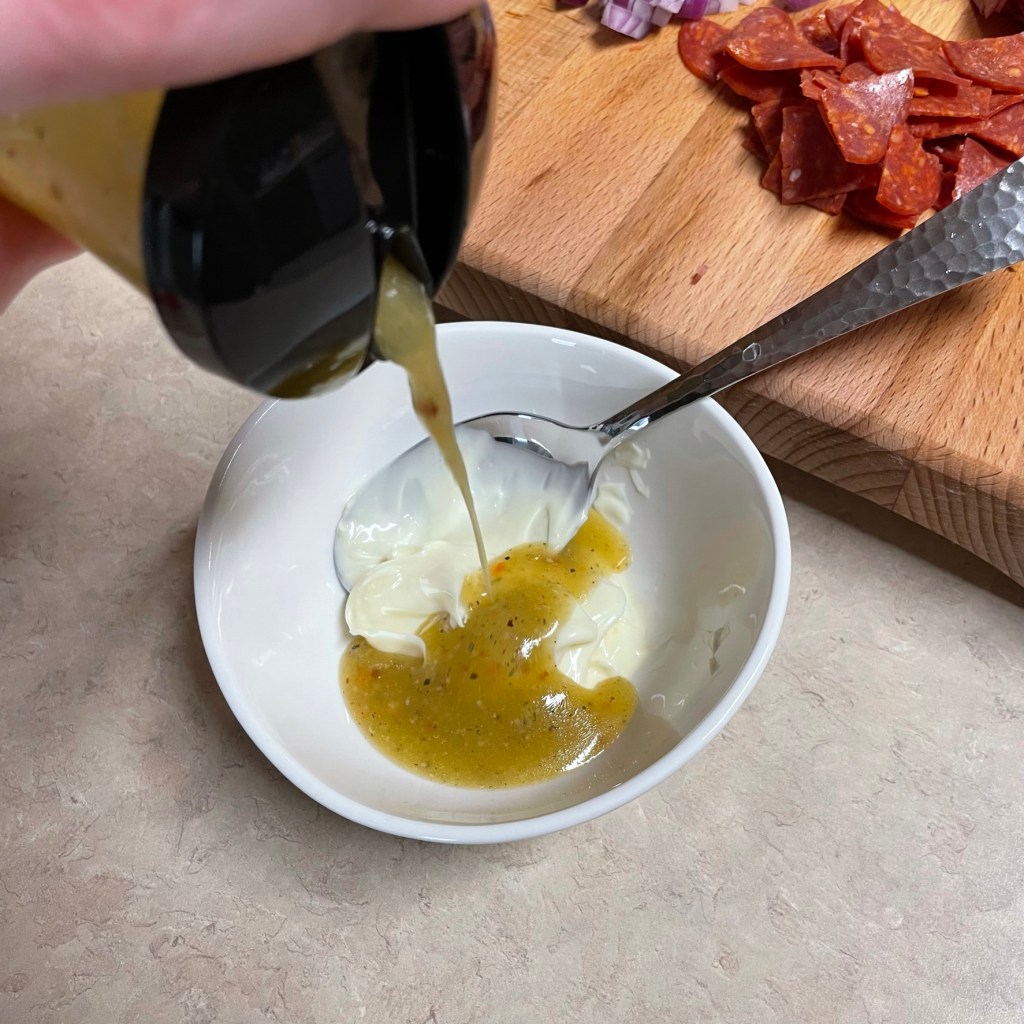
2 Tbsp. mayonnaise (optional, see notes)
4 Tbsp. prepared Italian vinegar-and-oil dressing (I used Good Seasons)
Several slices provolone cheese, cut into bite-sized pieces
Several slices uncured Italian salami, cut into bite-sized pieces
Several slices uncured pepperoni, cut into bite-sized pieces
About 1 cup giardiniera vegetables*, drained well and chopped
1/2 can garbanzo (ceci) beans, drained
Handful of fresh grape tomatoes, halved
Fresh baby spinach, for plating
*Notes
I used Buitoni fresh pasta, the kind you find in the refrigerated case near the ricotta cheese. Frozen tortellini would probably work well, too. Or you could go crazy and make it from scratch! If you want a lighter salad, substitute about half a box of penne or rotini pasta.
If you prefer a dressing that is not creamy, skip the mayonnaise and increase the Italian dressing by a tablespoon or two.
This was one of those times that I thought a store-bought ingredient would be “just as good” as a homemade one, but this giardiniera does not hold a candle to the one I make myself. Before fall officially begins, I promise I will share that recipe!
I used half of this 20 oz. package of tortellini. The rest will be wonderful in a soup.
This salad would work with Italian dressing on its own, but I wanted a creamier version, so I mixed it with a couple of tablespoons of mayonnaise.
My supermarket only had a mild version of these Italian pickled vegetables, but spicy would be delicious.
Instructions
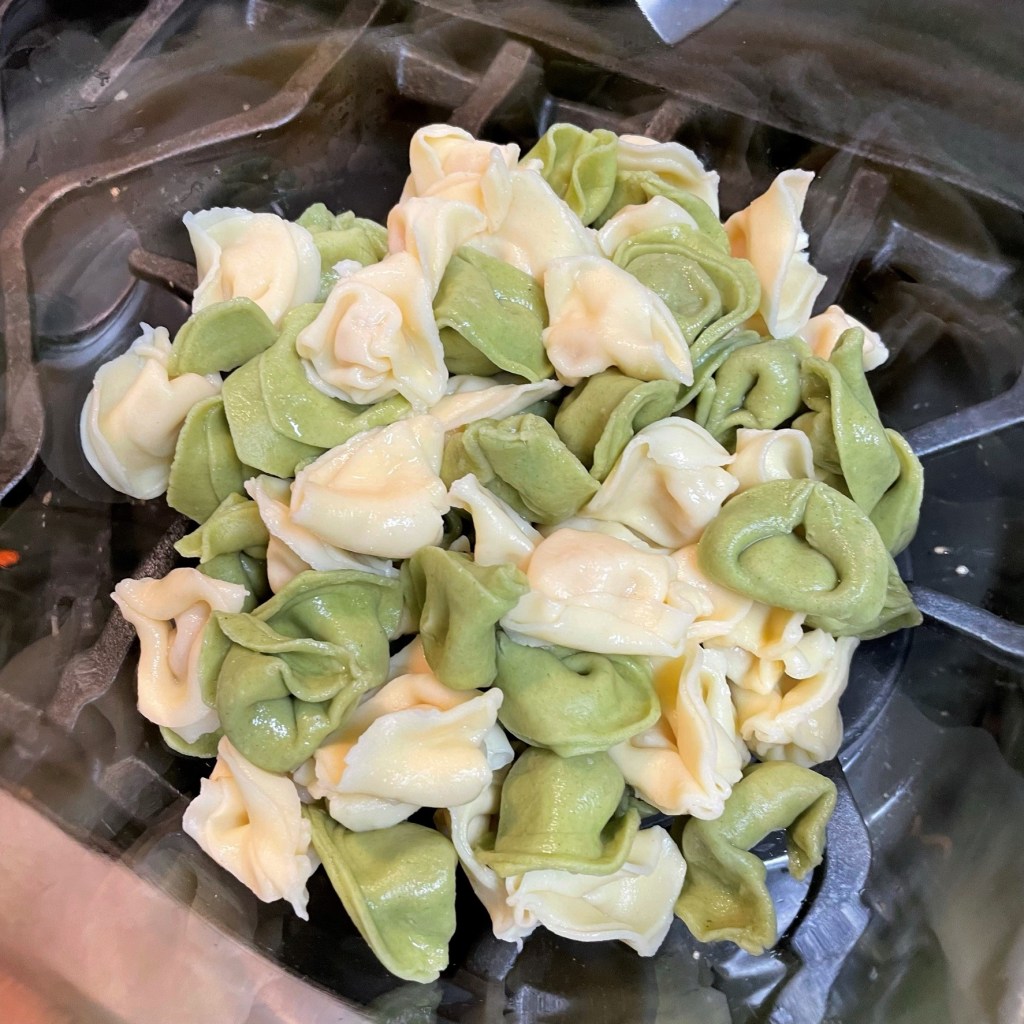
Cook the tortellini until just tender, then plunge them into ice water to abruptly stop the cooking. Drain it really well.
It’s easy to see why this salad was so hearty, with provolone cheese, giardiniera, salami, pepperoni and red onions.
Pour the Italian dressing over the salad ingredients and use a rubber spatula to gently fold the mix together.
I thought at first that I’d made the dressing too creamy, but the mayonnaise was absorbed pretty quickly into the tortellini.
Cook the fresh tortellini according to package instructions, stopping just shy of tender. Drain it, and then immediately transfer the cooked pillows to a bowl filled with ice water to halt the cooking. Drain completely, and if you have enough time, chill the pasta by itself for an hour or two before adding the other salad ingredients.
Prep all the other ingredients, along with anything else you think belongs in an Italian deli pasta salad. Be sure to drain any ingredients that are packed in water.
Combine mayonnaise and Italian dressing until smooth.
Toss the add-ins into the bowl with the cooked, chilled tortellini. Pour the dressing over the mix and gently fold with a spatula to combine and coat all the ingredients.
Chill for at least one hour before serving. I found that this salad was better the second day, because the cooked tortellini tightened up a bit.
Serve on a bed of baby spinach leaves, topped with halved grape tomatoes and a sprinkling of grated parm-romano cheese.
I tried to include all the great flavors of an Italian deli. Did I miss anything? 🙂
March was National Flour Month, and I’m finally catching up on paying respect to the many ways flour feeds us, beyond the obvious (bread). My first attempts at making handmade pasta 10 years ago were outright disastrous, mostly because I had assumed the method of stirring eggs by fork into a mountain-like peak of all-purpose flour was going to be easy. In my defense, the shows I had watched on Food Network made it seem easy, but in real life, it was a humongous freaking mess that left me cussing up a storm and vowing that I’d “never make that again.” Truth is, it is those really frustrating failures that inspire me the most to give it another go, and I’m so glad I did!
In my later efforts, I enjoyed more success, letting my KitchenAid do the mixing, but there was always something about the handmade pasta that didn’t sit right with me, even after I had invested in a “Made in Italy” hand-crank pasta roller. The dough always seemed heavy or thick, even on the thin roller setting. It fell apart or crumbled, or stuck to the roller or cutting blades. But a few years ago, I found the perfect, James Beard Foundation-approved recipe that fixed all the problems I had encountered. My issue was not only how I was making the dough or rolling the pasta, but also the ratio of ingredients I was using. To that point, I had been using only all-purpose flour and whole eggs (yolks and whites). I had no idea what temperature was best for my ingredients, nor did I fully understand how long to knead the dough or whether it needed to be rested.
I cringe when I see this old photo. Besides all the background junk in my tiny, post-divorce apartment kitchen, the ragged edges on my pasta sheet reveal how much I had yet to learn! 🙂
The better recipe, and the one I use to this day, takes advantage of a special variety of wheat called durum, which is used to make semolina flour, the gold standard in authentic Italian pasta recipes. Semolina lends a warm, slightly nutty flavor, a light yellowish color and a firmer, more toothsome texture. It has been a game changer in my journey to making handmade pasta.
The other big difference was a shift in liquid ingredients in my formula. Rather than using whole eggs, the recipe that has become my standard requires separation of the eggs, using only the yolks, plus an amount of water. Once I found this easy formula, the flavor possibilities became near-endless. And that’s where the real fun of making handmade pasta begins! Being creative with the colors, flavors and shapes of handmade pasta is one of the things that gives me—a home cook—a very satisfying sense of accomplishment.
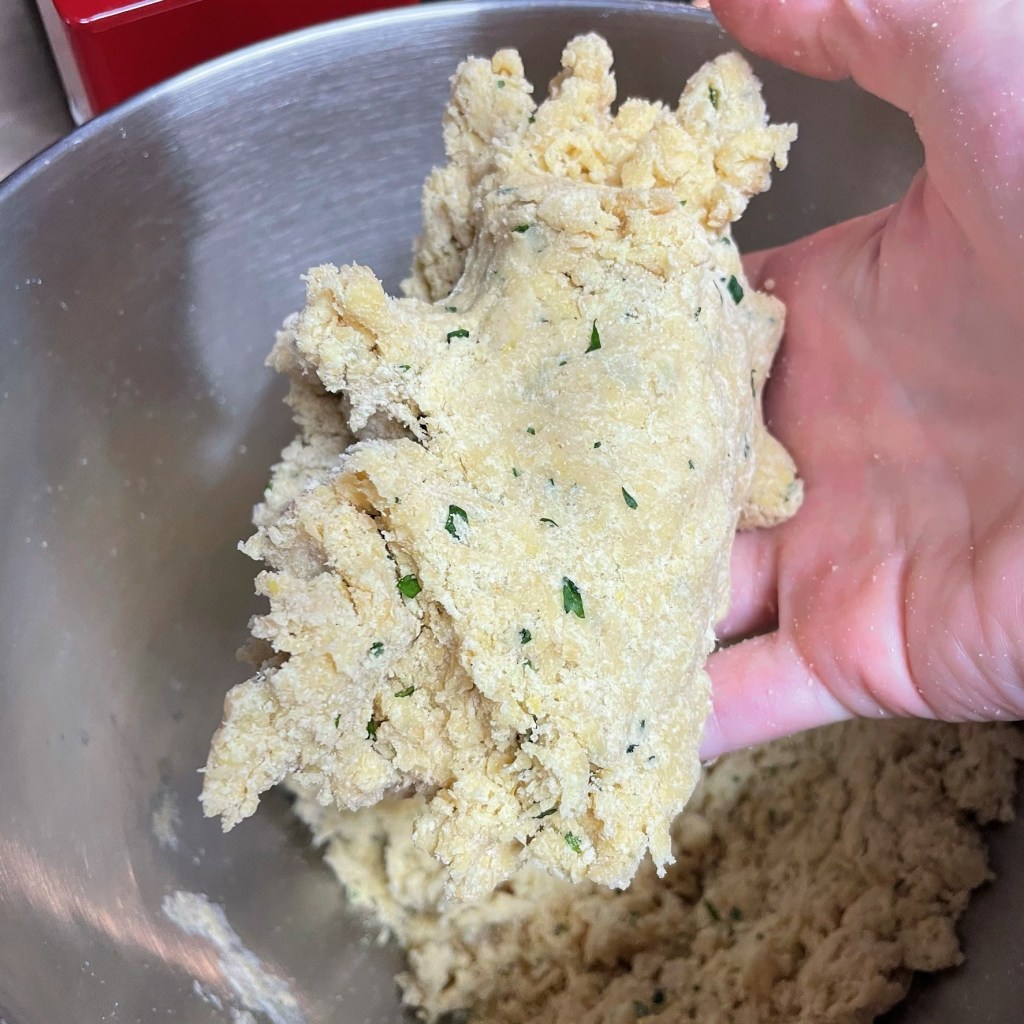
I won’t claim that handmade pasta is “easy,” because I still feel the ego bruises from my early attempts, but I will say that if you are already making handmade pasta, go on and experiment with the flavors until you find something amazing. New flavors make their way into the mix either in the liquid, perhaps by using finely pureed vegetables as part of the water measurement, or by way of dry add-ins, as I am sharing in today’s post. And if you’re still on the fence about trying handmade pasta, I hope my adventure inspires you!
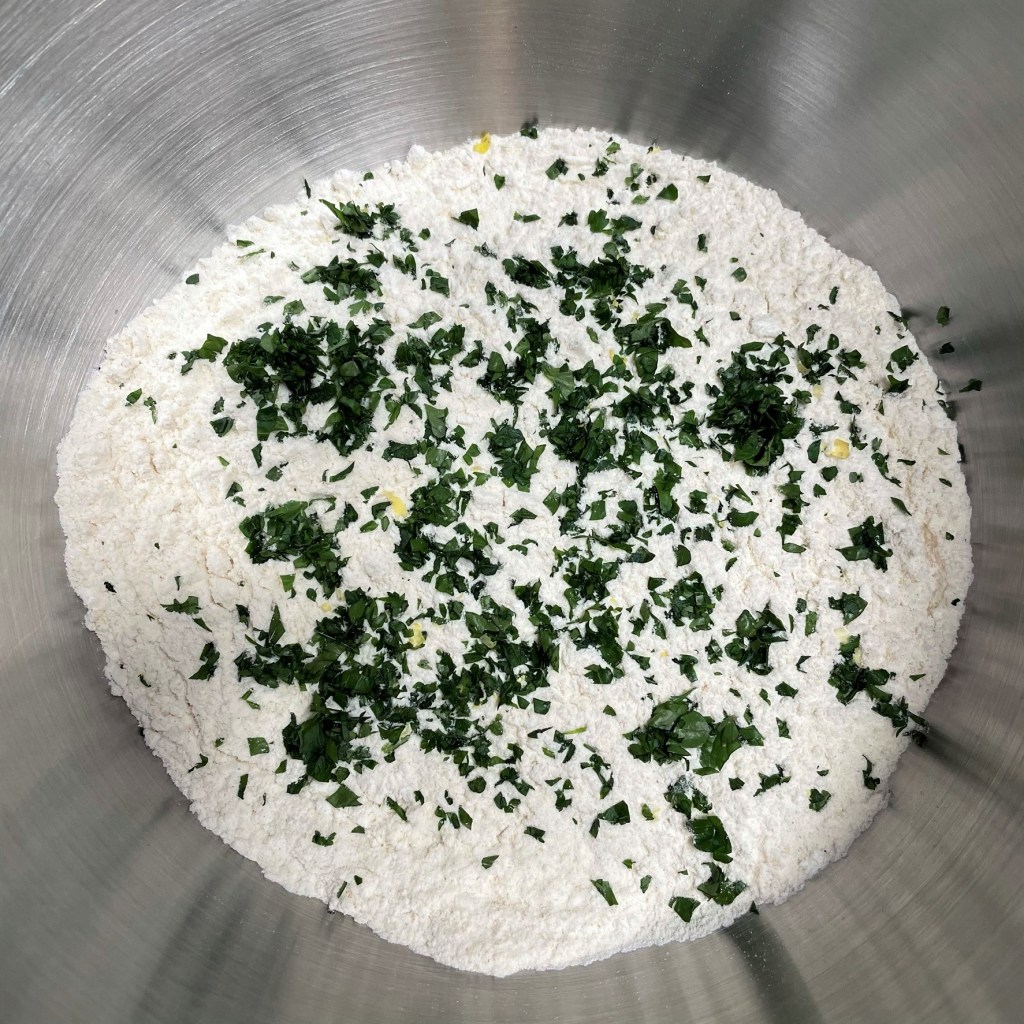
This recipe has helped me use some of the abundance of fresh herbs I’ve had since my husband, Les, gifted me the countertop hydroponic herb garden that keeps throwing parsley at me. The lemon, parsley and basil combination is terrific and perfect for spring, but you could just as easily flavor your pasta with sun-dried tomatoes, dried mushrooms, roasted red peppers or—well, you can imagine your own (and I do hope you’ll share those fabulous ideas).
Making your own pasta is so much fun. I hope you’ll try it!
8 oz. semolina flour (plus extra for rolling pasta dough)
4 oz. unbleached, all-purpose flour* (see notes)
2 oz. white whole wheat flour*
1/2 tsp. kosher salt
1/2 cup filtered water, room temperature*
2 egg yolks, room temperature*
1 Tbsp. extra virgin olive oil (mine is whole lemon-fused for bright lemon flavor)
Zest of one organic lemon* (only the bright yellow peel)
2 Tbsp. very finely minced fresh herbs (I used a combination of Italian parsley and Genovese basil)
*Notes
All-purpose flour is easy to find, but “00” flour is better if you can get your hands on it. The double-zero flour is milled to a very fine texture, and its use results in tender, silky pasta. I have seen it in well-stocked larger supermarkets, gourmet shops and online. I also use some portion of whole grain flour in my pasta dough, but if you prefer, skip the white whole wheat and make up the difference with equal amount of additional all-purpose or 00 flour.
As with bread dough, I have found that hydration of flour for pasta dough is much improved with room temperature or slightly warm water. Cold water makes for very stiff dough that is tougher to knead.
Eggs are more easily separated when cold, but once this is done, cover the bowl of yolks and let it rest at room temperature for at least 30 minutes before you begin mixing the pasta dough.
Most of the time, conventionally-grown citrus is fine. But when you intend to eat any part of the peel, it’s best to choose organic to avoid chemical pesticides.
Instructions – making the dough
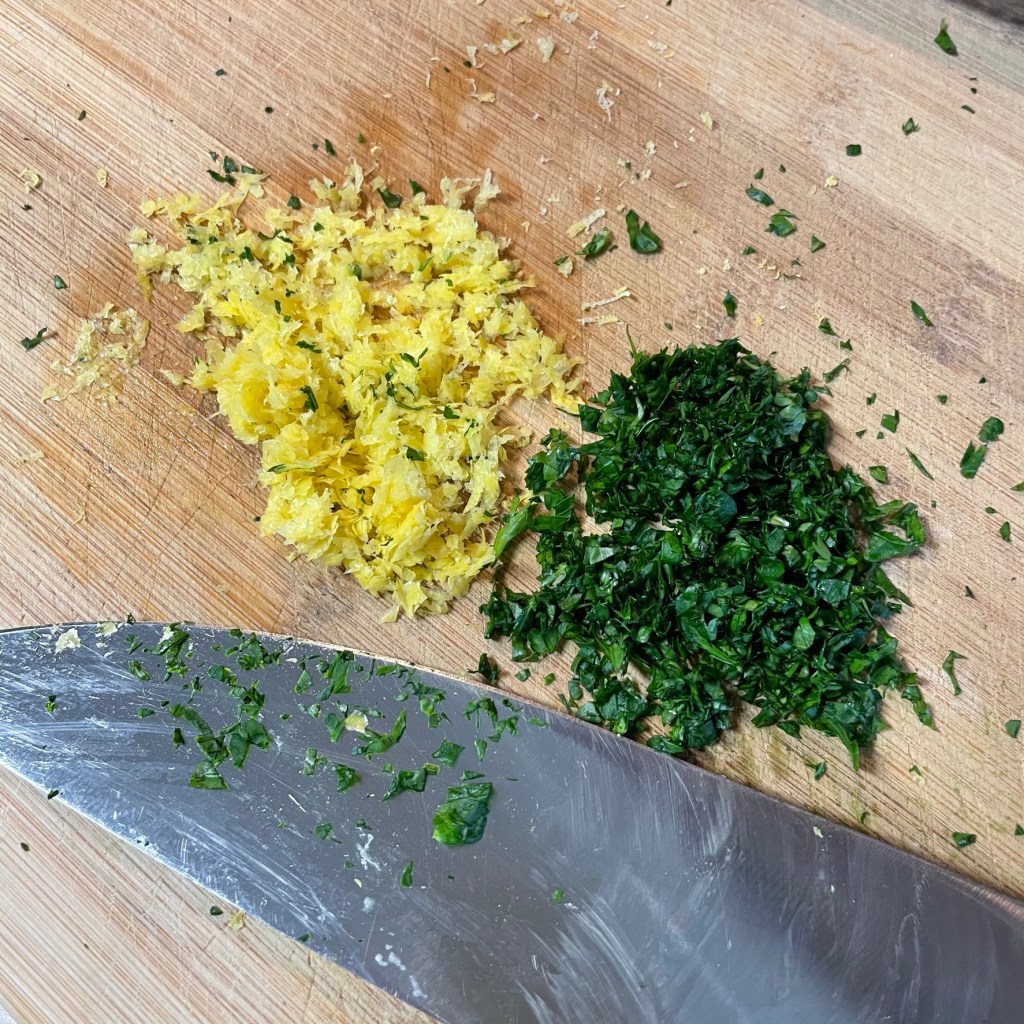
I used a microplane on the lemon, and left the zest and the finely chopped herbs to dry a bit on the cutting board.
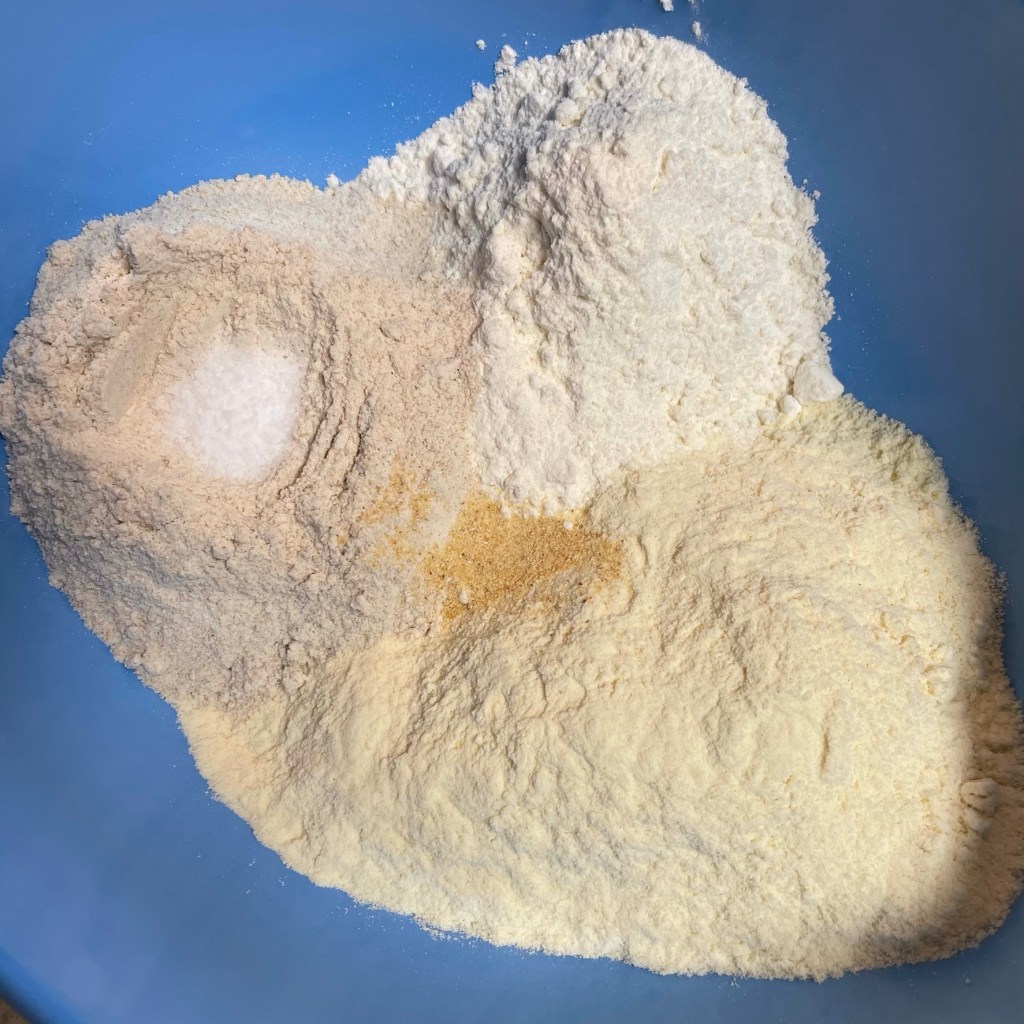
Clockwise from the top: all-purpose flour, semolina, white whole wheat (with salt in the center) and a last minute addition of garlic powder right in the middle of it all.
Use a whisk to blend the slightly dried herbs into the dry ingredients.
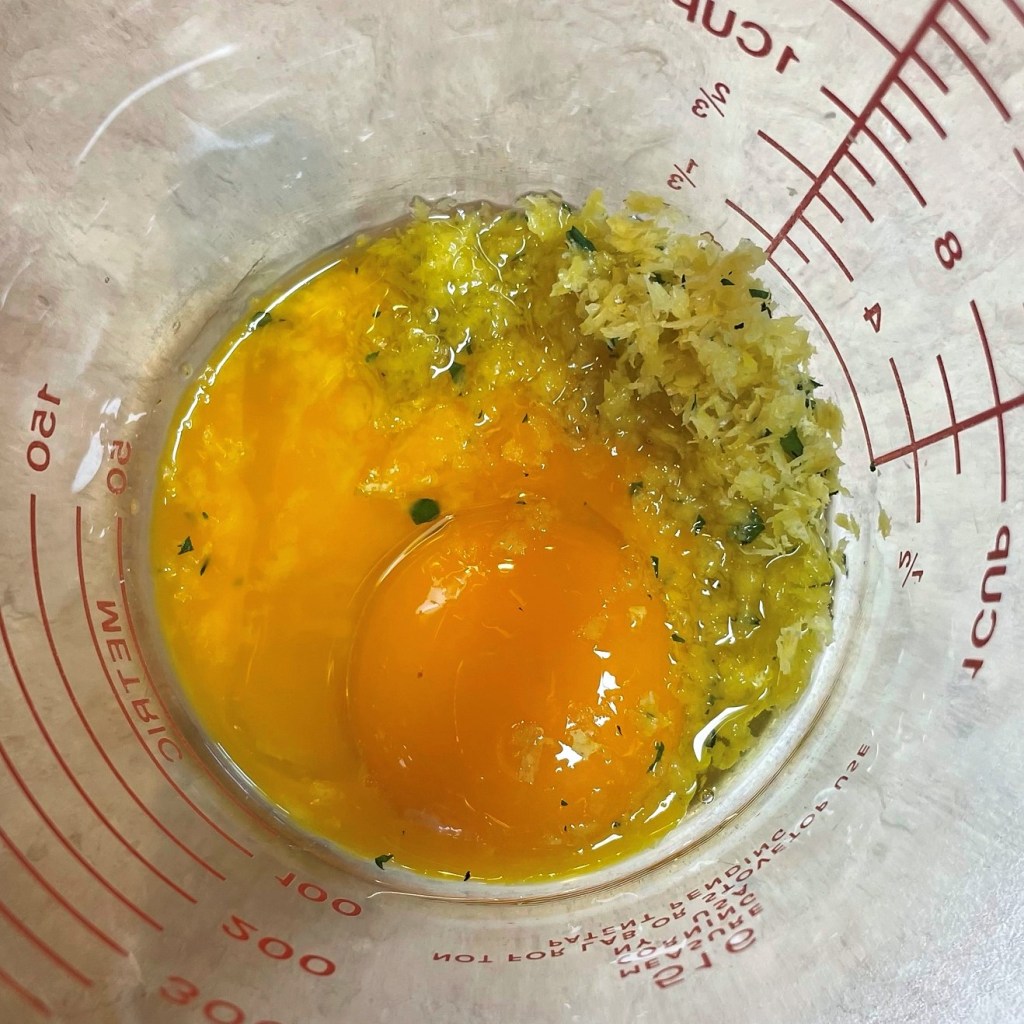
Combine the egg yolks, olive oil and lemon zest in a glass measuring cup.
Pour in room temperature water and whisk until evenly combined.
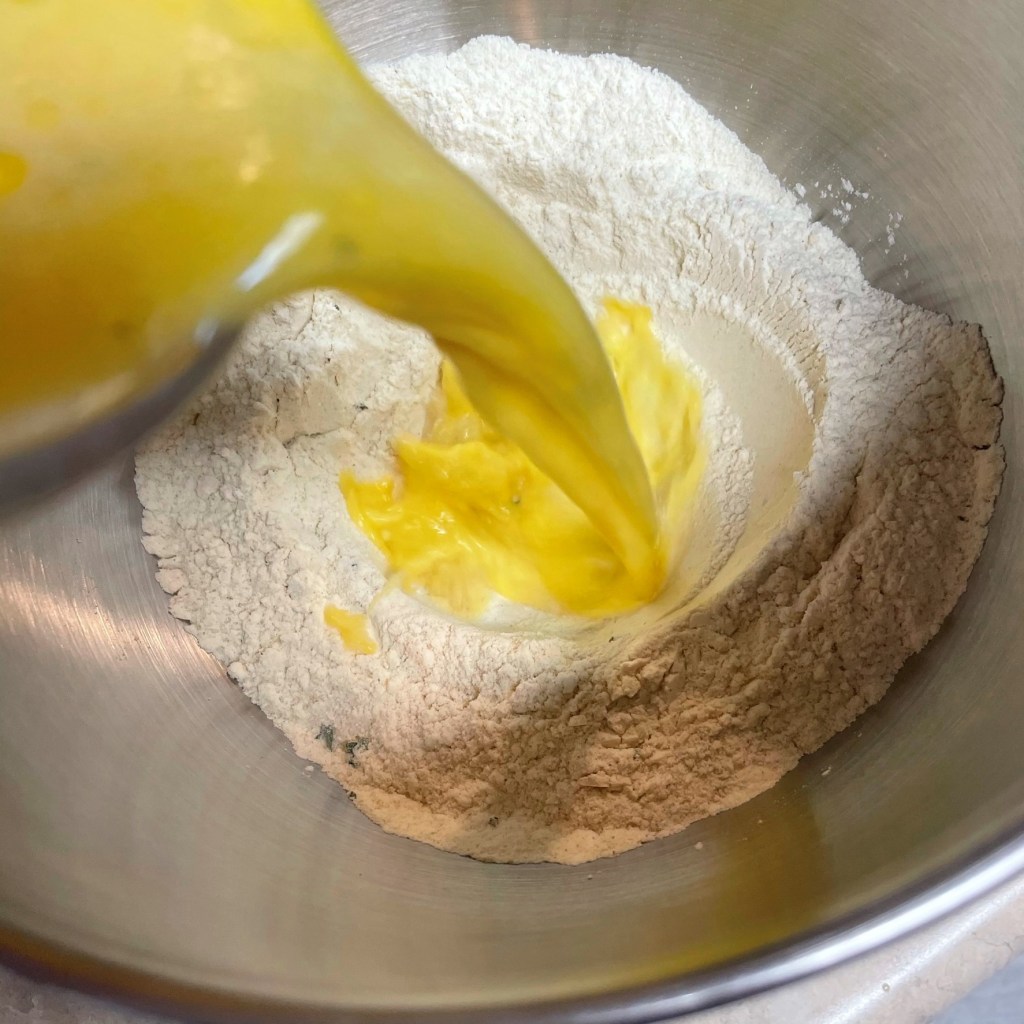
Make a well in the center of the dry ingredients, and pour the egg-water mixture into the center of it.
Use the dough hook of the stand mixer, which mimics the action of mixing with a fork. This will take a while, and you’ll want to avoid the temptation to add more water at this point.
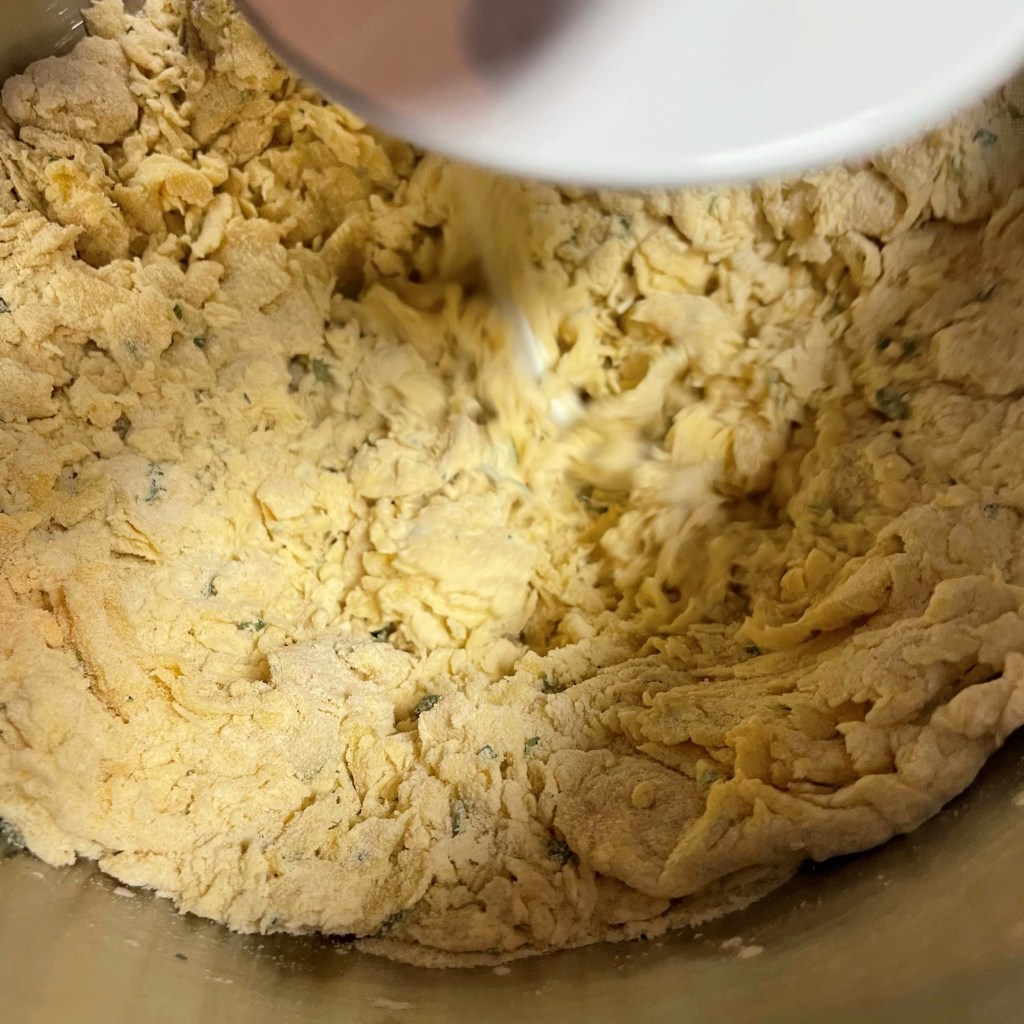
At my first squeeze of the pasta dough, it is evident that my mixture is too dry. It should come together in a shaggy but cohesive mass. This is dry and grainy, so I’ll add a tablespoon of water and mix again.
Much better! You can see the difference in hydration already, and it feels more smooth on the surface.
If I can use the mass of dough to pick up all the crumbs from inside the bowl, it’s ready to knead. If too many crumbs stay behind, I would add another small splash of water. This is just right.
Get ready for a workout in this phase. I don’t like the knead that my KitchenAid mixer does here, so I move the dough to the counter and start rolling the dough over itself, rotating it a quarter turn with each knead.
My dough is very firm, and I see lots of “breaking” in the surface as I continue kneading. This is a sign that the dough is still too dry.
I wet my hands and continue to knead. If the dough continues to crack and break a lot, I’ll repeat this as many times as necessary.
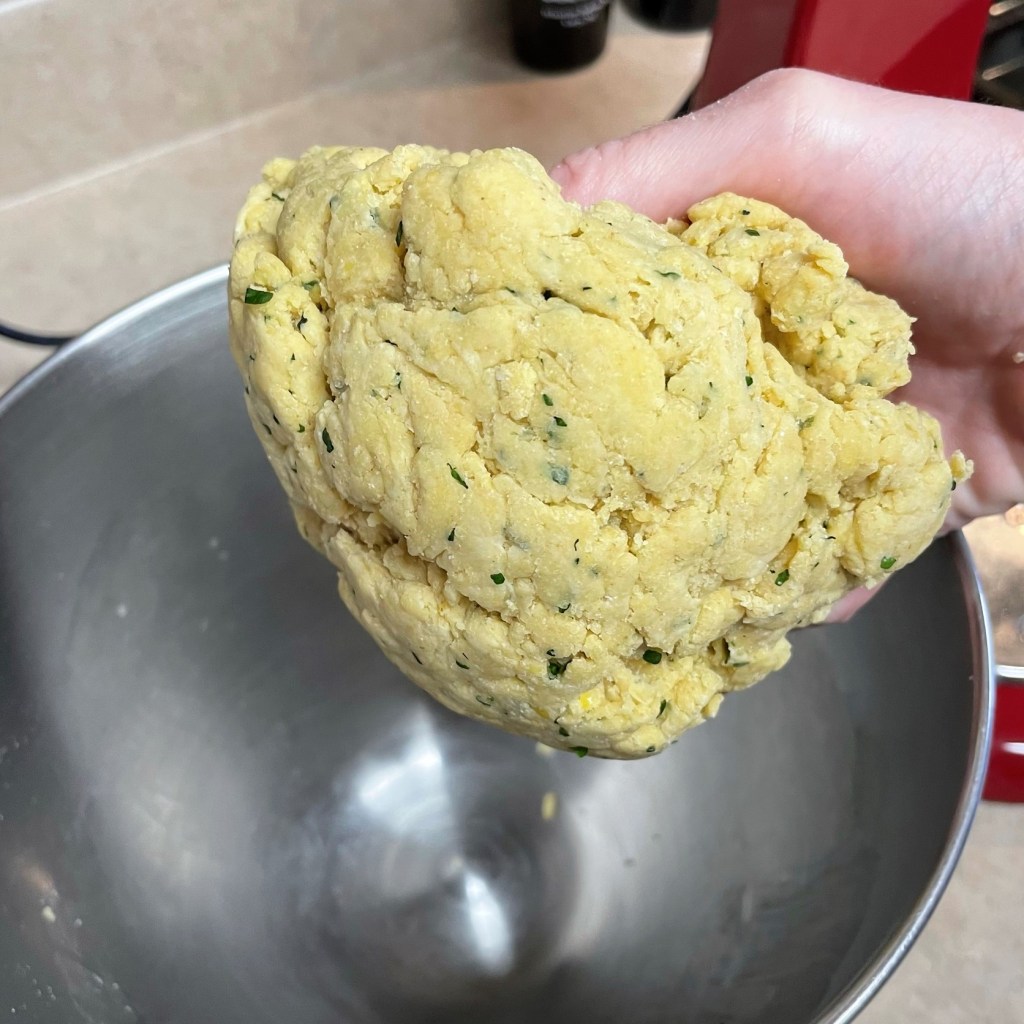
Kneading develops the gluten, which allows the pasta to take and hold shape. Some of my early handmade pasta attempts were unsuccessful because I didn’t knead the dough long enough. Go at least 10 minutes, or 15 if you can.
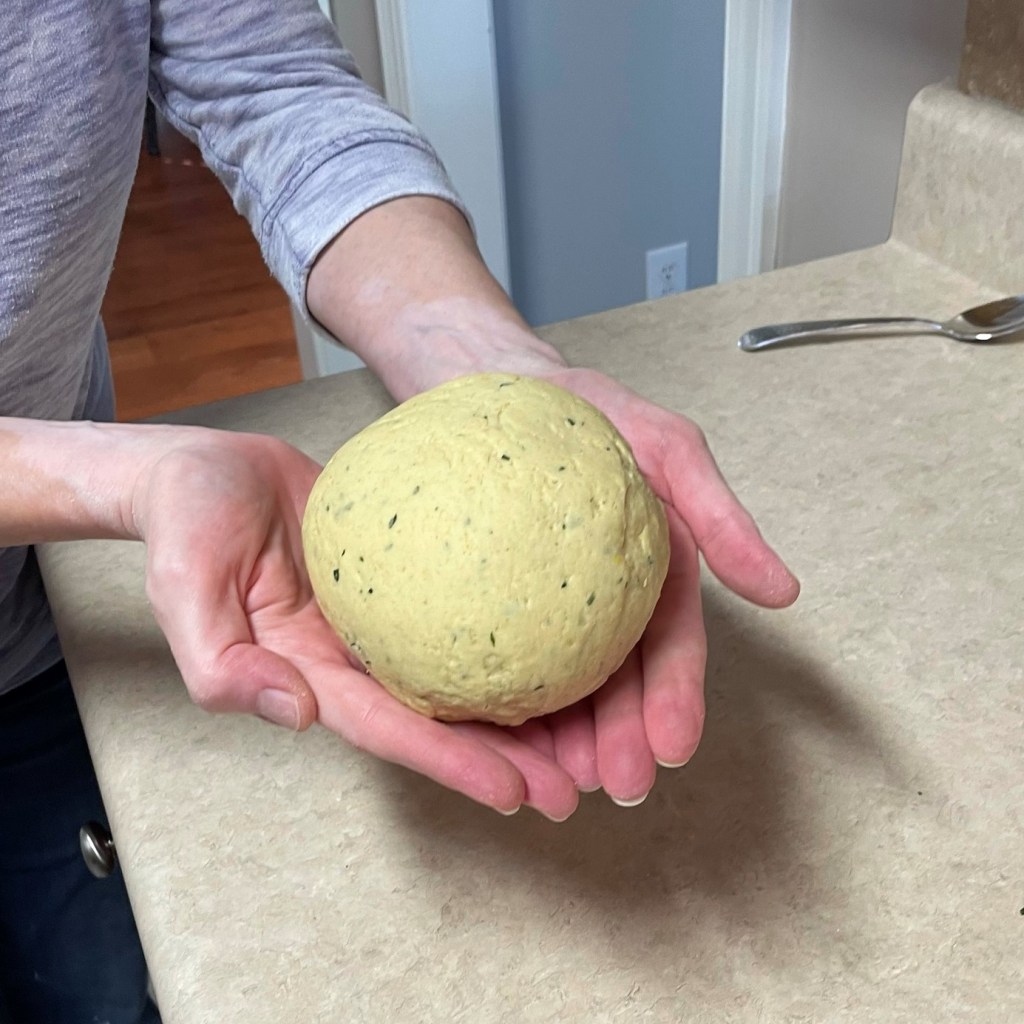
When finished, the kneaded dough should be firm, smooth and supple. A few stretch marks on the surface will be fine, but it should not appear broken. Wrap it tightly in plastic, and send it to the fridge.
Zest the lemon and mince the herbs first, and spread them out on a cutting board so that the add-in ingredients dry out a bit.
Combine flours, salt, lemon zest and lightly dried herbs in the bowl of a stand mixer.
Combine egg yolks and water in a separate bowl and whisk them together until the mixture is light and frothy.
Make a well in the center of the dry ingredients, pour the wet ingredients into the center and use the dough hook to do the blending. Though it might seem logical to mix with the beater blade, using the dough hook completes the blending from the center-out, in the same way as the chefs using only a fork to gradually mix the eggs into the flour. Allow the mixer to do this work for you, until the dough mixture is combined but crumbly, and no dry flour remains in the bowl. Add more water, one tablespoon at a time, if needed to achieve this stage.
Empty the dough onto your work surface, and knead by hand for at least 10 minutes, probably more like 15 minutes. The dough should be smooth and elastic, with no creases or cracks or lumps. If the dough shows any sign of cracking or breaking, wet your hands and continue to knead, repeating as many times as necessary until the smooth texture is achieved.
Wrap the dough tightly in plastic wrap and refrigerate the dough ball at least one hour, or up to overnight. Do not refrigerate more than a day.
Time to make the pasta!
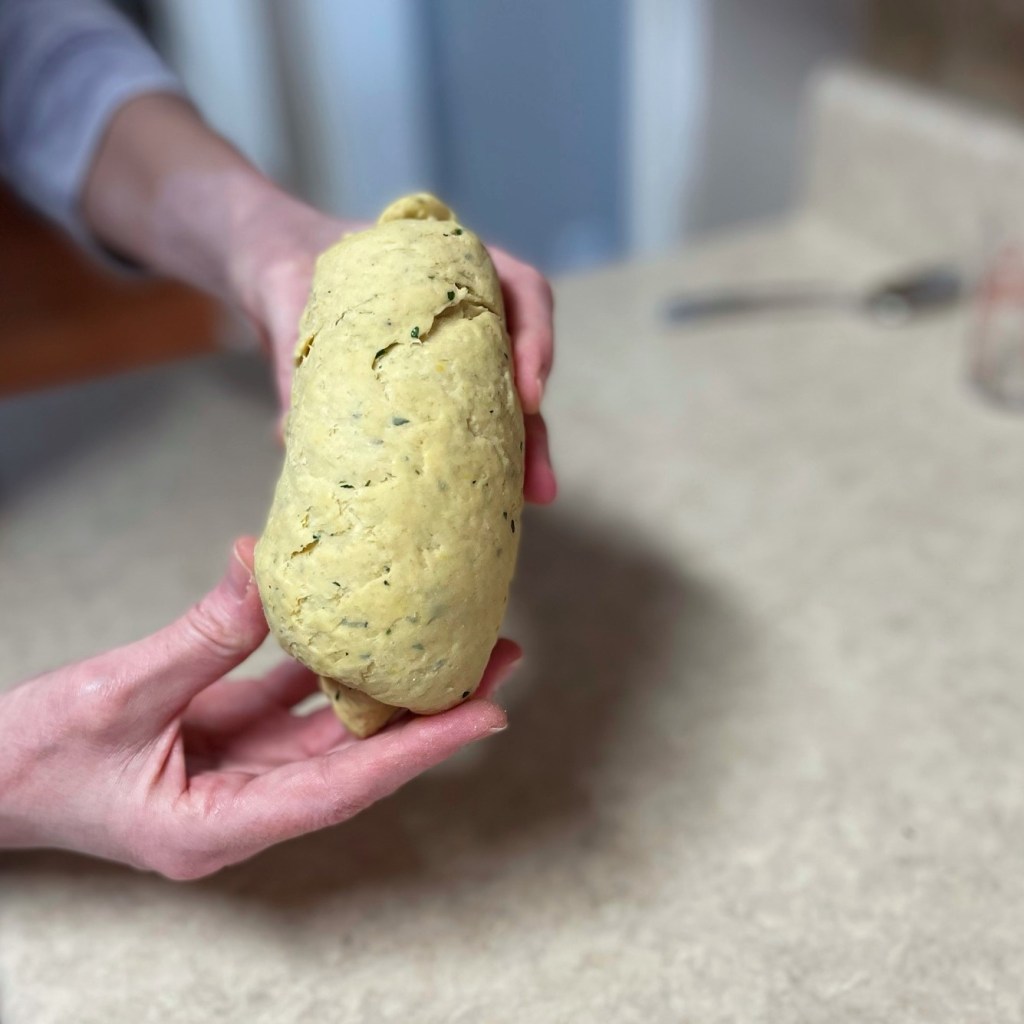
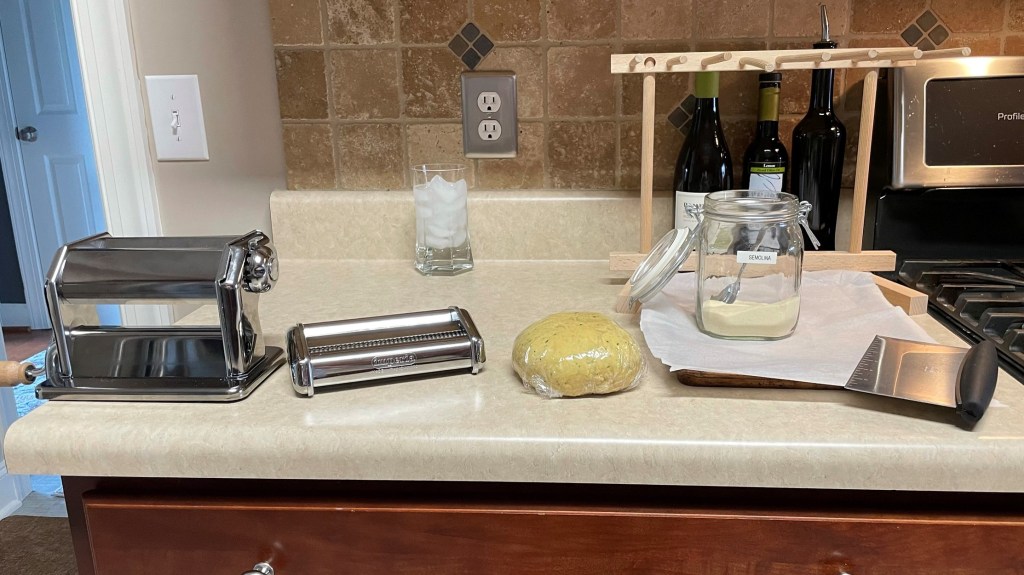
Here’s my work station for rolling pasta dough. My machine is clamped onto the edge of the counter, my cookie sheet and drying rack are ready, and my chilled dough is resting at room temperature.
Remove the pasta dough from the fridge (still wrapped) about 30 minutes before you plan to roll it, to remove some of the chill. Set up your pasta rolling machine, and keep fresh semolina out to aid in rolling and to prevent the dough from sticking. Have a parchment-lined cookie sheet within reach, and set up your drying rack if you’re using one.
Instructions – rolling the pasta
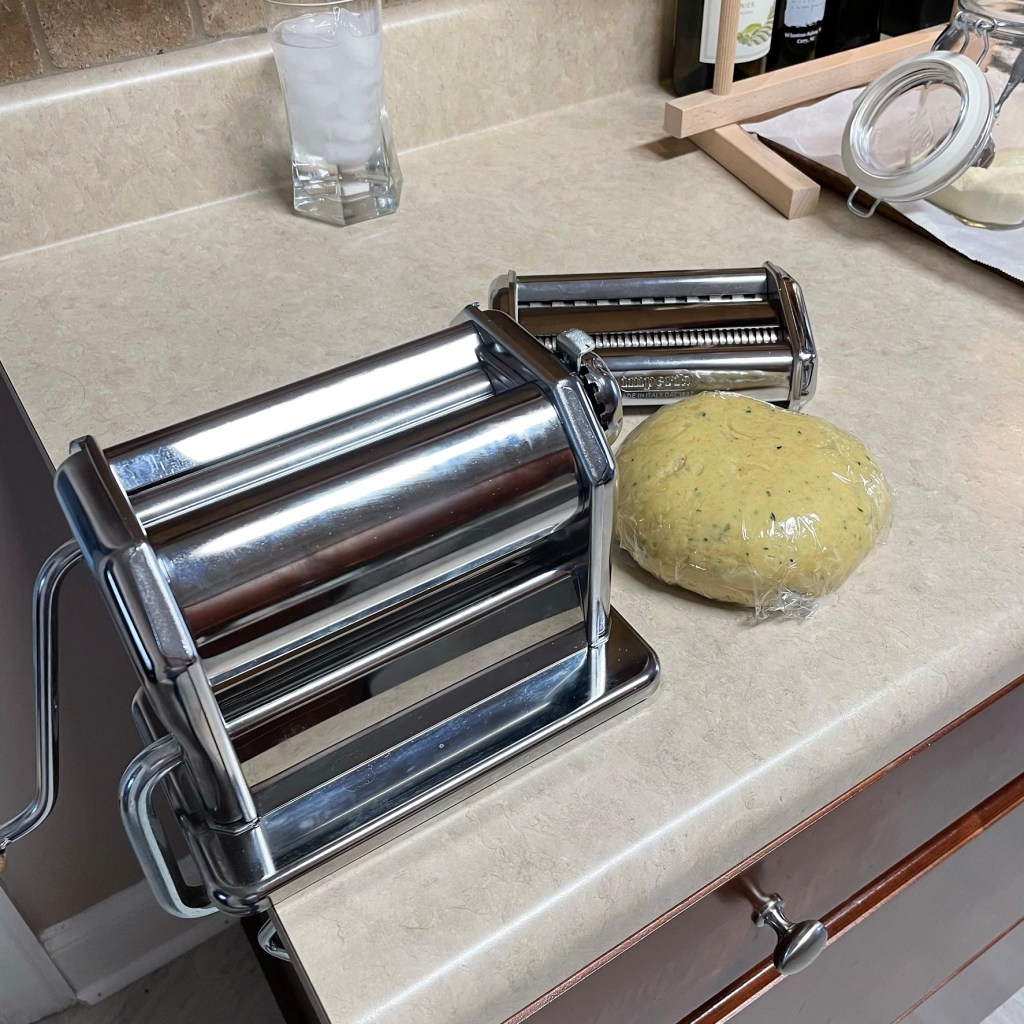
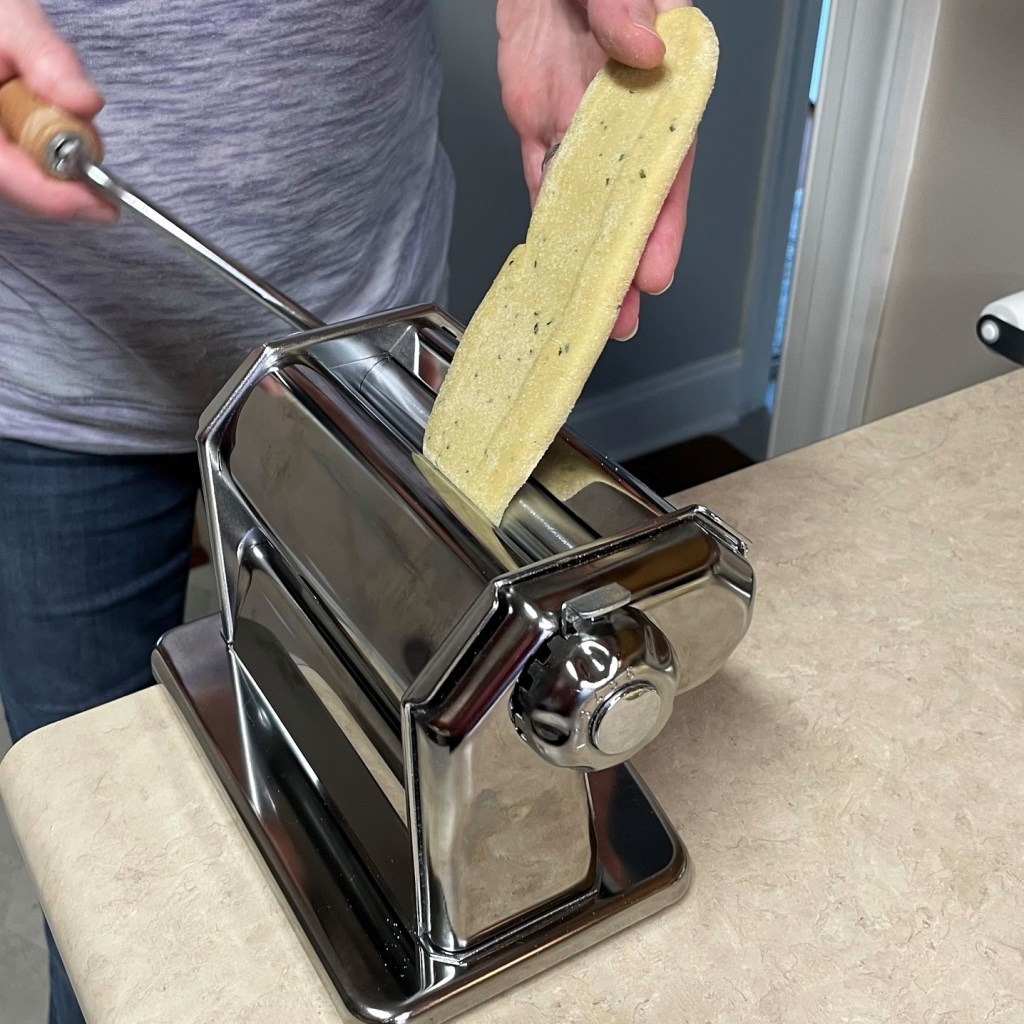
I love my hand-crank pasta machine. ❤ It’s made in Italy, and is very easy to use. The nearby attachment lets me cut my pasta sheets into fettuccine or linguine.
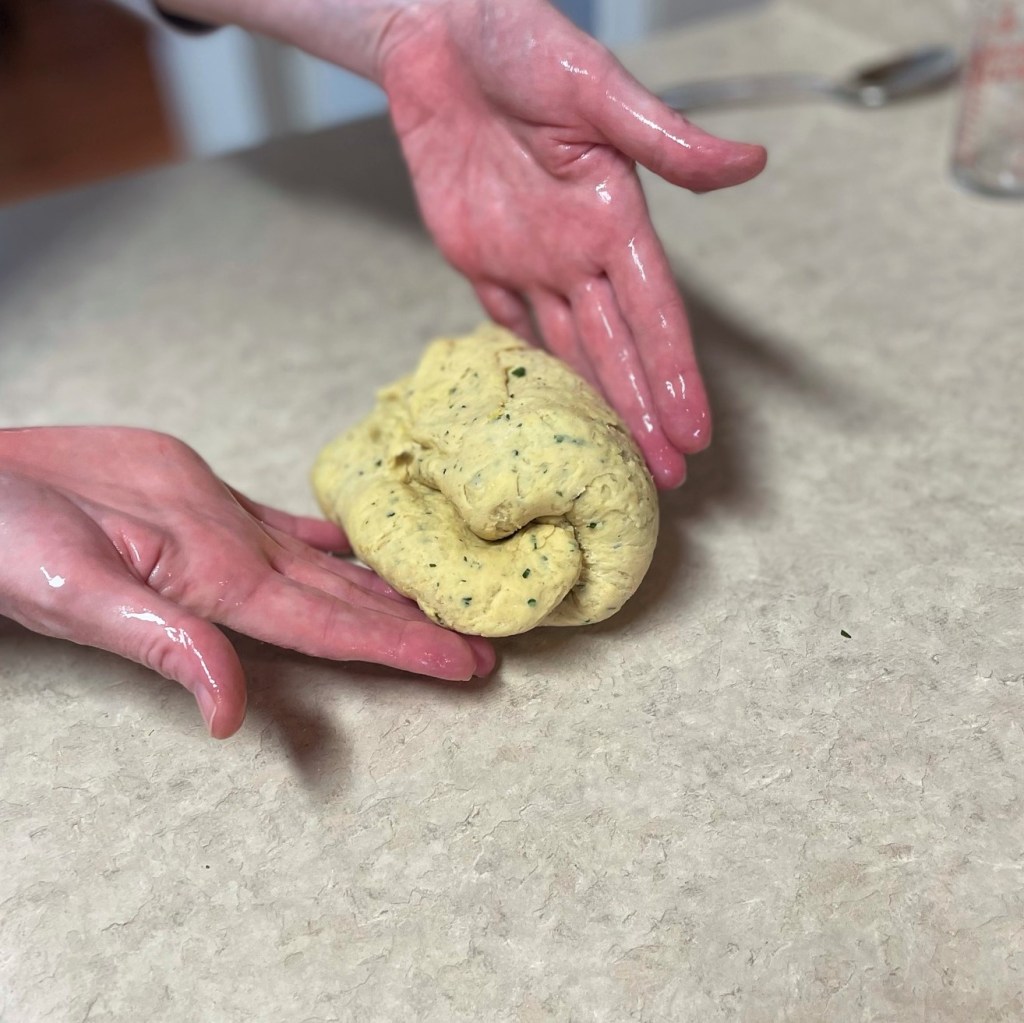
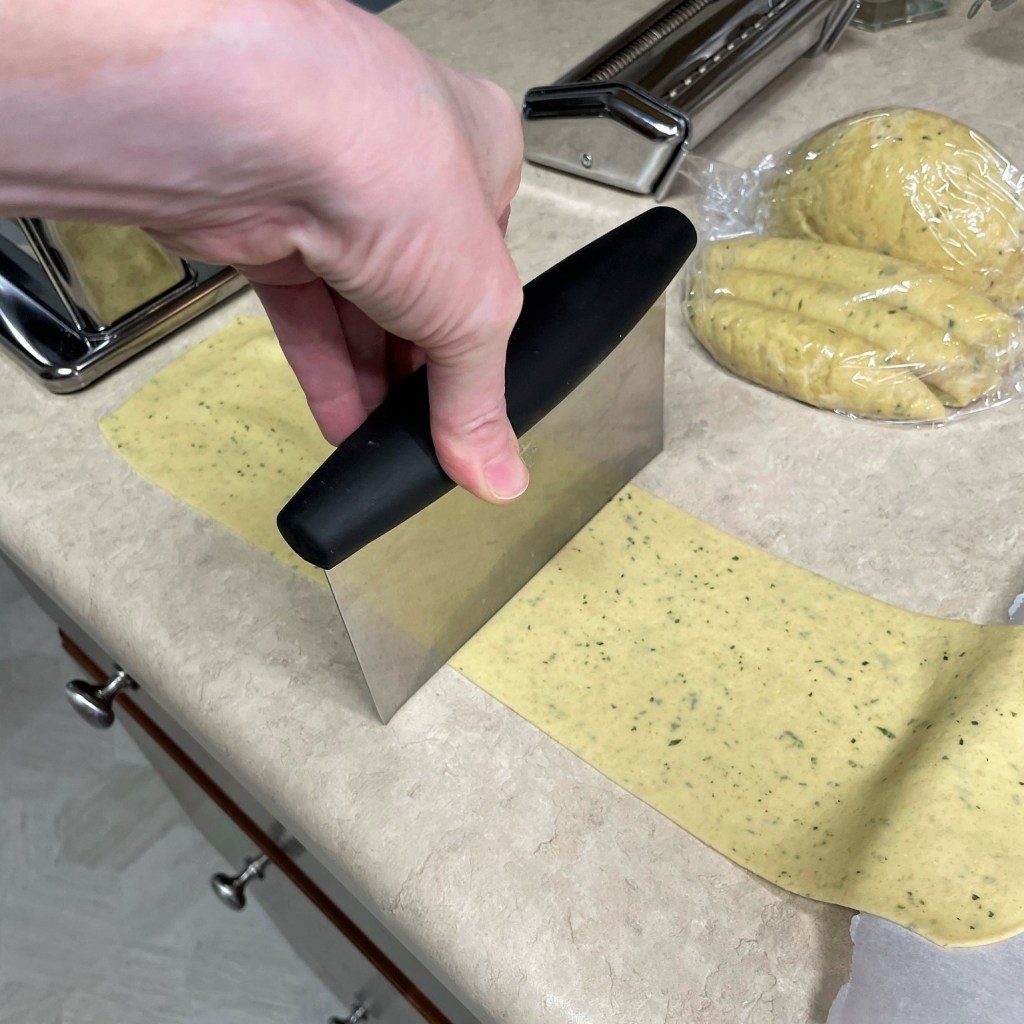
Unwrap the dough and use a bench scraper tool to slice off thick disks of dough. Roll out one disk at a time, and keep the rest tightly wrapped to prevent drying.
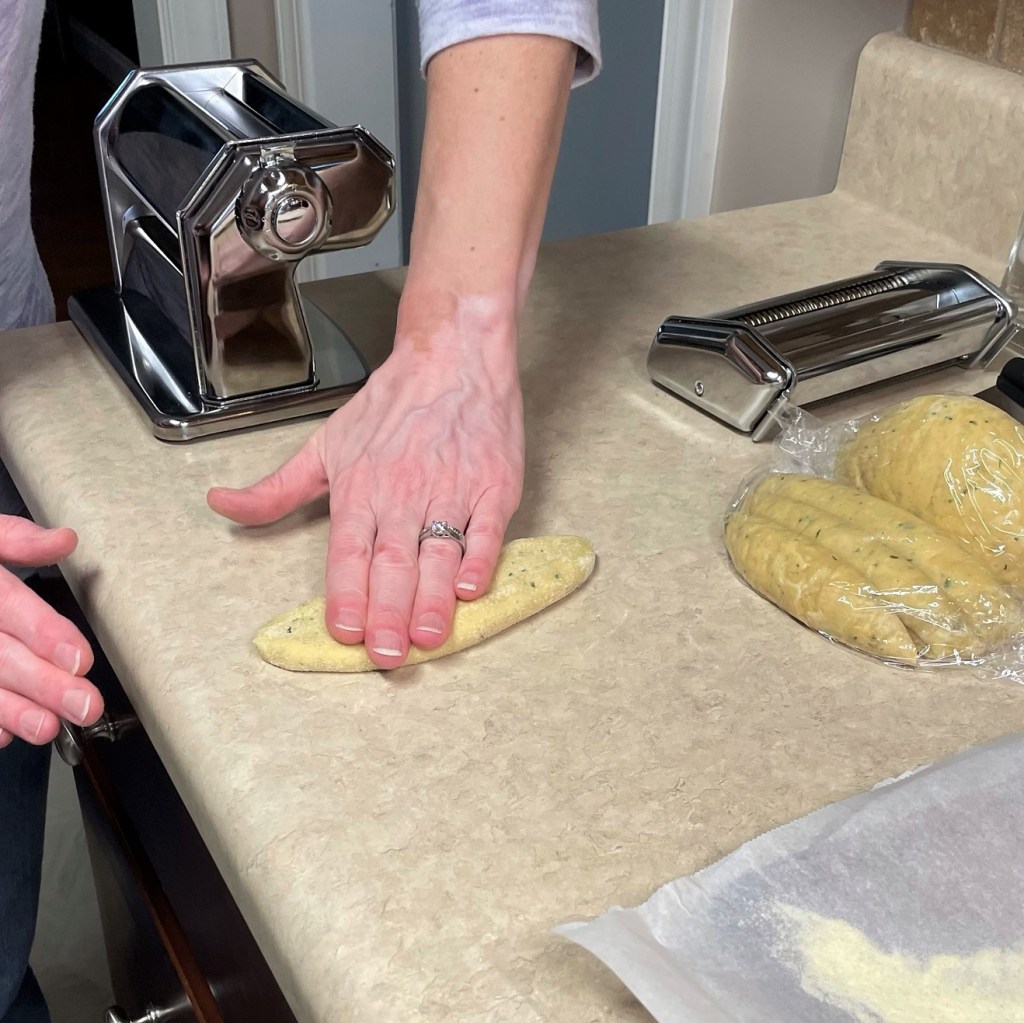
Begin by flattening a disk into a long oval shape. You can use a rolling pin to do this, but I usually flatten it by hand. Keep a small pile of semolina handy to dust each side before rolling it through the machine.
With the dial set on the thickest setting, turn the crank to run the dough through the pasta machine. Be ready to receive it on the underside as you go.
The first run-through makes a significant difference in thickness, but don’t rush through the next steps.
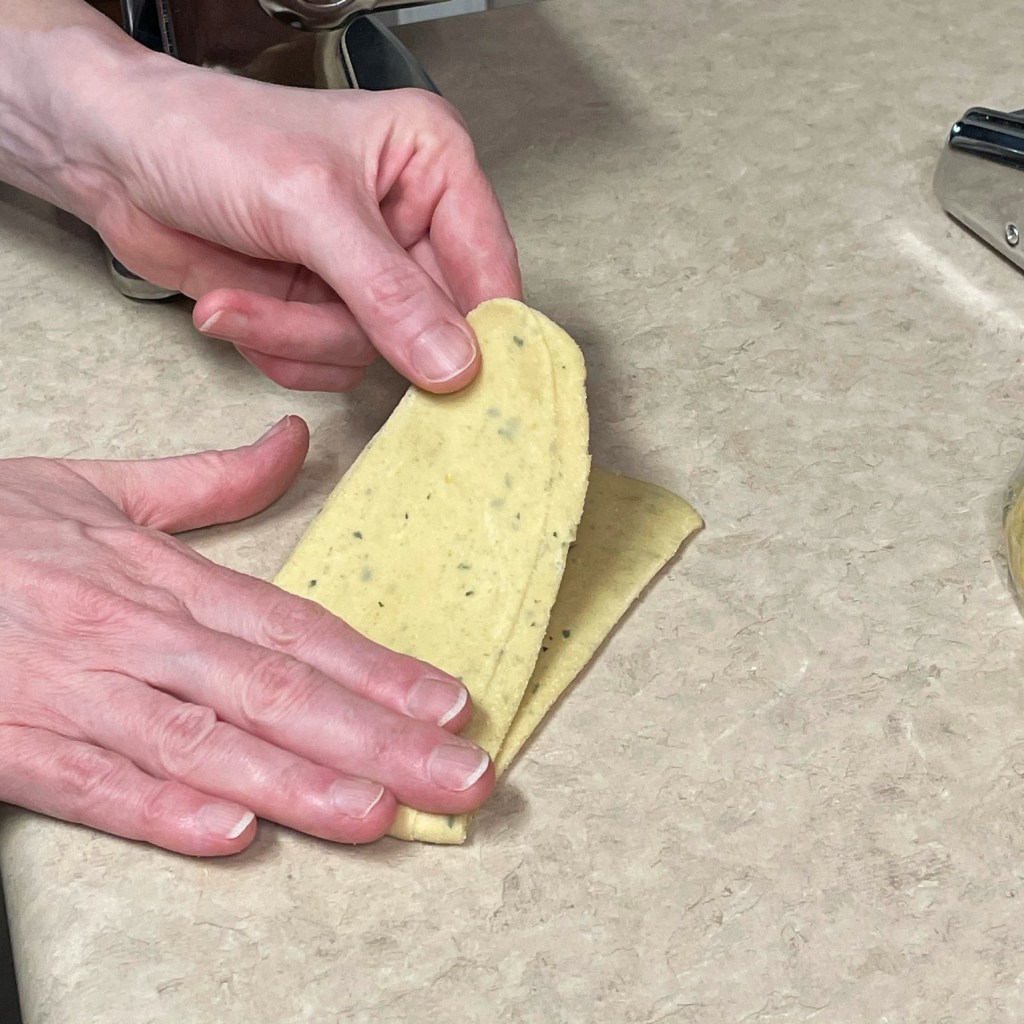
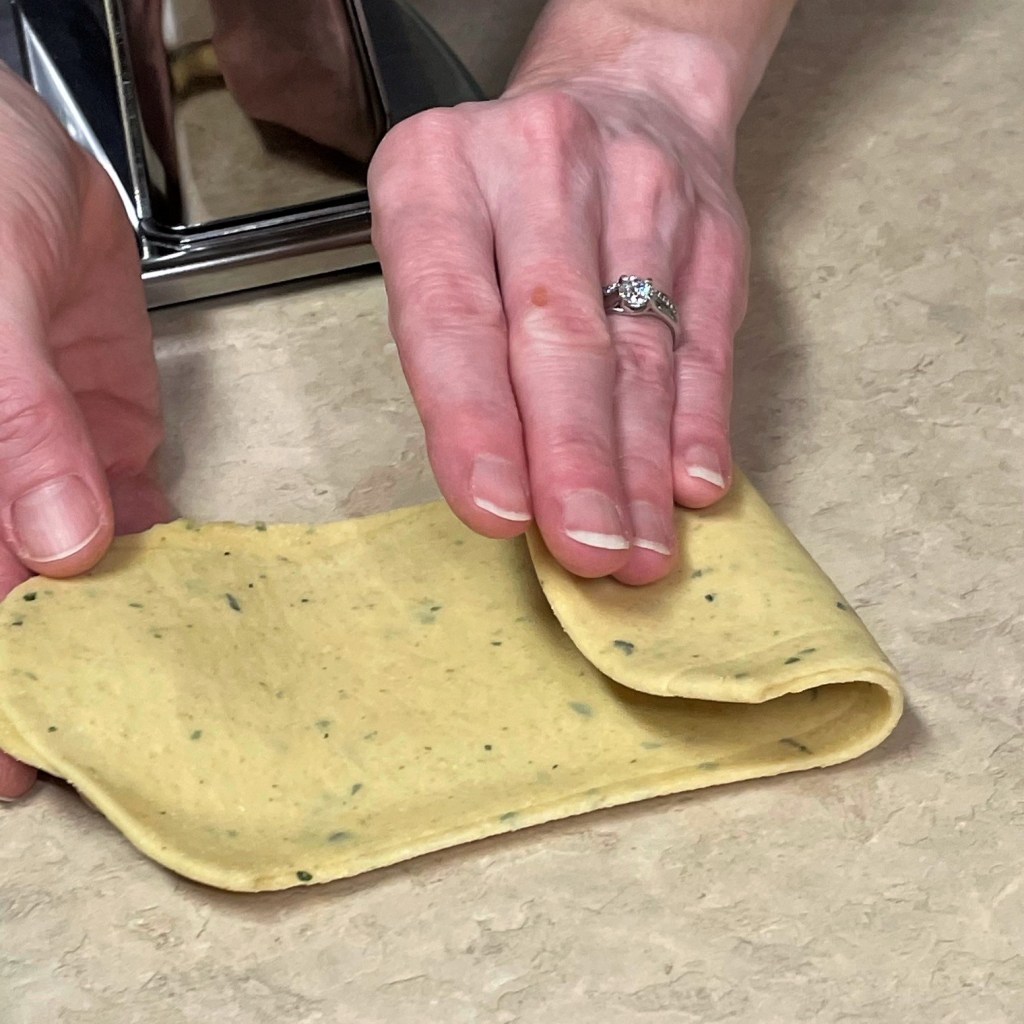
After the first pass, fold the rolled dough in half and roll it through again. Repeat this a couple of times.
When the dough passes through the machine easily, Fold it into thirds, as if folding a letter, and then run it through the pasta machine the other direction. This helps build strength in the dough, and also helps prevent curling of the fettuccine later when it is drying.
When the dough is passing evenly, reduce the thickness by one notch and repeat passing it through. On these thinner passes, you do not need to fold and turn the dough as before.
When I get several notches into the process, I find that the dough sheets are too long for me to easily manage. I use the bench scraper to cut the sheet into two pieces, then I continue rolling the sheets individually.
On the thinnest setting, the pasta will be very thin, which is great for a delicate ravioli, but this is too thin for fettuccine. I’ll fold it onto itself and run it through the machine again at the next thicker setting.
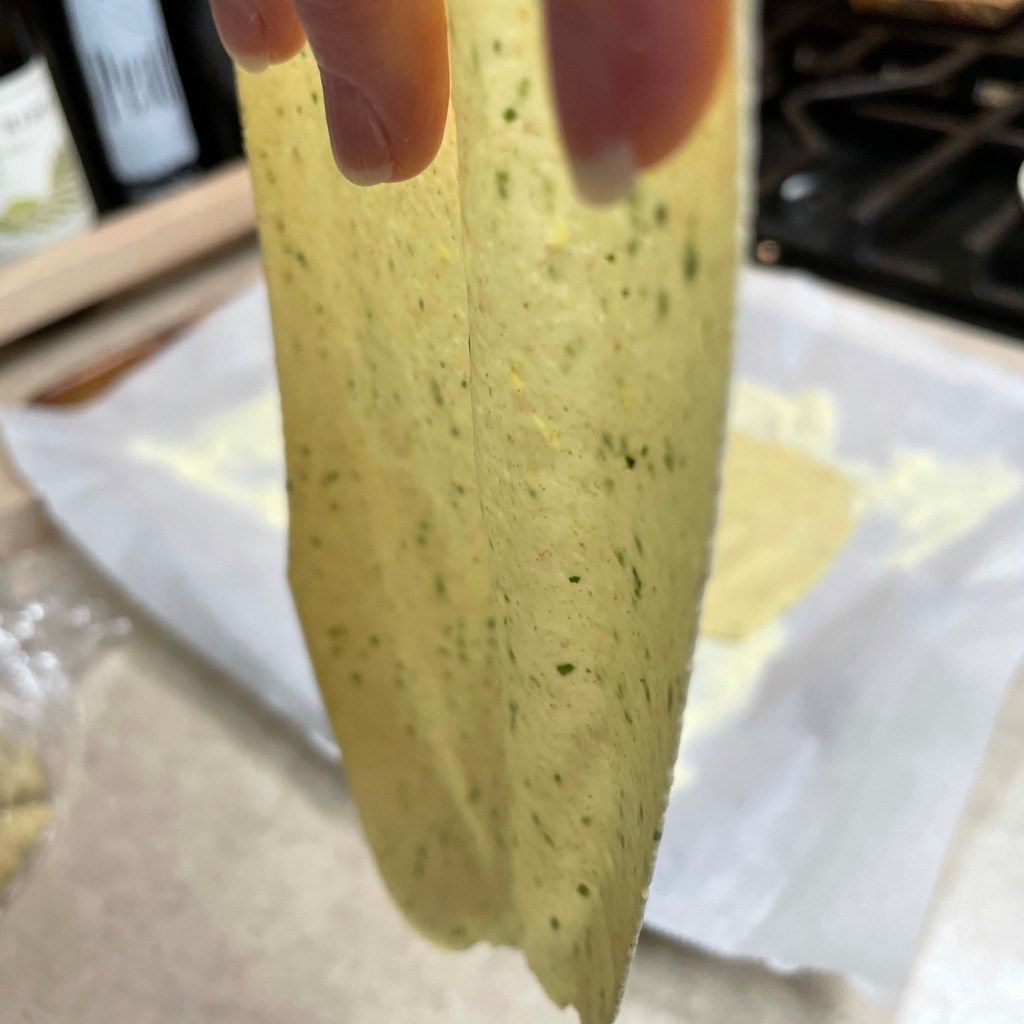
How about those beautiful flecks of herb and lemon?! Rest the sheets on a semolina-dusted tray for a few minutes before cutting.
I’ve attached the cutter to my pasta machine, and begin passing the sheets of pasta dough through the fettuccine blades. It helps to have a friend to assist with catching the pasta. I found myself in very awkward positions this time because I was making room for my Les to take pictures. 🙂
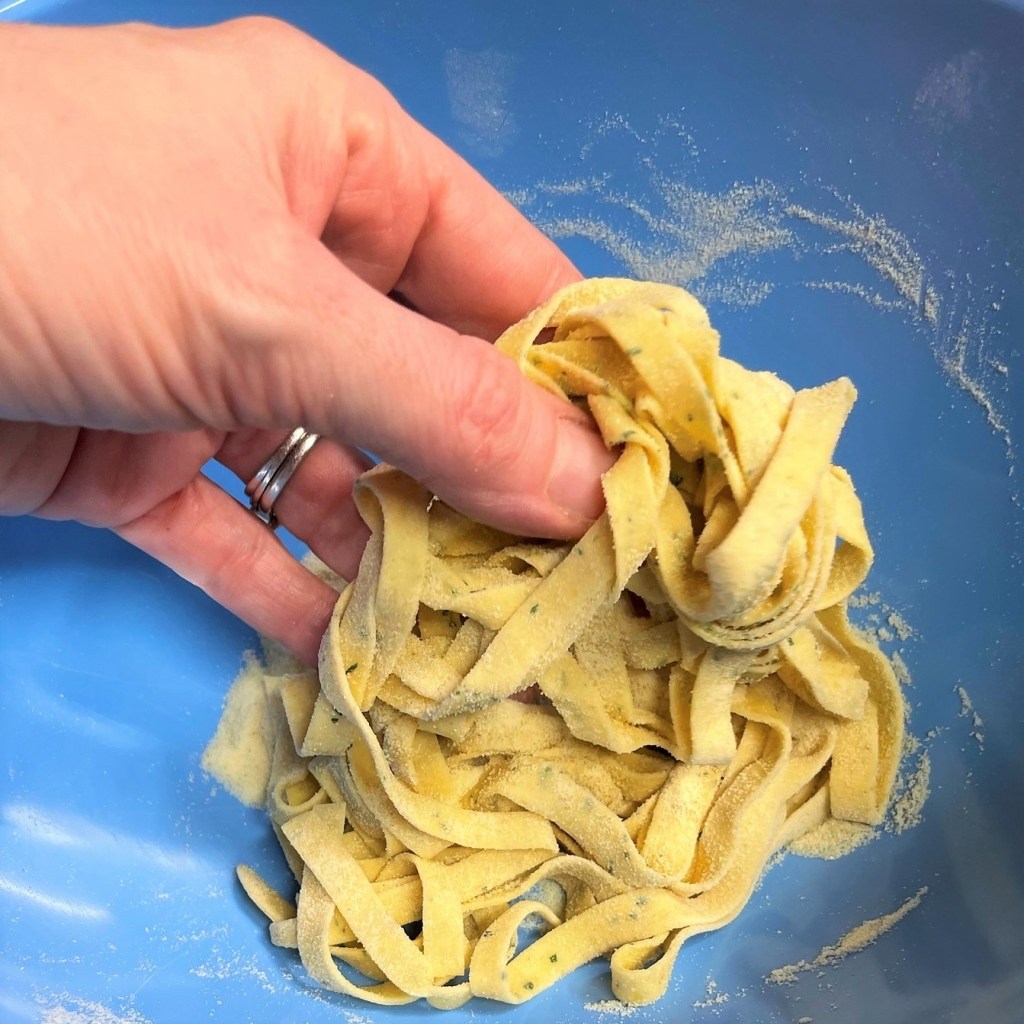
To keep the pasta from sticking to itself, toss gently in flour before placing it on a drying rack. I use semolina for this because it is not easily absorbed into the finished dough, and it falls into the pot during cooking.
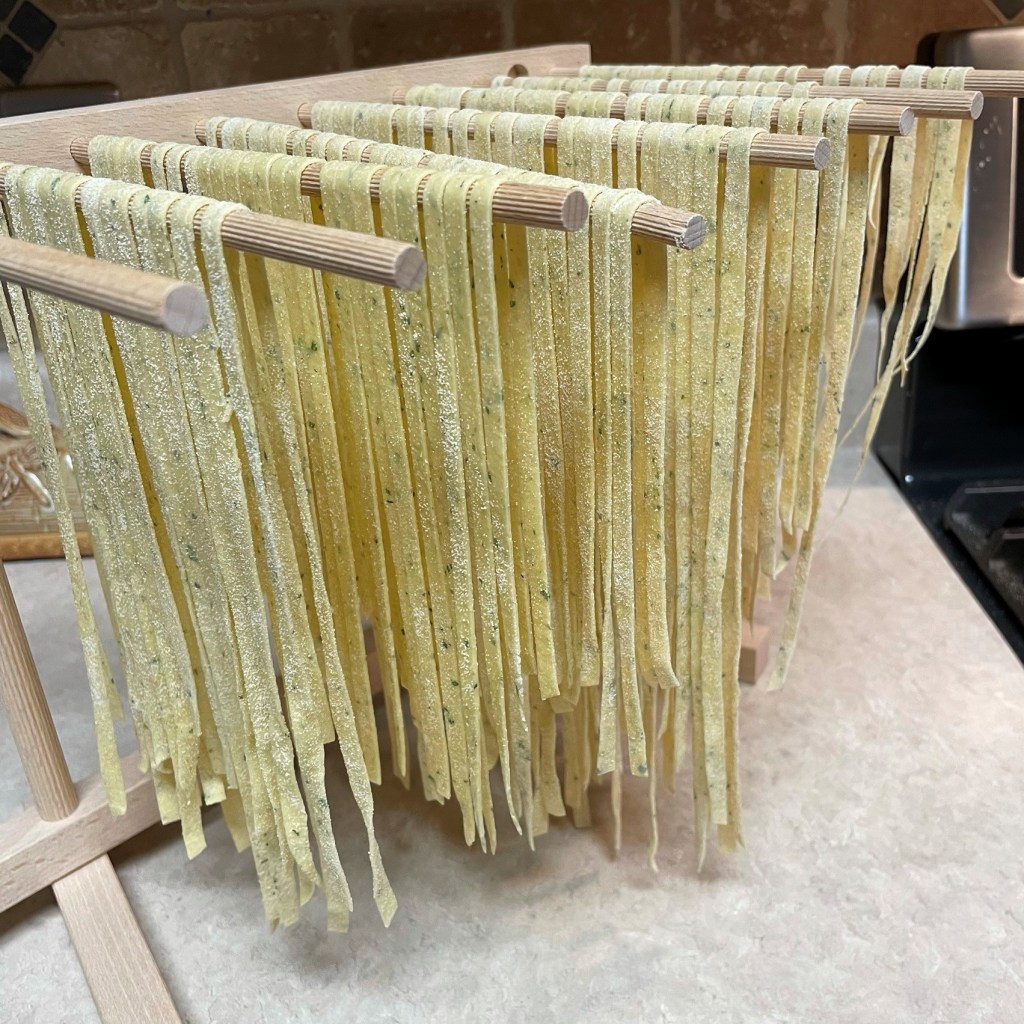
Separate the pasta strands a bit as you place them on the drying rack. If they stick together, it makes cooking them more challenging. No rack? No problem. Toss the strands in semolina and arrange in small piles on a parchment sheet.
The amount of dough in this recipe will just about fill up a standard drying rack. If you are using the dough to make ravioli, it will make about 30 pillows.
Unwrap the pasta dough and use a bench scraper or sharp knife to slice off sections of dough about one inch thick. Keep remaining dough tightly wrapped until ready to roll, so it doesn’t dry out.
Flatten a piece of dough into an oval-shaped disk, then roll it through the pasta machine on the thickest setting. For the first few passes, fold the pressed dough in half and run it through again on the same setting. Fold it in thirds, as you would fold up a letter, and turn the dough 90° so that it runs through the machine at a different angle. This helps to reduce curling or bending when the pasta dries later. When the dough feels supple after running through the press several times, begin reducing to thinner setting with each pass.
When the dough reaches the desired thickness (either the thinnest or next-to-thinnest setting, allow the sheet to dry slightly before cutting into strips or using as ravioli. In my experience with pasta, the cutting and shaping stage seems to work better when the pasta is not super-soft. If you rush directly to cutting it, at least with a machine, the dough tends to stick in the rollers, and it will definitely stick to a ravioli mold.
After pasta sheets are complete, allow them to rest for a couple of minutes before cutting, either with the pasta machine or by hand with a fluted pasta trimmer, pizza slicer or sharp knife. If cutting by hand, the simplest way is to fold the pasta sheet crosswise multiple times, and slice through the layers with a pizza wheel or sharp knife. Dust the pasta really well with extra semolina flour before cutting to minimize sticking.
This time, I’ve opted to use the cutter attachment for my pasta roller to fashion my lemon-herb pasta into fettucine strips, but this lemony pasta would also be terrific for making sweet crab-stuffed ravioli, or ricotta-filled tortellini. I will save those for another day. 🙂
We used the lemon-herb pasta in a couple of ways—first, with littleneck clams in white wine broth, and again as a base for an amazing dish of chicken thighs in vodka sauce that Les made for us.
It happens every time. The start of a new year is filled with good intentions, as everyone makes their resolutions to get fit, lose weight, improve their health. This is the reason for all the TV ads for gym memberships, weight loss products and home exercise equipment. It isn’t a terrible idea, of course, but there are simpler (and more sustainable) things we can do to get back into better habits, and most of them begin in the kitchen.
Along with many other people at the end of holiday indulging, I’m tired of so much rich food and find myself aching for fresher, lighter fare. After the heavy flavors of Thanksgiving dishes, it was spicy that I craved. But after the double whammy of Christmas and New Year’s, and all the sweets and booze that came with them, I just want to eat something—anything—fresh. Oh, and easy would be nice, too!
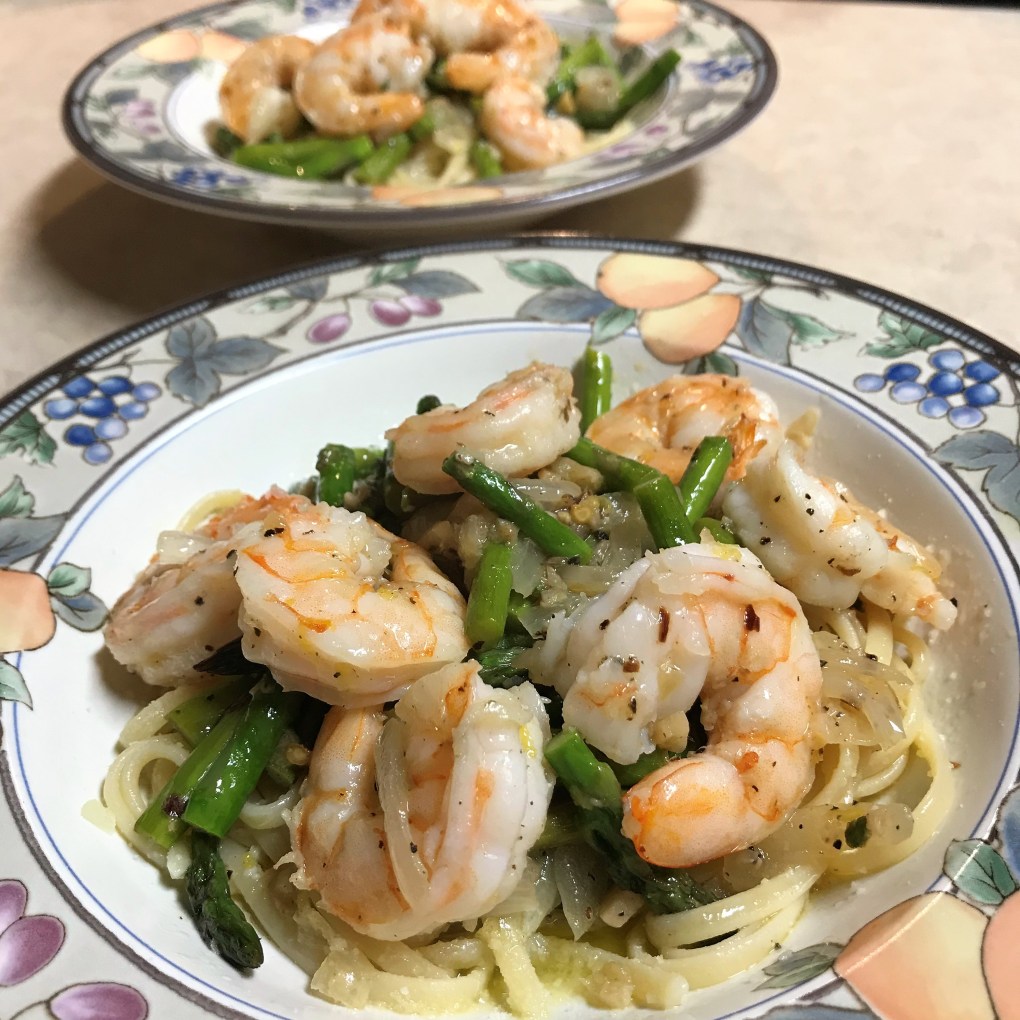
That’s where this recipe comes in, and there’s plenty to love about it. The dish is light and lemony, with big, juicy shrimp and bright, barely-crunchy asparagus. Piled high on a bed of al dente pasta, it looks like it came from a restaurant kitchen, and it tastes like fresh air after all the decadence we’ve plated in this house over the past six weeks.
You don’t have to go to a restaurant for a beautiful, tasty seafood dish. This one is easy to make at home!
Scampi is a simple dish to make, and the main thing to embrace is patience. You will cook the garlic slowly in olive oil over low heat, which allows it to essentially poach rather than sauté. This low and slow approach leads to the soft, mellow garlic flavor that is distinctive in scampi. And yes, it is a fair amount of oil, but remember that extra virgin olive oil is monounsaturated—what nutritionists call “good fat.” The meal will satisfy, and there are health benefits to boot. Sounds good to me!
If you don’t care for asparagus, sub in another crisp green vegetable, maybe some sugar snap peas or fresh broccolini. Or skip the sauteed veggie and serve the scampi alongside a salad. After the holidays, you deserve whatever fresh flavors suit your craving. Make it your own.
Serves: 2 Time to make it: About 35 minutes
Ingredients
2/3 pound fresh or frozen (uncooked) shrimp, 16-20 count* (see notes)
1/4 cup extra virgin olive oil
5 cloves fresh garlic, chopped
1/2 medium sweet onion, halved and sliced in crescent moon shapes
1/2 pound fresh asparagus, trimmed and cut into 2-inch pieces
A few shakes crushed red pepper flakes, if you like it spicy
Five cloves is a lot of garlic for two dinner portions, but the slow simmer mellows the flavor. Cut the onions and asparagus into similar sized pieces.
*Notes
The “count” on shrimp refers to its size, and represents the average number of shrimp per pound. The higher the number, the smaller the shrimp. I have no problem with using frozen shrimp, especially because supermarkets often receive the shrimp frozen anyway. For many reasons, including food safety, fair trade and human rights, I always purchase shrimp harvested in the U.S., and my preference is white gulf shrimp. It’s sweet and juicy, whereas some other types of shrimp can be sharp and briny. Check with your seafood department for flavor recommendations, and whatever you purchase, be sure to thoroughly clean and de-vein it (instructions for this at the end of the post).
Instructions
The oil should only barely bubble at the edges of the garlic. Turn down the heat as needed to ensure this process goes slowly.
After several minutes, the garlic will appear softer and more plump. Let it continue nice and slow for a total of about 20 minutes.
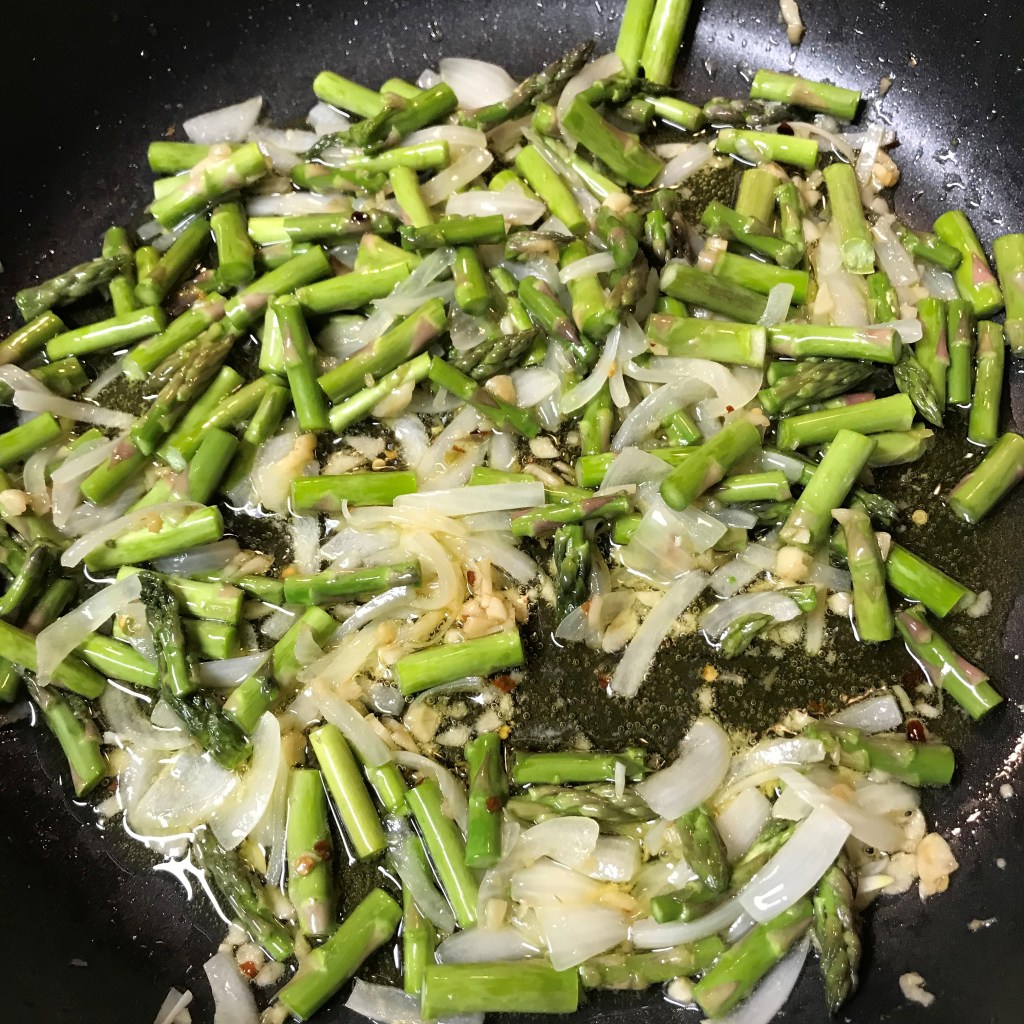
Increase the heat when you toss in the veggies, and cook until the onions are softened and the asparagus is tender yet still bright green.
The shrimp will change color at the edges as it cooks. When all pieces appear brighter at the edges, turn them over.
A generous squeeze of fresh lemon juice, plus some of the lemon zest, gives this dish a bright, delicious finish.
Move the hot pasta directly to the skillet, and swirl it around to grab the garlicky flavor.
We can’t resist adding a quick shake of parm-romano to the pasta before topping with the shrimp, but it’s optional. 🙂
Place a large, non-stick skillet over low heat. Add olive oil and garlic (plus the red pepper, if using) and leave it alone. When the oil heats very slowly, the garlic gets softer and more mellow, which leads to the flavor we all know in scampi. Rush this step and the garlic will burn, which is definitely not delicious. Expect this low, slow cooking to take about 20 minutes.
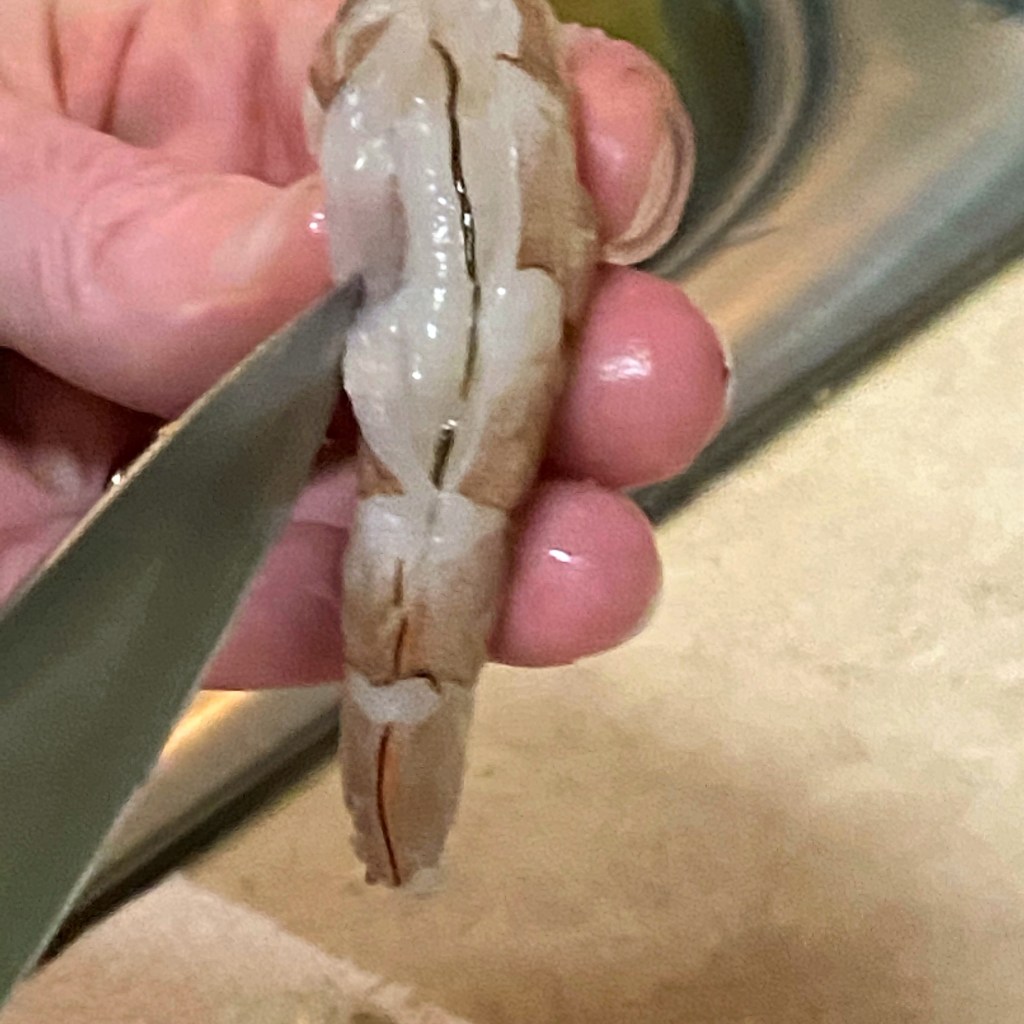
Thaw the shrimp (if frozen), and then peel and de-vein each one. If you have never done this before, it’s easy but extremely important, and I’ve provided some images at the end of the post to walk you through it. Removing the peel is pretty simple. Next, use a sharp paring knife to make a shallow cut down the outside curved part of the shrimp, revealing a dark stringy thing. I hate to tell you, but this isn’t actually a vein—it’s a digestive tract. Disgusting, but important to know. Slip the sharp tip of the knife underneath this nasty thing and pull it out. Lay the cleaned shrimp on layers of paper towel and set aside for now. If working ahead, cover and refrigerate.
Bring a large pot of water to boil for cooking the pasta. Season it generously with kosher salt and (once boiling) add the pasta, stirring to prevent sticking. Cook until al dente, according to directions on the pasta box. While this is underway, continue with the recipe below.
After the garlic has poached about 20 minutes, turn the skillet heat up to medium. When oil begins to bubble around the garlic, add the onions and asparagus and sauté 5 to 7 minutes, until the onions are translucent and the asparagus is slightly softened but still bright green.
Move the veggies to the outer edges of the skillet and arrange the cleaned shrimp in the center. Cook only long enough for the bottom of the shrimp to become pink and opaque.
Turn the shrimp, season the whole skillet with salt and pepper, and add in the lemon zest. Squeeze the lemon half over the mixture and continue to cook until the second side of the shrimp is cooked. Move all the skillet ingredients to the outer edges.
Using tongs, move the cooked pasta directly to the center of the skillet and swirl it around to coat it with the flavors of the skillet.
Arrange the pasta on serving plates or bowls, hit it with a little parm-romano blend, if you’d like, and top with veggies and shrimp.
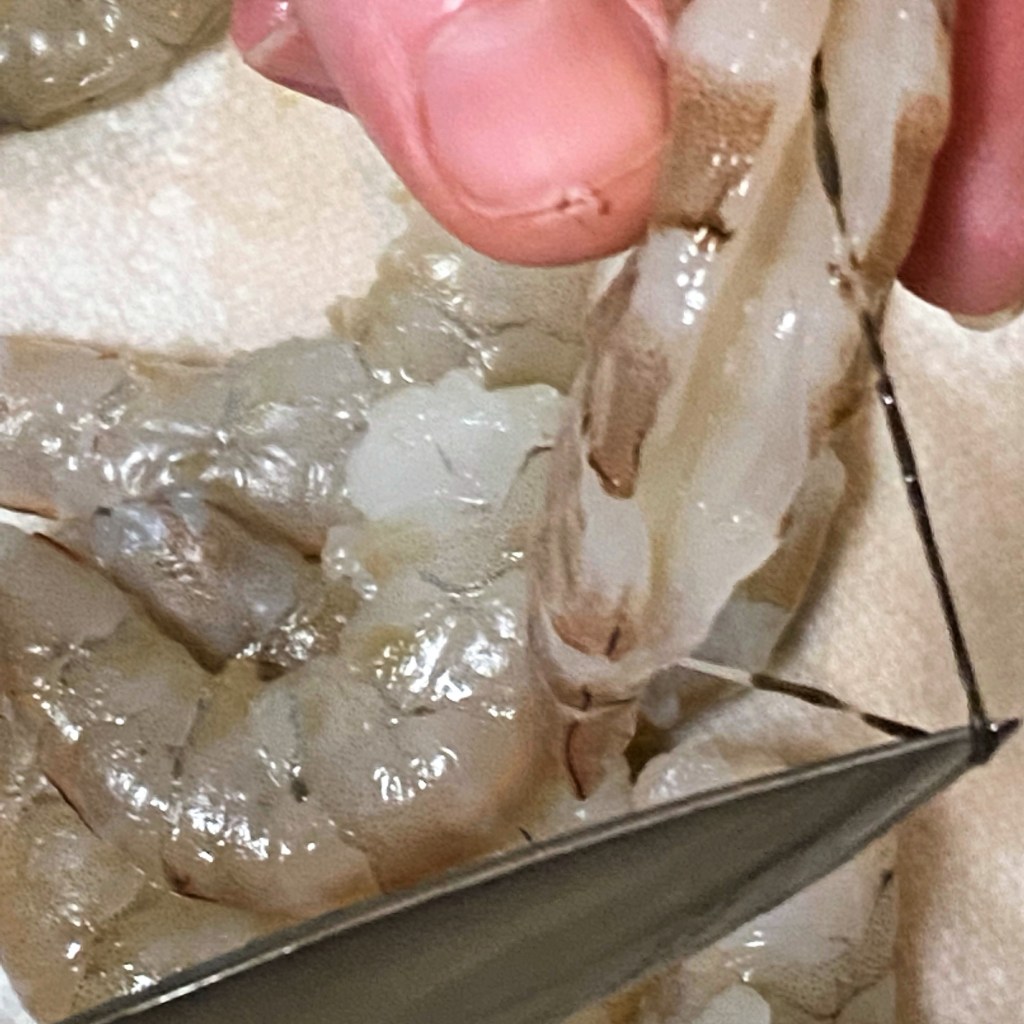
For goodness sake, do not skip this important step. As noted above, the “vein” in the outer curve of shrimp is actually a digestive tract, and the gunk inside is what’s left of the critter’s most recent meal (yuck). Food safety experts haven’t expressed serious concerns about eating it, but if it grosses you out (as it does me), grab a sharp paring knife and get that thing outta there!
Use the tip of a paring knife to slice into the outer curve of the shrimp, about 1/8″ deep.Pull the flesh back to reveal the dark stringy thing that isn’t really a “vein.” Carefully slip the knife tip underneath the thing, taking care not to cut it into pieces.Use the knife tip or your fingers to pull it out. I keep a paper towel handy to wipe the junk away.Follow these easy steps, then rinse the shrimp well and carry on! 🙂