I can’t remember exactly when I ditched boxes of potato flakes and started making mashed potatoes the real way for Thanksgiving (and every other time I wanted mashed potatoes). But I can say the process has evolved over the years. As my wife, Terrie, creator of this blog often says, cooking is about being inspired, taking chances and elevating your dishes. Just as I continue to try new methods and ingredients on the first dish I ever successfully created (chili), I’ve tweaked these garlic mashed potatoes over the past 20 years. In fact, they didn’t even start out as garlic mashed!
When I was growing up, I would sometimes take the baked potatoes my mother made, scoop out the innards, add margarine (Parkay, to be specific) and mash. It seemed to make them more tolerable.
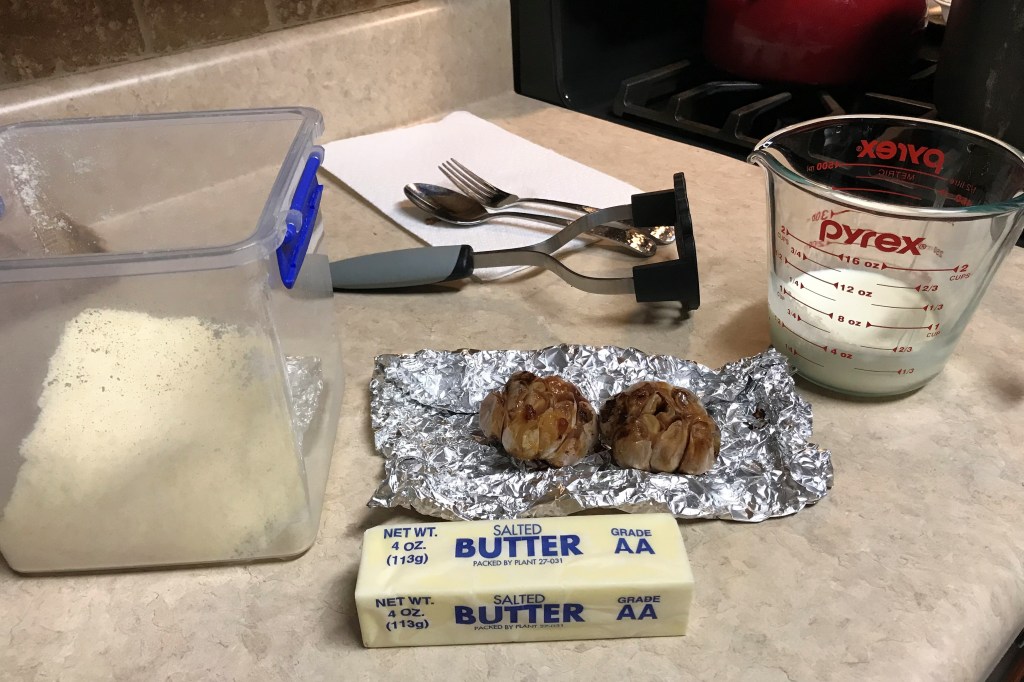
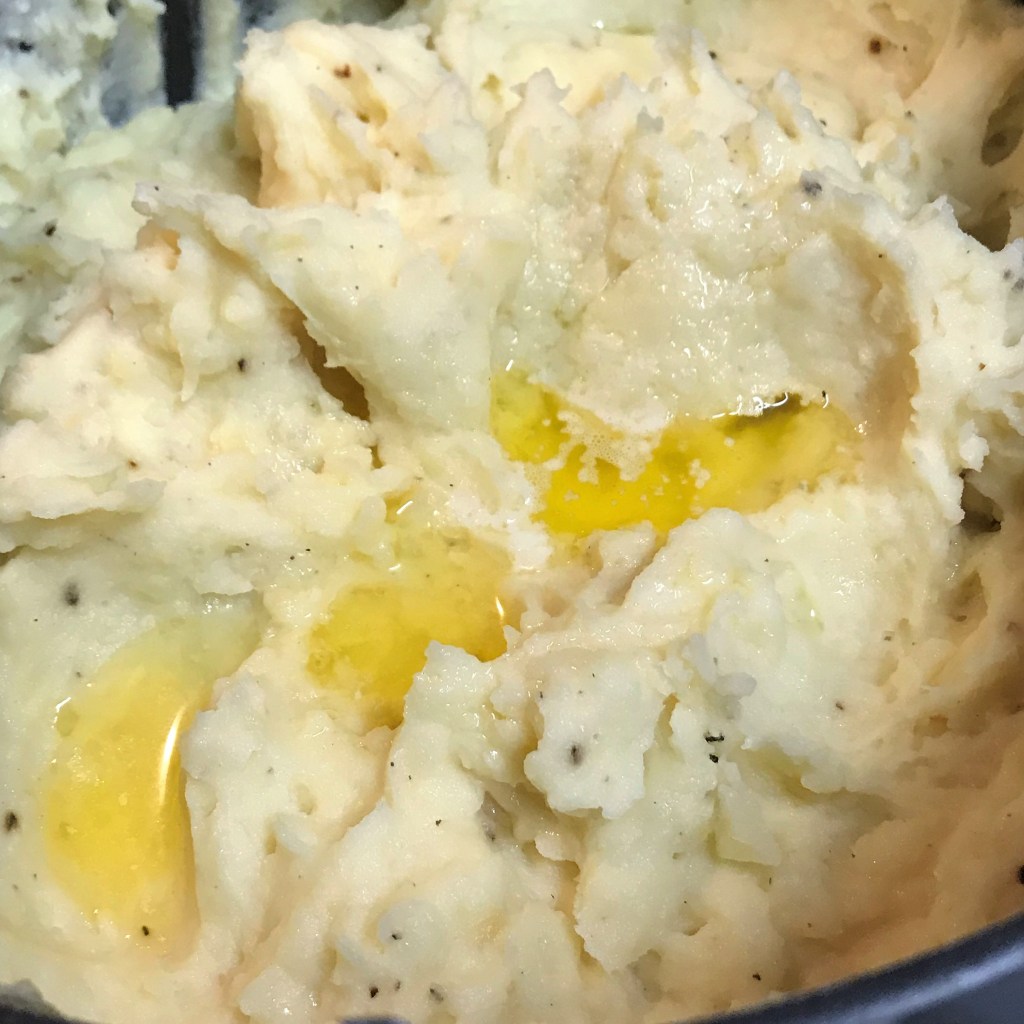
For the current version, I’ve upped the ante by adding real butter, roasted garlic, our grated parm-romano blend and heavy cream, none of which were in the early year versions of this dish. About a decade ago, I decided to experiment with the potato mix. I loved Yukon Gold and had a hunch doing a 50-50 mix of Yukon and russet would work well. I was right. The garlic mashed I’m serving up here is a silky blend of flavor that kind of melts in your mouth. I usually add more butter than what the recipe calls for. Just because, as Terrie and I say about certain recipes, “There’s too much butter (or parm-romano blend, bacon, bourbon, chocolate). Said nobody. Ever.”
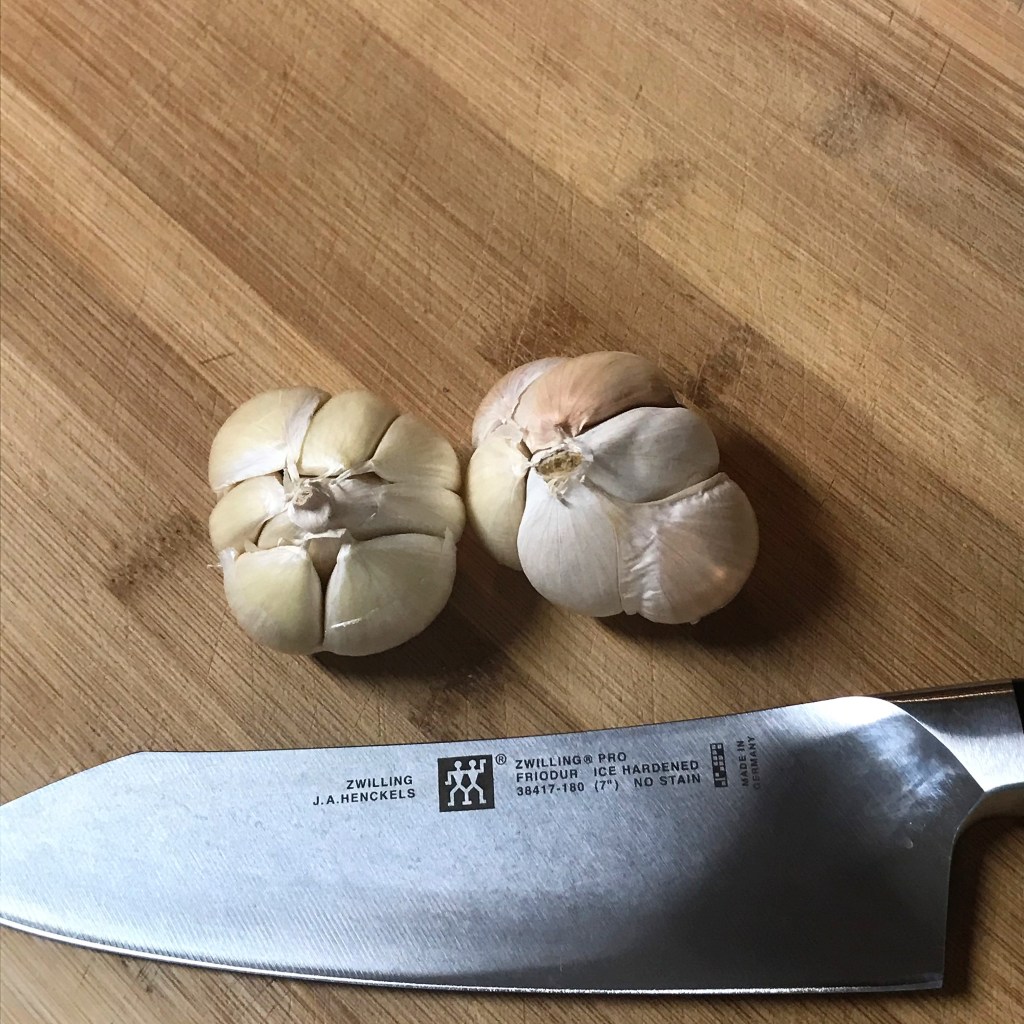
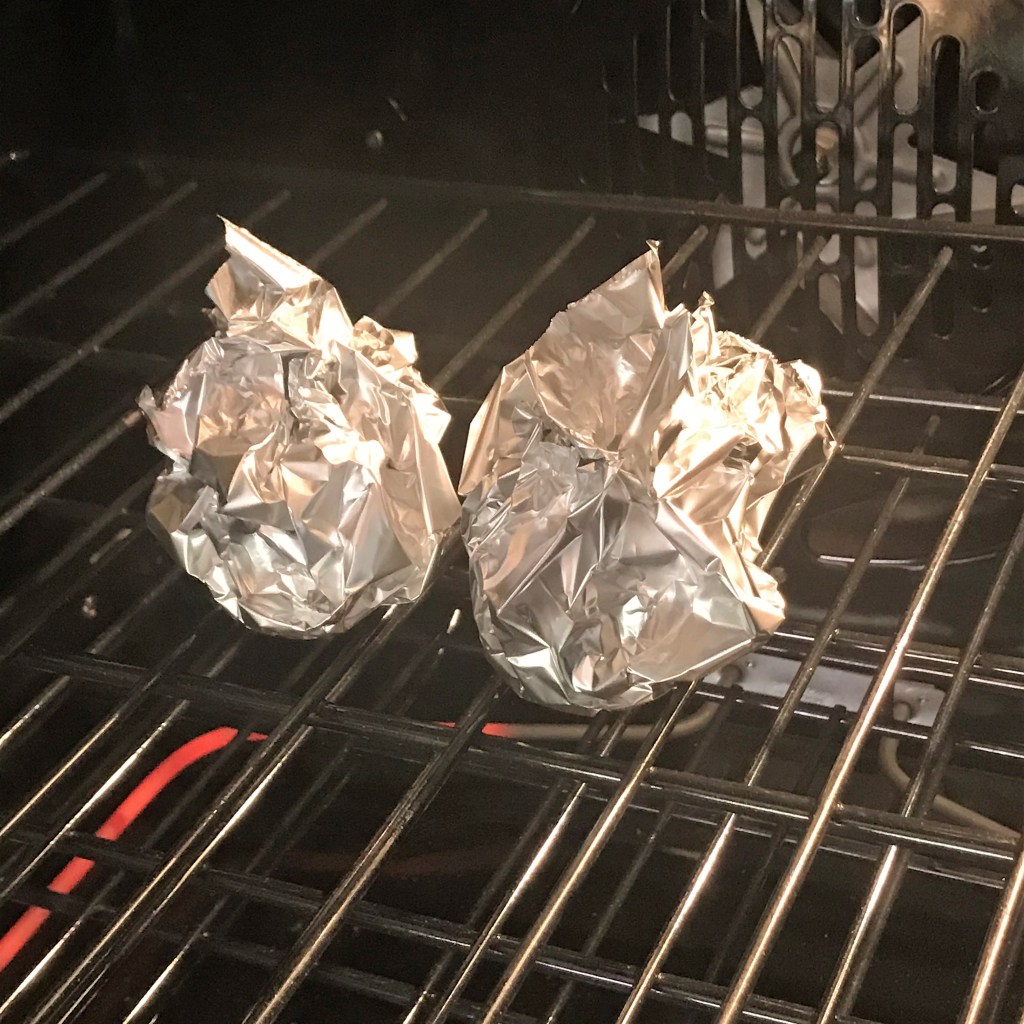
Preheat oven to 350° F. Roast the head of garlic by cutting off the top, adding oil (olive oil preferred) either from a bottle or a spray can. Wrap tightly in foil and roast for about an hour. You can check out Terrie’s post from yesterday for more detail and step-by-step pictures, but it goes like this:
Peel away most of the paper around the garlic, so you can see the individual cloves. This makes it easier (and less messy) to squeeze them out when the roasting is finished.Olive oil spray is very convenient for this task. Be sure to choose one that does not contain propellants.You don’t need any special equipment to do this. I usually put the garlic pouches directly on my oven rack.After about an hour at 350 F, the garlic is soft and caramelized. Roasting really mellows the flavor and adds complexity to whatever you’re making.
Peel and dice the potatoes and heat stove-top on high. As the water begins to boil, add salt and reduce heat to simmer. Cook until potatoes are soft enough to pierce with a fork. Drain potatoes and return to pot.
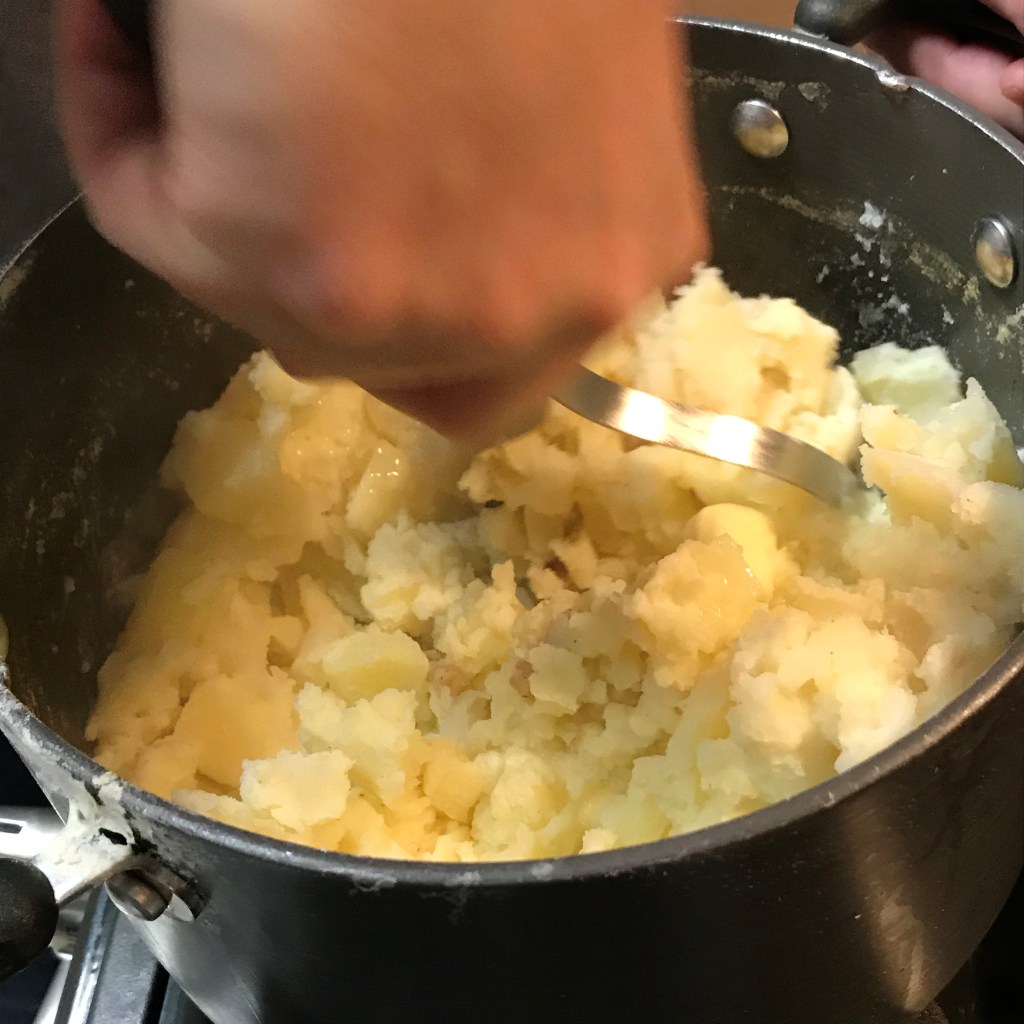
I started with two large russets and three good sized Yukon golds. Altogether, about 3 pounds.We call this “mise en place,” everything in its place for the mixing stage.When they’re fork tender, I drain the potatoes and put them straight back into the hot pot.
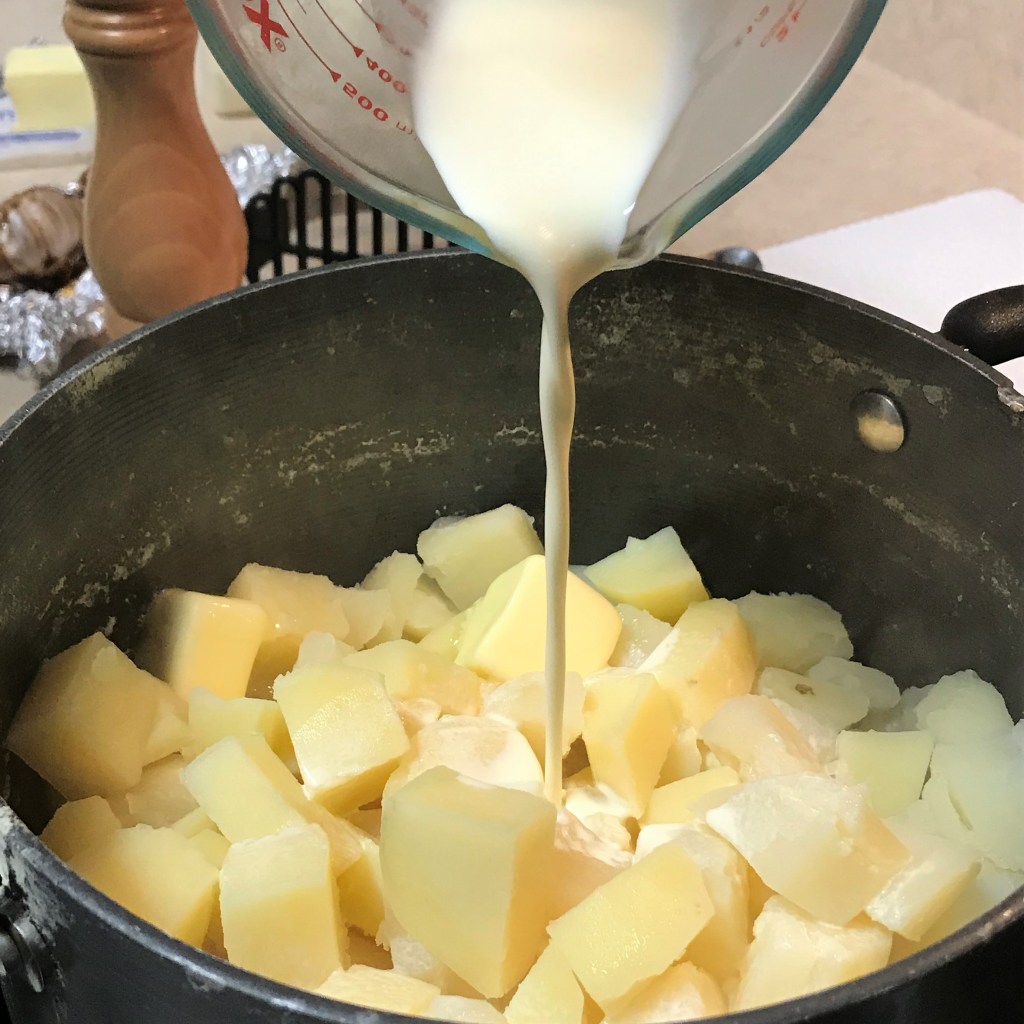
Add butter and heavy cream, add salt and pepper. Squeeze out the roasted garlic bulbs into the potatoes. Use a potato masher and mash by hand if you like. Or use a potato ricer if you like (before adding ingredients) for an even silkier texture. There was a time when I added the blend to a stand mixer, but I’ve since disavowed those years (the potatoes get too pasty).
Adding the initial cream. The butter is in there, too, the same color as the Yukon golds.The roasted garlic is the key to the garlic mashed.I get in there with my masher and start blending everything together.
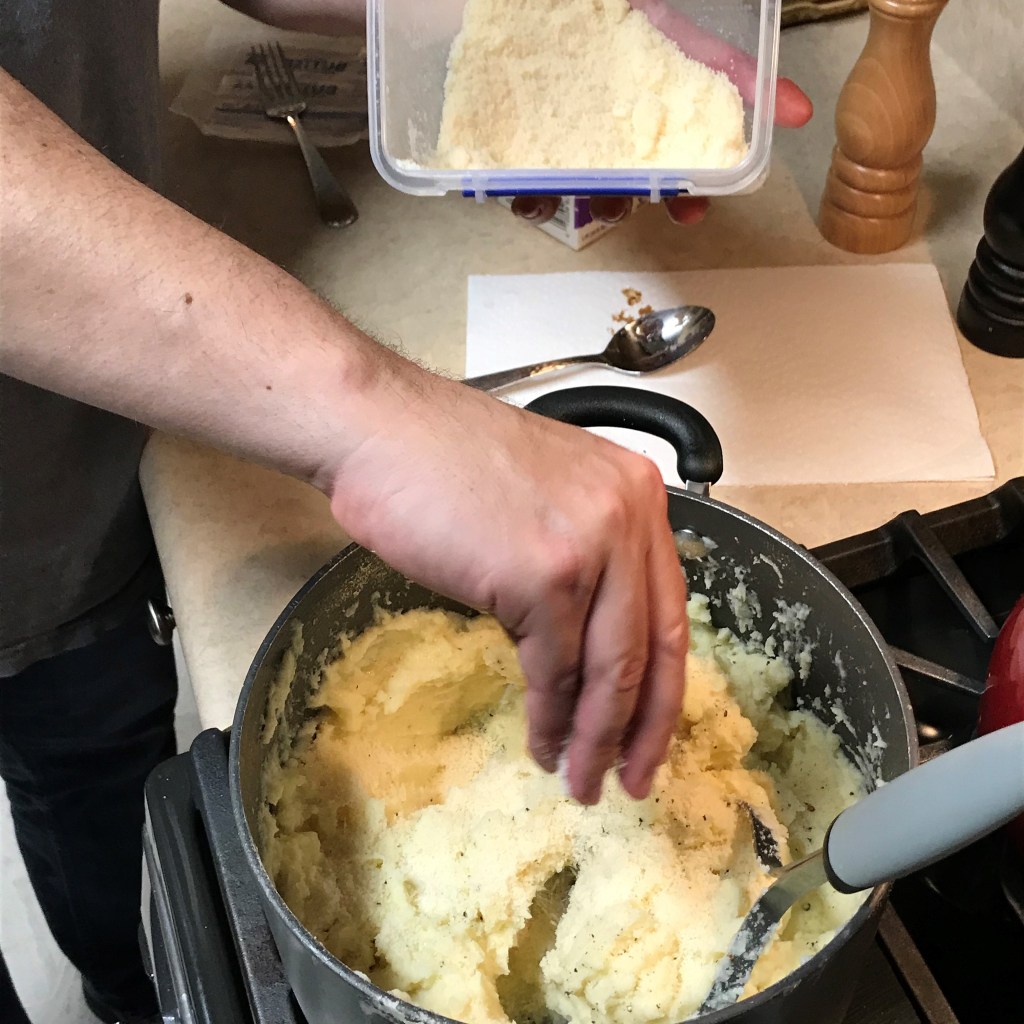
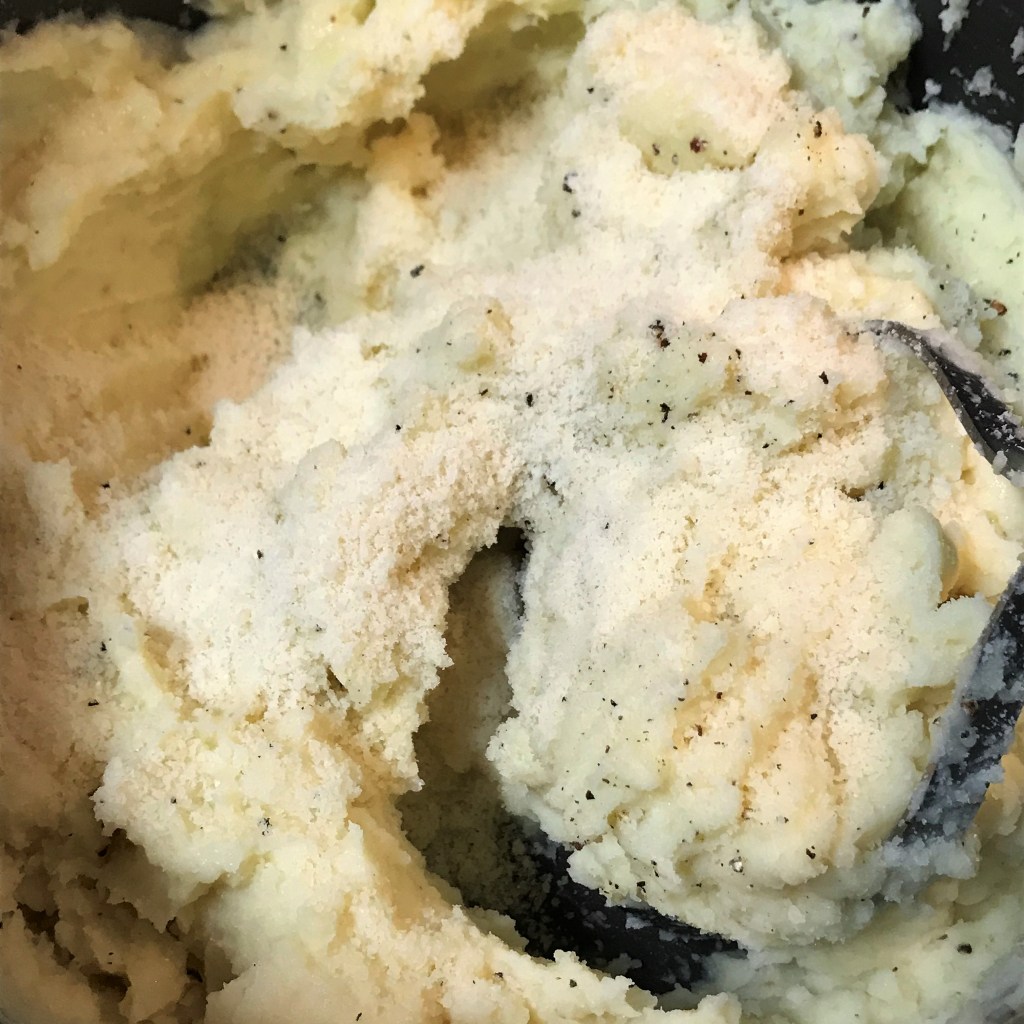
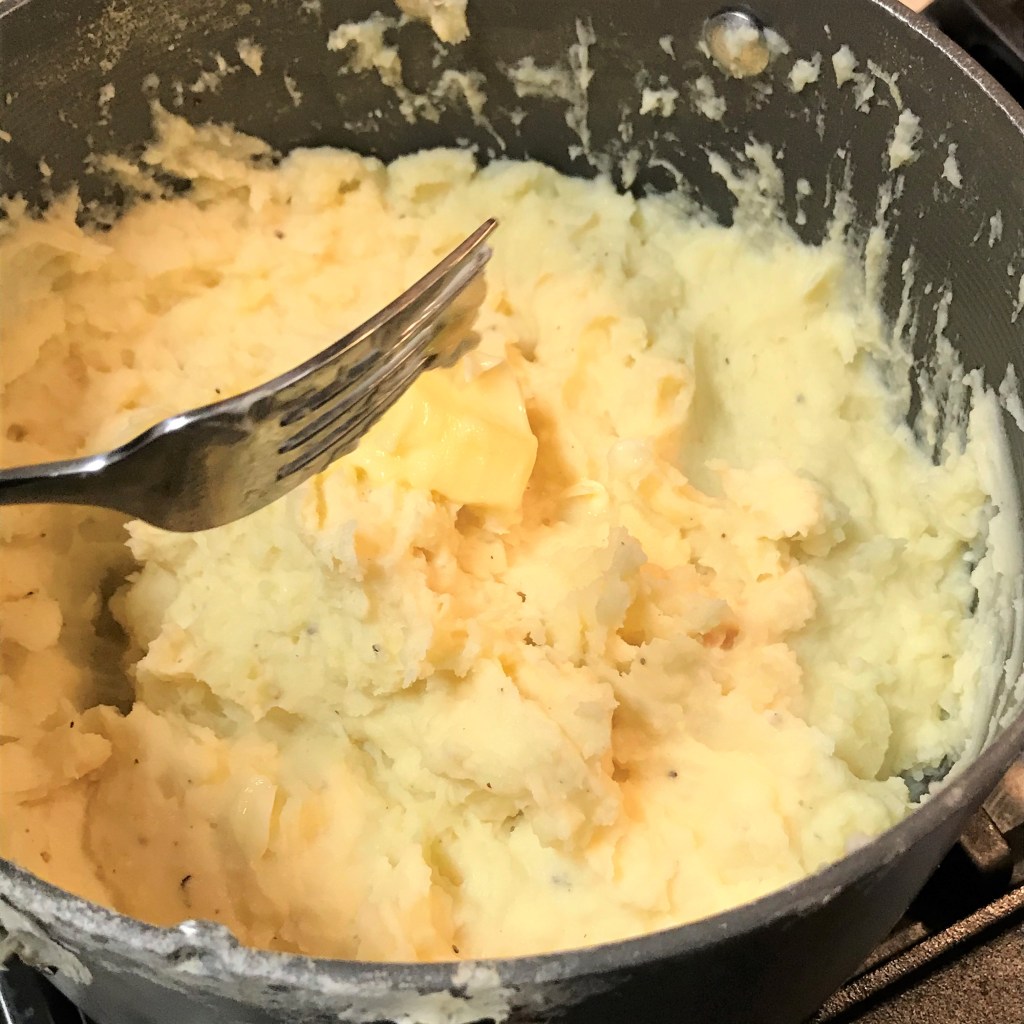
As you mix, continue to taste, adding salt and pepper as needed, but also adding additional butter and/or cream if it feels too potato-ey. Add the grated cheese blend and continue to mash until it completely disappears into the mix, which won’t take long.
You can never have too much parm-romano.More mashing to incorporate parm-romano and extra pepper.More butter. Of course!
Serve with an additional pat of butter, gravy or your own preferred alternatives. Terrie is already eating it straight from the pot.
Now we have perfection.
Terrie’s note:
The blend of potatoes Les uses makes these so special because the Yukon golds are smooth and creamy, while the russets add a soft fluffiness. The roasted garlic and parm-romano add new levels of savory flavor. They are good for Thanksgiving, but we also make them as a side for more casual meals, such as meatloaf, steaks, pork chops and beer can roasted chicken. I confess that I’m always on the lookout for another new main dish that would be an excuse to make these again. Feel free to share your ideas in the comments section. 🙂
One of the most satisfying cooking achievements is striking an item off my culinary “bucket list.” I started my running list a couple of years ago as a way to challenge myself in the kitchen, and my late-night Pinterest surfing (which, unfortunately, coincides with midlife insomnia) is making it longer. Occasionally, I might see a Pinterest recipe I want to try as it is, but more often, I see something that inspires me in a different direction. Either way, you don’t have to be good at math to recognize that my habit (plus my imagination) can only grow the bucket list, so moving an item over to the “made it” column feels like a major accomplishment. Today’s dish has been on the bucket list for at least a year. It’s time!
These pierogi—yes, that is the plural—will be coming up again in rapid rotation, because they were delicious and filling, but also easier to make than I expected. In the big picture of comfort foods, these Polish dumplings are about as far as you can go—tender dough stuffed with potatoes, onions, vegetables or whatever else you like, then boiled and fried in a skillet. With butter! What’s not to love? The arrival of fall seems like the perfect time to tackle them, too. The challenge for me in trying a classic dish for the first time is choosing which recipe to use, and that’s what I’m really sharing today.
An internet search for “best pierogi” will yield at least two pages worth of results that declare to be the original, the best, the most authentic, etc. One person’s “perfect” pierogi dough will fully contradict the next, and here’s the deal on that—everyone had a grandma, and everyone’s grandma made dishes that were “original” for their family, and so that was the best for them. But my grandma was Scandinavian, so how do I know from a cultural standpoint what is truly authentic—at least when it comes to pierogi?
Simple—I research it.
I dig deeper to learn where a dish comes from, who were the people who created it, what was their life and what foods were common to their everyday diet. All of these background notes help me arrive at my own approach to the dish. The central and eastern Europeans who created this dish were likely Jewish peasants, and so they would have used simple, inexpensive ingredients. Over time, the dish caught on with other classes, and sweet, fruit-filled versions evolved, but I’ve decided to keep them savory for my first run-through.
Next, I consult trusted recipe resources, whether that is cookbooks I already own or internet sites such as AllRecipes.com that provide multiple recipes for a particular food. I do not select a single recipe and give it a go. Rather, I look for commonality among the recipes, and then I trust my own cooking instinct as I dive in to create it.
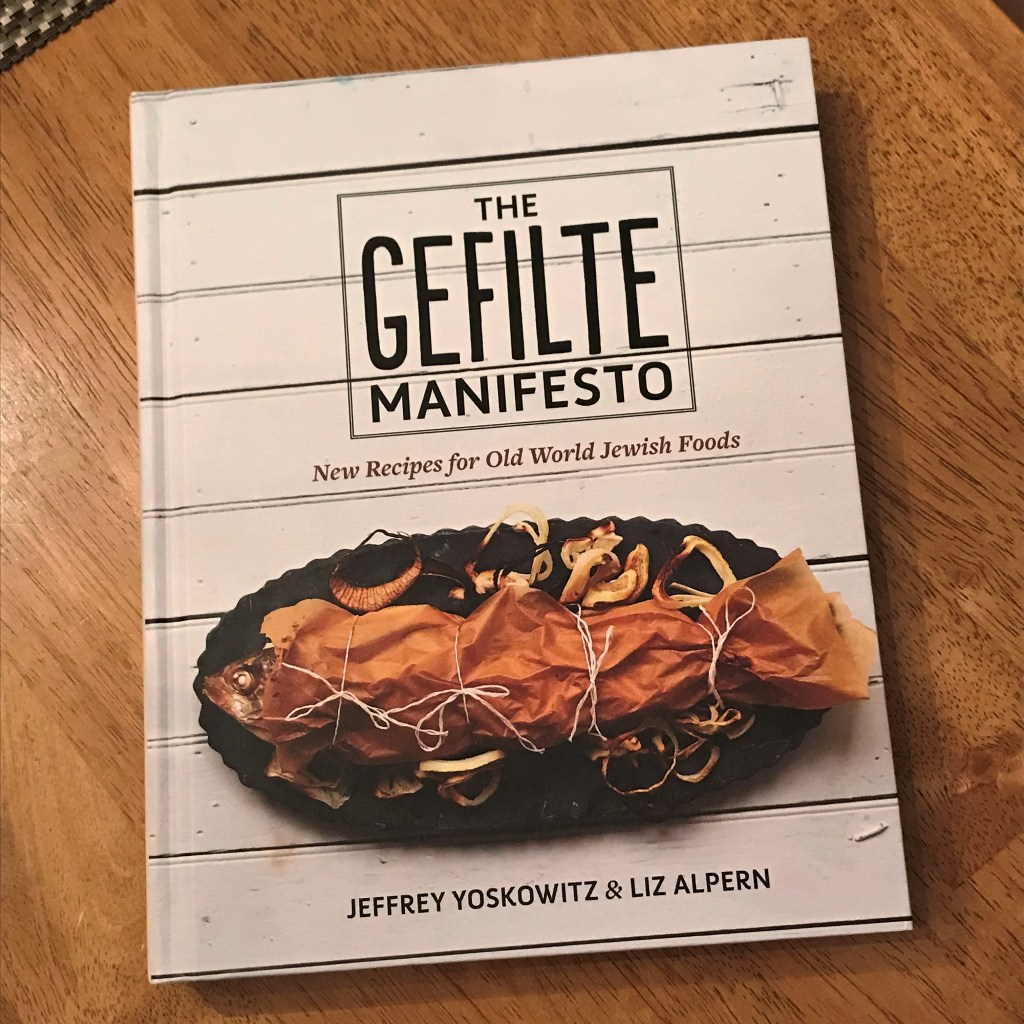
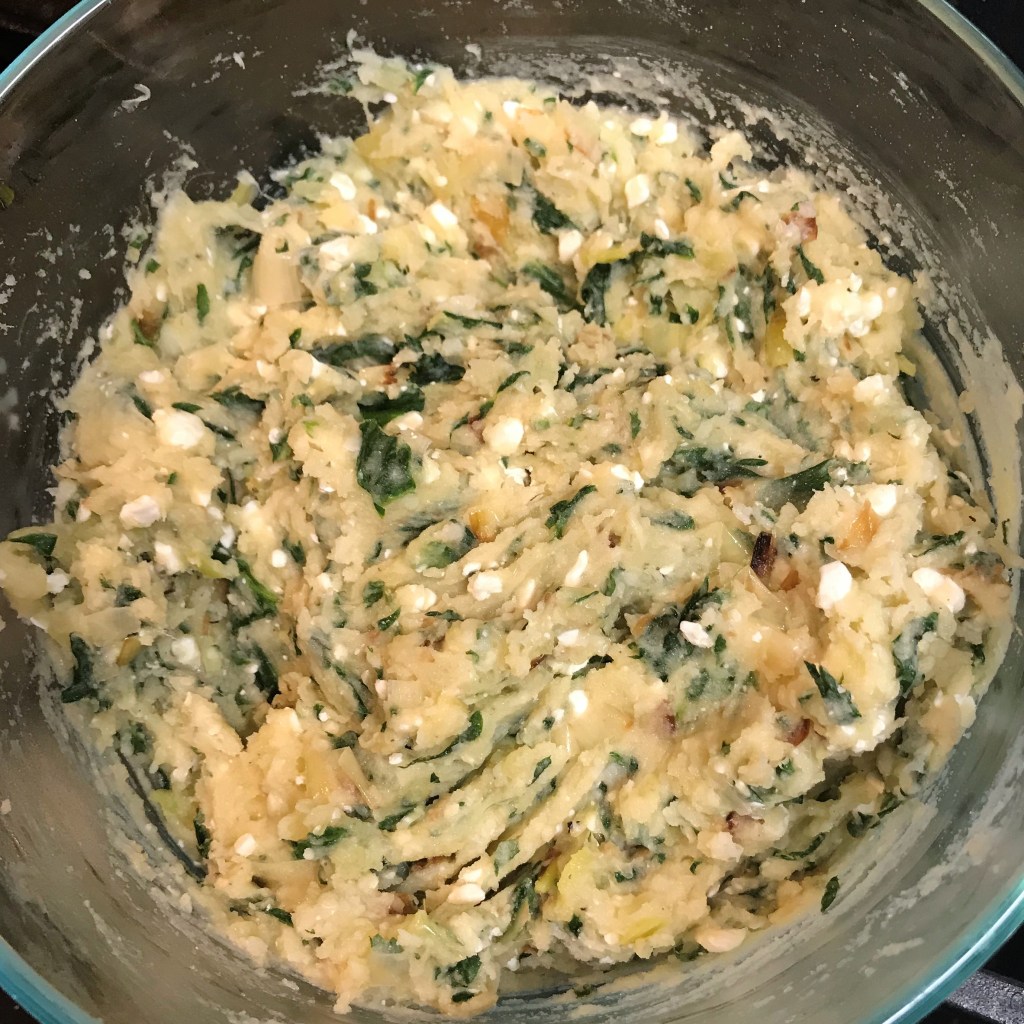
I’ve trusted this book, The Gefilte Manifesto, for the dough portion of the pierogi recipe, primarily because their ingredients and technique are very similar to Italian pasta dough, which is in my wheelhouse so I have a bit of confidence going into this. I’ll save the cream cheese-based dough for another time. For the filling, I followed early tradition and made a potato-cheese-onion mixture. And I’ve added sauteed fresh spinach because my half-Polish, all-Jewish husband (whose family, unfortunately, never made him pierogi) can’t get enough of it, so I always have spinach on hand.
Here we go!
Dough Ingredients
(adapted from The Gefilte Manifesto)
1 3/4 cups all-purpose flour
1/2 cup spelt flour
1 1/2 tsp kosher salt
2 eggs
3 Tbsp. warm water
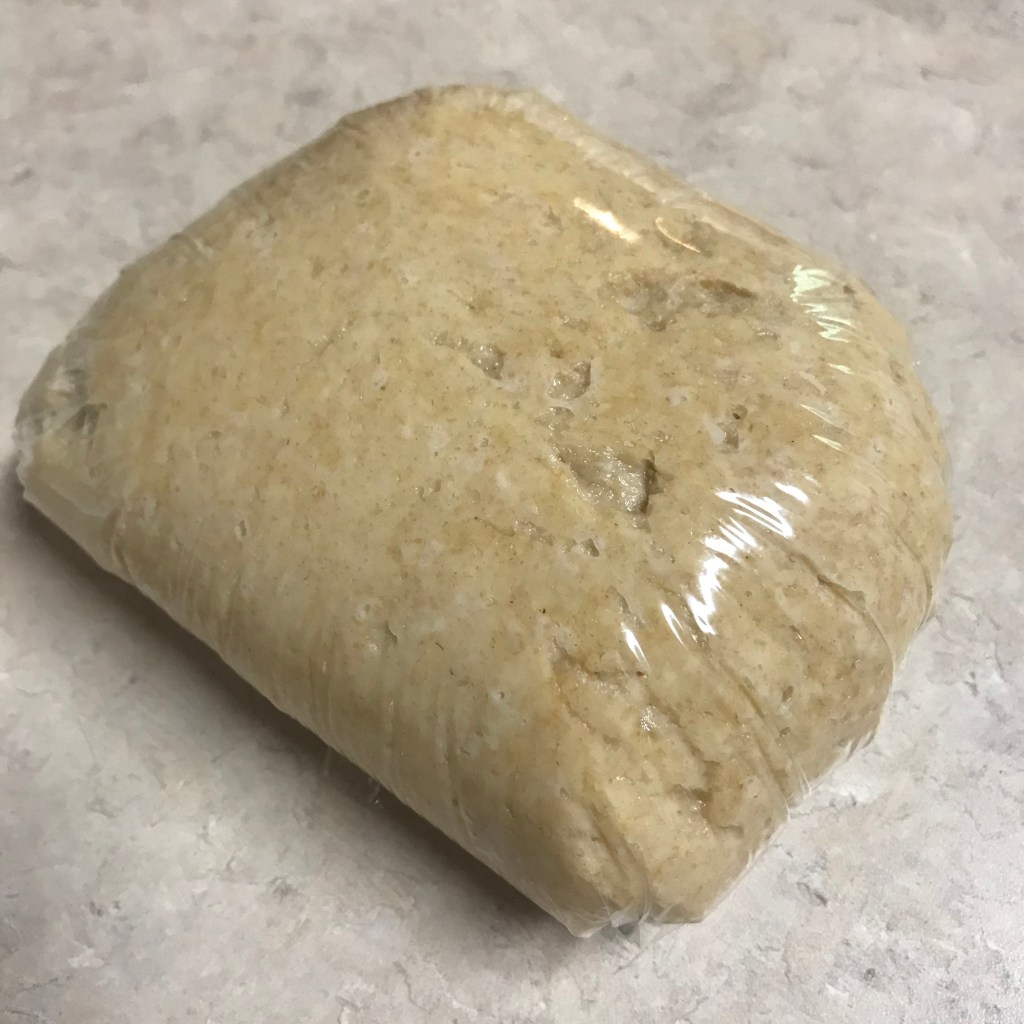
The original recipe made a very large batch of pierogi, and in hindsight, I wish I had gone that way because they turned out so delicious. But I halved the ingredients, as I often do when I make something for the first time. The original used only AP flour (which I never follow on anything), so I’ve adjusted for some whole spelt flour so that we can have some amount of whole grain. The original recipe said 3 eggs, but chickens don’t lay eggs in halves, so I used 2 and cut back on the suggested amount of water. I suppose I could’ve whisked three eggs together and divvied out half by weight, but that seemed overkill, and the eggs add richness and protein. I followed my instinct and made the dough the same way I make pasta dough but with less kneading, and set it aside to rest while I made the filling.
Unlike pasta dough, this pierogi dough was only kneaded enough to be fully mixed.
Filling Ingredients
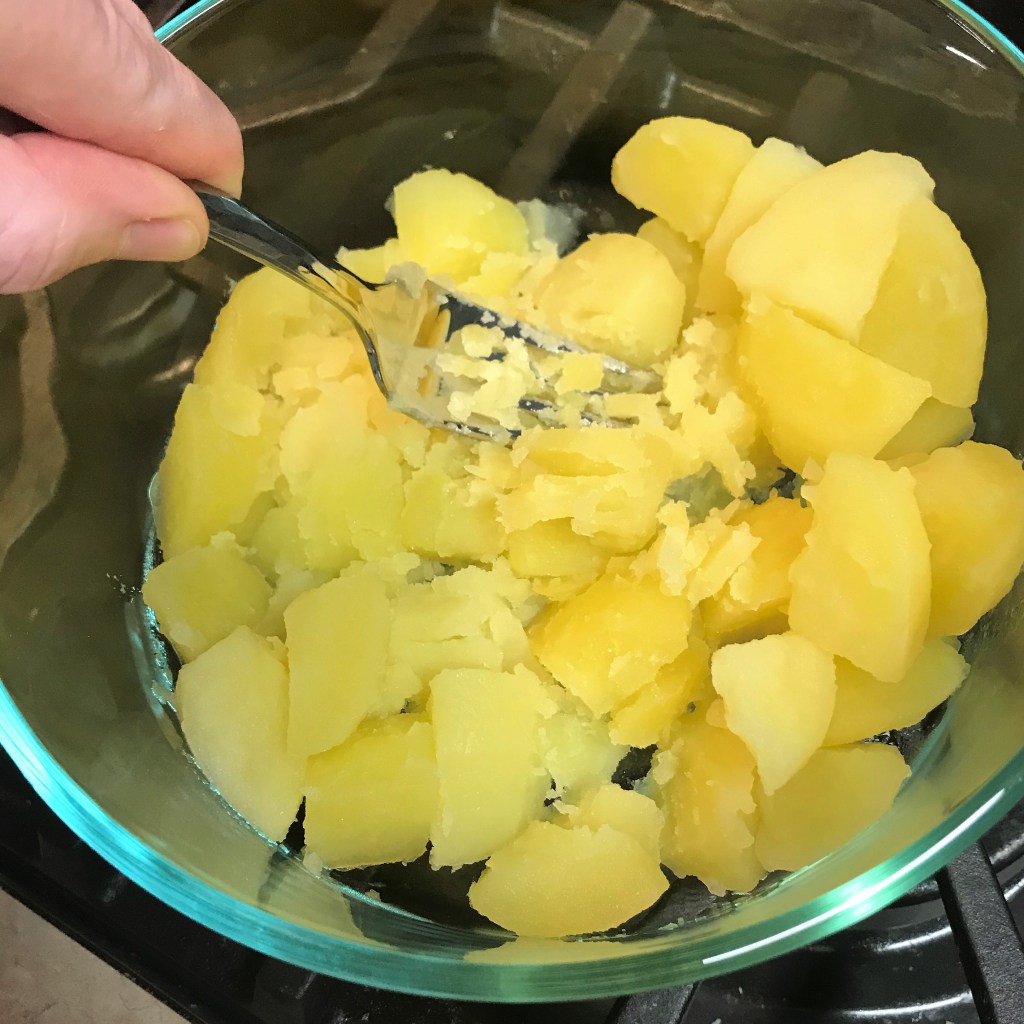
4 medium Yukon gold potatoes, peeled and boiled until fork-tender
1 Tbsp. extra virgin olive oil
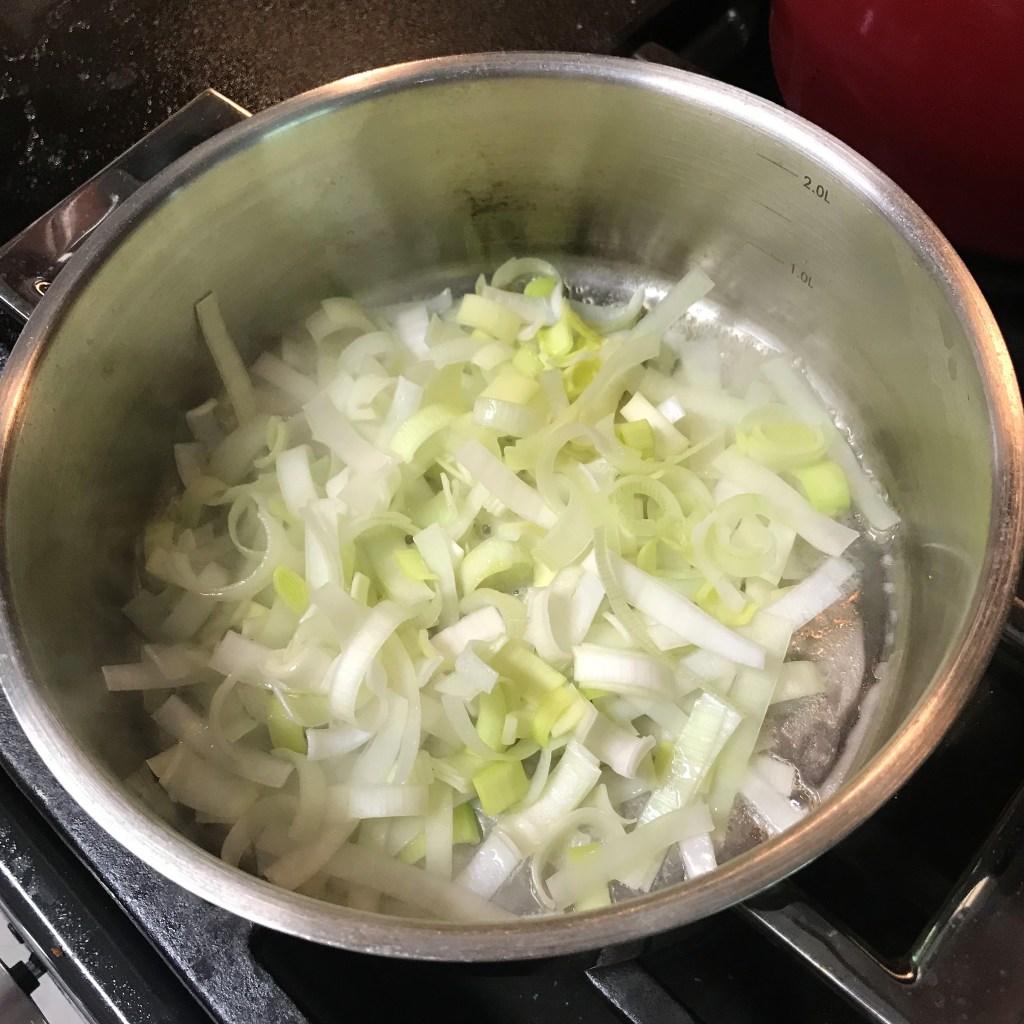
1 leek, white and light green parts, split lengthwise and sliced thin
2 handfuls fresh baby spinach
1/3 cup small curd cottage cheese
1/2 tsp. freshly grated nutmeg
2 oz. finely shredded white cheddar cheese
Kosher salt and freshly ground black pepper to taste.
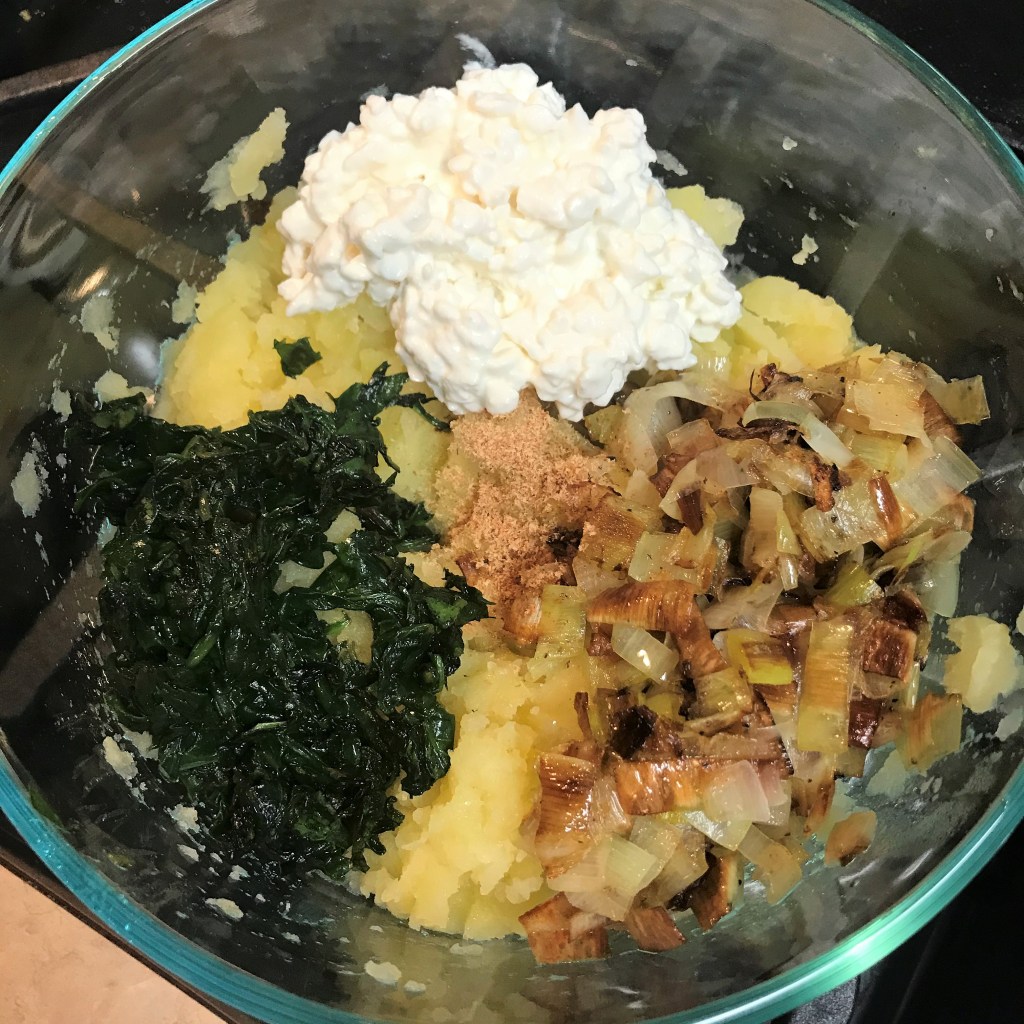
The filling ingredients are all very simple on their own, but so comforting in combination.
Some of the suggested filling recipes I considered mentioned addition of an egg, but I didn’t feel this was important, given that the Yukon gold potatoes already had a creamy quality. I decided the cheddar and cottage cheeses provided enough binder. I put the mixture in the fridge to chill while I rolled and cut the dough into circles.
Putting it all together
Rolling out the dough proved more time consuming than I expected, given that I hadn’t kneaded it much. It was surprisingly strong, which means gluten strands had formed during the rest time. Again, I followed my instinct from experience with pasta, and covered the dough a few minutes to relax those strands, then continued rolling, until the dough was about 1/8” thickness. I did this in two batches.
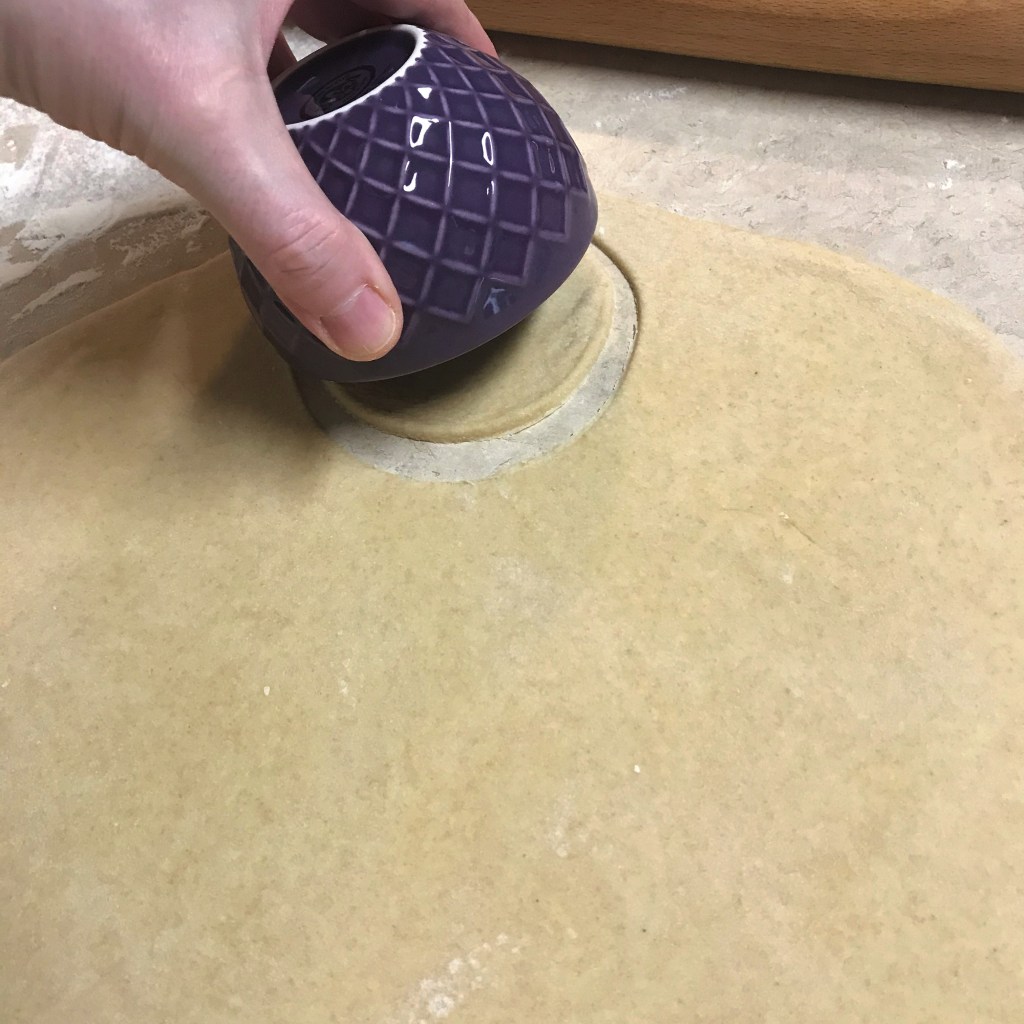
All the recipes I found suggested cutting about 3 1/2” circles, and the only thing I had that size was a little ice cream bowl. Note to self: buy a biscuit cutter already!
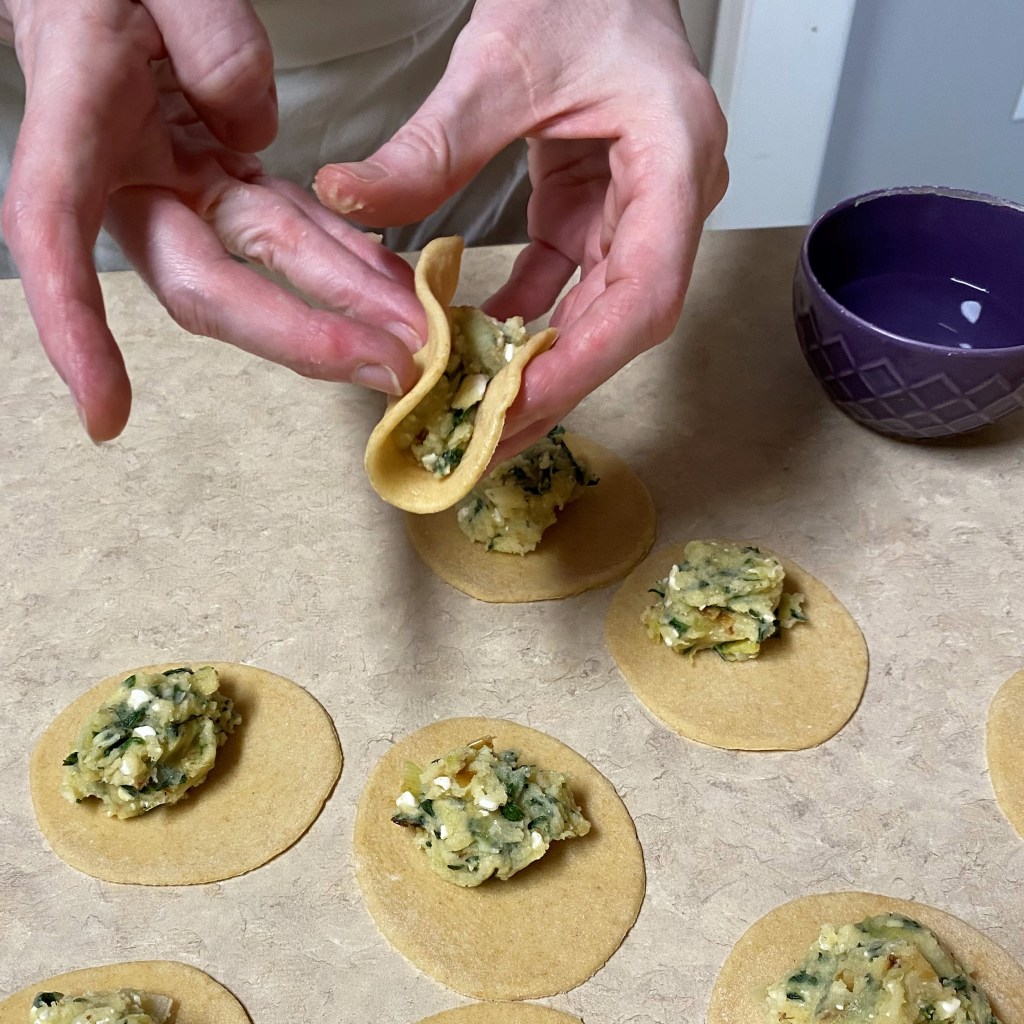
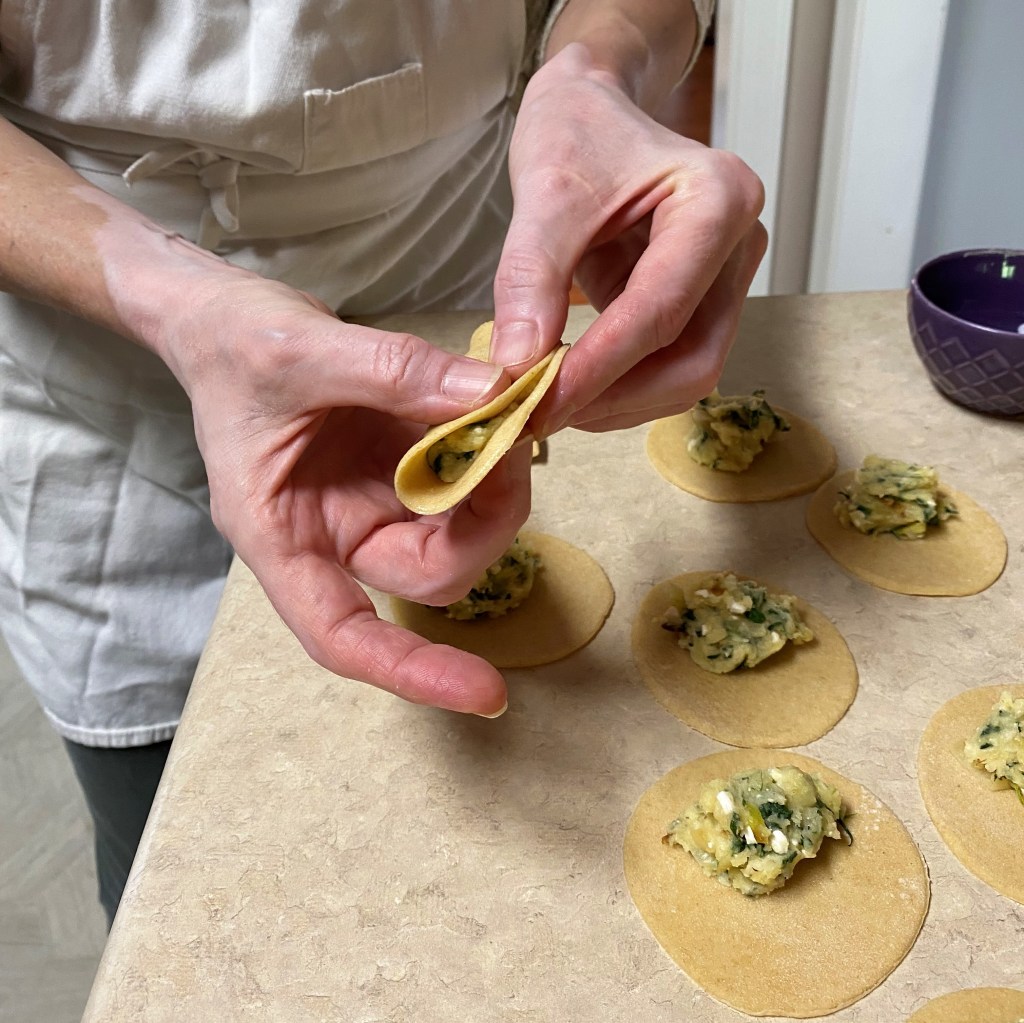
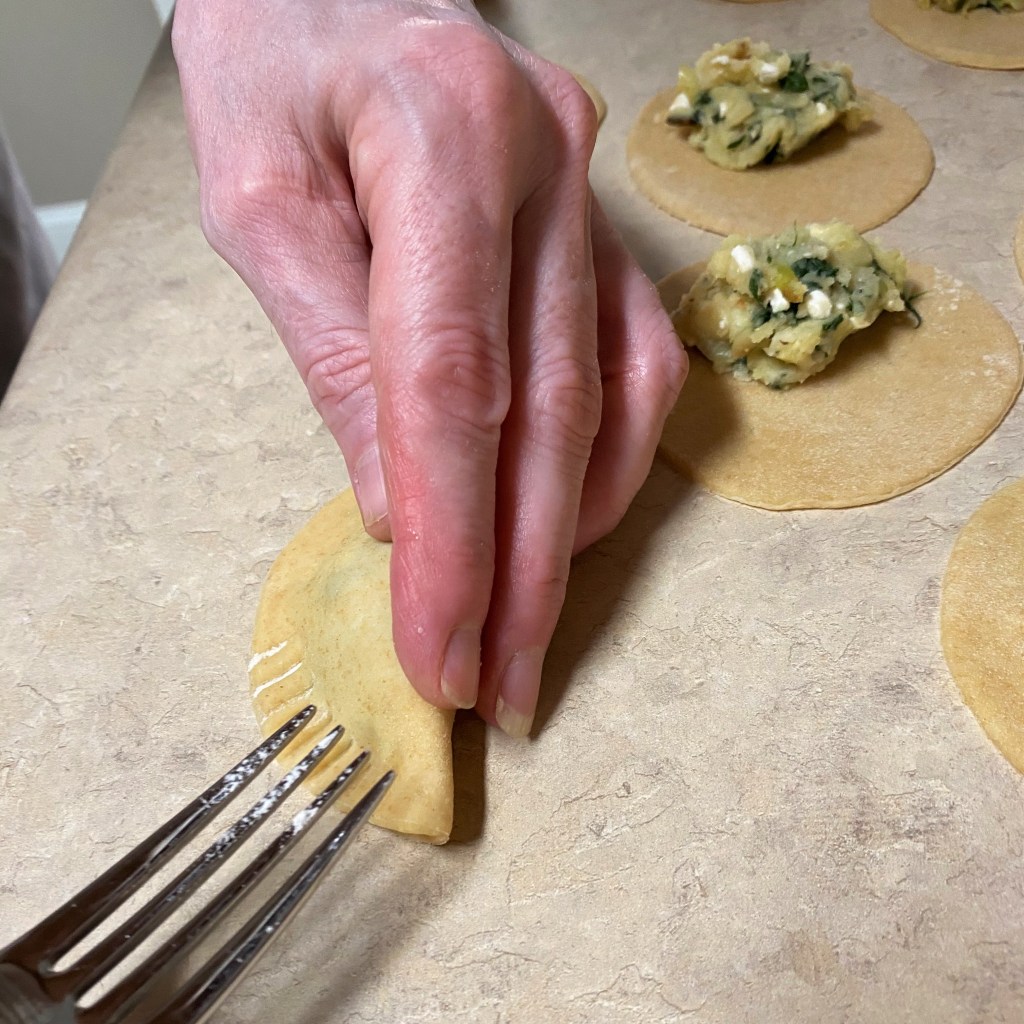
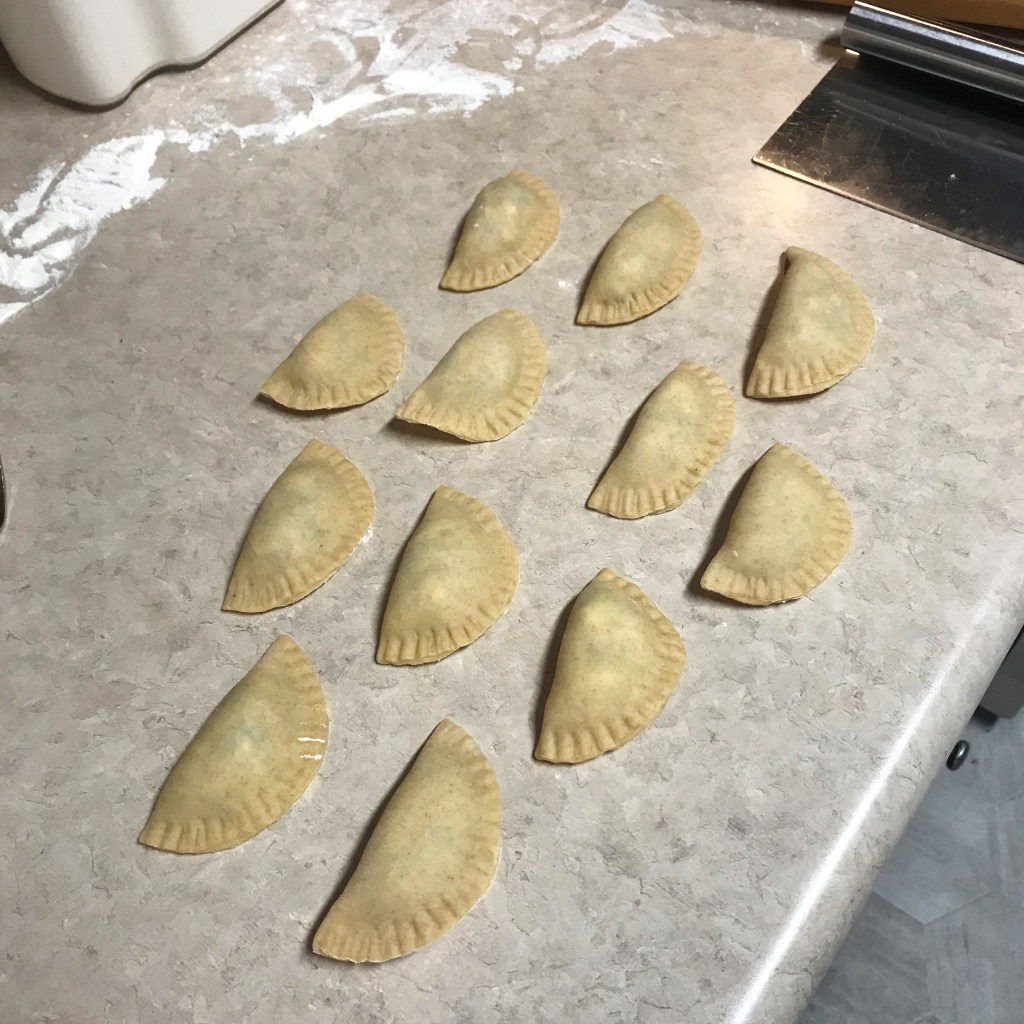
On to the fun part—shaping the pierogi! I spooned about 1 1/2 teaspoons of filling mixture onto the center of each dough round, then I dipped a finger into a small dish of water and wet the outer edge of the rounds to help seal the dough. This is important, because a good seal prevents the filling seeping out during boiling. Anything oily along the edge of the dough will cause the edges to separate, so I was also careful to keep the filling right in the center of the rounds as I closed them. I cupped the dough round in one palm, and used my other hand to seal the edges tight, stretching the dough as needed to fully envelop the filling. Once the rounds were sealed up into half moon shapes, I crimped the edges with a floured fork and let them rest while the water came to boil.
The bowl was not ideal for cutting, but the right size. Cut circles close together to get the most out of the dough.
I carefully stretched the dough as needed to cover the filling completely.
Being careful not to squish the filling to the edges.
Crimping provides a tighter seal and also improves the appearance.
I let these guys hang out on the counter while the water came to a boil.
Boiling and Pan-frying
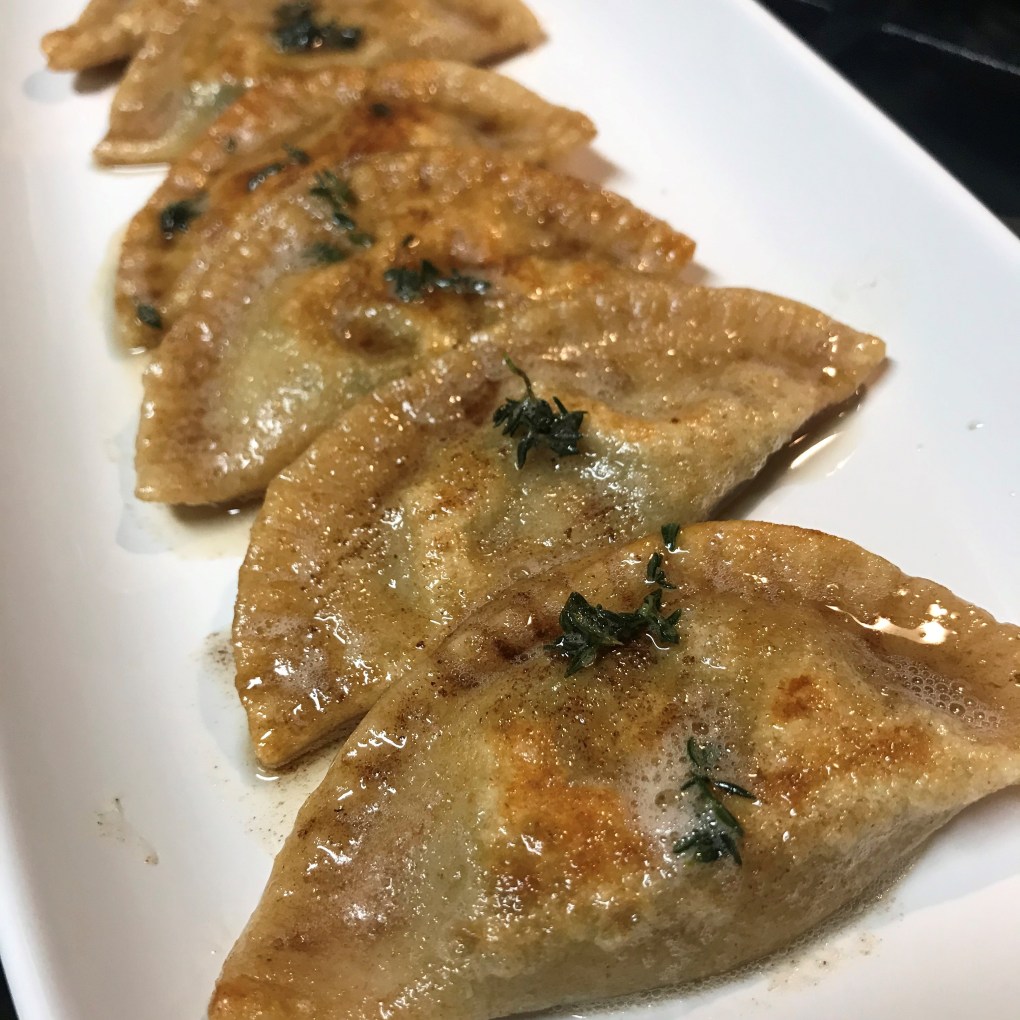
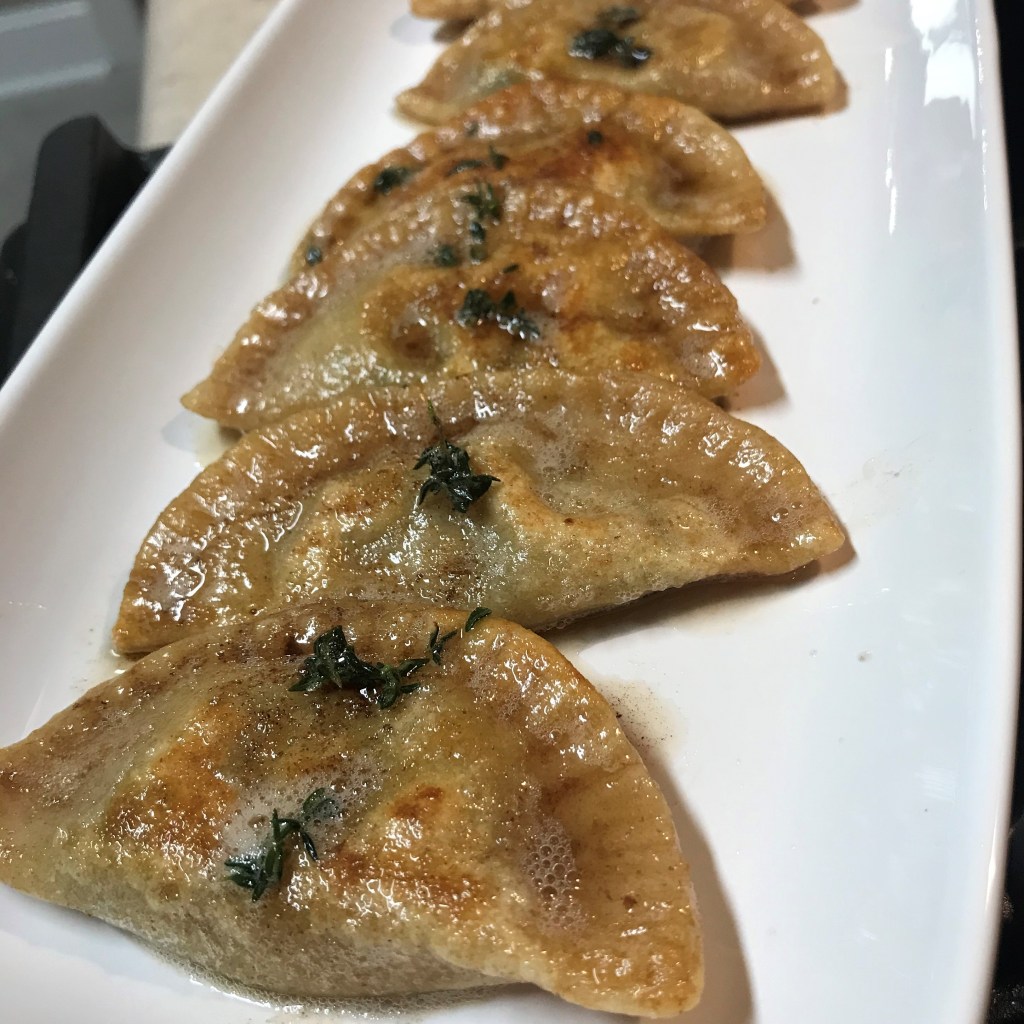
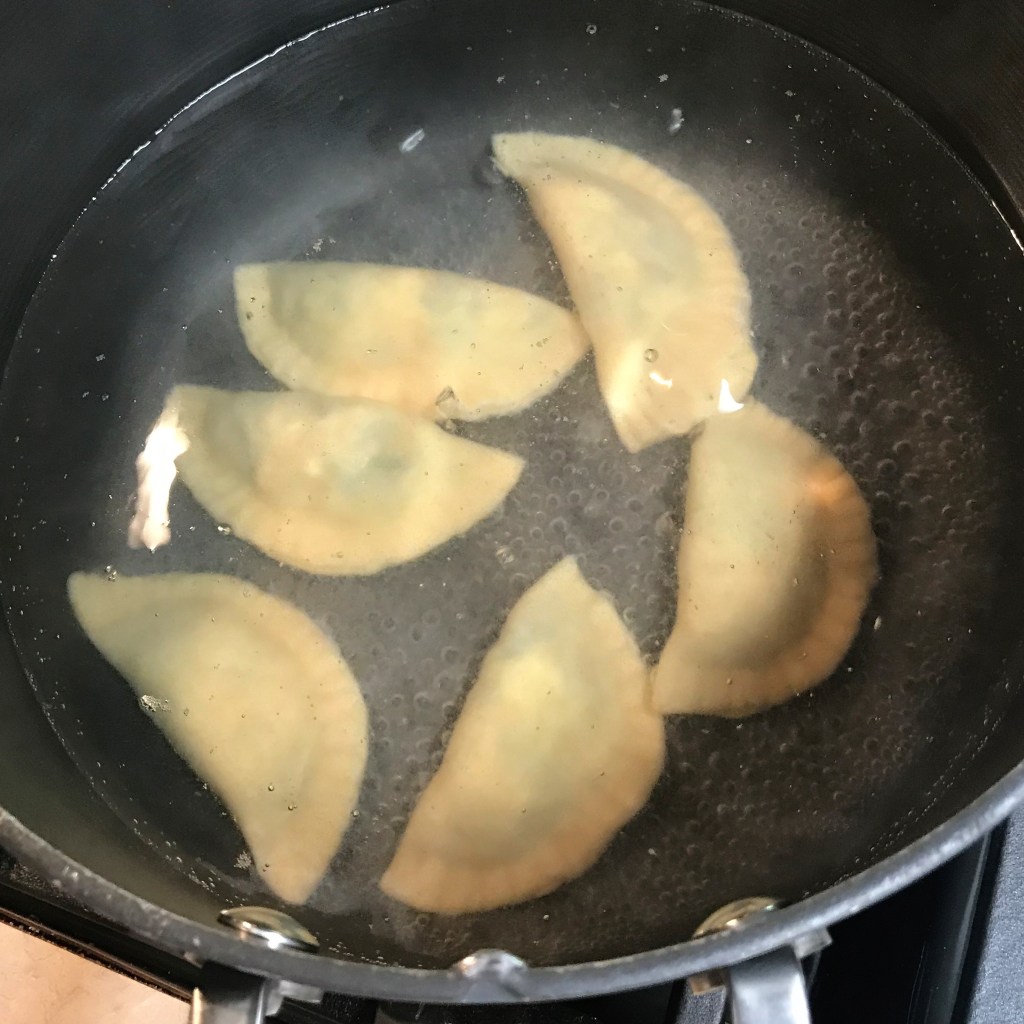
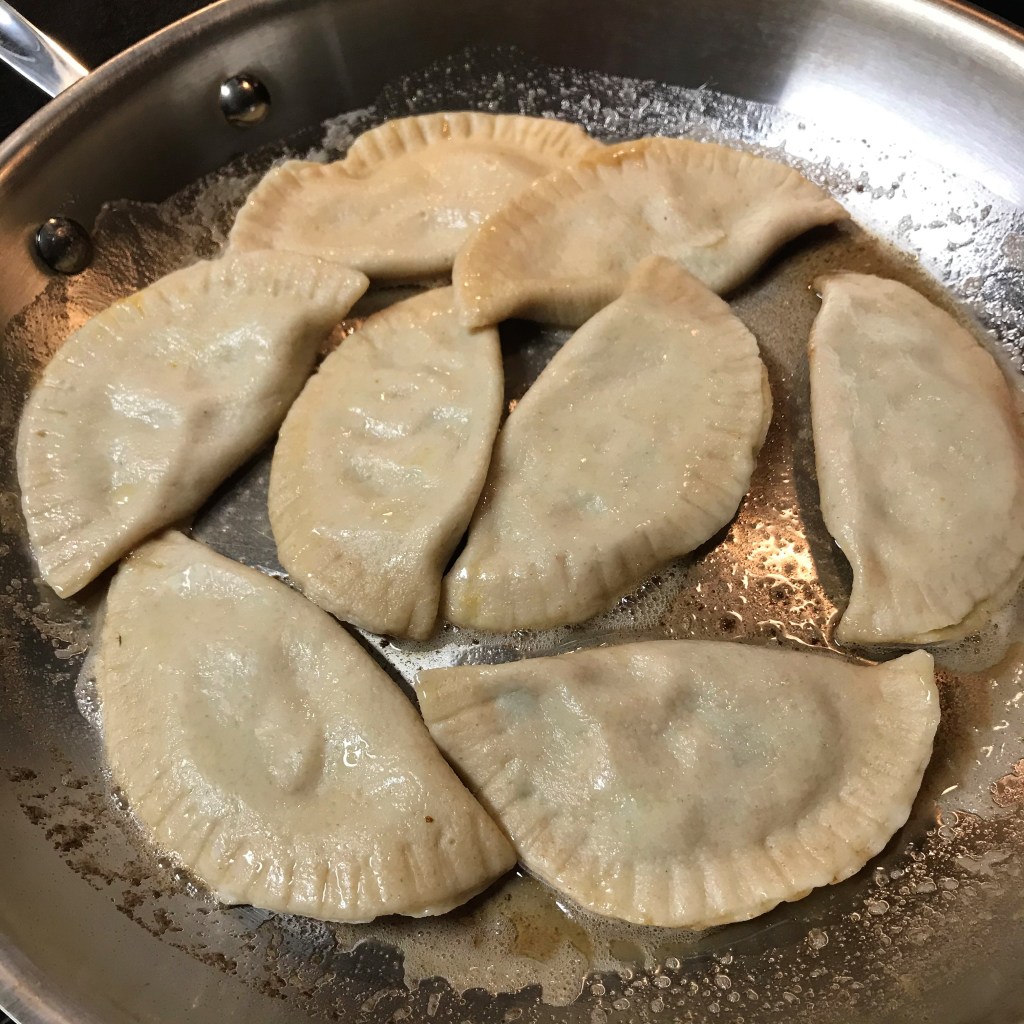
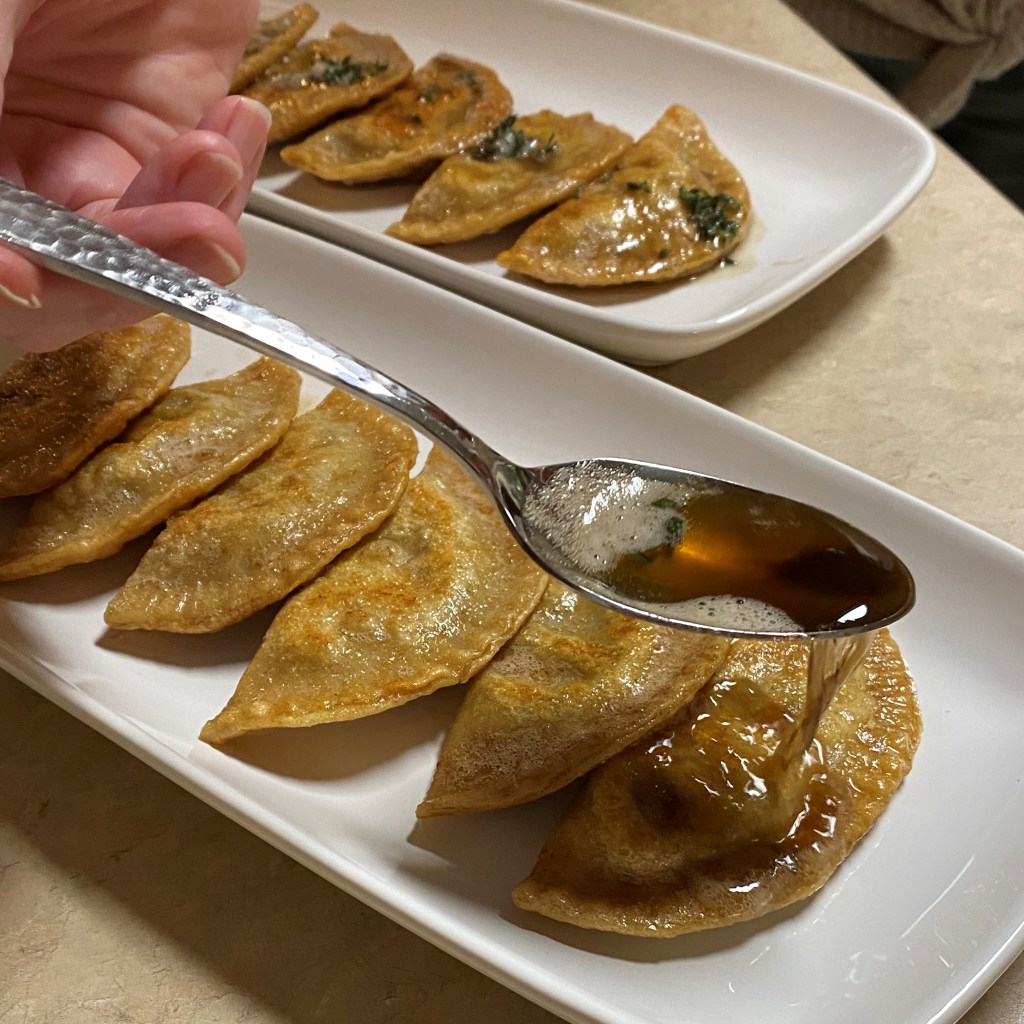
As with pasta water, I used a generous amount of salt. Don’t skimp on this out of fear of sodium—remember that most of the salt will stay in the water, and the pierogi (like pasta) will take up just enough to season it well. Various recipes I’d seen suggested that the dumplings would initially sink but eventually float, and I followed the recommendation to cook them about 4 minutes from the float stage. They cooked at a gentle boil, just above a simmer. I scooped them out onto parchment paper, and though they could have been served exactly like that, I pressed on with the pan frying to give them some extra texture—and, of course, the browned butter. 😊
Don’t crowd the pan, and keep the boil gentle.
I used 2 tablespoons unsalted butter for frying.
Look at that beautiful browning!
The browned butter gave a really nice, nutty flavor finish, and the fresh thyme leaves dressed them up perfectly.
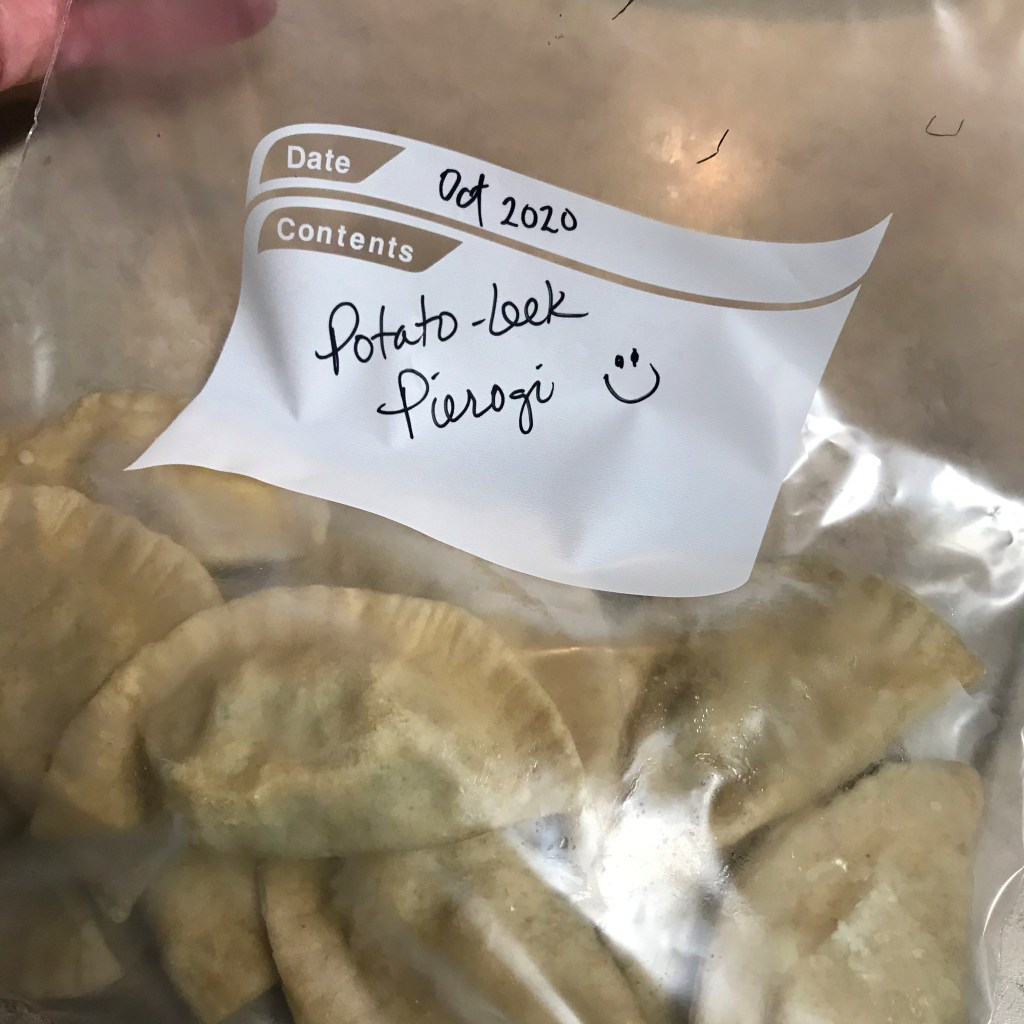
This half-batch of pierogi fed us for dinner twice, and I ended up with enough leftover to freeze for later. I laid the (un-boiled) individual dumplings out on a parchment-lined sheet, covered loosely with another sheet of parchment and frozen overnight, then I transferred them to a zip top bag for cooking later.
Ready for a quick weeknight meal later this fall! Boil them straight from the freezer.
These turned out so comforting and delicious, I wish I had made them sooner, but I’m glad to get them off my bucket list! 🙂 Here is a sampling of my remaining “someday” recipes, and I hope that sharing this glimpse with you will give me the accountability I need to get cooking:
Porchetta (an Italian specialty made with pork belly wrapped around pork tenderloin) Why I haven’t made it: It looks fussy and complicated, and that scares me a little.
Black-and-white cookies (one of Les’s favorite NYC classic treats) Why I haven’t made them: He loves them so much, I’m worried I’ll mess them up (crazy, I know).
Barbacoa (slow cooked spicy beef, which I love, thanks to Chipotle chain) Why I haven’t made it: I’m committed to only using grass-fed beef in my recipes, and our city doesn’t have the best options for grass-fed, so I need to venture out to a market in a nearby city.
Hold me to it, dear friends! Those dishes deserve a shot in my kitchen. What foods are on your bucket list, either to cook or just to try?
As with art, music and just about everything else in life, appreciation of food is subjective. When I learned recently that September is “Better Breakfast Month,” I wasn’t sure what to make of it. “Better” can mean any number of things—qualitative and quantitative. At our house, we are always aiming for our version of a better breakfast in that we actually sit down and eat the meal. Together. At the table. It’s a terrific concept, and we’re committed to keeping that going!
We have a few favorite breakfasts in regular rotation, the most common of them being what we lovingly refer to as “Jewish Boy Breakfast,” or JBB, as I like to call it on my menu planning spreadsheet (yes, I’m really that nerdy). This morning meal is the namesake of my darling husband, Les, who is Jewish and raised in New York, the best city in the world for Jewish food. A typical JBB at our house looks like this:
You can’t take the NYC out of the boy. Les loves his bagels!
It’s a whole wheat everything bagel, topped with spreadable scallion cream cheese, thin slices of red onion, capers (on mine, anyway) and lox. We are lucky to have a reliable source of fresh-daily bagels in our city, otherwise I would have to bake them myself (which I’ve done exactly twice, and wow, what a project). The cream cheese is a homemade schmear that’s super easy to make yourself (check out that link above), and we are forever on the lookout for a sale on lox, because this salty cold-smoked salmon can get pricey.
In case you’re wondering, there is in fact a side of bacon on the plate—which clearly is not part of a balanced Jewish breakfast. I never said he was devout.
JBB has a special role in our love story as well. During our courtship, I straddled the fence about getting serious with Les, following too much drama and heartbreak in my own past. About eight months in, we had a huge snowstorm (in North Carolina, that means more than two inches of snow at once), and though he had been willing to run a bunch of random errands in such conditions, he declined my invitation to dinner. Better to “play it safe,” he said, given the weather and all. In response, I decided to play it safe by being hurt, and I went to bed feeling sorry for myself. Next morning, I was awakened by a text from Les—“why aren’t you answering your door?” I hadn’t heard him knocking, but there he stood—in the middle of a blizzard, people!—sporting a hat with flaps that covered his ears, and holding a bag of fresh bagels plus all the proper accoutrements. The man had risked his very life to be with me. OK, not exactly—but he had shown me (again) that he was different and dependable, so I married him. ❤ And I do love a JBB.
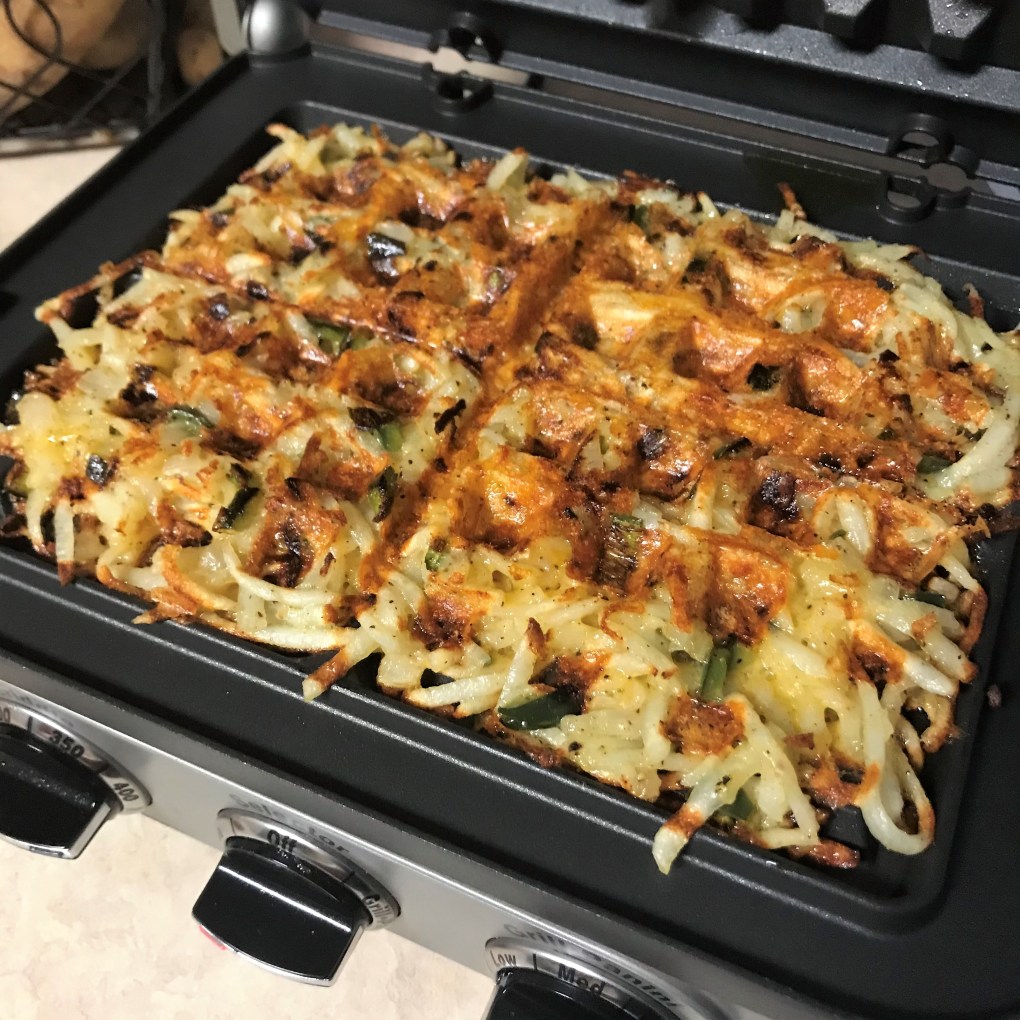
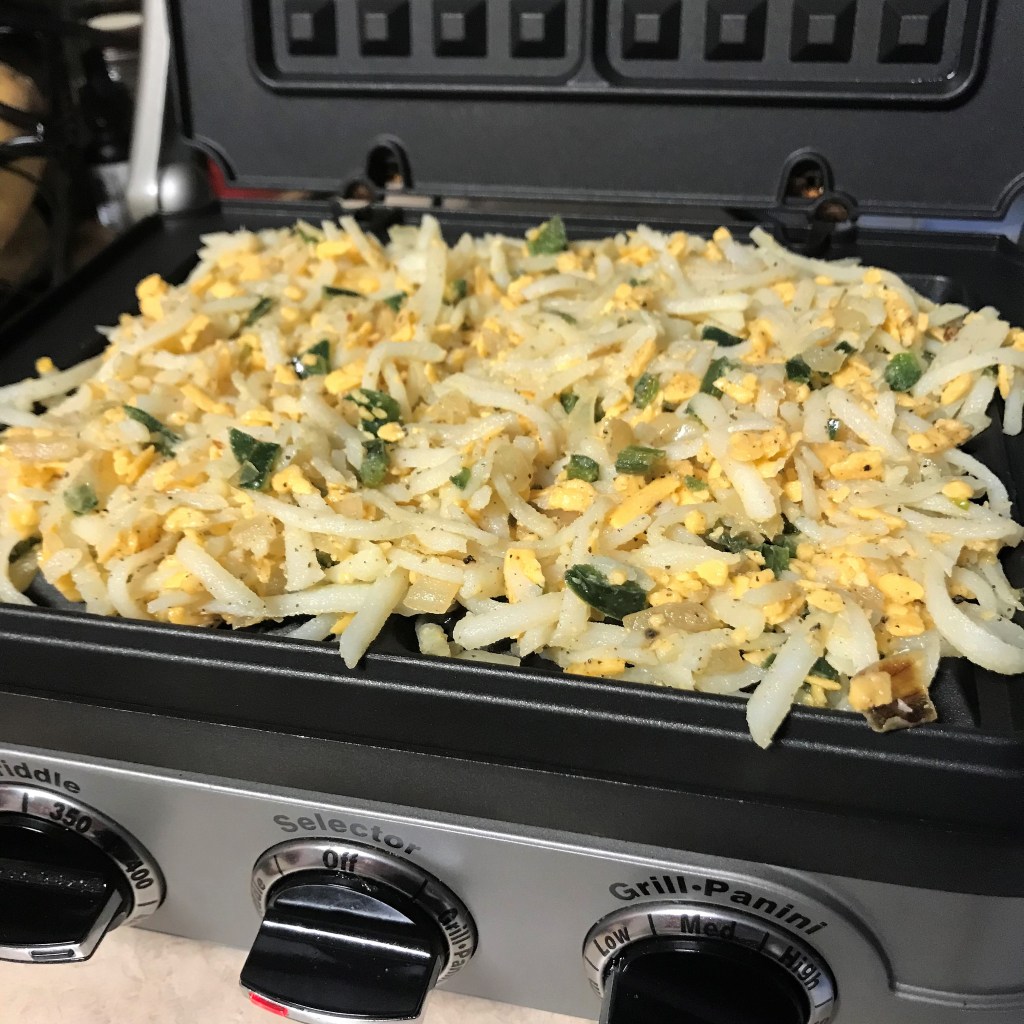
Anyway, when the weekend comes, we like to go big on breakfast. And by big, I mean with preparation of things that are too fussy for a busy out-the-door weekday morning. One of our go-to “better breakfast” menu items? These ultra-crispy, fun and flavorful hash brown waffles. Let’s just savor this image for a moment. Lean in to your screen and try to smell them.
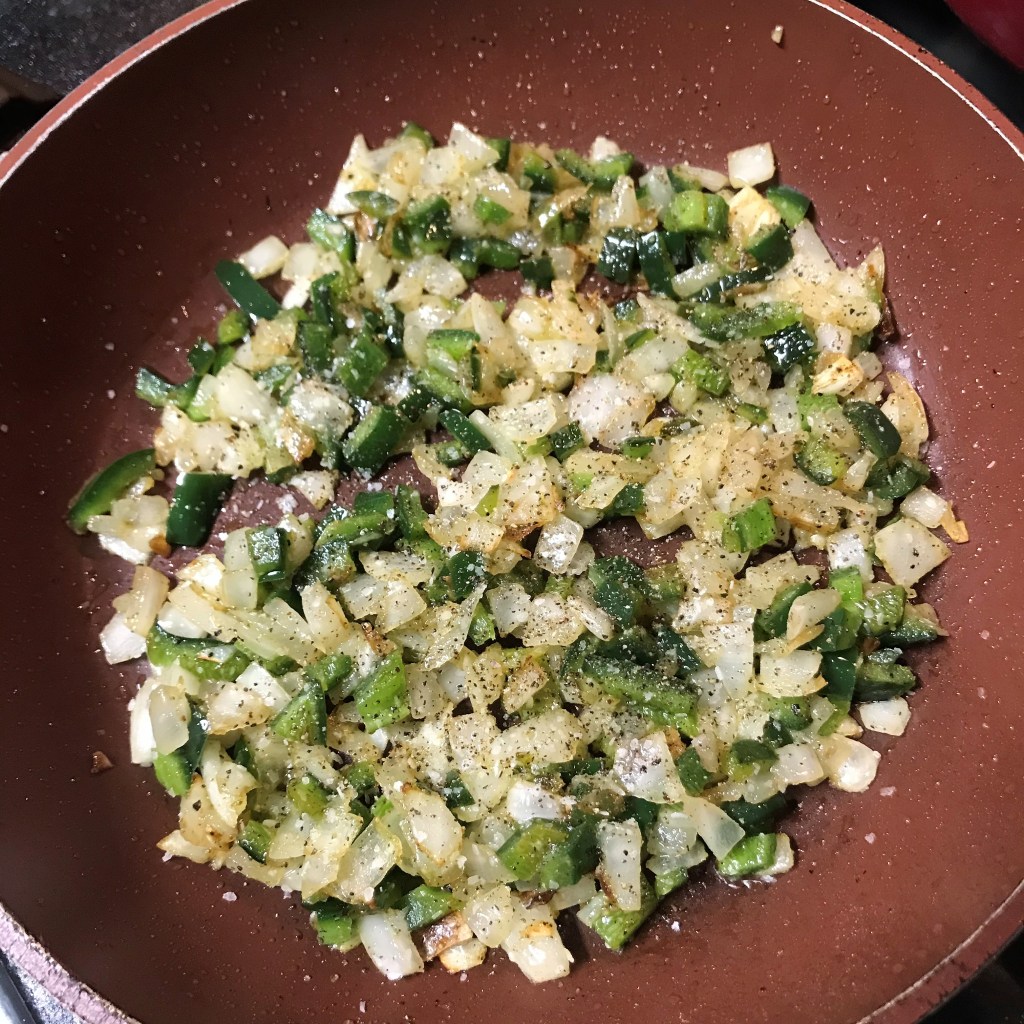
I love those little bits of pepper and onion glistening under the crispy, cheesy potato shreds.
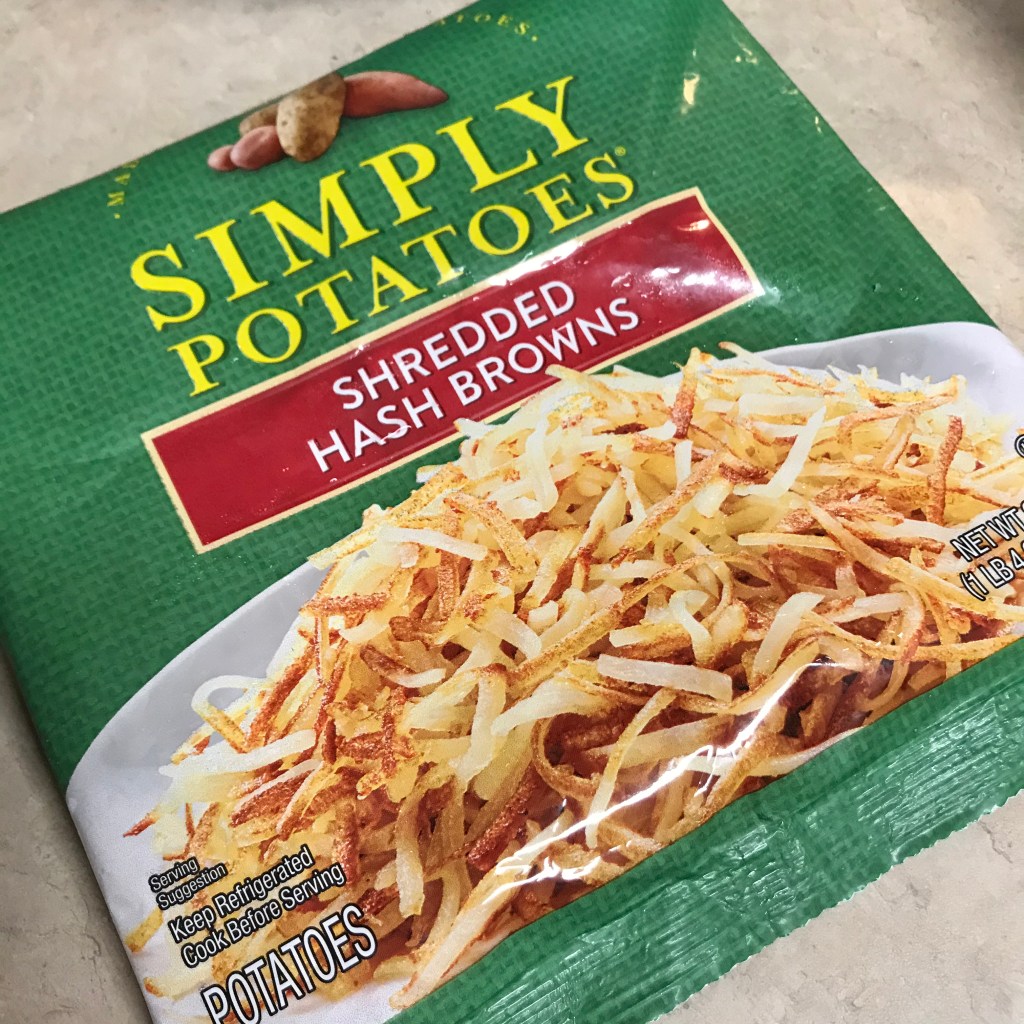
They emerge from the waffle iron crackling crisp on the outside, hot and soft on the inside, and they’re perfectly customizable, based on our craving du jour. This is how we use up all assortments of leftover cheese, onion and pepper scraps, and they come together in short order because I take a rare shortcut in the form of this:
You won’t often see me tout a ready-made grocery product like this one, but these are such a time saver, I can’t help myself.
I hope you aren’t disappointed to learn that I don’t actually make every single thing from scratch. Though I’ve considered shredding fresh potatoes myself for these, I’ve learned that once in a while is often enough to make an exception. These pre-shredded potatoes are such a worthy exception, and they can be found in any well-stocked supermarket. I only wish someone would explain to me why they are always in the dairy section. (hmm)
Here’s how they happen, and obviously, you will need a waffle iron to try them at home. I recommend a standard square or round waffle maker rather than Belgian style, but if you try it in a Belgian maker, please do let me know how it comes out for you, OK?
This recipe is a guaranteed way for us to use up whatever bits of onion and pepper are hanging around the fridge. Today, it was poblano pepper and vidalia onion.
Here’s my secret to extra crunch–a drizzle of olive oil mixed throughout the hash brown blend.
Pile the mixture onto the preheated waffle iron, and press down the lid.
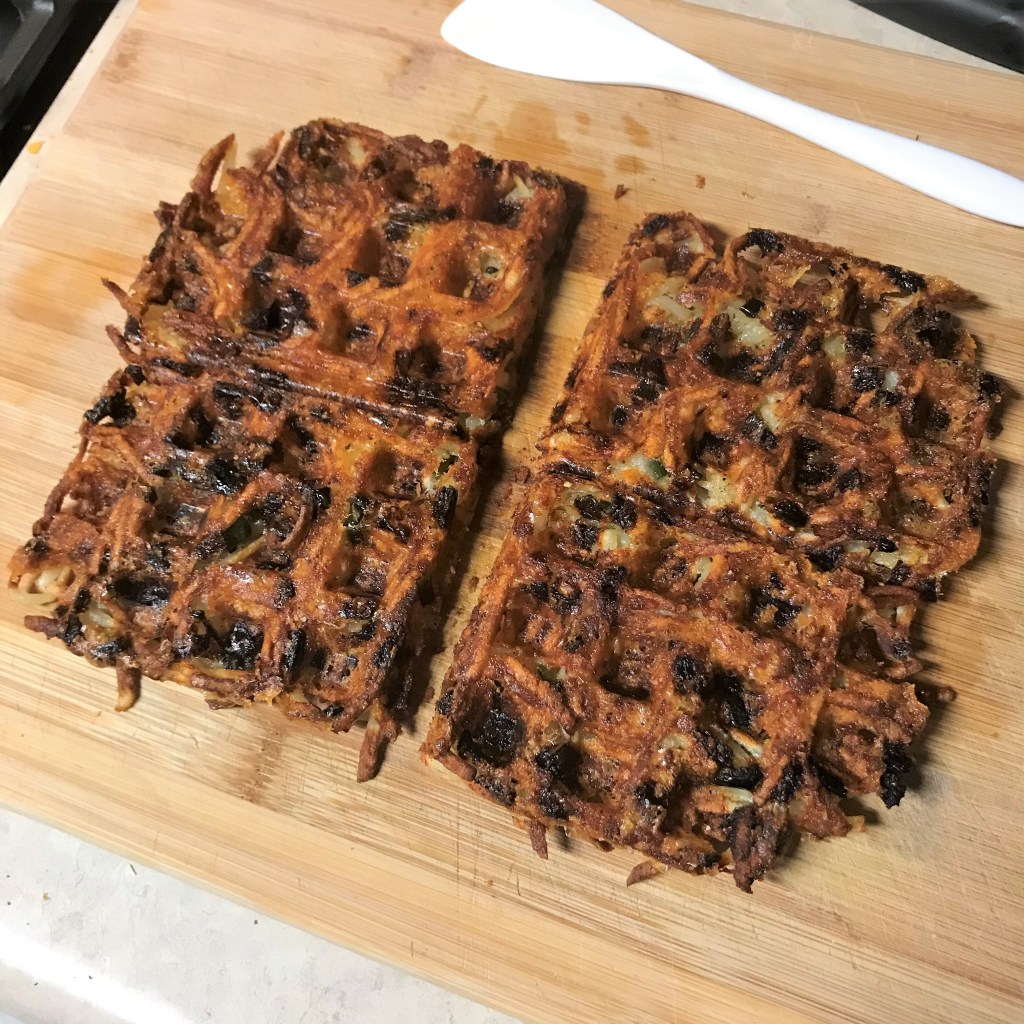
The golden crust is formed after 10 minutes, but I’m crazy about the crunch so I will let them go another minute.
The bottom of the finished waffles is extra crispy-crunchy, our favorite!
As the photo conveys, we lean toward the crispy side of things at our house, but you could certainly cut the time a bit shorter and remove them when they are just golden and lightly crisp. You’re the boss of your own kitchen. I’m enjoying the heck out of them in this crunchy state because we’ve recently decided to give up potato chips, our latest bad habit that was wrecking our waistlines. Enjoy them any way you’d normally serve breakfast potatoes, or make them the main dish as we do, topped with a runny egg!
I love the contrast of crispy edges with the soft potato inside. Now, THIS is a better breakfast!
I know what you’re thinking. Yes, they are also a terrific menu option the next time you’re in the mood for “breakfast for dinner.”
Go on, make them. 🙂
Ingredients
Extra virgin olive oil
1/2 bag Simply Potatoes shredded hash browns
1/2 cup (give or take) diced onion
1/2 bell pepper (or poblano or jalapeno, you decide)
1/4 cup diced and cooked leftover ham, sausage, bacon (optional)
Approximately 3/4 cup shredded melting cheese (cheddar, swiss, Monterey jack, gouda, etc.)
Salt and pepper to taste
1/2 tsp. ground cumin (this is excellent with any fried potatoes)
Instructions
Preheat waffle iron to 400° F.
Place a small skillet over medium heat. Add a generous swirl of olive oil to the pan, and sauté the onions and peppers until they are softened and lightly browned. If you are adding breakfast meat that is not yet cooked, go ahead and toss that into the pan as well. Season to taste, stir in cumin and remove from heat.
Combine shredded hash browns, onion mixture and shredded cheese and stir well to evenly blend the ingredients.
Drizzle in about 1 tablespoon of additional olive oil and stir to combine. I’ve learned from all my experimentation with this recipe that the extra oil goes above and beyond to deliver my hash brown waffles with the crispiest possible exterior. Thank goodness olive oil is a “healthy” fat!
When waffle maker is preheated, pile the hash brown mixture evenly over the plate and press to close the iron lid. Leave it alone for about 10 minutes, and carefully raise the lid to check their doneness. I’ve learned that if the waffle iron doesn’t release right away, whatever I’m waffling needs more time. The food will release when it’s ready, and for my Cuisinart waffle maker, 13 is the lucky number.
Carefully remove the waffle sheet, in one piece, to a platter or cutting board and cut into serving pieces.
Serve as desired, but may I recommend again the runny egg? It’s so, so good. 🙂
A little Frank’s red hot sauce for kick. And I might have broken off a crispy piece for dipping into the egg yolk. Yes, I believe I did.
This recipe will make five waffles, each about 4 x 6 inches. We make four at once for breakfast, then we fight over the fifth during kitchen cleanup. I love our life!
I’m breaking all the cooking rules on some all-time classic comfort foods, as I’m determined to find new ways to prepare foods that have too long depended on the oven. It’s hot enough this time of year, so I’m turning off the oven and moving dinner prep outside.
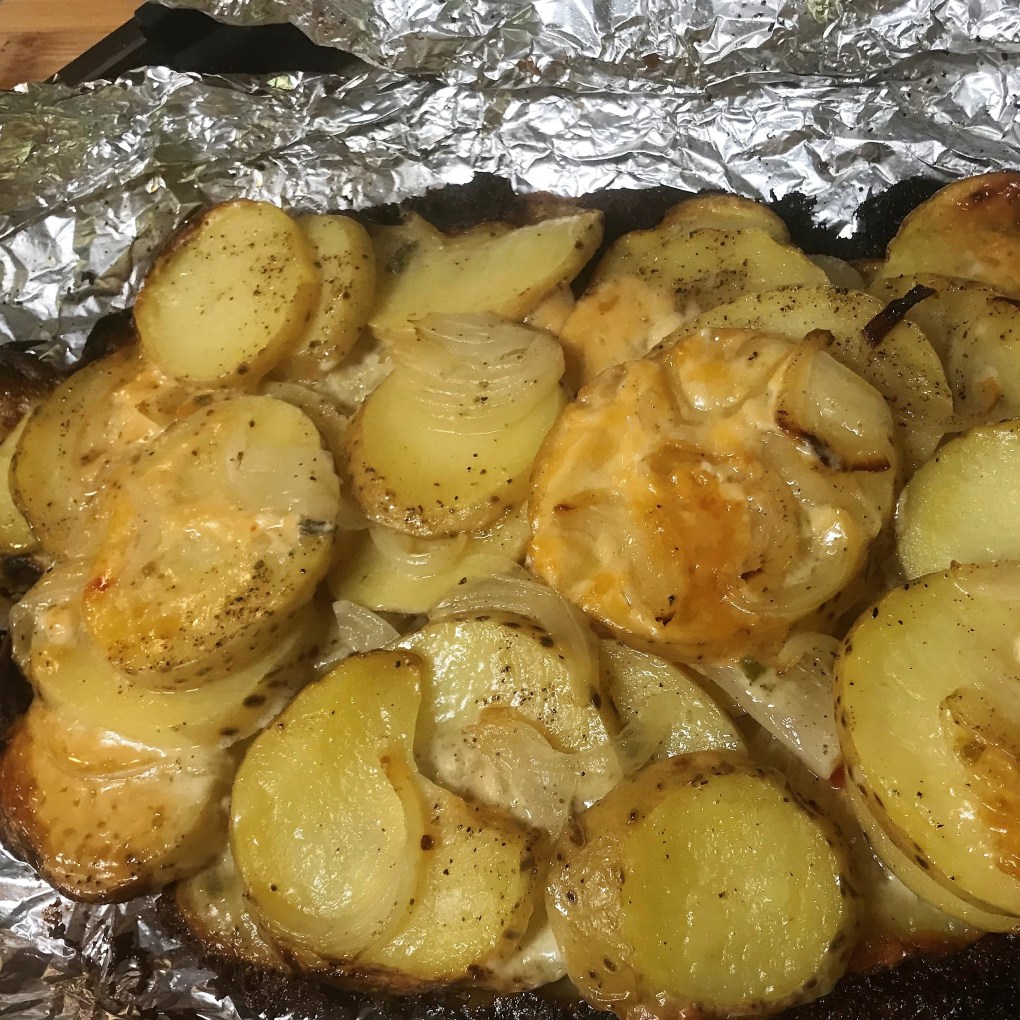
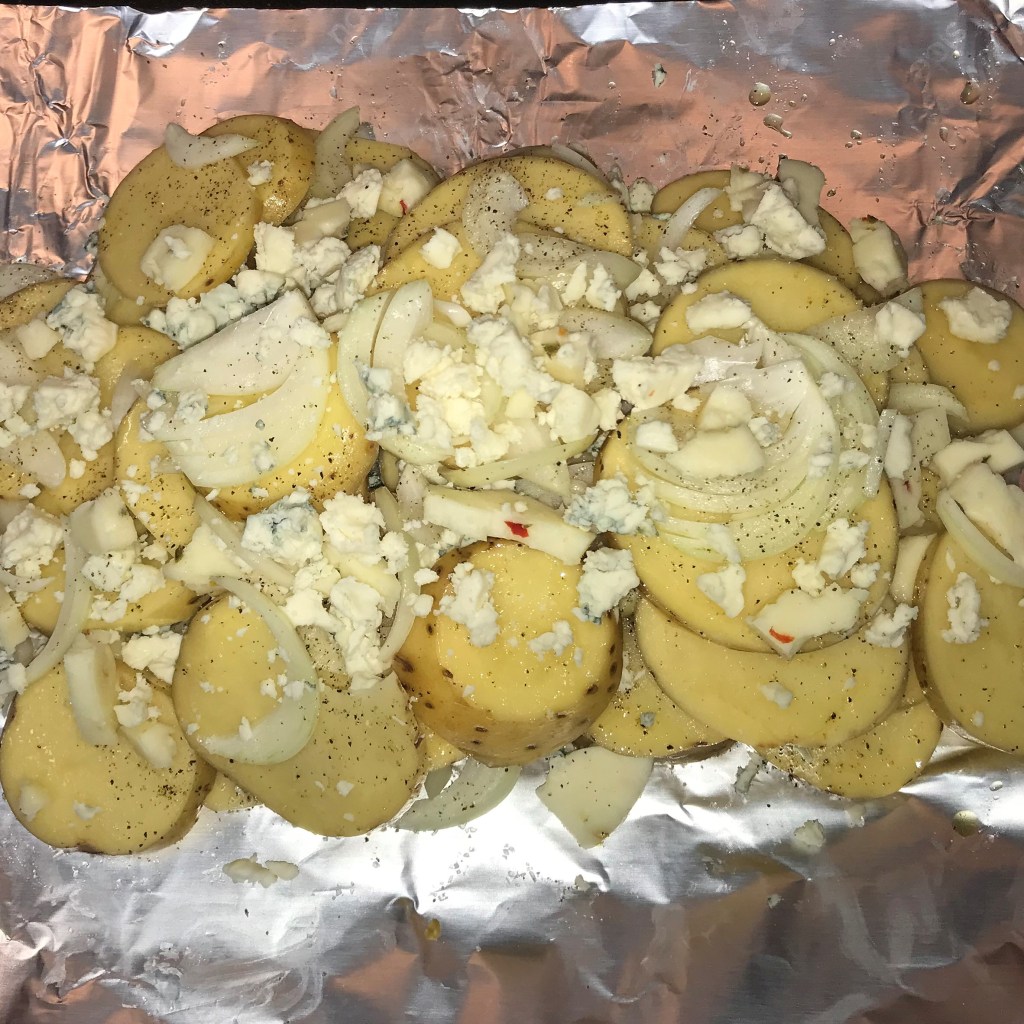
We won this battle at our house recently with a twice-grilled meatloaf, which we served up with these cheesy-good, grilled scalloped potatoes. This Comfort du Jour twist was simple to whip up because it doesn’t involve a cream sauce (that would be a disaster on the grill), but it was every bit as delicious, with tender potatoes, thin slices of onion and two kinds of cheese—pepper jack for a little kick, and crumbled bleu cheese for an interesting touch of funk. The potatoes were great just like this, but I’m certain they’d also be good with cheddar, smoked gouda or any other favorite cheese.
I used non-stick aluminum foil as the cooking vessel, so cleanup was—well, nothing! Seriously, is there anything to not love about this?
This was perfection. Classic comfort foods, with a Comfort du Jour twist that will become a summer go-to for us.
Ingredients
5 medium Yukon gold potatoes, scrubbed clean and sliced 1/4″ thick* (see picture tip, below)
1 small sweet onion, thinly sliced
Extra virgin olive oil
3 oz. sliced or shredded pepper jack cheese
1/4 cup bleu cheese crumbles
Sea salt and freshly cracked black pepper
*Tip
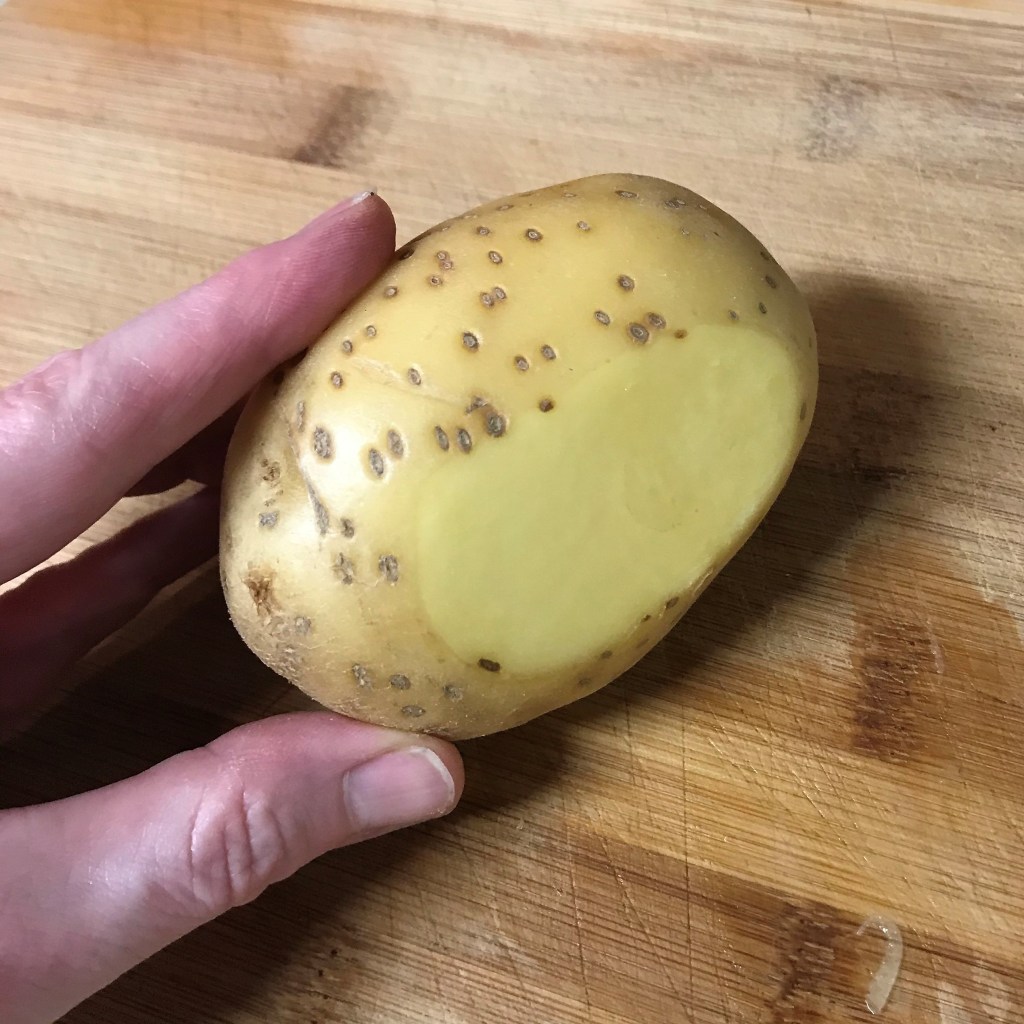
Whole potatoes can slip really easily when you’re trying to slice them thin. Either use a mandoline (be careful there, too), or try this easy trick. Slice a very thin section off one side of the potato, so it will lay flat on your cutting board, making it easier to safely cut it into slices.
Instructions
In a large bowl, drizzle olive oil over the potato slices and give them a good tossing to coat them.
Arrange a single layer of potatoes on a large rectangle of heavy aluminum foil (I recommend the non-stick type).
Add a layer of onion slices, season with salt and pepper and distribute half amounts of each cheese.
Repeat with another layer of each ingredient.
Place a second sheet of foil over the “casserole” and crimp the foil all the way around to seal the edges.
Grill over indirect heat (we placed them on the upper rack of our gas grill) for about 30 minutes.
Open the packet very carefully, as escaping steam will be very hot. Serve directly from the foil pack for easy-and-done cleanup!