It’s always a comical scene at Trader Joe’s this time of year, as every aisle, endcap and special display is loaded up with pumpkin spice goodies. Eager customers load up their carts with all the pumpkin spice cookies, donuts, oat milk, cold brew concentrate (guilty) and even candles and dog biscuits flavored with pumpkin spice. It’s a fall frenzy! Love it or hate it, this trend isn’t going away anytime soon.
And though I personally love the pumpkin and sweet spice combination, I also love the savory side of pumpkin, which doesn’t get nearly enough attention when fall rolls around. Pumpkin on its own is not sweet at all— it’s a variety of winter squash, you know— but we have become so conditioned to think of it as a pie filling or latté enhancer that we sometimes miss the opportunity to let those savory aspects shine.
Autumn Benedicts, anyone?
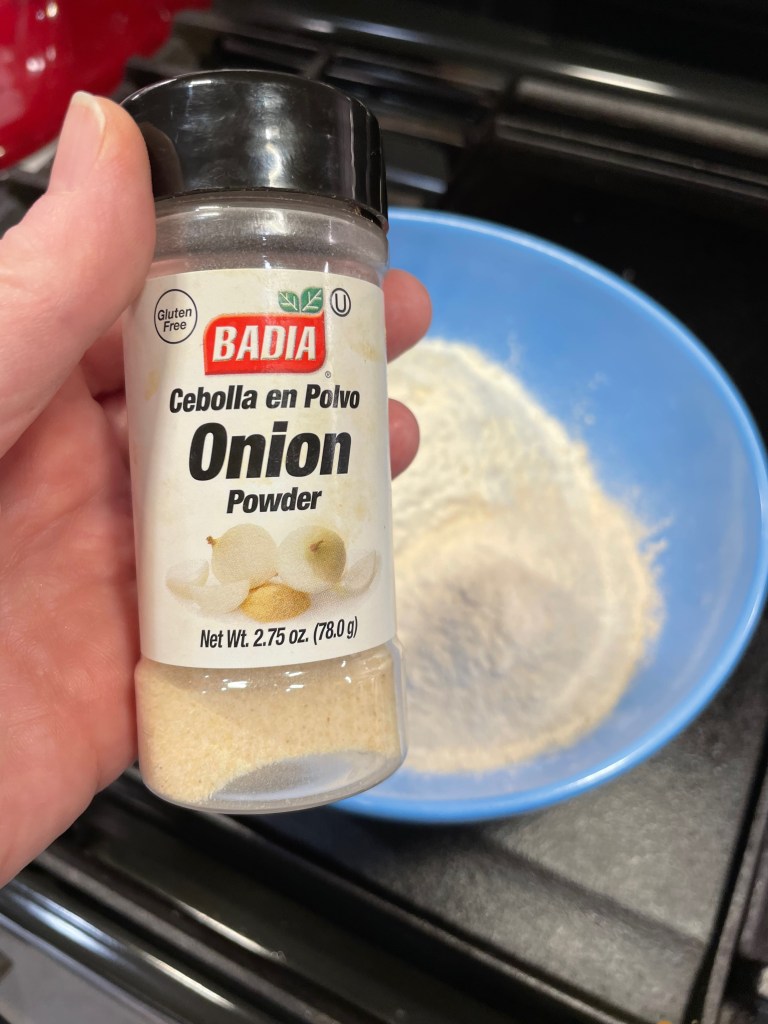
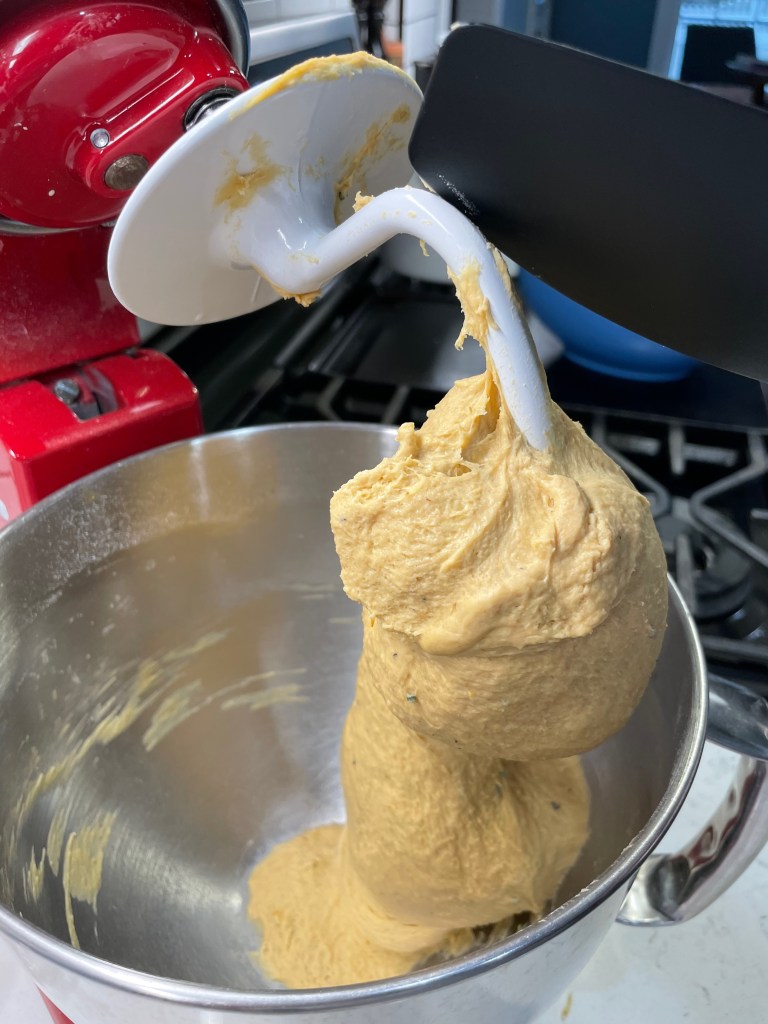
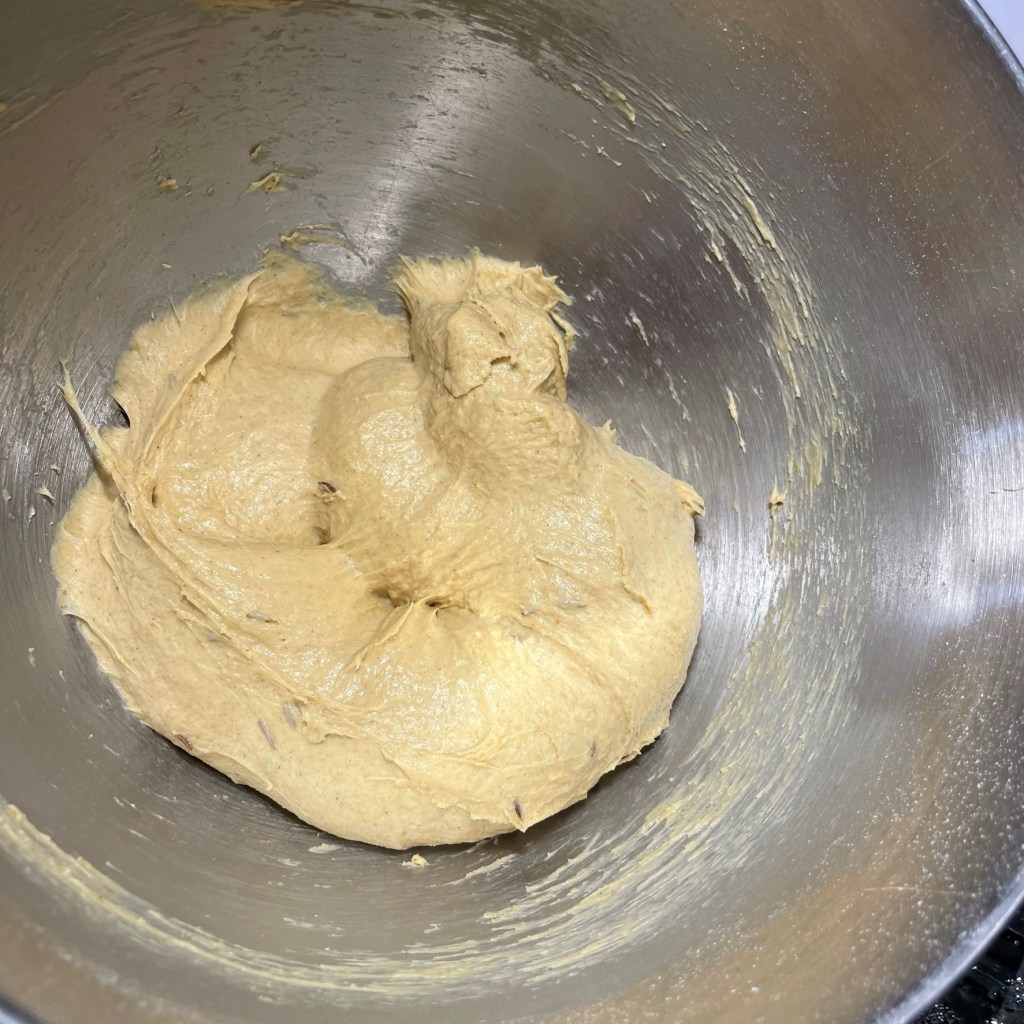
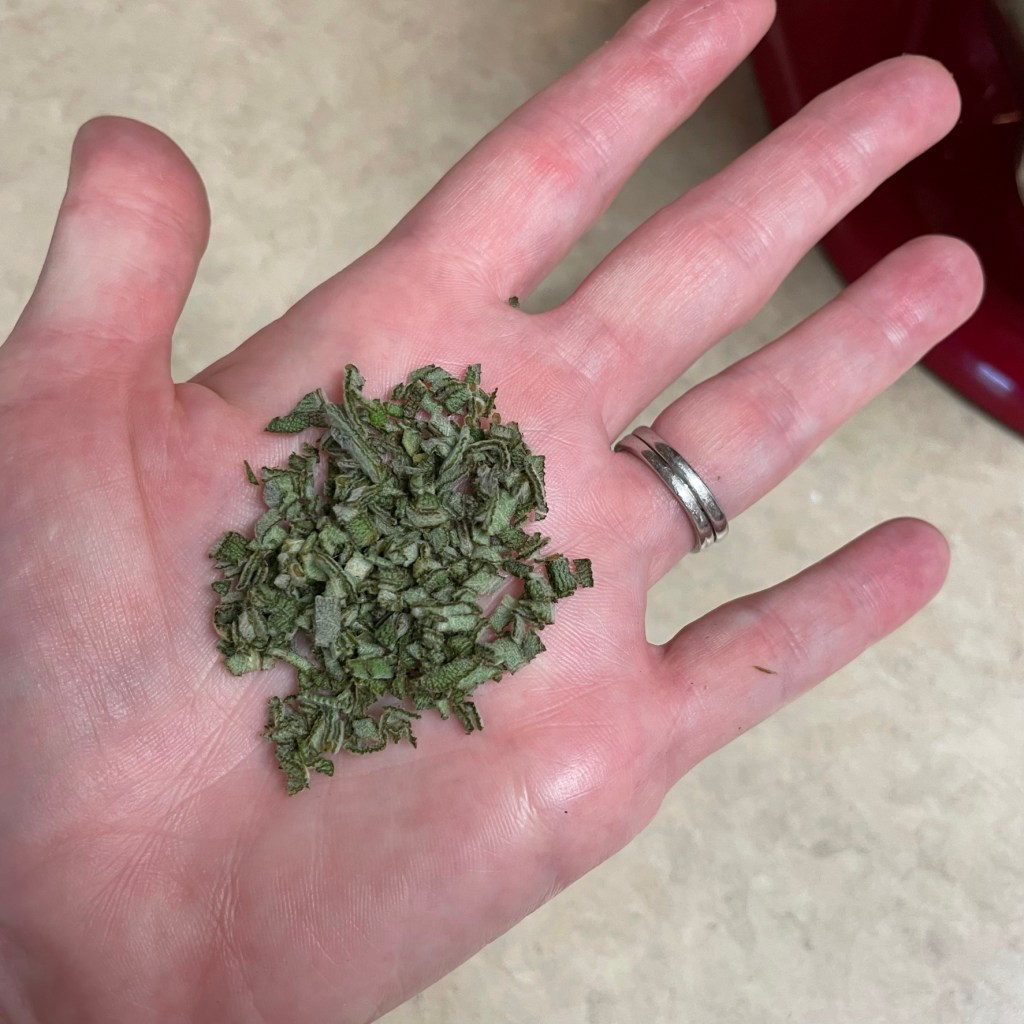
But today, these barely sweet, griddle-baked goodies are getting all the praise. I’ve made a few easy swaps from my go-to sourdough English muffin recipe, working in pure pumpkin and a swap of molasses, plus a hint of onion and some fresh chopped sage leaves.
These ingredients are responsible for keeping it savory.
The dough is easy to work, and there’s no need to even turn on the oven because these babies bake on a griddle or in a hot cast iron pan. Let them bring some seasonal pizzazz to your breakfast sandwiches and autumn brunches. Also perfect just toasted with butter.
I want one of these every day until Spring!
Welcome, fall. We are so glad you’re here!
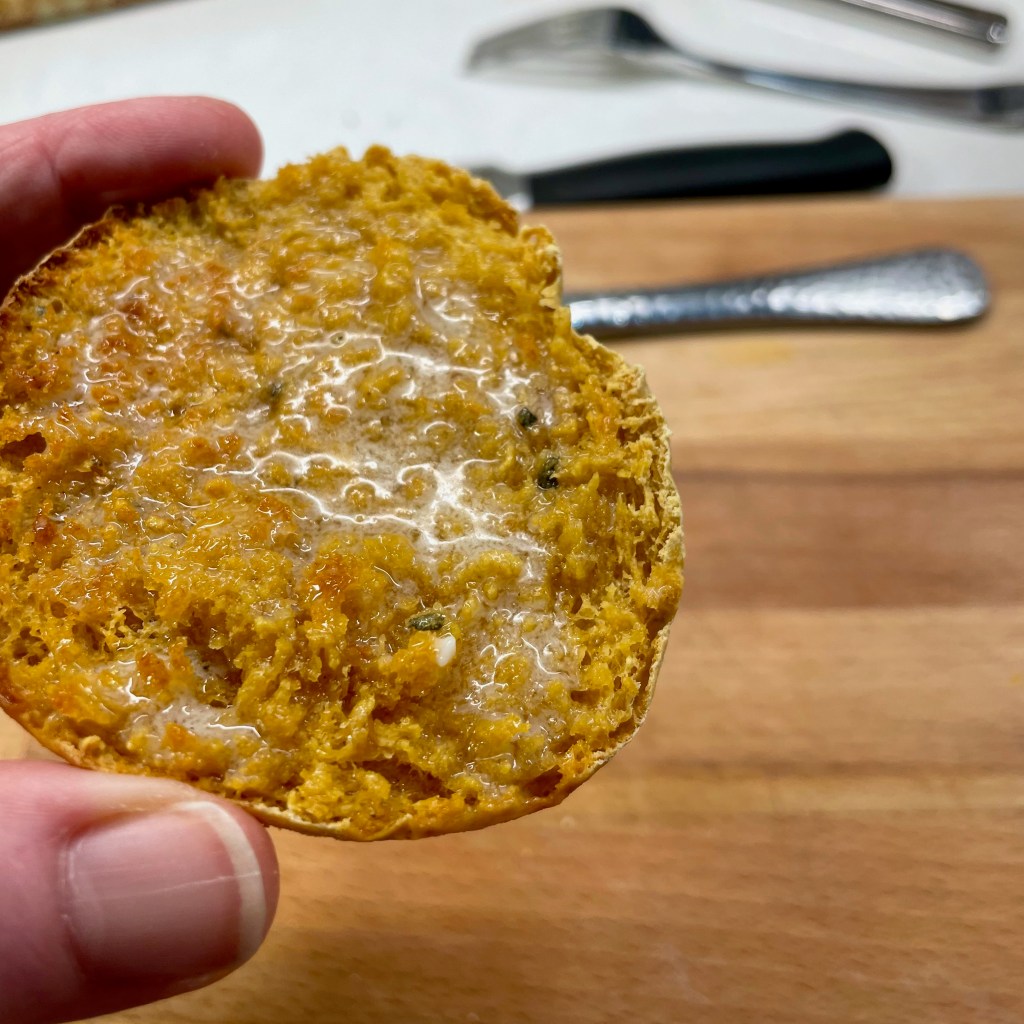
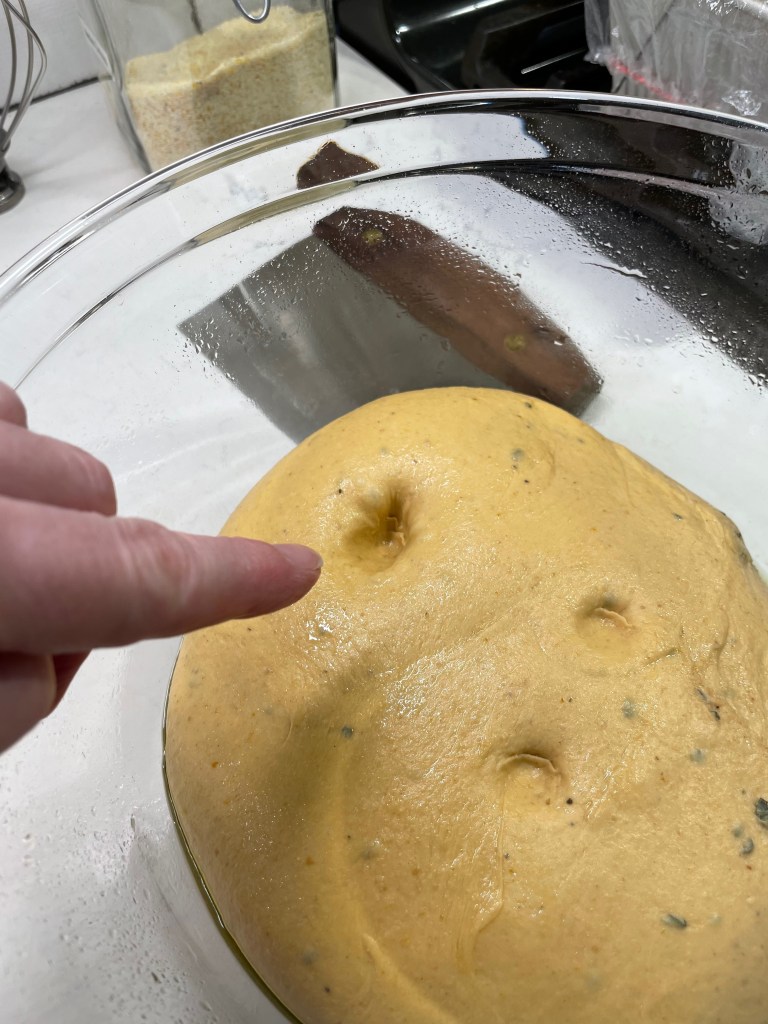
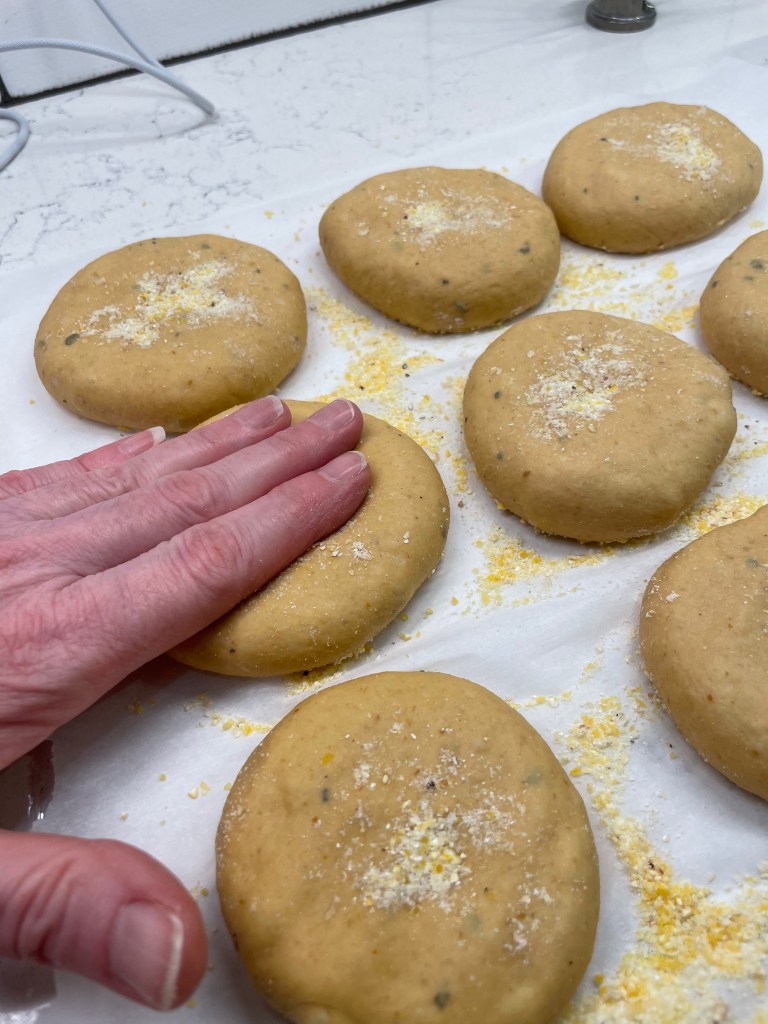
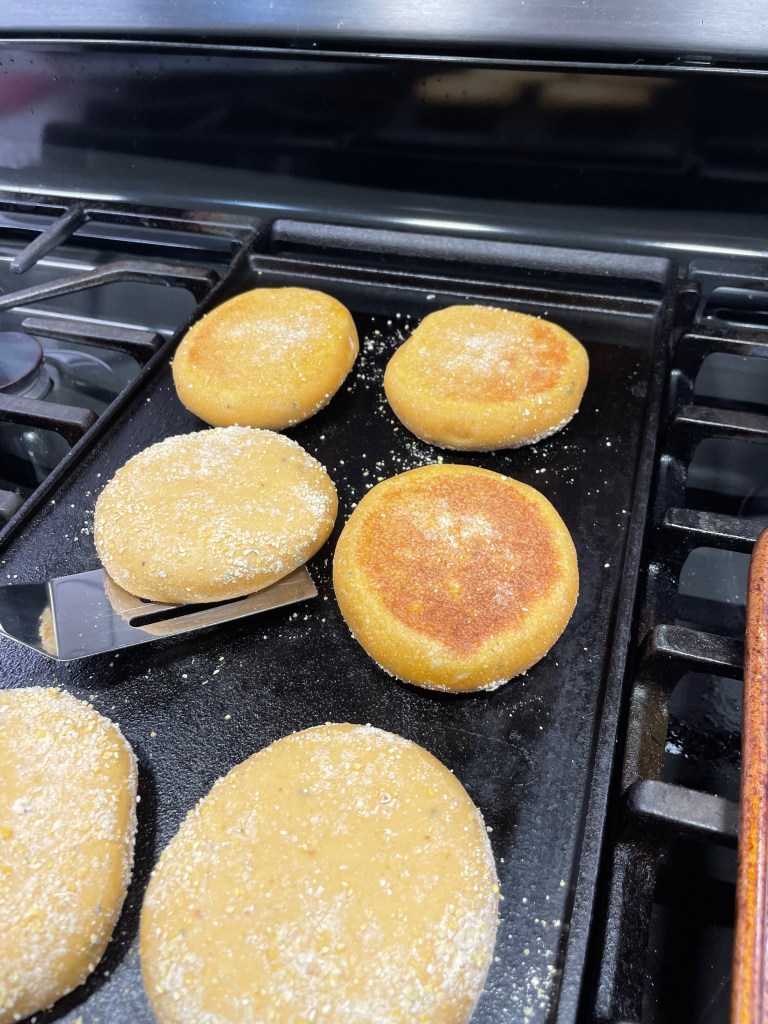
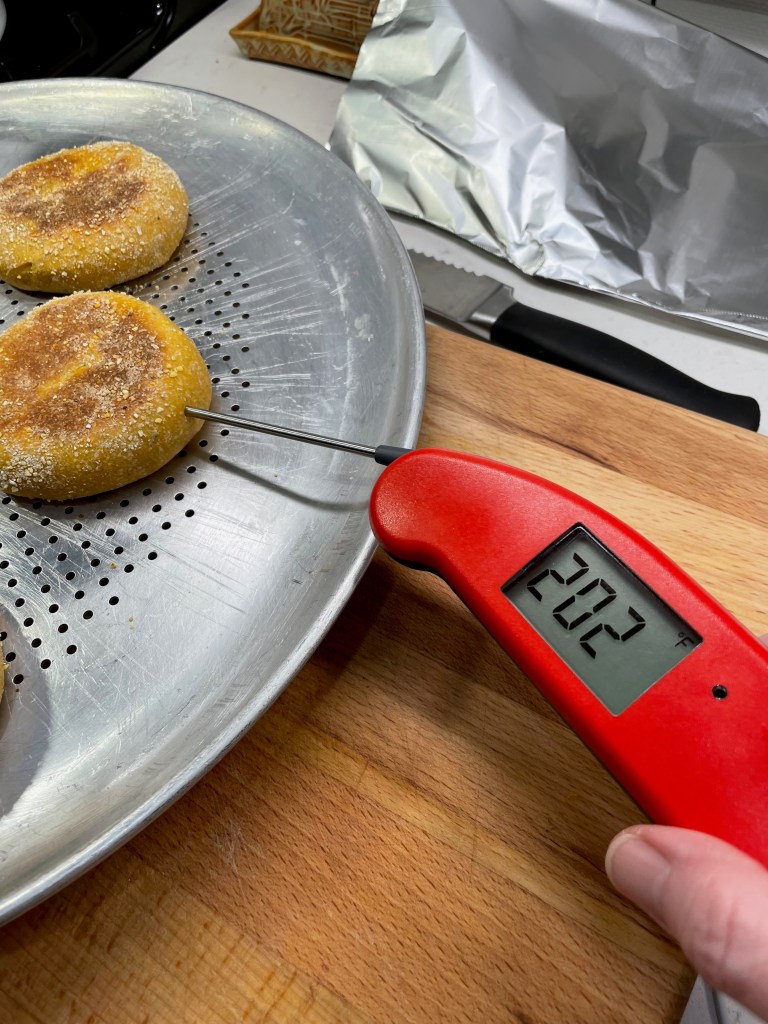
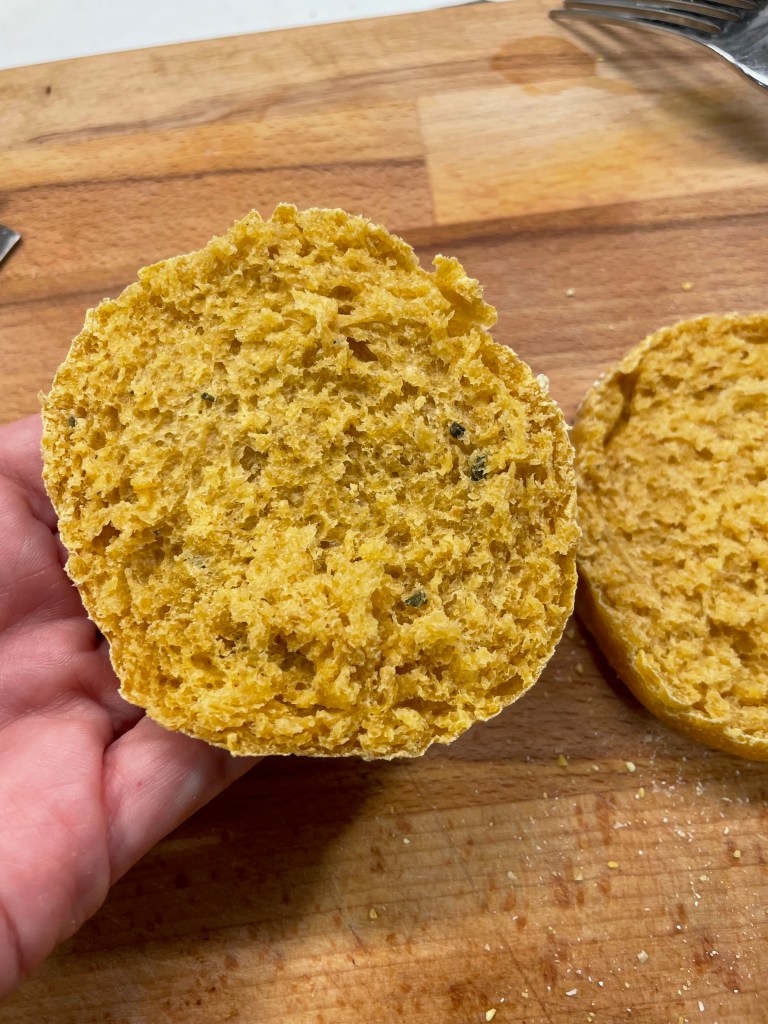
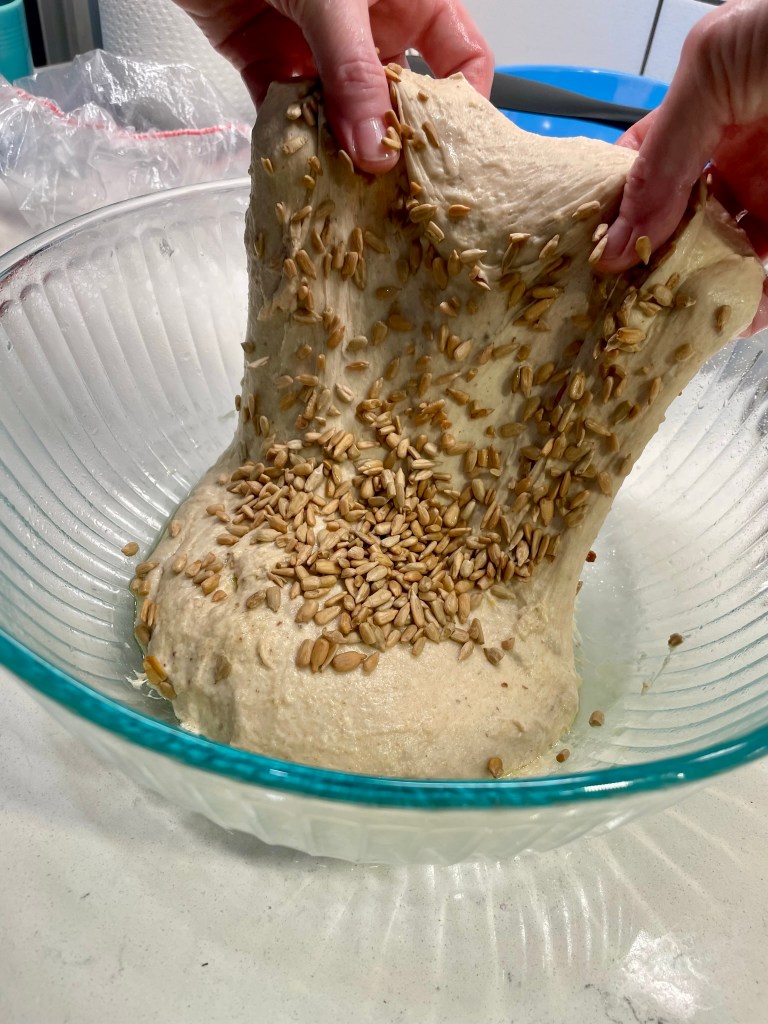
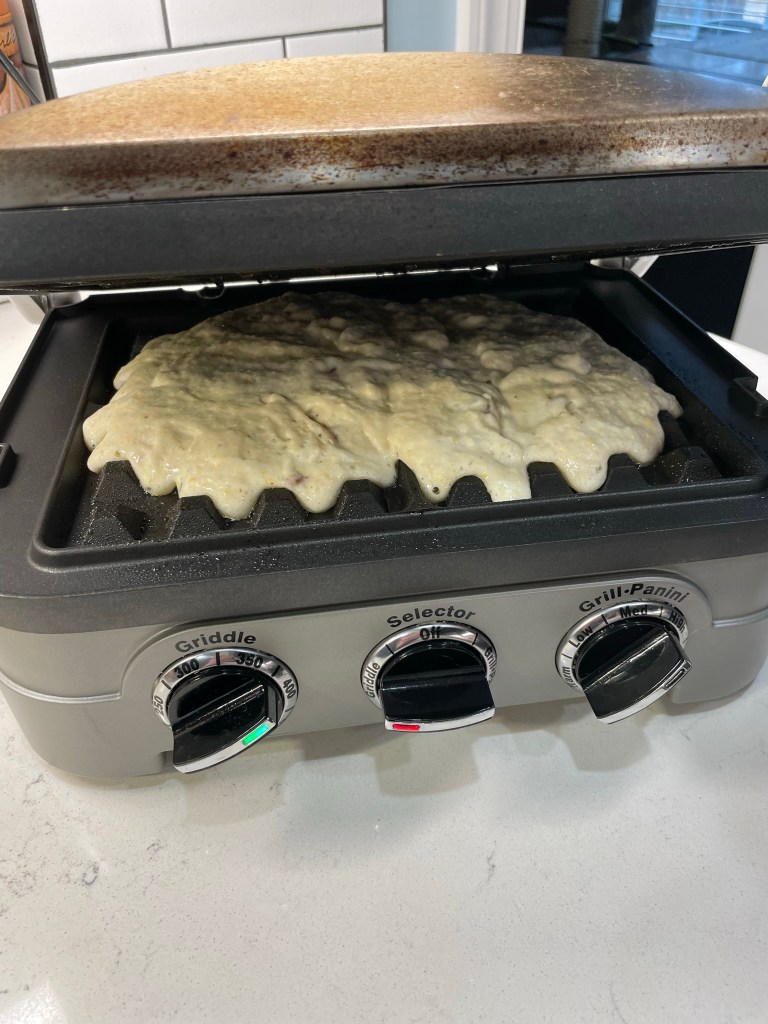
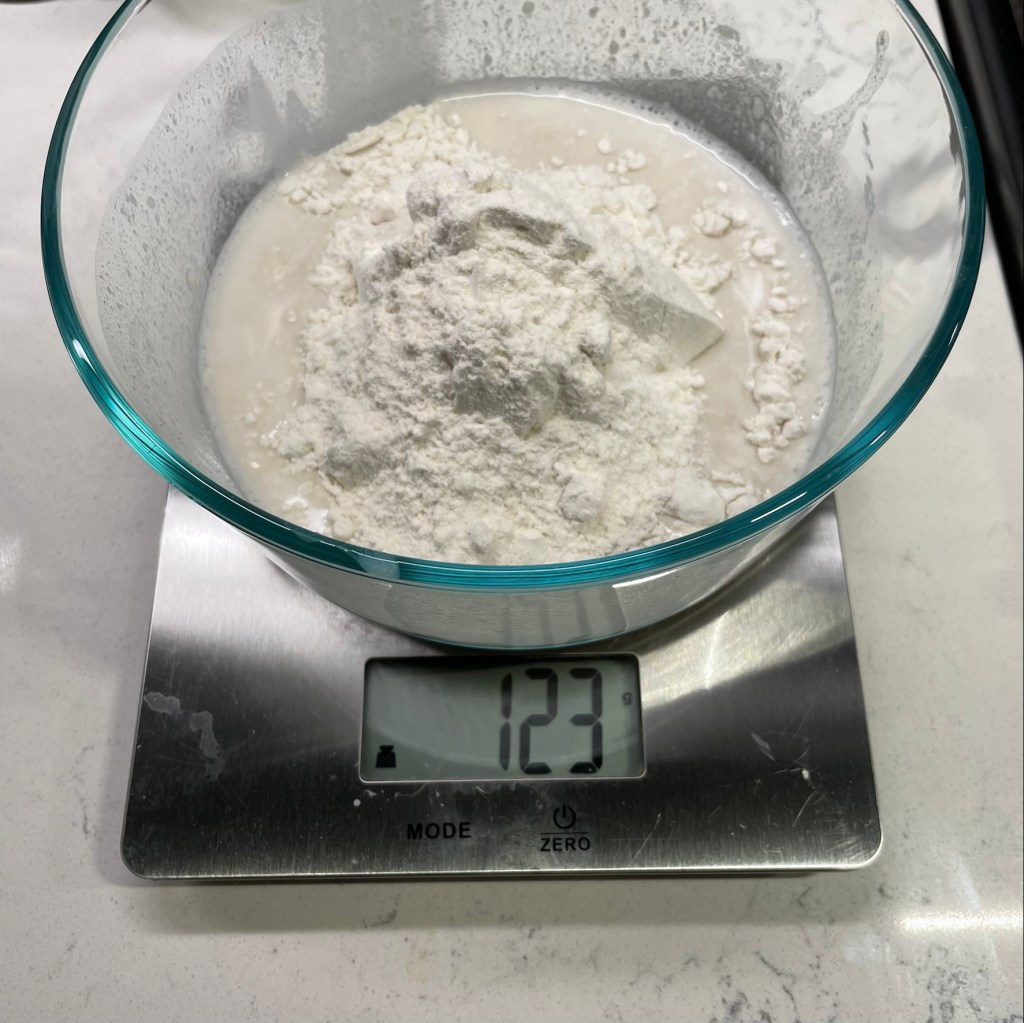
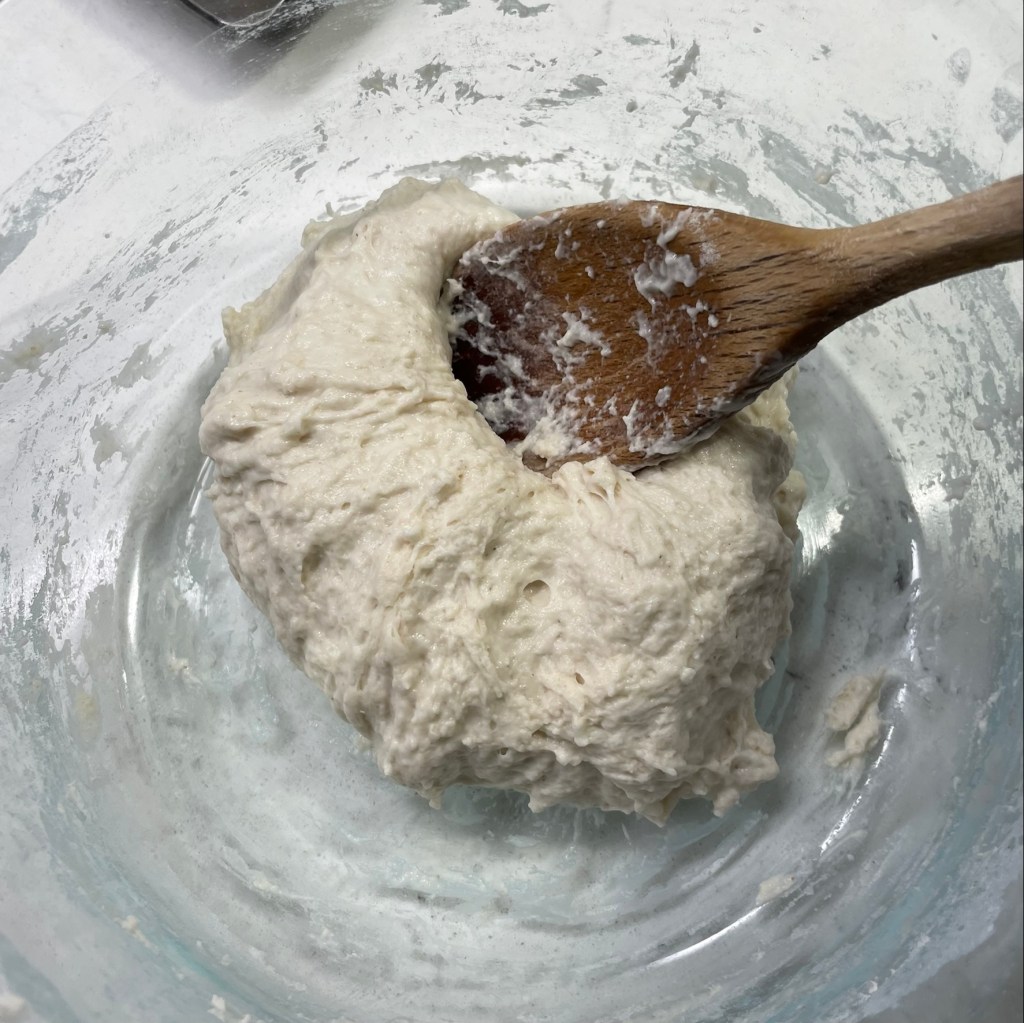
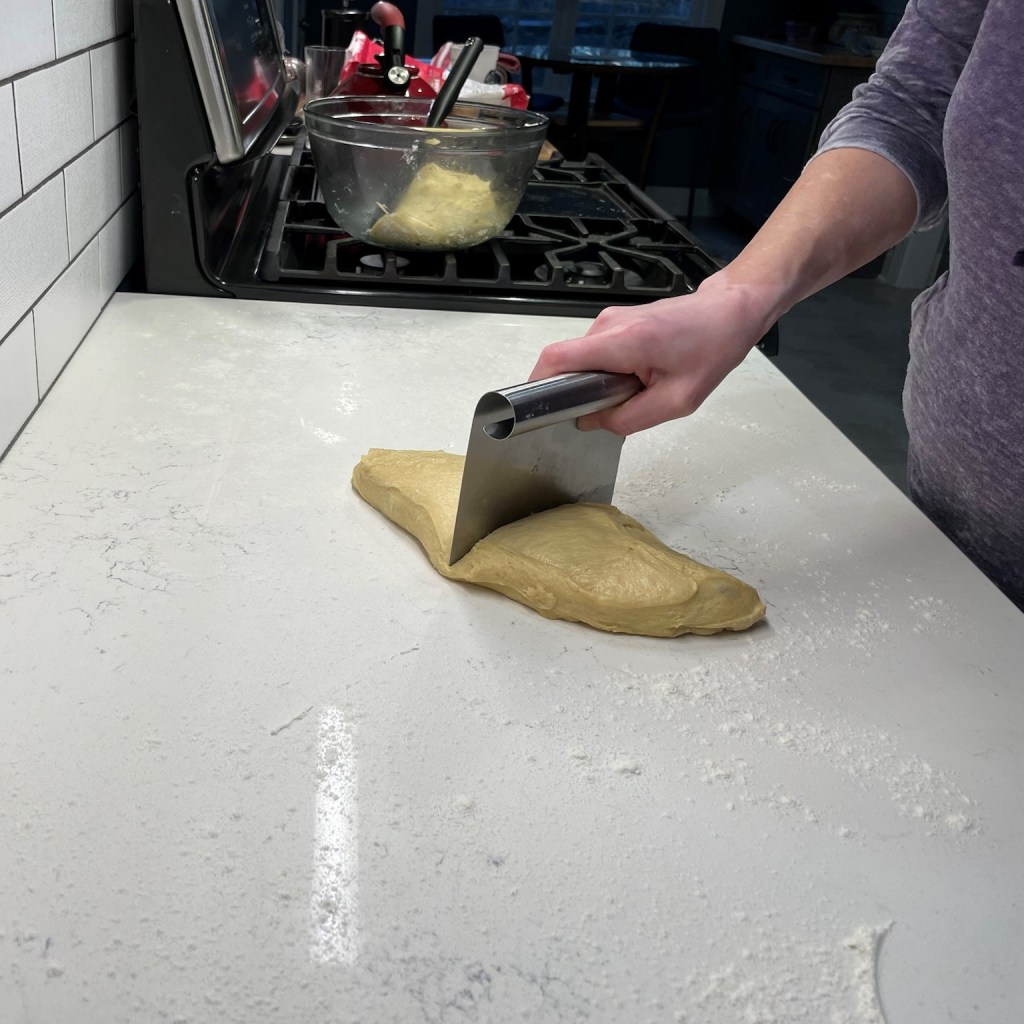
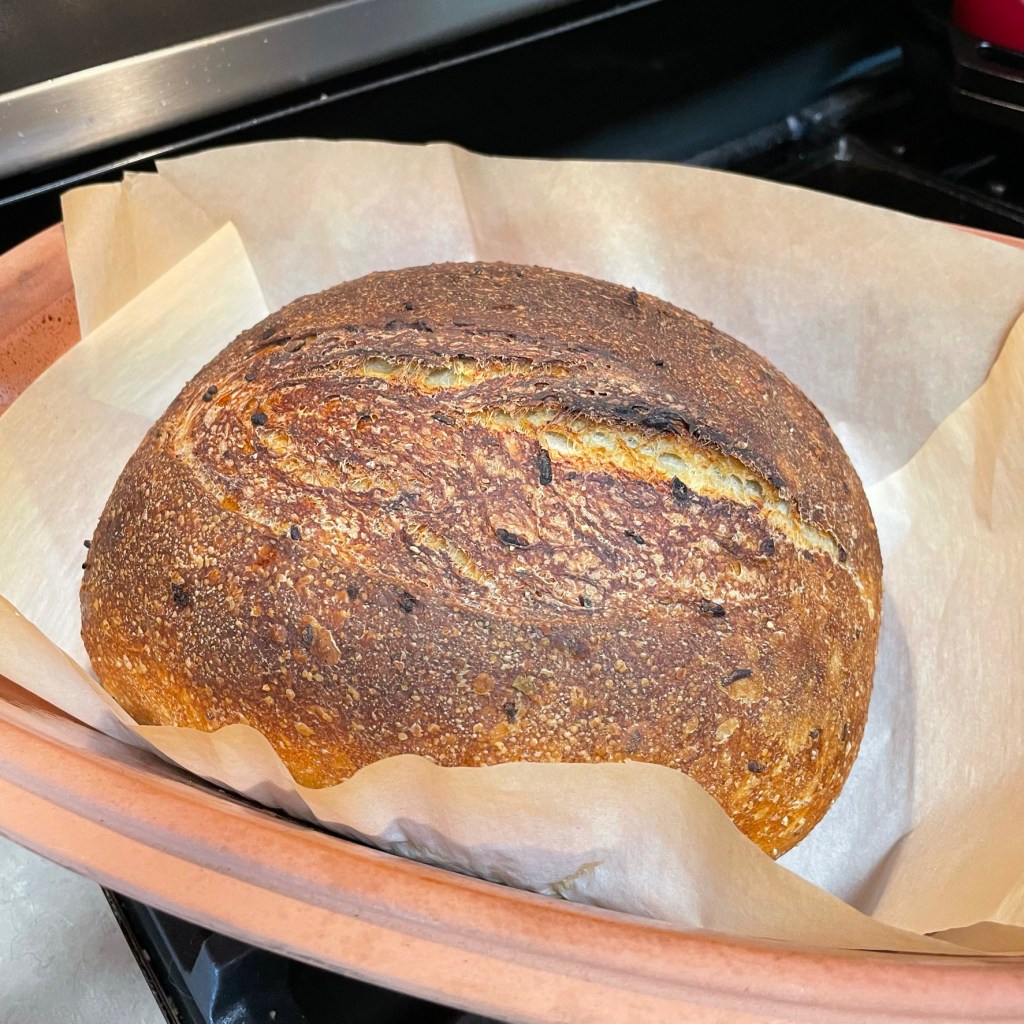
Sage, onion and a twist of black pepper are keeping these savory.It’s that rich pumpkin color that gets me!My flour blend includes whole wheat for nutrition.This soft dough is lovely to work with.It’s ready to shape when a poke doesn’t bounce back.Cut into 12 equal pieces and shape into balls.Keeping cozy under a towel for their final rise.Press into shape with cornmeal before “baking.”A cookie sheet on top promotes even cooking.Ready to flip when they are evenly browned.Internal temp should be in the 200° F range.The little flecks of sage! 😋
This easy recipe gives pumpkin a chance to show off its savory side. With onion, sage and a touch of molasses, these griddle-baked muffins are ready to elevate your autumn breakfasts. They also work great for turkey sandwiches!
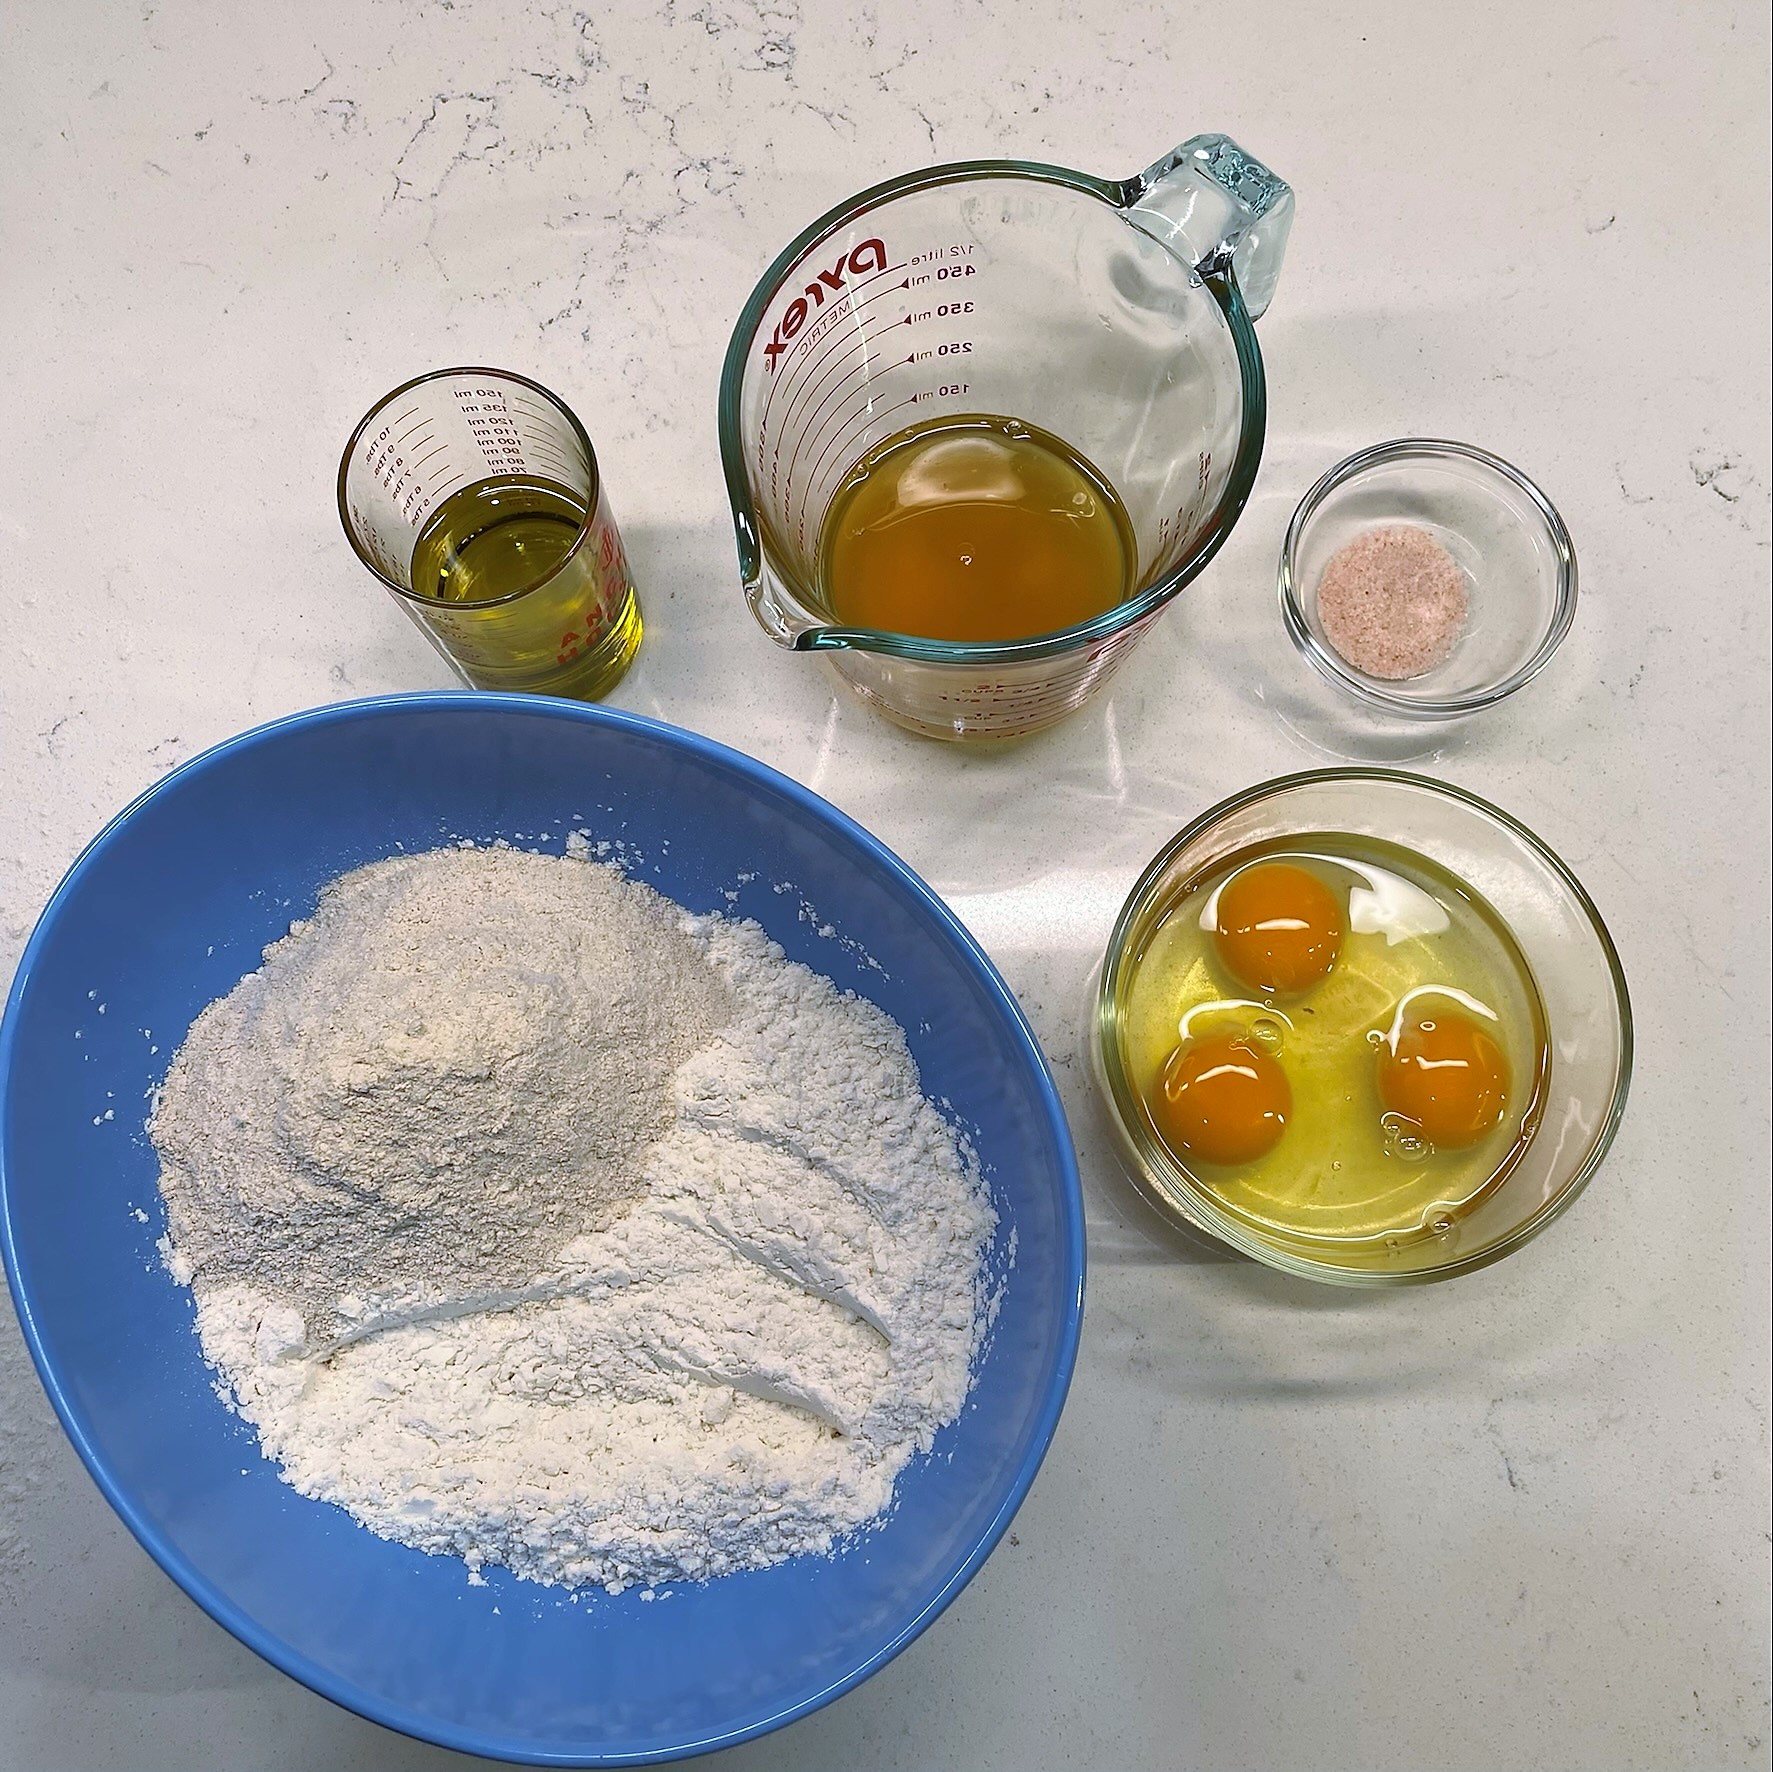
Ingredients
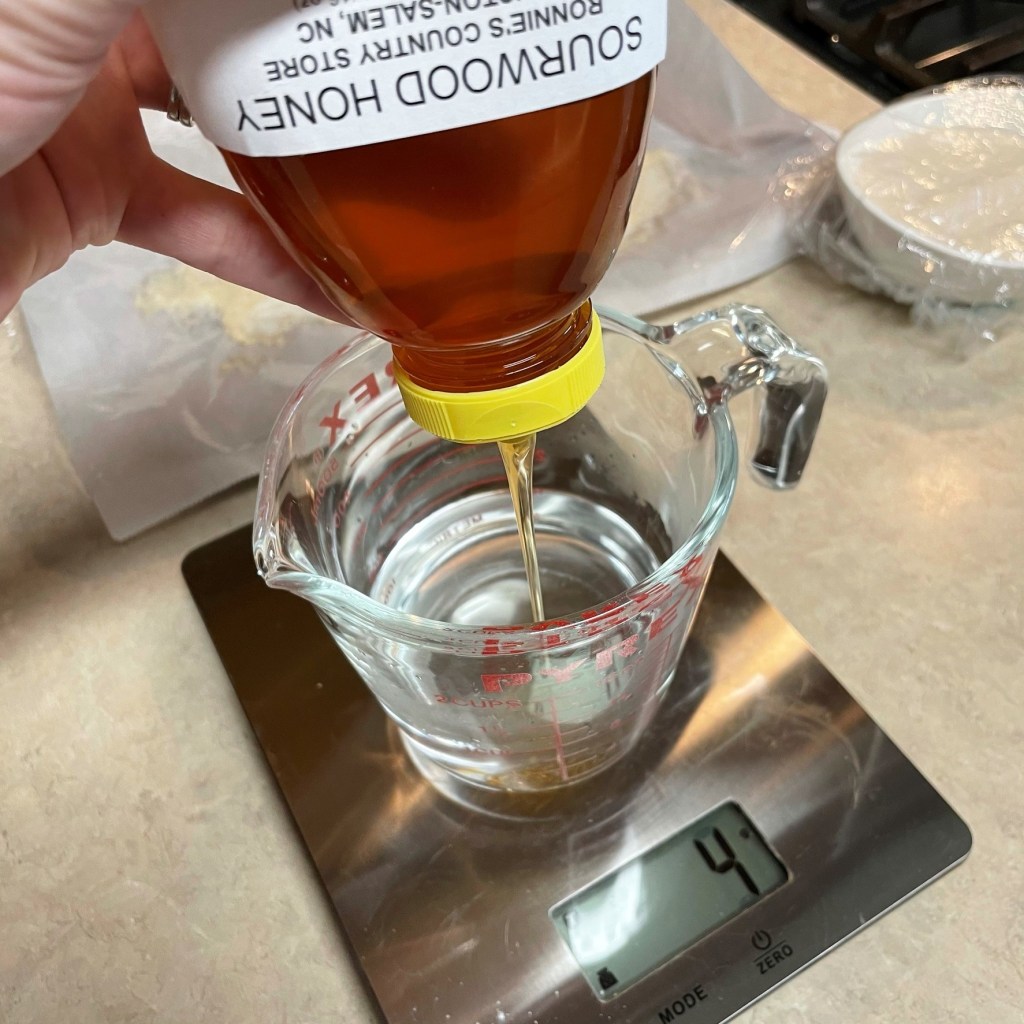
106 g pumpkin puree
170 g warm water
28 g olive oil
113 g ripe sourdough starter
15 g molasses
1 Tbsp fresh sage leaves, chopped
1 tsp onion powder
100 g white whole wheat
320 g all-purpose
22 g dry milk powder
1 1/2 tsp salt
1 tsp instant dry yeast, optional for quicker rise
cornmeal for dusting muffins before baking
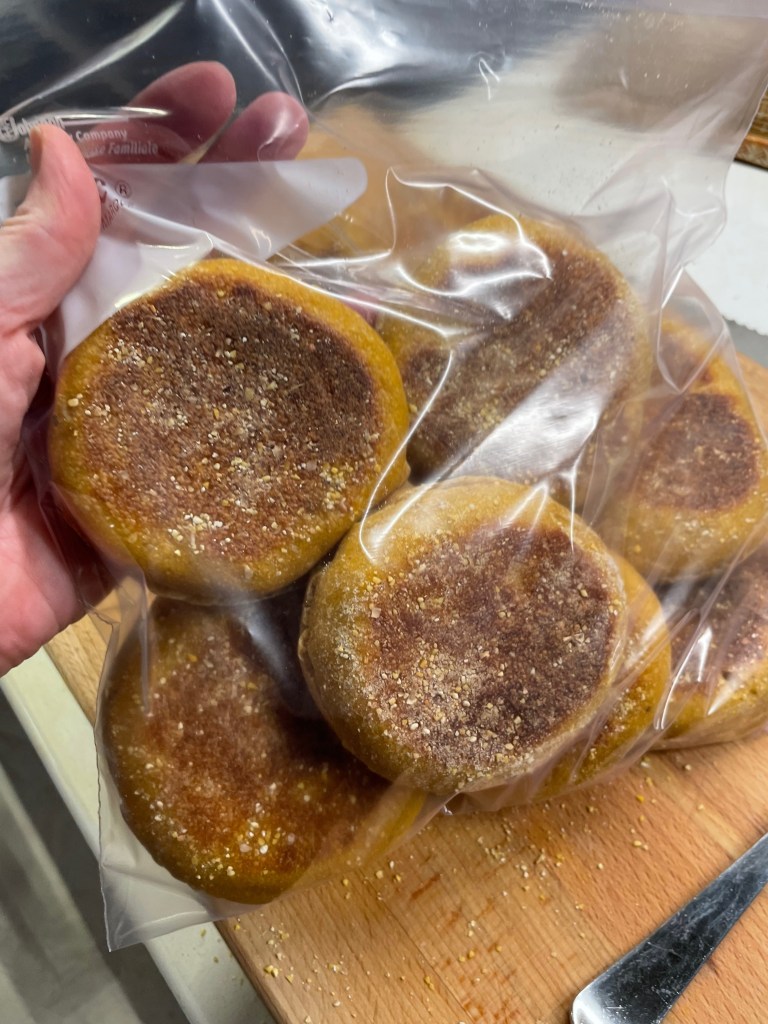
Note: These english muffins will freeze beautifully. Fork-split them all the way through, and pop them into a zip top freezer bag. Press out as much excess air as possible before sealing. When you are ready to serve, either defrost them for an hour or two, or pop them into the toaster on the defrost setting for a few minutes before toasting.
Directions
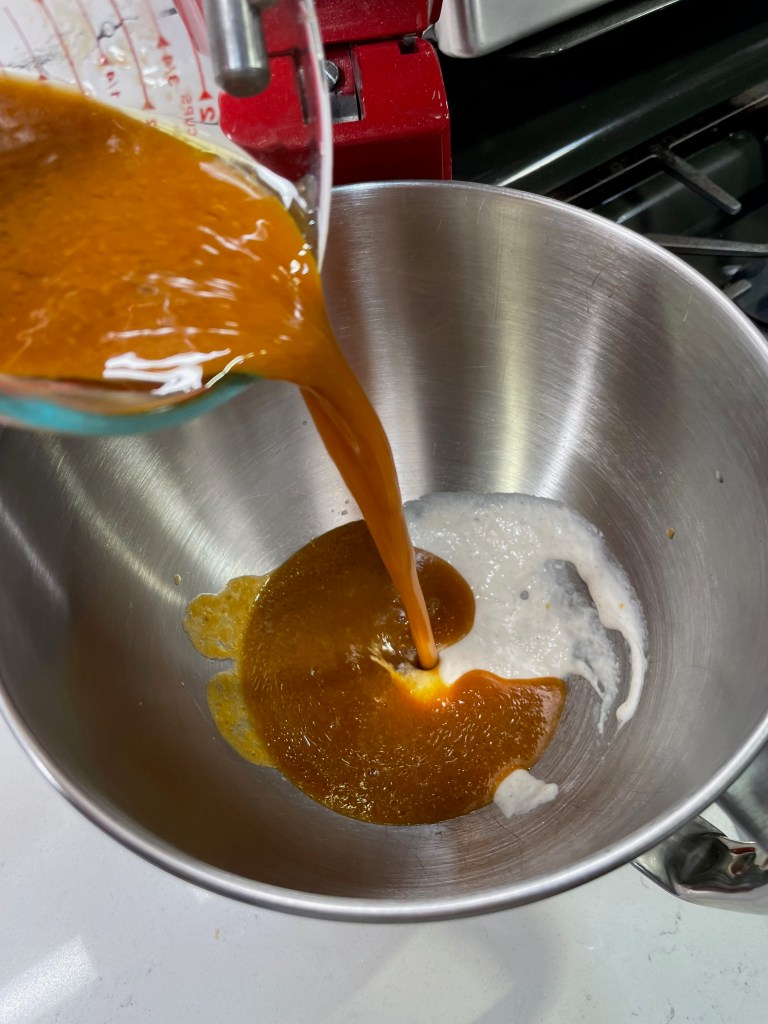
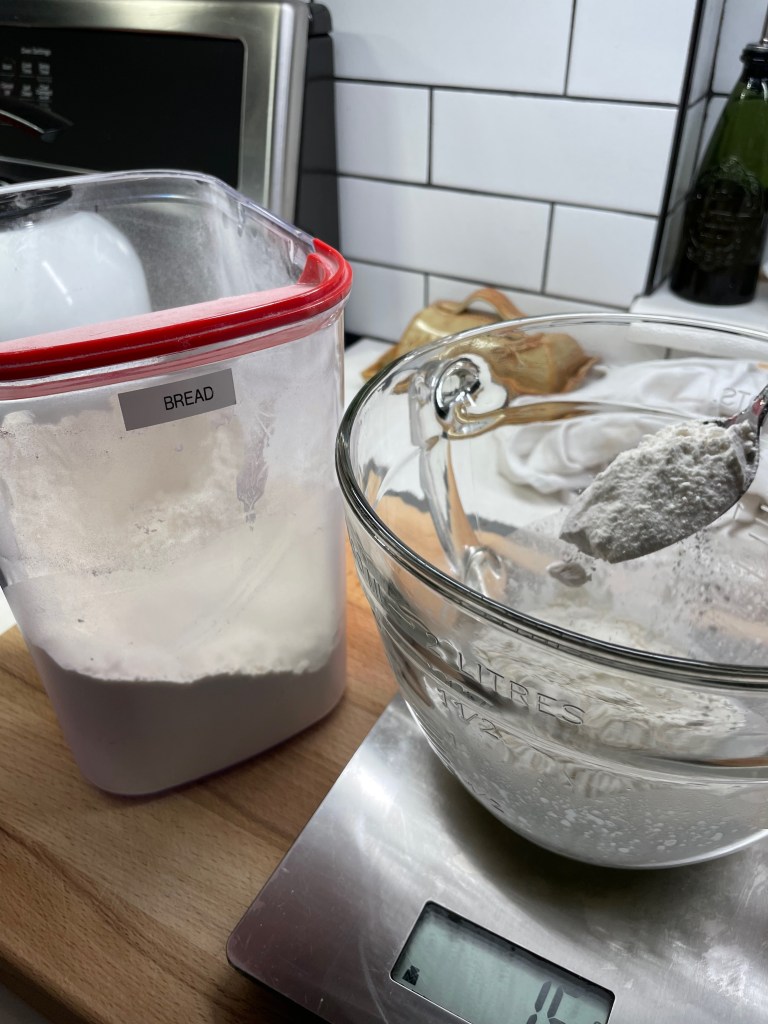
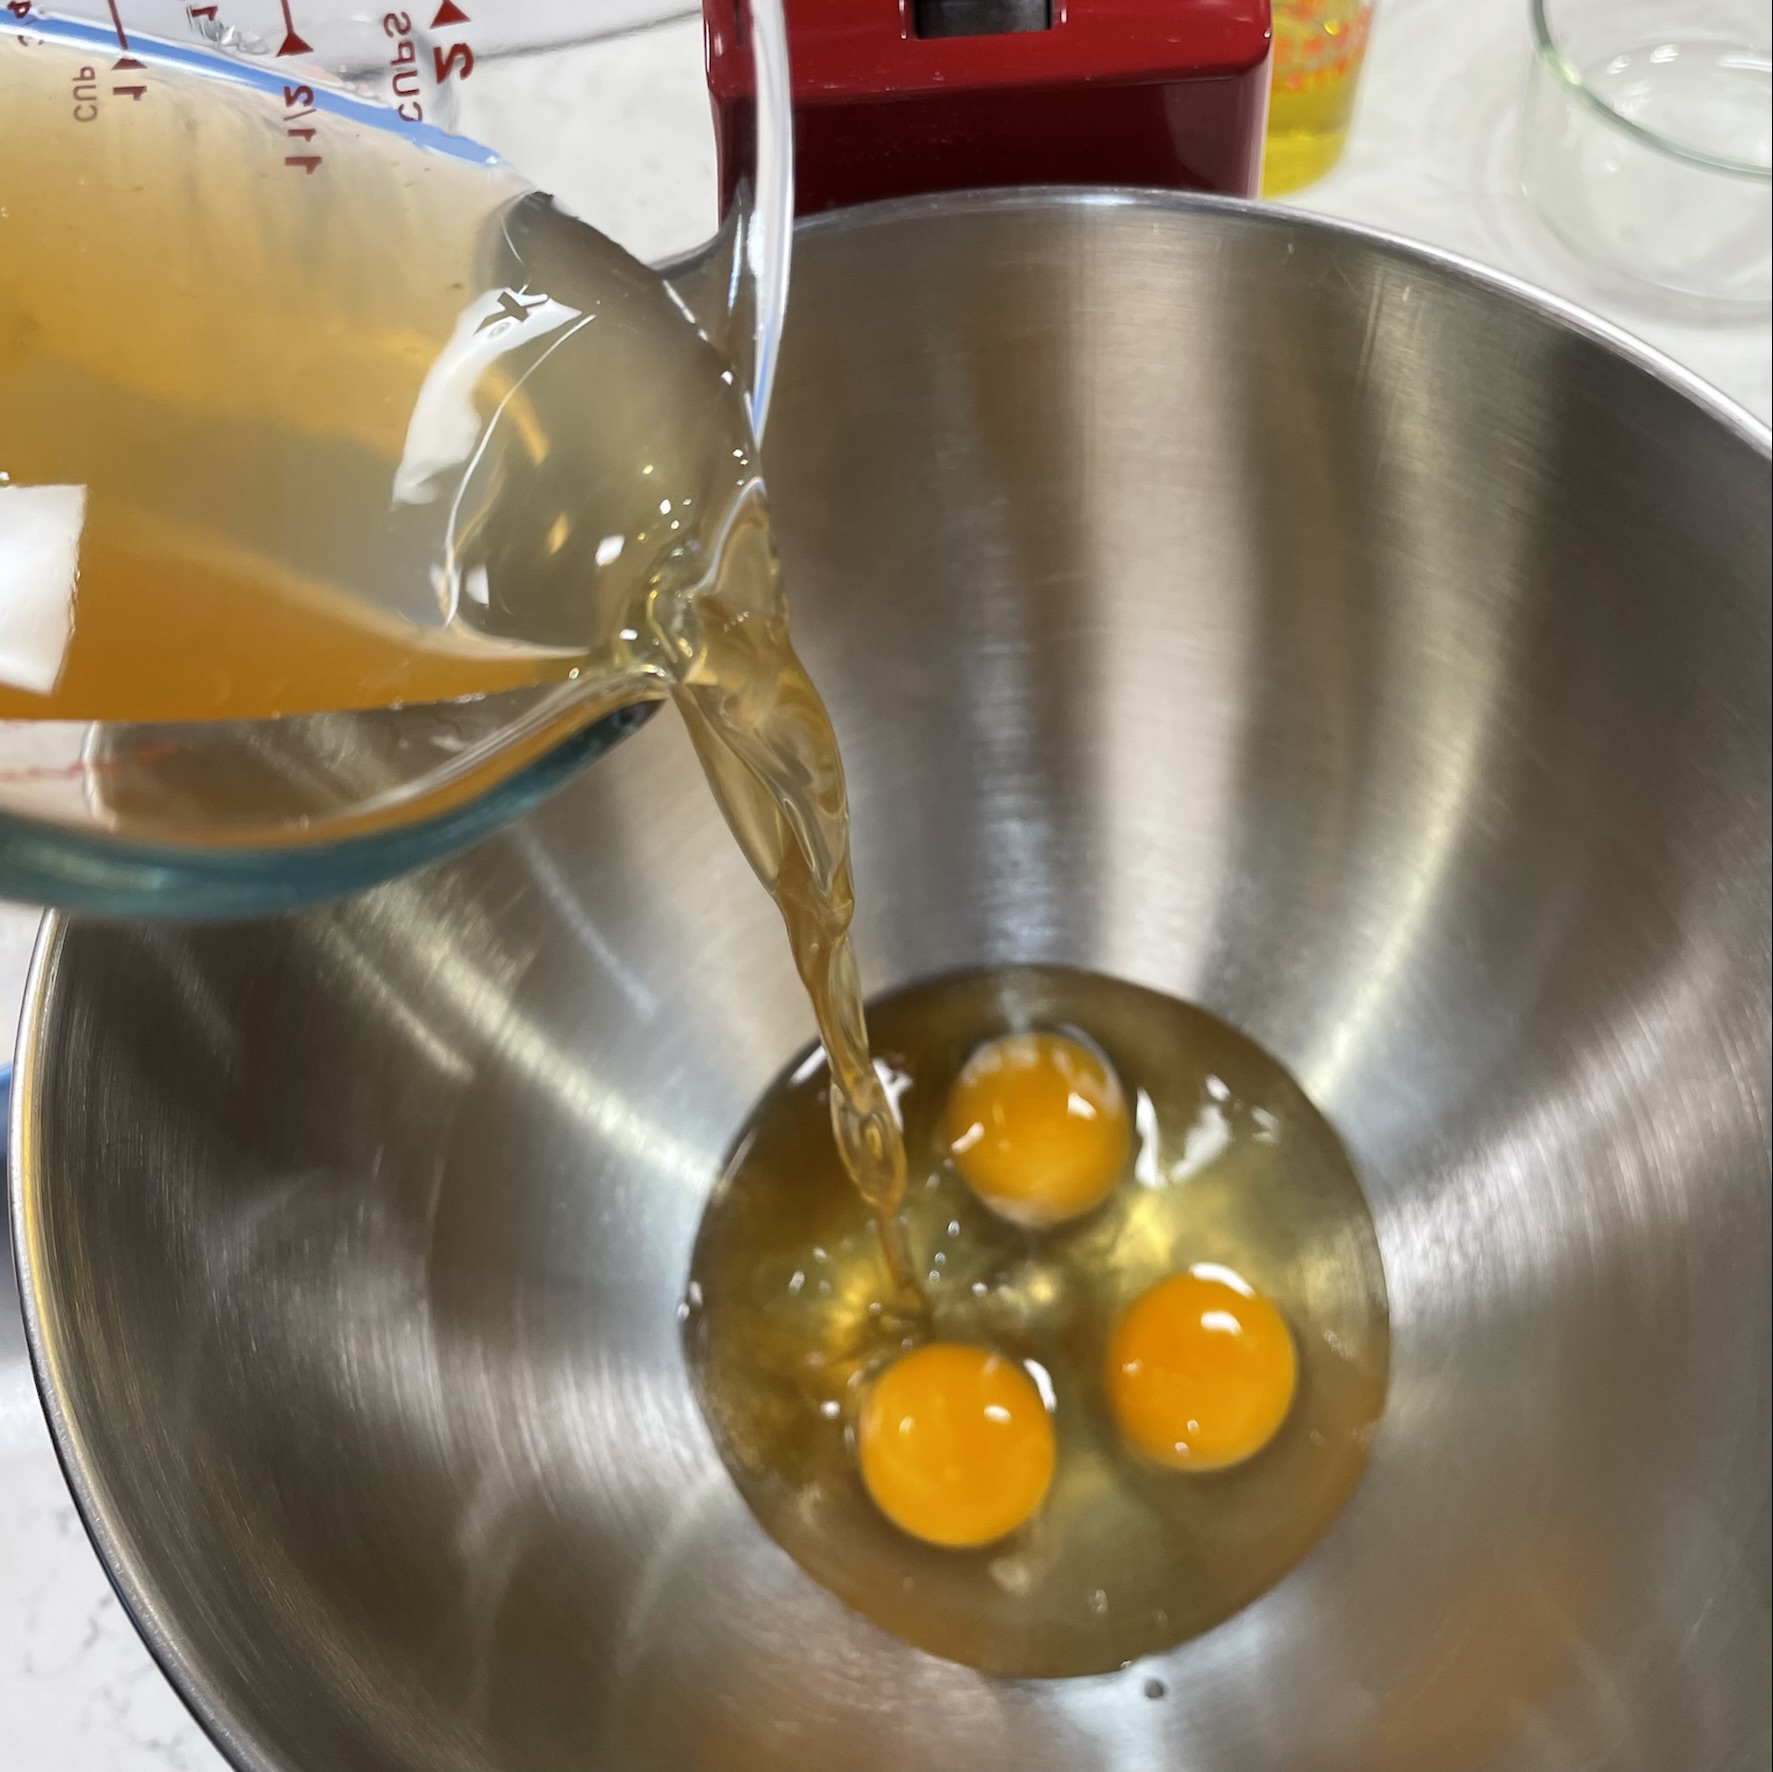
Combine pumpkin, water, olive oil and molasses in a measuring cup with a spout. Warm in the microwave for 30 seconds if the pumpkin is cold.
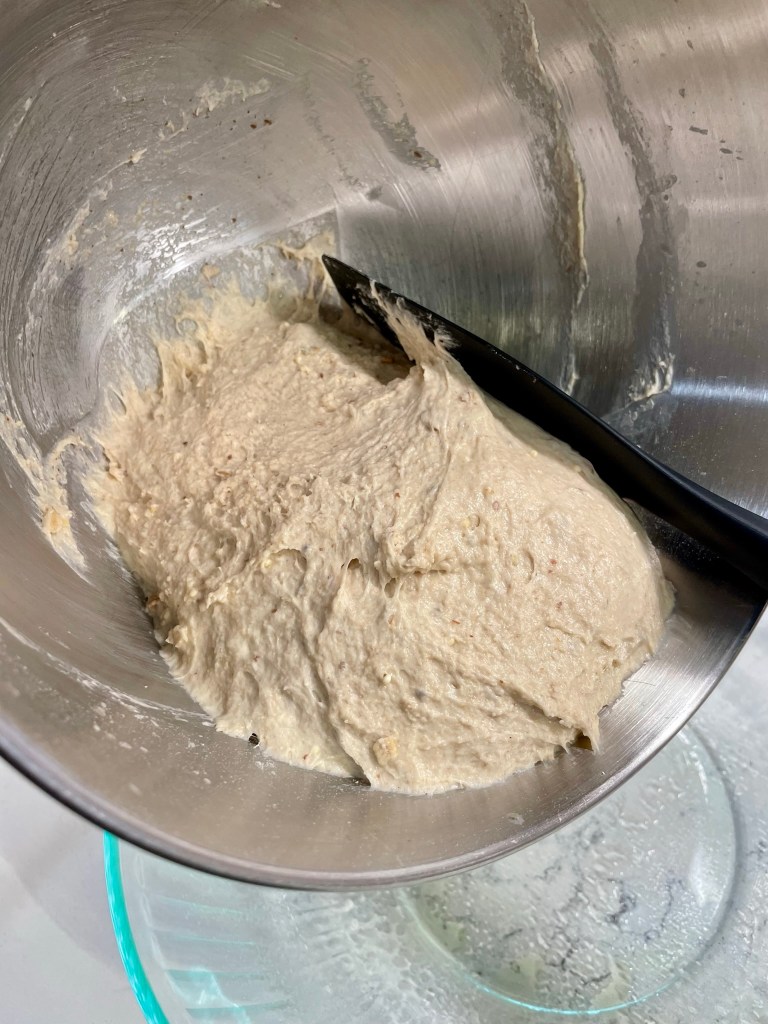
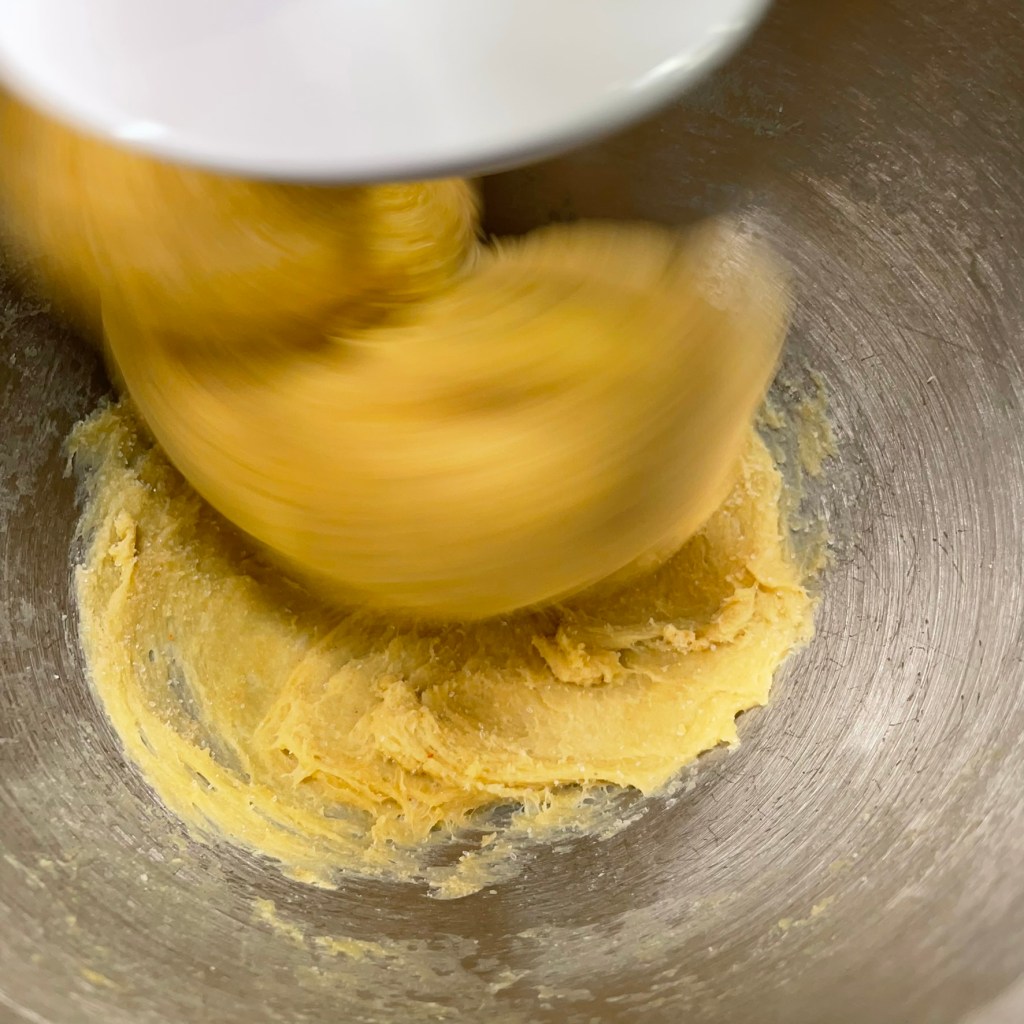
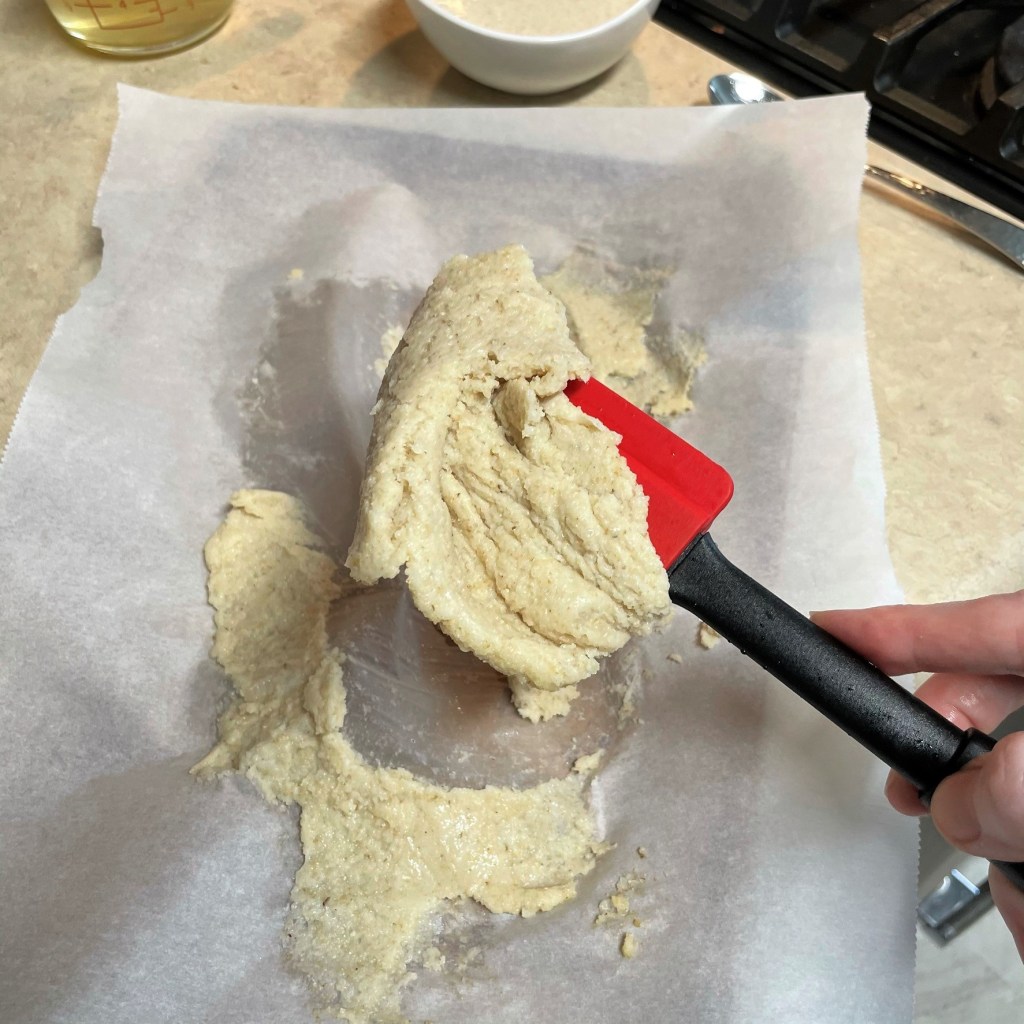
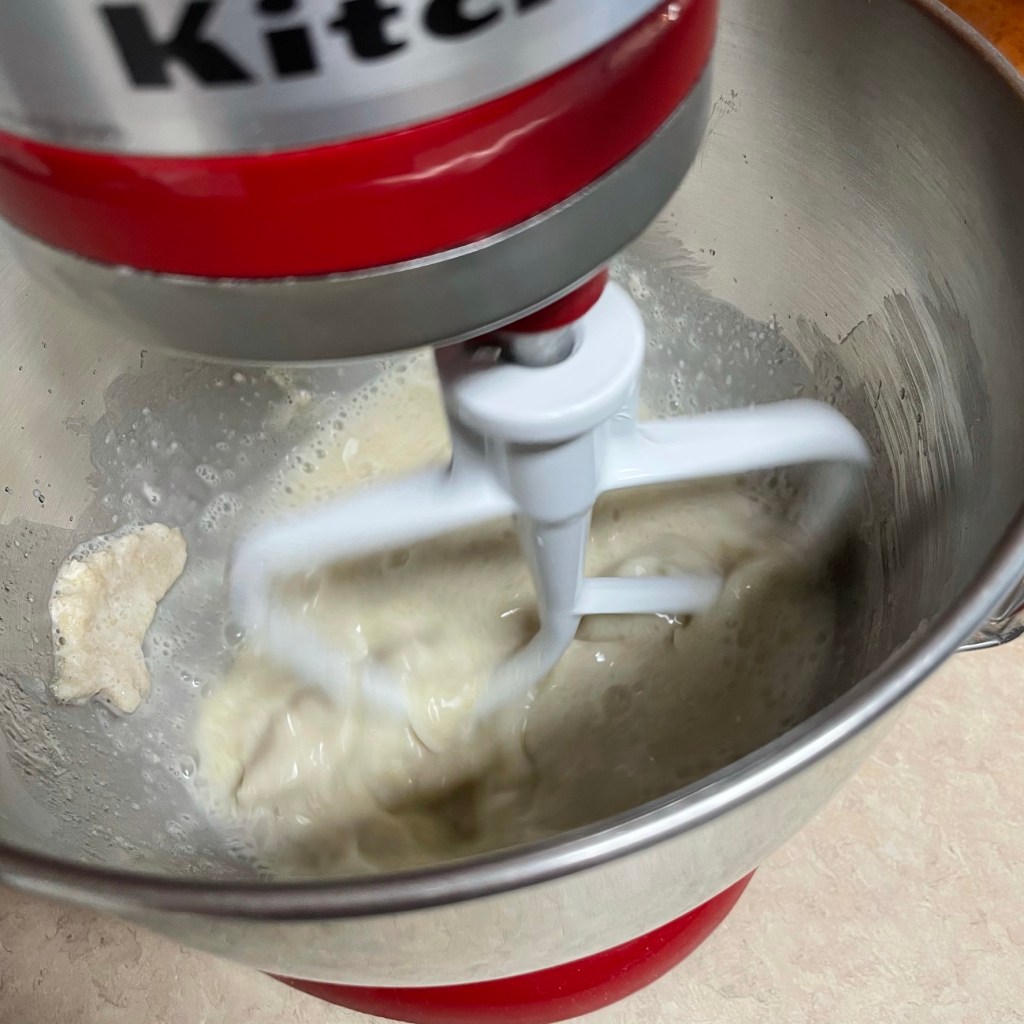
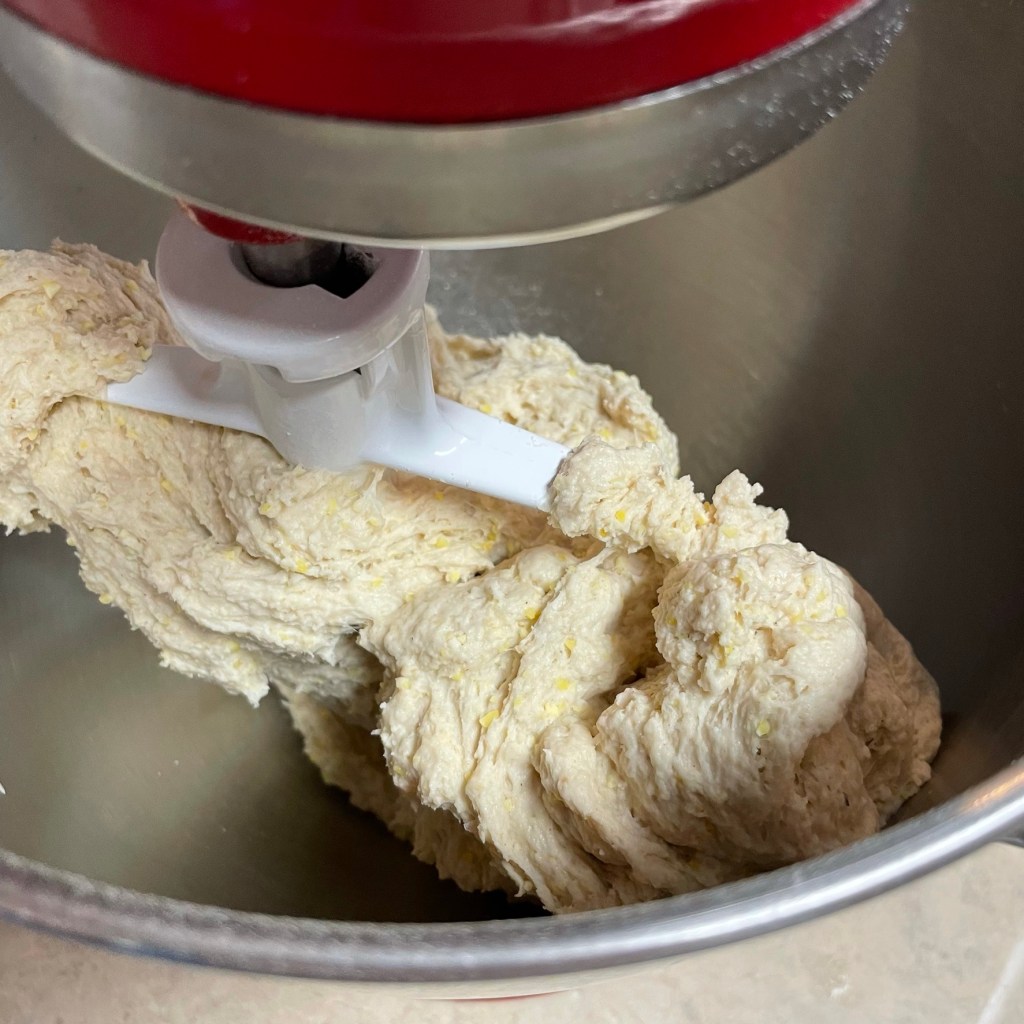
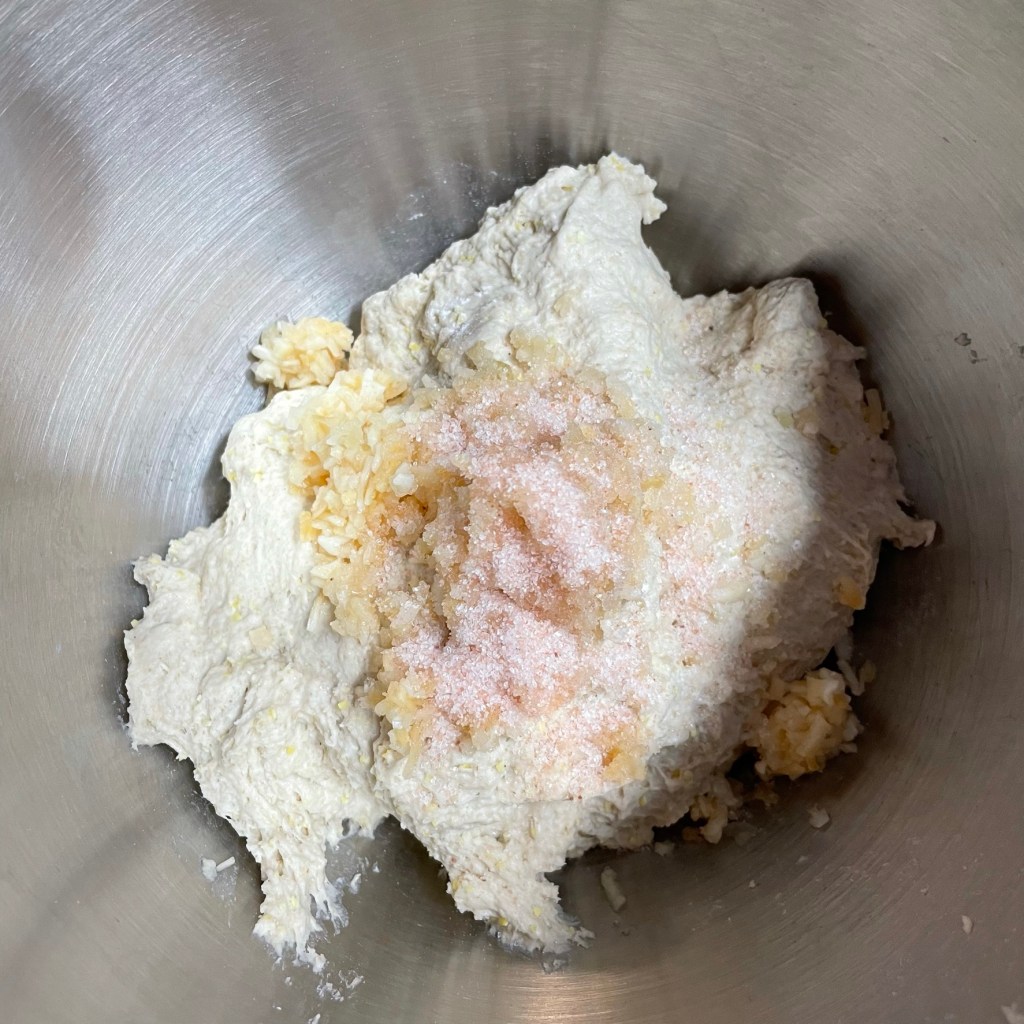
Mix together the starter and pumpkin mixture in the bowl of a stand mixer, fitted with the paddle blade. Blend until smooth.
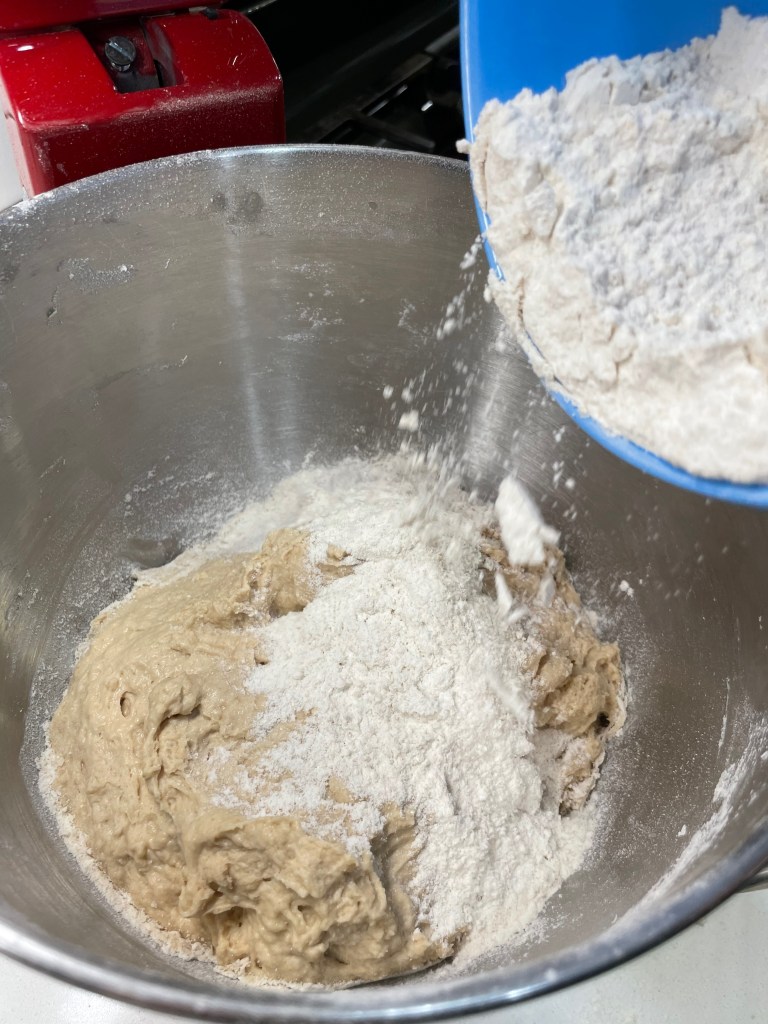
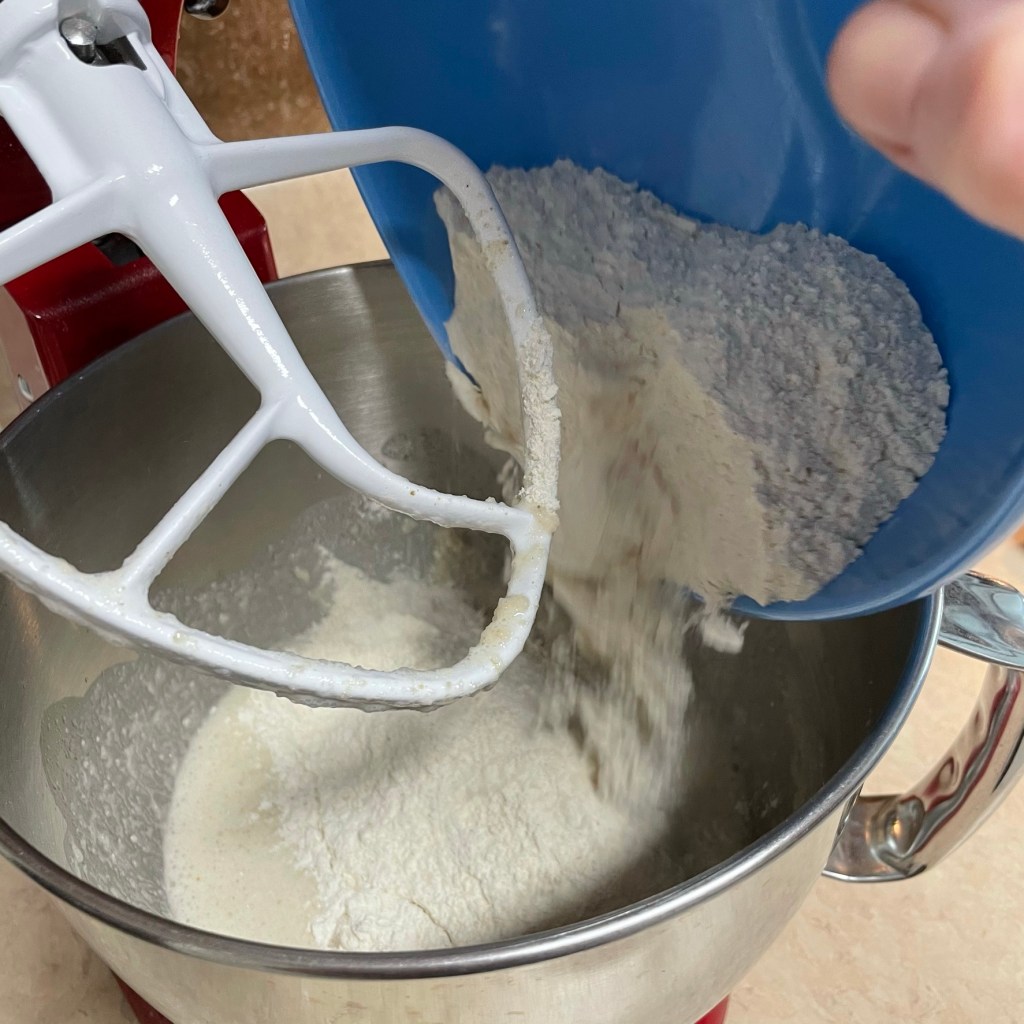
Whisk together dry ingredients, plus sage, in a separate bowl.
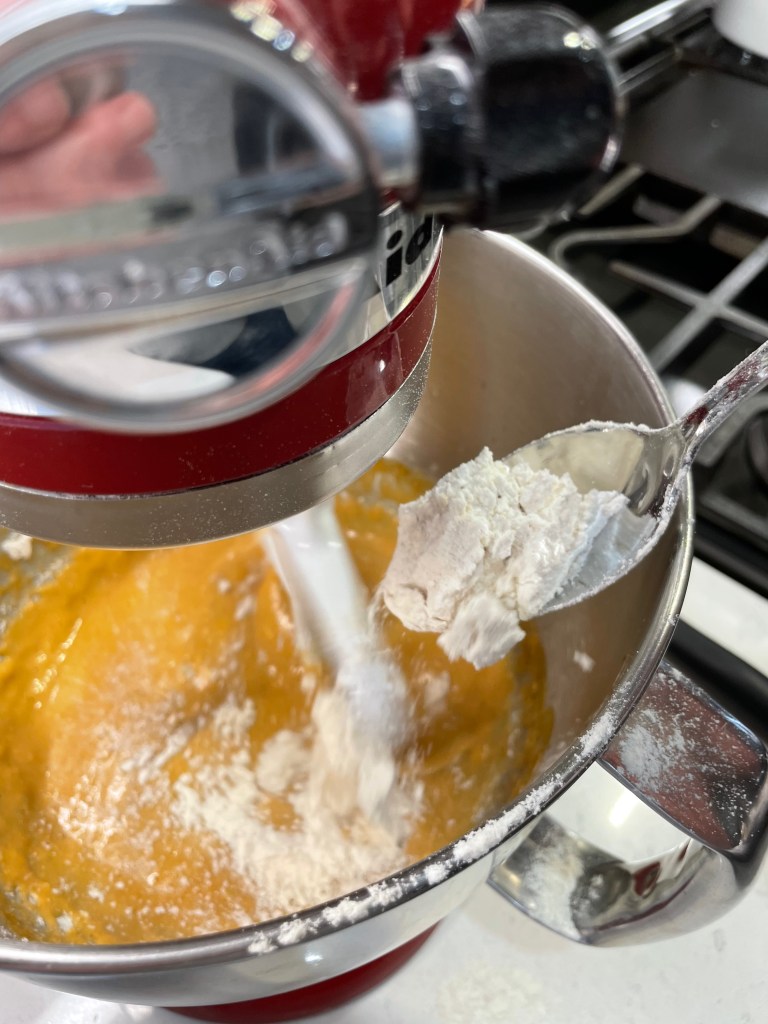
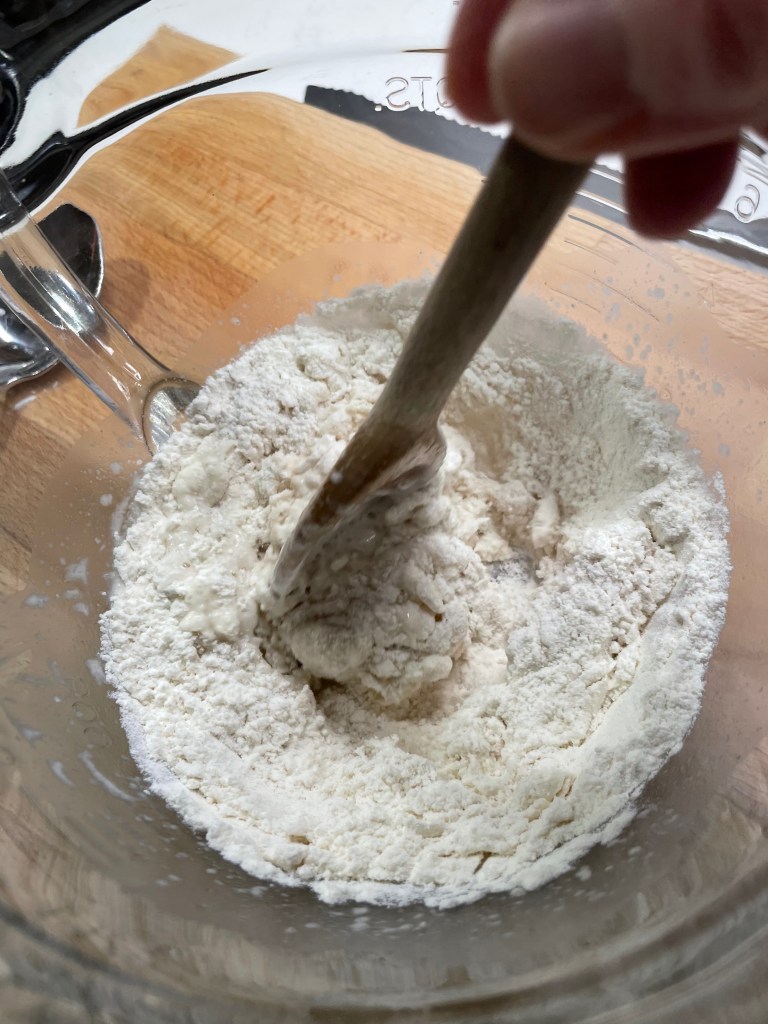
With mixer running on lowest speed, add dry ingredients by the spoonful, just enough to reduce the “splash” of the wet mixture. Stop the mixer and add remaining dry ingredients, then mix on low speed until all the flour is incorporated. Scrape down off the paddle and cover the bowl to rest the dough for about 20 minutes.
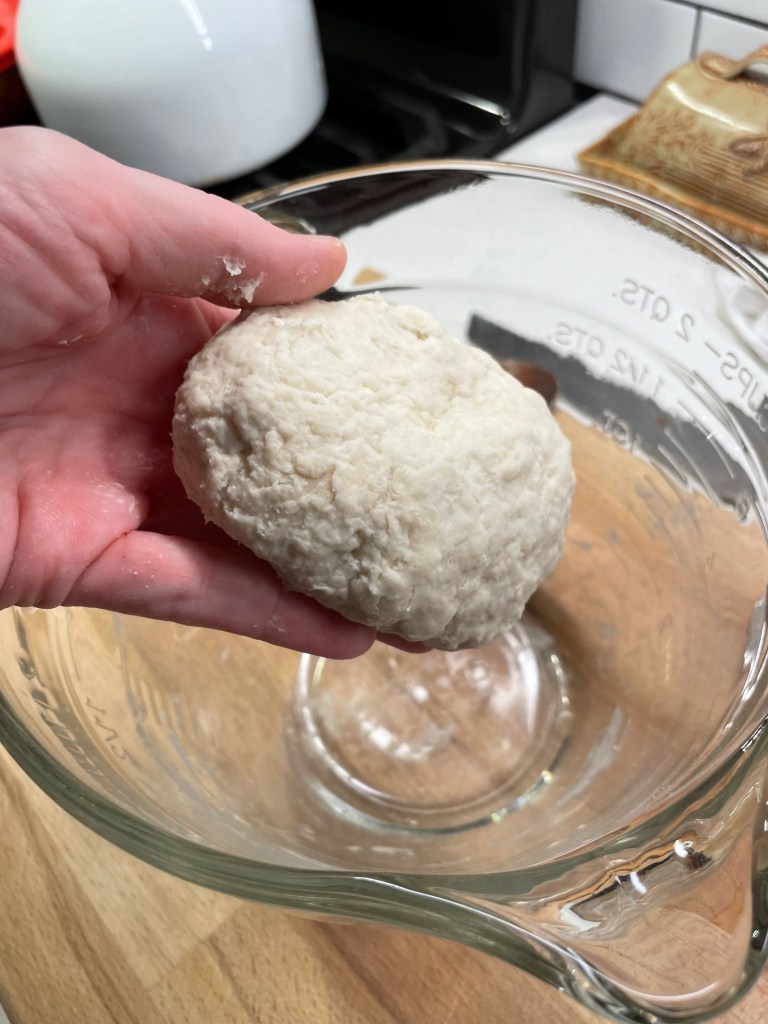
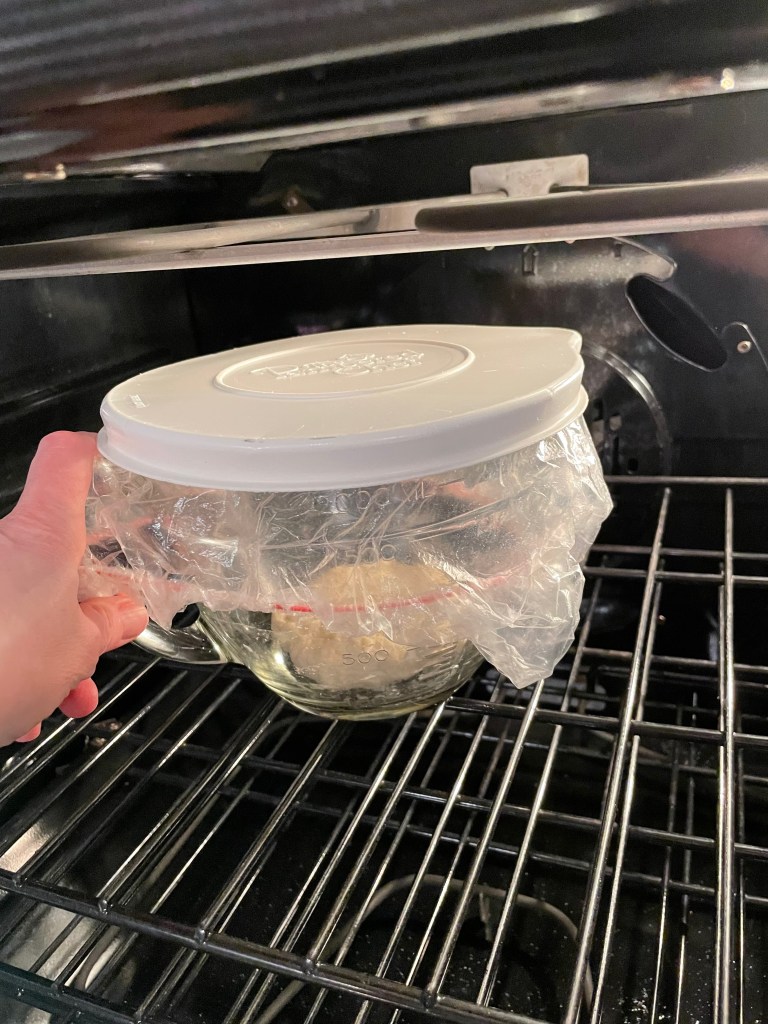
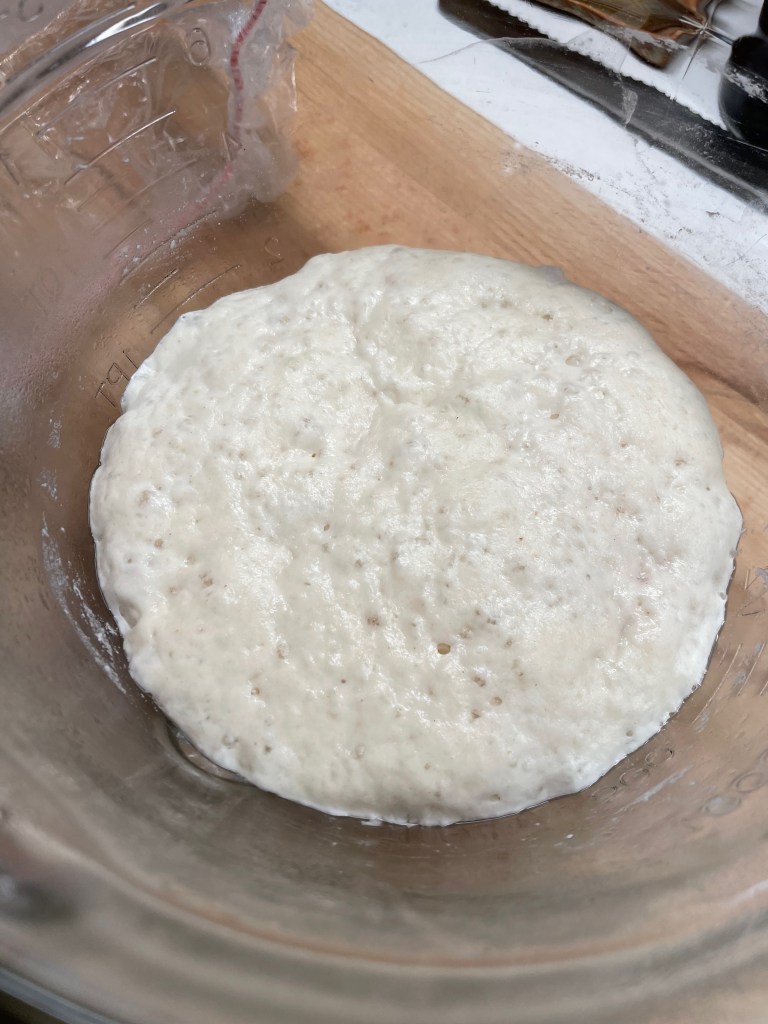
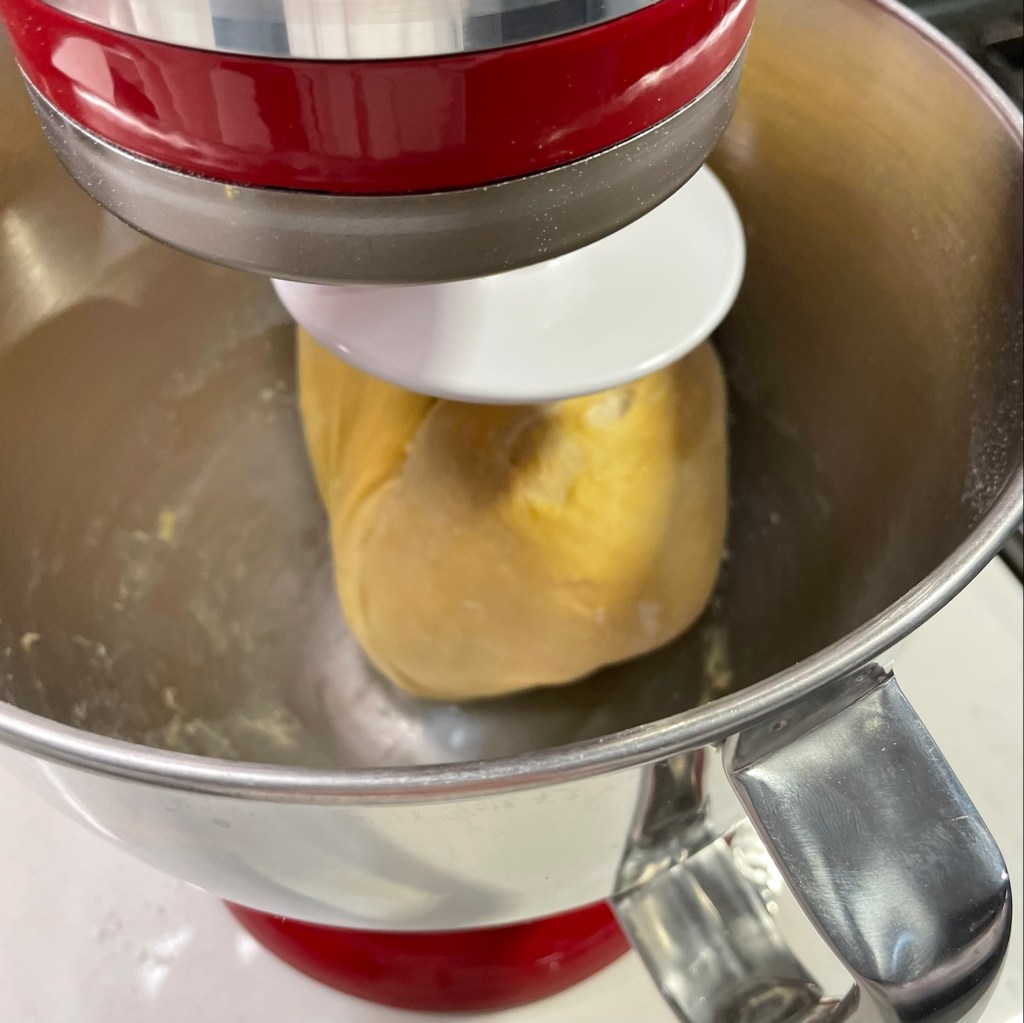
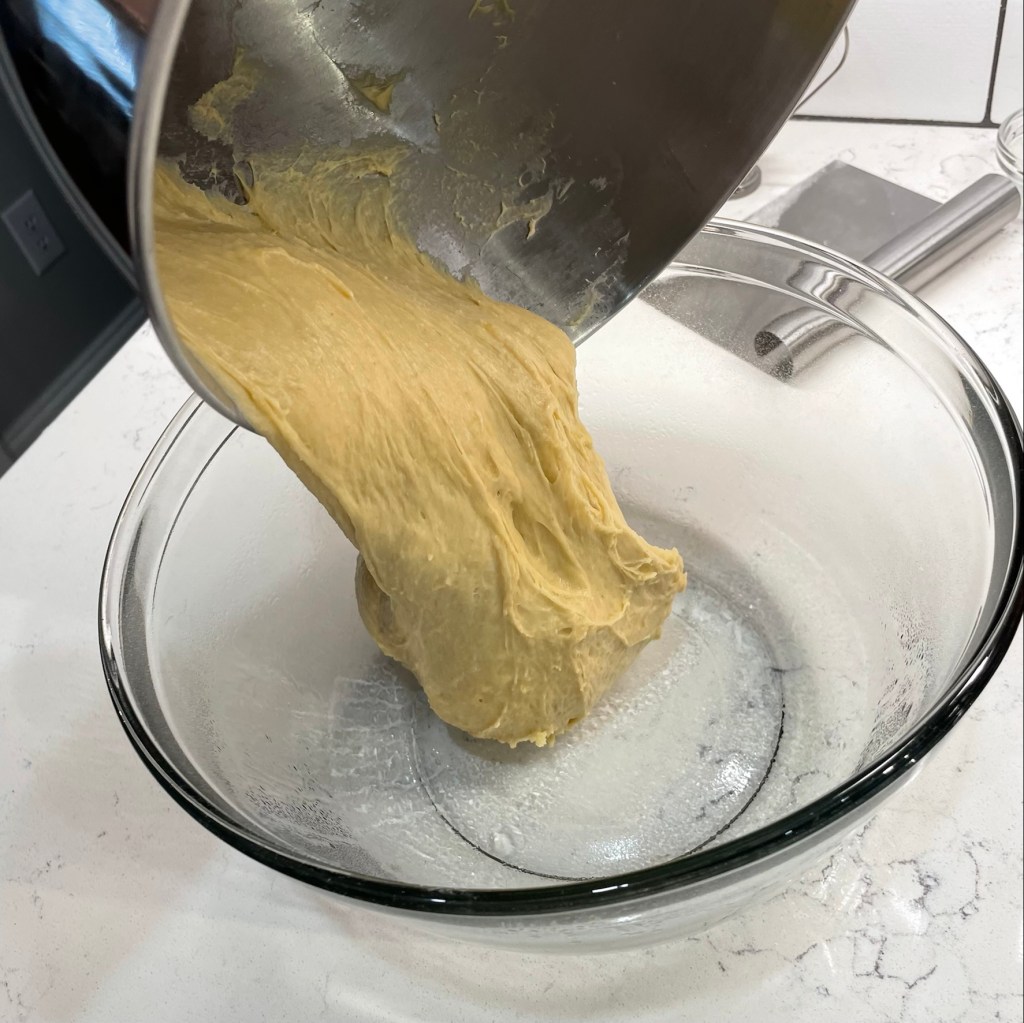
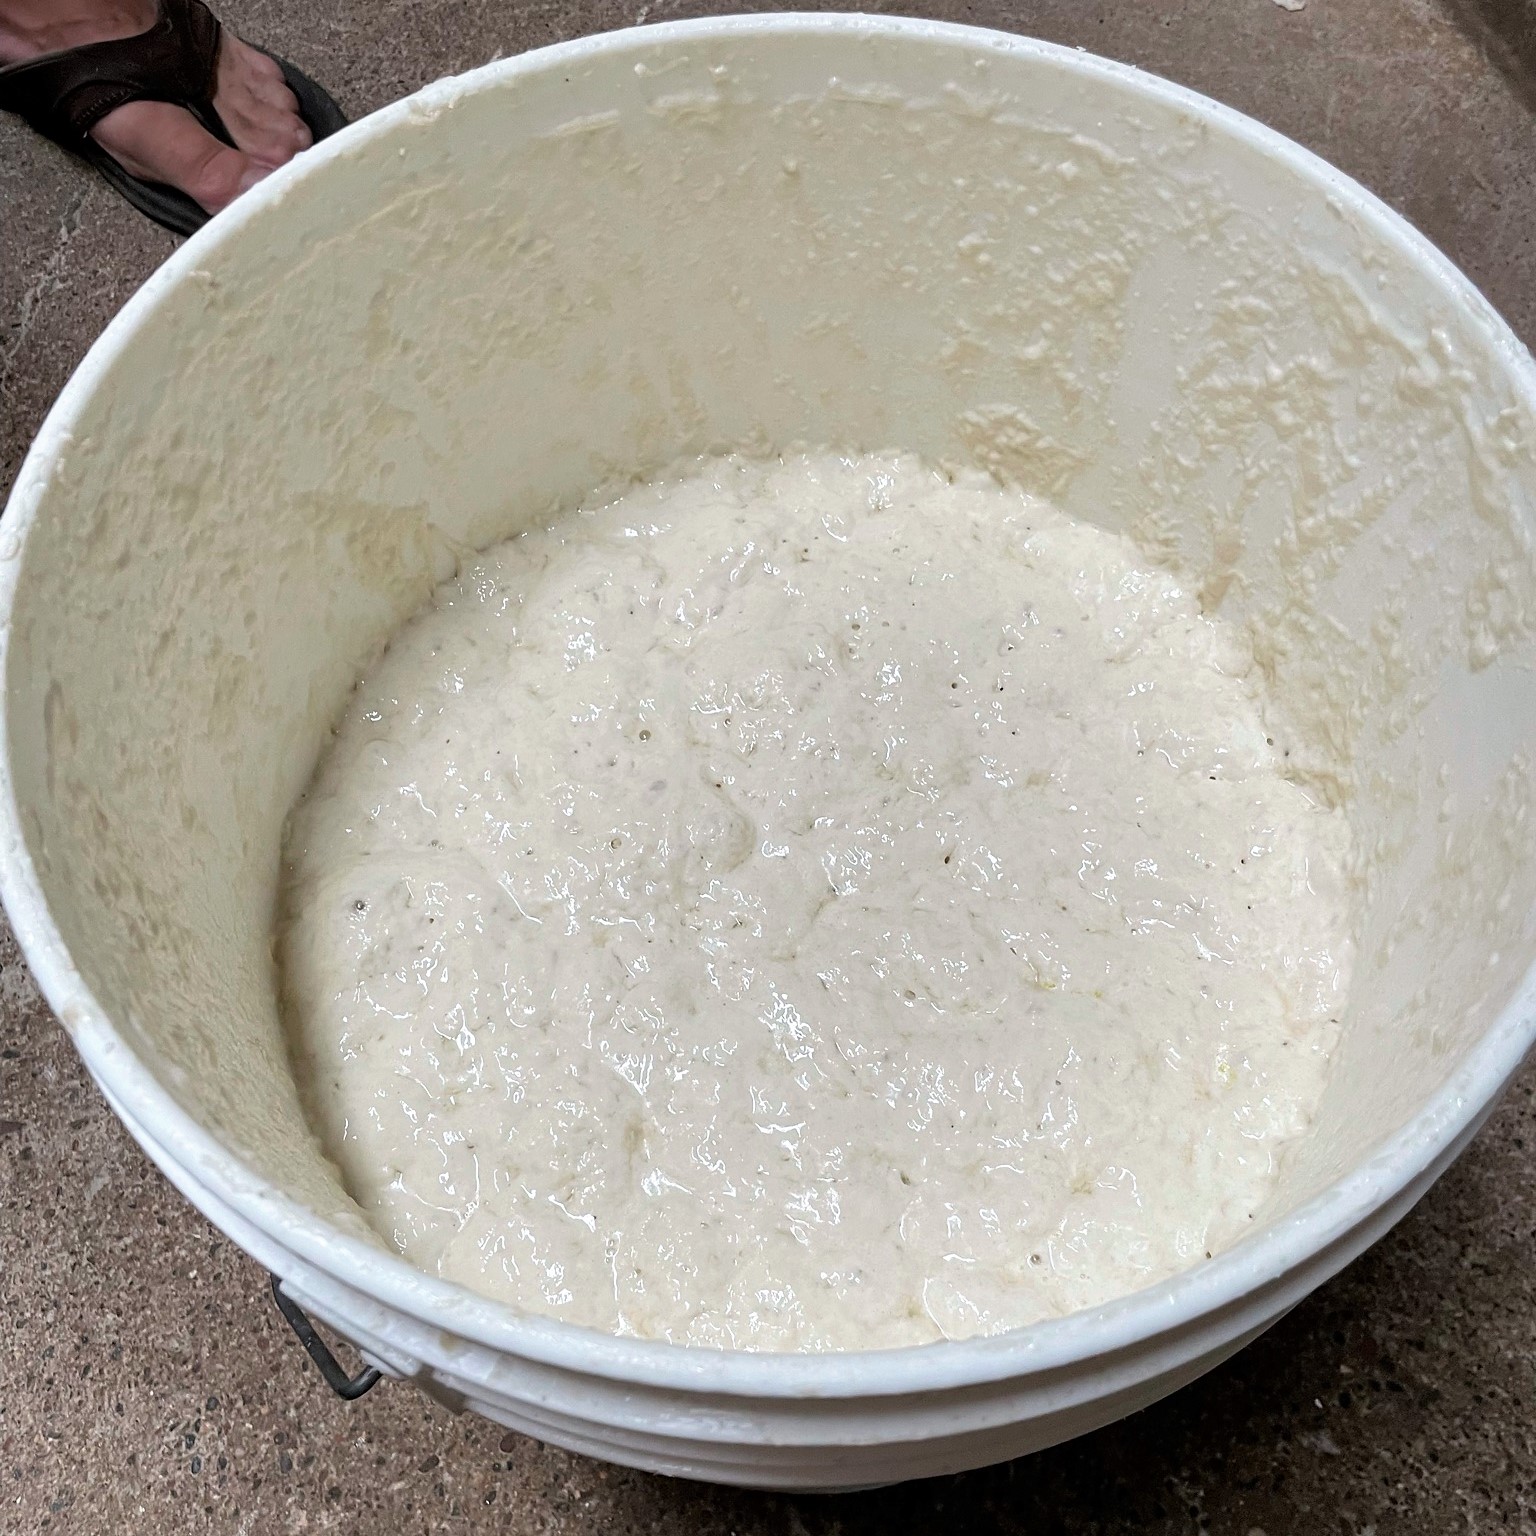
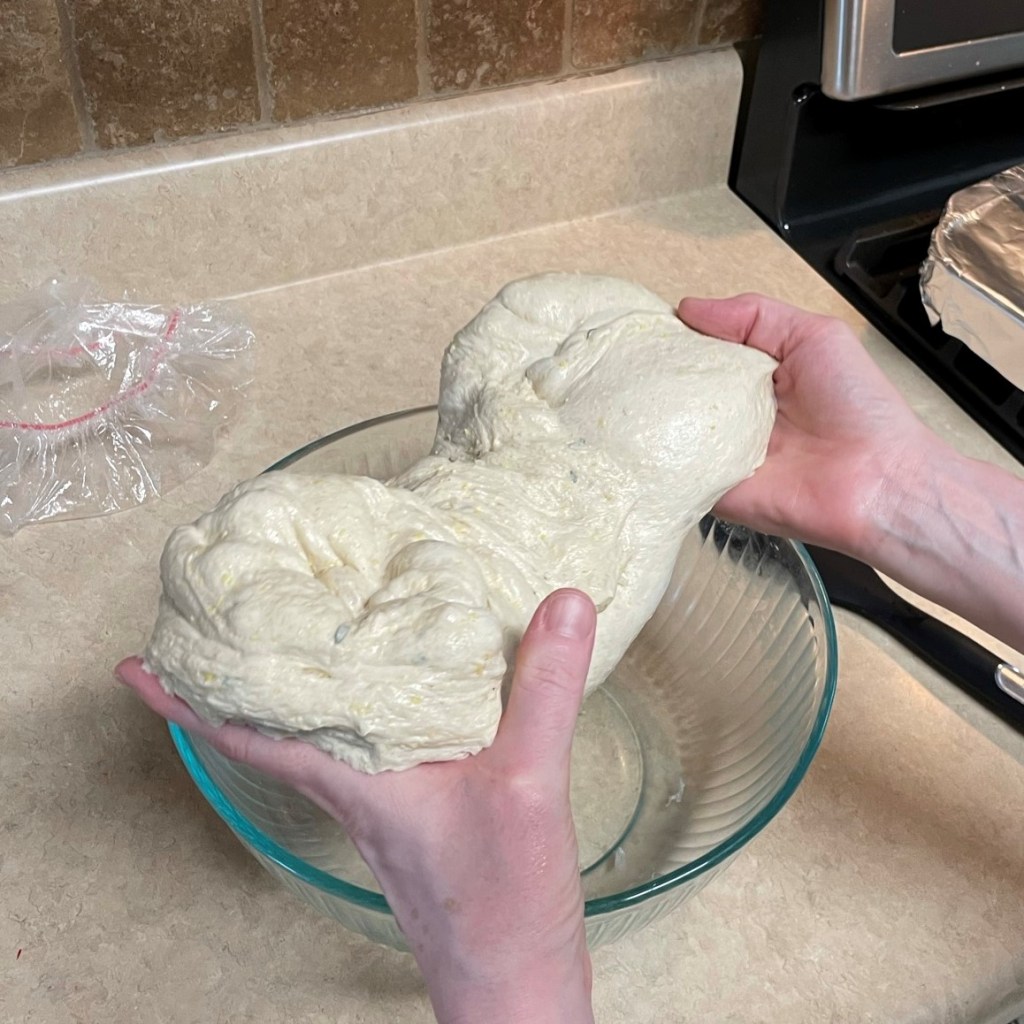
Switch to the dough hook and knead for about 6 minutes until dough is smooth and shiny. Transfer dough to a large bowl, sprayed lightly with oil. Cover and ferment in a warm spot of the kitchen until dough is quite puffy, which could be 2 to 3 hours (or less, if using the yeast).
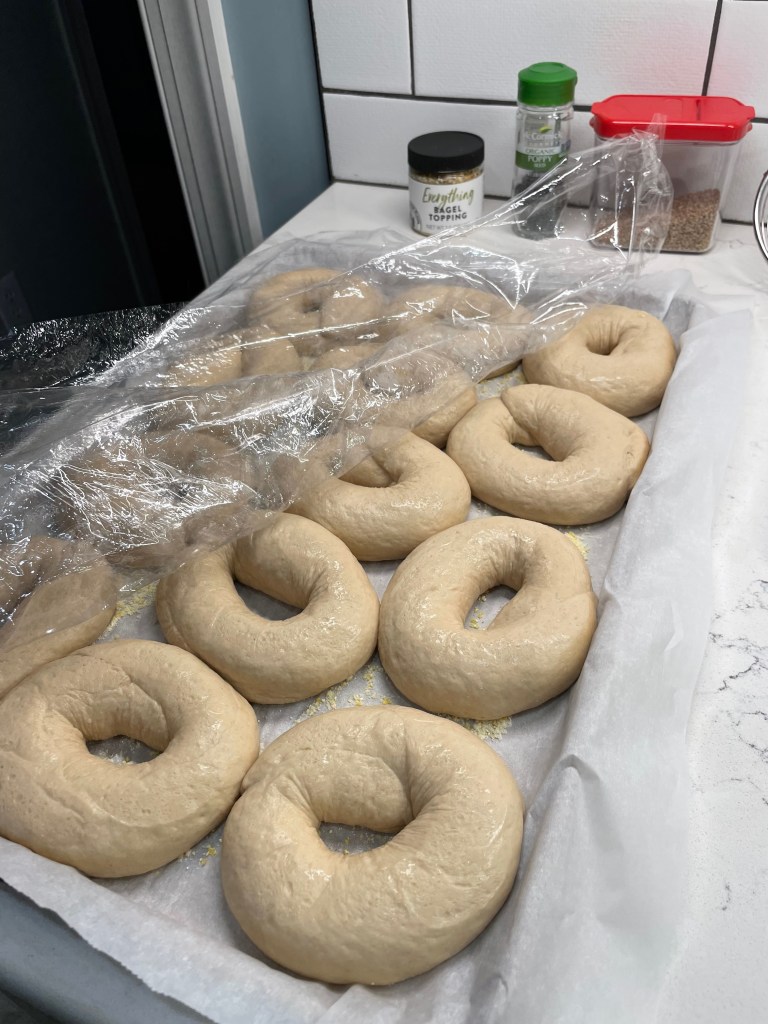
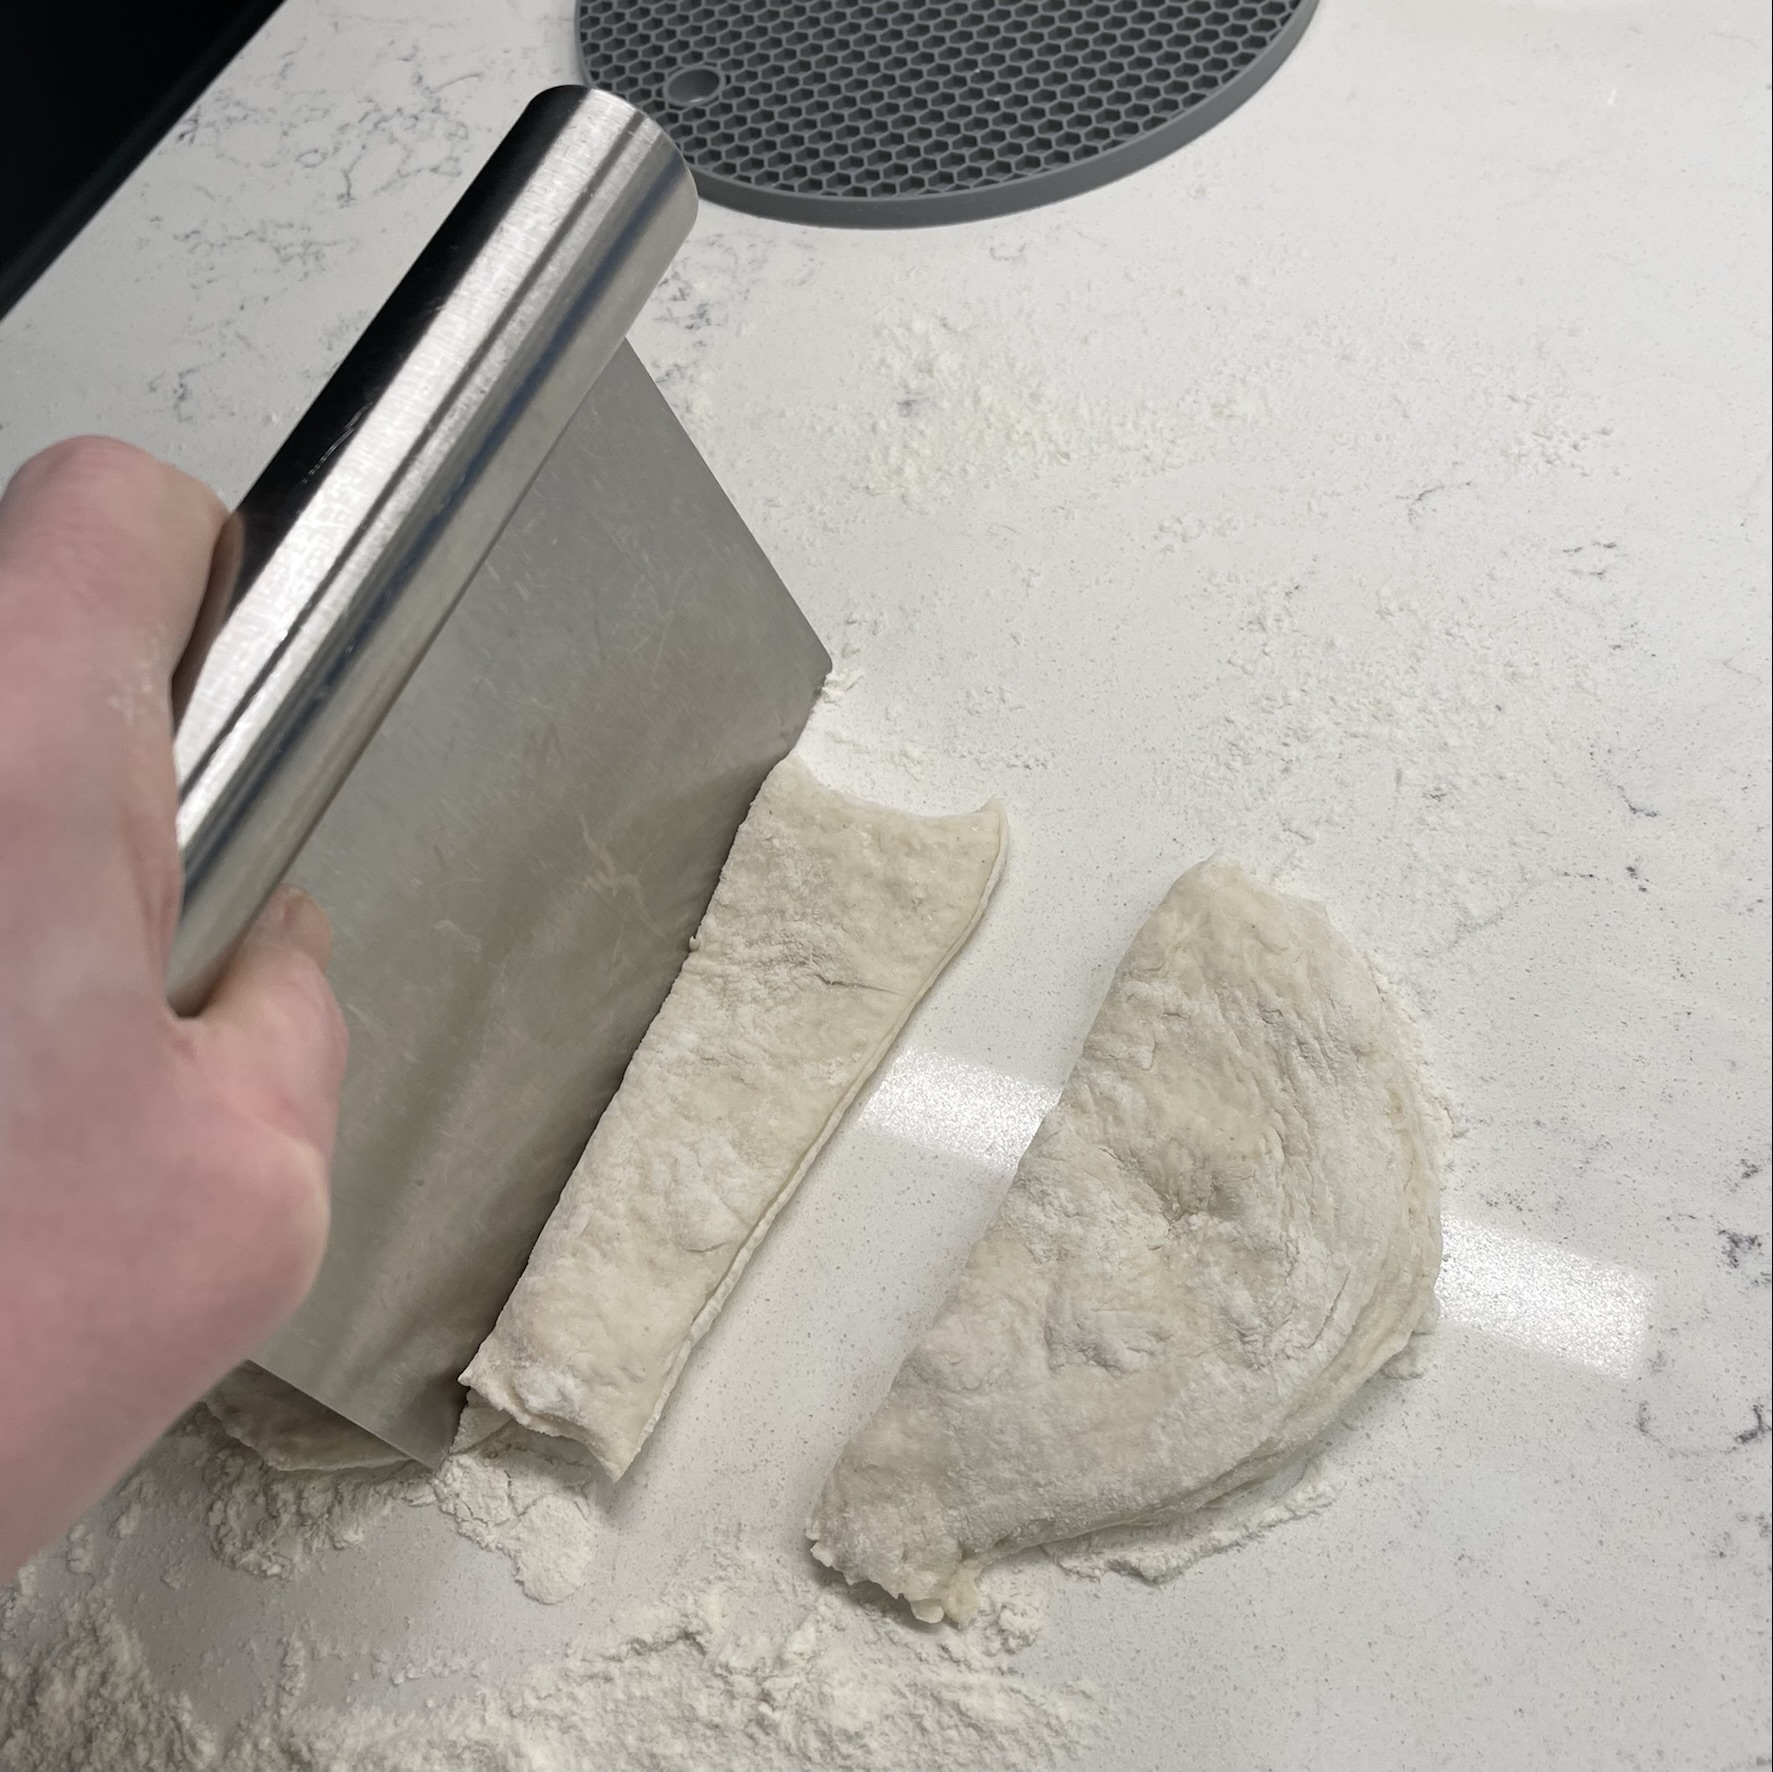
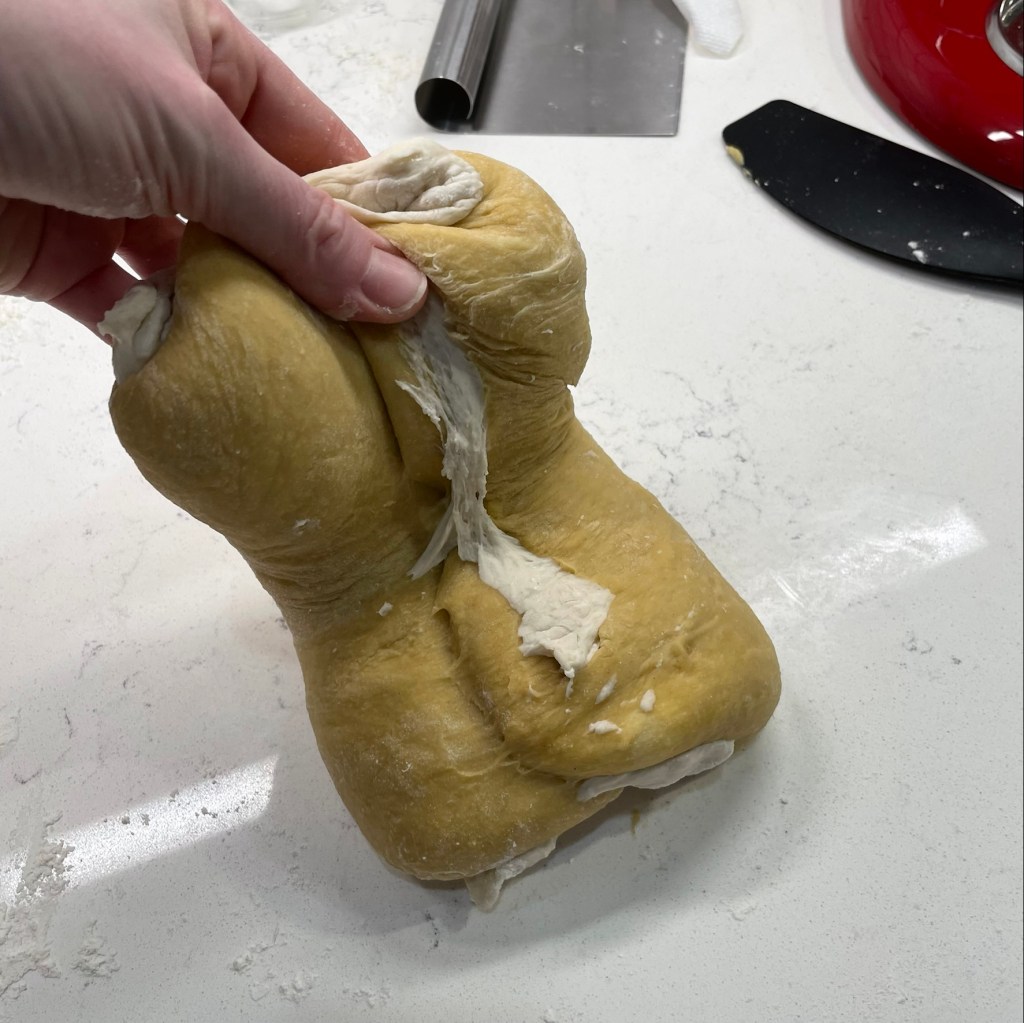
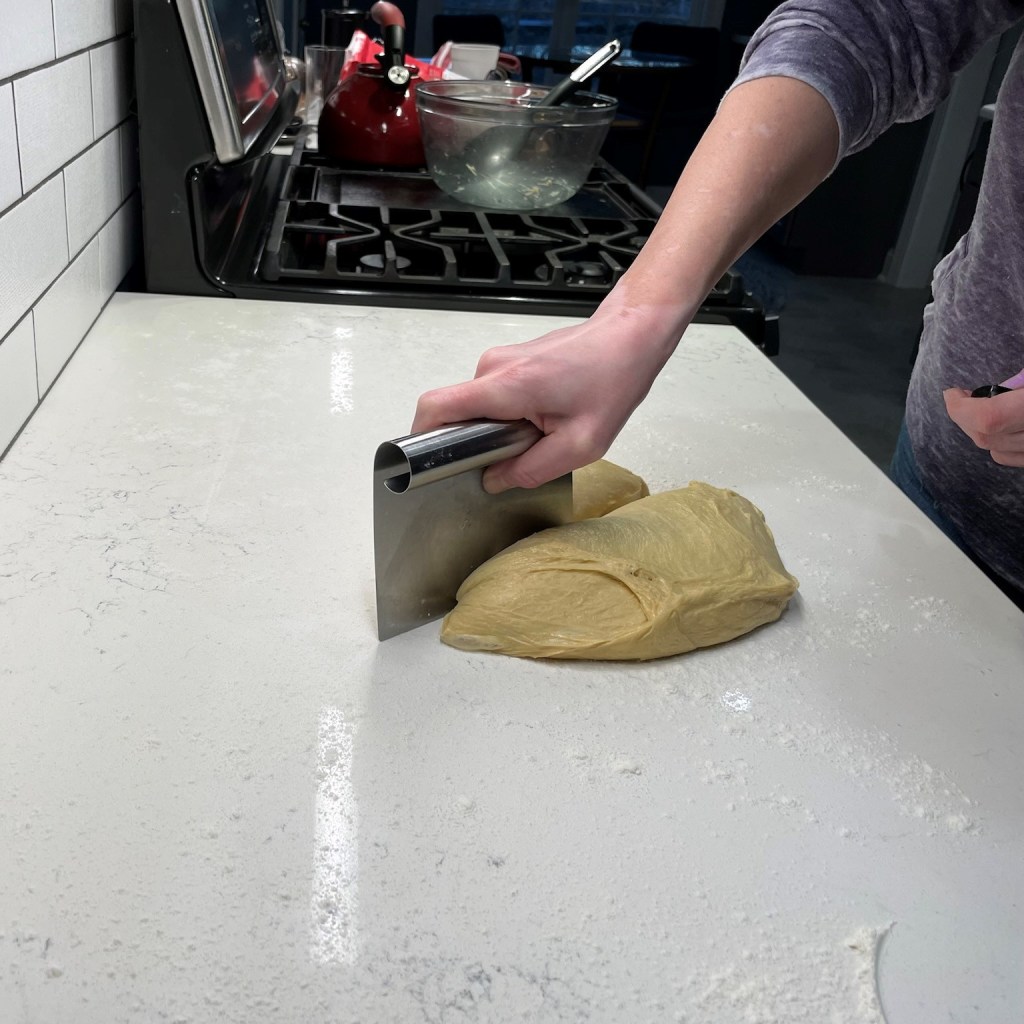
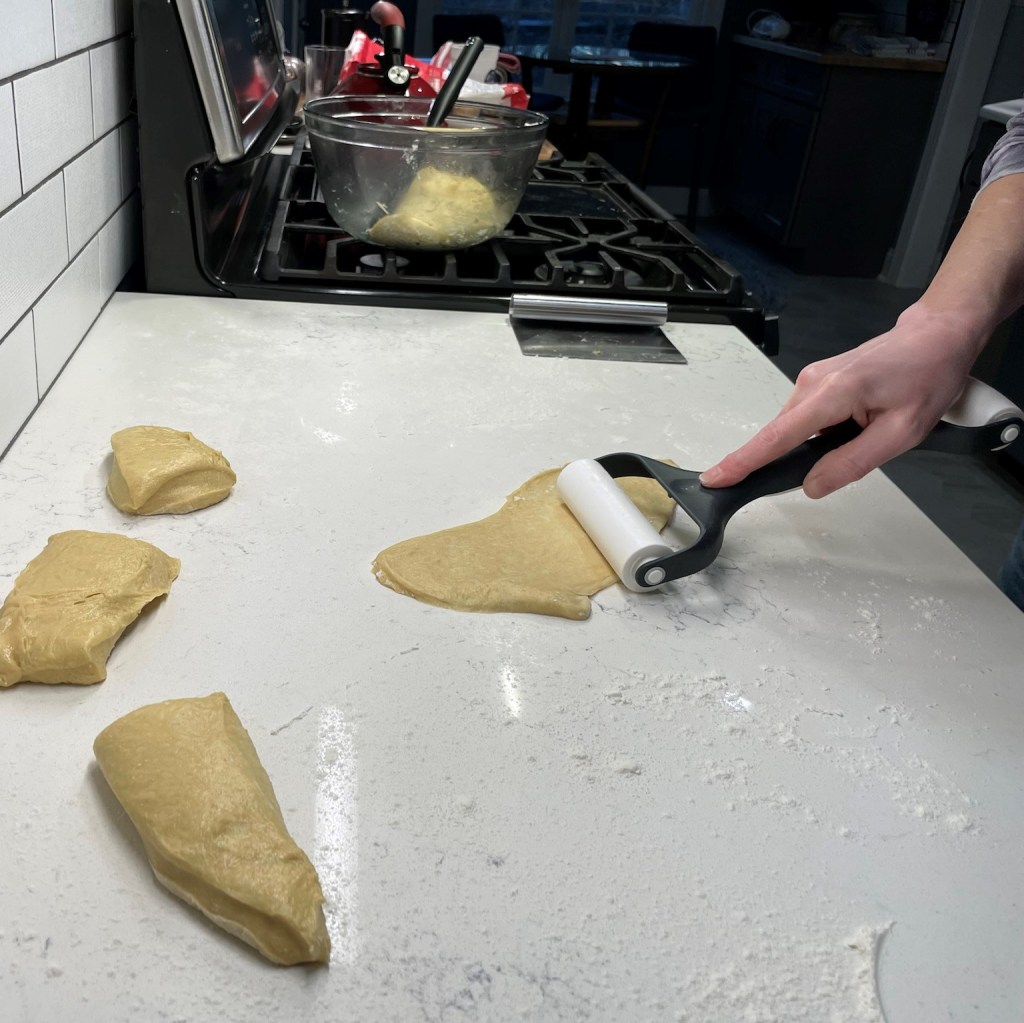
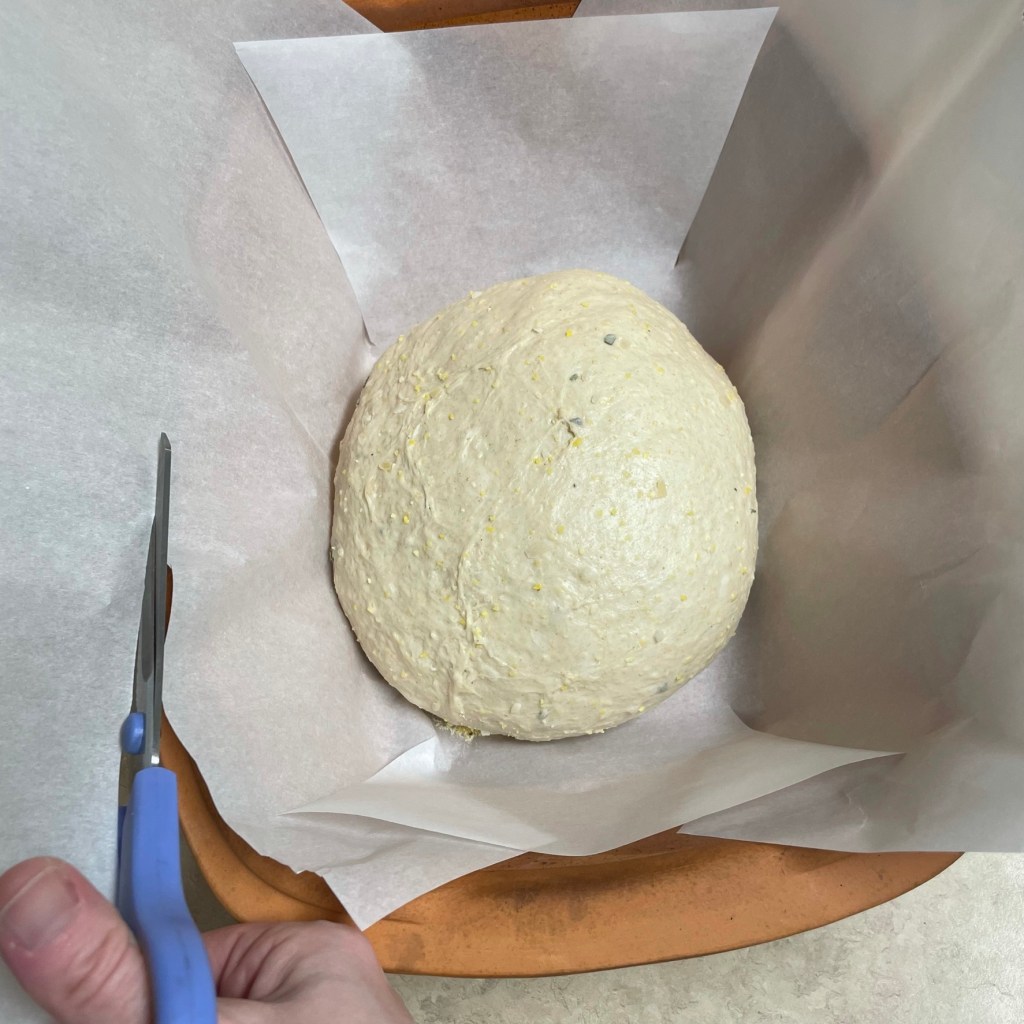
Transfer dough to a lightly floured countertop and cut into 12 equal pieces. Shape the pieces into balls and flatten each ball with your fingertips onto a piece of parchment paper, sprinkled lightly with corn meal. They should measure about 3 1/4” across. Sprinkle the tops with additional corn meal. Cover loosely with oil-sprayed plastic wrap and a kitchen towel. Rest until the dough balls pass the “poke” test.
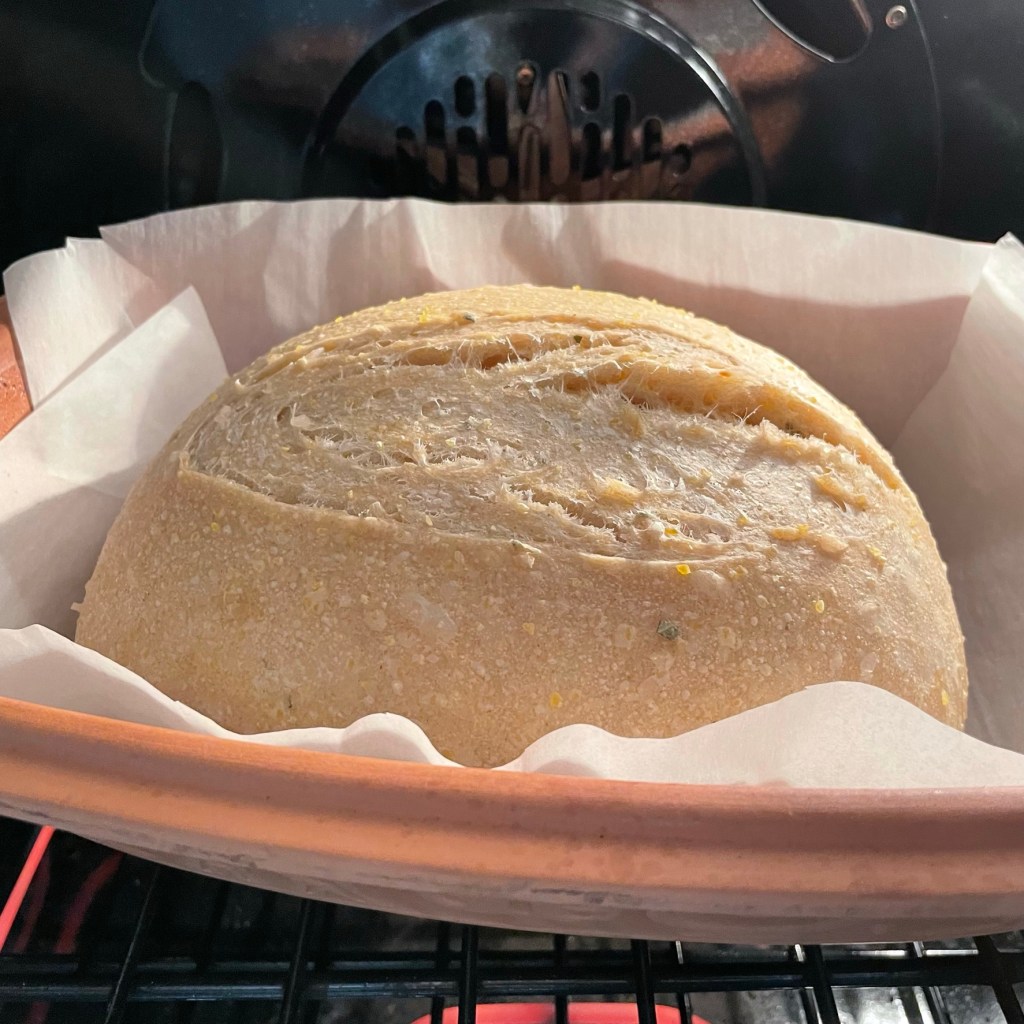
Heat a griddle to medium-low heat (about 325° F). Gently flatten each dough ball, and place them on the griddle, a few inches apart for easy turning. Place a dry cookie sheet on top of the muffins once the griddle is loaded; this helps give the muffins a nice flat second side.
After 6 or 7 minutes, the bottoms of the muffins should be a golden brown color. Give them a little longer if needed. Gently turn the muffins to “bake” the other side. Don’t be concerned if the sides of the muffins still seem soft. The dough will cook from the radiant heat. If the muffins feel spongy or wet, but the sides are done, transfer them to a baking sheet and put them in a 350° oven for a few minutes to finish them off.
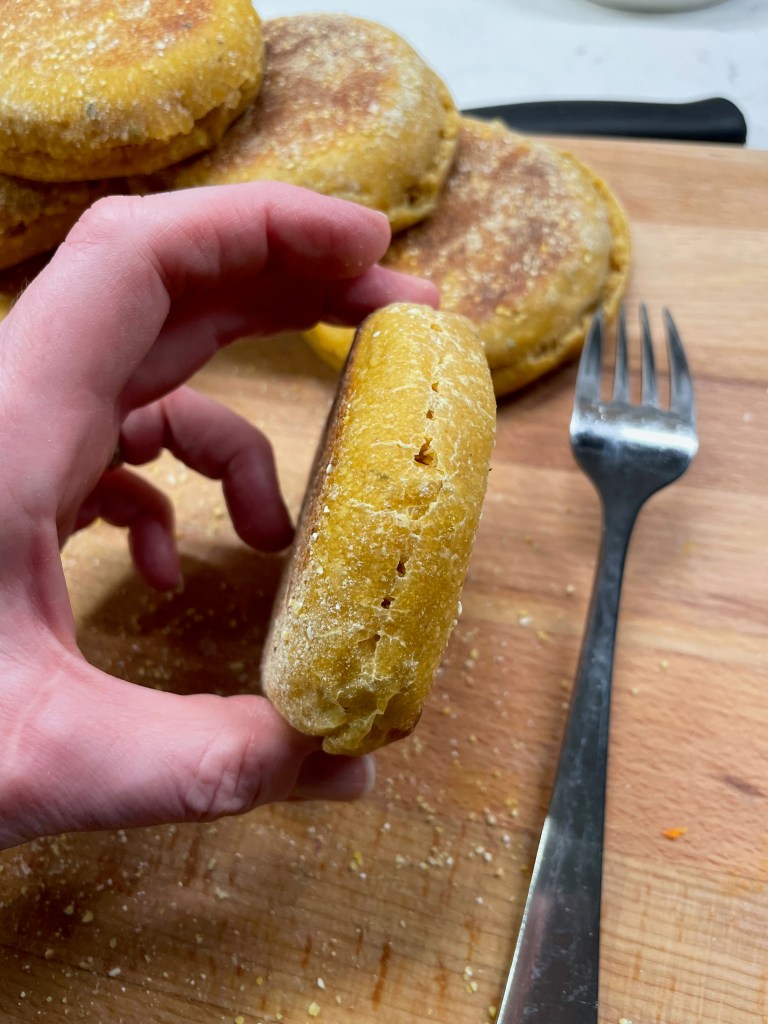
Cool the muffins on a wire rack, and when completely cool, use a fork to gently “split” the sides of each muffin for easy slicing when you are ready to serve them.
In case you’re wondering…
Yes! You can freeze them for later. These English muffins freeze beautifully, and they can go straight to the toaster without thawing, too. Simply fork-split them, separating the halves, and load them into a zip-top freezer bag. Be sure to squeeze out excess air. Enjoy!
If someone had asked me how I spent last weekend, this would be my answer. It is not that making these bagels took the whole weekend, but that I spent most of the weekend thinking about them and anticipating the crispy crust, chewy interior and the sheer satisfaction of having them turn out so well.
The adventure I had making sourdough bagels is much more than a recipe, though I’ll be happy to share where my recipe came from. Here you go: https://www.theperfectloaf.com/sourdough-bagel/
Maurizio Leo’s creations have been intimidating, er, fascinating me for a few years now, since I first discovered one of his recipes on the King Arthur Baking site, where Maurizio had been an occasional contributor. This guy is one of my culinary idols, and his expertise with sourdough is astounding. One of the things that used to scare me about his recipes was his attention to the science, and especially his guidelines for the temperature of the dough at various stages. But my worries were eased when I remembered something I learned in my King Arthur Baking class last summer: concern about temperature is more crucial in a production environment, where you have to be ready for baking on a schedule, than in a home kitchen. Once I recalled that fact, I’ve been able to relax and just appreciate the outcome with less worrying along the way. Baking is supposed to be enjoyable, right?
It does help to remember two simple tips about temperature: yeast dough (including sourdough) rises more quickly in a warmer environment, and dough develops more flavor in a cooler environment. Both of these principles come into play with this bagel recipe.
When I got the itch to make bagels for the first time in ages, it was Maurizio’s blog that I turned to for the best recipe and expert advice. He did not let me down.
This renewed interest in making bagels came about in early November, after my husband, Les, and I had participated in a trivia night at the temple in our city. We were assigned to a team and challenged in a variety of categories— from movies, sports and music to Jewish culture and history. Thanks to the diverse interests of our team, we did very well in round after round, and then came a food question that left us, shall we say, farblonjet (a Yiddish word that loosely translates to “we don’t know what the heck”). The trivia clue went something like this:
What staple Jewish food was said to have originated when Polish King Jan Sobieski saved Austria during the Ottoman Empire?
I’m paraphrasing because I don’t remember the exact details of the question; I only remember that we had a lot of discussion at our table and we still got it wrong. One teammate said knishes, which we thought might have had ties to Poland but we weren’t sure. I thought perhaps bialys, which I was certain were Polish but that’s all I knew about them. And a third person on the team said bagels because it seemed the most obvious. I chimed in that maybe it was too obvious, and then we agonized until time was up and we went with “knishes.”
The answer was, of course, bagels! And then a whole conversation ensued across the entire room, about what makes a bagel great— from the New York City water to the best toppings— and I haven’t stopped thinking about them since.
We are lucky to have a very good local bagel store in Winston-Salem (conveniently located practically next door to the temple), and we are perfectly content with their bagels most of the time. But when I found myself with a little free time last weekend, I decided to go for it. Making bagels requires a fair amount of planning and a few weird ingredients, which I happened to have on hand because, despite my lack of knowledge about the history of bagels, I’m still a bread nerd. This has been a long time coming!
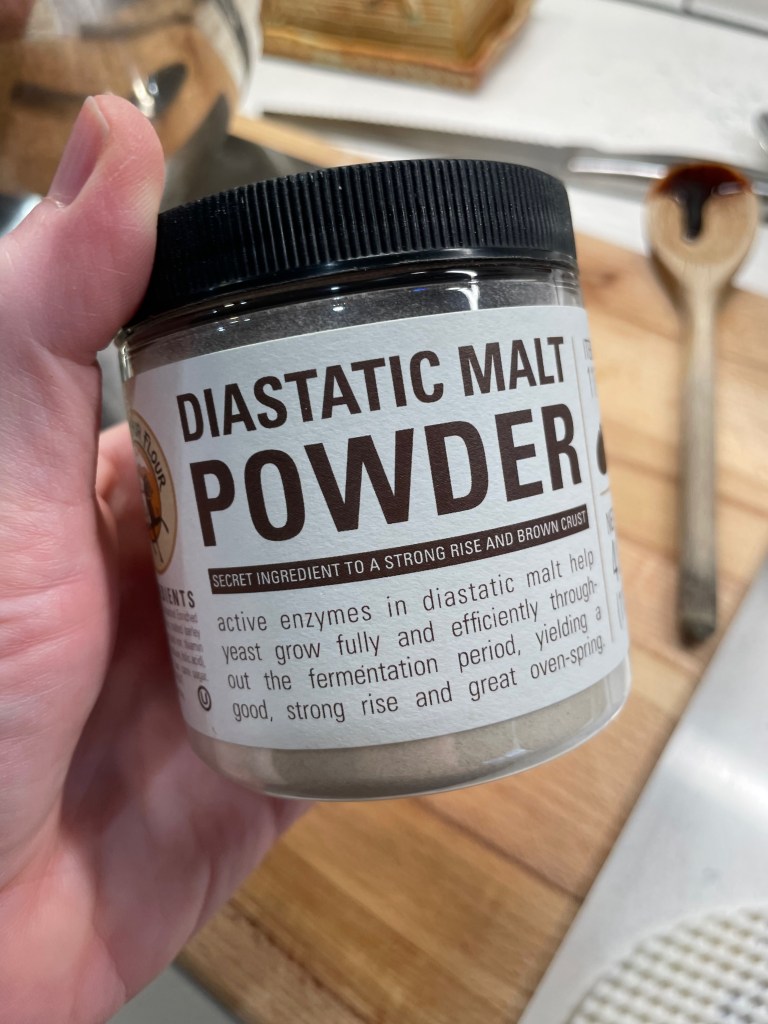
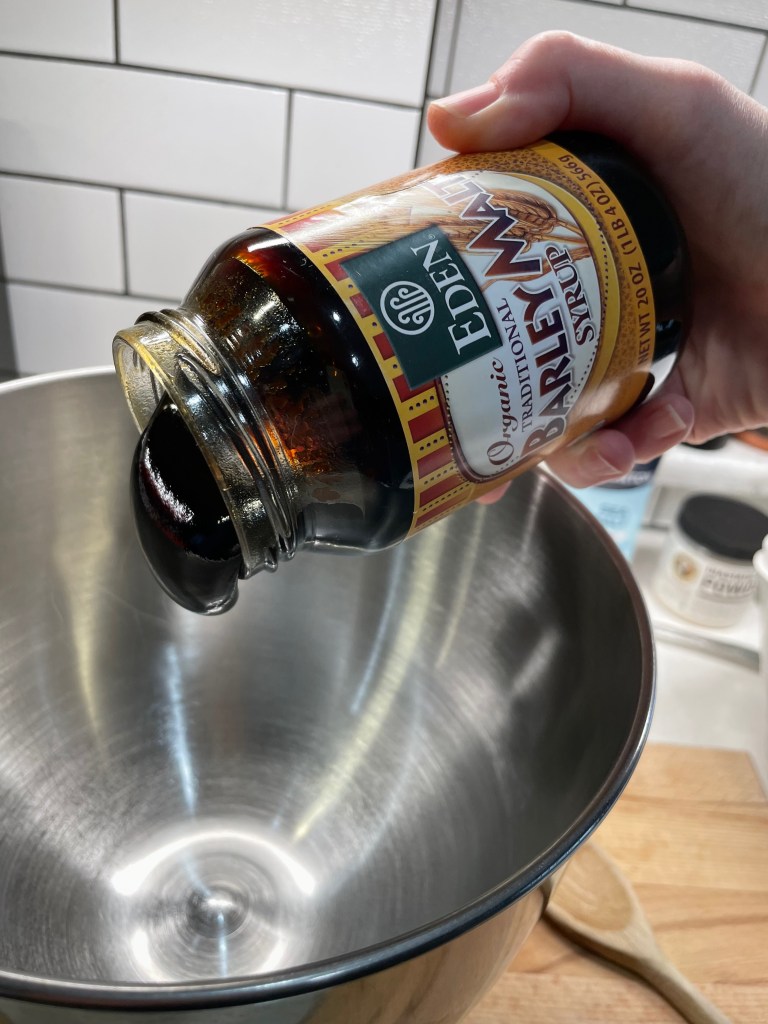
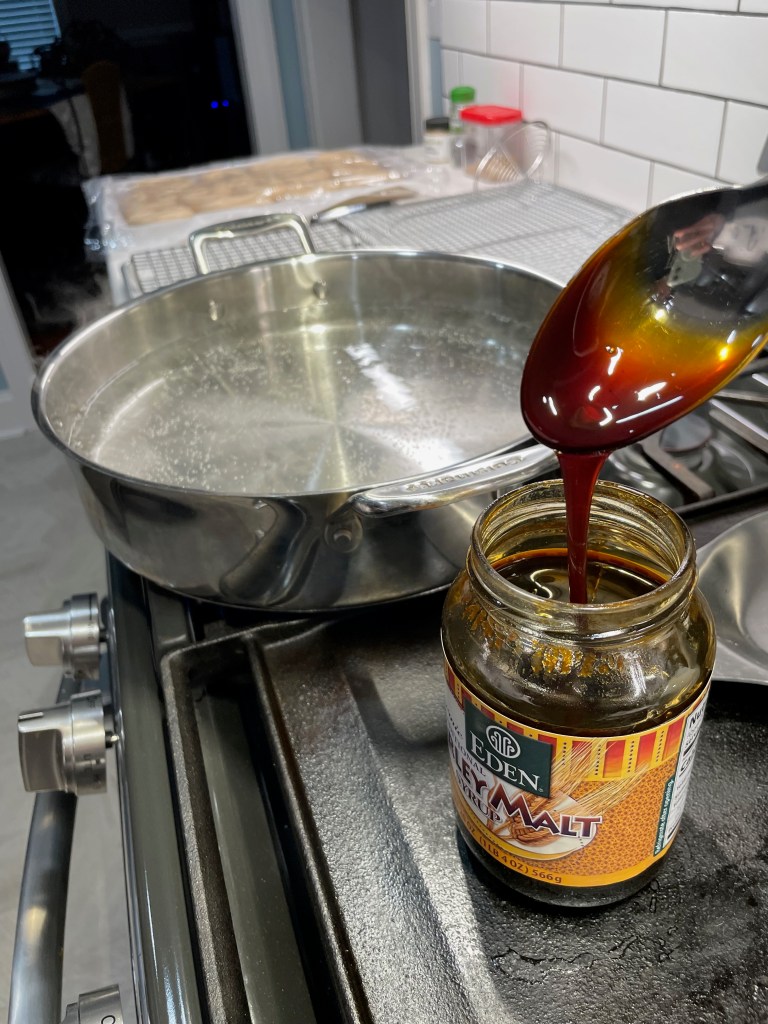
Diastatic malt powder boosts oven rise and browning.Barley malt syrup is kinda like cold molasses in January… but slower. 😂
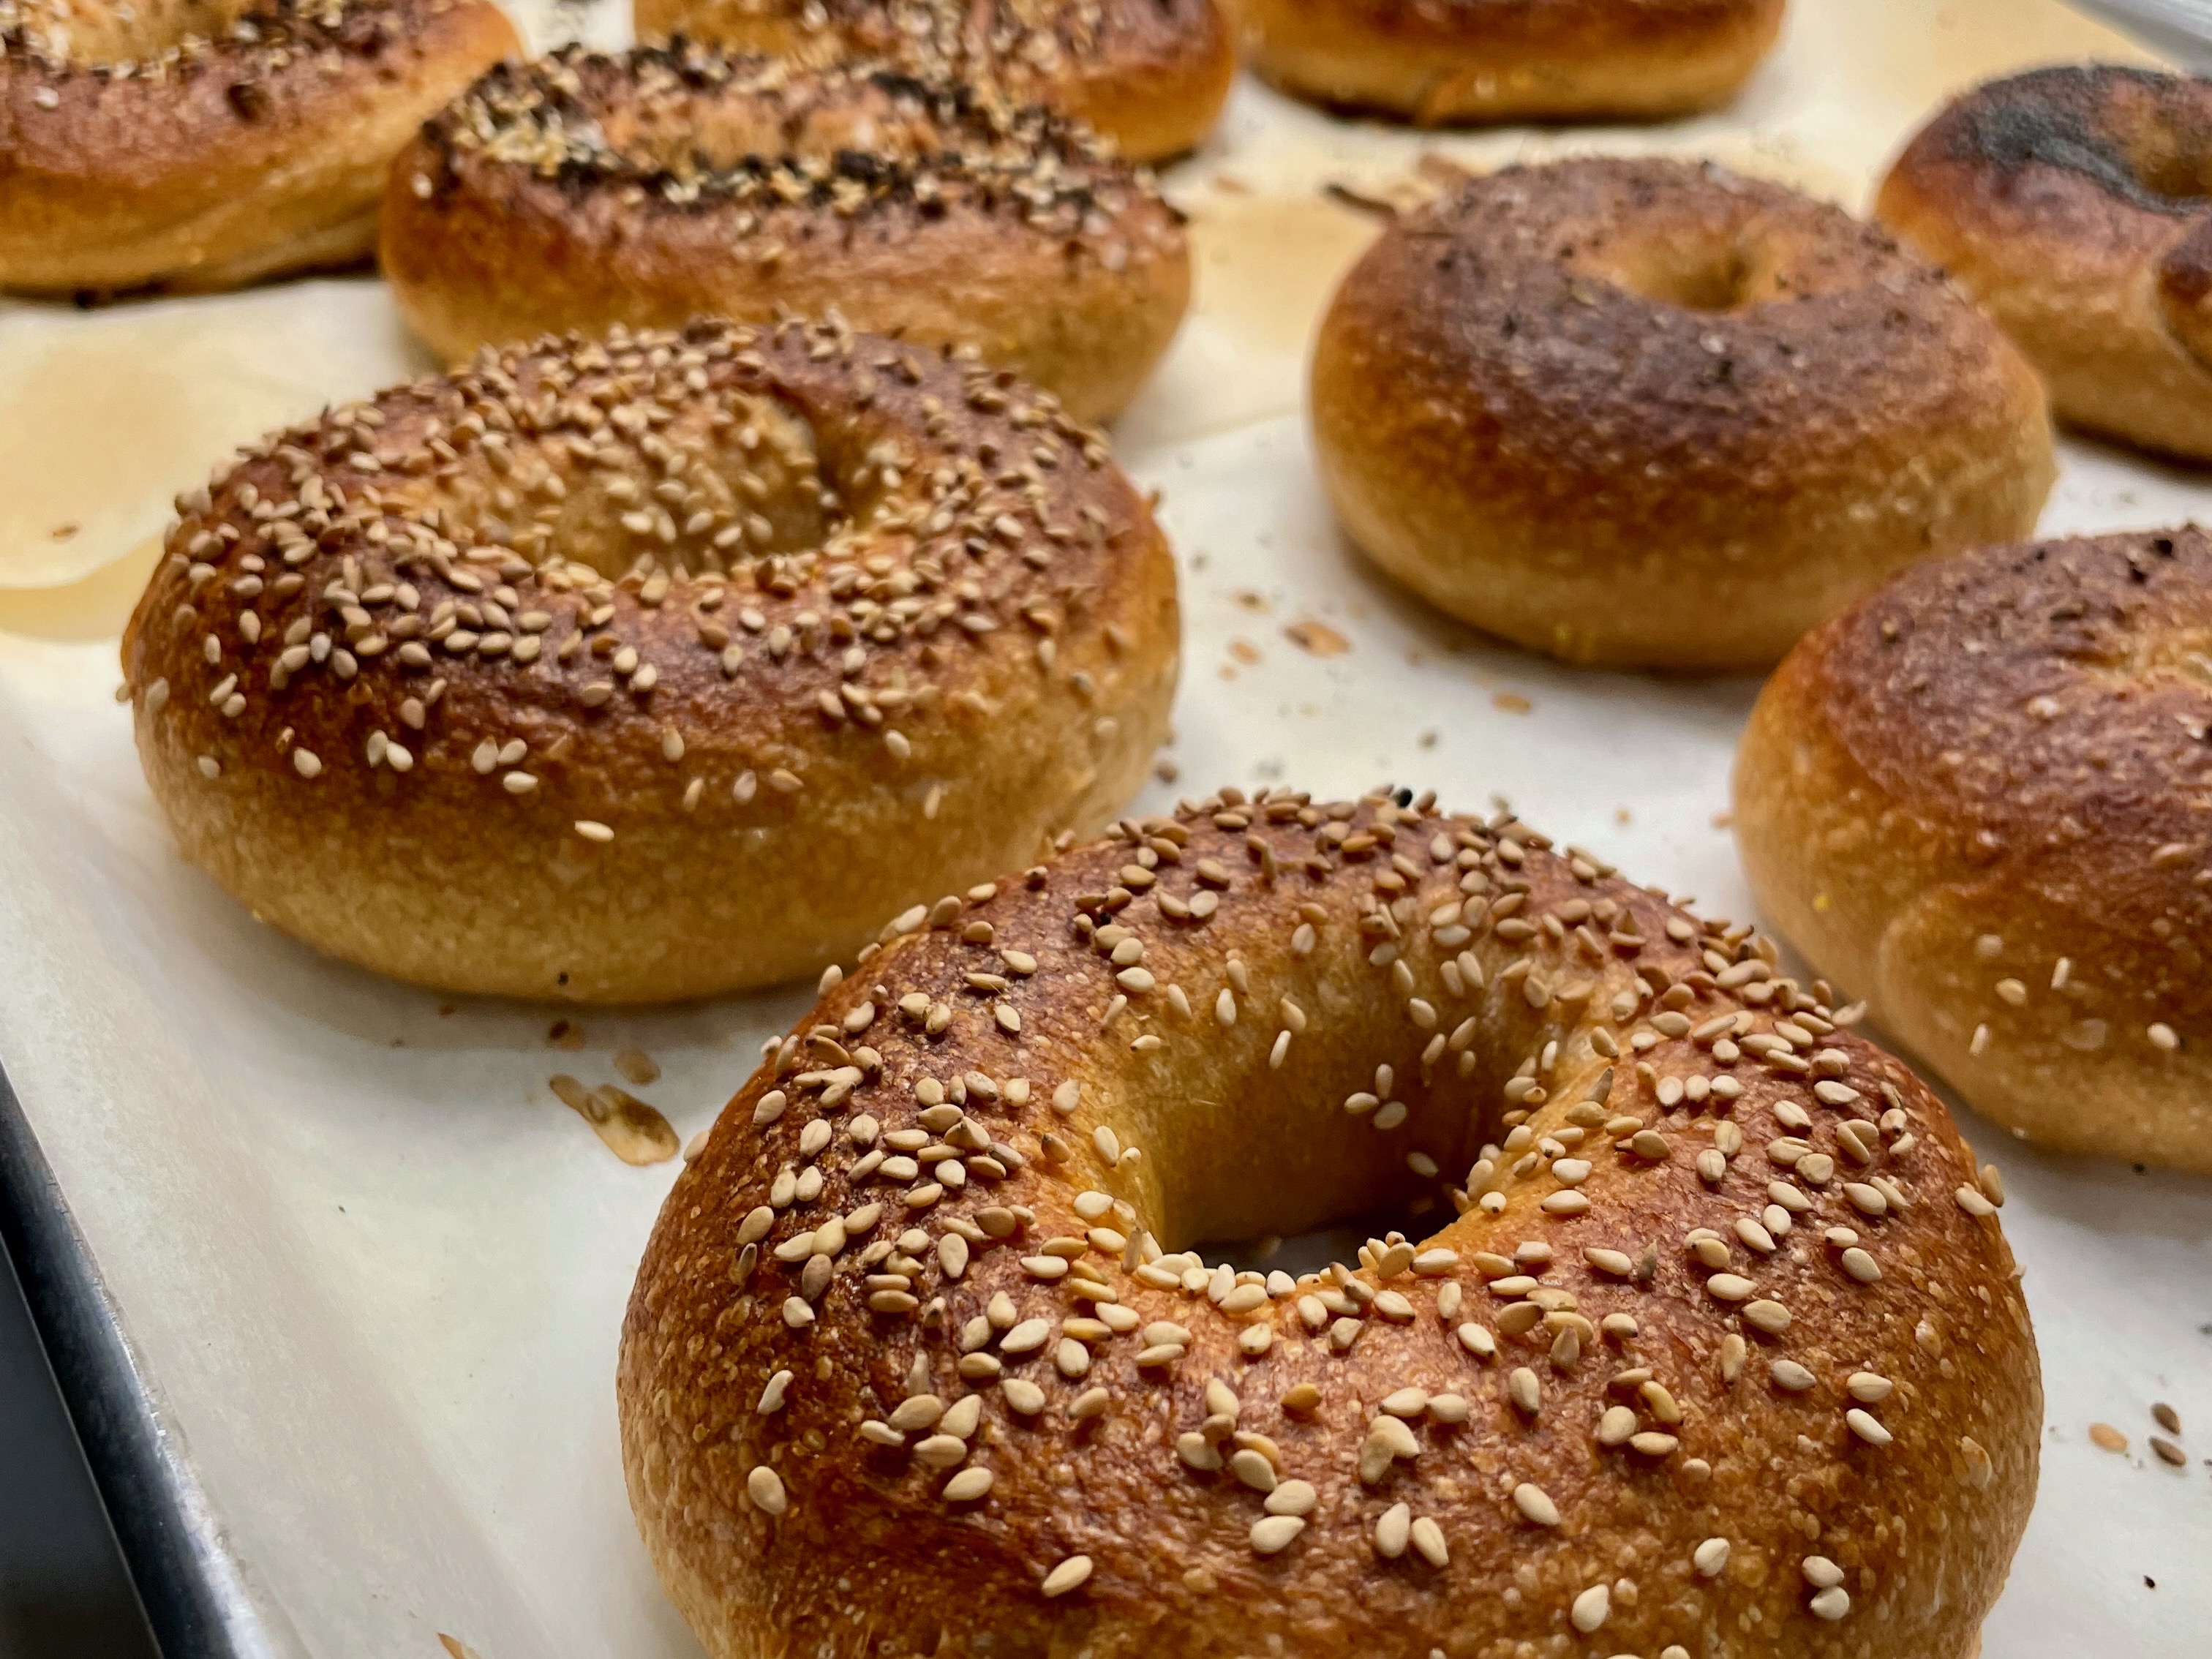
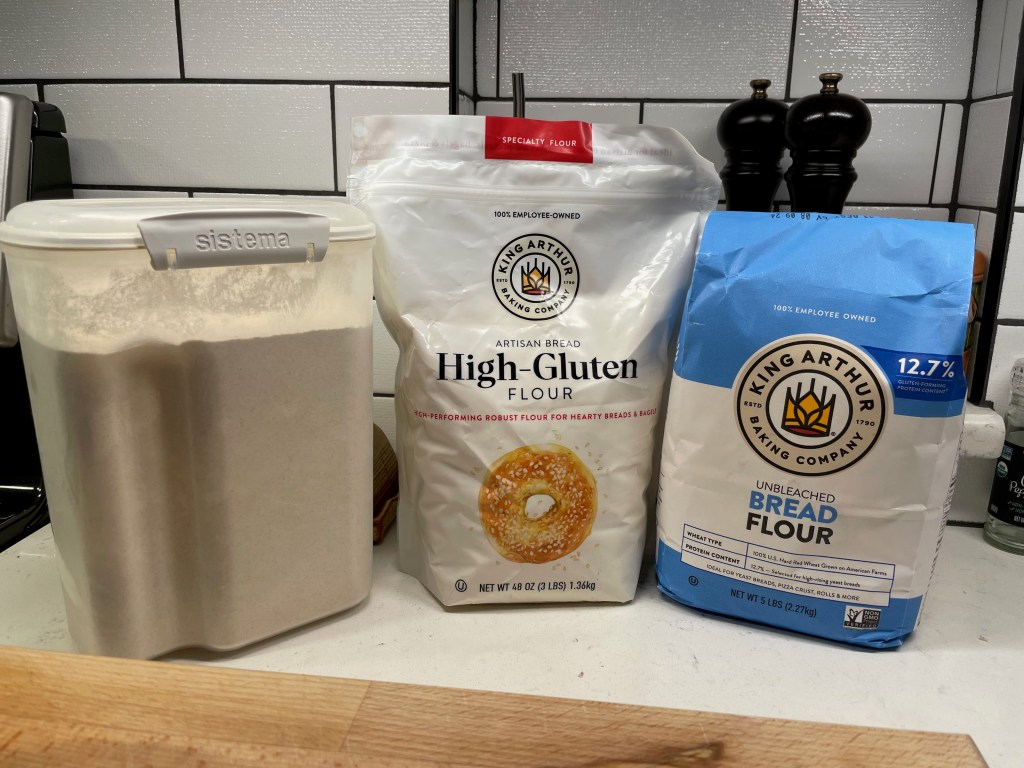
I made only two changes to Maurizio Leo’s recipe, and I’ll describe them in case you want to follow my variations. The first was a flour swap— rather than the full amount of bread flour suggested in his recipe, I used half bread flour and the other half was a split of high-gluten flour and white whole wheat flour. Both of these substitutes are thirstier than bread flour so I also increased the water somewhat (though perhaps not enough) to ensure hydration. Still learning here!
A trio of flours gave my bagels great body and flavor.The steam pan keeps the oven humid and the baking steel is crazy hot.
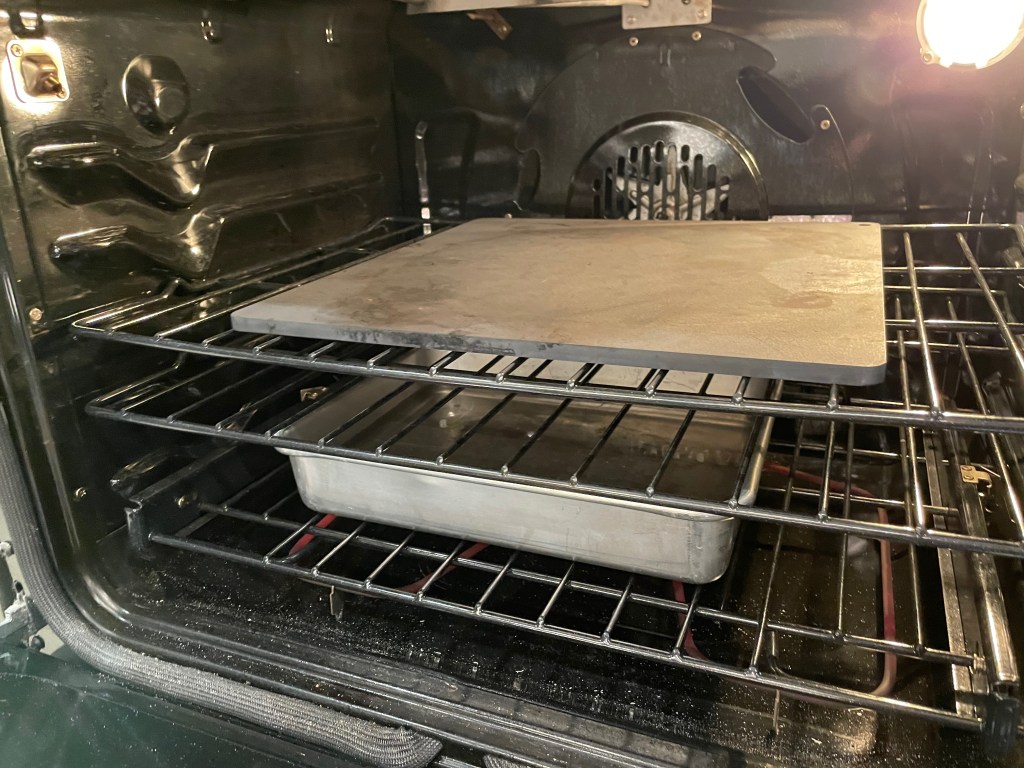
The other change was a technical one— I used my own version of a steam bake, which is simply an oblong baking pan filled halfway with hot water that preheats with the oven. Maurizio’s suggestion (a roasting pan filled with preheated lava rock, onto which you’ll toss ice cubes) is a good one if your oven has room for the setup he describes. But I’ve been leery of using ice in the oven ever since 2016, when an unfortunate accident resulted in shattering the oven light in my rental apartment. After that, I read on another baking blog that when you’re baking with steam, it does not need to be dramatic; you just need to have a very humid environment in the oven. I’ve never had trouble with my method of steam baking, and the result with my bagels was terrific.
The recipe begins two nights before you plan to bake, with an intermediate feeding of a tiny bit of ripe sourdough starter to create a dough called levain, an intermediate starter that will be worked into the final dough. This levain is a very firm, tight dough, and after mixing it, I let it rise overnight in the oven with the light on. This kept it warm and cozy for its 12-hour ferment, and it’s the first of the two principles I mentioned earlier about temperature.
After the overnight ferment, the levain was spongy and bubbly. Success!
The final dough is made the next day, beginning with a slurry of the barley malt syrup, some cane sugar, salt and a splash of the warm mixing water. This is the simplest way to thoroughly blend in an ingredient as sticky as the malt syrup. The slurry was blended with all of the overnight levain, the rest of the water and my flour blend. If I could back up to change any part of my process, it would have been this point— my increase of water may not have been enough, given the swaps I made to the flour.It can be risky to add more water to an already-formed dough, so I pressed on with this very firm dough. But next time, I’ll adjust the water further or hold back some of the flour toward the end to be sure the dough can handle it.
I mixed the bagel dough as much as I could in the mixer before I turned it out onto the counter to finish it by hand.
This was such a large volume of dough that I could not mix it completely in my KitchenAid, and that’s part of the reason it took me so long to pursue making bagels. Things get messy with a big batch of dough, and though I used my mixer’s splash guard (for the first time ever), I still needed to roll up my sleeves to finish the kneading by hand. Once I got into the rhythm, I found it almost therapeutic.
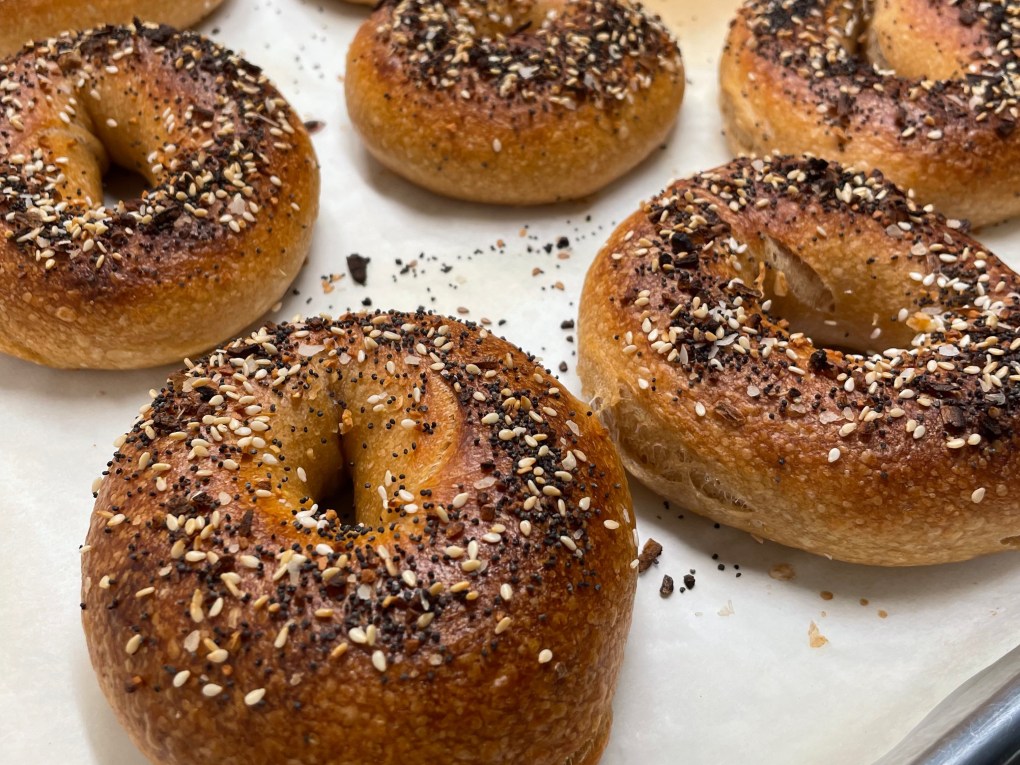
My cold-risen bagels and setup for parboiling, an essential step for making authentic bagels.
The second principle about temperature applies to the bagel dough after it’s shaped into rings. The bagels rest at room temperature for a couple of hours and then in the refrigerator overnight. That chilling time ensures the best and most flavor in the finished product. There is one other change I made from Maurizio’s recipe, and that was to add a little of the barley malt syrup to the boiling water. It isn’t necessary, but I love the aroma and besides, what else am I going to do with a huge jar of that sticky stuff? Unless I make pretzels. Hmm…
Here’s how the rest of my bagel adventure went, and boy, was it worth the trouble!
Before I forget to mention, our team took first place that night at the temple trivia event! It was a fun time that inspired me to aim for bagel greatness, and Maurizio Leo helped me get there. I may have missed the mark on their history, but for sure, I’ll make room for more of these homemade sourdough bagels in our future!
Way to go, Table 3!
Wanna give it a go? If you’re a sourdough baker, you’re gonna love these. Thanks, Maurizio! 😁
My heart has ached this week, at the approach of today’s one-year anniversary of Russia’s unprovoked attack on Ukraine. The people of that nation have stunned the world with their incredible resilience and dedication to their country. Many brave men, women and families have refused to leave in the wake of hostile invasion and are living under constant threat amid air raid sirens, bombings and widespread power outages. They are truly an inspiration.
The older I get, the more grateful I am to have never experienced true hardship or food insecurity, and when stories like the ones emerging from Ukraine are presented, I want to do something, anything, to help. It isn’t possible, of course, for me to make a huge meal to help people on the other side of the world, but I am proud to support an organization that puts itself on the front line to do exactly that.
In a few days, my husband and I will be in attendance for a lecture by Chef José Andrés, the founder of World Central Kitchen, a non-profit organization that has spent the last year bringing much needed food and comfort to war-torn Ukraine, as well as other regions stricken by climate disaster and other catastrophic situations— usually, it even juggles multiple relief efforts at once (see a sampling of their current work here). That’s how strong they are!
The decision to support a relief organization is personal, and if you’re like me, you do some homework to be sure your money is being used responsibly. I am extremely impressed by the integrity of World Central Kitchen, which has earned an A+ rating from charitywatch.org, and meets or exceeds all its requirements for governance and transparency. The organization is powered by thousands of volunteers, professional and amateur, and they are able to activate and mobilize very quickly when a crisis occurs. Yesterday, I also registered to be a volunteer; if a crisis occurs near me, I’m already signed up and ready to go. Giving and volunteering is easy to do on the WCK website.
I cannot make enough bread in my kitchen to feed the people of Ukraine, but I have great confidence in knowing that my tax-deductible contributions to World Central Kitchen are used wisely and effectively to care for the people whose hardships weigh heavily on me. If you also wish you could do something to help, I hope you’ll consider partnering with this exceptional effort.
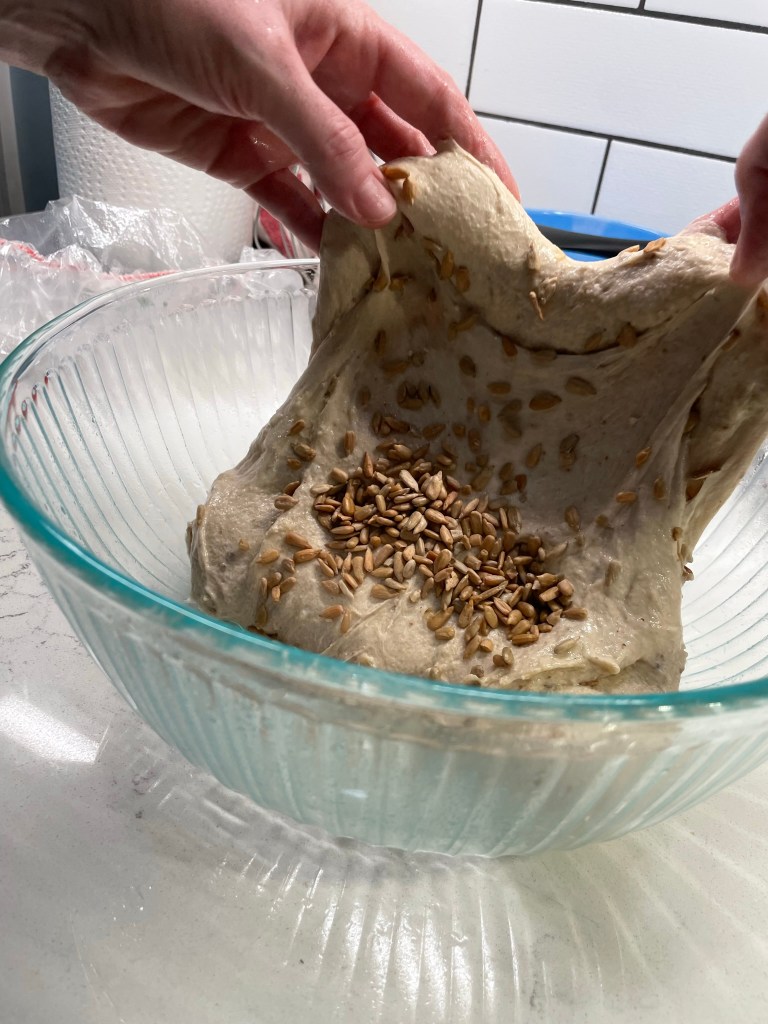
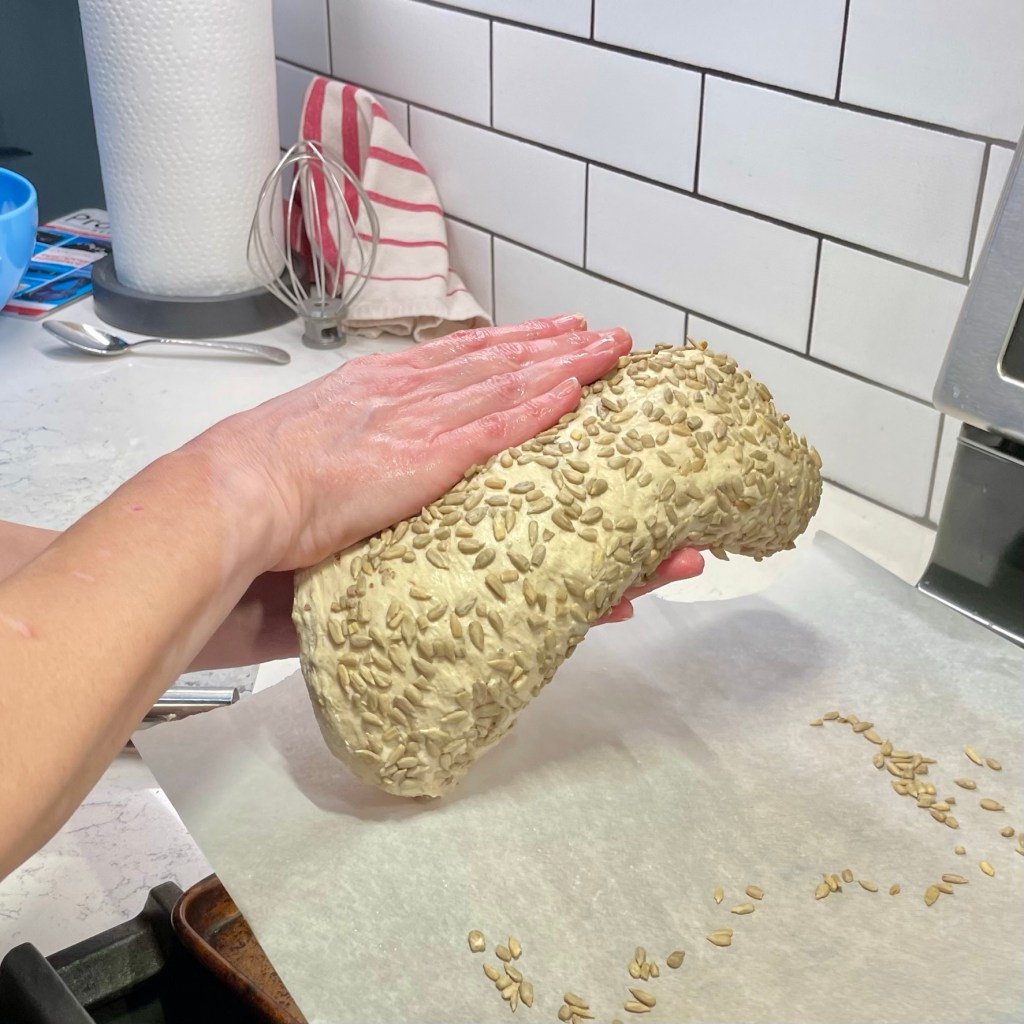
If I could make enough bread to make a difference, I’d make a million loaves of this one, mostly because it’s a hearty and nutritious whole grain loaf, but also because it is sweetened with honey and embellished inside and out with sunflower seeds. The beautiful sunflower is the national flower of Ukraine, and also happens to be a favorite of honeybees. To me, a bread like this is a reminder that we are all connected on this big blue ball we call home.
Rather than repeat all the instruction I’ve already given for my basic bread, I’ll point to what I did differently for this one, and trust you’ll find your way back to my earlier post if you need more visual information. This bread, like the other, depends on a portion of fed, ripe sourdough starter. It uses a special technique of pre-cooking a portion of the flour in milk, then cooling it before adding to the recipe.
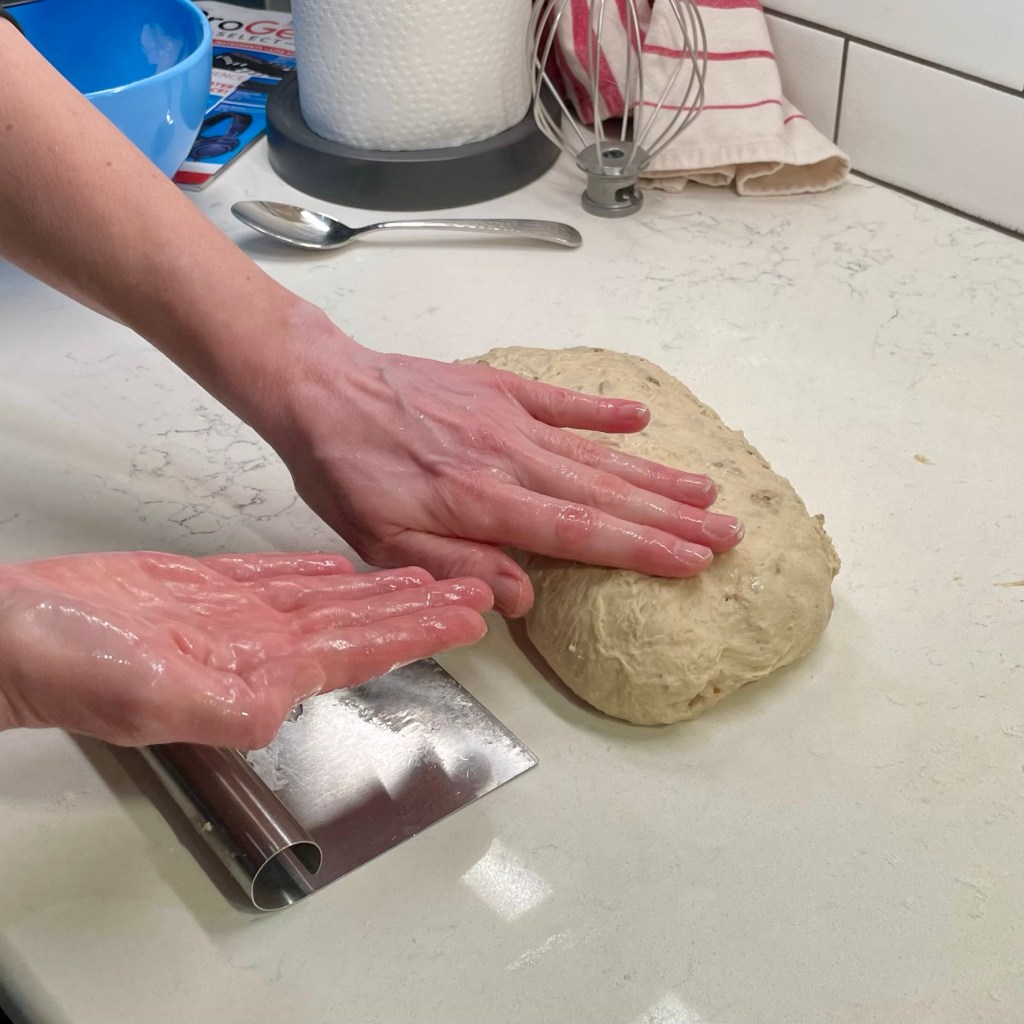
I swapped in a generous amount of white whole wheat flour as well as a portion of an ancient grains blend flour from King Arthur, called Super 10. This super-nutritious flour includes quinoa, buckwheat, amaranth and millet, among others. It gives my bread a flavor and texture boost without making it dense or heavy. I nearly doubled the amount of honey from my base recipe, and used the stretch-and-fold phase of the fermentation to fold in about a half cup of toasted sunflower seeds. This dough is very sticky, thanks to the ancient grains and high hydration, so use wet hands to complete the stretches. This is a gentle but effective way to knead the dough and incorporate the extra ingredient of seeds.
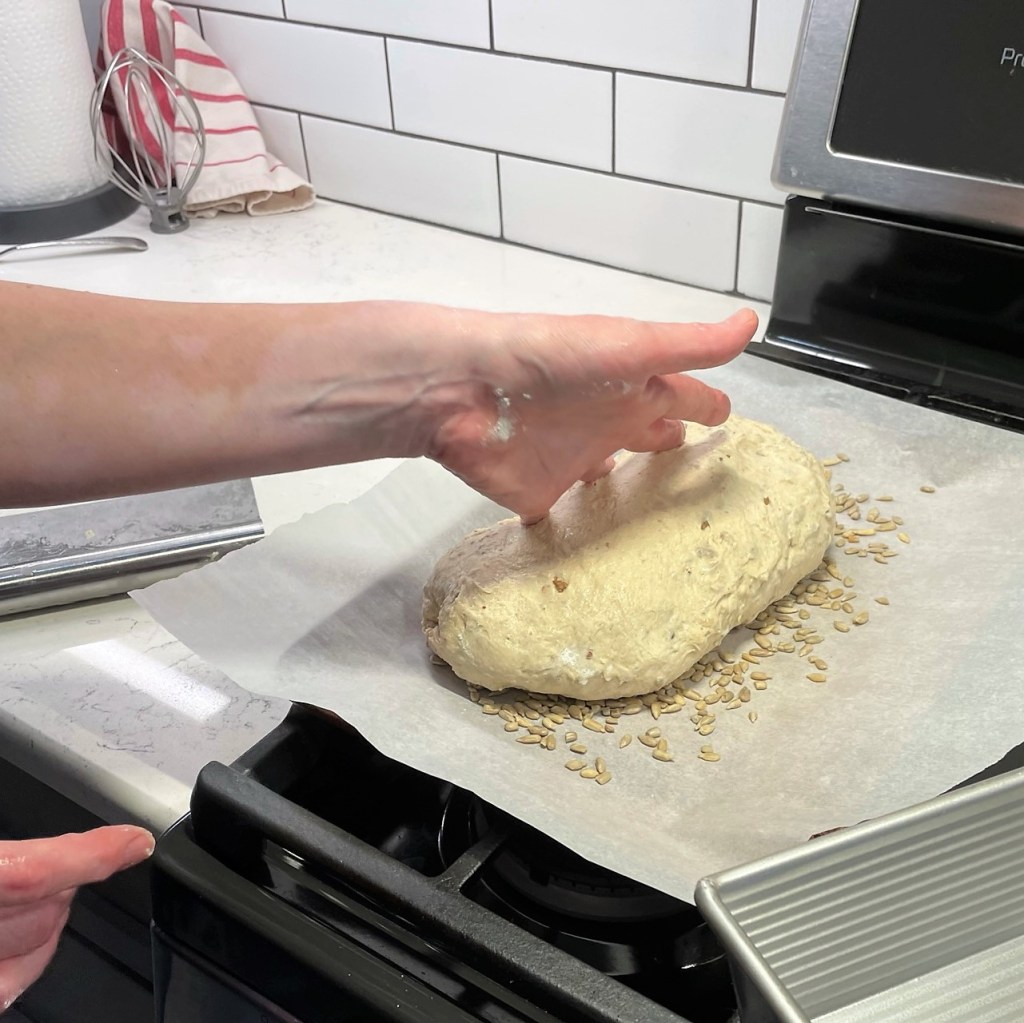
When the dough was ready for shaping, I used wet hands again to form a loaf, and then moistened the underside and rolled it lightly in additional sunflower seeds before placing it in my baking pan. Then, I baked the loaf as directed in my original post. Use a steam pan for the first 20 minutes, and a tent foil for the remainder of the baking time.
Rise and shine! 🌻
We love a good sandwich bread at our house. My husband filled two slices of this one with tuna salad for lunch, and I’ve already enjoyed it toasted with breakfast. Without a doubt, this bread will become a regular item in our rotation, and with every loaf I pull from the oven, I’ll hold the mighty people of Ukraine in my heart. 💙💛
The countdown to Easter will begin next week, and for many people who follow religious tradition, that means giving things up for Lent. I don’t participate in the observance of Lent myself, but I always know that it’s coming because all the fast-food chains start advertising their fish sandwich options again. When Ash Wednesday arrives, those who do observe will “fast” until Easter from any number of things— whether food, habit or activity— to mirror the fasting and spiritual introspection that the Bible says Jesus modeled during the 40 days he wandered in the wilderness before his trial and crucifixion.
But before that period of fasting and self-restraint, we eat and we party!
According to this article on Food52, the old-time religious faithful observing Lent would spend the day ahead (which they called Shrove Tuesday) ridding their homes of luxury ingredients such as eggs, sugar, butter and milk, so they wouldn’t give in to temptation during those 40 days of self-deprivation. It just so happens that pancakes are an easy way to use up all of those tempting ingredients, and the tradition of eating pancakes the night before Lent was born.
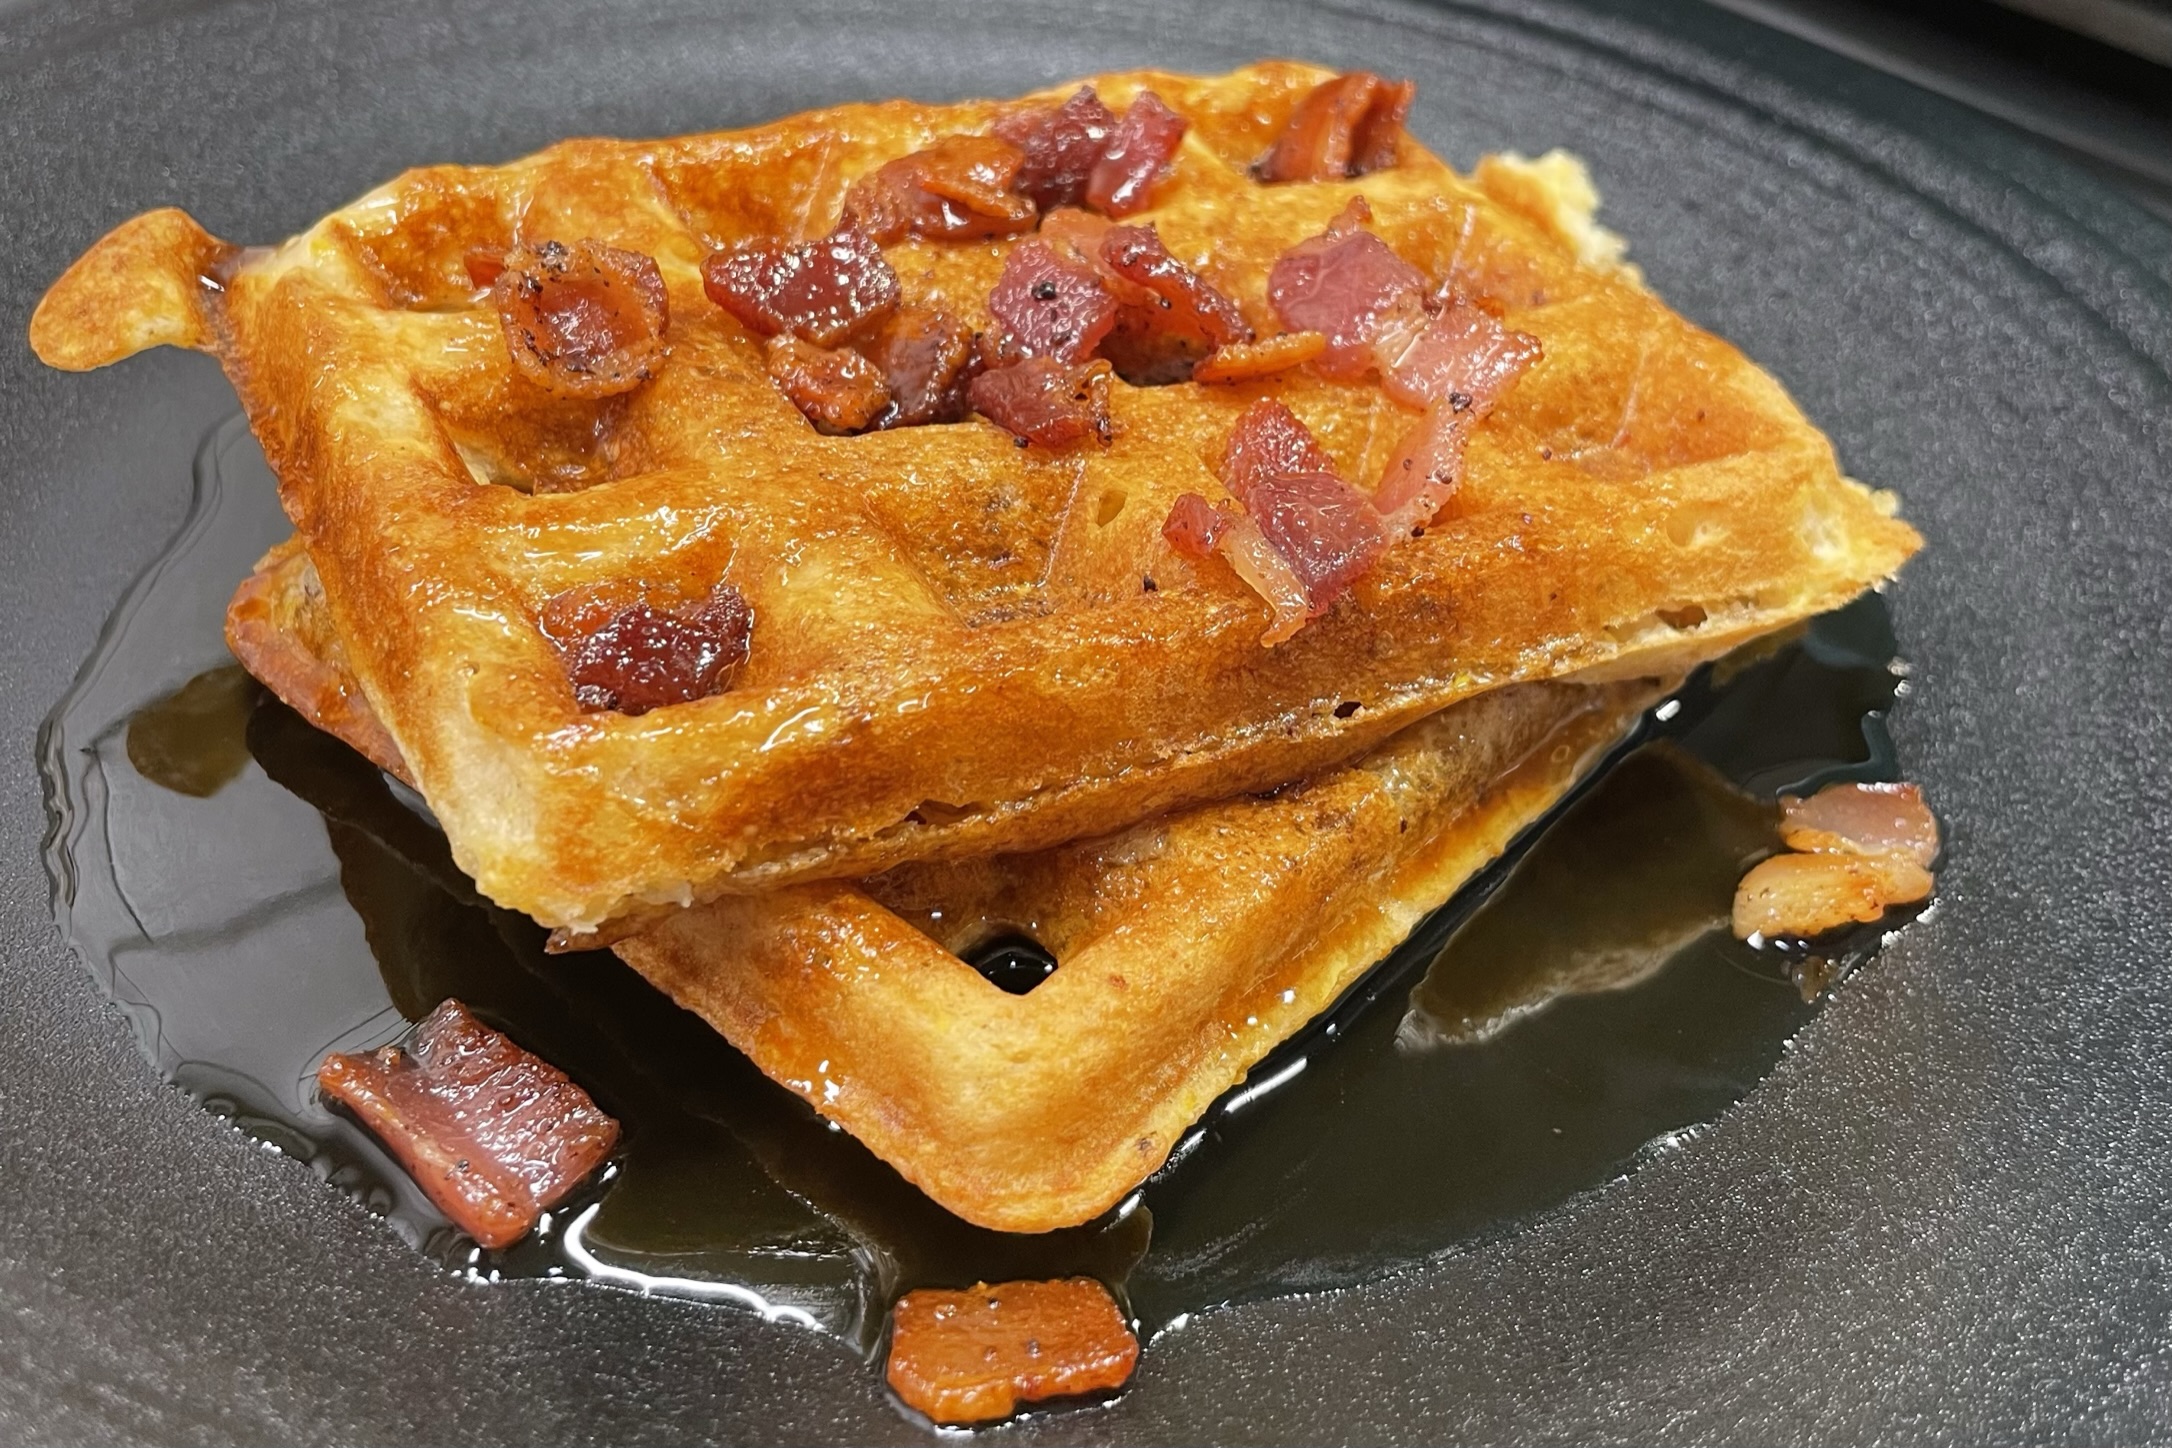
This tradition of indulging the day before Ash Wednesday is also evident with the festivities of Mardi Gras, which translates literally from French to “Fat Tuesday.” Is there a better way to observe a day called Fat Tuesday than chowing down on thick, fluffy pancakes, drenched in butter and sweet syrup? Possibly. If you want to shake things up this year, either for Shrove Tuesday or Mardi Gras, ditch the plain old pancakes and whip up a batch of bacon and bourbon waffles instead.
These are darn near sinful!
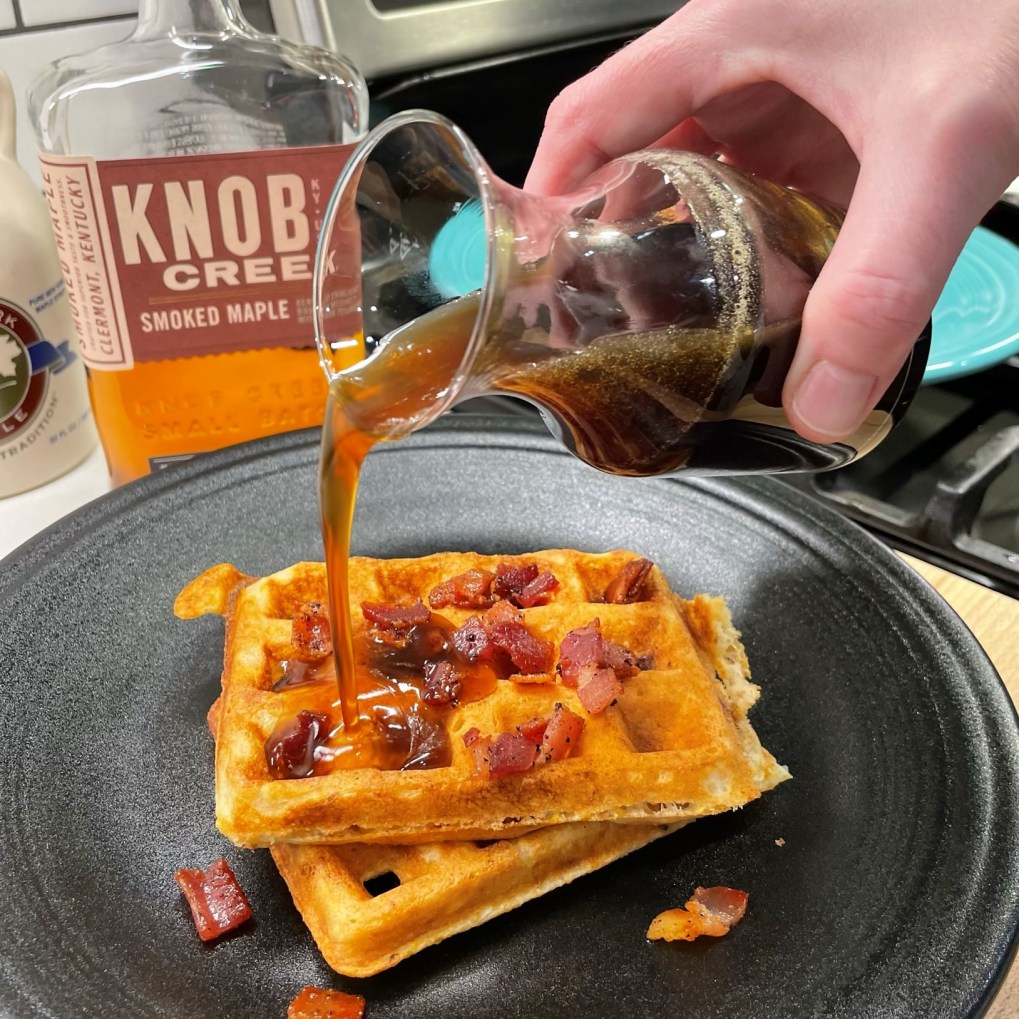
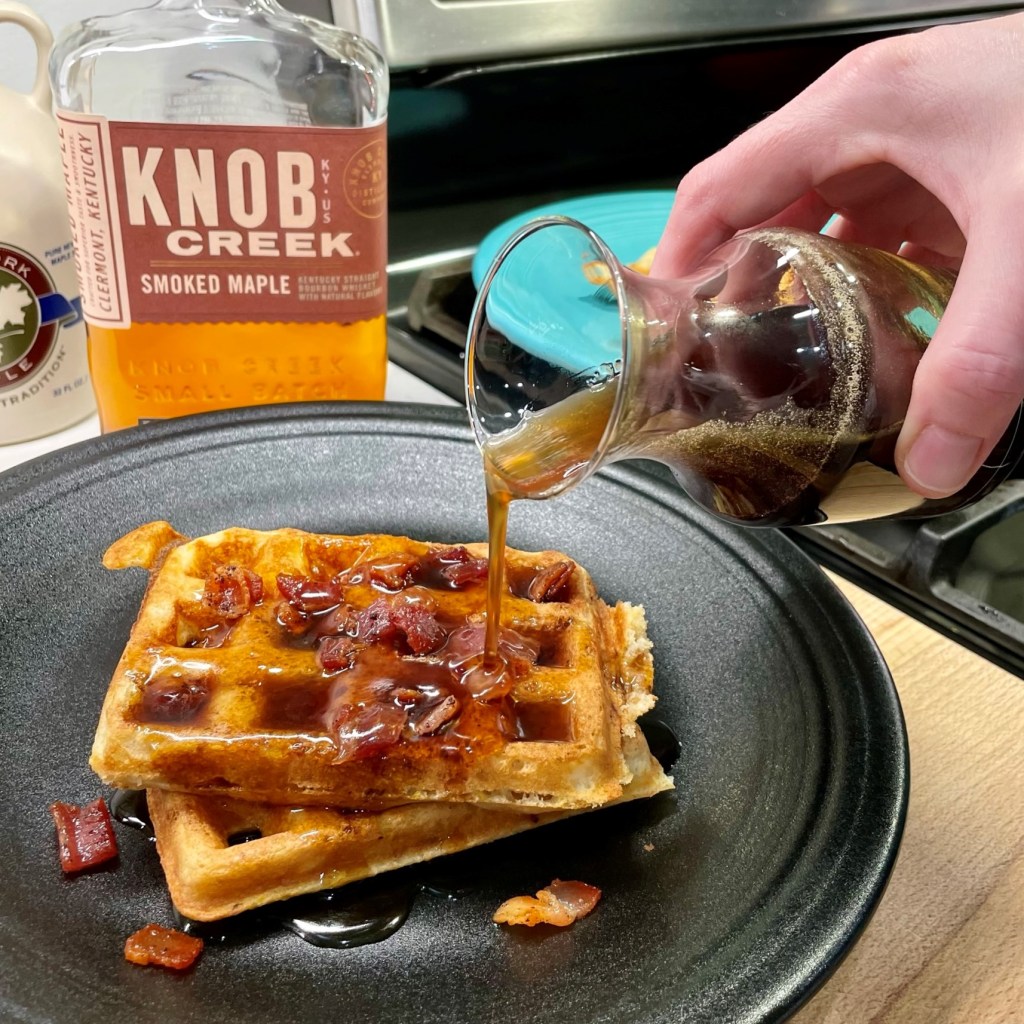
My waffles have crispy bacon and smoky, maple-infused bourbon— on the inside and the outside. This meal feels perfectly appropriate for Mardi Gras, in the spirit of indulgence and with a whisper of New Orleans— bourbon whiskey, after all, was likely named after the same French ruling family that gave Bourbon Street its name. I put a tablespoon of my smoked maple bourbon right into the batter of my waffles, and kissed the syrup with a splash of it as well. If you can’t get your hands on this bourbon, any quality bourbon will work fine. But for the syrup, you owe it to yourself to use real maple. For waffles this indulgent, supermarket syrup just won’t do.
The smoked maple bourbon is exquisite, and does fine things for cocktails, too!
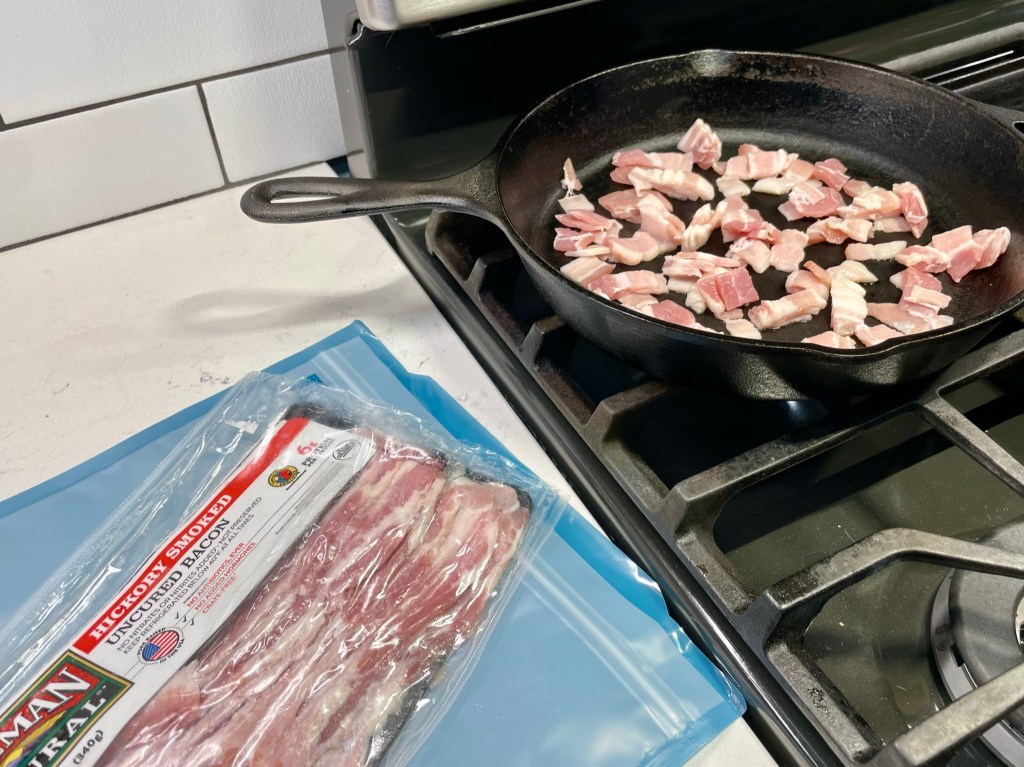
The waffles make use of my sourdough discard, and the batter includes a bit of cornmeal, for texture but also as a friendly nod to the corn in the mash bill of the bourbon. Start building the batter overnight if you’ll be enjoying the waffles for breakfast (hey, if you’re down with a splash of bourbon at breakfast, you are definitely my kinda people), or in the morning if you want them for Fat Tuesday dinner. Stir together the flour, cornmeal, buttermilk and sourdough starter, then cover it and leave it on the counter til you’re ready to waffle.
If you don’t have sourdough starter, try adding the bacon and bourbon to your favorite waffle recipe. It’s about the flavors, not the ingredients!
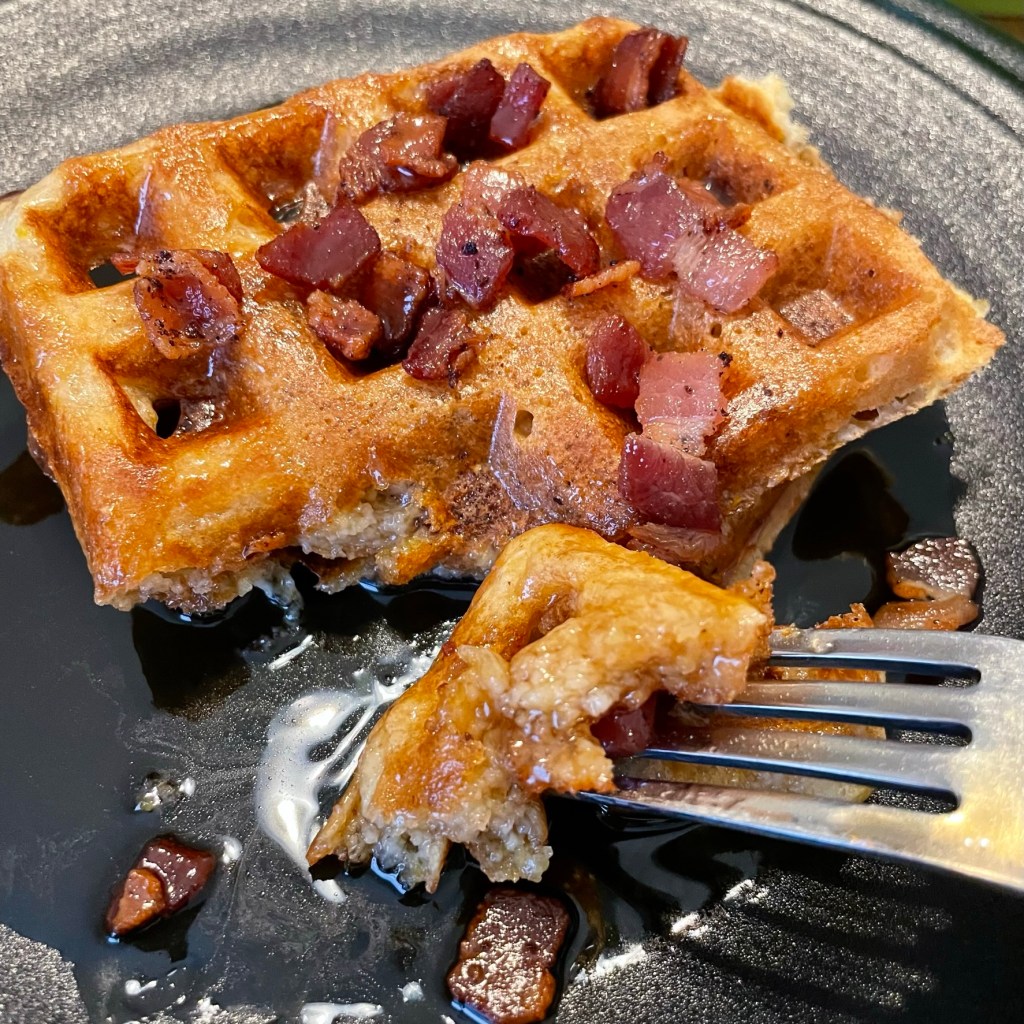
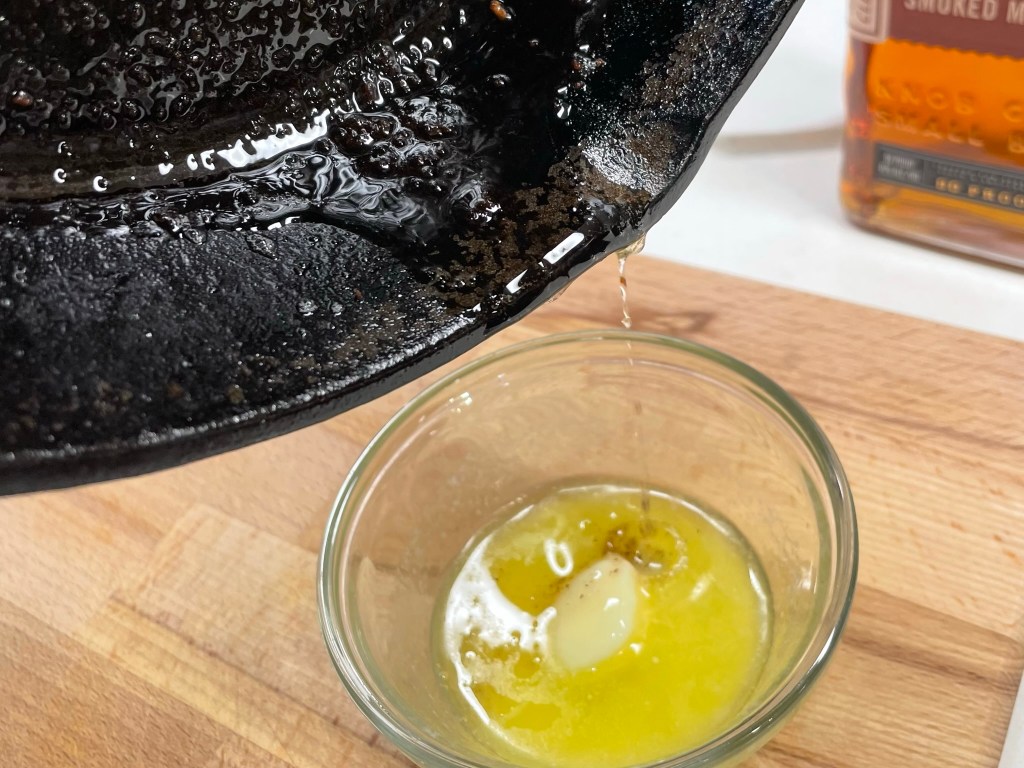
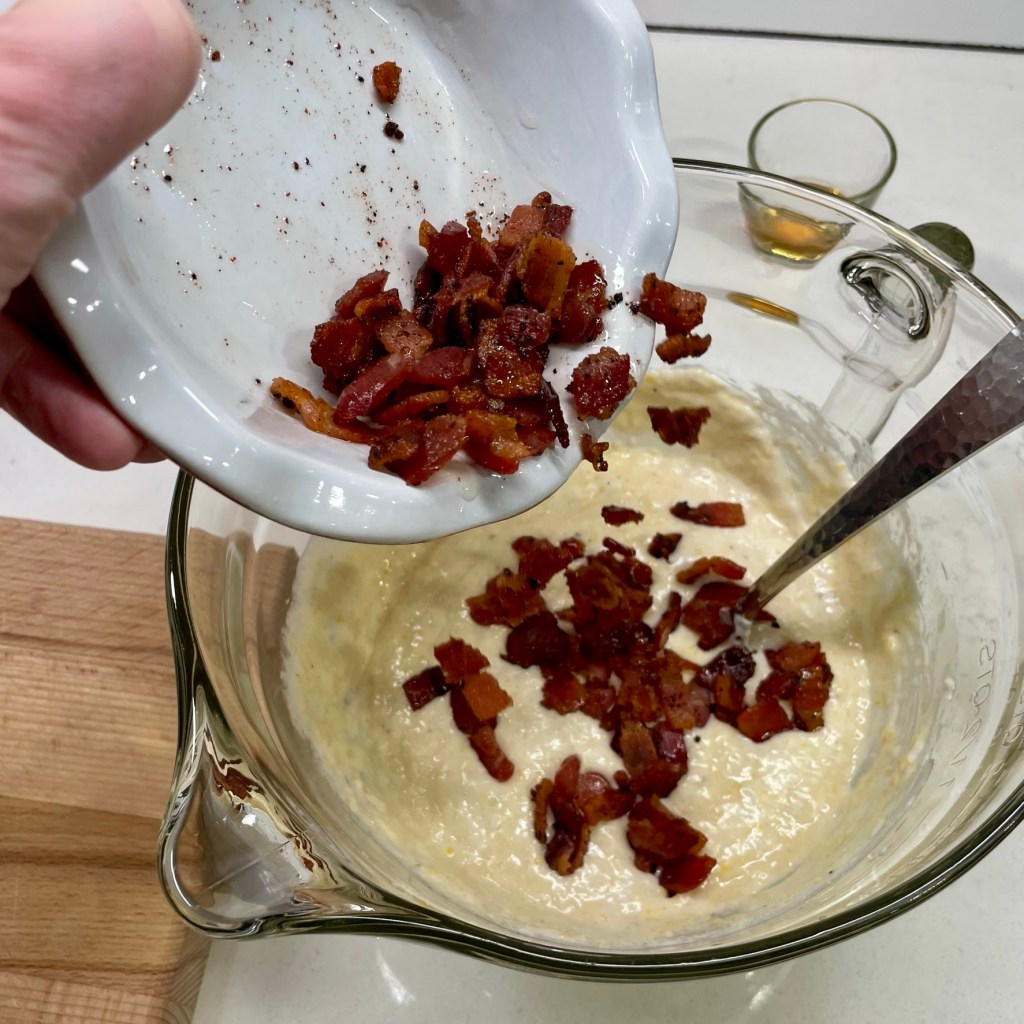
When it’s time to eat, cook up some bacon pieces until they’re crispy, and add the drippings to the melted butter that will be mixed into the batter. We use uncured bacon at our house, and I love the natural flavor. The smoky bacon emphasizes the smoked maple flavors in the bourbon as well, and it’s a nice offset to all the sweetness that hits you in the syrup.
The bacon drippings lend another layer of savory smokiness to the waffles.
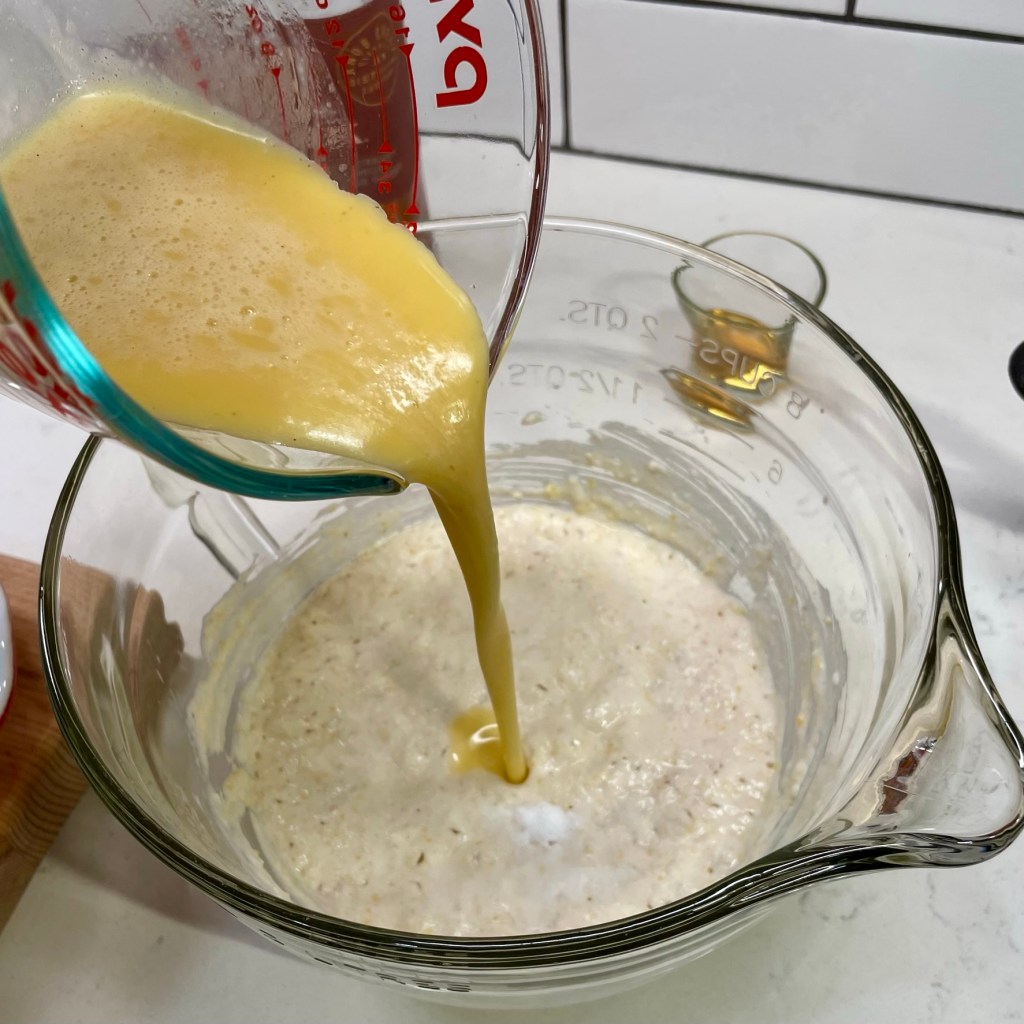
Get the waffle iron going, and then mix the rest of the ingredients into the batter. Whisk the butter into the beaten egg, then half of the bourbon. Sprinkle the salt and baking soda over the bubbly overnight batter, then stir in the egg mixture and fold in about half of the crispy bacon bits. Within a couple of minutes, the batter will expand as the soda interacts with the acidic buttermilk. This chemical reaction is what gives the waffles their loft and fluff.
Finish building the batter, and then you’re ready to waffle!
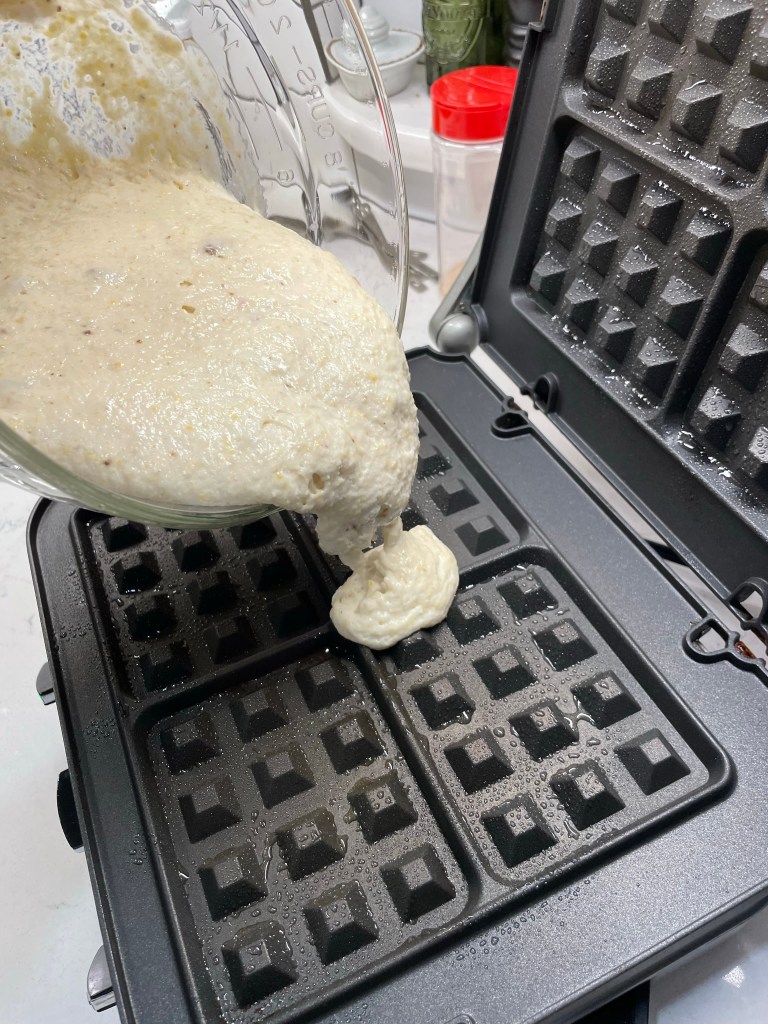
When the waffle iron is hot, add the batter and close the lid. Depending on your model and baking temperature, it may take 5 to 8 minutes for your waffles to be ready. Resist the urge to open the iron before the indicator light comes on, and feel free to give them an extra minute if you prefer your waffles more golden.
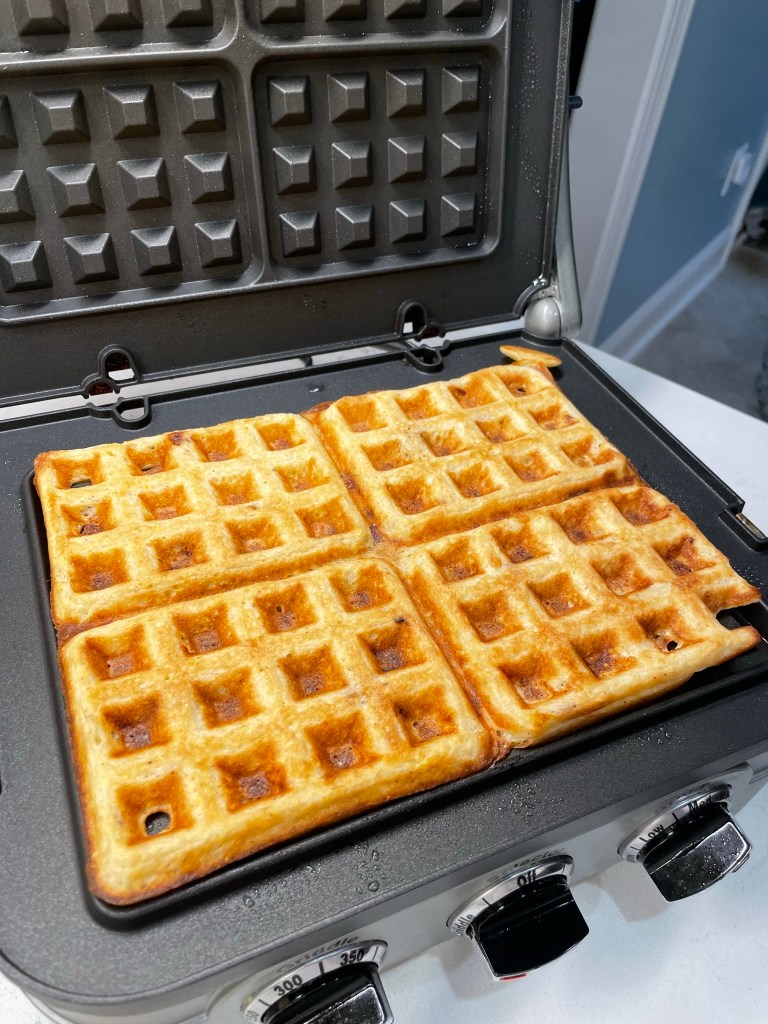
Sourdough waffles work great in either a Belgian waffle maker, or a standard one, as I’ve used here.
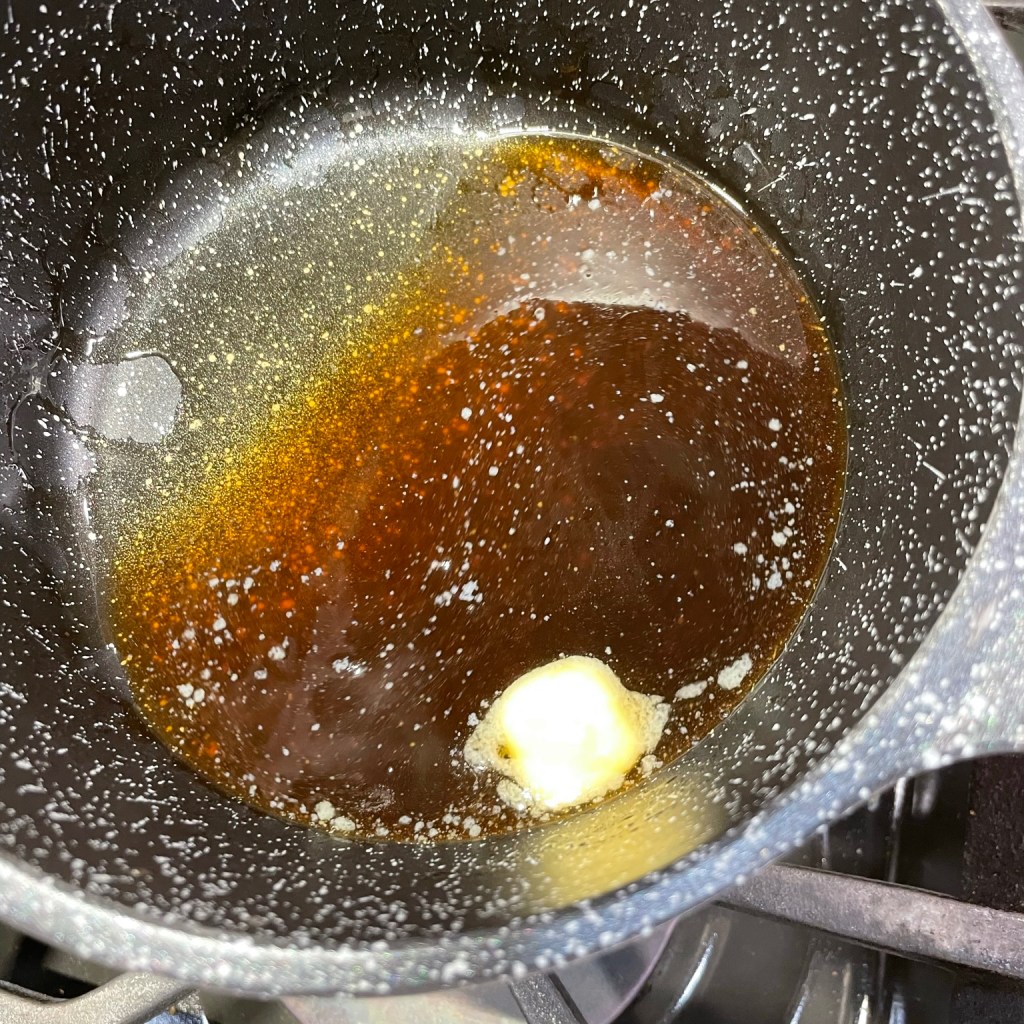
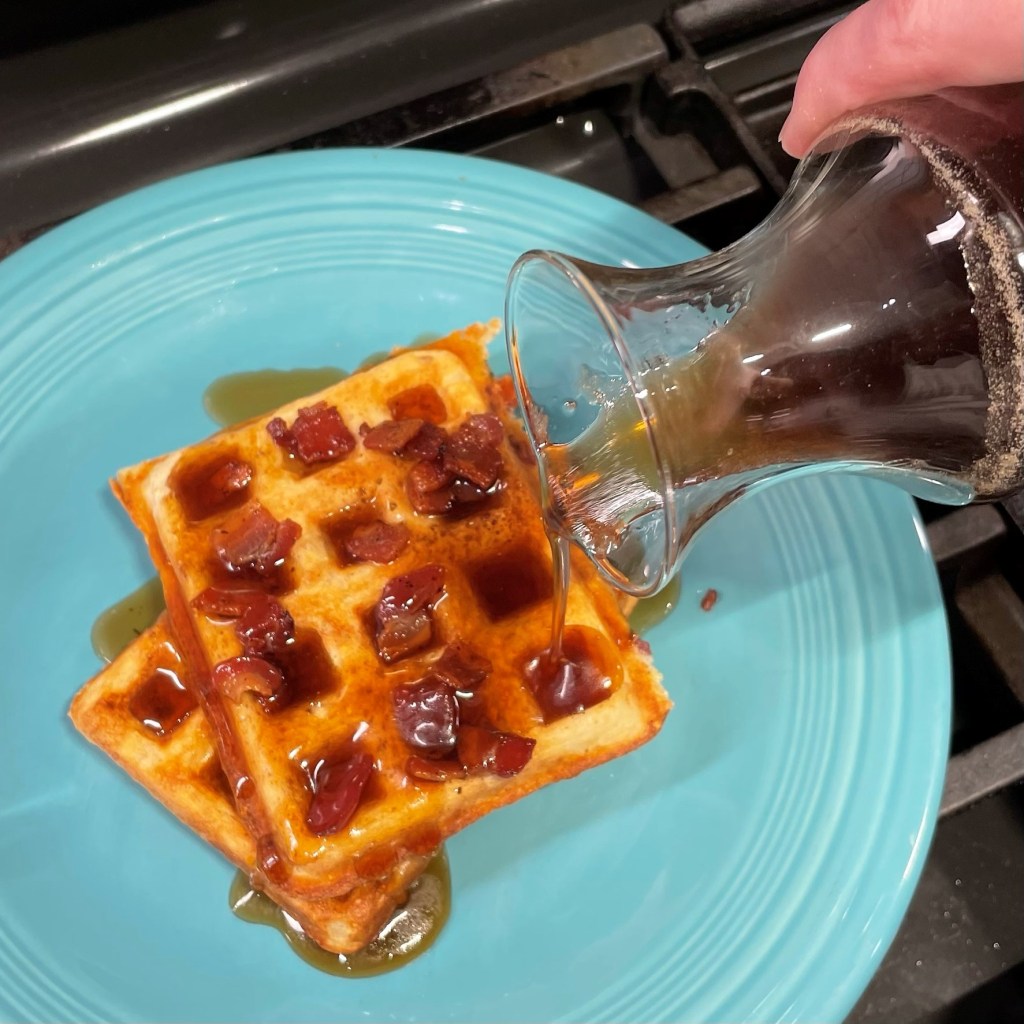
If you’re making a large batch of waffles, you can keep the first ones warm by placing them on a rack over a baking sheet, inside a 250 F oven. While mine were baking, I warmed up real maple syrup with the remaining tablespoon of bourbon and a pat of butter. Plate the waffles with a quick scatter of the remaining crispy bacon and the syrup.
Melting the butter into the syrup eliminates a step at serving time.
Ditch the boring pancakes and shake up Shrove Tuesday with these sourdough waffles, accented with bacon and bourbon from the inside out!
Ingredients
2/3 cup + 1 Tbsp. all-purpose flour (85g)
1/4 cup medium grind cornmeal (40g)
1 cup cultured buttermilk (227g)
1/3 cup sourdough starter (75g; discard is fine)
2 tsp. maple (or granulated) sugar
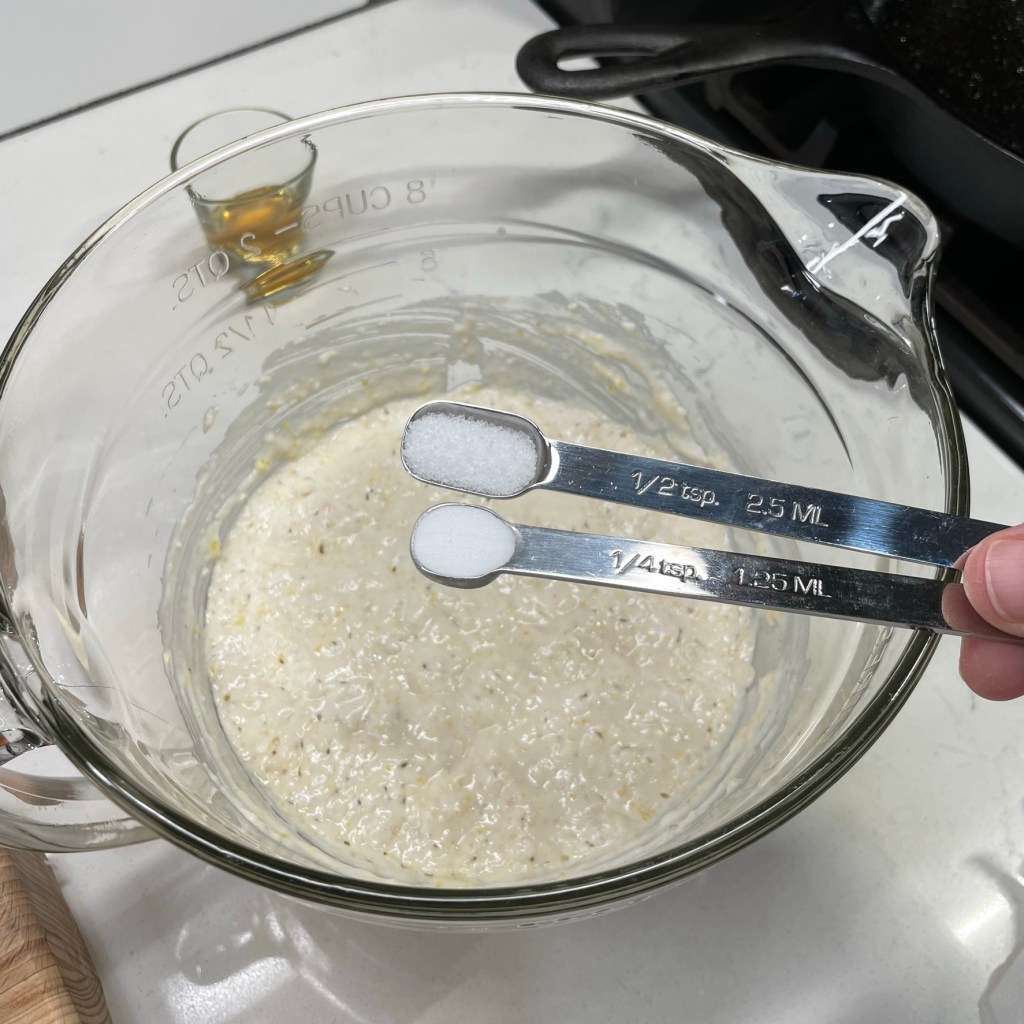
1/2 tsp. salt
1/4 tsp. baking soda
1 large egg, beaten
3 Tbsp. salted butter, melted and cooled (or swap in some of the bacon drippings for extra bacon flavor)
5 slices uncured smoked bacon, cut into pieces and cooked until crispy (use half in the batter and reserve the rest for topping the waffles)
2/3 cup real maple syrup
2 Tbsp. Knob Creek smoked maple bourbon, divided (use half in the batter and half in the syrup for serving)
I made these waffles using a standard, non-stick waffle maker and they were delicious. I expect that a Belgian waffle maker would produce a lighter, crispier waffle. Follow your manufacturer’s instructions regarding oiling the plates, temperature and baking time.
Directions
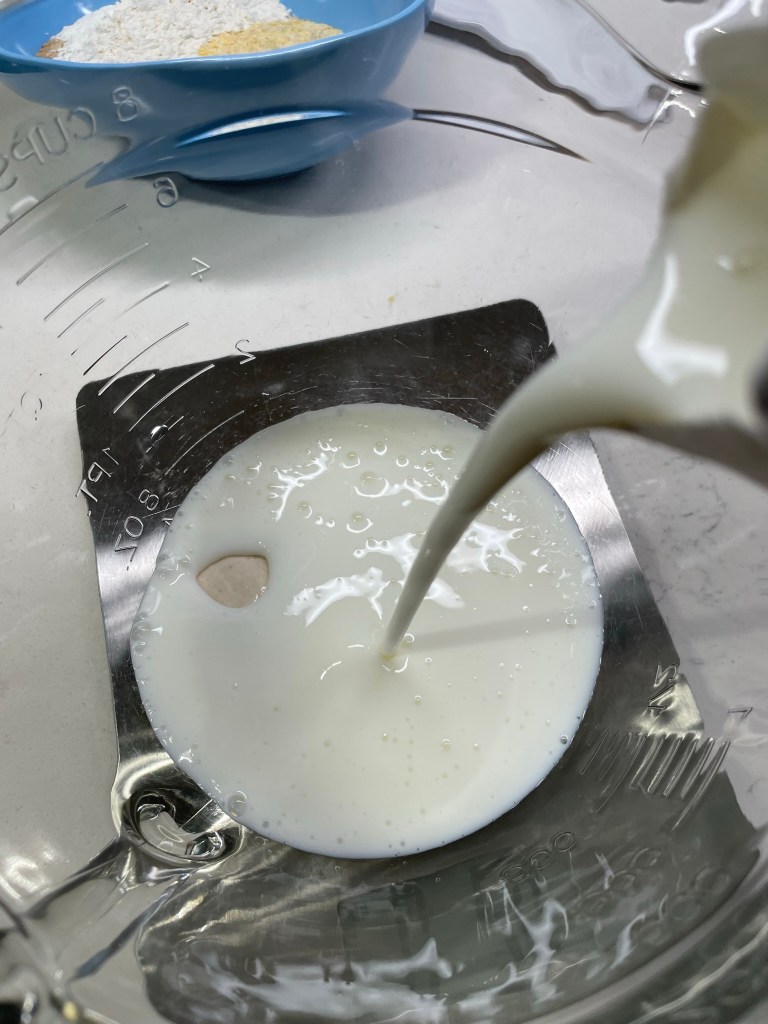
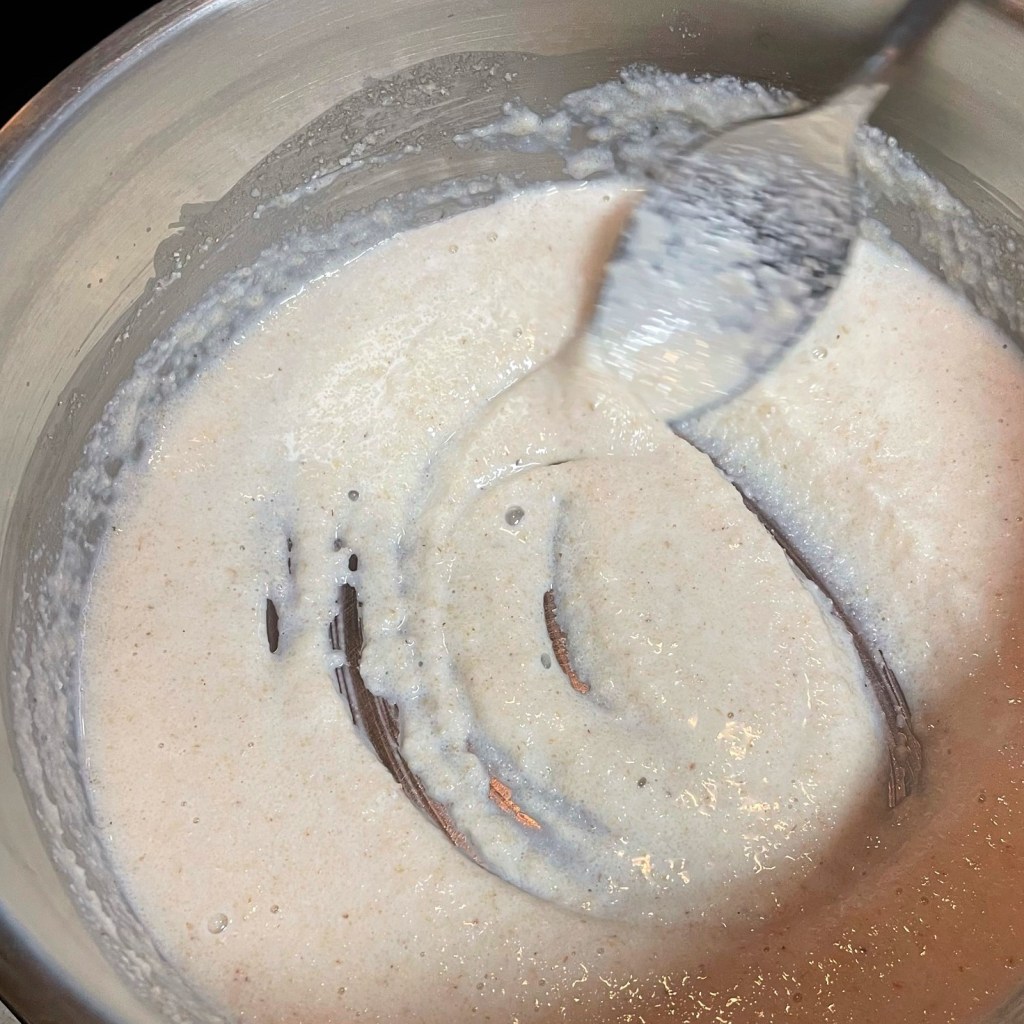
The night before, combine flour, cornmeal, sourdough starter and sugar in a large bowl. Stir it well to ensure no pockets of dry ingredients. Cover and leave at room temperature overnight (about 8 hours).
When you’re ready to make the waffles, prep the bacon and set up the waffle iron to preheat. Set oven to 250 F and place a rack inside a baking sheet for keeping waffles warm. Take the egg out of the fridge to bring to room temperature.
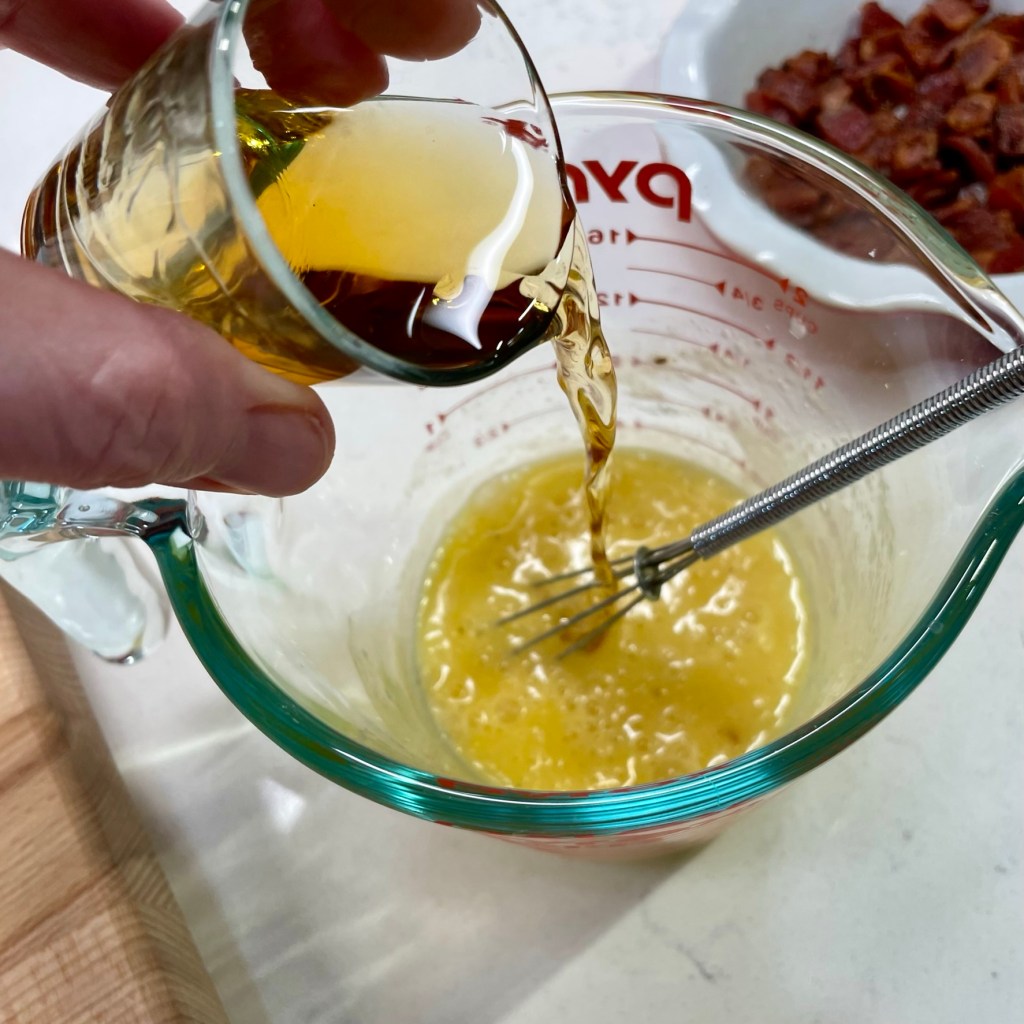
Whisk the melted butter into the egg. Stir in 1 tablespoon of the bourbon.
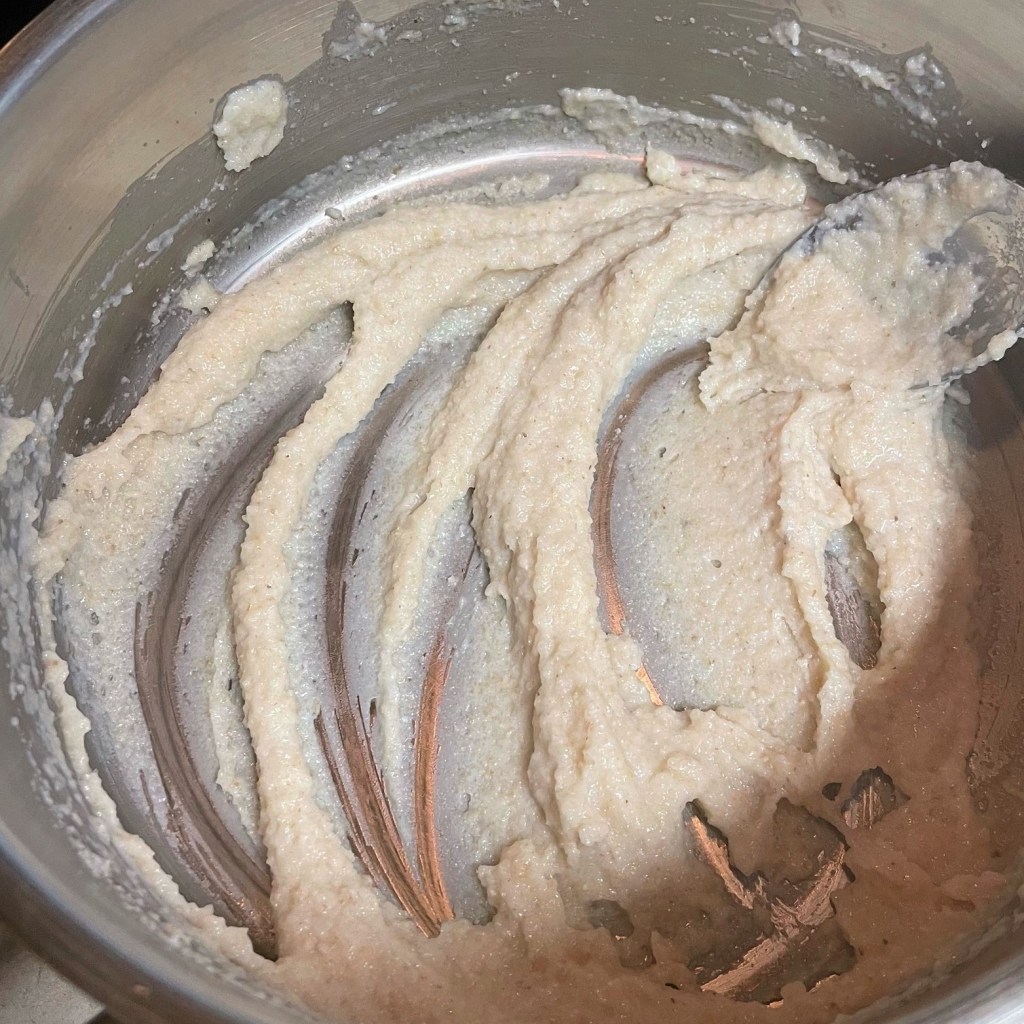
Sprinkle the salt and baking soda over the overnight starter, which should be nice and bubbly. Pour the egg mixture into the batter and stir vigorously but briefly to get the chemical reaction started. Fold in half of the crispy bacon pieces. Let the batter rest until the waffle maker is fully preheated.
Pour batter into waffle iron and close the lid. Avoid the temptation to lift the lid until your waffle iron indicator says it’s time. Keep waffles warm in oven while you prepare the next batch.
Combine maple syrup and remaining bourbon in a small saucepan and heat until warm. If desired, melt a teaspoon or two of salted butter into the syrup.
Scatter remaining crispy bacon over finished waffles and drizzle maple bourbon syrup over for serving.
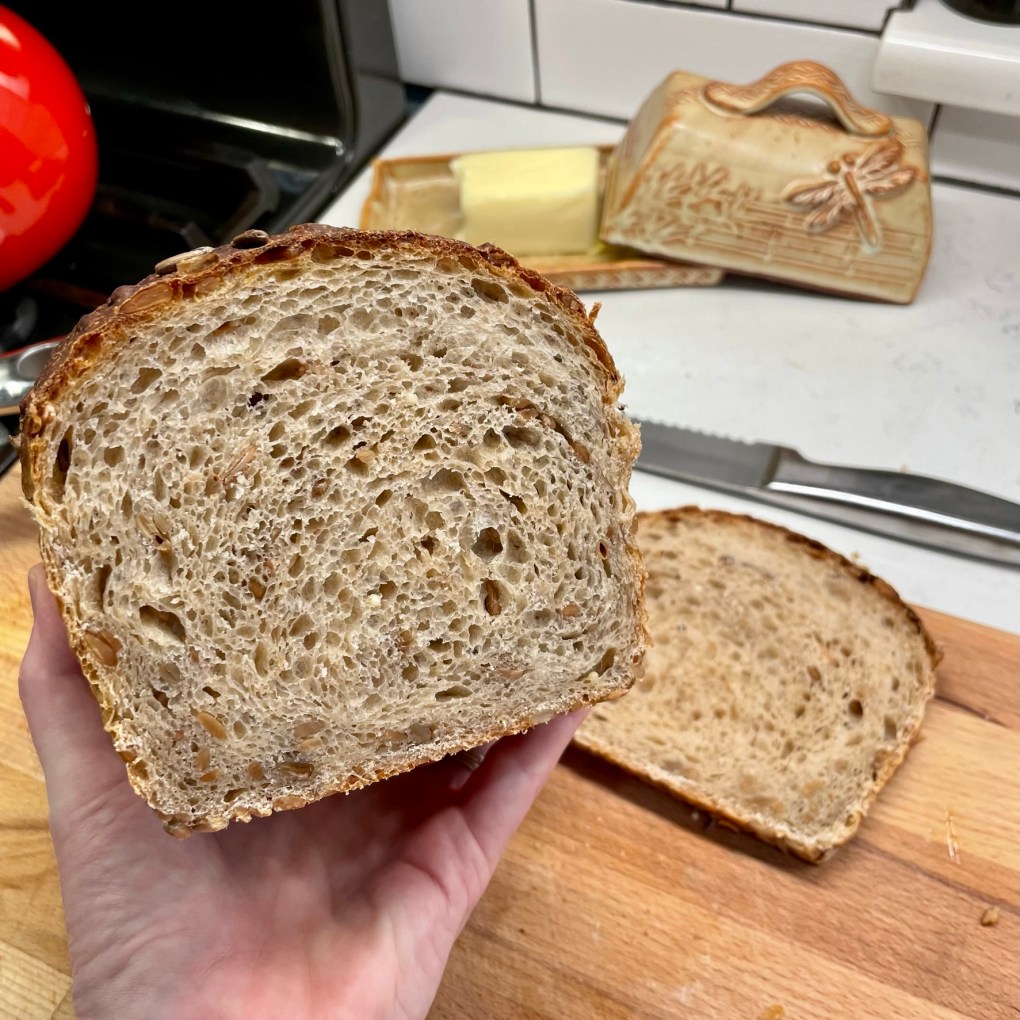
With the cool, crispness of fall in the air, I have been giving my stove and oven a serious workout. Many of my recipes have been reruns of things I’ve already posted, but I have made a few exciting new things, too.
Last week, I opened a can of pureed pumpkin for another recipe (I can’t remember what), and I had just a little bit leftover—at exactly the same time I needed to feed my sourdough starter to make a new loaf of bread for my husband’s lunchtime sandwiches. Why not add the pumpkin to a bread dough? My first inclination was to make a cinnamon roll-type thing, but I remembered how delicious pumpkin is without the spice and sugar, so I took it in this savory direction instead, using my favorite sourdough sandwich bread recipe as a template.
It even looks like autumn!
The go-to recipe I modified came from Maurizio Leo, a pro baker whose passion for naturally leavened bread shines on such sites as Food 52 and King Arthur Baking Company. He understands and explains all the science of breadmaking (which I love) and though I keep saying I want to make some of the other Insta-worthy recipes on his blog, The Perfect Loaf, I keep coming back to this one. It relies on an unusual method of pre-cooking a portion of the flour—a technique which locks in much more liquid than you’d otherwise get into a sandwich loaf—and this initial step ensures a super-soft, tender bread with a perfectly chewy edge on every slice.
I’ve experimented many times with Maurizio’s original recipe, first to split it in half because we can’t finish two loaves that quickly, partly out of necessity on days that I didn’t have honey or whole milk, but also out of curiosity to see how far I could push it in the direction of more whole grain. This time, I wanted to see how the loaf would fare with a half cup of fiber-rich pumpkin puree, and as you can see, it turned out quite good.
My big test for any new loaf is toast, and this one was divine!
I love toast so much.
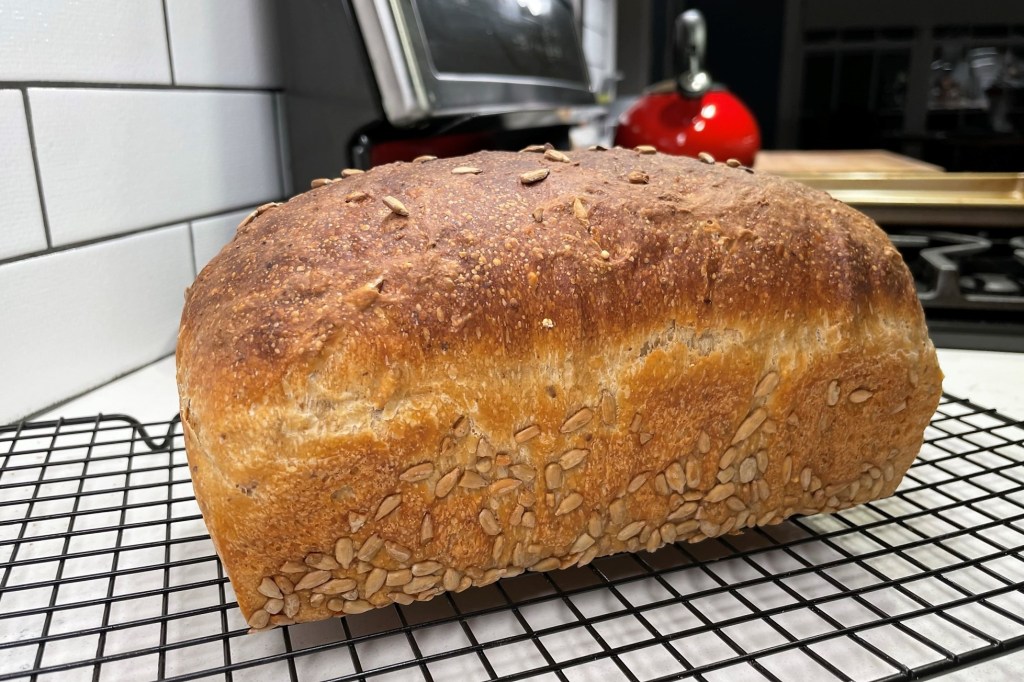
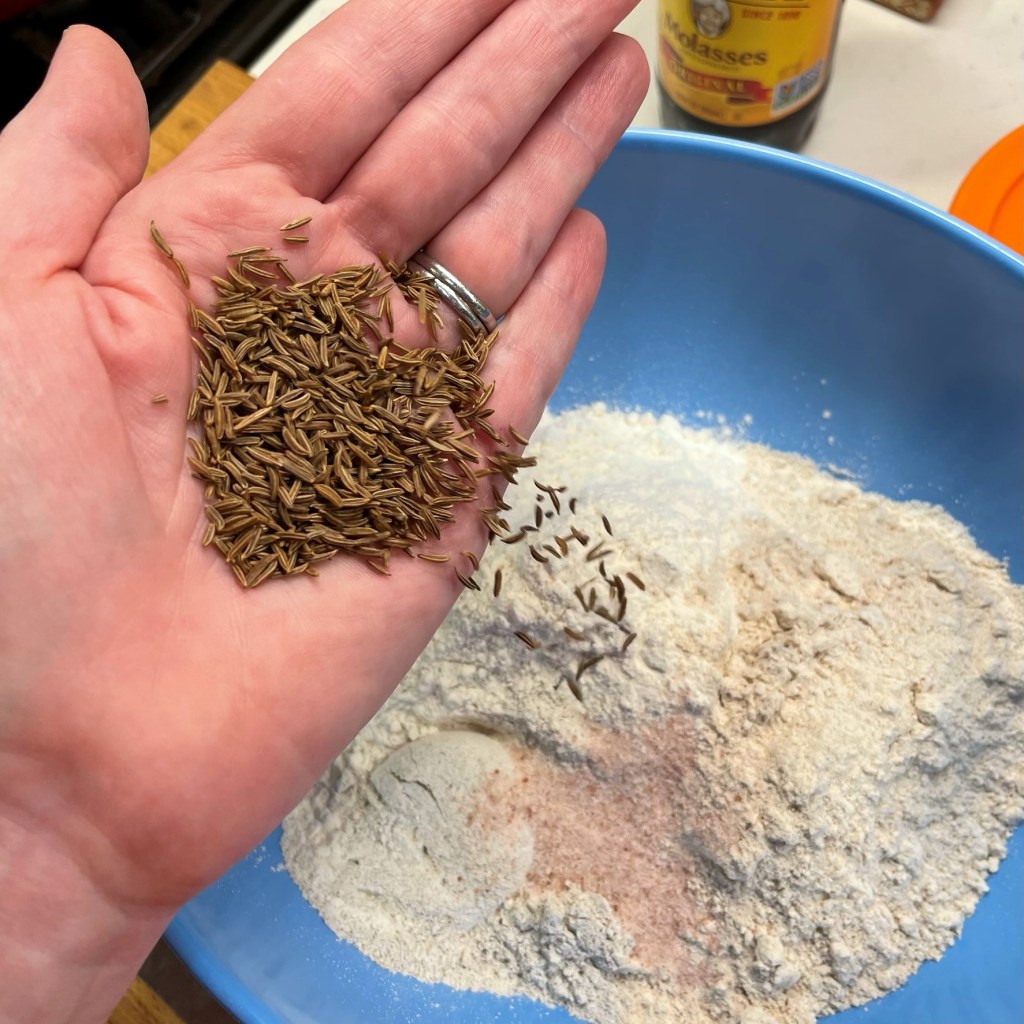
To make my pumpkin sandwich bread even more rustic and autumn-like, I swapped out a good amount of my usual white whole wheat flour in favor of whole dark rye and played up that rye infusion with a spoonful of caraway seed. I swapped in molasses for honey because I love the deep, earthy flavor of molasses with rye. It all worked beautifully, and the aroma of this loaf as it emerged from the oven was nothing short of fantastic. Sometimes it pays to experiment.
Fair warning, my recipe is written in metric measurement because that’s the way I bake. Scaling a recipe by volume measurements is a near-impossible task, and I will say honestly that my cheap digital kitchen scale is one of the items I would never go without today.
This loaf depends on a portion of ripe sourdough starter. “Ripe” means it has been refreshed within the past 8 to 12 hours, so it is fully fermented, active and ready to use. If you don’t have a sourdough starter, you could try a swap-in of canned pumpkin for about half of the water called for in your favorite yeast-based recipe, and then add about 2 tablespoons of extra water. It would be best to experiment with a recipe that you are very familiar with, so you have a better sense of when the dough looks and feels “right.”
Here’s how it went down in my kitchen, beginning with the flour and milk paste, which are whisked together and cooked over medium heat until it looks like a roux. This stage needs constant attention, so don’t look away even for a moment, and be ready to switch from whisk to spoon when it starts to get thickened so you don’t get it all caught up in the whisk.
This process starts slowly, but once the flour begins to thicken it moves fast!
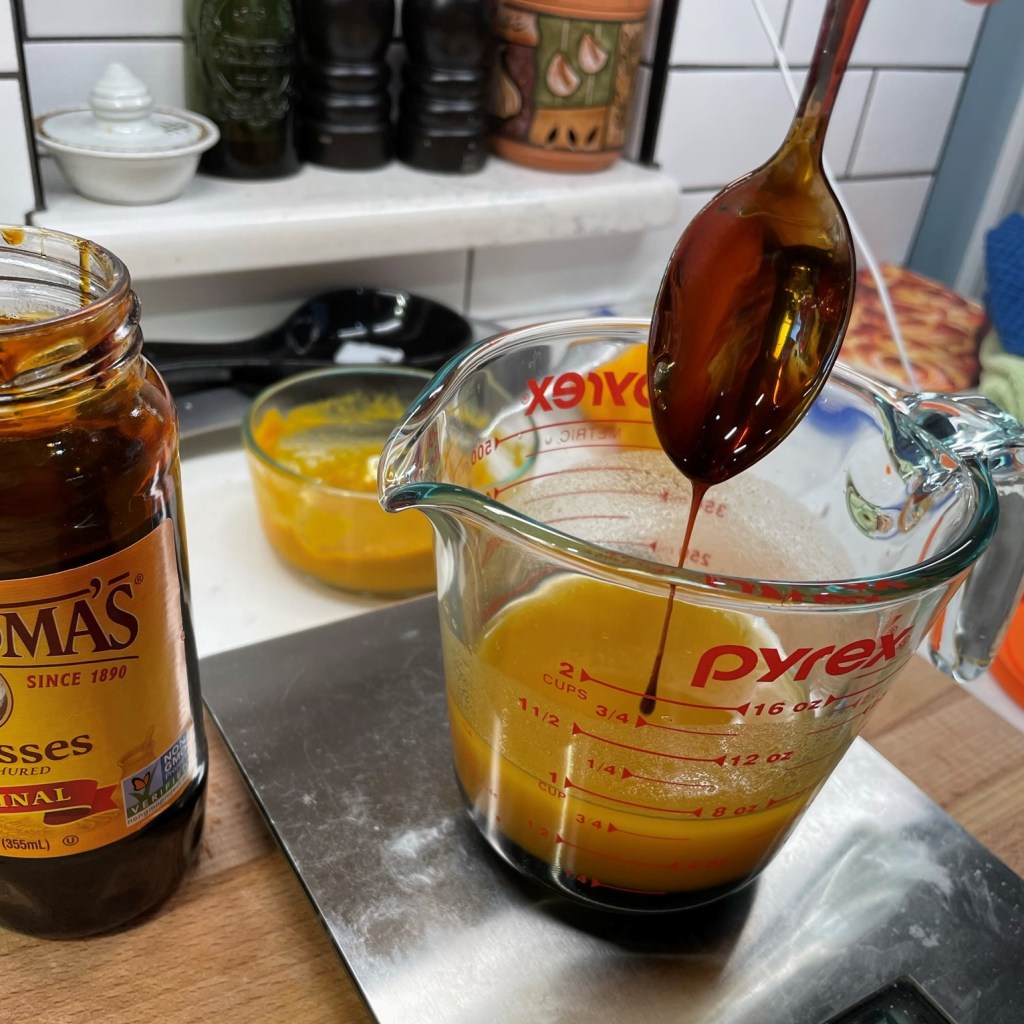
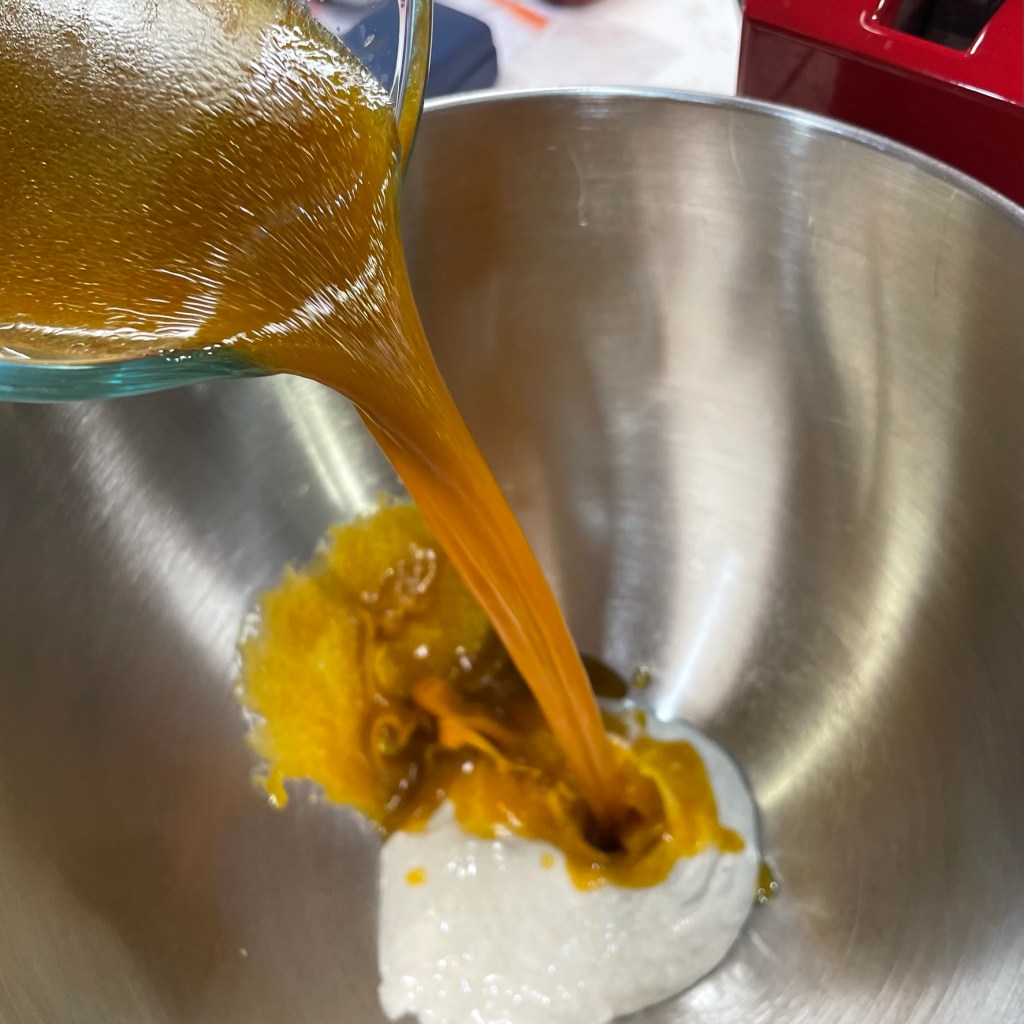
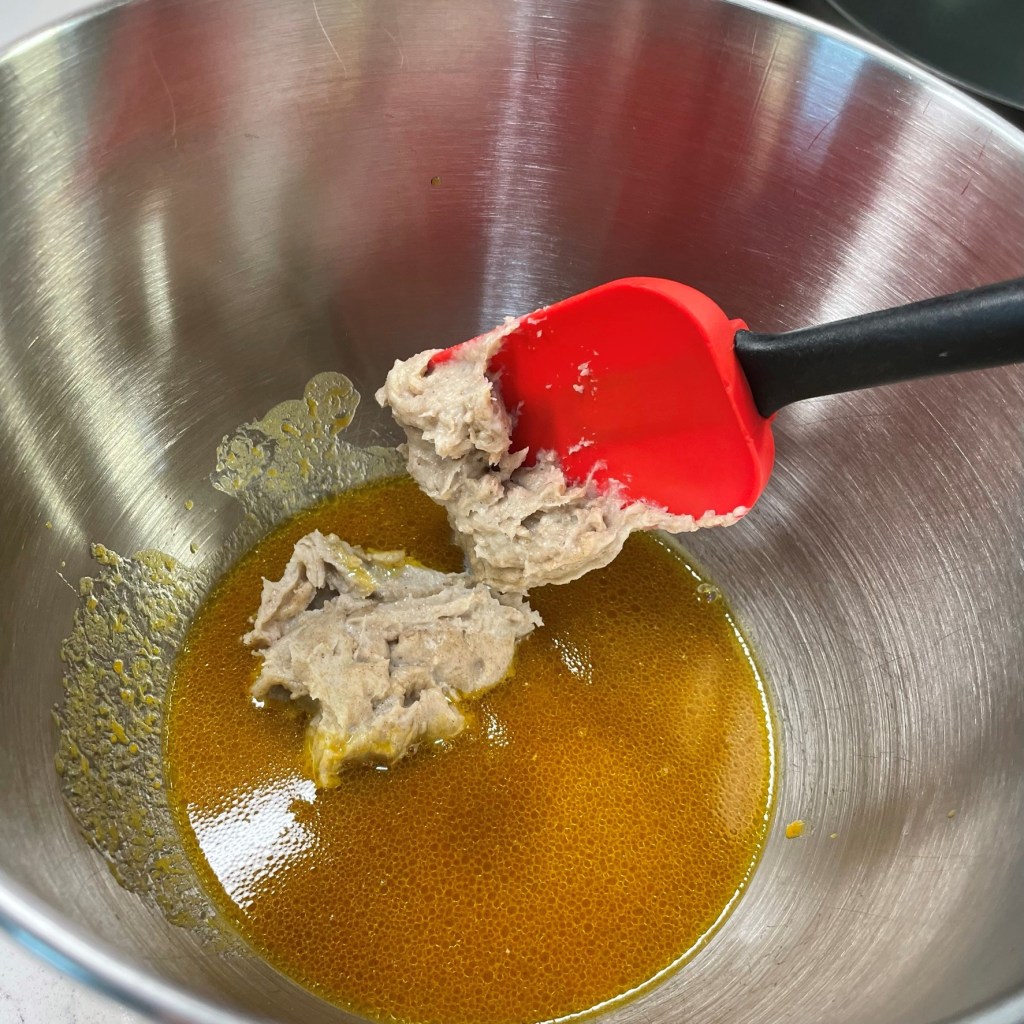
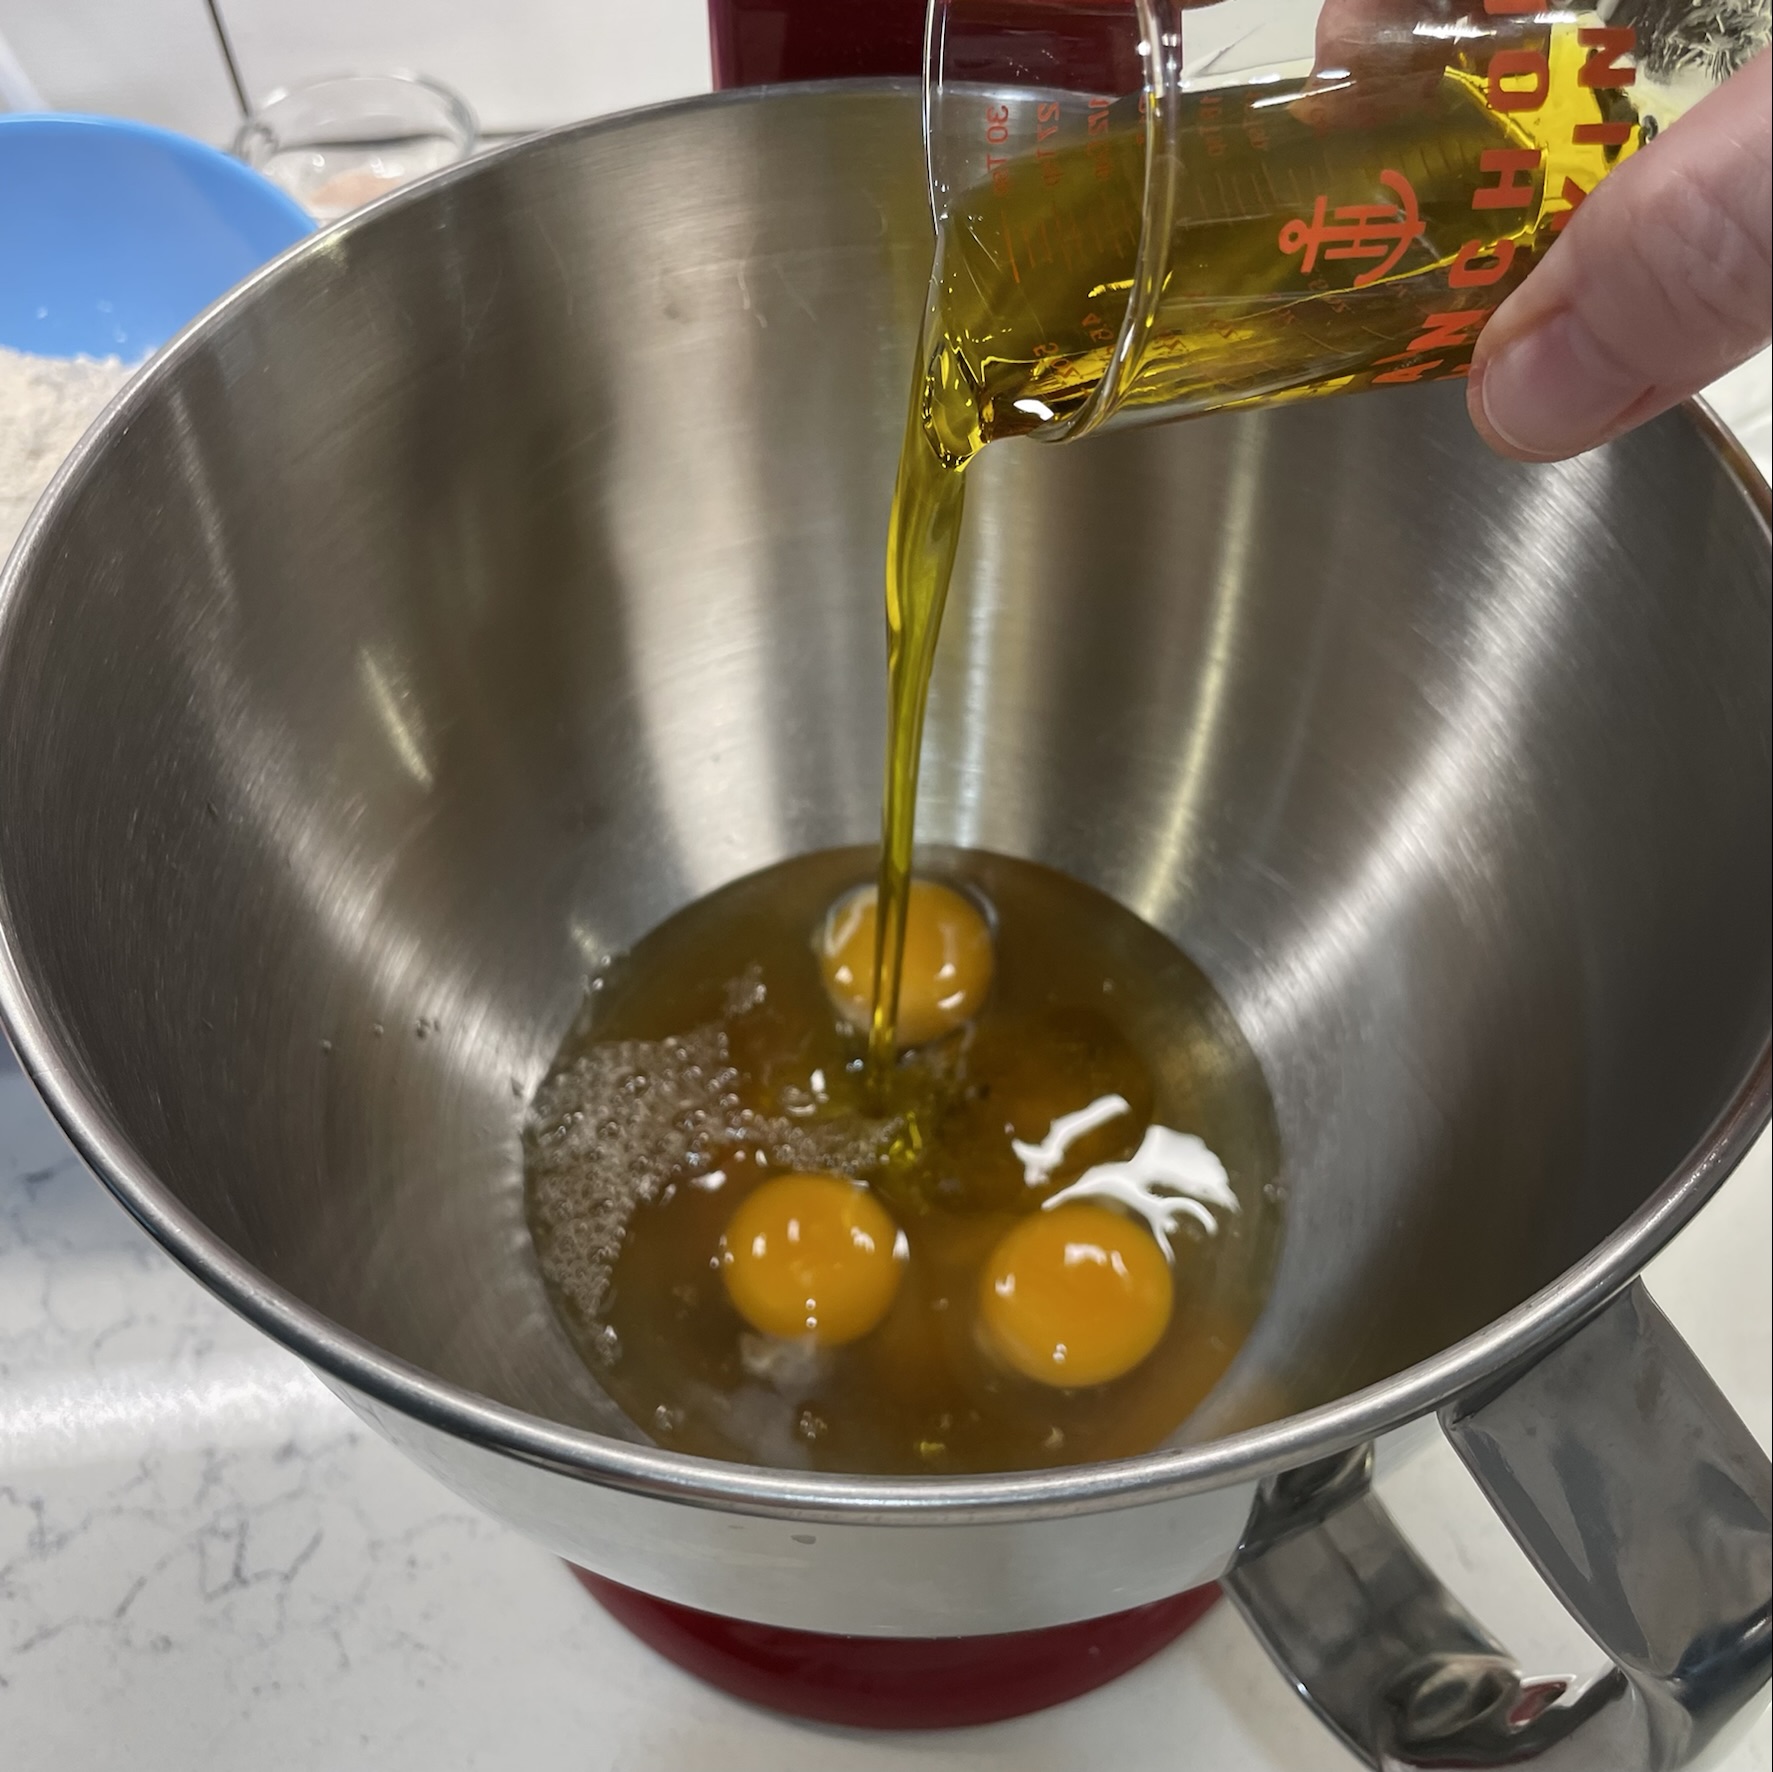
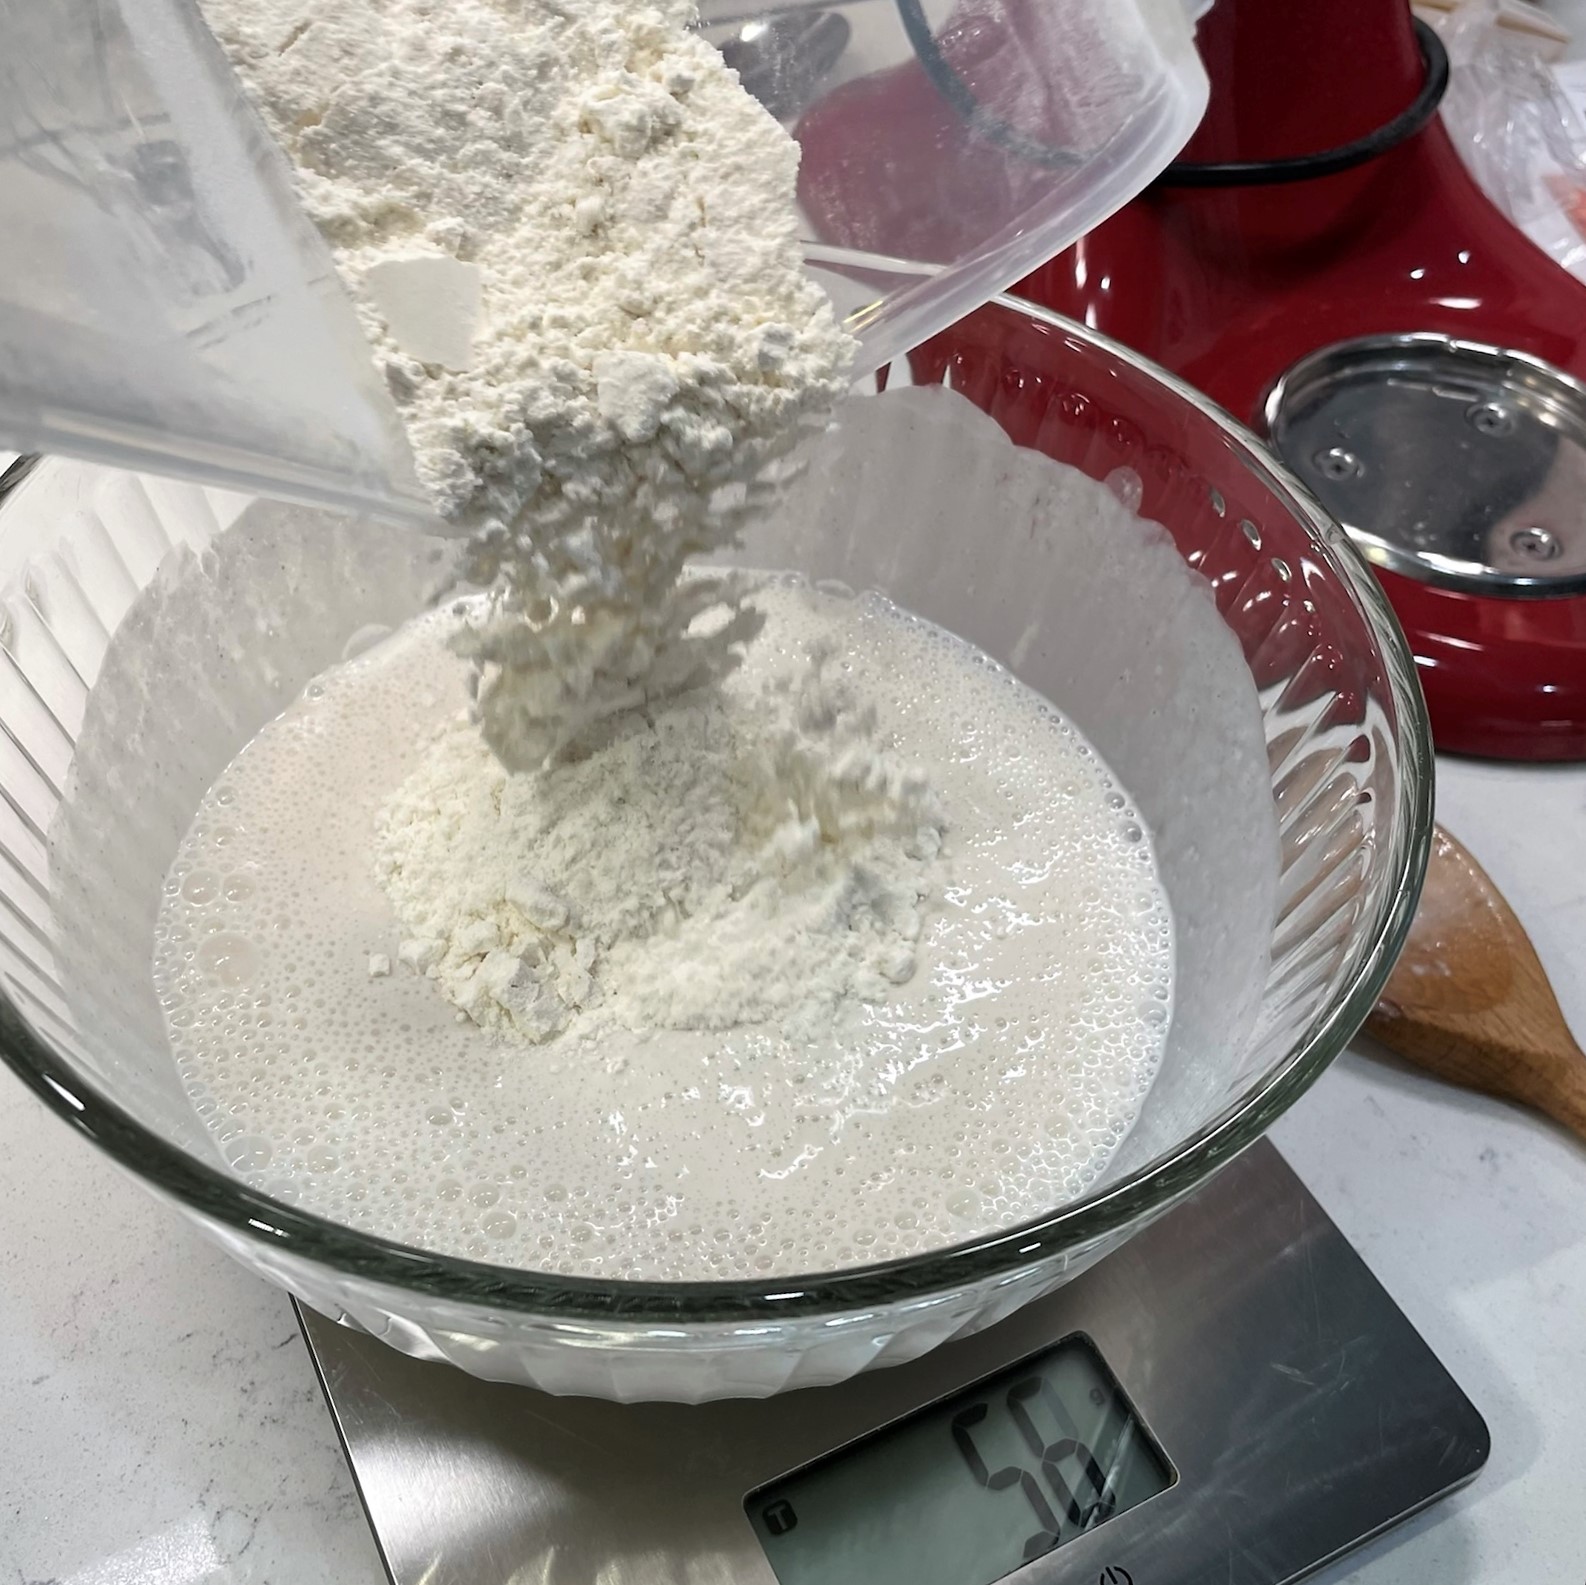
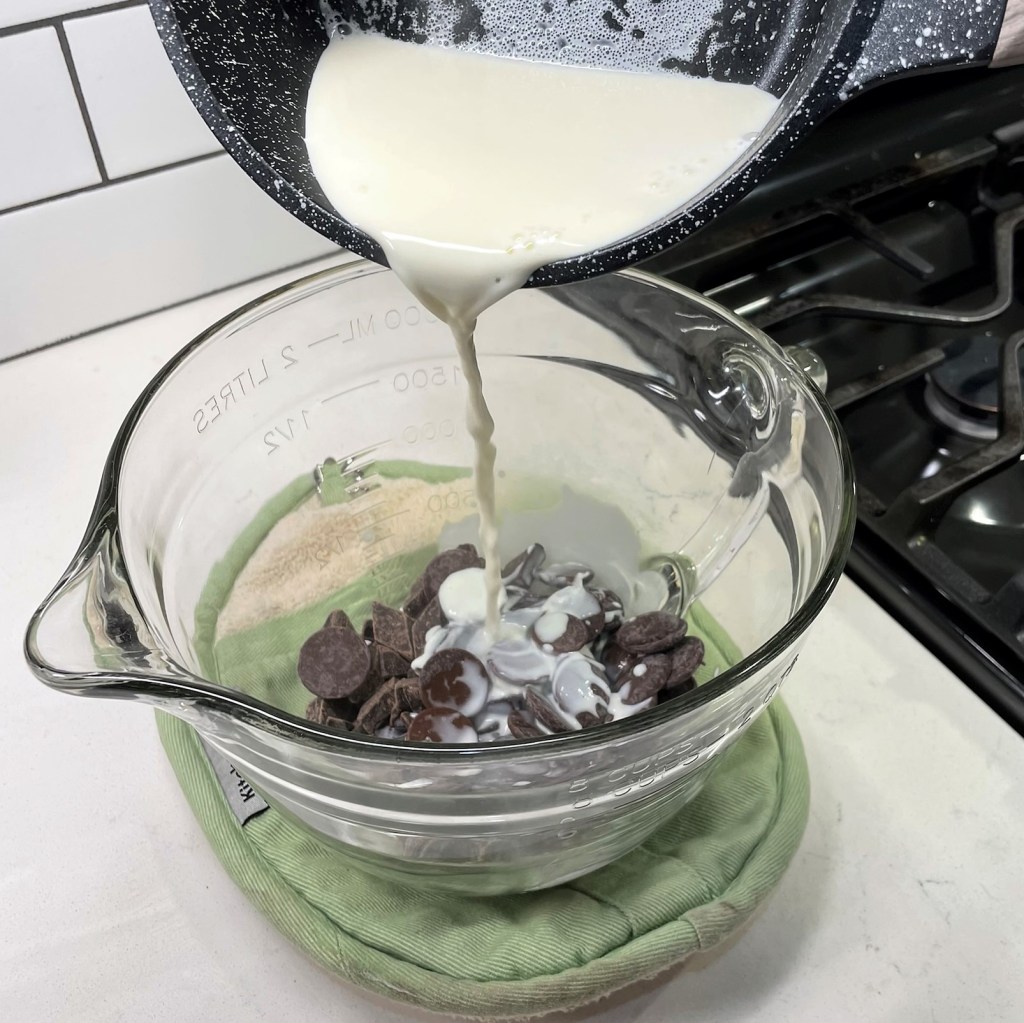
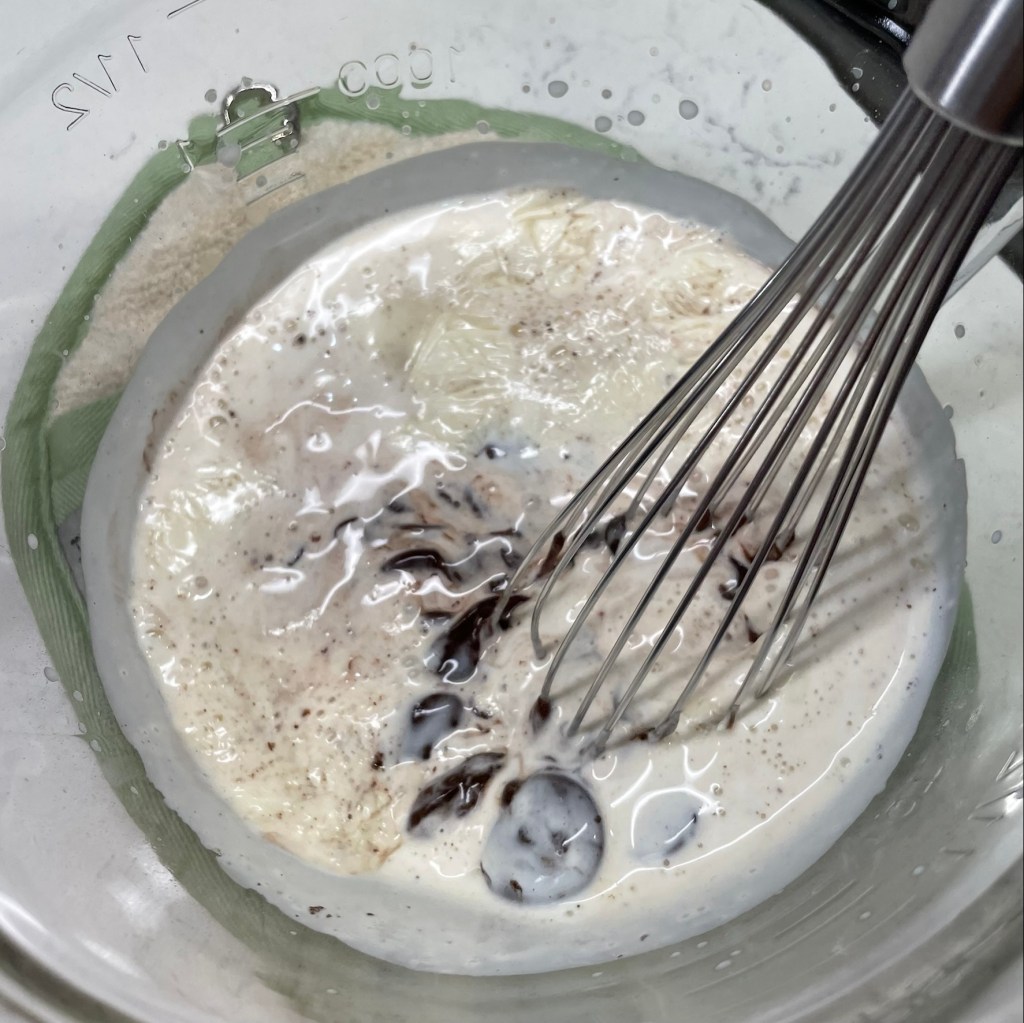
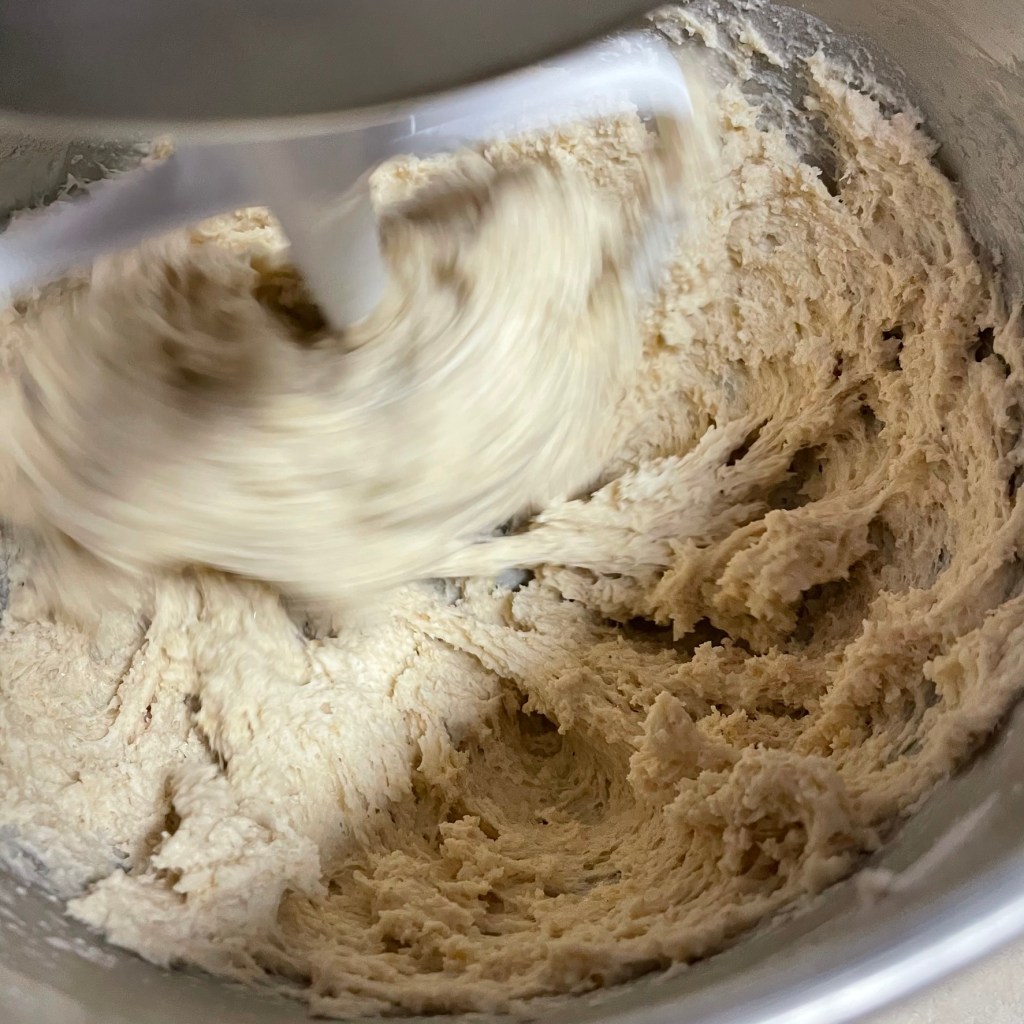
Next, combine the pumpkin and warm water, whisk in the molasses and olive oil, and then combine it with the sourdough starter and the cooled roux paste in the bowl of a stand mixer. Use the beater blade for this and blend it for several minutes, until it’s smooth and evenly mixed.
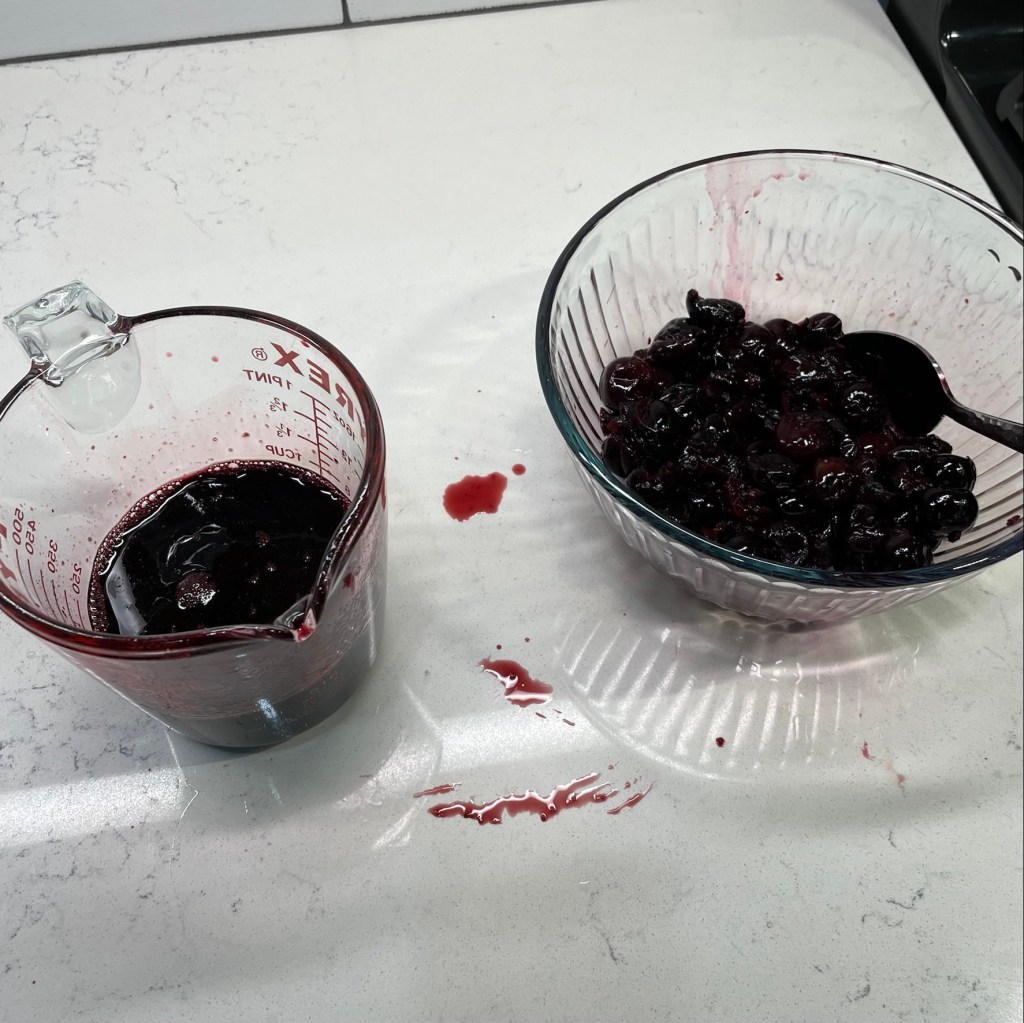
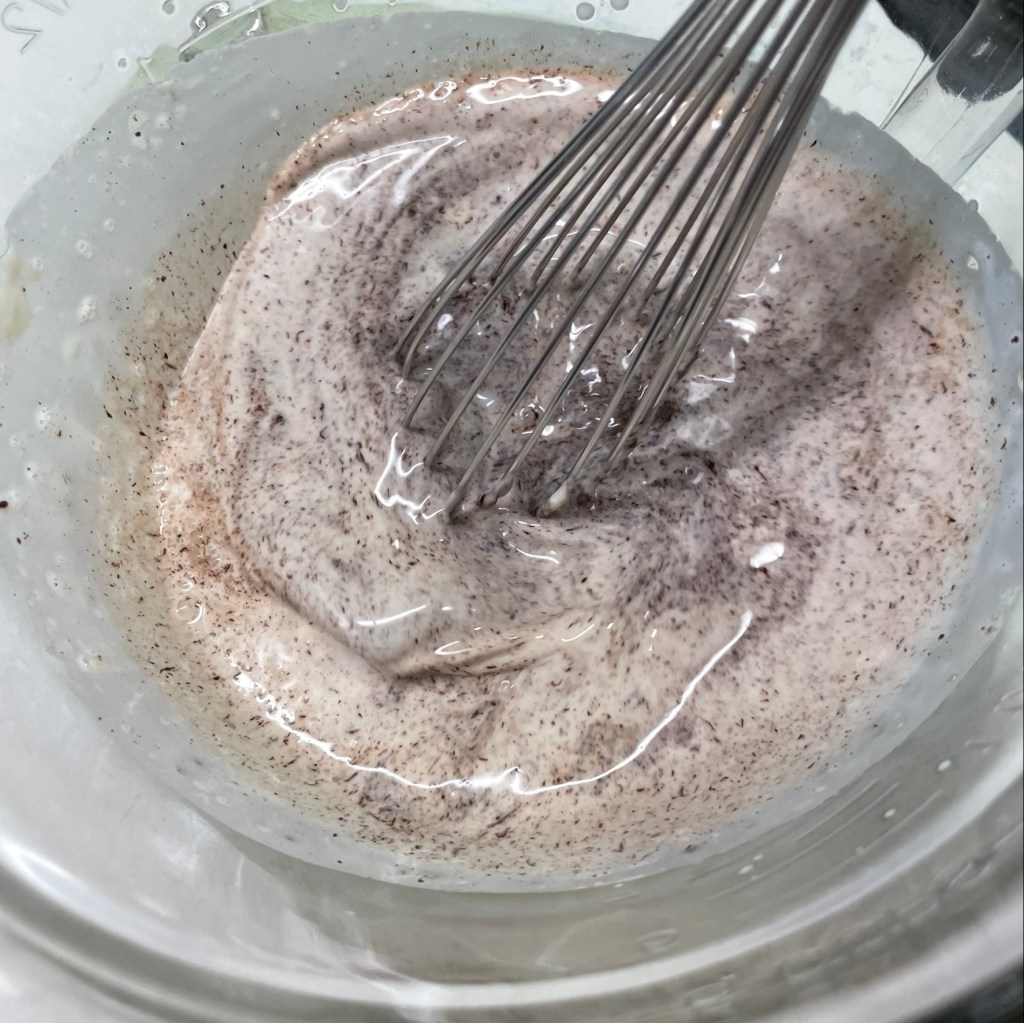
Pumpkin + molasses = beautiful autumn color!
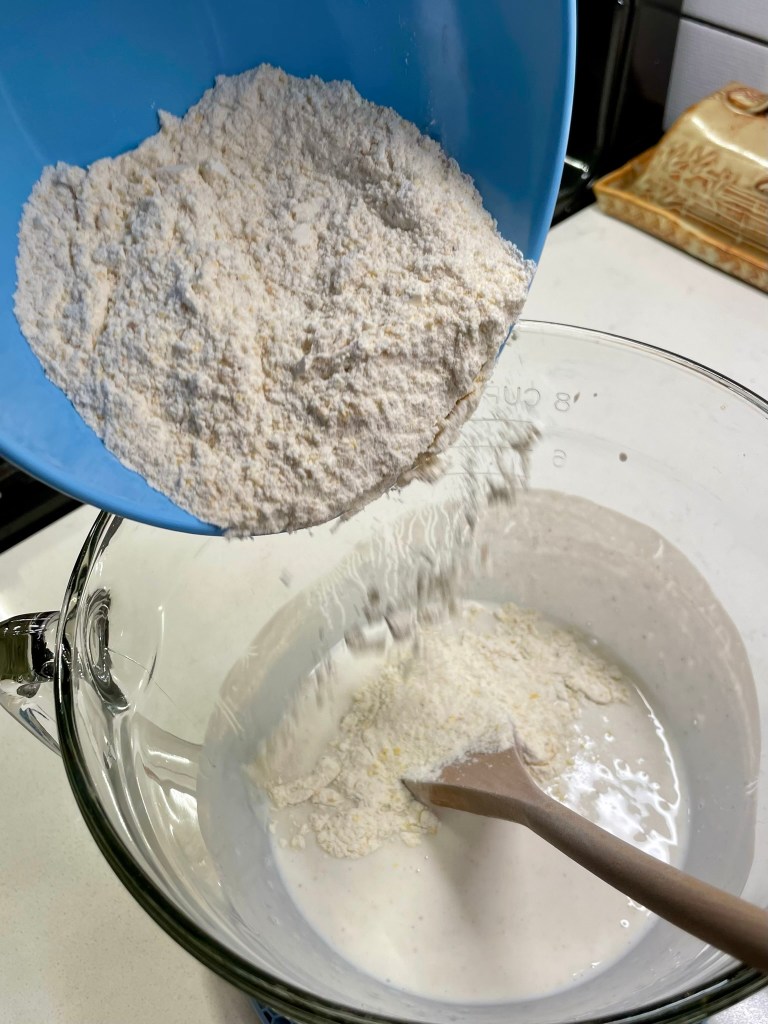
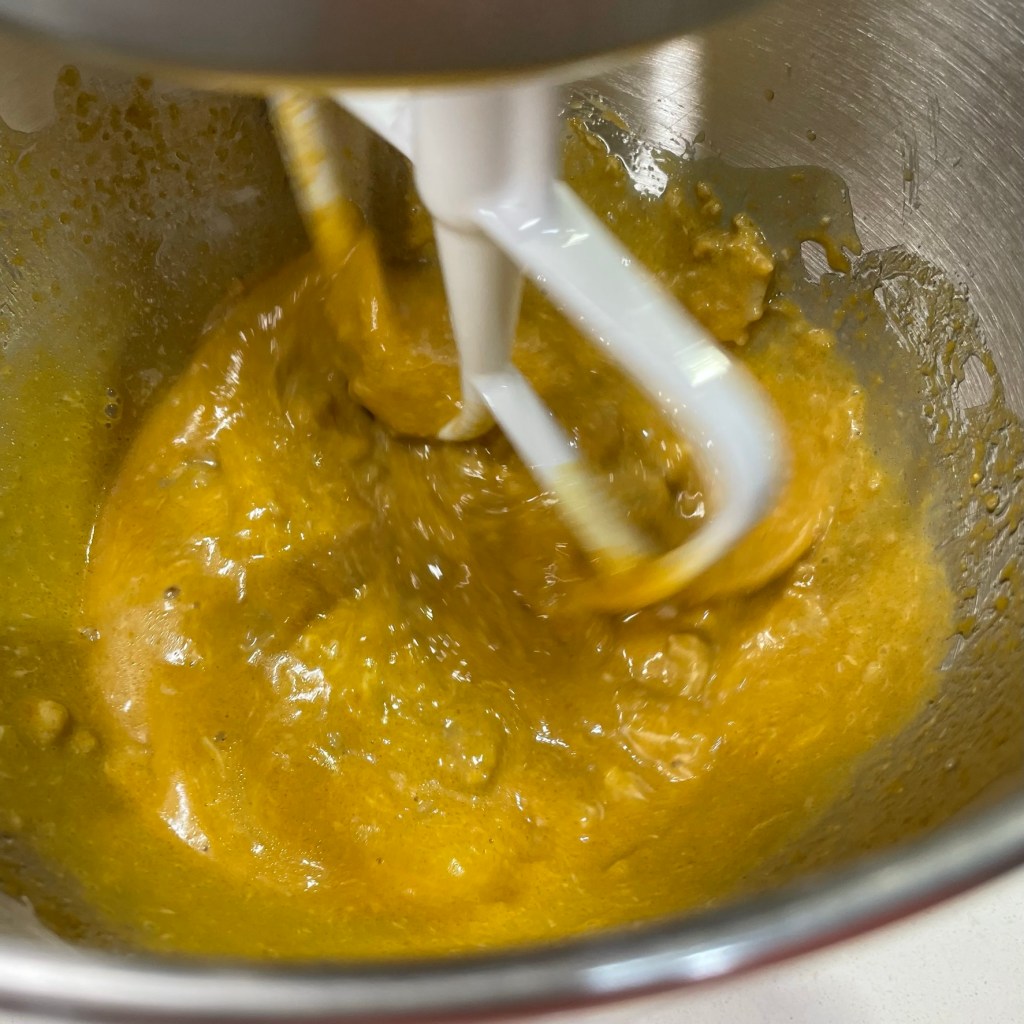
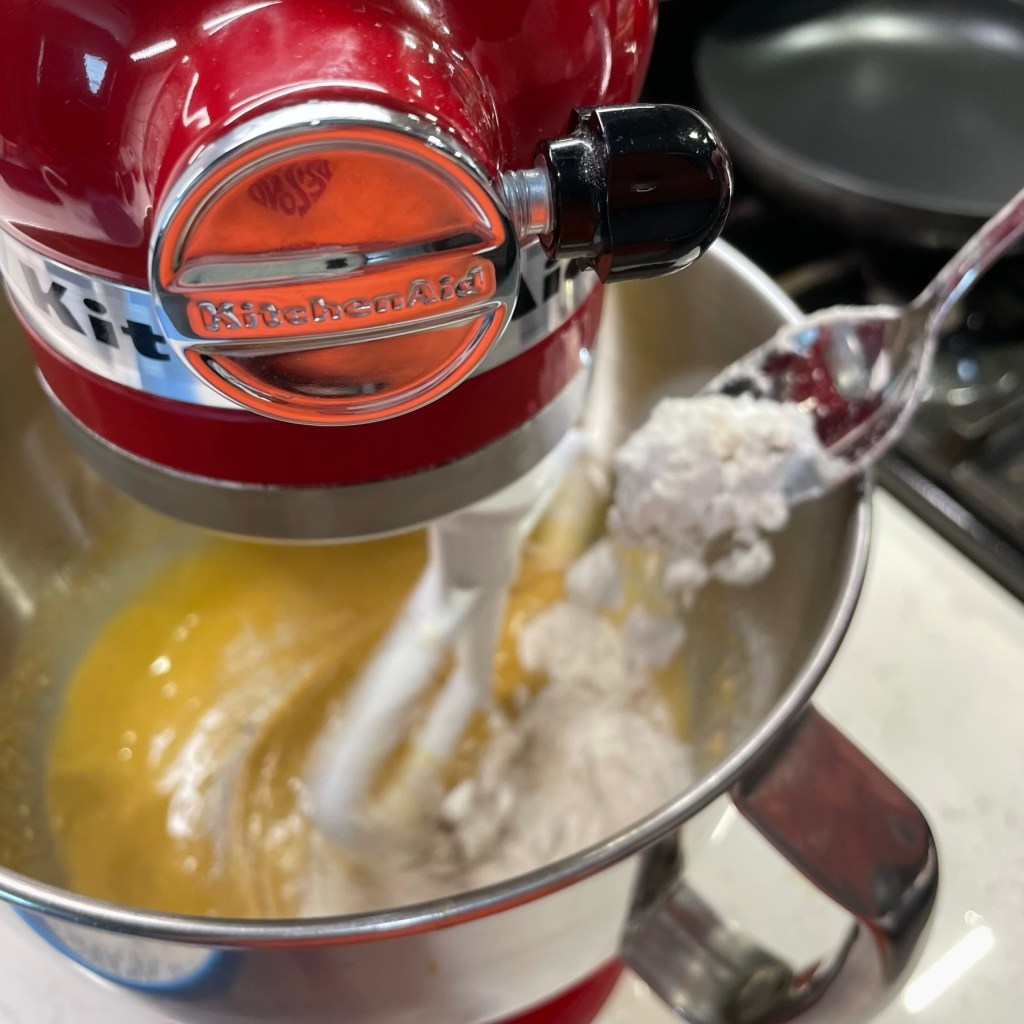
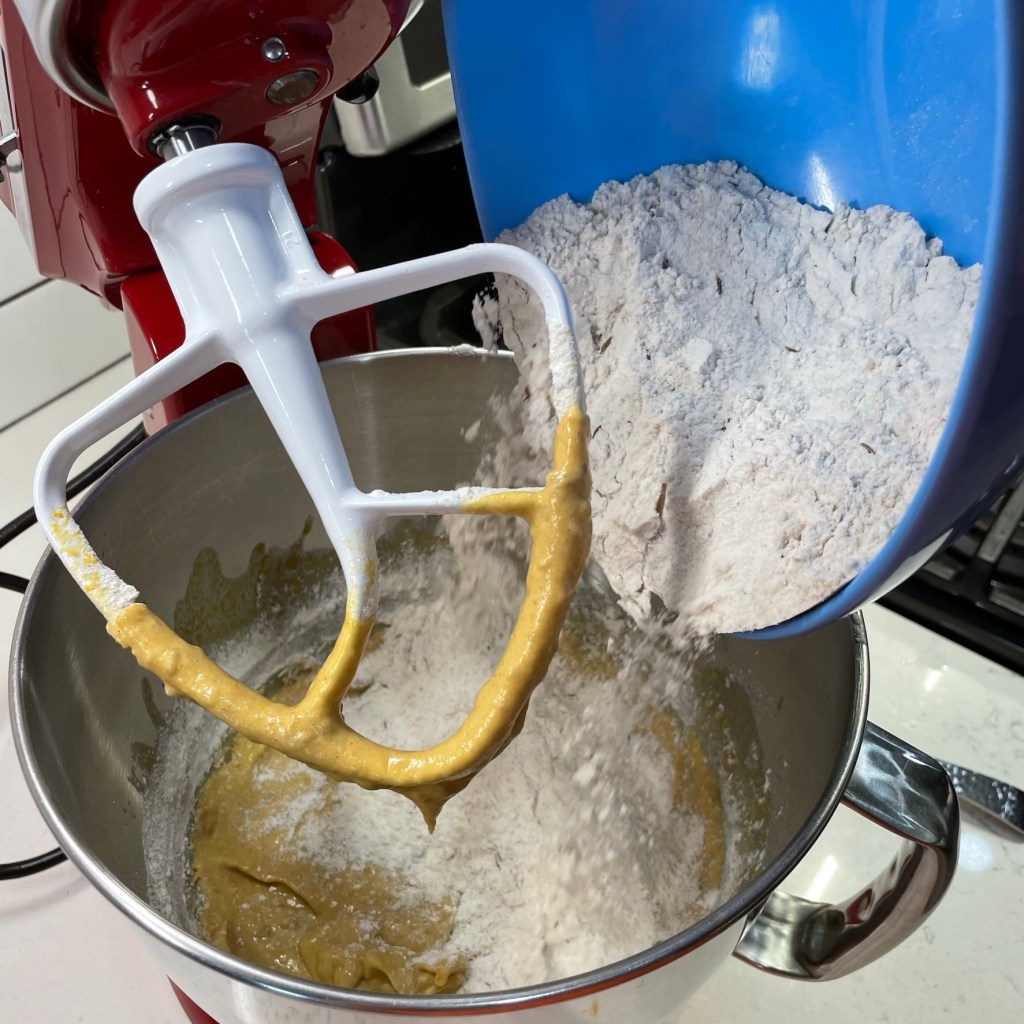
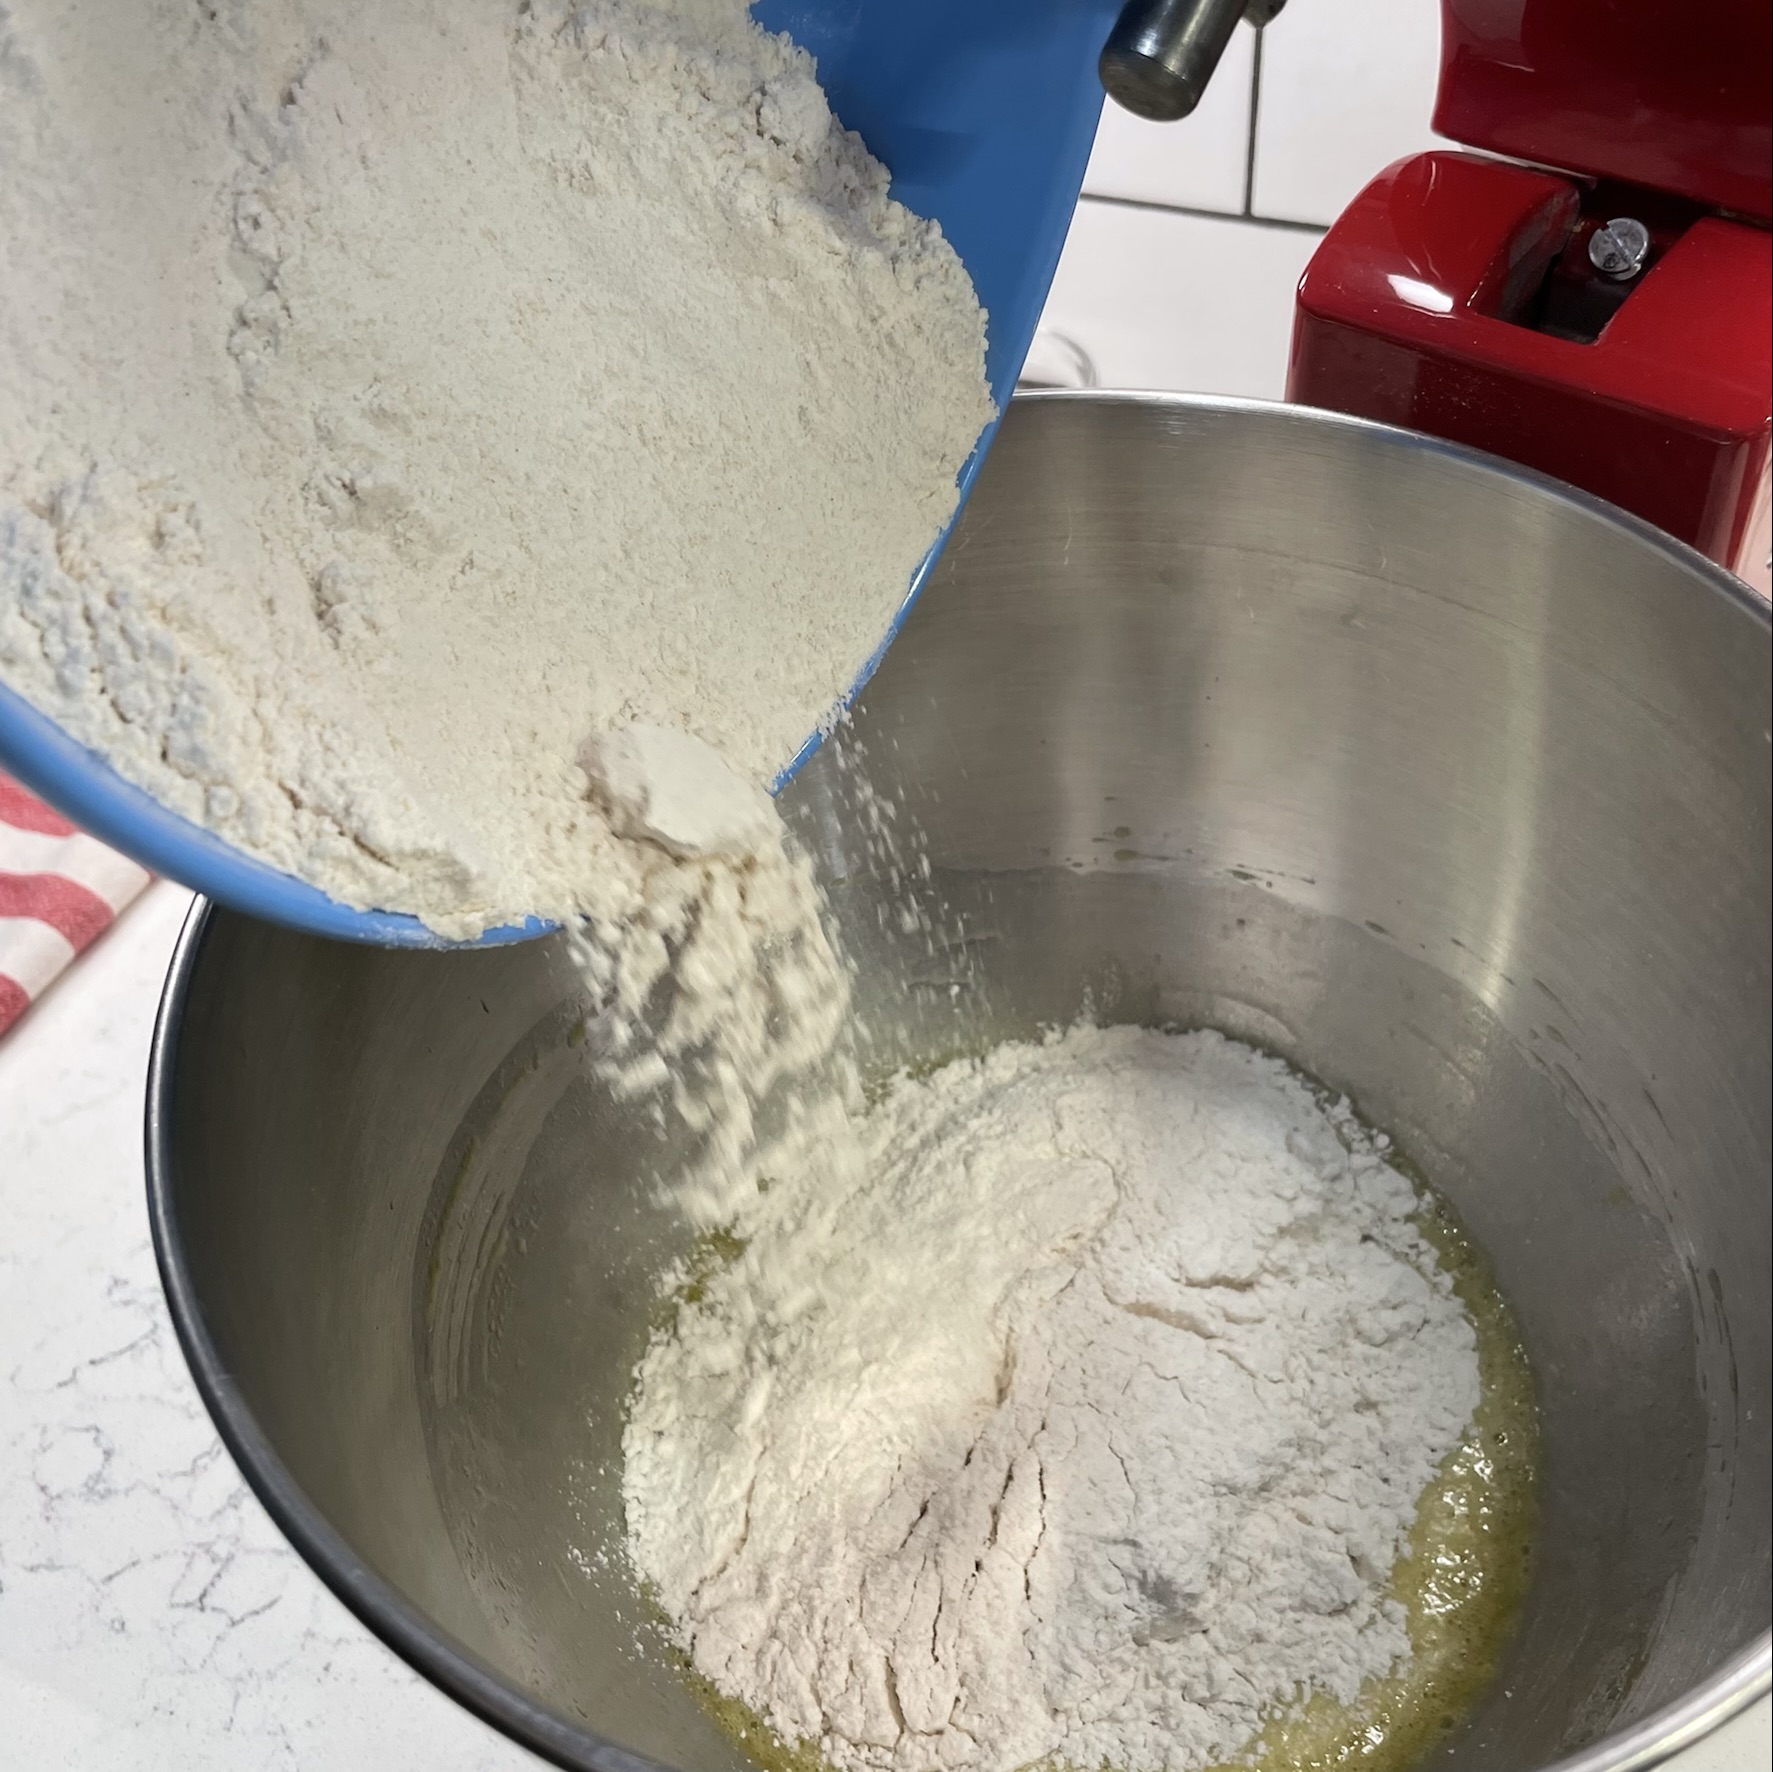
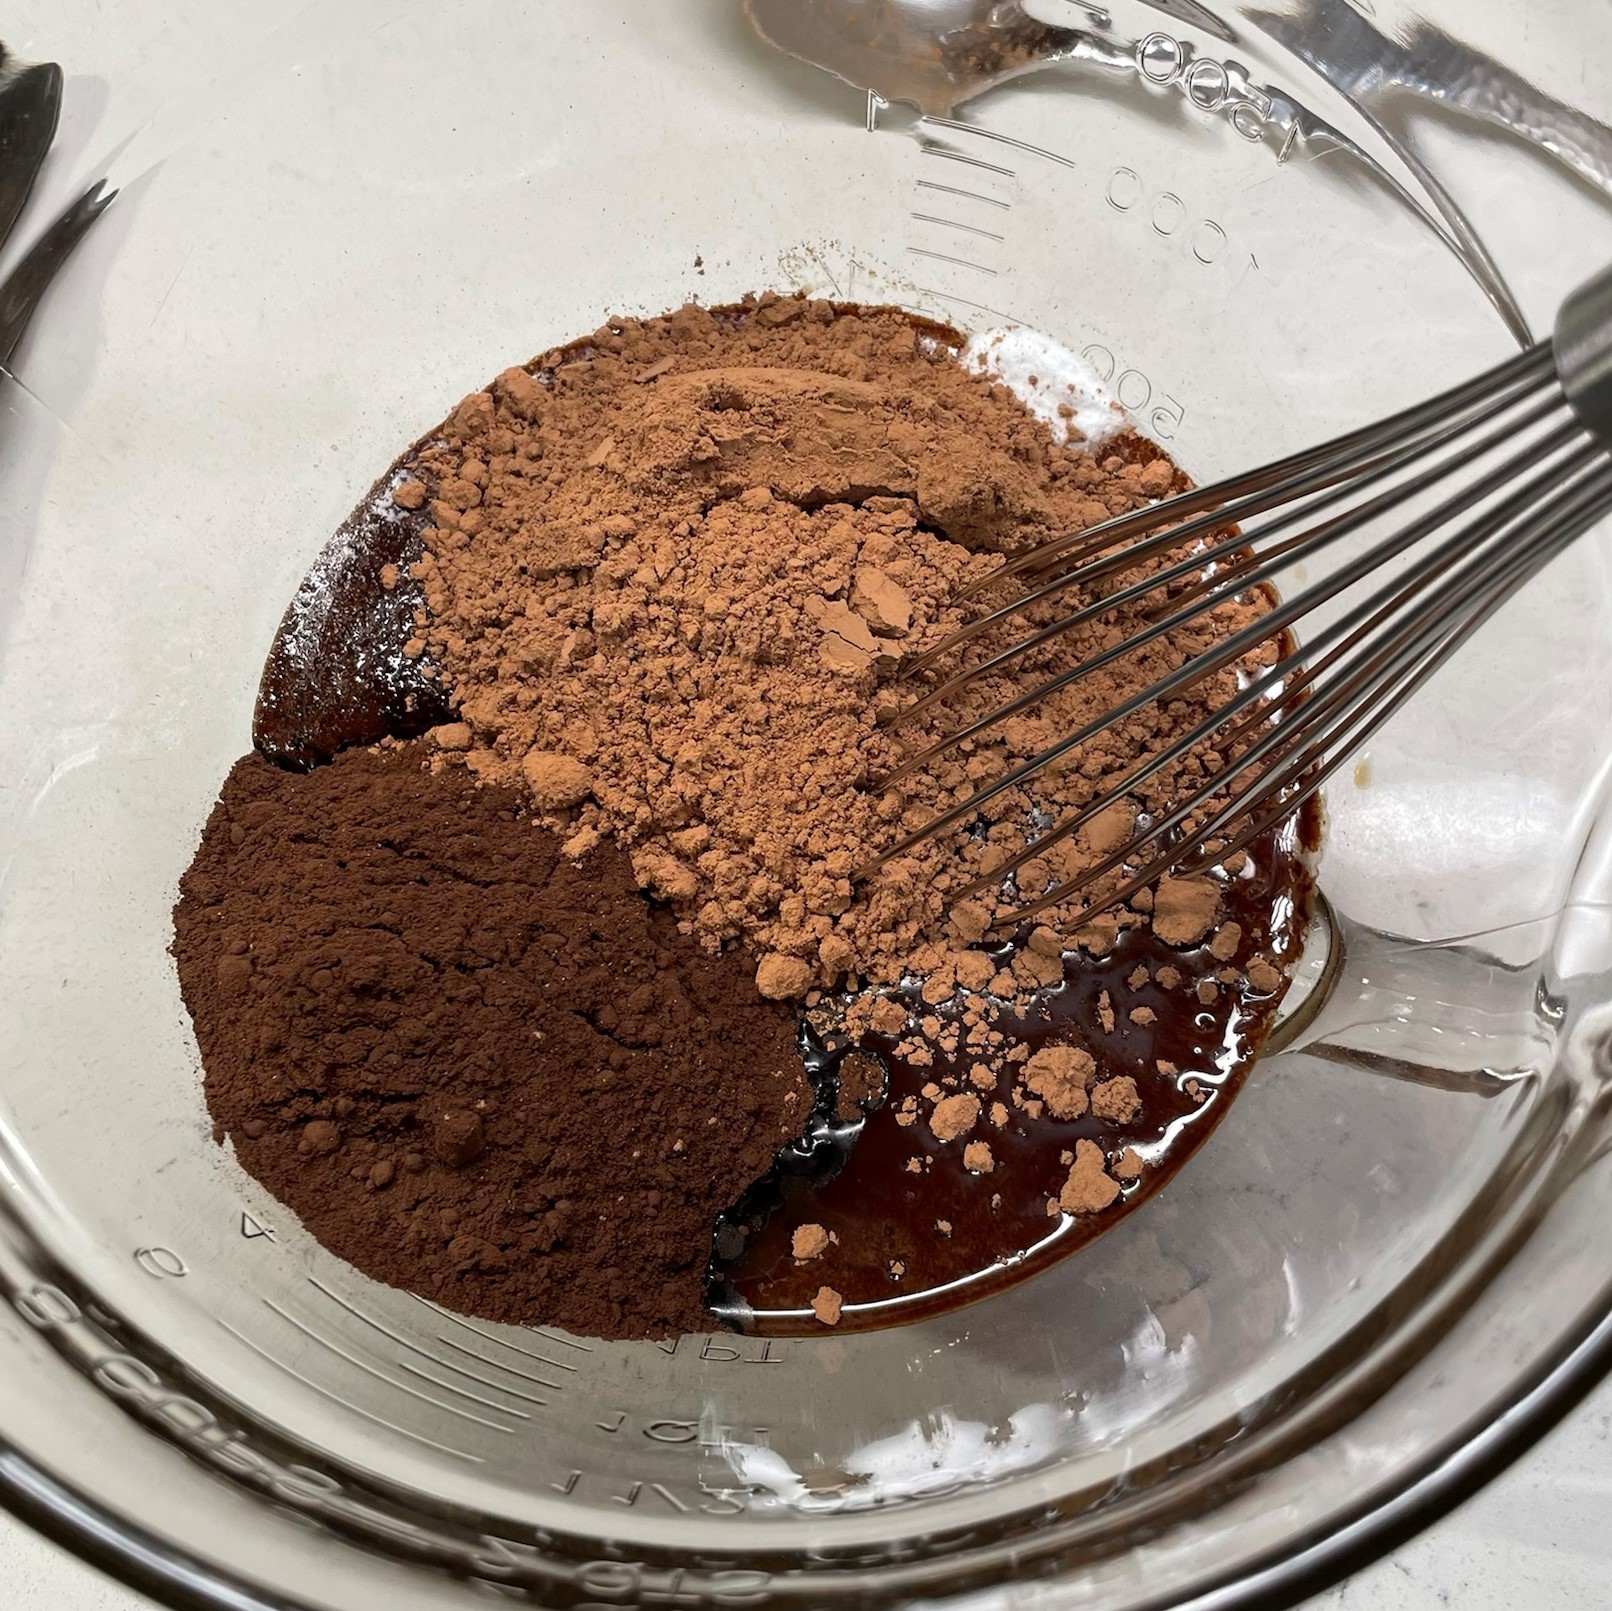
Whisk the flours together—here I used a combination of dark rye, white whole wheat and bread flour, which is high in gluten for a strong rise—and stir in the salt and caraway seed. Add a spoonful of these dry ingredients at a time to the mixing bowl while it’s running, until the dough begins to look like batter. Then turn off the mixer and add the rest of the flour ingredients all at once. This is not an essential step for the recipe, but my technique for reducing the splash that usually happens when I start my mixer with wet and dry ingredients in the bowl. I hate the mess, and this really helps!
Adding the dry ingredient mixture gradually at first prevents splashing.
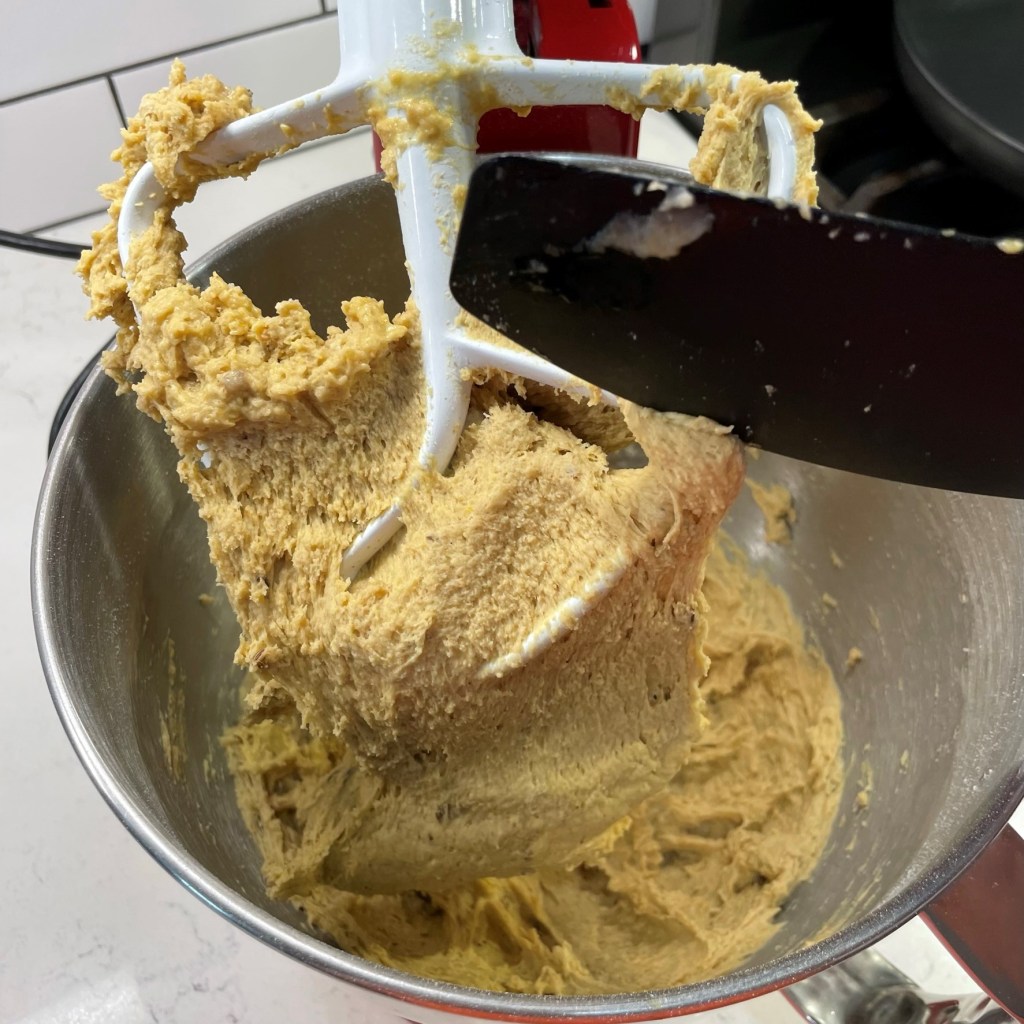
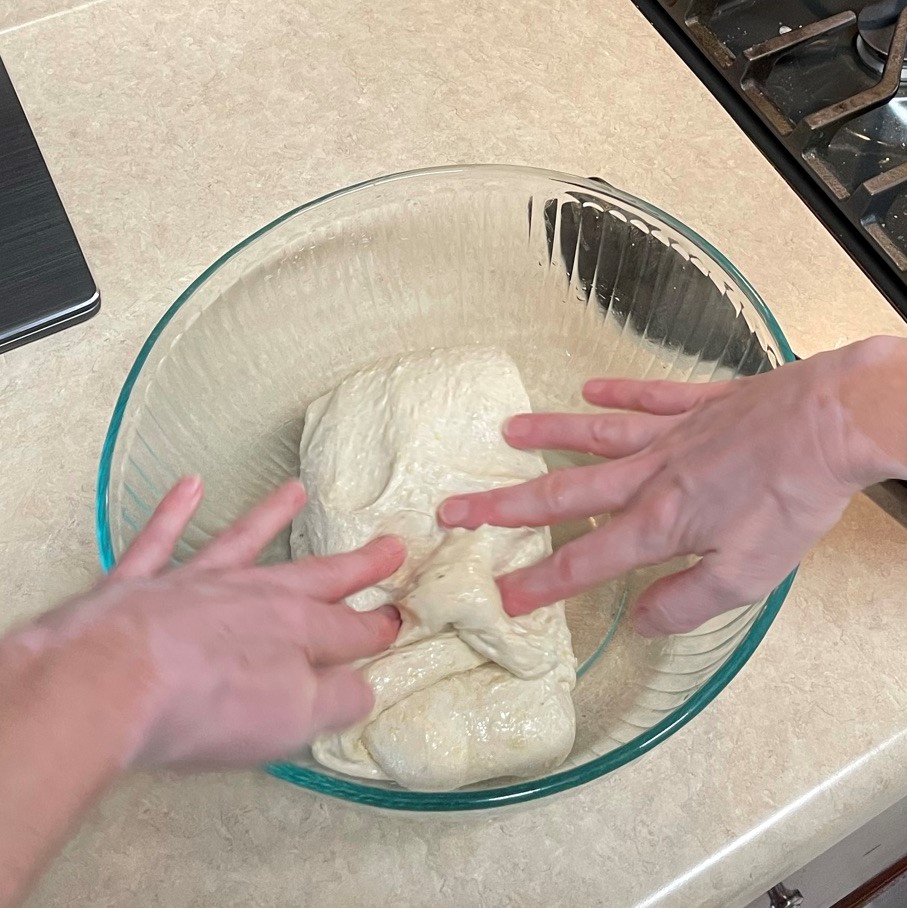
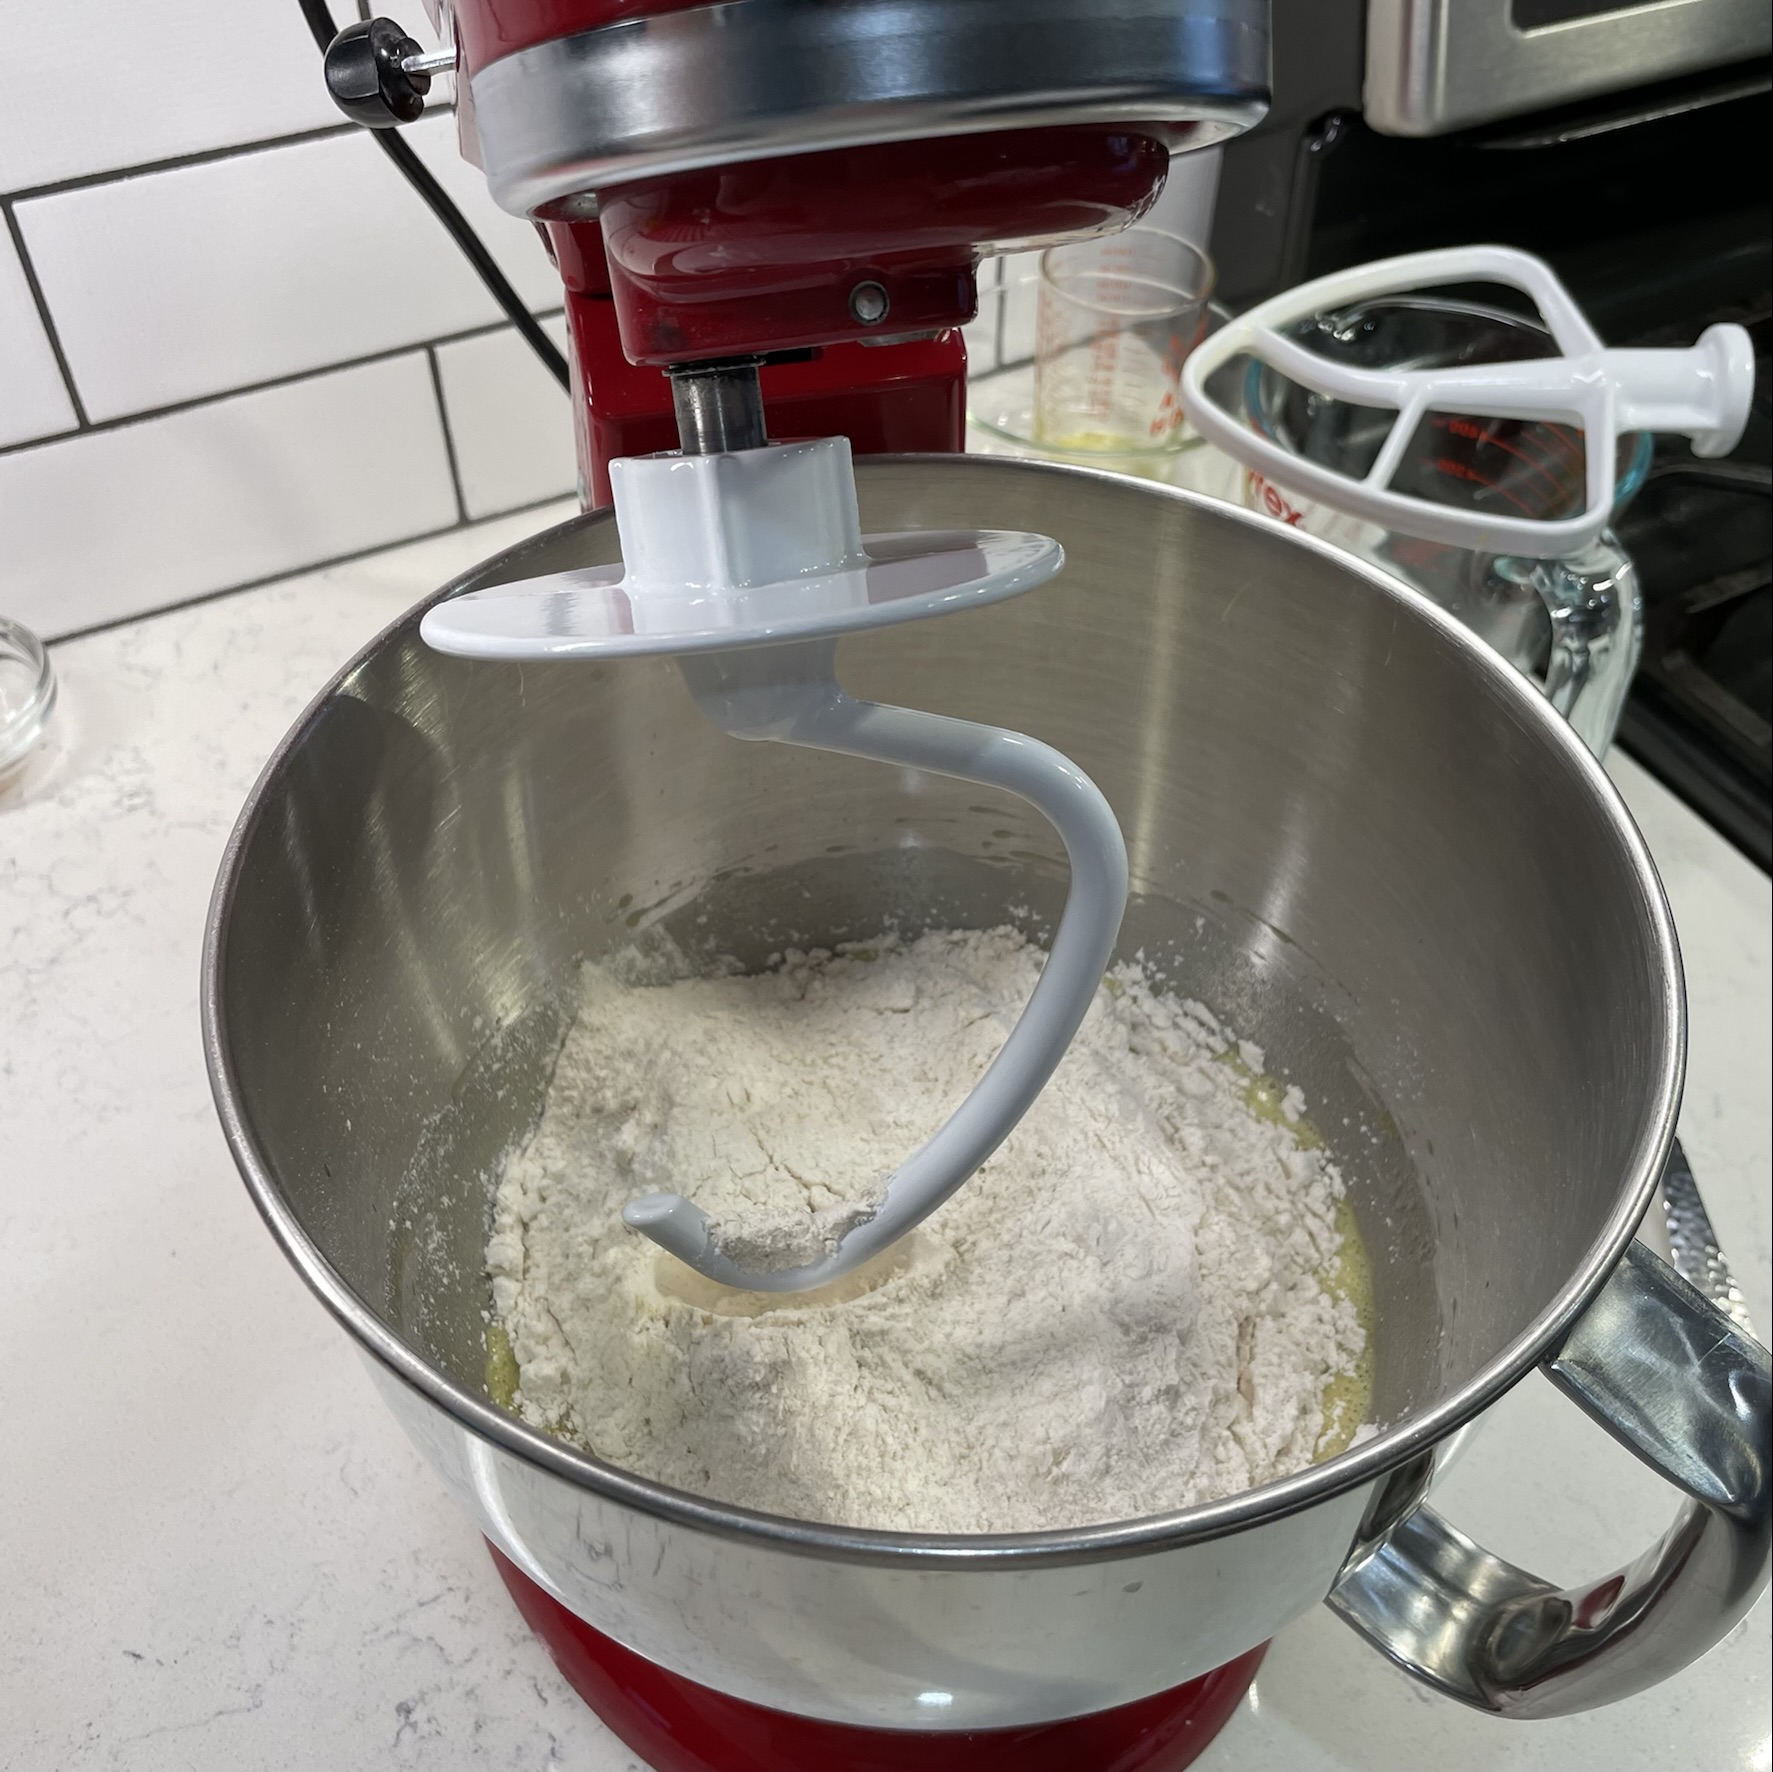
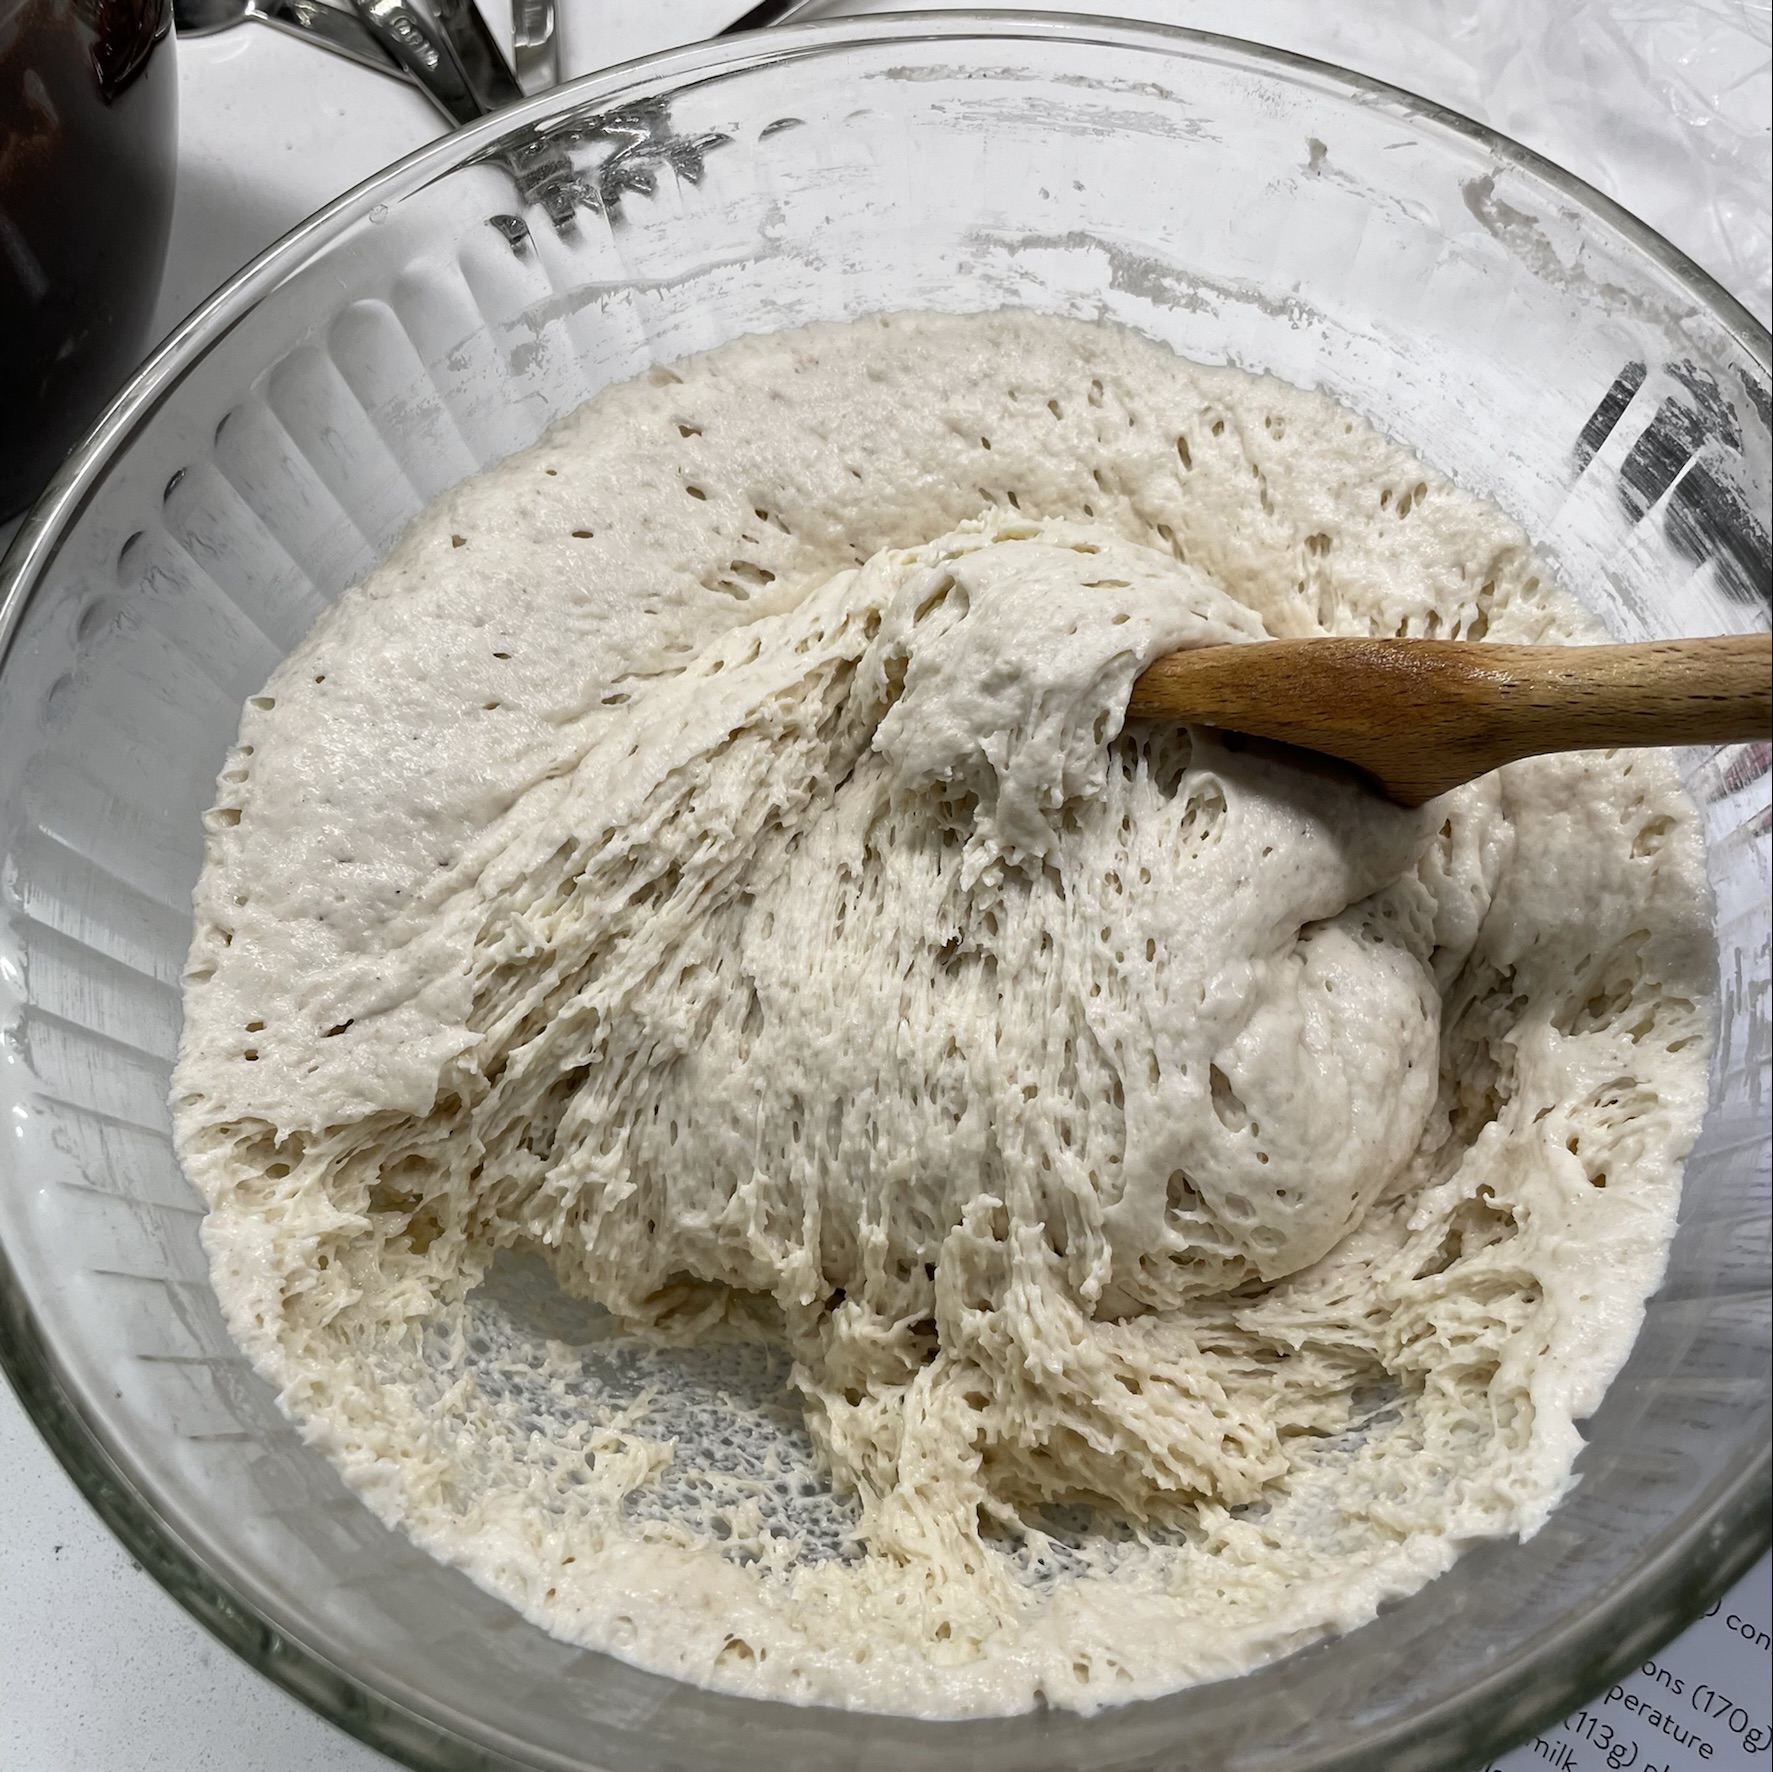
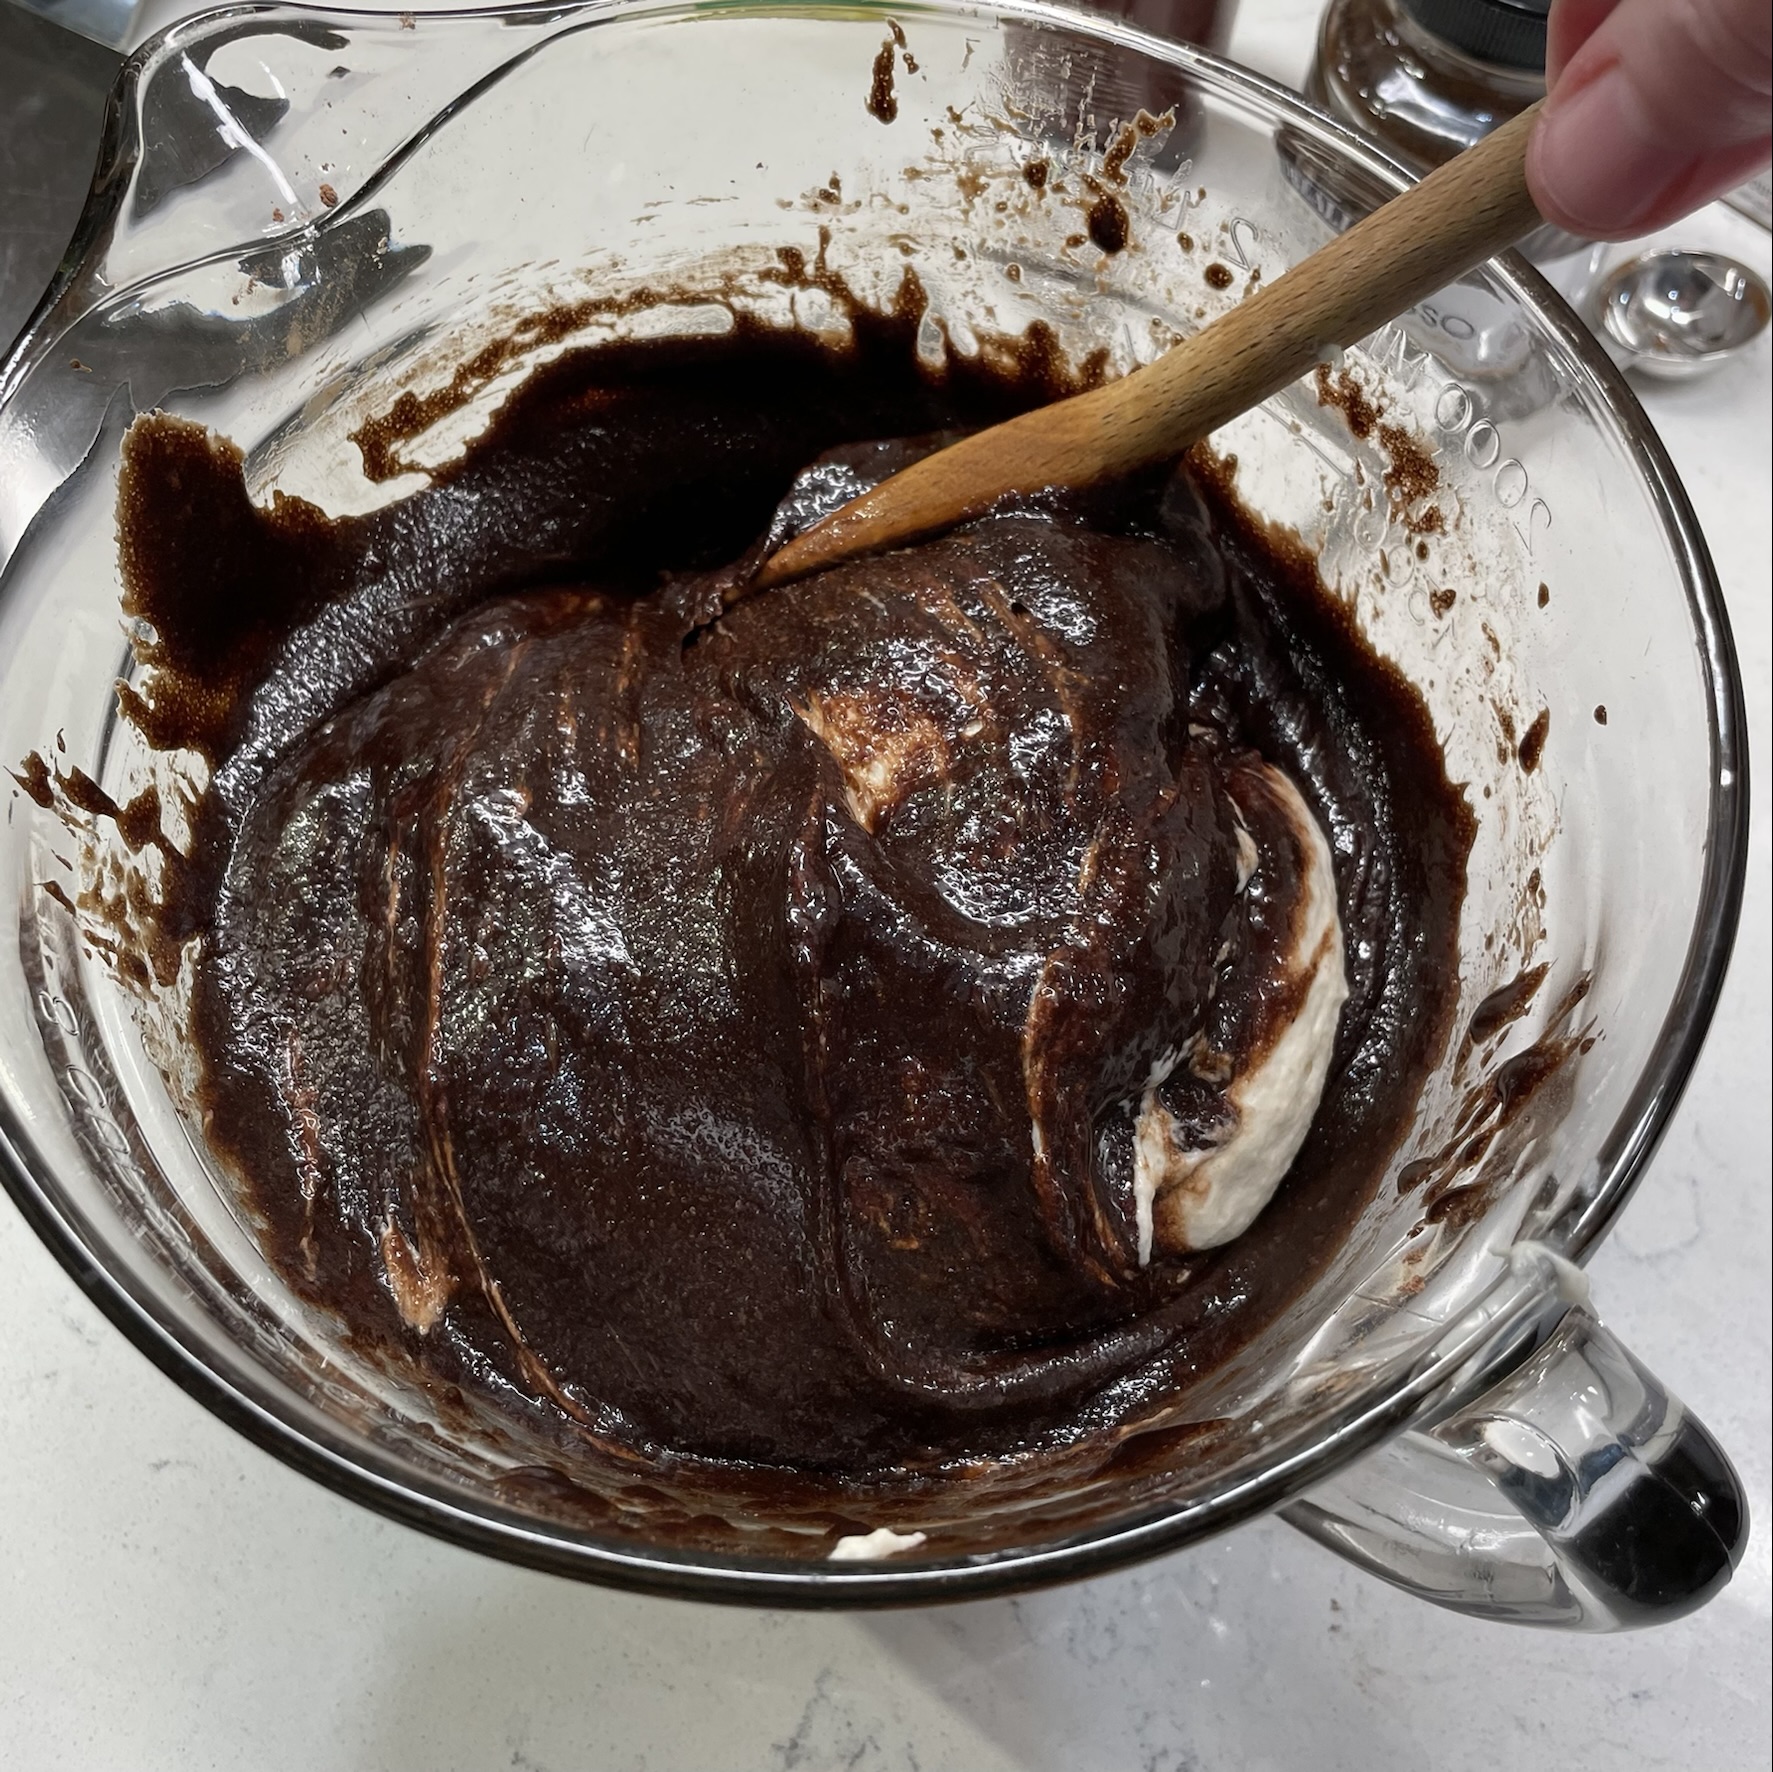
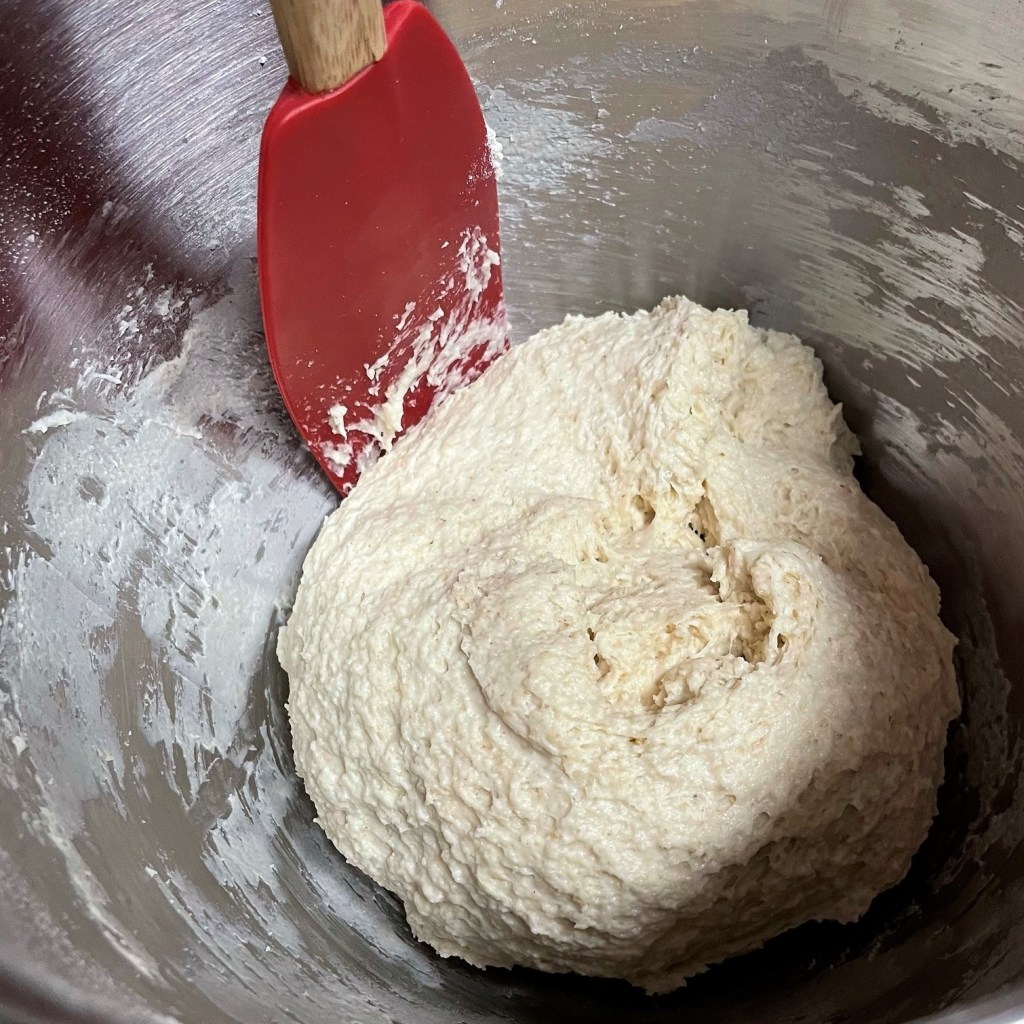
Continue mixing until all the dry ingredients are completely incorporated. Stop the mixer and scrape the dough off the beater blade into the bowl. Cover the bowl and let the dough rest for at least 20 minutes, up to an hour. This is a departure from Maurizio’s recipe; it’s my own trick for making the dough more workable, as the rest time gives the grain time to fully hydrate. Fit the mixer with the dough hook and knead the dough until it’s smooth, soft and shiny. Resist the temptation to add more flour—yes, the dough will seem too soft, but the next step of stretching and folding will increase its strength. Trust the process. Transfer the soft dough to a large, lightly oiled bowl. Cover it and stay nearby for the next step.
The rest time makes the dough easier to knead.
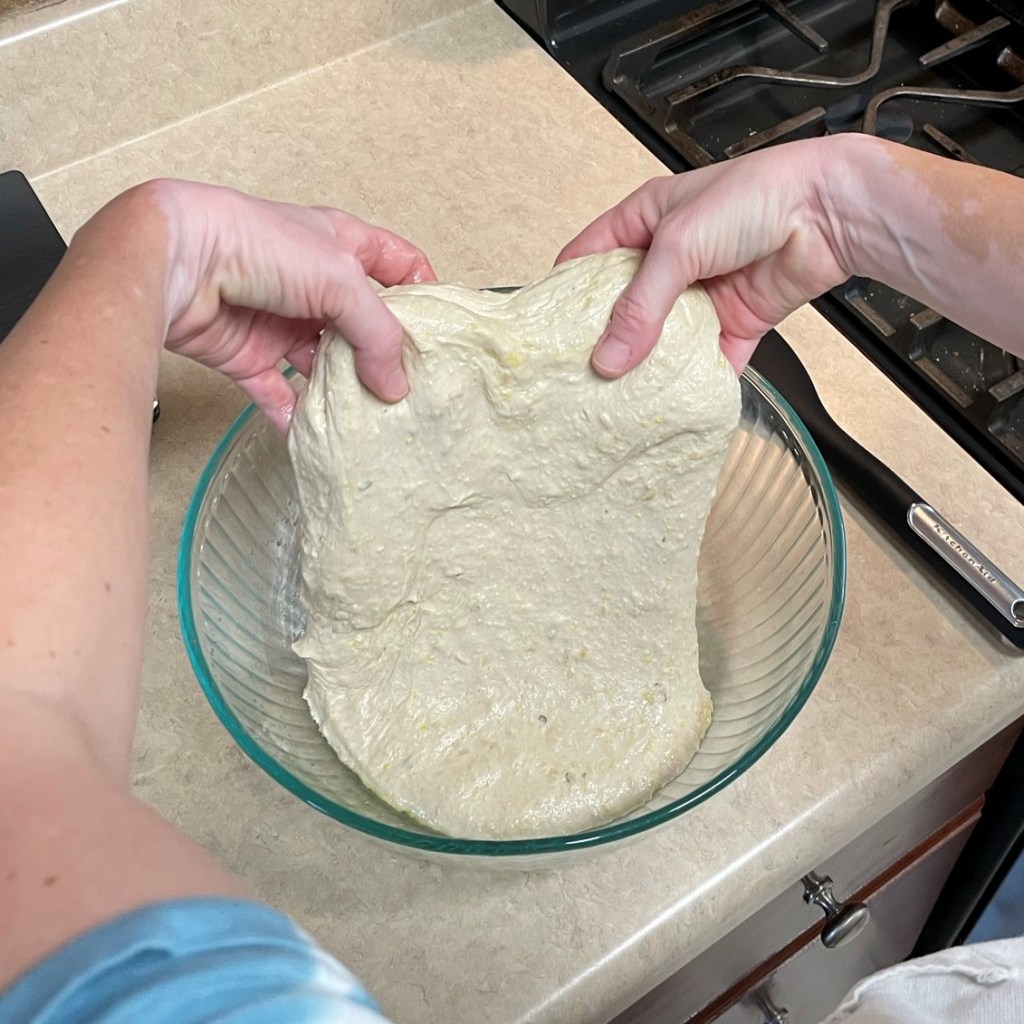
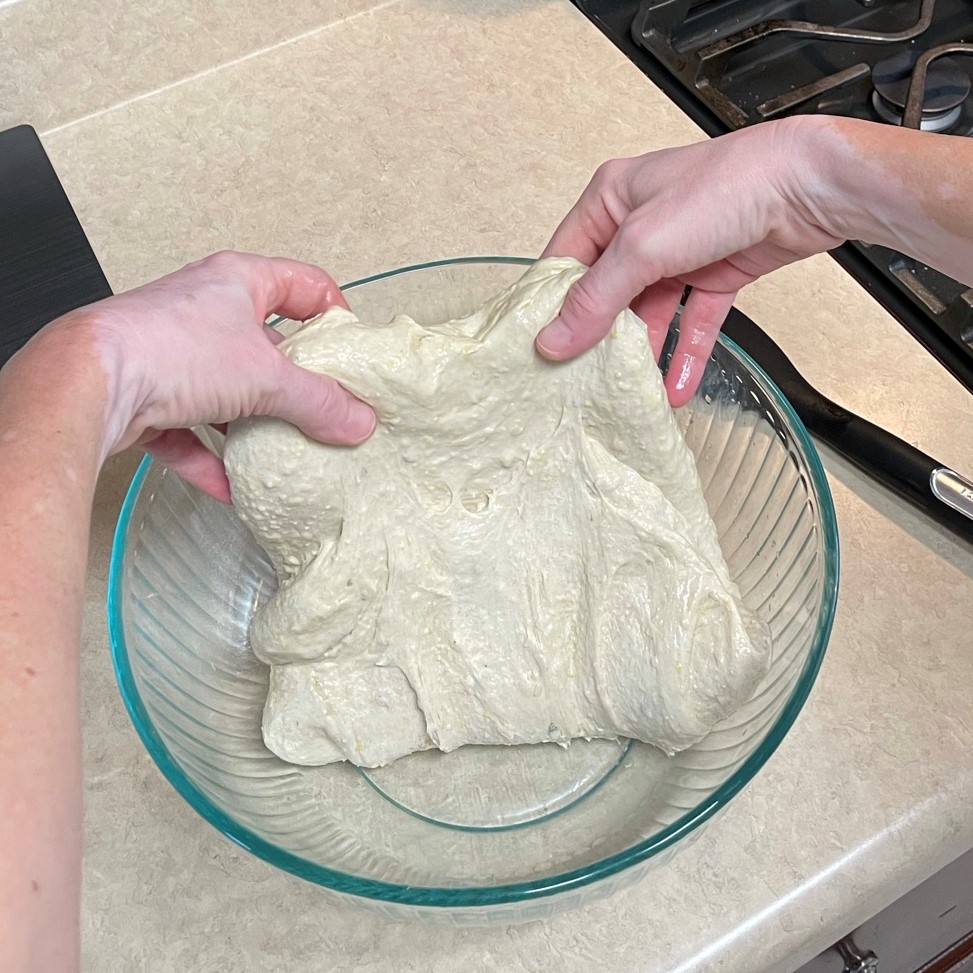
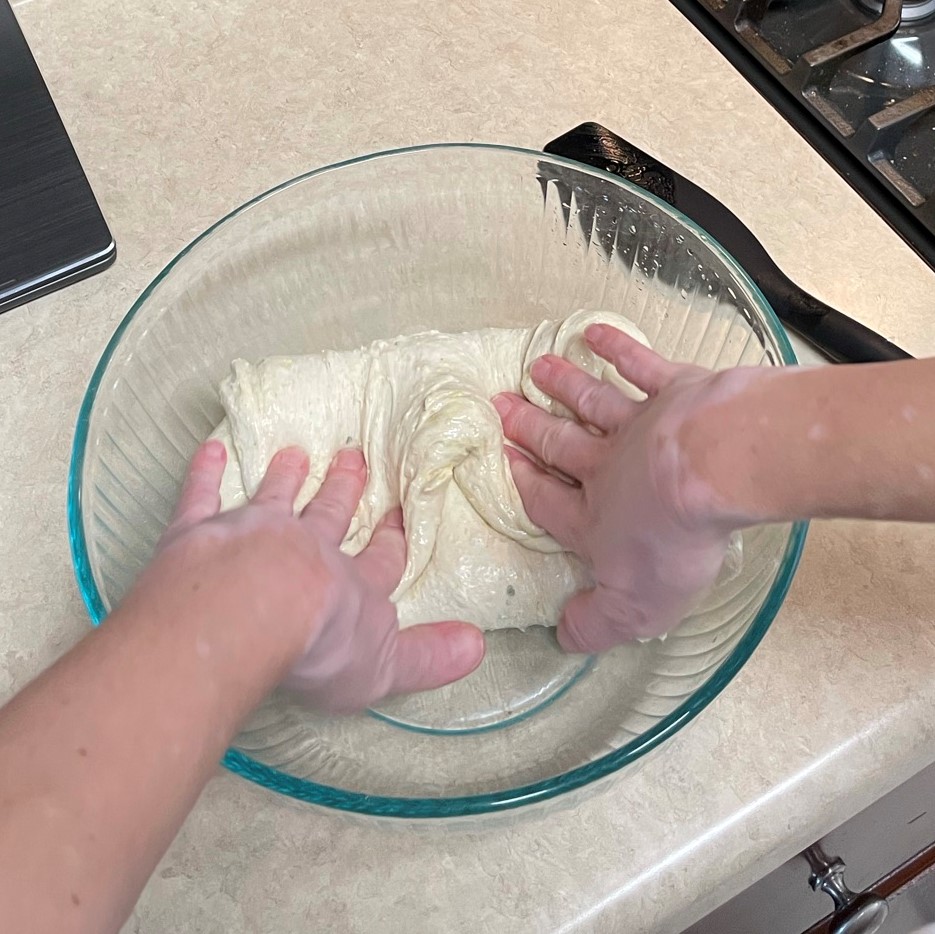
I was working alone in the kitchen on this day, so the stretch and fold pictures I’m sharing below are borrowed from an earlier post for a different bread (notice the ugly old counters?), but the process is exactly the same. Do this at least twice (three is better), about 30 minutes apart during the first part of the ferment time. This may not seem like much, but this step builds a great deal of strength in the dough so it rises big in the oven.
Once you begin the stretch-and-fold, it will make sense.
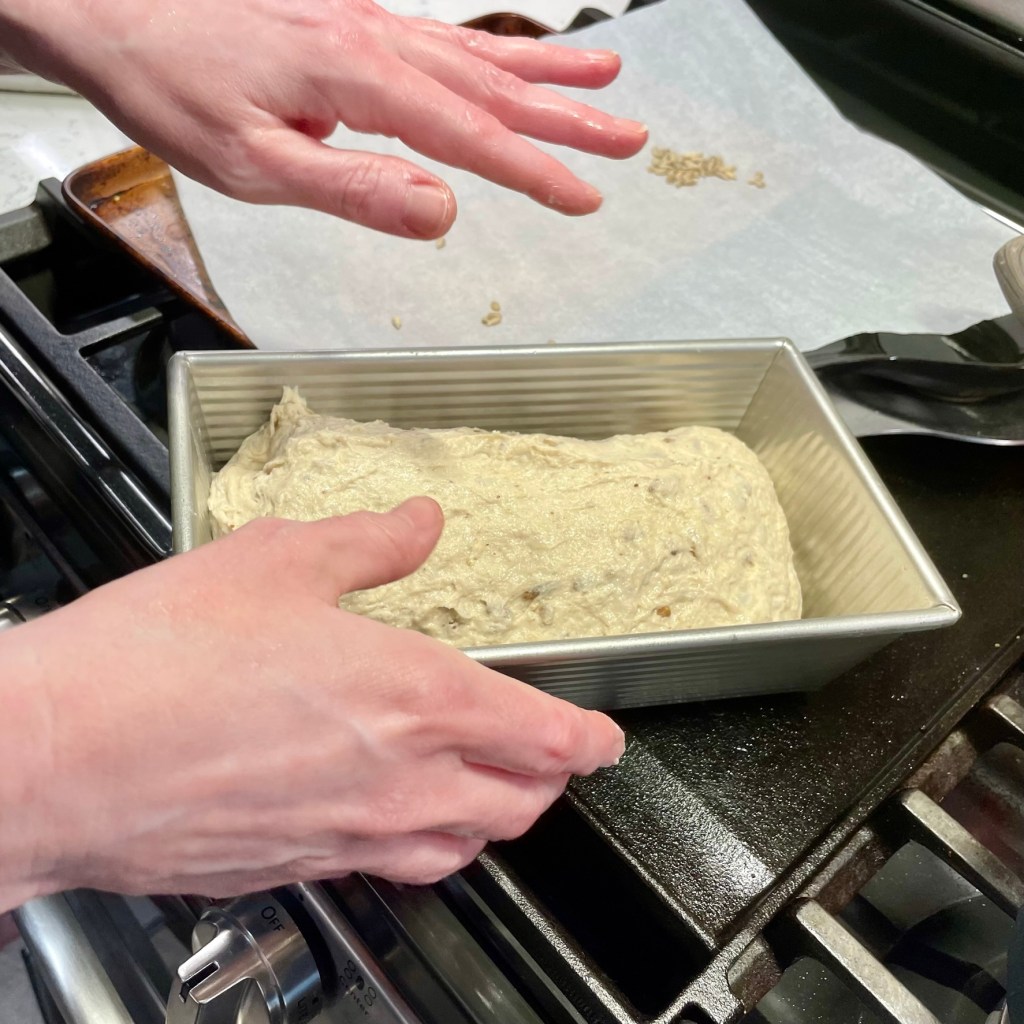
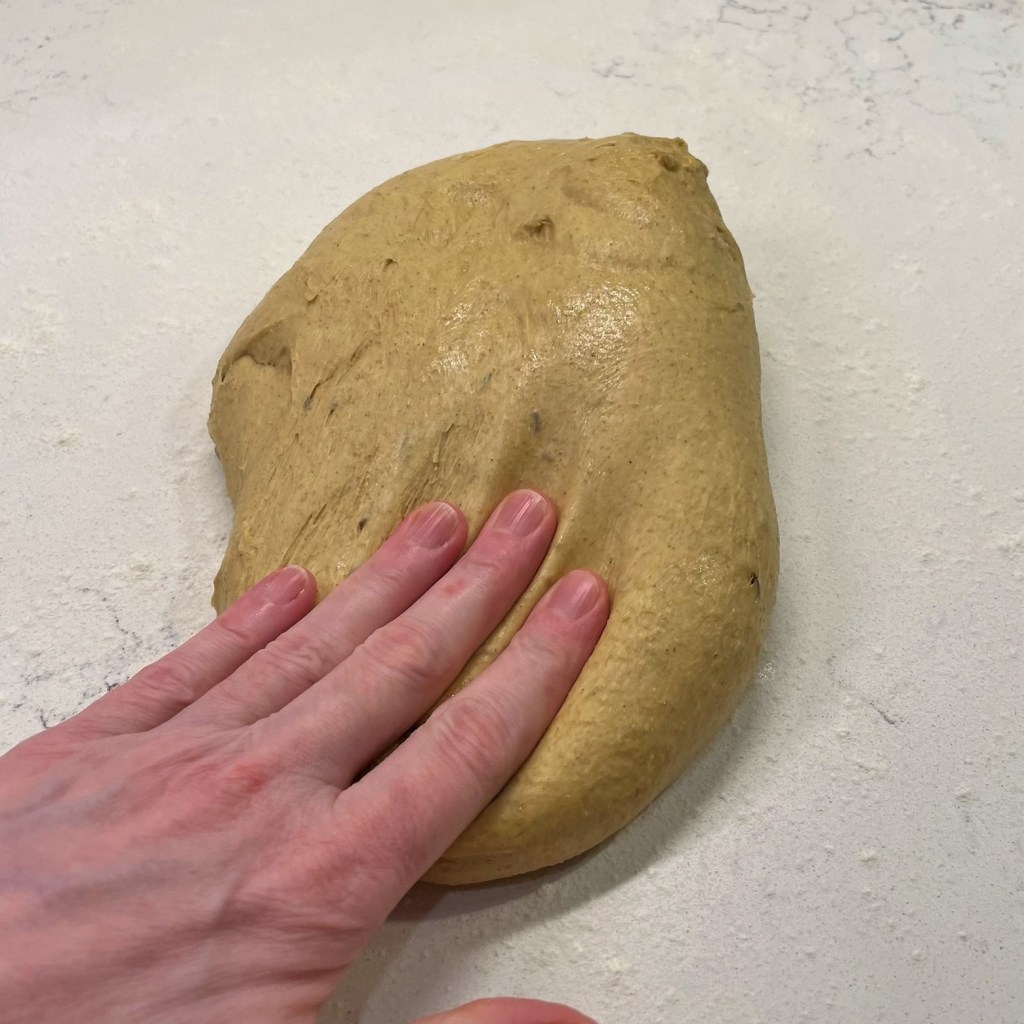
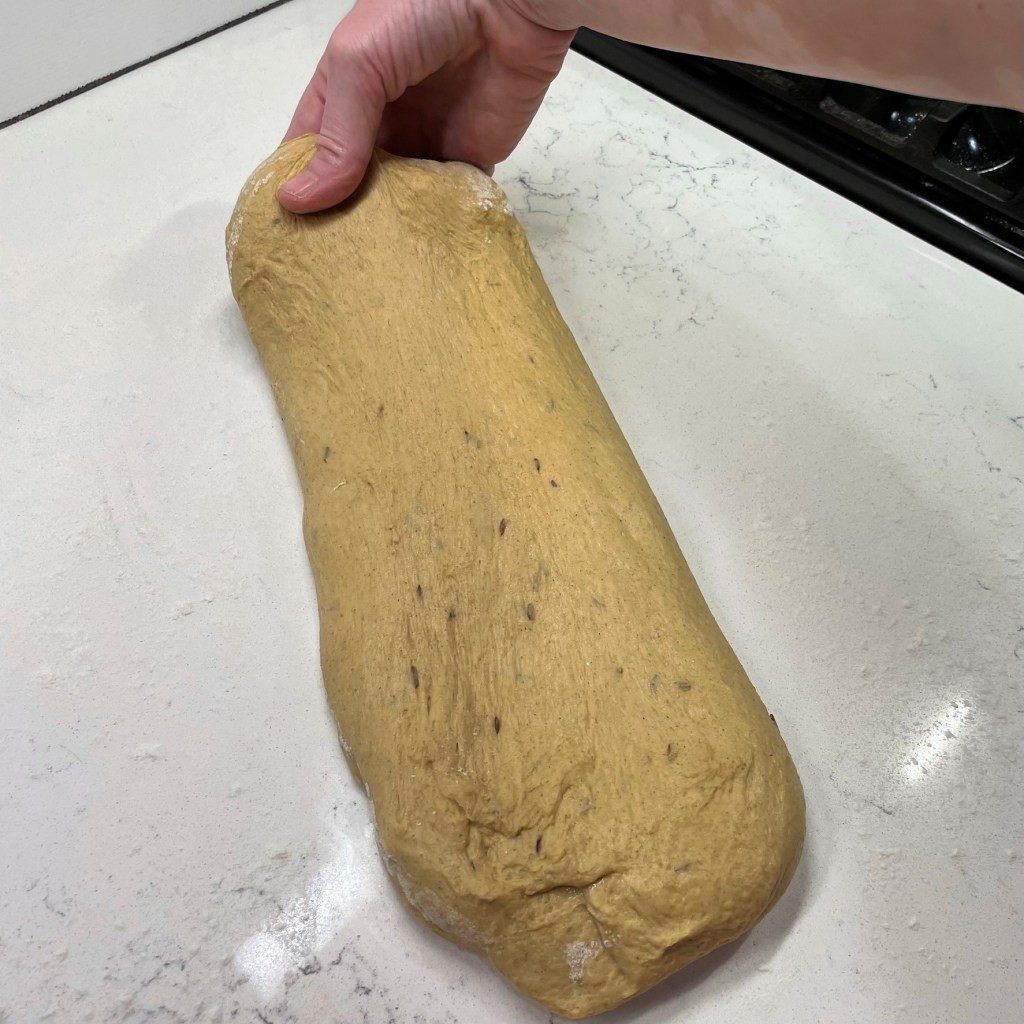
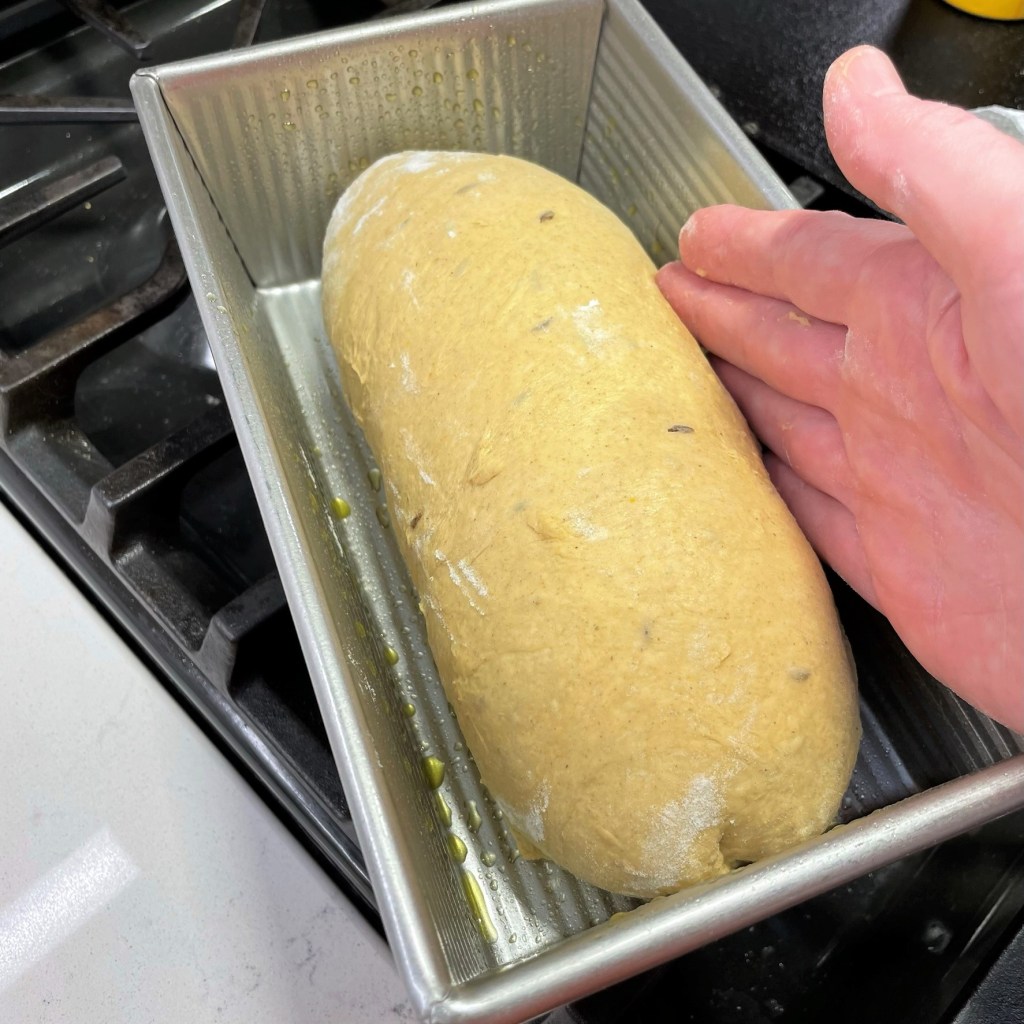
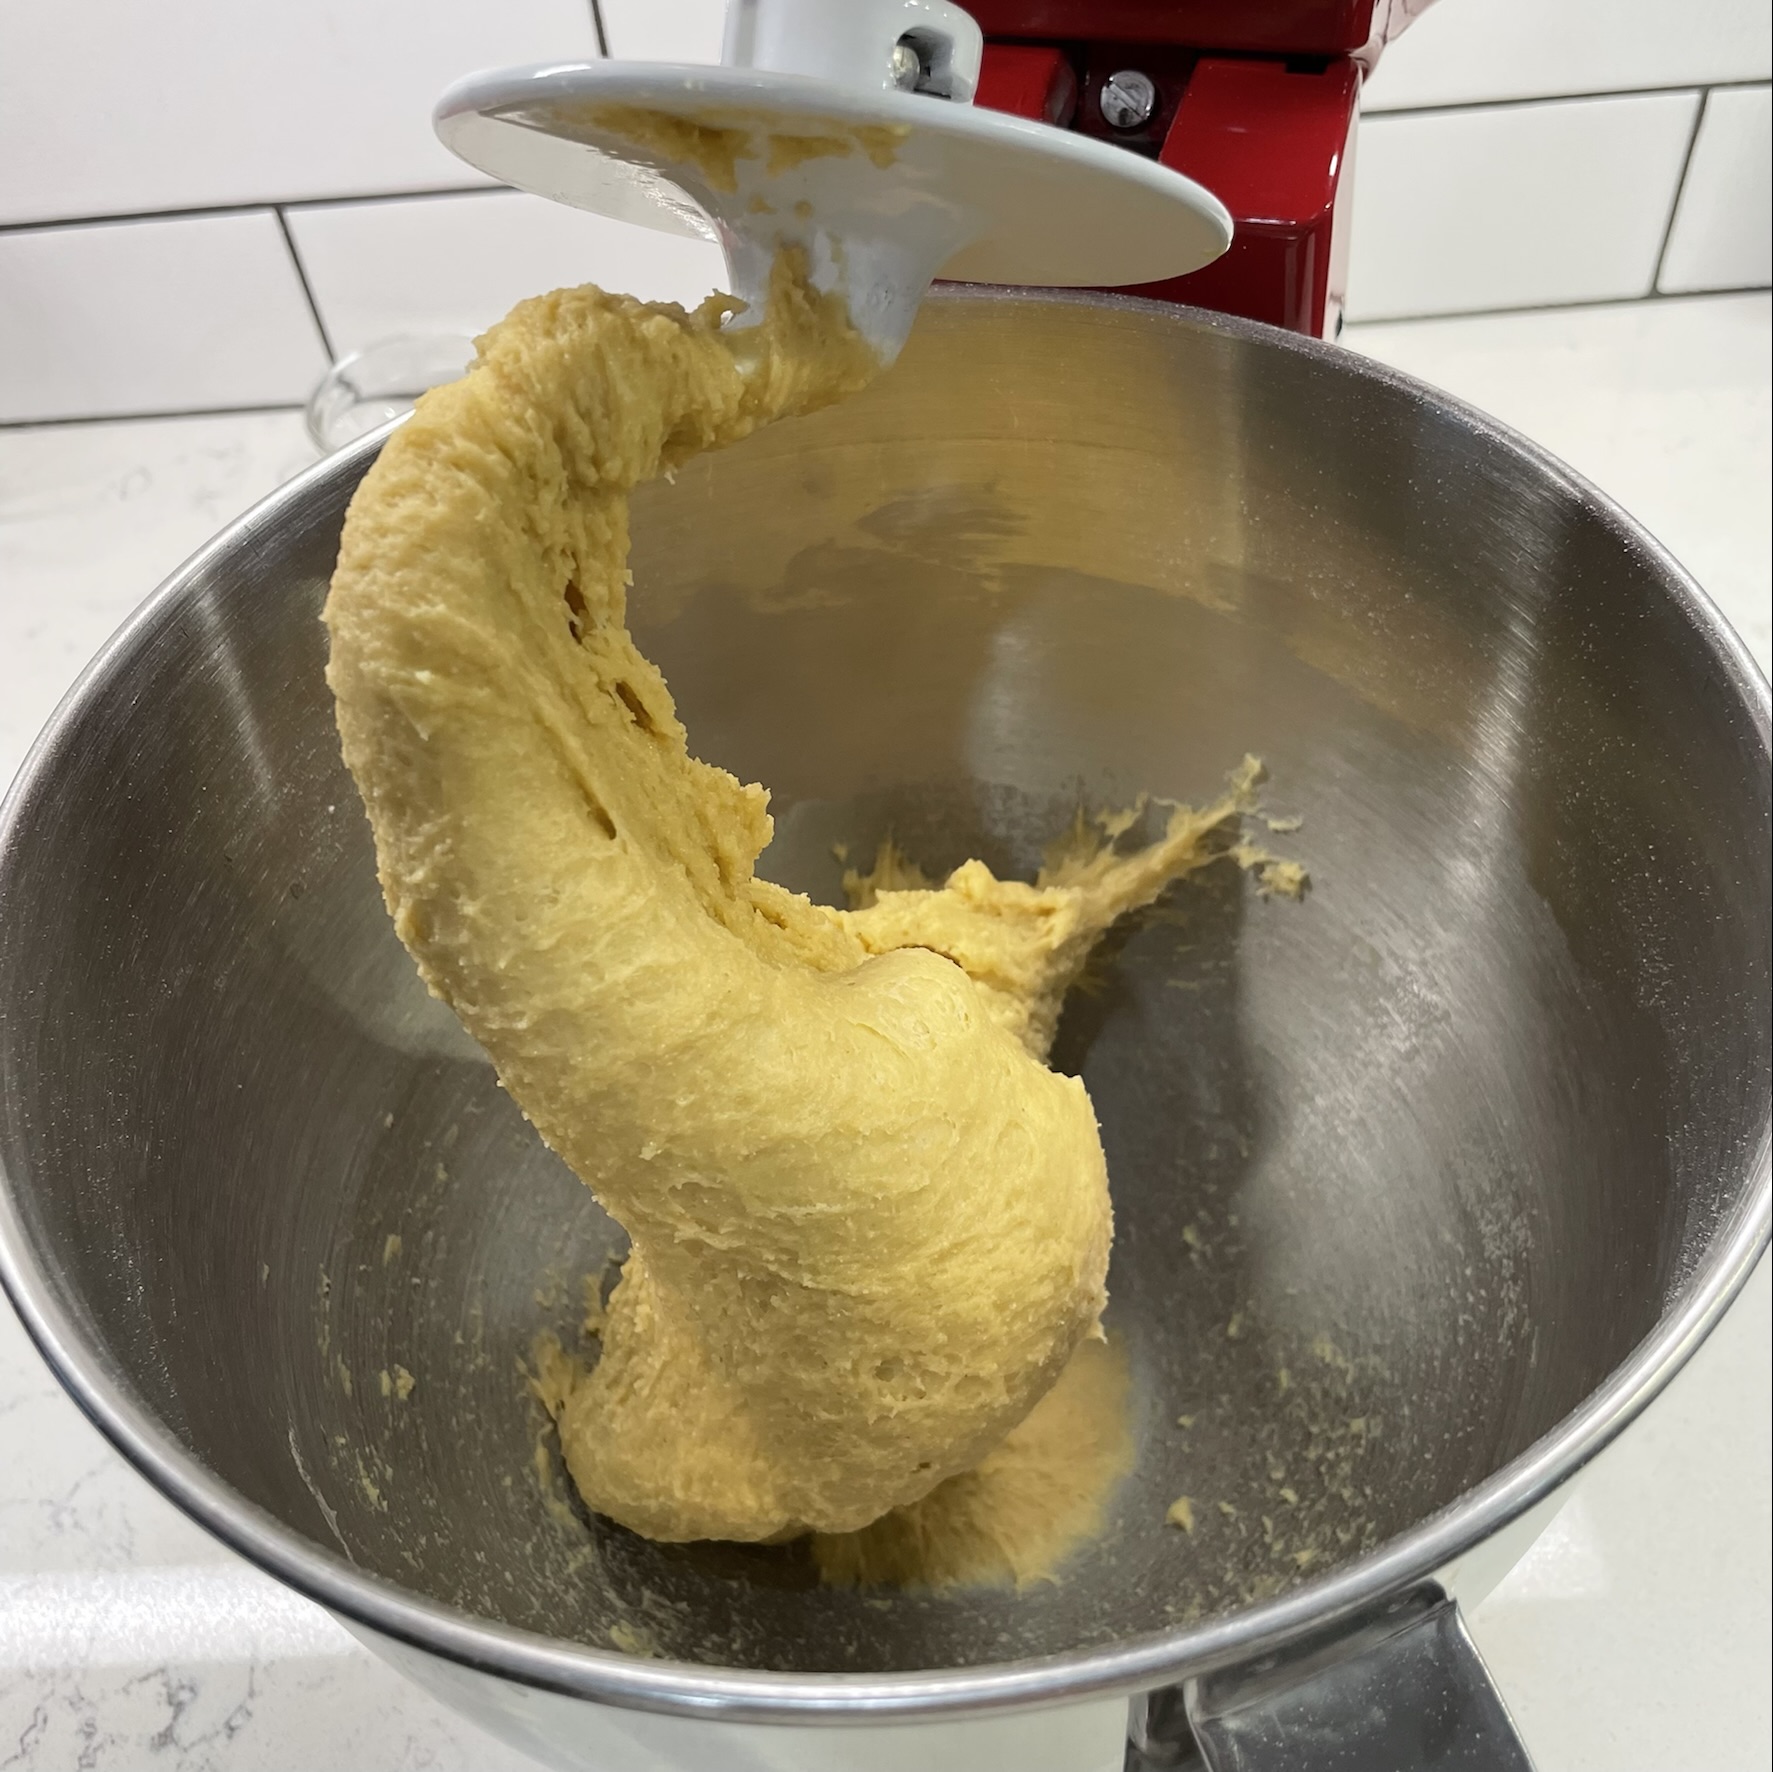
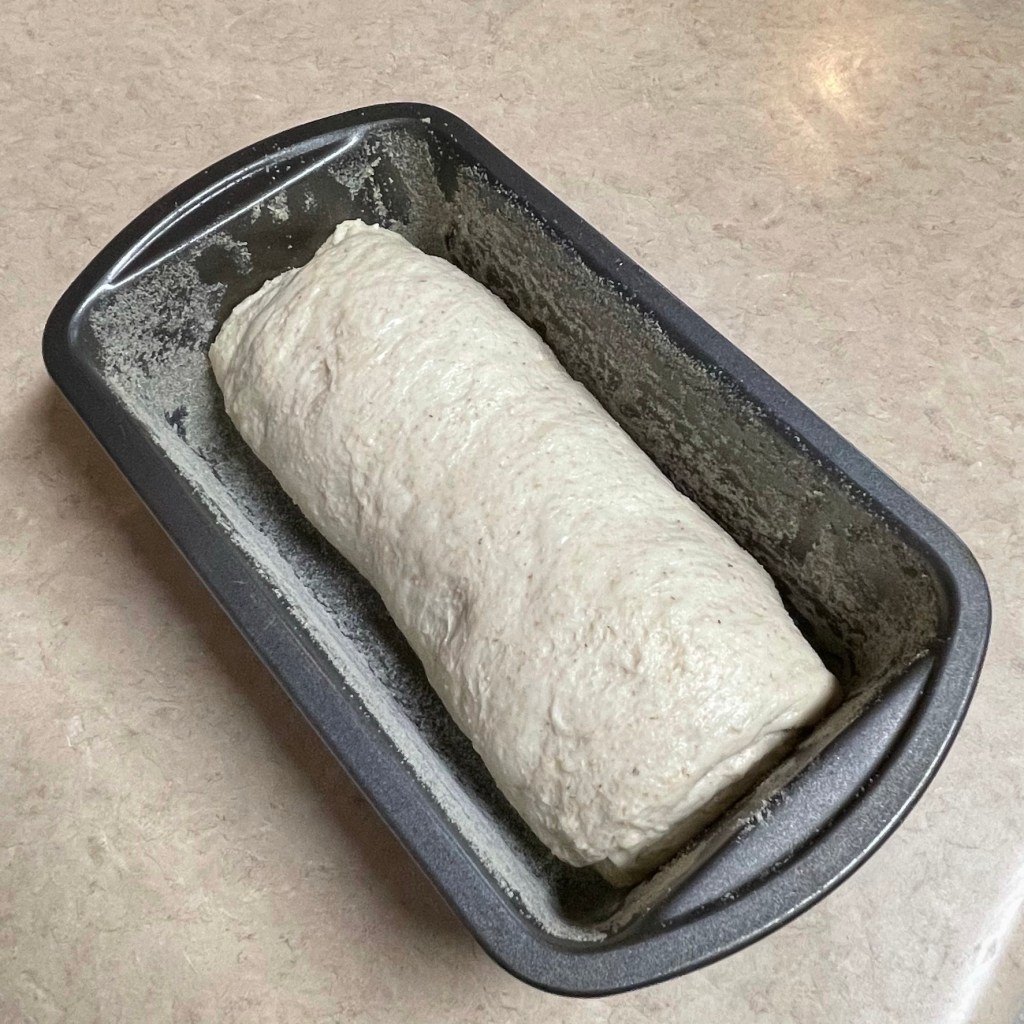
After about three hours, the dough will be puffy and stretchy. Turn it out onto a lightly floured countertop and gently press and stretch it into a long rectangle. Beginning on the short end nearest you, roll it up tightly into a cylinder shape, tucking in the sides as you go. Pinch the ends of the roll closed and seal the long edge. Place the loaf, seam side-down, into a greased (or non-stick) bread pan. Cover with plastic wrap and place the pan in a draft-free zone in your kitchen—tucked into the microwave is a good bet—until the dough rises to one inch above the rim of the pan.
The dough will be very elastic, thanks to the stretch-and-folds.
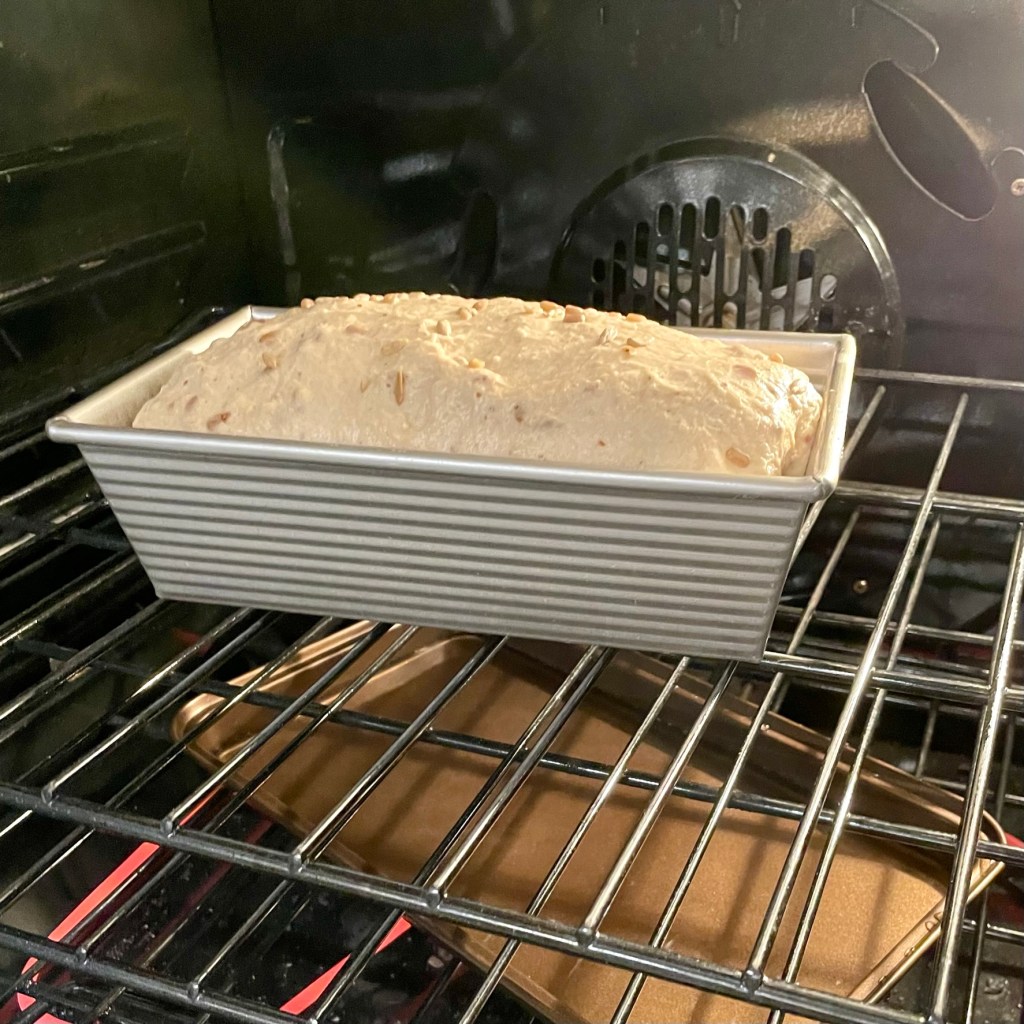
Preheat the oven to 400° F with rack in center position and another rack in the lowest part of the oven, which you’ll use for a steam pan. Fill a second, shallow baking pan with hot water and place the pan on the lowest rack while the oven preheats.
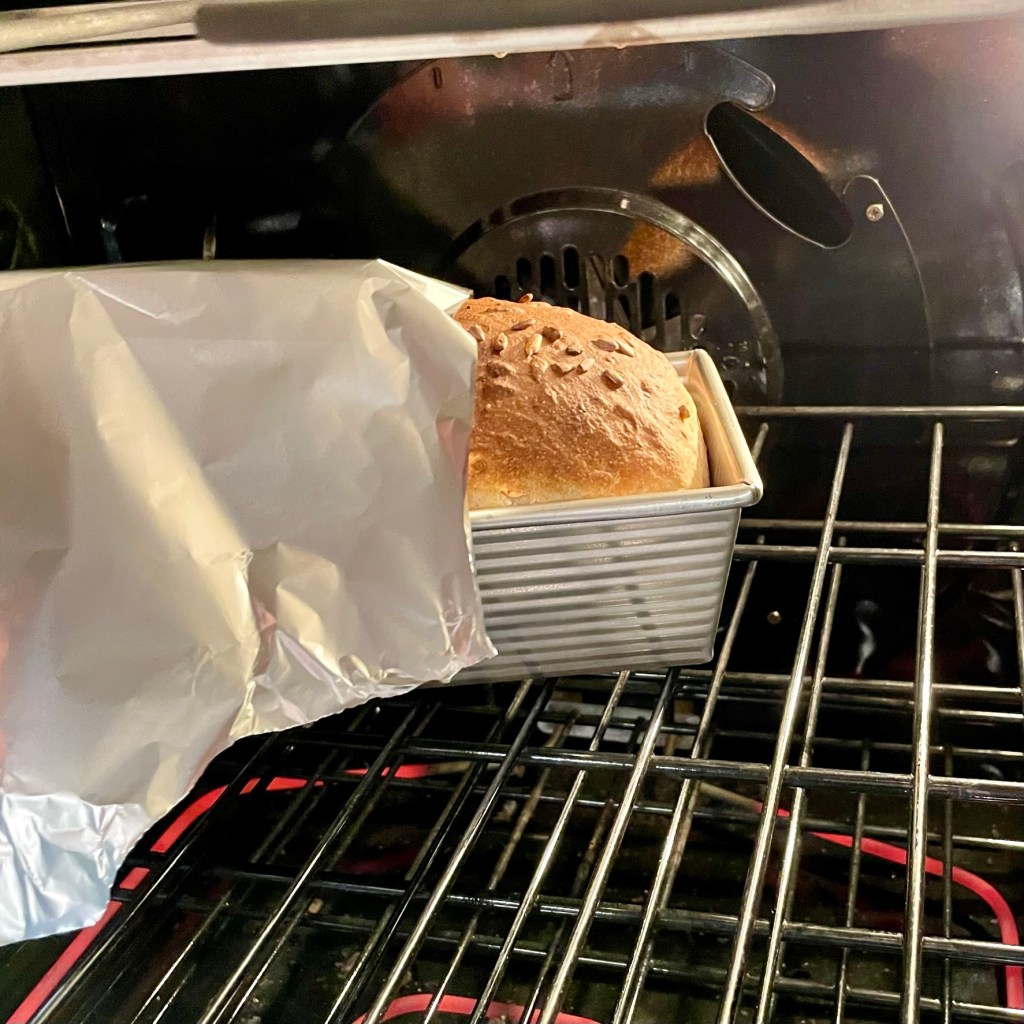
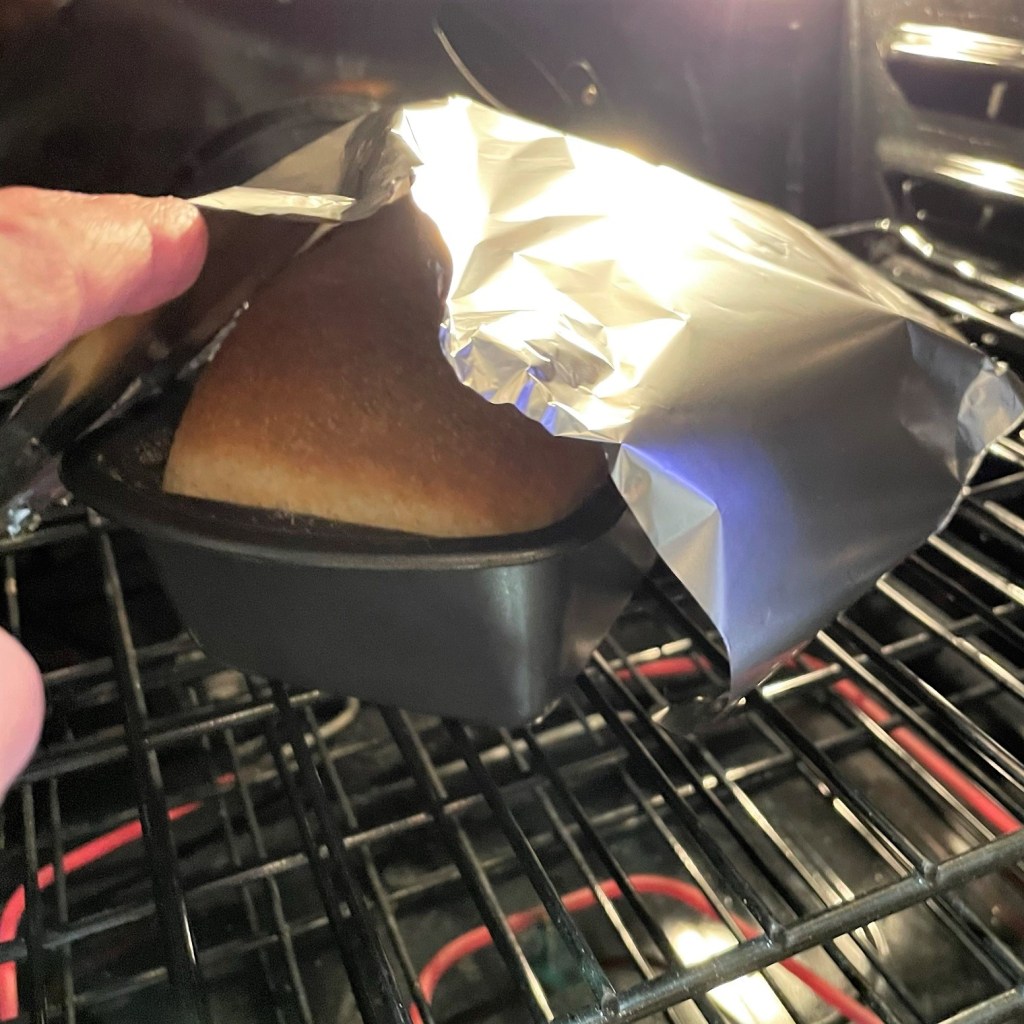
Bake 22 minutes with steam, then remove the steam pan and rotate the bread to bake more evenly. If the loaf is already brown on top, place a loose foil tent over it to prevent burning. Bake 22 minutes more, until bread is golden brown all over and internal temperature is around 205° F.
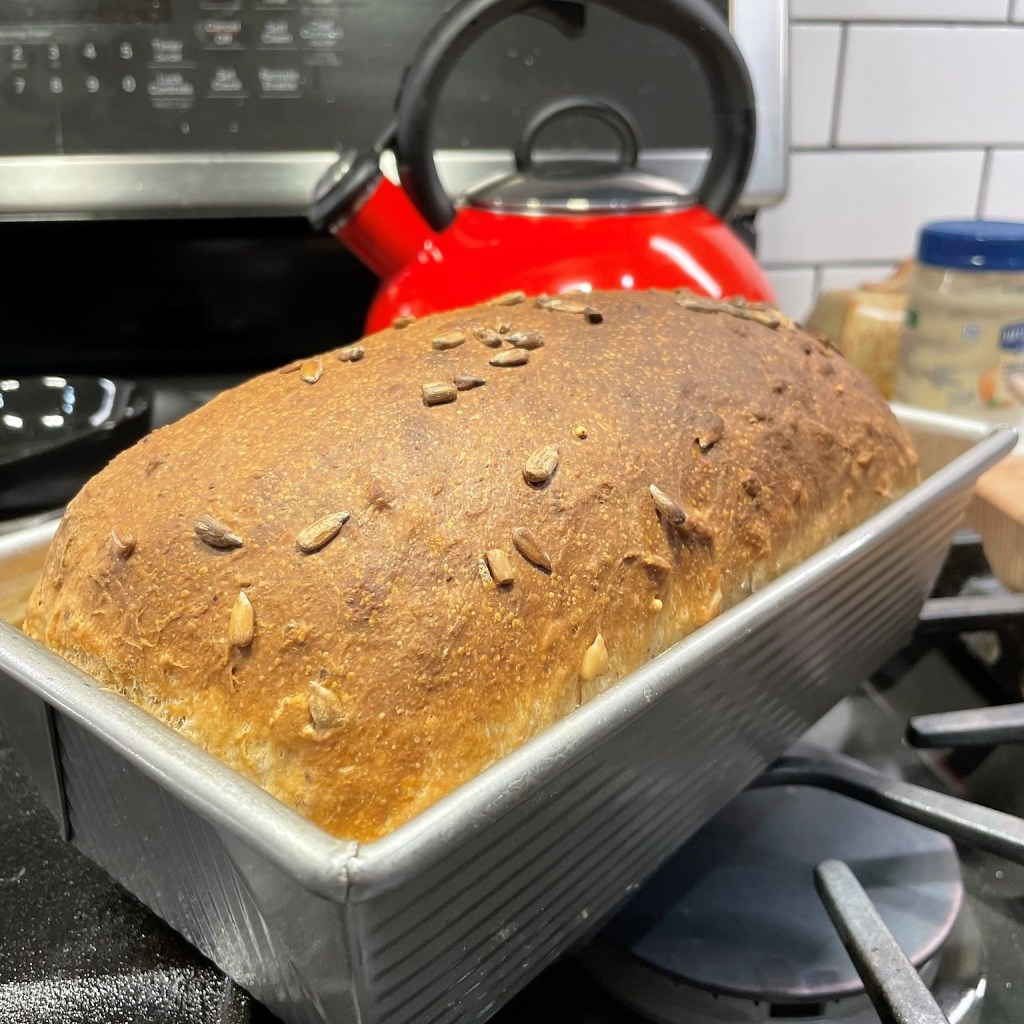
Pumpkin perfection!
Turn the finished bread out onto a cooling rack immediately and cool at least four hours—preferably longer—before cutting into it. That is, if you can stand the wait. 😊
This bread is rich with the rustic flavors of fall, and well worth the wait!
Ingredients
148 g whole milk
37 g whole dark rye flour
106 g sourdough starter, recently refreshed
100 g pureed pumpkin (NOT pie filling)
85 g filtered water, heated 30 seconds in the microwave
18 g unsulphured molasses
30 g extra virgin olive oil
285 g bread flour
60 g white whole wheat flour
28 g whole dark rye flour
2 tsp. caraway seed (optional)
1 1/4 tsp. salt
Directions
Combine milk and first amount of rye flour together in a small saucepan. Whisk them together over medium-low heat until flour is thickened into a paste-like texture. This will take about 10 minutes. Let the mixture cool to room temperature.
In a measuring cup with a pour spout, combine pumpkin, water, molasses and oil. Whisk until smooth. Combine this mixture with the sourdough starter and rye-milk paste, using the beater blade, until the mixture is evenly blended.
Whisk remaining flour ingredients together with salt and caraway seed. Add flour ingredients and continue mixing with beater blade just until the mixture comes together and pulls away from the sides of the bowl. Scrape dough from blade, cover the bowl and let it rest at least 20 minutes, up to one hour.
Attach the dough hook to the mixer and knead on medium-low speed for about 8 minutes, until dough is smooth and shiny. Transfer dough to a large, lightly oiled bowl. Cover and rest for up to three hours. Perform a few stretch-and-folds during the first hour and a half. These folds will help build strength in the dough.
When the dough has puffed considerably, shape it into a loaf and place it in a greased pan, seam side down. Cover and let rise for about two hours, until dough has risen about one inch above the rim of the pan.
During the end of the rising time, preheat oven to 400 F with rack in center position and another rack near the bottom of the oven. Prepare a shallow pan with hot water and place it on the lower shelf during preheating time. This will provide steam for the first half of baking.
Bake 22 minutes with steam, then carefully remove the steam pan. Rotate the bread pan and cover with a loose foil tent to prevent over browning. Continue to bake 22 more minutes, until bread is deep golden brown and internal temperature is in the 200-205 F range.
Turn bread out immediately onto a cooling rack and cool completely before wrapping.
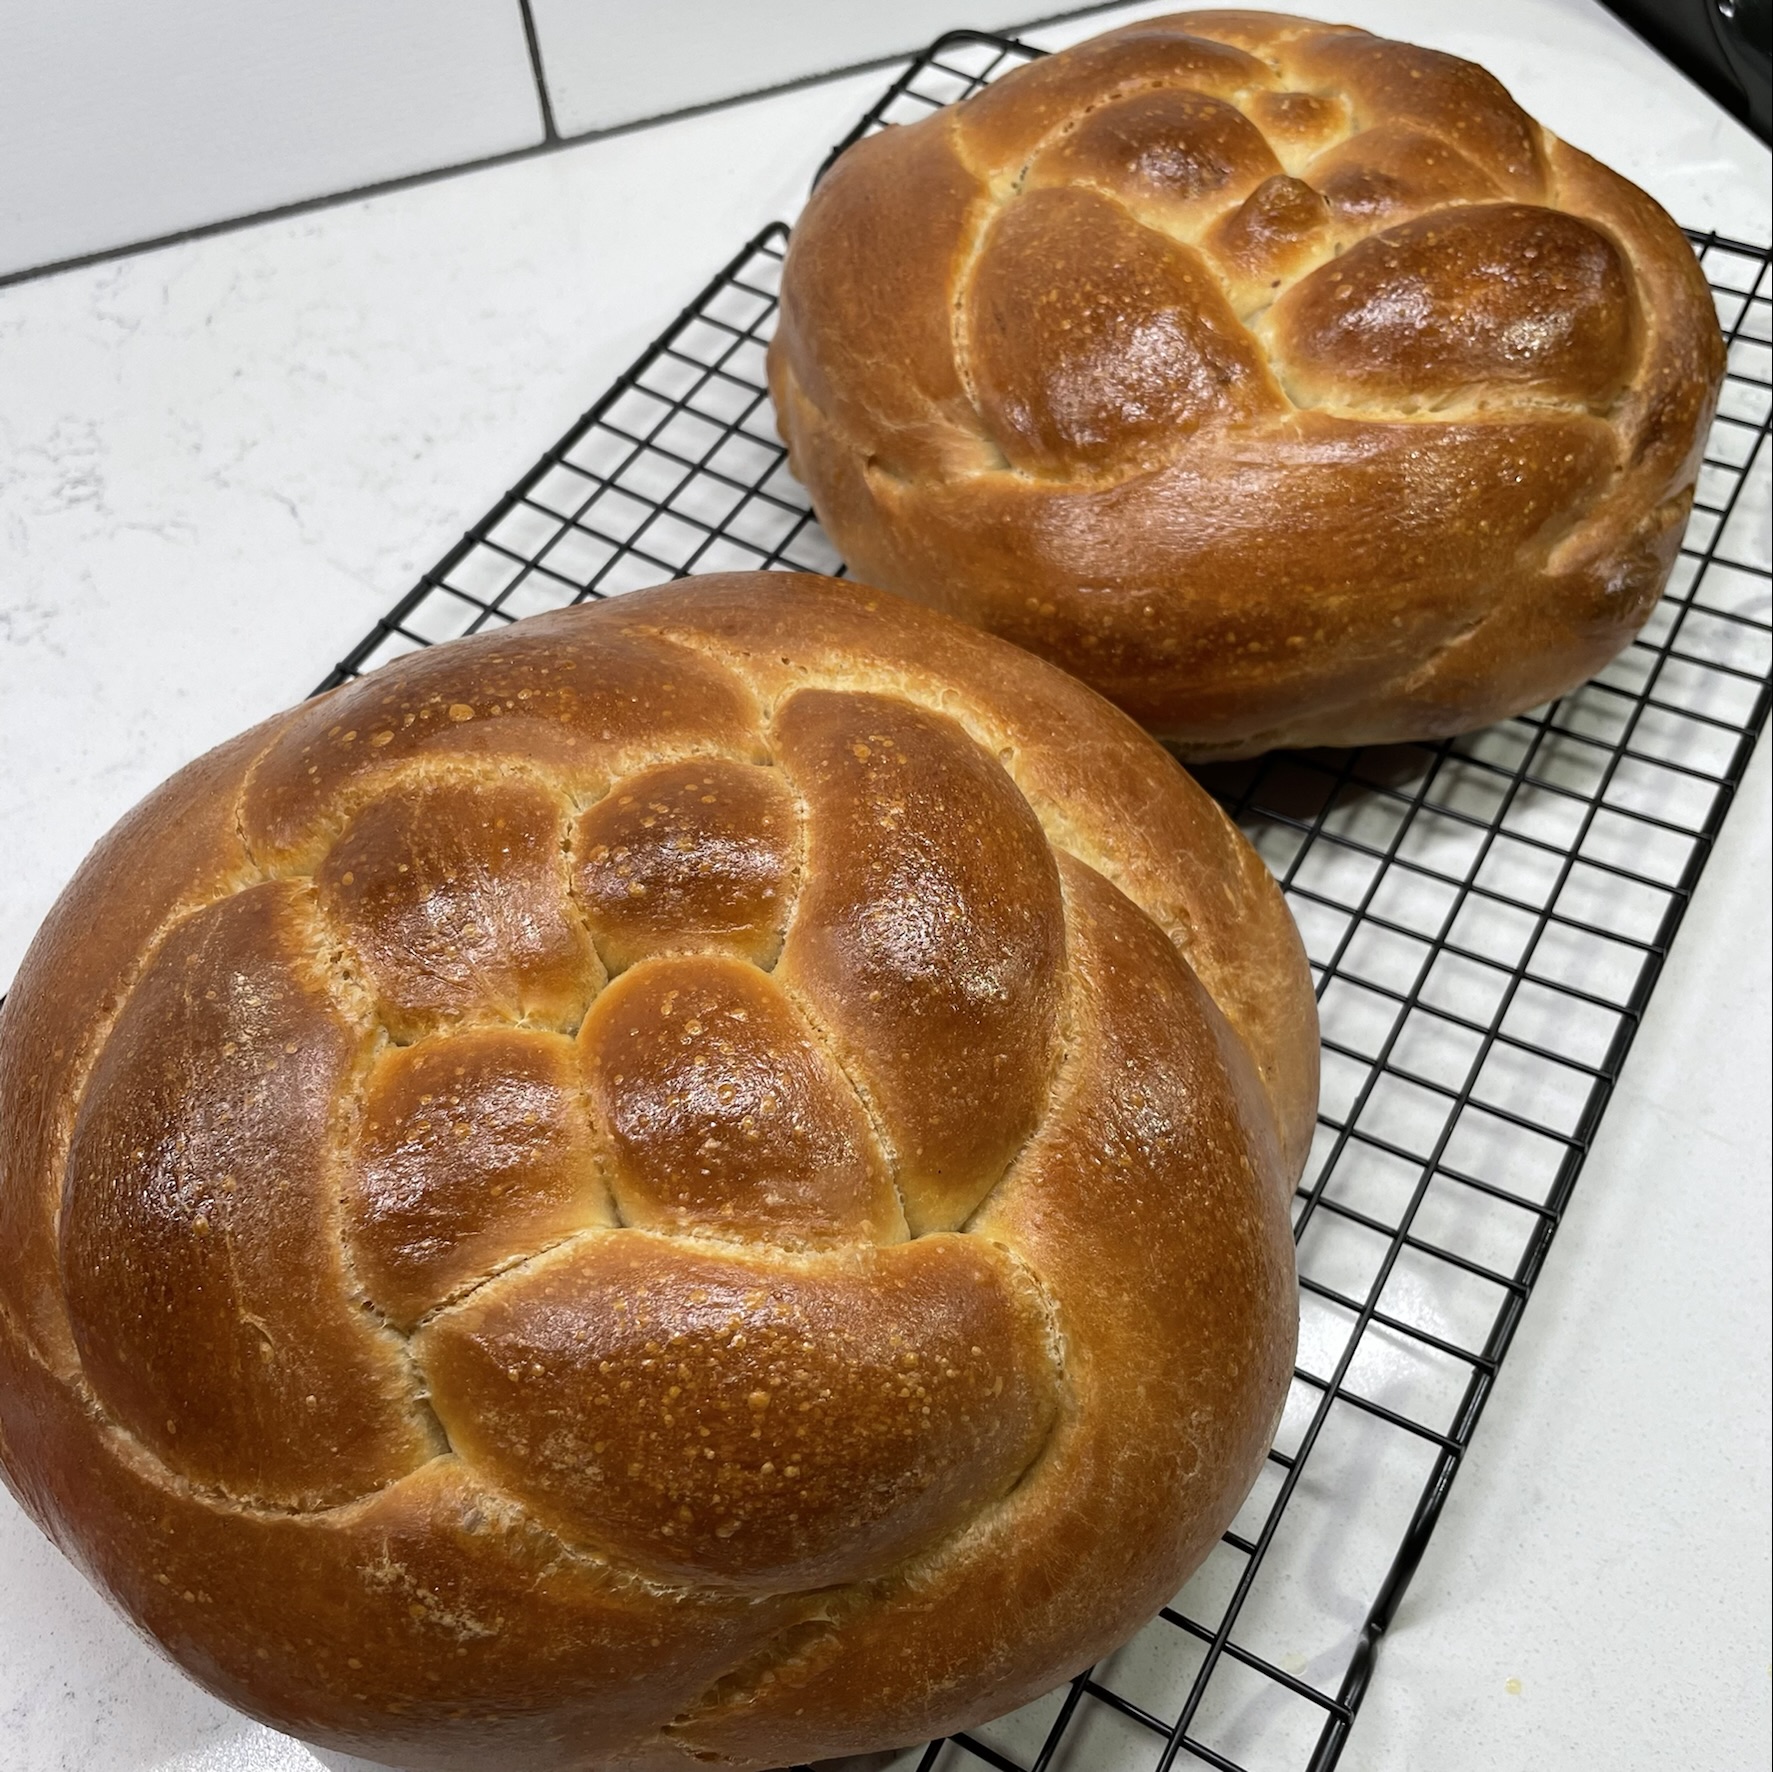
The Jewish High Holy Days are upon us, and that means it’s time for me to share one of my favorite breads. Regardless of your religious background or practices, you have probably heard of, seen or tasted this classic Jewish bread, which is rich with eggs, oil and honey. Challah is a mainstay of Jewish life, and is served weekly at Shabbat services and especially during holidays—or, at least, the ones in which leavened bread is allowed. Rosh Hashanah is a perfect time to enjoy this round version of challah, and there’s no doubt every last crumb will be gone before the fasting of Yom Kippur begins next Tuesday.
The great thing about challah, besides the fact that it is a sweet, soft and tasty bread, is that you don’t have to be Jewish to enjoy it or to make it (I’m proof of both points). From the time I became seriously involved with my husband, Les, I have been very interested in learning the foods of his Jewish heritage, and challah has become a favorite in our rotation. My sourdough version is a bit sturdier than a yeasted loaf, thanks to the higher protein bread flour that ensures a good oven rise. But the texture is still airy and it makes excellent toast, French toast and bread pudding.
There are two main challenges I’ve faced in making sourdough challah, but both can be resolved with time and practice. The first is the challenge of getting this dough to rise; any bread dough with a high volume of sugar (or honey, in this case) struggles against the yeast action, and challah is even more so because it contains so much heavy oil. The best way to win this battle is simply to give it more time. From start to finish, this bread takes almost a full day, but most of that time is spent just waiting—for the pre-ferment to be ready, for the dough to double in size (which it hardly ever does), and for it to rise for baking. Make it on a day that you have lots of other things going on at home so you aren’t tempted to stand and watch it, which I have learned the hard way doesn’t make it happen any faster.
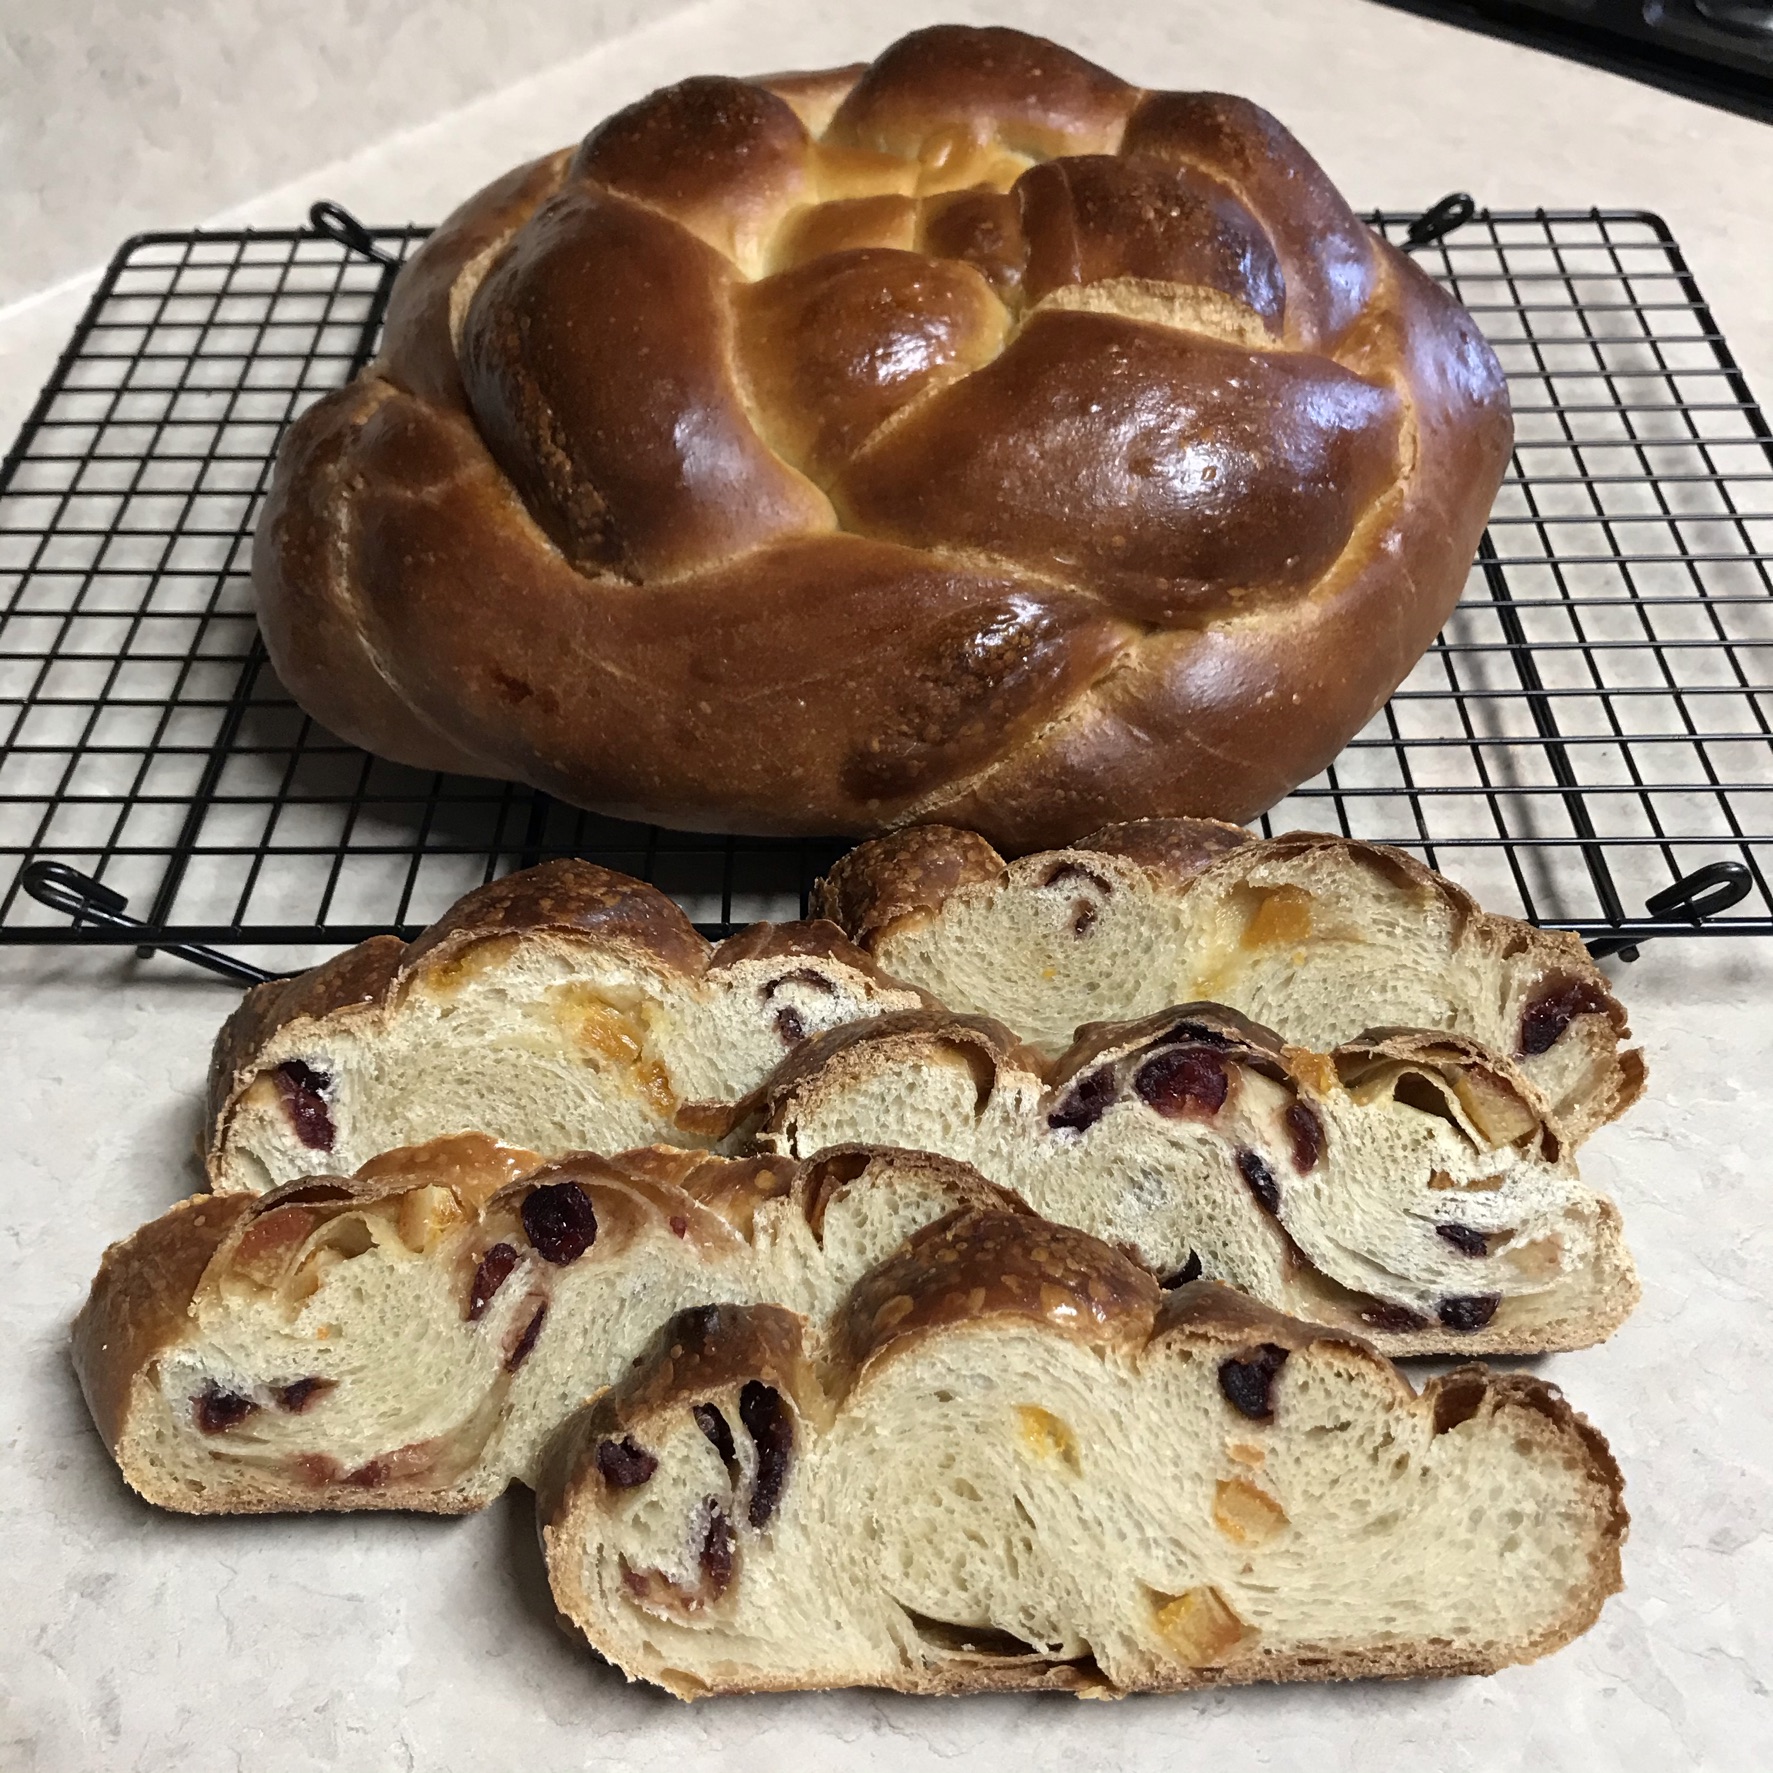
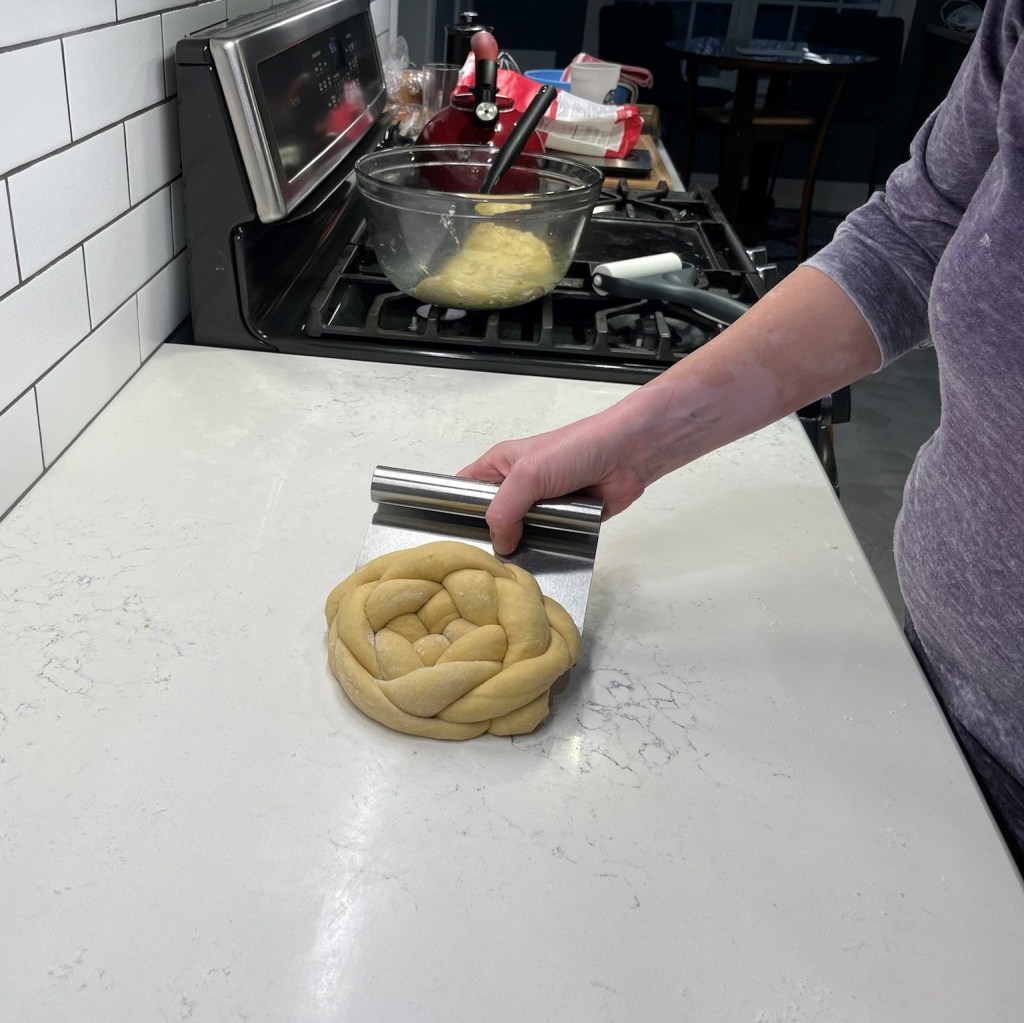
The second challenge with making challah (sourdough or otherwise) is creating the beautiful, braided shapes. This is not nearly as complicated as you might think, and I’ll share my own technique for doing this, whether you want to try making a basket-weave round (as in the featured photo) or a simpler straight braid, which is no more difficult than braiding a kid’s hair. For Rosh Hashanah, I like to make challah in a round, as its shape is a symbol for coming full circle into a new spiritual year.
For extra flair and flavor, I use orange- or lemon-infused olive oil in my dough because I love the aroma of the challah in the oven and the intoxicating citrus scent in the finished loaf. Extra virgin olive oil does impart a slightly stronger flavor to the challah, but I find it delicious. Also, I frequently add dried fruit to the dough as it is rolled up for braiding, but the photos I’ll share are mainly without it. If you do choose to add dried fruit, such as raisins or cranberries, don’t concern yourself with rehydrating it first; it bakes up beautifully straight from the package, and for your effort, you’ll be rewarded with beautifully studded slices. Did I mention that it is amazing in French toast? 🙂
This is an old photo of a loaf I made before our kitchen remodel last year. The braids are stuffed with dried cranberries and oranges.
This bread requires a ripe sourdough starter, an intermediate overnight feeding, about 3 hours to ferment on baking day, and up to 5 hours for final rise after shaping, so plan accordingly. Don’t let this lengthy process alarm you; if you make the starter the night before, you only need about an hour of hands-on time for making the dough and about half an hour to shape it for proofing. As I said, there’s a lot of waiting. All my measurements are metric, so please depend on a digital scale for getting your ingredients right.
You’ll begin the night before you plan to bake, with creation of a firm starter, which is essentially an in-between feeding that bridges the basic wet starter and the final dough. This type of starter, also called “levain,” uses less water than a wet starter, and it concentrates the rising power of the culture in your final dough. Begin with a slight amount of ripe wet starter, stirring in water to make a slurry and then flour and mixing it together until no dry flour remains. The firm starter must ferment several hours, so it’s easiest to do this the night before and leave the bowl covered at room temperature, then bake the next day. If you wish, you can make the firm starter farther ahead and then refrigerate it for up to one day.
The next morning, measure out your flour and get all the other ingredients lined up, including your firm starter, which should be cut into pieces for easy introduction to the final dough. Most of the moisture in this dough comes from oil and eggs, so there is very little water to measure for the final dough. In this picture, my honey is stirred together with the small amount of water, but I usually measure the oil first and then measure the honey in the same cup—it slides right out without sticking. You’ll have an easier time mixing the eggs into the dough if they are closer to room temperature, so give them a few extra minutes on the counter before you begin.
Challah ingredients, clockwise from the top: honey and water, salt (I like to use mineral-rich pink salt), whole large eggs, flour (I use a blend of high-protein bread flour and white whole wheat) and olive oil (mine is blood orange-infused extra virgin).
In the bowl of a stand mixer (or in a really large mixing bowl, if you don’t mind mixing by hand), combine the eggs, oil, honey and water and whisk until even. Add the flour all at once. Mix until all flour is completely incorporated, about two minutes in a mixer. Sprinkle the salt over the dough, cover the bowl and let it rest for about 30 minutes. This gives the flour time to absorb the moisture, and kneading is easier at that point.
Mixing the honey with the water makes it easier to pour. Add it to the eggs in the bowl of a stand mixer.
This is a rare occasion when the oil is added to the dough early on. Mix these wet ingredients until completely blended.
Next, add the flour all at once.
I use the dough hook for this initial mixing. It replicates the action of mixing by hand better than using the paddle, and produces less splash.
Blend just until the dough comes together on the hook, with no flour remaining on the sides of the bowl. Swipe it off the hook to rest in the bowl for about 30 minutes.
Sprinkle the salt over the dough, which will be very dense at this point. As the dough rests, the flour will absorb moisture and the salt will begin to dissolve.
Turn the firm starter out onto a floured counter and cut it into pieces about the size of walnuts. Cover with a towel and set aside while the dough rests.
After the rest time, the salt will have begun to dissolve. Knead on medium speed to fully incorporate the salt, which should take 3 to 4 minutes. Transfer the dough to the counter or kneading board and press several pieces of the firm starter all over it. Fold the dough into thirds (like a letter) and press in the remaining pieces of firm starter. Move the dough back into the mixing bowl and knead on medium speed for 6 minutes, long enough to evenly blend the firm starter into the dough and also to get the gluten development going. Transfer the dough to a large bowl, cover and let rest at room temperature for at least 3 hours to ferment.
When the dough has fermented (you’ll know because it won’t spring back from a good finger poke), turn it out onto the counter and divide it into halves. This recipe makes two loaves; return one half of the dough to the bowl while you shape the first. Depending on how adventurous you want to be with braiding, divide the first dough section into either 3 or 4 equal-sized pieces. A 3-strand challah is made the easy way, as you would braid a child’s hair. To make the basket-weave round challah, you need 4 pieces.
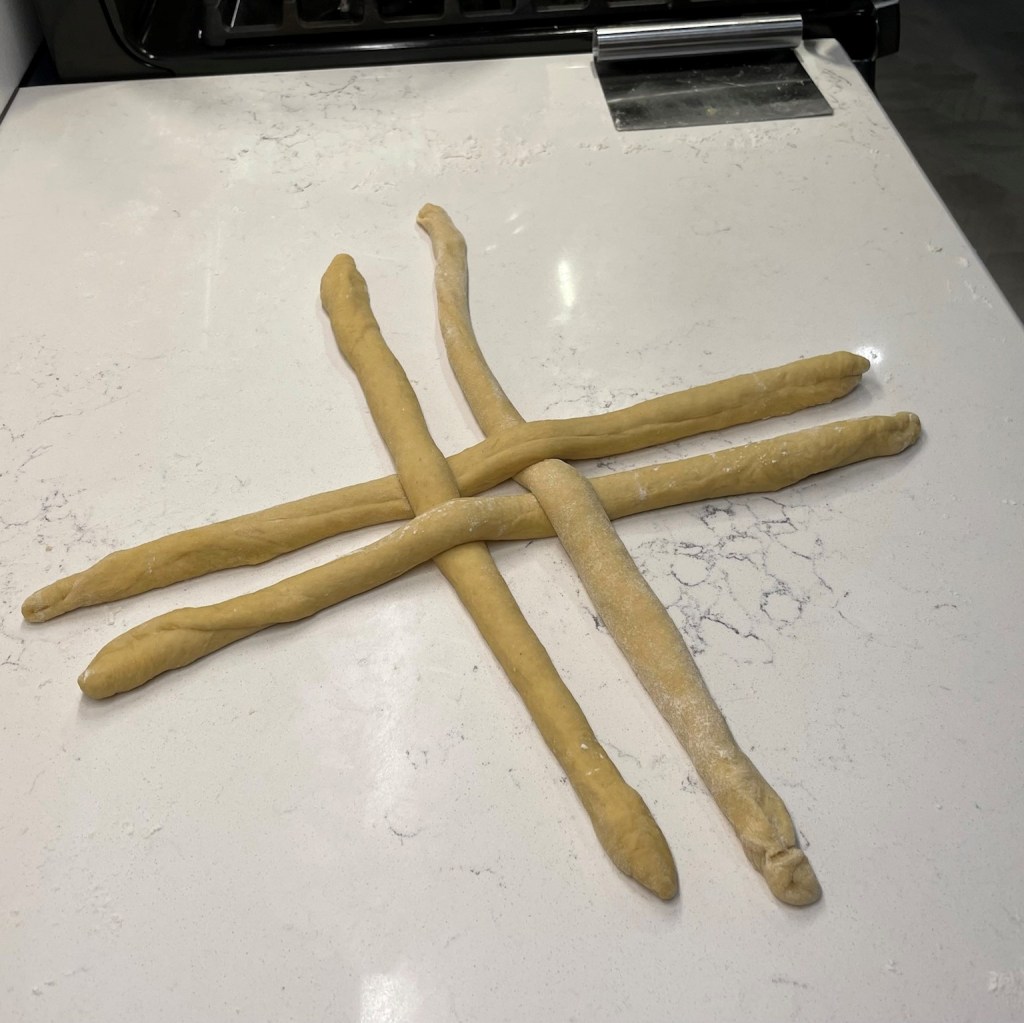
Stretch each section of dough out into an imperfect rectangle shape, and then use a rolling pin to roll it into a long, oval shape. The dough will be very thin on the counter, and that’s good. Use spray oil to keep it from sticking, or dust the counter with a very light amount of flour. Roll up the oval into a long rope shape, keeping it tight as you roll and pinching the seam to secure it. Roll it out firmly to stretch the rope into an 18″ length, with the ends somewhat tapered from the fuller, center part of the rope. Repeat with the other three pieces and arrange them in a tic-tac-toe shape, with the centers fairly close together (but not tight) and long strands extended in all four directions. Notice the over-under pattern, as this is the important starting position for braiding a round.
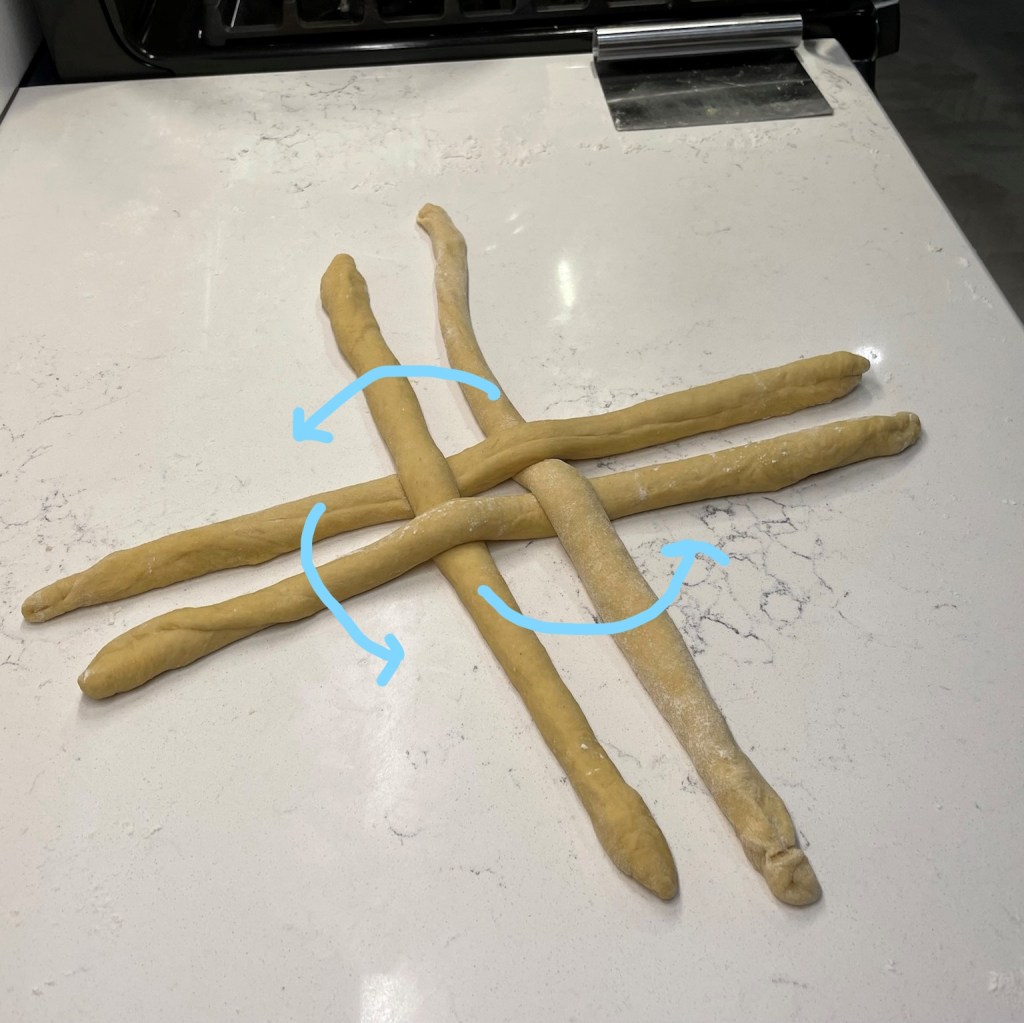
One important thing to note is that you do not want the dough strands to be too tightly crossed, either at the start or after braiding. You should be able to wiggle a finger between strands after braiding, and this is important because the dough needs room to expand during proofing; otherwise, it will expand into one large blob and you’ll lose the beautiful pattern.
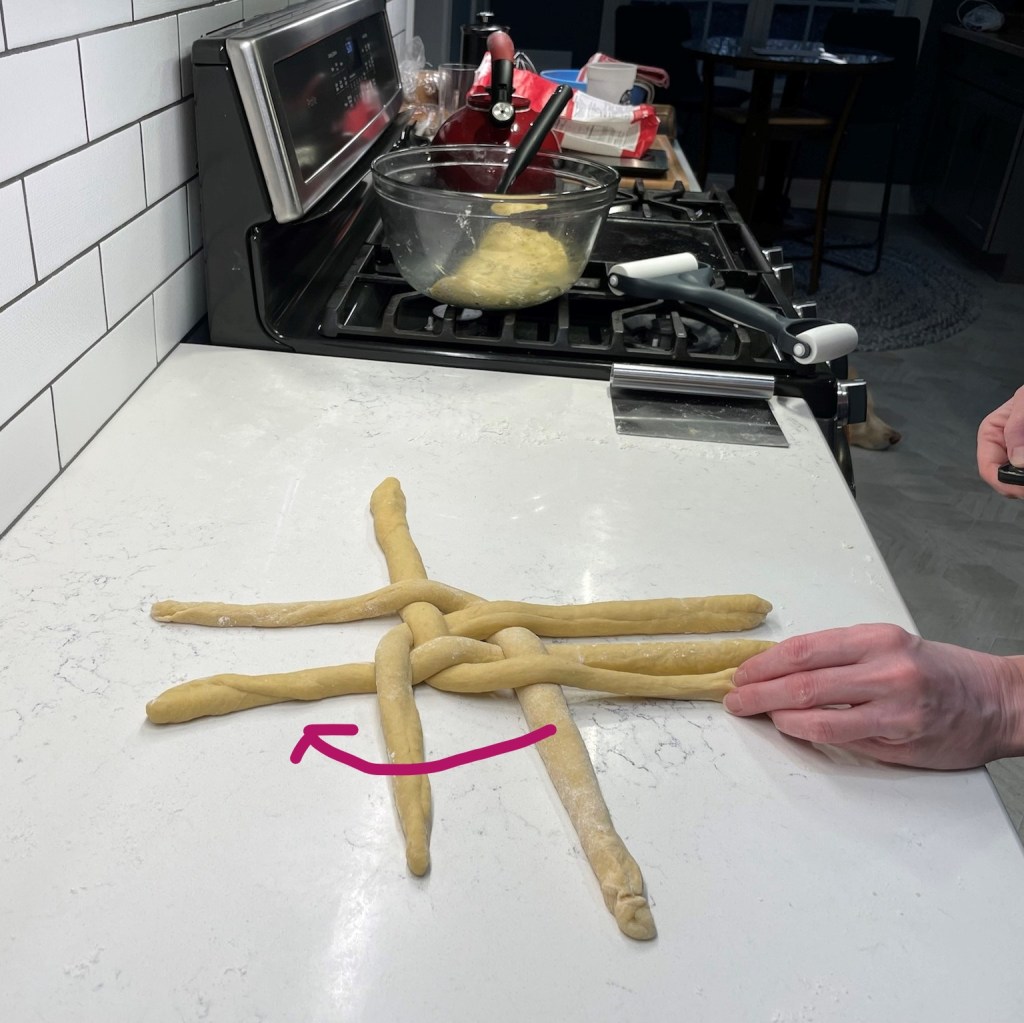
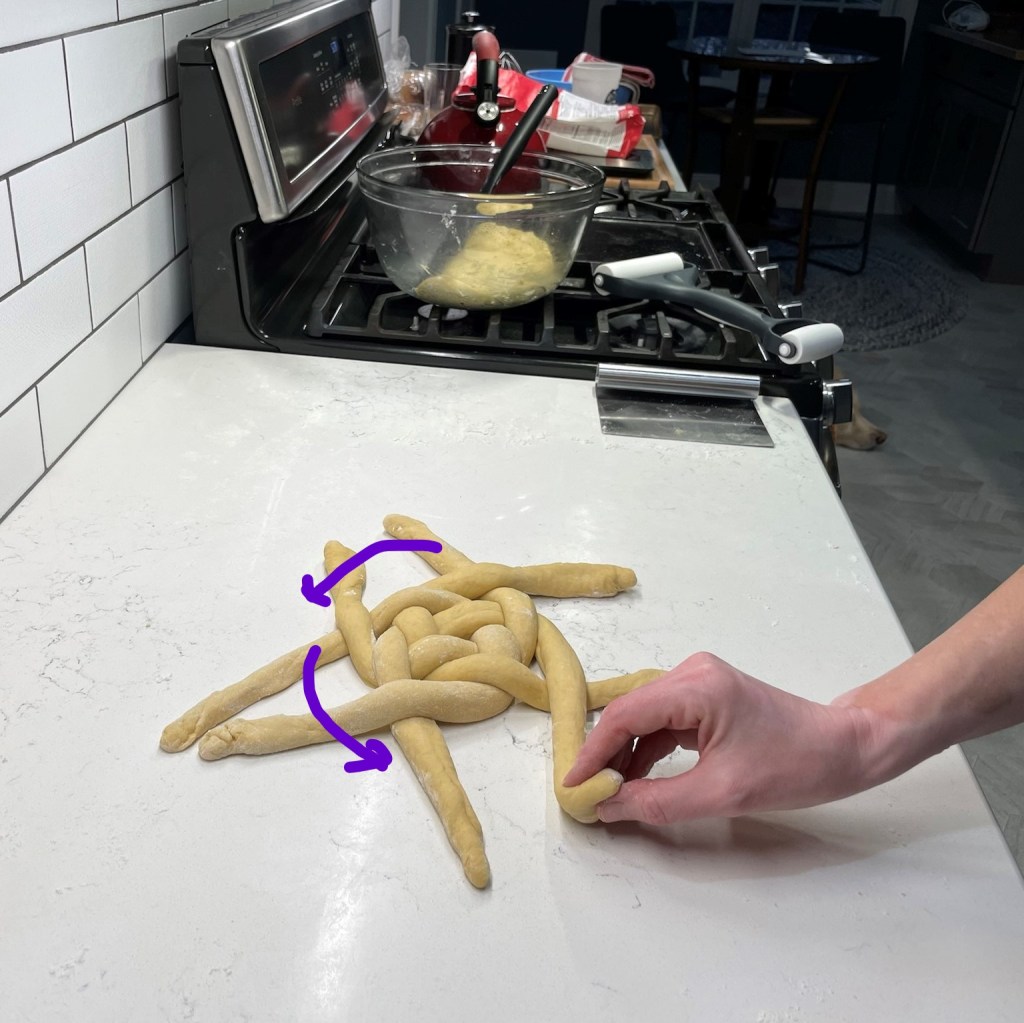
Shaping the dough is probably best learned through pictures, but I’ll try to describe it here. Take any long strand that is under the piece that crosses it, and sweep it over the piece parallel to it so that its new position is parallel to the cross piece. Repeat with the other four strands. Next, reverse direction but do the same thing, taking the underneath pieces and cross over to make them parallel to the piece next door. Repeat with the other four. Continue this pattern of reverse-crossing until the strands are too small to cross over. At that point, twist and pinch together the ends you would otherwise cross so that the dough doesn’t unravel. Tuck the twisted ends underneath and transfer the bread to a parchment-lined baking sheet.
Follow the arrows to see how the braiding goes. To begin, you’ll simply move the ropes that are underneath a cross piece over top of their parallel rope and perpendicular to their original direction.
Next, reverse the direction and do the same with the ropes that are now in underneath position.
Keep reversing and crossing until you run out of dough length.
When you can no longer cross the ropes, bring them together in a twist to seal them into place.
Tuck the twisted ends underneath. Remember that it doesn’t have to be perfect, and you can practice the technique with yarn, twine or strips of fabric to get a feel for it.
When the braiding is finished, the challah round won’t be much larger than a bread plate, but don’t worry, it’ll rise significantly during the proofing stage!
Here’s how I fill a braid with fruit. Simply scatter about two tablespoons worth of dried fruit over the section of dough before rolling it into a rope. It will feel lumpy as you stretch out the rope, but it settles down during proofing.
Repeat with the second batch of dough and lightly spray or brush the loaves with olive oil and secure a couple of layers of plastic wrap over them. Keep the plastic somewhat loose, allowing room for rising, but not so much that air can dry out your loaves.
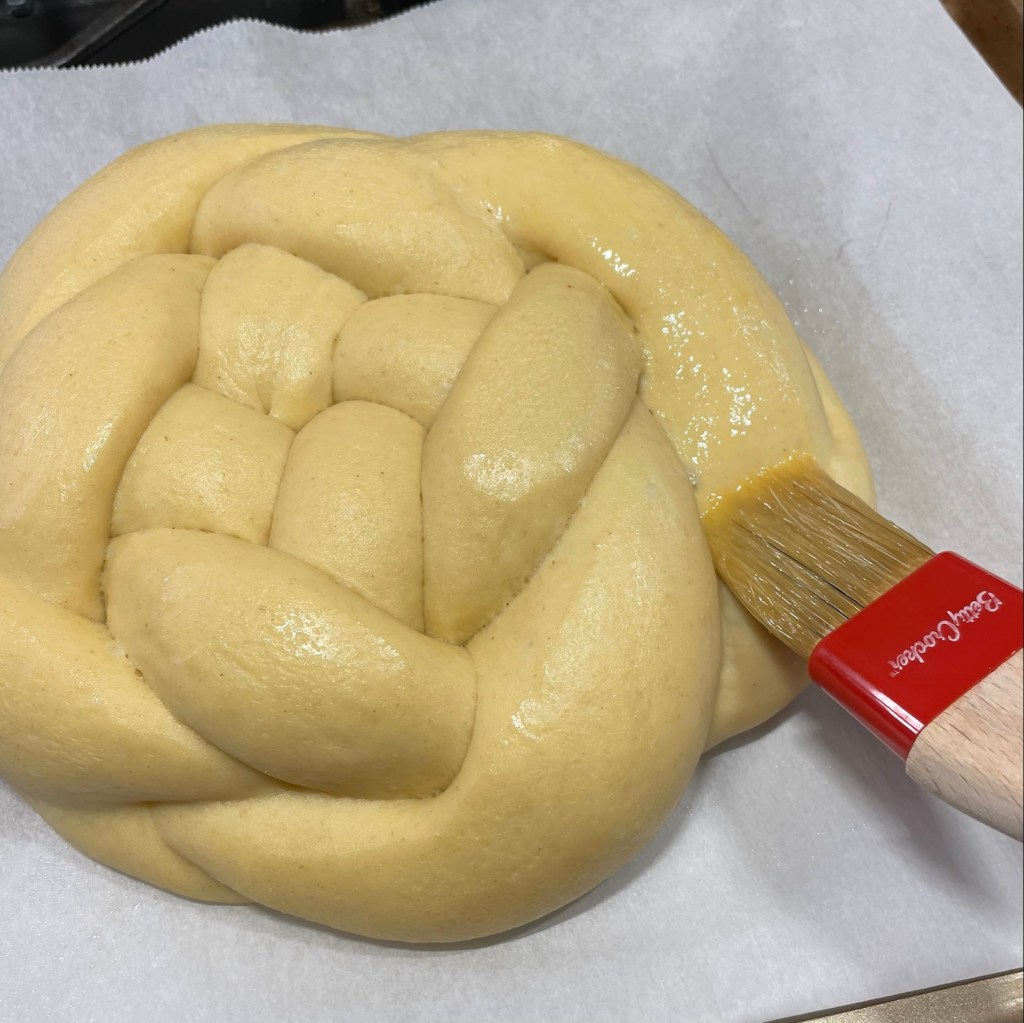
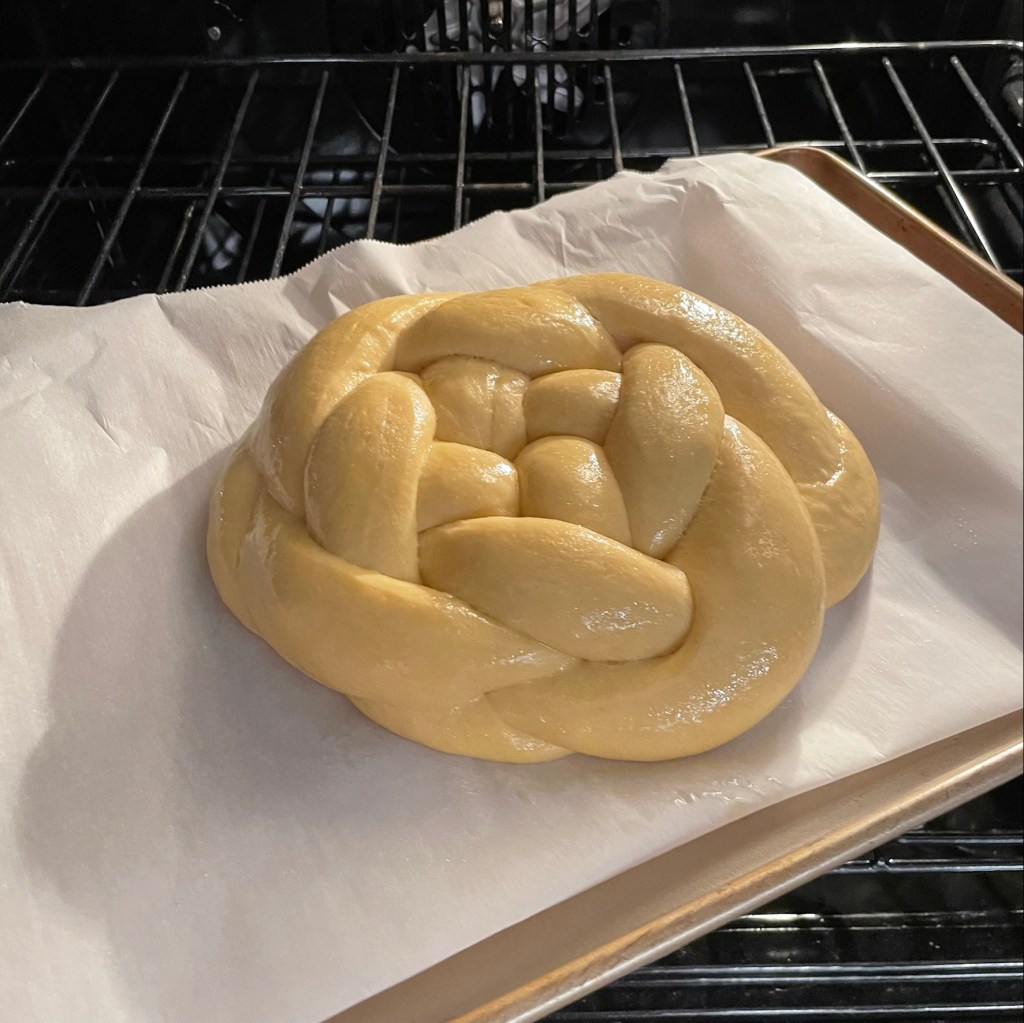
Proof the loaves at warm room temperature for up to 5 hours, until they have at least doubled in size. They will be quite “poofy” when they are ready. Preheat the oven, brush all over with egg wash (get into every nook and cranny) and bake until they are deep golden brown all over, with internal temperature at 200° F.
Transfer to cooling racks and cool completely before slicing or wrapping.
The braiding technique is the easiest thing about these loaves, which are enriched with eggs, citrus-scented olive oil and sweet honey. The recipe takes time, but the reward is as sweet as my wish for you in the Jewish New Year.
Ingredients
35g recently fed sourdough starter
80g room temperature water
130g bread flour
Mix the firm starter ingredients together, cover and let stand at room temperature overnight. Or, refrigerate after 8 hours fermentation and remove from fridge one hour before proceeding.
Ingredients
65g warm water
65g honey
3 large eggs, room temperature
55g olive oil
300g bread flour
100g white whole wheat flour
1 1/2 tsp. fine sea salt
all of the firm starter (above)
1 large egg, mixed with a tablespoon of water (for egg wash)
Directions
In the bowl of a stand mixer, combine the water, honey, eggs and oil. Whisk together until fully blended. Add flour ingredients and mix with the dough hook until all flour is incorporated.
Remove dough from hook, sprinkle with salt and cover. Rest the dough for about 30 minutes, as this will make kneading easier. Rinse all dough bits from the hook so it’s ready for the next kneading step.
Turn the fermented firm starter out onto a floured countertop. Use a bench scraper to cut the dough into several pieces, toss them in the flour to coat, and then cover with plastic wrap or a clean towel to keep it from drying out.
After resting, the salt on top of the dough will have dissolved a bit. Knead with the dough hook for a few minutes to fully incorporate the salt, then transfer the dough to a lightly floured countertop.
Spread the challah dough out to enlarge it, and then press several pieces of the firm starter into it. Fold it up in thirds, like a letter, and press the remaining pieces of firm starter into it. Return the dough to the mixing bowl and knead with the dough hook for several minutes. You should not see any streaks of starter, and the dough should be dense, smooth and shiny. Transfer it to a large, oiled bowl and cover. Let it ferment at room temperature for about 3 hours. It likely will not double in size, but it will expand somewhat.
Turn the dough out onto a clean counter and use a bench scraper to divide it in half. Return one half to the bowl and cover to prevent drying while you shape the first loaf.
Cut the first dough portion into equal parts for braiding, either 3 or 4 pieces. Flatten into rough rectangle/oval shapes and roll up tightly into ropes, pinching to seal the edges. Roll out with the flat part of your palms to stretch the ropes to 18″, with ends that are tapered a bit.
8, Arrange the dough ropes for braiding, following visual instructions in this post. Place braided loaves on parchment-lined baking sheets and cover with lightly oiled plastic wrap. Proofing time will be anywhere from 3 to 5 hours, depending on the temperature of your kitchen, humidity and moon cycle. Just kidding on that last one, but honestly, the time needed for proof can vary broadly, so my best advice is to begin checking after 3 hours. Dough will double or nearly triple in size, and it is ready to egg wash and bake when it refuses to bounce back after a finger poke.
Preheat oven to 350° F. Gently brush egg wash all over every visible surface of the challah loaves. Bake for approximately 35 minutes, until bread is deep golden brown all over. Internal temperature should be about 200° F. Transfer to a cooling rack and cool completely before slicing or wrapping.
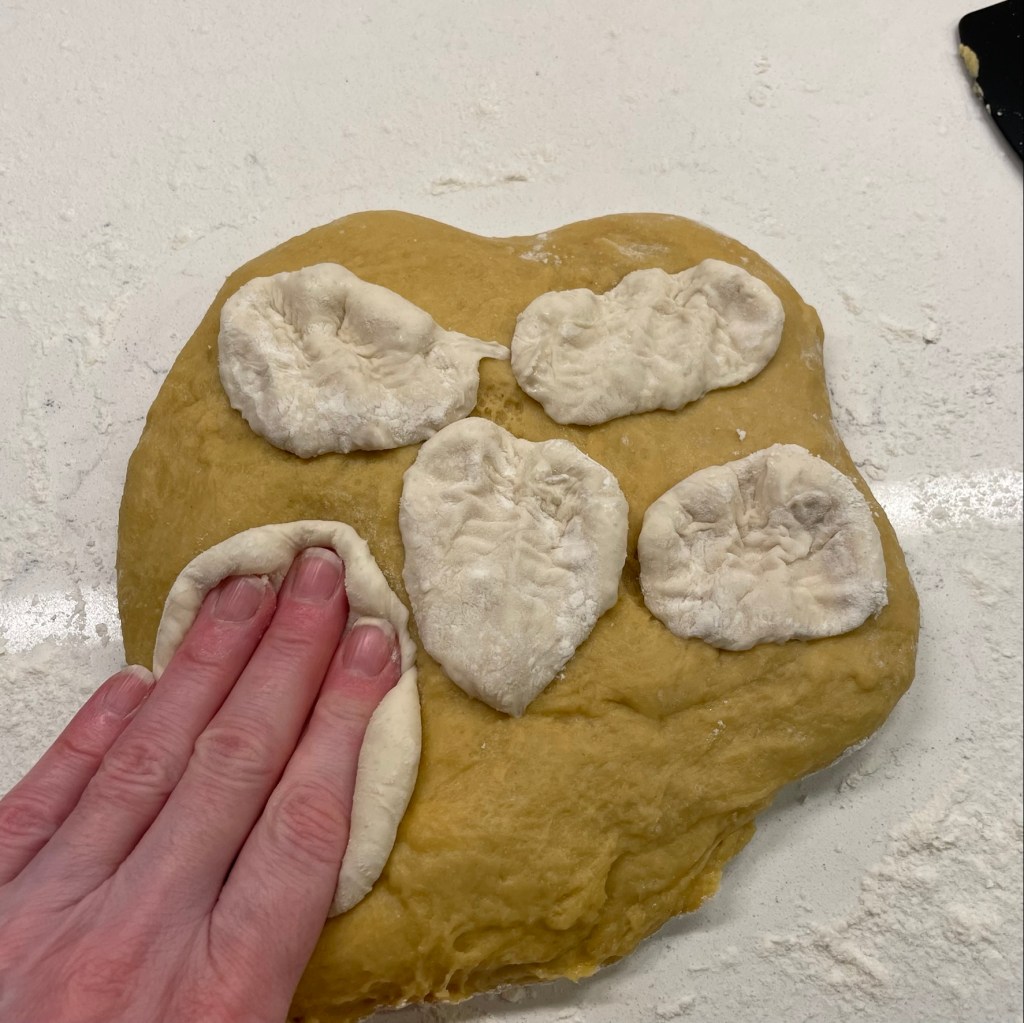
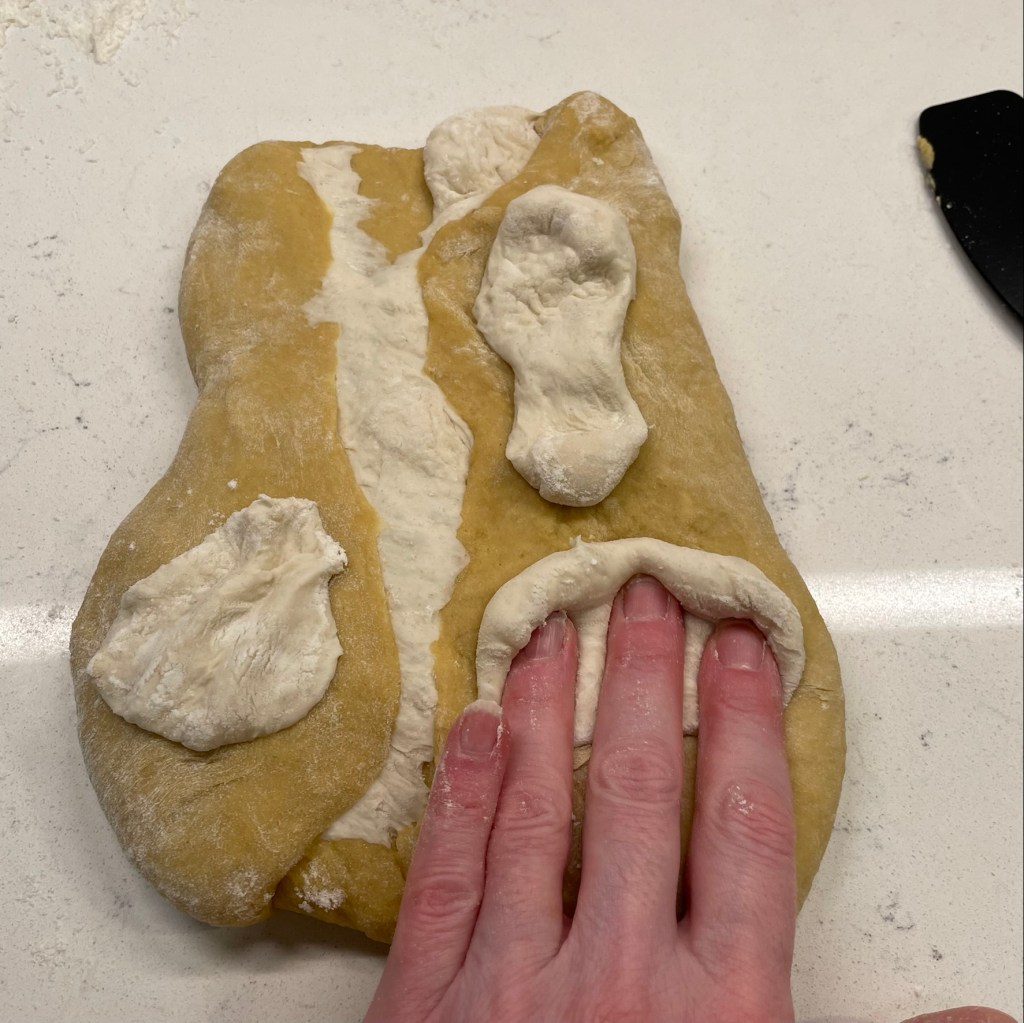
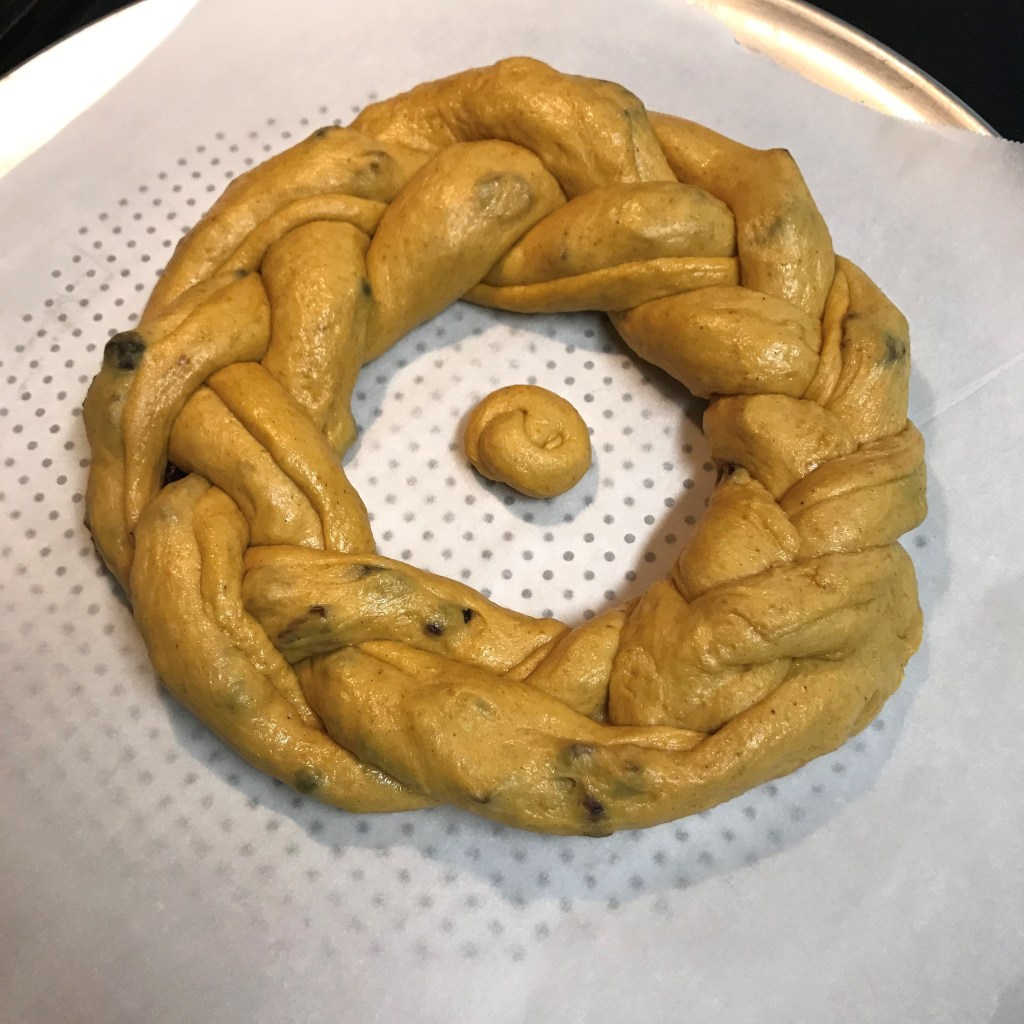
From the CDJ archive, here’s another way you can achieve a “round” challah, if you aren’t feeling the love for the basket-weave design. Divide your dough for one of the loaves into three equal segments and braid them like a hair braid, and then curl it around, tucking and pinching to seal the ends together. It’s more of a wreath than a round, but still has the circle symbolism. This was an experimental sourdough pumpkin challah, filled with Trader Joe’s “golden berry blend” dried fruit, and it was nothing short of fabulous. 🙂
The wreath shaped loaf is filled with a blend of dried fruits: cranberries, golden raisins, blueberries and cherries.
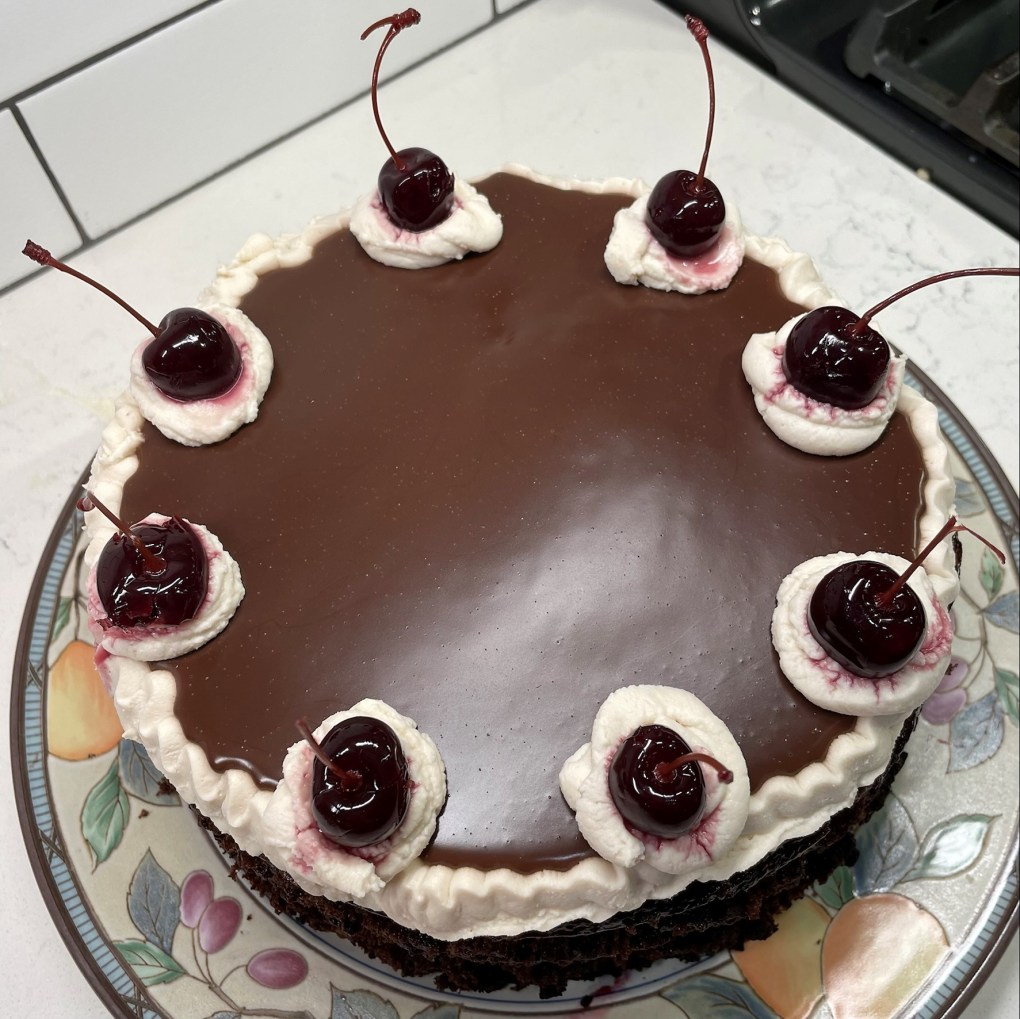
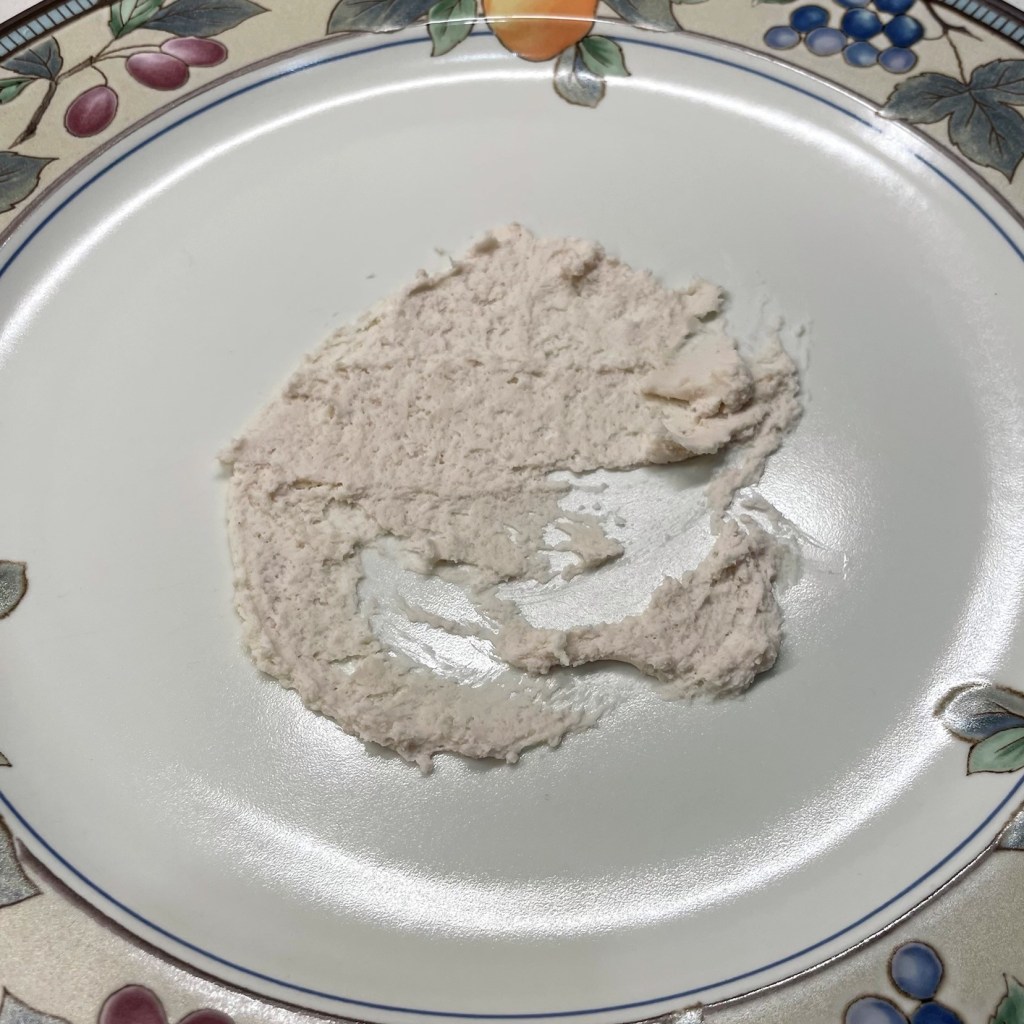
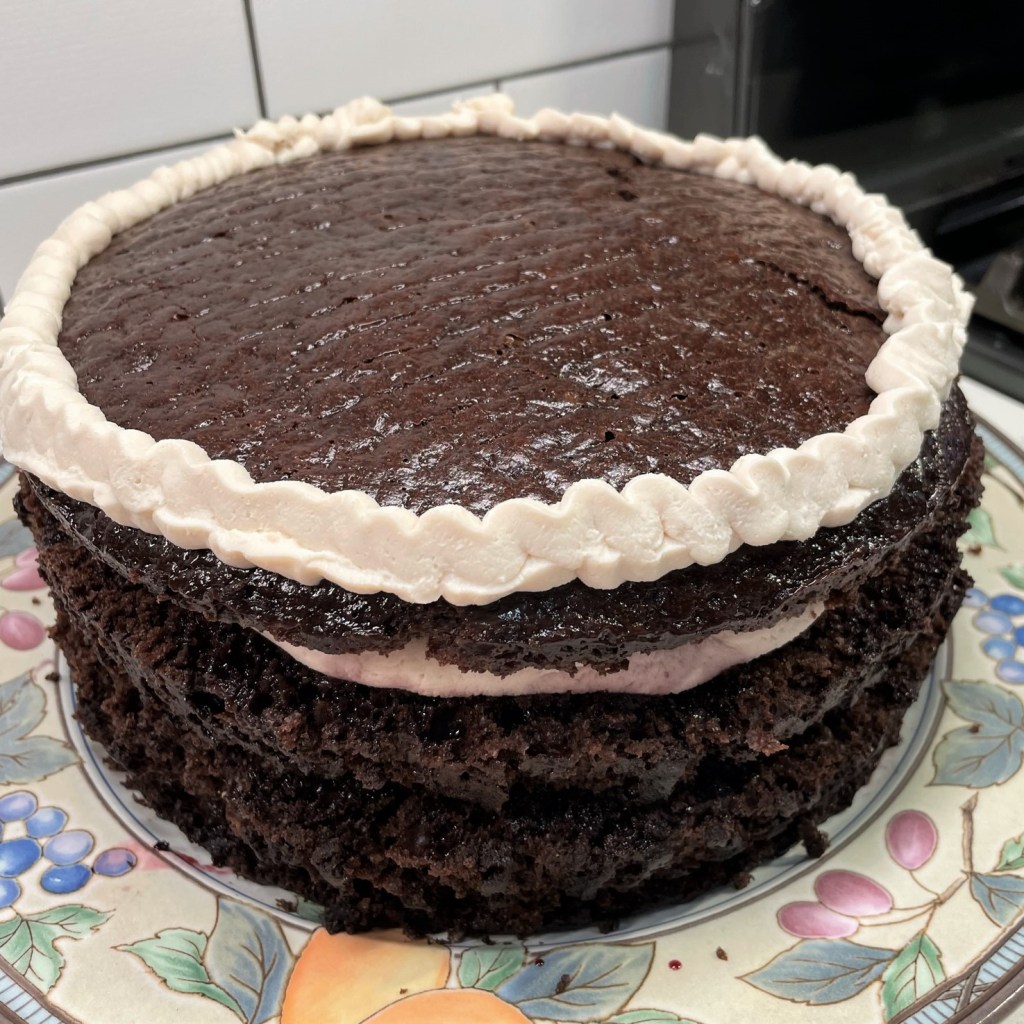
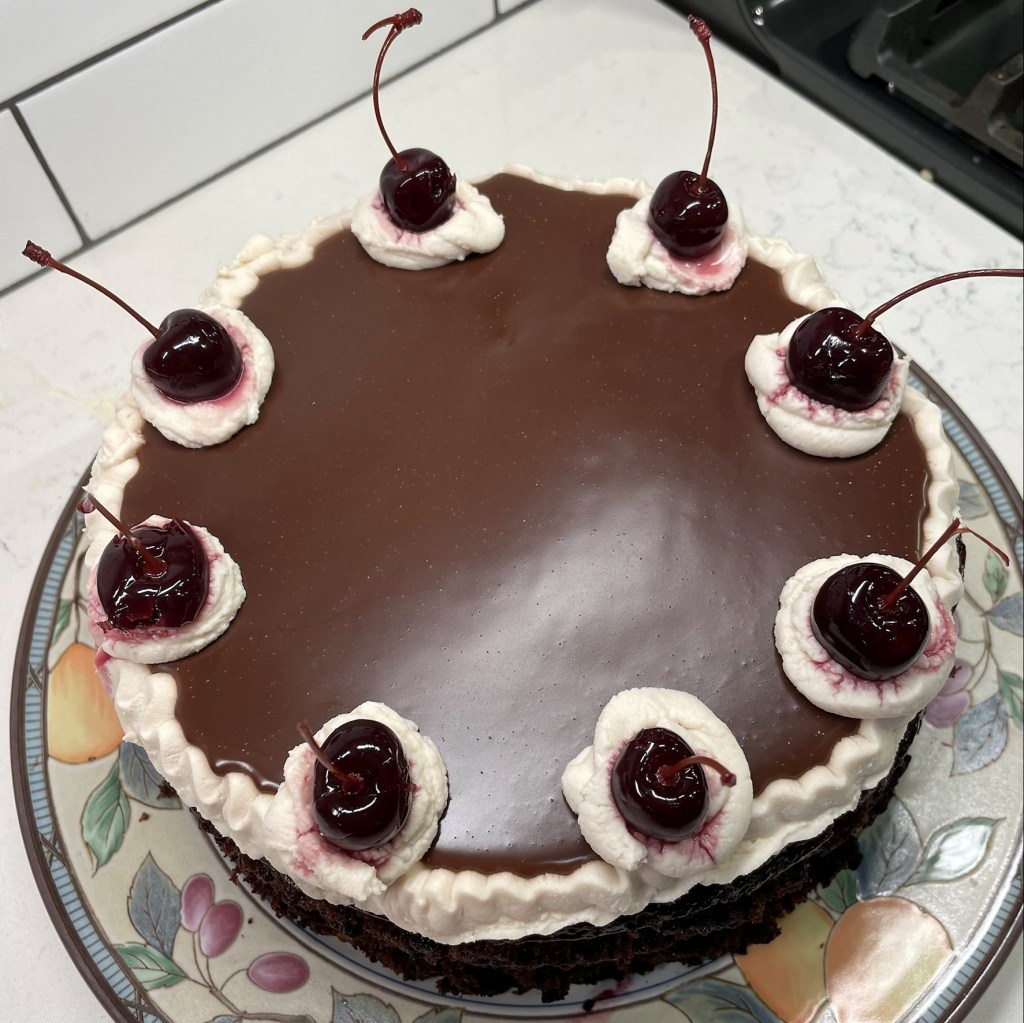
Before we get into it, I’d like to issue my own disclaimer about the inauthenticity of this recipe as a “Black Forest” cake. Any purist would quickly point out that a true, German Schwarzwälder Kirschtorte would be more of a spongy chocolate cake, soaked with kirsch (a clear cherry liqueur) and decorated with whipped cream, sour cherries and shavings of chocolate. But when is the last time you remember me sticking to tradition?
My version of this cake is a departure in almost every category, save for the chocolate and cherry flavors. Cake baking is not in my wheelhouse, so I went for a recipe that I knew I could count on—a sourdough chocolate cake from King Arthur Baking that has served me well before—and I adjusted the fillings to match it. My whipped cream filling is enhanced with mascarpone, making it more substantial to support the sturdy cake. The cake itself is not super sweet, so the cherries had to be. And kirsch liqueur (or any cherry liqueur, for that matter) is nowhere to be found in our liquor stores, so I reached straight for what’s plentiful at our house—bourbon, and that was a very good call.
The cake is not difficult to make, but it is fussy enough that it deserves a special occasion. I was going to save this until the week of Valentine’s Day, but my husband heard on his favorite sports talk show this morning that today is National Chocolate Cake Day, so, heck yeah! We might as well get a jump start on swooning over it. 😉
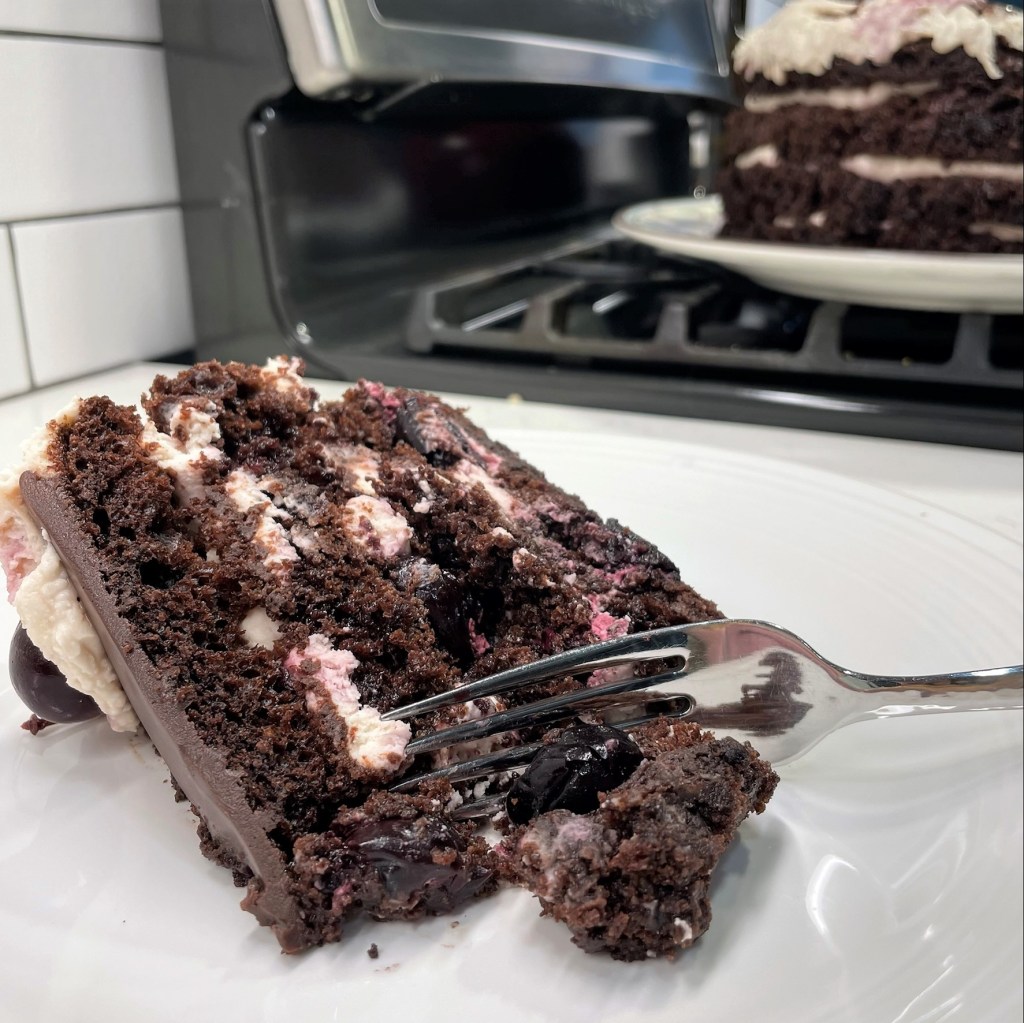
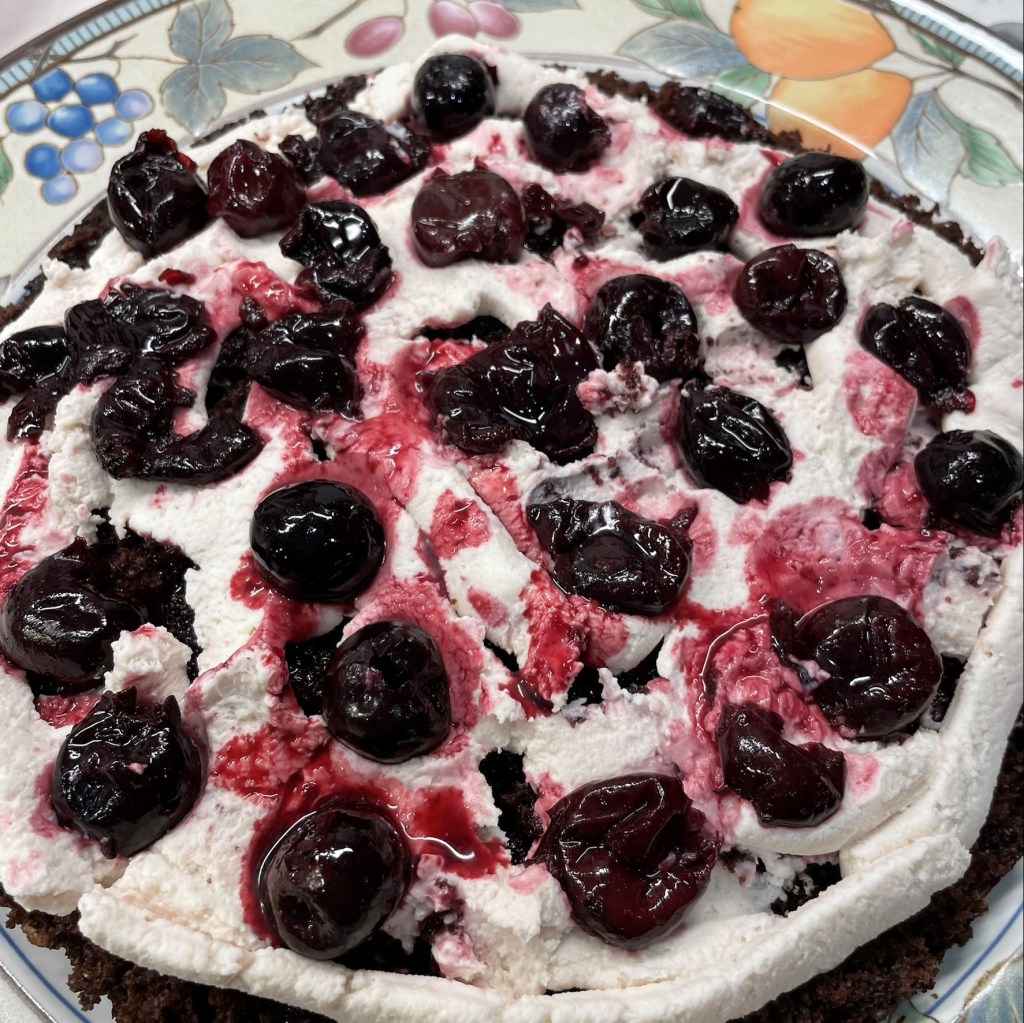
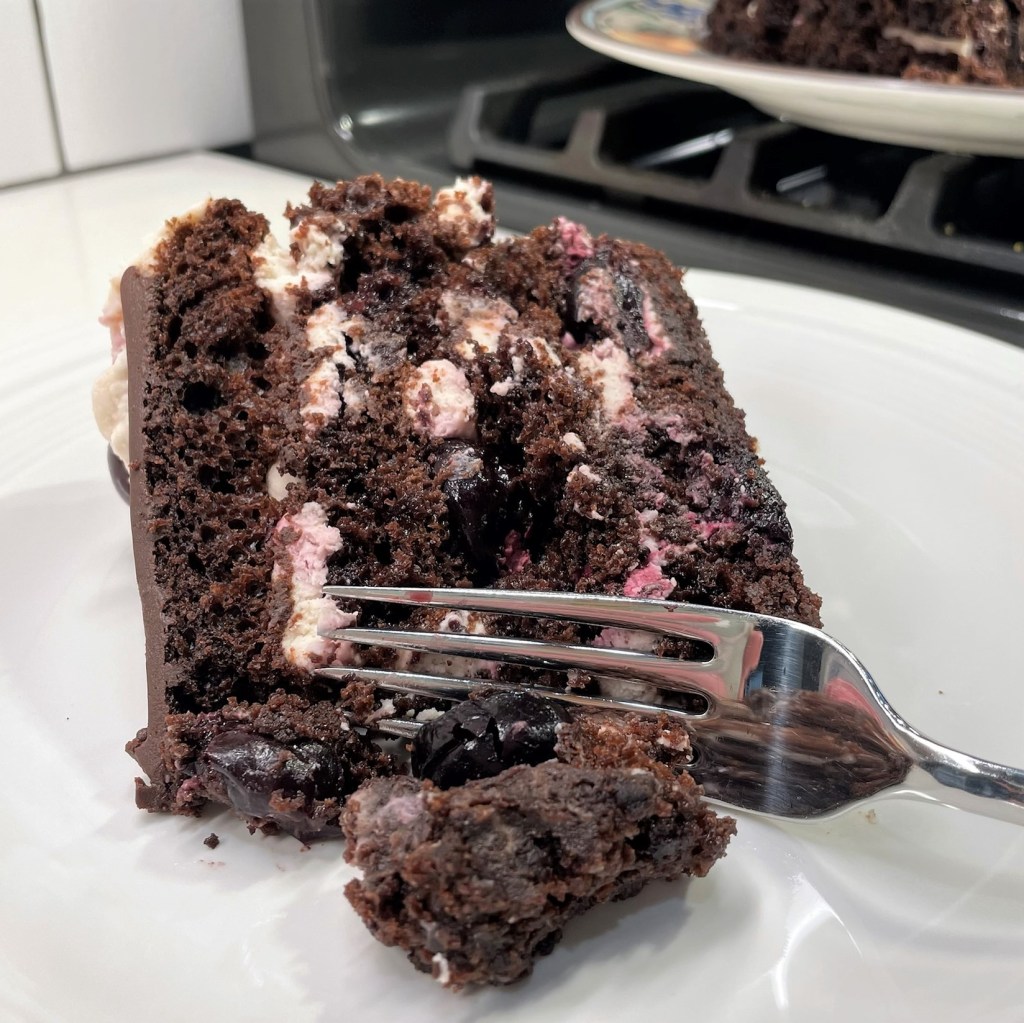
Every slice has a great balance of cherry and chocolate. Who cares if it isn’t a true Black Forest cake? 🙂
We splurged on this decadent, multi-layer dessert to finish our New Year’s Eve meal of White Clam Pizzaand our newest addition, the Oysters Rockefeller Pizza, and the cake was delicious for the occasion (and, remarkably, just as good later as leftovers straight from the fridge).
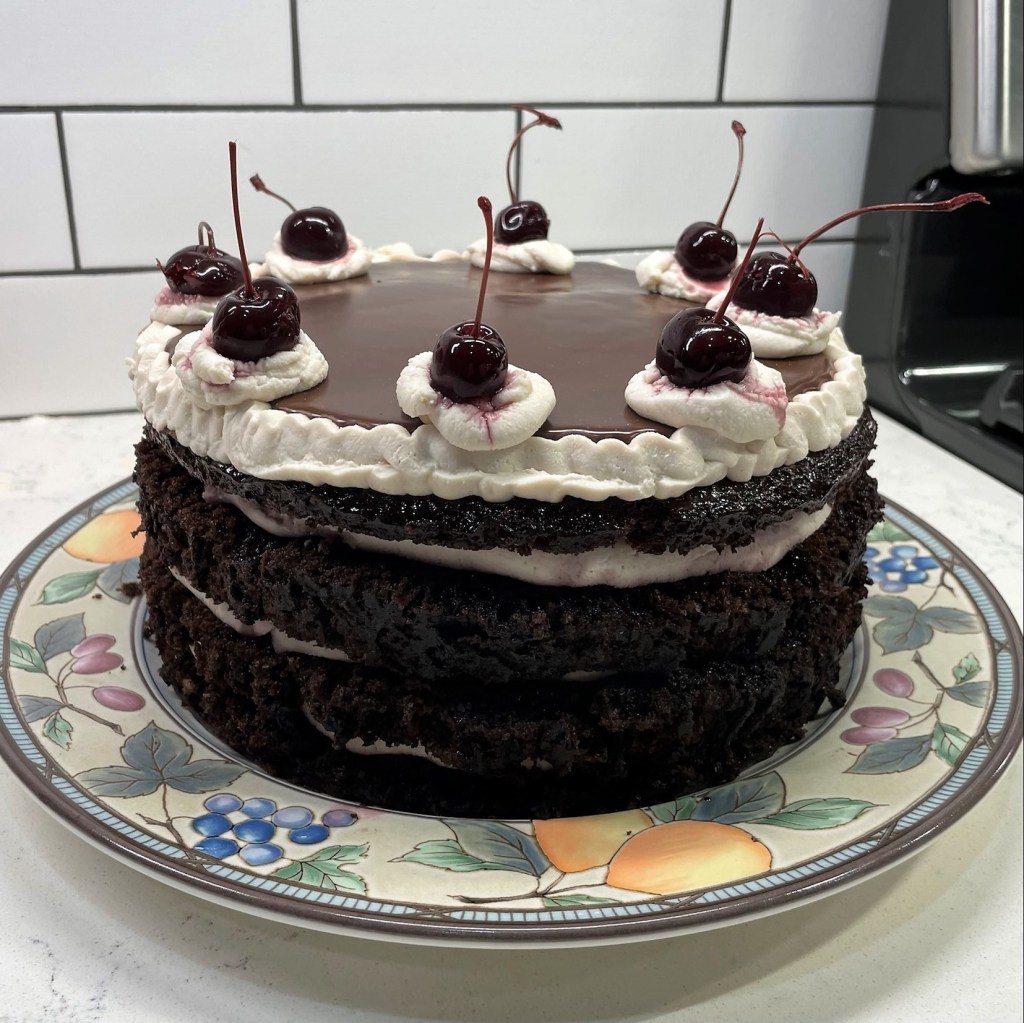
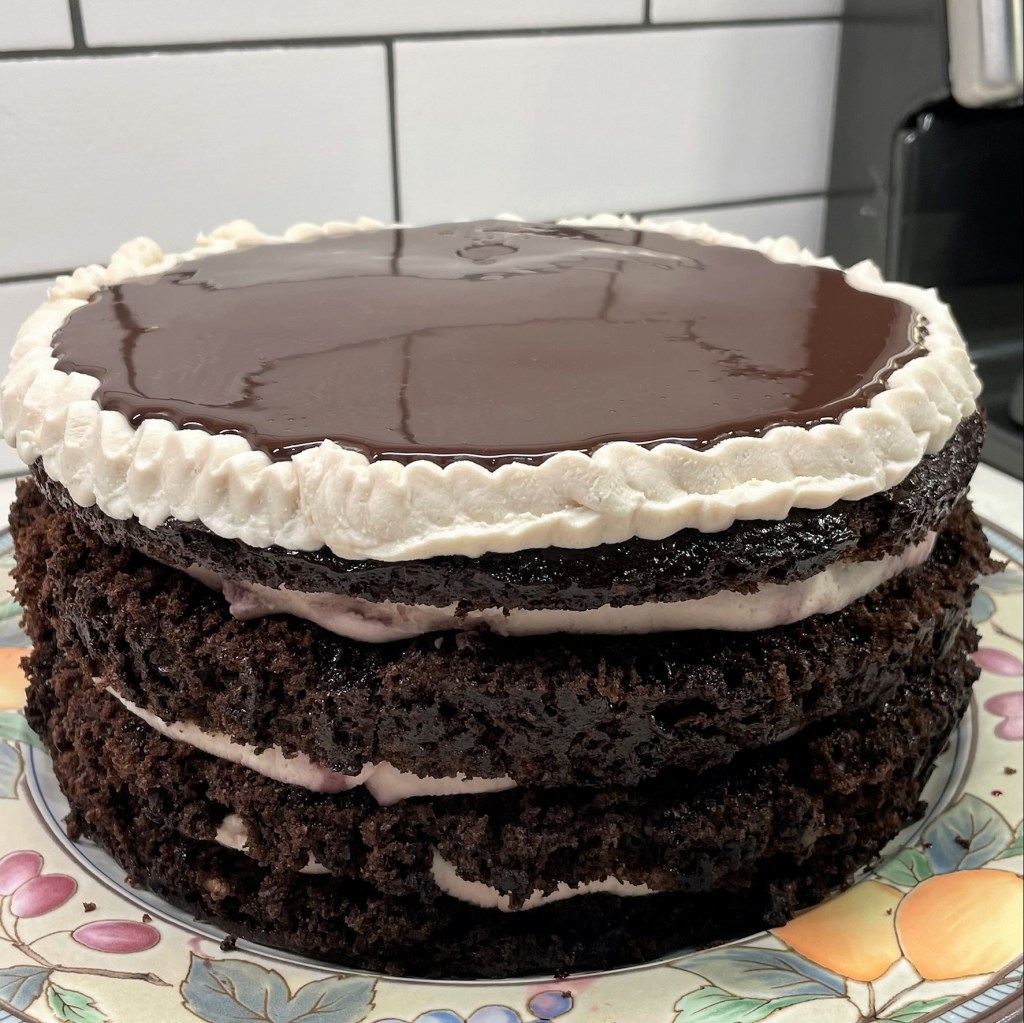
Frosting a cake requires patience that I do not have (especially at the holidays), so I went for a more rustic appearance, which also afforded us a glimpse of the yumminess that was to come, in the form of mascarpone cream and cherries hanging out the sides. There was no whipped cream wrapped around the outside of my cake and no shavings of chocolate, as one would find on a true Black Forest Cake. But it was delicious, with a capital D.
My layers were a little uneven, but the flavors were phenomenal.
So, is it authentic Black Forest Cake? No, but “Sourdough Dark Chocolate Cake with Bourbon-Soaked Cherry and Mascarpone Filling with Ganache Topping” is a mouthful. Plus, it didn’t fit in the title box. 😉
8 bourbon cherries or morello cherries, with stems (for decorating cake top)
Instructions
Bake the cake as instructed on King Arthur website. I followed the instructions with one ingredient adjustment; I replaced half of the natural cocoa with KA’s Double Dark Dutch Cocoa. I am crazy about the deep, dark color and chocolate flavor! Also, I baked it in two buttered and cocoa-dusted 9-inch layer pans rather than the 9 x 13 that was suggested, and the cake was done in 30 minutes. Cool the cake layers completely before removing them from the pans.
Not riding the sourdough train? No problem; use any other dark chocolate cake recipe you like, provided the layers are sturdy.
First, you build an overnight starter.By morning, the starter is very spongy.I used half natural cocoa, and half Double Dutch Dark cocoa. Love that color!It seems impossible, but it works!My Gram taught me to dust the cake pans with cocoa when making a chocolate cake, so that’s what I do.I baked the cake in layers rather than in a 9 x 13, as suggested on the King Arthur site. The pick comes out clean after 30 minutes.
For the cherry syrup, mascarpone filling and shiny ganache topping, I’ll provide a visual walkthrough, and you can scroll to the bottom of the post for a printable recipe if you want to give it a go in your kitchen. Happy Chocolate Cake Day! 🙂
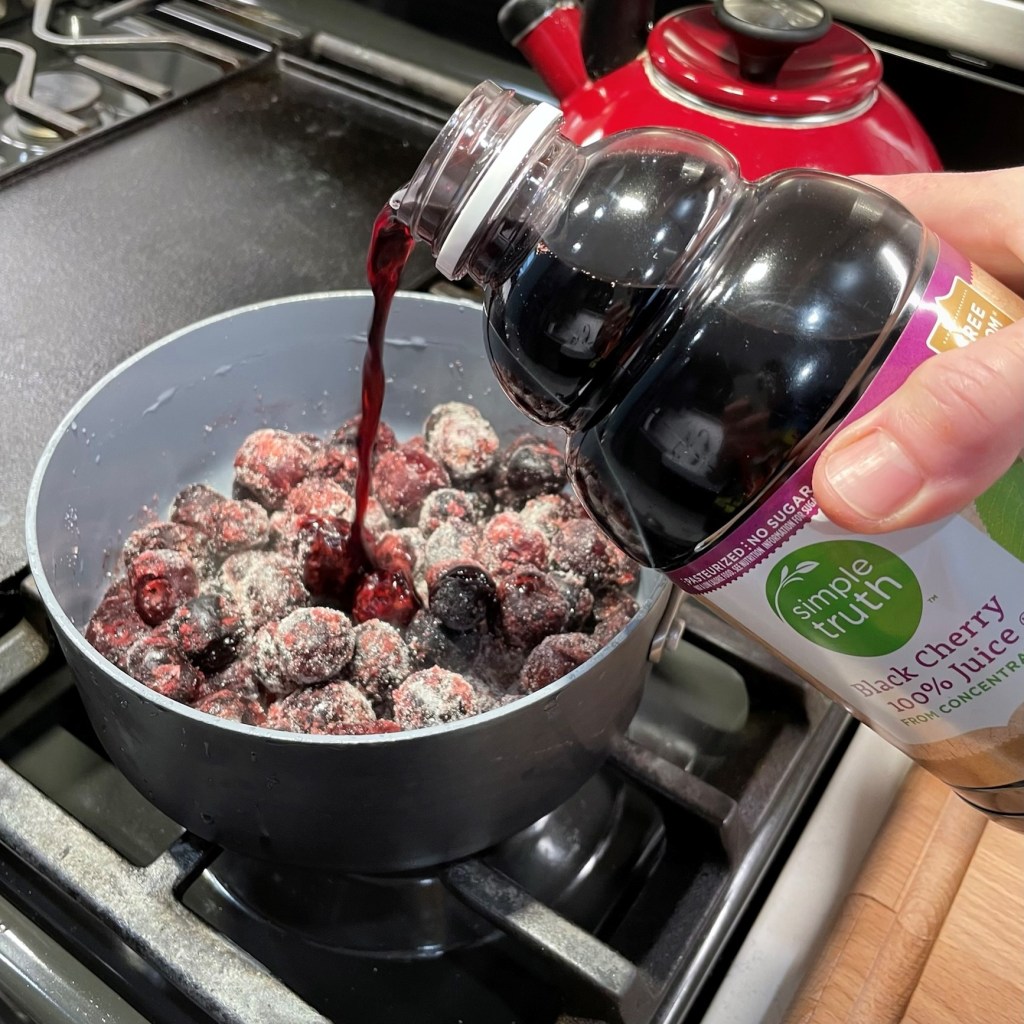
Combine the frozen cherries and sugar in a saucepan.
Add the unsweetened black cherry juice and bring to a slight boil.
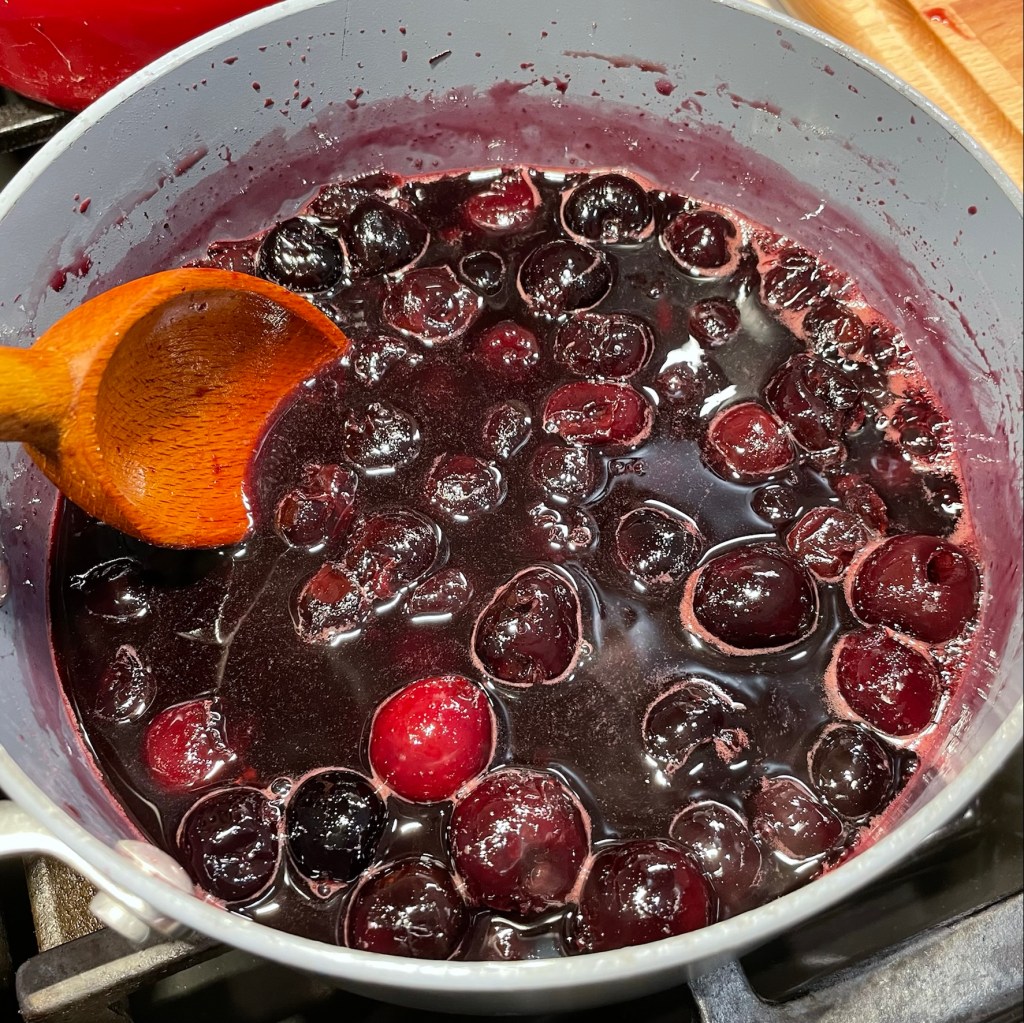
When the syrup has simmered a few minutes, drain the cherries into a bowl and return the syrup to the pan.
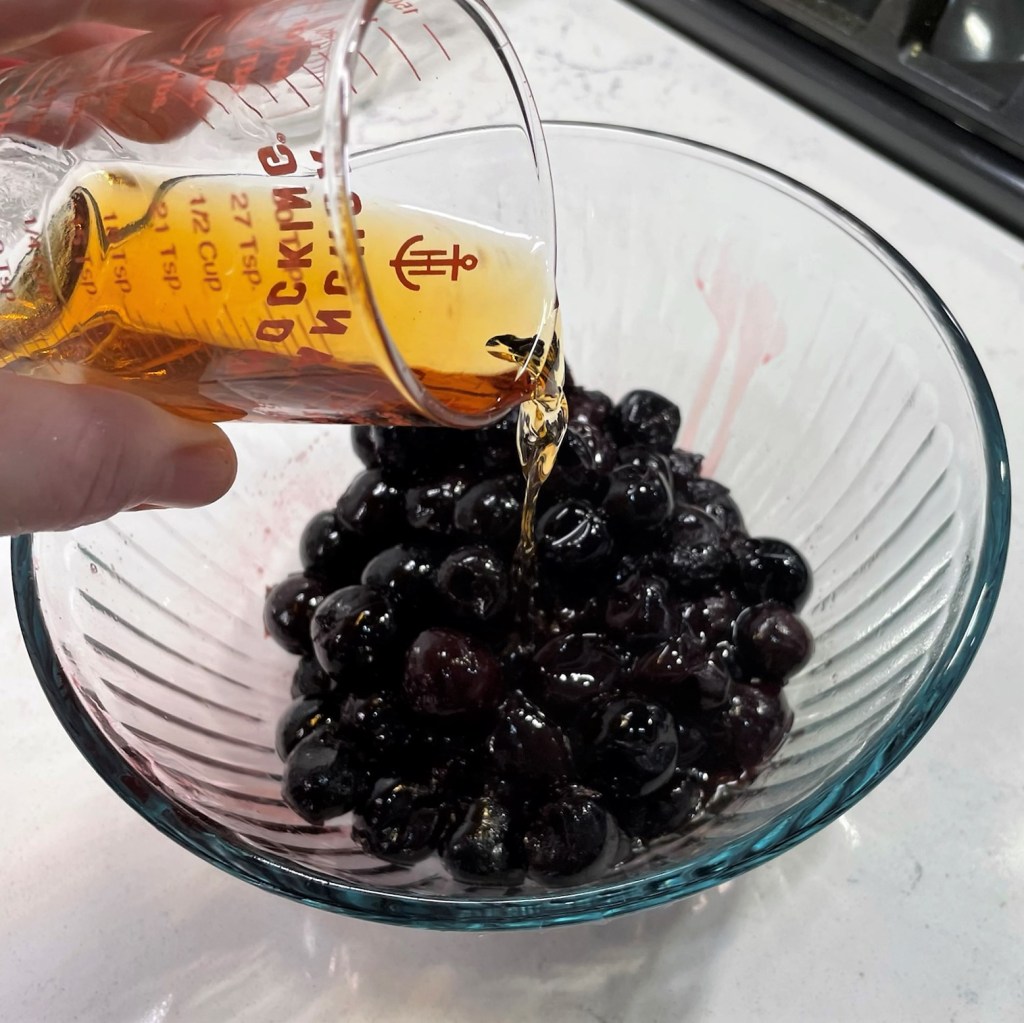
Pour bourbon over the strained cherries and steep until they are cooled.
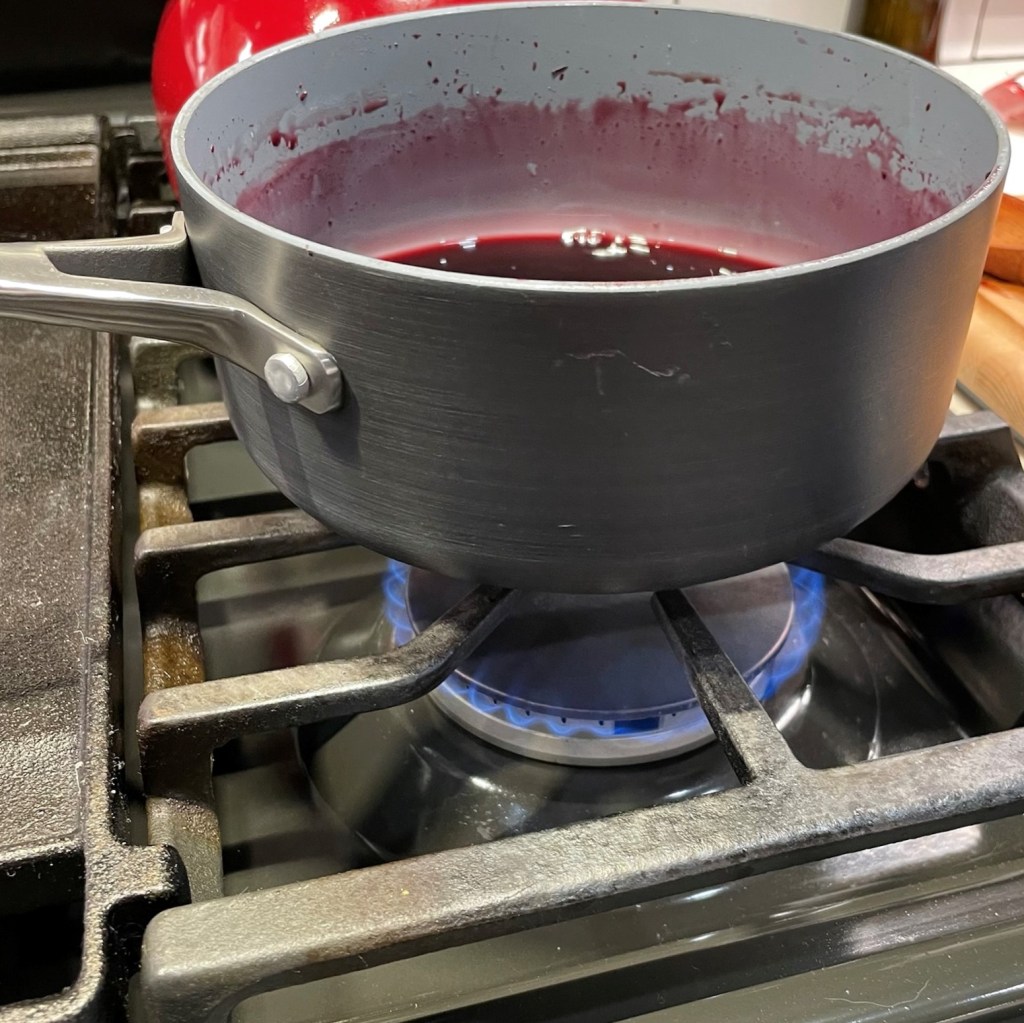
Simmer the syrup over medium heat until reduced to 2/3 cup.
Drain the cherries again and add the bourbon syrup to the other syrup.
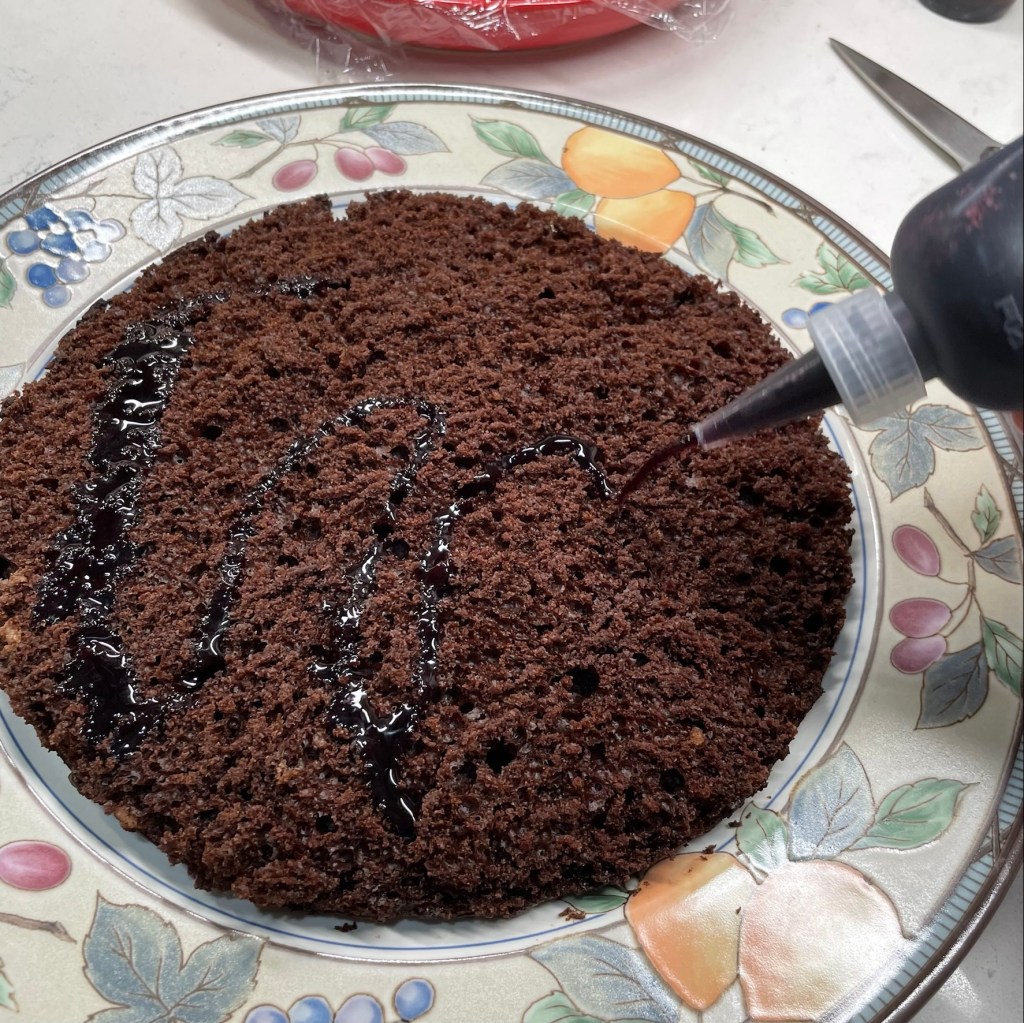
Transfer the syrup into a squeeze bottle if you have one; I found it an easy way to distribute the syrup over the cake layers.
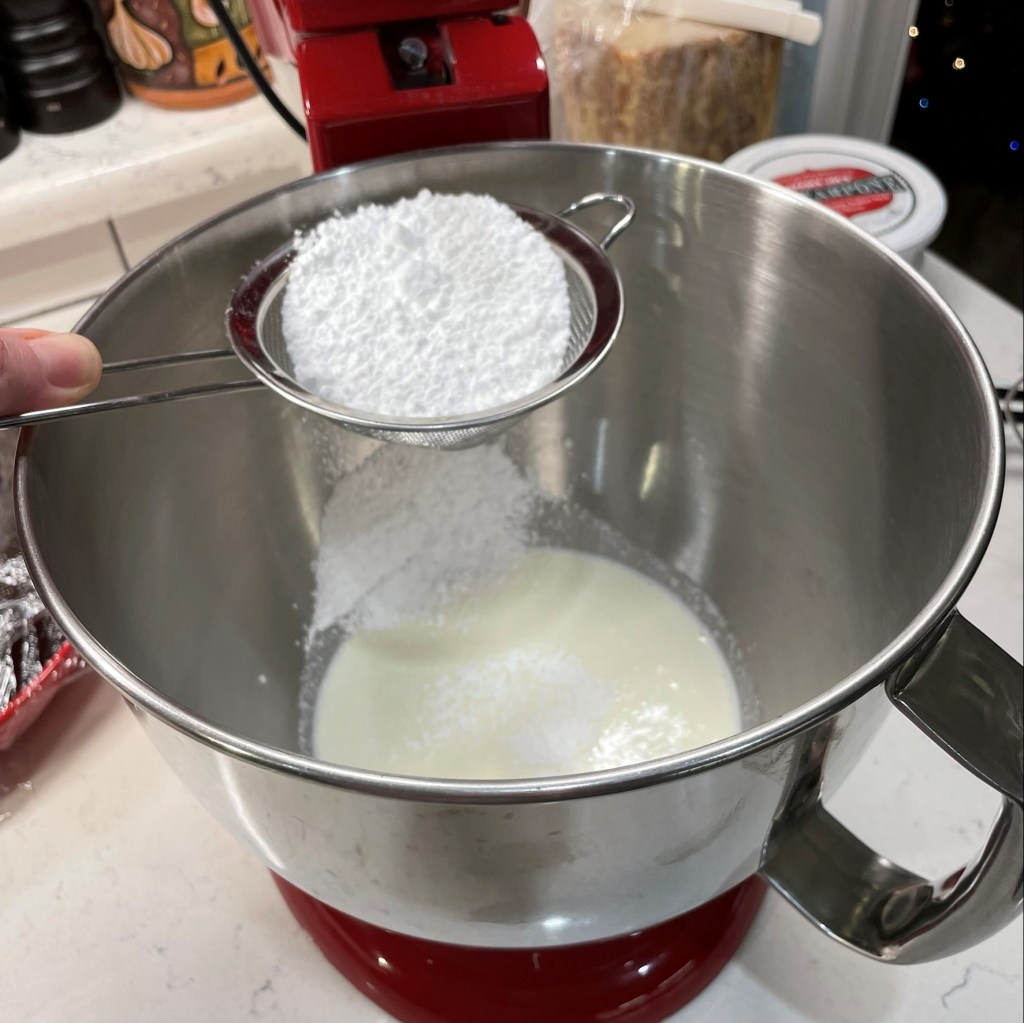
Sift powdered sugar into the heavy cream.
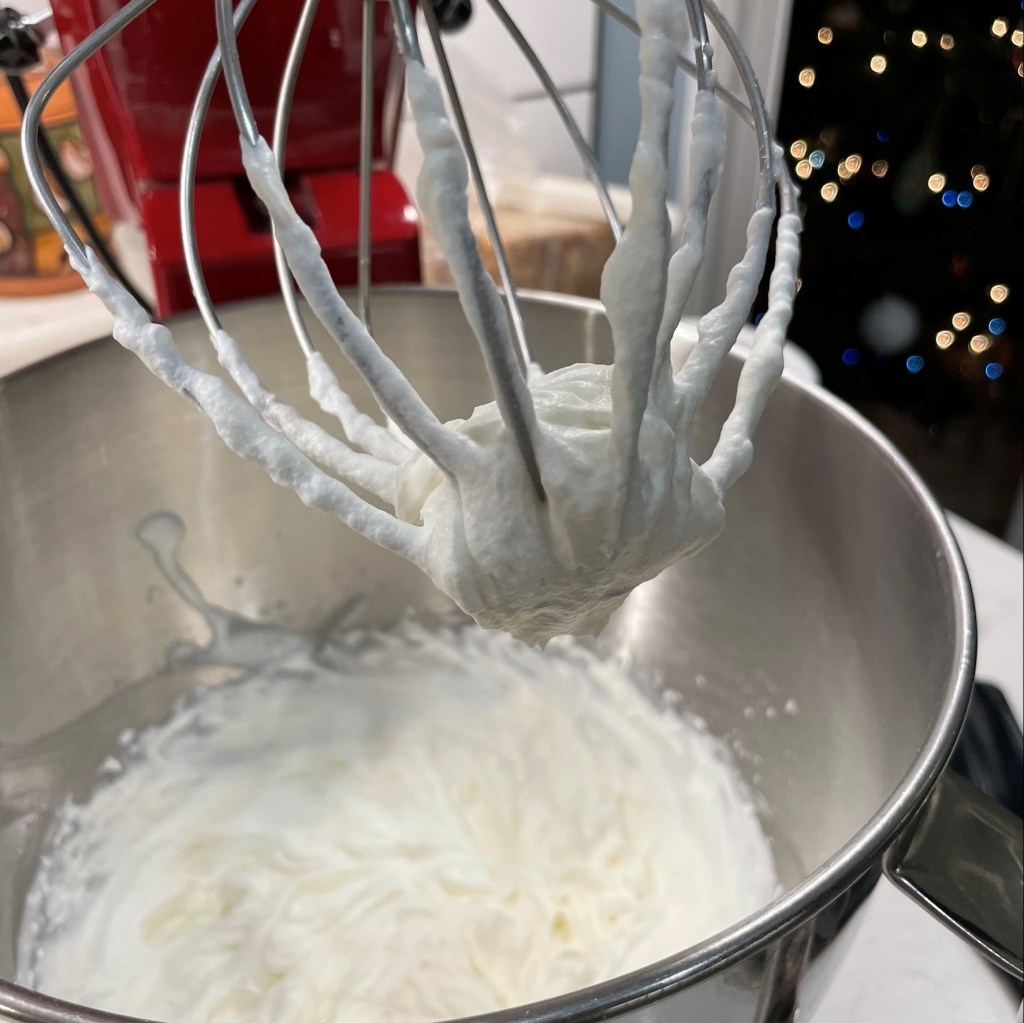
Whip the sweetened cream until soft and lightly fluffy.
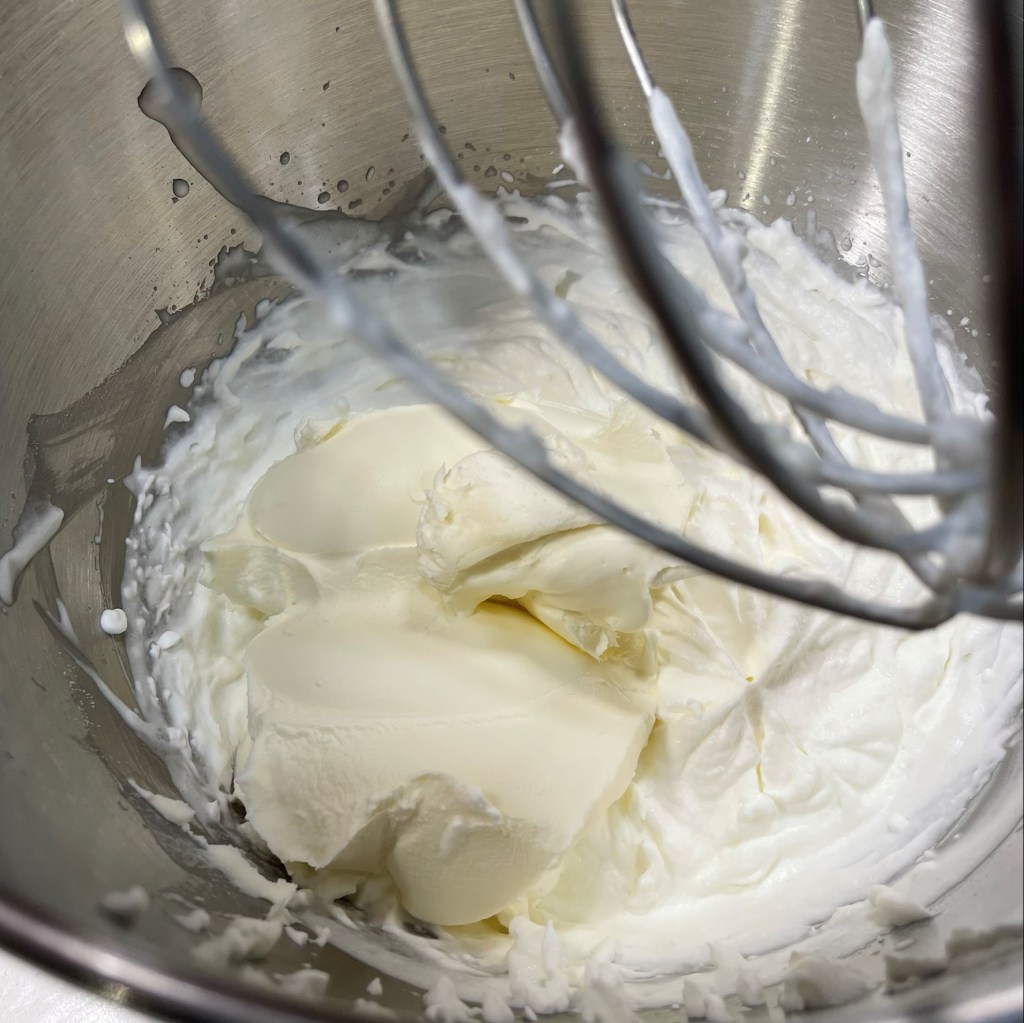
Add the mascarpone and whip on low speed until until combined.
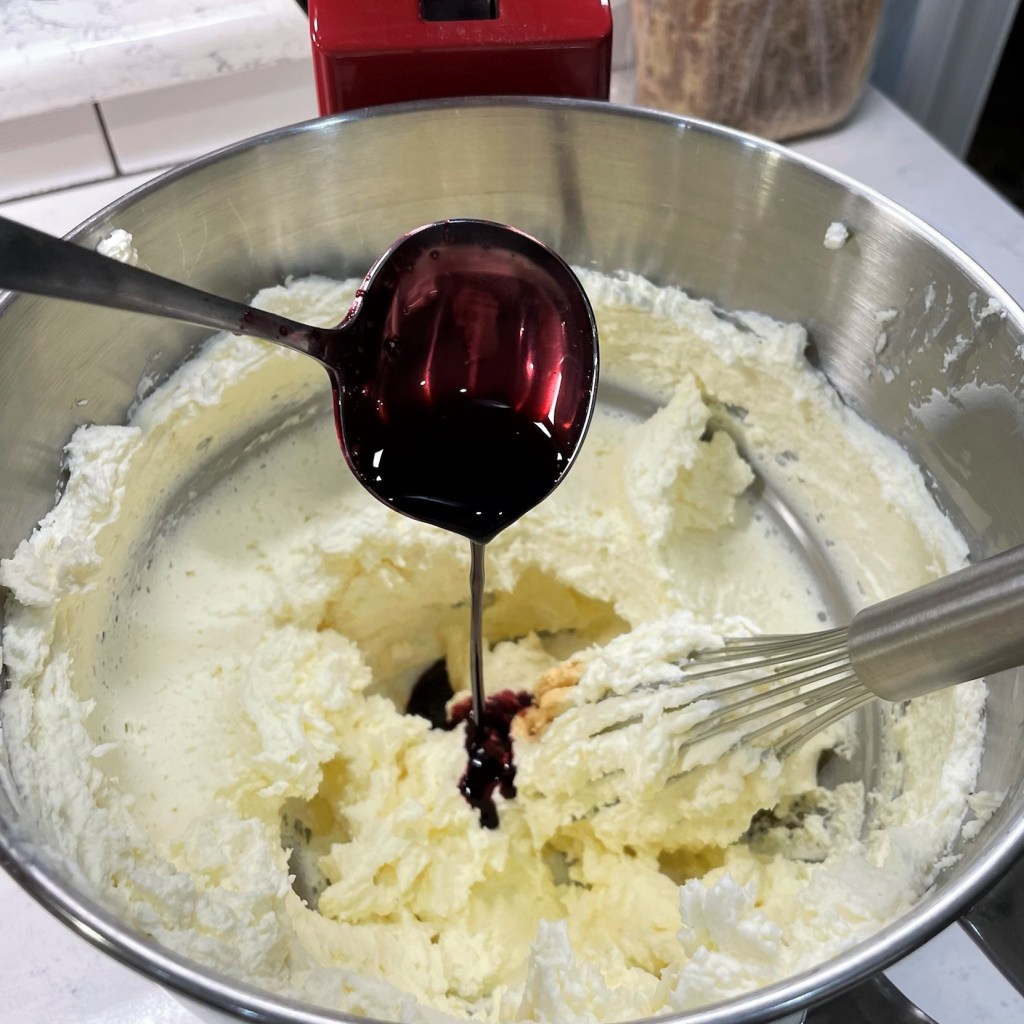
Drizzle 2 tablespoons of the syrup into the mascarpone and fold until blended.
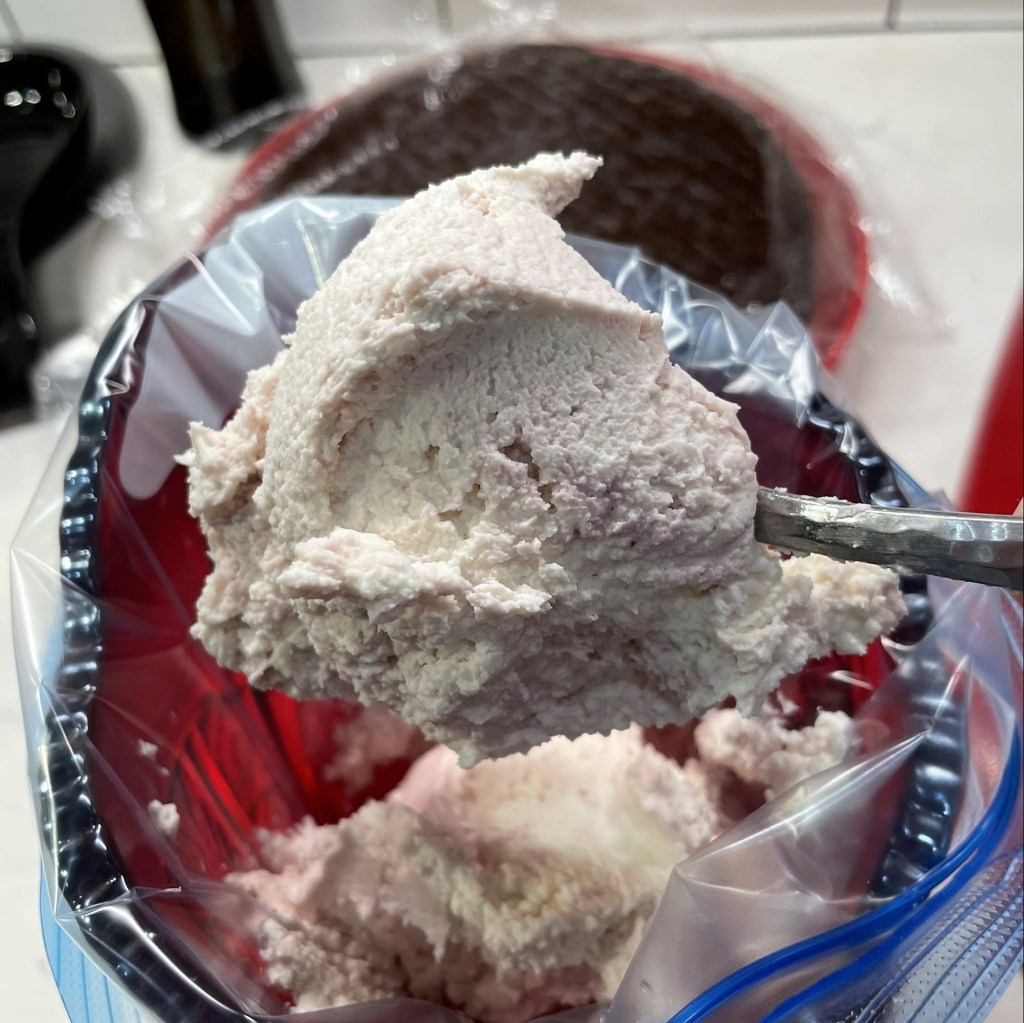
Transfer the mascarpone cream to a large zip-top bag and put it in the refrigerator.
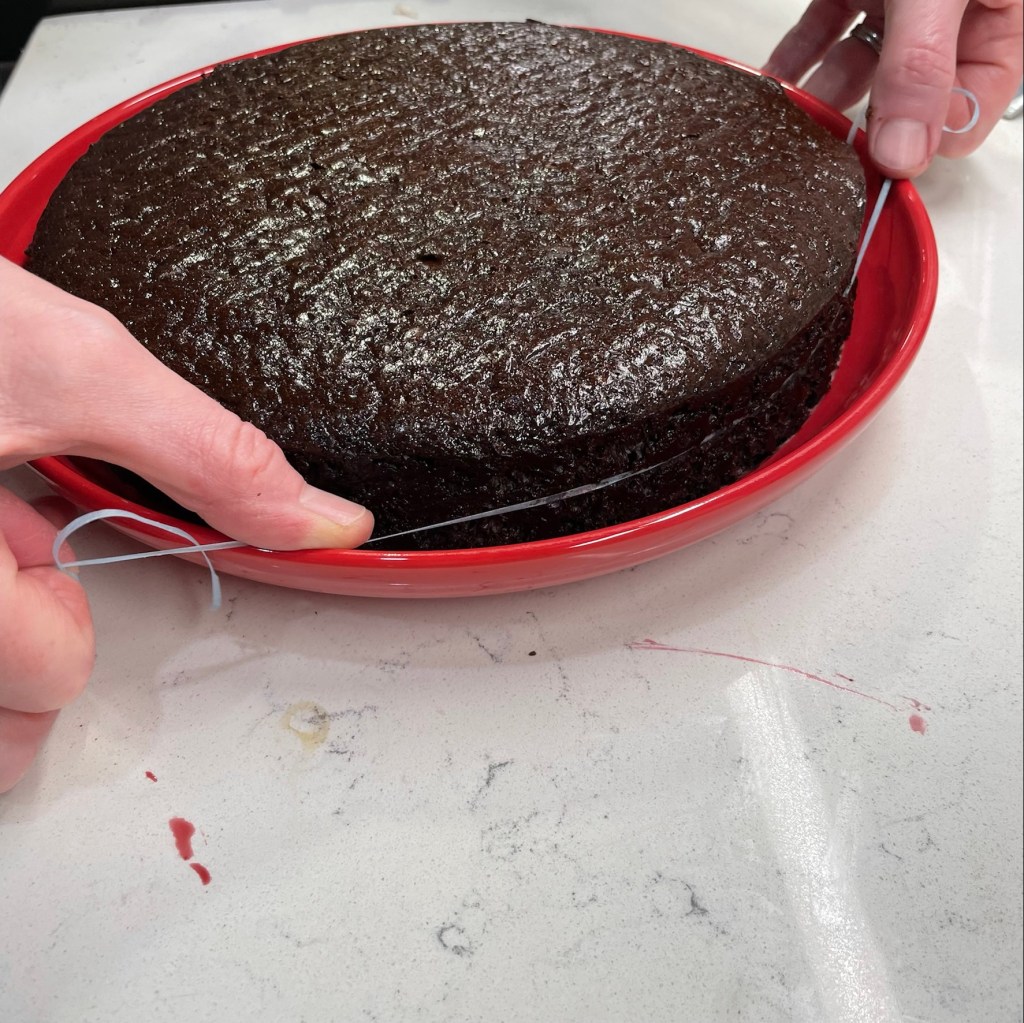
To slice the cake layers, I used a long piece of unflavored dental floss.
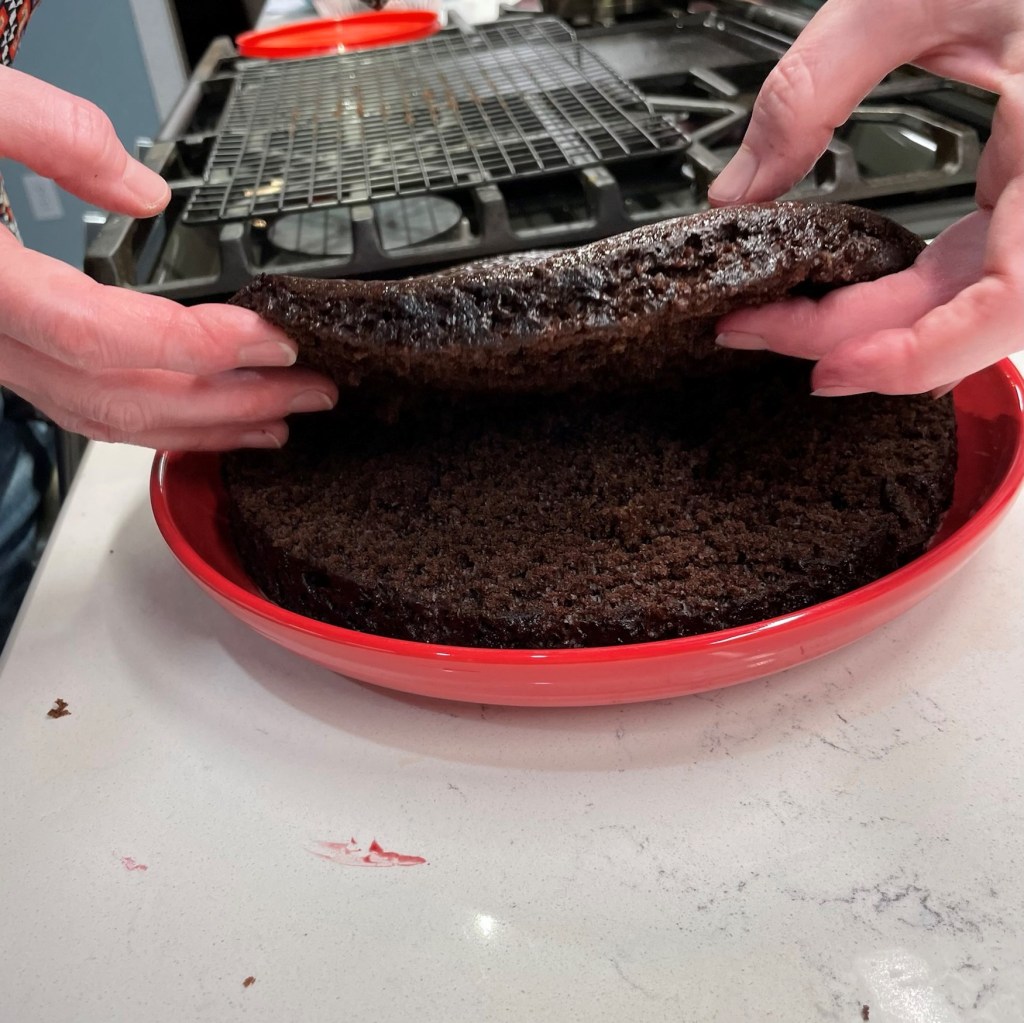
The layers may not be totally perfect, but that’s OK.
When you’re ready to assemble the cake, smear a small amount of mascarpone cream onto the cake platter to stabilize the first layer.
Drizzle about 1/3 of the cherry syrup over the cut side of the cake layer.
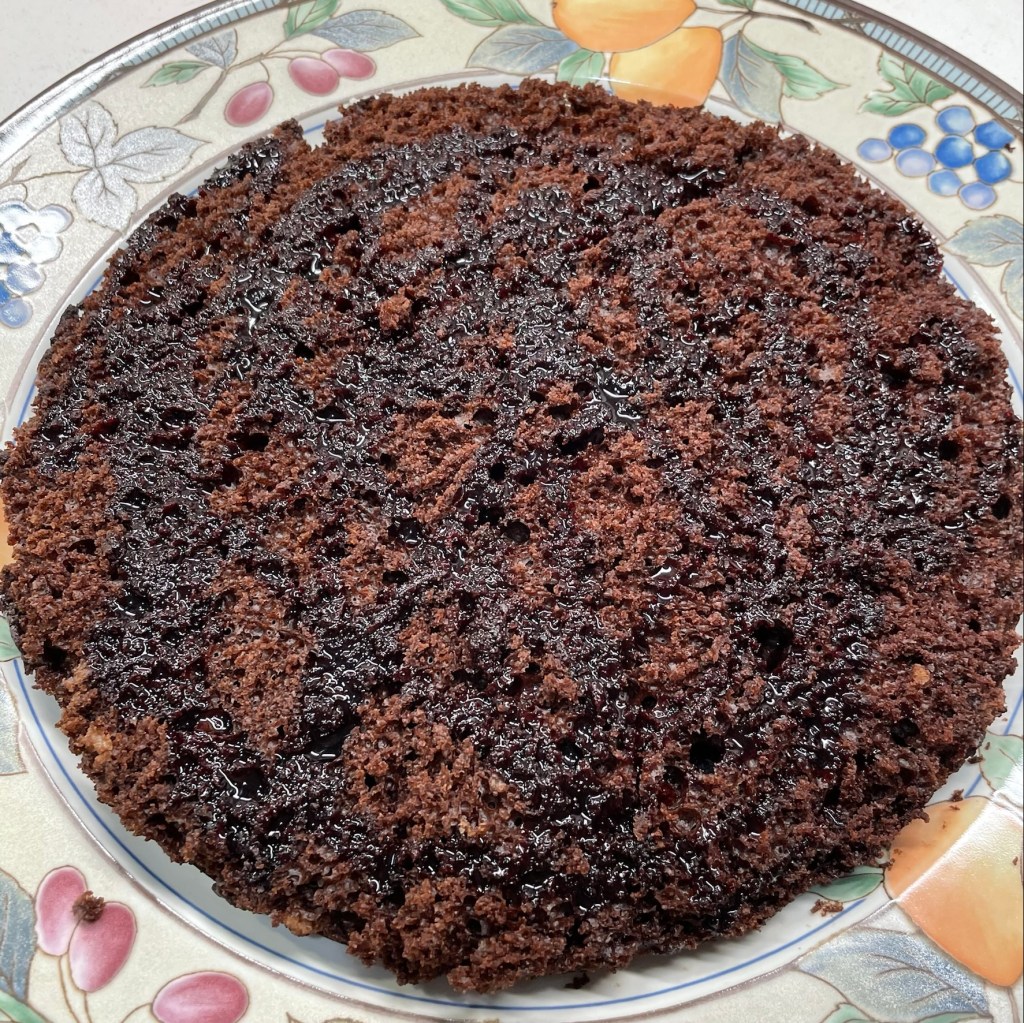
The syrup will soak into the cake, drenching every bite with the bourbon-cherry flavors.
Snip the corner of the mascarpone cream bag and pipe about 1/4 of it onto the soaked cake layer. Spread gently to get more coverage, or just fill in with a few dots of additional cream.
Arrange 1/3 of the drunken cherries onto the mascarpone cream. Repeat with the next two layers, saving a rounded piece for the top.
Pipe some of the remaining mascarpone cream around the top edge of the final layer. Refrigerate the cake while you make the ganache.
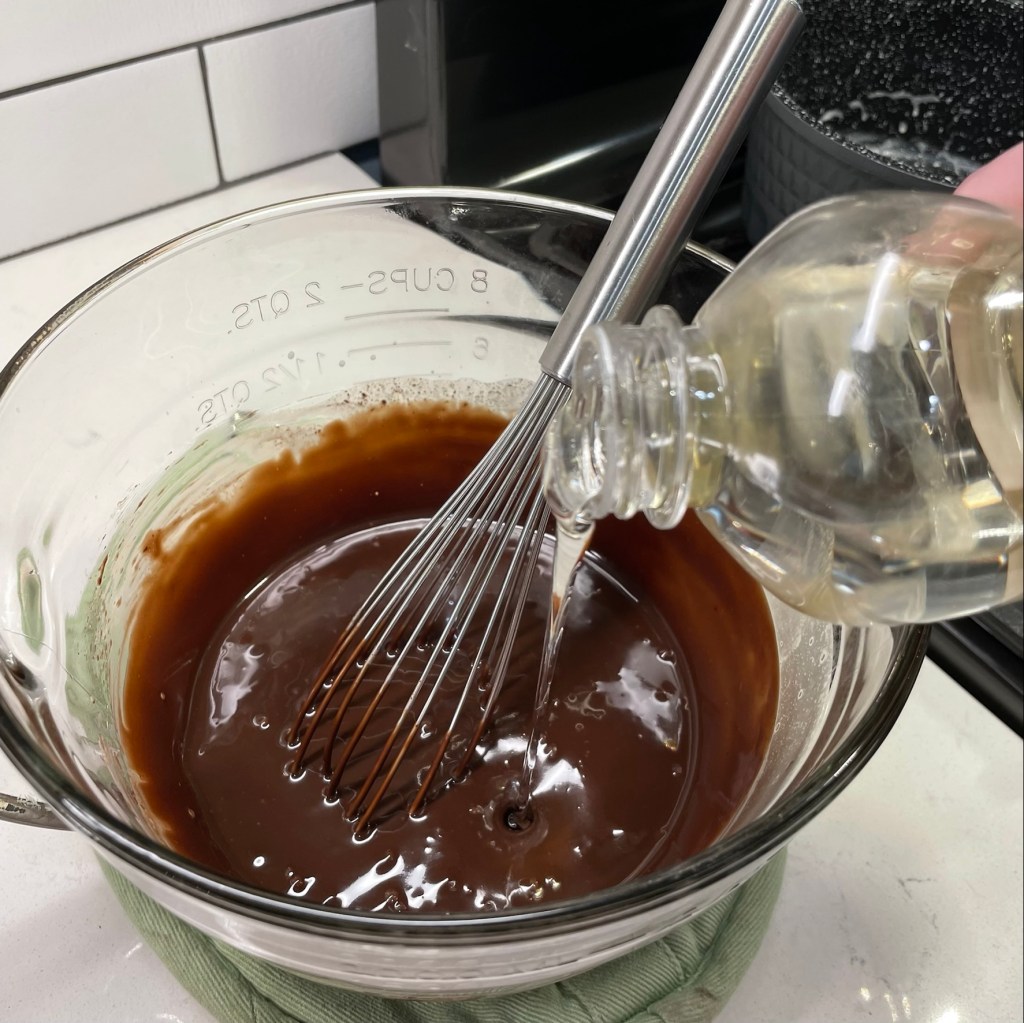
To make the ganache, heat heavy cream over medium-low heat until steaming. Pour over chocolate and leave it alone for 10 minutes.
After 10 minutes, blend with a whisk, stirring mainly in the center of the bowl.
At first, it will seem like it isn’t working, but stay with it.
Aha! Continue to whisk until the entire mixture is smooth and chocolatey.
This is what my ganache looked like after only one minute of whisking.
Stir in a small amount of corn syrup for a glossy shine and to keep the sugars from crystallizing.
Just for fun, I whisked in a half shot of amaretto. We like it in bourbon-cherry cocktails, and it worked here as well.
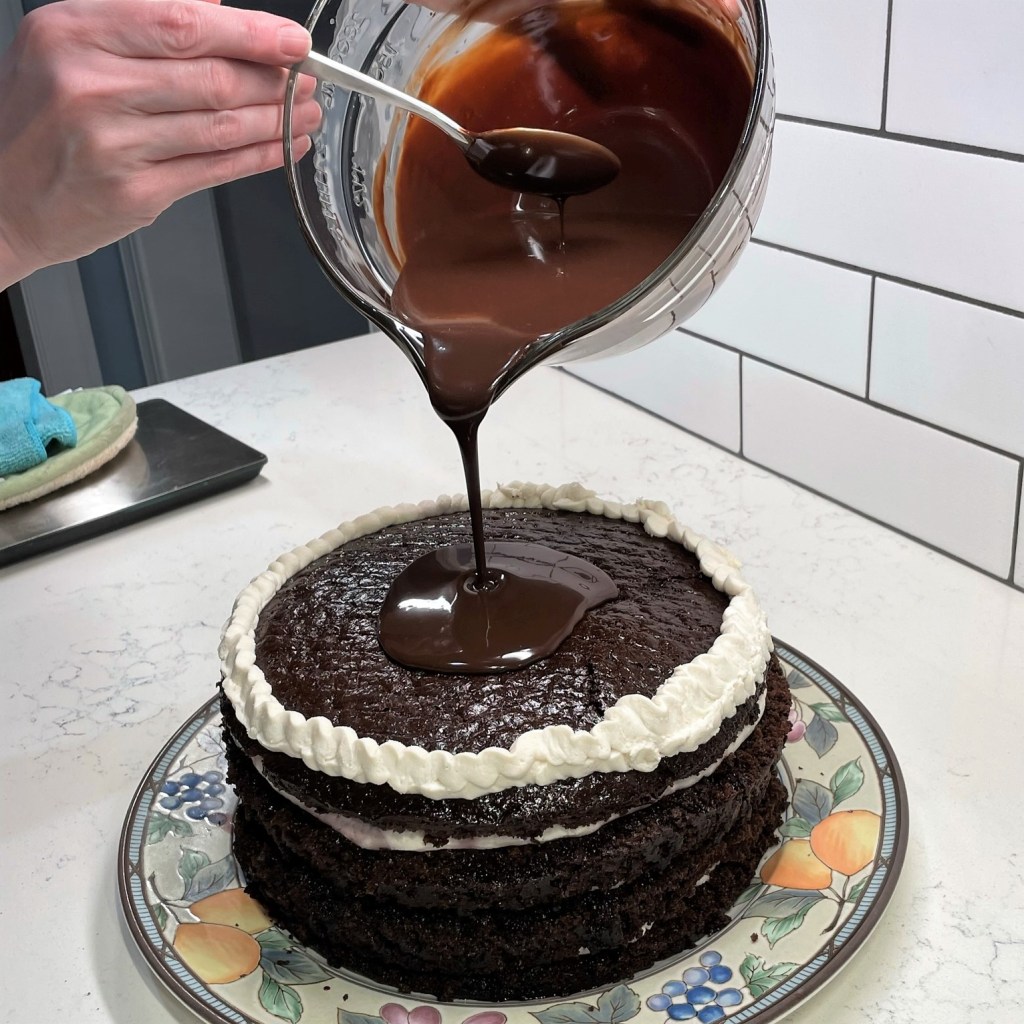
Slowly pour the cooled ganache onto the cake. The ganache will run off the center of the cake, but the mascarpone will keep it from running off. Keep pouring.
I poured the ganache right to the top of the edge. When the ganache has set, cover and refrigerate the cake until ready to serve.
Just before serving, pipe on the last bit of mascarpone cream, making little cushions for the bourbon cherries. Serve immediately.
The cake keeps very well in the fridge, and we decided the flavors were even better after a day or two!
Anybody who doesn’t get excited about pizza has, well, never had a good one. That’s my philosophy, and it’s one of the many reasons my husband, Les, and I are so darn compatible. Our tenacity in searching out the best foods is another. It is not possible for me to pass on reading an article about food—whether it relates to a trend, a signature dish or a hot new restaurant. Les is the same. So when we found ourselves at Modern Apizza in New Haven, Connecticut, near the end of our summer vacation, it was pretty much heaven for both of us.
You have to say it like the locals do… it’s Modern “Ah-Beetz!”
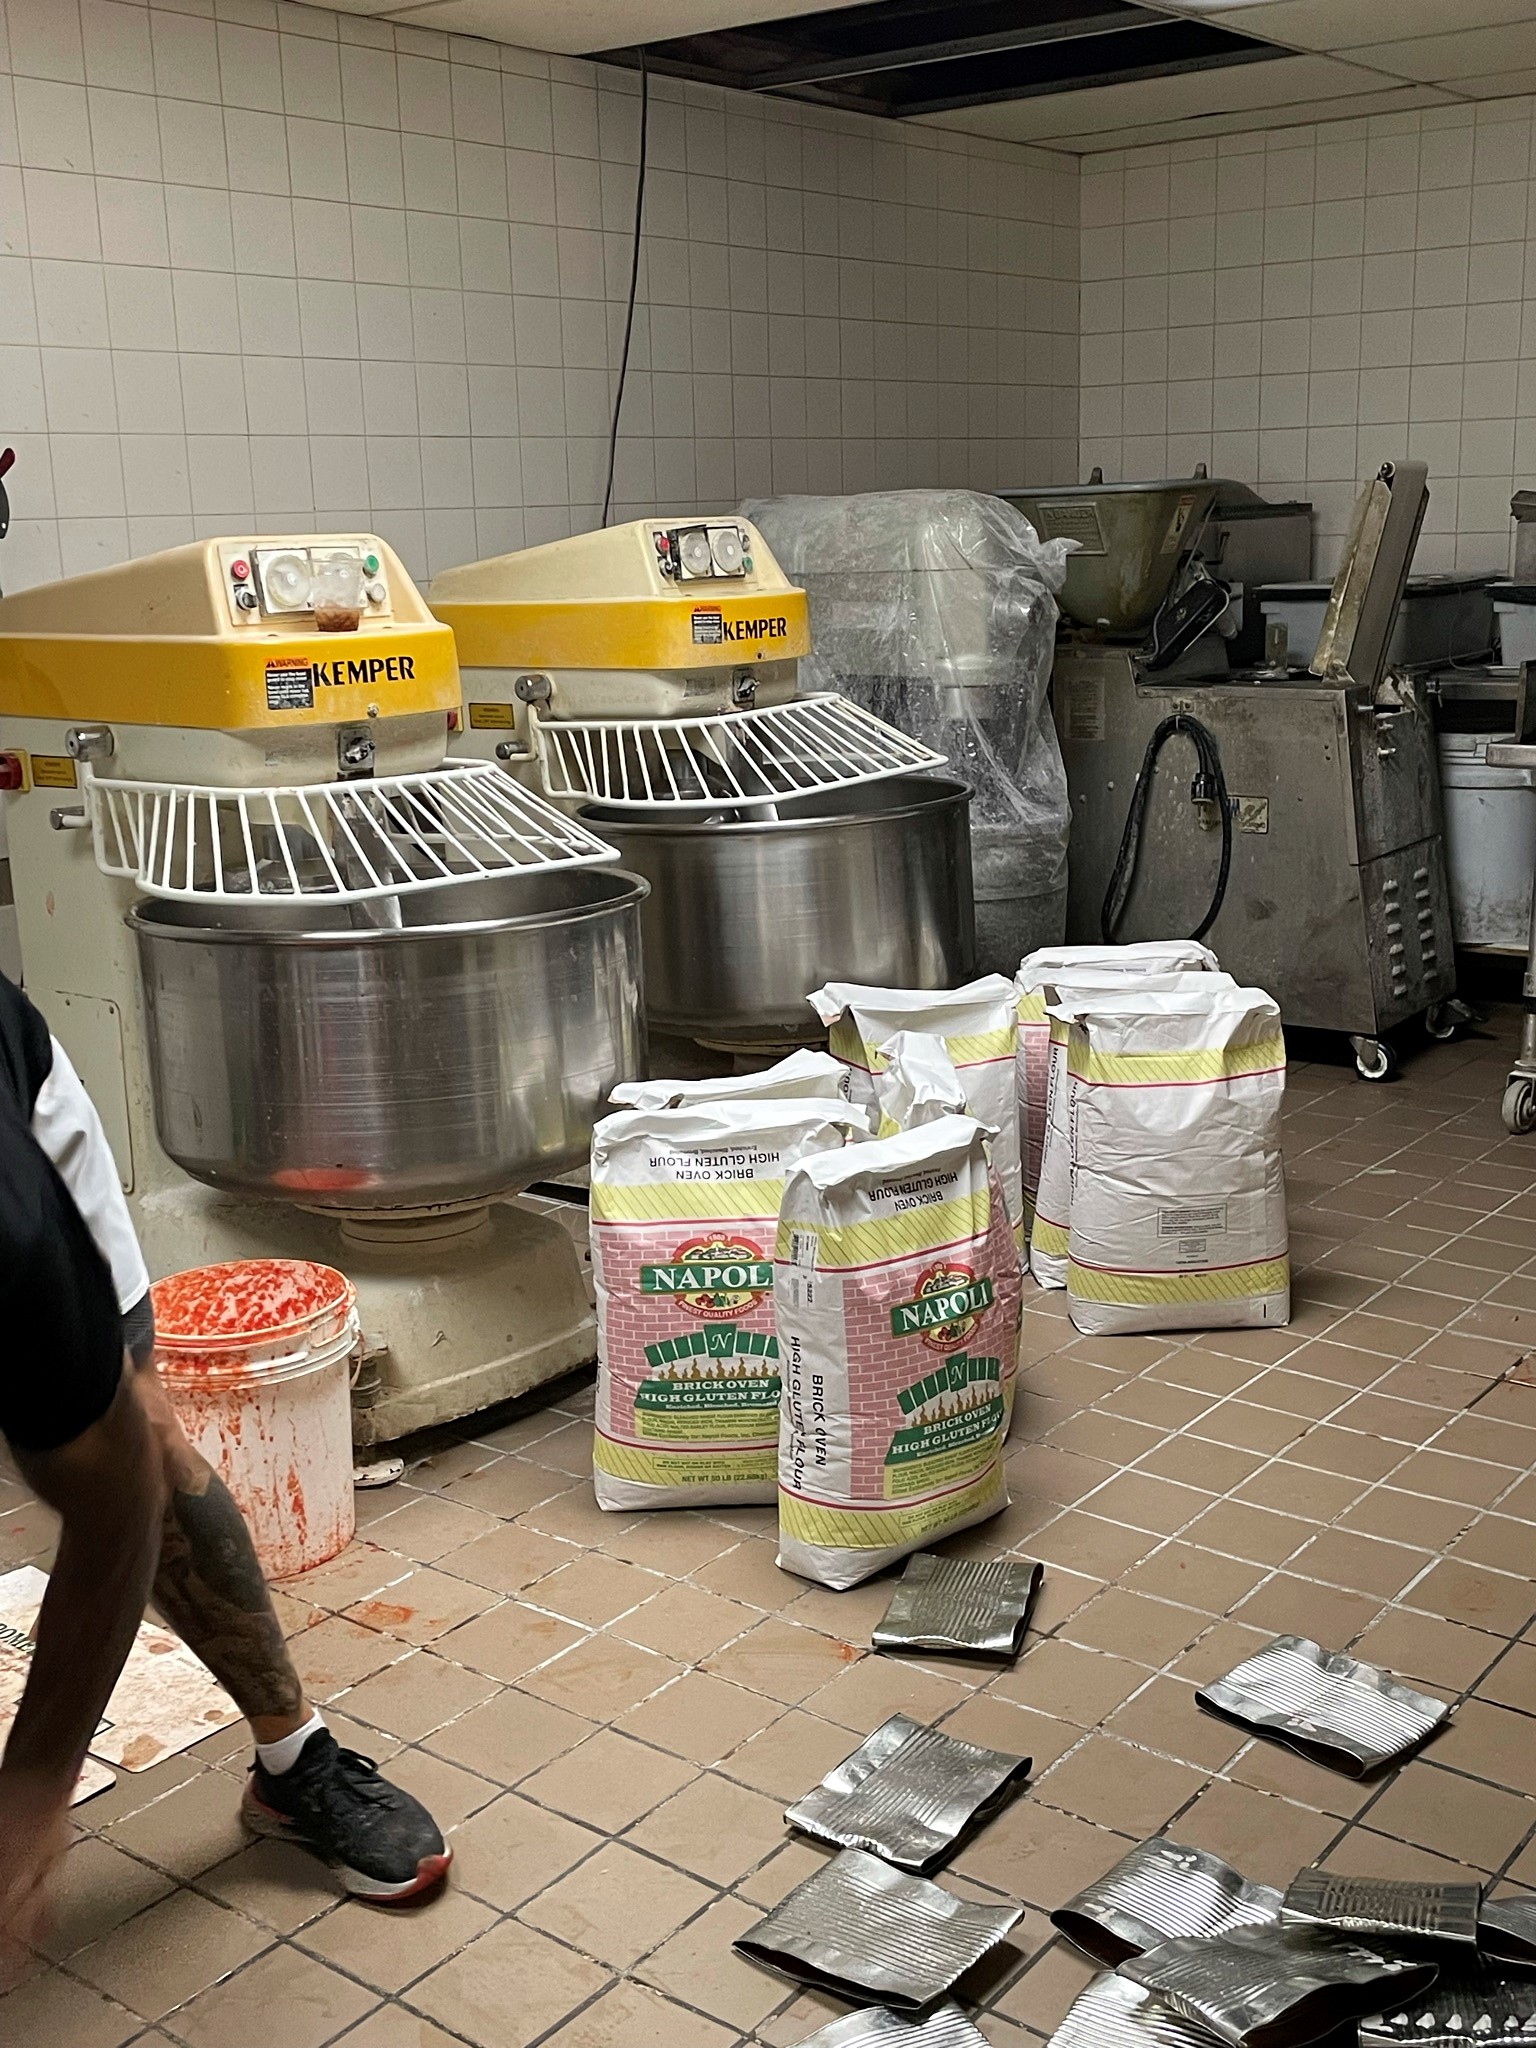
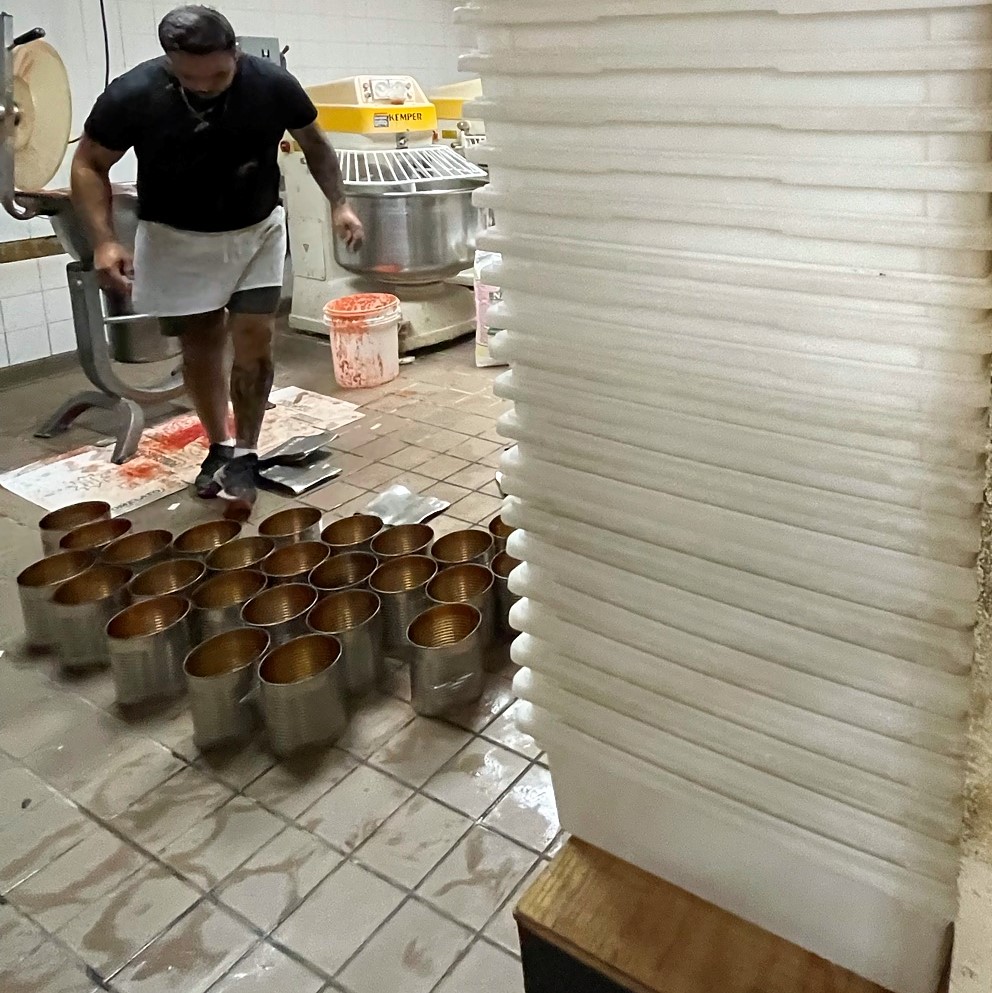
Our visit was not by chance; it was intended to be a highlight from the very start of our vacation planning, and we worked other aspects of our trip around it. That’s how seriously we take our pizza. And we had a big inside connection that won me a behind-the-scenes tour of the place, through the kitchen and prep spaces, and all the way down to the basement where they make more sauce and dough than I have ever imagined.
All these buckets of sauce are made for just one day’s pizzas.Those mixers are a wee bit bigger than my KitchenAid, yes? That’s 400 pounds of high-gluten flour, for ONE day’s pizzas!
How did I have such an opportunity, you might wonder, to be invited into the heart of this business that is 650 miles from my home? Easy. Les knows the owners! During what seems like a lifetime ago, when he lived in the New Haven area, Les owned a home two doors down from Bill and Mary Pustari, who bought Modern Apizza in 1988 and continued the long tradition of excellence there that had begun in 1934. After a few years owning the place, they expanded the dining room and added a second, oil-fired brick oven to their kitchen to keep pace with the popularity of their amazing pizzas.
When Les reached out to his old friends to inform them of our plans to visit New Haven, they were gracious to offer me a tour of the restaurant, to witness the magic up close and personal. For me, it was as exciting as many of the backstage events I had experienced during my radio years and one of the biggest highlights of our entire trip, and I’m excited to share my experience, and the pizza it inspired me to make at home. But first—lunch!
Oh, YUM!
Our server, Arianna (who also happens to be a daughter of the owners), didn’t hesitate when we asked which pizza is most popular with their customers.
“Hands down, the Italian Bomb,” she said. Well, sure, the one with sausage, bacon, pepperoni, mushroom, onions, peppers and fresh garlic, of course! That sounded like a lot to chew on for lunch, and we decided on a half-and-half pizza (kind of amazing they are willing to do that), with artichoke hearts and eggplant on one side, and Italian sausage with hot cherry peppers on the other. Both combinations were delicious, but what I could not get over was the complex flavor and chewy-but-crisp texture of the crust, and I was about to come face-to-face with the signature ingredient that gives Modern Apizza a culinary edge over its competitors.
Veggie heaven, with artichoke hearts and eggplants.Italian sausage and hot pepper “apizza.”This looks and feels exactly like the crust I’ve been working to achieve at home!
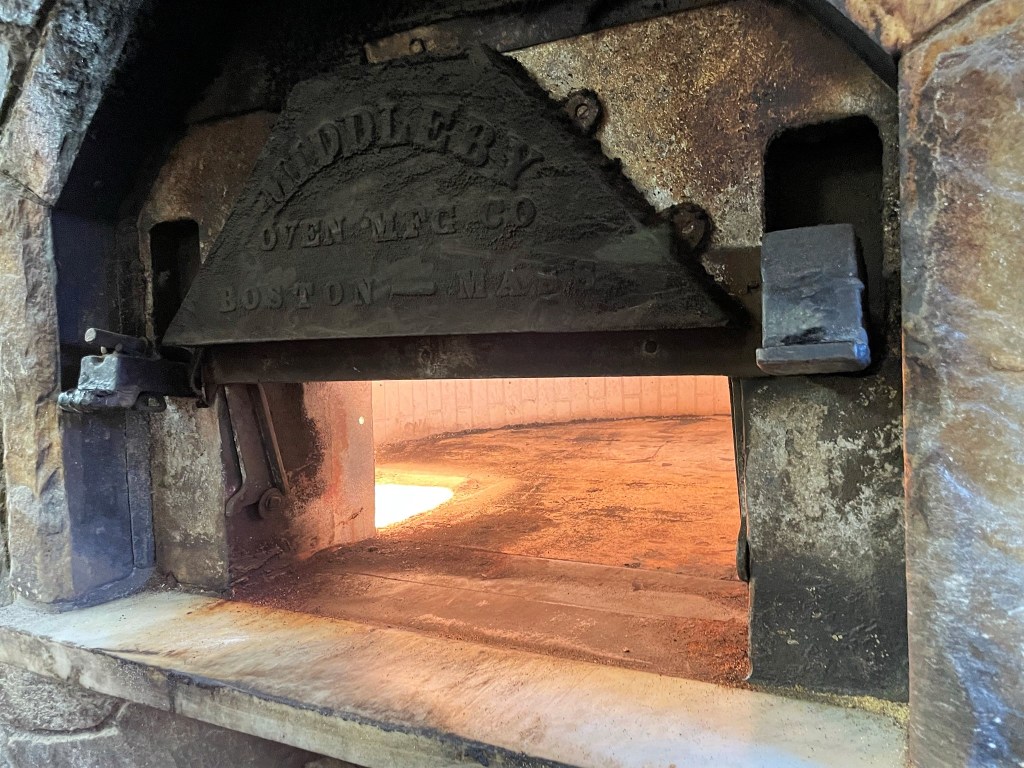
When it was time for my “backstage” tour, Bill took me first through the kitchen, and then to the original oven, which they still fire up when business is booming. An oil-fired oven is an incredible sight, and when Bill informed me that the coolest spot in the oven is 700° F, I couldn’t resist asking what the hottest temperature in the oven was. Care to guess?
Modern Apizza’s original brick oven, still in action after all these years.
“The temperature of fire,” Bill answered. Wow!
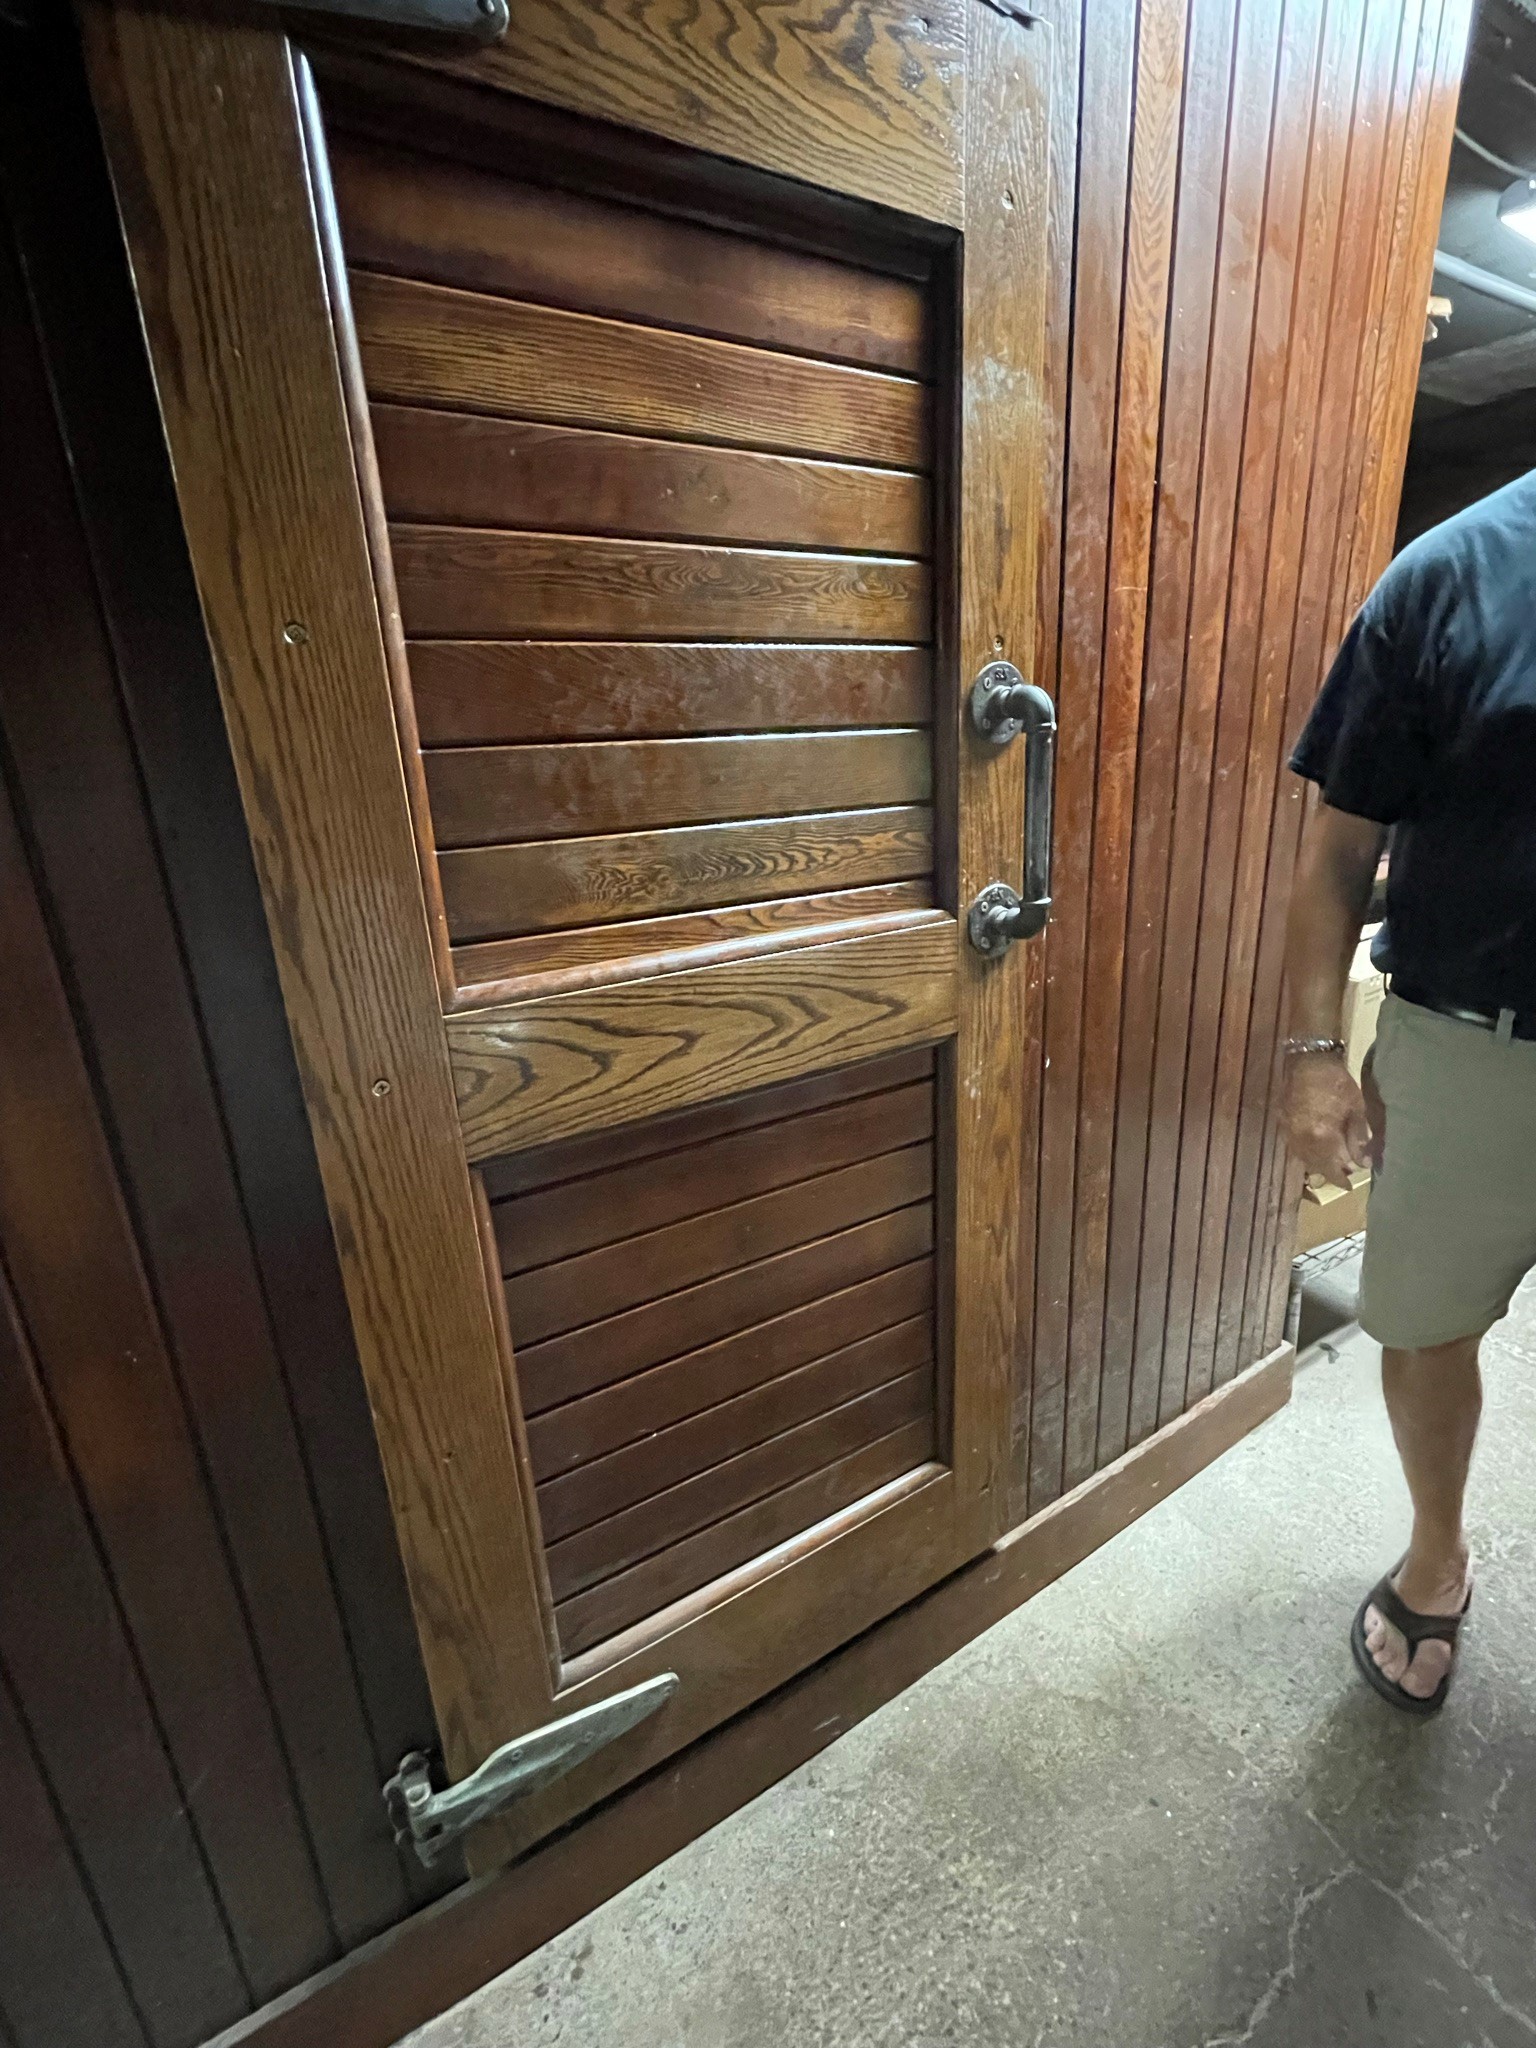
From there, Bill led me downstairs to the basement of the restaurant and to a very special, very old refrigerator that is home to a very old resident—and the secret to their flavorful dough—a sourdough starter!
Behind this antique refrigerator door lies the secret to Modern Apizza’s great flavor.Hello, Gorgeous!!! 🙂
They call this glorious culture “The Bitch.”
Despite her unbecoming name, The Bitch is a beloved member of the family at Modern Apizza. They feed her every day, and if there is ever a weather emergency or power outage, she goes home with someone for safekeeping. Bill told me that several years ago, he wanted to take Modern’s pizzas to a new level, so he got a bit of a 100-year-old starter from a local French bakery, and that ushered in a whole new chapter in Modern’s history. This revelation thrilled my sourdough-loving heart to pieces and connected the dots on why our lunch pizza reminded me of home.
I got more confirmation about my pizza-at-home techniques when we went back upstairs to the kitchen, where William (also a Pustari) and George worked in harmony with Jesse, the oven guy, preparing pizzas to order for their customers, at an astonishing rate of two pizzas per minute. Honestly, I wanted to throw on an apron and jump in on the action!
They have this down to a science!
From the shaping of the dough, the order of topping ingredients, the high-heat baking and the natural leavening of the pizza dough itself, I left Modern Apizza feeling that I was doing something right—or, really, doing a lot of things right, at home. All my research, trial and error had put me on the right pizza path, and that is a very good feeling. Before I share my home pizza that was inspired by this visit, can you stand just a little more bragging on Modern Apizza?
Yes, it takes time to crush and recycle all the cans. But, as Bill Pustari told me, it’s the right thing to do.As do the other amazing pizzerias in New Haven, Modern Apizza serves up local soft drinks from Foxon Park.Fresh from the local farm!
Despite the extra time it takes his prep crew, Bill is committed to doing right by his community. All those cans for the tomato sauce get recycled. He purchases sausage from a local butcher, serves local Foxon Park soft drinks, and Modern’s mozzarella comes from Liuzzi’s, the same Italian market Les and I had visited earlier in the week. Just before he arrived at the restaurant, Bill had met with a farmer to purchase local tomatoes to be used on the fresh tomato pizza which is, of course, a New Haven classic. All these neighbors supporting each other and finding great success—kinda makes me want to live in New Haven!
Sourdough was the key to the great flavor we experienced at Modern Apizza, and it’s my go-to pizza dough at home. My favorite recipe is linked in the ingredients list, and I recommend using a pizza steel and the hottest temperature your home oven can handle. My dough ferments in the refrigerator, but I bring it to almost-room temperature when I’m ready to shape and bake it.
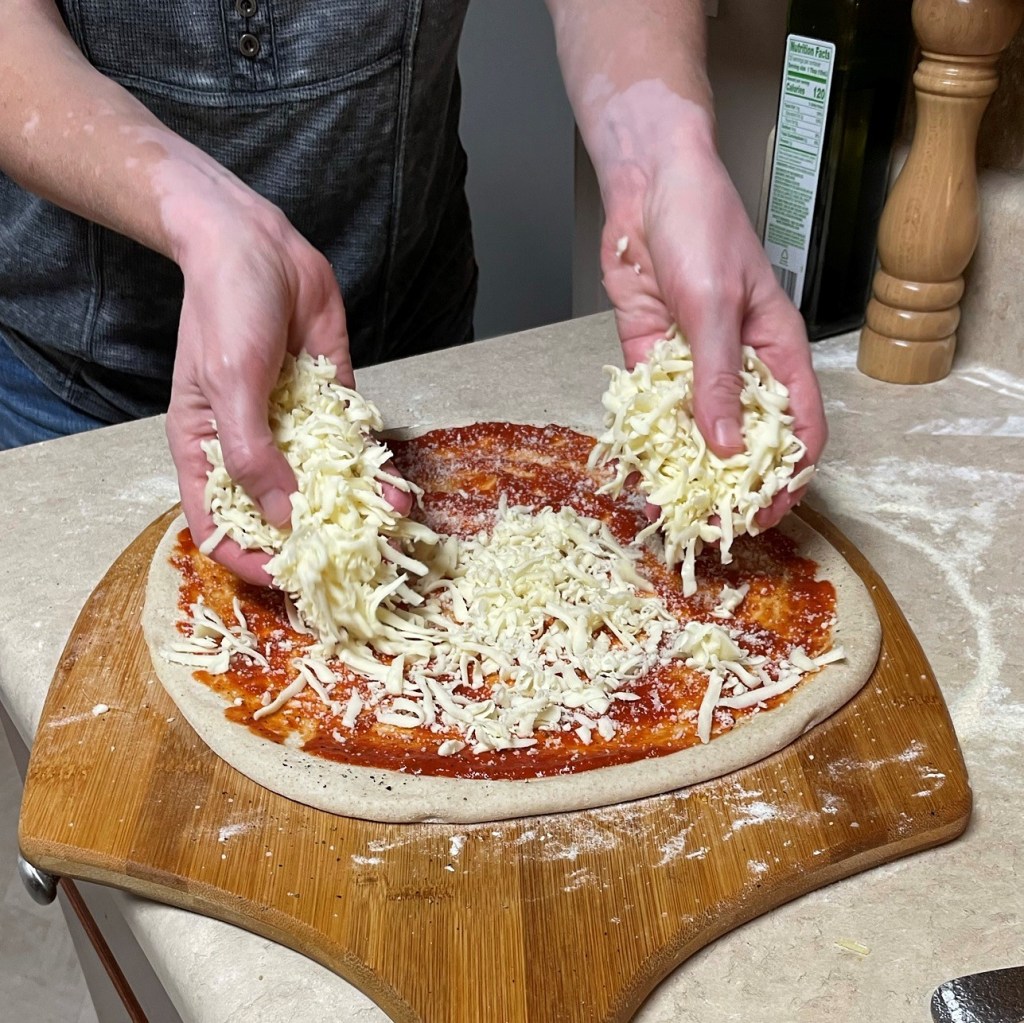
Use firm, whole milk mozzarella for best results—and yes, you absolutely should shred it yourself rather than using pre-shredded, pre-bagged cheese. Pre-bagged cheese may be convenient but it is coated with a powdery substance that prevents clumping in the bag, which unfortunately for use on pizzas also prevents even melting. So please shred your own; it’s worth it.
Instructions
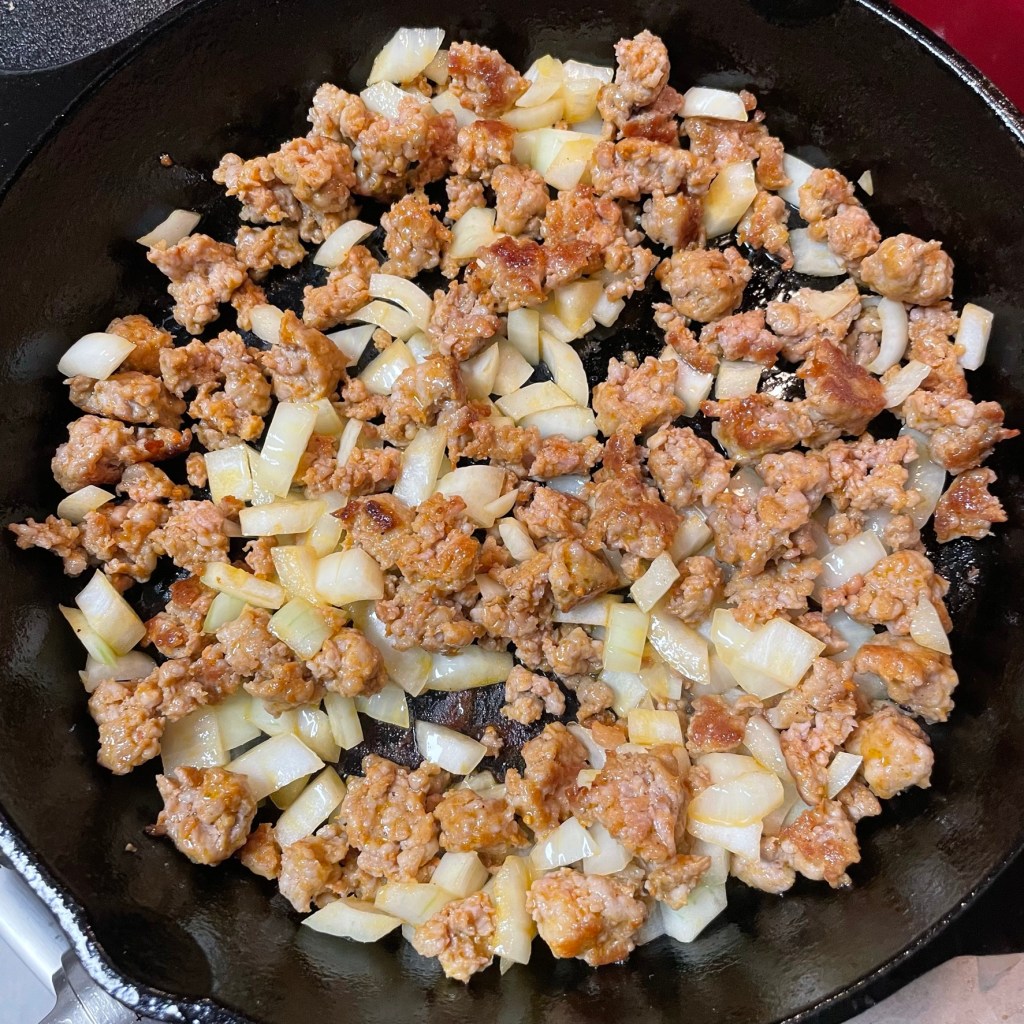
Crumble the Italian sausage and cook in cast iron just until it starts to brown. Add the onions and cook a minute or two more.
Hot or mild, your choice! Drain them and pat dry with paper towels. Chop into smaller bits if desired.
Swirl your sauce onto the shaped pizza dough, then scatter a generous amount of freshly shredded mozzarella over the whole thing.
Arrange the sausage and cherry peppers all over the pizza.
This is a new thing for me, thanks to my experience at Modern Apizza. Drizzle a bit of extra virgin olive oil over the pie before you slide it into the oven.
The hot pizza steel gives us a bit of brick-oven style baking at home. Our pizzas take about 6 minutes.
Loving it! 🙂
Preheat the oven to 550°F, with the oven rack positioned about 8 inches below the top element and a pizza steel in place for a solid hour at temperature.
Heat a cast-iron skillet over medium heat. Crumble up the Italian sausage and brown it until some of the edges are just developing a crust. You want it to hang onto its moisture for the most part, as it will cook again in the oven. Add the onions to the skillet and cook until they are softened. Transfer the meat and onions to a bowl and cool completely.
Drain the cherry peppers and pat them dry on layers of paper towel. Chop them into bite-sized pieces.
When the oven is ready, shape the dough into a 14” round and transfer to a flour- and cornmeal-dusted pizza peel, which will make it easy to slide the pizza into the hot oven.
Swirl pizza sauce over the dough, then scatter parm-romano and mozzarella evenly. Arrange the cooked sausage and onions over the pizza, and follow that with the cherry peppers.
Drizzle olive oil lightly over the toppings and quickly transfer the pizza to the hot oven for about 6 minutes, or until the cheese is hot and bubbly and the edges of the crust are browned and blistered.
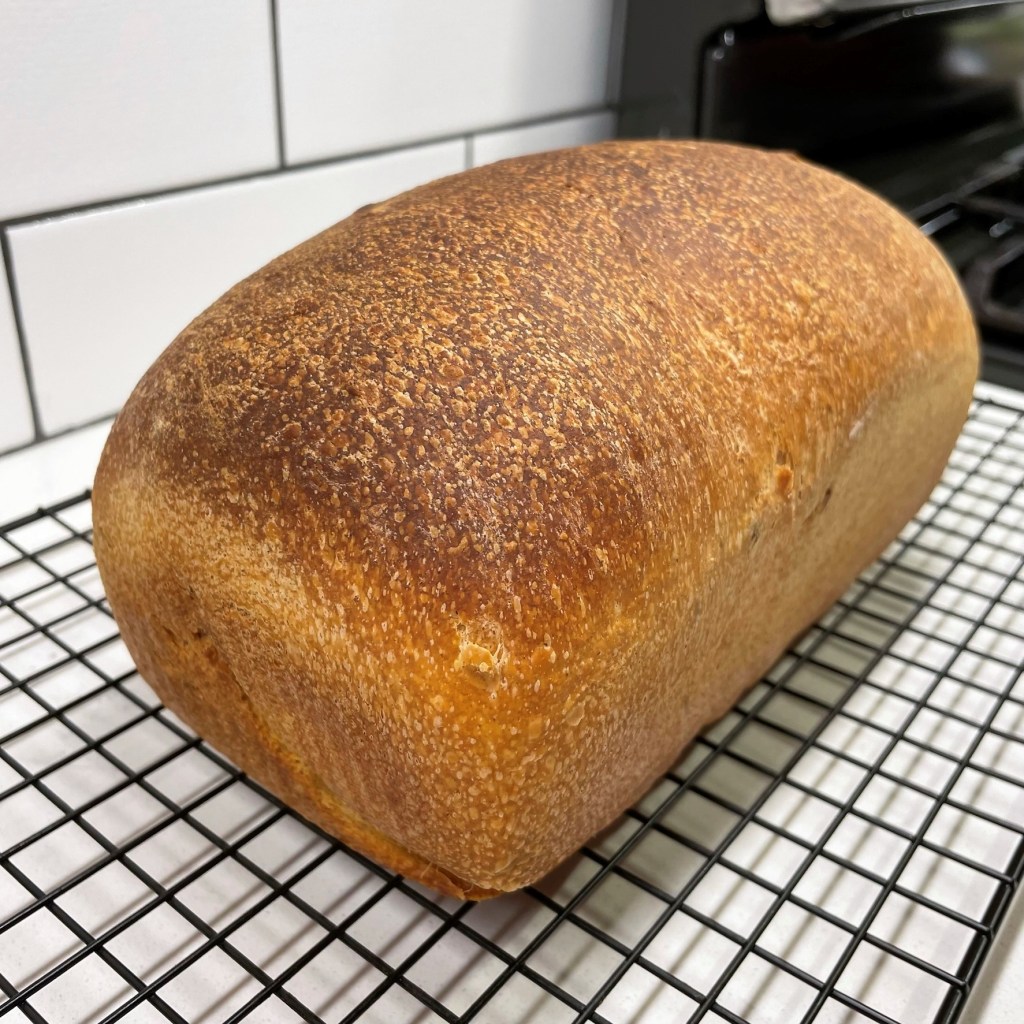
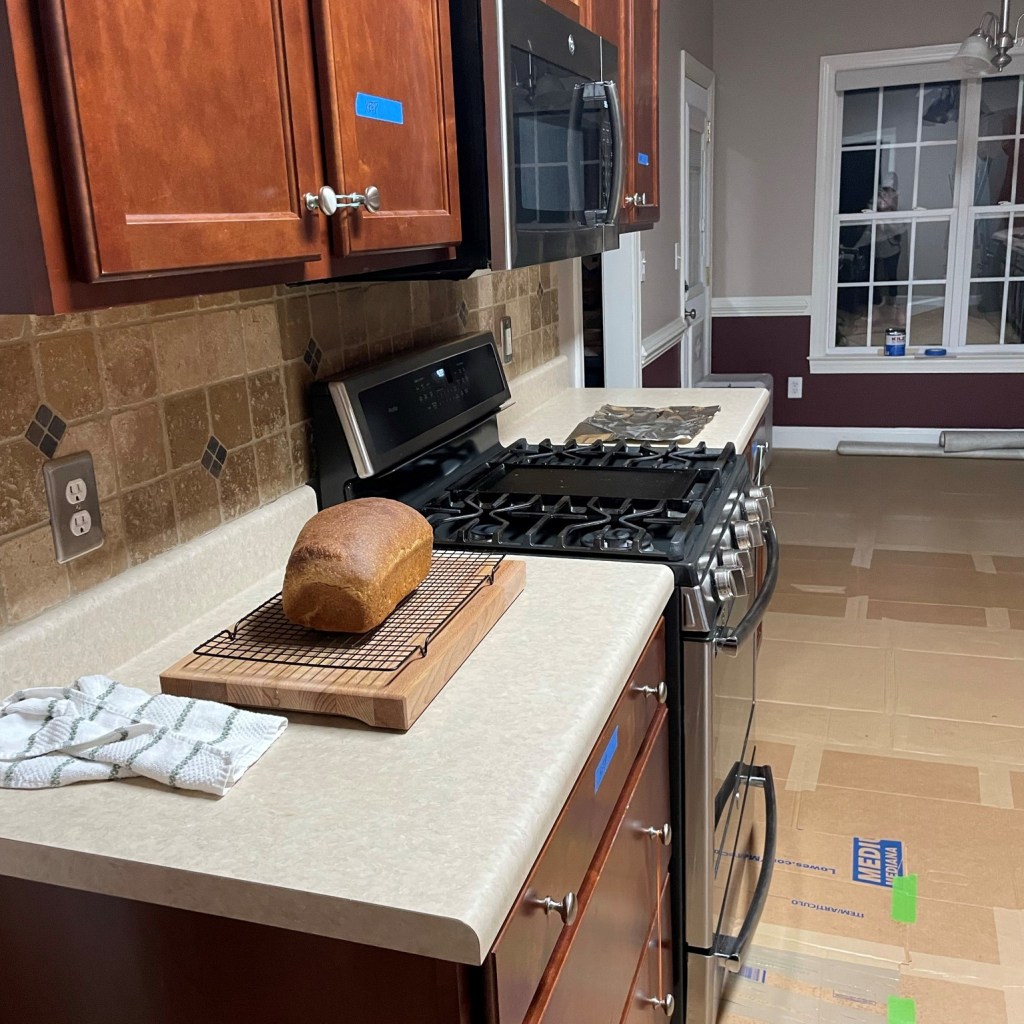
If I had to guess a number, I’d say conservatively that I have probably made about 280 loaves of sourdough bread since I developed my starter back in the spring of 2016. That’s figuring an average of one loaf per week for 5½ years. Of course, there have been some weeks that I have baked much more than that (especially during holiday seasons) and others that I have not baked at all, either because our schedule didn’t allow it or we didn’t need it or, as has been the case recently, because we didn’t have a kitchen.
What to do with my sourdough starter was a big part of the discussion when my husband, Les, and I sat down to figure out the details of our kitchen renovation, which I am pleased to say is nearly done. Would I just let the starter go to sleep and try to revive it when all was said and done? I supposed that I could at least make my Sourdough English Muffins, which are cooked on a griddle. Or should I keep feeding the yeasty rascal on schedule and just call the discard a total loss? That would be a shame.
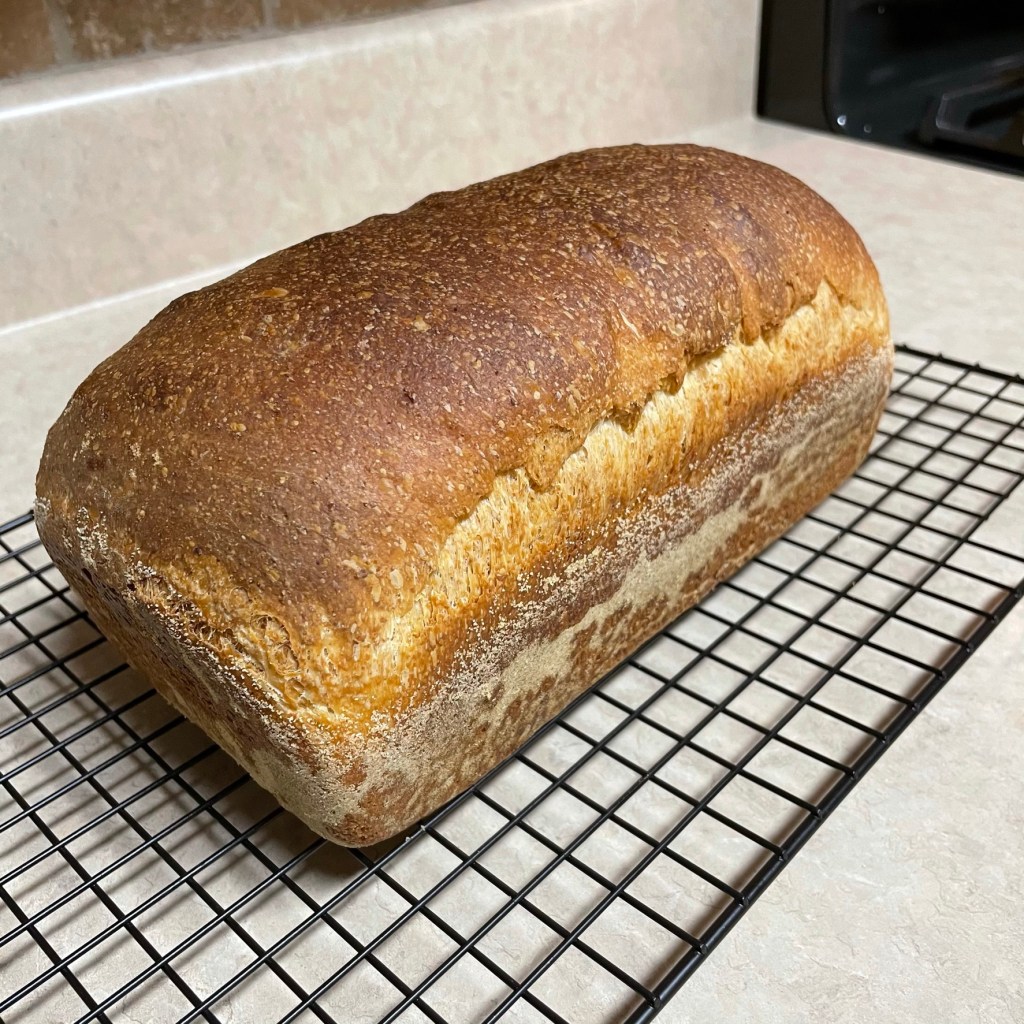
A freshly baked loaf of homemade sourdough bread was the last thing I made in our old, time-worn kitchen, and it is the first thing I have made in the shiny new kitchen, even though a few loose ends remain before we can do our big reveal. The bread I made both times was this one—a sourdough-based recipe by Maurizio Leo, a master bread maker whose own blog, The Perfect Loaf, has been on my radar for about a year, thanks to a few contributions he has made to the King Arthur Baking website. Maurizio is a genius when it comes to sourdough, and I can hardly keep up with my desire to bake everything on his blog at least once.
Last bread, baked only hours before the kitchen was torn down.We still have protective film on the counters, but I’m already making bread!
This bread, which Maurizio has named Sourdough Sandwich Bread with Pre-cooked Flour, is a favorite at our house because of its softness, height, chewy crust and versatility for sandwiches, toast and just plain eating with a fat schmear of soft butter. As the recipe name suggests, there is an amount of the flour that is pre-cooked, specifically with whole milk, and this pre-cooking of the flour creates a sticky, roux-like addition that lends a beautiful texture to the finished bread and, as a bonus, prolongs its shelf life. This pre-cooking technique itself is not new; the Japanese have been doing it for a long time, and they call it “tangzhong.” But the combination of that milk-cooked method with sourdough and no added commercial yeast sends it straight over the top for me. Quite simply, I love this bread.
I’m happy to report that I have been able to make bread, even without access to my beloved oven during this remodel, thanks to the generosity of a couple of our neighbors, who offered their own ovens as surrogates. They received their own loaves of this bread as a barter for their oven services (not to mention the benefit of that lingering aroma), so it was a win-win situation.
The crumb is soft, tender and perfectly composed with no crumbling. The crust is chewy and soft.
So, have I put my own spin on this fantastic bread? Kind of, but not much. My method of steam baking is less sophisticated than what Maurizio Leo describes in his original recipe, but it works. I have fiddled with the ratio of flours in favor of greater percentage of whole grain and have even swapped in whole rye for the pre-cooked part several times, and the bread still comes out terrific. I have also subbed out the honey—with brown sugar, maple syrup, molasses and even sorghum—and it wows me every time. Finally, I’ve halved the original recipe because I usually only make one loaf at a time (unless, of course, I’m baking at a neighbor’s).
One of these days, I’ll get around to trying some of Maurizio’s other recipes; I especially want to check out the Jalapeno Cheddar Sourdough Bread (yum!), and for sure, my Thanksgiving table deserves his Super-soft Sourdough Rolls this year. How ridiculous is it, given that I love making fresh bread, that I have never made it at Thanksgiving? I guess I have been too busy with everything else for the table, or else I didn’t plan well to have the oven free, but this will be the year.
In the meantime, I’ll keep making this darn-near perfect bread, my favorite, go-to sourdough. Enjoy!
Before you begin:
This recipe requires use of a mature, ripe starter. Plan to feed your starter eight to 12 hours before making this dough.
All ingredients are listed by weight. I highly recommend use of a digital scale for sourdough baking.
Plan to have a shallow pan available for steam baking. It is also helpful, but not essential, to have a digital thermometer for testing doneness of the bread at the end of baking time.
Ingredients
148 g whole milk
38 g whole wheat flour* (see notes)
175 g room temperature water
18 g honey*
32 g olive oil
106 g sourdough starter, recently refreshed (starter should be 100% hydration)
295 g bread flour
78 g whole wheat flour*
8.5 oz. fine sea salt
*Notes
I have had great success using whole grain rye flour in the first step of pre-cooking. The resulting dough will be rather sticky, but I find it more manageable to handle it with wet hands.
If you want to increase the nutrition by using more whole wheat flour in this recipe, try swapping about 30 grams for equal amount of the bread flour. Greater adjustment may require that you also increase the volume of water by a small amount, as whole wheat flour absorbs more water.
Alternative sweeteners can be an equal swap by weight if they are liquid. If you swap in sugar or brown sugar, try using two heaping tablespoons, and add them with the dry ingredients rather than in the starter mixture.
Instructions
The images in the how-to are from a previous bake, so please don’t be startled to see the old kitchen.
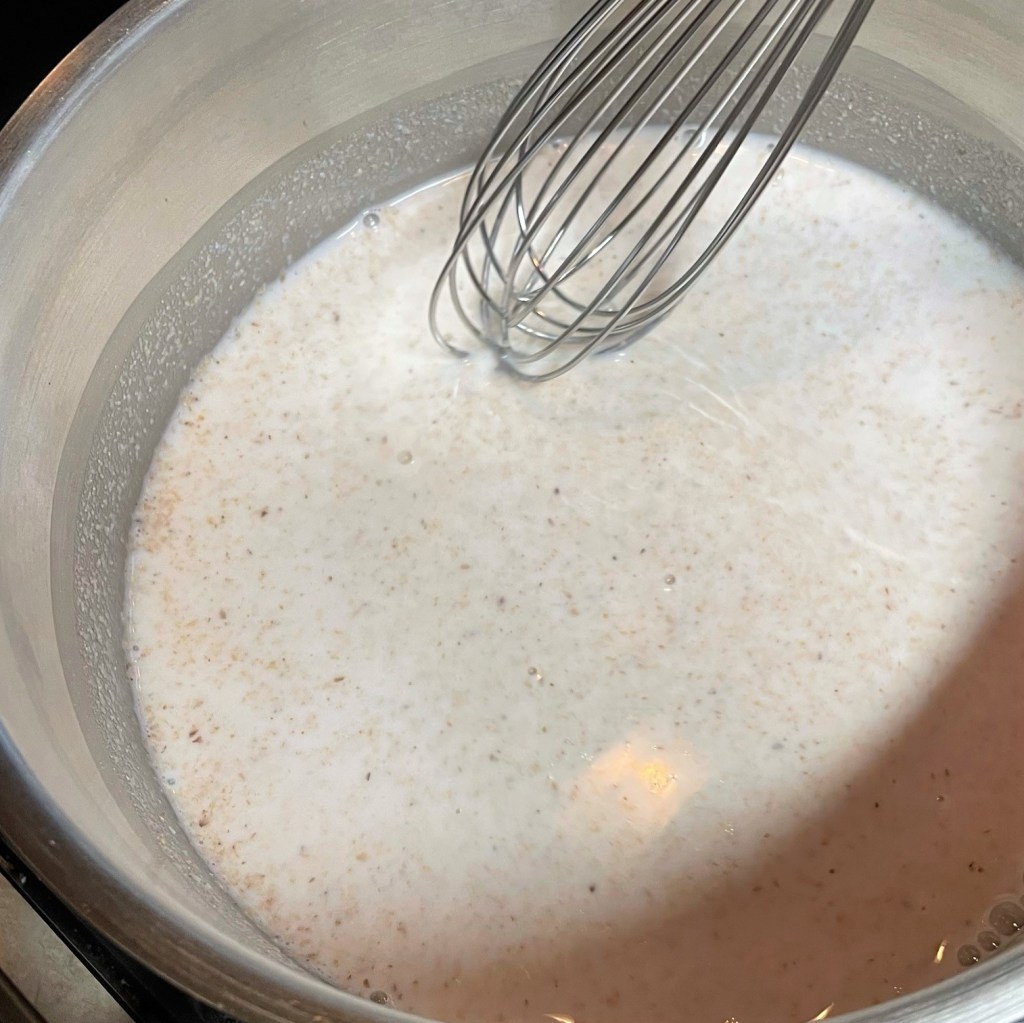
Use a whisk to blend the milk and flour together, and cook over medium heat until it begins to thicken.
When the roux begins to thicken, switch to a spoon (or you’ll never get it out of the whisk).
It will seem like nothing is happening, until all at once, it becomes like wallpaper paste.
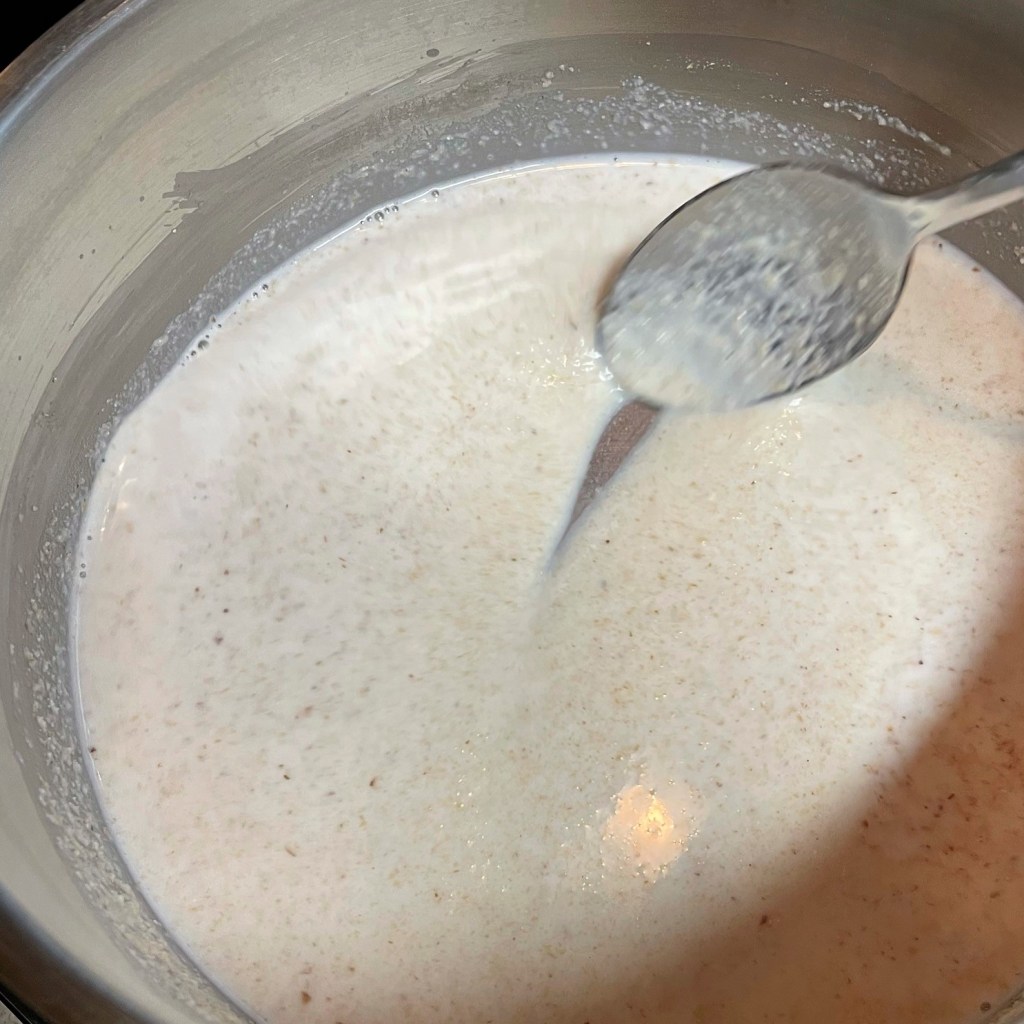
When it is cooked to this point, remove from heat. You can cool it in the pan while you prep for the next steps.
Or spread it out onto a plate or parchment paper to cool faster.
Measure by weight for accuracy. For this particular loaf, I used freshly milled Kamut flour in place of the usual whole wheat.
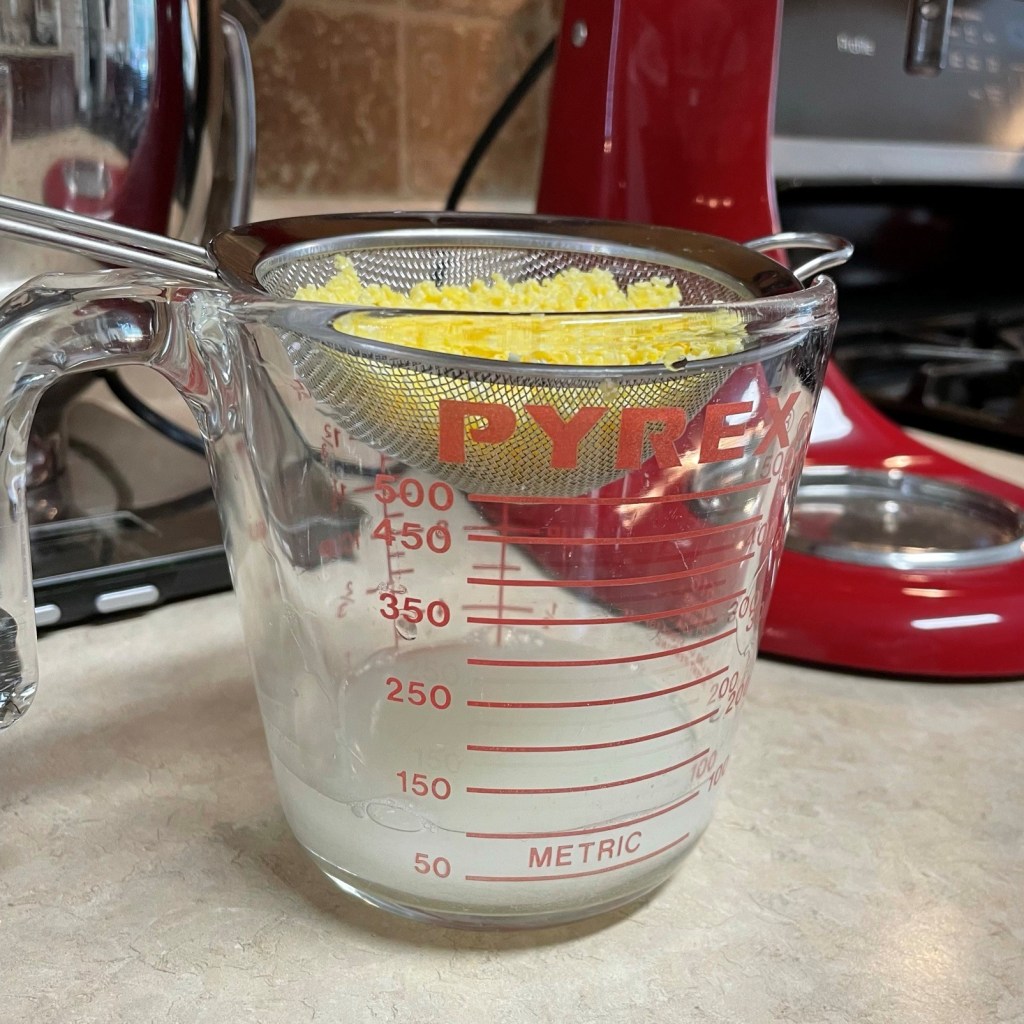
Measure the liquid ingredients by weight, too. Water, honey and oil.
Stir until the honey is dissolved.
Mix together the two kinds of flour with the salt. I’ve used Himalayan pink salt so we can see it in pictures.
The roux mixture will be quite firm after cooling.
Be sure you feed your starter the night before, so it is good and active.
Combine the roux, starter and liquid ingredients.
Mix with beater blade until evenly combined.
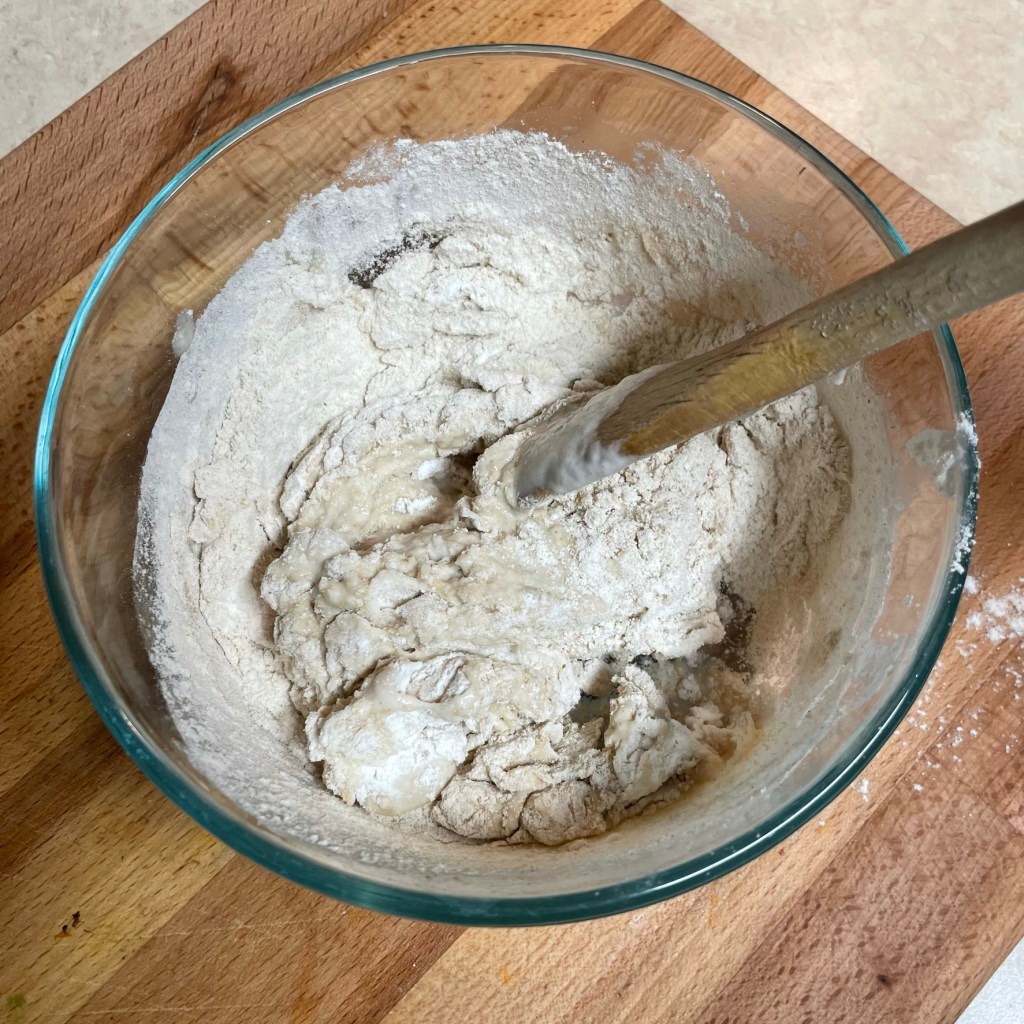
Add the flour ingredients all at once.
Mix with beater blade until all flour is incorporated and dough begins to organize on the beater. This will only take a minute or two.
Scrape the dough off the beater and let it rest for at least 20 minutes; 30 is better. It will look rather shaggy at this stage.
After the rest time, use the dough hook to knead the relaxed dough for about 7 minutes.
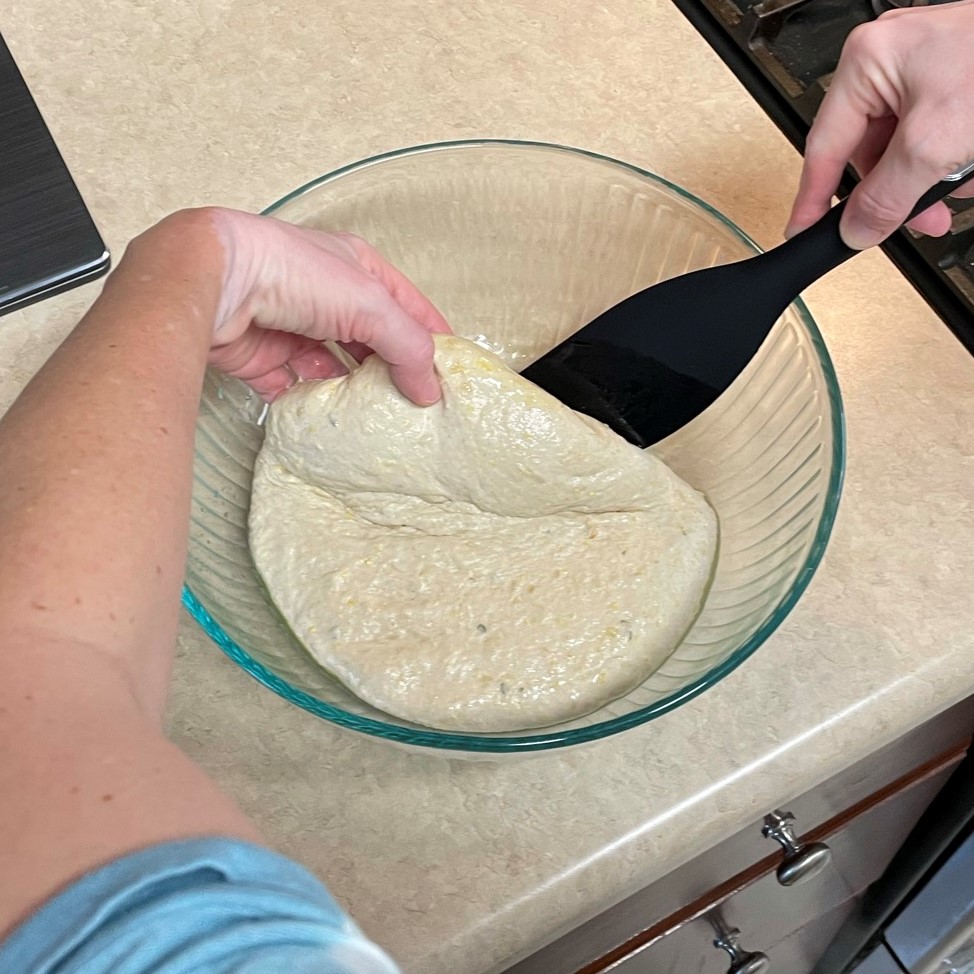
The dough will still be sticky and stretchy. Resist the urge to add more flour. Transfer to an oiled bowl, cover it and rest it 30 minutes.
Stretch and fold the dough at 30 minute intervals. Use wet hands to lift and stretch one side up and toward the center. Rotate the bowl and do the opposite side.
Finish by stretching and folding the ends created by the first two stretches.
Turn the dough so that the folded ends are underneath. Cover and rest until the next stretch time.
When dough has doubled in size, shape it by spreading it onto a lightly floured (or very lightly oiled) counter. Begin at the long end and roll up tightly.
Tuck in the ends early in the roll, and again if needed to keep uniform cylinder shape.
Keep the dough as tight as possible to avoid air bubbles.
When the roll is complete, pinch the end to seal it together.
Place the dough, seam side down, into a loaf pan that has been greased and dusted with semolina or fine cornmeal. Cover and proof for about 90 minutes.
Dough is ready to bake when it has risen to about an inch above the rim of the pan.
Bake on the center rack at 400° F, with a steam pan with hot water on the lower rack.
After 20 minutes, remove the steam pan and rotate the loaf. Tent it loosely with foil if it is browning quickly. Bake 25 more minutes.
The honey in the bread contributes to the golden crust. Remove the loaf immediately to a cooling rack.
When finished, the bread should register around 205° F inside. This is just right!
This bread makes the best sandwiches and toast!
Whisk together milk and first amount of flour in a small saucepan. Cook over medium heat, whisking constantly, until mixture thickens and becomes sticky and heavy. Remove from heat and spread the mixture out onto a plate to cool for several minutes.
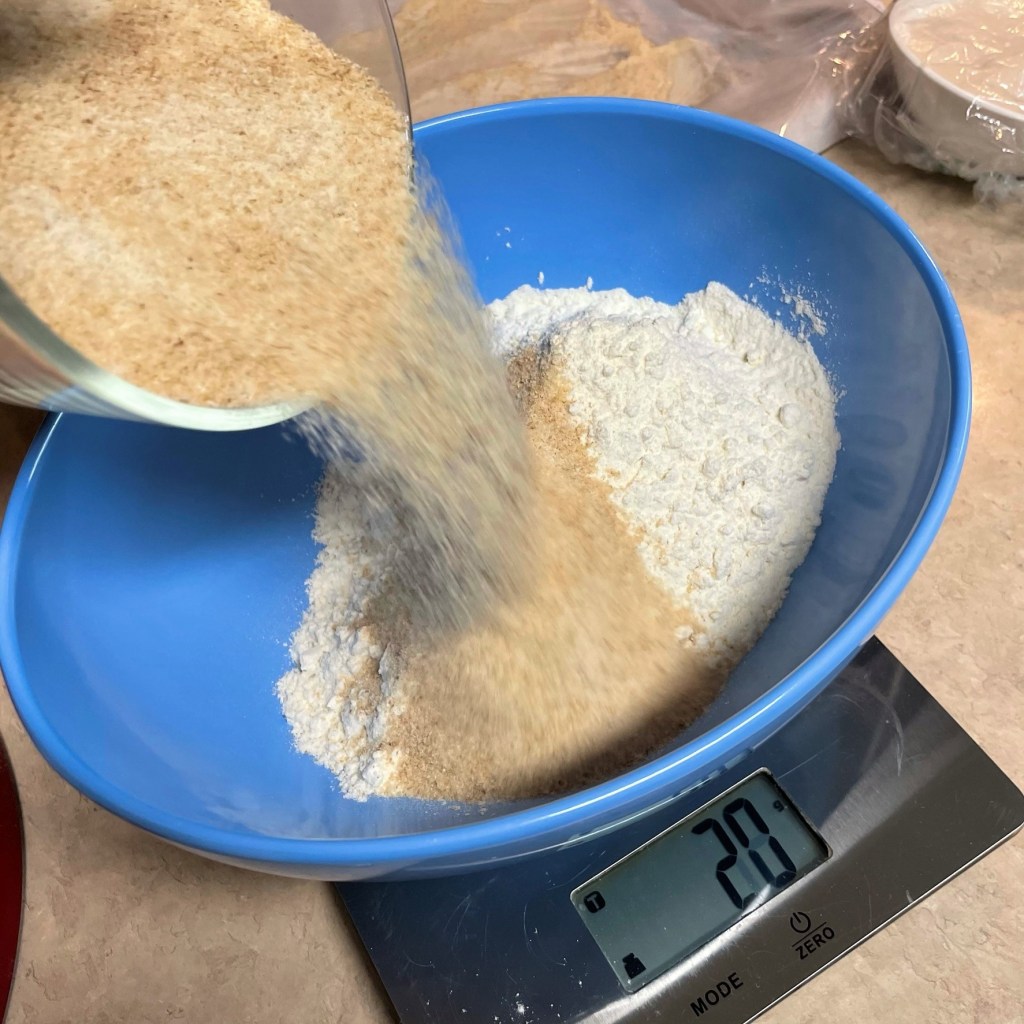
Combine bread flour, whole wheat flour and salt in a bowl.
In the bowl of a stand mixer, combine starter, water, honey and olive oil until blended and smooth. Add pre-cooked flour mixture and blend with the beater blade until smooth. Add dry ingredients all at once and mix with the beater blade until all the flour is incorporated and the dough begins to look organized on the blade. Scrape dough from blade and cover the bowl. Allow it to rest for about 30 minutes before kneading.
Switch to the dough hook, kneading the dough on speed two for about 7 minutes. Spray a large glass bowl with oil and transfer the dough into the bowl. Cover and rest it for 30 minutes.
Wet your hands, then stretch and fold the dough like this: Loosen the dough from the edge of the bowl that is farthest away from you and lift it, stretching and folding it down toward the center. Rotate the bowl to fold the opposite, then rotate the bowl to repeat the folds on the sides of the dough. Cover and rest again and repeat the folds twice more at 30-minute intervals.
By the final stretch and fold, you will find that the dough has built enough strength to feel resistant. Prepare a large loaf pan, oiling and dusting with semolina or cornmeal if needed to reduce sticking.
Shape the loaf by flattening it out onto a flour-covered board, the rolling it up tightly into a cylinder shape. Pinch the final rolled edge to seal it, and pinch the ends of the roll. Cover the loaf pan with plastic wrap or an elastic bowl cover and let it nap in a warm spot in the kitchen, with no drafts. Final proofing will be about 90 minutes.
Preheat oven to 400° F, with one rack in the center of the oven and another rack below it for the steam pan. When oven reaches temperature, place a shallow pan of hot tap water on the lower rack and allow it to preheat 10 minutes longer.
Bake the bread with steam for 20 minutes. Remove the steam pan, rotate the bread for even browning, and cover with a loose tent foil if the bread is browning quickly. If the loaf is still pale, the foil may not be necessary. Bake an additional 25 minutes without steam. Internal temperature of finished bread should be 205° F. Remove from pan right away and cool on a rack.
This most recent bake had significantly more whole wheat, and it still turned out just perfect. I love a versatile recipe!
With the arrival of fall comes the joy of having the house filled with the addictive aromas of meaty stews, roasted vegetables, and every variety of freshly baked breads and desserts. A few days before we dismantled the kitchen for our remodel, I pulled this favorite sourdough recipe out of my arsenal and baked it to accompany the roasted butternut squash lasagna that I shared last month.
The recipe I share today is a mashup of several bread recipes I have tried from an amazing blog called “The Fresh Loaf.” The site is a virtual community and message board for sourdough lovers—from novice to expert—and over the years, I have gained invaluable wisdom by eavesdropping on the conversations of those I consider to be far advanced of my own skills. I was barely beginning my own sourdough journey when I discovered TFL, but the pictures and formulas I found there inspired me to attempt new techniques, and I now proudly consider myself to be an “intermediate” bread maker.
One of the methods I learned is baking with steam, a simple technique that results in a perfectly crusty yet chewy exterior and lovely crumb texture that the aficionados would call “gelatinized.” Breads made with this steam-baked method make fantastic toast and sandwiches (especially grilled cheese).
The extra hydration of the dough creates the big, open crumb inside the bread. The steam makes the crust perfectly chewy.
The generous amounts of onion and sage I’ve added to this loaf also make it perfect for Thanksgiving stuffing or dressing, or you can follow my lead with any stale leftovers and turn it into savory croutons for hearty salads and all the soups you’ll be simmering during the autumn and winter months ahead.
Up close, you can see the golden polenta, the bits of onion and flecks of sage. This bread is perfect for fall!
Besides the intoxicating fall-scented flavors, this loaf also uses a pre-ferment, which is a fancy way of describing a pumped-up sourdough starter, and a soaker, which is nothing more than grains (in this instance, corn) that have been soaked overnight in water—a technique that coaxes the deepest flavors out of the grain and into the bread.
The pre-ferment is a next-level feeding of my ripe starter.Polenta is soaked overnight, then drained. But keep the soaking water!
The kneading method used for this bread is also a bit different. It’s called “stretch and fold,” and it is an easy way to build strength in dough with a high volume of water, without so much messy, sticky kneading. Try this a few times, and you will be astonished at the elastic texture and volume achieved in the bread dough.
Wet hands and a silicone spatula help me get started with my first round of stretch and folds.Stretch upward until the dough resists, then fold it toward the front edge of the bowl. Press down when you fold, to push out trapped gas.
If this all seems confusing, trust me, it isn’t. I have found sourdough baking to be joyfully simple once you get the hang of it. As I mentioned last fall when I made the sourdough pumpkin challah, this kind of baking—naturally leavened and slow-fermented—is like a good relationship; the more you open yourself up to it, the more it comes back to you until you finally reach a point of familiarity that you can’t imagine ever buying a loaf of bread at the grocery store.
One more note: I strongly recommend measuring ingredients by weight when baking any kind of bread, but especially sourdough. Weight measuring takes the guesswork out of your ingredient ratios, and you can find an inexpensive, easy-to-use kitchen scale just about anywhere, including Walmart (where I bought mine).
That’s my story, and this is my favorite sourdough for autumn. I hope the pictures entice my fellow sourdough bakers to give it a go, and if you scroll to the bottom of the post, you’ll find a downloadable PDF for your recipe files. My ingredients are listed in grams (sorry, no volume measurements), so go on and get your kitchen scale and get baking.
Enjoy!
Add water to the soaking water until you have the total amount. No sense wasting that flavor!
Re-hydrate the dried onions with just enough water to cover them.
Combine the pre-ferment, soaker and water in a stand mixer bowl.
Add poultry seasoning to the flour blend for extra savory fall flavor!
The dough will ball up on the beater blade. Scrape it off the beater, then let it rest.
Dump the hydrated onions onto the dough, followed by the salt. I used Himalayan pink salt so you can see it! 😉
After a 45 minute rest, use the dough hook to knead in the onions and salt.
Rinse and dry the fresh sage leaves, about this much.
It measures approximately 1 tablespoon when finely chopped.
Knead the sage into the dough. Cover and rest 30 minutes before the first set of stretch and folds.
Stretch upward until the dough resists, then fold it toward the front edge of the bowl. Wet your hands to prevent sticking.
Press down when you fold, to push out trapped gas.
Rotate the bowl and fold the opposite sides of the dough, so that all four sides have been folded onto each other. Repeat this twice at 20 minute intervals.
By the third stretch and fold, the dough is noticeably stronger and puffier.
You can do the final stretch and fold by lifting it out of the bowl. Be sure to squeeze the fat air bubbles out.
Shape the dough into a ball by folding the edges to the center, and continue this while rotating the dough around.
Tuck and pinch the bottom of the dough to seal it and place it on parchment paper. Cut darts in the paper so that it doesn’t wrinkle in the lidded baker.
I usually trim the excess parchment so the lid fits better without folding it onto the bread.
When dough is puffy and fully proofed, score it with a lame tool or a sharp knife, but make it quick and decisive!
The score should be about 1/2″ deep into the dough, and this will give steam inside the dough an easy escape.
Bake at 450° F for 20 minutes with the lid on, then remove the lid and bake for 25 more minutes.
Be still, my heart! This smells amazing.
Internal temperature should be 205° F. This one is done!