We are fast approaching a foodie trifecta— Super Bowl, Mardi Gras and Valentine’s Day will all happen in the same week this year, and I’m in a bit of a tizzy about it. My schedule has been so busy lately that I’m struggling to put up even one post a week, let alone three, and with delicious recipes standing by for all of these occasions, I’m feeling the pressure.
So I’m getting a jump on things with this recipe for mac and cheese bites, which will be every bit as enjoyable for this weekend’s conference championships as it will for the big game on Feb. 11. Heck, you might enjoy them so much, you’ll make them twice!
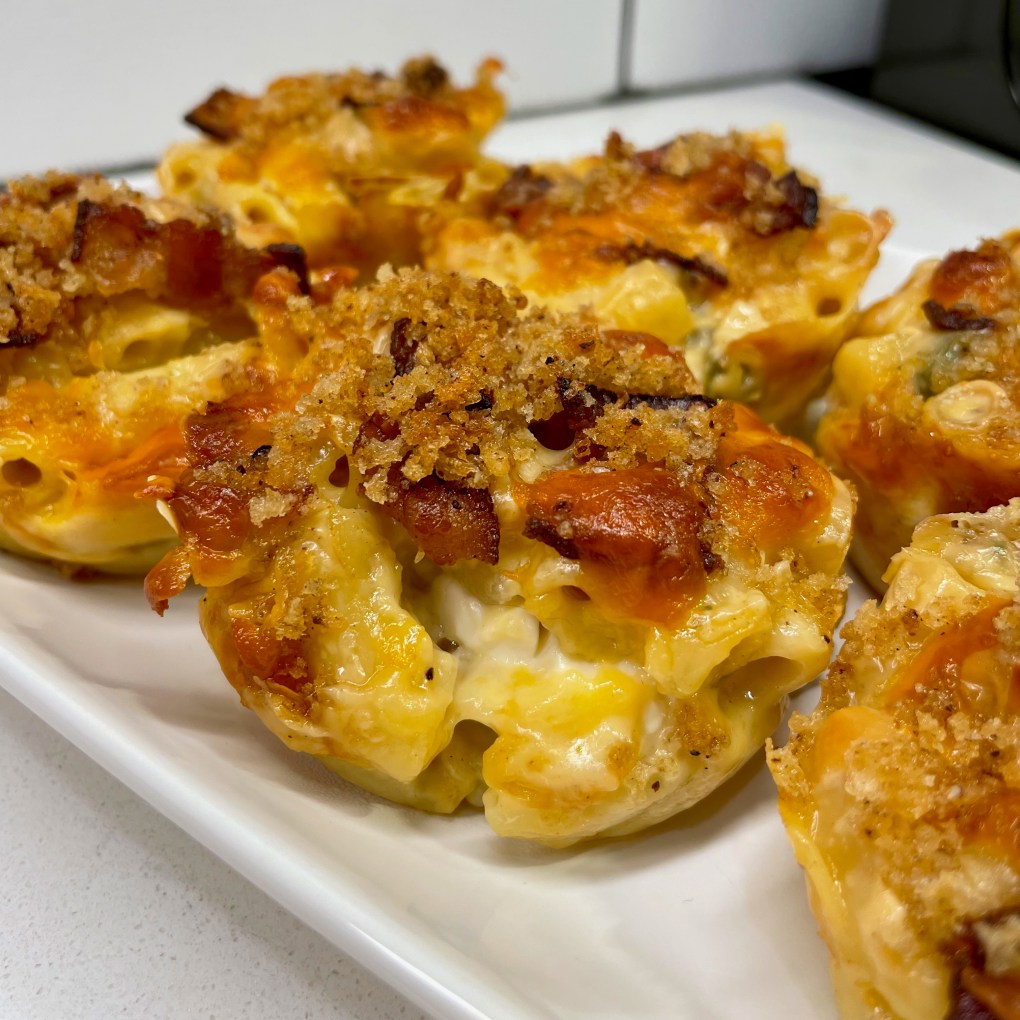
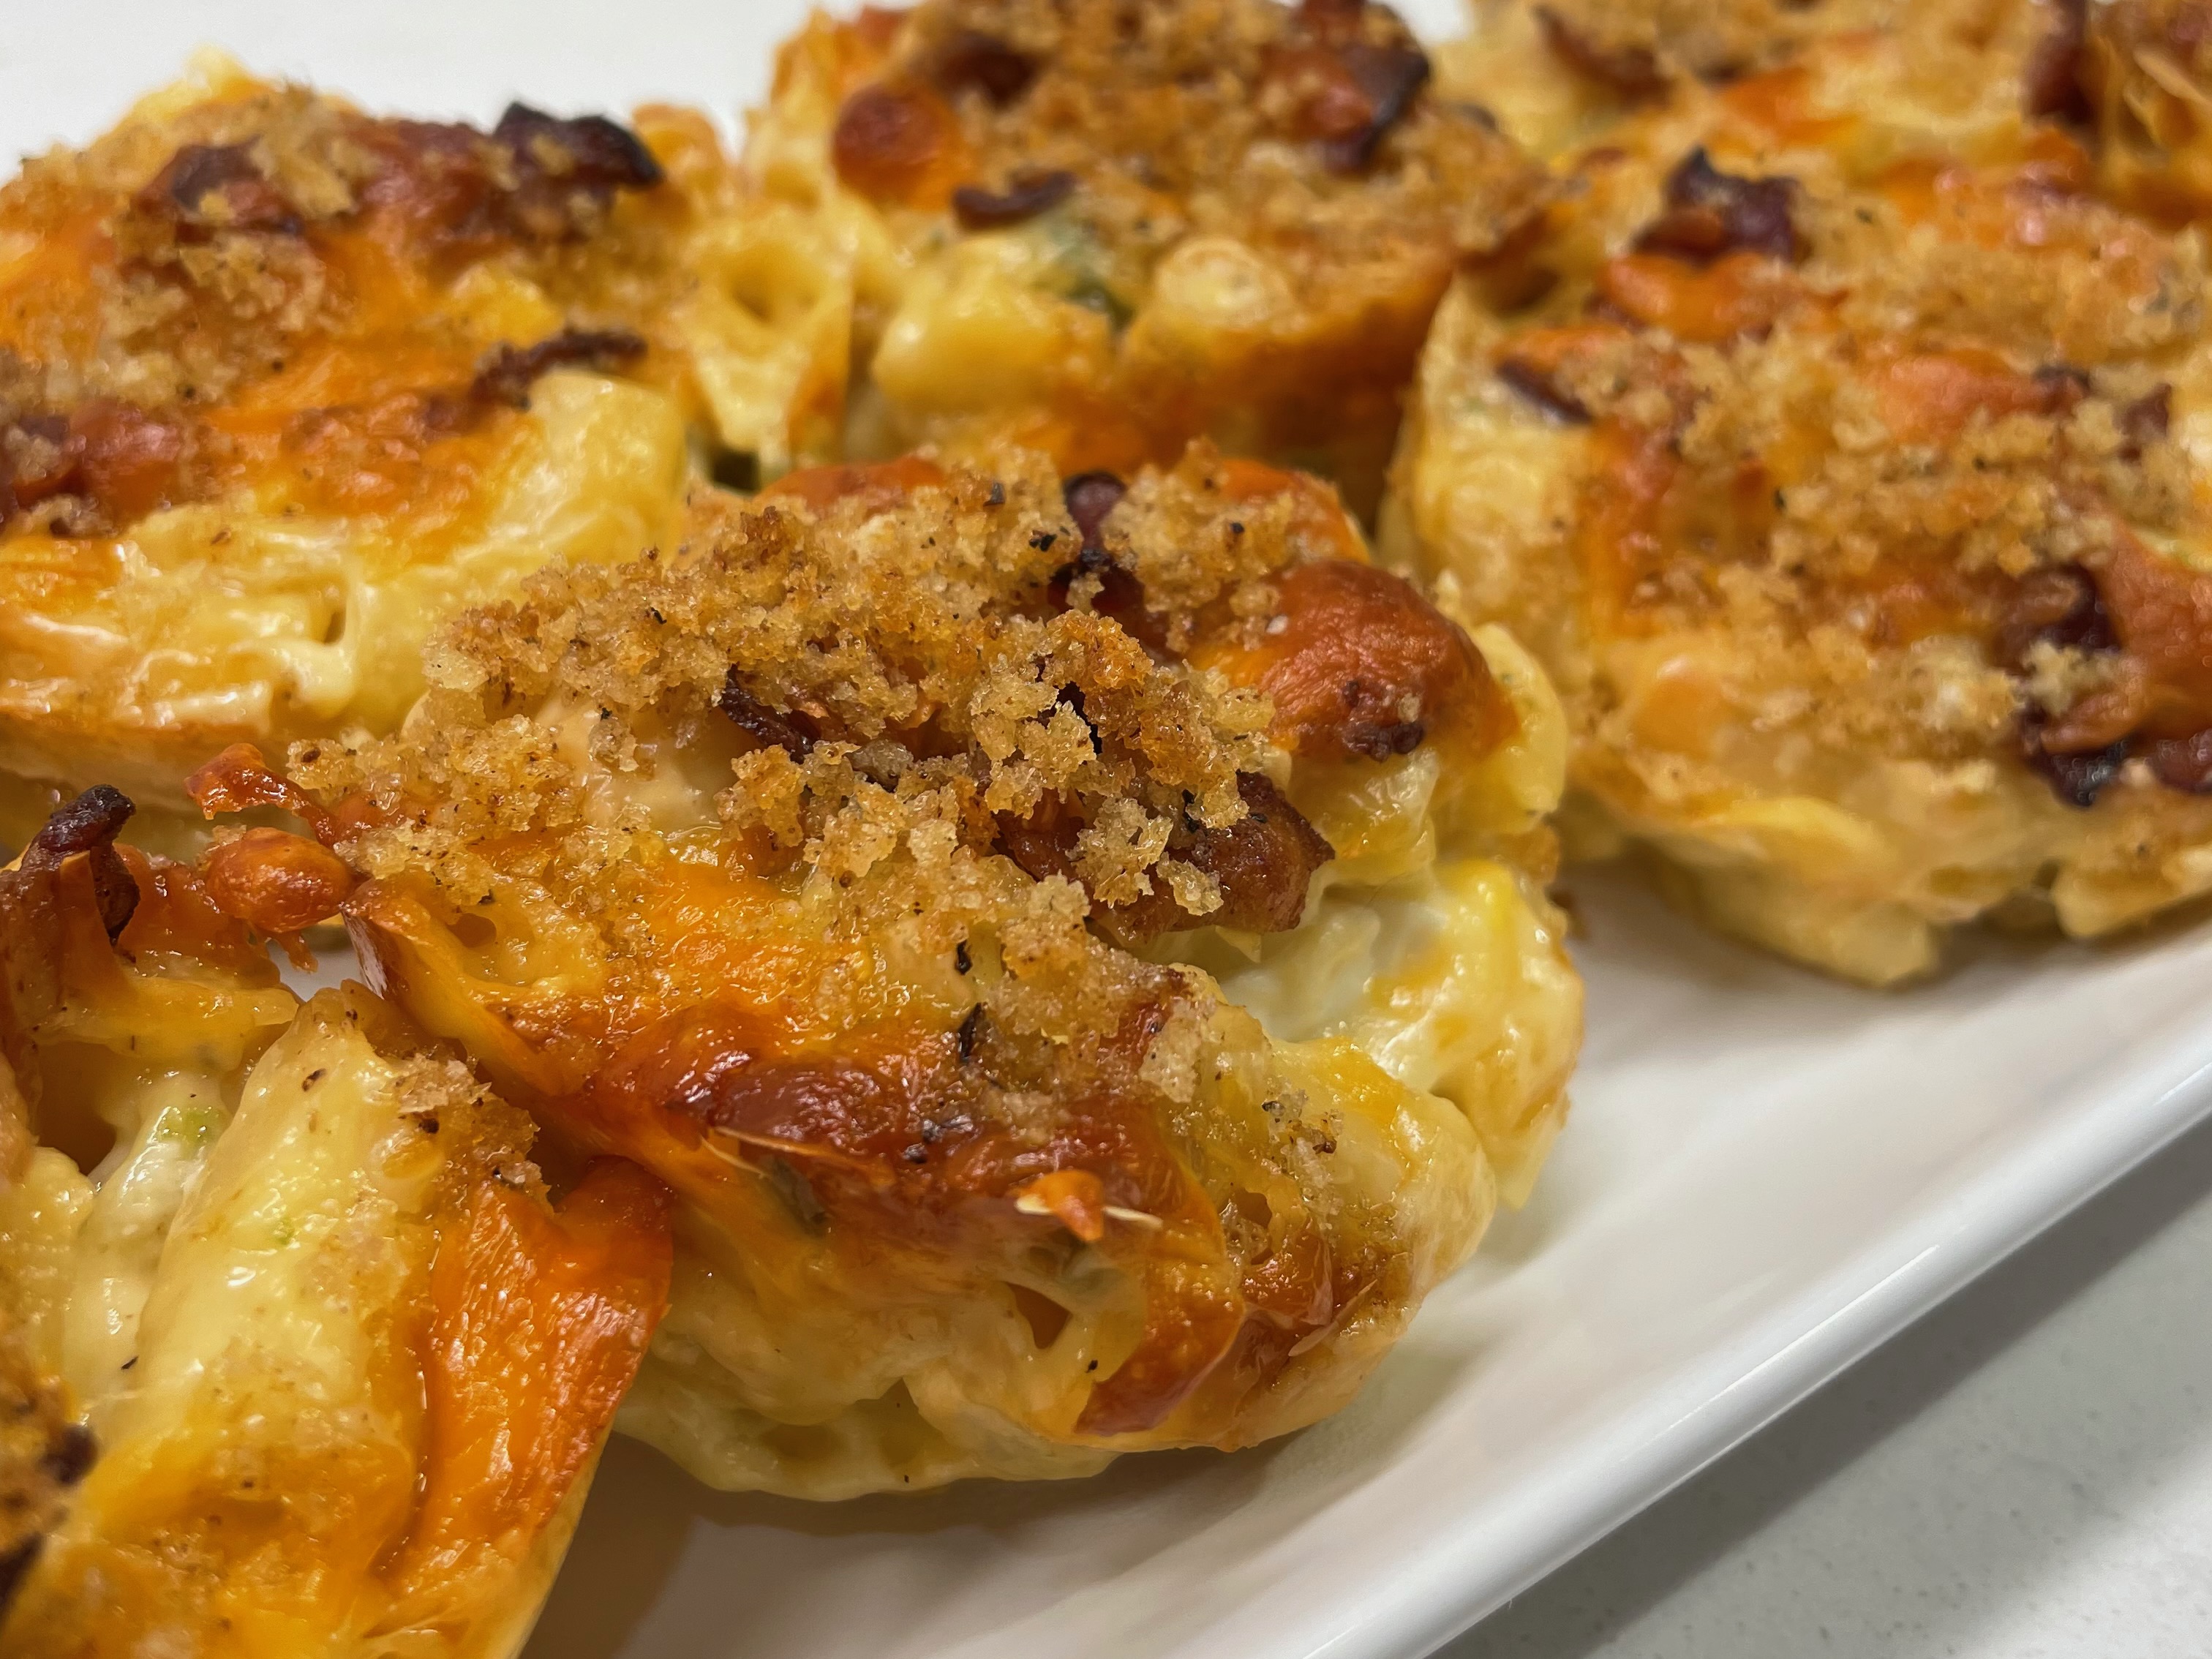
One of my great joys for Comfort du Jour is twisting favorite foods together, and these little handheld bites might be one of my tastiest mashups ever. My husband and I love the spicy, cheesy bite of jalapeño popper appetizers, and who doesn’t love mac and cheese? This was a no brainer. And though my initial plan was to simply make mac and cheese with the popper flavors, I pivoted to my muffin tin to keep the snack in handheld form. For any game day watch party, the less you have to mess with utensils, the better.
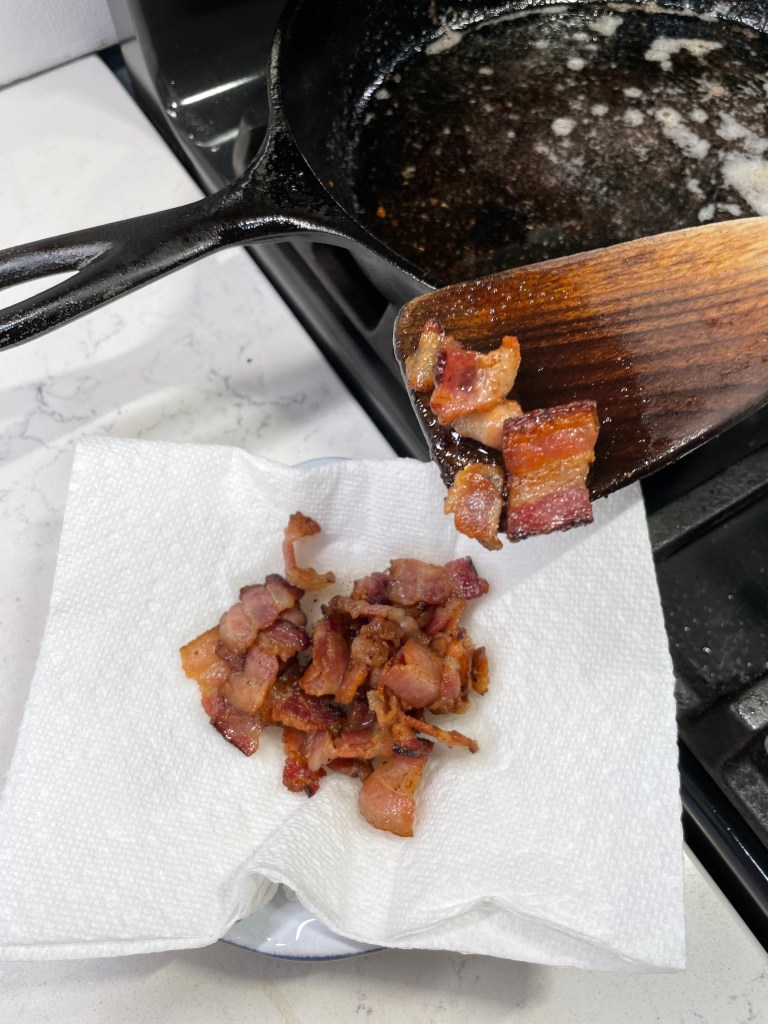
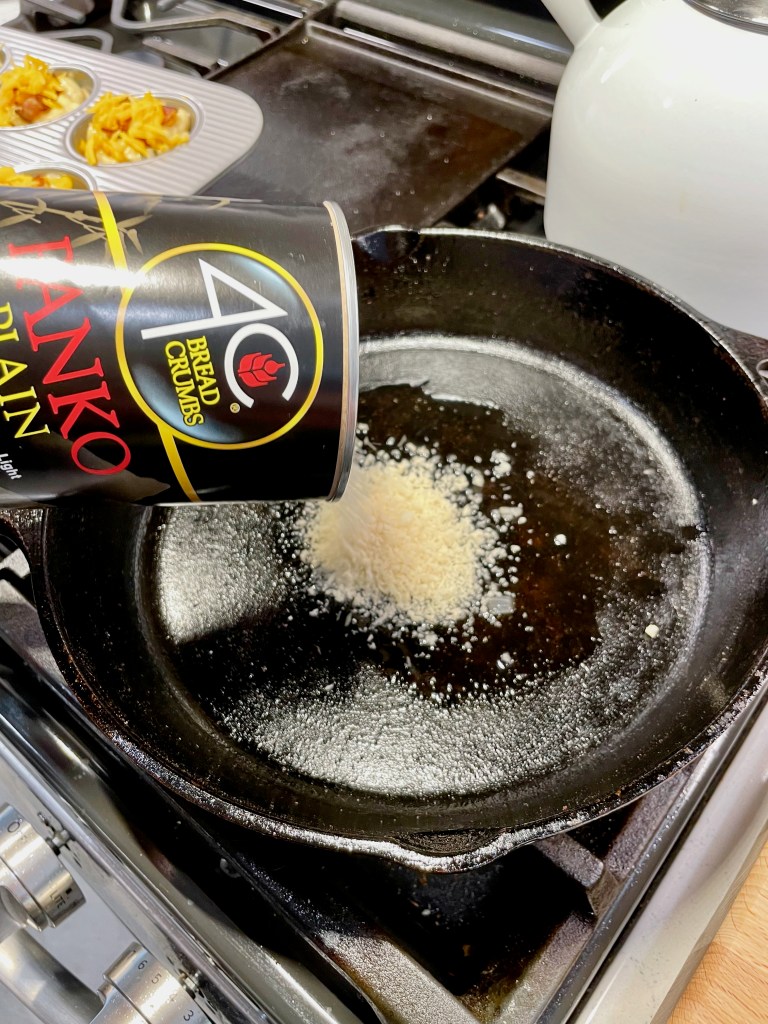
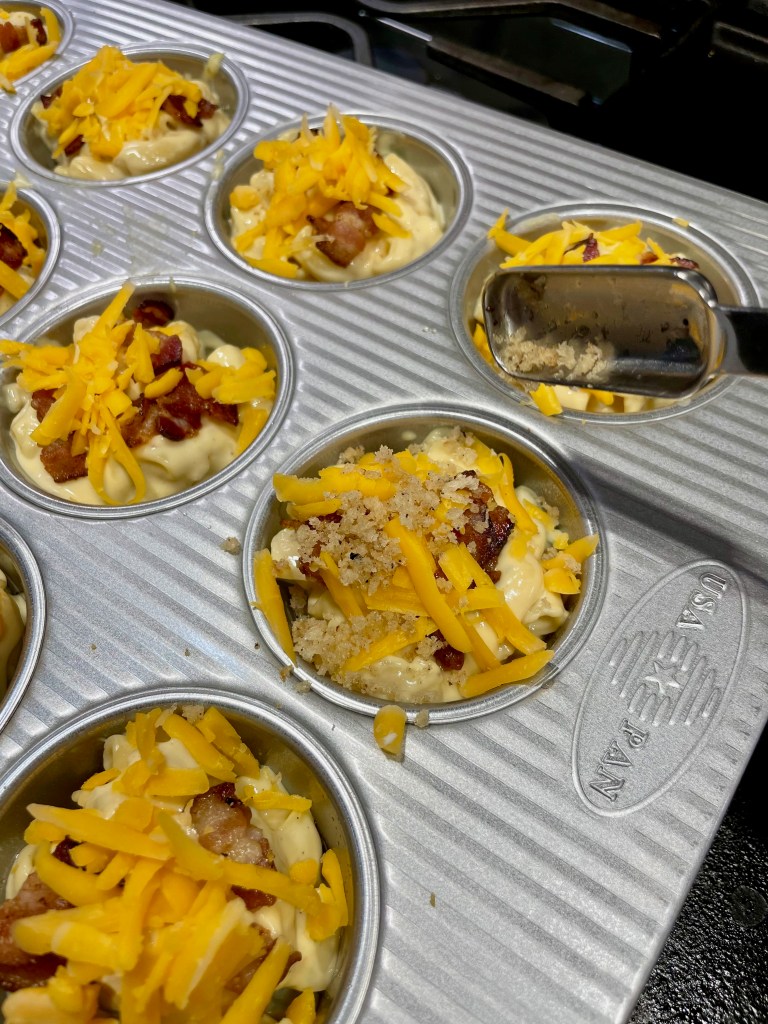
This recipe begins with crisped up bacon, which is reserved for the top. I drained off the excess bacon grease and then tossed panko crumbs into the skillet to soak up the smoky bacon flavor. This would be a topper for my mac and cheese bites, because every game day snack is better with a little crunch.
Of course there’s a lot of fat in these. It’s a game day snack!
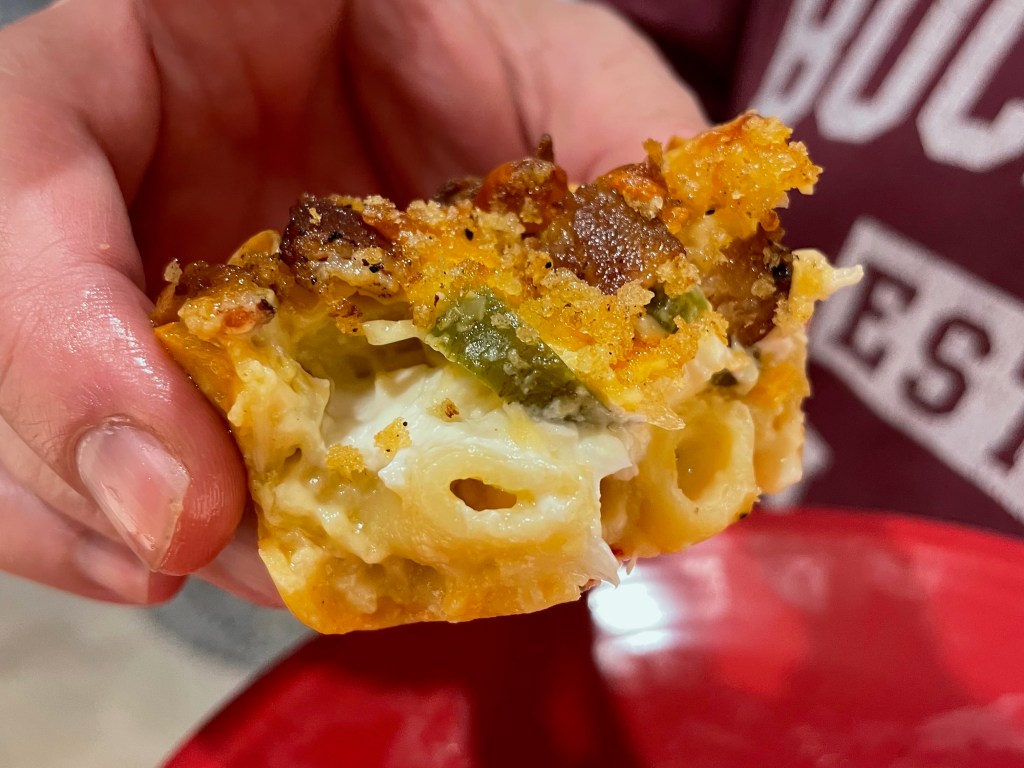
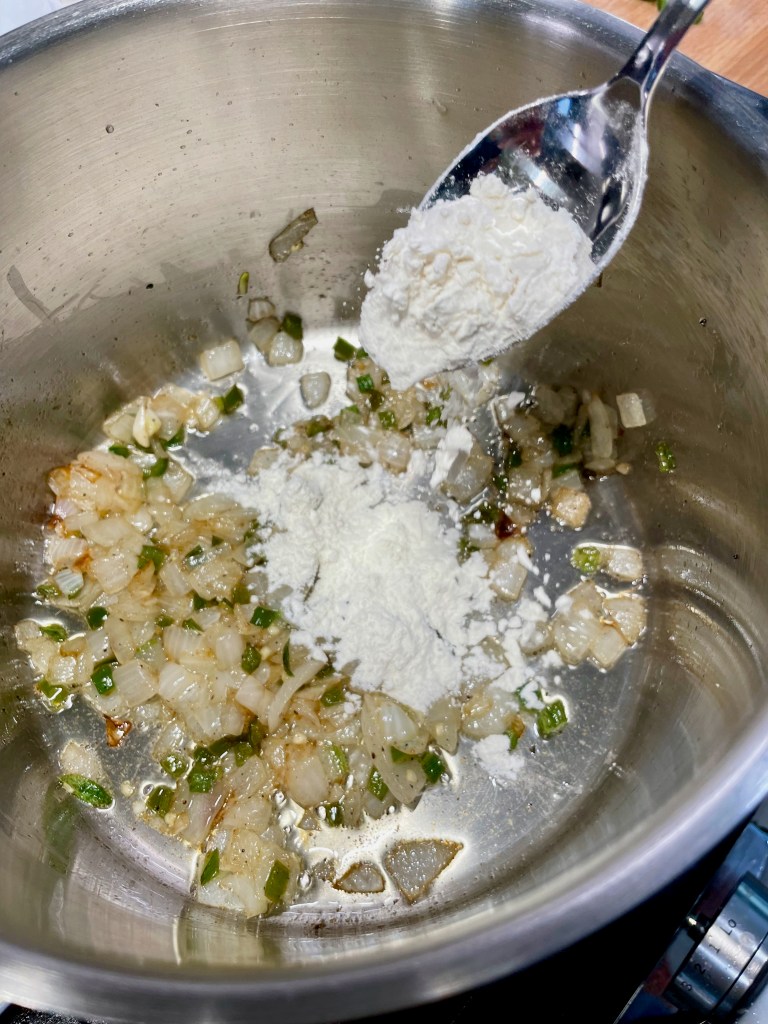
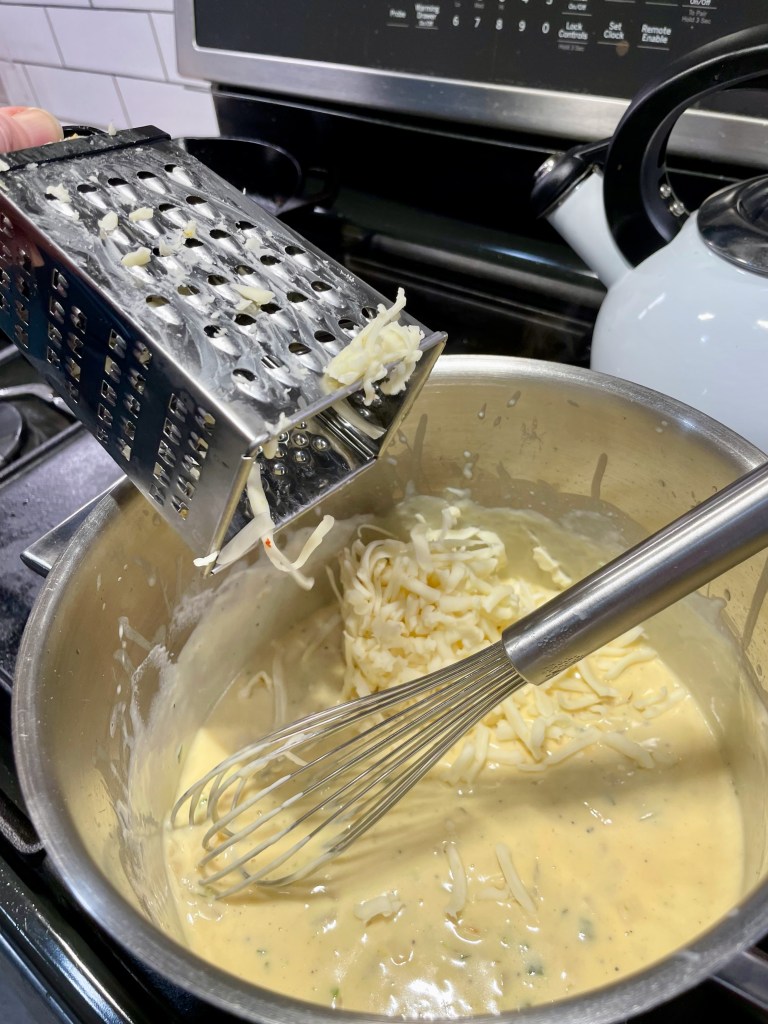
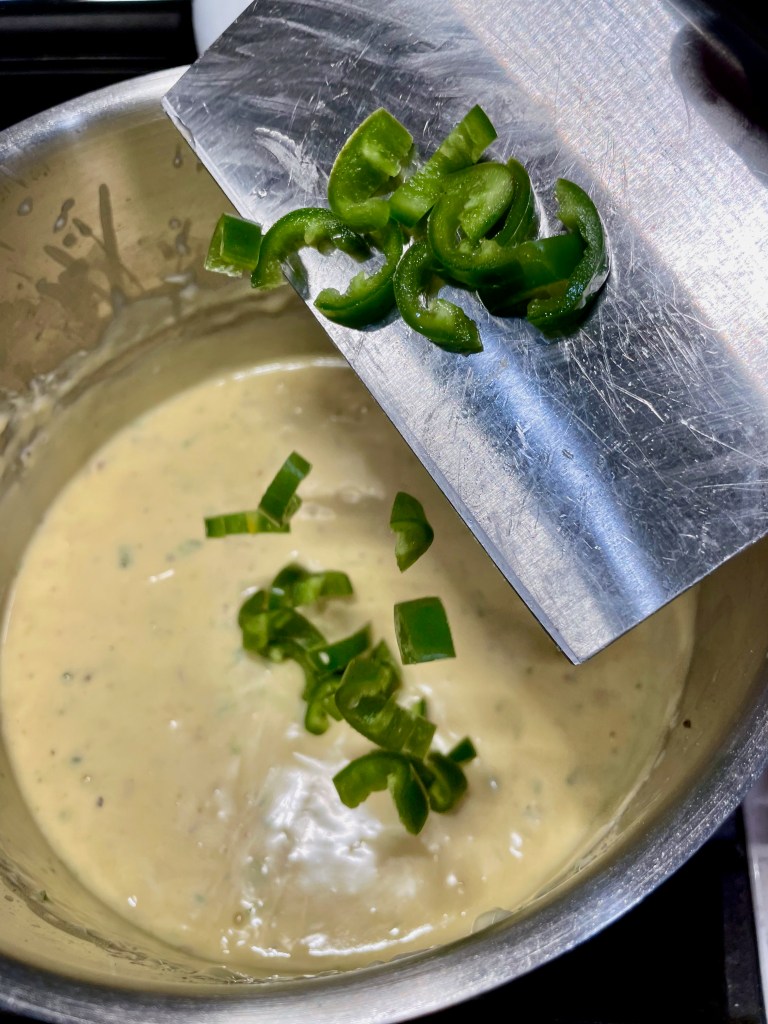
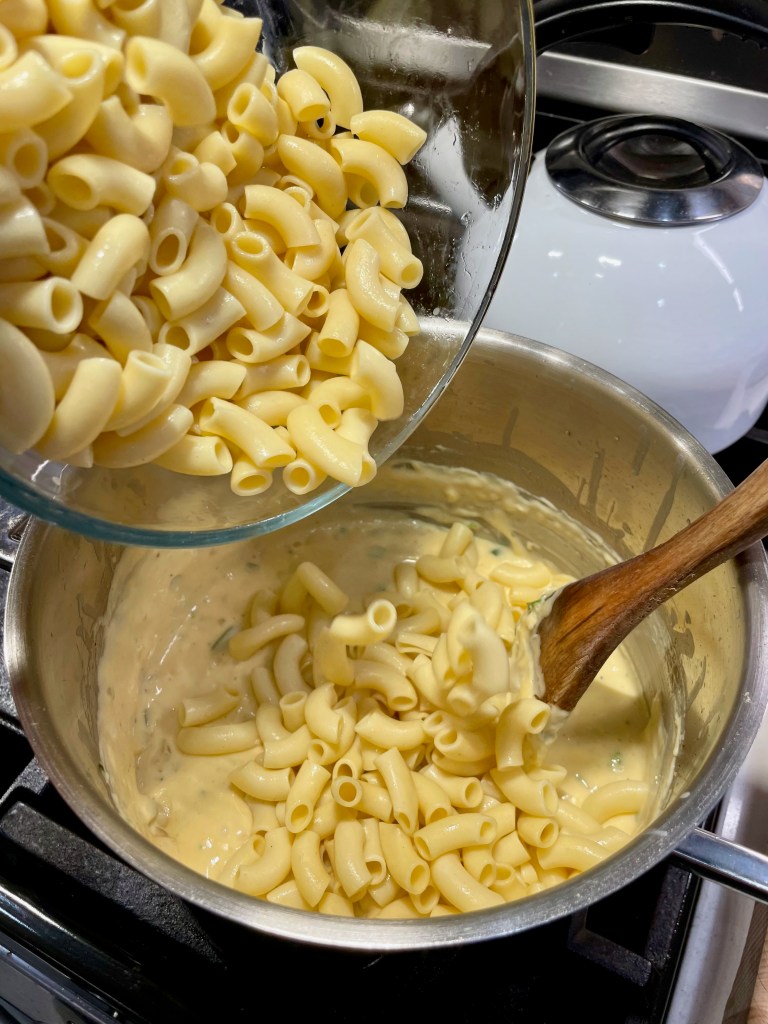
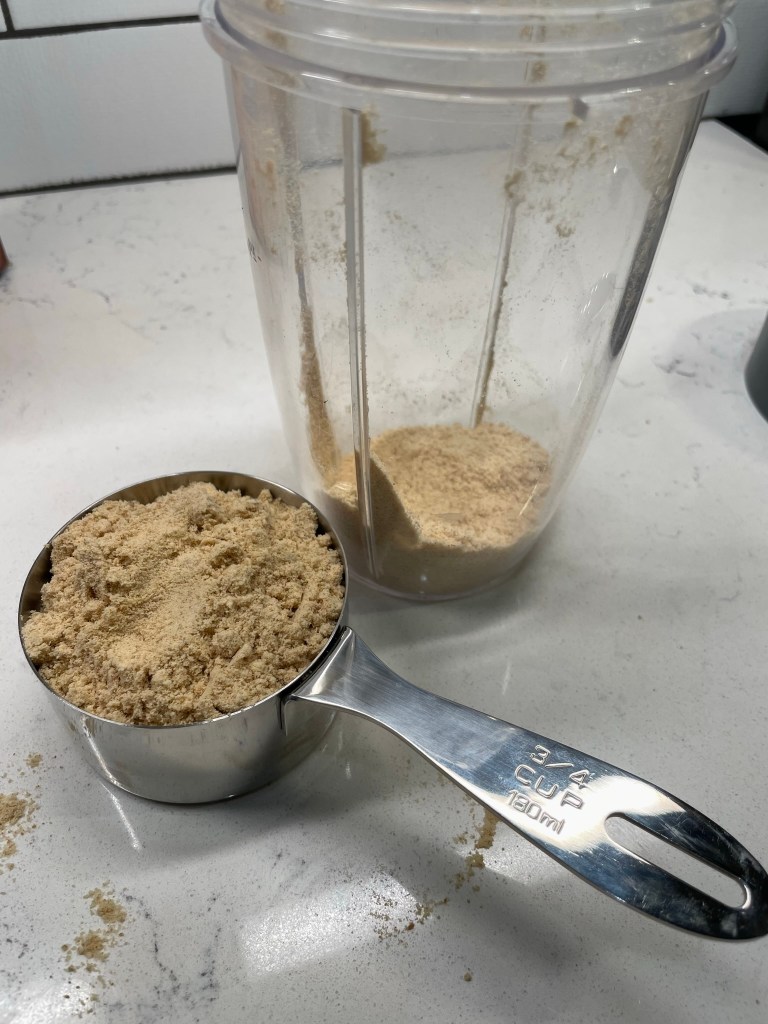
The drained-off bacon grease becomes the backdrop of the jalapeño-studded cheese sauce for the mac and cheese. I followed my usual formula for the sauce: first the roux, then milk for the base, followed by American cheese and shredded cheese (I opted for pepper jack). More fresh jalapeños went into the sauce, and then the cooked elbows.
Of course, this would also be delish baked in a casserole.
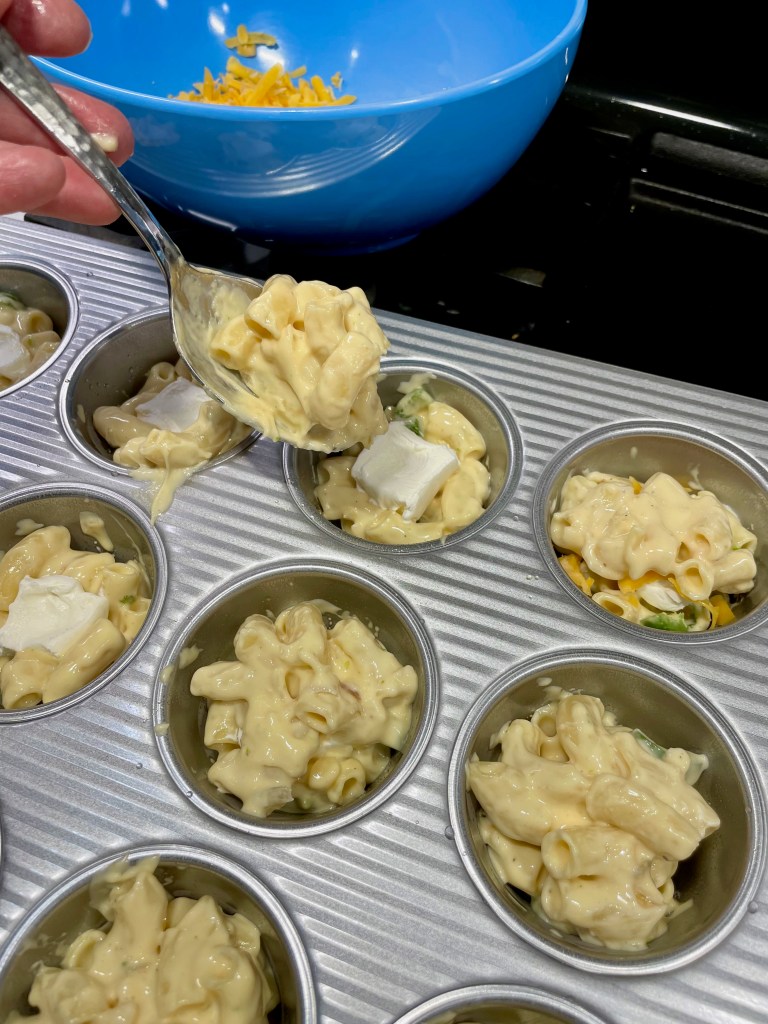
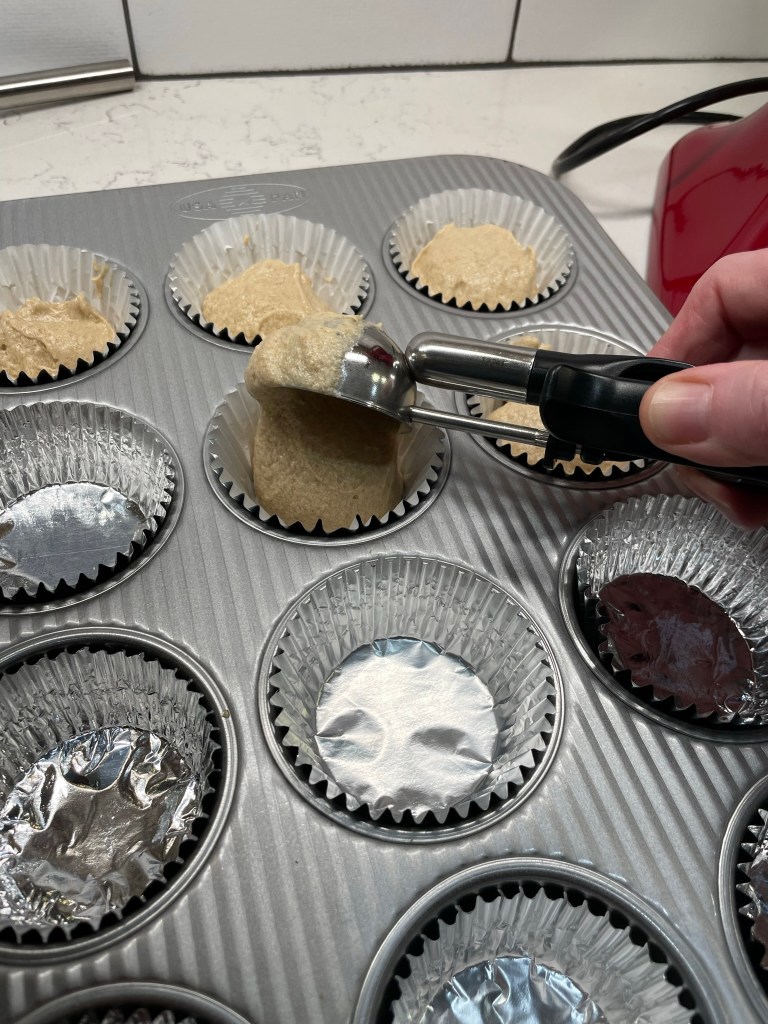
To capture all the components of poppers, I buried a nugget of cream cheese inside layers of the mac and cheese, then topped the “muffin” bites with the crispy bacon, more shredded cheddar and those bacon-scented panko crumbs. The recipe can be made ahead to this point and refrigerated, then baked on game day right before kickoff, but I would recommend adding the toppings just before baking so the bacon and crumbs remain crispy.
Let them cool a few minutes, so the cheese firms up for easy, non-messy removal.
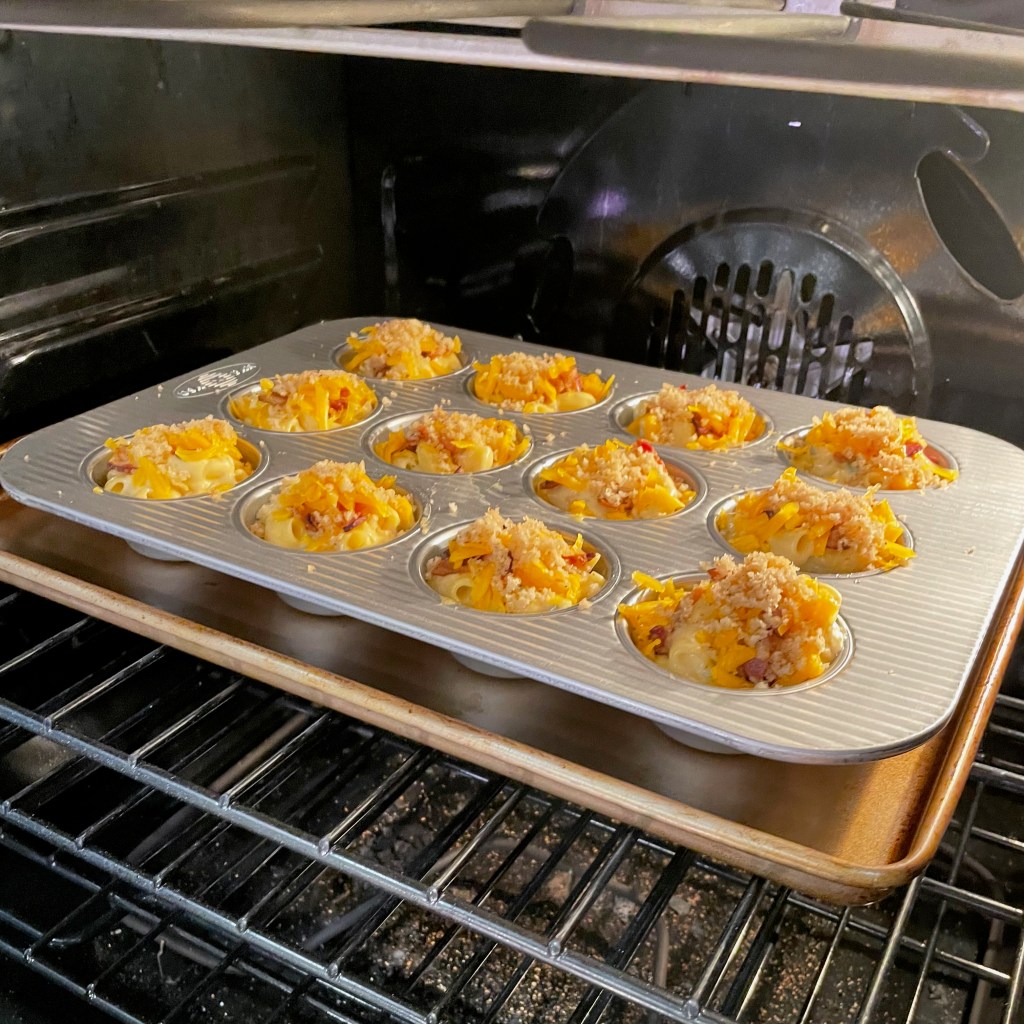
Half an hour at 350° F, and these are ready for the big game or any other snacking occasion coming our way. Next up, Mardi Gras! ⚜️
What better time than Super Bowl for a snack that marries the spicy flavors of a favorite appetizer and the down home comfort of mac and cheese?
Ingredients
4 thin slices uncured smoked bacon, cut into 1-inch pieces
1/2 cup panko crumbs
1/2 sweet or yellow onion, rough chopped
3 jalapeno peppers, divided (dice one, slice the other two)
Salt and pepper
2 Tablespoons all-purpose flour
1 1/2 cups whole milk
5 oz. American cheese, cubed (I usually purchase a chunk from the supermarket deli)
4 oz. pepper jack or Monterey Jack cheese, shredded (fresh is better than the pre-shredded stuff in a bag)
1/2 lb. cooked elbow macaroni
2 oz. cream cheese, divided among cups
2 oz. sharp cheddar, shredded and divided among cups
Note: This game day snack can be made in advance and refrigerated overnight. For best results, add bacon pieces and panko just before baking. Oven time may be extended if the bites are baked cold from the fridge.
Directions
Cook bacon pieces in a cast iron skillet until lightly crispy; reserve 3 tablespoons of bacon fat for making the cheese sauce.
Add the panko crumbs to the warm skillet and toss to soak up the residual bacon grease. Set the crumbs aside for topping the mac and cheese bites.
Heat the reserved bacon fat over medium heat in a good sized pot. Add the onions and diced jalapeño and season with salt and pepper. Sauté the vegetables until softened.
Sprinkle in flour and cook a few minutes until the mixture is bubbly and begins to brown. Add milk all at once and cooking, whisking constantly, until the mixture thickens into a sauce. Add American cheese cubes and then pepper jack shreds, melting completely after each addition.
Add the cooked elbow macaroni and remaining jalapeño slices and stir to coat completely. Allow this to cool several minutes.
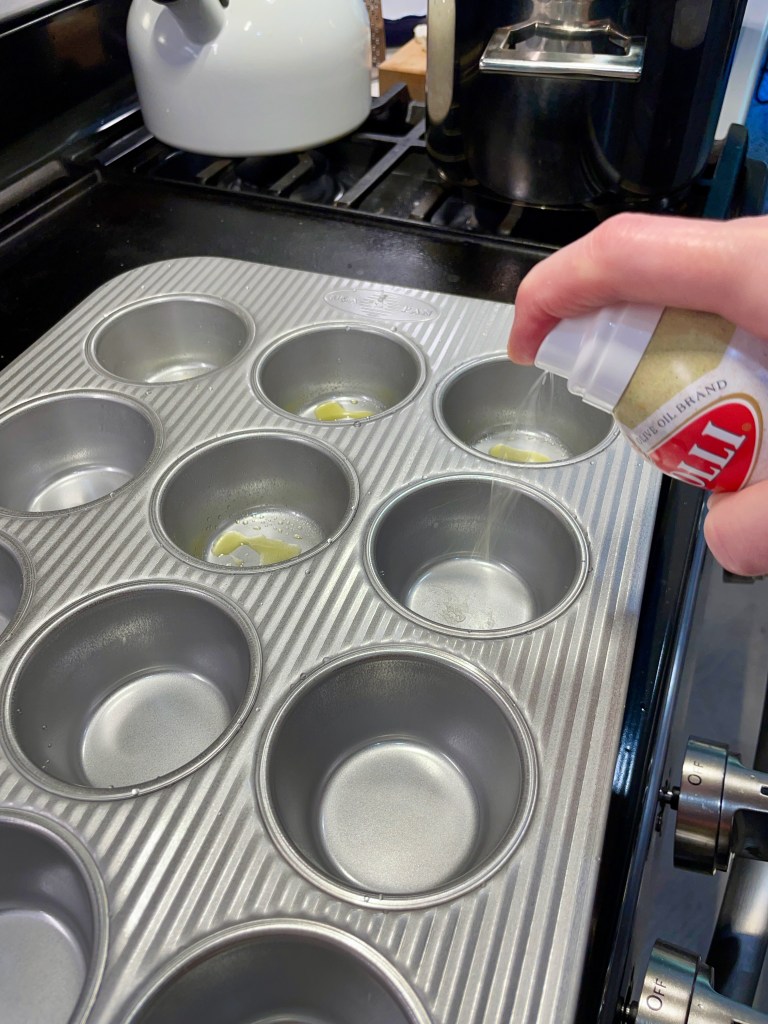
Spray the cups of a 12-cup muffin tin with oil to prevent sticking. Divide half of the mac and cheese among the cups, then place a bit of cream cheese in the center of each cup and cover with the rest of the mac and cheese. Divide the bacon pieces over the top of the cups, and then top each with the shredded cheddar and bacon-moistened panko crumbs.
Bake at 350° F for about 30 minutes, until cheese is bubbly and crumbs are crispy.
Let the mac and cheese bites cool a few minutes to firm up the cheese, then run a knife around the outside of each muffin cup to release the bites from the pan. Transfer to a serving dish and enjoy watching them fly off the plate.
There is a special meal tradition at our house on New Year’s Eve. Our annual celebration of fancy pizzas began in 2018, right around the time that I was working to perfect my sourdough pizza crust. Les had shared his memories of the amazing White Clam Pizza he enjoyed while living near New Haven, Connecticut, and we decided to try one at home for New Year’s Eve. It turned out so good that we repeated it the next two years, and in 2020, we added a second specialty flavor to our repertoire— the Oysters Rockefeller Pizza. Last year, we tweaked tradition yet again, trading in the white clam pie with this creative twist on the classic Italian pasta dish, shrimp scampi. Why wouldn’t the flavors of garlic, shrimp, parsley and lemon be amazing on a blistered sourdough crust? Turns out, they most definitely are.
As with most of my specialty pizzas, this one takes a little time to prepare, but the good news is that you’ll do most of it in advance so that you have plenty of time to relax with a cocktail or mingle with guests (or both). There are three components to this pizza, and I’ll break down the details in photos ahead of the click-to-print recipe card at the end. You’re going to love this pizza!
My method for pizza baking
First things first, we bake all our pizzas in a regular home oven, preheated to 550° F with a baking steel on the rack. This combination of slab steel and maximum temperature helps us replicate the effect of a brick oven. If you don’t have a steel, you can get similar results with a pizza stone, but be sure to follow the manufacturer’s guidelines so that you don’t accidentally crack your stone under this extreme heat. With this method, you also need a pizza peel, which looks like a long-handled paddle. It’s helpful for easy transfer of the pizza into and out of the oven.
Our pizza stone doesn’t get much action since we invested in the baking steel. Whichever you choose, you’ll need a peel for easy transfer of the pizza.
About the pizza dough
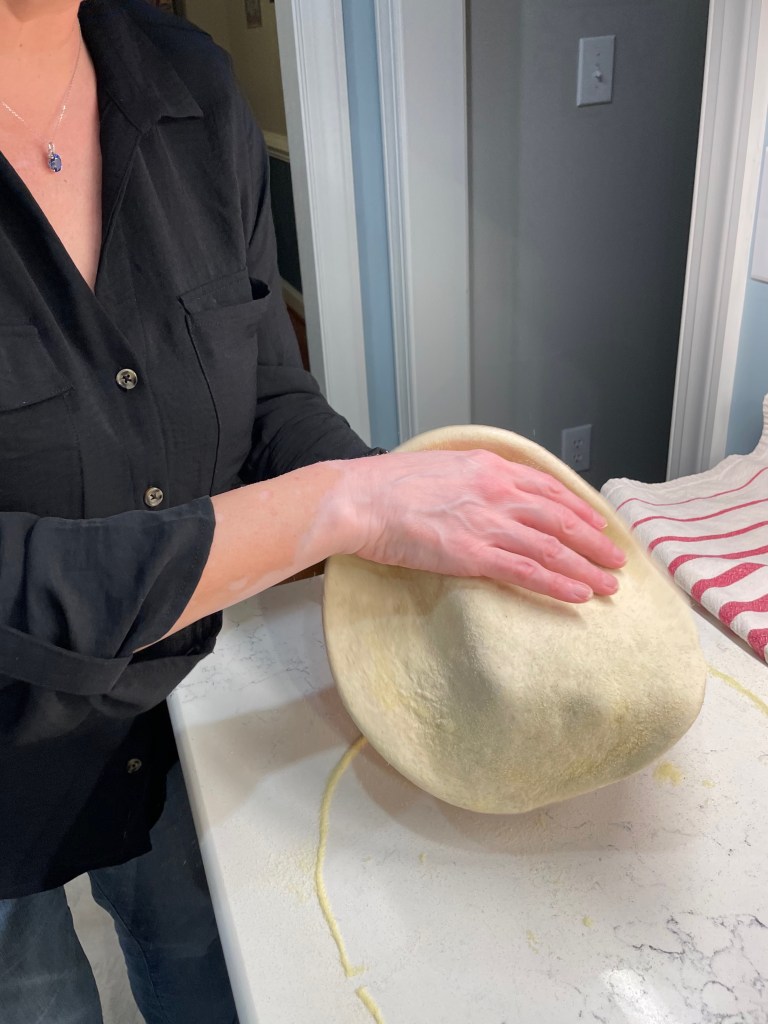
Second, my pizza dough is homemade from sourdough starter, and the shaping method is crucial to the kind of texture you see in my photos. We never use a rolling pin on the dough, as this deflates all the lovely air pockets. If you aren’t on the sourdough train, it’s no problem— you can use a yeasted dough or even a store-bought dough if you have a favorite that you trust. The link for my pizza dough also includes a yeast option, if you want to make your own without sourdough. Bring the dough to room temperature when you’re ready to bake.
Semolina flour works great to prevent dough from sticking while shaping. Fine cornmeal works well, too.
Cheez, Louise
Traditional scampi— the kind that’s piled onto a dome of angel hair— would not have any kind of cheese. But for my pizza, which does not have a base sauce, I’ve opted to scatter a bit of freshly grated mozzarella over the dough so that the shrimp curls have something to rest on. This is the firm variety of mozz, not the soft variety that is common for Caprese salad. Skip the pre-shredded stuff from the grocery store, as it is packed with an anti-caking agent that also prevents even melting.
My recipe also calls for parm-romano blend cheese, which we make in bulk at home because we use so darn much of it. A good Italian-made Parmesan is acceptable here, but again, do not use the pre-grated stuff. A special occasion pizza deserves the freshest cheese, and a few flicks of a microplane grater will bring big results, I promise.
The star of the show— shrimp
Finally, choose the right shrimp and for the love of flavor, don’t use pre-cooked. Choose fresh large shrimp— somewhere in the 20 pieces-per-pound range is just right— and buy them with the shells and tails on, as you’ll use those parts for the scampi sauce. Be sure to remove the “vein” from the curled back of the shrimp, and take note of the steps below for marinating them a few minutes before baking.
Let’s get cooking!
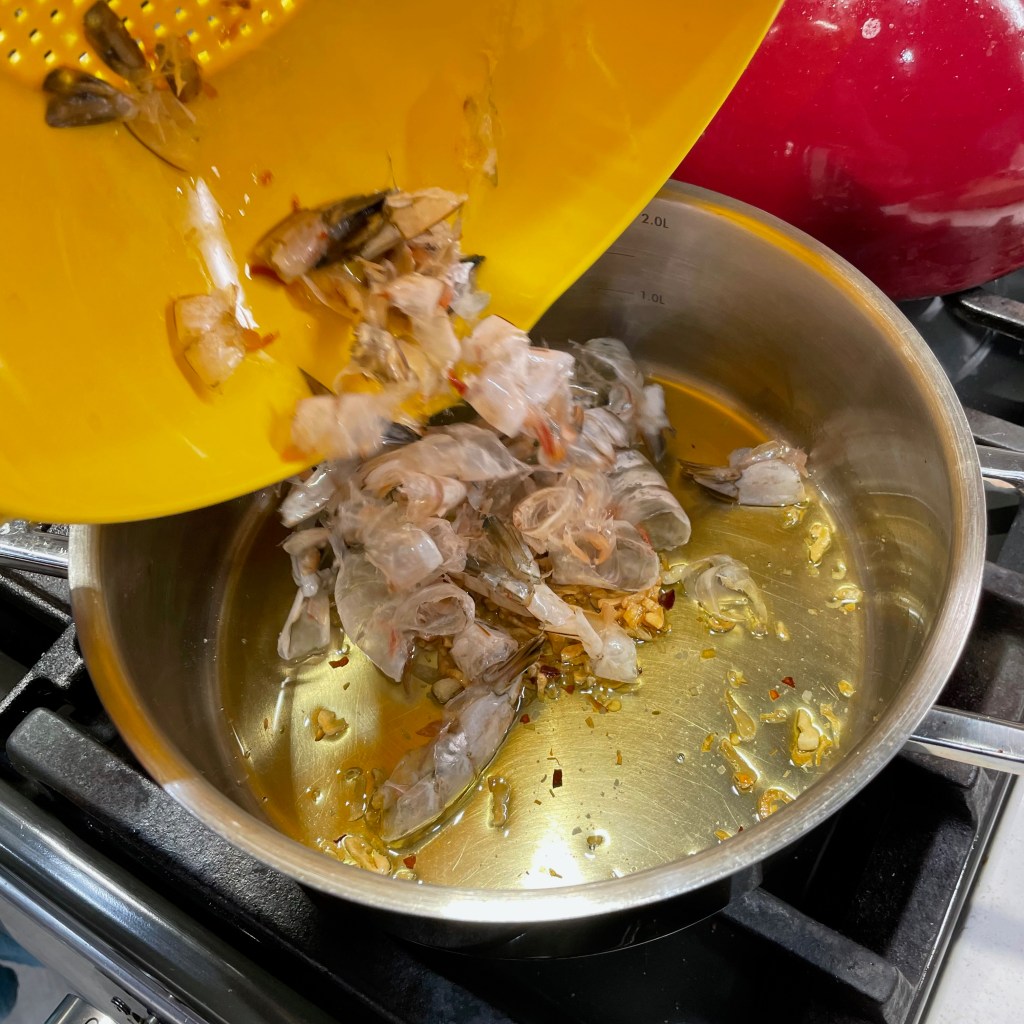
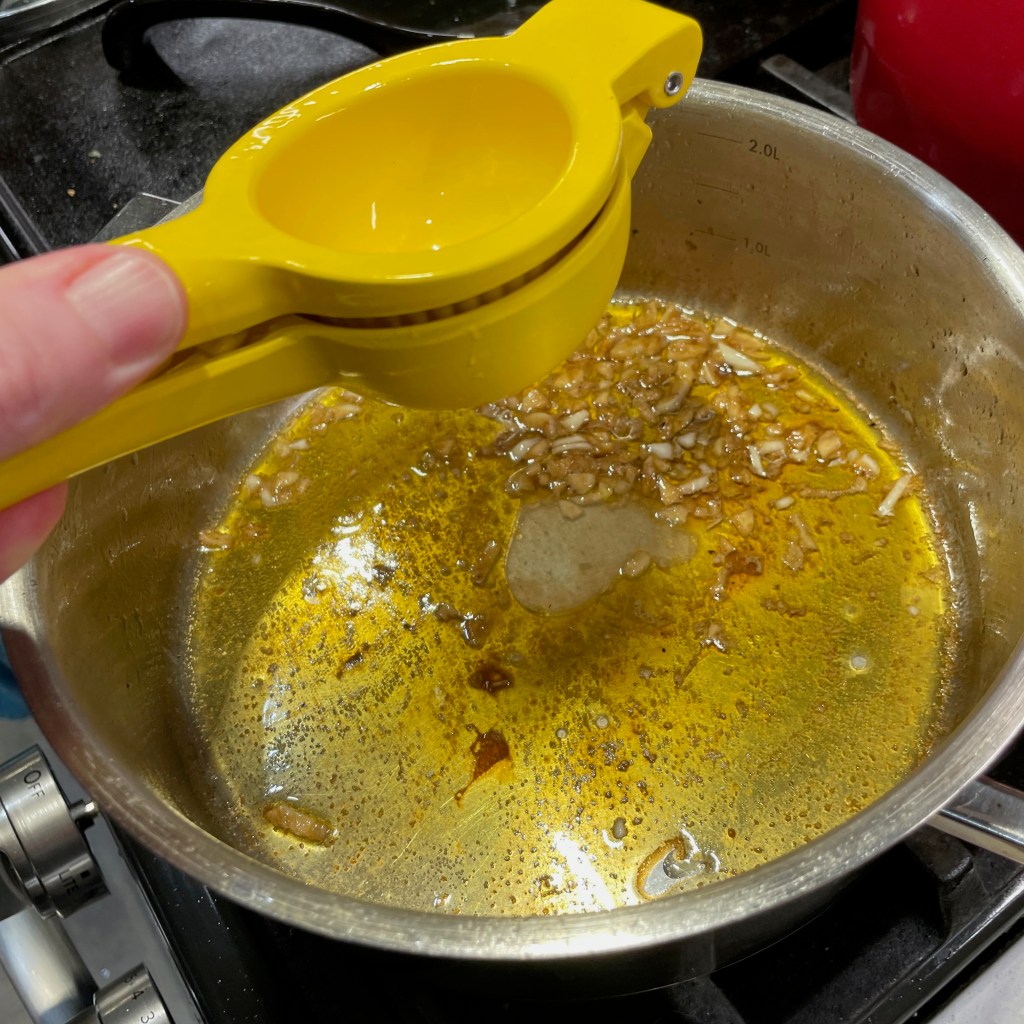
The sauce happens in two stages, beginning with what will seem like a ton of garlic and the parts and pieces that remain after you clean and set aside the shrimp. You’ll sauté the garlic at very low temperature for about 20 minutes, and then you’ll toss in the shrimp shells and tails for a gentle braising in dry vermouth.
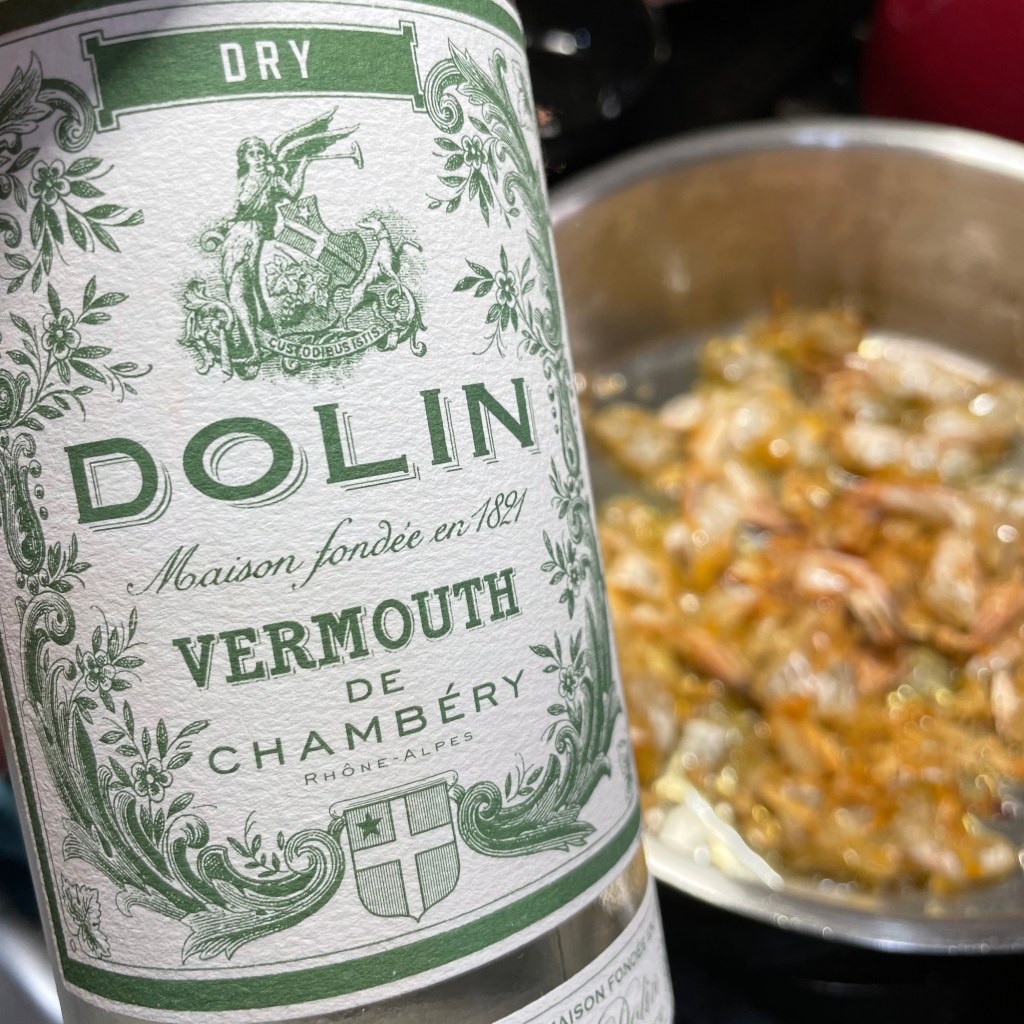
This seems like a ton of garlic, but trust this. If you avoid alcohol, use a seafood stock rather than wine.
Vermouth— one of the primary ingredients in a martini— is what I always have open, but you are welcome to use a dry white wine such as pinot grigio if that’s more your style. Either way, add only enough to cover the bottom of the pot, and be sure that each shell is at least partially submerged. This will go for about 30 minutes at low heat, until most of the liquid has evaporated. Strain out and discard the solids, and you’ll be left with a small amount of deeply flavored, shrimpy-garlicky oil.
Gently press to extract all the juices and flavor from the shells.
Next, transfer the strained base back to the pan over medium heat and add more minced garlic to it. Squeeze in the juice of half a lemon and simmer this until the garlic is softened (don’t let it burn!), and then turn off the heat. Add finely chopped parsley and swirl in a tablespoon of butter. Transfer to a straight-sided jar and use an immersion blender to whiz this mixture up into a smooth, garlicky butter sauce that you’ll drizzle onto the pizza when it’s hot from the oven. If you’re working ahead, this can be refrigerated and then brought to room temperature just before pizza baking.
Blending the sauce isn’t crucial, but it makes for a fully emulsified sauce that is super silky.
Marinate the shrimp
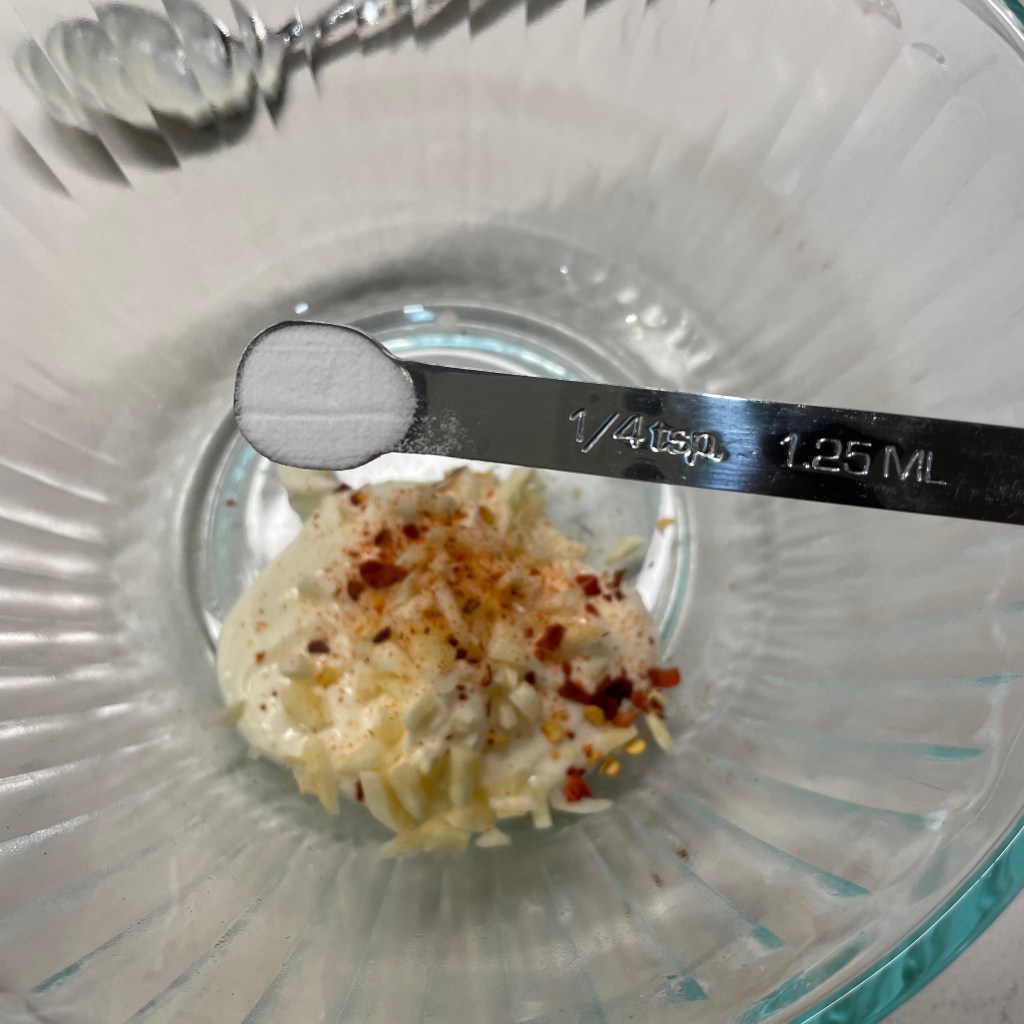
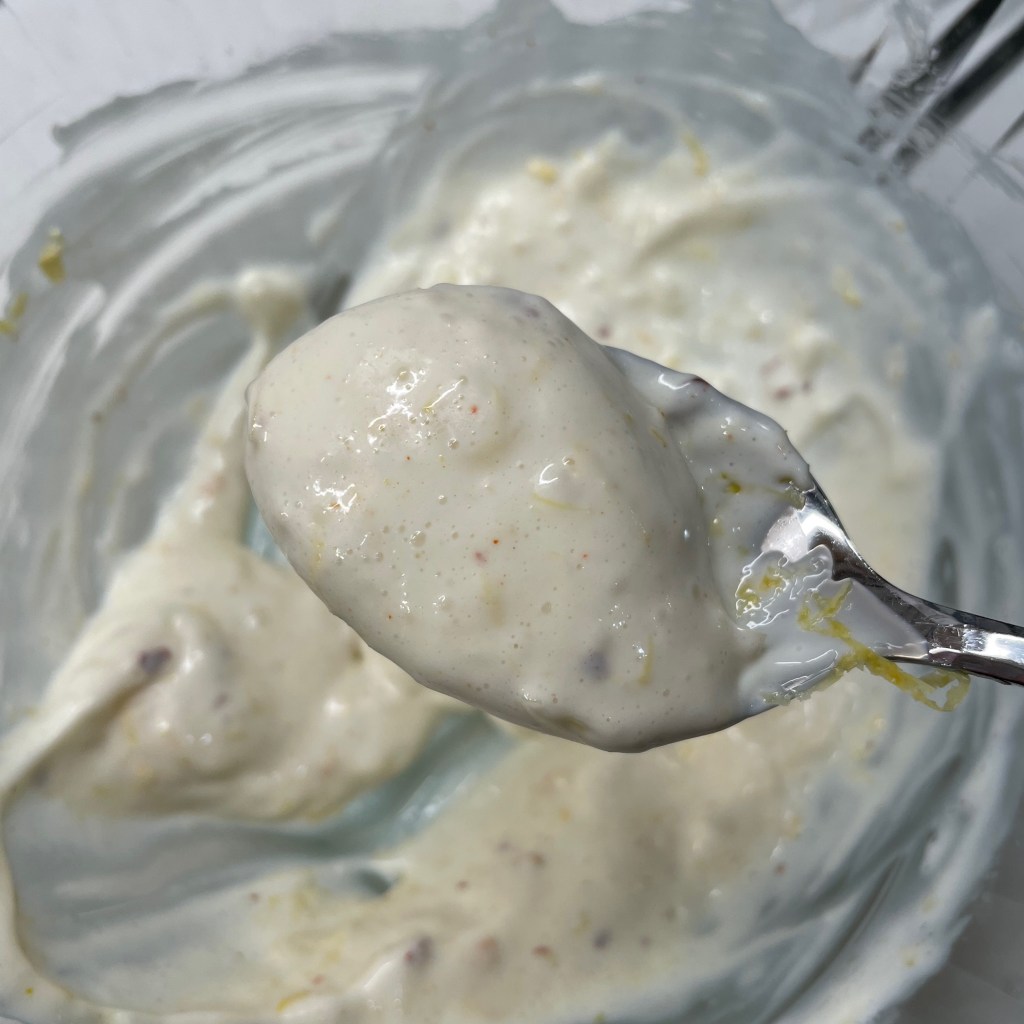
Now, do you remember the temperature this pizza will bake? Five hundred, fifty degrees! Under such extremes, the delicate shrimp needs a little protection, and I’m treating it with the mayonnaise trick I learned from rock star chef Kenji Lopéz-Alt. There is yet another clove of minced garlic in here, plus the zest of a small lemon and a shake of red pepper flakes. And then, the magic ingredient— baking soda! You can read all about my discovery of this technique here, if you wish, but suffice to say that it transforms the marinade to flavor the shrimp and protect it from the high heat. Twenty minutes will do it, but wait until just before pizza time for this step.
The baking soda changes the pH of the mayonnaise and accelerates the flavor into the protein.
Time to build the pizza!
Prep a pizza peel by rubbing in flour and then medium grind cornmeal, and hand-shape the pizza dough into a 14-inch round. Drizzle it with olive oil and season with salt and pepper. Next, scatter a sparse amount of the freshly grated mozzarella onto the dough as a base for the shrimp, and a quick shake of red pepper flakes. Arrange the shrimp (including that mayo marinade) onto the pizza. Give the whole thing a dusting of parm-romano cheese and slide it into the oven. Set a timer for 6 minutes (or longer, if using a pizza stone).
Have all your toppings lined up and ready, because this part goes quickly!
The preheated baking steel retains a great deal of heat, and the high temp of the oven ensures that the crust as well as the toppings will be perfectly browned in this time. Drizzle on the garlic-shrimp butter sauce, toss on more fresh parsley and one more dose of parm-romano blend cheese.
YUM!
The cheese and garlic butter will melt into the pizza, creating a perfect bite of tender shrimp, intensely flavored butter and garlicky goodness! This will be one of the two pizzas on our table this year as we count down to 2024.
Now, care to guess what other pizza I’ll be trying thisNew Year’s Eve? Hint: it’s more seafood. Stay tuned! 😉
Don't let the number of steps scare you away from making this insanely delicious pizza. None of them are difficult, and you'll be greatly rewarded for your effort!
Ingredients
1/4 cup extra virgin olive oil
5 to 6 cloves fresh garlic, peeled and sliced thin
Kosher salt
A few shakes red pepper flakes
Shells and tails of 3/4 pound uncooked shrimp
1/4 cup dry white wine (or vermouth, as I prefer)
2 additional cloves garlic, minced
Juice of 1/2 lemon
2 Tbsp. fresh parsley leaves, finely chopped
1 Tbsp. butter
Notes: Don’t skimp on the garlic in this component! It plays a prominent role in scampi, and though it may seem like too much, you’ll end up straining most of it out of the sauce base, so use enough to give it plenty of flavor.
Directions
Add olive oil to a heavy-bottomed pot placed over very low heat. Add first amount of garlic, salt and red pepper flakes and steep for about 20 minutes. Watch this carefully to be sure the garlic doesn’t burn; it should just barely simmer around the edges of the garlic.
Add shrimp shells and tails to the pot and toss until shells begin to turn pink. Raise heat slightly to medium-low. Add dry vermouth and simmer until liquid is mostly evaporated. Cool to room temperature and then strain out solids through a mesh strainer.
Wipe out the pot and add strained shrimp stock, minced garlic and lemon juice. Cook over low heat until garlic softens. Turn off heat, stir in parsley and whisk in butter.
Transfer sauce to a straight-sided jar and use an immersion blender to puree until smooth. Set aside or refrigerate and bring to room temperature before baking pizza.
Next, marinate the shrimp. If you make the marinade ahead, wait until last minute to add the baking soda.
Ingredients
1/3 cup mayonnaise
1 clove garlic, peeled and minced
1 or 2 shakes red pepper flakes
1/4 tsp. baking soda
Zest of 1 small lemon
3/4 pound wild-caught shrimp, peeled and deveined
Directions
Combine mayo, garlic, red pepper and baking soda in a bowl large enough to hold the shrimp.
Stir in lemon zest and toss shrimp in the mixture. Set aside for 20 minutes before assembling the pizza.
Time to bake: The oven should be preheated to 550° F for one hour with pizza steel placed about 8 inches from the top heating element of the oven. Dust pizza peel with flour and medium grind corn meal for easy transfer of the pizza to and from the oven. If you don’t have a peel, use the back of a cookie sheet to slide the pizza in, and grab the crust with tongs to pull it out when it’s finished.
Ingredients
11 oz. pizza dough ball, at room temperature
Drizzle of olive oil
Salt and pepper
1/3 cup freshly shredded hard mozzarella
A few shakes red pepper flakes
2 Tbsp. parm-romano blend cheese
Additional parm-romano and chopped Italian parsley (for final garnish)
Directions
Shape dough by hand into a 14-inch round and place it on prepared peel. Drizzle oil all over dough and give it a quick seasoning of salt and pepper.
Scatter mozzarella over pizza and shake on red pepper flakes. Arrange shrimp over mozzarella. Sprinkle parm-romano cheese all over pizza.
Slide pizza onto hot steel and bake for 6 minutes. Remove from oven and spoon over the garlic sauce, concentrating on the shrimp (don’t worry, it will melt and ooze everywhere). Sprinkle with parsley and additional parm-romano cheese. Serve immediately.
In all my working days— even those that I spent pitching in for a catering company— I never had a work assignment that involved developing a cocktail. Until now!
The second half of this year has been a wild ride for me, as I assumed a management role of sorts in the company where I’ve been working for the past decade. I’ve been busy since July learning new processes and data systems, tackling the billing records and helping other departments in our parent company learn more about my lesser-known branch of the business. It’s been exciting, exhausting and rewarding all at once.
With these new responsibilities came introduction to new people in the company, including my new direct supervisor, John. We’ve only met online, as he is based in northern California and I’m in central North Carolina, but we connect regularly for one-on-one updates, and he perked up in one of our early, get-acquainted conversations when he learned that I do a food blog. At the end of each monthly meeting, we usually squeeze in a little banter about the most interesting thing I’ve been cooking or shaking up that month. The rest of the department has not met me, though, and I’m told that John has been subject to some teasing by the team. They call me his “imaginary friend!” 😂
That will change this afternoon when I join an online holiday-themed meeting with the whole gang. To help with introductions, John gave me an assignment— spend a few minutes describing my branch of the business, and a few more minutes instructing the team in making a holiday cocktail. So it’s true— my reputation as an amateur mixologist precedes me. I’m good with that!
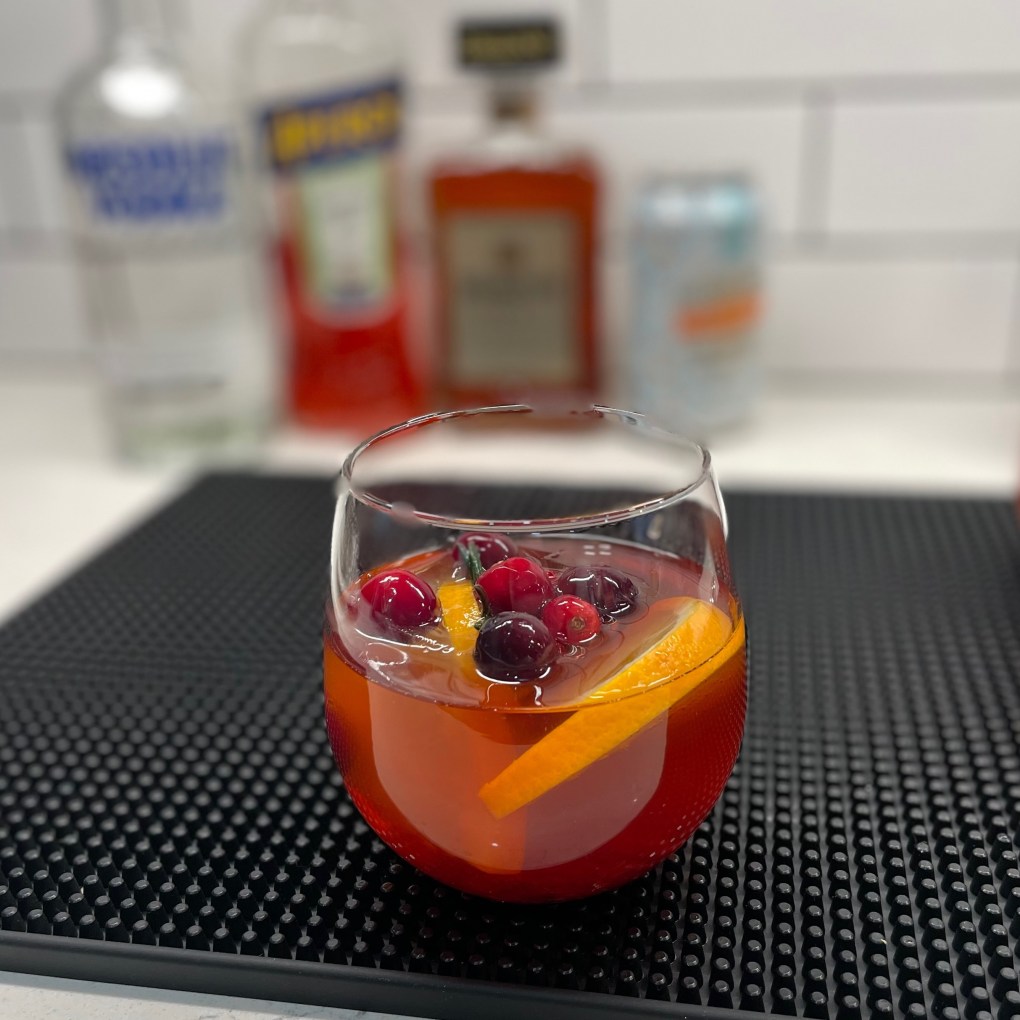
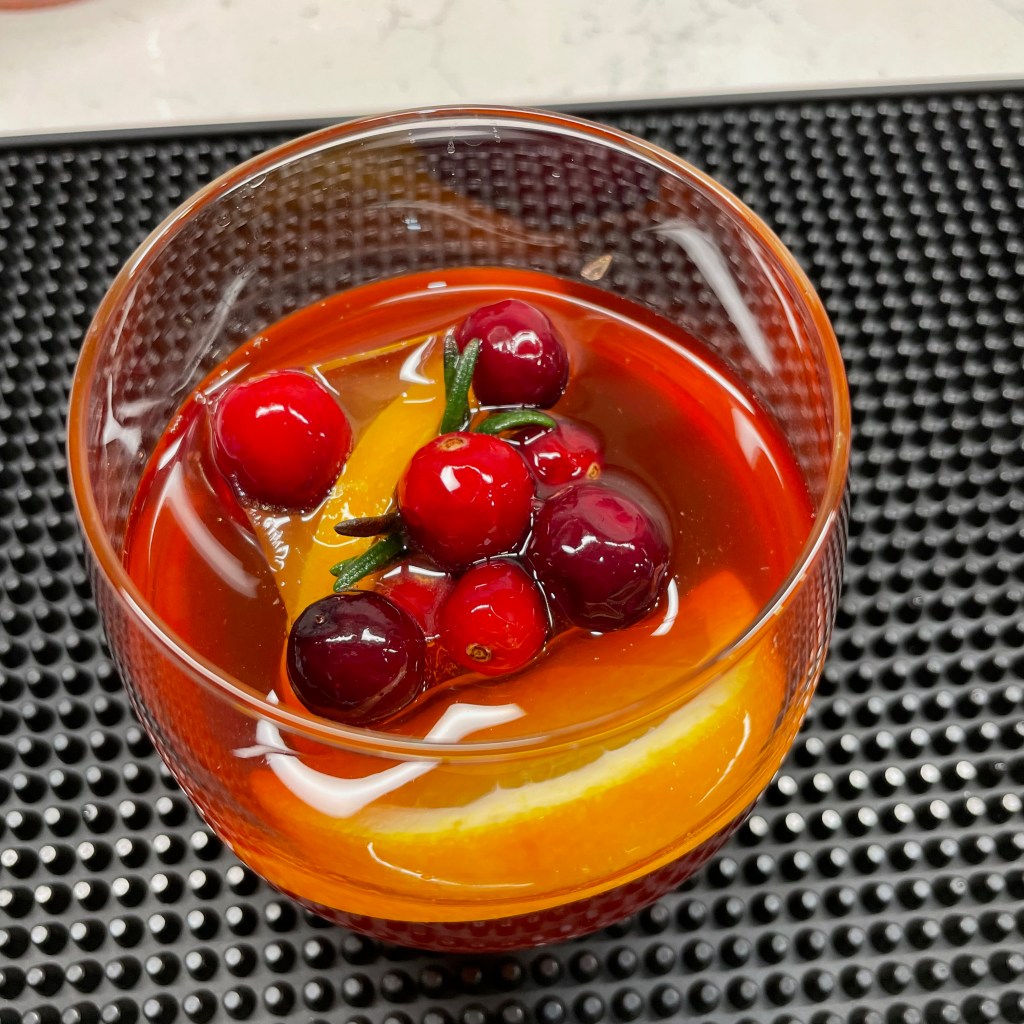
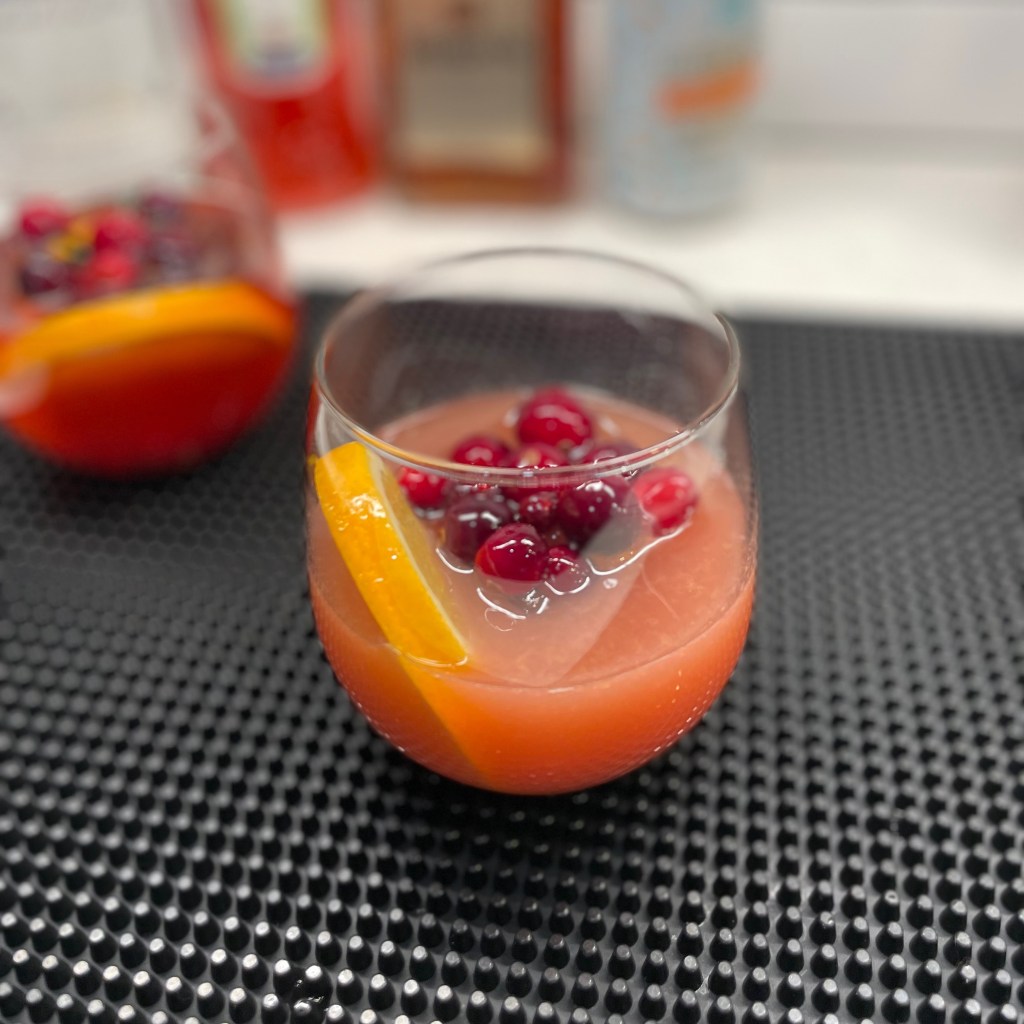
This cocktail even looks like Christmas!
The drink I’ve prepared is a fun and festive twist on a classic Italian Spritz, and I chose this approach for a few reasons:
It’s easy, made with widely available ingredients for a global audience.
It’s a good balanced drink— not too sweet or strong.
You don’t need fancy bartender tools, as this drink is built right in the glass.
It’s simple to sub in lighter ingredients for an alcohol-free version that is every bit as festive and sure to please the non-drinkers at your holiday gatherings.
So, what’s in this cocktail?
The almond and pomegranate flavors give a traditional Spritz a holiday flair.
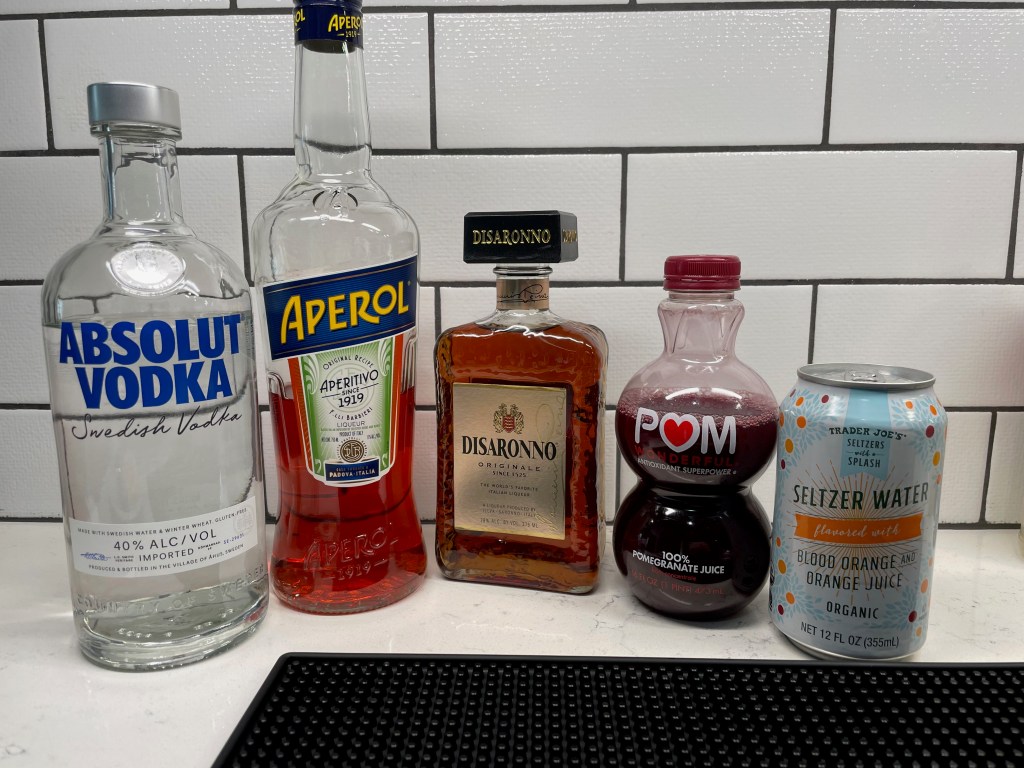
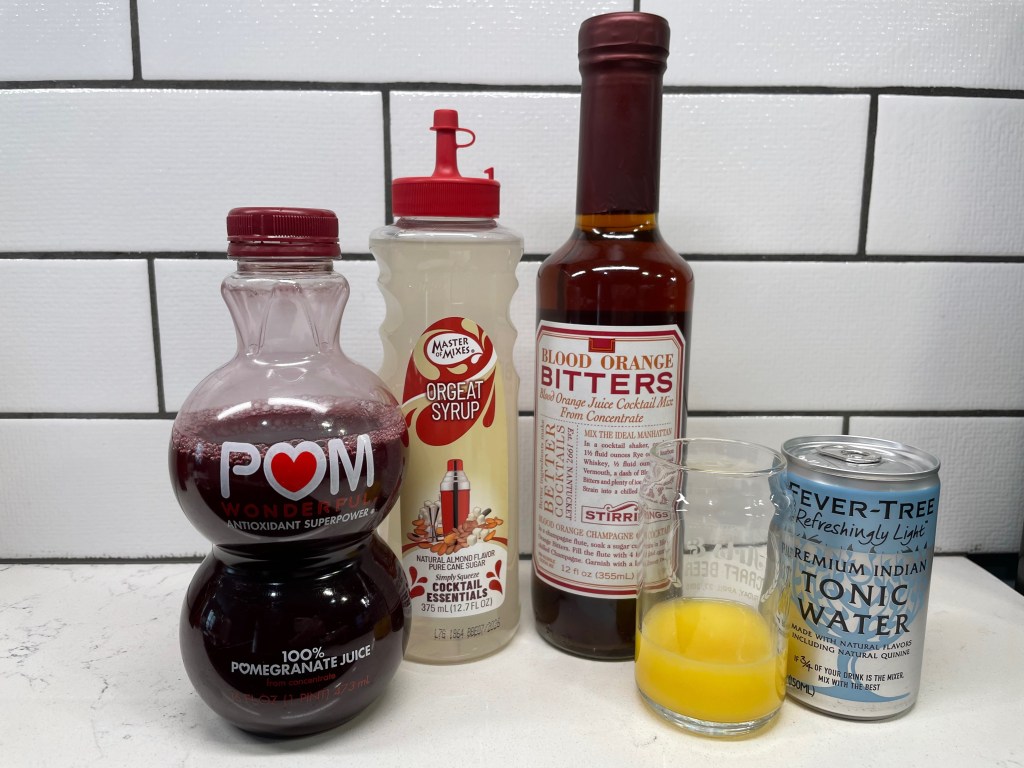
The flavors in my Spritz are seasonal— tart pomegranate and sweet almond— paired with Aperol, the slightly bitter Italian aperitivo that hits the taste buds like a marriage of grapefruit peel and orange LifeSavers candy. If you are already a fan of Aperol, you’ll love this drink. If Aperol feels a little too bitter for you, then you’ll appreciate the way the amaretto and pomegranate calm it down. Vodka is the primary spirit of the drink, but if you want something lighter, the drink won’t suffer without it.
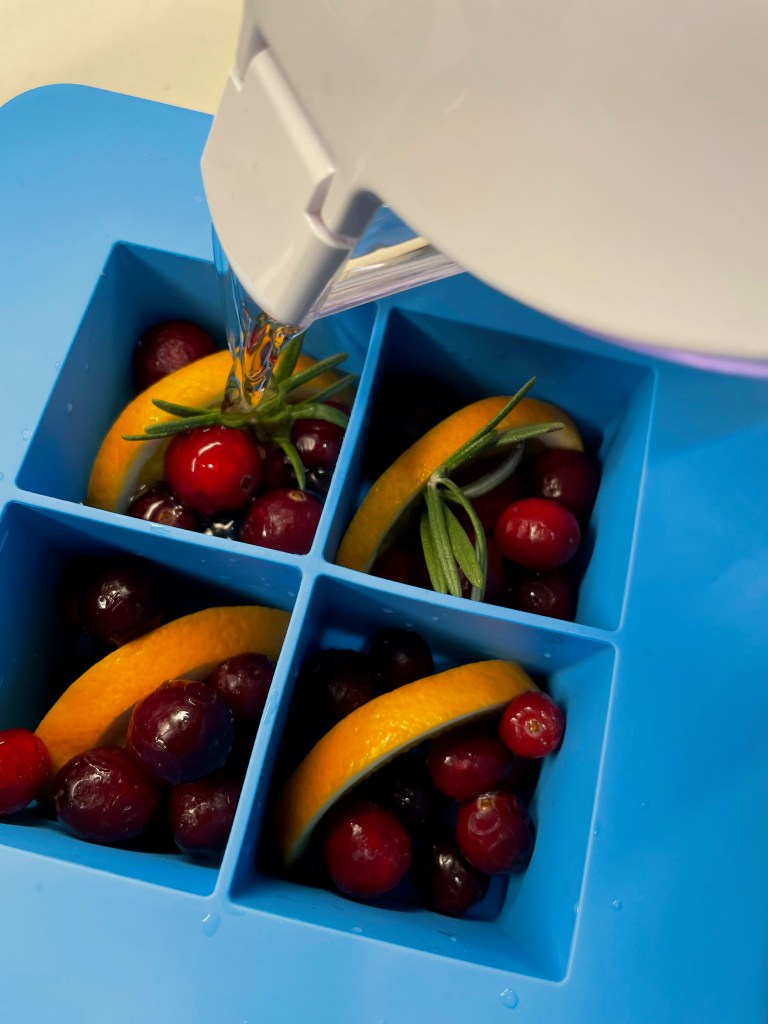
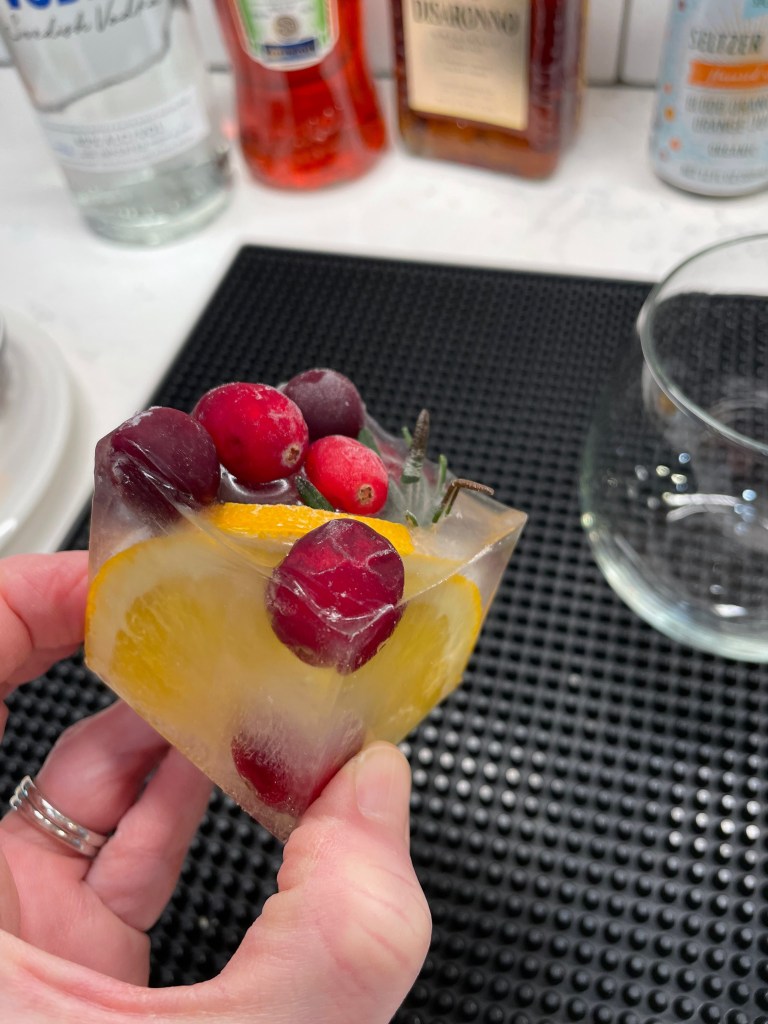
Don’t forget to garnish! A few pomegranate arils and a slice of orange in the glass will dress it up beautifully for the holidays and make a great impression! You know that I’m obsessed with fancy ice, too, and here I’ve found an easy way to make them extra festive, with orange slices, whole cranberries and a rosemary sprig frozen inside! My ice mold is made by True Cubes, but this trick should work with any silicone ice mold.
Don’t underestimate the wow factor of a thoughtful garnish!
Finally, this drink is topped off with sparkling water or seltzer because everything feels fancier with bubbles. If you’re in the mood for a stronger topper, go with Prosecco, as with the classic Spritz. I personally think it’s just right with seltzer, especially one flavored with blood orange. 😋
Can I get a no-booze version of this pretty drink?
Absolutely! The great thing about a drink made with fruit flavors is that it’s very adaptable to a no-alcohol or “zero proof” version.
This drink received rave reviews from non-drinkers at our house!
To maintain the good balance of sweet, tart and bitter, I’ll shift the ratio of ingredients slightly. Use non-alcoholic orange bitters to replace the Aperol and orgeat, an almond cordial syrup, as a stand-in for the sweetness of Amaretto. Freshly squeezed citrus is perfect here, and the pomegranate juice brings a little tartness. There’s no need to “replace” the vodka, which doesn’t have much flavor on its own. But if you’d like a little bite or tingle on the tongue, I have a trick for that, too. Tonic water!
The same flavors, but rearranged for a zero-ABV drink.
These alcohol-free ingredients are easy to find online or in the mixers section of a larger supermarket. You might also amp up the bitter orange flavor by crushing a piece of orange peel in the bottom of the glass. To give the drink a little “bite’ that you would otherwise have in a spirited cocktail, top it off with tonic water rather than seltzer.
Cheers!
For your holiday enjoyment, two click-to-print recipe cards are available below, one for each version of my holiday Spritz. For readers abroad, I’ve estimated the measure amounts in milliliters. Feel free to adjust to taste!
This cocktail is a festive, seasonal twist on a classic Aperol Spritz. The drink can be built right in the glass, and a garnish of fresh fruit is a beautiful finish!
Ingredients
1.5 oz vodka (40ml)
1 oz Aperol (25ml)
.5 oz pure pomegranate juice (15ml)
.25 oz amaretto or other nut liqueur (10ml)
2 oz. seltzer (or Prosecco, for a stronger drink)(50ml)
Pomegranate arils and fresh orange slice for garnish
Note: Hazelnut or pistachio liqueur would be an interesting substitute for the amaretto in this cocktail. If nut allergies are a concern, consider adding something with a touch of vanilla or ginger for an extra little something.
Directions
Measure vodka, Aperol, pomegranate juice and amaretto into a large cocktail or wine glass. Stir gently to mix.
Add ice and top off the drink with seltzer. Give it a quick little stir to activate the bubbles. Add garnish as desired.
The seasonal flavors of pomegranate and almond give this drink a festive feel without any of the consequences of alcohol! Look for orgeat and alcohol-free orange bitters online or in the mixers section of a larger supermarket.
Ingredients
1.5 oz. freshly squeezed orange juice (40ml)
.75 oz. pomegranate juice (20ml)
.25 oz. orgeat (almond cordial syrup)(10ml)
.25 oz. non-alcoholic blood orange bitters (10ml)
2 oz. seltzer (or tonic water, for a drink with more “bite”)(50ml)
Pomegranate arils and fresh orange slice for garnish
Note: If you cannot find the orgeat, consider using almond syrup, similar to what is used in fancy coffee shops. In a pinch, you can replicate the orange bitters by crushing a piece of fresh orange peel in the bottom of the glass before mixing the other ingredients.
Directions
Measure orange juice, pomegranate juice, orgeat and bitters into a large cocktail or wine glass. Stir gently to mix.
Add ice and top off the drink with seltzer or tonic water. Give it a quick little stir to activate the bubbles. Add garnish as desired.
A few weeks ago, as I was rummaging through my little black recipe box, I ran across a yellowed snippet I cut out years ago from one of those old-school women’s magazines perched at the grocery store checkout. This is a long-time habit of mine— hoarding recipes— and I’m only slightly embarrassed to admit that I frequently don’t get around to making the things that intrigue me enough to impulse-buy a magazine or cookbook. Or if I do make one of these recipes, I change it up so much that it barely resembles the thing that caught my eye in the first place. Blogging has changed me for the better, though, and I’ve been revisiting my box full of clippings, even creating a culinary bucket list of things to try.
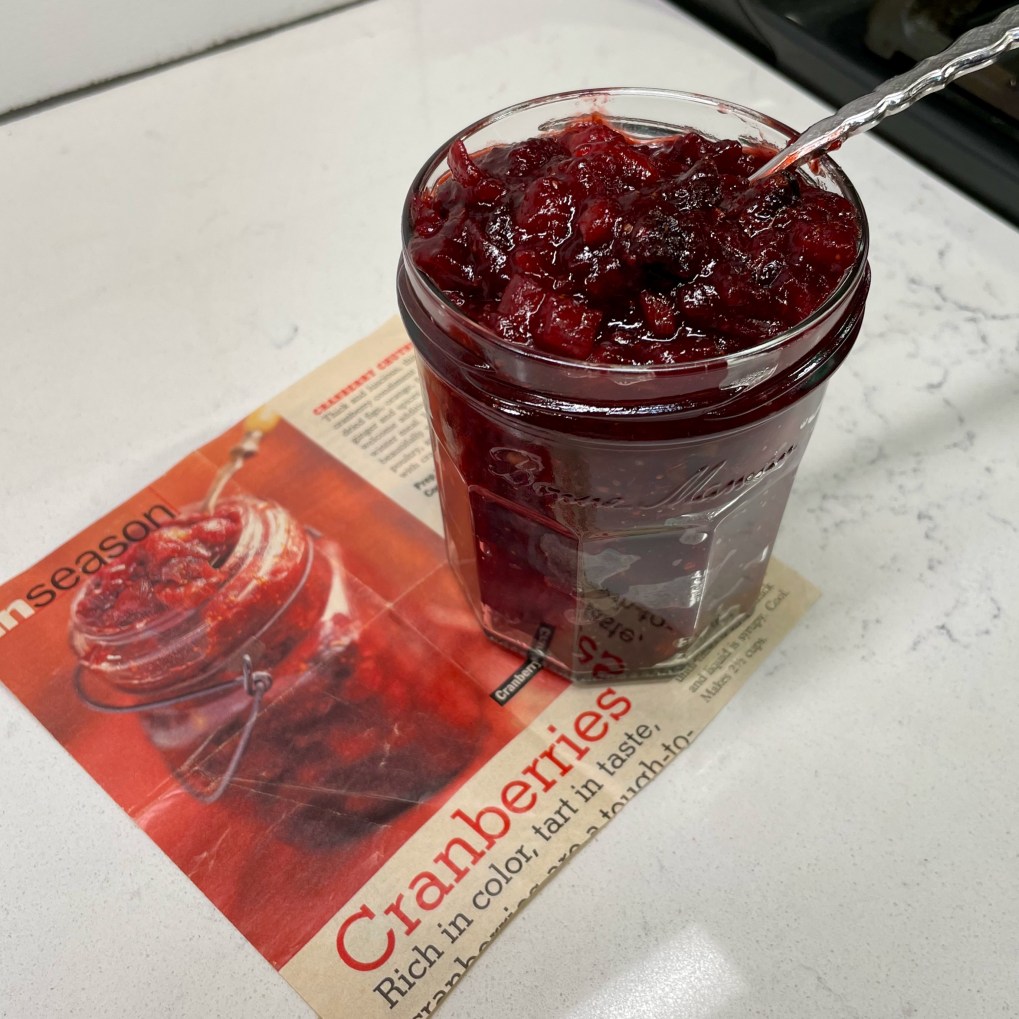
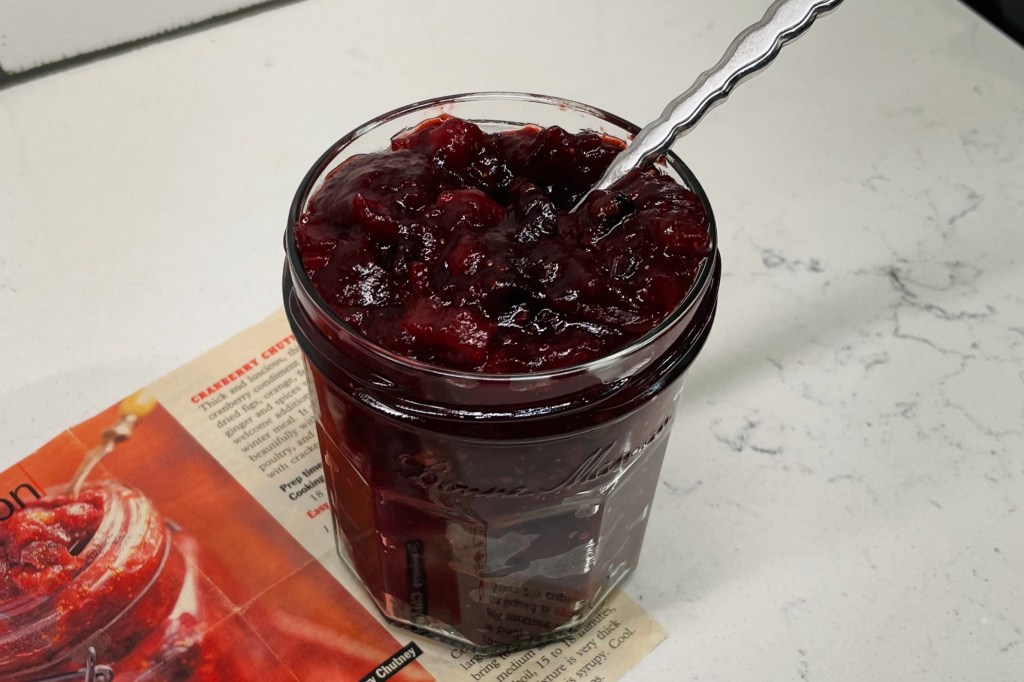
I have finally gotten around to this cranberry chutney, and for the life of me, I don’t know why I waited so long. It’s absolutely delicious! With a few adjustments (of course).
Chutney is a condiment that I only experienced in my adult years, and I appreciate it for many reasons. In addition to the warm spice flavors of India and competing notes of sweet and tart, there’s a texture element to chutney that I find most addictive. It certainly doesn’t hurt that chutney is a lovely complement to meat and vegetable dishes, and with cranberry in the spotlight, this one feels perfect for all the food holidays barreling down on us. I’m always on the lookout for an interesting twist on classic foods, and I can promise you this ruby-colored condiment will be on our Thanksgiving table, but it was also really dang good last week on my second go-round of Thanksgiving burgers.
Let’s go ahead and talk about the adjustments I made to the magazine recipe (I can’t help myself), and if you enjoy chutney as I do, I bet you’ll agree that these were necessary.
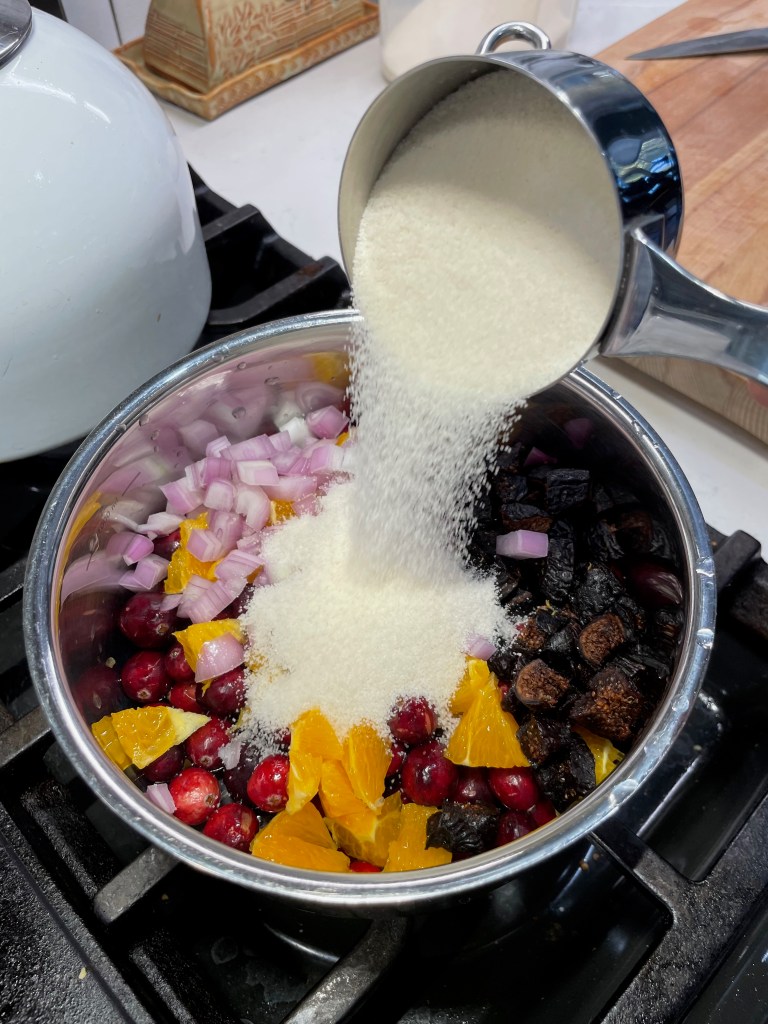
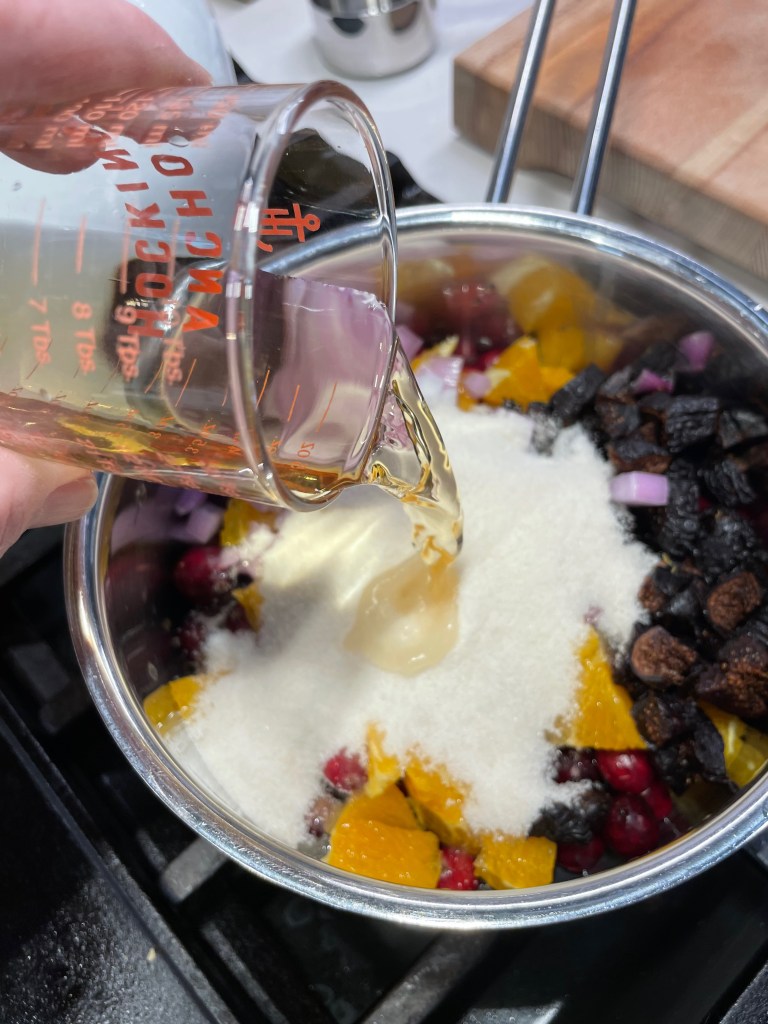
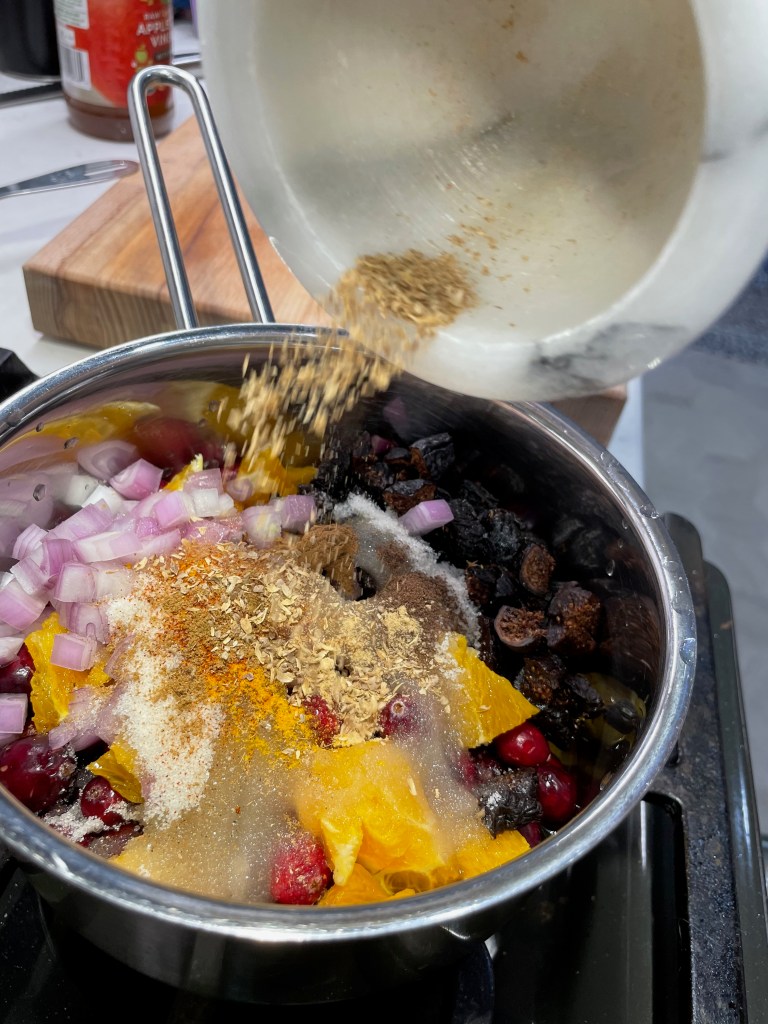
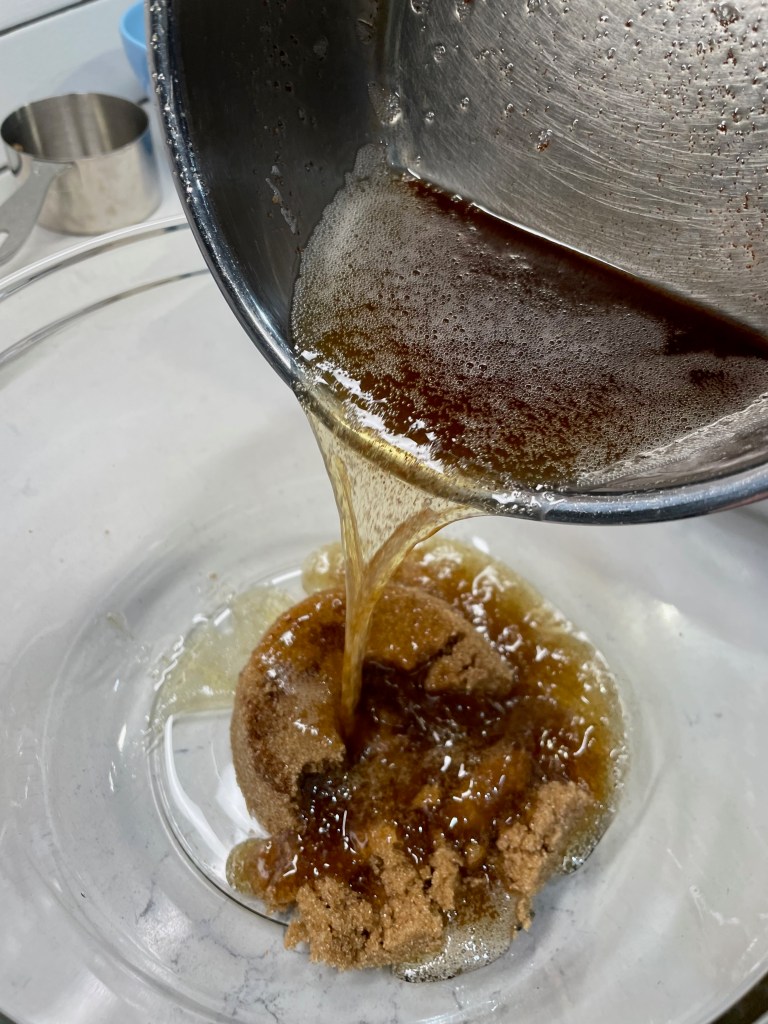
First, I knew straightaway that I would add onions to my version of this chutney, because I love the little crunch next to the tender cooked fruit and I wanted a gentle push-pull of sweet and savory in one bite. Every chutney I’ve ever loved had onions, and though sweet or even red onion would have worked fine, I chopped up a medium shallot for this. The magazine recipe had plenty of sweetness with dried figs and chopped oranges plus sugar. The fresh cranberries contributed a tart contrast, and cider vinegar gave it a slightly “pickled” flavor. The recipe called for sherry, and since I do not buy “cooking wines,” I used a generous splash of a high quality Spanish drinking sherry. It’s the holidays, why not?
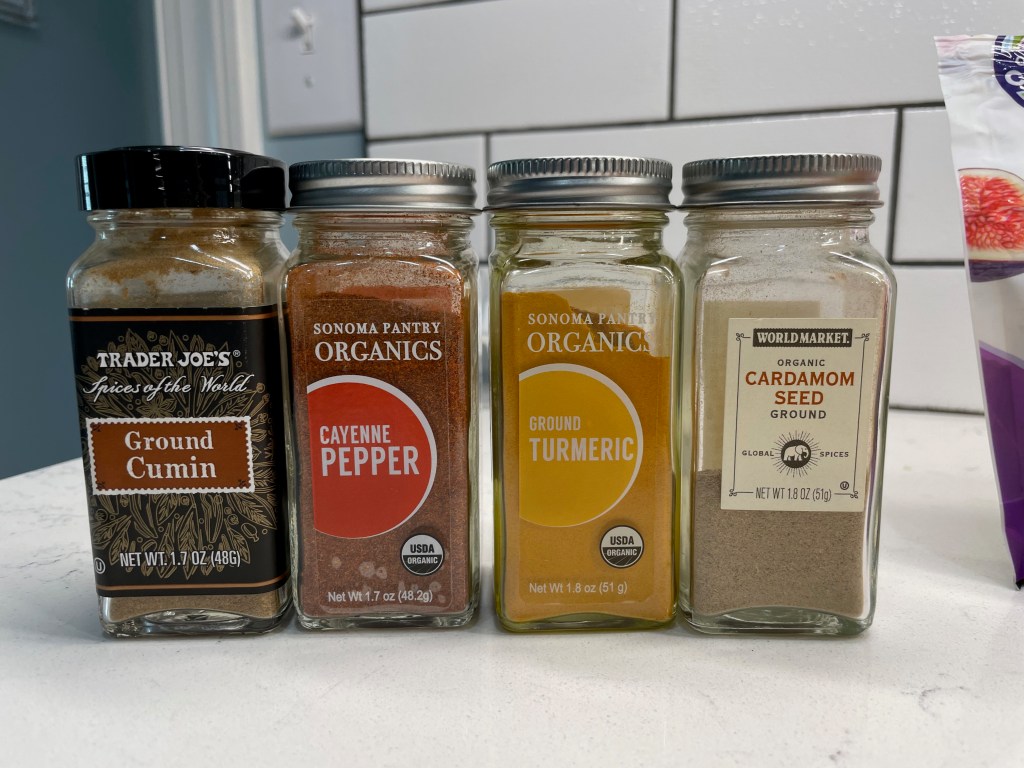
Then came the spices, and I had to improvise a bit here because I also don’t buy curry powder. It’s one of those blends that is different from one brand to the next, but I know enough about Indian flavors to estimate which ones belonged in this recipe. So I made up my own “curry” blend on the spot, with a few shakes each of cumin, turmeric, cardamom and cayenne, plus some freshly crushed coriander seed for a citrusy complexity. The recipe also suggested cinnamon and allspice, and those were easy. Ground ginger also stepped up in place of fresh, which I never seem to have when I need it.
The aroma of this concoction was instantly intoxicating, and as I began to stir, it hit me that I didn’t notice on the magazine recipe one very important ingredient. I had to look again to be sure— do you see what’s missing?
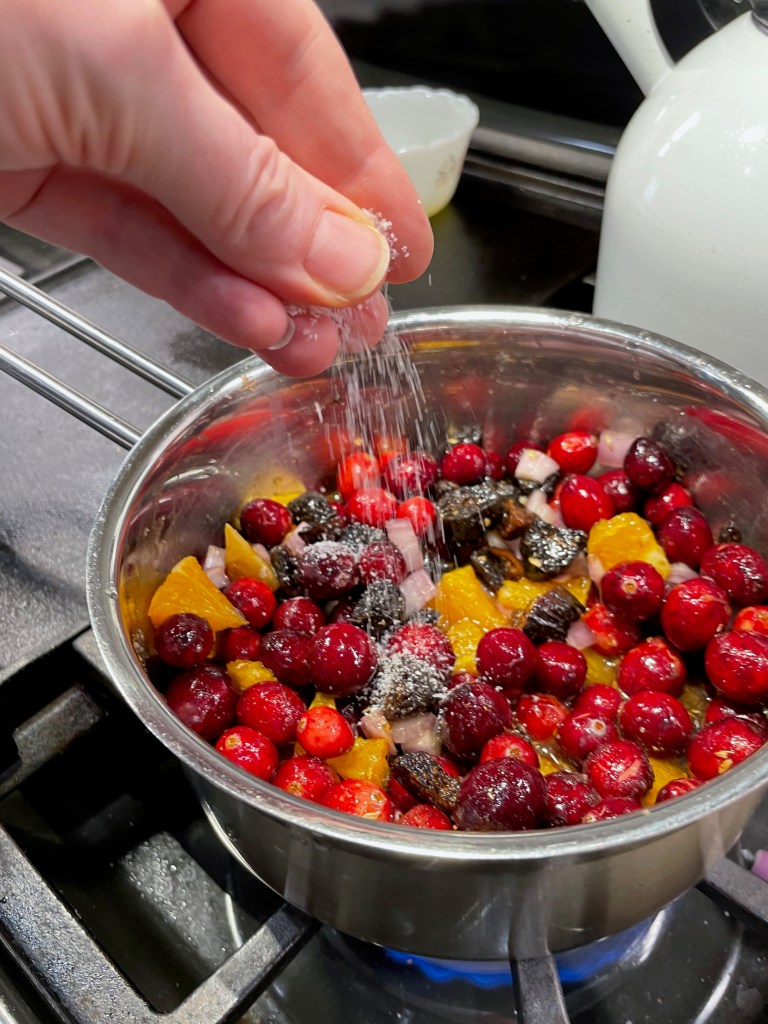
Salt, of course! Now, this may have been an oversight, or perhaps the author assumed that the reader would know to include it. This is one of the things I griped about in my post about the problem with recipes, and why I insisted that one still must know how to cook even when following a recipe. Even if this was meant to be just a “sweet” chutney, it should still have at least a pinch of salt to highlight the amazing flavors of the other ingredients. So, salt it I did.
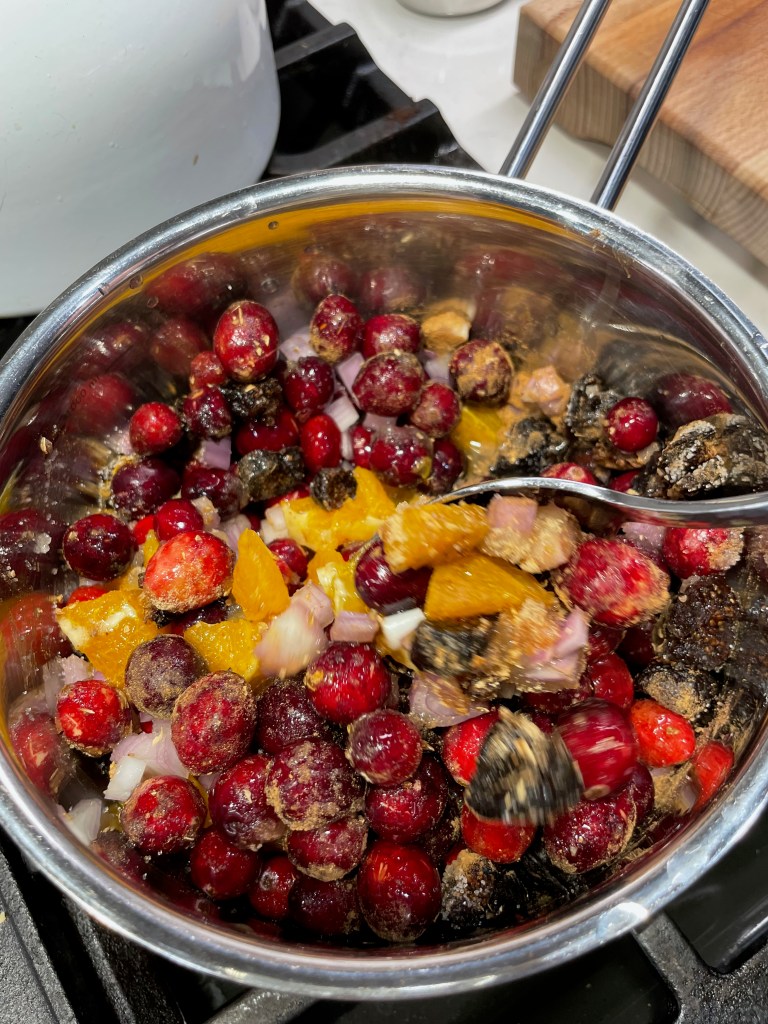
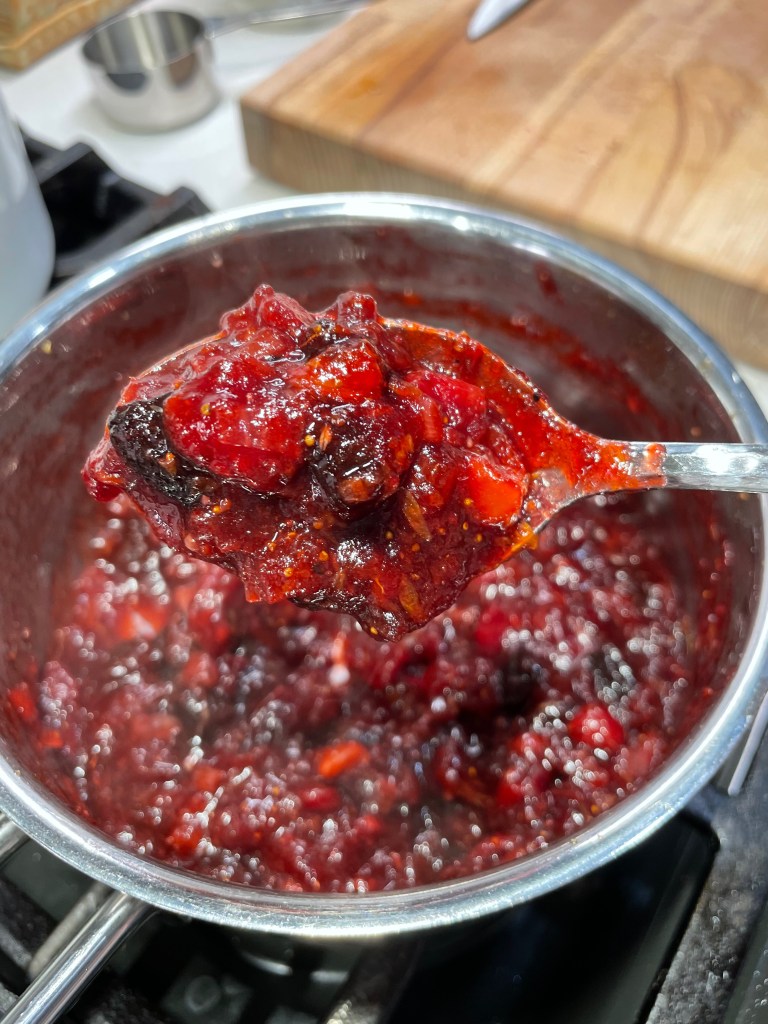
Twenty minutes later, I had this gorgeous, sweet and savory cranberry chutney. The oranges cooked down and took on the red color of the cranberries. The shallots were still a bit crunchy, the figs were delicate and chewy, and the spice aroma was just perfect.
I’m glad I didn’t put this one off another year. It’ll be great with my roast turkey, and my taste buds want it with pork chops, salmon and chicken, too. Will you be throwing a twist onto any Thanksgiving classics this year? Let’s hear about it in the comments, just below the click-to-print recipe card. As always, feel free to adjust to taste. 😉
This mouthwatering chutney brings a Thanksgiving classic together with warm Indian spices and crunchy bits of onion, making it a fantastic sidekick to pork, chicken, fish and (of course) roasted turkey!
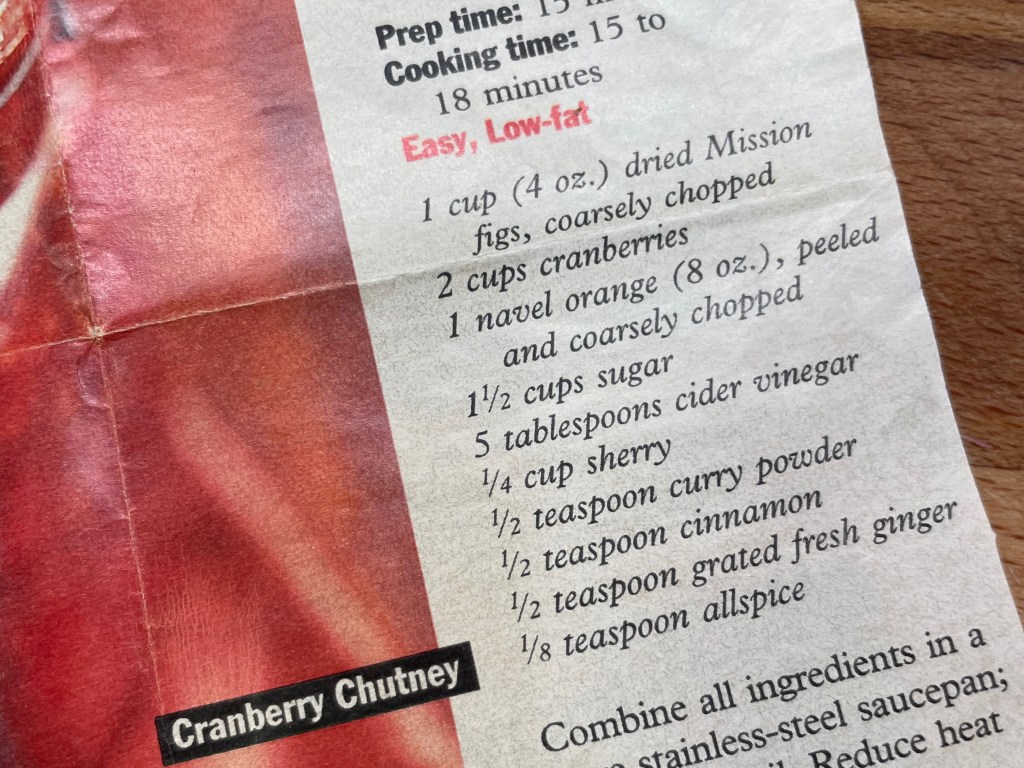
Ingredients
1 cup fresh cranberries, rinsed and picked over for duds
1/2 cup dried mission figs, stems removed and coarsely chopped
1/2 fresh navel orange, peeled and chopped
1 medium shallot, minced
2/3 cup granulated sugar
2 1/2 Tablespoons cider vinegar
2 Tablespoons sherry (optional)
1/4 teaspoon ground cinnamon (mine was smoked)
1/4 teaspoon ground ginger
1/8 teaspoon ground coriander (a similar amount of crushed seeds)
two shakes each ground cumin, cardamom, turmeric and cayenne* (see recipe notes)
two or three shakes ground allspice
a generous pinch of kosher salt
Notes: If you have a curry powder blend, 1/4 teaspoon of it will suffice in place of the cumin, cardamom, turmeric and cayenne listed above.
This was my first time making this wonderful chutney, so my ingredients represent a half-batch, which was enough to fill a jelly jar. Next time, you can bet I’ll make a whole batch!
Directions
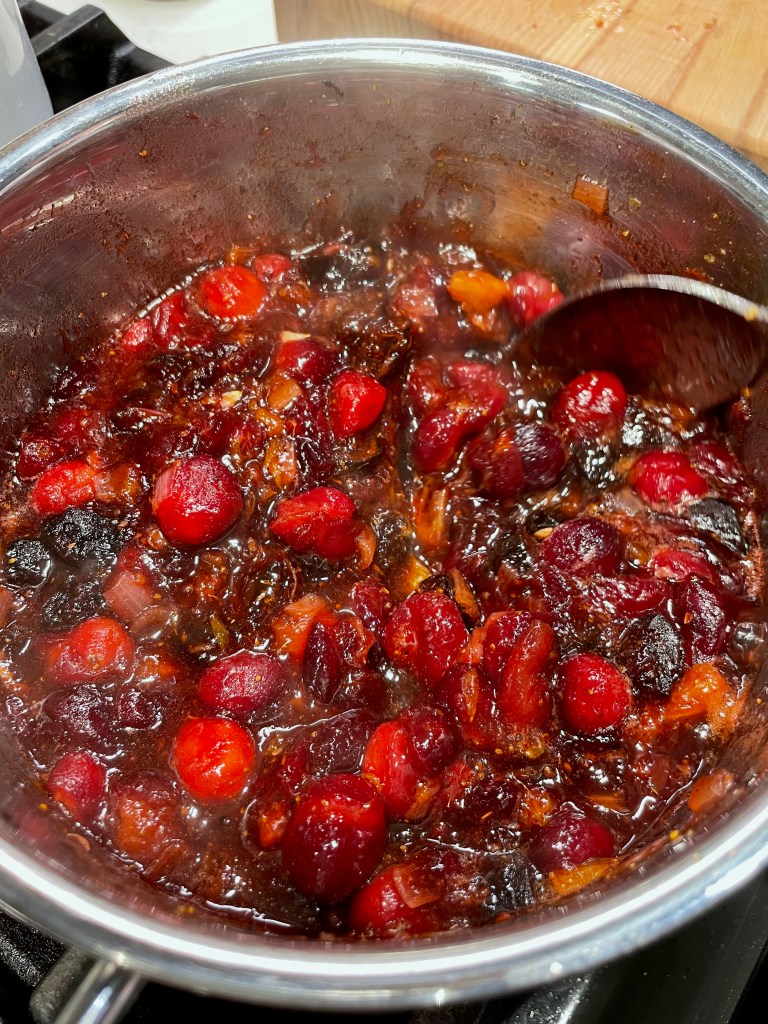
Combine cranberries, oranges, figs and shallots in a small saucepan.
Add sugar, vinegar, sherry and spices (plus salt) and toss to distribute the spices. Cook over medium heat until the mixture comes to a boil, then reduce heat and simmer for about 20 minutes. As the cranberries soften, use the back of your mixing spoon to gently smash them.
Allow chutney to cool to room temperature (it will thicken as it cools), and then transfer it to a clean jar to store in the refrigerator.
Now and then, my smartphone surprises me with an unsolicited trip down memory lane, in the form of a fully animated slide show recapping a theme, an occasion or a season from my past. The most recent of these was a reminder of “Thanksgiving through the years,” and the images from 2020 and 2021 struck me because those years were so different when we were all sidelined by the Covid-19 pandemic.
As the past-years’ photos scrolled to an indiscernible soundtrack, I noticed that in addition to the more adventurous dishes my husband and I created in 2020 (we figured a dinner without guests was a good time to experiment), I also created some meals that were scaled way back from the usual spread, in a way that might ease the expectation of a full-blown Thanksgiving but still satisfy the yearning for its traditional flavors. These two were delicious enough to make again one day.
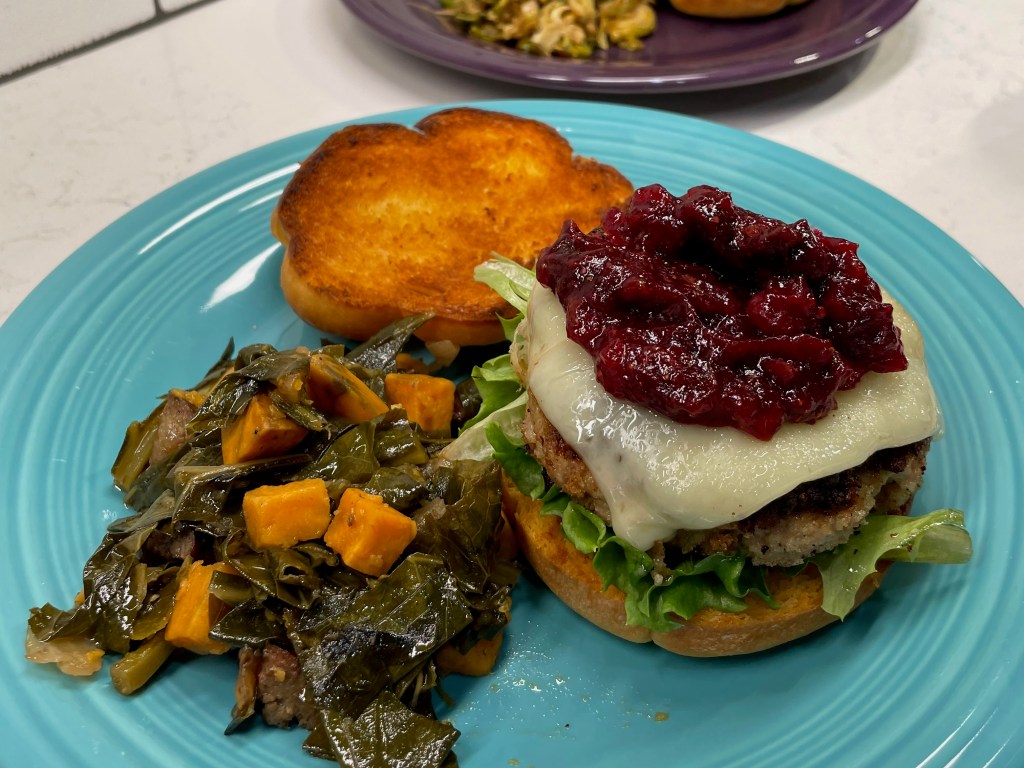
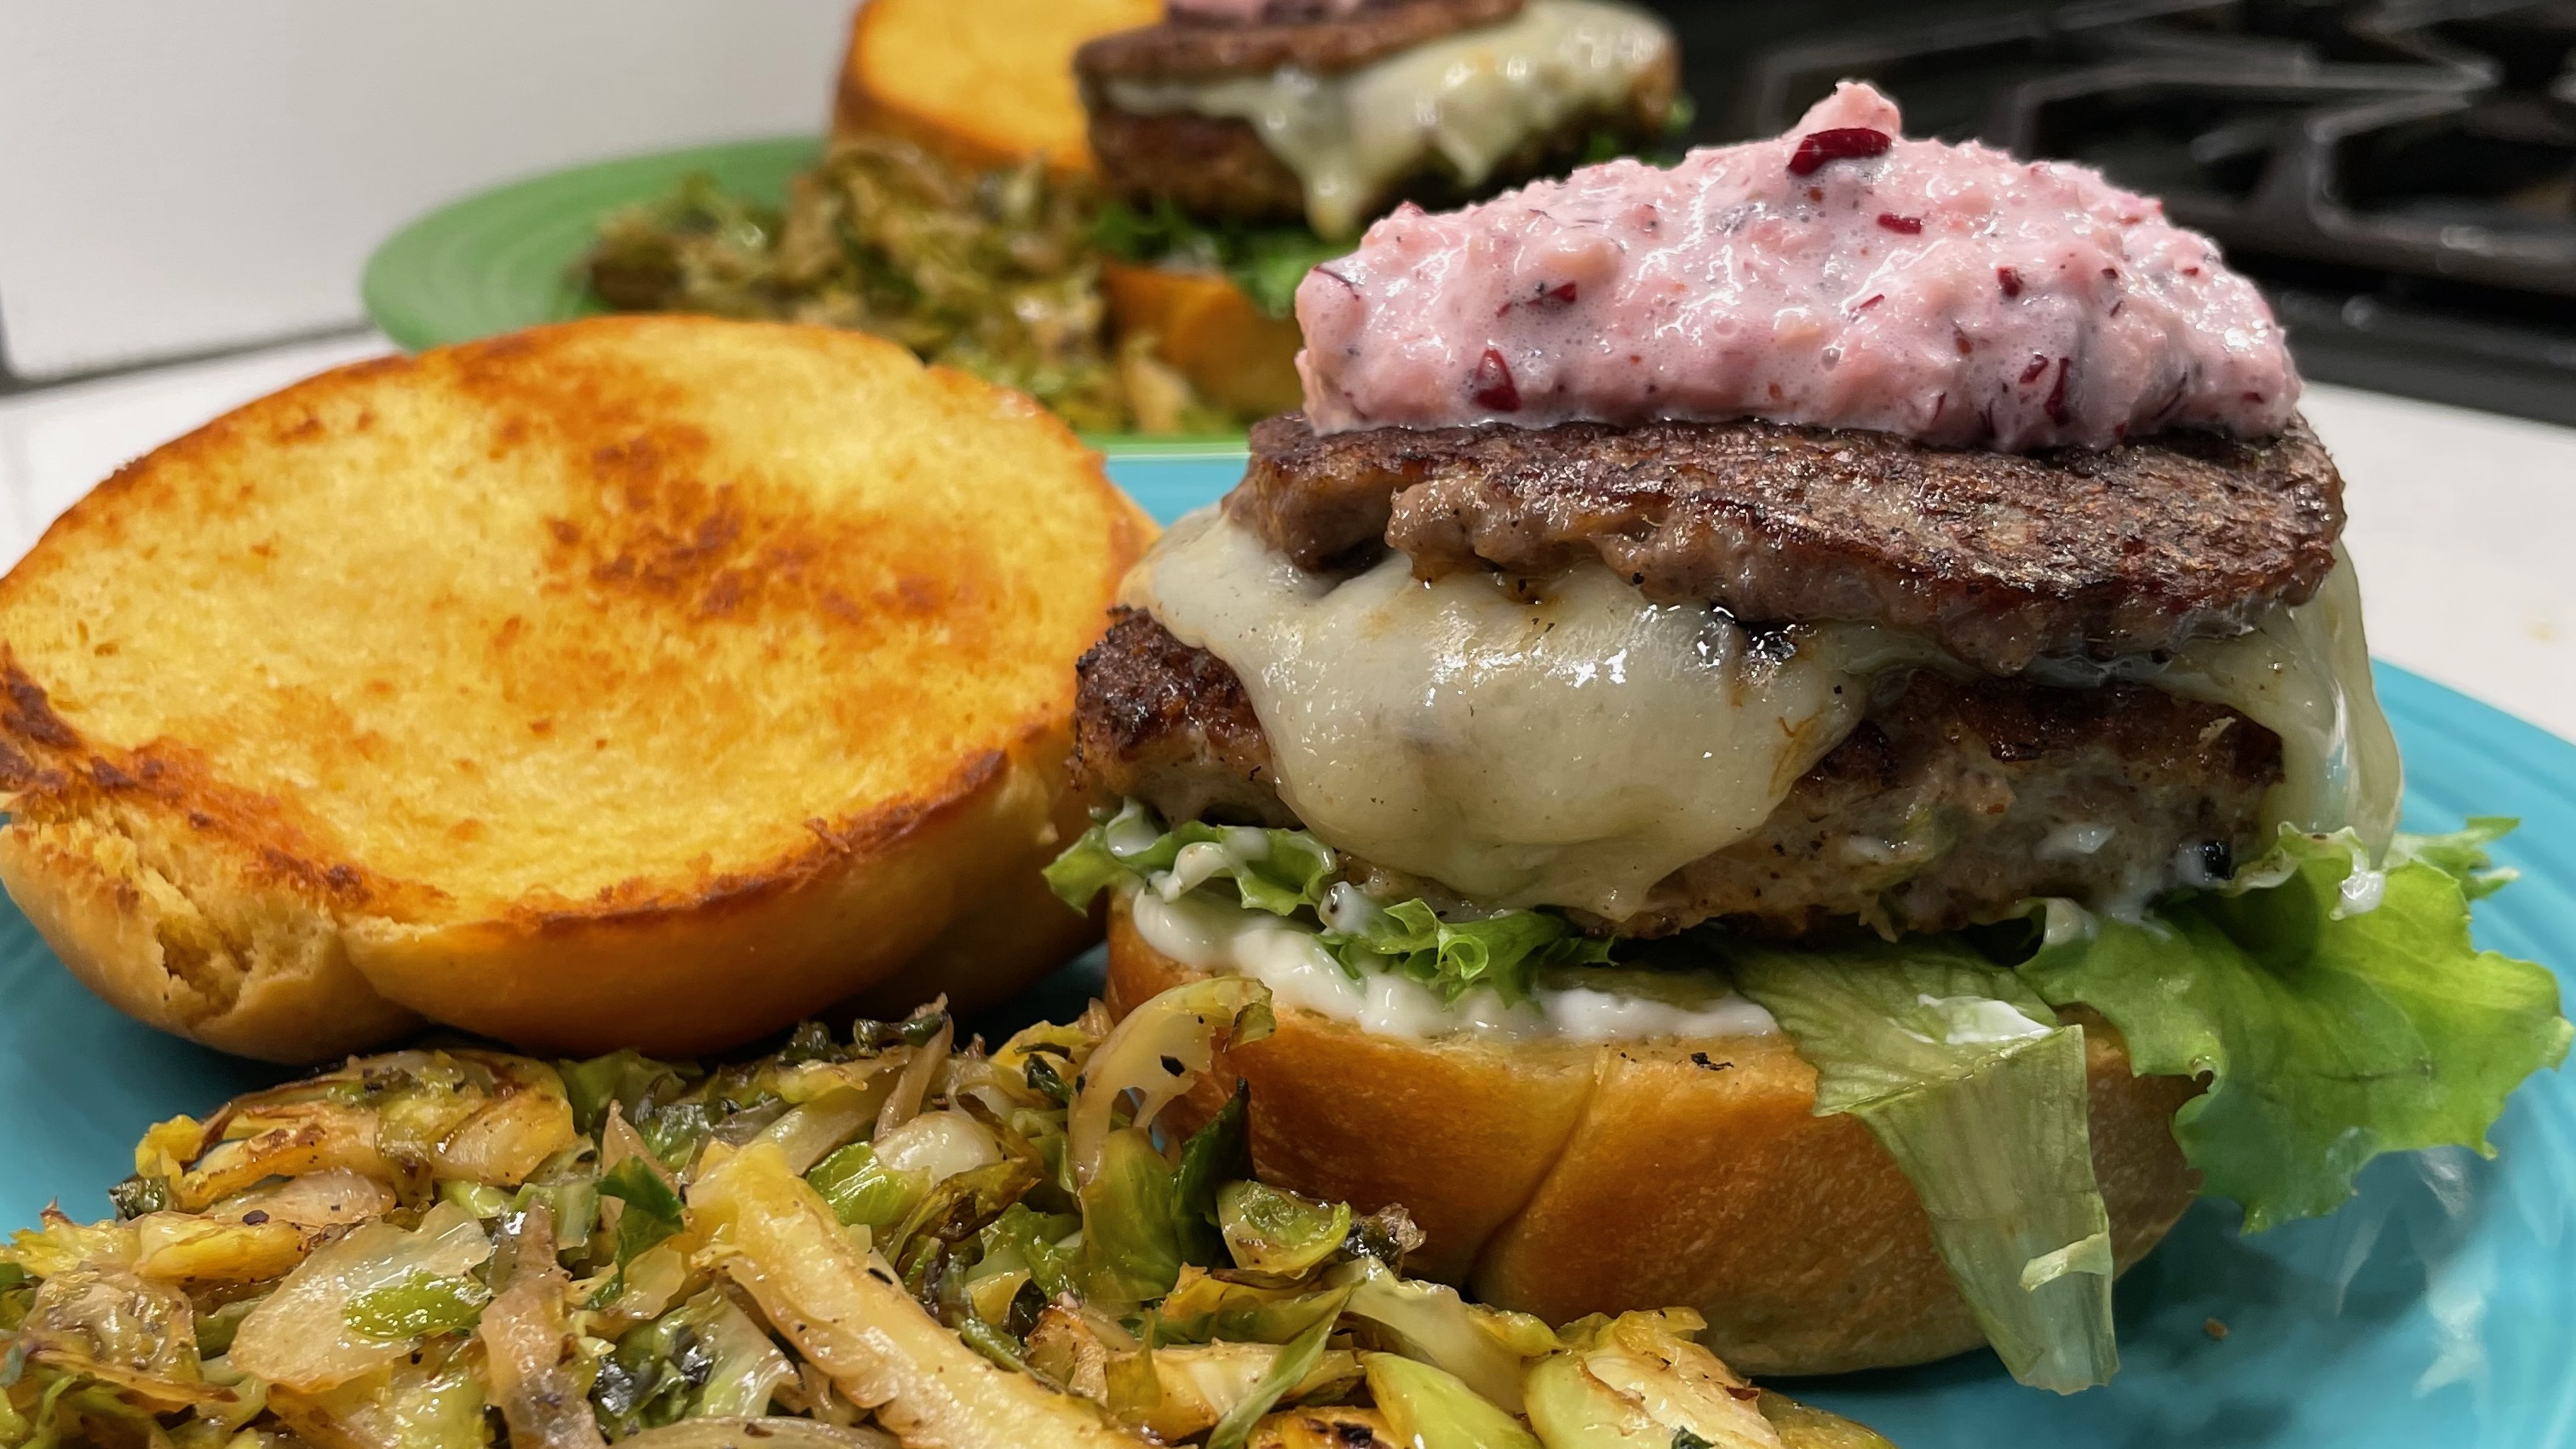
Thankfully, Covid has evolved to become more a nuisance than cause for panic (for most of us), and gathering with loved ones is fun again. At our house, we are counting the days until Thanksgiving (14 to go)! But some people still have neither the time nor inclination to produce an entire spread for Thanksgiving, and that has me thinking again about ways to capture the essence of the occasion in a single, simple bite. This is my first— but not last— attempt at making a Thanksgiving burger.
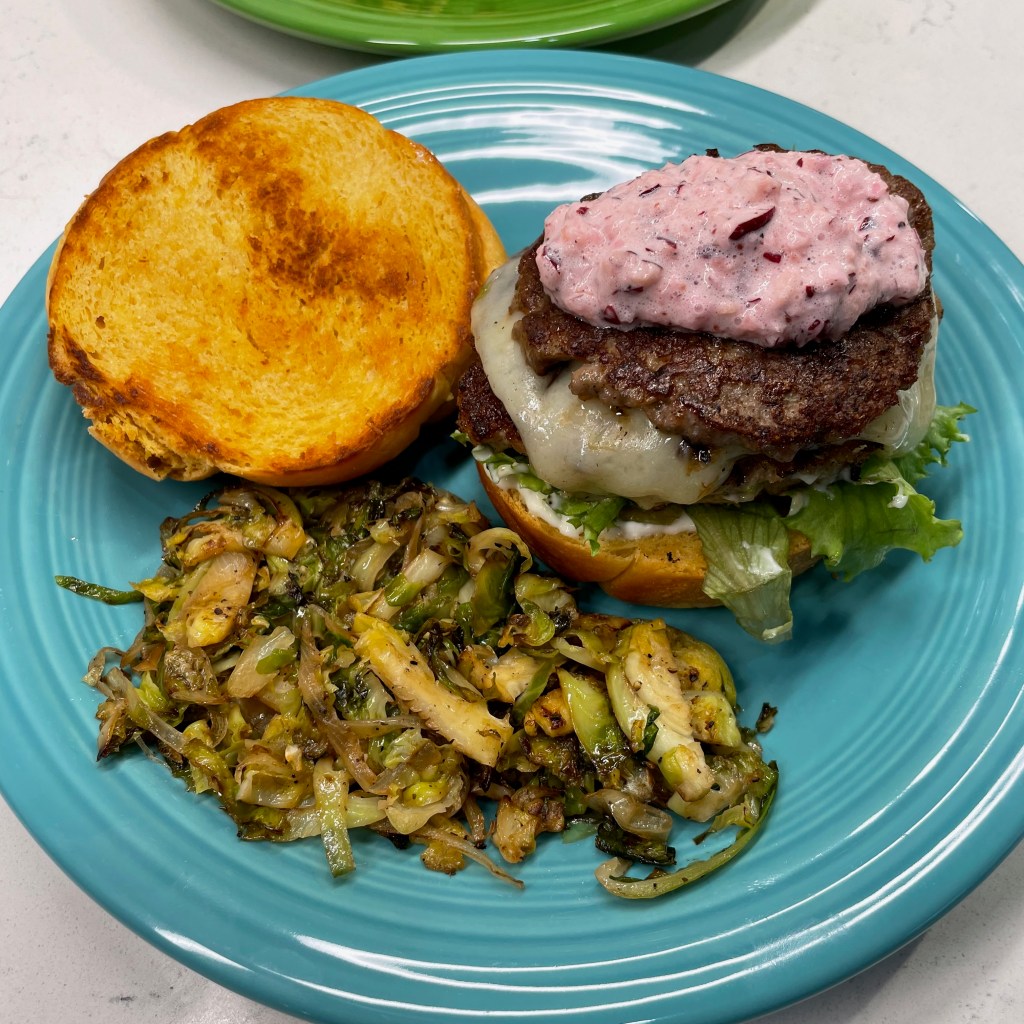
Pretty, isn’t it? 🙂
The Plan
I started this recipe with the bun, and though I considered a store-bought potato bun, I went instead with a recipe I found on King Arthur Baking website for sweet potato sandwich rolls They were very easy to make, and I followed the KA recipe to the letter. The recipe is linked, if you’d like to try them.
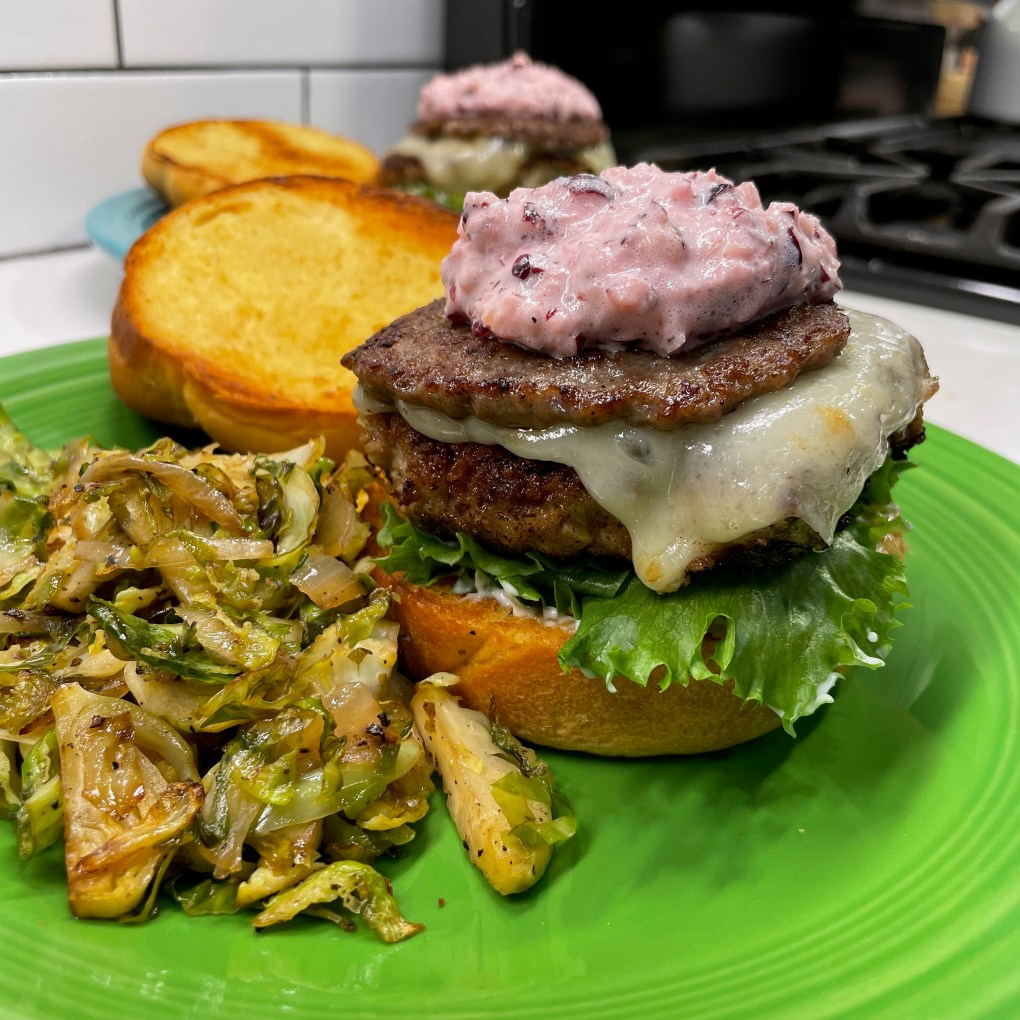
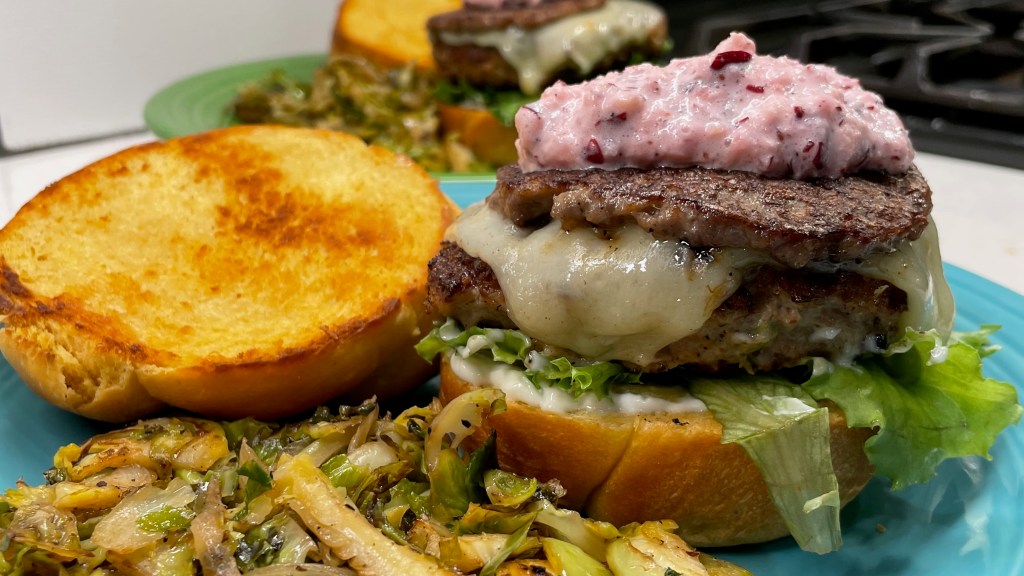
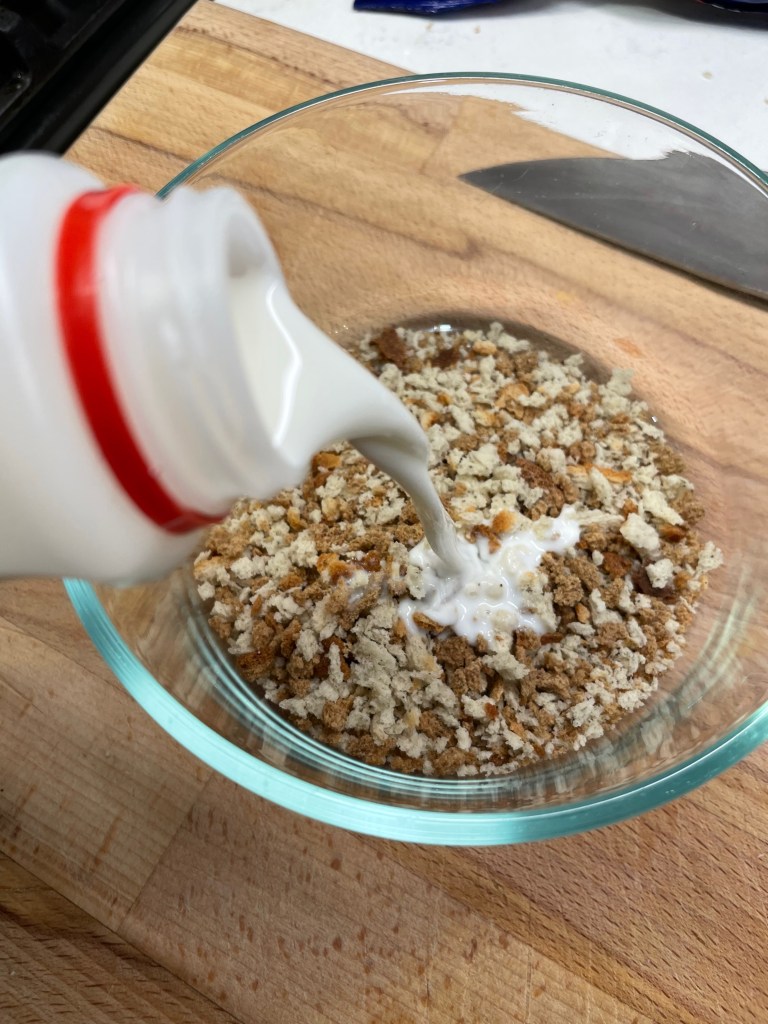
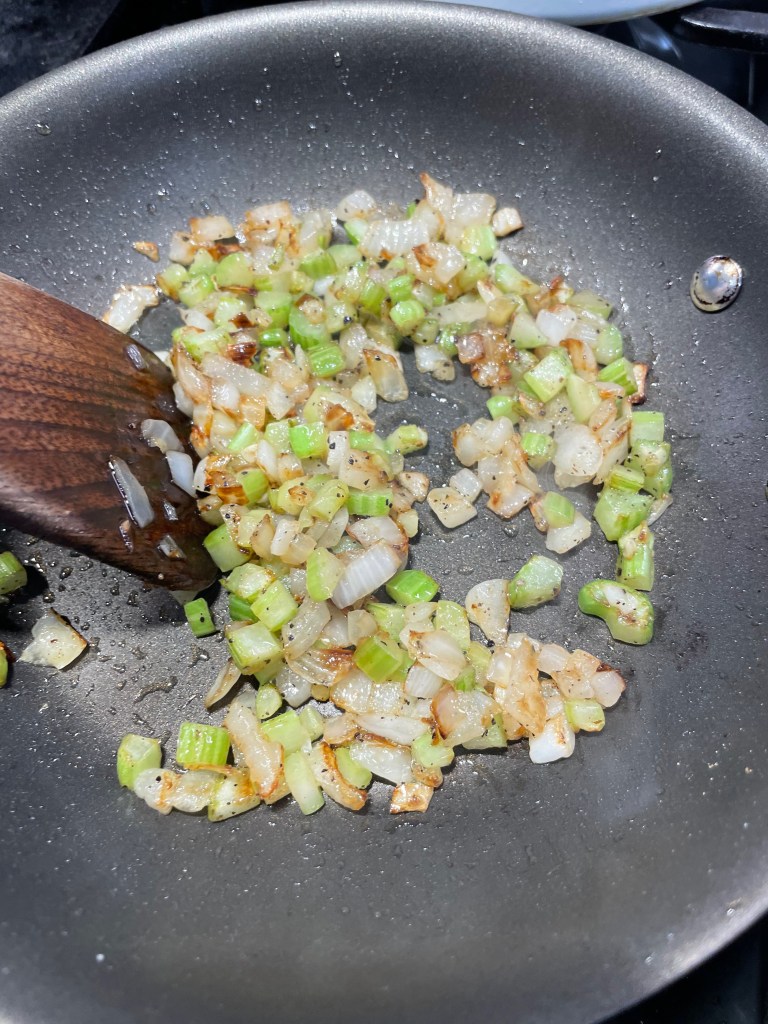
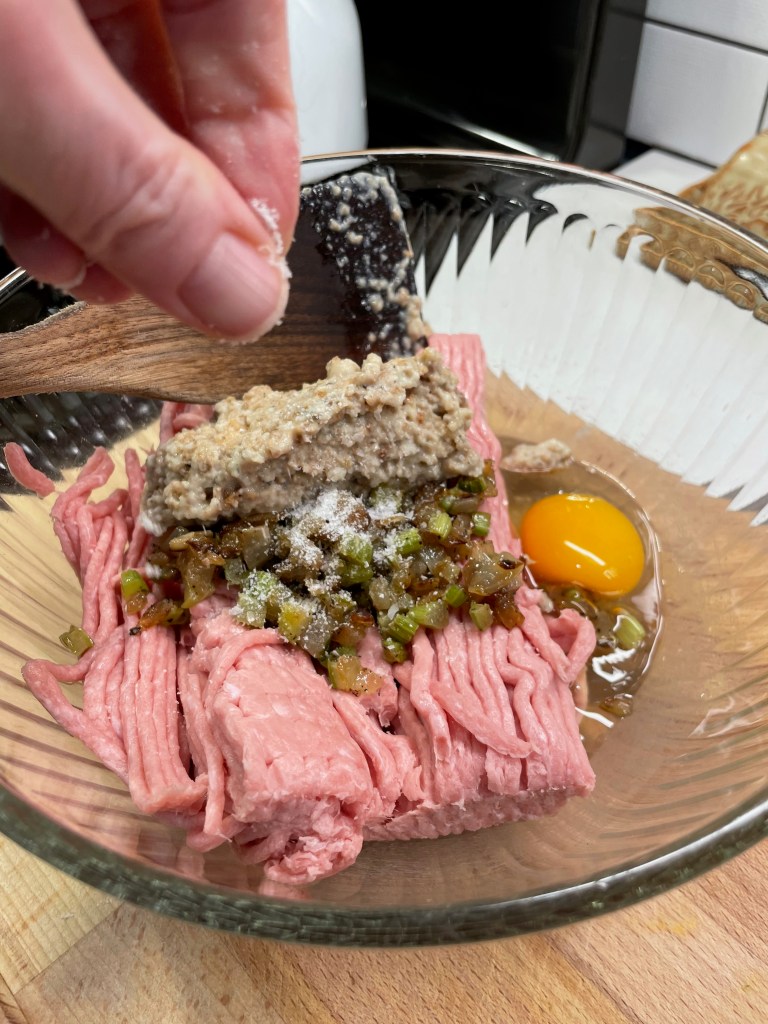
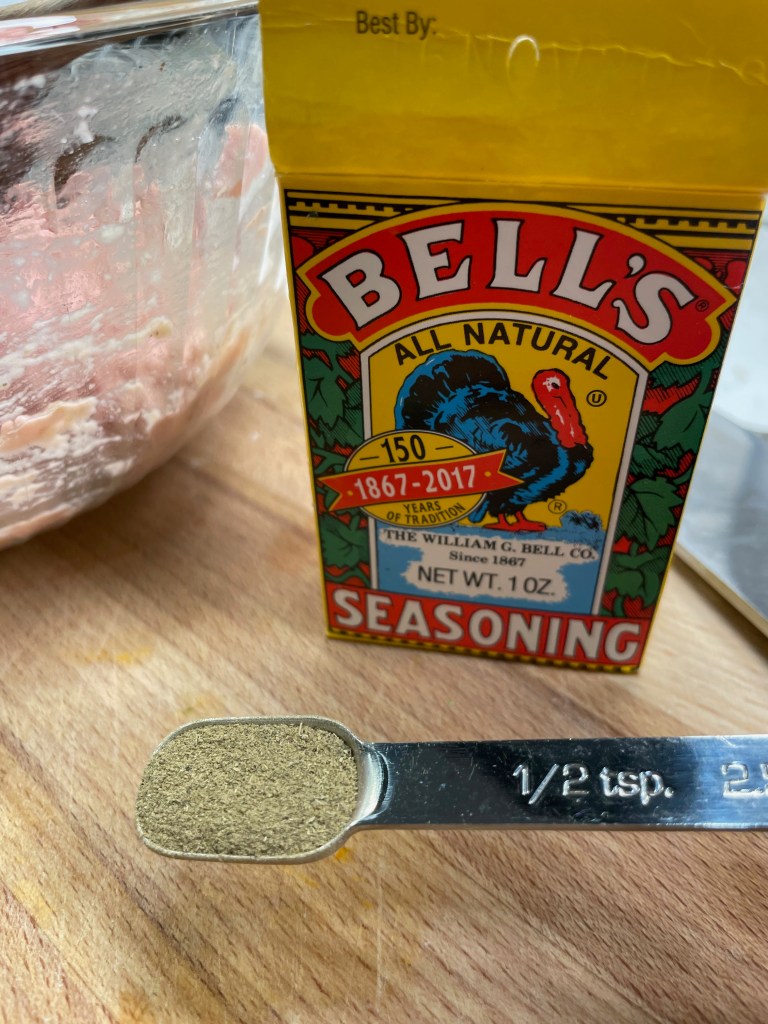
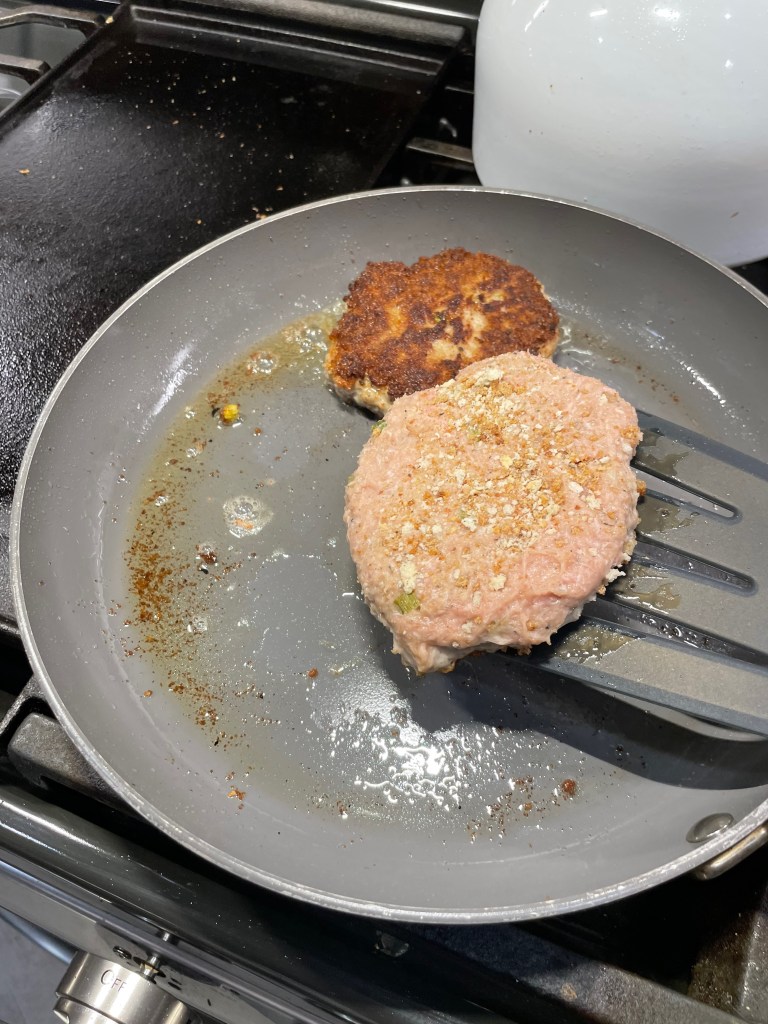
My burger is made from ground turkey, with sautéed celery and onions, plus an egg and a panade of herb stuffing mix blended in for structure and traditional flavor. The “burgers,” which were really more like meatloaf patties, were embellished with a spoonful of poultry seasoning to amplify the familiar Thanksgiving flavor.
I made a basic turkey meatloaf recipe, with herb stuffing mix in the binder and Bell’s poultry seasoning for Thanksgiving flavor.
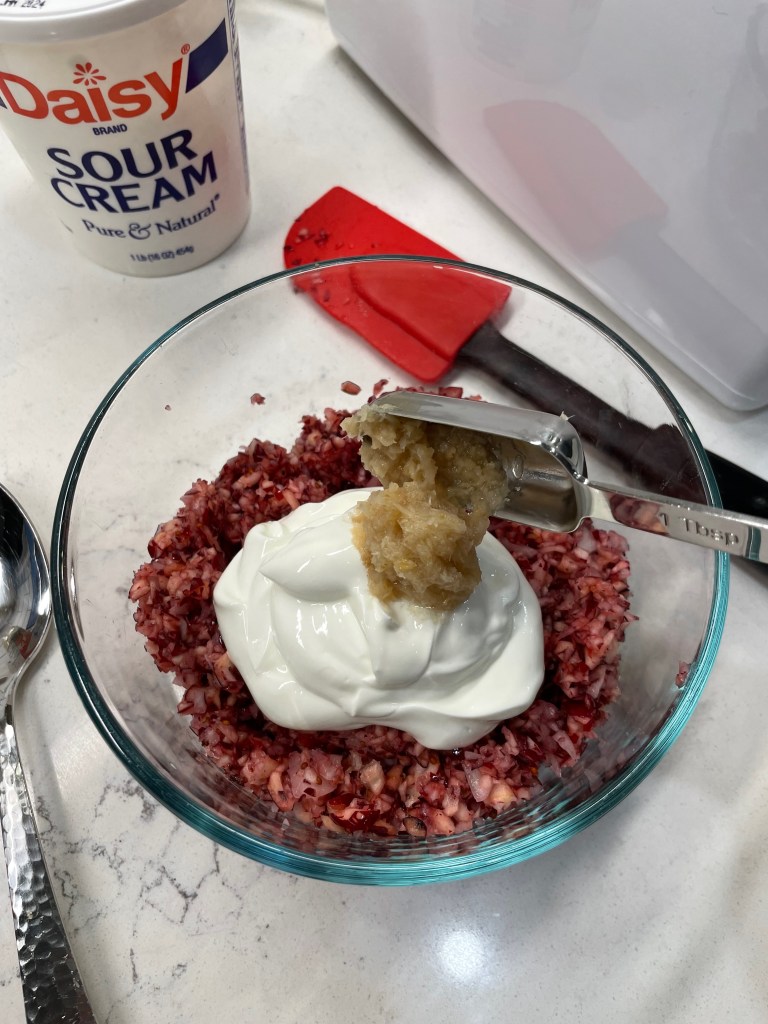
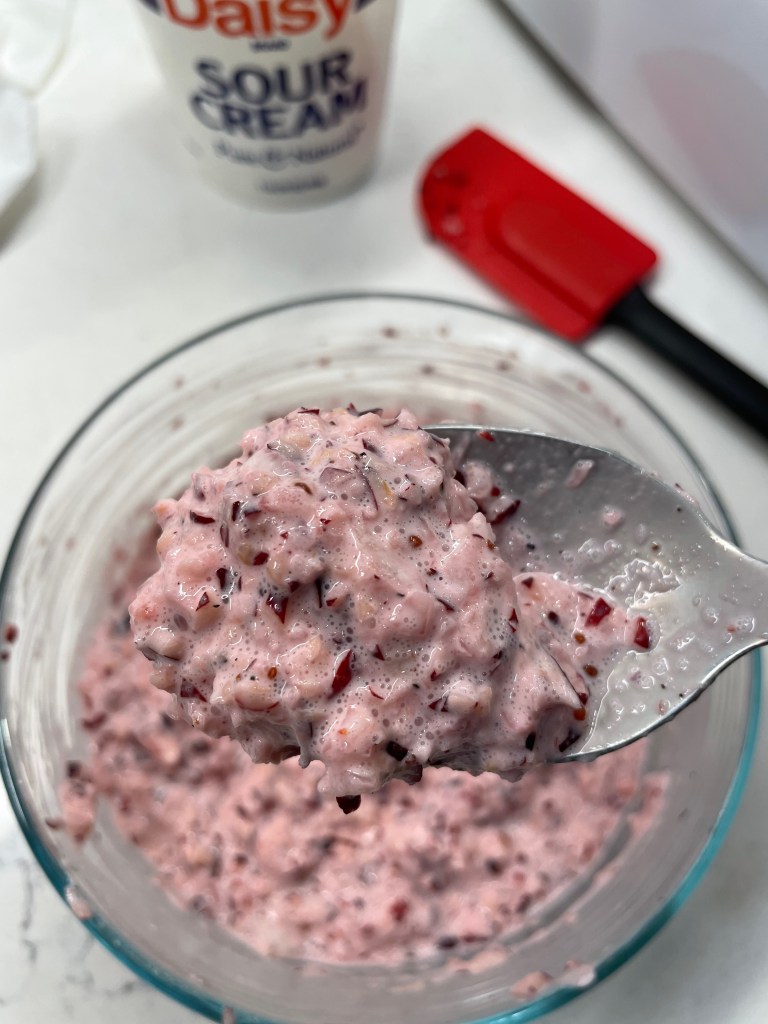
I thought, for a change of pace, this would be a good time to try the famous “NPR cranberry relish” that I’ve read about over the years. It uses fresh cranberries, sour cream and horseradish, if you can believe it. I made an only a half batch because Les tolerates horseradish but doesn’t love it as much as I do. More on this in a moment.
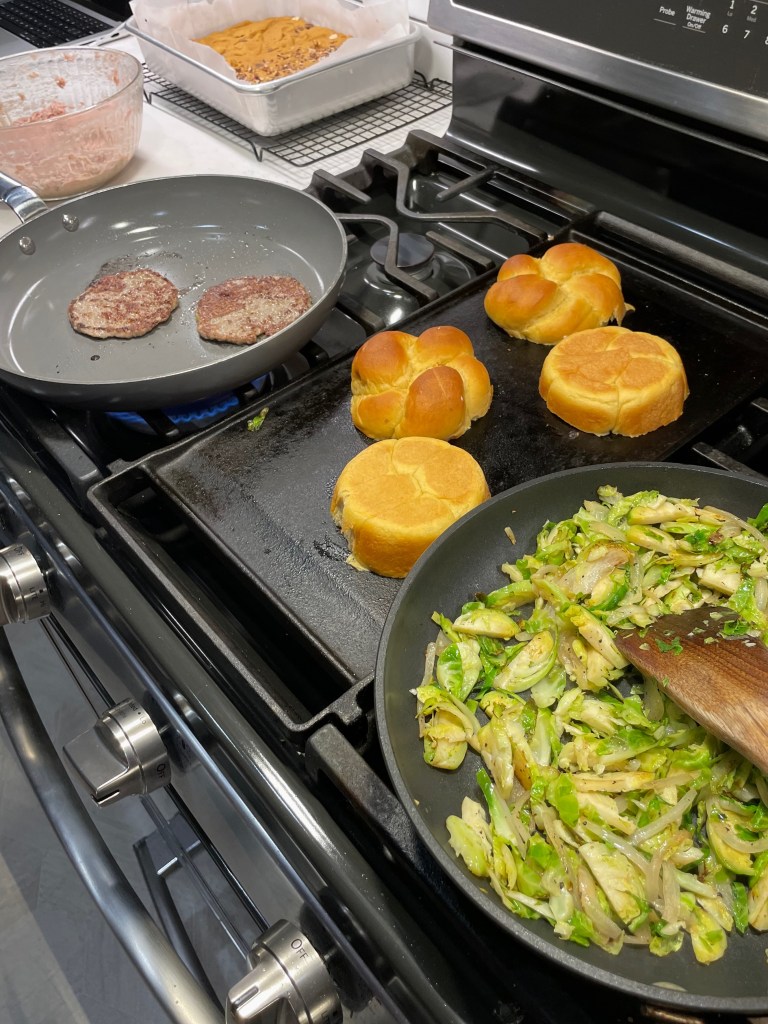
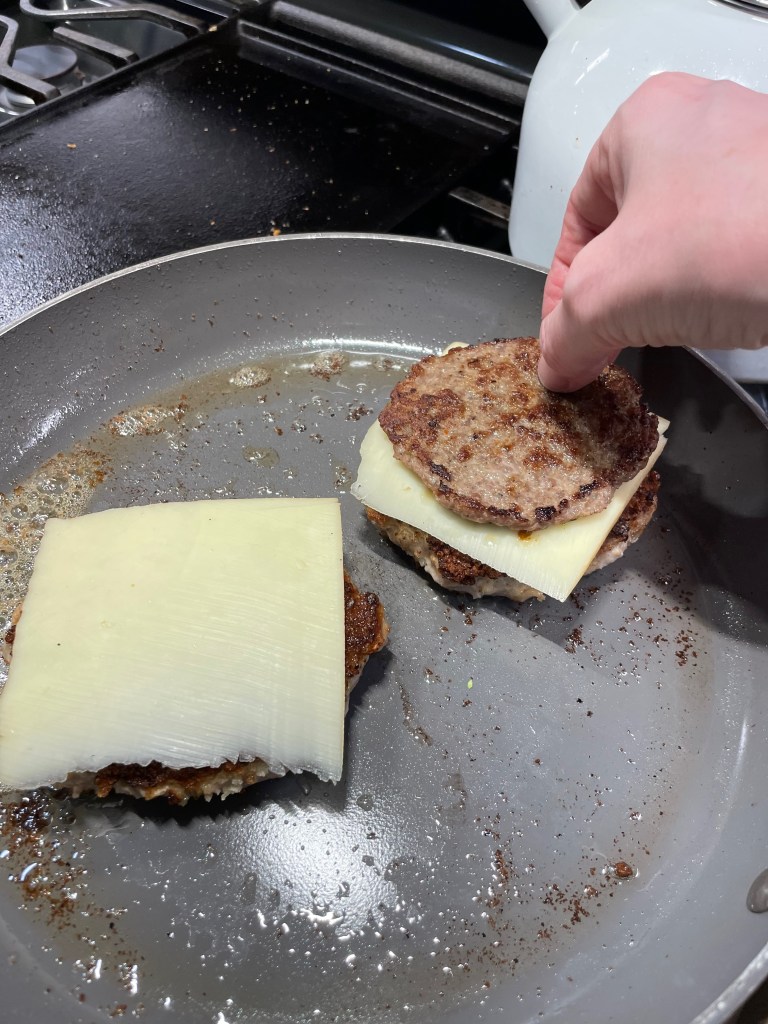
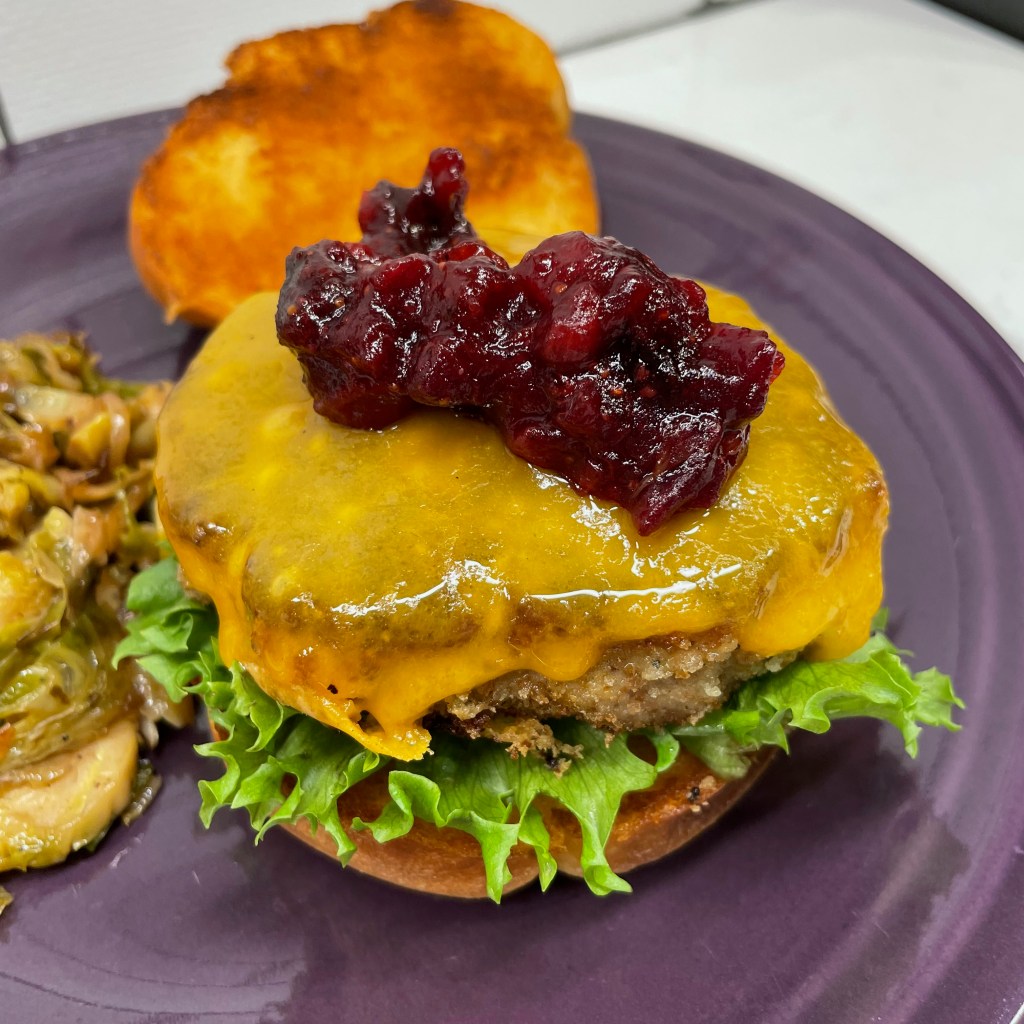
Sausage is a core ingredient of my usual holiday dressing, so I flattened some maple sausage patties and cooked them up to layer with my burgers. I buttered and griddled the sweet potato rolls, melted a slice of apple-smoked gruyère over the burgers, topped them with the thin sausage patties and loaded them onto the buns with some baby romaine for freshness.
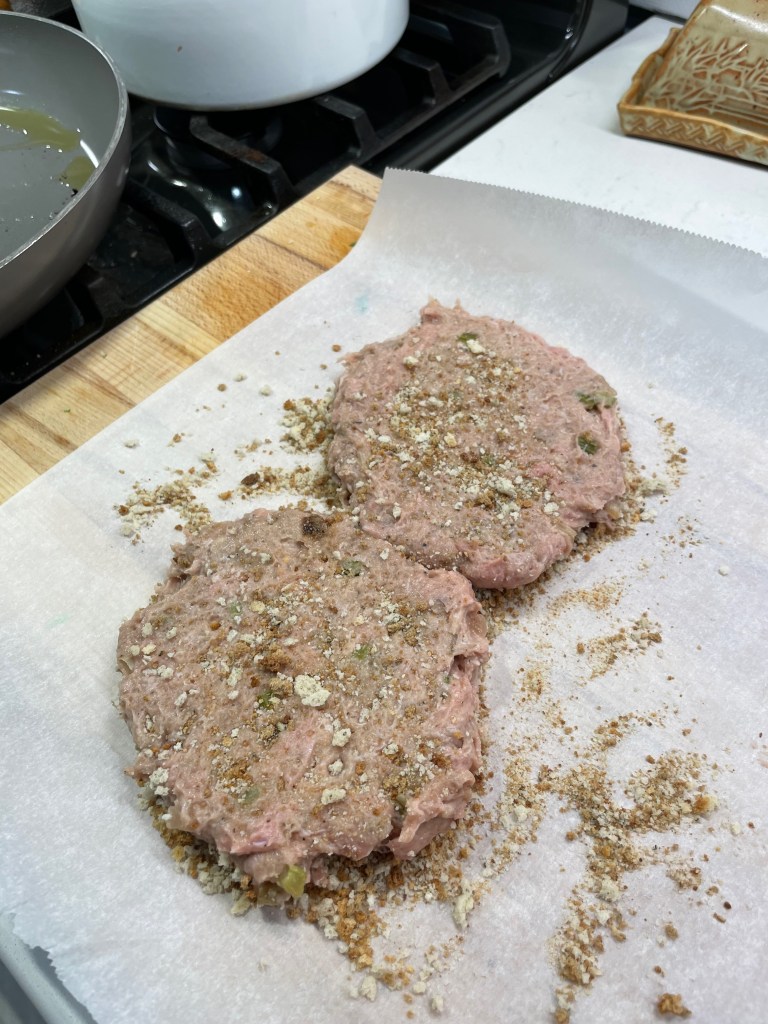
The extra stuffing mix coating the patties was key to getting the crunchy surface I wanted on the burgers.
My first Thanksgiving burger, with a side of shaved Brussels sprouts, sautéed with onions, salt and pepper.
The Verdict
I had covered all the flavor bases with my plan— sweet potato, turkey, stuffing and cranberry— and overall it was a very tasty burger, but it didn’t exactly scream “Thanksgiving” to me and my husband, and so there will be other efforts. The sweet potato rolls (which I made exactly as written on the KA site) were wonderful, but very subtle in sweet potato flavor and too tall for this sandwich, and that made taking a bite a little tricky (and messy). The herb-seasoned turkey patties were moist and tasty and their crunchy exterior was spot-on. They could have carried a bit more of the savory herb flavor, but otherwise they were excellent and I’ll make them again, for sure.
What about that unusual cranberry relish? This “famous” recipe was the biggest surprise for me, and not in a good way. As someone who really loves the zing of horseradish, I found this stuff—which has oodles of rave reviews online, by the way— to be rather plain, runny and uninteresting, even with the extra hot horseradish. My husband thought the sandwich would be better with a more traditional cooked cranberry topping, and I agreed.
As luck and leftovers would have it, I did have a chance to try again with a few changes! On my second run, I skipped the sausage altogether, and I tried a different cranberry concoction that was so delicious, I will be super excited to share it with you in a post of its own later this week!
Les also requested cheddar rather than the fancy schmancy gruyère. 😉
What about next time?
There’s still room for improvement on this idea and I’m keeping it in the “in-progress” column of my bucket list until I get it right. I’ll share below the recipe I created for the turkey patties because that part of the recipe was great, Thanksgiving or not. But I’d really like to hear from you, too, so that I might incorporate your ideas into a future iteration of the burger. How would you bring your favorite traditional flavors into this “Thanksgiving-in-a-bite challenge?” Please share your ideas in the comments section, and let’s see what we can come up with together!
The rest of the burger is a work in progress, but this recipe for Thanksgiving-flavored turkey burger patties is a keeper!
Ingredients
1/2 cup Pepperidge Farm herb seasoned stuffing mix, crushed
1/3 cup milk, to moisten the stuffing mix
1/2 sweet onion, minced
1 rib celery heart, strings removed and minced
1 Tbsp. extra virgin olive oil
Salt and pepper
1 pound ground turkey (I used 90% lean, but turkey breast would be great, too)
1 large egg
1 teaspoon ground poultry seasoning (I used Bell’s brand)
Additional 1/2 cup herb stuffing mix, crushed for coating the burgers before frying
Olive oil for frying
This ground turkey mixture is much leaner and softer than a typical burger mixture. For easy shaping of the patties, spoon dollops of the meat mixture onto a sheet of parchment paper that is sprinkled with the additional herb stuffing crumbs. Scatter more crumbs on top of the meat dollops and fold the parchment over them to flatten with your palm or a spatula. Be gentle with them, and keep them on the parchment until the skillet is ready.
Directions
Combine herb stuffing crumbs and milk in a small bowl and let rest for at least 15 minutes to soften into a panade. This mixture will help bind together the other ingredients into patties.
Heat a small skillet over medium heat. Add first measure of olive oil and sauté onions and celery until softened. Season with salt and pepper.
In a medium mixing bowl, combine ground turkey, panade, sautéed vegetables, egg and poultry seasoning. Season with salt and pepper. Use a heavy wooden spoon or your hands to fully blend the burger ingredients. Cover bowl and refrigerate a few hours so that the mixture will firm up.
When ready to cook, heat a large, non-stick skillet over medium heat with 2 tablespoons of olive oil. Shape the meat mixture into patties and coat them on both sides with the second measure of crushed stuffing mix.
Carefully arrange burger patties into the skillet, keeping enough room between them for easy turning. Leave them undisturbed for 5 minutes, or until the first side is nicely crusted. Turn the patties to cook the other side. If using cheese on your Thanksgiving burgers, lay the slices over the burgers immediately after turning so that it will melt.
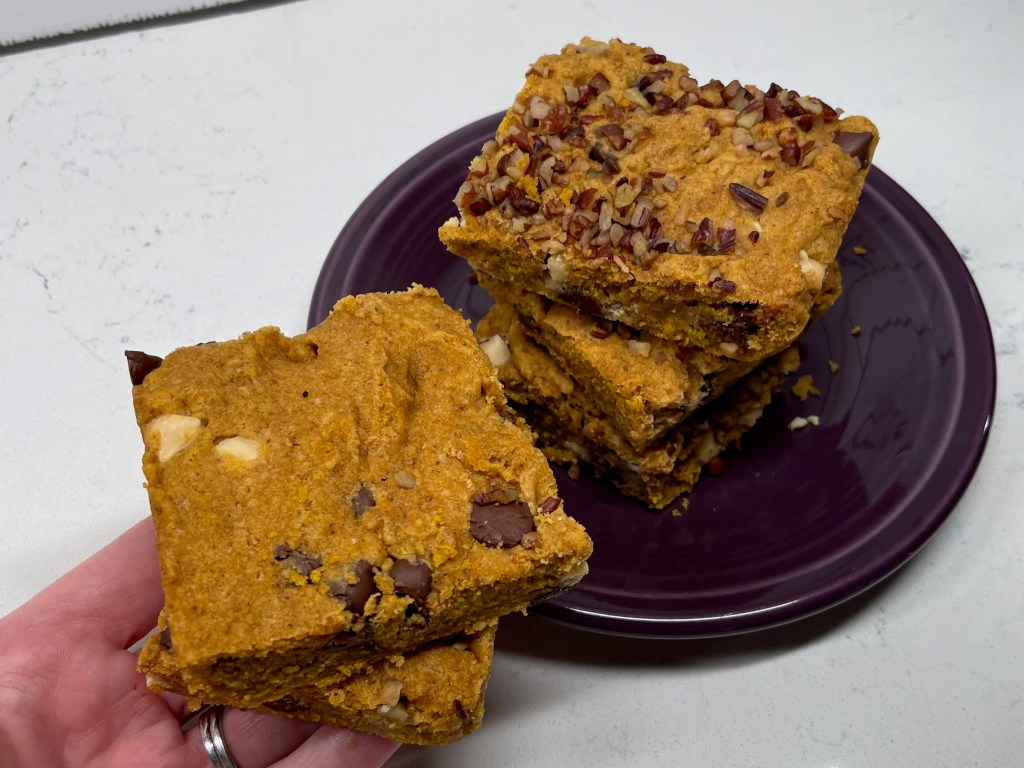
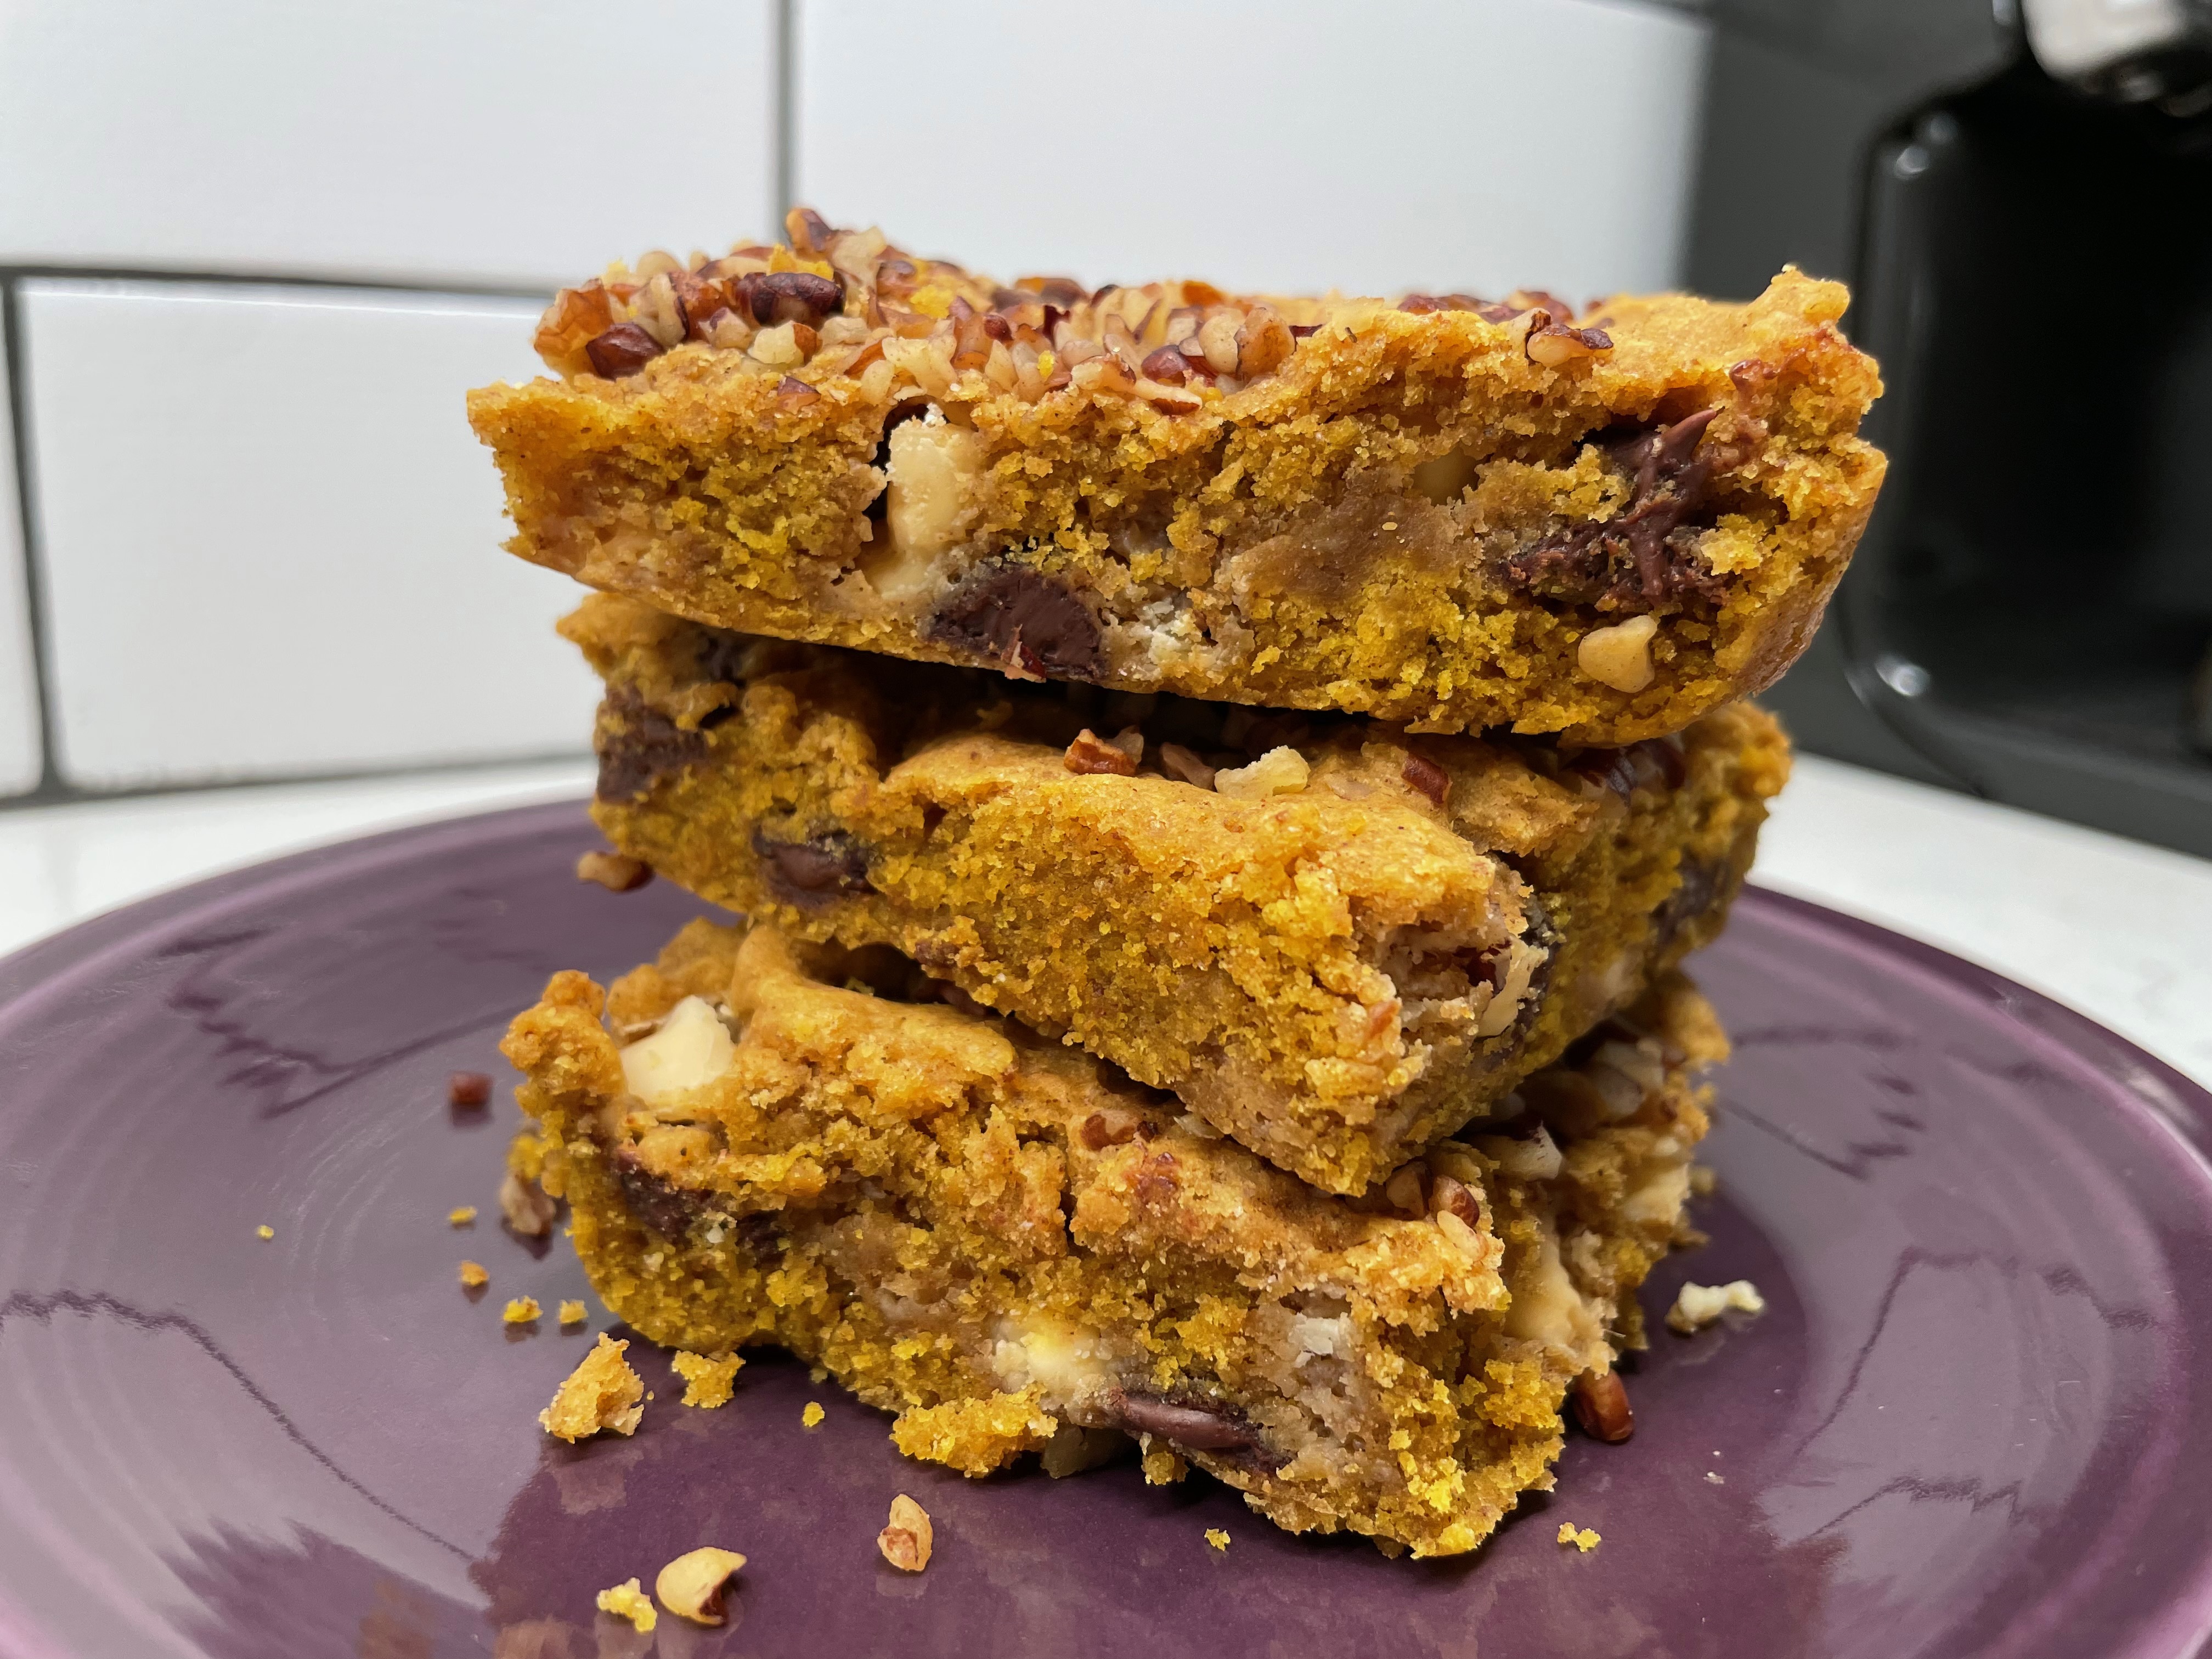
Is it fair to call these autumn-hued bar cookies “blondies?” Unlike classic blondies, which have a light golden color and are basically just chocolate chip bar cookies, these stunningly brilliant treats practically scream fall, with a deep orange color born from half a can of pumpkin puree. What else shall we call them— russets? Auburns?
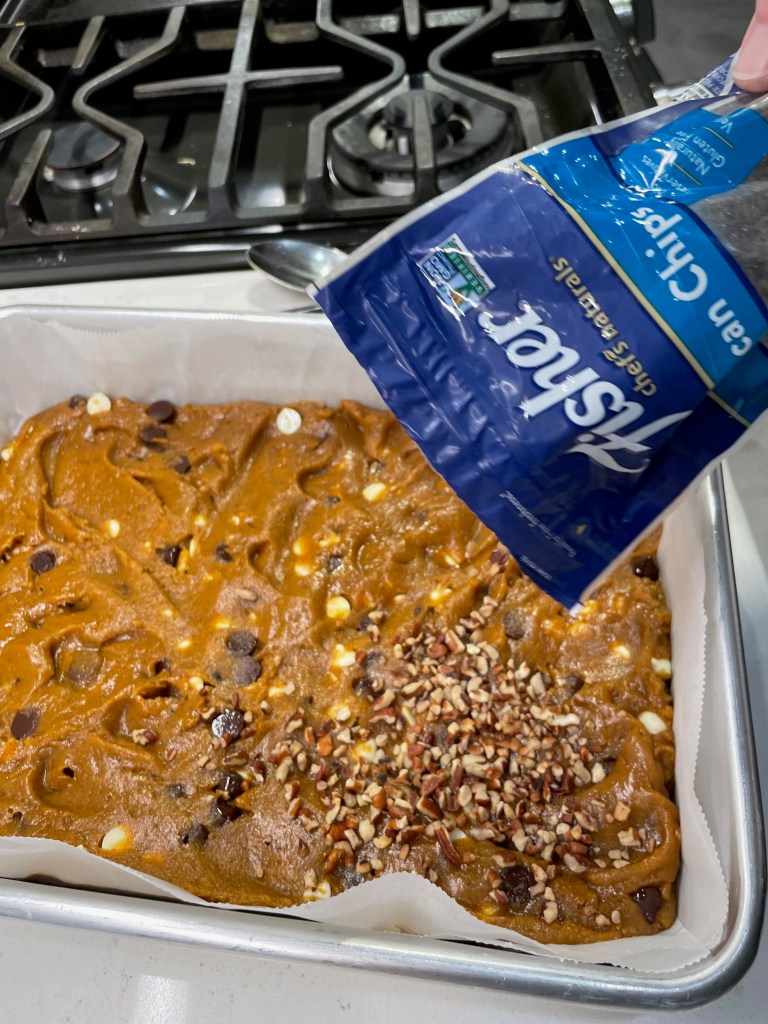
They are still in essence a “blondie,” which is meant to have all the delightfully chewy texture of brownies, just without the cocoa. But these have a lot more going on, with add-ins of white and dark chocolate chips and crunchy pecan bits on top (well, half of it, anyway). There’s a lot to love here, and I have no doubt there are many other add-ins that would be great.
What do you think— maybe dried cranberries or butterscotch chips?
Let’s start with the fact that they satisfy any craving for pumpkin and spice— though this recipe does incorporate a more assertive spice blend than most “pumpkin spice” foods. To kick these up a few notches, I used equal parts Vietnamese cinnamon and chai spice, an Indian-inspired blend of cinnamon, ginger, cardamom, anise and black pepper (yes, really). The bold spices gave these blondies an edge over some of the too-sweet, ordinary desserts you find in a supermarket bakery, and the flavor is still familiar but with a little special something.
I’ve been looking for ways to sneak pumpkin into so many things.
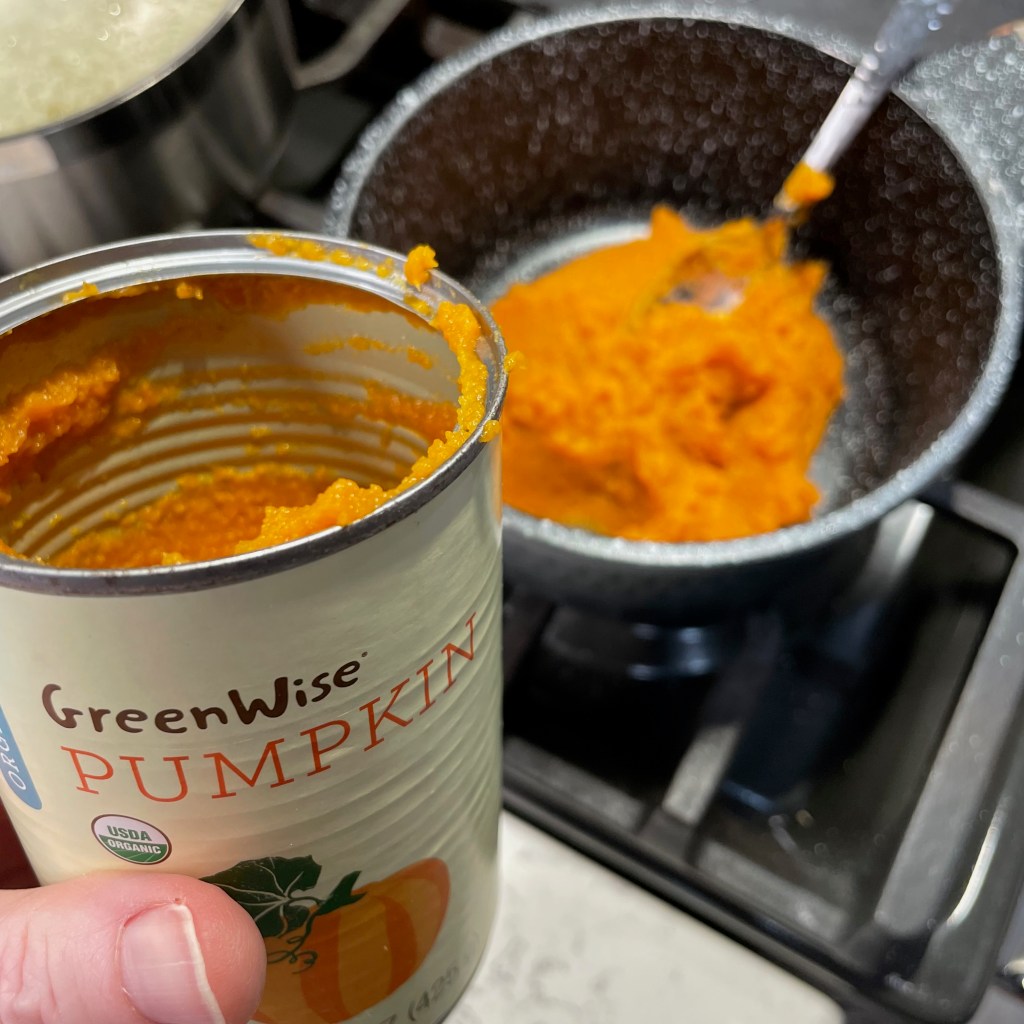
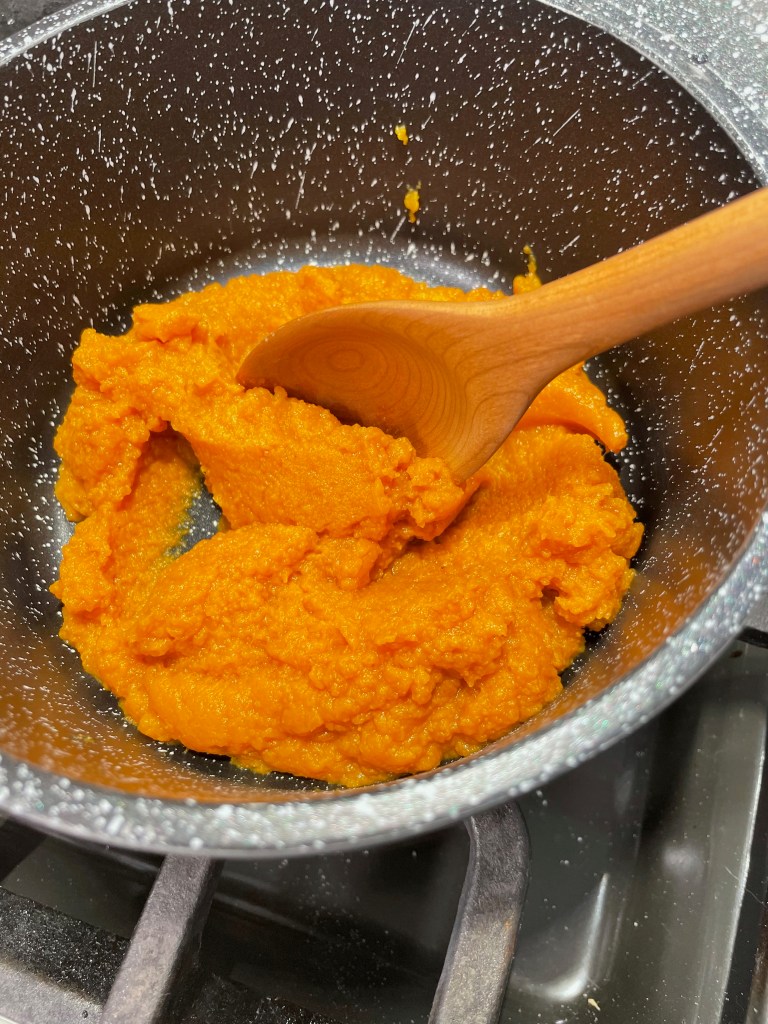
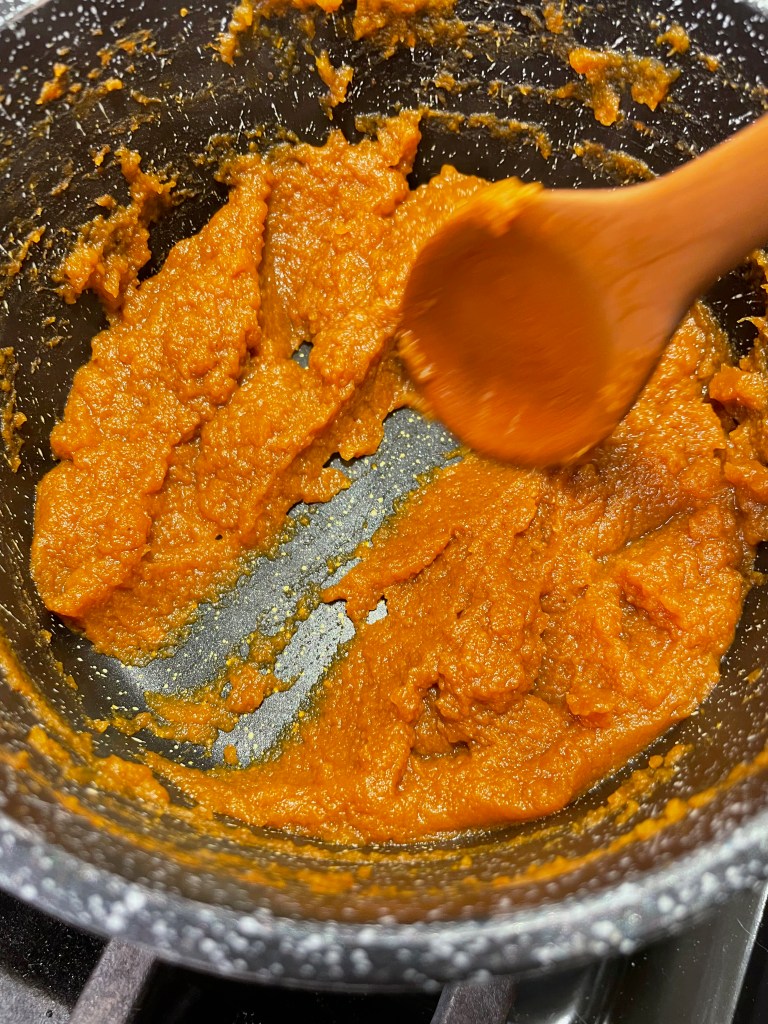
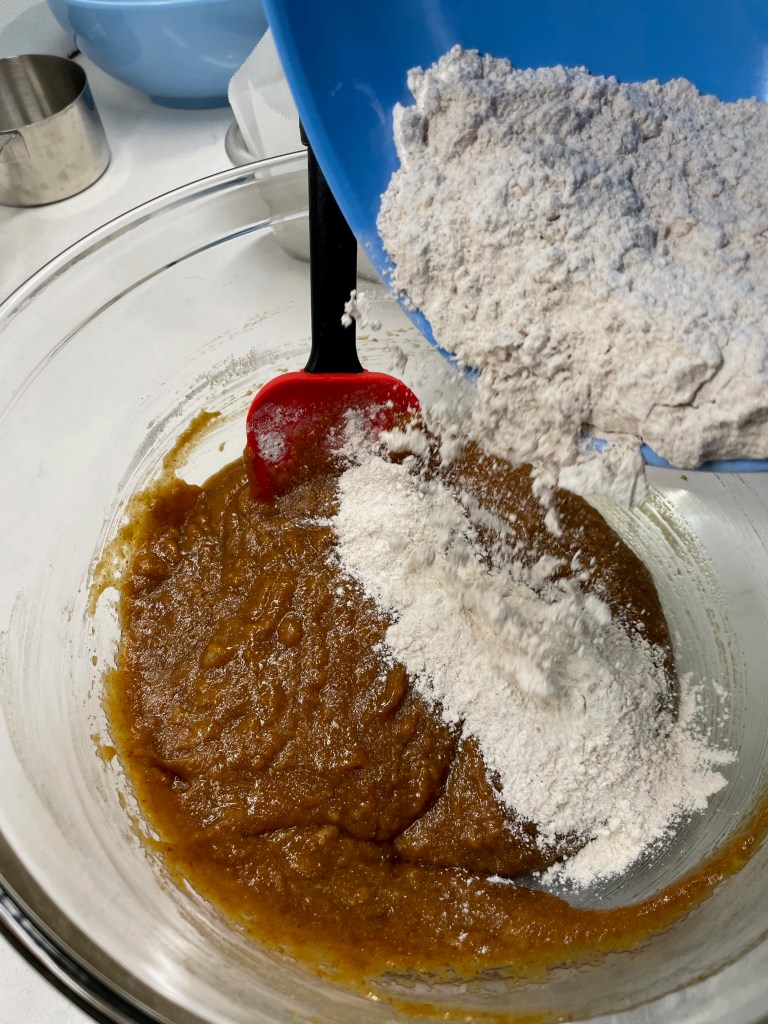
The downside of baking with pumpkin puree is that most recipes I’ve tried tend to be more cake-like than chewy— which is great when you want a cupcake, but not so much if you crave a cookie or blondie— and this is because of the high moisture content of the canned pumpkin. To counter this, I pulled a trick from the King Arthur Baking playbook, which is to cook the pumpkin puree until it is somewhat caramelized. The result is a thicker, more concentrated pumpkin flavor and a denser, more fudge-like texture of the finished auburns— er, blondies. I cooked mine with a bit of the brown sugar from the recipe, and the result was almost like pumpkin butter. So good!
I had a weird clump in my brown sugar container, so I dissolved it by cooking it with the pumpkin.
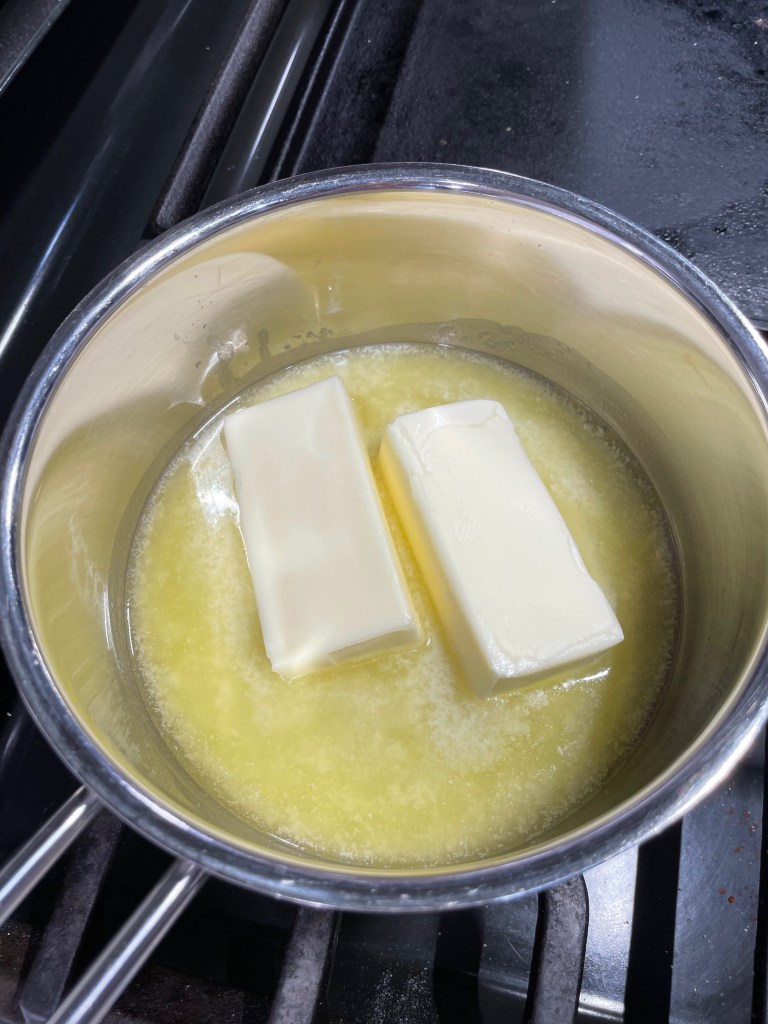
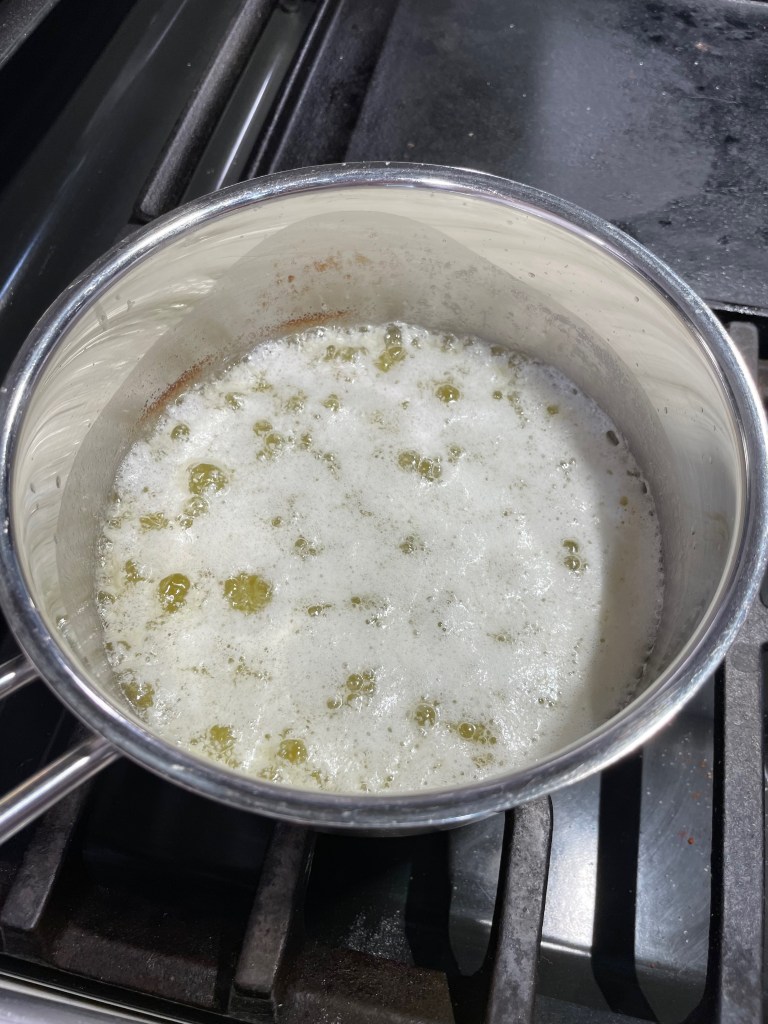
For additional autumn-inspired flavor, this recipe leans on browned butter, which is very easy to make though I don’t recommend trying to do it while multitasking the other components of the recipe. Browning butter takes very little effort but quite a bit of attention. Look away long enough to measure out your flour or caramelize your pumpkin, for example, and you may just find that the butter has turned to a charred, blackish liquid. I guess you can tell that I’m speaking from experience! 🤷🏻♀️
My butter was off to a good start, but it went too far. Oops!
My second attempt went much better!
Other than that, it’s a typical dessert recipe— flour (I used part whole wheat), baking powder, egg, sugar (light brown, in this case), splash of vanilla and some white and dark chocolate chips just for fun. For a little extra something, I also scattered pecan bits over half of the blondies after spreading it out into the baking pan. This is optional, and if you have any guests who cannot digest nuts, follow my lead and sprinkle the nuts on half. Everyone wins!
These came together really easily.
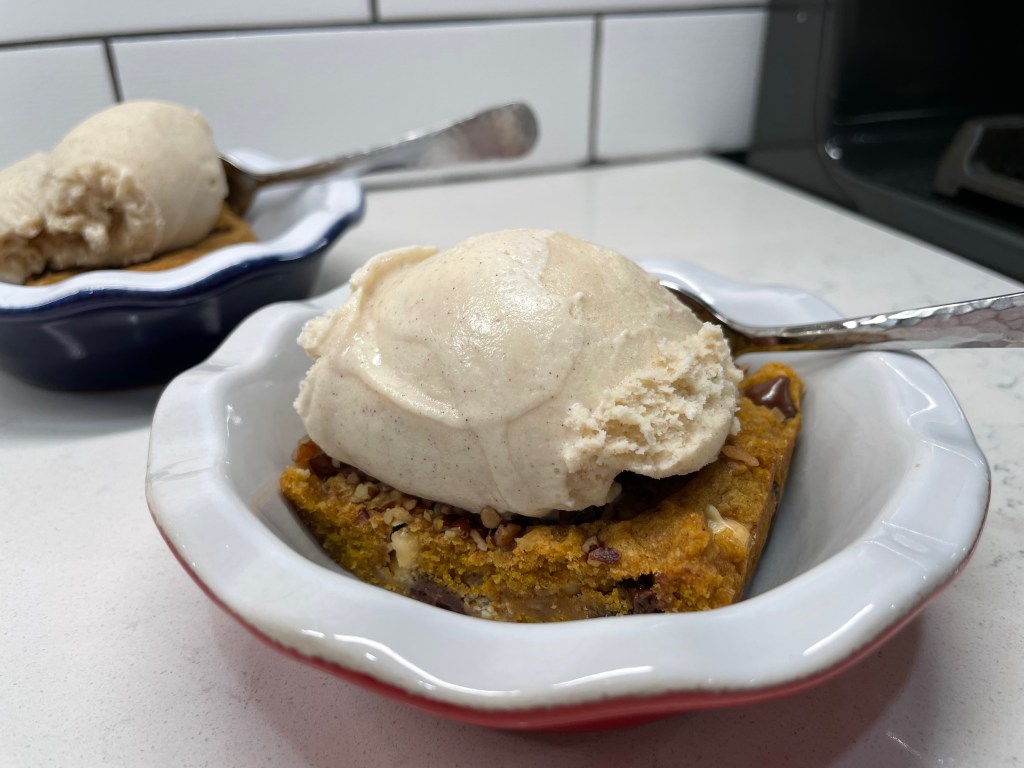
This was a fun fall dessert that would be nice for a casual Thanksgiving meal, the kids’ table, a brunch with friends, a treat for a special teacher or perhaps a snack for visiting grandkids that’s a bit healthier without them knowing it! As for us, we enjoyed it warmed 30 seconds in the microwave with a small scoop of ice cream. Delish!
Cooking the pumpkin puree before mixing the batter keeps this autumn-hued blondies nice and chewy, and the flavor will make you wish for fall to linger a little longer.
Ingredients
2 sticks unsalted butter
1 cup pumpkin puree
1 cup light brown sugar, packed
1 large egg, room temperature
2 teaspoons vanilla extract
1 1/4 cup all-purpose flour
1 cup white whole wheat flour
1 tsp. ground cinnamon
1 tsp. ground chai spice blend
1 tsp. kosher salt (I used Diamond crystals)
3/4 tsp. baking powder
1 cup white chocolate chips
1 cup dark chocolate chips
1/2 cup pecan bits (optional, or 1/4 cup for half the blondies)
Directions
Melt the butter in a saucepan, swirling frequently and watching carefully to prevent burning. Cook melted butter until it takes on a deep golden color and has a nutty aroma. Allow it to cool for about half an hour.
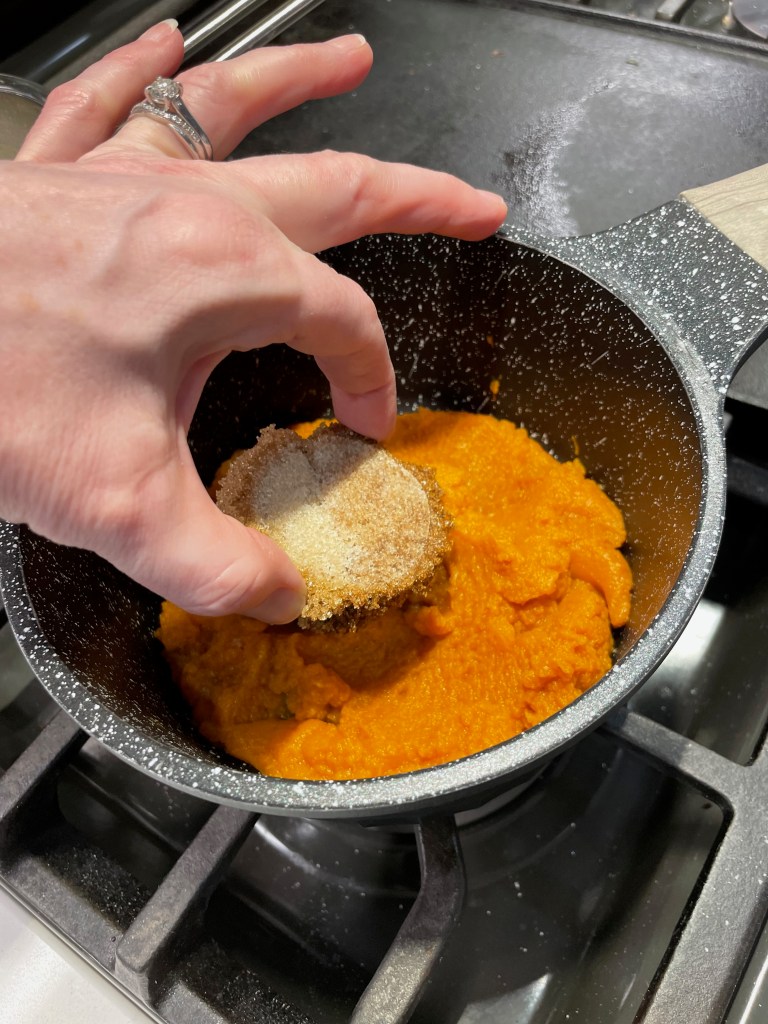
Meanwhile, add pumpkin puree and a few tablespoons of the brown sugar to a second saucepan. Cook over medium heat, stirring almost constantly, until sugar is dissolved and pumpkin puree has reduced slightly. Cool completely before proceeding.
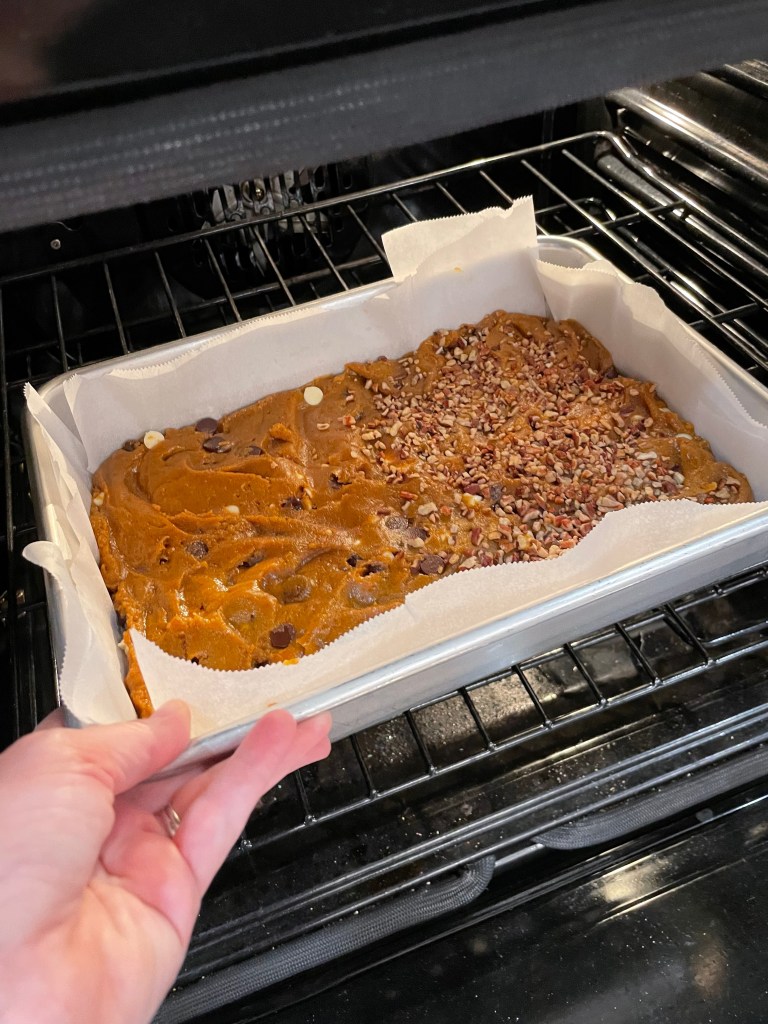
Preheat oven to 350° F, with oven rack in center position. Line a 9 x 13 baking pan with parchment paper, keeping a little extra to overhang for easy lifting of the blondies from the pan after baking.
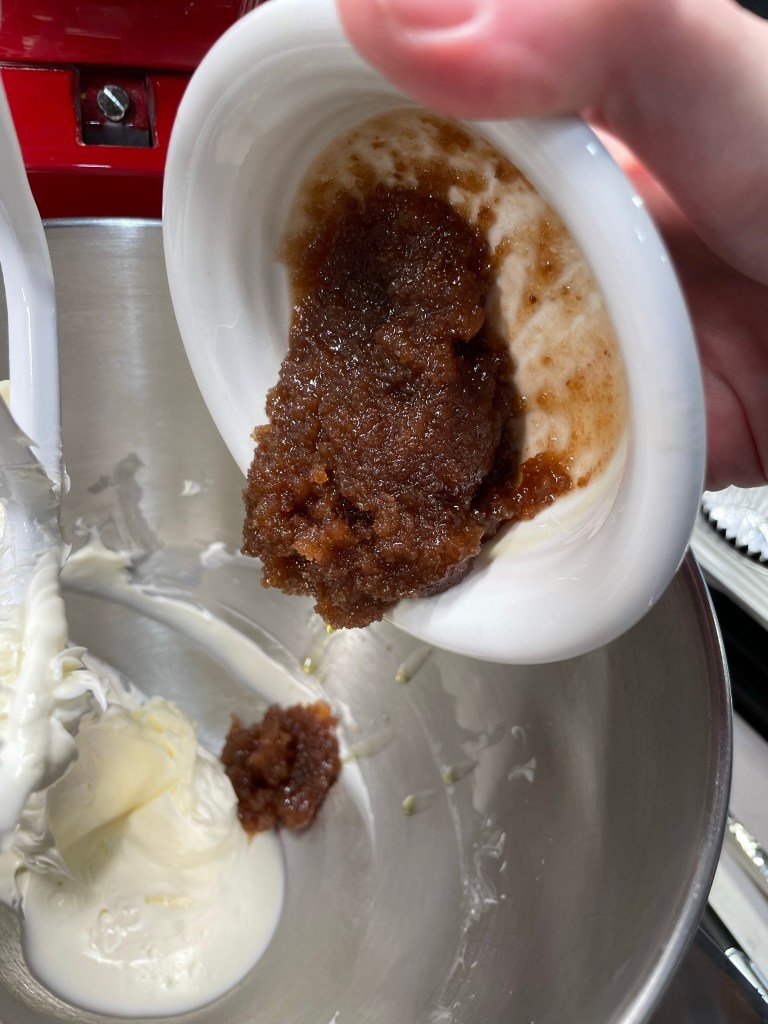
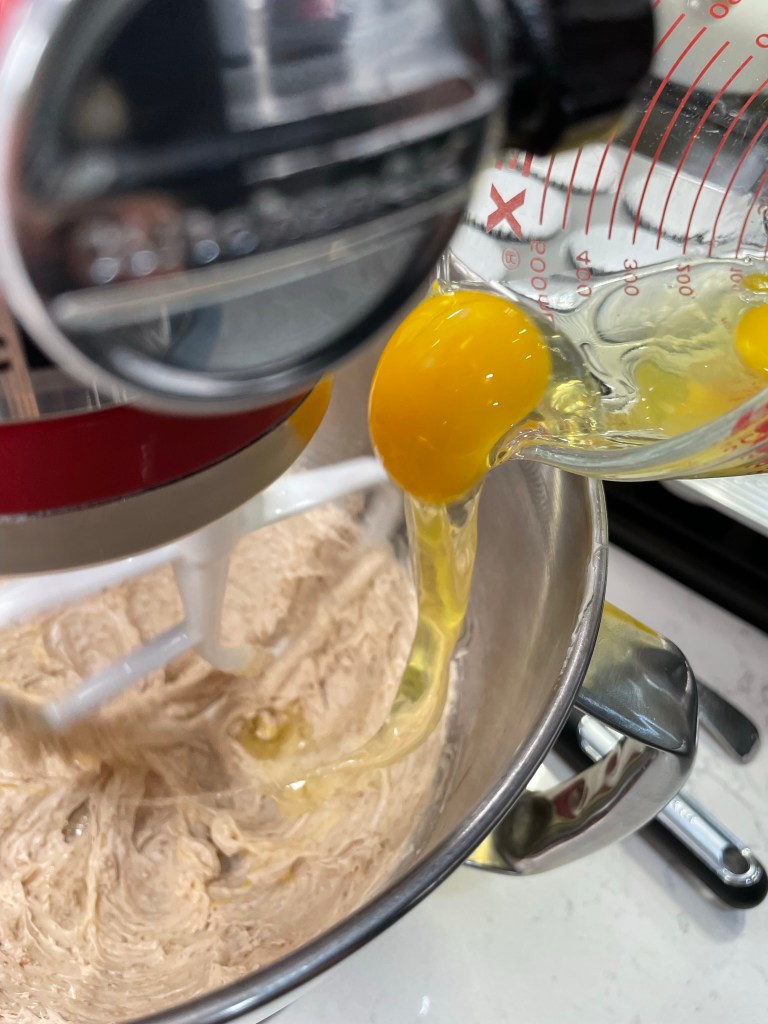
In a large mixing bowl (or the bowl of a stand mixer fitted with paddle), stir together browned butter and remaining brown sugar until evenly combined. Add reduced pumpkin puree and egg. Beat until combined.
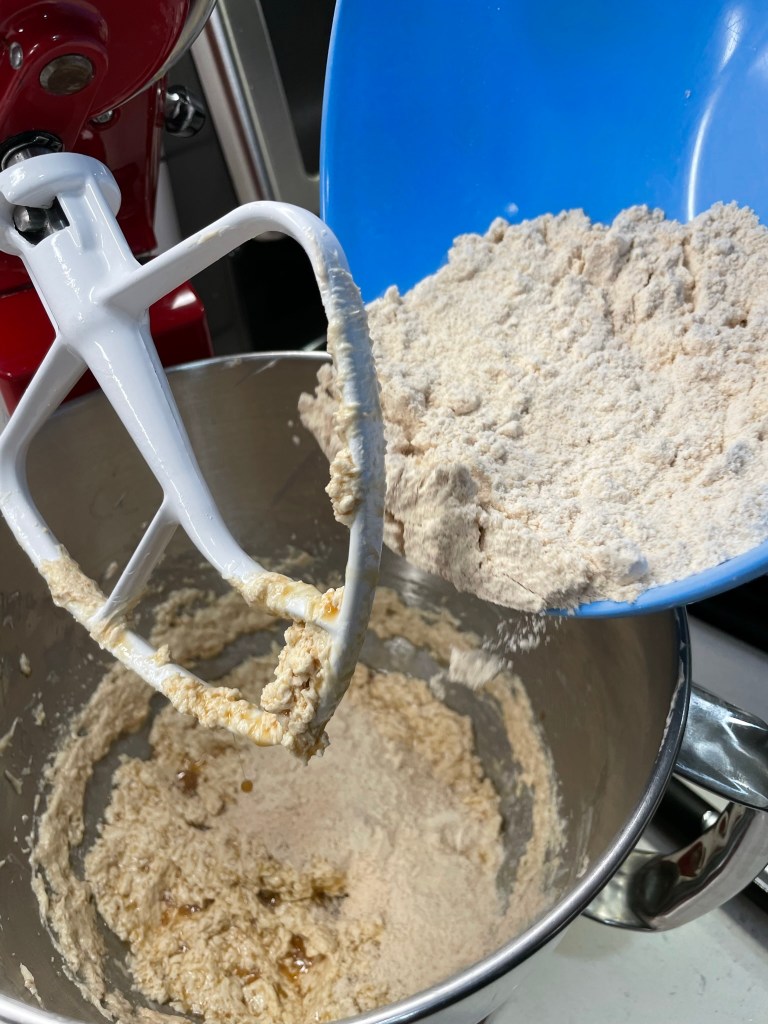
In a medium bowl, whisk together flours with spices, baking powder and salt. Add half the flour mixture to the butter mixture, folding just until all the dry ingredients are incorporated. Repeat with remaining flour blend. Gently fold in chocolate chips. The batter will be very thick and dense.
Spread batter evenly over parchment-lined baking pan. Sprinkle pecan chips over all or half the blondies, if desired. Bake for 30 minutes, or until blondies are set but not overly dry. Remember that they will continue to cook for a few minutes after removal. As with brownies, the type of pan may affect the outcome. For a glass pan, add a few extra minutes to the baking time.
Cool for about 30 minutes before using parchment to lift blondies from the pan. Cut into squares for serving. Keep leftover blondies wrapped or in a sealed container, at room temperature for up to three days.
These warm up beautifully in the microwave (give them 30 to 45 seconds on high), and they are delicious served with a scoop of ice cream.
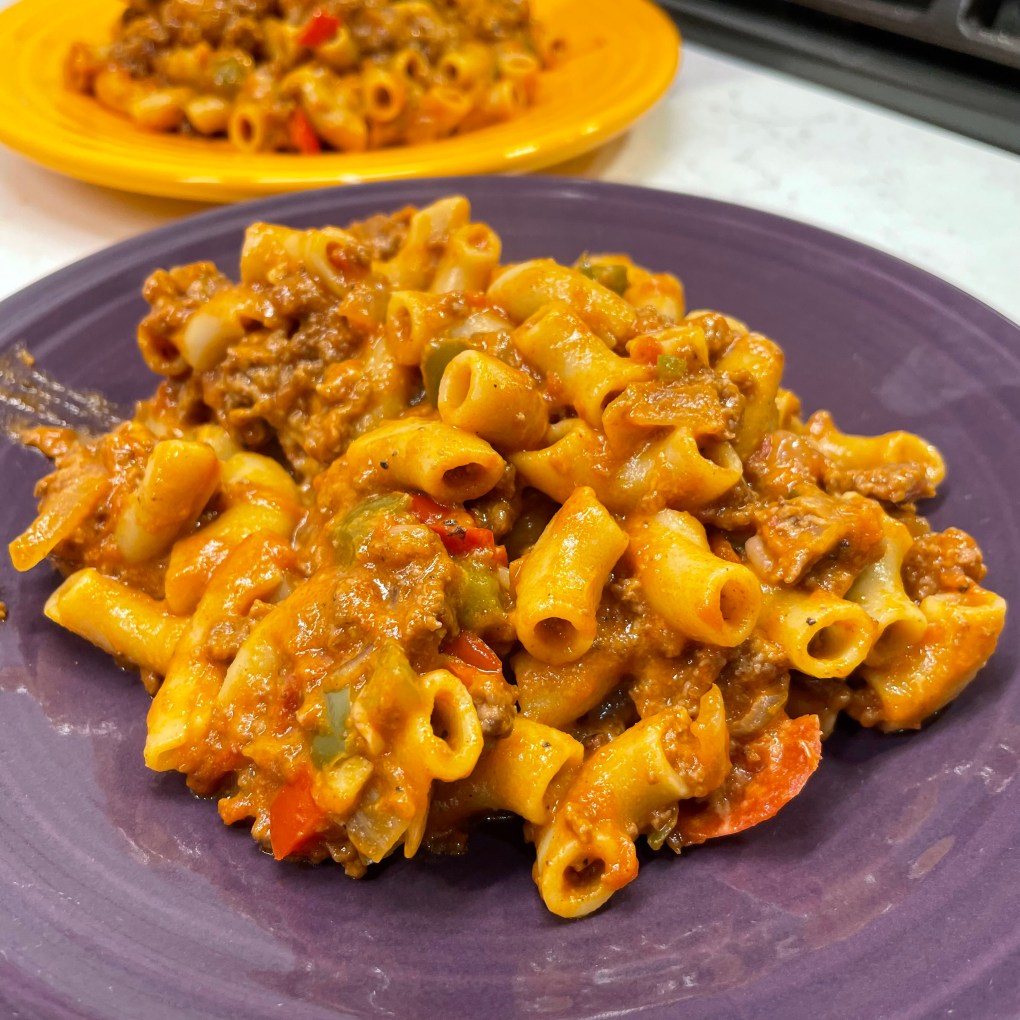
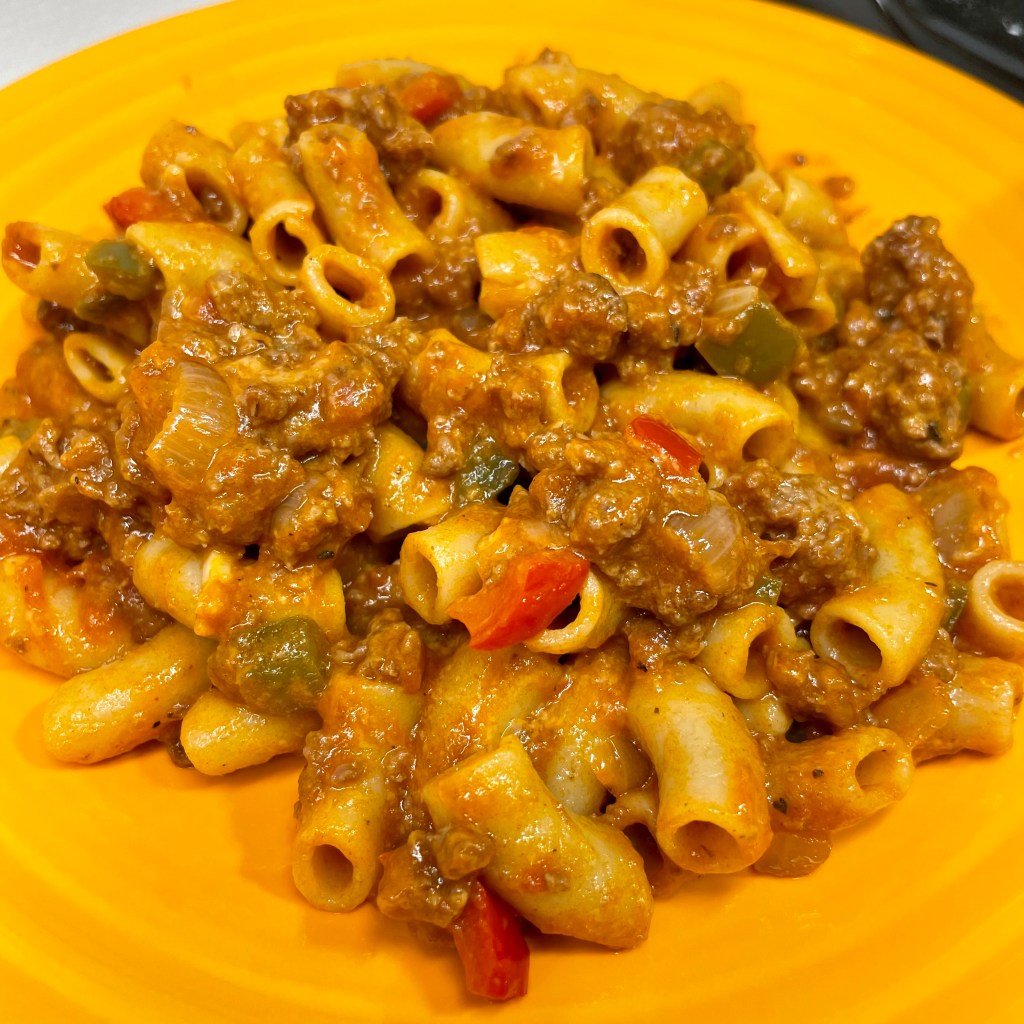
Here’s an easy, kid-friendly main dish that brings back a lot of memories from my childhood. There were just a few foods that my mother made on repeat, including some of the Mexican-themed meals I’ve shared here. Ground beef tacos were in hot rotation, as was tuna noodle casserole, green chili burritos and something she called “Swiss steak.” Once in a while, she also whipped up a pot of good old American goulash, but not quite the way I’ve prepared this batch. My single mom was all about shortcuts in the kitchen, so her version of goulash usually involved a jar of store-bought spaghetti sauce, probably Ragú, given that there weren’t many other brands available in the 1970s when I lived with her.
In the traditional sense, goulash— which has its roots in Hungarian cuisine— would not have the Italian flavors found in spaghetti sauce, and I’ve come around to making it my own way in my adult years. I do use ground beef, as my mom did, and this is a distinct Americanization of goulash, which would traditionally be made with stewed cuts of meat, plus vegetables and probably potatoes.
Not a Hungarian goulash, but so delish! And look at that brilliant Halloween color.
My version brings back some of the traditional goulash flavor, seasoned with plenty of smoked paprika, canned whole tomatoes, bell peppers, onions and garlic. In the devilish spirit of Halloween, I have also taken the liberty of adding some fiery heat in the form of a fresh jalapeño, chopped up with seeds and all. Even when I was a kid, I loved spicy flavors, and that was my mother’s influence, especially during the years we lived in southern Colorado.
If you’re not feeling it for the fire, or if you’re feeding little goblins whose taste buds aren’t quite there yet, feel free to omit the jalapeño, and maybe pull back on the smoked paprika a bit, too. Cooked pasta is another “American” twist on goulash, and I like large elbows for this because the shape is open to grab up plenty of that flavorful sauce, and it’s also easy to pick up with your fork, along with the tasty bits of meat, onion and pepper.
One last thing, and this is also a departure from my mom’s old standby recipe but is very popular in my house today. Just before serving, I stir in a half cup or so of shredded sharp cheddar. It’s a tangy little twist that makes this an even heartier meal, or perhaps even a graveyard smash. 👻
This is my adaptation of a dish I had countless times during my childhood. It makes good use of simple pantry ingredients and it is economical, using ground meat of your choice. I prefer it served from the stovetop, but it easy to adapt to a baked dish if you prefer to make it ahead.
Ingredients
Extra virgin olive oil
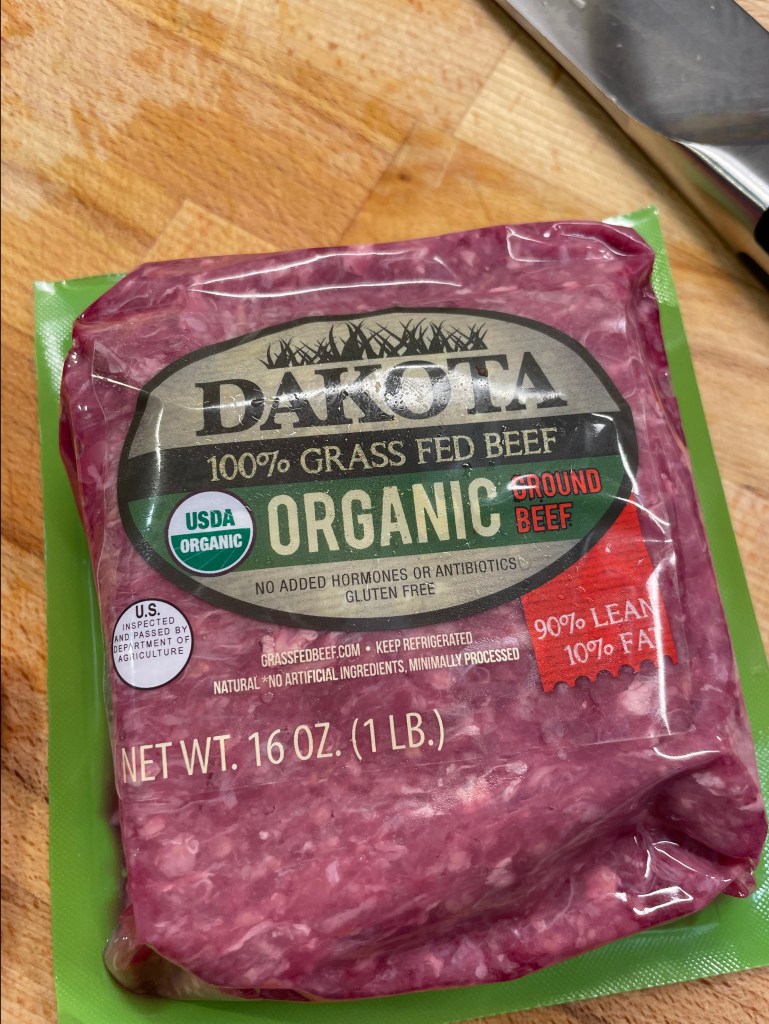
1 pound lean ground meat (beef, bison or turkey work well)
1/2 sweet or yellow onion, chopped
1 bell pepper, chopped (use green, red or a combination)
2 cloves garlic, minced
1 fresh jalapeño (optional), minced with or without seeds
Salt and pepper
1 teaspoon smoked paprika (Hungarian is traditional, but Spanish works nicely)
15 oz. can diced tomatoes, including juice
8 oz. can low-sodium tomato sauce
1/2 pound large elbow macaroni
About 1/2 cup shredded sharp or medium cheddar cheese
You can adjust the smoke and spice of this dish to your liking. For less heat, discard the seeds and membranes of the jalapeño or omit it entirely. For extra “smoke,” use two teaspoons of the paprika. For less smoke, substitute sweet paprika.
Directions
Bring a pot of salted water to boil for cooking the pasta. Heat a medium size, heavy-bottomed pot over medium heat. Swirl in a tablespoon or so of olive oil and add the ground meat, a little bit at a time, cooking until most of the pink color is gone.
Add chopped and minced vegetables and season with salt and pepper. Cook and stir until vegetables are softened and onions are slightly translucent.
Stir in paprika and then add tomatoes and tomato sauce. Reduce heat and cook at low temperature, stirring occasionally to prevent burning.
While the goulash mixture simmers, cook the pasta to al dente or desired doneness for serving from the stovetop. If you intend to bake the dish after mixing, undercook the pasta slightly as it will continue to absorb moisture and cook during baking.
Add cooked pasta and a few tablespoons of the pasta water to the meat mixture. Gently fold to combine. Stir in shredded cheddar and serve. If baking, transfer the mixture to a casserole dish and bake at 350° F for about 40 minutes. Consider topping the casserole with extra cheese before baking.
This post is kind of a recipe within a recipe, and my inspiration for the soup was born from my effort to make pasta using sourdough discard. I know— who would imagine such a thing, right? When Les and I traveled to Nashville, Tenn. recently, we met some friends for dinner and got to talking about gluten issues that each of them suffer. Our friend, Dick, said he had found real sourdough bread more digestible and that a few gluten-free breads were helpful to satisfy his carb cravings, but that pasta had been another story; it always left him feeling bloated and uncomfortable, and he didn’t enjoy the texture of the gluten-free options on the market. He knew about my food blog, and he said, “if you could make a real pasta that I could eat and enjoy…”
And over here was me— just hating the thought of someone missing out on a favorite food. There has to be a way, and I’m on a mission to find a way to ease the uncomfortable symptoms that gluten brings to people with mild or moderate sensitivities. If I can figure this out, and then advance to making an egg-free version that is suitable to dry, I will send some to Dick for feedback. My version is not gluten-free, obviously (I use wheat flour), but the fermentation process changes the gluten structure and exhausts the anti-nutrients that mess with non-celiac individuals, and that just might be enough for Dick. We’ll see.
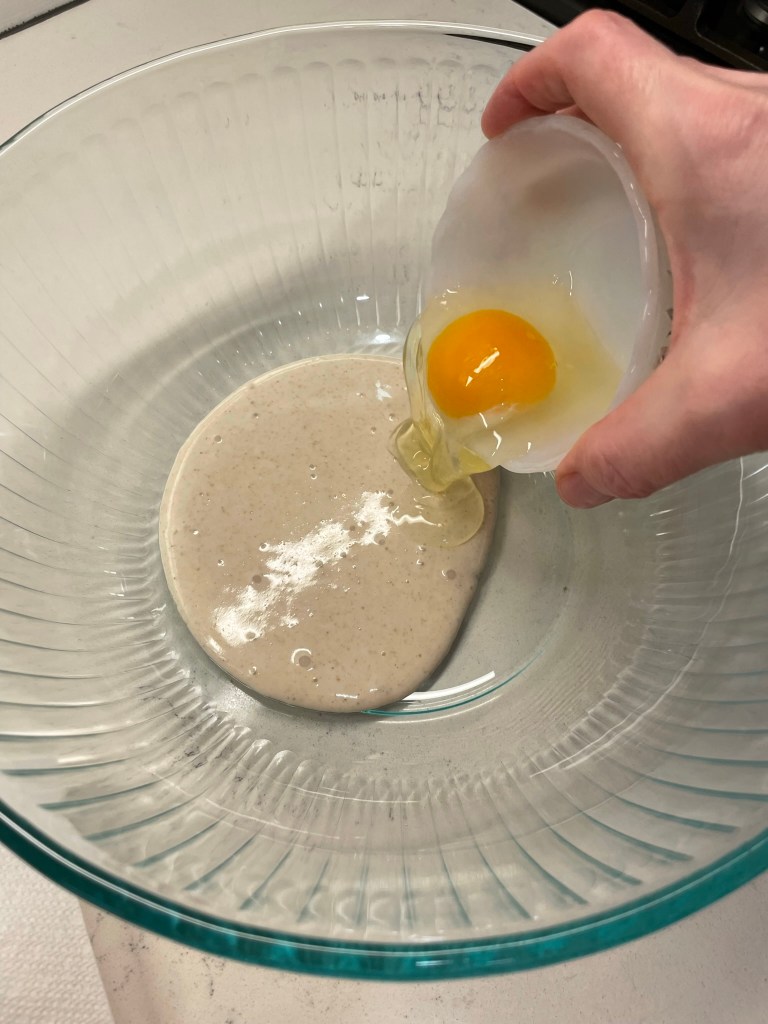
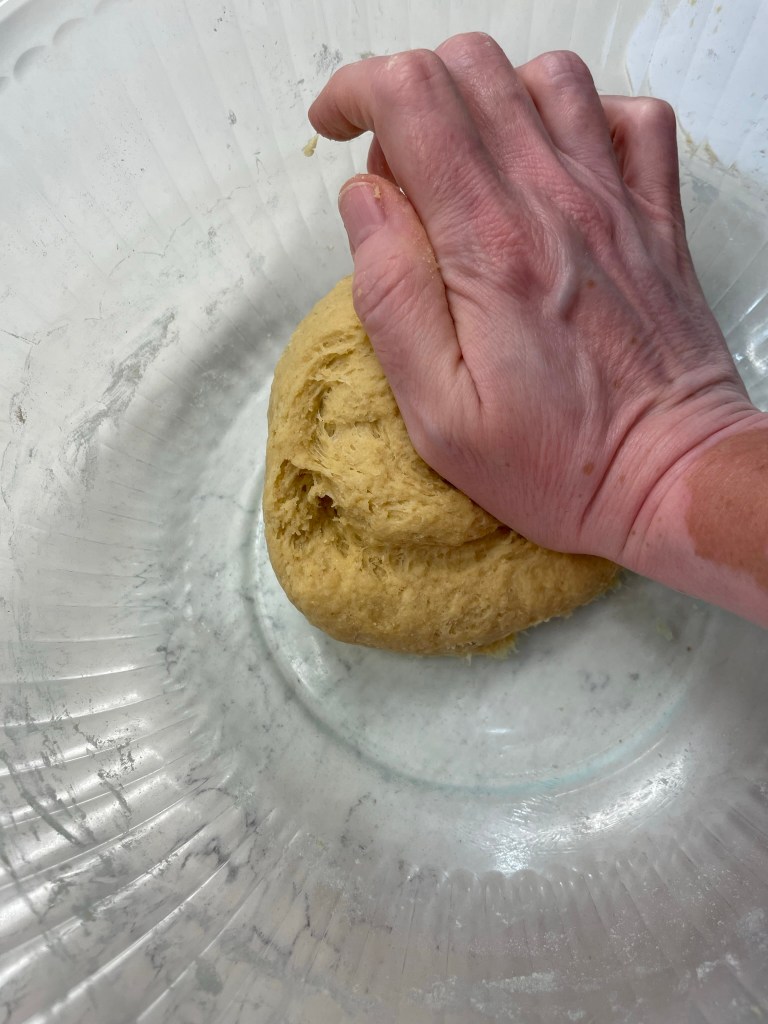
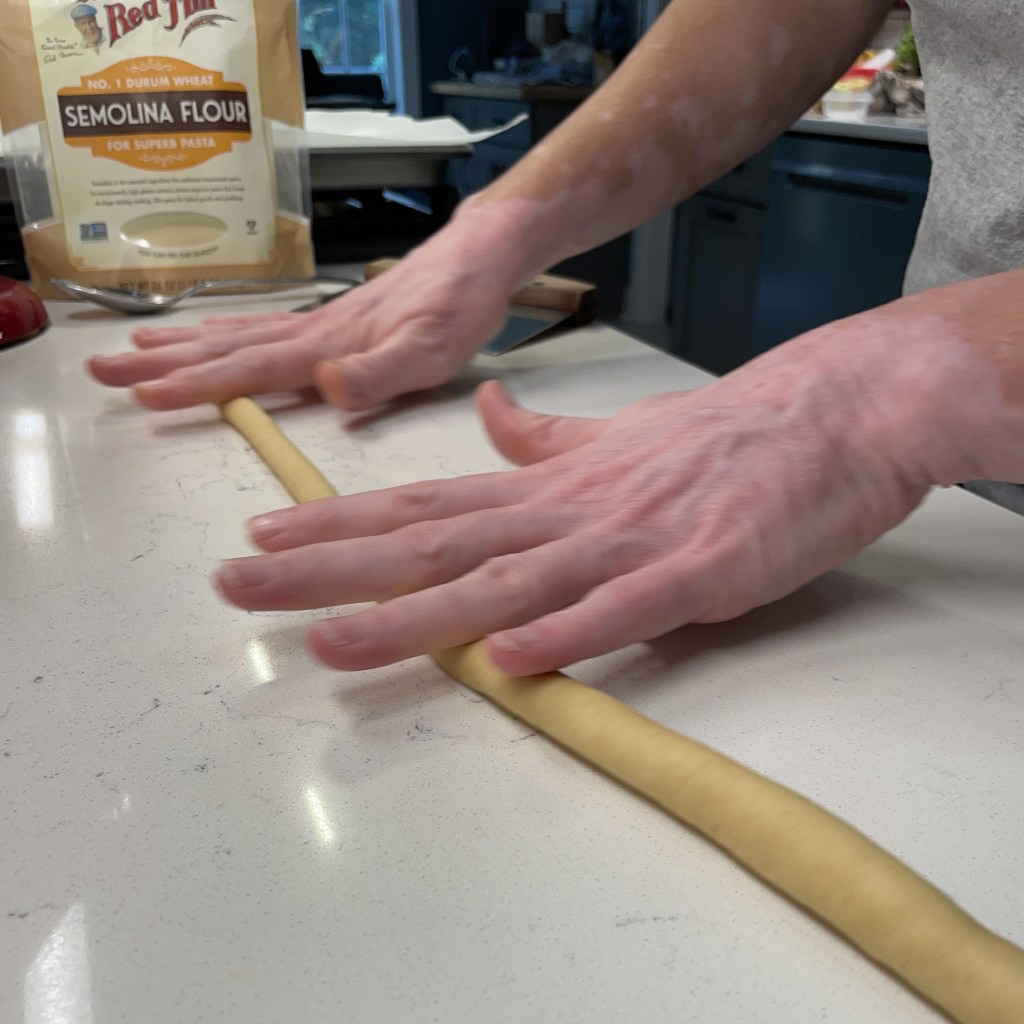
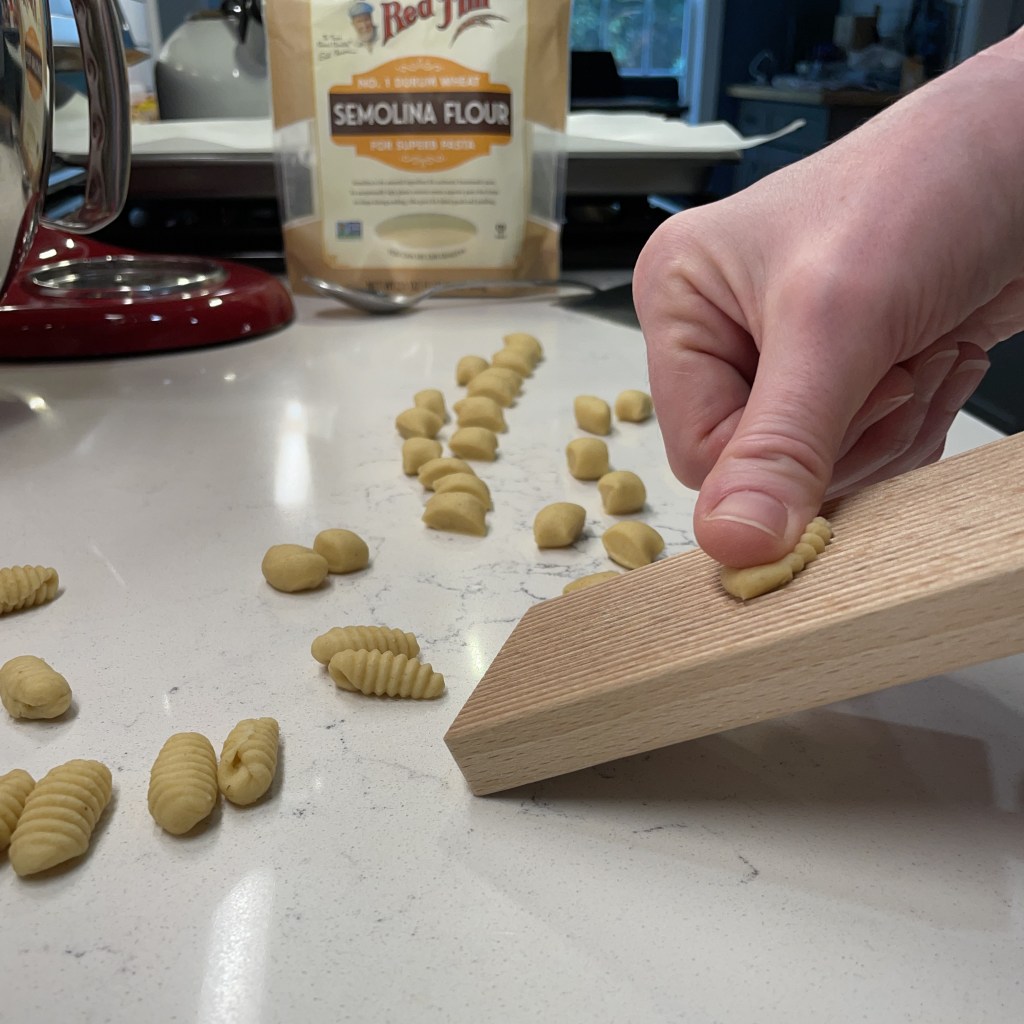
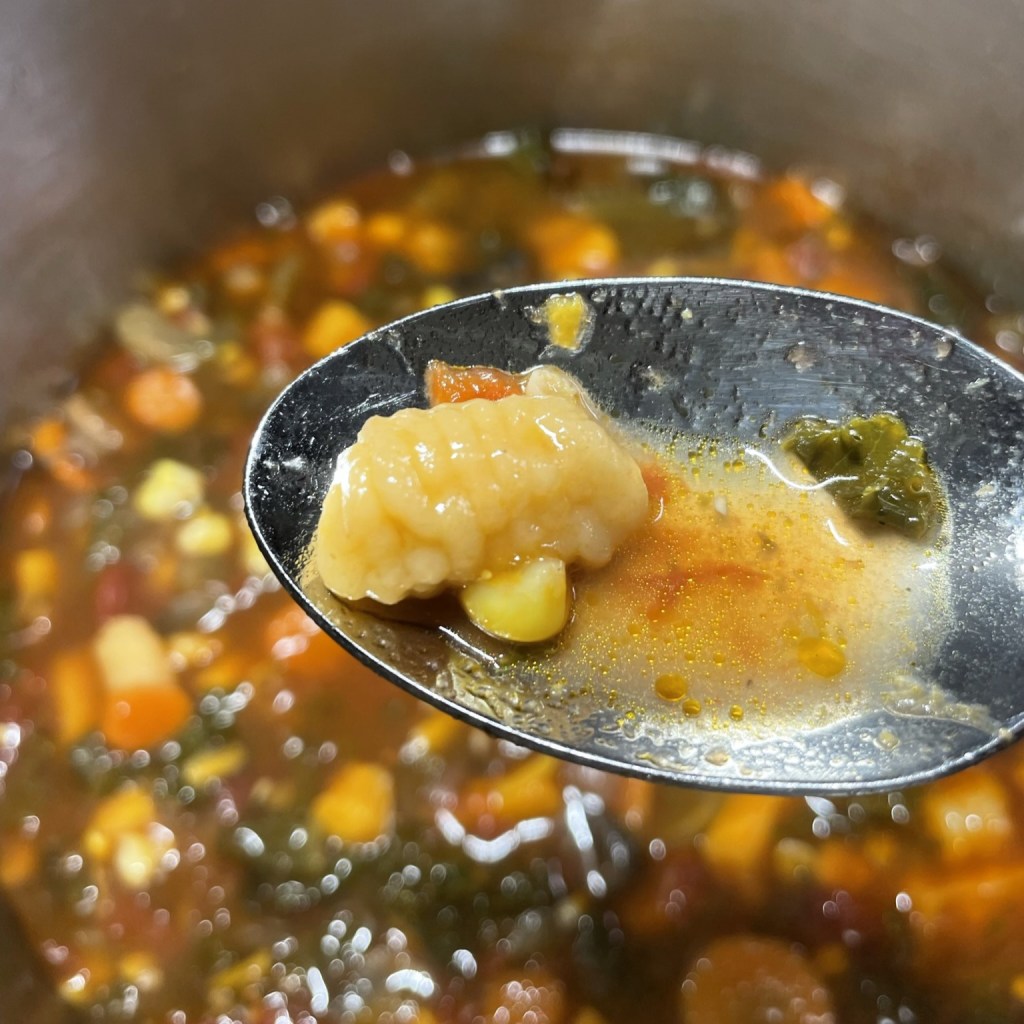
I’ll let you know how things progress with the sourdough pasta quest, but my immediate challenge was finding a good way to use my test batch. I used a combination of all-purpose, white whole wheat and semolina flours, plus sourdough discard and eggs, to make my pasta dough. It had been chilling in the fridge for a day, and I rolled it into ropes and shaped it into little gnocchi-meets-shell-shaped things. The first thing that came to mind for these little bites was soup, and here we are!
Mmmm, so good!
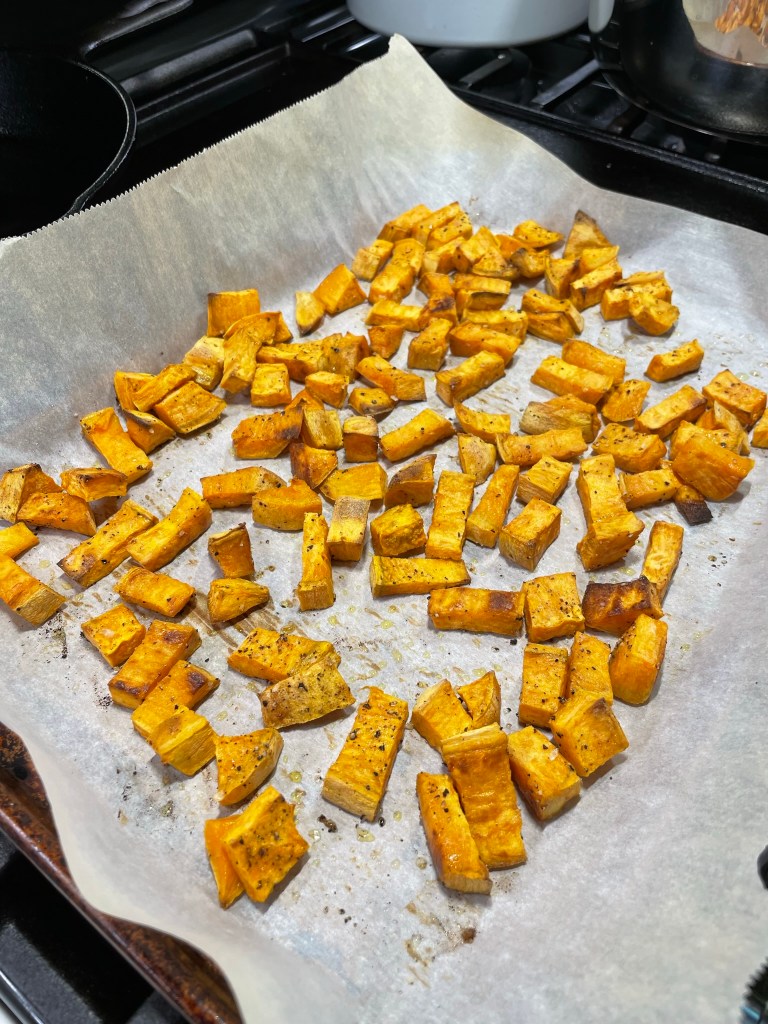
This soup brings together the best of two things for me— a whole bunch of terrific early fall ingredients and an all-day simmered vegetable soup. Sweet potatoes are abundant already this season, so I cut up a large one and roasted it with a touch of olive oil, salt and pepper. I could have put the cubes right into the soup, but I knew this would be a long simmer and I didn’t want them to turn to mush. Besides, roasting sweet potatoes caramelizes them and intensifies their autumn flavor. This turned out to be worth the extra step, for sure.
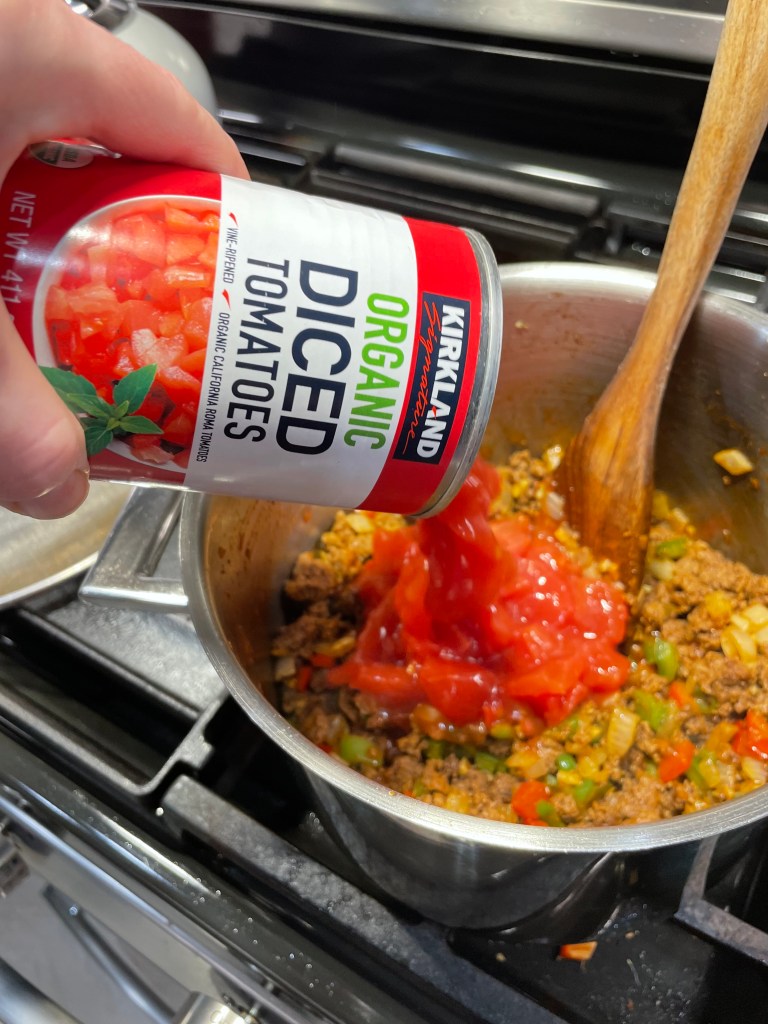
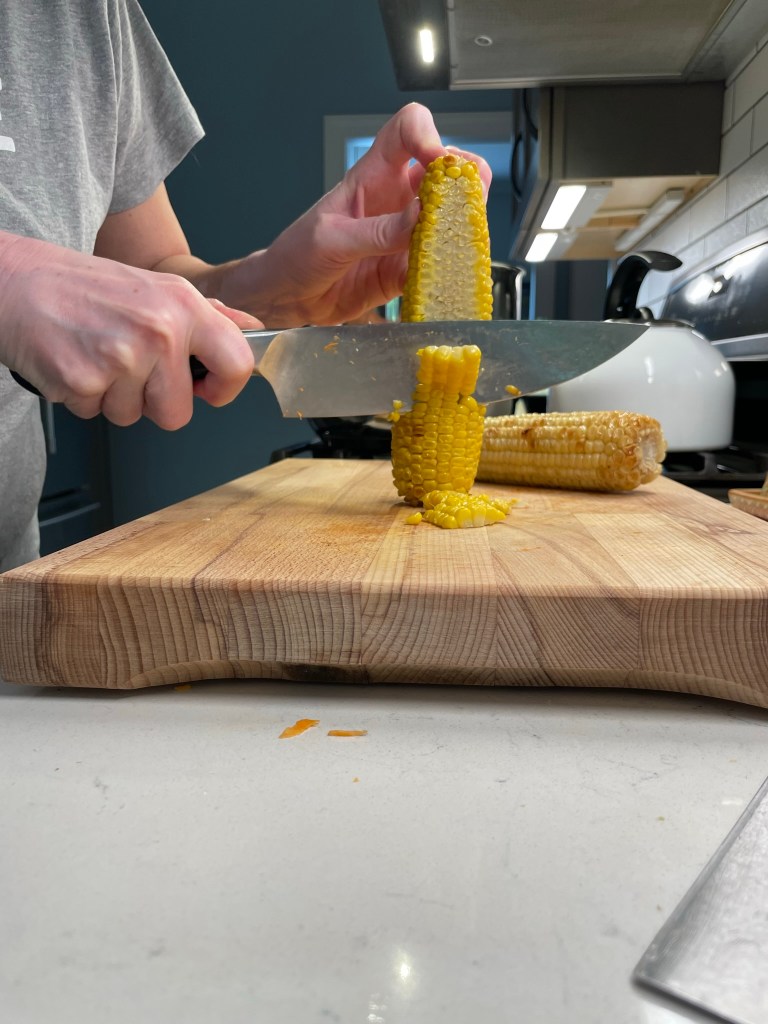
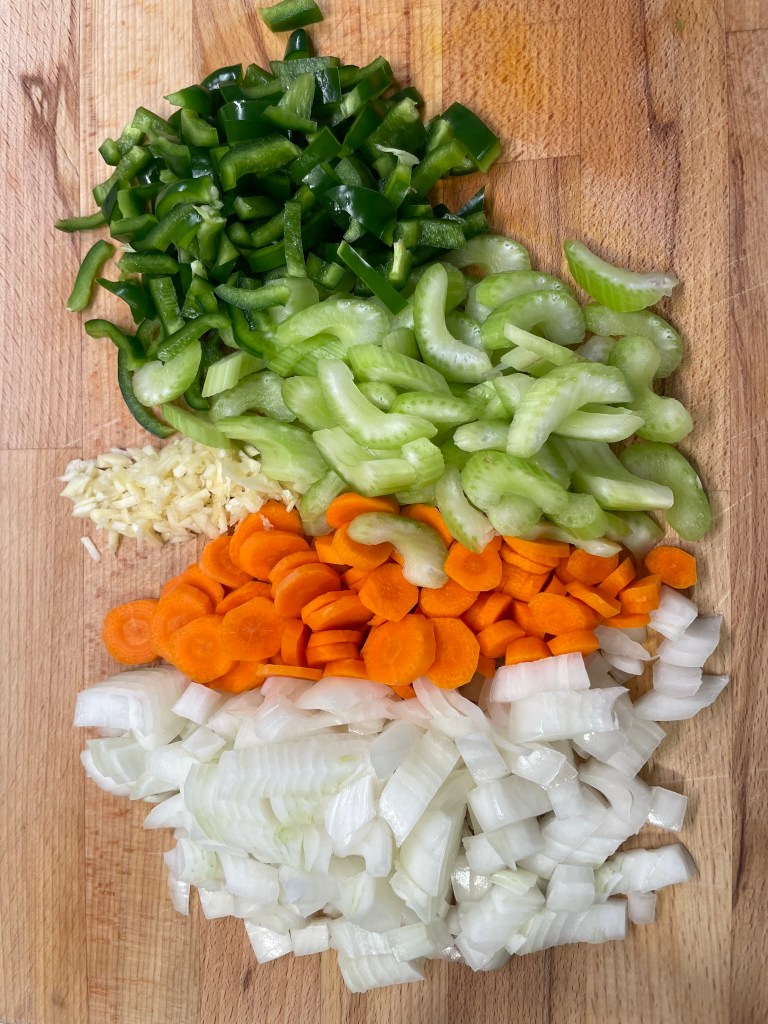
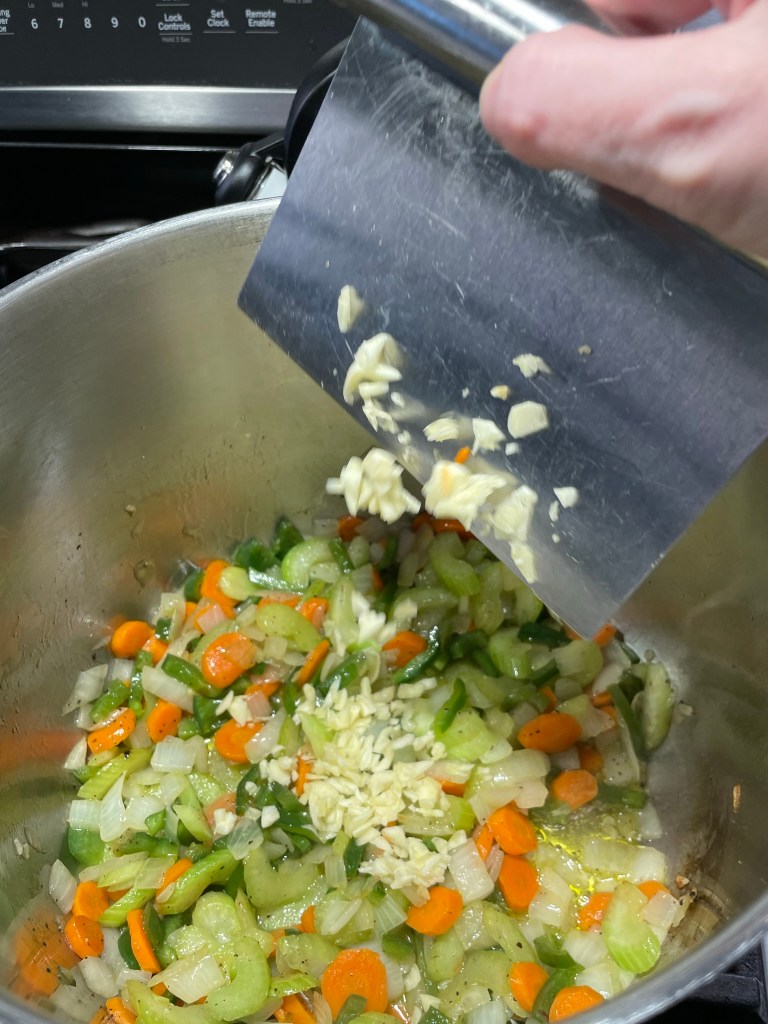
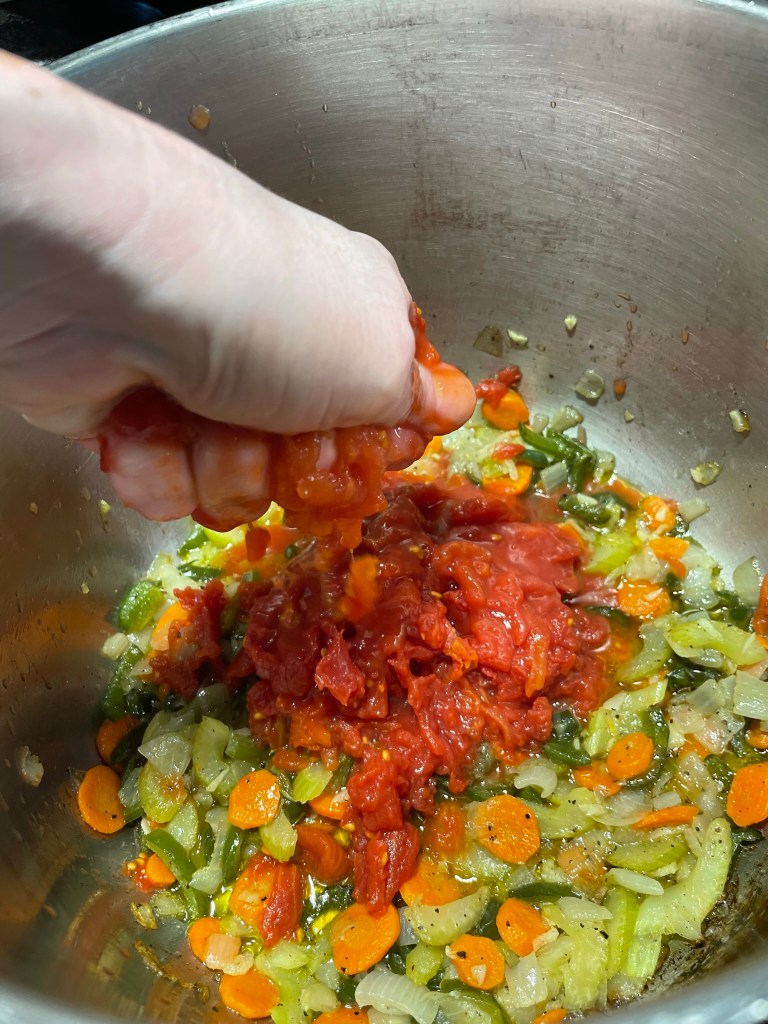
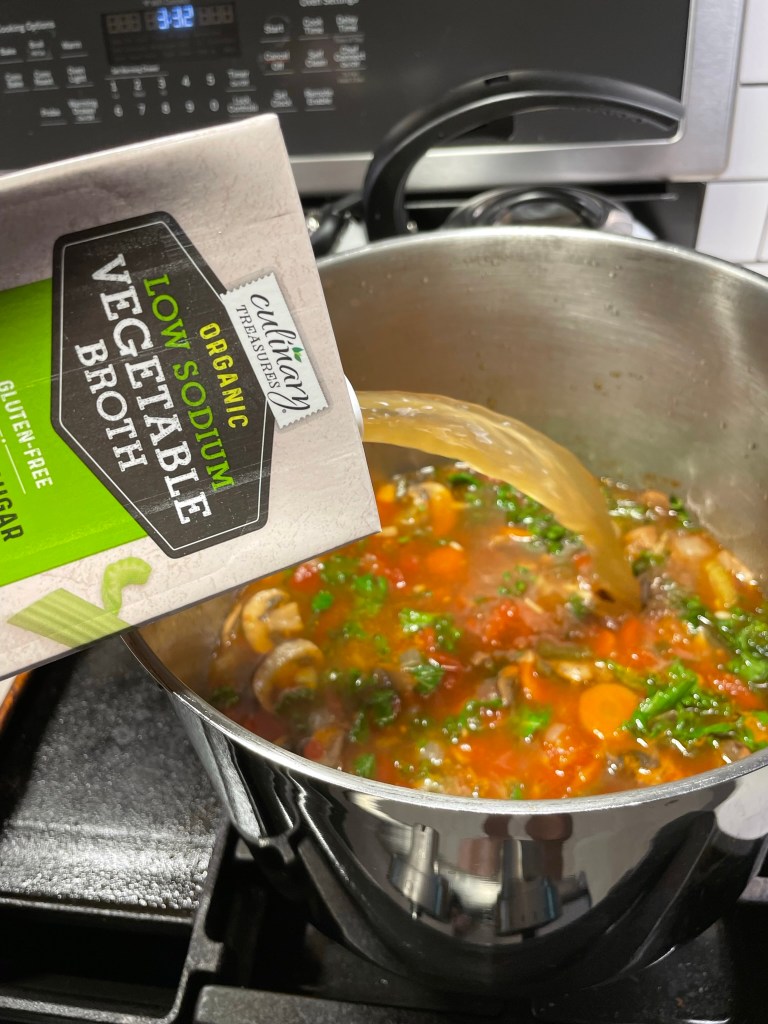
The corn season runs long around here, so I had Les grill up a couple extra ears when we had it for dinner recently. I stripped the kernels and set them aside while I prepared to build the soup base with carrots, celery and onion (otherwise known as mirepoix), plus poblano pepper and garlic. Whole canned tomatoes went in next, then mushrooms and veggie broth.
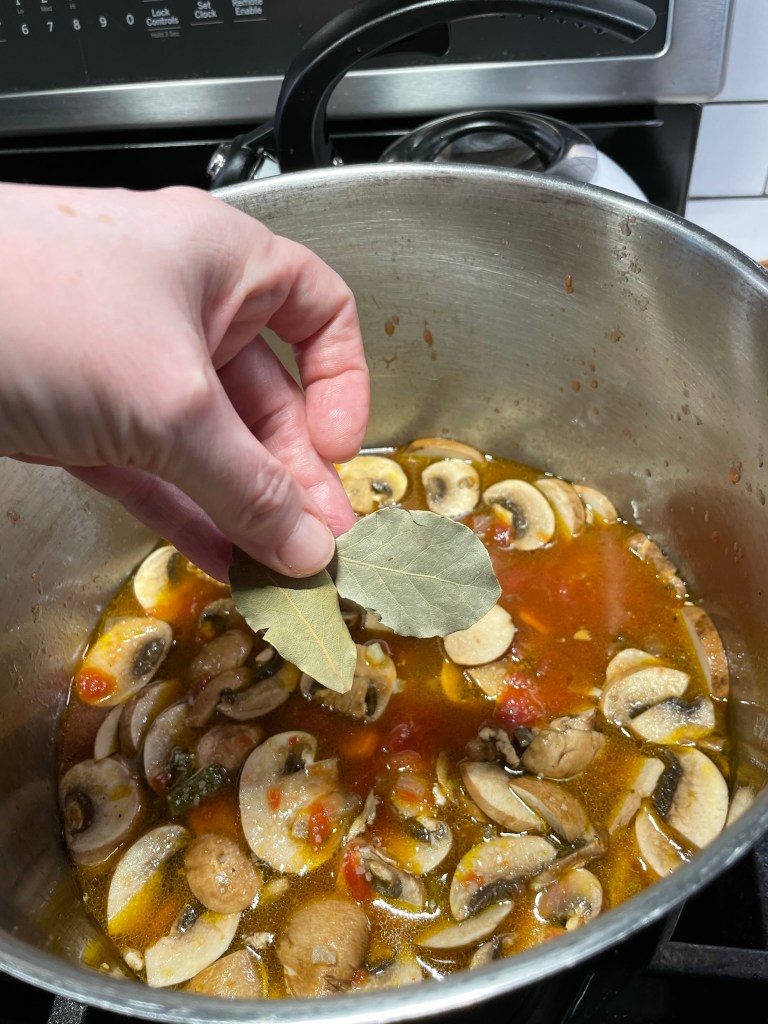
The only seasoning I added to this soup— other than the usual kosher salt and black pepper— was a couple of bay leaves. Anytime I make a simmered soup, stew or roast, bay leaf is like a magic ingredient that is not only flavorful but highly aromatic.
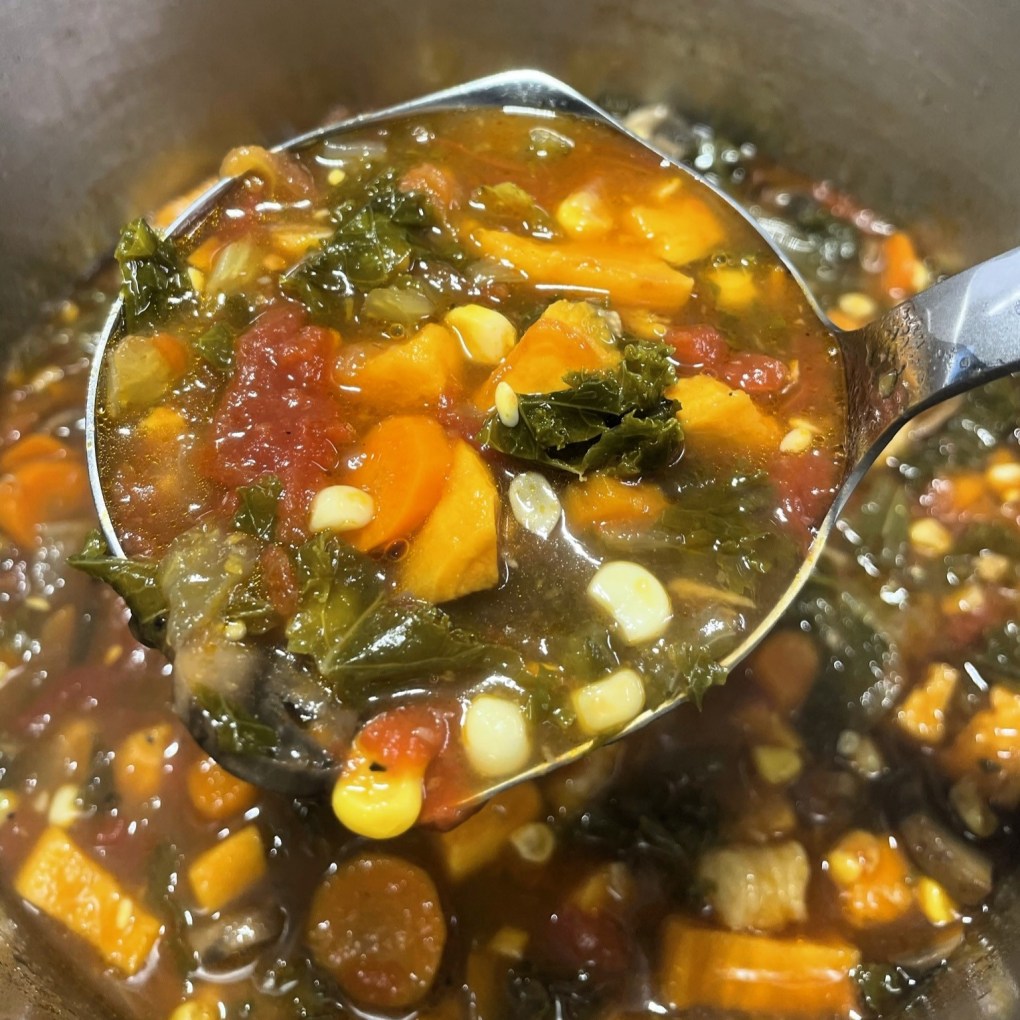
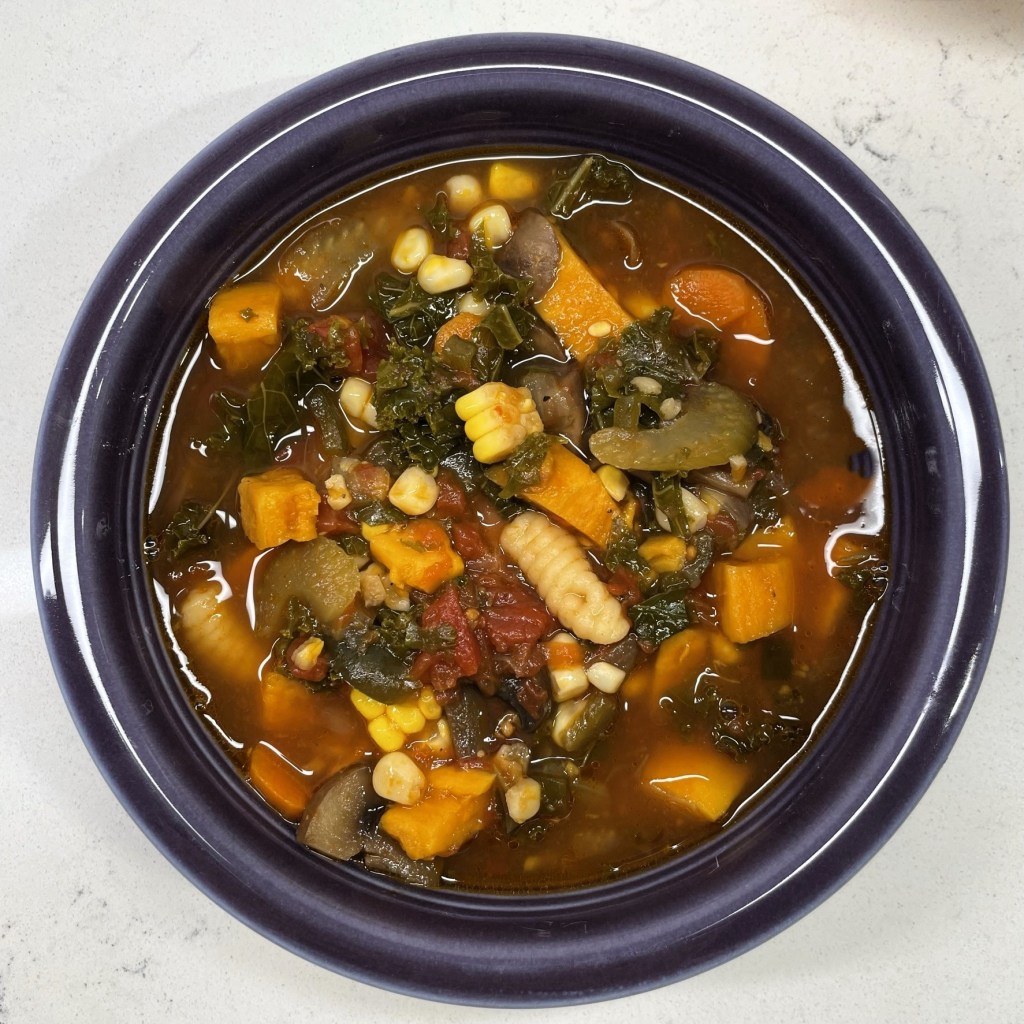
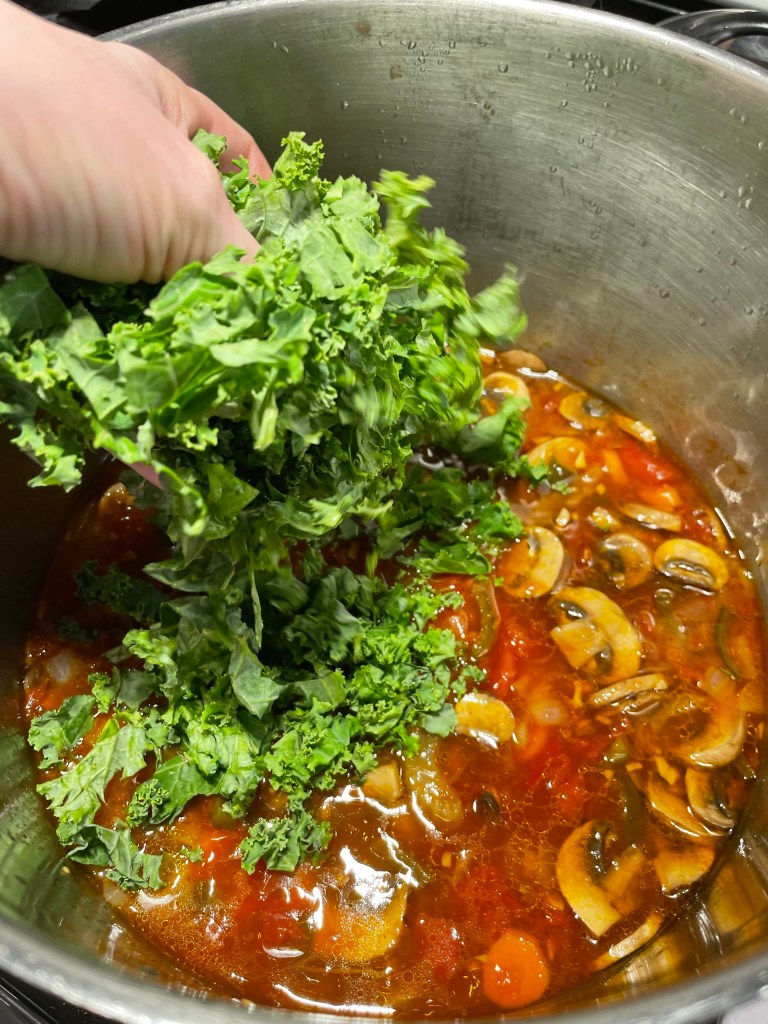
After a nice, long simmer—about an hour— I removed the bay leaves, added two “fat handfuls” of chopped kale, more broth and my homemade sourdough pasta (which went in straight from the freezer), and brought it up to a gentle simmer to cook the pasta through.
Finally, my soup was ready for the roasted add-ins I had prepared earlier, and dinner was served!
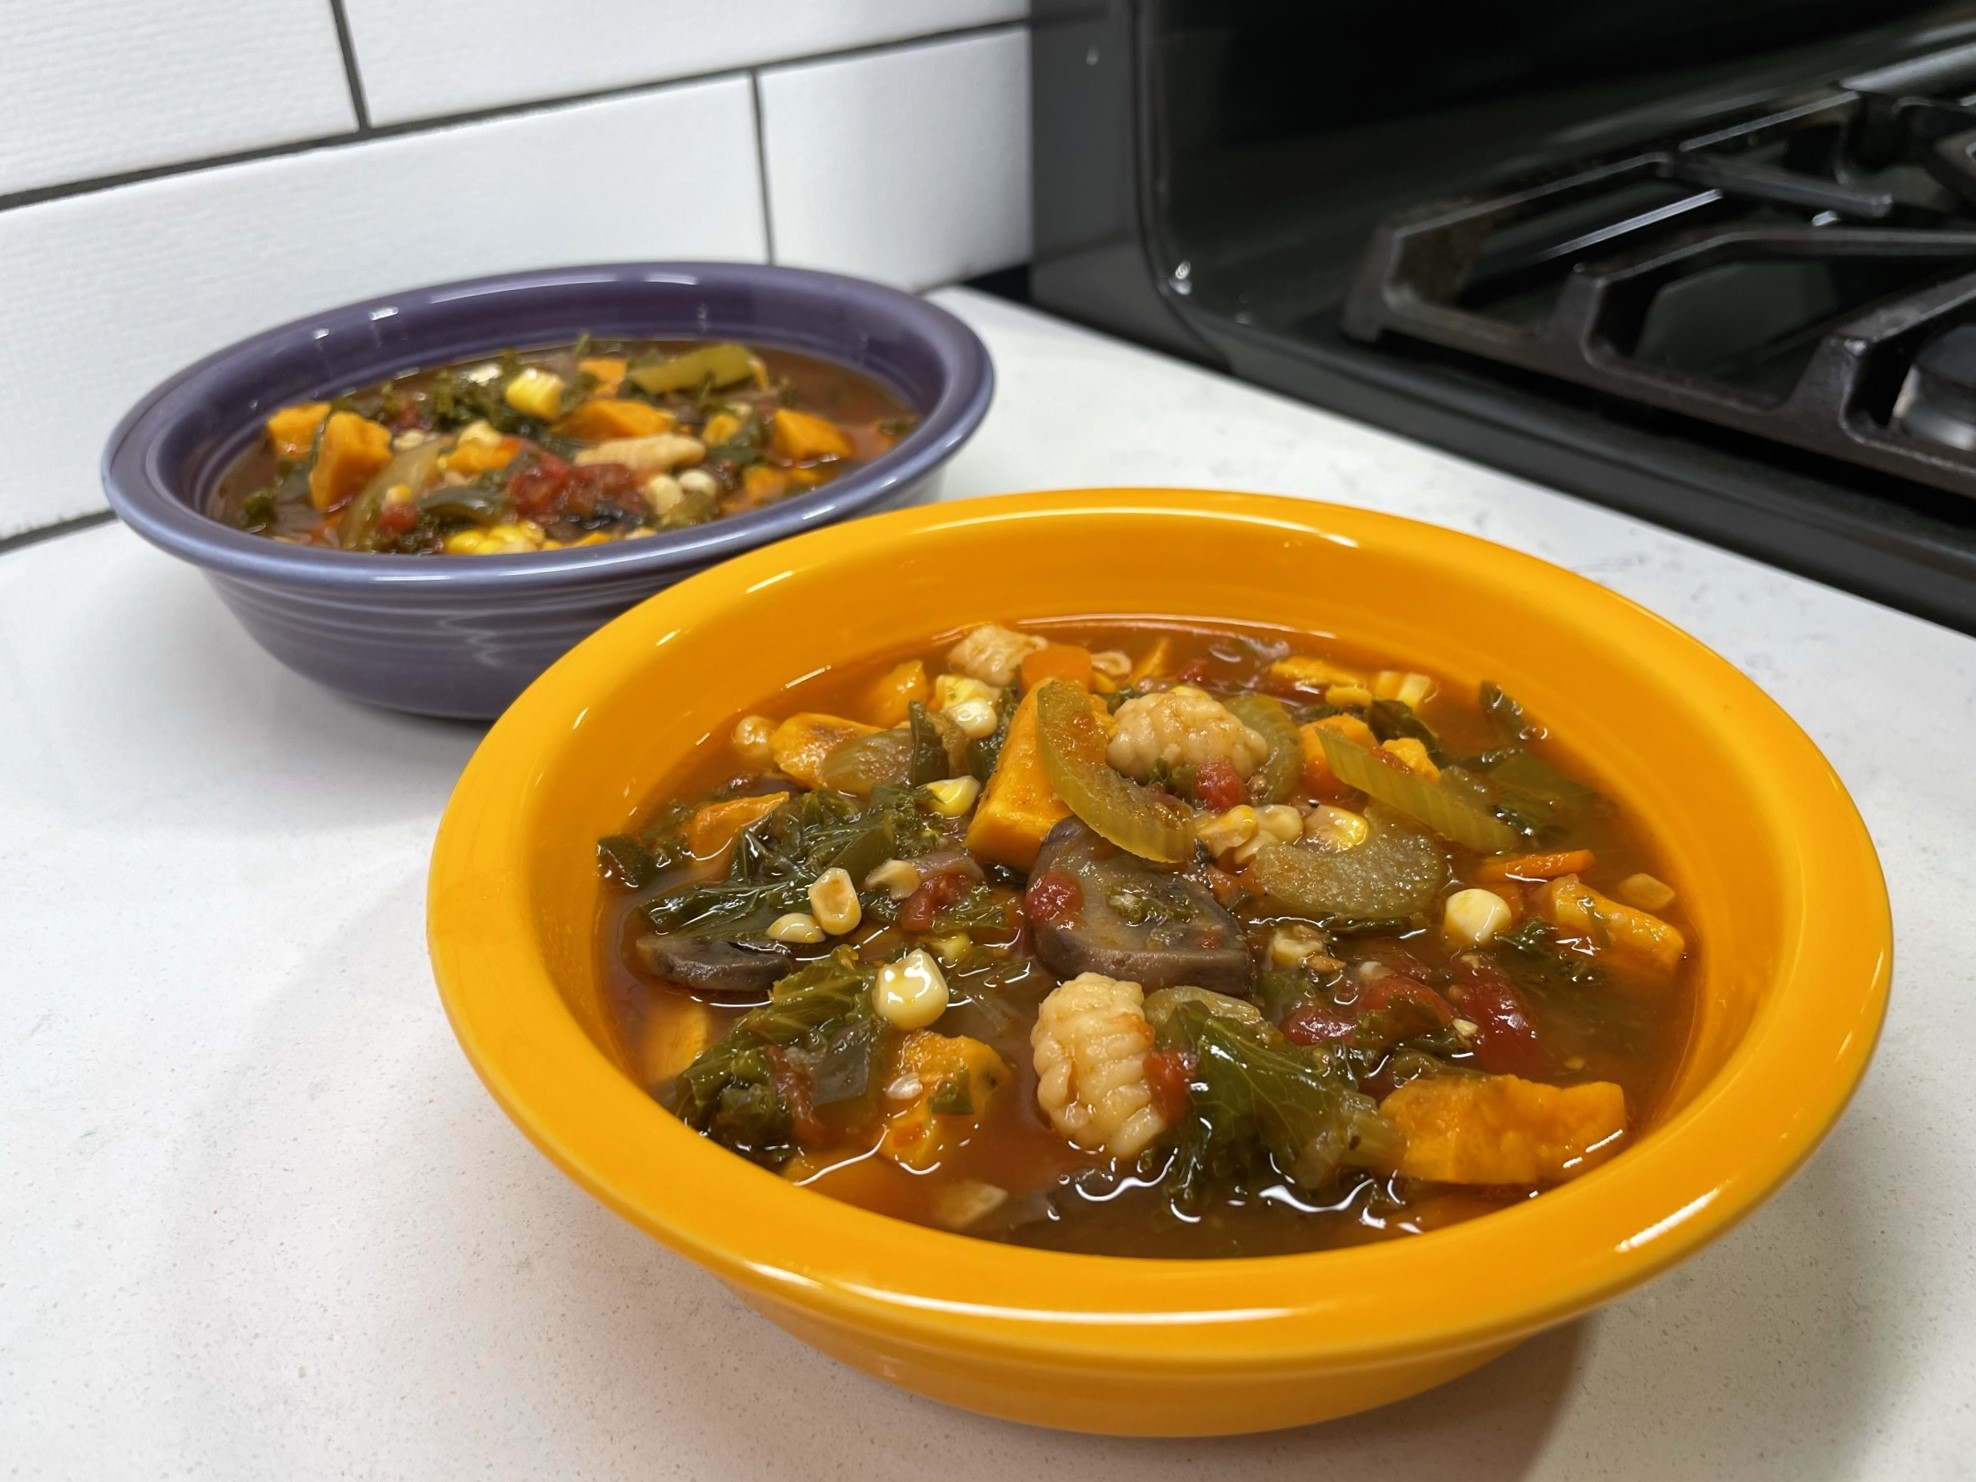
My friends, this autumn minestrone was far and away more delicious than any other vegetable soup I’ve ever made! All those flavors melded together wonderfully, and between the roasted, grilled and simmered vegetables, there was plenty of interesting texture, too.
The pasta cooked up like pudgy, tender dumplings and the tangy earthiness of the sourdough was a really nice complement to some of the sweeter flavors in the soup. If I had not been experimenting with the homemade sourdough pasta, any box pasta with hefty texture would have been a good choice (think rotini, trumpets or those cute little wagon wheels). Using box pasta would also have kept my soup vegan; the eggs in the pasta dough disqualified it from that category.
Oh, this soup hit the spot on a dreary, rainy early autumn day. But you can bet I won’t wait for another one to make this soup again!
This soup brings together the best of two things for me— a whole bunch of terrific early fall ingredients and an all-day simmered vegetable soup.
Ingredients
1 large sweet potato, peeled and cubed (about
1/4 cup extra virgin olive oil, divided (you’ll use a tablespoon to roast the sweet potato and the rest to sauté vegetables in the pot)
Kosher salt and freshly ground black pepper
1 sweet onion, chopped
2 medium carrots, peeled and thinly sliced
2 ribs celery, strings removed and sliced
2 cloves garlic, finely minced
1 poblano pepper, chopped
28 oz. can whole peeled tomatoes, drained (reserve liquid for another recipe)
6 cups low-sodium vegetable broth, divided (see directions for breakdown)
2 bay leaves
8 oz. carton cremini mushrooms, cleaned and sliced
2 fat handfuls kale, washed and rough chopped
1/2 pound pasta shapes (homemade or otherwise)
2 ears roasted corn, kernels cut from cob
Notes: I roasted the sweet potatoes first so that their flavor could be concentrated, and to keep them from turning mushy in the soup. Butternut squash would be a great substitute. I used a fresh homemade pasta that was shaped like baby gnocchi. My pasta contained eggs and I added to the soup straight from the freezer. Dry pasta such as elbows or rotini would be a great substitute.
Directions
Preheat oven to 350° F, with rack in center position. Line a sheet pan with parchment and arrange sweet potato cubes in a single layer. Drizzle with olive oil and season with salt and pepper. Roast about 45 minutes, until sweet potatoes are reduced in size and golden on all the edges. Set aside.
While the sweet potatoes are roasting, place a deep, heavy-bottomed pot over medium heat. Swirl in remaining olive oil and sauté the onions, carrots, celery and poblano peppers. Season with salt and pepper and cook until translucent. Add the garlic and continue to cook until vegetables are very soft.
Use your hands to squeeze the whole tomatoes into the pot. Add 4 cups of the vegetable broth and bring to a slight boil. Adjust salt to taste. Reduce heat to simmer.
Add sliced mushrooms and bay leaves and simmer for about an hour. Stir in chopped kale leaves until wilted. Add remaining vegetable broth and bring to a gentle boil.
Add pasta straight from the box or freezer and cook it in the minestrone until tender.
Finally, stir in corn kernels and roasted sweet potatoes. Make a final adjustment to salt and pepper, and then cook on low until heated through.
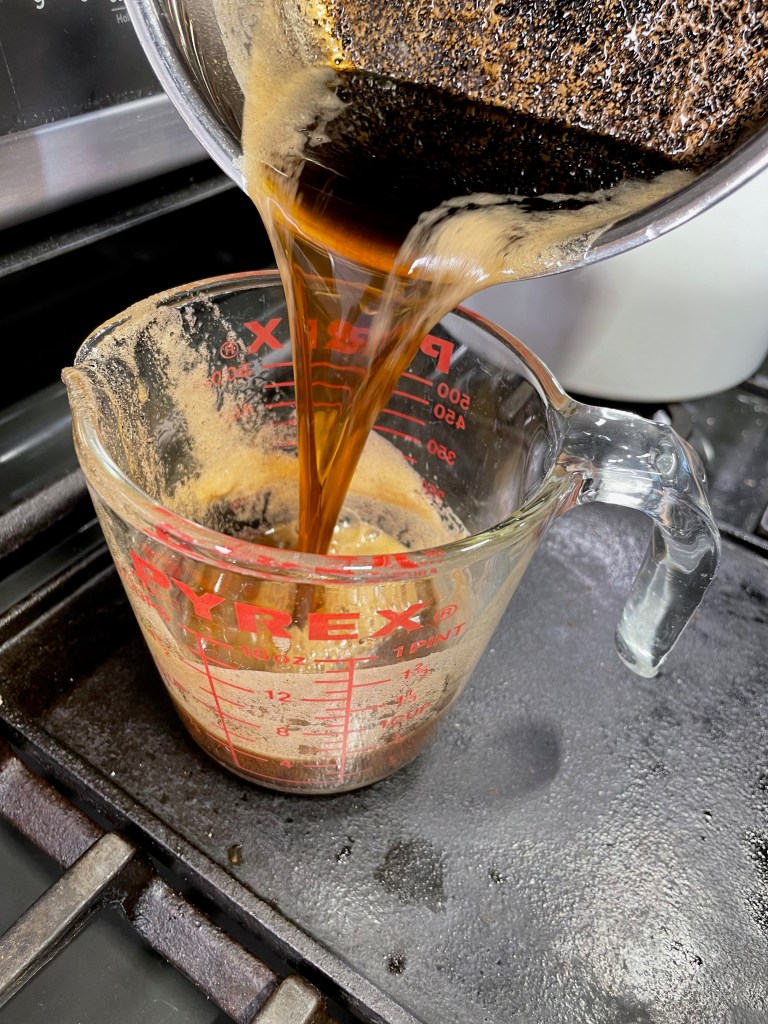
The first time I heard the term “reverse sear” was about five years ago, on Food Network, but that was already more than a decade after a young, rock-star chef and culinary consultant named J. Kenji López-Alt started talking about his discovery of a new method for cooking thick steak to perfection.
Rather than searing the meat first— you know, “to lock in the juices,” as we’ve all been advised since forever— Kenji tested this method of bringing the steak to ideal temperature in the oven first, and then throwing it onto the hot grill or skillet to sear it. The food world took notice of this brilliant discovery, but I’d been reluctant to try it, for reasons I can only explain as sentiment and tradition.
We’ve all seen the drawings on cave walls, with a man cooking animal parts over fire. This is the way we’ve always done it, and here I was, questioning what was already working. Still, I had to ask myself, are some of my mindsets about cooking set in stone because they date back to the actual Stone Age?
But Kenji hasn’t steered me wrong yet, as evidenced when I tried his brilliant baking soda technique that I like to call the miraculous mayo marinade. I use that one all the time now. Or last summer when he posted a recipe in NY Times Cooking, describing how to use salt to draw out the flavors of ingredients in this Mexican street corn guacamole, which Kenji says is his favorite and understandably so. And of course, the tremendous a-ha moment I had when I realized how positively simple it is to make my own sausage, following his salt-wait-grind-mix instructions.
So this summer, I finally decided to try the much-lauded reverse sear, and I’m here to report my experience. First things first, I had to pick up some steaks.
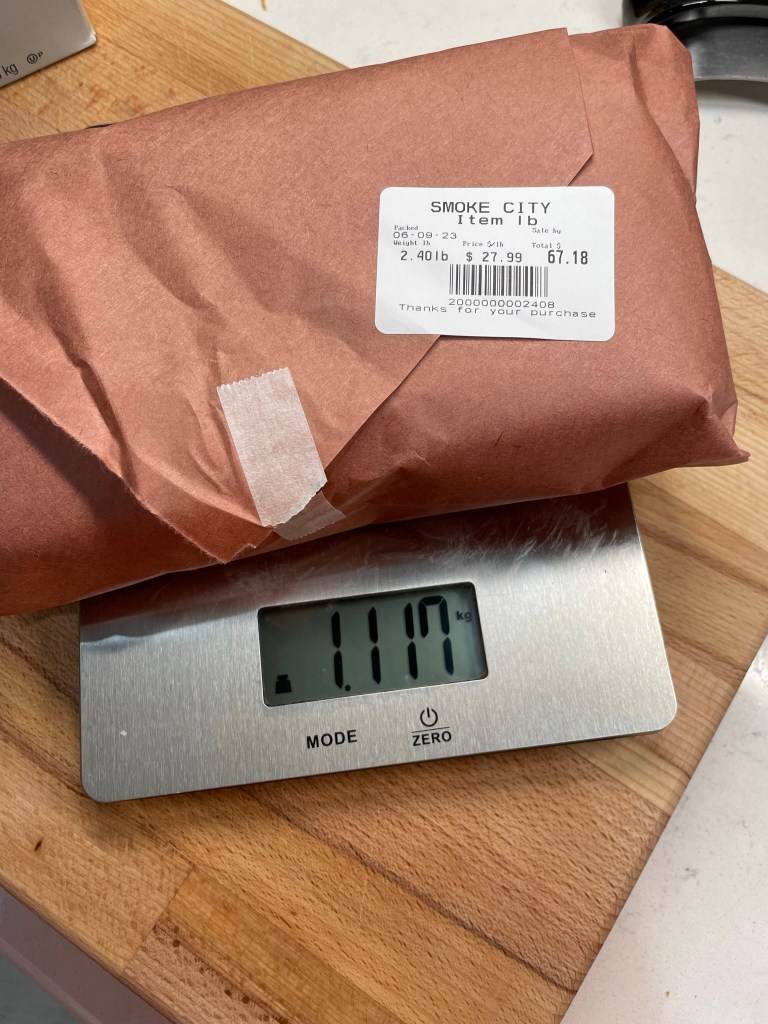
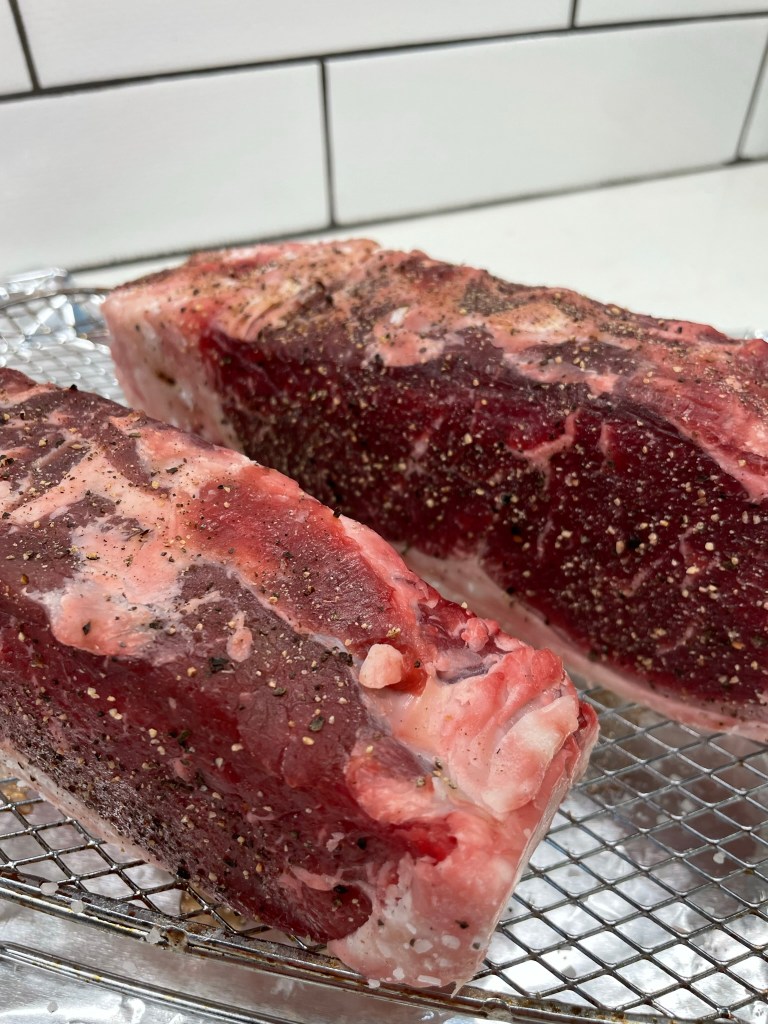
And not just any steaks. According to this article on Serious Eats, I needed to have steak that was close to 2 inches thick, and that usually means a custom order. When I explained to my local butcher what I had in mind, he pulled a huge slab of bone-in meat from the cooler in the back and went to work— slicing it nice and thick and trimming off the excess fat and bone. I’ll pause right here and acknowledge how much I appreciate having an actual butcher in town, one that sells locally produced meats with sustainability in mind, rather than a forced selection of meats from God-knows-where, shrink-wrapped over styrofoam trays. If you have a community butcher shop, please support it.
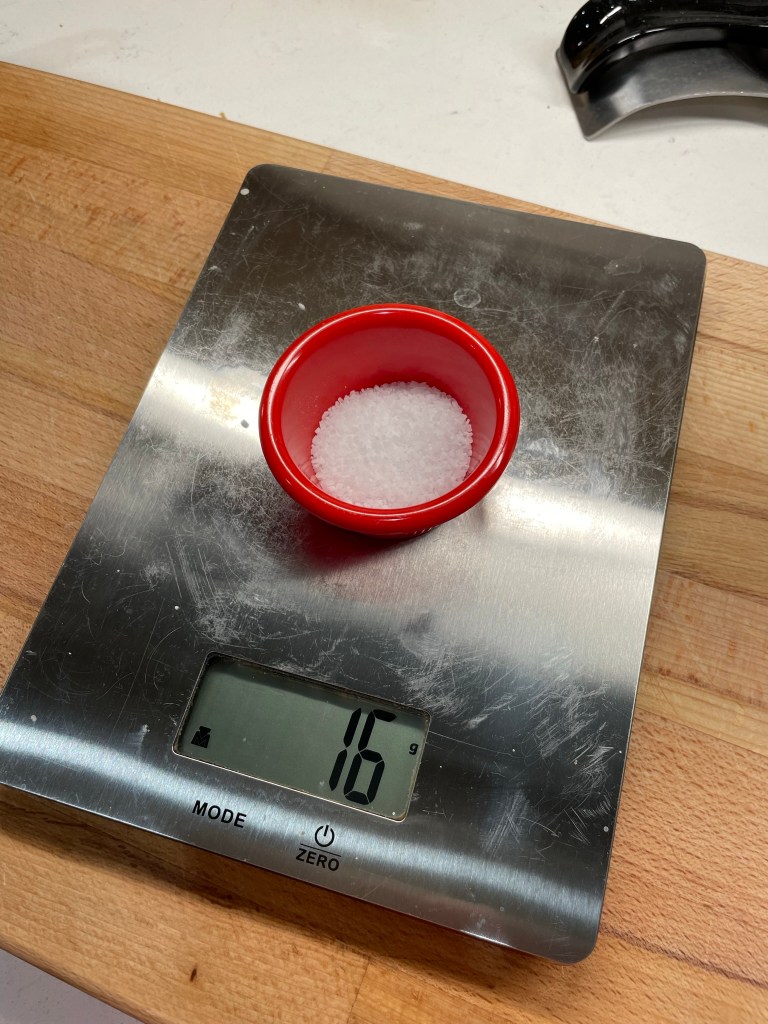
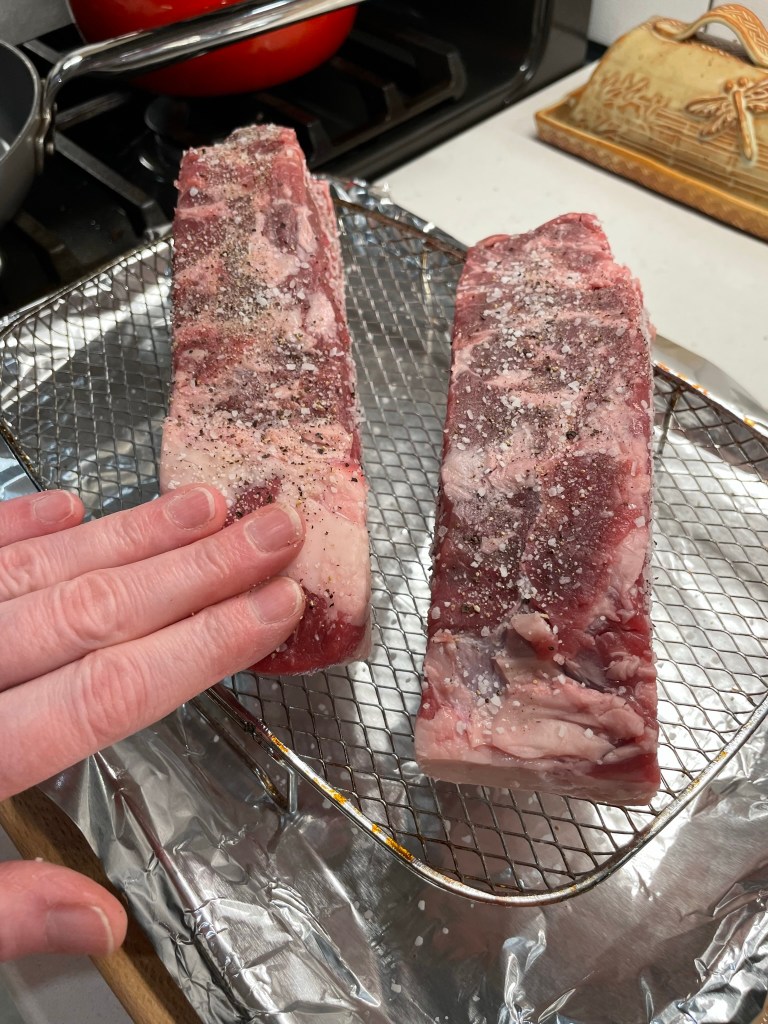
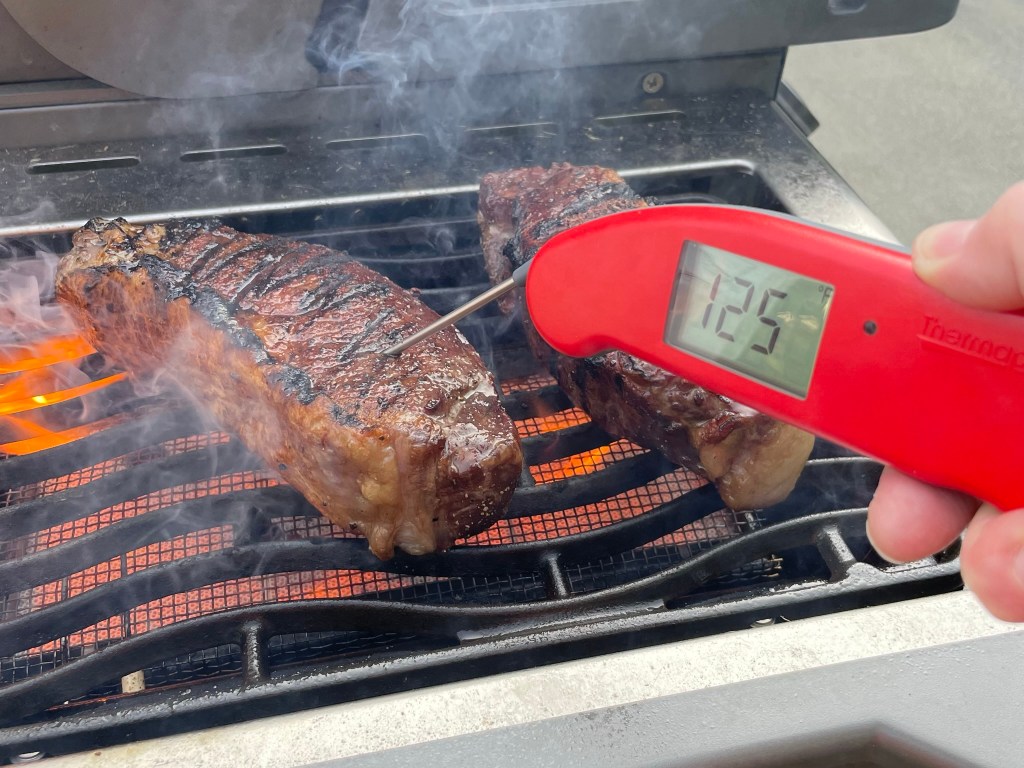
First, I weighed the meat in grams.Then weighed out kosher salt at 1.5% of the meat weight (close enough).Finally, added black pepper and rubbed the steak on all sides.
We ended up with two locally raised, grass-fed N.Y. strips that weighed roughly 2 and 1/2 pounds total— whew, that’s a lotta meat. At nearly 28 bucks a pound, this was not going to be a cheap experiment. My husband (and resident grill master), Les, was a great sport about the whole thing, even though the method defied his sensibilities, too, and even though it meant a longer wait for dinner.
Here’s how it was supposed to go.
Dry rub the steaks the night before — I used just kosher salt and black pepper, and they rested uncovered in the fridge.
Slow bake the steaks at low temperature (250° F) to just-shy of done — 25 to 30 minutes (we’ll just see about that).
Sear the steaks to perfection — we had the grill fired up and ready to go!
They don’t look juicy, and that’s the point.Into the oven for a slow roast.
Are we there yet??
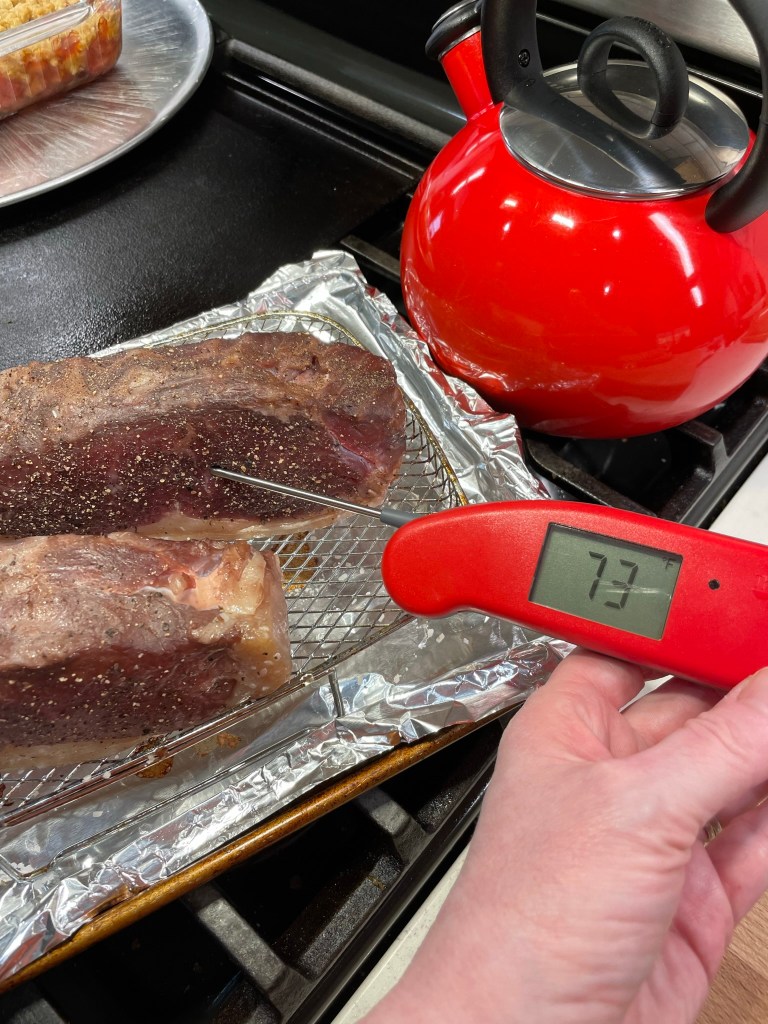
First, the process that was supposed to take 25 to 30 minutes ended up taking much longer. Were my steaks too thick? Was 40 minutes out of the fridge long enough to knock the chill off? Whatever the case, the steaks looked awful during this slow oven time. It’s a little upsetting to see expensive cuts of meat looking so— what’s the word? Grayish. 🫤
I started checking at the 30-minute mark, and we weren’t even close to the 115° F internal temperature we needed for a medium rare finish. This project was running slower than molasses in January. We resisted the urge to turn up the oven temp, but the clock was ticking, and we were getting damn hungry by this point.
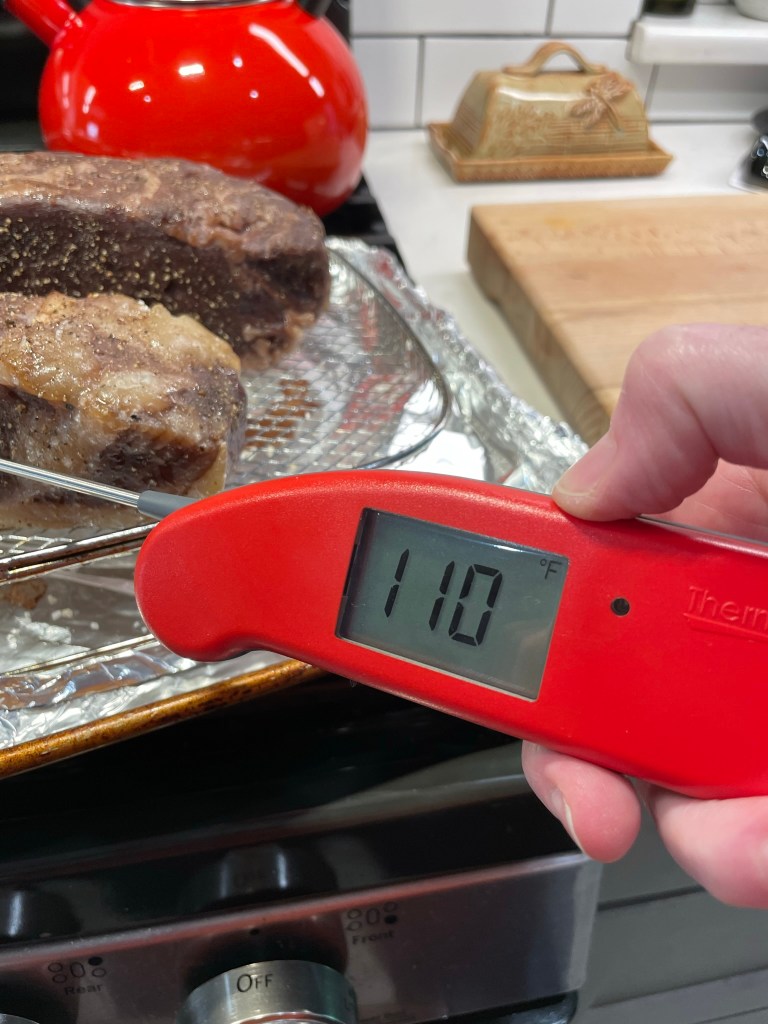
After 30 minutes.After 49 minutes.After 58 minutes.
C’mon, I’m starving!
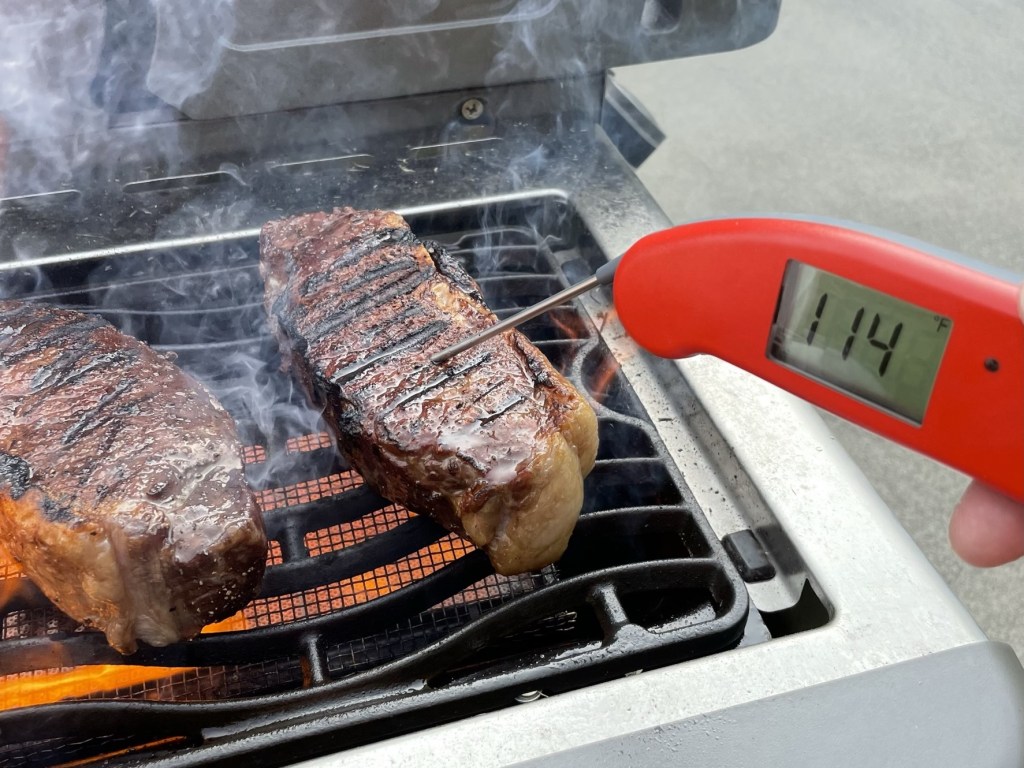
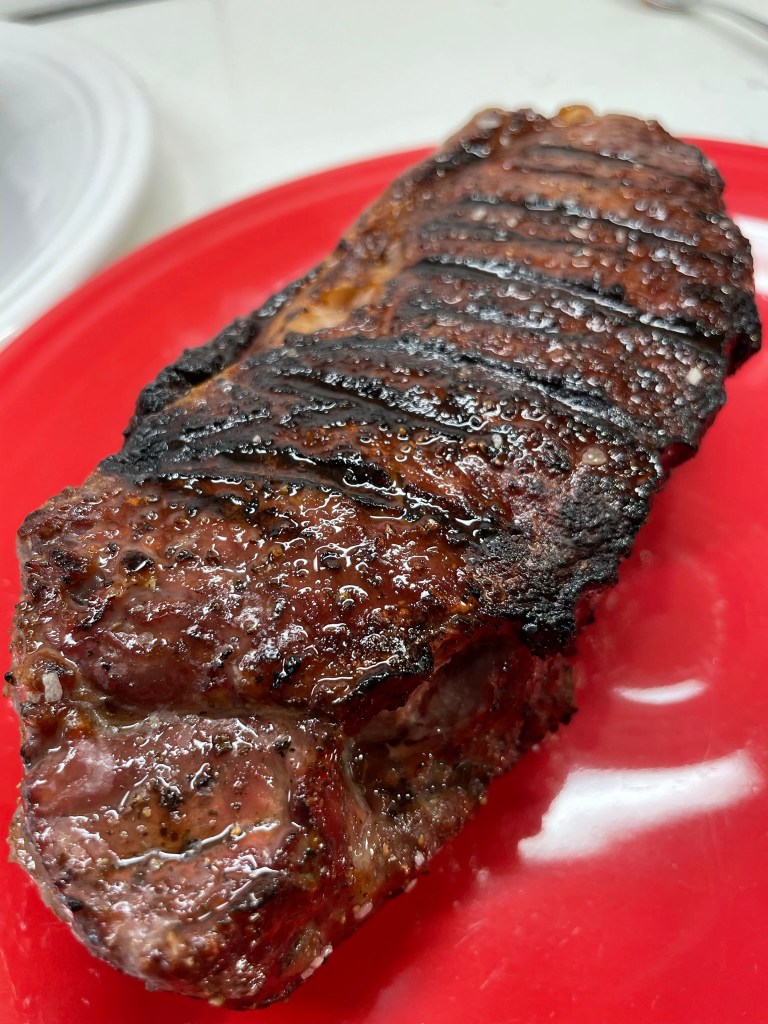
Finally, we decided that 110° was close enough, and when those steaks hit the infrared side burner of our Napoleon grill, it was quite dramatic! The sear was spectacular, and from that point, it took a mere four minutes to plating. We were grateful that Kenji’s instructions said there was no need to rest the steaks before serving. All that business of letting the juices redistribute was covered during the slow roast. Just slice and enjoy! I barely slowed down to take pictures.
This part of the process moved very quickly!
Finally, the taste test!
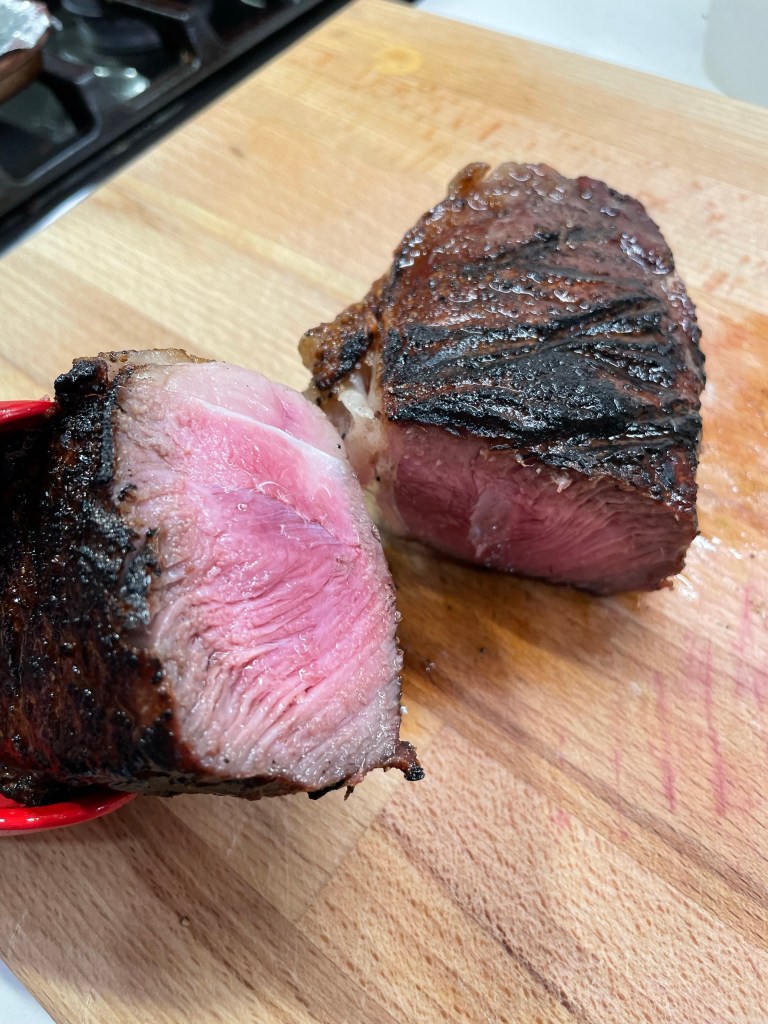
Perfect outside, perfect inside!
The texture of the reverse-seared steak really was perfect— crusted and flavorful on the outside, juicy and tender inside— and it was delicious. But was it superior to a seared-first steak— the kind we usually grill? I can’t say for sure, and I also can’t confirm that it was the cooking method alone that caused this perfection, as I also followed Kenji’s instruction for salting and seasoning the steak the night before. The overnight “dry-brining” technique used to make me uncomfortable, too, but I’ve done it with turkey, chicken, pork and duck, and had fabulous results. Maybe the dry brine on its own would have given us the same end result.
Would I do the reverse sear again? Possibly, but only on rare occasion and under the right circumstances. Les already does a terrific steak on the grill, following the old cave man method, and I do a darn good job with them in a cast-iron skillet. It is unlikely that we would ever choose such large steaks to begin with; nutritional guidelines say that 4 to 5 ounces is appropriate for a serving, and we usually push that into the 8-ounce range, but these were over a pound apiece! We should have shared one, I think, but I wanted leftovers.
The reverse sear technique could be useful if we had a large gathering for a grilled meal (probably why top-notch restaurants are doing it). Things can get a little dicey when you’re trying to get a bunch of steaks grilled at once, and the low-and-slow process would allow extra flexibility for accurate temperature and quick finish, and more time for cocktails and chit chat while we wait—nothing wrong with that.
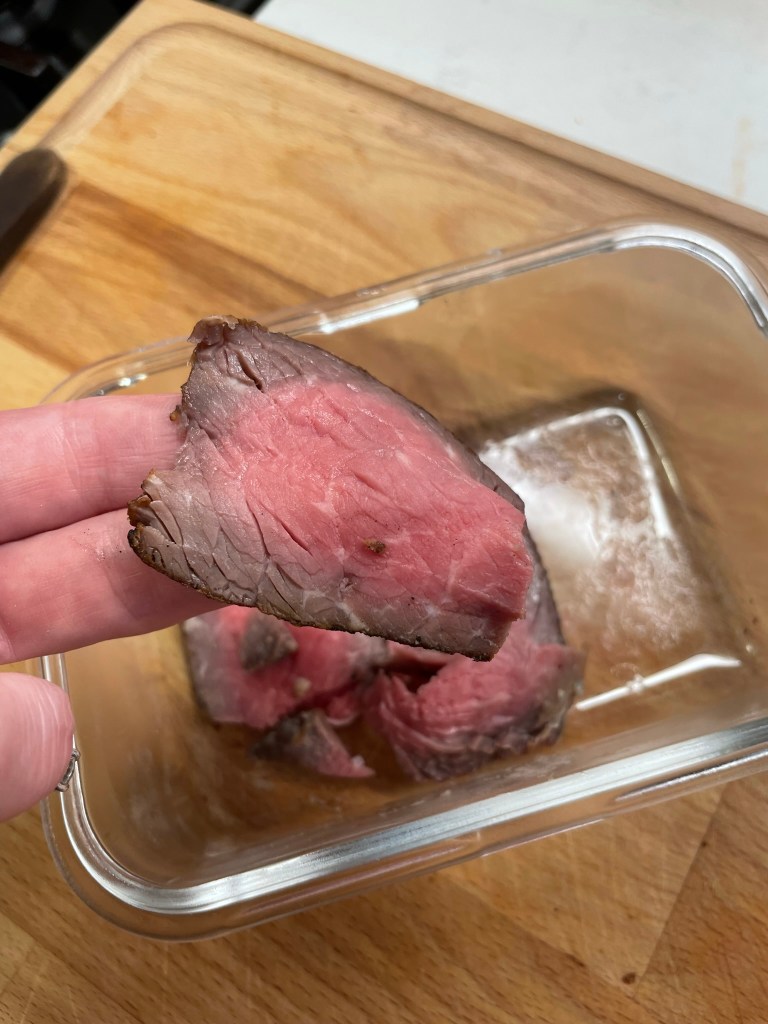
One final observation about reverse searing, and this one didn’t hit me until the next day when I sliced up some of the leftovers of our enormous steaks to top a salad. I can truly say that never-have-I-ever had leftover steak with such flavor and texture. The meat was still juicy and tender, much more so than I expected for round two, so there’s that.
I’m curious to know others’ experiences with reverse searing; if you have tried it, please let me know in the comments section below how things went for you. If you haven’t tried it, will you be firing up the grill (and oven) to give it a go this weekend?
My cousin, Annie, has a wicked sense of humor. Wicked, meaning funny, but also just a little bit wicked. During my visit last month at her lake house in Connecticut, Annie caught me off guard with what seemed like would be important, somber information.
“OK, listen” she began, cracking open a tall pantry door next to the kitchen of her sweet, cozy cottage. “If something happens to me, and you guys have to come here to the lake after I’m gone…”
“Yes,” I said, swallowing hard at that awful thought, as she pointed to a lower shelf inside the cabinet.
“Here’s where you’ll find the stuff for s’mores.”
Honest to God, I don’t know how she keeps a straight face when she delivers a punchline like that. But one thing is for sure, if there is an opportunity to bring joy to any situation or gathering, she has it covered— including s’mores, which we enjoyed as we relaxed in front of her patio fireplace, with the backdrop of gentle lapping sounds of the lake and an occasional bullfrog bellowing somewhere off in the distant darkness.
Who doesn’t have fun s’mores memories? The sweet little campfire sandwich of graham crackers, chocolate bar and toasted marshmallow has been a favorite of mine since I was a kid, and I was thrilled a few years ago to learn that the sugary treat has been awarded its very own day of celebration— National S’mores Day! Each August 10th since I started Comfort du Jour, I have presented a fun interpretation of s’mores. In 2020, it was a duo of treats with a s’mores cocktail and dessert pizza. In 2021, I gave you s’mores ice cream. Last year, those ooey-gooey s’mores brownies. And this year, well, it isn’t really a surprise, is it?
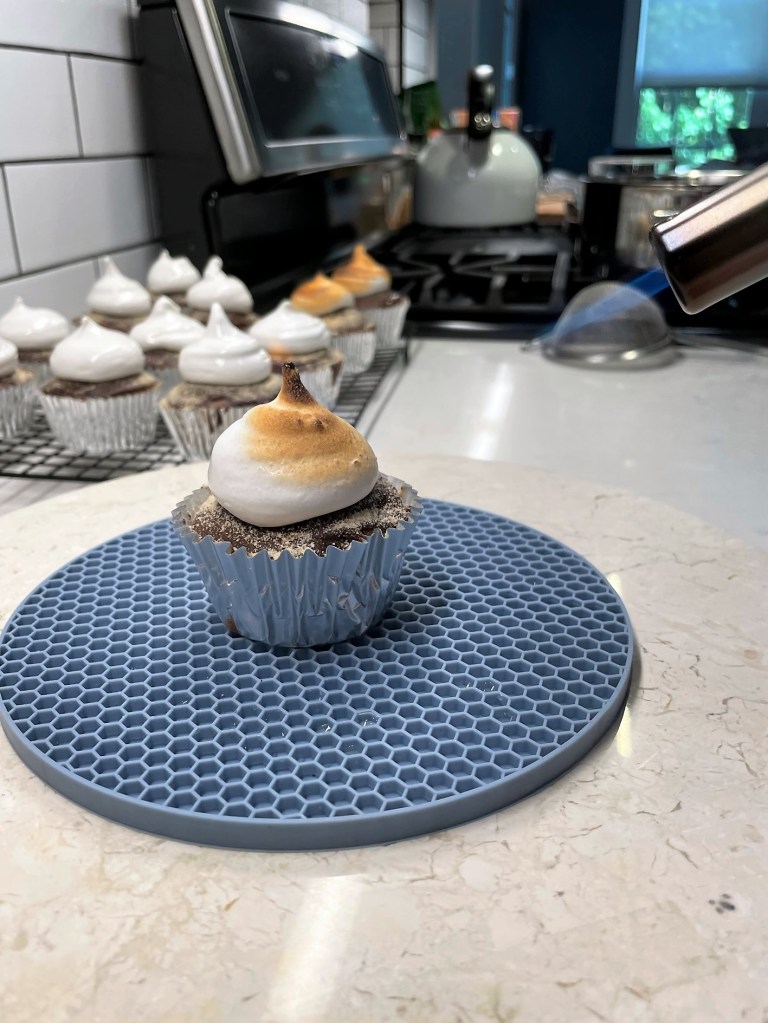
Behold, s’mores cupcakes!
These turned out to be everything I wanted!
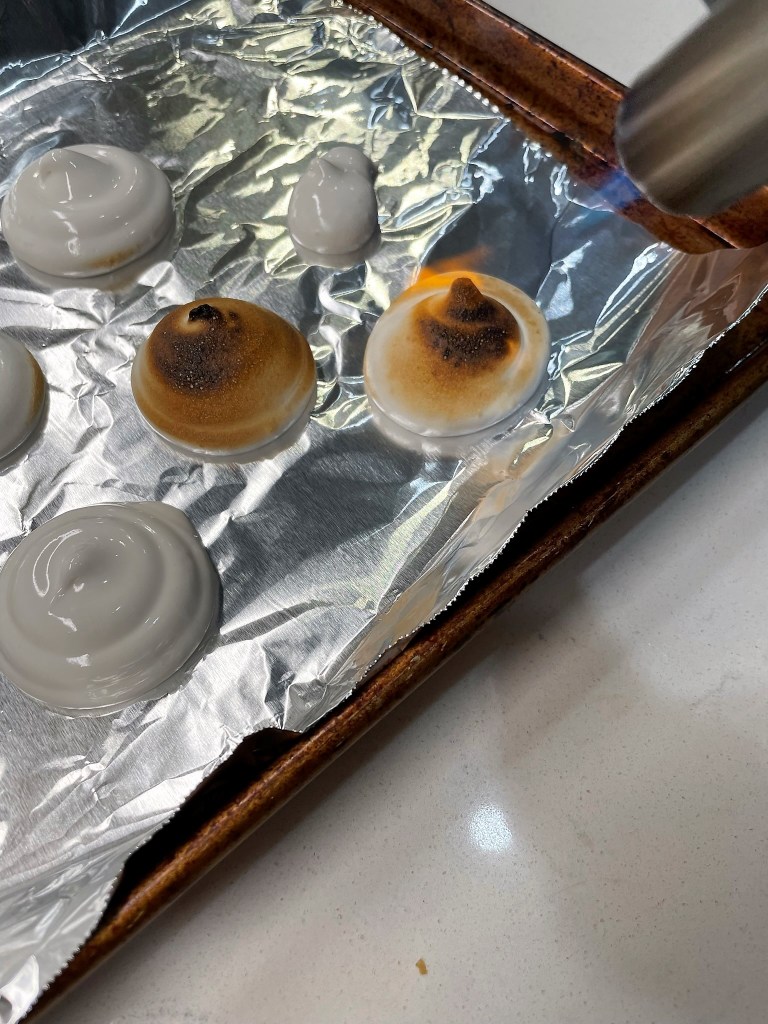
With a sweet honey-graham cake base, hollowed out for a dark-and-milk chocolate ganache filling, and topped with a homemade marshmallow frosting (toasted, of course), this may be my favorite s’mores treat to date.
I’d been scouting out component recipes for these for several months, and finally nailed it down after flipping through a special edition Food Network Magazine, called “The Cupcake Cookbook.” The pages held all kinds of cupcake creations, from fruit to spice to chocolate and vanilla, plus numerous flavors and types of frosting, icing and glaze. It was their recipe for “honey-graham cupcakes” that sealed the deal for my s’mores recipe, but I did (of course) put my own spin on them, using honey in place of sugar for an extra-sweet, extra-“graham-y” impression.
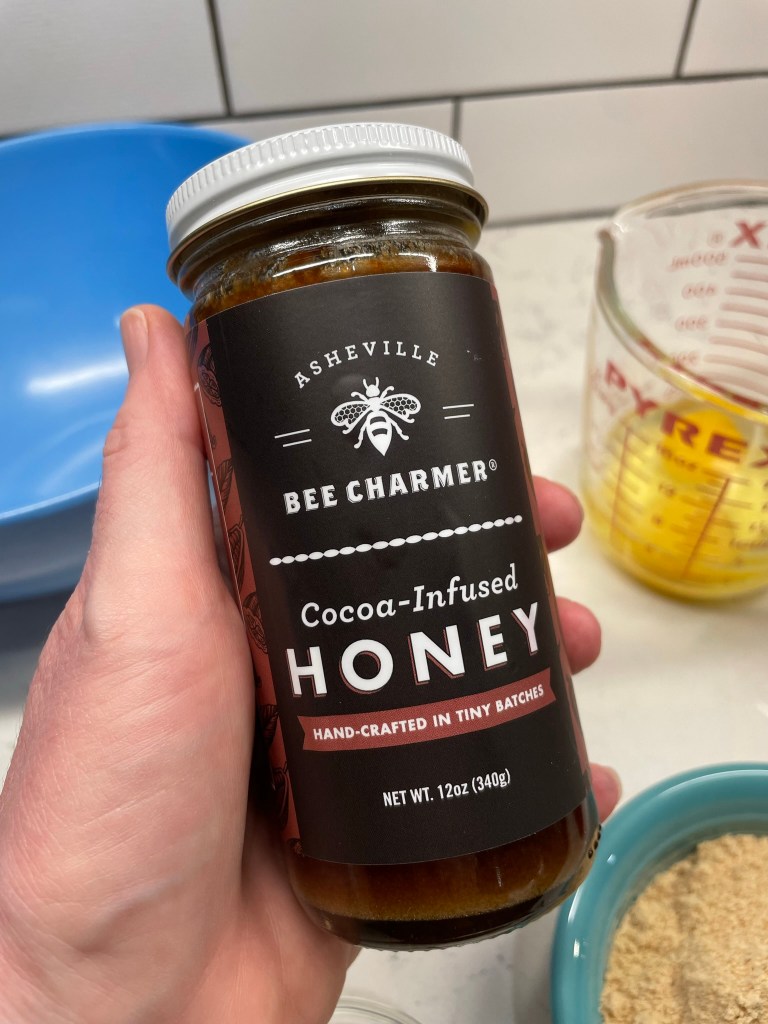
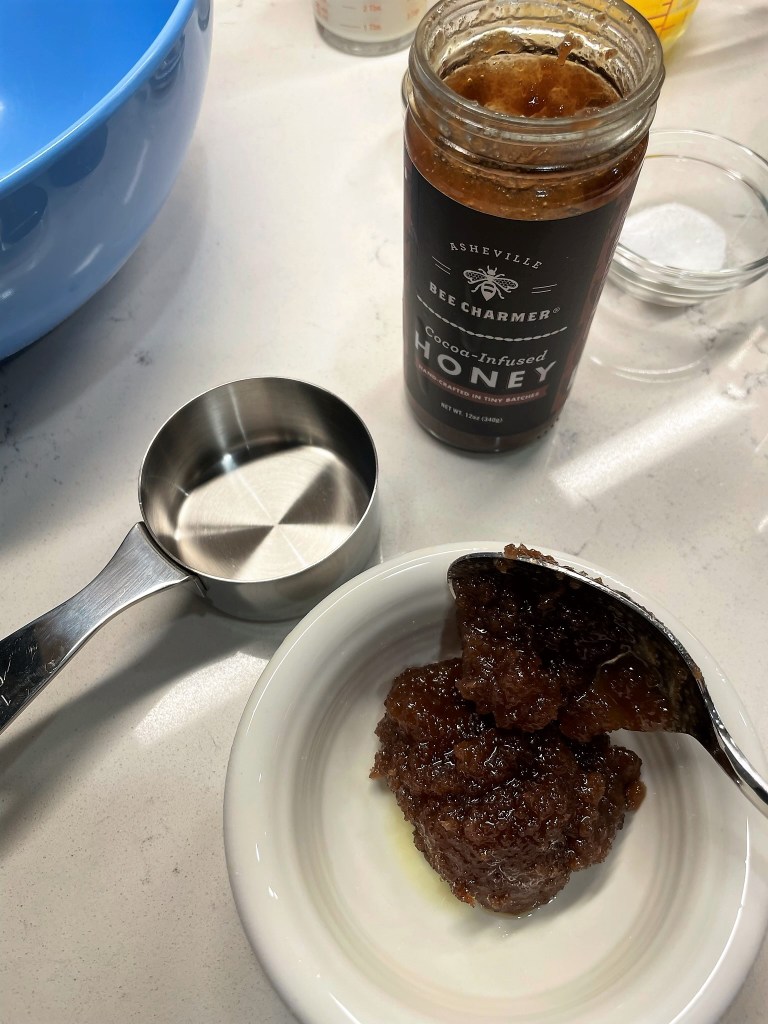
I had this cocoa-infused honey that I had picked up on an earlier trip to Asheville, N.C., where we go occasionally to visit my husband’s adult daughter. I suspected that the cocoa infusion would lend itself nicely to the s’mores vibe, and I was correct. The honey has been in my cabinet for about a year, so it was fairly crystallized, but the texture was no problem for my baked recipe.
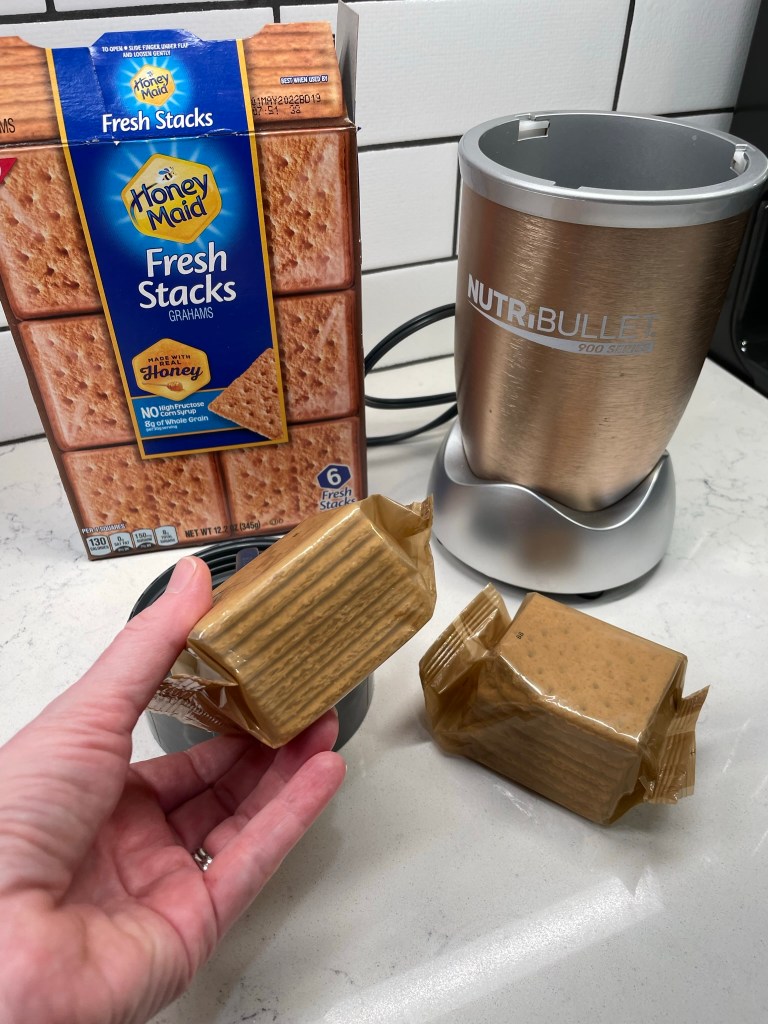
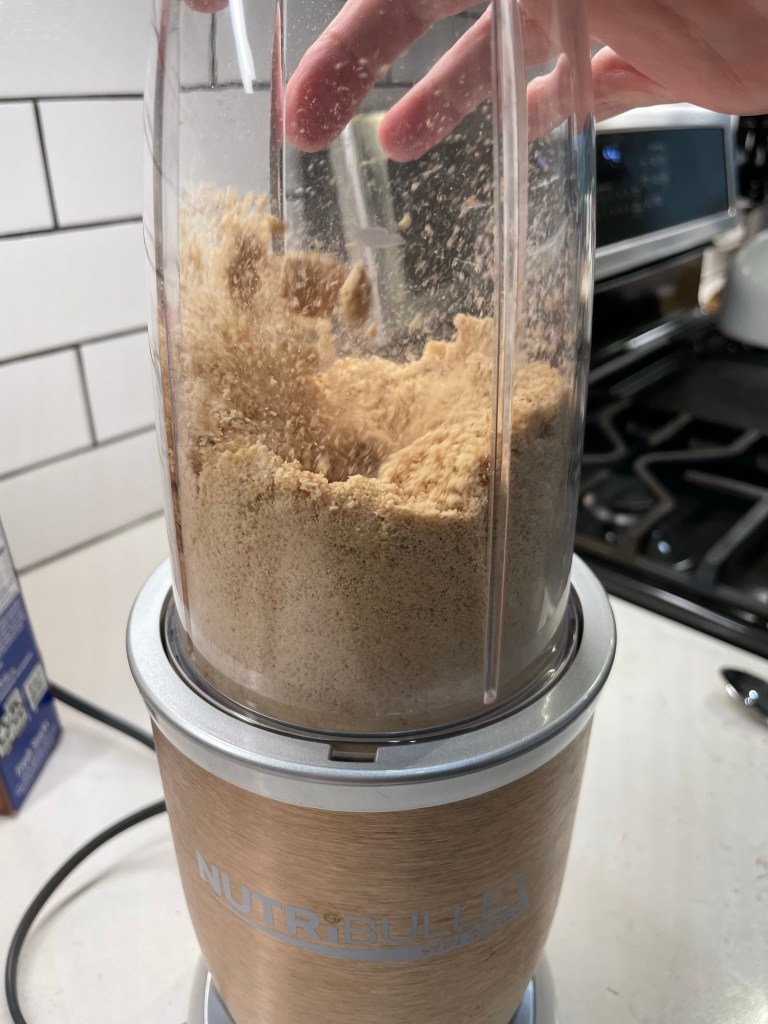
One of the things that appealed to me about the Food Network cupcake recipe is that it included actual crushed graham crackers. I was guaranteed to have the flavor I wanted, along with a slightly grainy feel from the already baked crumbs mixed into the cupcake batter. To crush the graham crackers, I piled a couple sleeves of them into my bullet-style blender and pulsed them for about 20 seconds, until they were reduced to a fine powder. I had the 3/4 cup of crumbs that I needed, plus 1/4 cup left over that I figured I’d use in the topping.
With all my ingredients lined up and measured, I was finally ready to bake!
Generally speaking, you can swap honey for sugar in a baking recipe, but you must take a few things into consideration, which I learned thanks to this article from an online honey supplier. Following those tips, I made the following adjustments:
used less honey than the sugar amount called for (because honey is sweeter)
reduced the milk amount slightly (because honey is also somewhat liquid)
added a touch of baking soda to balance the acidic effect of the honey
reduced the baking temperature a bit (because honey burns more easily than sugar), and slightly increased the baking time to compensate
I have accounted for all of those adjustments in my instructions, but the click-to-print recipe below also describes how the recipe should look if you’re using sugar to sweeten the cupcakes.
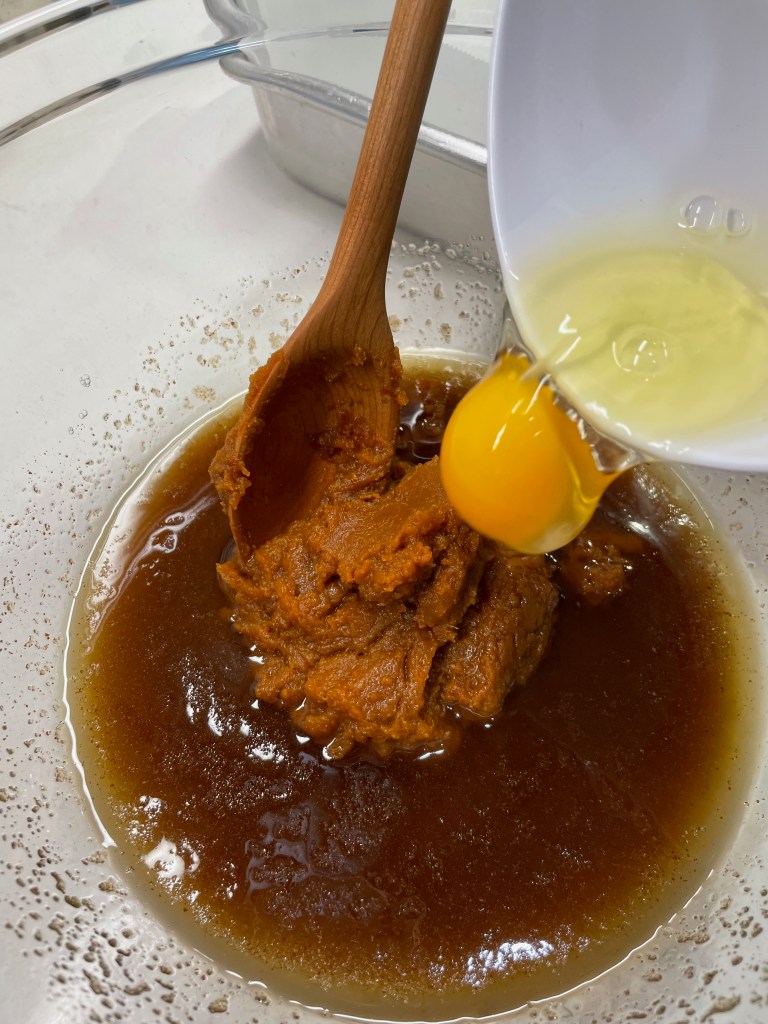
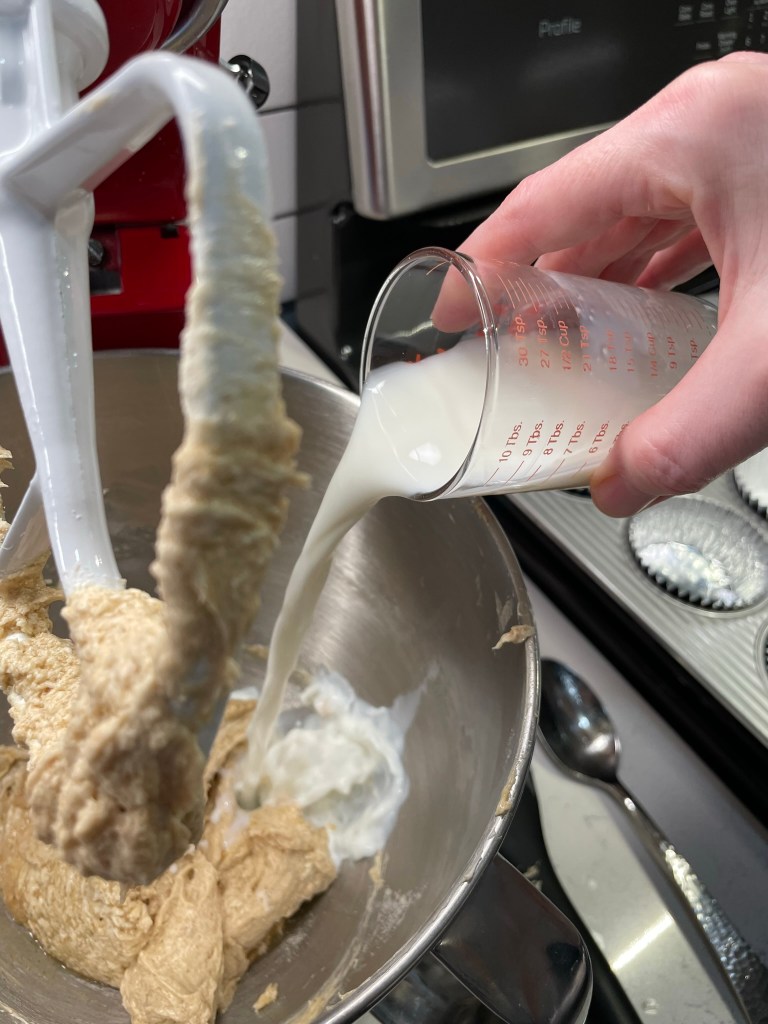
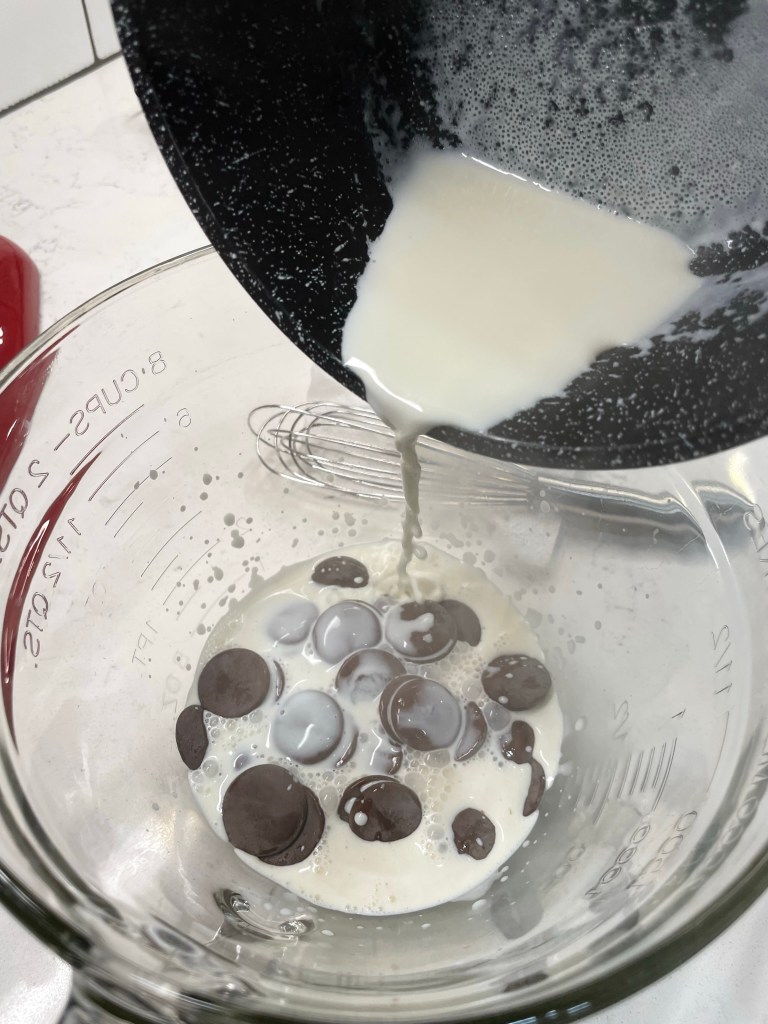
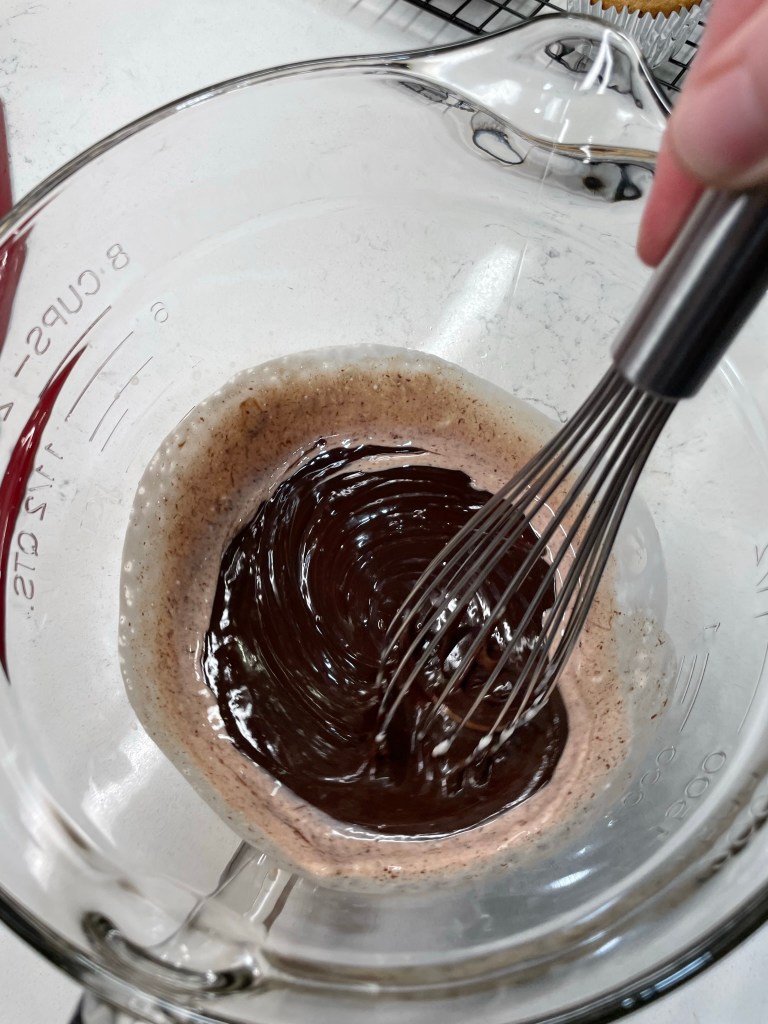
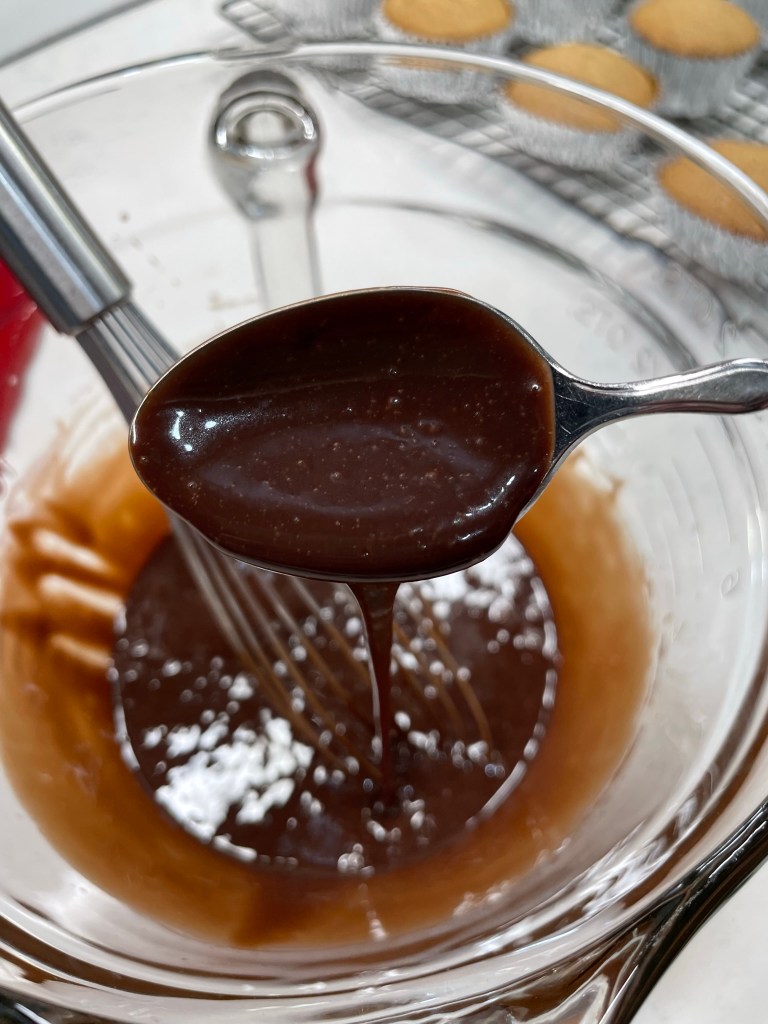
The ganache filling was the simplest component of this recipe; nearly equal parts chocolate— I used a combination of dark and milk chocolate for this— and heavy cream heated to just-shy of boiling. If you’ve never made ganache, you might be surprised how simple it is. Just heat the cream, pour it over the chocolate so it’s complete covered, wait 10 minutes, and stir to blend. Don’t be alarmed if the mixture seems very runny at first— it will thicken and firm up a bit as it cools. I wanted the ganache to be soft but not too messy, so I used slightly more chocolate than cream. In hindsight, equal parts would have been fine.
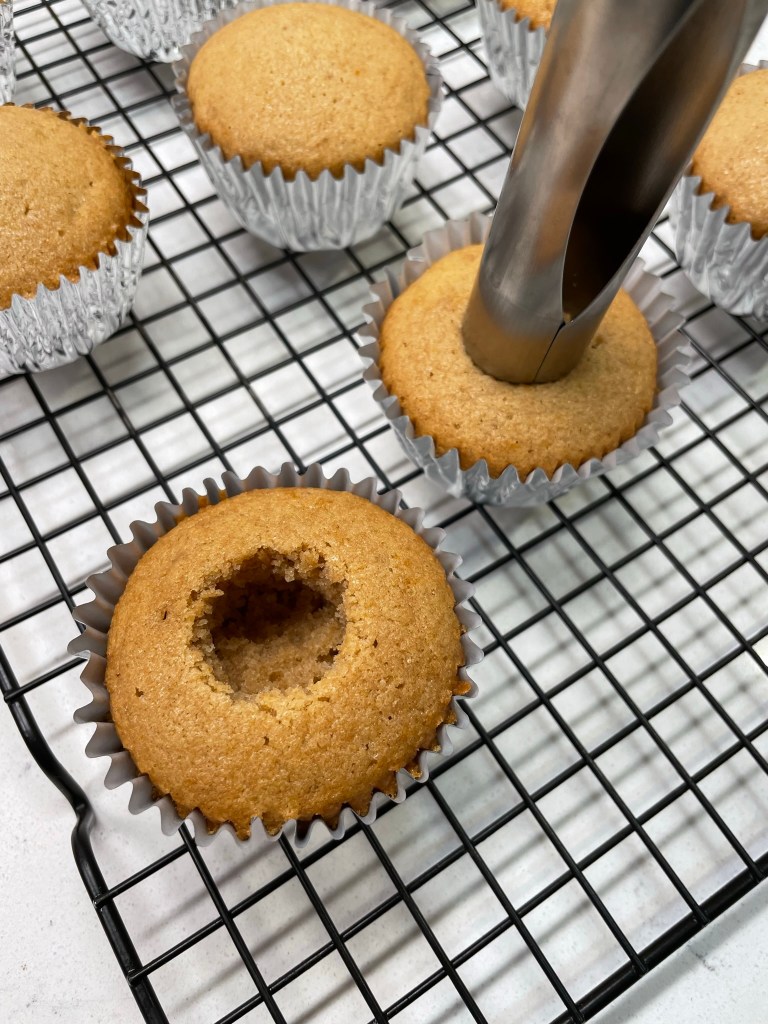
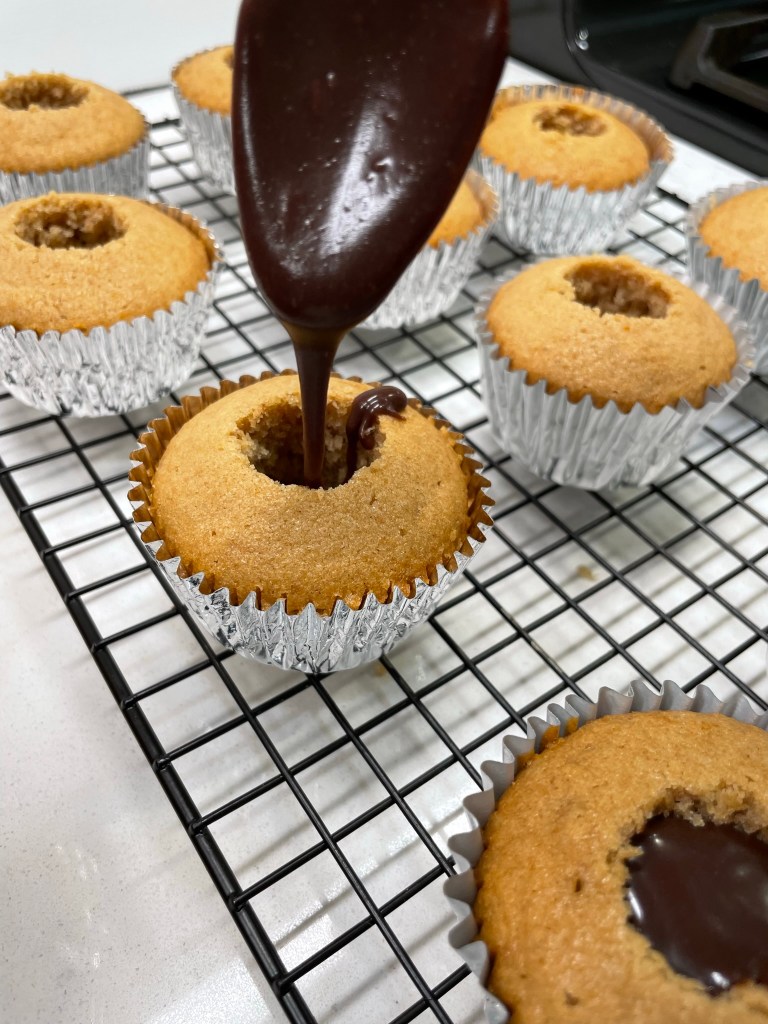
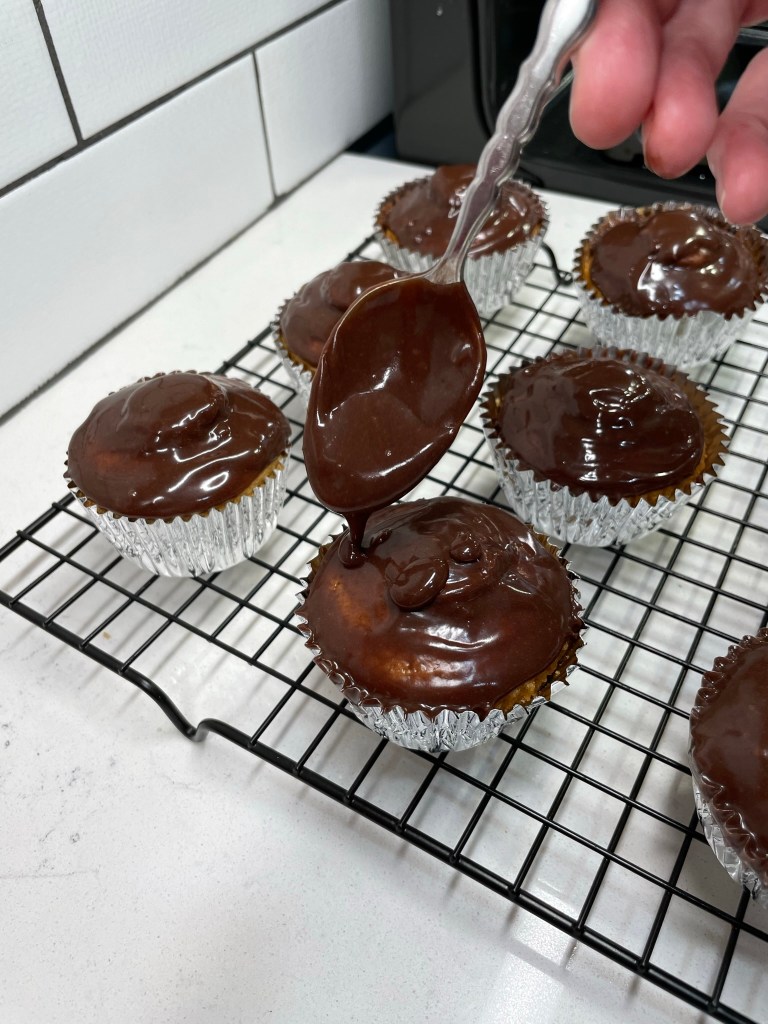
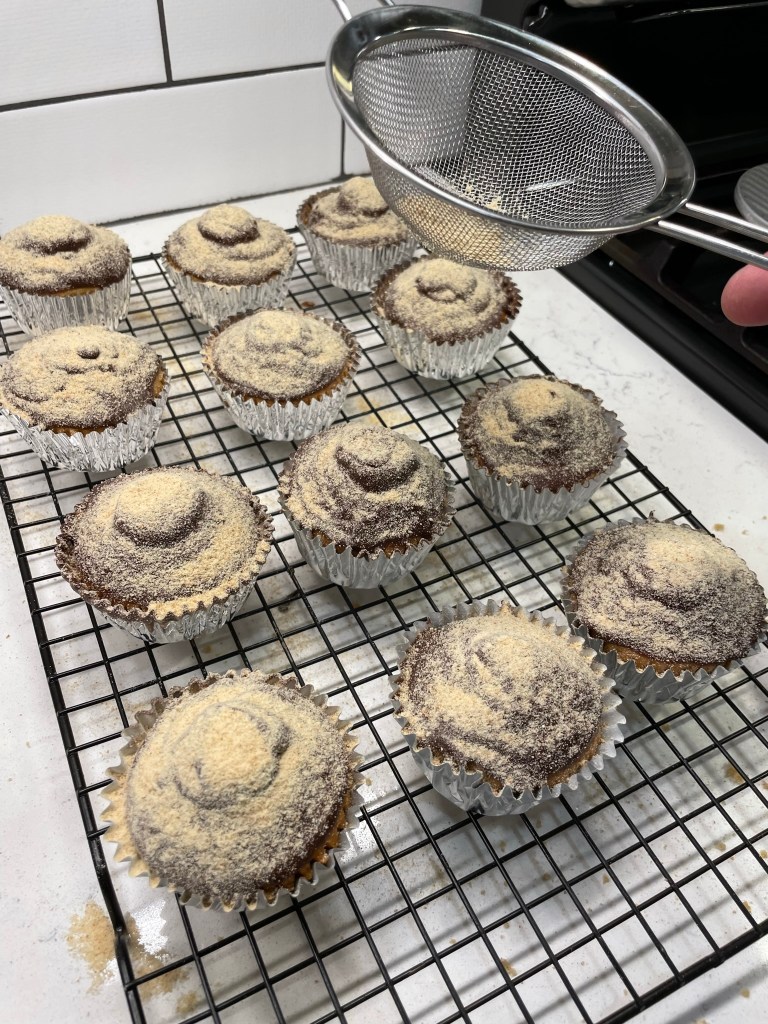
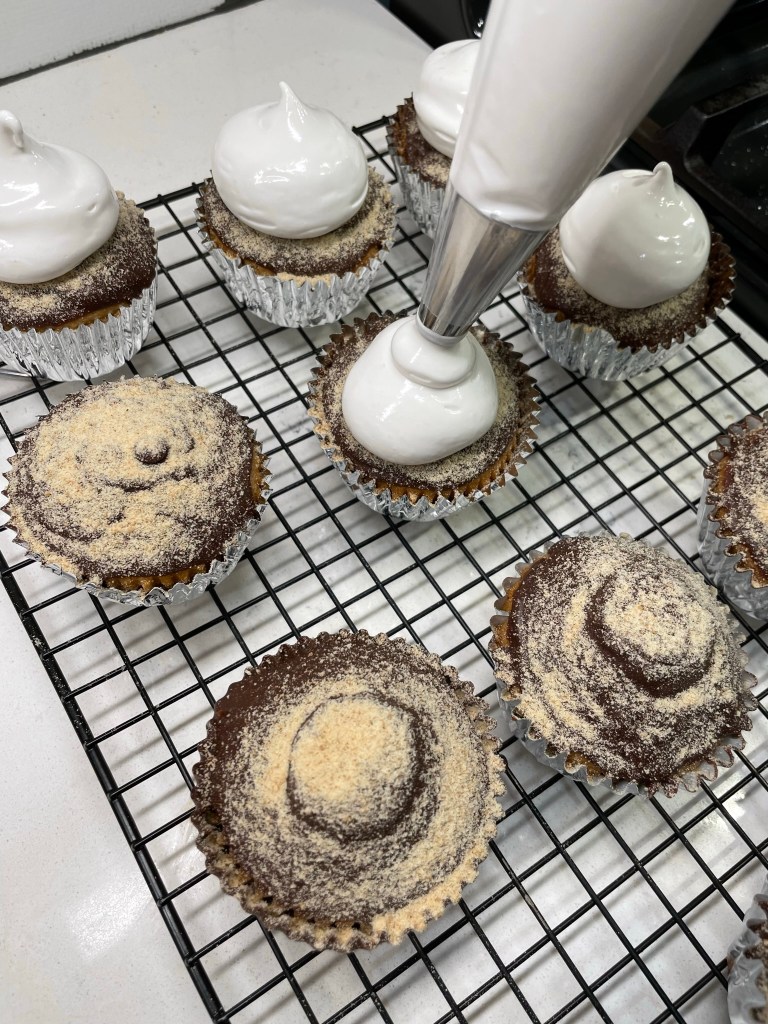
When the cupcakes were cooled, I used my apple corer tool to carefully cut out a plug shape bit of cake, keeping those pieces intact, to place back on top of the ganache, which I spooned inside the cupcake cavity. I didn’t mind that the tops didn’t sit flush with the cakes, because the whole thing would soon be buried in marshmallow frosting anyway. I had some ganache left over after filling the cupcakes, so I warmed it over hot water back to a spreadable consistency, and glazed the top of each cupcake, and then sifted some of the remaining graham crumbs on top as a bed for the marshmallow frosting.
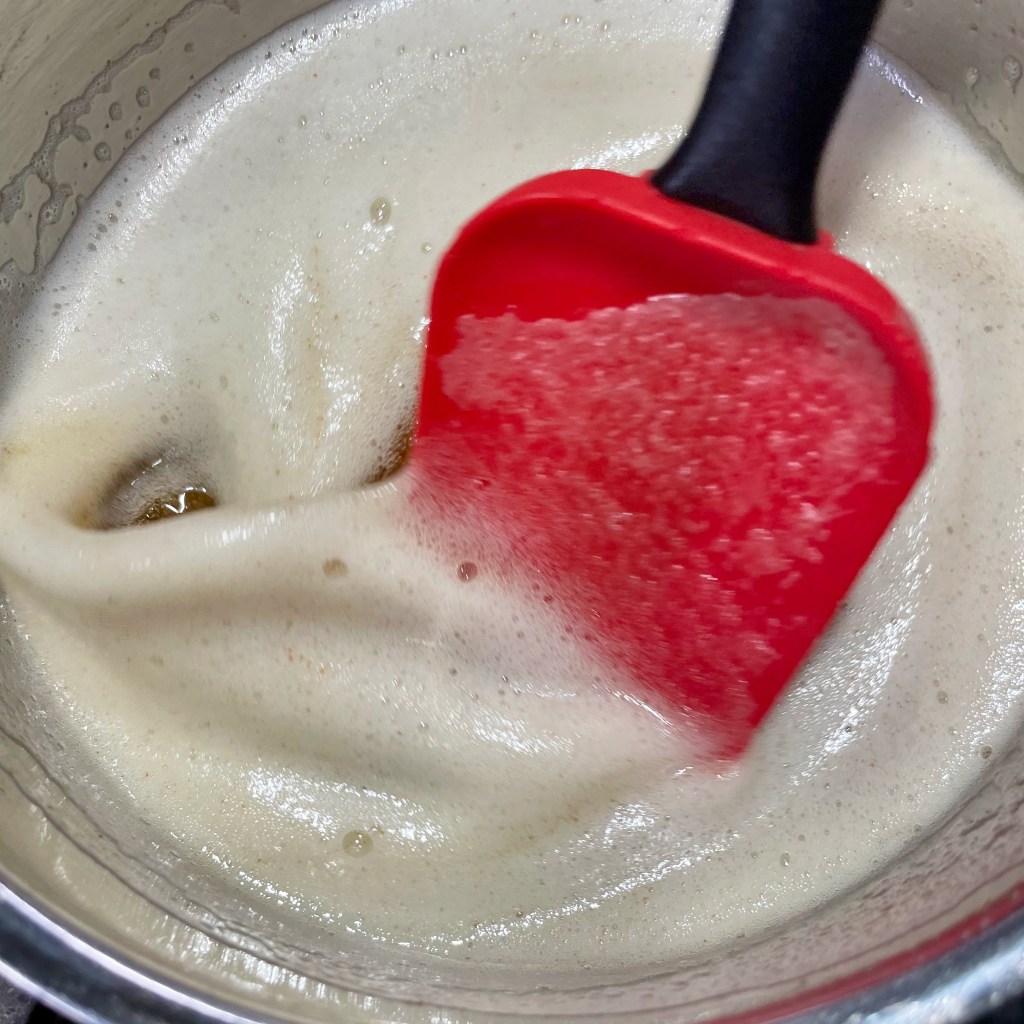
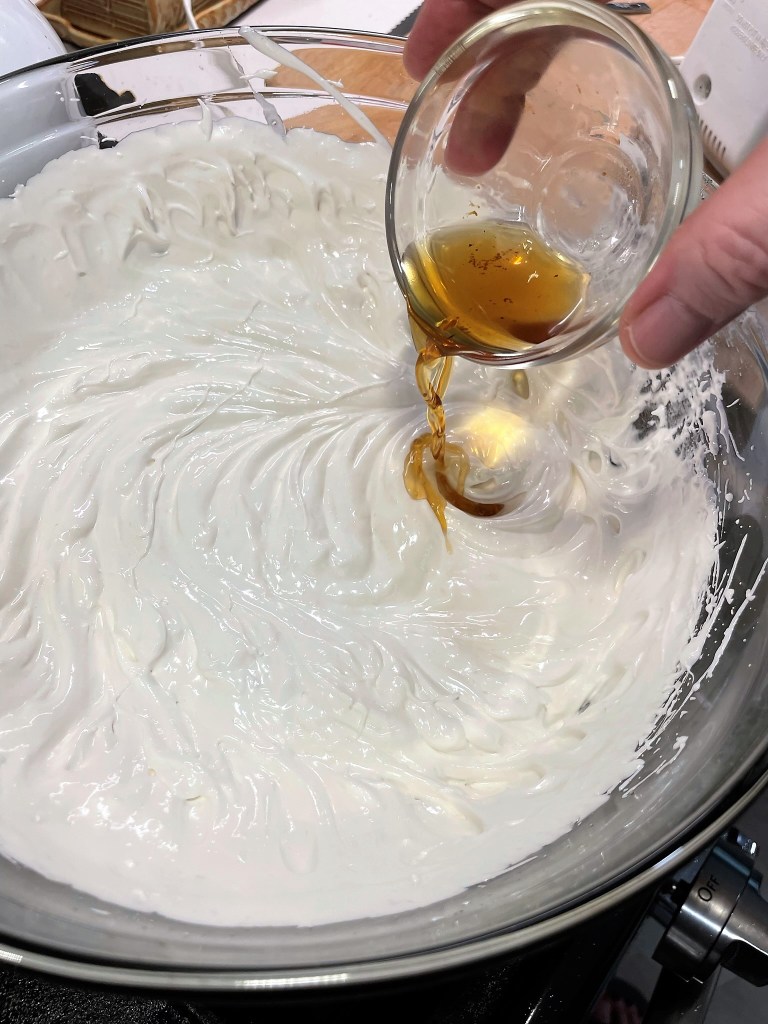
Almost done! I agonized a bit over which frosting recipe to use, and considered one in the Food Network Cupcake magazine, but it sounded more like meringue than frosting, and I wanted mine to be stable enough to keep its shape without getting watery. I finally found a “marshmallow frosting” recipe online that sounded more hefty, and about the time I got to the step to “whip it with a mixer for seven minutes over simmering water,” it occurred to me that this was exactly the same as a topping that my grandmother frequently made during her having-company-over days.
Corn syrup prevents crystallization.Start the frosting off the heat.Place over steaming water and continue beating.After 7 minutes, the eggs are cooked and soft peaks form.Vanilla goes in at the end.Marshmallow frosting!
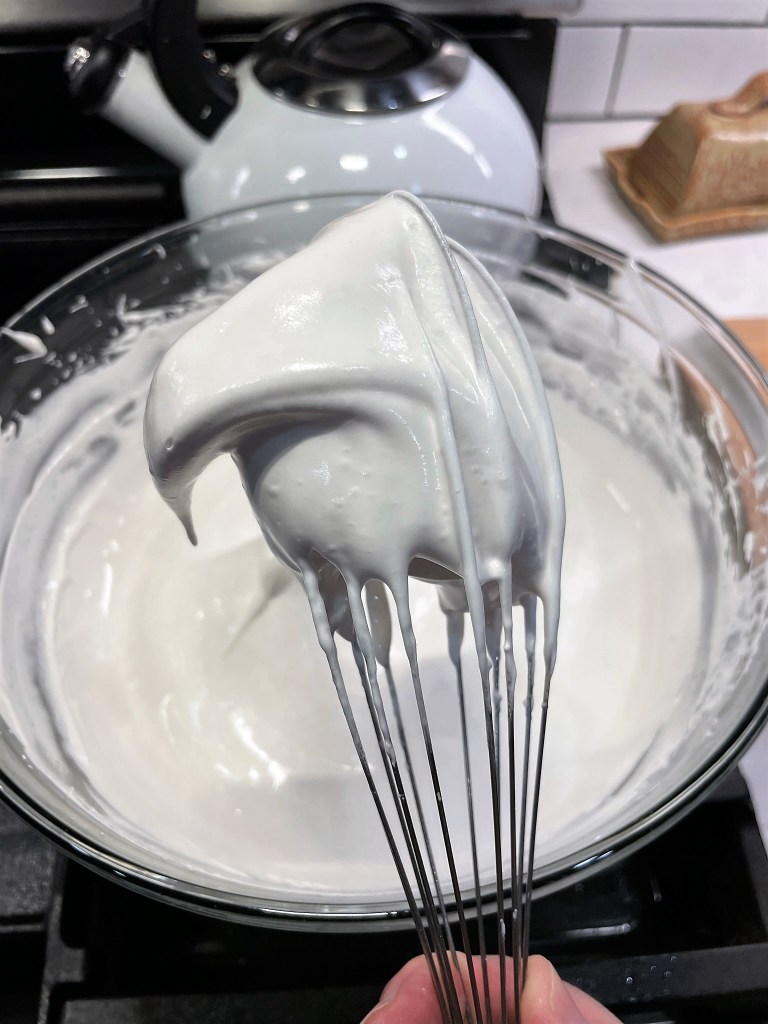
Turns out, seven-minute frosting is essentially marshmallow creme. I suppose you could probably just top the cupcakes with store-bought marshmallow creme, but by this time, my frosting was already done and I did enjoy piping the stuff onto the cupcakes— it made me feel like a real baker!
The only thing left to do was was toast the marshmallow topping. Having never done this before, and not wanting to ruin my pretty little s’mores cupcakes, I piped out some of the leftover marshmallow frosting onto a sheet of foil, and hit the dollops with my culinary torch to practice. Would you believe, this turned out to be the simplest part of the recipe?! The frosting toasted beautifully, and it stayed pretty for a few days after I made the cupcakes.
Incidentally, I had enough marshmallow frosting left over to cover at least two more batches of cupcakes, and most of the extra went to waste because I didn’t have a plan ready for using it. Perhaps I could have whipped up a quick batch of Krispie treats— and that of course, gives me an idea for National S’mores Day next year. 😉
With a sweet honey-graham cake base, hollowed out for a dark-and-milk chocolate ganache filling, and topped with a homemade marshmallow frosting (toasted, of course), this may be my favorite s’mores treat to date. There are three components of this treat, and I've described each separately below.
Ingredients
3/4 cup honey graham crackers, crushed fine (see notes)
3/4 cup all-purpose flour
1 tsp. baking powder
1/8 tsp. baking soda (omit if using sugar in place of honey)
1/2 tsp. salt
1 stick unsalted butter
1/2 cup honey (or 1 cup granulated sugar)
2 eggs
2 tsp. real vanilla extract
1/2 cup milk (minus 2 tablespoons if using honey)
Notes: Butter, eggs and milk should be at cool room temperature. Remove them from refrigerator about one hour before you plan to start the recipe.
To get a fine crush on the graham crackers, I broke them up into my bullet-style blender and processed them for about 15 seconds. Sift through them with your fingers to remove any remaining chunks. I used two wrapped packs of “Fresh Stacks” crackers, and had about 1/4 cup of crumbs left over, which I sprinkled on top of the ganache before frosting.
Directions
Preheat oven to 330° F (or 350° F if using sugar), and line cupcake pan with foil liners.
Combine crumbs, flour, baking powder, soda and salt in a medium bowl and set aside.
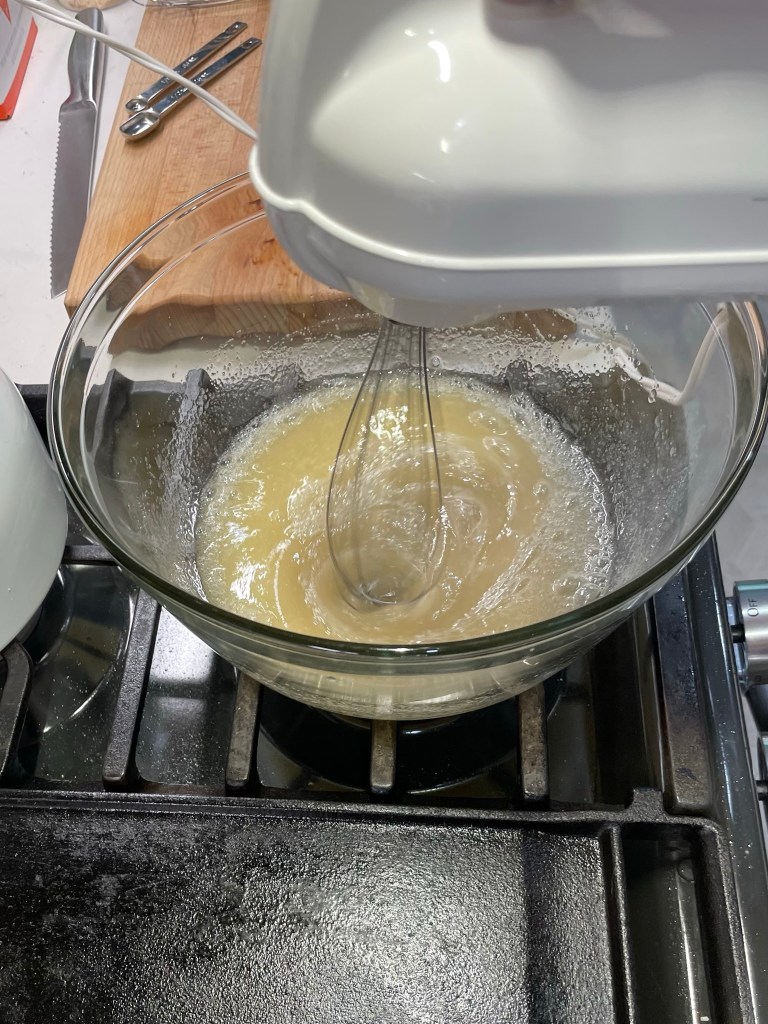
In a stand mixer, cream butter on medium speed until light and airy, about one minute. Add honey and beat on medium speed until fluffy and evenly blended, about four more minutes. Scrape down sides of the bowl.
Add one egg at a time, beating to blend after each. Scrape down sides of the bowl. On low speed, beat in one-third of the flour mixture just until no visible dry ingredients remain. Beat in half of the milk. Repeat with dry ingredients, then milk, then final dry ingredients. Scrape down sides.
Scoop cupcake batter into lined cupcake pan. Each cup should be about 2/3 filled.
Bake 25 to 30 minutes (less if using sugar), until cupcakes are golden and spring back easily when touched in the center.
Cool cupcakes in pan 5 minutes, then transfer to a wire rack to cool completely.
While the cupcakes are baking, prepare the ganache filling. It’s best to fill the cupcakes while the ganache is still somewhat warm and easily drizzled.
Ingredients
2/3 cup quality chocolate, wafers or bars preferred over chips
1/2 cup heavy cream
Directions
Add chocolate pieces to a medium bowl. Heat cream to just-shy of boiling point. Pour cream over chocolate and let sit 10 minutes.
Gently whisk or stir cream and chocolate together until evenly blended. This will seem impossible at first, but within one minute, it should be glossy and silky.
When cupcakes are completely cool, used an apple corer tool or paring knife to carefully cut a one-inch plug from the center of each cupcake. Set these aside.
Use a spoon to drizzle the warm ganache into each cupcake hole, then press the plugs back onto the cupcake. Carefully glaze the filled cupcakes with any remaining ganache. Scatter some of the remaining graham crumbs over the top and cool completely while you make the marshmallow frosting.
To prepare the frosting, you will need an electric hand mixer and a double boiler or a large, heatproof bowl that will fit over, but not inside, a medium saucepan. Be sure the mixing bowl and beater blades are completely clean, as any amount of oil or fat on them will prevent the egg whites from forming peaks.
Ingredients
2 egg whites, at room temperature
1 1/2 cups granulated sugar (I used a 50/50 mix of cane sugar and superfine caster sugar)
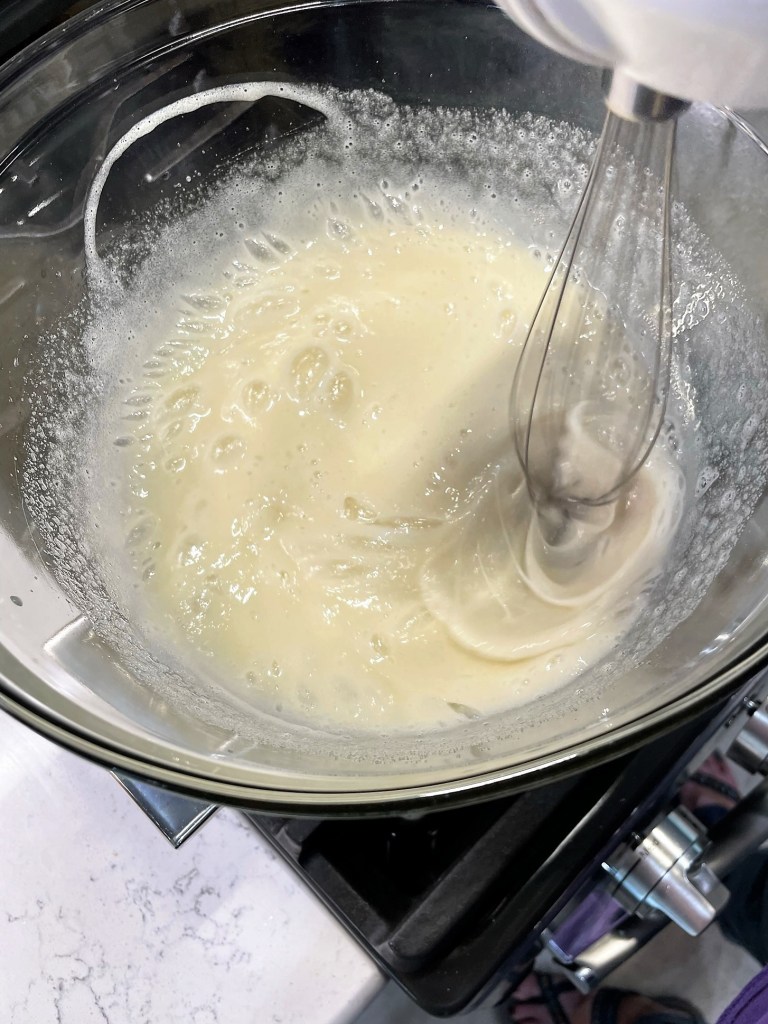
Bring a medium saucepan of water to a slight boil over medium heat. The water should not be high enough to touch the bottom of the bowl used in the next step.
In the heatproof bowl, combine all ingredients except vanilla. Do not place the bowl over the hot water yet.
Use a hand mixer to whip the frosting ingredients together. Start on low speed and increase slightly when the mixture starts to get frothy. After a minute or two, place the bowl over the simmering water.
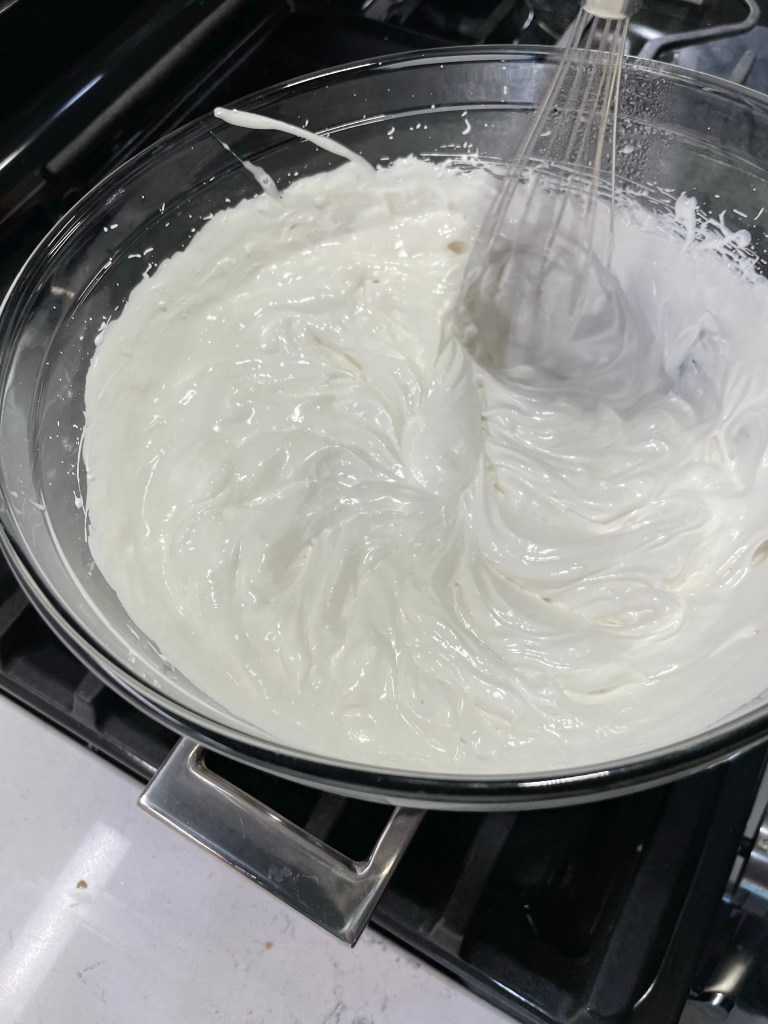
Continue to whip with the mixer for 7 minutes, until all the sugar has dissolved and soft peaks form in the frosting. Remove from heat.
Add vanilla and beat again just until incorporated. Cool a few minutes before frosting cupcakes.
Load frosting into a piping bag with a wide, round tip. Pipe frosting onto cupcakes.
Use a culinary torch to carefully toast the marshmallow topping. Cool before enjoying.