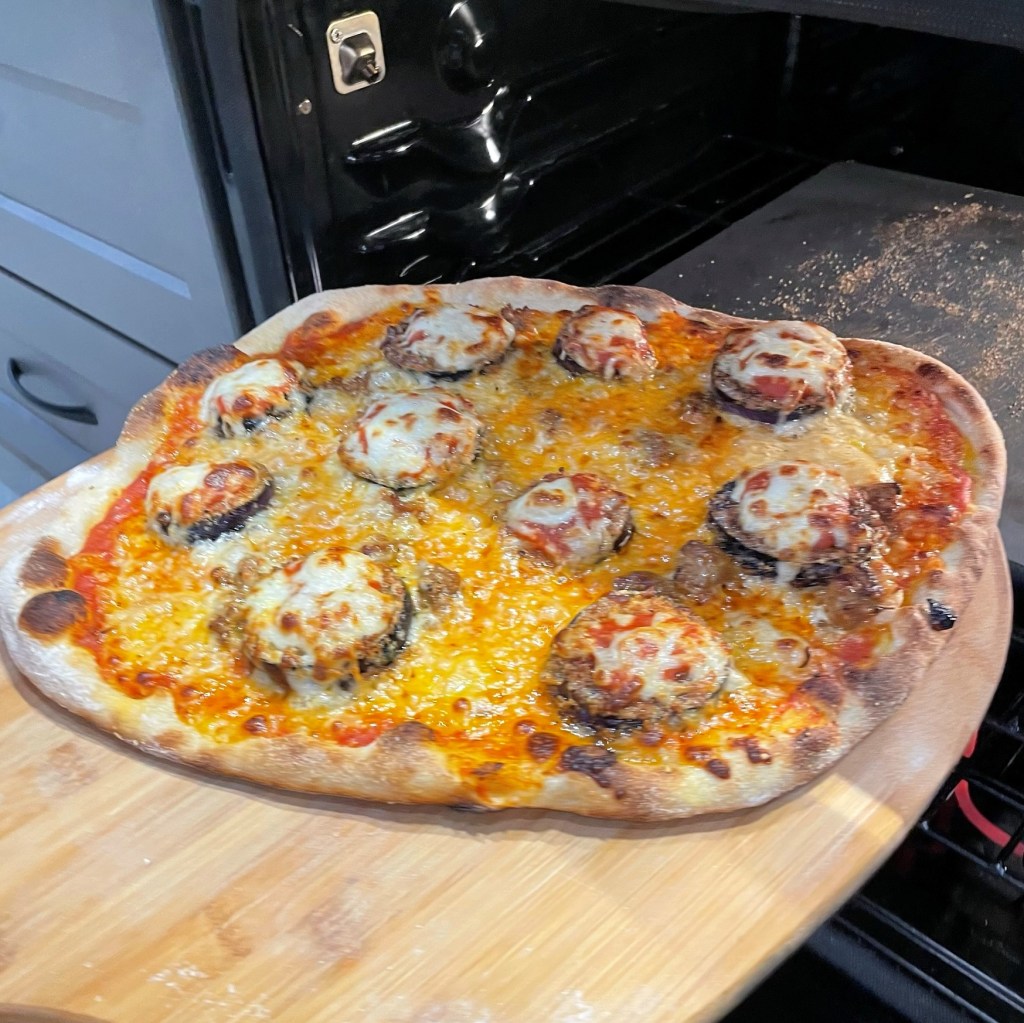
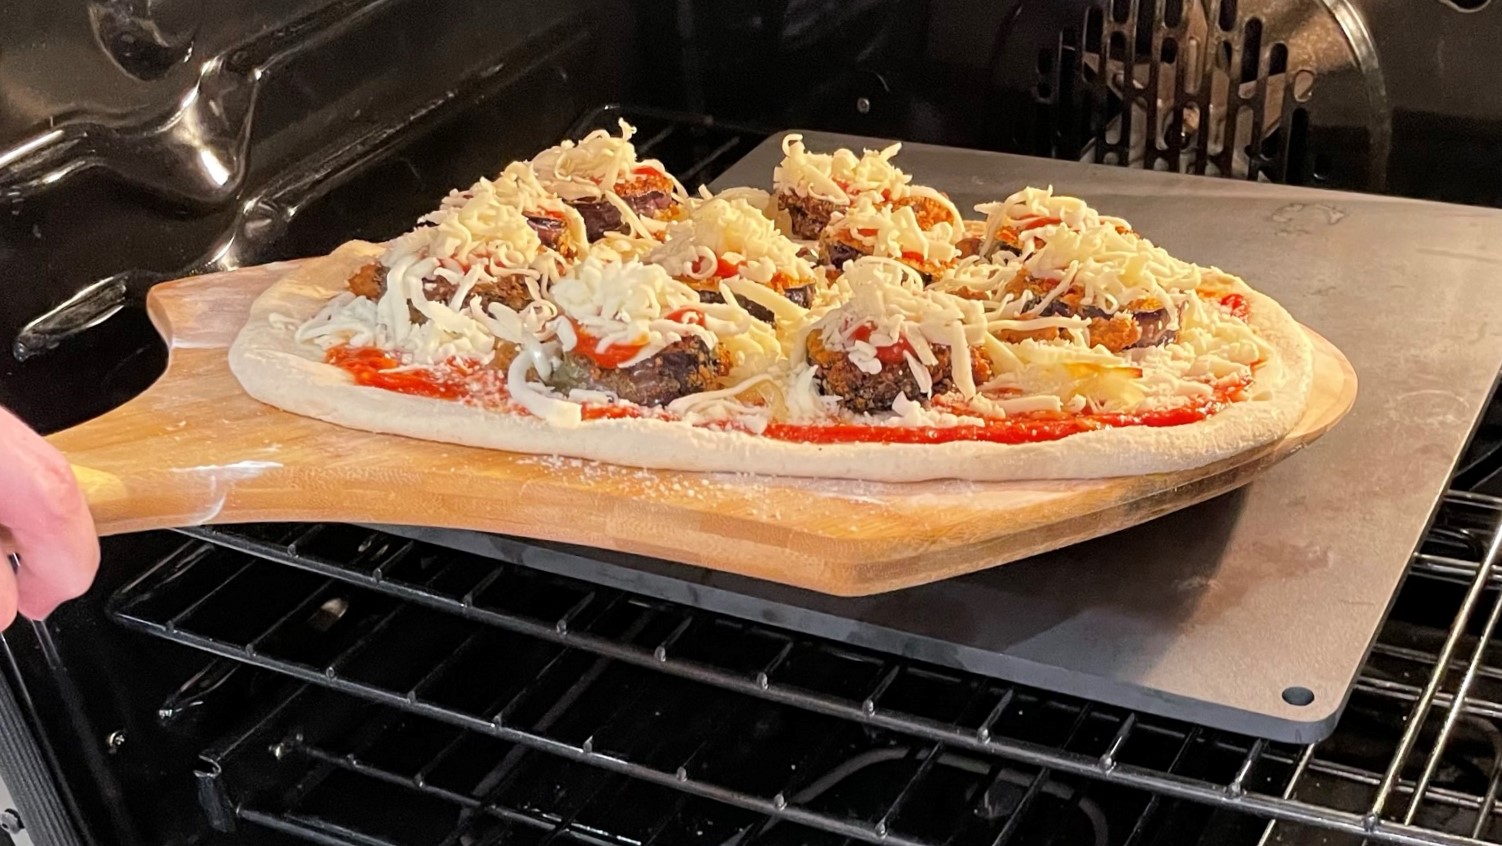
It’s been a long time since we’ve talked about pizza here on Comfort du Jour, but this one deserves a mention because it is a beautiful marriage of two classic Italian foods we love in this house. Every bite had a little bit of everything we love about eggplant parm—the crispy coating, meaty eggplant and gooey cheese—and a little bit of everything we love about pizza, especially the blistery crust and tangy tomato sauce.
This mouthwatering pie also deserves a mention because its star ingredient was grown in the first genuinely successful garden we have had in several summers. I shared a lot of tomato recipes this year but didn’t get in as many raves about the beautiful Japanese eggplant we enjoyed.
Homegrown produce rarely looks perfect. This one had a funny shape because it grew against the trellis that supported the plant! 🙂
Japanese eggplant tastes virtually the same as a typical “Italian” eggplant you’d see in the supermarket or farm stands, but its long, slender shape is distinctive and makes it suitable for smaller versions of things. My husband, Les, and I nibbled on miniature eggplant parm bites as an appetizer at least twice over the summer until he finally said, “hey, why don’t we put these on a pizza?”
Well, heck, yeah!
If you saw Les’s Veal & Eggplant Parm post a couple of weeks ago, you know that we achieved the perfectly crispy, cheesy exterior on the eggplant rounds with a careful breading—first flour, then egg wash and finally a seasoned panko crumb and Parm-Romano mixture before a dunk in hot oil. We did exactly the same with these mini eggplant slices, beginning with a 20 minute salt-and-rest time.
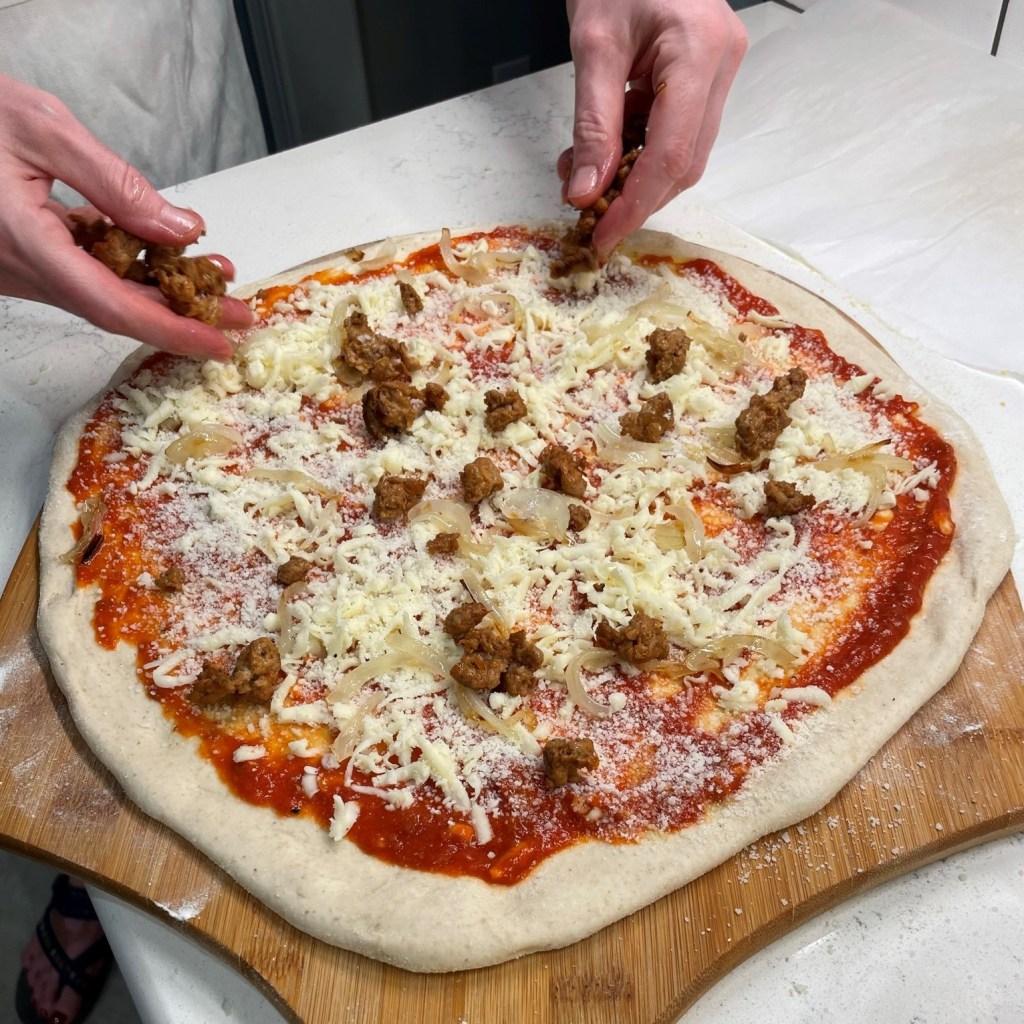
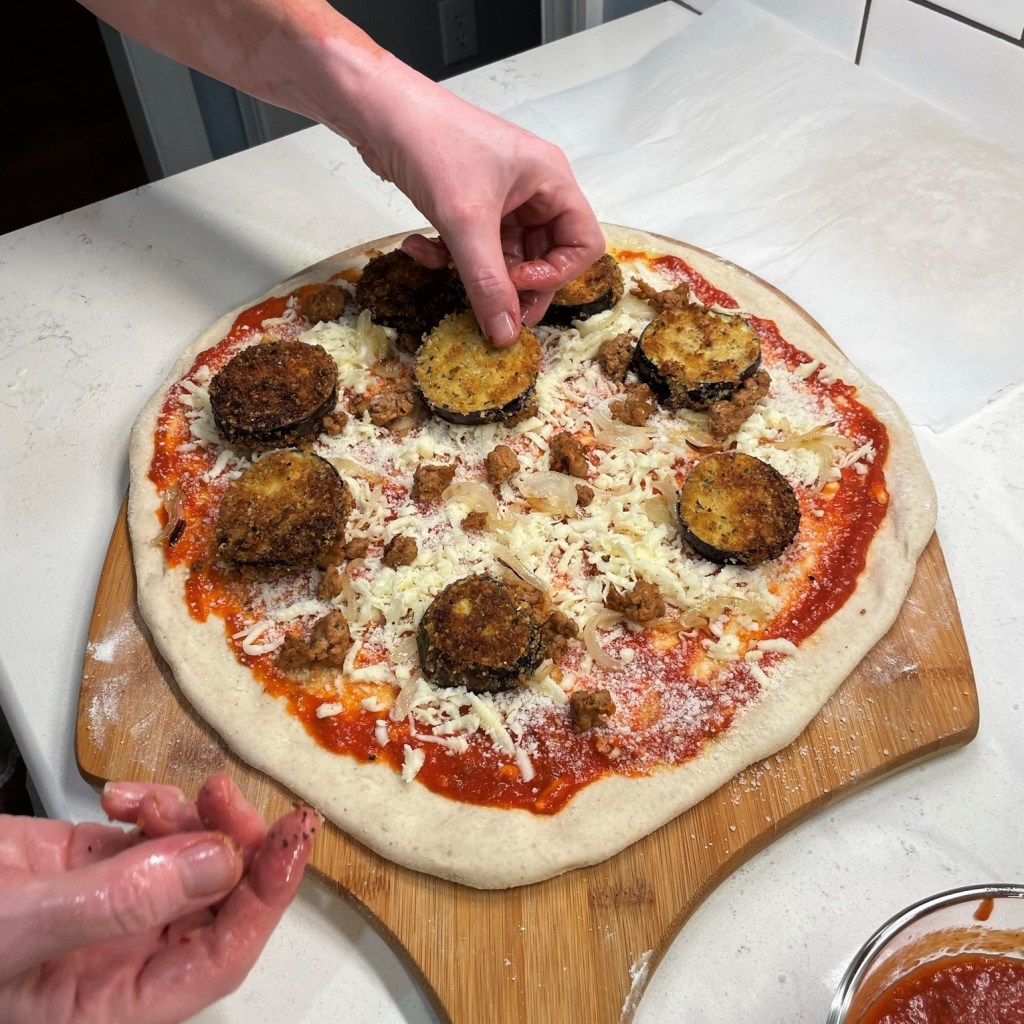
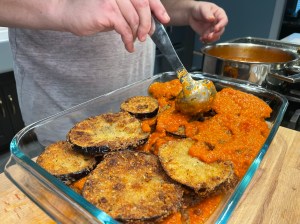
The crispy eggplant had plenty of flavor on its own, but we wanted to pair it with some complementary flavors, including soft, sauteed onions and a little bit of spicy sausage that I had left over from another recipe. I laid those down on a layer of shredded mozzarella, over our usual pizza sauce, with a few sprinkles of our Parm-Romano blend.
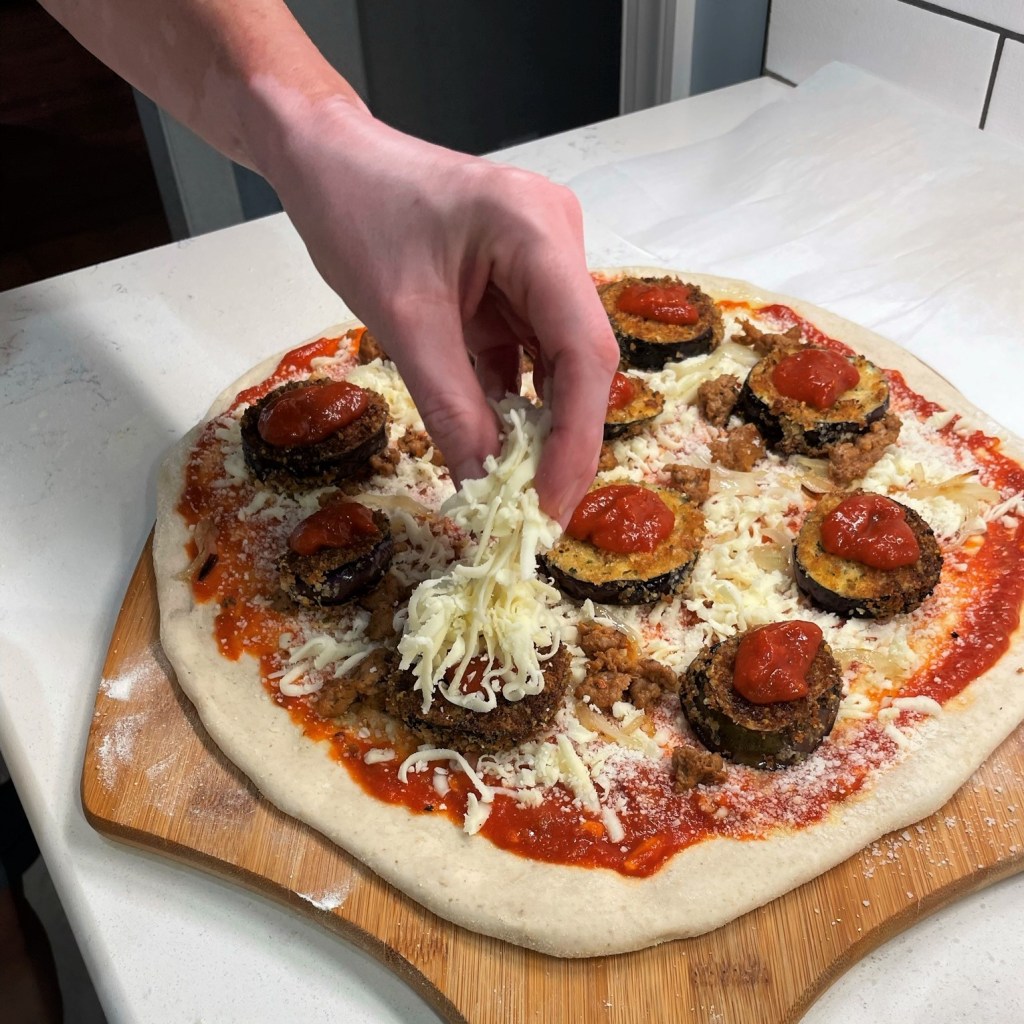
Then, the eggplant parm layer, and I spooned a bit more sauce right on top of each little medallion, then another good pinch of mozzarella to keep it nice and cheesy.
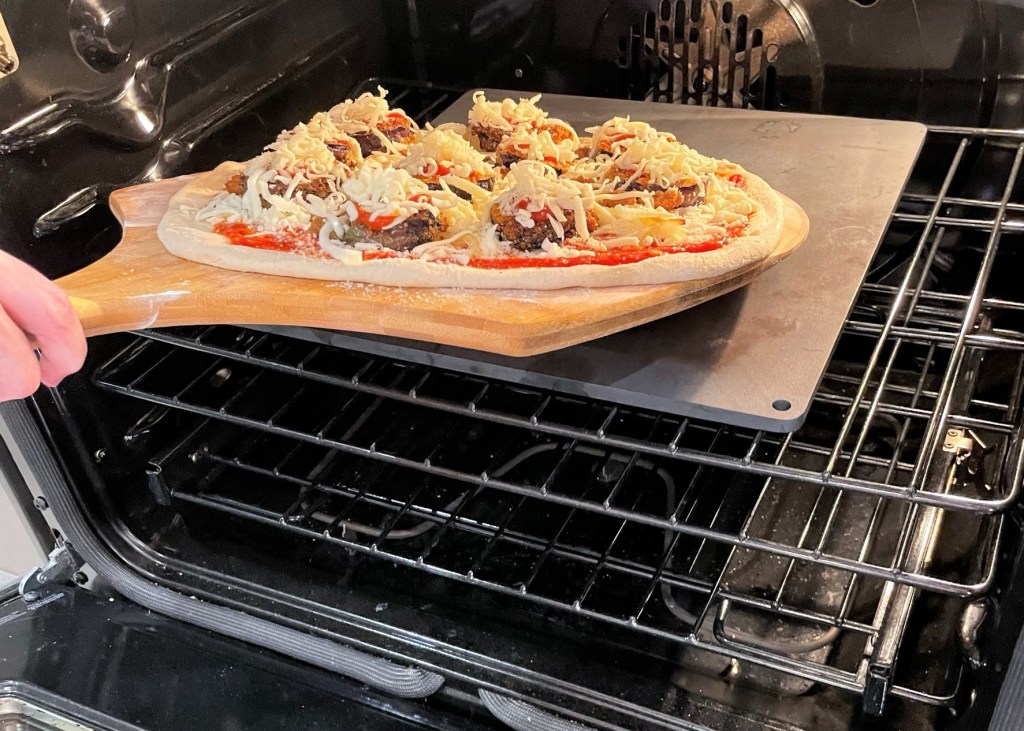
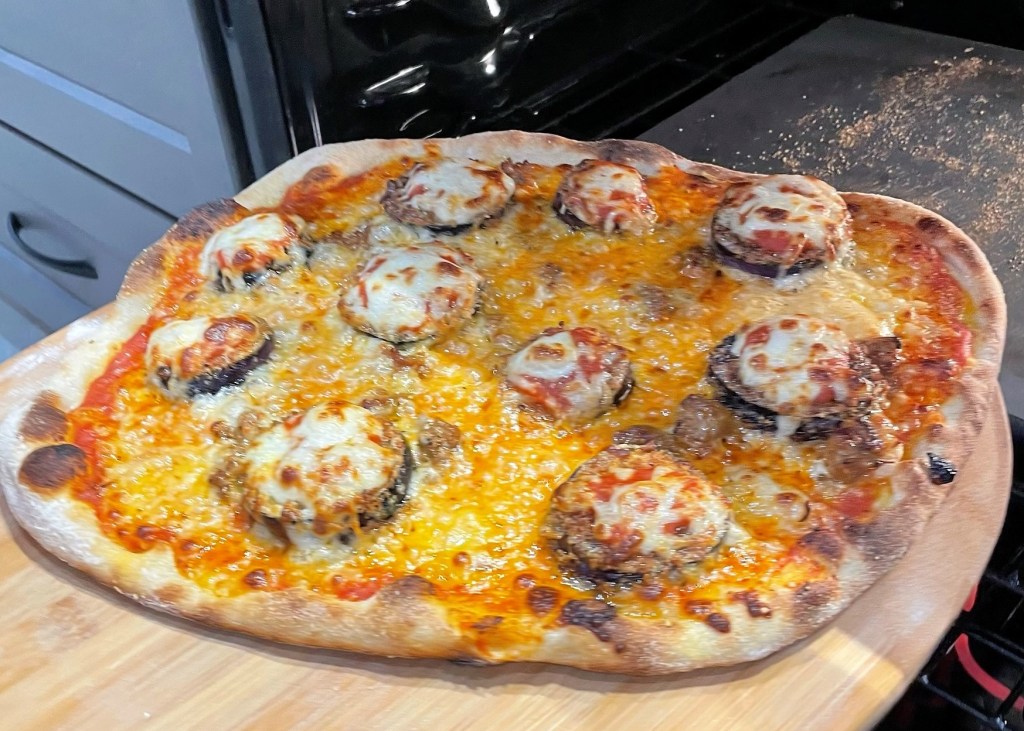
Into the 550° F oven on our beloved pizza steel, and six minutes later, we had this delicious Italian hybrid masterpiece!
This week, the temperatures in our area finally dipped below the frost point, and what was left of my summer garden is now history. I went out yesterday and plucked all the remaining green tomatoes (yep, we still had them coming in) and a whole bunch of jalapenos. This was a banner year for us in the garden department.
This pizza was very fun to make, and a delicious marriage of two of our favorite classic Italian comfort foods.
Ingredients
1 Japanese-style “millionaire” eggplant, sliced into 1/2-inch rounds
Kosher salt (for sweating excess moisture from the eggplant)
1/2 cup all-purpose flour, seasoned with black pepper and garlic powder
2 large eggs, beaten with a pinch of salt
1/2 cup Italian seasoned panko bread crumbs
1/4 cup Parm-Romano blend cheese (or regular, grated Parmesan)
Neutral vegetable oil, such as canola (for frying eggplant)
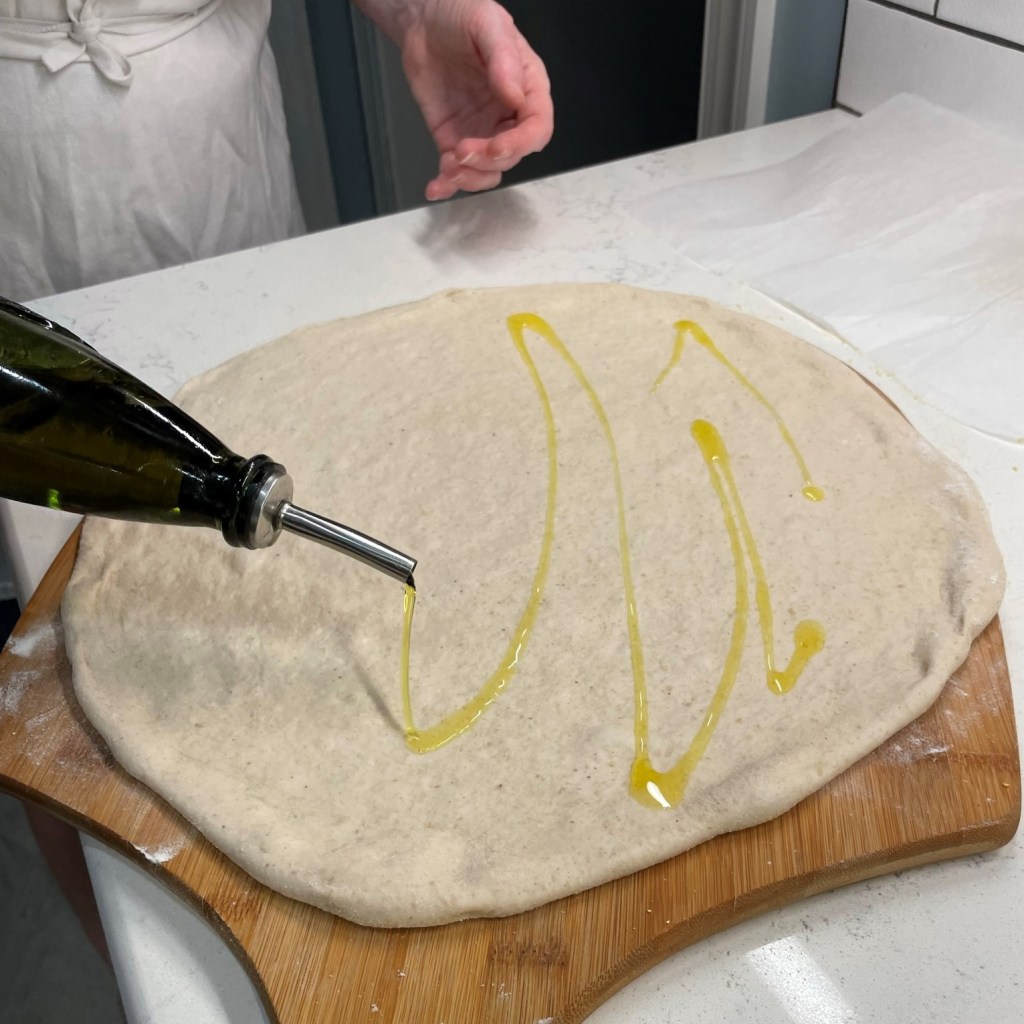
1 ball pizza dough, at room temperature
Extra virgin olive oil, for drizzling on dough
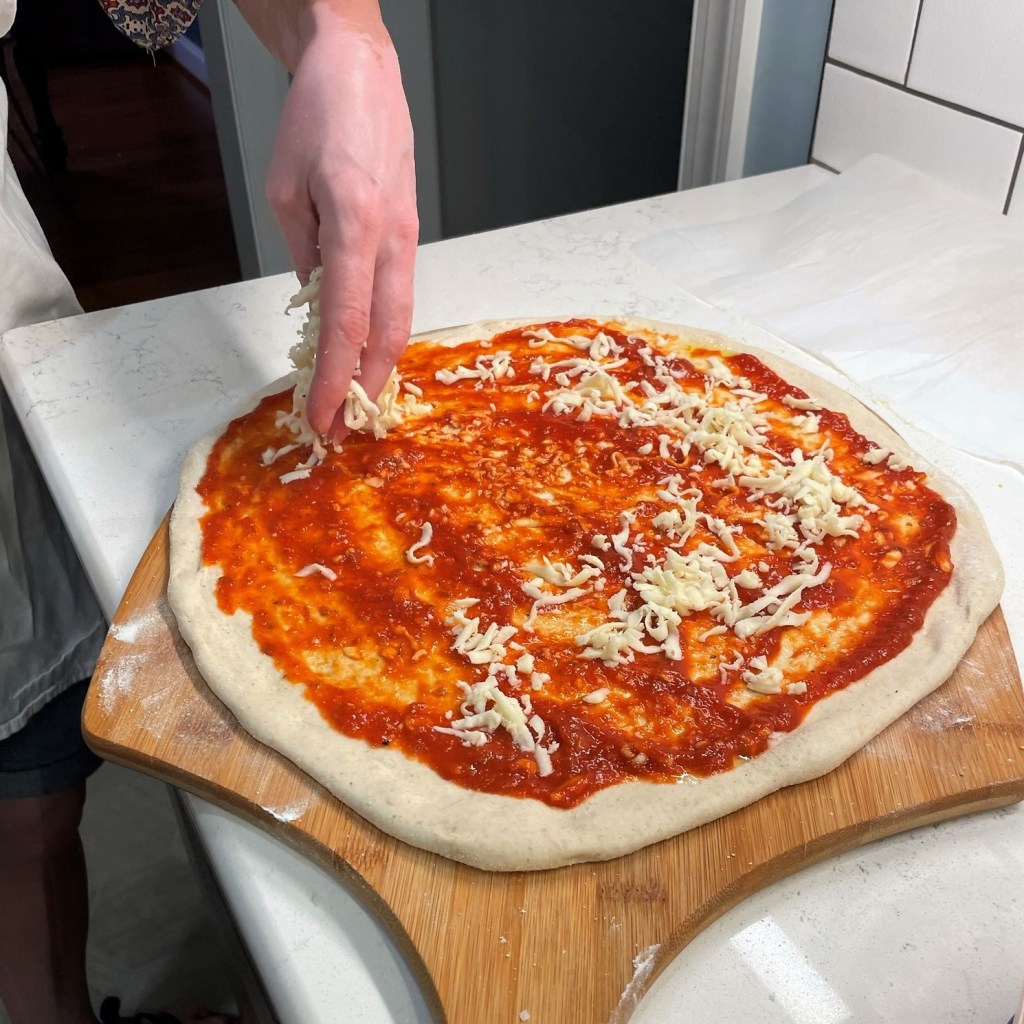
2/3 cup favorite pizza sauce, divided
1/2 small onion, sliced and sauteed until soft
1/2 cup cooked, crumbled Italian sausage
1 cup shredded mozzarella, divided
We bake all of our pizzas on a heavy pizza steel, pre-heated in a 550° F oven for one hour. If you bake on a pizza stone, use the highest temperature recommended for your stone, and adjust baking time accordingly.
Directions
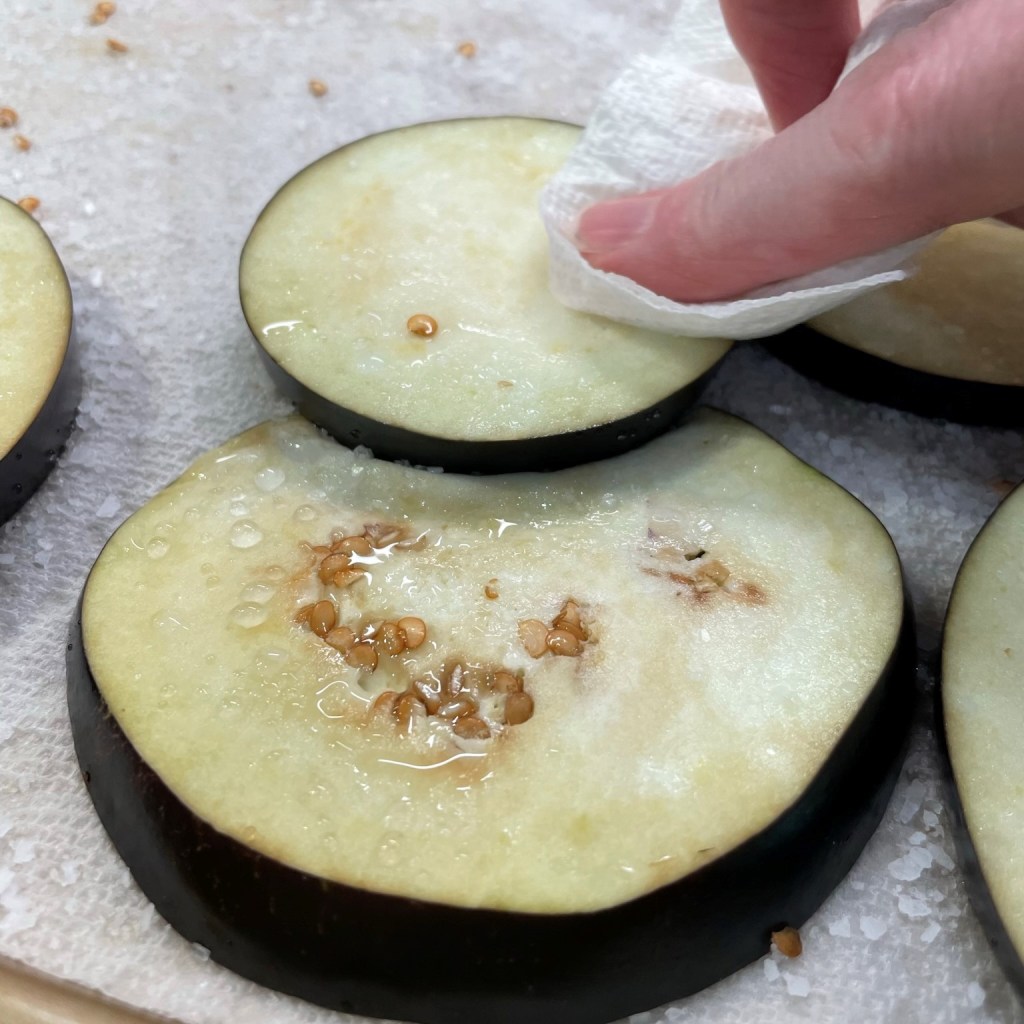
Arrange the eggplant slices on layers of paper towel. Sprinkle with salt and let them rest for 20 minutes, then use clean paper towels to wipe off the salt.
Heat oil in a cast iron skillet over medium heat. Set up breading station, with one container of seasoned flour, a second with beaten eggs and a third with the panko crumbs, mixed with Parm-Romano.
Dip each eggplant slice into the flour, then shake off excess and dip into the egg. Let excess egg drip from the slices and lay them into the panko crumb mixture, pressing panko onto each side for full coverage.
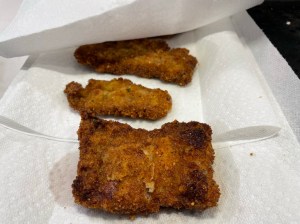
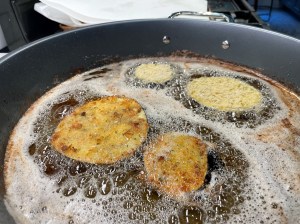
Carefully place the breaded eggplant slices into the hot oil, taking care not to crowd the pan. Turn the eggplant when the first side is golden and crispy. When both sides are done, transfer the eggplant to a paper towel-lined plate to absorb excess oil.
Shape pizza dough into a 14-inch round. Drizzle with olive oil, then swirl half of the pizza sauce onto the dough. Top with 1/2 cup of the shredded mozzarella, reserving the rest for the top of the eggplant rounds. Scatter the sauteed onions and cooked sausage crumbles over the cheese layer.
Arrange the crispy eggplant rounds onto the pizza, then divide the remaining pizza sauce and mozzarella over each round.
Bake on pre-heated pizza steel for about 6 minutes, until crust edges are golden and blistered and cheese is melted and bubbling.
When Terrie asked me a couple of months ago what I wanted for my birthday meal this year, I initially asked her for some kind of lobster, a dish she’s made before that I devoured. But the more I thought about it, the more a different idea bubbled in my head.
Five years ago, on Aug. 27, 2017, my mother died at age 91. It was two days before my birthday, and we chose to have her funeral on Aug. 29, largely at my request because it could be a sort of celebration for relatives who had arrived when she took ill.
With my mom on my mind, I told Terrie I wanted to play chef on my birthday weekend as a tribute to one of the few meals Mom made that I actually loved.
Once or twice a year, Mom would make veal parmigiana in an electric skillet (you know the one, square cast aluminum with the little pinwheel vent thing on top of the lid), and from the moment you walked into the apartment after school, the aroma was so distinct you instantly knew what was happening—a respite from the usual overcooked meat, baked potato and canned vegetables. What we smelled was veal parm, which she served with spaghetti with marinara (Ragu) and Parmesan cheese (Kraft, the familiar green container). Still, for me and my sisters, it was sublime.
When I first began cooking, veal parm seemed like a giant challenge, and I stuck to ordering it in restaurants. Around the same time, as an adult, I discovered the joy of eggplant. Then, one night in an Italian restaurant, I chose a dish called “Veal Sorrentino,” which added a slice of prosciutto between a veal cutlet and eggplant slices, and it was cooked in a pan with white wine sauce and a touch of tomato. Henceforth and forevermore, I knew what I was gastronomically bound to do whenever I wanted veal parm. Combine veal and eggplant.
Now as much as I enjoy veal Sorrentino, I don’t make that at home. Rather, I prefer veal and eggplant as a red sauce parmigiana meal, and, being as we still had lots of fresh tomatoes from our first successful garden in years, I spent a few hours cooking up a marinara on Saturday to go with Sunday dinner. This sauce was similar to the Not Quite Pizza Sauce I shared here a few weeks ago, but without the red bell pepper, and with the onions sautéed and blended right into the sauce. I married this sauce with veal and eggplant, and it was excellent.
Layer upon layer of Italian comfort food.
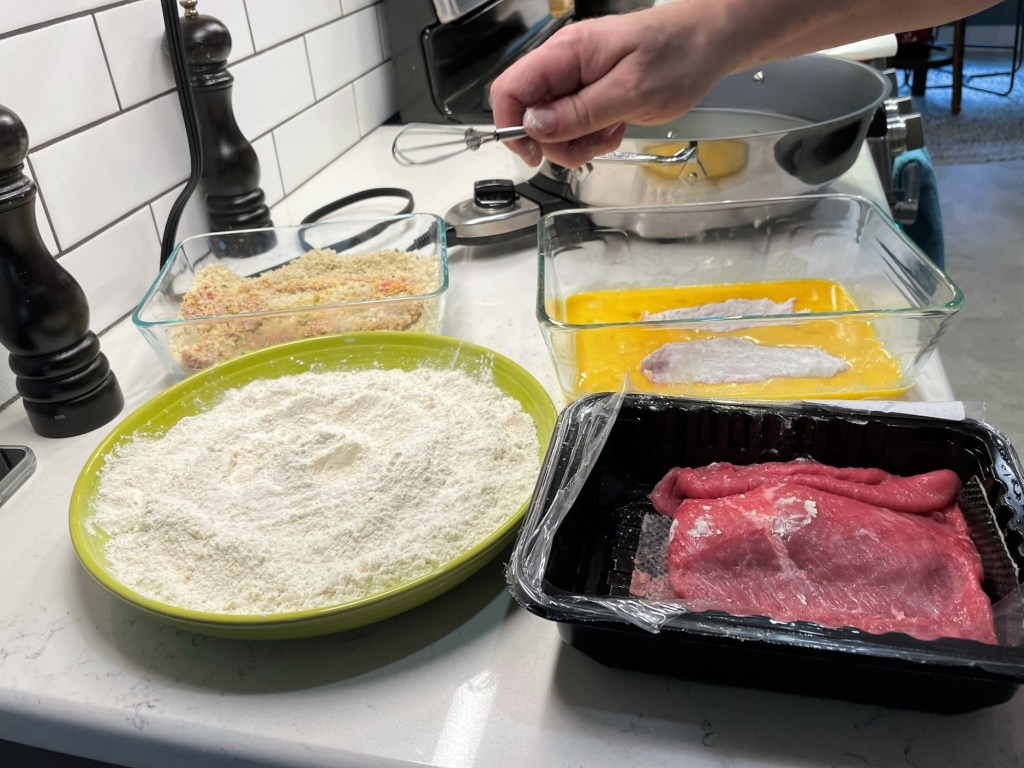
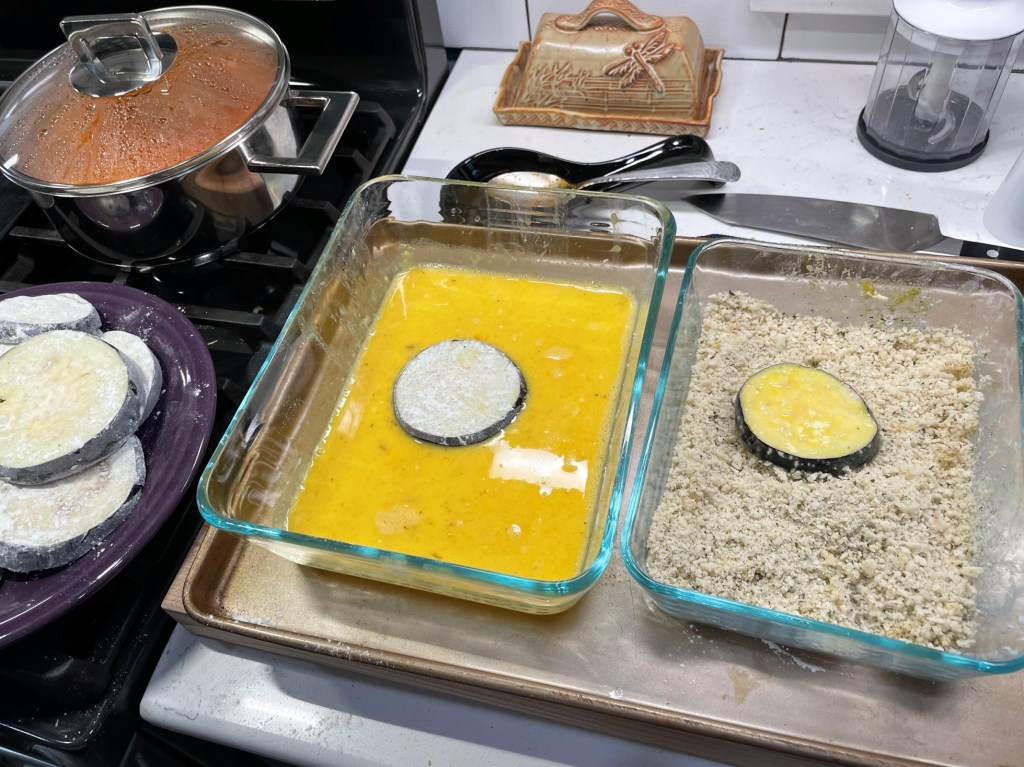
It helps to have the meal and kitchen counter space planned for this dish, because you need room for all the breading and frying. The first step is slicing a good Italian eggplant into 1/2-inch rounds, salting them on paper towels and letting them sweat for 30 minutes or more. Arrange the plates or containers to be used for preparing the eggplant and veal. My first plate held seasoned flour for dredging the eggplant and cutlets; salt and pepper the latter on both sides. The eggplant, of course, after its salting, won’t need more seasoning.
I used a rectangular Pyrex dish to hold four eggs, beaten. A second Pyrex contained a mix of Italian-seasoned bread crumbs (we actually used seasoned panko crumbs, then used an attachment on our immersion blender to grind them finely) and if you’re bold like we are, add some cheese to it; I used our Parm-Romano blend.
After consulting with Terrie, I decided to use our electric skillet (another nod to Mom, though this stainless All-Clad skillet is nothing like Mom’s old cast aluminum), and got that filled with about 1/2-inch deep canola oil, set to 375° F; the temperature may vary, depending on the vessel you use for frying, but whatever you put into the oil should sizzle and bubble as soon as it makes contact. Keep a roll of paper towels nearby; we used a ton of them catching the cutlets and eggplant as they came out.
During the frying phase, I put the marinara on a back burner at low to warm it and preheated the oven to 350° F. We bought fresh, pre-sliced mozzarella (the kind you’d use for Caprese), so I didn’t need to worry about prepping the cheese.
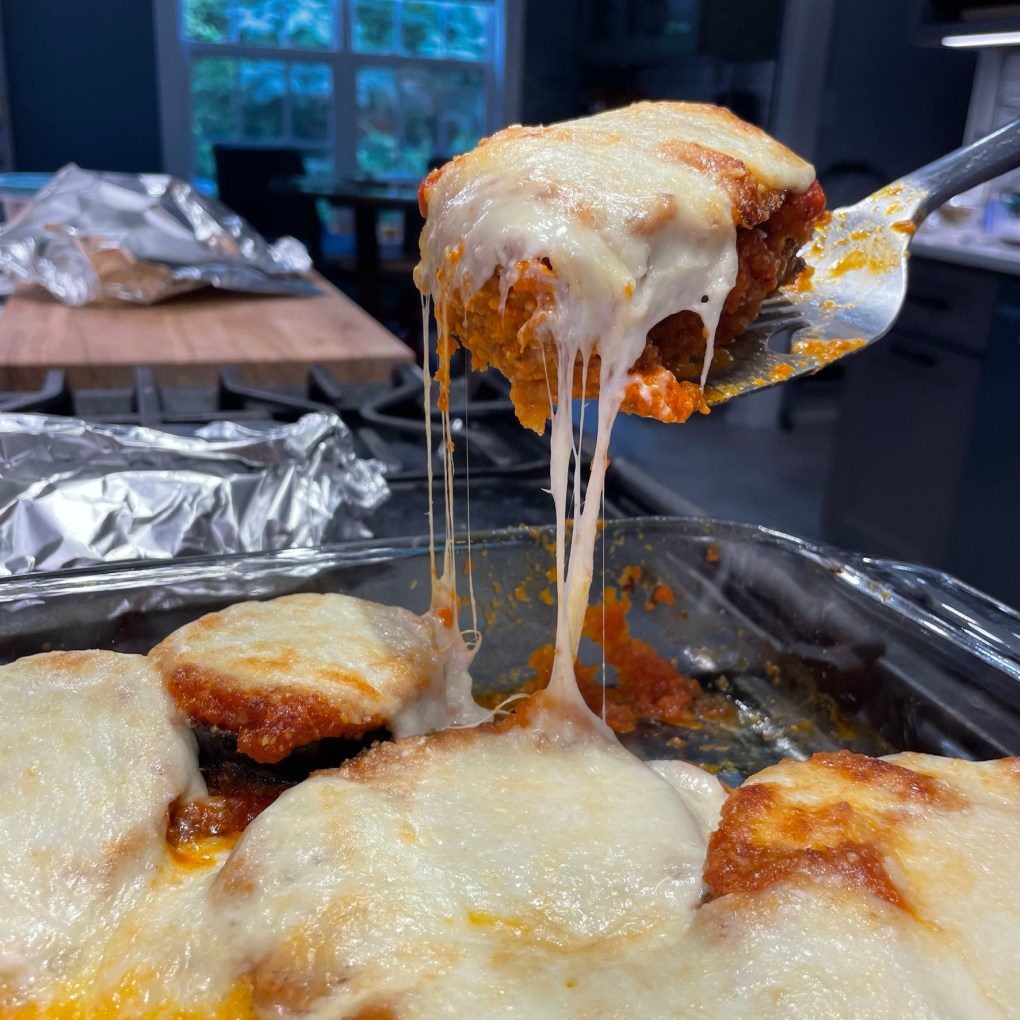
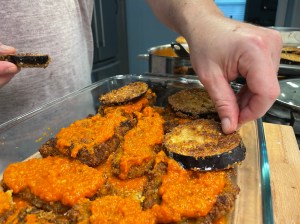
Once the eggplant and cutlets were fried, it was time to assemble. In a 9-by-13 Pyrex, I ladled healthy spoonfuls of marinara on the bottom, then lay down the cutlets. On top of that went marinara, followed by eggplant, followed by more marinara, followed by mozzarella, with a healthy sprinkling of our Parm-Romano Blend as a final touch.
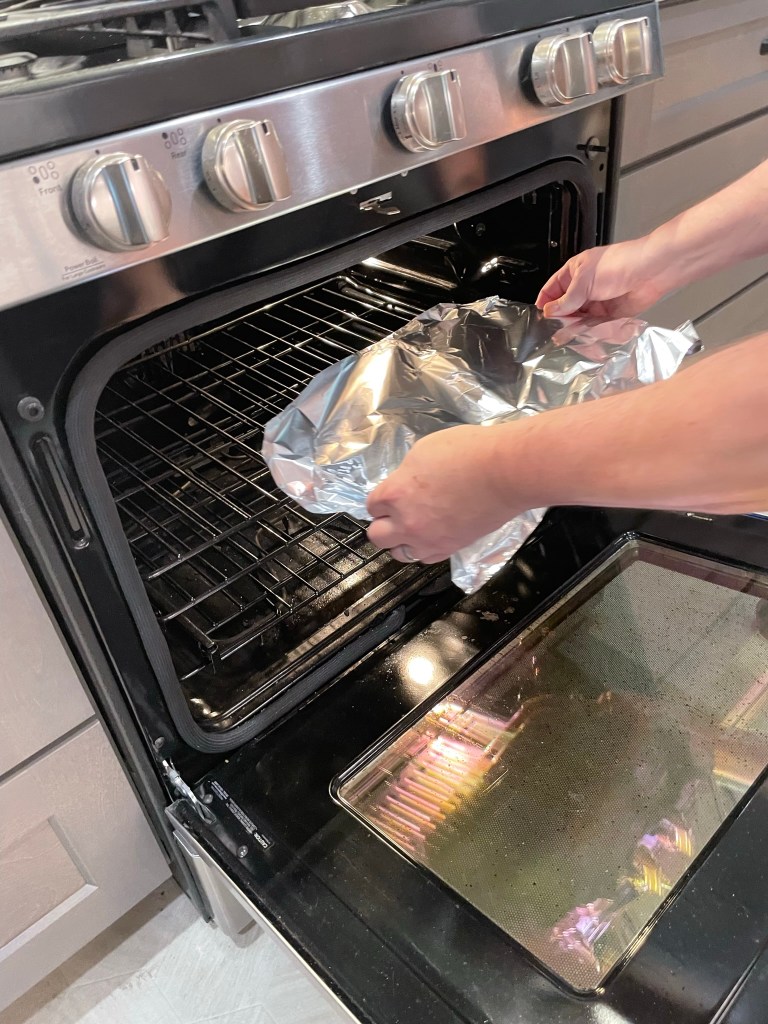
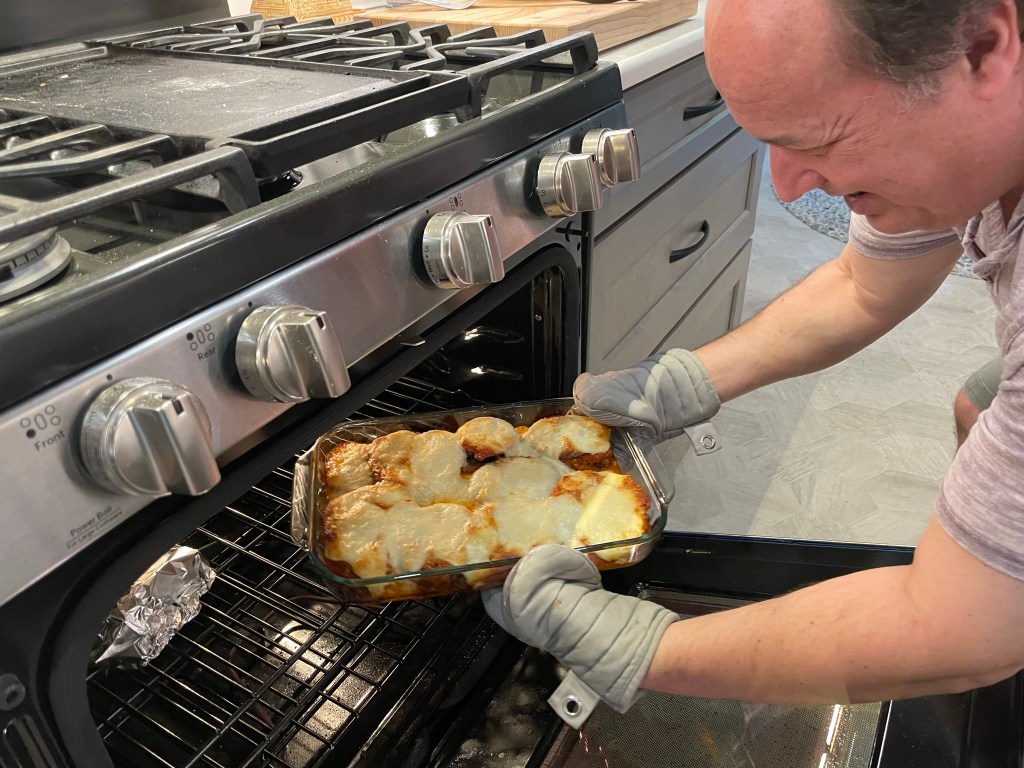
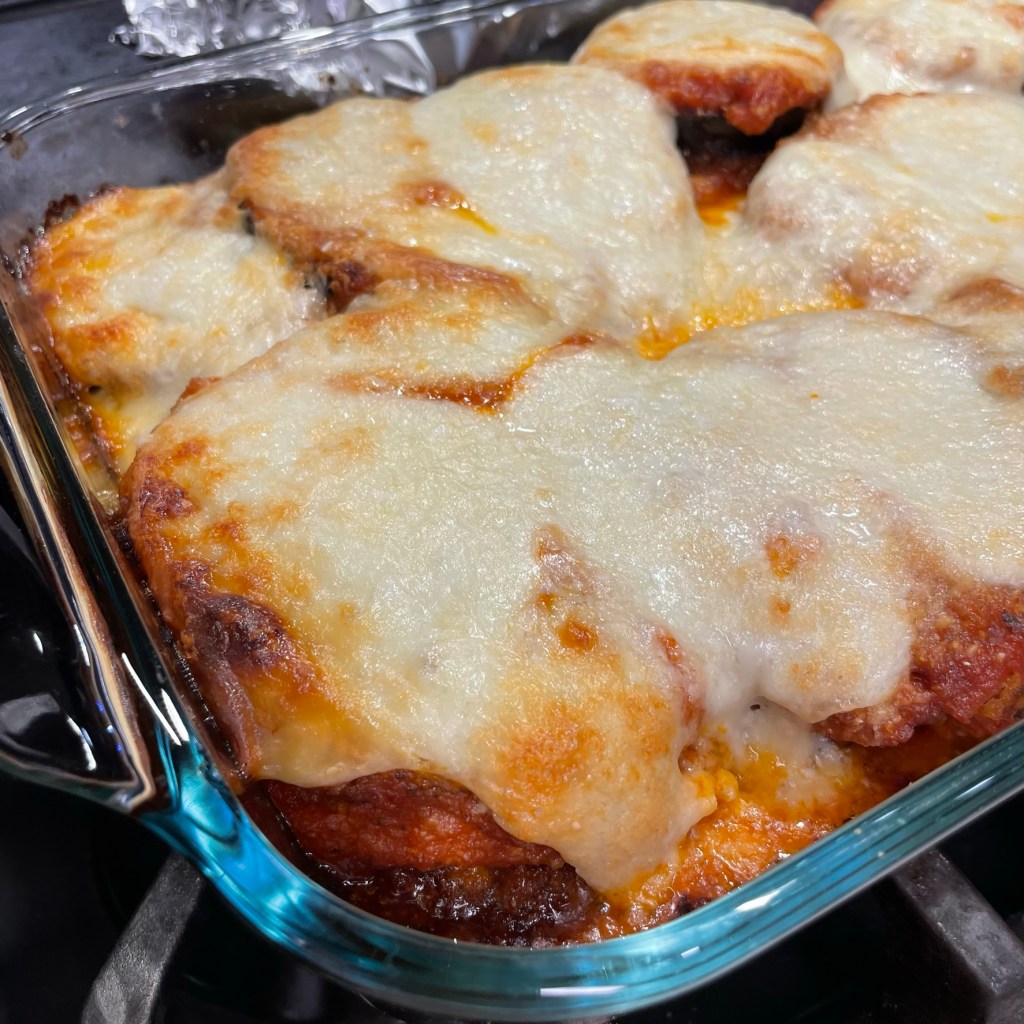
It baked (under foil for half the time) for about 45 minutes (ovens may vary by a few minutes) and what came out was pretty awesome. Homemade sauce on tender veal and fresh eggplant with a crunch of breading and those savory cheeses—oh yes, the cheeses are my favorite part!
This dish is the ultimate comfort to me.
For hours during and after this birthday meal, the kitchen smelled like my old apartment on 80th Street in Jackson Heights, N.Y., on those rare, but wonderful nights when Mom was making veal parm. The leftovers were pretty damn good, too.
When it came to dinner growing up, my sisters and I got a lot of the basics: meat, baked potato, canned vegetable. But oh for the once or twice a year when Mom decided to cook one of her specialty dishes—veal parmigiana. That’s the aroma I tried to re-create with my kicked-up version of it, with eggplant and garden-fresh, homemade marinara.
Ingredients
1 medium Italian eggplant. cut into 1/2-inch rounds
Kosher salt, for sweating the eggplant slices
1 1/2 lbs. veal cutlets
4 large eggs, beaten (for breading)
About 1 cup all-purpose flour, seasoned with salt and pepper (for dredging)
1 cup Italian seasoned bread crumbs (for breading)
1/2 cup Parm-Romano blend or Parmesan (for breading)
Vegetable or canola oil, for frying (enough to measure 1/2-inch deep in frying skillet)
About 4 cups favorite marinara sauce (see ingredient notes, below)
Arrange the eggplant slices in a single layer on paper towels sprinkled with kosher salt. Sprinkle salt over the top of the slices as well, and let them stand for 30 minutes to remove excess moisture from the eggplant. Wipe them dry with clean paper towels and set aside for breading.
Heat oil in an electric skillet or over medium heat to approximately 375° F.
While the oil comes up to temperature, set up a breading station with three dishes: one containing seasoned flour, a second containing beaten eggs and a third with a mixture of the Italian breadcrumbs and Parm-Romano blend.
Dredge the veal cutlets lightly in flour, shaking off the excess. Dip in the beaten egg, allowing excess to drip off. Coat both sides in the breadcrumb-cheese mixture. Arrange breaded cutlets on a parchment-lined plate.
Repeat the same dredging steps with the sweated eggplant slices.
Fry the cutlets and eggplant until golden on both sides, and set aside on paper towel-lined baking sheet until all are finished. The paper towels will absorb excess oil.
Preheat oven to 350° F, with rack in center position.
Spoon about one cup of the marinara sauce into a 9 by 13-inch glass baking dish, and spread it evenly across the bottom. Arrange a single layer of fried veal cutlets over the sauce, and then ladle a generous spoonful of sauce over each cutlet. Arrange the fried eggplant slices over the sauced cutlets, and repeat with another layer of sauce. You should still be able to see the veal and eggplant; don’t try to bury it in sauce. If you have extra marinara, use it to dress some spaghetti or linguine to serve on the side.
Arrange the fresh mozzarella slices evenly over the top of the sauced eggplant. Cover loosely with foil and bake 20 minutes. Remove foil and bake 20 more minutes, until cheese is golden, bubbly and oozing.
How is it possible that the simplest combination of ripe-at-the-same-time ingredients turns out to be such a mouthwatering flavor explosion, no matter how you put it together?
Any way you plate it, this is a great combo!
I never get tired of rearranging ratatouille—eggplant, zucchini, red bell pepper, onions and tomatoes—and this time, I married the classic Provencal stew with a classic Jewish breakfast dish, shakshuka.
The first time I heard of shakshuka was during a pre-wedding meeting with Rabbi Mark, who formerly led Temple Emanuel in Winston-Salem, where my then-fiancé, Les, is a member. When our ceremony-planning conversation took a detour toward food and cooking (as literally every conversation with me eventually does), Mark asked if I’d ever made shakshuka, the Middle Eastern dish that is a breakfast staple in many Jewish households. I was stumped because I had never even heard of this dish, let alone made it. But that changed quickly, and it has become an occasional favorite at our house.
Shakshuka is a humble and hearty, tomato-based skillet meal, and a great way to use up whatever other vegetables you have on hand, with eggs simmered right into the sauce. It is very similar to a dish the Italians call “eggs in purgatory.” I especially appreciate how simple it is to pull together when I have had a busy week with little time to plan a menu. Up until now, I have made it only with the spicy flavors that are traditional to the northern African region, where shakshuka originated—cumin, paprika, hot pepper, garlic and oregano.
But this time, I took the concept of shakshuka northward across the Mediterranean Sea, into the south of France, using Herbs de Provence alongside all the beloved vegetables of ratatouille. The result, as you can see, was awesome!
Served with a light sprinkle of Parm-Romano blend cheese at the table.
There was so much nourishing comfort in the stewed vegetables, which simmered long enough to become soft and melded, and the delicate herbs were just right. I’m already craving it again!
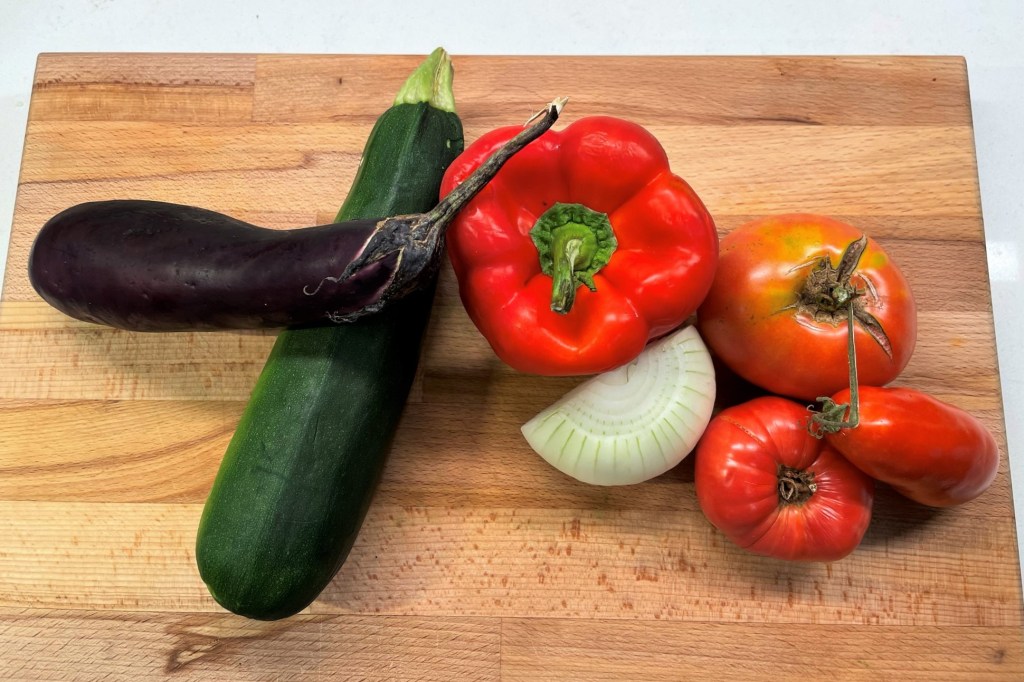
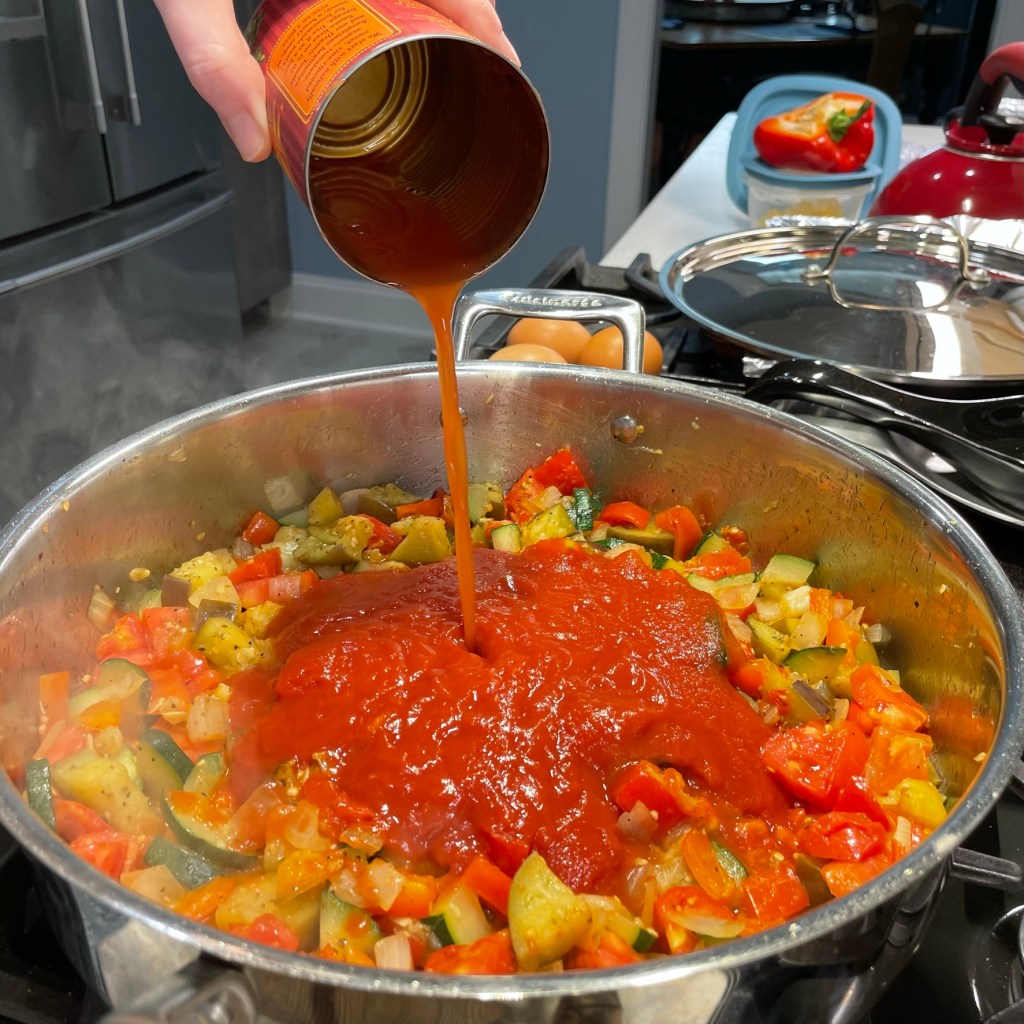
As with most recipes, it’s helpful to have all your ingredients chopped and ready before you begin. For any stew, I like to cut up the vegetables into roughly similar size. This ensures more even cooking, and also makes it possible to get a little bit of everything in each delicious bite. I used a large zucchini, a large “millionaire” eggplant (the slender, Japanese variety), half of a large onion, half of a huge red bell pepper and three fresh, red tomatoes from my garden. In addition to the fresh ingredients, you’ll need a 15 oz. can of tomato sauce, a splash of dry white wine (I used dry French vermouth), a pinch or two of Herbs de Provence, and up to six eggs.
We’re going to need a bigger pot!
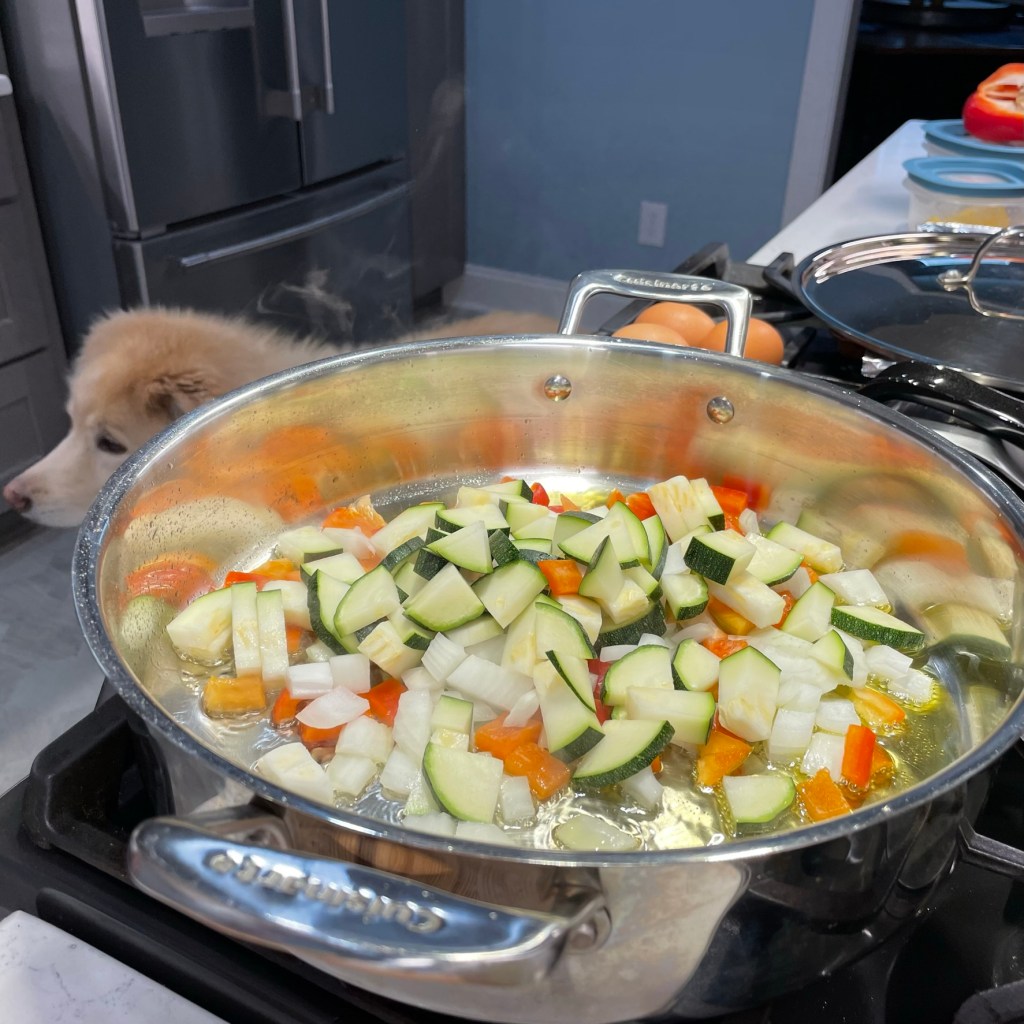
That’s a lot of veggies! I made this version of shakshuka in a larger pot than usual because I knew that tossing all of these fresh vegetables in my go-to cast iron would be a serious challenge, and I wanted to avoid making a big mess. The ratatouille also needs to be stirred as it cooks, so be sure your cooking vessel can handle the volume of ingredients as well as the mixing requirement. Choose a pot that has a snug-fitting lid, as this will be important for simmering.
The width of the pot is what matters, so you’ll have plenty of room to place the eggs.
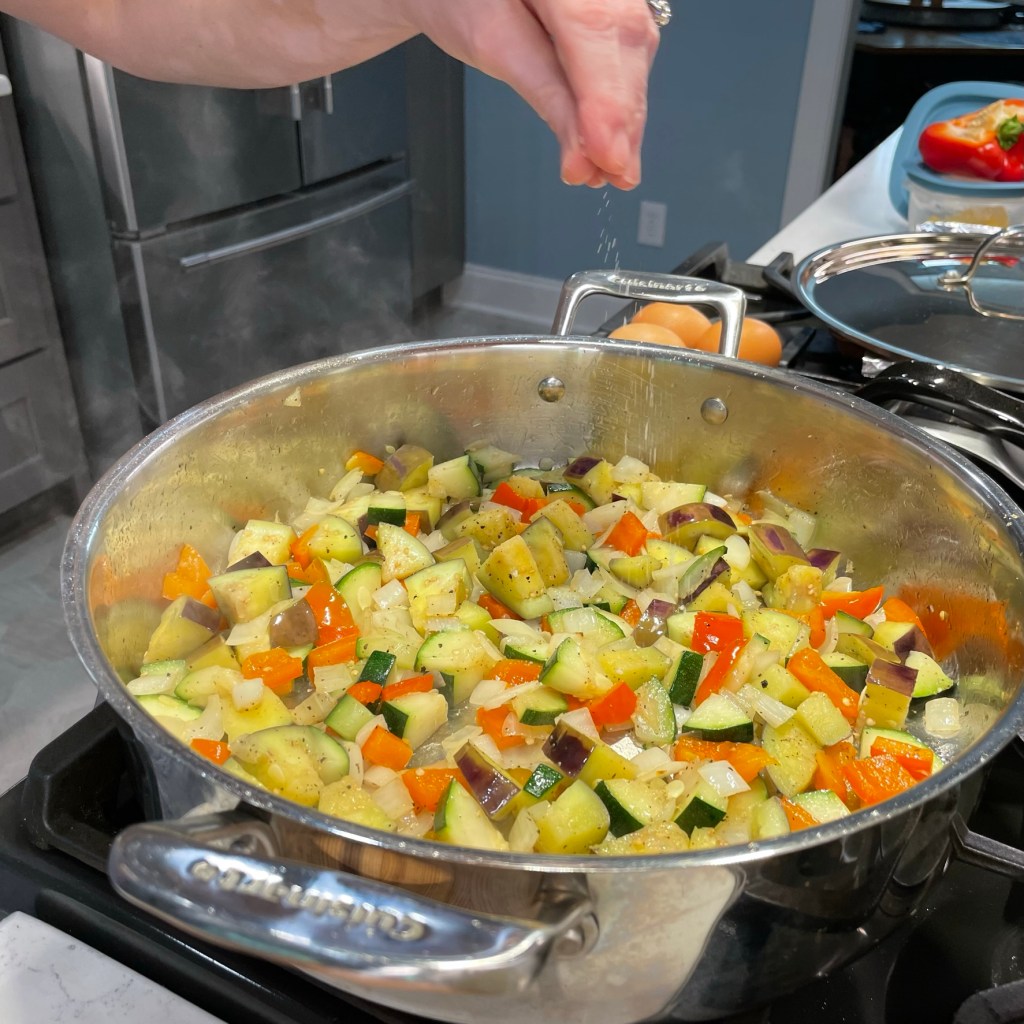
Begin by heating the pan over medium flame. Add oil and start sautéing the vegetables. Eggplant soaks up oil fast so I held that back until the peppers, onions and zucchini had a chance to soften. Remember to season each layer with a pinch of salt and pepper, not only for flavor, but also because salt helps to draw excess moisture from the vegetables as they cook. During this stage, also add a few pinches of Herbs de Provence, a French blend that includes any combination of thyme, savory, rosemary, marjoram and lavender. These are delicate herbs, but they do pack a fragrant punch, so start with a small amount and inch up to taste.
Nilla is always nearby when I’m cooking!There’s no need to peel the eggplant.A pinch of salt helps draw the moisture out of every layer. This is a lovely herb blend that I always use in my ratatouille twists.This stage is all about softening the vegetables and initial seasoning.
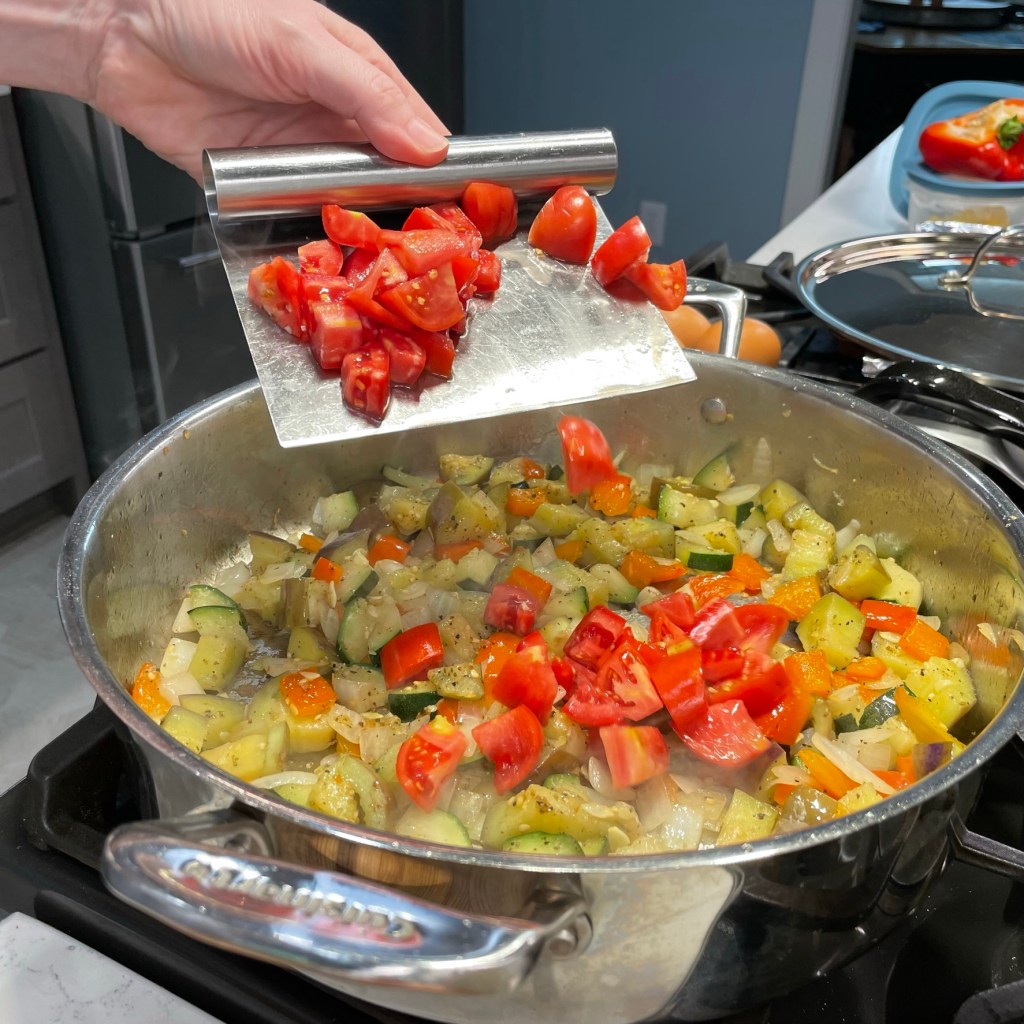
When the vegetables are visibly softened, add the fresh garden tomatoes and give it a stir. Add the tomato sauce and dry white wine. If I have used a canned ingredient, I usually swish the wine around in the empty can to rinse out the last bit of flavor. Another quick pinch of salt and pepper, and then reduce the heat, cover the pan and allow it to simmer for 15 to 20 minutes. The vegetables will continue to soften, melding the flavors together, but the sauce should not reduce too much. While it simmers, take the eggs out of the fridge; they will set in the shakshuka better if they are closer to room temperature.
Three small fresh tomatoes; I didn’t bother peeling them.Be mindful of the sodium in the tomato sauce, and adjust your additions accordingly.Swishing the dry vermouth in the can helped me get every last drop!Put a lid on it and set the table.The tomatoes bring the magic to ratatouille. Cover the pot during simmering so that the sauce doesn’t reduce too much.
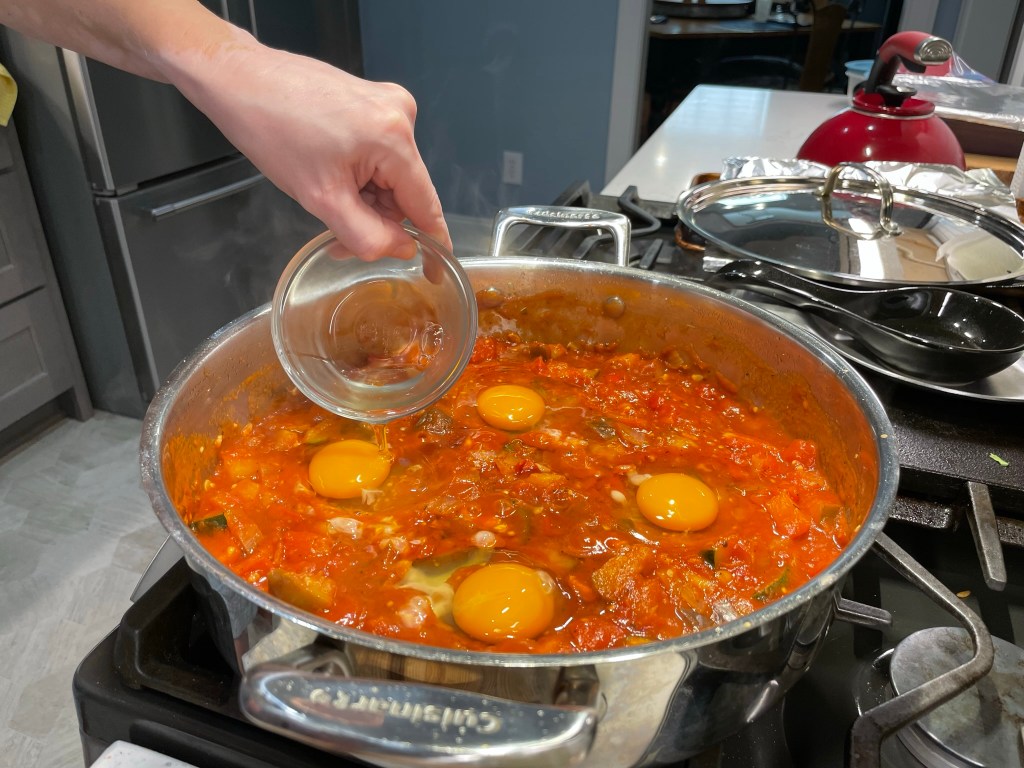
When the ratatouille stew has become very soft, crack each egg into a ramekin dish for easy transfer to the shakshuka. This may seem unnecessary, but trust me when I tell you that it is no fun at all trying to fish out itty-bitty pieces of egg shell that went astray into a big saucy mixture. If anything goes sideways with your cracked eggs, you want it to happen in the ramekin, not in your beautiful recipe!
Give the stew a gentle stir, and then use the back of a large serving spoon to create a slight depression for each egg to rest. This doesn’t have to be perfect, and you only need a spot about 3 inches across for each egg. I had room for six eggs in my large pot, but I only used four because I knew the extras would not warm up well without overcooking. Better to add fresh eggs when you heat up the leftovers.
Cook as many eggs as you plan to serve initially. Make more eggs when you reheat the leftovers.
Slip an egg into each depression and give the shakshuka one final pinch of salt and pepper before covering the pot. Keep the flame set on low and cook for 8 to 10 minutes, until the whites are set but the yolks still have a bit of jiggle to them.
I wish you could smell this! 😋
Scatter fresh, chopped herbs over the dish (I used fresh basil from the garden, but flat-leaf parsley would be nice, too), and serve immediately with a slice of crusty French bread. The best way to serve this dish is to use a wide, somewhat flat spoon to scoop underneath an egg, grabbing as much of the surrounding stew as possible at the same time. Sprinkle on a teaspoon or so of grated Parmesan for a big burst of umami flavor.
Choose a wide, covered pot for making your ratatouille, and prepare your workstation by chopping all vegetables before you begin.
Ingredients
1 large zucchini, trimmed and chopped
1/2 large sweet onion, chopped
1/2 large (or 1 medium) red bell pepper, chopped
1 large Japanese eggplant, chopped (or about 2 cups of alternate variety)
3 Tbsp. extra virgin olive oil
Kosher salt and black pepper to taste
Up to 1 tsp. Herbs de Provence (or Italian seasoning, if preferred)
3 small, fresh tomatoes, chopped
15 oz. can low-sodium tomato sauce
2 Tbsp. dry white wine (or dry vermouth)
6 large eggs* (see recipe note below)
Fresh basil or Italian parsley, for garnish
Note: If you wish, cook only the number of eggs you intend to serve initially. When you use the leftovers, fresh eggs will yield a better result at that time.
Directions
Heat large pan over medium heat. Add olive oil and saute vegetables, beginning with only zucchini, onion and bell pepper. When the first vegetables begin to soften, add the eggplant and saute until all veggies are tender. Season with salt, pepper and Herbs de Provence.
Add fresh tomatoes, tomato sauce and dry wine, stirring to combine evenly. Reduce heat, cover and simmer 15 to 20 minutes. Remove eggs from fridge during the simmer time.
When vegetables are fulley softened, crack each egg into a ramekin cup for easy transfer into the pot. Use the back or a large serving spoon to make a depression for each egg. Slip the eggs into the depressions, season with salt and pepper and cover the pan.
Cook over low heat about 8 minutes, until egg whites are set and yolks are still slightly jiggly. Serve immediately.
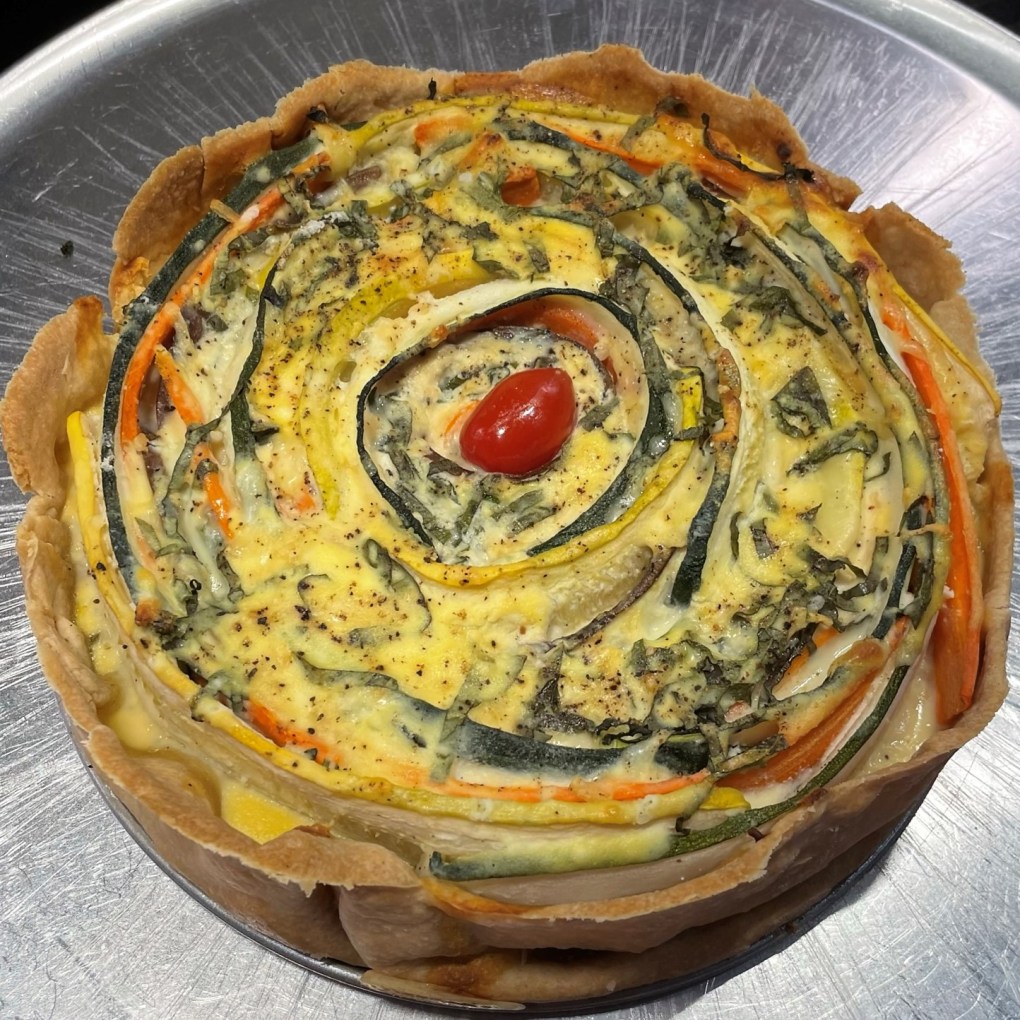
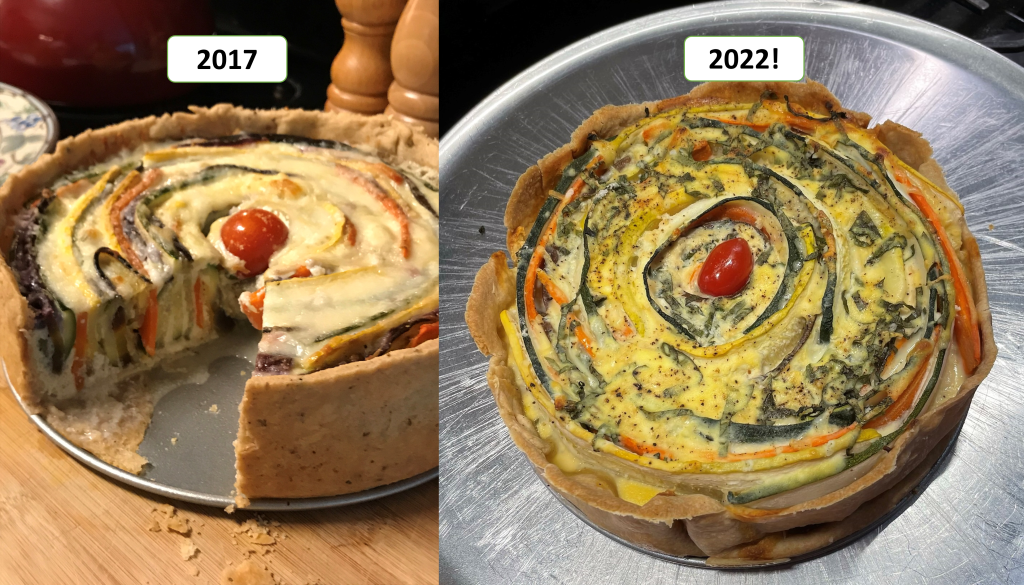
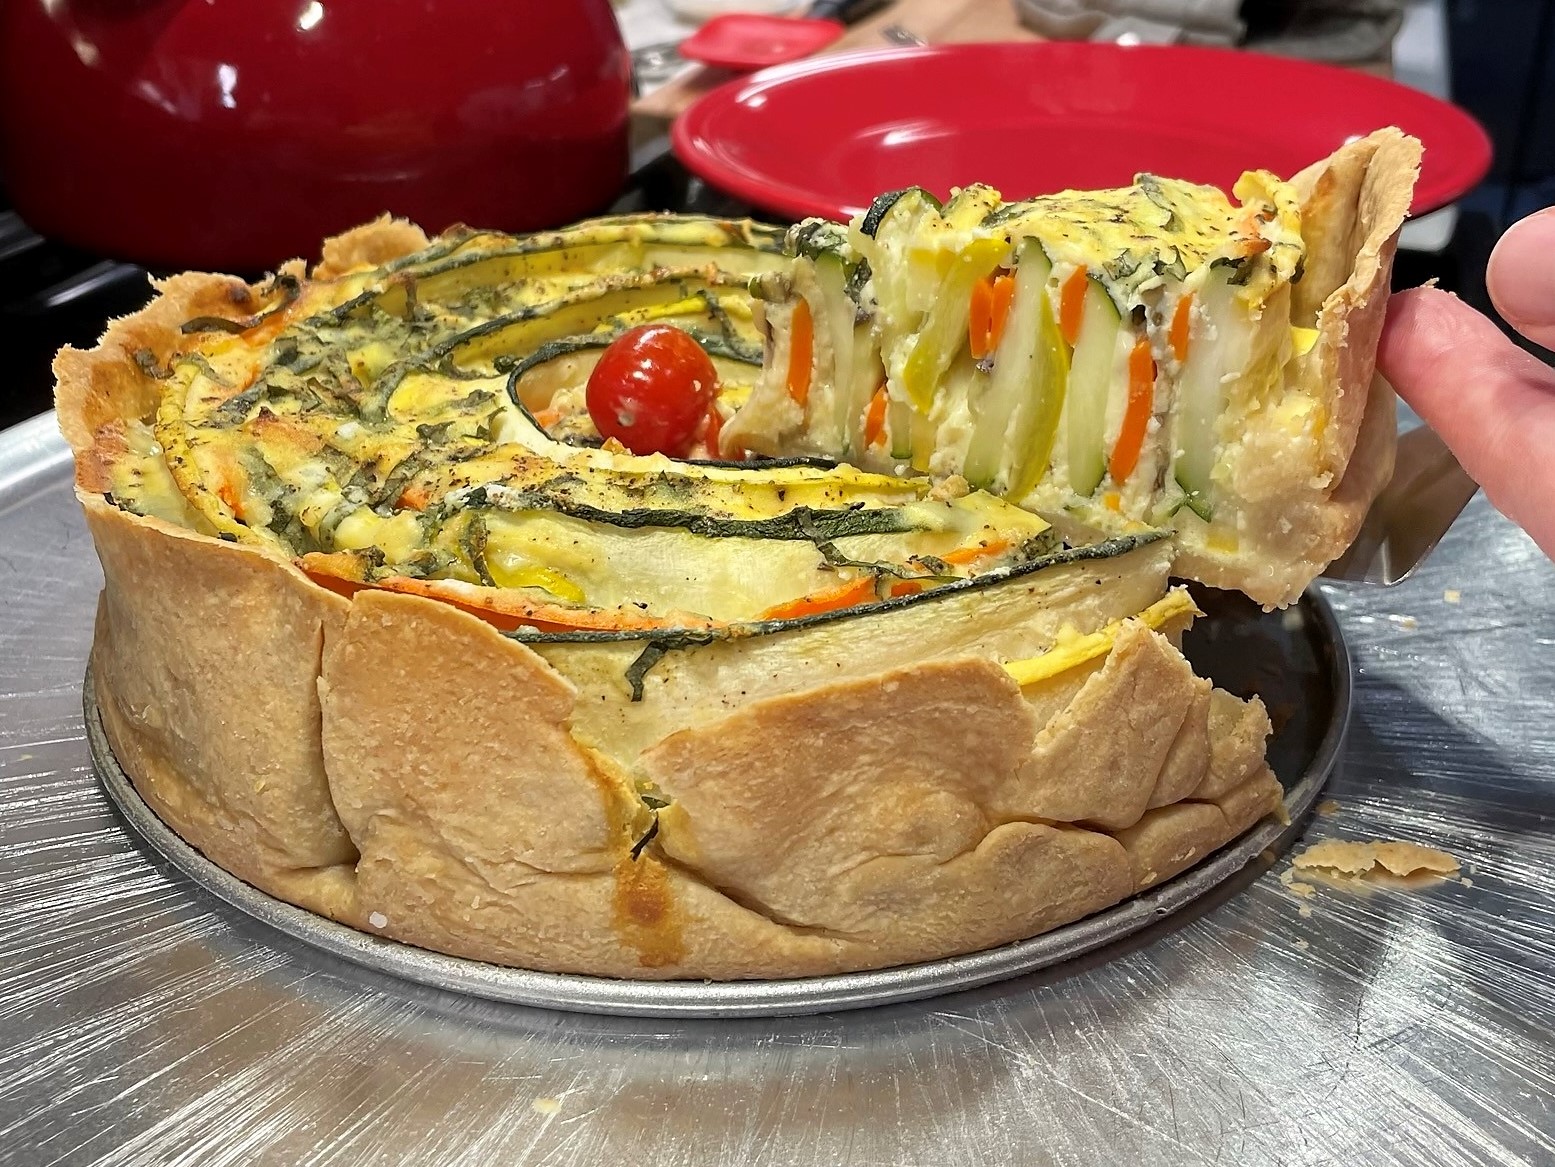
About once a week, my husband, Les, flashes me his phone to announce what has appeared on his Facebook page—“Five years ago, today!” It’s usually a throwback photo of our dog, Nilla, and I always love the ones that were taken years before I even met them. She was an adorable little fluff pup, and he has taken a ton of pictures of her through the years! The other day, though, he presented me with a picture that was instantly familiar— a pretty, fresh-from-the-oven spiral quiche made of fresh zucchini, yellow squash and eggplant from our own garden. The timing was remarkable, given that I had made plans to make the same recipe with veggies from this year’s garden, just days apart from the one I made in 2017. For your comparison, here they are, side by side:
Is it a quiche or a tart? Let’s just call it delicious.
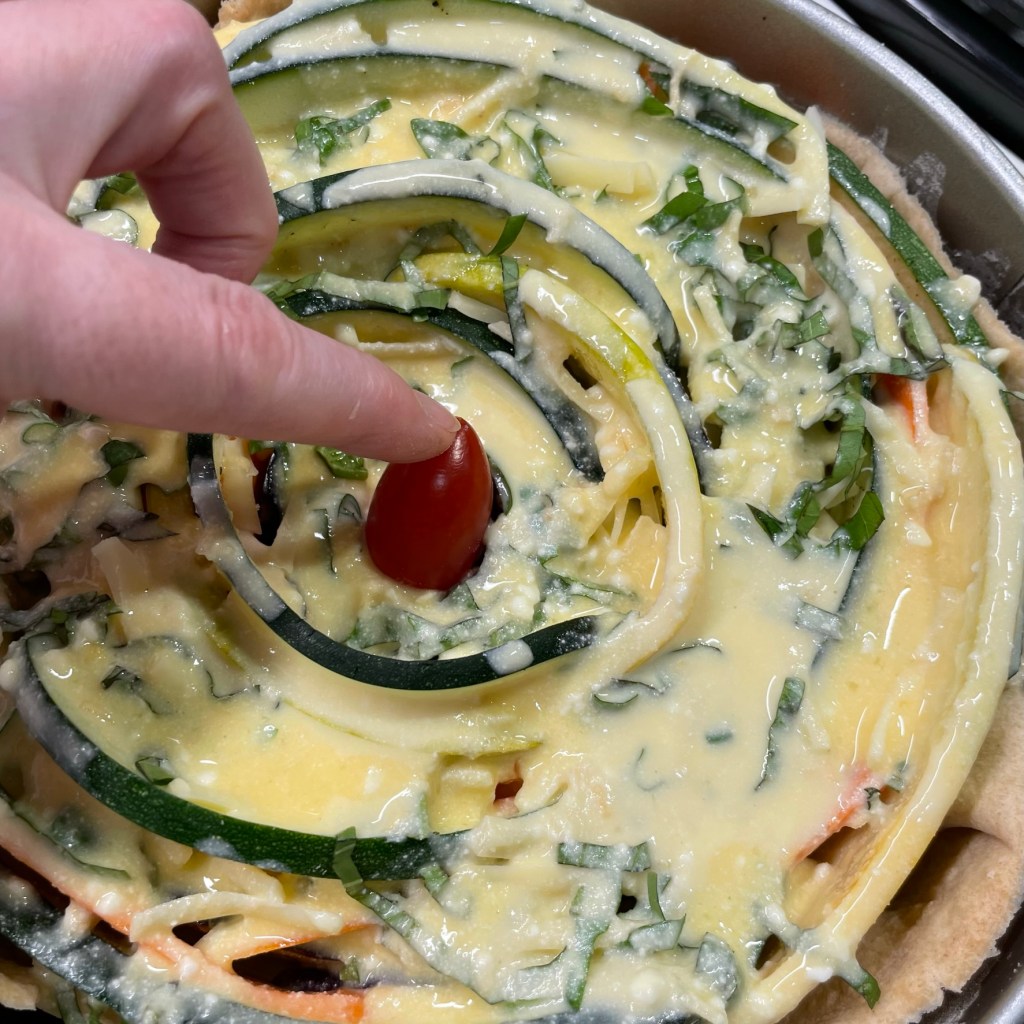
My inspiration for this brunch-worthy dish came directly from Pinterest, but the recipe did not. It was one of those pins that appeared with an exciting image, but no title or description, and a link that led to absolutely nothing. But I took the clickbait in stride because at that point, I had all the inspiration I needed; my mind was already racing with my own ideas for creating such a pretty pie. I’d use thin slices of eggplant and squash from my own garden, layering them around and around inside a blind-baked pastry in my springform pan. I’d slip a few store-bought carrot slices in wherever I could make them fit, and then I’d pour an omelet mixture over the whole thing and bake it until the eggs were set. I was not blogging at that time, so it didn’t occur to me to write down what I had done—I just followed my instinct and used what was fresh from the garden at the time. I had one measly cherry tomato that year (the deer got the rest), and I showcased it by placing it right in the center.
As it happens, the same things are fresh from the garden at the same time this year!
This is a veggie-packed quiche! I ended up swapping the parsley for fresh basil, and I skipped the fresh onion and garlic.
This was a delicious, meatless dinner, and I dressed up our quiche servings with a generous spoonful of marinara sauce and some sprinkles of our favorite parm-romano blend cheese. It was hearty and satisfying, and just look at all those layers of vegetables.
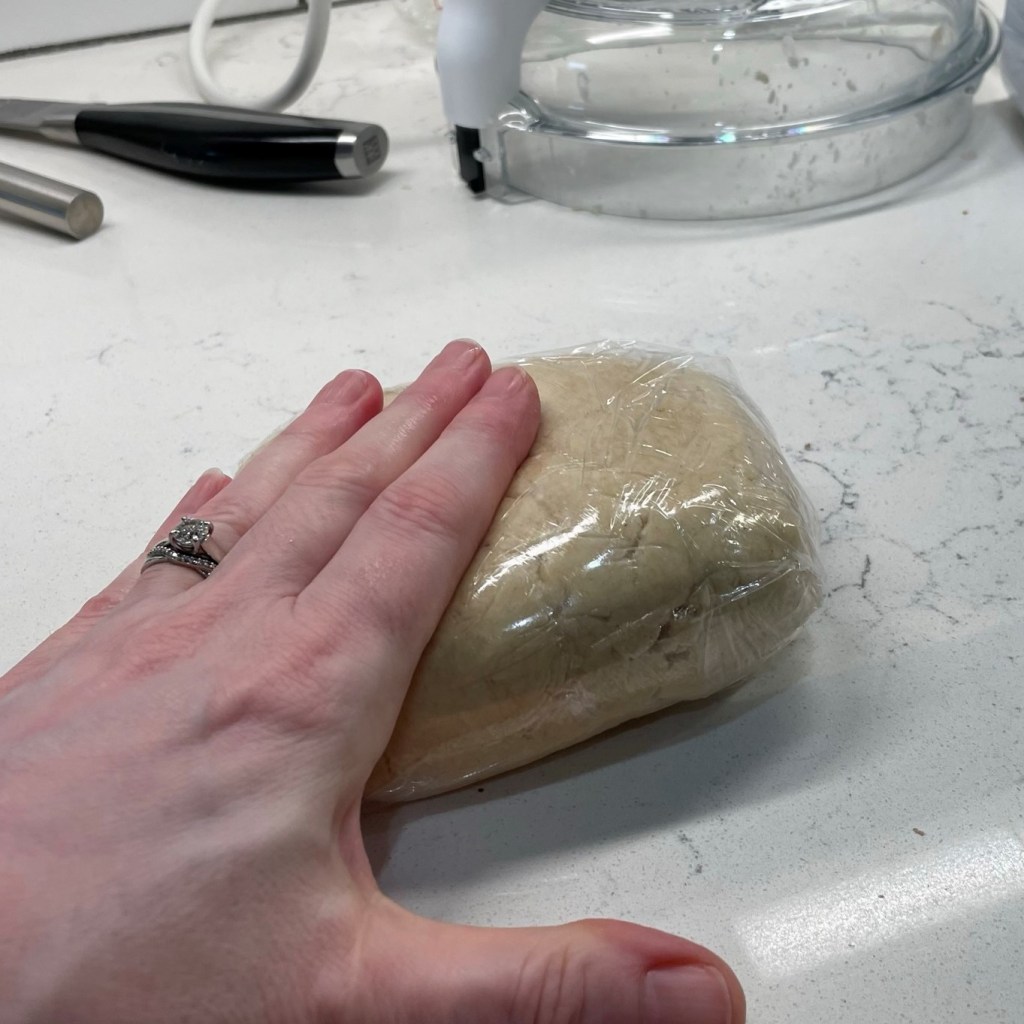
I began with a homemade pastry dough, but there’s no reason you couldn’t use a pre-made crust; be sure it’s the kind you can roll out, rather than a crust already in a tin. Because of the spiral, this will work best in a baking pan with straight sides. I used a springform pan, but a regular 9-inch cake pan with straight sides will work fine as well.
Want to save time? Pick up a roll-out pie crust from the supermarket.
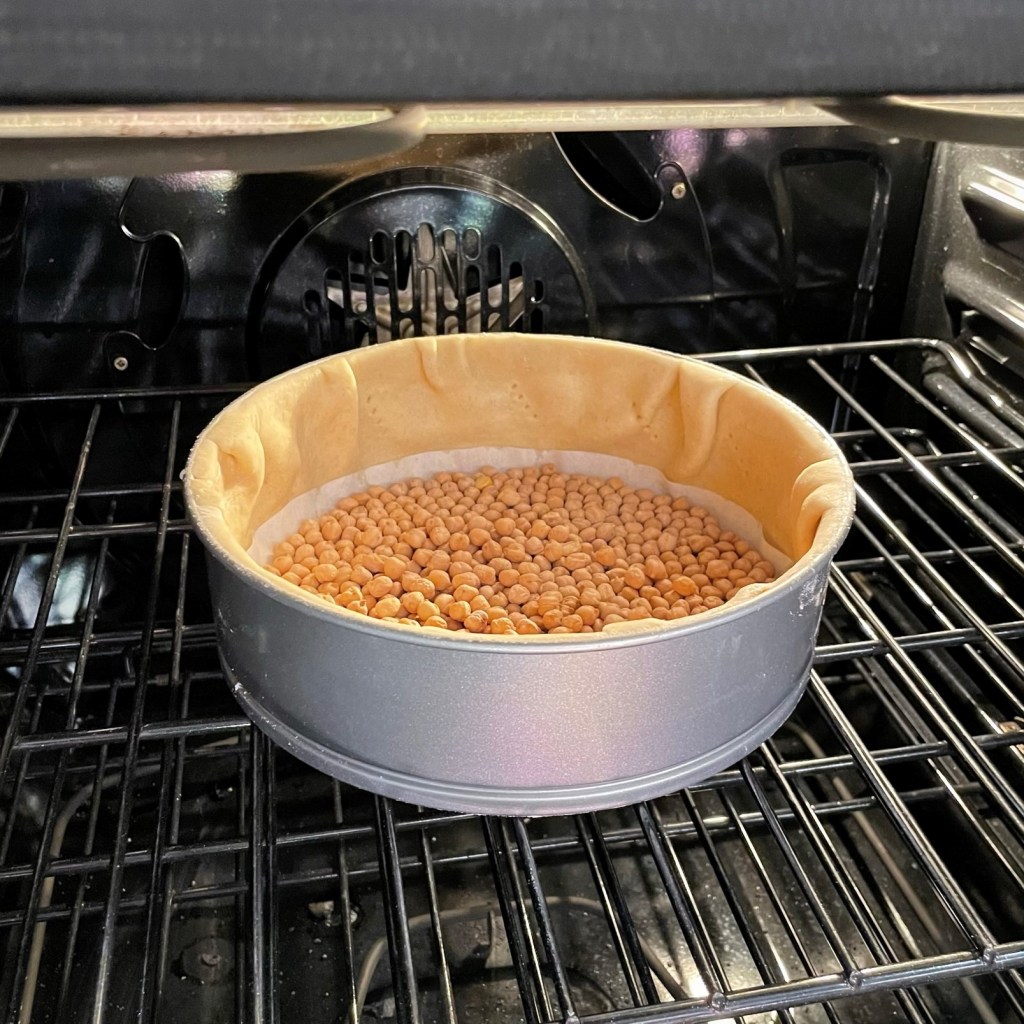
At this point, I made a mistake and you have probably already spotted it. Trimming off the excess dough, even with the top of the springform pan, seemed like the logical thing to do. But I didn’t take into account that the crust would shrink during blind baking, and the pan did not have any slope to keep it in position. The better choice would be to keep a bit of dough hanging just over the edge of the pan. Or, as I suspect was my method in 2017, use a double layer of foil to hold the pastry in place during baking. So, my advice here is, “do as I say, not as I do.” 😊
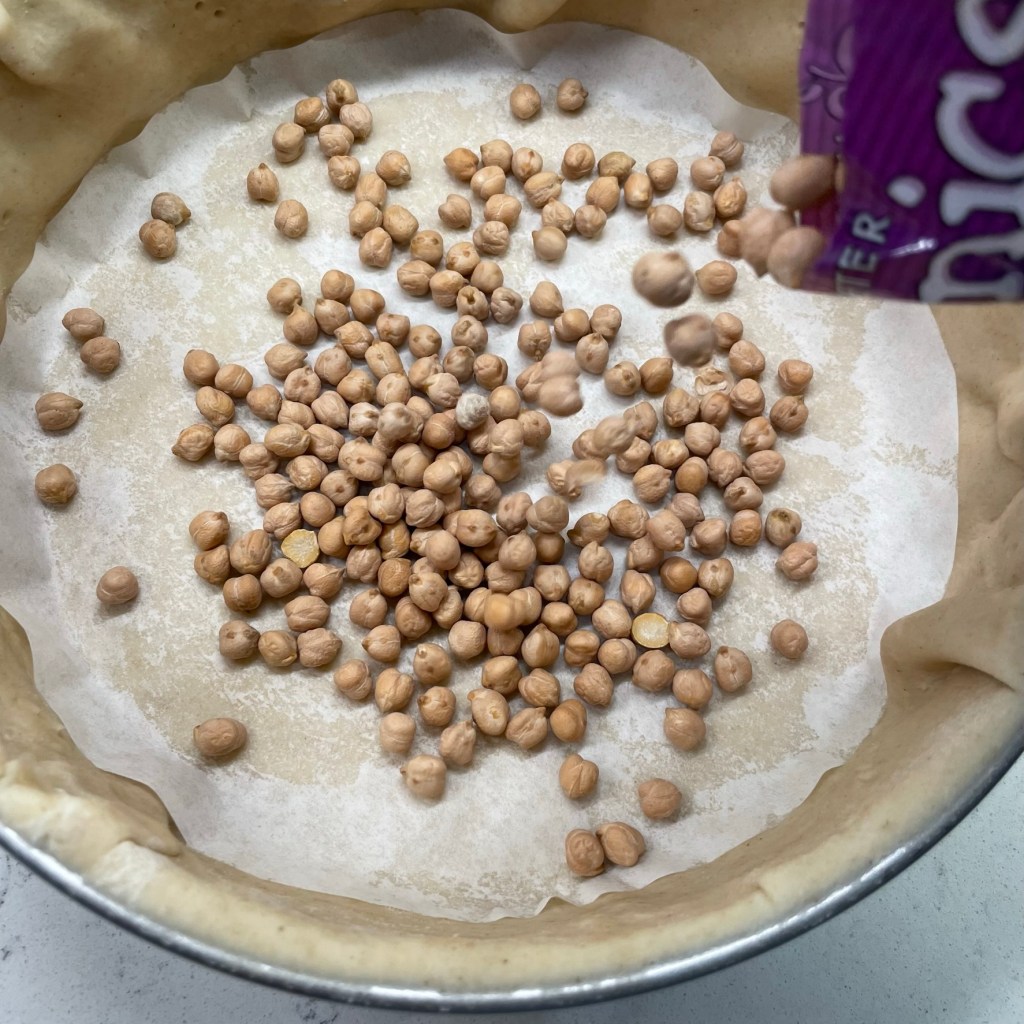
Follow whatever blind-baking method feels right to you, and check on it during baking. I docked a few holes in the pastry (the bottom and the sides), laid a parchment round into the pan and filled a shallow layer of dried beans to keep it from bubbling. One of these days, I will buy some pie weights! As you can see, my trimming method backfired, and the dough slid down the sides a bit. Live and learn—let’s call it “rustic,” shall we?
One day, I will splurge for ceramic pie weights. Until then, I’ll use dried chickpeas. 🙂
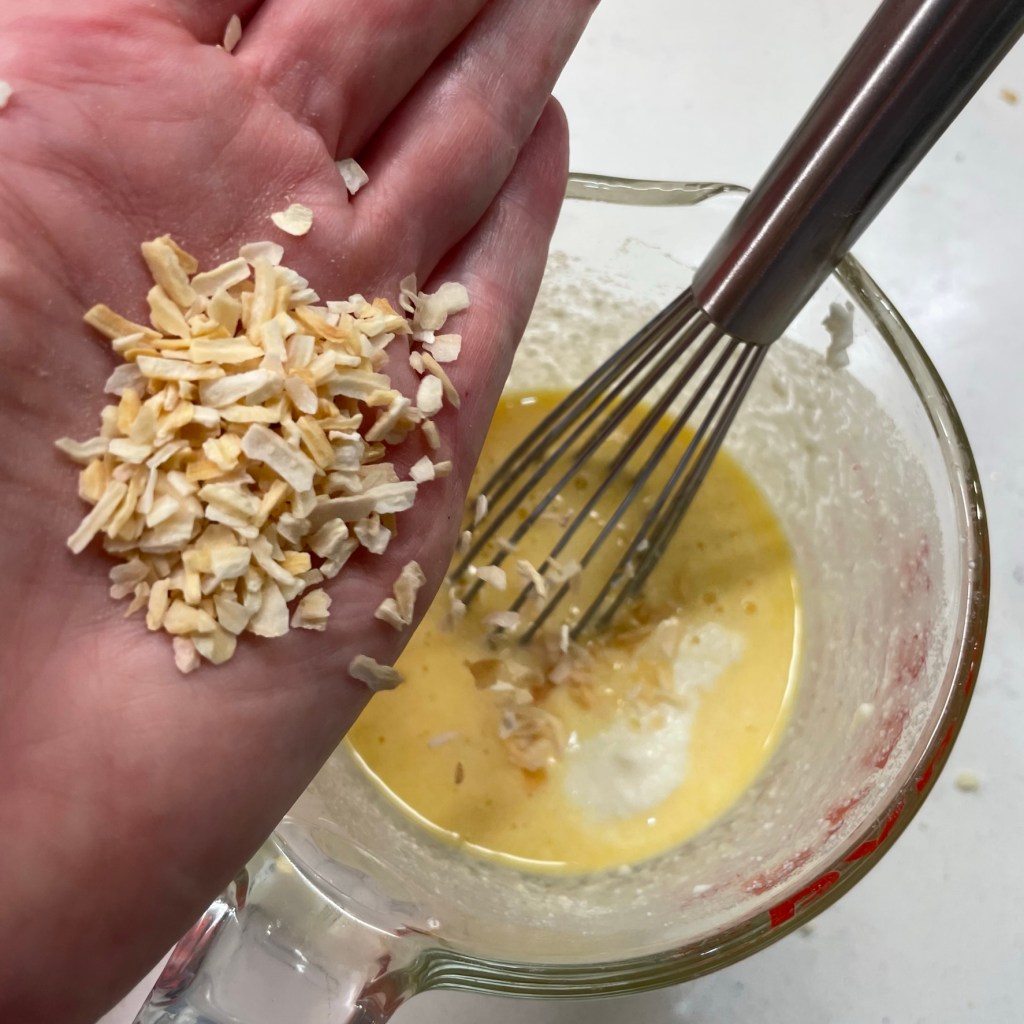
Allow the crust to cool completely while you prep the veggies. Trim and slice the zucchini, squash, eggplant and carrots into 1/4” thin planks. This was a task for the mandolin, which is serious business, so I didn’t attempt to take pictures of that process. Use a knife if you must and aim to keep the planks as uniformly thin as possible. The carrots were cut into thinner, 1/8″ slices. Sprinkle all the veggies with salt and pepper and arrange your ingredients for easy assembly. Combine beaten eggs with ricotta and whisk evenly. Shred the cheese and chop the basil into strips.
Sprinkle all the veggie planks with salt and pepper. Add dried, minced onion to the egg-ricotta mixture.
When the pastry is cooled, layer the zucchini and eggplant slices around the pan, overlapping them slightly to eliminate gaps. Don’t worry about keeping the slices even—it’s natural for some of them to sit higher in the pan—and expect that you may have a few veggie planks left over. Wiggle in the carrot slices wherever they fit, and then sprinkle the shredded cheese and sliced basil over the tart.
This was kind of like an art project. Have fun with it!
Pour the egg-ricotta mixture slowly over the veggie swirl, taking care to let it seep evenly as much as possible. This was a bit tricky with mine, given that my pastry had collapsed in several places, but it worked out OK. In a nod to my 2017 tart, I also placed a cherry tomato in the center before I slid it into the oven. About an hour later, the eggs were set and the veggies were tender, but there was a fair amount of excess moisture pooled on top in spots.
I used a paper towel to blot away the excess moisture, and tucked it back into the oven for another minute or two.
The moisture was not disastrous, and it didn’t make the crust soggy, but next time, I’ll salt the vegetables longer to draw out moisture, the same as I do with eggplant for moussaka or eggplant parm, and my instructions reflect this suggestion, too. More lessons learned. 😊
It’s fun to make, and uses up some of the fresh veggies coming out of the garden! This was delicious for Meatless Monday, or make it the star of the show at a summer brunch.
Ingredients
1 rollout pie pastry (store-bought or homemade; my recipe is below)
1 large or 2 medium zucchini, sliced lengthwise into 1/4″ planks
2 medium Japanese variety eggplant, sliced lengthwise into 1/4″ planks
1 medium yellow or zephyr squash, sliced lengthwise into 1/4″ planks
3 medium carrots, peeled and sliced lengthwise into 1/8″ planks
Kosher salt and black pepper
4 large eggs
1/2 cup ricotta
1 tsp. dried minced onions
1/2 cup shredded gruyere or cheddar cheese
Small handful of fresh basil leaves (or substitute Italian parsley)
Marinara sauce and grated parmesan, for serving
Directions
Preheat oven to 350° F. Prepare and blind-bake the pastry in a 9″ springform or other straight-sided cake pan. Allow it to cool to room temperature.
Spread out the veggie planks and season them generously with salt and pepper. Allow them to rest for about an hour, to draw out some of the moisture. Blot dry with paper towels. Select a smaller, “bendy” slice or two for the center of your quiche.
Whisk together the eggs and ricotta until evenly blended. Stir in dried minced onions.
Arrange zucchini, eggplant and yellow squash planks in the cooled pastry crust, overlapping slightly and alternating veggies for visual interest. Wrap the reserved slices tightly around your index finger and place it in the center (it will unwind to fill up the space). Tuck carrot slices in wherever you can make them fit.
Scatter shredded gruyere all over the veggie spiral. Slice or tear the basil leaves and scatter those over the quiche as well.
Carefully pour the egg mixture over the tart, taking care to let it seep down between the veggie planks. The mixture may or may not come all the way to the top.
Bake the quiche at 350° F for about an hour, until eggs are fully set and vegetables are softened. Let it cool at least ten minutes before slicing and serving.
Use your favorite pie pastry recipe, or take a shortcut with a store-bought, roll-out crust. Below is the recipe I used for mine.
Ingredients
1 cup all-purpose flour
1 cup whole wheat pastry flour (or white whole wheat)
1/2 stick unsalted butter, cold, cut into small cubes
1/8 tsp. kosher salt
1/3 cup very cold water
Directions
Combine the two flours and salt in the bowl of a food processor. Pulse one or two times to evenly mix.
Scatter the butter cubes all over the flour. Pulse about five times until the butter bits are smaller and coated in flour.
Slowly pour the cold water into the chute of the processor. Run continuously as you add the water, and mix just until the dough forms a ball. Turn the dough out onto a piece of plastic film; wrap it up tightly and refrigerate at least one hour or up to overnight.
To blind-bake the pastry, preheat oven to 350° F. Roll the dough out on a lightly floured countertop and drape it into the springform pan; trim off excess, but allow the dough to catch the edge a bit. Use a fork to prick a few holes into the dough; this helps reduce puffing while baking. Lay a piece of parchment over the bottom of the crust and fill with ceramic beads (or dried beans work well). Alternative, gently lay a doubled sheet of foil directly over the raw crust and up the sides. Bake for about 20 minutes, just until pastry is set but not golden. Allow it to cool before filling.
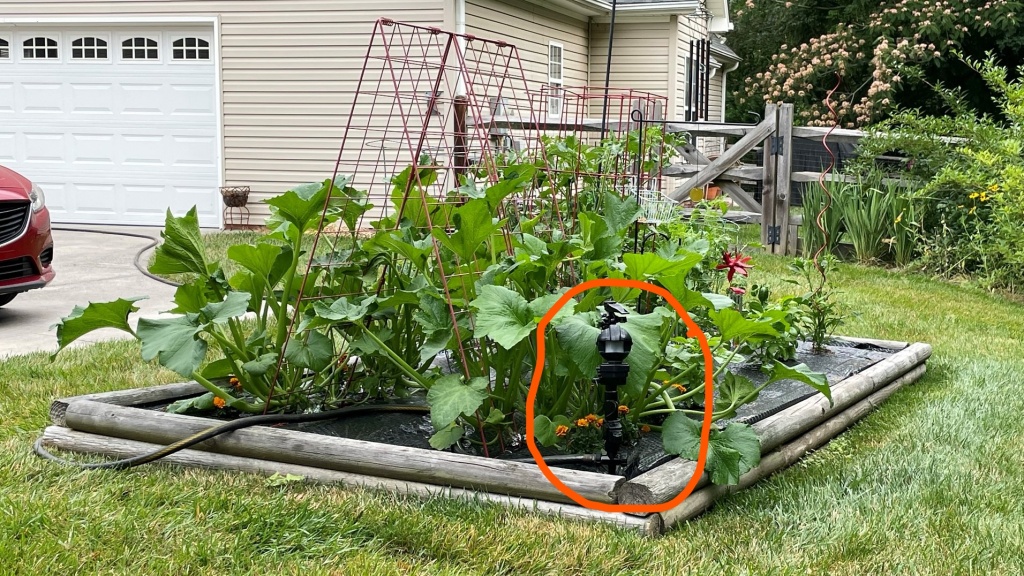
It has been an interesting week at our house, between the saga of our bathroom remodel, which included some high drama that nearly wrecked me (more on that another day), and an unfortunate, middle-of-the-night accident that occurred in the rear corner of our raised bed garden. It’s been going gangbusters, thanks to the vigilant security provided by this little fella:
The Yard Defender!!!
The “Yard Defender” has restored my hope for a vegetable garden, after several (literally) fruitless years of battle against the herd of deer that resides in the woods behind our cul-de-sac. We’ve tried all the home remedy stuff—Irish Spring soap, garlic hung on strings that spanned the tomato cages, human hair, commercial potions with a nasty rotten egg odor, ALL of it—and last year, well, I didn’t even bother. But with grocery prices soaring, I wanted to try again and so I splurged on this motion sensor device, advertised with the slogan, “don’t hurt ‘em, just squirt ‘em!”
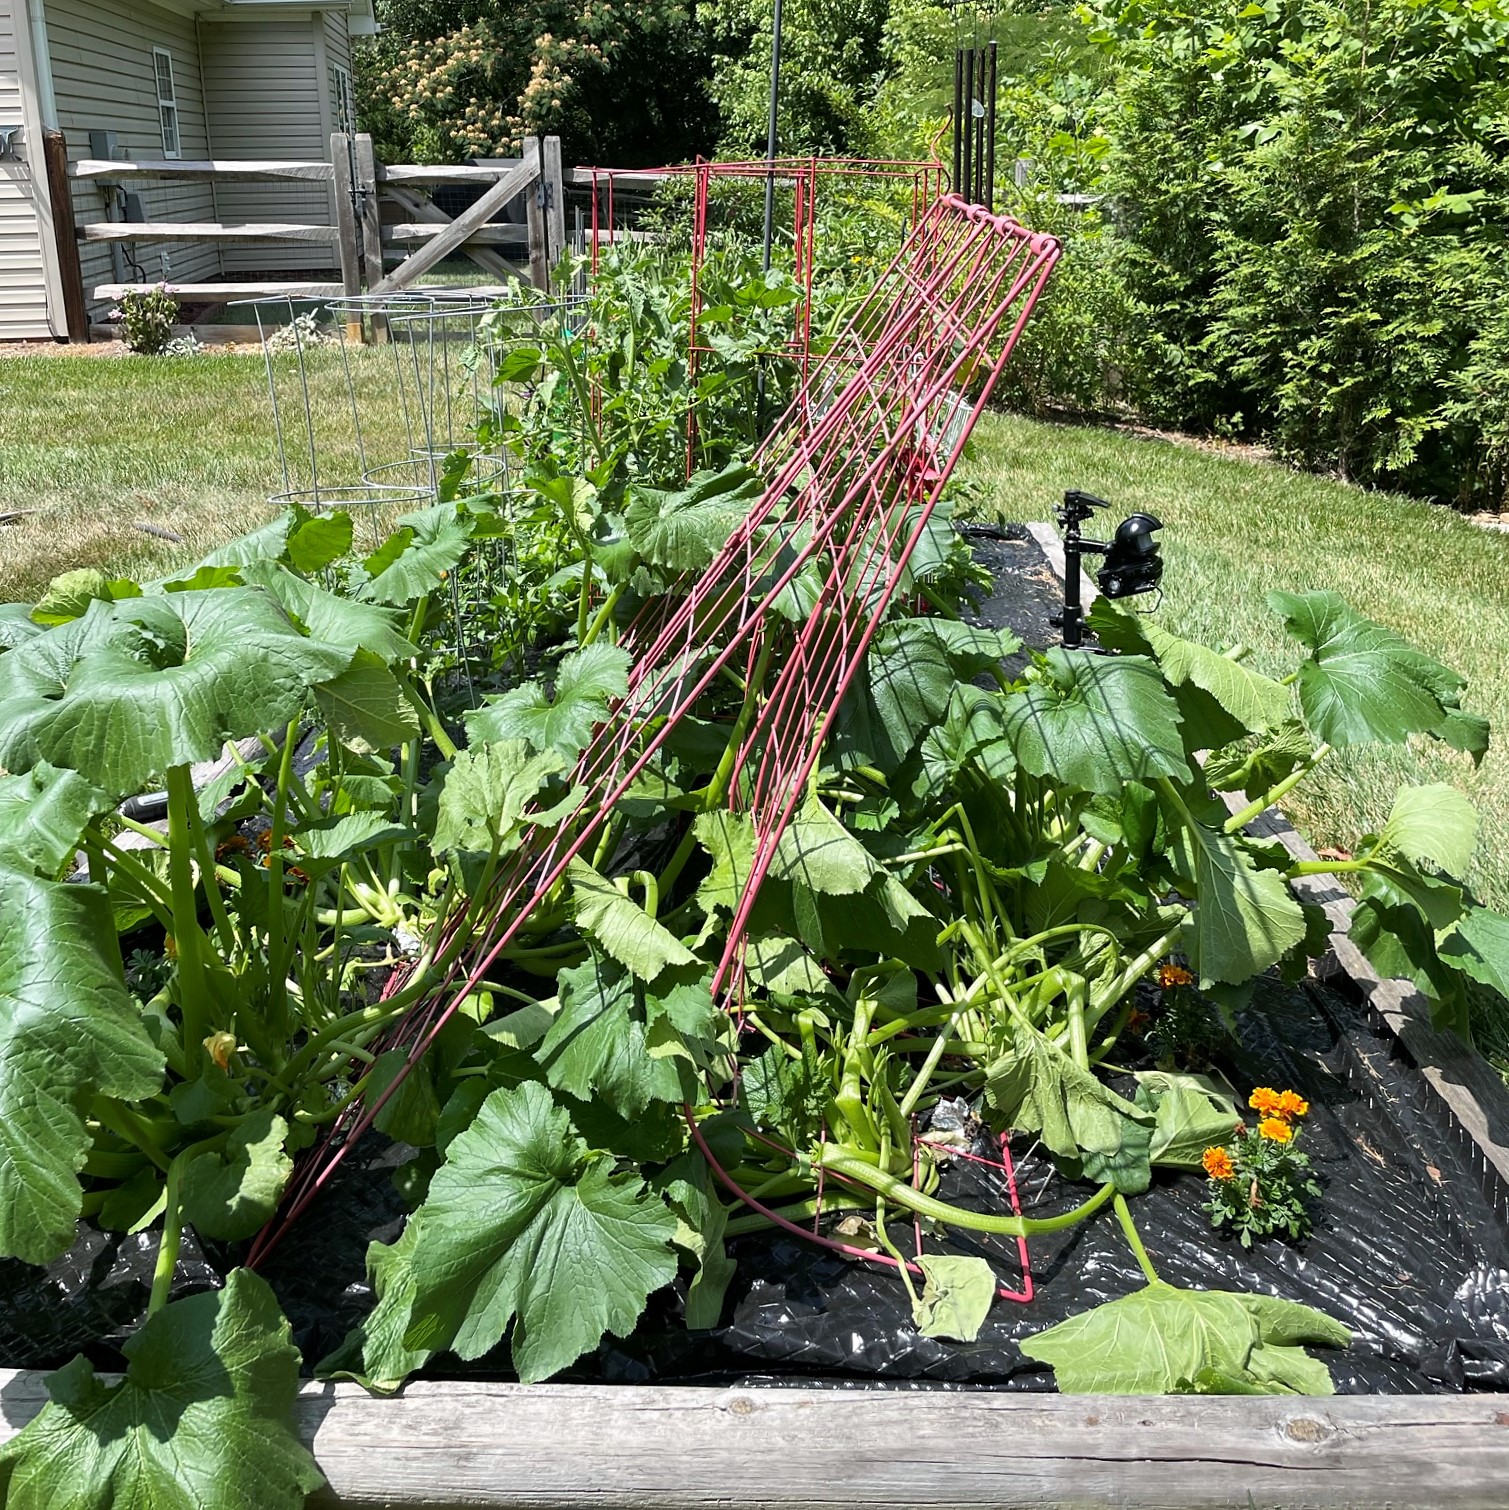
The thing has peripheral vision to spot deer (or other critters, or unsuspecting neighbors) when they approach the garden, and launches a hearty spray of water to chase them off. My garden looks better than ever! Yesterday morning, though, our neighbor texted to tell me that “something had happened” to one of my zucchini plants, and when I went out to investigate, I discovered what appears to be a hit-and-run.
YIKES!
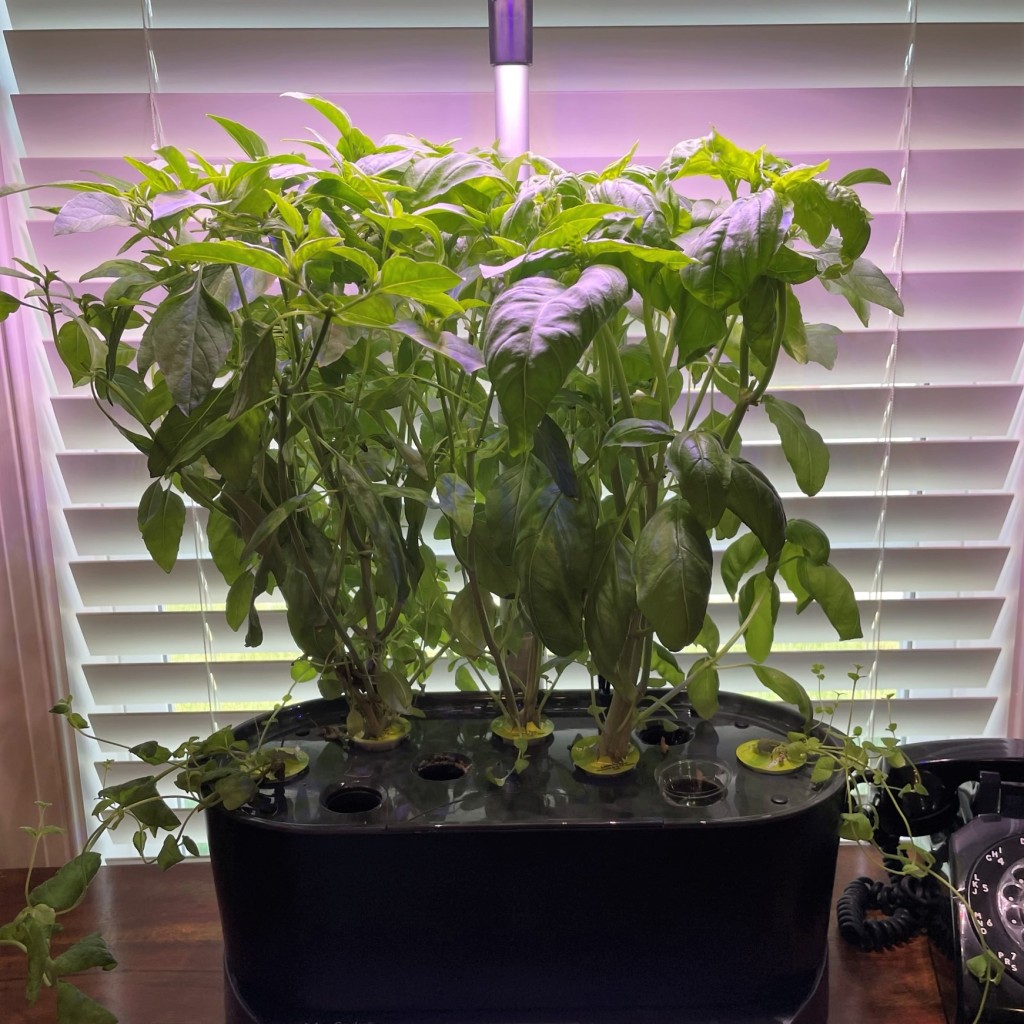
First of all, this trellis is heavy duty, so this was a serious accident. I was trying to train my zucchini to grow upward on both sides of it, to make more space in the garden and encourage more fruit. It was looking so healthy and I’ve just begun to see blossoms forming. My assumption is that a good-sized deer was already standing in the garden when the sensor detected its movement, and the precious thing got so spooked by the abrupt noise and spray, it panicked and fell onto the trellis. I have since moved the Yard Defender to the rear of the garden, where the tomatoes grow (it’s what they are after anyway), and hopefully we can avoid another dangerous incident. For sure, at least one of my zucchini plants is doomed (it was crushed, along with the trellis), but I hope that the other three endure so I can join the chorus of those who are sick to death of zucchini recipes, come August. Until then, I will continue to harvest what is growing out of control on the inside of my house, in the Aerogarden.
Here we go again, with the Thai basil!
I’ve been scrambling to come up with interesting ways to work this herb into “the rotation,” which is an inside joke for me and my husband, who swears we have not eaten the same thing twice since 2016. This is his fault, I say, for marrying a woman who loves to experiment in the kitchen. But using what is local and plentiful is part of what I do, and it doesn’t get more “local” than the dining room. I have in mind to substitute it for mint in a Mojito this weekend, and I’ll let you know how that goes. For now, let’s talk about what went into this bowlful of goodness.
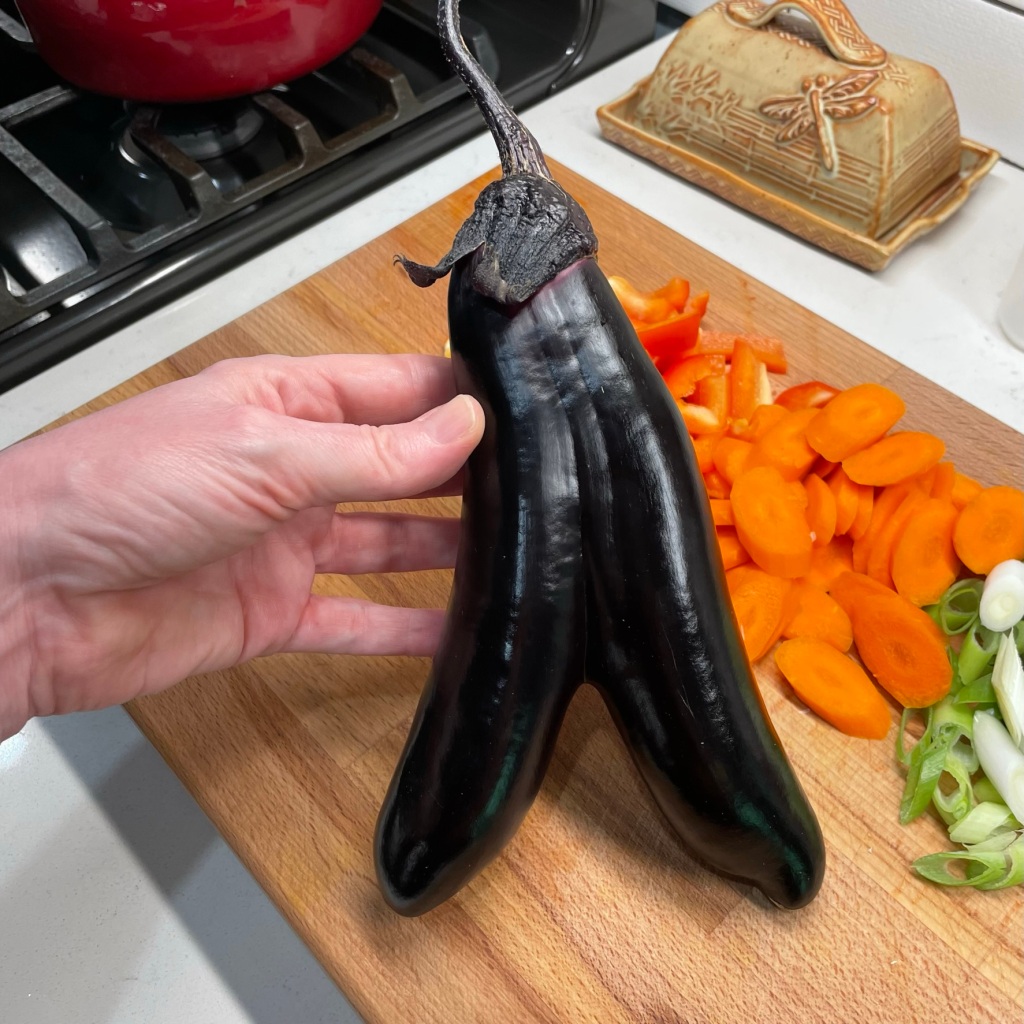
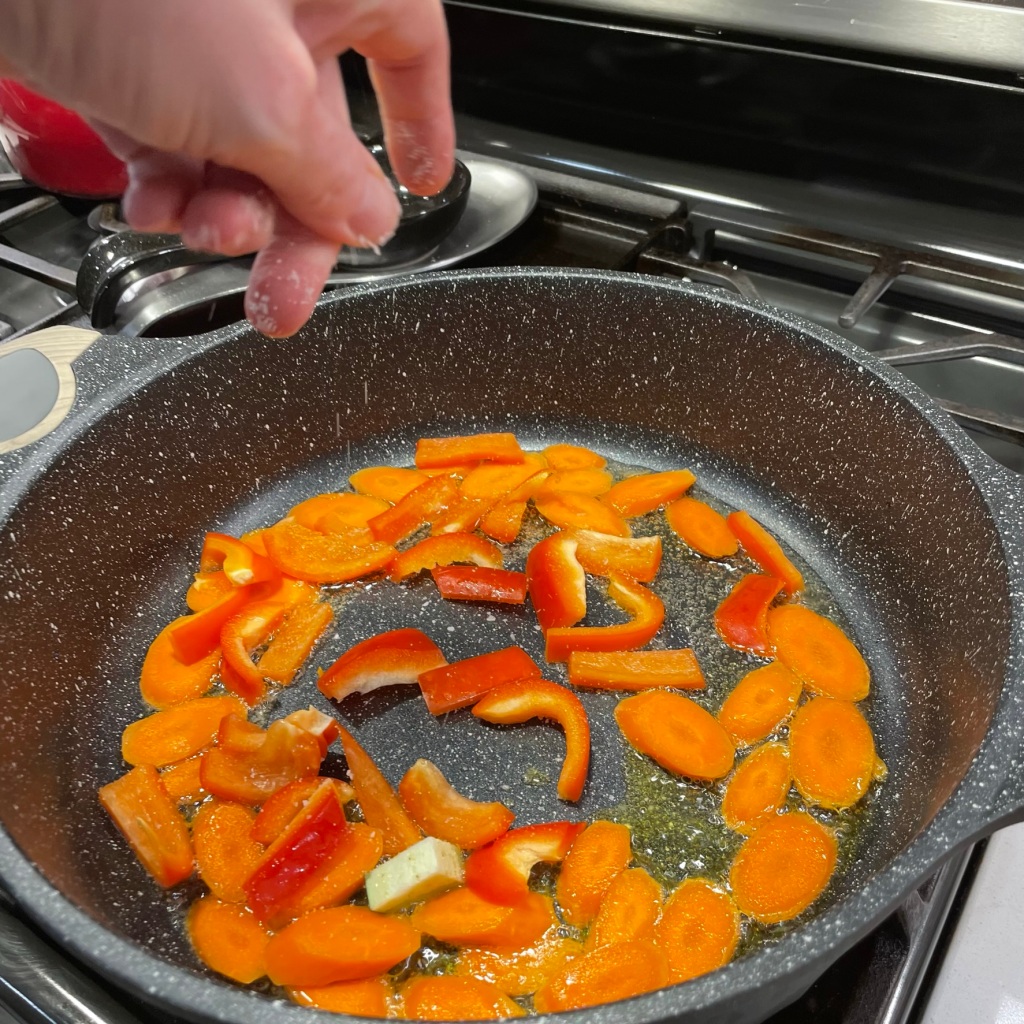
Some of the vegetables in this recipe were the same as in the Thai Basil Chicken I shared last week, but there were plenty of swaps that make this dish different. I used carrots and red bell pepper again, swapped in scallions for regular onions, and cut up the first fruit of my 2022 garden, a wonky eggplant!
My aunt said this twinsie eggplant looked like a pair of pants wearing a hat! 🙂It is coincidence that these are the same brand. The flavors are exquisite when combined!
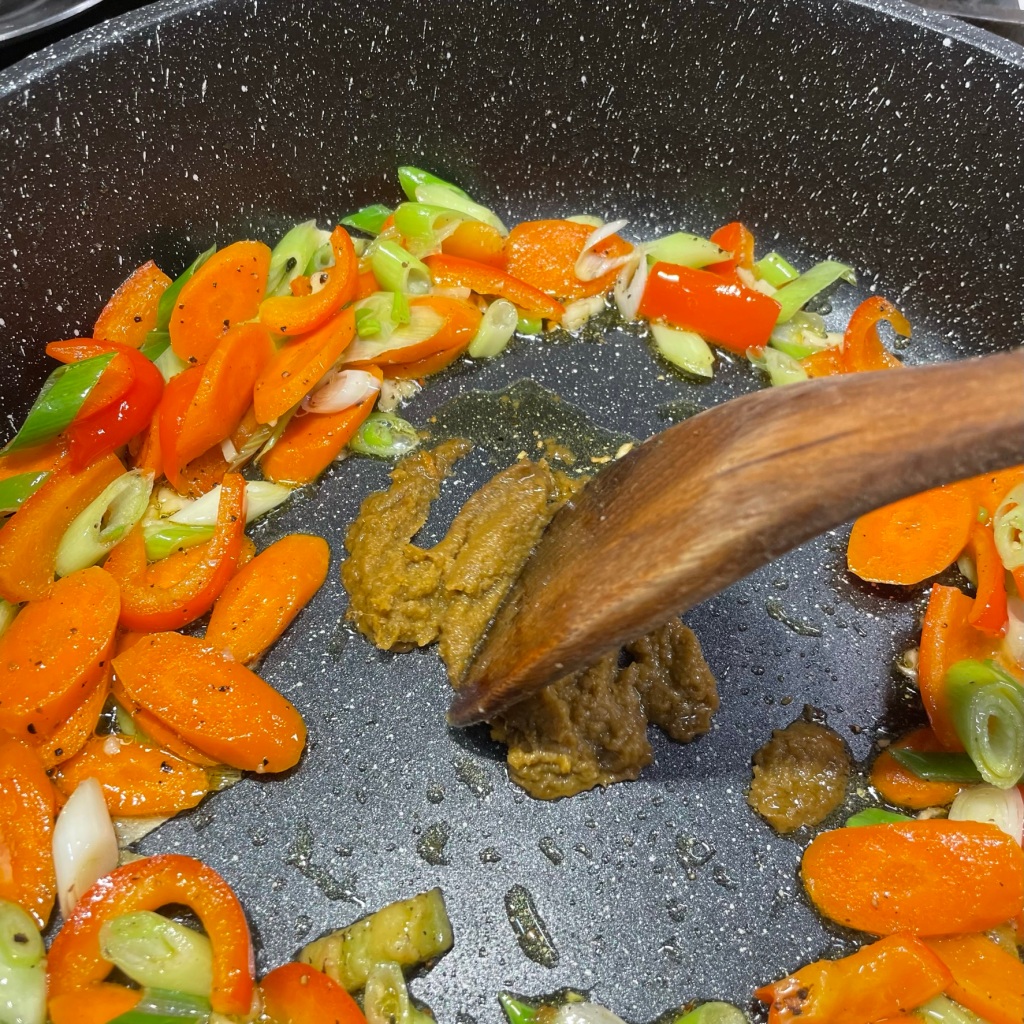
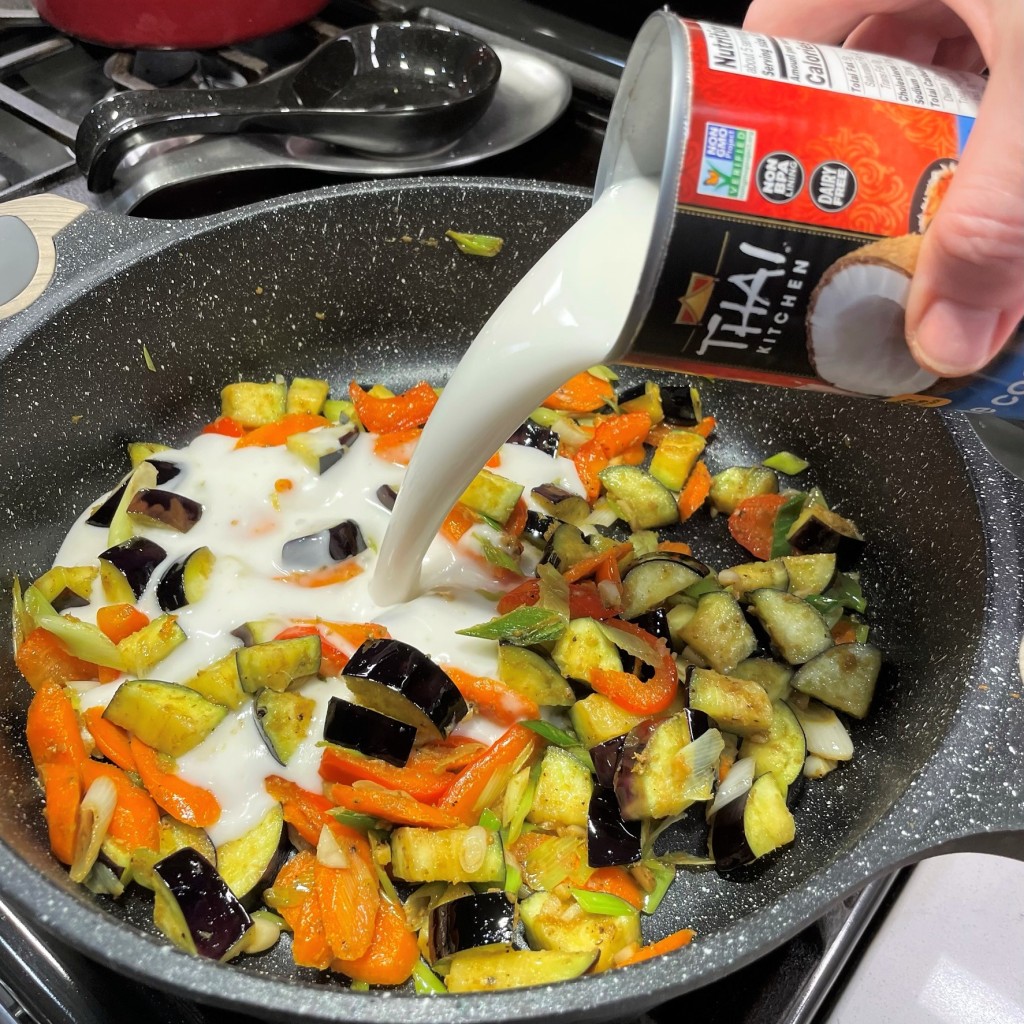
Shrimp was my protein and I shifted the sauce to a green curry-coconut vibe. Green curry is a vibrant blend of warm spices mixed with lemongrass, kaffir lime, green Thai chile and galangal, a rhizome that looks like ginger but tastes more herbal. It would be quite complex to make green curry from scratch, but a store-bought paste makes this recipe very simple. The aroma of the paste is pleasantly intoxicating, especially when it first hits the oil in your pan. Coconut milk is a natural companion for the flavor of any curry, and for this recipe, I used a “light” version to reduce the overall fat, but a full-fat coconut milk is fine and would lend more of the coconut flavor.
My first taste of green curry (circa 2005) was a pleasant surprise, and I was introduced to it by an unexpected culinary expert—my then-quite-young stepdaughter. She became a foodie at an early age, in part by my influence, but also that of her mother, who introduced her to Thai food when she was still in elementary school. Yes, when other kiddos were clamoring for fried chicken fingers at chain restaurants, our global flavor-savvy girl was scouting out the nearest sushi joint or Indian restaurant. When I had mentioned to her on a family dinner out in a Thai restaurant that I didn’t care for curry, she asked, incredulously, “not even green curry?” She offered me a taste of her favorite green curry chicken, and I was hooked. I’ve made it at home a few times in recent years, but this was my first time with shrimp. Delicious!
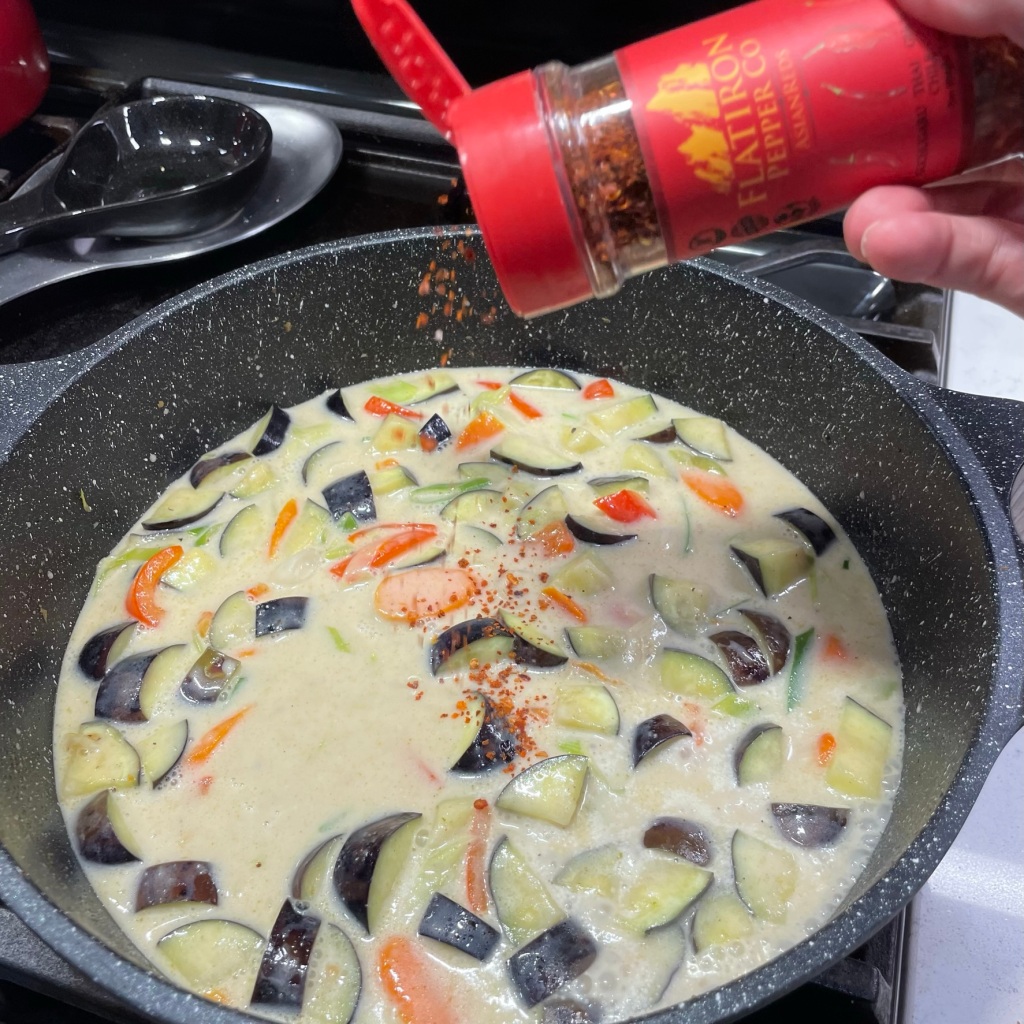
There is a bit of heat in my rendition of this dish, not only from the green curry paste, which leans spicier than red and yellow curries, but amped up by a few shakes of another fun ingredient in my pantry—Asian Reds hot chile blend, available online from the Flatiron Pepper Co. website. To be clear, I don’t get paid to brag about them, but I probably should, given that we own a bottle of darn-near every variety they make. What sets this company apart from others is that it offers region-specific blends of peppers that are otherwise hard to find. The Asian Reds includes Thai chile and ghost pepper, both of which are damn hot. I heartily recommend it for adding heat to any Asian-inspired dish, but a quick shake of the red pepper flakes you probably already have will work in a pinch for this recipe, or you could mince up half of a red jalapeno into the veggie mix for similar heat effect.
You won’t find these varieties of peppers just anywhere. Use it sparingly because it is HOT.
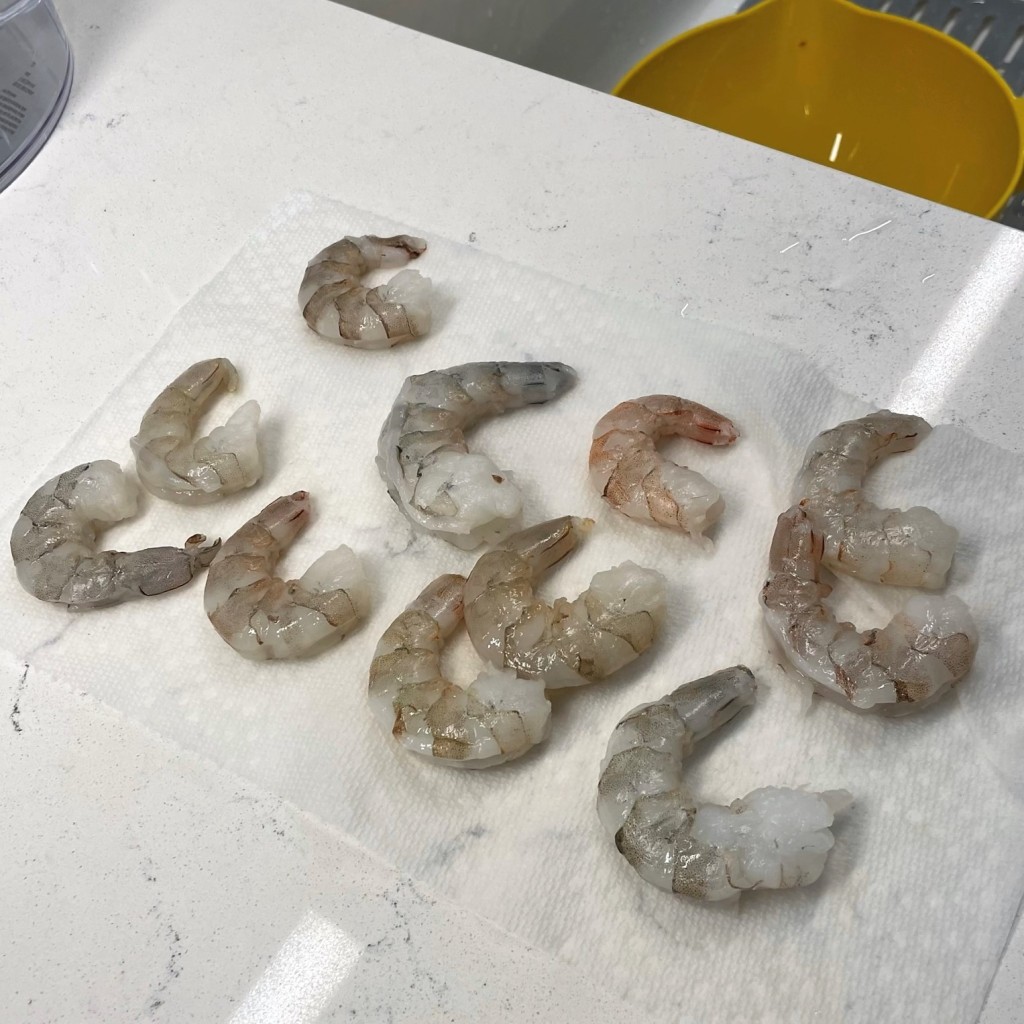
My advice for making this dish is the same as most every Asian-inspired recipe, and that is to get all your ingredients lined up and ready before you begin because things move quickly once the oil hits the pan. That means chop up your vegetables, clean and de-vein your shrimp and get your rice cooking (you’ll want that, for soaking up every last drop of the flavorful green curry sauce). Place a heavy bottomed pan over medium-high heat and add a couple of tablespoons of high-heat oil, such as canola, peanut or coconut. Give a quick stir-fry to the carrots and peppers first, because they take longer to cook. Then, add the scallions and garlic and toss long enough for the initial steam to dissipate. Move the vegetables to the outer edges the pan, drop another tablespoon of oil to the center and plop the green curry paste onto it. Prepare to be entranced by the aroma!
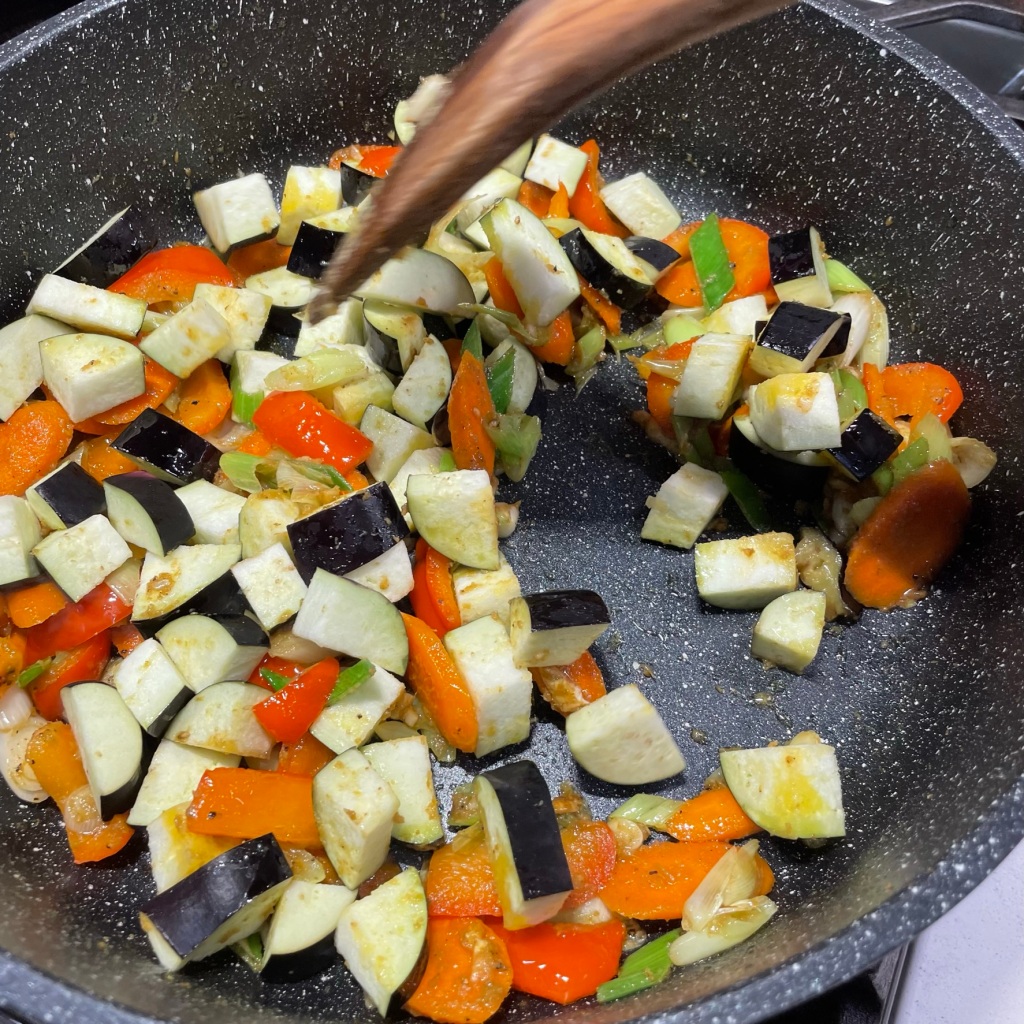
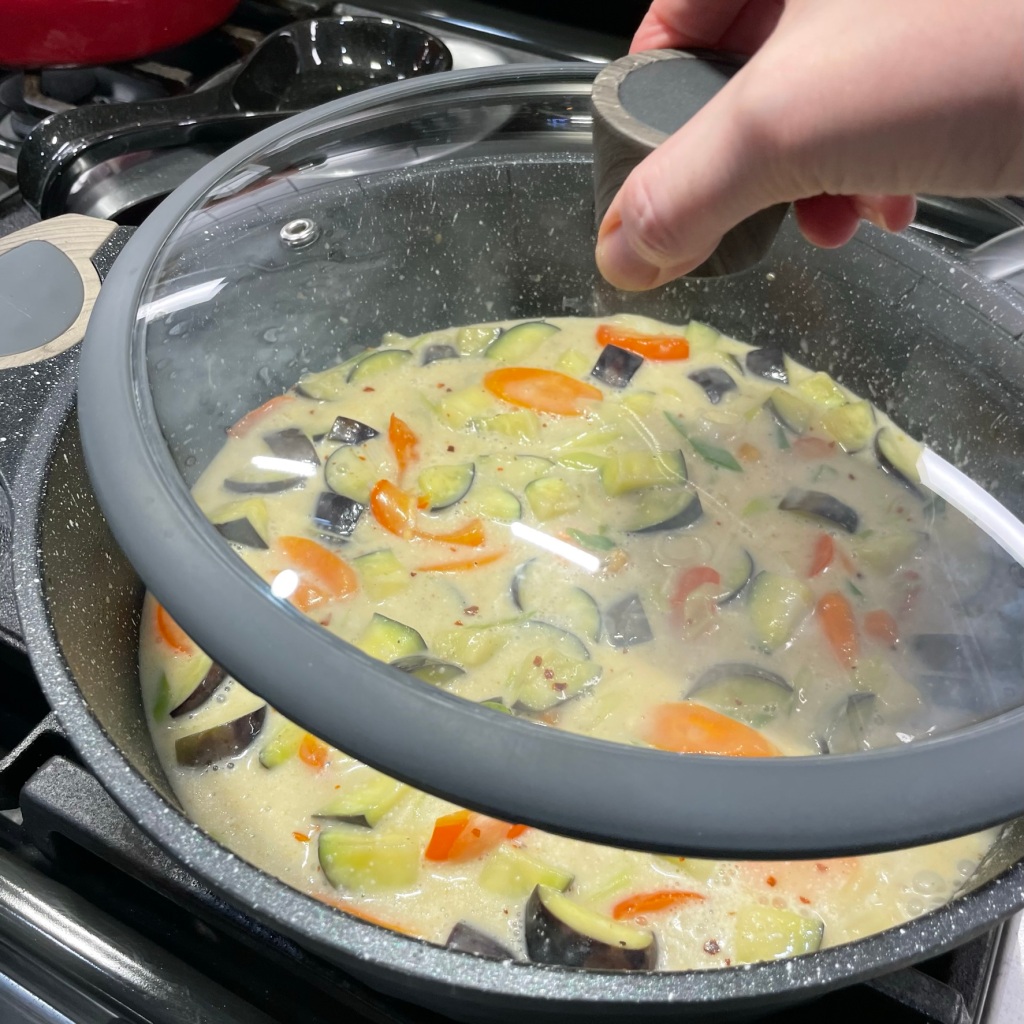
When the oil sizzles around the green curry paste, use a utensil to break it up and toss it with all the vegetable ingredients, so that everything is covered in a light film of the curry paste. The eggplant should go in last, given its tendency to instantly absorb oil. Toss everything just enough to coat the pieces, then add the entire can of coconut milk and stir to blend. Sprinkle in hot pepper flakes (if you want the extra heat), reduce the heat to low and cover the pan to simmer for 3 minutes. This gives the vegetables time to soften, and allows the green curry flavor to permeate everything.
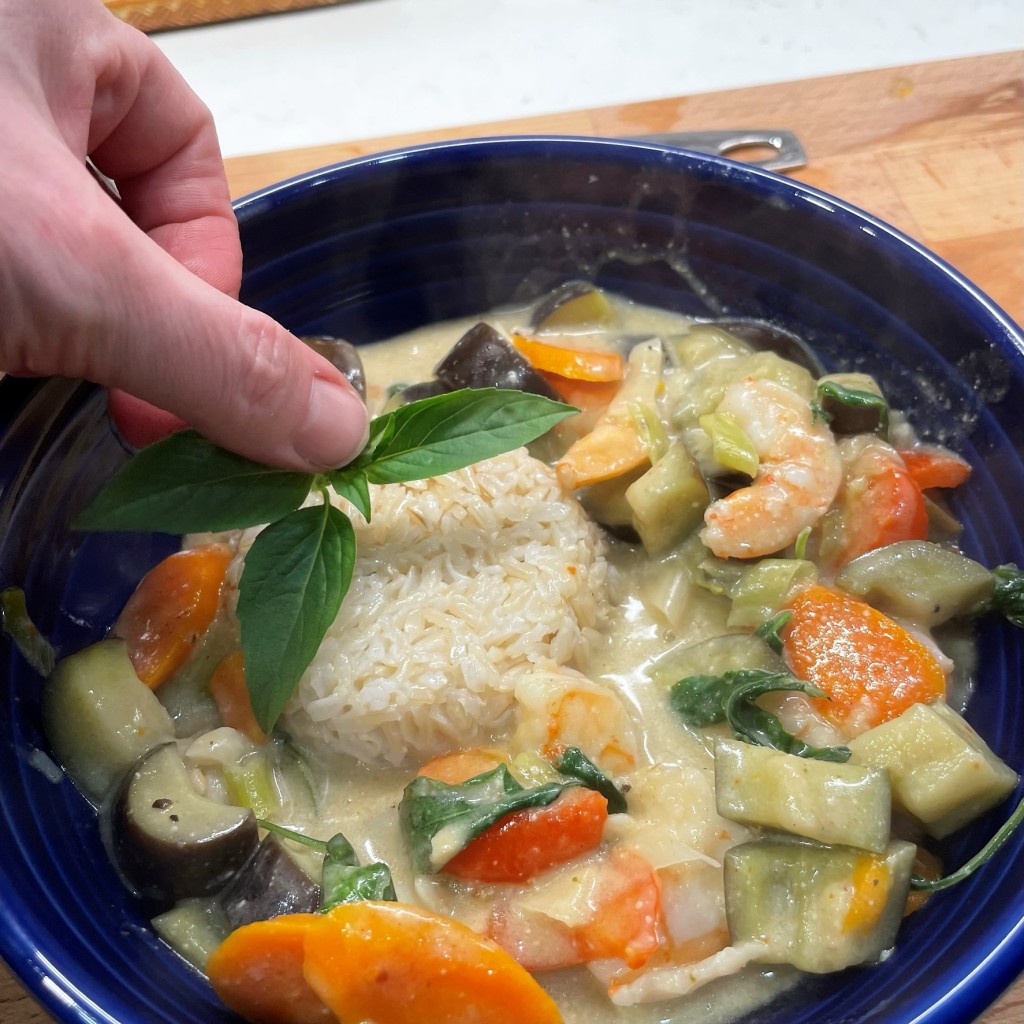
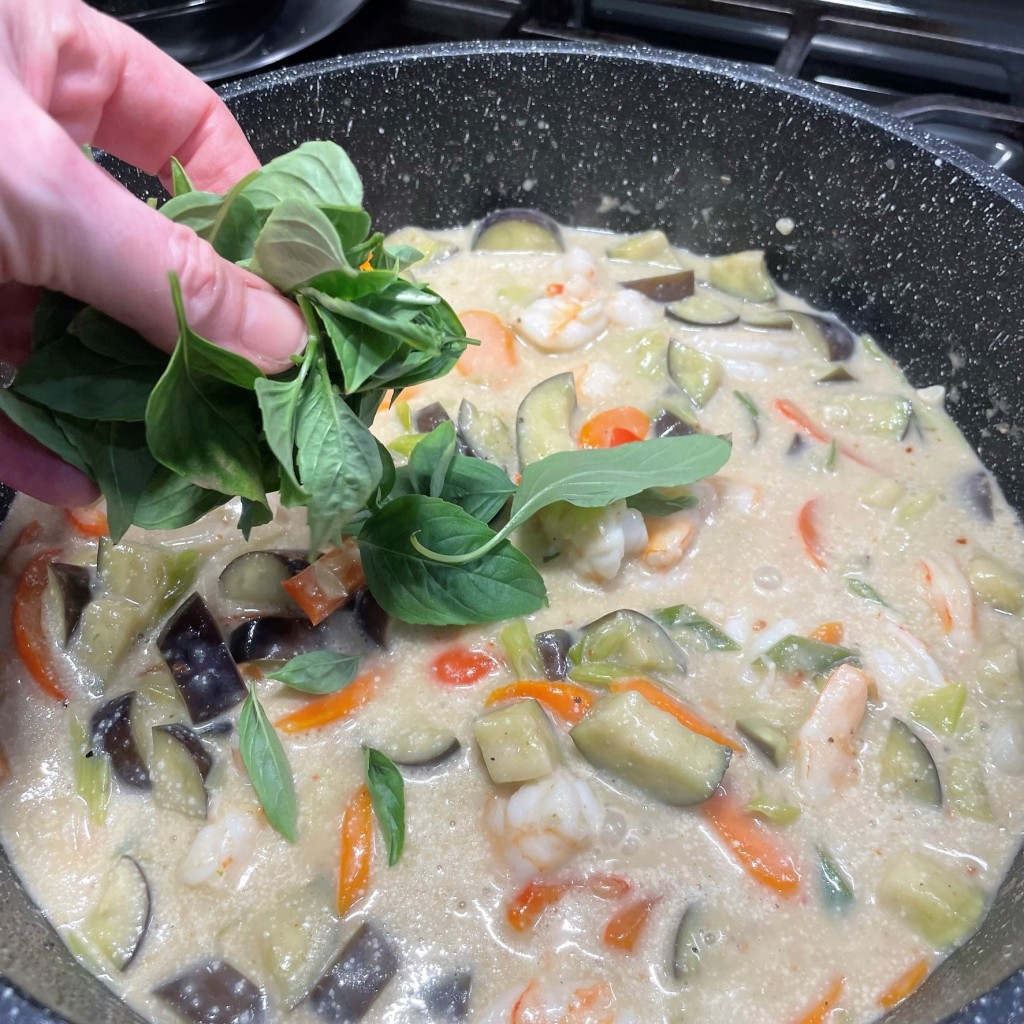
Add the shrimp to the pan and stir to submerge them beneath the simmering liquid. Depending on the size of your shrimp, it should only take 3 to 5 minutes for them to lose their pink color, so watch them closely. Add a handful of Thai basil and stir to wilt it into the dish. Serve immediately with a portion of jasmine rice.
Garnish with a pretty Thai basil leaf if you want to be fancy. 😉
This recipe comes together quickly and with ease, thanks to a store-bought paste that captures all the important flavors of Thai green curry. Substitute chicken or tofu if you wish. If you don’t have Thai basil, you could substitute regular basil or omit it altogether.
Ingredients
3 Tbsp. high-heat cooking oil, such as canola, peanut or coconut (you will divide this for cooking the vegetables and blooming the curry paste)
1 red bell pepper, sliced and halved
2 medium carrots, peeled and cut on a bias
3 scallions, cut on bias (white and green parts)
3 cloves garlic, chopped
1 medium Japanese eggplant, cut into bite sized chunks
2 Tbsp. prepared green curry paste
1 can light coconut milk (this is the culinary variety, not cartons for drinking)
a few shakes hot red pepper flakes, for extra heat
1/2 pound fresh shrimp, peeled and deveined
a handful of fresh Thai basil leaves (optional but delicious); substitute regular basil if desired
hot cooked jasmine rice, for serving (I used brown jasmine rice for extra flavor and nutrition)
Directions
Heat a large, heavy-bottomed pot over medium-high heat. Add 2 tablespoons of oil and stir-fry the carrots and red peppers for about two minutes to give them a head start. Season with salt and pepper to taste. Add scallions and garlic and toss to coat and wilt the scallions.
Move the vegetables to the outer edge of the pot. Add 1 tablespoon of oil to the center and spoon the green curry paste onto the oil. This will “bloom” all the flavors of the paste. Break it up a bit with your cooking utensil, then stir it together with the cooked vegetables. Add the eggplant and toss to coat.
Pour the entire can of light coconut milk into the pot and gently stir to blend. Sprinkle on hot pepper flakes (if using) and adjust salt and pepper to taste. Reduce heat to low and cover the pot, simmering for about three minutes, or until the mixture reaches a slight boil.
Add the shrimp pieces. tossing lightly to submerge them beneath the simmering liquid. Keep a close eye on them, as they will cook in as few as 3 minutes, depending on their size and original temperature.
Stir in Thai basil leaves until wilted. Serve immediately with hot cooked jasmine rice.
The summer season brings all the garden-fresh vegetables I love, including zucchini and eggplant, which I would definitely be growing in our little garden plot if it weren’t for the deer. Year after year, I have tried in vain to grow my own veggies, and the increase of deer activity on our property and that of our neighbors has been almost humorous. Almost.
Gardening, for me, started as a fun, nature-loving adventure but has rapidly declined into a frustrating drama, and now we have this elevated box in our yard, where we cannot grow anything but marigolds and basil, which have proven to be the only things our local deer detest. Last year’s garden was demolished, right down to the flowers and budding fruit of the eggplants and even the jalapeno pepper plants (which I had been told deer would never eat). We have tried all the folk remedies on the internet—human hair, shavings of bar soap, peppermint oil, so-called deer repellent, and even a weird concoction I made from rotten eggs, cayenne and dish soap. That last remedy had near-catastrophic results, but I won’t embarrass my husband again with that story (you can read it here, if you’d like). This year, we didn’t even bother planting a garden, and I’m contemplating turning the raised bed into some kind of wildflower bed. I get exasperated just thinking about it.
To make up for a lack of homegrown veggies, we are regularly visiting our weekly Cobblestone farmers’ market, which features a variety of vendors offering fresh produce as well as pastured meat, eggs, organic mushrooms, jams and preserves, and even handmade alpaca wool products. It’s a fun way to spend an hour on a Saturday morning, and this past weekend, we came home with everything I needed for a new batch of ratatouille. Ah, my favorite veggie-centered summer meal!
Classic ratatouille ingredients = zucchini, eggplant, pepper, onions (leeks this time), tomato and herbs de Provence!
Me being me, though, I cannot simply chop up these ingredients and make a “traditional” ratatouille, which would be a rustic casserole-meets-stew kind of thing. I have to twist it up! My culinary muse inspired me this time to combine the French classic dish with another favorite comfort food—lasagna. I figured that I could infuse my herbs de Provence seasoning into a ricotta mixture with lemon zest and some grated cheese and that it would be the “glue” to hold the other ingredients together inside a rolled-up lasagna noodle. The eggplant and zucchini would be sliced and roasted, and the red pepper would be worked into the sauce. This is how my mind sees a pile of ingredients, and the end result was exactly as I had imagined, both visually and in perfect summer flavor. Delicious!
Inside, you can see and taste all the flavors of a summer ratatouille!
This reimagined one-dish meal took mostly time to put together; it was not at all difficult. I cannot say definitively how much time is needed because I was cooking all day, in between work emails and other home tasks. I will say that it was mostly passive time; I was either waiting for things to lose moisture or to finish roasting or to boil or bake. The rest was just slicing, chopping and stirring, and there’s no particular order that must be followed. You could even make everything a day ahead and just assemble and bake it the next day.
I had so many things going on at once here! But mostly, I was just waiting…
And the broiler was busy blistering up the skin on my bell pepper.
The entire ratatouille-meets-lasagna project weaved itself nicely into my busy day, and because each ingredient received its own treatment, the simplest way I can describe it is to share the process of each component. I’ll share a PDF version of the recipe at the end if you want to try it, but I’ll let the pictures tell the story in today’s post. Here we go! 🙂
The Ricotta Filling
Drain excess moisture from the ricotta by placing it in a mesh strainer over a bowl. Let it rest about 45 minutes.
It’s surprising how much moisture will drain from the ricotta, which means it will not make these lasagna roll-ups soggy!
Ricotta add-ins, clockwise from top: freshly ground black pepper, lemon zest, egg yolk, herbs de Provence, parm-romano blend.
The Eggplant
Slice the eggplant into uniform 1/2-inch slices.
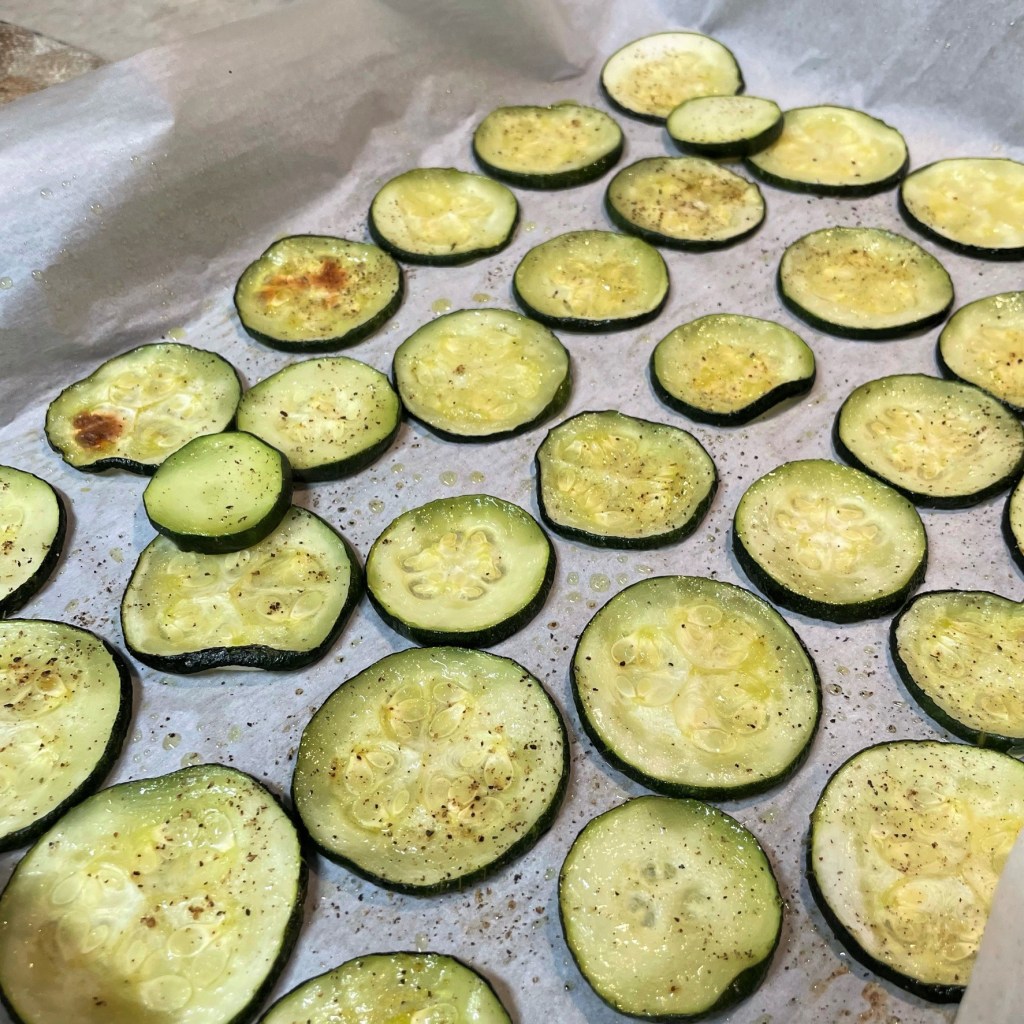
Salt and sweat the eggplant by placing it between layers of paper towel. This draws out moisture for better roasting.
For easy roasting, use olive oil spray to lightly coat both sides of the eggplant slices. Season them with fresh pepper, too.
The Zucchini
Do the same with the zucchini slices, but cut them into uniform 1/4-inch slices.
Turn slices frequently until most of the moisture is cooked out.
The Red Bell Pepper
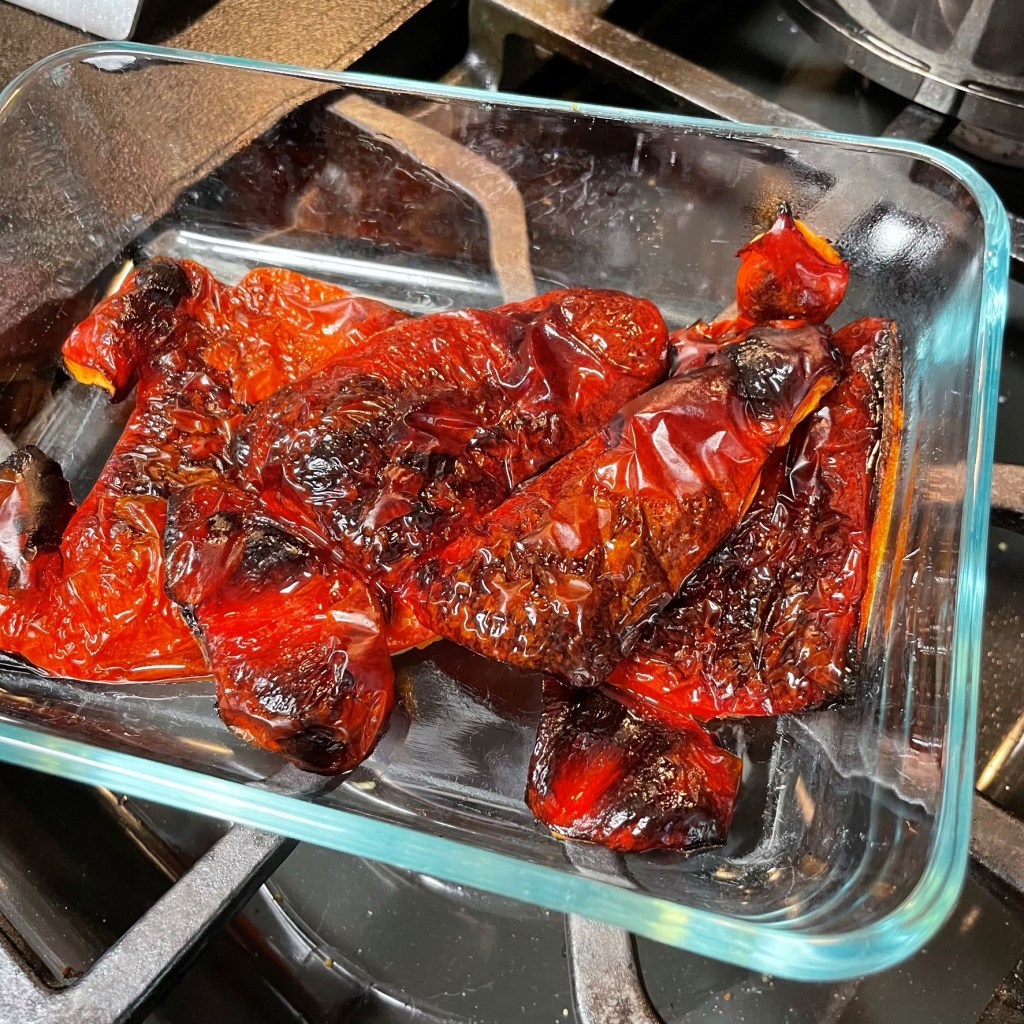
I prefer to cut up peppers before broiling, so I don’t have to deal with the seeds when it’s all slippery. Press down firmly to flatten for even blistering under the broiler.
When the peppers are blistered all over, transfer them to a dish and cover it with a lid or foil.
After about 20 minutes, the skins will be loosened for easy removal.
The Onions
Slice the white and pale green parts of the leeks and swish them around in cold water. Allow time for sandy grit to settle to the bottom of the bowl.
After draining and pressing the leeks dry, saute them in a little olive oil until softened and lightly browned.
The Tomatoes
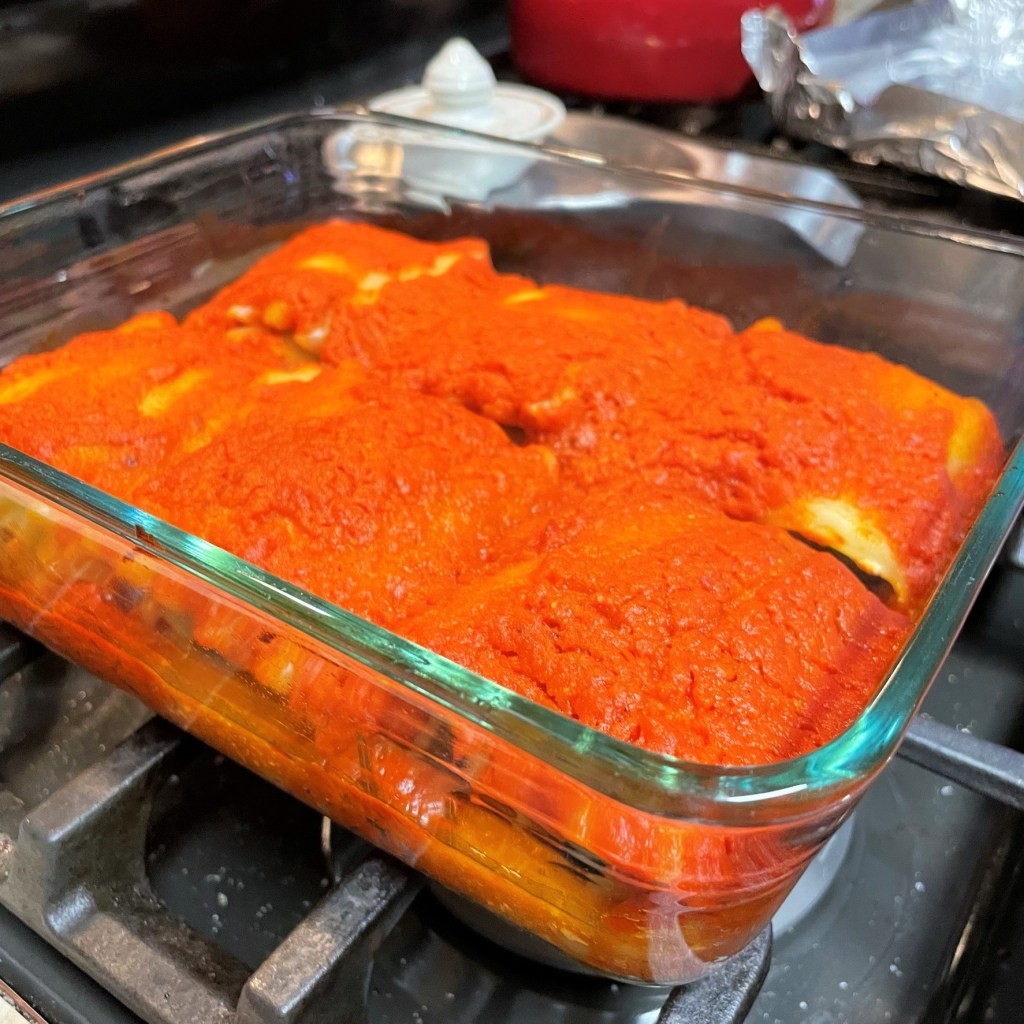
The only classic ratatouille ingredient remaining is tomato, and though my ingredients photo displays a big, lovely heirloom tomato from the farmers’ market, I thought better of it when I began cooking my ratatouille. The heirloom tomato would have been full of seeds and too juicy for this dish, so I cast it aside and used half a can of San Marzano tomatoes instead to produce a fusion sauce, together with the roasted red pepper and a healthy dose of garlic. This sauce was similar to the roasted red pepper sauce that my husband, Les, discovered last year, but it leans more toward tomato than pepper. It was exactly what this recipe needed.
Saute minced garlic and tomatoes in extra virgin olive oil until saucy.
For depth, add in about 1/4 cup dry white wine (or vermouth, as I’ve used here). Simmer several minutes to cook off the alcohol flavor.
Add the roasted red pepper pieces to simmer for the last few minutes, then whiz it up in the blender or food processor until smooth.
Putting it all together
Assembling and finishing my ratatouille lasagna roll-ups was a cinch! I par-cooked the lasagna noodles until they were soft and flexible, spread the ricotta mixture onto them, layered the eggplant, zucchini and leeks and rolled them up!
Spread about 3 tablespoons of the ricotta mixture onto the par-cooked lasagna noodles.
Layer on the sauteed leeks, eggplant and zucchini slices, and roll them up!
Carefully place the rolls (end side down) into a thin layer of sauce. Place them close together in a single layer.
Evenly pour the roasted red pepper-tomato sauce over the ratatouille roll-ups.
Cover the baking dish with foil and bake at 350° F for about 50 minutes.
Be gentle when removing the baked roll-ups. I used a rubber spatula and slotted spoon to lift them from the baking dish.
Oh, and that plump, juicy heirloom tomato I mentioned found its way instead to a BLT, which we enjoyed as a separate meal on freshly baked sourdough bread with local greens and some pastured pork bacon (also from the farmers’ market).
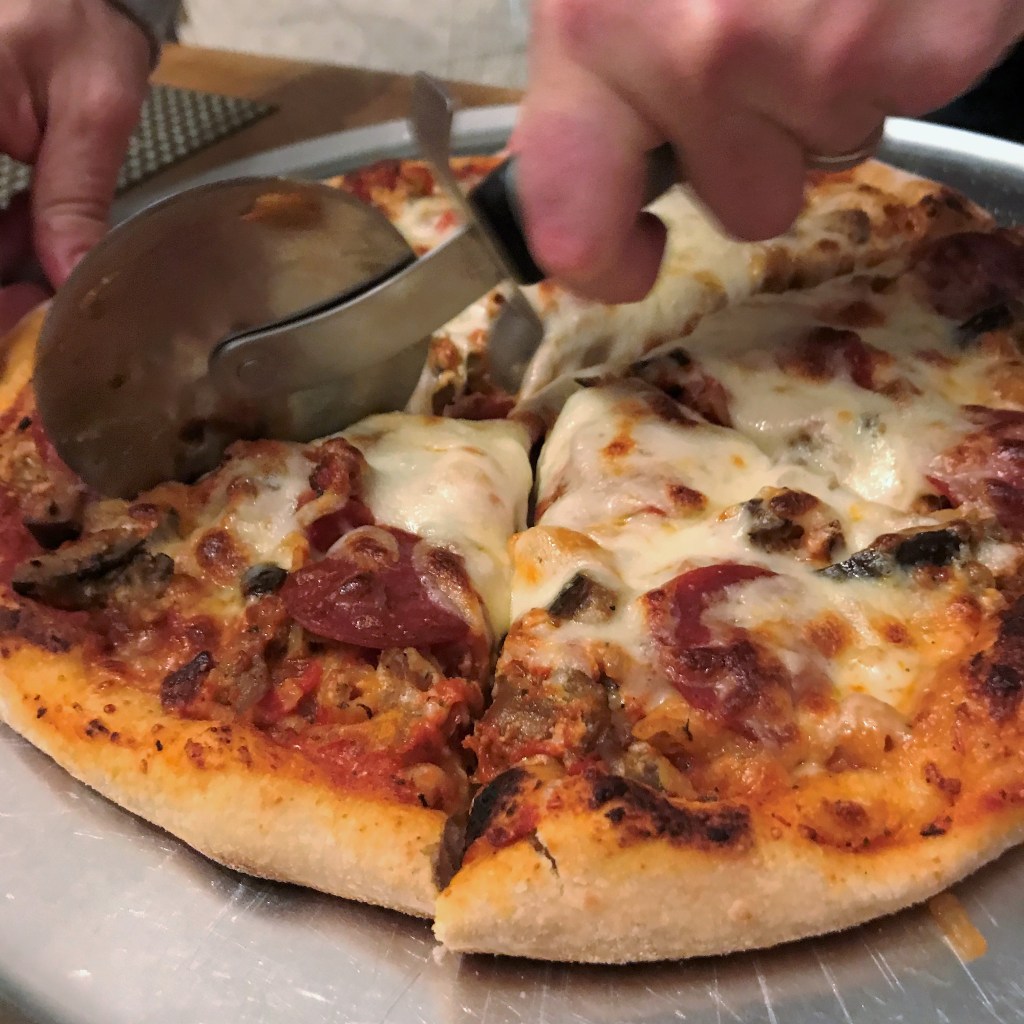
This is what I shouted as I was assembling this patchwork pizza, which had all the classic Italian flavors of eggplant parmesan, lasagna and spicy pepperonata. Yep, all that on a crust. But make no mistake, I did not plan it this way.
The end-of-weekend fridge clearing ritual at our house took an interesting turn last night when my husband, Les, who will never, ever turn his nose up to anything pizza or anything eggplant, suggested that we take the remnants of a sausage and eggplant noodle casserole (which was already a leftover creation), and chop it all up to top some fresh N.Y. pizza dough. After all, he reasoned, the flavors were right for pizza and we knew from experience that cooked macaroni on a thin crust pie was next level comfort food—we had tried it last summer with some leftover mac and cheese and it was awesome—plus, we had just enough scraps of pepperoni and shredded mozzarella to hold it all together. Why not?
I wish I had taken just one photo of the “original” leftover creation, which was sort of a poor man’s lasagna, made of layered cooked elbow macaroni, two leftover grilled spicy Italian sausage links, the sautéed peppers and onions that had topped the sausages on sandwiches earlier in the week, a can of diced tomatoes, ricotta mixed with Italian herbs and our favorite parm-romano blend, plus an eggplant that I had sliced, sweated and quick-roasted, and every last random slice of provolone and thin-sliced mozzarella that had been taking up space in the deli drawer. Unfortunately, I didn’t bother cataloguing the details of the casserole at the time because I hadn’t planned to share it here on Comfort du Jour, and I also hadn’t really planned on sharing this pizza. I have no specific measurements of ingredients or step-by-step photos to share. Sometimes I need to just focus on feeding us, you know? But the end result—this I must share, because it underscores the fact that one should never underestimate the power of leftovers. It’s one of the essential kitchen rules I learned from my grandmother.
Les was proud of the success of this leftover creation, and it just happened to have all his favorite flavors. 🙂
Not every idea in the kitchen has to be new and interesting, nor should everything be same old, same old. But sometimes, if you play it just right, the two collide and become something unexpectedly delicious, as we learned with this pizza. We had three slices leftover, naturally, and they will warm up nicely for lunch as leftovers of the leftover leftovers.
What crazy good thing have you made with leftovers recently? Drop it in the comments section so we can all be inspired!
Sumptuous layers of Mediterranean flavor—béchamel-topped eggplant, potatoes and ground meat seasoned with a delightfully different tomato-y sauce. Moussaka is one of my favorite Greek-themed foods. It’s not quite lasagna, not quite eggplant parmesan, but 100% the comfort food value of both, and while the one pictured is a vegetarian version, there is also a simple switch to make it vegan.
You read correctly. Vegan moussaka. All the flavor, all the richness, all the comfort, but none of the meat. And it’s way easier to make than you might imagine. I’ve learned that when it comes to “converting” a meat-centric recipe into a vegan delight, if you keep your focus on the spices and flavors, you’ll have a winner. It’s not the meat that makes moussaka special, but the other layers of flavor around it, and especially the tomato sauce. Unlike an Italian red sauce, this one gets its distinct flavor from warm spices, such as cinnamon and coriander. And if we can nail those flavors, it really doesn’t matter what goes in place of the meat—but of course, I’ll offer some suggestions to get you started.
This is my approach to making a vegan version of a classic dish. I want protein, texture and flavor—the three things the meat would otherwise contribute to the moussaka, and the rest of the recipe will remain traditional. Lentils will bring the protein, and they’re one of the earliest crops domesticated in ancient Greece, so they’re already speaking the same language as the spices and eggplant. And I love lentils! One cup of cooked lentils packs a hefty 16 grams of protein, about the same as a 3-ounce serving of cooked ground beef. They add more than 15 grams of dietary fiber, too. Nutrition-wise, this is a very smart substitute. If I didn’t have them, I’d probably be looking at garbanzo beans.
Plenty of vegetables provide the other qualities my recipe needs, but I want to avoid the ones that might compete with the eggplant and especially that scrumptious sauce. Bell peppers are great with eggplant (I can’t wait to make ratatouille this summer), but the flavor feels a little off for moussaka. Broccoli is too bitter. Green beans are too specific in shape. Zucchini is a little high on water content. I need something I can chop or pulse into smaller pieces in the food processor. That leaves me with cauliflower, washed kale leaves, onions and carrots. There’s good body in all of them, and they’ll hold their shape after a quick sauté.
There are a few other tricks I’ll employ to make this dish hearty and satisfying. I’ll salt and sweat the eggplant slices to make them more “meat-like,” and nutritional yeast will help bring an umami experience to the vegan bechamel topping, which would otherwise be bland and uninteresting. My husband’s adult daughter has embraced the vegan lifestyle, and she comes to town every so often for special dinners. As a result, all these ideas have become very common to me, but I don’t want to assume all of this makes sense to you, dear friends, so let me back up a little bit.
What does it mean to “salt and sweat” the eggplant?
Layering the sliced eggplant on salted paper towels will draw out the moisture from the eggplant, which improves the texture a great deal, especially when I want to grill or roast the eggplant as a replacement for meat. If you’ve ever had slimy, bitter or soggy eggplant, somebody skipped this step. Please give eggplant another chance. Properly “sweated,” eggplant will be remarkably meaty and substantial—exactly what we want in this moussaka. Take care of this step a couple hours before you’re ready to make the full recipe.
Sprinkle the salt on the paper towel AND on the eggplant slices. The moisture will draw from both sides, resulting in better texture.
Adding a little weight will speed up the process, but you should still plan on at least an hour. Two is even better.
Both the top and bottom paper towels pulled so much moisture from the eggplant, I could literally squeeze it out!
Yes, there will be “shrinkage” in the oven. But these slices are nice and sturdy after roasting, exactly what we need for moussaka.
What is nutritional yeast?
Nutritional yeast is a common substitute for cheesy flavor in vegan cuisine. It’s the same species, but not the same form as the yeast you’d use to bake bread. Nutritional yeast is a yellowish flaky substance, widely available at any natural foods store or online from Bob’s Red Mill. It provides some of the salty, savory quality you would expect in a hard cheese such as parmesan. It’s tasty just sprinkled on hot popcorn. And for the vegan moussaka, it will lend a familiar “cheesiness” to the béchamel alternative.
What does “umami” mean?
When I was a kid, we learned in science class that the human taste buds recognized four main things—sweet, sour, salty and bitter. But within the past decade or so, a fifth taste, “umami” was officially invited to join the party. It’s a savory flavor that is most easily described by example. Think of what you taste when you bite into a piece of steak, or a sautéed mushroom, or a piece of sharp cheese. This savory sensation is distinctly different from the other four tastes and is often the missing link in meatless dishes. If you can successfully supply this “umami” taste, you’ll be victorious in every vegan dish.
A.K.A. “The Bomb.”
This new seasoning from Trader Joe’s is one of the best ingredients ever for meeting this goal (no, they’re not paying me to say so). It is made from ground dried porcini and other mushrooms, plus garlic, onion, thyme, salt and some red pepper spice. I fell completely in love with this stuff last year at Thanksgiving, and I sometimes use it even in non-vegan dishes.
Ready? Let’s get cooking!
Ingredients
1 medium eggplant, sliced, salted and sweated
Kosher salt and freshly ground black pepper
3 medium Yukon gold potatoes, with peels
1 medium sweet onion, chopped
4 cloves garlic, rough chopped
1/4 head fresh cauliflower florets, rough chopped
1 large carrot, peeled and rough chopped
Several handfuls of washed kale leaves
Spice blend (listed below)
2 cups cooked lentils (I used a blend of red, brown and green)
1/4 cup dried potato flakes* (if needed for thickening)
*Notes
Some vegan butter brands will work better than others in this recipe. For the roux that will be the base of a cream sauce, choose an oil-based option. Earth Balance brand used to be my go-to, but my new favorite is the Country Crock line of plant-based butters (they’re not paying me, either). In this recipe, I used the avocado oil version. It melts perfectly and has a pleasant, neutral flavor.
When purchasing potato flakes (or any other processed ingredient) for vegan recipes, take notice of the label to be sure they don’t have some hidden dairy ingredient. I’m partial to the “instant mashed potatoes” available at Whole Foods. There’s only one ingredient—dehydrated potatoes. I love when something is simple.
Instructions
Wash the eggplant and trim the stem end, but do not peel it. Place a double layer of paper towels on a rimmed cookie sheet and sprinkle it liberally with kosher salt. Slice the eggplant into 1/2″ thick rounds and arrange them in a single layer on the salted towel. Sprinkle salt over the tops of the slices. Place another double layer of paper towels over the top of the eggplant slices, then place another cookie sheet, weighted by a cast iron pan, over the top. Allow this to rest on the counter a couple of hours.
When you are ready to proceed, pre-heat the oven to 350° F. Wipe the excess salt from the eggplant slices. You might be shocked at the amount of moisture the salting step has removed. Brush (or spray) both sides of the slices with extra virgin olive oil and arrange them on a parchment-lined cookie sheet. Grind some black pepper over them, and roast for about 30 minutes, turning once about halfway through. They will shrink considerably but that’s OK.
Scrub the potatoes clean and poke them all over with a fork. Microwave them for about 4 minutes, or until they are just tender enough to slice (not as tender as you’d serve). Cool, then slice them into rounds about 1/2” thick. This is a little thicker than I would slice them for a traditional meat-centric moussaka, but in this vegan version, I want them to provide a little extra body for the foundation of the casserole.
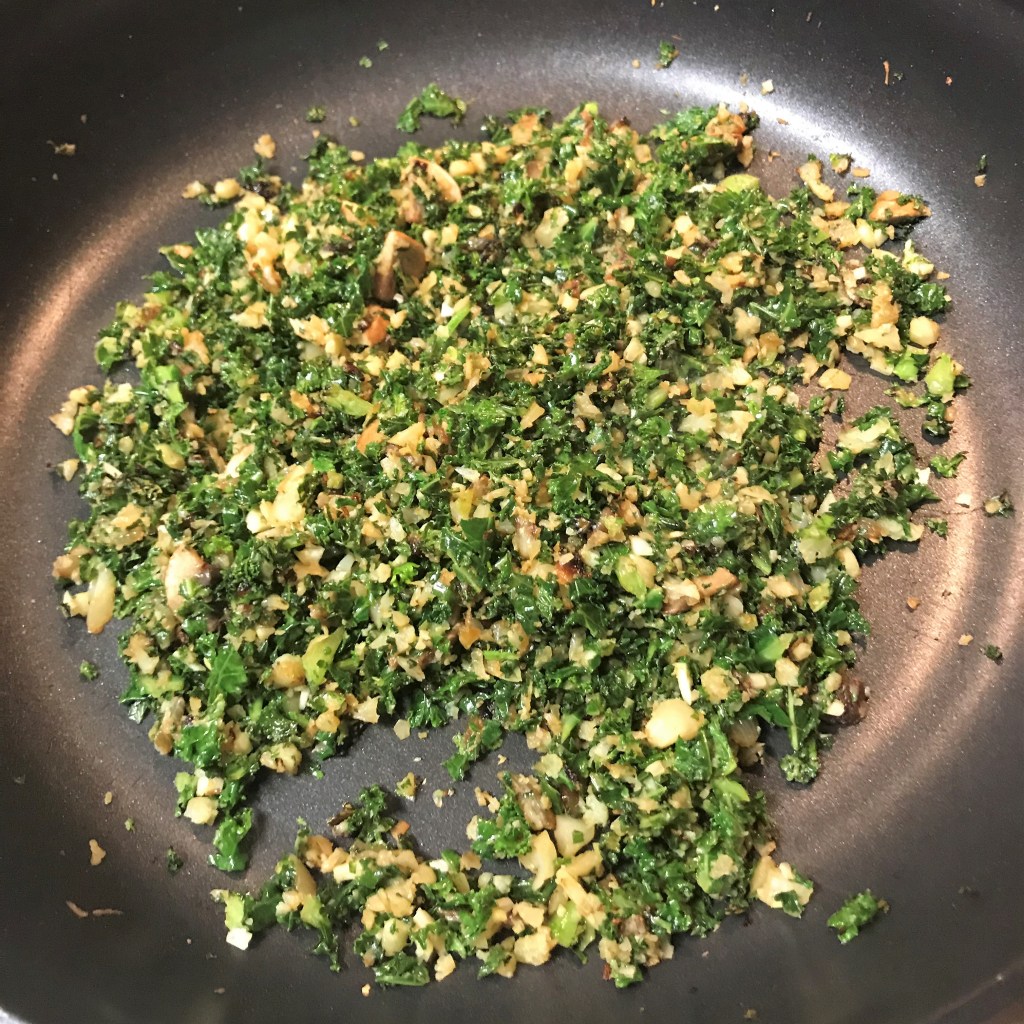
In a food processor with the chopping blade, add the rough chopped cauliflower and carrots. Pulse about 5 times, until vegetables have a coarse, uniform texture.
Place a large non-stick skillet over medium heat and add about 2 Tbsp. extra virgin olive oil. When the oil begins to shimmer, add the chopped onions and the processed carrot-cauliflower pieces. Stir and sauté while you process the kale.
Fill the food processor bowl with kale leaves, and pulse about 5 times until the kale is reduced to about half the original volume. The appearance of chopped parsley is just about right.
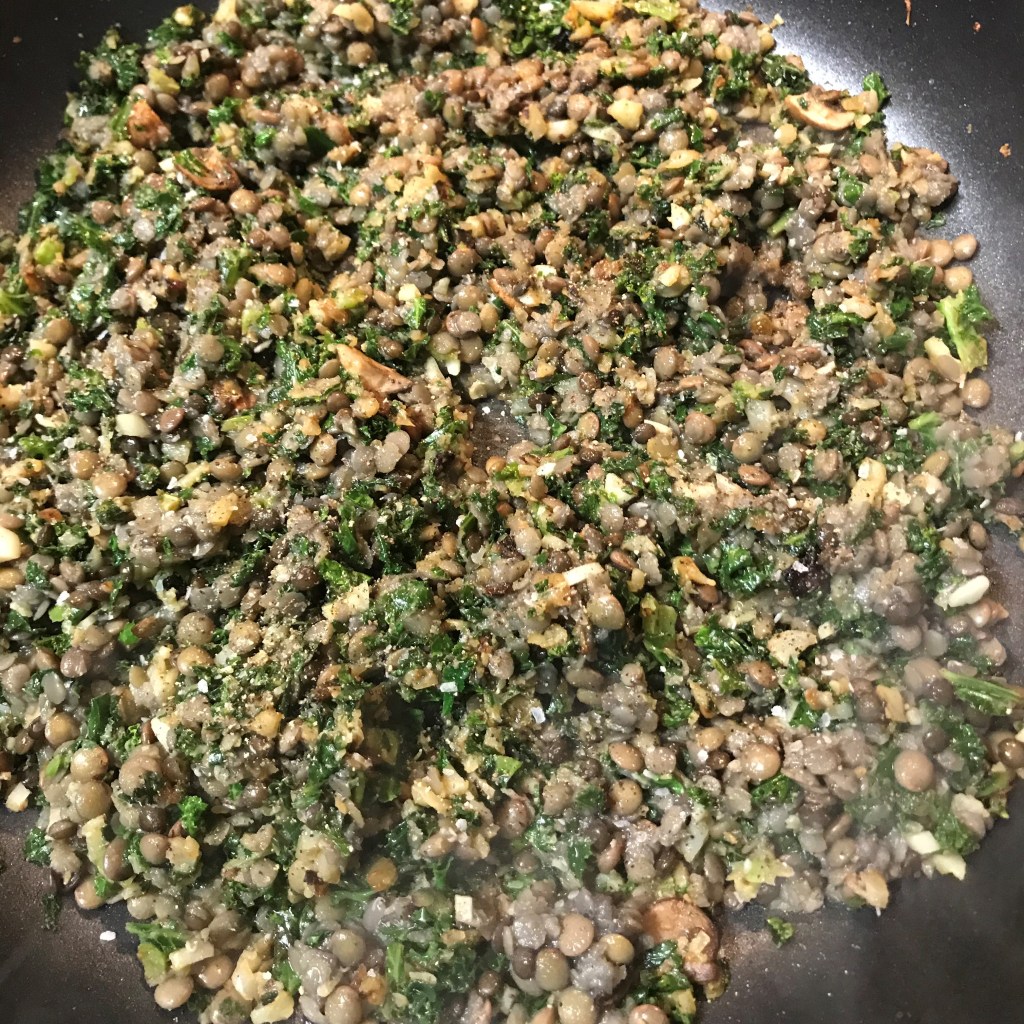
Add the chopped kale to the skillet and sauté the whole mixture about 3 minutes. Add the garlic, season with kosher salt, then add the spice mixture and cook another 2 minutes. Add the cooked lentils and the entire can of crushed tomatoes. Get every bit of flavor by “rinsing” the can with the red wine. Simmer on medium low heat about 10 minutes until liquid is reduced.
I save tons of prep time by purchasing the “pillow” bags of pre-washed kale. I filled my processor to the top and pulsed to this texture.
Give the vegetables a little head start, so they will be slightly tender when the lentils are added.
Don’t cook this mixture too long, or the delicate lentils will lose some of their shape. Just a light saute is good.
On a whim, I sprinkled some milled flax seed over the lentil mixture. Flax has more health benefits than I can list here, but our bodies use it best in milled form.
Notice that the sauce quickly seeps back to the center of the pan when I move my utensil through it. This is how I know it’s not quite ready.
That’s better. Like the parting of the Red Sea! When your sauce reaches this thickness, it’s done.
Assembling the Moussaka
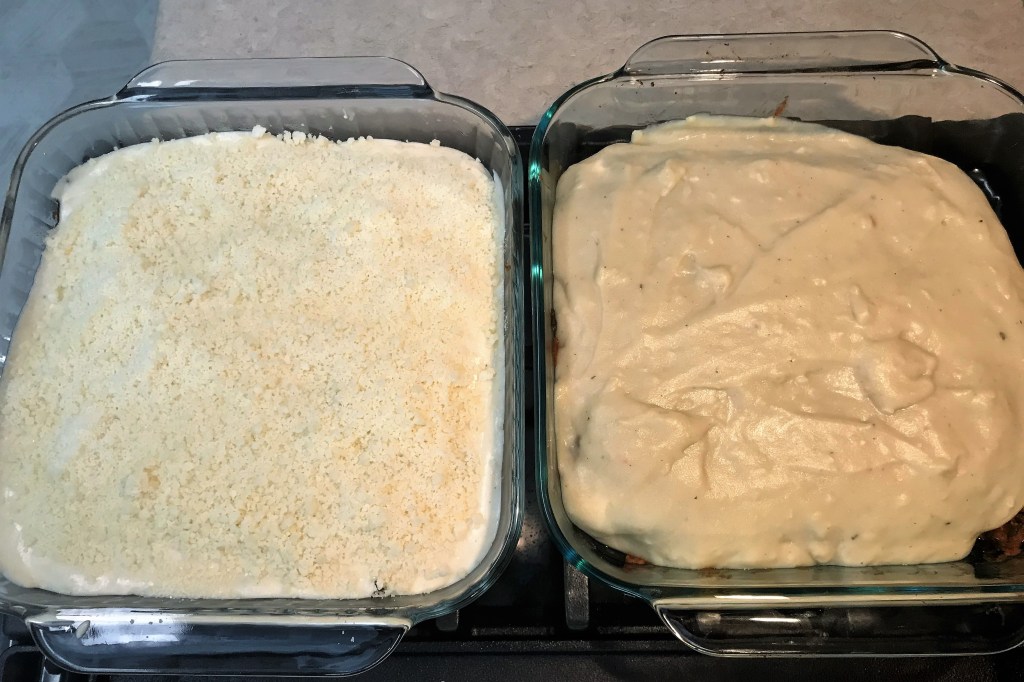
Spray an oblong (9 x 13) glass baking dish with olive oil spray. Arrange the cooked potato slices in a single layer, placing them as close to each other as possible to provide a good base for the casserole. Add about half of the sauce mixture and spread it evenly over the potatoes. Arrange the eggplant slices in a single layer, then top with the remaining sauce mixture. If you’re working ahead, you can pop this in the fridge for a day or two until you’re ready to add the vegan béchamel and bake the casserole. If you prefer a classic dairy béchamel, follow this recipe but with dairy butter and milk, and skip the nutritional yeast and umami seasoning. We usually toss on a handful of fresh parm-romano blend also. After baking, it should come out pretty much like this one:
Lentil moussaka with dairy bechamel
To make a vegan béchamel, begin by melting the vegan butter and cooking the flour in it until it becomes lightly golden and bubbly. Add the almond milk, then cook and whisk over medium heat several minutes until mixture begins to thicken. Add salt, fresh nutmeg, white pepper, nutritional yeast and umami seasoning. Spread over the layered casserole and bake at 350° F for about 40 minutes, or until you can see the inside sauce bubbling around the edges of the béchamel. Give it a couple minutes to cool and firm up, then dive right in.
My brand of almond milk was on the thin side and didn’t thicken as well as I’d expected. I resolved the viscosity issue by whisking in about 1/4 cup of dehydrated potato flakes. I’m a bread-making nerd, so I have such things on hand. Without it, I probably would have made flour or corn starch slurry to whisk into the sauce instead. But the potato trick worked like a charm, and it made kind of an “echo” of potato-ness from the bottom of the casserole. If your béchamel seems to be the correct consistency, this step would not be necessary, but still delicious.
This dish has become a “go-to” recipe for our Meatless Monday rotation, and my husband, Les, and I generally don’t mind having some dairy ingredients in the béchamel topping. Frankly, we prefer it because we love his DIY parm-romano cheese blend lavishly sprinkled on top. But we were delightfully surprised on Memorial Day weekend to hear from his adult daughter—Syd was planning to drive two hours into town for a visit and wondered if she could bring her boyfriend to meet us around midday the next day. Of course! Let’s plan on lunch while we’re at it. Normally, a bit more notice gives me greater confidence in preparing a completely plant-based meal, but as fate would have it, this lentil moussaka was already in my plan for the weekend. Coincidence? We don’t believe in coincidences in our house.
By the time Syd phoned us, I had already prepped the moussaka up to the point of adding the béchamel, so we made a last-minute decision to divide the 9 x 13 casserole into two smaller 8 x 8 casseroles—one with dairy béchamel and the other with a vegan alternative.
Dairy on the left, vegan on the right.
Side by side, you can see the slight difference between our two versions. Underneath the topping, they were exactly the same. The spices offered a nice complexity, and the texture of the lentils, cauliflower and kale made it feel substantial—all the things I described when we first talked about Meatless Monday.
Les is a great dad (and husband), and he gets pretty excited any time either of his kids pay a visit, and we were extra lucky that day because his adult son also happened to join us for our moussaka dinner. Alex came home unexpectedly from Hungary during the early weeks of the pandemic and having both of his kids with us at once was a real treat. Honestly, it was the first sit-down meal we’ve hosted for guests since New Year’s Eve—five whole months ago. For a couple of hours, life felt almost normal.
So excuse me forgetting, but I got a little sidetracked and missed taking pictures of the casserole just out of the oven or even at the table. One of the new things I’m learning during this pandemic is to pay closer attention to the people you love while they’re in front of you. If that means I miss a photo of the plated food—well, no big deal. I’ll update this post when I make it again one day. 😊