Back when I got my first bullet smoker in the late 1990s in Connecticut, the first food I ever tried was salmon.
Why? Heritage, of course.
I’m Jewish and grew up in New York with lox (a cold-smoked, cured salmon) and bagels most Sunday mornings, a little weekly splurge in the Gura household. On rare occasions of extended family gatherings, someone may have picked up smoked salmon salad, which we all salivated over, probably based on the fact that our parents had splurged even more for this delicacy (more expensive than lox). We spread it over cream cheese on a bagel or bialy in place of lox, or sometimes with lox on top for a double-salmon shot.
Now that I’ve had years of experience smoking salmon myself, I can definitely say that the “delicacy” salmon spread of my youth was meh, a mayonnaise-laden, salmon-light blend that, compared to the dish I’m about to share, may well have been created in a blender. Mine is fresh and flavorful, with bits of fresh vegetables and only enough mayo to serve a purpose. It’s always a hit when we serve it at summer parties or holiday gatherings, and it’s easy to make.
It’s all about the salmon
But let’s start with the basics. Smoking salmon is remarkably easy and the process brings out salmon’s textured, salty flavor in a smooth, delicious bite, more nuanced than grilled or baked salmon.
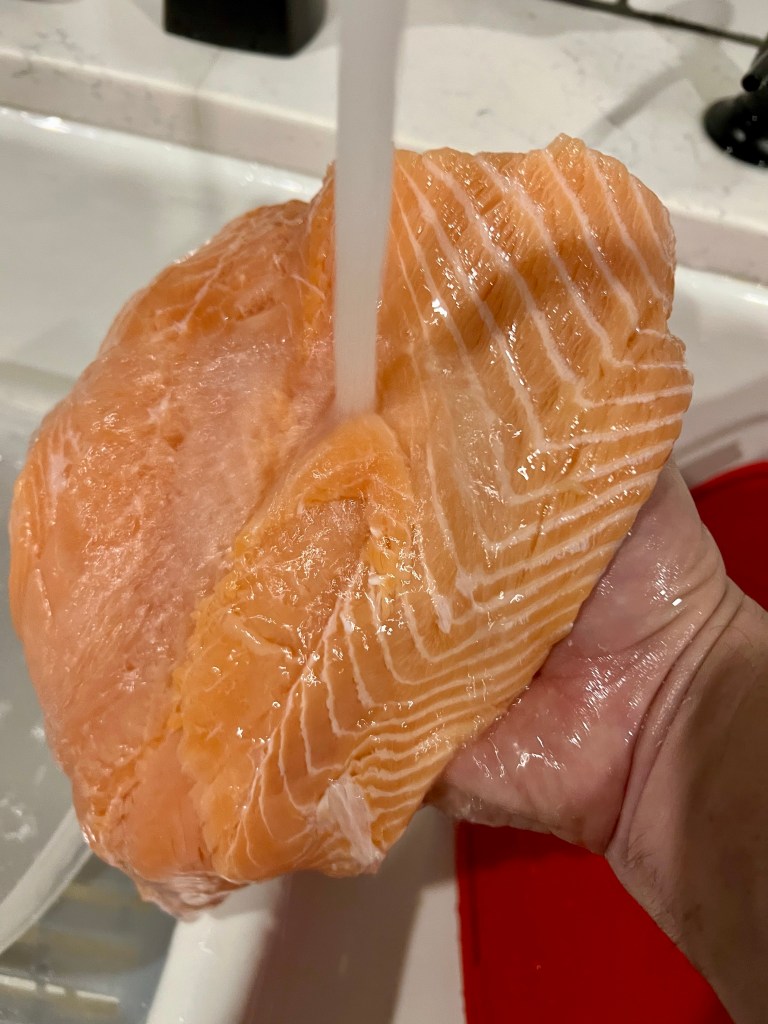
So how does one smoke a salmon? It starts with a nice fillet of salmon; although we typically buy wild caught fish, farm-raised salmon works fine when smoking. We purchase ours from a local seafood shop that emphasizes sustainability, and it is well worth the extra cost. The salmon should be brined overnight in saltwater; I use about 1/3 cup of kosher salt in two quarts water, warm enough to dissolve the salt. I add a little ice to cool the water before placing it in a large glass or plastic container so that the fish is completely covered. Give it an overnight if possible, or at least eight hours refrigerated in the brine.
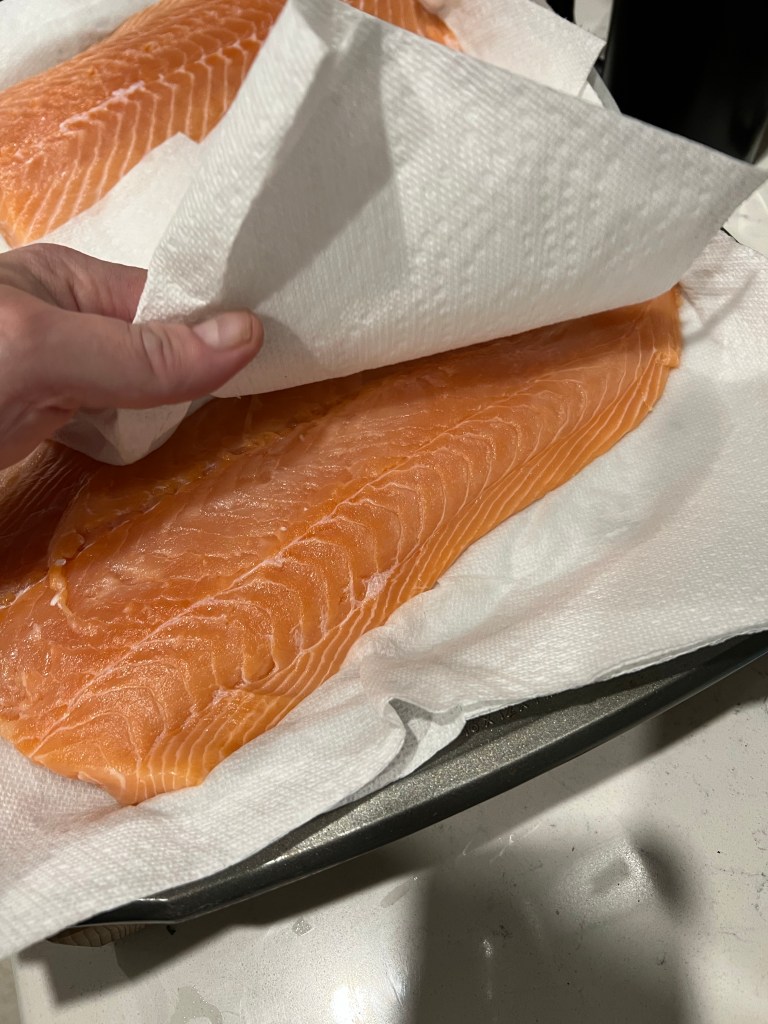
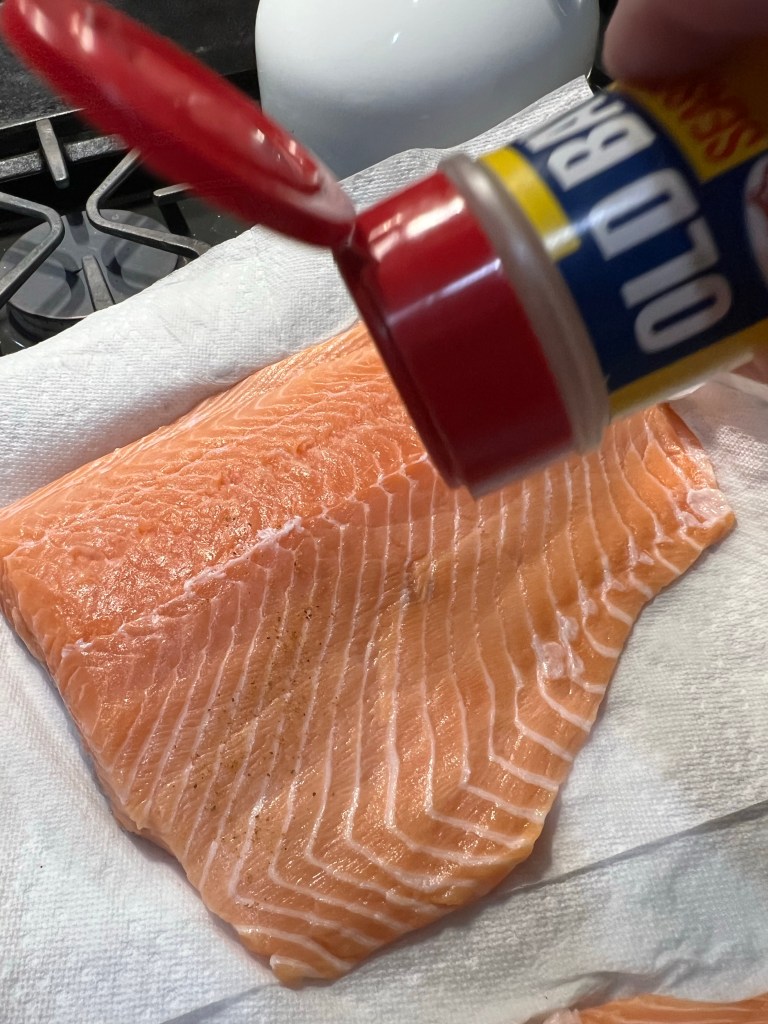
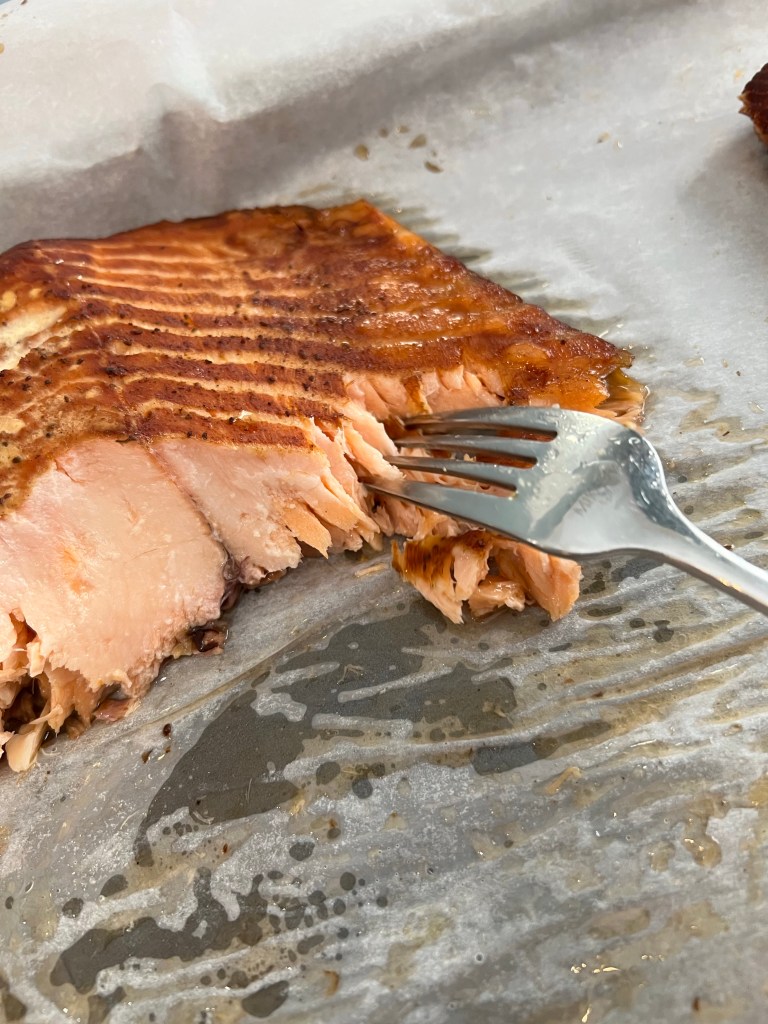
The next morning, remove the fish and rinse it thoroughly under cold water, gently massaging it for as long as five minutes to remove the bulk of the salt. Pat the fish dry with paper towels, then season to your taste. Because the brining inevitably leaves a good salt within, even after rinsing, I don’t use a heavy season. I give it just a light sprinkle of Old Bay.
Fire up the smoker
Smokers can be gas, electric or charcoal; I’ve always had charcoal smokers. I thoroughly spray the cooking grates with oil. The night before, I soak wood chips in water; this time it was apple wood, but other varieties work well, too. The wetness, I believe, helps to create more “flavored” steam in the cylinder. Though there is quite a bit of internet debate about the need to soak the chips.
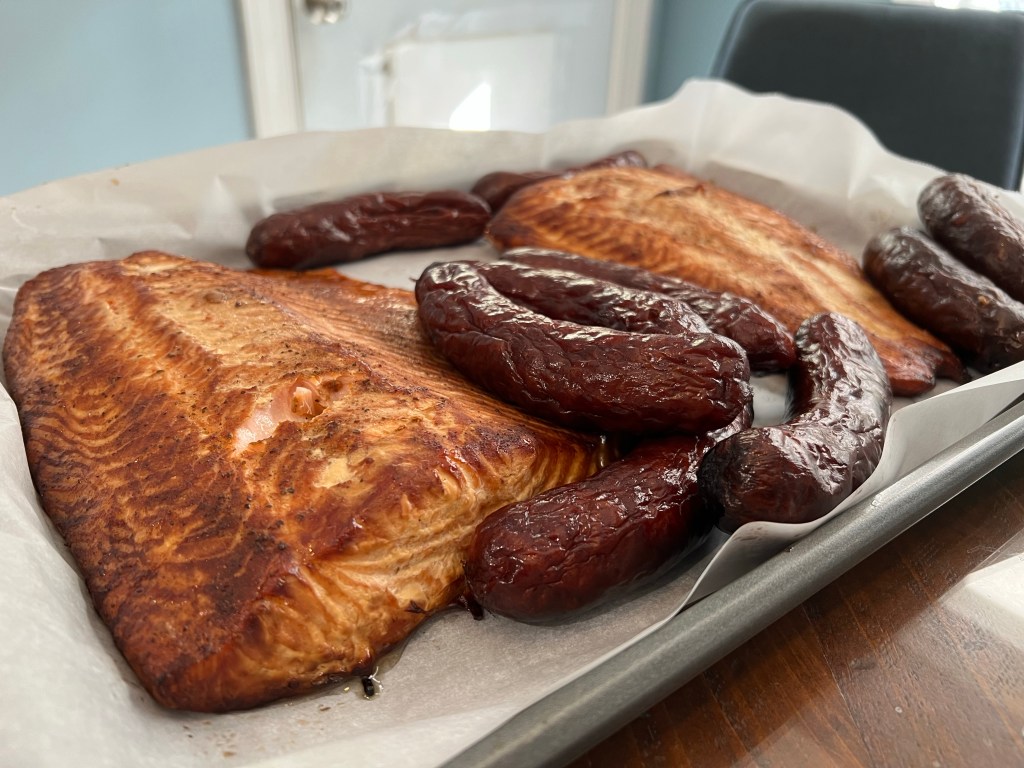
I fill my Weber smoker with enough lump charcoal to last for hours, not so much for the salmon, which can take as little as 90 minutes to 2½ hours depending on the thickness of the fillet, but for the additional food I put on the lower of the two cooking grates. Typically, I will smoke a pork shoulder, though I’ve done turkey, brisket, or pastrami in previous smokes. Next to the salmon on the top grate, we usually smoke sausages to serve as appetizers. Yes, this is one big smoker Terrie bought me for my birthday three years ago.
My new smoker is almost three times the size of my old one!
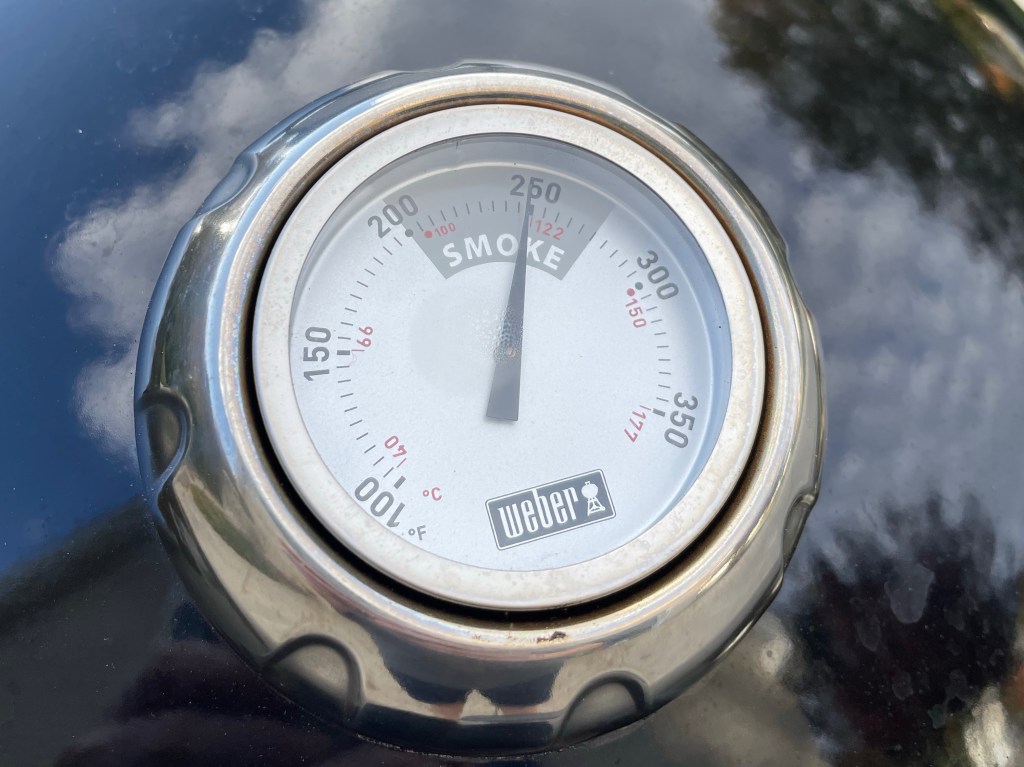
When the charcoal lumps have turned ash gray, I work quickly by adding the soaked wood chips on top, and then pouring a gallon of water into the pan below that, in effect, steams the foods as they smoke. For interesting flavor, I also add a half gallon of some other liquid— beer is my go-to, but this time, it was fresh-pressed apple cider. I put the pork shoulder on the lower grate, add the top grate and the salmon and sausages, and cover it. The smoker has a temperature gauge and several vents to control air flow and temperature. My smoker has a “smoke range” of 200° to 275° F, and the ideal is smack in the middle. I’ve learned to work the vents regularly through the cooking, and can typically now keep the smoker “in the range” for six hours, enough to cook most things through.
The sweet spot.
Occasionally, if I lose temperature before a pork shoulder or brisket are finished, we finish it in the oven at 300° F, wrapped tightly in heavy duty foil and roasted to desired tenderness. Salmon (and sausages) fortunately don’t take anywhere near that long. You know the fish and sausages are done just by sight. After an hour and 45 minutes with this cook, they were both ready.
Who’s hungry?
So many options for smoked salmon
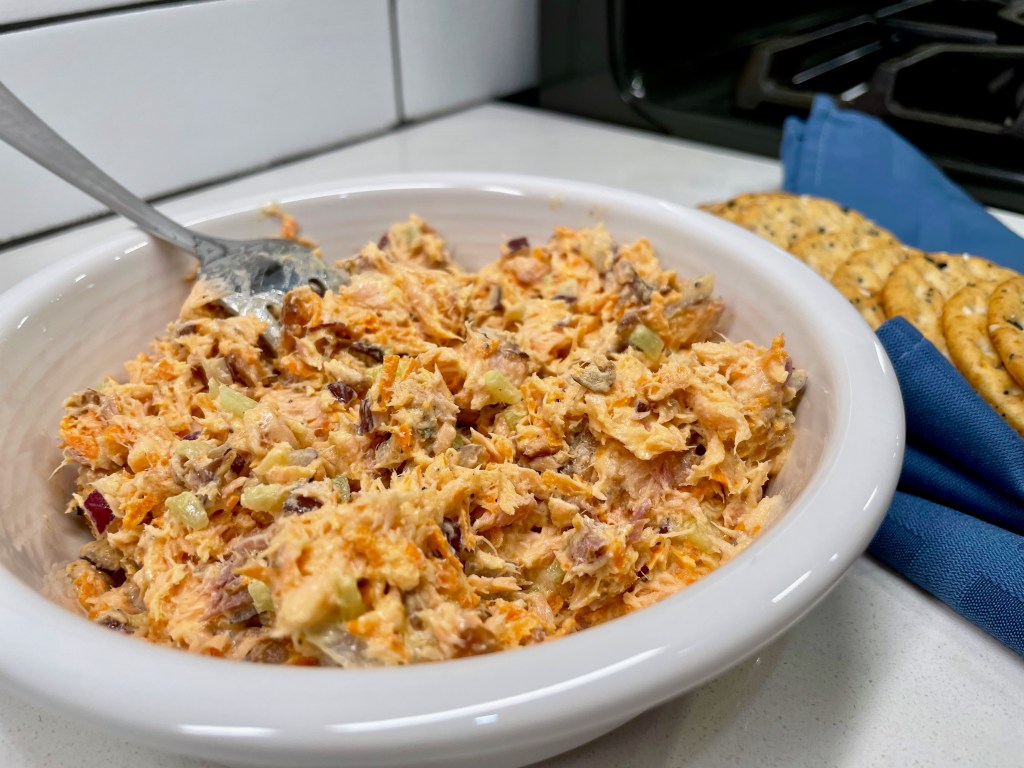
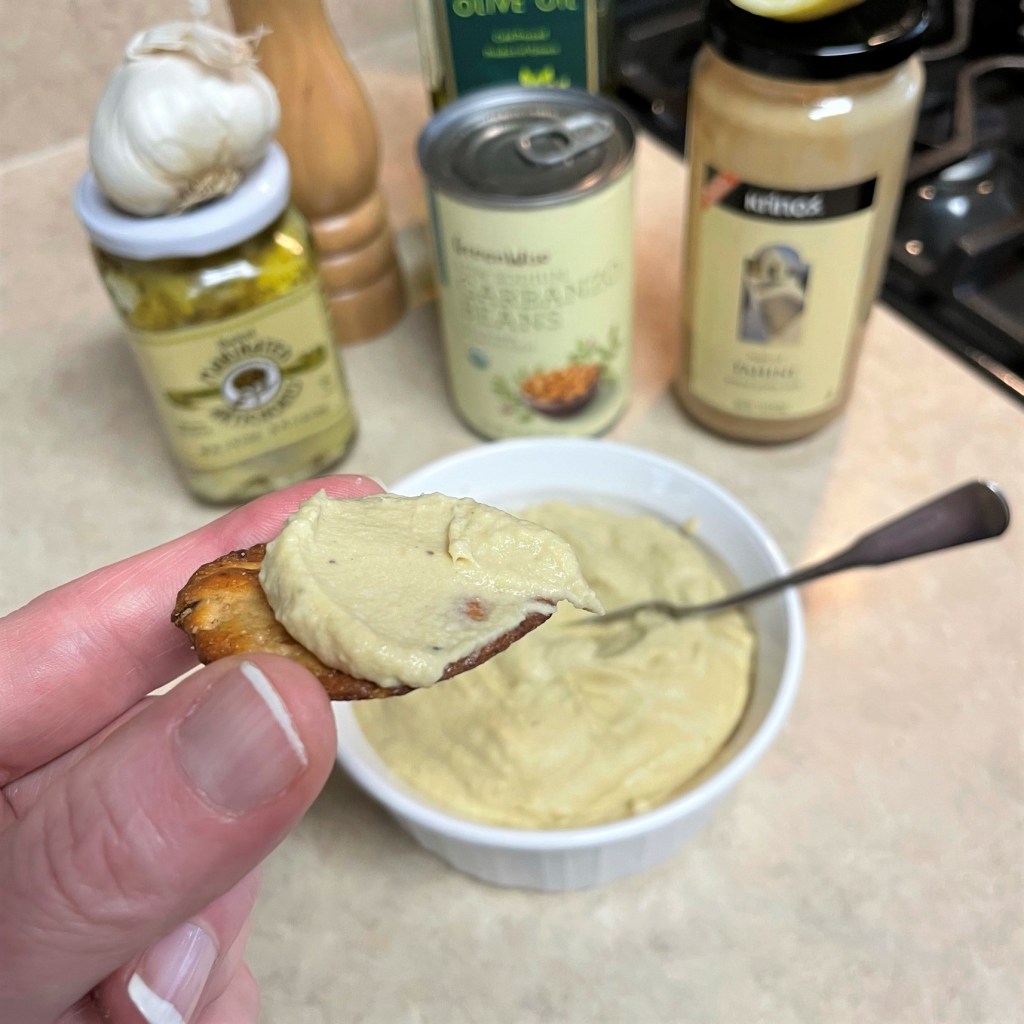
When it’s freshly cooked, Terrie and I could eat a whole salmon between us, it’s so delicious. But we refrain to a few nibbles because we usually have other good things in store for it. The smoked salmon is great on top of a mixed greens salad, and sometimes Terrie will incorporate it into a pasta dish with sautéed spinach and sun-dried tomatoes. But my personal favorite use for smoked salmon is right here in this bowl.
This salmon spread is so addictive.
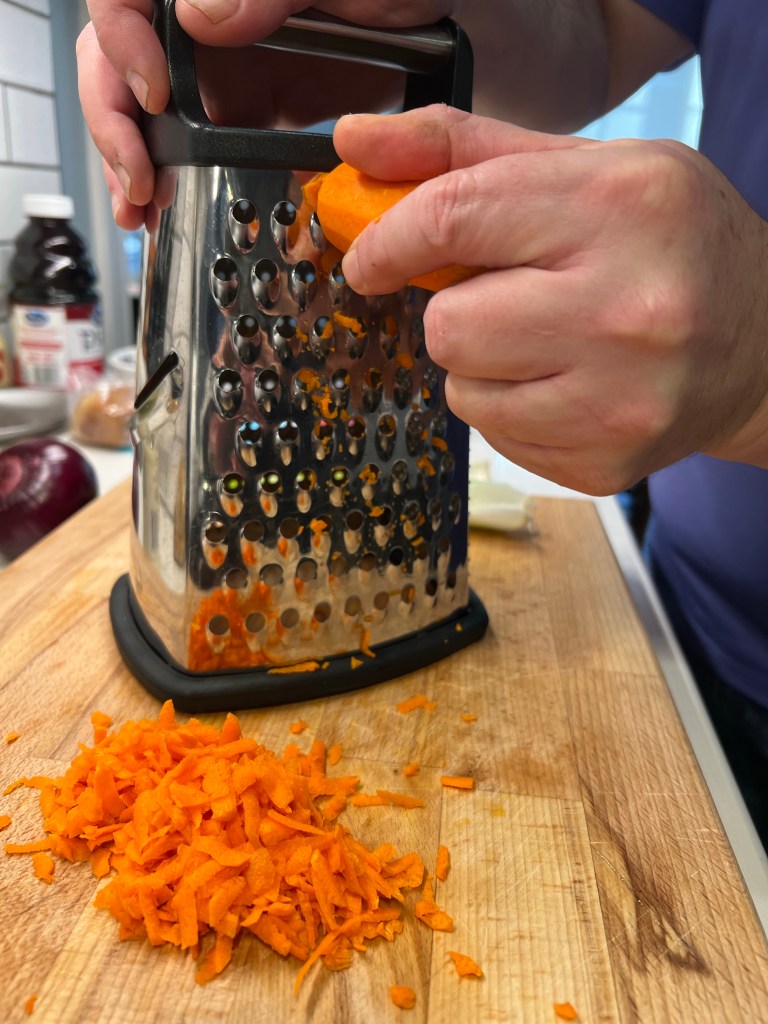
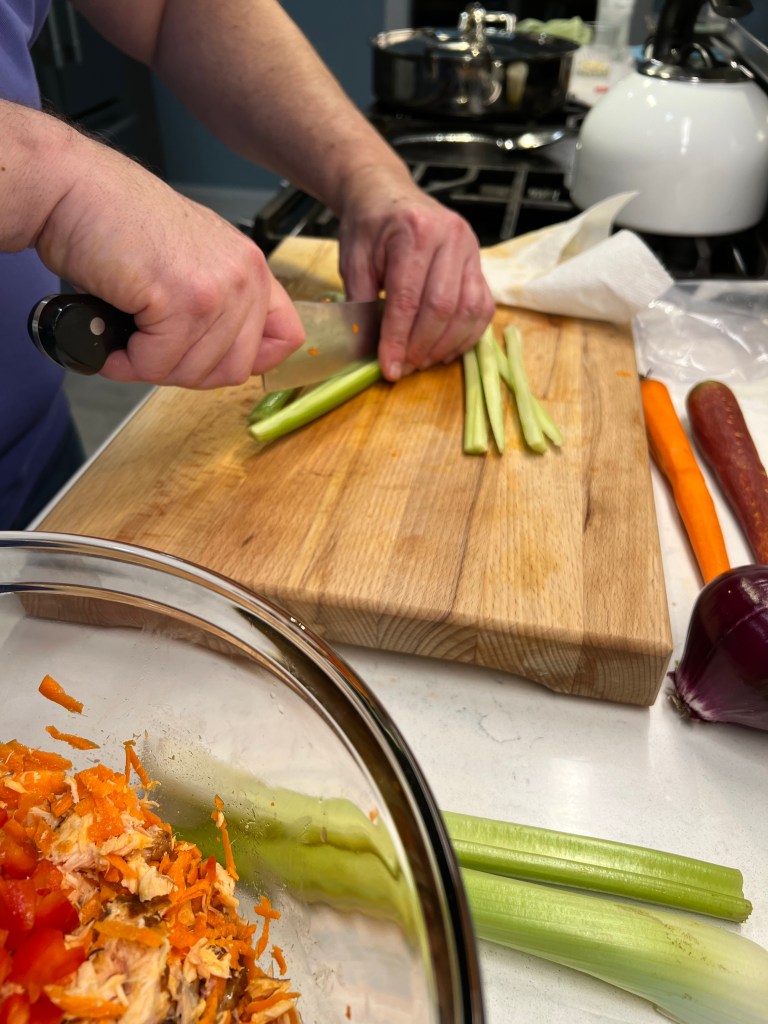
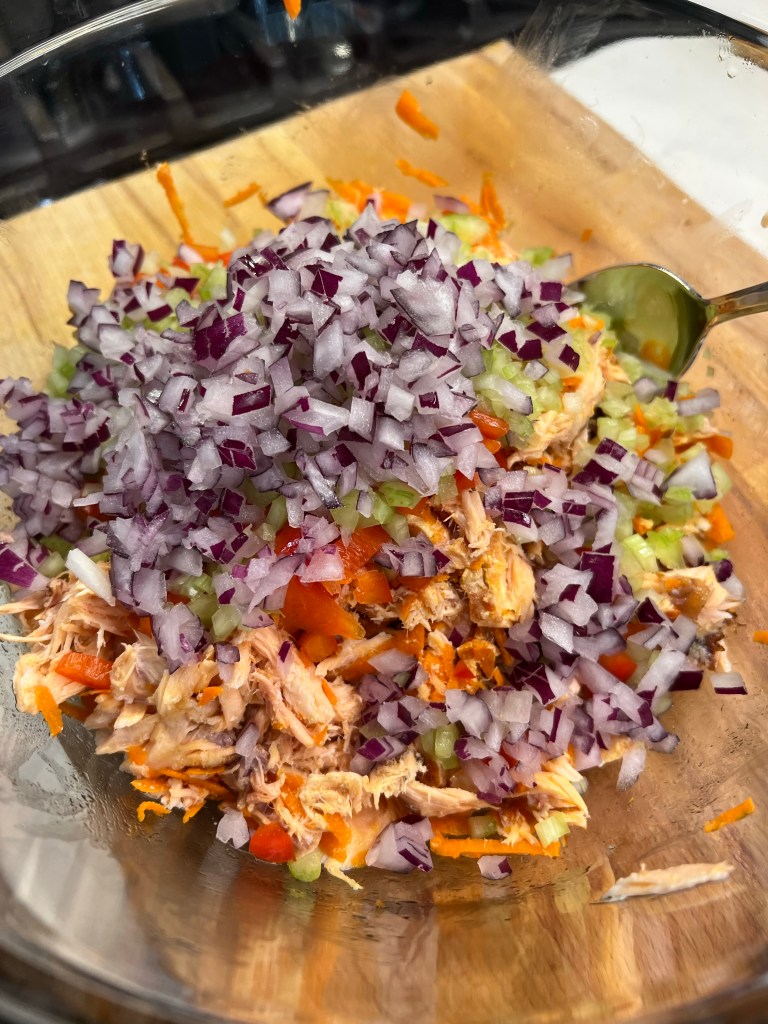
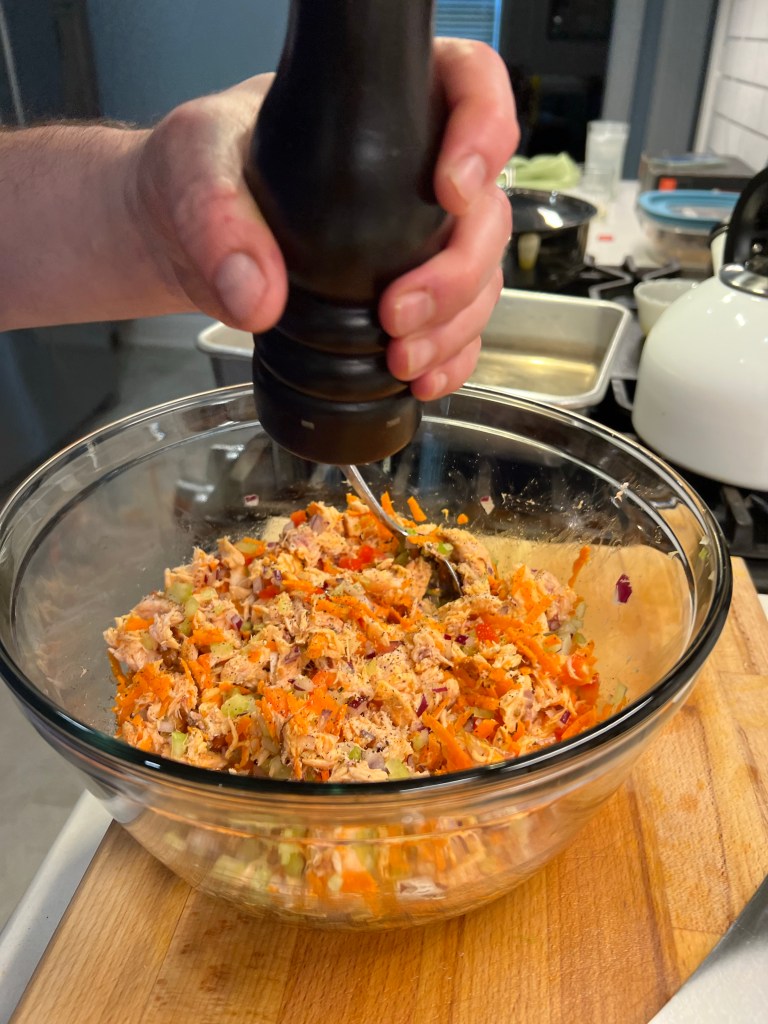
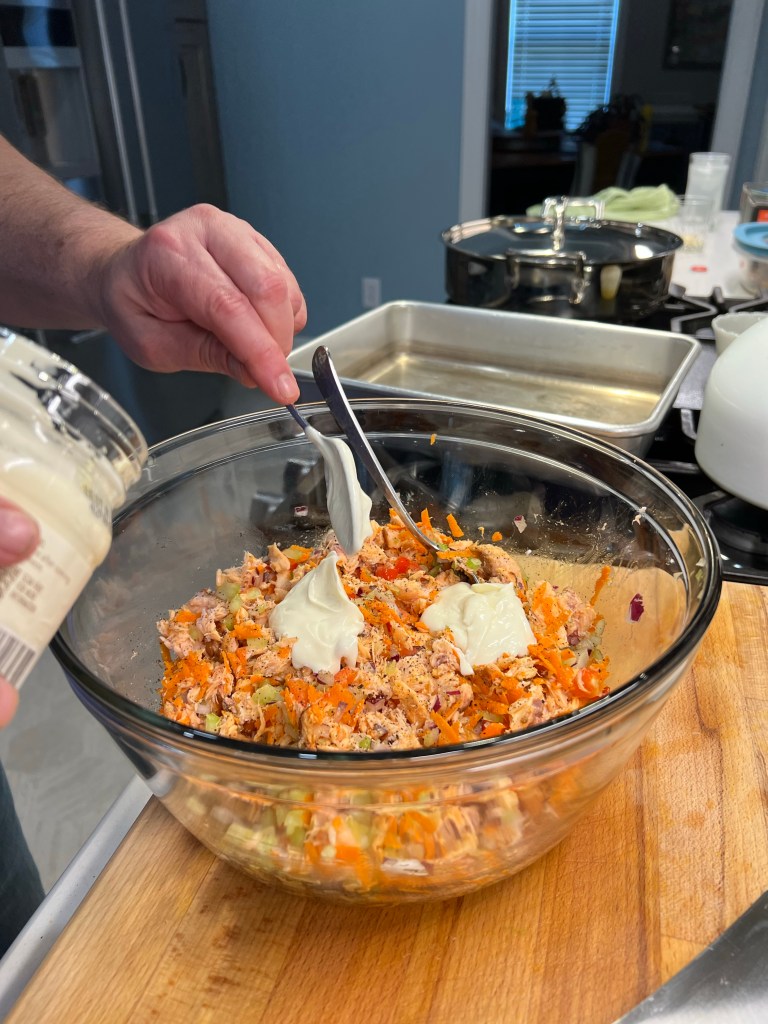
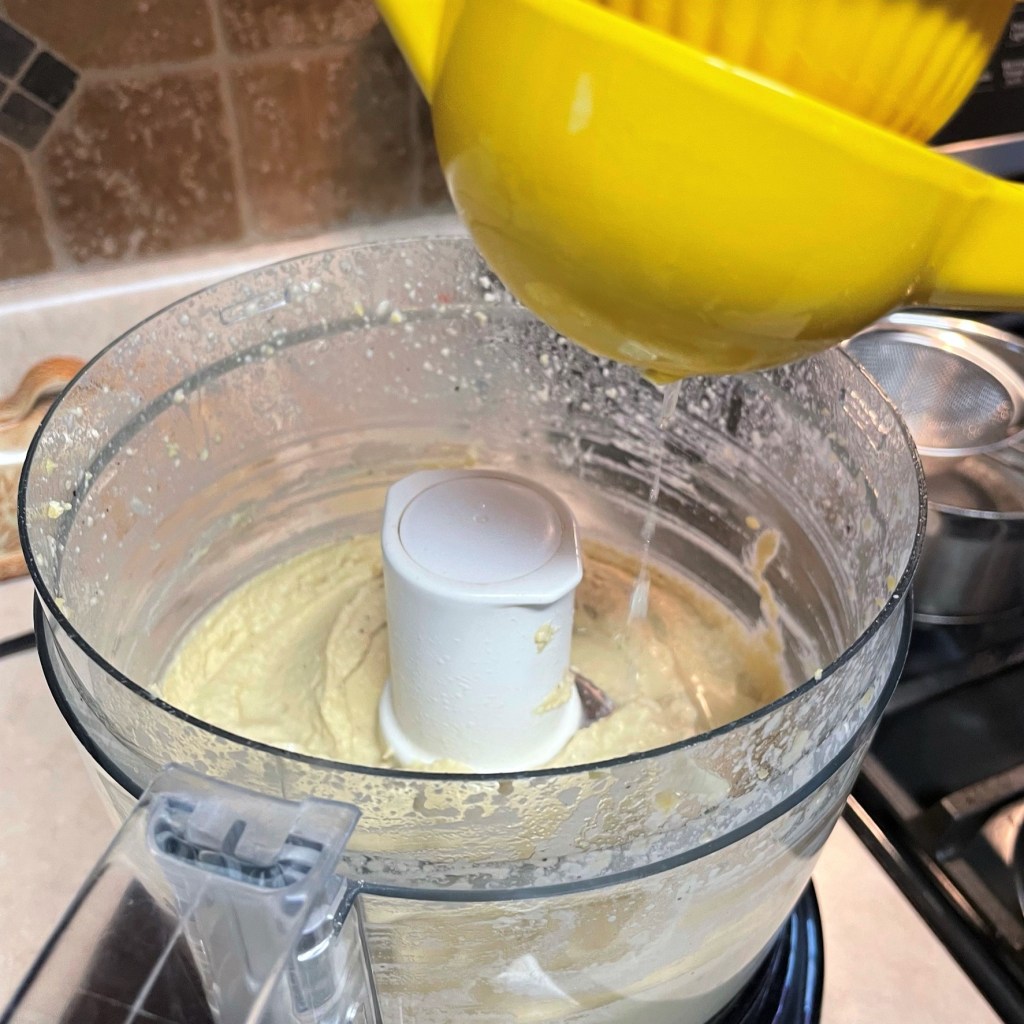
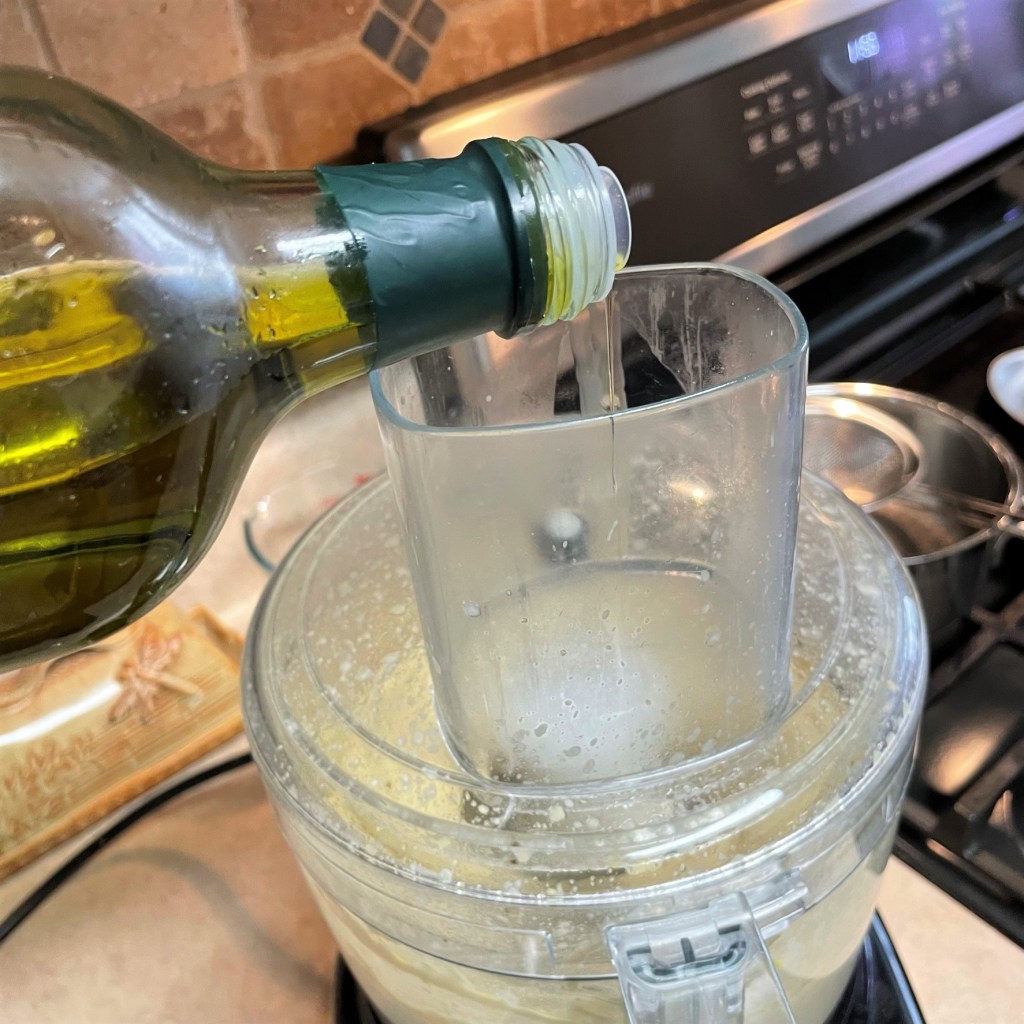
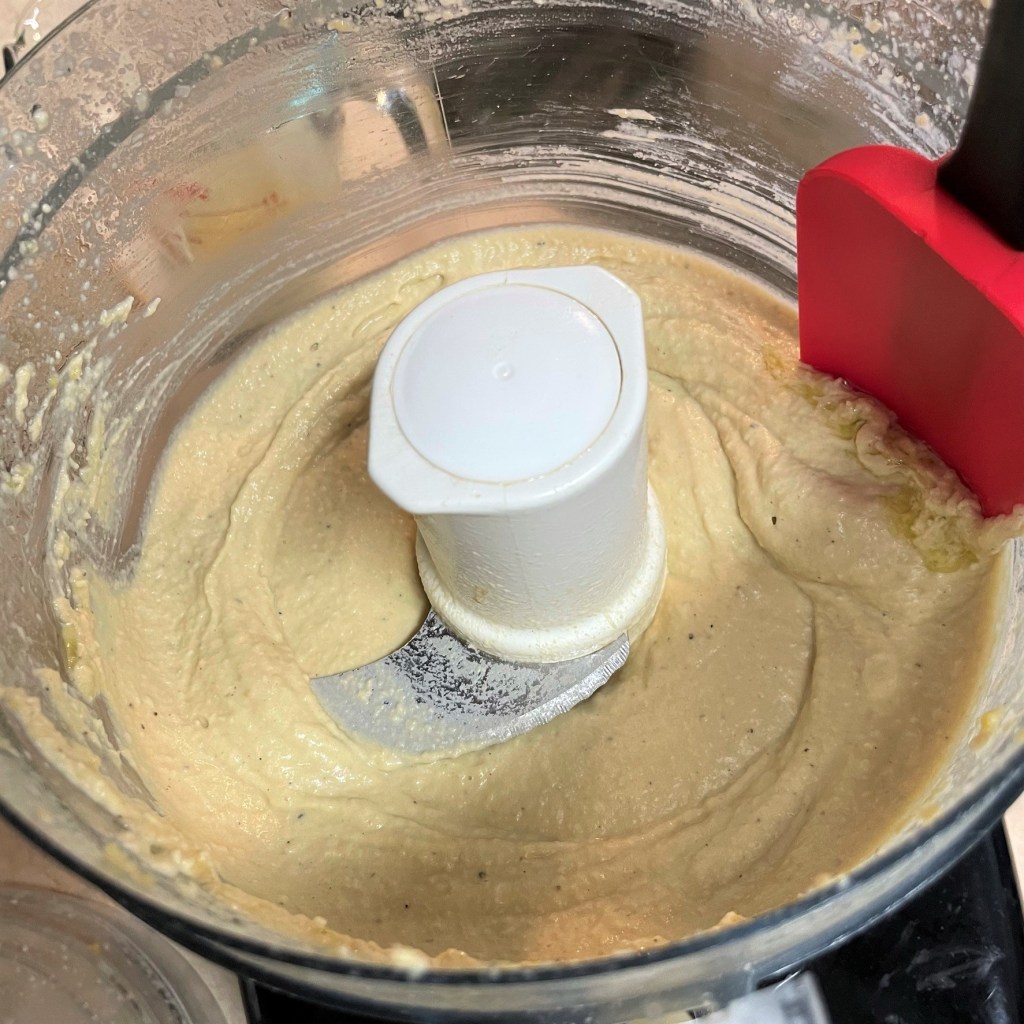
It starts with a nice chunk of the freshly smoked salmon, about a pound. Then, I dice up some red pepper, red onion and celery, and grate some carrot. Pepper to taste (salt usually isn’t necessary) and fold in just enough mayonnaise to moisten it. Mix it all together and refrigerate until ready to serve. We love it as a spread on crackers or pita chips, and it is fantastic (of course) on a bagel.
Yep, it’s as easy as it looks.
This salmon salad puts the store-bought variety of my youth to shame because it is chunky and not too laden with mayonnaise. Mainly, though, the difference is being able to smoke a fresh salmon rather than consuming a processed version. Of course, growing up in a New York City apartment building, I have to remind myself, it wasn’t like you could “fire up the smoker.” So if you have the space, the inclination and the smoker, have at it, friends.
This salmon spread is a real crowd pleaser! It is very easy to make, and especially delicious when made from your own smoked salmon.
Ingredients
About 1 pound freshly smoked salmon (see note below)
1/2 red bell pepper, diced
1/2 medium red onion, diced
1 good sized carrot, peeled and grated
2 stalks celery heart, strings removed and diced
About 1/3 cup mayonnaise, just enough to moisten the mixture
A few twists of freshly ground black pepper
Note: This spread is made with “hot” smoked salmon that is cooked, not the lox-style cured salmon. If you do not smoke your own, consider purchasing this from a good delicatessen or check the packaging to be sure the salmon is fully cooked.
Directions
Flake the salmon into a medium size mixing bowl. Add vegetables and toss gently.
Fold in mayonnaise, a little at a time, until the mixture is moistened enough to hold together. Season to taste.
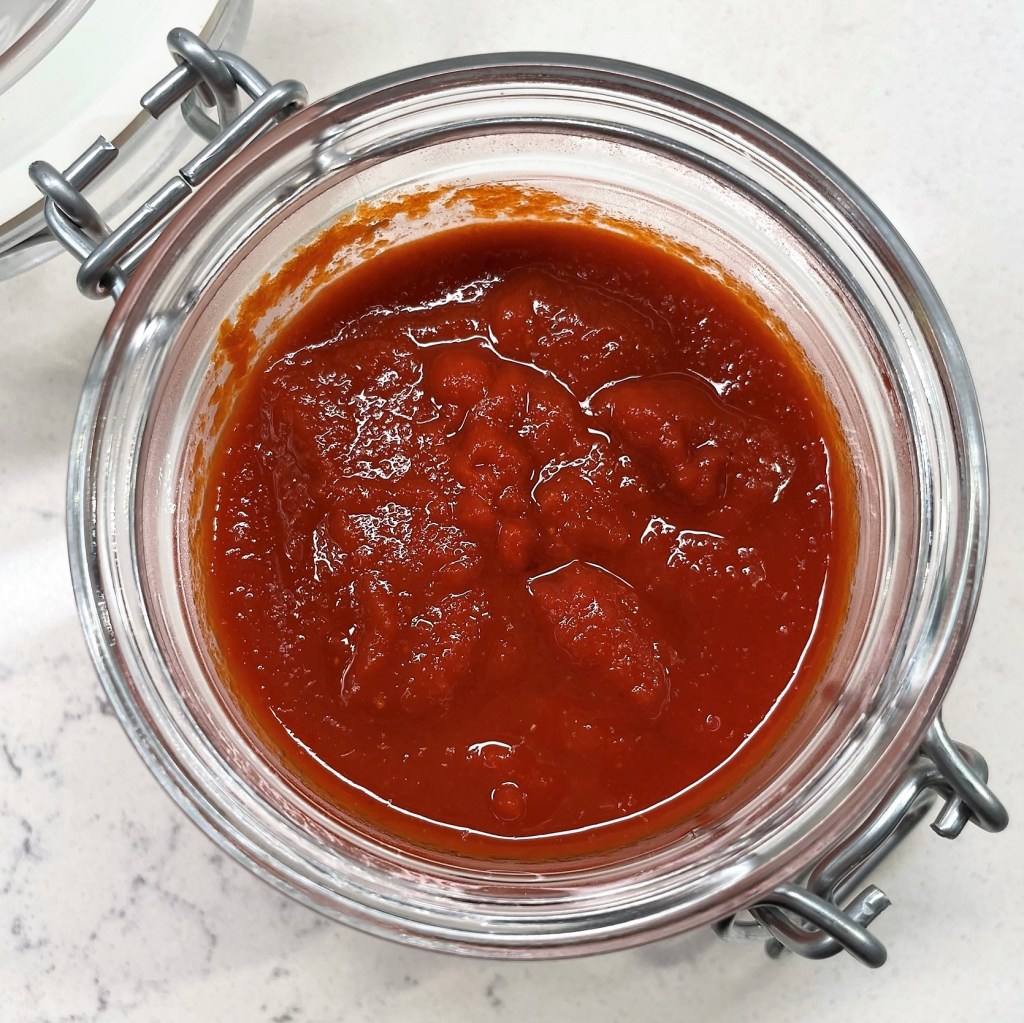
Before I explain how I made this small batch version of sriracha, I have a confession. I made it last summer— you know, the first time the grocery stores ran out of it. It seemed like a smart thing to do, given the enormous popularity of sriracha (the one with the green cap and the rooster) and the panic that ensued when the word got out it was depleted. But time got the better of me, and when I circled back months later to share my experience on my blog, the crisis was over and sriracha was restocked in the stores. I crossed it off my blog schedule and even deleted the photos from my iPhone. Why bother, I figured, when sriracha was easy to buy again?
What I didn’t expect was that this condiment crisis would repeat itself. Yet, earlier this week, I found my news feed riddled with articles about this year’s shortage, and I thought, here we go again. It must be related to the scorching temperatures and the fact that absolutely nothing wants to grow in this God-awful heat. That seemed to be the gist of the problem last year, anyway, but how true was it?
One of the articles I read, in The New York Times, throws shade on the notion that the sriracha shortage is entirely related to our changing climate. The Times piece is a good read for anyone who enjoys falling down rabbit holes of journalistic information (guilty over here). For the rest of you, I’ll summarize what I learned.
First, sriracha is not a pepper, but a concoction based on a traditional Vietnamese recipe, and Huy Fong, the California company that makes the most popular version of sriracha, a.k.a. “rooster” sauce, has been blaming its snowballing supply chain issues on environmental decline. Interestingly, other hot pepper sauce-making companies are shrugging it off; they haven’t experienced the same disruptions, and they aren’t hearing sob stories from their suppliers, either. In short, this sounds like it could be more a business problem than a climate problem. Either way, it’s bad news for sriracha lovers because the shelves are bare— again. And if that doesn’t sit right with your craving for a little shot of spicy, then you might want to have a backup plan. I’m talking, of course, about making your own.
It’s not as difficult as you might imagine. And, as luck would have it, I discovered that the pictures I had taken last year were waiting patiently in a folder on my desktop computer— I had edited, titled and saved them before deleting them from my phone— it’s like they knew they’d have their moment. Let’s do this!
What do we do when the stores run out of something we love? We make our own!
The Ingredients
I’ll begin with the simple list of ingredients. On the back of a bottle of the “rooster sauce,” we find chili (don’t ding me, that’s how it’s spelled on the bottle), sugar, salt and garlic, plus a whole bunch of preservatives that allow you to keep it at room temperature after opening, something I never do— condiments other than vinegar belong in the fridge, as far as I’m concerned. I’ll share more of what I learned about the preservatives in a bit, but let’s skip ahead to the pictures and the fun part.
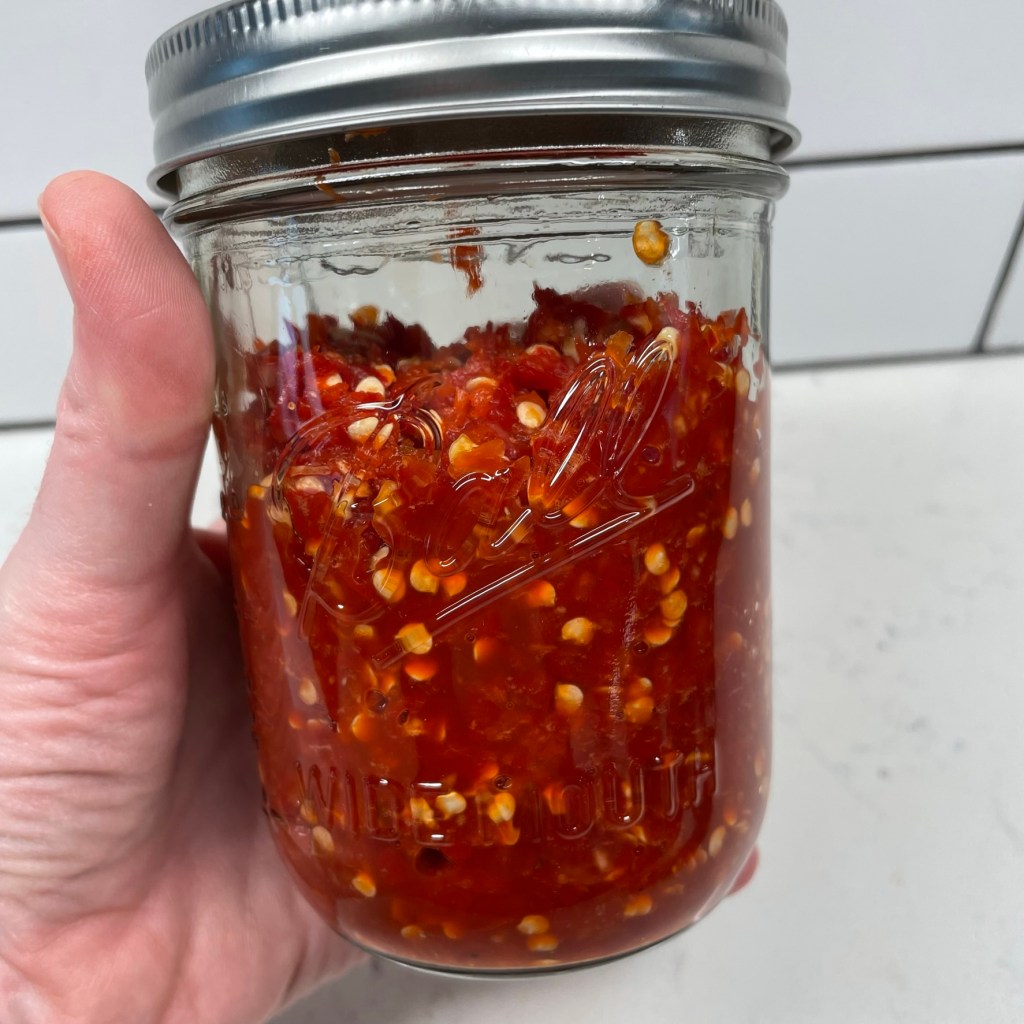
Look at that gorgeous pop of color!
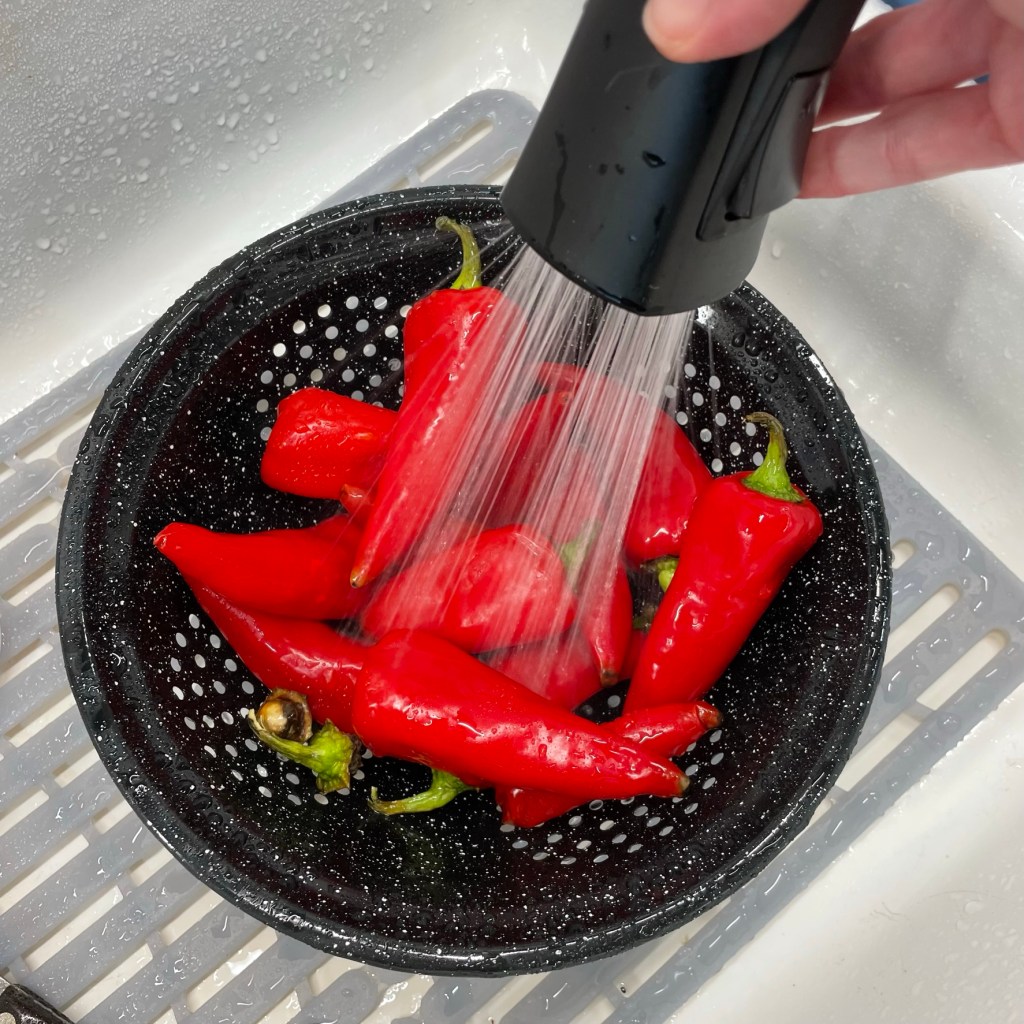
You can use either red jalapeños or Fresno chiles, depending on availability and flavor preference. I used a combination, but mostly Fresno, which offers a slightly more feisty flavor and happened to be plentiful at my supermarket that day. We love spicy foods at our house, so the extra heat was not a concern for us. If you happen to be growing jalapeños in your home garden, leaving them on the vine an extra couple of weeks will turn them red and intensify the heat.
Keep the seeds and, yes, the green caps.
I used light brown sugar, kosher salt and fresh garlic, peeled and smashed. Though the ingredients are simple, the sriracha label doesn’t describe how to transform them into an addictive, put-it-on-anything sauce. For that, I found this article on Serious Eats which gave me helpful insight, plus a road map to launch my own sriracha journey.
The Process
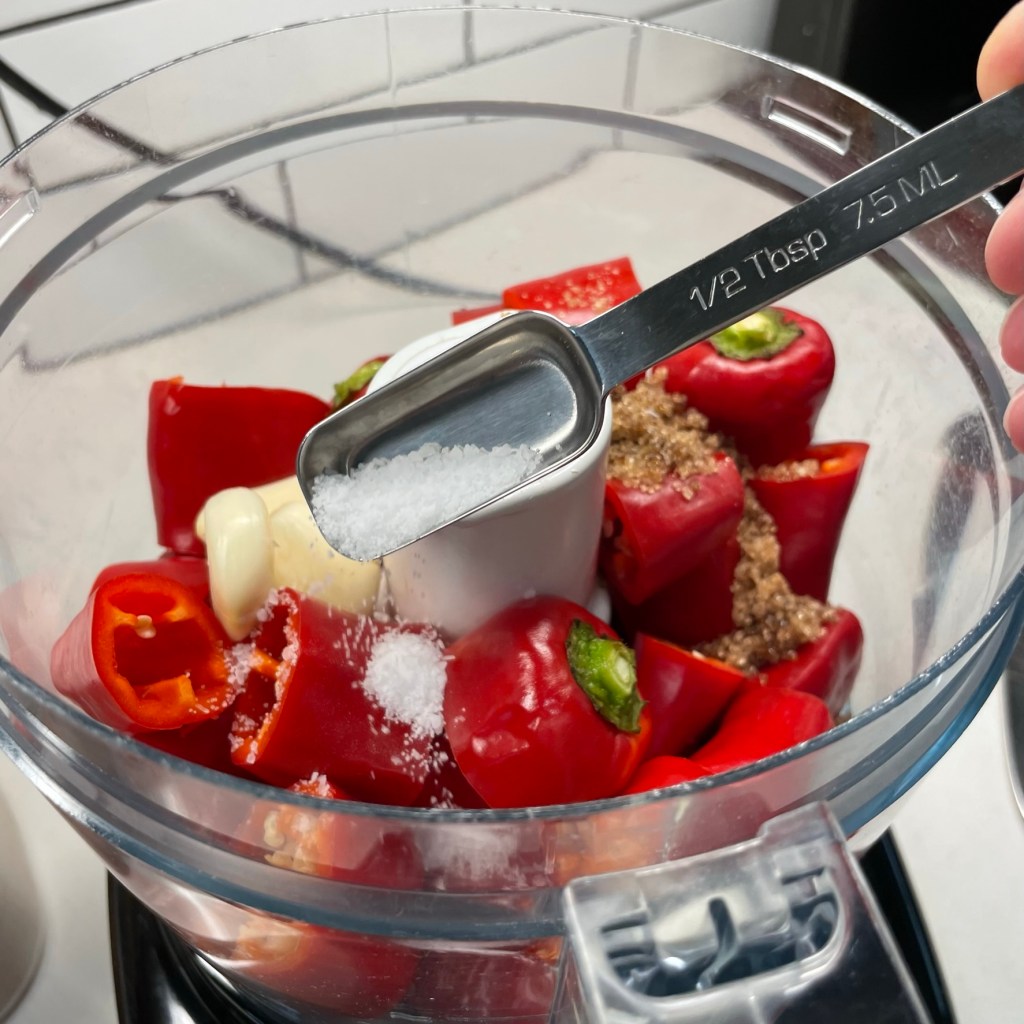
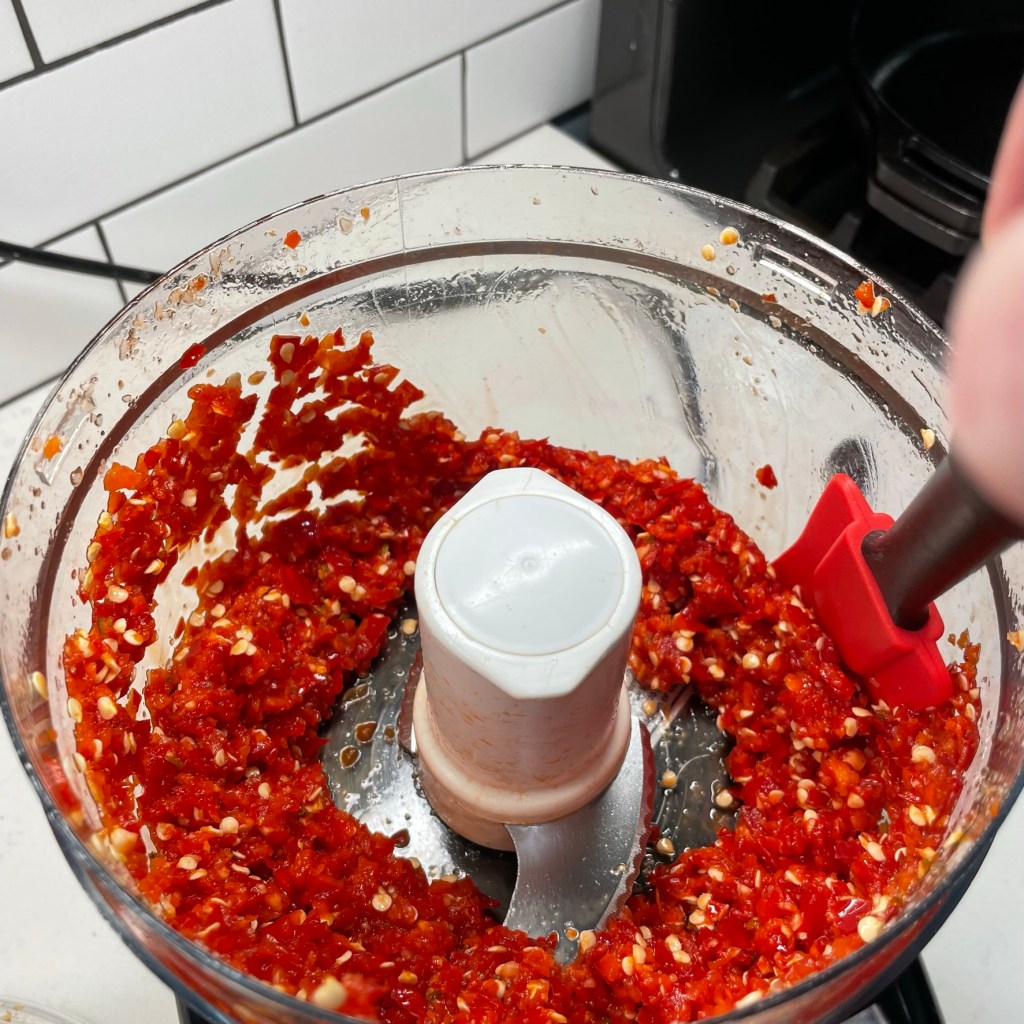
The first step is fermentation, a roughly week-long process that builds the deep, funky, earthy flavor that we know and love in sriracha. Clean the peppers well, and cut off the stems but keep the dark green “caps” that connect to the top of the pepper. Give the peppers a rough chop and add them (seeds and all) to the bowl of a food processor with brown sugar, fresh garlic and kosher salt. Pulse several times until the mixture is coarse and chunky but well blended. Transfer it to a mason jar, cover it and set it aside on the counter for 5 to 7 days. The Serious Eats article suggested stirring the pulp every day, but I’ll admit that I missed this when I was in the thick of things, and mine managed to ferment without assistance.
The green caps are not visible after the peppers are chopped up, and they are responsible for some of the earthy notes in sriracha.
The Additives (for better or worse)
While the sriracha mixture ferments, let’s chat about the “other” ingredients listed on the store-bought bottle. One big advantage of making your own sriracha— besides the obvious one of overcoming the shortage— is avoiding chemicals such as sodium benzoate, an all-too common food additive that serves as a preservative. You might read that there is no harm in sodium benzoate, and that may be true. But apparently, if it’s combined with ascorbic acid (better known as Vitamin C), then studies show sodium benzoate morphs into a known carcinogen called benzene. This information alarmed me quite a bit because I know that red bell peppers are higher in Vitamin C than even citrus fruit. Aren’t red jalapeños related? It makes me uneasy just reading about it.
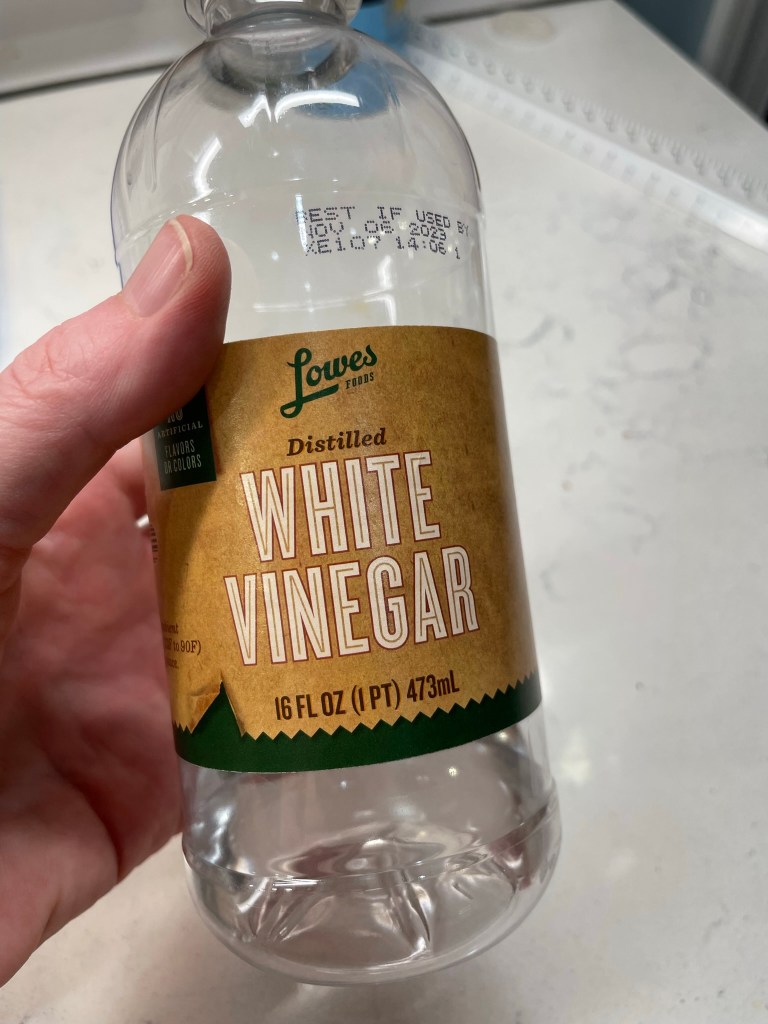
The disadvantage of making your own sriracha is, well, the same. Without heavy preservatives, homemade sriracha must be stored in the fridge and even then, it will not keep as long as store-bought. This recipe only yields about a cup, so that shouldn’t be a problem if you love sriracha because you’ll likely use it up pretty quickly. There is one preservative ingredient, however, that will be making its way into my homemade version of sriracha, and that is acetic acid. I just happen to have some in my pantry cabinet— and you likely do as well. Take a look:
All vinegars have some level of acetic acid, but white distilled vinegar checks in with about 5%, higher than other culinary vinegars. It will help preserve both the color and freshness of my homemade sriracha, while also brightening up the flavor notes, and it comes into play in the next step— pureeing the fermented Fresno paste. Ready to finish this?
The Home Stretch
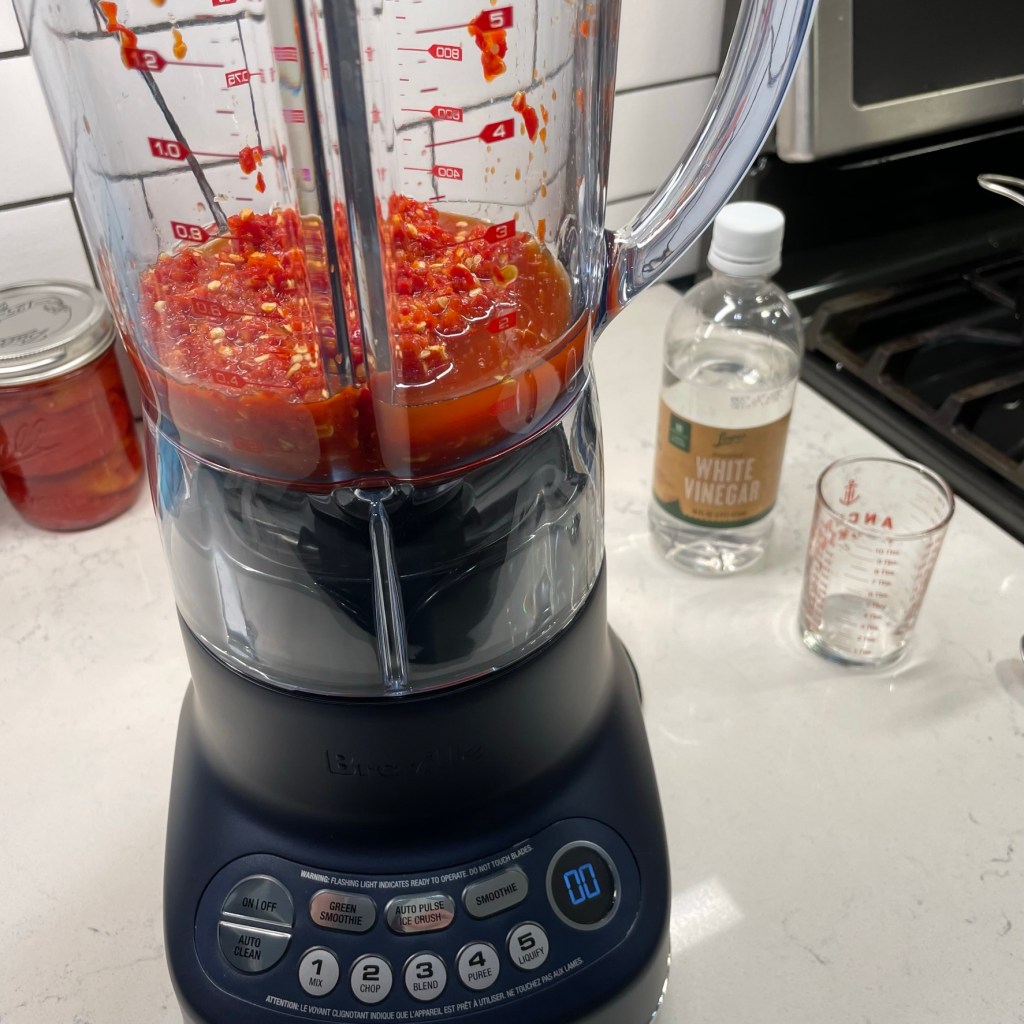
According to the roadmap article in Serious Eats, the pepper pulp is ready when large bubbles are visible in the jar, and mine definitely was. It also had a pleasantly funky, fruity-meets-spicy aroma. It smelled like, well, sriracha!
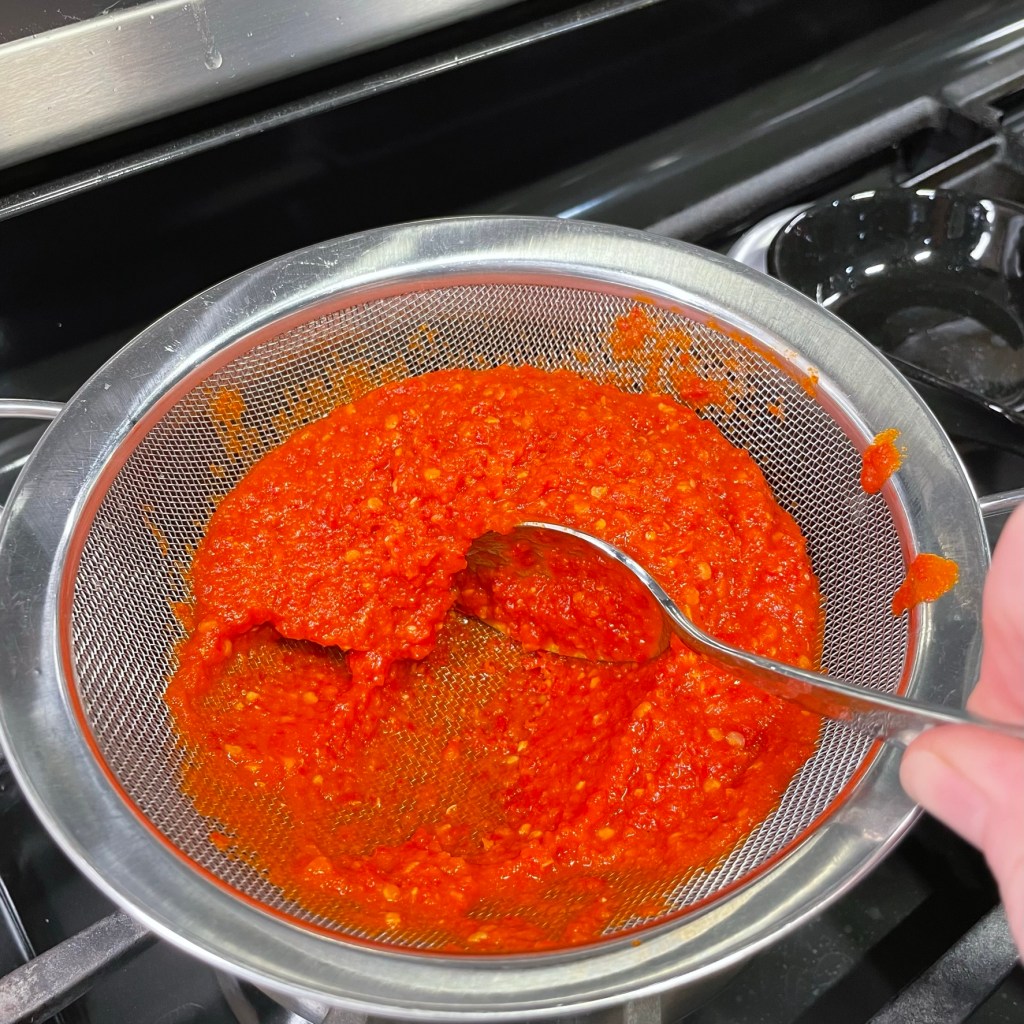
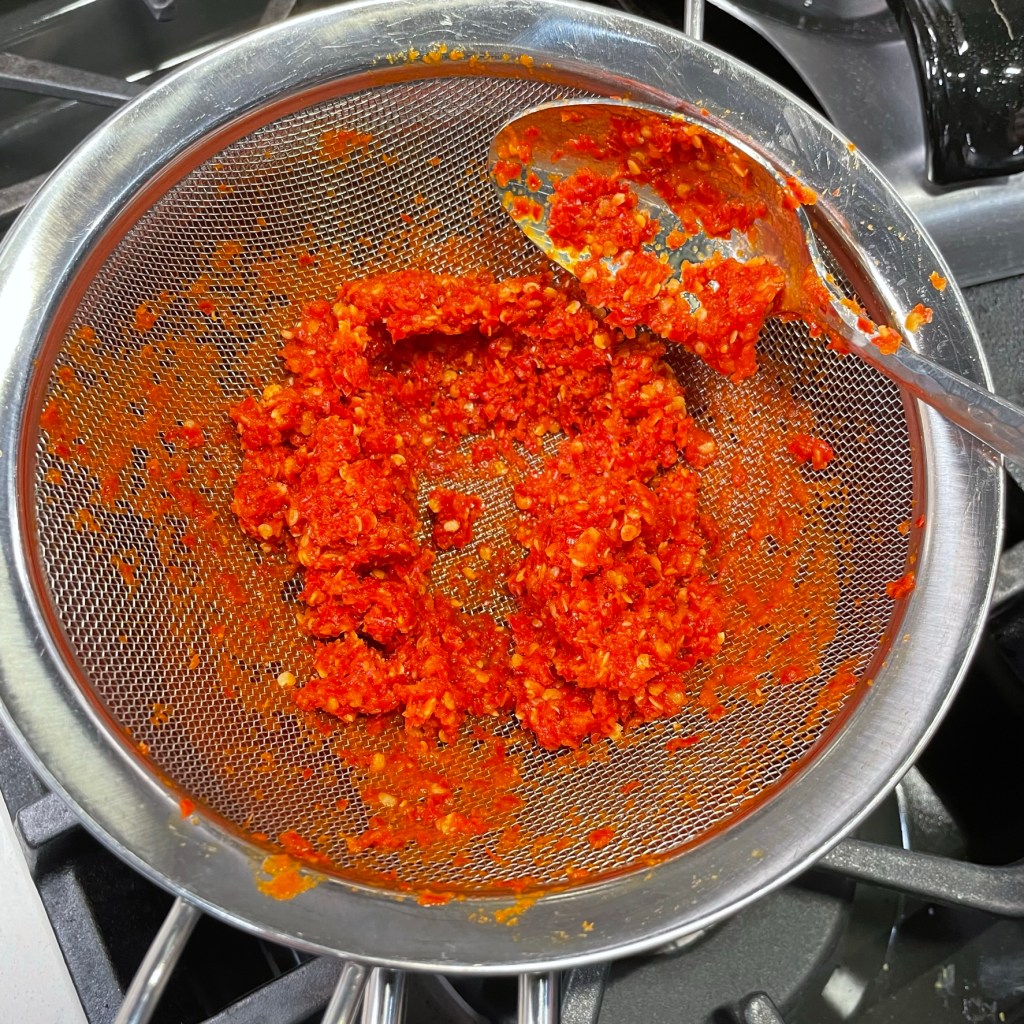
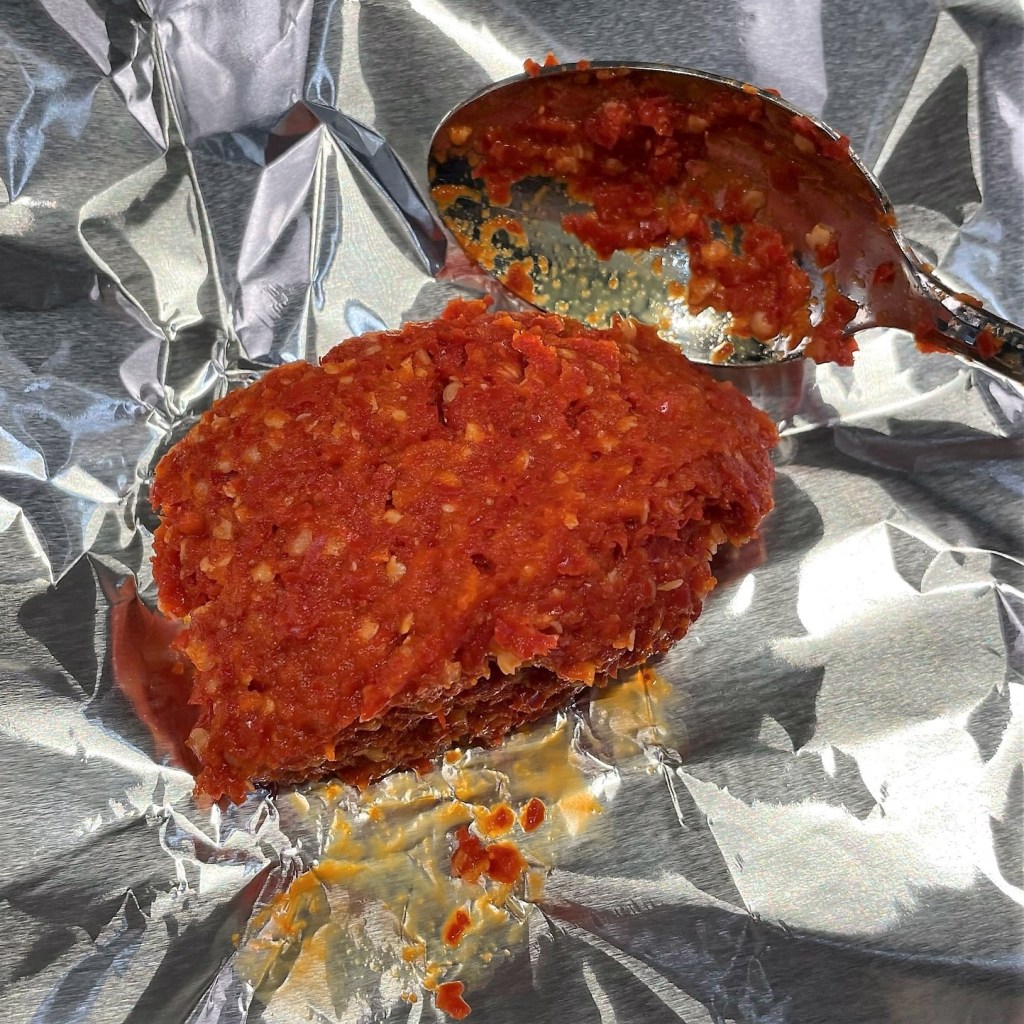
The whole jar’s worth of pulp goes into the blender with a splash of white vinegar, and this time, you’ll puree it until the mixture is as smooth as you can get it. Then, press it through a mesh strainer to separate the solids. Last year when I made this, I spread that nasty lump of hot pepper solids on the ground around the tomatoes in my garden. Probably another reason that I had a decent harvest for the first time in ages, as I can’t imagine any critter wanted to be near that stuff!
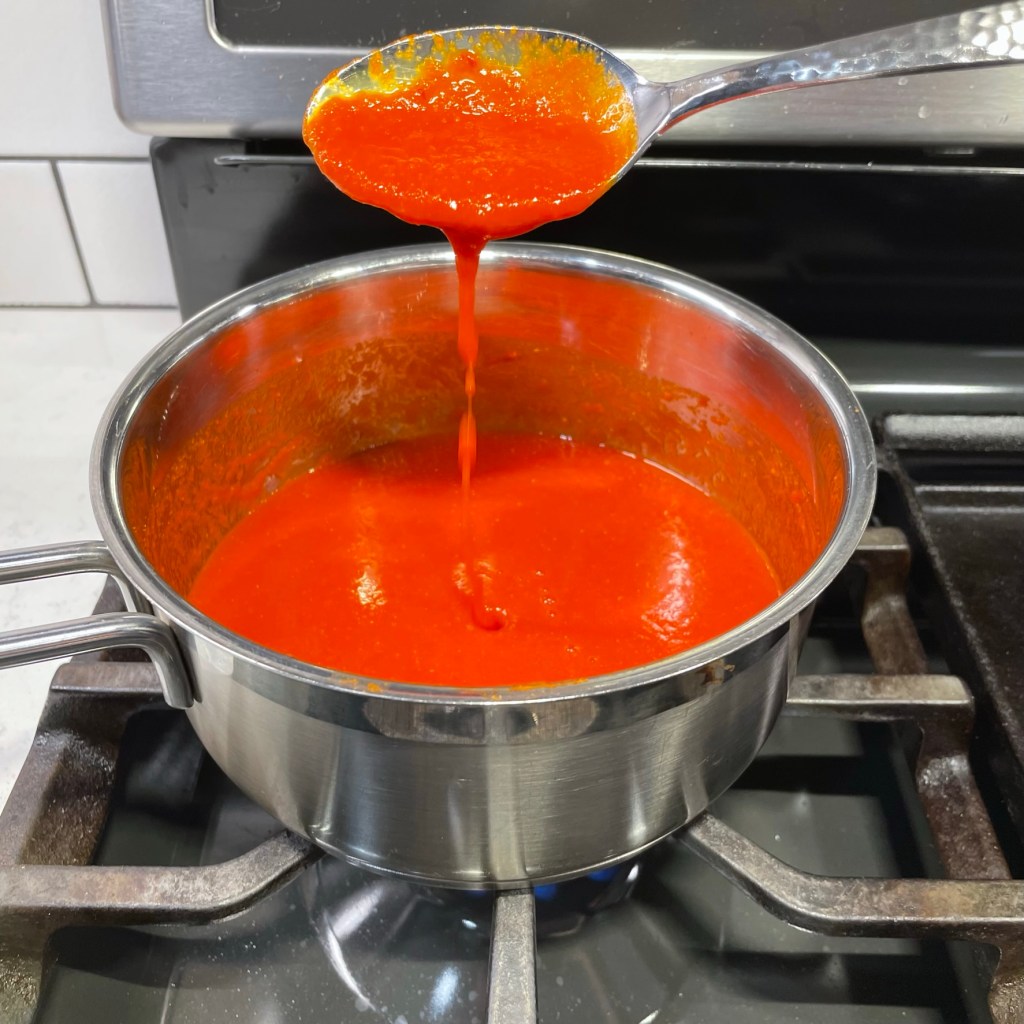
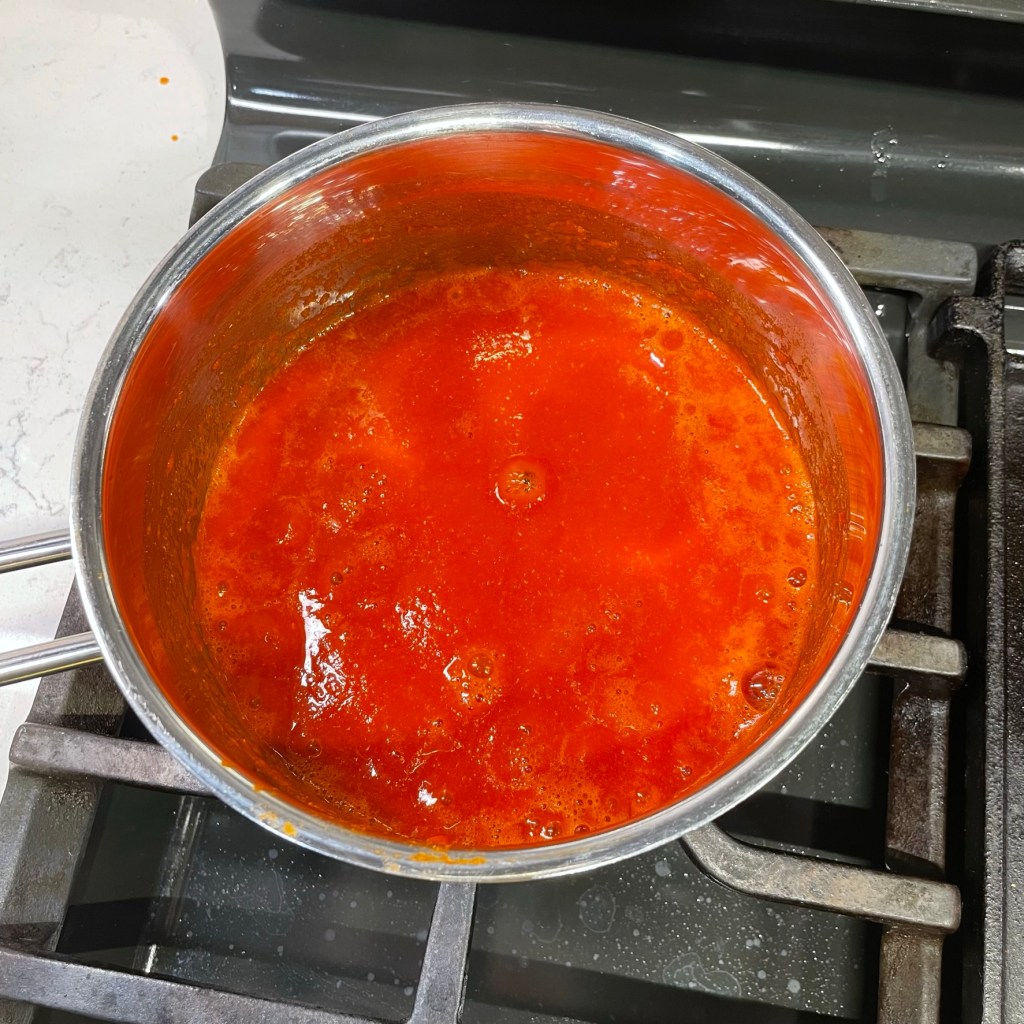
The strained puree simmered for about 30 minutes until it reached the consistency one would expect for sriracha, and then I transferred it to a jar for longer storage—in the fridge!
The Verdict
This adventure surprised me! I’ve always imagined that condiments are not DIY projects because of their complexity, but there was nothing difficult about making my own sriracha, and it was really very good. As the Serious Eats author noted, the flavor registered brighter and more fresh than the bottled stuff, but that shouldn’t come as a shocker. I’m already eyeing my jalapeño plants, and thinking I may try something similar when they start going gangbusters. And though I will admit that I currently have a bottle of the Huy Fong sriracha in my refrigerator door at this moment, I feel empowered just knowing that if the manufacturer doesn’t get its act together next year, I’ll be just fine. 🌶️
When life gives you lemons, make lemonade. But when life takes away your beloved sriracha, don't despair. Just make your own!
Ingredients
About 3/4 pound fresh red hot peppers (jalapenos or Fresno work great)
2 Tbsp. light brown sugar (white sugar would likely be fine, too)
1 1/2 tsp. kosher salt
3 cloves garlic, peeled and smashed
1/4 cup distilled white vinegar (added during step 3)
My recipe is based on this one from Serious Eats: https://www.seriouseats.com/sriracha-recipe-from-scratch. Note that this homemade sauce must be refrigerated, and it should be used up within a few weeks. Without the excessive preservatives that are included in the store-bought variety, you should expect a much shorter shelf life.
Directions
Thoroughly rinse peppers, wiping away any debris, and then dry them. Give the peppers a rough chop, discarding stems but keeping the green caps.
Add pepper chunks (seeds and all) to the small bowl of a food processor. Add sugar, salt and garlic. Pulse several times to break up the pepper into smaller chunks, then run the processor continually for about 10 seconds. Transfer pepper pulp to a clean mason jar. Cover with a lid and set the jar aside to ferment at room temperature for 5 to 7 days.
When the pepper pulp has a significant amount of bubbles throughout, and a slightly funky aroma, it’s ready. Transfer it to a blender container. Add white vinegar and puree for a solid couple of minutes until the mixture is nearly liquified. Stop and scrape down the container as needed.
Pour pepper puree through a large mesh strainer into a saucepan. Use a spatula to gently press and scrape the puree through the strainer. Discard the solids.
Heat puree to a boil, then reduce heat and simmer until it reduces to desired thickness; for me, this was almost 20 minutes. Allow sauce to cool to room temperature, then transfer to a clean jar and store in the refrigerator.
This is not a fancy dish by any means, but it is one of the oldest comfort foods from my childhood. My mother began making a ground beef version of this flavorful chili when I was about 6. It’s easy to estimate my age at the time because we moved around a lot, and I can recall where we lived when certain memories were made. My mom was newly remarried and we had moved out west from upstate New York for my stepfather’s job as a truck driver. I loved my stepdad, but he was gone a lot, so it was frequently just my mom and me taking up space in a single-wide mobile home in rural southern Colorado, where Mexican flavors reign supreme.
You could barely see our little box of a house from the main road, which ran a straight line through the tiny town of about 350 people. There was a long, dusty driveway leading from the school bus stop, over some railroad tracks and past the big white propane tank that provided us fuel for heating and cooking. Occasionally, during deer season, I’d see a carcass hung up from a tree near our house, and that meant my new daddy had a good hunting trip and venison would soon be on the menu. Most days after school, our sweet little dog, Ginger, would meet me halfway on my walk from the bus, and on the days that I’d catch a whiff of my mom’s green chili when I opened the door—well, that’s a very happy memory.
A short time after, many things changed in my world. For the second time in my young life, my parents split. We moved again and the relationship with my mom began a sad but steady decline. I shuttled back and forth between parents (and states) until high school graduation, and then made the decision to move away on my own. Visits with my mother became few and far between, and eventually when I visited as an adult and requested the green chili, I learned that her recipe had shifted from the familiar ground beef to cubed pork. It was tasty, but I longed for the texture of the tender ground meat.
What I really wanted was a taste of happy childhood. Isn’t that what comfort food is?
I can taste my childhood in this chili.
The first time I made my own green chili, about 15 years ago, I used a flavorful pork sausage I had discovered at Whole Foods. The sausage was made in-house and was utterly addictive with its mild, smoky green chiles and spicy habanero peppers, and I found it a happy medium to provide the soft meat texture I loved about the first version of green chili I ever had and the rich, savory flavor of pork. When my local Whole Foods stopped making it, I was beyond disappointed. I figured I’d have to settle for plain ground pork going forward.
But recently, necessity being the mother of invention and all, I learned how to make my own spicy sausage and baby, I’m back!
There’s a simple salt-and-wait method for making sausage, and it’s easier than you might expect.
I’m still in the learning stages of sausage production, but my imagination has run pretty wild, considering all the unique flavor possibilities before me. I have delved into a few other flavor combinations already, but I know it won’t be long before this one comes up in rotation again. It’s because the green chili burritos I made from the sausage was just that delicious—even better than any of the versions I made before. Link back to the homemade pork sausage post for the particulars on this sausage, or choose a store-bought sausage that has green chile flavors if you want a shortcut. Heck, maybe your Whole Foods still sells that sausage, and you’ll be in business.
This is my happy place. 🙂
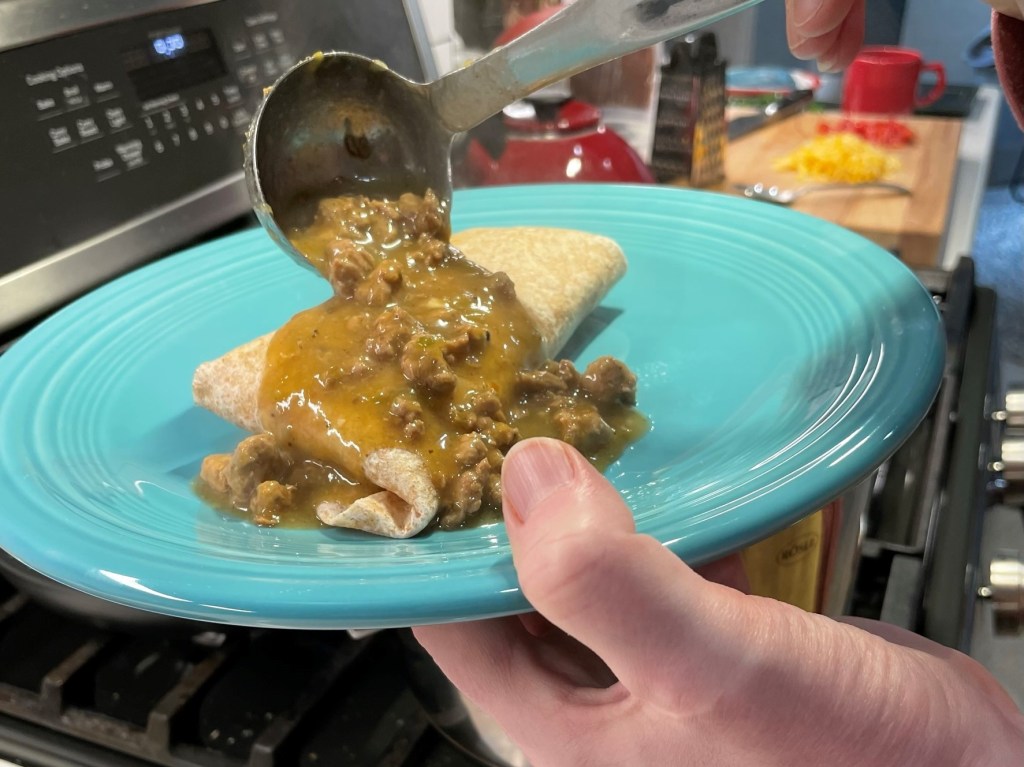
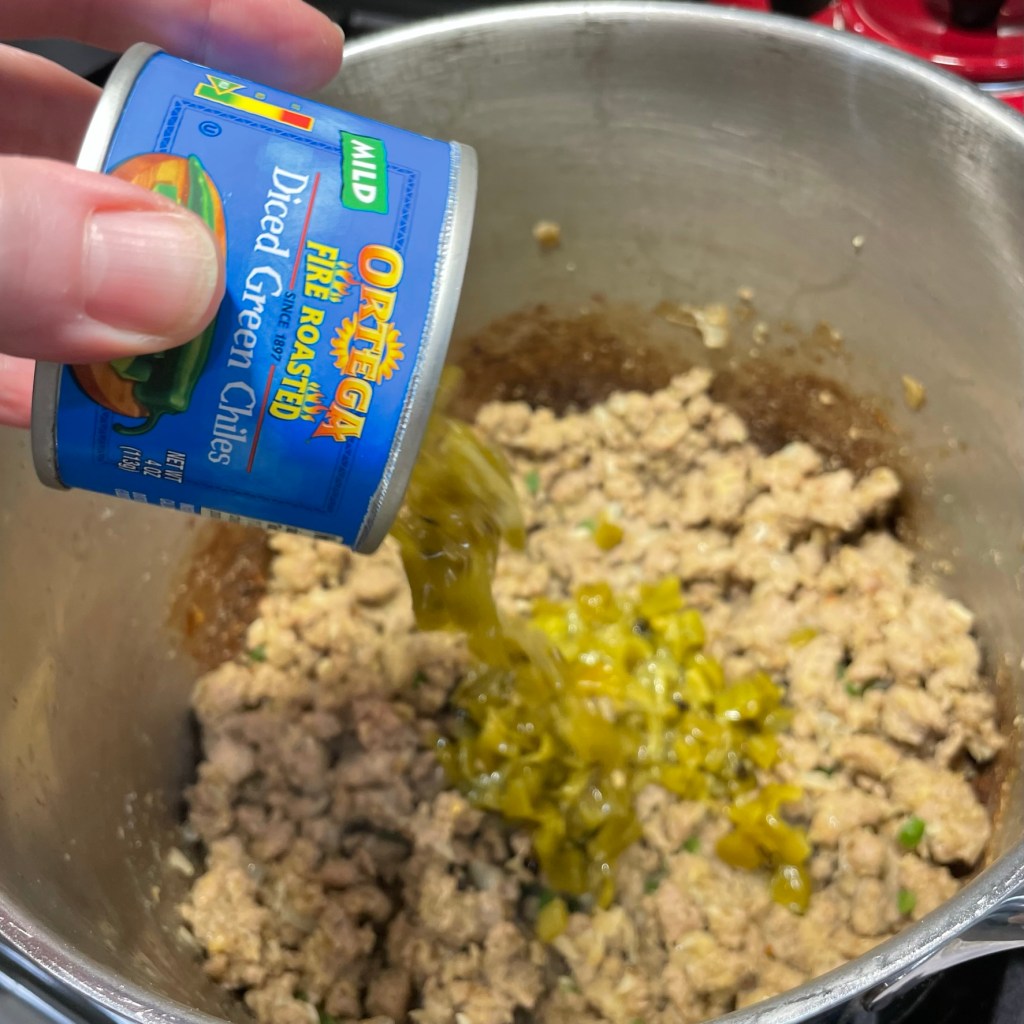
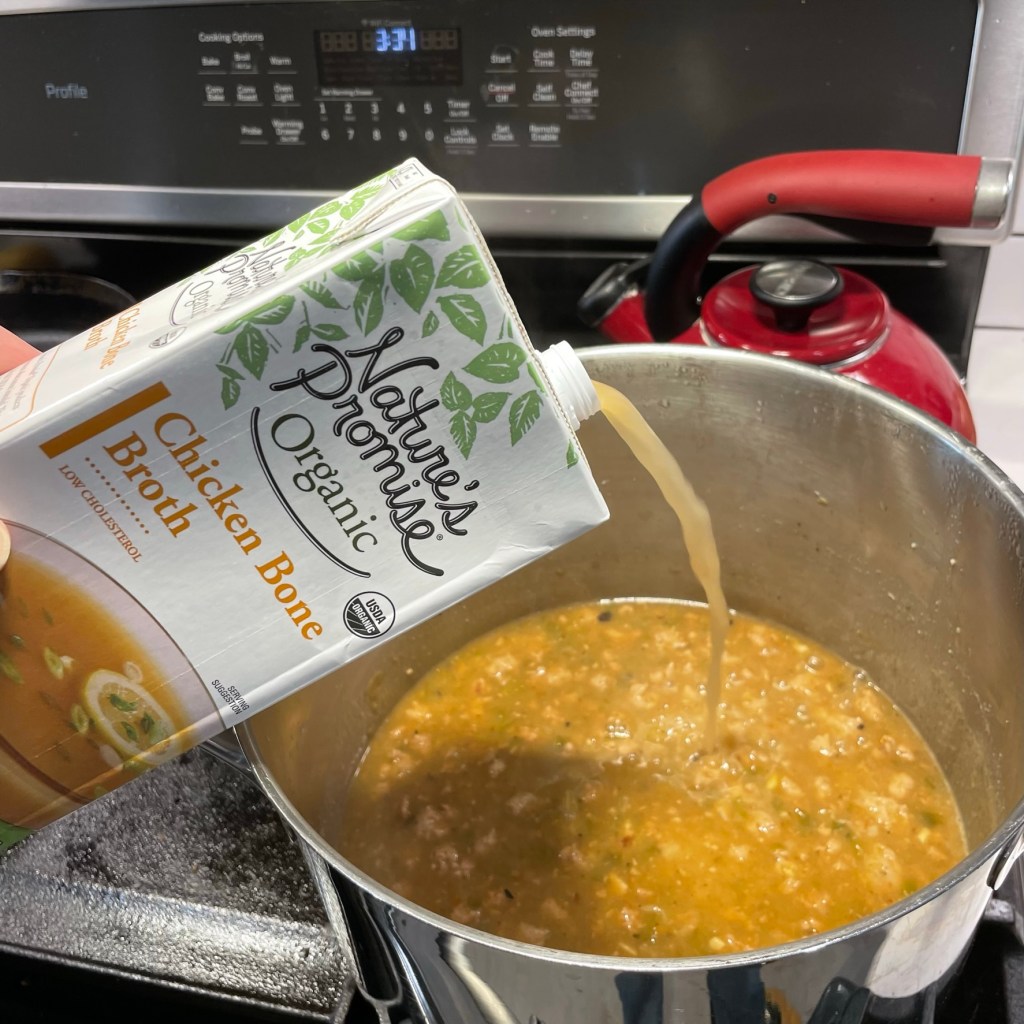
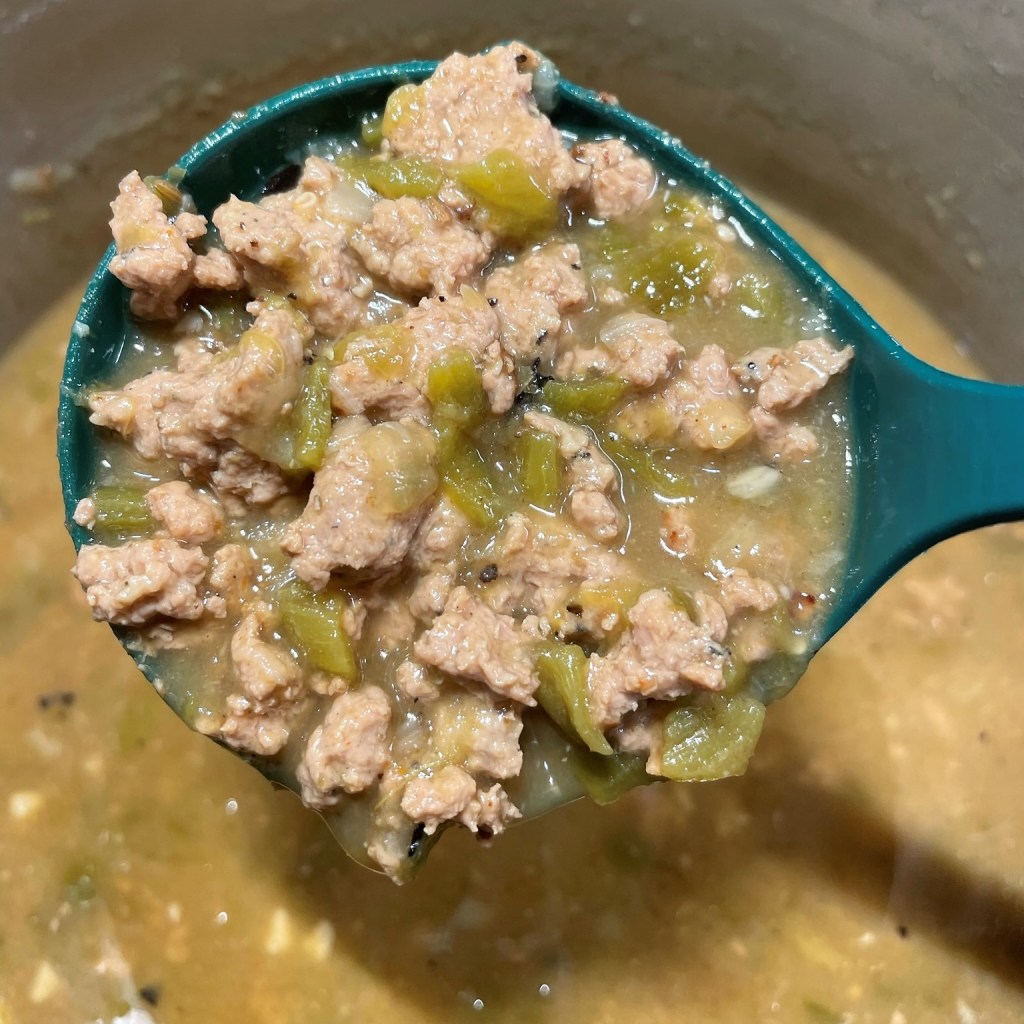
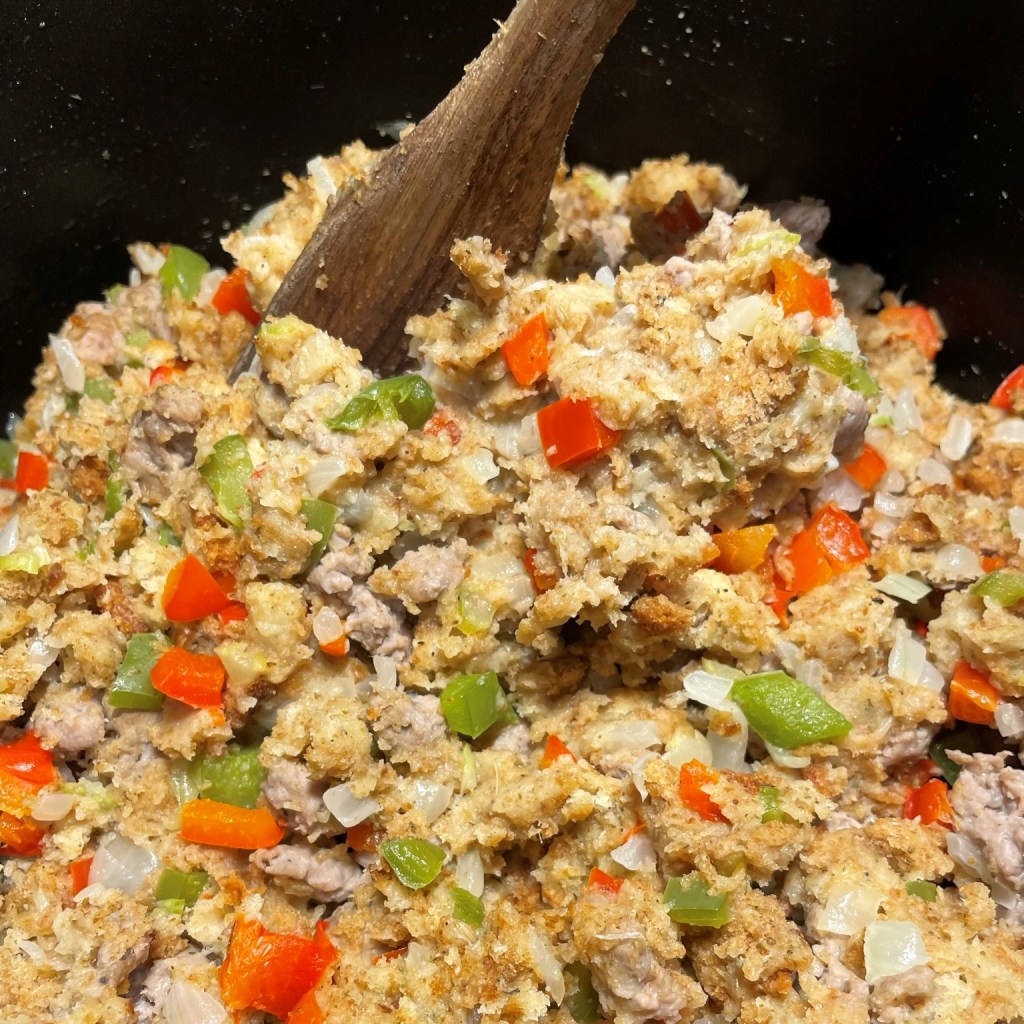
The chili itself is the star of these burritos; the rest is just a tortilla rolled around seasoned beans and cheese. Accompanying the sausage were onions, garlic, flour and masa flour (for thickening), canned green chiles, fresh jalapeno (if you love the heat, as we do), a few simple seasonings, and broth (I used both veggie and chicken). Putting the chili together is easy, and then it settles in for a long, low simmer. If you have an extra day, let it sit in the fridge overnight because the flavors mingle even more for better flavor.
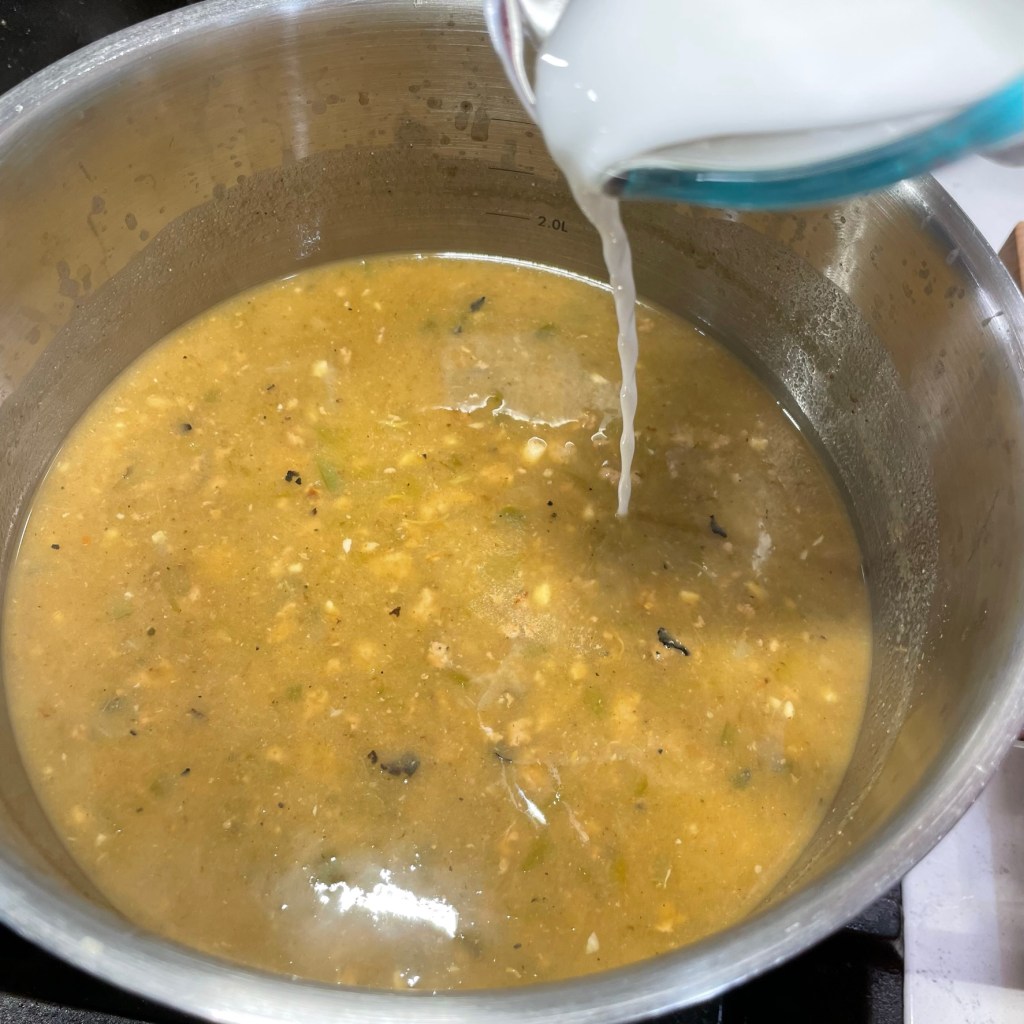
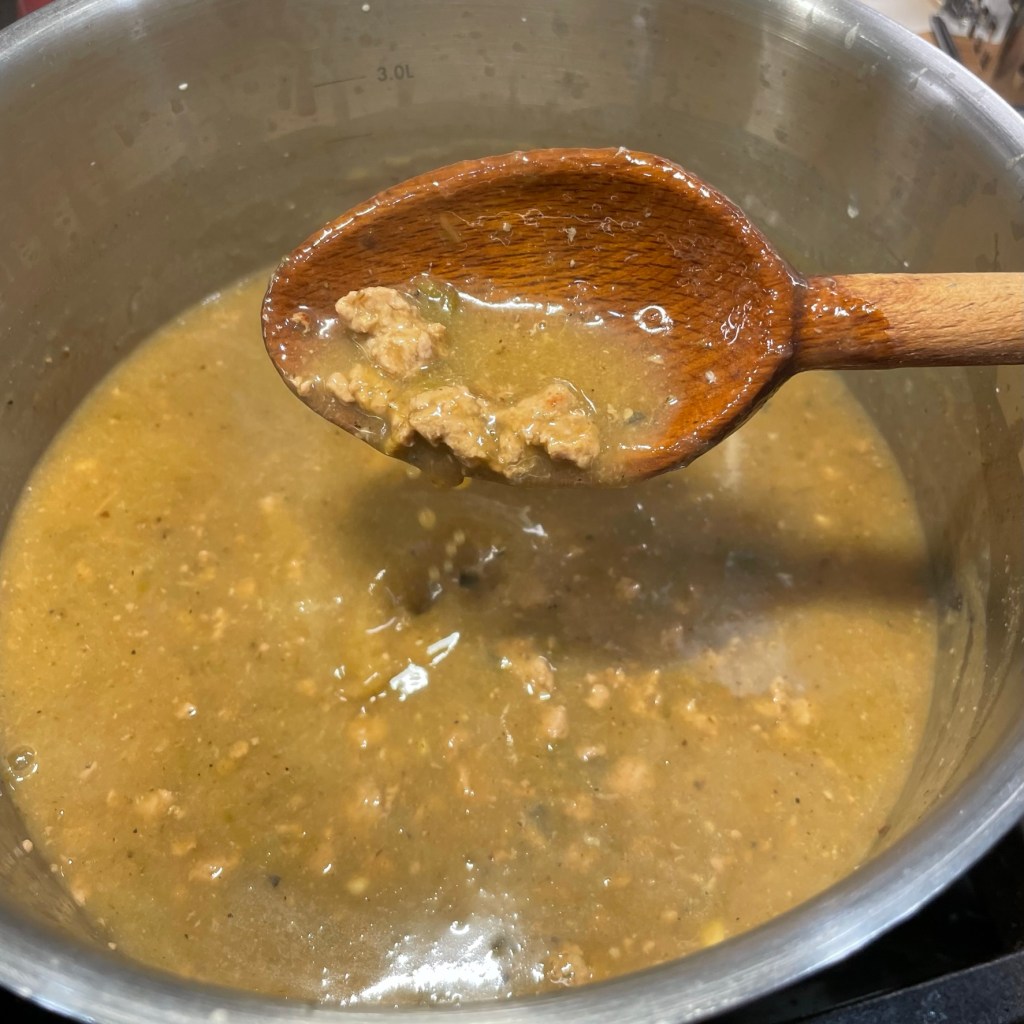
If you like, you can serve the finished chili just as it is—either by the steaming bowlful with a handful of shredded cheese or by ladling it over a burrito—but if it thins out more than you prefer during the cooking, whip up a bit of corn starch slurry and stream it in over medium heat. When it’s thickened and glossy, it’s ready to go.
Initially, my chili was a bit thin.Equal parts corn starch and cold water makes a slurry for thickening.The chili is even more comforting when it’s thickened.
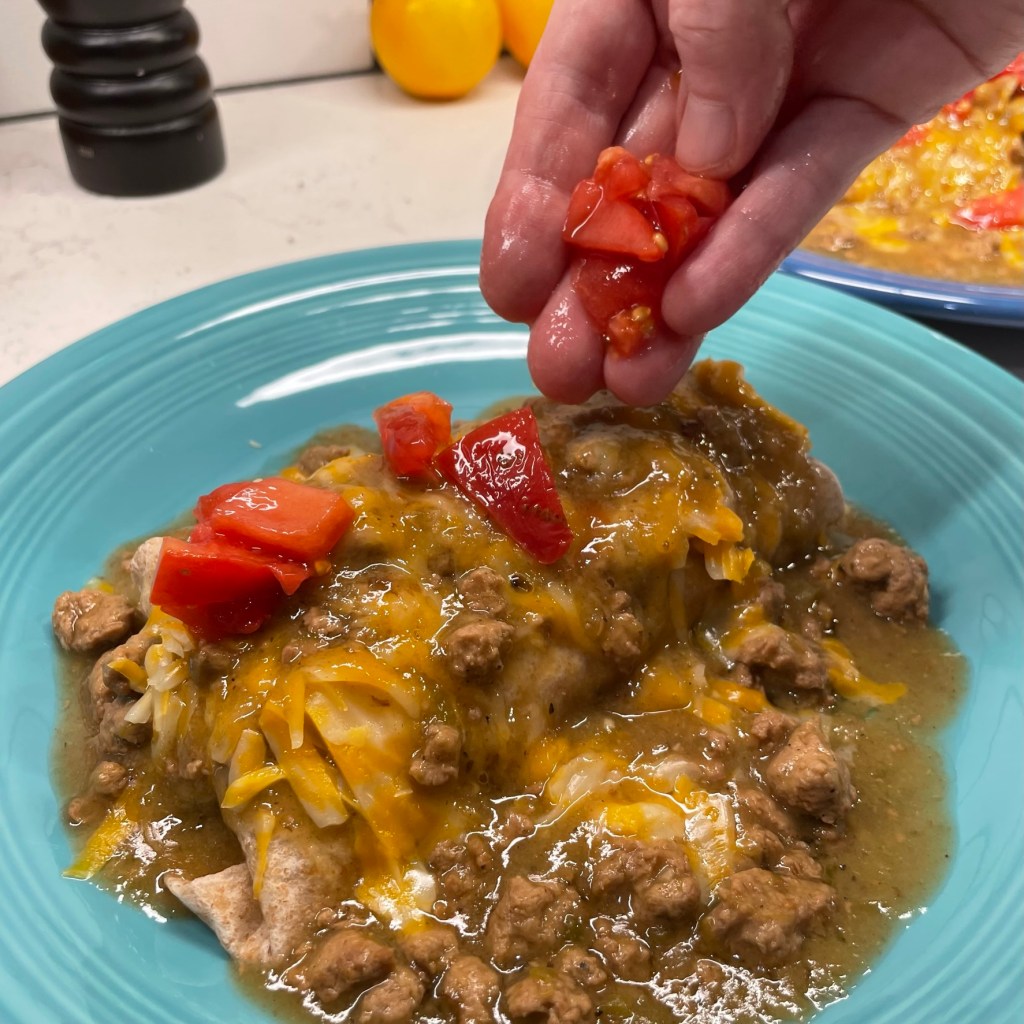
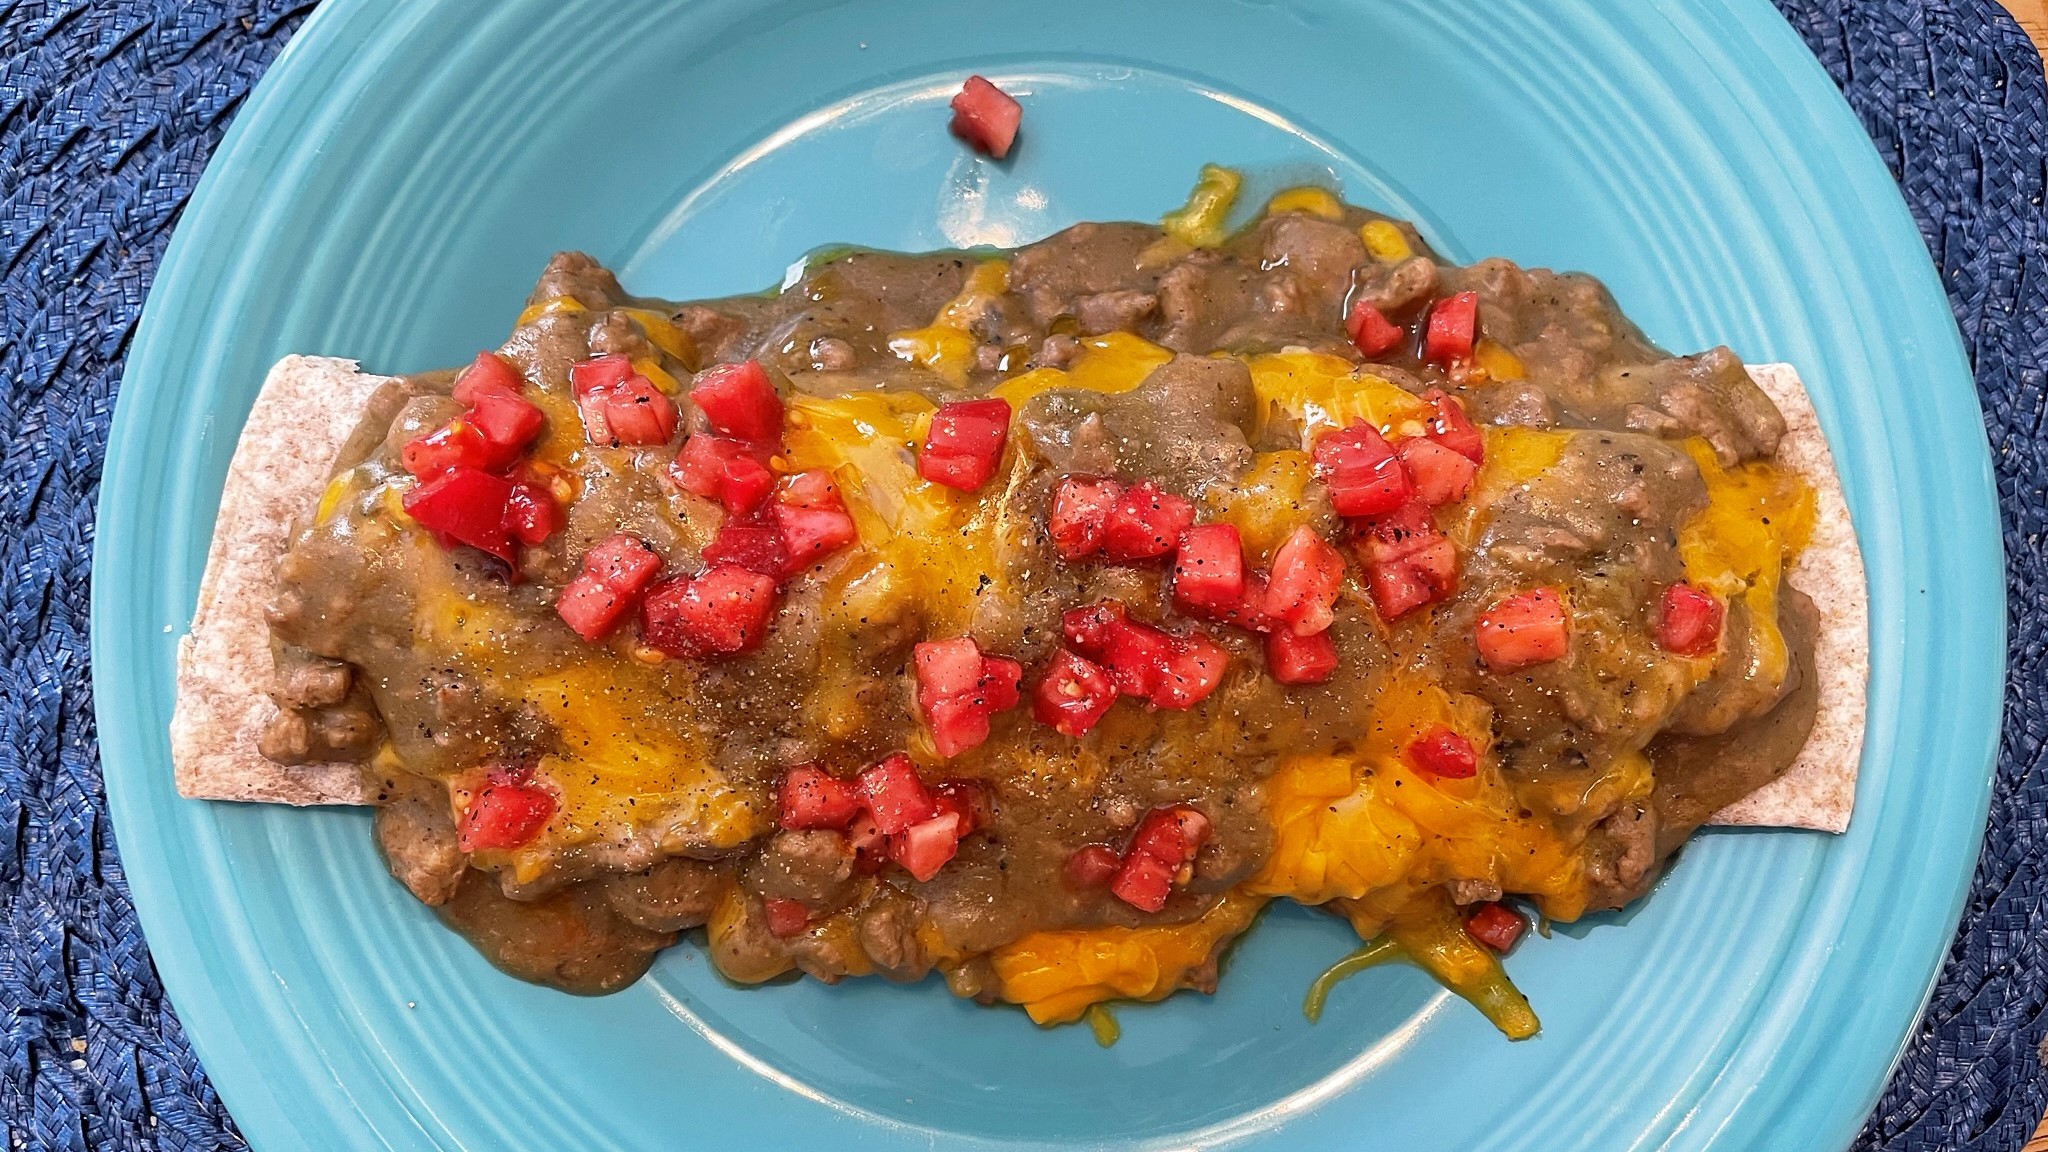
At our house, we enjoyed this at dinner, lazily draped over bean and cheese burritos. And we enjoyed it again for a weekend breakfast, stuffing our tortillas with black beans, scrambled eggs and cheese, plus a scatter of fresh chopped tomatoes.
If we get snow this winter, I’ll be making this again!
This dish speaks the language of my childhood, with comforting chili made from ground pork and all that beautiful, melty cheese.
Ingredients
1 large yellow onion, chopped
3 or 4 cloves garlic, minced
1 Tbsp. EVOO
Kosher salt and freshly ground black pepper
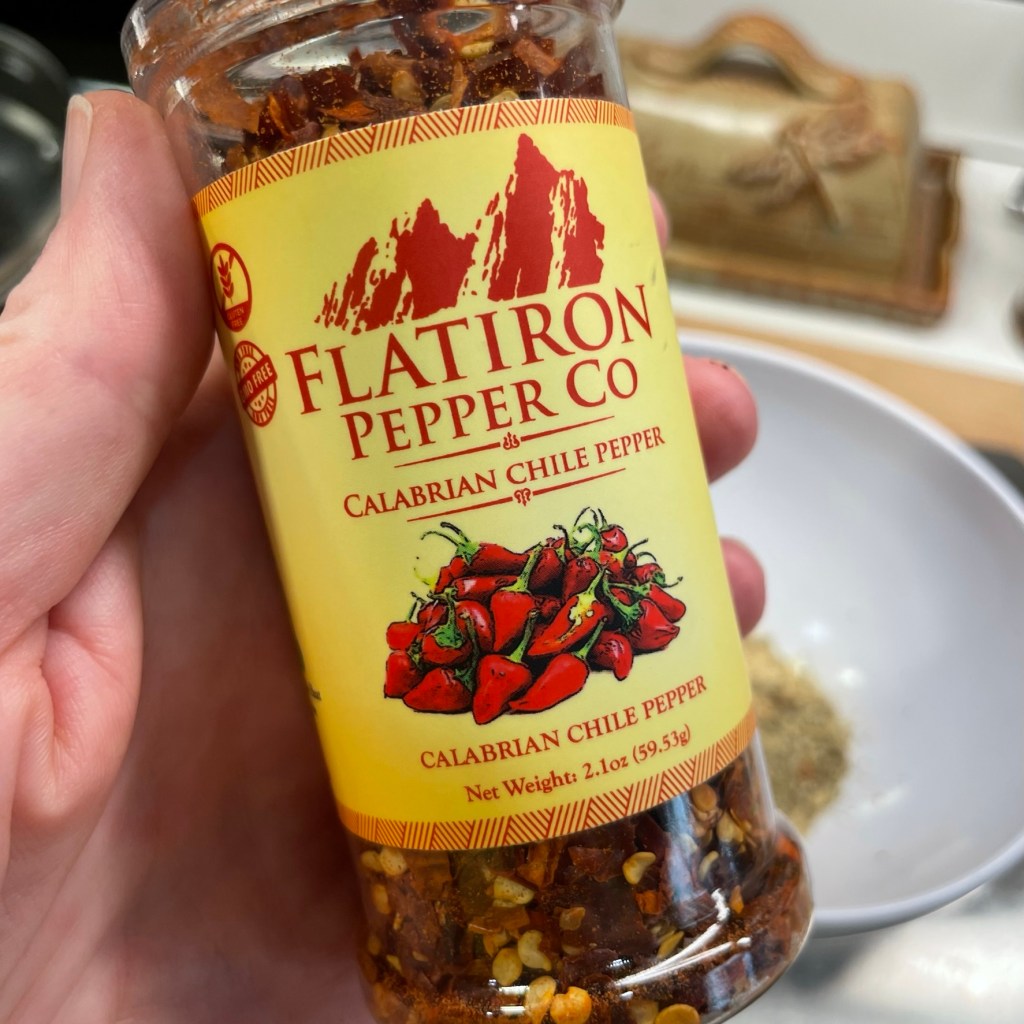
2 tsp. dried green chile flakes (mine were from Flatiron Pepper Co., available online)
1.5 lbs. green chile pork sausage (store-bought, or my recipe which is included below)
1 whole fresh jalapeno, seeded and chopped (keep some of the seeds if you like it hot)
2 or 3 Tbsp. additional EVOO to provide fat for roux
1/4 cup all-purpose flour
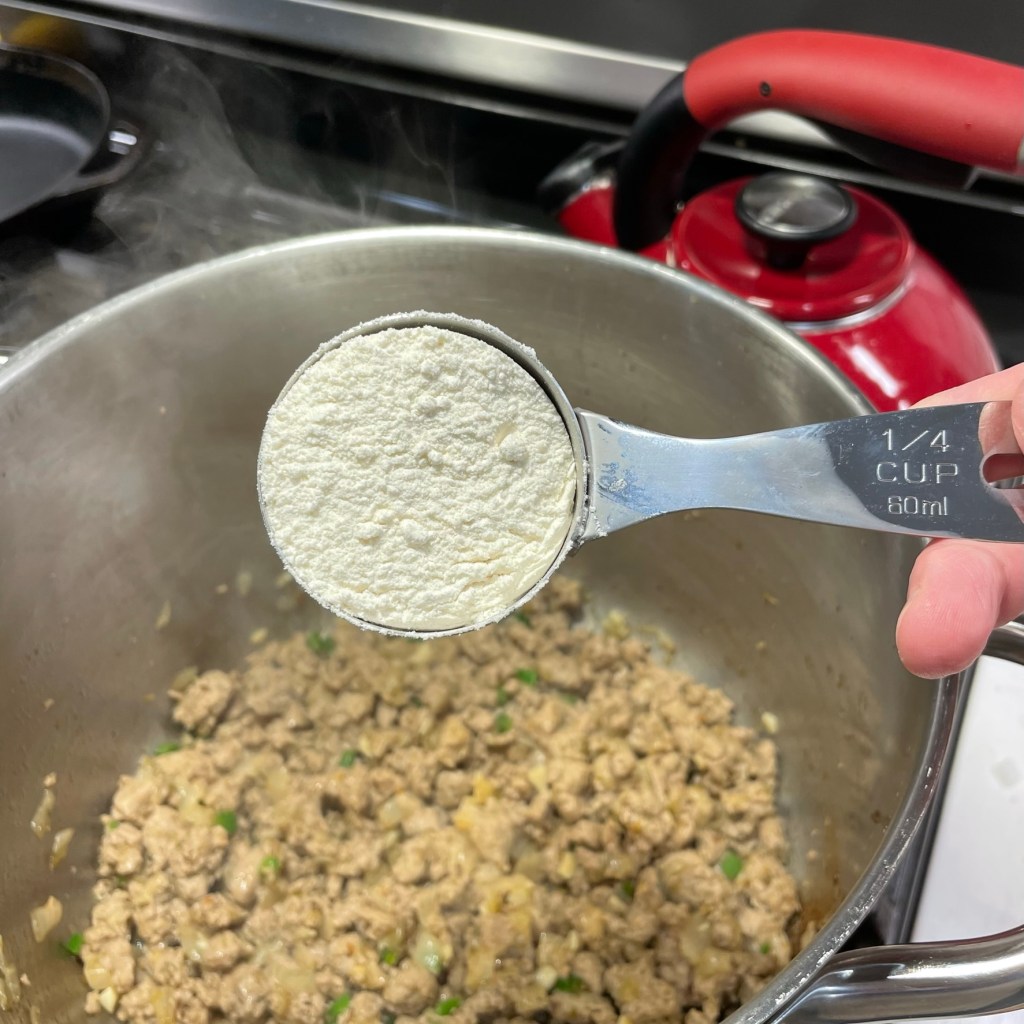
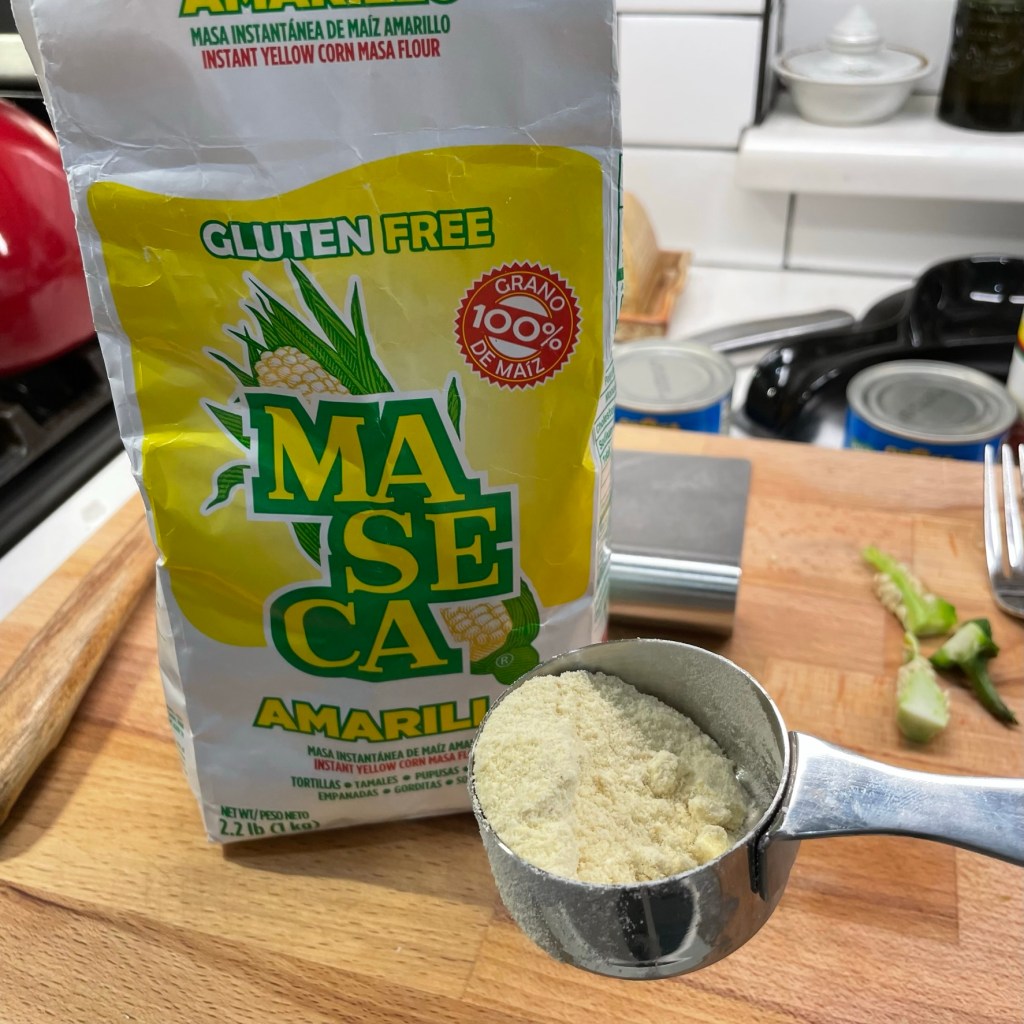
3 Tbsp. masa flour (Maseca)
2 small cans (4 oz.) fire roasted diced green chiles
1 1/2 tsp. ground cumin (from toasted seeds if possible)
4 cups low-sodium veggie or chicken broth (I used 2 cups of each)
Corn starch slurry with equal parts corn starch and ice water (About 1/3 cup total)
2 cans refried beans, warmed with oil and onions (for serving burritos)
Large flour tortillas (for burritos)
8 oz. block cheddar, colby jack or pepperjack cheese, shredded
Fresh tomatoes, chopped (optional)
Directions
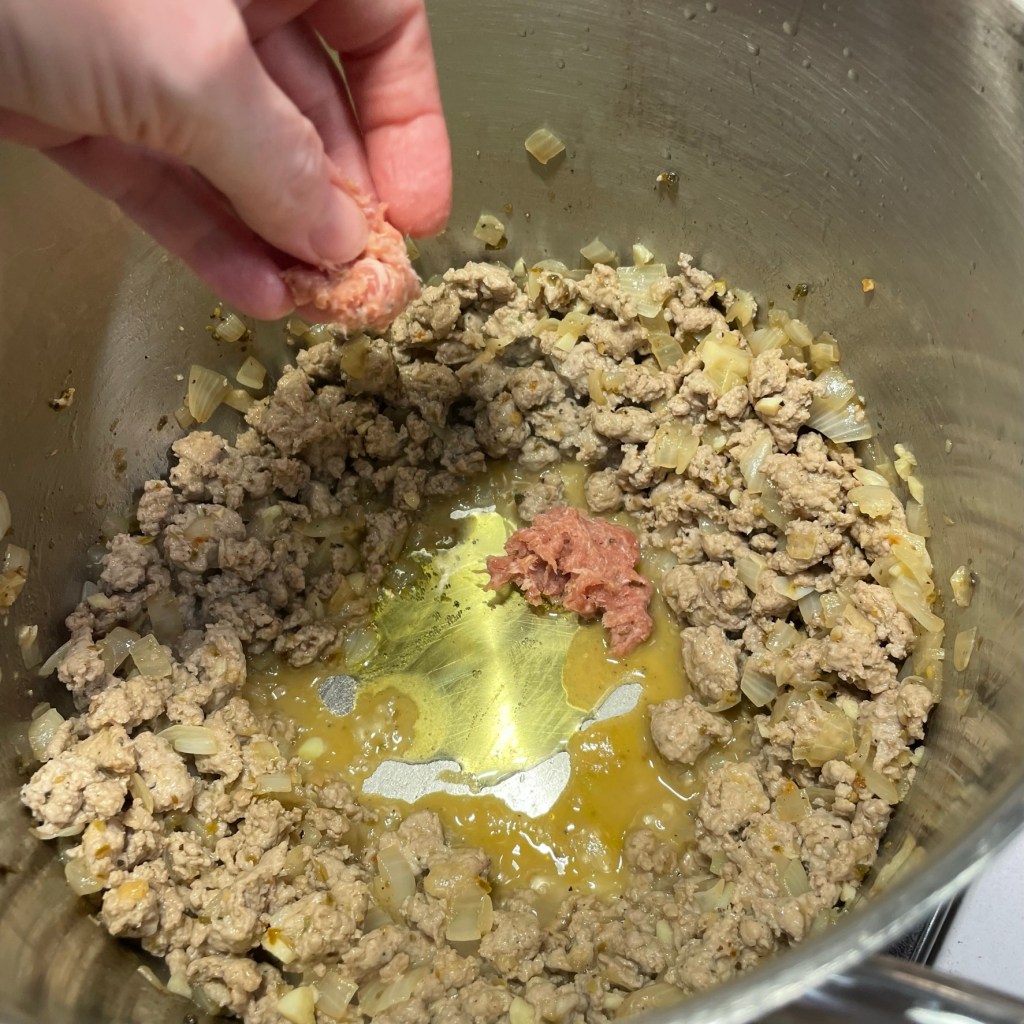
Saute onions and garlic in olive oil, season with salt and pepper.
Add sausage, a bit at a time, to brown it without overcrowding the pan.
Add jalapeno and drizzle with olive oil to provide fat for the roux. Stir in ground cumin.
Sprinkle flour and masa all over the meat mixture and toss to coat, adding more oil if needed to make it sticky and evenly coated.
Add veg or chicken broth, half at a time, stirring each to blend and thicken.
Cover the pot, reduce heat and cook at a low simmer for a couple of hours. Aim to keep it below the boiling point so that the thickening doesn’t cook off. If the chili seems “thin” after its simmer, use the corn starch slurry to thicken it back up. Be sure to let it simmer vigorously for a few minutes to cook off the starchy flavor.
To serve the chili over burritos, warm the refried beans in a skillet or deep saucepan with some sautéed onions. Add a generous spoonful of the beans onto the center of a large flour tortilla. Add a small handful of shredded cheese and roll it up, placing it seam side-down on an oven-safe plate. Ladle chili over the burrito, sprinkle on more shredded cheese and just a small amount of extra chili. Place in the hot oven or microwave to melt the cheese.
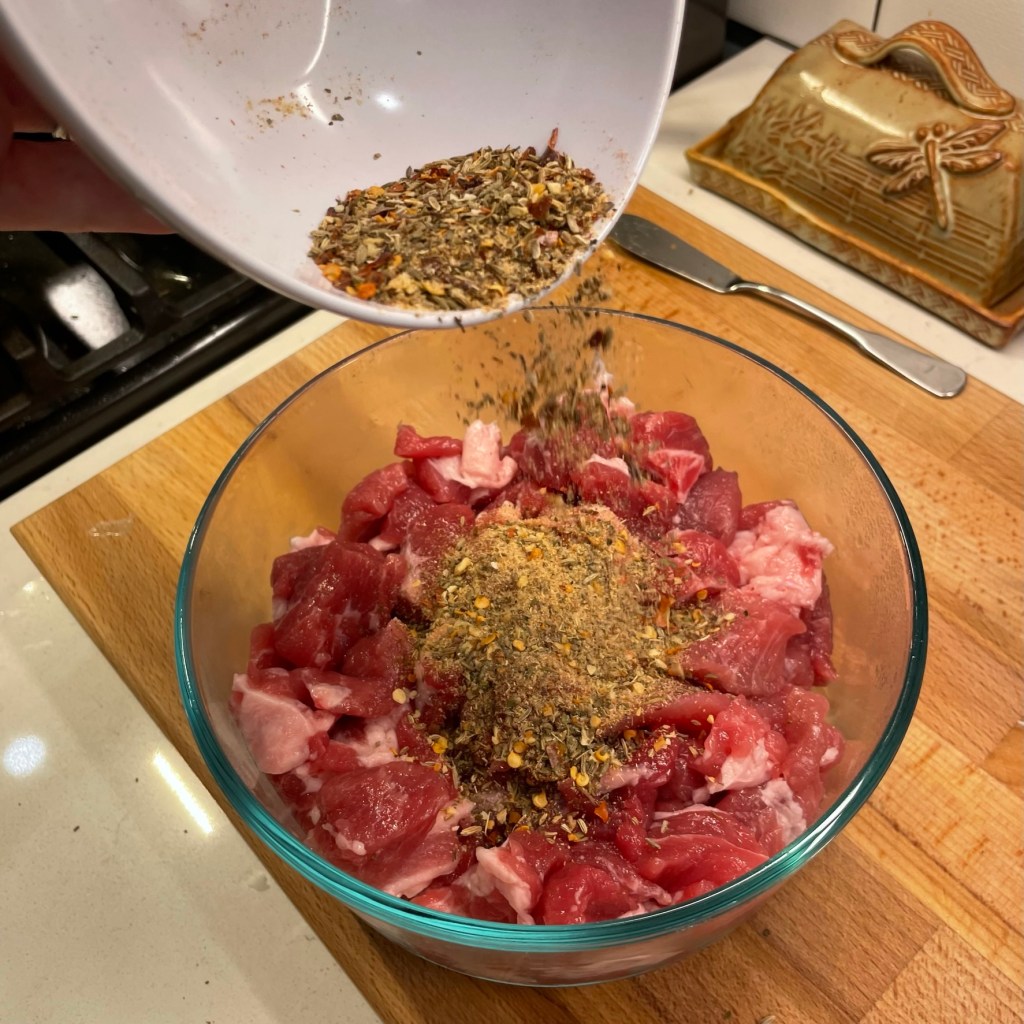
Below are the ingredients I used in the green chile sausage. Full instruction for making the sausage can be found in my previous post for homemade pork sausage.
Ingredients
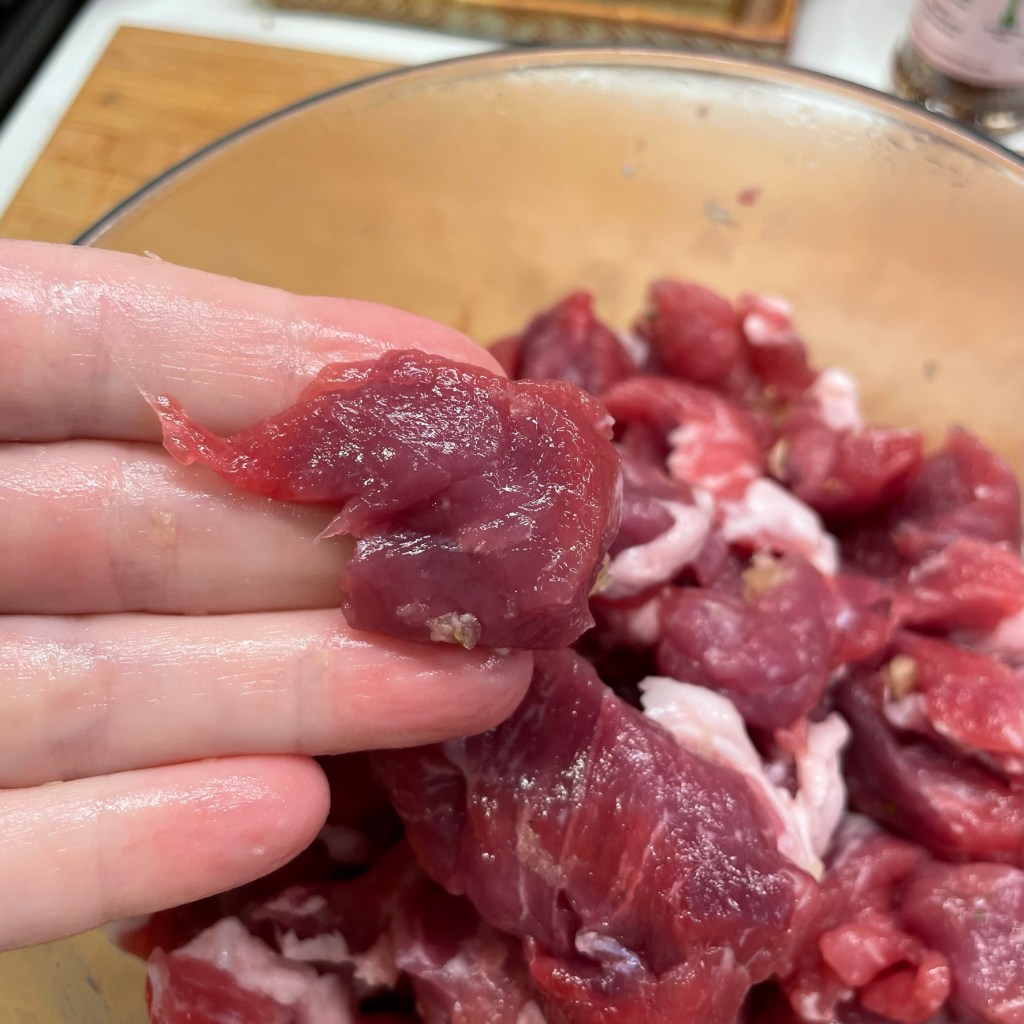
Pork shoulder cubes (gram weight of pork determines how much seasoning blend to use)
If I were able to physically load my stress onto the pages of a calendar, December would be the heaviest, but it has nothing to do with holiday anxiety or preparing to entertain. For me, the stress comes with realization of all that I didn’t accomplish during the year, despite my intentions and wishes. I have tried to shift my attention to the things I’ve finished rather than not but, sadly, this seems to be my default. It is heavy on my mind this week as I have reviewed my culinary bucket list, and the ever-growing “I want to try” column.
My most frequent lamentation to my husband is that “I want to do everything at once!” Most of the time, I’m doing good to just break even on my get-it-done list, and the biggest obstacle I face is my own lofty expectation, especially in the kitchen. I don’t want to throw proverbial spaghetti at the wall, hoping something will stick. I research unfamiliar techniques and recipes carefully and if they seem complex, I research some more until I feel at least somewhat equipped for the task. Sometimes, I just keep researching until I flat-out scare myself away from it.
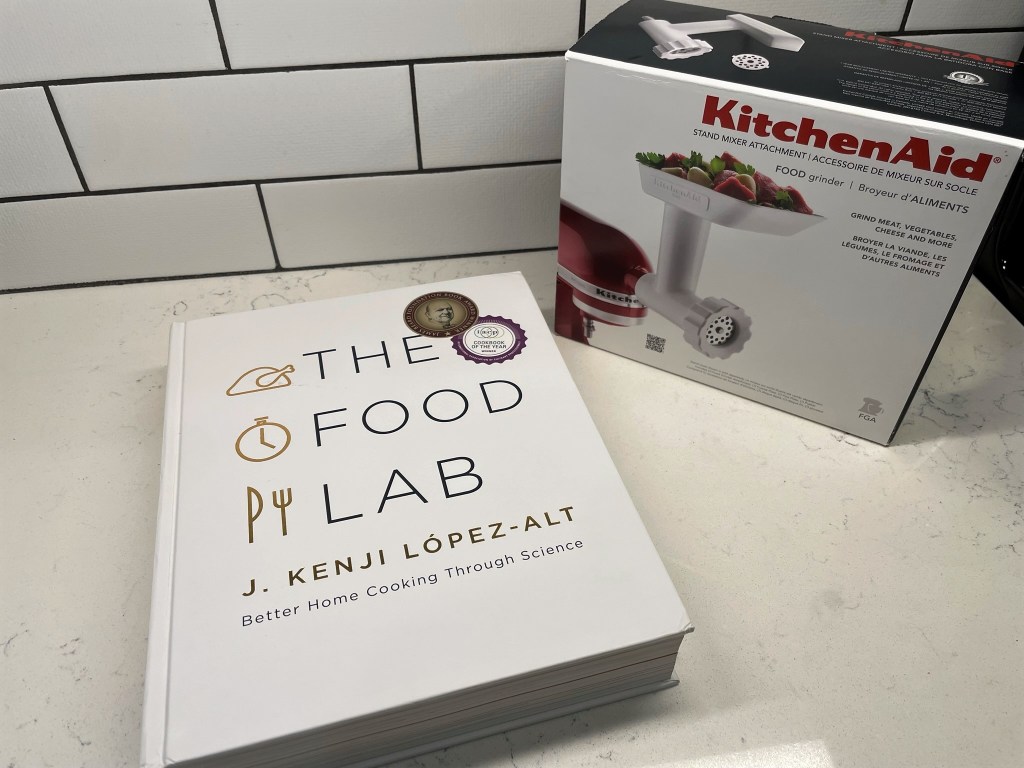
But once in a while I give in and try something that surprises me with its simplicity, and this homemade sausage is one of those things. Turning a chunk of pork shoulder into a flavorful, composed ground meat mixture is not at all the challenge I imagined it to be, thanks in large part to this book by J. Kenji López-Alt and an easy-to-use attachment for my stand mixer.
I was gifted this fascinating book a couple of years ago for my birthday, and I love the science that its author lays out on every page. If you want the full scoop and Kenji’s brilliant approach to things in the kitchen, get the book. You won’t regret it. But not everyone cares to know the backstory details of a recipe and why it works (what can I say? I’m a nerd), so rather than echo the 13 pages of detailed, scientific information Kenji has provided on this subject, I’m grinding it down into three takeaway points and then I’ll share my own adventure in sausage-making. Here goes!
Use a digital scale to determine how much salt and seasoning to use in your sausage; don’t make yourself crazy trying to do the math using cups or teaspoons.
Let the meat chill in the fridge with the proper amount of salt and seasonings for about 24 hours before grinding; it changes the texture of the meat so it’s optimal when you grind.
Keep it cold, cold, cold for best results; this means putting your grinding tools (and the meat, for a time) in the freezer, and working quickly to avoid a big mess.
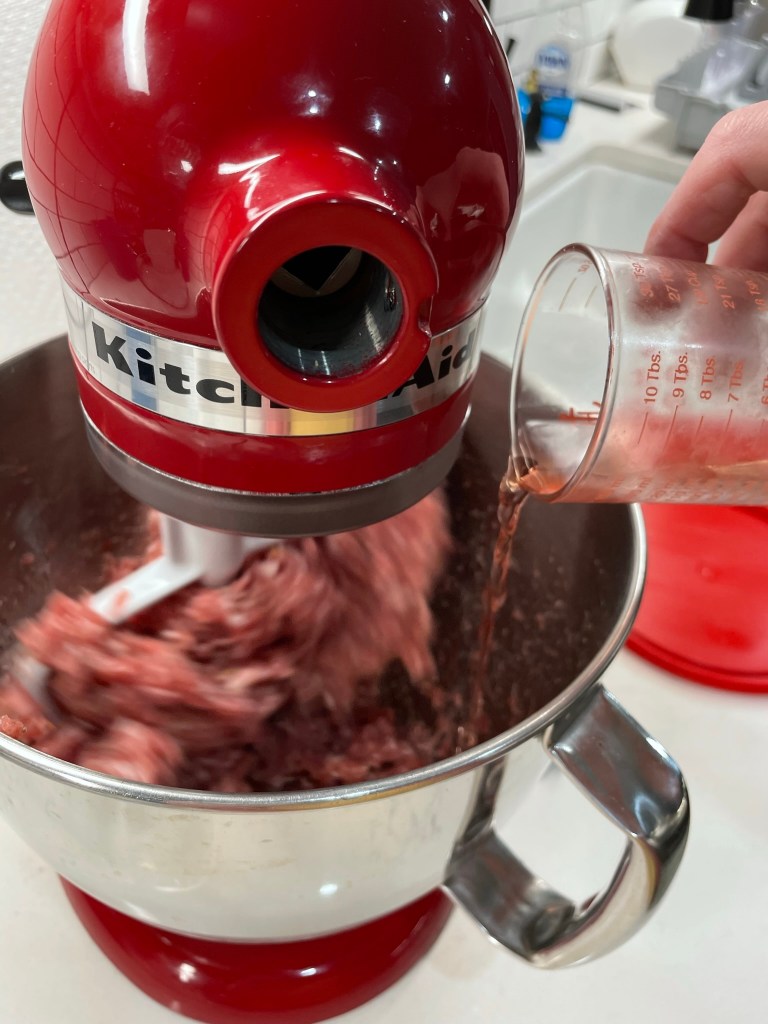
I should disclose here that I did not go “all in” to the point of using casings for link sausages. Frankly, I’m not sure where to even buy them, though I might talk with our favorite local butcher about that in the future, especially before next summer’s grilling and smoking season rolls around. This experiment has been all about bulk sausage, and I have not had a bad batch yet!
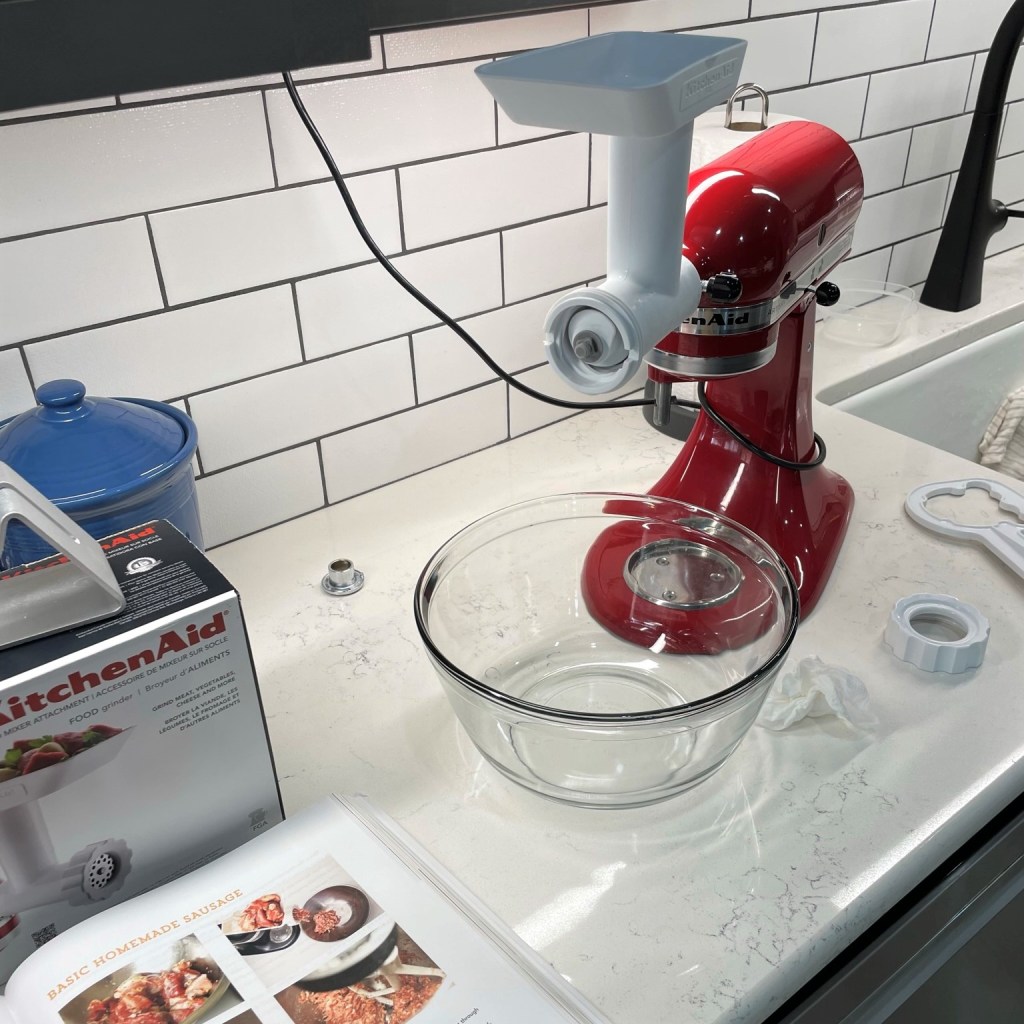
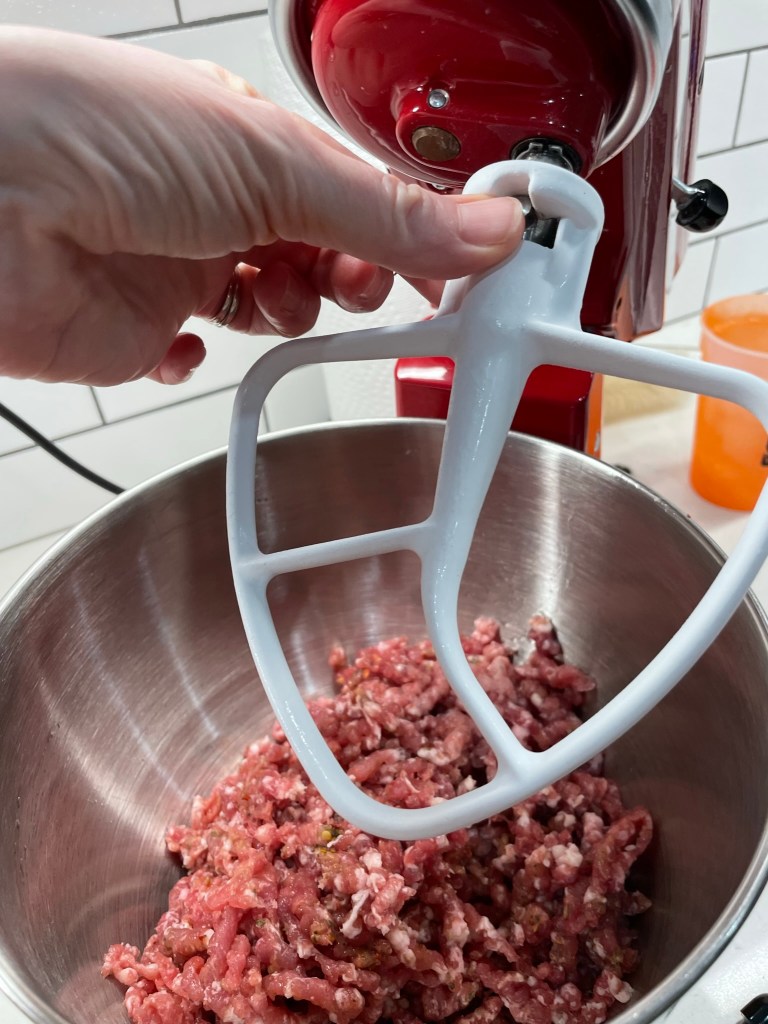
If you have a Kitchen Aid stand mixer, there’s a simple attachment that allows for grinding of food with a propeller-type blade that cuts the food chunks as they pass through a feeder tube. It takes practice, but works great. If you don’t have this device, I think you could probably begin with smaller chunks of meat and use the pulse function of a food processor to achieve a similar result. Kenji even discusses that in The Food Lab.
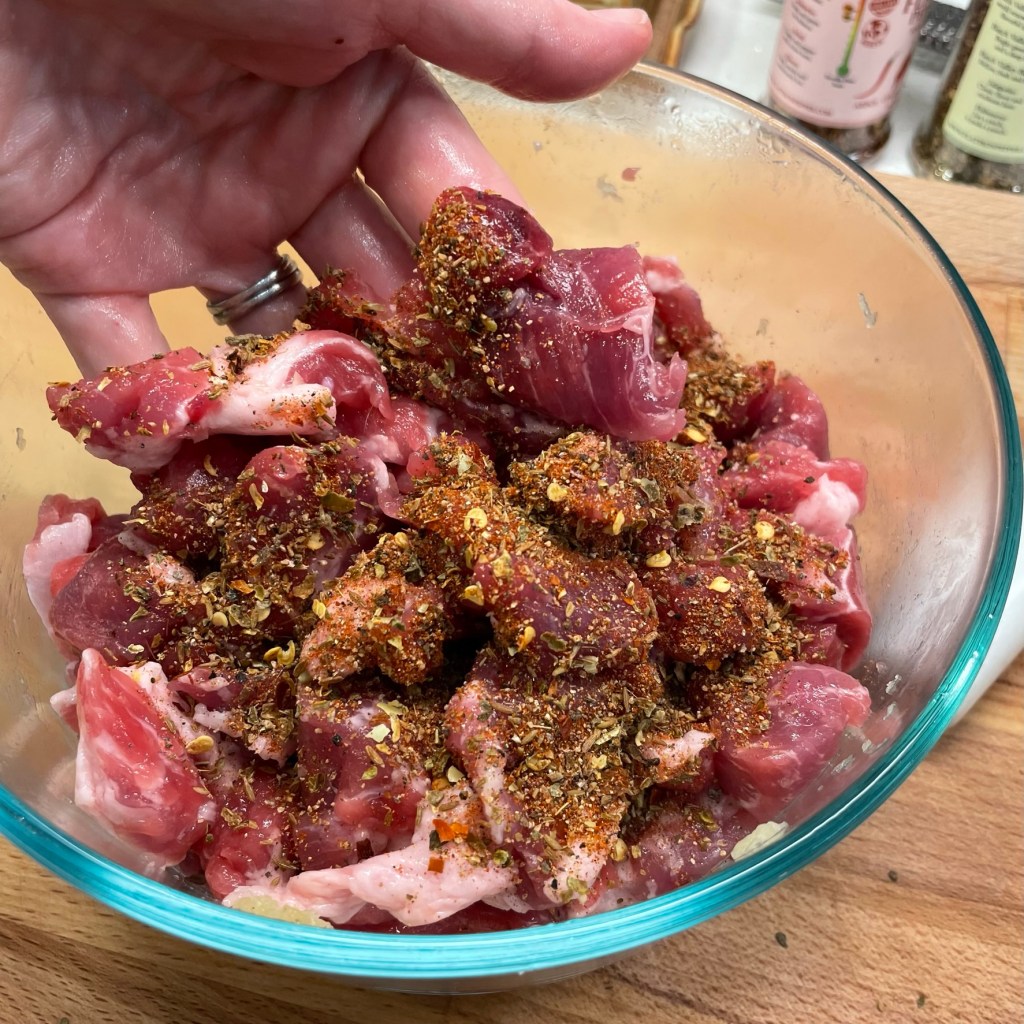
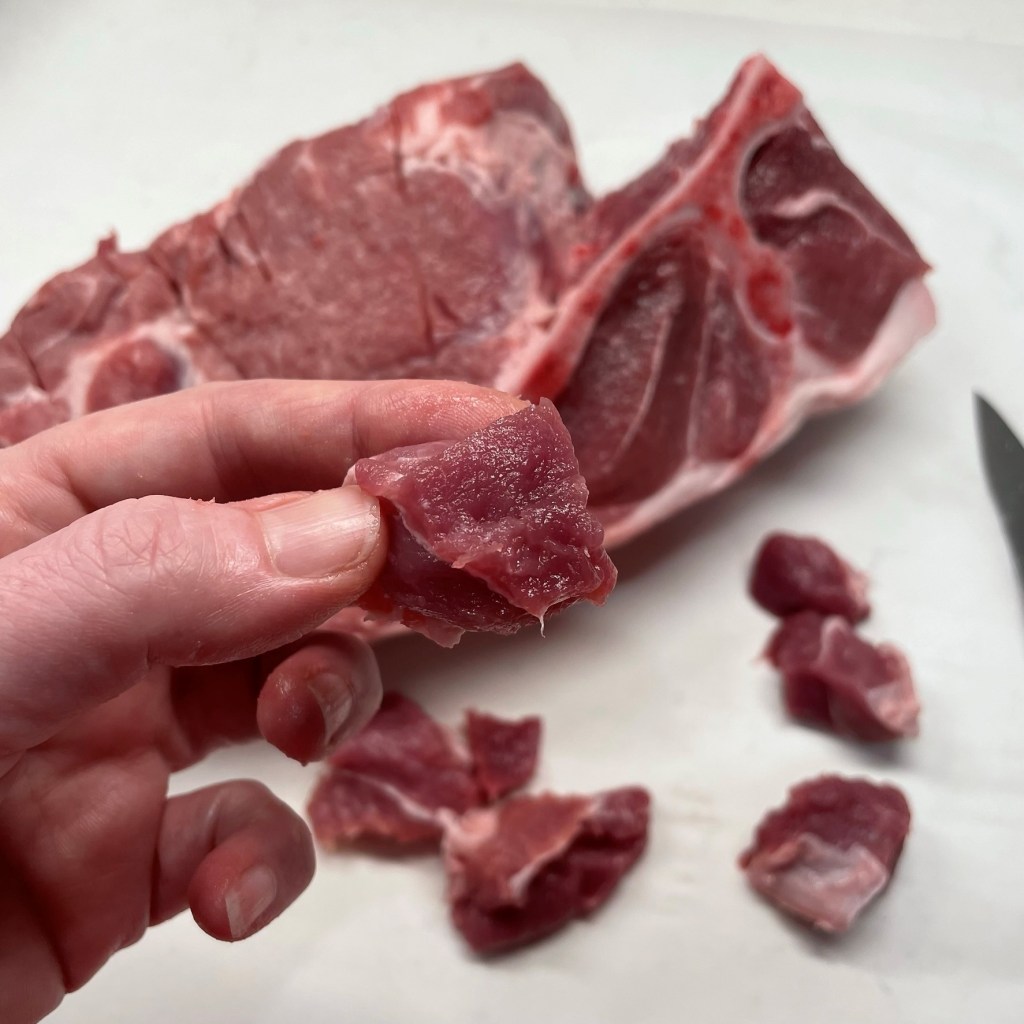
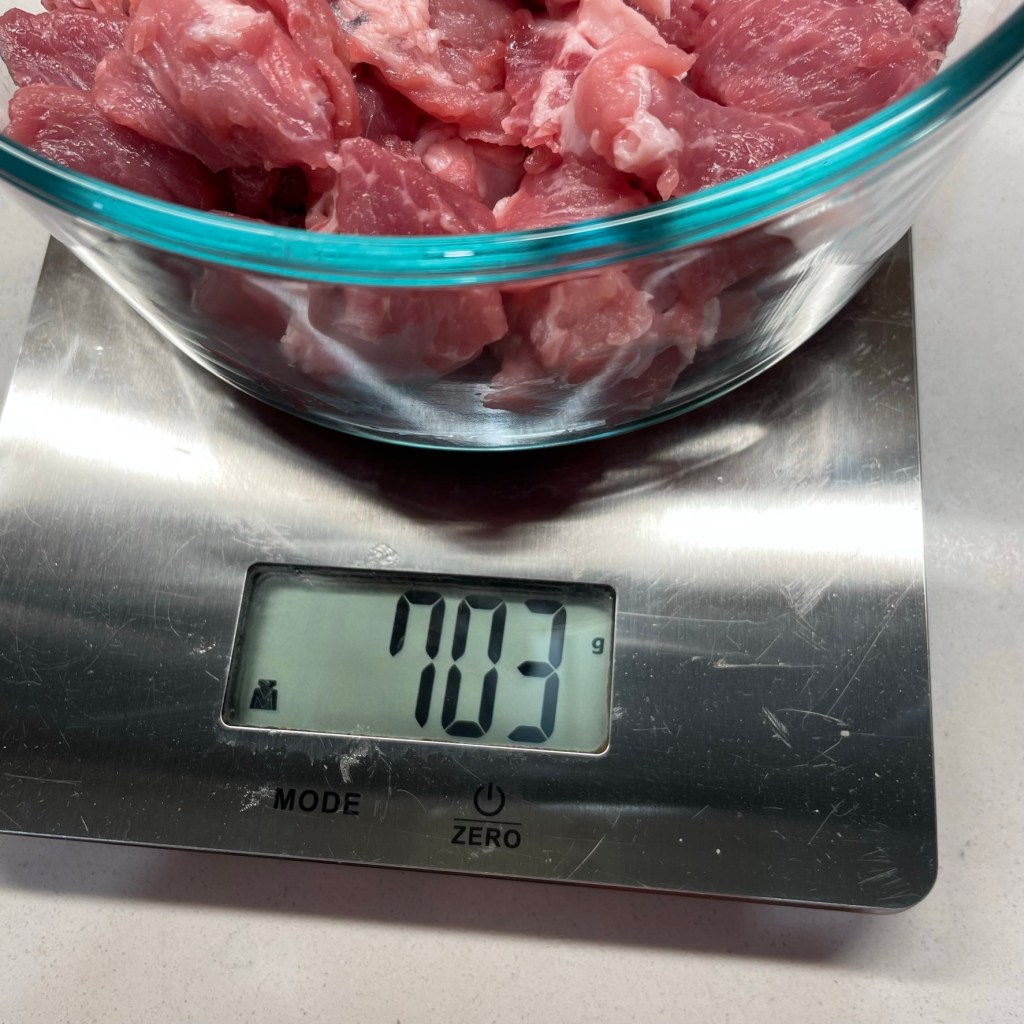
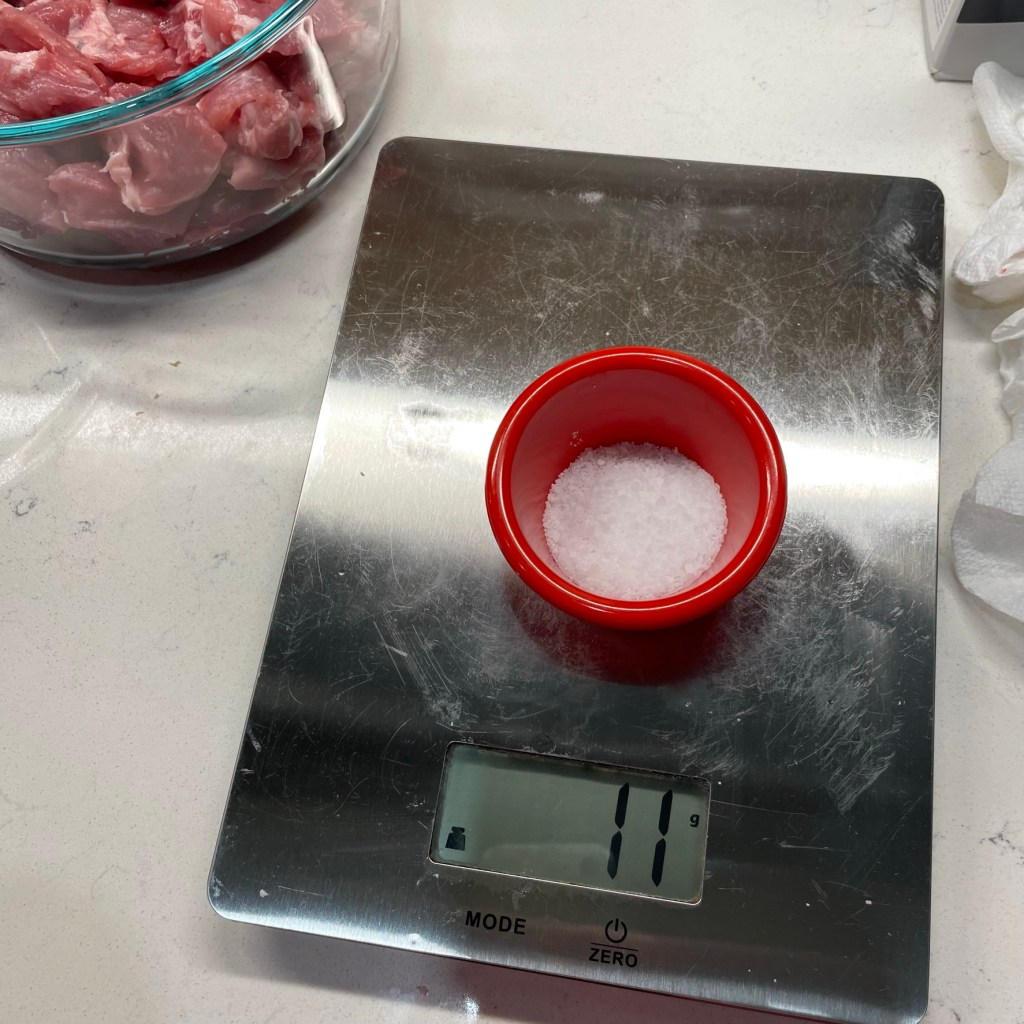
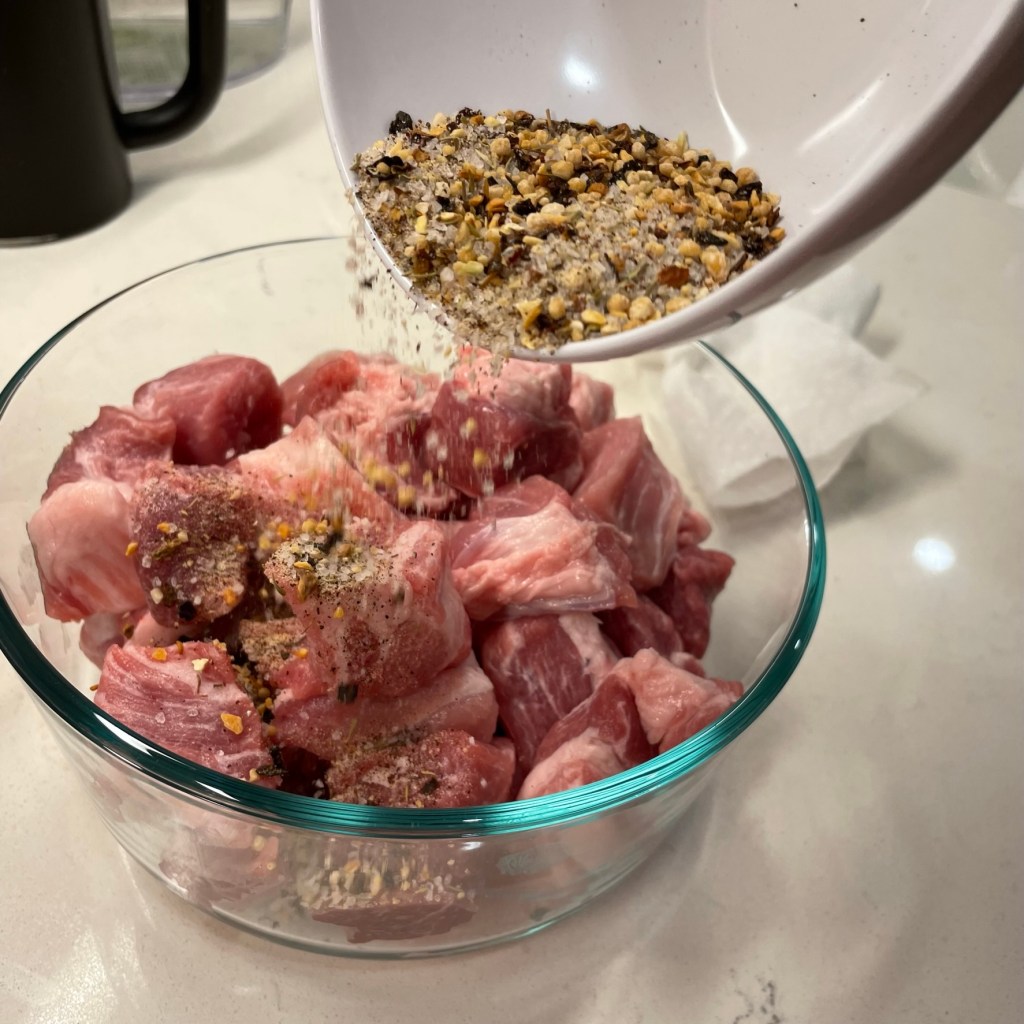
Here’s the basic technique that I learned from Kenji. Cut up the pork shoulder (best quality you have available, of course) into chunks about the size of walnuts. Weigh the raw meat, using the grams setting of a digital scale. Next, grab a calculator to determine what is 1.5% of the meat weight—that’s how much kosher salt you need. Not that this is kosher, mind you. It’s pork, so of course not. But un-iodized salt is recommended here, and kosher is what I use in the kitchen anyway. Sea salt would probably be fine.
703 (grams of meat) X .015 (1.5%) = 10.54, which I rounded up to 11 grams of salt.
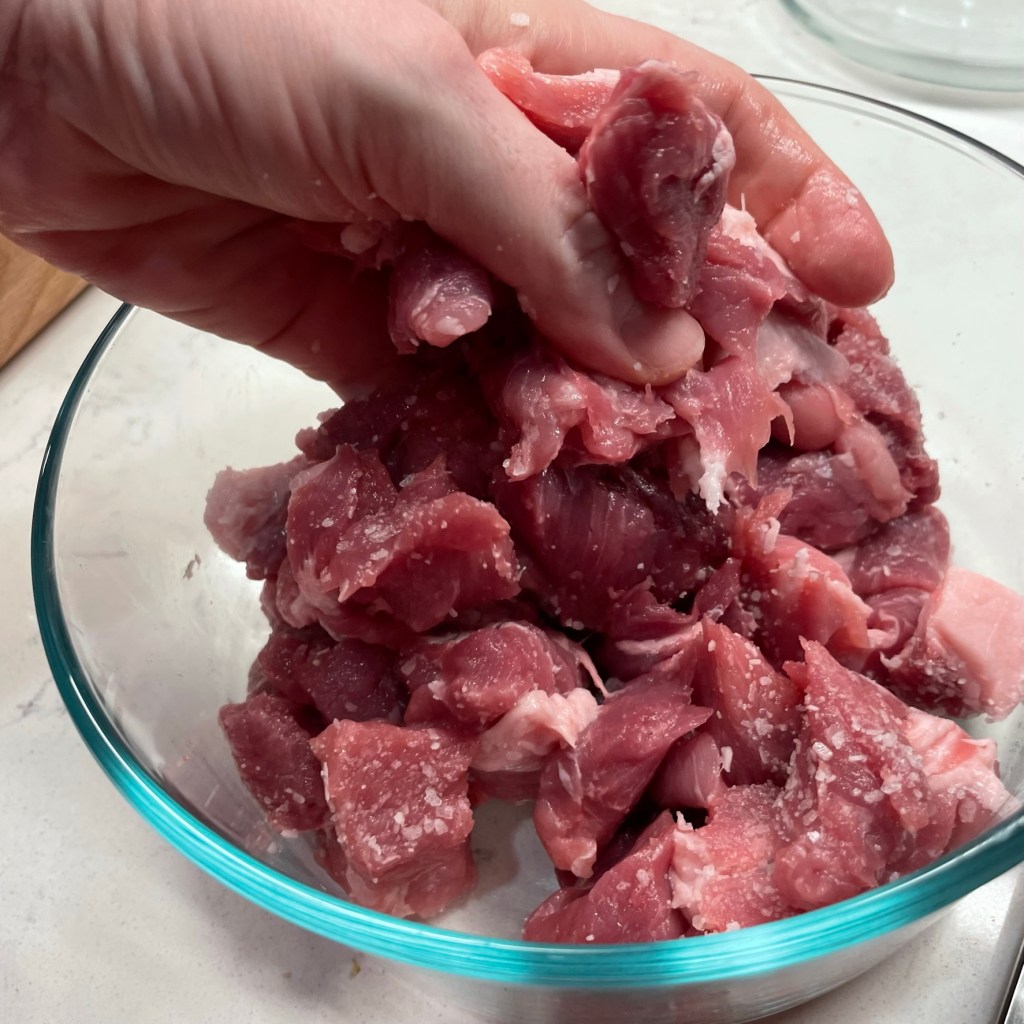
Toss the meat chunks to evenly distribute the salt, cover the bowl and refrigerate it for 24 hours. After the rest time, you can see the difference in the texture of the meat. It looks darker, smooth and glossy, and is noticeably smaller in volume. This consistency change is what makes sausage different from regular ground meat, and it’s as easy as “salt and wait.”
My interest in making homemade sausage stems largely from repeated disappointment at the Whole Foods meat counter, where I used to buy a fantastic green chile and habanero pork sausage that was wonderfully spicy and perfect for my favorite green chili recipe. But, as with most “big box” retailers, Whole Foods only appeals to the masses now (even more so since they were bought by Amazon) and after hearing for the umpteenth time that “nobody wants to buy that spicy sausage,” I finally decided to get on with things and make my own.
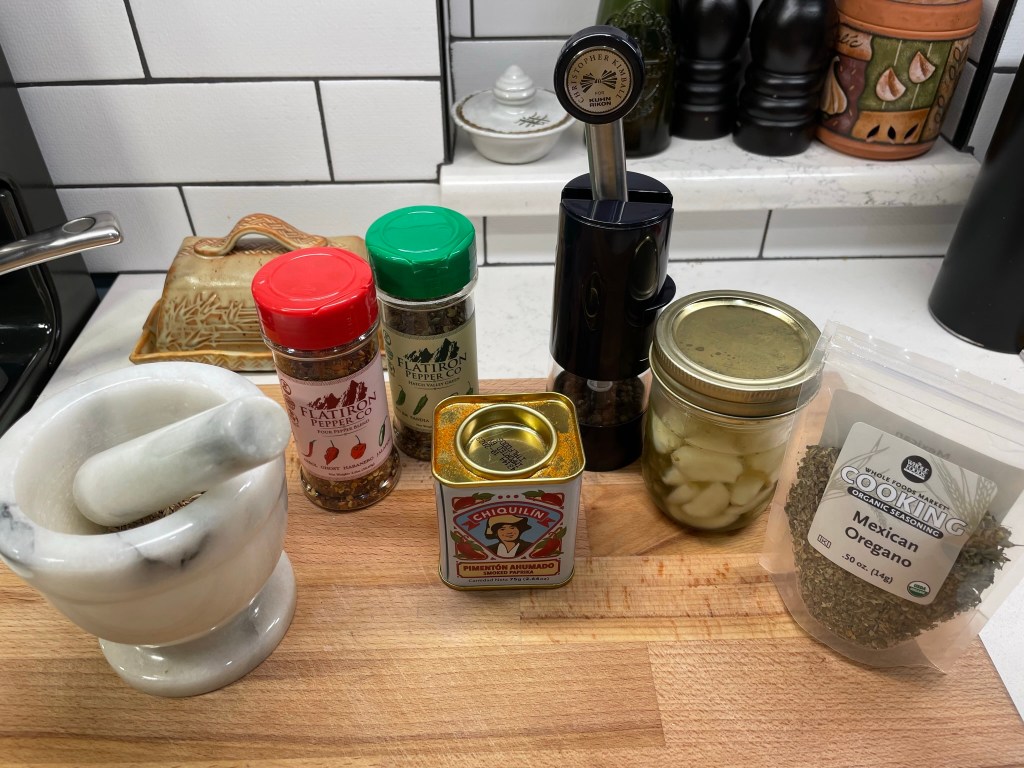
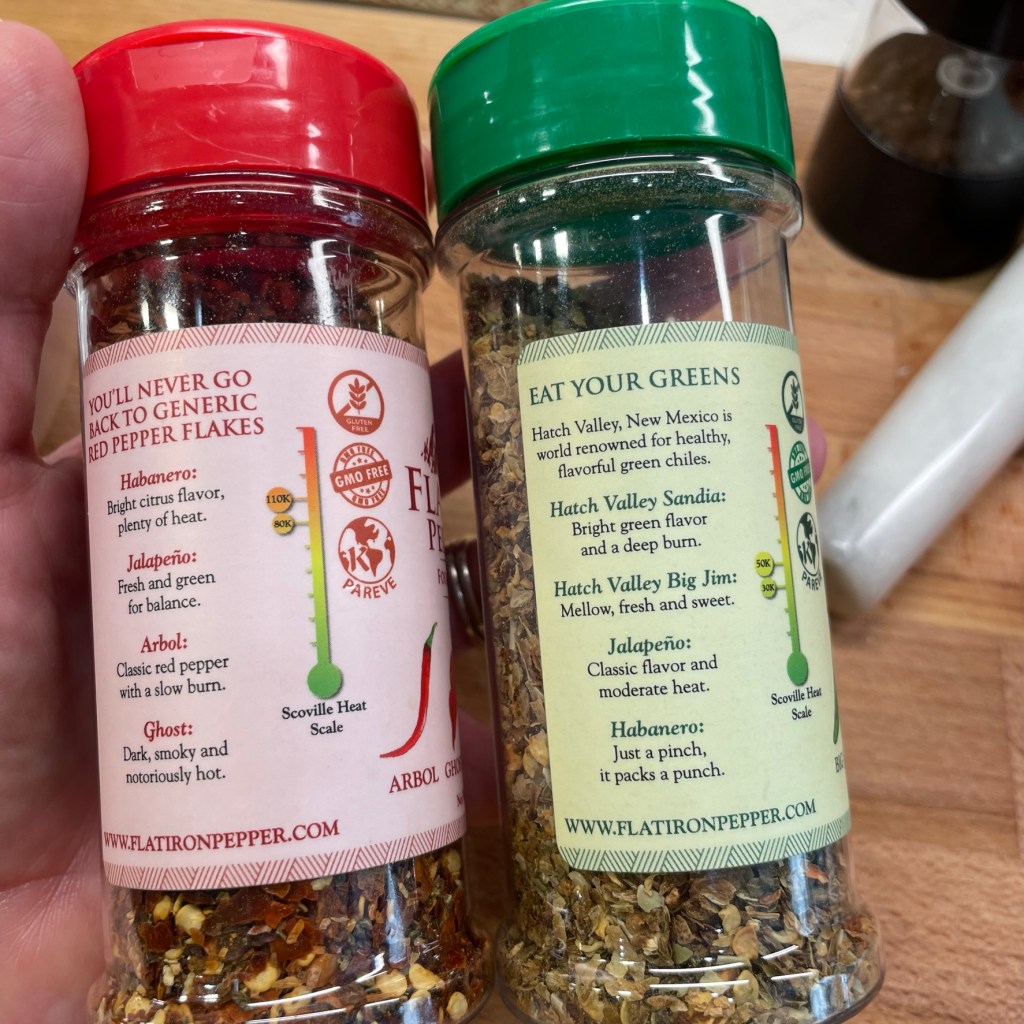
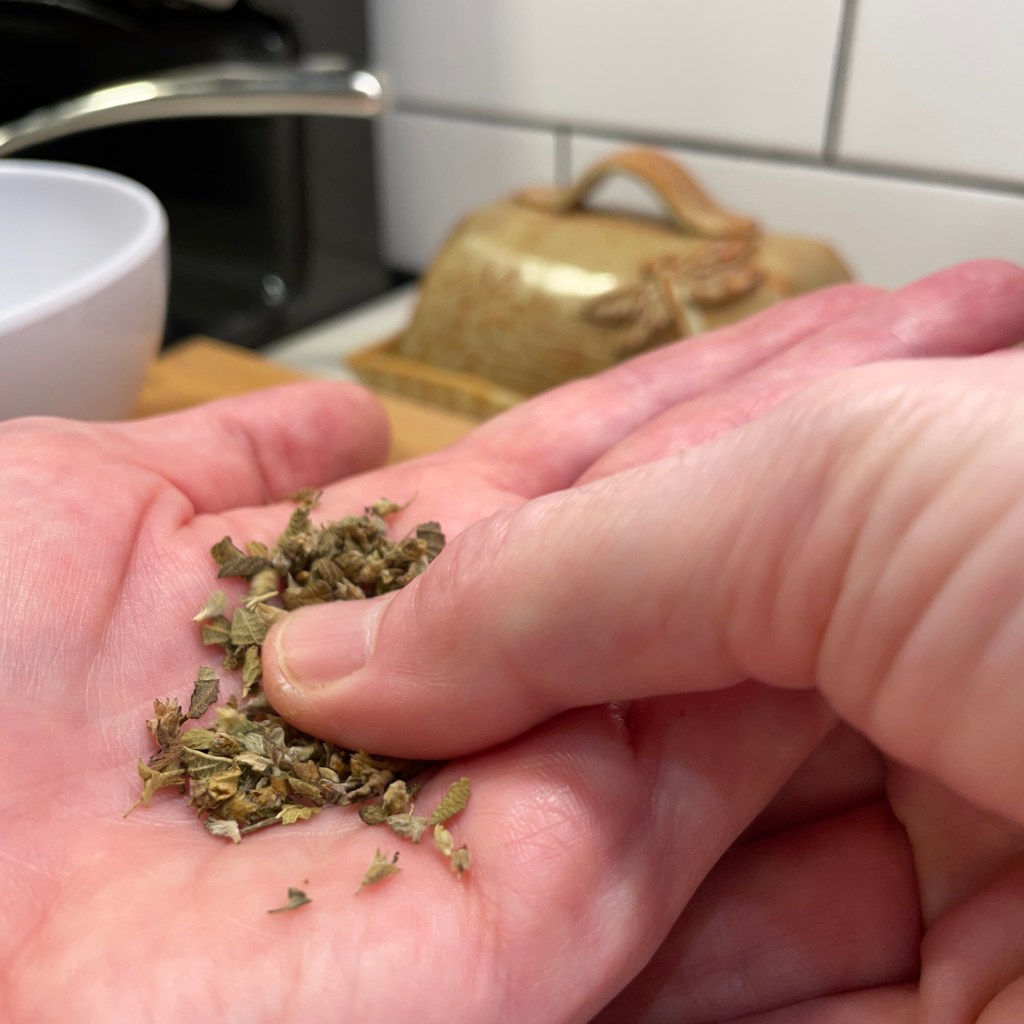
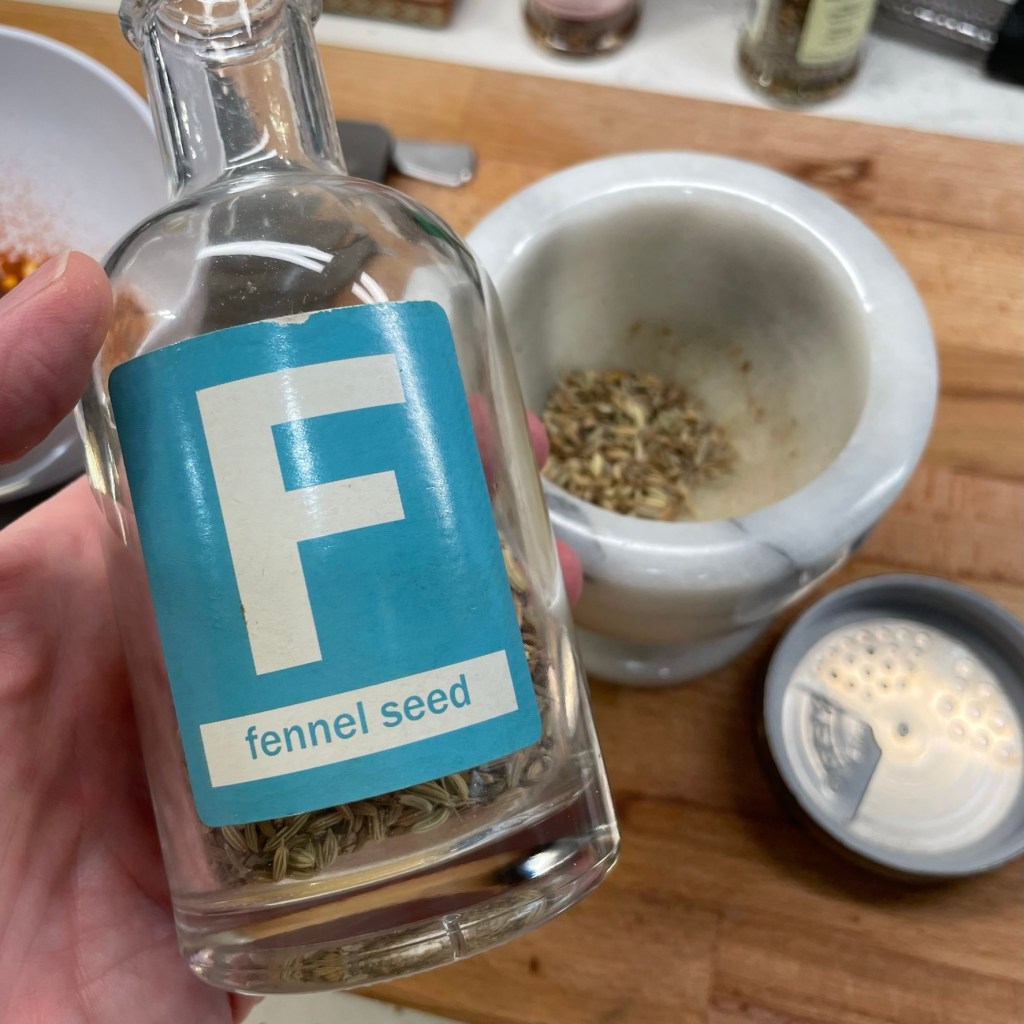
Kenji’s tutorial in The Food Lab did not include suggested seasonings for a green chile-habanero version, but I trusted my instinct and put the flavors together myself. Two kinds of Flatiron Pepper Co. chile flakes, smoked paprika, cumin seeds, pickled garlic (which I ended up not using because I couldn’t get the darn lid off), Mexican oregano and black pepper.
For this batch, I waited to add the seasonings (2% of the original meat weight, per Kenji), but I discovered later that I could have added it at the same time as the salt. In subsequent batches, I’ve added my spices at the same time as the 1.5% of kosher salt.
703 (grams of meat) X .02 (2%) = 14 grams of (non-salt) seasoning.
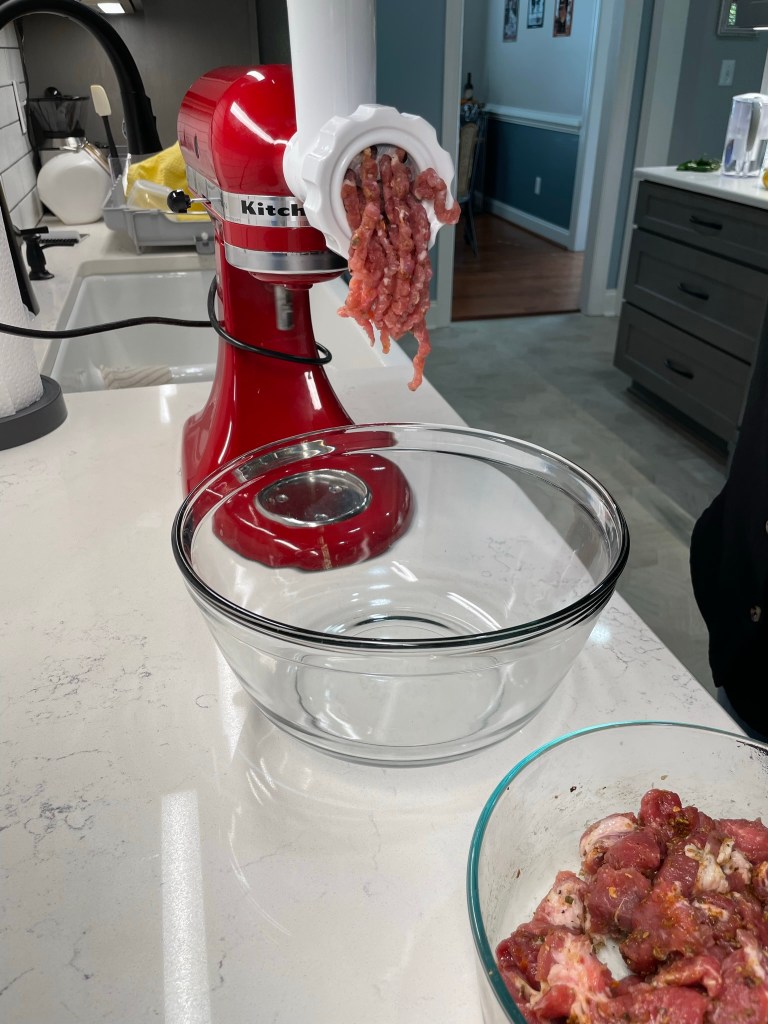
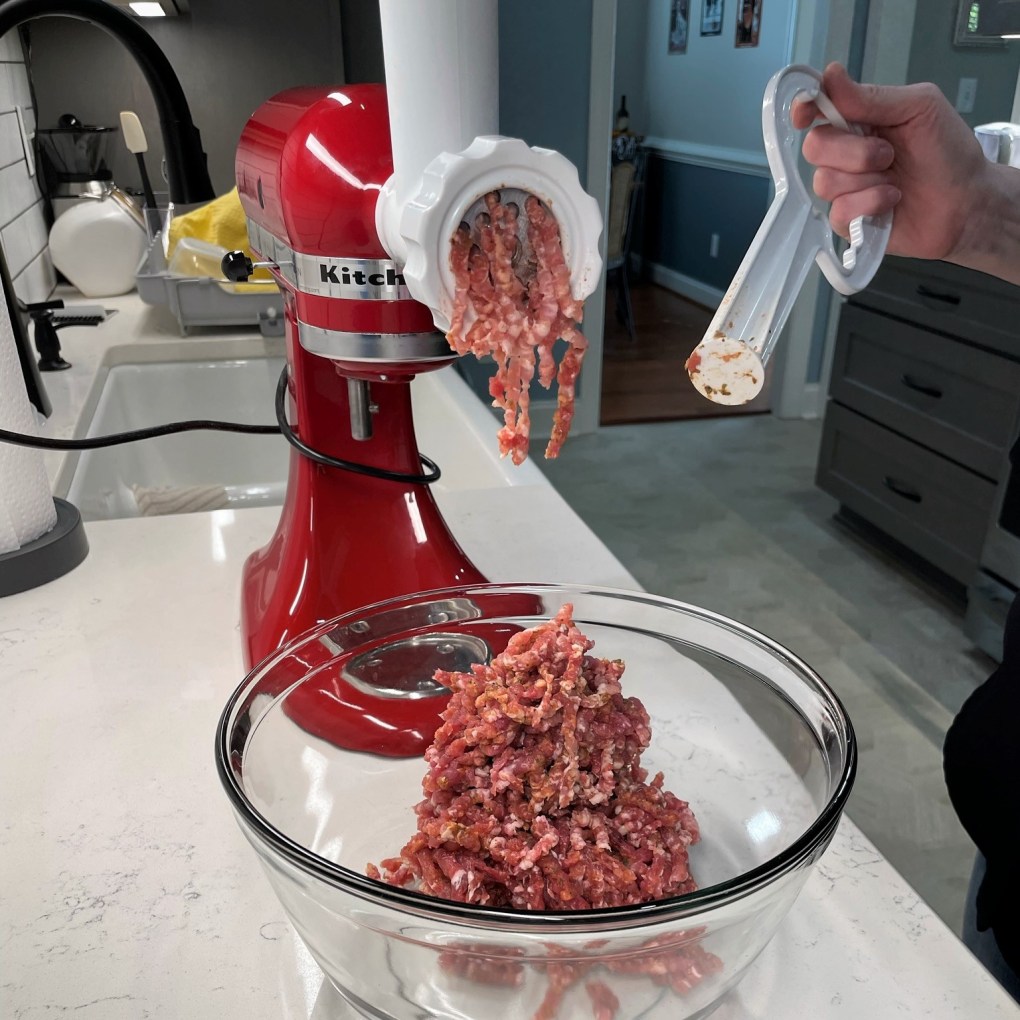
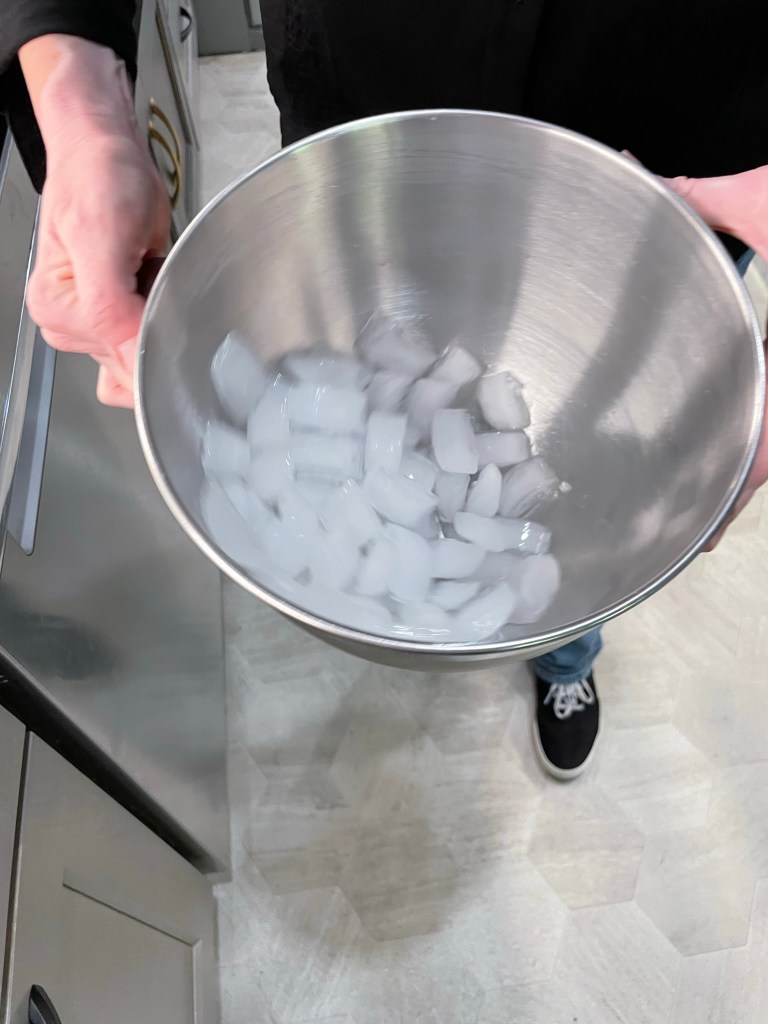
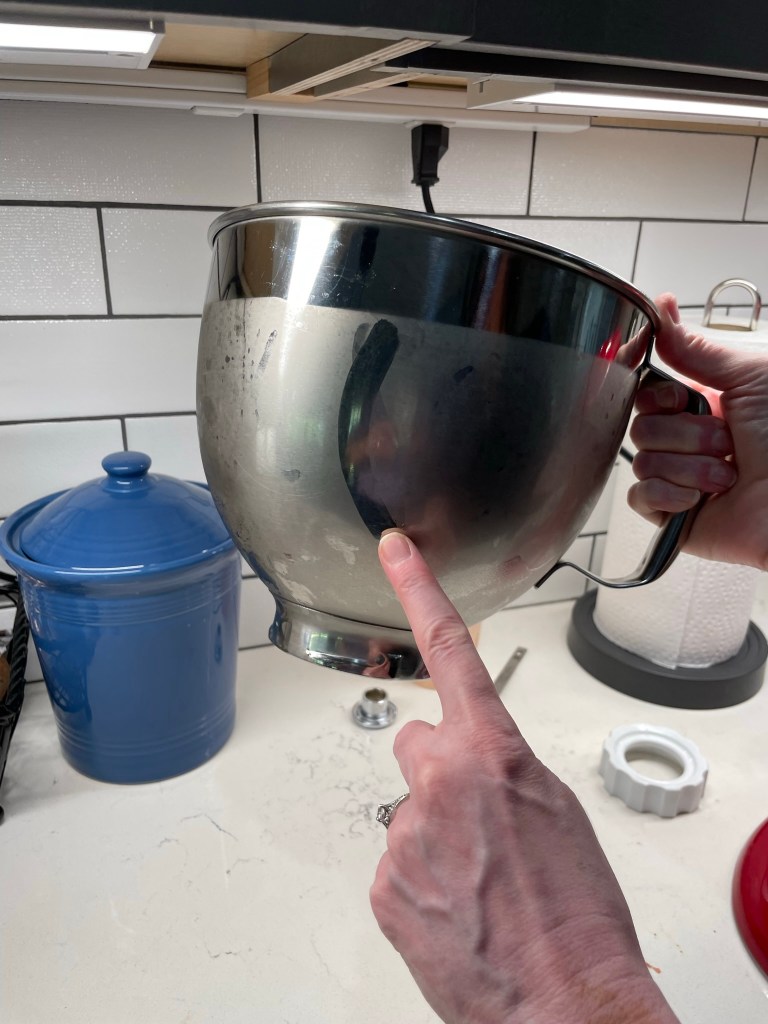
I spread the meat out into a single layer on a baking sheet and slipped it into the freezer for 15 minutes while I set up the meat grinder attachment for my stand mixer. The meat and all the parts that touch the meat should be really cold, so I also put the cutter blade, the large-hole cutter plate and my mixer’s beater blade into the freezer. I took Kenji’s advice about this to heart and it paid off with an easy grinding process. I also put ice in my stainless steel mixing bowl to chill it down for the next step.
The mixer image doesn’t show it, but there is a blade and plate assembly that fits over the grinder. It was still in the freezer when I snapped the photo.
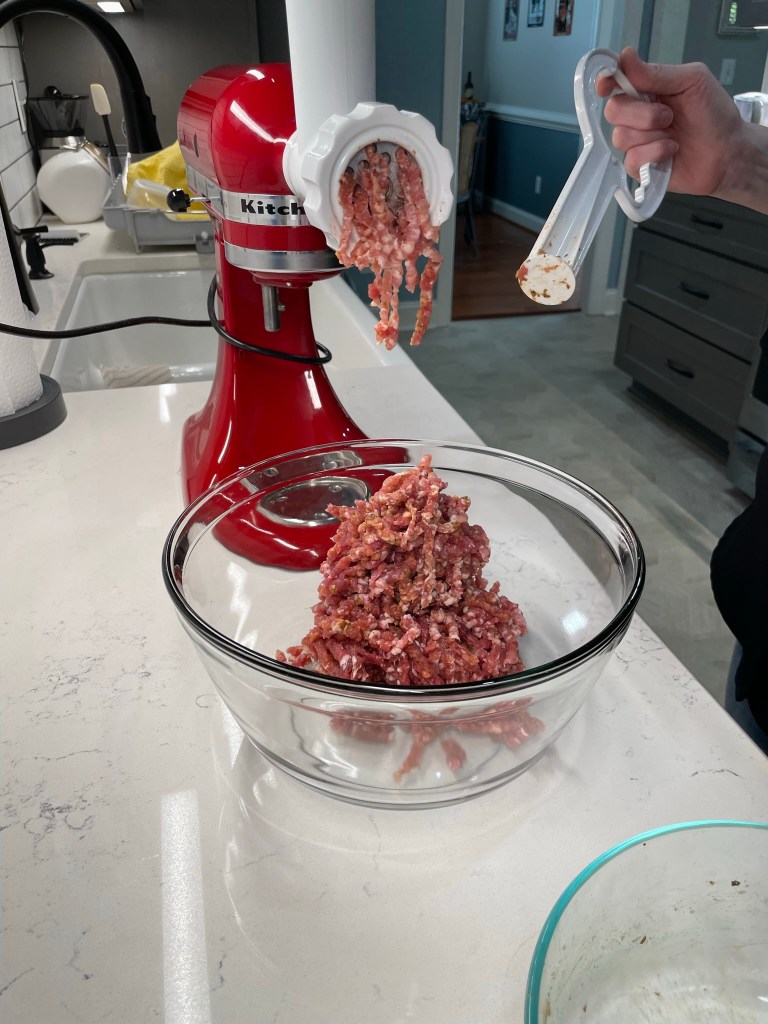
This part of sausage production moved quickly, and I couldn’t take pictures from every angle as I pulverized the very cold meat, but the action shots here tell the story pretty well. As soon as it was ground, I transferred it to my chilled mixing bowl and used the beater blade to whip it around for about 2 minutes. During this mixing stage, which essentially serves to make the meat mixture sticky and cohesive, I poured in roughly 2 tablespoons of red wine vinegar. That acidity makes all the difference in flavor!
If you don’t use a stand mixer, this blending stage can be done with a sturdy spoon and some elbow grease.
For my first batch of sausage, I passed the meat through the grinder a second time before mixing it, using the small-hole cutter plate included with my food grinder. This proved to be tedious and unnecessary, and my later batches were all done in one pass, using only the large-hole cutter plate. Sometimes the lesson is about what you don’t need to do, right?
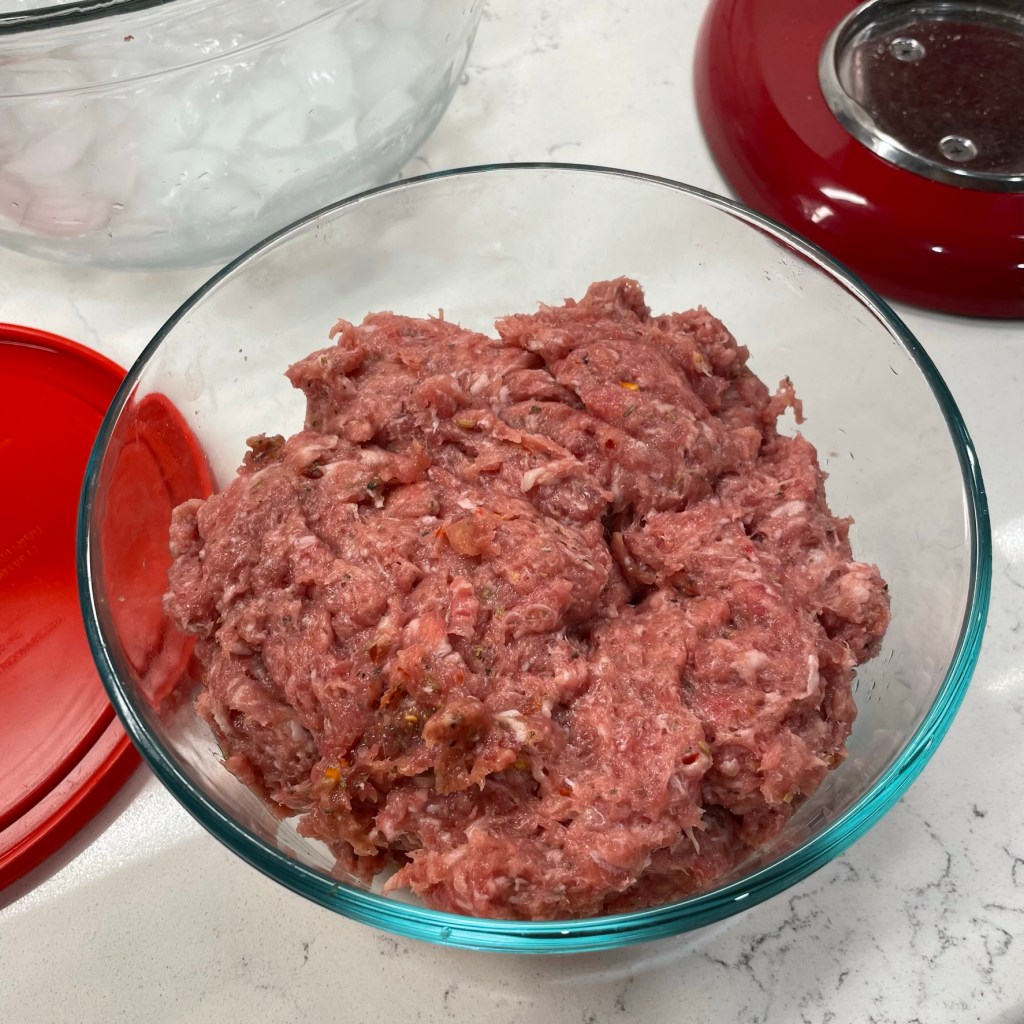
My first batch of homemade sausage! 🙂
The green chile sausage was fantastic, and I used it make a pot of this oh-so-comforting green chili for burritos. This is a favorite dish from my childhood, and I’ll share the recipe in January.
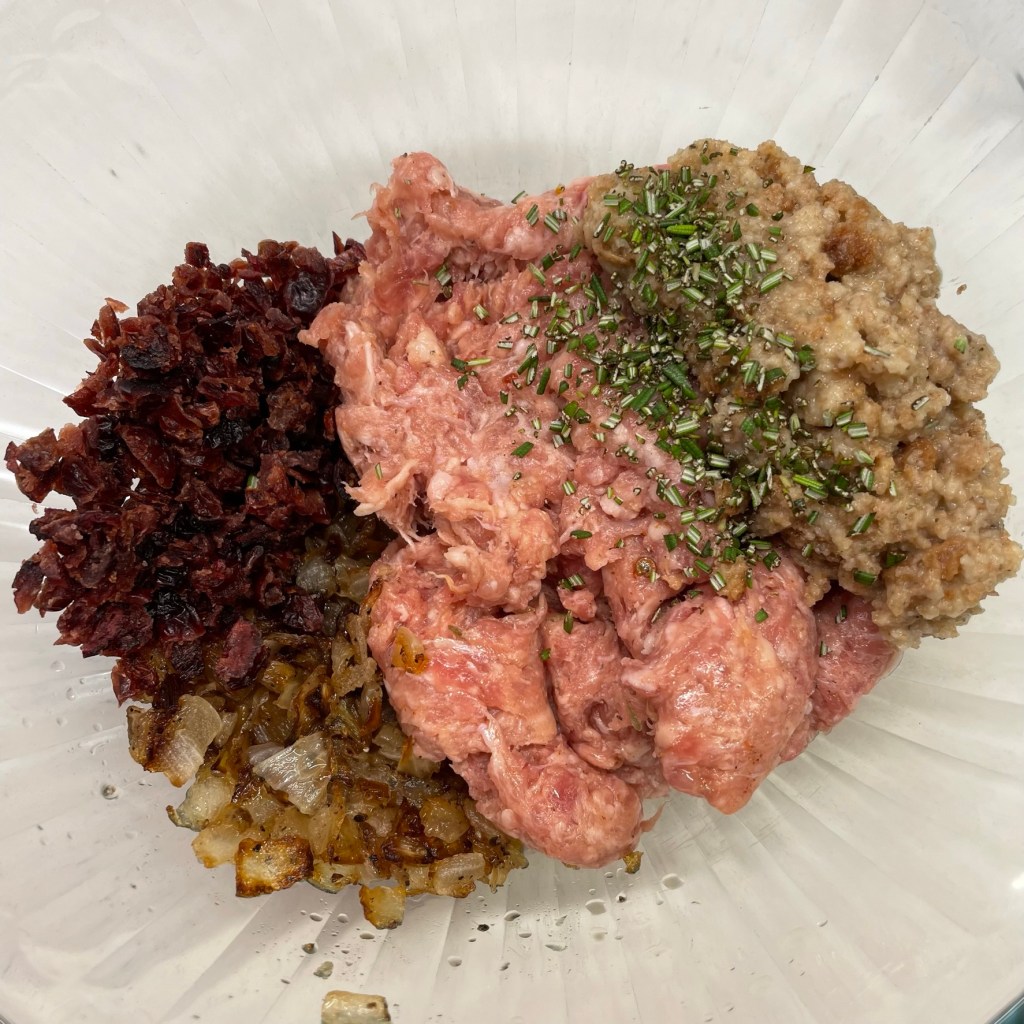
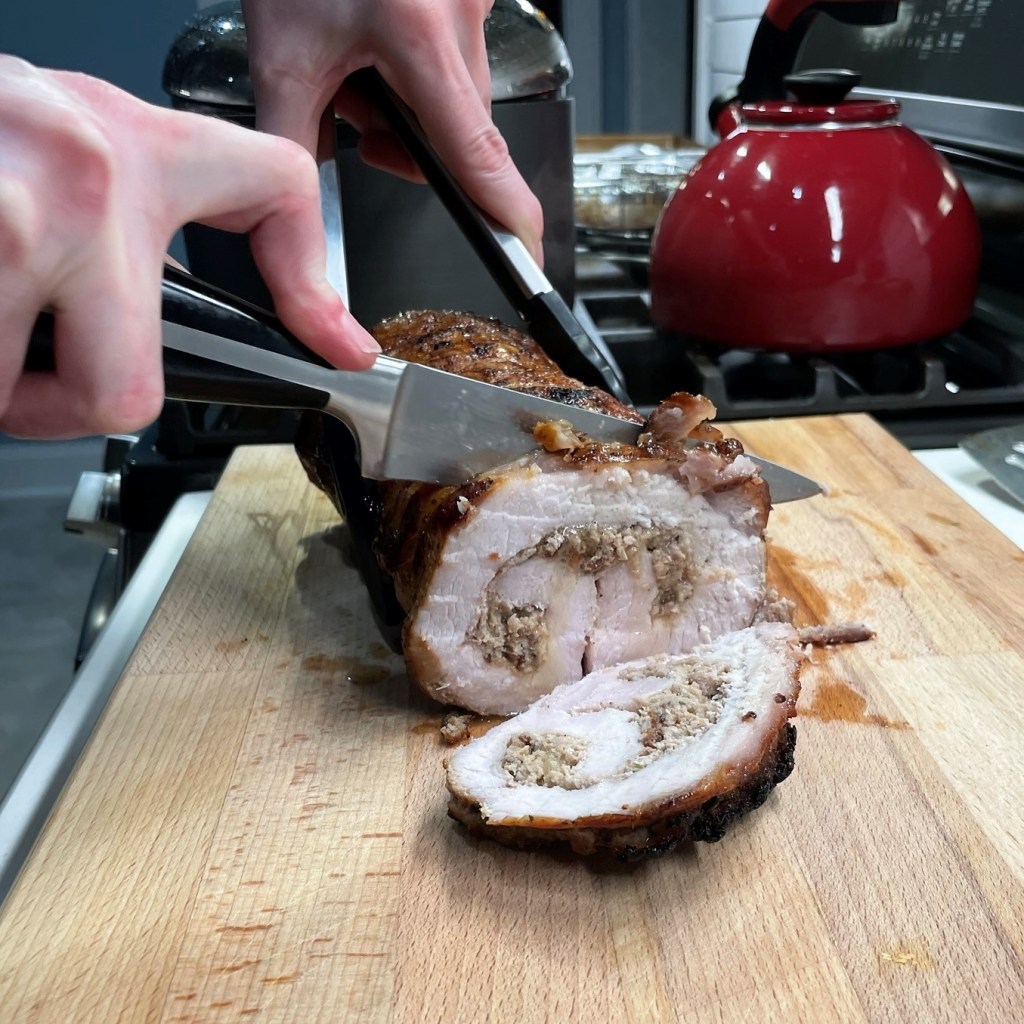
I also made a chipotle, ancho chile and maple sausage, which I used in a stuffing blend for a rolled pork loin roast that we enjoyed with friends a few weeks ahead of Thanksgiving. I’ll share the recipe for that lovely roast sometime in the next couple of weeks.
And I made an Italian fennel and Calabrian chile sausage, which became the big flavor enhancer for the sausage used in Les’s amazing Thanksgiving stuffing. It was his year for the bird, and though I said it was his best turkey ever, he declared the sausage made it his best-ever stuffing. We are a darn good team!
We have used up all the sausage I’ve made so far, but I already have a dozen ideas for flavors I want to make next. Here I go again, wanting to do everything at once! I can’t, of course. But homemade sausage is now definitively in the “done” column, with more variations coming your way soon. 🙂
Making your own sausage is not as intimidating as it may seem. All you need is the right meat-to-salt ratio, a good imagination for flavor, and a device to grind the meat. Use a digital scale to measure the ingredients and keep the meat and grinding device as cold as possible through the entire process.
Ingredients
Good quality pork shoulder meat, with a decent amount of fat
Kosher (or other non-iodized) salt, in 1.5% proportion to meat weight
Non-salt seasonings of your choice, in 2% proportion to meat weight
1 to 2 Tbsp. vinegar for each pound of meat
Use the “grams” setting of a digital scale for the easiest ratio calculation. Weigh the meat, then use a calculator to determine percentages. If your calculator doesn’t have a percentage button, convert it to decimal value. 1.5% = .015 and 2% = .02.
Directions
Cut the pork shoulder into chunks about the size of walnuts. Place a bowl on the digital scale and zero the tare weight. Add the pork and take note of the gram total weight.
Calculate salt and seasoning measurements, using the notes above as a guide. Sprinkle both over the pork chunks and toss to combine. Refrigerate overnight, preferably 24 hours.
Arrange meat in a single layer on a parchment-lined baking sheet. Place the sheet pan into a flat space in the freezer for about 15 minutes to partially freeze the pork chunks. Also place the metal grinder parts into the freezer for this time, as the meat grinds best when it is perfectly cold. Measure the vinegar into a glass or cup and put it in the fridge to chill.
Grind according to manufacturer’s instructions for your grinder. Place ground meat immediately into the fridge again to chill it down.
Add 2 cups of ice to the bowl of stand mixer (or bowl you’ll be using to blend ground meat) and swirl it around to chill the bowl. Dry the inside with paper towels.
Add chilled ground meat to the cold bowl and beat for 1 to 2 minutes, adding vinegar a bit at a time until blended in.
With 20 days to go before Thanksgiving, I’m starting to feel a little edgy. There’s no point planning the menu, because I will change my mind about it a dozen times before Turkey Day arrives. It’s too soon to start much of the cooking, but I can’t sit still either. It’s just my nature, and so I have to focus my effort. And because this will be the first full table since 2019, getting organized feels more important than ever before.
But what can I do, this far ahead?
Spiff Up the Dining Room
To a good degree, we have already done this by having the room professionally painted and replacing the dated, builder-basic chandelier with a beautiful, recycled glass fixture that complements our kitchen remodel. It looks great, and we have a few more upgrades coming soon.
Table wise, I will be washing platters and serving dishes to knock a year’s worth of dust off them. I’ll inspect the table linens and press the napkins if they need it. I’ll wash all the wine glasses in the corner cabinet to be sure they are spot-free and gleaming. I’ll double-check our wine selection and attend a few tastings to be sure we have something for everyone.
Dust the chandelier and the window blinds and tidy up the bar. Clean and fill all the salt and pepper shakers because we don’t want to find an empty one when the meal is on the table.
Refresh the Kitchen
A few weeks before Thanksgiving each year, I pack up my favorite knives and take them to Chef Larry, my sharpening guy, and he will get them in tip-top condition for me. I’ve noticed a little greasy film on the cabinet doors nearest the stove, so I’ll be filling a bucket of hot soapy water to knock that down. It’s time for a deep clean of the gas range and the oven, too, and then the kitchen will be ready!
Restock the Essentials
This is one area that I tend to keep in order throughout the year, and much of that is attributed to my regular baking. I have more than enough flour, sugar and spices. But there are some ingredients I use more during holiday cooking, so I’ll be stocking up— especially nuts, because they are best when they are fresh. While I’m at it, I’ll clean out canned goods that we aren’t using and get them ready for donation.
OK, Now What?
I’ll be wringing my hands with too much time ahead to really start any cooking. Except for one thing— by this weekend, I will at least have my turkey stock in the done column. I don’t know at this point exactly what side dishes we’ll be serving on Thanksgiving— those decisions are always up for grabs until a few days before— but I do know for sure that there will be turkey and mashed potatoes, and that means we will need gravy (My husband, Les, will be making the turkey this year, because we alternate and he does the even-numbered years. He felt I needed to share that, while also noting that he “allows me” to make stock for him).
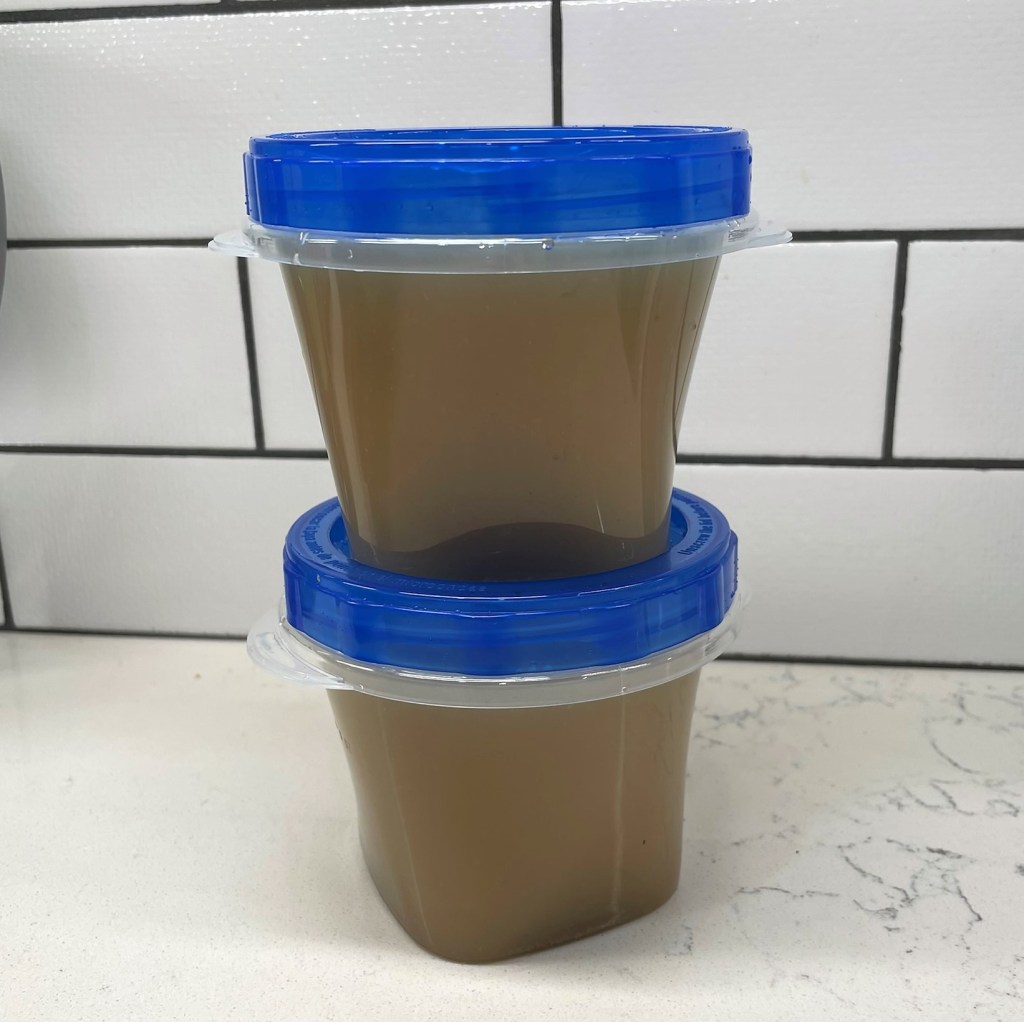
I am a big fan of store-bought broth, and I use it regularly throughout the year. But for a meal as special as Thanksgiving, it absolutely must be homemade. The holiday week will be busy enough without me taking up a burner all day to simmer down my ingredients, so my solution is to make the stock now and stash it in the freezer for a few weeks to make the best homemade gravy to accompany our meal.
Freezer-ready and packed with flavor!
My stock cannot be salty, because we brine our bird, and the drippings can be quite salty on their own; having a stock that doesn’t amplify the sodium is very important. So, as odd as it seems for me to not suggest “season every layer,” in this particular case, I advise against it if you are also a brine enthusiast.
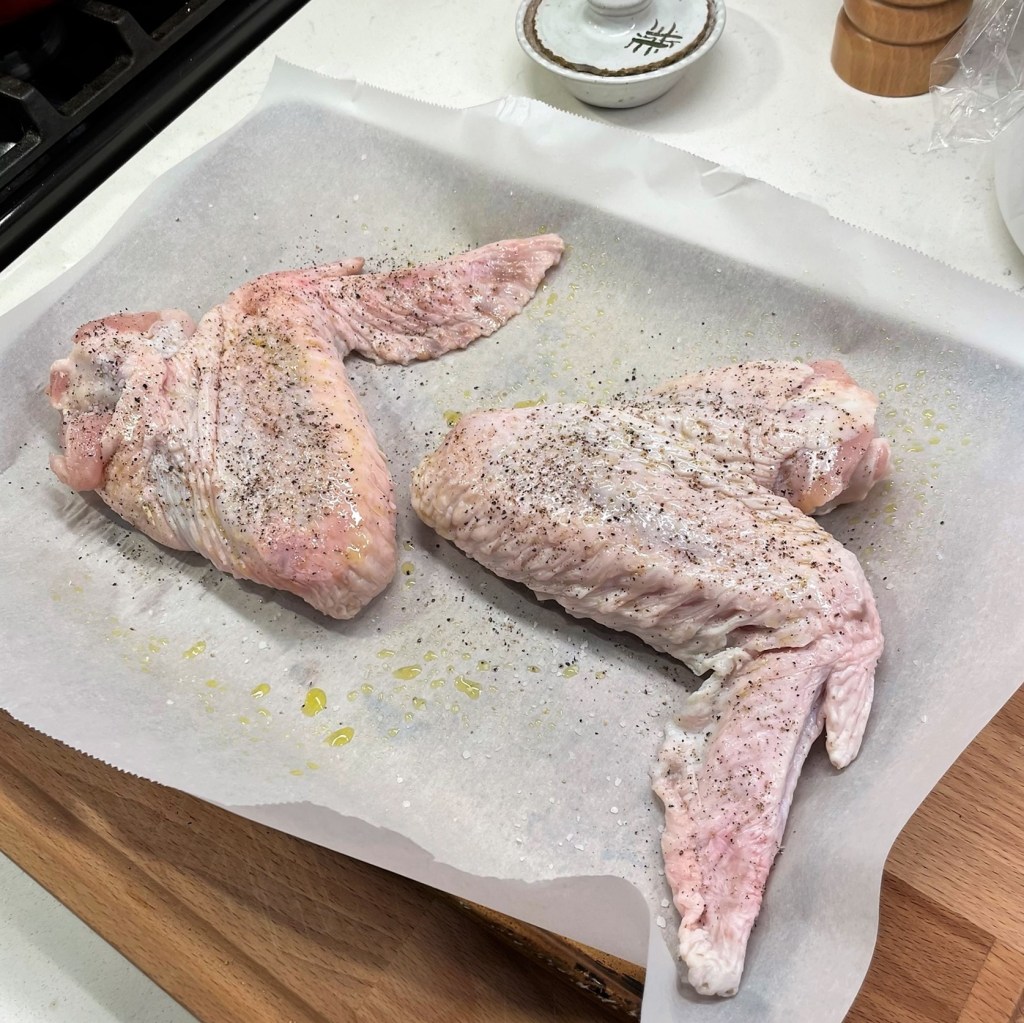
What does go into my stock is some roasted turkey flavor, and I get that by oven roasting a few turkey wings, seasoned only with black pepper and the slightest touch of salt. Let them go until they are golden brown all over, and then strip some of the meat off the bones—these turkey bits are excellent for spoiling any good dog or kitty you have around the house—and then simmer them down with a pile of chopped aromatic vegetables and some chicken parts.
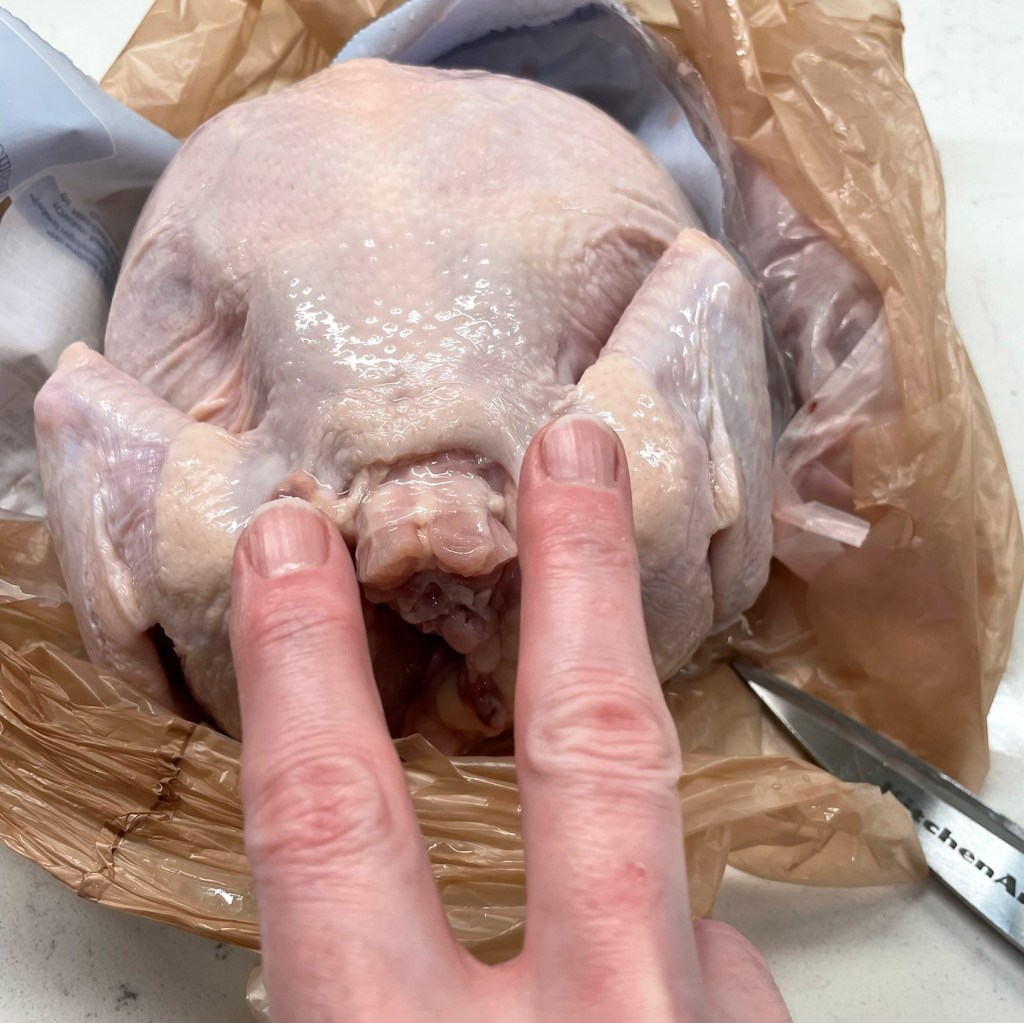
I like to roast a whole chicken around the same time I make my stock, because I can spatchcock the chicken to remove the backbone and also use that, plus the giblet packet, in my stock mix. Wait— have you ever spatchcocked a chicken? It’s sooo easy to do; just grab a pair of kitchen scissors.
Locate the backbone, and use kitchen scissors to cut down each side.With the backbone removed, you can open up the chicken to lay it nearly flat.This works well for even roasting of any bird.
Next week, I’ll share the wonderful recipe I made with the spatchcocked chicken. For now, let’s just take the backbone and get back to the homemade stock.
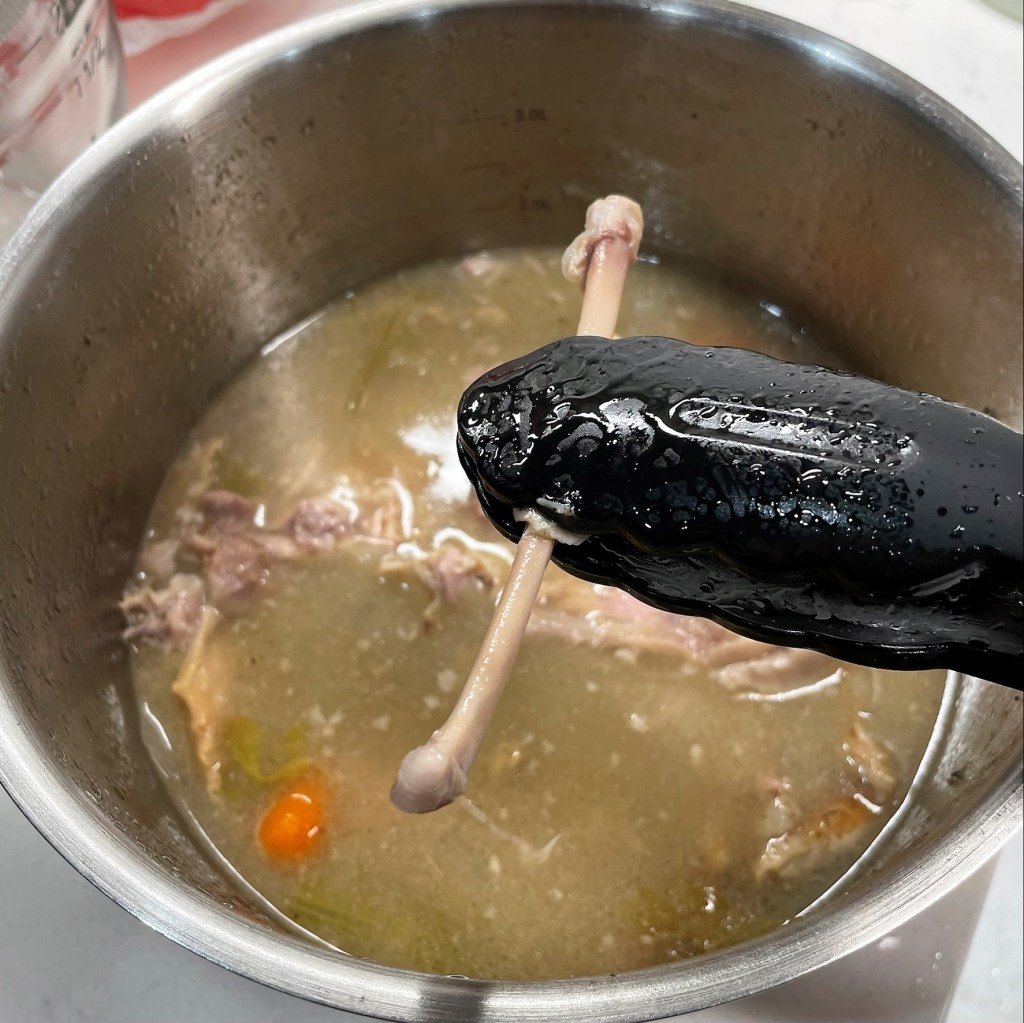
Load up the roasted wings, chicken parts, vegetables and spices into your stock pot and add enough water to cover it all, which should be about two quarts (or roughly two liters). Bring it to a slight boil and then put a lid on the pot and reduce the heat to a low simmer, checking on it occasionally to be sure it isn’t boiling down too quickly. It takes time to extract all the flavor from the poultry parts, so don’t rush it.
Roast the wings first.Add the wings, chicken parts and veggies to a pot of water.Simmer until the meat falls off the bones.Strain out the solids, and the stock is ready.
After about five hours, the vegetables will be nearly mushy and the turkey will have literally fallen apart—this ensures the most flavorful, collagen-rich stock, and it’s exponentially better than any store-bought stock you’d find. Pick out and discard the solids, and then strain the stock through a mesh strainer into a pitcher bowl. Let it cool for a few minutes, and transfer the stock to freezer-safe containers for storage up to two months. We rarely have more than eight people at our table, so this four-cup batch of stock is enough for our brood, including some gravy left over. Obviously, if you are cooking for a crowd, double all your ingredients for a larger batch.
One day before you’re ready to use the stock, transfer it to the refrigerator to thaw. Warm it in a sauce pan, and add it to thickened roast turkey drippings to make the best homemade gravy your Thanksgiving table has ever seen!
This is one of the most important make-ahead items for Thanksgiving, and you can get it done this weekend! Make the stock now and freeze it for a truly amazing homemade Thanksgiving Day gravy. Did I mention that it's also easy to do?
Ingredients
2 fresh turkey wings, sprinkled with pepper and only a small amount of salt
Spine, neck and giblet packet from a fresh, whole chicken (see recipe notes about the spine)
1 medium onion, cut into large chunks
3 ribs celery (plus leaves), cut into large chunks
2 medium carrots, unpeeled and cut into large chunks
1 tsp. black peppercorns
2 dried bay leaves
Cold, filtered water
Notes: Plan to roast a chicken a few weeks before Thanksgiving, and purchase a whole one with the giblet package and neck included. Spatchcock the chicken, using heavy duty kitchen scissors, and reserve the backbone for this stock, along with the other chicken innards.
Directions
Preheat the oven to 375 F. Line a small baking sheet with parchment paper and arrange the turkey wings on it. Roast the wings for about an hour, until the skin is golden all over. You’ll know they’re done when the kitchen smells wonderful! Cool the wings to room temperature, then shred some of the meat off the bones for any other purpose you choose. Keep about 1/3 of the meat intact on the bones.
Place turkey wings and all other ingredients in a heavy-bottomed stock pot. Add enough cold water to just cover everything.
Bring the pot to a slight boil, then reduce heat and cover the pot. Allow the stock to simmer on low heat (no boiling) for about 5 hours, or until the meat pulls easily from the bones. Cool for about an hour.
Remove and discard the large solids, and then strain the remaining stock through a mesh strainer into a pitcher bowl. Double strain as needed, to remove any fine bits of bone or solid pieces. Transfer to freezer-safe containers and freeze for up to two months. Thaw in refrigerator before using.
If you wish to make a lower fat stock, place the pitcher bowl in the fridge overnight, then scrape the solidified fats off the top before transferring the stock to your freezer containers. The stock will be gelatinized, which is normal. Reheat for a few minutes to return it to liquid form before freezing, if preferred.
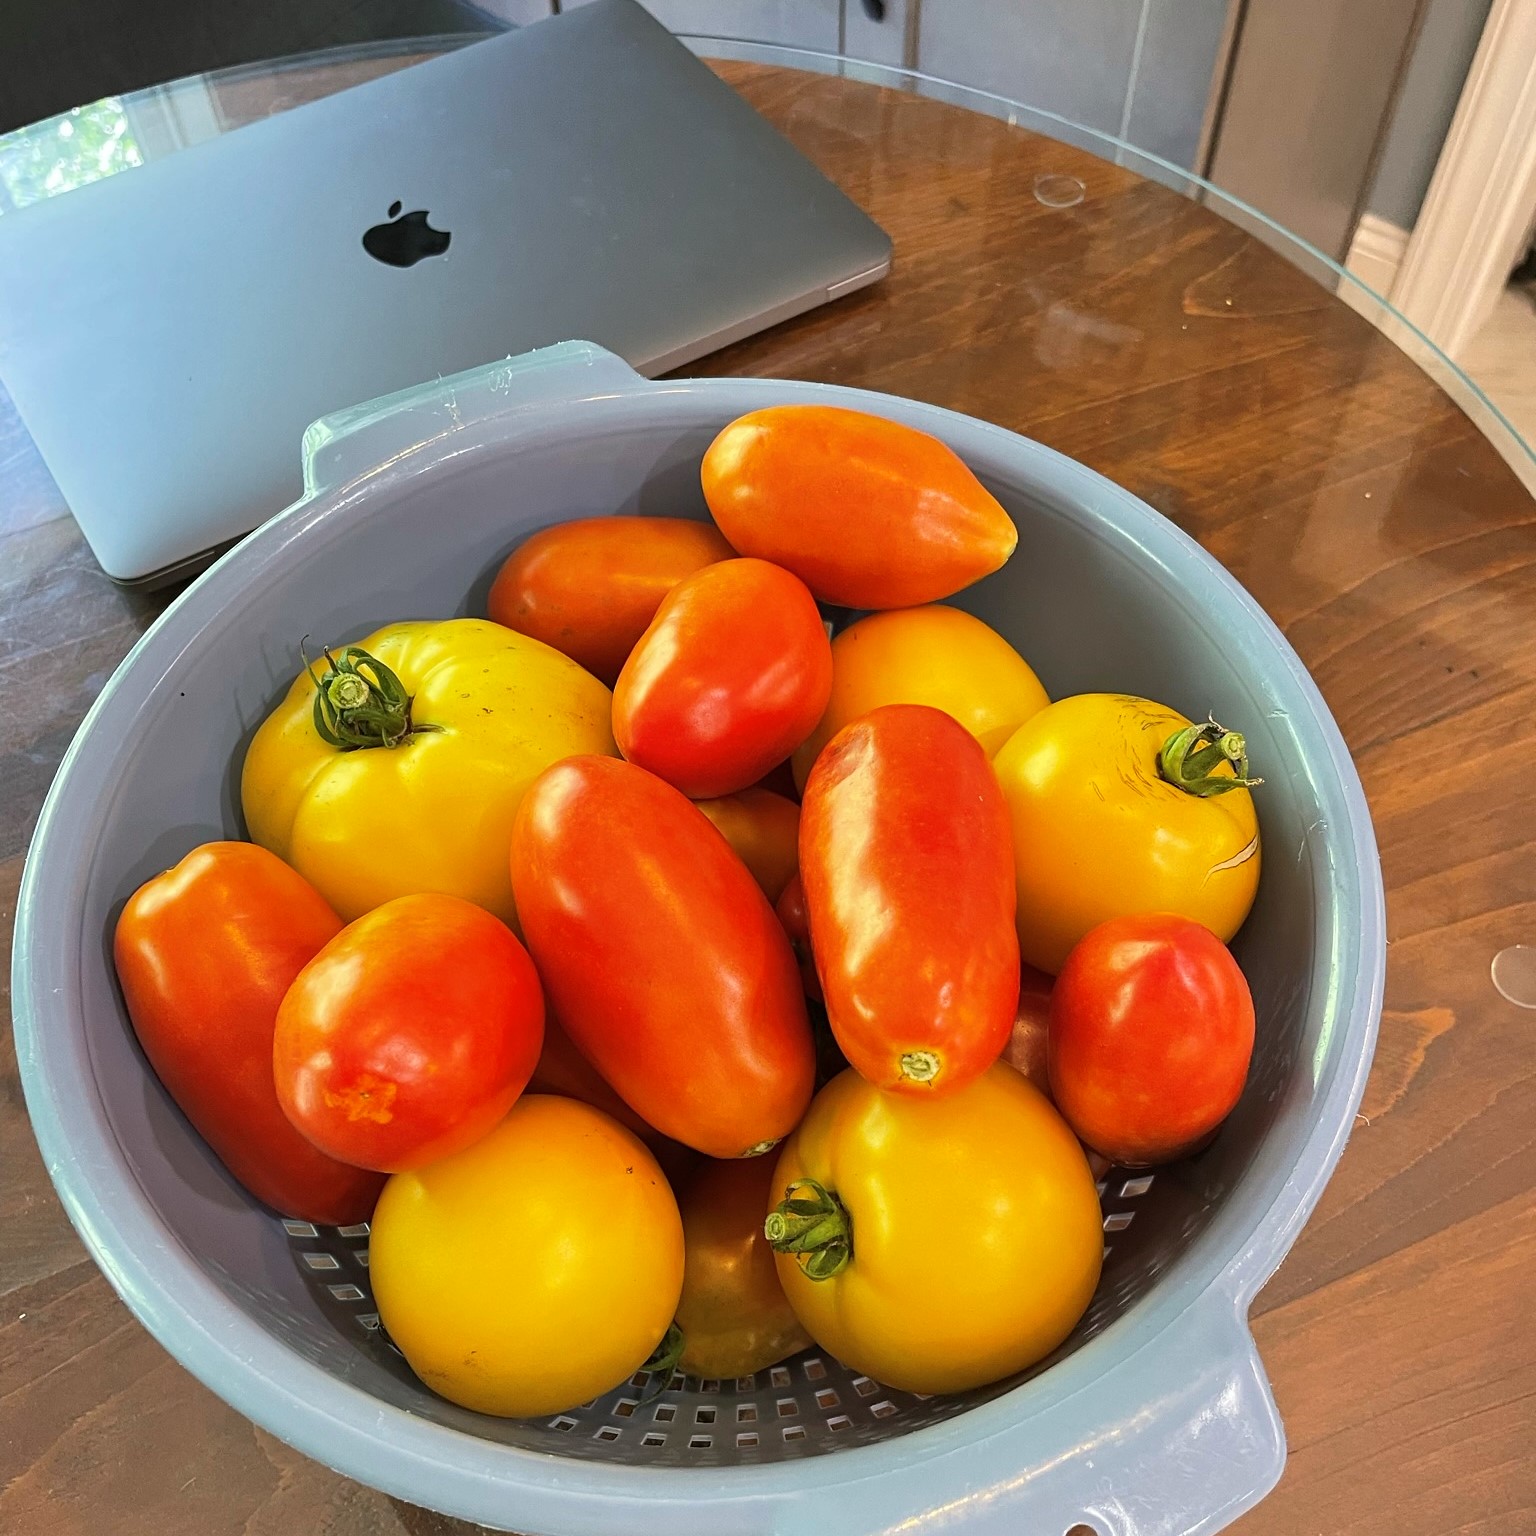
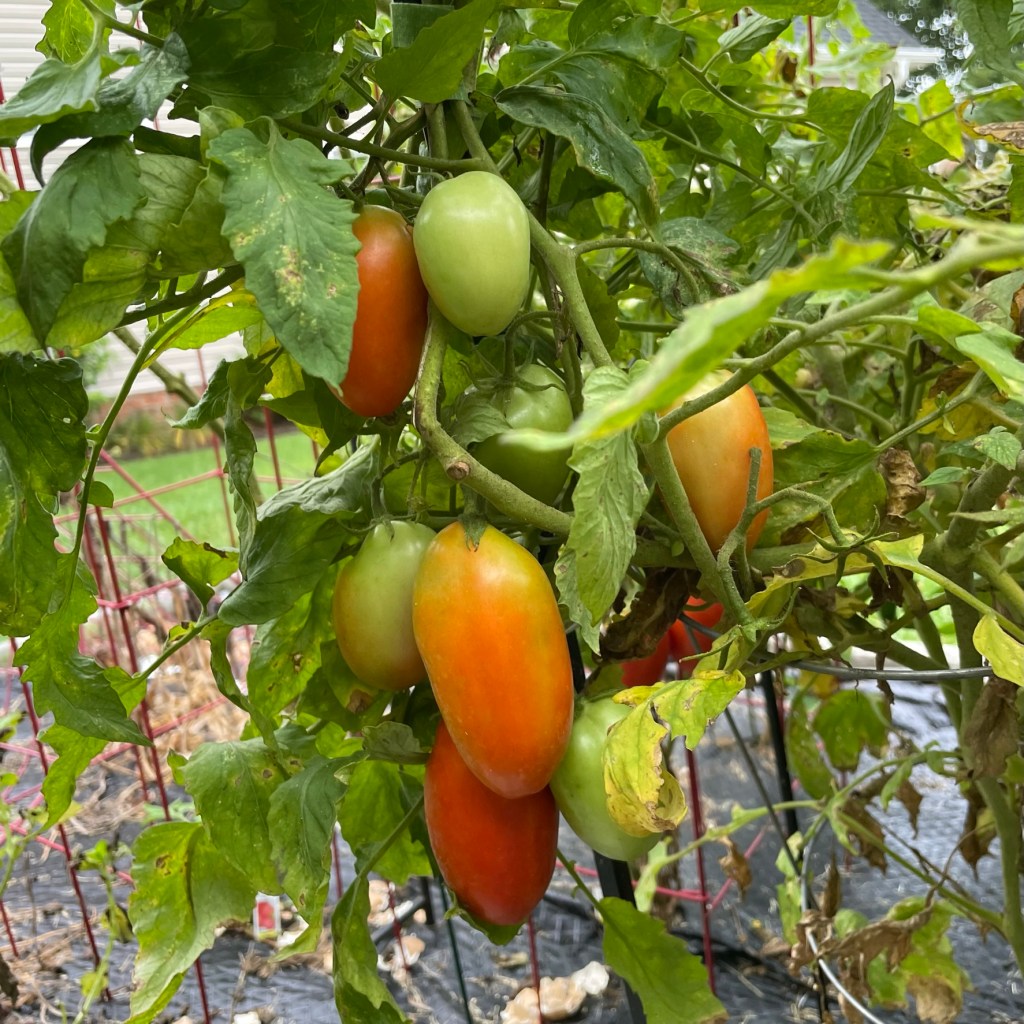
Now that we’re fortunate enough to have a garden again, thanks to Terrie’s persistence, we have a bounty of summer tomatoes to deal with.
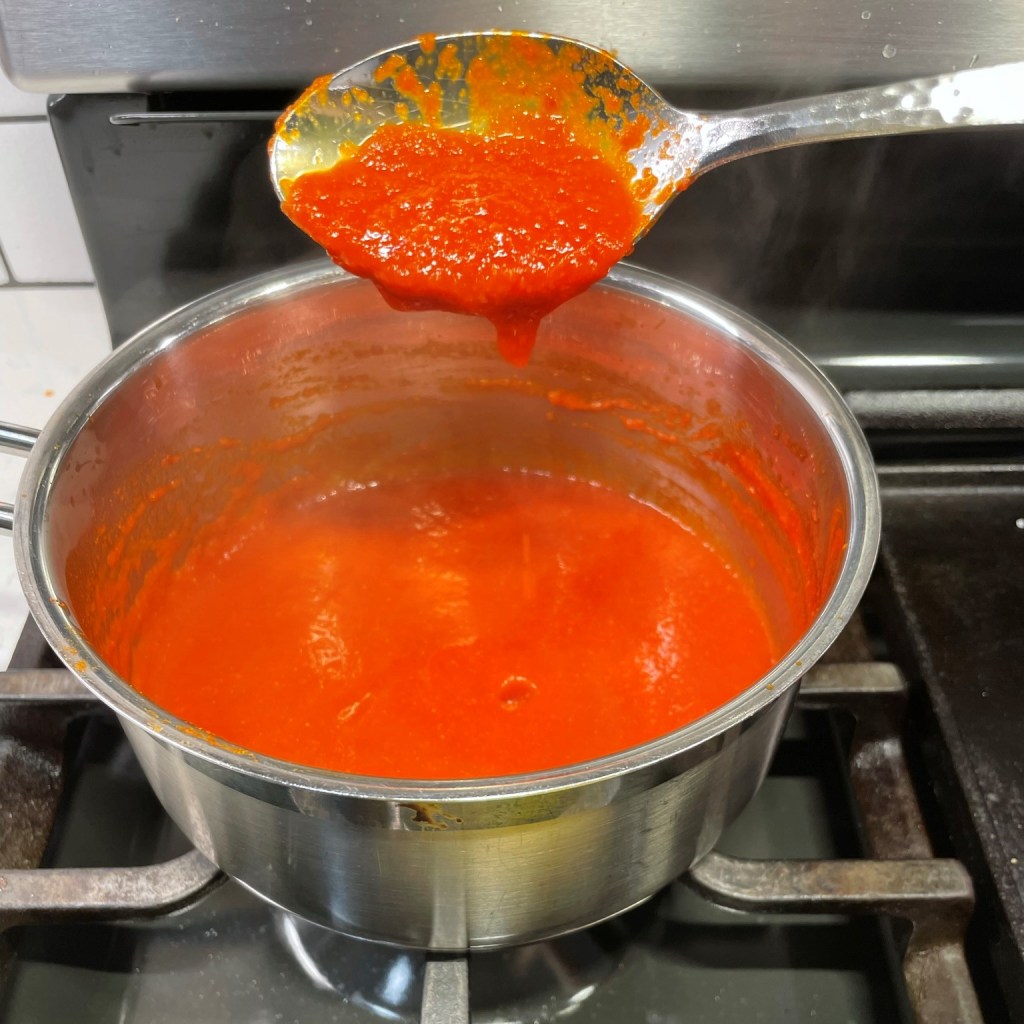
And recently I had the chance to create a pizza sauce. I used to always make my own sauce when I made pizza (pre-Terrie, pre-sourdough) with store-bought dough. But we’ve been using sauce we buy at a market because there’s quite a variety now and they’re way more flavorful than even just a few years ago. But homemade sauce, that’s the good stuff. And we have fresh Roma tomatoes, so why not?
Every day, we’ve come in from the garden with another haul.
As an aside, I should note that I’ve been gardening and canning off-and-on for 25 years, but several years ago conceded gardening to Terrie for two reasons—the persistence of the deer wore me out, and in 2013, I had an allergic reaction to yellow jacket stings and was advised by my doctor that activity in the grass where yellow jackets hung out could be dicey for me. And our raised-bed garden is right in the middle of a lot of grass. Every time I go near it, I always see bees buzzing and I’m on high-alert mode.
I know you mean well, Buddy.
But back to the story. Sauces are a big thing for me. Before Terrie, I would concoct all kinds of sauces for things I grilled. My go-to sauce for grilled chicken, for example, was a combination of five ingredients that I can still name from memory even though I’ve not made it that way for years: a base barbecue sauce such as Sweet Baby Ray’s, Italian dressing, Kraft Catalina dressing, duck sauce (most often Saucy Susan brand), and some splashes of either soy, teriyaki or hot sauce depending on my mood.
Under Terrie’s watch, however, we have eliminated anything containing ingredients such as high-fructose corn syrup (bye-bye Sweet Baby Ray’s) and soybean oil (see ya, Kraft Catalina). The result is that we’ve eliminated a lot of my go-to’s, and to be honest, I don’t mind that. When I create a sauce now, it’s with more natural ingredients and usually means I’m investing my own labor, starting with sautéing vegetables and ending by blending. That’s how it was to be when I told Terrie I wanted to make a pizza sauce.
To increase my knowledge, I searched the inter-webs for pizza sauce recipes. I know how to create “Sunday gravy,” but a homemade pizza sauce from scratch is a different animal. Do you know that almost every recipe out there, including in the cookbooks we have at home, all start with one can (28 ounces) of plum tomatoes? So I changed the search to include “pizza sauce using homegrown tomatoes.”
We’ve had so many fresh, meaty Romas. I’ll use canned tomatoes in January.
The problem is I was mostly interested in a recipe by one of Terrie’s favorite chefs, J. Kenji Lopez-Alt. And he also used canned tomatoes. I remembered another bit of Terrie’s constant advice—don’t be married to a recipe; use your instinct. As a result, I used the Lopez-Alt recipe as a baseline but was able to embellish it with my own touches, like fresh tomatoes.
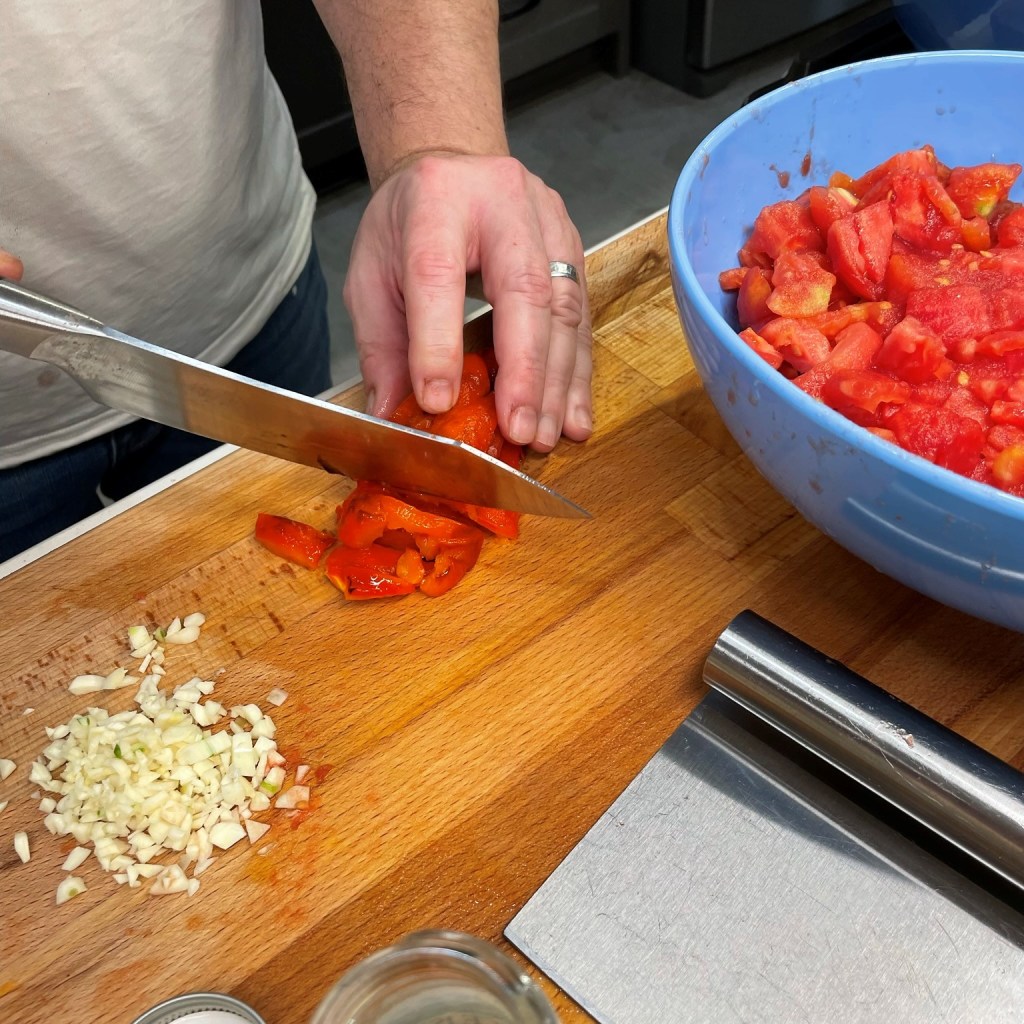
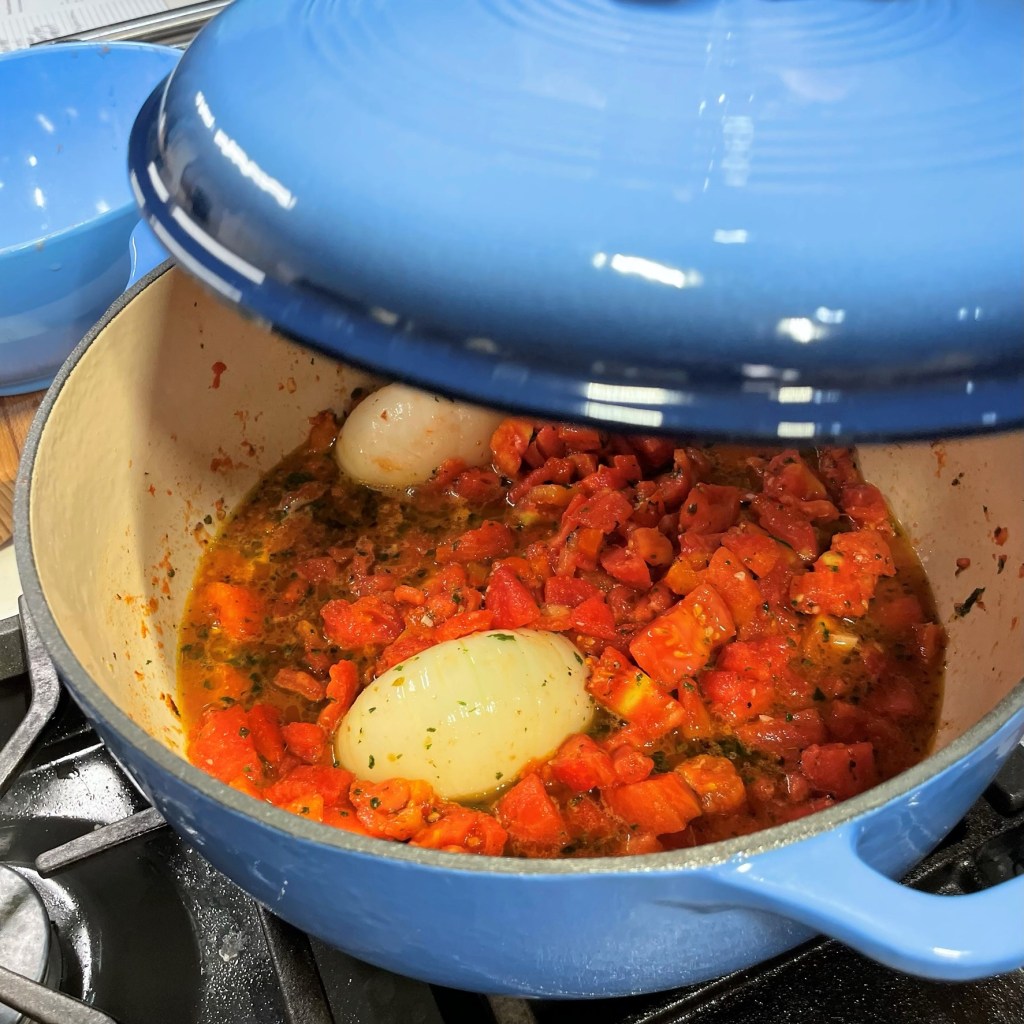
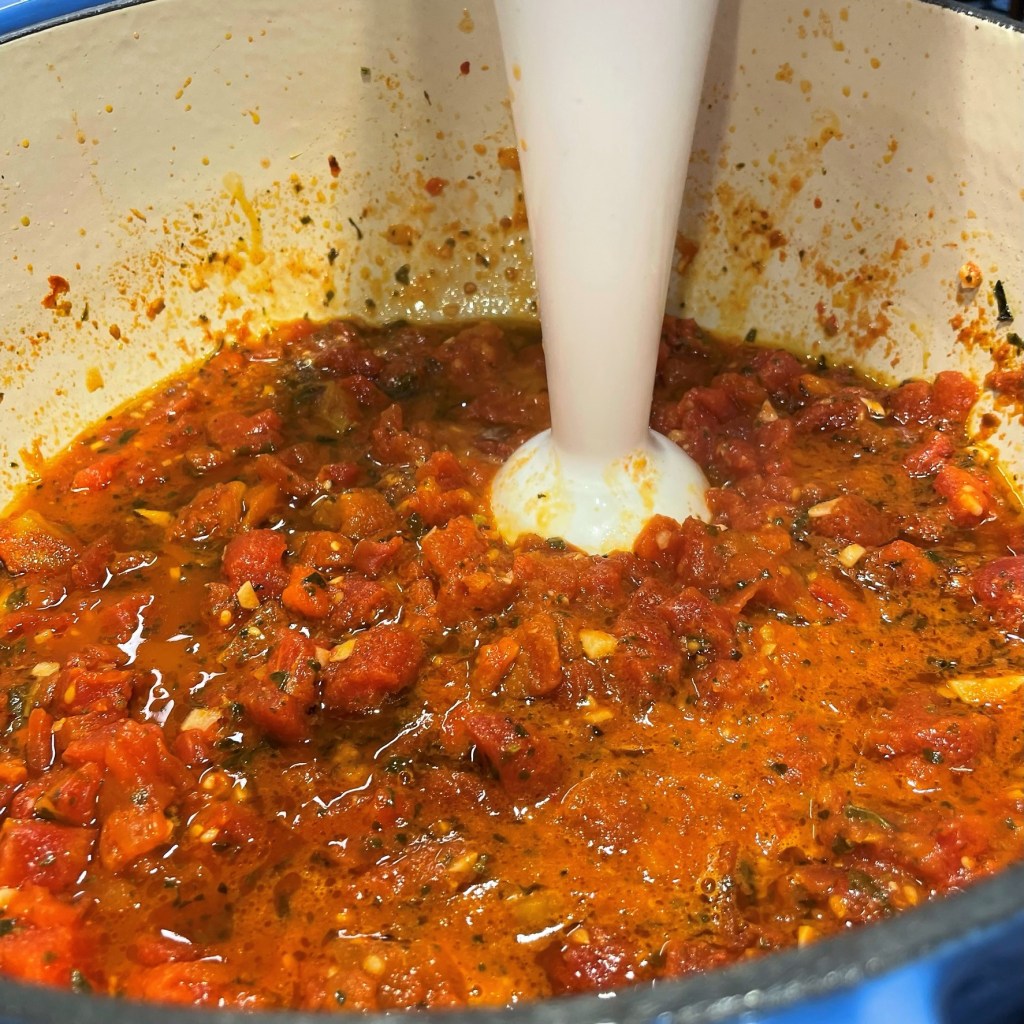
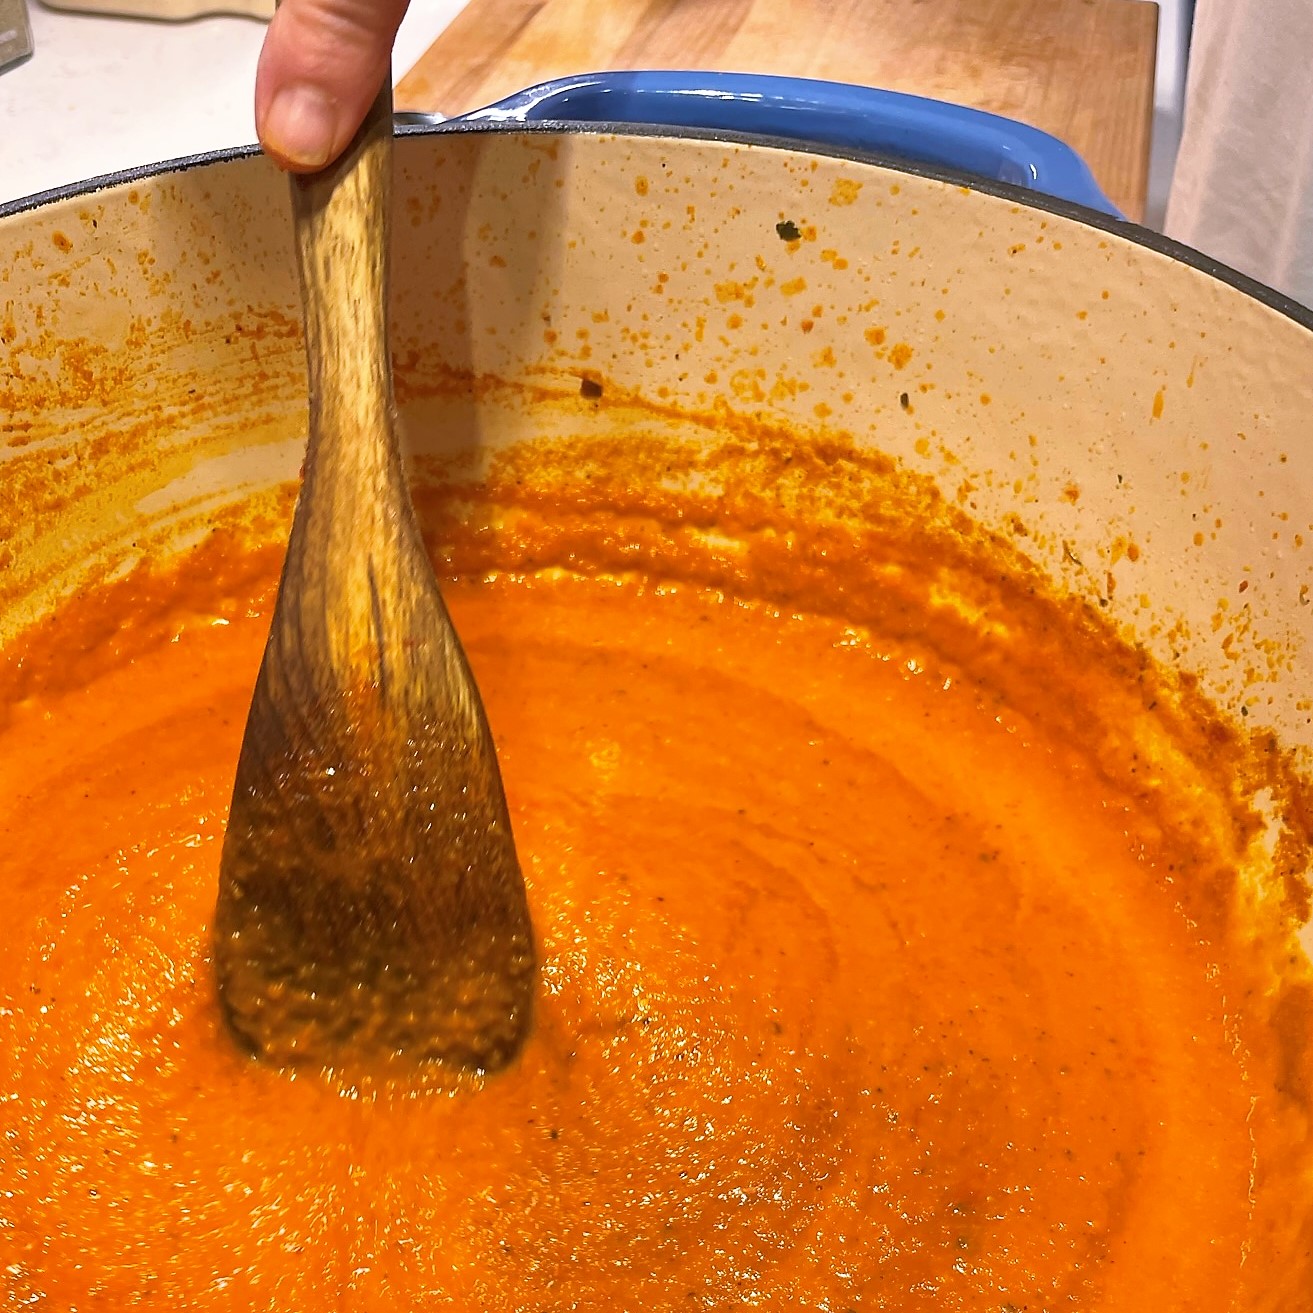
This included blanching (and then ice bathing) the tomatoes, sautéing garlic and some seasonings in a combination of olive oil and butter, roasting and dicing a sweet red bell pepper, and then adding an onion cut in half for the cooking (but removing at the end), then whizzing it up smooth with an immersion blender. The end result was amazing!
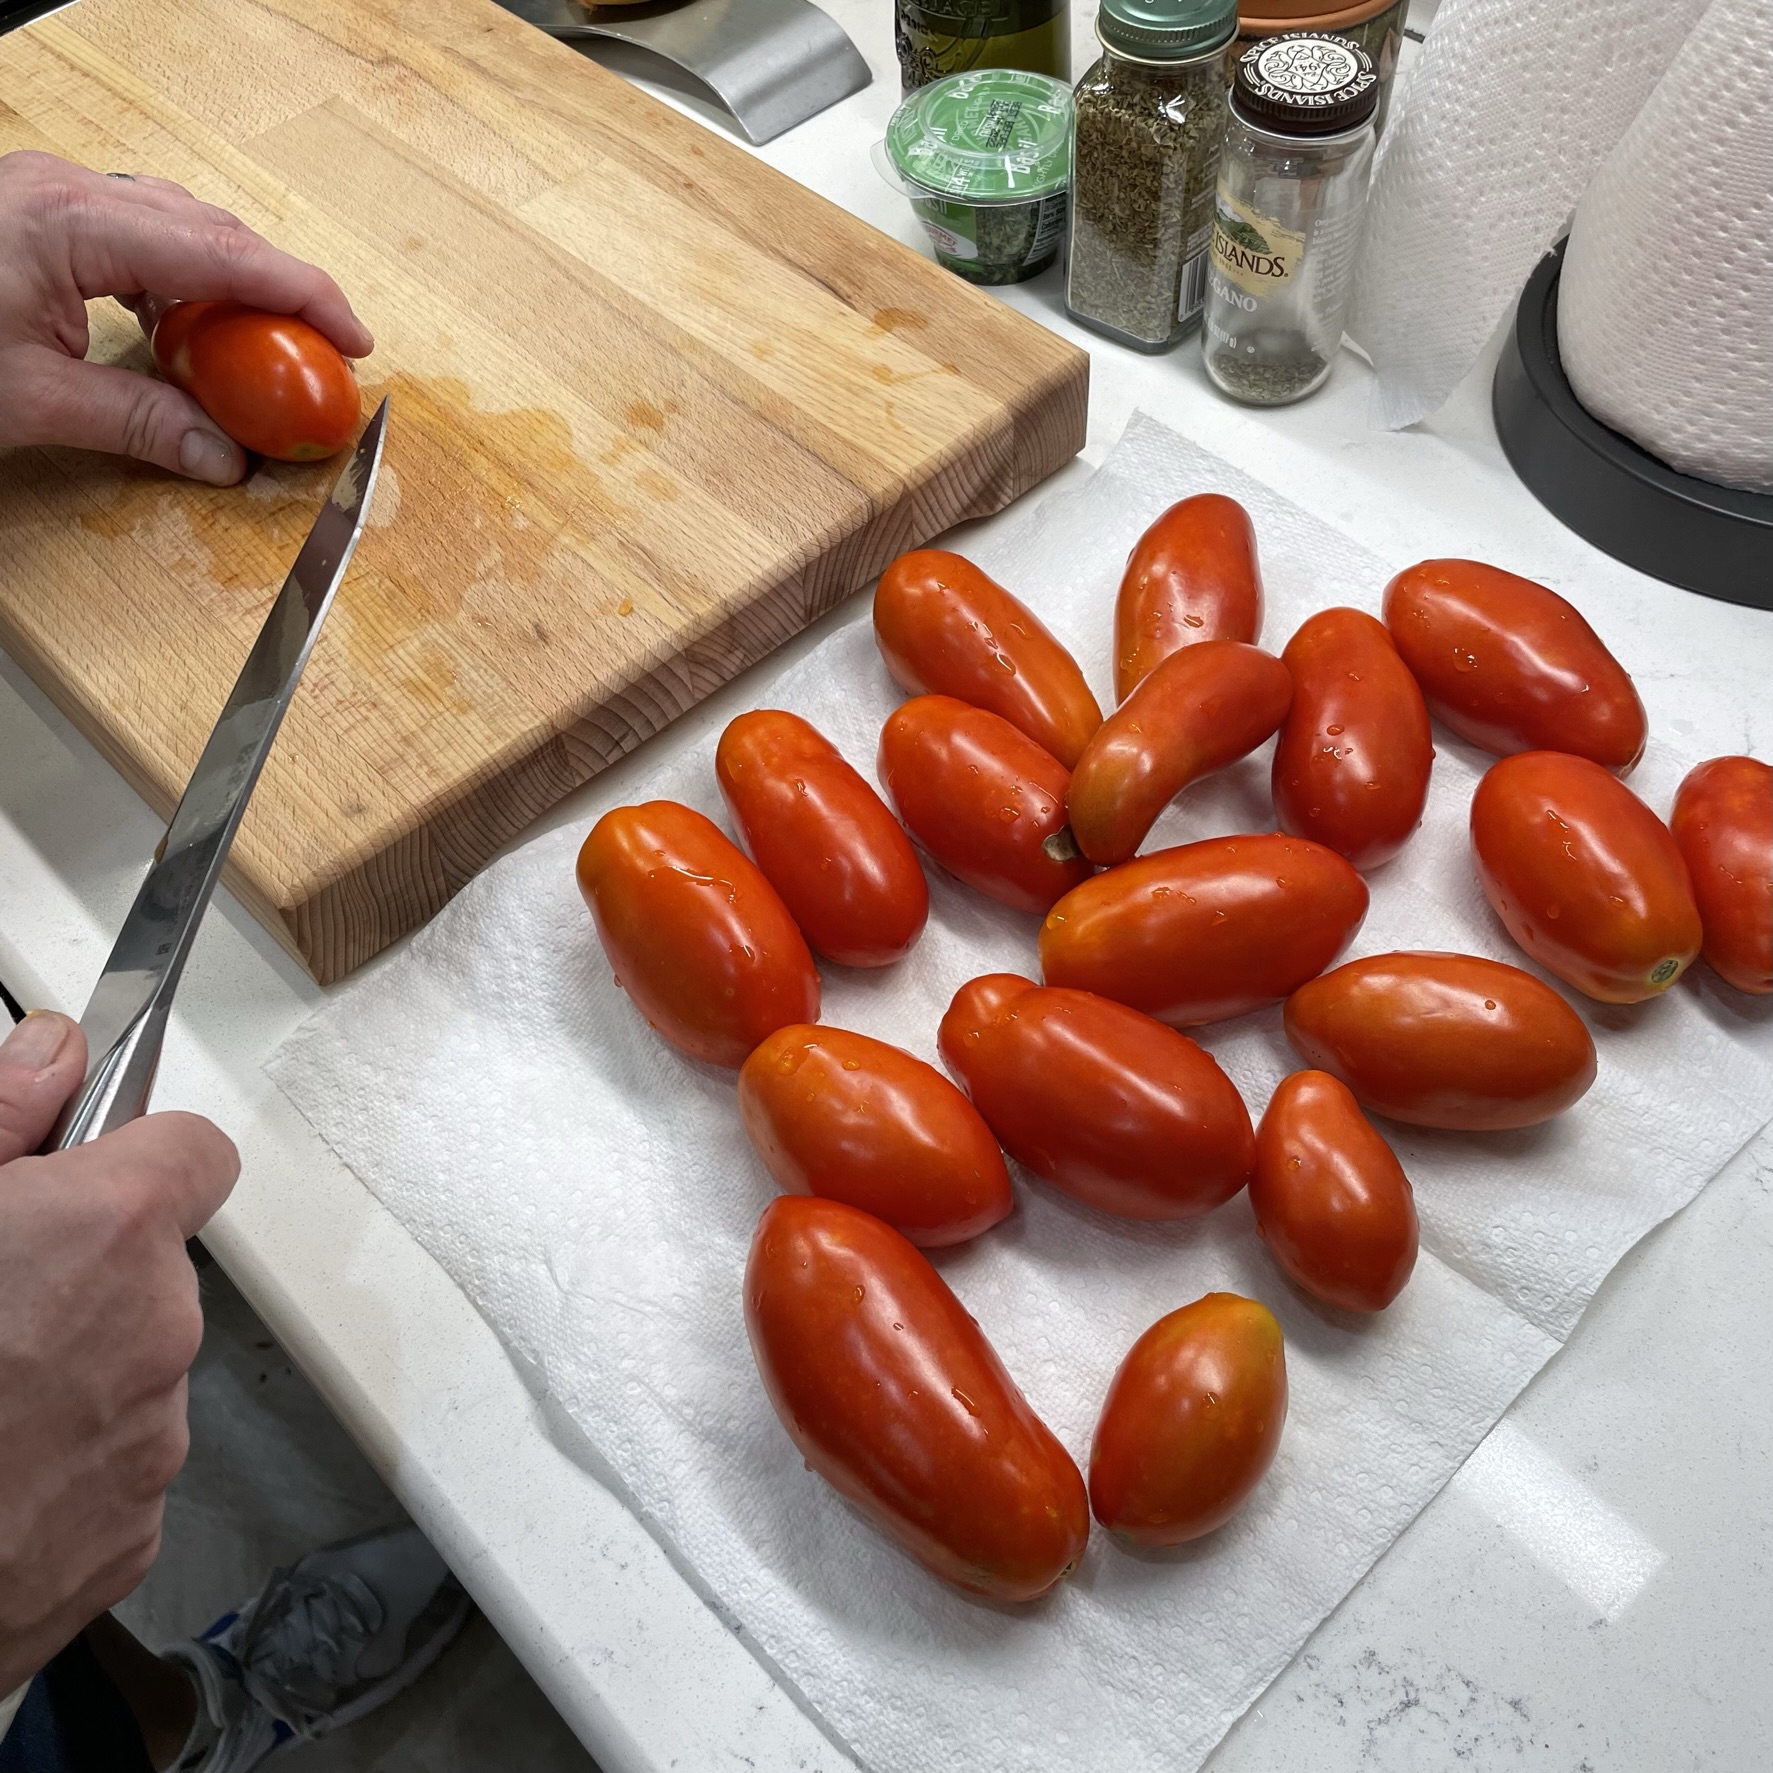
Blanch and shock the tomatoes for easy peeling.Chop the roasted red pepper along with the tomatoes and garlic.Everything into the pot with the oil, butter and seasonings!Putting it down for a two hour nap.
Use an immersion blender to puree it nice and smooth.
There was just one teeny problem. It’s not quite pizza sauce.
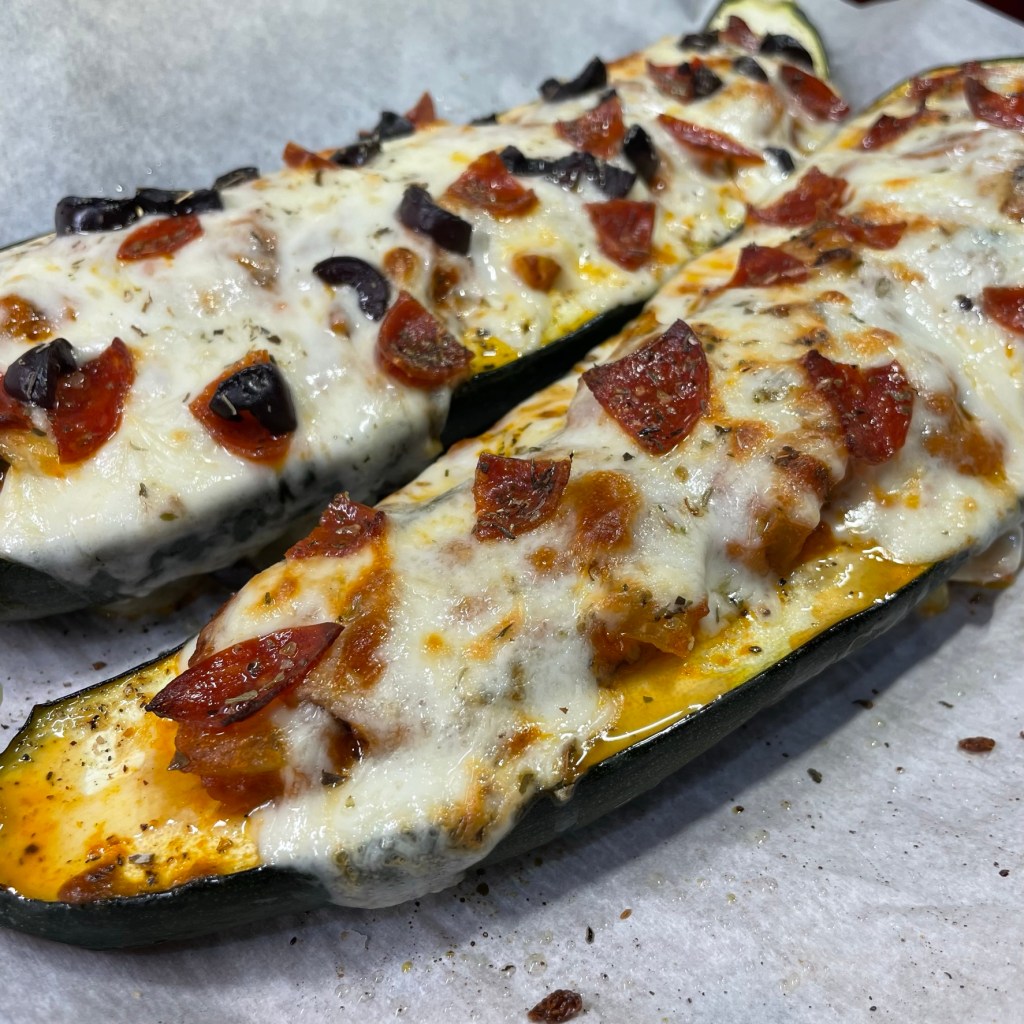
Rather, the sweetness of the red bell pepper and spice of the red pepper flakes meant it read uniquely, a cross between roasted red pepper sauce (like the one linked here that I made last summer) and something akin to vodka sauce (but without vodka, go figure). It was more complex than I wanted for pizza, which to me is a more tomato-forward and simple taste. We wound up using this sauce instead for turkey meatball subs. The subs had a tangy, bright pop thanks to our garden ingredients, and Terrie promises to share her recipe for the meatballs soon. The rest of the sauce (and meatballs) found its way into a stuffed zucchini boat, thanks to inspiration from a recent post on Dorothy’s New Vintage Kitchen.
Where there’s a sauce, there’s a way.
As for my desire to make pizza sauce, well, we still have plenty of Roma tomatoes coming in. Stay tuned.
My intention for pizza sauce turned into something more interesting and complex, perfect for topping pasta, Italian meatball subs or even lasagna. I used fresh Roma tomatoes from our garden, rather than canned tomatoes. If you use canned tomatoes, choose a 28 oz. can of Italian plum tomatoes and reduce the simmering time by half.
Ingredients
3 pounds fresh Roma tomatoes, cleaned
2 Tbsp. extra virgin olive oil
2 Tbsp. unsalted butter
1 small red bell pepper, roasted (instructions below)
1 large sweet or yellow onion, peeled and cut in half from stem to root end
3 Tbsp. grated Parmesan cheese (or the Parm-Romano blend that we are so fond of at our house)
1 or 2 tsp. sugar, to taste
Directions
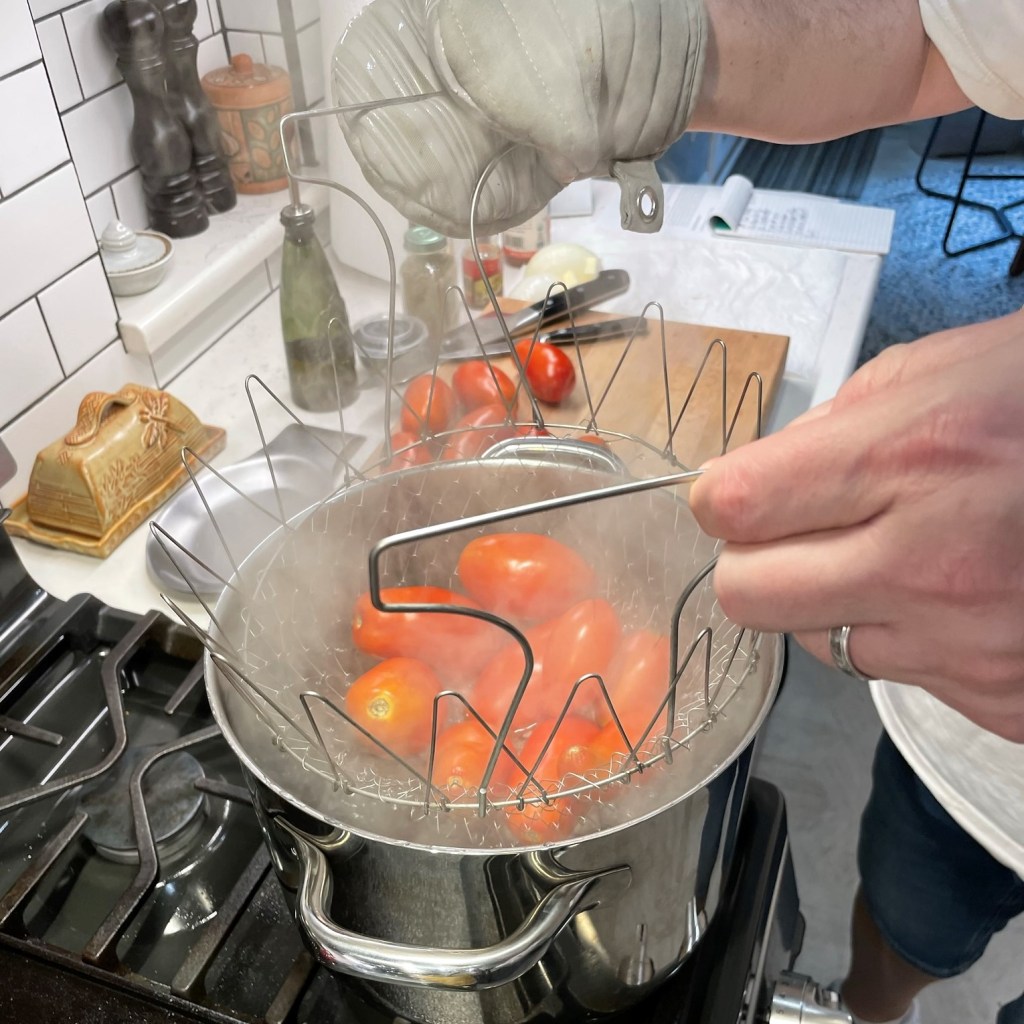
Bring a large stock pot of water to a boil for blanching the tomatoes. Score the blossom end of the tomatoes to make it easy to peel them. Plunge the tomatoes into the water and let sit until you can see clear signs of the skin splitting. Have a good-size pot or bowl filled with ice water to chill the hot tomatoes and keep them from cooking once they are blanched. Then peel the tomatoes, give them a rough chop and set aside.
Quarter the bell pepper and press the pieces to flatten them, skin side up, on a foil-lined baking sheet. Set the oven to broil setting and roast peppers for about 10 minutes, until charred but not burned. Transfer the pepper pieces to a bowl and cover to steam, which will allow easier peeling. Dice the pepper.
In a large non-reactive pot on a low flame, heat the oil and butter until the butter melts. Add the garlic, oregano and pepper flakes. If using dry basil, add it now, too. Continue cooking on low for 2 to 3 minutes, then add the tomatoes, and salt generously. Add the onion halves, Parmesan cheese, fresh sprigs of basil (if using that) and roasted red pepper. Bring to a low boil, then reduce heat and cook on low until volume is reduced by up to half (about two hours).
Remove the onions (and basil sprigs if you used fresh), and then process the sauce with an immersion blender until smooth. Continue to simmer on low, and taste and season it from that point to suit your palate.
Serve immediately over pasta or whatever dish needs a bright Italian sauce. This also can be refrigerated (the flavors really shine after a couple days in the fridge), but probably should be used within a couple of weeks. Or you can freeze it.
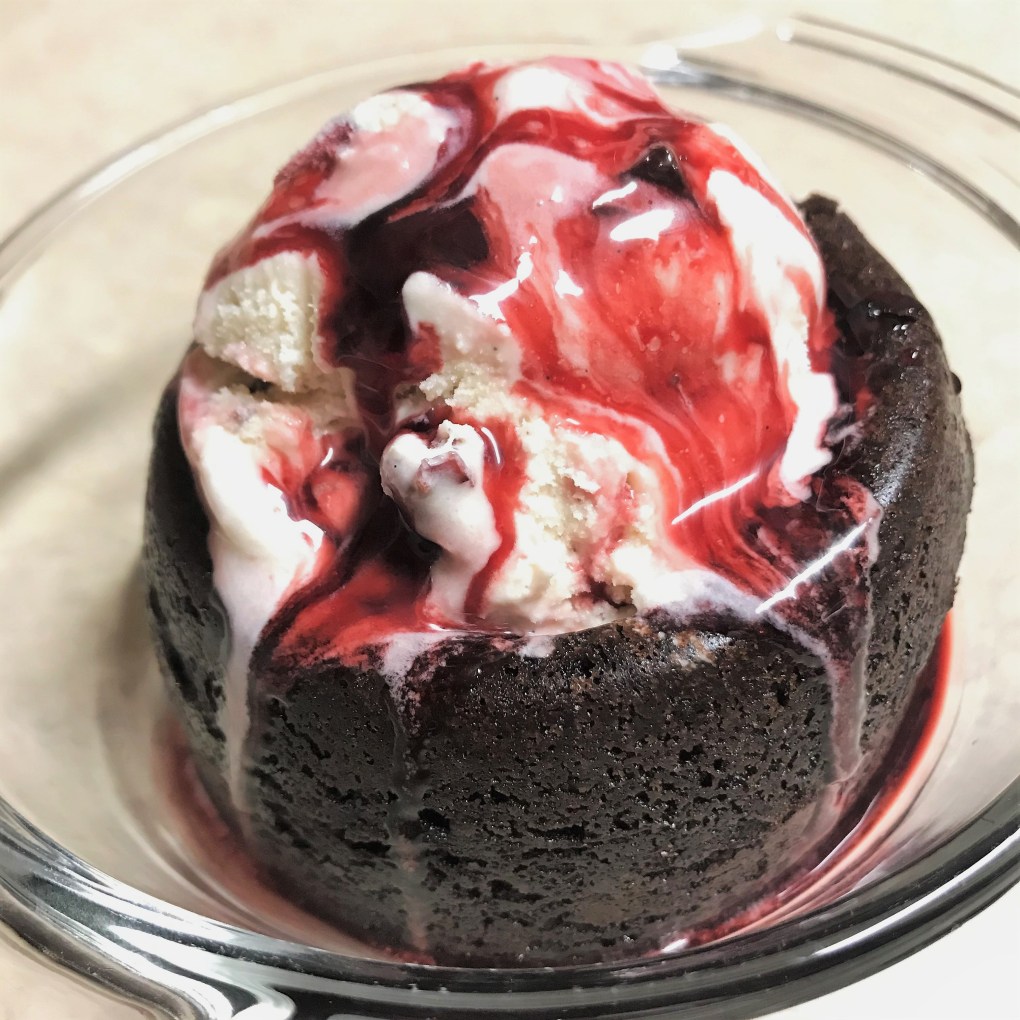
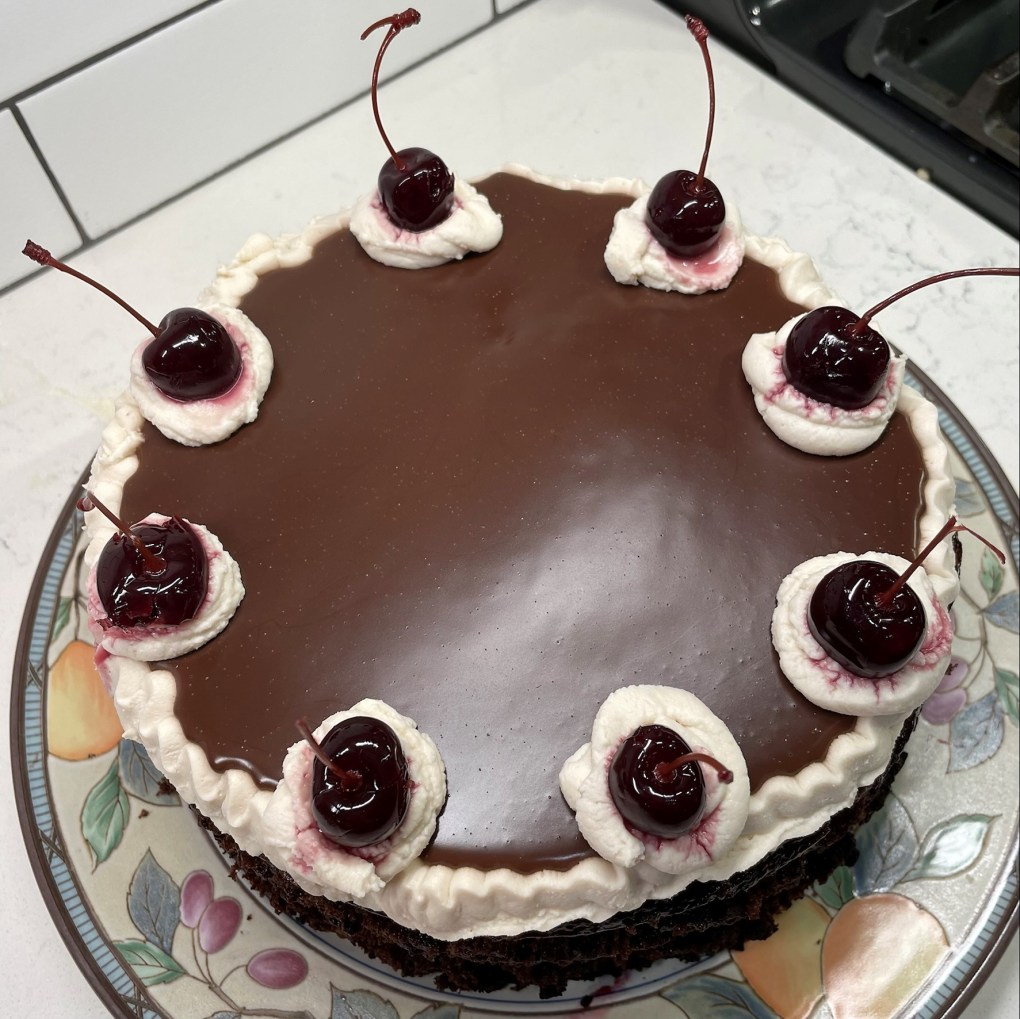
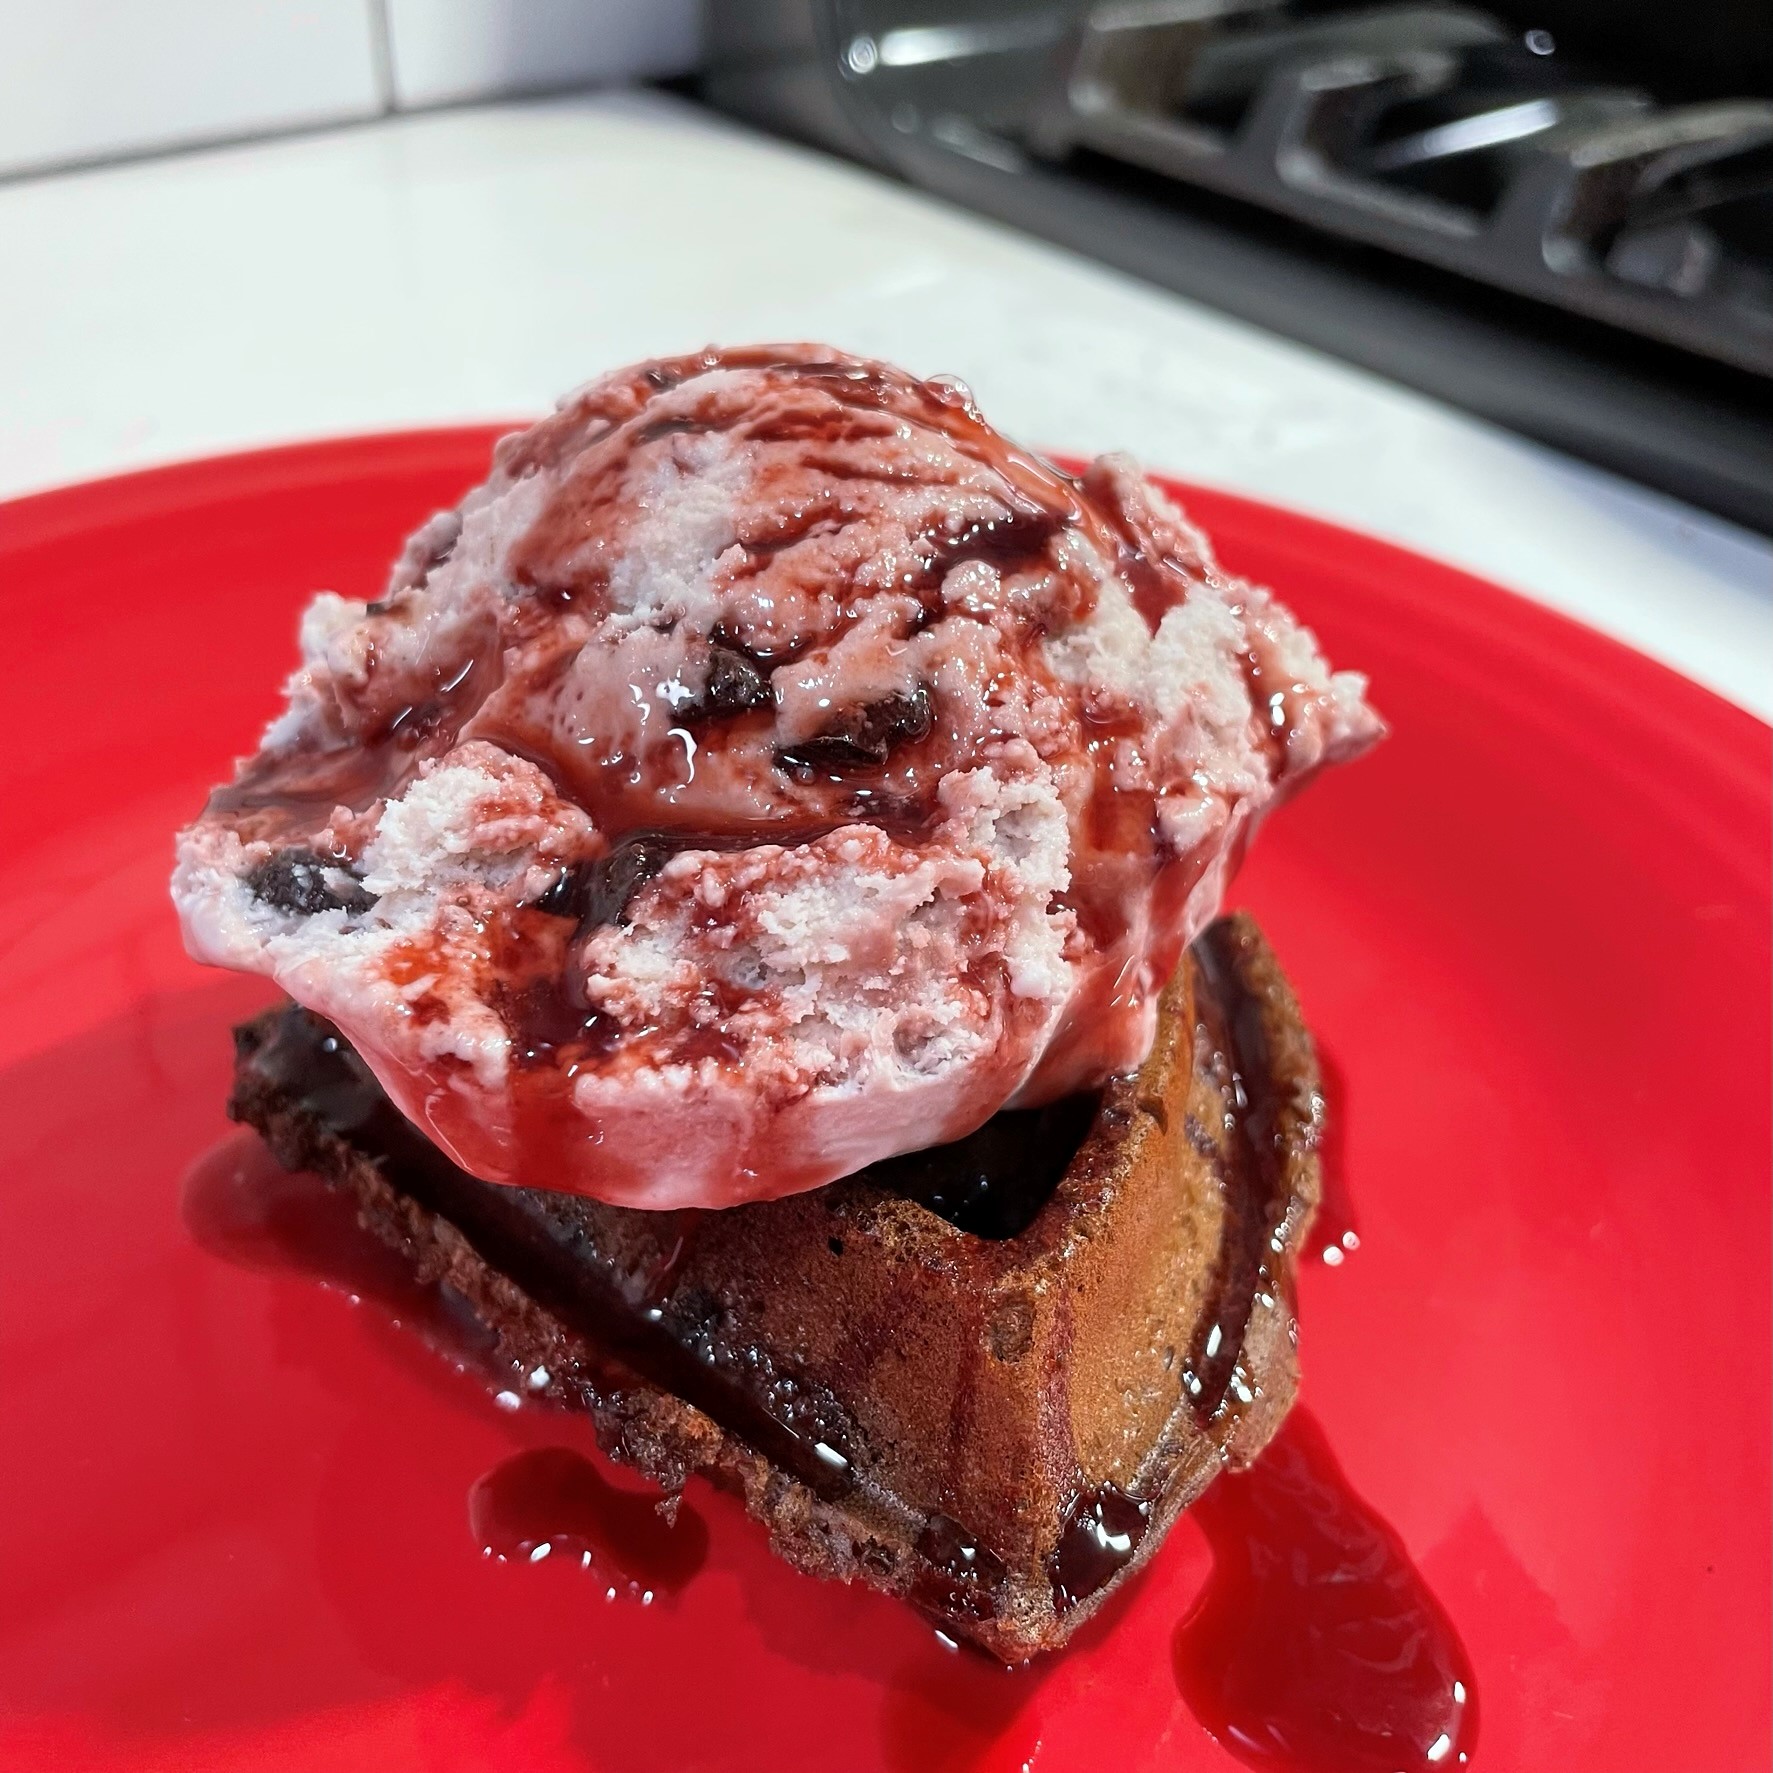
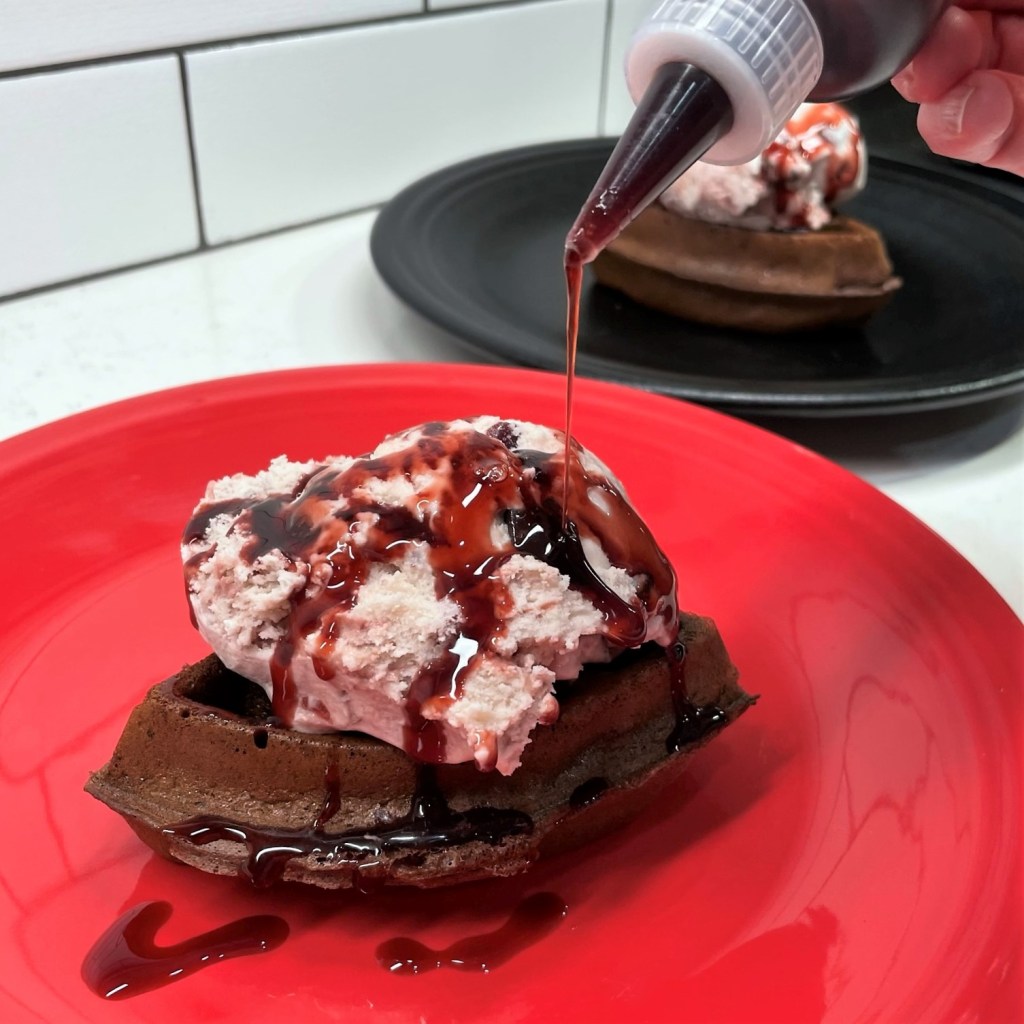
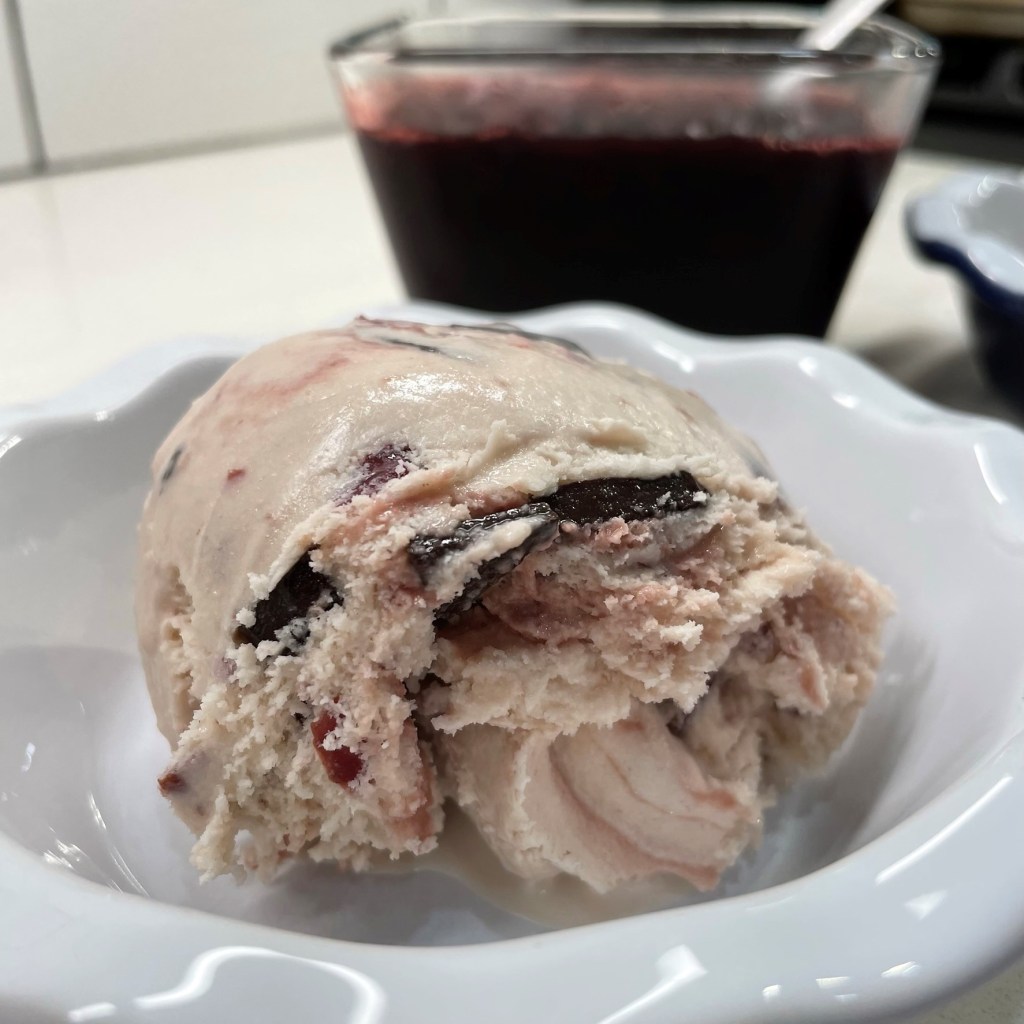
When you’re in love, you do crazy things. Not that making your sweetheart’s favorite foods is crazy, mind you, but I do think it’s possible to push the envelope quite far, as I have done at times in my quest to tantalize my husband’s taste buds. This dessert might qualify, because not only did I make a homemade version of his favorite ice cream, I scooped that deliciousness right over a chocolate waffle and drizzled it with a homemade cherry syrup.
This is the way to my lover’s heart! ❤
Les’s all-time favorite sweet flavor combination is chocolate with cherries, and I have mentioned this previously on Comfort du Jour, in these scrumptious posts:
All those desserts were delicious, but when it comes to cherry and chocolate, it is unquestionably ice cream that wins my man’s heart. One of his favorite grocery store ice creams is the Ben & Jerry’s classic flavor, Cherry Garcia, and though I made it back in October 2020 for the triple chocolate-cherry brownie bowls, I felt that it needed a little tweaking, so I didn’t share the recipe at the time. The color of my first batch was off, because I had used my go-to custard base that had a yellowish tint from the egg yolks. And the chocolate chunks were 70% cacao, which proved to be too bitter and a touch gritty in the mix of so much creaminess.
So, I did what I do best and gave the recipe a makeover. And I’m back to share it with you—a homemade version of “Cherry Garcia” ice cream—one that uses sweetened condensed milk in its base, for creamy sweetness without the yellow egg color, a ribbon of sweet-tart cherry syrup that is tinged with a surprise ingredient, and bits of semi-sweet chocolate that bring just the right balance to the sweet cream, vanilla and cherries.
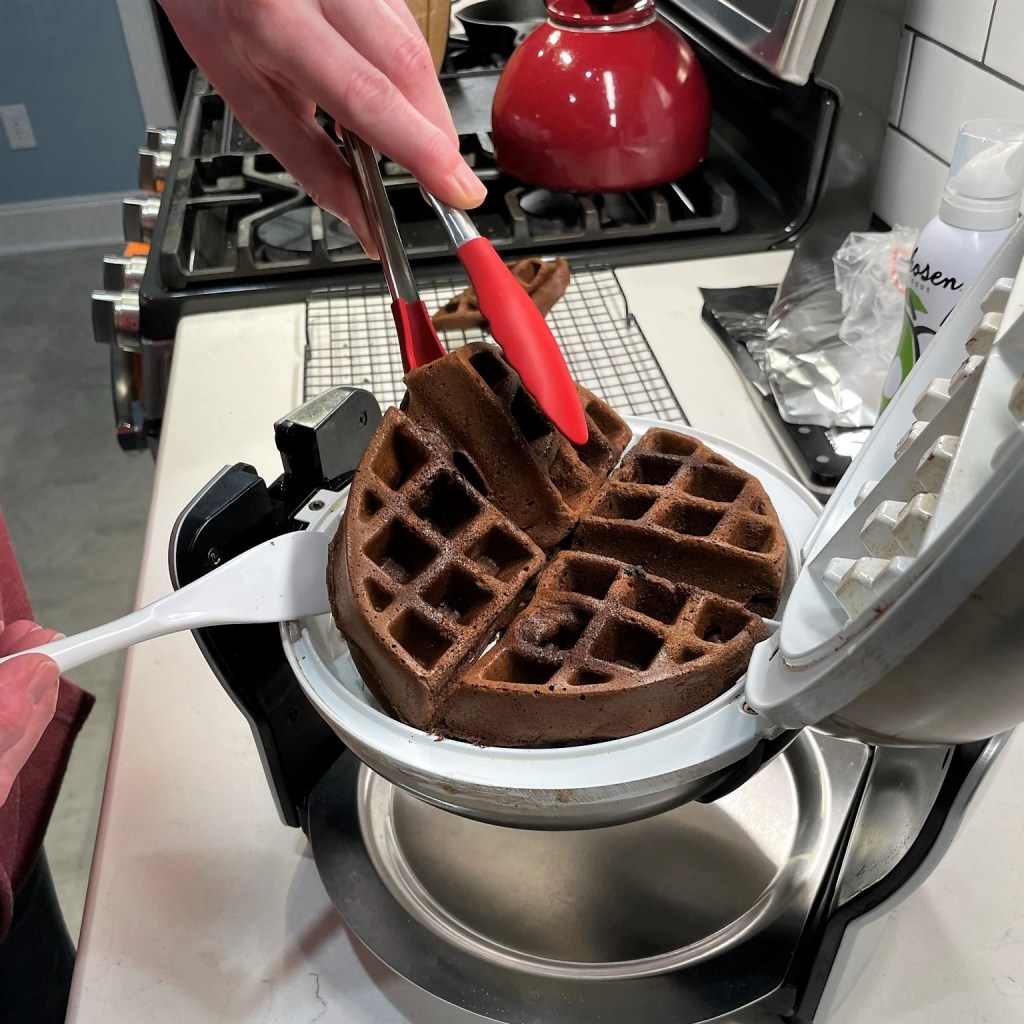
And, in a bold move, I gave it a go with a recipe I’d been eyeing for years on King Arthur Baking’s website—sourdough chocolate malt waffles. This dessert was nothing short of spectacular.
Over the top? Obviously, but c’mon, we’re talking about Valentine’s Day!
Be my ❤ alentine?
Before I get into the making of this lovely dessert, let me acknowledge that a few of you may not be inclined to go this crazy, or maybe you don’t have an ice cream machine yet, or you don’t have sourdough starter to make the chocolate waffles. Please feel free to lift any single part of this dessert for your own celebration, even if it means just making the cherry syrup to drizzle over store-bought ice cream, or serving the ice cream with a store-bought chocolate cookie. I ended up making a second batch of the cherry syrup (with chunks of cherries), and it was fantastic over plain vanilla ice cream.
My ingredients and instructions are all included in a downloadable PDF at the end of the post. Enjoy!
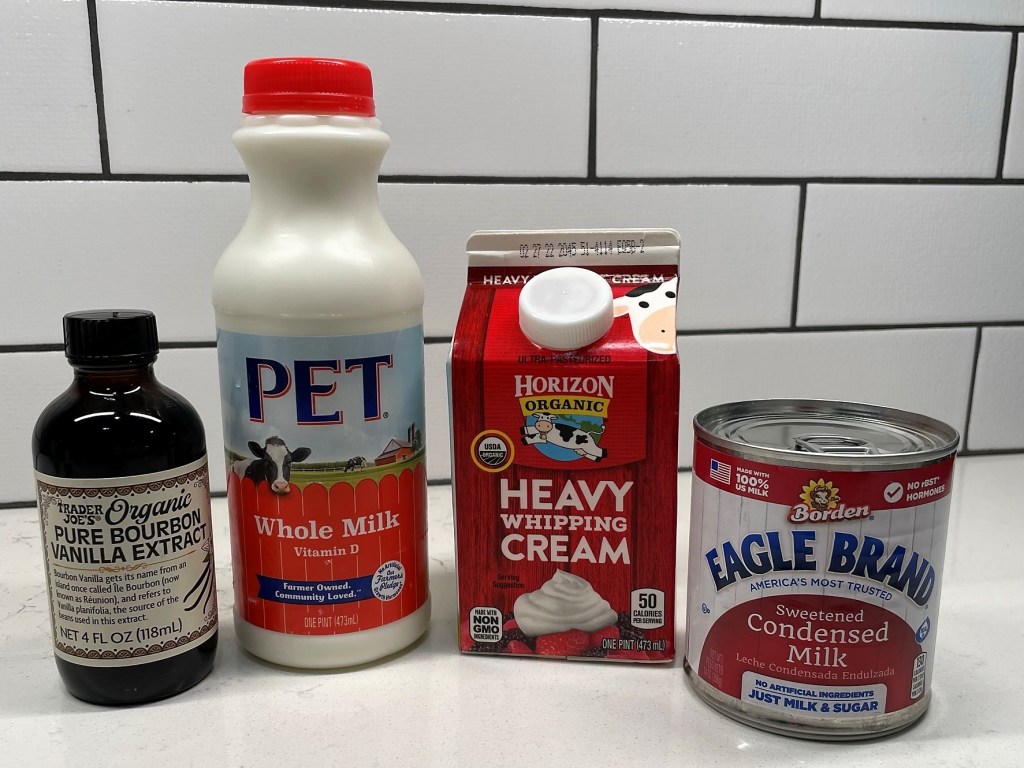
“Cherry Garcia” Ice Cream Base
This is my go-to ice cream ingredient list when I don’t want a custard base.
No extra sugar is needed for this base because the condensed milk is just right!
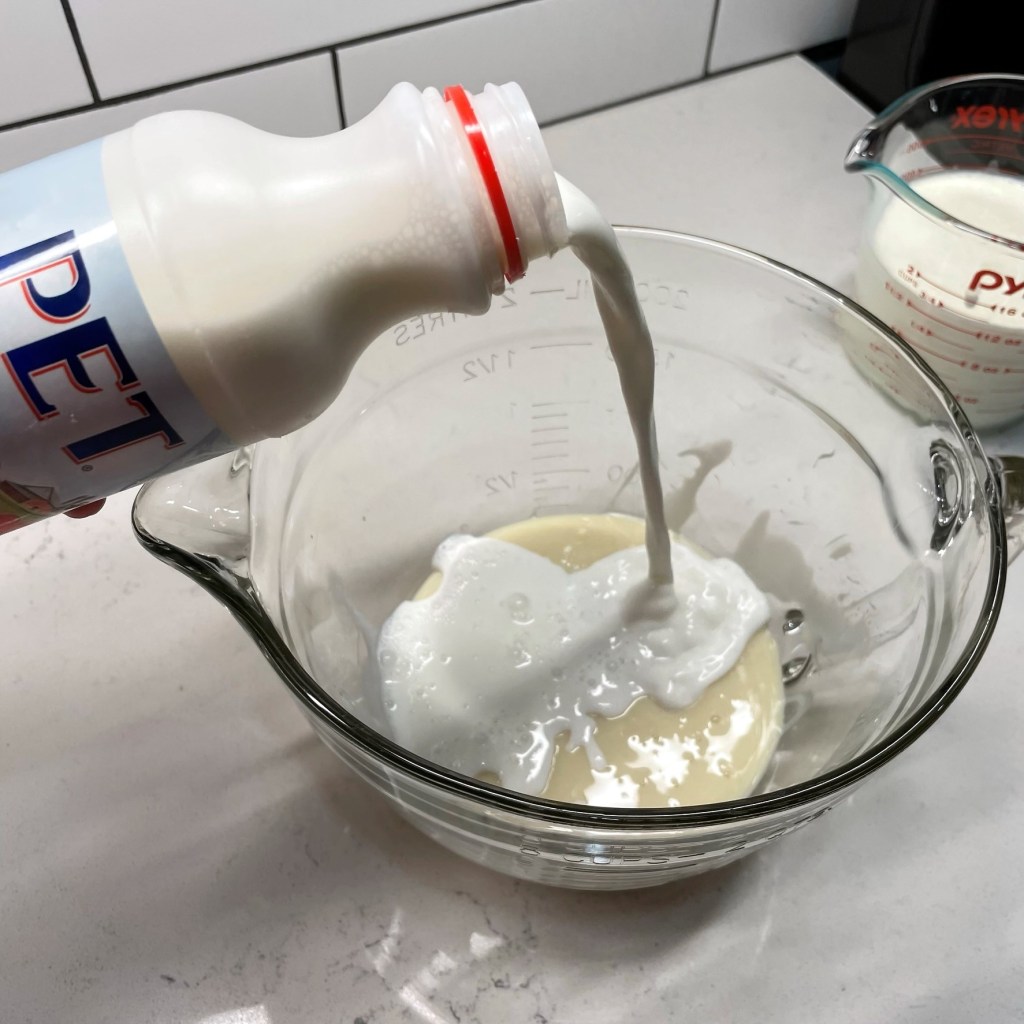
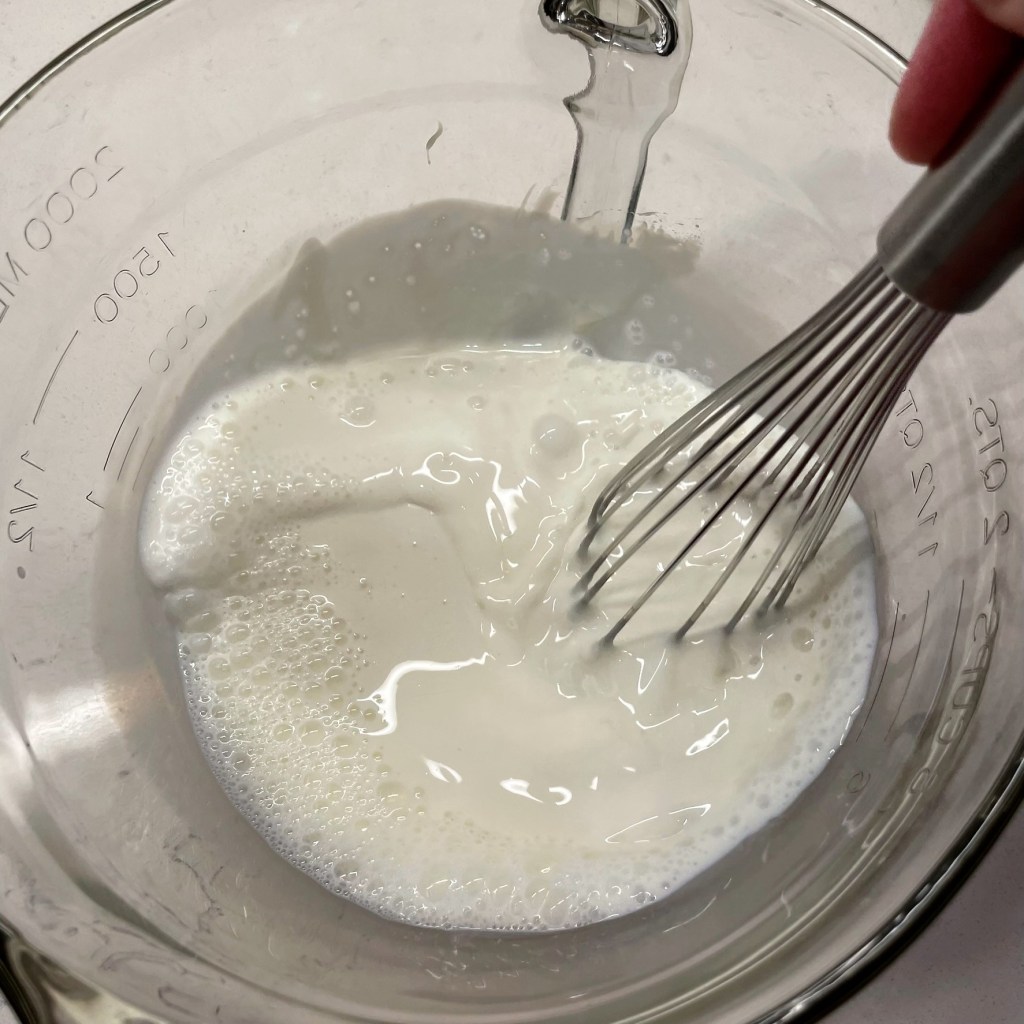
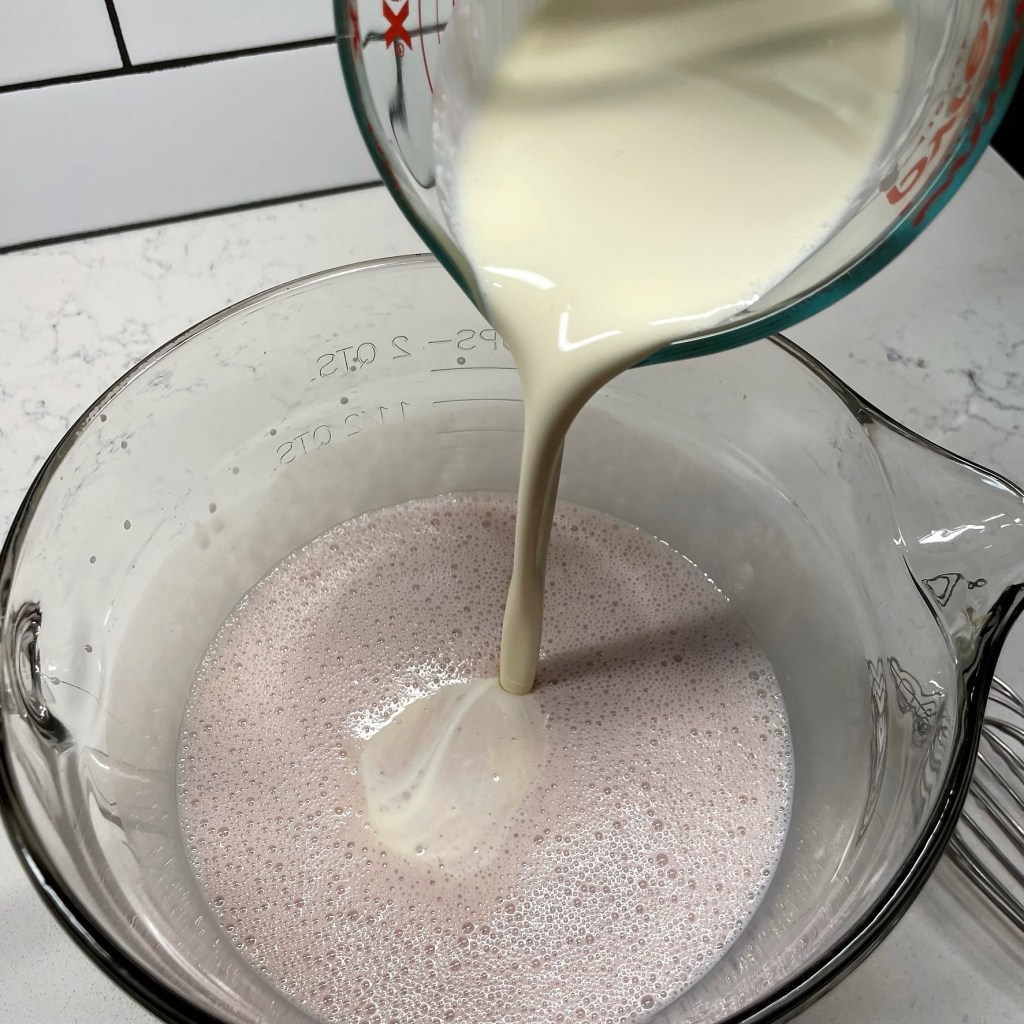
Add the whole milk to the condensed milk and whisk them together first.
These two ingredients are so different texture-wise that I want them to be thoroughly blended before adding the cream. Too much whisking would make the cream frothy.
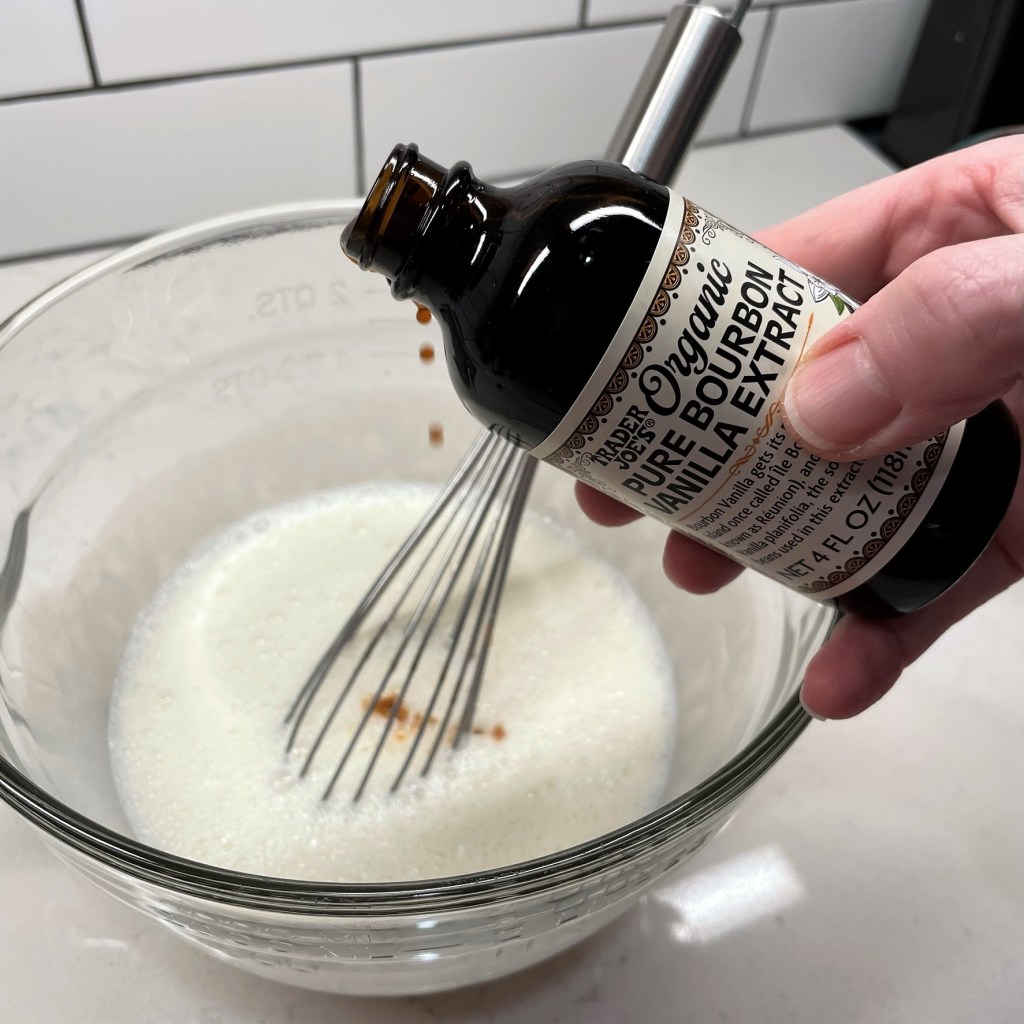
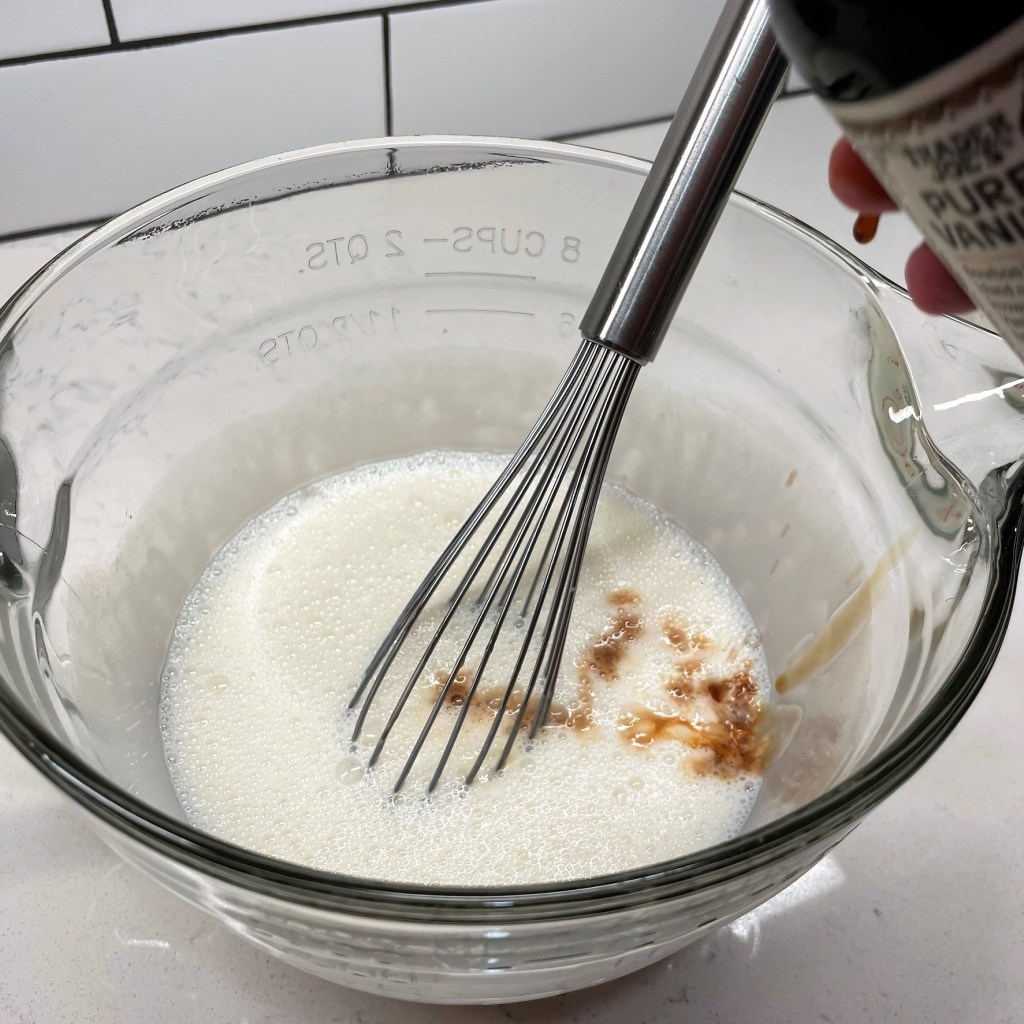
My vanilla extract was a brand new bottle, and I made a total mess while taking this picture! When are they going to put dropper lids on these things?
I ended up using more vanilla than I intended, but it turned out fine as a backdrop to all the cherry flavor yet to come. 😉
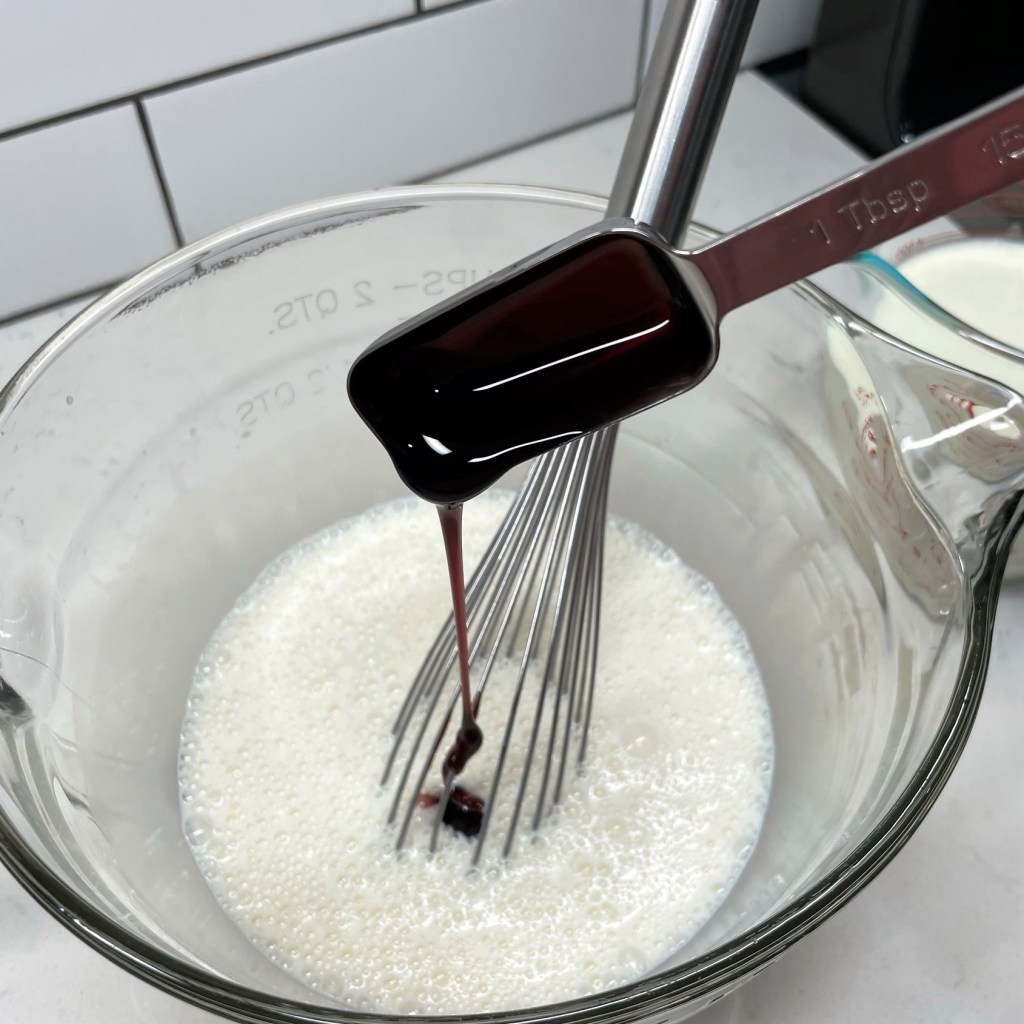
If you happen to have a jar of these cocktail cherries in the fridge, add some of the syrup to the ice cream base.
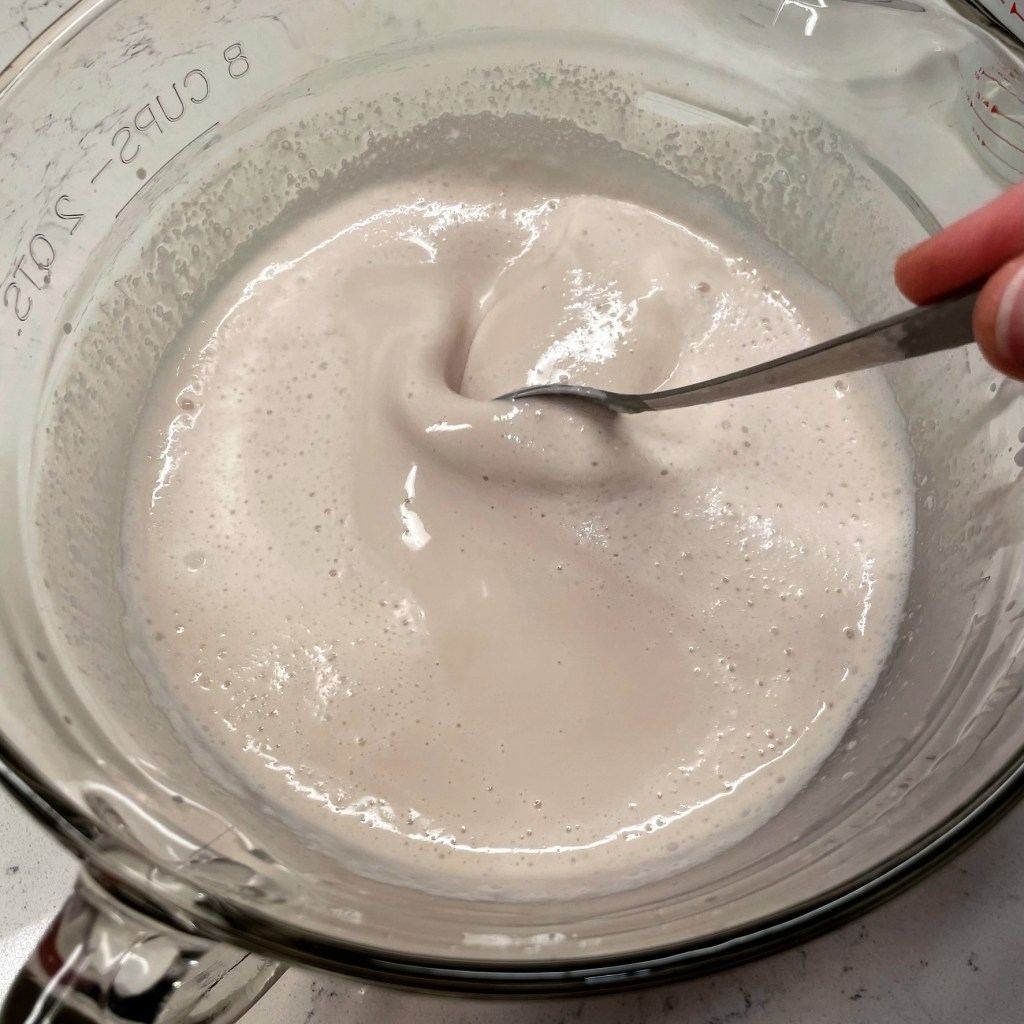
It’s dark, rich, sweet and so ridiculously CHERRY! I added two full tablespoons to my base.
I hardly ever add food color to anything, but the cherry syrup made my base look grayish. A few drops of natural red coloring helped correct it.
Finally, blend the heavy cream into the base.
The color was a pretty pink and the flavor was perfectly cherry-sweet-vanilla. Cover and refrigerate several hours to overnight.
Cherry Swirl Syrup
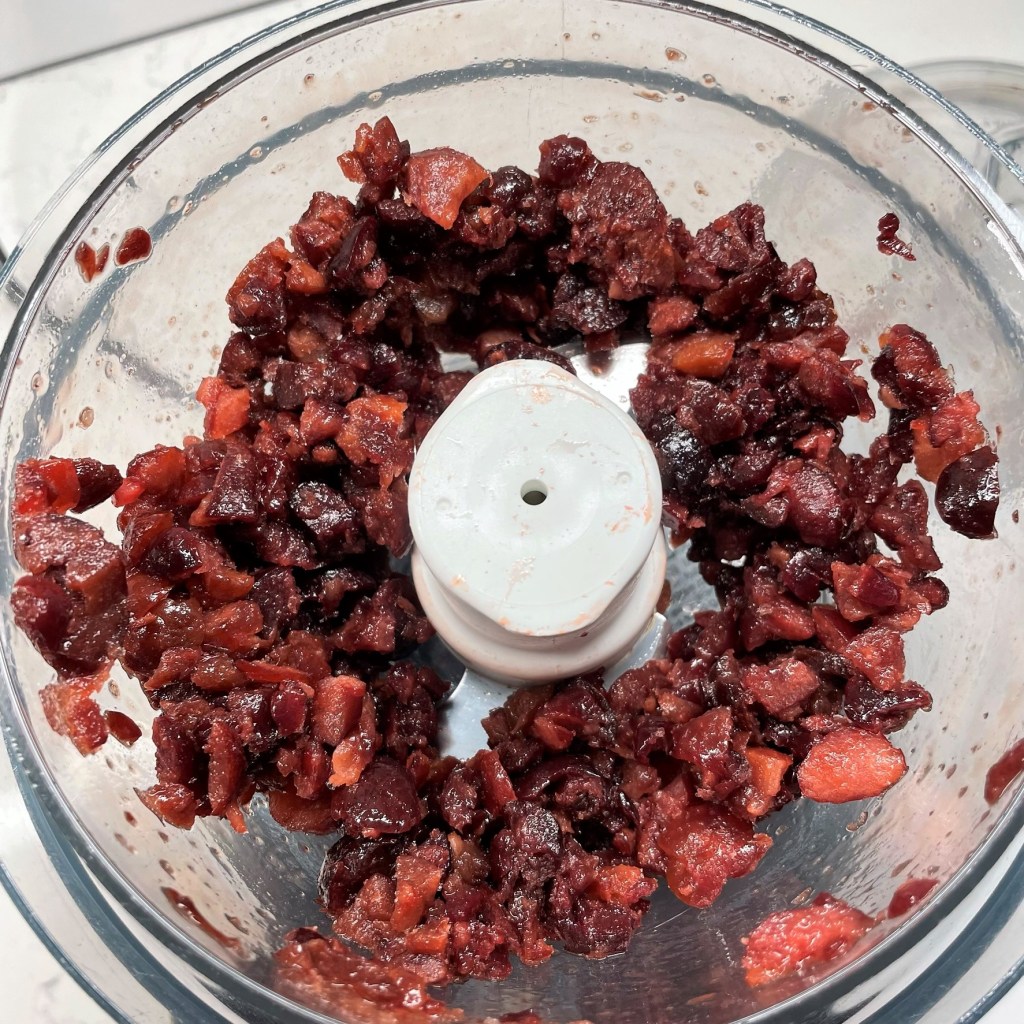
Pulse half of the frozen cherries in a food processor (or chop them roughly by hand) and transfer them immediately back to the freezer. You’ll mix them into the ice cream later.
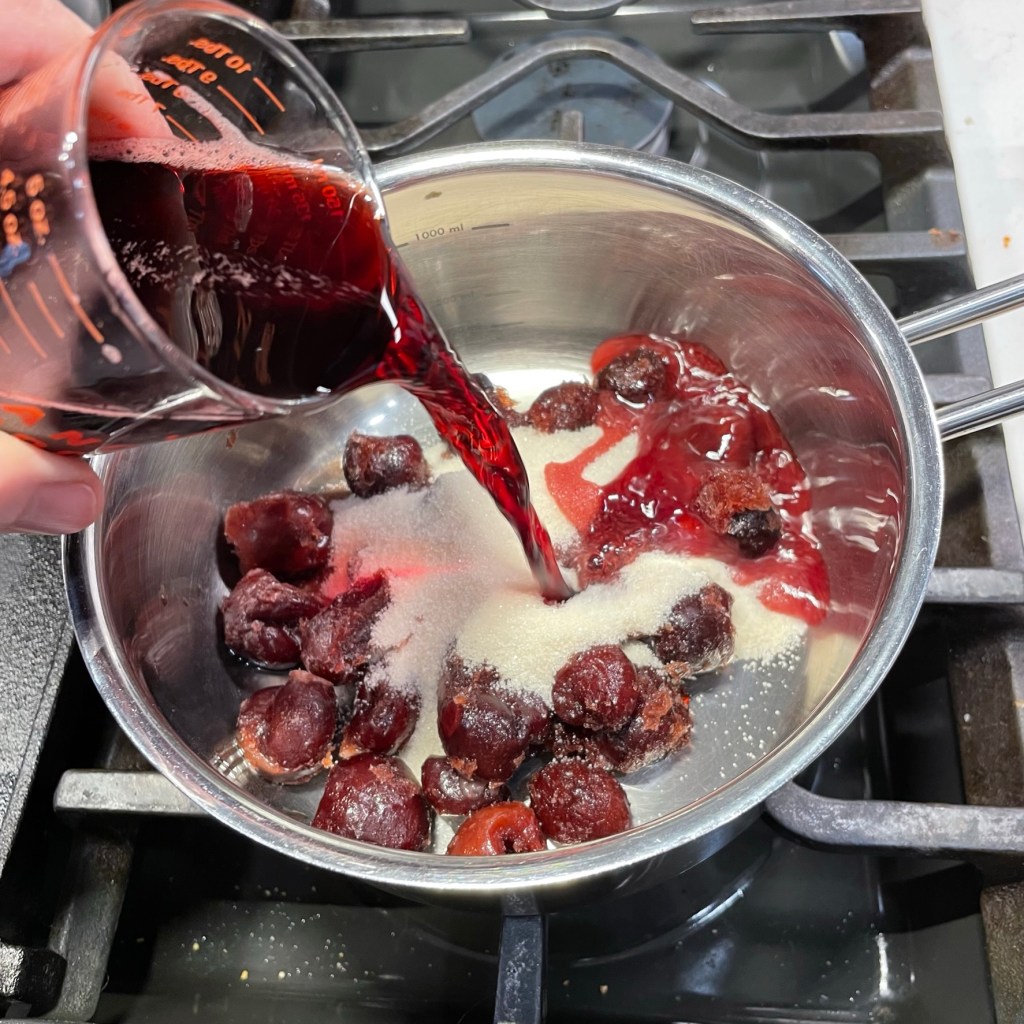
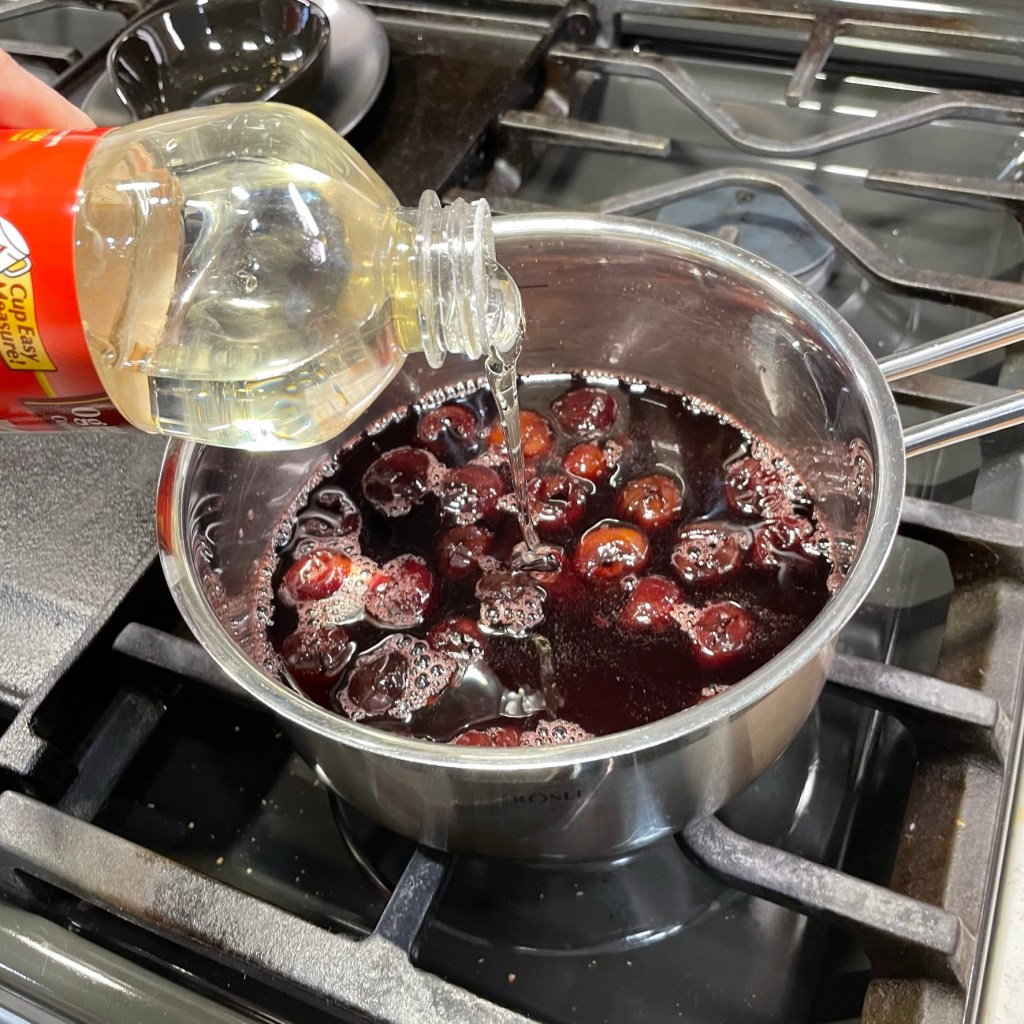
Add sugar and real cherry juice to the remaining frozen cherries, and stir over medium heat until sugar is dissolved.
A few tablespoons of light corn syrup prevents the sugars from crystallizing when it’s cooled.
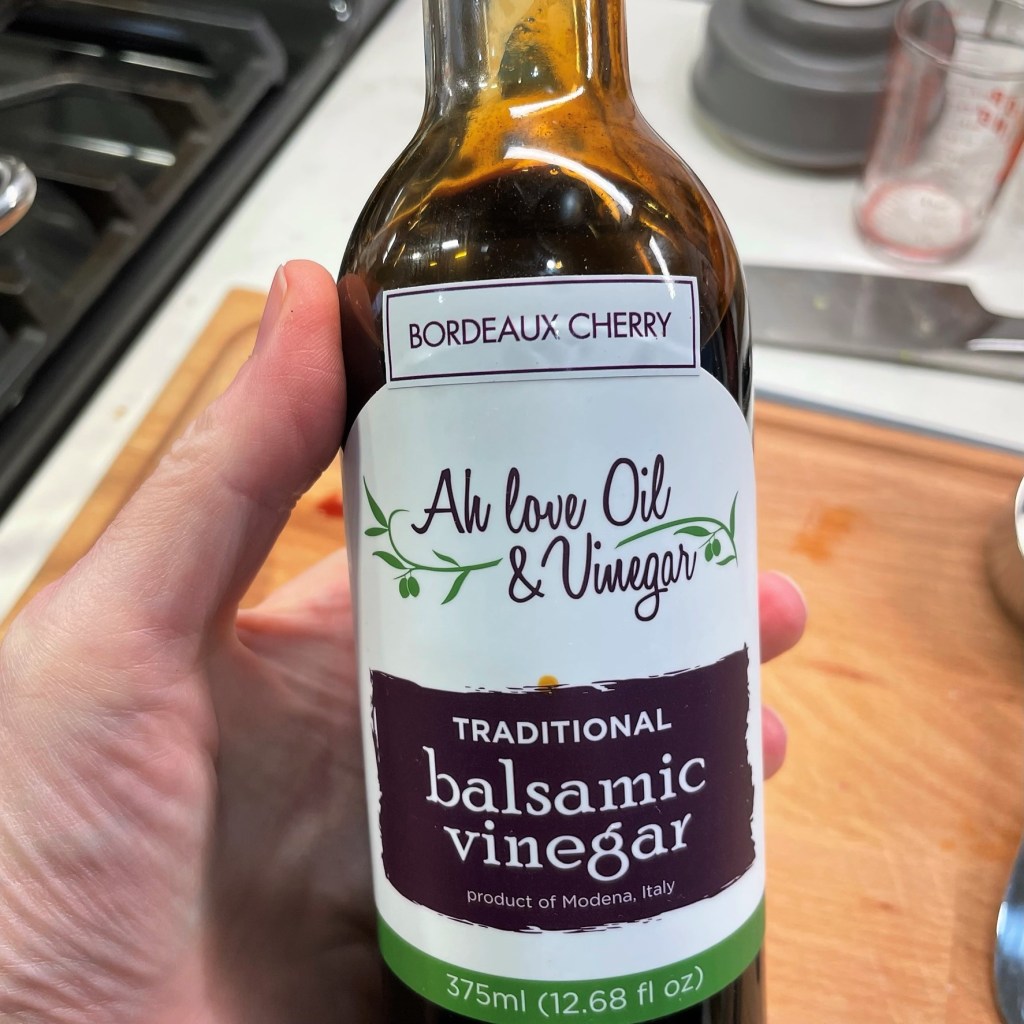
My secret ingredient! Les and I picked this up in a gourmet shop on a recent trip to Alexandria, VA. The balsamic intensifies the sweet cherry flavors in the sauce.
Finally, just because almond pairs so nicely with cherry, I splashed in about an ounce of amaretto. Skip this if you’re feeding kids or non-drinkers.
Scoop out the cherries (I’ll come back to them later) and strain the syrup through a mesh sieve to filter any solid bits.
If you have small squeeze bottles, transfer 1/2 cup of the syrup into one for easy layering into the ice cream later.
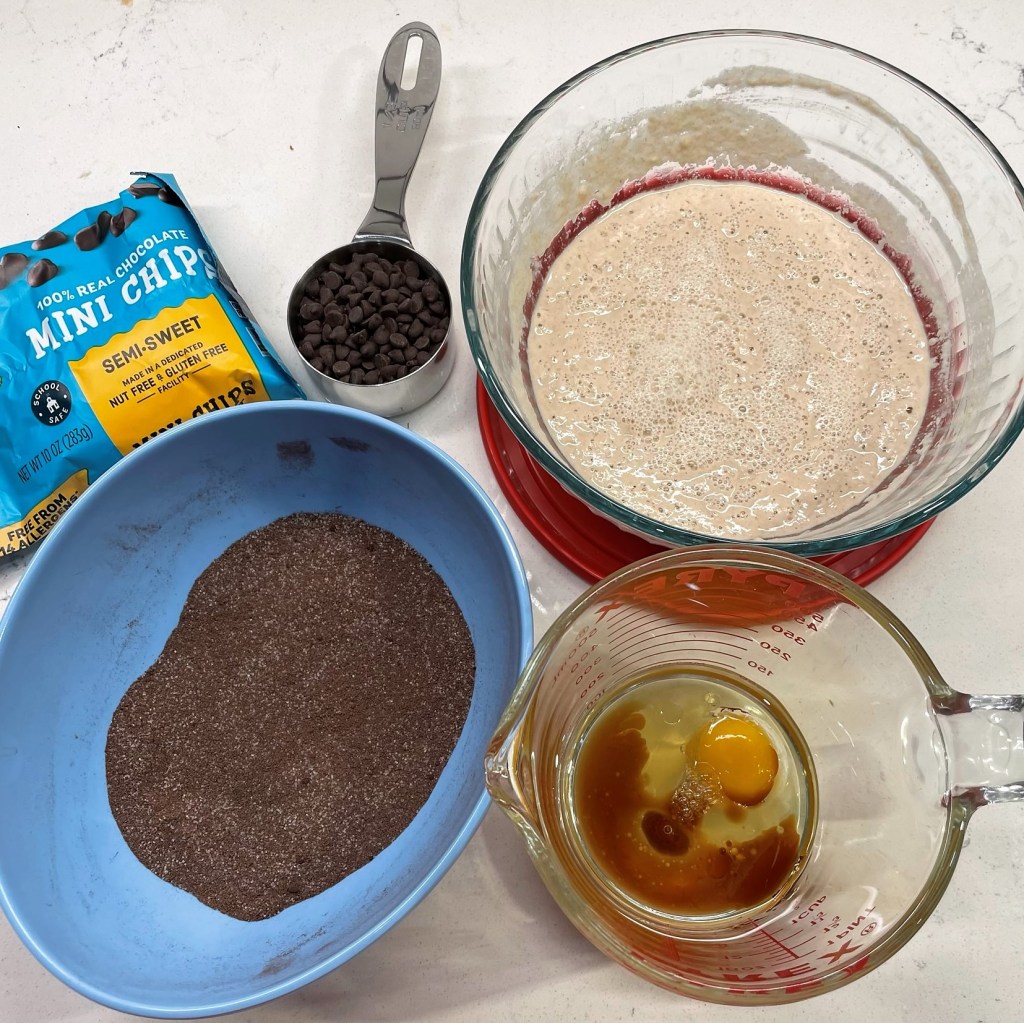
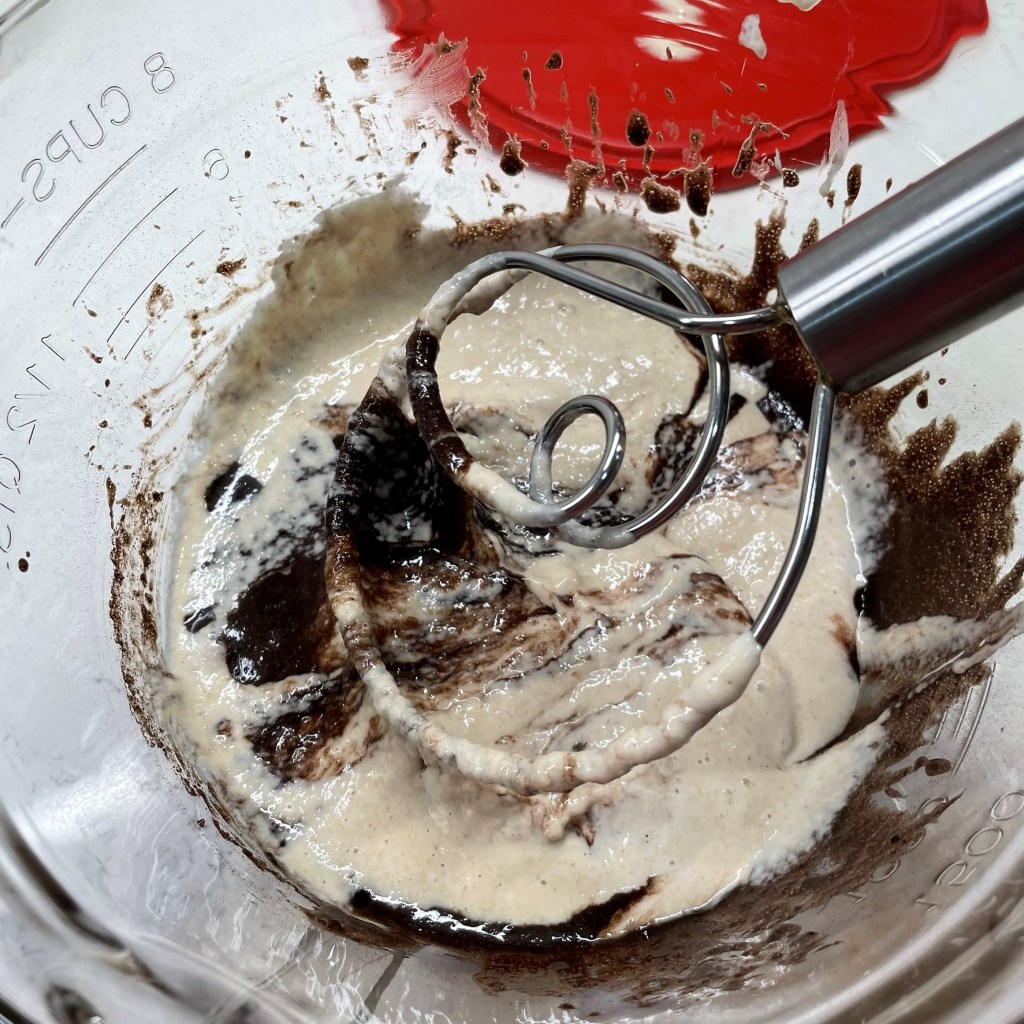
I lined up all the ingredients for King Arthur’s “Chocolate Malt Waffles,” including the overnight starter. I made a half-batch and still had enough for three Belgian waffles.
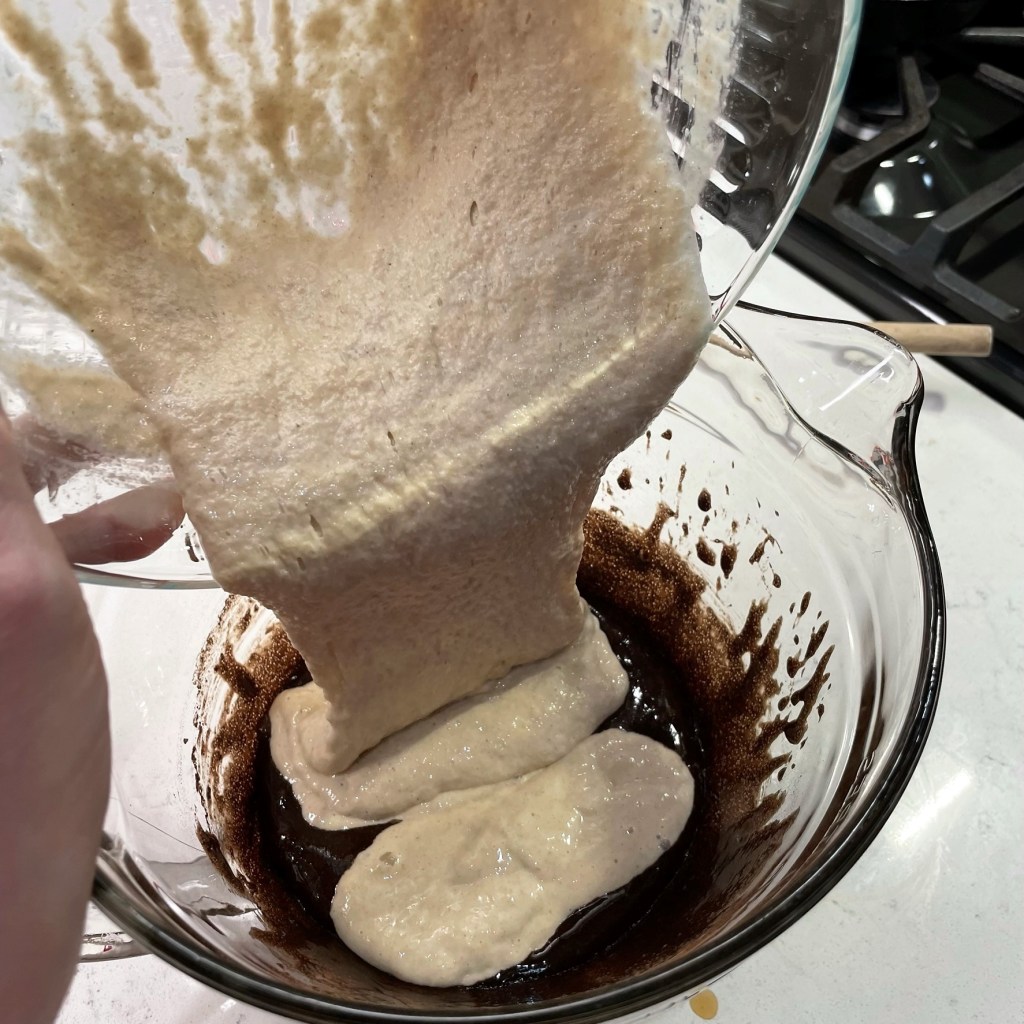
When I was mixing the starter into the fudgy liquid mixture, it reminded me of the sourdough chocolate cake I made a few weeks earlier.
And I remembered that my blog buddy Sandy suggested the Danish dough whisk for mixing the sloppy ingredients together. I’m teachable, so I grabbed mine for this work! 🙂
This was much easier than folding with a spoon or spatula. Thank you, Sandy!
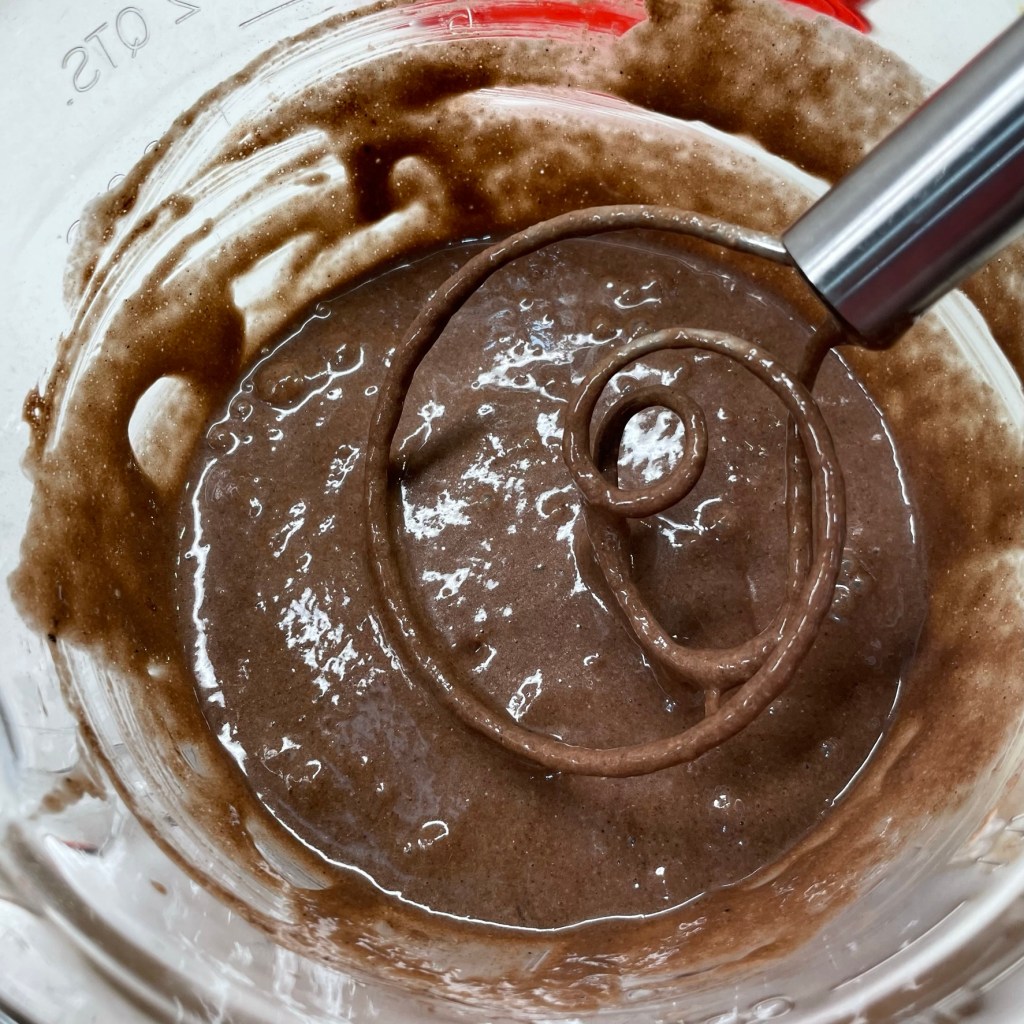
I held my breath, hoping the mini chocolate chips would not stick to my Belgian waffle maker. (They didn’t.)
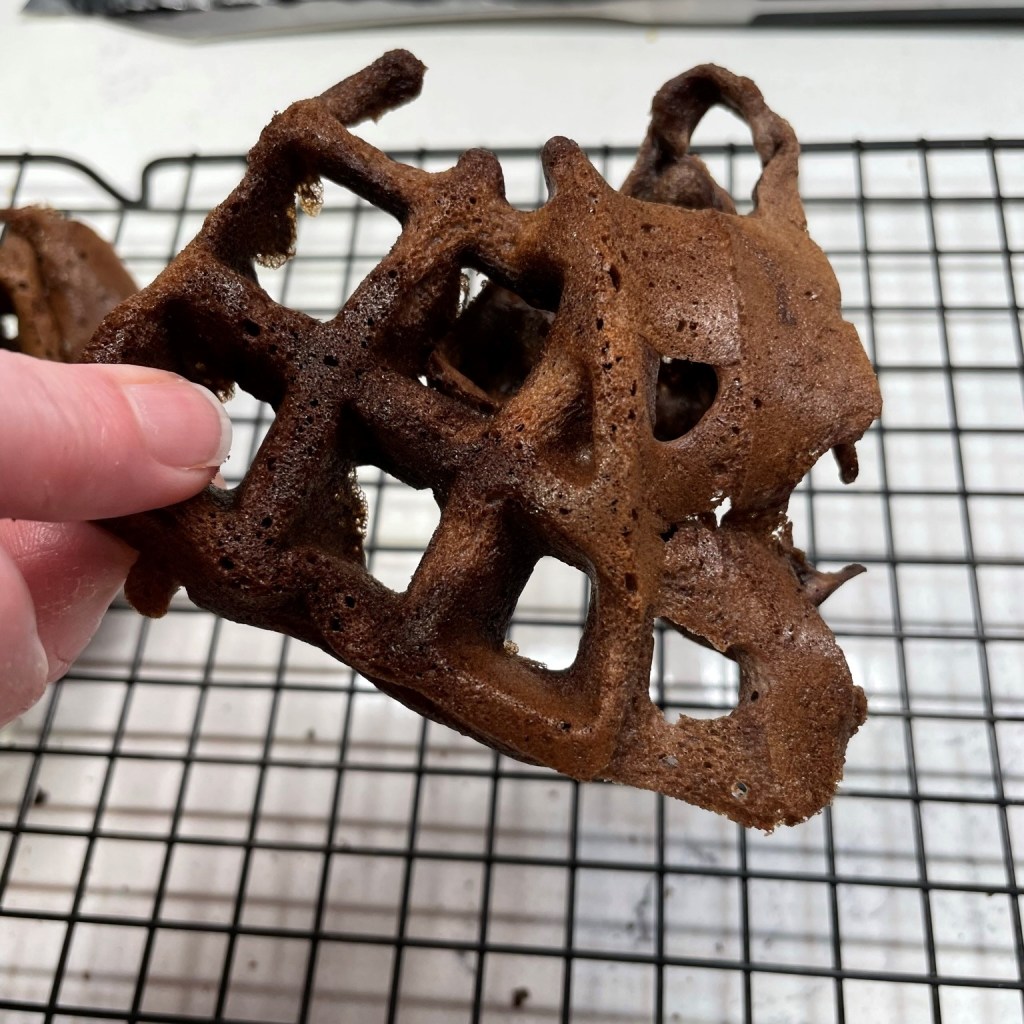
I didn’t use enough batter in the first waffle, and it spread unevenly when I flipped the iron over.
It was very lacy and it twisted out of shape when I pulled it from the iron. Oops!
Second waffle was better but still very delicate and tough to remove. King Arthur cautioned that they’d be very soft right after baking, and they weren’t kidding.
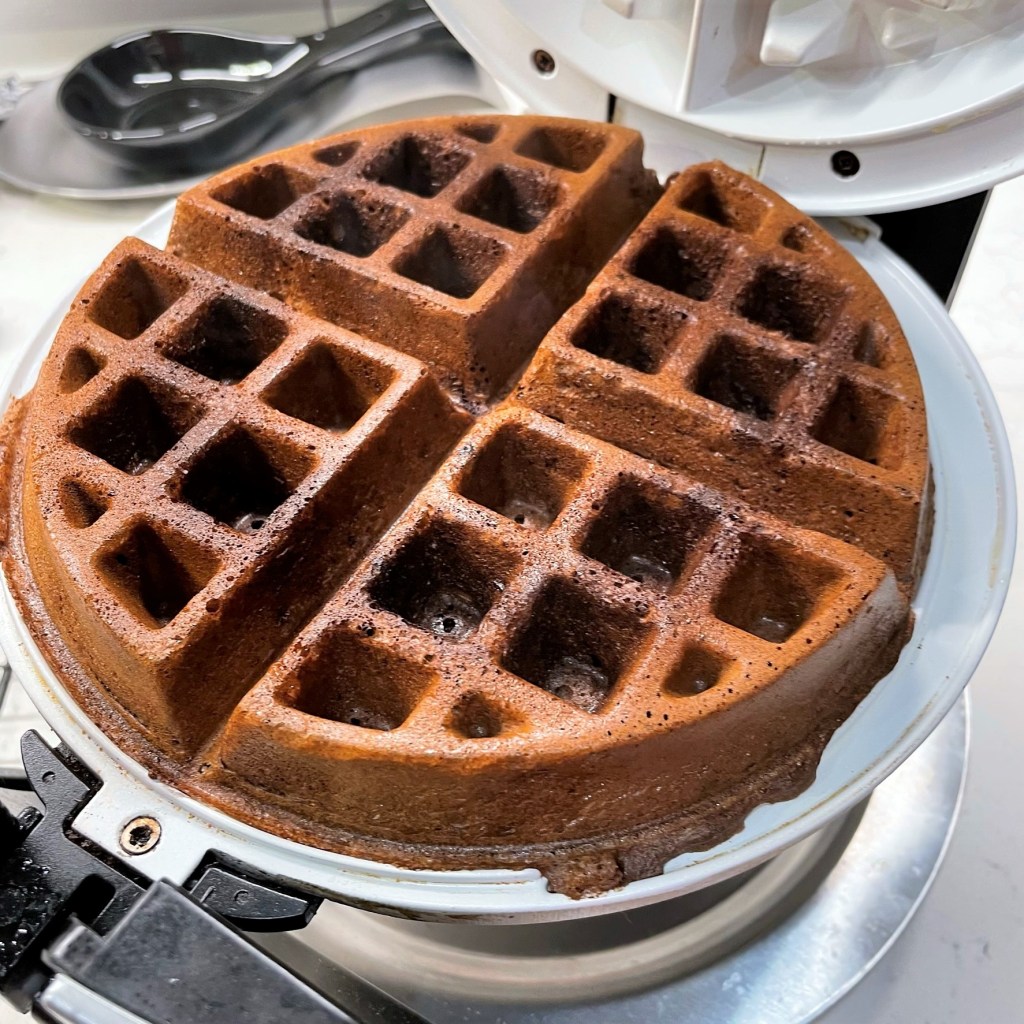
Third time’s a charm! This one was perfect, and all we needed for our over-the-top dessert. After cooling a few minutes, the waffle crisped right up.
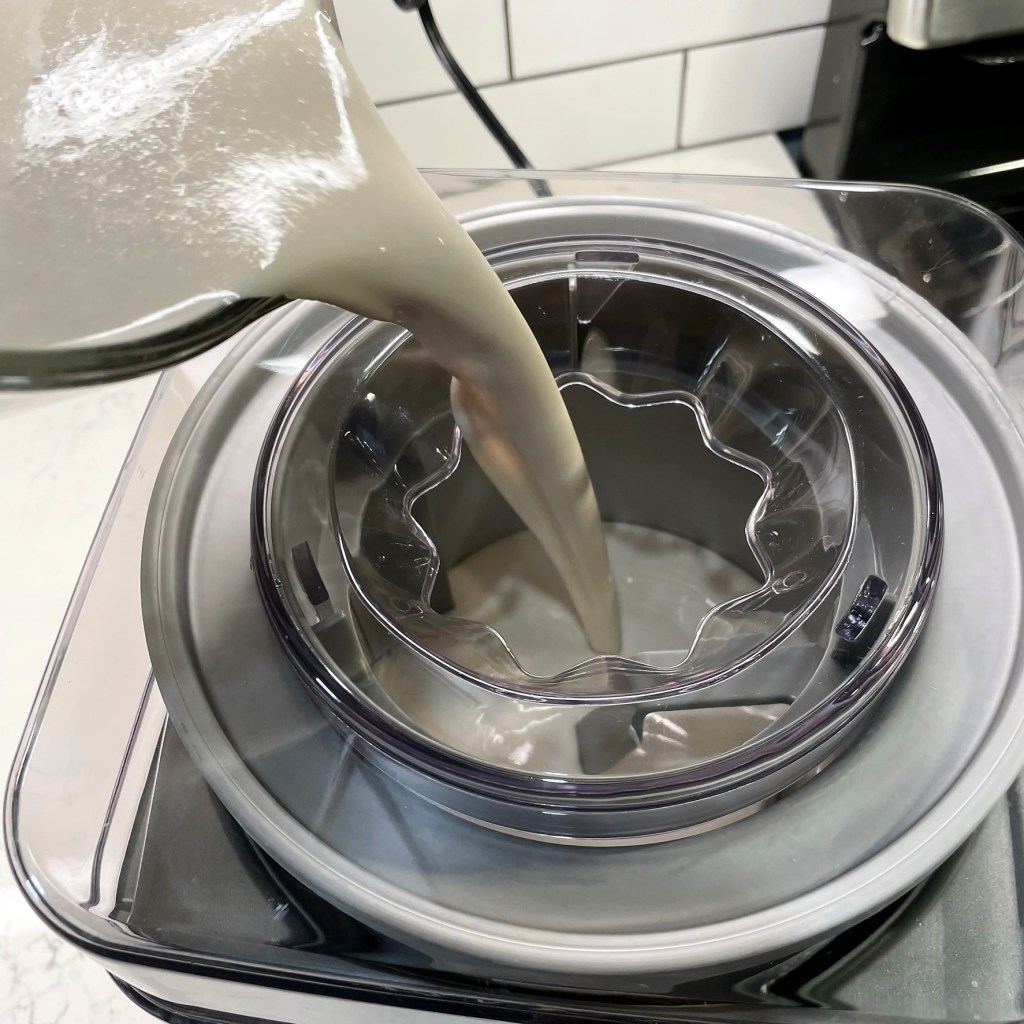
Freezing the Cherry Garcia Ice Cream
When the ice cream base is completely chilled, pour it into your machine and follow manufacturer’s instructions for freezing. Mine takes about 25 minutes.
When the ice cream is soft-serve consistency, add the frozen cherry bits and churn until they are incorporated.
A splash of vodka in the final minute ensures a perfectly scoopable texture, straight from the freezer. This is optional and I would not recommend it if you’ll be serving kids or non-drinkers.
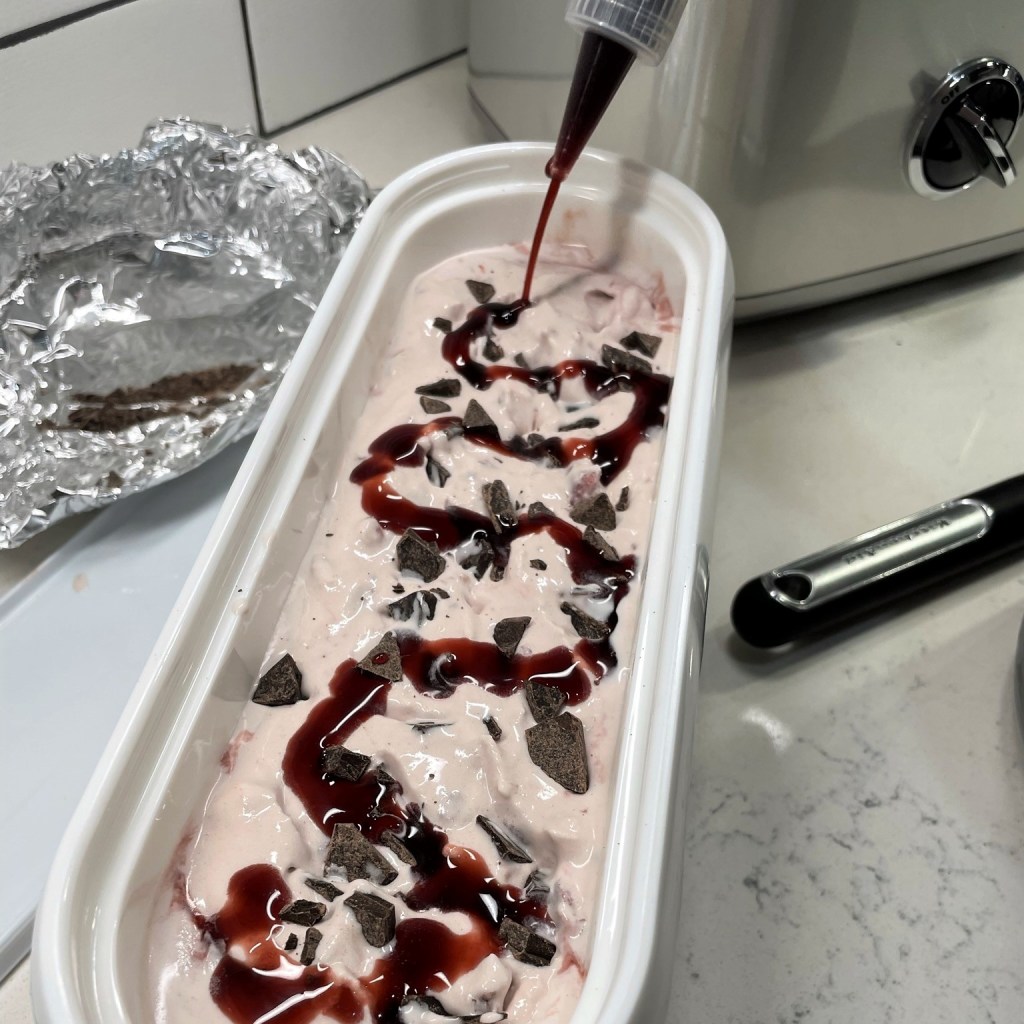
Time to layer the ice cream! Pour about 1/3 of the mixture into an insulated container.
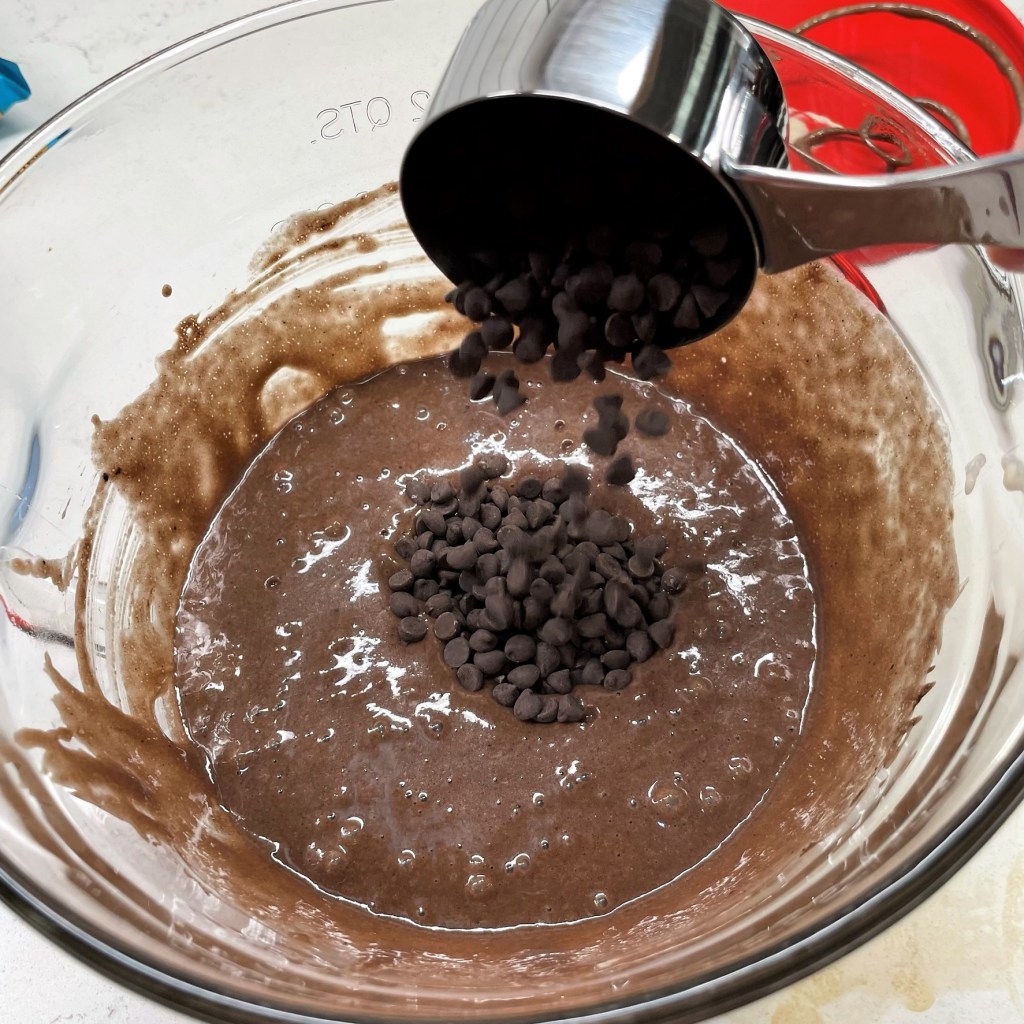
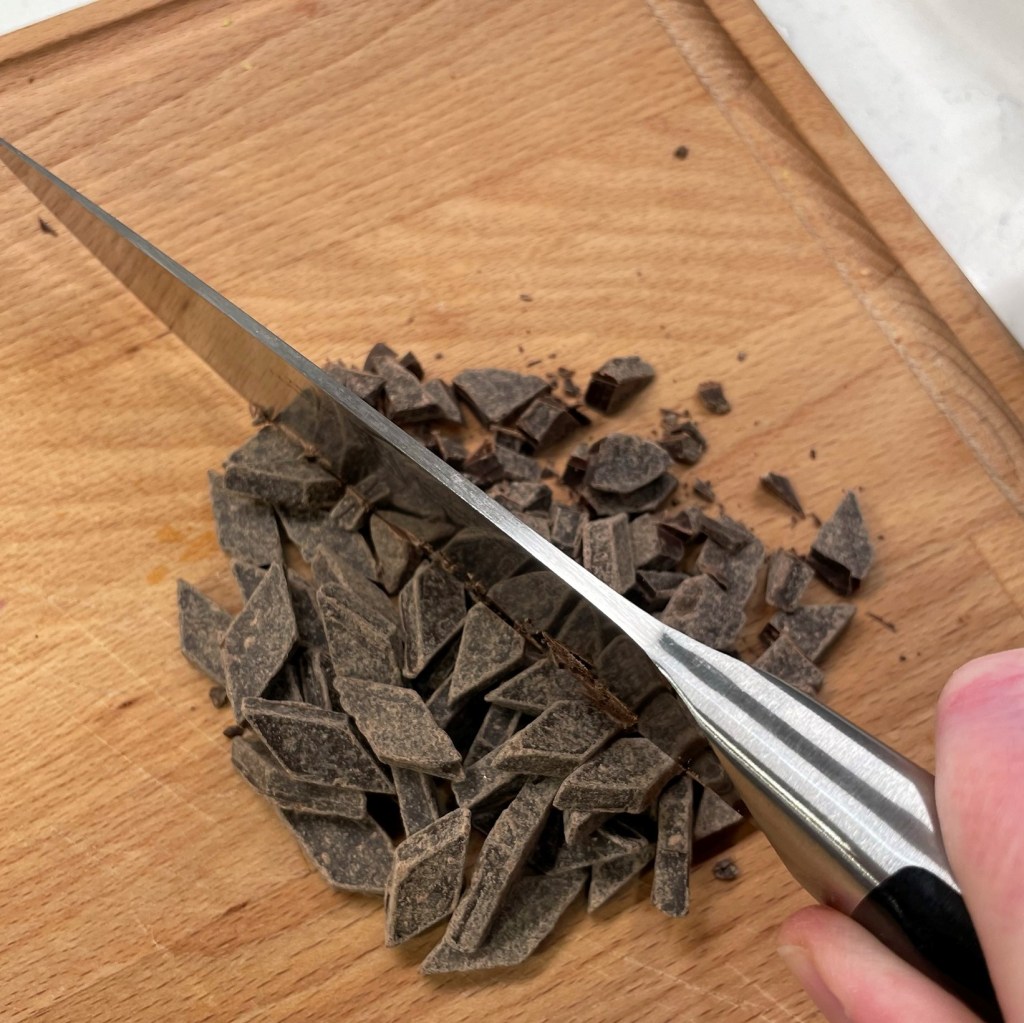
This time, I used semi-sweet chocolate chunks, rough-chopped a little smaller.
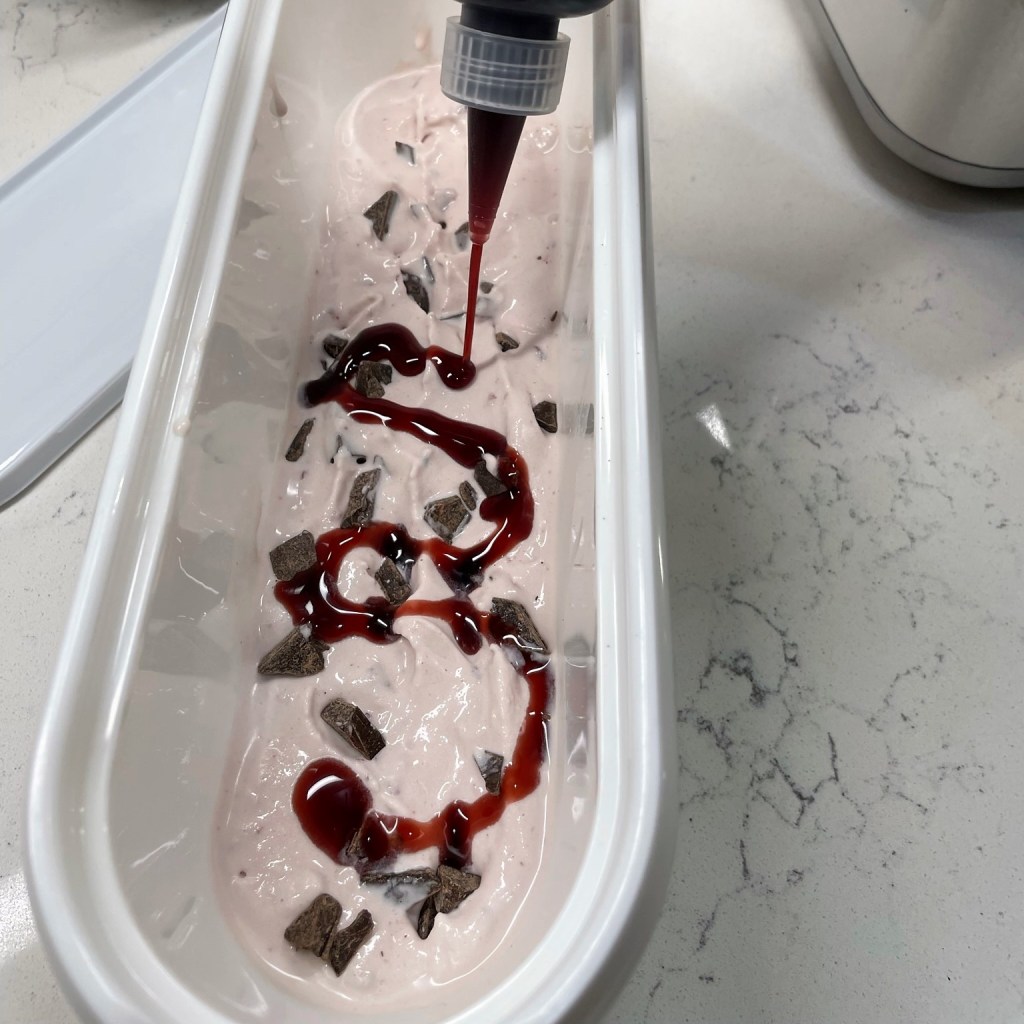
Scatter 1/2 of the chocolate bits and squeeze a generous drizzle of the cherry syrup.
Second verse, same as the first… Then, top it with the final 1/3 of ice cream. Save remaining syrup for topping ice cream, or add it back to the original cherry sauce.
Just to be fancy, I used a spatula to swirl the top just a bit. Cover and freeze overnight.
Chocolate-Cherry Heaven, Coming Right Up!
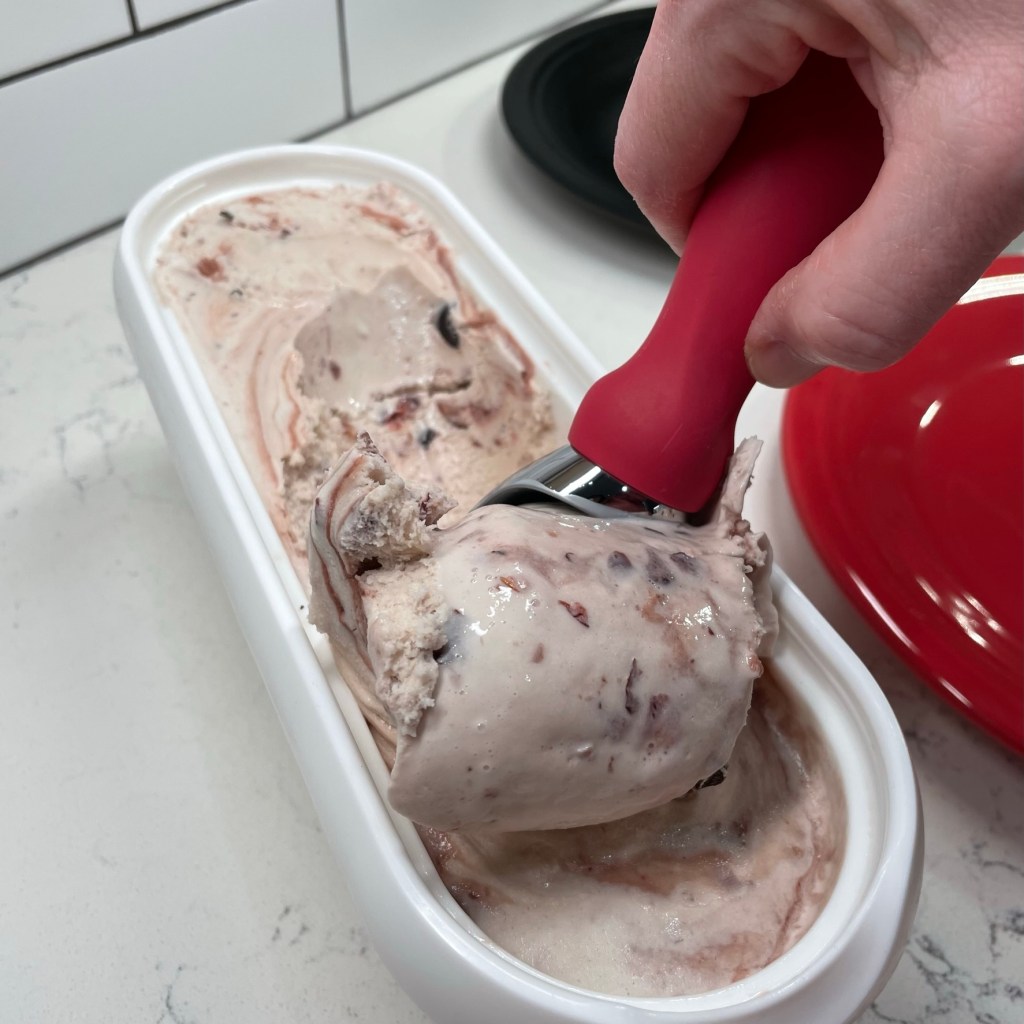
The vodka mixed in at the end made this ice cream a dream to scoop. If you skip the vodka, take the ice cream out of the freezer about 10 minutes early to soften slightly.
I don’t need to explain this, right?
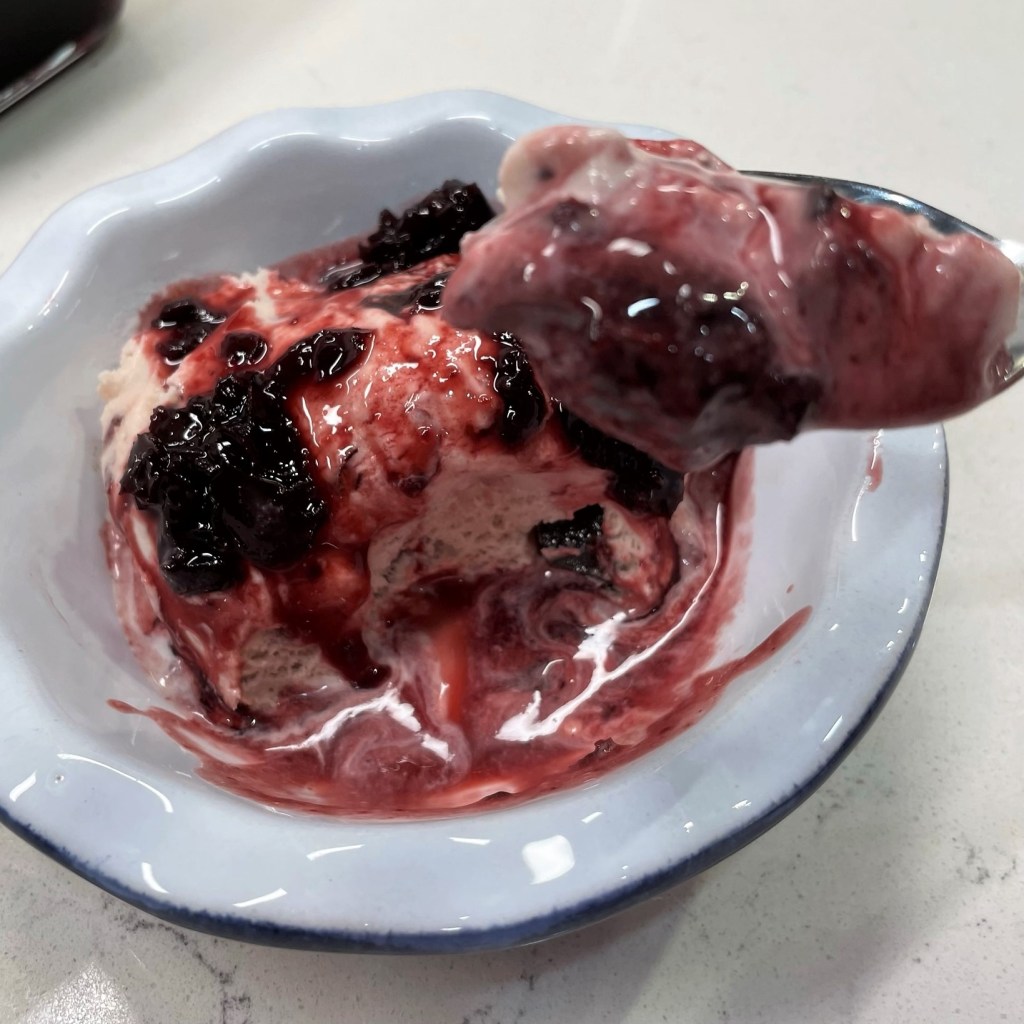
For our later servings of ice cream, we served scoops with some of that scrumptious reserved cherry sauce.
There was a time (in the not-so-distant past) that we didn’t rely on overly processed food from the supermarket for every little thing. Before the grocery aisles were jam-packed with 173 kinds of salad dressing, there was oil and vinegar, and people spiced those up by whisking in a handful of other common items to create dressings far tastier than the pre-made stuff. Vinaigrette is one of the simplest dressings to make from scratch, and creamy dressings are equally simple with a few basic ingredients.
You might be amazed at how much flavor you will be able to create at home with nothing more than simple fridge items, a few spices and a whisk (or, as I’ll show you today, a food processor). On the economic side, it costs pennies on the dollar to make your own dips and dressings, and it only takes a few minutes to pull them together.
The other benefit of making your own dressing—besides the savings and the flavor factor—is that you will know exactly what is in it. Commercial dressings contain so many stabilizing and preservative ingredients that aren’t necessary. And if it seems a healthier bet to buy the packets of ranch dressing mix and “make it yourself” with fresh buttermilk, all I can suggest is to take a closer look:
As soon as I see maltodextrin and monosodium glutamate (MSG), I’m gone!
I suppose these ingredients might be perfectly harmless (remember when they said that about partially hydrogenated vegetable oil?), but it’s a fair assumption that the fresh herbs and minimal spices you add to a real homemade dressing will present a lesser concern. And your dressing will taste better, which might even lead you to enjoying more salads and vegetables.
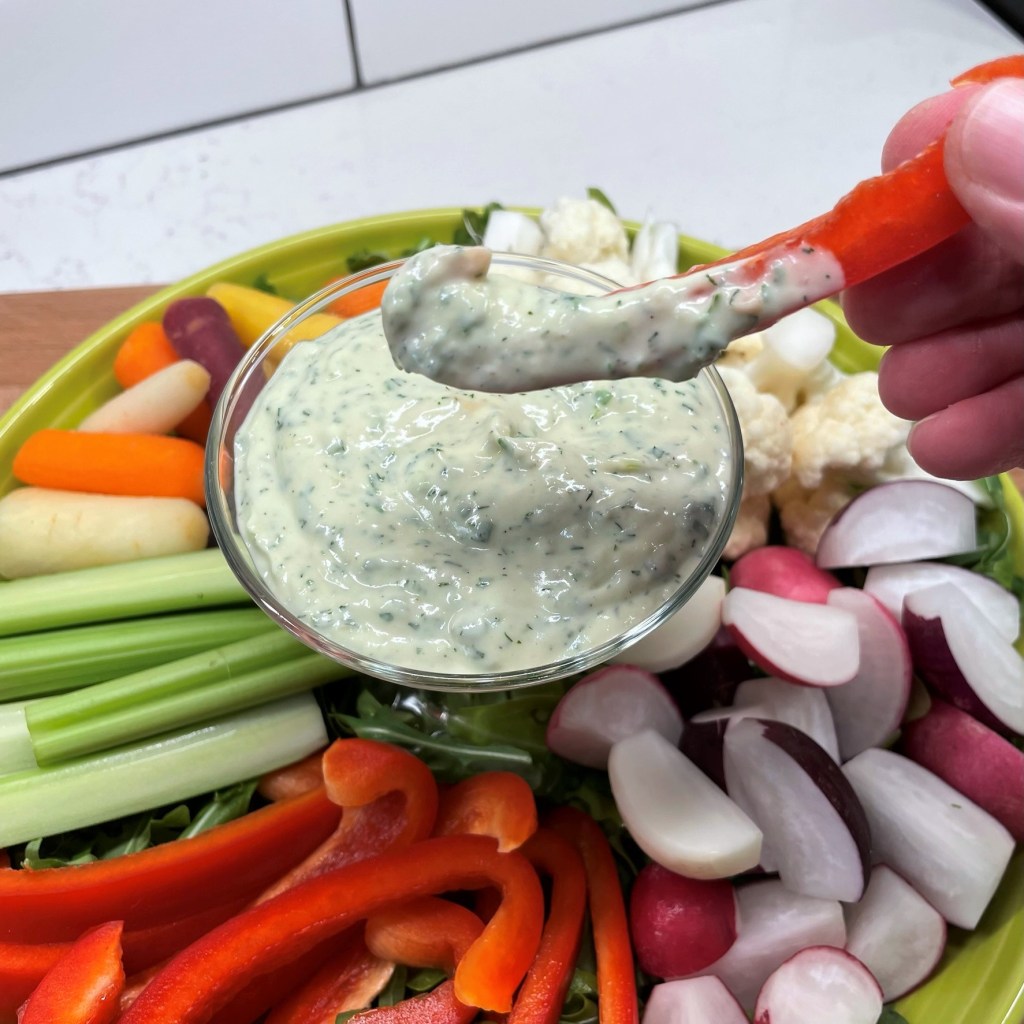
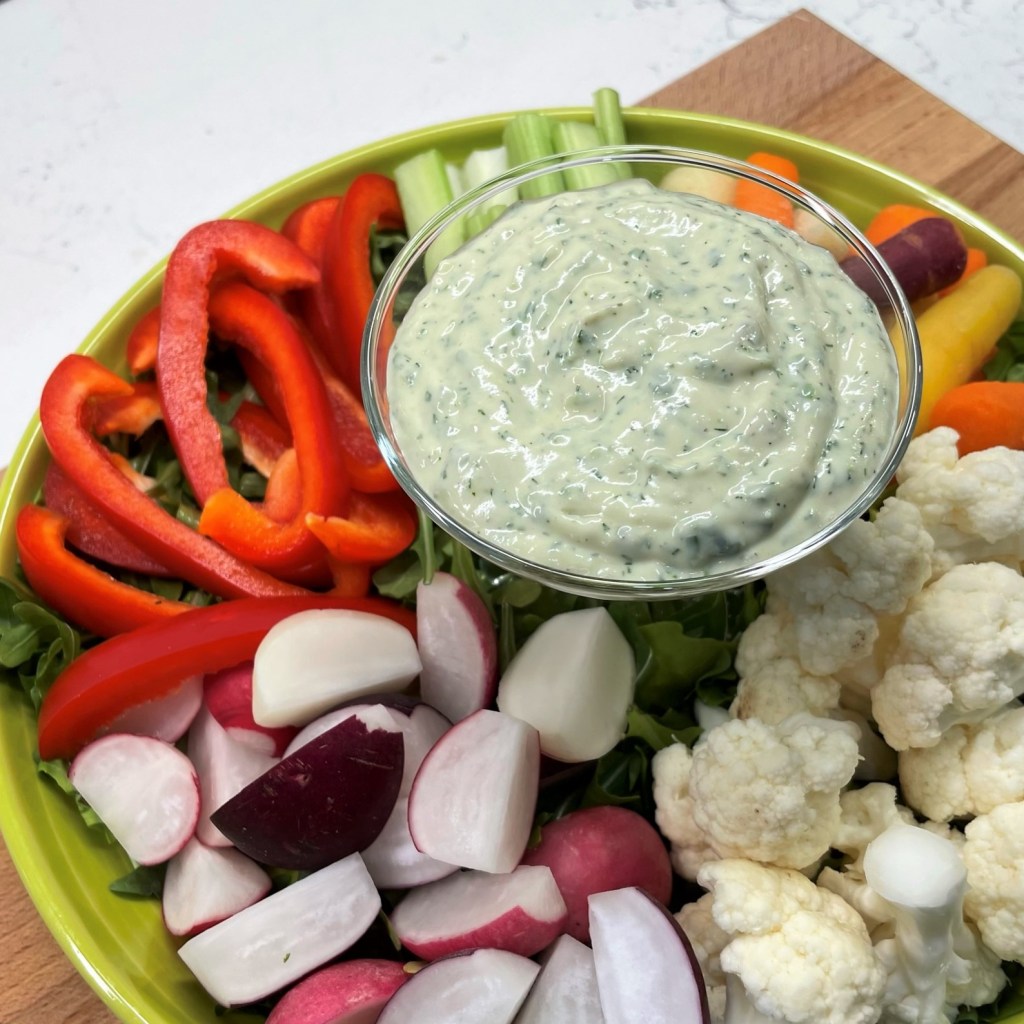
For this creamy ranch dressing dip, I have used a whole bulb of roasted garlic to add a mellow flavor to plain Greek yogurt, buttermilk, olive oil-based mayo and a bunch of fresh herbs. A little salt and pepper, a squeeze of lemon, and that’s all there was to it. If you prefer a bit more zing, use fresh garlic, but only a fraction of what is called for here. If you don’t have the same fresh herbs, substitute what you have or what you like. If you want to add half of a ripe avocado in place of some of the mayonnaise, go for it.
Nice to have something a little healthy for a game day snack!
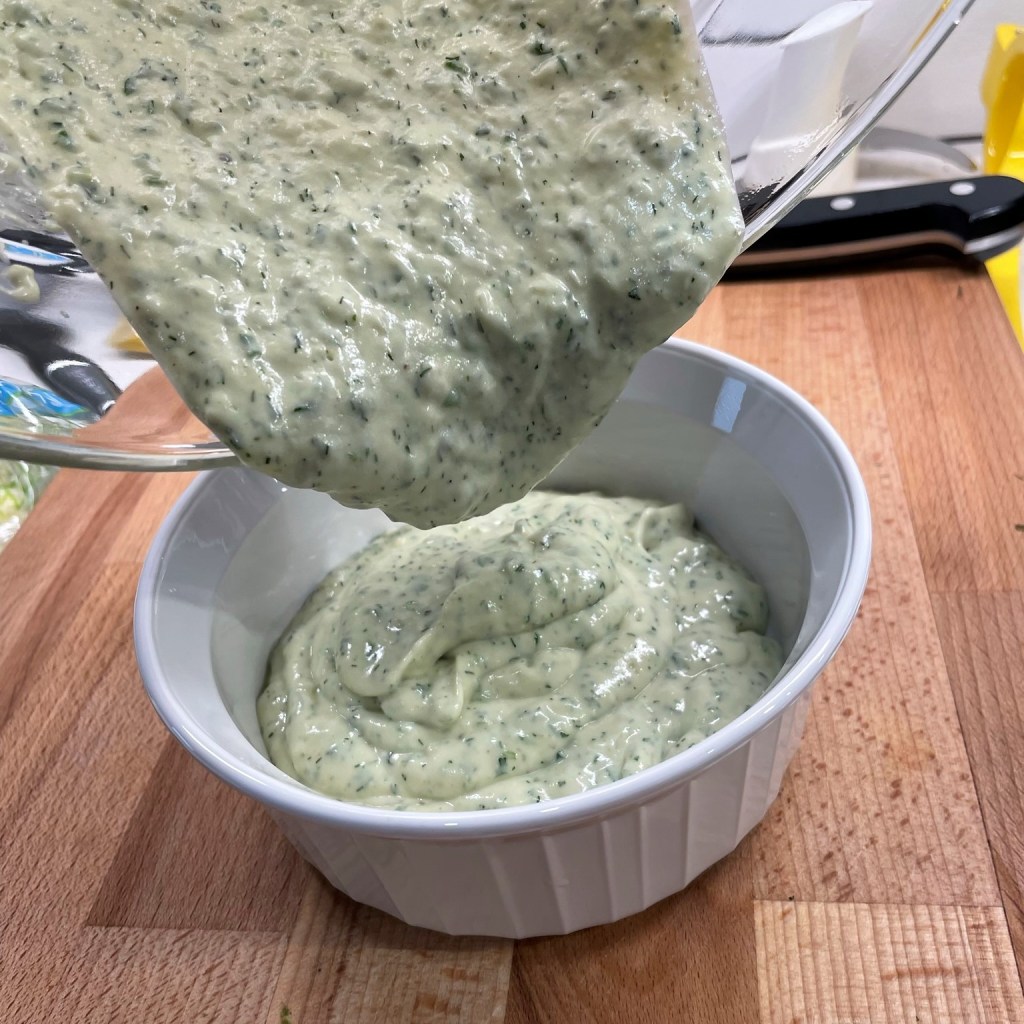
My homemade roasted garlic ranch dip was intended for dipping fresh veggies as a game day snack, but if you prefer a more pourable dressing for salads, simply ease up on the mayo and use more buttermilk.
This recipe makes about 1 1/4 cups.
Ingredients
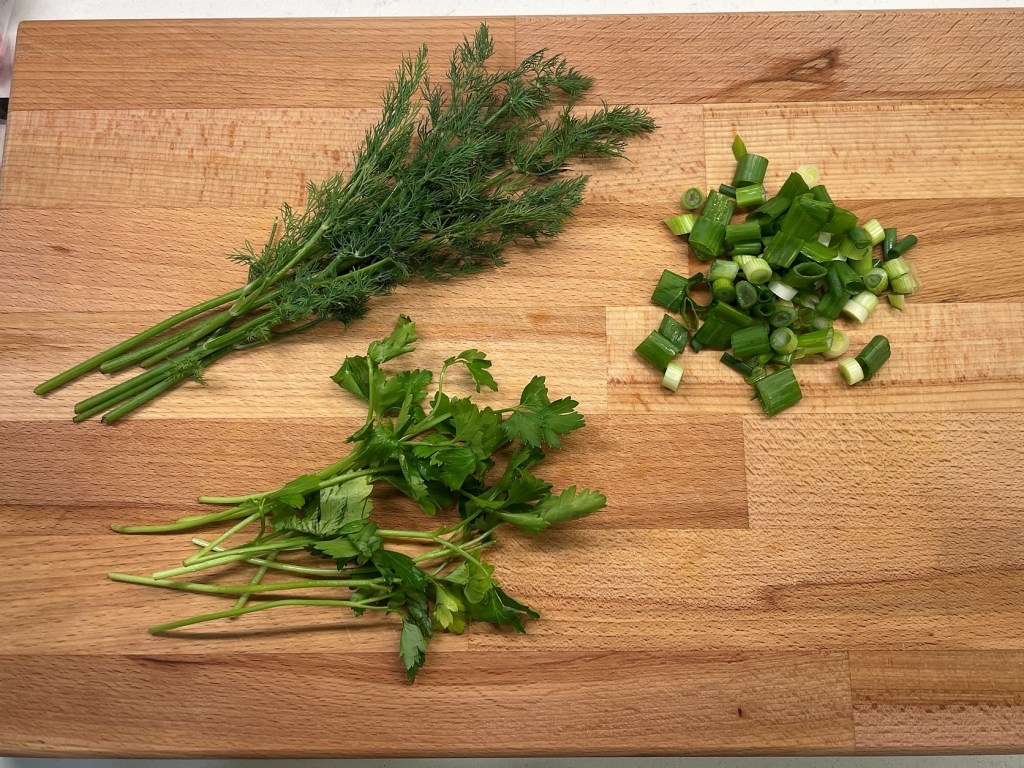
2 scallions, white and green parts
1 small handful fresh parsley
1 small handful fresh dill
1 tsp. Dijon mustard
2 Tbsp. freshly squeezed lemon juice (about 1/2 an average-sized fruit)
1/4 cup stirred Greek yogurt (whole fat or 2% recommended)
1/4 tsp. onion powder
1/4 tsp. carboxymethylcellulose (just kidding—I’ve never heard of this, but it’s in the store-bought ranch mix!)
*Notes
Choose a mayonnaise that you trust, bearing in mind that labels can be misleading. The front of the jar may suggest that your mayo is made with olive oil, but on further inspection, soybean oil could be listed as the first (most prominent) ingredient, with the healthier oil listed much later. Learning what your food is made of can be an eye-opener, and when you do find a product that meets your health standards, you will be able to build on it to make a lot of other foods serve you better.
Thick buttermilk works especially well for dip-style dressings. Look for a brand that doesn’t have a lot of “gum” ingredients, which are unnecessary stabilizers. Bacterial cultures should be present in good buttermilk as well. And for this dip, I do not recommend making a buttermilk substitute using regular milk and lemon juice or vinegar. That works for some baking recipes, but not in this instance, as you will miss the smooth textural element that buttermilk lends to your dip or dressing.
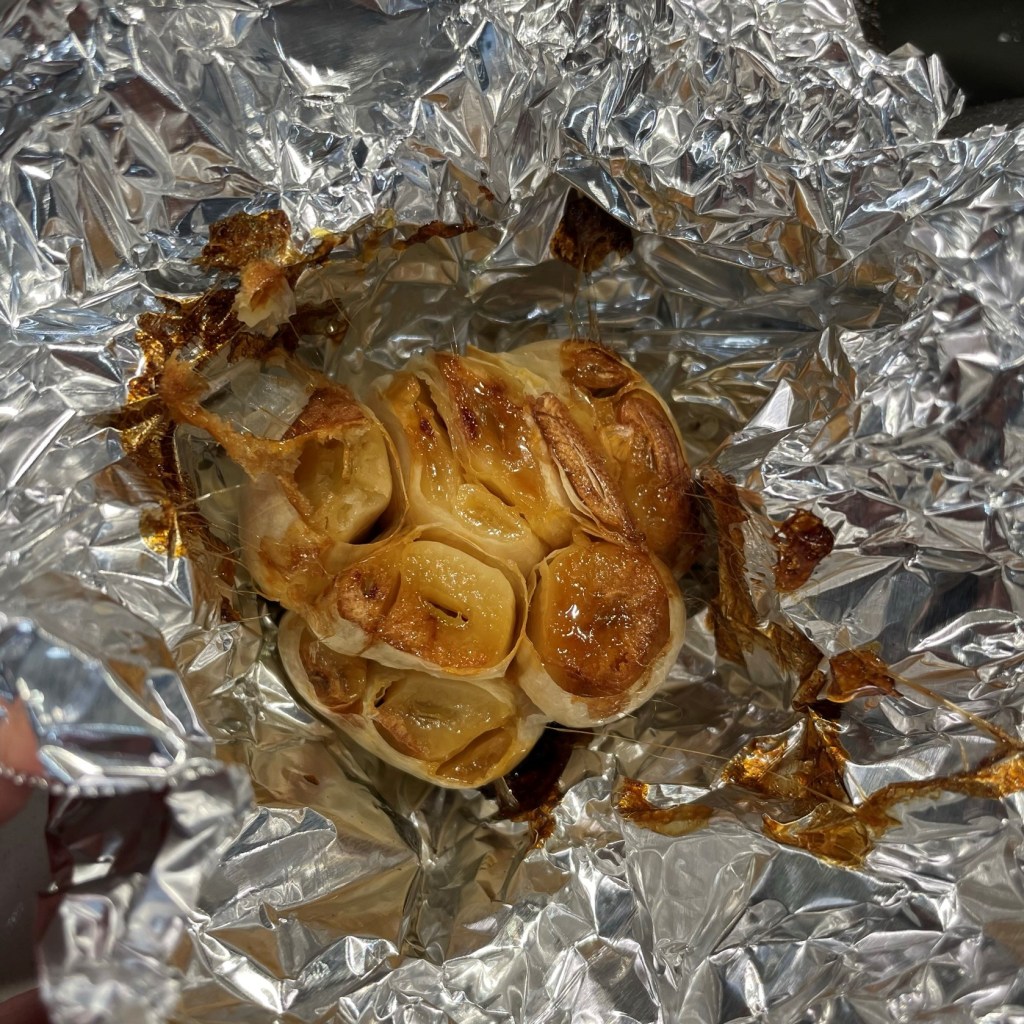
I love roasting garlic for use in many things, and it is easy to do. If you have never made your own, you may find some helpful tips in my previous post for making your own roasted garlic. When roasted, the garlic takes on a mellow, somewhat nutty flavor that lends a lot of depth to foods. If you prefer fresh, or simply don’t have the time or patience to roast it, I would recommend only using one or two segments of the garlic rather than a whole bulb (unless you’re battling vampires, obviously).
Instructions
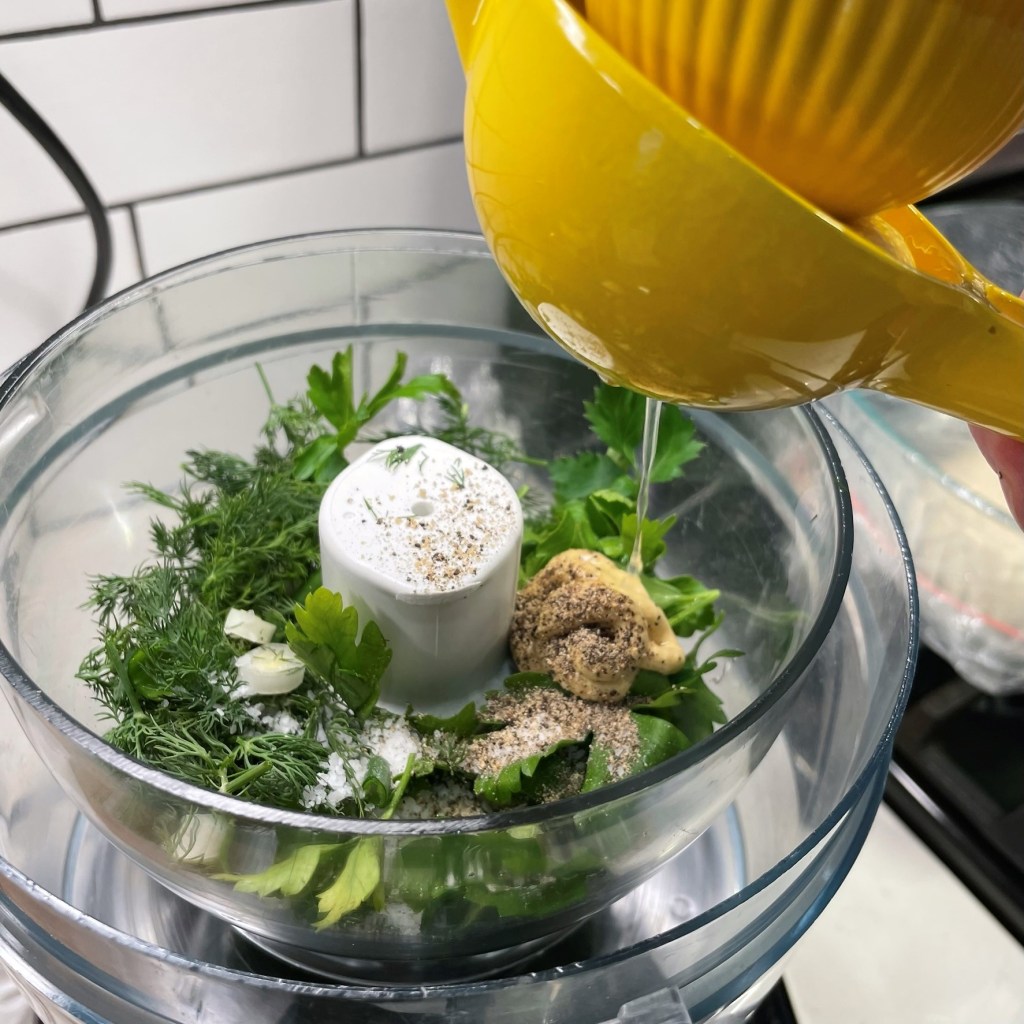
Mix and match your herbs as desired. I used two scallions, flat-leaf parsley and fresh dill.
Roasted garlic has a mellow flavor and I love the depth of it in a dressing. Use only a clove or two if you’re using fresh!
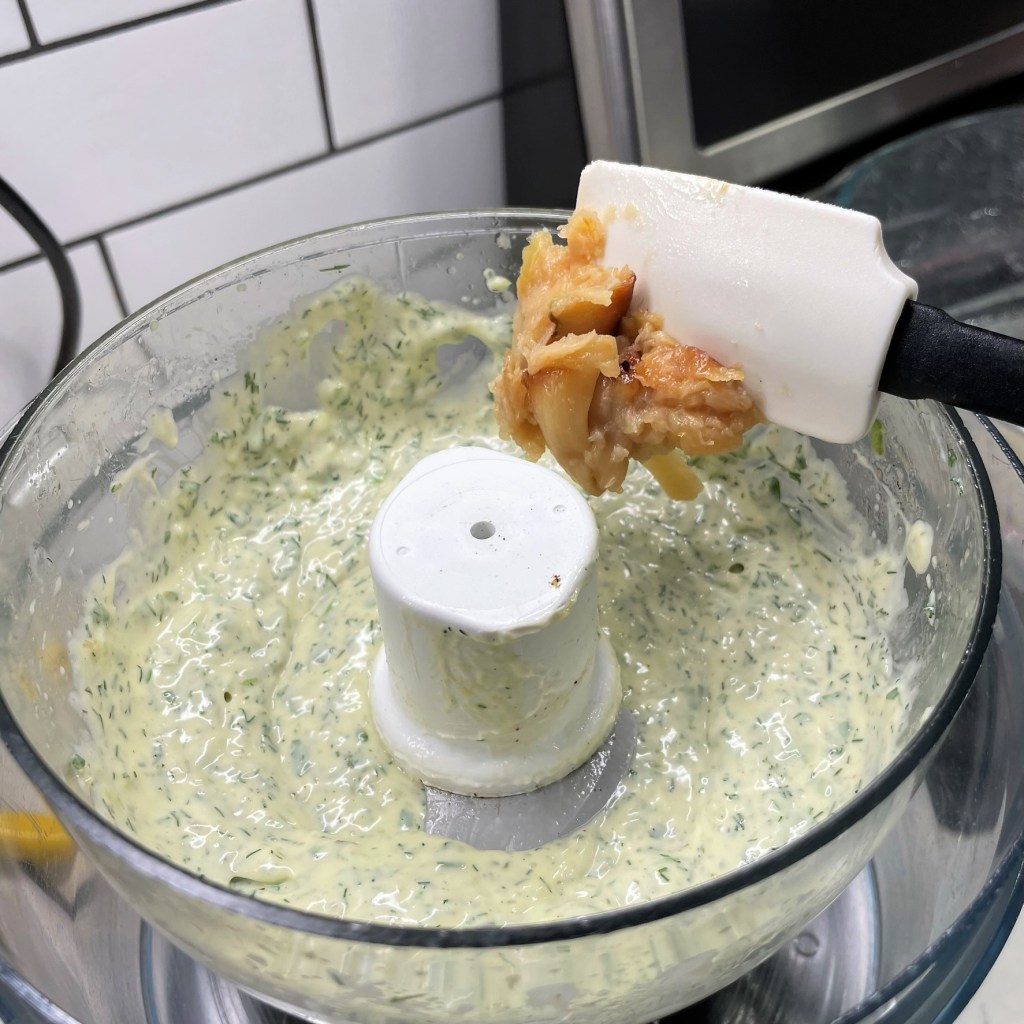
Combine the herbs, Dijon, salt and pepper in the small bowl of a food processor. Squeeze in the fresh lemon juice.
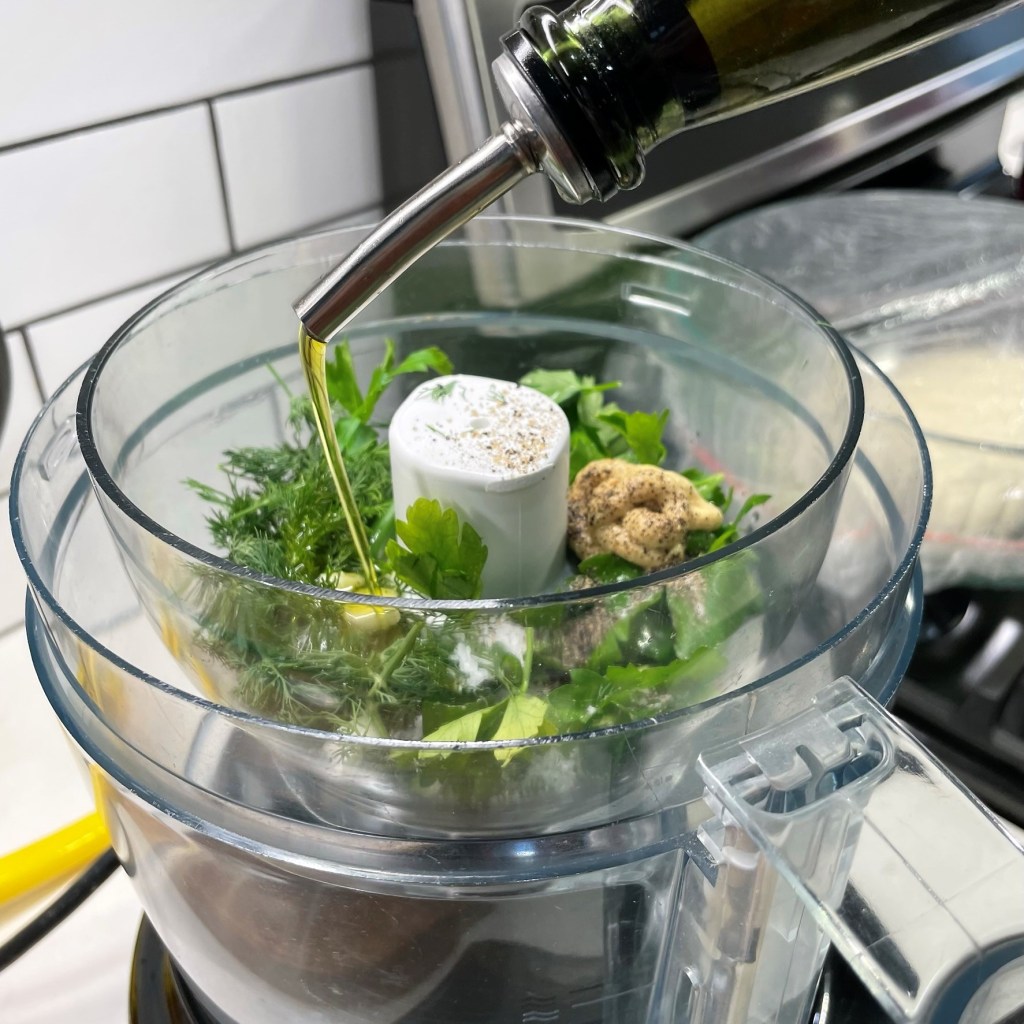
Drizzle about a tablespoon of olive oil into the mixture to assist with blending. Pulse a few times, just to knock down the bulk of the herbs.
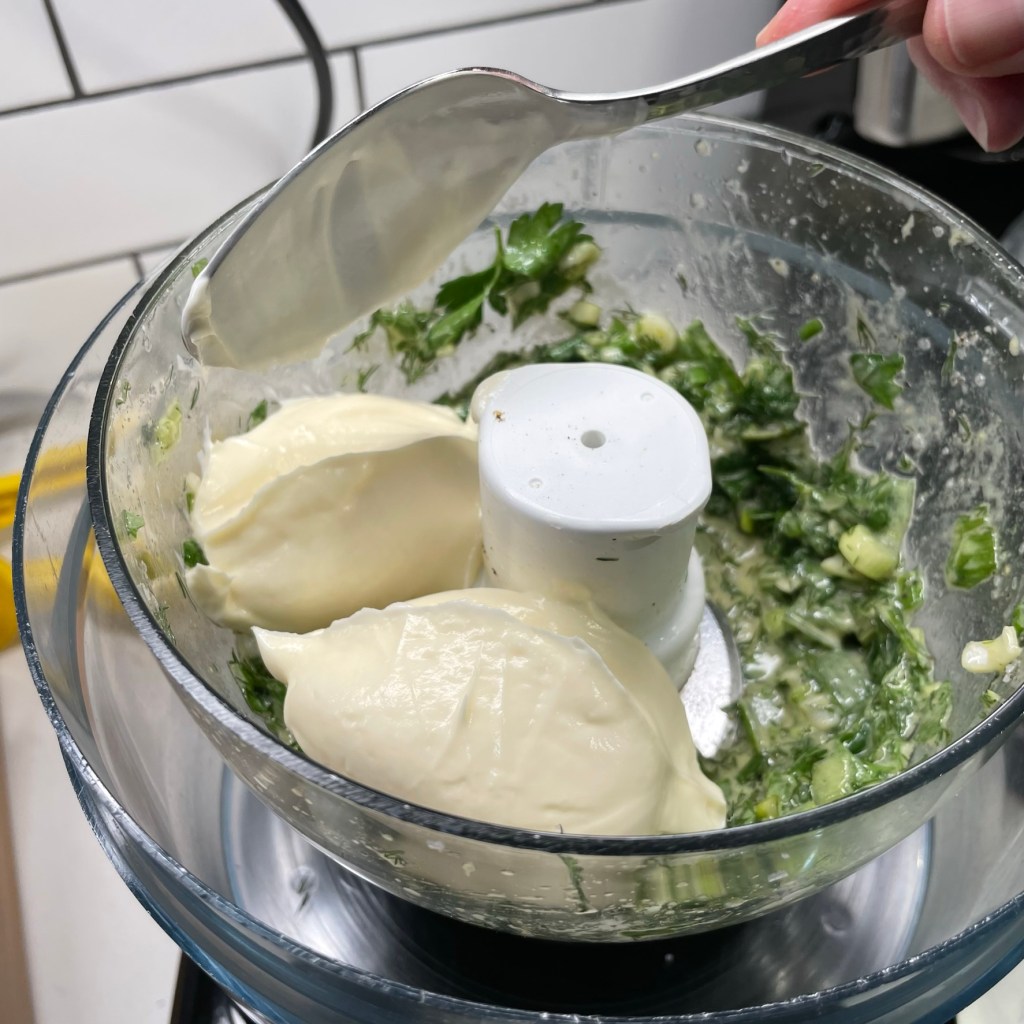
Add mayo to the pulsed herb mixture and pulse again, then process continuously until the mixture is smooth and even.
Add roasted garlic and pulse again. If you are leery about so much garlic, start with half and give it a taste before adding more. I used a whole bulb!
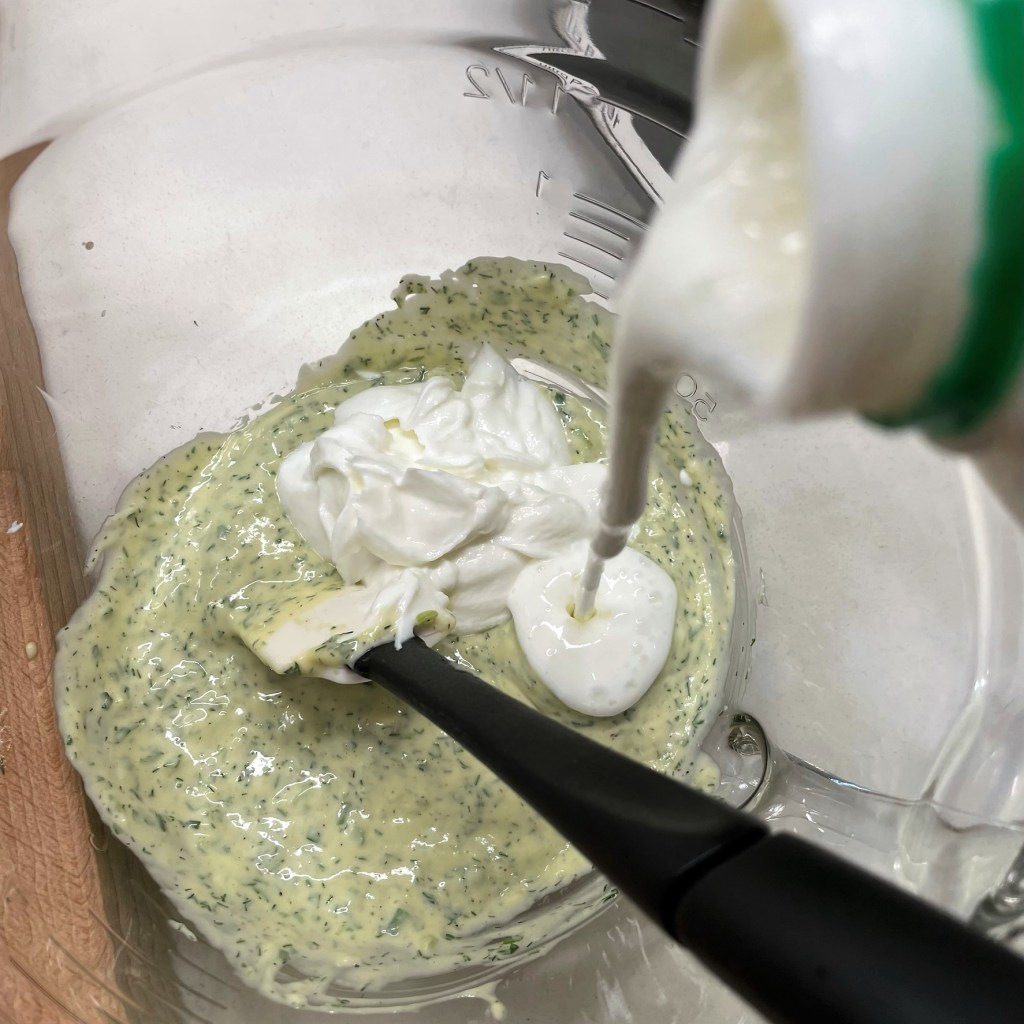
Transfer the mixture to a bowl and add the yogurt and buttermilk.
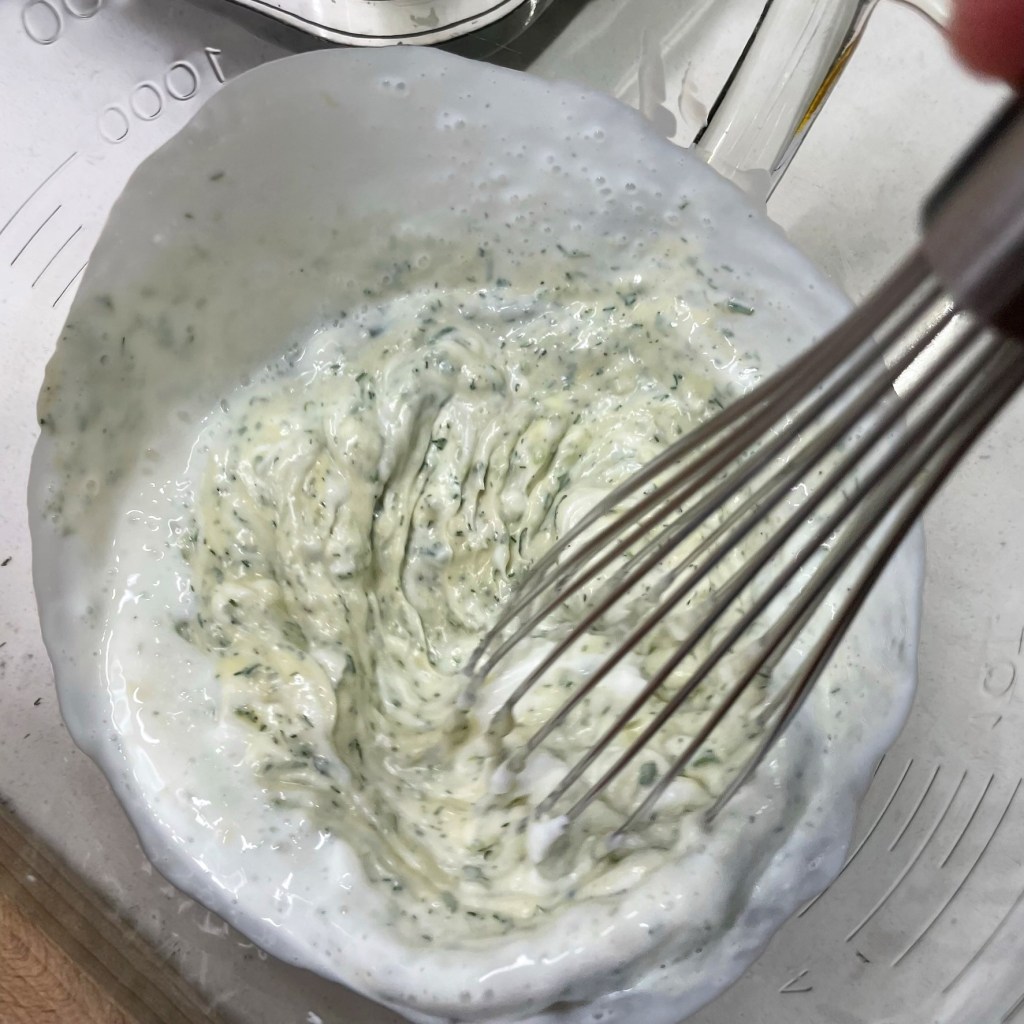
Whisk to blend the dairy ingredients into the dip. Adjust seasonings to taste.
This is a thick mixture, perfect for a veggie tray. If you prefer a more pourable dressing for salads, use less mayo and more buttermilk.
It’s fresh, creamy and full of flavor.
Begin by chopping up your fresh herbs, together with the Dijon, salt, pepper, lemon juice and olive oil. I made a small batch this time, and my processor only rough-chopped these ingredients, even in the small insert bowl. As long as the volume reduces to make room for the other ingredients, it’s fine.
Add the mayo and pulse to combine. Add the roasted garlic and process until you no longer see visible bits of the garlic.
Transfer the mixture to a bowl. Add yogurt, buttermilk and onion powder, and whisk until smooth. Adjust seasoning to taste (remember that additional salt will need time to dissolve, so you may want to let it rest a few minutes before final taste adjustments).
Chill the dip at least one hour before serving. Enjoy within a few days for best freshness and give it a good stir when you take it out of the fridge.
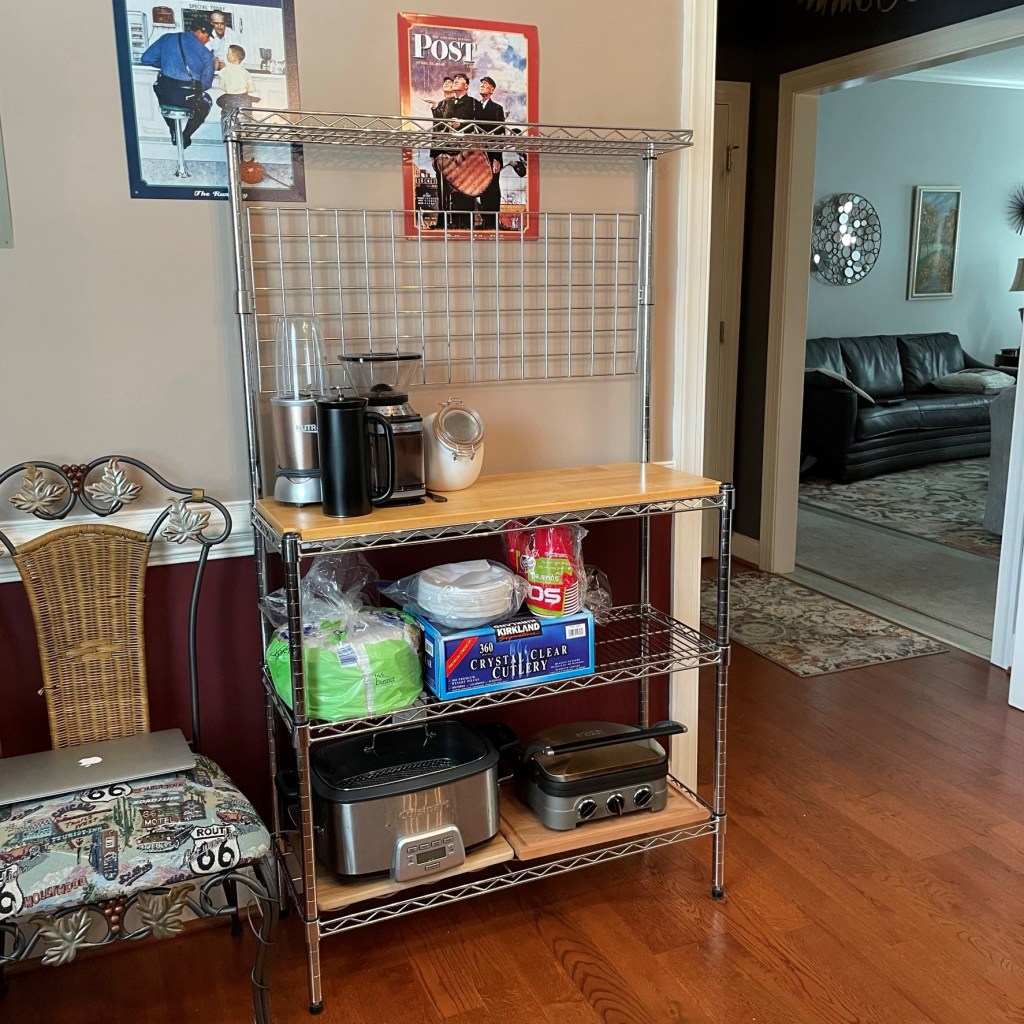
Of all the things to be excited about when our kitchen remodel is finished, I’m especially looking forward to having my pasta rolling machine closer at hand. We have what we call the “prime real estate” rule in our existing kitchen, which means that we must use a gadget or appliance more than a couple times each week to justify giving it counter space or base cabinet storage. Everything else is relegated to the baker’s rack in the attached garage, or atop the wall cabinets in our laundry room.
See it way up there? Next to the spiralizer, my grain mill and underneath the deadly mandoline.
My pasta machine, which I only use once every few months, lives way up there, mere inches from the ceiling. I can only reach it if I stand on tippy toes on the top step of our stepladder—it is inconvenient, to say the least. And I have not pressed very hard on the argument that if I could actually reach the thing, I might use it more often, thereby earning its spot in the better real estate. It’s a catch-22 kind of thing, and a real shame because I love to make handmade pasta.
But my deepest pasta prayers will be answered with the installation of a brand-new section of cabinetry in this unused corner of our kitchen, right next to the huge sunny window. It will be my own special space—a baking station—and the cabinets and drawers will give me all the space I need for my favorite gadgets, including the pasta machine, plus a lovely butcher block countertop where I will make pasta (and sourdough bread) to my heart’s content. I cannot wait!
Am I the only one who hears angels singing?
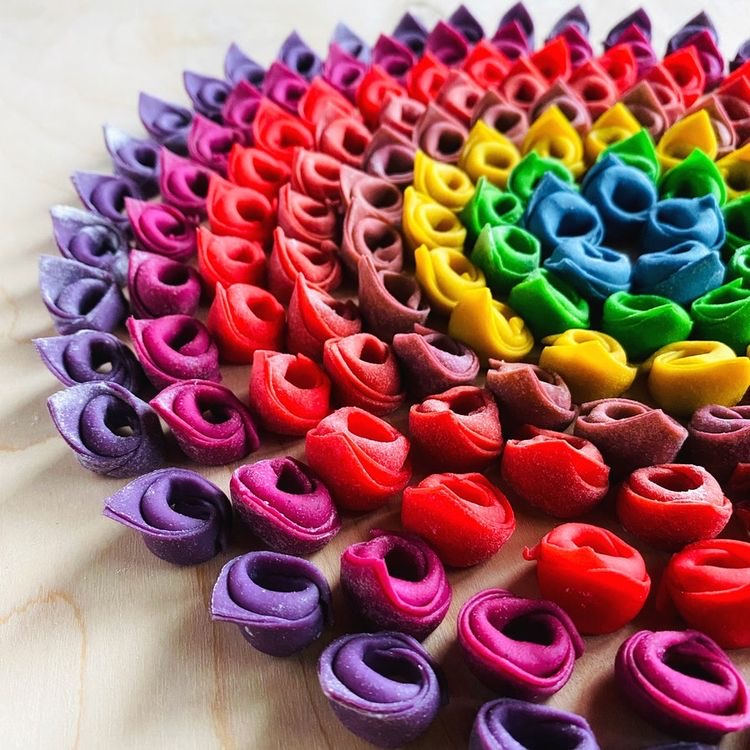
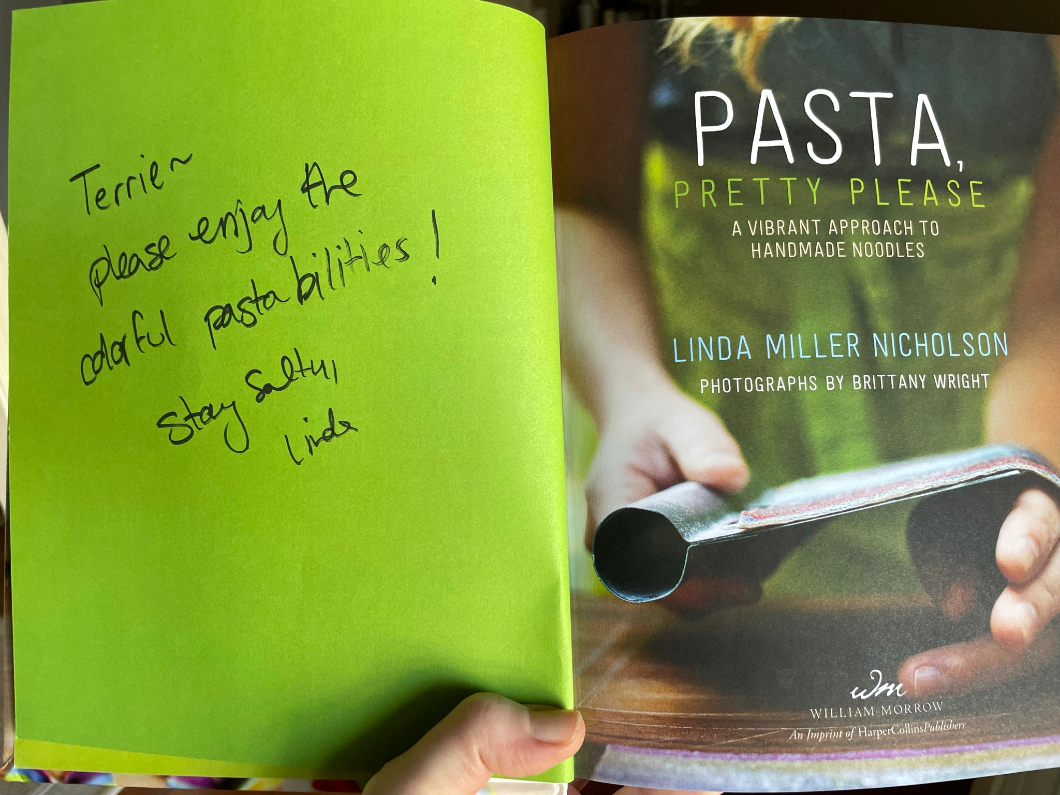
And in preparation for that time, I have been getting in some practice rounds with handmade pasta, due in part to my purchase of this amazing how-to book. The author of Pasta, Pretty Please, Linda Miller Nicholson, describes her recipes for brilliantly hued handmade pasta dough, flavored and colored with pure, natural ingredients, and then shaped with the most clever and creative techniques. Linda is all over Facebook, YouTube and Instragram with her craft, and you can count me among those who are utterly enthralled by her incredible, edible art. Feast your eyes!
Amazing, right??
The impatient side of me wants to dive head first into the most complex shapes, designs and colors, but I am restraining and pacing myself—partly so that I don’t get frustrated with techniques that I don’t yet understand, and partly because there is only so much pasta that my husband, Les, and I can consume in a week. If I made as much pasta as my heart desired, we’d be in major carb overload!
But I am practicing, both with the natural color ingredients and some of the special shaping. I’m happy to share a sneak peek of my progress, and then I’ll dive into the recipe that I promised at the beginning.
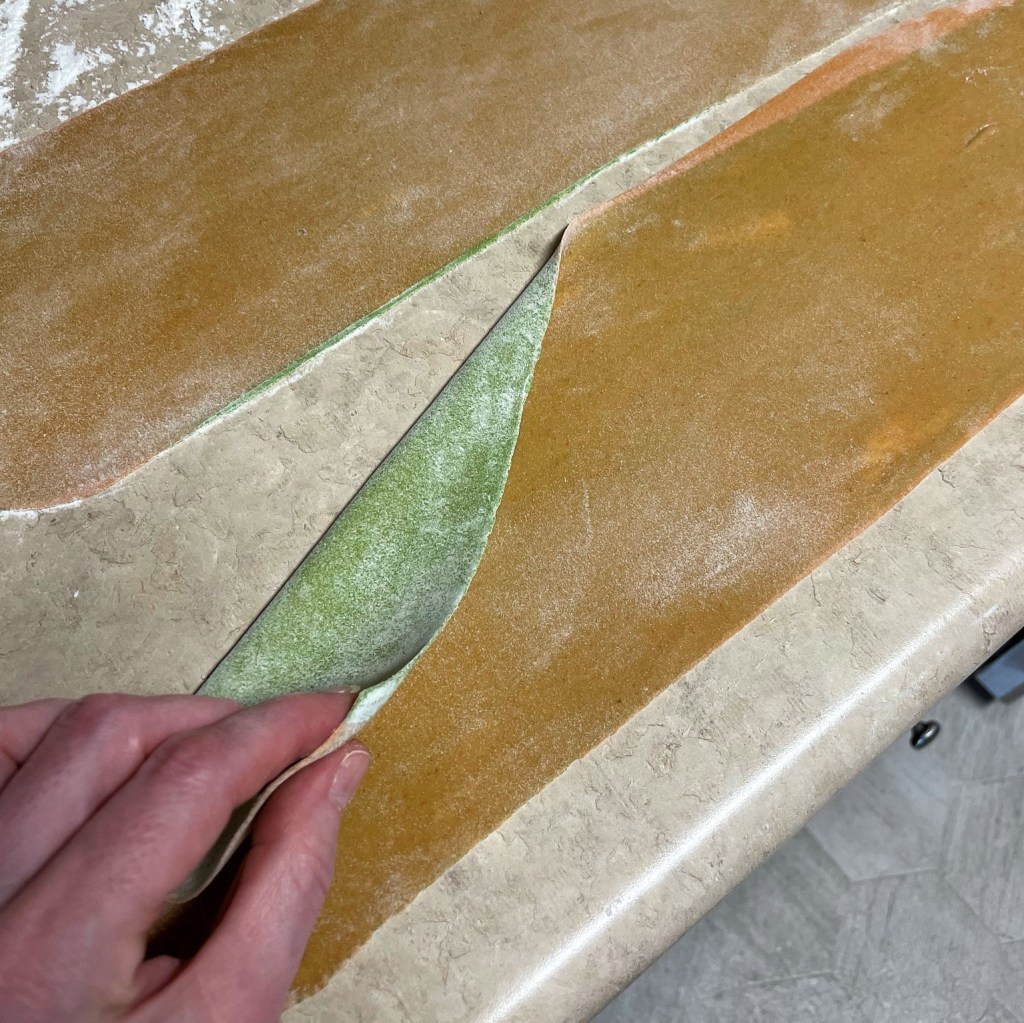
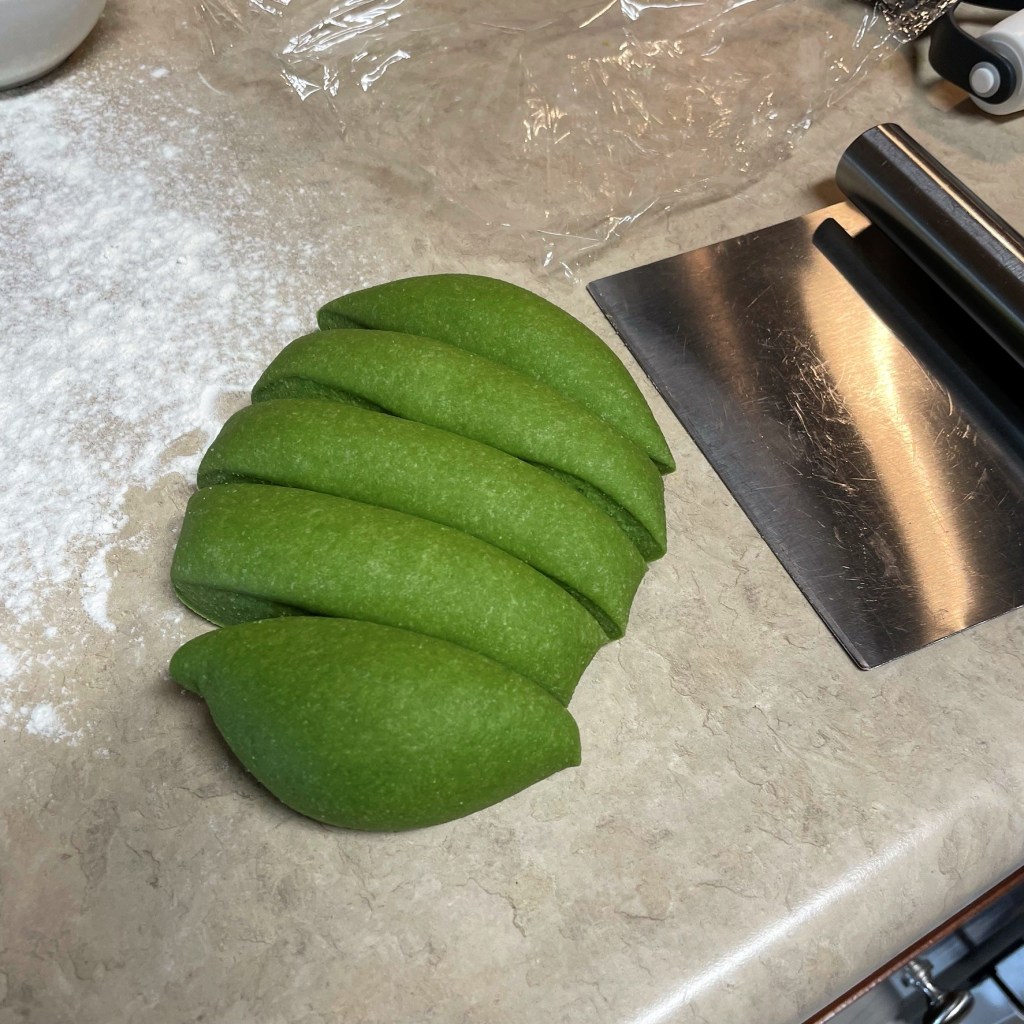
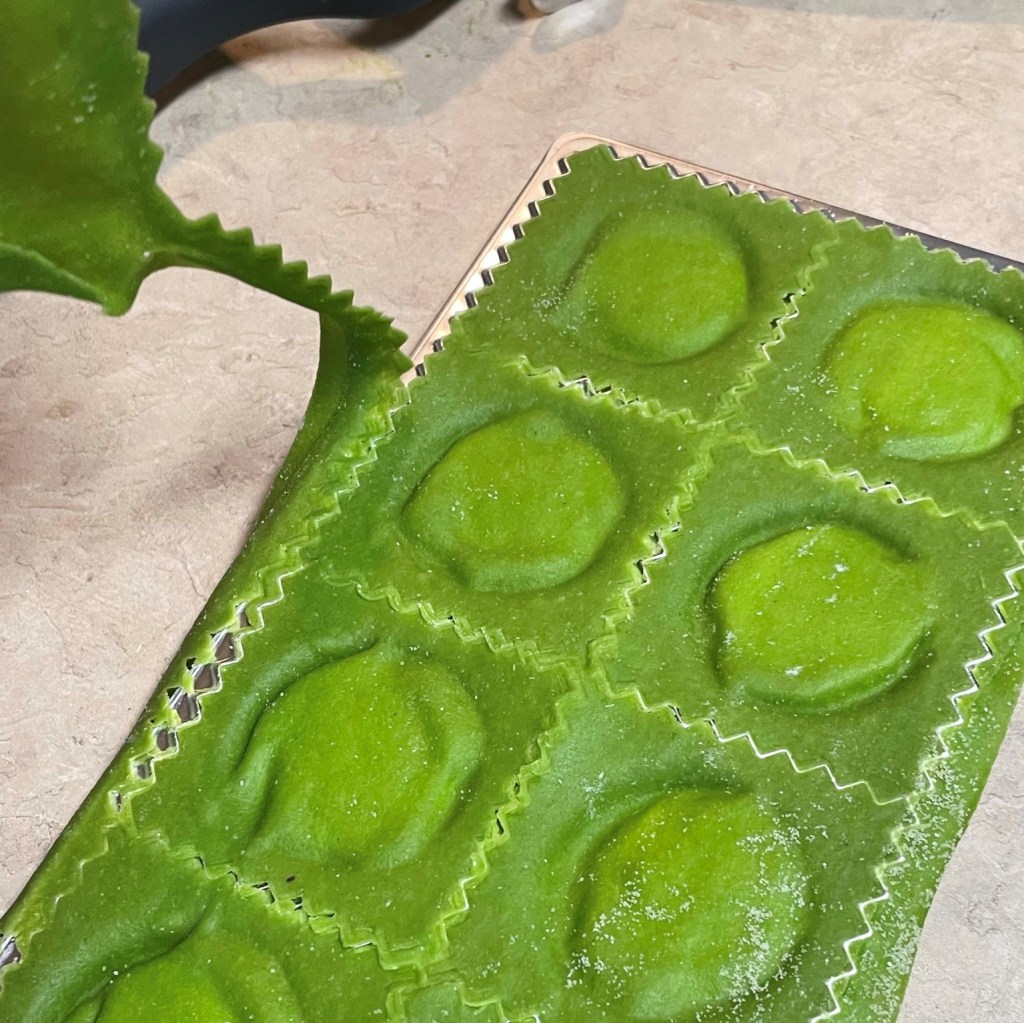
I used mostly semolina dough to make two colors; the orange was pureed sun-dried tomato, and the green was blanched kale.
Following Linda Miller Nicholson’s guidance, I sheeted the individual pasta colors, then laminated them together!
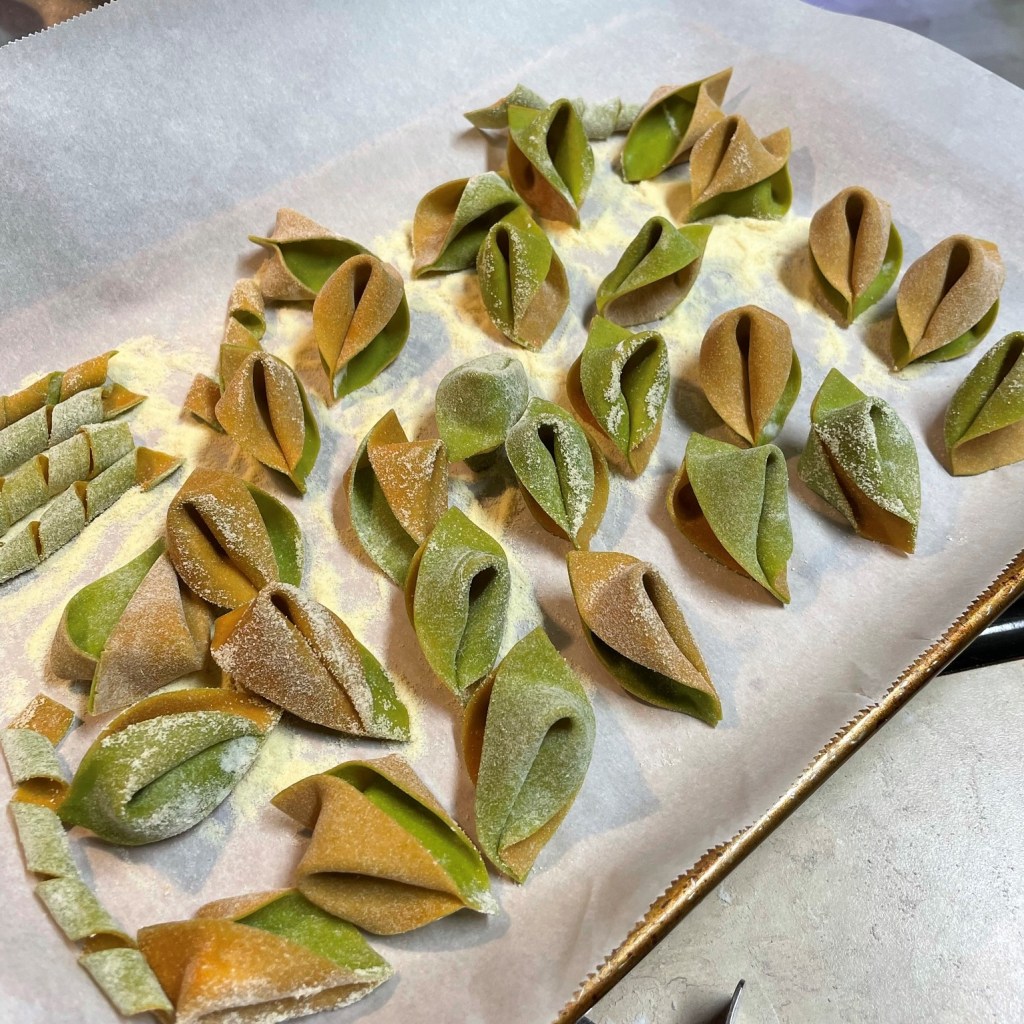
These shapes are called “soprese,” which means “surprise!” The surprise is that they do not have anything inside. 😉
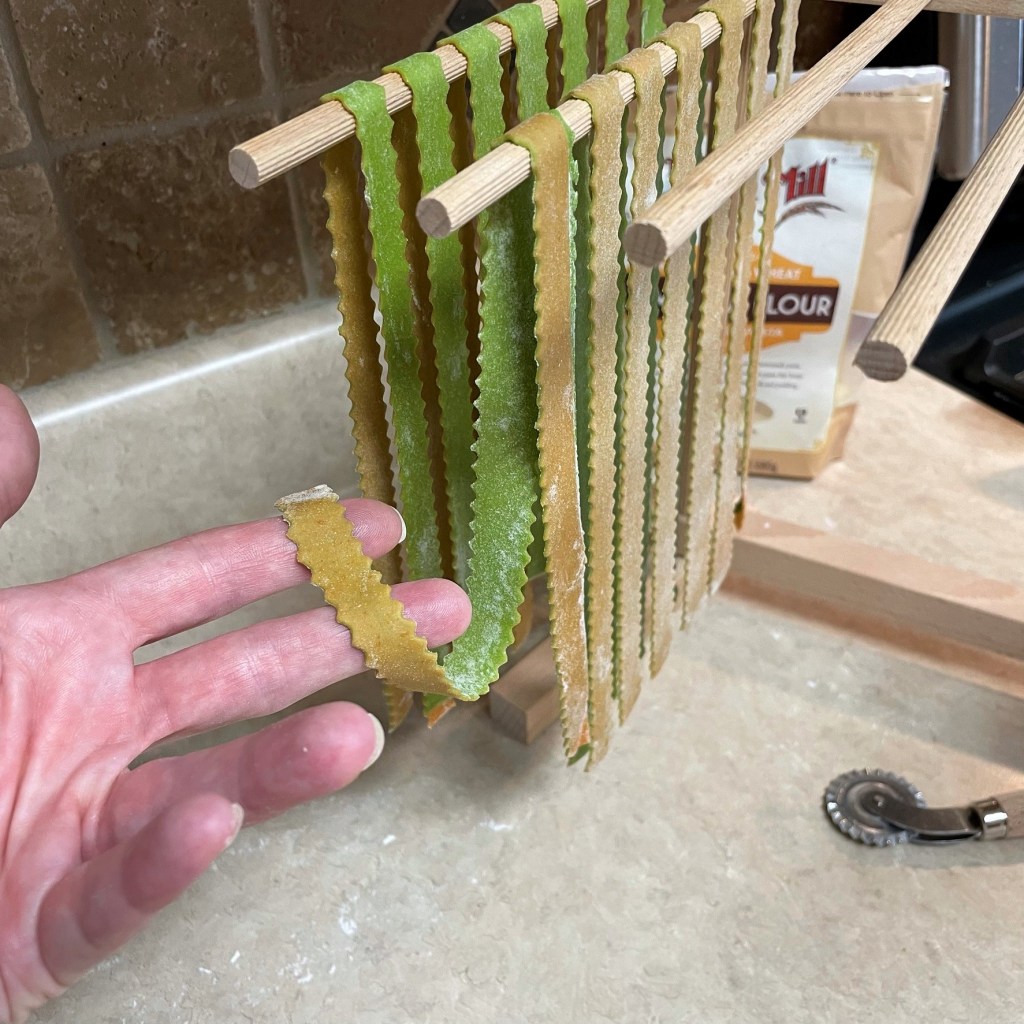
I also rolled out fettucine with the two colors. This is seriously fun!
Practice makes perfect, so I will keep at it.
Stay tuned for more progress as I go. Until then, let’s talk about this handmade spinach pasta, lovingly wrapped around an easy ricotta and parm-romano filling. I will not be so smug as to imply that handmade pasta is a cinch (because it does take practice), but I will absolutely say that it is worth the effort, and if you have made pasta before, you can make a couple of simple changes to twist up the flavor and color, and you will impress even yourself with the outcome. I’ve made colored and flavored pasta many times before—with spinach, butternut squash, sun-dried tomato, lemon and dried mushrooms as ingredients—but I have already learned some new tricks from Linda Miller Nicholson, and I am excited to share them with you.
For starters, her instruction shifted me away from extensive kneading of the dough to a simpler means of laminating the dough to build gluten strength. Laminating means “layers.” After a brief kneading and a half-hour rest, you repeatedly fold the sheets of dough onto itself, layer upon layer, as you run it through the pasta machine. As you go, the dough becomes more and more supple and strong enough to withstand pressing into thin sheets for ravioli. This is good news for anyone who finds kneading tedious or painful.
Next, the color of the pasta can be intensified with a simple addition of baking soda in the blanching water for any vegetables you use to color up your dough; then, a quick straining through a mesh sieve weeds out the solids for a cleaner-looking dough. In the past, I have simply wilted spinach in a pan and pureed it into my dough. My previous results were good, but not this good.
I am astonished at how bright green the color remains, even after cooking. The baking soda trick when blanching the spinach really makes a difference.
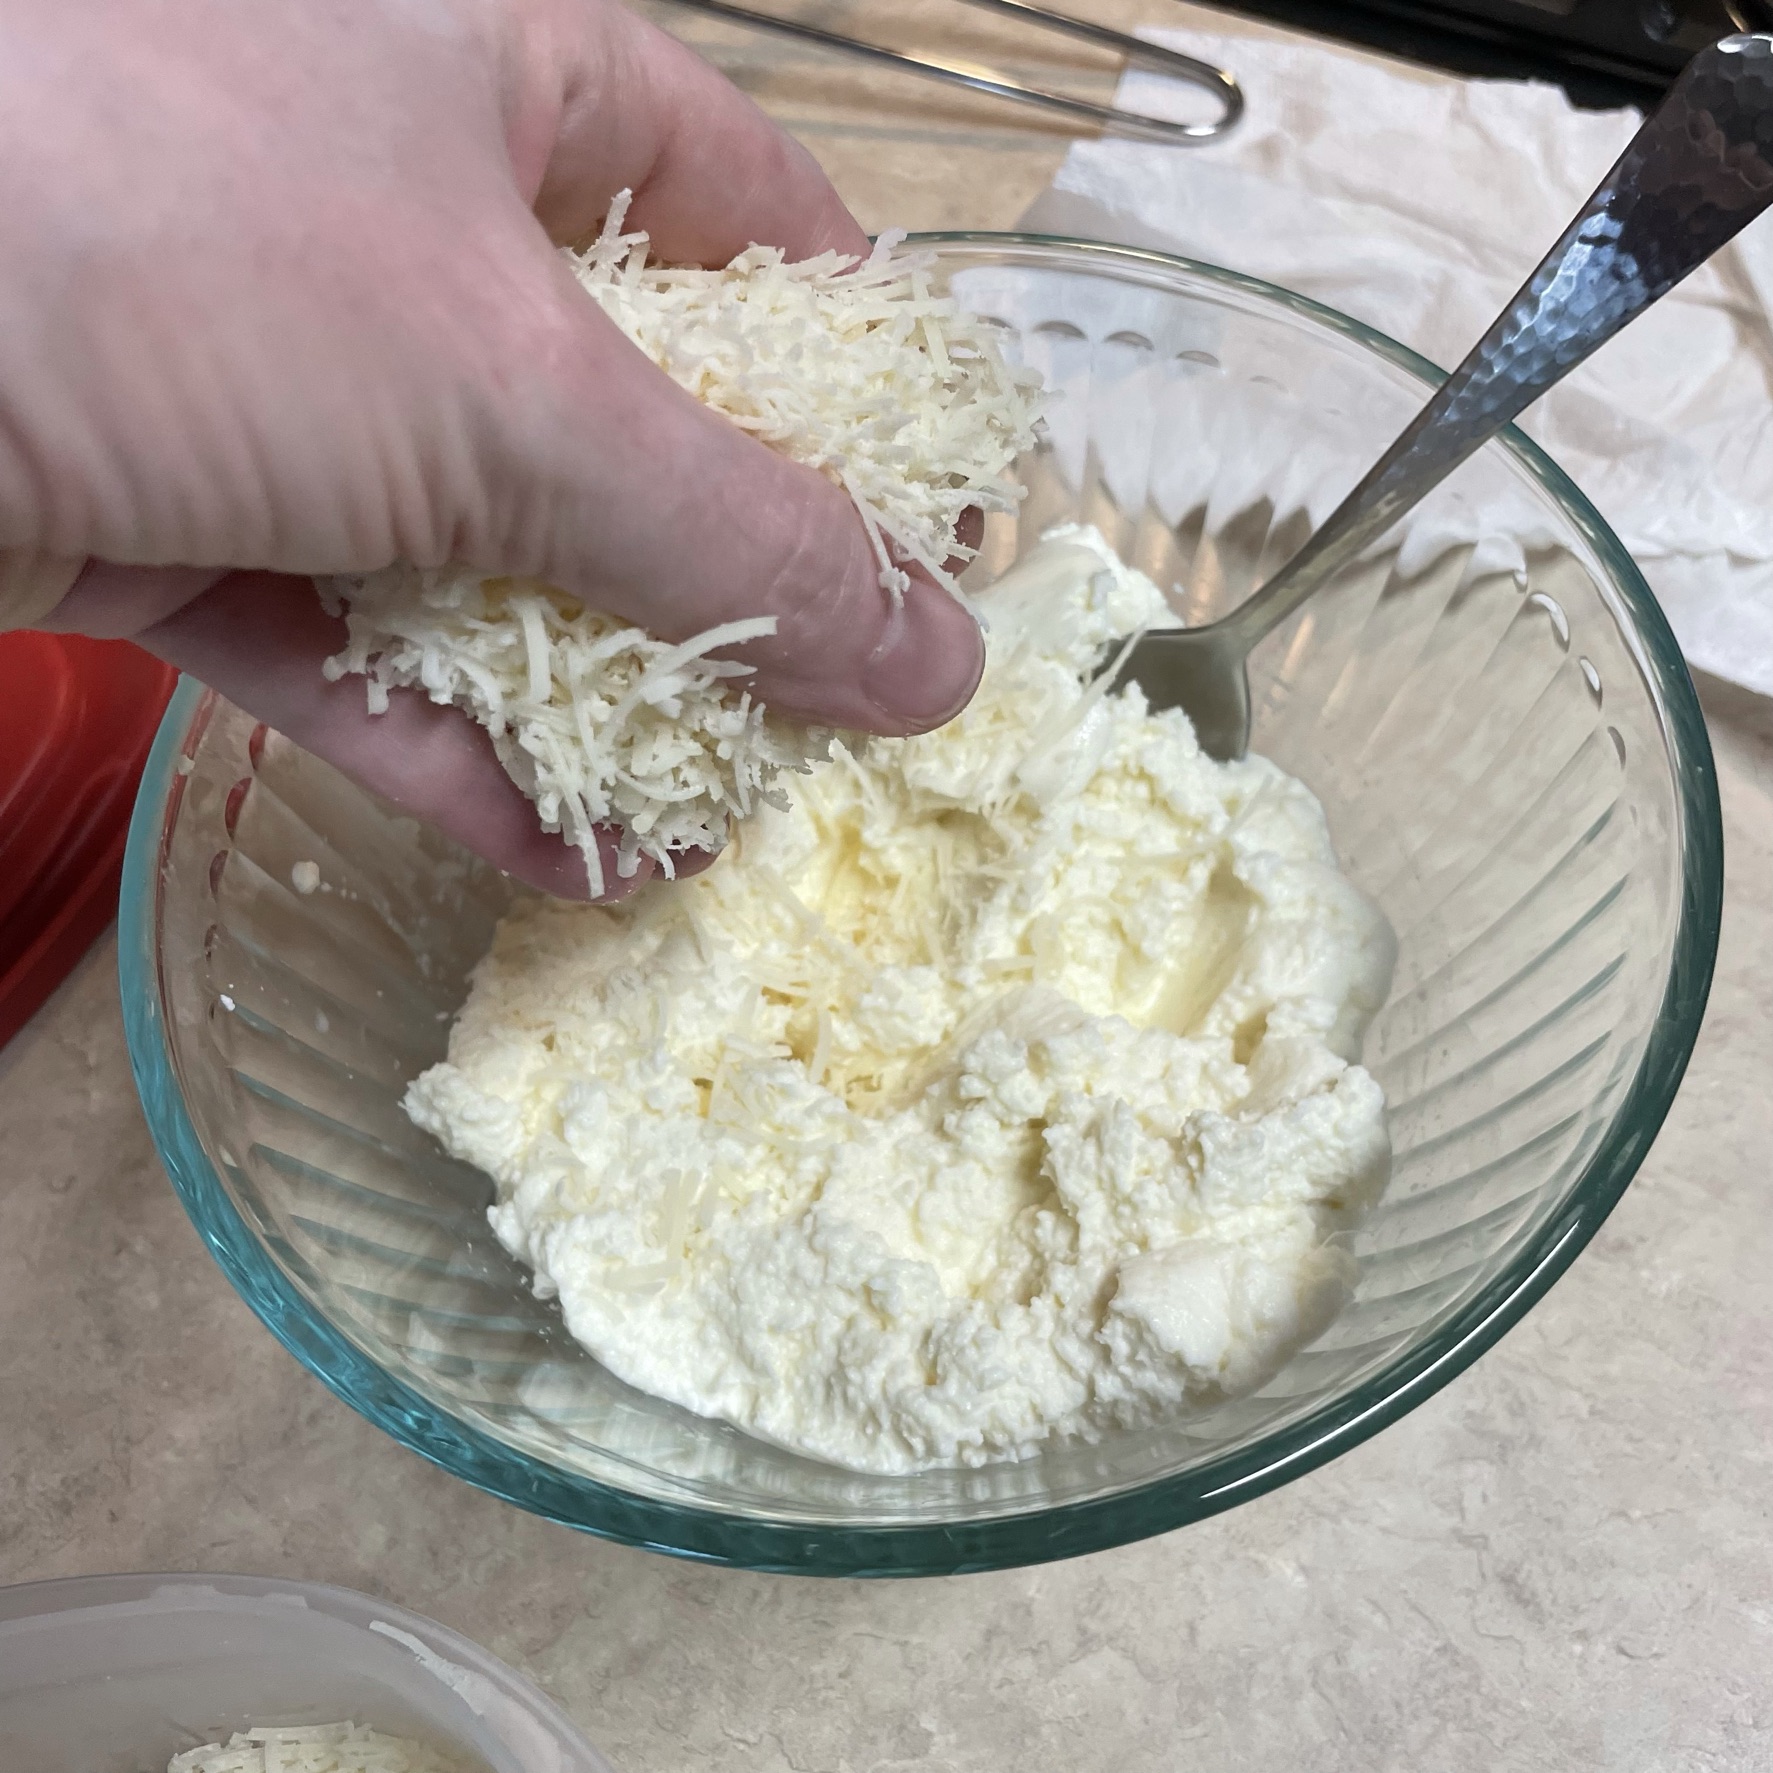
And my filling is improved also, simply because I took a few extra minutes to drain excess moisture from the ricotta before mixing the filling. More advice from Linda, and it worked like a charm. Oh, it pays to stay curious!
Pressing the ricotta through cheesecloth in a strainer.
This is why it matters to drain the ricotta. That extra moisture would make my ravioli mushy inside.
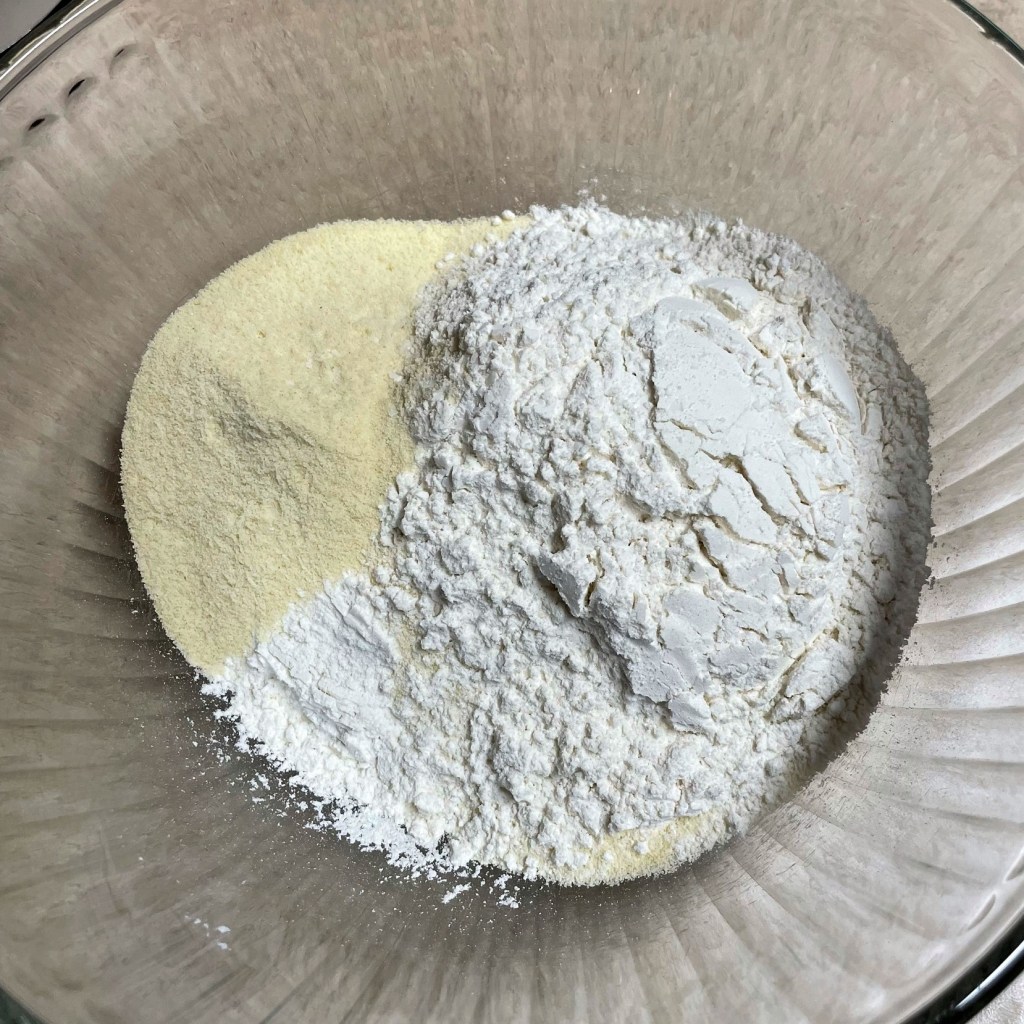
The dough
2 1/4 cups unbleached all-purpose flour* (see notes)
2 large eggs, room temperature (plus water, as noted in the instructions)
A fat handful of fresh baby spinach leaves, washed
1 tsp. baking soda (in the blanching water, not the dough)
1 Tbsp. kosher salt (also for the blanching water)
As always, be sure you measure the flour properly so that your dough is not dense. Use the fluff, sprinkle, level method if measuring by volume. For less fuss and greater precision, measure it by weight—270 grams.
The very best flour to use for pasta is Italian 00 milled flour or finely milled durum (semolina), which is my favorite. But both can be tricky to find. For the sake of practice, I have been using King Arthur all-purpose flour, and I have had excellent results so far. If you sub in any amount of whole wheat flour, increase the water a bit as well.
Instructions
Here, I will run through the instructions in pictures, as usual. At the end of the post, you’ll find a PDF available for download, so you can print it for your recipe files. 🙂
A pinch of baking soda in the water preserves the bright green color of the spinach.
Drain the spinach briefly and let it cool 5 minutes.
Press down on the spinach to release the dark-colored liquid.
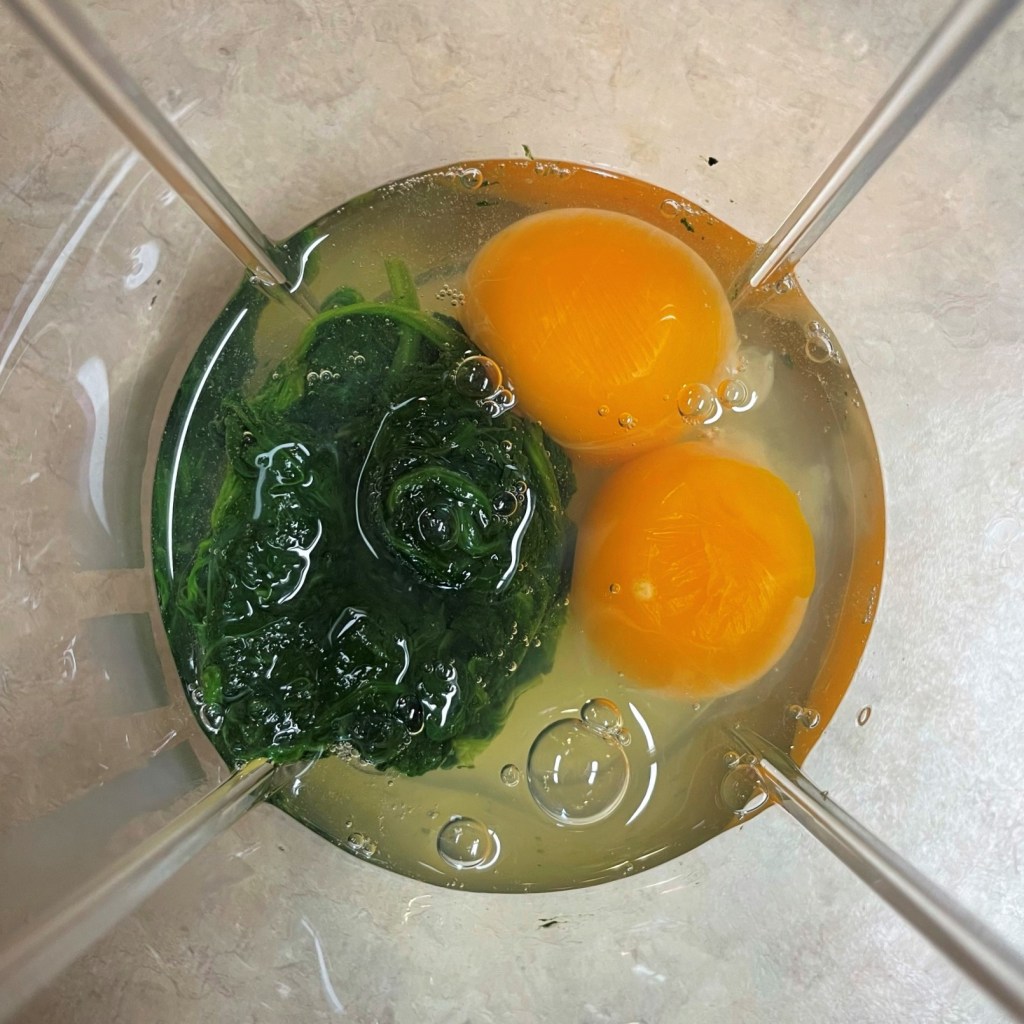
Combine the whole eggs and spinach in a blender.
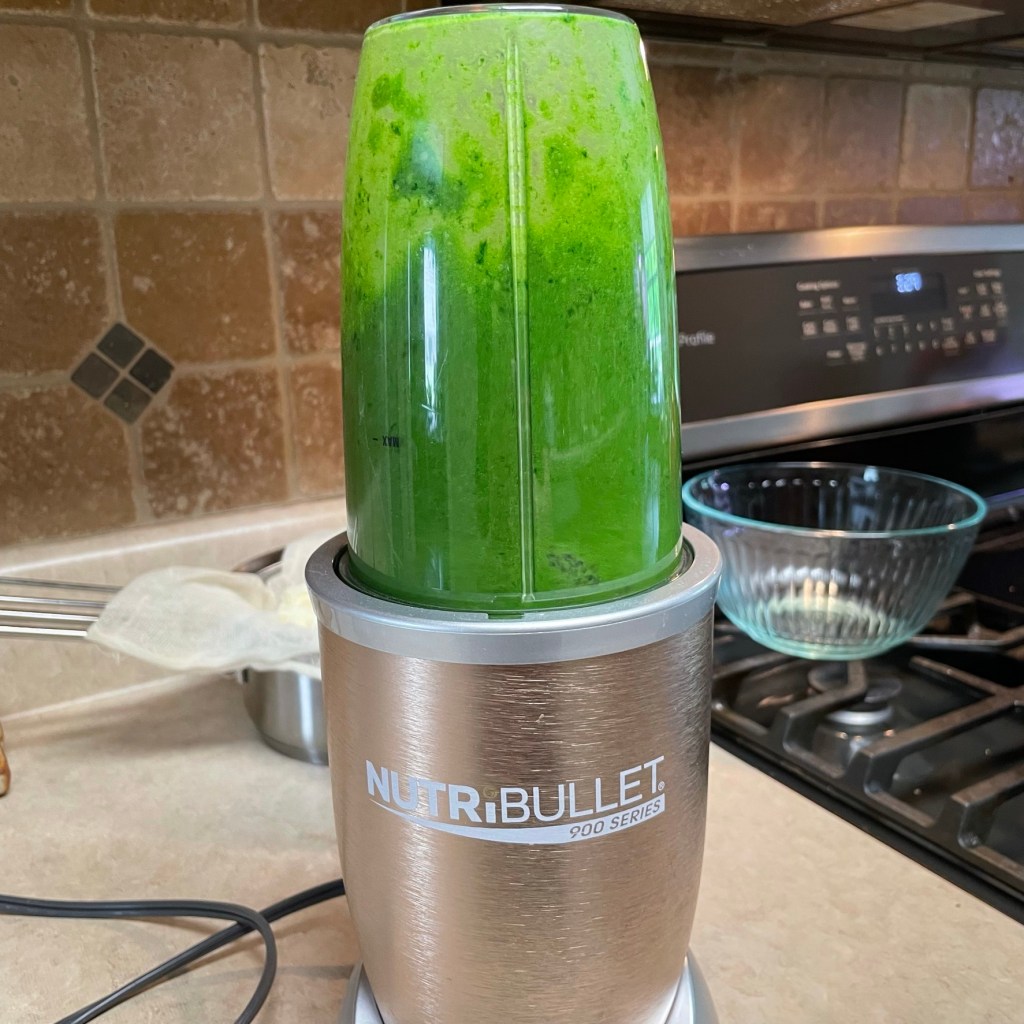
Pulse then blend until the color is uniform.
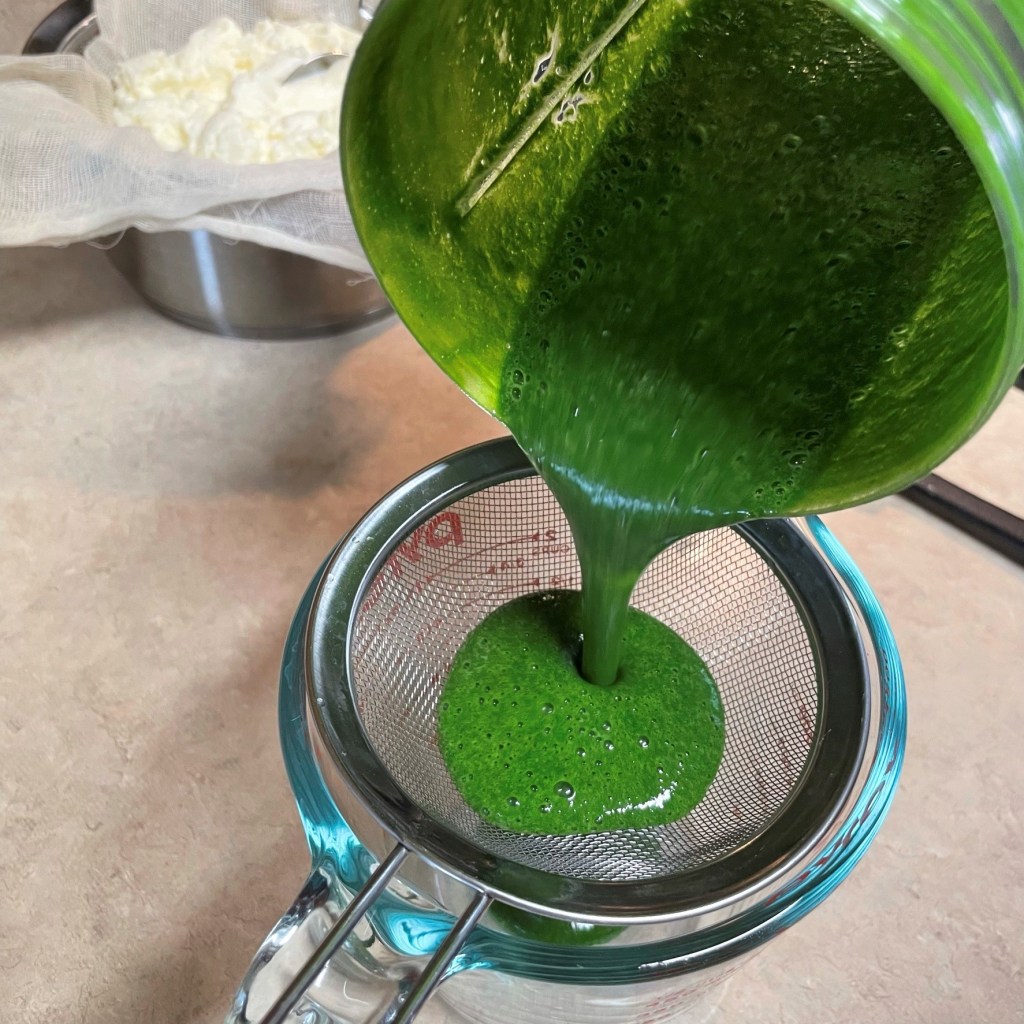
Strain the solids through a mesh strainer placed over a glass measuring cup.
Add filtered water to equal 3/4 cup liquid.
For this batch I used a combination of all-purpose flour and semolina. Total volume 2 1/4 cups.
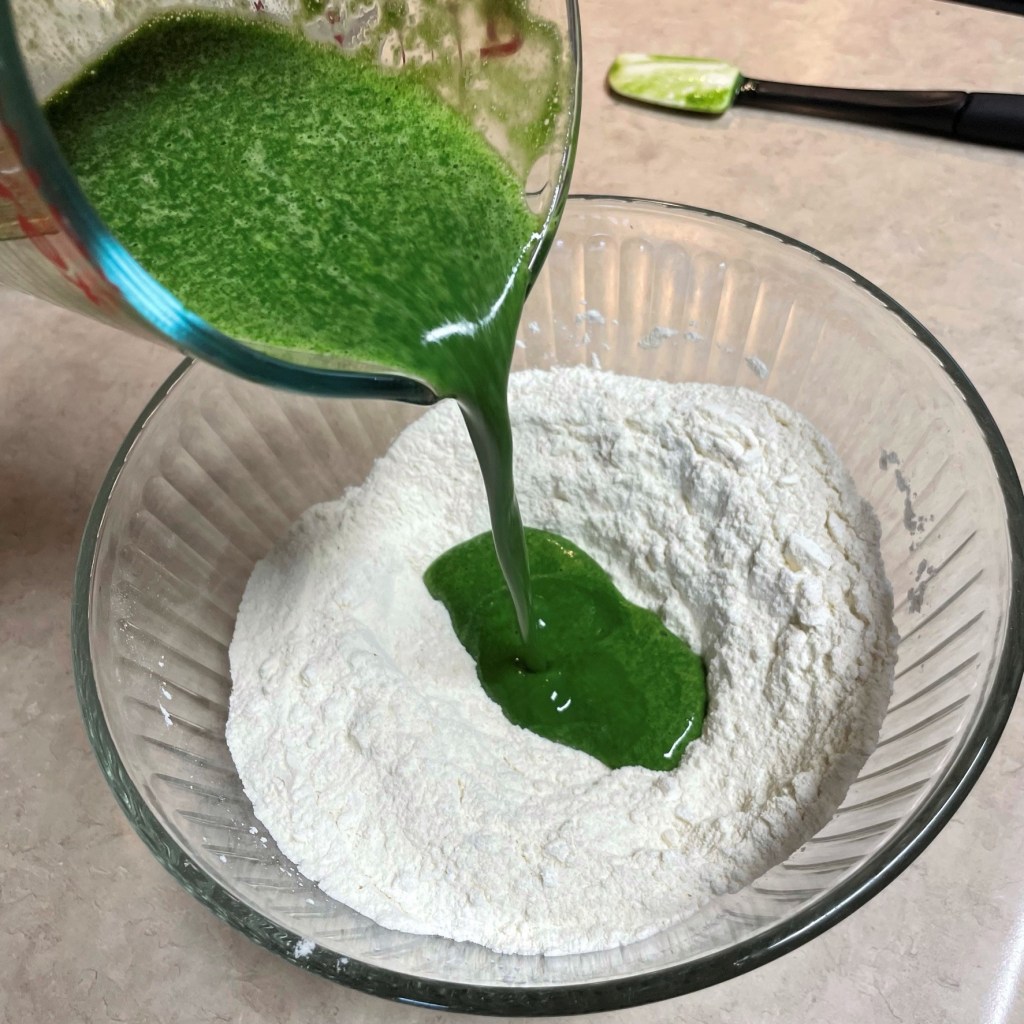
Pour the puree directly into the blended flour.
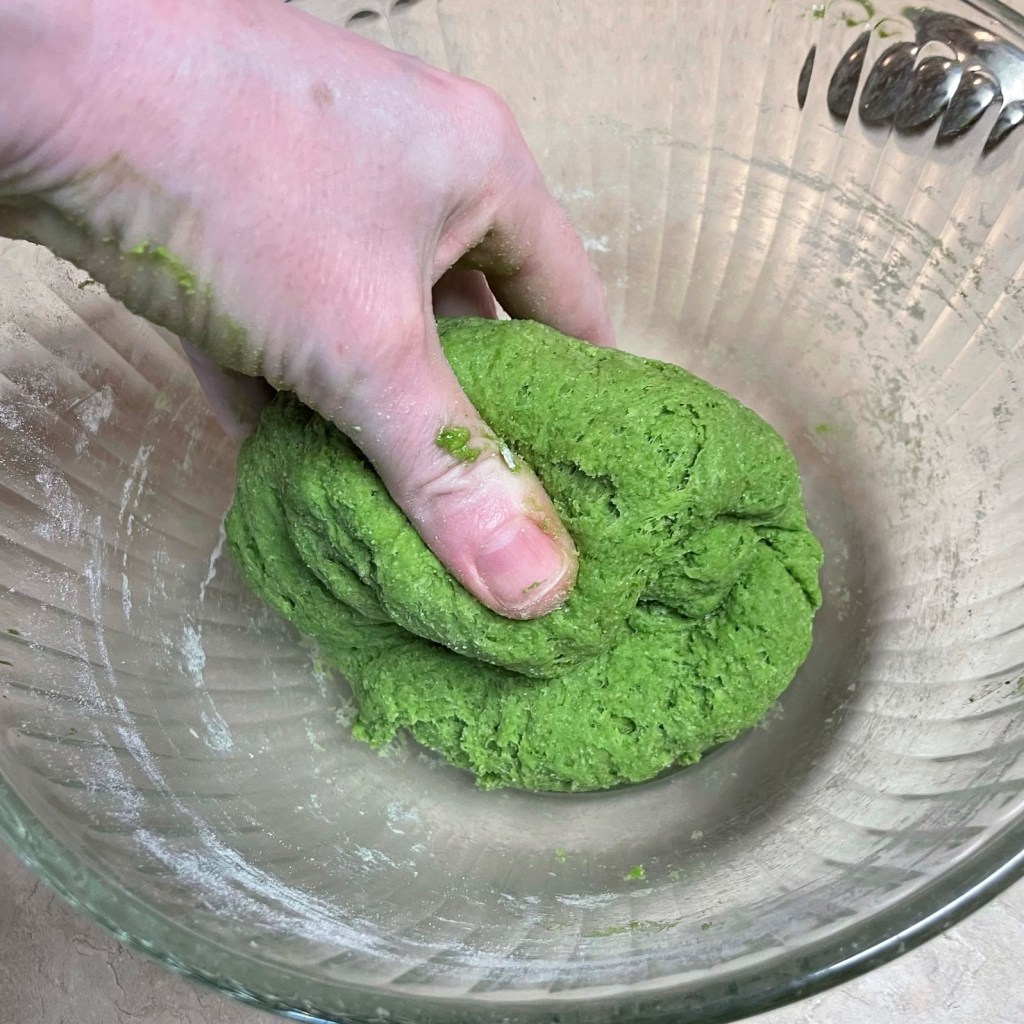
Stir it together with a spoon as much as you can, then knead by hand to work the dough.
It only takes a minute or two to fully incorporate the flour. This time, I did all of my kneading directly in the bowl.
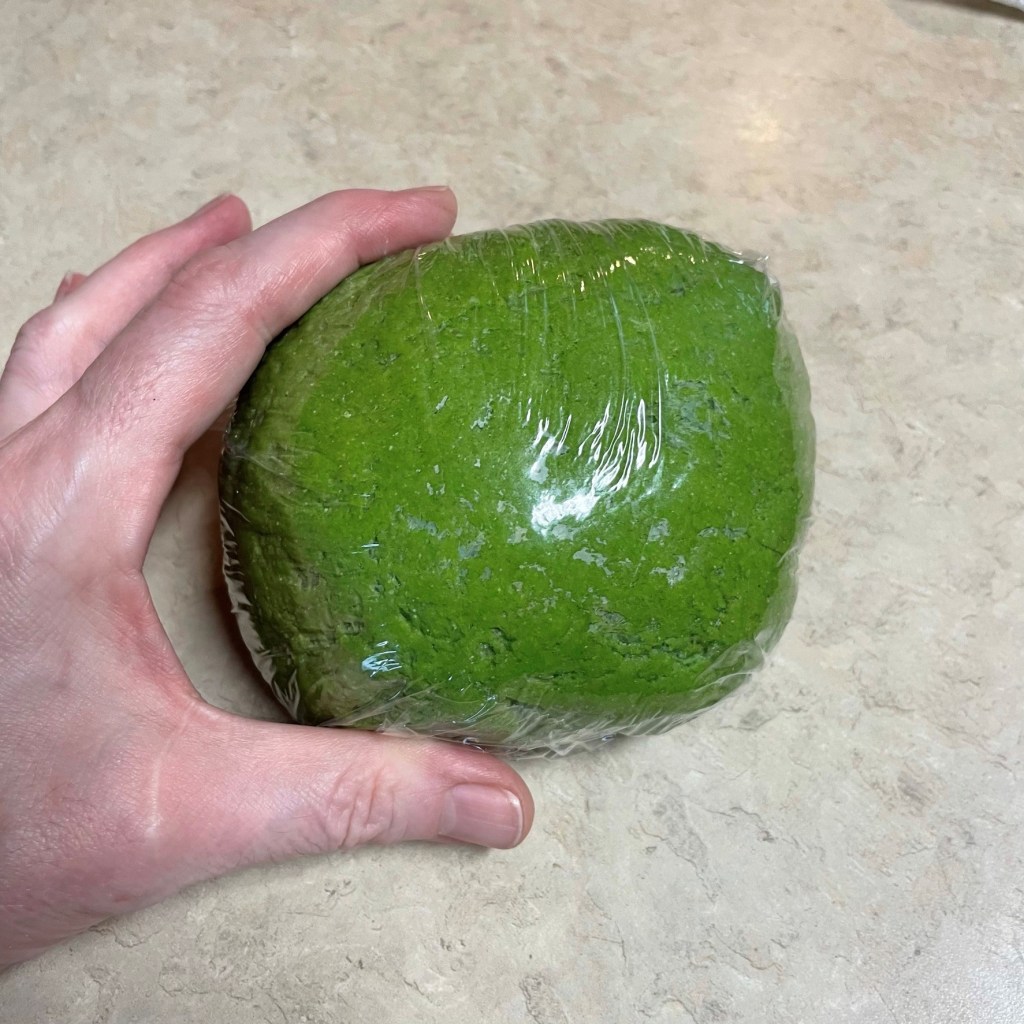
Wrap the dough ball tightly in plastic and rest at least 30 minutes. Put it in the fridge if you plan to sheet it later.
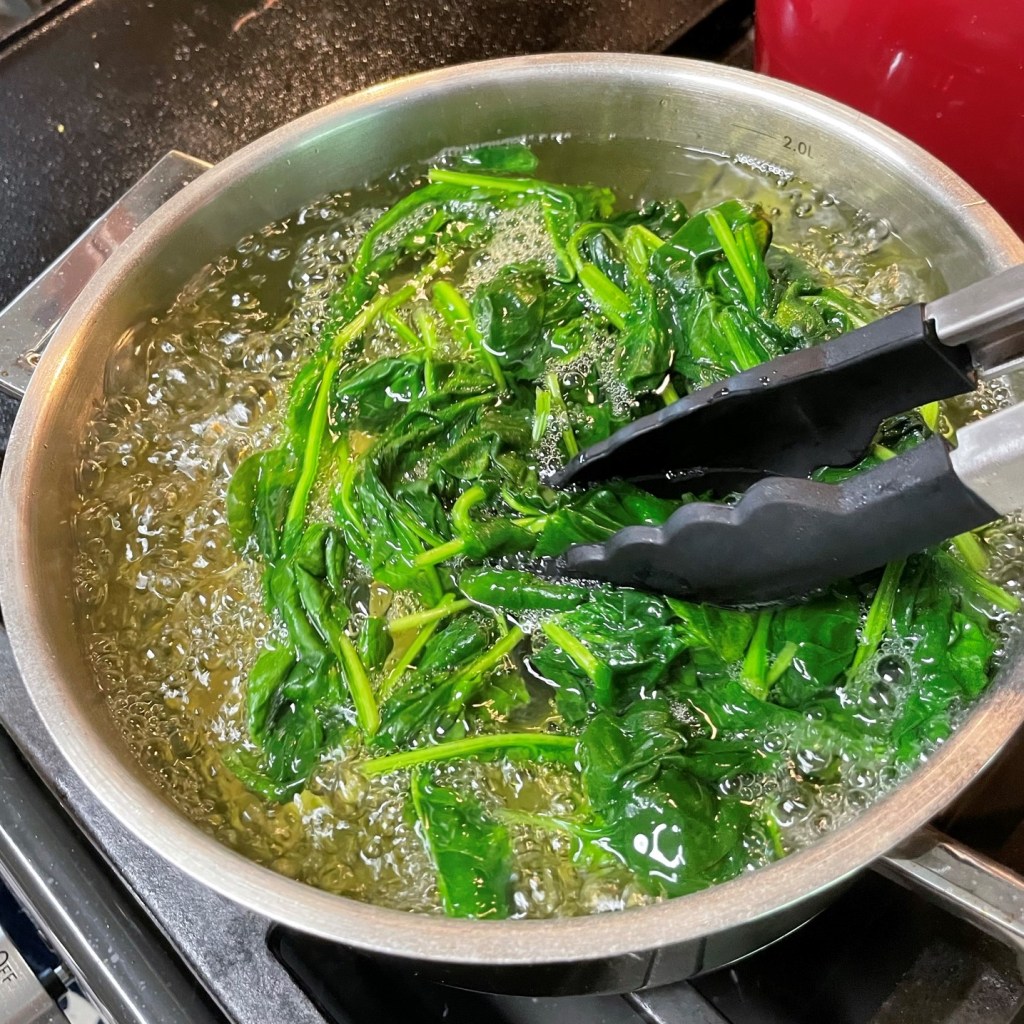
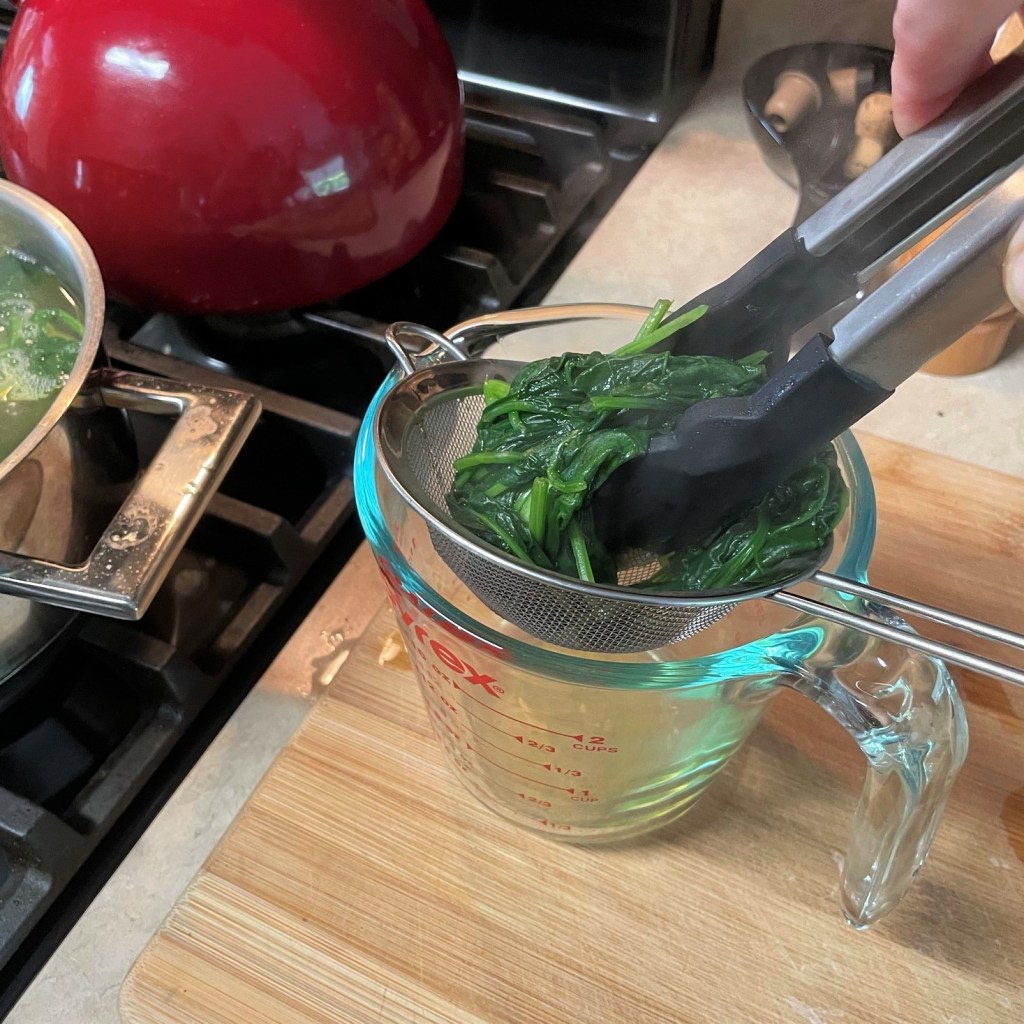
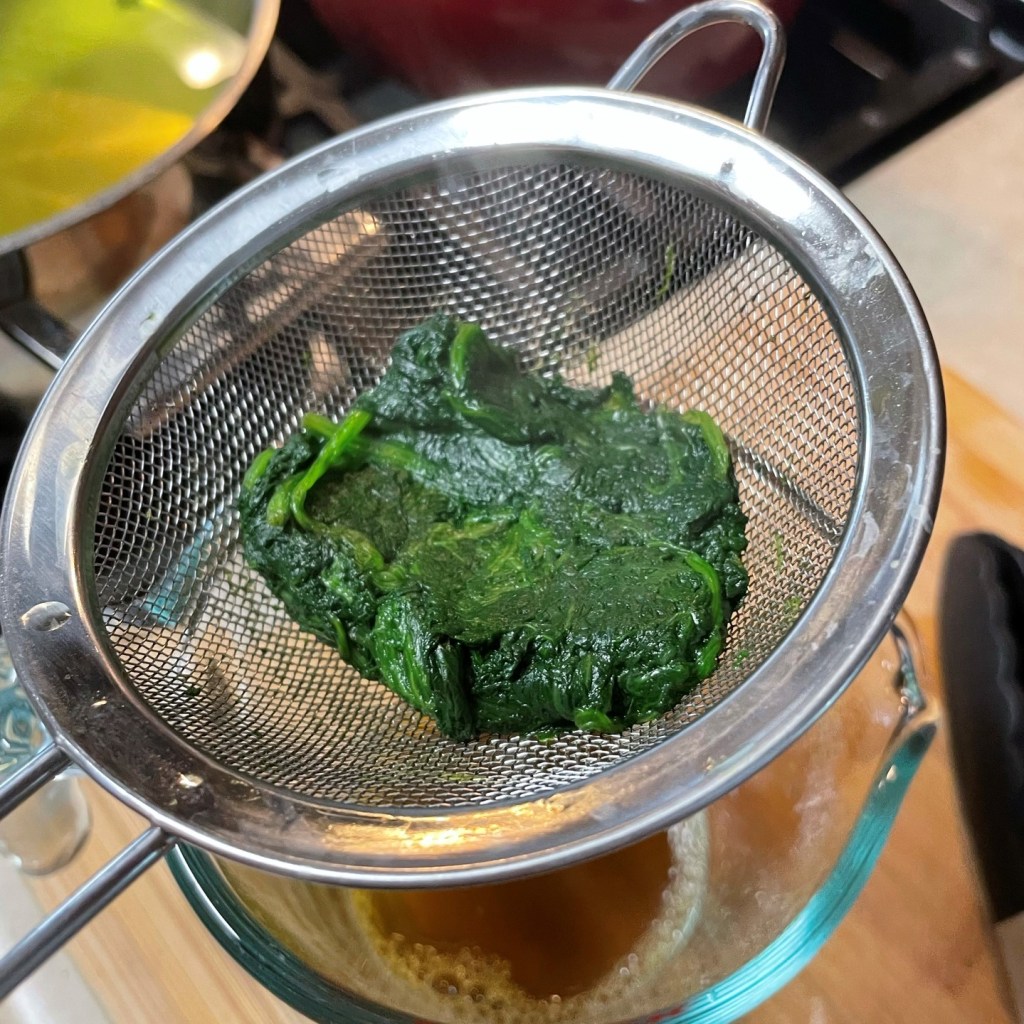
Bring a pot of water to boil. Add the salt and baking soda and stir briefly to dissolve. Toss in the baby spinach and stir it around for 15 seconds. Use a slotted spoon or tongs to remove the spinach and place it in a mesh strainer to drain excess water.
Transfer the spinach to a regular or bullet blender, together with the eggs. Pulse blend a few times, and then run the blender continuously until the mixture is evenly mixed.
Pour the pureed mixture through a mesh strainer over a glass measuring cup. Press the puree through to strain out the solids, and then add enough water to the mixture in the glass to measure exactly 3/4 cup.
In a large bowl, stir a generous pinch of salt into the flour and create a well in the center of the flour. Pour in the pureed spinach mixture and mix with a spoon until a clumpy mixture comes together. Knead with your hands in the bowl or turn the dough out onto a countertop and knead several times until all flour is incorporated and no dry spots remain.
Wrap the dough tightly in plastic wrap and let it rest for at least 30 minutes before rolling. You may also refrigerate the dough for several hours or even a day. I’ve found this formula for pasta dough to be very forgiving.
Make the ricotta filling while you rest the pasta dough
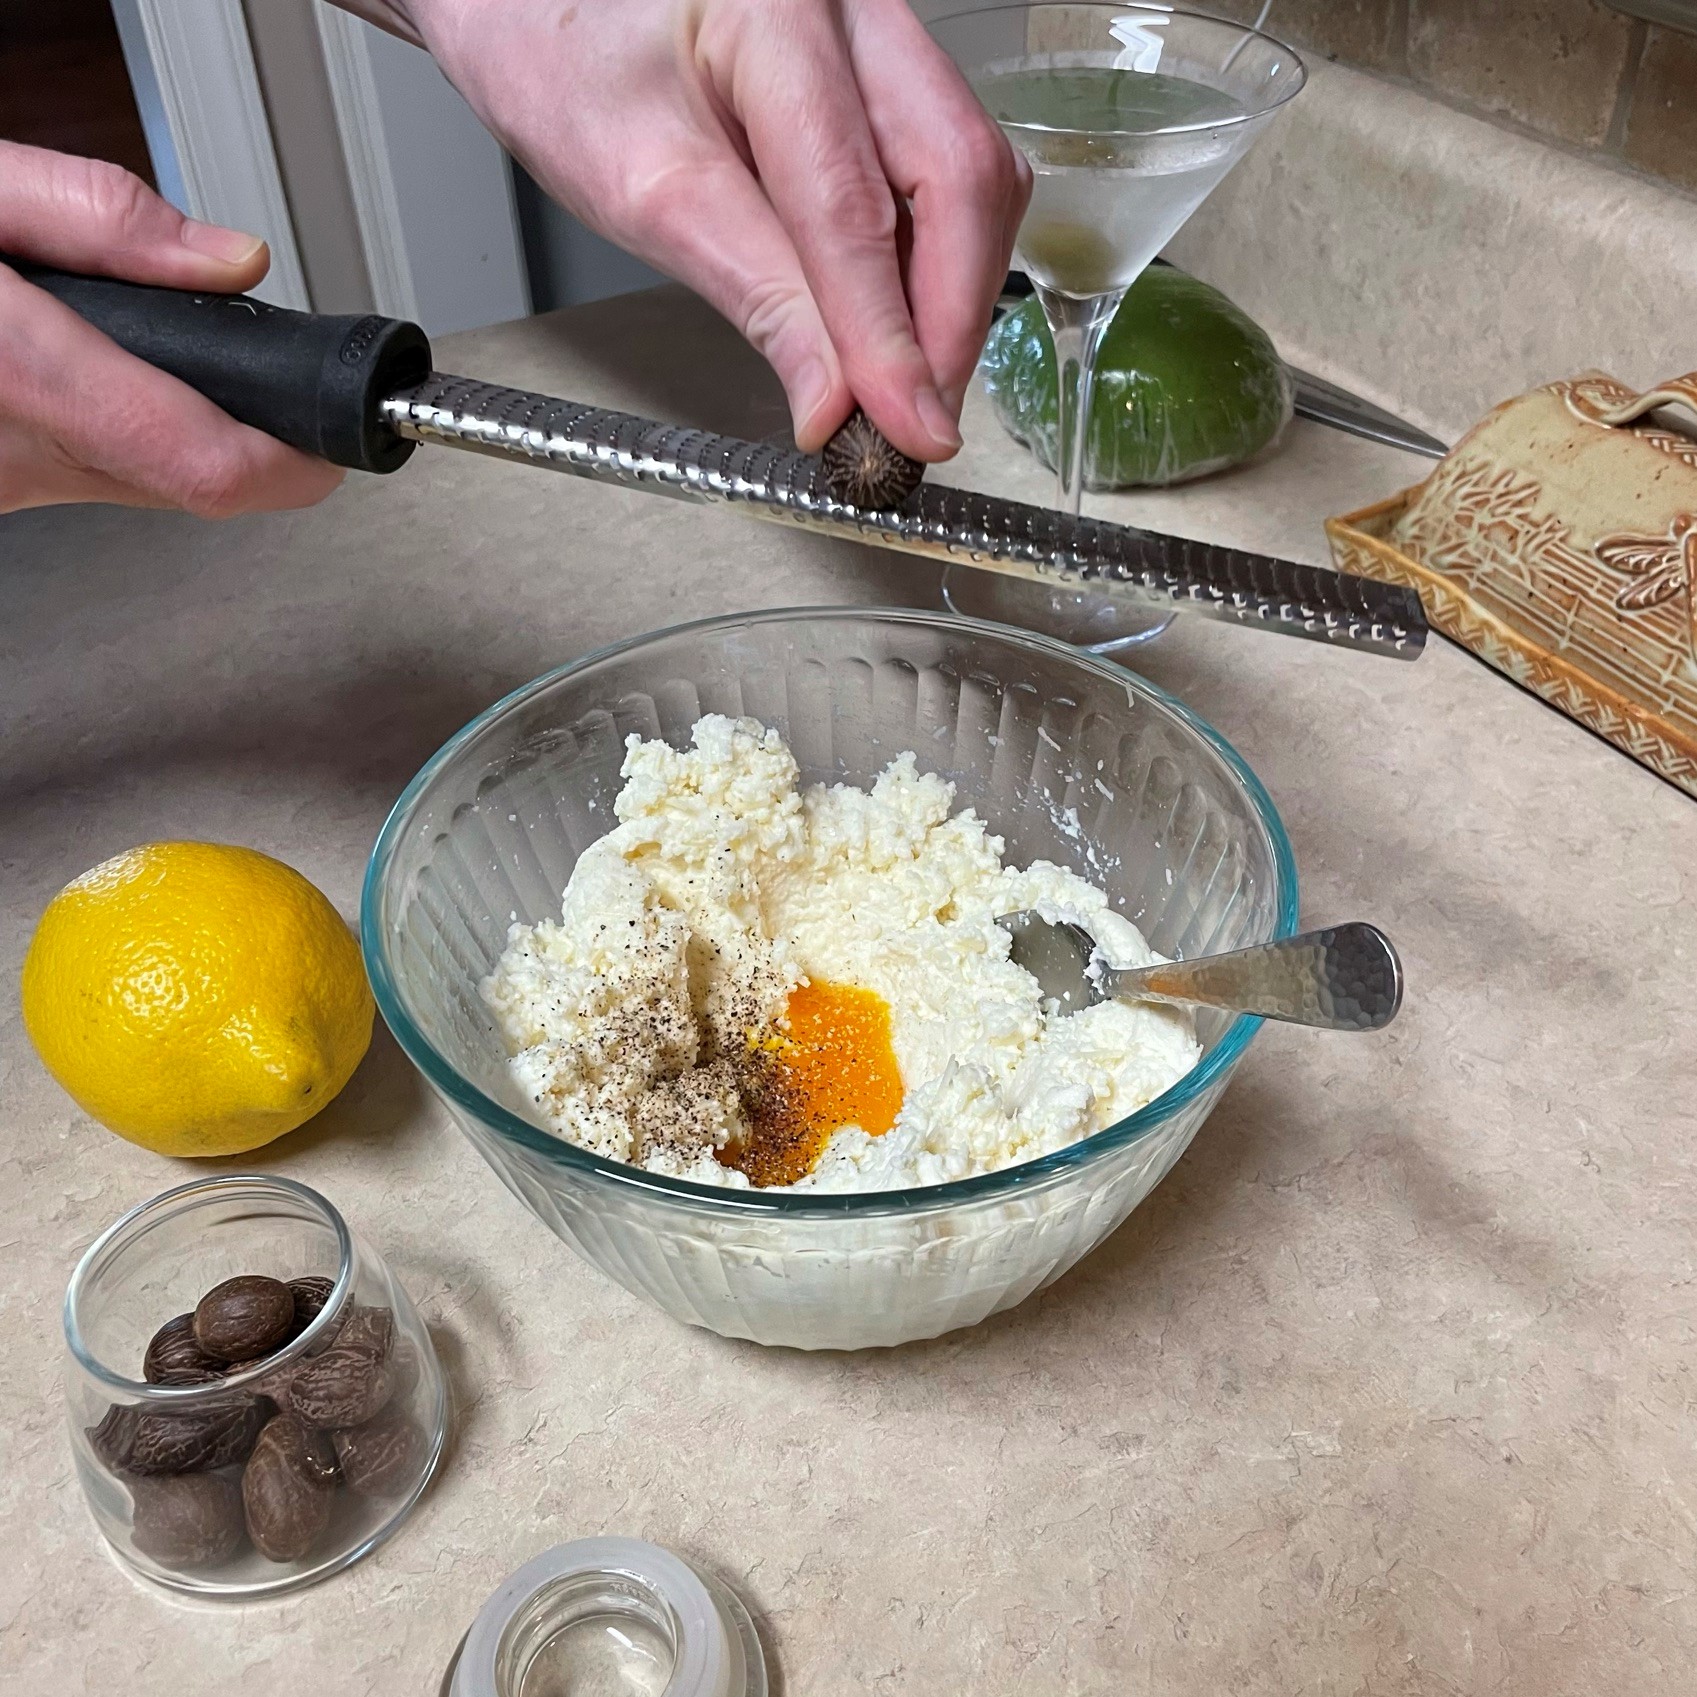
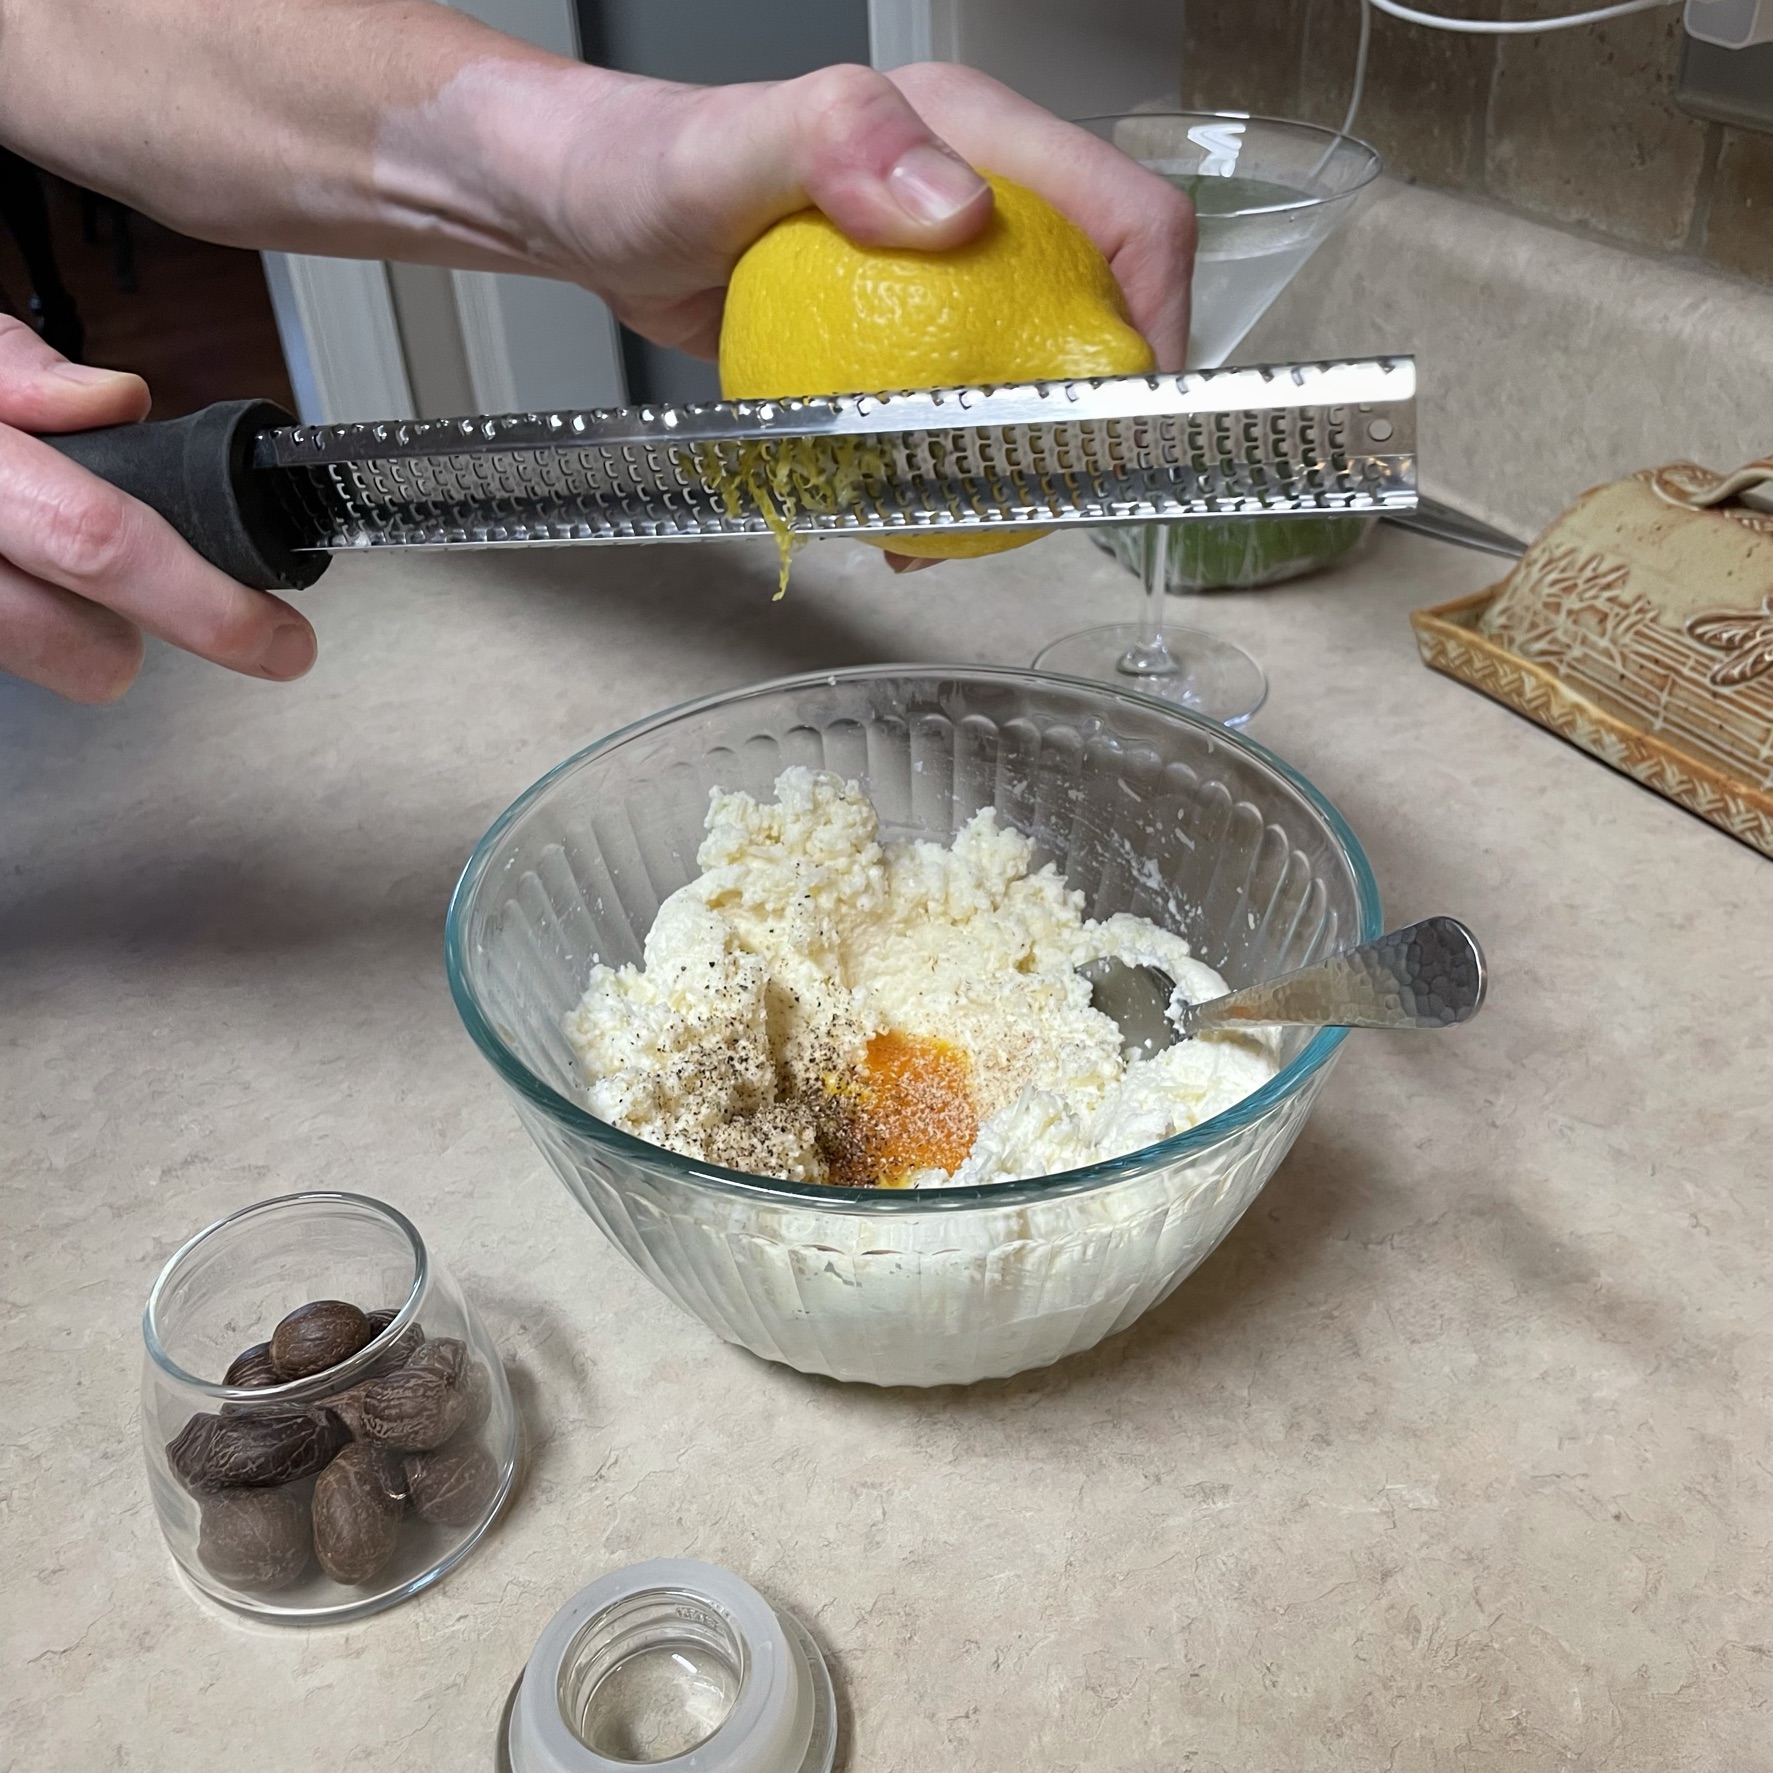
See how chunky the ricotta is after straining? Stir in the parm-romano. Add the egg yolks, salt and pepper.
I like to grate a little fresh nutmeg into the ricotta mixture. I also like to enjoy a dry gin martini while I work. 😉
Use organic lemons if you are using the zest.
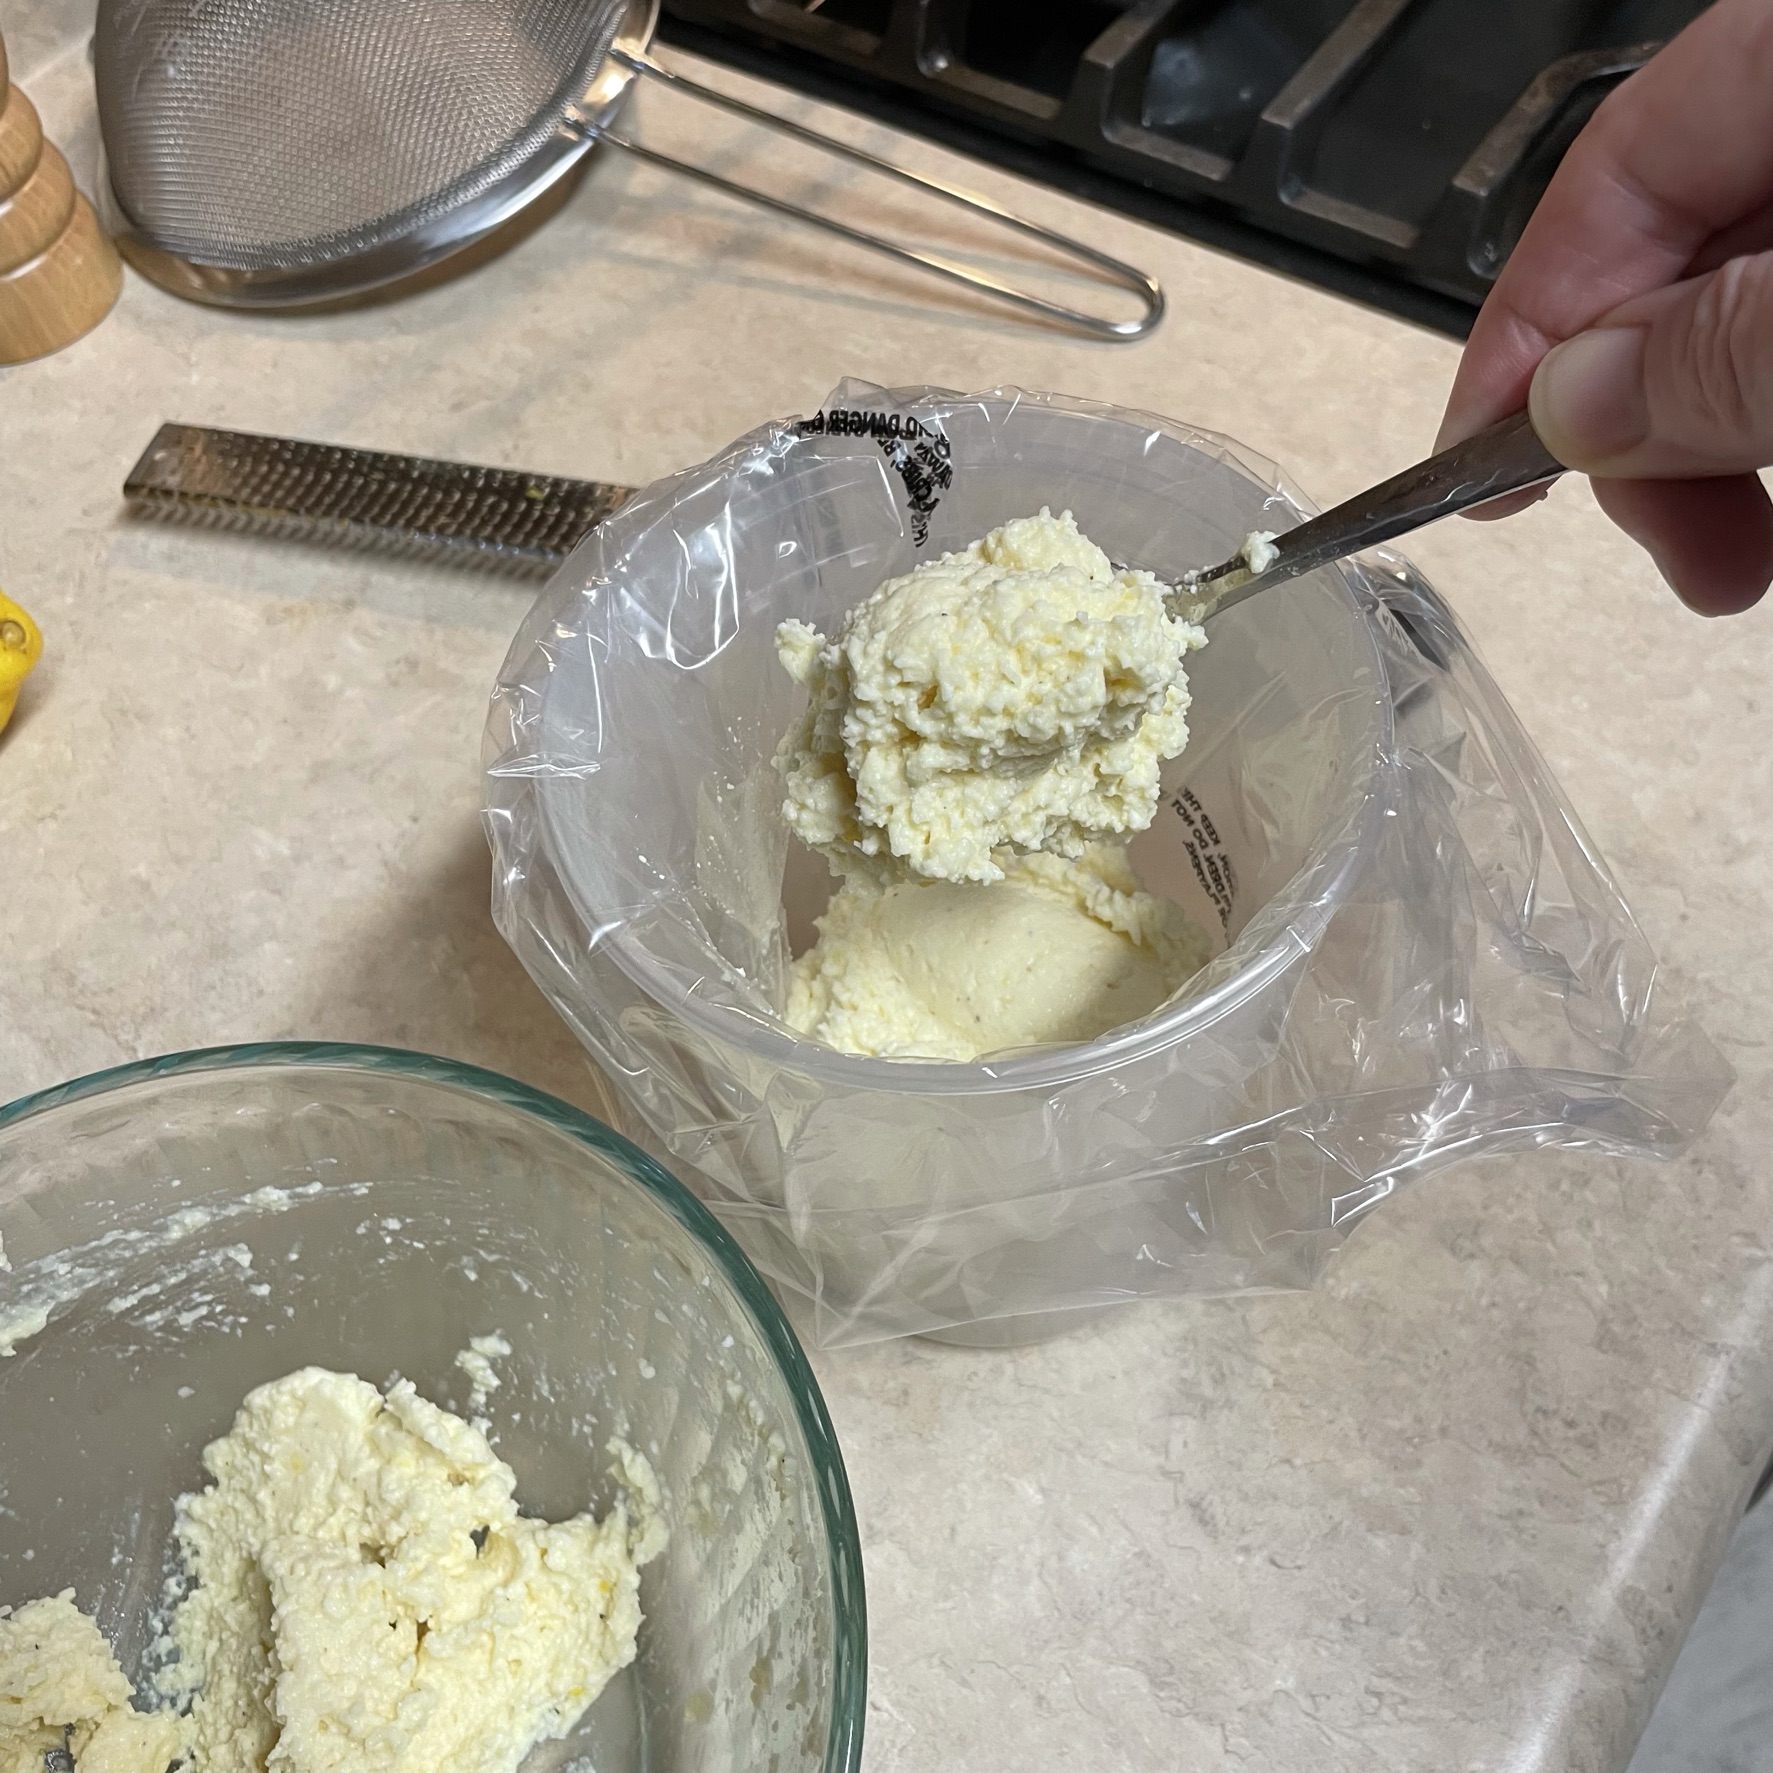
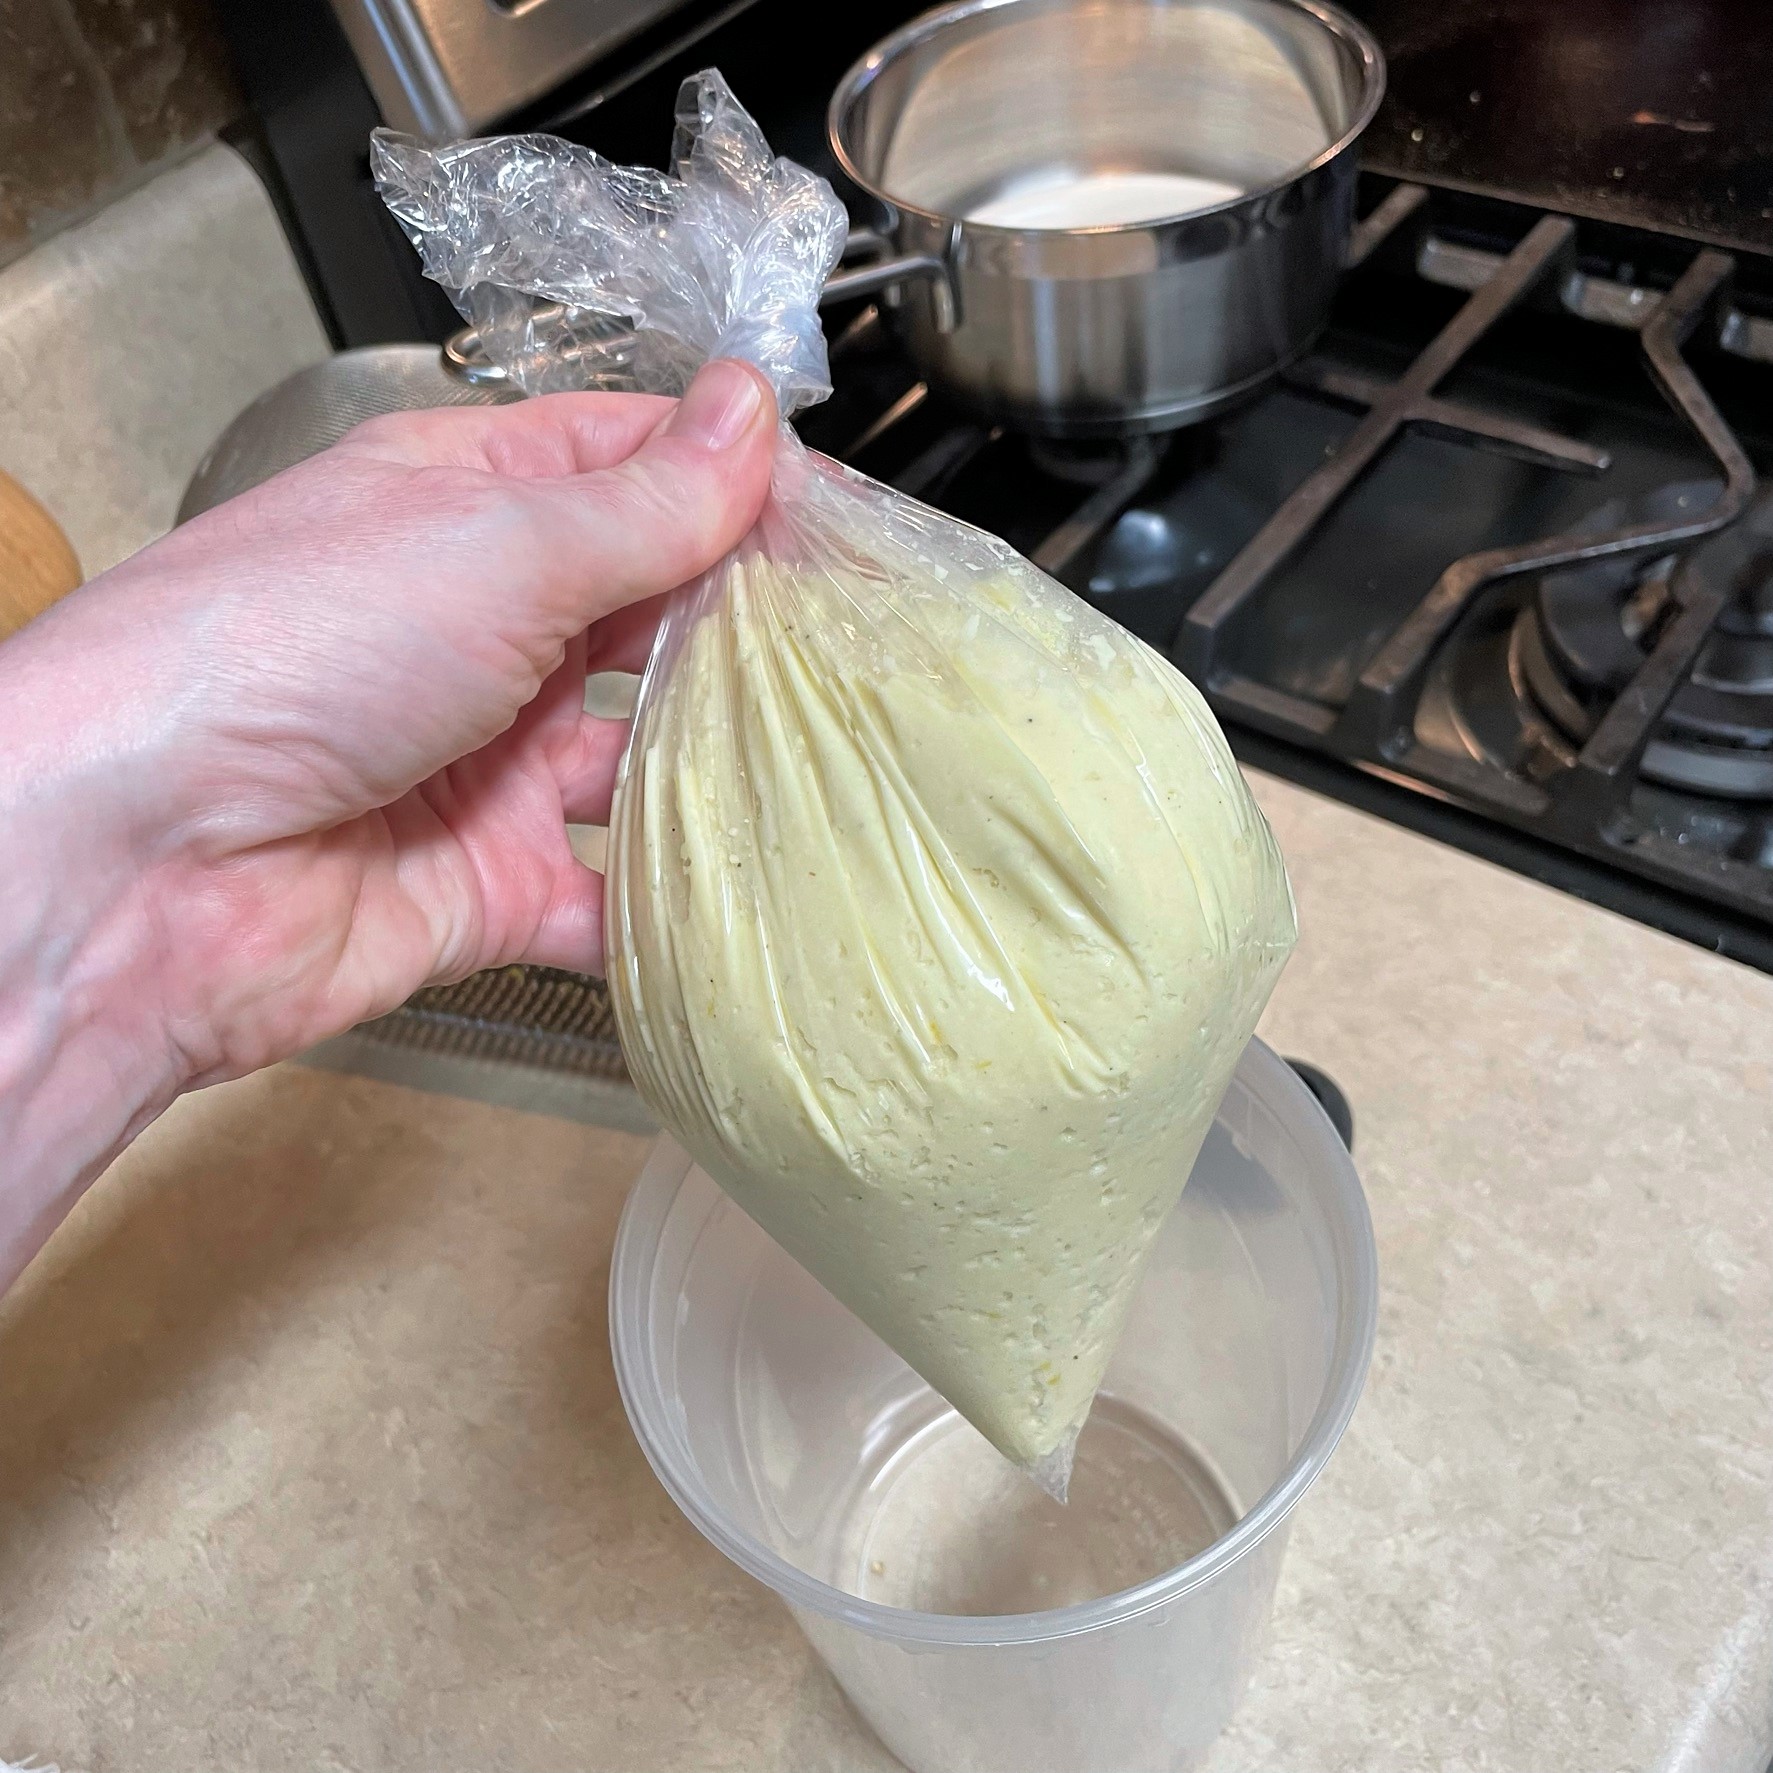
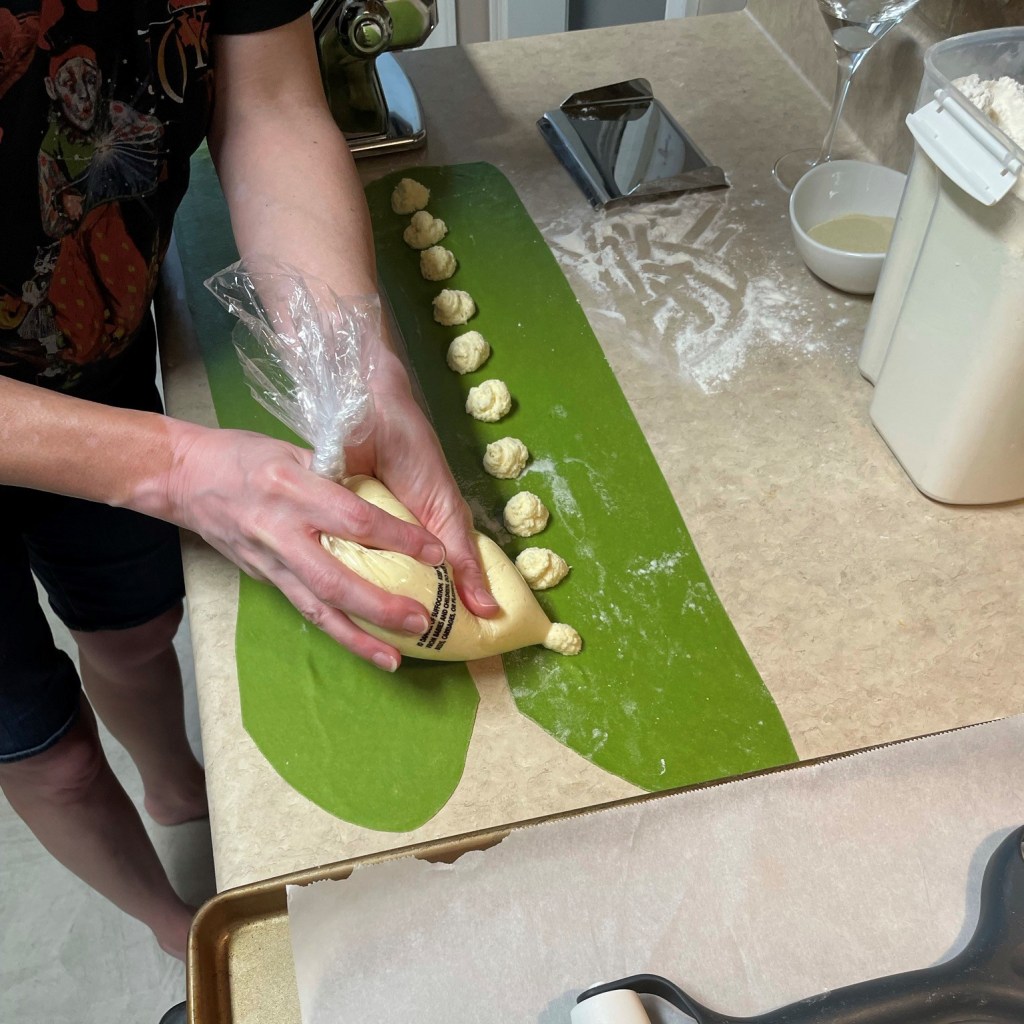
Spoon the filling into a plastic bag as a makeshift piping bag. I used a clean bread bag here, but a quart sized zip top would also work.
Nudge the filling toward a corner and tie a knot in the bag. I’ll refrigerate it in this container until I’m ready to shape and fill my ravioli.
Strain the ricotta in a mesh strainer (lined with cheesecloth if you have it) over a medium bowl. Let the ricotta drain for at least 30 minutes. Stir in parm-romano, egg yolk, lemon zest and nutmeg. Salt and pepper to taste. Spoon the mixture into a plastic bread bag for easy piping. Refrigerate mixture while you roll out the pasta dough.
Sheet the pasta and fill the ravioli
Use a bench scraper or knife to divide the dough into pieces that will flatten into roughly the size of a deck of cards. Keep the remaining dough wrapped while you work the first piece.
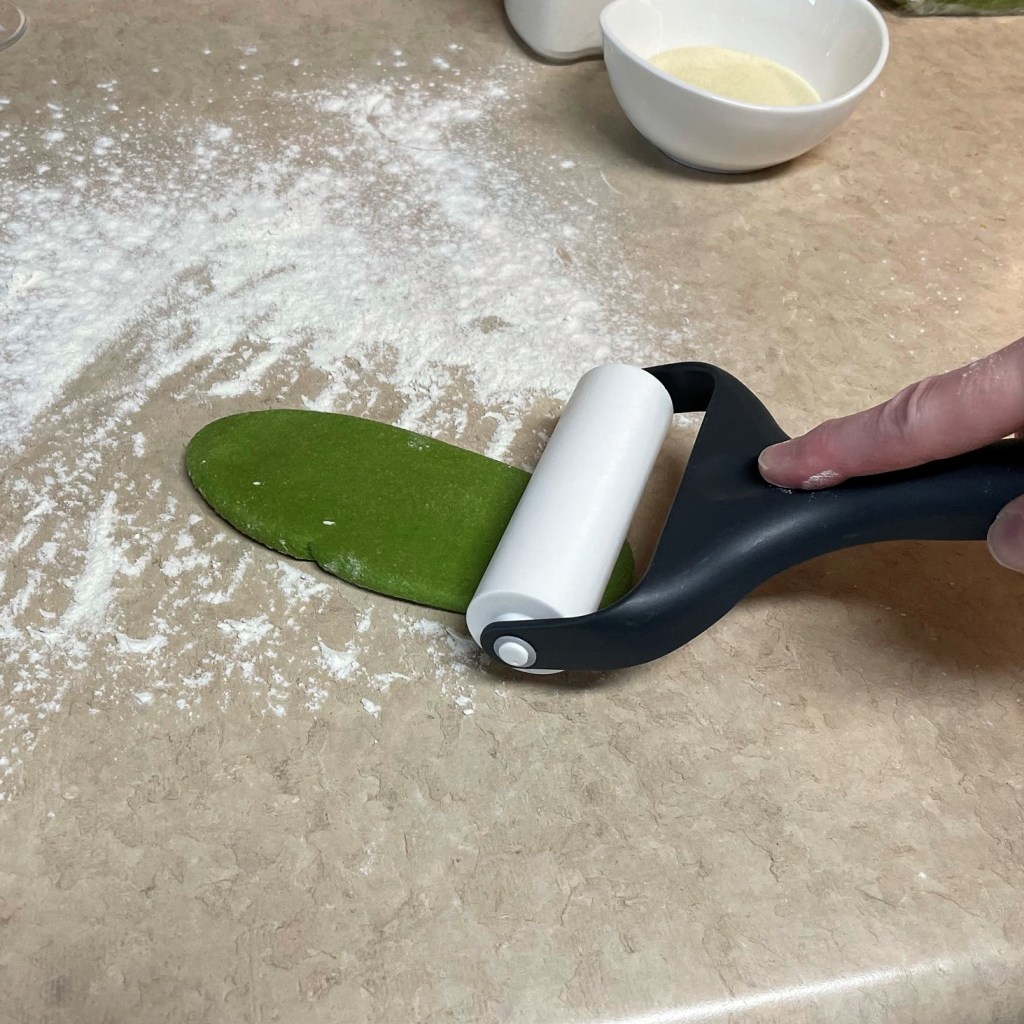
Use a roller or the heel of your hand to slightly flatten the piece of dough.
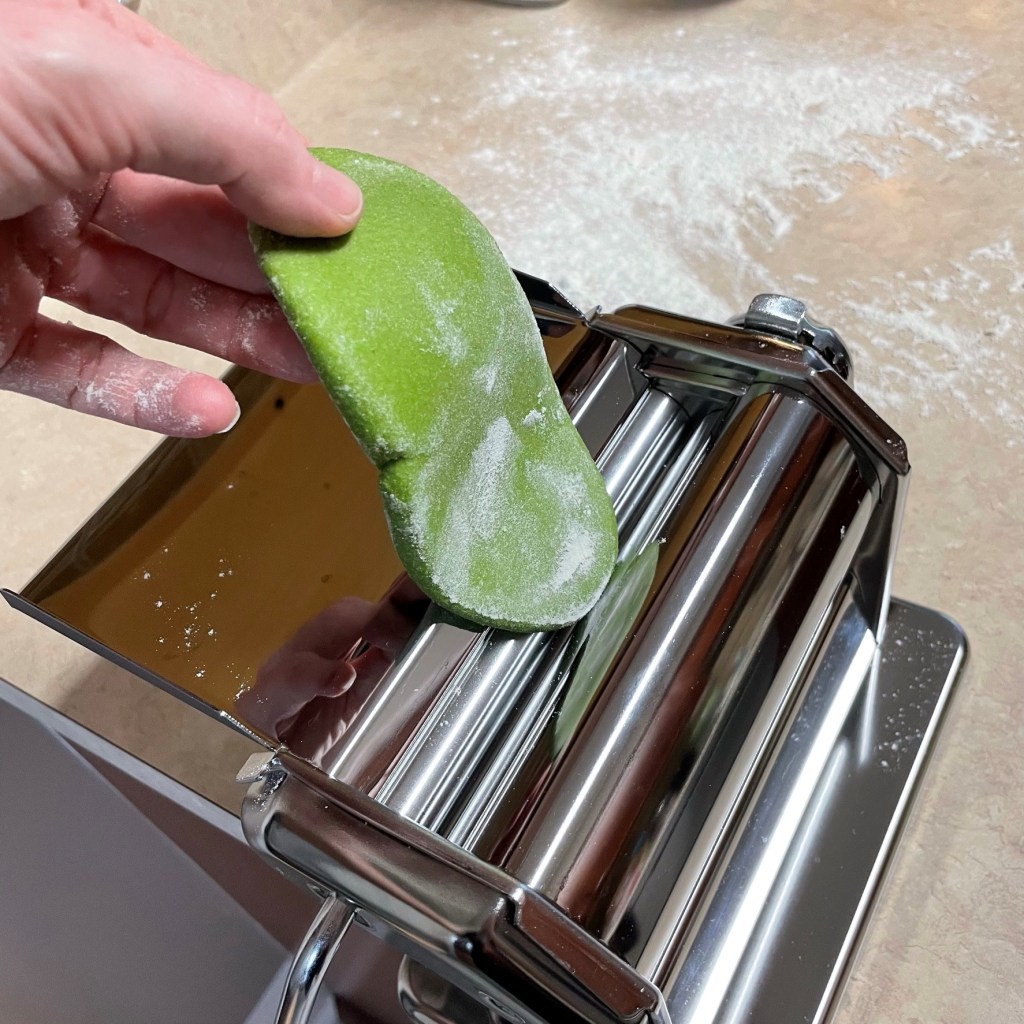
Pass it through the pasta roller on the widest setting. Turn the piece over and pass it through again.
Fold the thinned piece of pasta into thirds, as if folding up a letter. You know, those paper things we used to communicate before texting? Run it through the machine again.
After several folds and passes, begin reducing the settings for a thinner sheet.
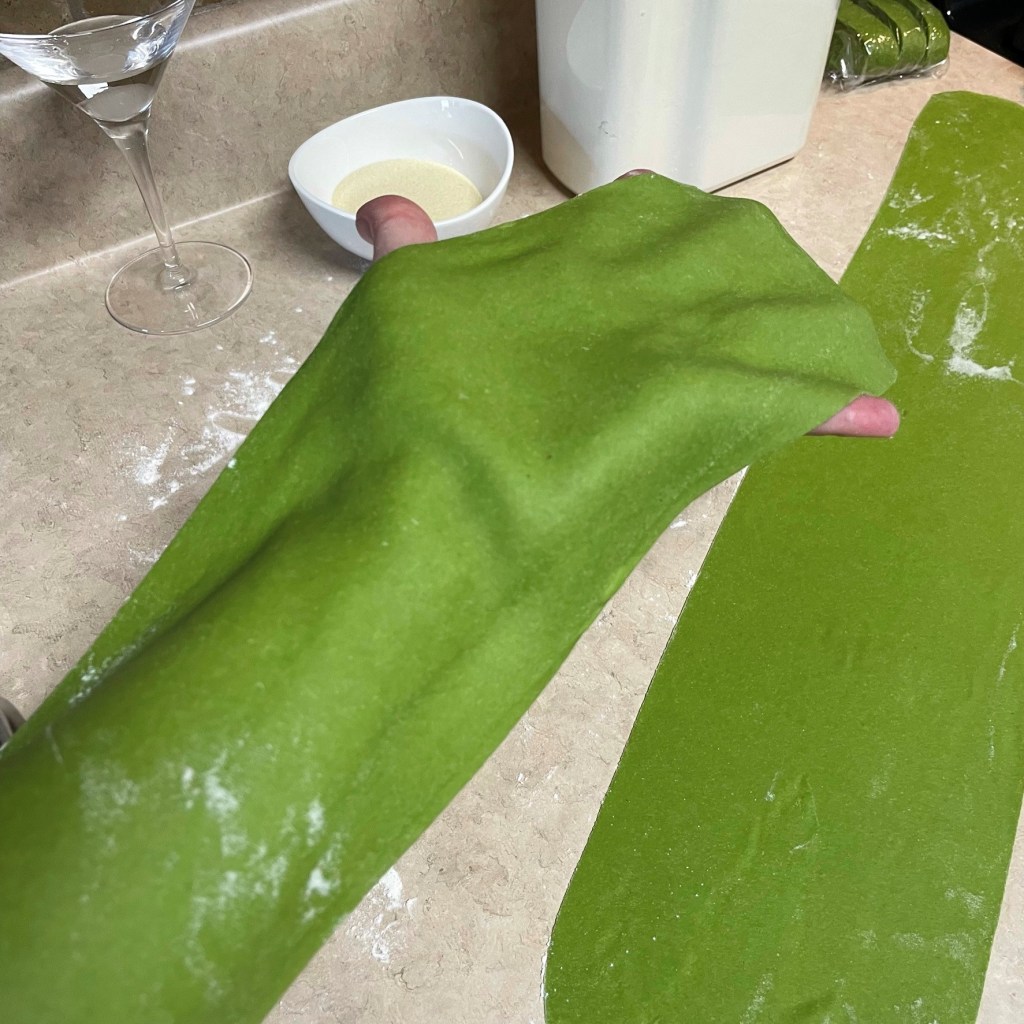
Eventually, the small piece of dough will look something like this. Rest this piece about 10 minutes on a floured counter before shaping into ravioli. You can work on another piece while you wait.
Rest the new piece, and use the first piece to make your first batch of ravioli.
The length of the dough sheets vary, depending on the size of the initial section. These were rolled to the same thickness setting.
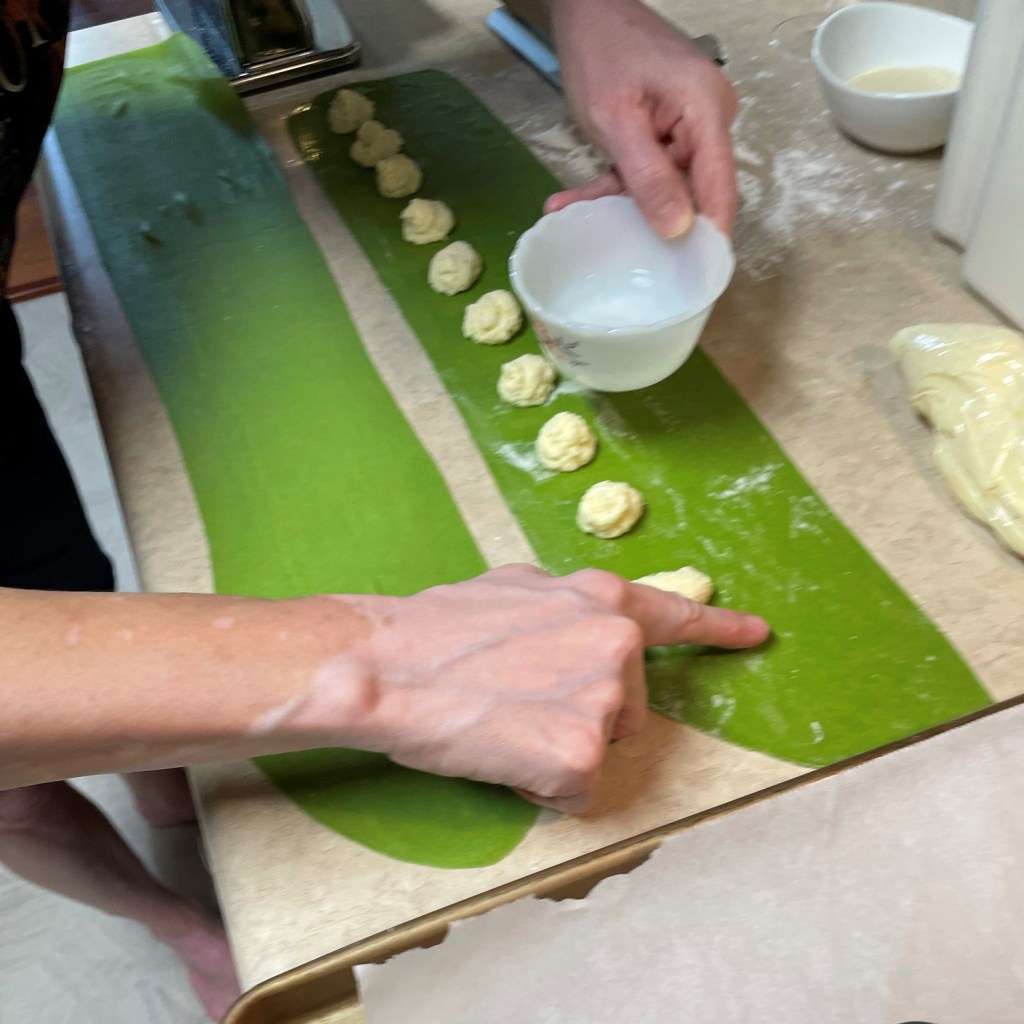
Cut the corner from your piping bag and squeeze dollops along the center of one side of the pasta sheet. The other side will be folded over. Keep some space in between.
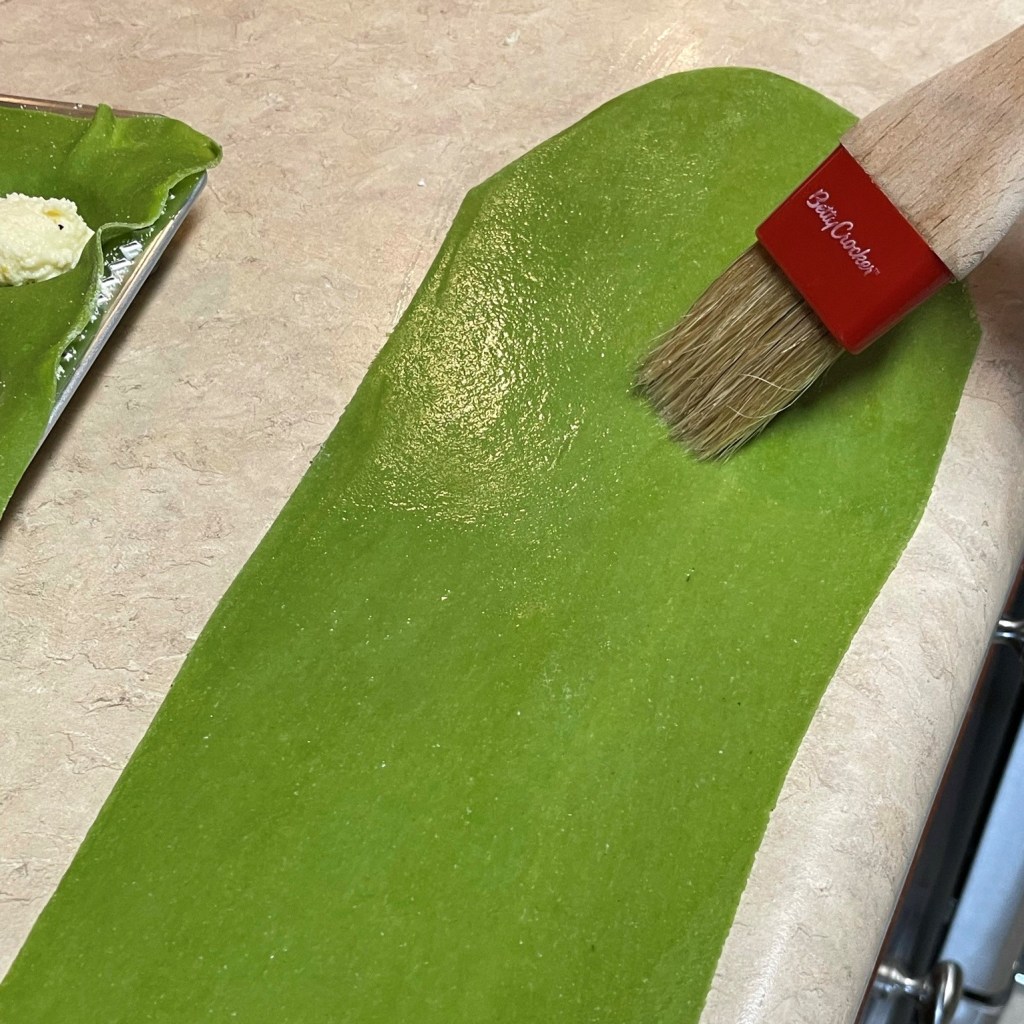
With a damp finger, moisten the pasta dough around the dollops. This means two long swipes along the length and a quick swipe in between them.
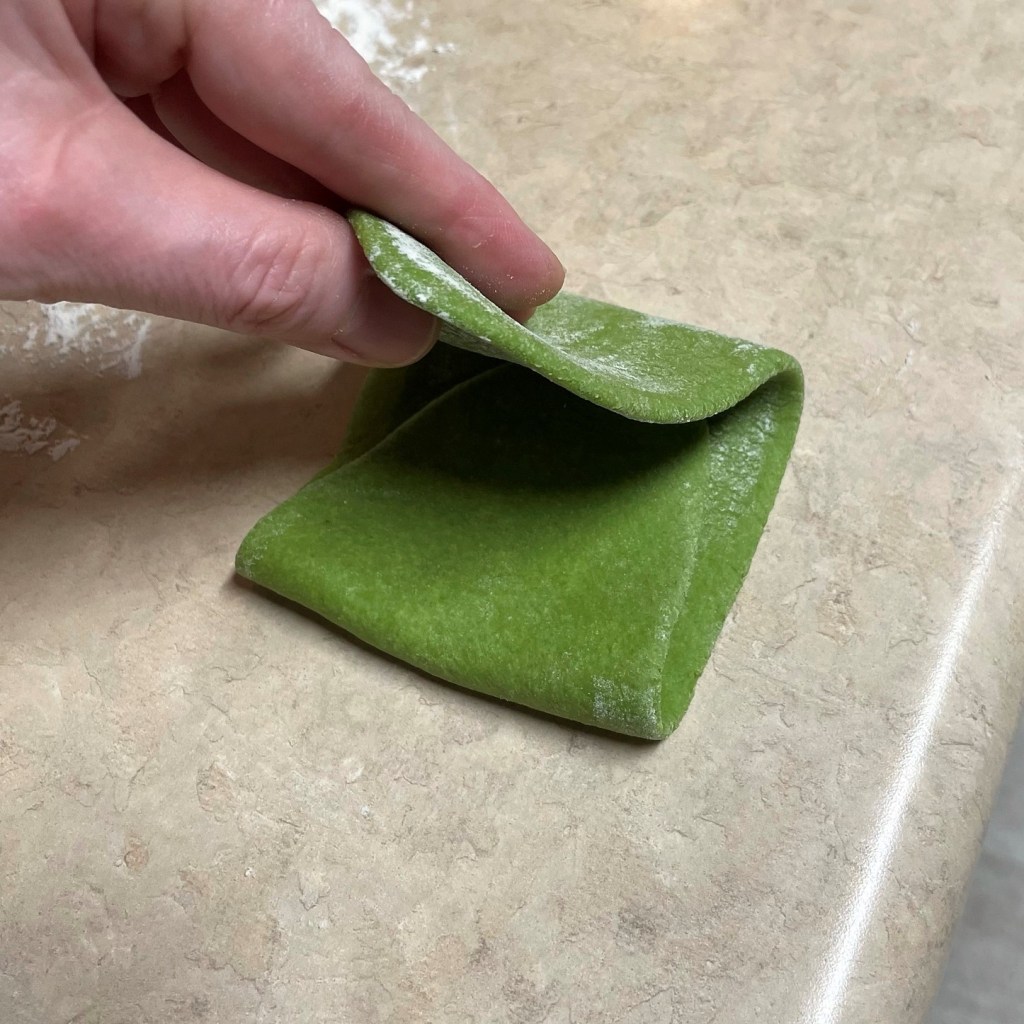
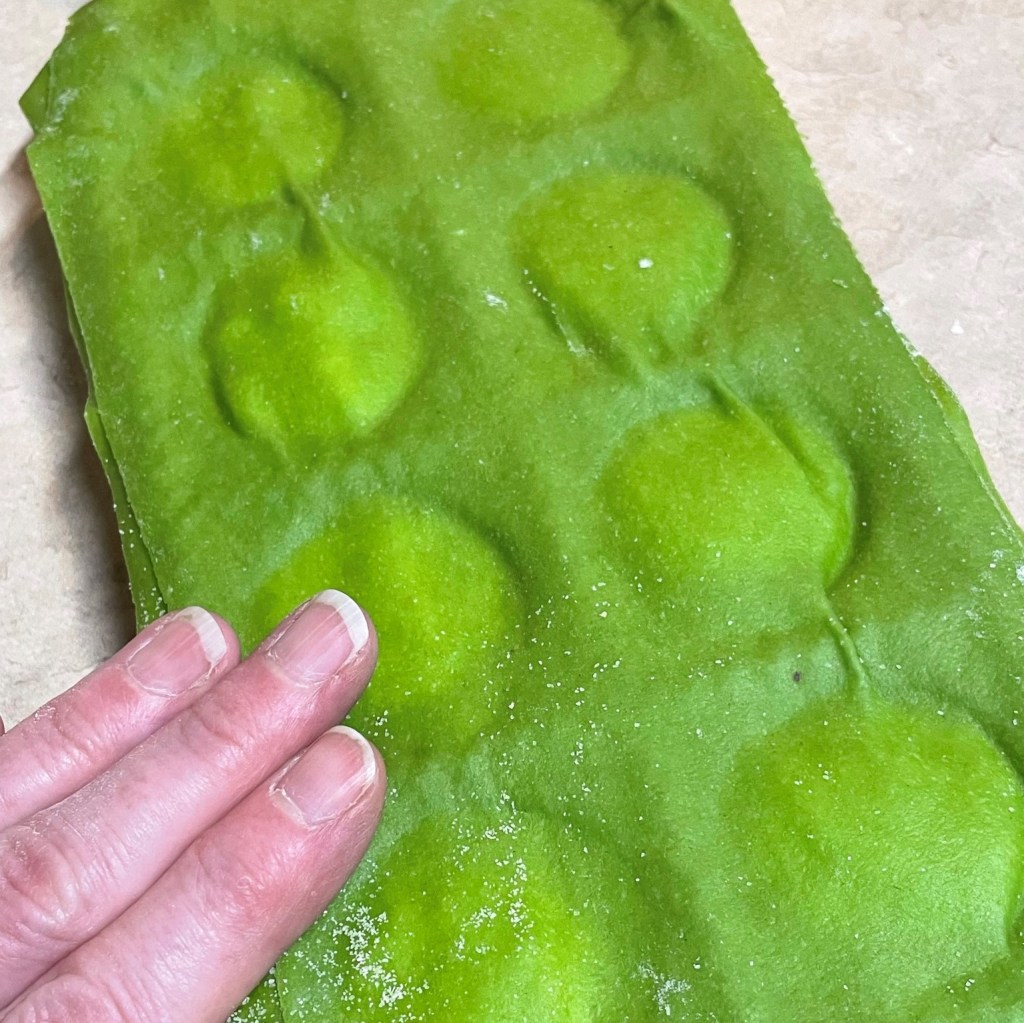
Gently fold the dough to rest over the top of the ricotta dollops but do not begin sealing yet.
Beginning along the folded edge, gently press toward the ricotta lump to nudge any air out. Work on one dollop at a time, from fold to sides to front. Repeat for the rest.
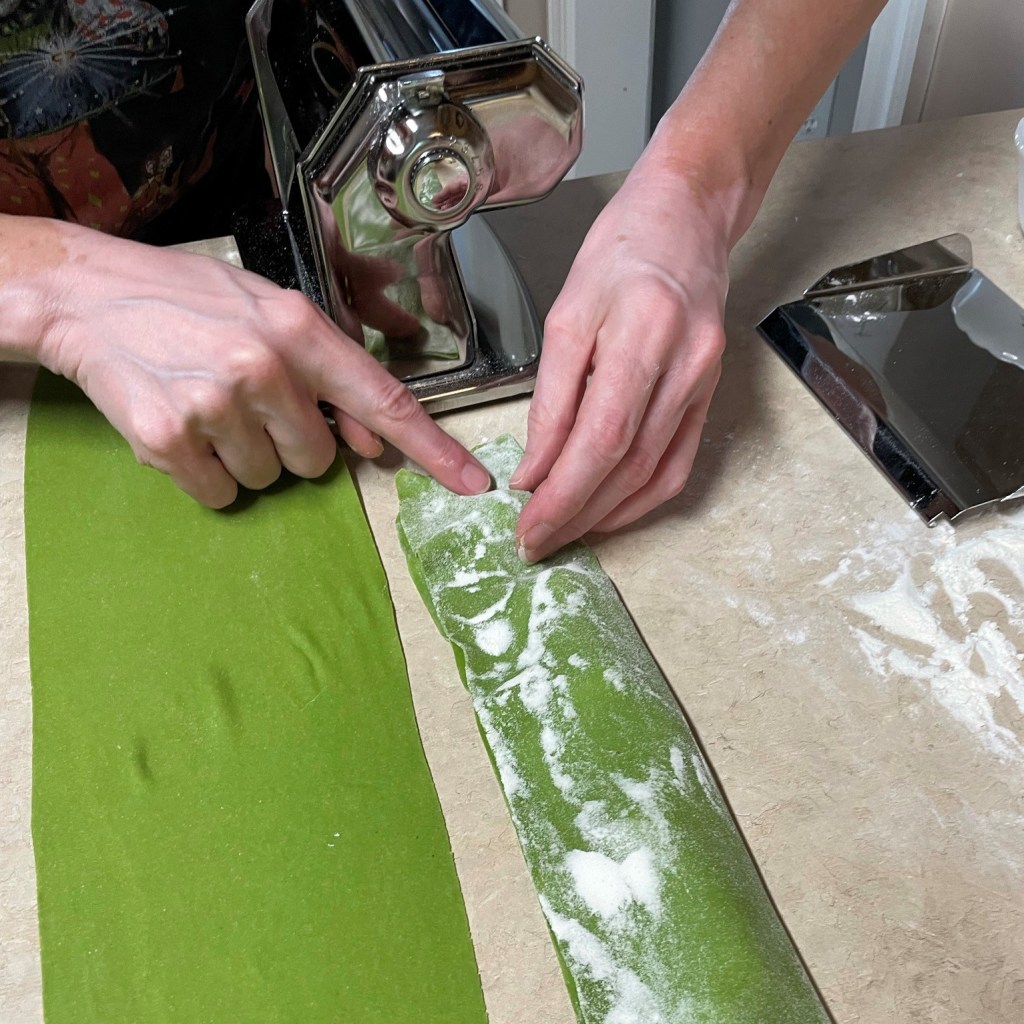
Here, I found an air bubble, so I used the edge of my bench scraper to gently pry open the dough. Air bubbles will wreck your ravioli.
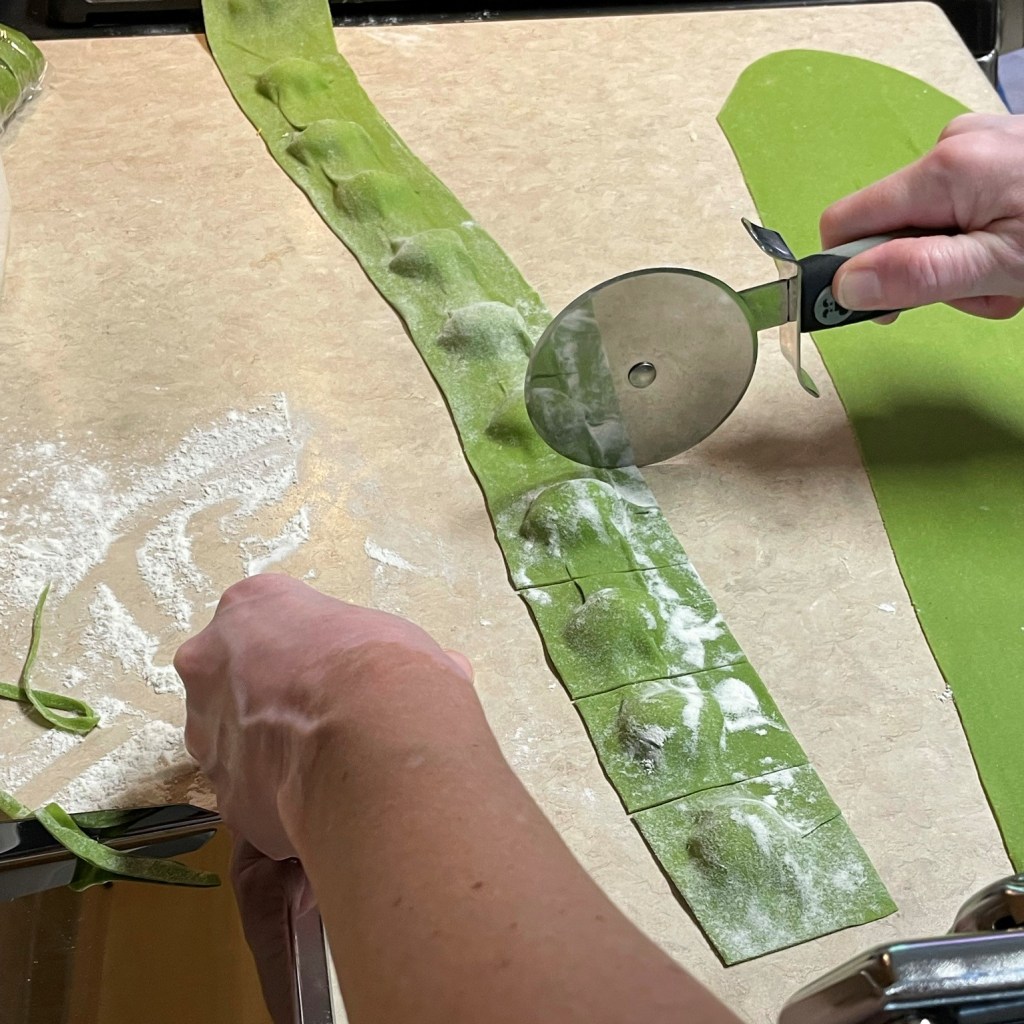
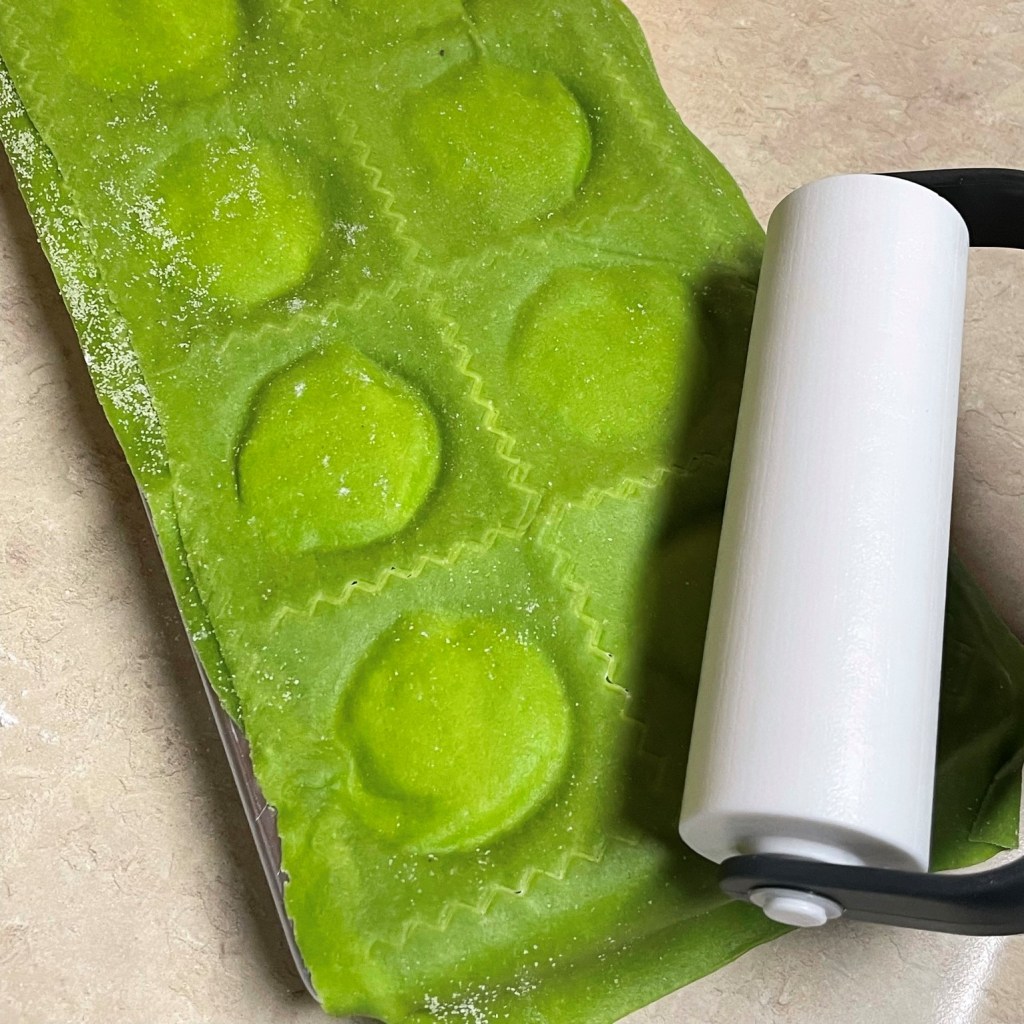
When the ravioli are all sealed, use a pasta cutter, pizza wheel or sharp knife to cut them into pieces.
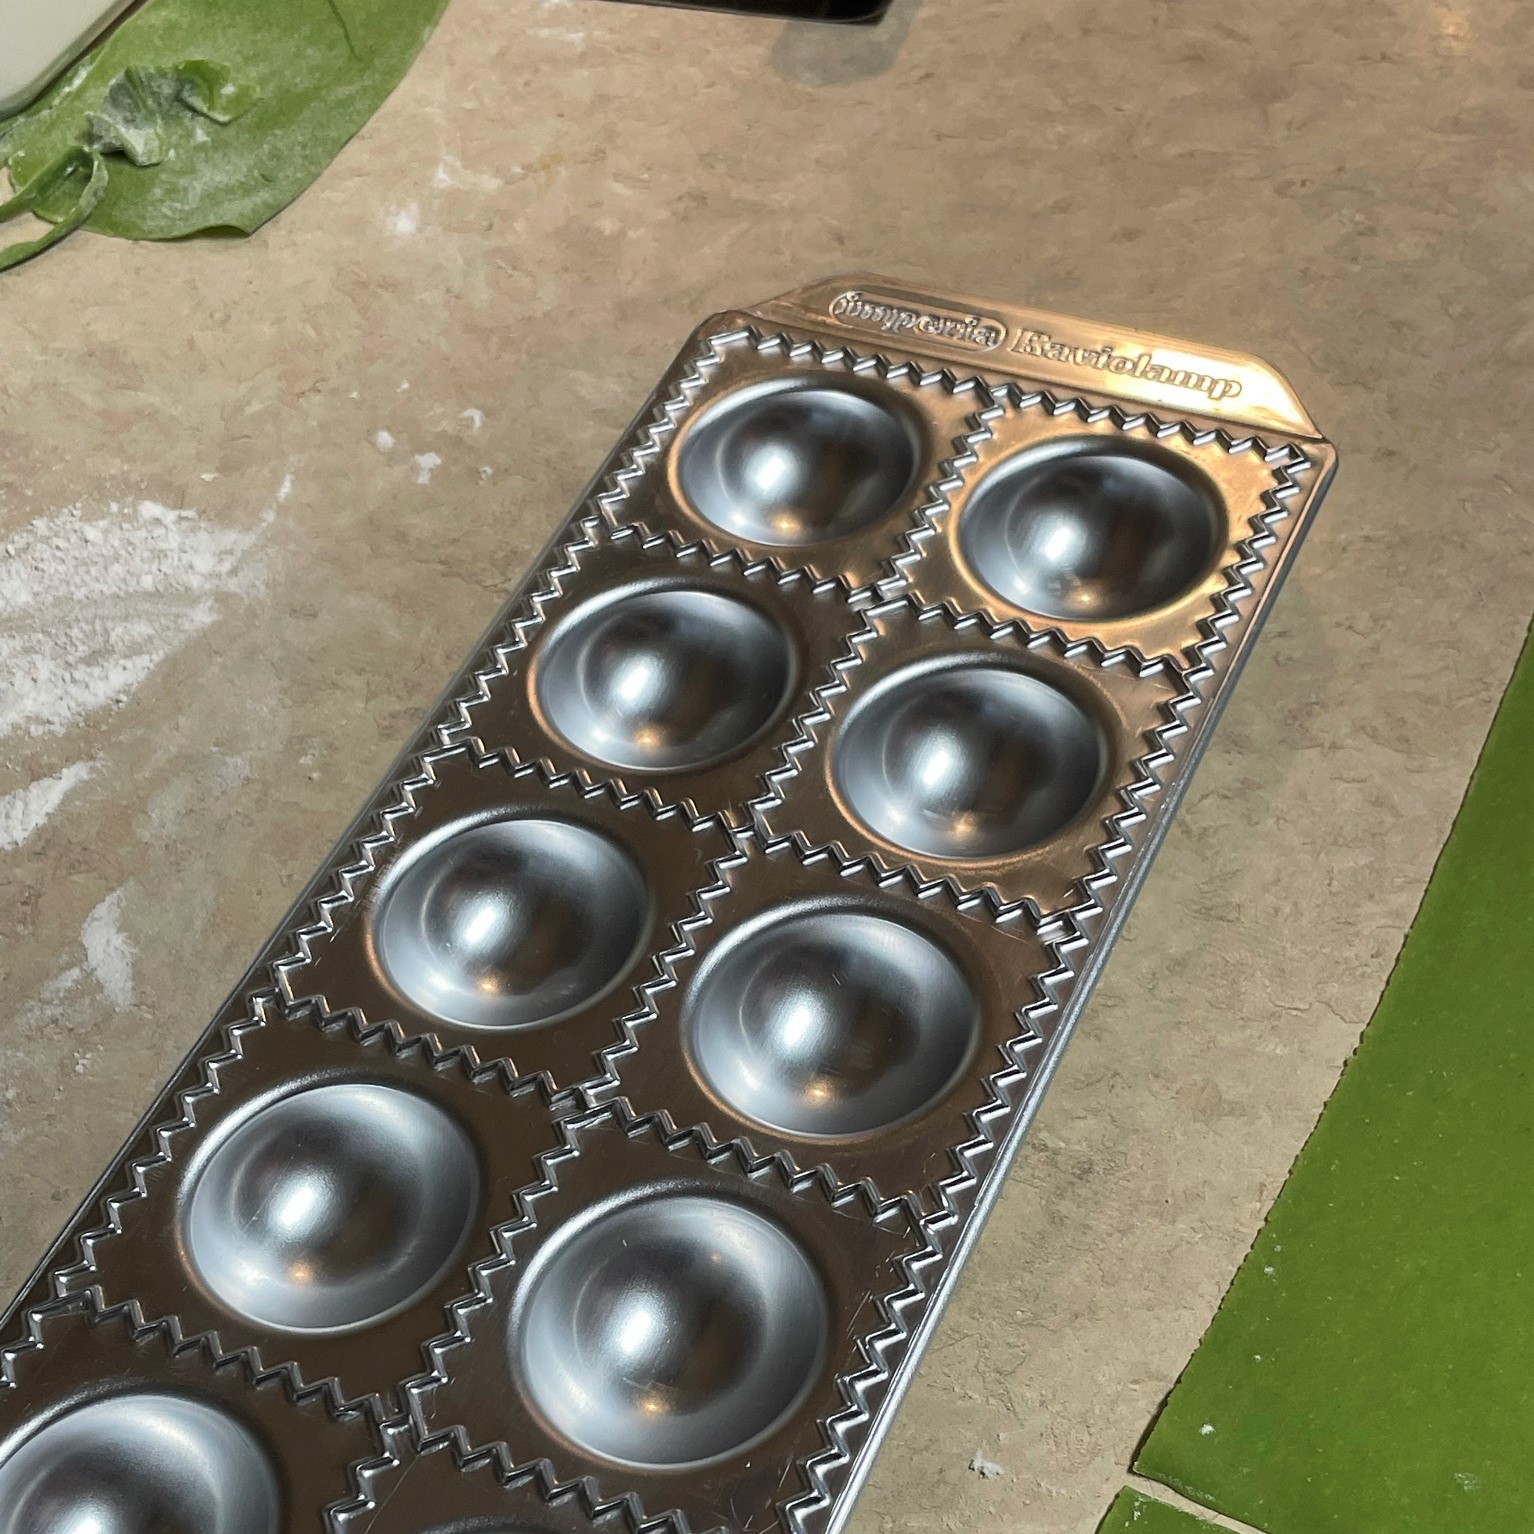
Divide the dough into sections, keeping most of them wrapped as you work on one. Use a rolling pin or the heel of your hand to press the first section into a flat oval. Run it through the pasta machine on the thickest setting, folding it into thirds like an envelope and then run it through again. If it sticks, dust both sides with flour. When the dough reaches a very supple stage, adjust the setting knob one notch per run, until the dough reaches the desired thinness. For ravioli, I recommend using the thinnest or second-thinnest setting.
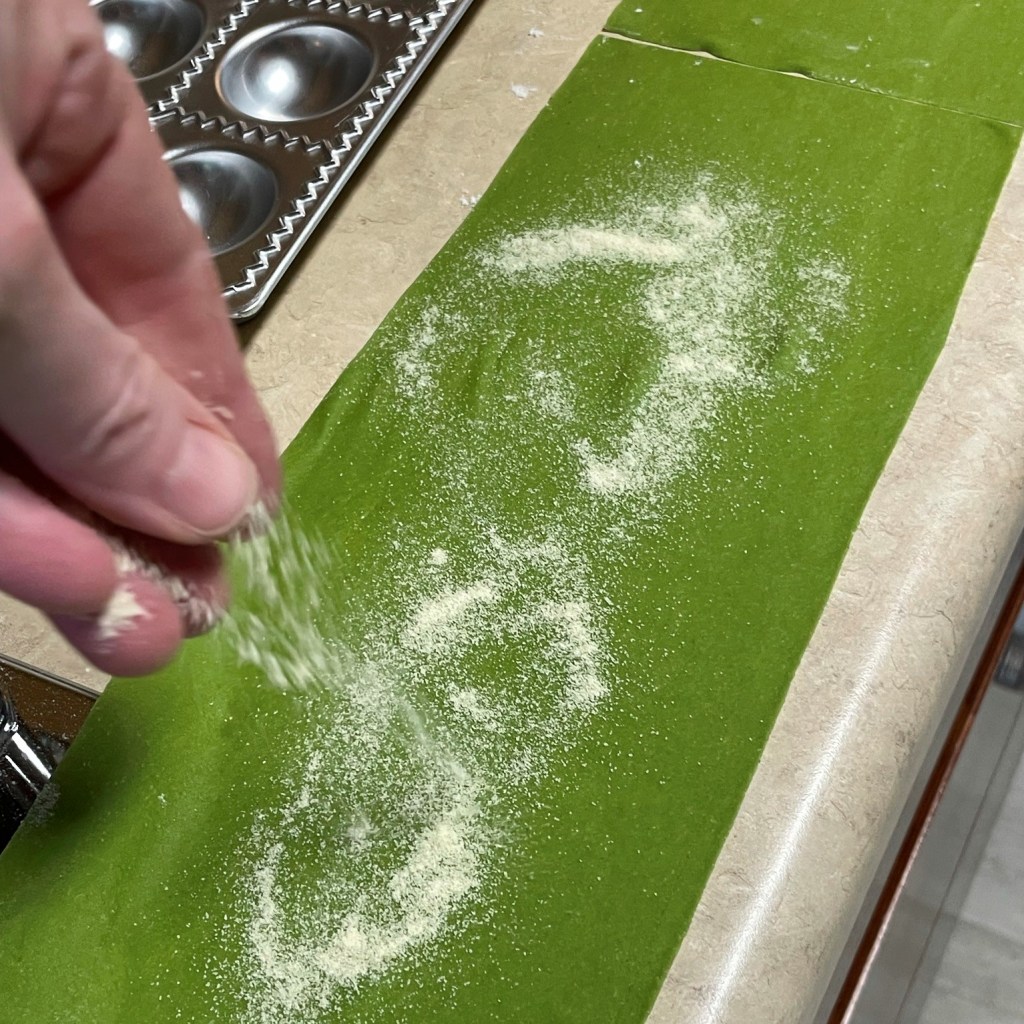
Let the pasta sheet rest, uncovered, on the floured counter for about 10 minutes before filling with ricotta filling. This gives the pasta time to tighten up a bit for easier shaping.
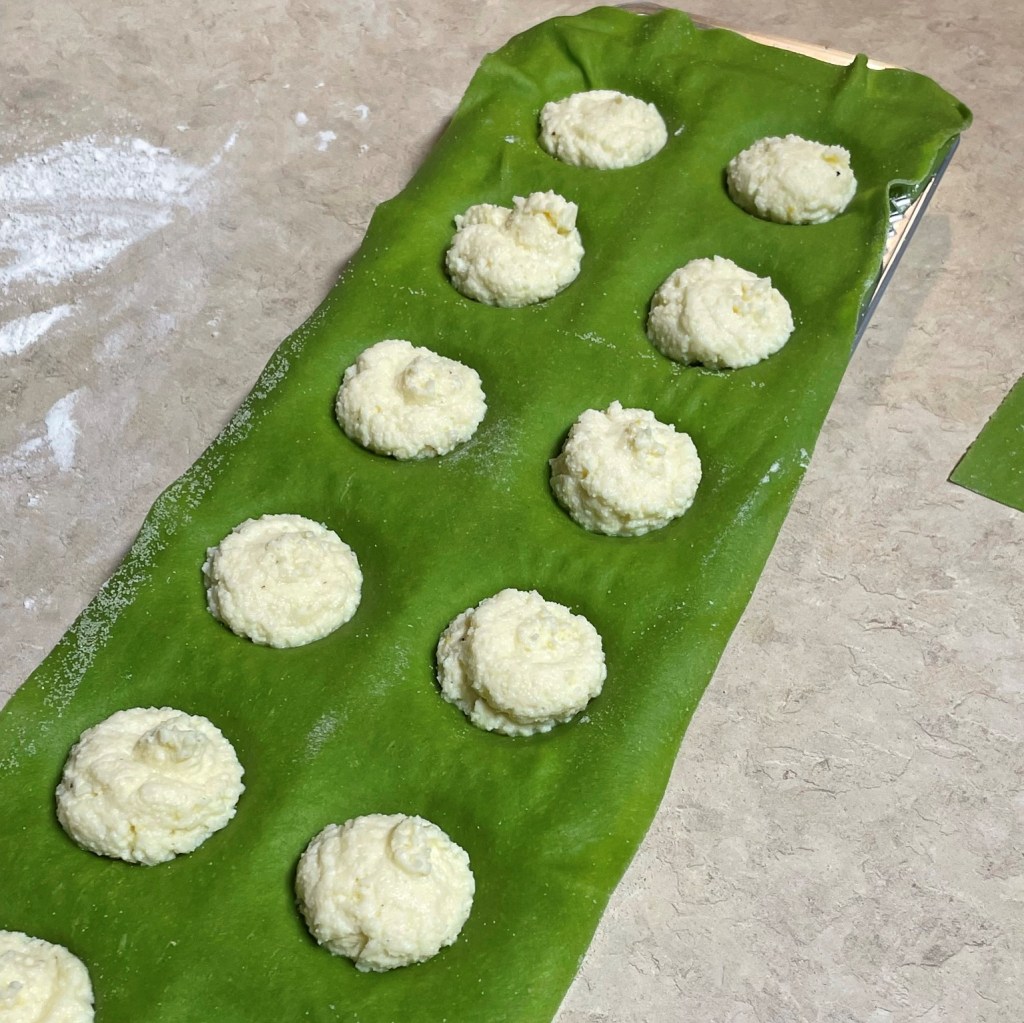
If you are making ravioli without a mold, squeeze 1 1/2 teaspoon-sized dollops of ricotta filling onto one long side of the pasta sheet. Space the dollops about 2 inches apart, allowing room to seal up the pillows on all sides. Dip a finger into a small bowl of water and slightly moisten the dough in between ricotta dollops and along the long edge.
Fold the dough over the ricotta dollops, taking care to keep the edges aligned. Carefully press out any air pockets, starting from the folded edge, then in between dollops. Seal the open edge last to ensure no air bubbles are trapped.
Use a pizza wheel or sharp knife to trim any ragged edges. Cut between the raviolis and transfer them to a semolina- or flour-dusted parchment paper. Allow the ravioli to dry for at least an hour before cooking.
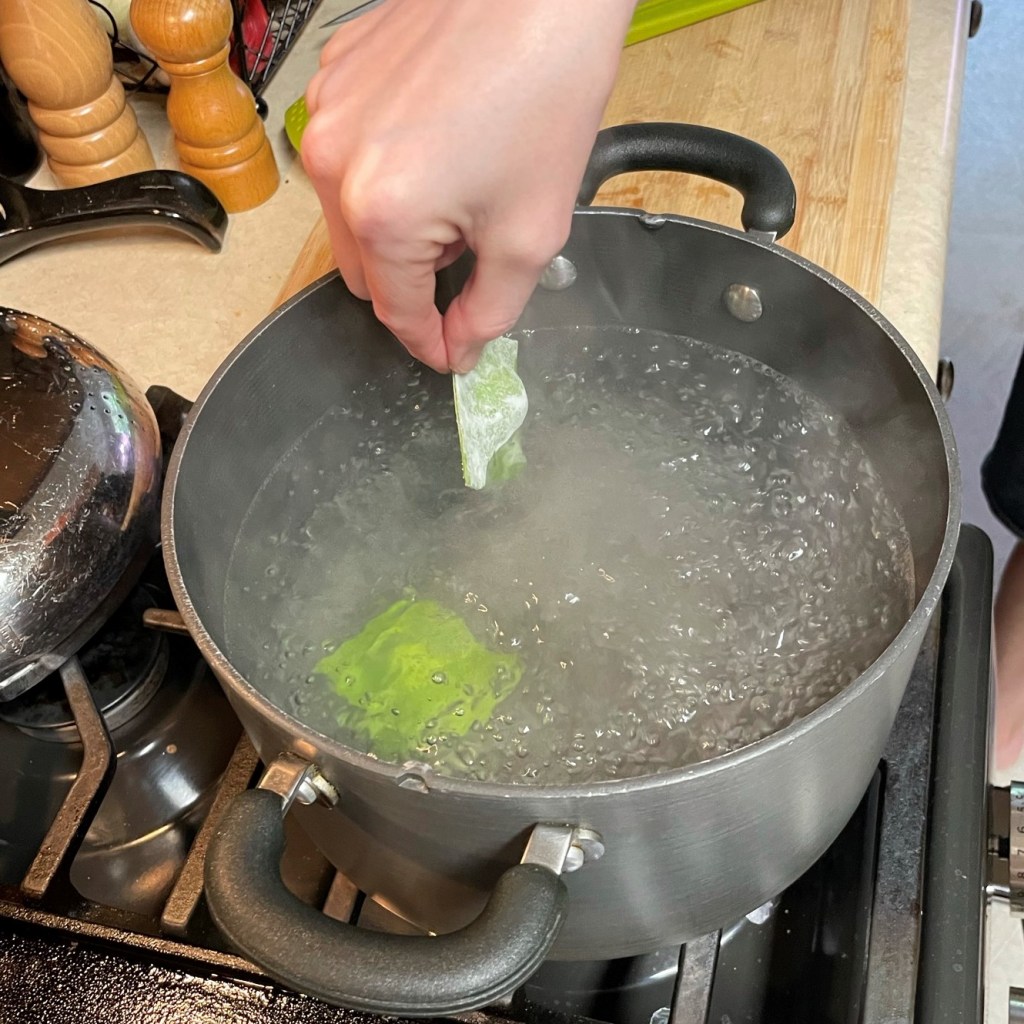
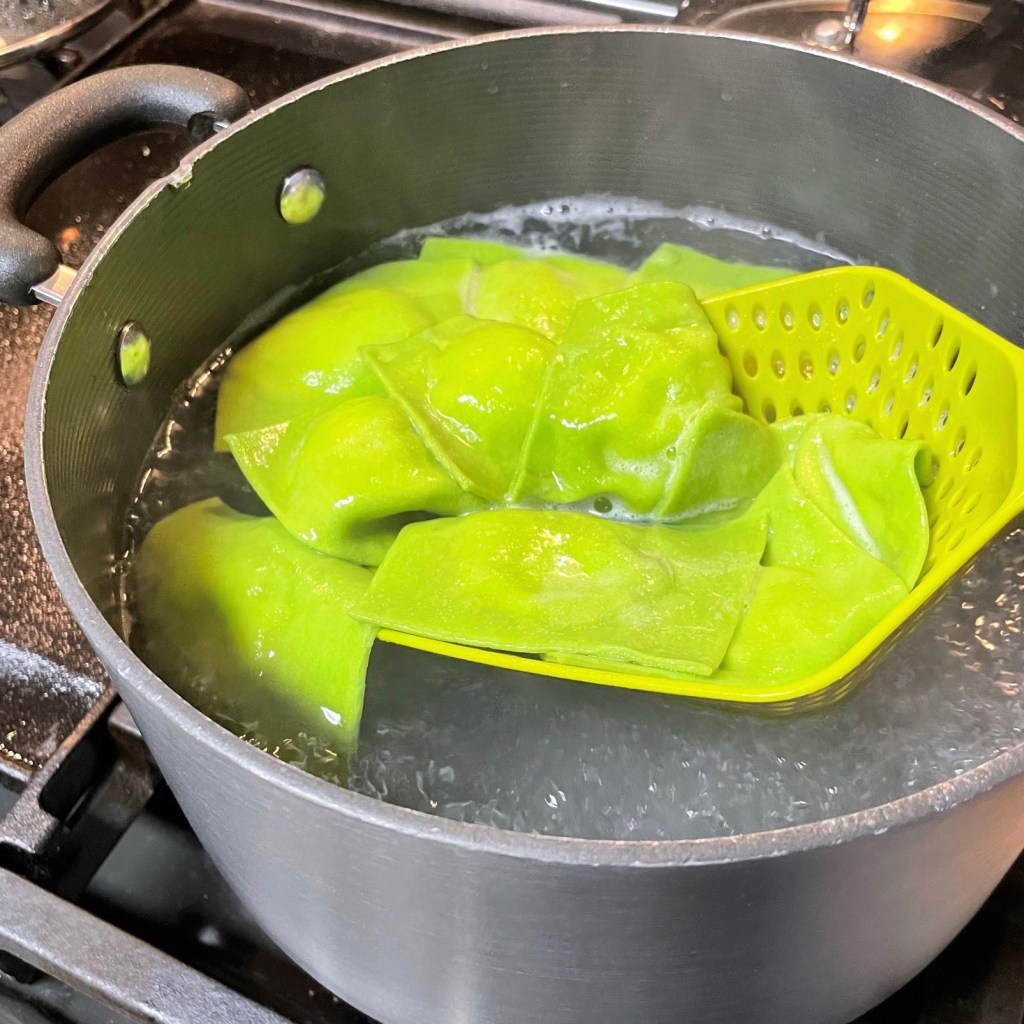
To cook handmade ravioli, bring salted water to a gentle boil. Carefully transfer ravioli, taking care not to overcrowd the pot. Fresh pasta cooks much more quickly than dried or frozen, so keep an eye on it and prepare to rescue it from the pot after about four minutes.
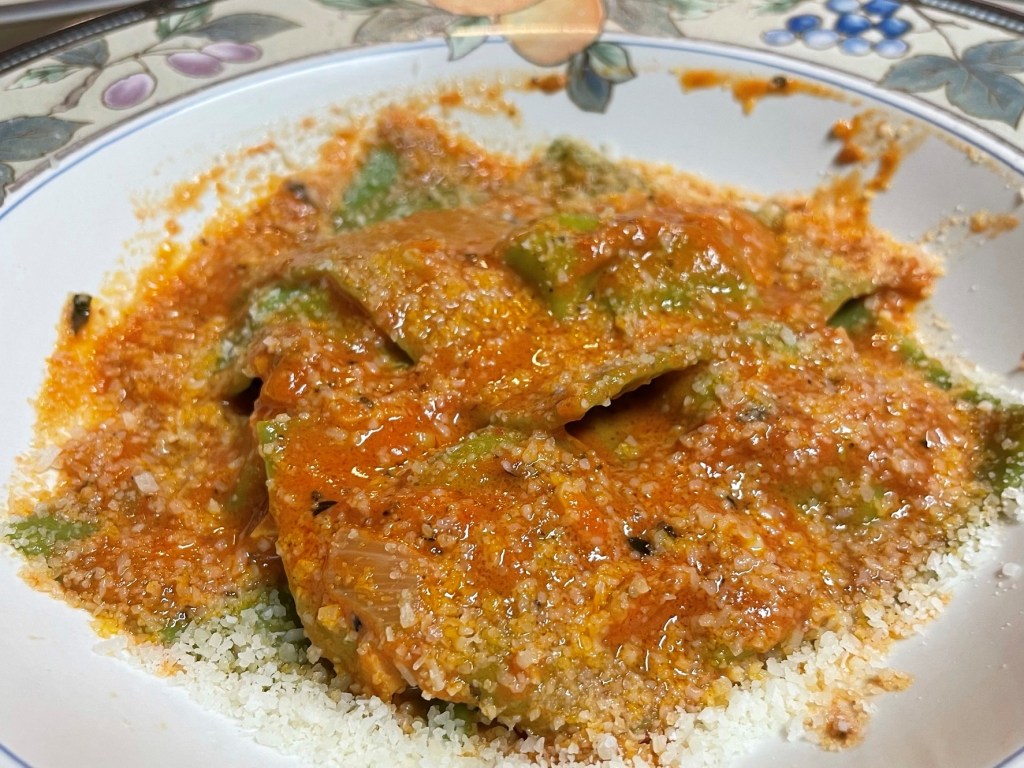
Serve with any favorite sauce. I made the simplest marinara with sauteed onions and garlic, my own Italian spice blend and canned San Marzano tomatoes, plus a splash of cream.
Your cooking water should be seasoned with salt and simmering at a low boiling point. Add ravioli carefully.
Scoop out the ravioli and transfer them directly to the sauce. The starchy water that clings will help the sauce adhere to the pasta.
Gently swirl the ravioli around in your favorite sauce, then transfer to your plate and enjoy!
Is it worth all that effort? You better believe it.
A ravioli mold makes this work much simpler. I bought a set of three different shapes for about $20, also at TJMaxx.
Dust the sheet with semolina and gently press it in before turning the sheet over onto the mold. This keeps it from sticking.
There is no need to press the dough into the indents; let the pressure of the ricotta filling do it for you.
Each ravioli should have just enough filling to crest at the top of the indent. Remember that it will smoosh and flatten with the top sheet.
Lightly dampen the surface of the dough that will be turned over on top. You want it to be just tacky, not dripping.
Press the air out of each ravioli, beginning down the center of the mold, then around the sides of each pillow.
Use a roller to press, seal and score the pillows.
The ravioli mold is so easy, and a small investment if you make a lot of pasta.
Boom!
If you wish to freeze them for later, dry for an hour then place the sheet directly into the freezer for an hour or so.
When the individual ravioli have frozen, you can easily transfer them to freezer bags, then into a sealed container for freezer storage. Cook them from frozen.
For the record, I bought Linda Miller Nicholson’s book with my own hard-earned money. This is not a paid advertisement for Linda, but I cannot help sharing my discovery of her work because she is just awesome. You can pick up a copy of Pasta, Pretty Please at the bookstore or on Amazon, but I bought it directly from Linda’s website, called Salty Seattle. If you buy the book directly from Linda, she will even sign it for you. 🙂
In six short weeks, life will be turned upside down for my husband, Les, and me. This is when our kitchen tear-out will begin, and we are beginning to shift our expectations as we prepare for the eight weeks or so that we will be “without” a kitchen. Welcome, friends, to our “in-between” kitchen!
How about that? A two-burner “stove” right on the dining table!
This rack is going to get a LOT more cluttered in the weeks ahead.
At least we will have the bar nearby… 🙂
We have rearranged our dining room space to accommodate a baker’s rack that will hold some of the appliances that will help us get through the chaos. A new two-burner induction cooktop will allow us to do simple stove-top cooking, including heating water for my daily dose of French press coffee. We will make good use of our slow cooker, toaster oven and the panini griddle that doubles as a waffle iron. We have the gas grill for outdoor cooking, and so far, the only thing I haven’t quite figured out is how I will make bread without our oven, though don’t be surprised if I use one or more of the above to make it happen!
As we are preparing for the load out of the old kitchen (not to mention a bevy of random pantry and freezer ingredients), I’m giving all of our other small electrics a chance to prove themselves worthy of a spot in our new space. One item that will be (sadly) getting the boot is our KitchenAid 11-cup food processor, but not because we don’t use it; on the contrary, this thing gets so much action, it is on its last legs. The protective film over the power buttons has become brittle and is completely worn away from the pulse button, the feed chute is cracked and the inside of the “S” blade stem has some dried-on crud that I have not been able to remove. I have had the appliance nearly 20 years, and KitchenAid no longer makes my model (or any of the parts), so my only choice will be to replace the machine.
I’m surprised this is the only button missing the cover.
This probably happened while I was make parm-romano blend.
I don’t even want to know what dangers lurk in those crevices…
My KitchenAid processor has had a good run!
Until then, I’ll keep going with recipes like this one, for easy homemade hummus made with garbanzo beans, lemony artichoke hearts and lots of fresh garlic. Hummus is one of my favorite “blank canvas” foods, and it’s so simple at home, it makes no sense to buy it. The other key ingredients include tahini, olive oil and a squeeze of fresh lemon, which is a perfect highlight to the tangy artichoke.
Warm the garbanzo beans to soften them up before you begin and use a food processor or a good blender for best, smoothest results. Enjoy your hummus on crackers, chips, crostini or fresh veggie slices.
It’s so much tastier than store-bought!
Ingredients
15 oz. can garbanzo beans, with liquid
3 Tbsp. tahini* (see notes)
2 to 3 cloves garlic, finely chopped
About 1/2 cup marinated artichoke hearts*, drained and rough-chopped
Juice of 1/2 lemon
Kosher salt and pepper
3 Tbsp. extra virgin olive oil
*Notes
Tahini is a paste made of ground sesame seeds. It is available in most larger supermarkets, usually in the same section as olives, or perhaps in the international aisle.
The artichoke hearts I used were Trader Joe’s, marinated in sunflower oil, vinegar and spices. If you use plain hearts, consider adding a pinch or dried herbs (dill or oregano would be great), and either way, drain all the excess liquid from them.
Instructions
Simmering the garbanzos softens them, and helps achieve a silky texture in the hummus.
Drain off most of the liquid, and keep it nearby for the blending stage.
Transfer all the beans, still warm, into the processor (or blender) bowl. Keep the chute lid open while blending to allow steam to escape.
The add-ins, clockwise from top: tahini, fresh garlic, chopped artichoke hearts, salt and pepper.
Pouring in the warm liquid keeps the mixture nice and smooth as it processes.
I love my citrus squeezer because I get all of the juice and none of the seeds!
Drizzle the olive oil in slowly as the machine processes continuously.
After each step or addition, stop and scrape the sides to ensure all bits of ingredients are evenly blended.
Pour the entire contents of the canned garbanzo beans into a small saucepan. Heat over medium-low heat until mixture just begins to boil. Remove from heat and drain liquid off beans, but do not discard it (you’ll use it for blending).
Transfer warm beans into a food processor or blender and pulse a few times to grind the beans into a meal-like texture. Scrape down sides of the processor bowl. Add tahini, garlic, artichoke hearts, salt and pepper. Pulse a few times to combine. Scrape down the sides again.
Turn processor on and run continuously while slowly pouring about 3 tablespoons of the warm liquid into the processor. Blending slowly will help to emulsify the ingredients into a smooth blend. Add more or less of the liquid, depending on your preference for hummus consistency. Remember that the mixture will become firmer after chilling. Scrape down sides once more.
Run processor continuously and slowly blend in about 3 tablespoons of extra virgin olive oil.
Transfer hummus to a bowl and refrigerate, covered, for up to a week.